

Page 1
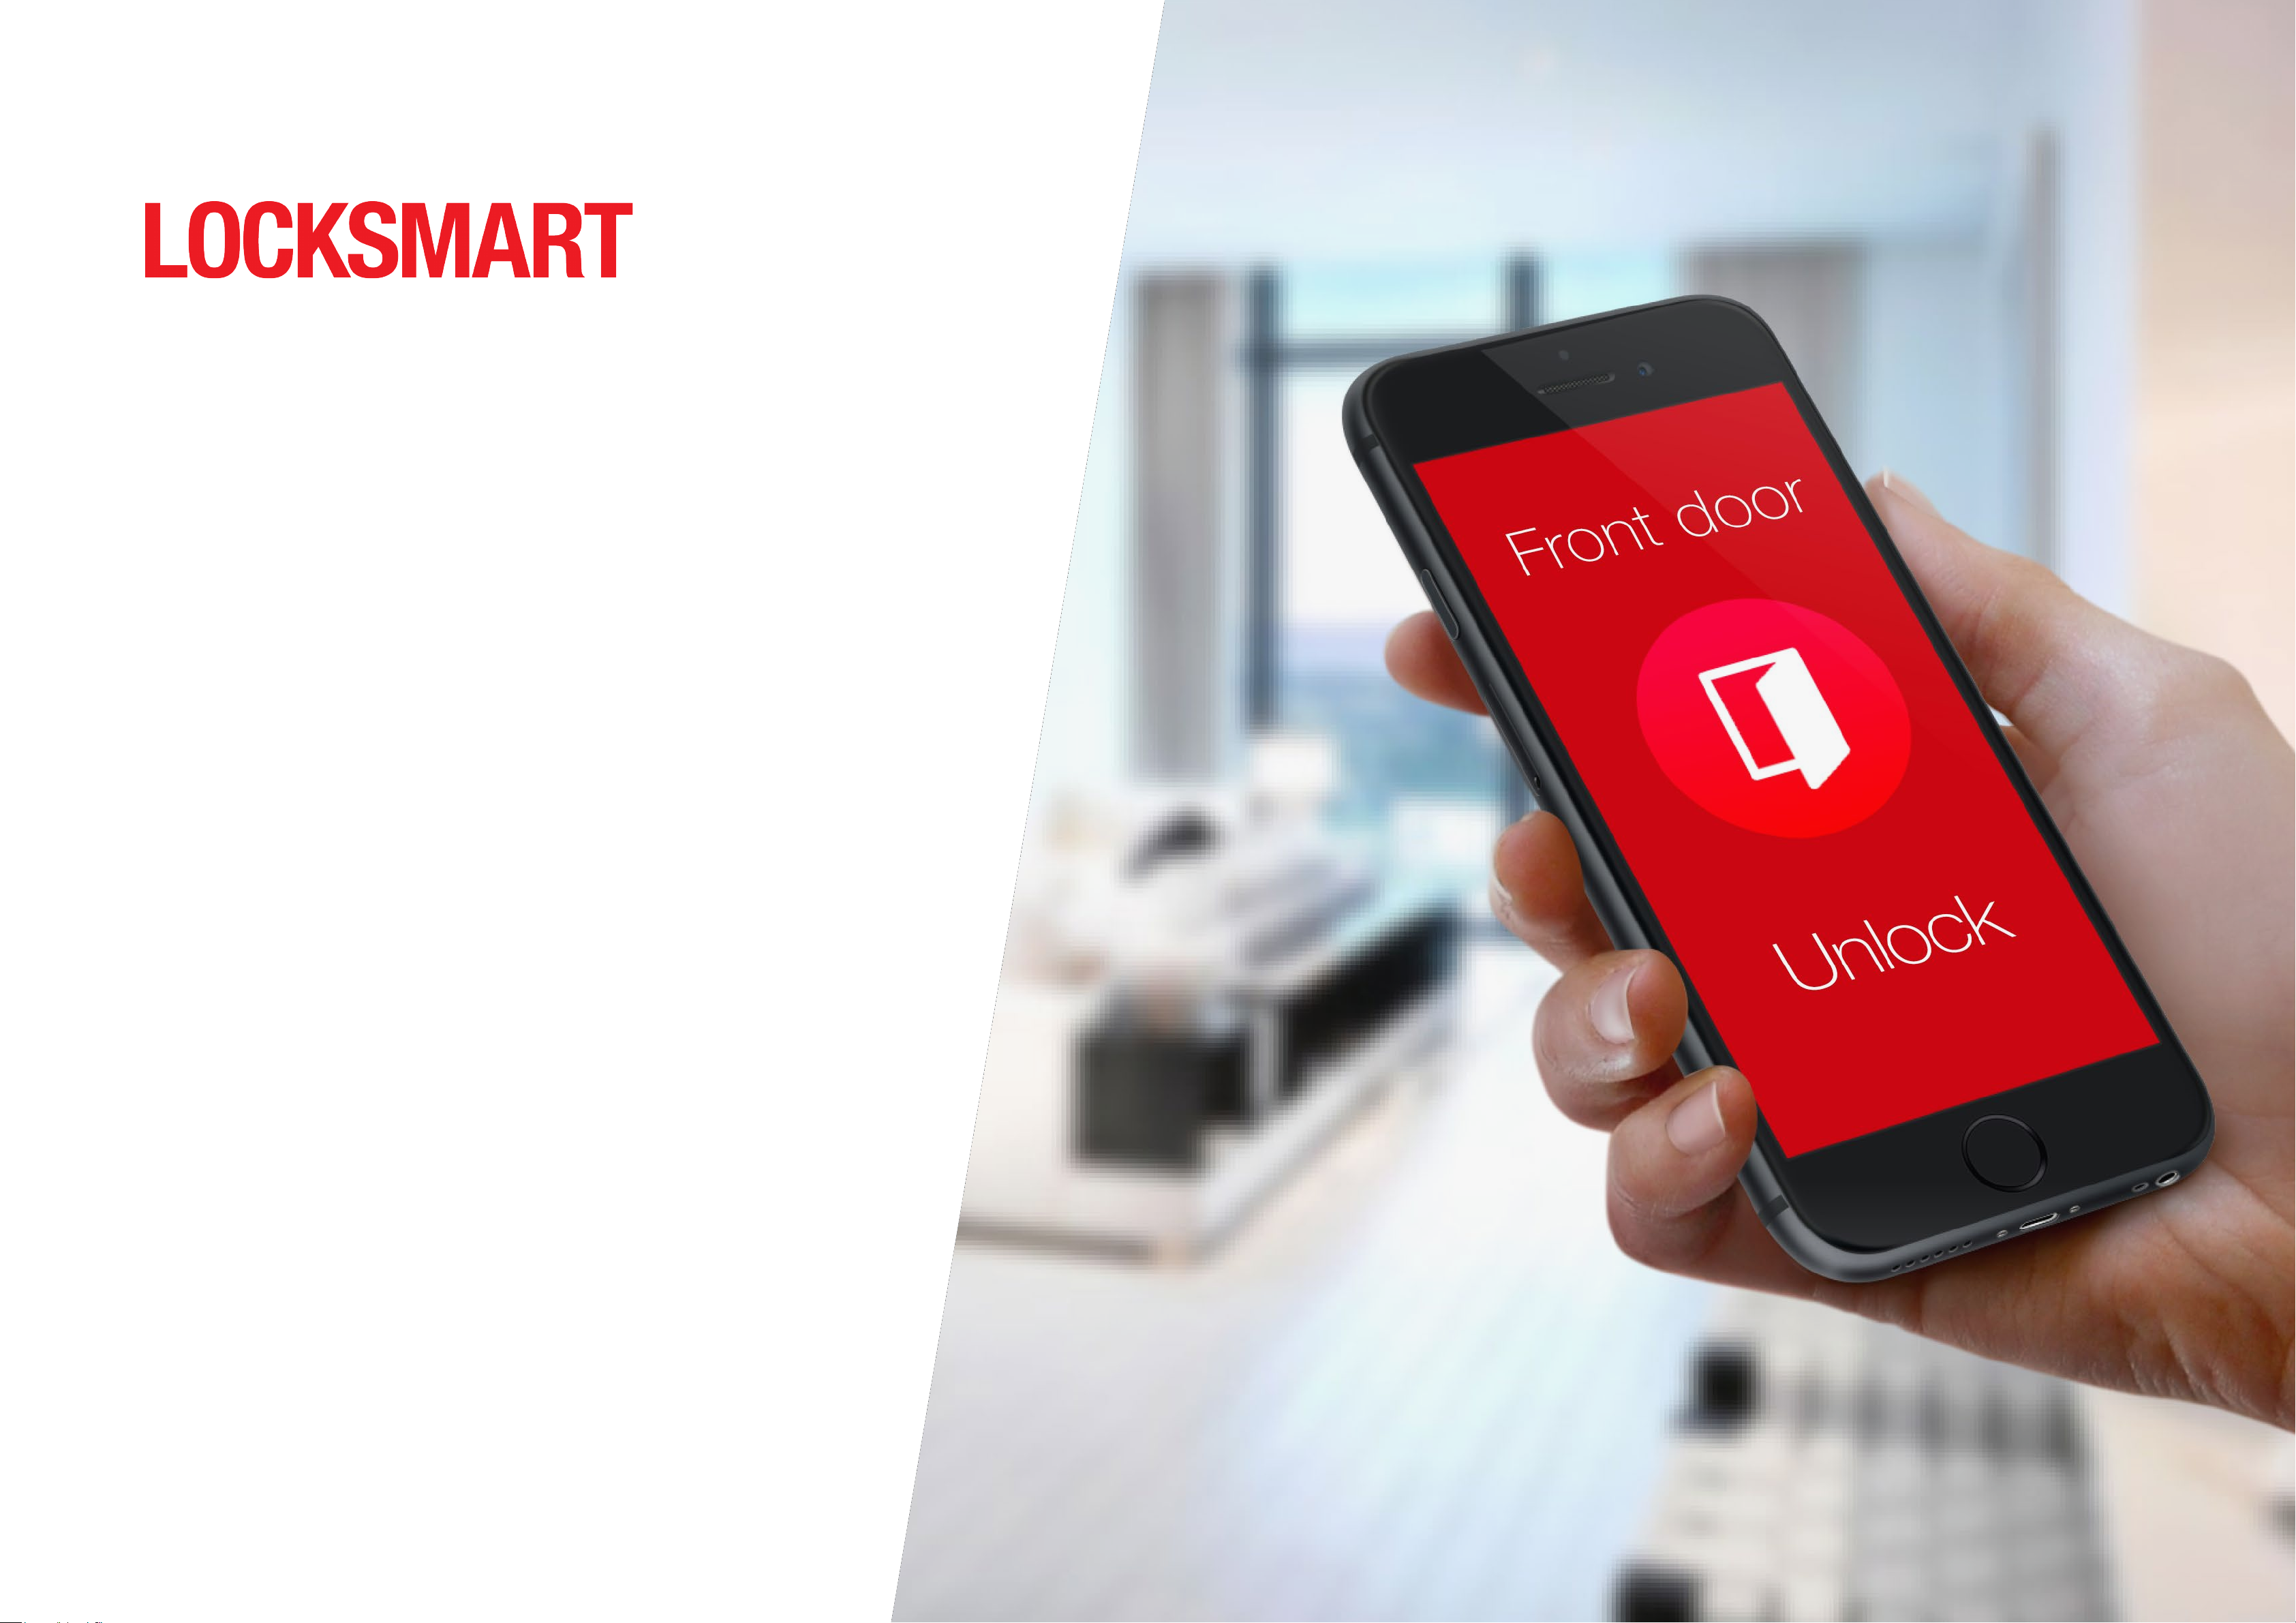
Instruction Guide
Front Door
LOCKSMART ABODE
Open
Page 2

Table of contents
Getting started
Installation guidance ----------------------------------------------------- 4
Downloading the LockSmart app ----------------------------------- 6
Sign in with Facebook -------------------------------------------------- 6
Create a LockSmart account ----------------------------------------- 7
Log in with a LockSmart account ----------------------------------- 7
Add a lock ------------------------------------------------------------------ 8
Finding and sharing
Share a lock with someone else ---------------------------------- 20
Scheduled access for shared users ------------------------------ 21
Shared lock functionality --------------------------------------------- 22
Activity log ---------------------------------------------------------------- 23
Transferring a lock to a new owner ------------------------------- 24
Sharing a pin code ----------------------------------------------------- 25
Logging out of the app ------------------------------------------------- 9
Setting up Wi-Fi Bridge ----------------------------------------------- 10
Unlocking
Tap to unlock ------------------------------------------------------------- 11
Touch ID / Fingerprint -------------------------------------------------- 12
Passcode ------------------------------------------------------------------- 13
Other features
Notifications -------------------------------------------------------------- 26
Anti-break-in and security function ------------------------------- 26
Modify account or password --------------------------------------- 27
Lost mobile device ----------------------------------------------------- 28
Add a photo to a lock ------------------------------------------------- 30
Battery percentage display ------------------------------------------ 31
Face unlock --------------------------------------------------------------- 14
Apple Watch unlock ---------------------------------------------------- 15
Auto unlock --------------------------------------------------------------- 16
RFID -------------------------------------------------------------------------- 17
Key pad pin code ------------------------------------------------------- 18
Physical key -------------------------------------------------------------- 19
What to do if your lock runs out of battery power? --------- 32
Serial number & firmware version --------------------------------- 33
Lock ID & Maintenance
Firmware upgrade ------------------------------------------------------ 34
Replacing your batteries --------------------------------------------- 35
Lock care ------------------------------------------------------------------ 36
3
Page 3
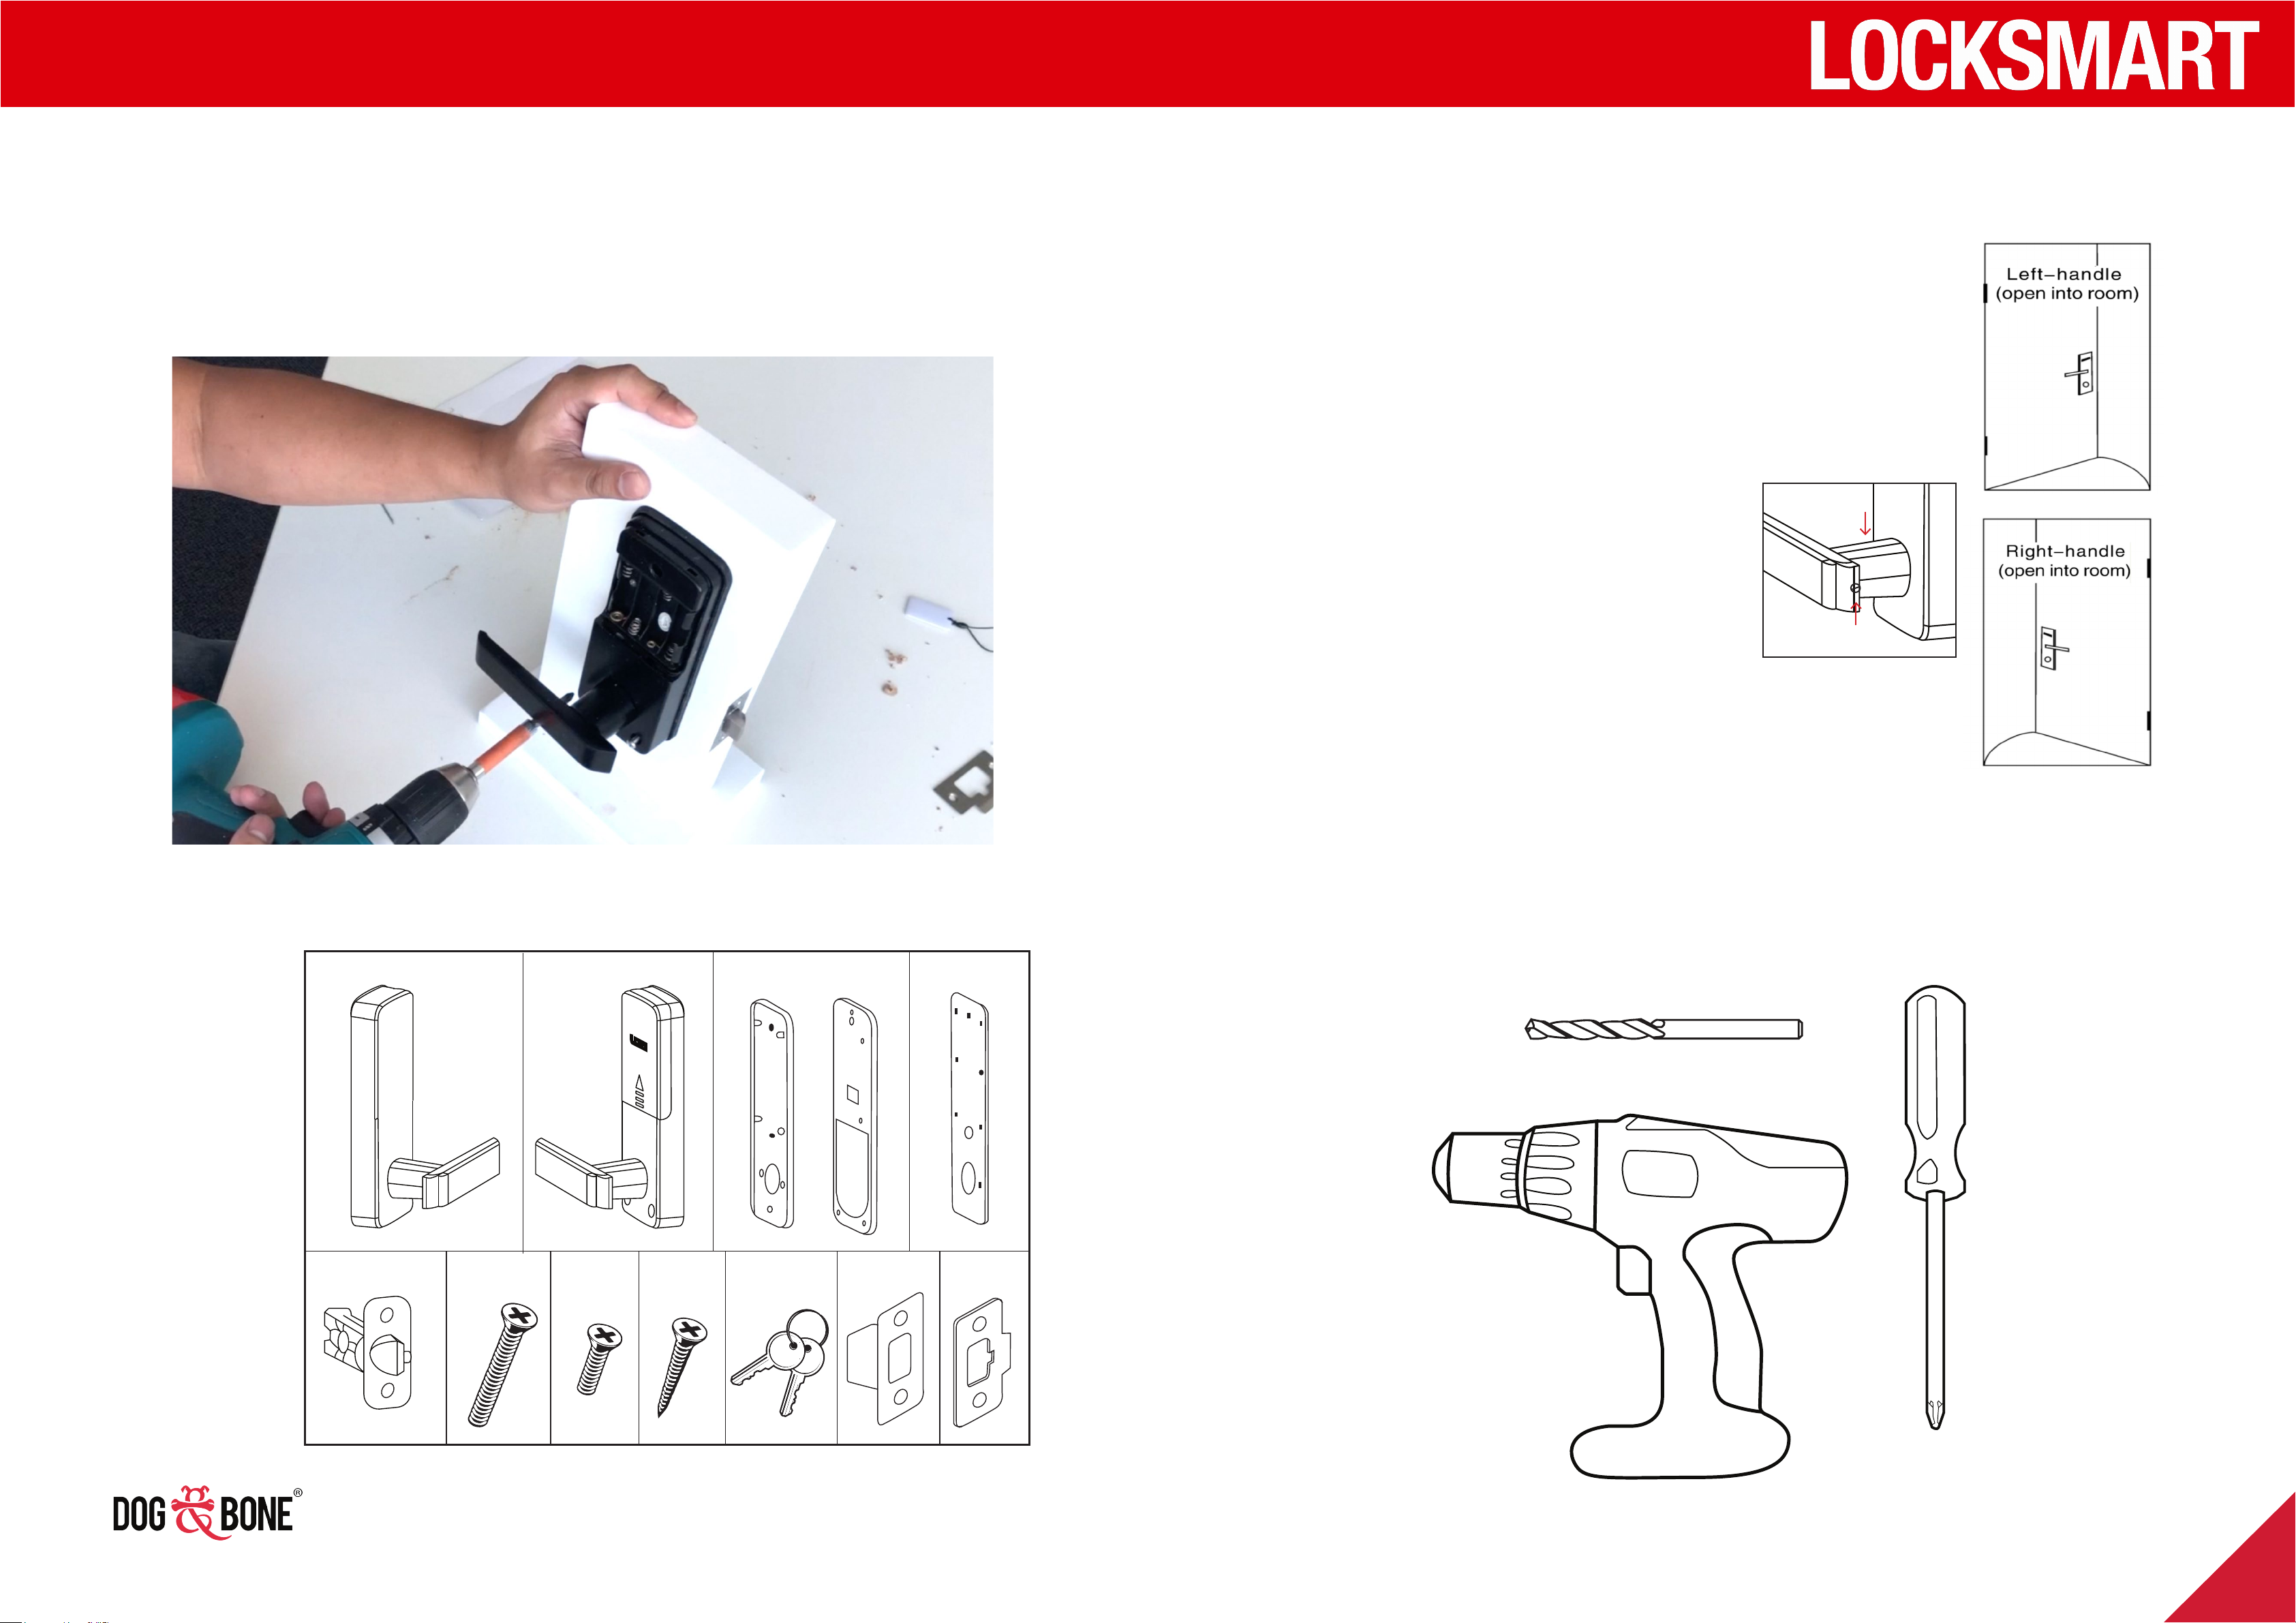
25mm Spade Bit
To fit a new door
To retrofit existing door
Chisel
Hammer
Getting started
A B
Installation guidance
Locksmart Abode
Before installation
Check: Door thickness must be
38-55mm, Door frame ≥110mm
Check: Use the grub screw
located on the lock stem
assembly and reposition
the handle to suit your door
Grub screw
position. See diagram on right
Lock stem
Included
A B
C1 & C2
D
Check: Existing lock has been removed
from door
What you will need to retrofit existing door
10 mm Drill Bit
E F x3 G x2 H x2 I x2 J K
#2 Phillips
Drill
Screw Driver
4
Page 4
E
Getting started
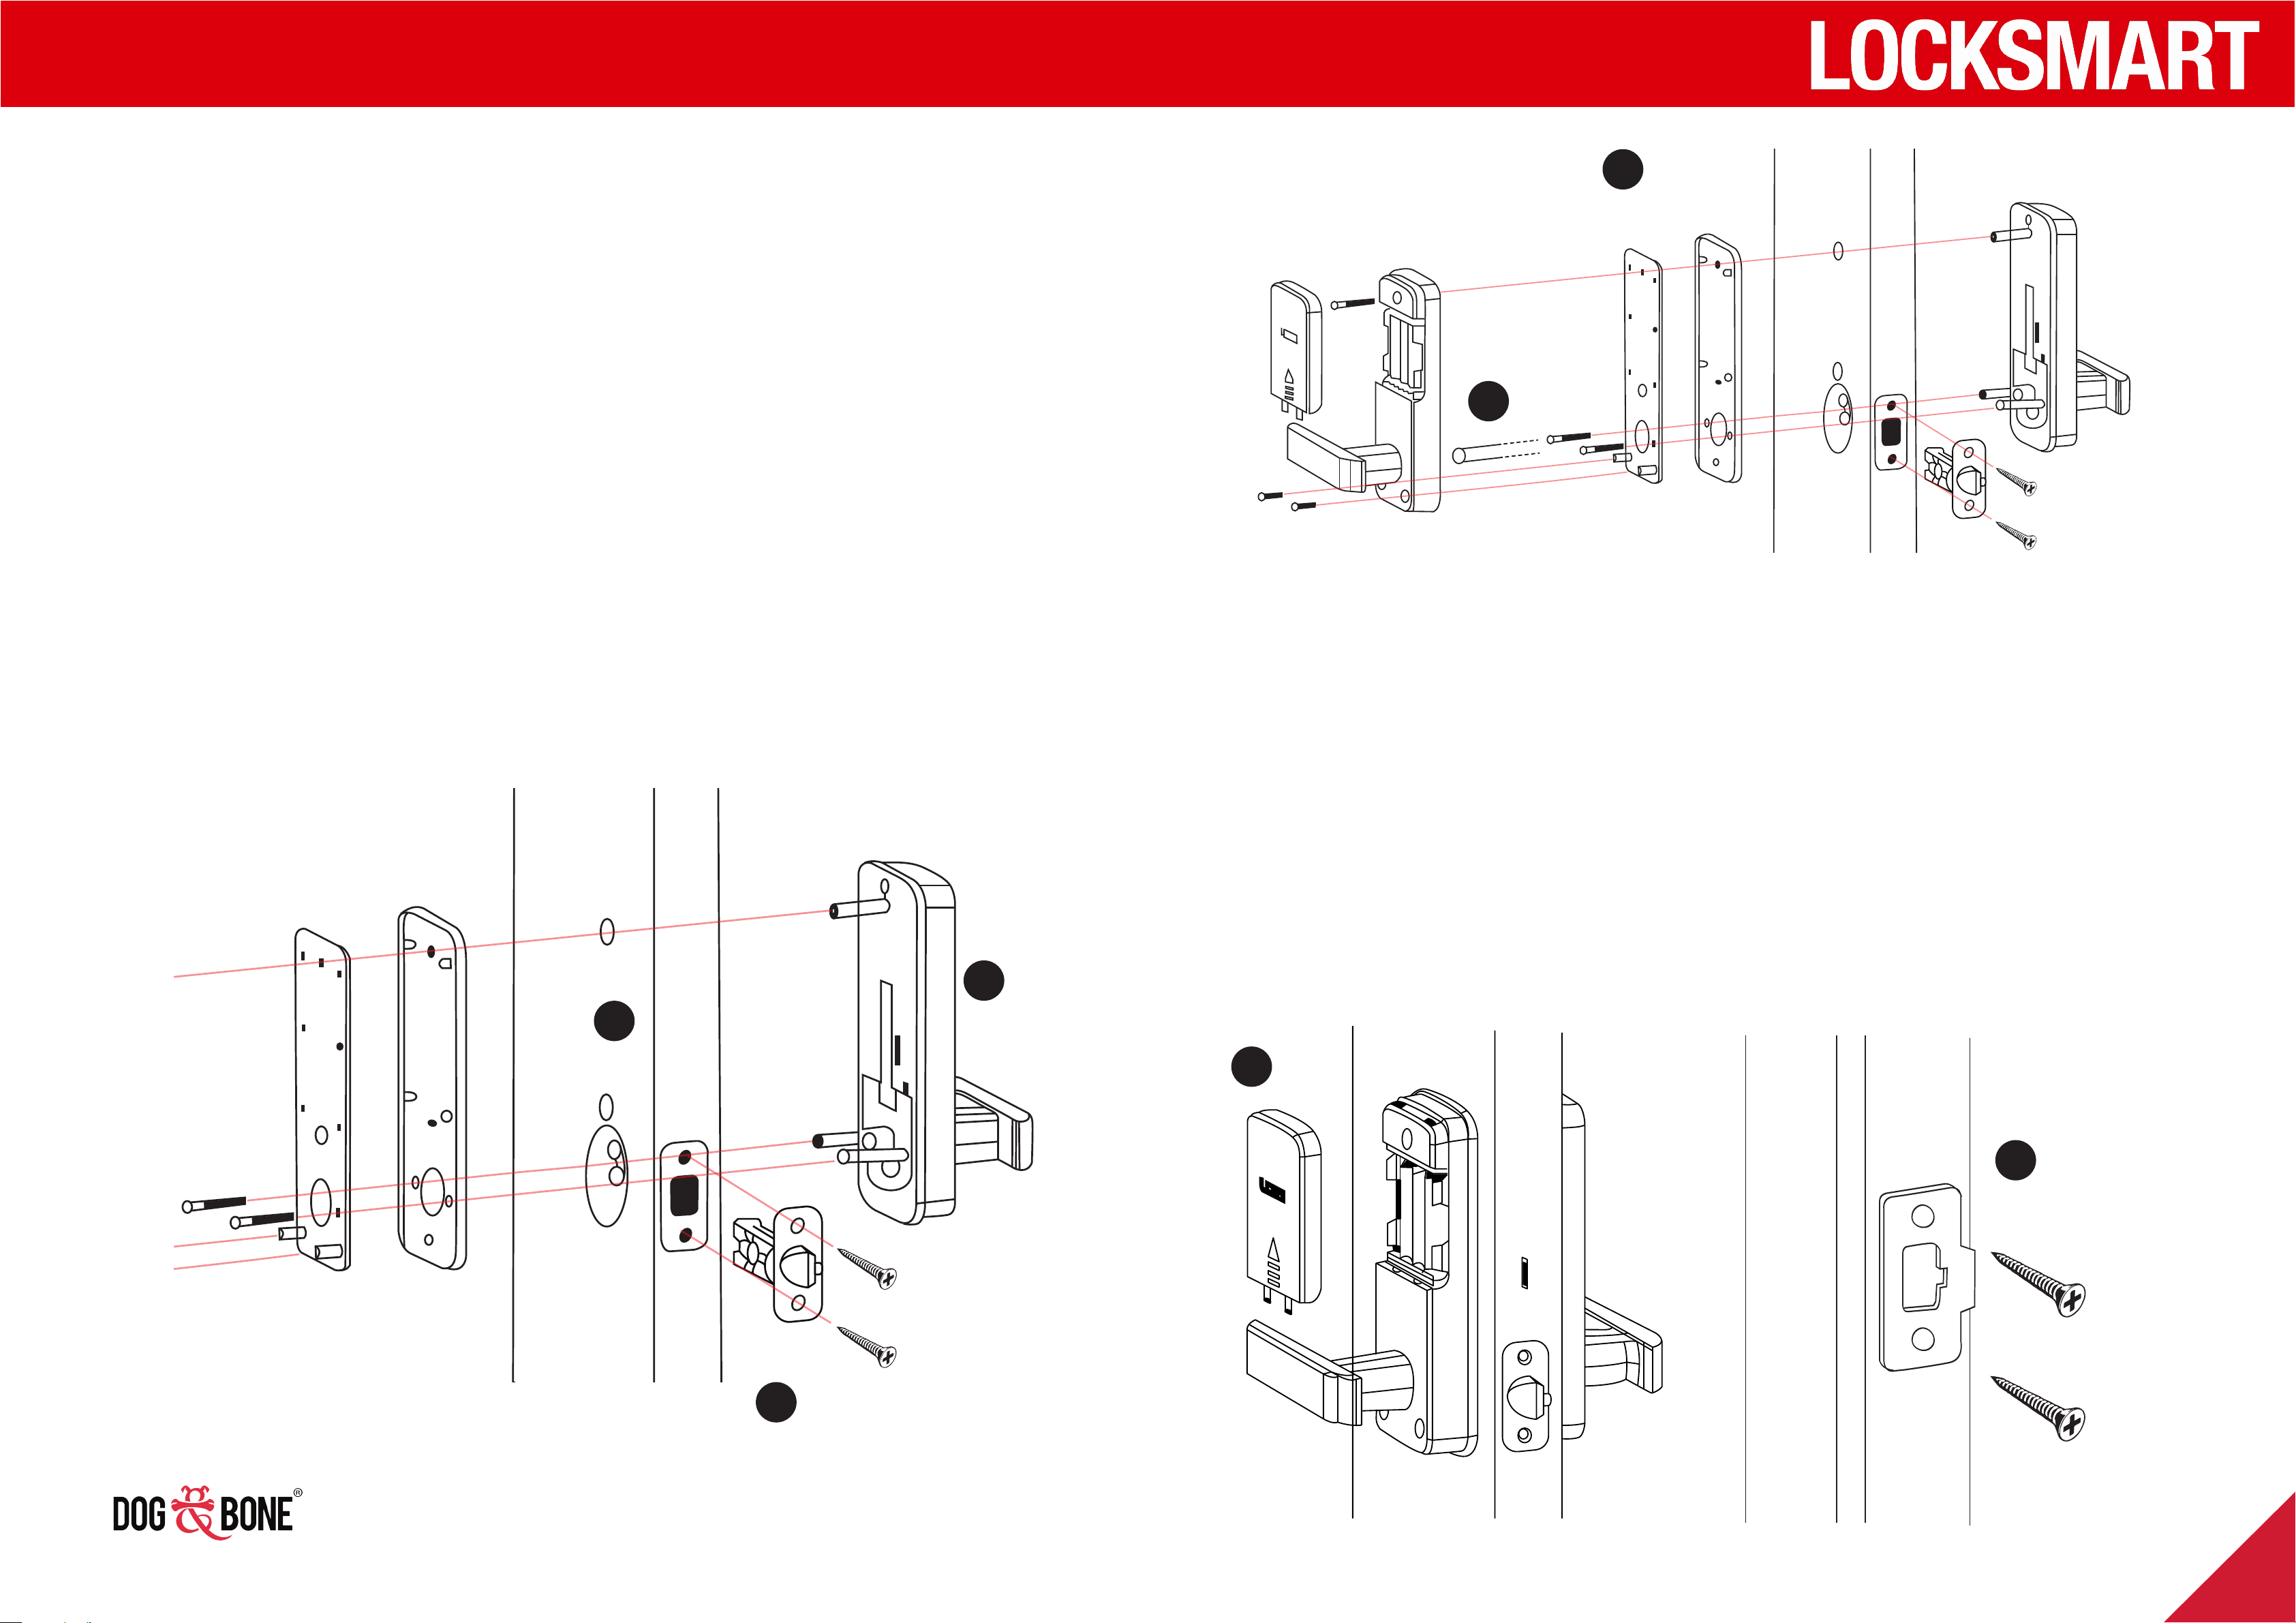
Installation process
Step 1: Drill two holes with the template using a 10mm
drill
Step 2: Install the lock latch (E) using supplied screws
(H). (Suits Australian standard door latch sizing)
G
F
B
4
F
5
D
C1
K
C2
H
A
Step 3: Install the front lock panel (A) with the rubber
gasket (C2) and fix them with screws (F) through the
and gasket (C1) and backplate (D)
C2
A
C1
D
Step 4: Thread cable through centre hole and connect to
cable in back panel and gasket
Step 5: Install the back panel (B), fix with screws (2xG,F)
Step 6: Install 4 x AA batteries. Replace battery cover
Step 7: Use existing latch plate, if suitable. If required,
attach supplied latch plate (J, K) to door frame
F
3
1
6
K
J/K
7
H
E
H
2
For install video go to www.dogandbonecases.com/abode
5
Page 5
Getting started
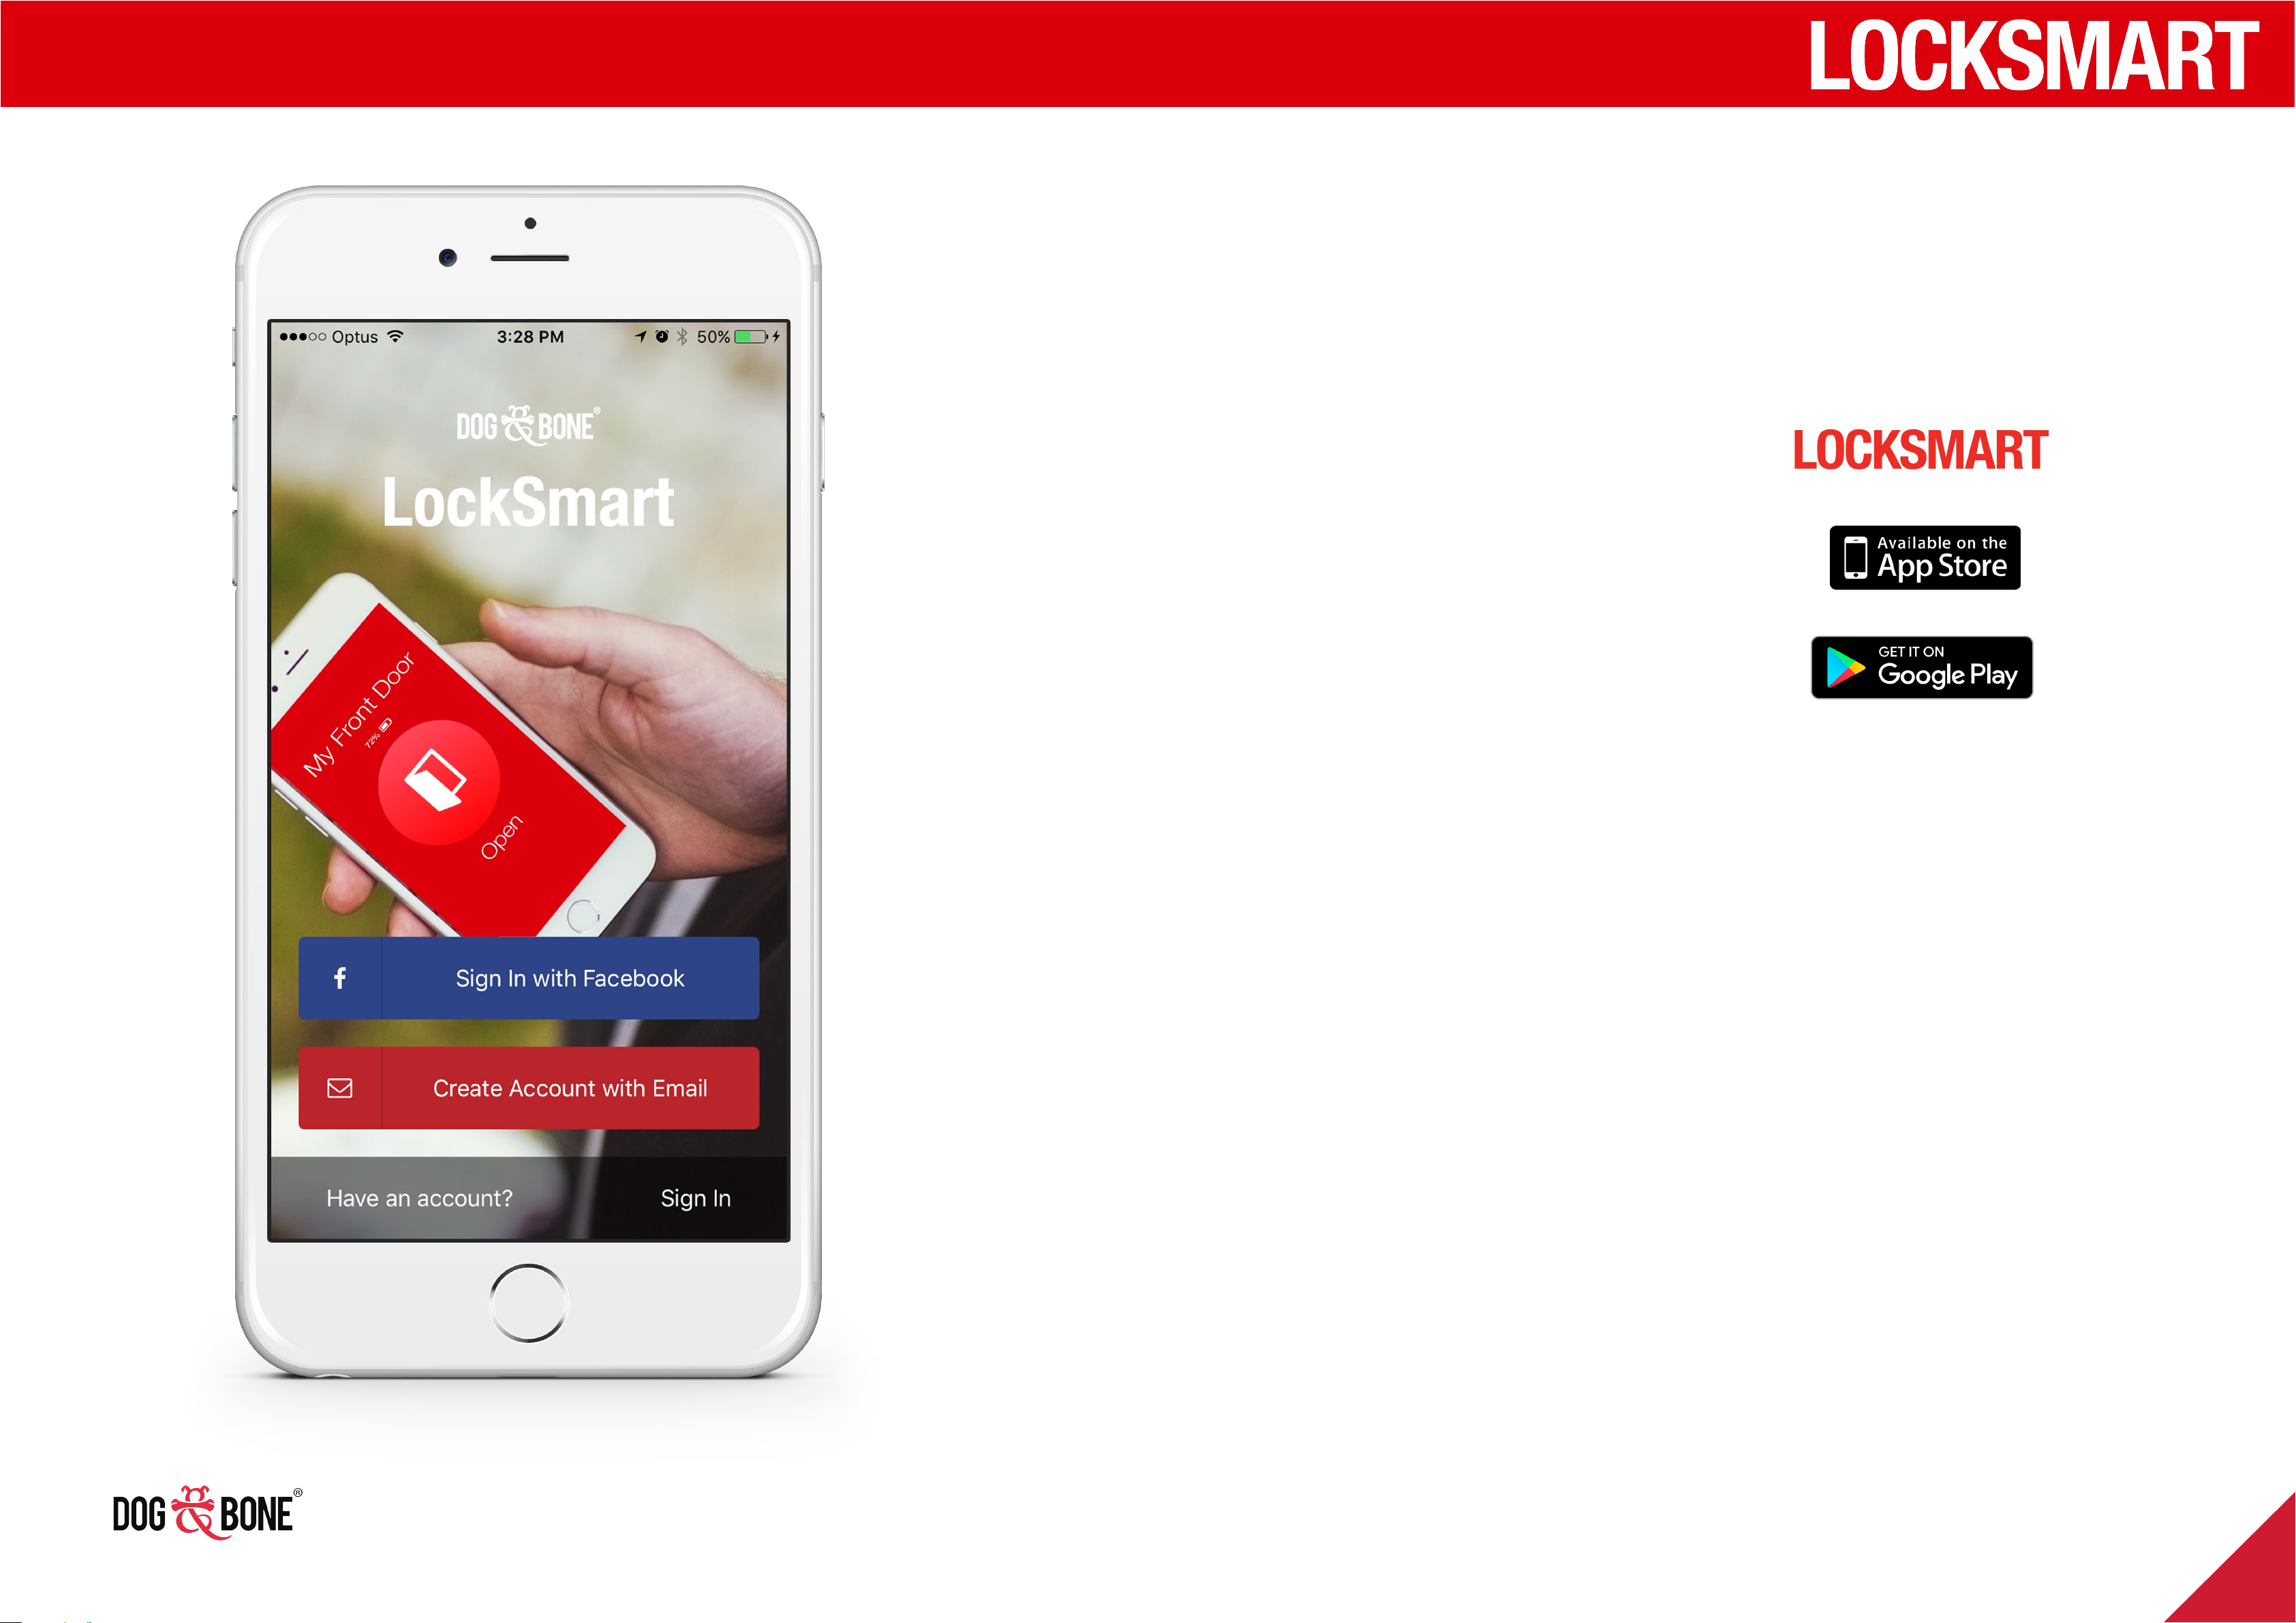
Downloading the LockSmart app
1. Open the App Store on your iOS
or Android device*
2. Go to search and type in
‘LockSmart’
3. Select LockSmart from the search
results and install the application
Sign in with Facebook
1. To log in with your Facebook account, press
‘Sign in with Facebook’
2. You will be asked to authorise your use of
Facebook to login via LockSmart
3. Once authorised, your LockSmart account
will be created using your Facebook account
information
* Compatible with iOS devices supporting Bluetooth 4.0 or higher
and running iOS 8.2 or later.
Compatible with Android devices supporting Bluetooth 4.0 or higher
and running Android 4.3 or later.
For best performance, please ensure your device is running the
latest version of the LockSmart software.
6
Page 6
Getting started
Create a LockSmart account
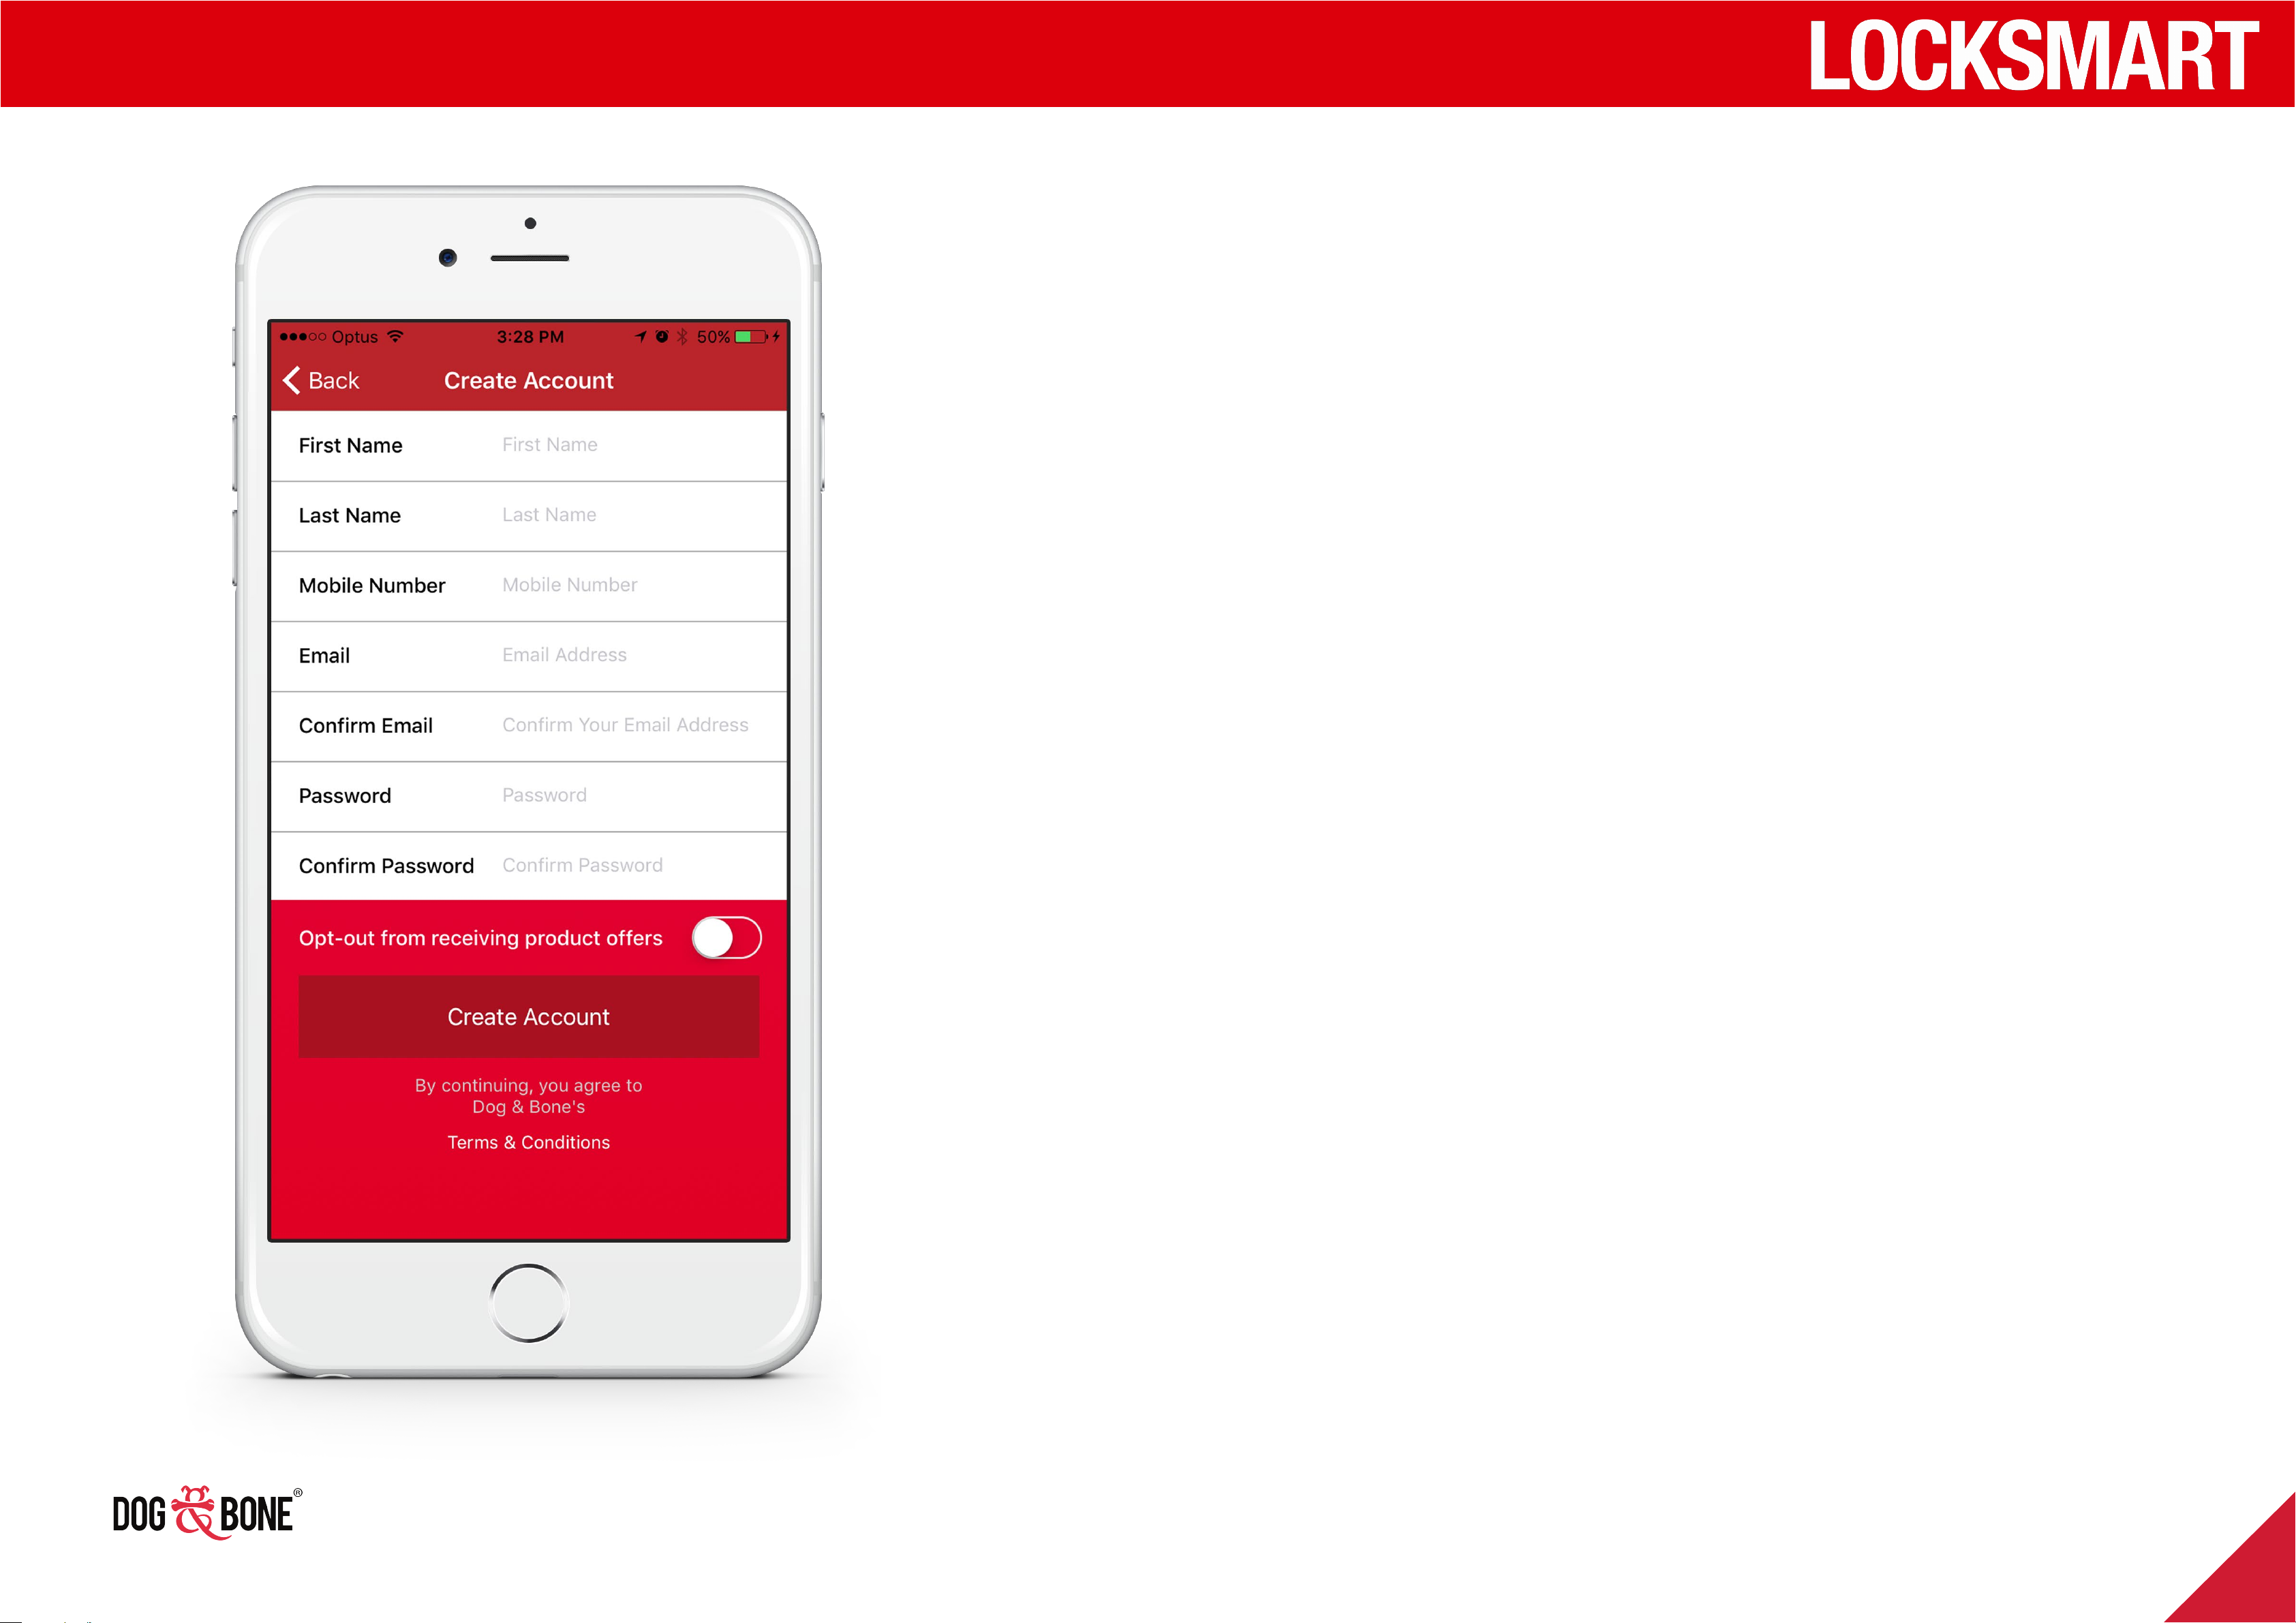
1. Press ‘Create Account with Email’ on the home
screen
2. Fill in all of the required details including First
Name, Last Name, Mobile Number, Email and
Password
3. Choose whether or not to opt-out from receiving
product oers
4. Press ‘Create Account’ to create your account
Log in with a LockSmart
account
1. To log in with your LockSmart account, press the
‘Have an account? Sign in’ button on the home screen
2. Enter your user name and password
3. Press ‘Sign In’ to log in to your account
7
Page 7
Getting started
Add a lock
1. Ensure you have Bluetooth
enabled on your device
2. Ensure lock is in range (5m)
3. Ensure the lock does not
belong to another user
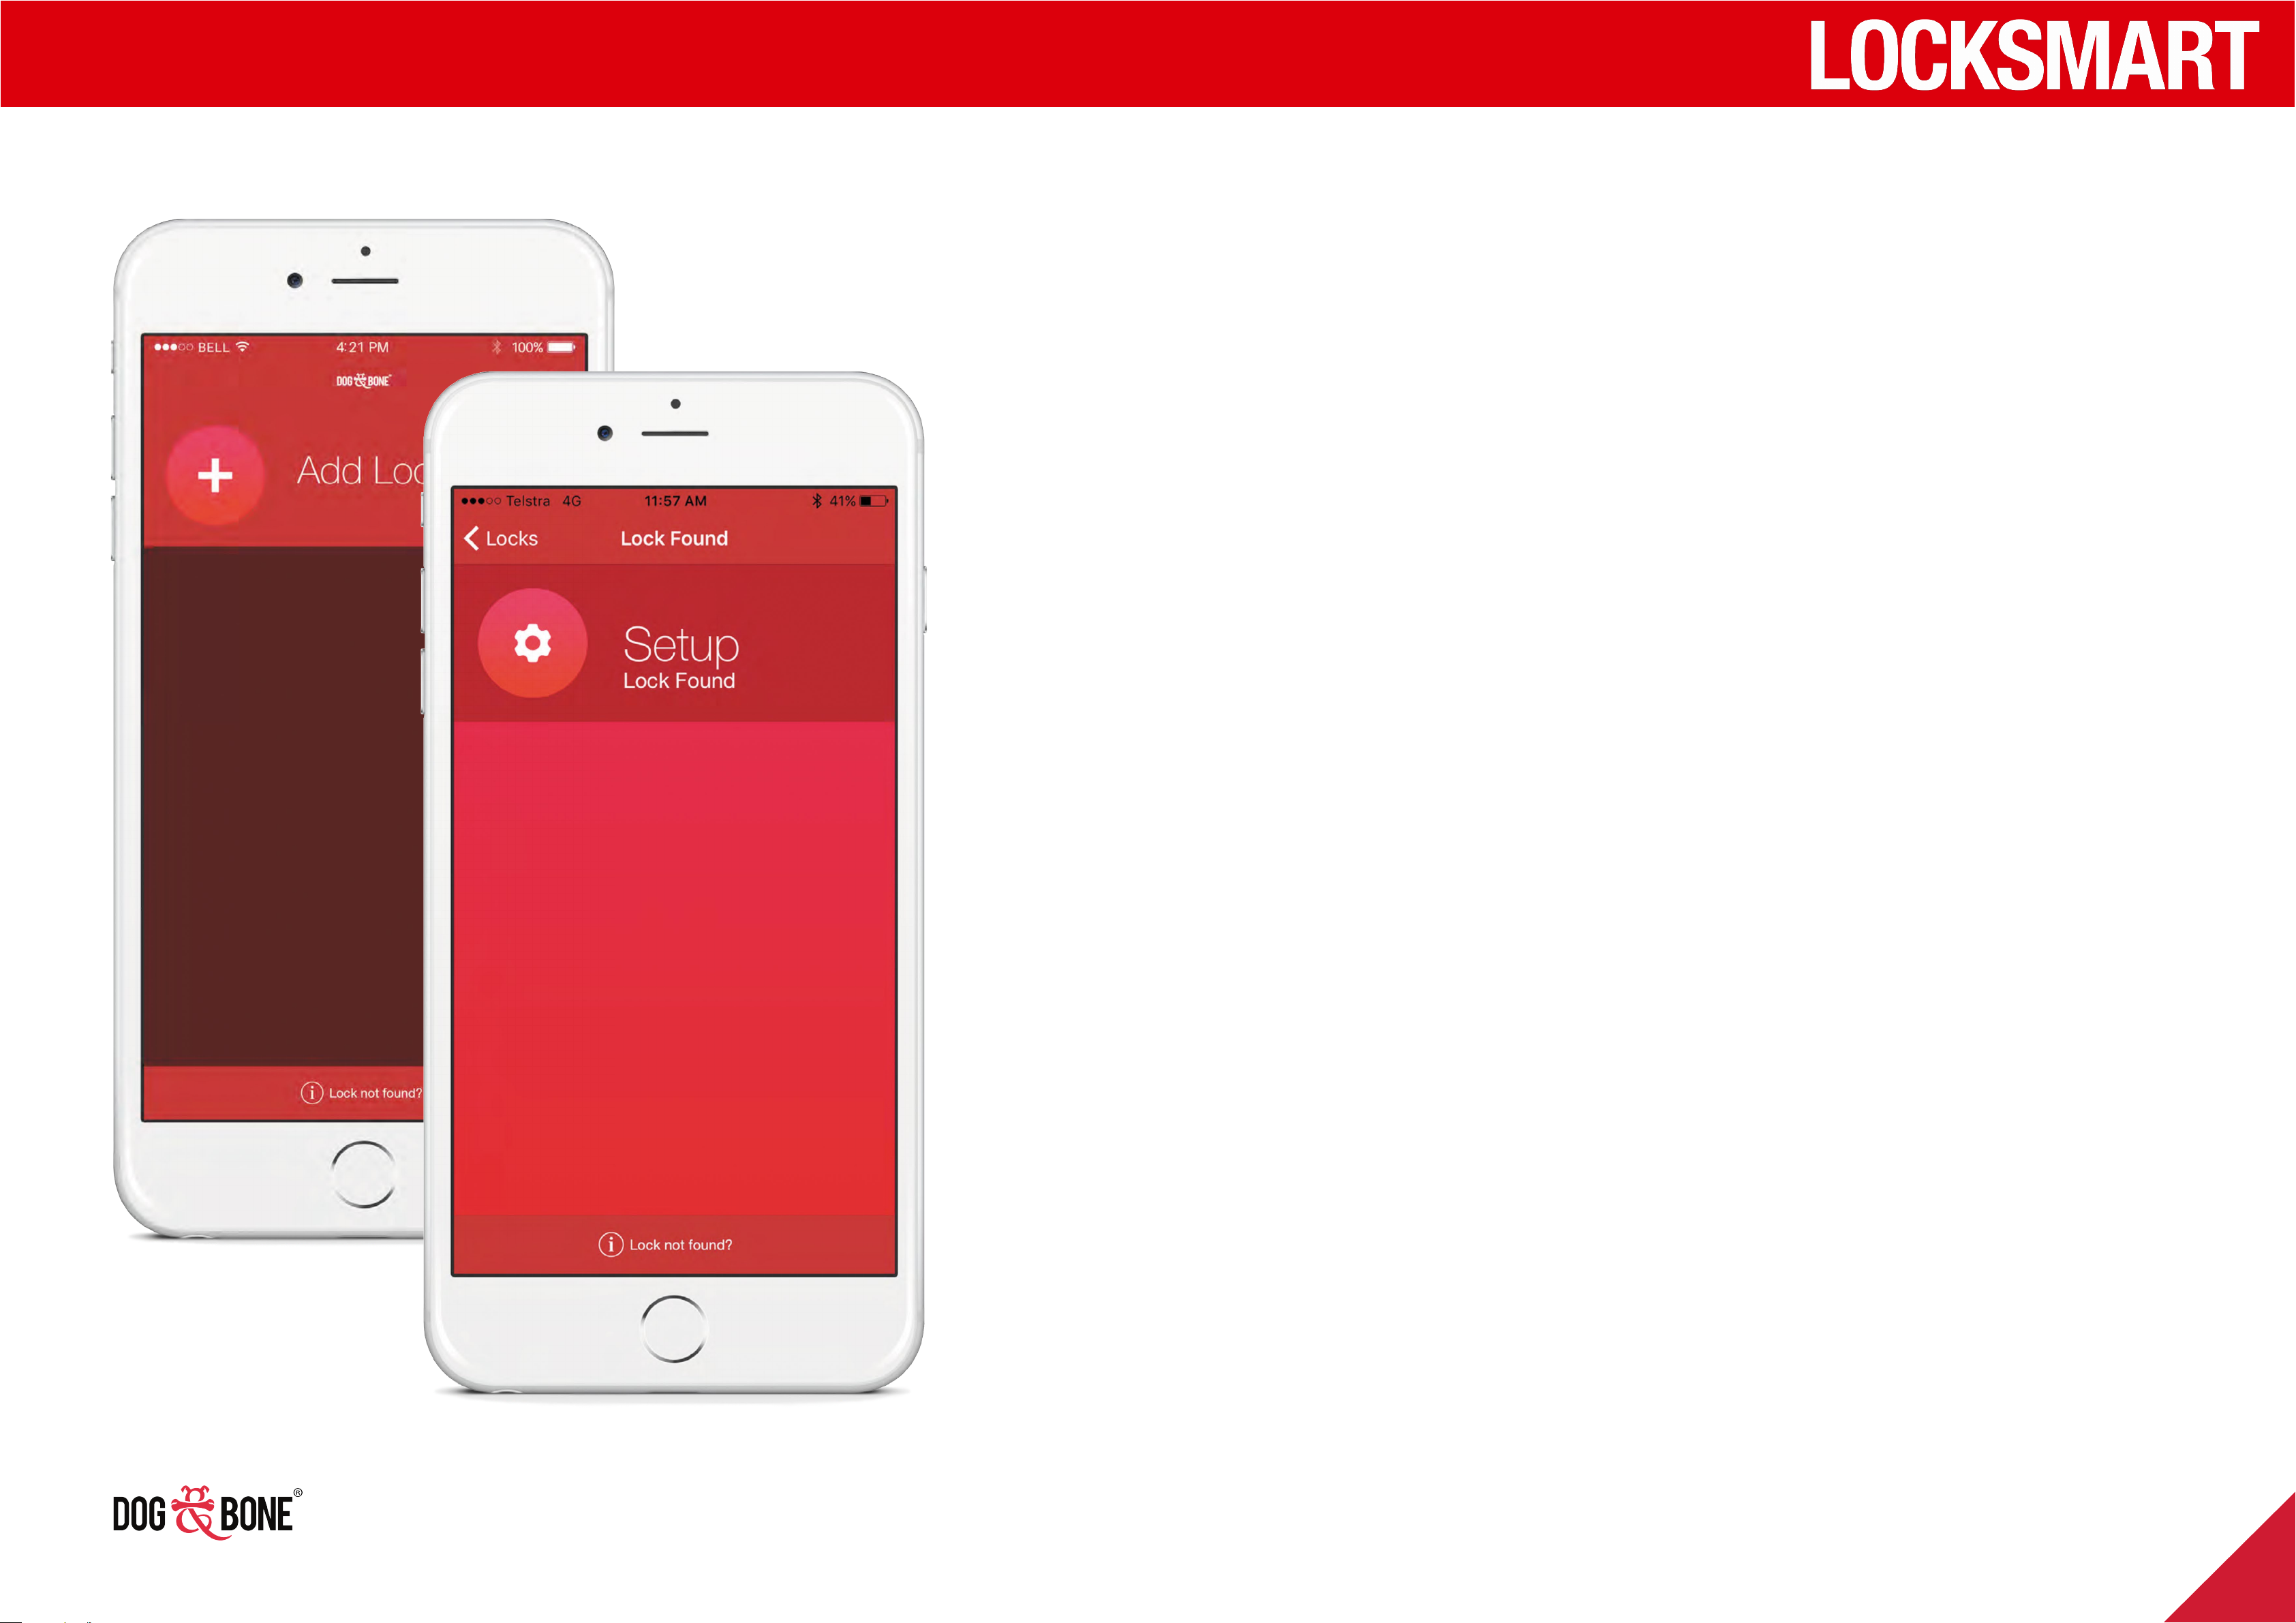
4. Press ‘Add Lock’ on the lock
screen
5. Follow instructions on
NB If you wish to transfer
ownership of the lock from
one user to another, please
see the ‘Transferring a lock
to a new owner’ section on
page 24. If you wish to share
a lock with another user,
please see the ‘Share a lock
with someone else’ section
screen and press ‘Next’
6. The app will now search for
the lock via Bluetooth
7. Once lock is found, press
‘Setup’ to confirm lock
ownership
8. You will now return to your
lock list. Select your lock,
on page 20.
then press ‘Settings’ to
name your lock, control
access, set notifications and
other options
9. Press ‘Done’ to save your
lock name
8
Page 8
Getting started
Options menu
Logging out of the app
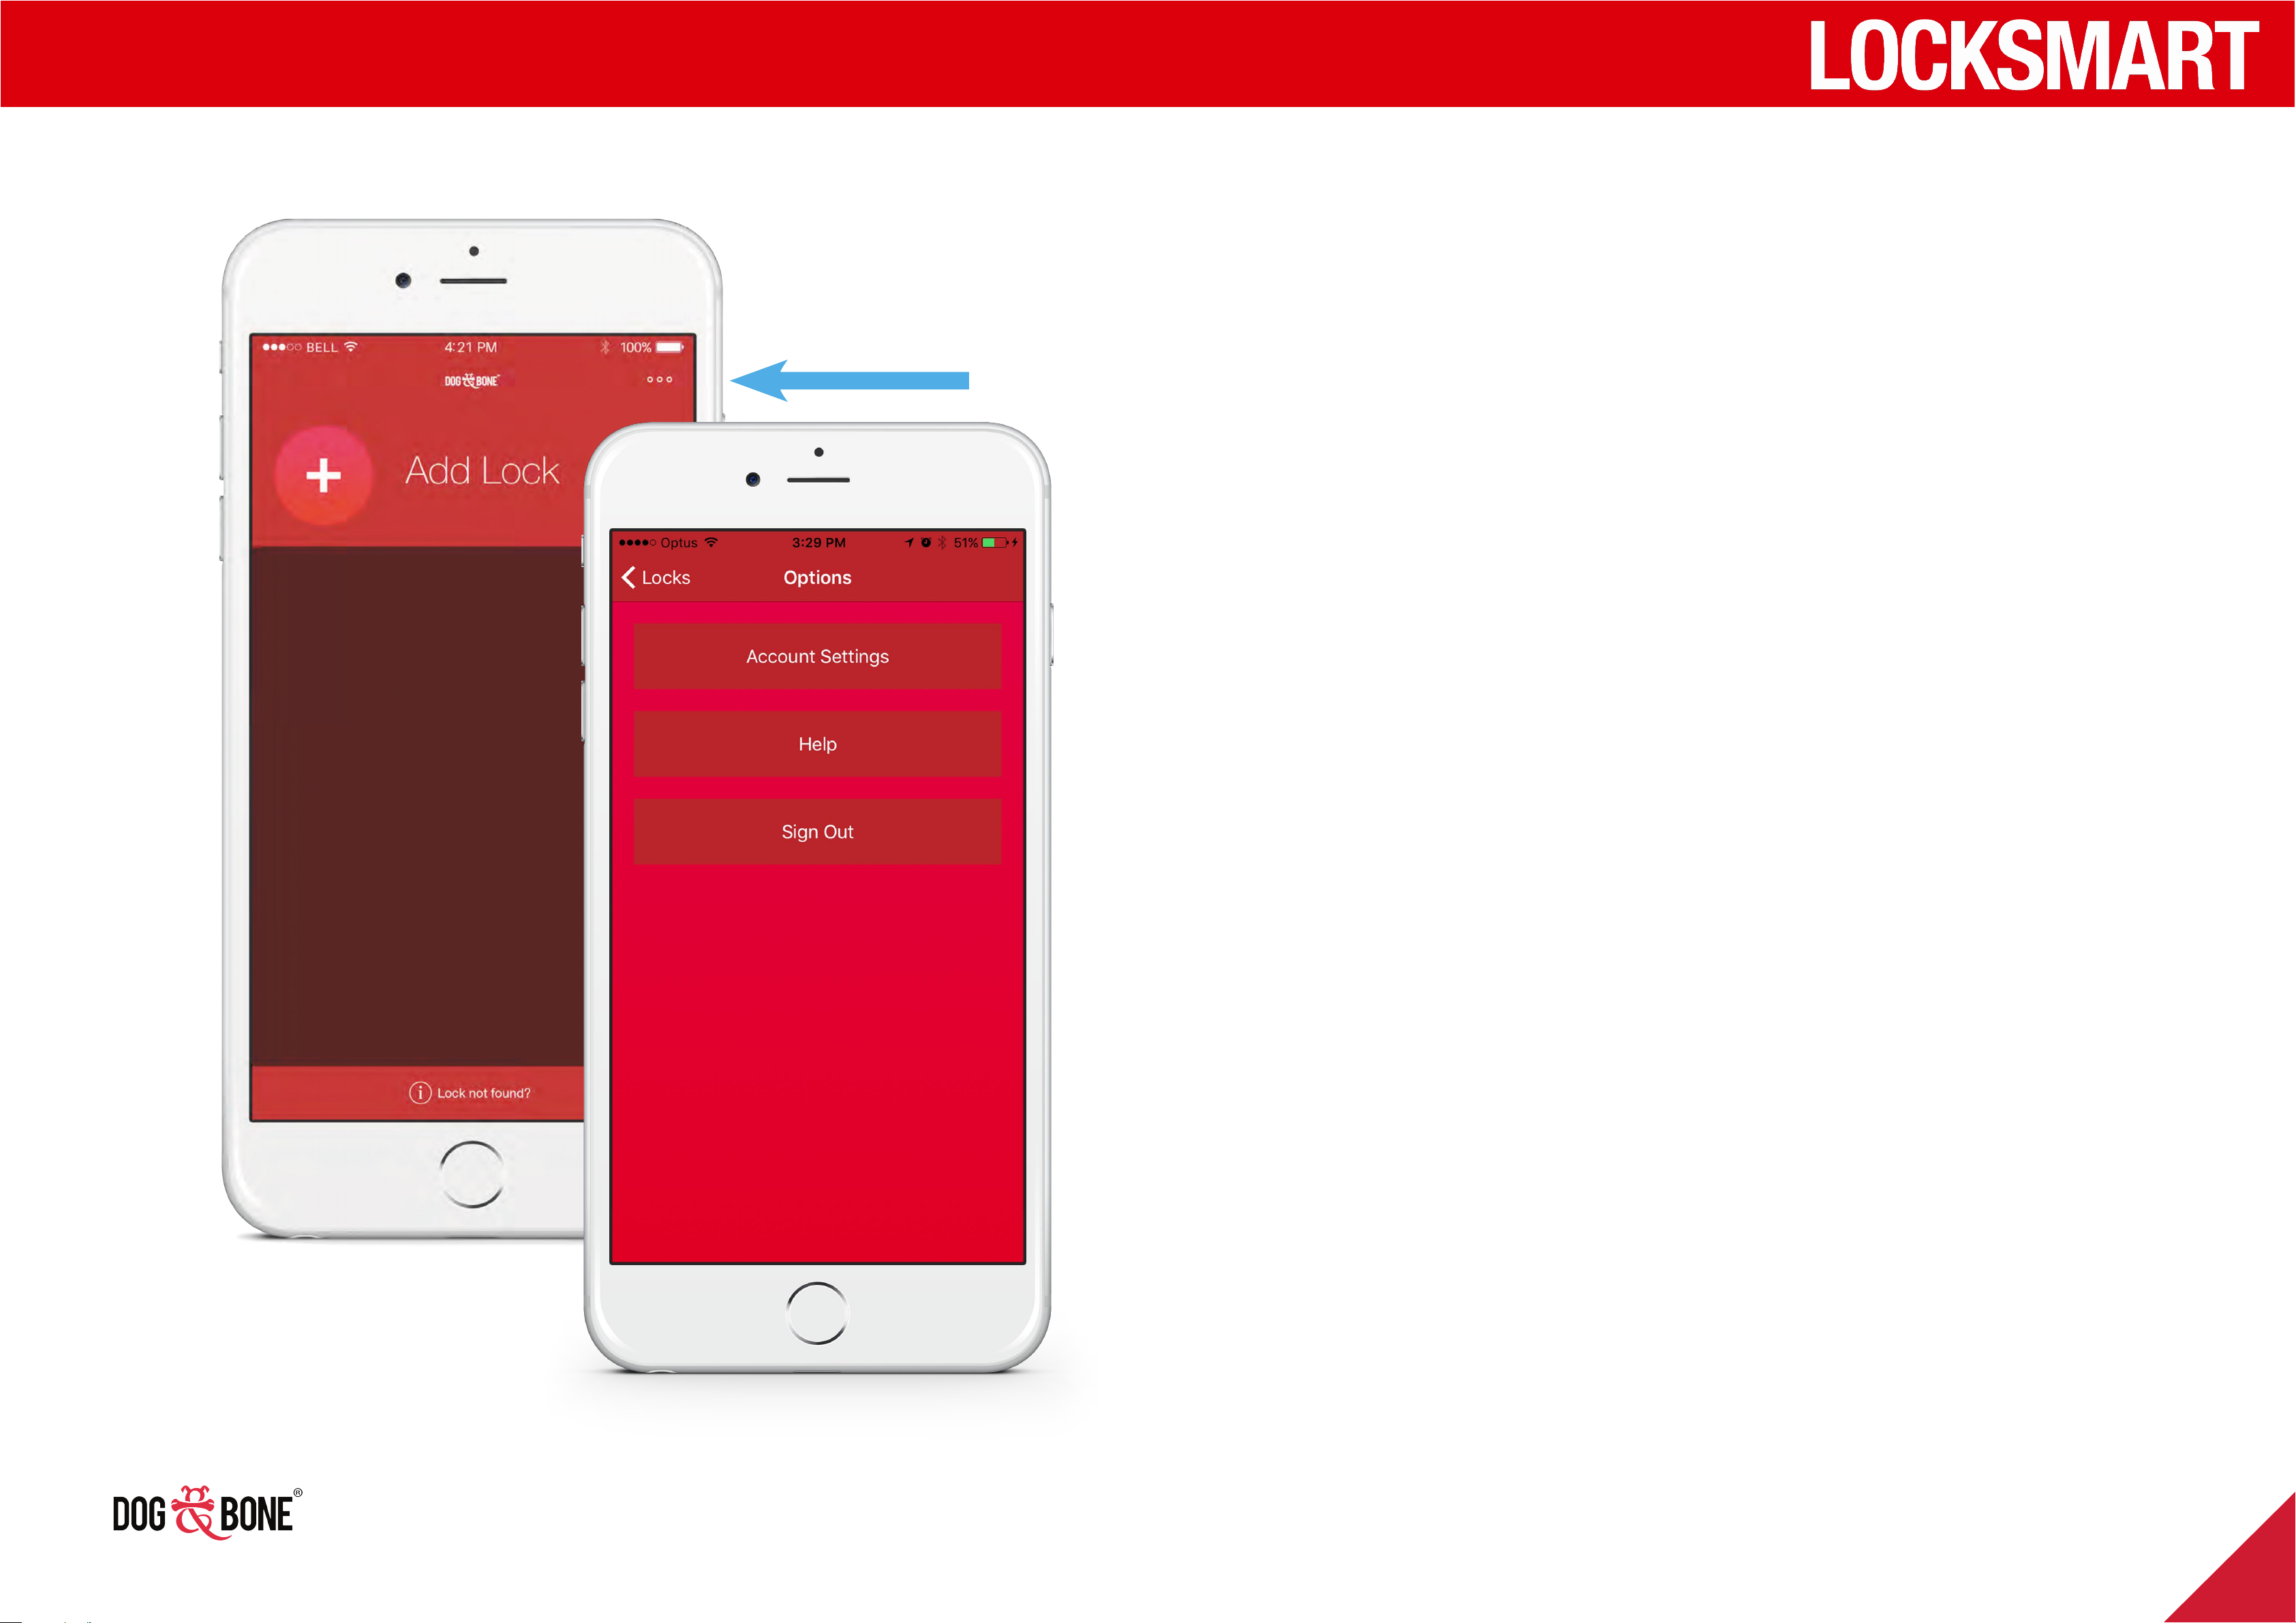
1. Open the options menu by pressing the
three buttons in the top right section of
the ‘Locks’ list screen
2. Press ‘Sign Out’
3. All of your personal and lock information
will be removed from your device until
you sign in again
9
Page 9
Getting started
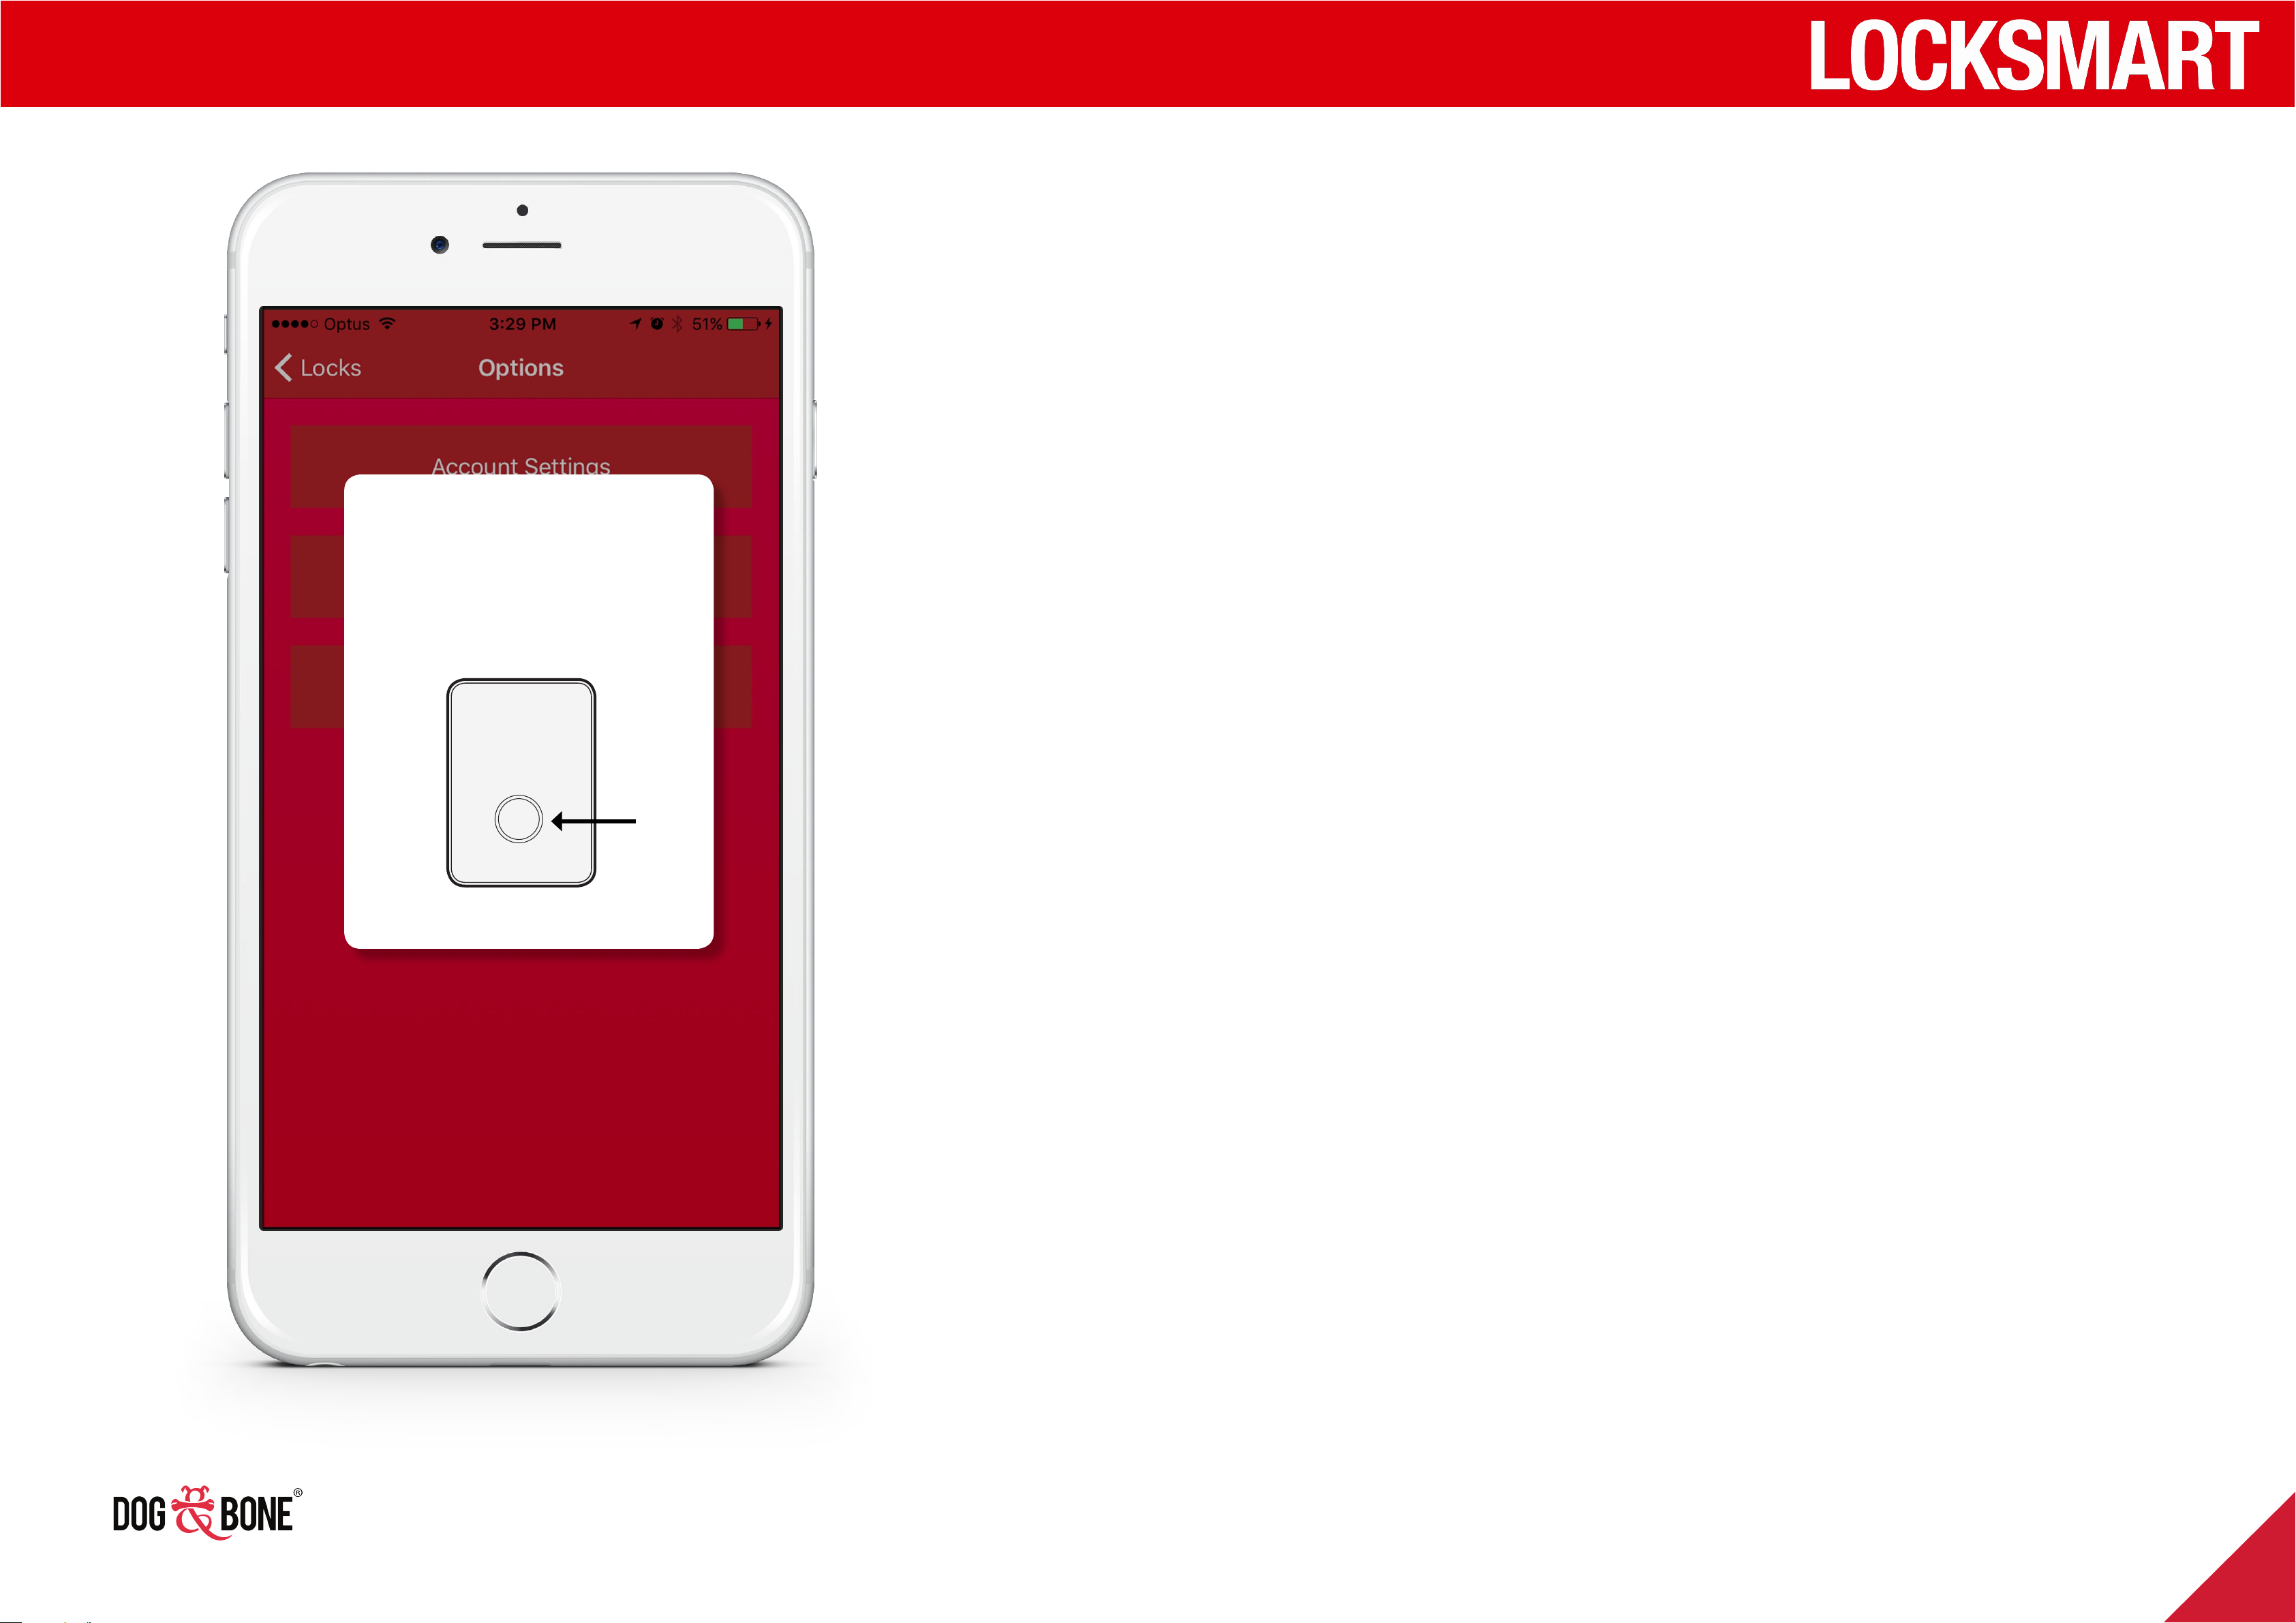
Press the button
on the Wi-Fi
Bridge wall unit
Setting up Wi-Fi Bridge
For Siri voice activation and other Wi-Fi features, you require
the Wi-fi Bridge (purchased separately to be paired to your
door lock).
1. Enable Wi-Fi bridge from the settings menu for your lock
2. Press and hold the button on the Wi-Fi bridge for 3
seconds
3. When prompted, enter your Wi-Fi details within the app
10
Page 10
Unlocking
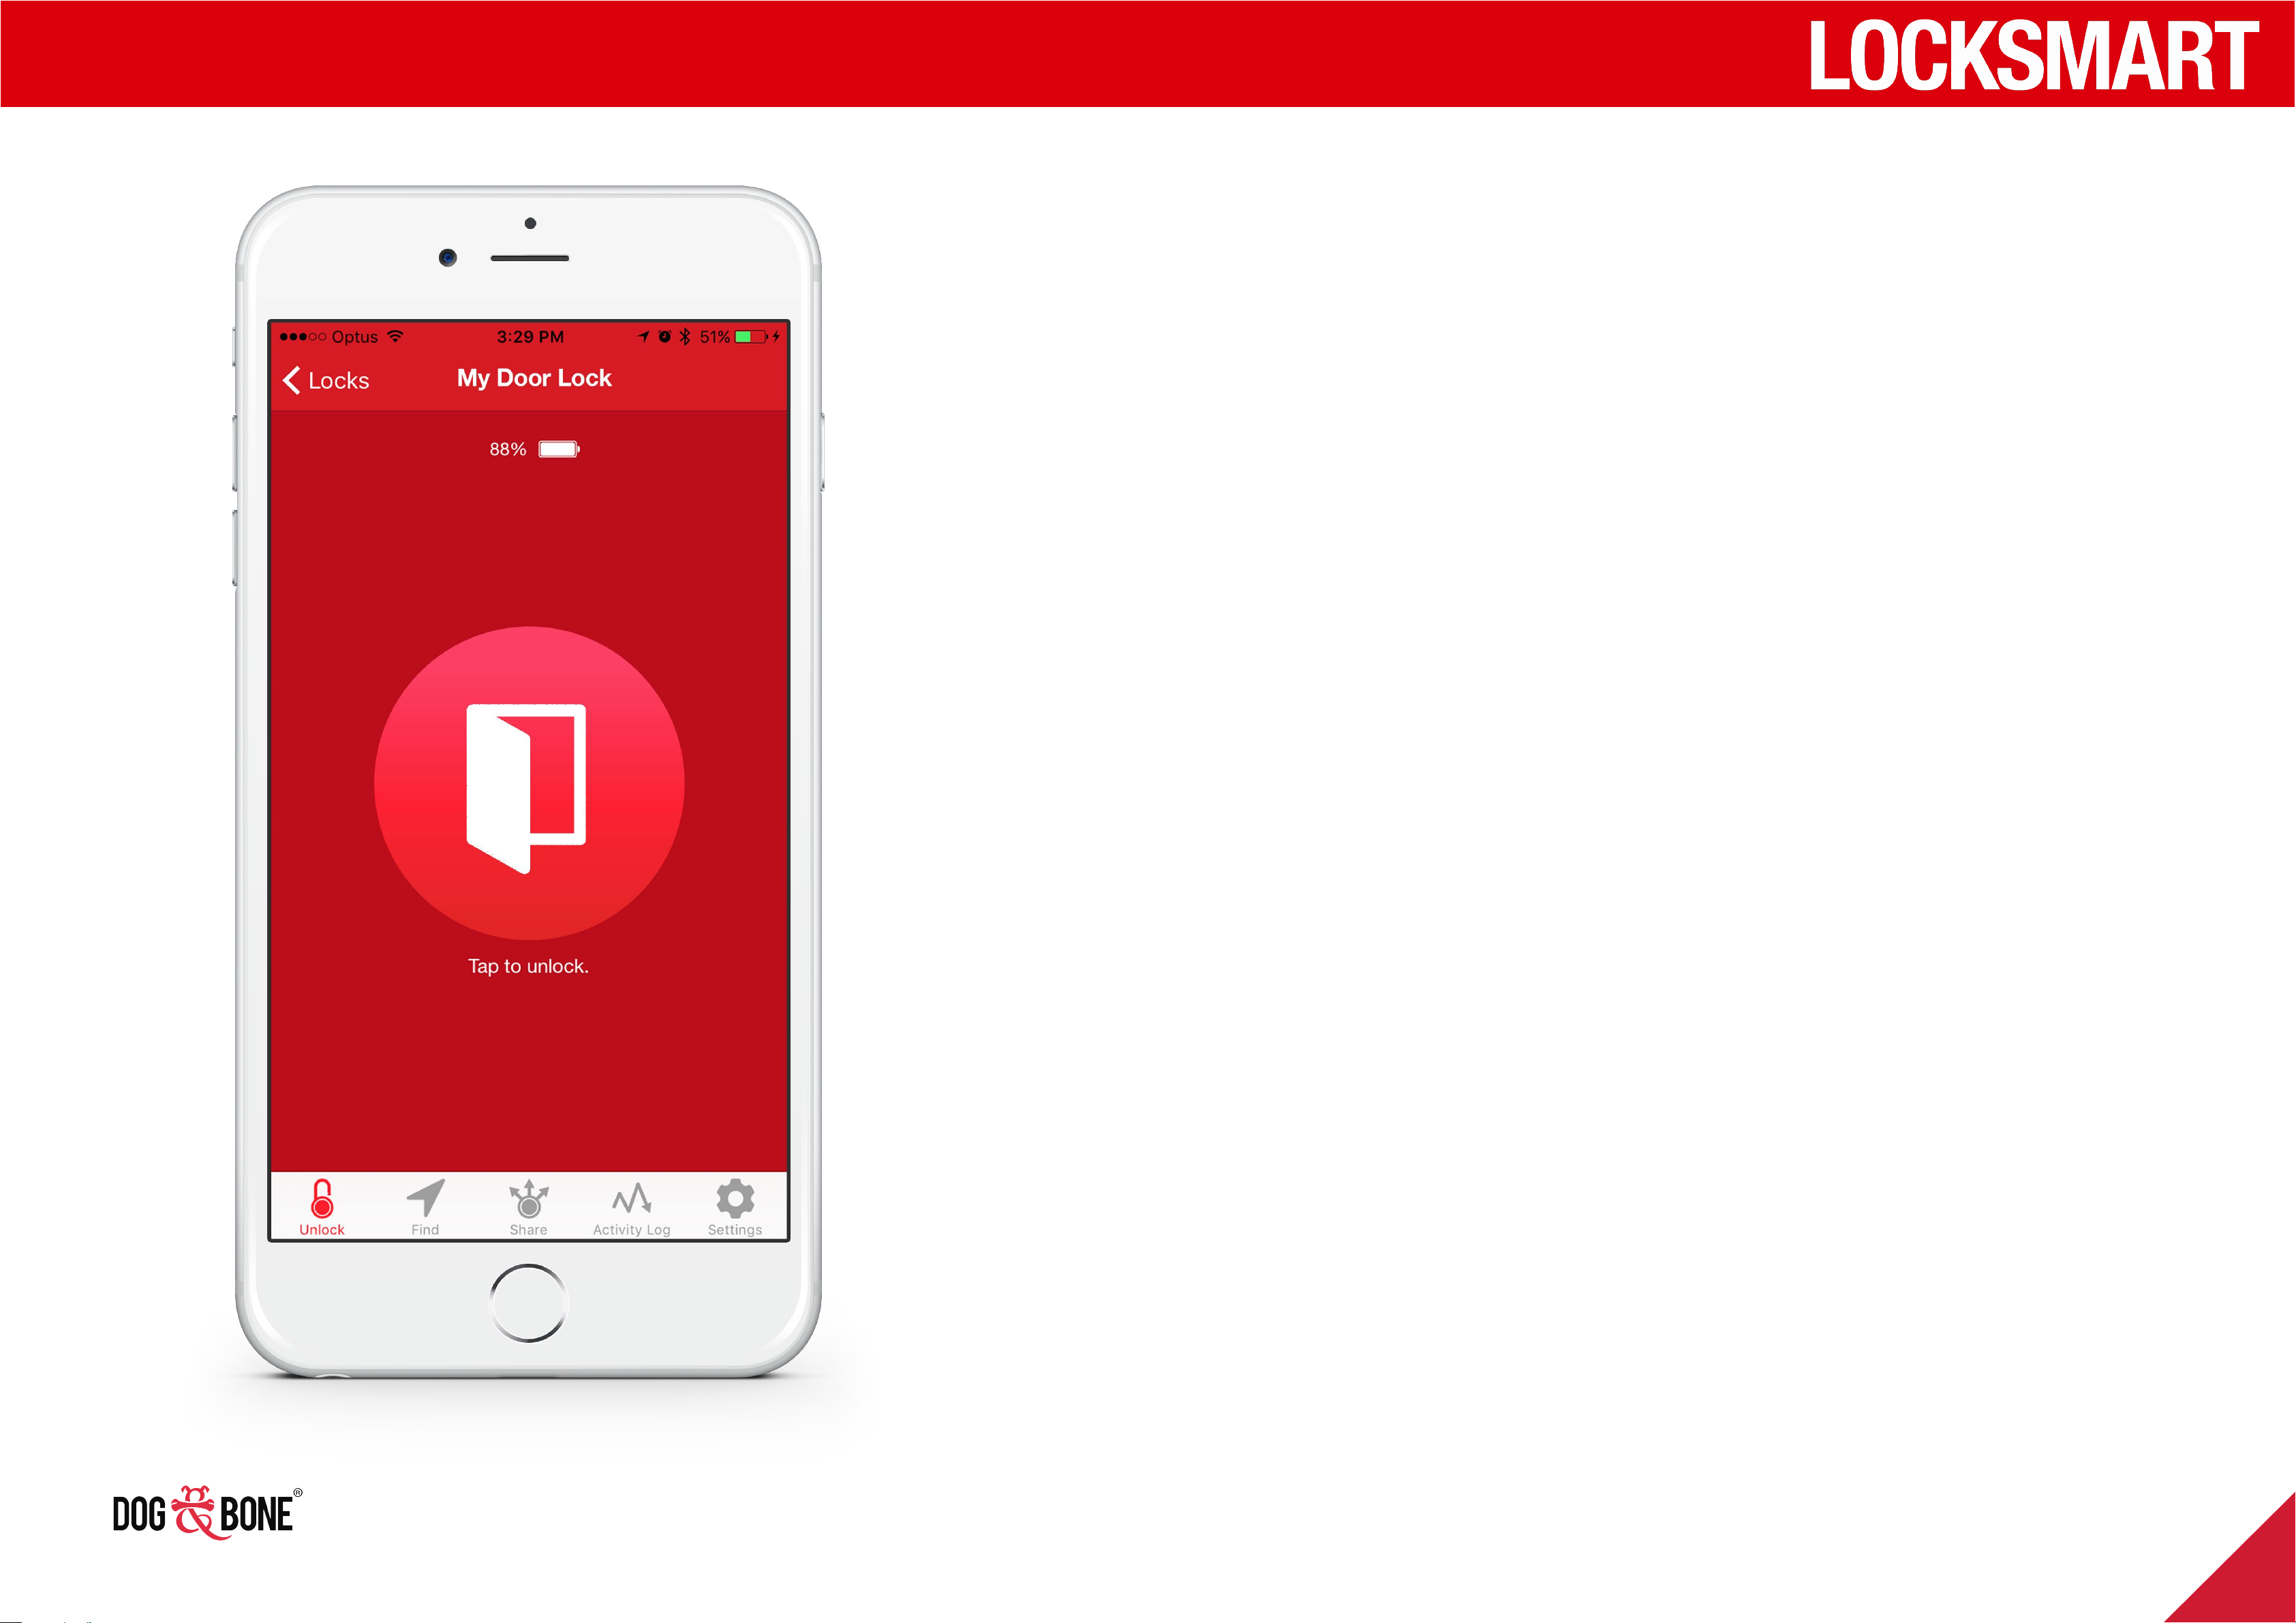
Tap to unlock
1. Ensure you have already enabled Tap to unlock
authentication from the settings menu for your lock
2. Ensure you have Bluetooth enabled and the lock is
within 5m of your device
3. Choose the lock from the lock list screen
4. You will see a large door button in the center of the
screen
5. Simply tap on the door button to unlock
11
Page 11
Unlocking
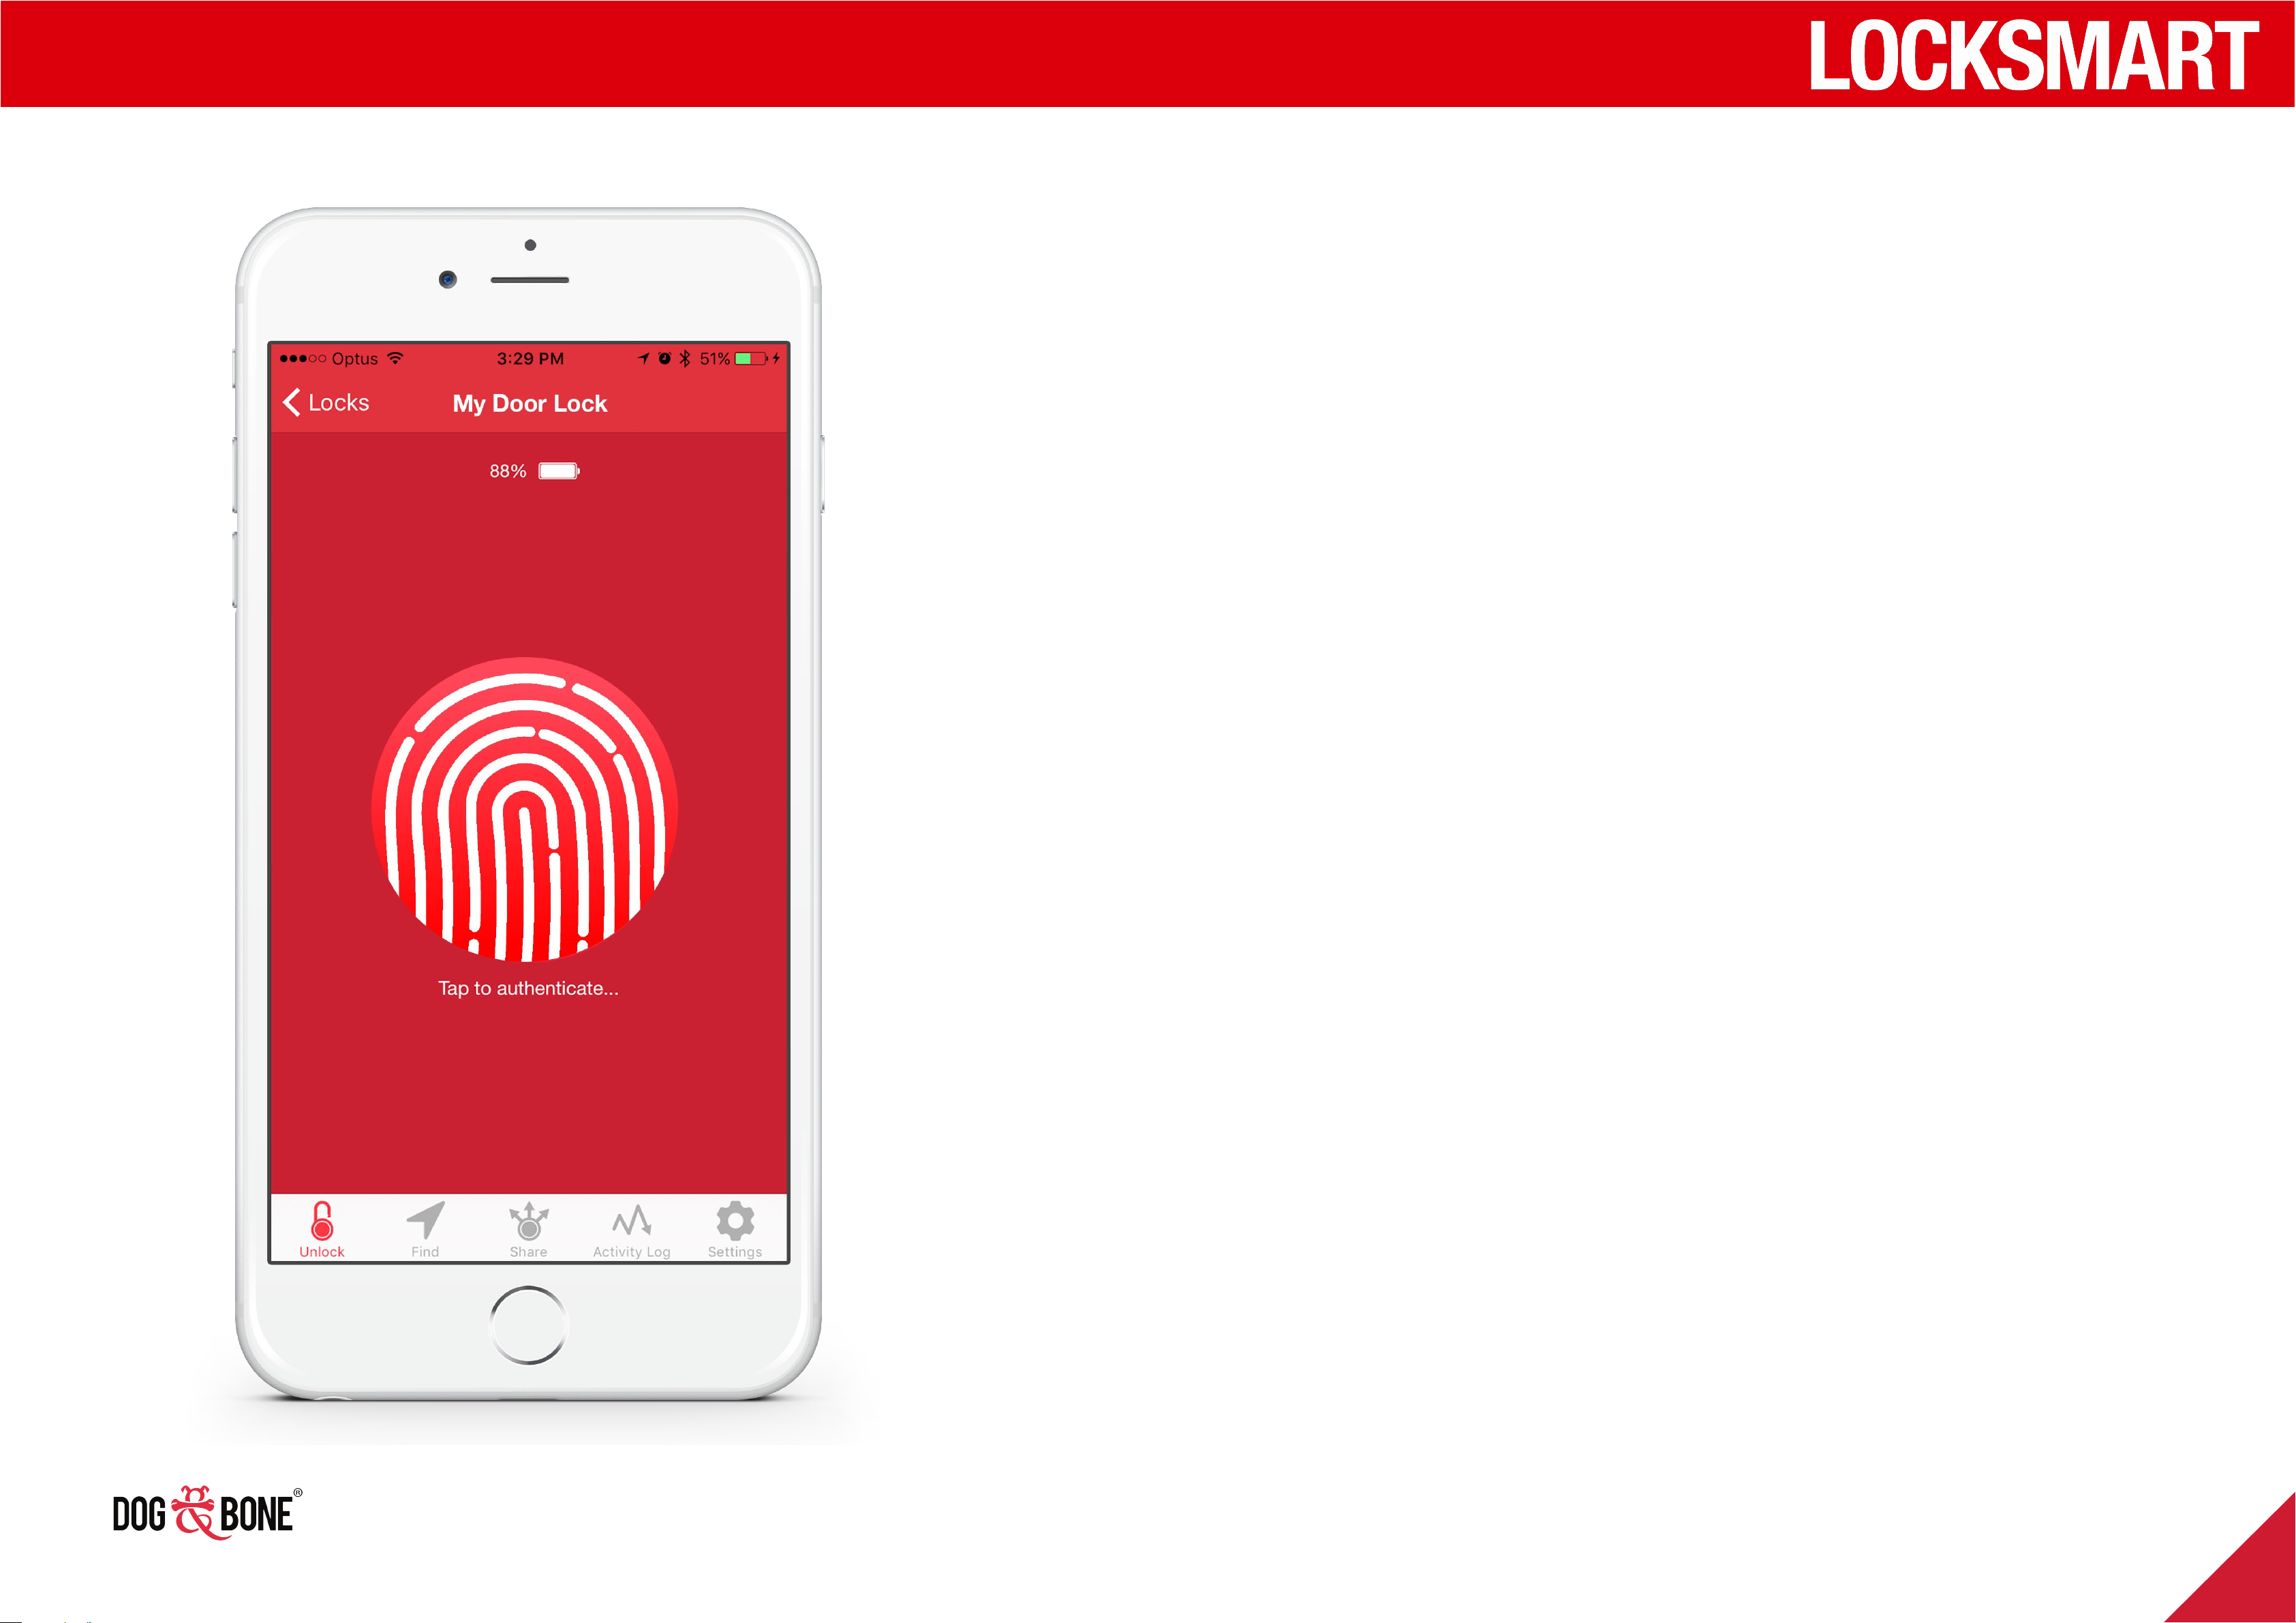
Touch ID / Fingerprint
Available on compatible mobile devices
1. Ensure your device has been previously
configured to enable Touch ID (on iOS
devices) or Fingerprint (on Android devices)
2. Ensure you have Bluetooth enabled and the
lock is within 5m of your device
3. Ensure you have Bluetooth enabled and that
the lock is within 5m of your device and turned
on. To turn on, press the button on the bottom
of the lock until a solid green light is displayed
4. Choose the lock from the lock list screen
5. You will see a large button in the center of the
screen
6. Tap on the button on screen
7. When prompted, place your finger on your
device’s home button to unlock the lock
12
Page 12
Unlocking
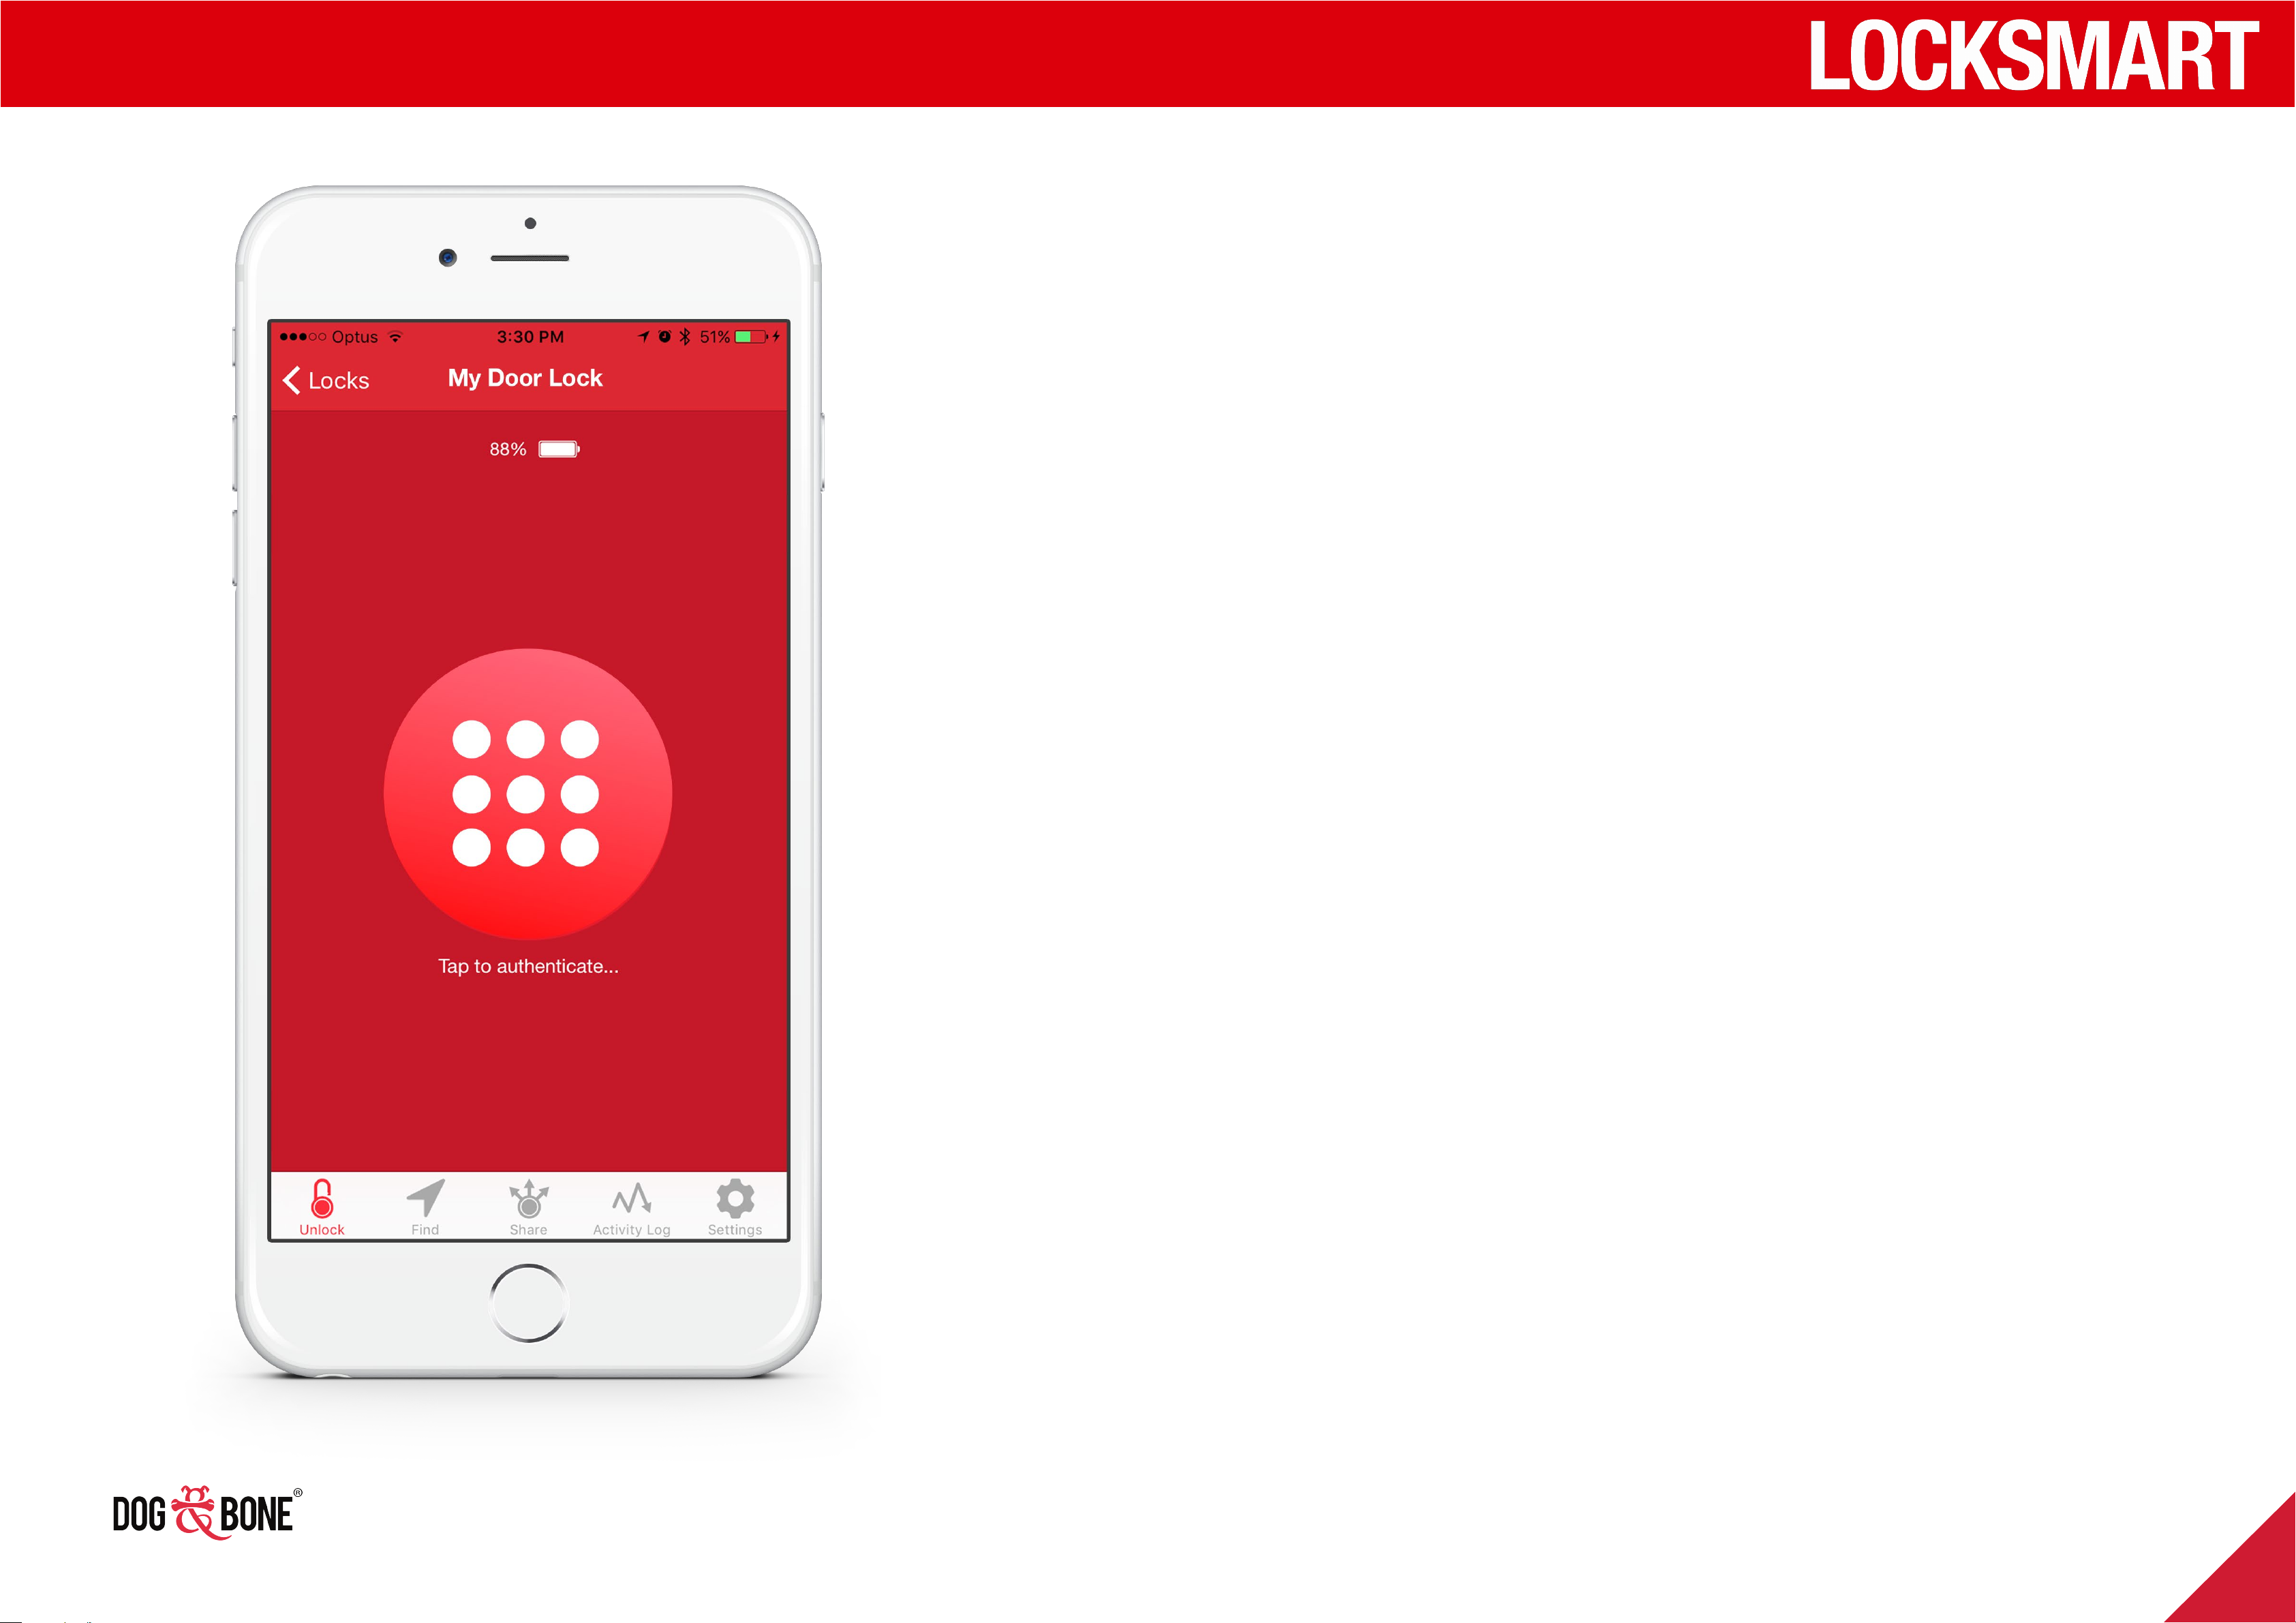
Passcode
1. Ensure you have already
enabled Passcode
authentication from the
settings menu for your lock
- Once enabled, you will
be required to enter this
passcode to access the
settings screen, invite a
shared user, or to unlock
2. Ensure you have Bluetooth
enabled and the lock is within
5m of your device
3. Choose the lock from the lock
list screen
4. You will see a large button in
the center of the screen
5. Tap on the button on screen
your lock
- After successfully
entering your passcode
to access settings or
unlock your lock, you will
remain authenticated for
a period of five minutes
- If you lock your phone
or exit the application,
6. Enter your passcode to unlock
the lock
this authentication will
immediately expire
13
Page 13
Unlocking
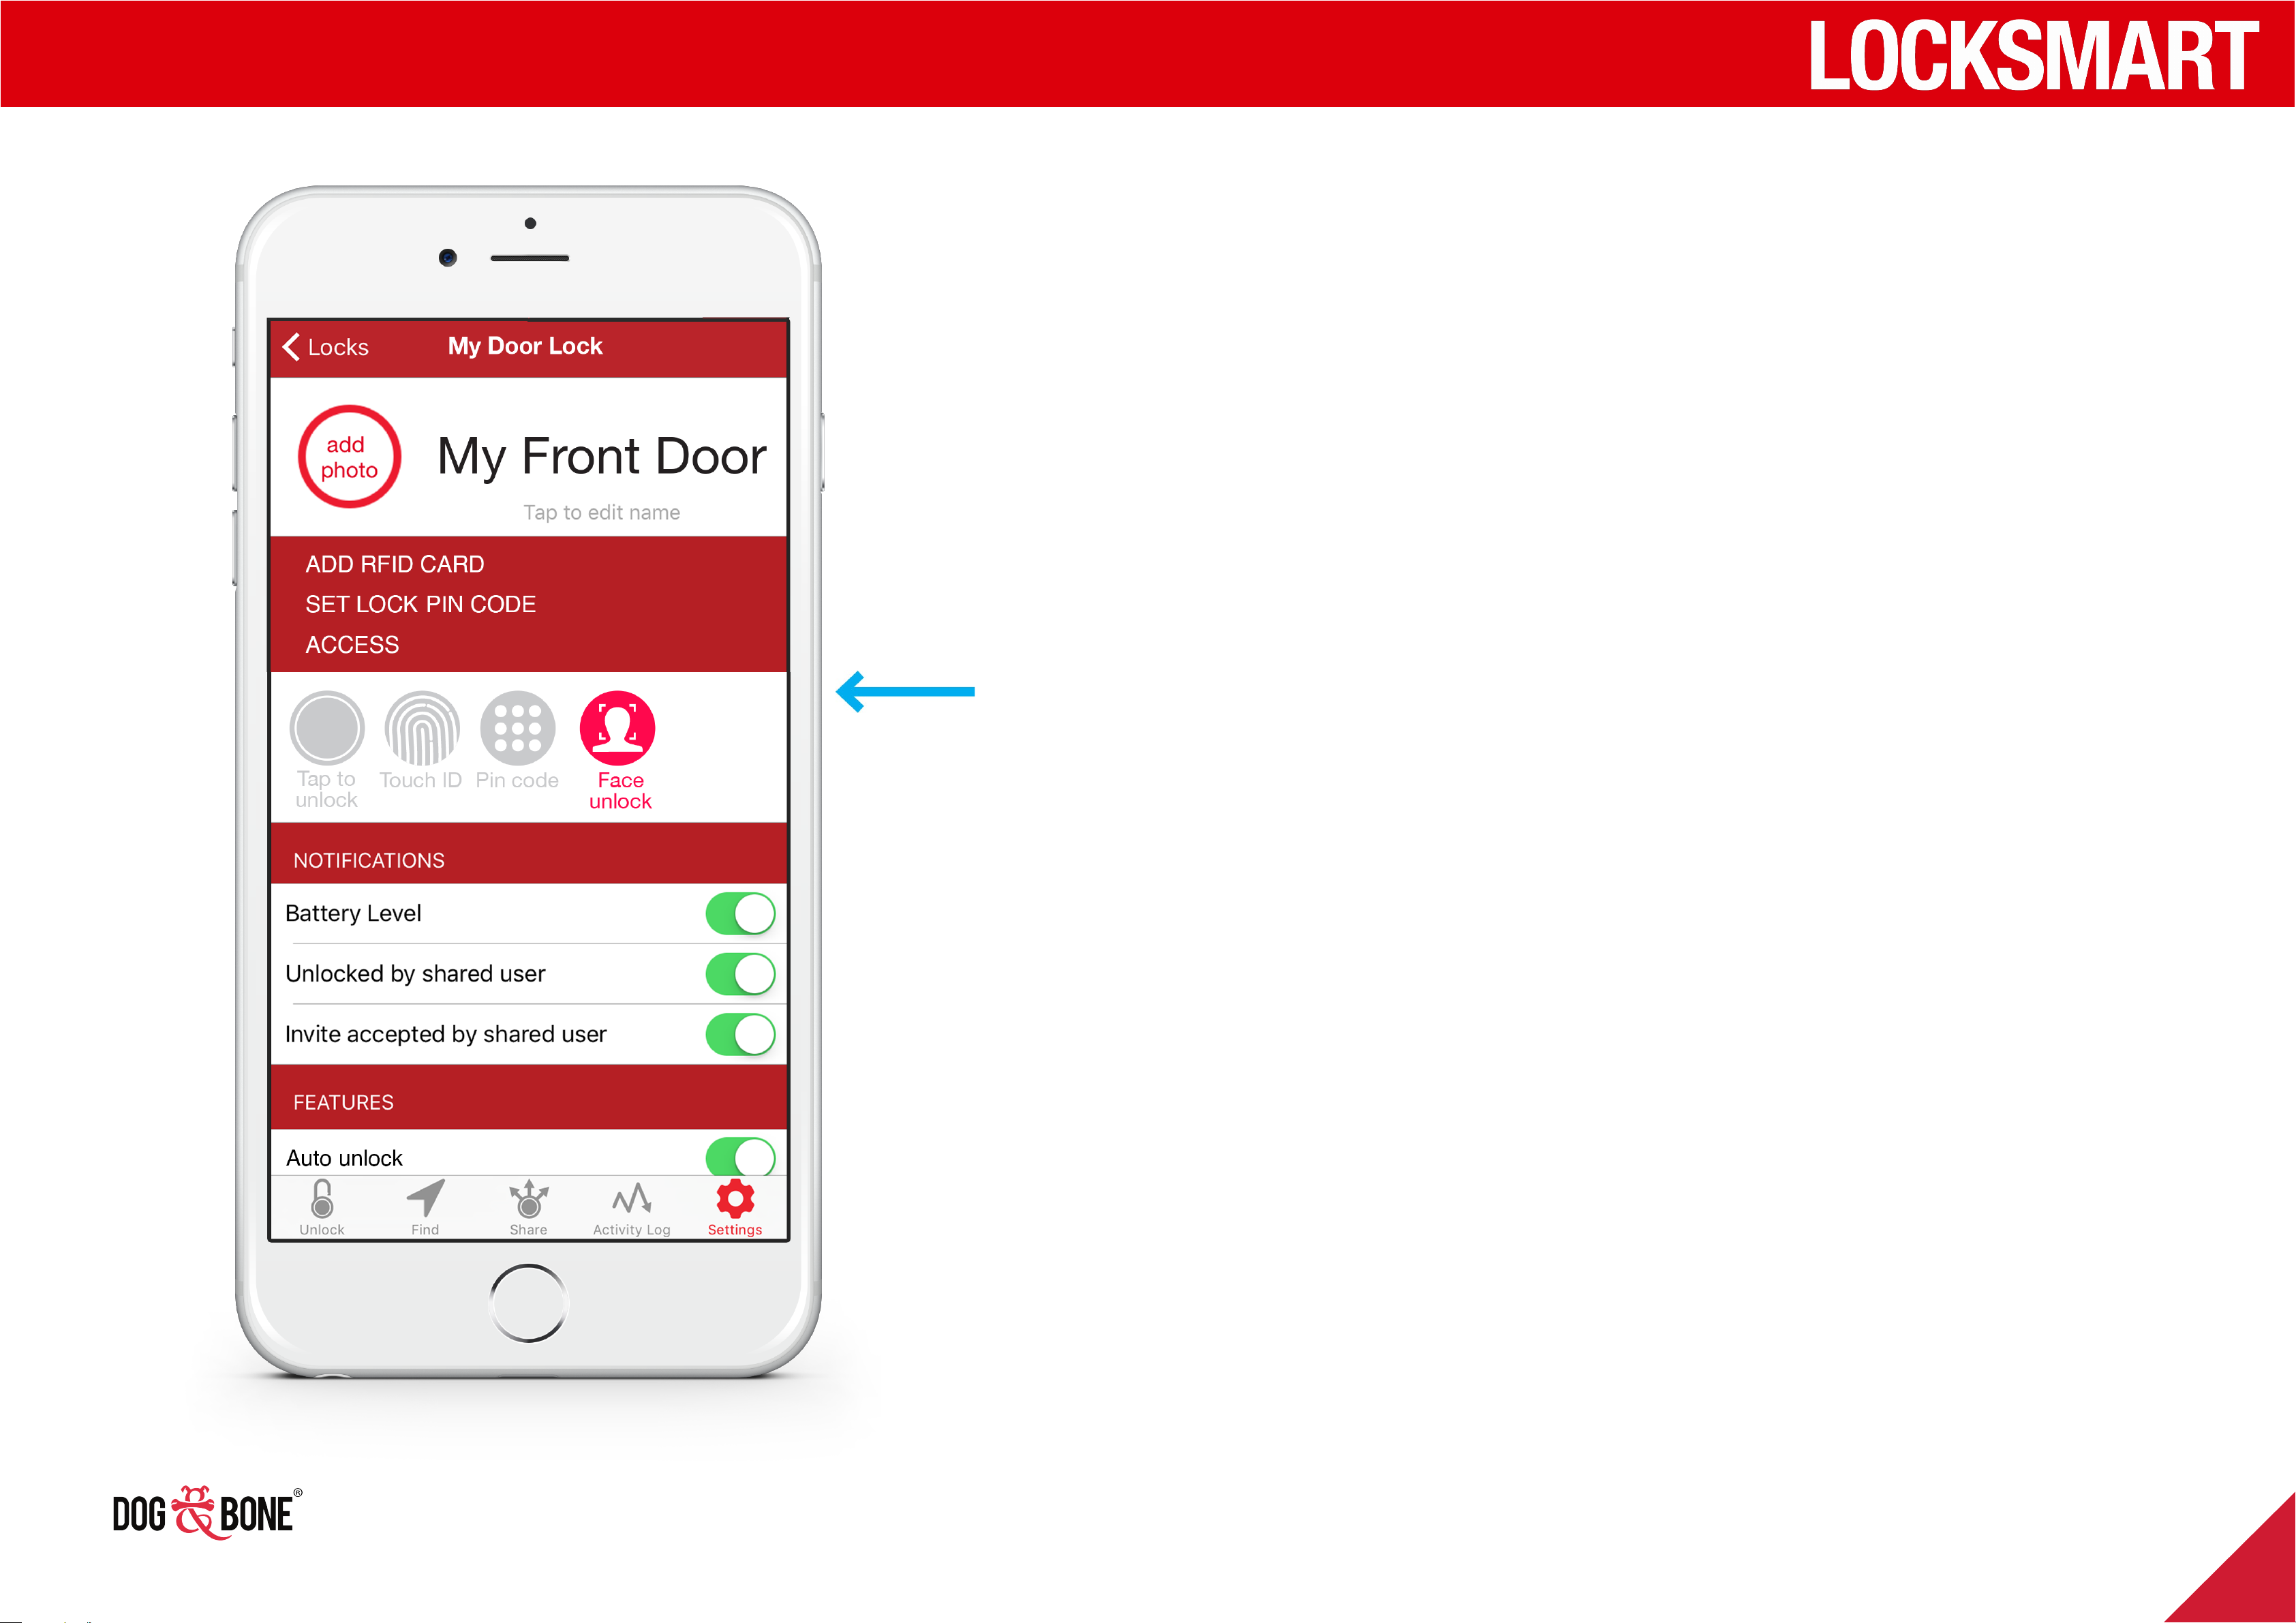
Face unlock
Available on compatible mobile devices
1. Ensure your device has been previously configured to enable
Face Unlock
2. Ensure you have already enabled Face Unlock authentication
from the settings menu for your lock
3. Ensure you have Bluetooth enabled and that the lock is within
5m of your device
4. Choose the lock from the lock list screen
5. When prompted for Face ID, position your face towards your
mobile screen camera to unlock the lock
14
Page 14
Unlocking
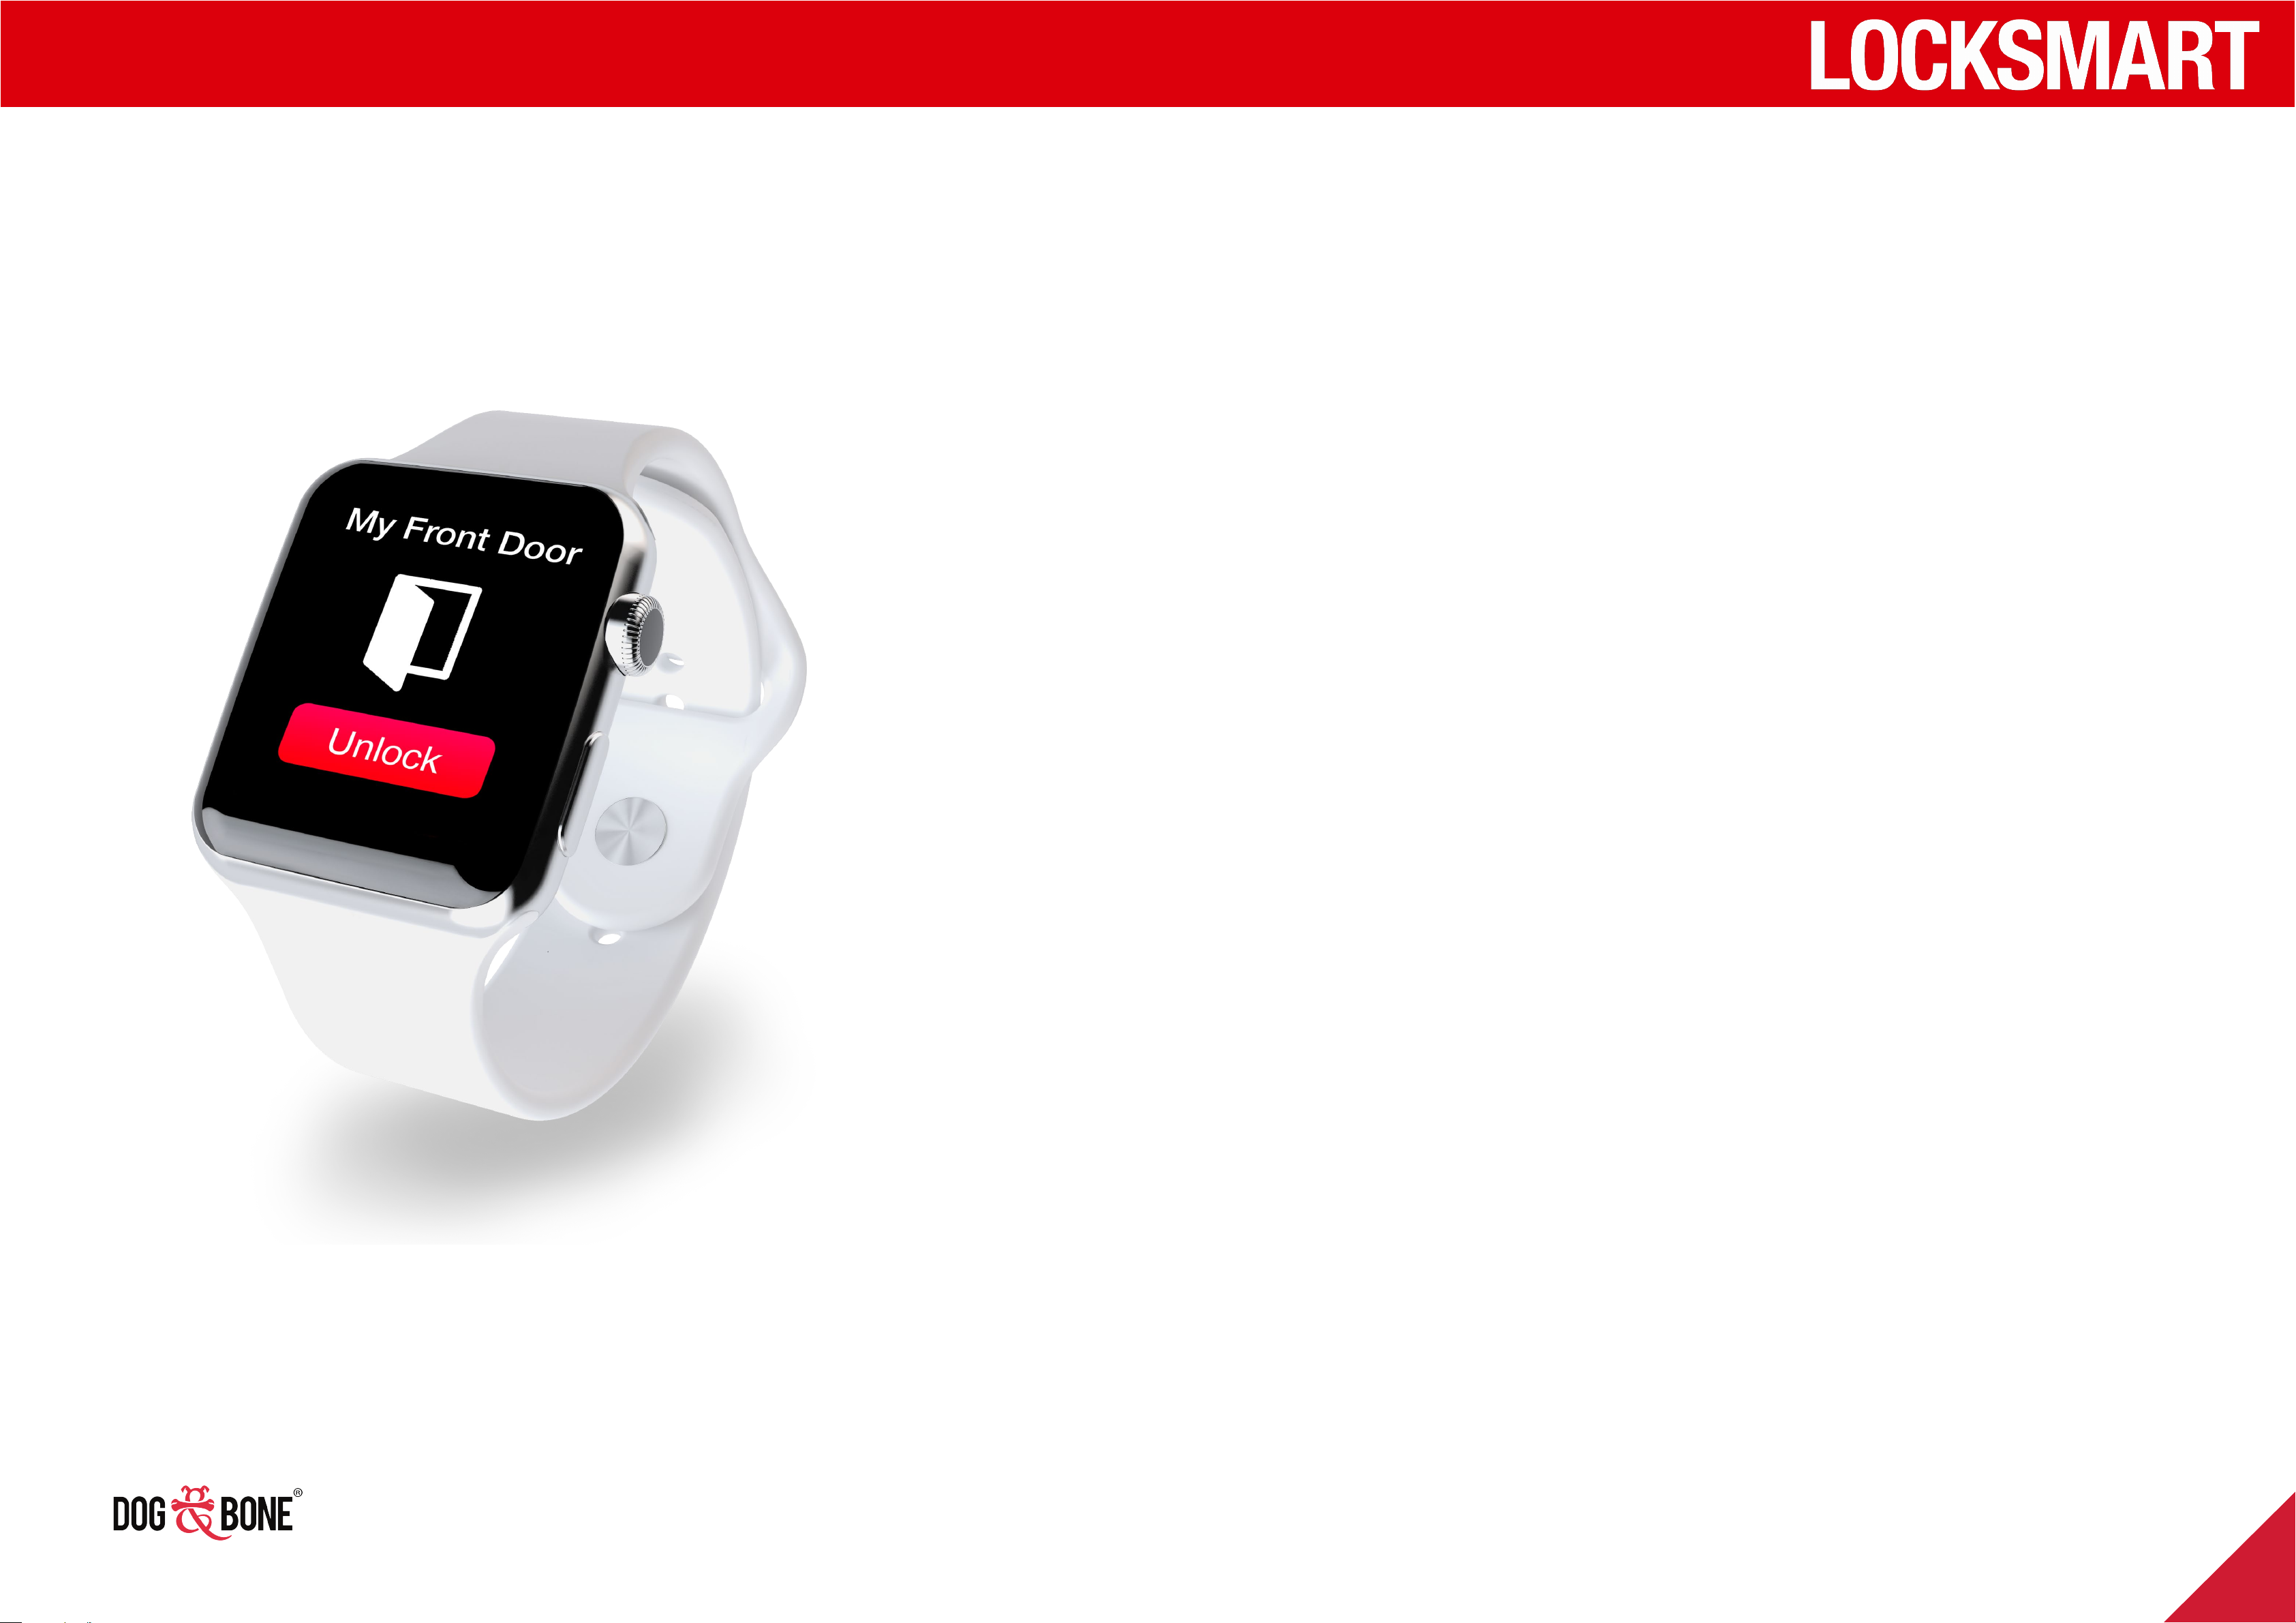
Apple Watch unlock
NB Lock must already be paired to your account
1. Ensure your Apple Watch is paired to your mobile device
2. Ensure your paired device has the latest version of LockSmart
downloaded. Go to the app store to update if not downloaded
3. Ensure the LockSmart app is selected within the Watch App
4. Ensure your Bluetooth is enabled on your mobile device and that
the lock is within 5m of your device
5. Choose the lock from the lock list screen on your watch
6. You will see a large button in the center of your watch screen
7. Simply tap on the button to unlock
15
Page 15
Unlocking
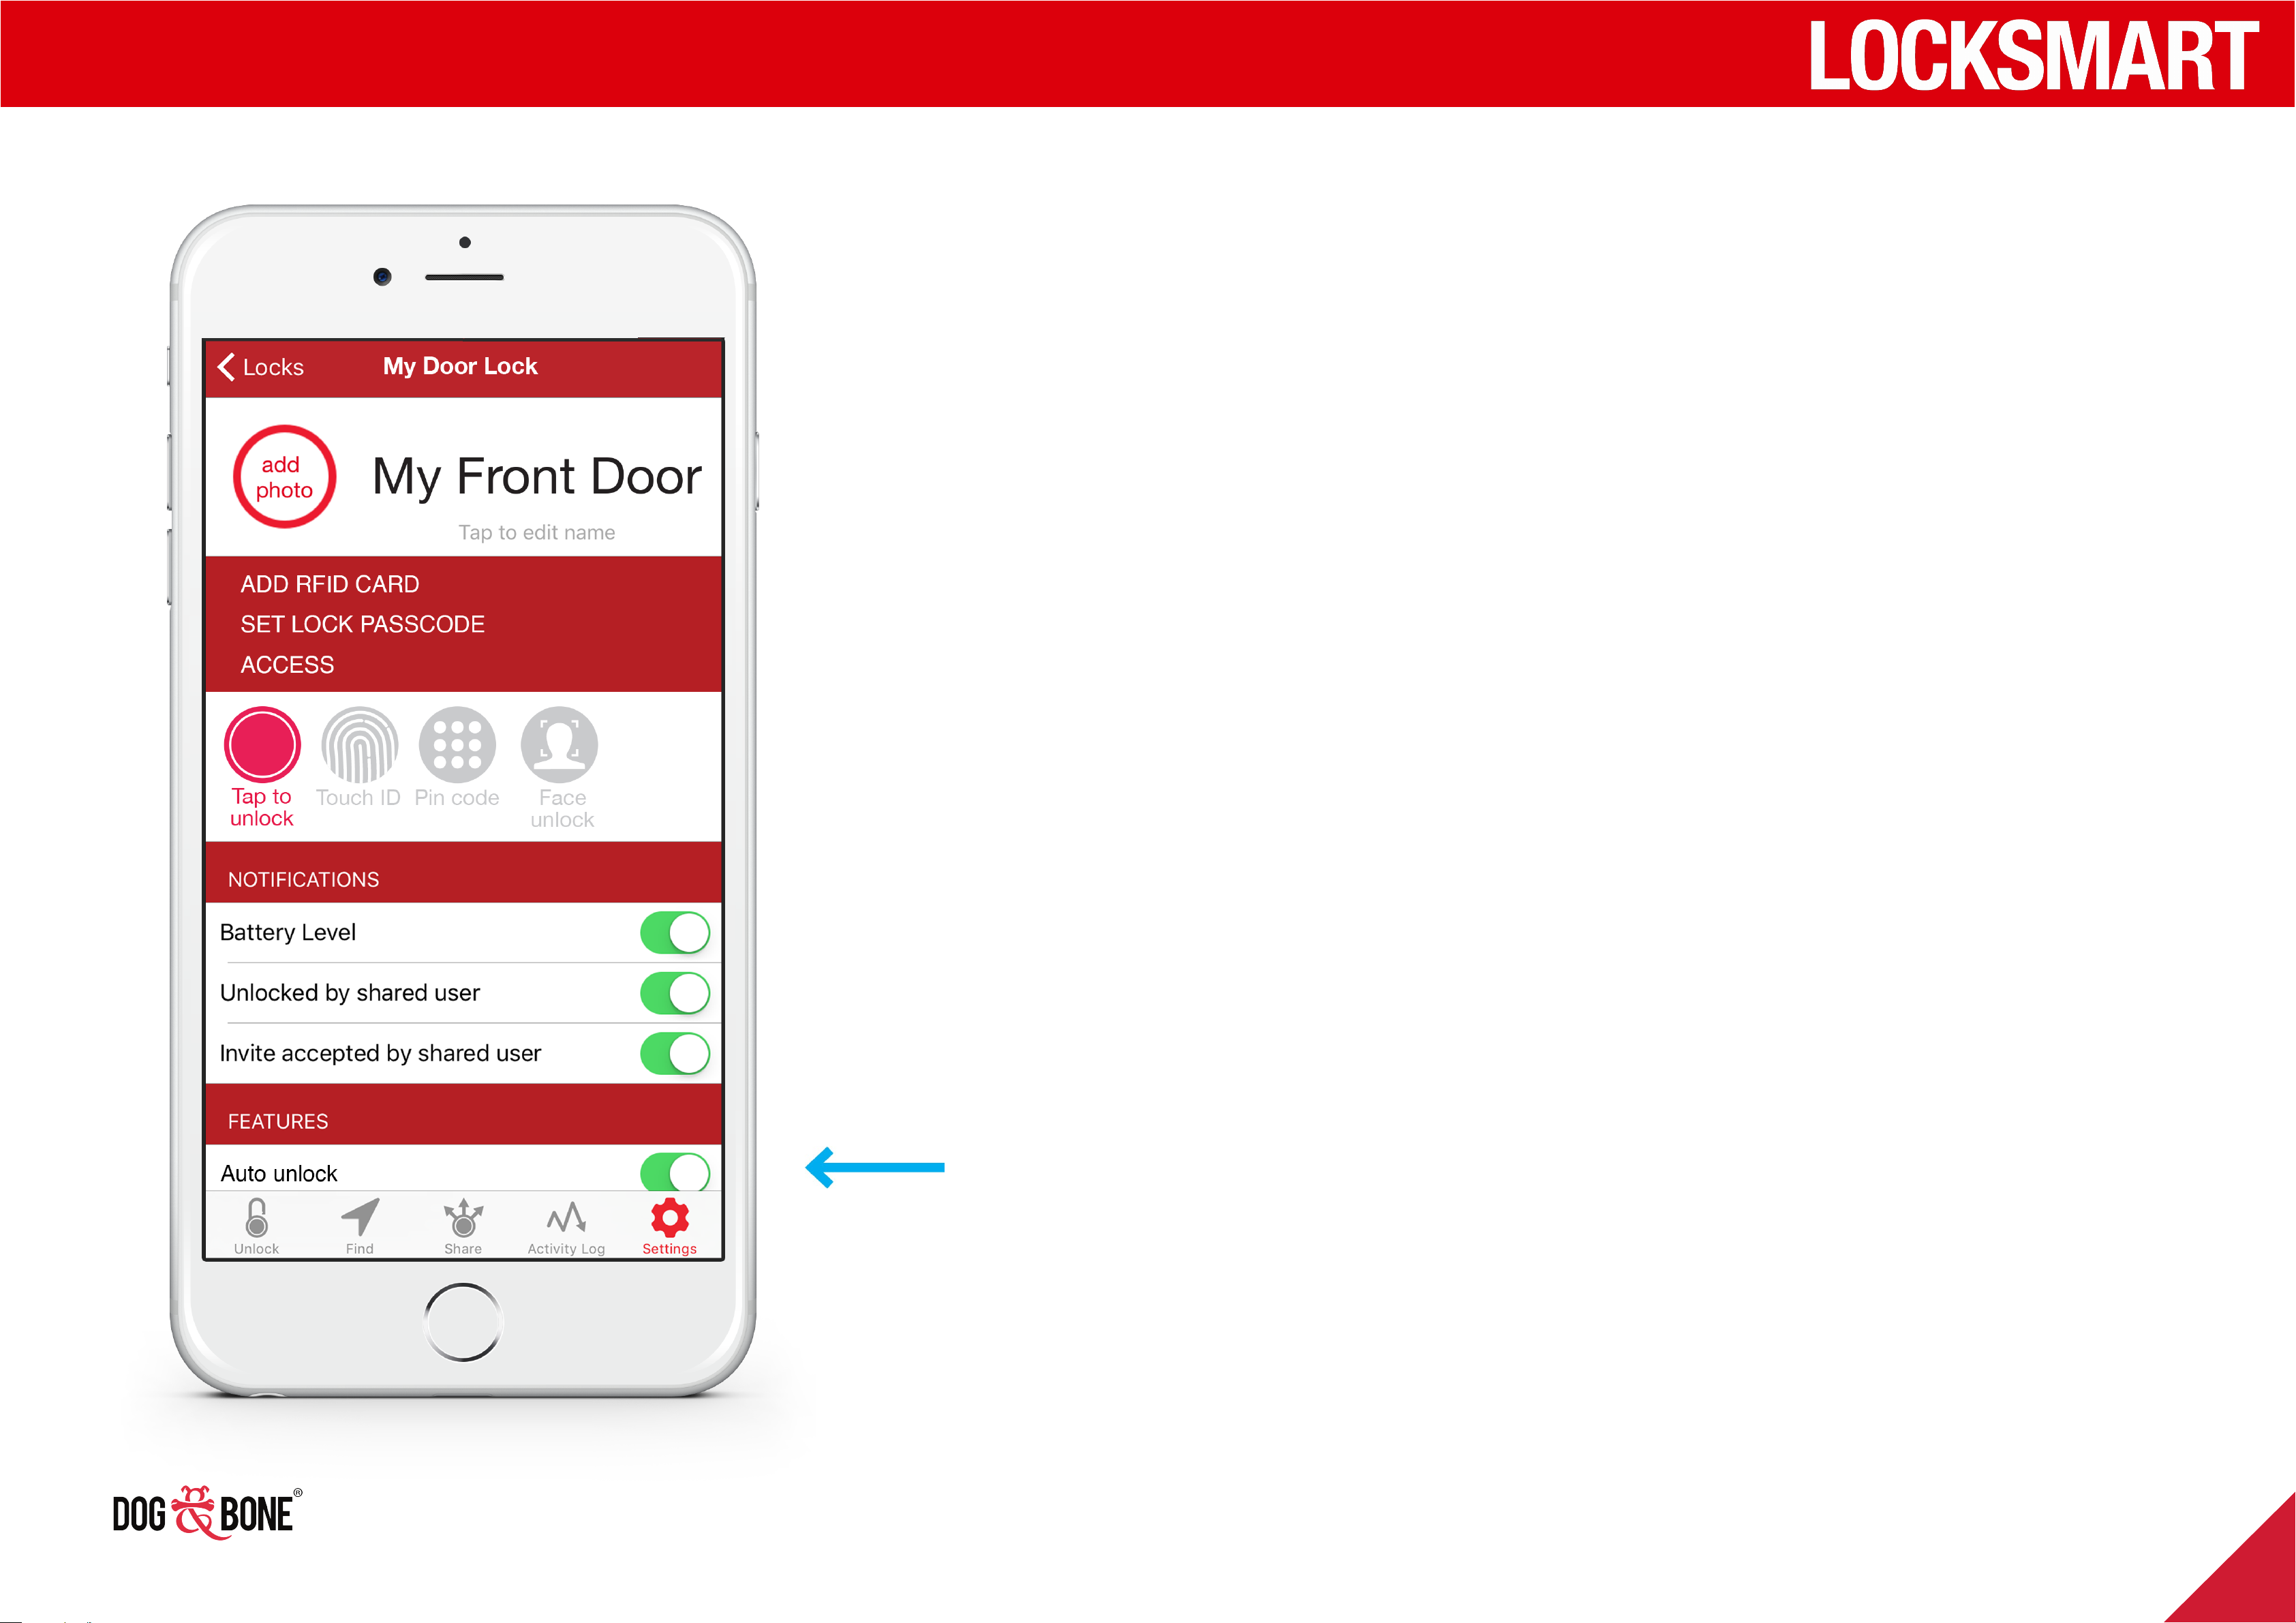
Auto unlock
1. Ensure you have already enabled Auto Unlock from the settings
menu for your lock
2. Ensure you have already enabled Location Services on your mobile
device
3. Ensure you have Bluetooth enabled on your mobile device
4. When you approach lock within 5m of your device, it will
automatically unlock
16
Page 16
Unlocking
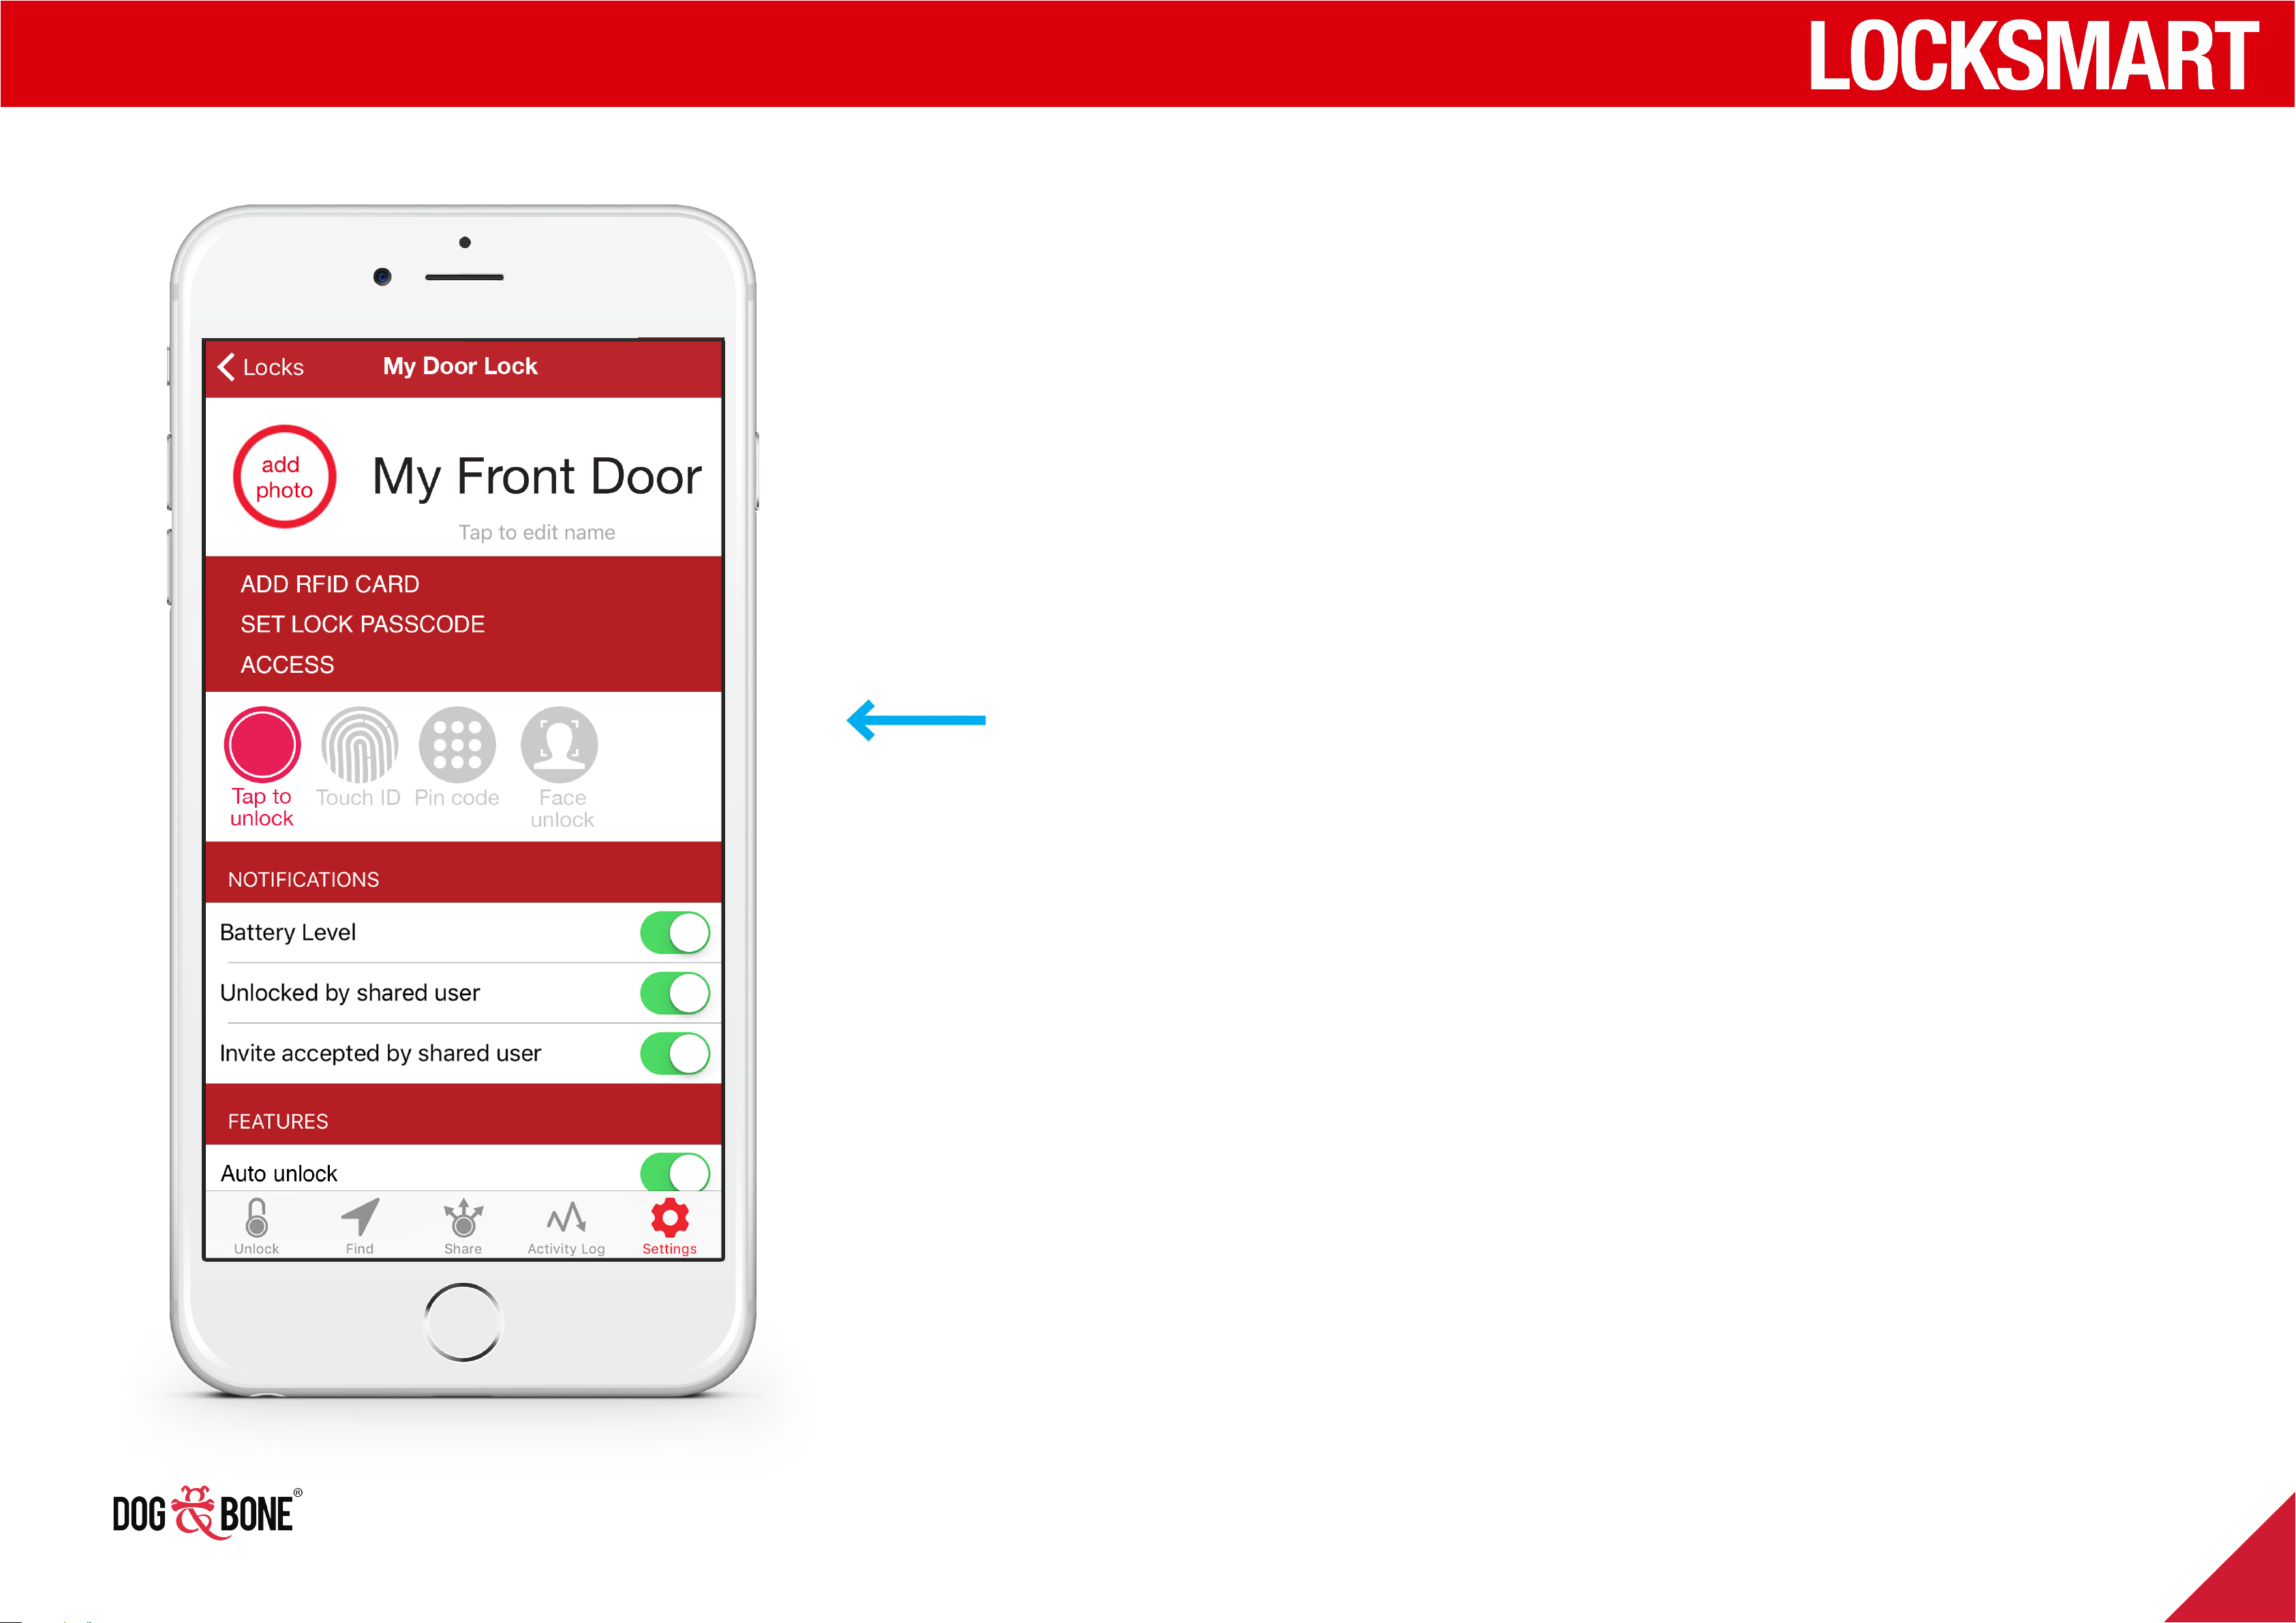
RFID
1. Before first use, pair RFID with lock by a) Selecting Add
RFID within settings menu for your lock followed by b)
Swiping card in front of lock keypad on prompt
2. Swipe the card on the front of the lock to unlock
NB To remove card, click the ‘X’ button
17
Page 17
Unlocking
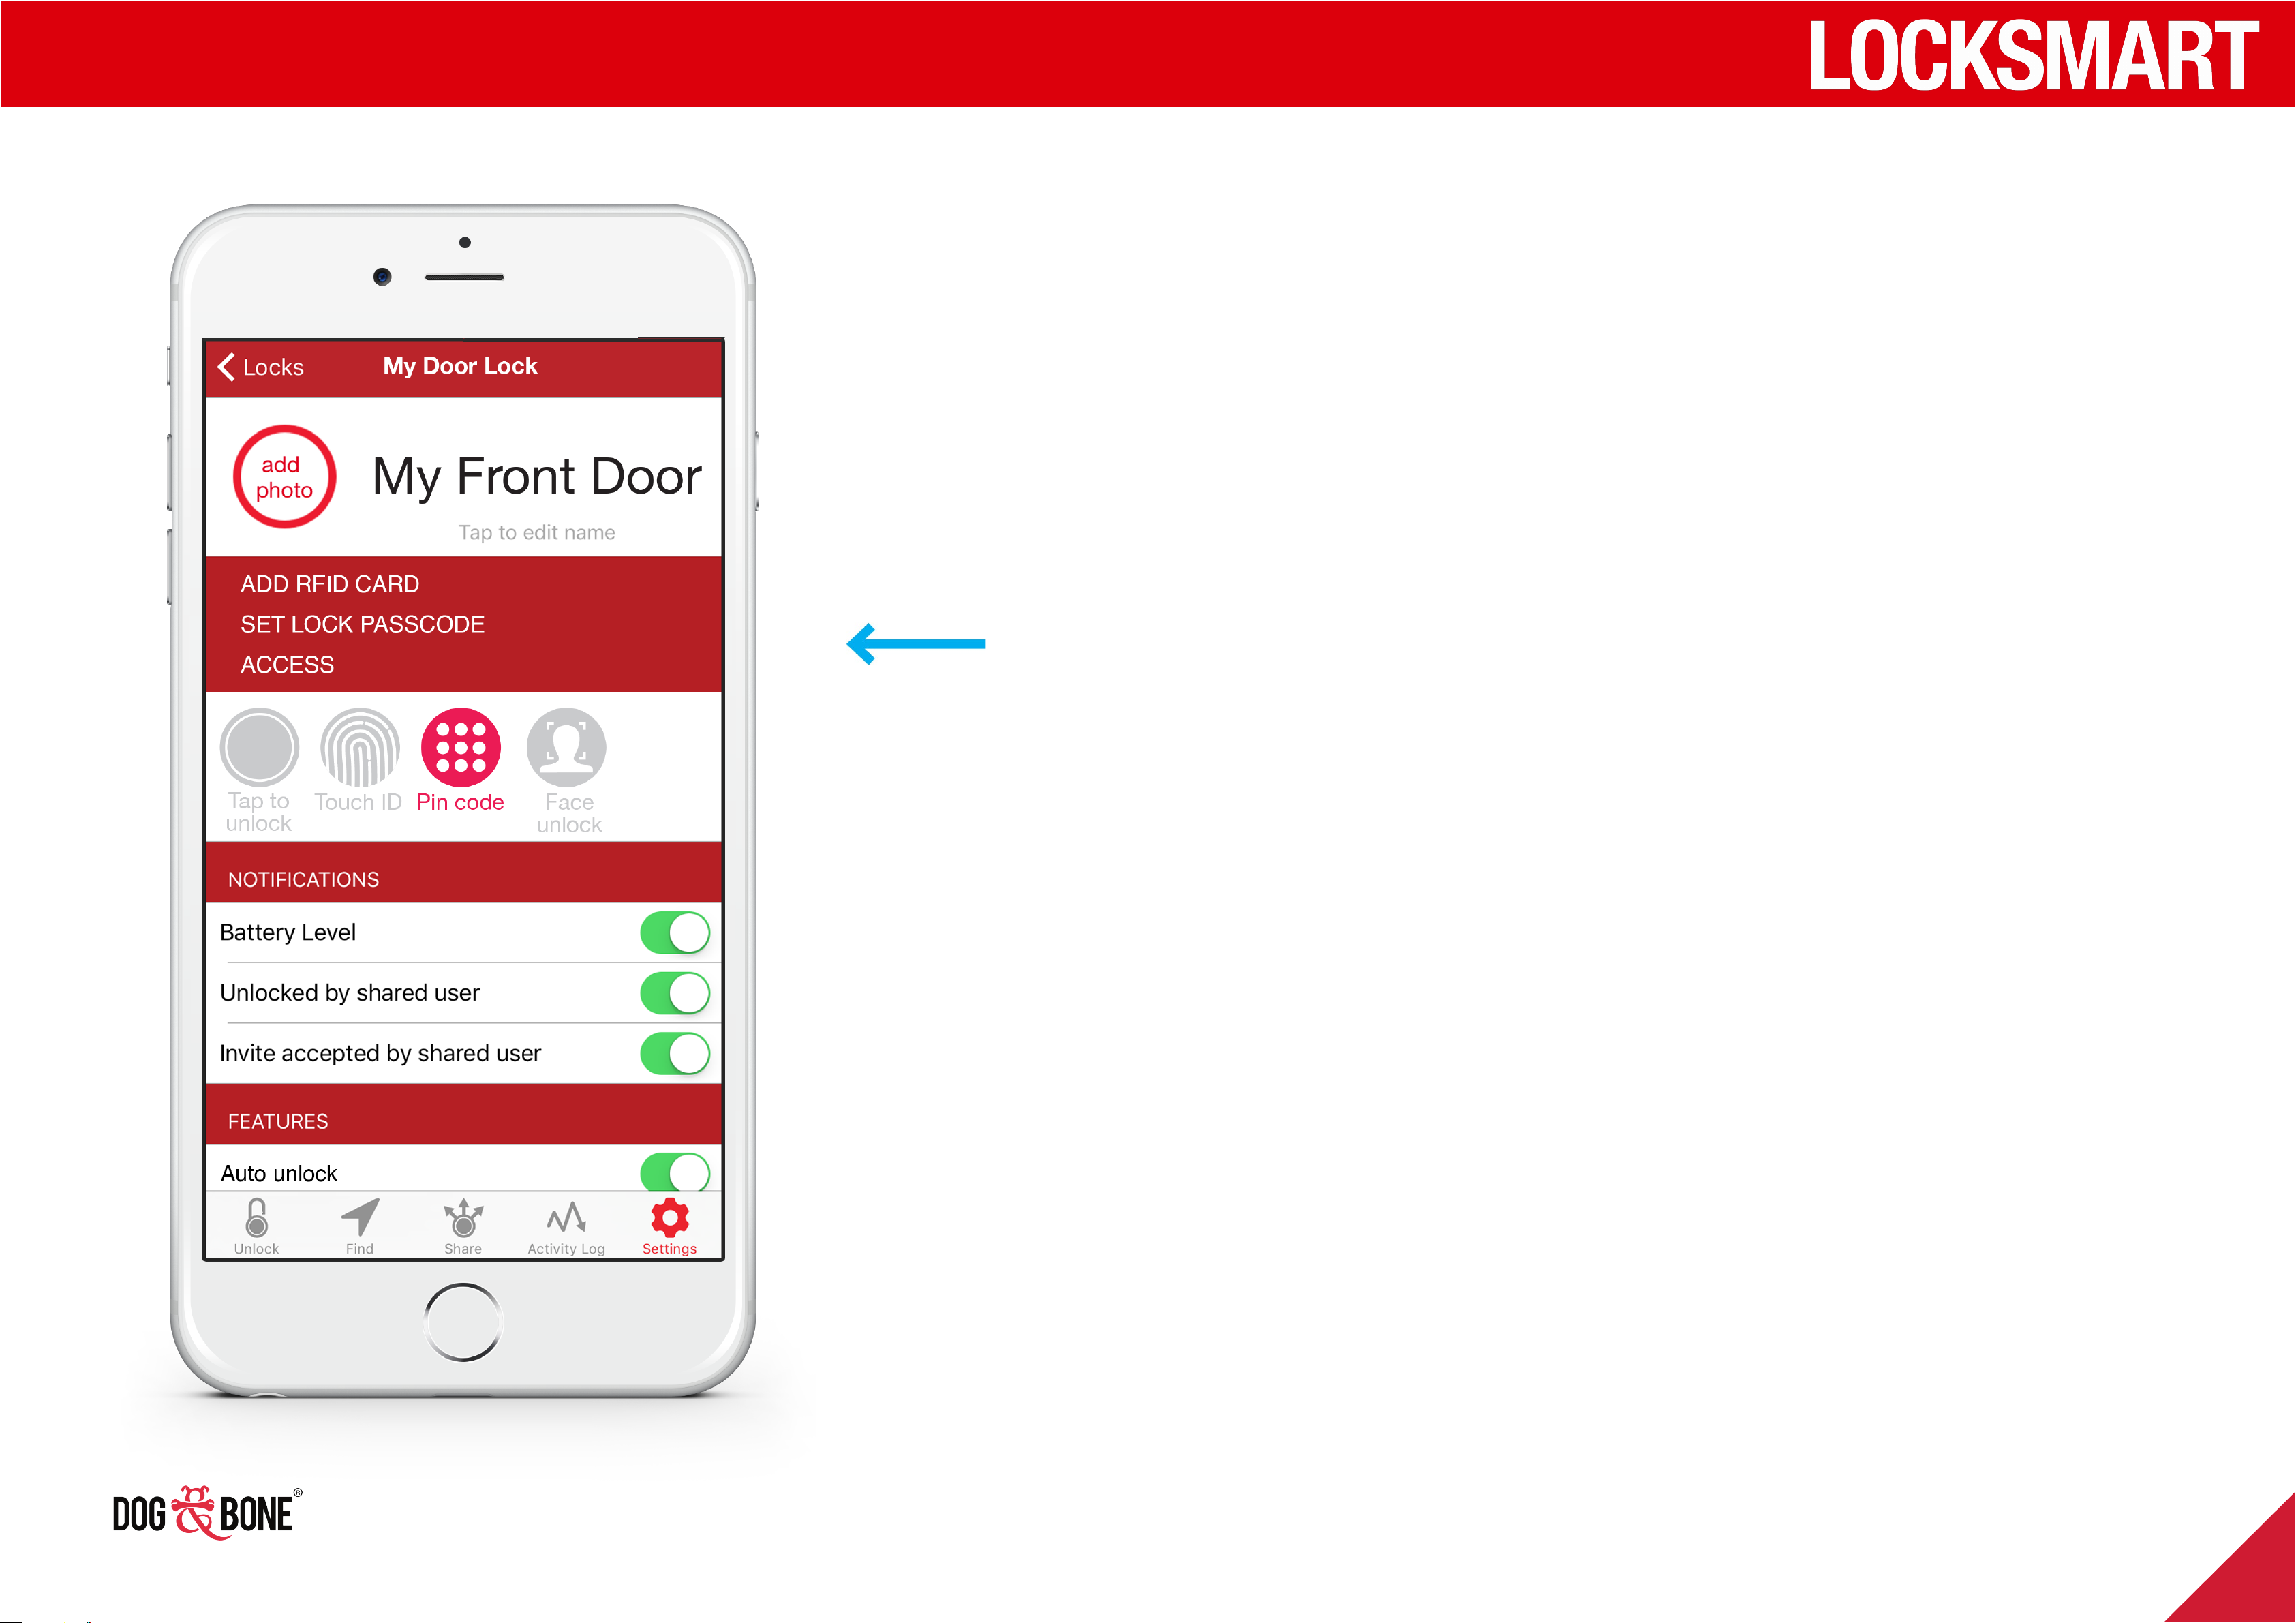
Key pad pin code
1. Before first use, set Key Pad Pin Code from the settings
menu for your lock by entering the pin code into the
app as prompted. Pin codes can be unlimited or limited
by time or use
2. Enter pin code on lock key pad to unlock
18
Page 18
Unlocking
Physical key
LockSmart Abode
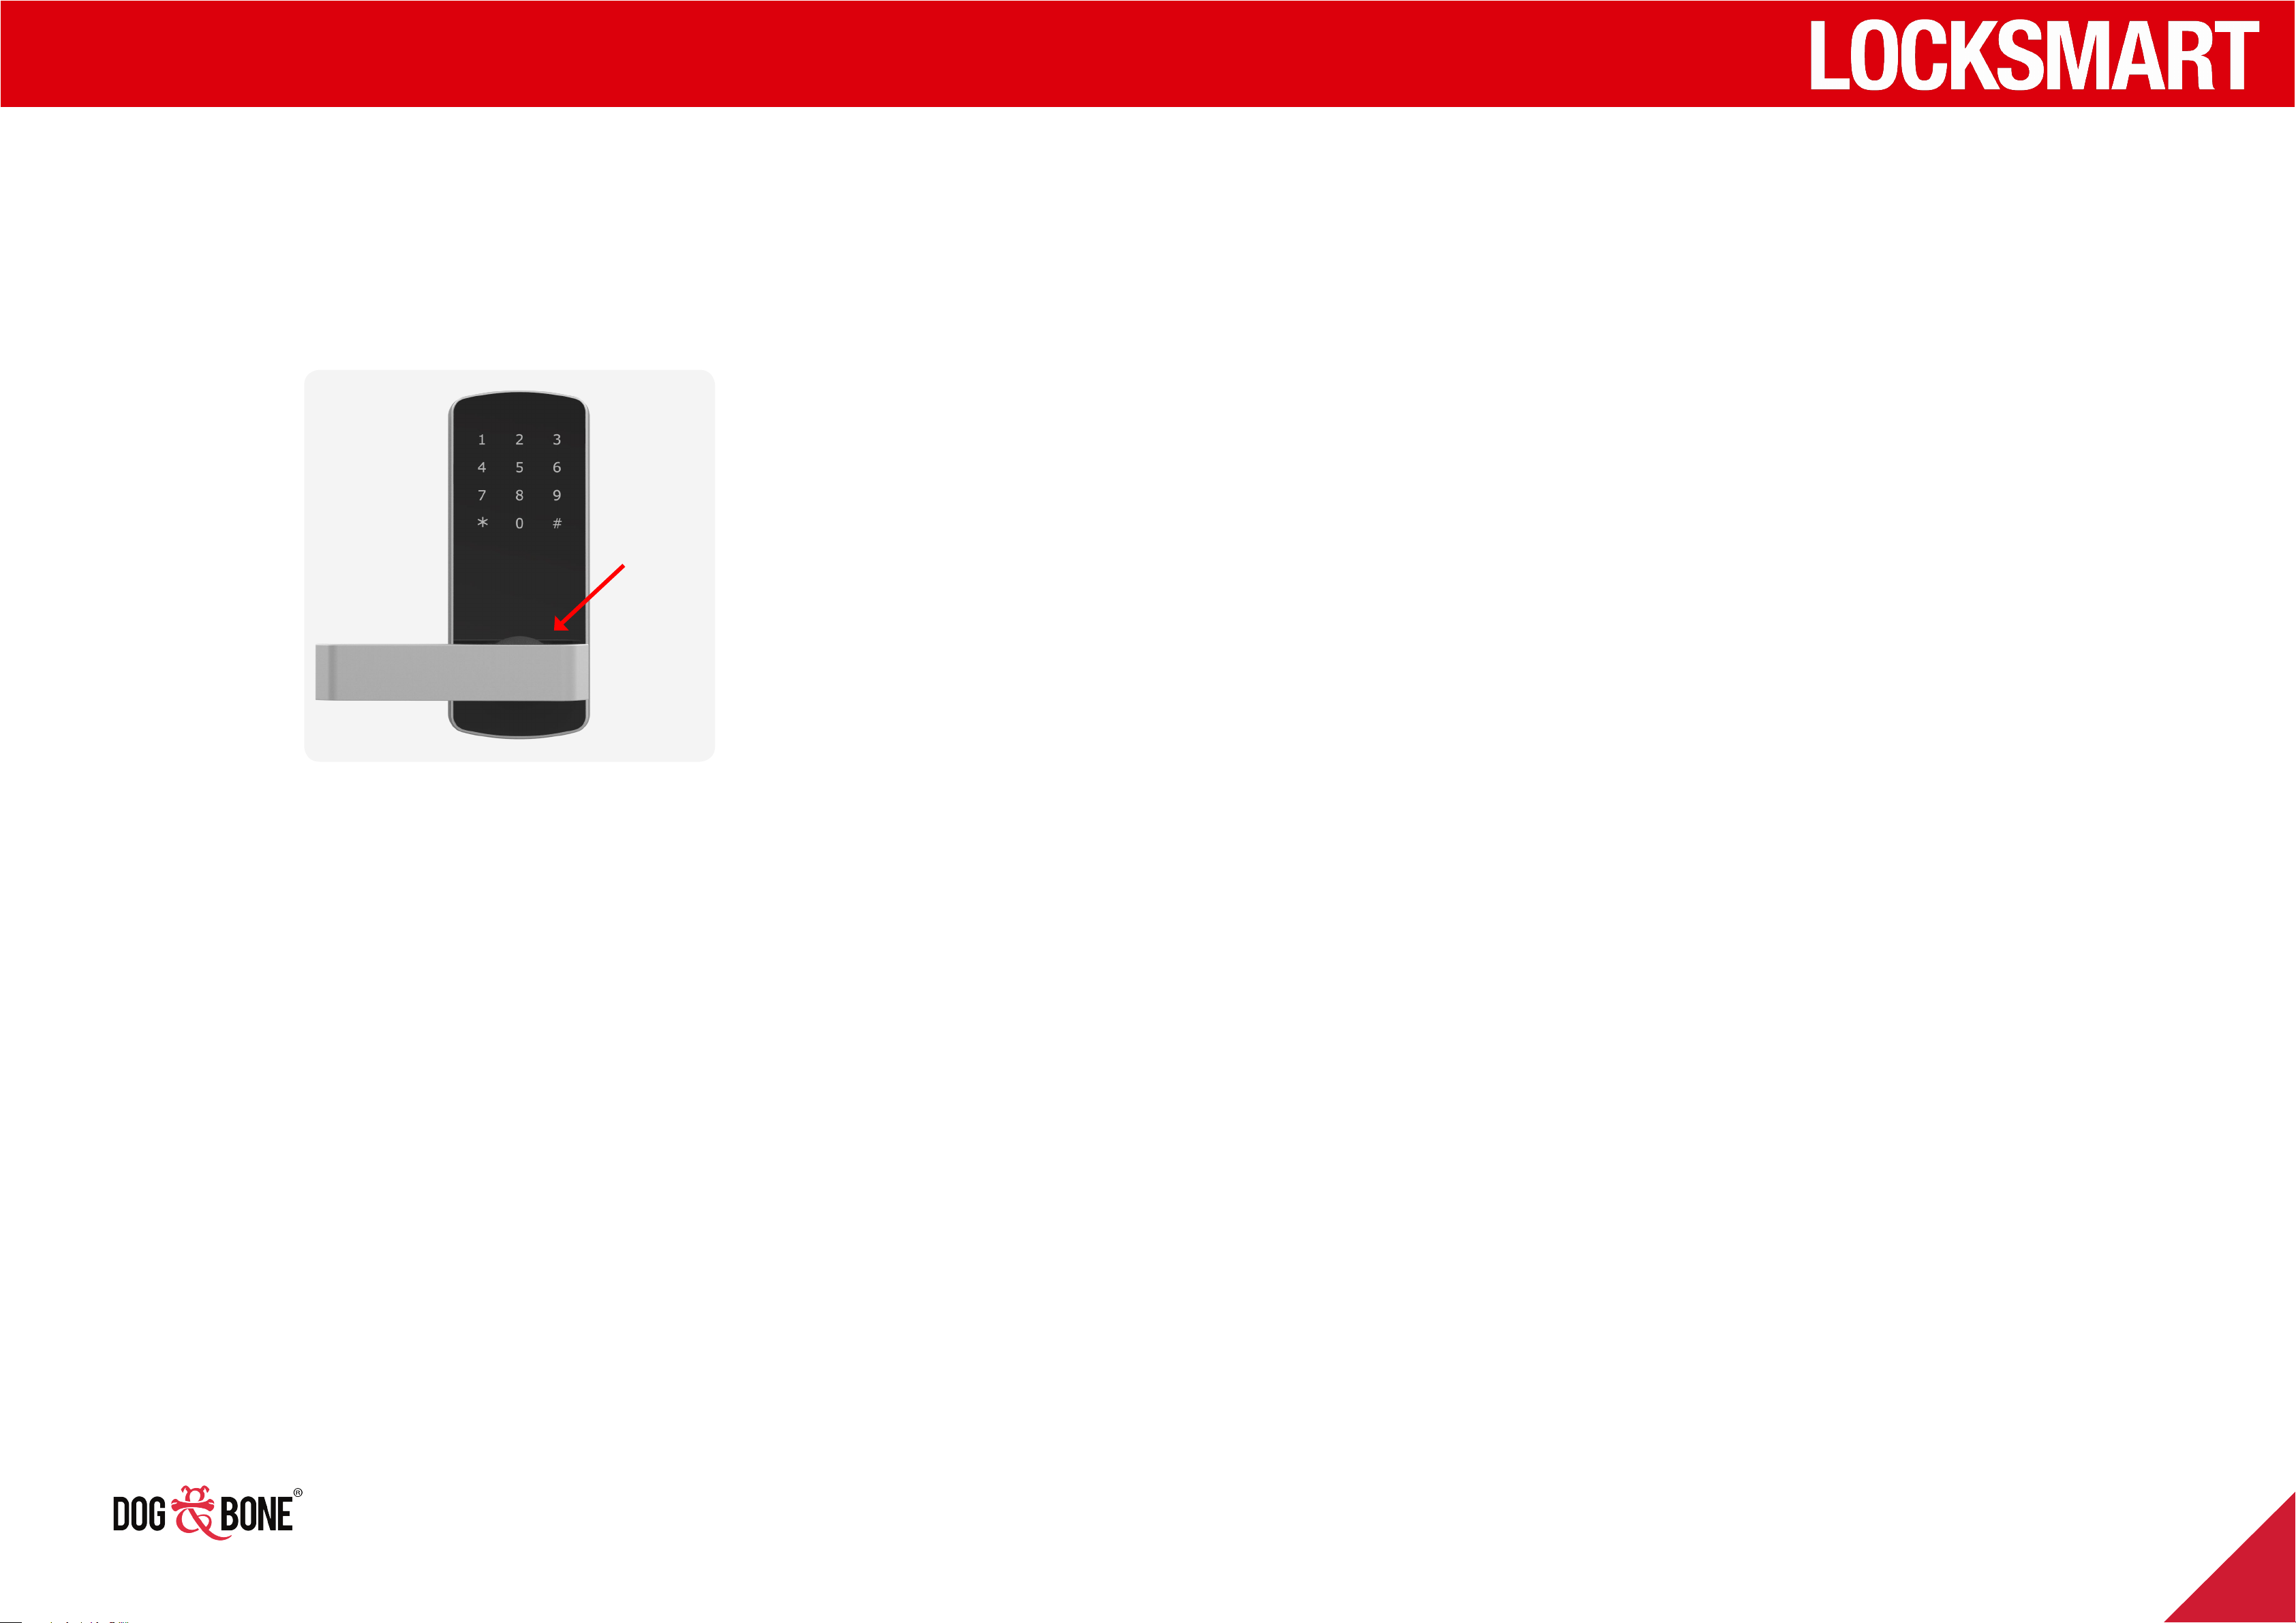
For peace of mind, the LockSmart door locks have a back-up
physical key
For the LockSmart Abode
Use the supplied allen key to undo the grub screw holding
the handle in place. Remove the handle. Key barrel is located
behind the lock handle
LockSmart Room 121
19
Page 19
Finding and sharing
Share a lock with someone else
Each LockSmart lock can be shared with
up to 50 users
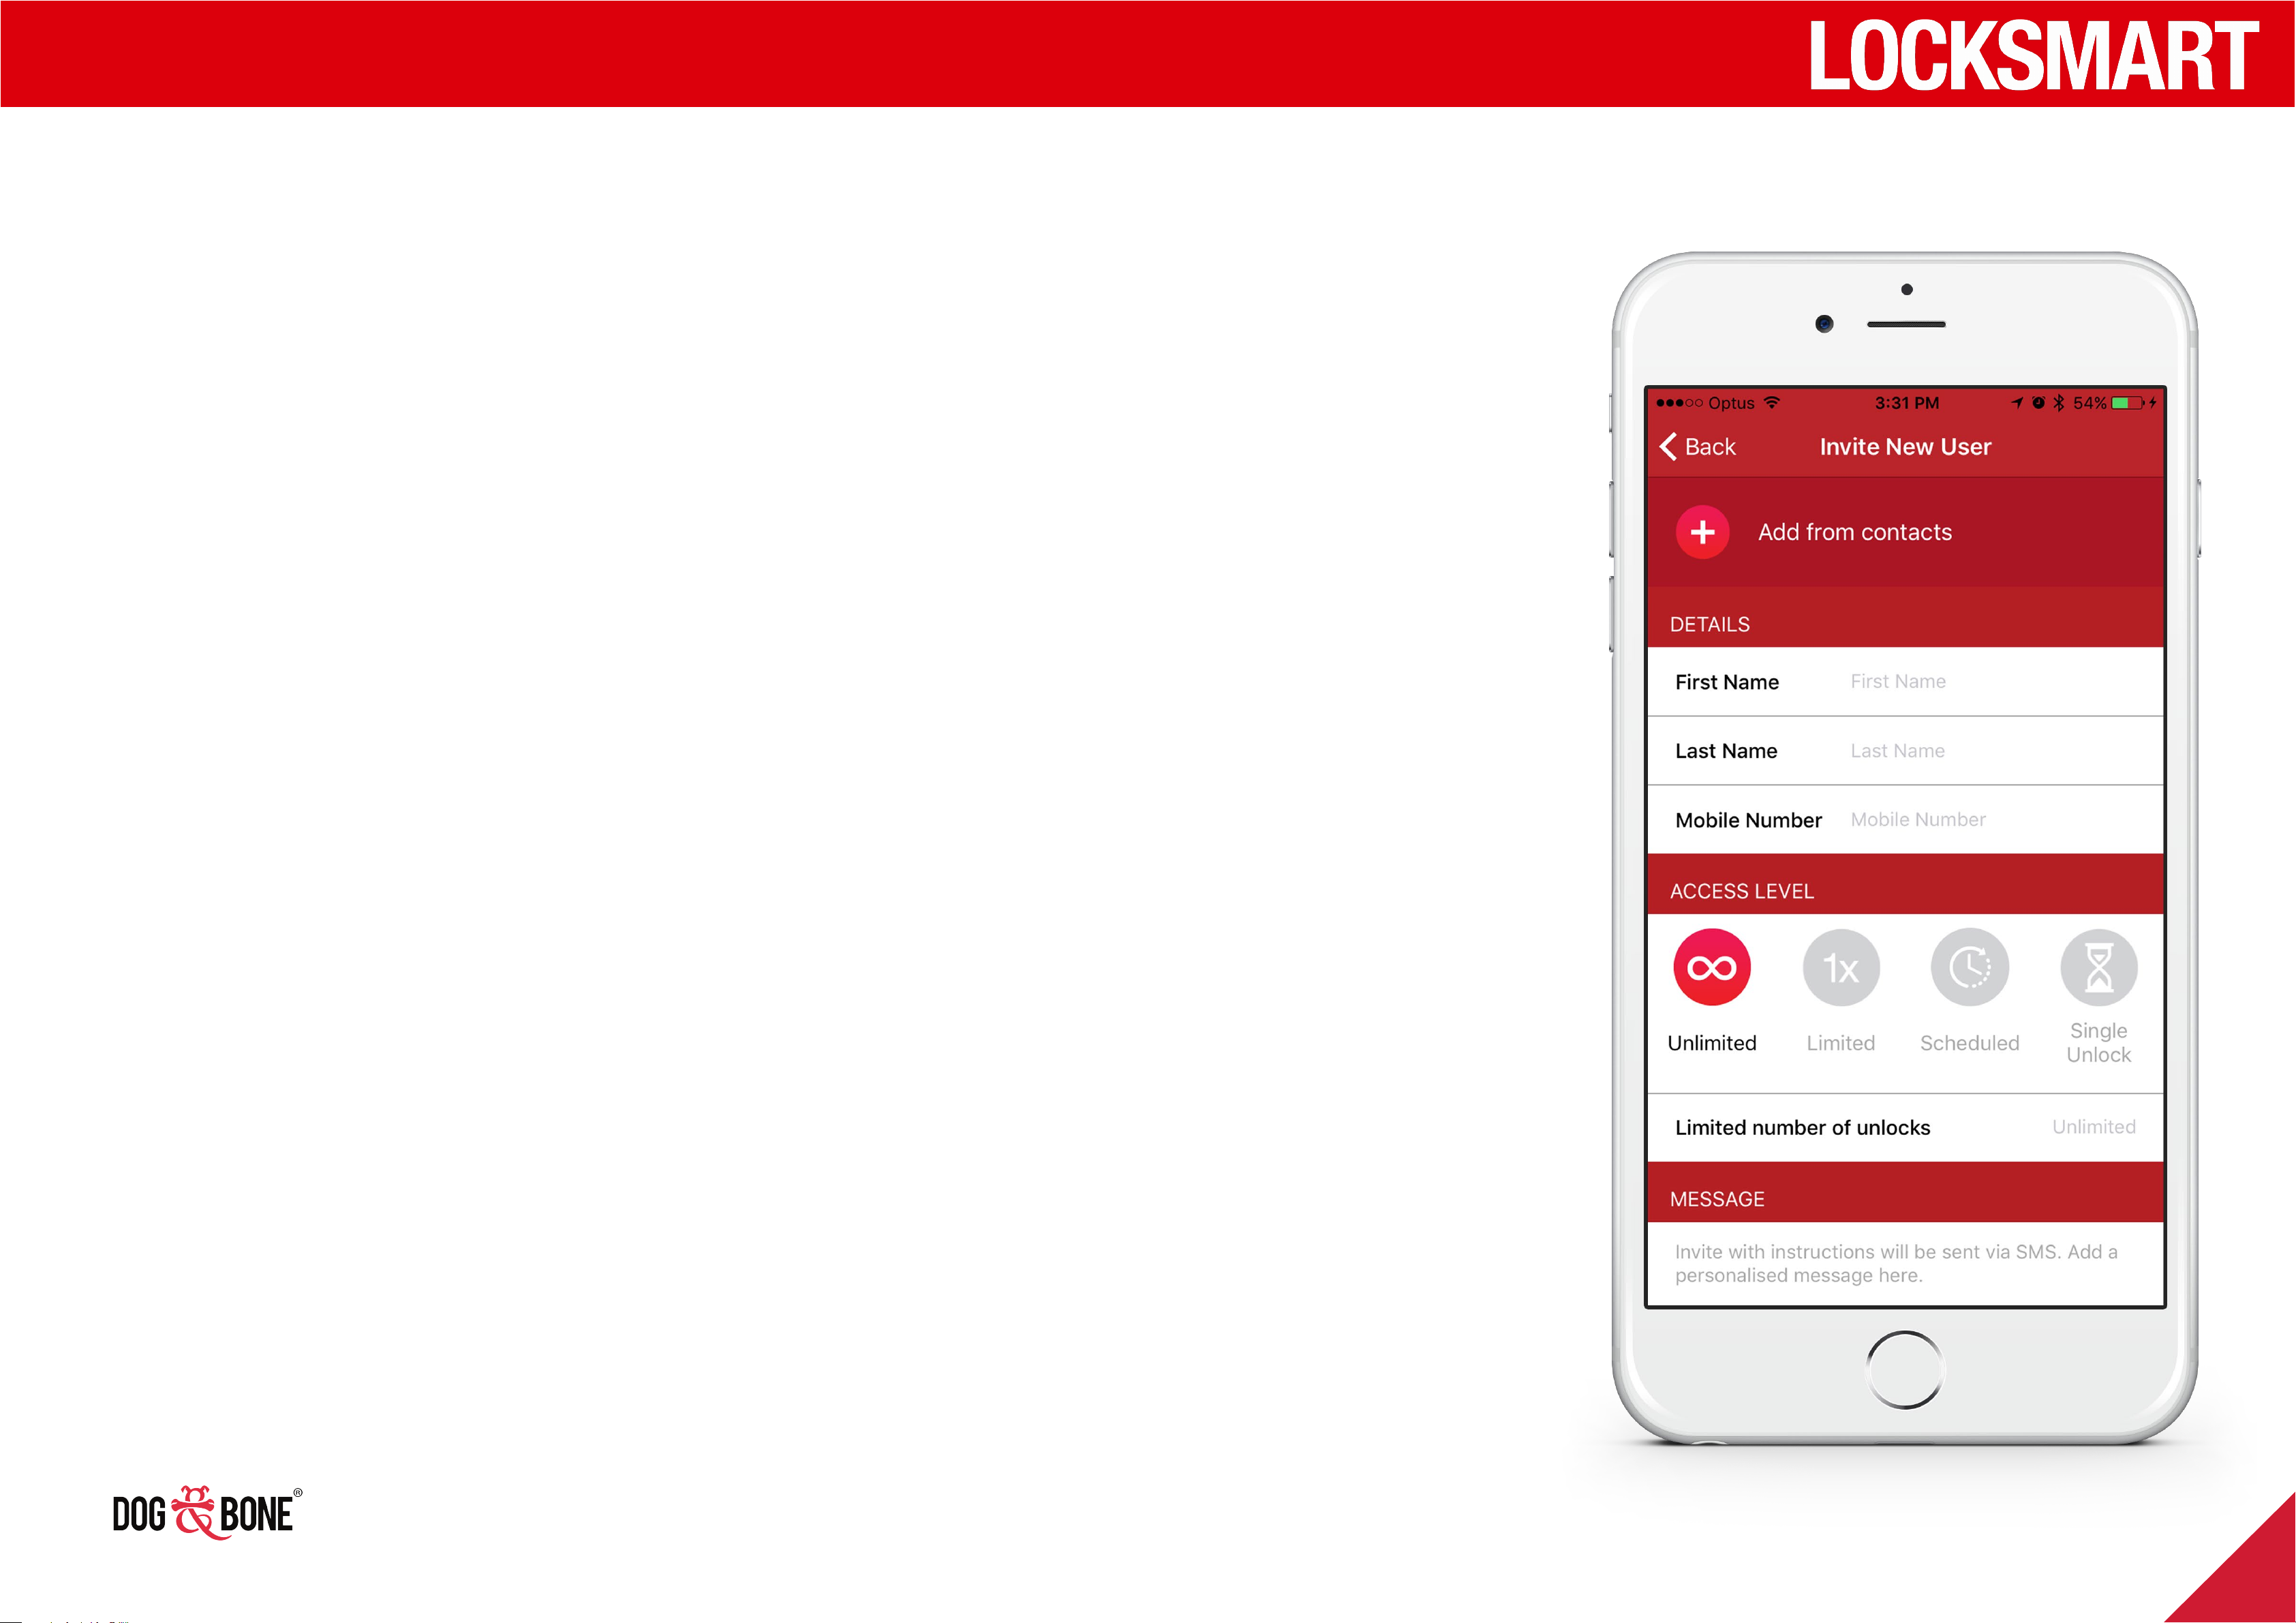
1. Choose any lock from the lock
list screen and press the ‘Share’
option in the bottom menu
2. Press the ‘Invite New User’ button,
and enter the shared user’s
contact details
5. Your device’s native SMS
messaging application will be
opened with an editable invitation
message to send to the invited
user
6. After opening the web link, the
invited user will be prompted to
install the LockSmart application
and create a new account (if they
3. Press the ‘Add From Contacts’
option to add a user from your
device’s contact list
4. Select an access level for the
shared user: ‘Unlimited’, ‘Limited’,
‘Scheduled’, or ‘Single Unlock’
- Unlimited: Unrestricted
unlock access
have not already done so)
7. After installing LockSmart, the
invited user must press the
‘Accept Invite’ button from
their device on the invitation
acceptance web link to add the
shared lock to their account
- Pressing this button will
- Limited: User will be
limited to the specified
number of unlocks
- Scheduled: see page 21
- Single Unlock: Unlock the
lock a single time without
needing to login or register
open the LockSmart
application and add the
shared lock to their account
using the included security
code
8. The shared lock will now appear
in the user’s LockSmart list screen
20
Page 20
Finding and sharing
Scheduled access for shared users
1. Choose ‘Scheduled’ as the
access level when adding a
shared user (see page 21)
2. The ‘Timezone’ selected
on the ‘Invite New User’
screen (see page 20) will be
used as the timezone for all
dates/times selected on this
screen
range of access time
during the week, which
will be repeated every
week
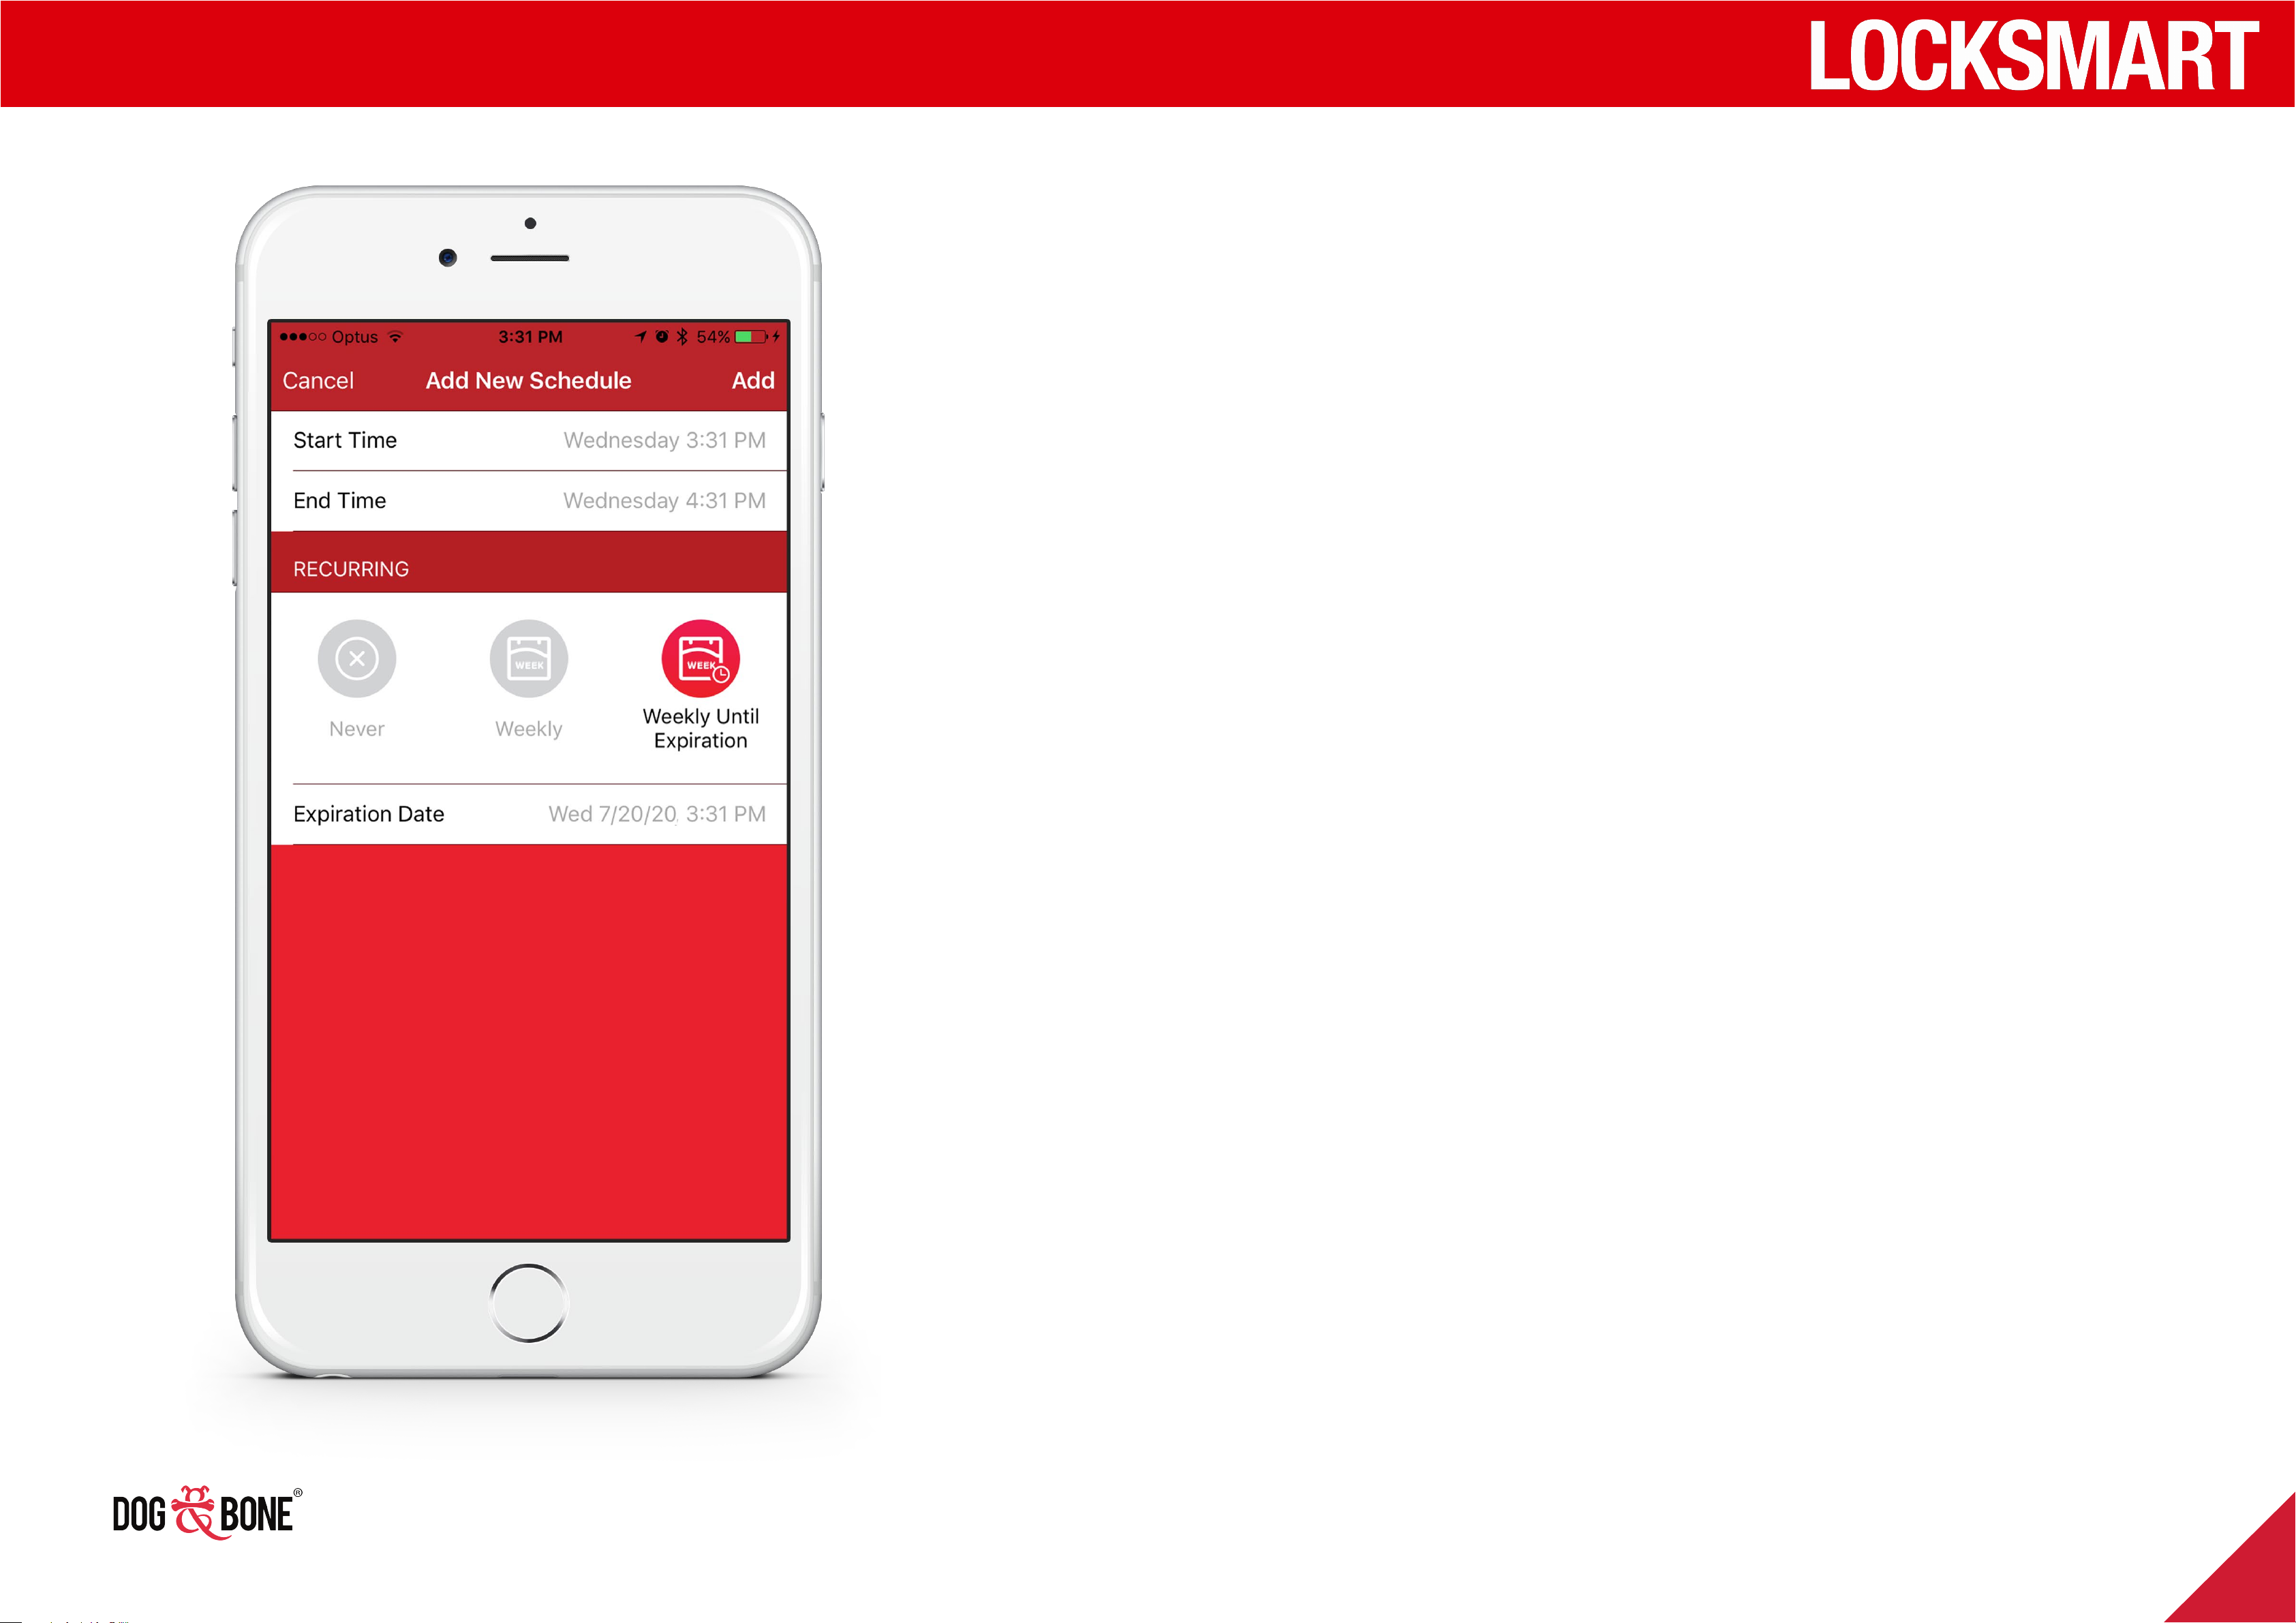
- Weekly Until
Expiration: Same as
‘Weekly’, but will stop
on the set date
5. Press the ‘Add’ button to
3. Choose the ‘Start Time’
and ‘End Time’ for when
a shared user may unlock
your lock
4. Choose the schedule
recurrence option of ‘Never’,
‘Weekly’ or ‘Weekly Until
Expiration’
- Never: Create a fixed
add this schedule to the
shared user, and you will
be taken back to the ‘Invite
New User’ page to complete
the invitation process
6. You can create multiple
schedules for the user
by pressing ‘Add New
Schedule’ again and
schedule from the
chosen start date until
the end date
- Weekly: Choose a
repeating the above steps
21
Page 21
Finding and sharing
Shared lock functionality
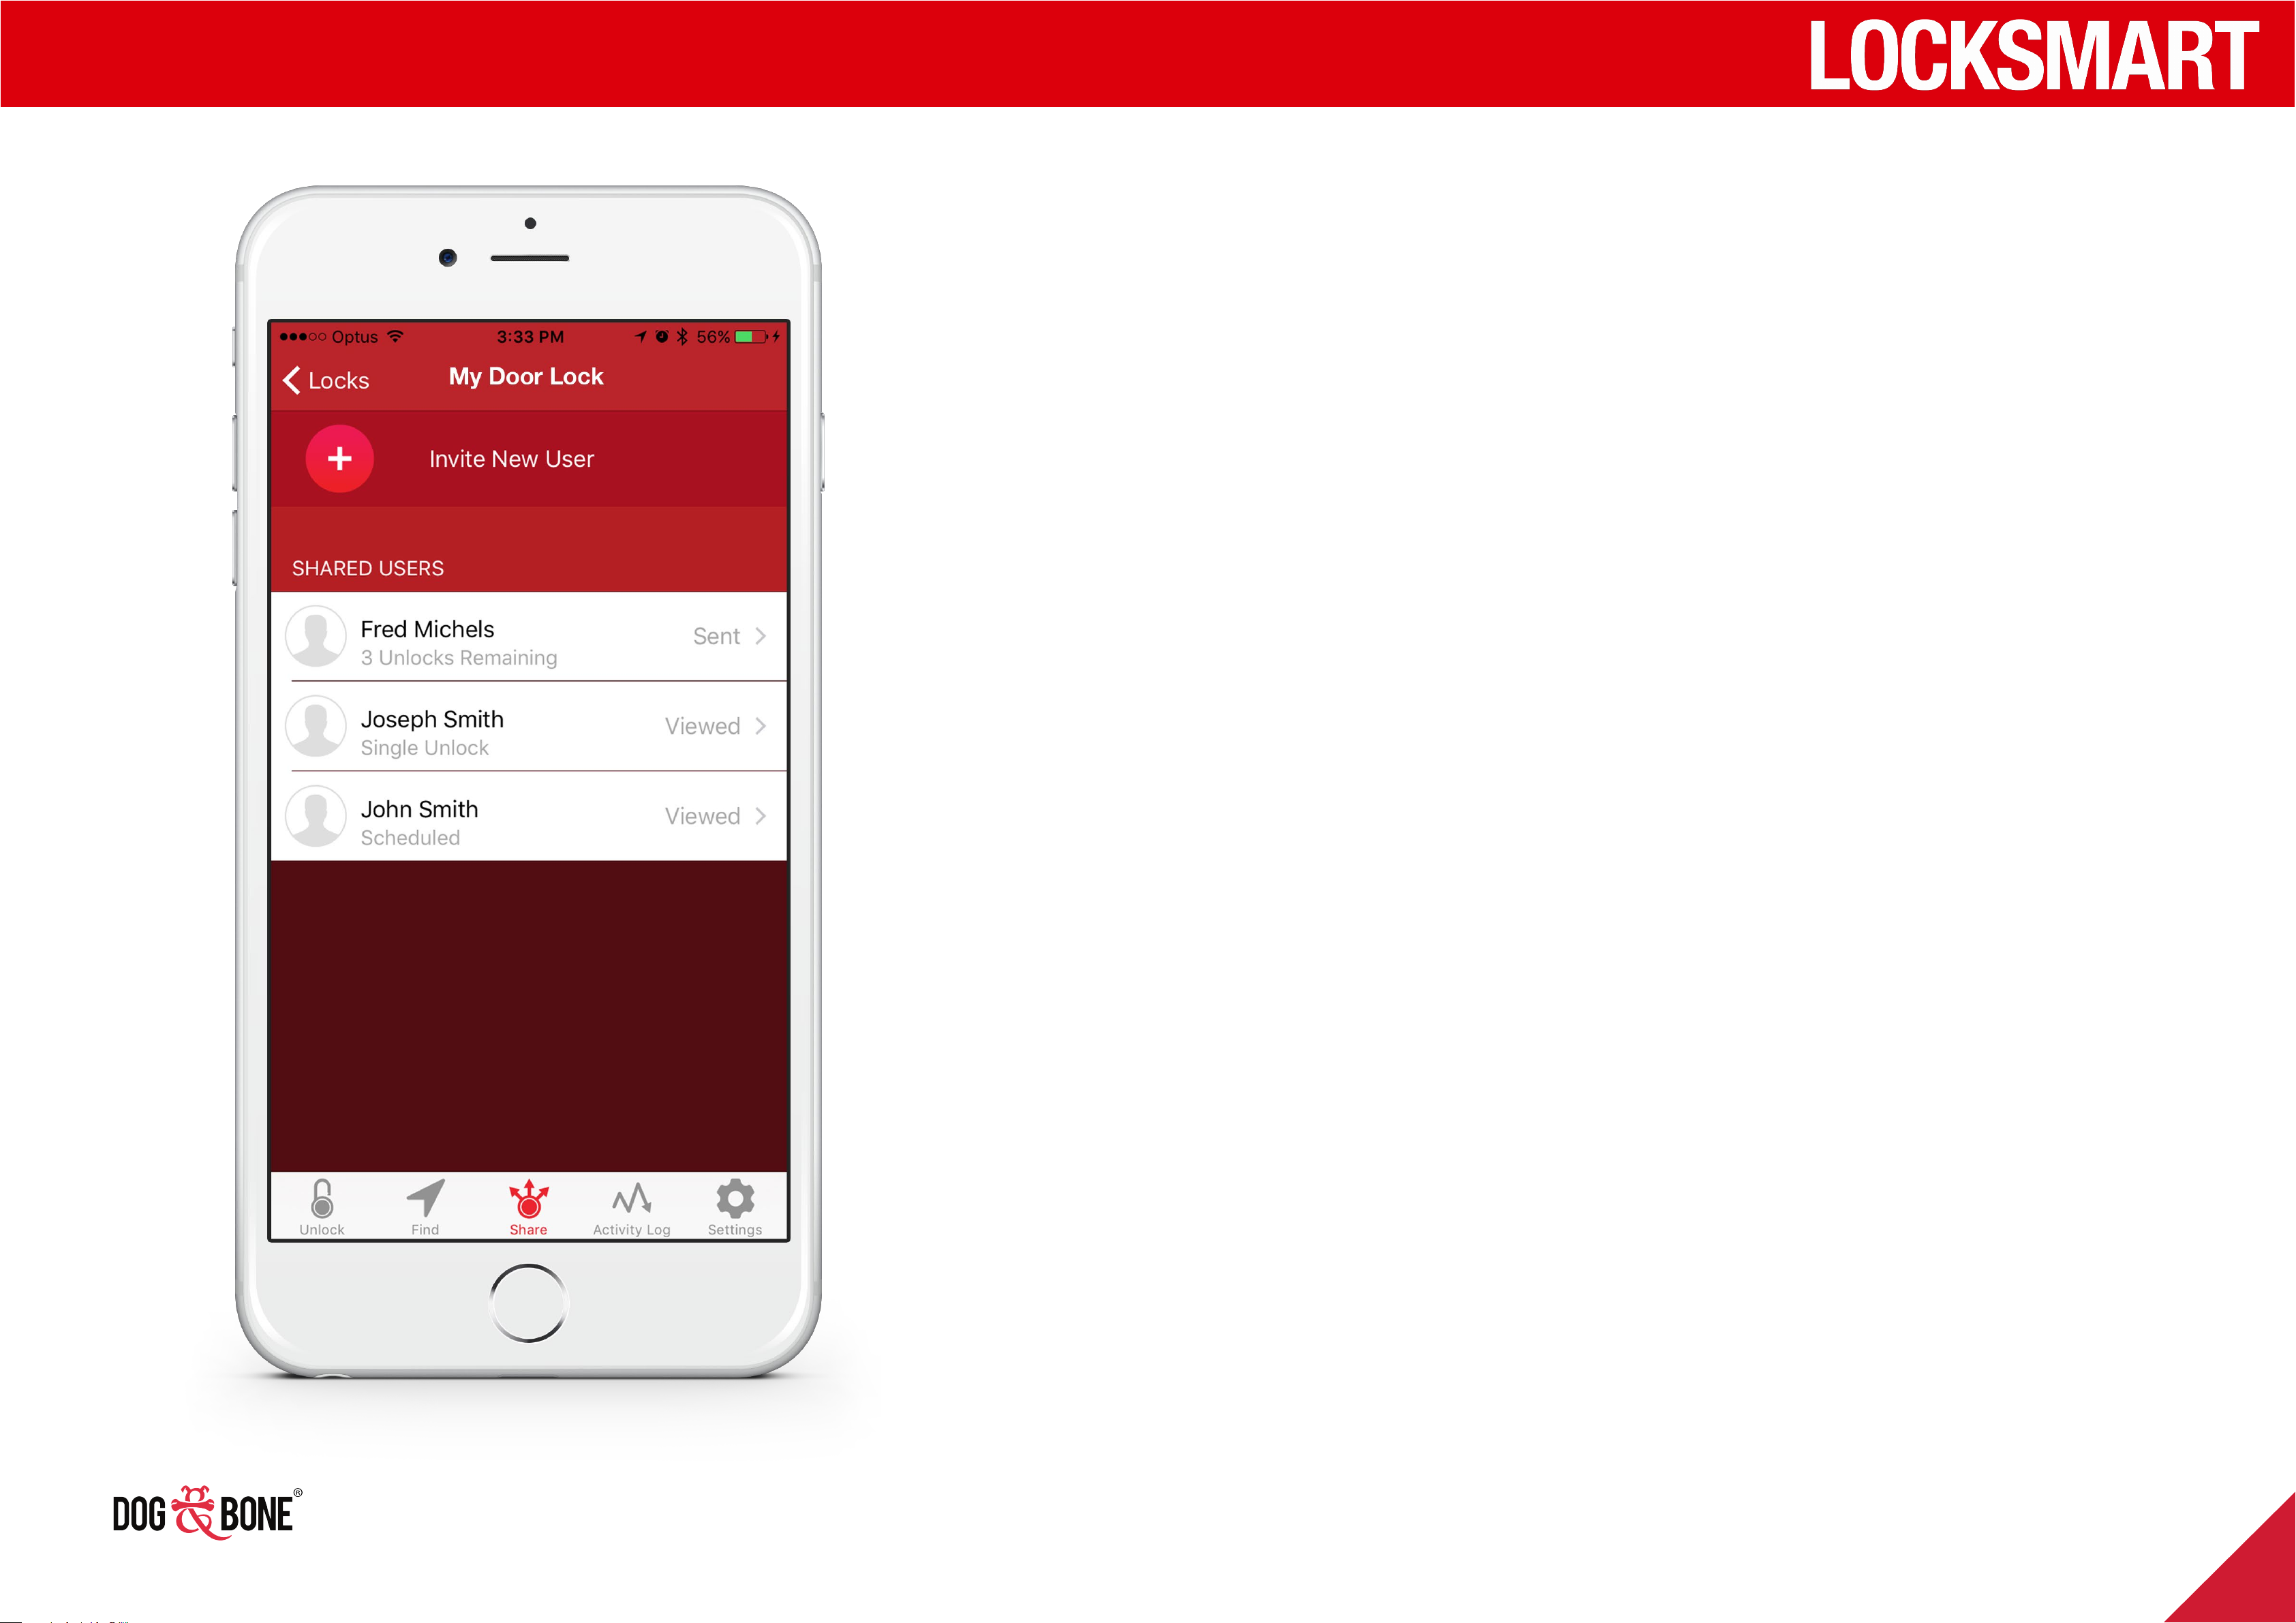
1. Shared users will be able to view the photo of the lock if
the owner has set one
2. Shared users will not have access to the lock’s settings,
activity log, location and will not be able to invite other
users
3. The shared user may open their lock using ‘Tap To Unlock’.
Please see ‘Tap To Unlock’ on page 11 for more details.
4. The shared user must have Internet connectivity when
they attempt to to access the lock
5. The security code for the lock is temporarily downloaded
at the moment that the shared user attempts to unlock the
lock
6. Every time the security code is downloaded by a shared
user, a log record is added to the lock’s activity log for the
owner
22
Page 22
Finding and sharing
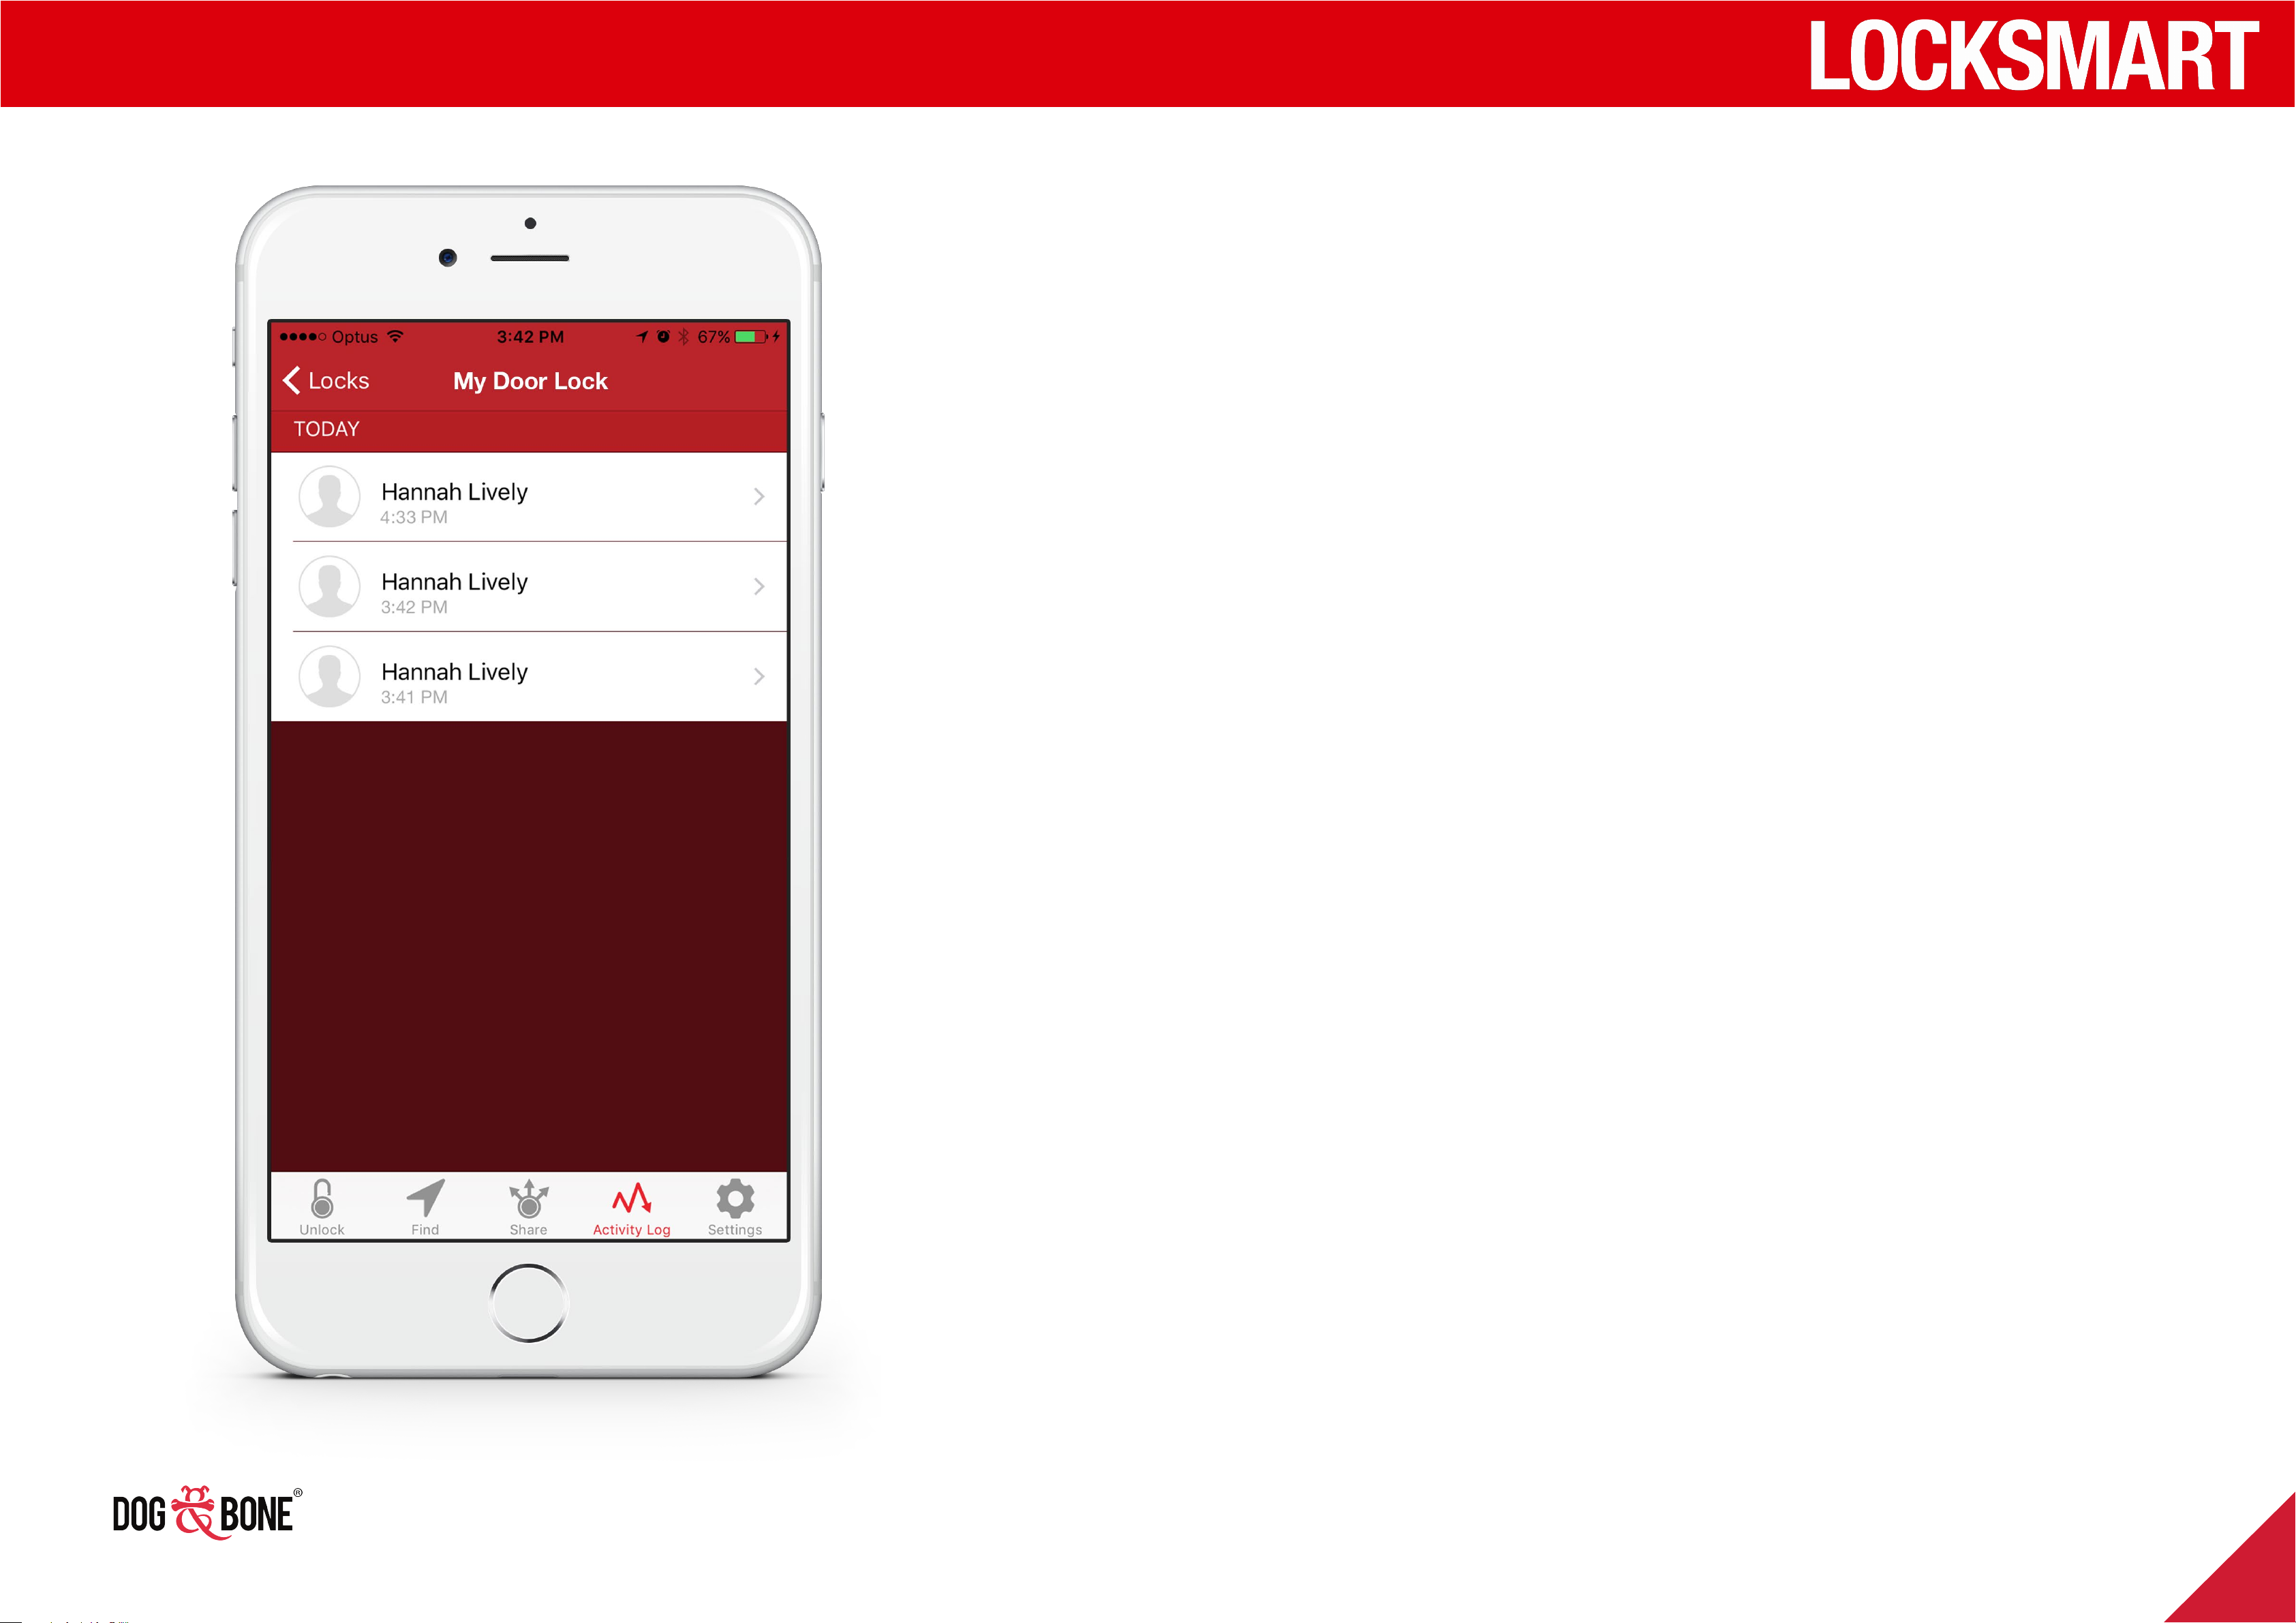
Activity log
1. Choose any lock from the lock list screen
2. Press the ‘Activity Log’ option from the bottom
menu of the unlock screen
3. This screen shows a list of unlock activities for any
time a shared user unlocks the lock (as described
in the Shared Lock Functionality section on page
22)
23
Page 23
Finding and sharing
Transferring a lock to a new
owner
Each lock can only be owned by a single primary user. To
transfer the ownership of the lock, you have to remove it
from your account first.
1. Ensure you are online and connected to the Internet
2. From the Locks list, swipe left on the lock you want to
remove
3. A ‘Delete’ button will be displayed to the right of the
lock
4. Press the ‘Delete’ button
5. A confirmation popup will appear. Press ‘Confirm’ to
delete the lock from your account, or press ‘Cancel’
to cancel the operation.
6. The lock is now available to be added by another
user as per the ‘Add a Lock’ section on page 8
24
Page 24
Finding and sharing
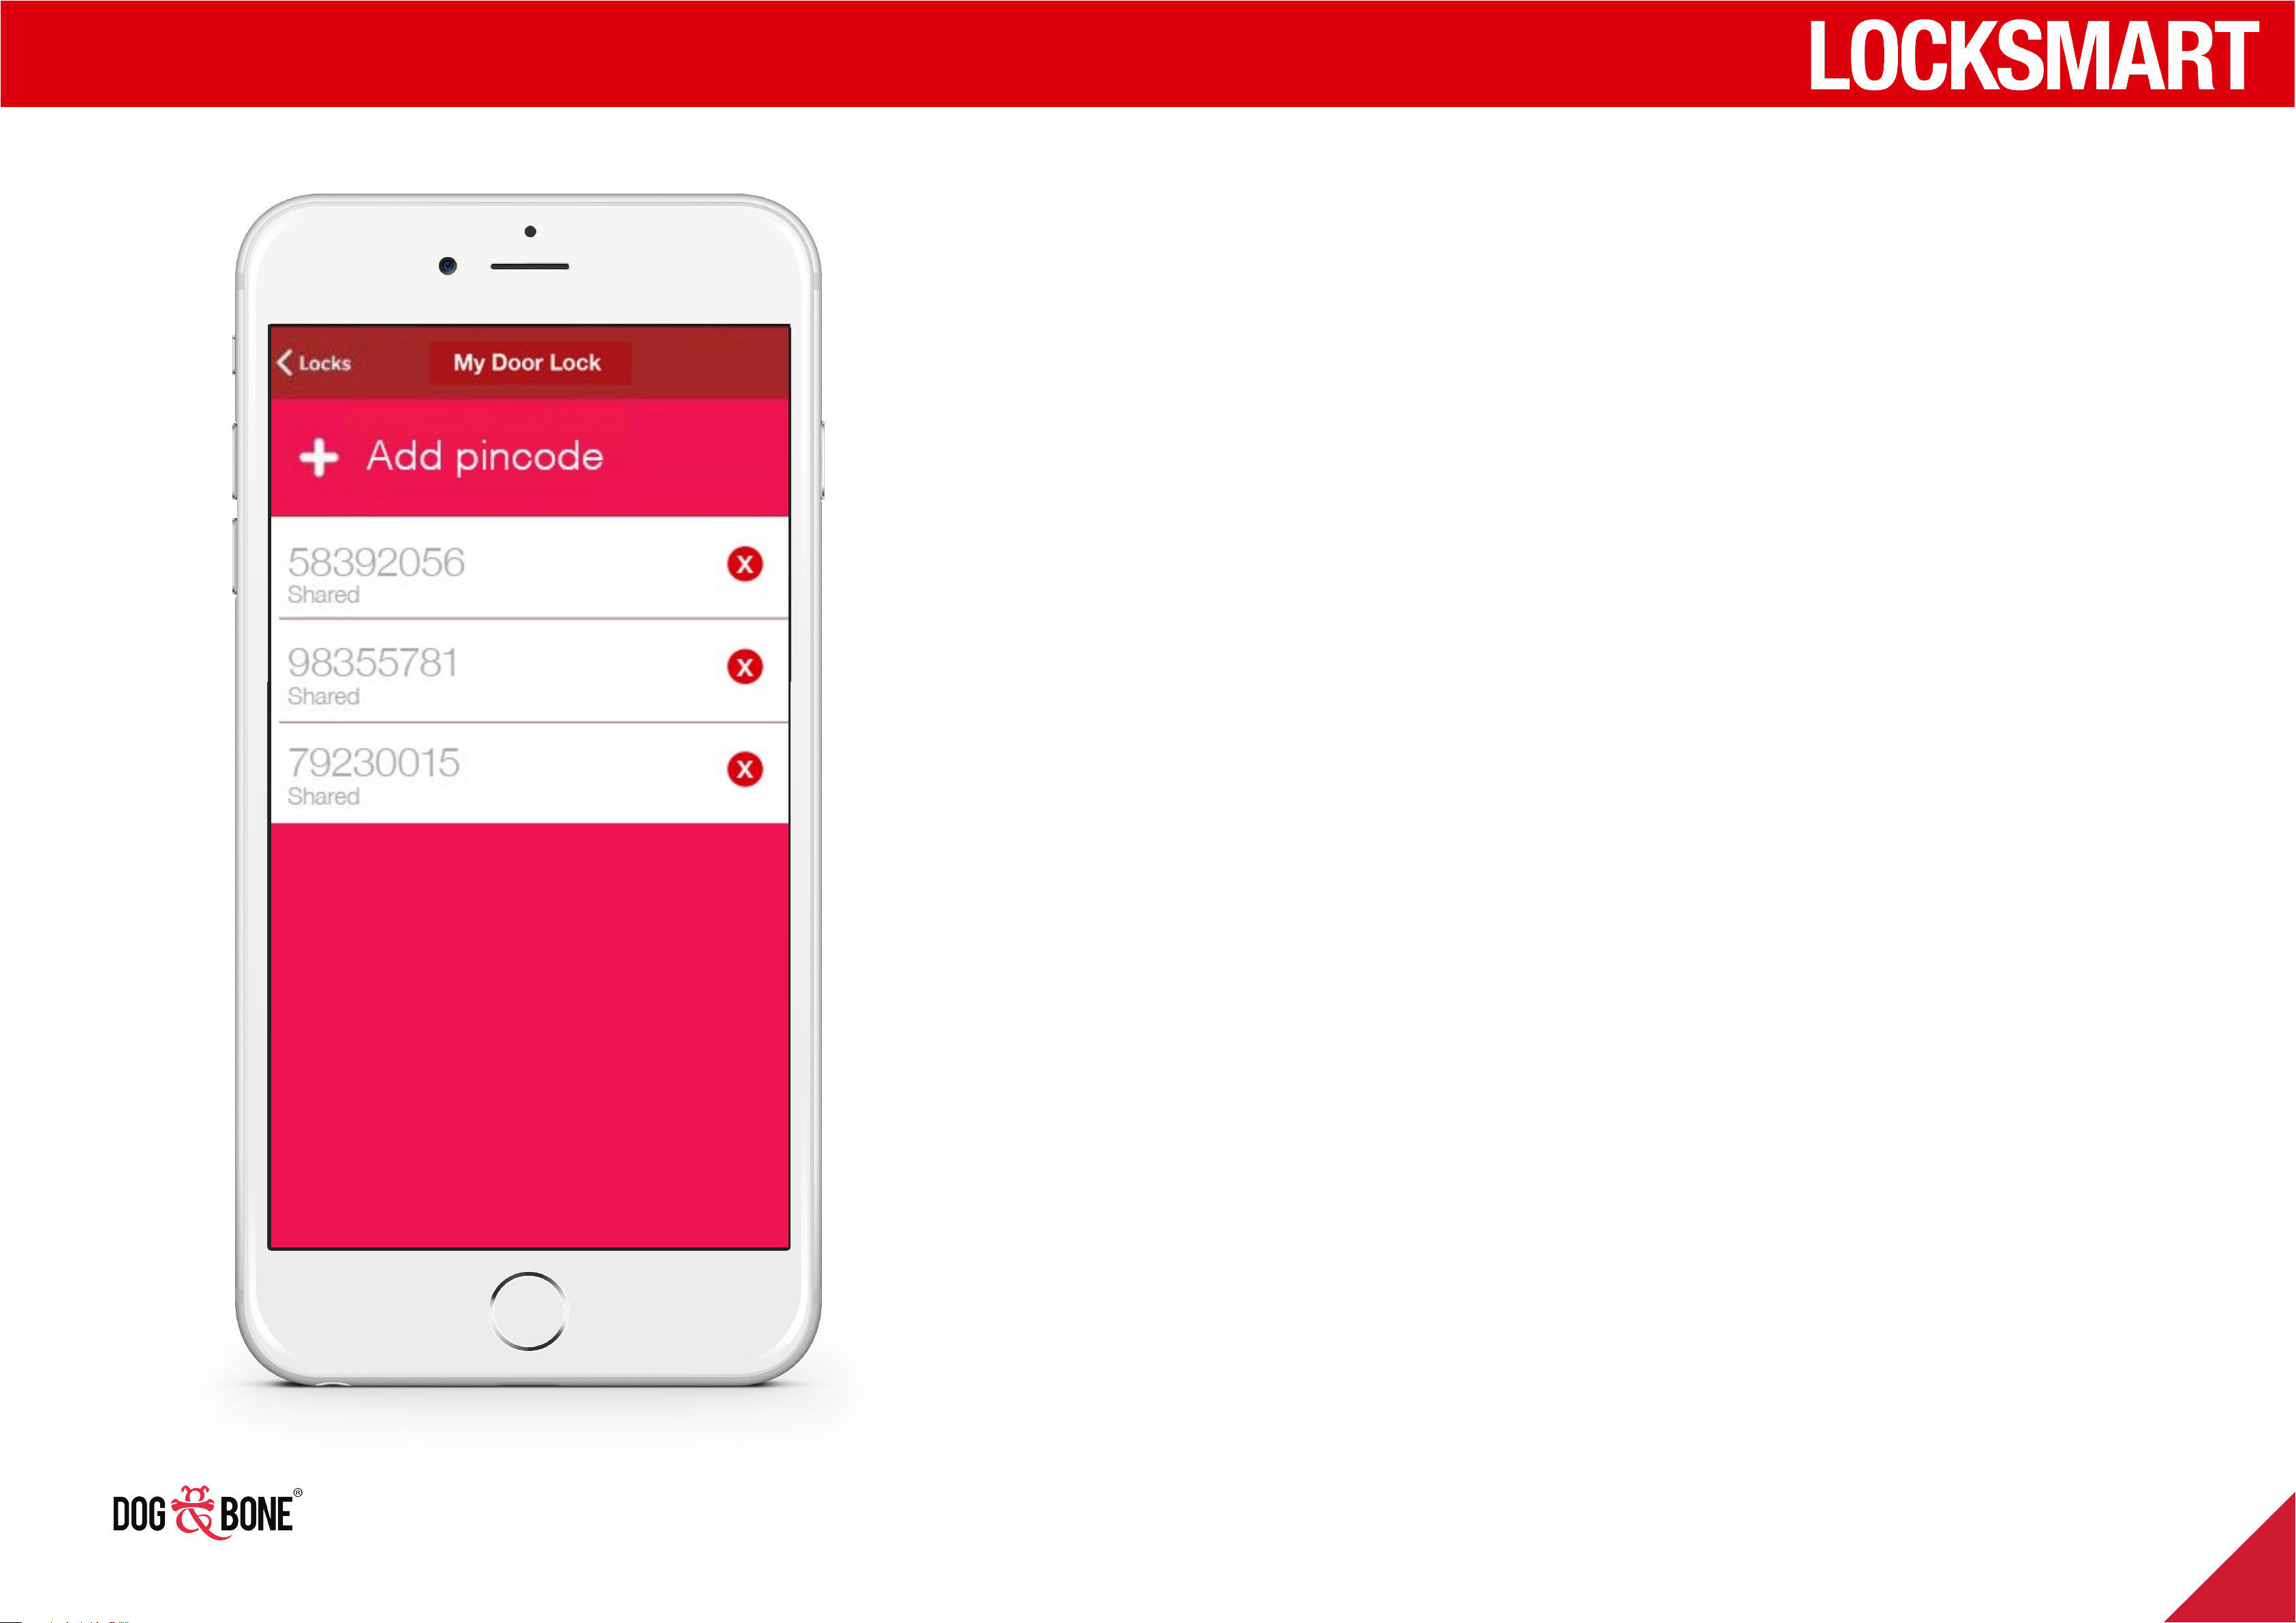
Sharing a pin code
1. Choose any lock from the lock list screen and
press the ‘Settings’ option in the bottom menu
2. Select lock pincode
3. Select contact it to forward
4. An SMS message will be generated. Click send
to deliver the pin code to the contact.
25
Page 25
Other features
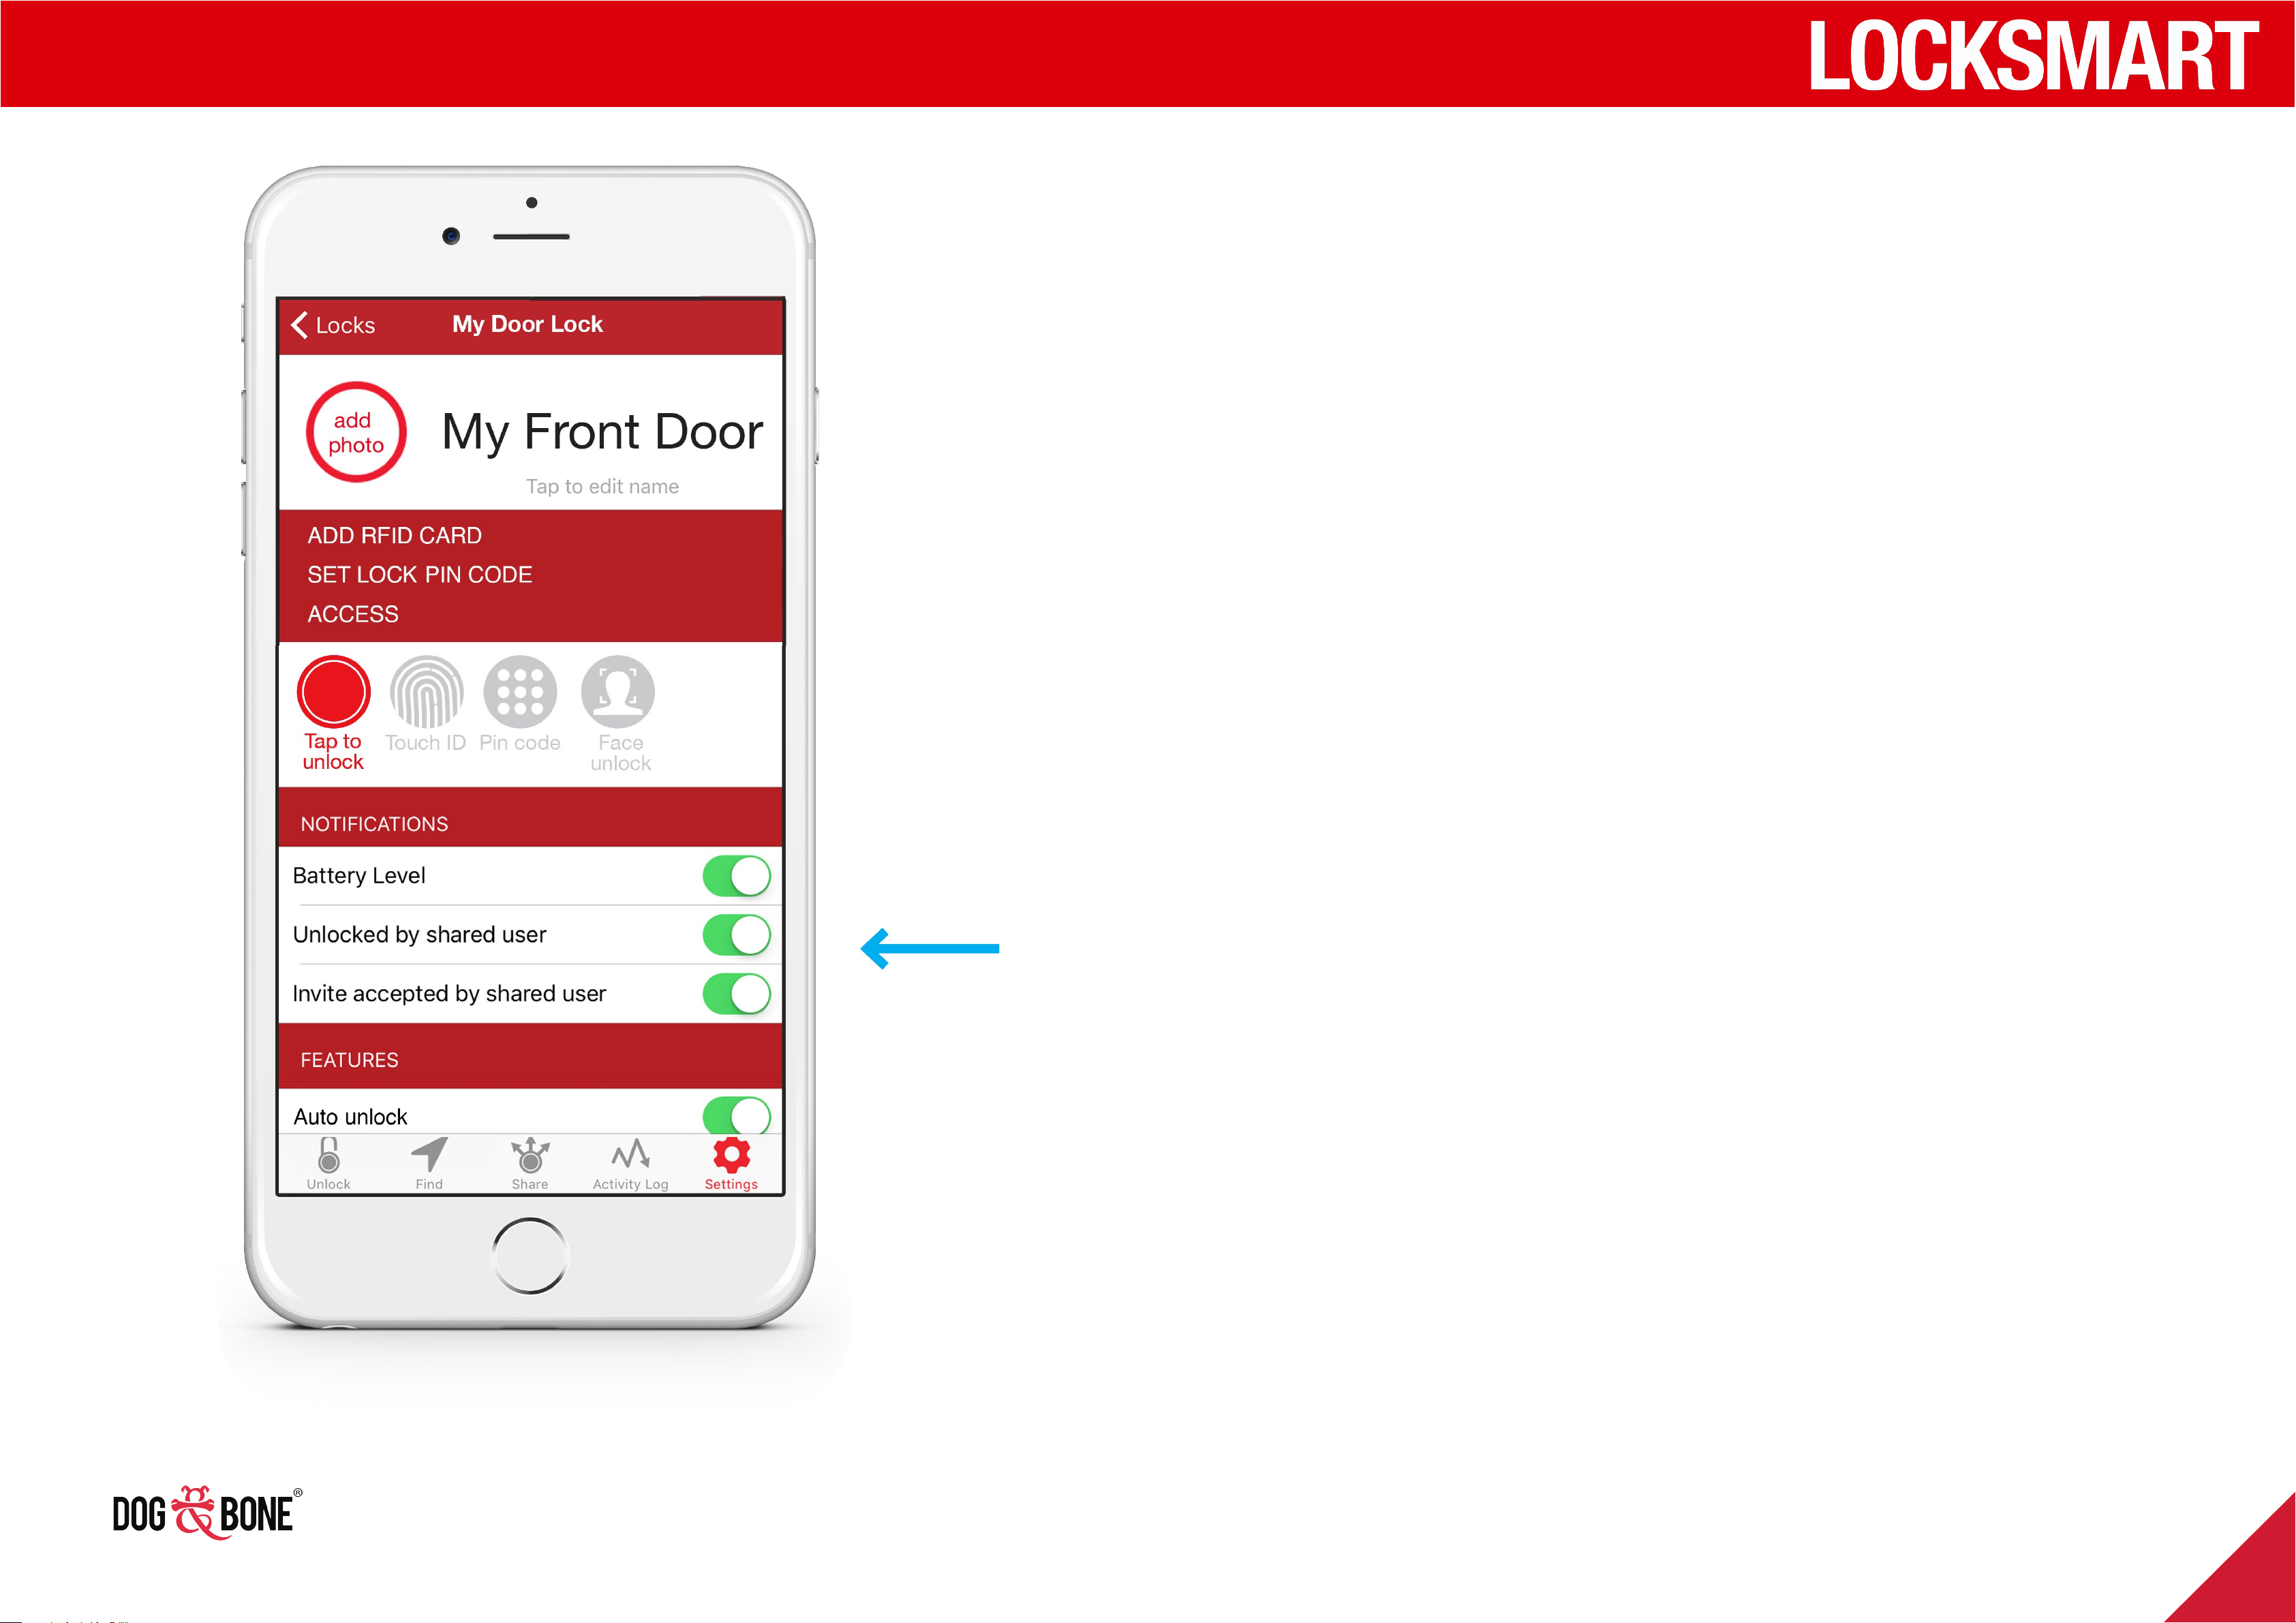
Notifications
1. Choose any lock from the lock list screen
2. Press the ‘Settings’ option from the bottom menu
3. Under the ‘Notifications’ section, toggle on or o the
following notification options:
4. ‘Battery Level’: with this option enabled, you will
receive a notification upon connecting to your lock
when the battery level has dropped below 50%, 10%,
and 5%
5. ‘Unlocked By Shared User’: when enabled, you will
receive a notification every time this lock is unlocked
by a user in your shared users list
6. ‘Invited Accepted By Shared User’: when enabled,
you will be notified when your lock invitation is
accepted
Anti-break-in and security
function
Input wrong password 5 times, the keypad will be locked
for 5 minutes
26
Page 26
Other features
Modify account or password
Modify your account details, change
your password, and more
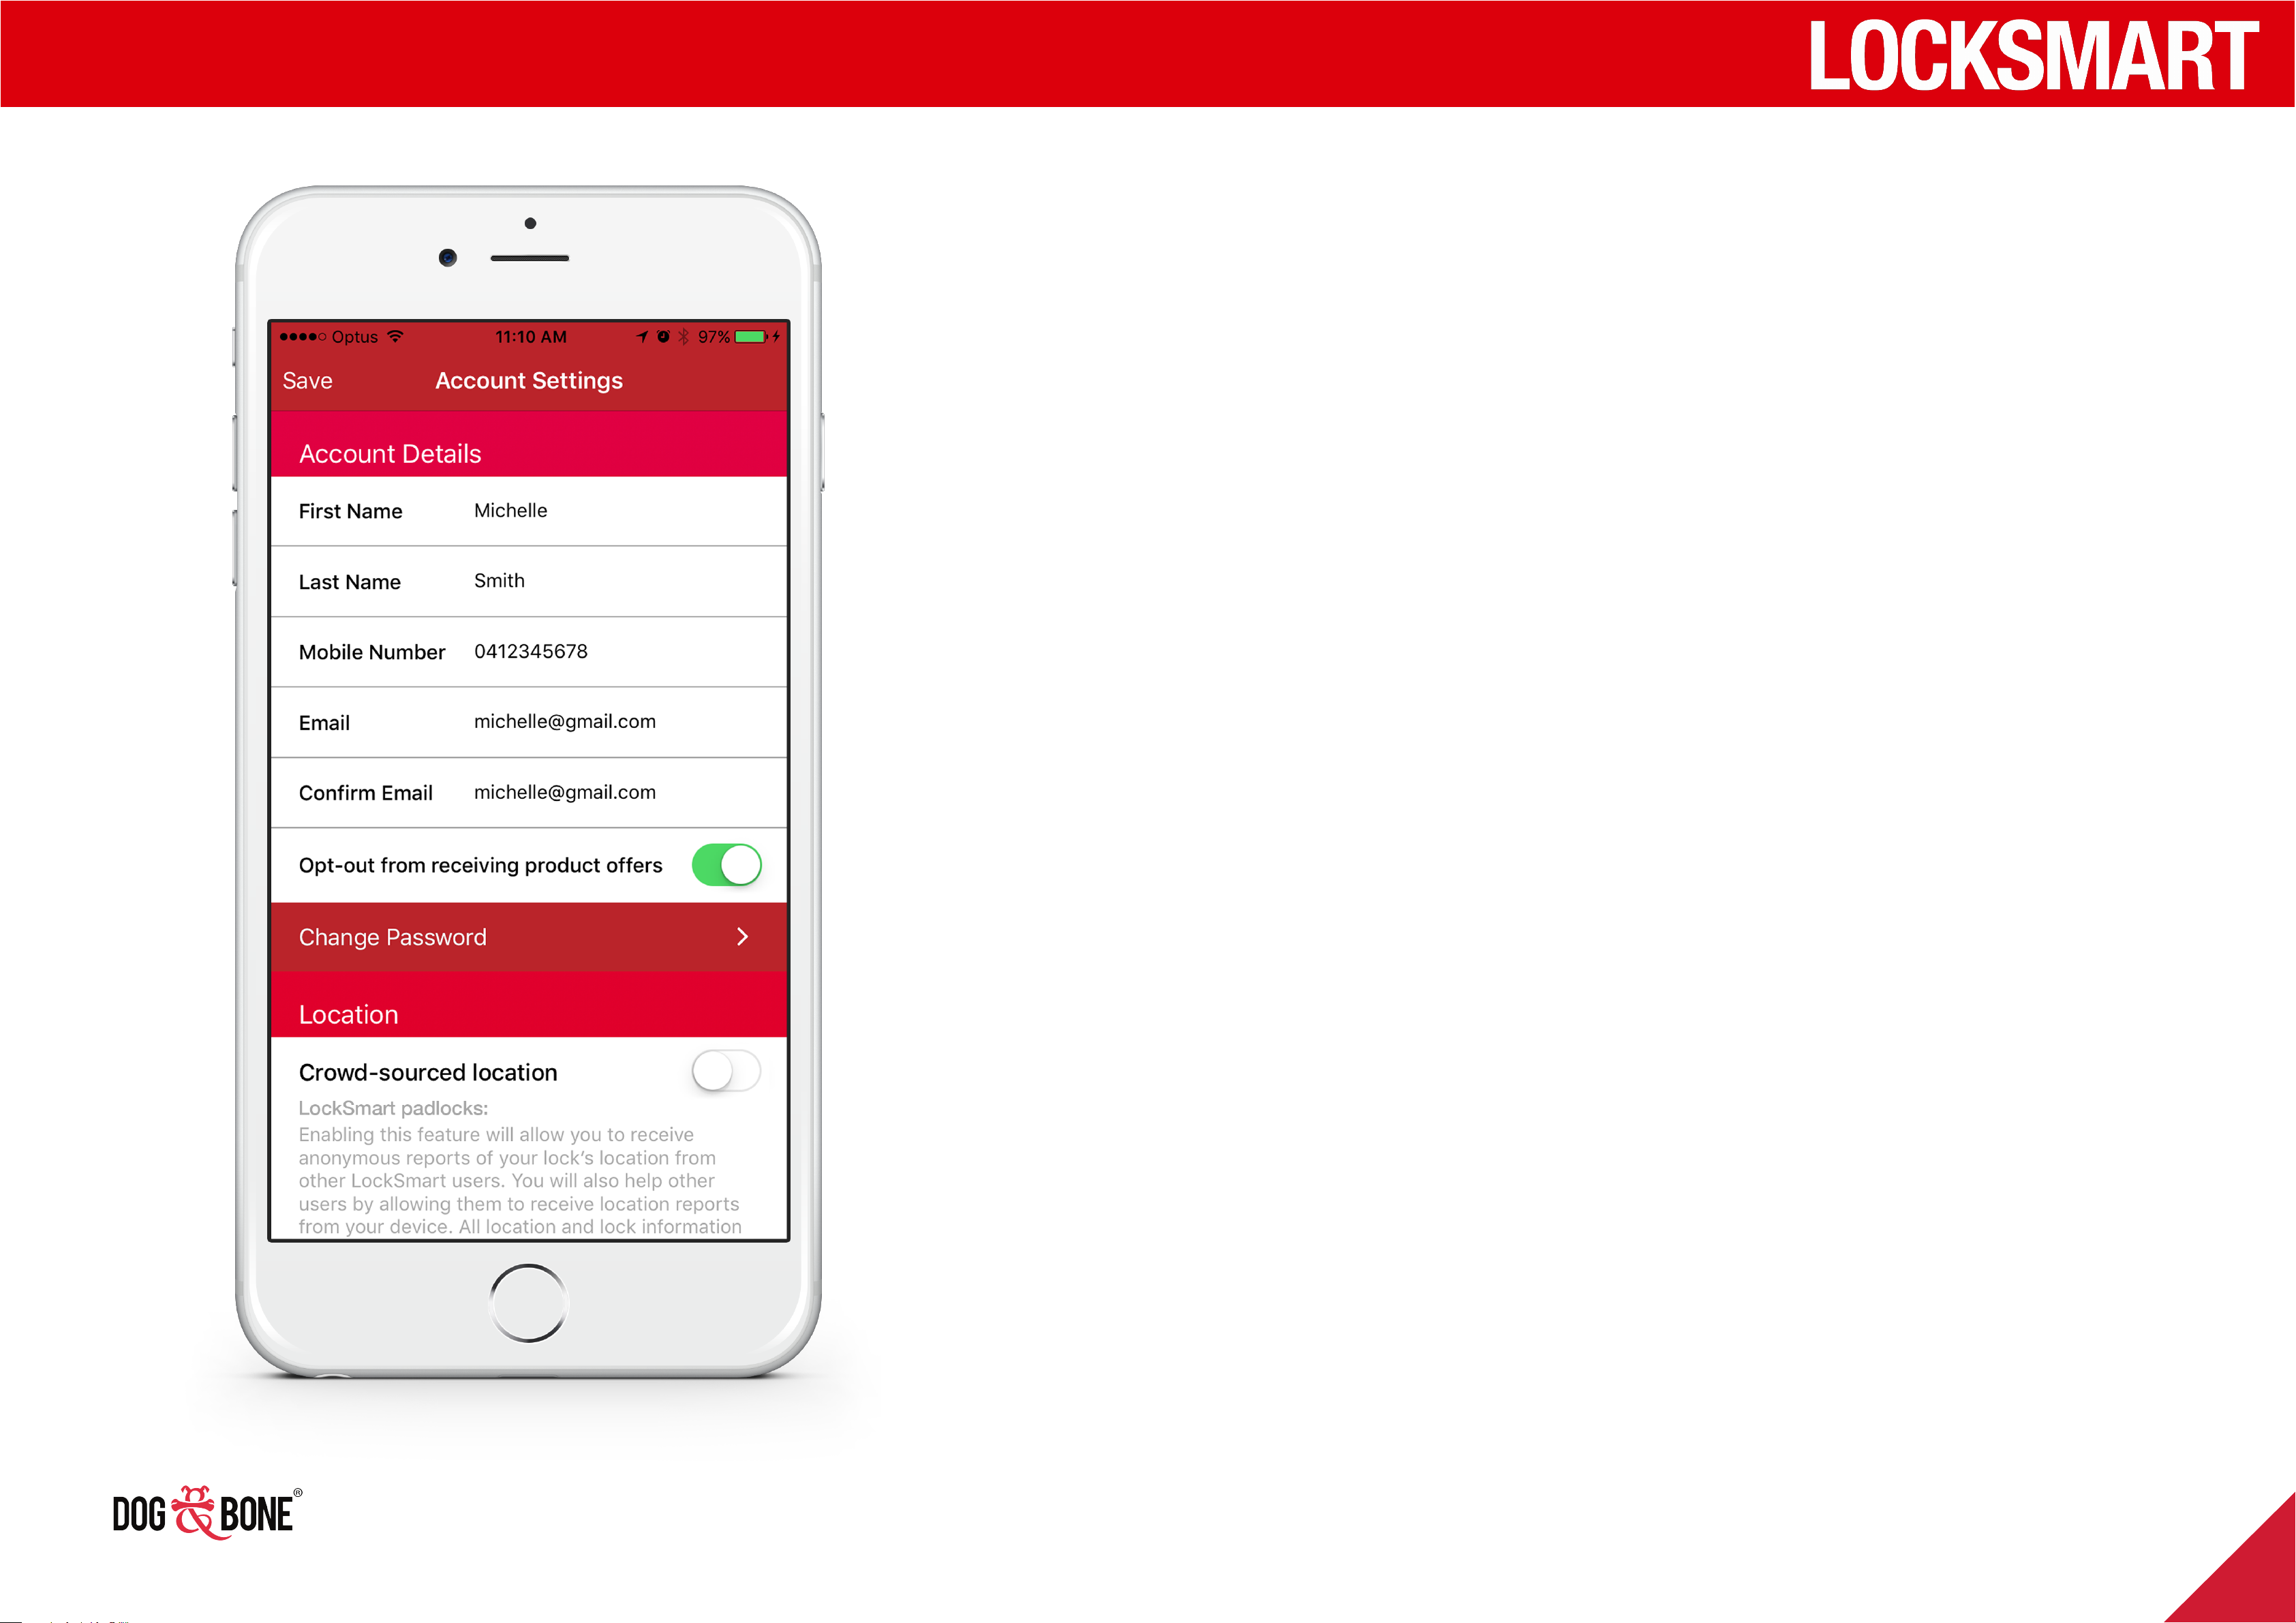
1. To access Account Settings,
press the three buttons on
the top right of the screen on
the ‘Locks’ list, then press the
‘Account Settings’ button
2. The Account Details section
can be used to change
6. Press the ‘Save’ button in
the top right to save your
password changes
7. Under the Notifications
section, ‘Shared lock status
updates’ can be toggled on
and o. This feature allows
you to receive notifications
about locks that are shared
your First Name, Last Name,
Mobile Number and Email
3. You can change your
selection for receiving
product oers by toggling the
‘Opt-out’ button
4. To change your account
password, press the ‘Change
with you.
Password’ button
5. Enter your current password,
new password and confirm
your new password
27
Page 27
Other features
Lost mobile device
For lock owner
Follow the steps below for optimum
security of your account and locks in the
event of losing your device.
• In order to immediately protect your
account, login with your LockSmart
username and password on another
compatible device
- Each LockSmart user may only
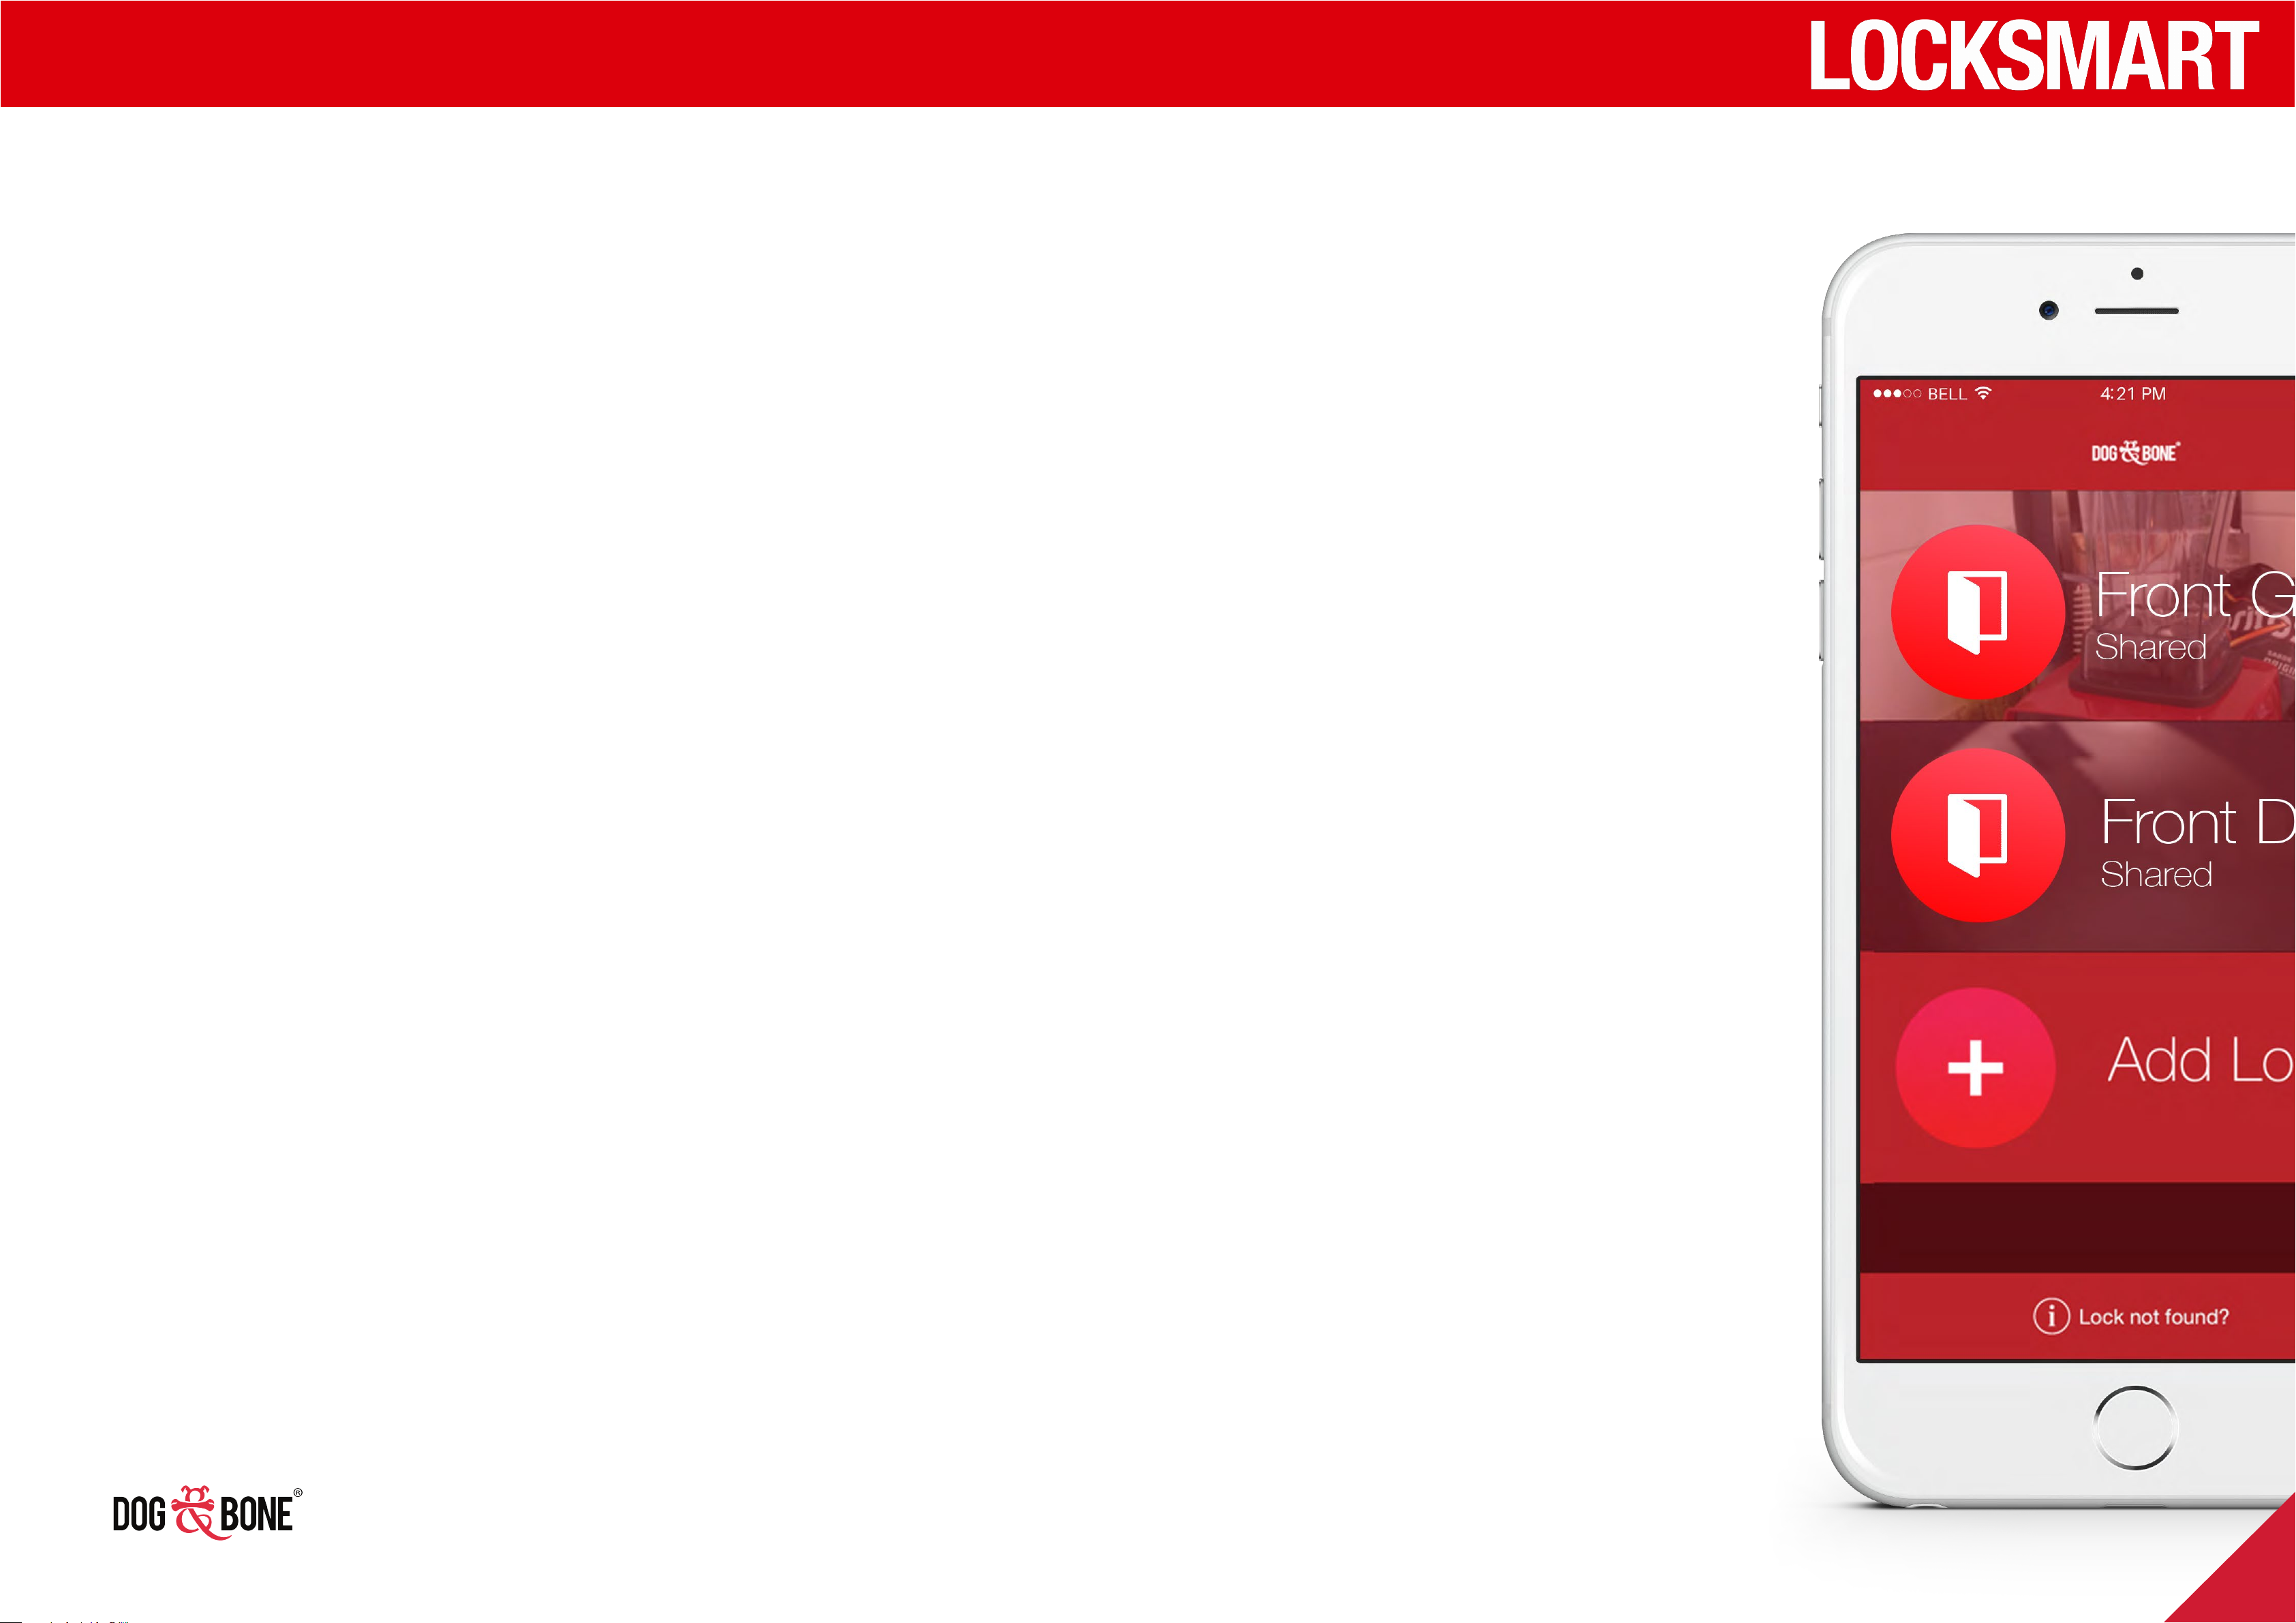
1. Open the lock list screen
2. Swipe left on each of your locks
3. A delete button will show up on the
right
4. Press the delete button
5. Add the lock to your device again
as per the ‘Add a lock’ section on
page 8.
be logged in on one device at
a time. Your lost phone will be
logged out automatically
- Note: If the lost phone is in
airplane mode, this action
will not be eective, and your
locks should instead be reset,
following the instructions
below
6. The process of re-adding a lock to
your account resets the security key
for that lock
Note: Deleting and re-adding a lock will reset the
settings, activity log and shared users for that lock.
We strongly recommend changing your account
password; details on changing your password can be
found in the Modify account or password section on
24.
• If you want to reset all of your
lock security keys for maximum
protection, you can do so by
removing and re-adding each lock
to your account
28
Page 28
Other features
For shared user(s)
If the lost phone is a shared user of the lock, the owner
only has to remove the shared user from having access
to the lock to secure. The owner should:
1. Choose the lock from the lock list screen
2. Press the ‘Share’ option from the bottom menu
3. Press on the name of the shared users you would
like to delete
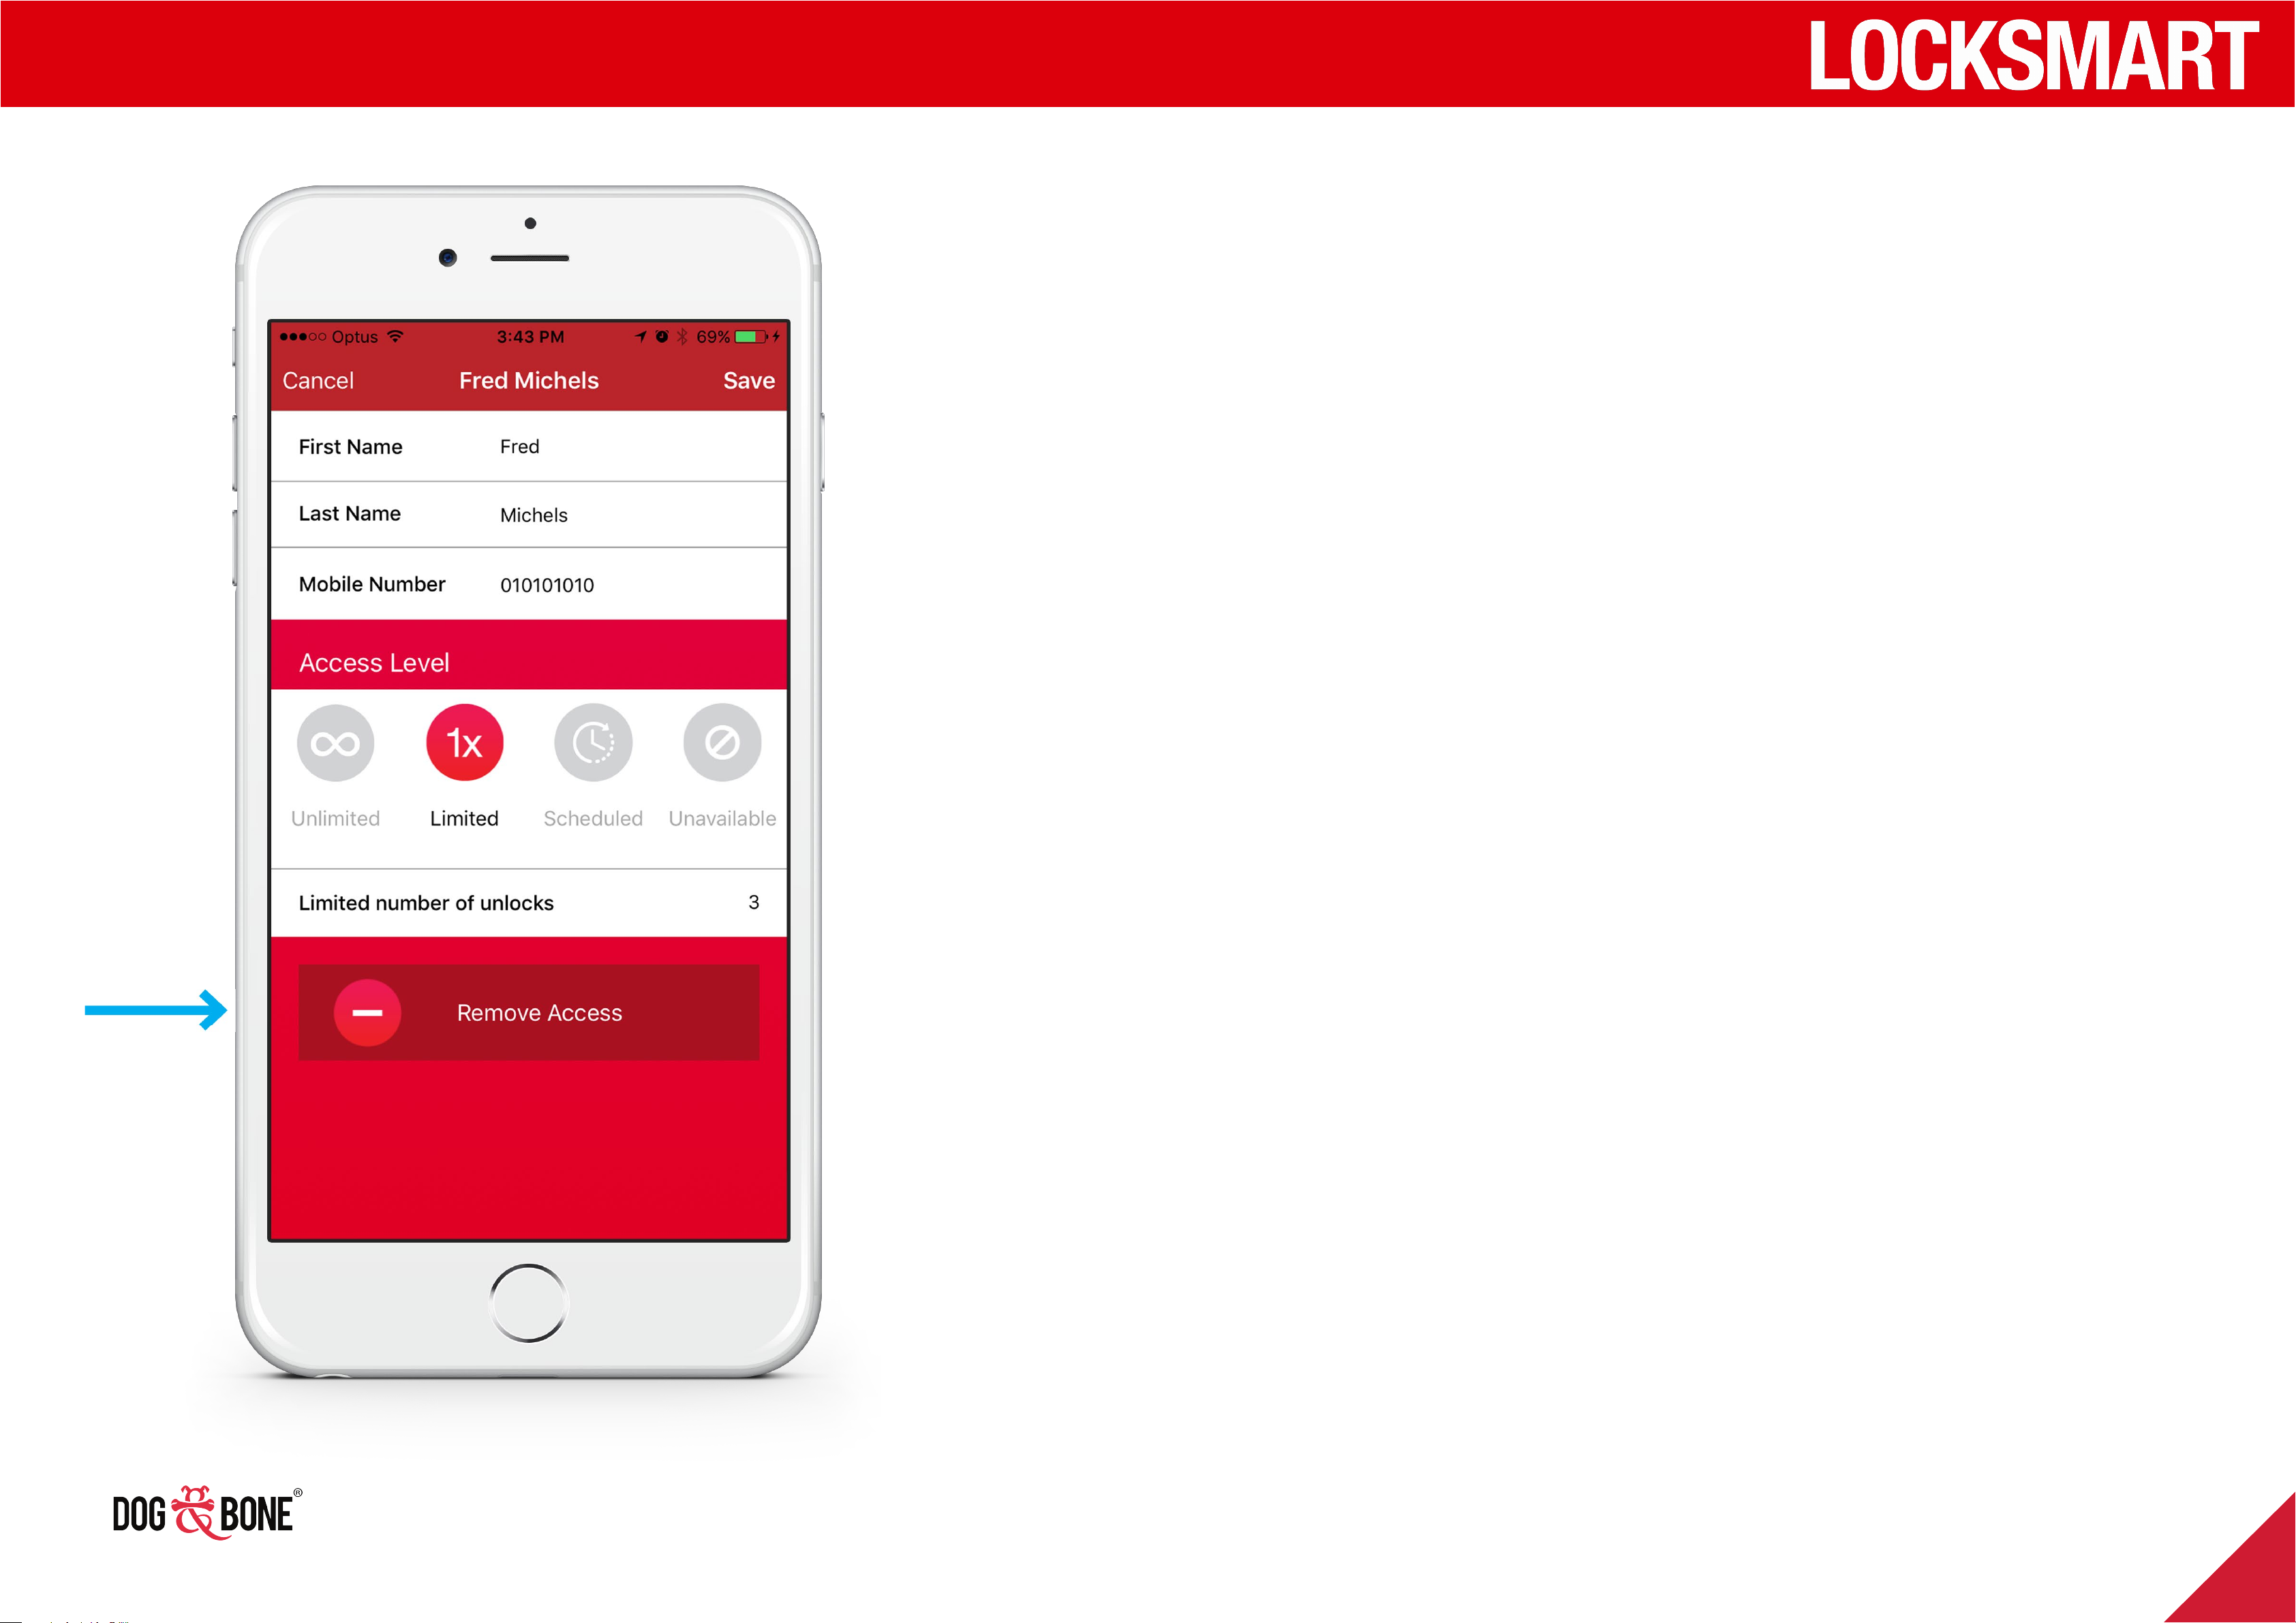
4. A new page will open (see left) with the shared
user’s details
5. Press the ‘Remove Access’ button (indicated by the
blue arrow, left)
We recommend to then change your account password;
details on changing your password can be found in the
Modify account or password section on page 27.
29
Page 29
Other features
Add a photo to a lock
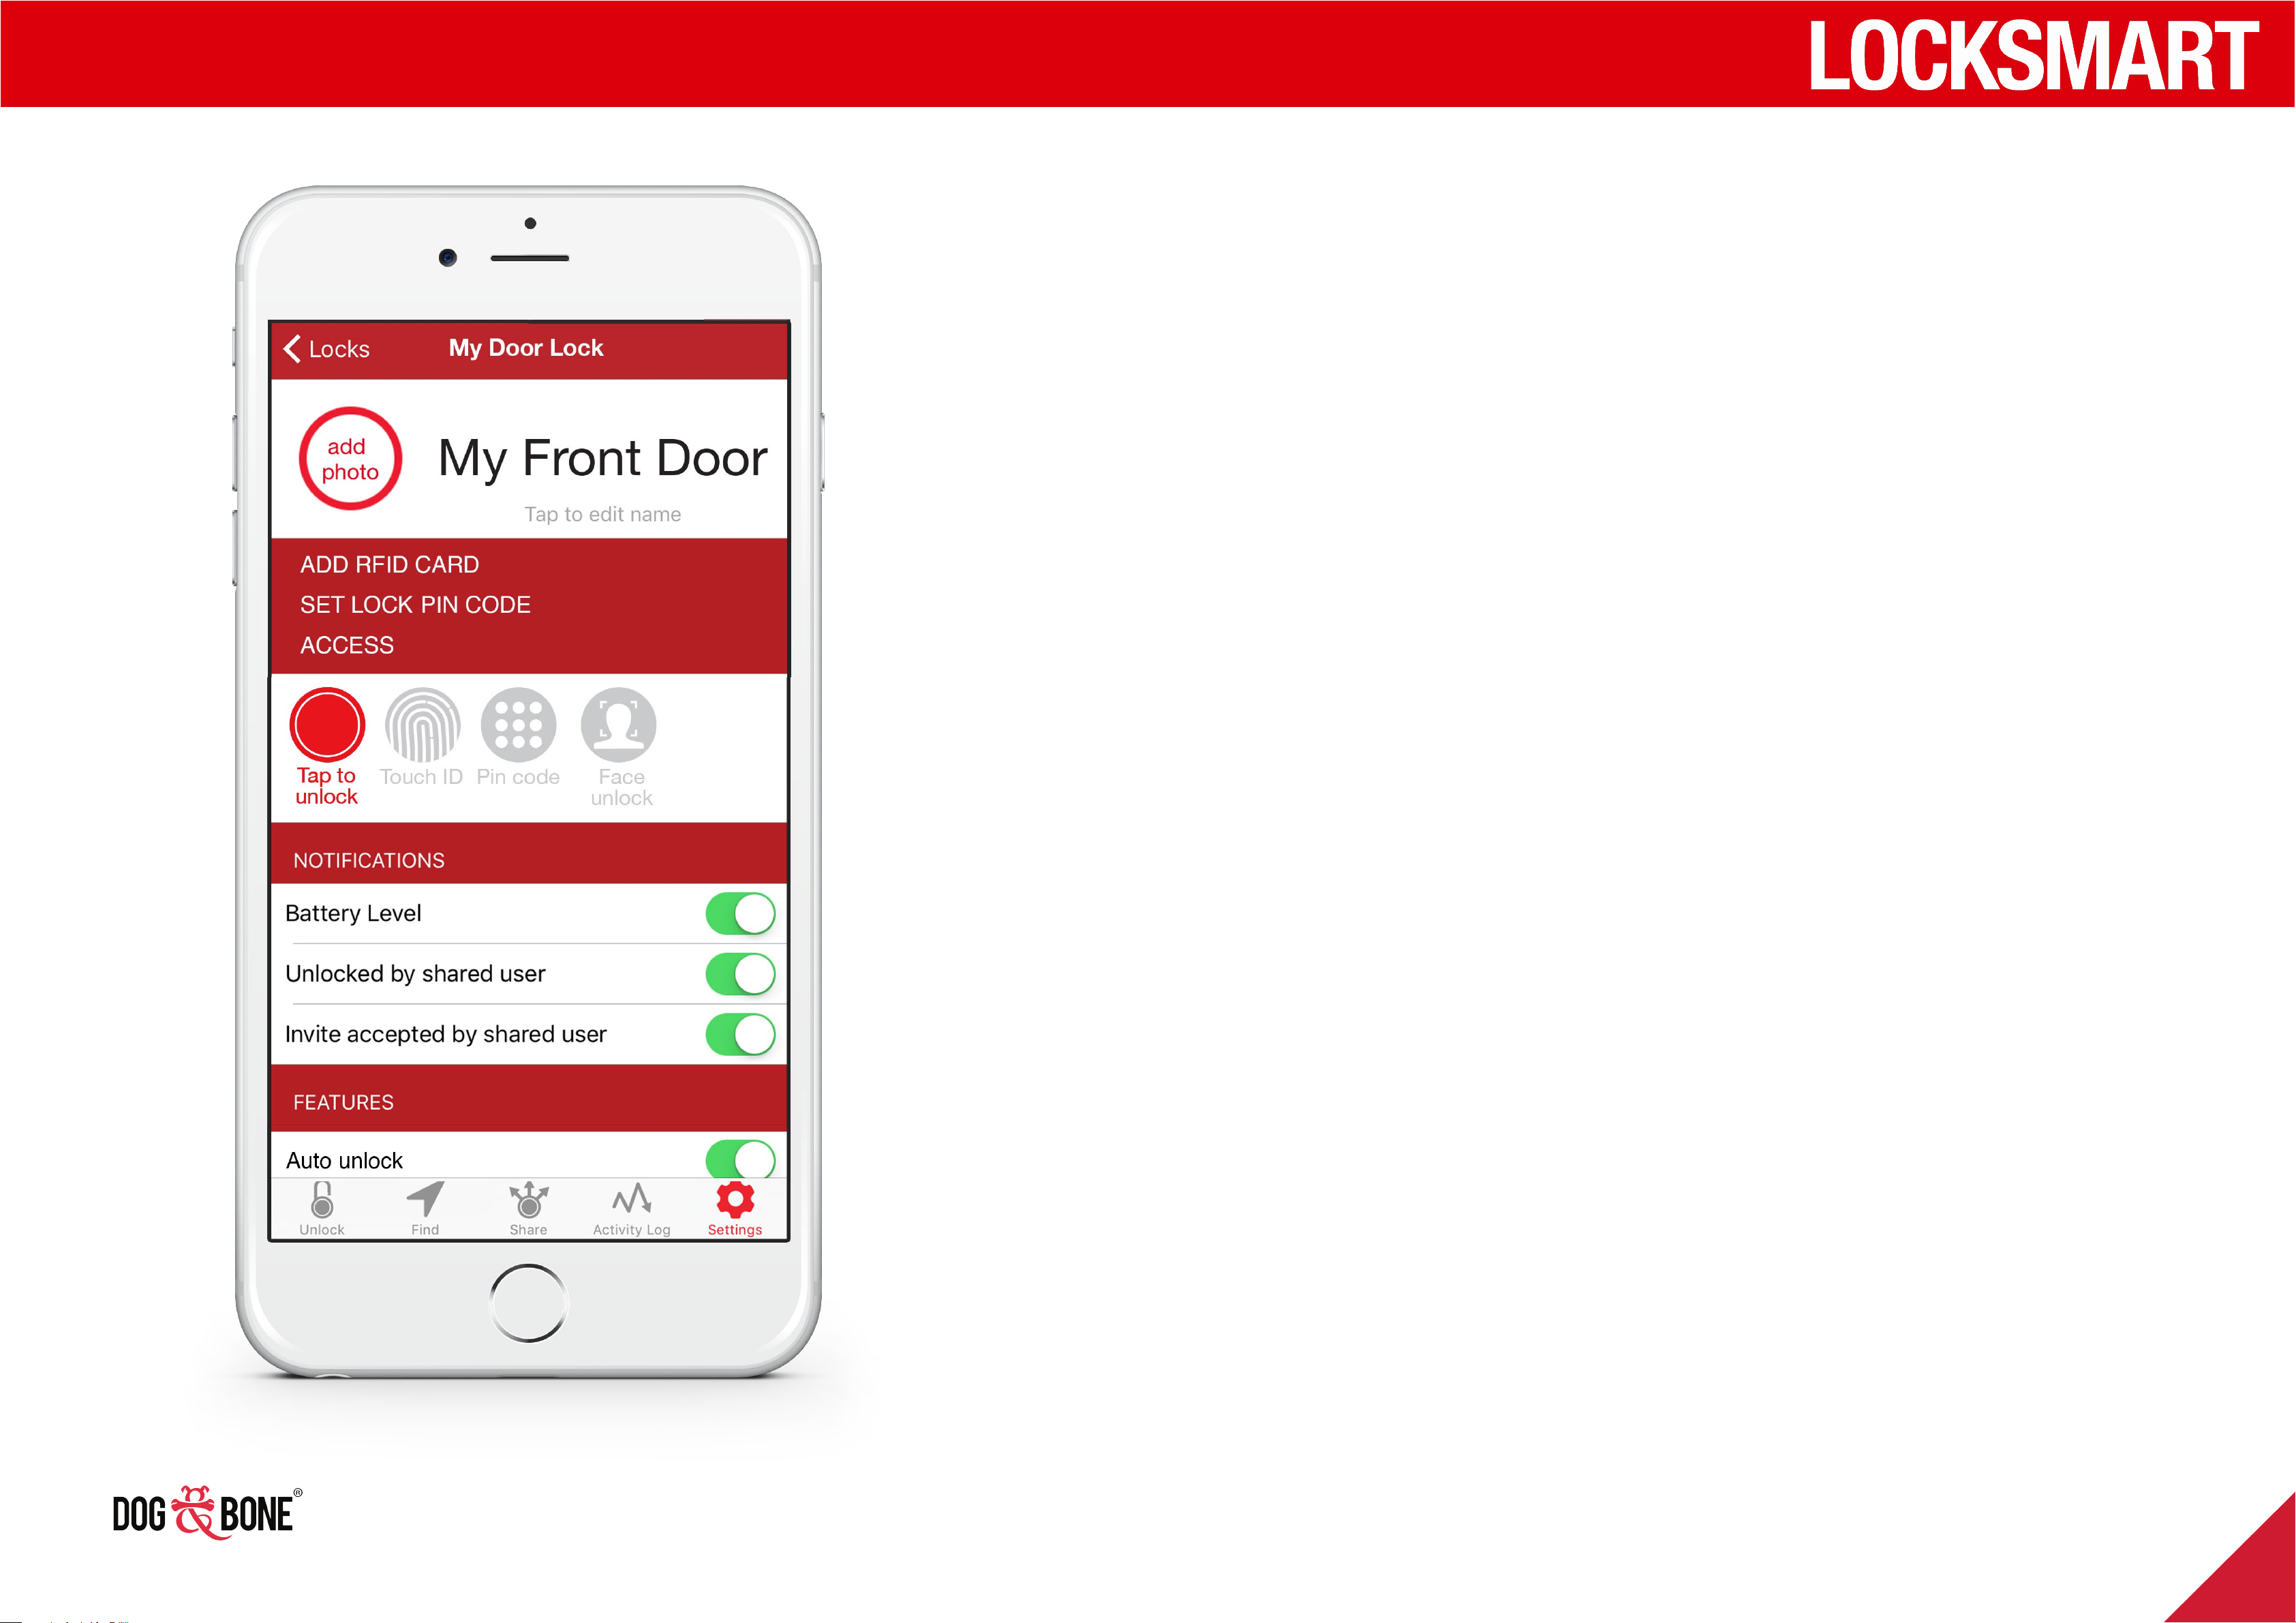
1. Choose any lock from the lock list screen
2. Press the ‘Settings’ option from the bottom
menu
3. Press the ‘Add Photo’ button
4. You can choose a photo from your device’s
gallery or take a new picture with your camera
5. Note that this photo will be shared with any user
who is given access to your lock
30
Page 30
Other features
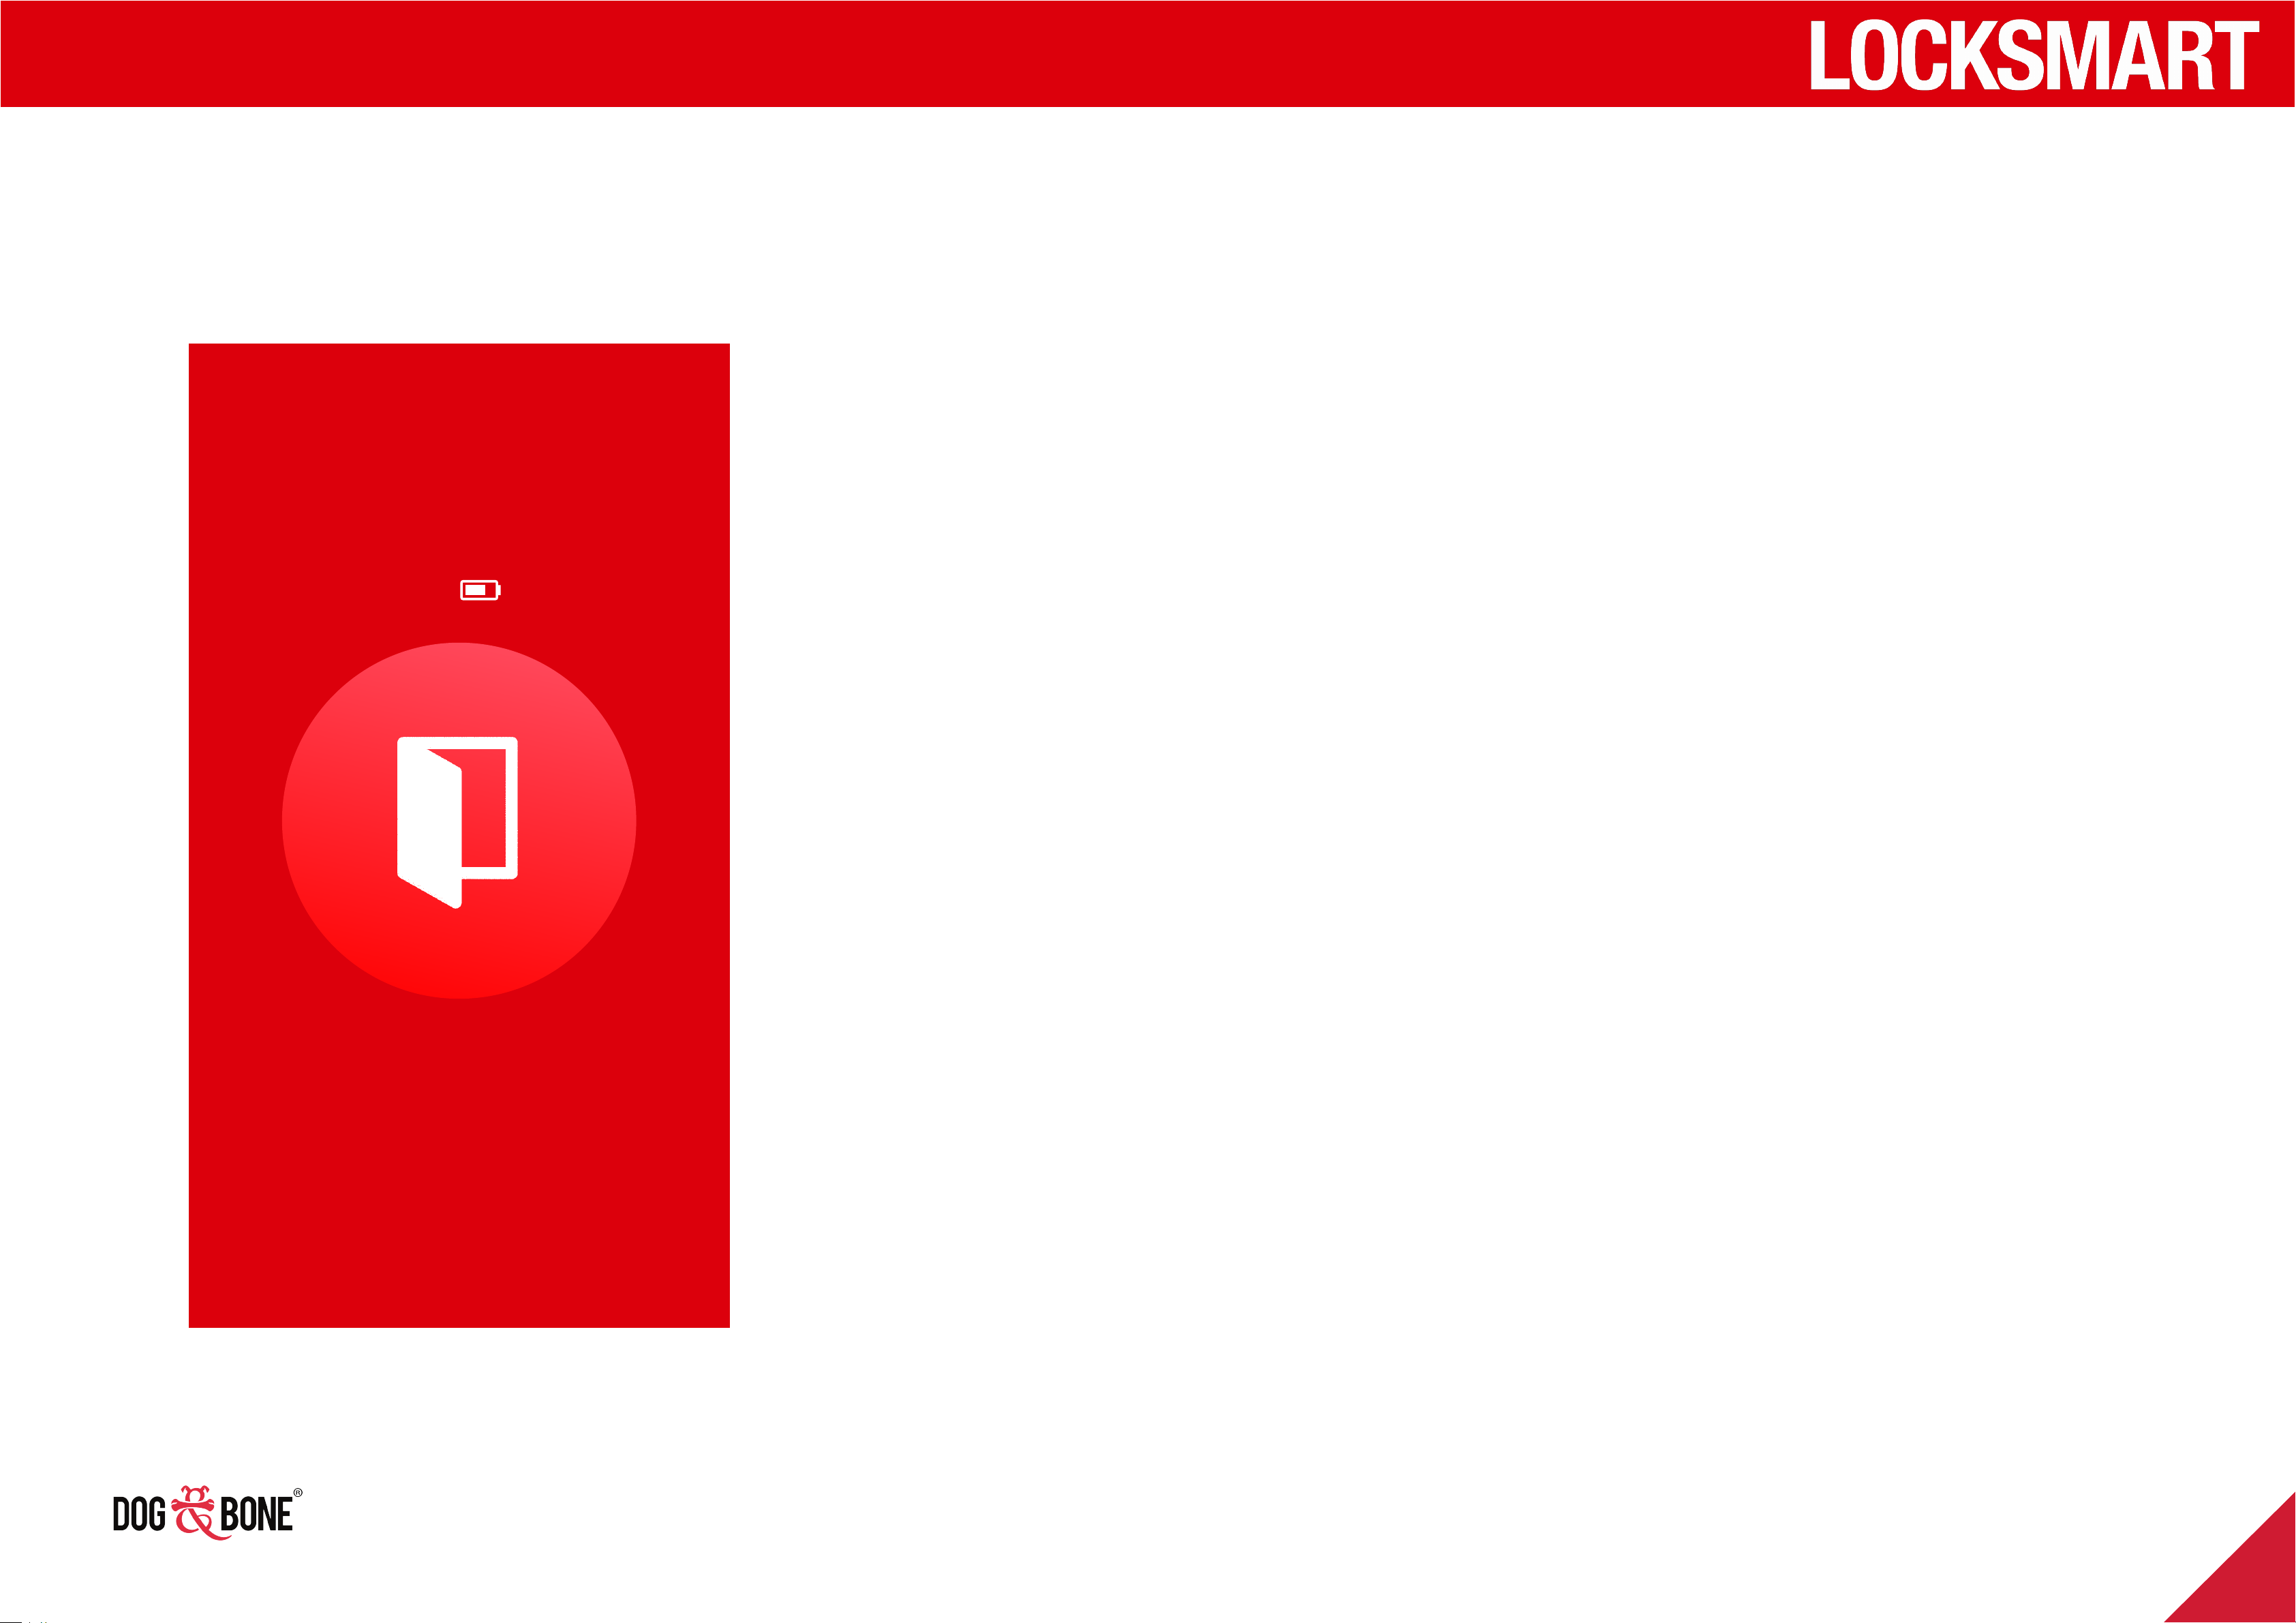
Battery percentage display
My Front Door
72%
1. Choose any lock from the lock list screen
2. You will see the battery level percentage displayed at
the top of the screen for the lock
3. The battery level is updated every time the application
connects to direct to the lock. Having a shared user
access the lock will not update this display
Open
31
Page 31
Other features
What to do if your lock runs out of battery
LockSmart Abode
power?
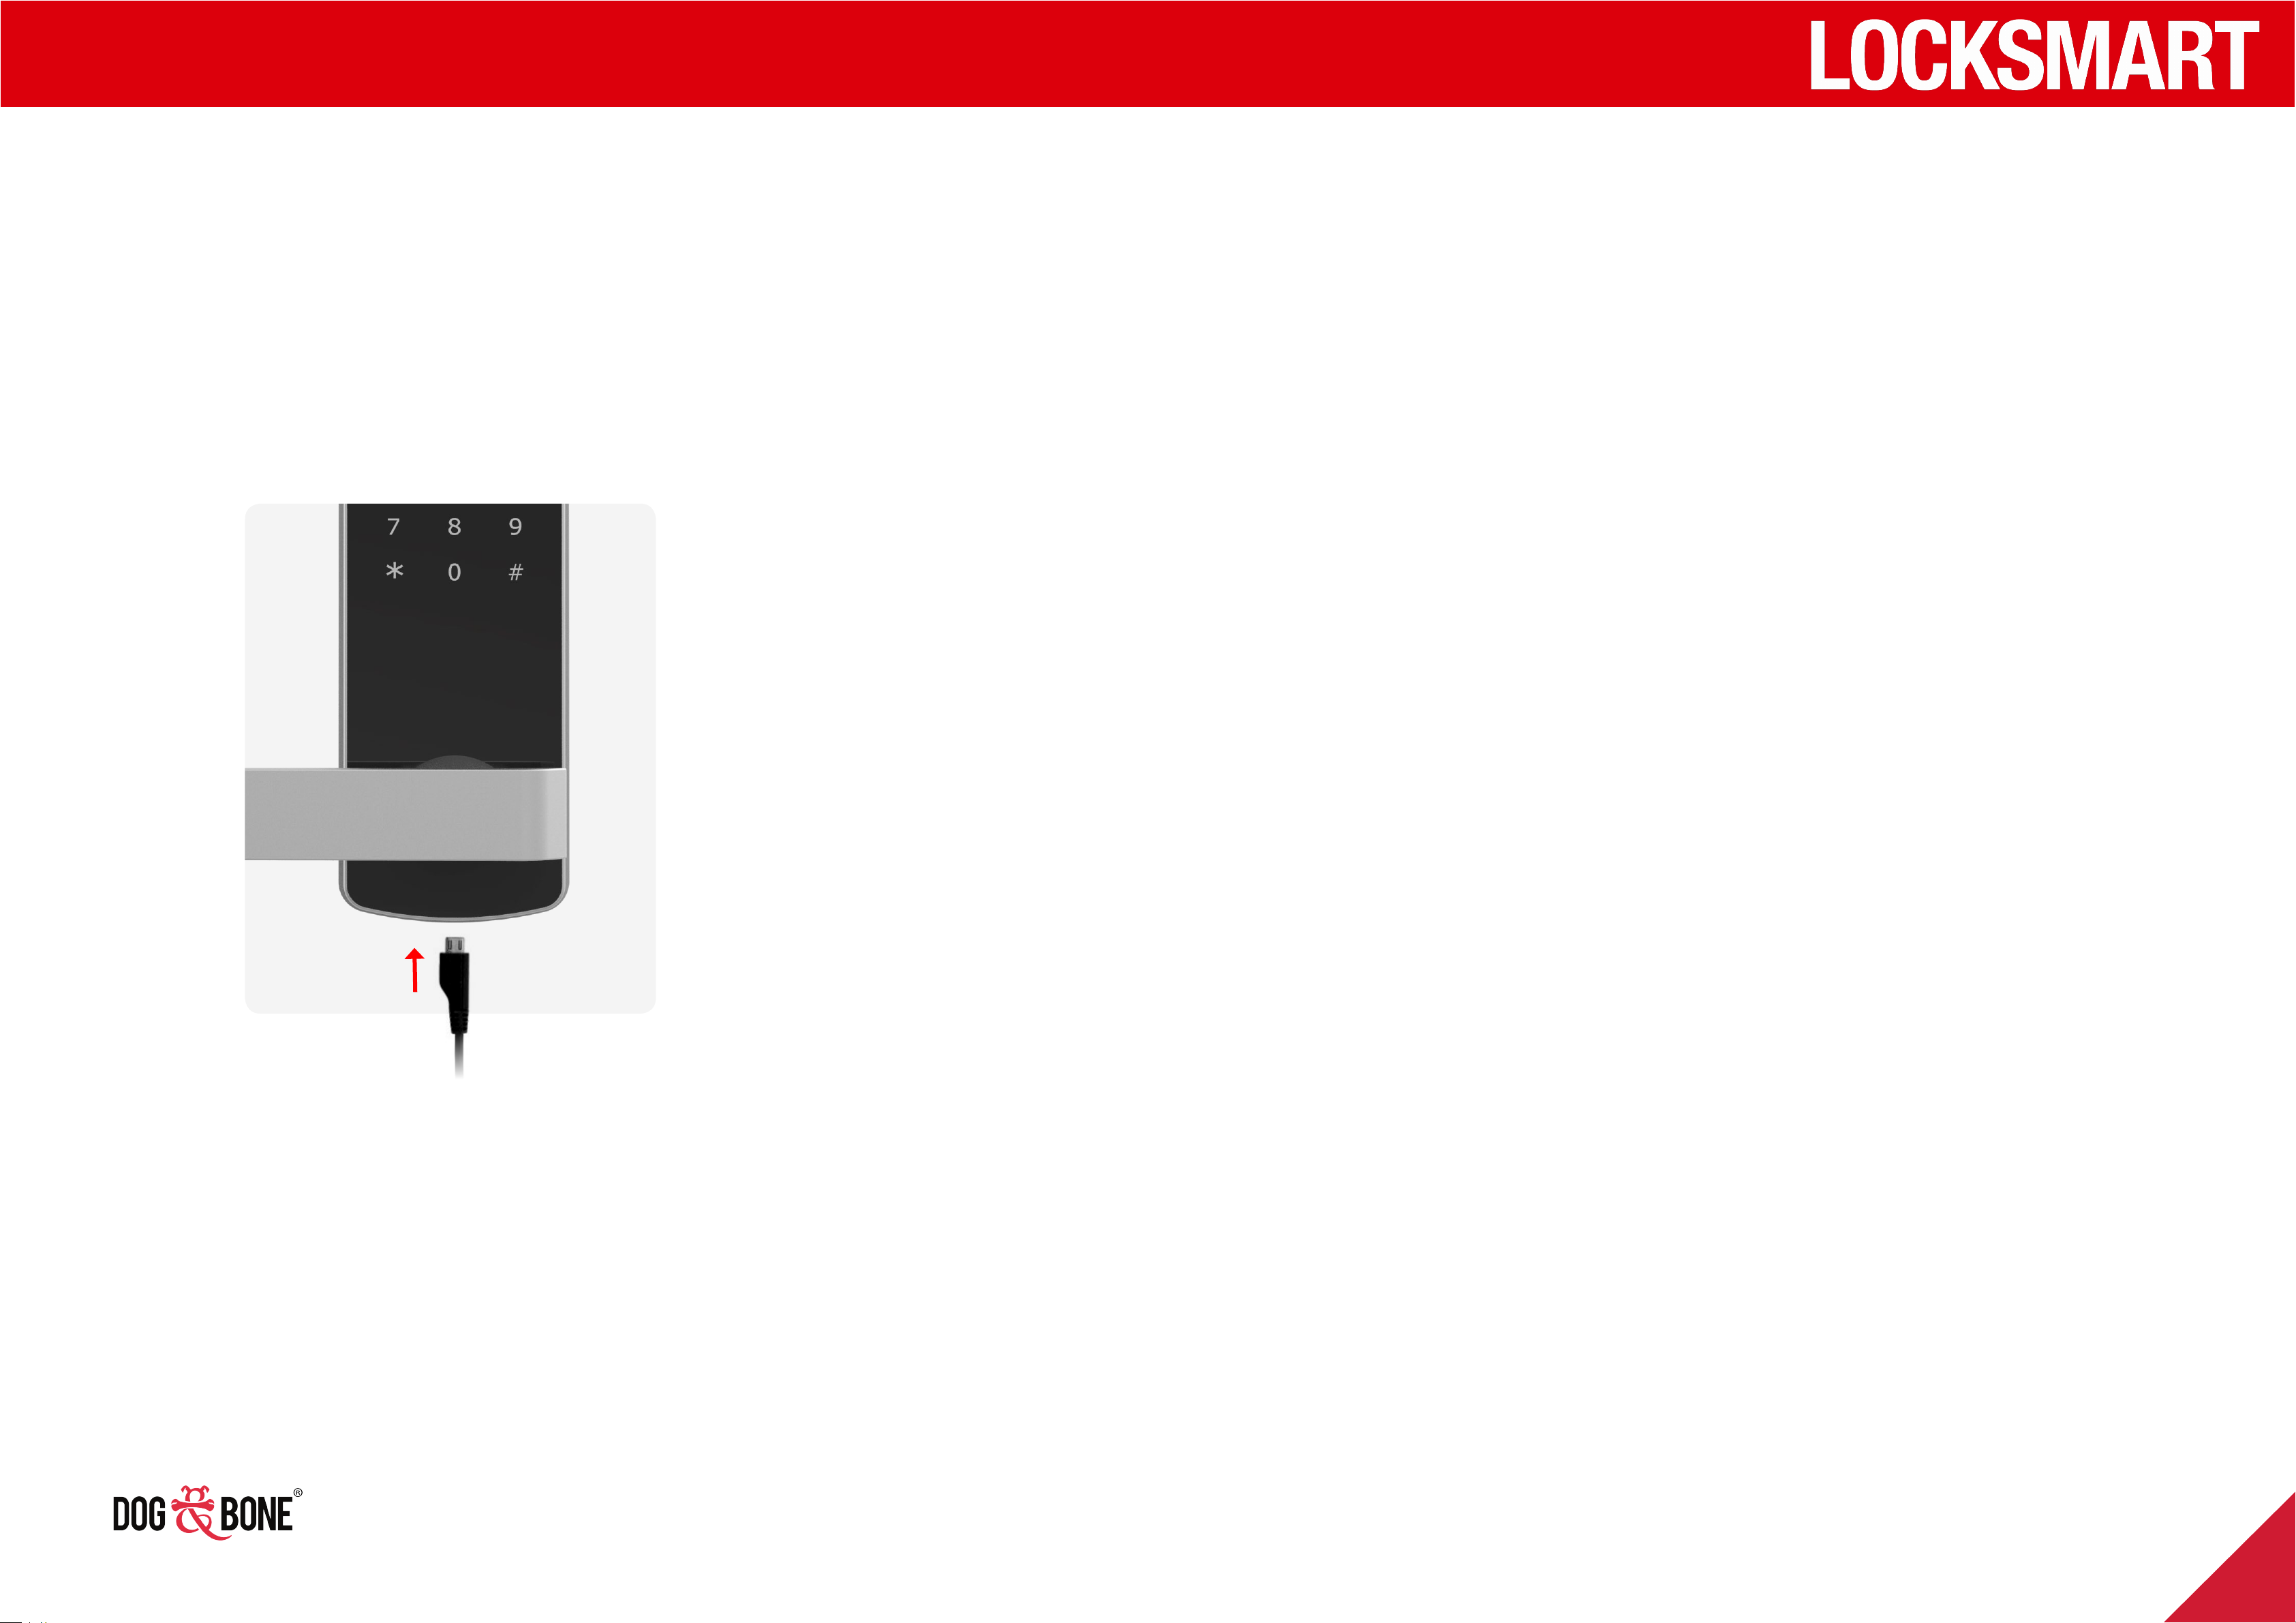
When the battery level is low, the indicator light will flash 8 times. The door will
unlock up to 200 times after this warning allowing ample time to change. Please
change batteries once prompted before they run completely flat. In the event
batteries run completely flat:
For the LockSmart Abode
1. Use the key back-up. See page 19 for key access or
2. USB jumpstart the power. Plug in any standard micro USB cable to the port
which is located on the underside of the front lock and connect to a power
source such as a power bank or laptop. You will immediately have enough
power to unlock. Replace batteries immediately
32
Page 32
Other features
Serial number & firmware
version
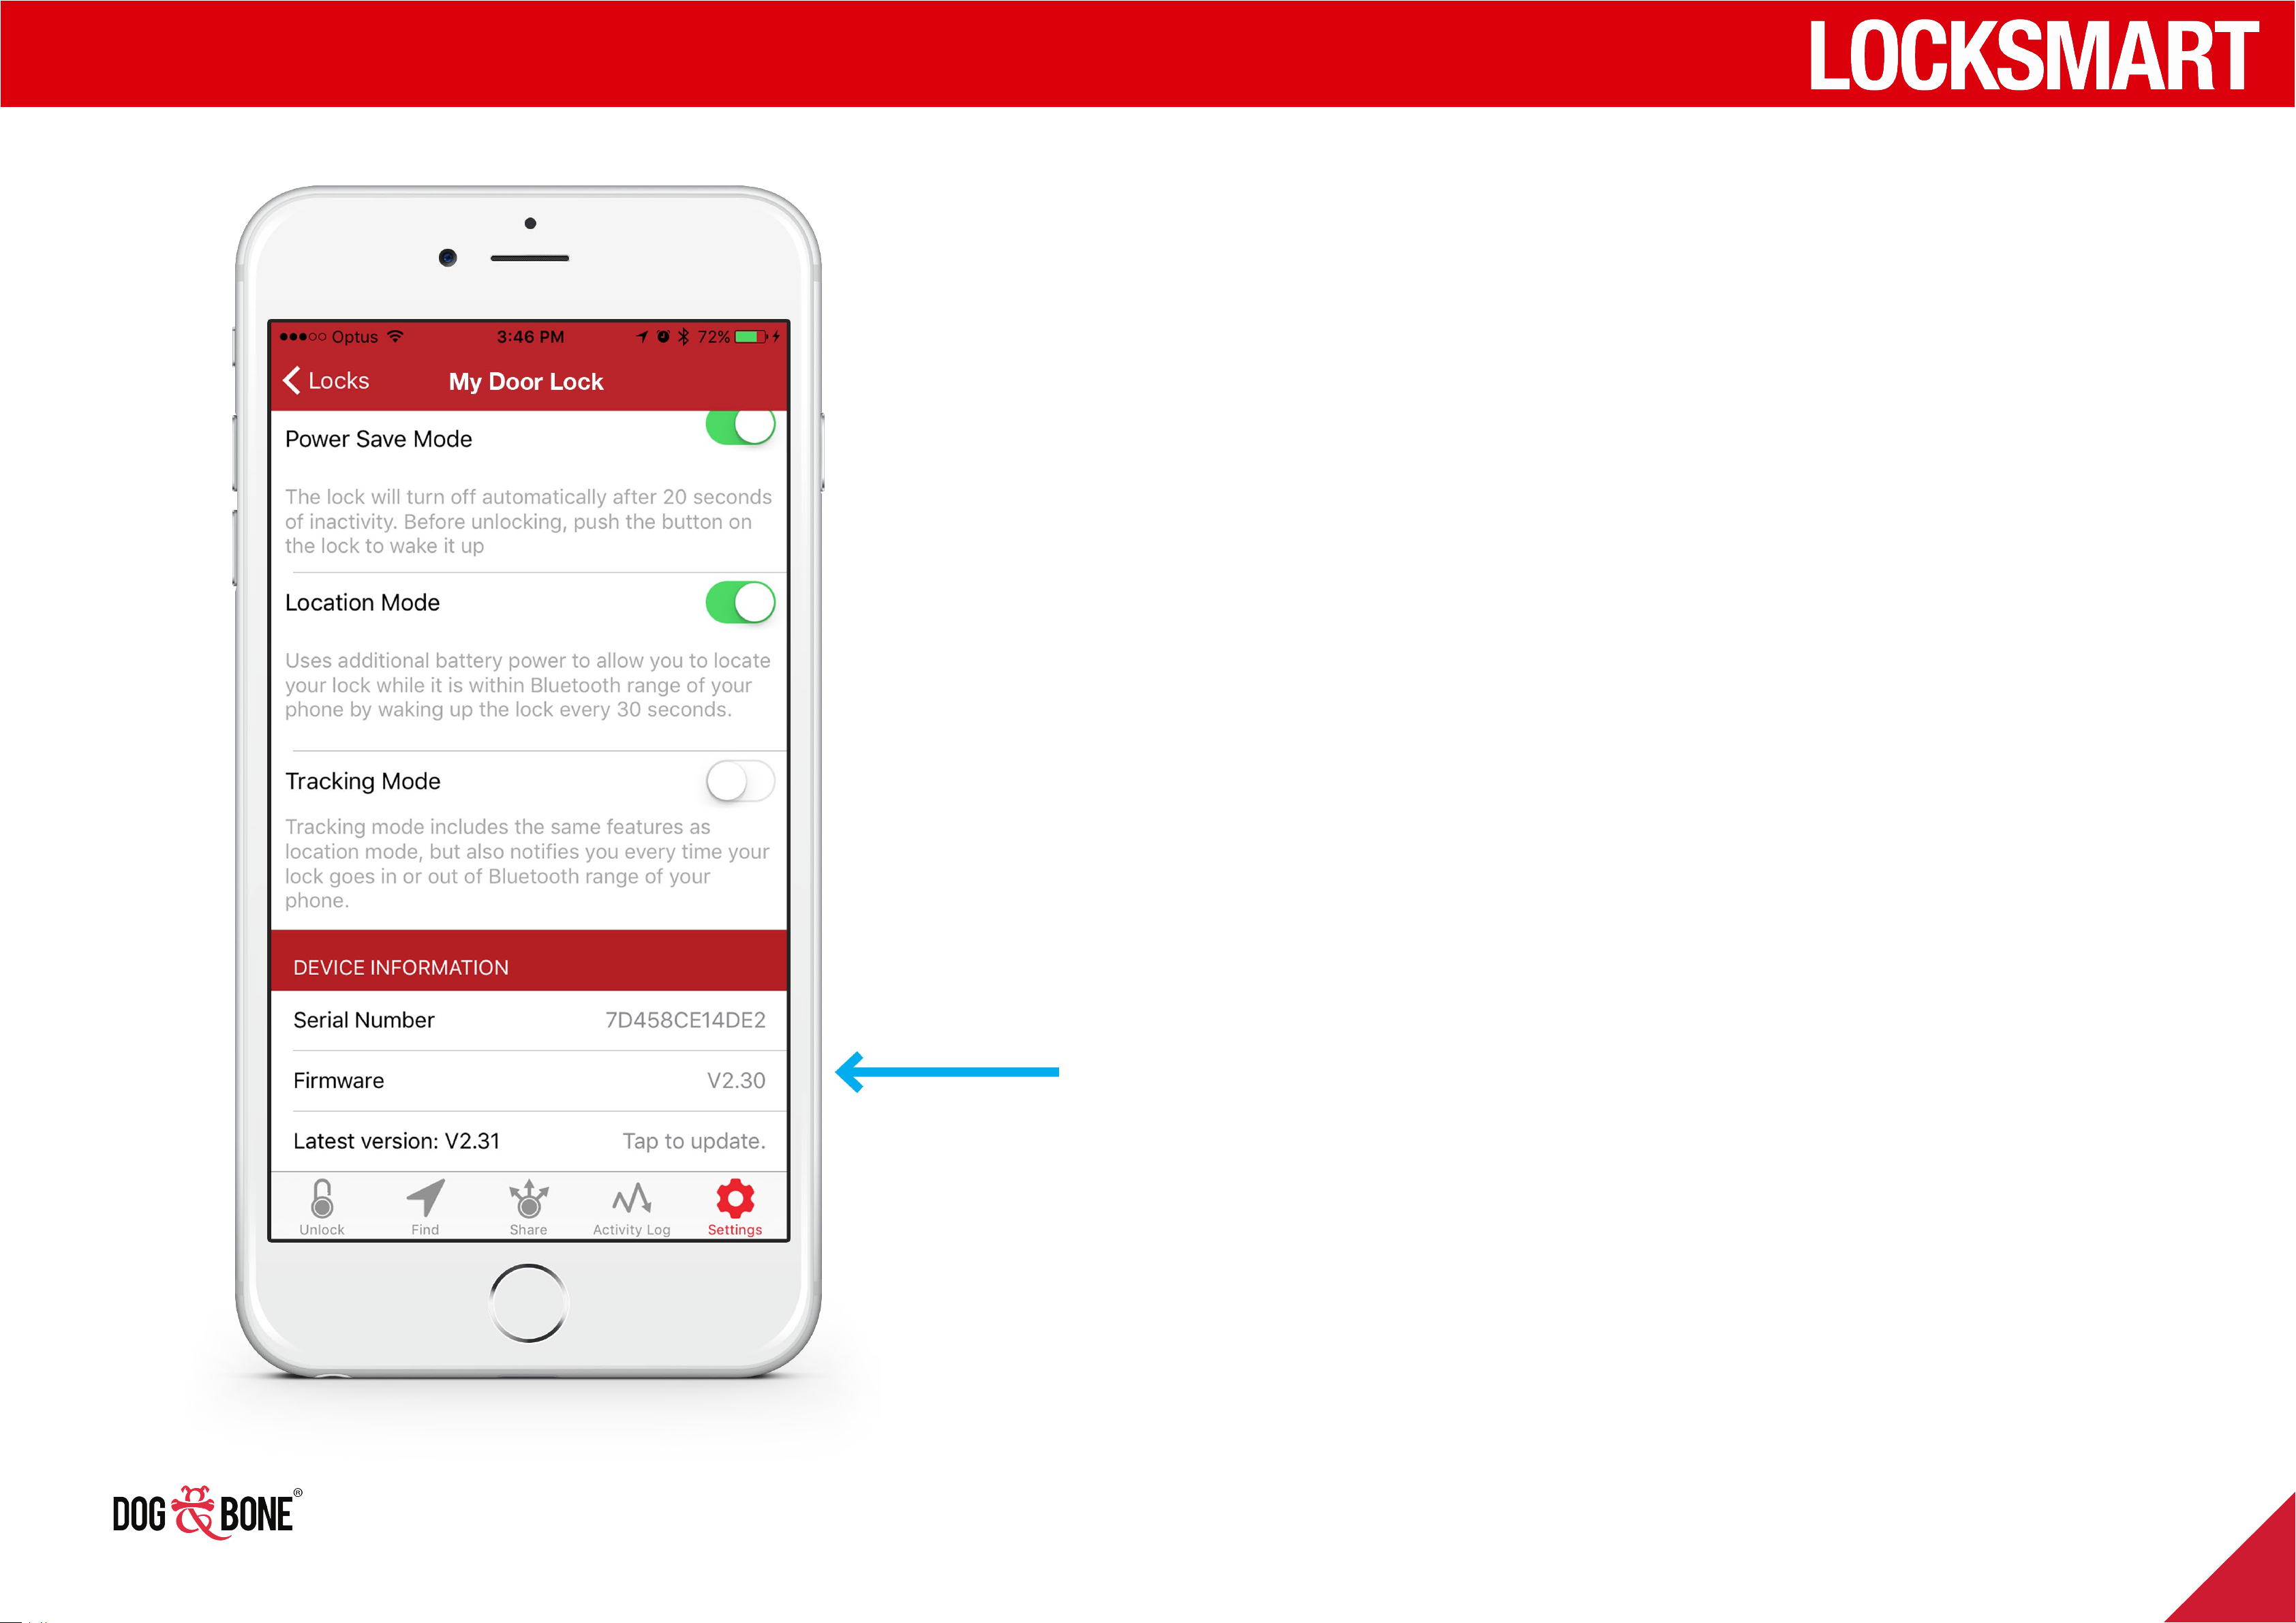
1. Choose any lock from the lock list screen
2. Press the ‘Settings’ option from the bottom menu
3. The lock’s unique serial number and current
firmware version number are located at the
bottom of the settings screen (firmware version is
only displayed when the lock is powered on and
connected to your device)
4. If your firmware version is the most current
available, you will see a message stating ‘Current
firmware version is the latest version’
33
Page 33
Lock ID & Maintenance
Firmware upgrade
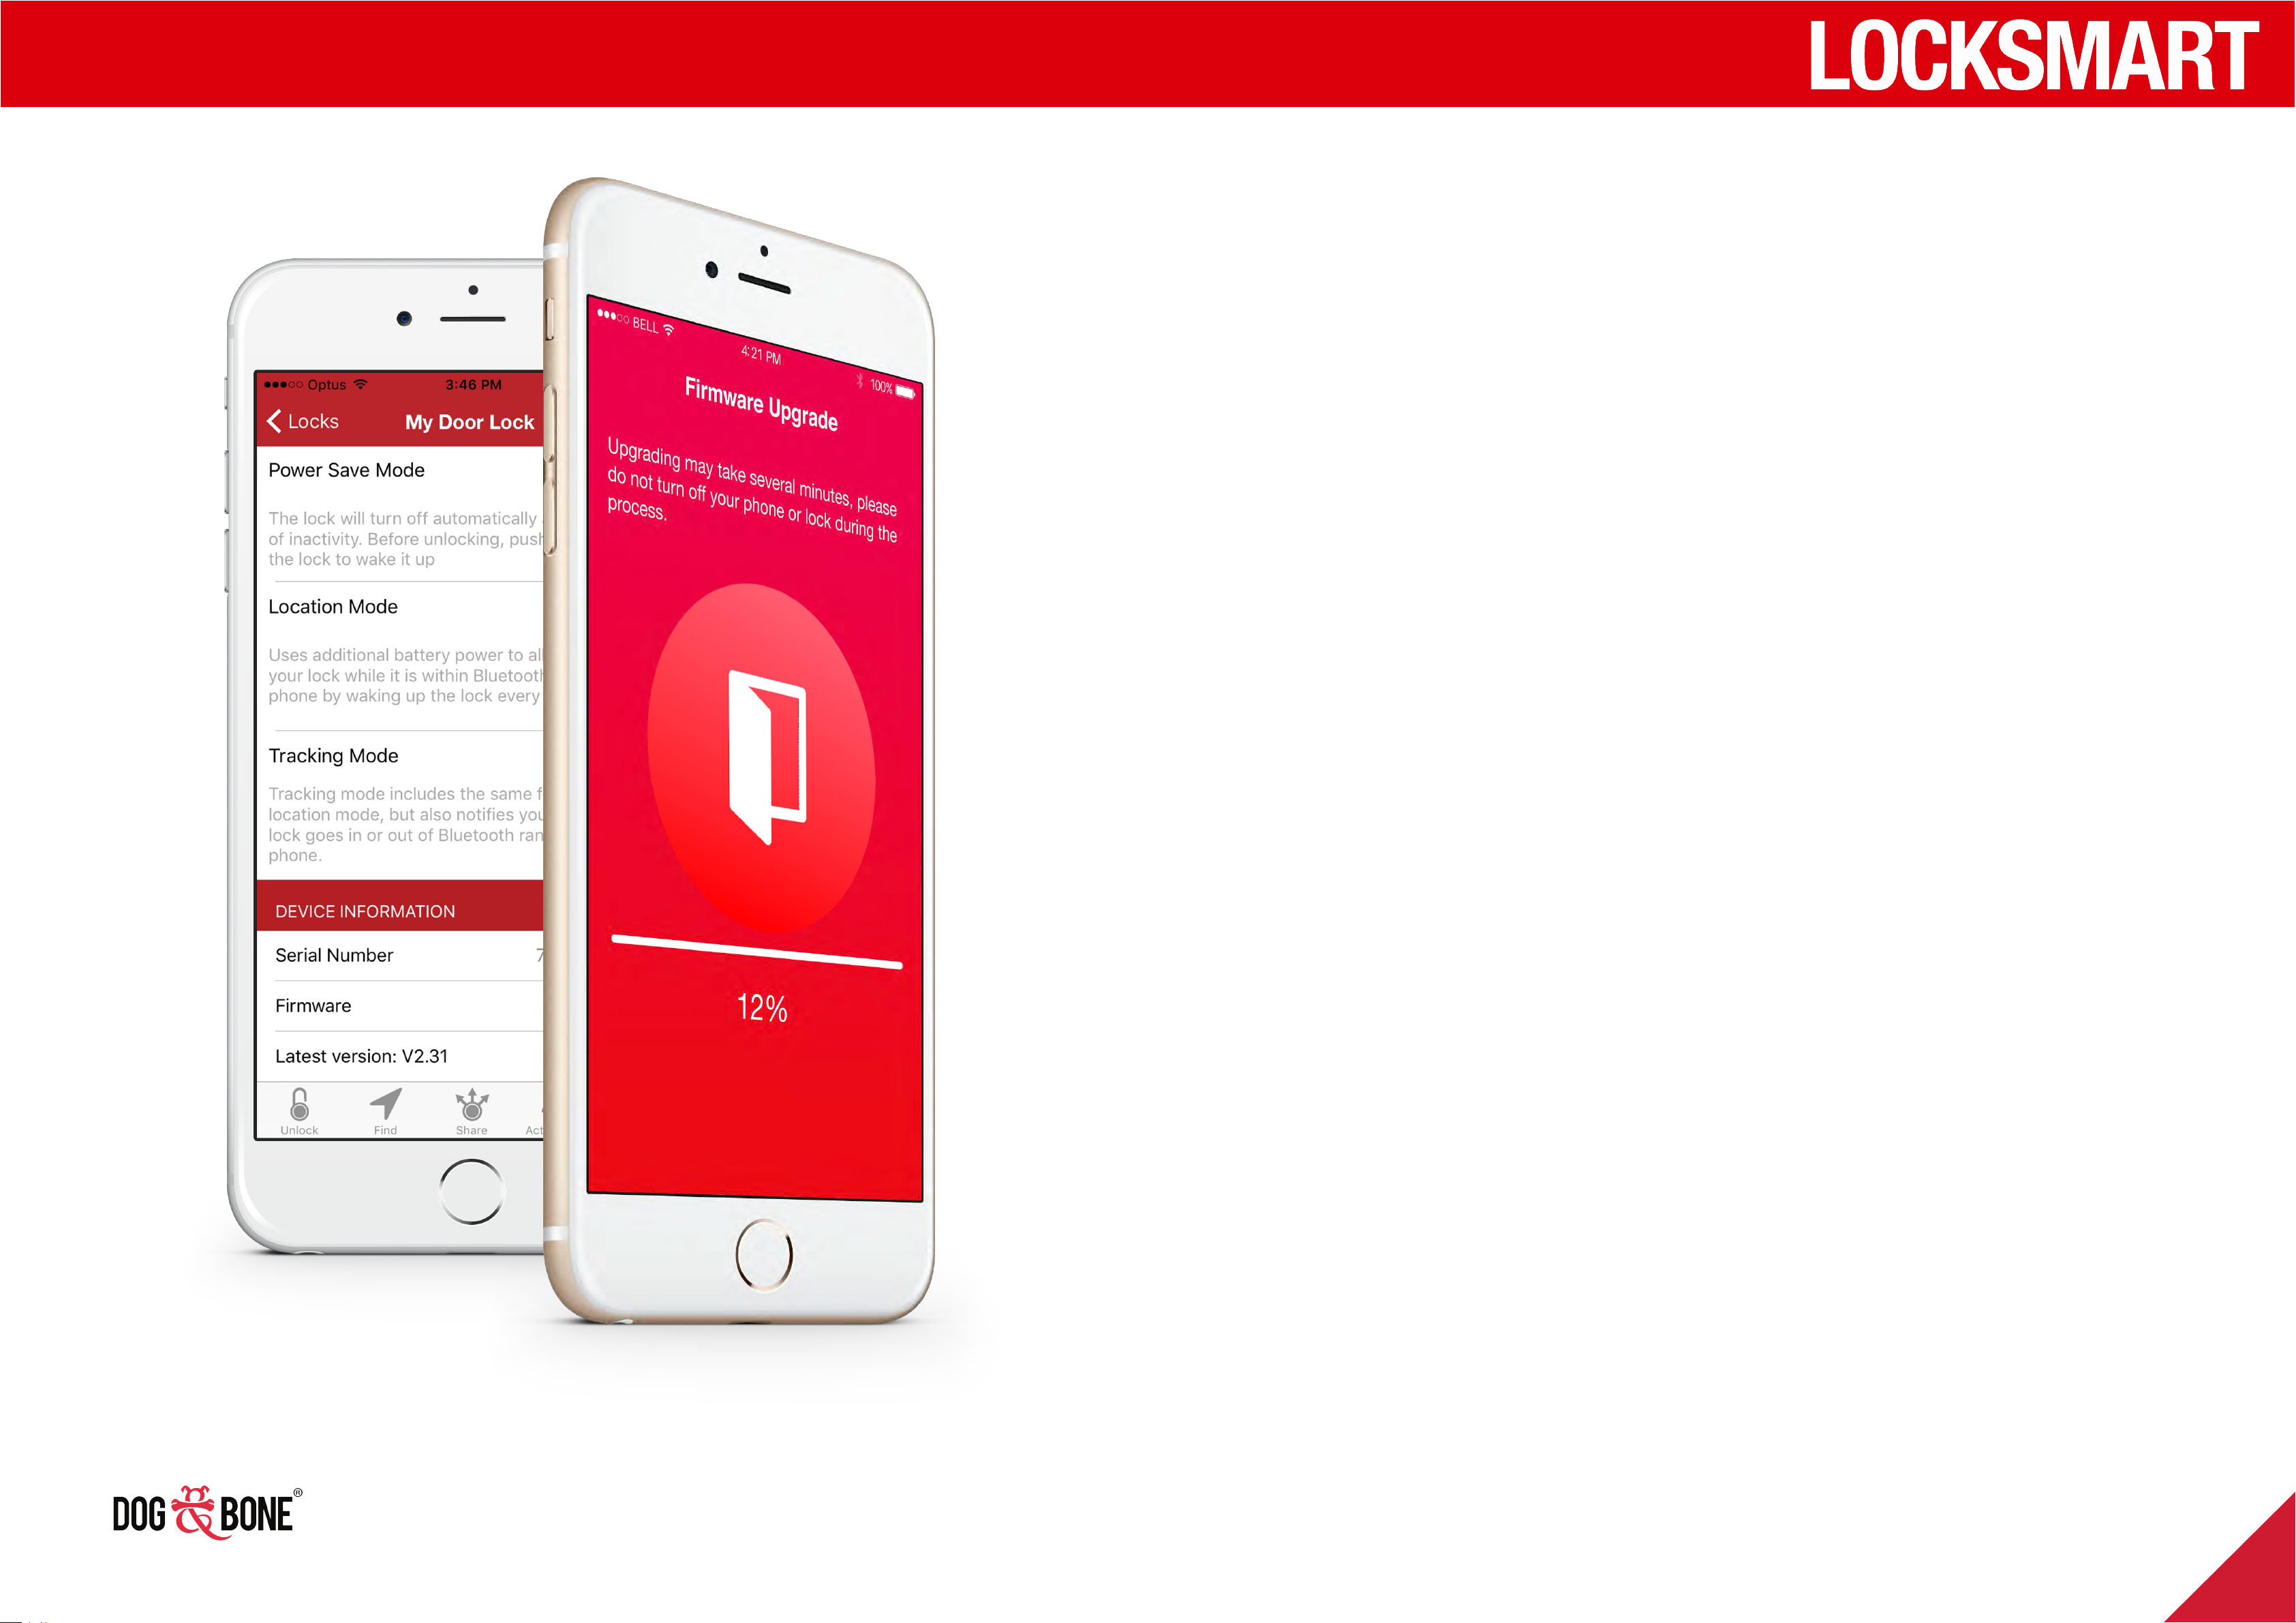
1. Upon connecting to a lock, the application will
detect if there is a new version of the LockSmart
firmware available for the device
2. If a new firmware is available, follow the prompts
to upgrade your lock
3. You can also check for firmware upgrades
manually by opening the ‘Settings’ screen for
your lock and scrolling to the ‘Device Information’
section
4. If a new firmware update is available, a ‘Tap to
Update’ field will be displayed. Pressing this field
will initiate the firmware upgrade process. Do not
power o your device or move away from the
lock during the update
34
Page 34
Lock ID & Maintenance
C1 & C2
D
Replacing your batteries
LockSmart Abode
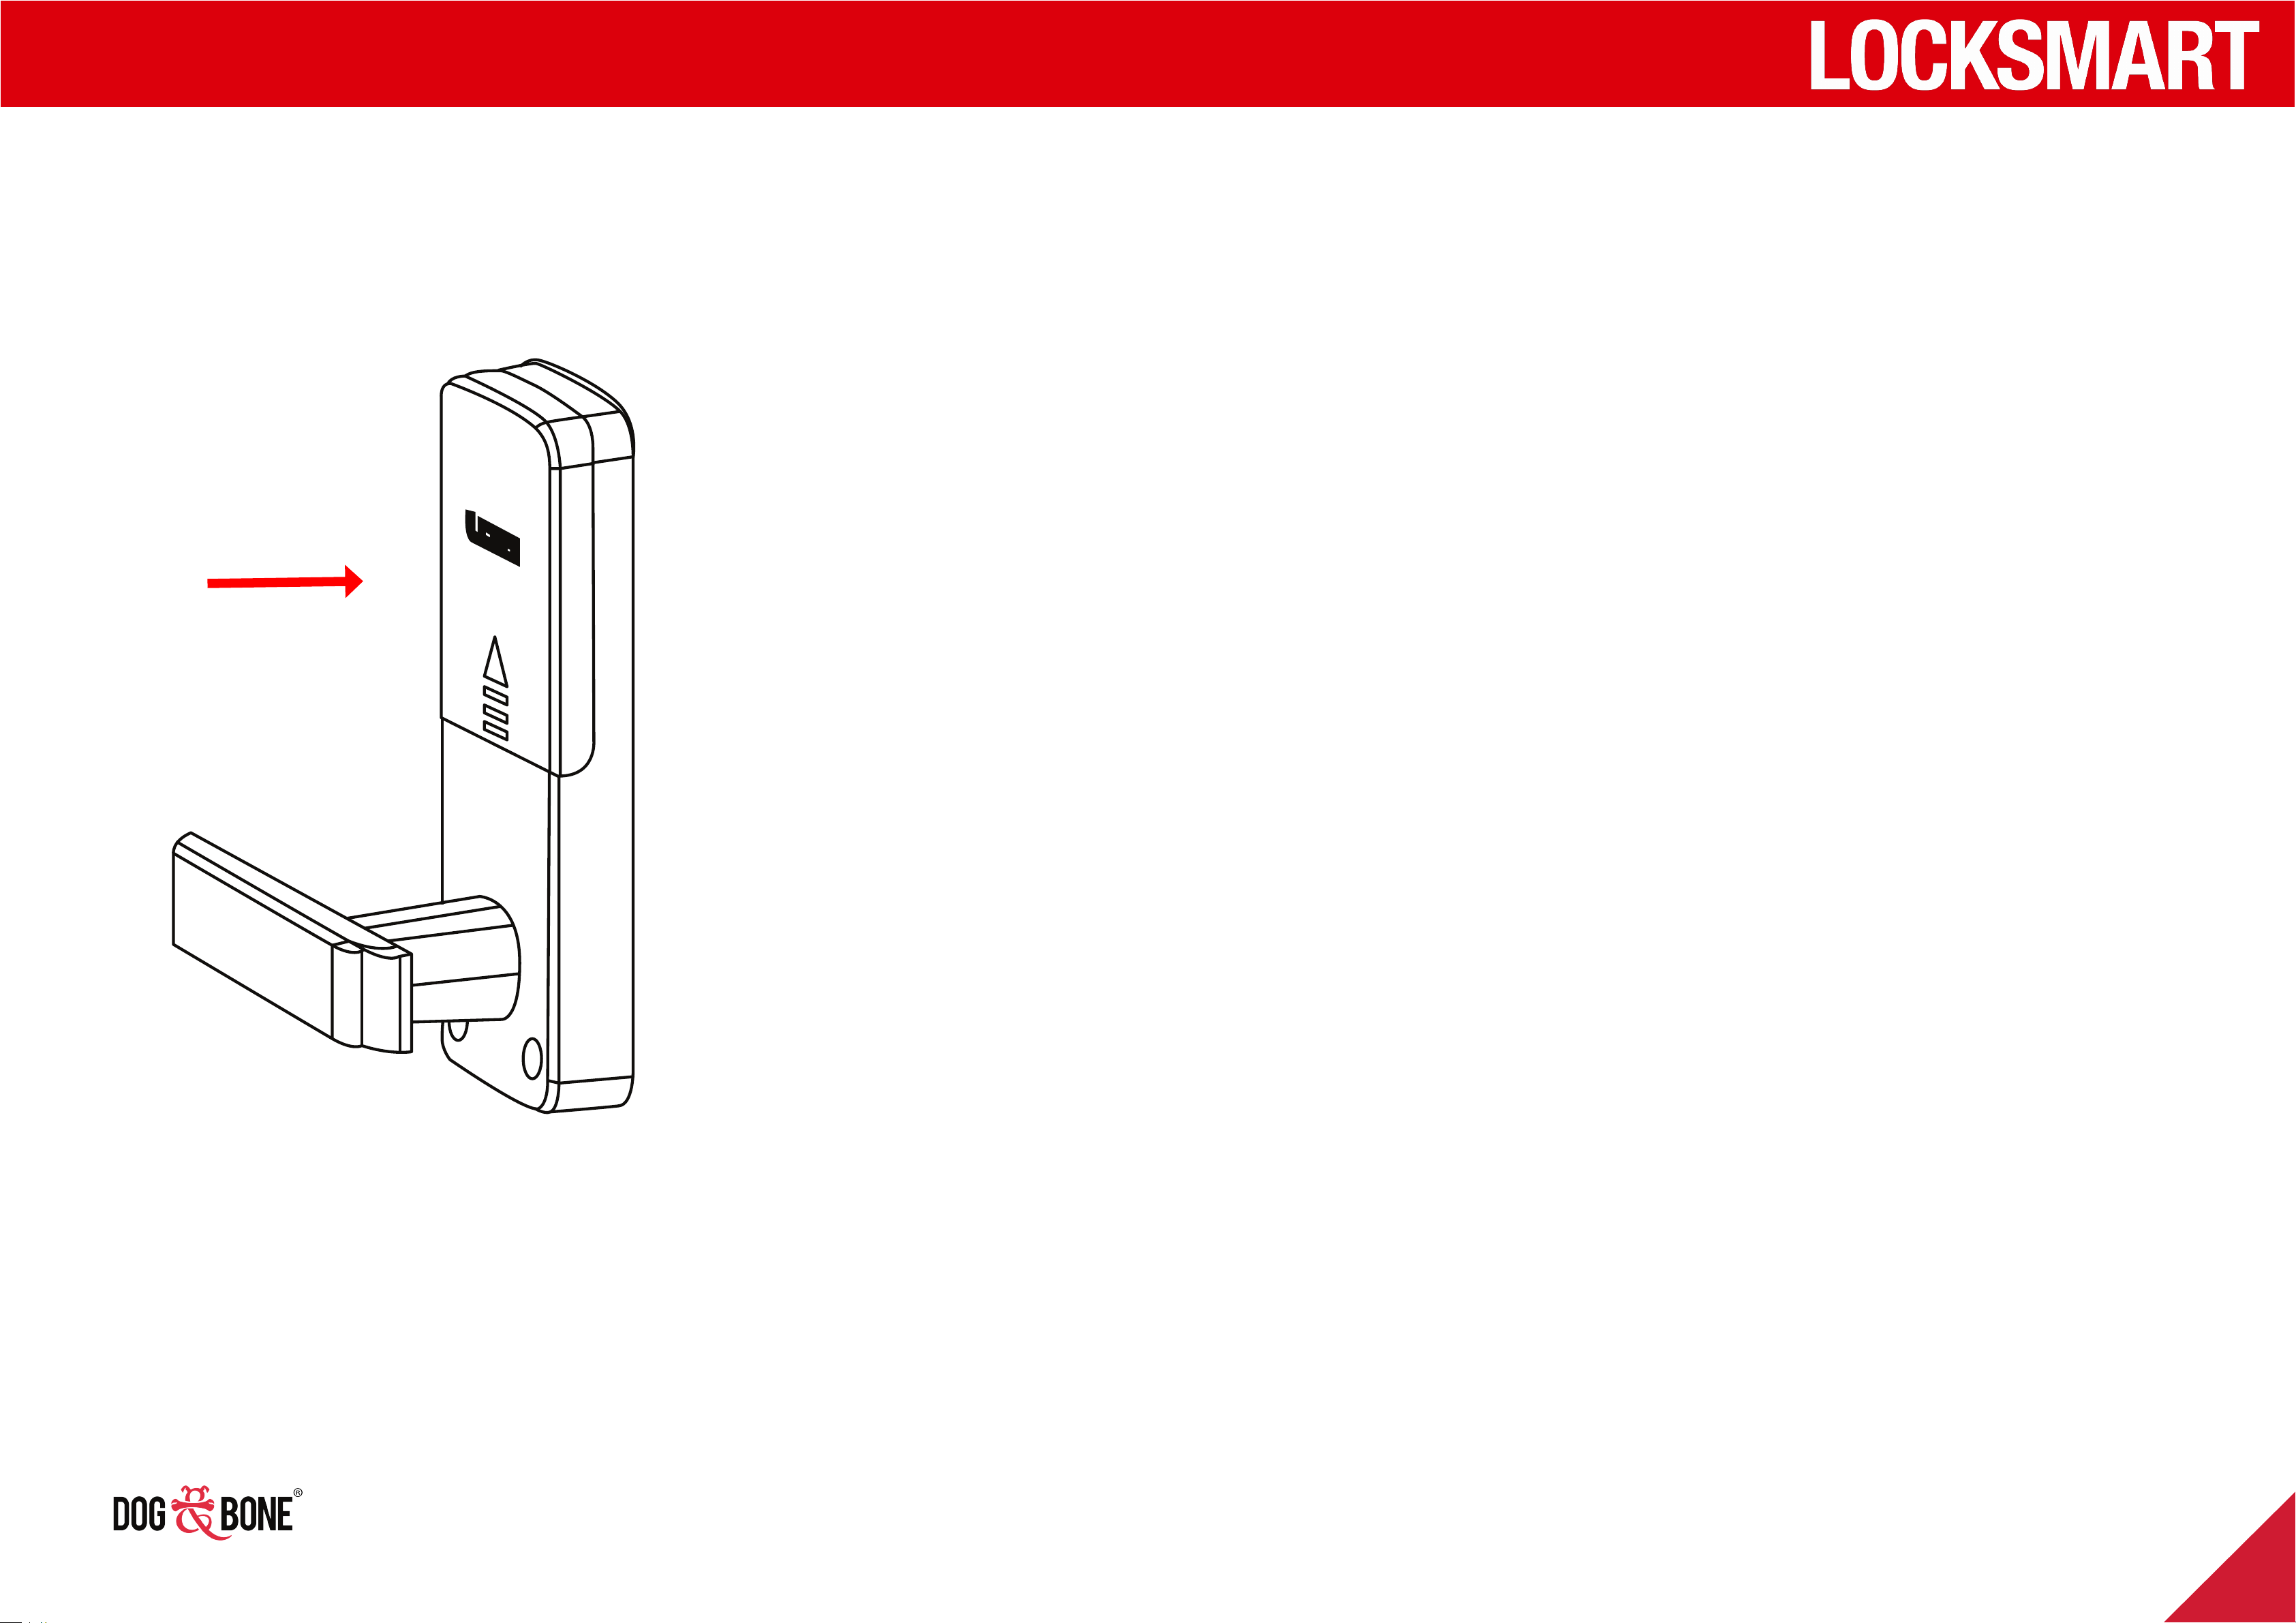
Remove battery cover on the rear side of the lock
by pushing upwards on cover. Replace with 4 x AA
Alkaline batteries and return cover in place
35
Page 35
Lock ID & Maintenance
Lock care
Your LockSmart door locks require very little
maintenance.Replace the batteries upon app prompt
the batteries are running low.
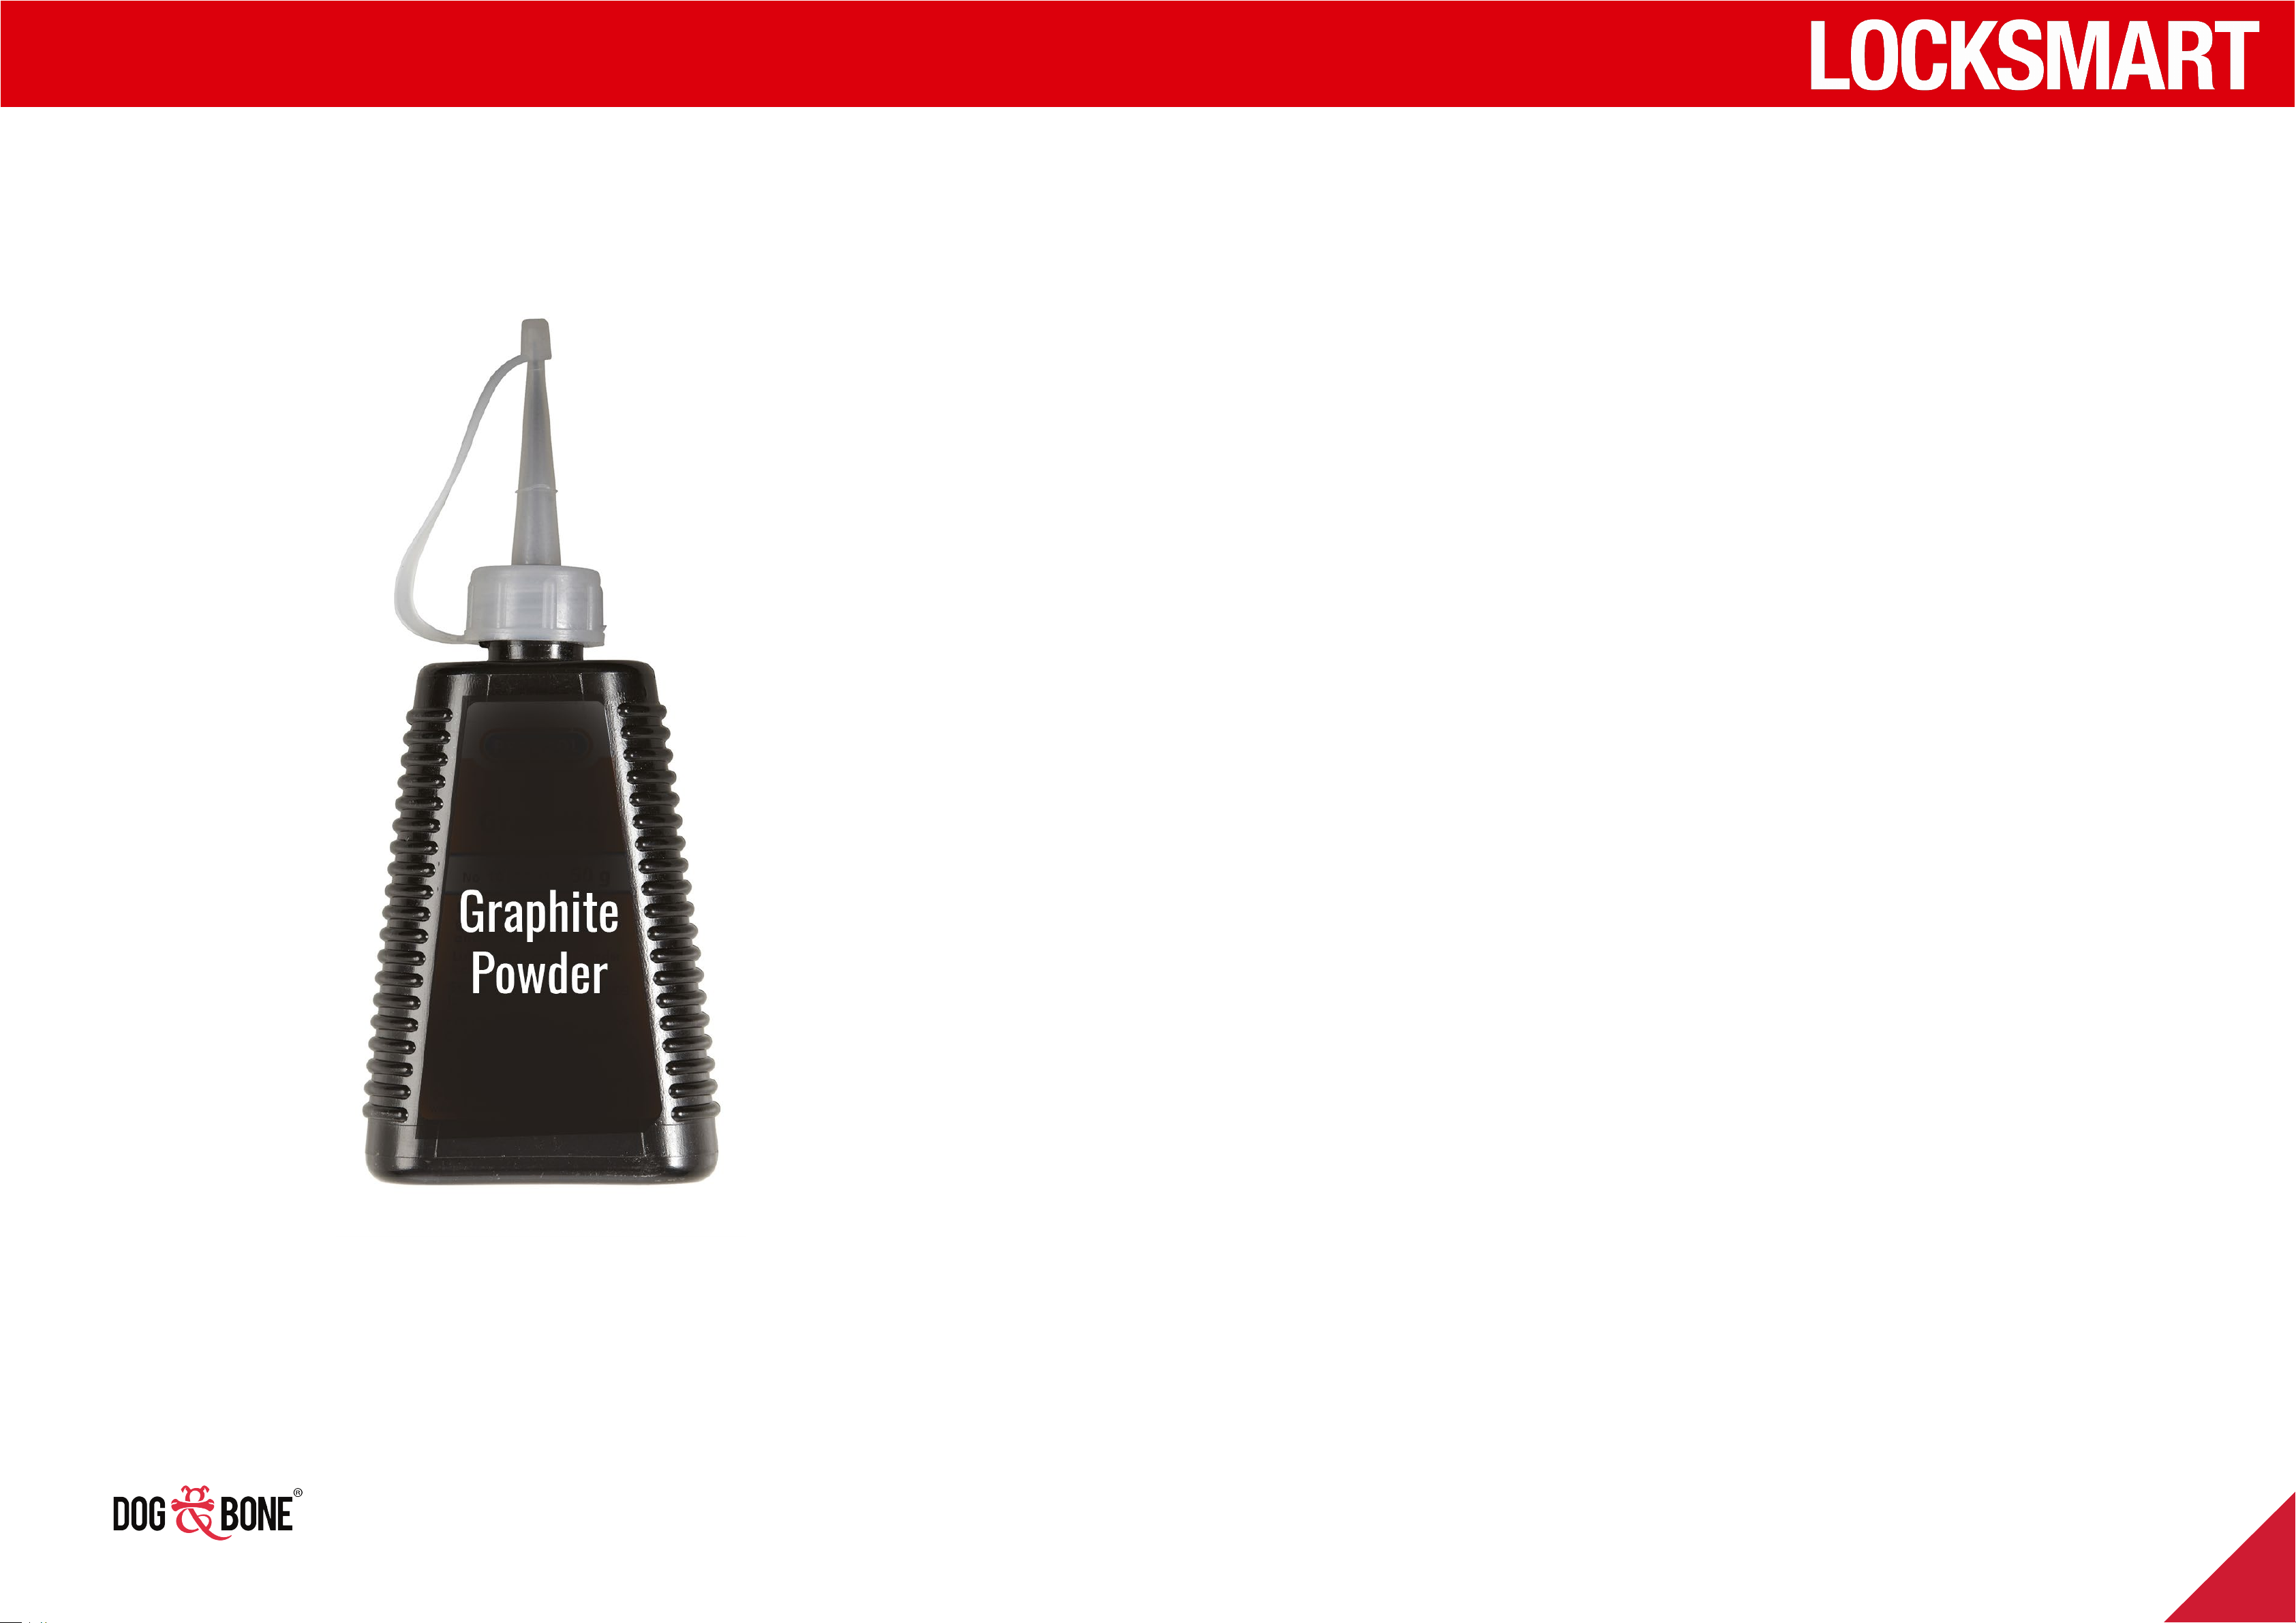
If the latches become sticky, please lubricate using
graphite powder.
36
 Loading...