

Page 1
d–control
professional 1000
Electronic training collar
d–control
professional 1002
Electronic training collar set
for two dogs
User guide
ENG
Page 2
Declaration of Conformity
We:
VNT electronics s.r.o.
Smetanovo namesti 104
570 01, Litomysl
declare under own responsibility that the product:
Dogtrace d-control professional 1000
is in compliance with the essential requirements and other relevant provisions of
Directive 1999/5/EC from 9. 3. 1999
meets requirements of General Licence of The Czech Telecommunication Oce
according to general licence no. VO-R/10/05.2014-3, and corresponds to the
IČO: 64793826
Electronic training collar
following standards:
ETSI EN 301 489-1 V1.9.2
ETSI EN 301 489-3 V1.6.1
ETSI EN 300 220-2 V.2.4.1
ETSI EN 60950-1:2006
The product is safe on condition of commonly used in conformity with instruction
This declaration of Conformity is created in exclusive responsibility of producer.
manual.
In Litomysl 5.8.2015
Ing. Jan Horak
executive director
Tel.: +420 731 441 541
www.dogtrace.com
Thank you for purchasing the product Dogtrace d-control professional 1000 from
Before using your product, please read the instructions in this user guide carefully and
Hereby, VNT electronics s.r.o., declares that this d-control professional is in compliance
with the essential requirements and other relevant provisions of Directive 1999/5/EC.
VNT electronics s.r.o., Czech Republic.
keep it for future reference.
2
Page 3

Important notice
■ The electronic training collars d-control are intended only to train animals. They
are not intended to harm, injure or to cause fear.
■ Do not use the electronic training collars for dogs with health problems (e.g.
heart disease, epilepsy, etc.) or for dogs with behavioral disorders (aggressive
dogs etc).
■ The collar should never be worn for more than 12 hours a day. Long-term eect
of contact points on the dog’s skin can cause skin irritation. If a rash or sore skin is
found, do not use the collar until it has healed.
■ Never connect a leash to the electronic collar; this could cause excessive pressure
on the contact points or mechanical damage of the receiver.
■ In case of any problems or for further advice do not hesitate to contact a professional
trainer.
■ Do not place the transmitter close to objects which are sensitive to magnetic
eld, this could cause a permanent damage.
■ Receiver and transmitter batteries need to be replaced every two years, even if
the kit has not been used. Never leave at batteries inside of the device - it could
damage your device.
■ The person with a personal instrument to support heart activity (pacemaker,
debrillator) must respect the relevant precautionary measures. The d-control
professional emits a certain stationary magnetic eld.
ECMA
VNT electronics s.r.o., professional producer of the dog training equipment, which
is manufactured and sold under the brand name Dogtrace, is a proud and active
member of the Electronic Collar Manufacturers Association.
ECMA was founded in Brussels in 2004 as a result of increasing awareness from
dierent manufacturers concerning the necessity of regulating their industry. The
main target of the association is to develop and produce reliable training systems
of high quality, which are safe for the animals and improve the communication
between pets and their owners. All members of the ECMA provide you with both
technical and training guides that contain instructions and advice for safe use of
electronic training equipment and enable all dog owners to use the training systems
in an eective, responsible and humane way. All ECMA member´s products meet the
latest technical requirements which ensure minimum production standards and
safety features and enable training while protecting animal welfare.
The ECMA is convinced that the electronic training collars are eective and humane
training tools when used responsibly and combined with an appropriate reward.
For more information please visit www.ecma.eu.com
3
Page 4

Contents
Important notice . . . . . . . . . . . . . . . . . . . . . . . . . . . . . . . . . . . . . . . . . . . . . . . . . . . . . . . . . . . . . . . 3
ECMA . . . . . . . . . . . . . . . . . . . . . . . . . . . . . . . . . . . . . . . . . . . . . . . . . . . . . . . . . . . . . . . . . . . . . . . . . . 3
Contents . . . . . . . . . . . . . . . . . . . . . . . . . . . . . . . . . . . . . . . . . . . . . . . . . . . . . . . . . . . . . . . . . . . . . . . 4
Introduction . . . . . . . . . . . . . . . . . . . . . . . . . . . . . . . . . . . . . . . . . . . . . . . . . . . . . . . . . . . . . . . . . . . . 5
Package contents . . . . . . . . . . . . . . . . . . . . . . . . . . . . . . . . . . . . . . . . . . . . . . . . . . . . . . . . . . . . . . . 5
Optional accessories . . . . . . . . . . . . . . . . . . . . . . . . . . . . . . . . . . . . . . . . . . . . . . . . . . . . . . . . . . . . 5
Product description . . . . . . . . . . . . . . . . . . . . . . . . . . . . . . . . . . . . . . . . . . . . . . . . . . . . . . . . . . . . . 6
Transmitter preparation . . . . . . . . . . . . . . . . . . . . . . . . . . . . . . . . . . . . . . . . . . . . . . . . . . . . . . . . . 8
Battery insertion and replacement . . . . . . . . . . . . . . . . . . . . . . . . . . . . . . . . . . . . 8
Checking the transmitter battery status . . . . . . . . . . . . . . . . . . . . . . . . . . . . . . . 8
Transmitter settings . . . . . . . . . . . . . . . . . . . . . . . . . . . . . . . . . . . . . . . . . . . . . . . . . . 8
Receiver preparation . . . . . . . . . . . . . . . . . . . . . . . . . . . . . . . . . . . . . . . . . . . . . . . . . . . . . . . . . . . 9
Battery insertion and replacement . . . . . . . . . . . . . . . . . . . . . . . . . . . . . . . . . . . 9
Checking the receiver battery status . . . . . . . . . . . . . . . . . . . . . . . . . . . . . . . . . . 9
Switching the receiver ON / OFF . . . . . . . . . . . . . . . . . . . . . . . . . . . . . . . . . . . . . 10
Programming (pairing) the transmitter with the receiver . . . . . . . . . . . . . 10
Choice of the contact points . . . . . . . . . . . . . . . . . . . . . . . . . . . . . . . . . . . . . . . . . . . 12
Fitting the collar . . . . . . . . . . . . . . . . . . . . . . . . . . . . . . . . . . . . . . . . . . . . . . . . . . . . 12
The basics of using a training collar . . . . . . . . . . . . . . . . . . . . . . . . . . . . . . . . . . . . . . . . . . . . 13
Button functions . . . . . . . . . . . . . . . . . . . . . . . . . . . . . . . . . . . . . . . . . . . . . . . . . . . 13
For the best results . . . . . . . . . . . . . . . . . . . . . . . . . . . . . . . . . . . . . . . . . . . . . . . . . . . . . . . . . . . . . 15
Troubleshooting . . . . . . . . . . . . . . . . . . . . . . . . . . . . . . . . . . . . . . . . . . . . . . . . . . . . . . . . . . . . . . . 16
Maintenance . . . . . . . . . . . . . . . . . . . . . . . . . . . . . . . . . . . . . . . . . . . . . . . . . . . . . . . . . . . . . . . . . . 17
Technical data . . . . . . . . . . . . . . . . . . . . . . . . . . . . . . . . . . . . . . . . . . . . . . . . . . . . . . . . . . . . . . . . 17
Warranty terms and conditions . . . . . . . . . . . . . . . . . . . . . . . . . . . . . . . . . . . . . . . . . . . . . . . . . 18
Certificate of warranty . . . . . . . . . . . . . . . . . . . . . . . . . . . . . . . . . . . . . . . . . . . . . . . . . . . . . . . . . 20
4
3
Page 5

Introduction
The electronic training collar Dogtrace d–control, consisting of the transmitter and the
receiver, is a modern, safe, reliable and effective training tool. d-control training collar
enables you to make corrections that are suited to your dog‘s temperament and the
distraction level of the moment, at the right time and with maximum training efficiency. However, making corrections to your dog’s unwanted behaviour is only a small part
of what you can do with the d-control.
Features of d-control professional 1000
EThe electronic training collar d-control professional is variable and impact resistant
device. Waterproof receiver and transmitter is designed mainly for a professional
sport and police training. d-control professional can be also used in everyday life
during common training. This model with a range of 1000 m will allow an individual
setting of four function buttons. Each funciton button can be set to any function as
follows: an audible beep tone, a stimulation impulse in 40 levels (momentary and
continuous), a vibration or a light. It is possible to use the d-control professional to
train one or two dogs at once.
■ range up to 1000 m
■ impact resistant transmitter construction
■ waterproof transmitter and receiver
■ 8 modes of light and 4 modes of vibration
■ 2 modes of audible beep tone – momentary /continuous
■ momentary and continuous stimulation
■ 40 stimulation levels
■ expands to train two dogs
■ optionally adjustable function buttons
■ possibility to programm one receiver with two transmitters
Package contents
■ transmitter
■ belt clip (including 2 screws)
■ receiver (with the strap), (two receivers for d-control professional 1002)
■ 2 pairs of contact points ( 12 mm and 17 mm), (2 sets of contact points for d-control
professional 1002)
■ 2 alkaline AAA 1,5 V batteries
■ lithium battery CR2 3 V (2 pieces for d-control professional 1002)
■ test discharge lamp (2 pieces for d-control professional 1002)
■ lanyard
■ user guide and certificate of warranty
■ carrying case
Optional accessories
■ spare rubber seal for the transmitter and the receiver
■ spare screws
■ spare contact points (12 mm, 17 mm, 21 mm)
■ dummy receiver (with the strap)
■ woven and plastic collars – various colours
■ spare batteries
4
5
Page 6
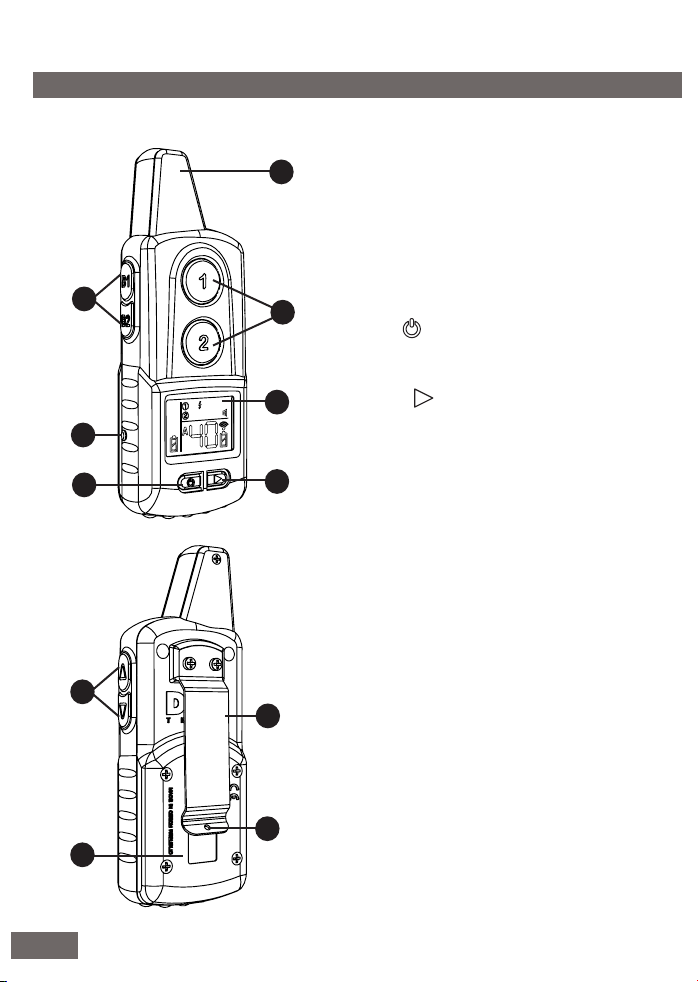
Product description
Transmitter:
3
5
1
1 - integrated antenna
2 - function buttons A1 /A2 - dog A
3 - function buttons B1 / B2 – dog B
4 - LCD - display
5 - target (round red indicator) indicating
where the magnetic switch is located
2
6 - button for power ON/OFF (long press),
or to choose function buttons A1 / A2 /
B1 / B2 (short press)
7 - button - to choose a command for
4
function buttons A1 / A2 / B1 / B2
6
7
14 - buttons for adjusting the mode level
of the function buttons
15 - belt clip
16 - strap eyelet
17 - battery cover
14
15
16
17
6
5
Page 7
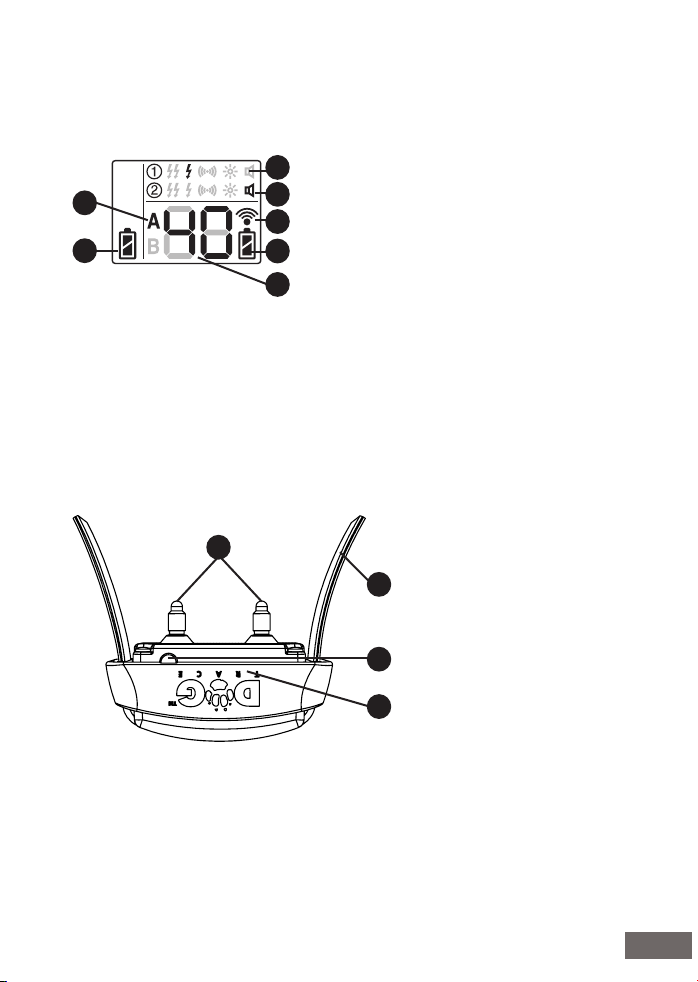
LCD panel:
11
12
Receiver:
8 - command indicator of function buttons
A1 or B1
8
9 - command indicator of function buttons
9
A2 or B2
10
10 - transmission indicator
11 - display indicator setting for the dog
12
A or B
13
12 - battery power indicator
13 - indicator of mode or stimulation level
1
2
3
4
1 - contact points
2 - strap
3 - target (red indicator) indicating where
the ON/OFF magnetic switch is located
4 - LED indicators
6
7
Page 8
Transmitter preparation
Battery insertion and replacement
1. Screw out 4 screws from the battery cover using a cross-head screwdriver and
remove the lid.
2. Insert two alkaline AAA batteries into the battery compartment with a correct
polarity (according to the polarity indicated with the “+” symbol in the battery
compartment). Wrong polarity may damage the unit.
3. Make sure that the rubber seal is clean and correctly seated in its groove.
4. Put the battery cover back and screw in the 4 screws adequately.
Checking the transmitter battery status
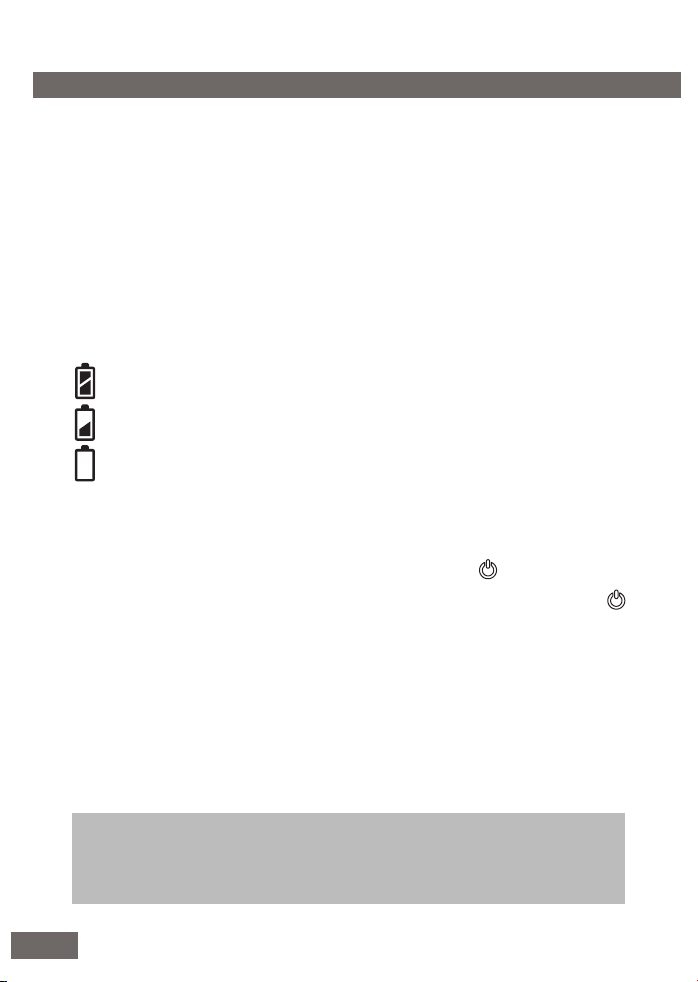
The battery power indicator on LCD shows the battery status:
– fully charged battery
– medium charged battery
– at battery
If the battery is at, insert new AAA alkaline batteries into the battery compartment.
Transmitter settings
1. Switching ON/OFF – press down for 1 second the button
2. Selection of the function button – by repetitive short pressing of the button
can be choosen one of the function buttons: A1 / A2 / B1/ B2. The selected function
button is shown on the LCD - letter A (front buttons A1 / A2), or letter B (side buttons
B1 /B2). Selected button is indicated on LCD with the letter A (front buttons A1 /
A2) or with the letter B (side buttons B1 / B2) and by ashing symbol in the rst or
second line of the LCD (rst line for buttons A1 / B1, second line for buttons A2 / B2).
Buttons A1 / A2 are designed for a dog A and buttons B1 / B2 are designed for a dog B.
Example: When in the rst line of the LCD ashes letter A together with the
command symbol – the device is ready for setting of the A1 function button.
TIP: When using the device for training one dog, you can program function
buttons B1 / B2 with the same receiver (collar) as function buttons A1 /A2 - see
chapter Programming function buttons B1 /B2 (or second transmitter) with
the rst receiver
8
7
Page 9
3. Command setting – by pressing down button you can choose a command
for the selected function button A1 / A2 / B1/ B2. Selected command will be sent to
the receiver collar.
You can select following commands:
■ long discontinuous stimulation impulse
■ momentary stimulation impulse
■ vibration
■ light
■ audible beep tone
4. Mode and stimulation level setting – use buttons for impulse intensity setting
or for mode setting.
Receiver preparation
Battery insertion and replacement
1. Screw out 4 screws from the battery cover using a cross-head screwdriver and
remove the lid.
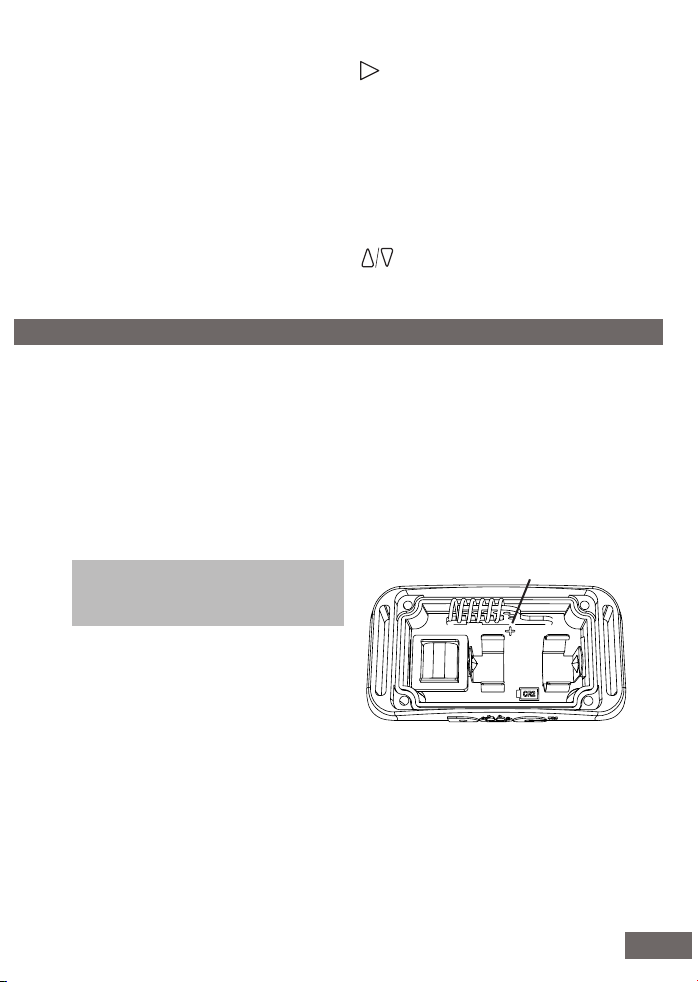
2. Insert the lithium CR2 3V battery into the battery compartment with a correct polarity
(according to the polarity indicated with the “+” symbol in the battery compartment –
see the Fig.). A wrong polarity may damage the unit.
When you insert the battery for the first time, or if the battery is removed longer than
a few tens of minutes (approximately 20 minutes), you will hear an audible beep
tone indicating the correct installation of the battery.
Note: When you replace the battery
quickly, you may not hear the audible
beep tone of the collar.
3. Make sure that the rubber seal is clean
and correctly seated in its groove.
Clean any dirt from the seal.
4. Put the battery cover of the receiver back
and screw in the 4 screws adequately.
Checking the receiver battery status
The status of the battery is indicated by LED indicators on the side of the receiver.
(see chapter : Product description – Receiver)
The batterry is fully charged – when switched on, green LED is ashing.
The battery is low – when switched on, red LED is ashing.
When the battery is low or at, insert a new CR2 3V lithium battery into the receiver.
Battery polarity indicator
8
9
Page 10
Switching the receiver ON / OFF
To turn the receiver ON / OFF ( or for programming the transmitter with the receiver)
is used a magnetic switch, marked with the red target on the receiver.
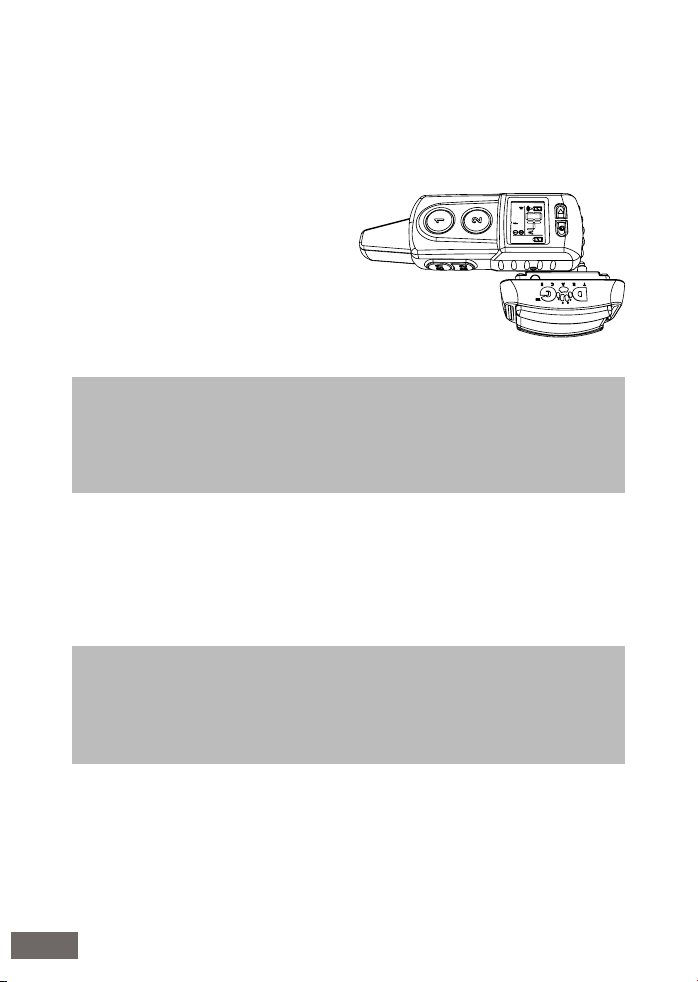
Switching ON
1. Move the red target of the transmitter
towards the receiver so it comes into
the contact with the red target of the
receiver. The red LED indicator of the
r eceiver will lit up, afterwards the green
LED indicator will lit up.
2. When the green LED lighted up, move
your transmitter away from the receiver.
The receiver LED indicator will ash
green to indicate the receiver is ON.
Important: When turning the receiver ON hold the red target of the receiver close
to the red target of the transmitter for about 1 second. When the targets are close
to each other for longer than 5 seconds the receiver will switch to the pairing (programming) mode of the transmitter with the receiver. This programming mode is
indicated by alternate ashing of the red and green LED indicator. If this occurs,
follow the chapter Programming (pairing) the transmitter with the receiver.
Switching OFF
When switching OFF, follow the same steps as when switching ON.
1. Move the red target of the transmitter towards the receiver so it comes into the
contact with the red target of the receiver. The green LED indicator of the receiver
will lit up, afterwards the red LED indicator will lit up.
2. When the red LED is lighted up, move your transmitter away from the receiver. The
receiver LED indicators will stop ashing.
Important: When turning the receiver OFF hold the red target of the receive close
to the red target of the transmitter for about 1 second. When the targets are close
to each other for longer than 5 seconds, the receiver will switch to the pairing (programming) mode of the transmitter with the receiver. This programming mode is
indicated by alternately ashing of the red and green LED indicator. If this occurs,
follow the chapter Programming (pairing) the transmitter with the receiver.
Programming (pairing) the transmitter with the receiver
Each transmitter has its own radio operational code. The programming of the transmitter with the receiver enables those two units to work together. When purchasing
new d-control professional set, there is no need to program the device. The set is programmed from the manufacture. In case you want to use another transmitter or receiver, you need to program the devices together. Programming is also necessary for
using all four function buttons with one receiver.
10
9
Page 11

The transmitter is designed for training two dogs, so you can pair it with two receivers.
Function buttons A1 / A2 are designed for the dog A and function buttons B1 / B2
for the dog B.
Important: Before the programming make sure no one else is using his d-control
professional or other products from the Dogtrace range close by. Your receiver could
accidentally record the code of his transmitter or interference could occure. Thus
could someone else transmit some commands into your receiver. If this occures,
program once again the communication of your receiver with your transmitter.
Programming function buttons A1 / A2 with the rst receiver:
1. Turn ON your transmitter.
2. The receiver must be turned OFF.
3. Move the red target of the transmitter towards the receiver so it comes into the con-
tact with the red target of the receiver and hold for 5 seconds. The red LED indicator
of the receiver will lit up, afterwards the green LED indicator will lit up.
4. After 5 seconds the receiver LED indicators will ash 3 times green and red colour
simultaneously. Afterwards the green and red LED indicators will start alternately
ashing.
5. Press down A1 or A2 button.
6. Successful pairing is indicated by a long beep tone of the receiver.
Programming function buttons B1 / B2 with the second receiver:
Proceed in the same way as in the previous chapter, only in the point 5 press down
the function button B1 or B2.
When you want to use the transmitter for training only one dog, it is possible to program all four function buttons A1 / A2 / B1/ B2 with the one receiver. You can also use
this function for the professional training and for programming communication of one
receiver with two dierent transmitters.
Programming function buttons B1 /B2 (or second transmitter) with the rst receiver:
1. Turn ON your transmitter.
2. The receiver must be turned ON.
3. Move the red target of the transmitter towards the receiver so it comes into the con-
tact with the red target of the receiver and hold for 5 seconds. The green LED indica tor of the receiver will lit up, afterwards the red LED indicator will lit up.
4. After 5 seconds the receiver LED indicators will ash 3 times green and red colour
simultaneously. Afterwards the green and red LED indicators will start alternately
ashing.
5. Press down B1 or B2 button (or any other function button on the second transmitter).
6. Successful pairing is indicated by a long beep tone of the receiver.
10
11
Page 12

Warning: If you program the receiver from the switched OFF status (see the chapter Programming function buttons A1 / A2 with the rst receiver), the device that
was programmed from the switched ON status will be automatically removed
(mostly used to remove the trainer‘s transmitter from your receiver after the
training is nished).
Choice of the contact points
The stimulation is transferred on your dog‘s skin through the steel contact points
of the receiver. Each set contains 2 types of contact points. Sucient length of the
contact pointso has to have a contact with the dog‘s skin, enabling the device to
operate correctly. If you have a short-haired dog use the 12 mm contact points, if you
have a long-haired dog replace them with the longer 17 mm contact points supplied
in the kit. Screw the contact points onto the screws of the receiver - see the picture
Receiver in the chapter Product description, page 7. Tighten them manually
carefully (do not use a key – this could damage the product).
TIP: If your dog has very long hair, you can order 21 mm long contact points. When
your dog has a dry skin in the area where the contact points are, it is good to lubricate the dog‘s skin with a vaseline, hand cream, or baby oil - which enables a correct
transfer of stimulation impulses.
Fitting the collar
The strap (receiver collar) with the receiver collar must be tightened enough so that
the contact points are in contact with the skin of the dog. We recommend you to
t the collar on the standing dog, so the receiver is on the bottom part of the neck.
When you can t two ngers between the collar and your dog‘s neck, the collar with
the receiver are tightened enough. If a dog has long or thick hair, it is suitable to trim
the hair in the area of the contact points or to switch to the longer contact points to
ensure a consistent contact.
Warning: If the collar is too loose, the receiver is likely to move and repeating
friction can irritate the skin of your dog. Furthermore, in this case it is not ensured a
reliable contact of contact points with the skin and a proper function of the training
collar. We do not recommend to leave the collar positioned at the same place for
more than several hours, because it could irritate the skin. If it is necessary to wear
the collar for long periods, change regularly the position on the neck of your dog. A
collar with a receiver that is overly tight, can cause pressure sores on the skin in the
contacet area of the contact points. If this happens, do not use the training collar
until all traces of irritation are gone.
12
11
Page 13
The basics of using a training collar
■ The trainer’s elementary knowledge of the dog training is the prerequisite for using
the training collar.
■ If you don´t have this knowledge, we recommend you to contact a training center,
a cynology club, or a school for dogs where you will learn the basic communication
with your dog.
■ You can start using the collar for the 6 months old dog, which have undergone the
basic training and is familiar with basic obedience commands including „sit“, „down“,
„stay“ or at least „stop it“, „leave it“.
■ Require these commands along with the audible beep tone, so your dog will create
a connection between them.
■ After a command that is successfully executed, you should always reward or
encourage your dog, so the dog will be happy to fulll your commands and a desire
to fulll your commands will grow.
■ You must not consider the executed command as the absolute obviousness and
punish disobedience - your dog would soon lose an interest.
■ If you are not sure that your dog will obey you after recall, start training e.g. on a
tracking rope.
■ Your dog will have to get used to the collar; let the dog wear the collar for a few
days, but do not use it so that your pet does not discover the connection with its
attachment and eects.
■ Armative and ecient training requires some time: don‘t hurry!
■ Select a well-known environment your dog is used to.
■ Choose the right moment to press the button; exactly at the moment when your
dog does something what is not allowed.
■ In case of any problems and for further advice, please do not hesitate to contact a
professional trainer.
Transmitter – button functions
Audible beep tone:
The receiver on dog‘s collar begins to emit an audible beep tone (an acoustic signal).
This command can precede a stimulation impuls. It is also a very eective warning
tool. You can use the acoustic signal instead of the command: Come! / Heel! In this
case it replaces a whistle, the dog always perceives its sound in the same intensity.
It‘s very important always to use the beep sounds in the same way in order not to
confuse your dog. While transmitting the audible beep tone, the green LED indicator of the receiver is emitting a light.
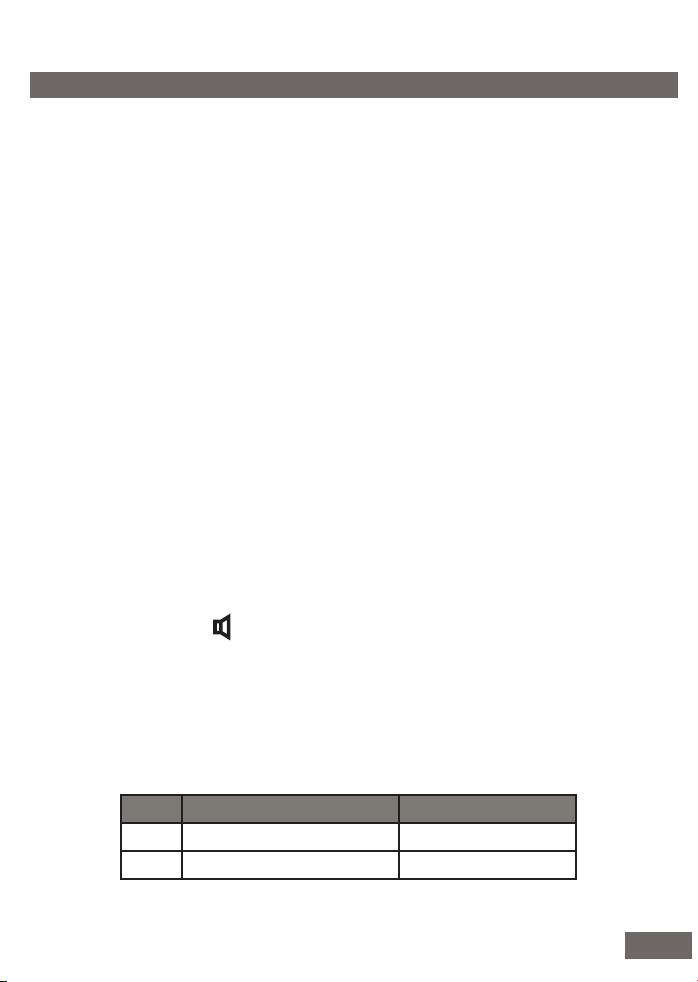
Mode Audible beeep tone Limit
1 long 30 s
2 short (electronic clicker) -
12
13
Page 14
Momentary / continuous stimulation:
This function enables you to activate a safe stimulation warning impulses in the receiver
transmitted by two contact points.
The purpose of stimulation impulses is not to hurt the dog, but this impulse is very unpleasant for your dog. Your dog will soon create a connection between your command,
an audible beep tone and the unpleasant feeling on the neck.
Later on, you will use only a minimum of these stimulation impulses because the dog
will connect them with disobeying your command.
While transmitting the stimulation impulse, the red LED indicator of the receiver is
emitting a light.
Momentary - correction impulse takes only 0,1 second no matter how long the button is held.
Continuous stimulation - a receiver emits a correction impulse as long as the but-
ton is pressed, but for safety reasons, it is limited to 8 seconds.
Choice of stimulation level
It is important to choose the right intensity of the stimulation impulse for your dog,
therefore it is gently adjustable in 40 levels. Because every dog has a dierent sensitivity, you can not estimate the proper stimulation level in advance. Beginn at the
lowest levels. If your dog does not respond at a low level, increase it gradually until
you can see a moderate reaction. The stimulation impulse should never cause your
dog a pain or a fear.
TIP: The command stimulation impulse in level 00 does not emit any stimulation
impulses. If you do not want to use the stimulation impulses, set a short and a long
stimulation impulse on the 00 intensity.
Light:
For an easy localization of your dog in the dark, this function provides several modes
of LED light. The LED diodes are placed in the transparent receiver housing of the
collar. The transmitter also allows you to set a dierent interval of ashing when
using two collars at the same time - you can easily spot your dogs according to the
ashing interval (example: a dog A - ashes once in a second and a dog B - ashes
once in two seconds).
Mode Light is ashing Period Limit
1 as long as the button is pressed down and held 0,5 s 30 s
2 after the button is pressed down, the light starts ashing * 2 s 3 2 x 0,5 s 4 10 x 2 s 5 as long as the button is pressed down and held 0,1 s 30 s
6 after the button is pressed down, the light starts ashing * 1 s 7 2 x 0,1 s 8 10 x 1 s -
* Flashing is switched o by repetitive pressing down the button
14
13
Page 15
Vibration:
This function enables you to draw an attention to sensitive dogs or dogs with
a hearing malfunction. It ensures a discreet recall of the dog, which is almost
impossible by deaf dogs and which can not be heard by anyone nearby. It provides a possibility to disturb the dog during an unwanted activity and to use
the moment of a surprise. Each mode can mean a different command.
While transmitting the vibration, the red LED indicator of the receiver is emitting a light.
Mode Vibration Period Limit
1 discontinuos vibration 0,5 s 30 s
2 continuous vibration - 30 s
3 3 x 0,5 s 4 short - -
For the best results
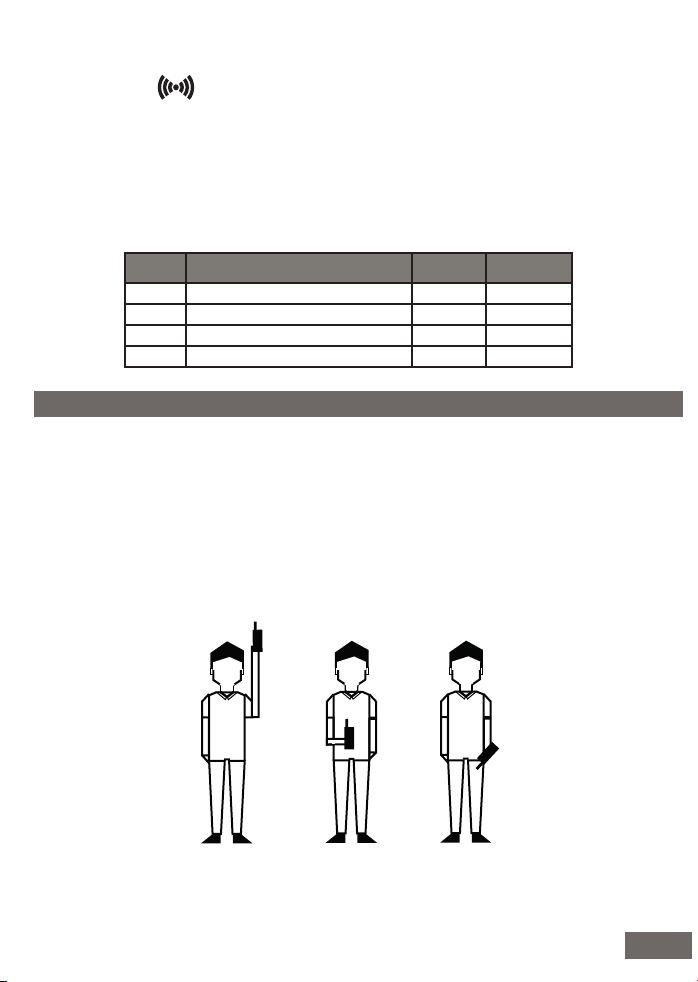
The training collar d-control professional 1000 can be used up to 1000 m working
range. The maximum range depends on many factors - weather, terrain, vegetation
and so on. To ensure maximum working range of the device:
■ Do not cover the transmitter antenna.
■ When transmitting commands, hold the transmitter in a vertical position, away
from the body and above your head.
■ Check the battery in the transmitter and in the receiver, replace it if necessary.
maximum range minimum rangeregular range
15
Page 16
Using training collar in winter
When using d-control in winter, please keep in mind:
■ Low humidity – causes less skin conductivity. It is necessary to provide better
conductivity between the contact points of the receiver and the dog‘s skin. This
can be achieved by lubricating the dog’s skin in the touching points of the
contact points with vaseline, baby oil, hand lotion, etc.
■ Thicker fur dog – it is necessary to tighten the collar so that the permanent
contact with the dog‘s skin is ensured. If the fur is too thick, it is recommended to
cut the hair or choose a longer type of contact points.
■ Battery properties change – temperatures below 0 °C slow down chemical reac-
tions in batteries. To ensure a performance of repetitive stimulation impulses
(especially of higher levels), it is recommended to insert a new battery into the receiver
for the winter time. During the training, observe continuously dog‘s reactions and
increase the stimulation level as needed.
Troubleshooting
1. Read again this user guide and make sure the problem is not caused by a at
battery or incorrect use.
2. Make sure the batteries are inserted with the correct polarity.
3. If the transmitter does not communicate with the receiver, try to program
communication - see chapter: Programming (pairing) the transmitter with the receiver
4. If it seems, that the dog does not respond to the stimulation impulse:
■ Check again the battery in the transmitter and in the receiver.
■ Test the receiver‘s functions with a test discharge lamp (see 5
chapter)
■ Check whether you have choosen correct length of the contact points (see chap-
ter: Choosing the contact points) and ensure contact points are well tightened
and in contact with your dog‘s skin (see chapter: Fitting the collar).
■ If the dog has dry skin, moisten the skin.
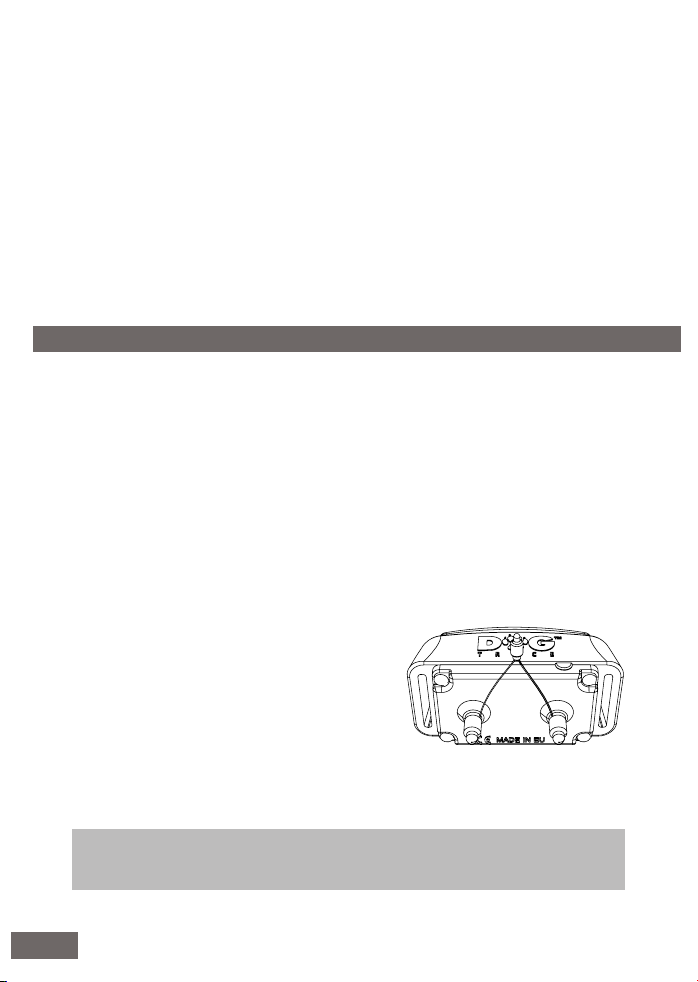
5. Check the correct function of the stimulation impulse
By using test discharge lamp you can easily check correct function of the mo mentary / continuous stimulation impulse.
■ Make sure that the receiver is turned OFF.
■ Place the test discharge lamp in contact
with each of the contact points - loosen the
contact points, insert the lamp‘s outlets
under the contact points so they are in the
touch with the screw and tighten them (see
picture)
■ Turn on the transmitter and the receiver.
■ Select momentary or continuous stimulation for any function button.
■ The test discharge lamp will increase a light intensity when increasing stimulation
level.
Note: The receiver does not emit any stimulation impulse, when setting the level
00. When using the test discharge lamp the stimulation impulses come on with less
intensity than without the testing lamp.
6. If the problem still persists, contact the dealer.
th
paragraph of this
16
15
Page 17

Maintenance
It is important to keep the device clean. Never use volatile substances eg.: thinner,
gasoline or other cleaners. To clean your Dogtrace d-control use a soft, damp cloth
and, if necessary, neutral detergent.
The transmitter and the receiver (collar) Dogtrace d-control professional is waterproof only on condition of the good state of the seal. We recommend you to replace
the rubber seal, which is placed under the cover of the battery compartment of the
transmitter and the receiver, once a year. Clean the rubber seal and make sure that the
rubber seal is correctly seated in its groove every time you change the batteries; tighten the
screws using adequate power.
If the device is not used for a longer time, take out the batteries from the battery
compartment.
Technical data
Transmitter
Range: . . . . . . . . . . . . . . . . . . . . . . . . . . . . . . . . . . . . 1000 m
Power supply: . . . . . . . . . . . . . . . . . . . . . . . . . . . . . 2 x AAA 1,5 V battery
Battery life: . . . . . . . . . . . . . . . . . . . . . . . . . . . . . . . 6 - 12 months, based on usage
Frequency:. . . . . . . . . . . . . . . . . . . . . . . . . . . . . . . . 869,525 MHz (100 mW)
Tightness:. . . . . . . . . . . . . . . . . . . . . . . . . . . . . . . . . waterproof
Weight:. . . . . . . . . . . . . . . . . . . . . . . . . . . . . . . . . . . 125 g (without the batteries)
Dimensions:. . . . . . . . . . . . . . . . . . . . . . . . . . . . . . . . . 113 x 53 x 29 mm (without the antenna)
Operating temperature:. . . . . . . . . . . . . . . . . . . -10 °C to +50 °C
Receiver (collar)
Power supply:. . . . . . . . . . . . . . . . . . . . . . . . . . . CR2 3 V lithium battery
Battery life:. . . . . . . . . . . . . . . . . . . . . . . . . . . . . . 6 months, depending on usage
Frequency:. . . . . . . . . . . . . . . . . . . . . . . . . . . . . . 869,525 MHz
Tightness:. . . . . . . . . . . . . . . . . . . . . . . . . . . . . . . waterproof
Weight:. . . . . . . . . . . . . . . . . . . . . . . . . . . . . . . . . . 65 g (without the battery)
Dimensions:. . . . . . . . . . . . . . . . . . . . . . . . . . . . . 77 x 39 x 33 mm
Operating temperature:. . . . . . . . . . . . . . . . . . -10 °C to +50 °C
17
Page 18

Warranty terms and conditions
VNT electronics s.r.o. provides a 2 year warranty on the Dogtrace products with
respect to defects in material and workmanship under normal use and service from
the date of the original purchase.
The limited warranty does not cover the following:
■ batteries
■ straps
■ direct or indirect risks during transportation of the product to the retailer
■ mechanical damage of the product caused by user‘s negligence or an accident
(eg. biting, breaking, impacts, excessive pulling of d-ring etc.).
1. The warranty period commences on the date of purchase. The sales receipt or
your purchase invoice showing the date of purchase of the product, showing the
serial number and date of purchase of the product, is the proof of the purchase date.
2. The warranty does not cover damage resulting from:
a) improper installation or breach of instructions from the manufacturer‘s user guide
b) improper use of the product
c) improper storage or maintenance of the product
d) modication by a non authorized person, or a repair made without manufacturer‘s
knowledge
e) natural disaster (wind, earthquake, lightning storm, etc.)
f) alternation of the goods made by the consumer if such an alternation resulted in a
damage of the product
g) due to a consumer’s mechanical damage
h) other customer‘s process, which would be in a contrary to the Warranty terms and
conditions and the User guide
3. The warranty can not be claimed if the goods is not completely paid, or when
purchased on a sale.
4. The claimant is obliged to prove the defect and to enable the manufacturer to check
the legitimacy of the product faults and assess the extent of the product faults.
Otherwise is loosing the right arising from the manufacturer’s responsibility for
product defect.
5. Consumer demands arising from the producer‘s liability for defects are regulated in
the general legislation.
18
17
Page 19

6. It is required that all items being sent for a repair must be properly cleaned. Items
deemed to be insuciently cleaned will be returned unrepaired to the customer.
Please do not include the strap or any other accessories if it is not a subject of the
warranty.
7. When sending the device to the service with a transport company, pack the goods
adequately to protect it against a damage; it is recommended to keep the original
packaging for this purpose. The producer is not responsible for a loss of goods
during transport.
The content of this user guide may be subject to change without prior notice.
18
19
Page 20
Certicate of warranty
Manufacturer: VNT electronics s.r.o.
Smetanovo náměstí 104
570 01 Litomyšl
Czech Republic
Phone: +420 733 121 890
www.dogtrace.com
Dealer:
Certicate of Warranty:
Serial Number: ..................................................................................................................
Date of Sale: .......................................................................................................................
Stamp and Signature:
Verze 2015-9-30 / ENG
Copying of this user guide is strictly prohibited without the
prior written consent of VNT electronics Ltd.
20
 Loading...