

Page 1

doepfer
1. Introduction
System A - 100
Module A152 is a useful switching and Track&Hold module. It combines three sub-units within one module:
• 1-to-8 multiplexer
• 8-fold Track&Hold
• 8-fold digital outputs unit
The active step of the three sub-units can be controlled
by an external control voltage (CV addressed mode)
or via a Clock/Reset controlled binary counter
(clocked mode). In this case the rising edge of each
clock signal causes an advance to the next step. The
rising edge of the reset signal resets to step 1.
The currently active step is displayed by a LED.
For the CV addressed mode a manual control and a
control voltage input with attenuator is available.
The module can be used for a lot of switching and
controlling functions in the A-100 system. Among other
things the T&H section of the A-152 allows the emulation
of the "toggling T&H" function of the Buchla module
266 "Source of Uncertainty".
Voltage Addressed T&H/Switch A-152
1
Page 2

Voltage Addressed T&H/Switch A-152
System A - 100
doepfer
2. Basic principles
The sum of the voltages coming from the manual
address control and the CV input define the currently
addressed step of the 3 sub-devices. An address in the
range 1...8 is generated by an internal analog-to-digital
converter. Three address signals (A0, A1 and A2) are
used to address the sub-units multiplexer, T&H and the
digital output section with LED display.
Alternatively the address signals A0, A1 and A2 can be
generated by an internal 3 bit binary counter that is
controlled by the signals clock and reset. For this the
the analog voltage applied to the analog-to-digital converter mentioned above has to remain unchanged as the
CV control has priority over the clock/reset control.
Sub-device #1 is the bidirectional 8-fold multiplexer
(nothing but an electronical 8-fold rotary switch). Bidirectional means that it works into both directions like a
mechanical rotary switch. The common socket may
work as an output that is connected to one of the 8
inputs that are e.g. connected to modulation or audio
sources. But the common socket may even function as
input. In this case the signal applied to the common
socket is output to the currently addressed single socket.
Sub-device #2 is the addressed 8-fold T&H. The signal
at the common T&H input is connected to the addressed
T&H output. The addressed output follows the voltage
applied to the common T&H input (track phase). As
soon as another output is addressed the last voltage is
stored (hold phase).
Remark:
A-148) the output voltage follows (i.e. tracks) to the input
voltage as long as the corresponding stage (1...8) is
active. Just when the stage is deselected the last voltage
is held. The S&H has only a very short track phase and
picks out a sample of the input voltage within a very
short time.
Sub-device #3 is the digital output section. The digital
output of the currently addressed step turns to "high". All
other digital outputs are low.
The digital output section also drives the LEDs.
In contrast to the Sample&Hold (see S&H
2
Page 3

doepfer
3. Overview
!
System A - 100
a
"
a
Controls:
Voltage Addressed T&H/Switch A-152
§
1 Address manual address control
2 CV attenuator for address CV input $
3
3 1...8 LED display (8x)
1
2
$
%
&
"
!
Inputs / Outputs:
!a SW I/O single multiplexer inputs/outputs (8x)
!b Common Switches In/Out
common multiplexer output/input
"a T&H Outs track&hold outputs (8x)
"b Common T&H Input
common track&hold input
§ Digital Outs digital outputs (8x)
$ CV In address control voltage input
% Clock In Clock input for the binary counter
% Reset In Reset input for the binary counter
b
b
3
Page 4

Voltage Addressed T&H/Switch A-152
System A - 100
doepfer
3. Controls / Inputs / Outputs
1 Address (control)
2 CV (control) / $ CV In (socket)
This group of elements is responsible for the address
generation in the voltage controlled mode. Control 1
Adress is used to adjust the address manually. The
control voltage input $ CV In with the corresponding
attenuator 2 CV can be used to modulate the address
by means of an external control voltage (e.g. ribbon
controller A-198, Theremin A-178, joy stick A-174,
ADSR, LFO, random voltage, sequencer and so on).
The required control voltage difference at socket $ is
about 5V to reach all available addresses with attenuator
2 set to it's maximum position.
% Clock In (socket) / & Reset In (socket)
This group of elements is responsible for the address
generation in the clocked mode with the internal binary
counter. In this mode each positive transition (rising
edge) of the signal applied to the Clock input % triggers
an advance to the next step. Any positive transition of
the signal applied to the Reset input & resets the
counter to step 1.
Attention! If the module is be controlled by clock and
reset signals the analog control voltage has to remain
unchanged as the CV control has priority over the
clock/reset control. E.g. simply turn the CV control 2
fully counterclockwise (or make sure that no control
voltage is applied to socket $) and do not touch the
address control knob 1. But of course this overwriting
behaviour can be used intentionally for special effects.
3 1...8 (LEDs, 8x)
The currently addressed step of all sub-units is displayed
with one of the LEDs.
!a SW I/O (sockets, 8x)
!b Common Switches In/Out (socket)
These sockets belong to the multiplexer sub-unit. The
common socket !b is connected to the currently addressed single I/O socket !a that is displayed by the illuminated LED 3. The remaining seven single I/O sockets
are open, i.e. at this moment they have no connection
among each other or to the common socket !b.
The multiplexer works bidirectional. This means that it
works into both directions like a mechanical rotary
switch. The common socket may work as an output that
is connected to one of the 8 inputs (which are e.g.
connected to modulation or audio sources). But the
4
Page 5

doepfer
System A - 100
Voltage Addressed T&H/Switch A-152
common socket may even function as input. In this case
the signal applied to the common socket is output to the
currently addressed single I/O socket.
Both control voltages and audio signals can be pro-
cessed by the multiplexer unit. The voltage range of the
in/outputs to be switched is the full A-100 voltage
range -12V....+12V. All A-100 signals can be switched
without any restrictions.
"a T&H Outs (sockets, 8x)
"b Common T&H Input (socket)
These sockets belong to the Track&Hold sub-unit. The
common T&H input "b is connected to the currently
addressed T&H output "a that is displayed by the
illuminated LED 3. The active T&H output follows the
voltage applied to the T&H input (track phase). As soon
as another output is addressed the last voltage is stored
(hold phase).
Only control voltages can be processed by the T&H
unit due to the holding capacitors of the T&H circuits.
The T&H section is not suitable for audio signals.
The T&H section of the A-152 allows the emulation of
the "toggling T&H" function of the Buchla module 266
"Source of Uncertainty". Only the first two T&H outputs
of the A-152 are required for this application (digital
output 3 has to be connected to the reset input).
§ Digital Outputs (sockets, 8x)
These sockets belong to the digital output section. The
digital output of the currently addressed step turns to
"high" (i.e. about +12V) . It is displayed by the illuminated
LED 3. All other digital outputs remain at low level.
The digital outputs can be used to reduce the number of
addressed stages in the clocked mode. If the digital
output 5 is connected to the reset input & only steps
1...4 of the counter will be addressed.
Another application is the triggering of other A-100 modules (e.g. ADSR, LFO reset, clock divider/sequencer,
trigger delay, analog sequencer and so on). For example
the ribbon controller A-198 can be used to trigger 8
different devices one after another by moving the finger
over the ribbon manual.
For logical connection of several digital outputs the logic
module A-166 can be used (e.g. for simple rhythmic
patterns).
To generate a short trigger signal from the gate-type
digital outputs the trigger modifier A-165 is the right
choice (each digital output remains in the "high" state
while it is addressed, this is called a "gate-type" signal).
5
Page 6

Voltage Addressed T&H/Switch A-152
Normalling options
System A - 100
doepfer
The common terminals of the multiplexer and the T&H
section can be normalled in different ways, i.e. they can
be pre-connected provided that no plugs are inserted
into the corresponding sockets. For that purpose two
single row pin headers with jumpers are available:
JP8: located on the pc board of the multiplexer unit
(labelled "BOARD C SWITCHES") at the lower edge
JP7: located on the pc board of the T&H unit (labelled
"BOARD B T&H") at the lower edge as well
There are two possibilities to set the jumpers of JP7 and
JP8:
• JP8 below, JP7 towards the common T&H socket
In this case the common socket of the multiplexer unit
!b is connected to the common input of the T&H unit "b
provided that no plug is inserted into the common socket
!b of the multiplexer unit. For both units T&H and
multiplexer the same input signal is used (applied to the
common input of the T&H unit "b). The eight single
sockets of the multiplexer unit !a function as outputs in
this case.
• JP8 top, JP7 away from the common T&H
(factory setting
In this case the common input of the T&H unit "b is
connected to the common socket of the multiplexer unit
!b provided that no plug is inserted into the common
input of the T&H unit "b. This leads to two possibilities:
1. For both units T&H and multiplexer the same input
signal is used. The signal is applied to the common
socket of the multiplexer unit !b. In this case the eight
single sockets of the multiplexer unit !a function as
outputs.
2. No plug is inserted into the common socket of the
multiplexer unit !b. In this case the single sockets of the
multiplexer unit !a are used as inputs for the T&H with a
separate input for each T&H output. Each single socket
of the multiplexer !a works as input for the neighbouring
T&H stage "a. In this case the eight single sockets of
the multiplexer unit !a function as inputs.
If one or both jumpers are removed no normalling is
active. We recommend to keep the jumpers for a later
re-installation of the normalling option.
)
6
Page 7

doepfer
System A - 100
5. User Examples
Graphic VCO
The right picture shows the principle patch for a socalled graphic VCO. For a graphic VCO the waveform is
determined by a sequence of voltage levels. Normally
the levels are adjusted with faders and the fader positions represent the waveform. In the A-100 such a VCO is
not available as we believe that the expenditure and
costs do not correspond to the result. From our point of
view the features of a graphic VCO are overestimated
very often. But with the A-152 one has the tool to built a
graphic VCO with a few additional modules only. And
that's how it works:
Voltage Addressed T&H/Switch A-152
The CV address input of the A-152 is connected to the
output of a VCO (e.g. sawtooth or triangle output of an
A-110 or A-111). The manual address control and the
CV attenuator are adjusted so that just all 8 LEDs of the
A-152 light up, i.e. that all 8 stages of the A-152 are
addressed while the VCO passes through it's waveform
(this is why only sawtooth/triangle/sine are suitable waveforms but not rectangle). The CV controlled address
generator of the A-152 is able to work up to moderate
audio frequencies. If different voltages are applied to the
eight multiplexer inputs of the A-152 one obtains a
graphic VCO signal at the common multiplexer output
that has the same frequency as the VCO.
Here are some examples how to generate the eight
voltages:
• 8 fixed voltages (e.g. from the CV source module
A-176): This is the "classic" graphic VCO with manually adjustable values (for DIY's: 8 faders connected
between GND and +12V could be used too)
• 8 automatically varying voltages (e.g. 8 LFO outputs
from two A-143-3)
• 8 random analog voltages (e.g. random voltages
from A-118 or A-149-1 or S&H A-148)
• 8 random digital voltages (e.g. A-149-2)
• or any combination of the above suggestions
7
Page 8
Voltage Addressed T&H/Switch A-152
System A - 100
doepfer
For the last 3 examples the waveform changes more or
less accidentally. If the A-149-1 resp. A-149-2 is used
the waveform changes can be synced as for these
modules the random voltages are triggered by a clock
signal. Especially in combination with an A-155 a lot of
interesting applications may result. E.g. the clock inputs
of the A-149-1 can be controlled by the sequencer clock
or a A-155 trigger row. In both cases the change to the
next waveform is in sync with the sequencer.
If the triangle output of a VCO is used to control the
A-152 only odd harmonics will occur as the graphic
waveform is passed through symmetrically in both directions.
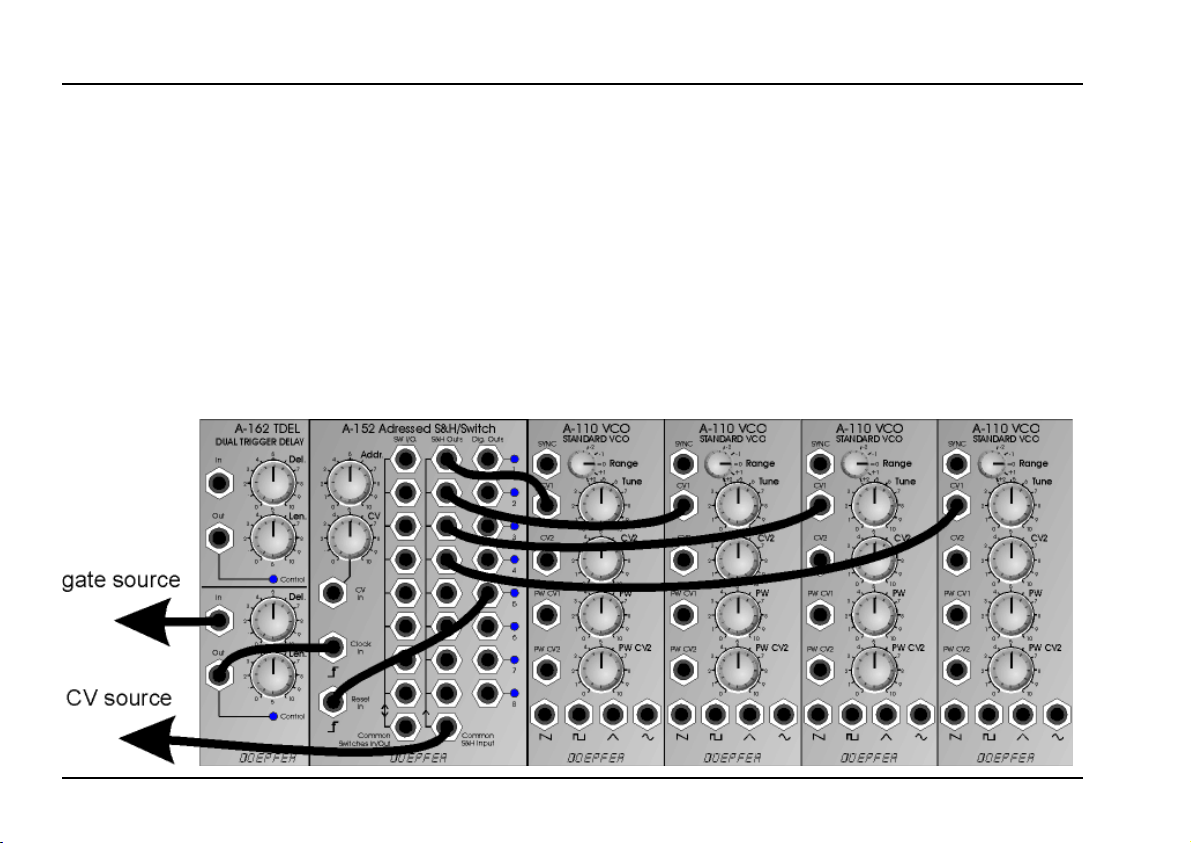
Mono-Poly-Konverter
The picture below shows an application of the A-152 that
distributes a monophonic pitch control voltage (e.g. the
CV of a sequencer, a MIDI-to-CV interface or a monophonic keyboard) into several polyphonic control voltages that are used to control several VCOs. And that's
how it works:
The pitch CV is connected to the common input of the
T&H unit. The positive transition of the corresponding
gate signal indicates that a new CV is generated (e.g. by
pressing a key on the keyboard or during the advance to
the next sequencer step). The gate signal is used to
8
Page 9

doepfer
System A - 100
Voltage Addressed T&H/Switch A-152
trigger the advance to the next address of the A-152.
The trigger delay connected between the gate source
and the clock input of the A-152 is required because of
the timing between the positive transition of the gate
signal and the CV change. The T&H has to take over
and store the CV not before the CV is stable. Otherwise
the result will not meet the expectations. As the time
correlation between the gate transition and the CV
change may vary the A-162 is used to solve problems
that may arise from this. Ideally the gate transition and
CV change happens exactly simultaneously, but "simultaneously" is a problem in the real world as there are
always some delays in the micro/millisecond range that
may cause problems (e.g. the MIDI-to-CV interface or
sequencer of manufacturer #1 generates the gate transition 200us before the CV change but for manufacturer
#2 the behaviour is reverse and the delay is 500 us). To
avoid such problems the A-162 is used. First the trigger
length is adjusted so that the A-152 triggers correctly. If
the width is too short the A-152 may not trigger or the
step advances are uneven. After that the delay time is
adjusted so that the CV values appear sequentially at
the T&H outputs of the A-152 as expected. Usually the
A-162 settings will be close to the left-most positions of
the controls for delay and length.
The four VCO outputs can be mixed in an A-138 before
the subsequent signal processing (VCF,VCA,ADSR ...).
But even each VCO outputs can be processed separately. In this case the digital outputs of the A-152 may be
used to trigger the envelope generators that are assigned to the corresponding VCO.
The number of outputs can be decreased or increased
by connecting the reset input to another digital output.
A special case is the limitation to two outputs. This leads
to the function of the toggling S&H unit of the Buchla
module 266 Source of Uncertainty. The only difference
is that the Buchla module contains two S&H instead of
two T&H. If an A-148 S&H is connected between the CV
source and the A-152 the functions are identically.
Another solution is to modify the A-152 so that the T&H
section works as S&H. For details please refer to the
DIY page on our web site www.doepfer.com.
In the example the digital output five is connected to the
reset input of the A-152 to limit the number of outputs to
four.
9
Page 10

Voltage Addressed T&H/Switch A-152
System A - 100
7-fold Manual Ribbon Gate
The right picture shows an application of the A-152 in
combination with the ribbon controller A-198. The position control voltage of the A-198 is used to address the
A-152. If the manual address control and the CV attenuator are adjusted in the right way the position sensor
of the A-198 covers the complete address range of the
A-152 and a small share of the position range is assigned to one of the eight addresses of the A-152.
If the hold switch of the A-198 is set "off" the A-152
jumps to address 1 as soon as the finger is removed
from the position sensor. As soon as the sensor is
touched, one of the stages in the range 2...8 is addressed and the corresponding digital output turns to "high" displayed by the corresponding LED. This leads to a
7-fold manual gate generator that can be operated like a
percussion set. According to the position of the finger,
that touches the position sensor of the A-198 one of the
gate outputs of the A-152 is active. The gate outputs
may be used to trigger percussive sounds stored in an
A-112 sampler module or percussive patches based on
other A-100 modules.
doepfer
are available that follow the position CV of the A-198 in a
certain range. As soon as the finger leaves the corresponding range the last voltage is stored.
In principle the gate outputs can be used for any gate/
trigger/clock function in the A-100.
In the example the position CV is also patched to the
common T&H input. At the T&H outputs control voltages
10
The multiplexer unit can be used for additional switching
functions (e.g. to connect different modulation or audio
sources to a module).
 Loading...