

Page 1

Factory Workshop Manual
Dodge
Stratus Coupe
L4-2.4L VIN G (2003)
Anonymous
1st January 2018
Make
Model
Engine and year
This manual was submitted by
Date
Page 2
Dodge Stratus Coupe Workshop Manual (L4-2.4L VIN G (2003))
Dodge Workshop Manuals > Relays and Modules > Relays and Modules - Accessories and Optional Equipment > Alarm
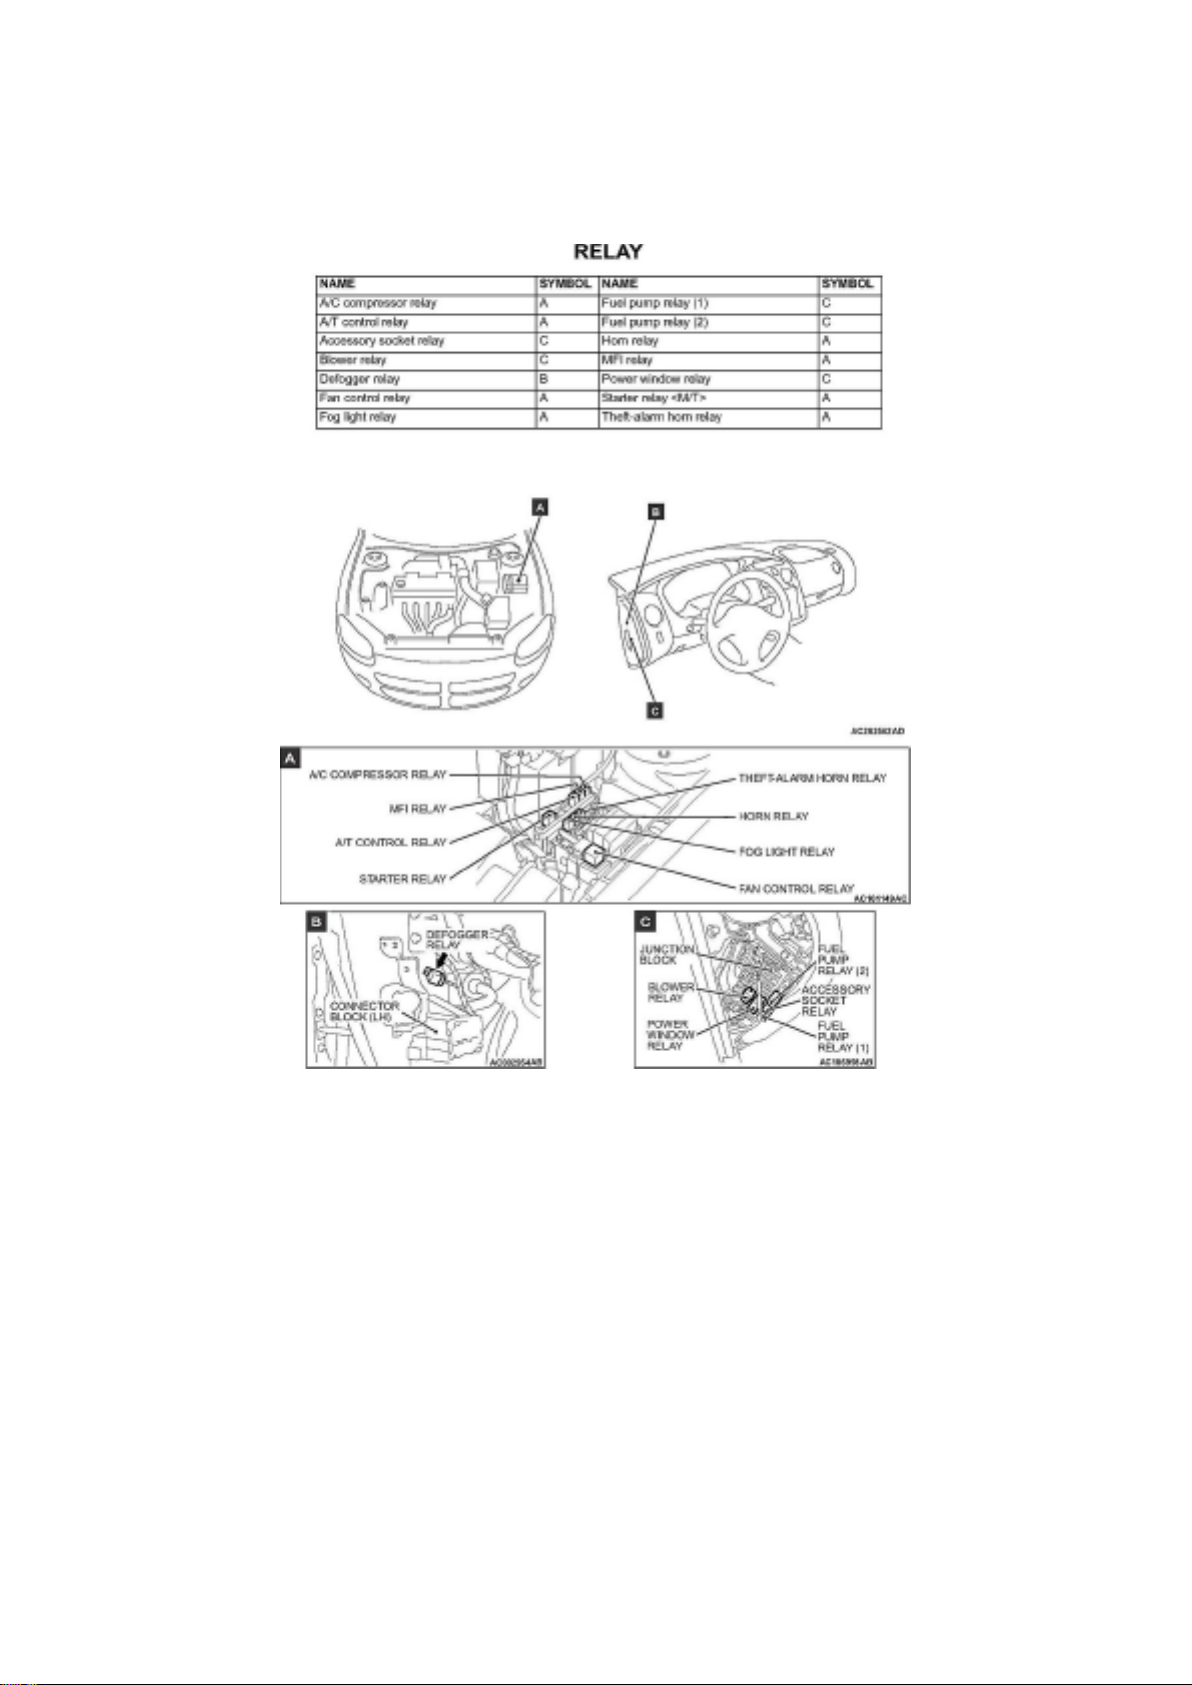
Horn Relay > Component Information > Locations
Alarm Horn Relay: Locations
Relay Location
Page 3
Dodge Stratus Coupe Workshop Manual (L4-2.4L VIN G (2003))
Dodge Workshop Manuals > Relays and Modules > Relays and Modules - Accessories and Optional Equipment > Alarm
Module, (Vehicle Antitheft) > Component Information > Locations
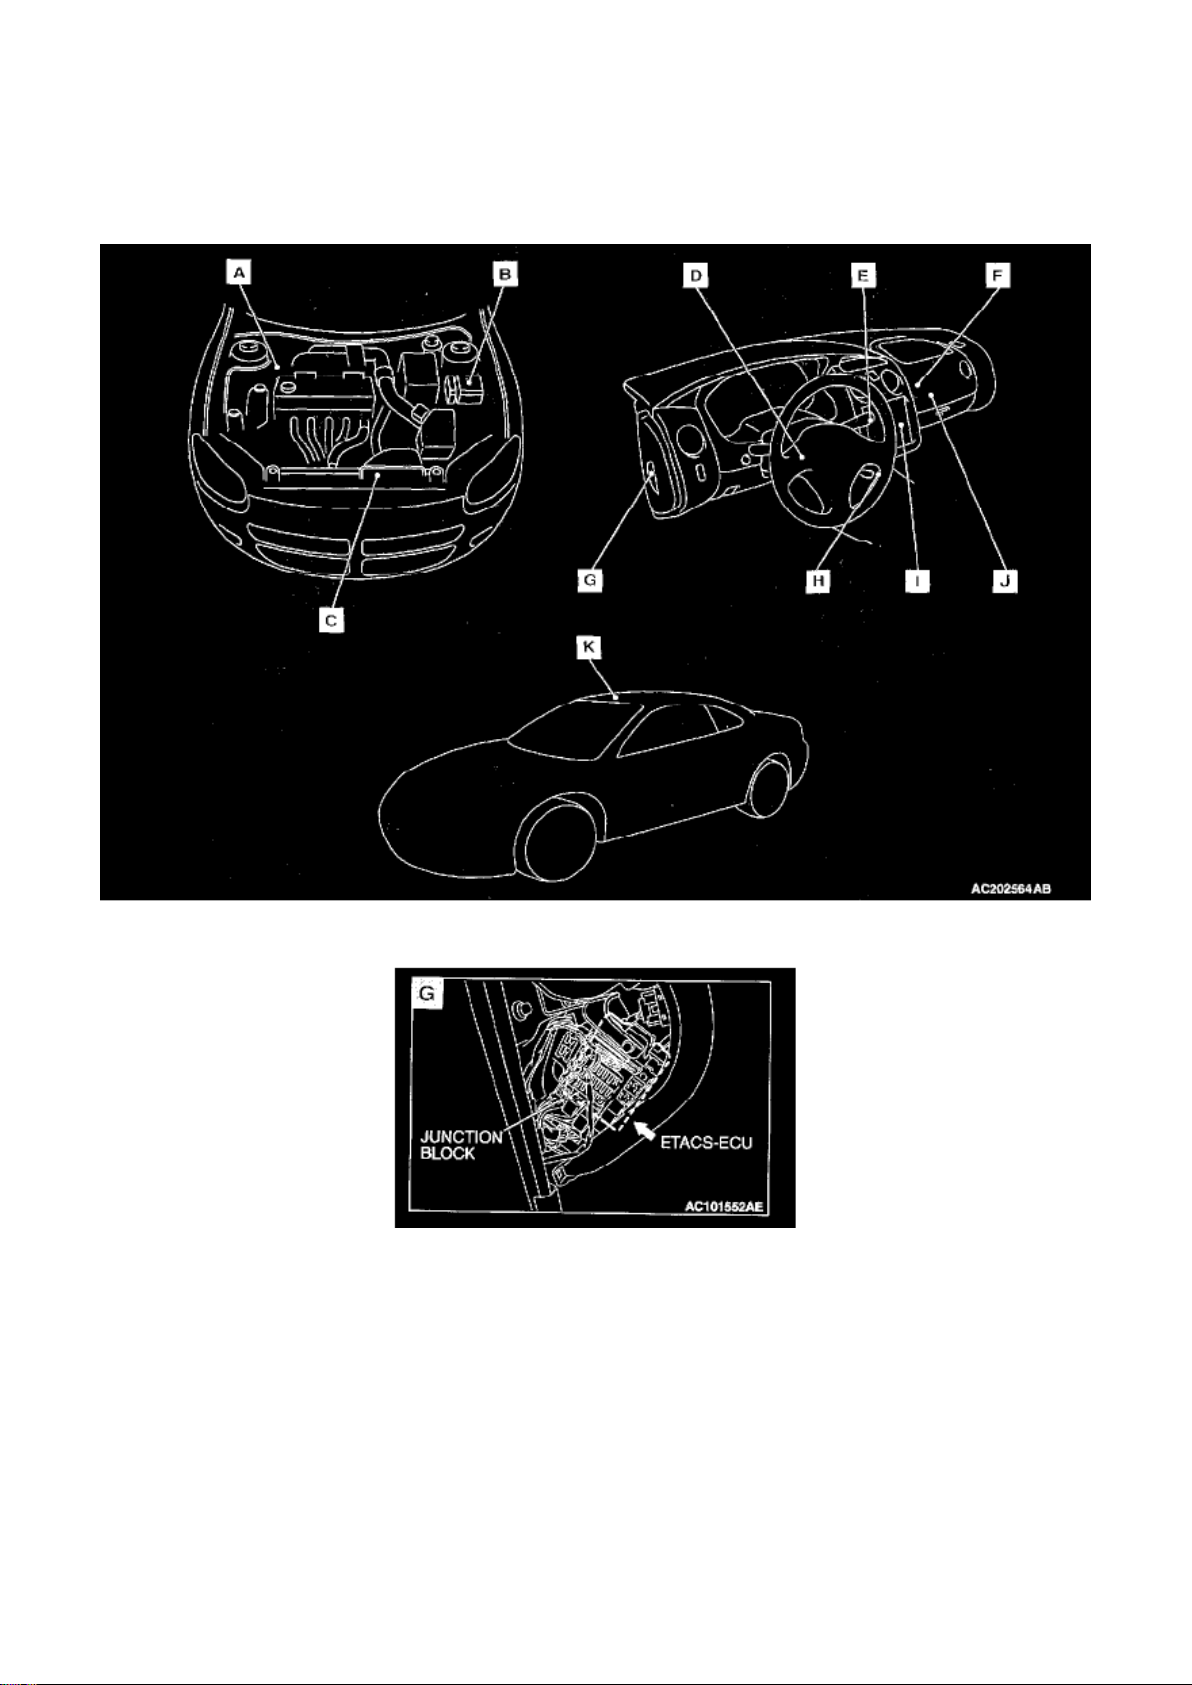
Alarm Module: Locations
Overall View
View G
Page 4
Dodge Stratus Coupe Workshop Manual (L4-2.4L VIN G (2003))
Dodge Workshop Manuals > Relays and Modules > Relays and Modules - Brakes and Traction Control > Electronic Brake
Control Module > Component Information > Locations
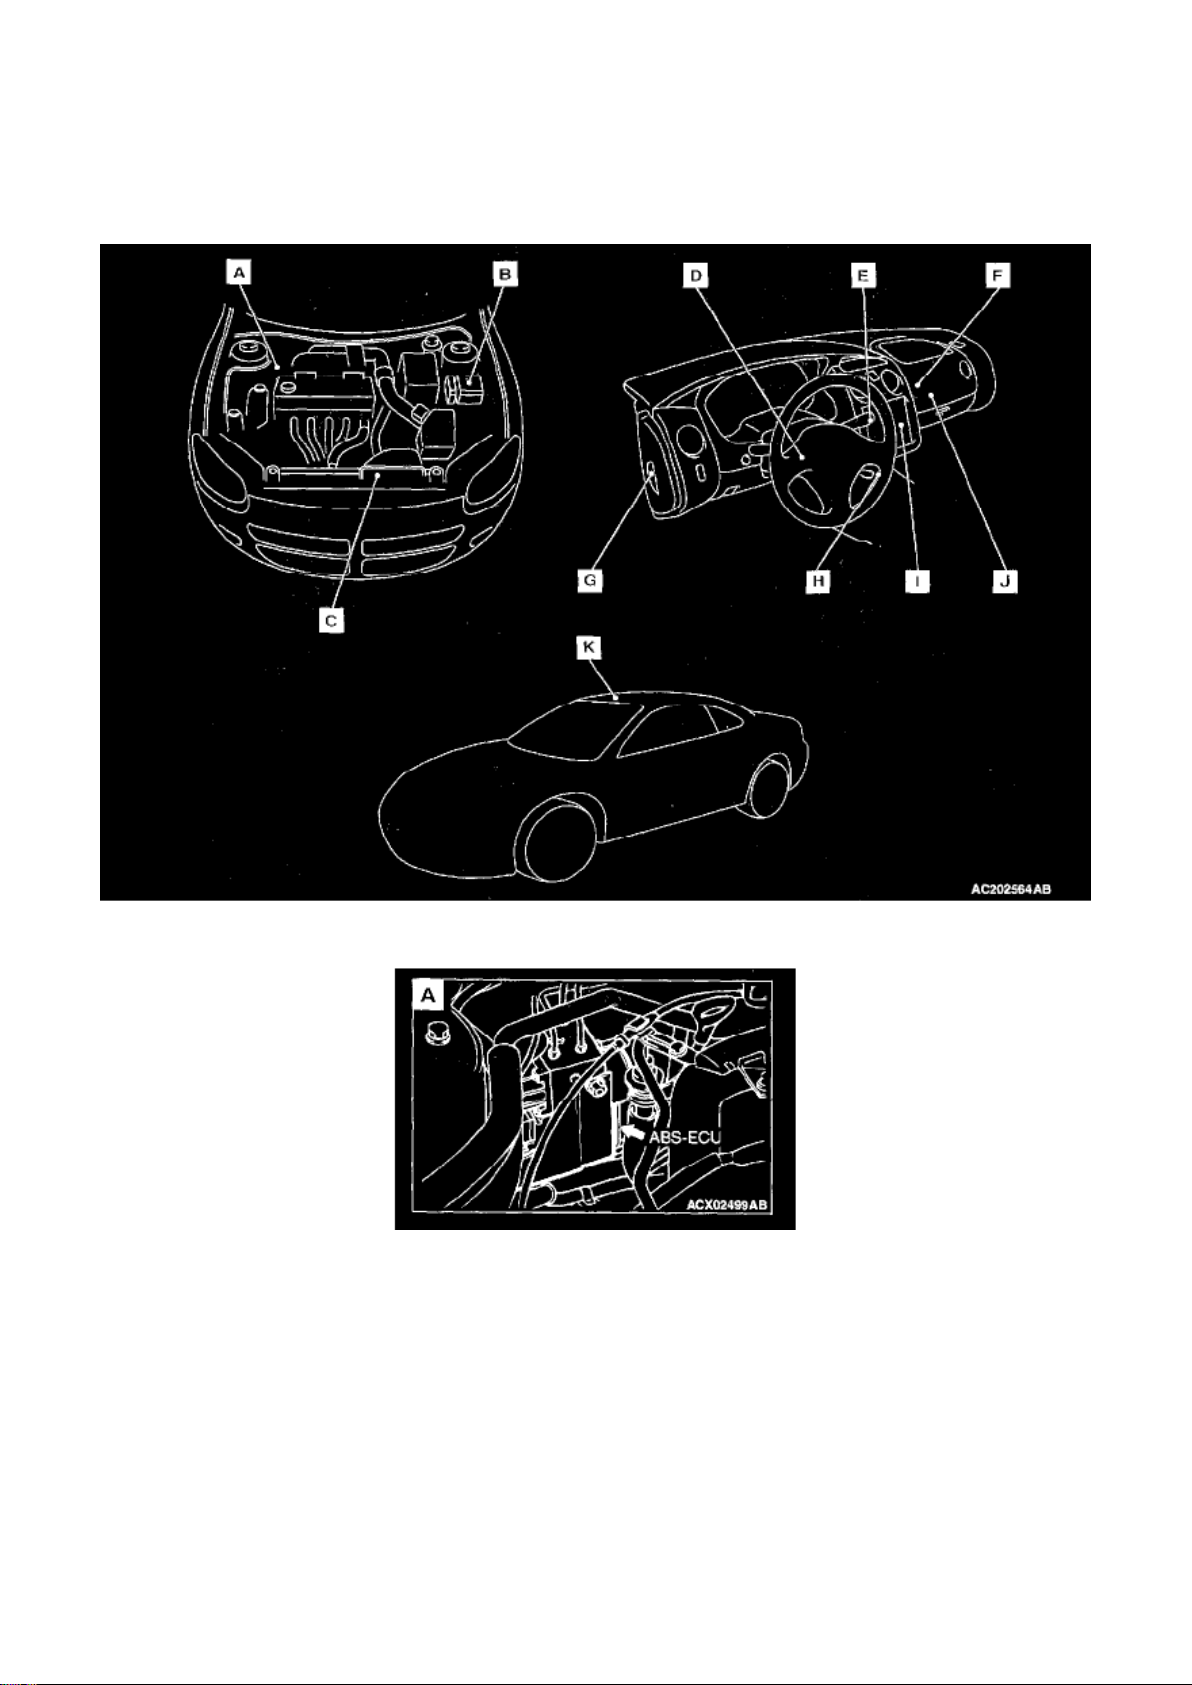
Electronic Brake Control Module: Locations
Overall View
View A
Page 5
Dodge Stratus Coupe Workshop Manual (L4-2.4L VIN G (2003))
Dodge Workshop Manuals > Relays and Modules > Relays and Modules - Cooling System > Radiator Cooling Fan Control
Module > Component Information > Locations
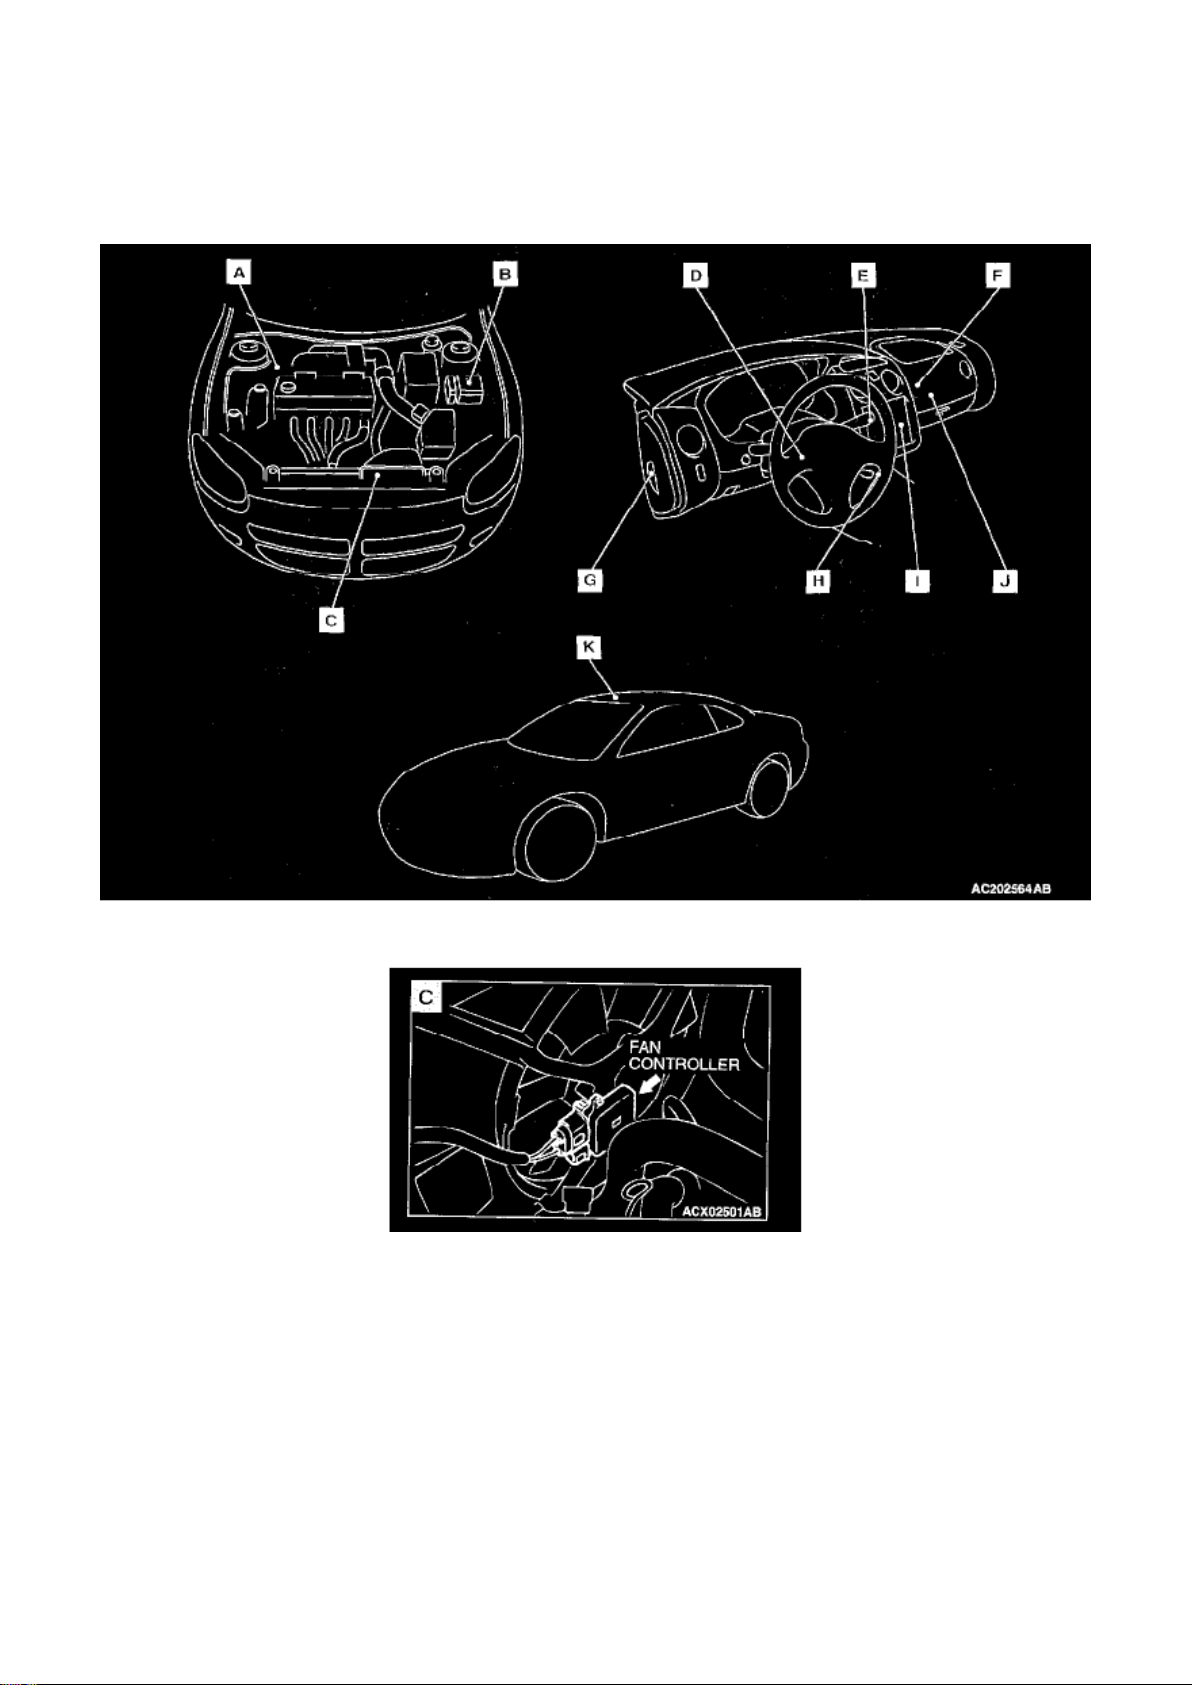
Radiator Cooling Fan Control Module: Locations
Overall View
View C
Page 6
Dodge Stratus Coupe Workshop Manual (L4-2.4L VIN G (2003))
Dodge Workshop Manuals > Relays and Modules > Relays and Modules - Cooling System > Radiator Cooling Fan Control
Module > Component Information > Locations > Page 18
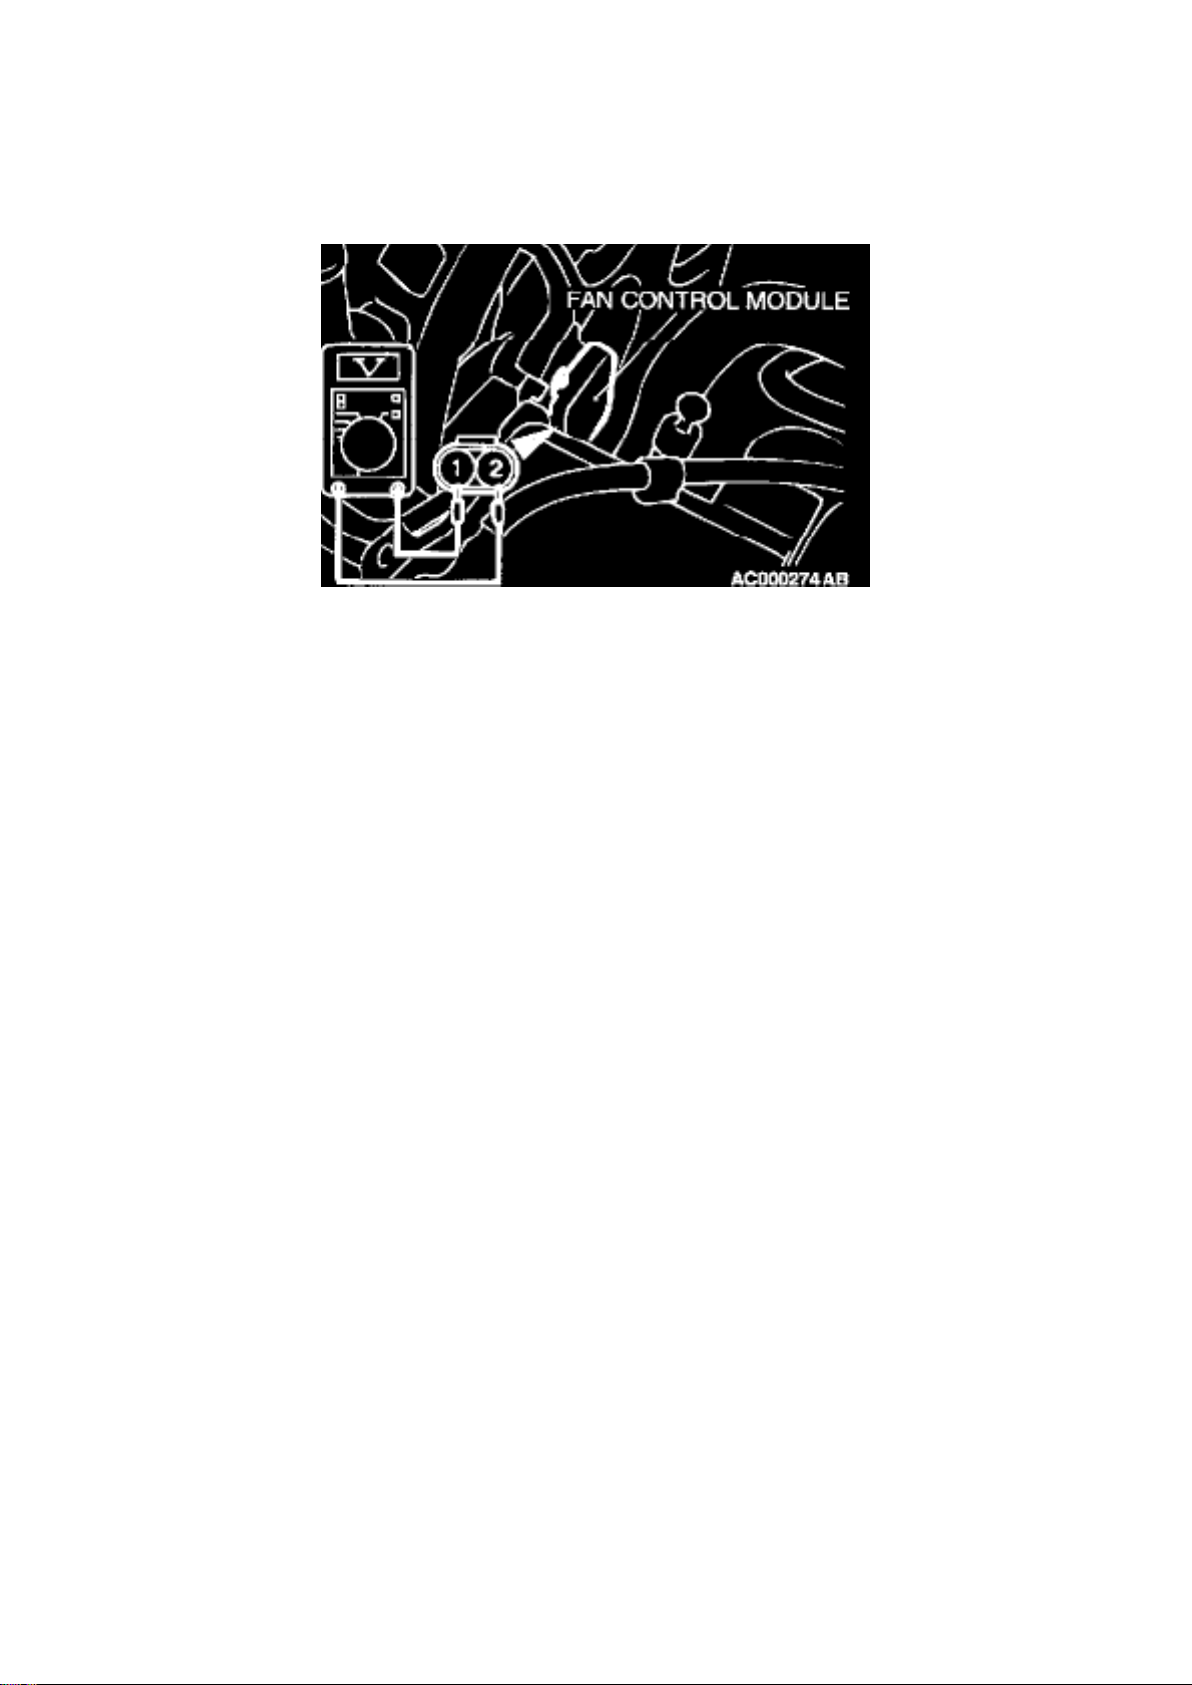
Radiator Cooling Fan Control Module: Testing and Inspection
FAN CONTROLLER CHECK
1. Remove condenser fan motor connector. 2. Start the engine and run it at idle. 3. Turn the A/C
switch to ON and maintain the coolant temperature at 80 °C (176 °F) or less.
4. When measuring the voltage between the fan control module-side connector terminals, check
that the value changes repeatedly as indicated by (1)
- (3) below. (1) 0 Volts (2) 8.2 ± 2.6 Volts (3) Battery positive voltage ± 2.6 Volts
5 If the voltage does not repeatedly change as indicated, replace the radiator fan motor and the fan
control module assembly.
Page 7
Dodge Stratus Coupe Workshop Manual (L4-2.4L VIN G (2003))
Dodge Workshop Manuals > Relays and Modules > Relays and Modules - Cooling System > Radiator Cooling Fan Motor
Relay > Component Information > Locations
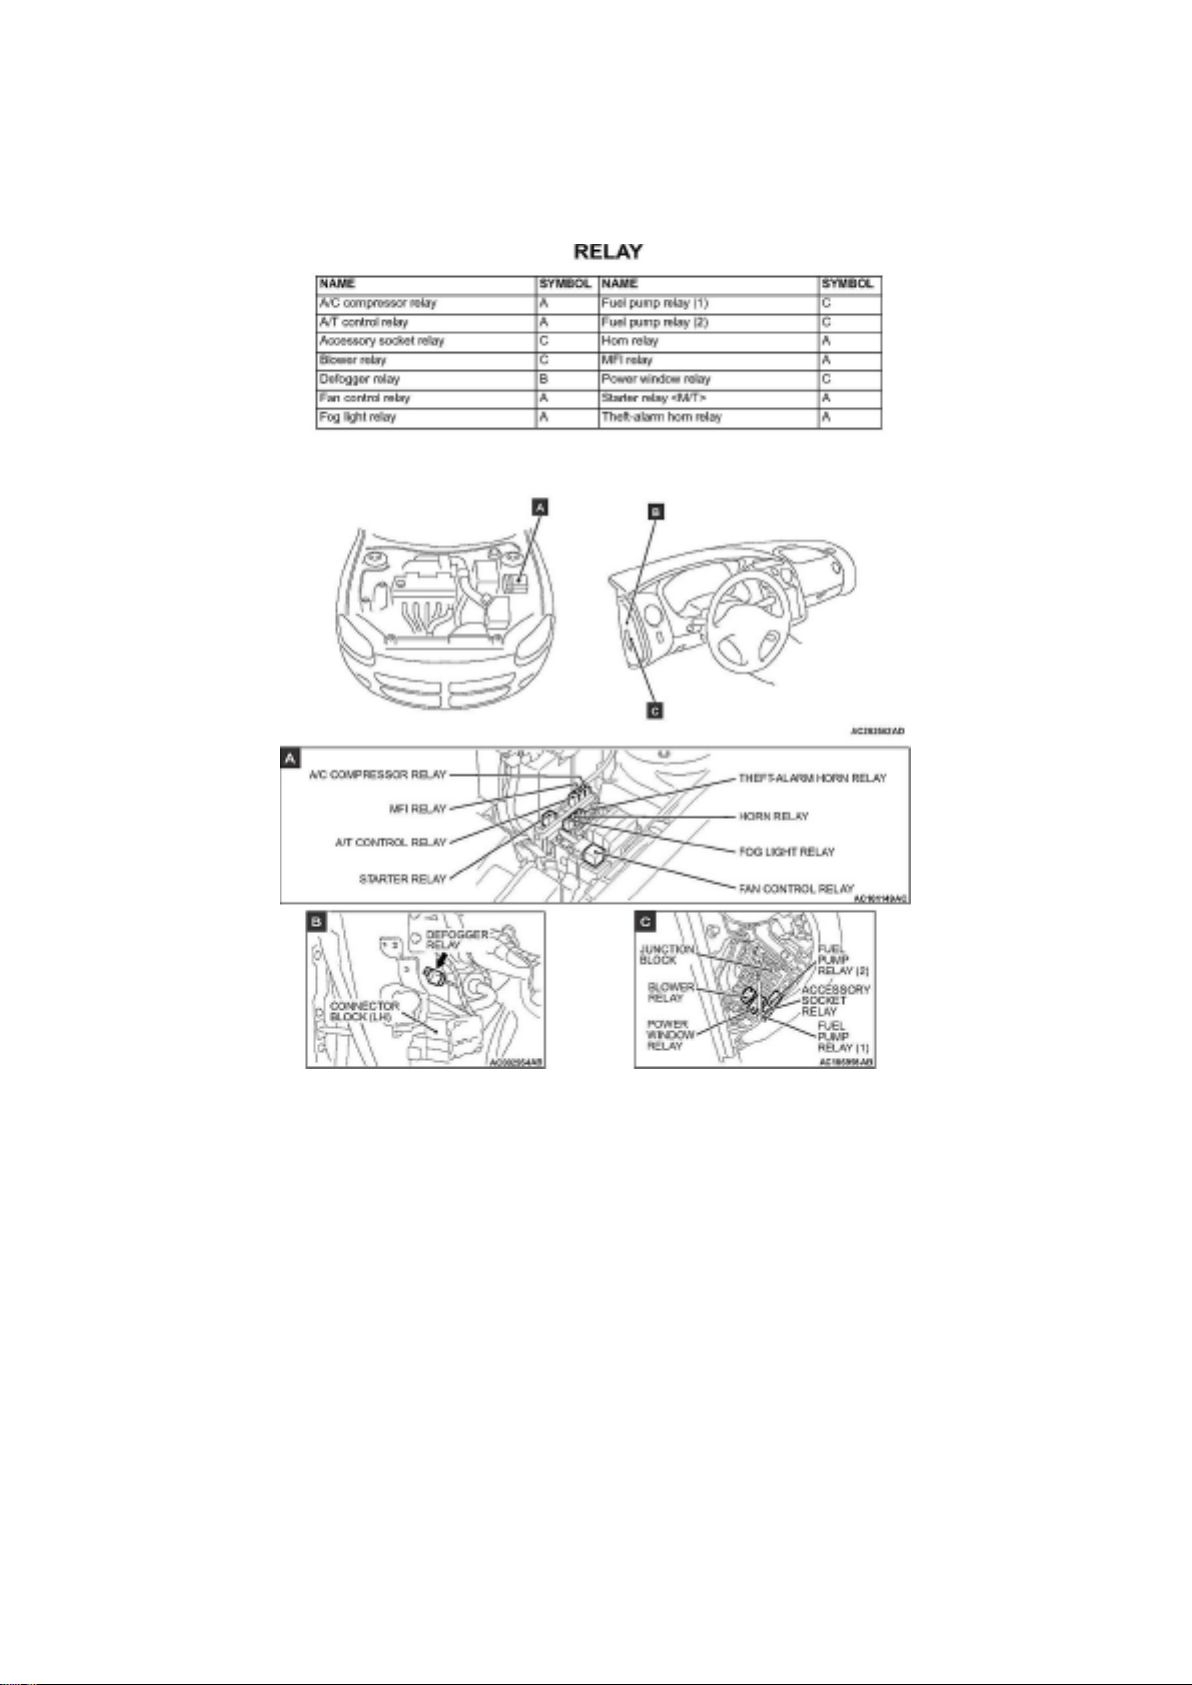
Radiator Cooling Fan Motor Relay: Locations
Relay Location
Page 8
Dodge Stratus Coupe Workshop Manual (L4-2.4L VIN G (2003))
Dodge Workshop Manuals > Relays and Modules > Relays and Modules - Cruise Control > Cruise Control Module >
Component Information > Locations
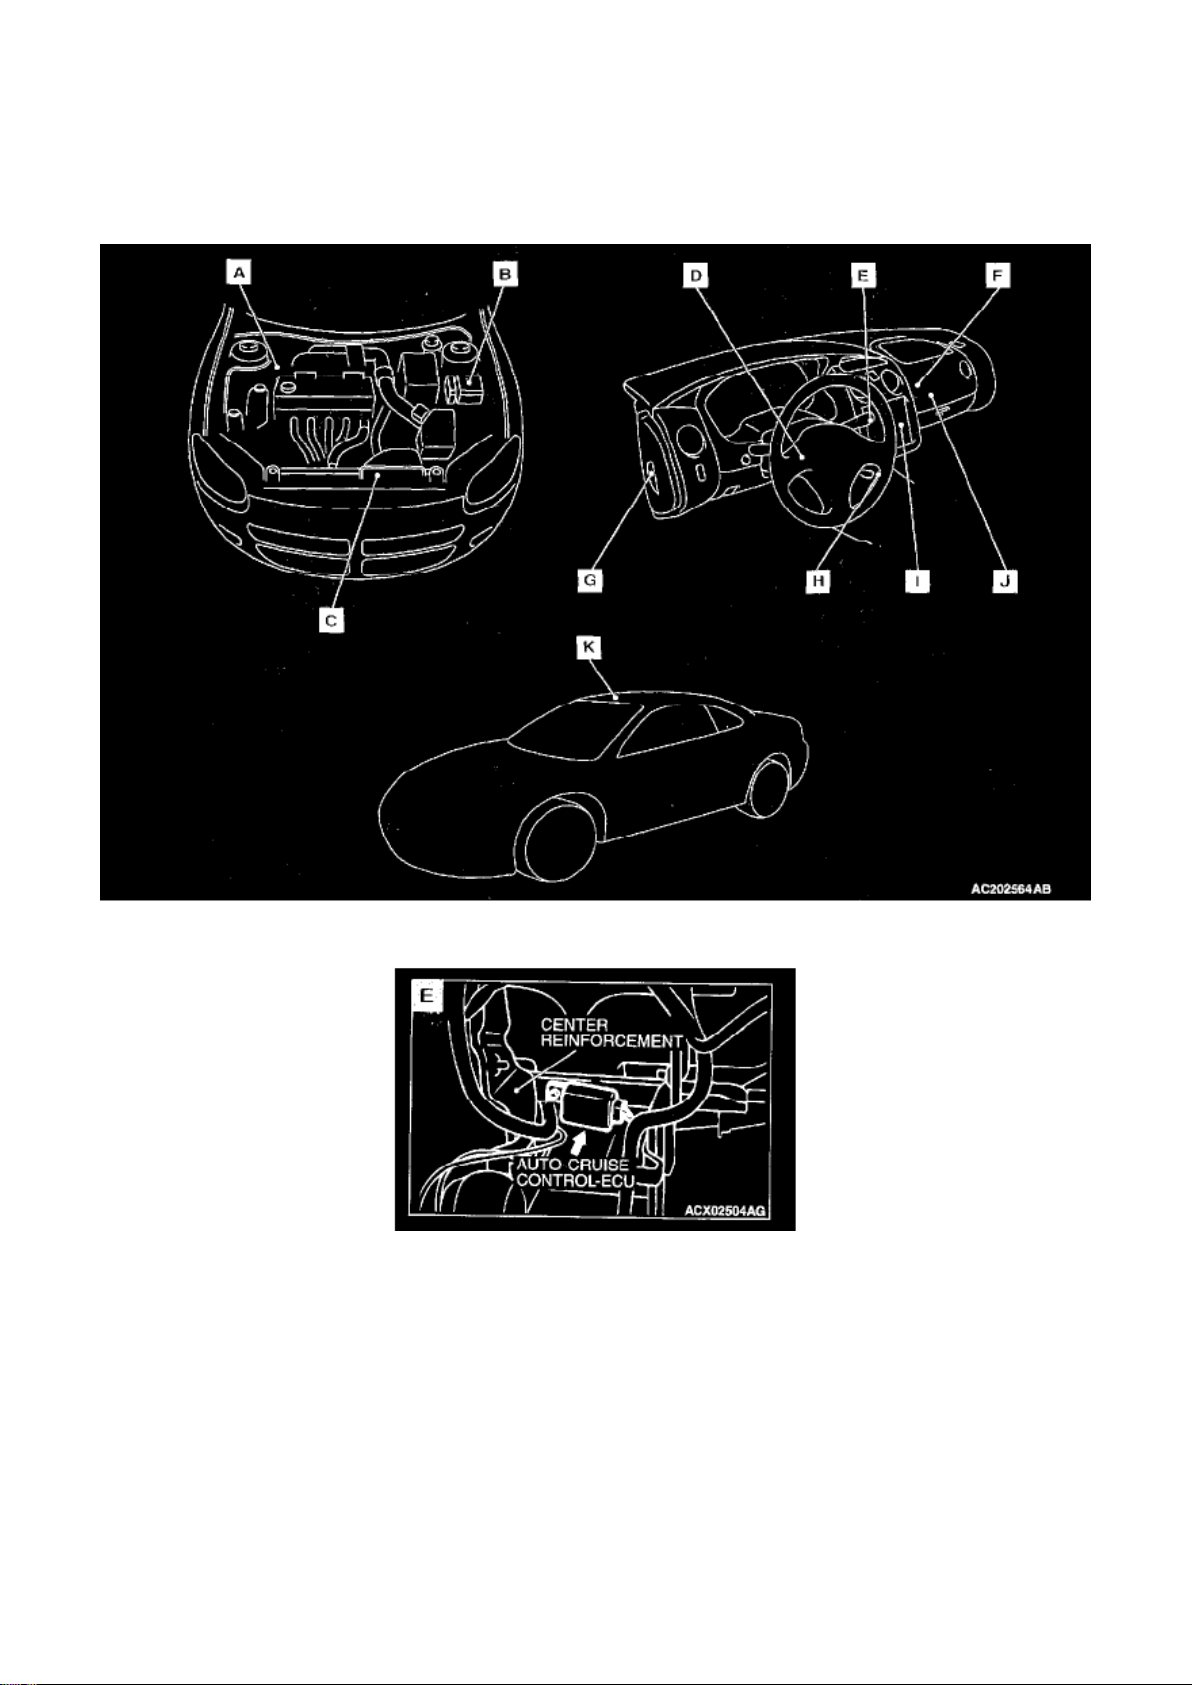
Cruise Control Module: Locations
Overall View
View E
Page 9
Dodge Stratus Coupe Workshop Manual (L4-2.4L VIN G (2003))
Dodge Workshop Manuals > Relays and Modules > Relays and Modules - HVAC > Blower Motor Relay > Component
Information > Locations
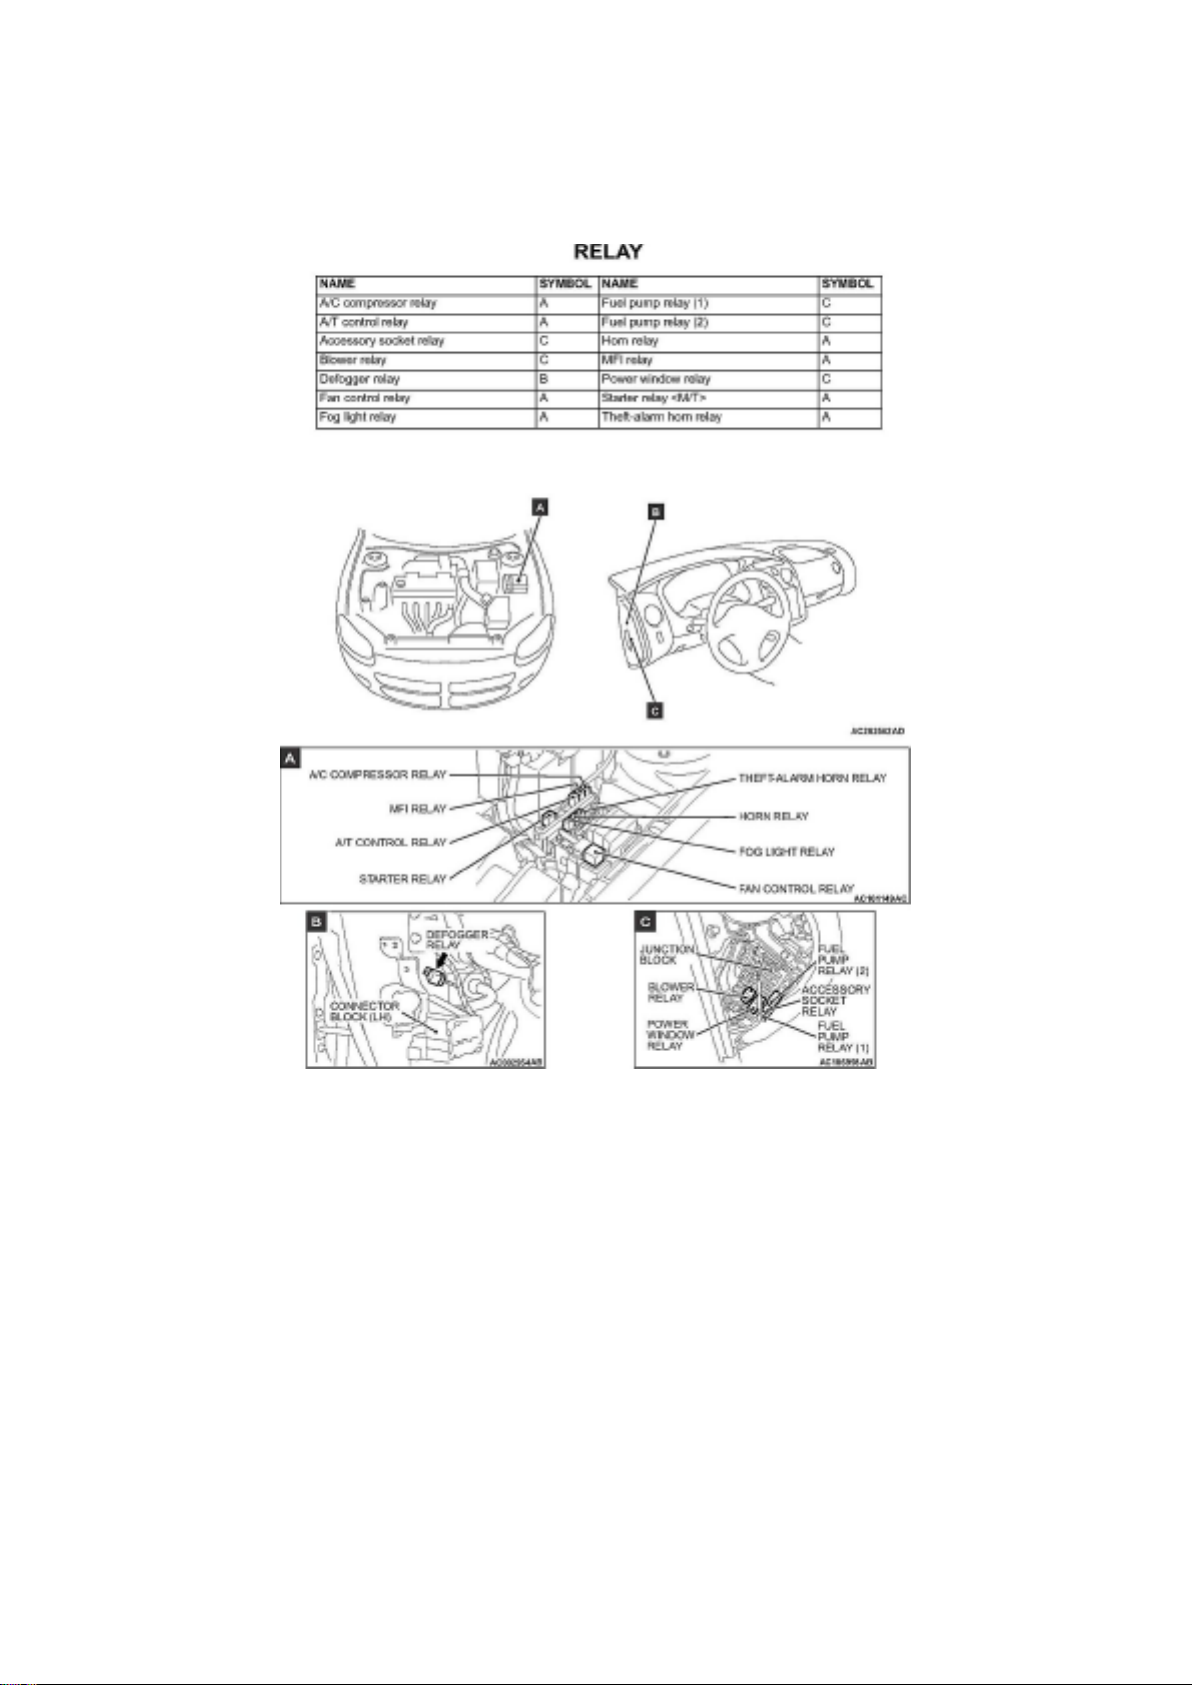
Blower Motor Relay: Locations
Relay Location
Page 10
Dodge Stratus Coupe Workshop Manual (L4-2.4L VIN G (2003))
Dodge Workshop Manuals > Relays and Modules > Relays and Modules - HVAC > Blower Motor Relay > Component
Information > Diagrams > Diagram Information and Instructions
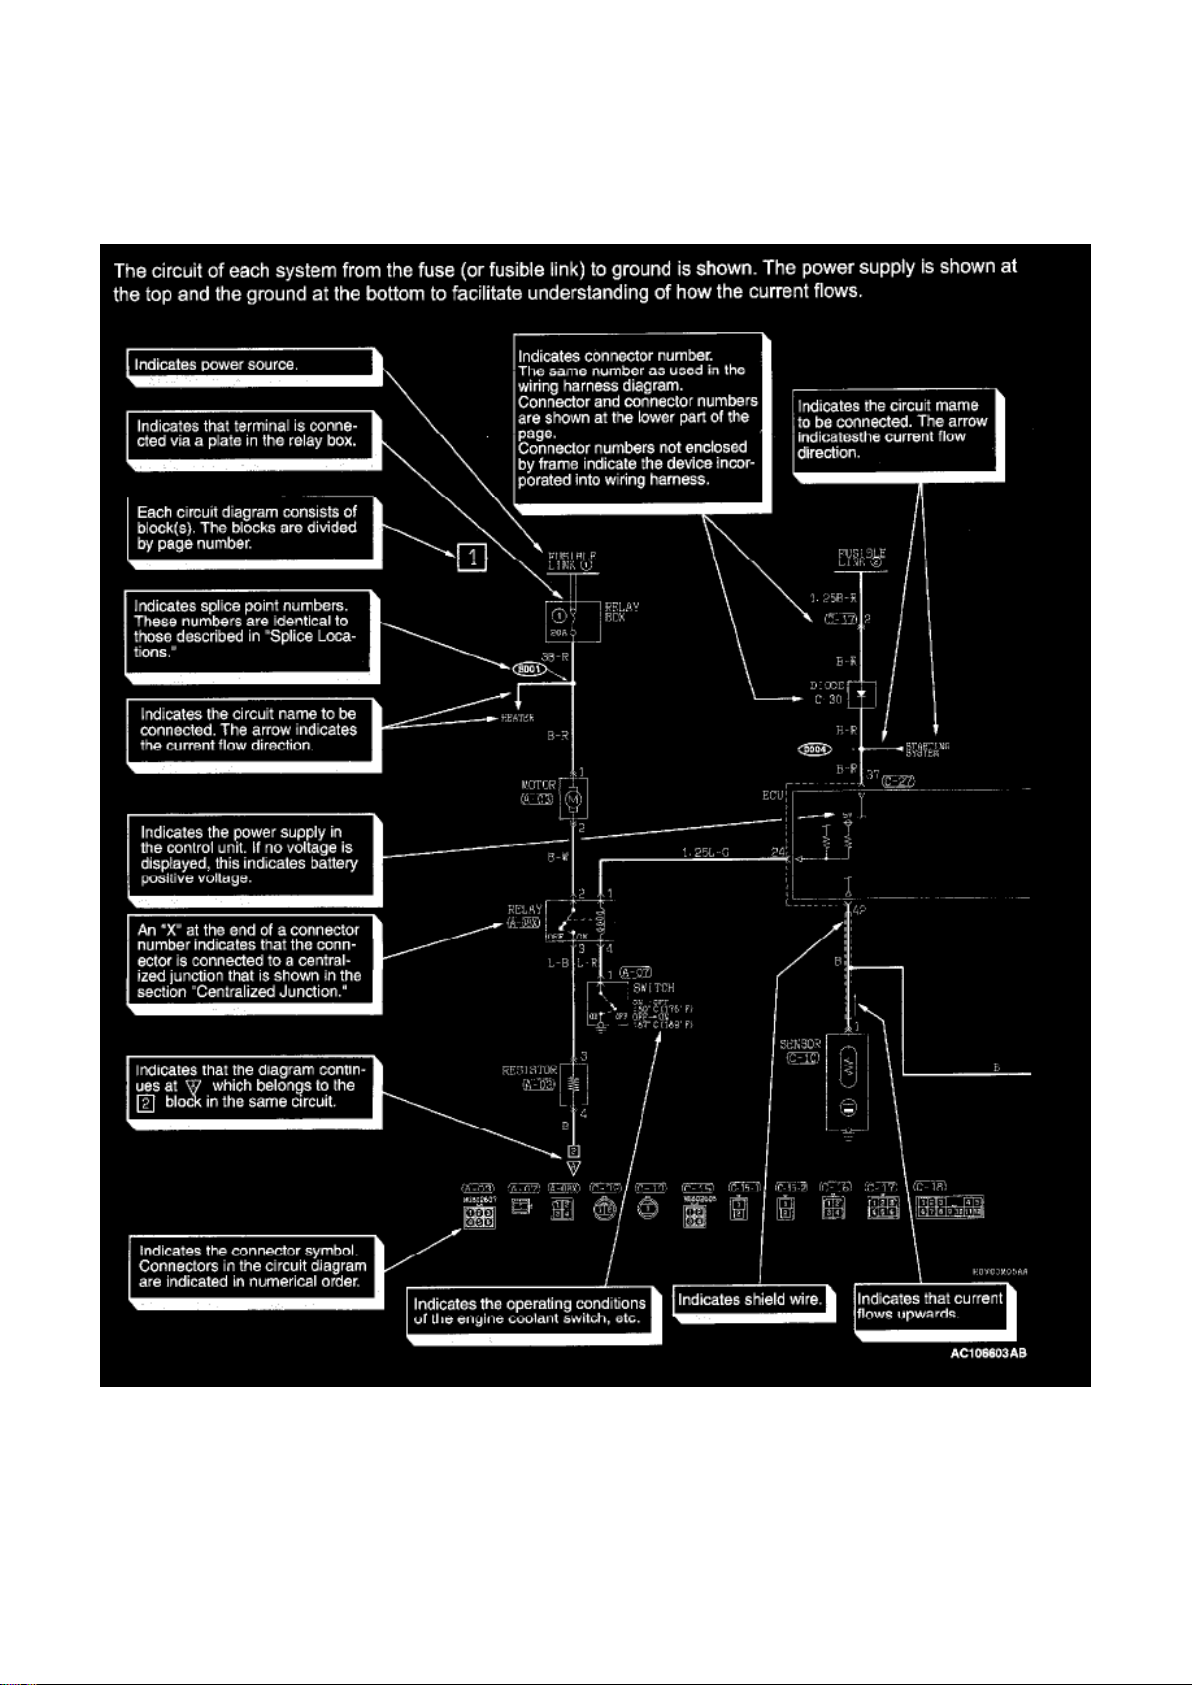
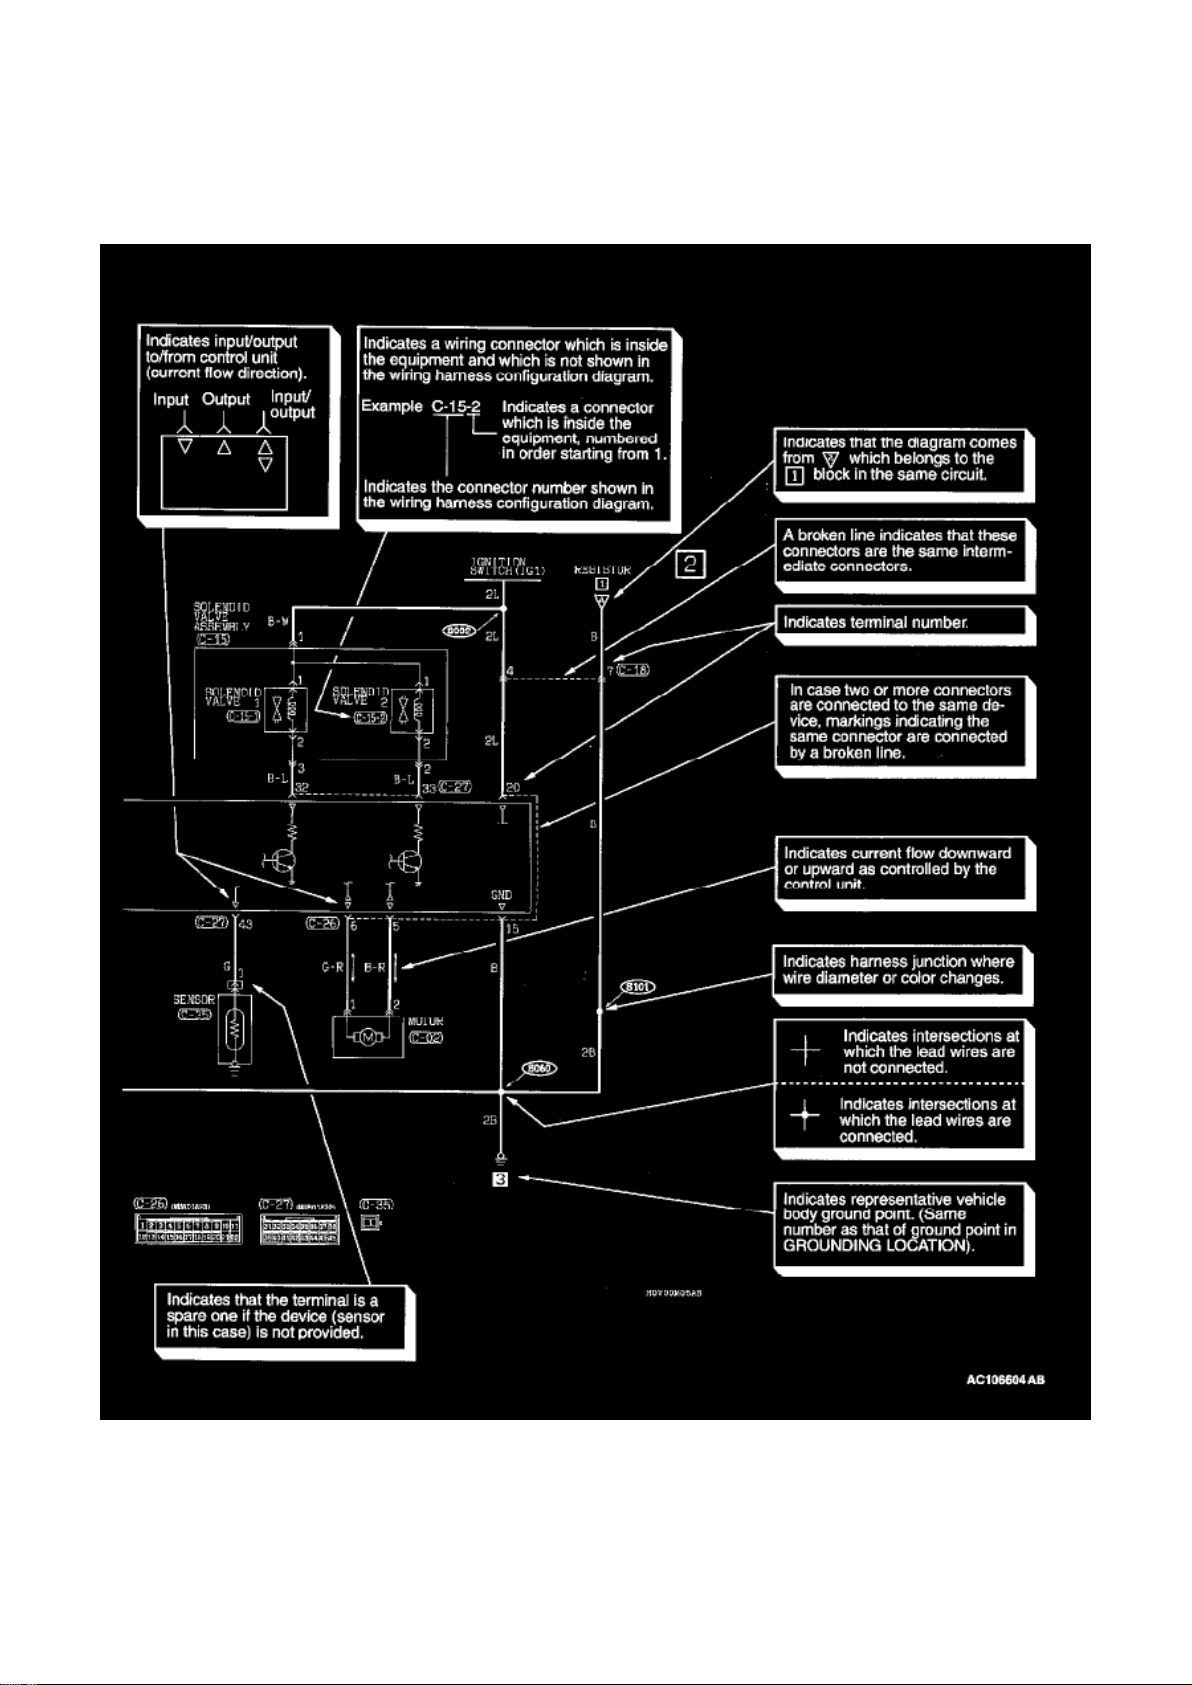
Blower Motor Relay: Diagram Information and Instructions
How To Read Circuit Diagrams - Part 1
Page 11
Dodge Stratus Coupe Workshop Manual (L4-2.4L VIN G (2003))
Dodge Workshop Manuals > Relays and Modules > Relays and Modules - HVAC > Blower Motor Relay > Component
Information > Diagrams > Diagram Information and Instructions > Page 32
How To Read Circuit Diagrams - Part 2
Page 12
Dodge Stratus Coupe Workshop Manual (L4-2.4L VIN G (2003))
Dodge Workshop Manuals > Relays and Modules > Relays and Modules - HVAC > Blower Motor Relay > Component
Information > Diagrams > Diagram Information and Instructions > Page 33
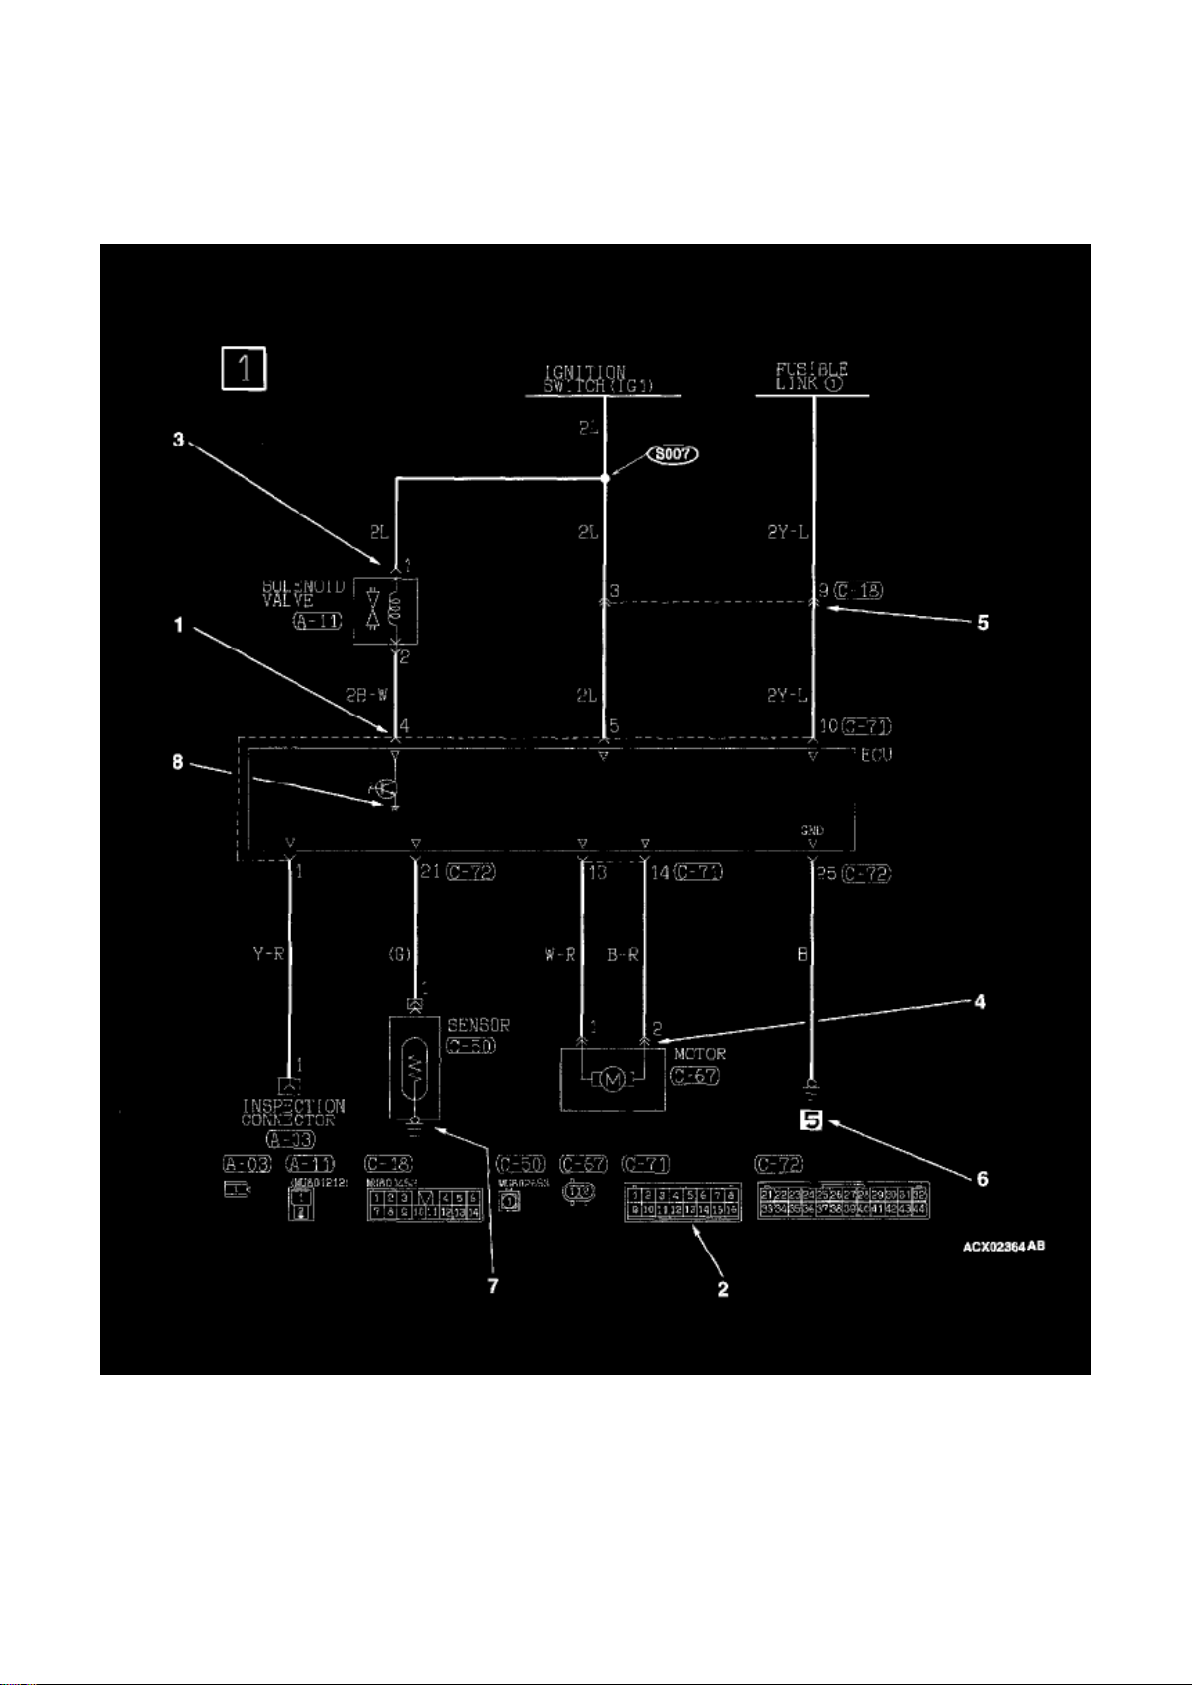
Connector/Grounding Indications Part 1
Page 13
Dodge Stratus Coupe Workshop Manual (L4-2.4L VIN G (2003))
Dodge Workshop Manuals > Relays and Modules > Relays and Modules - HVAC > Blower Motor Relay > Component
Information > Diagrams > Diagram Information and Instructions > Page 34
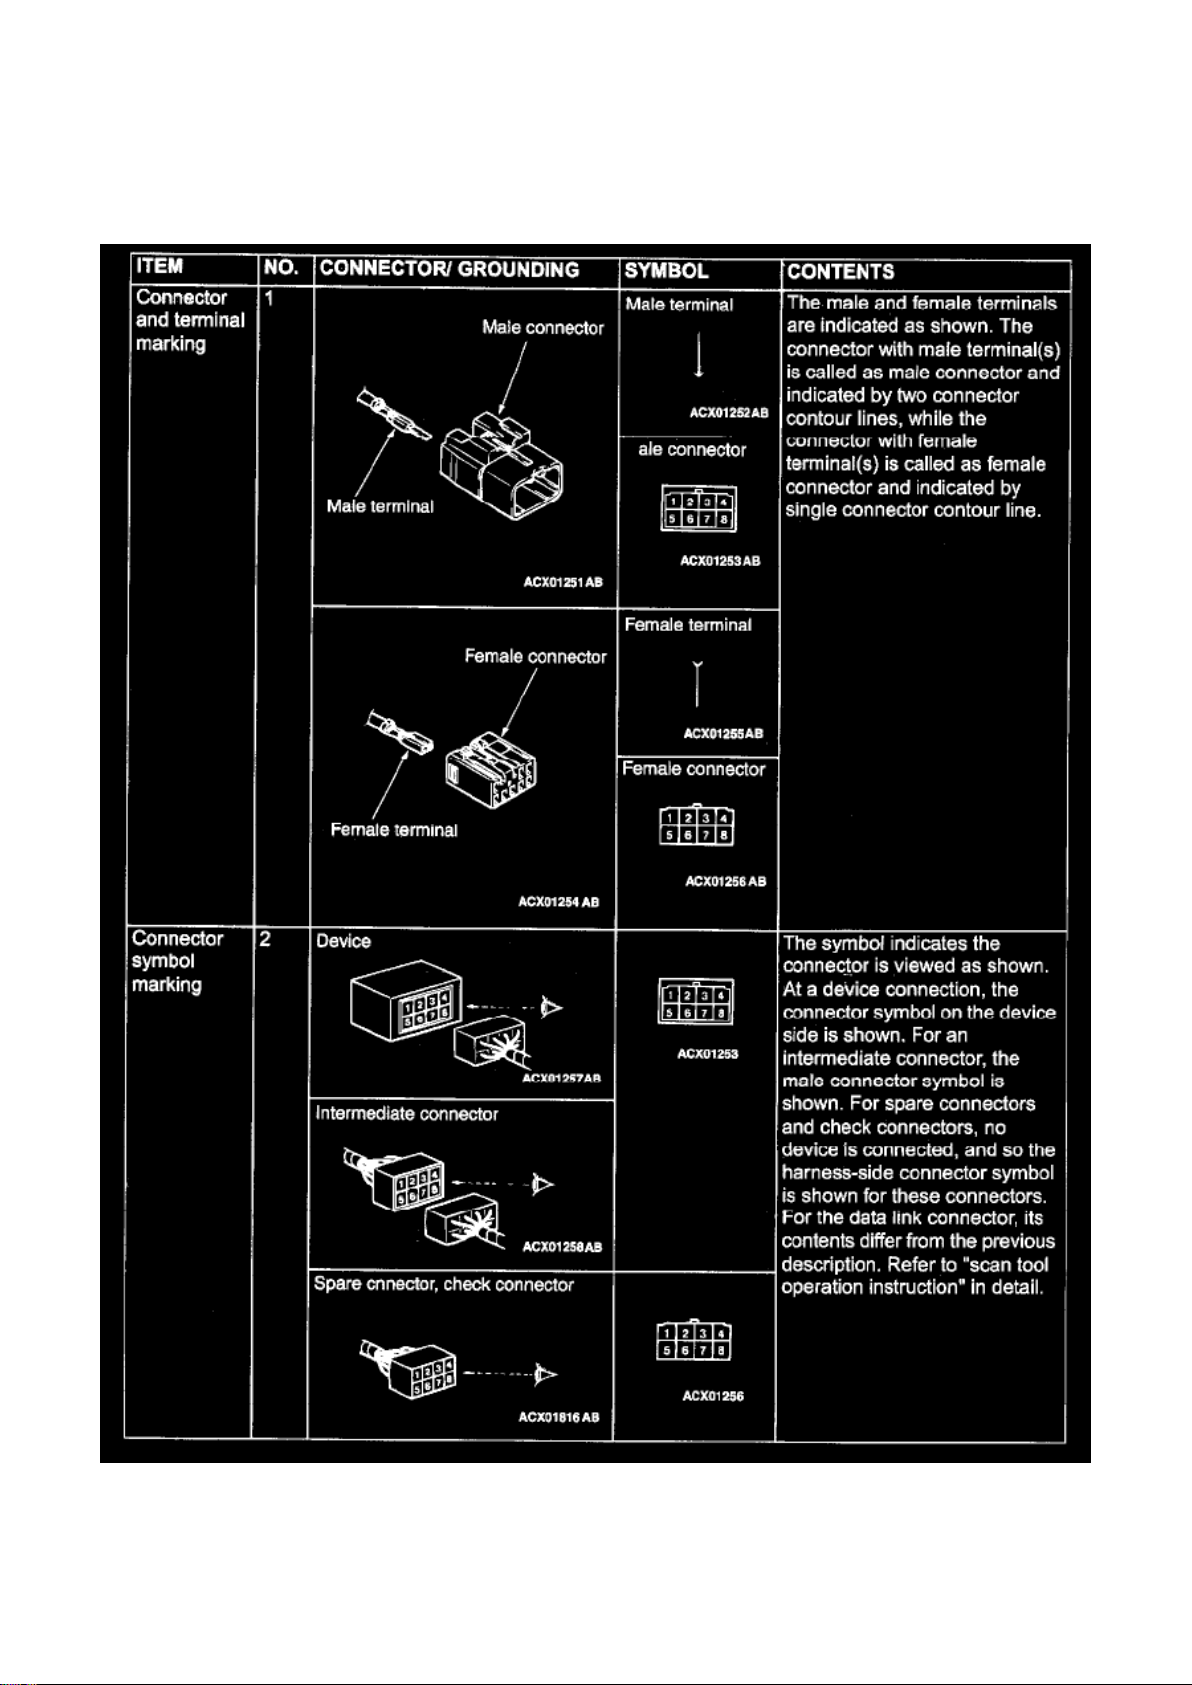
Connector/Grounding Indications Part 2
Page 14
Dodge Stratus Coupe Workshop Manual (L4-2.4L VIN G (2003))
Dodge Workshop Manuals > Relays and Modules > Relays and Modules - HVAC > Blower Motor Relay > Component
Information > Diagrams > Diagram Information and Instructions > Page 35
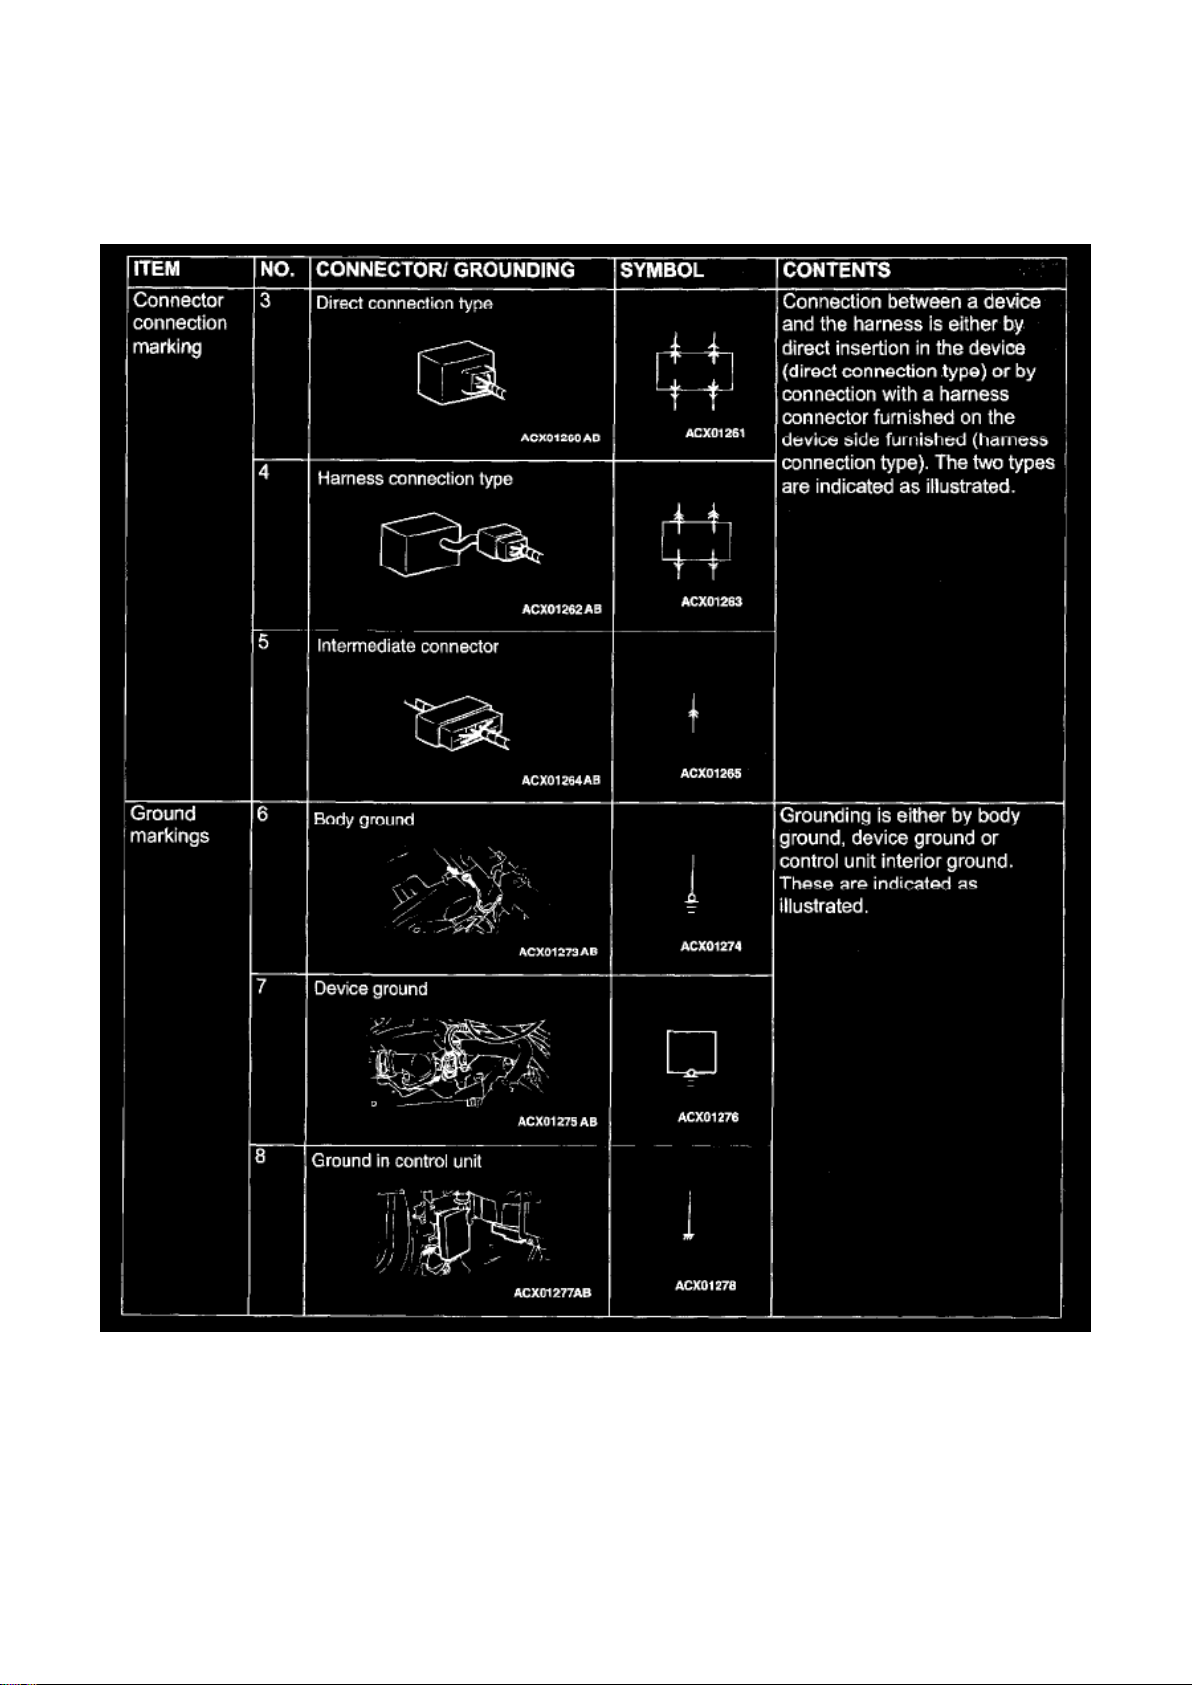
Connector/Grounding Indications Part 3
Page 15
Dodge Stratus Coupe Workshop Manual (L4-2.4L VIN G (2003))
Dodge Workshop Manuals > Relays and Modules > Relays and Modules - HVAC > Blower Motor Relay > Component
Information > Diagrams > Diagram Information and Instructions > Page 36
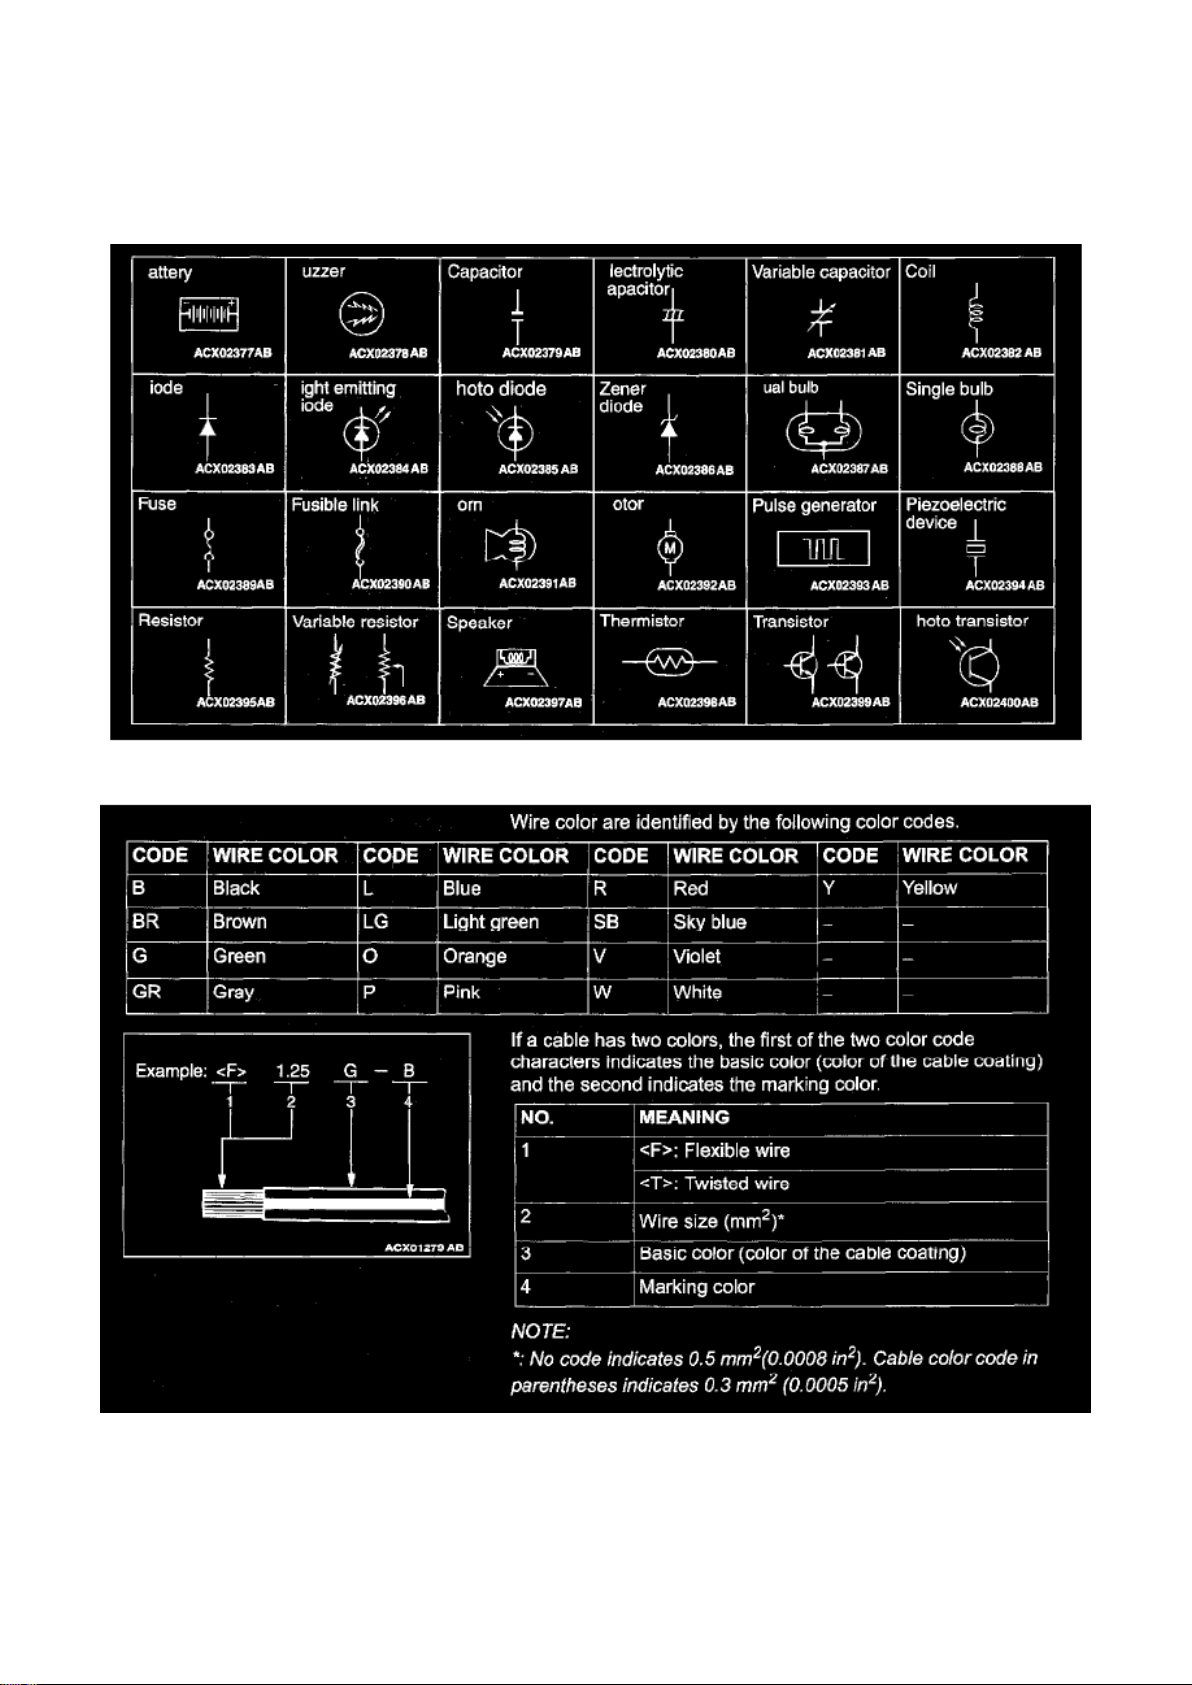
Symbols (Except Connector And Grounding)
Wire Color Codes
Page 16
Dodge Stratus Coupe Workshop Manual (L4-2.4L VIN G (2003))
Dodge Workshop Manuals > Relays and Modules > Relays and Modules - HVAC > Blower Motor Relay > Component
Information > Diagrams > Diagram Information and Instructions > Page 37
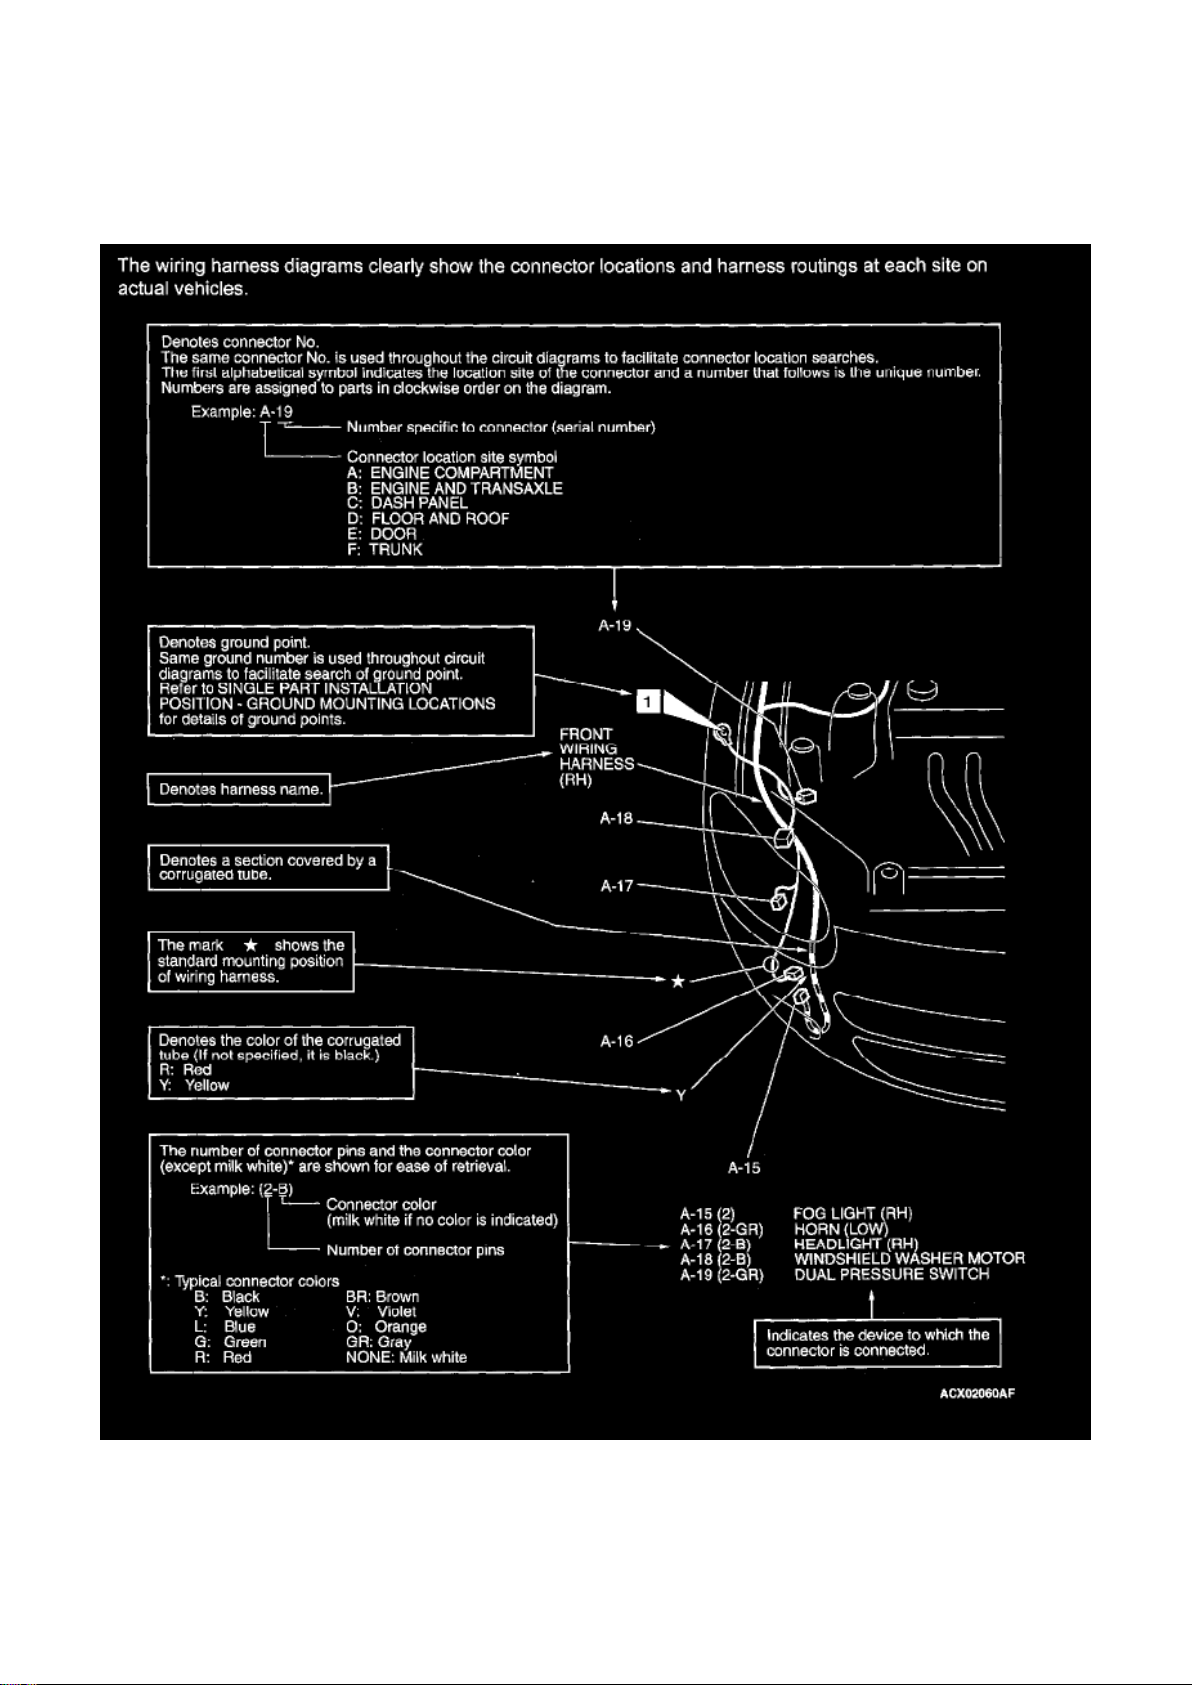
How To Read Configuration Diagrams
Page 17
Dodge Stratus Coupe Workshop Manual (L4-2.4L VIN G (2003))
Dodge Workshop Manuals > Relays and Modules > Relays and Modules - HVAC > Blower Motor Relay > Component
Information > Diagrams > Diagram Information and Instructions > Page 38
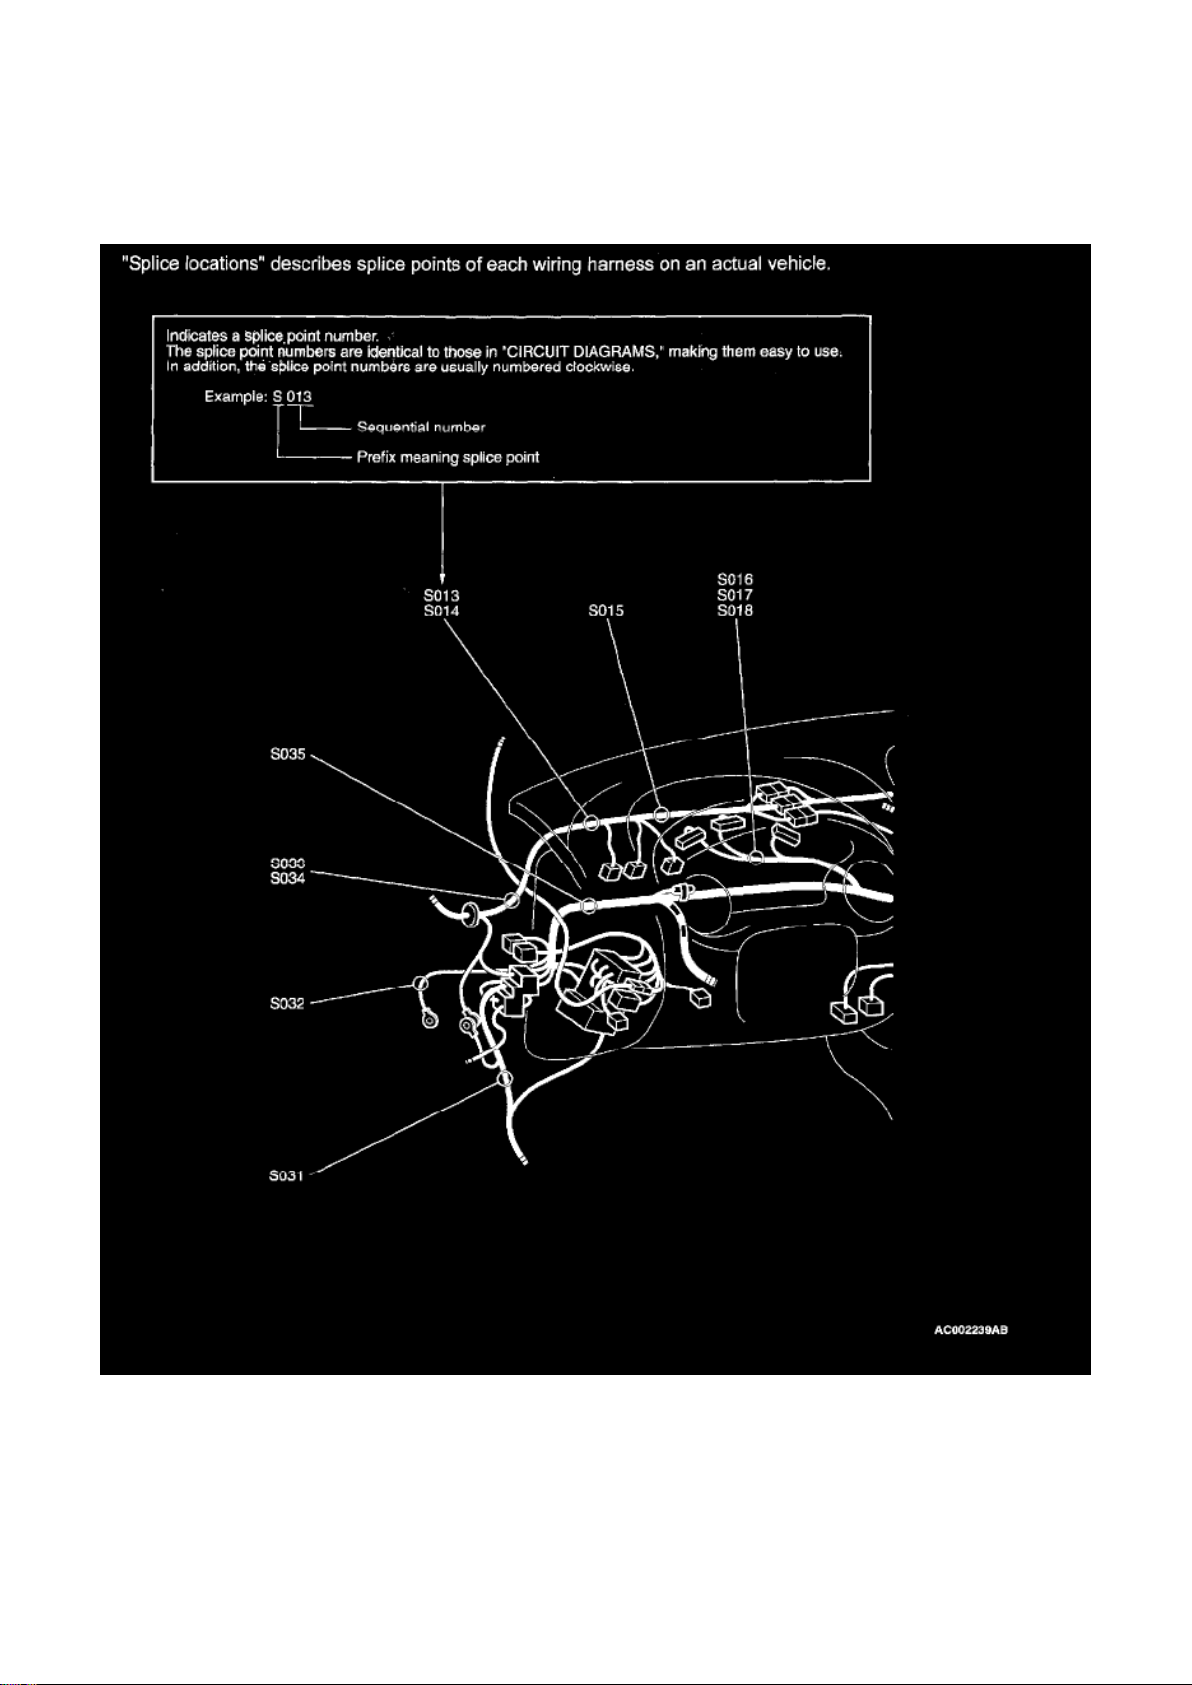
How To Read Splice Locations
Page 18
Dodge Stratus Coupe Workshop Manual (L4-2.4L VIN G (2003))
Dodge Workshop Manuals > Relays and Modules > Relays and Modules - HVAC > Blower Motor Relay > Component
Information > Diagrams > Diagram Information and Instructions > Page 39
Page 19

Blower Motor Relay: Diagnostic Aids
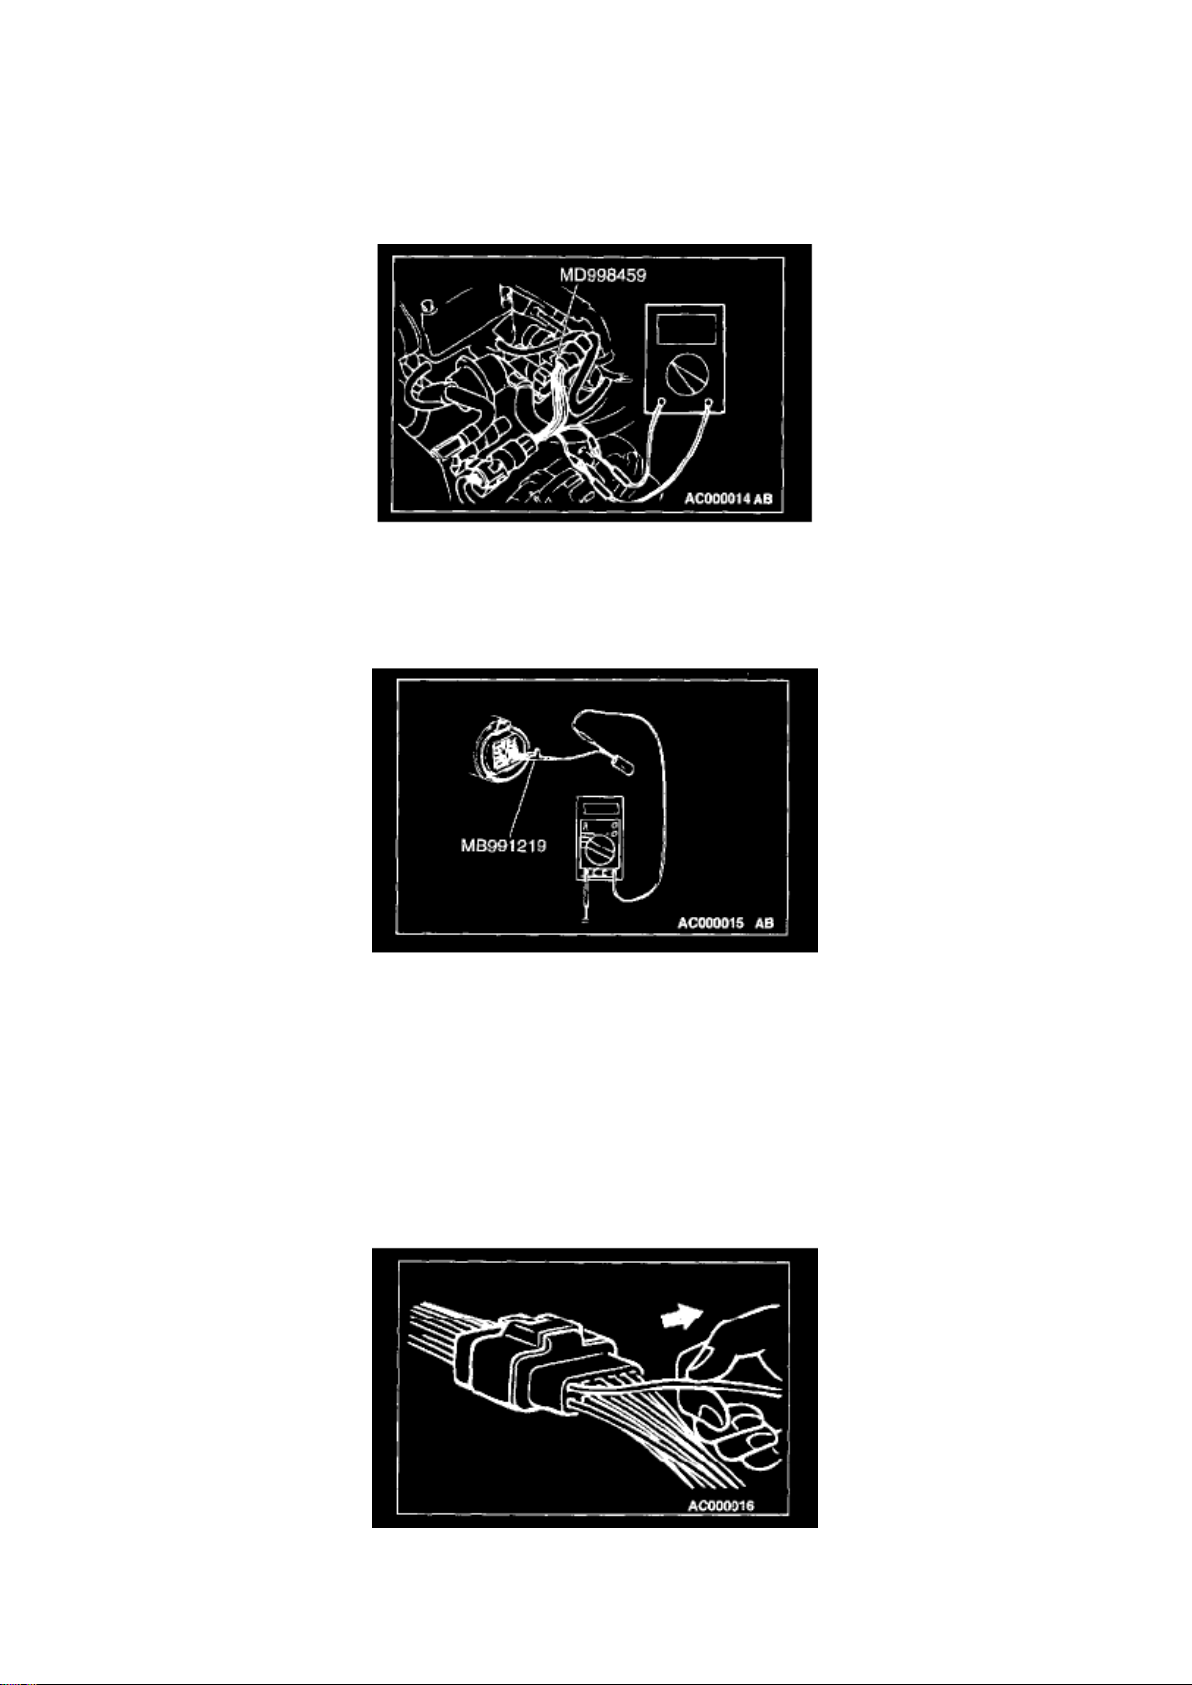
Harness Connector Inspection
CONNECTOR CONTINUITY AND VOLTAGE TEST
Required Special Tools:
- MB991219: Test Harness Set
- MD998459: Test Harness
Follow the steps below to avoid causing poor connector contact and/or reduced waterproof
performance of connectors when checking continuity and/or voltage at terminals of waterproof
connectors.
CAUTION: Never backprobe a waterproof connector. Backprobing this type of a connector may
cause the terminals to corrode, deteriorating circuit performance.
1. If the circuit is to be checked in the closed state, use a special tool such as MD998459.
CAUTION: Forcing the probe into the terminal may open the terminal, causing intermittent or poor
contact and creating an open circuit.
2. If the connector is disconnected for checking and the facing part is the female pin side, use an
appropriate male terminal for checking the contact
pressure of connector pins (such as MB991219).
CAUTION: Do not contact more than one terminal with the probe at the same time. Contacting two
or more terminals at the same time may damage a circuit, possibly to the point of starting an
electrical fire.
3. If the facing part is the male pin side, either carefully touch the probe to the pin so it does not
accidently contact other pins, or use an appropriate
female terminal.
Page 20
Dodge Stratus Coupe Workshop Manual (L4-2.4L VIN G (2003))
Dodge Workshop Manuals > Relays and Modules > Relays and Modules - HVAC > Blower Motor Relay > Component
Information > Diagrams > Diagram Information and Instructions > Page 40
Page 21

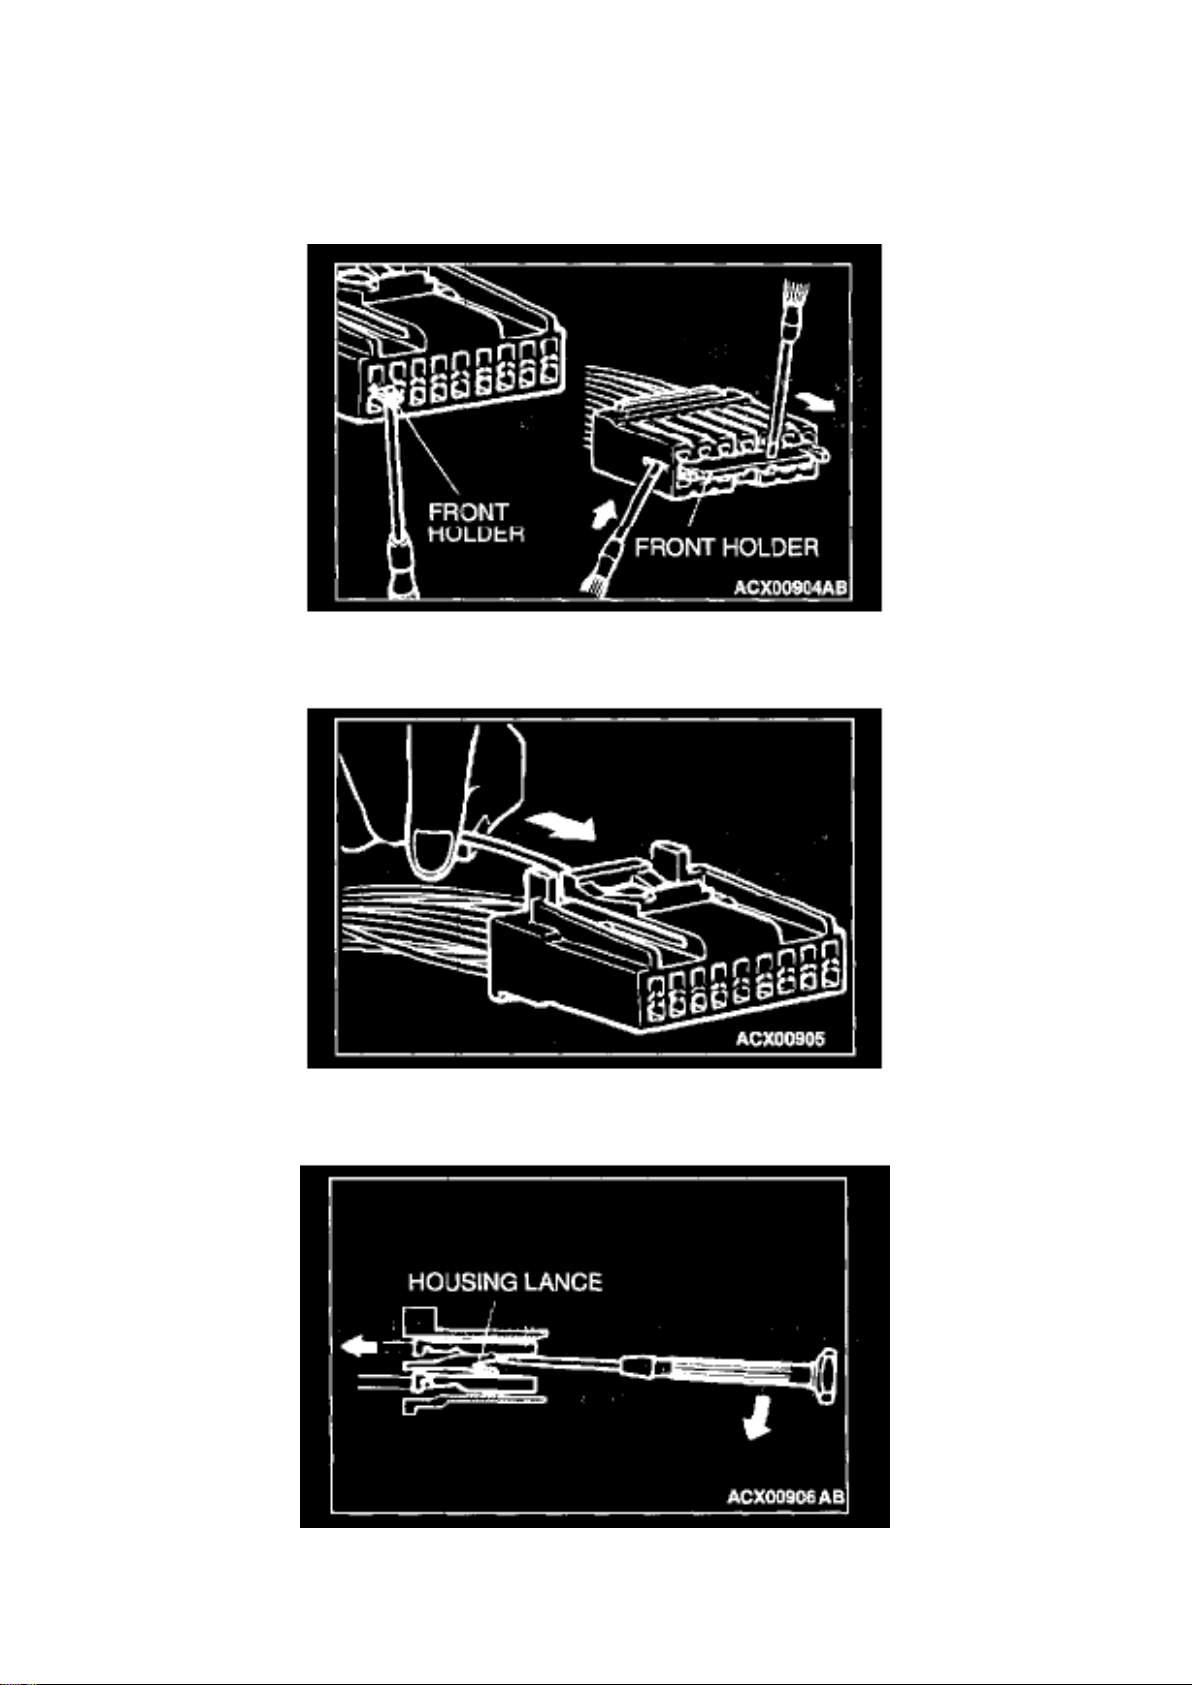
IMPROPER TERMINAL ENGAGEMENT CHECK
Terminals inside a connector may not engage properly even if the connectors engage. Make sure
that each terminal does not come out of the connector when gently pulling each harness wire. If it
does, repair or replace the terminal and/or connector.
CONNECTOR TERMINAL ENGAGEMENT AND DISENGAGEMENT
Loosely engaged terminals can be repaired by removing the female terminal from the connector
housing and raising its lance to establish better engagement. Removal of the connector terminal
used for MFI and INVECS-II A/T control circuits can be done in the following manner.
COMPUTER CONNECTOR
1. Insert a screwdriver [1.4 mm (0.06 inch) width] as shown in the figure, disengage the front
holder, and remove it.
2. Push the harness wire of the terminal to be repaired deep into the connector from the harness
side and hold it there.
3. Insert the tip of the screwdriver [1.4 mm (0.06 inch) width] into the connector as shown in the
figure, raise the housing lance slightly with the tip,
and pull out the terminal.
Page 22
Dodge Stratus Coupe Workshop Manual (L4-2.4L VIN G (2003))
Dodge Workshop Manuals > Relays and Modules > Relays and Modules - HVAC > Blower Motor Relay > Component
Information > Diagrams > Diagram Information and Instructions > Page 41
Page 23

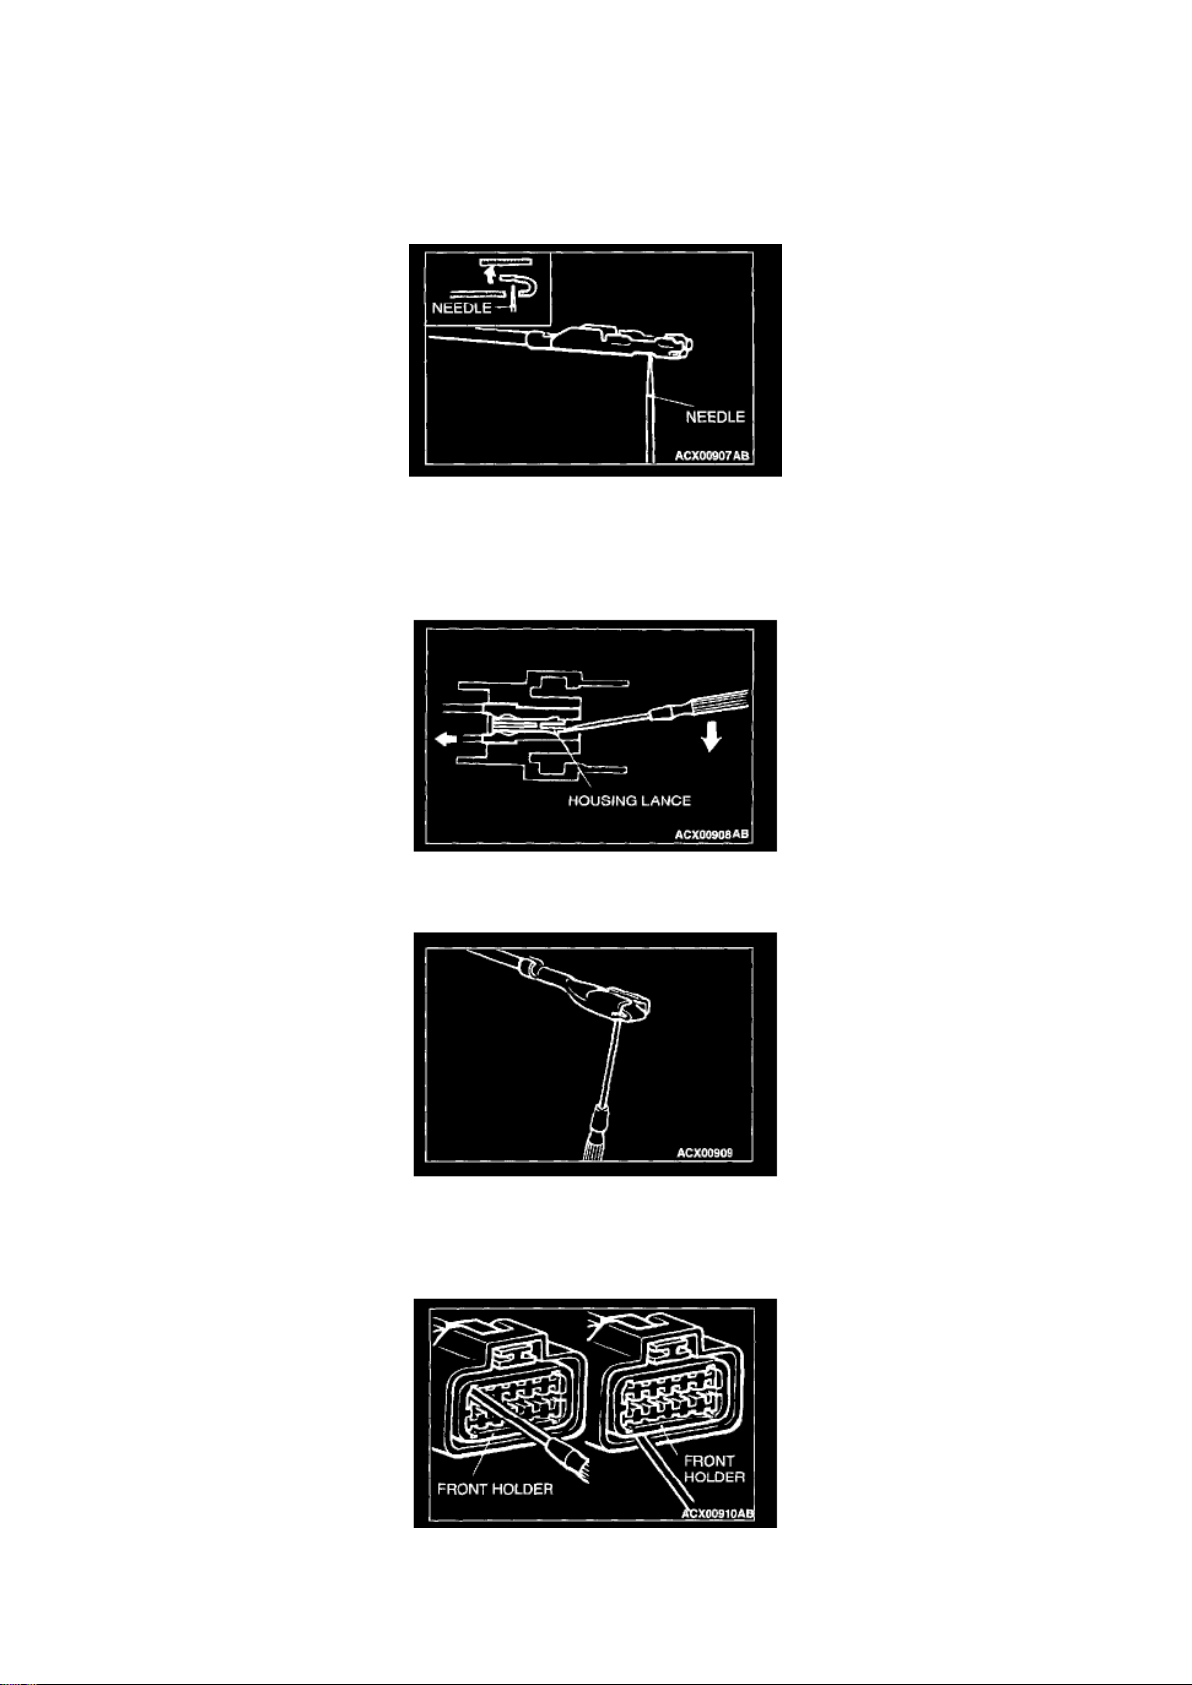
4. Insert a needle through the hole provided on the terminal and raise the contact point. Lightly
squeeze the outer edge so the flats are parallel with
the bottom.
ROUND WATERPROOF CONNECTOR
1. Remove the waterproof cap by using a screwdriver.
2. Insert the tip of the screwdriver [1.4 mm (0.06 inch) or 2.0 mm (0.08 inch) width] into the
connector as shown in the figure, raise the housing
lance slightly with the tip, and pull out the terminal.
3. Insert a screwdriver through the hole provided on the terminal and raise the contact point. Lightly
squeeze the outer edge so the flats are parallel
with the bottom.
RECTANGULAR WATERPROOF CONNECTOR
1. Disengage the front holder with a screwdriver and remove it.
Page 24
Dodge Stratus Coupe Workshop Manual (L4-2.4L VIN G (2003))
Dodge Workshop Manuals > Relays and Modules > Relays and Modules - HVAC > Blower Motor Relay > Component
Information > Diagrams > Diagram Information and Instructions > Page 42
Page 25

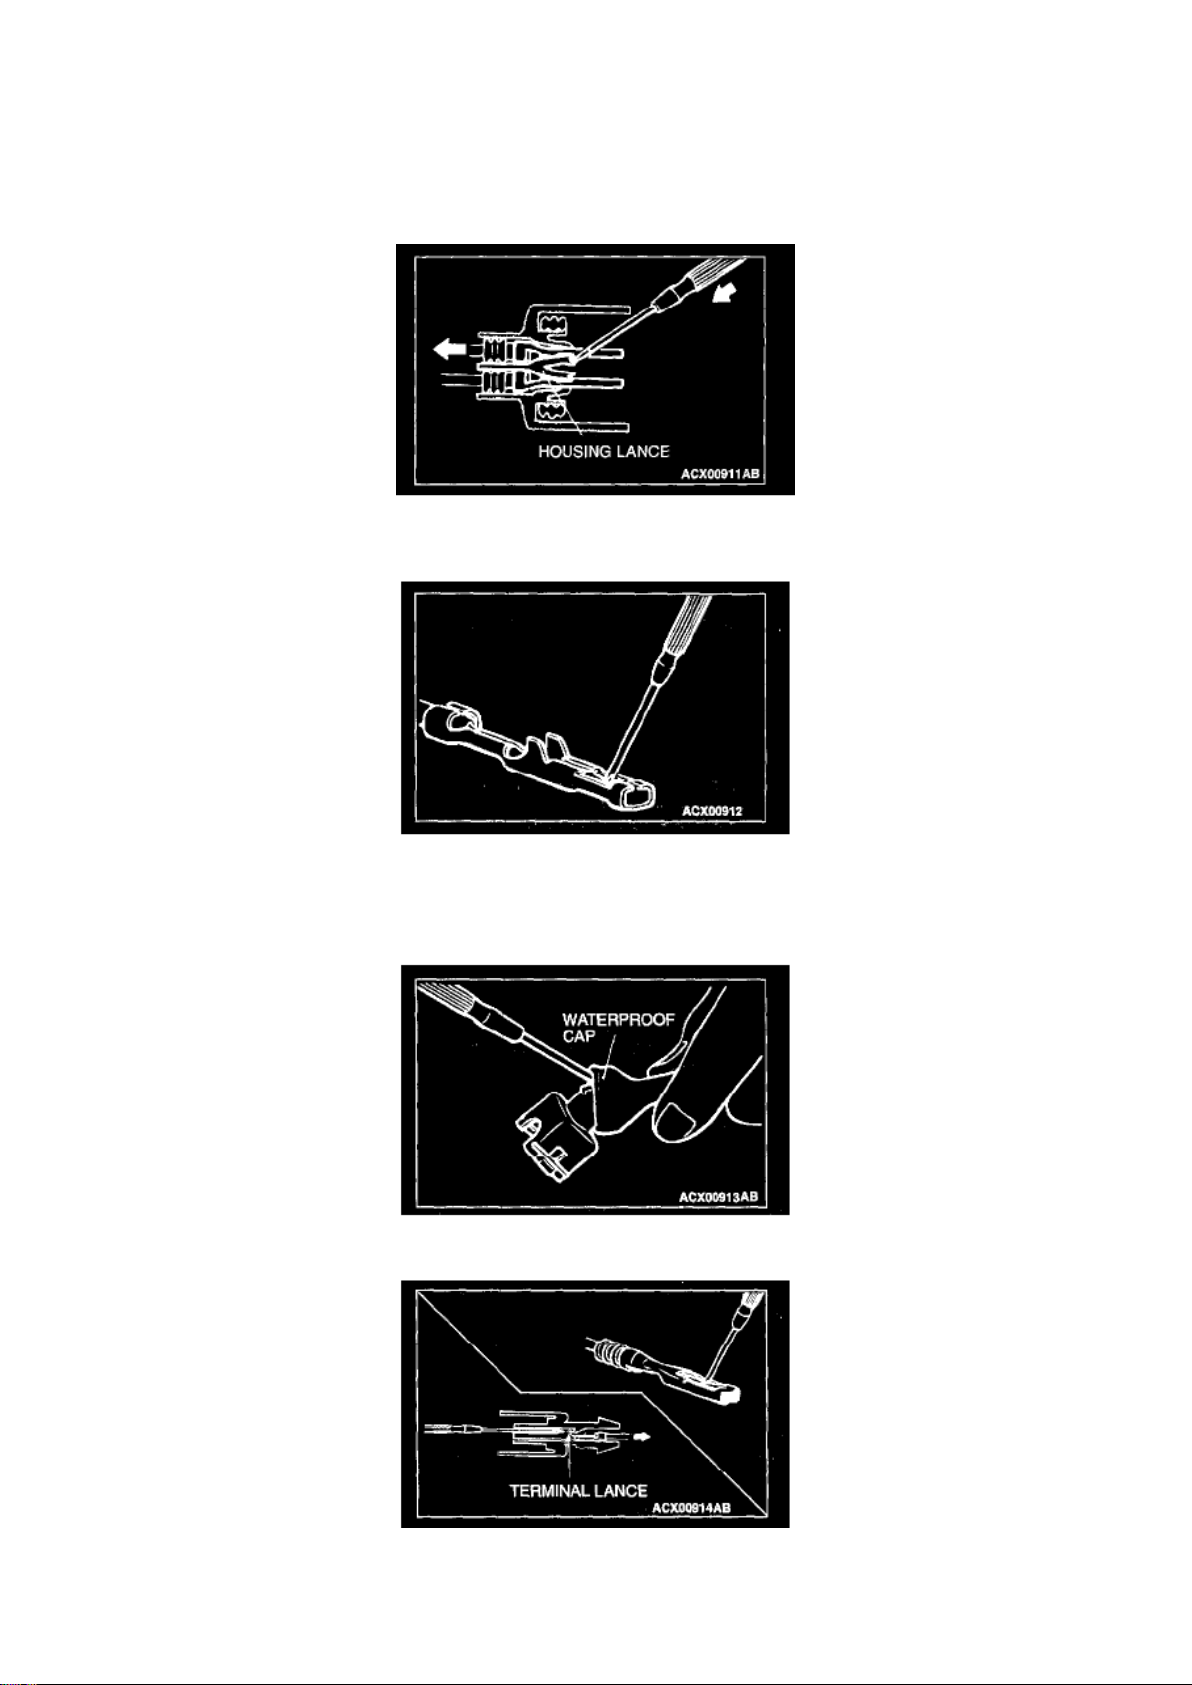
2. Insert the tip of a screwdriver [0.8 mm (0.03 inch) width] into the connector as shown in the
figure, push it lightly to raise the housing lance, and
pull out the terminal.
3. Press the contact point of the female terminal down by holding a screwdriver [1.4 mm (0.06 inch)
width] as shown in the figure. Lightly squeeze
the outer edge so the flats are parallel with the bottom.
INJECTOR CONNECTOR
1. Remove the waterproof cap.
2. Insert the tip of a screwdriver [1.4 mm (0.06 inch) width] into the connector as shown in the
figure, press in the terminal lance, and pull out the
terminal.
CAUTION: Make sure the lance is pressed in before the terminal is inserted into the connector.
3. Press the contact point of the male terminal down by holding a screwdriver [1.4 mm (0.06 inch)
width] as shown in the figure.
Page 26
Dodge Stratus Coupe Workshop Manual (L4-2.4L VIN G (2003))
Dodge Workshop Manuals > Relays and Modules > Relays and Modules - HVAC > Blower Motor Relay > Component
Information > Diagrams > Diagram Information and Instructions > Page 43
Page 27

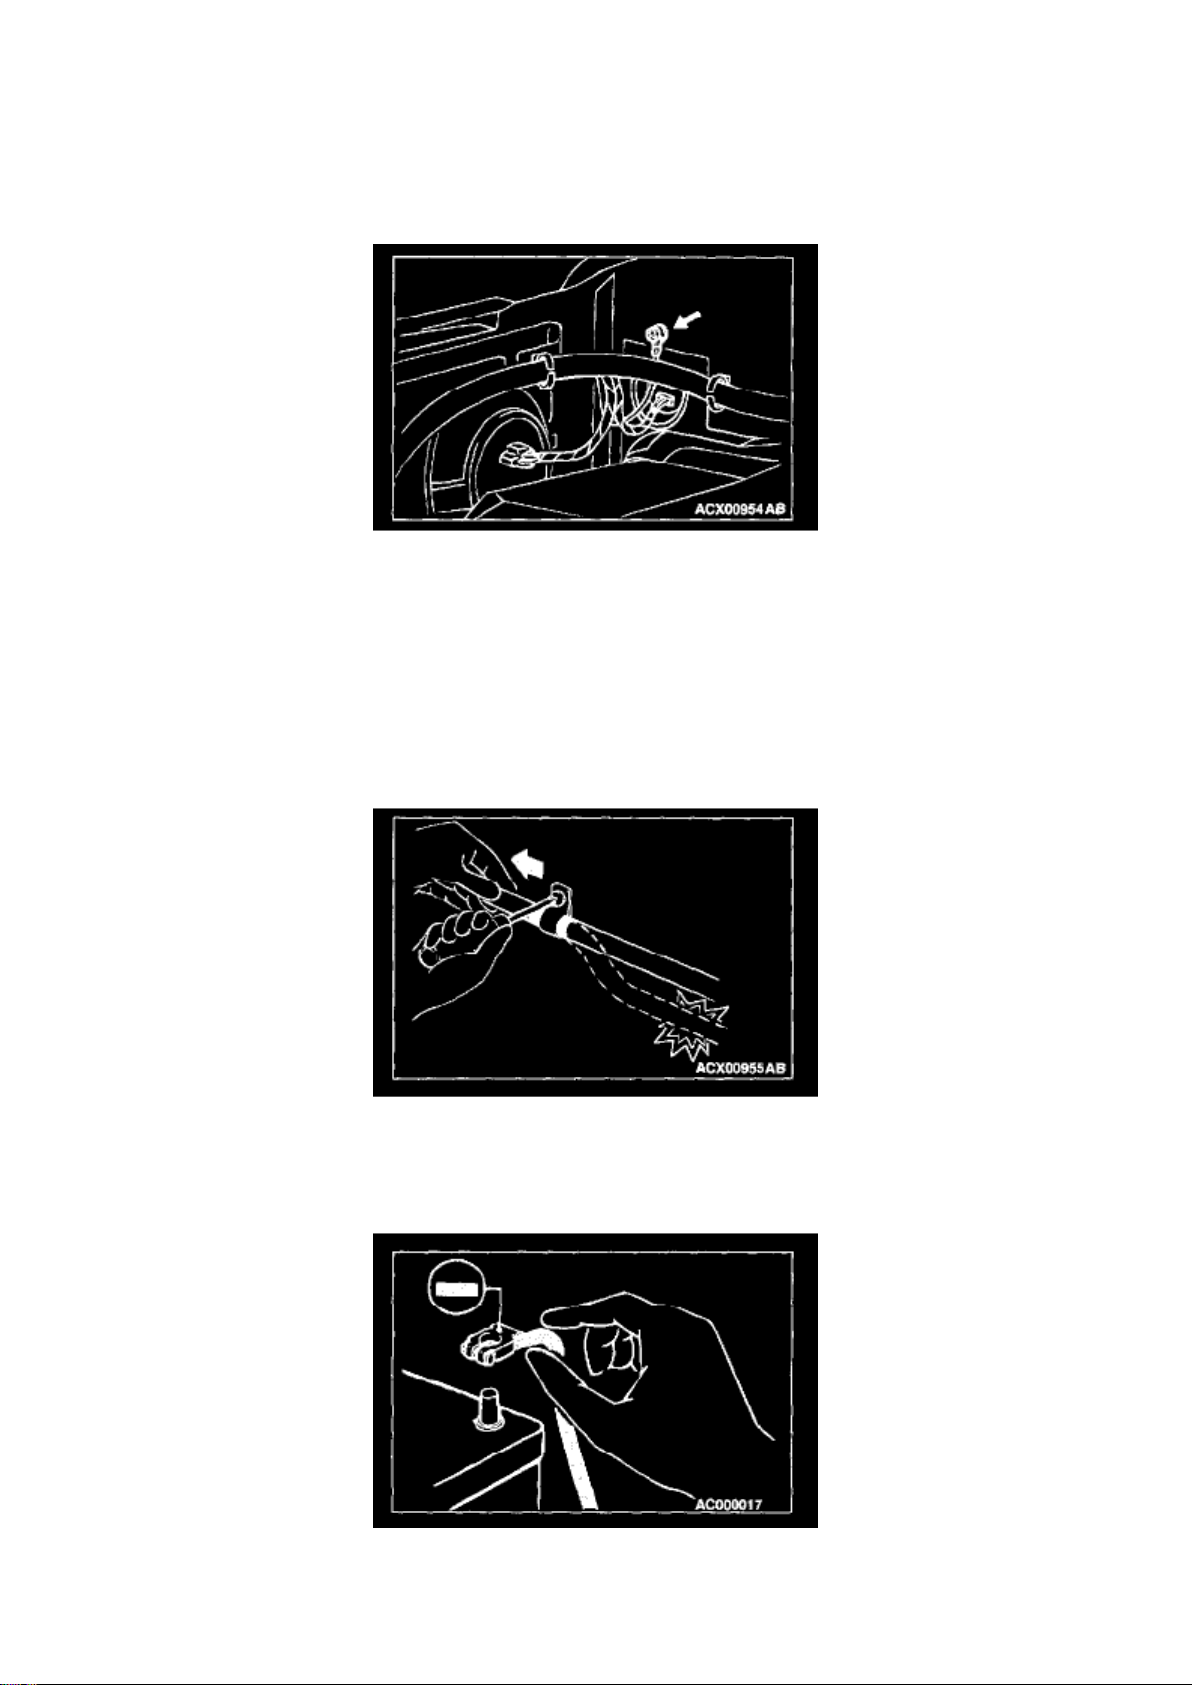
Cable and Wires Check
1. Check connections for looseness, rust, and stains. 2. Check terminals and wires for corrosion by
battery electrolyte, etc. 3. Check terminals and wires for open circuit or frayed wires. 4. Check wire
insulation and coating for damage, cracks, and wear. 5. Check conductive parts of terminals for
contact with other metallic parts (vehicle body and other parts). 6. Check grounding parts to verify
that there is complete continuity between attaching bolt(s) and vehicle body. 7. Check for incorrect
wiring. 8. Check that harnesses are secured to prevent contact with sharp edges and corners or
hot parts (exhaust manifold, pipe, etc.). 9. Check that harnesses are secured firmly to provide
enough clearance from the fan pulley, fan belt, and other rotating or moving parts.
10. Check that the harness between fixed parts (such as the vehicle body) and vibrating parts
(such as the engine) are long enough to allow for
vibration and movement.
Battery Handling
WARNING: Battery posts, terminals and related accessories contain lead and lead compounds.
WASH HANDS AFTER HANDLING
When checking or servicing does not require power from the vehicle battery, be sure to disconnect
the cable from the battery (-) terminal. This will prevent problems that could be caused by a short
circuit. Disconnect the (-) battery terminal first and reconnect it last.
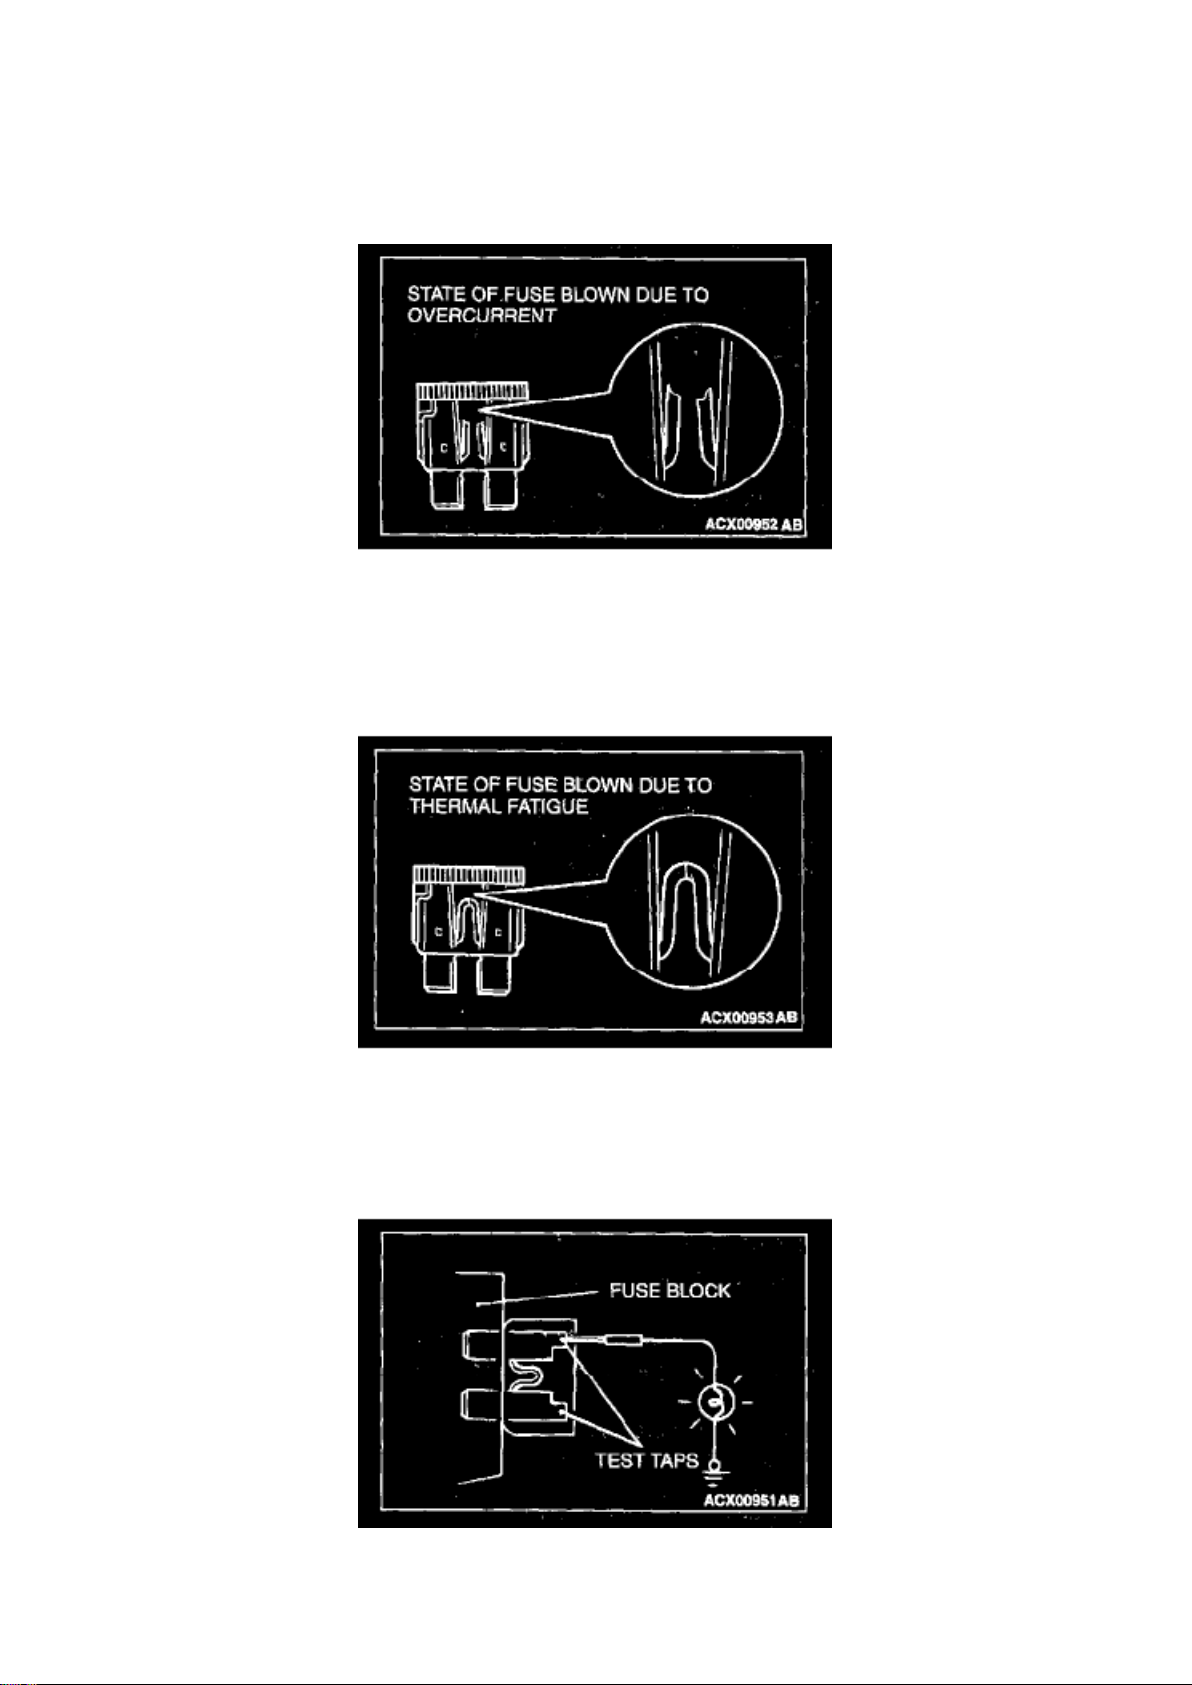
Cautions In Event of Blown Fuse
When a fuse is blown, there are two probable causes. One is that it is blown due to flow of current
exceeding its rating. The other is that it is blown due to repeated on/off current flowing through it.
Which of the two causes is responsible can be easily determined by visual check as described
below.
Page 28
Dodge Stratus Coupe Workshop Manual (L4-2.4L VIN G (2003))
Dodge Workshop Manuals > Relays and Modules > Relays and Modules - HVAC > Blower Motor Relay > Component
Information > Diagrams > Diagram Information and Instructions > Page 44
Page 29

1. Fuse blown due to current exceeding rating
The illustration shows the state of a fuse blown due to this cause. In this case, do not replace the
fuse with a new one hastily since a current heavy enough to blow the fuse has flowed through it.
First, check the circuit for shorts and check for abnormal electric parts. After correcting shorts or
replacing parts, use only a fuse of the same capacity as a replacement. Never use a fuse of larger
capacity than the original fuse. If a larger capacity fuse is used, electric parts or wiring could be
damaged, or could start a fire.
2. Fuse blown due to repeated turning current on and off The illustration shows the state of a fuse
blown due to repeated current on/off. Normally,
this type of problem occurs after a fairly long period of use and is less frequent than above. In this
case, simply replace with a new fuse of the same capacity.
Checking Fuses
A blade type fuse has test taps provided to allow checking of the fuse itself without removing it from
the fuse block. The fuse is okay if the test light comes on when its one lead is connected to the test
taps (one at a time) and the other lead is grounded. Remember to turn the ignition switch to ON to
ensure all circuits are live.
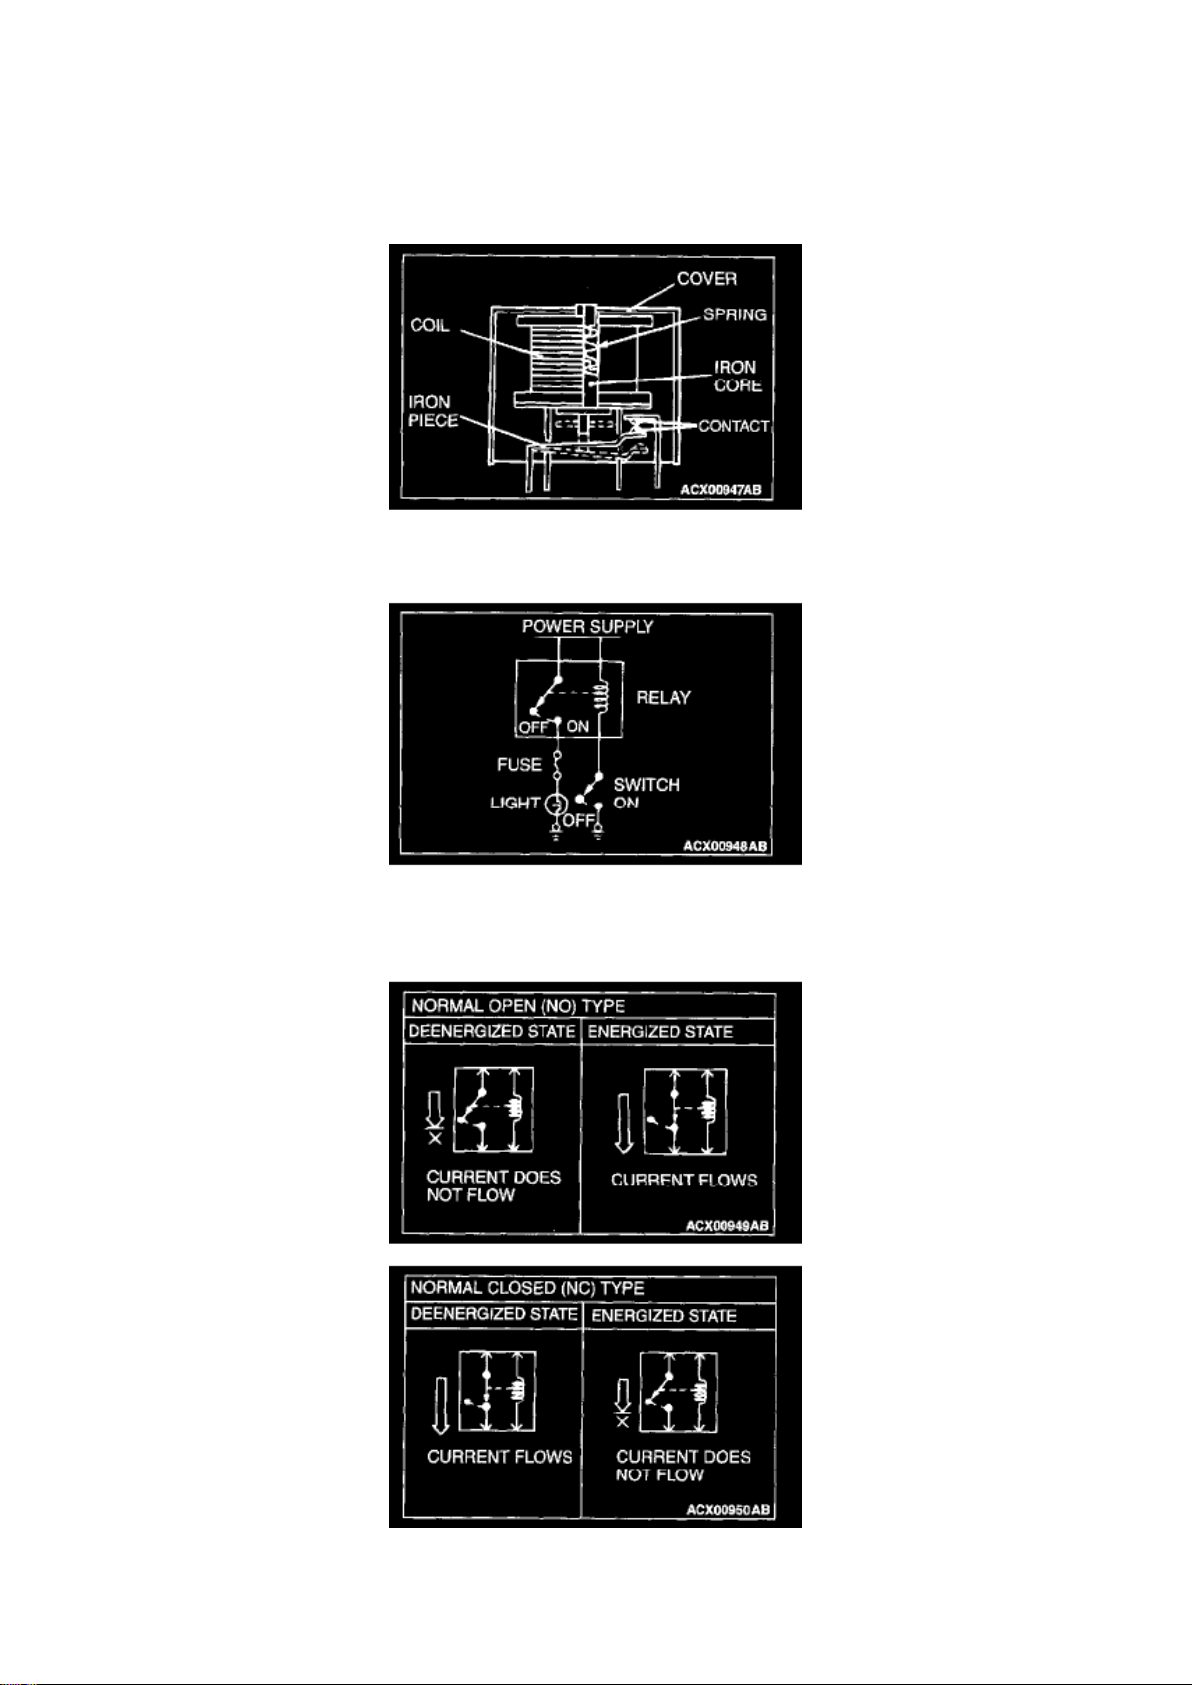
Checking Relays
NOTE: The deenergized state means that no current is flowing through the coil. The energized
state means that current is flowing through the coil.
Page 30
Dodge Stratus Coupe Workshop Manual (L4-2.4L VIN G (2003))
Dodge Workshop Manuals > Relays and Modules > Relays and Modules - HVAC > Blower Motor Relay > Component
Information > Diagrams > Diagram Information and Instructions > Page 45
Page 31

1. When current flows through the coil of a relay, its core is magnetized to attract the iron piece,
closing (ON) the contact at the tip of the iron piece.
When the coil current is turned off, the iron piece returns to its original position by a spring, opening
the contact (OFF).
2. By using a relay, a heavy current can be turned on and off by a switch using much less current.
For example, in the circuit shown here, when the
switch is turned on (closed), current flows to the coil of the relay. Then, its contact is turned on
(closed) and the light comes on. The current flowing through the switch is much less than that for
the light.
3. Relays may be classified as the normally open-type or the normally closed-type, depending on
their contact construction.
When a normally closed relay as illustrated here is checked, there should be continuity between
terminals 1 and 2 and between terminals 3 and 4 when the relay is deenergized. There should be
no continuity between terminals 3 and 4 when battery voltage is applied between terminals 1 and 2.
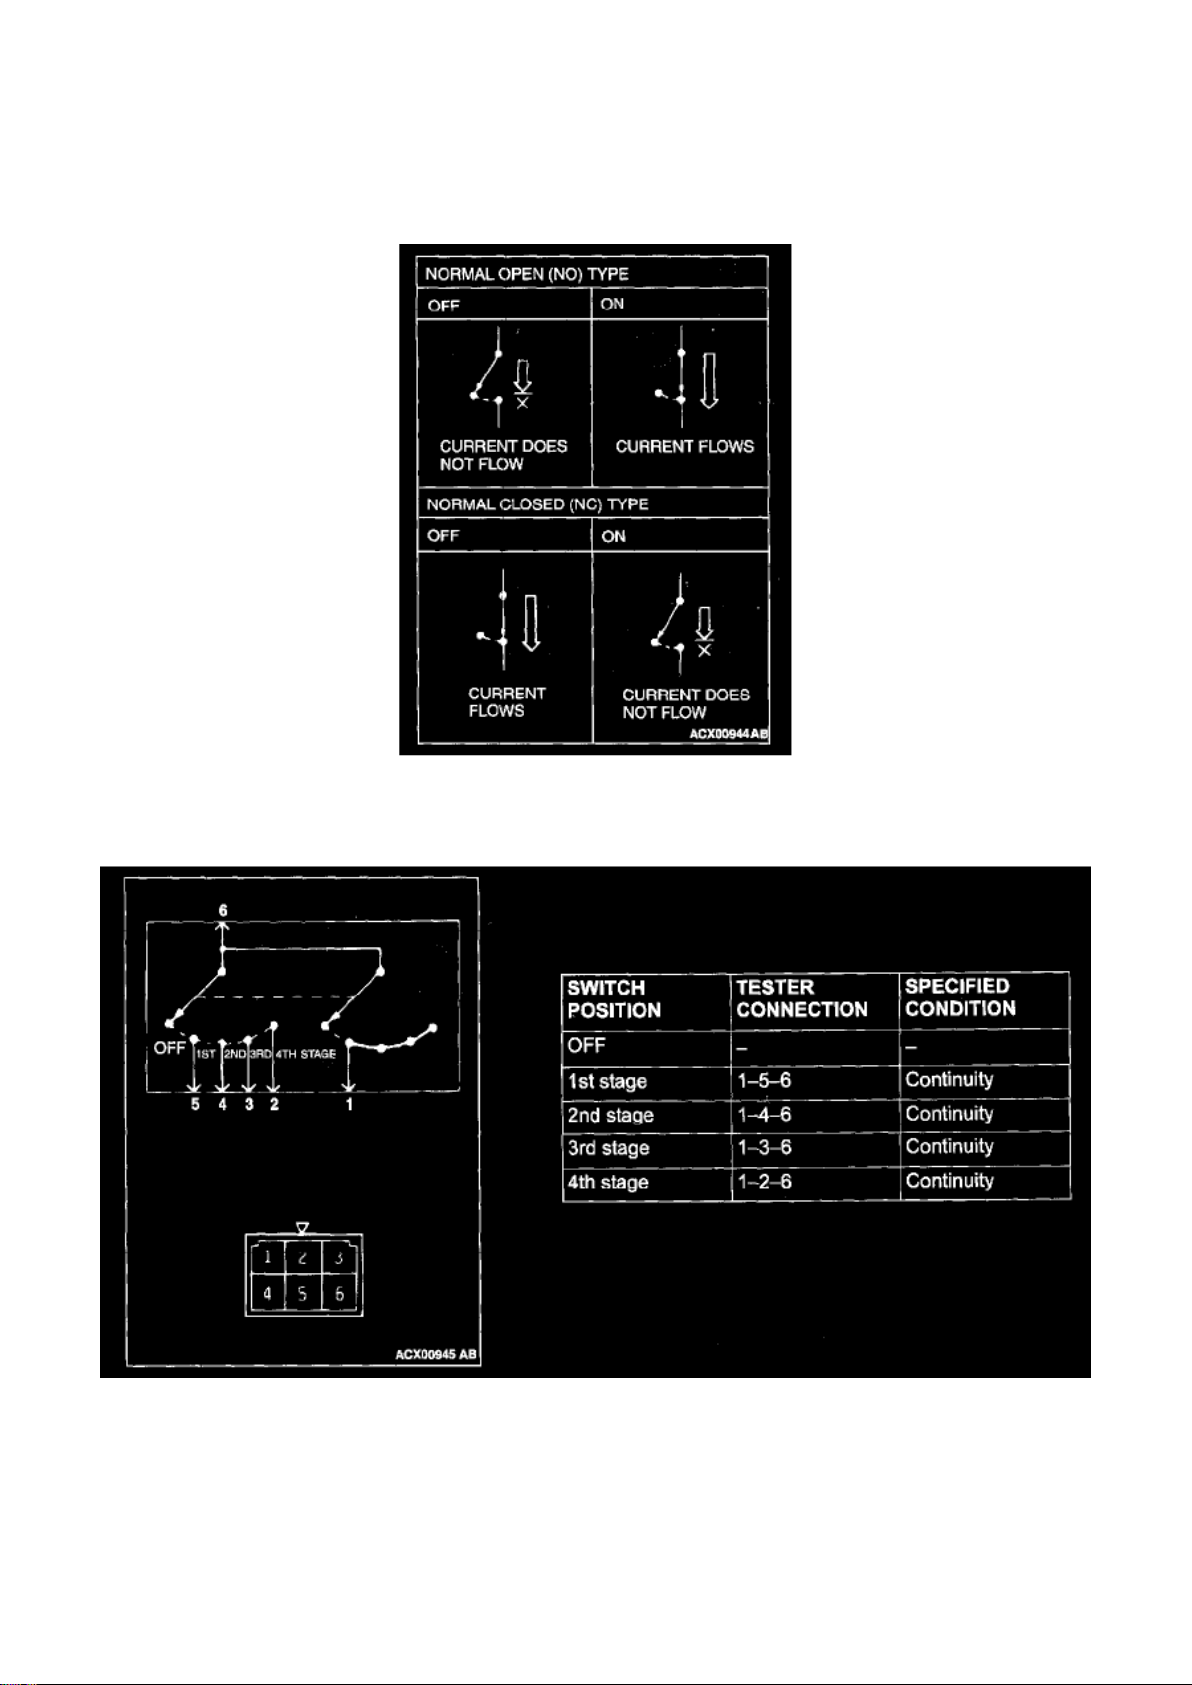
Checking Switches
In a circuit diagram, a switch is shown in the normal condition.
Page 32
Dodge Stratus Coupe Workshop Manual (L4-2.4L VIN G (2003))
Dodge Workshop Manuals > Relays and Modules > Relays and Modules - HVAC > Blower Motor Relay > Component
Information > Diagrams > Diagram Information and Instructions > Page 46
1. Normally open or normally closed switch
Switches are classified into those which open the circuit and those which close the circuit when off.
Switches are shown in their normal state unless specified otherwise.
Page 33

2. Switch connection
This figure illustrates a complex switch. The continuity between terminals at each position is as
indicated in the table below.
General Electrical System Check
GENERAL ELECTRICAL SYSTEM CHECK
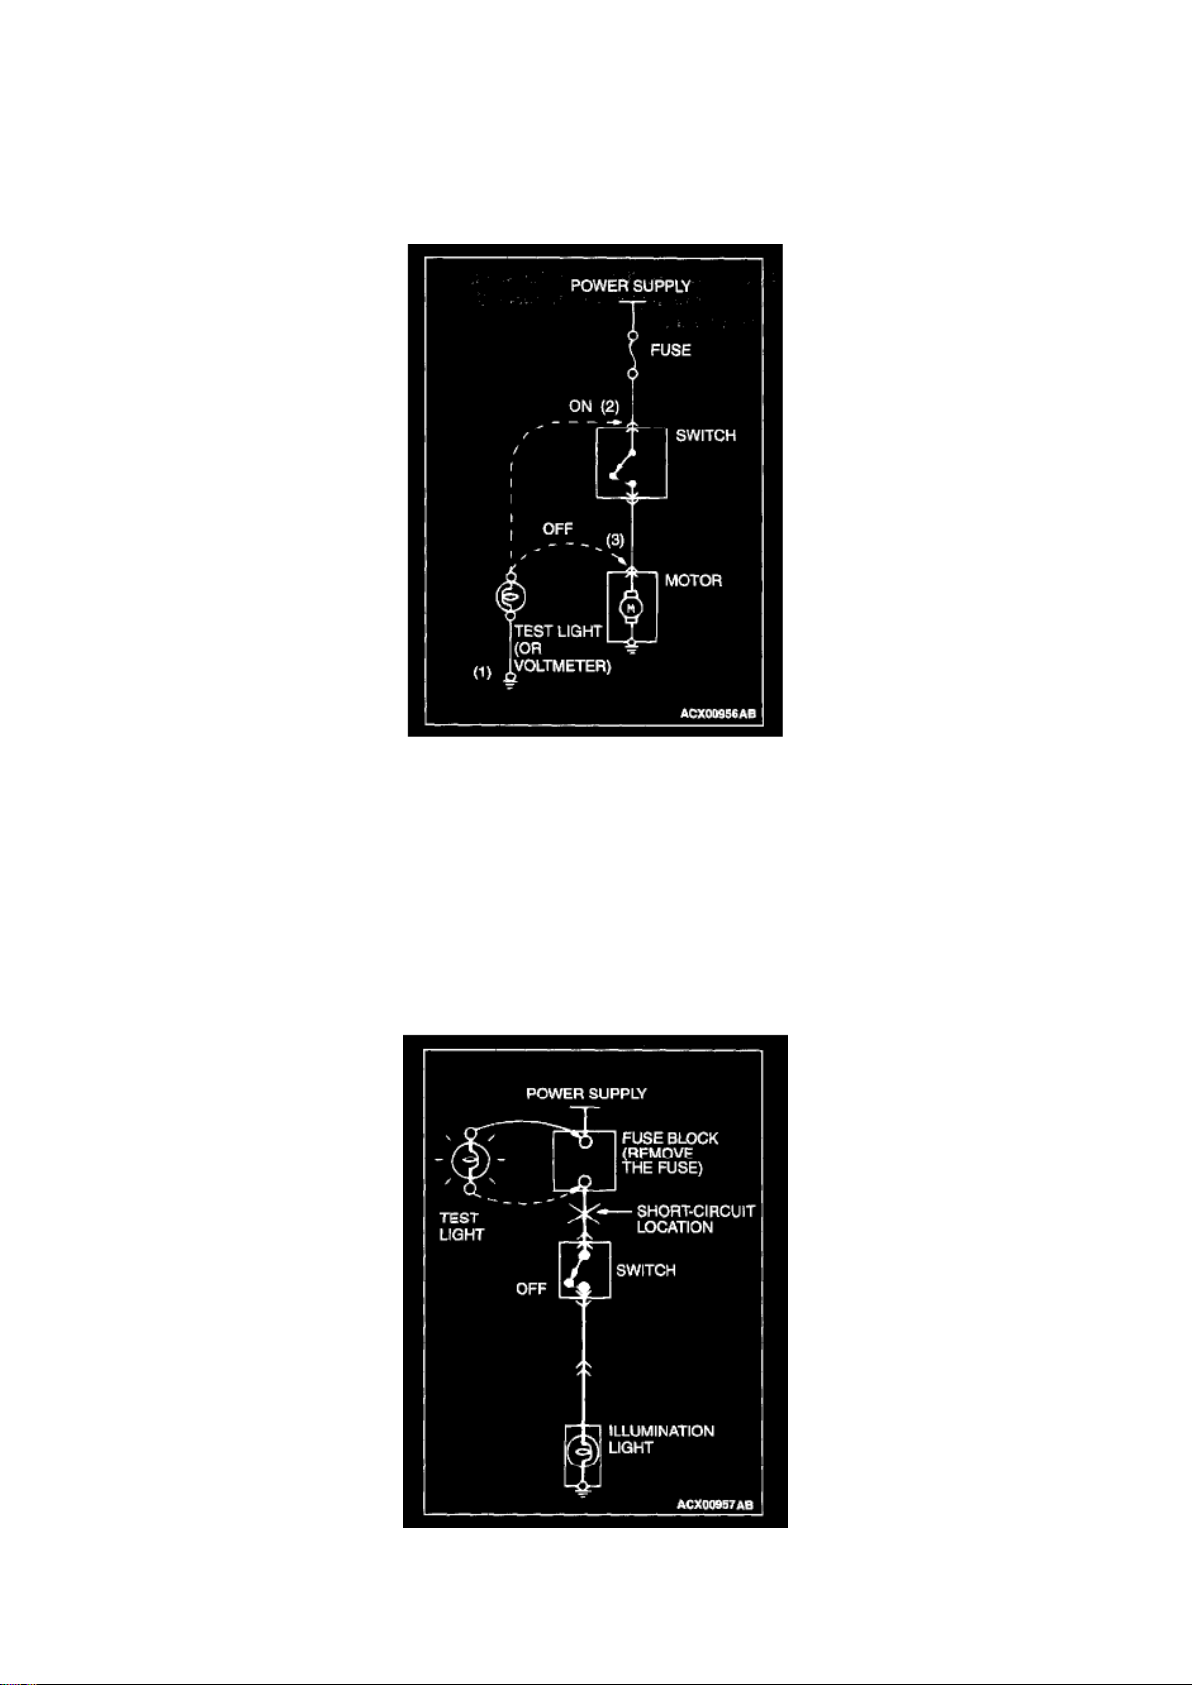
A circuit consists of the power supply, switch, relay, load, ground, etc. "there are various methods
to check a circuit including an overall check, voltage check, short-circuit check, and continuity
check. Each of the methods briefly described below apply only to circuits similar to the illustration.
Page 34
Dodge Stratus Coupe Workshop Manual (L4-2.4L VIN G (2003))
Dodge Workshop Manuals > Relays and Modules > Relays and Modules - HVAC > Blower Motor Relay > Component
Information > Diagrams > Diagram Information and Instructions > Page 47
Page 35

1. VOLTAGE CHECK
1. Ground one lead wire of the test light. If a voltmeter is used instead of the test light, ground the
grounding side lead wire. 2. Connect the other lead wire of the test light to the power side terminal
of the switch connector. The test light should come on or the voltmeter
should indicate a voltage.
3. Then, connect the test tight or voltmeter to the motor connector. The test light should not come
on, or the voltmeter should indicate no voltage.
When the switch is turned ON in this state, the test light should come on, or the voltmeter should
indicate a voltage, with the motor starting to run.
4. The circuit illustrated here is normal. If there is any problem, such as the motor failing to run,
check voltages beginning at the connector
nearest to the motor until the faulty part is identified.
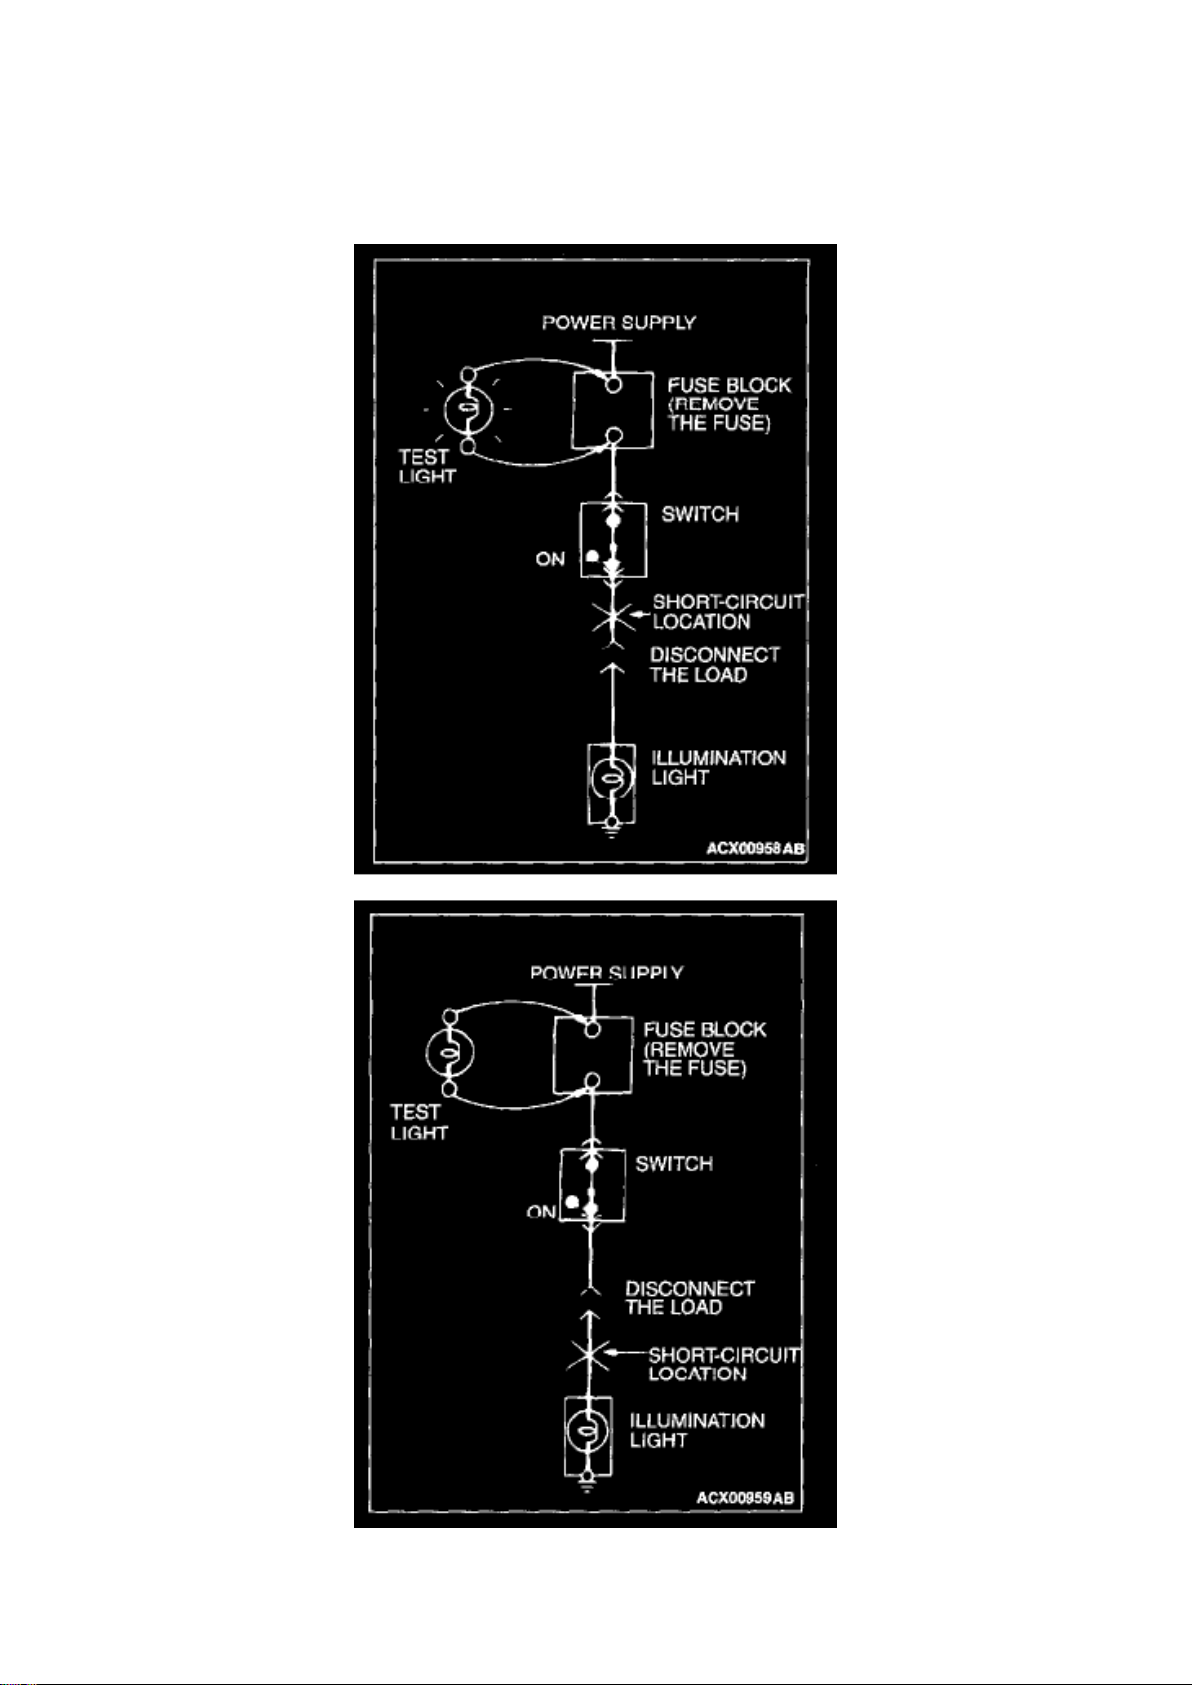
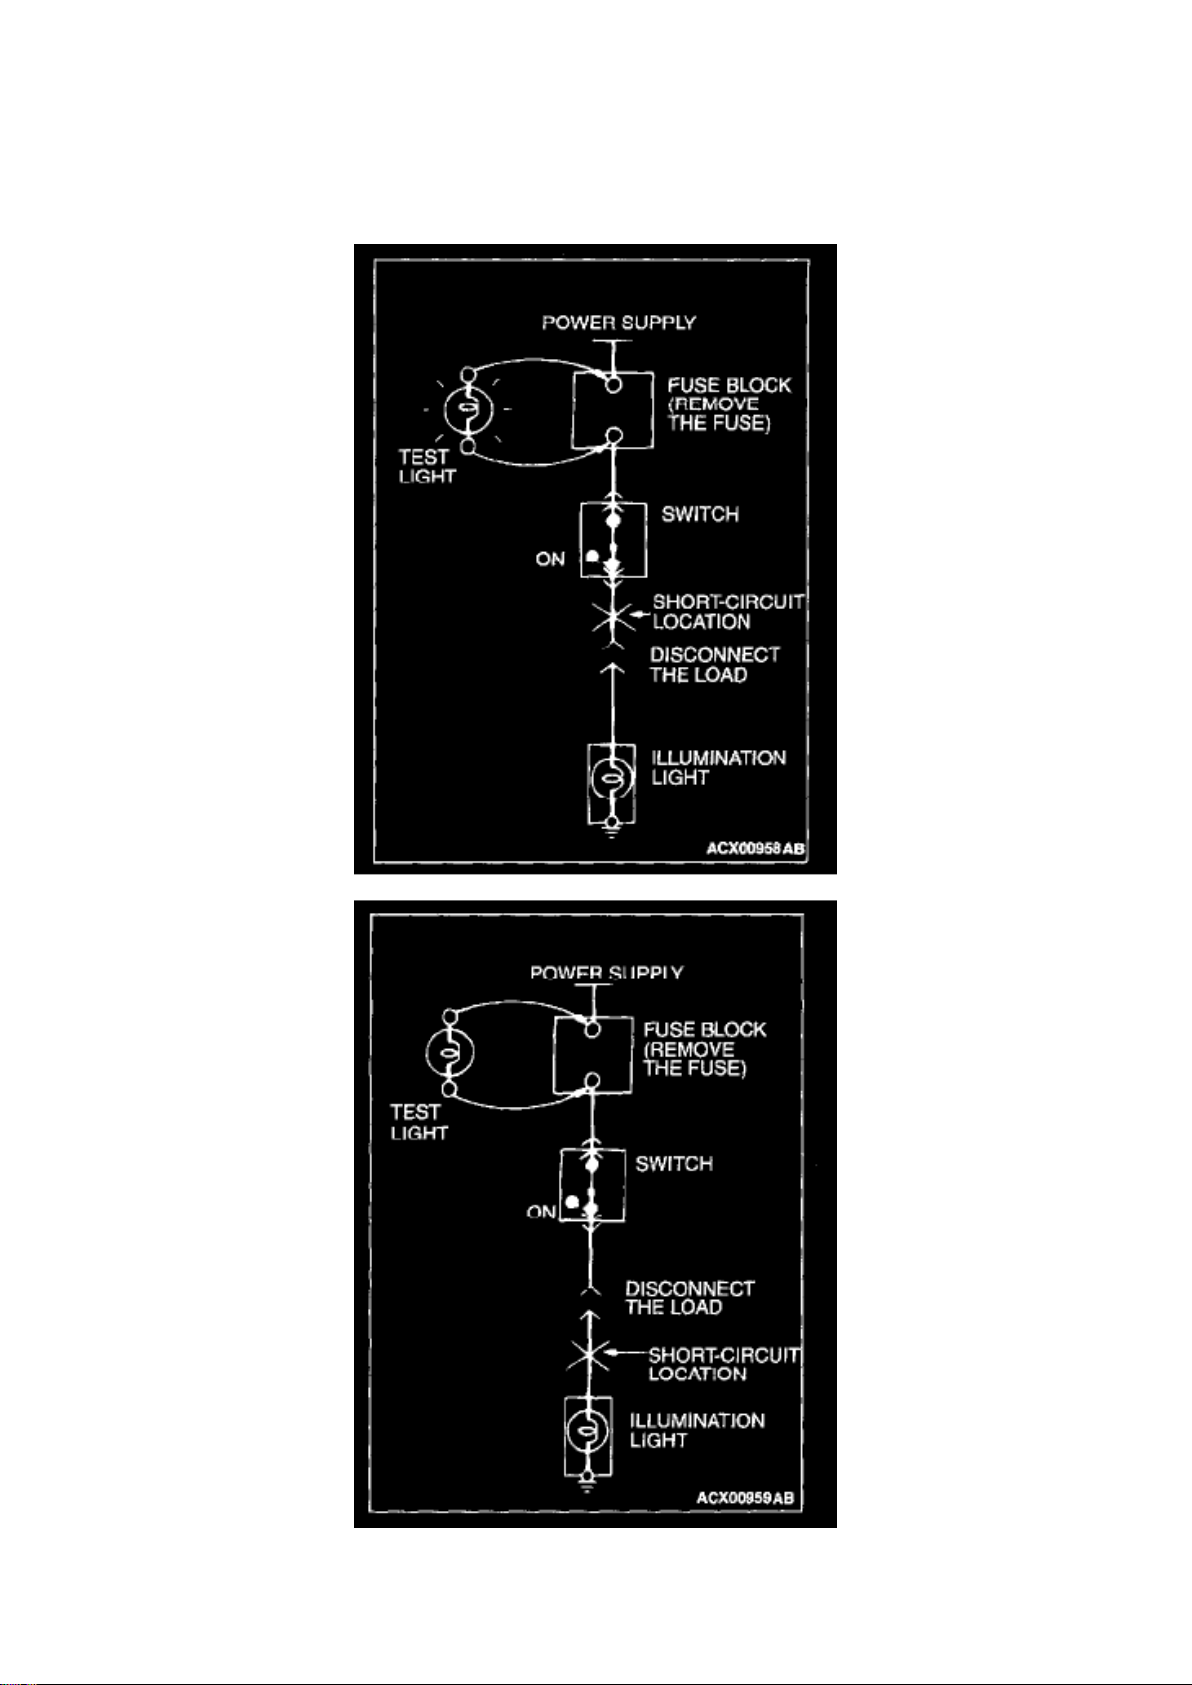
2. SHORT-CIRCUIT CHECK
Because the fuse has blown, it is probable that there is a short circuit. Follow the procedures below
to identify the short-circuit location.
STEP 1. Remove the blown fuse and connect the test light across the fuse terminals (Circuit
switch: OFF).
Q: Does the test light illuminate?
YES: Short-circuit exists between the fuse block and the switch. Repair the harness between the
fuse block and the switch.
Page 36
Dodge Stratus Coupe Workshop Manual (L4-2.4L VIN G (2003))
Dodge Workshop Manuals > Relays and Modules > Relays and Modules - HVAC > Blower Motor Relay > Component
Information > Diagrams > Diagram Information and Instructions > Page 48
Page 37

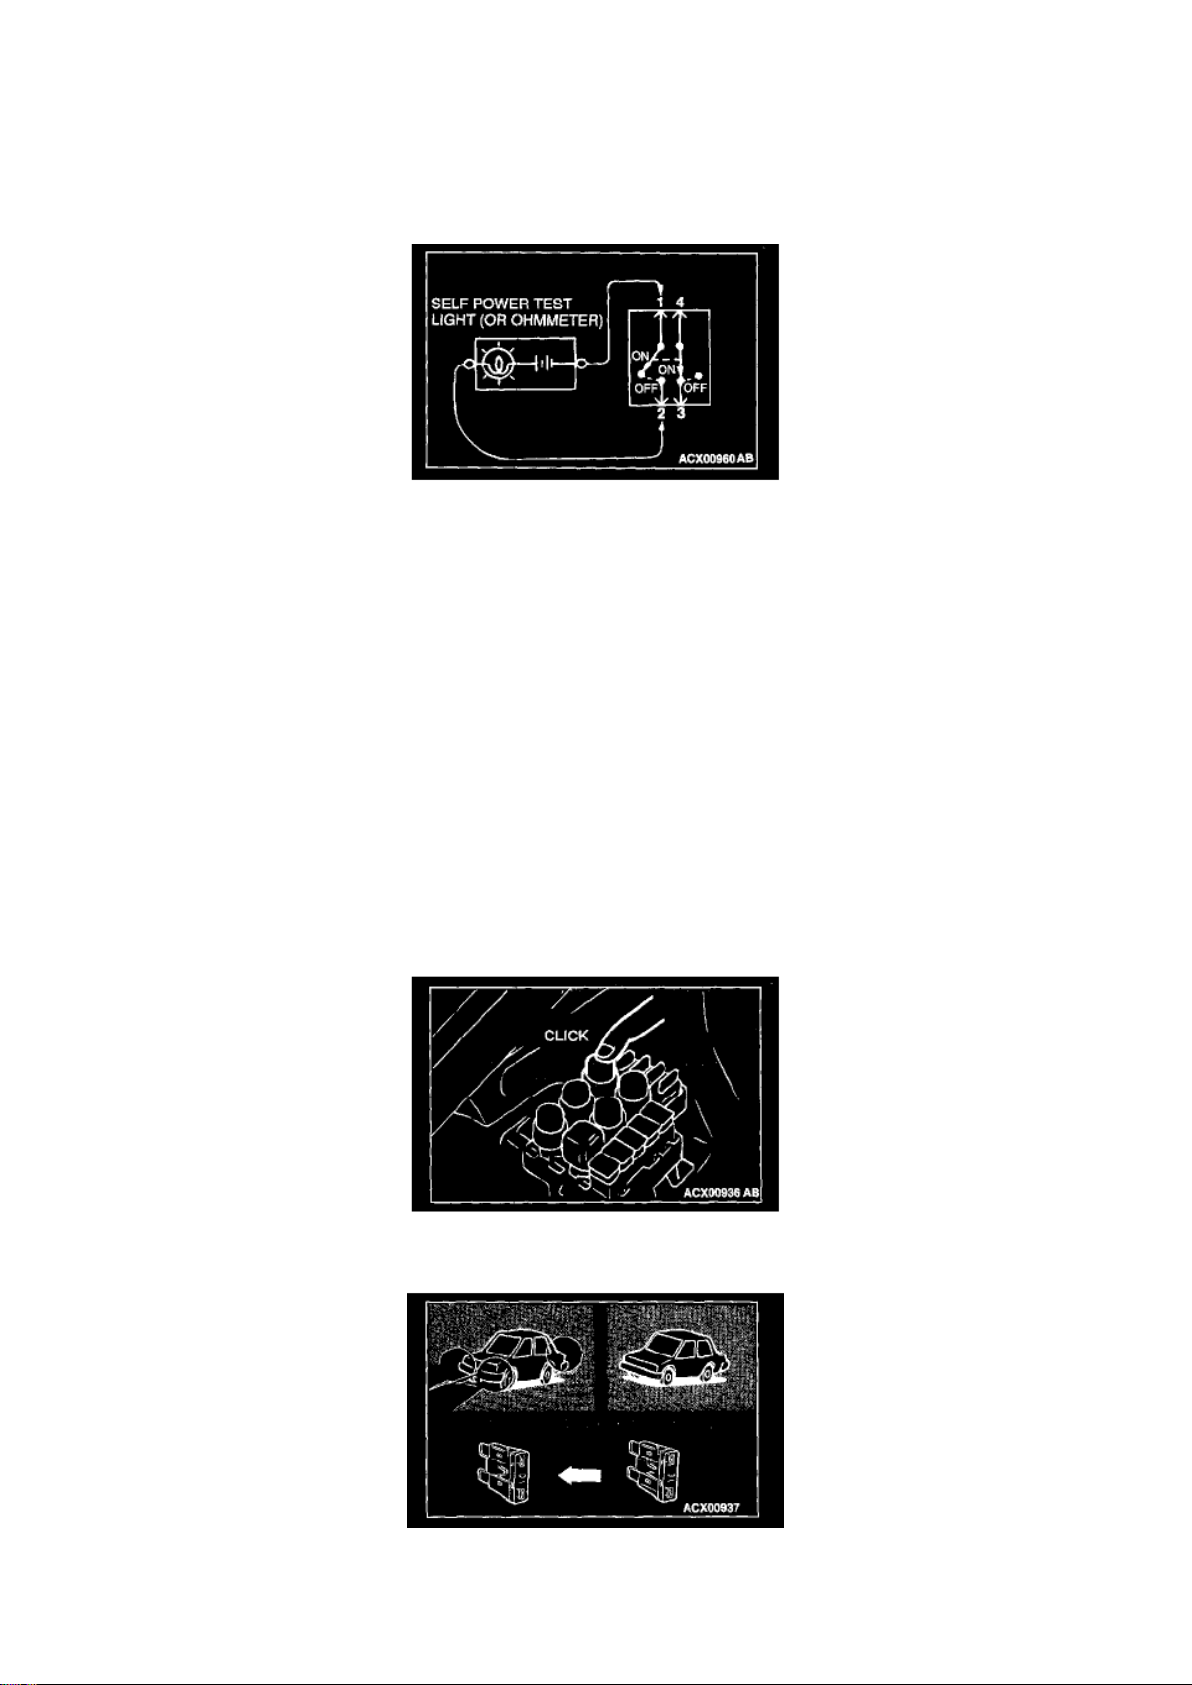
NO: Go to Step 2.
STEP 2. Turn the switch ON and disconnect the illumination light connector.
Q: Does the test light illuminate?
YES: Short-circuit exists between the switch and the connector. Repair the harness between the
switch and the connector. NO: Short-circuit exists between the connector and the illumination light.
Repair the harness between the switch and the connector.
Page 38
Dodge Stratus Coupe Workshop Manual (L4-2.4L VIN G (2003))
Dodge Workshop Manuals > Relays and Modules > Relays and Modules - HVAC > Blower Motor Relay > Component
Information > Diagrams > Diagram Information and Instructions > Page 49
Page 39

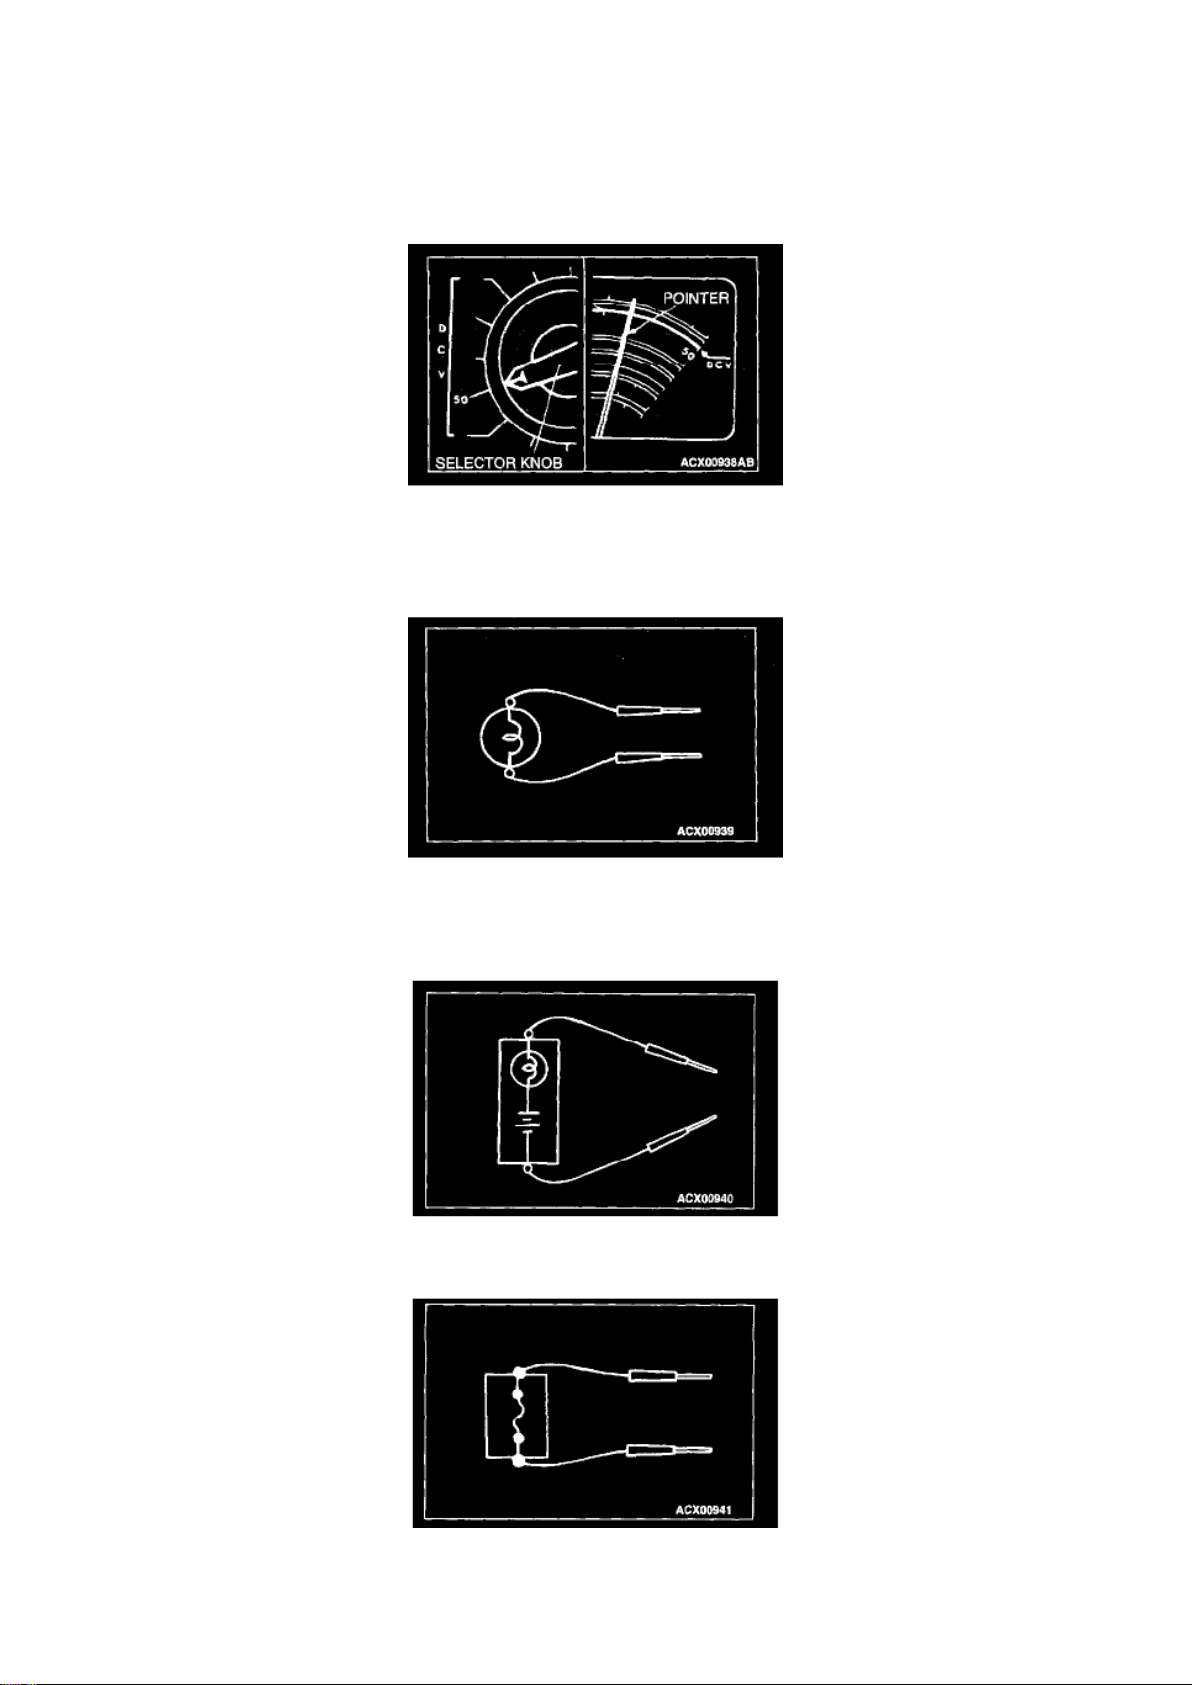
3. CONTINUITY CHECK
1. When the switch is in the "OFF" position and the contact points of terminals 1 and 2 are
connected, the self-powered test light should
illuminate or the ohmmeter should read 0 ohm.
2. When the switch is the "ON" position and the contact points of terminals 3 and 4 are connected,
the self-powered test light should come on or
the ohmmeter should read 0 ohm.
Information For Diagnosis
INFORMATION FOR DIAGNOSIS
This manual contains the harness diagrams as well as the individual circuit drawings, operational
explanations, and troubleshooting hints for each component. The information is presented in the
following manner:
1. Connector diagrams show the connector positions, etc., on the actual vehicle as well as the
harness path. 2. Circuit diagrams show the configuration of the circuit with all switches in their
normal positions. 3. Operational explanations include circuit drawings of voltage flow when the
switch is operated and how the component reacts. 4. Troubleshooting hints include numerous
examples of problems which might occur. Most of the problems can be traced backward in a
common-sense manner to the origin of the trouble. Problems whose origins may not be found in
this manner are pursued through the various system circuits.
NOTE: Components of MFI, ETACS, etc. with ECU do not include 3 and 4 above. For this
information, refer to a relevant sections that includes details of these components.
Inspection
1. Sight and sound checks
Check relay operation, blower motor rotation, light illumination, etc. Listen for a "click" when relay
covers are pushed down.
2. Simple checks
For example, if a headlight does not come on, a faulty fuse or poor grounding is suspected.
Replace the fuse with a new one. Or use a jumper wire to ground the light to the body. Determine
which part(s) is/are responsible for the problem.
Page 40
Dodge Stratus Coupe Workshop Manual (L4-2.4L VIN G (2003))
Dodge Workshop Manuals > Relays and Modules > Relays and Modules - HVAC > Blower Motor Relay > Component
Information > Diagrams > Diagram Information and Instructions > Page 50
Page 41

3. Checking with instruments
Use an appropriate instrument in an adequate range and read the indication correctly.
Inspection Instruments
For inspection, use the following instruments:
1. Test lights
A test light consists of a 12V bulb and lead wires. It is used to check voltages or short circuits.
CAUTION: Never use a test light for checking ECU-related circuits or ECUs.
2. Self-powered test light
A self-powered test light consists of a bulb, battery and lead wires connected in series. It is used to
check continuity or grounding.
3. Jumper wire
A jumper wire is used to close an open circuit.
Page 42
Dodge Stratus Coupe Workshop Manual (L4-2.4L VIN G (2003))
Dodge Workshop Manuals > Relays and Modules > Relays and Modules - HVAC > Blower Motor Relay > Component
Information > Diagrams > Diagram Information and Instructions > Page 51
CAUTION: Never use a jumper wire to connect a power supply directly to a load.
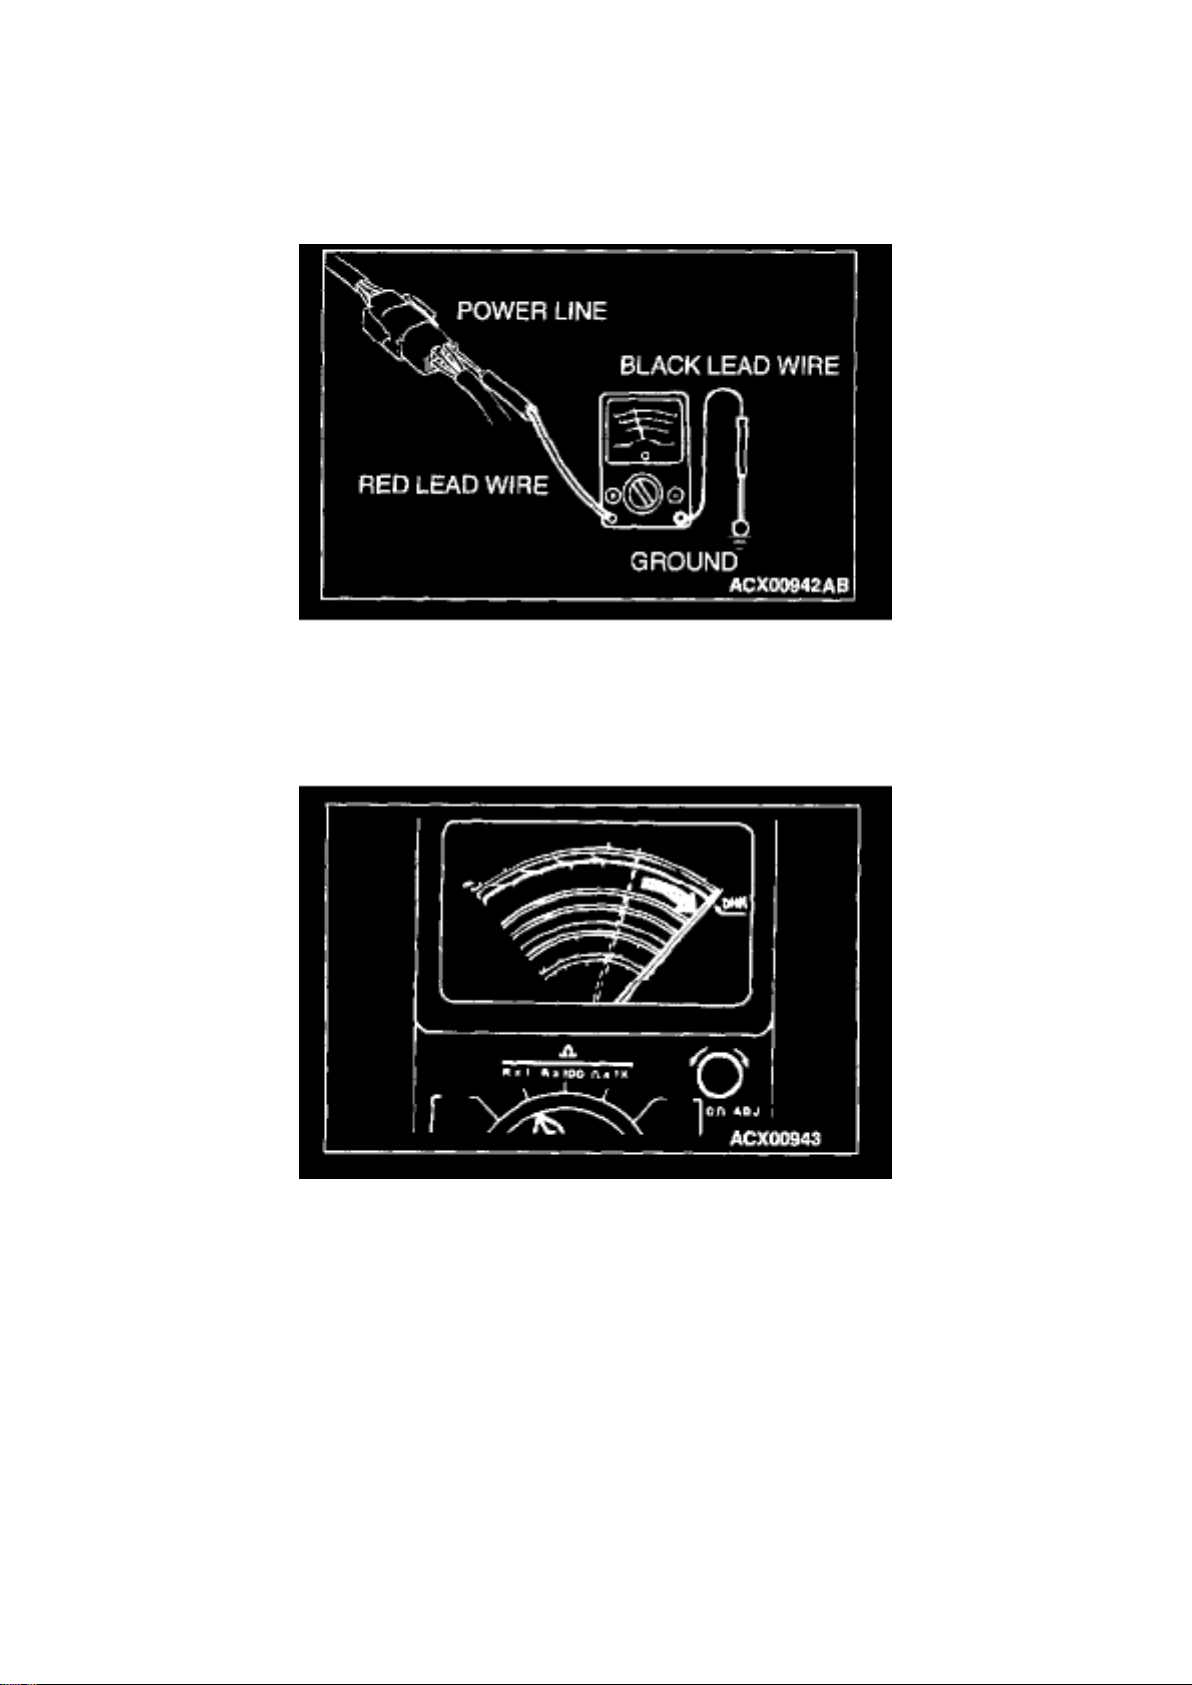
4. Voltmeter
A voltmeter is used to measure the circuit voltage. Normally, the positive (red lead) probe is applied
to the point of voltage measurement and the negative (black lead) probe to the body ground. Use a
digital voltmeter to check for voltage drop upstream and downstream of a component.
5. Ohmmeter
An ohmmeter is used to check continuity or measure resistance of a switch or a coil. If the
measuring range has been changed, the zero point must be adjusted before measurement.
Page 43

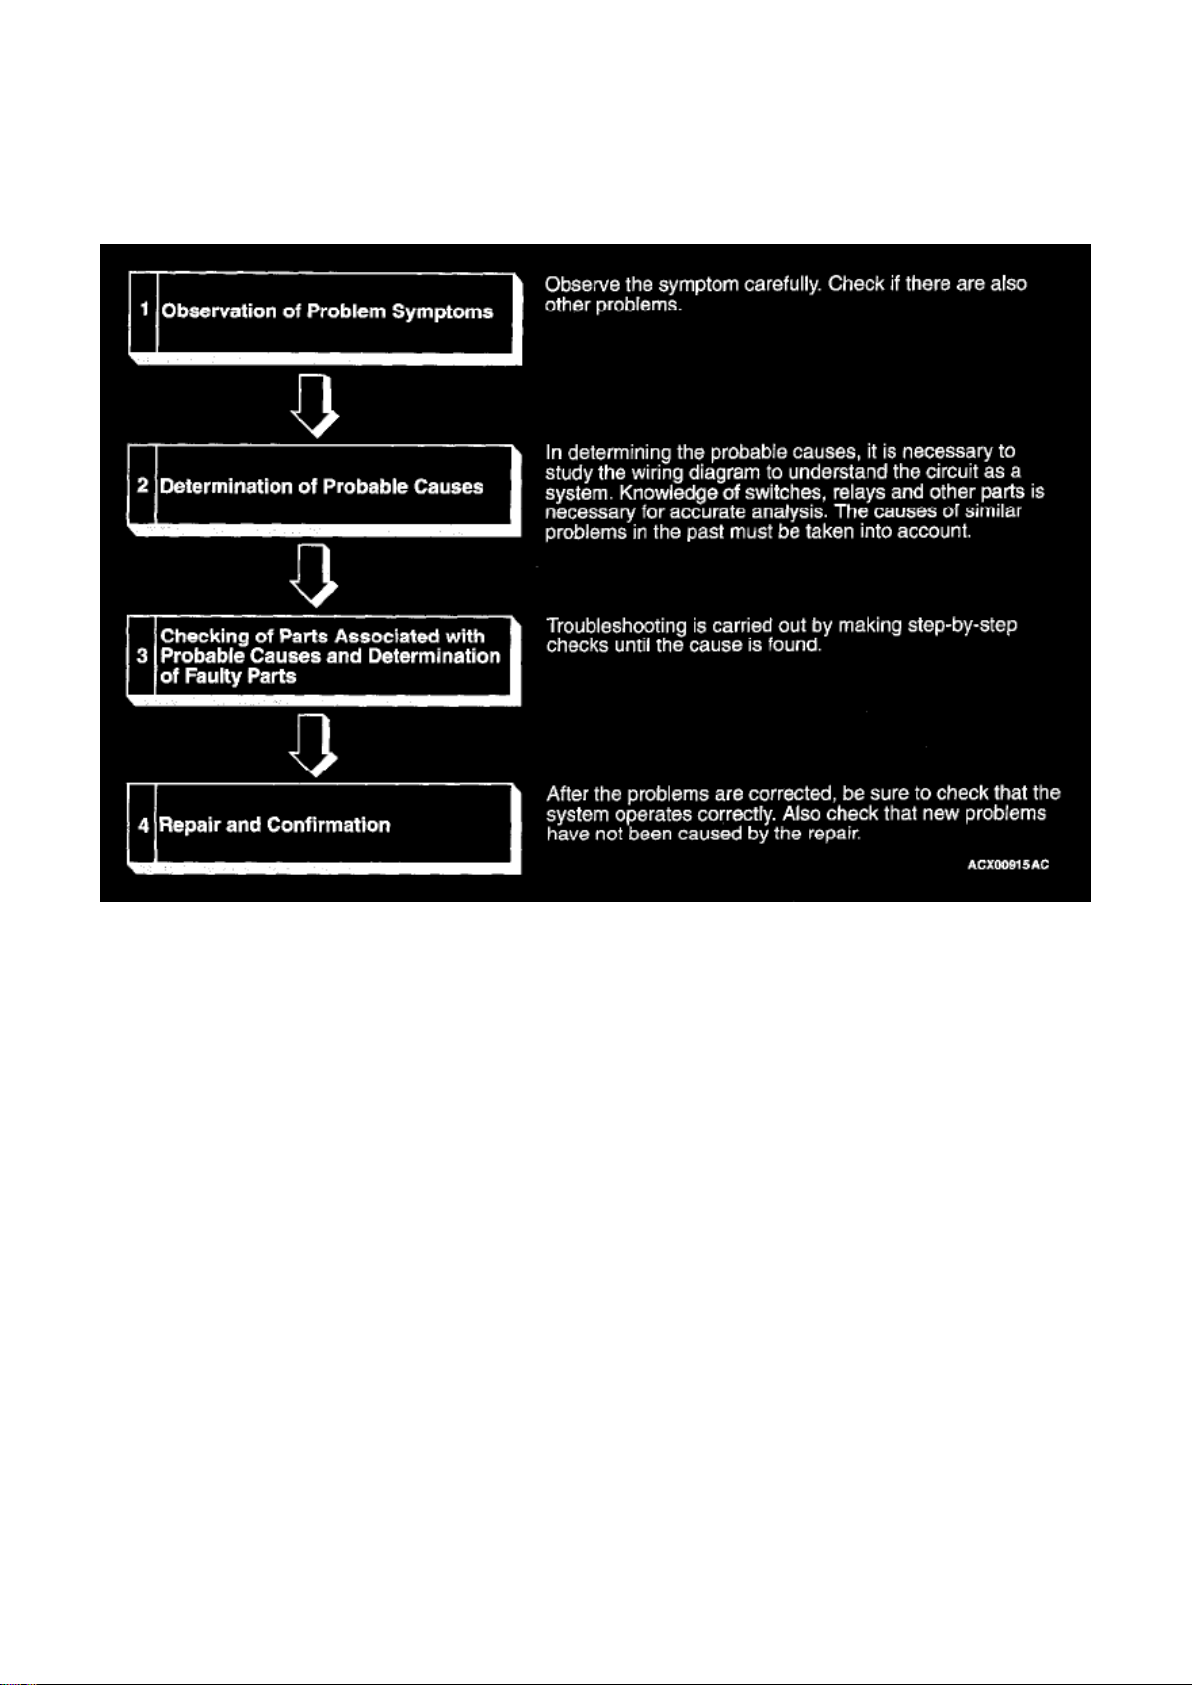
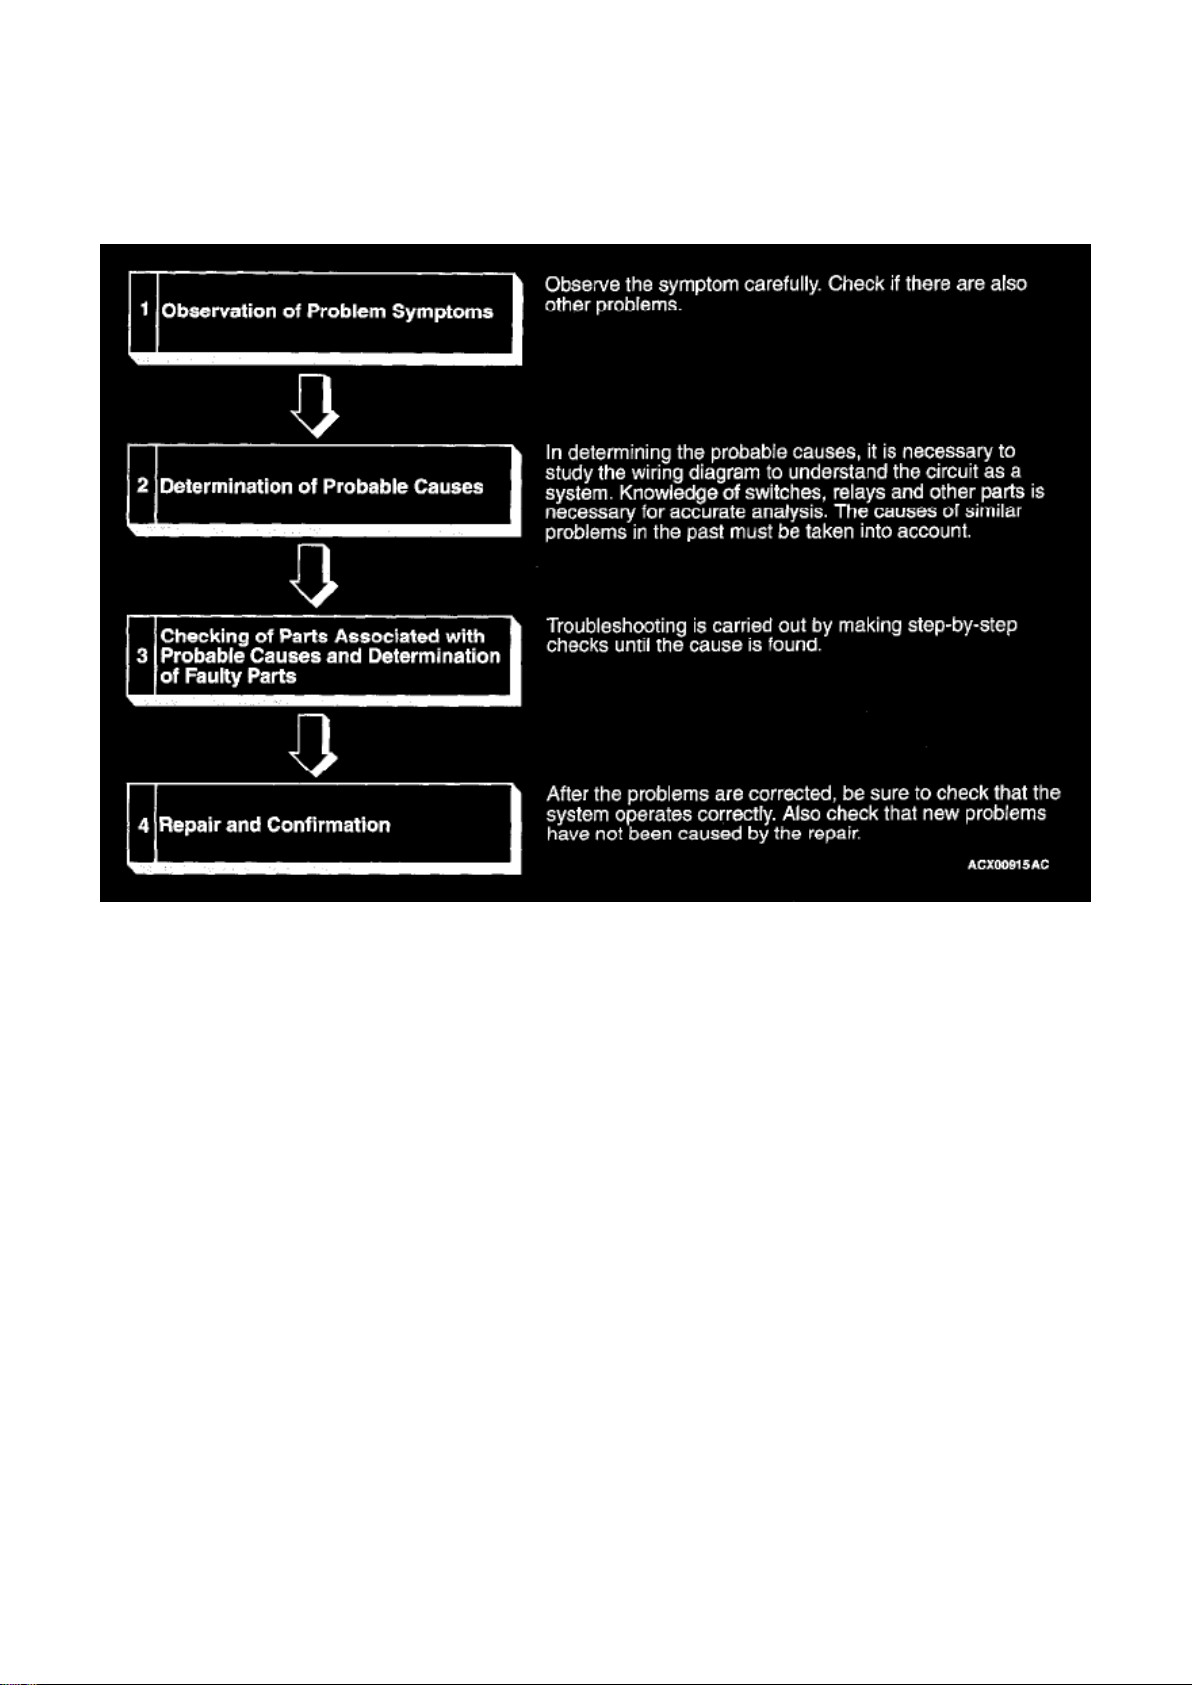
Troubleshooting Steps
HOW TO DIAGNOSE
The most important point in troubleshooting is to determine "Probable Cause." Once the probable
causes are determined, parts to be checked can be limited to those associated with such probable
causes. The determination of the probable causes must be based on a theory and be supported by
facts and must not be based on intuition only.
Page 44
Dodge Stratus Coupe Workshop Manual (L4-2.4L VIN G (2003))
Dodge Workshop Manuals > Relays and Modules > Relays and Modules - HVAC > Blower Motor Relay > Component
Information > Diagrams > Diagram Information and Instructions > Page 52
TROUBLESHOOTING STEPS
If an attempt is made to solve a problem without going through correct steps for troubleshooting,
the symptoms could become more complicated, resulting in failure to determine the causes
correctly and making incorrect repairs. The four steps below should be followed in troubleshooting.
Page 45
Dodge Stratus Coupe Workshop Manual (L4-2.4L VIN G (2003))
Dodge Workshop Manuals > Relays and Modules > Relays and Modules - HVAC > Blower Motor Relay > Component
Information > Diagrams > Page 53
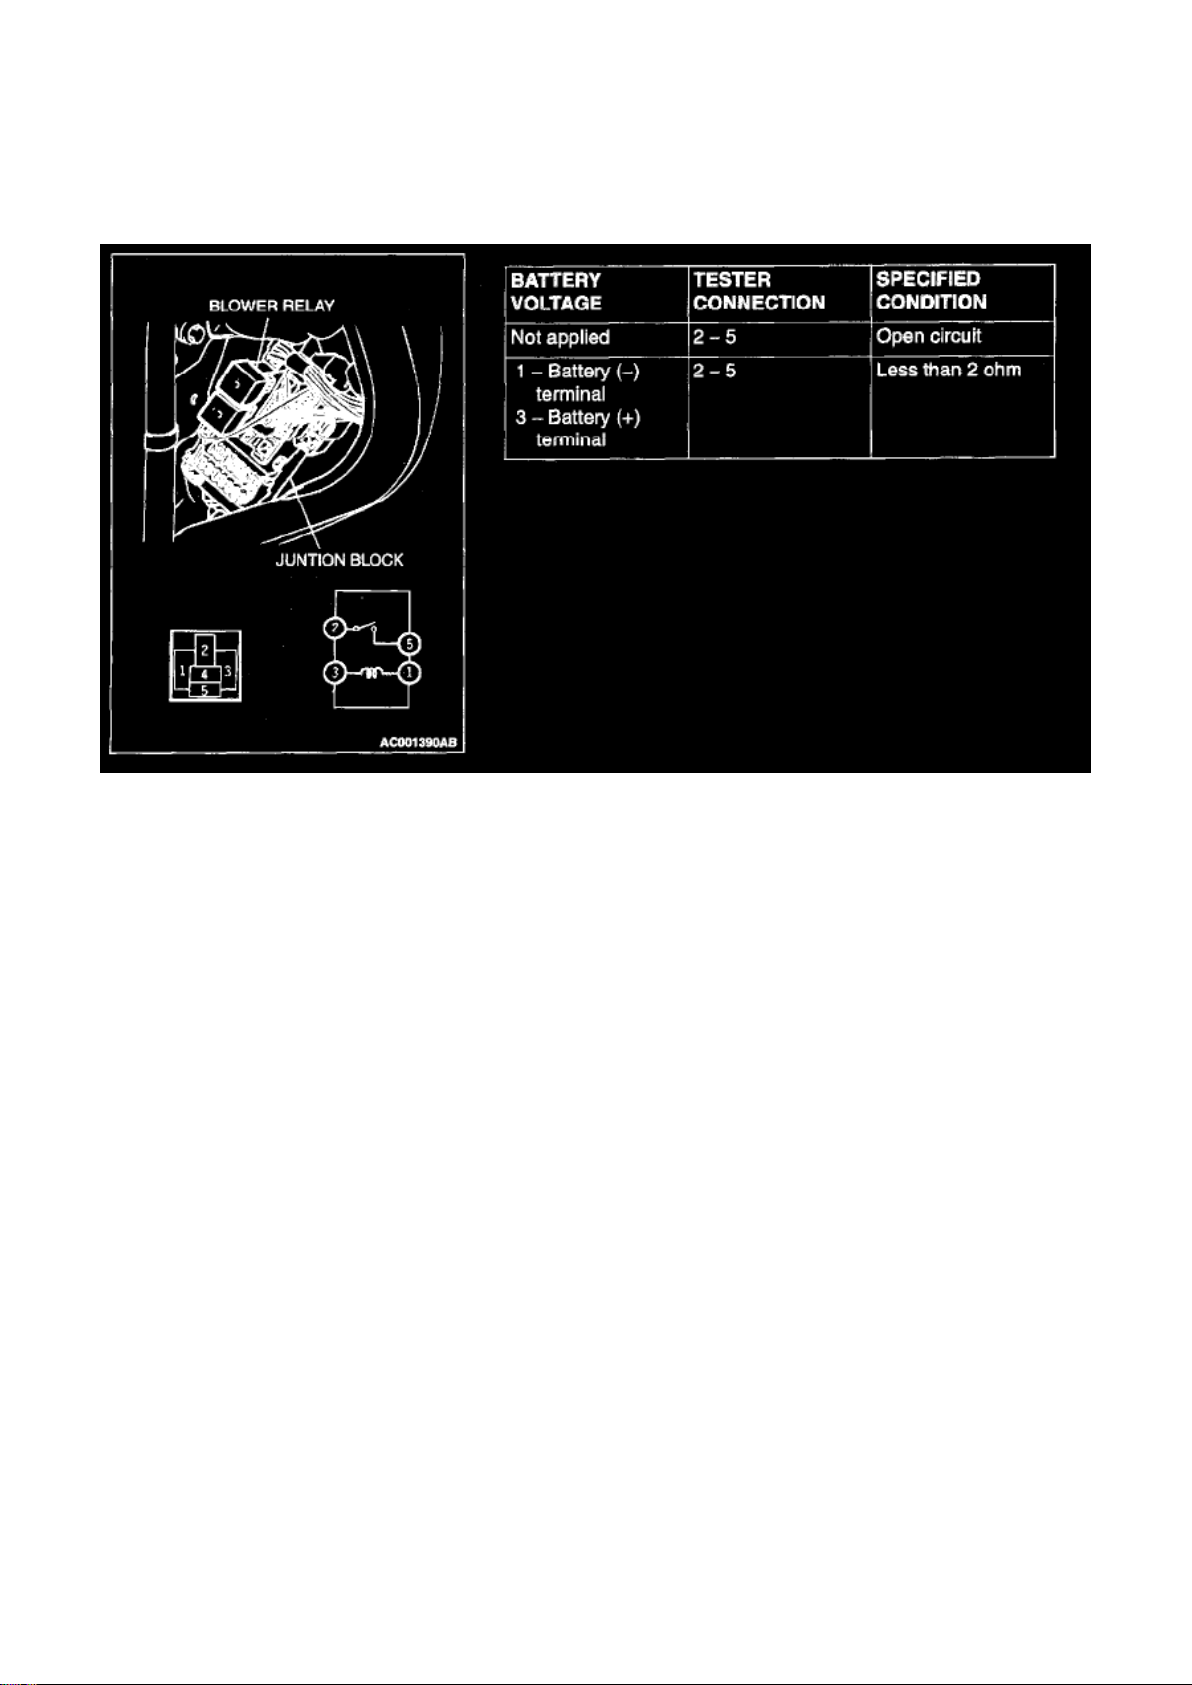
Blower Relay Continuity Check
Page 46
Dodge Stratus Coupe Workshop Manual (L4-2.4L VIN G (2003))
Dodge Workshop Manuals > Relays and Modules > Relays and Modules - HVAC > Compressor Clutch Relay > Component
Information > Locations
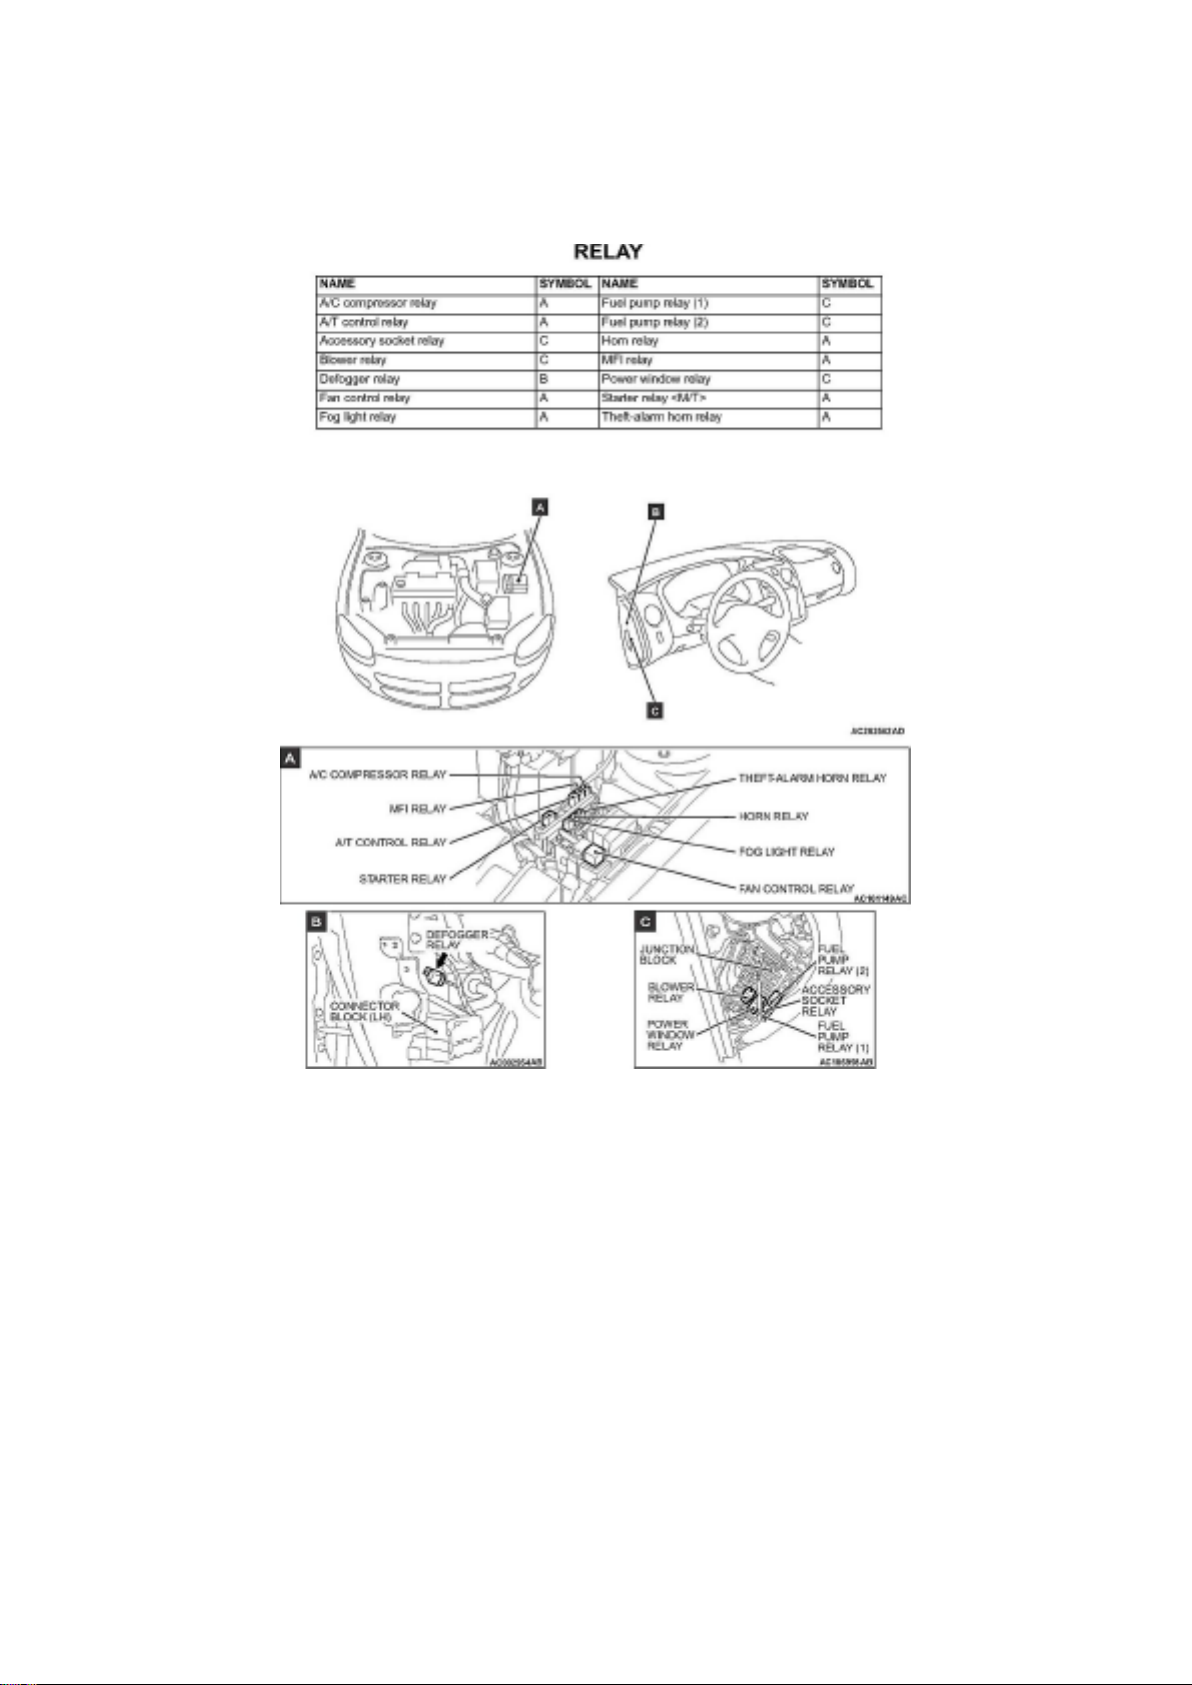
Compressor Clutch Relay: Locations
Relay Location
Page 47
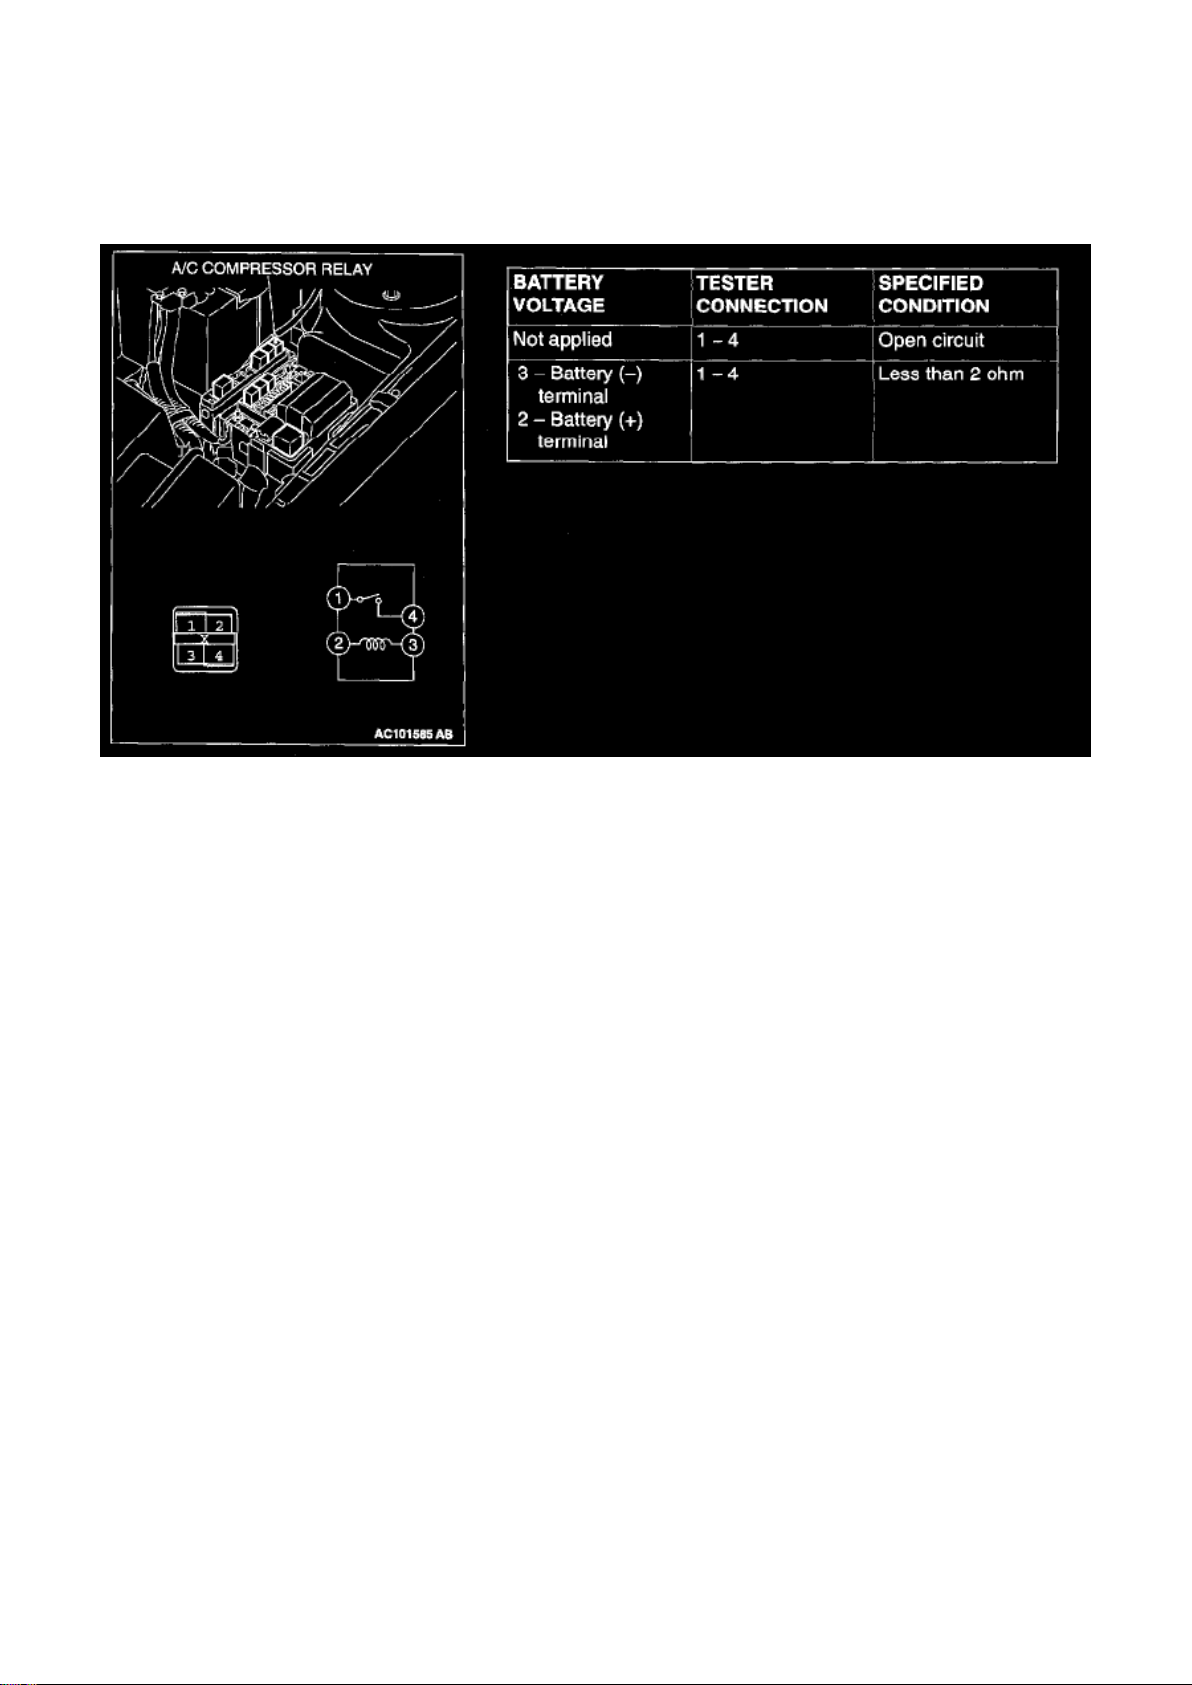
Dodge Stratus Coupe Workshop Manual (L4-2.4L VIN G (2003))
Dodge Workshop Manuals > Relays and Modules > Relays and Modules - HVAC > Compressor Clutch Relay > Component
Information > Locations > Page 57
A/C Compressor Relay Continuity Check
Page 48
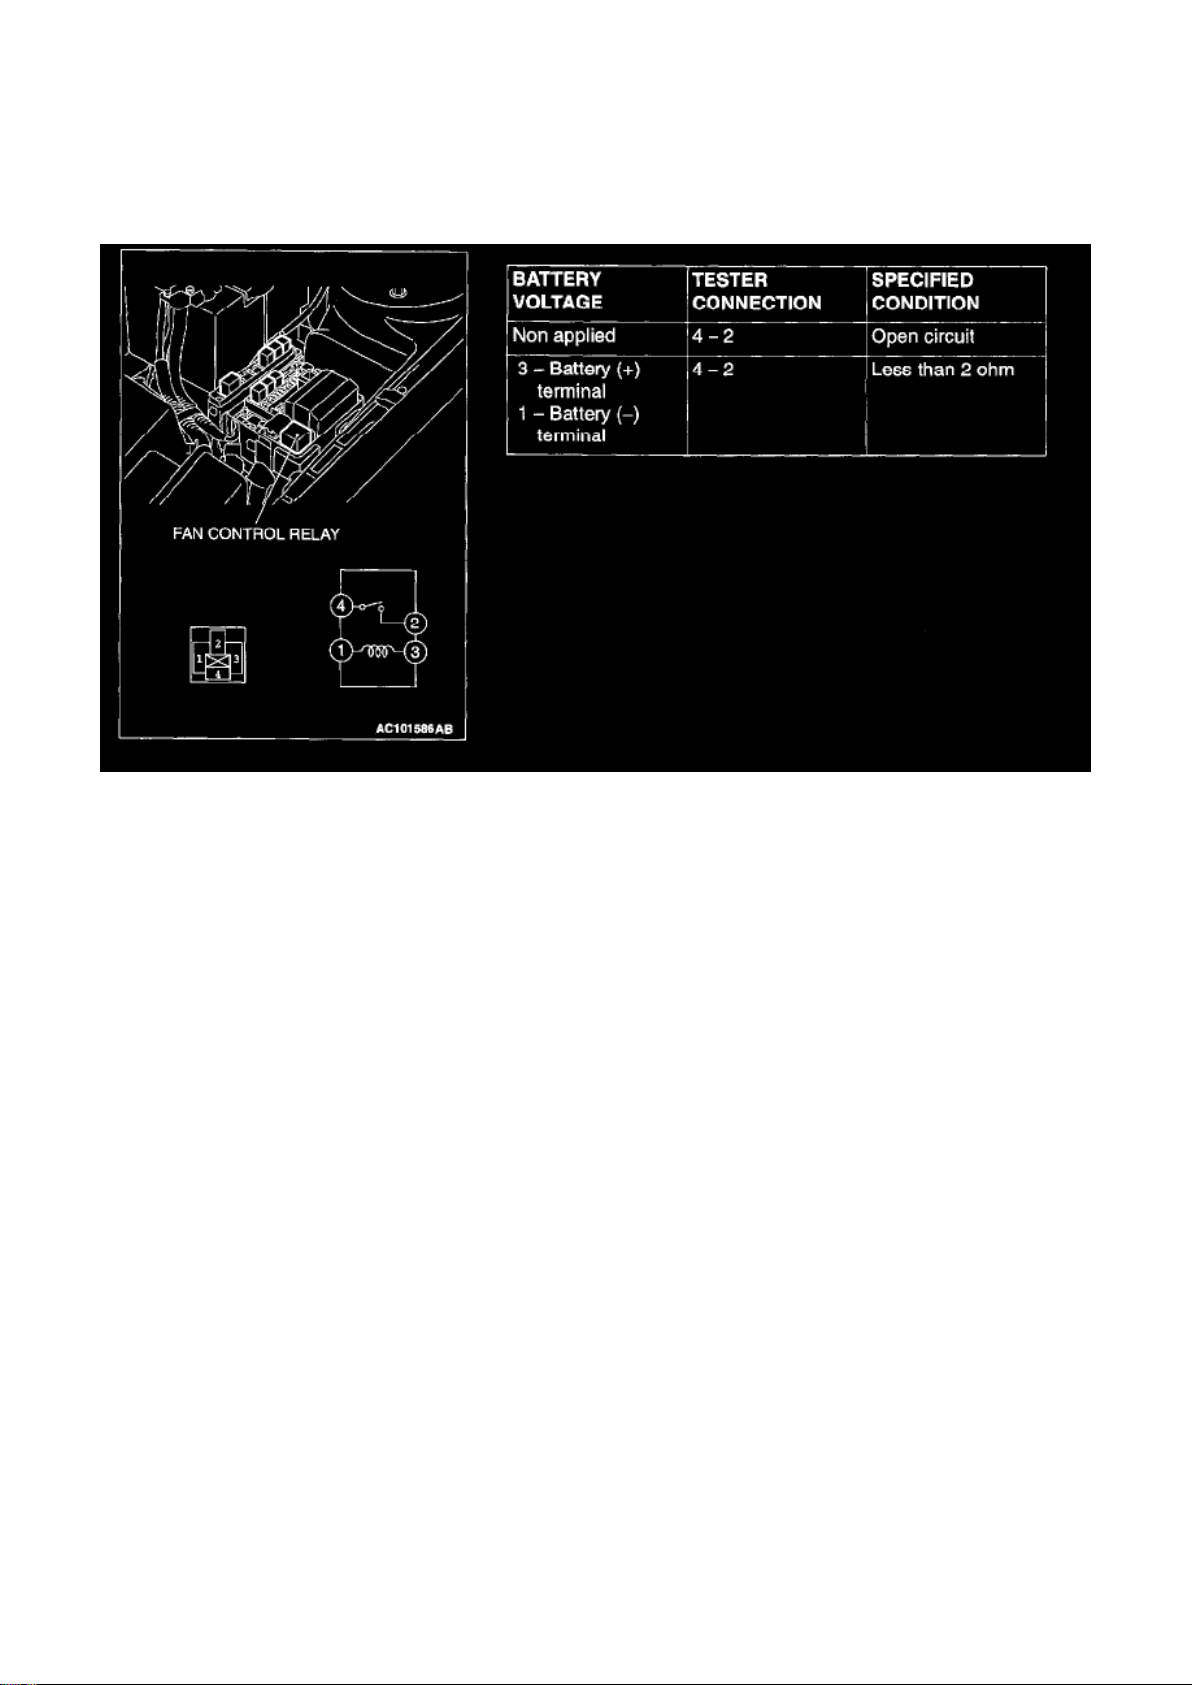
Dodge Stratus Coupe Workshop Manual (L4-2.4L VIN G (2003))
Dodge Workshop Manuals > Relays and Modules > Relays and Modules - HVAC > Condenser Fan Motor Relay, HVAC >
Component Information > Testing and Inspection
Fan Control Relay Continuity Check
Page 49
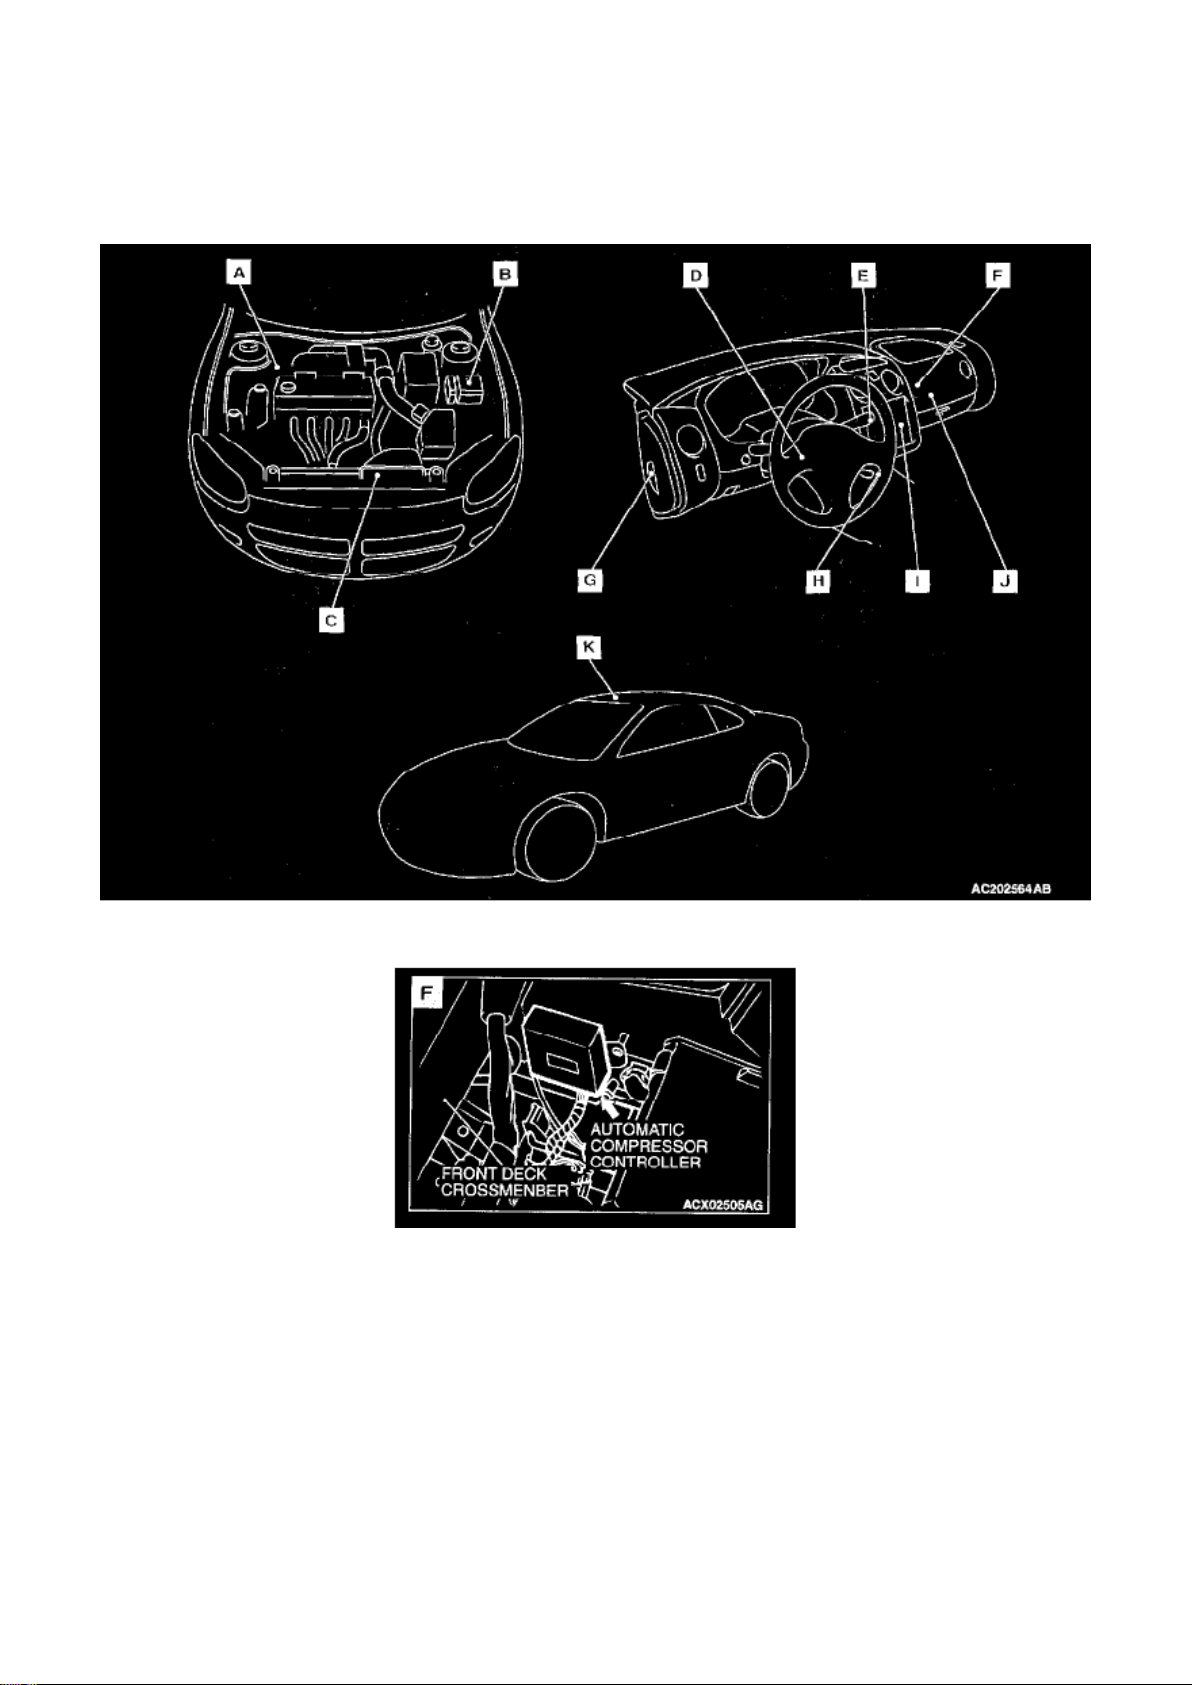
Dodge Stratus Coupe Workshop Manual (L4-2.4L VIN G (2003))
Dodge Workshop Manuals > Relays and Modules > Relays and Modules - HVAC > Control Module HVAC > Component
Information > Locations
Control Module HVAC: Locations
Overall View
View F
Page 50
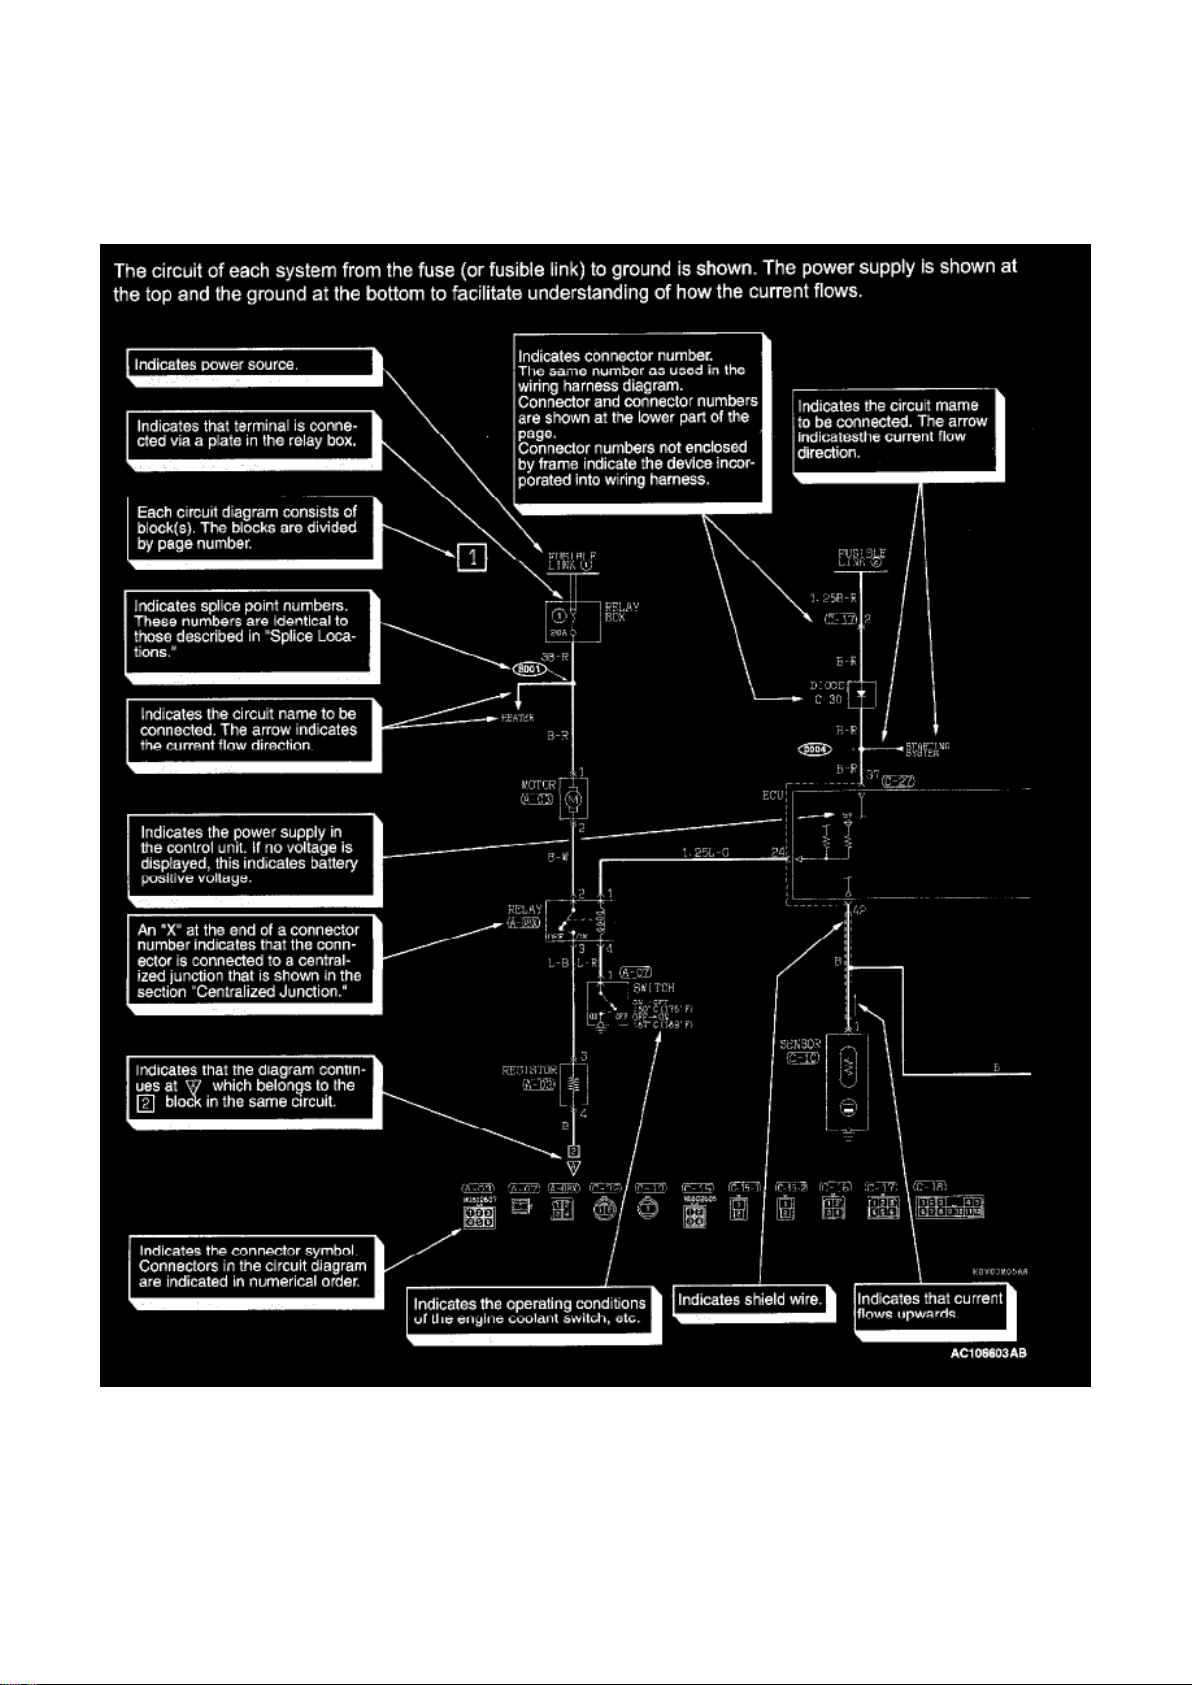
Dodge Stratus Coupe Workshop Manual (L4-2.4L VIN G (2003))
Dodge Workshop Manuals > Relays and Modules > Relays and Modules - HVAC > Control Module HVAC > Component
Information > Diagrams > Diagram Information and Instructions
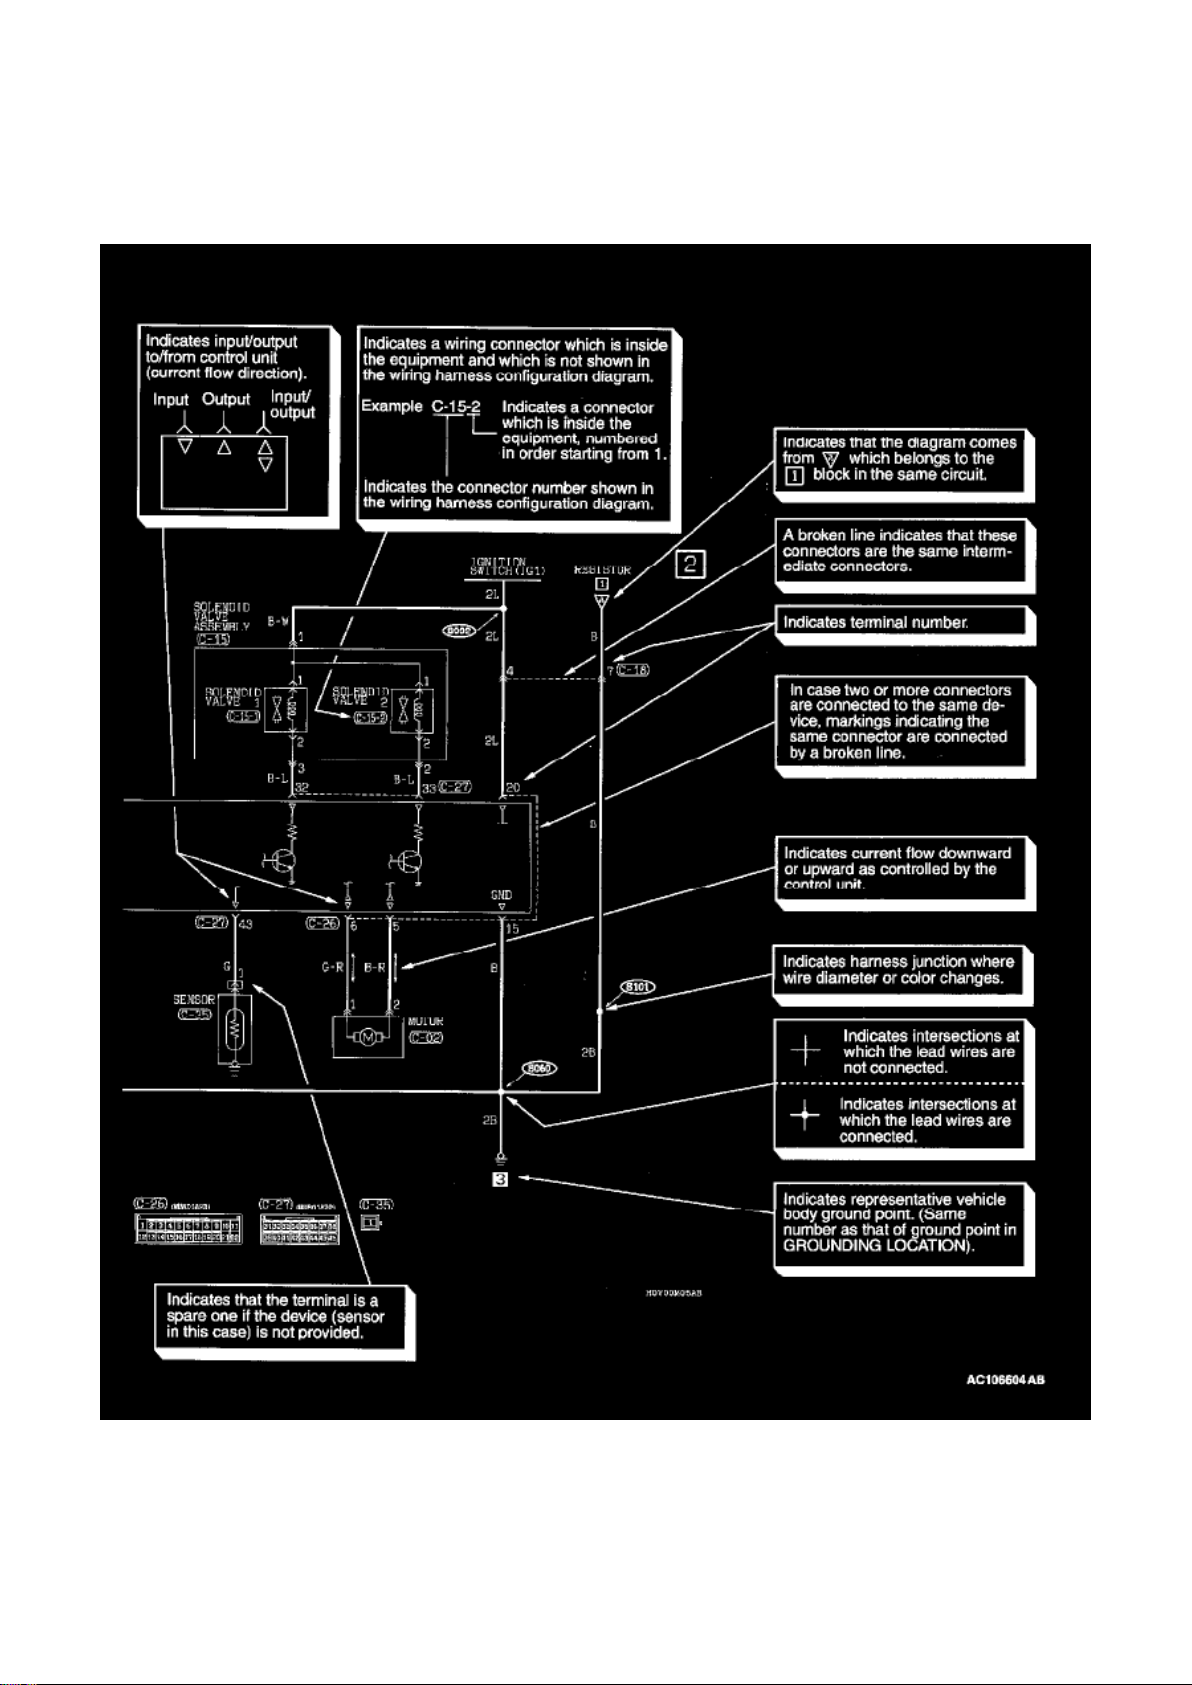
Control Module HVAC: Diagram Information and Instructions
How To Read Circuit Diagrams - Part 1
Page 51
Dodge Stratus Coupe Workshop Manual (L4-2.4L VIN G (2003))
Dodge Workshop Manuals > Relays and Modules > Relays and Modules - HVAC > Control Module HVAC > Component
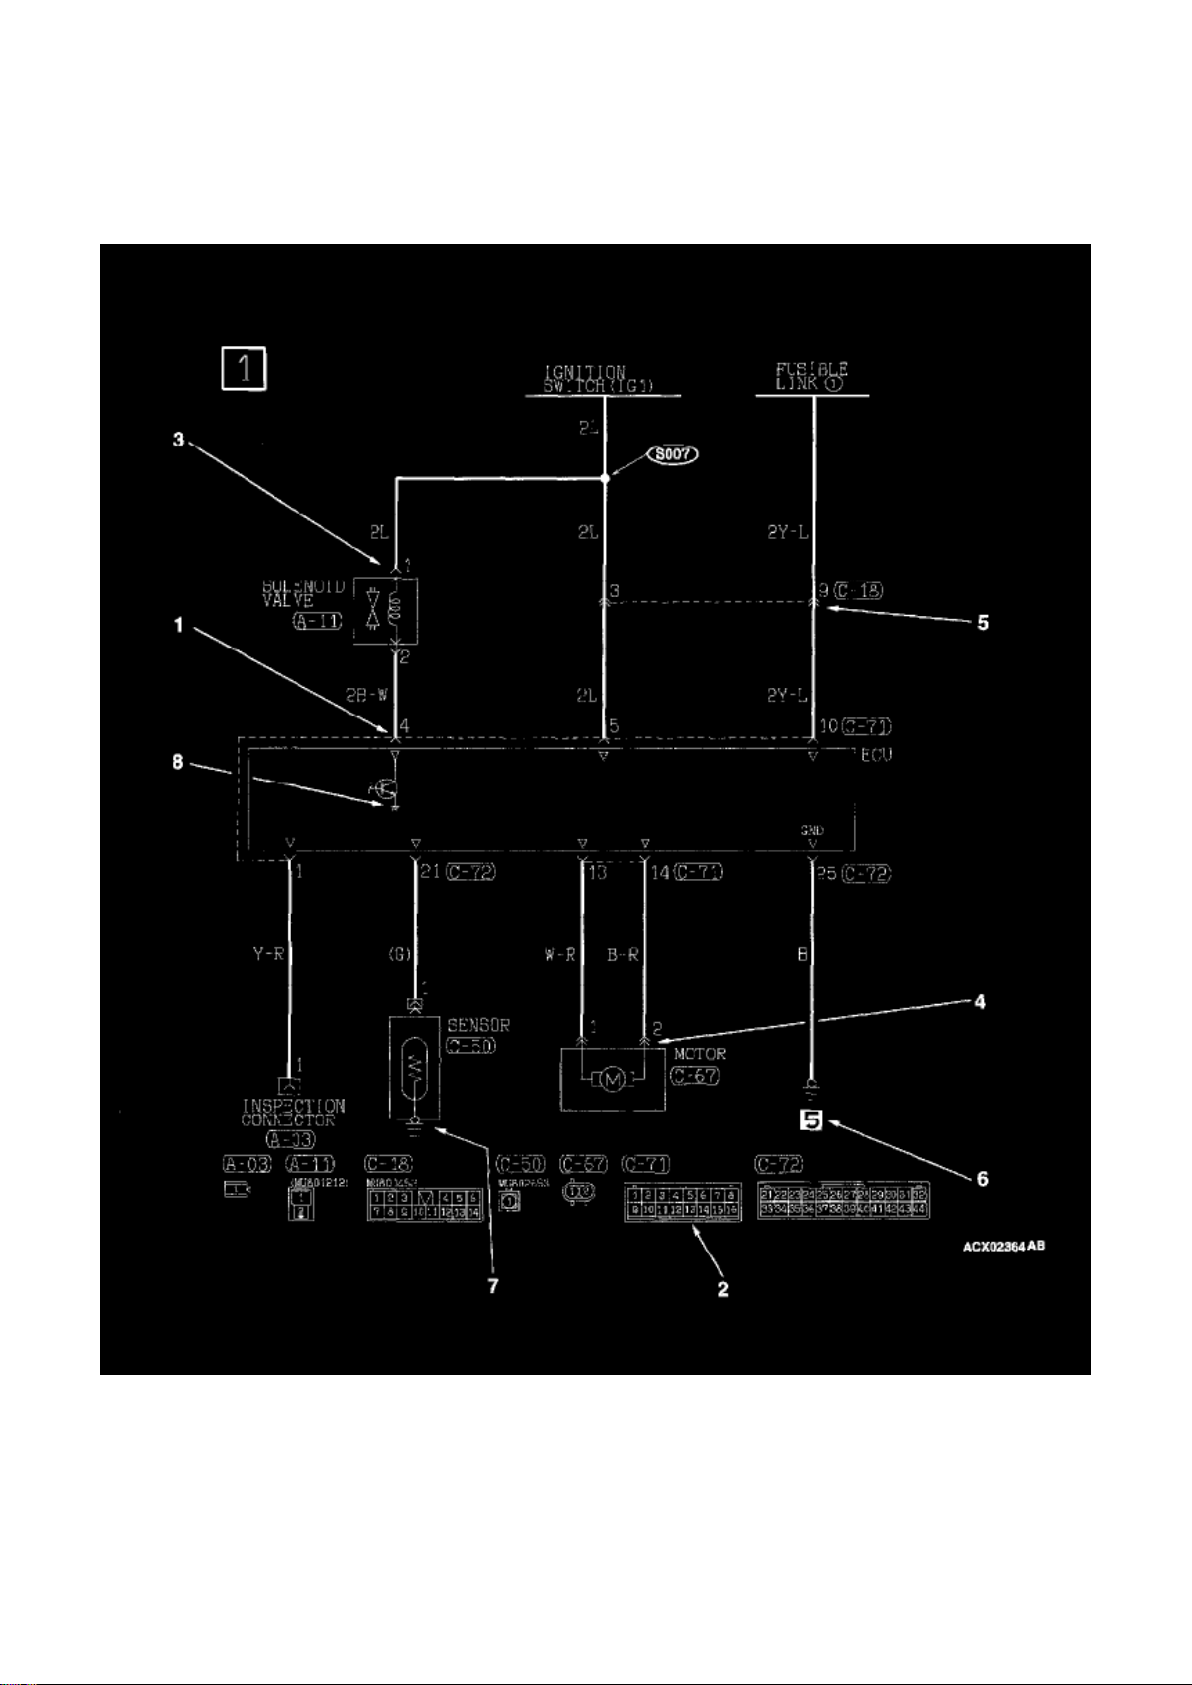
Information > Diagrams > Diagram Information and Instructions > Page 66
How To Read Circuit Diagrams - Part 2
Page 52
Dodge Stratus Coupe Workshop Manual (L4-2.4L VIN G (2003))
Dodge Workshop Manuals > Relays and Modules > Relays and Modules - HVAC > Control Module HVAC > Component
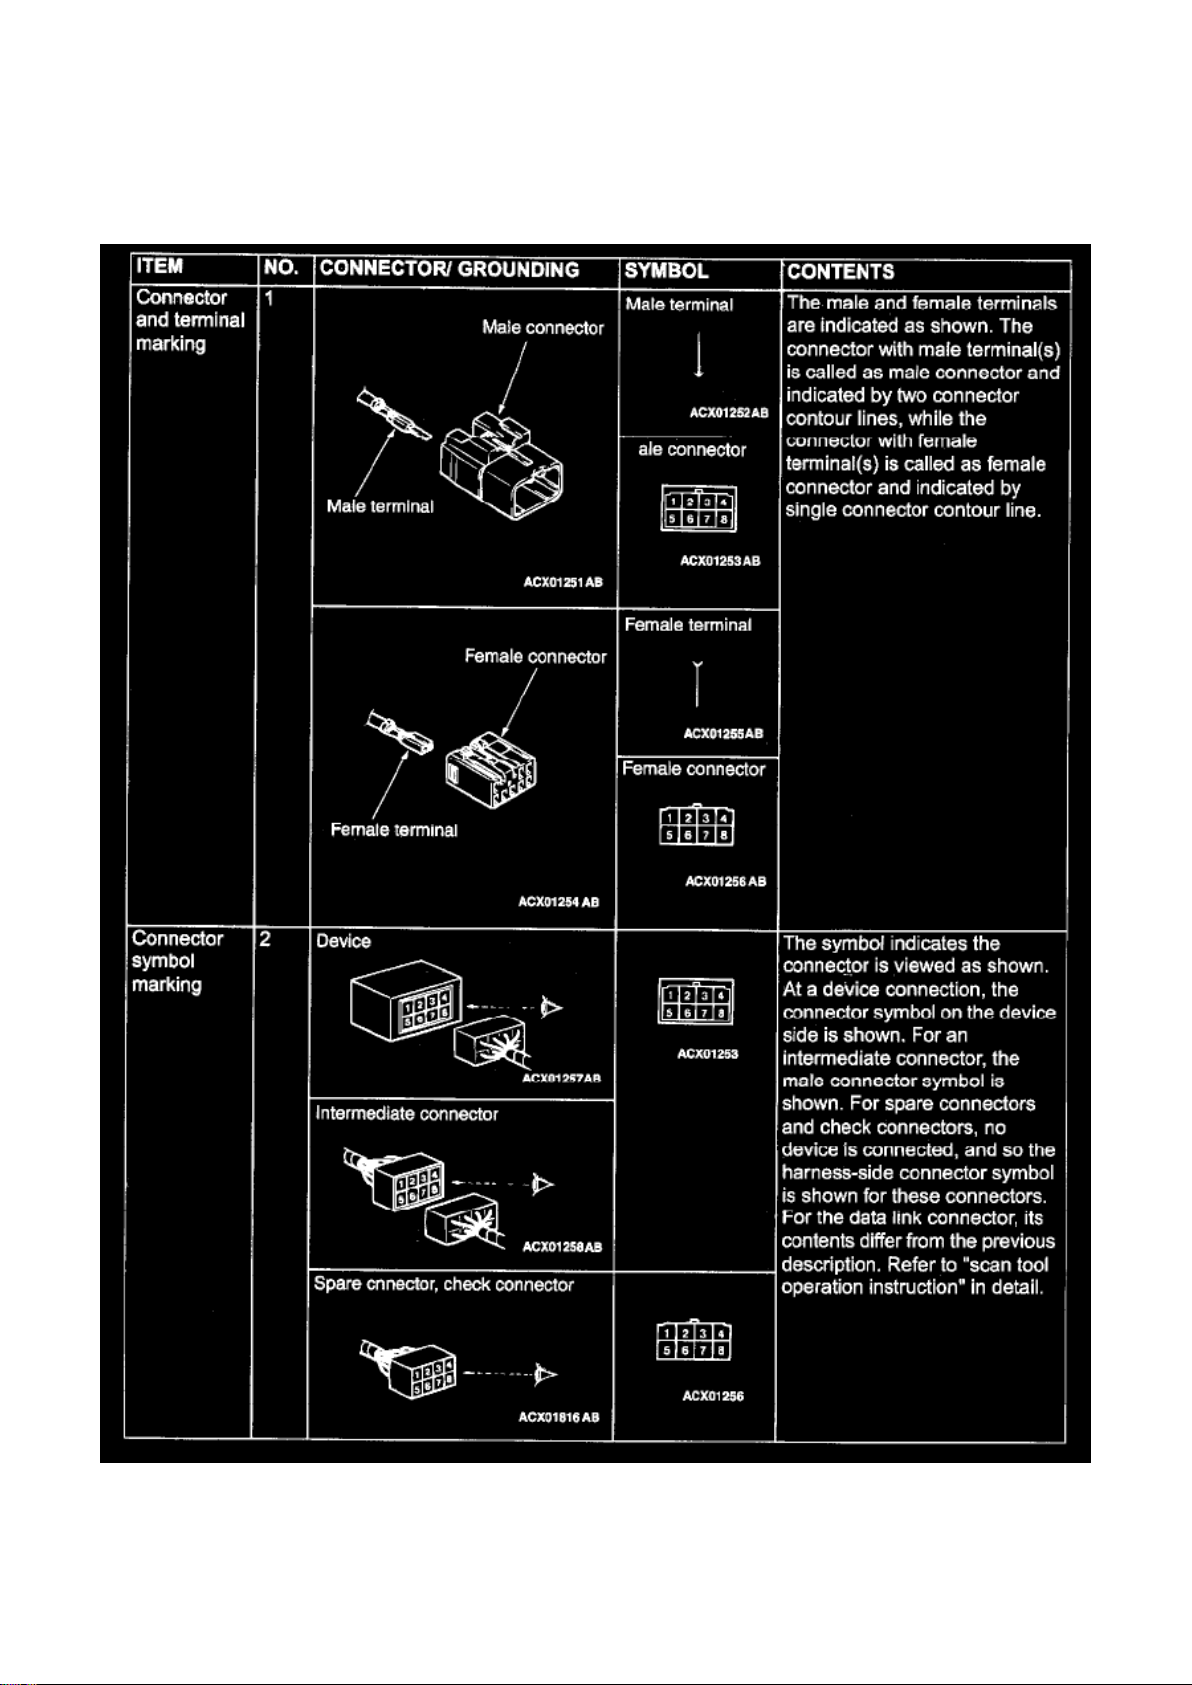
Information > Diagrams > Diagram Information and Instructions > Page 67
Connector/Grounding Indications Part 1
Page 53
Dodge Stratus Coupe Workshop Manual (L4-2.4L VIN G (2003))
Dodge Workshop Manuals > Relays and Modules > Relays and Modules - HVAC > Control Module HVAC > Component
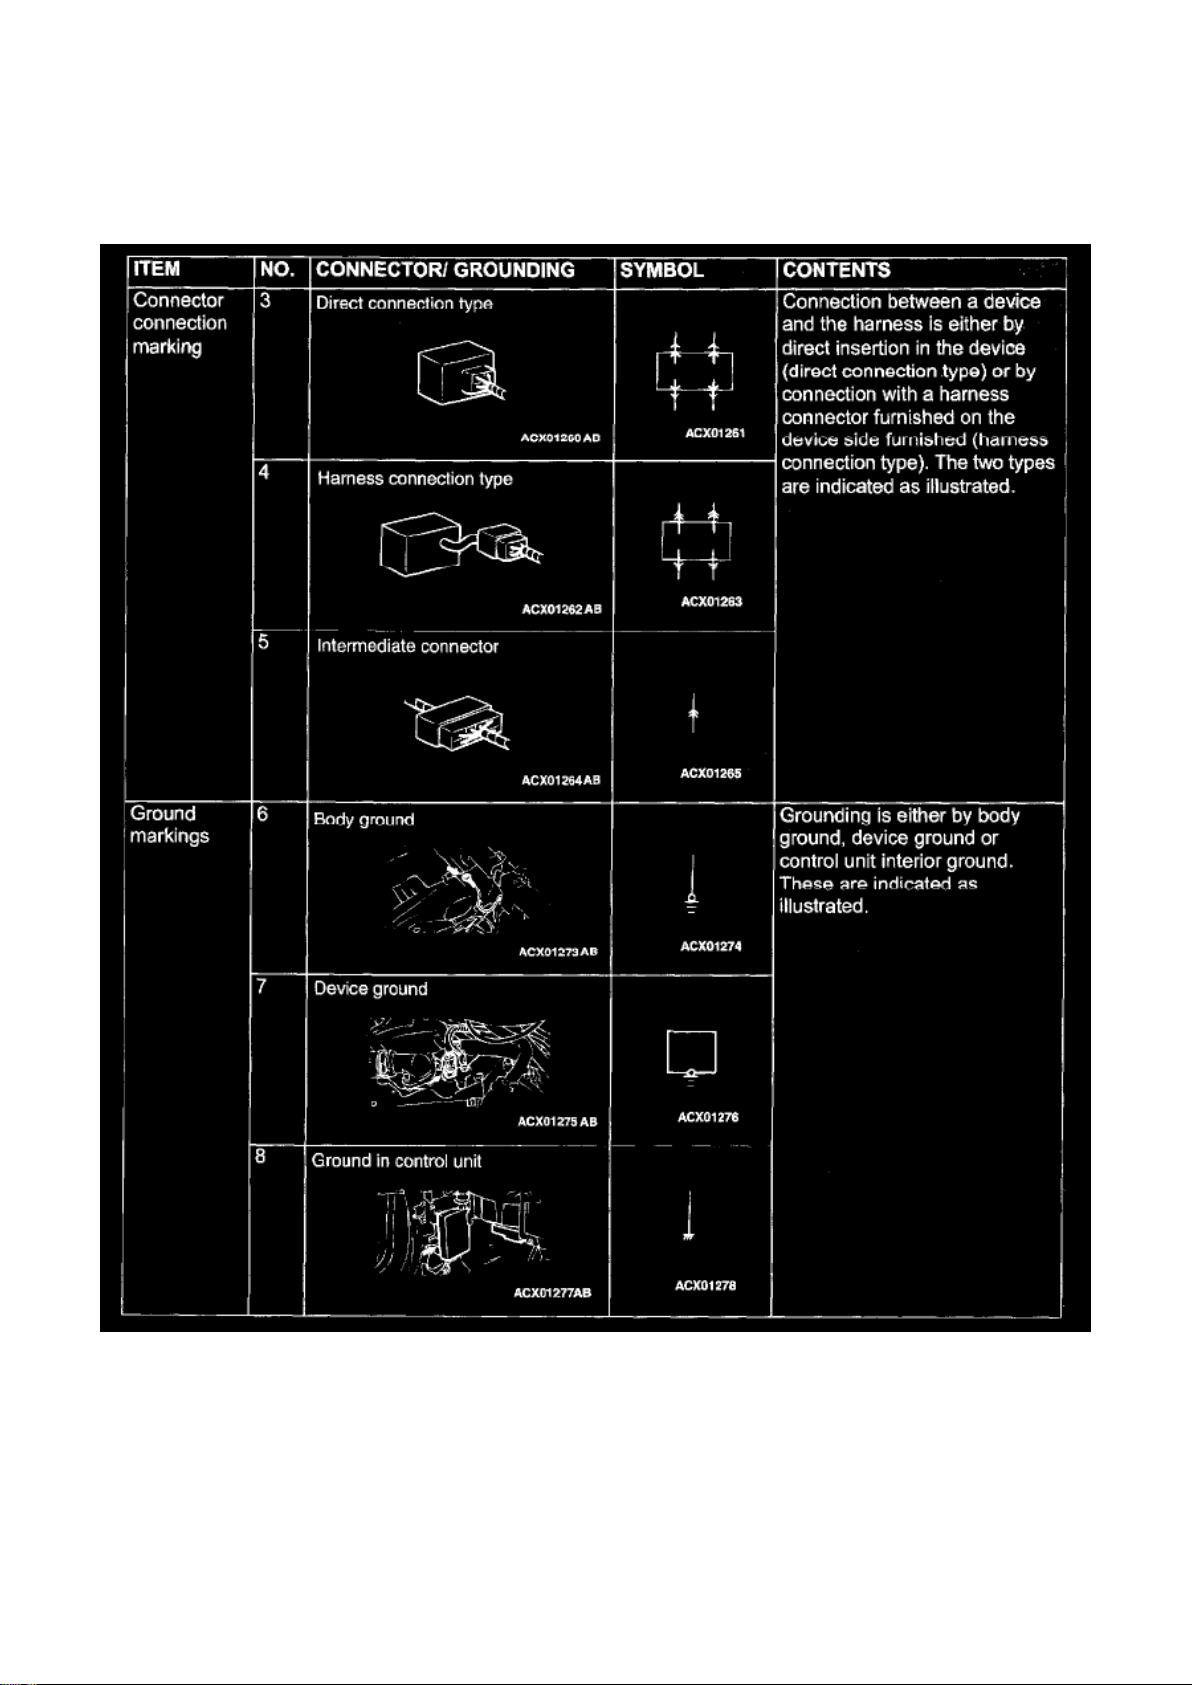
Information > Diagrams > Diagram Information and Instructions > Page 68
Connector/Grounding Indications Part 2
Page 54
Dodge Stratus Coupe Workshop Manual (L4-2.4L VIN G (2003))
Dodge Workshop Manuals > Relays and Modules > Relays and Modules - HVAC > Control Module HVAC > Component
Information > Diagrams > Diagram Information and Instructions > Page 69
Connector/Grounding Indications Part 3
Page 55
Dodge Stratus Coupe Workshop Manual (L4-2.4L VIN G (2003))
Dodge Workshop Manuals > Relays and Modules > Relays and Modules - HVAC > Control Module HVAC > Component
Information > Diagrams > Diagram Information and Instructions > Page 70
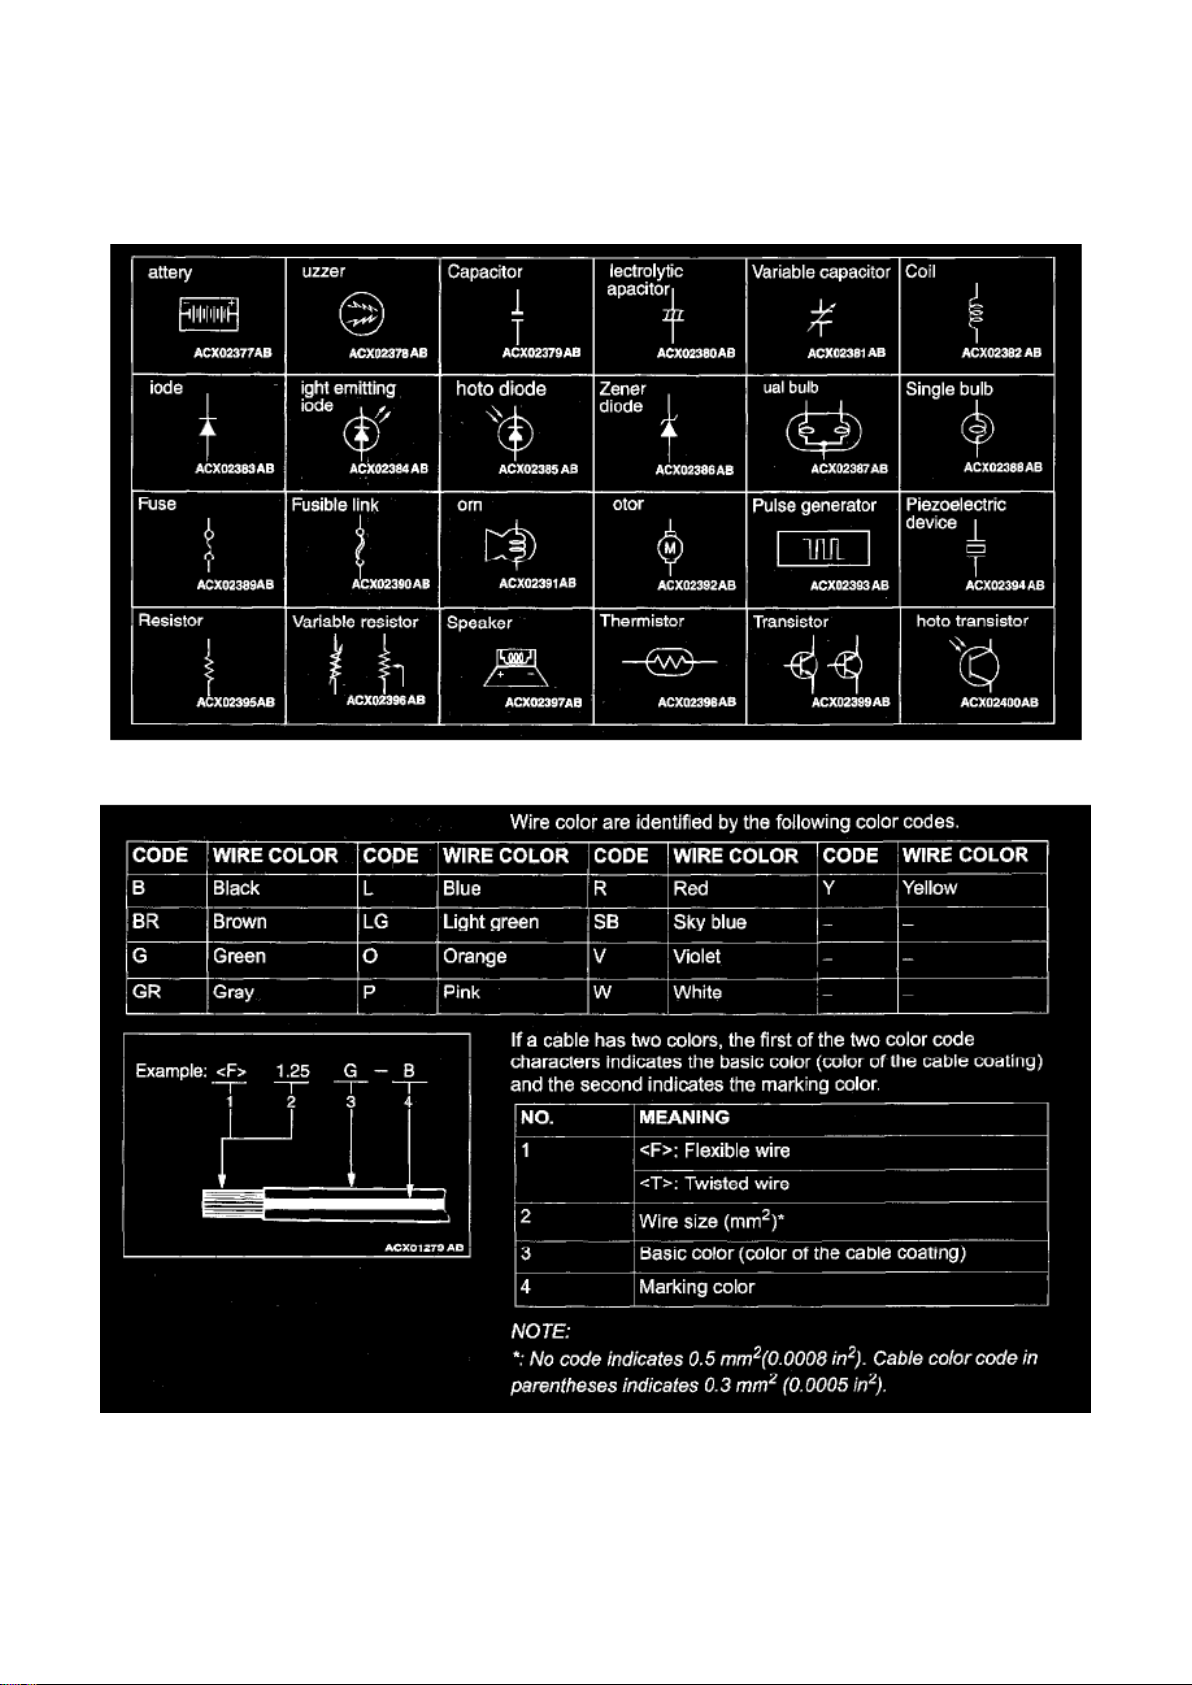
Symbols (Except Connector And Grounding)
Wire Color Codes
Page 56
Dodge Stratus Coupe Workshop Manual (L4-2.4L VIN G (2003))
Dodge Workshop Manuals > Relays and Modules > Relays and Modules - HVAC > Control Module HVAC > Component
Information > Diagrams > Diagram Information and Instructions > Page 71
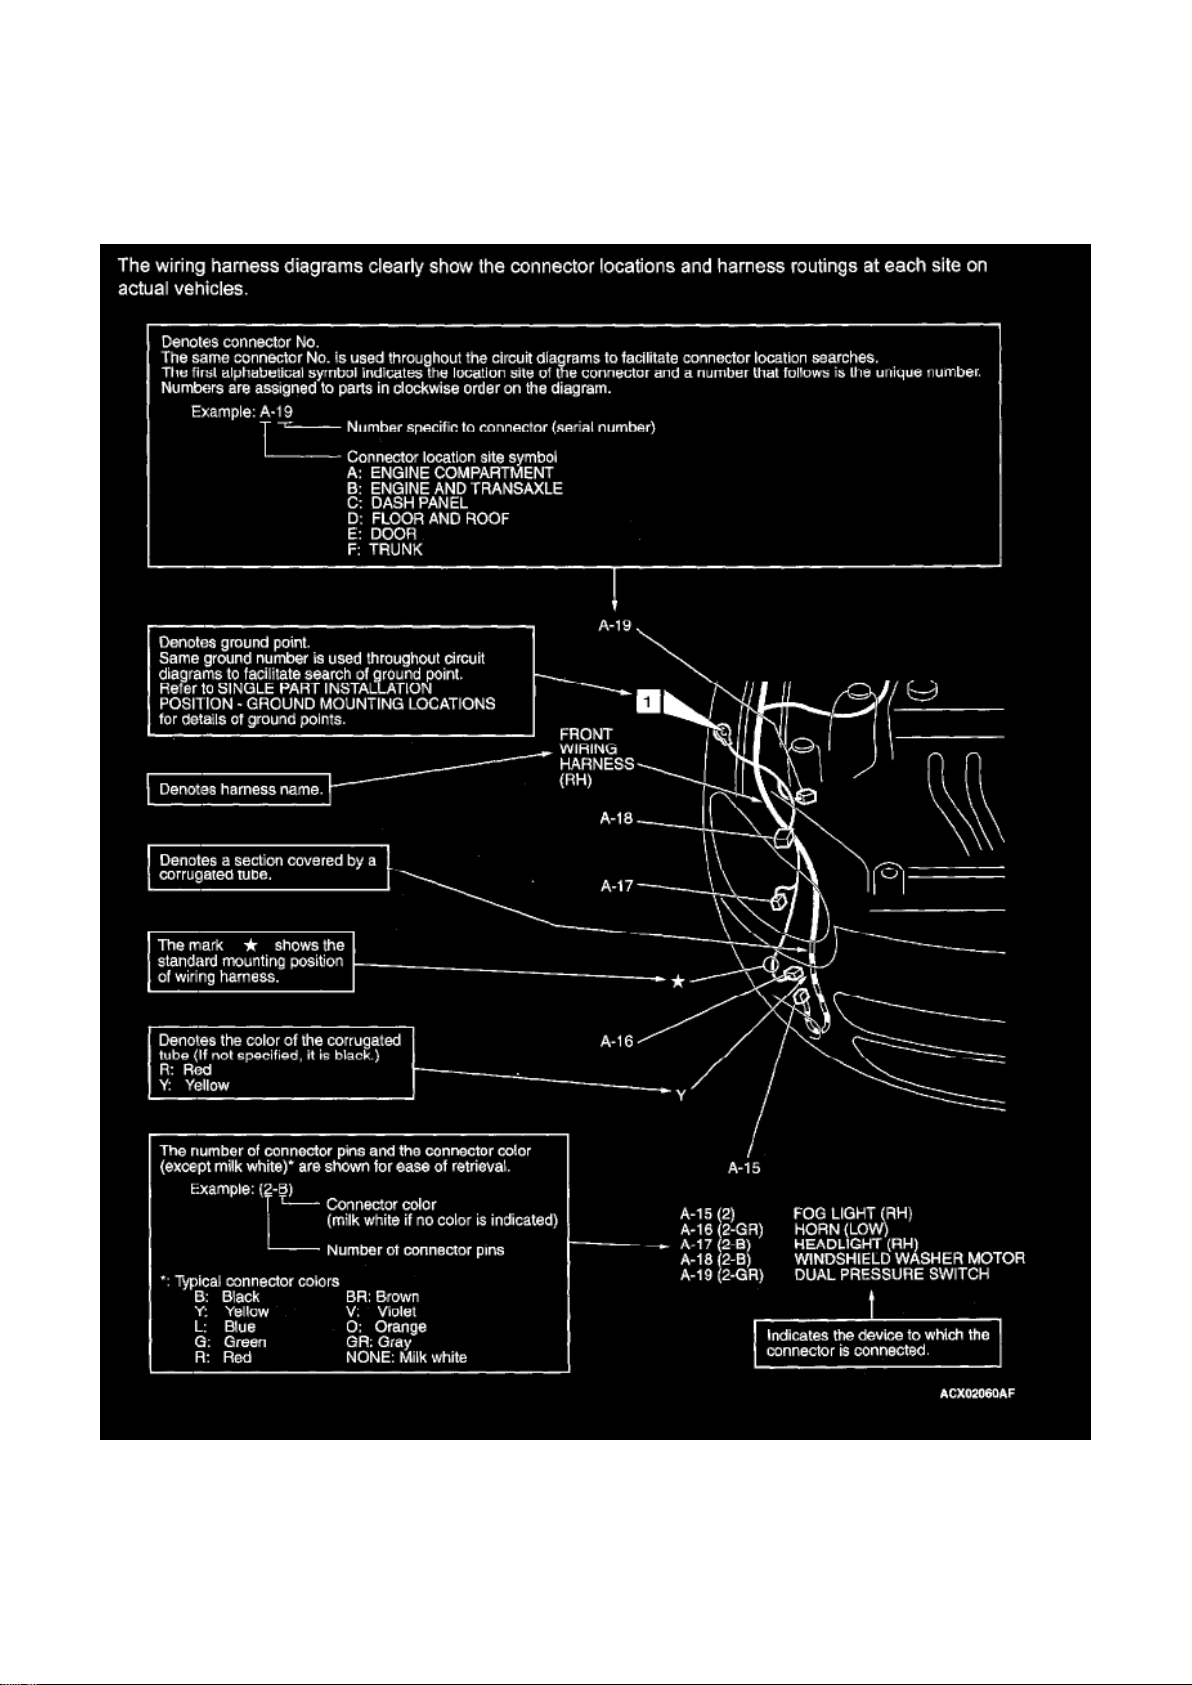
How To Read Configuration Diagrams
Page 57
Dodge Stratus Coupe Workshop Manual (L4-2.4L VIN G (2003))
Dodge Workshop Manuals > Relays and Modules > Relays and Modules - HVAC > Control Module HVAC > Component
Information > Diagrams > Diagram Information and Instructions > Page 72
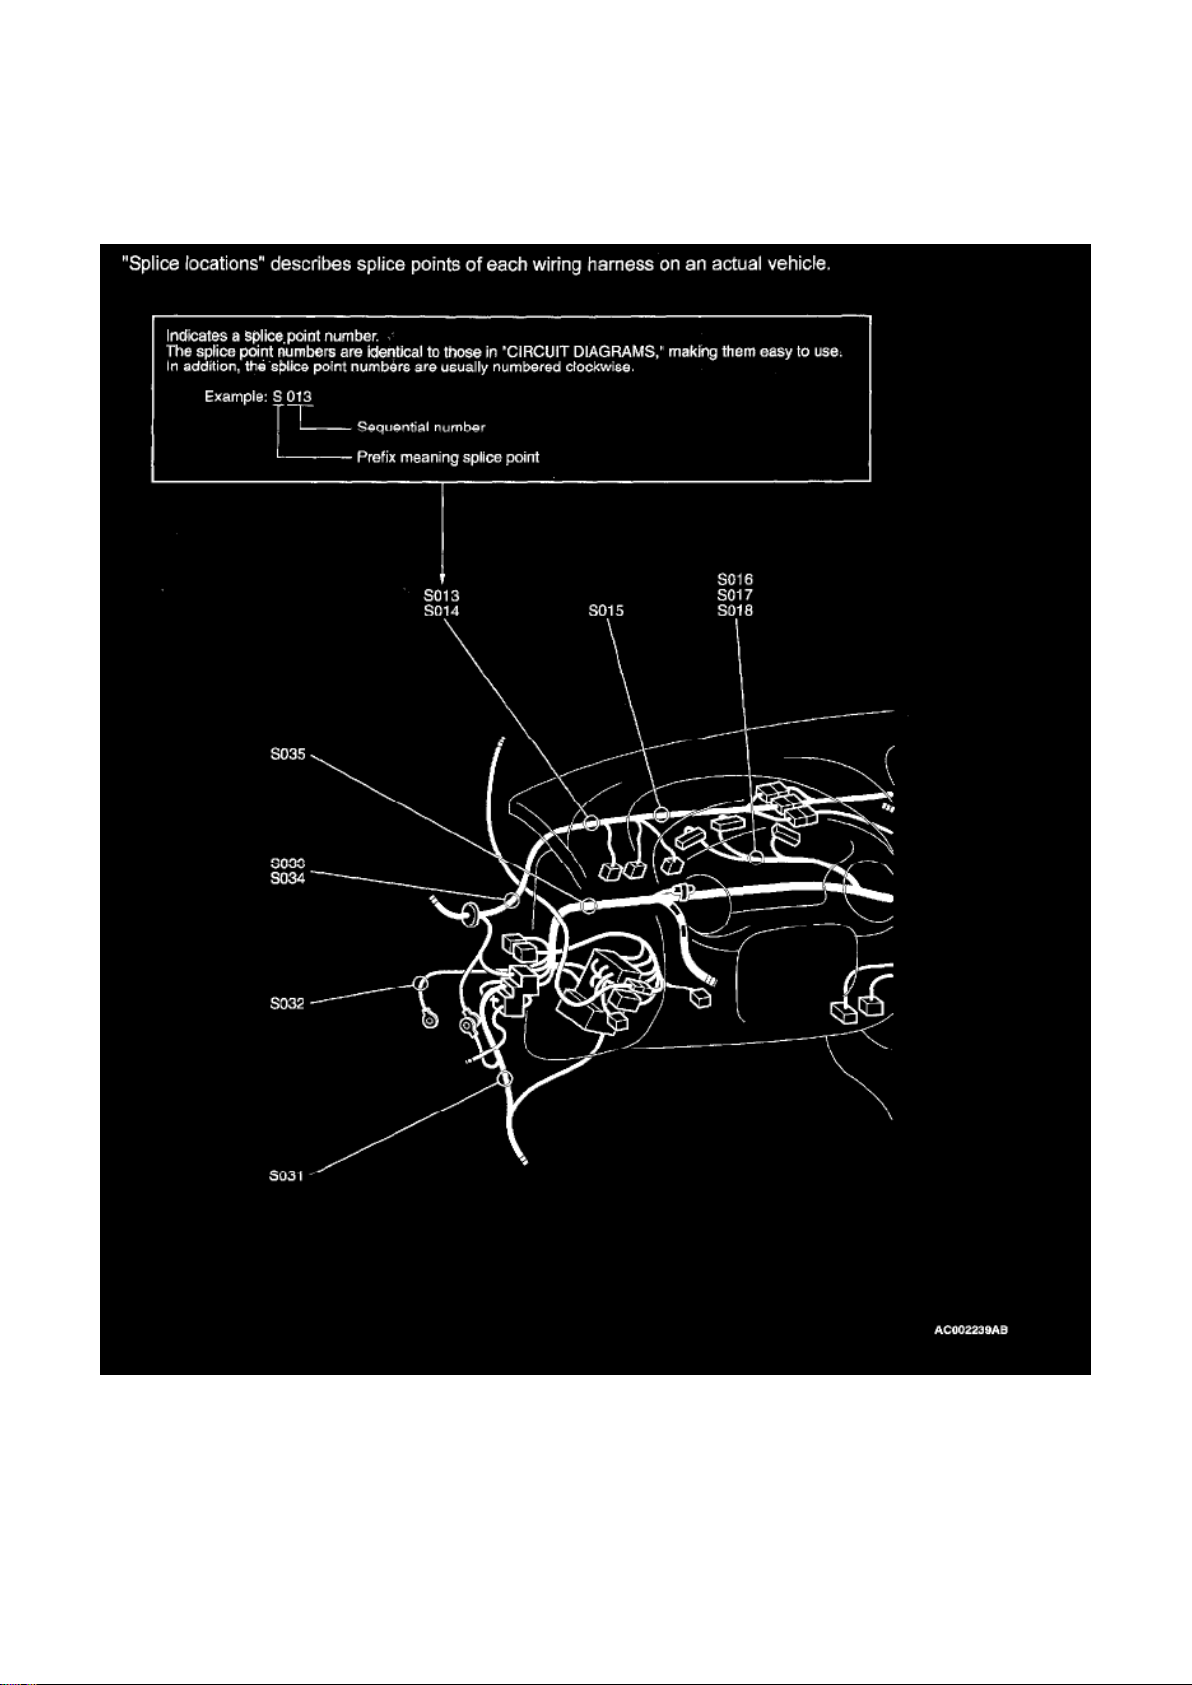
How To Read Splice Locations
Page 58
Dodge Stratus Coupe Workshop Manual (L4-2.4L VIN G (2003))
Dodge Workshop Manuals > Relays and Modules > Relays and Modules - HVAC > Control Module HVAC > Component
Information > Diagrams > Diagram Information and Instructions > Page 73
Page 59

Control Module HVAC: Diagnostic Aids
Harness Connector Inspection
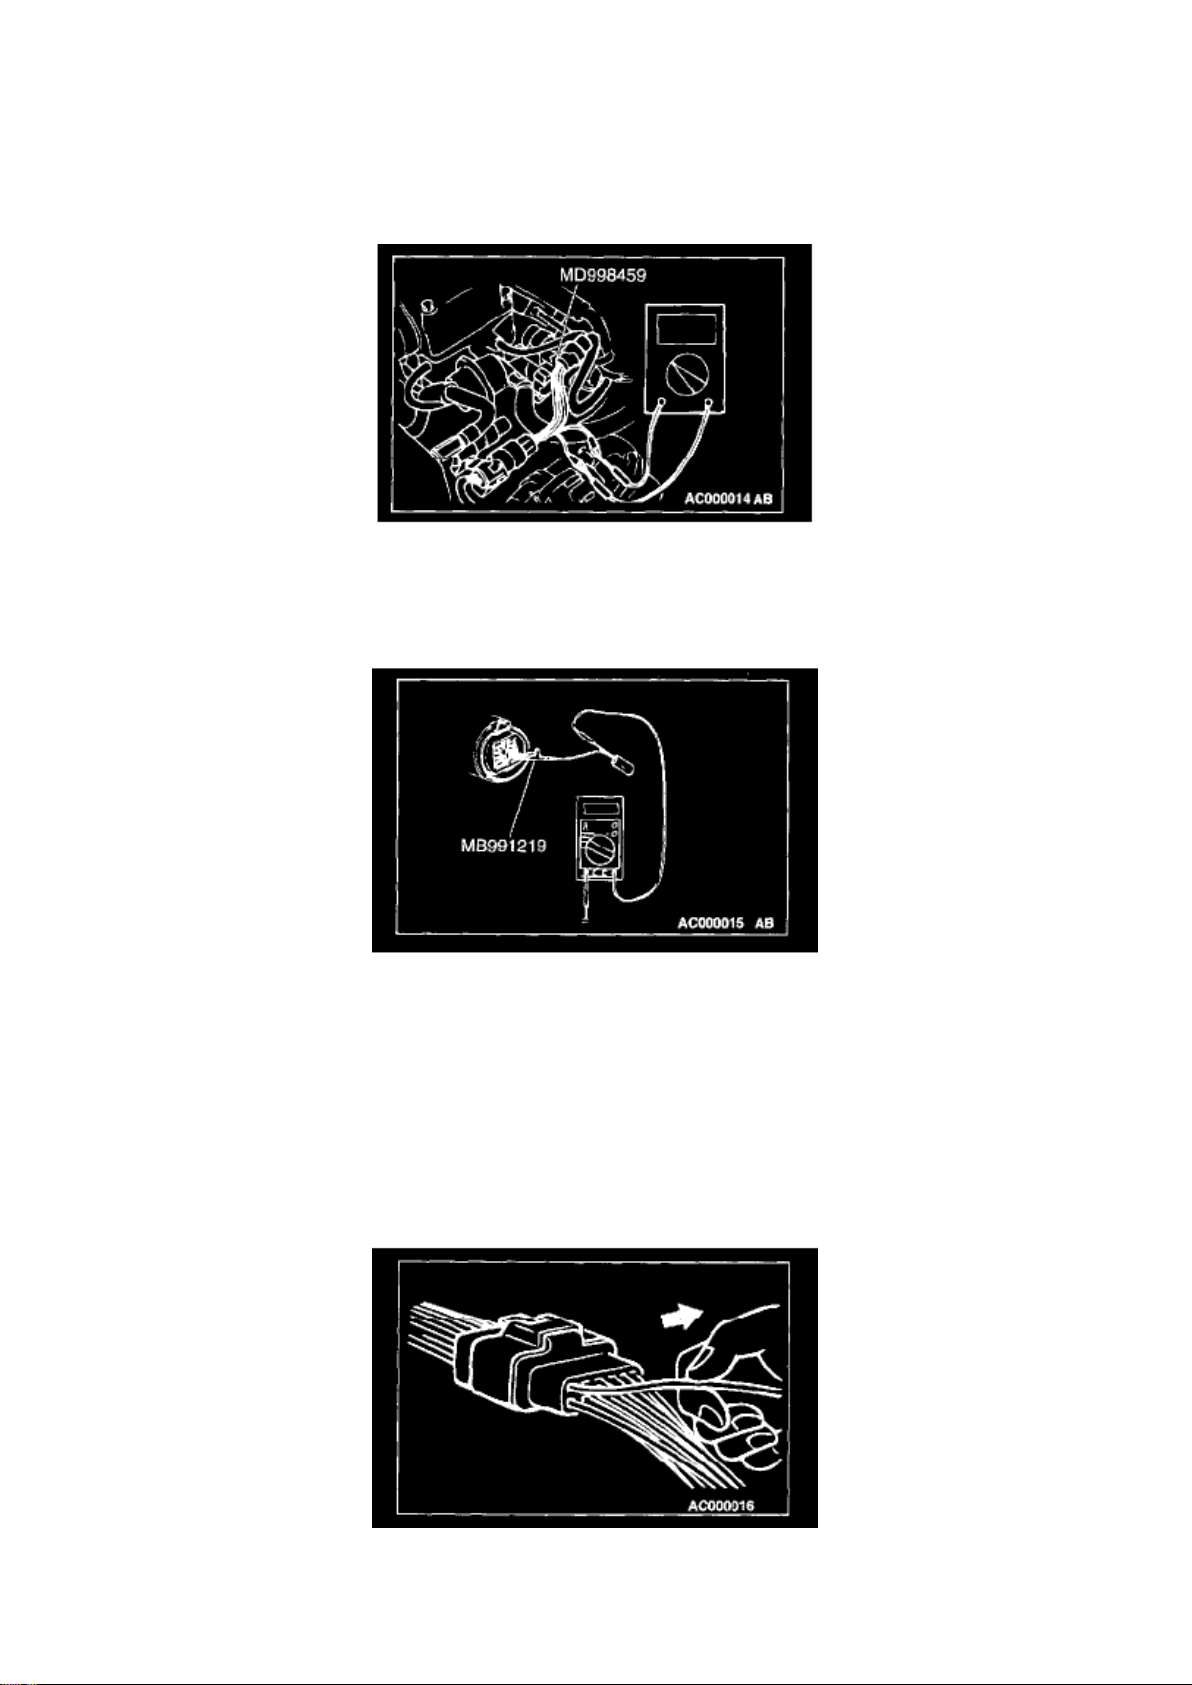
CONNECTOR CONTINUITY AND VOLTAGE TEST
Required Special Tools:
- MB991219: Test Harness Set
- MD998459: Test Harness
Follow the steps below to avoid causing poor connector contact and/or reduced waterproof
performance of connectors when checking continuity and/or voltage at terminals of waterproof
connectors.
CAUTION: Never backprobe a waterproof connector. Backprobing this type of a connector may
cause the terminals to corrode, deteriorating circuit performance.
1. If the circuit is to be checked in the closed state, use a special tool such as MD998459.
CAUTION: Forcing the probe into the terminal may open the terminal, causing intermittent or poor
contact and creating an open circuit.
2. If the connector is disconnected for checking and the facing part is the female pin side, use an
appropriate male terminal for checking the contact
pressure of connector pins (such as MB991219).
CAUTION: Do not contact more than one terminal with the probe at the same time. Contacting two
or more terminals at the same time may damage a circuit, possibly to the point of starting an
electrical fire.
3. If the facing part is the male pin side, either carefully touch the probe to the pin so it does not
accidently contact other pins, or use an appropriate
female terminal.
Page 60
Dodge Stratus Coupe Workshop Manual (L4-2.4L VIN G (2003))
Dodge Workshop Manuals > Relays and Modules > Relays and Modules - HVAC > Control Module HVAC > Component
Information > Diagrams > Diagram Information and Instructions > Page 74
Page 61

IMPROPER TERMINAL ENGAGEMENT CHECK
Terminals inside a connector may not engage properly even if the connectors engage. Make sure
that each terminal does not come out of the connector when gently pulling each harness wire. If it
does, repair or replace the terminal and/or connector.
CONNECTOR TERMINAL ENGAGEMENT AND DISENGAGEMENT
Loosely engaged terminals can be repaired by removing the female terminal from the connector
housing and raising its lance to establish better engagement. Removal of the connector terminal
used for MFI and INVECS-II A/T control circuits can be done in the following manner.
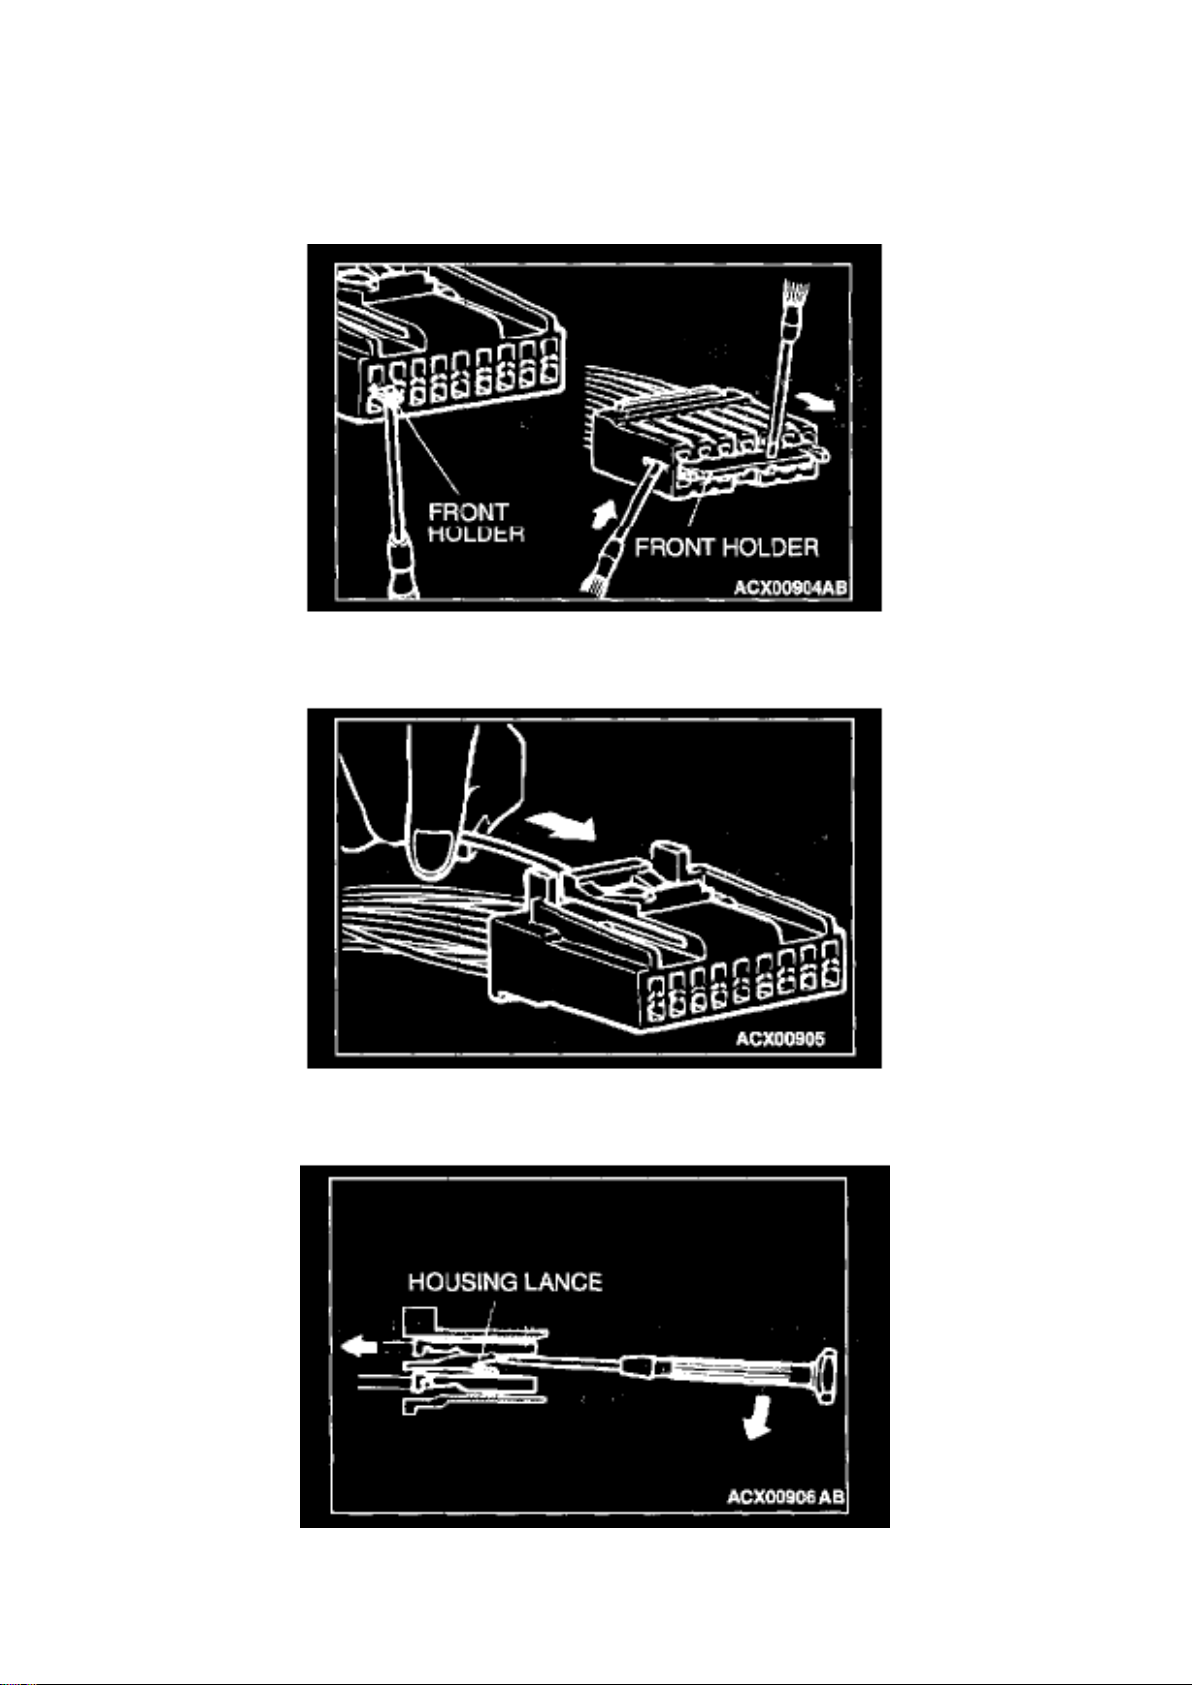
COMPUTER CONNECTOR
1. Insert a screwdriver [1.4 mm (0.06 inch) width] as shown in the figure, disengage the front
holder, and remove it.
2. Push the harness wire of the terminal to be repaired deep into the connector from the harness
side and hold it there.
3. Insert the tip of the screwdriver [1.4 mm (0.06 inch) width] into the connector as shown in the
figure, raise the housing lance slightly with the tip,
and pull out the terminal.
Page 62
Dodge Stratus Coupe Workshop Manual (L4-2.4L VIN G (2003))
Dodge Workshop Manuals > Relays and Modules > Relays and Modules - HVAC > Control Module HVAC > Component
Information > Diagrams > Diagram Information and Instructions > Page 75
Page 63

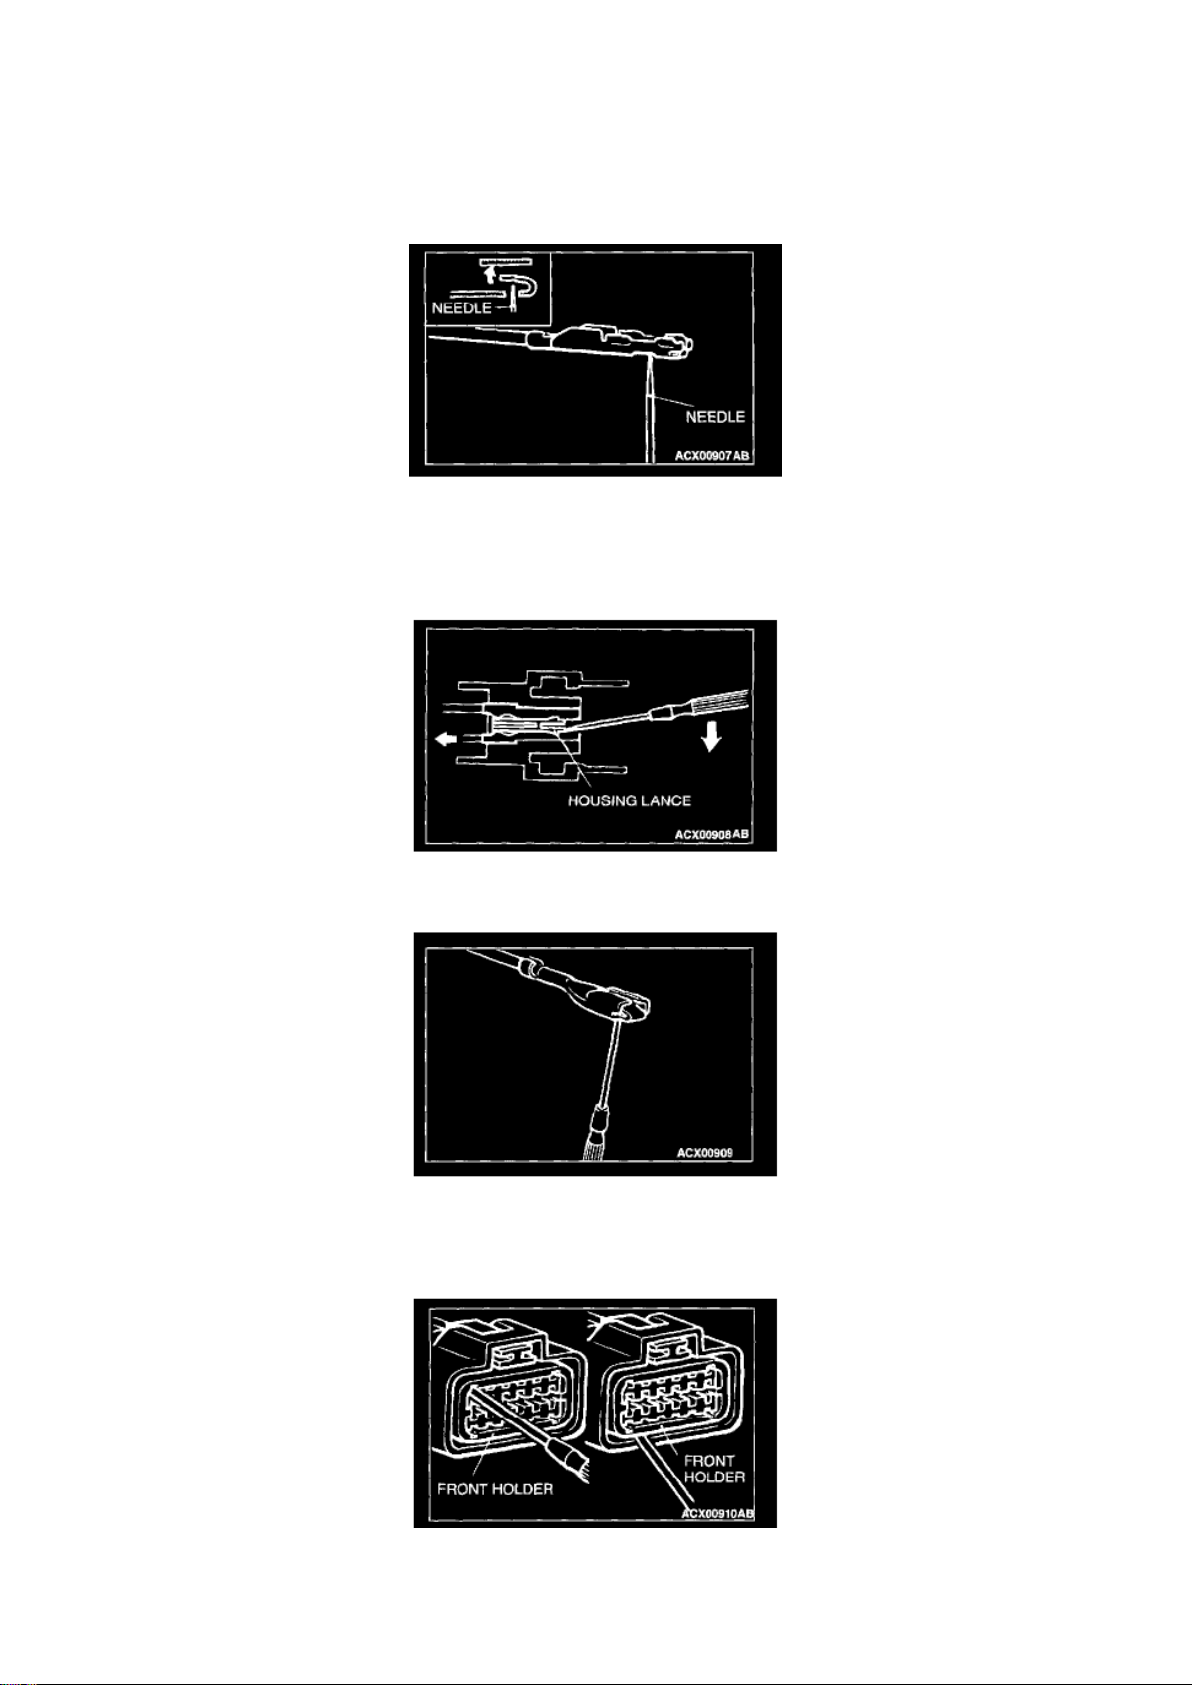
4. Insert a needle through the hole provided on the terminal and raise the contact point. Lightly
squeeze the outer edge so the flats are parallel with
the bottom.
ROUND WATERPROOF CONNECTOR
1. Remove the waterproof cap by using a screwdriver.
2. Insert the tip of the screwdriver [1.4 mm (0.06 inch) or 2.0 mm (0.08 inch) width] into the
connector as shown in the figure, raise the housing
lance slightly with the tip, and pull out the terminal.
3. Insert a screwdriver through the hole provided on the terminal and raise the contact point. Lightly
squeeze the outer edge so the flats are parallel
with the bottom.
RECTANGULAR WATERPROOF CONNECTOR
1. Disengage the front holder with a screwdriver and remove it.
Page 64
Dodge Stratus Coupe Workshop Manual (L4-2.4L VIN G (2003))
Dodge Workshop Manuals > Relays and Modules > Relays and Modules - HVAC > Control Module HVAC > Component
Information > Diagrams > Diagram Information and Instructions > Page 76
Page 65

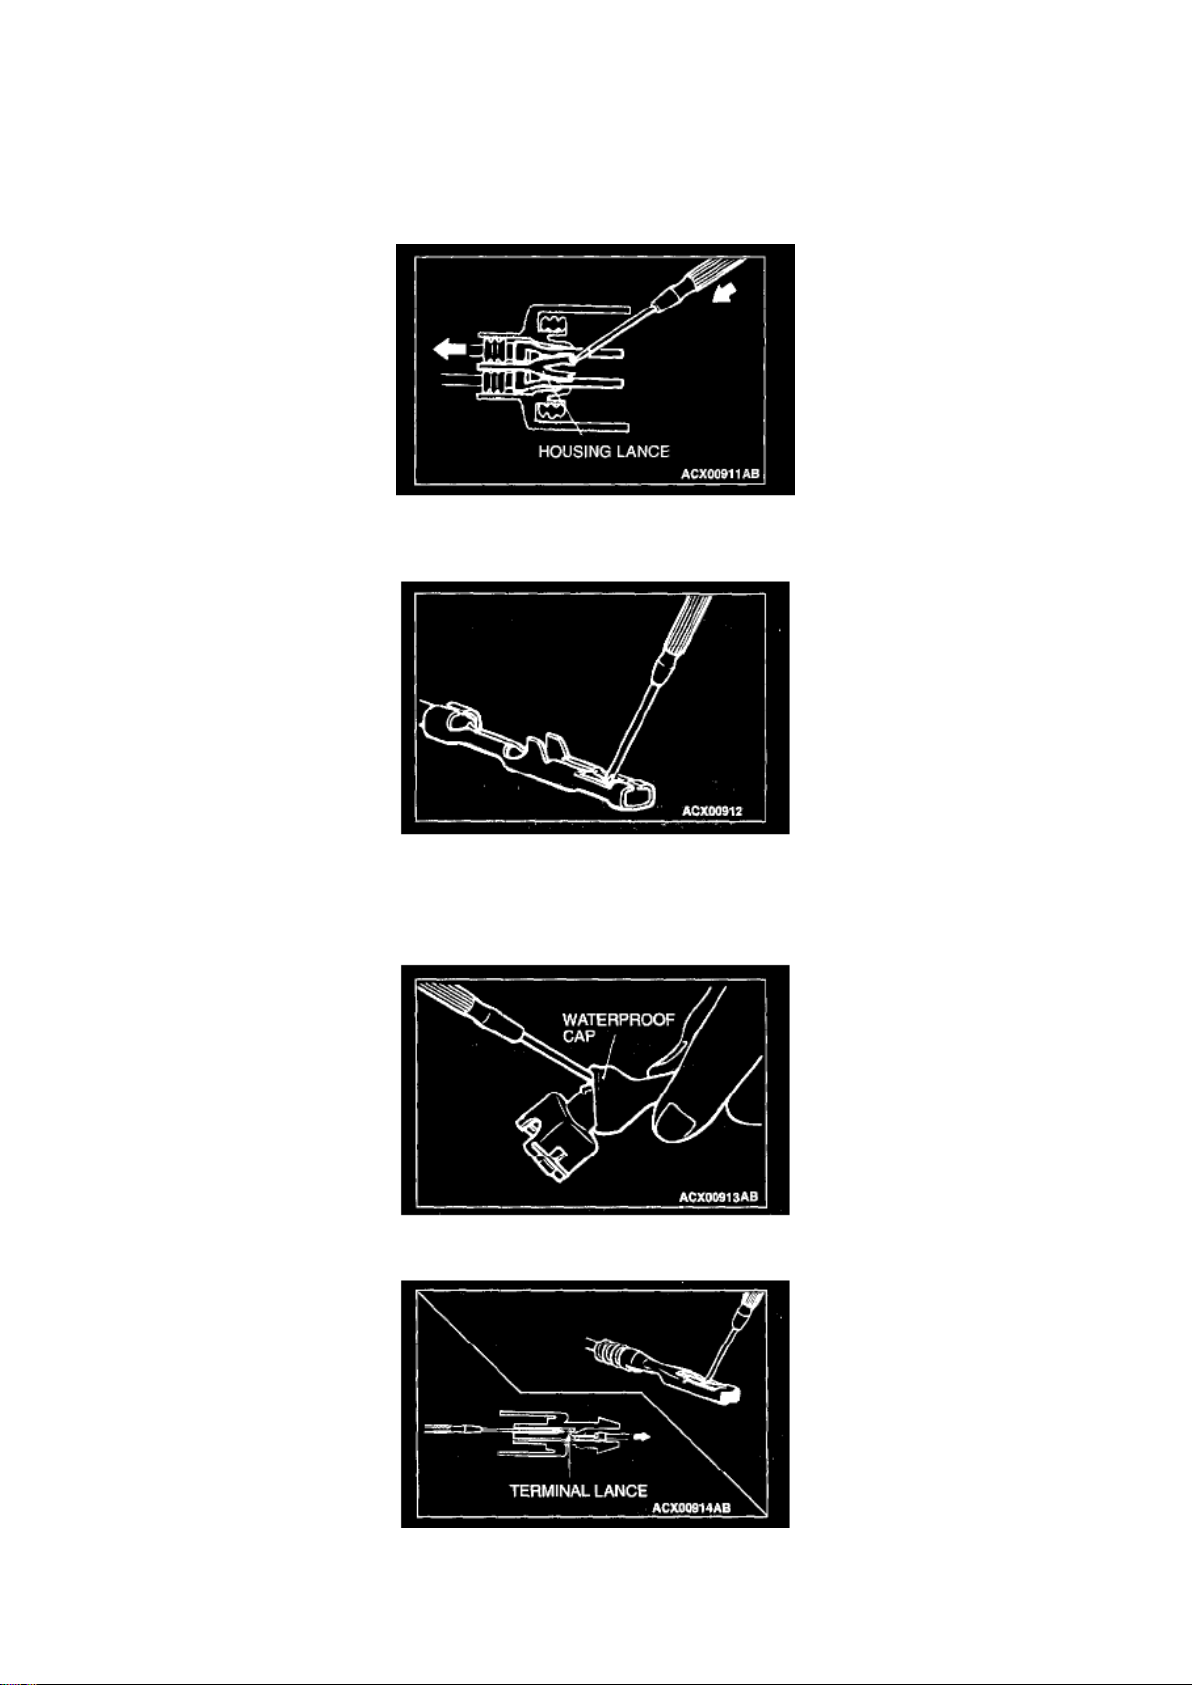
2. Insert the tip of a screwdriver [0.8 mm (0.03 inch) width] into the connector as shown in the
figure, push it lightly to raise the housing lance, and
pull out the terminal.
3. Press the contact point of the female terminal down by holding a screwdriver [1.4 mm (0.06 inch)
width] as shown in the figure. Lightly squeeze
the outer edge so the flats are parallel with the bottom.
INJECTOR CONNECTOR
1. Remove the waterproof cap.
2. Insert the tip of a screwdriver [1.4 mm (0.06 inch) width] into the connector as shown in the
figure, press in the terminal lance, and pull out the
terminal.
CAUTION: Make sure the lance is pressed in before the terminal is inserted into the connector.
3. Press the contact point of the male terminal down by holding a screwdriver [1.4 mm (0.06 inch)
width] as shown in the figure.
Page 66
Dodge Stratus Coupe Workshop Manual (L4-2.4L VIN G (2003))
Dodge Workshop Manuals > Relays and Modules > Relays and Modules - HVAC > Control Module HVAC > Component
Information > Diagrams > Diagram Information and Instructions > Page 77
Page 67

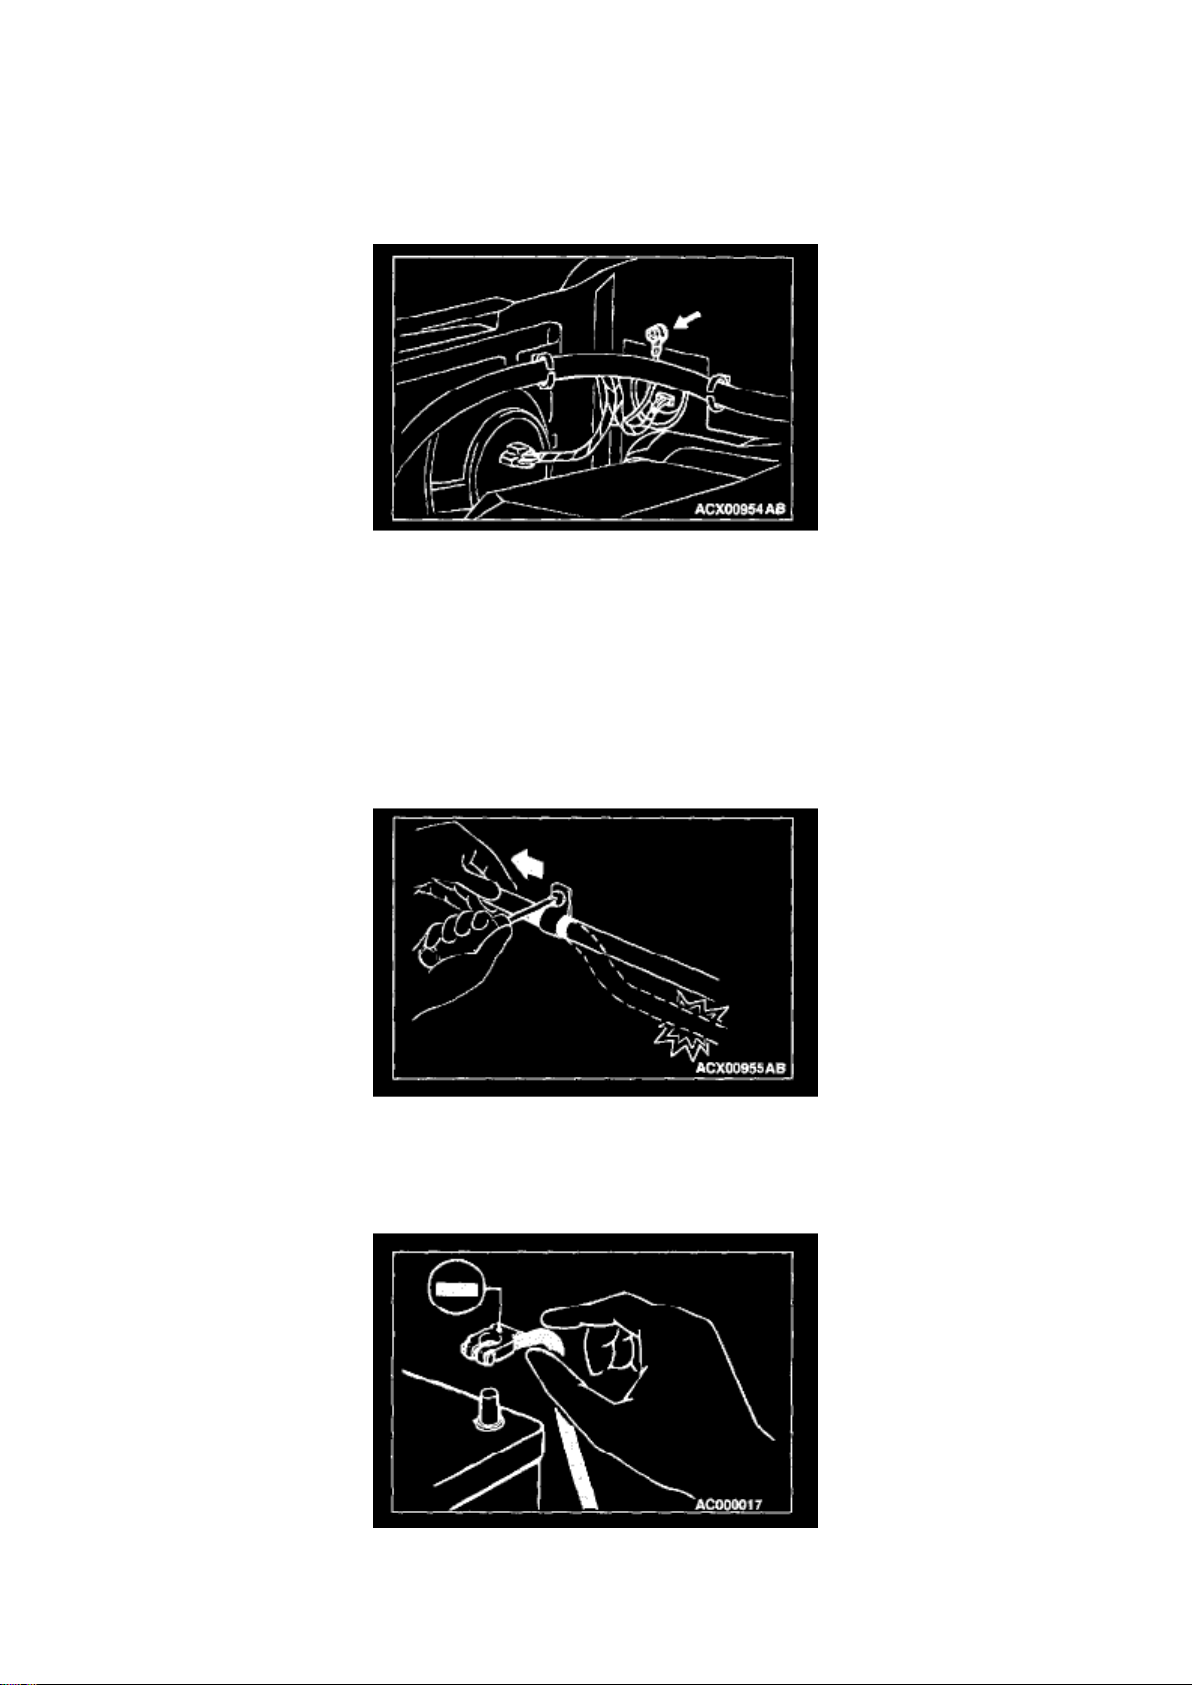
Cable and Wires Check
1. Check connections for looseness, rust, and stains. 2. Check terminals and wires for corrosion by
battery electrolyte, etc. 3. Check terminals and wires for open circuit or frayed wires. 4. Check wire
insulation and coating for damage, cracks, and wear. 5. Check conductive parts of terminals for
contact with other metallic parts (vehicle body and other parts). 6. Check grounding parts to verify
that there is complete continuity between attaching bolt(s) and vehicle body. 7. Check for incorrect
wiring. 8. Check that harnesses are secured to prevent contact with sharp edges and corners or
hot parts (exhaust manifold, pipe, etc.). 9. Check that harnesses are secured firmly to provide
enough clearance from the fan pulley, fan belt, and other rotating or moving parts.
10. Check that the harness between fixed parts (such as the vehicle body) and vibrating parts
(such as the engine) are long enough to allow for
vibration and movement.
Battery Handling
WARNING: Battery posts, terminals and related accessories contain lead and lead compounds.
WASH HANDS AFTER HANDLING
When checking or servicing does not require power from the vehicle battery, be sure to disconnect
the cable from the battery (-) terminal. This will prevent problems that could be caused by a short
circuit. Disconnect the (-) battery terminal first and reconnect it last.
Cautions In Event of Blown Fuse
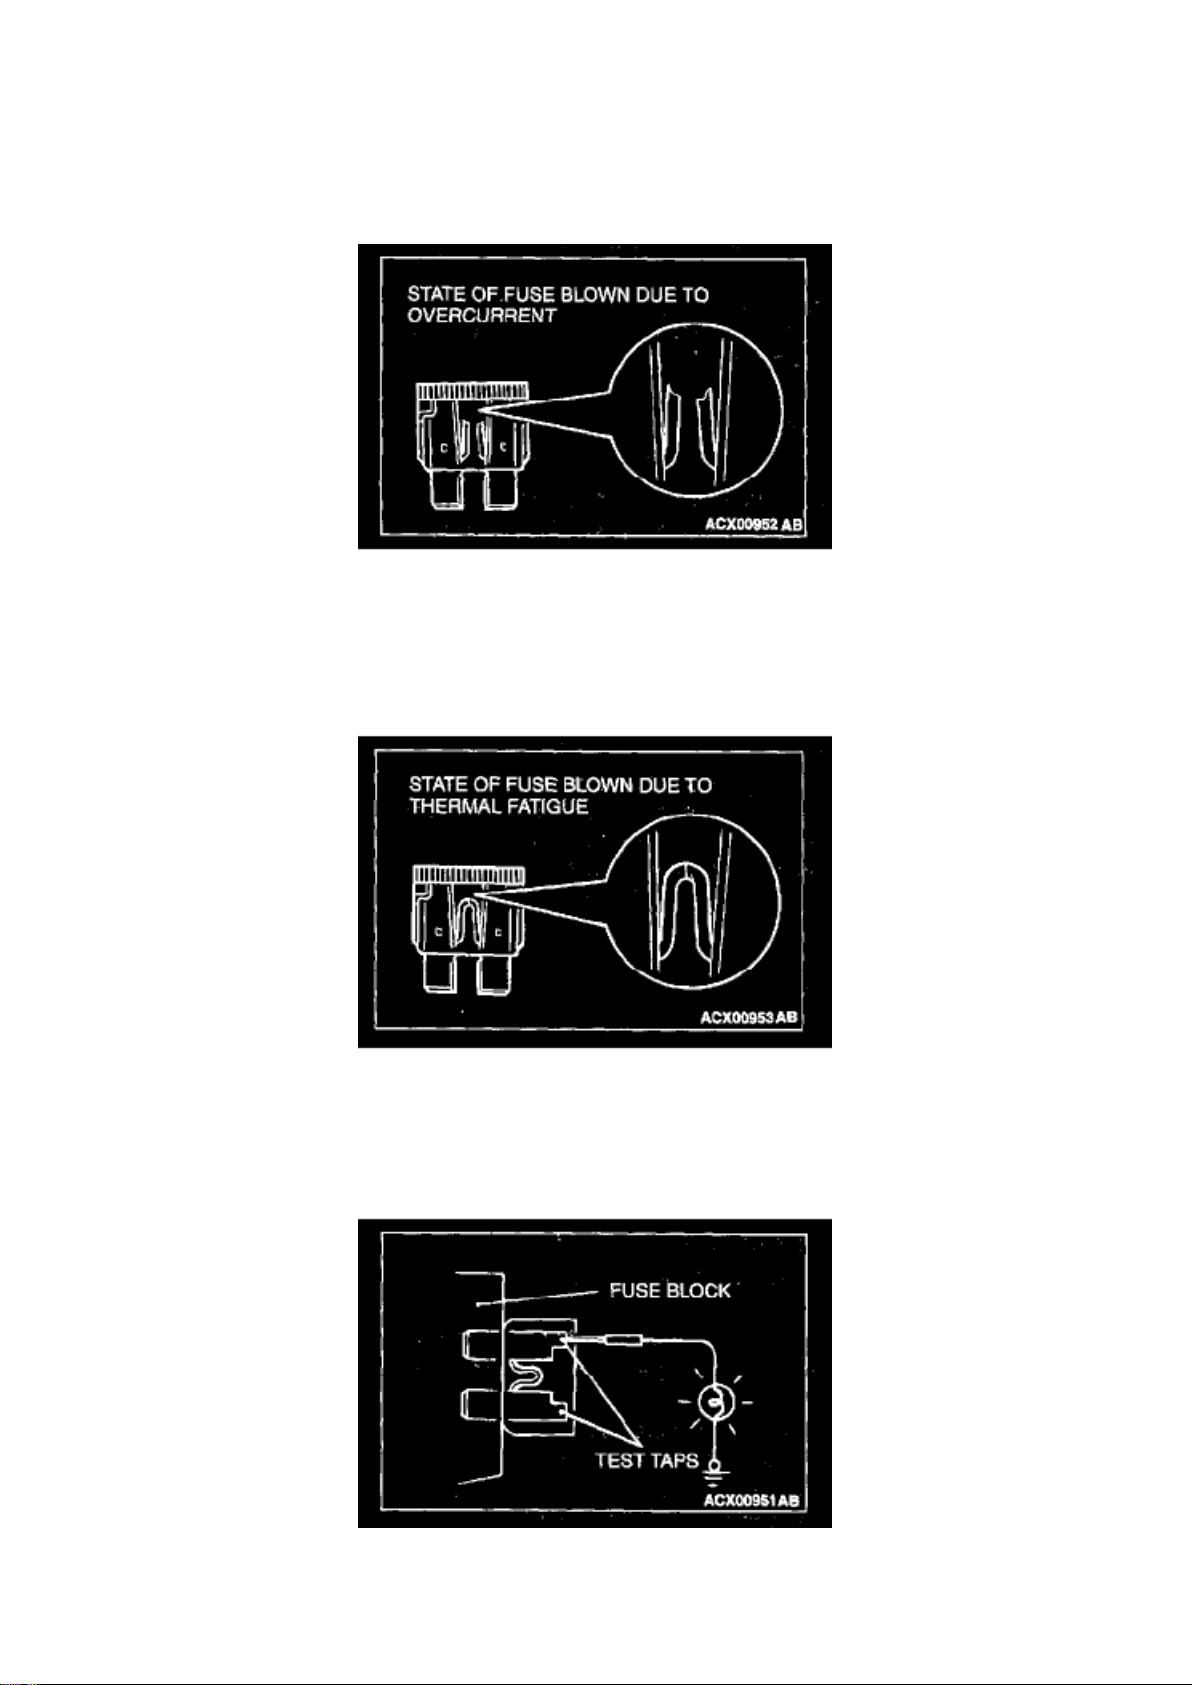
When a fuse is blown, there are two probable causes. One is that it is blown due to flow of current
exceeding its rating. The other is that it is blown due to repeated on/off current flowing through it.
Which of the two causes is responsible can be easily determined by visual check as described
below.
Page 68
Dodge Stratus Coupe Workshop Manual (L4-2.4L VIN G (2003))
Dodge Workshop Manuals > Relays and Modules > Relays and Modules - HVAC > Control Module HVAC > Component
Information > Diagrams > Diagram Information and Instructions > Page 78
Page 69

1. Fuse blown due to current exceeding rating
The illustration shows the state of a fuse blown due to this cause. In this case, do not replace the
fuse with a new one hastily since a current heavy enough to blow the fuse has flowed through it.
First, check the circuit for shorts and check for abnormal electric parts. After correcting shorts or
replacing parts, use only a fuse of the same capacity as a replacement. Never use a fuse of larger
capacity than the original fuse. If a larger capacity fuse is used, electric parts or wiring could be
damaged, or could start a fire.
2. Fuse blown due to repeated turning current on and off The illustration shows the state of a fuse
blown due to repeated current on/off. Normally,
this type of problem occurs after a fairly long period of use and is less frequent than above. In this
case, simply replace with a new fuse of the same capacity.
Checking Fuses
A blade type fuse has test taps provided to allow checking of the fuse itself without removing it from
the fuse block. The fuse is okay if the test light comes on when its one lead is connected to the test
taps (one at a time) and the other lead is grounded. Remember to turn the ignition switch to ON to
ensure all circuits are live.
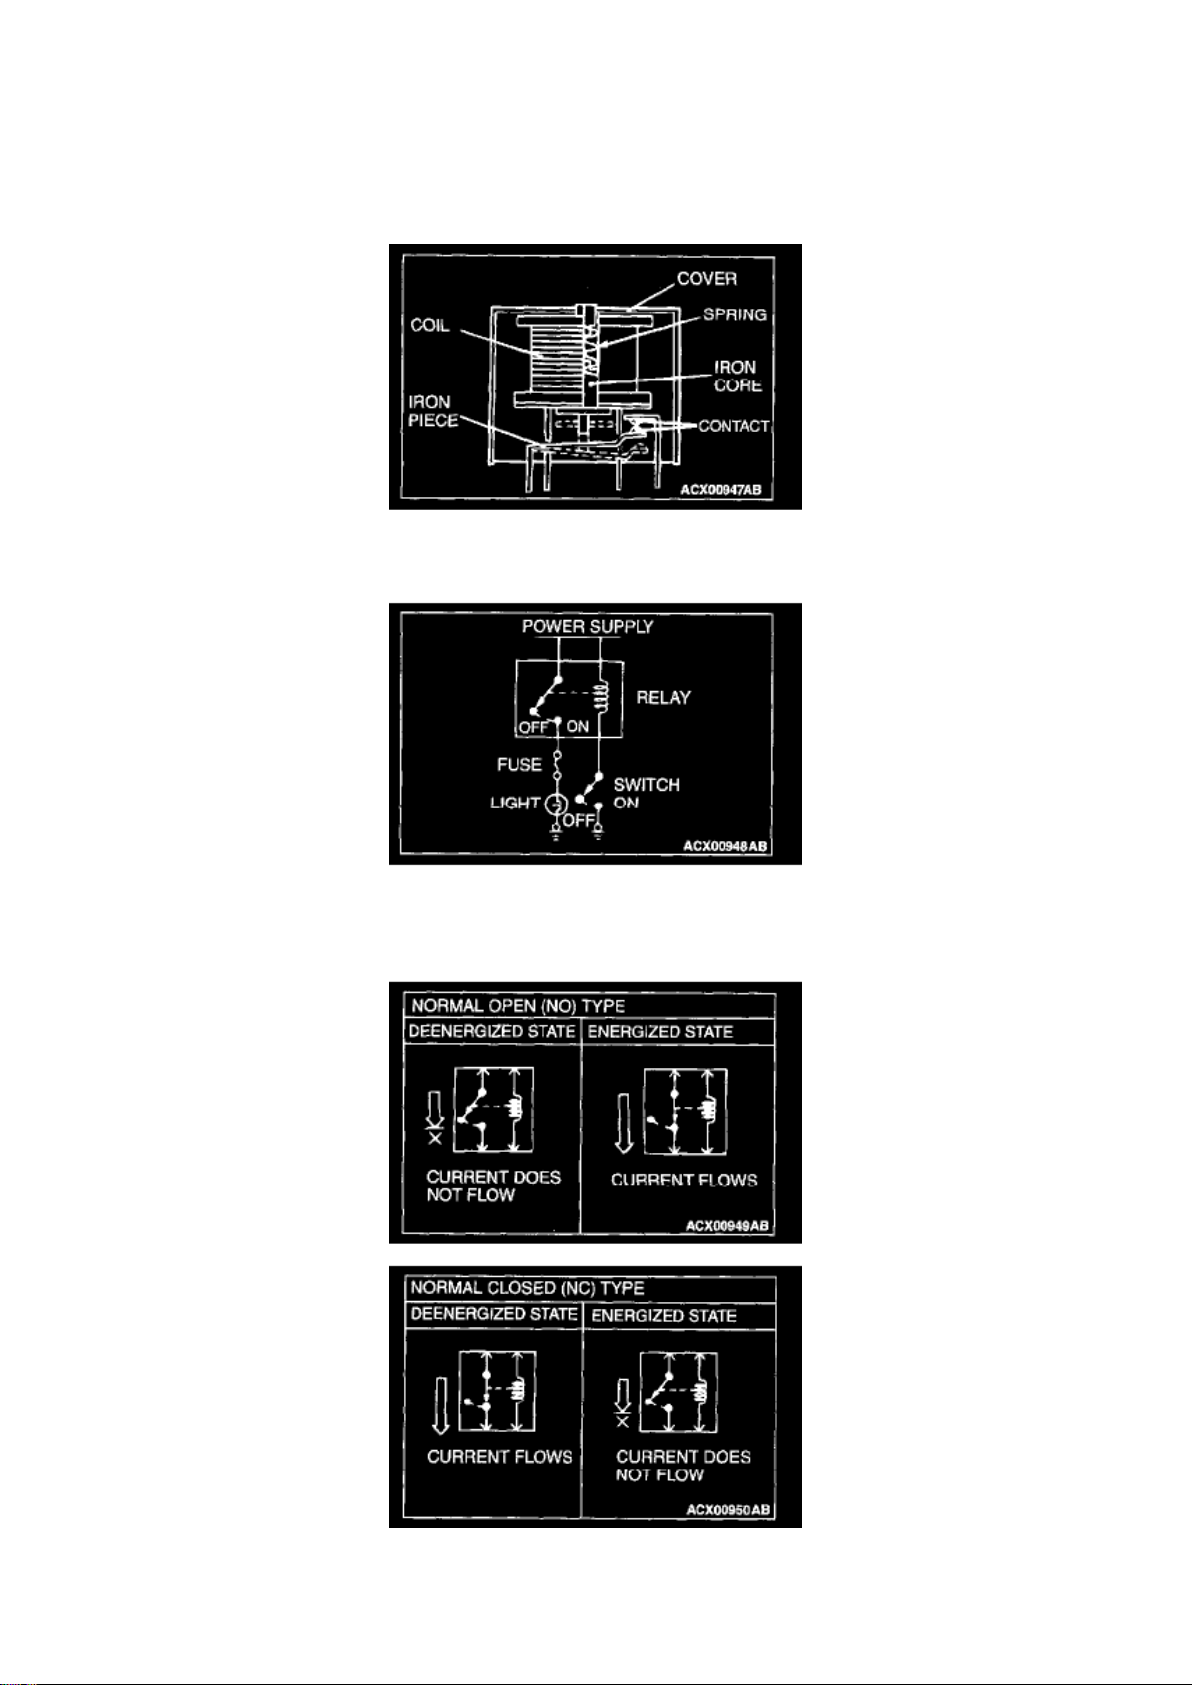
Checking Relays
NOTE: The deenergized state means that no current is flowing through the coil. The energized
state means that current is flowing through the coil.
Page 70
Dodge Stratus Coupe Workshop Manual (L4-2.4L VIN G (2003))
Dodge Workshop Manuals > Relays and Modules > Relays and Modules - HVAC > Control Module HVAC > Component
Information > Diagrams > Diagram Information and Instructions > Page 79
Page 71

1. When current flows through the coil of a relay, its core is magnetized to attract the iron piece,
closing (ON) the contact at the tip of the iron piece.
When the coil current is turned off, the iron piece returns to its original position by a spring, opening
the contact (OFF).
2. By using a relay, a heavy current can be turned on and off by a switch using much less current.
For example, in the circuit shown here, when the
switch is turned on (closed), current flows to the coil of the relay. Then, its contact is turned on
(closed) and the light comes on. The current flowing through the switch is much less than that for
the light.
3. Relays may be classified as the normally open-type or the normally closed-type, depending on
their contact construction.
When a normally closed relay as illustrated here is checked, there should be continuity between
terminals 1 and 2 and between terminals 3 and 4 when the relay is deenergized. There should be
no continuity between terminals 3 and 4 when battery voltage is applied between terminals 1 and 2.
Checking Switches
In a circuit diagram, a switch is shown in the normal condition.
Page 72
Dodge Stratus Coupe Workshop Manual (L4-2.4L VIN G (2003))
Dodge Workshop Manuals > Relays and Modules > Relays and Modules - HVAC > Control Module HVAC > Component
Information > Diagrams > Diagram Information and Instructions > Page 80
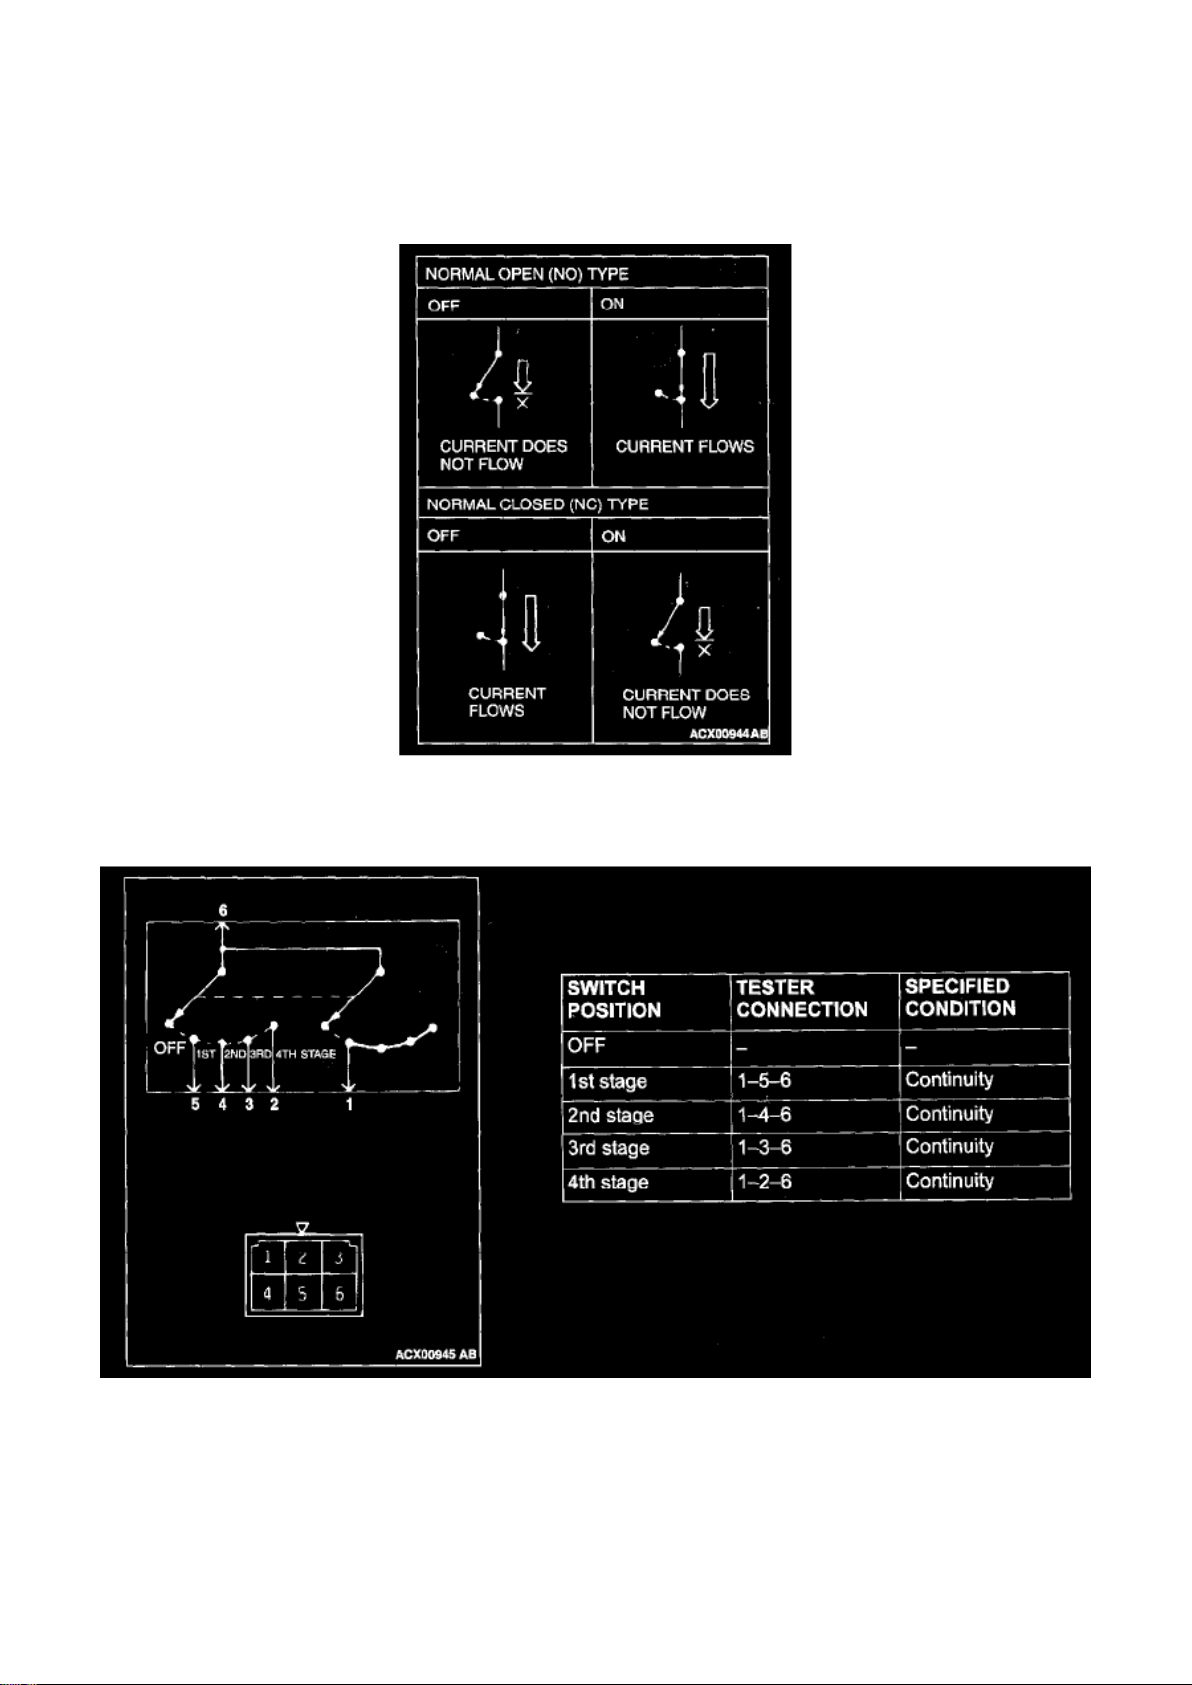
1. Normally open or normally closed switch
Switches are classified into those which open the circuit and those which close the circuit when off.
Switches are shown in their normal state unless specified otherwise.
Page 73

2. Switch connection
This figure illustrates a complex switch. The continuity between terminals at each position is as
indicated in the table below.
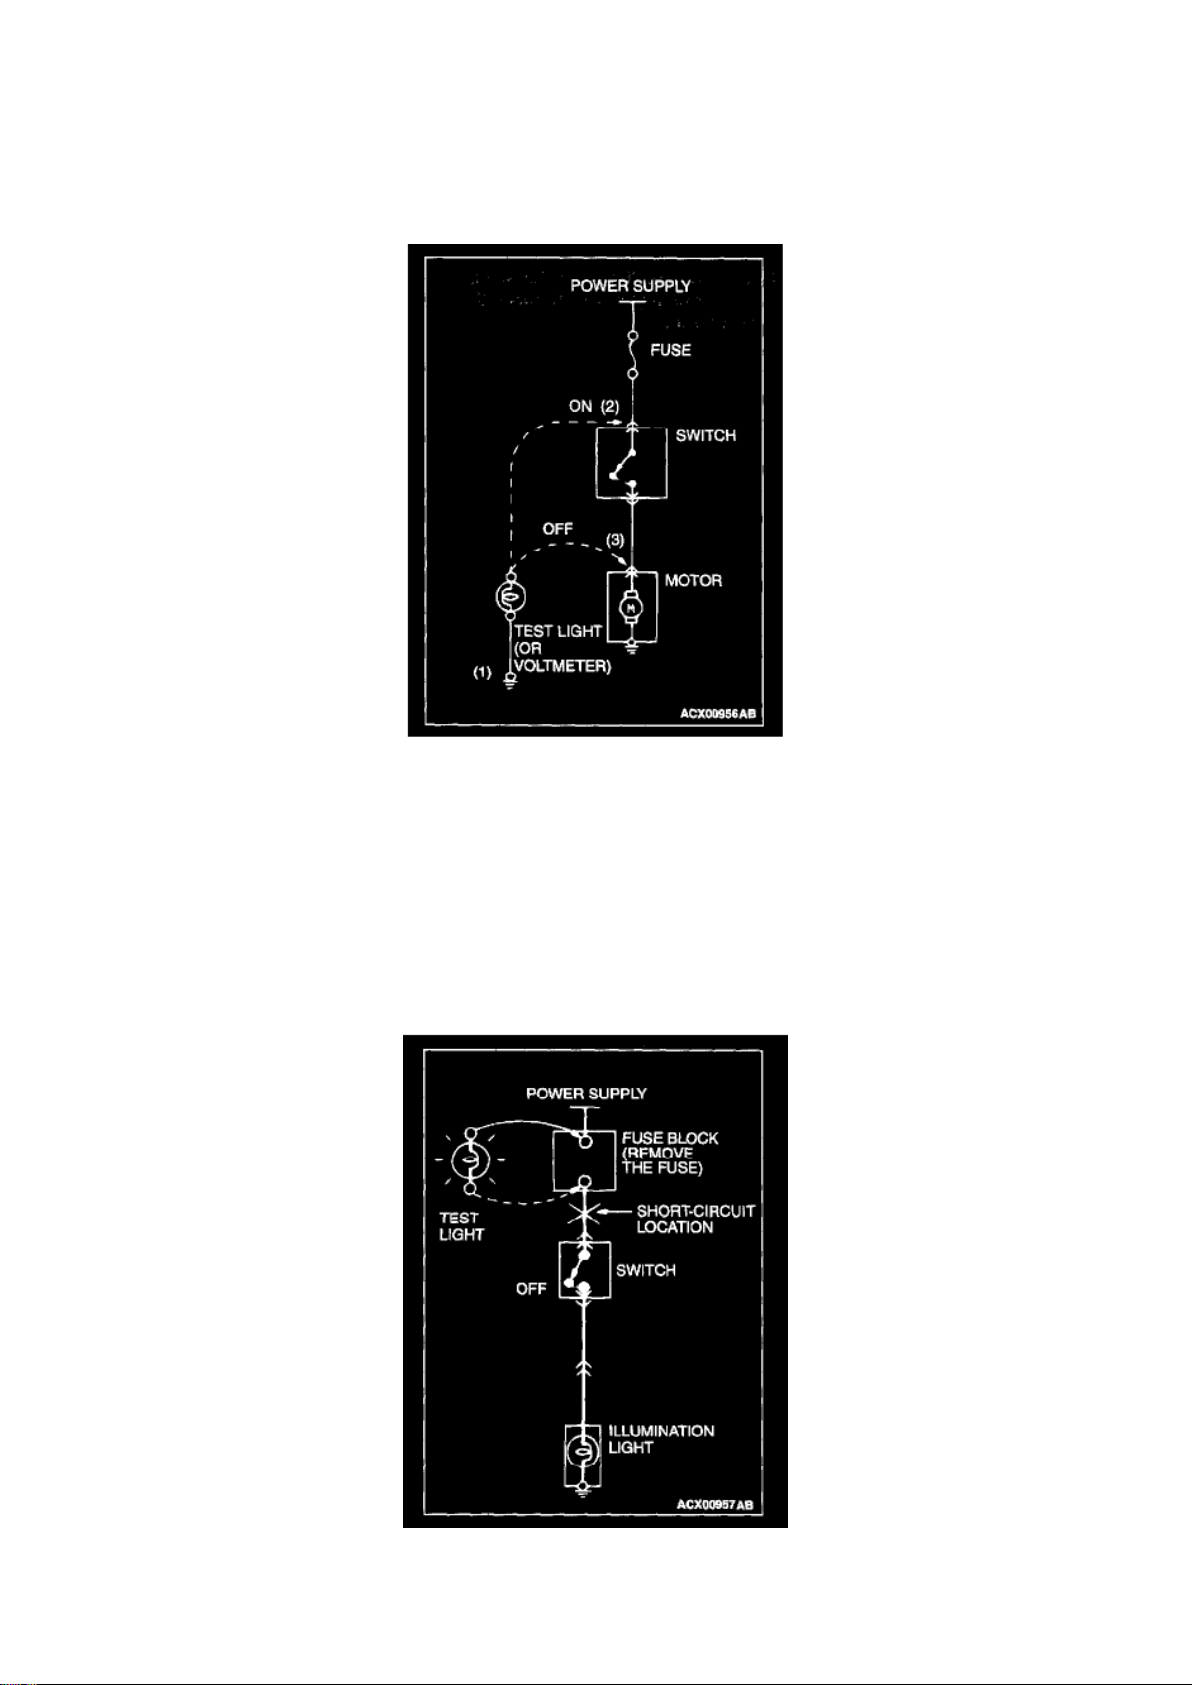
General Electrical System Check
GENERAL ELECTRICAL SYSTEM CHECK
A circuit consists of the power supply, switch, relay, load, ground, etc. "there are various methods
to check a circuit including an overall check, voltage check, short-circuit check, and continuity
check. Each of the methods briefly described below apply only to circuits similar to the illustration.
Page 74
Dodge Stratus Coupe Workshop Manual (L4-2.4L VIN G (2003))
Dodge Workshop Manuals > Relays and Modules > Relays and Modules - HVAC > Control Module HVAC > Component
Information > Diagrams > Diagram Information and Instructions > Page 81
Page 75

1. VOLTAGE CHECK
1. Ground one lead wire of the test light. If a voltmeter is used instead of the test light, ground the
grounding side lead wire. 2. Connect the other lead wire of the test light to the power side terminal
of the switch connector. The test light should come on or the voltmeter
should indicate a voltage.
3. Then, connect the test tight or voltmeter to the motor connector. The test light should not come
on, or the voltmeter should indicate no voltage.
When the switch is turned ON in this state, the test light should come on, or the voltmeter should
indicate a voltage, with the motor starting to run.
4. The circuit illustrated here is normal. If there is any problem, such as the motor failing to run,
check voltages beginning at the connector
nearest to the motor until the faulty part is identified.
2. SHORT-CIRCUIT CHECK
Because the fuse has blown, it is probable that there is a short circuit. Follow the procedures below
to identify the short-circuit location.
STEP 1. Remove the blown fuse and connect the test light across the fuse terminals (Circuit
switch: OFF).
Q: Does the test light illuminate?
YES: Short-circuit exists between the fuse block and the switch. Repair the harness between the
fuse block and the switch.
Page 76
Dodge Stratus Coupe Workshop Manual (L4-2.4L VIN G (2003))
Dodge Workshop Manuals > Relays and Modules > Relays and Modules - HVAC > Control Module HVAC > Component
Information > Diagrams > Diagram Information and Instructions > Page 82
Page 77

NO: Go to Step 2.
STEP 2. Turn the switch ON and disconnect the illumination light connector.
Q: Does the test light illuminate?
YES: Short-circuit exists between the switch and the connector. Repair the harness between the
switch and the connector. NO: Short-circuit exists between the connector and the illumination light.
Repair the harness between the switch and the connector.
Page 78
Dodge Stratus Coupe Workshop Manual (L4-2.4L VIN G (2003))
Dodge Workshop Manuals > Relays and Modules > Relays and Modules - HVAC > Control Module HVAC > Component
Information > Diagrams > Diagram Information and Instructions > Page 83
Page 79

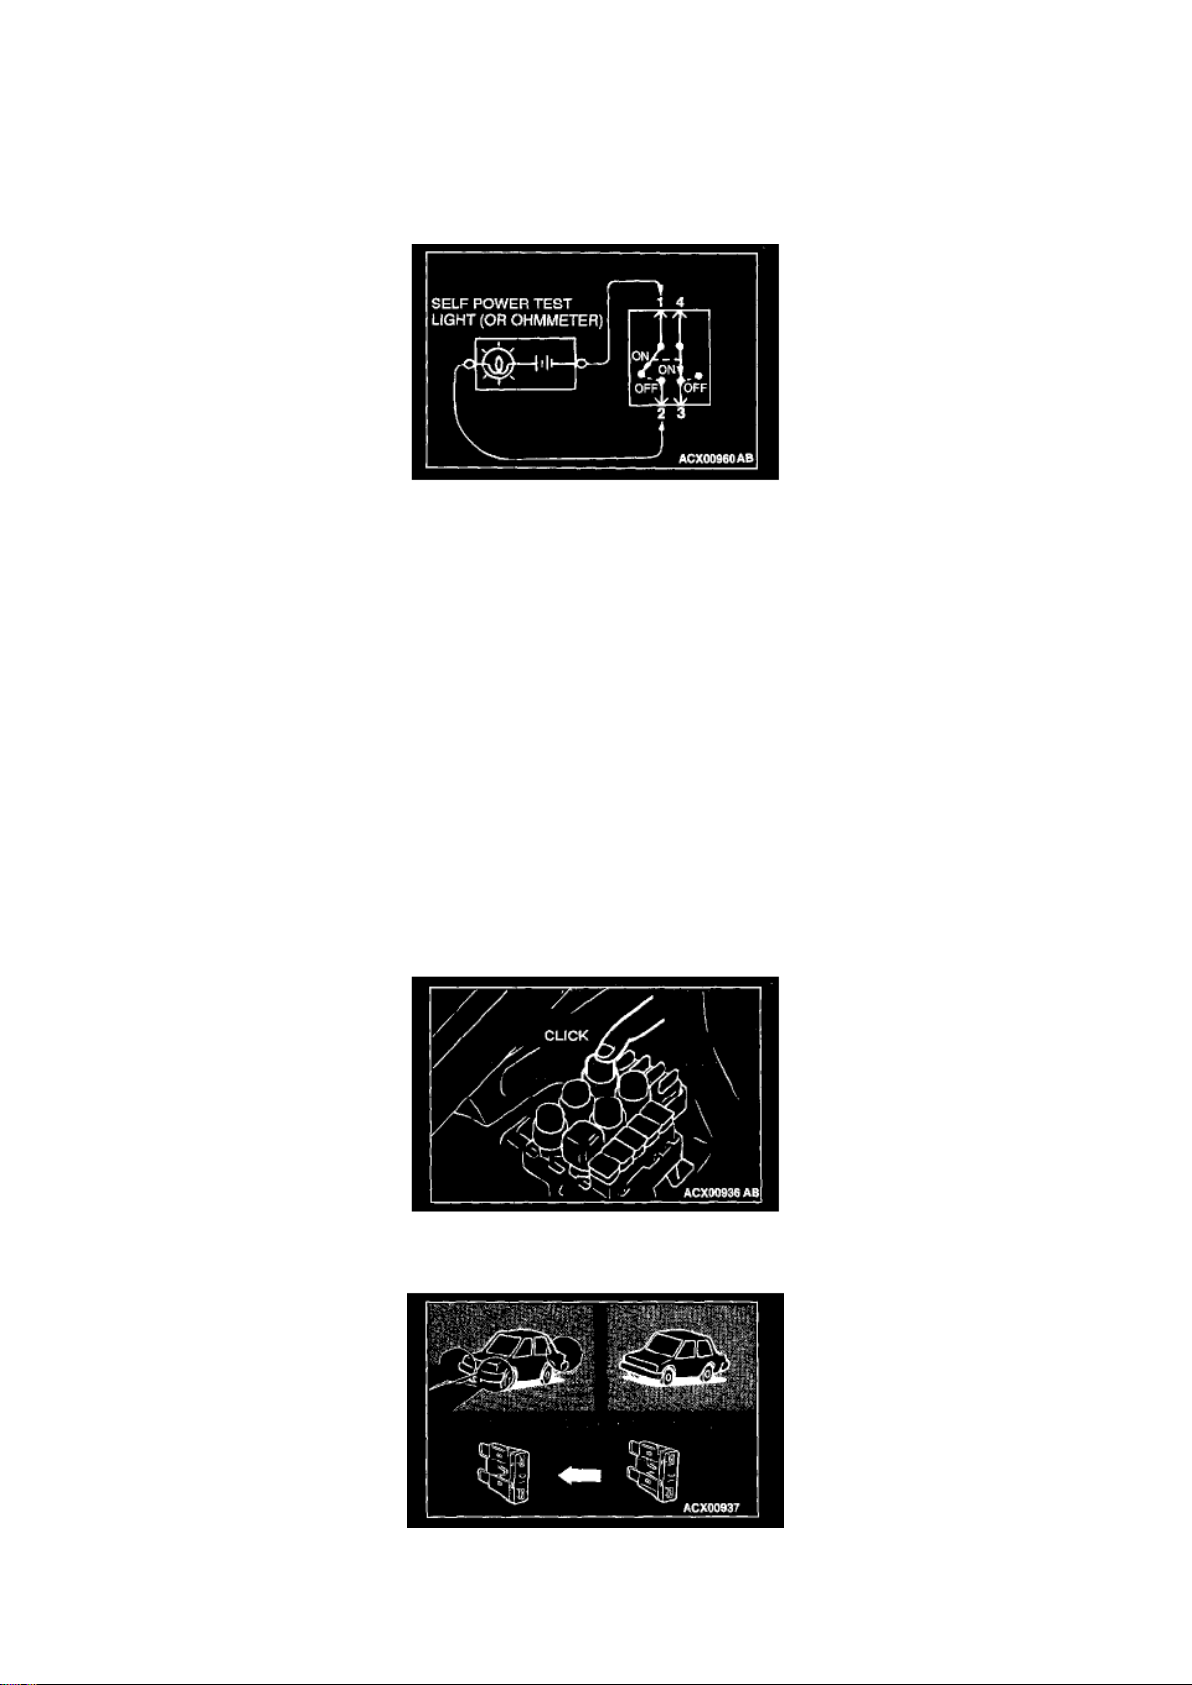
3. CONTINUITY CHECK
1. When the switch is in the "OFF" position and the contact points of terminals 1 and 2 are
connected, the self-powered test light should
illuminate or the ohmmeter should read 0 ohm.
2. When the switch is the "ON" position and the contact points of terminals 3 and 4 are connected,
the self-powered test light should come on or
the ohmmeter should read 0 ohm.
Information For Diagnosis
INFORMATION FOR DIAGNOSIS
This manual contains the harness diagrams as well as the individual circuit drawings, operational
explanations, and troubleshooting hints for each component. The information is presented in the
following manner:
1. Connector diagrams show the connector positions, etc., on the actual vehicle as well as the
harness path. 2. Circuit diagrams show the configuration of the circuit with all switches in their
normal positions. 3. Operational explanations include circuit drawings of voltage flow when the
switch is operated and how the component reacts. 4. Troubleshooting hints include numerous
examples of problems which might occur. Most of the problems can be traced backward in a
common-sense manner to the origin of the trouble. Problems whose origins may not be found in
this manner are pursued through the various system circuits.
NOTE: Components of MFI, ETACS, etc. with ECU do not include 3 and 4 above. For this
information, refer to a relevant sections that includes details of these components.
Inspection
1. Sight and sound checks
Check relay operation, blower motor rotation, light illumination, etc. Listen for a "click" when relay
covers are pushed down.
2. Simple checks
For example, if a headlight does not come on, a faulty fuse or poor grounding is suspected.
Replace the fuse with a new one. Or use a jumper wire to ground the light to the body. Determine
which part(s) is/are responsible for the problem.
Page 80
Dodge Stratus Coupe Workshop Manual (L4-2.4L VIN G (2003))
Dodge Workshop Manuals > Relays and Modules > Relays and Modules - HVAC > Control Module HVAC > Component
Information > Diagrams > Diagram Information and Instructions > Page 84
Page 81

3. Checking with instruments
Use an appropriate instrument in an adequate range and read the indication correctly.
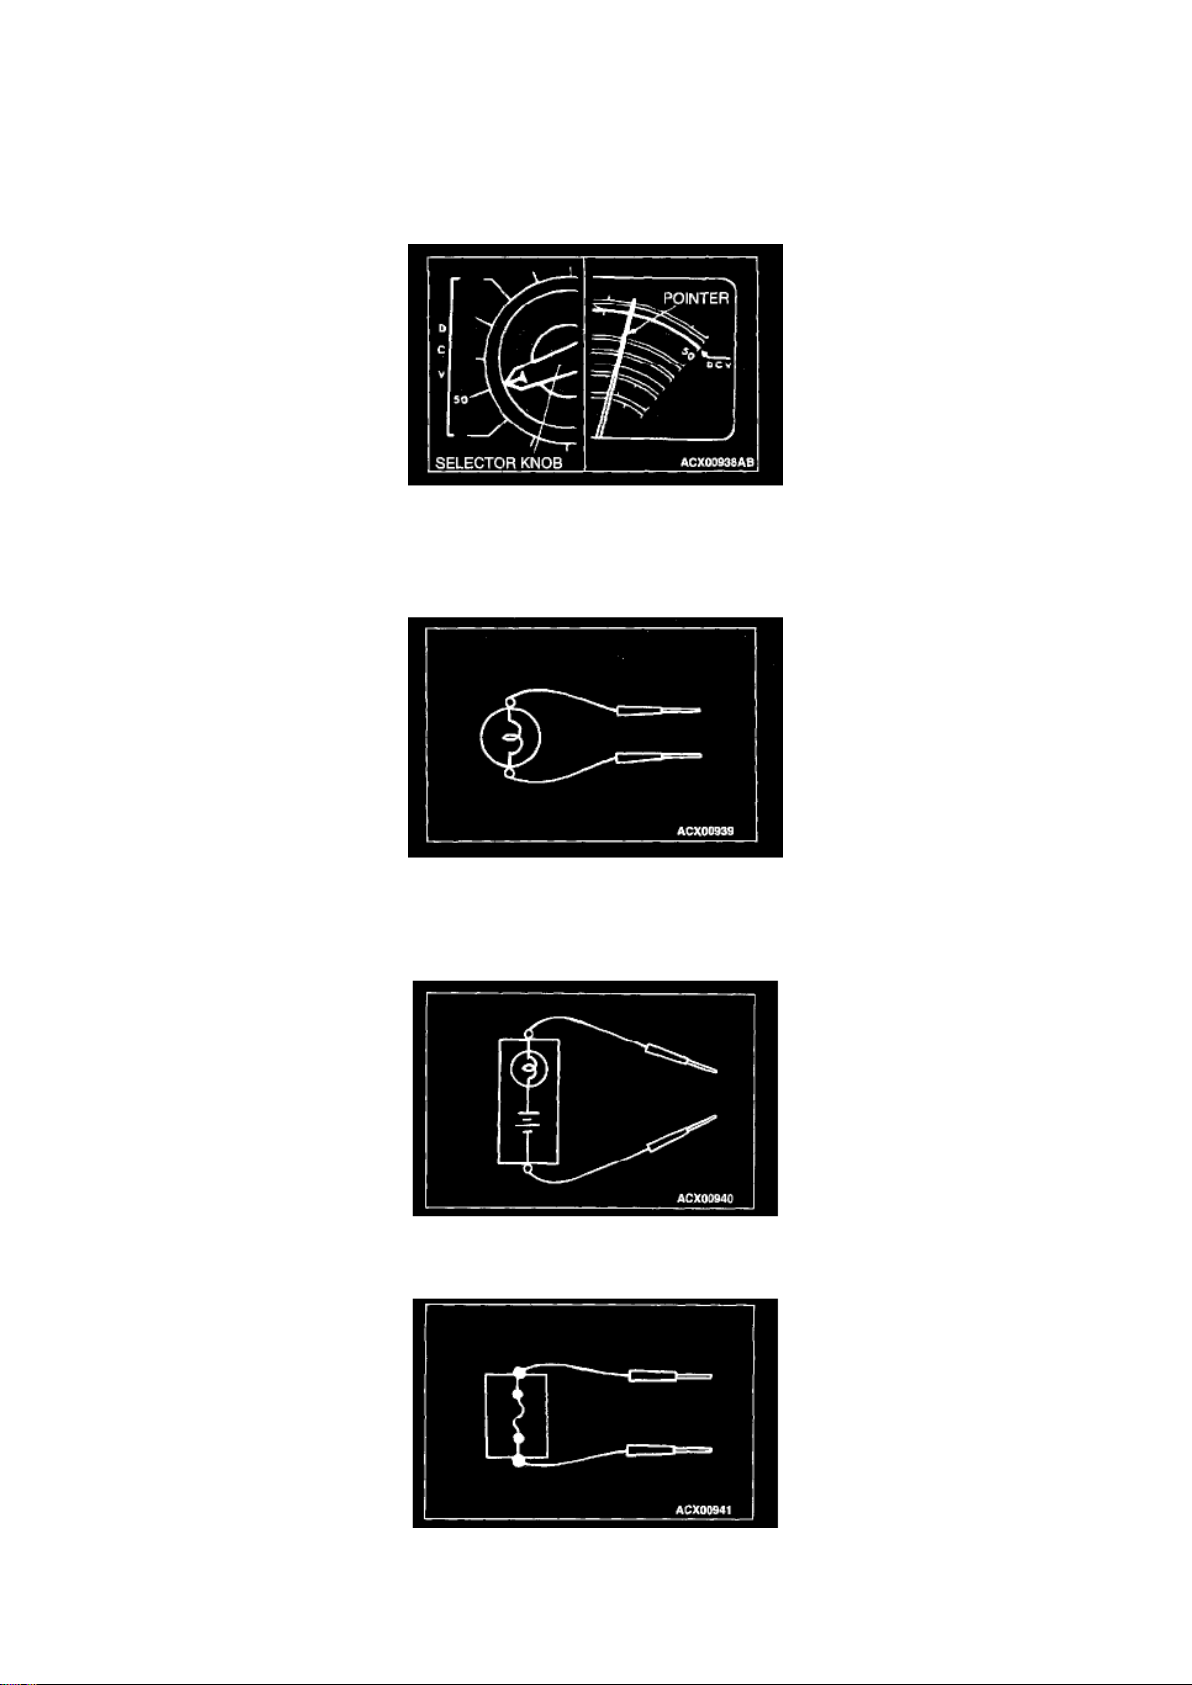
Inspection Instruments
For inspection, use the following instruments:
1. Test lights
A test light consists of a 12V bulb and lead wires. It is used to check voltages or short circuits.
CAUTION: Never use a test light for checking ECU-related circuits or ECUs.
2. Self-powered test light
A self-powered test light consists of a bulb, battery and lead wires connected in series. It is used to
check continuity or grounding.
3. Jumper wire
A jumper wire is used to close an open circuit.
Page 82
Dodge Stratus Coupe Workshop Manual (L4-2.4L VIN G (2003))
Dodge Workshop Manuals > Relays and Modules > Relays and Modules - HVAC > Control Module HVAC > Component
Information > Diagrams > Diagram Information and Instructions > Page 85
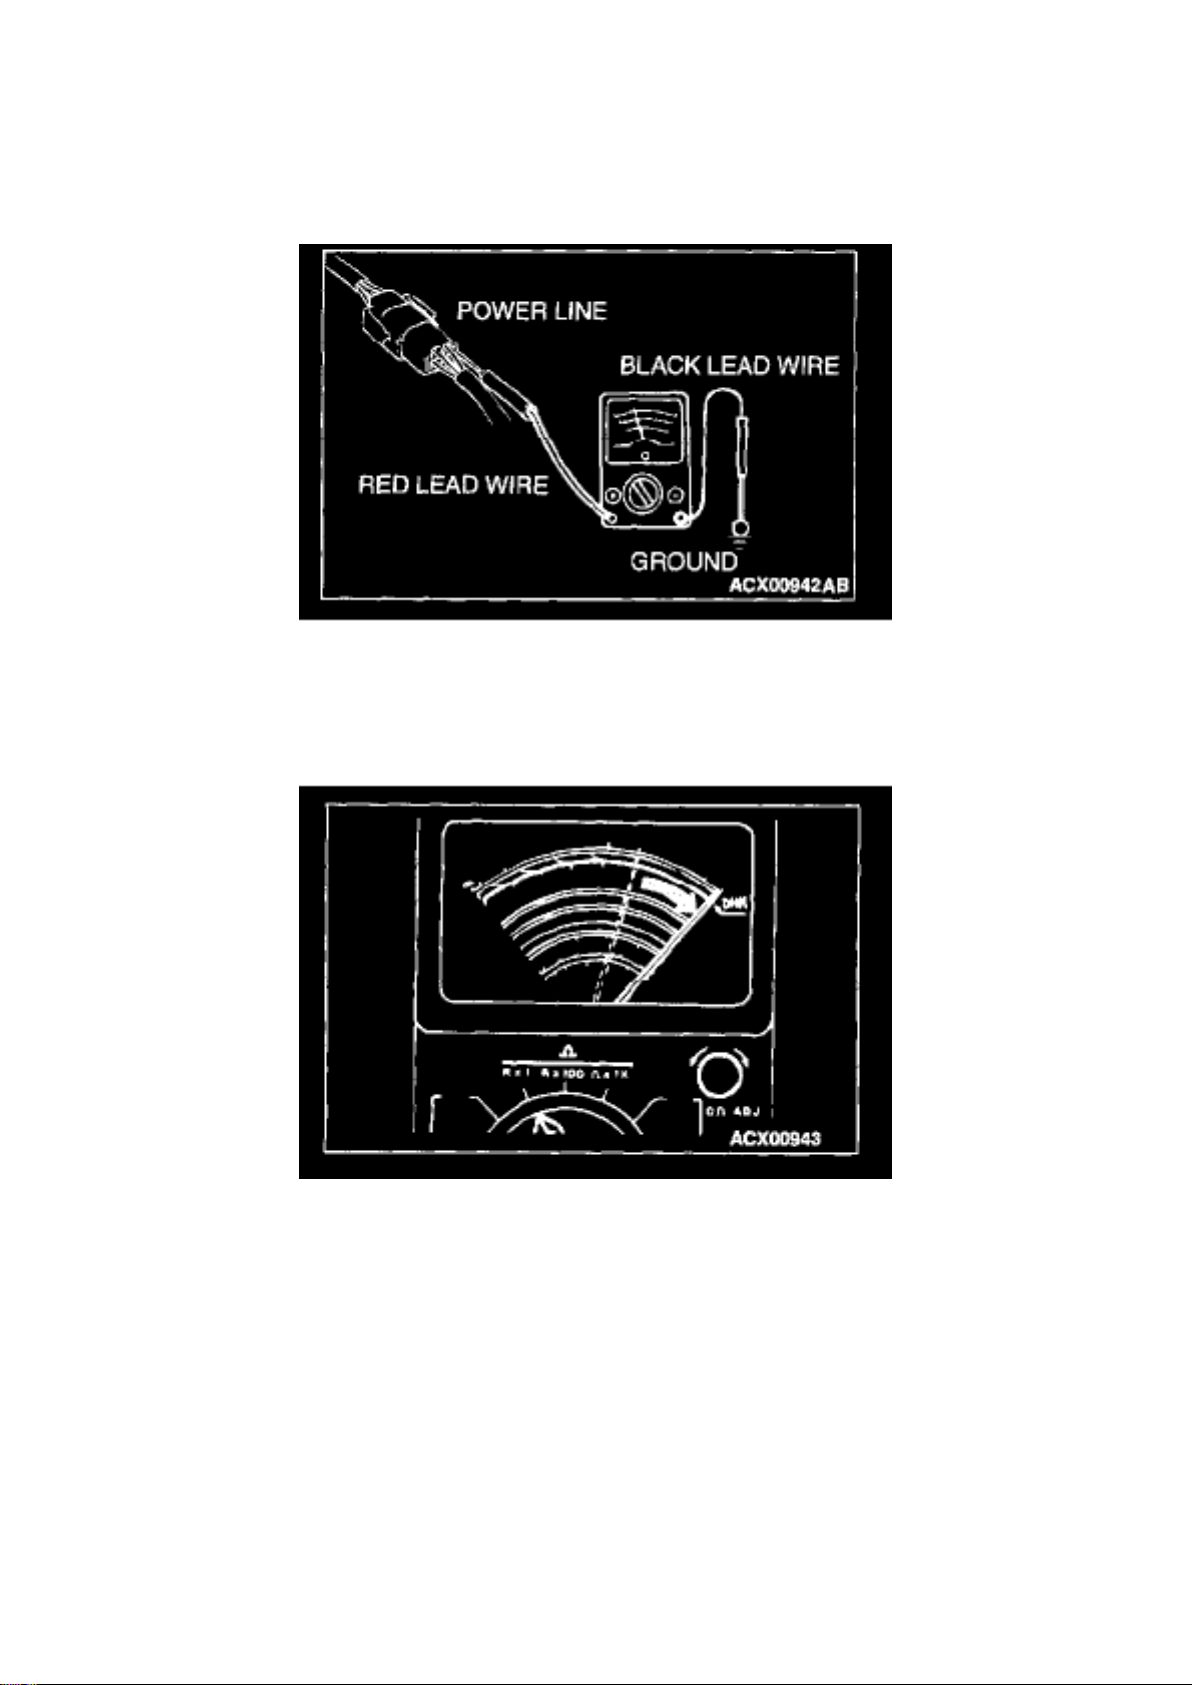
CAUTION: Never use a jumper wire to connect a power supply directly to a load.
4. Voltmeter
A voltmeter is used to measure the circuit voltage. Normally, the positive (red lead) probe is applied
to the point of voltage measurement and the negative (black lead) probe to the body ground. Use a
digital voltmeter to check for voltage drop upstream and downstream of a component.
5. Ohmmeter
An ohmmeter is used to check continuity or measure resistance of a switch or a coil. If the
measuring range has been changed, the zero point must be adjusted before measurement.
Page 83

Troubleshooting Steps
HOW TO DIAGNOSE
The most important point in troubleshooting is to determine "Probable Cause." Once the probable
causes are determined, parts to be checked can be limited to those associated with such probable
causes. The determination of the probable causes must be based on a theory and be supported by
facts and must not be based on intuition only.
Page 84
Dodge Stratus Coupe Workshop Manual (L4-2.4L VIN G (2003))
Dodge Workshop Manuals > Relays and Modules > Relays and Modules - HVAC > Control Module HVAC > Component
Information > Diagrams > Diagram Information and Instructions > Page 86
TROUBLESHOOTING STEPS
If an attempt is made to solve a problem without going through correct steps for troubleshooting,
the symptoms could become more complicated, resulting in failure to determine the causes
correctly and making incorrect repairs. The four steps below should be followed in troubleshooting.
Page 85
Dodge Stratus Coupe Workshop Manual (L4-2.4L VIN G (2003))
Dodge Workshop Manuals > Relays and Modules > Relays and Modules - Lighting and Horns > Fog/Driving Lamp Relay >
Component Information > Locations
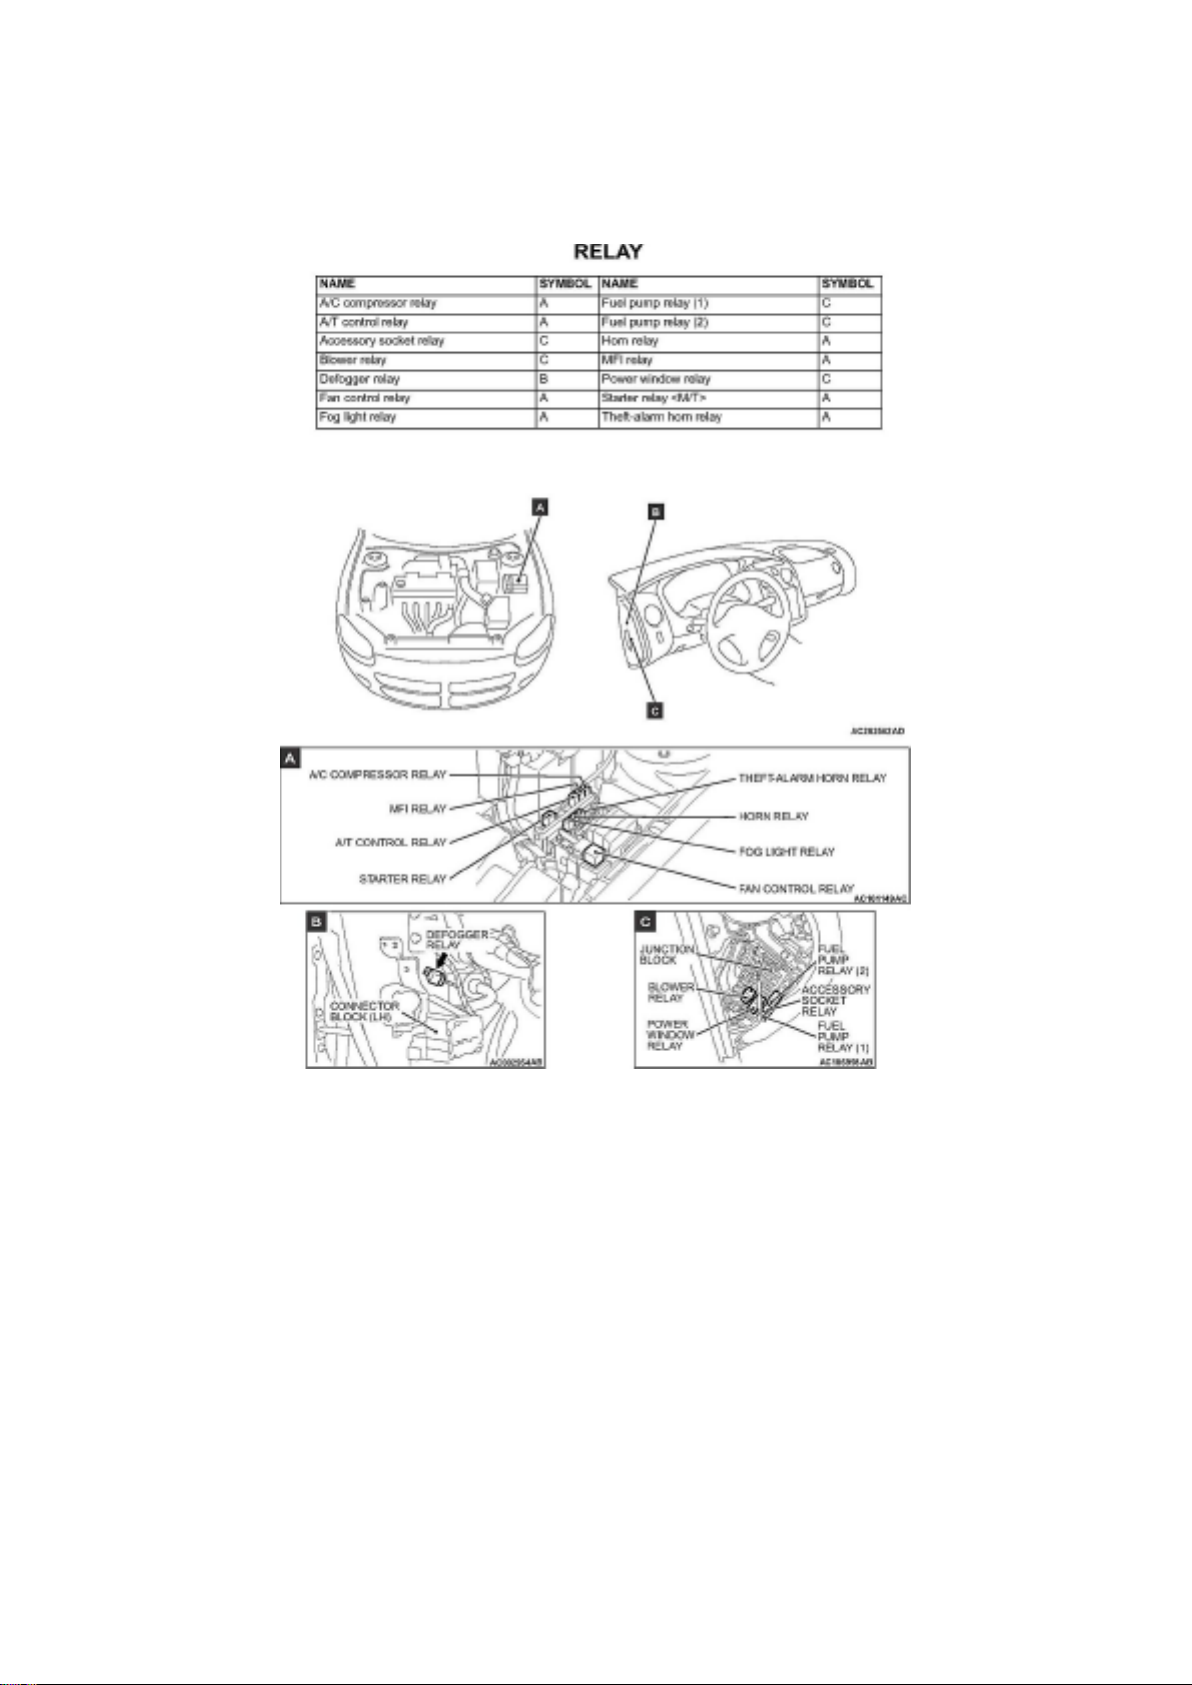
Fog/Driving Lamp Relay: Locations
Relay Location
Page 86
Dodge Stratus Coupe Workshop Manual (L4-2.4L VIN G (2003))
Dodge Workshop Manuals > Relays and Modules > Relays and Modules - Lighting and Horns > Fog/Driving Lamp Relay >
Component Information > Locations > Page 91
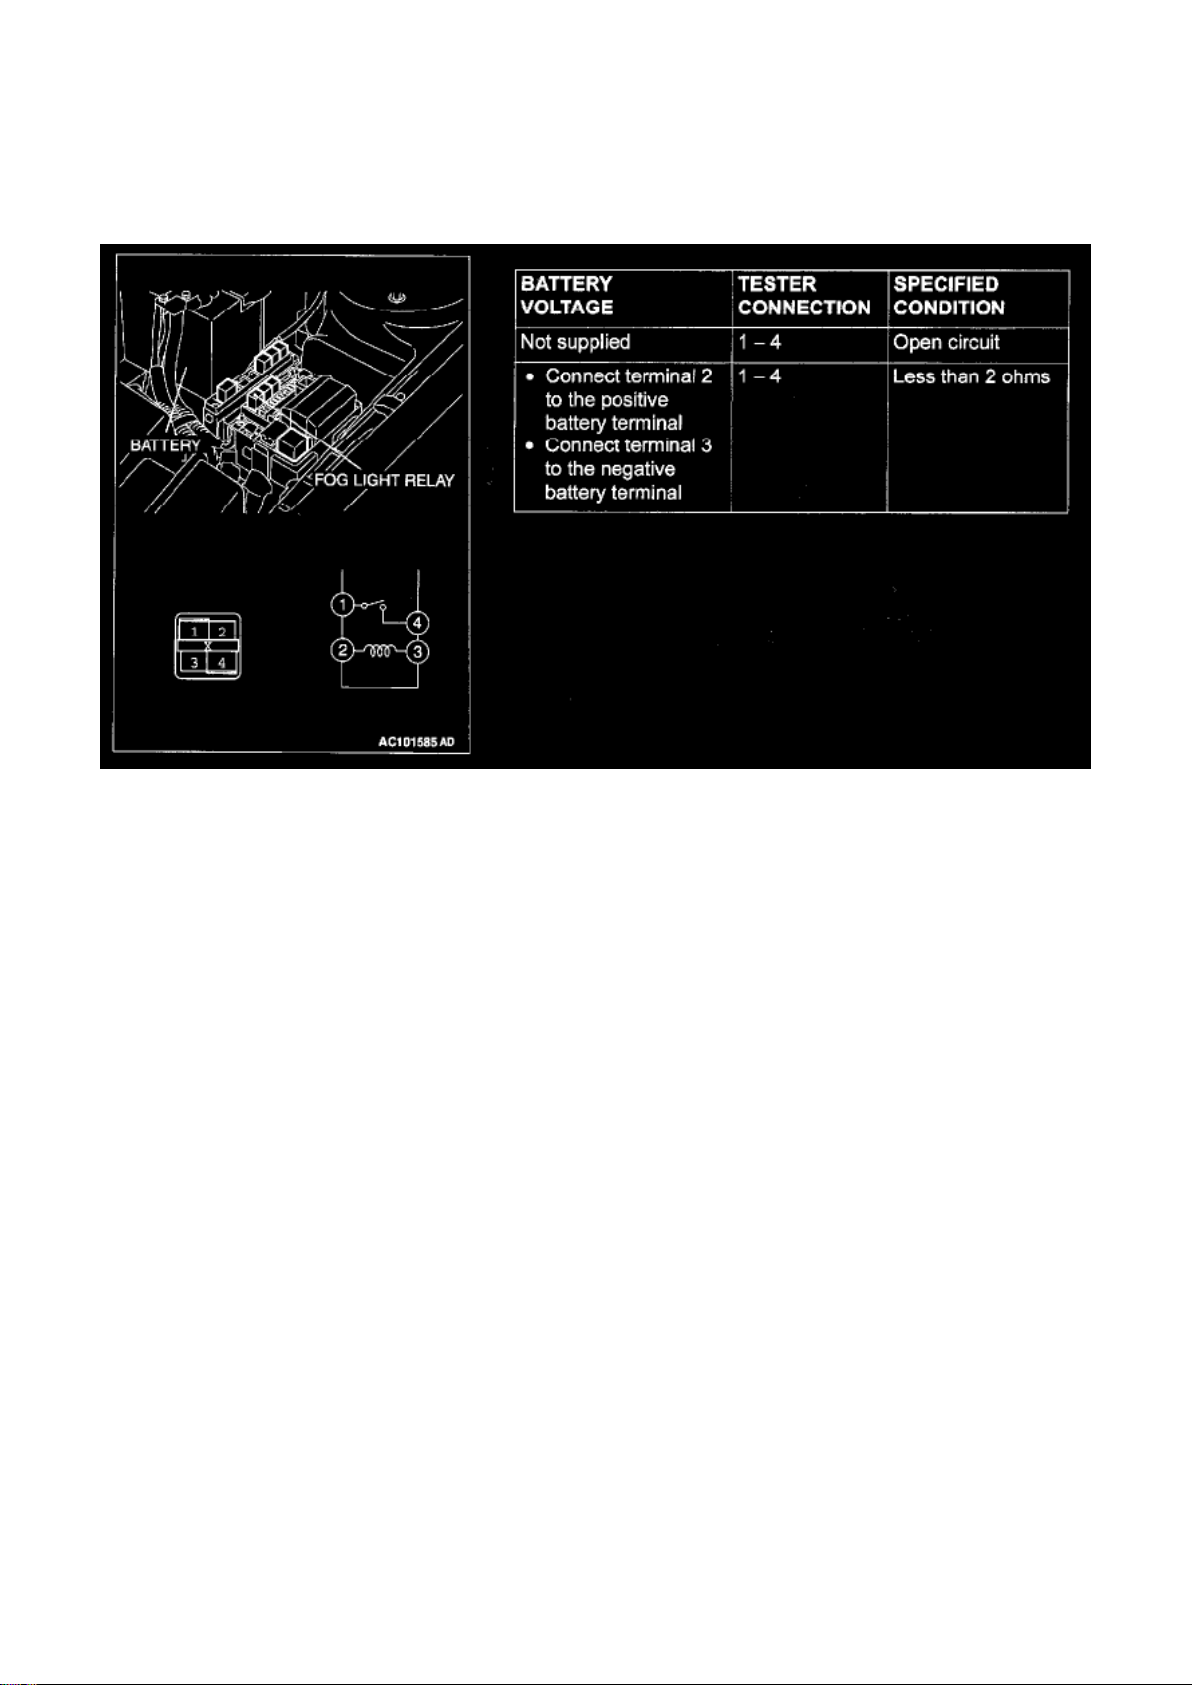
Fog Light Relay Check
Page 87
Dodge Stratus Coupe Workshop Manual (L4-2.4L VIN G (2003))
Dodge Workshop Manuals > Relays and Modules > Relays and Modules - Lighting and Horns > Horn Relay > Component
Information > Locations
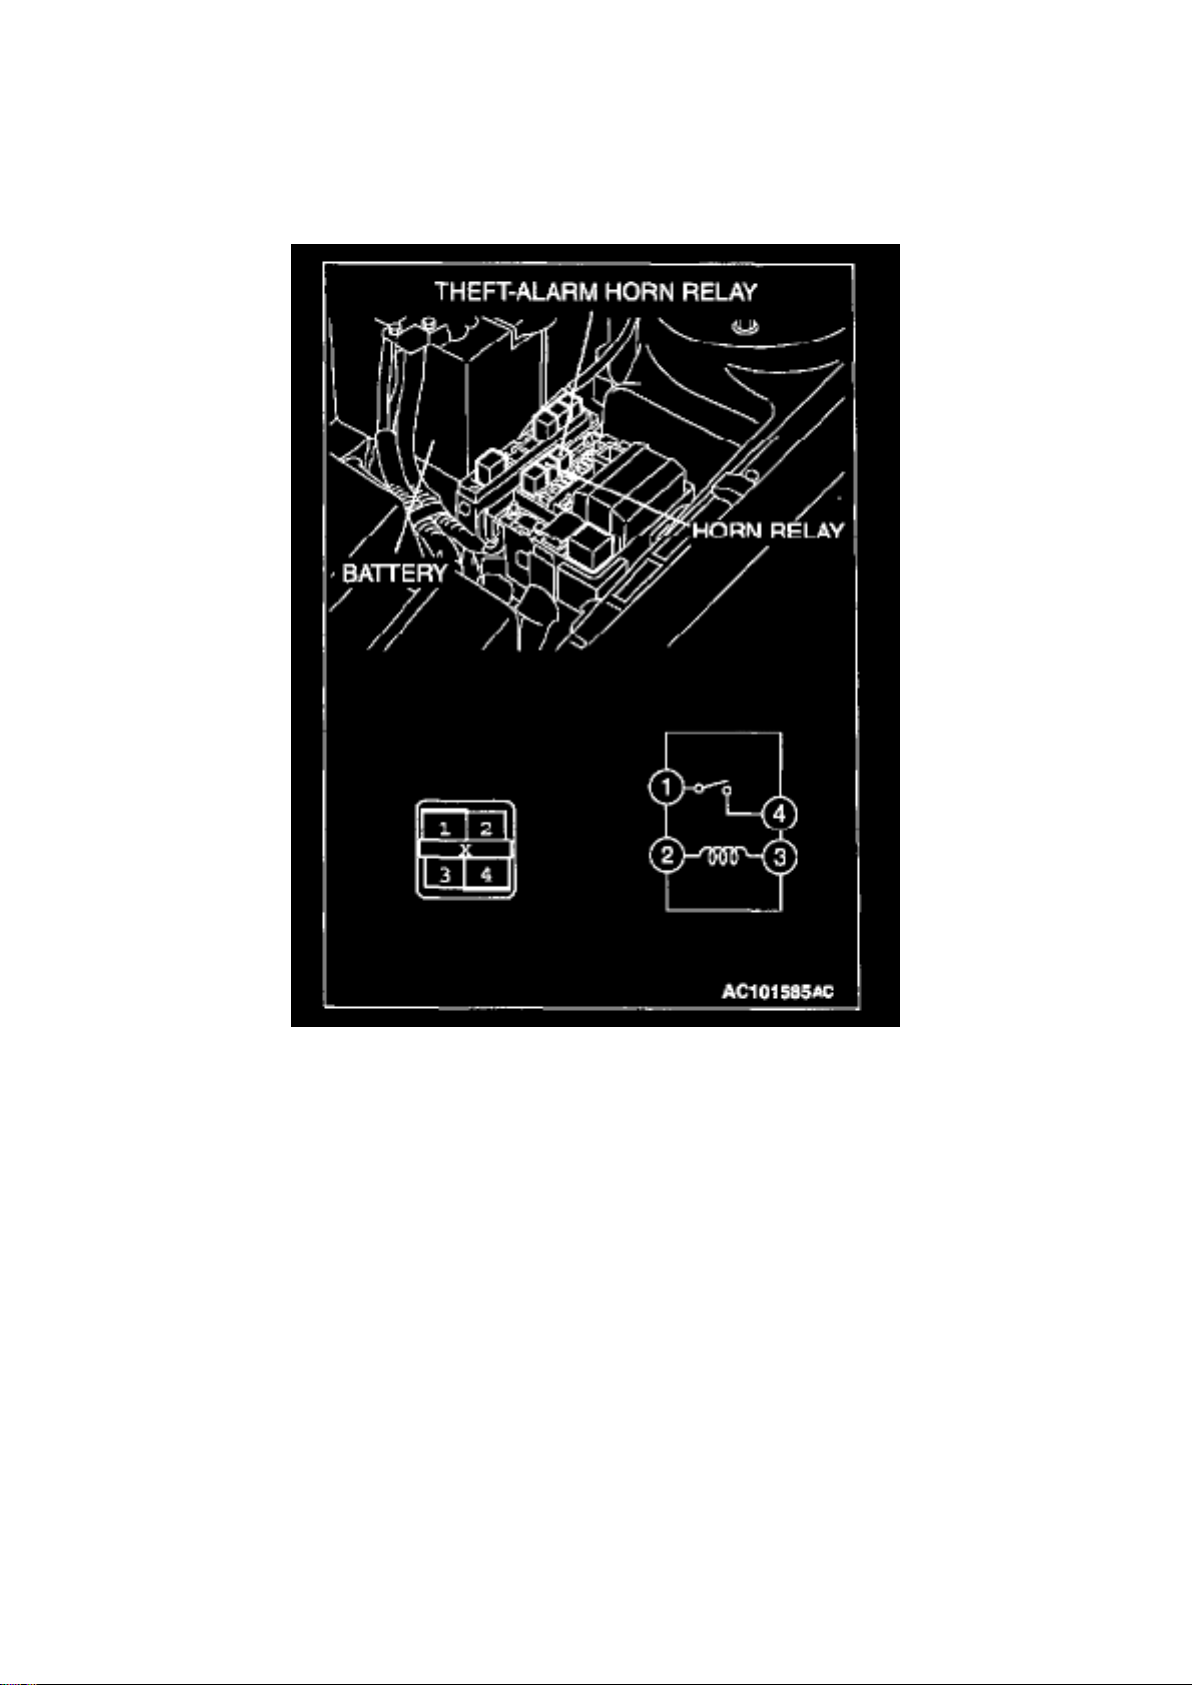
Horn Relay: Locations
Relay Location
Page 88
Dodge Stratus Coupe Workshop Manual (L4-2.4L VIN G (2003))
Dodge Workshop Manuals > Relays and Modules > Relays and Modules - Lighting and Horns > Horn Relay > Component
Information > Locations > Page 95
Horn Relay, Theft-Alarm Horn Relay Continuity Check
Page 89
Dodge Stratus Coupe Workshop Manual (L4-2.4L VIN G (2003))
Dodge Workshop Manuals > Relays and Modules > Relays and Modules - Power and Ground Distribution > Relay Box >
Component Information > Locations > Centralized Junction
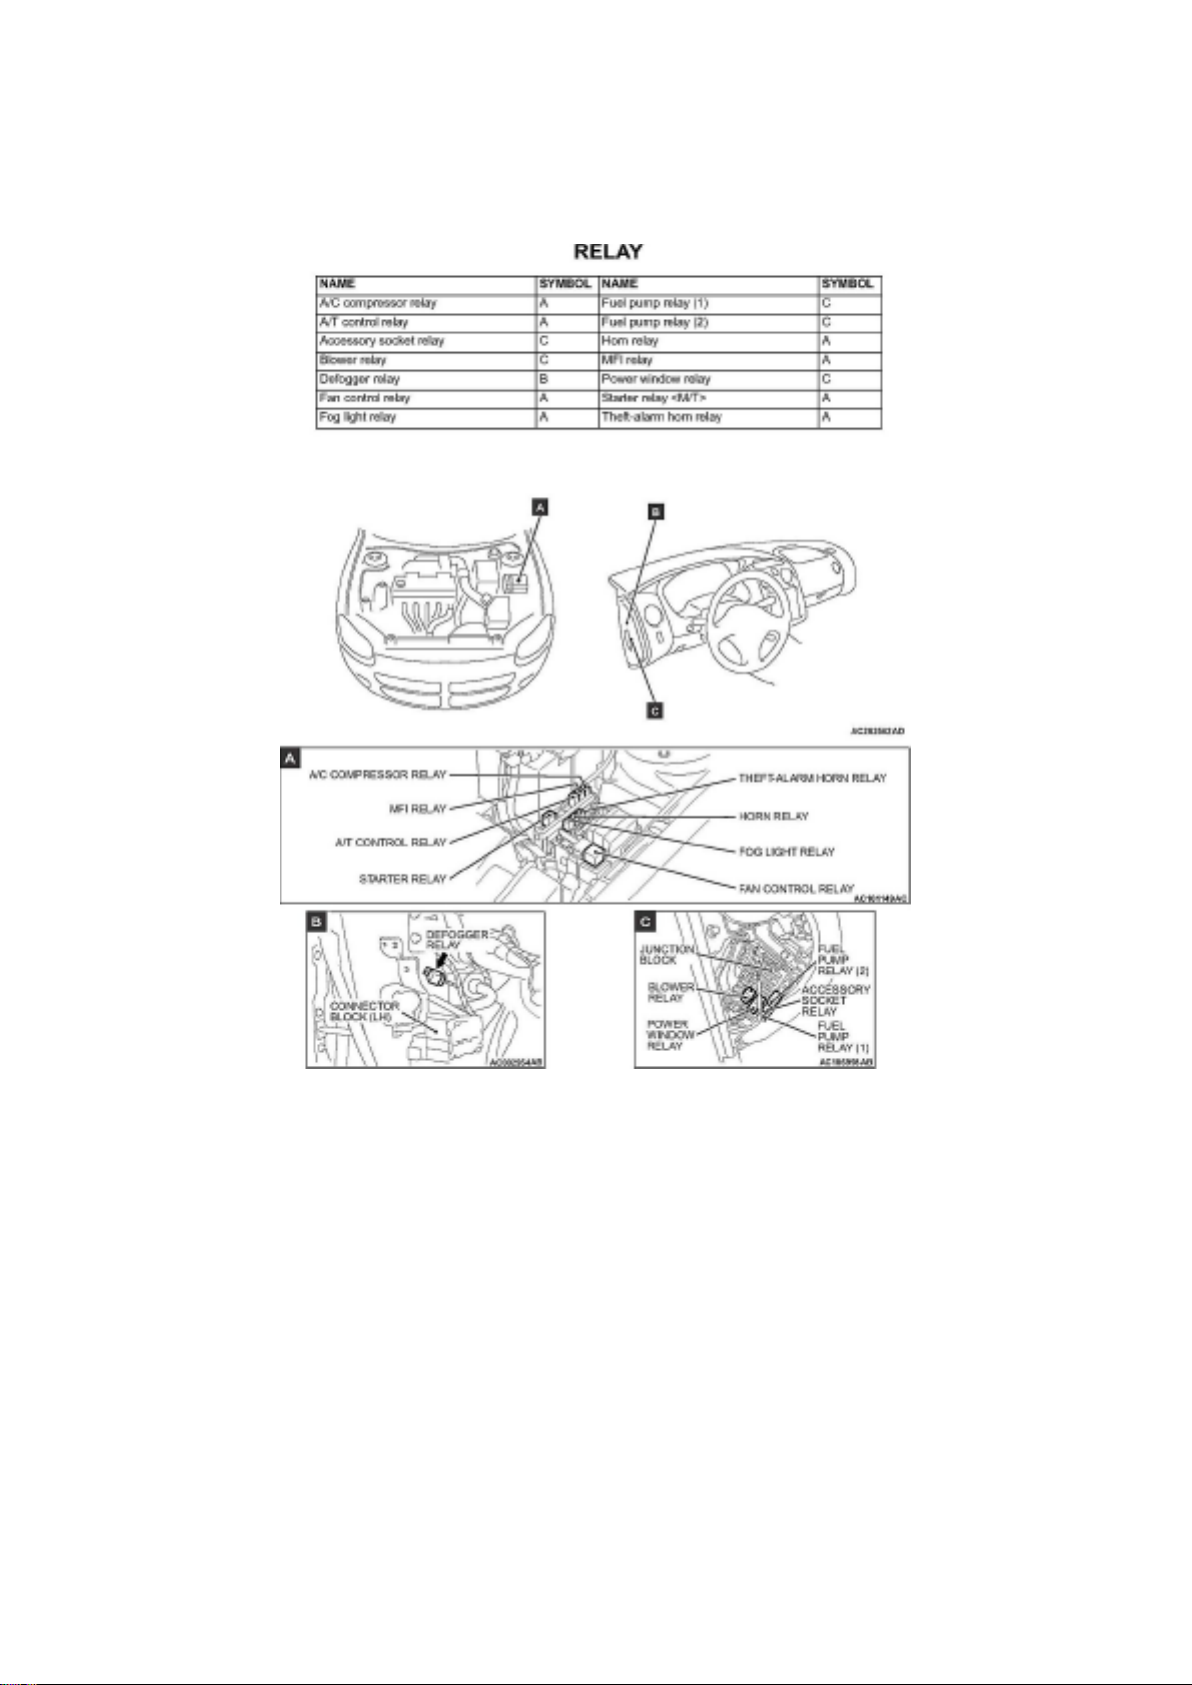
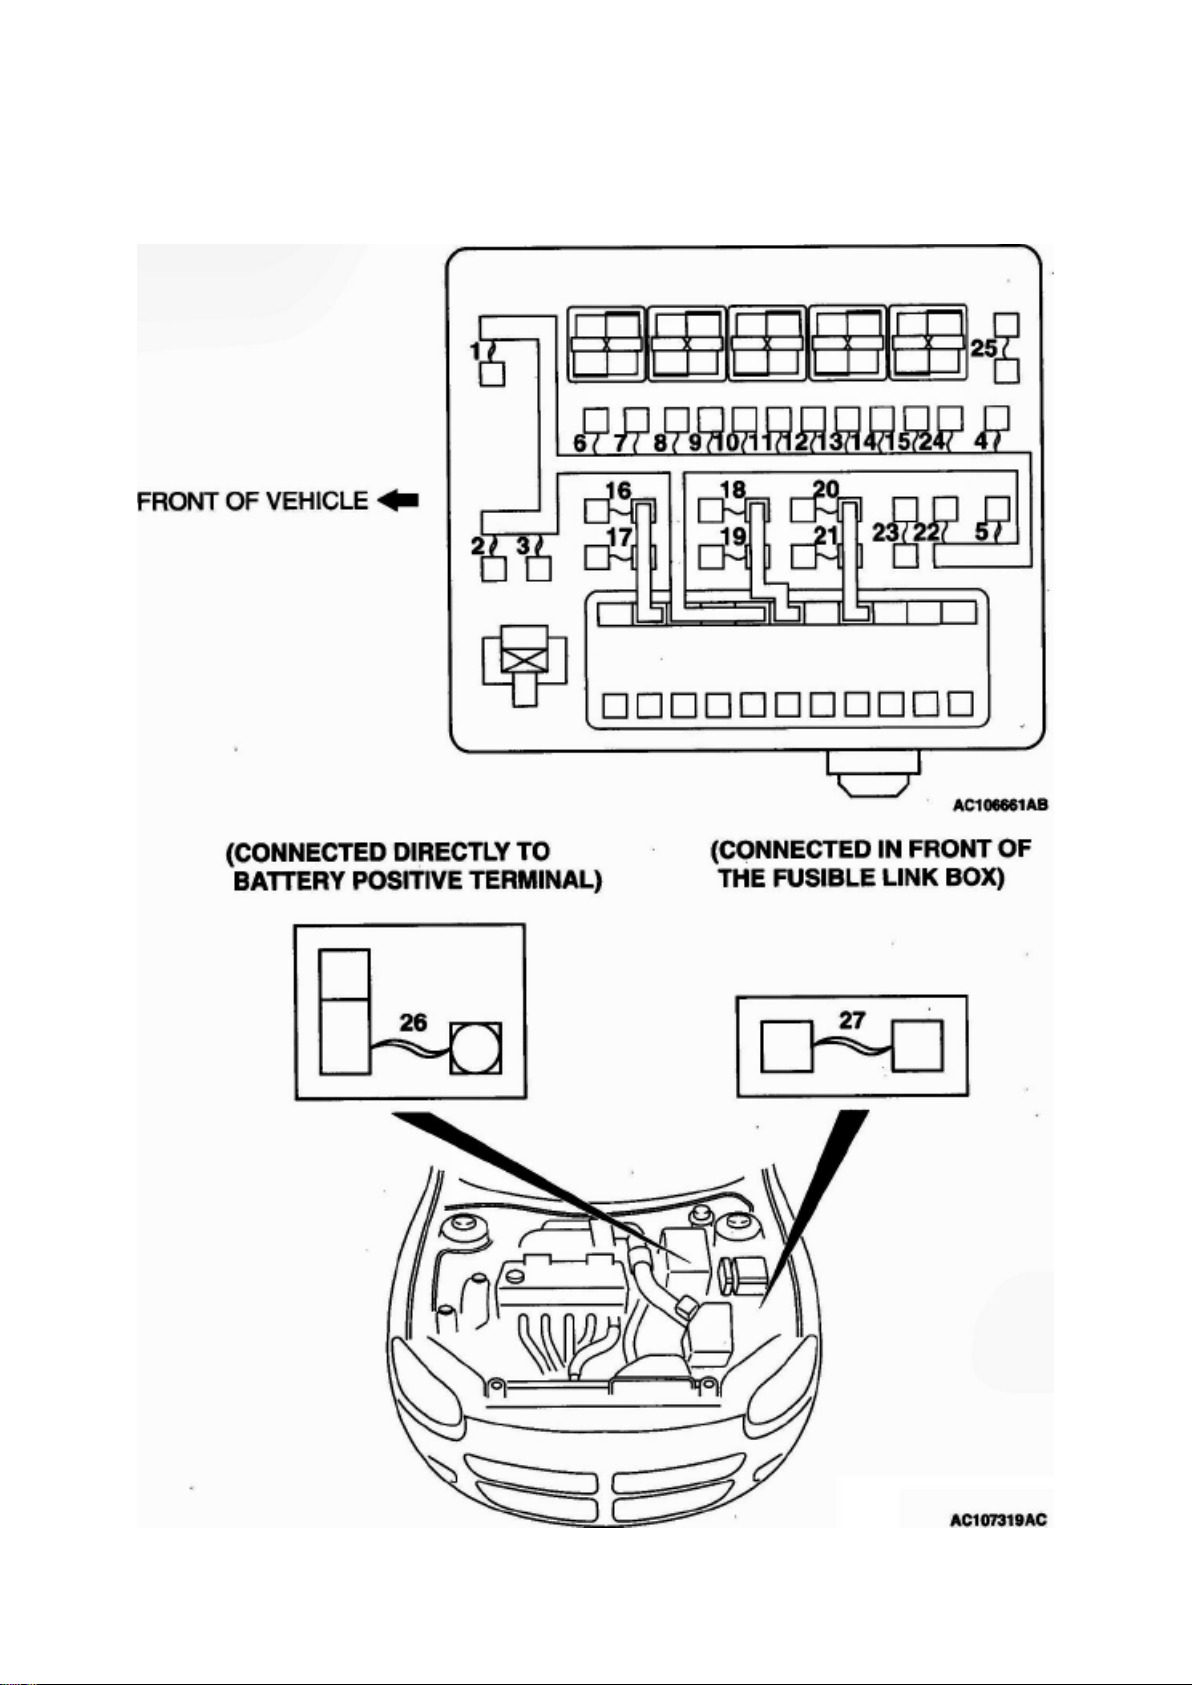
Relay Box: Locations Centralized Junction
Relay Location
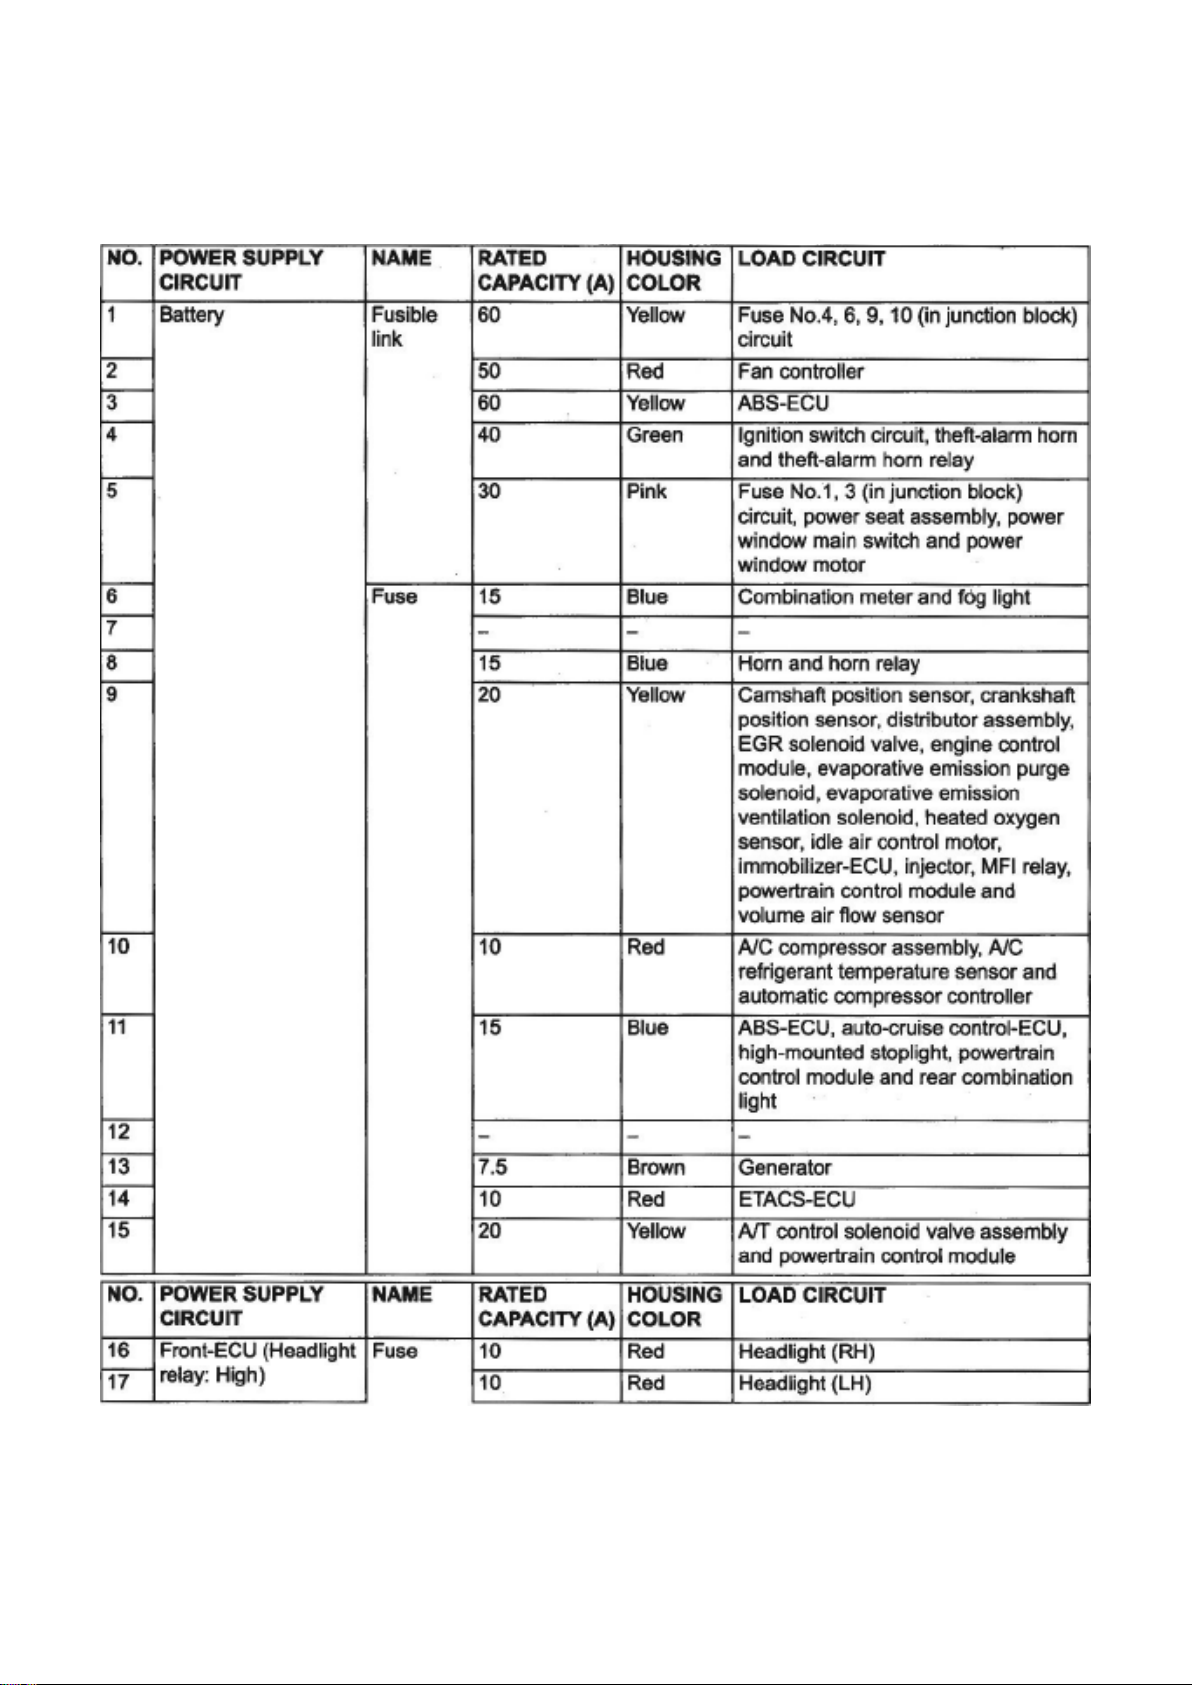
Fusible Link and Fuse
Page 90
Dodge Stratus Coupe Workshop Manual (L4-2.4L VIN G (2003))
Dodge Workshop Manuals > Relays and Modules > Relays and Modules - Power and Ground Distribution > Relay Box >
Component Information > Locations > Centralized Junction > Page 101
Page 91

Page 92
Dodge Stratus Coupe Workshop Manual (L4-2.4L VIN G (2003))
Dodge Workshop Manuals > Relays and Modules > Relays and Modules - Power and Ground Distribution > Relay Box >
Component Information > Locations > Centralized Junction > Page 102
Page 93
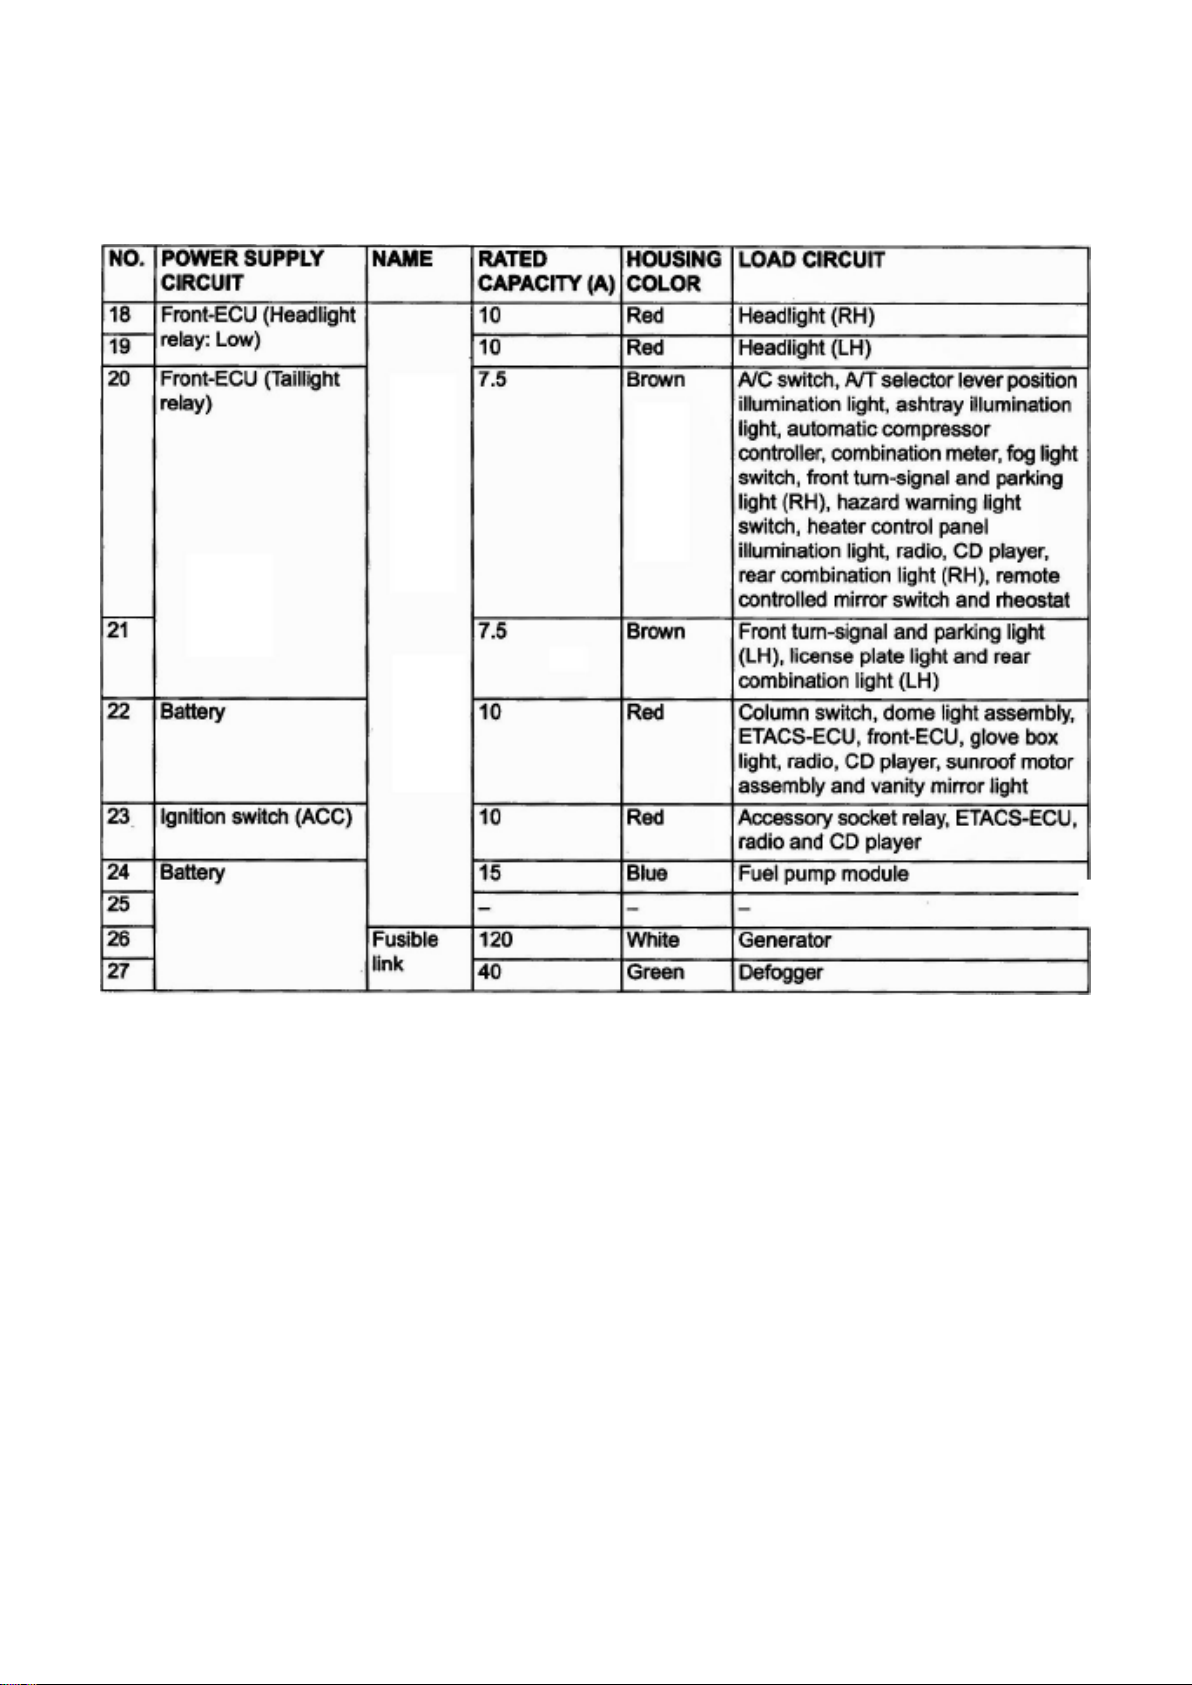
Dodge Stratus Coupe Workshop Manual (L4-2.4L VIN G (2003))
Dodge Workshop Manuals > Relays and Modules > Relays and Modules - Power and Ground Distribution > Relay Box >
Component Information > Locations > Centralized Junction > Page 103
Page 94
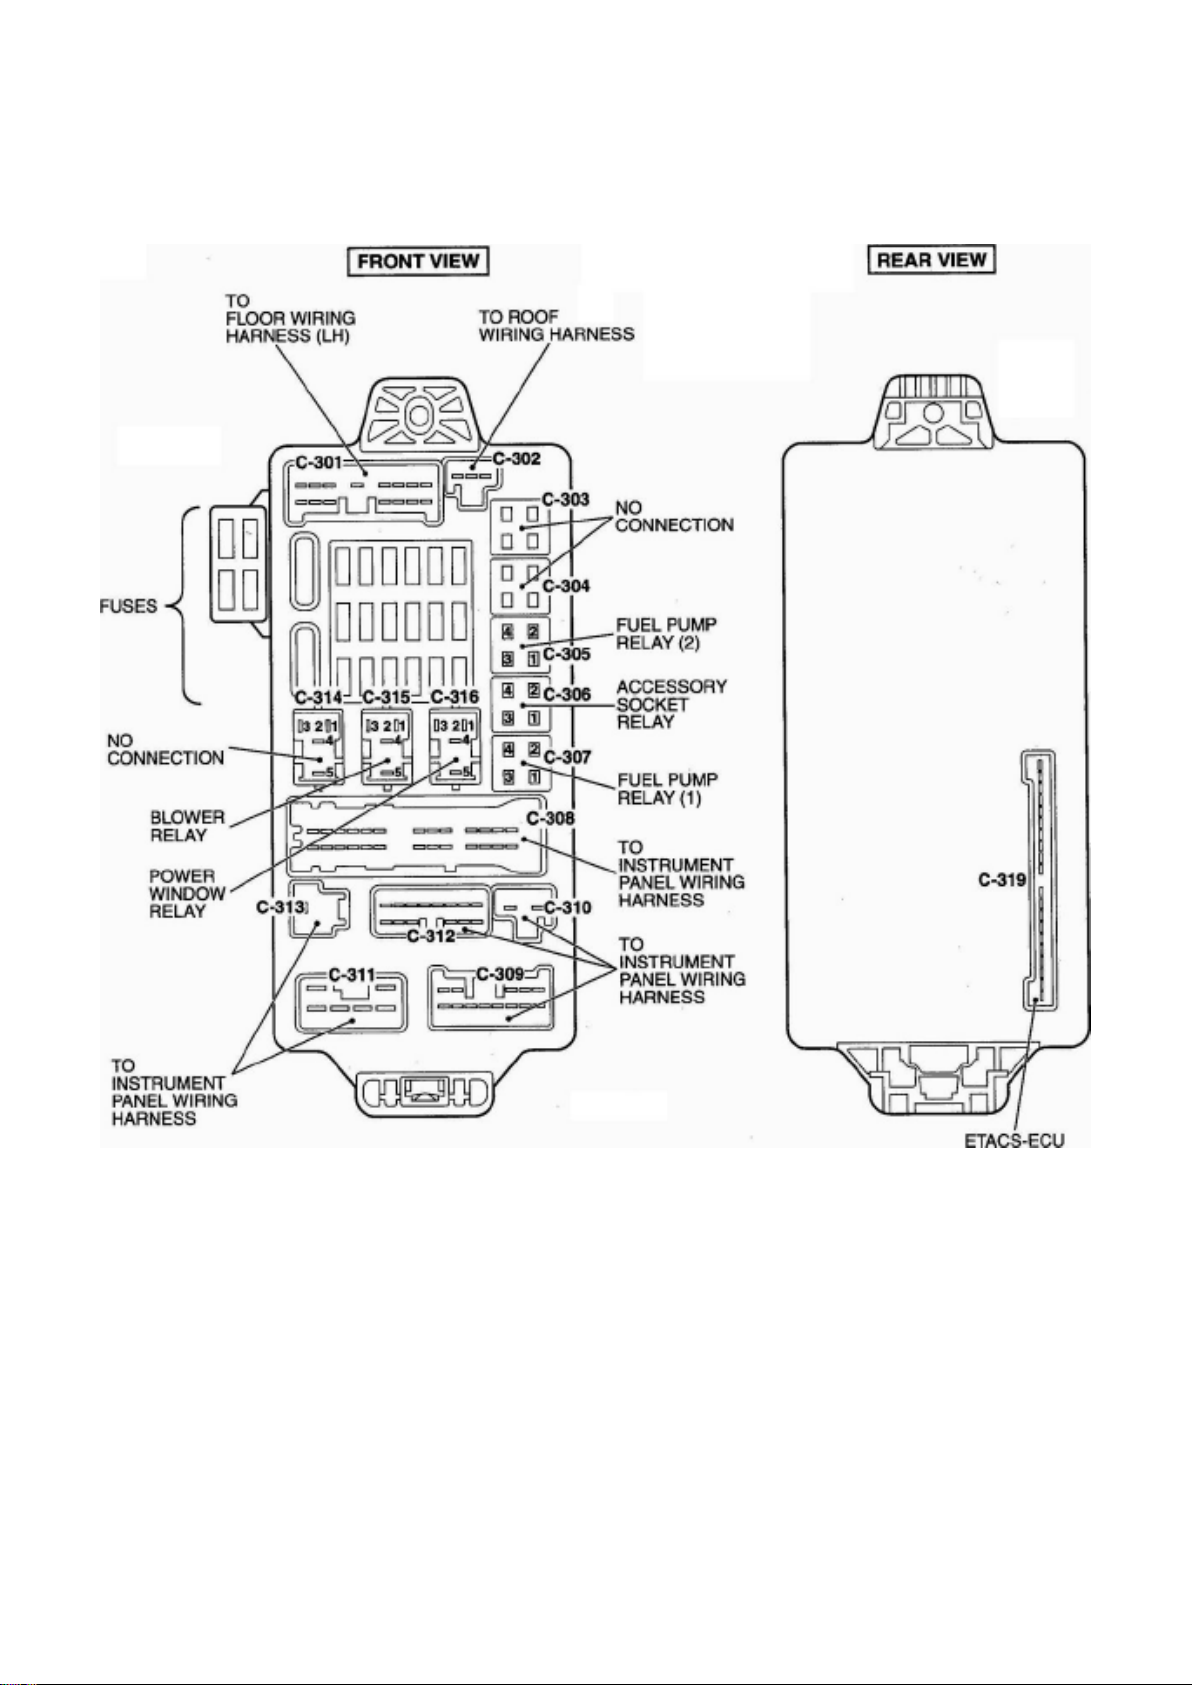
Dodge Stratus Coupe Workshop Manual (L4-2.4L VIN G (2003))
Dodge Workshop Manuals > Relays and Modules > Relays and Modules - Power and Ground Distribution > Relay Box >
Component Information > Locations > Centralized Junction > Page 104
Relay Box: Locations Junction Block
Page 95
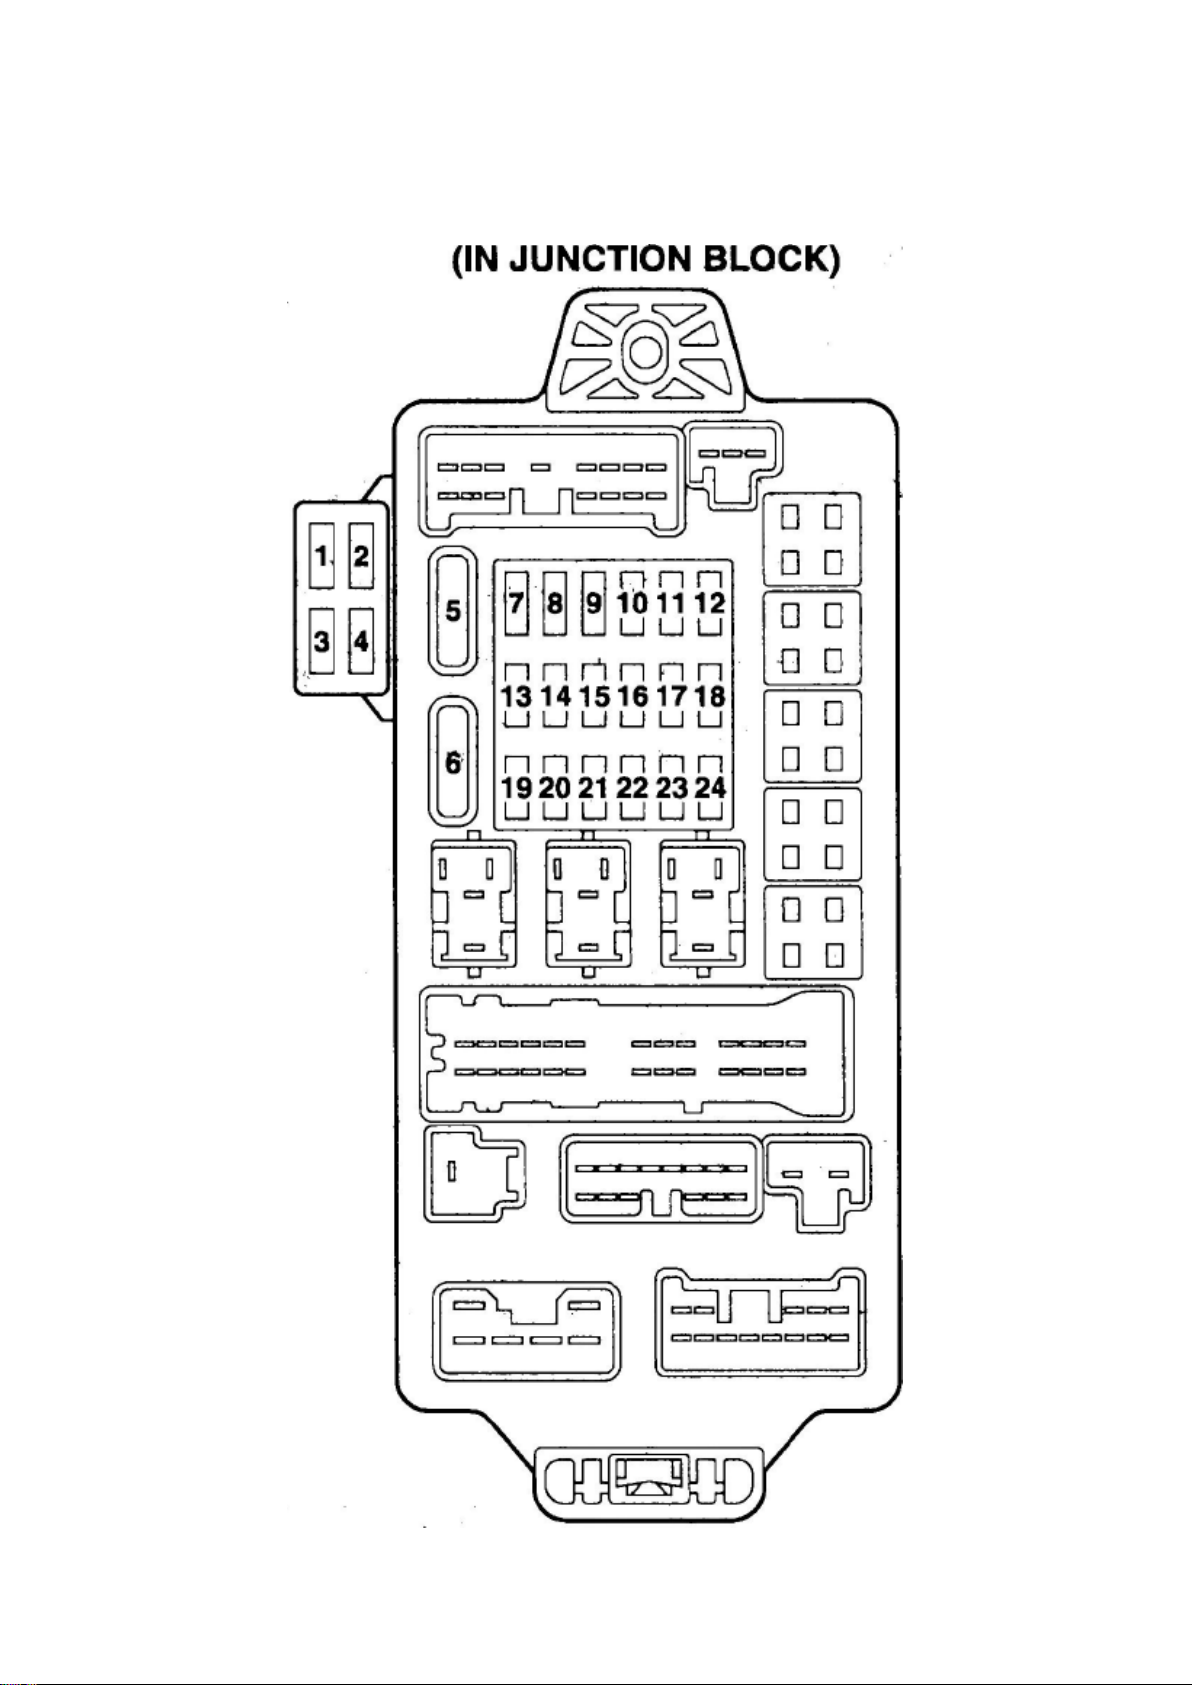
Dodge Stratus Coupe Workshop Manual (L4-2.4L VIN G (2003))
Dodge Workshop Manuals > Relays and Modules > Relays and Modules - Power and Ground Distribution > Relay Box >
Component Information > Locations > Centralized Junction > Page 105
Page 96

Page 97
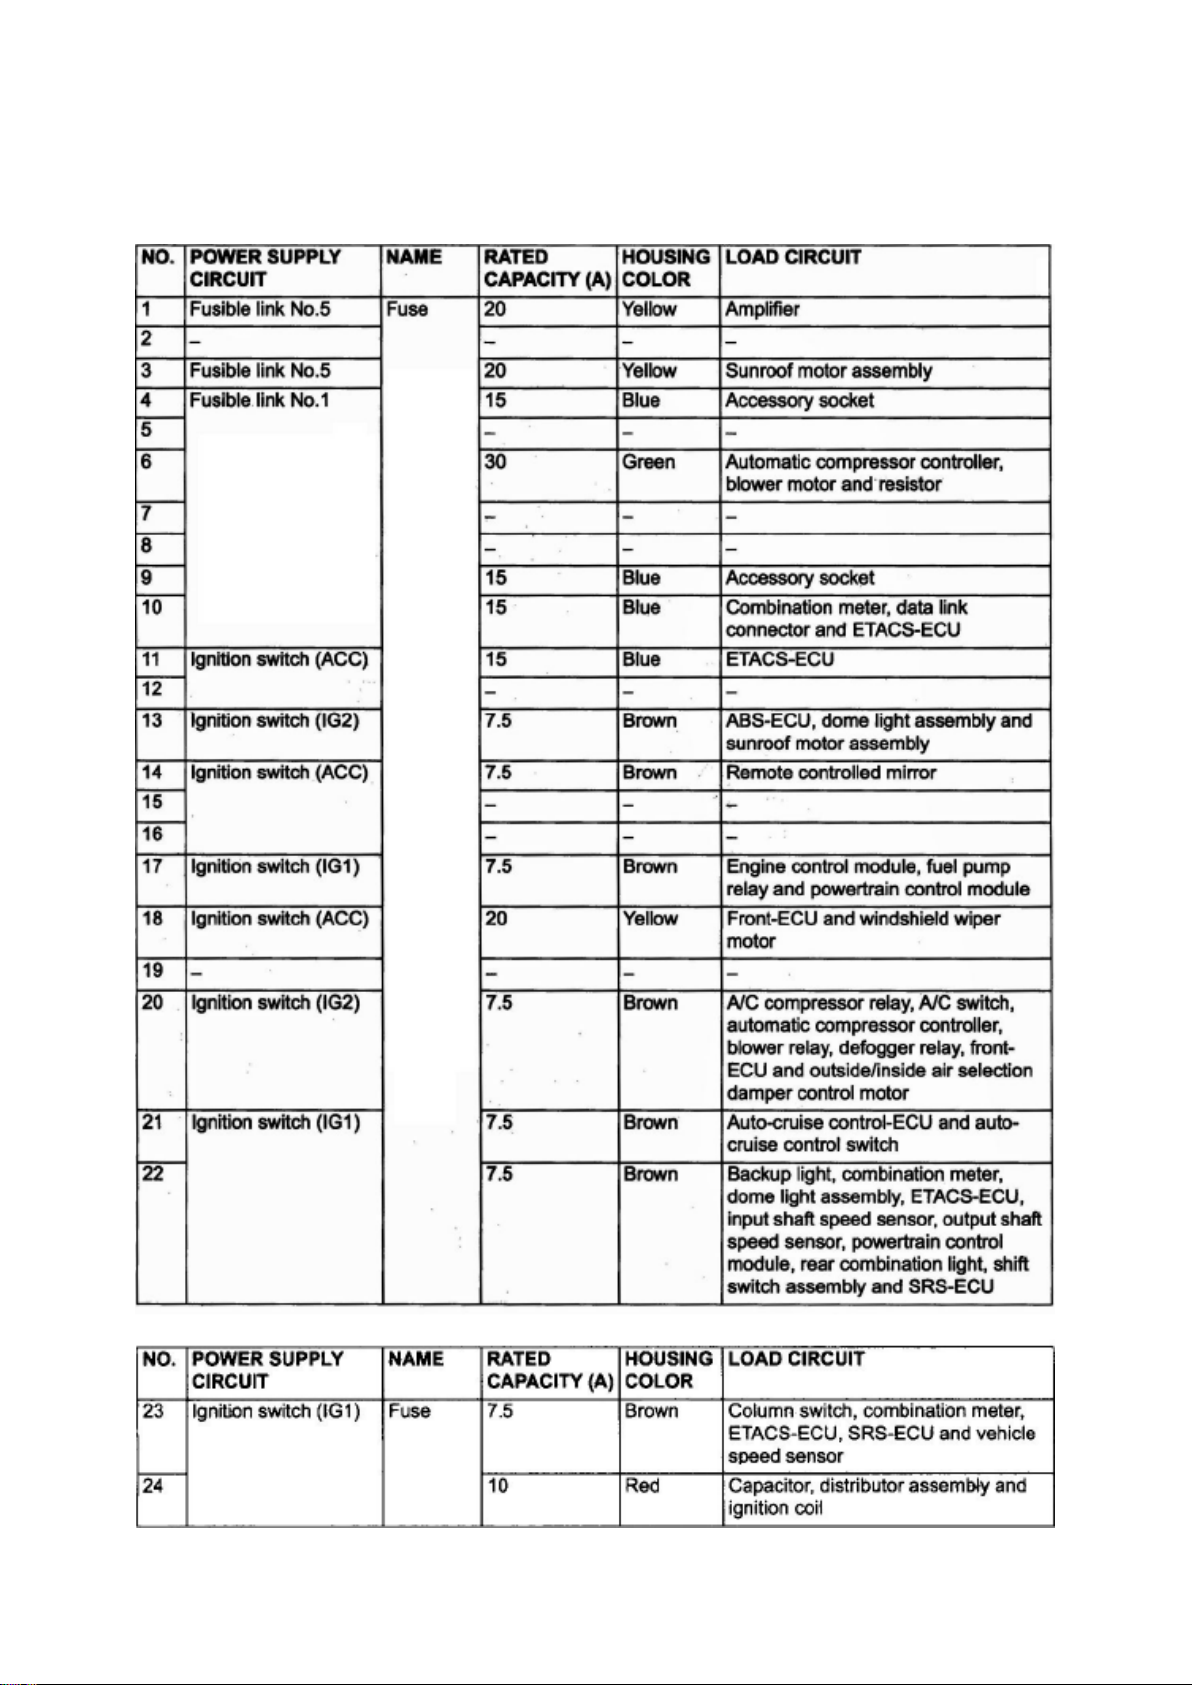
Dodge Stratus Coupe Workshop Manual (L4-2.4L VIN G (2003))
Dodge Workshop Manuals > Relays and Modules > Relays and Modules - Power and Ground Distribution > Relay Box >
Component Information > Locations > Centralized Junction > Page 106
Page 98

Page 99
Dodge Stratus Coupe Workshop Manual (L4-2.4L VIN G (2003))
Dodge Workshop Manuals > Relays and Modules > Relays and Modules - Power and Ground Distribution > Relay Box >
Component Information > Diagrams > Diagram Information and Instructions
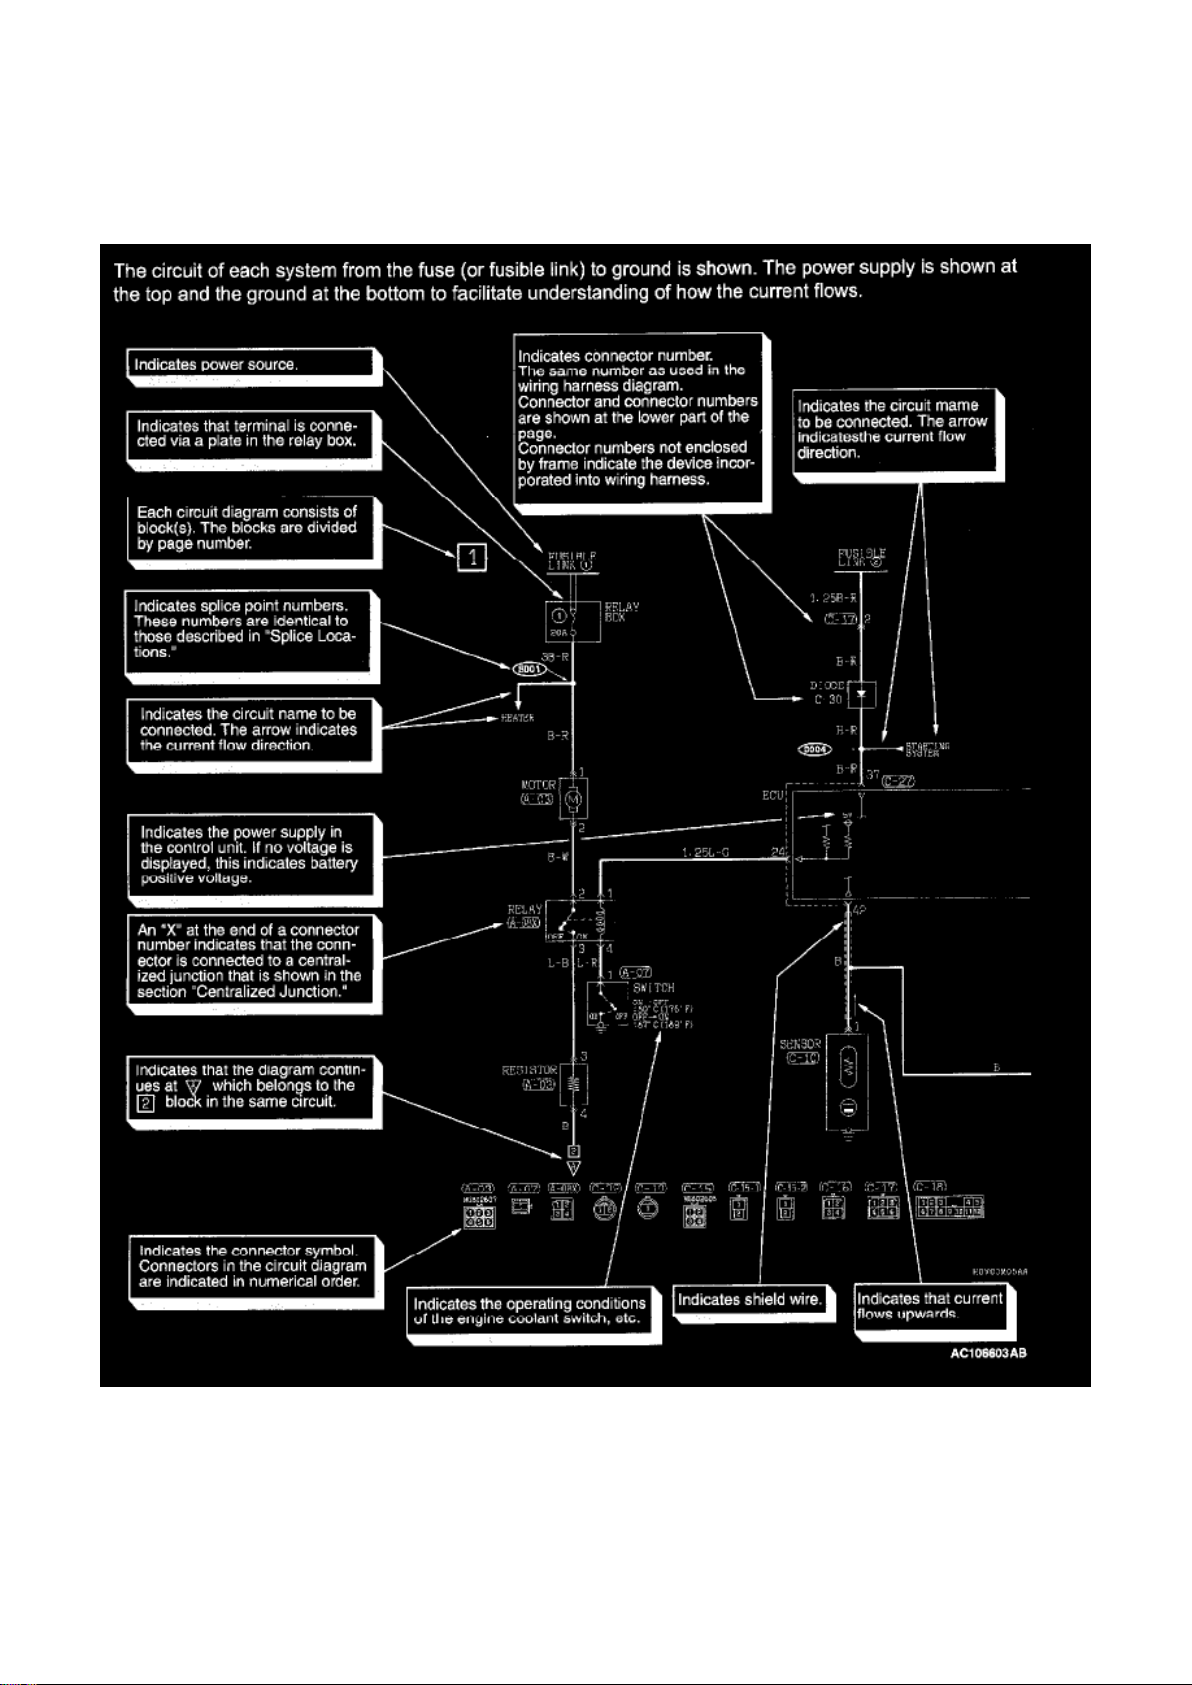
Relay Box: Diagram Information and Instructions
How To Read Circuit Diagrams - Part 1
Page 100
Dodge Stratus Coupe Workshop Manual (L4-2.4L VIN G (2003))
Dodge Workshop Manuals > Relays and Modules > Relays and Modules - Power and Ground Distribution > Relay Box >
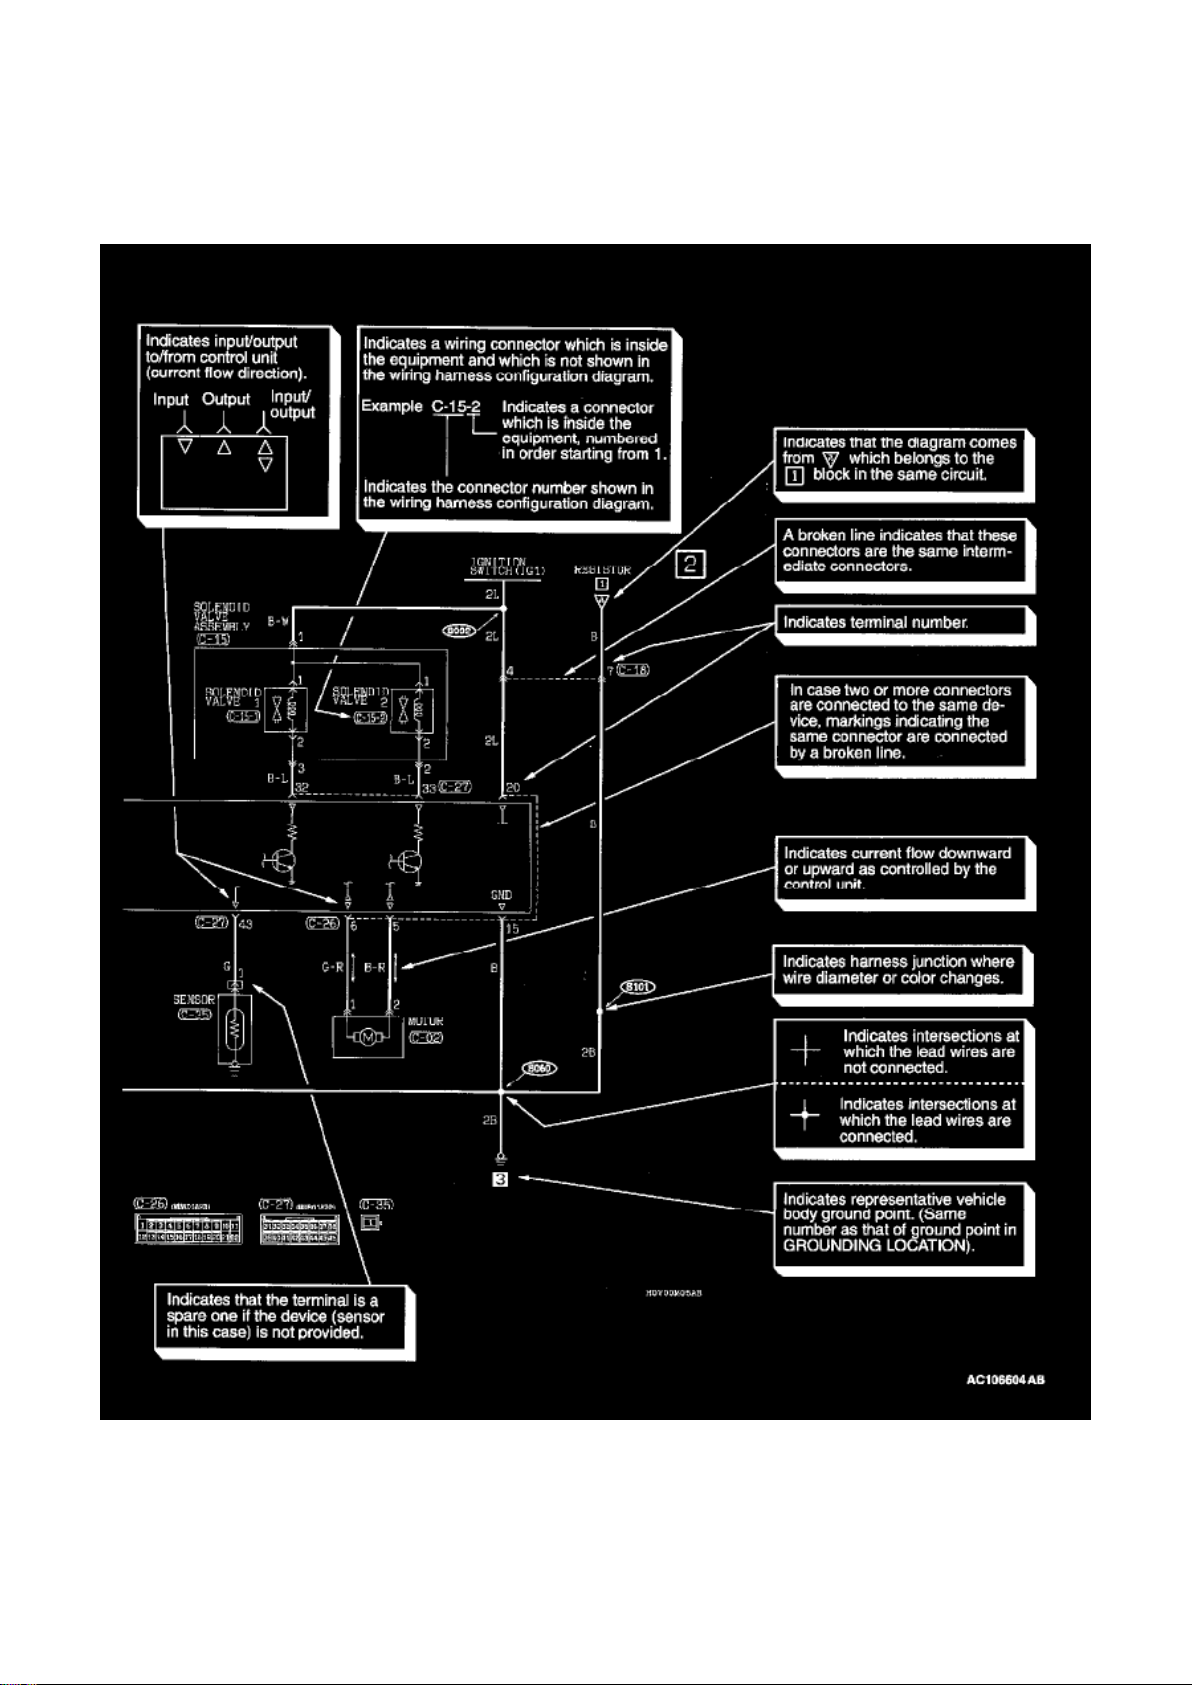
Component Information > Diagrams > Diagram Information and Instructions > Page 109
How To Read Circuit Diagrams - Part 2
 Loading...