

Page 1

SECTION PAGE
TABLE OF CONTENTS
10
1
2
3
4
5
6
7
8
9
INTRODUCTION . . . . . . . . . . . . . . . . . . . . . . . . . . . . . . . . . . . . . . . . . . . . . . . . . . . . . . . . . . . . . . . . . . . . . . . . . . 3
THINGS TO KNOW BEFORE STARTING YOUR VEHICLE. . . . . . . . . . . . . . . . . . . . . . . . . . . . . . . . . . . 11
UNDERSTANDING THE FEATURES OF YOUR VEHICLE. . . . . . . . . . . . . . . . . . . . . . . . . . . . . . . . . . . . 57
UNDERSTANDING YOUR INSTRUMENT PANEL . . . . . . . . . . . . . . . . . . . . . . . . . . . . . . . . . . . . . . . . . . 89
STARTING AND OPERATING. . . . . . . . . . . . . . . . . . . . . . . . . . . . . . . . . . . . . . . . . . . . . . . . . . . . . . . . . . . . 141
WHAT TO DO IN EMERGENCIES. . . . . . . . . . . . . . . . . . . . . . . . . . . . . . . . . . . . . . . . . . . . . . . . . . . . . . . . . 231
MAINTAINING YOUR VEHICLE . . . . . . . . . . . . . . . . . . . . . . . . . . . . . . . . . . . . . . . . . . . . . . . . . . . . . . . . . 251
MAINTENANCE SCHEDULES . . . . . . . . . . . . . . . . . . . . . . . . . . . . . . . . . . . . . . . . . . . . . . . . . . . . . . . . . . . . 303
IF YOU NEED CONSUMER ASSISTANCE . . . . . . . . . . . . . . . . . . . . . . . . . . . . . . . . . . . . . . . . . . . . . . . . . 311
INDEX . . . . . . . . . . . . . . . . . . . . . . . . . . . . . . . . . . . . . . . . . . . . . . . . . . . . . . . . . . . . . . . . . . . . . . . . . . . . . . . . . . 317
1
2
3
4
5
6
7
8
9
10
Page 2

Page 3

CONTENTS
INTRODUCTION
1
Introduction. . . . . . . . . . . . . . . . . . . . . . . . . . . . . . . . . 4
How to Use this Manual . . . . . . . . . . . . . . . . . . . . . . 5
Warnings and Cautions . . . . . . . . . . . . . . . . . . . . . . 5
Vehicle Identification Number, Sample
and Location . . . . . . . . . . . . . . . . . . . . . . . . . . . . . . . . 5
Vehicle Safety Certification Label, Sample
and Location . . . . . . . . . . . . . . . . . . . . . . . . . . . . . . . . 6
Vehicle/Engine Emission Label, Sample
and Location . . . . . . . . . . . . . . . . . . . . . . . . . . . . . . . . 8
Environmental Concerns and
Recommendations . . . . . . . . . . . . . . . . . . . . . . . . . . . 9
Drinking Alcohol or taking Drugs
while driving . . . . . . . . . . . . . . . . . . . . . . . . . . . . . . . 9
Information Regarding Electronic
Recording Devices . . . . . . . . . . . . . . . . . . . . . . . . . . 10
Stickers . . . . . . . . . . . . . . . . . . . . . . . . . . . . . . . . . . . . 10
Page 4

4 INTRODUCTION
INTRODUCTION
This manual provides information needed to operate
and understand the vehicle and its components.
Additional detailed information is contained in the
Owner’s Warranty Information Book and the Sprinter
Service Booklet.
WARNING!
Be sure to read the Operating Instructions. Otherwise you may not be aware of certain risks and
could injur yourself or others.
Sprinter vehicles are equipped with a variety of
components. Not all of the information contained in
this manual applies to every vehicle.
IMPORTANT: Descriptions and specifications in this
manual were in effect at the time of printing.
For your reference, keep this manual in the vehicle at
all times.
DaimlerChrysler Vans LLC reserves the right to
discontinue models and to change specifications or
design at any time without notice and without
incurring any obligation. Descriptions and
specifications contained in this publication provide no
warranty, expressed or implied, and are subject to
revisions and publication of new editions without
notice.
WARNING!
Engine exhaust, some of its constituents, and certain vehicle components contain or emit chemicals known to the State of California to cause
cancer and birth defects or other reproduction
harm. In addition, certain fluids contained in vehicles, and certain products of component wear,
contain chemicals known to the State of California to cause cancer and birth defects or other reproductive harm.
Page 5
INTRODUCTION 5
HOW TO USE THIS MANUAL
Consult the table of contents to determine which
section contains the information you desire.
The detailed index, at the rear of this manual, contains
a complete listing of all subjects.
WARNINGS AND CAUTIONS
This manual contains WARNINGS against operating
procedures which could result in an accident or bodily
injury. It also contains CAUTIONS against procedures
which could result in damage to your vehicle. If you do
not read this entire manual you may miss important
information. Observe all Warnings and Cautions.
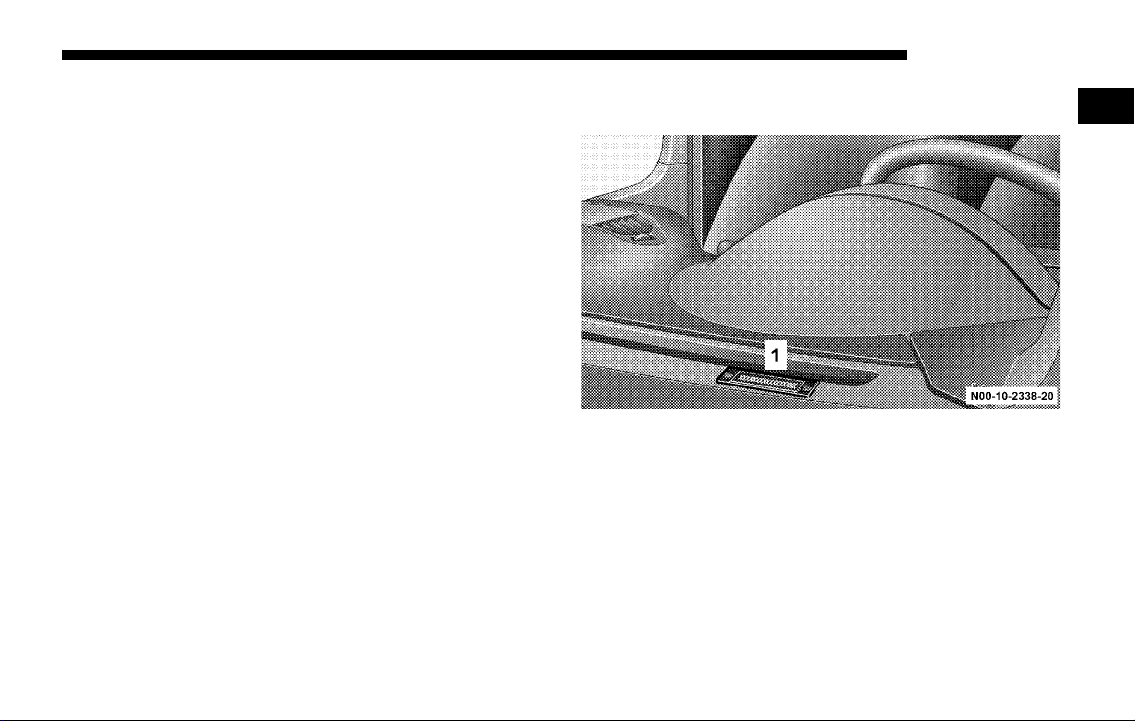
VEHICLE IDENTIFICATION NUMBER, SAMPLE
AND LOCATION
Vehicle identification number, visible (location: lower
edge of windshield) (1)
NOTE: Data shown on placards are for illustration
purposes only. Refer to placards on vehicle for actual
data specific to your vehicle.
1
Page 6
6 INTRODUCTION
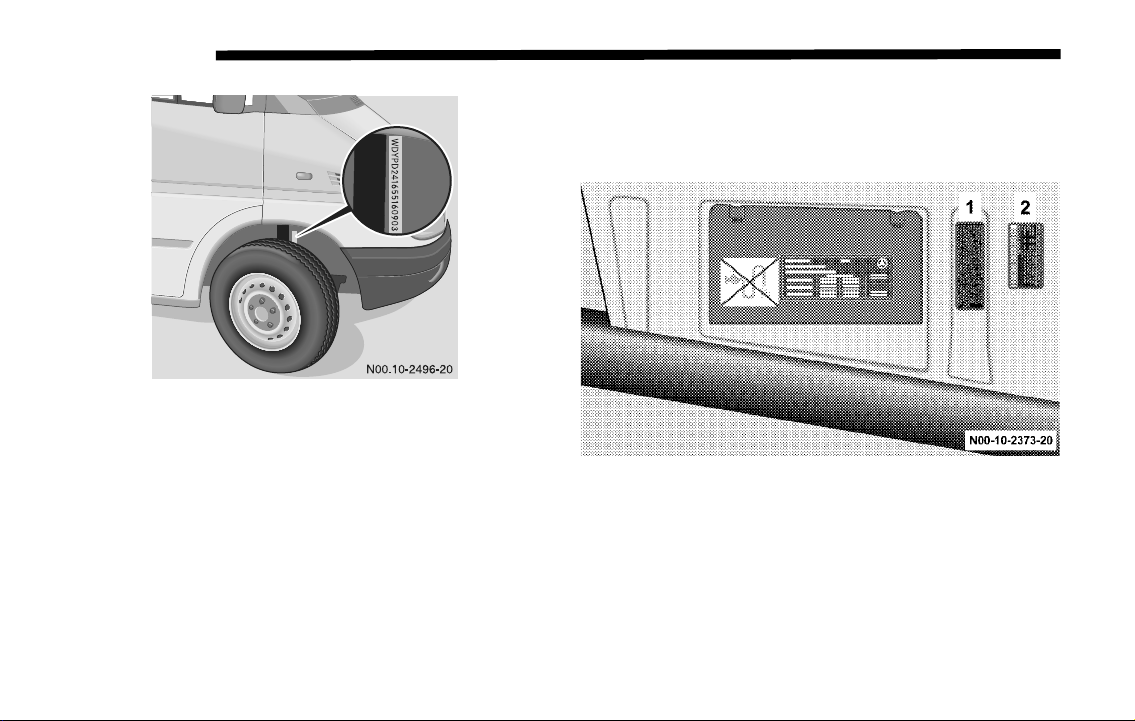
Vehicle identification number (location: on the chassis,
right hand).
VEHICLE SAFETY CERTIFICATION LABEL,
SAMPLE AND LOCATION
Location: below the driver’s seat on an outward facing
position of the mounting pillar.
Incomplete vehicle certification label for chassis/cab.
(1)
Certification Label (vehicle identification number,
permissible weights) (2)
Page 7
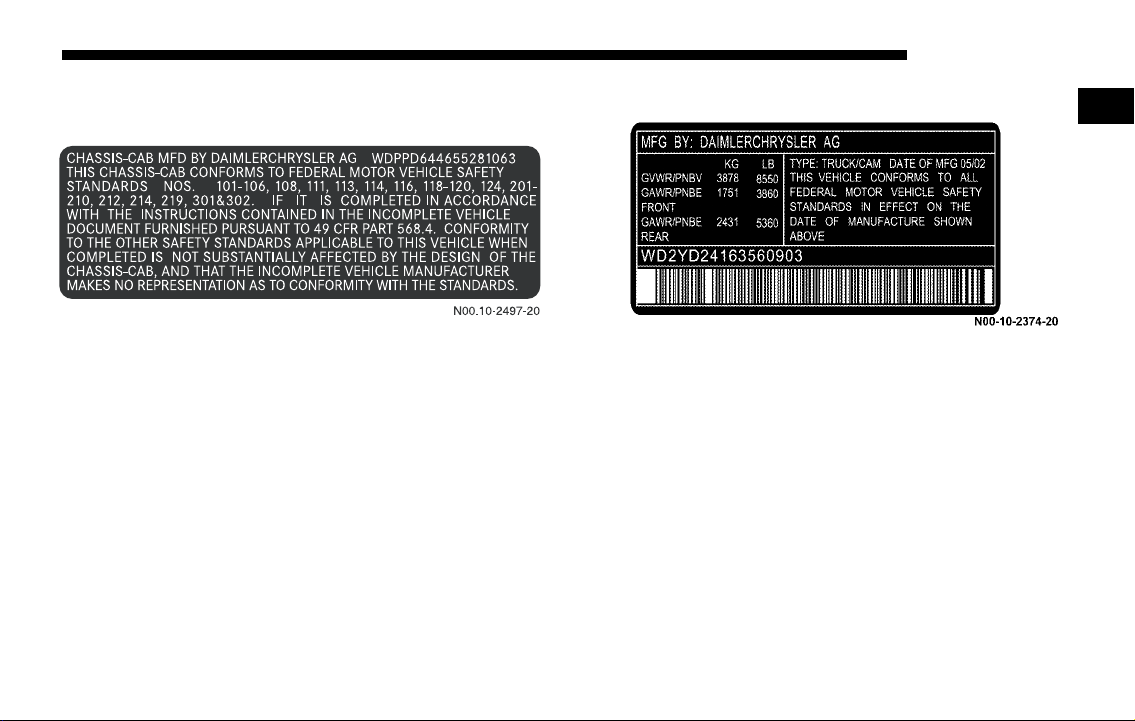
INTRODUCTION 7
Sample Incomplete Vehicle Certification Label
(Label 1)
NOTE: Data shown on label are for illustration
purposes only. Data are specific to each vehicle and
may vary from data shown in the illustrations.
Refer to label on vehicle for actual data specific to your
vehicle.
Sample Certification Label (Label 2)
1
Page 8

8 INTRODUCTION
VEHICLE/ENGINE EMISSION LABEL, SAMPLE
AND LOCATION
Location: on valve cover of the engine
NOTE: Data shown on label are for illustration
purposes only. Data are specific to each vehicle and
may vary from data shown in the illustrations.
Refer to label on vehicle for actual data specific to your
vehicle.
Sample:
Important Engine Information
This is a LOW EMISSION VEHICLE engine and meets all applicable
requirements of US EPA CFFV as “ILEV” per 40 CFR 88 and CARB
as “ULEV” per CCR 1956.8
DaimlerChrysler AG, Stuttgart, Germany
Mercedes-Benz Engine, Model
Engine Family / Engine Code
Exhaust Emission Control
System
Date of engine manufacture
Advertised output (SAE gr.)
Fuel rate at adv. Output
Valve lash cold (ins.)
Basic injection timing
Idle speed
This engine conforms to US, EPA, CARB and Canada regulations
applicable to 2004 Model Year.
This engine has a primary intended service application as a light HD
diesel engine.
This engine is not certified for use in an urban bus as defined at 40
CFR 86.093.-2. Sales of this engine for use in an urban bus is a
violation of Federal Law under the Clean Air Act.
This engine is certified to be operated on diesel fuel.
OM 647 LA CID 164
4 MBXH2.69DJB / Code I
TC, EMC, CAC, OC, EGR
2004
115 kW (154 HP) /3800 rpm
55 - 63 mm3 / stroke
n.a. int. / n.a. exh..
14.5 ± 1 degrees BTDC
680 ± 50 rpm
Page 9

INTRODUCTION 9
ENVIRONMENTAL CONCERNS AND
RECOMMENDATIONS
In this manual, whenever you see instructions to
discard materials, you should first attempt to reclaim
and recycle them. To preserve our environment, follow
appropriate environmental rules and regulations
when disposing of materials.
DRINKING ALCOHOL OR TAKING DRUGS WHILE
DRIVING
WARNING!
Drinking or taking drugs and driving can be a
very dangerous combination. Even a small
amount of alcohol or drugs can affect your reflexes, perceptions and judgement.
The possibility of a serious or even fatal accident
is sharply increased when you drink or take drugs
and drive.
Never drink or take drugs and drive or allow
anyone to drive after drinking or taking drugs.
1
Page 10

10 INTRODUCTION
INFORMATION REGARDING ELECTRONIC
RECORDING DEVICES
(Including notice pursuant to California Code § 9951)
Please note that your vehicle is equipped with devices
that can record vehicle systems data.
This information helps, for example, to diagnose
vehicle systems after a collision and to continuously
improve vehicle safety. DaimlerChrysler may access
the information and share it with others
• for safety research or vehicle diagnosis purposes
• with the consent of the vehicle owner or lessee
• in response to an official request by law
enforcement or other government agency
• for use in dispute resolution involving
DaimlerChrysler, its affiliates or sales/service
organization and/or
• as otherwise required or permitted by law.
STICKERS
There are various warning stickers affixed to the motor
home. Their purpose is to make you and others aware
of various dangers.
WARNING!
Do not remove any warning stickers.
If you remove the warning stickers, you or others
may not be aware of certain dangers and could be
injured.
Page 11

THINGS TO KNOW BEFORE STARTING YOUR VEHICLE
CONTENTS
2
Ignition Lock/Starter Switch . . . . . . . . . . . . . . . . . 13
Immobilizer . . . . . . . . . . . . . . . . . . . . . . . . . . . . . . 14
Central Locking (Optional) . . . . . . . . . . . . . . . . . . 15
Unlocking: . . . . . . . . . . . . . . . . . . . . . . . . . . . . . . . 16
Locking: . . . . . . . . . . . . . . . . . . . . . . . . . . . . . . . . . 16
Central Locking Switch . . . . . . . . . . . . . . . . . . . . 17
Locking Status Display . . . . . . . . . . . . . . . . . . . . 18
Locking and Unlocking . . . . . . . . . . . . . . . . . . . . 19
To Program the Automatic Lock
Feature when Starting the Engine . . . . . . . . . . . 19
Remote Keyless Entry (Optional) . . . . . . . . . . . . . 20
Unlocking with Remote Keyless Entry . . . . . . . 21
Locking with Remote Keyless Entry . . . . . . . . . 22
Replacing Batteries in Remote Keyless Entry . . . 22
Security System with Towing and Passenger
Compartment Protection (Optional) . . . . . . . . . . . 23
Audible Alarm . . . . . . . . . . . . . . . . . . . . . . . . . . . 24
Visual Alarm . . . . . . . . . . . . . . . . . . . . . . . . . . . . . 24
Switching off the Alarm . . . . . . . . . . . . . . . . . . . 24
Towing Protection and Passenger Compartment
Protection Switch (Optional). . . . . . . . . . . . . . . . . . 24
Towing Protection . . . . . . . . . . . . . . . . . . . . . . . . 24
Switching off the Towing Protection . . . . . . . . . 24
Passenger Compartment Protection . . . . . . . . . 25
Switching off the Passenger Compartment
Protection . . . . . . . . . . . . . . . . . . . . . . . . . . . . . . . . 25
Alarm Pushbutton
(Vehicles with Security Systems only) . . . . . . . 26
Page 12

12 THINGS TO KNOW BEFORE STARTING YOUR VEHICLE
Opening/Closing doors . . . . . . . . . . . . . . . . . . . . . 27
Sliding Door . . . . . . . . . . . . . . . . . . . . . . . . . . . . . 30
Rear Cargo Doors . . . . . . . . . . . . . . . . . . . . . . . . . 33
Passenger/Cargo Area Door 37
Occupant Restraints . . . . . . . . . . . . . . . . . . . . . . . . . 39
Seat Belts . . . . . . . . . . . . . . . . . . . . . . . . . . . . . . . . . . 41
Seat Belt Warning Lamp and
Airbag Malfunction . . . . . . . . . . . . . . . . . . . . . . . 44
Fastening and Removing . . . . . . . . . . . . . . . . . . 45
Belt Height Adjustment . . . . . . . . . . . . . . . . . . . . 46
Driver’s Airbag . . . . . . . . . . . . . . . . . . . . . . . . . . . . . 47
Front Seat Passenger Airbag (not in conjunction
with folding seat in partition wall) . . . . . . . . . . . . 48
Airbag and Belt Tensioners . . . . . . . . . . . . . . . . . . 49
SRS Malfunction Indicator Lamp . . . . . . . . . . . . 49
Belt Tensioners . . . . . . . . . . . . . . . . . . . . . . . . . . . 49
Safety Precautions for the Airbag . . . . . . . . . . . 50
Pedals . . . . . . . . . . . . . . . . . . . . . . . . . . . . . . . . . . . . . 52
Engine Break-In Specifications . . . . . . . . . . . . . . . . 52
The first 1,000 miles (about 1,500 km) . . . . . . . . 52
Engine Oil Consumption . . . . . . . . . . . . . . . . . . . 53
Safety Tips . . . . . . . . . . . . . . . . . . . . . . . . . . . . . . . . . 53
Inhalation of Exhaust Gas . . . . . . . . . . . . . . . . . . . . 54
Tie Down Rings (Optional) . . . . . . . . . . . . . . . . . . . 54
Page 13
THINGS TO KNOW BEFORE STARTING YOUR VEHICLE 13
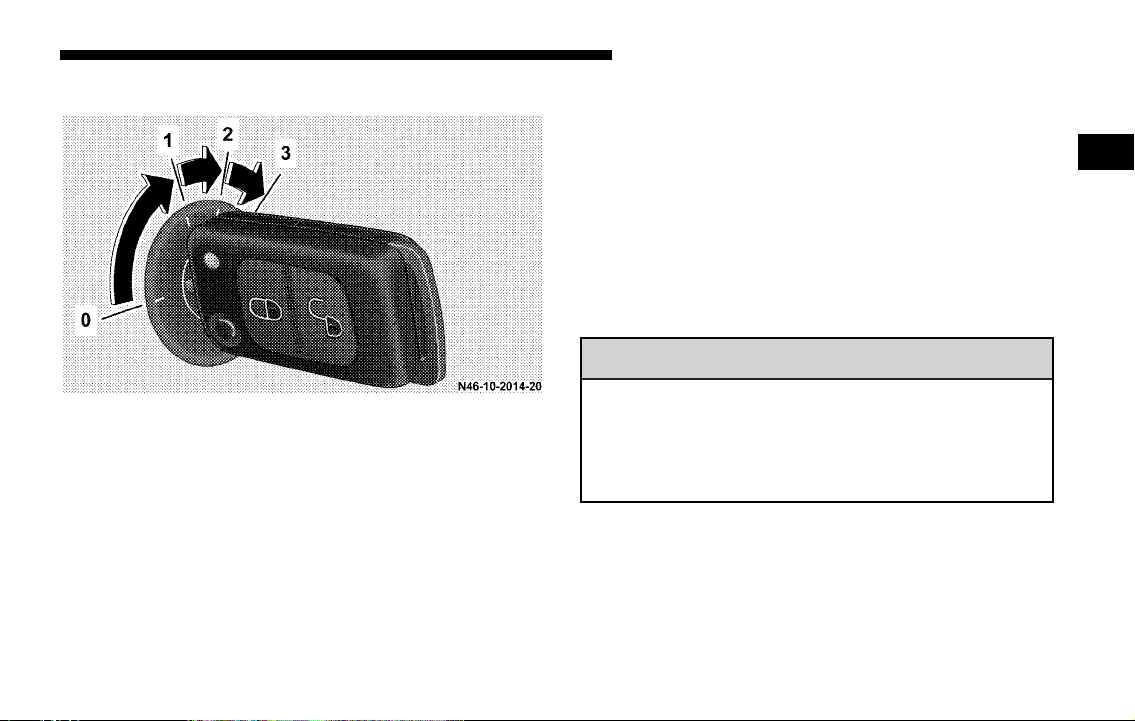
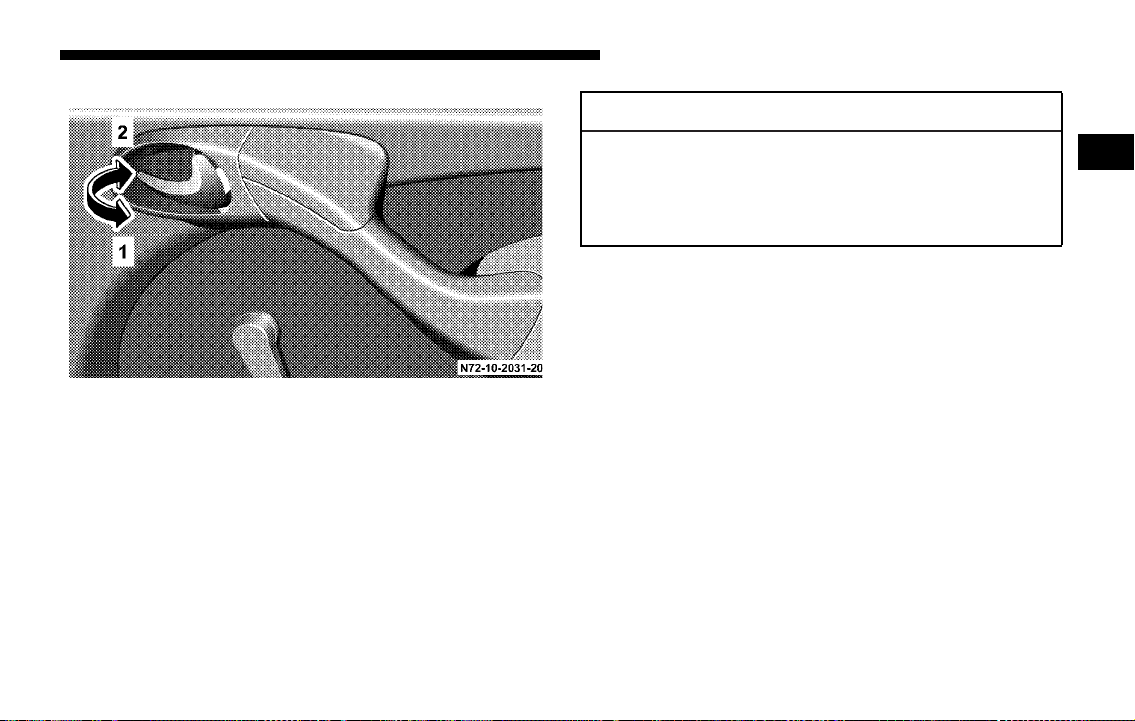
IGNITION LOCK/STARTER SWITCH
The steering wheel is locked when the key is removed (0)
To remove the key, place the gear selector lever in position
"P"; rotate the key in the ignition lock to position 0; and
remove the key.
The steering wheel is unlocked (1)
Preheating and driving position (2)
Start position (3)
To engage the steering wheel lock:
After removing the key, turn the steering wheel until
the steering wheel lock engages.
To release the steering wheel lock:
Turn the steering wheel slightly while turning the key
to position 1.
NOTE: If the driver’s or passenger’s door is opened
with the key in position 0 or 1 in the ignition lock, a
warning buzzer sounds.
WARNING!
Do not remove the key from the ignition lock unless the vehicle is stationary. Always remove the
key from the ignition lock when leaving the vehicle to prevent children or unauthorized persons from starting the engine.
2
Page 14
14 THINGS TO KNOW BEFORE STARTING YOUR VEHICLE
Immobilizer
The immobilizer is automatically activated when the
key is removed from the ignition lock. The engine
cannot be started. As soon as the correct key is inserted
into the ignition lock, the immobilizer is deactivated.
For notes on the remote keyless entry, refer to "Remote
Keyless Entry".
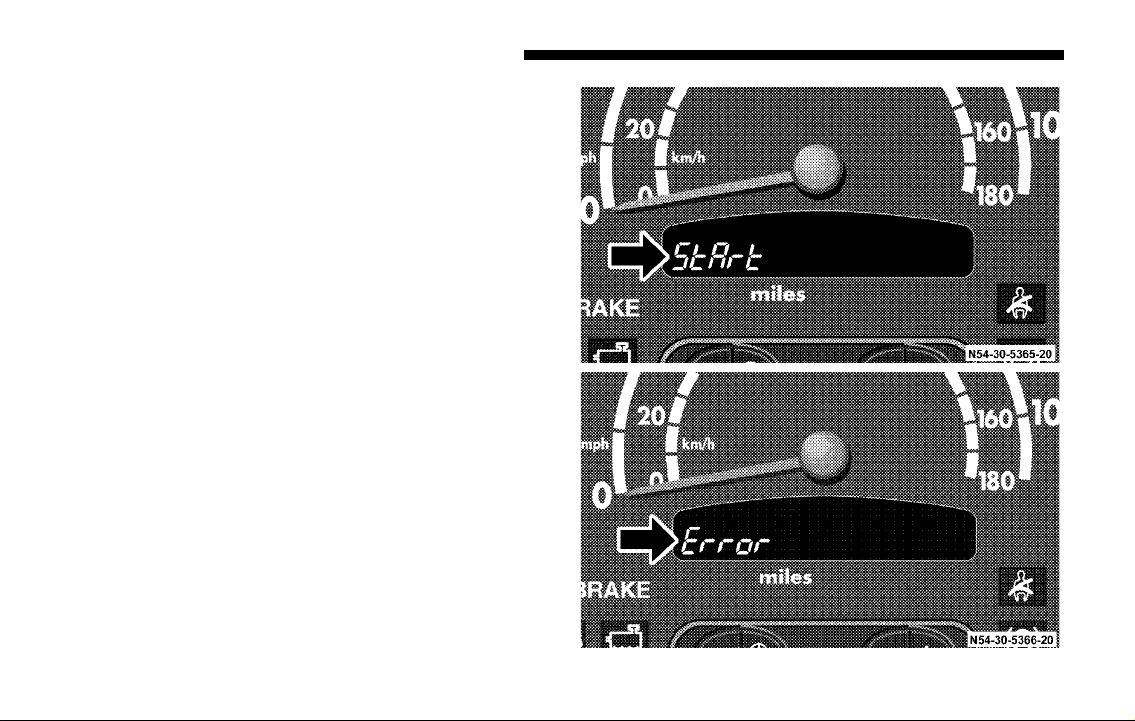
NOTE: If the engine cannot be started and the displays
Á and î appear alternately in the multi-function
indicator when the key is in position 2 in the ignition
lock, a fault has developed or the key used has not been
activated.
Remove the key and repeat the starting procedure. If
the engine still cannot be started, consult an authorized
Sprinter Dealer.
Page 15
CENTRAL LOCKING (OPTIONAL)
To unlock (1)
To lock (2)
CAUTION!
THINGS TO KNOW BEFORE STARTING YOUR VEHICLE 15
WARNING!
For personal security and safety in the event of an
accident, lock the vehicle doors when you drive
as well as when you park and leave the vehicle.
2
An unlocked vehicle is an invitation to thieves.
Always remove the key from the ignition and lock
all doors when leaving the vehicle unattended.
To unlock (1)
To lock (2)
Page 16
16 THINGS TO KNOW BEFORE STARTING YOUR VEHICLE
WARNING!
When leaving the vehicle always remove the key
from the ignition lock, and lock your vehicle.
Do not leave children unsupervised in the vehicle,
even if they are secured by a child restraint system.
The children could
• injure themselves on parts of the vehicle
• release the child-proof locks by pressing the
central locking button and could thereby open
the doors and
• cause injury to others as a result
• get out of the vehicle and could either injure
themselves when doing so or they could be
injured by the traffic approaching from the rear
• suffer serious or fatal effects in the event of long
periods of hot weather
• release the parking brake. The vehicle could
then start moving of its own accord.
Unsupervised use of vehicle equipment may cause
severe personal injuries, death and property damage.
Unlocking:
If a door lock or interior handle on the driver or front
seat passenger door is unlocked, only the driver or
front seat passenger door will be unlocked.
NOTE: If a door lock or interior handle on the sliding
door or tailgate is unlocked, only the sliding door or
tailgate will be unlocked.
Locking:
All doors are automatically locked if a door lock or
interior handle is locked.
NOTE: If the central locking automatically unlocks
again after having been locked, at least one door is
closed incorrectly.
If it then locks again within about 5 seconds, then all
closed doors are locked.
The central locking displays vehicle locking with one
or more open doors by means of a special function
sequence (locking, unlocking, locking). Once closing
has been completed, an open door will not
automatically be locked.
Page 17
THINGS TO KNOW BEFORE STARTING YOUR VEHICLE 17
After the engine is started (about 1 second), all doors
with the exception of the driver-side door are locked
automatically.
NOTE: In vehicles without central locking only the
respective door will be locked or unlocked.
CAUTION!
In case of an accident, rescue from the outside may
be more difficult if the vehicle is locked.
To unlock the vehicle after the engine is started,
refer to
"Central Locking Switch".
Central Locking Switch
The central locking switch is located
on the center section of the
dashboard.
The entire vehicle or just the
passenger door and the cargo doors
can be locked or unlocked from
inside the vehicle with the central locking switch.
After the engine is started (about 1 second), all doors
with the exception of the driver-side door are locked
(standard setting).
2
Page 18

18 THINGS TO KNOW BEFORE STARTING YOUR VEHICLE
WARNING!
When leaving the vehicle always remove the key
from the ignition lock, and lock your vehicle.
Do not leave children unsupervised in the vehicle,
even if they are secured by a child restraint system.
The children could
• injure themselves on parts of the vehicle
• release the child-proof locks by pressing the
central locking button and could thereby open
the doors and
• cause injury to others as a result
• get out of the vehicle and could either injure
themselves when doing so or they could be
injured by the traffic approaching from the rear
• suffer serious or fatal effects in the event of long
periods of hot weather
• release the parking brake. The vehicle could
then start moving of its own accord.
Unsupervised use of vehicle equipment may cause
severe personal injuries, death and property damage.
Locking Status Display
Left-hand indicator lamp is illuminated:
The driver’s door is locked.
Right-hand indicator lamp is illuminated:
Front-seat passenger door and rear-seat passenger
area/cargo area are locked.
Both indicator lamps are illuminated:
The entire vehicle is locked.
If an indicator lamp flashes:
At least one door has not been properly closed.
NOTE: The indicator lamps go out,
once the remote keyless entry transmitter has been
used to completely lock the vehicle;
if the ignition lock is in the position 0, and once the
interior handles/closing cylinders have been used to
completely lock the vehicle;
after about 15 minutes in position 0 in the ignition lock.
The display can be reactivated by pressing the central
locking switch, located on the center section of the
dashboard.
Page 19
THINGS TO KNOW BEFORE STARTING YOUR VEHICLE 19
Locking and Unlocking
To lock entire vehicle:
Press top of central locking switch.
The left and the right indicator lamp in the switch
illuminate. If one of the two indicator lamps blinks, at
least one door is not closed properly.
To unlock entire vehicle:
Press top of central locking switch again.
To lock the front-seat passenger door and the rear-seat
passenger area/cargo area:
Press bottom of central locking switch.
The right indicator lamp in the switch illuminates. If
the indicator lamp blinks, at least one door is not closed
properly.
To unlock the front-seat passenger door and the rearseat passenger area/cargo area:
Press bottom of central locking switch again.
CAUTION!
In case of an accident, rescue from the outside may
be more difficult if the vehicle is locked.
To unlock the vehicle after the engine is started,
refer to ‘‘Central Locking Switch’’.
To Program the Automatic Lock Feature when
Starting the Engine
Place the key in position 2 in the ignition lock and close
all doors.
To switch off automatic locking of the front-seat passenger
door and the rear-seat passenger area/cargo area:
Press the central locking switch at the bottom and hold
it there for about 5 seconds. The right indicator lamp
flashes twice. Automatic locking when the engine is
started is switched off.
To switch on automatic locking of the front-seat passenger
door and the rear-seat passenger area/cargo area:
Press the central locking switch at the bottom and hold
it there for about 5 seconds. The right indicator lamp
2
Page 20

20 THINGS TO KNOW BEFORE STARTING YOUR VEHICLE
flashes four times. Automatic locking when the engine
is started is switched on (standard setting).
NOTE: A door which is closed after the engine has
been started will not be locked automatically.
CAUTION!
In case of an accident, rescue from the outside may
be more difficult if the vehicle is locked.
To unlock the vehicle after the engine is started,
refer to ‘‘Central Locking Switch’’.
Automatic Unlocking in Case of an Accident
The doors will unlock in the event of certain accidents,
provided that the power supply is still maintained.
REMOTE KEYLESS ENTRY (OPTIONAL)
NOTE: This device complies with Part 15 Subpart C
Section 231 of the FCC Rules. Operation is subject to
the following two conditions:
This device may not cause harmful interference, and
this device must accept any interference received
including interference that may cause undesired
operation.
NOTE: Any unauthorized modification to this device
could void the user’s authority to operate the
equipment.
NOTE: Included with your vehicle are 2 remote
keyless entry transmitters plus removable mechanical
key.
Keys which were not included with delivery must be
activated at an authorized Sprinter Dealer before they
can be used.
If a non-activated key is used, after the fourth attempt
to start, the starting process will be blocked for 1
minute.
The multi-function display will alternately show Á
and î, refer to "Immobilizer".
Malfunctions could occur if the remote keyless entry
transmitter is exposed to moisture. As a precaution,
both remote keyless entry transmitters should always
be carried.
Page 21
The remote keyless entry transmitter transmits in all
directions. It does not have to be pointed at the vehicle.
Do not expose the remote keyless entry transmitter to
high levels of electromagnetic radiation in order to
avoid the risk of malfunctions.
The remote keyless entry transmitter has an average
range of about 32 ft (about 10 m). Always verify the
correct operation of the remote keyless entry
transmitter by listening for the locking noise and by
checking that the white patch on the interior door
handle is visible.
When pressing the Œ or ‹ buttons, the indicator
lamp illuminates. If the indicator lamp does not
illuminate, the batteries must be replaced.
The remote keyless entry transmitter will not function
when there is a vehicle key inserted in the ignition lock.
THINGS TO KNOW BEFORE STARTING YOUR VEHICLE 21
2
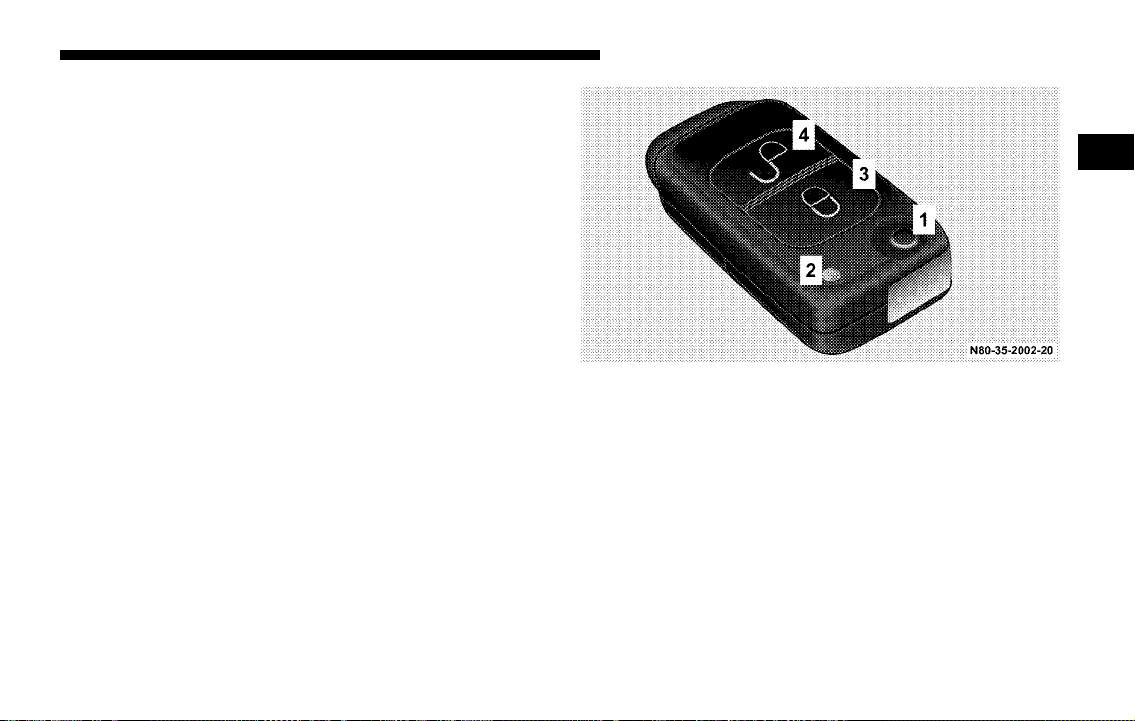
Release button for mechanical key (1)
Indicator lamp (2)
Lock button ‹ (3)
Unlock button Π(4)
Unlocking with Remote Keyless Entry
Press the Œ button once. The driver’s door is
unlocked and the hazard warning lamp, as well as the
remote keyless entry transmitter indicator lamp, blink
once.
Page 22

22 THINGS TO KNOW BEFORE STARTING YOUR VEHICLE
Press the Πbutton a second time. The passenger
door and cargo doors are unlocked and the turn signal
lamps, as well as the remote keyless entry transmitter
indicator lamp, blink once again. The button must be
pressed a second time within about 2.5 seconds,
otherwise the second request to open can not be
performed.
NOTE: The vehicle is automatically locked again, if
within about 40 seconds of unlocking with the remote
keyless entry transmitter, none of the doors are
opened. The hazard warning lamp does not blink.
Locking with Remote Keyless Entry
Press the ‹ button. The entire vehicle is locked and
the hazard warning lamp blinks three times. The
remote keyless entry transmitter indicator lamp blinks
once.
If the hazard warning lamp does not blink, at least one
door is improperly closed. Check to see if there is a
door that is not properly closed or if there is a key in the
ignition lock. Remove key from ignition lock and/or
close doors properly and press the ‹ button again.
REPLACING BATTERIES IN REMOTE KEYLESS
ENTRY
Do not touch the battery contact surfaces (insert the
batteries with a lint-free cloth).
WARNING!
Keep batteries away from children.
Consult a doctor immediately if a battery is
swallowed.
Dispose of used batteries in an environmentally
responsible manner.
Danger of explosion if the battery is not correctly
replaced. Replacements should always be either
of the same type or one which has been
recommended by the manufacturer.
NOTE: Do not operate the remote control while the
battery is being replaced.
Page 23
THINGS TO KNOW BEFORE STARTING YOUR VEHICLE 23
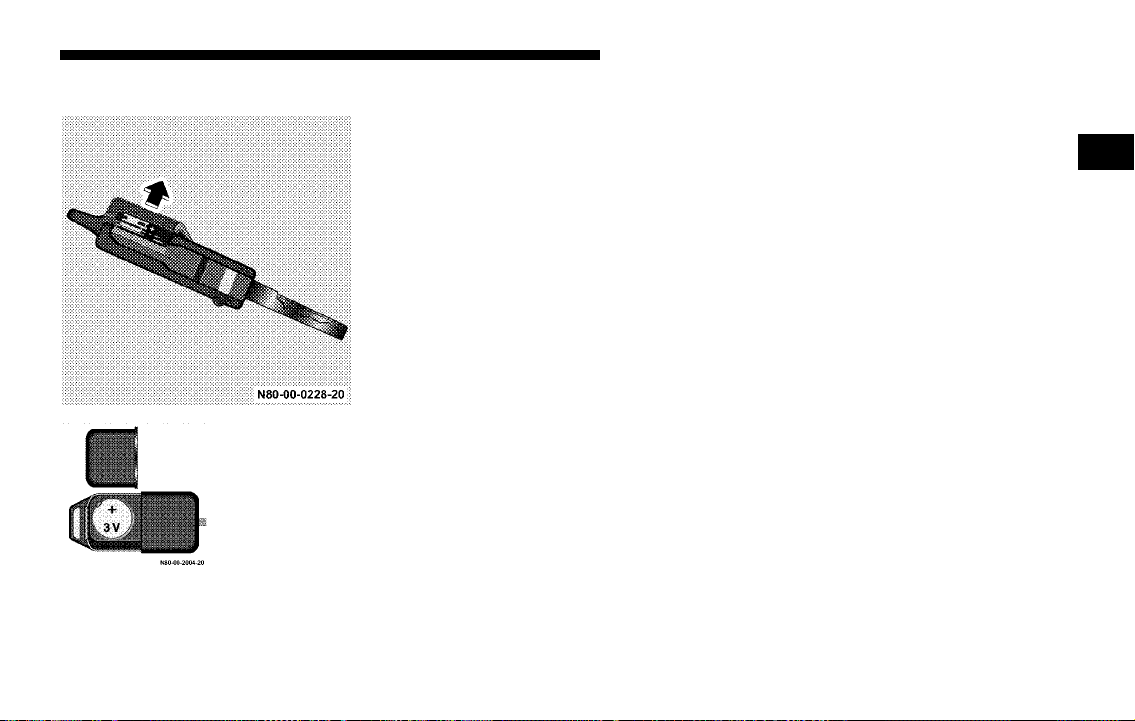
Replacing Batteries
3. Remove the battery and install
4. Press on the battery cover until it
Rated voltage: 6 V
DC (2x 3V)
Rated current:10 mA
1. Release the
mechanical key
by pressing the
release button.
2. Remove the
battery cover.
new one (note correct polarity;
positive terminal up).
snaps into place.
SECURITY SYSTEM WITH TOWING AND
PASSENGER COMPARTMENT PROTECTION
(OPTIONAL)
The security system is ready for operation, if the
vehicle is locked with the remote keyless entry
transmitter.
If a door is open, the security system is not switched on
during the locking process.
Security system activation is indicated by the turn
signal lamps flashing three times in succession.
For a function check, when the security system is
switched on, the indicator lamps in the towing
protection/passenger compartment protection switch
flash.
The security system will switch off if the vehicle is
unlocked using the remote keyless entry transmitter.
The turn signal lamps flash once.
2
Page 24

24 THINGS TO KNOW BEFORE STARTING YOUR VEHICLE
The alarm is triggered if the security system has been
activated and
• A door is opened,
• a door is unlocked from inside,
• the engine cover is opened,
• the key is used to unlock the vehicle at any door,
• the key is turned to position 2 in the ignition lock.
Audible Alarm
The horn sounds for about 25 seconds.
Visual Alarm
The turn signal lamps flash for about 4 minutes.
Switching off the Alarm
The alarm will switch off immediately if the vehicle is
unlocked using the remote keyless entry transmitter.
NOTE: Do not manually unlock the doors as this will
trigger the alarm.
TOWING PROTECTION AND PASSENGER
COMPARTMENT PROTECTION SWITCH
(OPTIONAL)
See Section 4, Understanding Your Instrument Panel,
for switch locations.
Switch off the towing protection
Indicator lamp
As a function check, (1) the indicator
lamp (2) flashes when the security
system is switched on.
Switch off the passenger compartment protection (3).
Towing Protection
The towing protection is ready for operation after
30 seconds as the security system has been activated.
The alarm is triggered if the vehicle is lifted while the
security system is activated.
Switching off the Towing Protection
If the vehicle is to be transported or loaded, the towing
protection must be switched off in order to avoid a
false alarm.
Page 25

THINGS TO KNOW BEFORE STARTING YOUR VEHICLE 25
1. Place the key in position 0 or 1 in the ignition lock.
2. Press the switch up (1) to switch off the towing
protection.
The indicator lamp (2) is briefly illuminated.
If passenger compartment protection will be switched
off as well, wait until the indicator lamp (2) goes out,
and
3. Press switch (3) downward.
The indicator lamp (2) flashes about 10 times.
To activate the setting (towing protection/passenger
compartment protection switched off):
4. Keep the key in locking position in the driver’s
door lock for more than 2 seconds or
5. lock the vehicle using the remote keyless entry
transmitter.
The towing protection will remain switched off until
the vehicle is locked again with the remote keyless
entry transmitter.
NOTE: The alarm will switch off immediately if the
vehicle is centrally unlocked using the remote keyless
entry transmitter.
Passenger Compartment Protection
The passenger compartment protection is ready for
operation 30 seconds after the security system has been
activated. The alarm is triggered if movement inside
the vehicle is registered while the security system is
activated.
NOTE: Close the side windows and the glass tilting
roof.
Do not leave any objects (mascots, hangers) on the
interior mirror or on the roof grab handles, as these
could trigger a false alarm.
Switching off the Passenger Compartment
Protection
If persons or animals remain in the locked vehicle,
switch off the passenger compartment protection to
prevent a false alarm.
1. Place the key in position 0 or 1 in the ignition lock.
2. Press the switch downward (3) to switch off the
passenger compartment protection. The indicator
lamp (2) flashes about 10 times.
If towing protection is to be switched off as well, wait
until the indicator lamp (2) goes out, and
2
Page 26

26 THINGS TO KNOW BEFORE STARTING YOUR VEHICLE
3. Press switch up (1).
The indicator lamp (2) is briefly illuminated.
To activate the setting (passenger compartment/
towing protection switched off):
4. Lock the vehicle using the remote keyless entry
transmitter.
The passenger compartment protection will remain
switched off until the vehicle is locked again with the
remote keyless entry transmitter.
NOTE: The alarm will switch off immediately if the
vehicle is centrally unlocked using the remote keyless
entry transmitter.
Alarm Pushbutton (Vehicles with Security Systems
only)
See Section 4, Understanding Your Instrument Panel,
for switch locations.
Trigger the alarm manually/lock the
vehicle.
The audible and visual alarm can be
triggered manually by using the
alarm pushbutton.
Audible Alarm
The horn sounds until the alarm is switched off.
Visual Alarm
The turn signal lamps flash until the alarm is switched
off.
Trigger the alarm manually and lock the vehicle.
Press the alarm pushbutton upward once.
The indicator lamp flashes in the towing/passenger
compartment protection switch.
Page 27

THINGS TO KNOW BEFORE STARTING YOUR VEHICLE 27
The vehicle will be centrally locked if all doors are
closed.
Switching Off the Alarm and Unlocking the Vehicle
Press the alarm pushbutton up one more time.
The vehicle will be centrally unlocked if it was not
centrally locked before the alarm was manually
triggered.
OPENING/CLOSING DOORS
Front Doors
WARNING!
Do not leave children unsupervised in the vehicle,
even if they are secured by a child restraint system. The children could
• injure themselves on parts of the vehicle
• release the child-proof locks by pressing the
central locking button and could thereby open
the doors and
• cause injury to others as a result
• get out of the vehicle and could either injure
themselves when doing so or they could be
injured by the traffic approaching from the rear
• suffer serious or fatal effects in the event of long
periods of hot weather
• release the parking brake. The vehicle could
then start moving of its own accord.
Unsupervised use of vehicle equipment may cause
severe personal injuries, death and property damage.
2
Page 28
28 THINGS TO KNOW BEFORE STARTING YOUR VEHICLE
WARNING!
Only drive with the doors properly closed. You
could lose the load, for example, and endanger vehicle occupants or other road users if the doors are
open.
Only open the doors when road and traffic
conditions permit.
Do not leave children alone in the vehicle. They
could open a locked door from the inside despite
the road and traffic conditions, thereby
endangering themselves and others.
To prevent severe personal injuries, always keep
hands and fingers away from the door opening
when closing a door. Be especially careful when
small children are around.
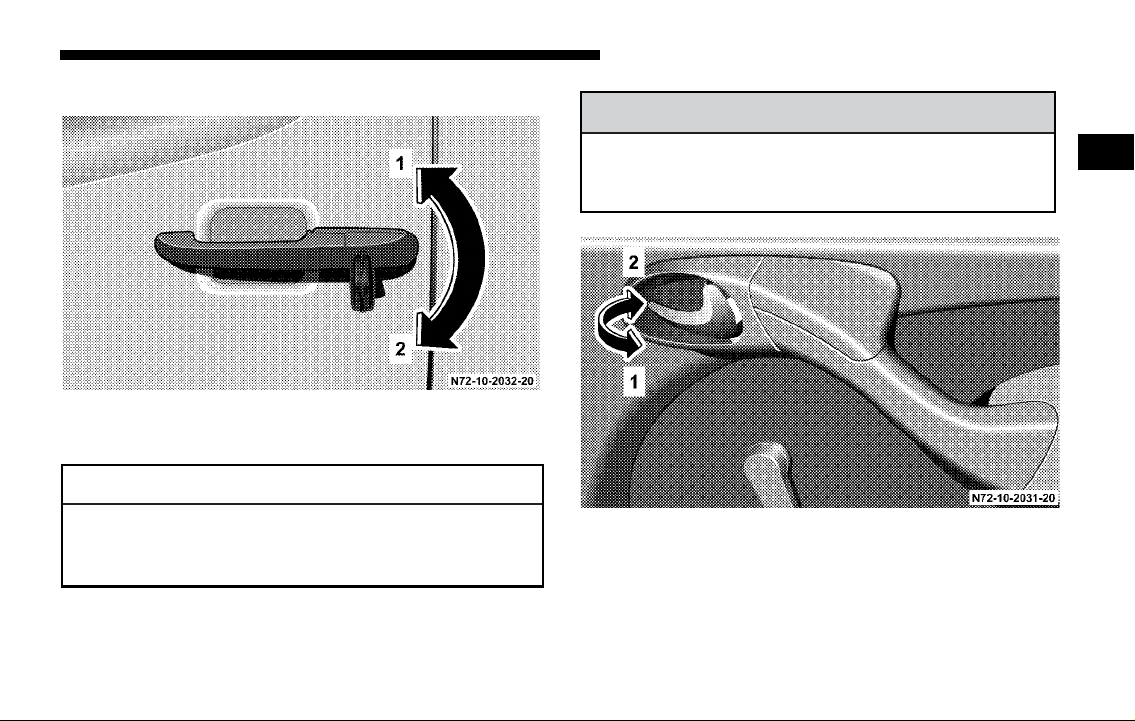
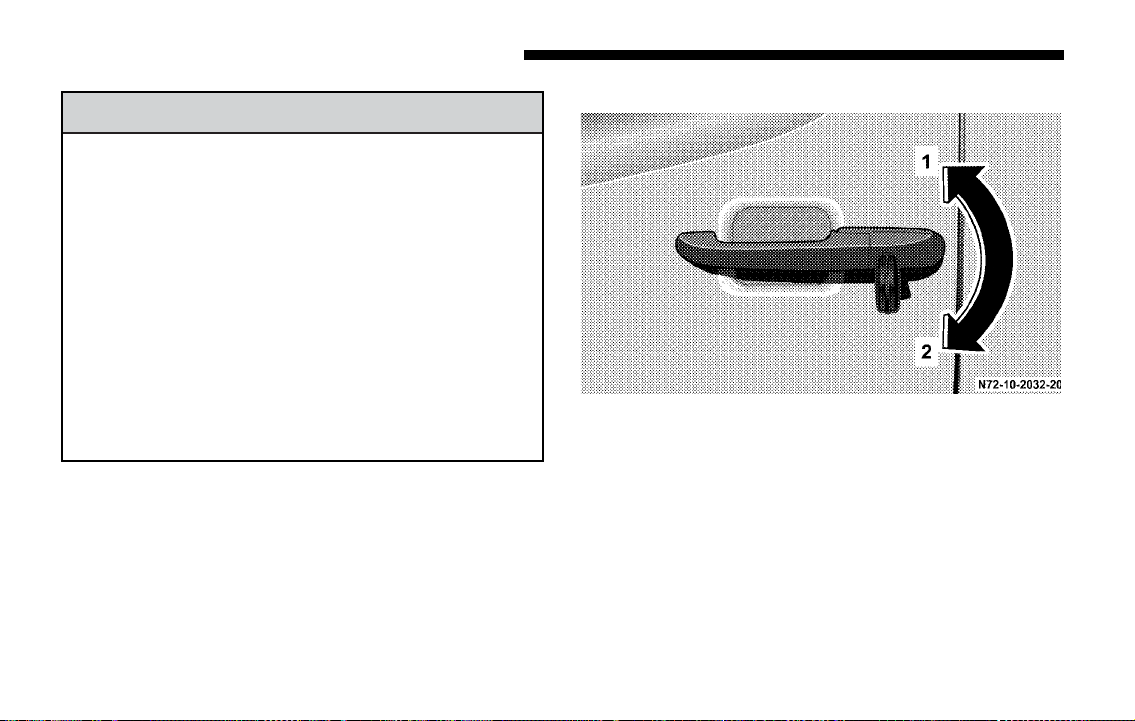
From the Outside
To unlock (1)
To lock (2)
To open the door:
Pull the handle to open the door.
Page 29
THINGS TO KNOW BEFORE STARTING YOUR VEHICLE 29
From the Inside
To unlock (1)
To lock (2)
To unlock and open
Pull handle.
To lock:
Press the handle in. All closed doors will be locked.
The door is locked when the white patch in the handle
can be seen. If an open door is detected, refer to
"Central Locking".
CAUTION!
In case of an accident, rescue from the outside may
be more difficult if the vehicle is locked.
To unlock the vehicle after the engine is started,
refer to
NOTE: The driver’s and passenger’s doors cannot be
locked when they are open (lockout protection).
In vehicles without central locking only the respective
door will be locked or unlocked.
Please note anti-theft alarm system: The anti-theft
alarm will be triggered when the doors are manually
unlocked. Cancel alarm by pressing button Œ. The
anti-theft alarm system will not be activated when the
doors are manually locked.
"Central Locking Switch".
2
Page 30

30 THINGS TO KNOW BEFORE STARTING YOUR VEHICLE
Sliding Door From the Outside
WARNING!
Only drive with the doors properly closed. You
could lose the load, for example, and endanger vehicle occupants or other road users if the doors are
open.
To prevent possible personal injury, always keep
hands and fingers away from the door opening
when closing a door. Be especially careful when
small children are around.
Only open the doors when road and traffic
conditions permit.
Do not leave children alone in the vehicle. They
could open a locked door from the inside despite
the road and traffic conditions, thereby
endangering themselves and others.
Do not leave doors open on uphill or downhill
grades. Doors could be released from the door
support and slam shut. If they are not closed
properly, sliding doors can open on their own.
This could result in severe injury. Be especially
careful when small children are around.
To unlock (1)
To lock (2)
To open the door:
Pull the handle and slide the door back to the stop.
To close the door:
Slide it forwards by the handle until it latches.
Page 31

THINGS TO KNOW BEFORE STARTING YOUR VEHICLE 31
From the Inside without Lock Button
To unlock (1)
To lock (2)
To unlock and open:
Pull handle.
To lock:
Press the handle in.
The door is locked when the white patch in the handle
can be seen. If an open door is detected, refer to
"Central Locking".
From the Inside with Lock Button
2
Lock button (1)
Handle (2)
To unlock and open:
Pull lock button (1)
(the door is unlocked, all other doors remain locked).
Pull handle (2).
To lock:
Page 32

32 THINGS TO KNOW BEFORE STARTING YOUR VEHICLE
Press lock button (1)
(all doors are locked)
If the central locking automatically unlocks again after
having been locked, at least one door is closed
incorrectly.
If it then locks again within about 5 seconds, then all
closed doors are locked.
The central locking displays vehicle locking with one
or more open doors by means of a special function
sequence (locking, unlocking, locking). Once closing
has been completed, an open door will not
automatically be locked.
CAUTION!
In case of an accident, rescue from the outside may
be more difficult if the vehicle is locked.
To unlock the vehicle after the engine is started,
refer to
NOTE: If an open sliding door is locked before being
closed, then only the sliding door will be locked.
"Central Locking Switch".
In vehicles without central locking only the respective
door will be locked or unlocked.
Please note anti-theft alarm system: The anti-theft
alarm will be triggered when the doors are manually
unlocked. Cancel alarm by pressing button Œ. The
anti-theft alarm system will not be activated when the
doors are manually locked.
Page 33

THINGS TO KNOW BEFORE STARTING YOUR VEHICLE 33
Rear Cargo Doors From the Outside
WARNING!
Only drive with the doors properly closed. You
could lose the load, for example, and endanger vehicle occupants or other road users if the doors are
open.
To prevent possible personal injury, always keep
hands and fingers away from the door opening
when closing a door. Be especially careful when
small children are around.
Only open the doors when road and traffic
conditions permit.
Do not leave children alone in the vehicle. They
could open a locked door from the inside despite
the road and traffic conditions, thereby
endangering themselves and others.
When the rear cargo doors are opened to an angle
of 90
° (catch position), more than 50% of the rear
lamps are concealed. When the door is open in this
manner, you should warn others in accordance
with legal requirements.
2
To unlock (1)
To lock (2)
To open the door:
Pull the handle to open the door.
Page 34

34 THINGS TO KNOW BEFORE STARTING YOUR VEHICLE
From the Inside without Lock Button
To unlock and open:
Pull handle.
To lock:
Press the handle in.
The door is locked when the white patch in the handle
can be seen. If an open door is detected, refer to
"Central Locking".
From the Inside with Lock Button
Lock button (1)
Handle (2)
To unlock and open:
Pull lock button (1)
(the door is unlocked, all other doors remain locked).
Pull handle (2).
To lock:
Press lock button (1)
(all doors are locked).
Page 35

THINGS TO KNOW BEFORE STARTING YOUR VEHICLE 35
If the central locking automatically unlocks again after
having been locked, at least one door is closed
incorrectly.
If it then locks again within about 5 seconds, then all
closed doors are locked.
The central locking displays vehicle locking with one
or more open doors by means of a special function
sequence (locking, unlocking, locking). Once closing
has been completed, an open door will not
automatically be locked.
NOTE: In vehicles without central locking only the
respective door will be locked or unlocked.
Opening Left-Hand Door
2
To open:
Move the handle up.
To close:
Close the door until it engages.
Page 36

36 THINGS TO KNOW BEFORE STARTING YOUR VEHICLE
To lock manually:
Move the handle down until it is in the vertical
position.
Automatic locking:
If the left-hand door is closed, it will be automatically
locked as soon as the right-hand door has been closed.
NOTE: If an open tailgate is locked before being
closed, then only the tailgate will be locked.
Please note anti-theft alarm system: The anti-theft
alarm system will be triggered when the doors are
manually unlocked. Cancel alarm by pressing
button Œ. The anti-theft alarm system will not be
activated when the doors are manually locked.
Opening Angle 270°
To open:
Unhinge the door check strap.
Open the door 270° and press the door stay against the
outer sidewalls. The doors will be kept in this position
by retaining plates.
Page 37

THINGS TO KNOW BEFORE STARTING YOUR VEHICLE 37
To close:
Pull the doors away from the retaining plates on the
outer sidewalls.
Passenger/Cargo Area Door
WARNING!
Always drive with the doors properly closed, because if the vehicle is operated with the doors
open, serious personal injury may result.
To prevent possible personal injury, always keep
hands and fingers away from the door opening
when closing a door. Be especially careful when
small children are around.
NOTE: The maximum cargo area door height is 5 feet
7 inches (176 cm).
2
Page 38

38 THINGS TO KNOW BEFORE STARTING YOUR VEHICLE
To Unlock the Door from the Passenger Area
To unlock, turn key to left (1)
To open door (2)
To close door and lock (3)
To Unlock the Door from the Cargo Area (Optional)
To unlock, press latch in direction (1)
To open door (2)
To close door and lock (3)
Page 39

OCCUPANT RESTRAINTS
Seat belts, belt tensioners, airbag and child restraint
systems are independent restraint systems whose
functions complement each other.
All states and provinces require use of child restraints
that comply with U.S. Federal Motor Vehicle Safety
Standard 213 and Canadian Motor Vehicle Safety
Standard 213.
All child restraint systems are designed to be secured
in vehicle seats by lap belts or the lap belt portion of a
lap-shoulder belt.
For your safety and that of your passengers, you must
use the seat belts and child restraint systems and use
them properly. We strongly recommend their use.
WARNING!
In a collision, you and your passengers can suffer
injuries, including fatalities, if you are not properly buckled up. You can strike the interior of your
vehicle or other passengers, or you can be thrown
out of the vehicle. Always be sure you and others
in your vehicle are buckled up properly.
THINGS TO KNOW BEFORE STARTING YOUR VEHICLE 39
WARNING!
Do not modify the components or electrical wiring of the restraint systems. This includes the installation of additional trim material, badges etc.
over the steering wheel hub, or front door trim
panels, and installation of additional electrical/
electronic equipment on or near restraint system
components and wiring.
Any work on the restraint systems should only be
carried out by an authorized Sprinter Dealer.
Unprofessional work can lead to the restraint
systems triggering incorrectly or failing.
Damaged seat belts or belts that were highly
stressed in an accident must be replaced and their
anchoring points must also be checked. Use only
belts installed or supplied by an authorized
Sprinter Dealer.
Do not pass belts over sharp edges.
Do not make any modification that could change
the effectiveness of the belts.
2
Page 40

40 THINGS TO KNOW BEFORE STARTING YOUR VEHICLE
WARNING!
Airbag and belt tensioners are designed to function on a one-time-only basis. An airbag or belt
tensioner that was activated must be replaced.
An airbag system component integrated in the
steering wheel gets hot after the airbag has
inflated. Do not touch.
No modifications of any kind may be made to any
components or wiring of the restraint system.
Keep area between airbag and occupants free of
objects (e.g. packages, purses, umbrellas, etc.).
In addition, through improper work there is the
risk of rendering the restraint system inoperative.
Work on the restraint system must therefore only
be performed by an authorized Sprinter Dealer.
WARNING!
When discarding of the airbag unit or emergency
tensioning retractor, you must follow our safety
instructions. These instructions are available at
your Sprinter Dealer.
Given the considerable deployment speed and the
textile structure of the airbag, there is the possibility
of injuries and even death resulting from being
positioned too close to the airbag when it deploys.
Do not seat children less than 5 feet tall or 12 years
and under in the front. The back seat is the safest
place for children. If the vehicle is not equipped with
a back seat, children less than 5 feet tall or 12 years
and under must never ride in this vehicle. Never place
an infant seat on the front passenger seat.
Children less than 5 feet tall or 12 years and under
require a special restraint system for protection in
the event of an accident as they may be too small
to wear seat belts properly.
Page 41

WARNING!
Children should never ride sitting on the lap of
another occupant. In an accident they will be completely without protection and could even be injured by the person they are sitting on. For the
safety of all occupants read the child restraint system manufacturer’s instructions carefully when
fitting any child restraint system.
When the child restraint is not in use, remove it
from the vehicle or secure it with the seat belt to
prevent the child restraint from becoming a
projectile in the event of an accident.
Do not leave children unsupervised in the vehicle,
even if they are secured by a child restraint
system.
THINGS TO KNOW BEFORE STARTING YOUR VEHICLE 41
SEAT BELTS
WARNING!
Always wear the seat belts, even for very shorttrips.
Wearing a seat belt incorrectly is dangerous. Seat
belts are designed to go around the large bones of
your body. These are the strongest parts of your
body and can take the forces of a collision the best.
Wearing your belt in the wrong place could make
your injuries in a collision much worse. You
might suffer internal injuries, or you could even
slide out of part of the belt. Follow these
instructions to wear your seat belt safely and to
keep your passengers safe, too.
A belt that is buckled into the wrong buckle will
not protect you properly. The lap portion could
ride too high on your body, possibly causing
injuries. Always buckle your belt into the buckle
nearest you.
A belt that is too loose will not protect you as well.
In a sudden stop you could move too far forward,
increasing the possibility of injury.
2
Page 42

42 THINGS TO KNOW BEFORE STARTING YOUR VEHICLE
WARNING!
Wear your seat belt snugly.
A belt that is worn under your arm is very
dangerous. Your body could strike the inside
surfaces of the vehicle in a collision, increasing
head and neck injury. A belt worn under the arm
can cause internal injuries. Ribs aren’t as strong as
shoulder bones. Wear the belt over your shoulder
so that your strongest bones will take the force in
collision.
A shoulder belt placed behind you will not protect
you from injury during a collision. You are more
likely to hit your head in a collision if you do not
wear your shoulder belt. The lap and shoulder
belt are meant to be used together.
Pregnant women should also use a lapshoulder
belt. The lap belt portion should be positioned as
low as possible on the hips to avoid any possible
pressure on the abdomen.
Two people should never be belted into a single
seat belt. People belted together can crash into one
another in an accident, hurting one another badly.
WARNING!
Do not secure any objects with a seat belt if it is
also being used for one of the vehicle’s occupants.
Do not allow the seat belt straps to become caught
or to be damaged by sharp objects. A frayed or
torn belt could rip apart in a collision and leave
you with no seat belt protection. Inspect the belt
system periodically, checking for cuts, frays, or
loose parts. Damaged parts must be replaced
immediately.
Do not disassemble or modify the system. Seat
belt assemblies must be replaced after a collision
if they have been damaged (bent retractor, torn
webbing, etc.). Have damaged seat belt
assemblies replaced by an authorized Sprinter
Dealer. Only use seat belt assemblies approved by
the manufacturer.
Keep the backrest upright or nearly upright.
Page 43

THINGS TO KNOW BEFORE STARTING YOUR VEHICLE 43
WARNING!
Never ride in a moving vehicle with the backrest
reclined. Sitting in an excessively reclined position can be dangerous. You could slide under the
seat belt in a collision. If you slide under it, the
belt would apply force at the abdomen or neck.
This could result in severe personal injuries and
death.
The backrest and seat belt provide the best
restraint when the wearer is in an upright position
and the belt is properly positioned on the body.
Failure to wear and properly fasten and position your
seat belt greatly increases your risk of injuries and
their likely severity in an accident. You and your
passengers should always wear seat belts.
If you are ever in an accident, your injuries can be
considerably more severe without your seat belt
properly buckled. Without your seat belt buckled,
you are much more likely to hit the interior of the
vehicle or to be ejected from it. You can be
seriously injured or killed.
WARNING!
In the same crash, the possibility for injury or
death is lessened with your seat belt buckled.
Seat belts which have been subjected to heavy
loads in an accident must be replaced and their
anchorages must also be checked. Only use seat
belts which have been supplied and installed by
an authorized Sprinter Dealer.
No modifications are to be made to the seat belts,
their anchorages, the inertia reels or belt buckles.
2
Page 44

44 THINGS TO KNOW BEFORE STARTING YOUR VEHICLE
Seat Belt Warning Lamp and Airbag Malfunction
When the key is in position 2 in the ignition lock, the
warning lamp < lights up for about 6 seconds; this
takes place whether or not the driver’s seat belt is
fastened.
The warning lamp < must go out after about
6 seconds if the driver’s safety belt is fastened, or the
vehicle is standing still and the driver’s door is opened.
If after about 6 seconds, the driver’s safety belt is not
fastened with all doors closed,
• and the vehicle speed does not exceed 15 mph (25
km/h), the warning lamp < remains on for as
long as the driver’s safety belt is not fastened.
• and the vehicle speed exceeds 15 mph (25 km/h),
the warning lamp < flashes and a warning signal
sounds, which is repeated increasingly frequently
until the driver’s safety belt is fastened, or for a
maximum of 153 seconds from the time the vehicle
speed exceeded 15 mph (25 km/h) if the driver’s
safety belt remains unfastened.
If the driver’s safety belt remains unfastened after 153
seconds, the warning lamp < stops flashing and the
warning signal stops sounding. The warning lamp
< lights up for as long as the driver’s safety belt is
not fastened.
If the warning lamp < flashes after the first 6
seconds and no warning signal is audible, the
malfunction indicator lamp 1 is defective.
Have the malfunction indicator lamp 1checked and
repaired by an authorized Sprinter Dealer as soon as
possible.
Malfunction indicator lamp 1, refer to “SRS
Malfunction Indicator Lamp”.
Page 45

THINGS TO KNOW BEFORE STARTING YOUR VEHICLE 45
Fastening and Removing
Belt tongue (1)
Belt buckle (2)
Release button (3)
Fastening Seat Belts
1. Pull the seat belt over the body. The seat belt must
not be twisted or you could be injured.
2. Press the tongue into the buckle and make sure that
it is heard to engage.
3. The seat belt must be tight across the body. Check
this immediately after fastening the seat belt, and at
regular intervals during the trip.
If necessary, tension the lap belt by pulling the
shoulder strap up in front of the body.
WARNING!
A lap belt worn too high can increase the risk of
internal injury in a collision. The belt forces won’t
be at the strong hip and pelvic bones, but across
your abdomen. Always wear the lap part as low as
possible and keep it snug.
In an accident a twisted belt cannot fufill its
protective function. In a collision it could even cut
into you. Be sure the belt is straight. If you cannot
straighten a belt in your vehicle, take it to an
authorized Sprinter dealer and have it fixed.
2
Page 46

46 THINGS TO KNOW BEFORE STARTING YOUR VEHICLE
Removing Seat Belts
1. Press the release button in the belt buckle.
2. Guide the seat belt back to its rest position.
WARNING!
A frayed or torn belt could rip apart in a collision
and leave you with no protection. Inspect the belt
system periodically, checking for cuts, frays, or
loose parts. Damaged parts must be replaced immediately. Do not disassemble or modify the system. Seat belt assemblies must be replaced after a
collision if they have been damaged (bent retractor, torn webbing, etc.).
Seat Belt Warning System
When the key is turned to position 2 in the ignition
lock, a warning buzzer sounds for about 6 seconds if
the driver’s safety belt is not pressed into the belt
buckle. The buzzer stops as soon as the safety belt is
fastened. Press the safety belt into the belt buckle.
Belt Height Adjustment
Belt height adjustment button (4)
Do not adjust the belt height while the vehicle is
moving.
To lower:
Press the button and move the belt sash guide down.
To raise:
Move the belt sash guide up.
The shoulder strap must pass between the neck and the
shoulder.
Page 47

DRIVER’S AIRBAG
The driver’s airbag is located within the padded center
of the steering wheel.
THINGS TO KNOW BEFORE STARTING YOUR VEHICLE 47
WARNING!
To reduce the risk of injury when the front airbag
inflates, it is very important for the driver to always be in a properly seated position and to wear
the seat belt. Since the airbag inflates with considerable speed and force, a proper seating position
with hands on the steering wheel will help to
keep you in a safe distance from the airbag. Keep
hands on the outside of the steering wheel rim.
Placing hands and arms inside the rim can increase the risk and the potential severity of hand/
arm injury when the driver front airbag inflates.
2
Page 48

48 THINGS TO KNOW BEFORE STARTING YOUR VEHICLE
FRONT SEAT PASSENGER AIRBAG (NOT IN
CONJUNCTION WITH FOLDING SEAT IN
PARTITION WALL)
WARNING!
To reduce the risk of injury when the front airbag
inflates, it is very important for the driver to always be in a properly seated position and to wear
the seat belt. Since the airbag inflates with considerable speed and force, a proper seating position
with hands on the steering wheel will help to
keep you in a safe distance from the airbag.
Do not place any pieces on the top of the
mounting lid above the airbag. If the airbag is
activated the pieces could be thrown into the
passenger compartment. This could result in
severe personal injuries and death.
Page 49

AIRBAG AND BELT TENSIONERS
The vehicle is equipped with an airbag for the driver
and the front seat passenger as well as belt tensioners
for the driver and the front passenger. The system is
known as a Supplemental Restraint System (SRS). It
has been designed to work together with the seat belt
and to supplement.
WARNING!
Do not put anything on or around the front airbag
covers or attempt to manually open them. You
may damage the airbags and you could be injured
because the airbags are not there to protect you.
These protective covers for the airbag cushions are
designed to open only when the airbags are inflating.
SRS Malfunction Indicator Lamp
When the key is in position 2 in the ignition lock, the
malfunction indicator lamp 1 will light up in the
instrument cluster for about 4 seconds as a function
check.
THINGS TO KNOW BEFORE STARTING YOUR VEHICLE 49
WARNING!
If the malfunction indicator lamp 1 does not
light up when the key is in position 2 in the ignition lock, if it flickers or lights up while the vehicle is moving, there might be a problem in the
airbag system. There is then a danger that the airbag will not deploy in the event of an accident or
will deploy when it should not do so. Have the vehicle inspected and repaired by an authorized
Sprinter Dealer without delay.
Belt Tensioners
The belt tensioners are located on the three-point seat
belts of the driver’s and front passenger seats.
The belt tensioners will not operate unless the key has
been turned to position 1 or 2 in the ignition lock.
The airbag and/or belt tensioners are designed to only
trigger in certain frontal impacts as not all accidents
call for airbag and/or belt tensioner deployment.
2
Page 50

50 THINGS TO KNOW BEFORE STARTING YOUR VEHICLE
Safety Precautions for the Airbag
WARNING!
Airbags can seriously injure or kill you, especially
if you are close to the airbag when it deploys.
Always wear your seat belt. Airbags do not
replace seat belts but instead supplement the
protection offered by seat belts. Wearing a seat
belt also makes it less likely that you will be out
of position and will not be injured or killed as the
airbag deploys.
Never place an infant seat which faces to the rear
on the front passenger seat. Children 12 years old
and under, and any child who cannot wear a seat
belt properly, must never ride in the front of this
vehicle.
The airbag does offer an additional degree of
protection, especially to belted occupants, but the
following precautions should still be taken to
prevent injuries when the airbag is inflating.
Do not position the seat closer than necessary to
the airbag inflation point.
WARNING!
Do not lean forward when the vehicle is in motion.
Do not lean on the doors from inside the vehicle.
Do not put your feet on the dashboard.
Only hold the steering wheel by the outer rim so
that the airbag can inflate unhindered.
No objects should be positioned on the airbag or
between the airbag and the vehicle’s occupants.
If children are traveling, they should always use
an appropriate child restraint system.
Do not touch any hot parts after the airbag has
inflated. Airbags which have triggered in an
accident must be replaced.
The center of the padded steering wheel must not
be covered by any materials or have any labels or
stickers attached to it, or else the airbag may not
function reliably.
Page 51

THINGS TO KNOW BEFORE STARTING YOUR VEHICLE 51
WARNING!
Do not attempt to manually open the front airbag
covers. You may damage the airbags and you
could be injured because the airbags may not
function as designed. These protective covers for
the airbag cushions are designed to open only
when the airbags are inflating.
Do not modify any components of the restraint
systems or their wiring.
Observe relevant safety precautions when
discarding off airbag units. Any authorized
Sprinter Dealer can provide information and
assistance.
Make sure to give any new owner of your vehicle
this Owner’s Manual so that the new owner will
be aware of all safety warnings.
WARNING!
If the instrument cluster indicates a malfunction
of the "SRS", as explained above, we strongly recommend that you visit an authorized Sprinter
Dealer immediately to have the system checked;
otherwise the "SRS" may not be activated when
needed in an accident, which could result in serious or fatal injury, or it might deploy unexpectedly and unnecessarily, which could also result in
injury or death.
The activation of the "SRS" temporarily releases a
small amount of dust from the airbag. This dust,
however, is neither injurious to your health, nor
does it indicate a fire in the vehicle. The dust
might cause some temporary breathing difficulty
for people with asthma or other breathing trouble.
To avoid this, you may wish to get out of the
vehicle as soon as it is safe to do so. If you have
any breathing difficulty but cannot get out of the
vehicle after the airbag inflates, then get fresh air
by opening a window or door.
Given the considerable deployment speed and the
textile structure of the airbag, there is a risk of
abrasions and injuries due to airbag deployment.
2
Page 52

52 THINGS TO KNOW BEFORE STARTING YOUR VEHICLE
PEDALS
The freedom of movement of the pedals must not be
impaired in any way, such as by floormats.
WARNING!
Do not lay any objects in the driver’s footwell. Be
careful that floor mats or carpets in the driver’s
footwell have sufficient clearance for the pedals.
During sudden driving or braking maneuvers the
objects could get caught between the pedals. You
could then no longer brake or accelerate. This
could cause an accident which could in turn lead
to injuries.
ENGINE BREAK-IN SPECIFICATIONS
The first 1,000 miles (about 1,500 km)
The more cautiously you treat your vehicle during the
break-in period, the more satisfied you will be with its
performance later on. Therefore, drive your vehicle
during the first 1,000 miles (1,500 km) at moderate
vehicle and engine speed.
Avoid depressing the accelerator pedal beyond the
pressure point (kickdown). Do not manually shift
down.
Avoid accelerating by kickdown. It is not
recommended to brake the vehicle by manually
shifting to a lower gear. We recommend that you select
positions "3", "2" or "1" only at moderate speeds (for
hill driving).
After 1,000 miles (about 1,500 km) you can gradually
increase road and engine speeds to normal driving and
requirements.
Page 53

THINGS TO KNOW BEFORE STARTING YOUR VEHICLE 53
Engine Oil Consumption
When the engine has passed the break-in period, oil
consumption may reach 0.5 % of the fuel consumption
recorded in actual operating circumstances. In isolated
cases and in arduous operating conditions, oil
consumption may increase to 1 % of the fuel
consumption recorded in actual operating
circumstances.
Engine oil consumption depends on the driving style
adopted and the operating conditions. It can only be
judged after the engine has passed the break-in period.
SAFETY TIPS
• Check the vehicle’s lights and the general condition
of the vehicle before each trip.
• Keep tires at the recommended tire inflation
pressure.
• All occupants should fasten their seat belts before
each trip.
• Driving in an environmentally responsible manner
will reduce noise, fuel consumption and exhaust
emissions.
• Allow the engine to warm up under low load use.
• Avoid unnecessarily hard acceleration, driving with
the throttle fully open, and carrying loads not
specifically needed on the journey.
• Stop the engine during lengthy waiting periods, for
example at traffic lights.
• Remove ancillary parts, such as wind deflectors and
roof racks, as soon as they are no longer needed.
2
Page 54

54 THINGS TO KNOW BEFORE STARTING YOUR VEHICLE
INHALATION OF EXHAUST GAS TIE DOWN RINGS (OPTIONAL)
WARNING!
When driving or parking the vehicle, make sure
that its exhause system does not come into contact
with flamable material (such as dry leaves) as
these materials my otherwise catch fire.
Inhalation of exhaust gas is hazardous to your
health. All exhaust gas contains carbon monoxide
and inhaling it can cause unconsciousness and
lead to death.
Do not run the engine in confined areas (such as a
garage) which are not properly ventilated. If you
think that exhaust gas fumes are entering the
vehicle while driving, have the cause determined
and corrected immediately. If you must drive
under these conditions, drive only with at least
one window fully open.
Tie Down Rings (1)
The rings (1) are used to attach the load with the help
of tension belts. Place the tension belt around the load,
secure it on the rings (1) and tie it down.
Page 55

WARNING!
If you tension the tensioning belts between the
sidewalls, the maximum permissible load for the
lashing rings could be exceeded if the brakes are
applied suddenly or in the event of an accident.
The load would no longer be secured, which could
result in serious injuries caused by the load slipping.
For this reason, do not tension a tensioning belt
between the side walls.
Observe the loading guidelines.
THINGS TO KNOW BEFORE STARTING YOUR VEHICLE 55
NOTE: Use neither elastic fastening straps nor nets
when lashing down the load. These are only intended
as anti-slip protection for lighter loads.
2
The means used to tie down the load must not be run
over sharp edges or corners. Sharp edges or corners
should be given protective padding. Observe the
operating instructions for the material used to tie down
the material. Spread the load evenly between the
anchorages. If using a tensioning device, do not
overstress the lashing rings.
Page 56

Page 57

UNDERSTANDING THE FEATURES OF YOUR VEHICLE
CONTENTS
Mirror Adjustment . . . . . . . . . . . . . . . . . . . . . . . . . . 59
Interior Mirror (Optional) . . . . . . . . . . . . . . . . . . 59
Electrically Adjustable Exterior
Mirror (Optional) . . . . . . . . . . . . . . . . . . . . . . . . . 59
Seat Adjustment . . . . . . . . . . . . . . . . . . . . . . . . . . . . 60
Driver’s and Front Passenger’s Seat . . . . . . . . . 60
Lumbar Support . . . . . . . . . . . . . . . . . . . . . . . . . . 61
Armrest (Optional) . . . . . . . . . . . . . . . . . . . . . . . . 62
Head Restraint . . . . . . . . . . . . . . . . . . . . . . . . . . . 62
Folding Seat at Partition (Optional) . . . . . . . . . 63
Seat Heater (Optional) . . . . . . . . . . . . . . . . . . . . . . 63
Rear Seat Bench Removal and Installation . . . . . 64
Retrofitting Seat Mounting Cups . . . . . . . . . . . . 65
Hood . . . . . . . . . . . . . . . . . . . . . . . . . . . . . . . . . . . . . . 66
Headlamp Range Control . . . . . . . . . . . . . . . . . . . . 68
3
Fog Lamp Switch (Optional) . . . . . . . . . . . . . . . . . 68
Interior Lighting . . . . . . . . . . . . . . . . . . . . . . . . . . . . 69
Interior Lamps in the Driver and
Rear-Seat Passenger Area/Cargo Area . . . . . . . 69
Interior Lamps with Interior Sensor
Protection (Optional) . . . . . . . . . . . . . . . . . . . . . . 69
Interior Lighting with Reading Lamp,
Front Passenger Space Only . . . . . . . . . . . . . . . . 70
Interior Cargo Area Lighting (Optional) . . . . . 71
Multifunction Switch . . . . . . . . . . . . . . . . . . . . . . . . 72
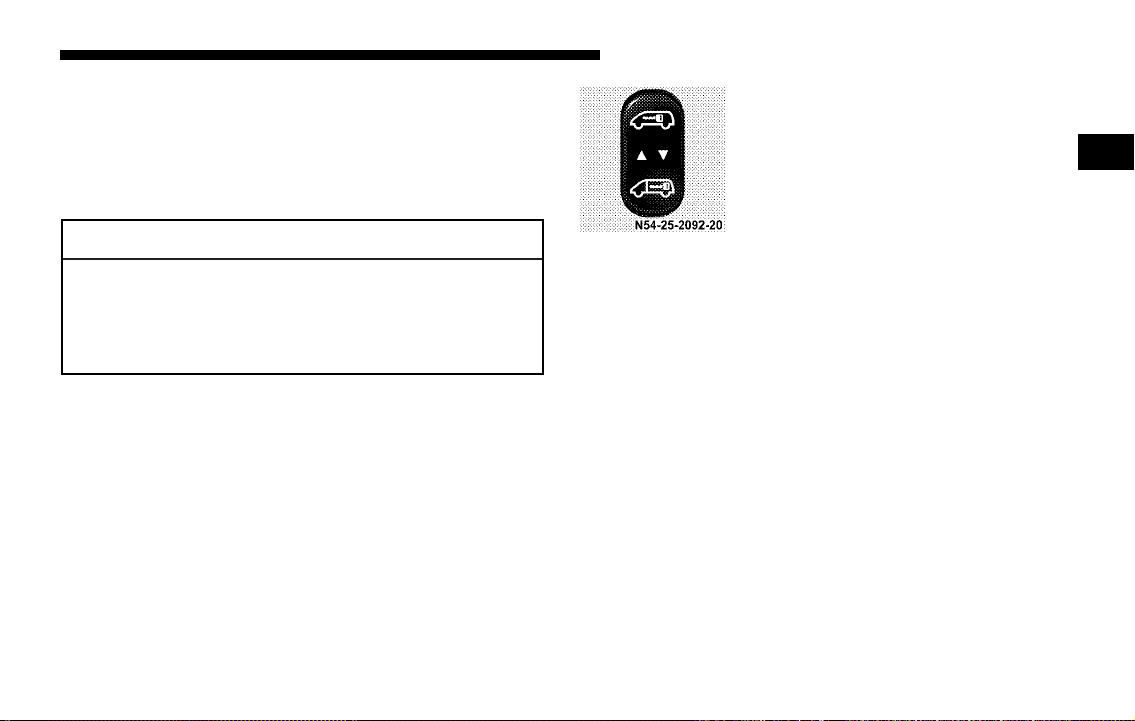
Window Operation . . . . . . . . . . . . . . . . . . . . . . . . . 74
Mechanical Window Operation . . . . . . . . . . . . . 74
Electric Window Operation (Optional) . . . . . . . 74
Windshield Wiper Switch . . . . . . . . . . . . . . . . . . . . 75
Windshield wipers with rain sensor
(Optional) . . . . . . . . . . . . . . . . . . . . . . . . . . . . . . . . 76
Page 58

58 UNDERSTANDING THE FEATURES OF YOUR VEHICLE
Headlamp Cleaning System (Optional) . . . . . . 77
Speed Control (Optional) . . . . . . . . . . . . . . . . . . . . 77
Sunroof (Optional) . . . . . . . . . . . . . . . . . . . . . . . . . . 80
Manual Sun Roof (Optional) . . . . . . . . . . . . . . . 80
Electric Sun Roof (Optional) . . . . . . . . . . . . . . . . 81
Mechanical Operation of Electric Sun Roof . . . 81
Ashtray/Cigar Lighter. . . . . . . . . . . . . . . . . . . . . . . 82
Electrical Outlet. . . . . . . . . . . . . . . . . . . . . . . . . . . . . 84
Control and Operation of Radio Transmitters . . . 84
Radio, Telephone and Two Way Radio . . . . . . 84
Mobile and Two Way Radio and Fax Machines. . 85
Cup Holder . . . . . . . . . . . . . . . . . . . . . . . . . . . . . . . . 85
Glove Compartment. . . . . . . . . . . . . . . . . . . . . . . . . 87
Compartments in Front Doors . . . . . . . . . . . . . . . . 87
Page 59

UNDERSTANDING THE FEATURES OF YOUR VEHICLE 59
MIRROR ADJUSTMENT
Interior Mirror (Optional)
Normal position (DAY) (1)
Anti-glare position (NIGHT) (2)
Electrically Adjustable Exterior Mirror (Optional)
The switch is located in the door lining next to the door
handle.
Mirror adjustment, left (1)
Mirror adjustment, right (2)
When the key is in position 2 in the ignition lock, each
mirror may be adjusted by pressing the adjustment
button.
NOTE:
(optional equipment) when outdoor temperatures are low.
The exterior mirror is heated automatically
3
Page 60

60 UNDERSTANDING THE FEATURES OF YOUR VEHICLE
SEAT ADJUSTMENT
Driver’s and Front Passenger’s Seat
WARNING!
Do not adjust the driver’s seat while driving. Adjust the seat only while the vehicle is parked.
Adjusting the seat while driving could cause the
driver to lose control of the vehicle. The seat belt
might not be properly adjusted and you could be
injured. Avoid seat positions in which you cannot
wear your seat belt correctly. They are a safety
hazard and must therefore be avoided; refer to
"Seat Belts".
Never ride in a moving vehicle with the backrest
reclined. Sitting in an excessively reclined position
can be dangerous. You could slide under the seat
belt in a collision. If you slide under it, the belt
would apply force at the abdomen or neck as this
could result in severe personal injuries and death.
The backrest and seat belt provide the best
restraint when the wearer is in an upright position
and the belt is properly positioned on the body.
Use the recliner only when the vehicle is parked.
WARNING!
Never place hands under seat or near any moving
parts while a seat is being adjusted. If the seat is
moved, to ensure engagement, the seat catches
must be heard.
The arms should be slightly bent when you are
holding the steering wheel. The distance from the
pedals should be such that you can depress them fully.
The rear area of the vehicle should not be used as
a play area by children when the vehicle is in
motion. They could be seriously injured in an
accident. Children should be seated and using the
proper restraint system.
It is extremely dangerous to ride in a cargo area,
inside or outside of a vehicle. In a collision,
people riding in these area are more likely to be
seriously injured or killed.
Do not allow people to ride in any area of your
vehicle that is not equipped with seats and seat belts.
Be sure everyone in your vehicle is in a seat and
using a seat belt properly.
Page 61

UNDERSTANDING THE FEATURES OF YOUR VEHICLE 61
Comfortseat (Optional)
Seat adjustment, fore/aft (1)
Seat cushion depth (Optional) (2)
Seat height adjustment, front (3)
Seat height adjustment, rear (4)
Backrest tilt (5)
Lumbar Support
3
Hand pump (1)
Bleeder valve (2)
Reinforce support:
Use hand pump (1).
Relieve support:
Press bleeder valve (2).
Page 62

62 UNDERSTANDING THE FEATURES OF YOUR VEHICLE
Armrest (Optional)
Tilt adjustment (1)
By adjusting the tilt adjustment (thumbwheel) (1) the
tilt of the armrest can be changed.
Head Restraint
If you need to remove the head restraint, press the
catch at the head restraint socket and pull the head
restraint up and out.
WARNING!
You should never drive the vehicle if the head restraint has been removed for an occupied seat. This
could result in severe personal injuries and death in
case of an accident. Adjust the head restraint so that
it touches the back of the head at about ear level.
Page 63

Folding Seat at Partition (Optional)
Key (1)
Seat cushion (2)
Fold down the seat cushion of the folding seat.
UNDERSTANDING THE FEATURES OF YOUR VEHICLE 63
WARNING!
When folding down the seat cushion, make sure
that nobody can become trapped.
The risk of injury to the front-passenger is
increased in the event of sharp steering
movements or an accident if a key is inserted in
the passenger/cargo area sliding door lock.
Remove the key from the load compartment
sliding door before using the folding seat.
SEAT HEATER (OPTIONAL)
The seat heater switch is located on
the center section of the dashboard.
The seat heater only works when the
key is in position 2 in the ignition
lock .
Low heating output, press top of the seat heater switch.
The left indicator lamp in the switch illuminates.
High heating output, press bottom of seat heater
switch. The right indicator lamp in the switch
illuminates.
3
Page 64

64 UNDERSTANDING THE FEATURES OF YOUR VEHICLE
REAR SEAT BENCH REMOVAL AND
INSTALLATION
WARNING!
The integrated seat belt can only offer the degree
of protection for which it is designed if you install
the specified rear bench seats correctly. Never operate vehicle unless all rear bench seats are properly installed and all release levers are locked.
When retrofitting seat benches, make sure that the
exterior seat shells have four cross-ribs.
Keep the seat bench mounting cups in the vehicle
floor free from dirt and foreign objects. This is the
only way to guarantee that the locking
mechanisms will engage securely.
Unlocked (1)
Locked (2)
To remove:
1. Turn all release levers on the legs of the appropriate
rear bench seat up. The rear bench seat can then
move in the seat mounting cups.
2. Lift the rear bench seat up and out of the seat
mounting cups.
Page 65

UNDERSTANDING THE FEATURES OF YOUR VEHICLE 65
To install:
1. With the rear bench seat facing in the direction of
travel, insert the legs of the rear bench seat in the
respective seat mounting cups on the floor.
2. Slide the rear bench seat forwards with some force
as far as it will go, until the release levers are heard
to engage and all release levers are parallel to the
vehicle floor.
3
Page 66

66 UNDERSTANDING THE FEATURES OF YOUR VEHICLE
HOOD To open:
WARNING!
When the hood is open, there is a risk of injury due
to very hot engine components.
When the engine is running or the key is in
position 2 in the ignition lock, there is a risk of
injury due to moving engine components and the
electrical system.
The engine is equipped with a transistorized
ignition system. Because of the high voltage it is
dangerous to touch any components (ignition coils,
spark plug sockets, diagnostic socket) of the
ignition system with the engine running, while
starting or if the ignition is on and the engine is
turned manually.
To help prevent severe personal injuries and death,
stay clear of moving parts when the hood is open
and the engine is running.
If you see flames or smoke coming from the engine
compartment, or if the coolant\temperature gauge
indicates that the engine is overheated, do not open
the hood. Move away from vehicle and do not open
the hood until the engine has cooled. If necessary,
call the fire department.
1. Pull the release lever (1).
The hood then opens slightly and is restrained by
the safety catch.
Do not pull the release lever (1) while the vehicle
is in motion. Otherwise the hood could be forced
open by passing air flow.
WARNING!
Page 67

2. Open the safety catch (2).
3. Swing the hood up until the support strut (3)
engages.
UNDERSTANDING THE FEATURES OF YOUR VEHICLE 67
To close:
3
1. Lift the hood up slightly.
2. Press the support strut (3) down.
3. Swing the hood down and make sure that it
engages in its retaining catch.
4. Check that the hood is engaged properly by pulling
on the front edge.
Page 68

68 UNDERSTANDING THE FEATURES OF YOUR VEHICLE
WARNING!
Be sure the hood is properly closed before driving.
If the hood is not fully latched, it could fly up
when the vehicle is moving and block your forward vision. Be sure all hood latches are latched
fully before driving.
When closing the hood, use extreme caution not to
catch hands or fingers.
HEADLAMP RANGE CONTROL
See Section 4, Understanding Your Instrument Panel,
for switch locations.
The range of the headlamps can be
adjusted to the load in the vehicle.
Turn the thumbwheel down to
headlamp beam down.
Turn the thumbwheel up to
headlamp beam up.
When the vehicle is not loaded (driver only), the
thumbwheel must be in position 0.
Where necessary, adjust the headlamp range with the
thumbwheel to 82 yards (75 m).
Always keep the headlamp range less than 110 yards
(100 m), so that oncoming traffic is not blinded.
FOG LAMP SWITCH (OPTIONAL)
See Section 4, Understanding Your Instrument Panel,
for switch locations.
Lamp switch position õ
To switch on:
Press the upper section of the switch.
To switch off:
Press the lower section.
Page 69

UNDERSTANDING THE FEATURES OF YOUR VEHICLE 69
INTERIOR LIGHTING
Interior Lamps in the Driver and Rear-Seat
Passenger Area/Cargo Area
Permanently on (1)
Off (2)
Interior lamps are switched on/off by the door contact
switches (3)
Interior Lamps with Interior Sensor Protection
(Optional)
3
Interior lamp switch (1)
Reading lamp switch (2)
Page 70

70 UNDERSTANDING THE FEATURES OF YOUR VEHICLE
Operation of Interior Lamps
Position 1: Continuous operation
Position 2: The door contact switches
are used to switch the interior lamps
on and off
Position 3: Switched off
Operation of Reading Lamps
Position 1: Left-hand reading lamp switched on
Position 2: Switched off
Position 3: Right-hand reading lamp switched on
Interior Lighting with Reading Lamp, Front
Passenger Space Only
Continuous operation (1)
The door contact switches are used to switch the
interior lamps on and off (2)
Switched off (3)
Reading lamp (4)
Page 71

Interior Cargo Area Lighting (Optional)
The switch is located on the center
section of the dashboard.
To switch on:
Press top of switch:
The indicator lamp in the switch will
illuminate.
To switch off:
Press bottom of switch.
UNDERSTANDING THE FEATURES OF YOUR VEHICLE 71
3
The switch (1) is located on the right side of the cargo
area at the entrance for the sliding door.
To switch on:
Press top of switch – the indicator lamp in the switch
will illuminate.
To switch off:
Press bottom of switch.
Page 72

72 UNDERSTANDING THE FEATURES OF YOUR VEHICLE
MULTIFUNCTION SWITCH
The switch (2) is located in the right rear of the cargo
area.
To switch on:
Press top of switch, the indicator lamp in the switch
will illuminate.
To switch off:
Press bottom of switch.
NOTE: The interior cargo area lighting will shut off
automatically after 15 min.
Turn signal indicator lamp, right (1)
Turn signal indicator lamp, left (2)
Short turn signal, press combination switch to pressure
point.
Continuous turn signal, engage combination switch.
If a turn signal on the vehicle fails, the indicator lamp
in the instrument cluster flashes at twice the normal
rate.
Page 73

Lamp switch (3)
C Side lamps, license plate and instrument
lighting
õ Low beam headlamps, high beam
headlamps
ƒ Marker lamps, right, combination switch
up (1)
Marker lamps, left, combination switch
down (2)
UNDERSTANDING THE FEATURES OF YOUR VEHICLE 73
High beam headlamps (lamp switch positionõ) (4)
Headlamp flasher (also when turn signals are on) (5)
NOTE: When the key is in the ignition lock in the 0
position and the driver’s or passenger’s door is open, a
warning buzzer sounds, if the vehicle exterior lighting
(except for the marker lamps) has been switched on.
On vehicles with automatic switching-off of high
beam, with the key in 0 position and the lamp switch
position õ on low and high beam, parking lamps
are automatically switched on. When the driver’s or
passenger’s door is opened, a warning buzzer also
sounds.
For high beam (4) and headlamp flasher (5), the
indicator lamp A in the combination instrument
lights up.
3
Page 74

74 UNDERSTANDING THE FEATURES OF YOUR VEHICLE
WINDOW OPERATION
Mechanical Window Operation
To open the window:
Turn the manual window control in a
counterclockwise direction.
To close the window:
Turn the manual window control in a clockwise
direction.
Electric Window Operation (Optional)
The window operation switches are
located on the driver’s and frontpassenger doors.
WARNING!
Make certain that no one gets caught when the
side windows are closed.
The key should be removed from the ignition lock
even if the vehicle will only be left for a short time
to prevent situations such as children or
unauthorized persons opening and closing the
windows and becoming caught.
Page 75

UNDERSTANDING THE FEATURES OF YOUR VEHICLE 75
Place the key in position 2 in the ignition lock.
To open the window:
Keep switch pressed downward until the window has
reached the desired position.
To close the window:
Keep switch pressed upward until the window has
reached the desired position.
WINDSHIELD WIPER SWITCH
3
Intermittent wipe and rain sensor (optional) (1)
Normal wipe (2)
Rapid wipe (3)
Windshield wiper system and headlamp cleaning
system (optional) (4)
Page 76

76 UNDERSTANDING THE FEATURES OF YOUR VEHICLE
WARNING!
Sudden loss of visibility through the windshield
caused by e. g. ice, steam, fog or water could lead
to an accident. You might not see other vehicles or
other obstacles. To avoid sudden icing of the
windshield during freezing weather, warm the
windshield with the defroster or with the windshield heater (optional) before and during windshield washer use.
Follow the recommended settings for de-fogging
and de-icing the front windows given in Section 4.
Touch-wipe:
Press the windshield wiper switch up to the pressure
point.
NOTE: Smears may form on the glass when the
windshield wipers are in use. In this case, operate the
windshield washer, even in rainy weather.
Check wiper blades regularly for damage and
contamination.
Windshield wipers with rain sensor (Optional)
To switch on:
Turn the windshield wiper switch to Intermittent
wipe.
When switched on, the windshield wipers wipe one
time. After that the wiping interval and wiping speed
(normal and rapid), depend on wetness of the
windshield and are controlled automatically.
CAUTION!
Do not leave windshield wipers in intermittent
setting when vehicle is taken to an automatic car
wash or during windshield cleaning and/or deicing. Wipers will operate if the windshield gets
wet, and wipers may be damaged as a result.
Page 77

UNDERSTANDING THE FEATURES OF YOUR VEHICLE 77
Headlamp Cleaning System (Optional)
The headlamps will be cleaned with a high-pressure
water jet when
• the headlamps are switched on
and
• the windshield wipers operate with washer fluid.
NOTE: Fluid for the headlamp cleaning system is also
supplied from the washer system fluid reservoir.
SPEED CONTROL (OPTIONAL)
3
Set/accelerate speed (1)
Set/decelerate speed (2)
Off (3)
Resume set speed (4)
Page 78

78 UNDERSTANDING THE FEATURES OF YOUR VEHICLE
The speed control allows you to drive in a more
relaxed manner, for example over long distances, as it
automatically maintains the set speed by actively
regulating the throttle setting.
The speed control lever on the steering column is used
to activate and operate the speed control.
NOTE: The responsibility for the driving speed is
always that of the driver. The cruise control is only an
aid for the driver.
NOTE: A change of gear does not shut off the cruise
control.
Every speed traveled above 25 mph (40 km/h) can be
set.
Once the speed is set, it is maintained constant by the
speed control, the accelerator pedal can be released.
WARNING!
Leaving the Speed Control on when not in use is
dangerous. You could accidently set the system or
cause it to go faster than you want. You could lose
control and have an accident. Always turn the
system off when you are not using it.
Setting momentary speed
Briefly push speed control lever up (1) or down (2).
Cancel speed control
Push speed control lever forwards (3) or step on the
brake pedal.
Increase set speed
Push up speed control lever (1) briefly – speed increase
of 0.6 mph (1 km/h) each time.
To increase speed steadily = hold the speed control
lever in the push-up position.
Page 79

Decrease set speed
Push down speed control lever (2) briefly – speed
decrease of 0.6 mph (1 km/h) each time.
To decrease speed steadily, hold the speed control
lever in the push-down position.
Resume set speed (after shutting off)
Push speed control lever back (4).
With the accelerator pedal the set speed can be
increased (for passing).
When the accelerator pedal is released again, the set
speed regulates itself again.
With the key in position 0 or 1 in the ignition lock the
set speed is cancelled.
UNDERSTANDING THE FEATURES OF YOUR VEHICLE 79
WARNING!
The speed control does not adapt itself automatically to road conditions; therefore do not use
cruise control on icy roads. There is a risk of skidding and loss of vehicle control. This could cause
an accident resulting in severe personal injuries,
death and property damage.
NOTE: On uphill and downhill grades it may not be
possible to maintain set speed.
3
Page 80

80 UNDERSTANDING THE FEATURES OF YOUR VEHICLE
SUNROOF (OPTIONAL) Manual Sun Roof (Optional)
WARNING!
In an accident, there is a greater risk of being
thrown from a vehicle with an open sun roof. You
could also be seriously injured or killed. Always
fasten your seatbelt properly and make sure all
passengers are properly secured too.
Do not allow small children to operate the electric
sun roof.
Never allow fingers or other body parts, or any
object to project through the sun roof opening.
Injury may result.
Make certain that no one gets caught when the
electric sun roof is closed. The key should be
removed from the ignition lock even if the vehicle
will only be left for a short time to prevent
situations such as children or unauthorized
persons opening and closing the electric sun roof
and becoming caught.
• To open, turn the handwheel counterclockwise.
Maximum opening = turn until the stop is reached.
• To close, turn the handwheel clockwise until the
stop is reached.
Page 81

WARNING!
Never allow fingers or other body parts, or any object to project through the sun roof opening. Injury may result.
Make sure that nobody can be trapped when
closing the sun roof.
Electric Sun Roof (Optional)
See Section 4, Understanding Your Instrument Panel,
for switch locations.
Place the key in position 2 in the
ignition lock.
To open the electric sun roof:
Keep switch pressed upward until
the sun roof has reached the desired
position or the end position.
To close the electric sun roof:
Keep switch pressed downward until the sun roof has
reached the desired position or is completely closed.
UNDERSTANDING THE FEATURES OF YOUR VEHICLE 81
Mechanical Operation of Electric Sun Roof
The sun roof does not open or close:
Check electrical fuse. Electrical fuses refer to “Electrical
Fuses“.
If the fuse works correctly, the sun roof can also be
closed or opened manually.
3
Page 82

82 UNDERSTANDING THE FEATURES OF YOUR VEHICLE
ASHTRAY/CIGAR LIGHTER
Remove cover (1) at the front frame of the sun roof.
Remove tool (2) from the cover (1) and insert.
Open manually:
Press in tool (2) and turn counterclockwise (3).
Close manually:
Press in tool (2) and turn clockwise (4).
Have malfunctions rectified by an authorized Sprinter
Dealer.
Ashtray in the driver’s compartment.
Ashtray (1)
Cigar lighter (2)
Page 83

UNDERSTANDING THE FEATURES OF YOUR VEHICLE 83
To open the ashtray (1):
Pull the ashtray (1) out until it locks into place.
To close the ashtray (1):
Push the ashtray (1) forward over the working point
until it reaches the stop.
To switch on the cigar lighter (2):
Press in the cigar lighter (2),
it will automatically spring back as soon as the filament
begins to glow.
Ashtray in the rear passenger compartment.
3
The ashtrays are located in the side linings in the
passenger compartment.
Page 84

84 UNDERSTANDING THE FEATURES OF YOUR VEHICLE
ELECTRICAL OUTLET
The electrical outlet is located on the
lower right in the center of the
dashboard.
NOTE: Maximum capacity: 180 VA
CAUTION!
• Many accessories that can be plugged in draw
power from the vehicle’s battery, even when not
in use (i.e. cellular phones, etc.). Eventually, if
plugged in long enough, the vehicle’s battery
will discharge sufficiently to degrade battery life
and/or prevent engine starting.
• Accessories that draw higher power (i.e., coolers,
vacuum cleaners, lights, etc.), will degrade the
battery even more quickly. Only use these
intermittently and with greater caution.
• After the use of high power draw accessories, or
long periods of the vehicle not being started (with
accessories still plugged in), the vehicle must be
driven a sufficient length of time to allow the
alternator to recharge the vehicle’s battery.
CONTROL AND OPERATION OF RADIO
TRANSMITTERS
Radio, Telephone and Two Way Radio
WARNING!
Please do not forget that your primary responsibility is to drive the vehicle. Only operate the radio, telephone, navigation system, two-way radio
or fax when road and traffic conditions permit.
Otherwise you could be distracted from the traffic
and cause an accident. Always obey local laws and
regulations.
Remember that at a speed of just 30 mph (about 50
km/h), your vehicle is covering a distance of 50
feet (about 14 m) every second.
Page 85

UNDERSTANDING THE FEATURES OF YOUR VEHICLE 85
MOBILE AND TWO WAY RADIO AND FAX
MACHINES
WARNING!
Never operate radio transmitters equipped with a
built-in or attached antenna (i.e., without being
connected to an external antenna) from inside the
vehicle while the engine is running. Doing so
could lead to a malfunction of the vehicle’s electronic system, possibly resulting in severe personal injuries and death.
Radio transmitters, such as a mobile phone or a citizens
band unit should only be used inside the vehicle they
are connected to an antenna that is installed on the
outside of the vehicle.
Refer to the radio transmitter operation instructions
regarding use of an external antenna.
CUP HOLDER
The cup holder in the driver’s compartment is located
below the instrument panel between the driver’s and
front passenger’s seats.
3
Page 86

86 UNDERSTANDING THE FEATURES OF YOUR VEHICLE
The cup holders in the passenger compartment are
located in the center below the seat benches.
Pull out cup holder in the direction of arrow.
WARNING!
Your primary responsibility is to drive the vehicle.
Do not use cup holder while the vehicle is in
motion. Otherwise you could be distracted from
traffic and cause an accident or liquid could spill
from the containers due to for example breaking
or other vehicle movement.
Place only containers that fit into the cup holder to
prevent spills.
Do not fill containers to a height where the
contents could spill, especially hot liquids.
Otherwise you may scald yourself.
Page 87

UNDERSTANDING THE FEATURES OF YOUR VEHICLE 87
GLOVE COMPARTMENT
To open glove compartment:
Pull handle (1)
COMPARTMENTS IN FRONT DOORS
3
Locked (1)
Unlocked (2)
Page 88

Page 89

CONTENTS
UNDERSTANDING YOUR INSTRUMENT PANEL
Instruments and Controls . . . . . . . . . . . . . . . . . . . . 91
Instrument Cluster and Indicator Lamps . . . . . . . 93
Indicator Lamp Symbols . . . . . . . . . . . . . . . . . . . 95
Multi-Function Indicator . . . . . . . . . . . . . . . . . . . 96
Clock . . . . . . . . . . . . . . . . . . . . . . . . . . . . . . . . . . . 98
Odometer and Trip Meter . . . . . . . . . . . . . . . . . . 99
Instrument and Display Lighting . . . . . . . . . . . 99
Outside Temperature Display . . . . . . . . . . . . . 100
Reversing Aid Distance Display (Optional) . . 101
Tachometer (Engine rpm) . . . . . . . . . . . . . . . . . 103
Coolant Temperature Gauge . . . . . . . . . . . . . . 103
Fuel Gauge with Reserve Fuel
Indicator Lamp . . . . . . . . . . . . . . . . . . . . . . . . . . 105
Battery Charge Indicator Lamp . . . . . . . . . . . . 106
Water in Fuel Indicator Lamp . . . . . . . . . . . . . 106
Engine Oil Level Indicator Lamp . . . . . . . . . . . 107
Coolant Level Indicator Lamp . . . . . . . . . . . . . 108
Engine Control Unit Indicator Lamp . . . . . . . 109
Switch Locations . . . . . . . . . . . . . . . . . . . . . . . . . . . 110
4
ASSYST Maintenance Computer (Optional). . . . 112
Engine Oil Level – Display in Instrument
Cluster (Vehicles with ASSYST Maintenance
Computer only) . . . . . . . . . . . . . . . . . . . . . . . . . 114
Displaying Engine Oil Level with
Engine Off . . . . . . . . . . . . . . . . . . . . . . . . . . . . . . 115
Engine Oil Level Indicator in Instrument
Cluster (Vehicles without ASSYST
Maintenance Computer) . . . . . . . . . . . . . . . . . . . . 117
Heating, Ventilation . . . . . . . . . . . . . . . . . . . . . . . . 118
Ventilation . . . . . . . . . . . . . . . . . . . . . . . . . . . . . . 119
Air Recirculation . . . . . . . . . . . . . . . . . . . . . . . . . 119
Heating . . . . . . . . . . . . . . . . . . . . . . . . . . . . . . . . . 120
De-Fogging and De-Icing The Front
Windows . . . . . . . . . . . . . . . . . . . . . . . . . . . . . . . 121
Side Air Vents and Center Air Vents . . . . . . . . 122
Page 90

90 UNDERSTANDING YOUR INSTRUMENT PANEL
Upper Air Vents . . . . . . . . . . . . . . . . . . . . . . . . . 122
Heated Rear Window (Optional) . . . . . . . . . . . 123
Windshield Heater (Optional) . . . . . . . . . . . . . 123
Residual Engine Heat Utilization (REST) . . . . 124
Air Conditioning, Regulated (Optional) . . . . . . 124
Climate Control (on Vehicles with
Air Conditioning) . . . . . . . . . . . . . . . . . . . . . . . . 125
Dehumidification
(on Vehicles with Air Conditioning) . . . . . . . . 126
Air Conditioner for the Rear Passenger
Compartment (Optional) . . . . . . . . . . . . . . . . . 127
Air Recirculation . . . . . . . . . . . . . . . . . . . . . . . . 128
Air Strainer . . . . . . . . . . . . . . . . . . . . . . . . . . . . . 129
Electric Blower (Optional) . . . . . . . . . . . . . . . . . . . 130
Heater Booster . . . . . . . . . . . . . . . . . . . . . . . . . . . . . 131
Auxiliary Heater – Water or Air Heater
(Optional) . . . . . . . . . . . . . . . . . . . . . . . . . . . . . . . . . 132
Auxiliary Heater Switch . . . . . . . . . . . . . . . . . . 134
Timer Auxiliary Heater . . . . . . . . . . . . . . . . . . . 134
Settings with the Auxiliary Heater
switched on . . . . . . . . . . . . . . . . . . . . . . . . . . . . . 138
Auxiliary Heat Exchanger in Load Compartment,
only with Auxiliary Heater (Optional) . . . . . . . . 139
Auxiliary Heater – Tips for Coping
with Problems . . . . . . . . . . . . . . . . . . . . . . . . . . . . . 140
Overheating . . . . . . . . . . . . . . . . . . . . . . . . . . . . . 140
Page 91

INSTRUMENTS AND CONTROLS
UNDERSTANDING YOUR INSTRUMENT PANEL 91
4
Page 92

92 UNDERSTANDING YOUR INSTRUMENT PANEL
Legend For Instruments And Controls
1. Left-hand air vent.
2. Multifunction switch.
3. Speed control.
4. Hood release lever.
5. Instrument cluster, refer to "Instrument Cluster
and Indicator Lamps".
6. Hazard warning flasher switch.
7. Steering wheel with horn, front driver airbag.
8. Fuse box.
9. Windshield wiper switch, refer to "Windshield
Wiper Switch".
10. Ignition lock/starter switch.
11. Center air vents.
12. Upper air vents.
13. Radio, see individual manual.
14. Temperature control switch.
15. Airflow control switch.
16. Air distribution switch.
17. Temperature sensor, automatic heating
control/air conditioning, regulated.
18. Air conditioning switch.
19. Heater booster switch.
20. Residual engine heat utilization switch.
21. Gear selector lever (automatic transmission)
22. Timer for auxiliary heater.
23. Electrical outlet.
24. Ashtray.
25. Cup holder.
26. Front passenger airbag.
27. Right-hand air vent.
28. Glove compartment.
NOTE: For layout of switches, see previous page.
Page 93

INSTRUMENT CLUSTER AND INDICATOR LAMPS
UNDERSTANDING YOUR INSTRUMENT PANEL 93
4
Page 94

94 UNDERSTANDING YOUR INSTRUMENT PANEL
Legend For Instrument Cluster And Indicator Lamps
1. Tachometer (Engine rpm), refer to "Tachometer
(Engine rpm)".
2. Turn signal indicator lamp (left), refer to
"Multifunction Switch".
3. Turn signal indicator lamp (right), refer to
"Multifunction switch".
4. ASR warning lamp or ESP
®
* warning lamp.
5. Speedometer.
6. Multi-function indicator, refer to "Multi-Function
Indicator".
7. Gear selector lever position.
8. Coolant temperature gauge, refer to "Coolant
Temperature Gauge".
* 2500 Type vehicles only
9. Fuel gauge with reserve fuel indicator lamp
(yellow), refer to "Fuel Gauge with Reserve Fuel
Indicator Lamp".
10. Warning and indicator lamps.
11. Odometer/trip meter selector, refer to "Odometer
and Trip Meter".
Clock/outside temperature display selector, refer
to "Clock and Outside Temperature Display".
12. Instrument lighting brighter/dimmer, refer to
"Instrument Lighting".
Page 95

UNDERSTANDING YOUR INSTRUMENT PANEL 95
Indicator Lamp Symbols
v Acceleration skid control (ASR)
or electronic stability program (
or slippery surface warning.
ESP
®
)*
1 Airbag Malfunction (USA only).
Parking brake applied.
A High beam on, refer to "Multifunction Switch".
# Battery not being charged,
refer to "Battery Charge Indicator Lamp".
Water in fuel filter, refer to "Water in Fuel
Indicator Lamp".
2 Brake pads worn.
: Engine oil level too low,
refer to "Engine Oil Level Indicator Lamp".
/ Coolant level too low,
refer to "Coolant Level Indicator Lamp".
; Brake fluid level too low and electronic brake force
distribution (EBD) malfunction (USA only).
*2500 Type Vehicles only.
3 Brake fluid level too low and electronic brake force
distribution (EBD) malfunction (Canada only).
< Seat belt warning lamp.
- Anti-lock brake system (ABS) malfunction.
# Electronic stability program (ESP
®
)* malfunction.
± Engine control unit malfunction.
k Acceleration skid control (ASR) malfunction
and brake assist system (BAS)1 malfunction.
™ Constant RPMs on.
W Fluid level in windshield washer low.
q Preheating.
4
Page 96

96 UNDERSTANDING YOUR INSTRUMENT PANEL
Multi-Function Indicator
WARNING!
Never operate buttons (1, 2, 3 and 4) in the multifunction indicator while driving.
To operate these buttons the driver must reach
through the steering wheel, which could
significantly impede its movement.
Your attention will also be diverted from the road
and traffic conditions.
This could cause you to lose control of the vehicle
and could lead to an accident and result in severe
personal injuries or death.
For this reason, make sure that the traffic
conditions are safe before pressing the buttons, so
that nobody may be endangered.
When possible, reach around the steering wheel
to operate the multi-function indicator buttons.
Do not rest your head or chest on the steering
wheel or dashboard when operating the buttons.
Page 97

UNDERSTANDING YOUR INSTRUMENT PANEL 97
The multi-function indicator can be used to call up the
odometer, trip meter, clock and outside temperature,
or information such as remaining time/distance until
the next service is due, or the engine oil level.
If your vehicle is equipped with reversing aid, the
multi-function indicator also displays the distance
between your vehicle and a detected obstacle.
The multi-function indicator is activated by:
Turning the key to position 2 in the ignition lock,
opening the driver’s door,
pressing one of the buttons (‘), I, ç or
æ,
switching the side lights on, refer to "Combination
Switch".
1. Press the button (‘) to switch between the
odometer and the trip meter, and to reset the trip
meter.
Press the button (‘) to activate the ASSYST
maintenance computer.
2. Press the I button to switch between the time
and outside temperature and to activate the time
adjustment.
3. Press the ç to adjust (dim) the display and
instrument lighting and to adjust the clock.
4. Press the æ to adjust (brighten) the display and
instrument lighting and to adjust the clock.
4
Page 98

98 UNDERSTANDING YOUR INSTRUMENT PANEL
Clock
Activate the multi-function indicator, refer to "MultiFunction Indicator".
Button I – to reverse the time adjustment/
switch between hours and minutes (1)
Button ç – to turn the time back (2)
Button æ – to advance the time (3)
To switch between Time and Outside Temperature
Display (Optional)
Press the I button briefly.
If button I is pressed twice within one second, the
display will revert to the original mode after
20 seconds.
To Adjust the Time
Call up time display:
1. Press button I and hold – the hours display will
flash.
To change the time by one hour = briefly press
button æ or ç.
To change the time by several hours = press and
hold button æ or ç.
2. Briefly press button I – the minutes display will
flash.
To change the time by one minute = briefly press
button æ or ç.
To change the time by several minutes = press and
hold button æ or ç.
3. Briefly press button I – the set time is accepted.
Page 99

UNDERSTANDING YOUR INSTRUMENT PANEL 99
Odometer and Trip Meter
Activate the multi-function indicator. The total
distance covered by the vehicle will be shown.
1. To switch between the odometer and the trip meter,
press button (1) briefly.
2. To reset the trip meter, call up trip meter. Press
button (1) and hold until the trip meter shows 0000.
NOTE: Odometer and trip meter display
– "mi" in USA only.
– "km" in Canada only.
Instrument and Display Lighting
4
Display lighting:
3. Press button ç, to display lighting dimmer
4. Press button æ, to display lighting brighter
Page 100

100 UNDERSTANDING YOUR INSTRUMENT PANEL
Instrument and display lighting:
1. Switch on the marker lamps, refer to "Combination
Switch"
2. Press button ç, to make instrument and display
lighting dimmer
3. Press button æ, to make instrument display
lighting brighter
Outside Temperature Display
Clock/outside temperature display selector (1)
Press button I briefly. The display will switch to
the required mode.
If button I is pressed twice within one second, the
display will revert to the original mode after
20 seconds.
 Loading...