

Page 1

Chrysler / DoDge Minivan
Service Manual
2011-2014 Model Year
Main: (800) 956-6668
Local: (952) 890-7851
Fax: (952) 808-2775
TM
Your Life. Your Ride.
6591 W. Hwy 13
Savage, MN 55378
www.rollxvans.com
Page 2

Page 3

chrYSler / dodge Minivan
2011-2014 Model Year
Service Manual
#13315-004
June 2014
Page 4

TaBle of conTenTS
Important Item Locations ...................................................................................................................... 1
Battery Information - General ............................................................................................................... 6
Battery Information - Draw Test Procedure .......................................................................................... 8
Rollx Vans Door (Motor Bar) - Troubleshooting .................................................................................... 9
Rollx Vans Door (Motor Bar) - Replacement Parts ............................................................................. 10
OEM Power Door - Troubleshooting....................................................................................................11
Door Modifications .............................................................................................................................. 12
Exhaust System.................................................................................................................................. 14
Exterior / Van Dimensions .................................................................................................................. 16
Fuel System........................................................................................................................................ 17
Front Suspension (Struts)................................................................................................................... 23
Rear Suspension ................................................................................................................................ 24
Engine Mounting (Cradle Drop) .......................................................................................................... 25
Torque Specifications (Suspension) ................................................................................................... 26
Interior..................................................................................................................................................27
Kneeler - Troubleshooting....................................................................................................................29
Kneeler - Replacement Parts...............................................................................................................30
One Touch System - Troubleshooting..................................................................................................31
One Touch System - Overview.............................................................................................................32
One Touch System - v8.0 Basic Interface............................................................................................34
One Touch System - v8.0 Advanced Interface - Setup ....................................................................... 35
One Touch System - v8.0 Advanced Interface - Debugger ................................................................ 36
One Touch System - v8.0 Error Codes ............................................................................................... 38
One Touch System - Relay Board Troubleshooting ........................................................................... 41
In The Floor - Troubleshooting ........................................................................................................... 43
In The Floor - Replacement Parts ...................................................................................................... 44
Folding Ramp - Troubleshooting ........................................................................................................ 45
Page 5

TaBle of conTenTS
Folding Ramp - Replacement Parts ................................................................................................... 46
Folding Ramp - Motor Install / Removal and Adjustment ................................................................... 49
Rear Heat & Air................................................................................................................................... 51
Remote System - Troubleshooting ..................................................................................................... 52
Remote System - Location & Wiring .................................................................................................. 53
Seat Detector - Location & Description .............................................................................................. 54
Seat Wiring - Driver’s Side (2011-2014)..............................................................................................55
Seat Wiring - Passenger’s Side (2011-2012) ..................................................................................... 63
Seat Wiring - Passenger’s Side (2013-2014) ..................................................................................... 69
One Touch - Wiring (With Door Open Limit Switch)............................................................................73
One Touch - Wiring (With Door Detector)............................................................................................75
One Touch - Wiring (No Can Bus).......................................................................................................77
One Touch - Wiring (With Wing Window Interface).............................................................................79
Rollx Vans Power Door (Motor Bar) - Wiring ..................................................................................... 81
Maintenance Information .................................................................................................................... 83
Warranty ............................................................................................................................................. 84
Page 6
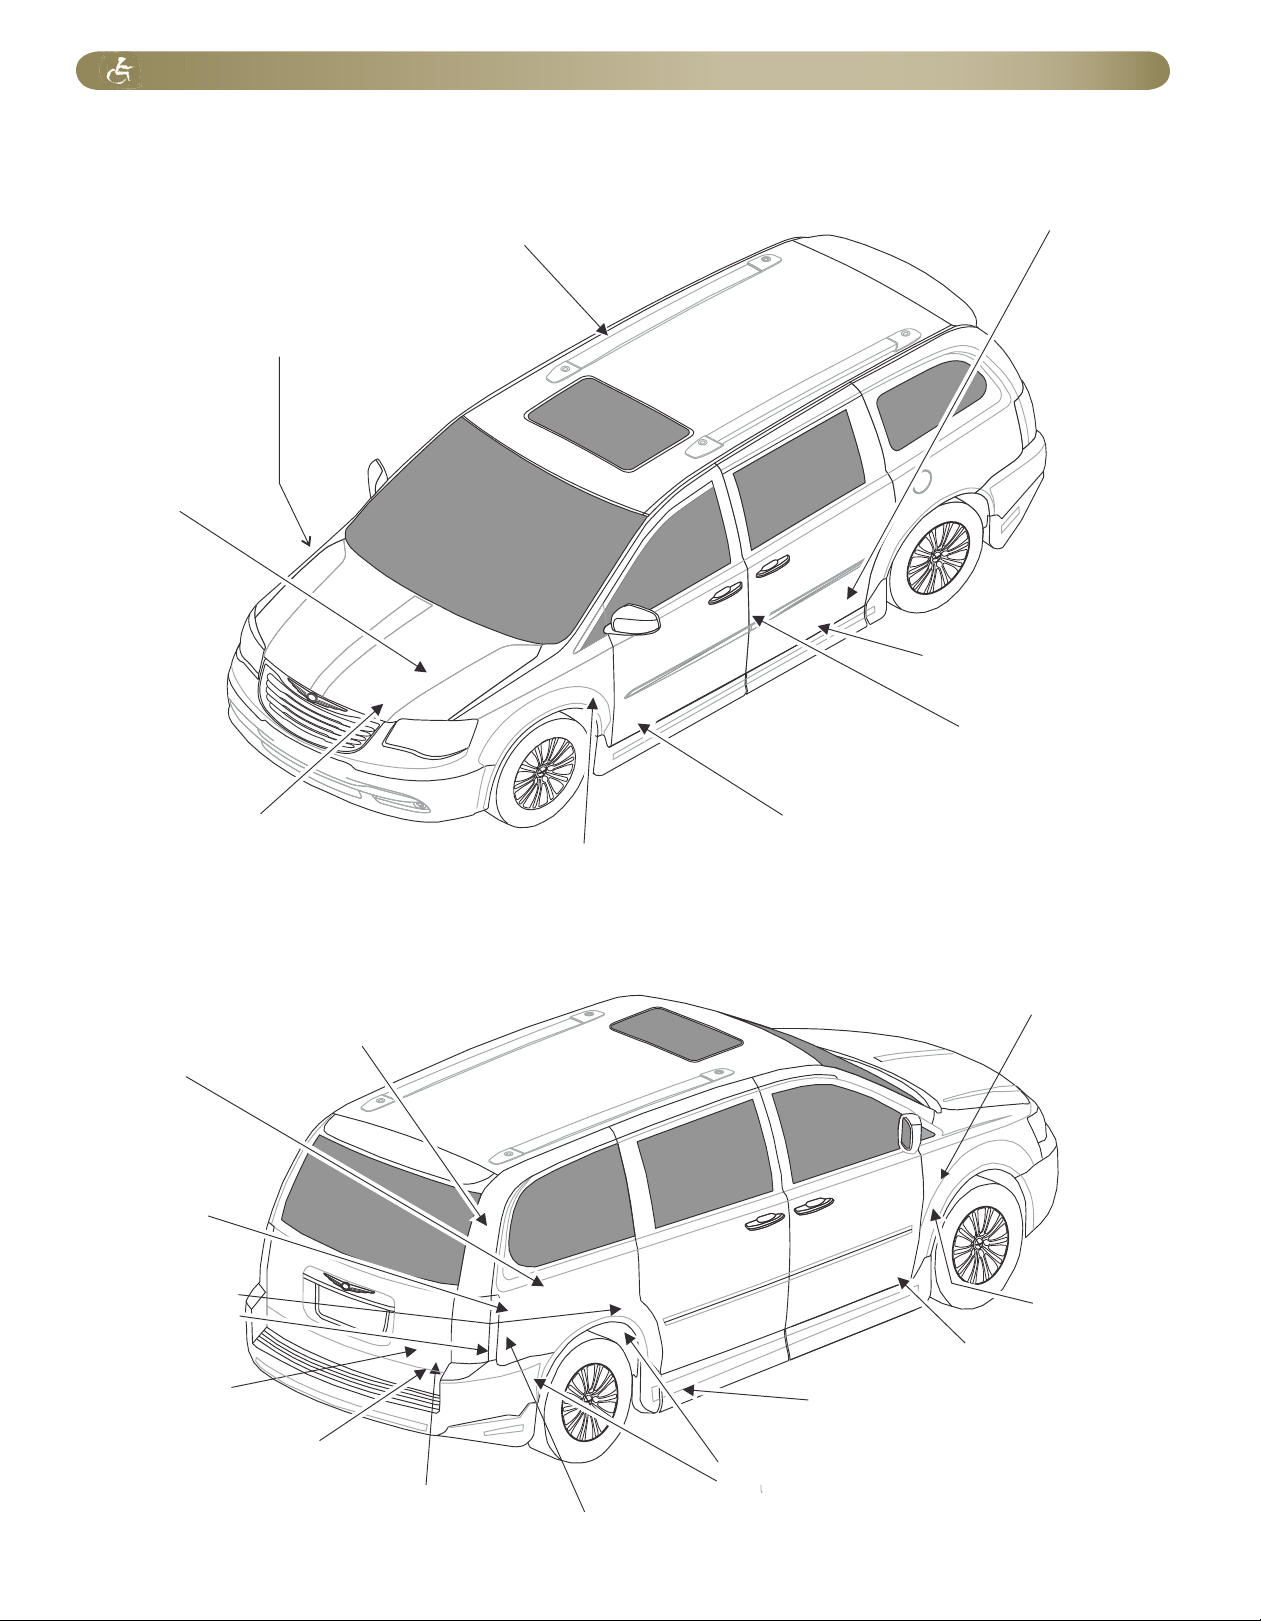
Kneeler
Passenger Sliding
Door Open Switch
(Before 8/26/2013)
Rear Heat Connections
Rear A/C Connections
OTC Remote
Receiver
OTC fuse panel
(Under Glove Box)
Passenger
Seat
Detetector
Rear Heat
and Air Unit
Driver Seat
Detector
OTC
Main Fuse
Rollx Vans Main Wire Harness
(Ceiling Along Passenger’s Side)
ITF Ramp Access
Panel
Power Seat
Connector(s)
Power Seat
Connector
OEM Main Wire Harness
(Floor Along Driver’s
Side)
Neutral Safety
Signal Splice
ITF Ramp Override
Switch
OTC Remote
Programming
Switch
Rear Heat & A/C Front
Connections
Door Detector
(
after 4/15/2014
)
(
after 8/26/2013
)
Wing Window Interface
(
after 4/15/2014
)
iMPorTanT iTeM locaTionS
Page 1
Page 7
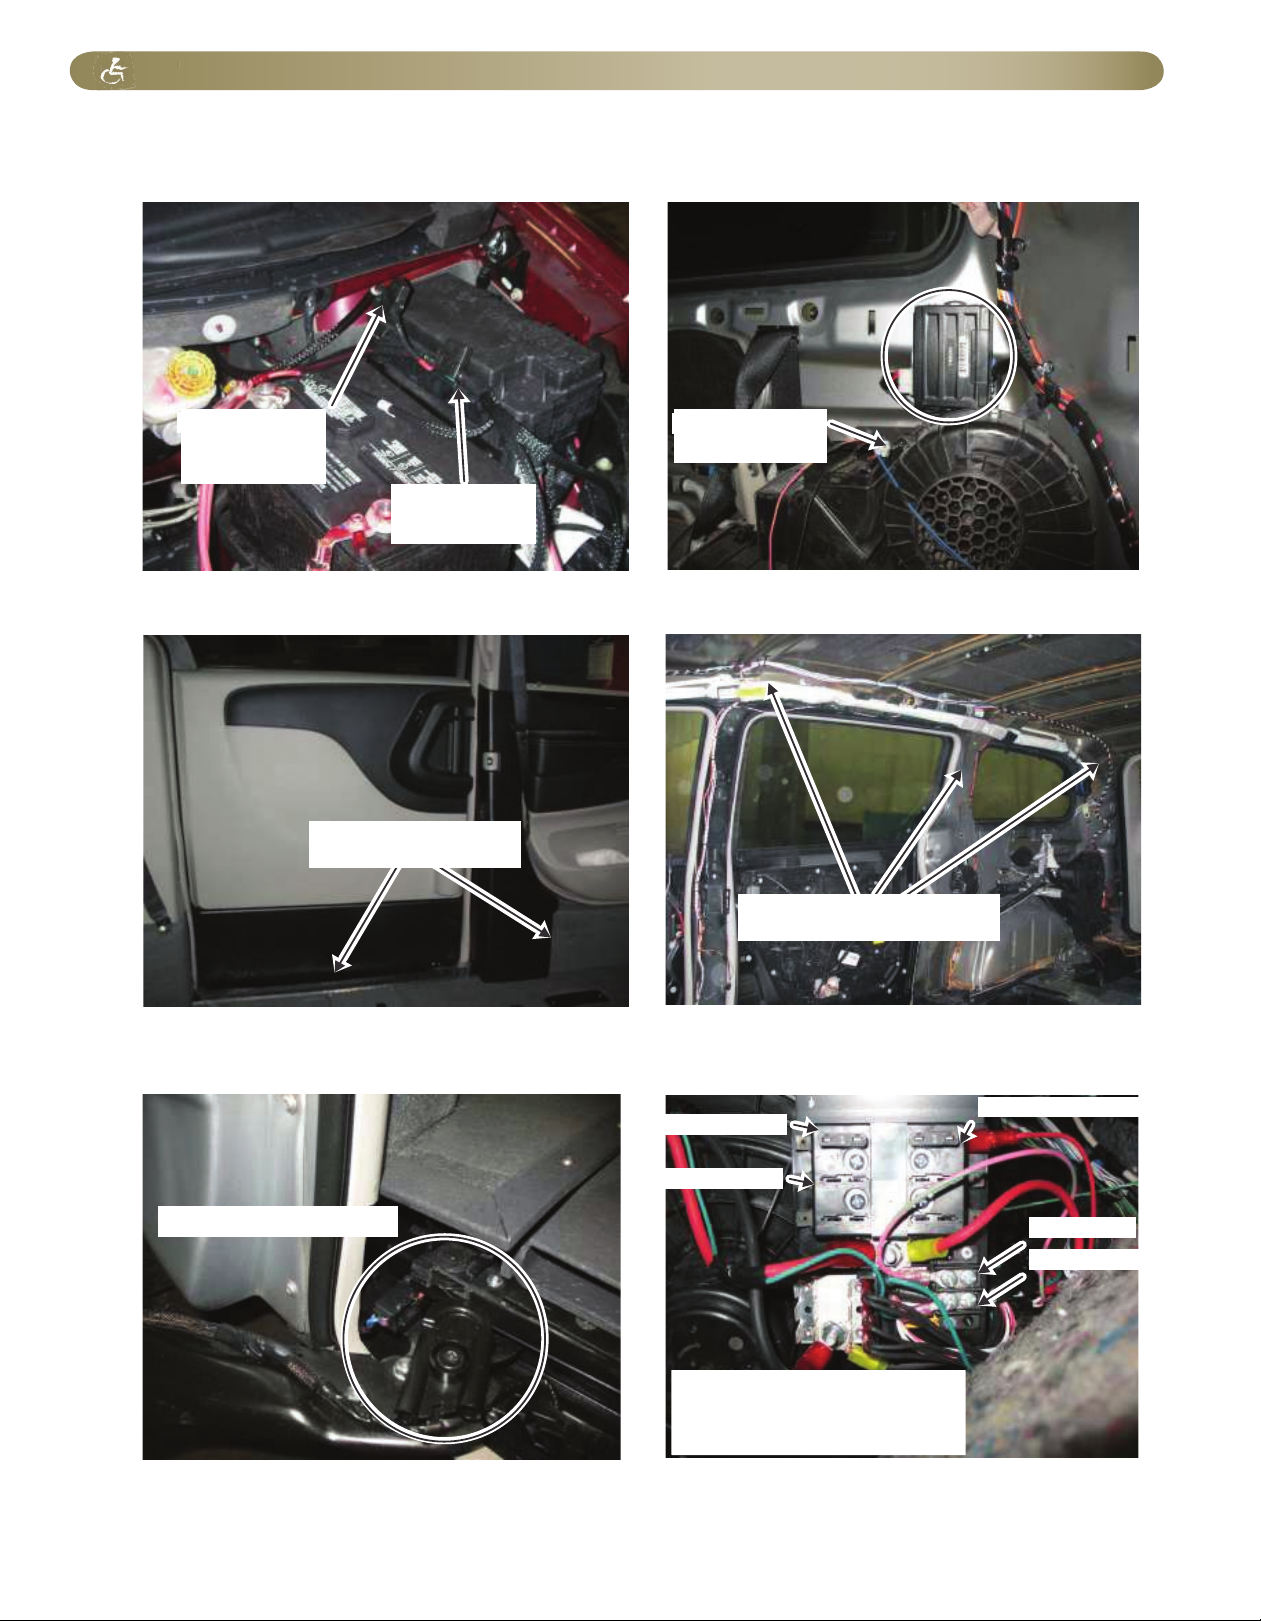
OTC Remote Receiver
Rollx Vans Main Wire HarnessOEM Wire Harness
Main Fuse
(Engine Compartment)
OTC Fuse Panel
(Under Glove Box - Must Pull Back Fabric)
Passenger Sliding Door Open Switch
Rollx Vans Remote
Power Tie Down
(If Equipped)
Ignition Hot
Vans are equipped with a Ignition Hot and
Neutral Safety Panel to allow for quick
connection. See OTC Wiring for more
information.
6way controller
(If Equipped)
Neutral Safety
Used Before 8/26/2013
6way Seat Fuse
(40 Amp)
(If Equipped)
Main OTC Fuse
(40 Amp)
Rear Heat & A/C
Unit
Runs Along Driver’s
Side Floor
Runs Along Passenger’s
Side Ceiling
iMPorTanT iTeM locaTionS
Page 2
Page 8
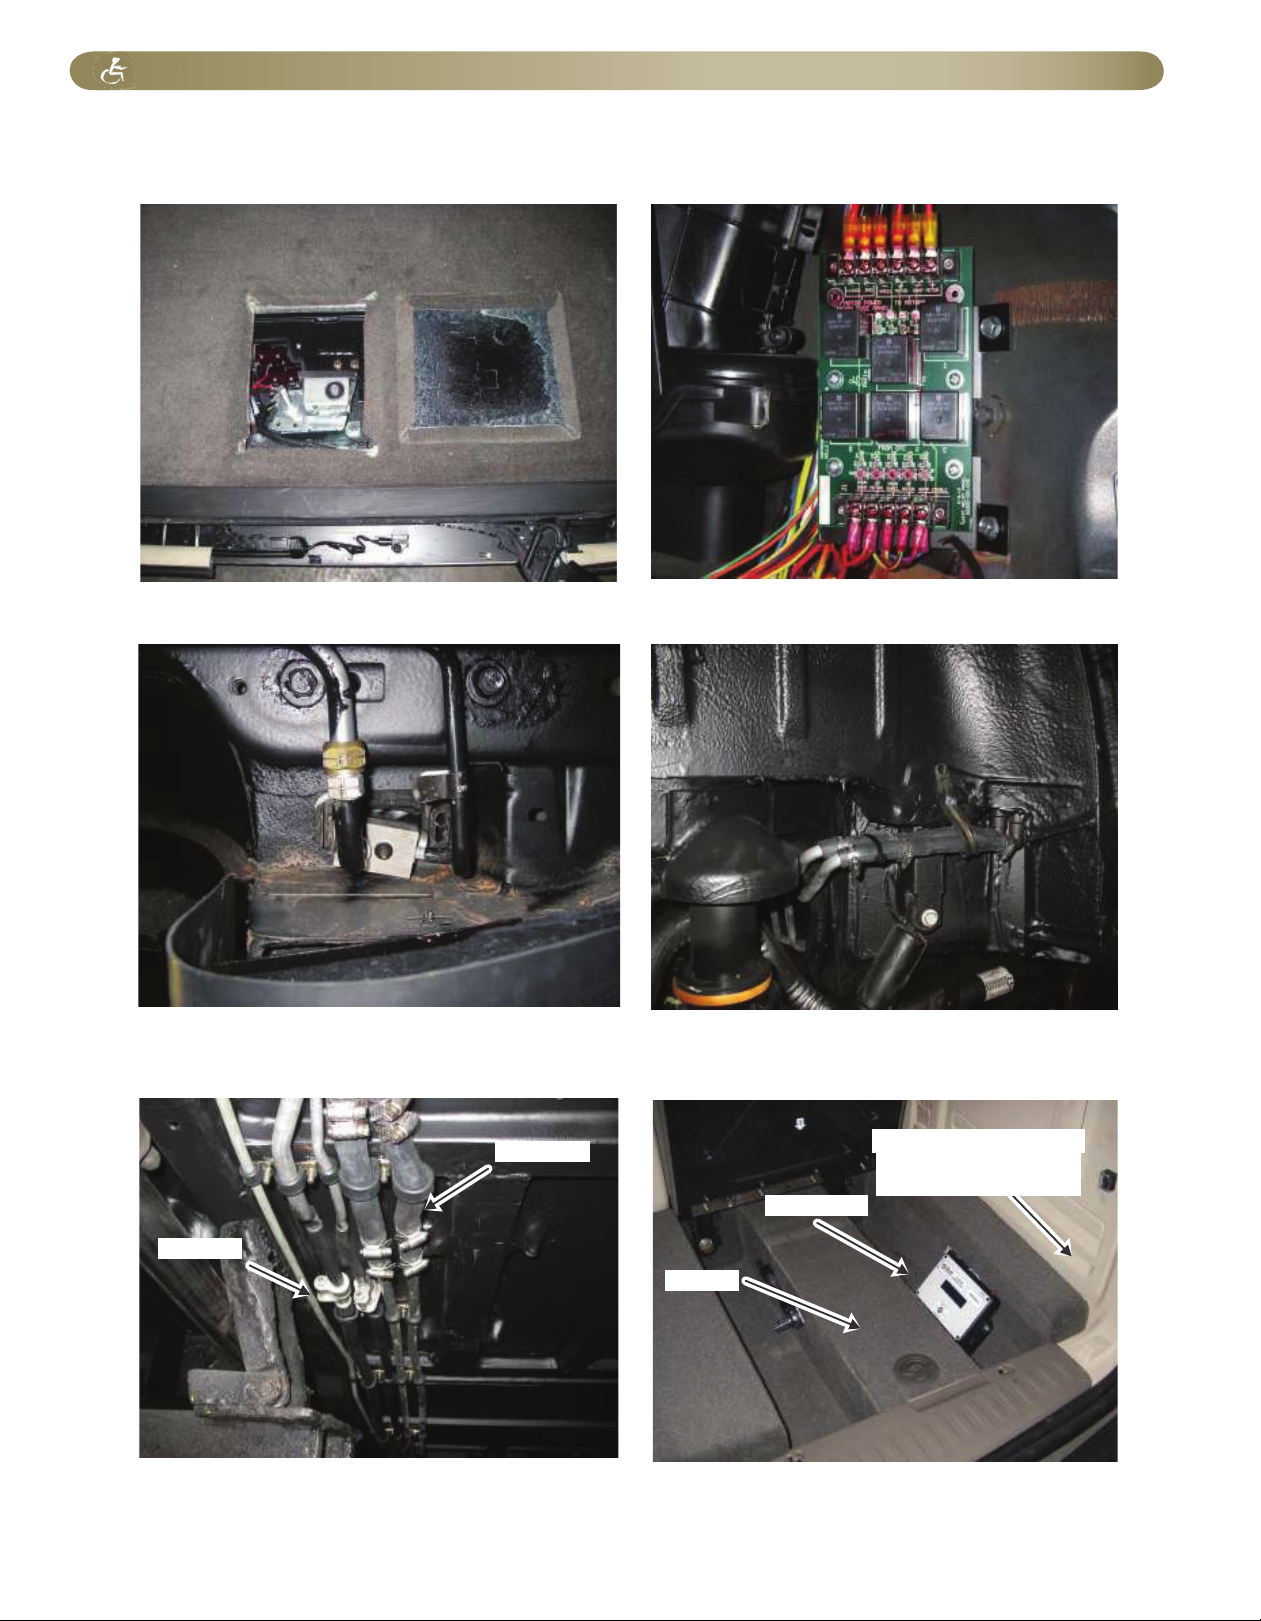
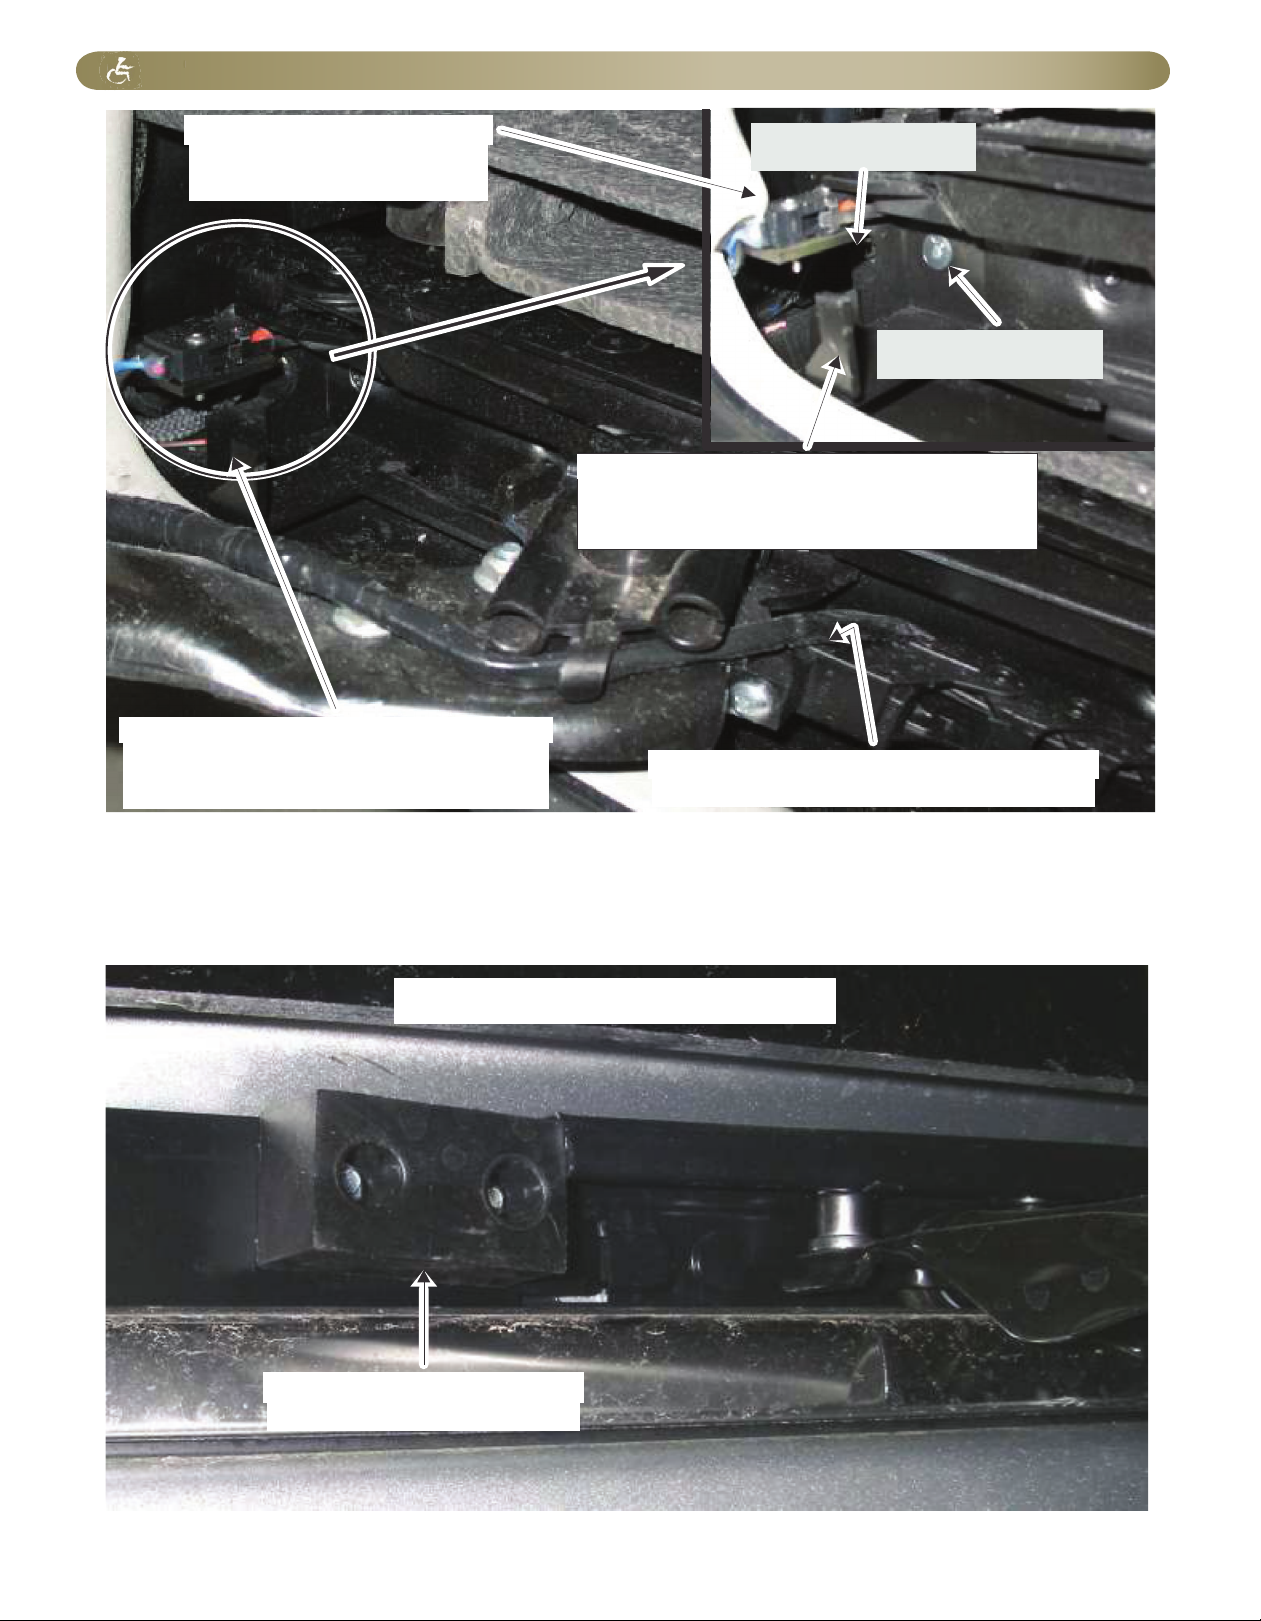
iMPorTanT iTeM locaTionS
Kneeler
OTC Board
Rear AC (Rear Connections)
(Behind Rear Right Tire)
Rear Heat (Rear Connections)
(Right Rear Tire)
ITF Ramp Access Plate
OTC Relay Board
(Behind Rear Passenger Quarter Panel)
Rear Heat & A/C (Front Connections)
(Under Passenger’s Side Front Seat Area)
Kneeler and One Touch Controller
Rear Heat
Rear A/C
Universal Door Detector
Used After 8/26/2013
(behind panel)
Page 3
Page 9
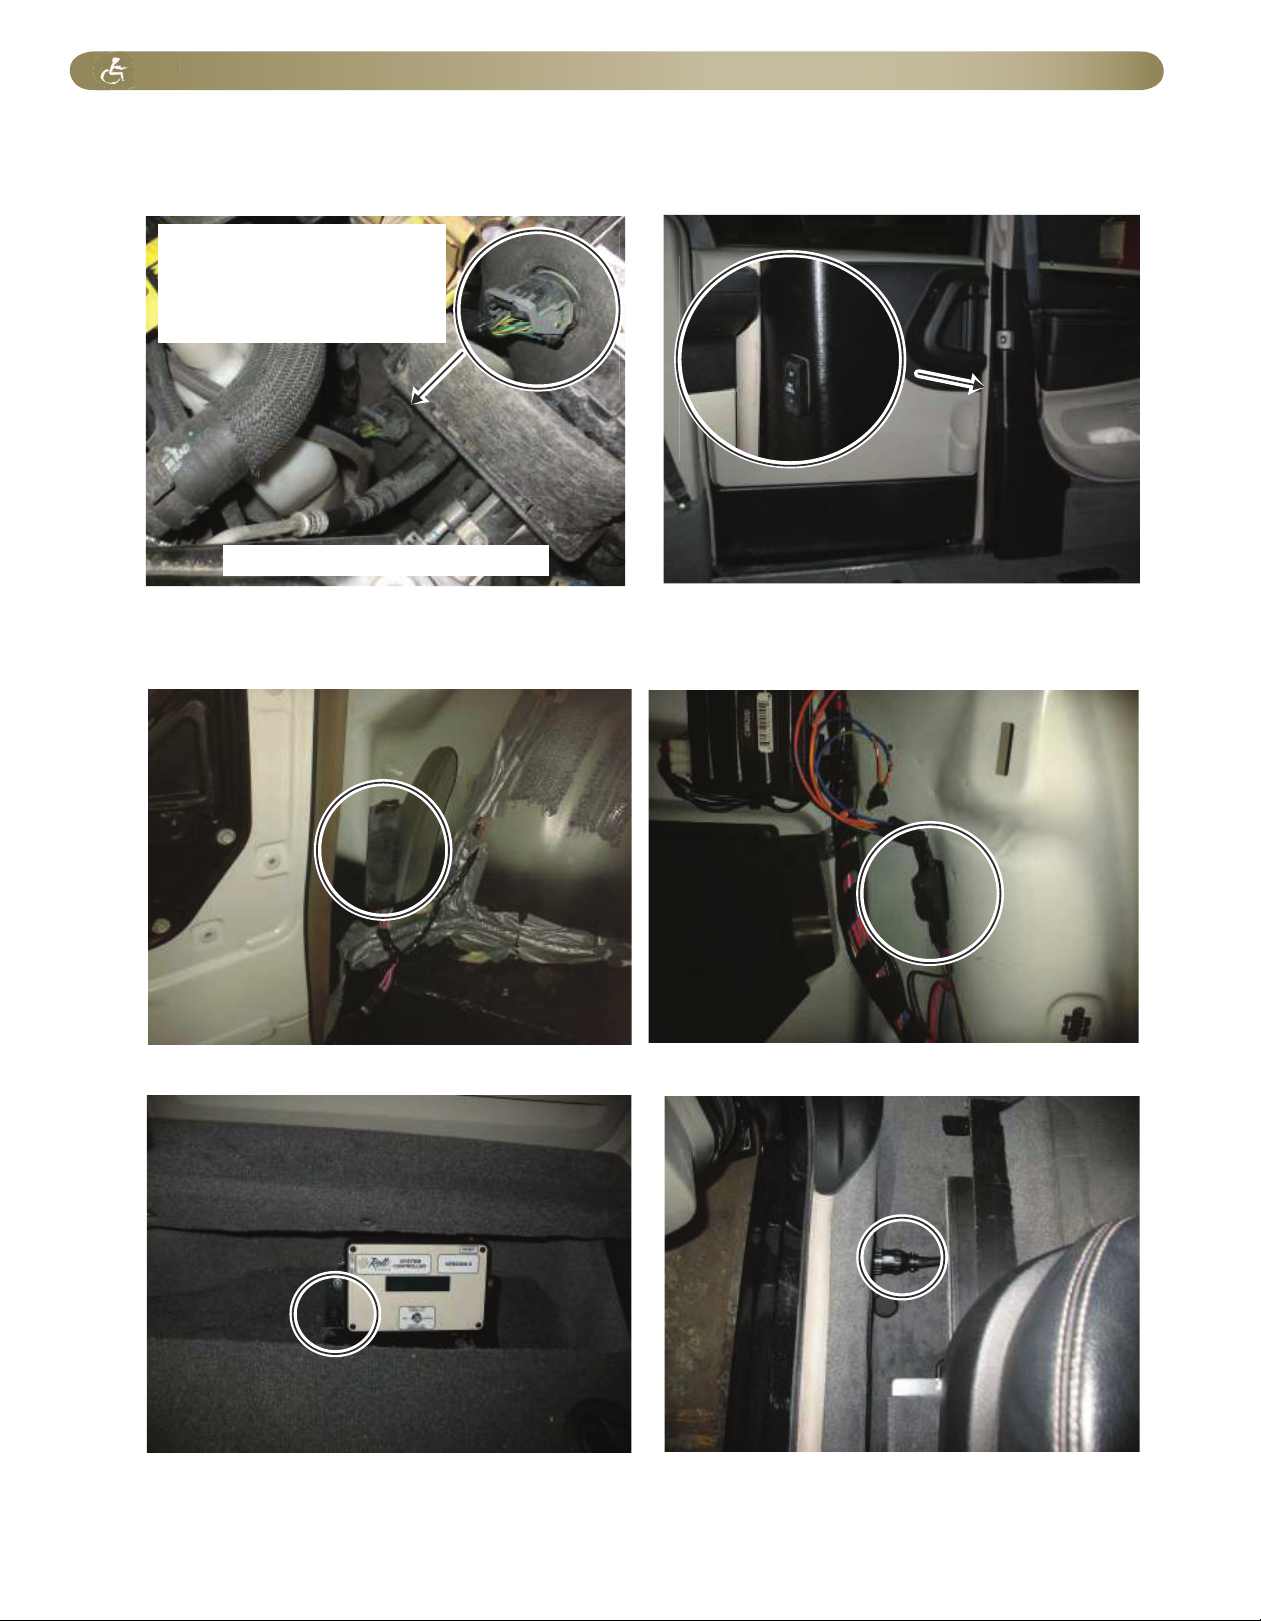
iMPorTanT iTeM locaTionS
Passenger’s Door Detector (Built After 4/15/2014)
(On Passenger’s C-Pillar)
Wing Window Interface (Built After 4/14/2014)
(Behind Rear Heat & Air Unit)
Neutral Safety Signal
ITF Ramp Override Switch
OTC Remote Programming Switch
*See OTC WIRING for diagram
NOTE:
Rollx V
ans taps into the
“TRS T3 SIGNAL” at the
“TRANSMISSION SOLENOID
PRESSURE SWITCH” to pick up
the Neutral Safety signal
Driver’s Power Seat Connector
(Passenger’s Same)
Page 4
Page 10
iMPorTanT iTeM locaTionS
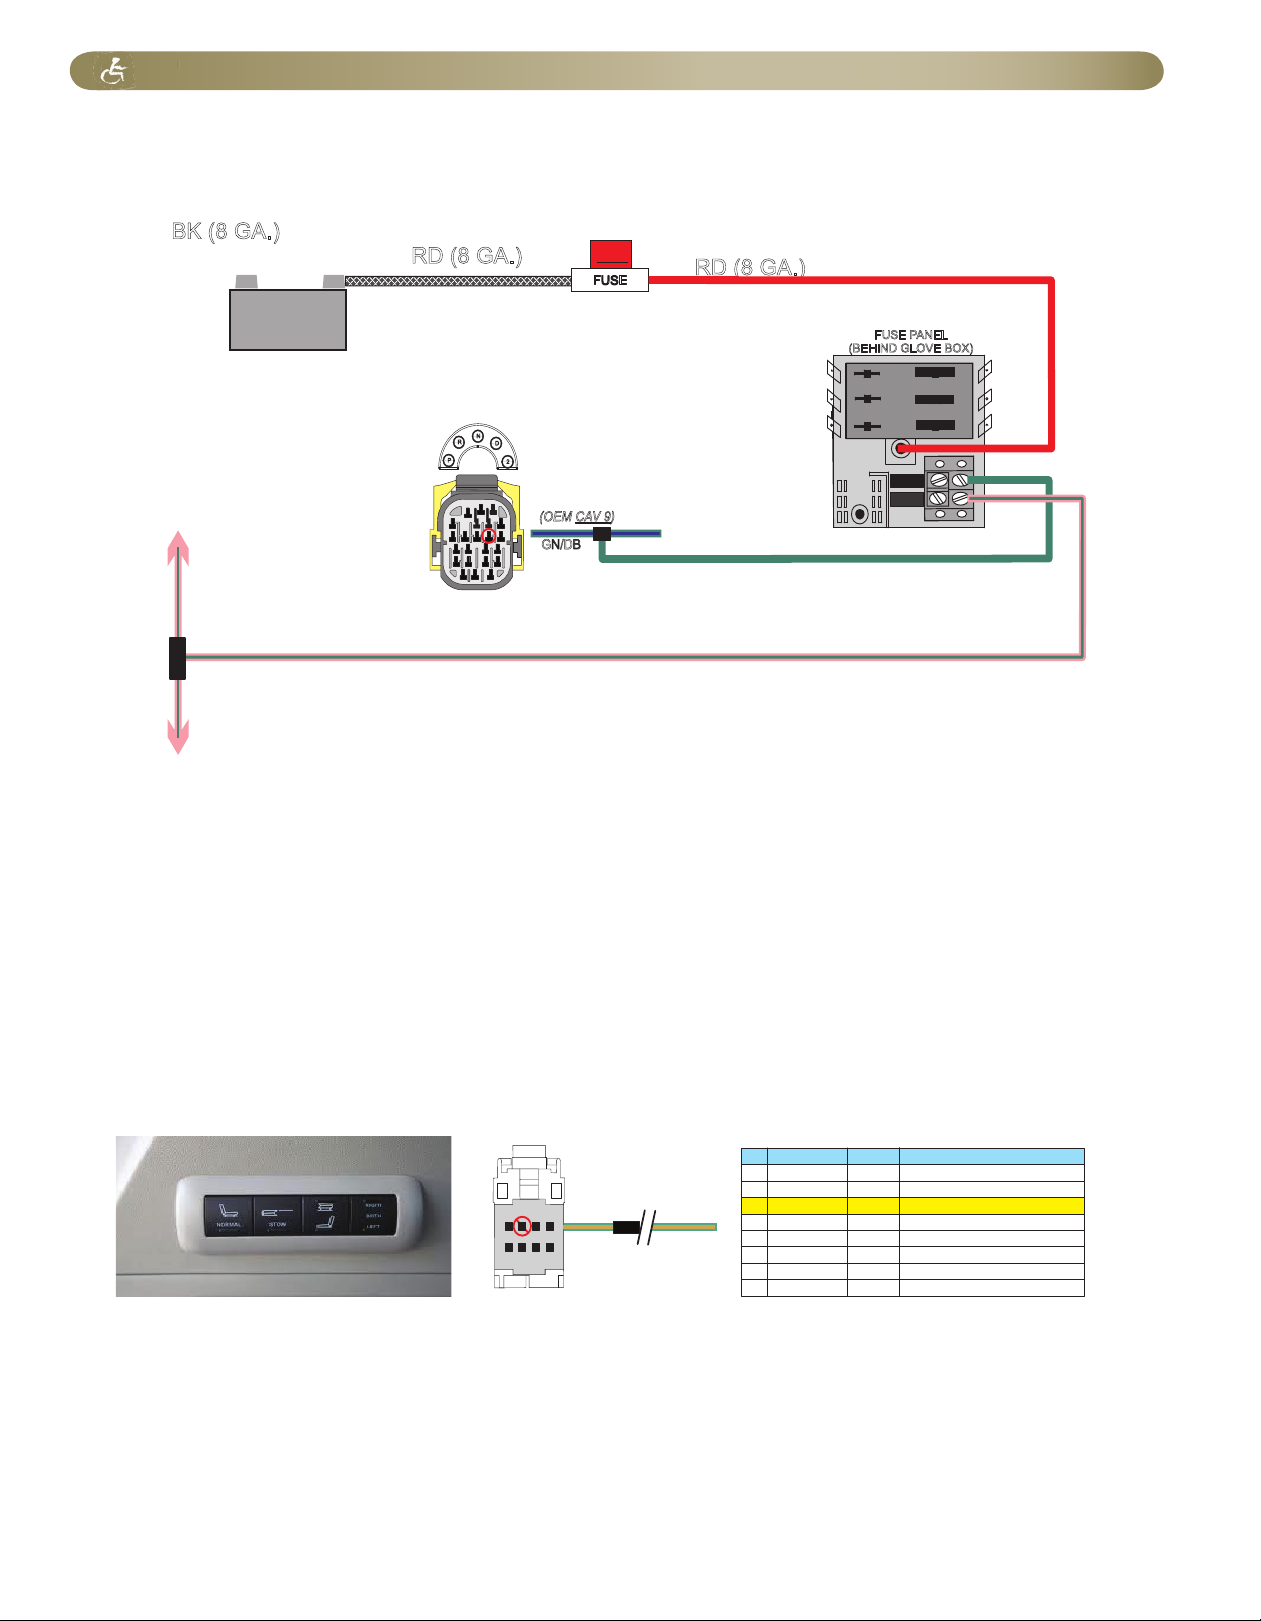
RED (12V CONSTANT)
PK / YL
(OEM IGNITION HOT)
PK / GN (12V IGNITION HOT)
Rollx Vans Ignition Hot & Neutral Safety Board Wiring
2008-2013 Chrysler Minivans (built after 5/28/2009)
TAPS INTO OEM IGNITION
HOT (PK/GN WIRE) THAT IS
LOCATED BEHIND THE CENTER
BEZEL GOING INTO THE RADIO
Power Folding Rear Sofa
If the van is equipped with a Power Folding Rear Sofa, Rollx Vans disables the FOLD/TAILGATE
SWITCH MUX which would allow the seat to be stowed into the floor. Rollx Vans cuts the LG/TN wire
at the switch.
Pin Wire Color Gauge Function
1 NO CONNECTION
2 LG/YL 22 SEAT SWITCH SELECTOR SIG
3 LG/TN 22 SEAT FOLD SIGNAL
4 LG/DB 22 SEAT STOW SWITCH SIGNAL
5 LG/VT 22 FOLDING SEAT SWITCH RET
6 NO CONNECTION
7 NO CONNECTION
8 NO CONNECTION
1 AMP
REMOTE
DOOR DETECTOR
CONTROLLER PWR
1 AMP
1 AMP
Nuetral
Safety
Ignition
Hot
FUSE PANEL
(BEHIND GLOVE BOX)
*
2
D
N
R
P
GN/DB
Neutral Safety
1
4
8
13
17
21
3
7
23
20
16
(OEM CAV 9)
*(To Inition Hot)
located under
steering column
12
RD (8 GA.)
BK (8 GA.)
FUSE
40A
-
+
RD (8 GA.)
Cut
1
4
8
5
Page 5
Page 11

BaTTerY inforMaTion - general
The following procedure should be used to test the current draw from any battery
used in our vans.
1) Insure the battery is fully charged.
2) Remove the key from the ignition switch.
3) Close all the doors including the sliding doors and the rear tailgate.
4) Close all the windows including the rear vent windows.
5) Remove the negative (Black) cable from the battery and move it to a safe location
away from both the positive (Red) and negative terminals of the battery.
6) Acquire a Digital Multimeter with a 20 Amp current range function. NOTE: A
standard van can draw between 15 and 17 amps of current when it is first powered
up (When the battery is reconnected). You must use a multimeter with a 20 Amp
range. Using a Multimeter with a lower current range function will damage the
meter if it does not have an internal fuse. If it has an internal fuse, it will be blown.
NOTE: DO NOT RUN THE ROLLX VANS OTC OR TRY TO START THE VAN WHEN
YOU HAVE THE METER CONNECTED! YOU WILL DAMAGE THE METER!
7) Place the function switch of the Multimeter in the 20 Amp Current Measurement
position.
8) Connect the negative (black) probe (wire lead) to the black jack on the multimeter.
9) Most multimeters have more than one red jack for the positive (red) probe. They
usually have one jack for measuring AC & DC voltage and resistance, along with a
second Jack for measuring AC & DC Current. Some multimeters have more than
one red jack for measuring current (three red jacks total). As an example a meter
might have two red jacks, one rated for 200 Milliamps and a second for 20 Amps.
You should use the 20 Amp plug (or the one with the largest rating).
10) Acquire two test jumpers with alligator clips (Radio Shack # 278-002). Attach one
jumper to the positive (Red) probe and the other to the negative( Black) probe.
11) Turn the multimeter on.
12) Attach the other end of the jumper clipped on the positive (red) meter probe to the
disconnected battery cable.
NOTE: Polarity does not matter much when measuring current. A positive current
is the same as negative current. Disregard the polarity indicator on the multimeter
during these tests.
13) Attach the jumper on the negative (black) meter probe to the negative terminal of
the battery.
NOTE: YOU MAY GET A SPARK WHEN YOU ATTACH THE JUMPER. THIS IS
NORMAL. ALL THE CURRENT BEING USED BY THE VAN IS NOW RUNNING
THROUGH THE METER. AS MUCH AS 15-17 AMPS).
Page 6
Page 12

BaTTerY inforMaTion - general
14) The Multimeter should now show a reading. Keep your eye on the meter and
watch the draw. A typical van can have from 18 to 28 computer modules in it.
They are all woke up when power was applied to the van by attaching your meter
probes. As you watch the current reading you will note that it will start to fall. This
happens as the computers in the van decide they are not needed and put
themselves to sleep. Chrysler says it can take up to thirty minutes for everything
to go into sleep mode.
The current should drop in stages similar to the sequence below:
a. The reading will start as high as 15-17 amps for a short period of time.
b. It then fall to 6-8 amps for a short time.
c. Then 1 to 1.5 amps for a period of time.
d. It will then settle on around .800 amps (800 Milliamps) for a while.
e. Then it may drop to .100 to .200 amps (100 to 200 Milliamps) for period of
time.
f. Finally it will drop all the way into sleep mode, .040 to .100 amps (40 to 100
Milliamps) and will stay there until the van is woke up.
g. Note: The values you will see will vary from van to van, from van type to
type and by the number and type of accessories installed on the van. The
important thing is that it drops to a value less the 100 Milliamps (.100
Amps) for a standard van when it goes into sleep mode.
15) You can wake the van simply by opening the driver’s side door for a few seconds,
then closing it.
16) Watch the meter again to see the van go into sleep mode again. You should repeat
this test until you are satisfied the van’s “Sleep Mode” is functioning correctly.
Page 7
Page 13
BaTTerY inforMaTion - draW TeST Procedure
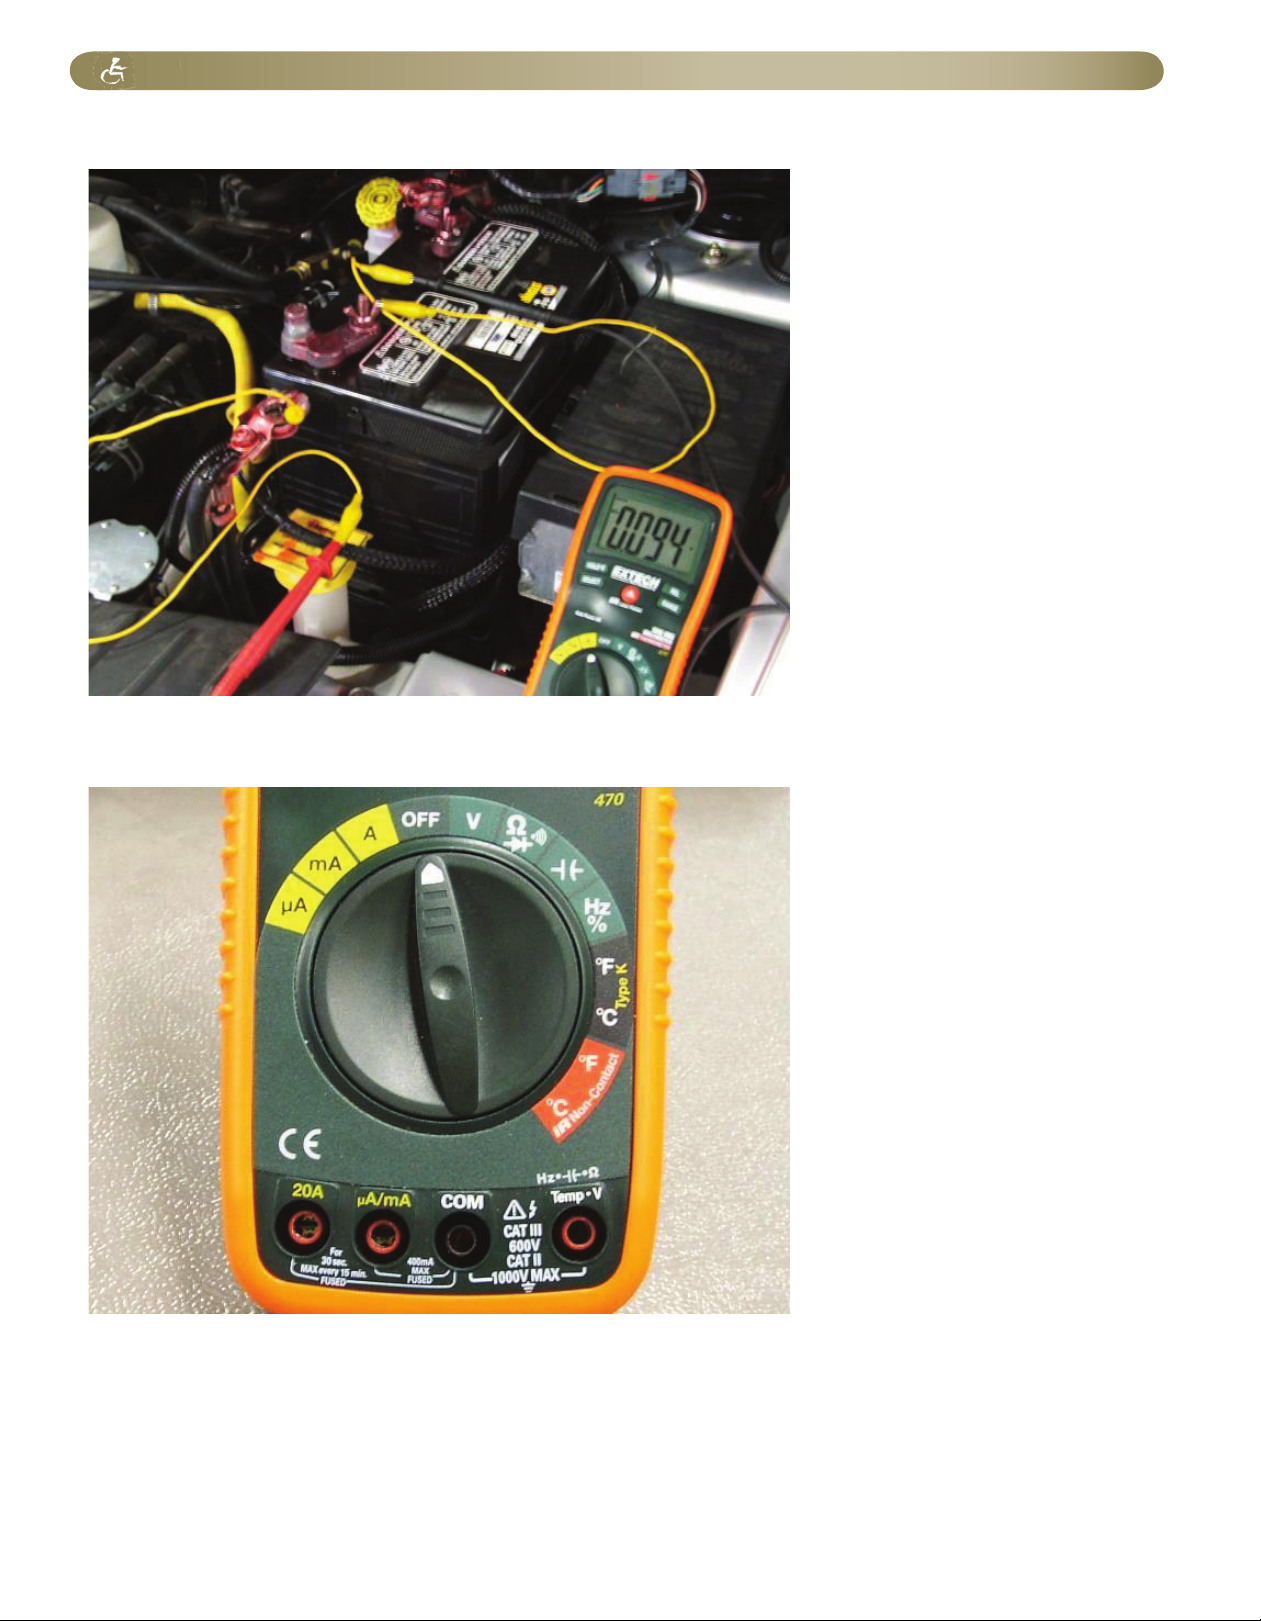
This picture shows a complete setup for a Draw Test:
Note the black probe attached to the negative terminal and the red probe attached to the
negative battery cable.
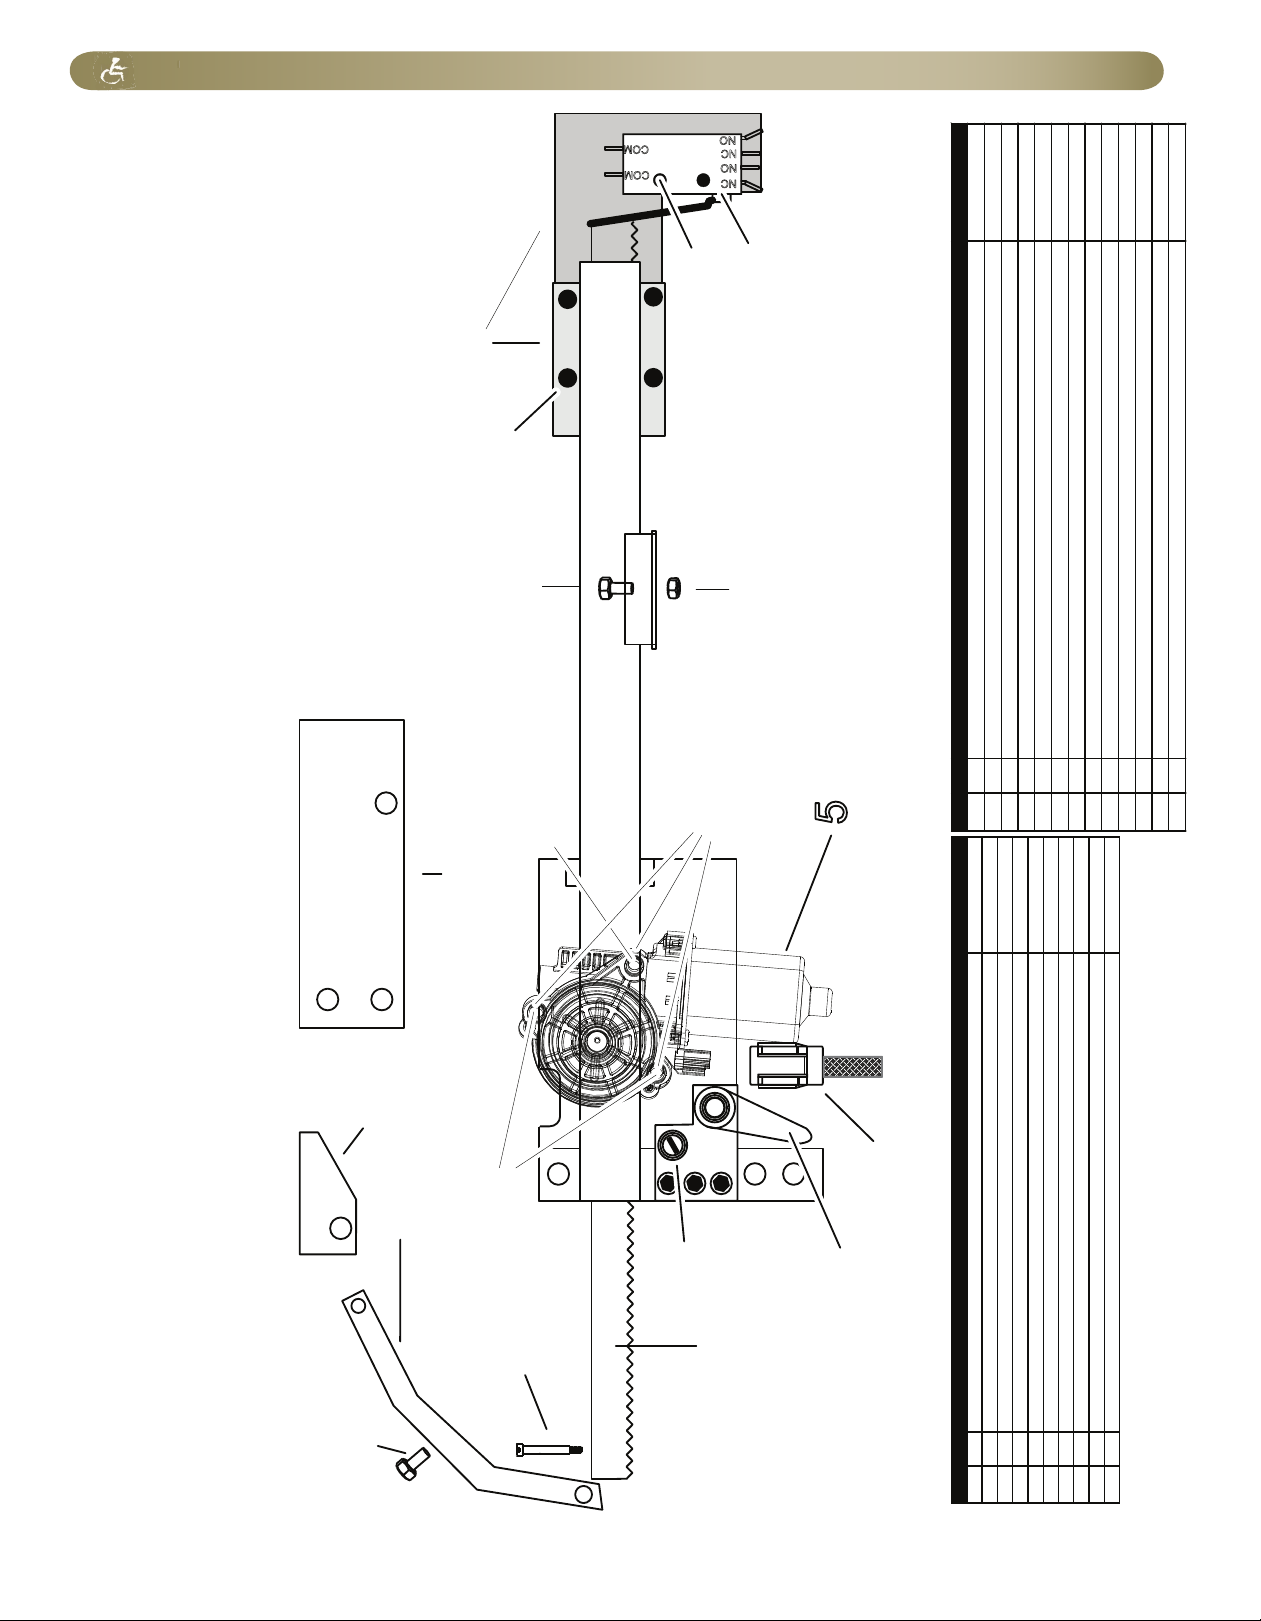
This picture shows a typical multimeter. Note the current range switch settings and
current probe jack markings are all in yellow for uA (Microamps), mA (Milliamps and A
(Amps).
Also note that the meter has two Jacks for current measurement, “20A” and “uA/mA”. On
this meter, for our Draw Test, we would place the Function Switch in the “A” (for Amps)
position and plug the Red Probe into the “20A” Jack. The Black Probe always goes in the
Black Jack.
Page 8
Page 14

rollX vanS door (MoTor Bar) TrouBle ShooTing
Symptom Possible Cause Remedy
Front passenger door is locked.
Unlock front passenger door.
Switch is stuck.
Make sure all user switches are not stuck.
Blown fuse.
Replace 30 or 15 amp blade fuse located
underneath hood near battery.
Manual release handle is not engaged. Turn handle all the way counter-clockwise.
Door will open, but ramp will not
deploy.
Door open limit switch needs adjustment.
Adjust the door open limit swtich (#7 on next
page). The switch can be accessed by the
passenger side rear speaker area (remove the
speaker first).
Door will open, but not close or
door will "jump" closed.
Ramp up limit switch is not engaged. Adjust the cam for up limit.
Gear on motor is stripped.
Replace motor.
Gear on bar is stripped. Replace gear rack (bar).
Door does not operate.
Door "ratchets" when operating
(make sure kneeler is off).
Page 9
Page 15
rollX vanS door (MoTor Bar) rePlaceMenT ParTS
COM
COM
NC
NC
NO
NO
1
2
3
4
5
6
7
8
9
10
11
15
12
12
13
14
Rollx Vans Power Door Exploded View
Item Qty. Description Part #
1 DOOR BAR ASM (INCLUDES THE 3 FOLLOW ING) 10026ASM
1 MTR BAR DOOR OPENER (RACK AND ASSEMBLY) 10026
1 WIRE HARNESS 5.5" FOR 310-1059
1 MTR 12V 10NM 10MM DOUBLE 210-1011
1 1 GEAR RACK (SPECIFY LONG OR SHORT)* 10026-4
LONG BAR
2 1 3/8 X 1 STRIP
1126318
3 1 ARM BAR (FOR MOTOR BAR) 10026-22
4 1 WIRE HARNESS 5.5" FOR 310-1059
5 1 MOTOR ONLY W /GEAR ASM (INCLUDES WIRE HARNESS AND SHIMS**)
10026-15ASM
* LONG USED BEFORE ~2001 IF NO REAR HEAT & AIR
** SHIMS ONLY NEEDED IF BEFORE ~2003 BUT ALWAYS SENT WIT H MOTOR
Item Qty. Description Part #
6 1 B RKT MTR BAR LIMIT SW ITCH MB1006
7 1 S WITCH DPDT (CHERRY) E19-50H
8 1 HANDLE CHROME INSIDE 6022
9 1 DOOR BRACKET A (DOOR BRACKET B - ) MB1001 (MB1002)
10 2 DOOR ARM PLATE MB1005
11 N/A MANUAL RELEA SE TENSION ADJUSTMENT NA
12 N/A 1/4-20 NYLOCK NUT SHOP SUPPLY
13 2 #6 NYLOCK NUT SHOP SUPPLY
14 1 1/4-20X3/4 HEX HEAD SCREW SHOP SUPPLY
15 1 5/8-20X1 HEX HEAD SCREW (ADJUSTMENT) SHOP SUPPLY
16 1 SHIM KIT FOR DOOR OPENERS (INCLUDES ALL 3 - VARYING SIZES) 10026-12
17 2 #10-32X2 HEX HEAD (5/32) PARTIALLY THREADED SCREW SHOP SUPPLY
18 1 #10-32X2-1/2 HEX HEAD (5/32) PARTIALLY THREADED SCREW (NUT ON BACK) SHOP SUPPLY
17
18
16
Page 10
Page 16

oeM PoWer door TrouBleShooTing
Symptom Possible Cause Remedy
Van is NOT in park. Place van into park.
Overhead on/off switch is turned to the OFF
position.
Turn switch to ON position.
OTC program failure. Press OTC reset button.
OTC reads low voltage.
Start van's engine and press OTC reset button.
If door still does not open review OTC board
display and contact customer service.
Bad OTC board.
Press the OTC reset button and while in Idle
Mode press a user button and watch the LED.
Notice if OTC appears to be working properly.
Review error codes stored and call customer
service.
Main OTC fuse (40 amp) is blown. Replace fuse under hood by battery.
OEM overhead ON / OFF switch is OFF.
Turn switch to ON position. This switch enables /
disables the OEM buttons located on the B
pillars that Rollx Vans uses to trigger the sliding
door to open or close.
Defective OEM door opener.
Operate door manually and contact customer
service.
Ramp sliding door does NOT
attempt to CLOSE after ramp
stows.
Ramp up limit switch is not being activated
properly.
Close door manually, press OTC reset button,
and press Rollx Vans user button to operate
system again. If door still does not attempt to
close after ramp is stowed, review OTC board
display and contact customer service.
Defective door open bracket. Adjust the bracket and contact customer service.
Defective OEM door opener.
Press OTC reset button, press interior OEM
push button to see if door will close
automatically. If door still does not respond,
review OTC board display and contact customer
service.
Obstruction. Check door track for any debris and remove.
Ramp needs adjustment (Foldout only). Adjust folding ramp to stow more.
OEM door sensitivity set low. Contact local Chrysler Dealership.
Ramp sliding door opens and van
kneels, but when door is all the way
open, van unkneels and cycle
ends.
OEM Door Ajar Pin Switch (Rollx Vans Door
Close signal) is never deactivated when door
begins to open.
If the OTC thinks the door is open and closed it
will end the cycle. Examine switch / wiring.
Ramp needs adjustment (Foldout only). Adjust folding ramp to stow more.
Defective OEM cinch motor.
Operate door manually and contact customer
service.
Ramp sliding door does NOT
OPEN manually.
Door is locked.
Unlock door. When pulling door handle, pull
handle out and then slide door to open.
Ramp sliding door does NOT
OPEN manually from interior
handle, but does from exterior
handle.
Child safety lock is activated.
See OEM owner manual to deactivate child
safety lock.
Ramp sliding door closes half way
and then moves back and forth.
Stuck door open limit swith, or CAN BUSS door
opener Module.
Adjust swtich located in rear of lower door track,
or unplug module & wait 2 seconds.
Door handle is not releasing.
Pull handle to disengage latch and slide to
close.
Obstruction. Check door track for any debris and remove.
Ramp sliding door will NOT CLOSE
manually.
Ramp sliding door does NOT
OPEN with interior OEM push
buttons after pressing OTC reset
button.
Ramp sliding door attempts to
close (door motor runs) after ramp
stows, but door does not move.
Ramp sliding door kicks back when
opening or closing.
Ramp sliding door does not seal
when almost closed.
Passenger sliding door does NOT
OPEN with interior Rollx Vans user
button.
Note: In order to disable the OEM door from closing when the ramp is out, Rollx Vans interupts
Chryler’s CAN BUS circuit to prevent the door from getting any signal to close. The Scan tool will read
a “No Communication with the Right Rear Door Module” everytime the system deploys
the ramp. This is a normal trouble code and is to be excpected.
Page 11
Page 17
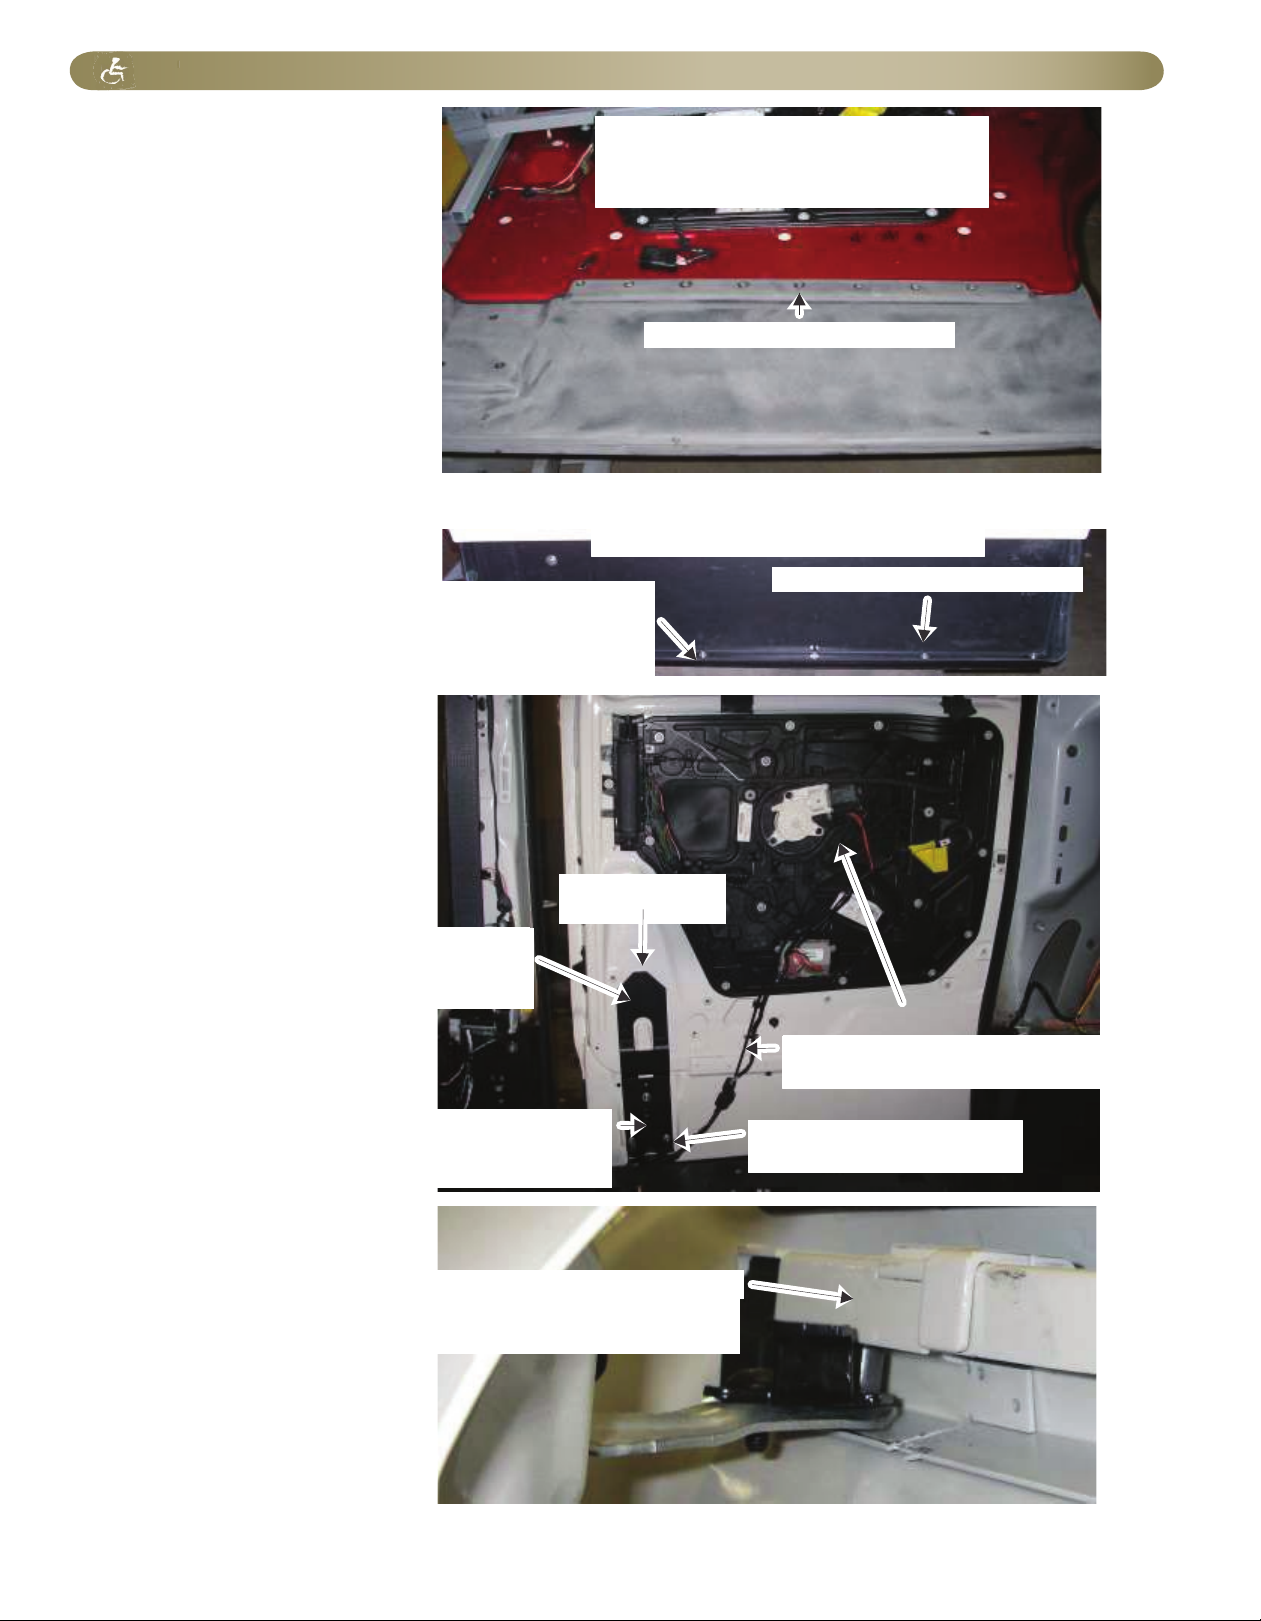
door ModificaTionS
#10277 - Rivets (9 per Door)
Inner Door Skin (Extension)
Driver Side - #B08180-D5
Passenger Side - #B08180-P5
DOOR TRACK EXT BKT UPPR 08
#B08030ASM
Needs to be painted to match van
Outer Sliding Door
#10277 - Rivets (6 per Door)
Door extension kits
part numbers and
descriptions
-B08180-D5-KIT-ITF
Door skin svc kit itf dr
-B08180-D5-KIT-FO
door skin svc kit fo dr
-B08180-P5-KIT-ITF
Door skin svs kit itf pass
-B08180-P5-KIT-FO
Door skin svs kit fo pass
OEM BOLT (3)
A#6505 480A
#B08033
‘08 LOWER DOOR ARM
(Spaceship bracket)
OEM LOWER DOOR ROLLER ARM
Passenger Side - #5020 920AB
Driver Side - #5020 921AB
Current
#B08180-DP6 - L BRKT DOOR SKIN DR/PASS 08
Before 10/20/2008
#10503 - 1”X 1” 14GA ROLLED ANGLE
CABLE POWER DOOR 2008
#AR-2008
BOLT (3) - #0115007
WASHER (3) - #1133004
Page 12
Page 18
door ModificaTionS
DOOR TRACK EXT BKT LOWR 08 ASM
#B08032ASM
(#B08032-1ASM Vans Started after 7/21/2010)
(Includes Switch, Wire Harness, and Bracket)
SNAKE CONNECT BLOCK SLIDE ARM
#B08050 (Not Shown)
BUMPER, MIDDLE TRACK
#9306K14
Passenger Sliding Door Middle Track
ZOOM +
Door track kits and descriptions include OEM track and door open switch bracket
B08059asm-dr - Door track asm 08-09 dr
B08059asm-dr-2010 - Door track asm 10-13 dr
B08059asm-ps - Door track asm 08-09 ps
B08059asm-ps-2010 - Door track asm 10-13 ps
DOOR OPEN SWITCH
ASSEMBLY - #05089-003
Built Before 8/26/2013
DOOR TRACK EXT BKT LOWR 08
#B08032
(#B08032-1 Vans Started after 7/21/2010)
1/4-20X1/2” Hex Bolt
#0115001
FHSCS 1/4-20X1/2 ZB
#94222
Page 13
Page 19
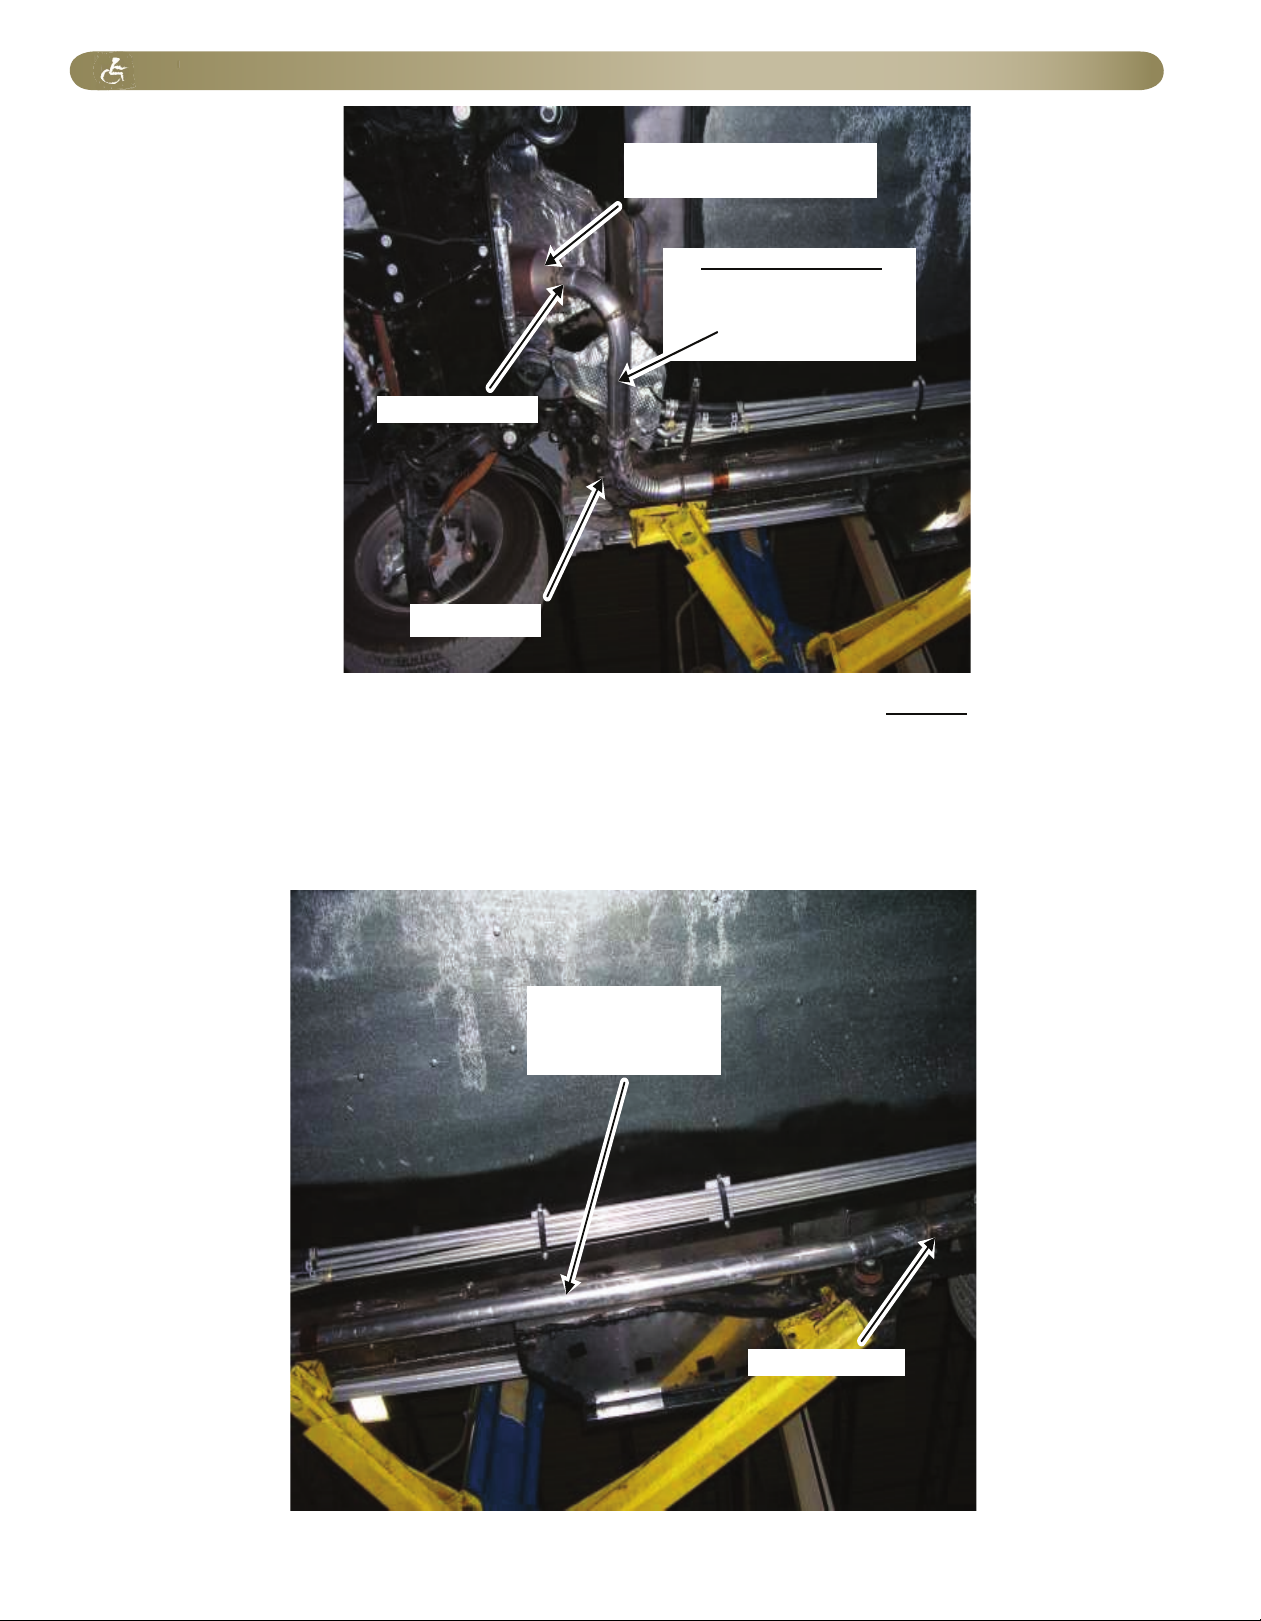
Rollx Vans Exhaust
#B08201-SS
Rollx Vans begins their exhaust from the OEM Catalytic Converter (Rollx Vans does not modify the OEM
Catalytic Converter or OEM 02 Sensor). Rollx Vans Exhaust is welded to the OEM Catalytic Converter
and runs down the passenger side of the van.
Rollx Vans reuses the OEM Hangers to support the exhaust. Rollx Vans Exhuast is 2-1/4 inch diameter
aluminized tubing and replaces the OEM 2-1/2 exhaust.
OEM Hanger
Rollx Vans Weld
OEM Catalytic Converter /
O2 Sensor
Rollx Vans Exhaust
3.3L & 3.8L #B08200-SS
4.0L #B08202
3.6L #B11200-SS
Rollx Vans Weld
eXhauST SYSTeM
Page 14 Page 14
Page 20
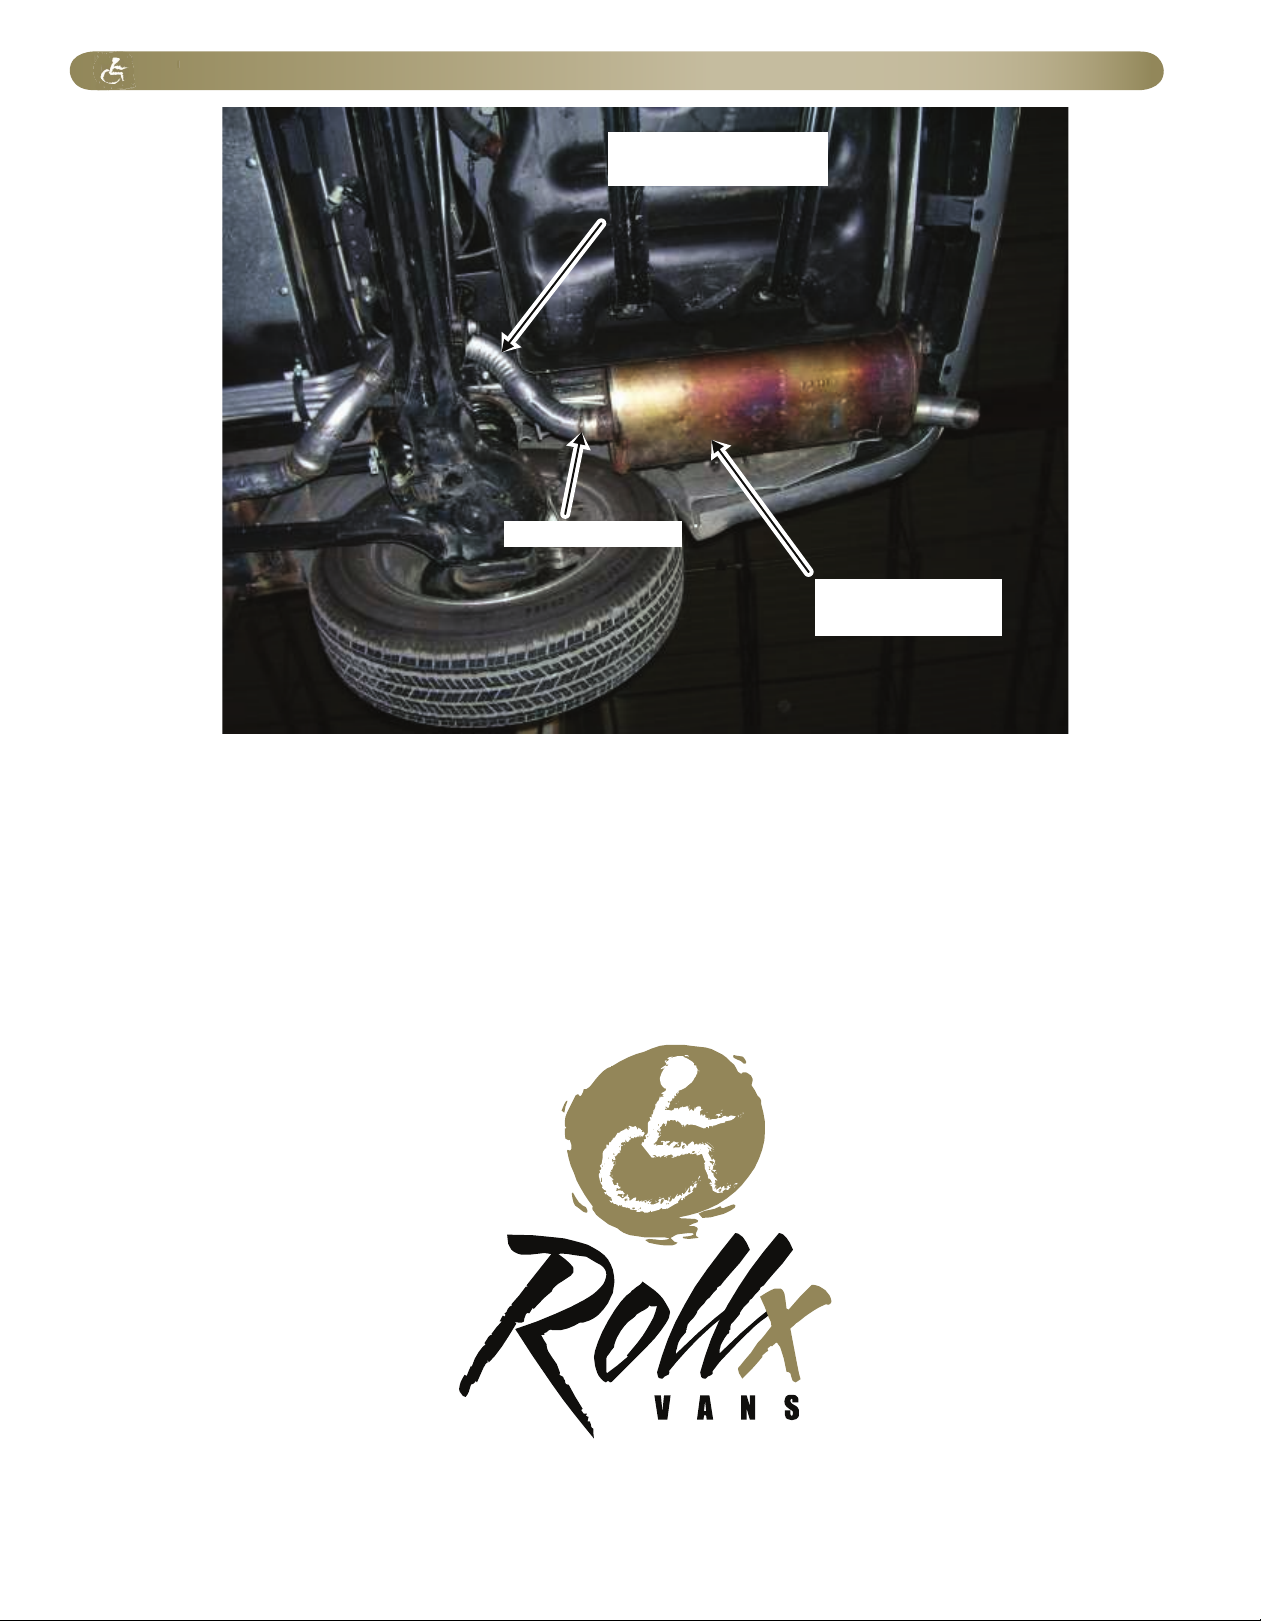
Rollx Vans Exhaust continues over the rear axle and is welded to the OEM Muffler and Tailpipe.
Rollx Vans eliminates the OEM Resonator.
Rollx Vans Exhaust
#B08201-SS
OEM Muffler and
Tailpipe
Rollx Vans Weld
eXhauST SYSTeM
Page 15
Page 21
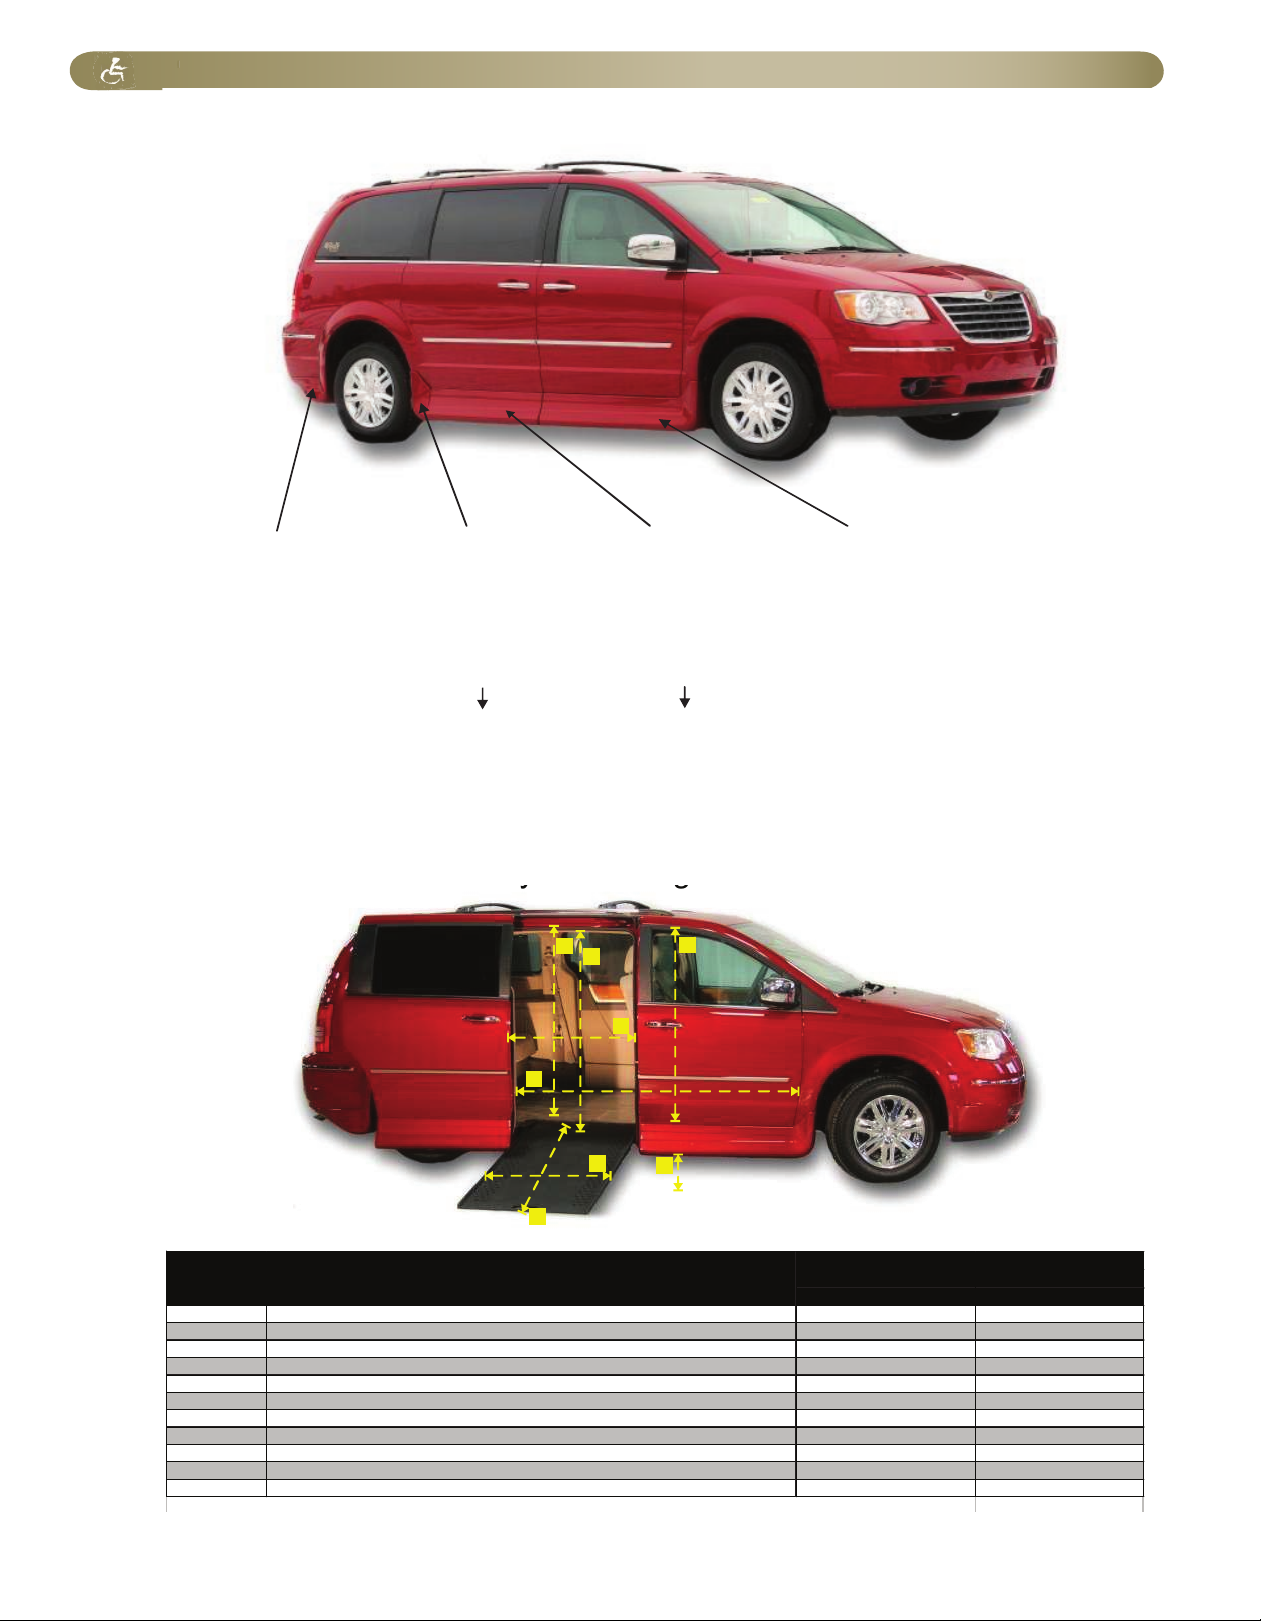
eXTerior / van diMenSionS
AAAAA21AAAAA2AAAA2
3
4
5
7
6
68
2011-2013 Chrysler / Dodge Minivan Dimension Sheet
Rollx Vans Chrysler/Dodge Rollx Vans Chrysler/Dodge
In The Floor Ramp Folding Ramp
11 Inch Drop 11 Inch Drop
1 Floor to Ceiling Height 58 58
2 Passenger Sliding Door Opening Height 54.5 54
3 Floor to Overhead Console 57 57
4 Passenger Sliding Door Opening Width 31.5 31.5
5 Cargo Area Length (Rear "z" to Firewall Along Floor) 84 84
6 Ground Clearance - Ground Effect 7 7
7 Ramp Length 50 55.5
8 Ramp Width (Inside Wall to Inside Wall) 30 29
Cargo Area Width When Closed (Door to Door / Door to Ramp) 66.5 61.5
Ground Clearance - Lowest Point (Exhaust) 5.5 5.5
Cargo Area Length (Rear Sofa to Clip-in Base) 54.5 54.5
* All measurements are subject to change depending on various van configurations and should be used as approximation
s.
Measurement Description
#B08180-P1
#B08180-D1
(Before 12/2/08)
#B08180-P3
#B08180-D3
(After 12/2/08)
#B08180-P3.2
#B08180-D3.2
(Chrysler Vans Only)
(Dodge Vans Only)
#B08180-P4D
#B08180-D4D
#B08180-P4
#B08180-D4
#B08180-P = Passenger Side
#B08180-D = Driver Side
(Before 12/2/08)
#B08180-P2
#B08180-D2
(After 12/2/08)
#B08180-P2.2
#B08180-D2.2
When replacing either of these ground effects on a 2008 Chrysler van built before 12/2/08. order
as follows:
D3 or P3 = it is necessary to replace both the D2 and D3 with the new D2.2 and D3.2
(same for passenger side).
D2 or P2 = we have about 20 in stock of each so just replace that required piece until
out of stock, then follow above rule.
Ÿ
Ÿ
Page 16 Page 16
Page 22
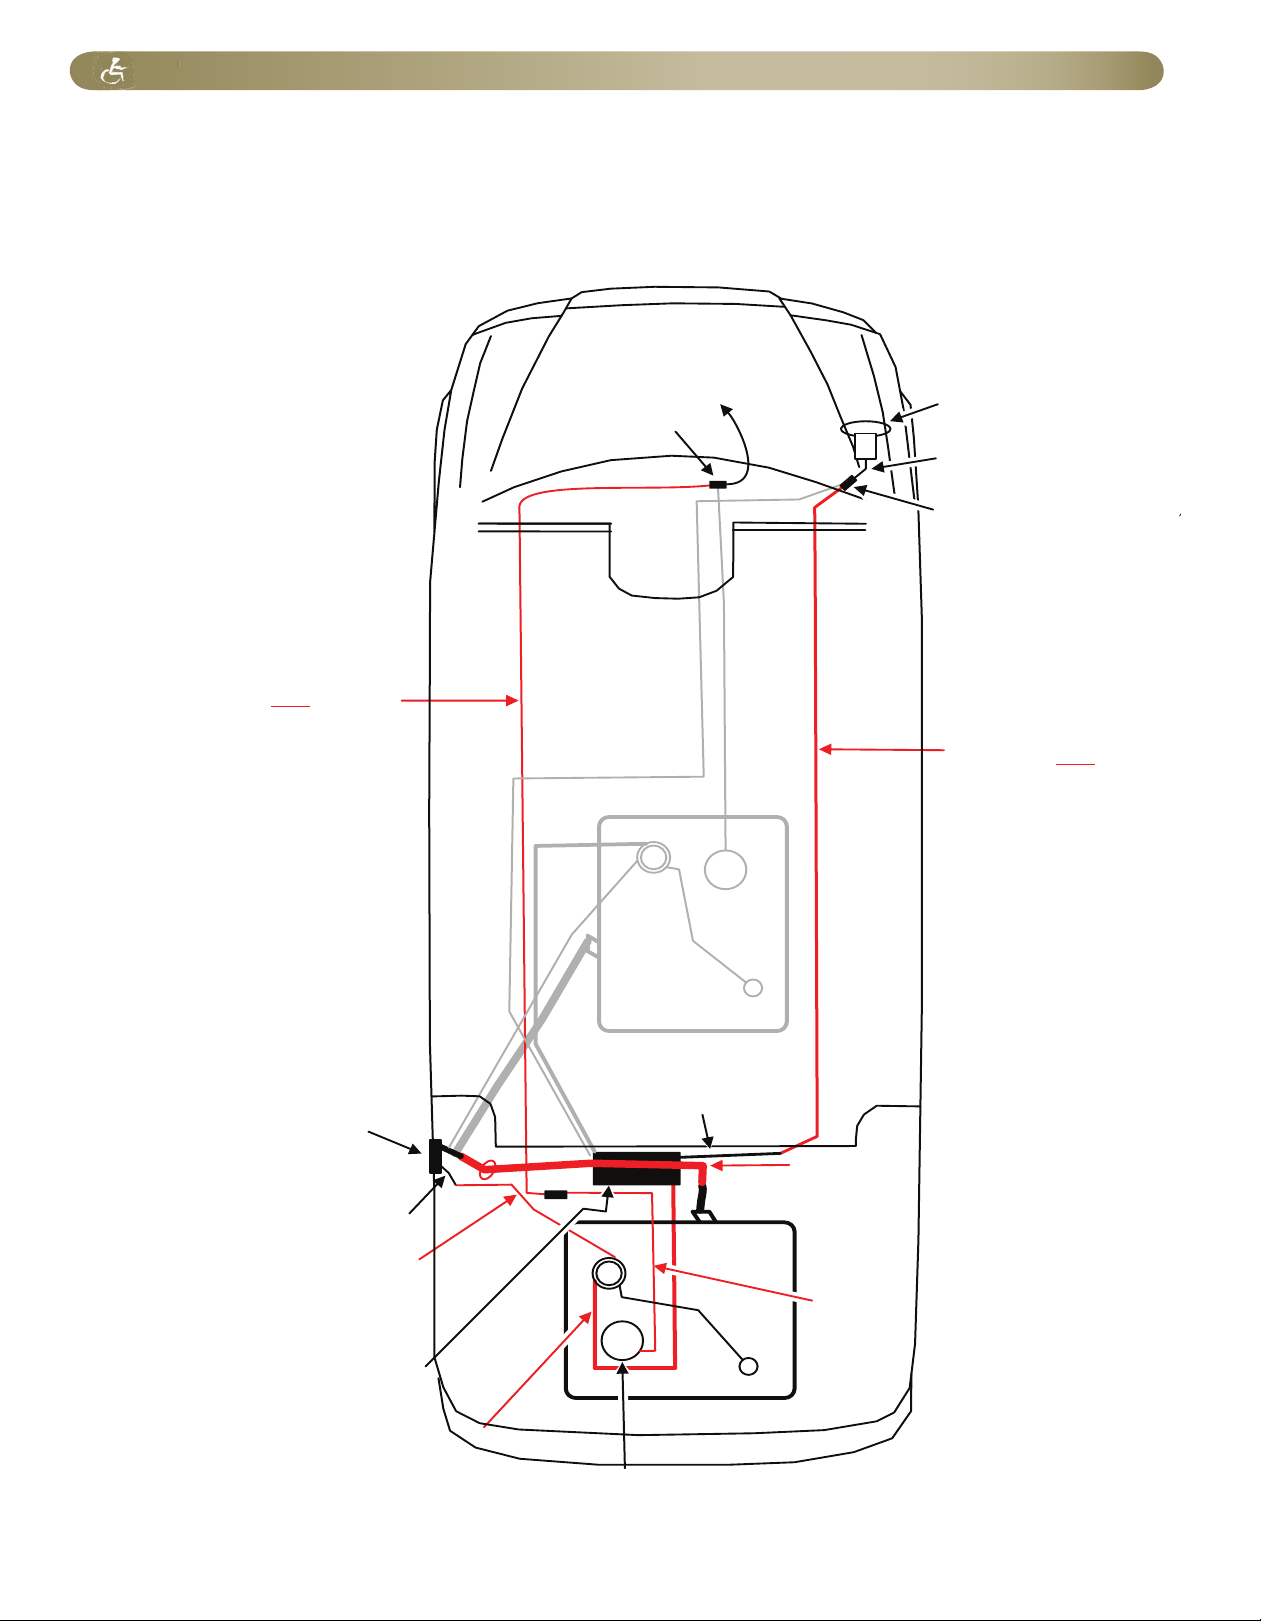
OEM Filler Neck Top
(Gas Cap)
OEM Fuel Fill
Vent Line
Rollx Vans Fuel Fill
Vent Hose (5/16”)
OEM Fuel
Tank
Rollx Vans Charcoal
Canister Vent Hose (5/8”)
OEM Fuel Pump /
OEM Fuel Filter
Rollx Vans Main Fuel Hose (3/8”)
Rollx Vans Filler Neck Metal Tube
Rollx Vans Main Fuel Metal Line (5/16”)
Rollx Vans Charcoal
Canister Vent Metal Line (3/8”)
OEM Charcoal
Canister
To Engine
OEM Fuel Quick
Disconnect (5/16”, 0°)
Pre-modified
OEM Setup
2011-2014 Chrysler Town & Country / Dodge Grand Caravan (3.6L)
Rollx Vans Fuel / Emission System Overview
(V5)
OEM EGR Valve
OEM Plastic Line
OEM Quick Disconnect (3/8”, 45°)
OEM Charcoal
Canister Vent Line
*See page 18 for Rollx Vans part #’s
fuel SYSTeM
Page 17
Page 23
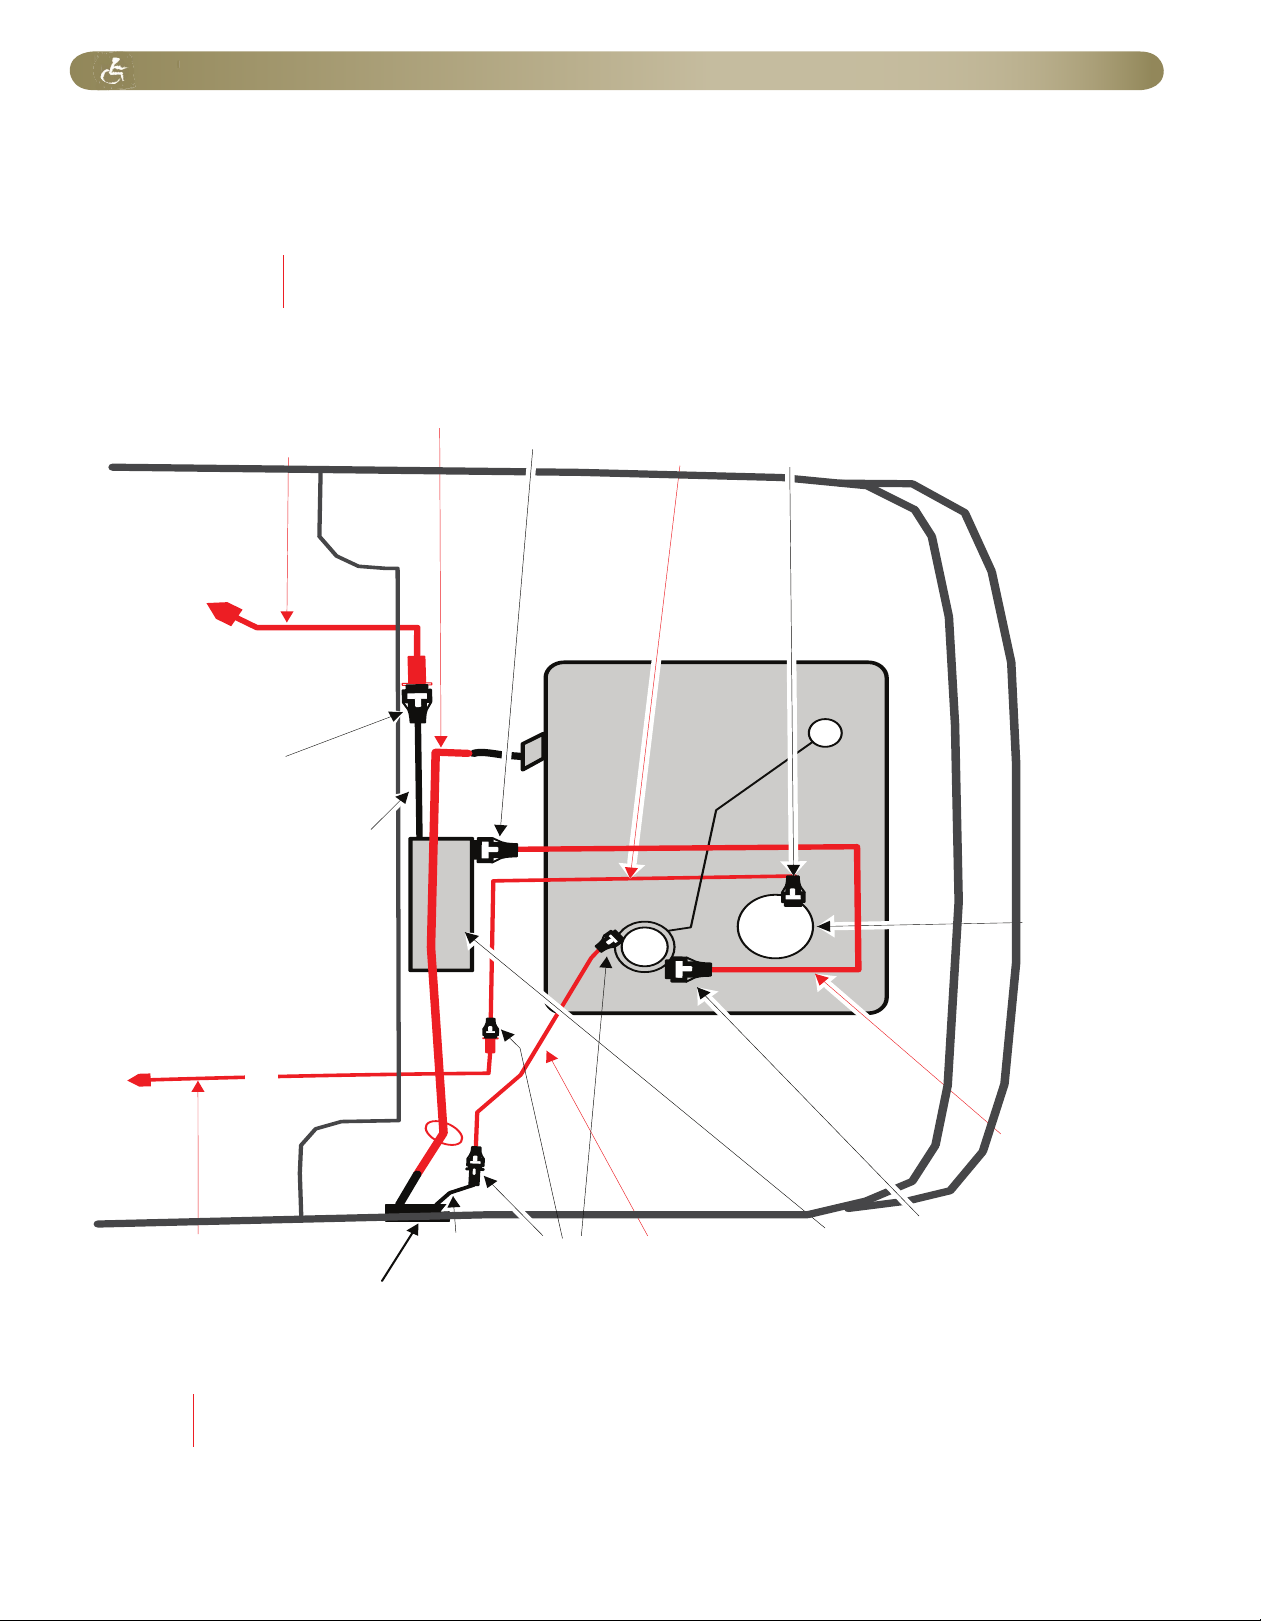
OEM Filler Neck Top
(Gas Cap)
OEM Fuel Fill
Vent Metal Line
Rollx Vans Fuel Fill
Vent Hose (5/16”)
Part #H-211
(5/16” HIGH PRESSURE
HOSE-R9) 37 inches
OEM Fuel
Tank
Rollx Vans Charcoal
Canister Vent Hose (5/8”)
Part #10929-00834
(FUEL LINE 5/8”-R7)
53 inches
OEM Fuel Pump /
OEM Fuel Filter
Rollx Vans Main Fuel Hose (3/8”)
Part #H-212
3/8” HIGH PRESSURE HOSE-R9)
40 inches
Rollx Vans Filler Neck
Part #B08103ASM
(FILLER NECK 2008 ASM)
Rollx Vans Main Fuel
Metal Line (5/16”)
Part #126299
(5/16”X028/X13' FUSION)
Rollx Vans Charcoal
Canister Vent Metal Line (3/8”)
Part #101865
(3/8”X028X13' FUSION WELD)
OEM Charcoal
Canister
OEM Charcoal
Canister Vent Line
OEM Quick Disconnect (3/8”, 90°))
OEM Quick
Disconnect (5/16”)
OEM Quick Disconnect (5/8”)
OEM Quick Disconnect (5/8”)
OEM Quick Disconnect (3/8”)
0°
OET 15
90°
90°
OET 17
45°
OET 17
90°
Clamp #10
45°
Clamp #10
90°
OET 15
fuel SYSTeM
Page 18
Page 24
fuel SYSTeM
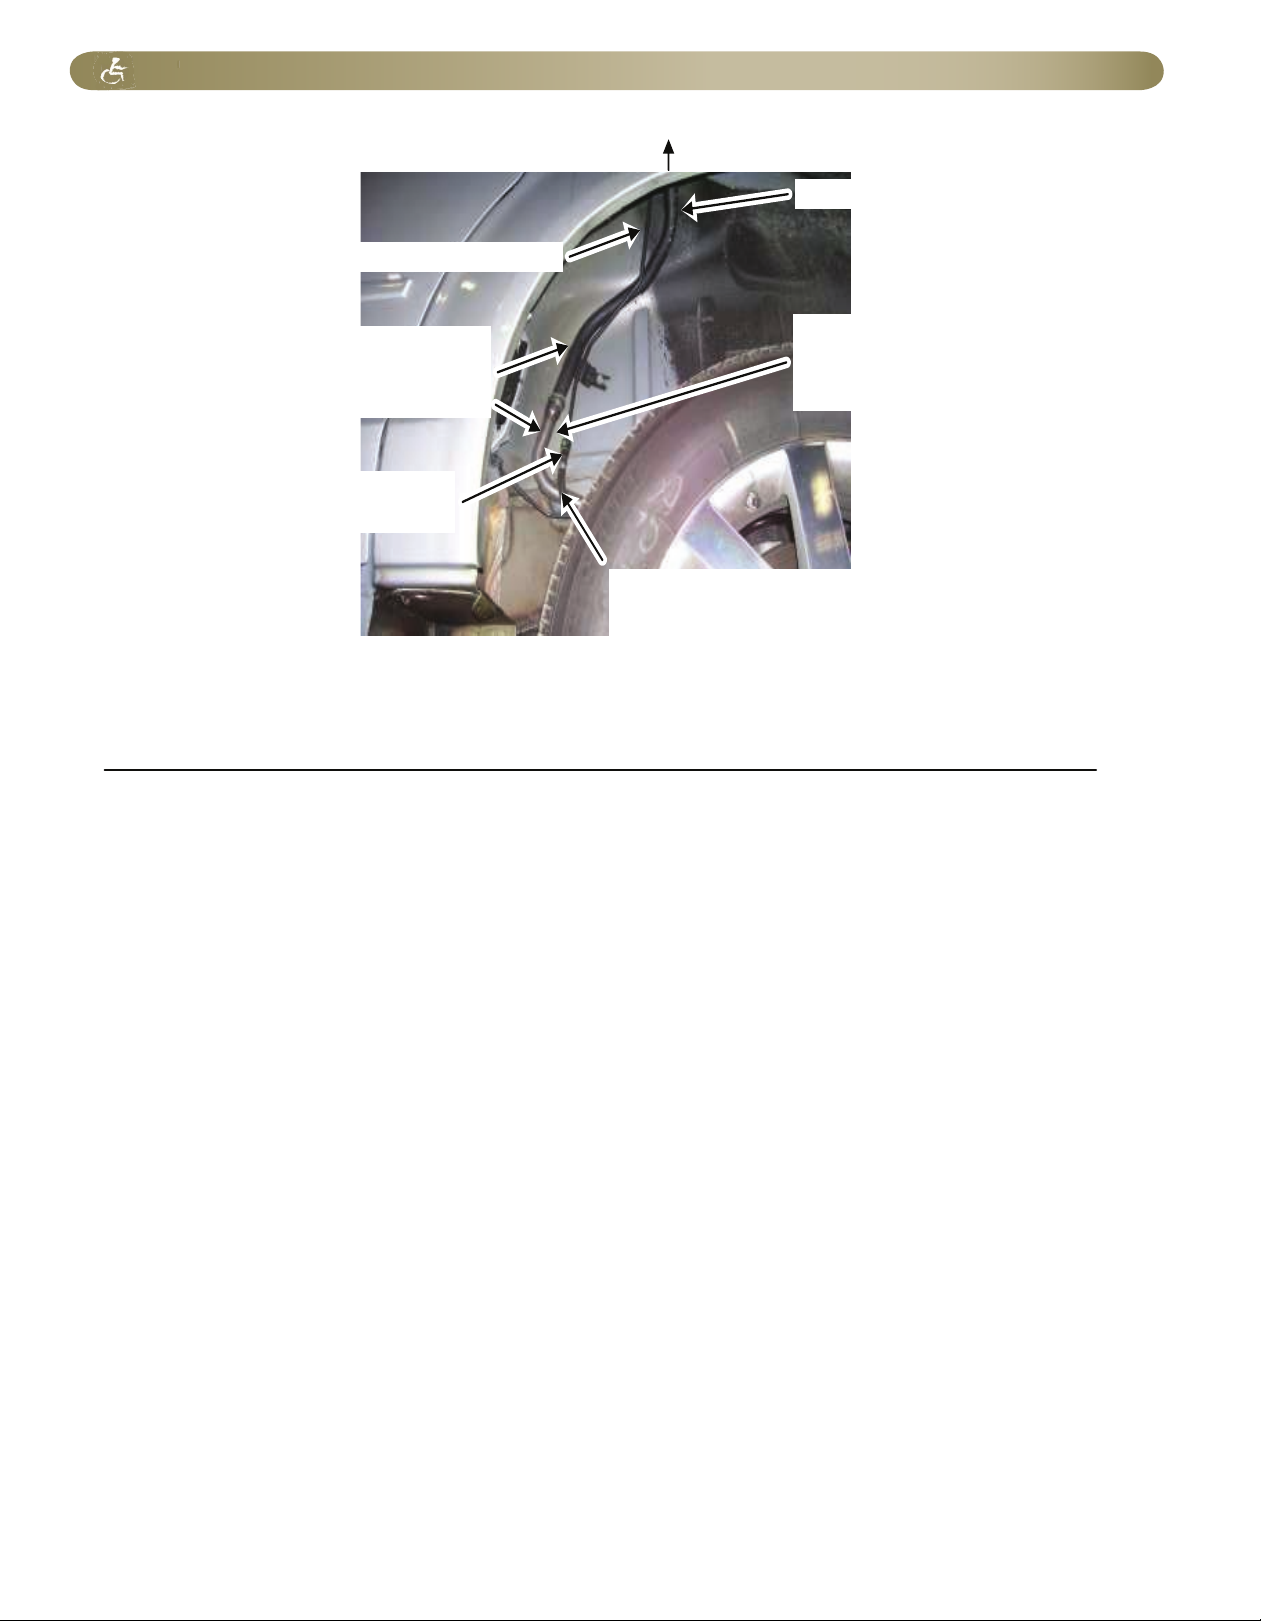
OEM Fuel Fill Neck
OEM Fuel Fill Vent Line
Rollx Vans Fill Neck Extension
#B08103
(Aluminized Steel Tubing)
OEM Fuel Filler Neck (Gas Cap)
Rollx Vans welds a Fill Neck Extension onto OEM Fuel Fill Neck to extend the OEM Fuel Fill Neck to
the OEM Fill Neck Hose that attaches to the tank. The completed assembly is #B08103ASM that
includes the OEM Fuel Fill Neck welded to the Rollx Vans Fill Neck Extension. The modified filler neck
Is smoke tested for possible pin hole leaks.
Rollx Vans attaches a Fuel Fill Vent Hose that begins at the gas tank to the OEM Fuel Fill Vent Line
with a 9/16” clamp. This hose and the filler neck tube are routed underneath the frame.
Rollx Vans Fuel Fill Neck
Assembly
#B08103ASM
Rollx Vans Fuel Fill Vent Hose
#H-211
(5/16” Fuel Injection Hose,SAE 30R9, Goodyear)
OEM Quick Disconnect
with Rollx Vans Clamp #OET 1315 (5/16”)
Page 19
Page 25
fuel SYSTeM
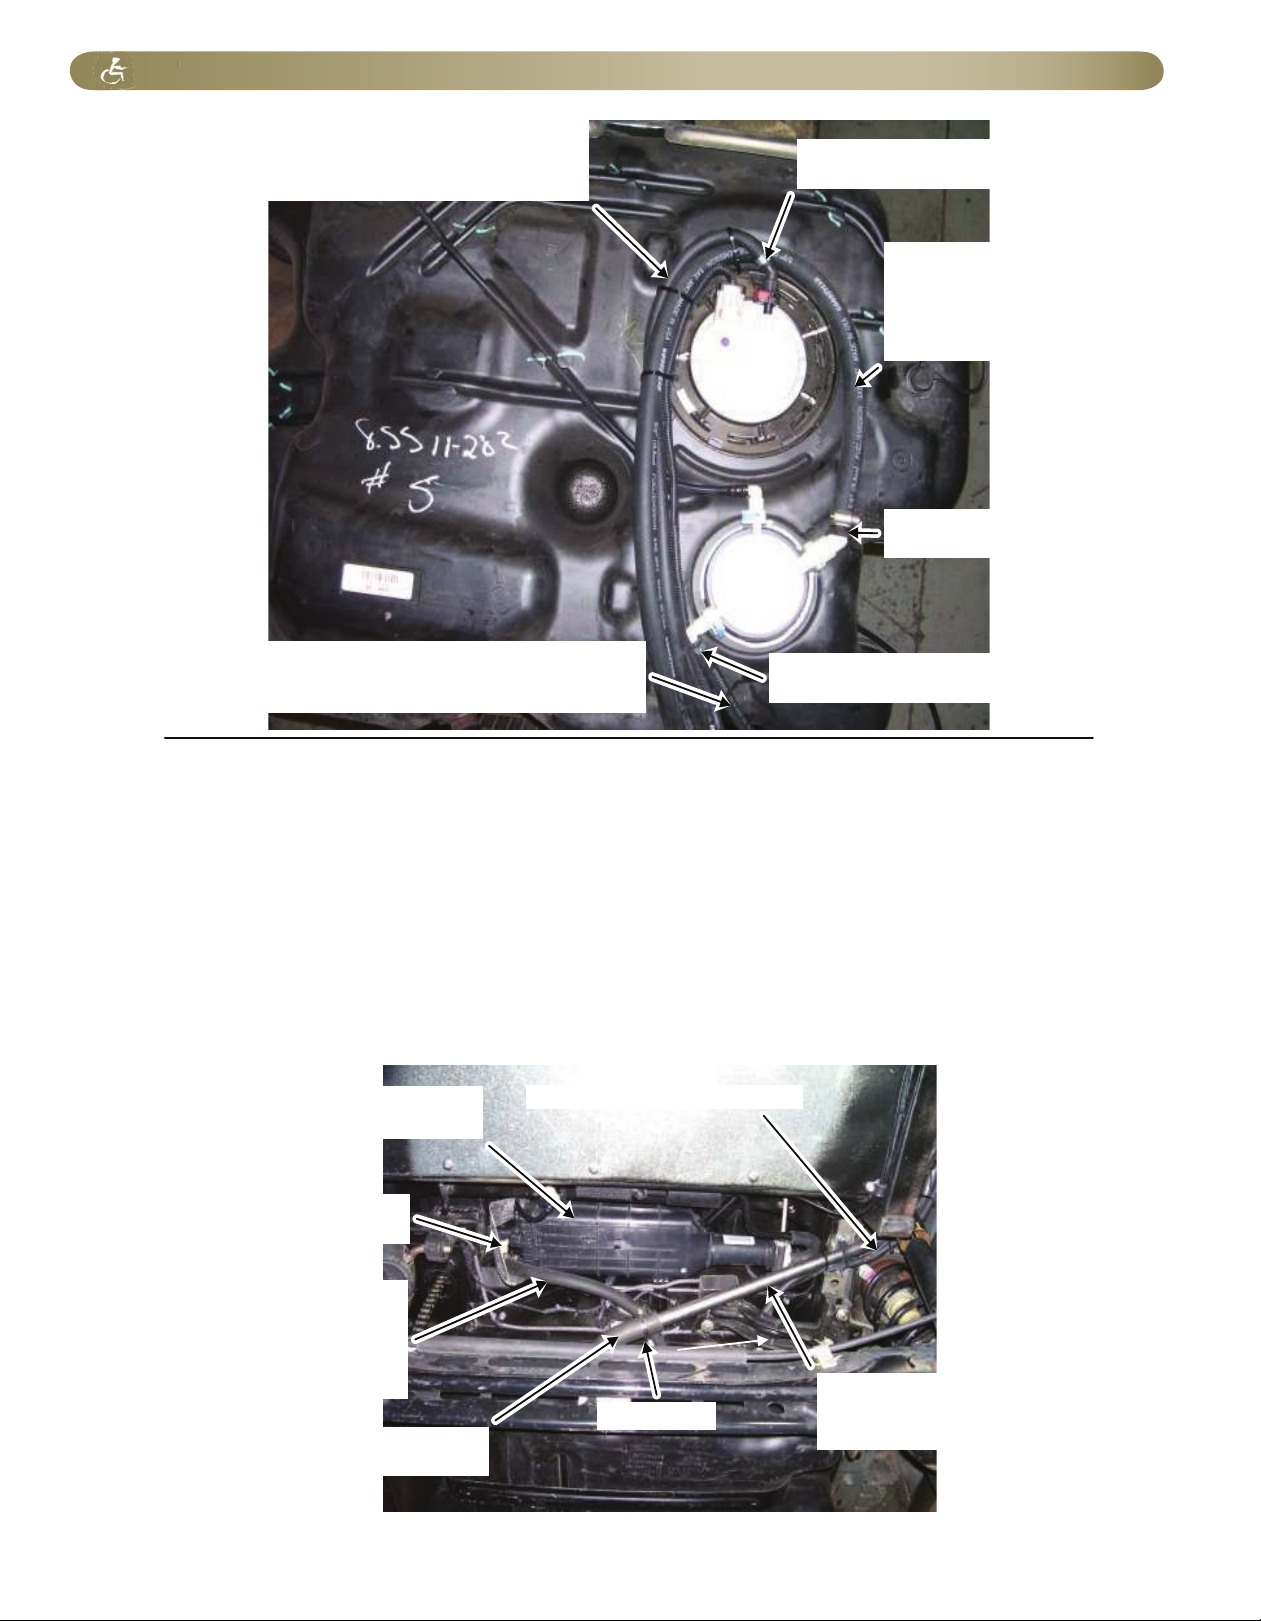
Rollx re-uses the OEM Gas Tank.
Vans
Rollx replaces OEM Fuel Fill Vent Hose with Rollx Fuel Fill Vent Hose that runs to OEM Fuel
Vans Vans
Vent Line near Filler Neck top (Gas Cap).
Rollx replaces OEM Charcoal Canister Vent Hose with Rollx Charcoal Canister Vent Hose
Vans Vans
that runs to OEM Charcoal Canister. Rollx does not modify the OEM Charcoal Canister or its mounting.
Vans
Rollx replaces OEM Main Fuel Hose with Rollx Main Fuel Hose that runs to Rollx Main
Vans Vans Vans
Fuel Metal Line where it is attached to the flared metal line with the OEM Quick Disconnect.
Rollx Vans Main Fuel Hose
Part
#H-212
(3/8” Fuel Injection Hose,SAE 30R9,180 PSI,WP,
CARB #c-u-06-002, Gates Corp.)
Rollx Charcoal Canister Vans
Vent Hose
Part #10929-00834
(5/8” Fuel/Emissions Hose,
SAE 30R7, Goodyear)
Rollx Fuel Fill Vent Hose
Vans
OEM Quick Disconnect
with #10 Hose Clamp
Rollx Fuel Fill Vent Hose Vans
Part
#H-211
(5/16” Fuel Injection Hose,SAE 30R9, Goodyear)
OEM Quick Disconnect with
Rollx Clamp #OET 1315 (5/16”) Vans
Part
OEM Fuel Fill Hose
at Tank
OEM Clamp
Rollx Fill Neck Extension
Vans
Part #B08103ASM
(Aluminized Steel Tubing)
Rollx Charcoal Vans
Canister Vent Hose
Part #10929-00834
(5/8” Fuel/Emissions Hose,
SAE 30R7, Goodyear)
OEM Charcoal Canister
(OEM mounting)
OEM Quick Disconnect with
Rollx Clamp #OET 1317 (3/8”)Vans
Part
OEM Quick Disconnect
with #10 Hose Clamp
Page 20
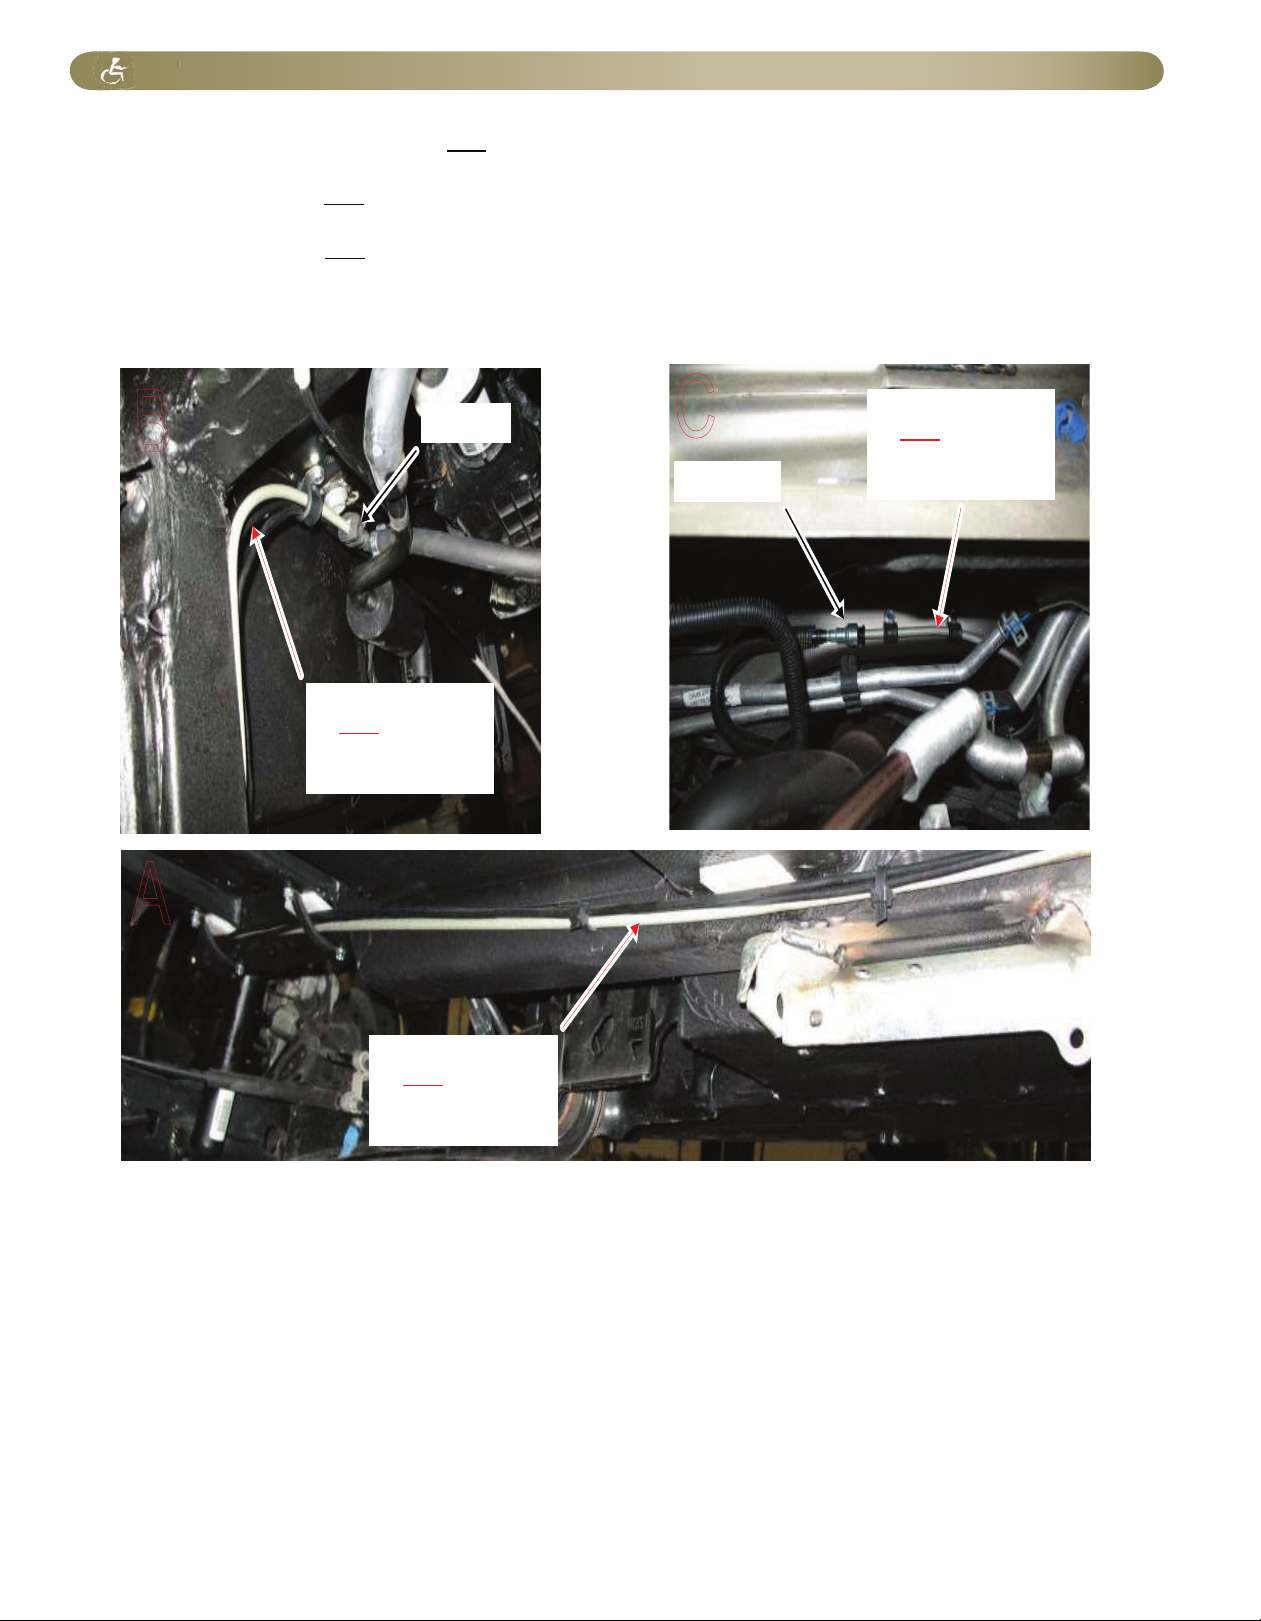
Page 26
fuel SYSTeM
A) Rollx routes the Rollx Main Fuel Metal Line (5/16”) under the driver’s side of the van using P-Clamps to secure.
Vans Vans
B) The Rollx Main Fuel Metal Line (5/16”) is routed up the rear z, flared and attached to OEM Quick Disconnect.
Vans
C) The Rollx Main Fuel Metal Line (5/16”) is routed up under the engine compartment, flared and attached to OEM Quick Disconnect.
Vans
Rollx Vans Main Fuel
Metal Line (5/16”)
Part #126299
(5/16”X028/X13' FUSION)
Rollx Vans Main Fuel
Metal Line (5/16”)
Part #126299
(5/16”X028/X13' FUSION)
Rollx Vans Main Fuel
Metal Line (5/16”)
Part #126299
(5/16”X028/X13' FUSION)
OEM Fuel Quick
Disconnect (5/16”, 0°)
A
B
C
OEM Fuel Quick
Disconnect (5/16”)
Engine Compartment
Page 21
Page 27
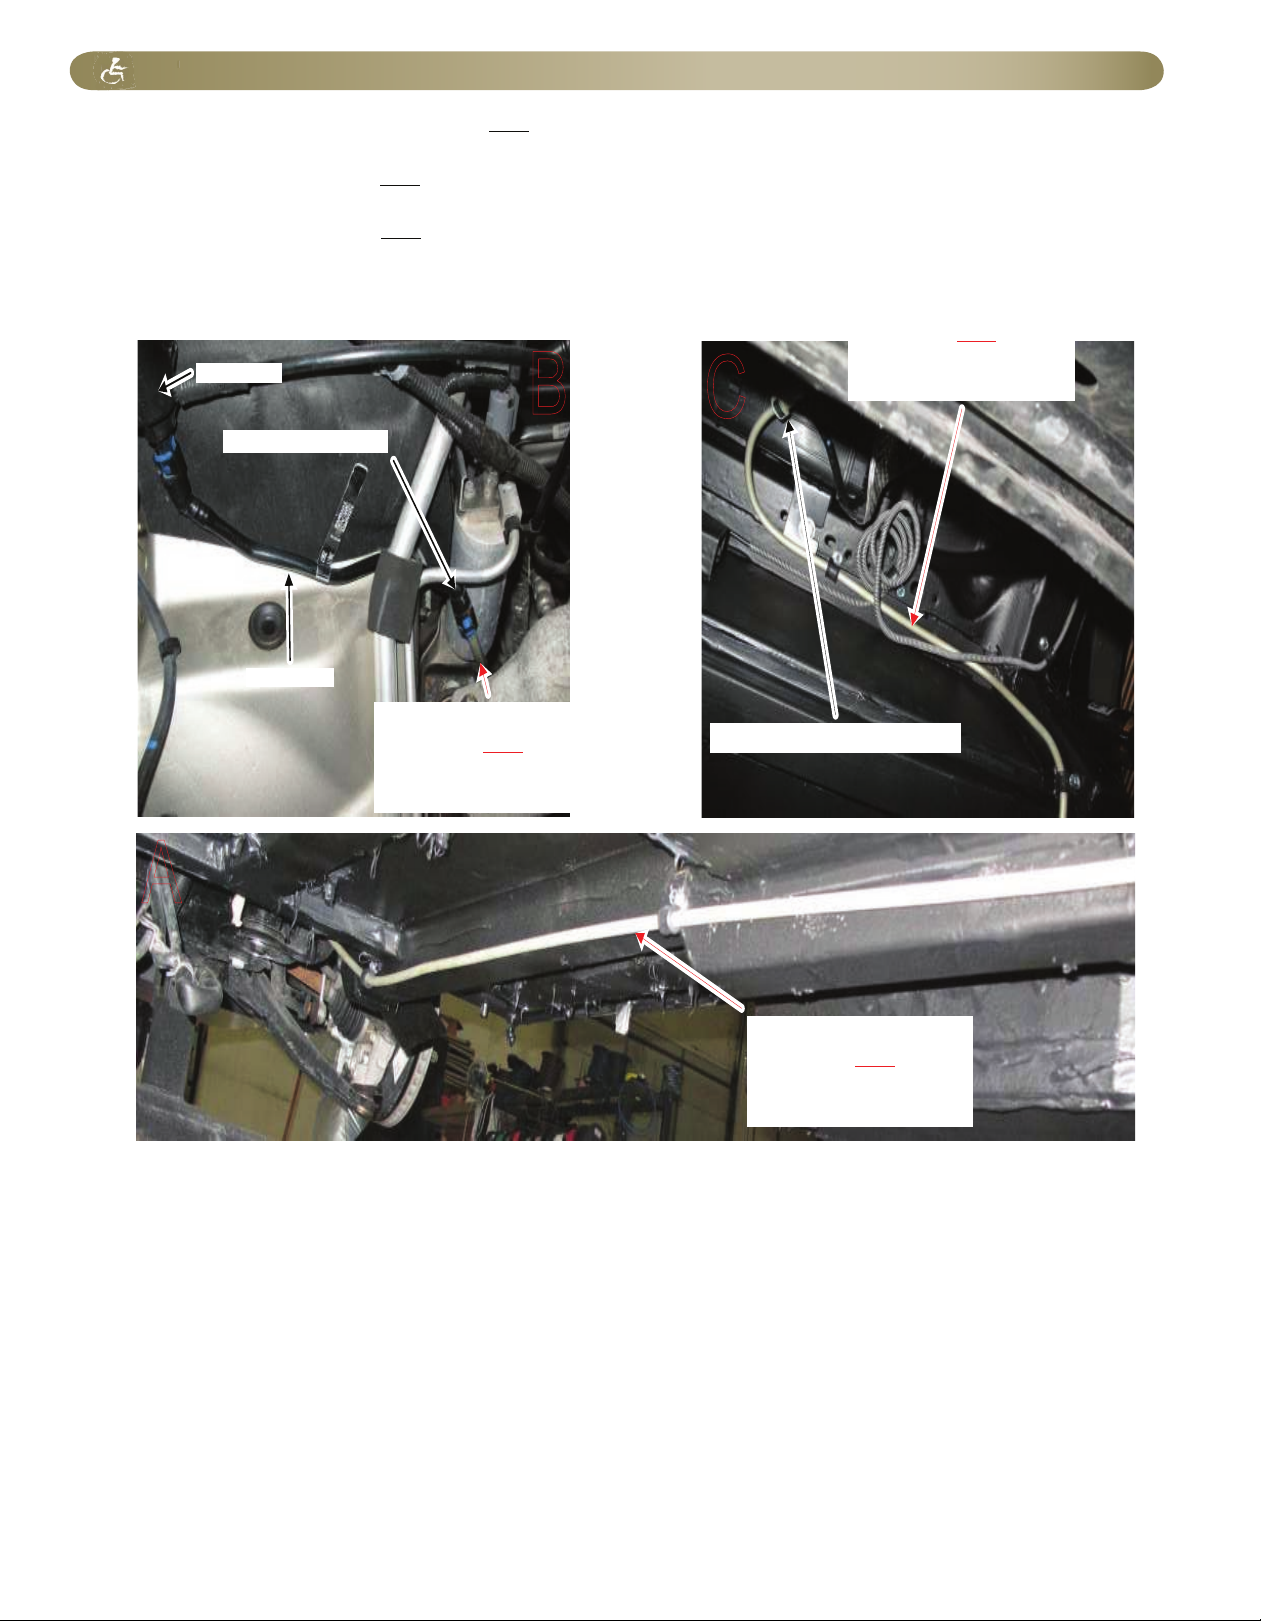
fuel SYSTeM
A) Rollx runs the Rollx Canister Vent Metal Line (3/8”) under the passenger side of the van using P-Clamps to secure.
Vans Vans
B) The Rollx Canister Vent Metal Line (3/8”) is routed up under the engine compartment, flared and attached to OEM Quick Disconnect.
Vans
C) The Rollx Canister Vent Metal Line (3/8”) is routed up the rear z, flared and attached to OEM Quick Disconnect.
Vans
A
B
C
Engine Compartment
Rollx Vans Charcoal
Canister Vent Metal Line (3/8”)
Part #101865
(3/8”X028X13' FUSION WELD)
Rollx Vans Charcoal
Canister Vent Metal Line (3/8”)
Part #101865
(3/8”X028X13' FUSION WELD)
OEM Quick Disconnect (3/8”, 90°))
Rollx Vans Charcoal
Canister Vent Metal Line (3/8”)
Part #101865
(3/8X028X13' FUSION WELD)
OEM Quick Disconnect (3/8”, 45°)
OEM Plastic Line
OEM EGR Valve
Page 22
Page 28

Strut Collar Assembly #B08001ASM
Adjustable
Camber Bolt #41-214
Front Strut Mounting Bolts #B08001ASM
BOLTS:
5/16” -18 x 1” (QTY 6)
#0115055
WASHERS:
1/4” ZINC FLAT(QTY 6)
#1133004
LOCK WASHERS:
5
/16” (QTY 6)
#1133892
*Reuse OEM strut collar nuts
to fasten collar to strut.
OEM
Camber Bolt
Stabilizer Bar Link
Strut Assembly
fronT SuSPenSion
Page 23
Page 29

Snubber Extension Assembly
p.n. B08055ASM
Vans Built Prior to 1-2-2013
SERVICE KIT #R0046
COIL SPACER ON BOTTOM
Vans Built After 1-2-2013
SNUBBER EXTENSION ON TOP
Kneel Axel Mount B08022
Brake line bracket B08068ASM-DR
Brake line bracket B08068ASM-PS
Traction Bar Spacers B08065
BOLTS:
(QTY 4)
M10-1.50 x 100mm
#0153998
WASHERS: (QTY 4)
1/2” ZINC FLAT
#1133012
Traction Bar
Trailing Arm
Shock Absorber
Coil Spacer
Coil Spacer
rear SuSPenSion
Page 24
Page 30

engine MounTing (cradle droP)
Front Engine Mount
Right Side Engine Mount
Left Side Engine Mount
1” Motor Mount
N05010 (QTY 4)
2.5” Motor Mount
N05011 (QTY 5)
BOLTS:
M10-1.50 x 70mm (QTY 3)
#0153994
WASHERS:
3/8” ZINC FLAT(QTY 3)
#1133008
BOLTS:
M12-1.50 x 70mm (QTY 2)
#38503
WASHERS:
1/2” ZINC FLAT(QTY 2)
#1133012
BOLTS:
M14-2.0 x 190mm (QTY 4)
#0122055
Left Cradle Mount
(Right side same)
Left Crossmember Bracket
(Right side same)
WASHERS:
3/8” ZINC FLAT(QTY 4)
#1133012
BOLTS:
M12-1.75 x 50mm (QTY 4)
#0122055
WASHERS:
3/8” ZINC FLAT(QTY 4)
#1133012
OEM Isolator bolt
#4721 746AB (QTY 1)
1” Motor Mounts
N05010 (QTY 5)
Page 25
Page 31

TorQue SPecificaTionS
Torque Specifications
Location Torque
100 Ft. Lbs.
116 Ft. Lbs.
65 Ft. Lbs.
21 Ft. Lbs.
21 Ft. Lbs.
100 Ft. Lbs.
40 Ft. Lbs.
129 Ft. Lbs.
60 Ft. Lbs.
55 Ft. Lbs.
55 Ft. Lbs.
Engine & Cradle Front Engine Mount 83 Ft. Lbs.
Mounting
40 Ft. Lbs.
70 Ft. Lbs.
Left & Right Cradle Mounts 120 Ft. Lbs.
Left & Right Cross Member Brackets (M14 Bolts) 120 Ft. Lbs.
Left & Right Cross Member Brackets (M12 Bolts) 40 Ft. Lbs.
Right Side Engine Mount
Left Side Engine Mount
Front Suspension Wheel nuts
Camber Bolts
Stabilizer Bar Link Nuts
Rear Suspension
Trailing Arm Pivot Thru-Bolts
Item
Shock Absorber Upper Mounting Bolts
Shock Absorber Lower Mounting Bolts
Strut Collar-to-Strut
Traction Bar To Axle Bolts
Strut Collar-to-Body
Trailing Arm Bracket-to Body Bolts
Wheel nuts
Page 26
Page 32

L-TRACK 12 HOLE #10015-1
L TRACK 5 HOLE - #10006
L TRACK 3 HOLE (FRONT) #10016
L-TRACK 4-(FRONT) #Fe200763
END CAP FOR SERIES L
#8663 END CAP
L-TRACK 6 HOLE #10007-1
CLIP IN SEAT BASE COVERS
#B08070-1
FOLDOUT RAMP ROLLER ASM
(NOT SHOWN, FOLDOUT RAMP ONLY)
BRACKET STABILIZER, 2008 - #F08018
ROLLERS CUSHIONED - #22875T11
DOG BONE COVERS
#B2205-1
B PILLAR INTERIOR
DRIVER #B8800-1
PASSENGER #B8801-1
DOOR PANEL INTERIOR
DRIVER #B8802-1
PASSENGER #B8803-1
Wheel Well Cover
Driver #B8808-1
Passenger #B8807-1
Interior Wire Cover #B8806-1
(may need to be painted to match)
inTerior
Page 27
Page 33

SEATBELT PASS, FEMALE, MED. SLATE
PART #1GX881D5AA
SEATBELT PASS. FEMALE, DK. SLATE
PART #1GX881S3AA
CLIP IN FOOTREST11 IN.,DR
#4003-11INCH-D-FOOTREST
#4003-11INCH-P-FOOTREST
CLIP IN COVER FLAP
(NOT SHOWN -
FLAP TO ACCESS SEAT
CONNECTORS)
#B08070
CLIP IN BASE,11
#4003-11-ASM-DR
#4003-11-ASM-PS
(INCLUDES FOOTREST)
TIRE COVER 2008 ASM
#B08060ASM
KNEEL ACCESS COVER
(NO PART NUMBER)
SEATBELT EXT L TRACK
#5086227AA-L
SEATBELT EXT 2008 12"FEM/MALE
(NOT SHOWN) - MAKES SHOULDER
HARNESS LONGER)
#5086227AA-EXT
SEAT BELT MOUNT BRKT "Z"
PART #STBLT1
inTerior
Page 28
Page 34

Kneeler TrouBleShooTing
Symptom Possible Cause Remedy
Kneel on / off switch is turned OFF. Turn kneel switch to the ON position.
Kneel motor or Broken Chain
Review display board. Turn kneel switch to the OFF position
and press OTC reset button. Operate without kneel option
enables. Contact customer service.
After van is lowered to ground the kneeler makes a loud ratcheting sound. Kneel down limit switch was not activated.
Adjust kneel down limit switch. Replace if broken. Contact
customer service.
Kneel on / off switch is turned OFF. Turn kneel switch to the ON position.
Kneel motor .
Review display board. Manually un-kneel van, turn kneel switch
to the OFF position and press OTC reset button. Contact
customer service.
Kneel up limit switch is activated incorrectly.
Adjust kneel up limit switch. Replace if broken. Contact
customer service.
Van raises and while door closing the kneeler ratchets. Kneel up limit switch is not activated.
Once door is closed and van is at normal height, turn kneeling
switch to the OFF position.
Van will NOT RAISE when ramp is stowed.
Van does NOT LOWER to ground while door is opening after Rollx Vans user button
is pressed.
Page 29
Page 35

Kneeler rePlaceMenT ParTS
1
2
3A
4
5
6
15
8
9
10
11
12
13
11
2
6
14
Part# KNEEL SNG OT-02 - Desc. KNEEL ASM CHRY, SNG,
OTC, 2005-12v2 (COMPLETE ASM)
3
Item Qty. Description Part #
1 1 ACTUATOR KNEELING ASM K2XG20-12V-08RX-ASM
2 2 50 CONN LINK N0511-C
3 1 KNEEL CHA IN ASM 2008 6261K534ASM-02 2008
3A 1.5 CHAIN 50 ROLLER 6261K534
4 1 KNEEL CHA IN SW IVEL K05012
5 1 COTTER PIN 98338A220
6 2 FLANGE BRG 10FDU06
7 1 SPRING TORSION ASM LTR-075M-6-5ASM
8 1 SPROCKET FOR #50 CHAIN 6280K249
9 1 KNEEL LIMIT SWITCH ASM 03220-003
10 2 SW ITCH TANG BZ-2RW80-A2 6X284
11 3 HCS 3/8-16 X 1YZ8 QPA 0115105
12 4 PPH MS 6-32 X 1 1/2Z 1128838
13 4 10-32 NYLOCK NMZ 1137015
14 1 ACTUATOR GUIDE ASM K05006ASM
15 1 KNEEL AXLE MOUNT B08022
1 RATCHET REVERSIBLE 800-0072*
1 SOCKET 3/8" 4PW71*
1 BOOT BLK " 2005" KNEELACT 152303*
* Not Shown
Parts on Va n
7
Page 30
Page 36

one Touch SYSTeM TrouBleShooTing
Symptom Remedy
Check that OTC ON/OFF switch is on. The power toggle switch
is on the actual board.
Ensure the connections on the back of the OTC board are tight.
Check the OTC main fuse (40 amp) located near the vehicles
main battery.
Check the OTC Board fuse (1 amp) located in the Rollx Fuse
Panel behind the glove box.
Reset the OTC. The reset is located on the dash by the drivers
left knee or on the OTC Board.
Check battery voltage.
Van has been sitting for an extended period of time. Charge the
battery.
Check the current draw by placing an ammeter in series with the
negative terminal on the battery with all doors closed and engine
off. The draw varies, but awake, the system should be less than
.850 amps and when sleeping, less than .050 amps. Additional
equipment installed will also vary these numbers. See Battery
section for more information.
The OTC display is garbled.
Reset the OTC. The reset is located on the dash by the drivers
left knee or on the OTC Board.
The van's battery is dead.
No power to One Touch Controller (OTC).
Battery is low. Turn off the OTC and charge battery. Note: The
alarm will sound when the battery voltage is below 11.4 vdc. This
is to prevent the OTC system from draining the battery far
enough as to prevent the vehicle from starting. This level is
adjustable in the board's Setup menu.
OTC beeps 4 times when the user tries to
run a normal open/close cycle.
Important: If OTC Board is removed, the OEM System will not operate normally unless the CAN
Bus Shunt is installed. The shunt is attached to the wire harness behind the OTC board. See OTC
Wiring Diagram for more information.
Page 31
Page 37

one Touch SYSTeM overvieW
The Rollx Vans One Touch Controller, known as the OTC, is a Single Board Computer specifically
designed for the Rollx Vans system.
The OTC system was designed to be independent to the operation of the Chrysler computer system.
When power is removed from the OTC, it has no effect on the operation of the Chrysler system as long as
the OTC Shunt Plug is installed into the OTC Main Harness on all 2008 Chrysler Vans due to the CAN
BUS system (see OTC Wiring Diagram for more information).
The OTC is a low power system. When the OTC is in Sleep Mode with the Display disabled, it typically
draws less then 10ma of current from the battery. When awake in Idle Mode (not running a cycle) with the
Display enabled, it typically draws less than 200ma of current from the battery.
The current state of the OTC can be determined by viewing the Display. During open or close operation
the progress of the system can be tracked by watching the Display.
OTC V8.0
8
Sequence of Operation
Open Cycle
1) The OTC is activated by any Rollx Vans User Switch or Remote being pressed.
2) Door unlock command sent (1 sec.) To Front Passenger Door Control Module to unlock all doors.
3) Door open command sent to OEM B-Pillar Door Open/Close Button to open the passenger sliding door.
4) Door starts to open.
5) Kneeler motor is turned on and starts to lower van.
*If door fails to open within 2 seconds of User Switch being pressed, cycle stops (van unkneels and
cycle is ended)
6) Door reaches open position and activates Rollx Vans Door Open Limit Switch.
7) Passenger sliding door is disabled by OTC interrupting the CAN Bus signal with built in relay.
8) Ramp motor is turned on and starts to deploy.
9) Kneeler stops lowering when Kneel Down Limit Switch is activated.
10) Ramp stops deploying when Ramp Down Limit Switch is activated.
11) OTC enters Idle Mode.
12) OTC enters Sleep Mode.
Close Cycle
1) The OTC is activated by any Rollx Vans User Switch or Remote being pressed.
2) Ramp motor is turned on and starts to stow.
3) After a few seconds (ramp is off the ground and begun to slide into van) kneeler motor is turned on and
starts to raise the van.
4) Kneeler stops raising when Kneel Up Limit Switch is activated.
5) Ramp stops stowing when Ramp Up Limit Switch is activated.
6) Passenger sliding door is enabled by OTC reconnecting the CAN Bus signal with built in relay.
7) Door close command sent to OEM B-Pillar Door Open/Close Button to close the passenger sliding door.
8) OTC receives signal from OEM Door Ajar Pin Switch that door is closed.
9) OTC enters Idle Mode.
10) OTC enters Sleep Mode.
Note: There are “Watch Dogs” programmed in the OTC software that act as timers to end a function if the
function does not complete within a certain amount of expected and very reasonable time.
Page 32
Page 38

INPUTS
KNEEL DISABLE SWITCH ( ) Allows the user to enable (the “I” position) or disable (the “O”
position) the kneeling system. There is no display for this input.
OTC CONTROLLER POWER ( ) Supplies power to the OTC Board
USER SWITCH INPUT ( ) Active while any Rollx Vans user button or Rollx Vans remote is
pressed.
NEUTRAL INPUT ( ) Indicates the status of the gear shifter. When active, the van is either in
neutral or park. The OTC system will not run a operational cycle unless the van is in neutral or park.
DOOR OPEN LIMIT INPUT ( ) Active when the right side sliding door is fully open.
DOOR CLOSE LIMIT INPUT ( ) Active when the right side sliding door is fully shut.
OUTPUTS
System Status: Indicates if the system is ready to except a command. It is off when the OTC is in sleep
mode. V8.0 Display will show Rollx Vans: Idle.
Violet wire
2 White/Red wires
Blue wire
Green wire
Orange/Red wire
Violet/Yellow wire
Red/Green wire
Red/White wire
Yellow/Green wire
Yellow/White wire
Red wire
Red/Black wire
Yellow/Black wire
Yellow/Red wire
Orange/Blue
Orange
Red/Blue wire
Green/White
RAMP UP LIMIT INPUT ( ) Active when the ramp in the up position.
RAMP DOWN LIMIT INPUT ( ) Active when the ramp is in the down position.
KNEEL DOWN LIMIT INPUT ( ) Active when the kneeler is in the down position.
KNEEL UP LIMIT INPUT ( ) Active when the kneeler is in the up position.
RAMP DOWN MOTOR OUTPUT ( ) Active when the OTC is driving the ramp down (V6.0 & V8.0
OTC boards have obstacle detection monitoring this output).
RAMP UP MOTOR OUTPUT ( ) Active when the OTC is driving the ramp up (V6.0 & V8.0
OTC boards have obstacle detection monitoring this output).
KNEEL DOWN MOTOR OUTPUT ( ) Active when the OTC is driving the kneeler up
KNEEL UP MOTOR OUTPUT ( ) Active when the OTC is driving the kneeler up.
DOOR DISABLE OUTPUT ( ) Used by the OTC to disable the Chrysler right side door
controller anytime it wants to open the ramp. This prevents the right side door controller from banging the
right side sliding door against the ramp.
DOOR CONTROL OUTPUT ( ) OTC sends a command to the Chrysler system to open or close the
right side sliding door.
RAMP DISABLE OUTPUT ( ) Active anytime when the OTC is driving the ramp up or down. It
indicates the ramp manual mode is disabled.
DOOR UNLOCK OUTPUT ( ) OTC sends a command to the Chrysler system to unlock the
doors at the beginning of an open cycle.
one Touch SYSTeM overvieW
Page 33
Page 39

one Touch SYSTeM - v8.0 BaSic inTerface
ESC
ENTER
DOWN
UP
Rollx Vans
Idle
Kneel Up
ESC
ENTER
DOWN
UP
Manual
Kneeler
Kneel Down
ESC
ENTER
DOWN
UP
Data Logger
Setup
Password
Required
(Move to previous Log Entry)
ESC
ENTER
DOWN
UP
#02 0000:00:00
Status: Err# XX
#02 0000:00:00
Scrolls Error Info
Scrolls
Last Error
ESC
ENTER
DOWN
UP
#03 0000:00:00
Status: Err# XX
#03 0000:00:00
Scrolls Error Info
ESC
ENTER
DOWN
UP
#01 0000:00:00
Status: Err# XX
#01 0000:00:00
Scrolls Error Info
START
(Move to next Log Entry)
To get into setup a password is required. Setup options
include Cycle Tester, Battery Alarm Level, Debugger,
Cycle Counter, Ramp Type, Kneeler Mode, and Obstacle
Detection Level. For more info on Debugger see next
page. Also see OTC 6.0 User Interface Flowchart for
more in depth information.
One Touch Controller Basic Operation
1) How to manually kneel van
2) How to check software and hardware versions
3) How to review error codes in Data Logger
ESC
ENTER
DOWN
UP
Rollx Vans Service
800-956-6668
ESC
ENTER
DOWN
UP
Serial #
XXXXX
Hardware Version
V-X.XX
Software Version
Mod X
Page 34
Page 40

Password Good
Setup
Data Logger Mode
START
Options within Setup
ESC
ENTER
DOWN
UP
Setup
View Data Log
Setup
Engineering
Setup
Cycle Counters
Setup
Kneeler
Setup
Battery Alarm
Setup
Cycle Tester
Setup
Serial Number
Setup
Debug
Setup
Hobbs Meter
Select “Log All Mode” or “Log Error Only Mode” to decide
which type of errors to record. Default is “Log Error Only
Mode”.
View the past 30 errors recorded. Hit enter to view Error
Details.
Displays the number of Open and Close cycles.
Select if Kneel System installed or not. Default is “Yes”.
Select the Battery Alarm Trip Point between 10.9 vdc and
12.4 vdc. If OTC reads vdc below Trip Point, OTC will not
operate. Default is “11.5 vdc).
Select the number of cycles between 10 and 99 you want
the system to run automatically in order to test. Hit Esc to
stop.
Select between “Input Test Mode” and “Output Test Mode”
to test OTC System operation. THIS IS VERY USEFUL.
For more information see How To Use Debugger on next
page.
Displays current Clock Time.
Setup
OB Detect Level
Select the sensitivity of the ramp’s obstacle detection
between 0 and 9. “0” is the weakest and “9” is the
strongest (ramp is very hard to stop at “9”). Default is “5”.
one Touch SYSTeM - v8.0 advanced inTerface - SeTuP
Page 35
Page 41

one Touch SYSTeM - v8.0 advanced inTerface - deBugger
Output Test Mode
Ramp Down
START
How to Use Debugger
(Output Test Mode)
ESC
ENTER
DOWN
UP
Output Test Mode
Output Test Mode
Door Unlock
Output Test Mode
Door Close
Output Test Mode
Door Open
Output Test Mode
Kneel Down
Output Test Mode
Kneel Up
Output Test Mode
Ramp Enable
Output Test Mode
Ramp Up
Relay should click and ramp should go out.
Use extreme caution when using the Output Test Mode. The
Output Test Modes sends the signal directly to the OTC Relay
Board which results in power going to the called motor. No
safeties are in place (ie. The Ramp Down will operate the ramp
regardless if the door is open or closed.
Closes the passenger sliding door.
Opens the passenger sliding door.
Press and hold to operate the kneeler and lower the van.
Relay should click.
Press and hold to operate the kneeler and raise the van.
Relay should click.
Relay should click and ramp should go in.
All OEM Doors should unlock.
Relay should click.
Page 36
Page 42

one Touch SYSTeM - v8.0 advanced inTerface - deBugger
Input Test Mode
Ramp Up
START
How to Use Debugger
(Input Test Mode)
ESC
ENTER
DOWN
UP
Input Test Mode
Input Test Mode
Neutral
Input Test Mode
Door Close
Input Test Mode
Door Open
Input Test Mode
Kneel Sw
Input Test Mode
Kneel Down
Input Test Mode
Kneel Up
Input Test Mode
Ramp Down
ON when ramp is all the way in.
The Input Test mode is very useful for testing the various limit
switches the systems requires. To operate:
1) Select a Limit Switch (Input) you would like to test from the
list below.
2) Notice if the Switch is “On” or “Off” when it is suppose to be.
The audible beeps let you test the switch by hand without
looking at the OTC Board.
- On (activated) = Double Beeps
- Off (not activated) = Single Beeps
ON when passenger sliding door is closed.
ON when passenger sliding door is all the way open.
ON when Dash Kneel On/Off switch is on.
ON when kneeler is all the way down (knelt).
ON when ramp is all the way out.
ON when van is in Park or Neutral.
ON when kneeler is all the way up (normal).
Page 37
Page 43

one Touch SYSTeM - v8.0 error codeS
Code Description - What Caused the Code
Error 1 - Battery Low Error
Everytime before the OTC cycles, it checks the Main
Battery's voltage. If reading is below the value set in the
OTC Setup, the OTC will continue to operate, but will
indicate a low battery warning. The default value is 11.5
volts.
Diagnostic Tests More Information
Rollx Vans recommends starting your van every 4-5 days,
allow it to run 15-20 minutes to keep the battery at a
sufficient state of charge.
A timer is included on the OTC that will shut it off after 5
minutes UNLESS in Setup Mode. Update OTC if needed.
Perform a Draw Test
Follow instuctions in 'Battery Information - Draw Test Procedure'
Section
For information about OTC Interface and how to use the Debugger, please refer to 'One Touch System - v8.0
Advanced Interace' section. Remember, in Input Test Mode, double beeps indicate the switch is on or activated and
single beeps indicate that it is not. Also refer to the 'One Touch System - Relay Board Troubleshooting' for more
information about the Relay Board, its Overide Switches and LED Indicator Lights.
Code Description - What Caused the Code
Error 11 - Door Control Error
Door Control Output failure (The OTC did not successfully
control the door to open or close). The OTC did not
receive the signal that the door came off the OEM Door
Ajar Switch when opening or did not receive the signal that
the door came off the Rollx Vans Door Open Switch when
closing. Once the OTC sends the signal to open the door,
it waits about 2 seconds to see if the Door Ajar Switch is
not activated. If the Door Ajar Switch is still active, this
message will appear.
Diagnostic Tests More Information
Output Test
Place OTC in Debug - Output Test Mode to verify OTC operates
the door correctly by sending signal to OEM B-Pillar Switch
and/or OEM Front Passenger Door Unlock Switch.
1) Check Door Open.
2) Check Door Close.
3) Check Door Unlock.
4) Check Ramp Enable. This closes a relay on the OTC Relay
Board that enables the ramp to run (prevents the ramp from
running if the door is not open, door open enables ramp enable).
OEM B-Pillar Switch / Door On/Off
If off, the OEM Overhead Power Sliding Door On/Off
Switch will prevent the door from operating from the OEM
B-Pillar Switch. The OTC uses this switch to open or close
the door. When off, the OTC can not control the door.
Make sure the switch is on and try hitting the OEM B-Pillar
switch. If the door still does not work, likely an OEM issue.
If OEM function works, but OTC does not check wiring.
Door Unlock Switch
Door must be unlocked to open. First try OEM Unlock
Switch in Passenger Front Door. The OTC uses this switch
to unlock all the doors before an Door Open Command is
sent. If OEM Switch does not unlock doors, likely an OEM
issue. If OEM functions, but OTC does not check wiring.
Door Ajar Switch
If the OEM Door Ajar Switch is not deactivated within 2
seconds of the start of the cycle, Door Control Error will be
returned.
Input Test
Place OTC in Debug - Input Test Mode to verify limits operate
correctly.
1) Check Door Open (Rollx Vans Door Open Switch), by
opening door all the way in Door Open.
2) Check Door Close (OEM Door Ajar Switch), by close door
all the way in Door Close. Rollx Vans taps into OEM Door Ajar
Switch in Lower B-Pillar (See OTC Wiring for more
information).
Page 38
Page 44

one Touch SYSTeM - v8.0 error codeS
Code Description - What Caused the Code
Error 18 - Ramp Obstacle
Detection Error
OTC detected that the ramp may have hit an obstruction
on the in or out cycle. The OTC detects an obstruction by
measuring the current generated from the ramp motor.
The obstruction could be something in the way or a Ramp
Limit is not recognized. If this current exceeds the set limit
in the OTC Setup (default is 5, scale is 1-10 with 1 being
the most sensative)
Diagnostic Tests More Information
Check Error Log for multiple Obstactle Detection Errors. If
there are many, raise the level in Setup.
Setup - OB Detect Level (default is 5, scale is 1-10 with 1
being the most sensative)
Input Test
Place OTC in Debug - Input Test Mode to verify limits operate
correctly.
1) Check Ramp Up [Limit Switch] by operating the ramp with
Power Overide Switch (ITF Ramp) or manually raising (Folding
Ramp).
2) Check Ramp Down [Limit Switch] by operating the ramp
with Power Overide Switch (ITF Ramp) or manually raising
(Folding Ramp).
If a Ramp Limit Switch fails, the Obstacle Detection should
activate and cause an error. If the Obstacle Detection
does not activate, the Ramp Watchdog Timer should. This
will also cause an error (Error 27) and end the cycle.
Code Description - What Caused the Code
Error 23 - Neutral Status Error
Everytime before the OTC cycles, it checks to make sure
the van is in Park. This is for safety and can not be
changed.
Diagnostic Tests More Information
Input Test
Place OTC in Debug - Input Test Mode to verify OTC recognizes
if the van is in Park correctly
1) Check Neutral by placing the van in and out of Park and
listening for the double beeps from the debugger.
Refer to Important Item Information or OTC Wiring
Diagram for more information about where Rollx Vans gets
this signal.
Code Description - What Caused the Code
Error 25 - Emergency Stop
Error
Anytime a Rollx Vans User or Remote Button is pressed
during an open or close cycle, the system will stop
immediately. If a Hard Wired User Button is held down
long enough, the OTC will think it has been pressed twice
and thus, cause an error.
Diagnostic Tests More Information
Operate User Button to verify working correctly.
This is a safety feature and can not be changed.
Code Description - What Caused the Code
Error 27 - Ramp Watchdog
Error
Once the OTC sends the signal to start running the ramp
motor in or out, a timer starts. If enough time passes
before the proper limit switch is activated at the end of the
cycle, the OTC will return this error. This is a safety feature
to limit power to the motor in case of mulitple failures.
Diagnostic Tests More Information
Operate the In-The-Floor ramp with Power Overide to help
determine if motor and ramp are functioning correctly.
Not available on Folding Ramps.
Output Test
Place OTC in Debug - Output Test Mode to verify OTC operates
the ramp motor correctly.
1) Check Ramp Open.
2) Check Ramp Close.
Several factors such as low battery, cold weather or debris
can prevent the motor from operating correctly. If low
battery, very cold or a bad motor, the motor may run too
slow causing this watchdog to activate. Debris can also
prevent the motor or ramp operating at correct speed, also
causing this error.
Input Test
Place OTC in Debug - Input Test Mode to verify limits operate
correctly.
1) Check Ramp Up [Limit Switch] by operating the ramp with
Power Overide Switch (ITF Ramp) or manually raising (Folding
Ramp).
2) Check Ramp Down [Limit Switch] by operating the ramp
with Power Overide Switch (ITF Ramp) or manually raising
(Folding Ramp).
If a Ramp Limit Switch fails, the Obstacle Detection should
activate and cause an error (Error 18). If the Obstacle
Detection does not activate, the Ramp Watchdog Timer
should. This will also cause an error.
If OTC Debug Output Test does not activate the motor
being tested, try the overides located on the OTC Relay
Board. This will inidicate a communication problem
between the One Touch Controller and One Touch Relay
Board.
Page 39
Page 45

one Touch SYSTeM - v8.0 error codeS
Code Description - What Caused the Code
Error 28 - Door Watchdog Error
Once the OTC sends the signal to operate the OEM Door,
a timer starts. If enough time passes before the proper
limit switch is activated at the end of the cycle, the OTC will
return this error.
Diagnostic Tests More Information
Operate the OEM Door with the OEM B-Pillar Switch to
determine of OEM Door is functioning properly.
If OEM B-Pillar Switch is not working, try the OEM
Overhead Door Switch and make sure the OEM Overhead
Door On/Off Switch is on.
Input Test
Place OTC in Debug - Input Test Mode to verify limits operate
correctly.
1) Check Door Open (Rollx Vans Door Open Switch), by
opening door all the way in Door Open.
2) Check Door Close (OEM Door Ajar Switch), by close door
all the way in Door Close. Rollx Vans taps into OEM Door Ajar
Switch in Lower B-Pillar (See OTC Wiring for more
information).
If Door Limits function correctly and door cycles open and close
okay, the issue is with the door taking too long to open or close.
Check alignment or motor.
Output Test
Place OTC in Debug - Output Test Mode to verify OTC operates
the door correctly by sending signal to OEM B-Pillar Switch
and/or OEM Front Passenger Door Unlock Switch.
1) Check Door Open.
2) Check Door Close.
If an Output is an issue, the Door Control Error (Error 11)
will likely display.
Code Description - What Caused the Code
Error 29 - Kneeler Watchdog
Error
Once the OTC sends the signal to operate the Kneeler, a
timer starts. If enough time passes before the proper limit
switch is activated at the end of the cycle, the OTC will
return this error.
Diagnostic Tests More Information
Operate the Kneeler with Power Overide to help determine
if motor is functioning correctly.
Reset - Esc - Kneel Up/Kneel Down
Input Test
Place OTC in Debug - Input Test Mode to verify limits operate
correctly.
1) Check Kneel Up [Limit Switch], by raising Kneeler until
switch is activated or activate switch by hand.
2) Check Kneel Down [Limit Switch], by Lowering Kneeler until
switch is activated or activate switch by hand.
Testing with Power Overide is preferreed since it will incidicate
if Limit Switch is being properly activated by Actuator's Guide.
When Kneel Actuator reaches its runlimit, it will begin to ratchet
making a terrible sound. This is simply the motor's clutch
mechanism, is not damaging but should try and be minimized.
Output Test
Place OTC in Debug - Output Test Mode to verify OTC operates
the Kneeler correctly.
1) Check Kneel Up.
2) Check Kneel Down.
If OTC Debug Output Test does not activate the motor
being tested, try the overides located on the OTC Relay
Board. This will inidicate a communication problem
between the One Touch Controller and One Touch Relay
Board.
Also a low battery, bad motor or cold weather causing the
motor to run very slowly can return this error.
Code Description - What Caused the Code
Error 33 - Door Ajar Error
The OTC will not run a Cycle if the door is Ajar (Not fully
opened or closed). If Ramp deployed, open door fully. If ramp
stowed, fully close and latch door.
Diagnostic Tests More Information
Operate the OEM Door with the OEM B-Pillar Switch to
determine of OEM Door is functioning properly.
If OEM B-Pillar Switch is not working, try the OEM
Overhead Door Switch and make sure the OEM Overhead
Door On/Off Switch is on.
Input Test
Place OTC in Debug - Input Test Mode to verify limits operate
correctly.
1) Check Door Open (Rollx Vans Door Open Switch), by
opening door all the way in Door Open.
2) Check Door Close (OEM Door Ajar Switch), by close door
all the way in Door Close. Rollx Vans taps into OEM Door Ajar
Switch in Lower B-Pillar (See OTC Wiring for more
information).
Page 40
Page 46

one Touch SYSTeM - relaY Board TrouBleShooTing
RELAY BD OTC VERSION 2
P.N. 08044-003
ORDER #OTCV8 RELAY BD
OUTPUTS
Run to the Kneeler and Ramp Motors
INPUTS
Run from the OTC Control Board
LED Indicator Lights
Manual push button test switches
*Pressing the switches should operate each
function as shown on the board as long as the board
is working properly. Remember, in order to run the ramp,
the Ramp Enable must also be pressed at the same time.
Pressing a switch is the same as sending a
ground to the terminal.
Page 41
Page 47

This page was intentionally left blank
Page 42
Page 48

in The floor TrouBleShooTing
Symptom Possible Cause Remedy
Door open limit switch is not being activated.
When a Open Cycle starts, the OTC will send a
command to the Chrysler System to unlock the
doors. It then sends a second command to the
Chrysler System to open the Right Side Sliding
Door. The OTC Computer then waits two
seconds and checks the Door Closed Limit
Switch. If it finds it still indicates the door is
closed, it assumes that a person (or and
obstacle) stopped the door opening sequence. It
then ends the open cycle and goes back into Idle
Mode. After ten to fifteen seconds it goes back
into Sleep Mode. This is the sequence of events
you will see if the Door Closed Limit Switch
malfunctions (sticks closed).
Ramp motor not engaged.
Engage ramp motor. Refer to the "Manual
Operation" section of this manual.
Ramp down limit switch needs adjustment to
deactivate.
Press Rollx Vans user button again to unkneel
van and close door. Review display on OTC
board and contact customer service.
Ramp motor.
Review display on OTC board and contact
customer service.
OTC program failure.
Press OTC reset button.
Ramp motor not engaged.
Engage ramp motor. Refer to the "Manual
Operation" section of this manual.
Ramp motor.
Review display on OTC board and contact
customer service.
Low voltage from the battery.
Start vehicle. Press OTC reset button and press
Rollx Vans user button again.
Ramp will deploy before door is all
the way open.
Door open limit switch is shorted to ground or
malfuctioning.
Examine door open limit switch, connections,
and wiring.
Clear obstruction and press Rollx Vans user
button.
Review display on OTC board and contact
customer service.
Ramp will start to deploy or stow
then stop functioning.
Pressure on cover plate.
Ensure that there are no objects on top of cover
plate.
Ramp will STOP AND REVERSE
mid-cycle.
Ramp will NOT DEPLOY after door
opens automatically.
Obstacle is detected.
Ramp will NOT STOW
automatically.
Page 43
Page 49

in floor (MeTal SPringS ) rePlaceMenT ParTS
16 8 3/8 NYLON FLAT WASHER 1107632
4 ROLLER, ITF RAMP PLATE N1-N1DXLA
17 1 RAMP ITF ASM N005001ASM
18 2 5/16-18X2 S/S FHSCS 1173912
19 1 TRACK FLOOR PLATE FRONT ASM N05017ASM
20 1 TRACK FLOOR PLATE REAR ASM N05016ASM
21 1 TRACK TRACK EXT.BKT, LOWER 08,ASM B08032ASM
21a 1 DOOR OPEN SWITCH ASSEMBLY 05089-002
22 1 ALUMINUM UNTHREADED (ACTIVATOR) 92510A351
23 2 PRECISION MINATURE IDLER 2483K18
24 1 ROLLER PLATE 2008, CHYSLER N05003ASM
26 1 CONN LINK #35 CARBON CHRLCL035
27 1 LOCKING HOLE & VENT 24412
28 4 SS TORX BHCS 1/4-20 10929-02112
30 4 1/4 USS F/W Z 1133004
31 2 TEFLON BLOCK FOR ITF RAMP N05049
32 4 RIVETS 97517A130
33 2 SPACER ROLLER CUSHIONED N05048
34 1 SEE PAGE 15
35 1 SEE PAGE 15
36 1 CARPET TRIM FRONT N05021G-F
37 1 CARPET TRIM BACK N05021G-B
38 1 FLOOR TRACK DRIVER N08025-11
39 1 FLOOR TRACK PASSENGER N08026-11
31
30
3
13
23
28
27
1
3
4
5
7
9
10
14
15
17
18
19
24
26
30
Item Qty. Description Pa rt #
1 1 ITF ACCESS PLATE N05019
2 1 MOTOR GEAR BOX ITF 2008 ASM N08111ASM
1 MOTOR WITH GEAR ONLY
N08111-MTR/GEAR ASM
3 6 1/4-20 YZ NE NYLOCK 1137183
4 10 CHAIN ROLLER SS #35 35
5 1 TENSIONER/SPROCKET ASM ITF 10005
6 2 ROLLERS CUSHIONED 22875T11
7 8 SS TORX BHCS 1/4-20 10929-02112
8 1 FLAP ASM ITF RAMP N05014ASM
3 PRECISION MINATURE IDLER* 2483K18
3 5/16" x 1/16" NYLN WSHR 76002
3 HCS 1/4-20X1 1/4 YZ8QP* 0115007
3 1/4-20 YZ NE NYLOCK* 1137183
9 7 SS TORX BHCS 1/4-20 10929-02112
10 2 HCS1/4-20X1YZ8 QPACK 0115005
12 2 HCS 1/4-20 X 3/4 YZ8 QPA 0115003
13 1 CHAIN ANCHOR N05033
14 4 FPH MS 10-32X3/8 Z K 29504
15 2 RAMP SPRING N05044
20
33
37
21
36
16
8
12
2
35
34
6
32
21a
22
38
39
Page 44
Page 50

Symptom Possible Cause Remedy
Ramp fuse or circuit breaker is blown.
Press Rollx Vans user button again to unkneel
van and close door. Reset circuit breaker or
check ramp fuse and replace if needed with 15
amp glass fuse located in glove box.
Door open limit switch is not being activated.
When a Open Cycle starts, the OTC will send a
command to the Chrysler System to unlock the
doors. It then sends a second command to the
Chrysler System to open the Right Side Sliding
Door. The OTC Computer then waits two
seconds and checks the Door Closed Limit
Switch. If it finds it still indicates the door is
closed, it assumes that a person (or and
obstacle) stopped the door opening sequence. It
then ends the open cycle and goes back into Idle
Mode. After ten to fifteen seconds it goes back
into Sleep Mode. This is the sequence of events
you will see if the Door Closed Limit Switch
malfunctions (sticks closed). This switch is
located in the Right Side Sliding Door Latch
Assembly.
Ramp down limit switch needs adjustment to
deactivate.
Press Rollx Vans user button again to unkneel
van and close door. Review display on OTC
board and contact customer service.
Ramp motor.
Press Rollx Vans user button again to unkneel
van and close door. Review display on OTC
board and contact customer service.
OTC program failure.
Press OTC reset button.
Ramp fuse or circuit breaker is blown.
Press Rollx Vans user button again to unkneel
van and close door. Reset circuit breaker or
check ramp fuse and replace if needed with 15
amp glass fuse located in glove box.
Ramp motor.
Review display on OTC board and contact
customer service.
Ramp will deploy before door is all
the way open.
Door open limit switch is shorted to ground or
malfuctioning.
Examine door open limit switch, connections,
and wiring.
Clear obstruction and press Rollx Vans user
button.
Review display on OTC board and contact
customer service.
Ramp will STOP AND REVERSE
mid-cycle.
Obstacle is detected.
Ramp will NOT STOW
automatically.
Ramp will NOT DEPLOY after door
opens automatically.
folding raMP TrouBleShooTing
Page 45
Page 51

1
2
3
4
5
6
7
8
9
10
11
12
13
14
15
16
17
18
19
20
21
22
21A
RLXR1000-04-OTC / RLXR1000-04-MB / RLXR1000-04-NARROW-MB
Item Qty. Description Part #
1 1 MOTOR RAMP (Does not include connector (OTC only) K01325A350
2 2 CAM FOR PICK UP ARM ALUM RLXRP00CAM-ALUM
3 2 #8-32X1/4 CUP POINT SET SCREW N/A
4 1 ROLLER CROWNED YOKE CY36L
5 1 5/16-18 X 1-1/4 BHSCS 1124072
6 4 5/16-18 X 1-1/4 FHSC 1124257
7 1 BEARING/BUSHING SF-2432-8
8 1 RAMP LIMIT SWITCH ASM 03220-004
9 2 SWITCH MINI SNAP ACTING 7779K62
10 1 SWITCH SPACER STD RAMP RLXRPOO-14
11 2 S/S PPHMS 4-40X1 1/2 72498
12 2 #4 sae 5/16od z f/w 1133066
Item Qty. Description Part #
13 2 4-40 S/S NYLOK NUT 1170854
14 1 RAMP CABLE W/BALL SHANK, RLXR1100
15 1 BHSCS 5/16-18 X 7/8 24070
16 1 5/16-18HX JAM Z 1137023
17 3 5/16-18 FLAT NYLON WASHERS 76062
18 1 CB 10AMP RESETTABLE CB-PM3-10
19 2 HCS 3/8-24 X 1 YZ8 18834
19A 2 3/8 HI-ALLOY L/W YZ 1133893
19B 2 3/8 USS F/W Z 1133008
20 1 WOODRUFF KEY, 3/16X3/4 FLAT BOTTOM N/A
21 1 PICK UP ARM (RAMP) RLXR2005 (INCLUDES SET SCREW)
21A 1 1/4-20X3/8 CUP POINT SET SCREW N/A
22 1 5/16-18X1 3/4 FHSCS 1124259
22 1 5/16-18X1 3/4 FHSCS* 1124259
23 1 5/16-18HX JAM Z 1136204
COVER RAMP NEW GENERATION 10068
* For motor bar ramps only
folding raMP rePlaceMenT ParTS
Page 46
Page 52

1
2
3
4
5
6
7
8
9
10
11
12
13
14
9
10
15
16
RLXR1000-05-OTC / RLXR1000-05-MB / RLXR1000-05-NARROW-MB
Item Qty. Description Part #
1 1 RAMP STANDARD (RAMP NARROW) RLXR4000 (RLXR4000N)
2 1 RAMP CABLE W/BALL SHANK, RLXR1100
3 3 CLAMP INSULATED 3/8" 8863T13
4 3 1/4-20 X 1/2 BHSCS 1124049
5 3 1/4-20 NTE JAM NYLOK 1137020
6 3 10-32 X 3/4 BHSCS 1124042
7 6 #10 SAE F/W Z 1133074
8 2 1/4 HI-ALLOY L/W YZ 1133891
9 2 3/8 USS F/W Z 1133008
10 2 3/8-16 YZ8 NE NYLOCK 1137185
Item Qty. Description Part #
11 1 HCS 1/4-20X1/2 YZ8 QPA 0115001
12 12 1/4-20X5/8 SS BUTTON HEAD CAP SCREW 10929-02786
13 1 HINGE, RAMP FOLDING W BOLTS RLRX4006
14 1 CABLE GUIDE (ROUND DISC) RLXR1025
15 4 RIVETS* 97517A130
15 4 #4 sae 5/16od z f/w 1133066
15 1 RUBBER BULB SEAL BACK FOAM* NX504B1
16 0.4 ANTI-RATTLE RUBBER URETH FOR (Motor Bar Only)* 27036
17 1 HINGE UPPER RAMP FO PAINTED RLXR1007
18 12 1/4-20 KEPS NUT 1137410
19 1 Ramp Base Weldment Assembly RLXR4003
* Not Shown
17
18
VAN SIDE OF HINGE
RAMP SIDE OF HINGE
RAMP BASE
RAMP
HINGE (#13)
1/4-20 KEPS NUT (#18)
KEPS NUT (#19)
1/4-20x5/8 BOLT (#12)
RAMP HINGE AREA CROSS SECTION
19
folding raMP rePlaceMenT ParTS
Page 47
Page 53

This page was intentionally left blank
Page 48
Page 54

folding raMP MoTor inSTall / reMoval and adJuSTMenT
Folding Ramp Motor Install (steps 1-19)
Ramp Removal Instructions (steps 1-4 + 15-19)
1. Remove carpeted motor panel. This is held on by two Phillip head screws.
2. Disconnect wires going to limit switches and motor.
3. Unbolt ramp. There are two bolts (3/8) that go into the side of the van above ramp
motor and two nuts (3/8) on the floor of the van-one nut is by the motor and one nut
is by b-pillar.
4. Remove ramp from van.
5. Extend ramp so it is laying flat.
6. Remove roller from pick up arm. Also, remove cable bolt.
7. Remove set screw from pick up arm. Then insert 5/16 bolt into pick up arm to pull pick
up arm off of motor shaft. If this does not work, cut motor shaft with a saw and
punch out scrap piece from pick up arm.
8. Remove limit switches off of ramp.
9. Take out the four Allen head bolts (3/16) holding ramp motor. Remove motor.
10. Insert new motor. Reinstall the four Allen head screws with lock tight.
11. Reinstall limit switches.
12. Remove cams off of old motor and install on the new ramp motor. You will need to
adjust these cams at step 16.
13. Reinstall pick up arm. Line up pick up arm and key way. Ensure Woodruff key is all
the way inserted into the pick up arm.
14. Reinstall set screw (3/16) with lock tight.
15. Reinstall ramp in the van. Secure ramp with original hardware.
16. Install wiring for limit switches and motor.
17. Adjust ramp cams. Refer to Ramp Adjustment Instructions.
18. Test ramp for proper limit switch adjustment.
19. Reinstall carpeted motor cover.
Folding Ramp Adjustment Process
1. Bring folding ramp into the stow position so it resting in the van where you want it.
2. Remove carpeted motor panel. This is held on by two Phillip head screws.
3. Locate Adjustment Cam Set Screws and loosen.
4. Rotate the Up Limit Cam until it activates the Up Limit Switch and tighten set screw.
5. Push ramp out slowly and rest on something that is 6 inches off the ground as shown
below.
6. Rotate Down Limit Cam until it activates the Down Limit Switch and tighten set screw.
7. Test ramp for proper limit switch adjustment and reinstall carpeted motor cover.
6 Inches
Page 49
Page 55

folding raMP MoTor inSTall / reMoval and adJuSTMenT
3/8 Nut
Pick Up Arm Roller
Resettable Circuit Breaker
Phillips Head Screws
Cable Bolt
3/8 Bolt
Set Screw
3/8 Nut
Adjustment Cam Set Screw
Limit Switches
Backstop
Adjustment
Bolt
Up
Adjustment Cams
Down
Adjustment Cams
Page 50
Page 56

rear heaT & air
MODEL YEAR 2012-2014
Hose Clamps
705-1012 (6)
Hose Clamps
705-1012 (6)
WELDED ENDS
WELDED ENDS
#B01200-RASM - REAR A/C LINE 5/16”
#B01201-RASM - REAR A/C LINE ½”
#B2100-REAR HEAT LINE 5/8” (2 PER)
ASSEMBLIES
REAR BLOWER
OEM CONNECTORS
OEM CONNECTORS
FRONT
CONNECTIONS
REAR
A/C CONNECTIONS
REAR HEAT
CONNECTIONS
REAR HEAT & A/C
#68125530AA - AFTERMARKET O-RING 5/16”
#68030834AA - AFTERMARKET O-RING ½”
O-RINGS INCLUDED IN A/C ASSEMBLIES
Page 51
Page 57

reMoTe SYSTeM TrouBleShooTing
Symptom Possible Cause Remedy
Receiver out of range. Try remote within 10 feet of van.
Overhead on/off switch is turned to the OFF position. Turn switch to ON position.
Transmitter battery is dead.
Remove case by loosening screw on back and prying open.
Replace battery with battery type A23. Use second remote or
Rollx Vans user button.
Blown fuse. Locate fuse box under glove box and check / replace fuse.
Receiver malfunction. Review display on OTC board and contact customer service.
Lost Programming Reprogram
(See OTC Remote System)
* If remote does not work first try to operate door and ramp from any interior Rollx Vans user button. If interior Rollx Vans user button operates normally, see below for remote system troubleshooting
Door does not open when One Touch remote is pressed.
Neither One Touch remote works.
Page 52
Page 58

reMoTe SYSTeM locaTion & Wiring
OTC Remote Receiver
(Behind Rear Passenger Quarter
Panel Above Rear Heat Unit)
OTC Remote Transmitter
BLUE LED
Indicator Light
OTC Remote Receiver
(Rear View)
ASM #03295-003
1BAMR-ASM
CR2016 Batteries
(X 2)
ANTENNA
FUSE PANEL
(BEHIND GLOVE BOX)
RD (8 GA.)
DB (20 GA.)
BK (20 GA.)
RD (14 GA.)
BK (8 GA.)
FUSE
ANTENNA RUNS
UP PASSENGER
“D” PILLAR
+
-
1 AMP
REMOTE
DOOR DETECTOR
CONTROLLER PWR
40A
1 AMP
1 AMP
Nuetral
Safety
Ignition
Hot
BK
DB
ASM #03220-005
CM6200
ASM #03295-003
To Rollx Vans user
switches
Programming switch
PROGRAMING SWITCH
Programming the Rollx Vans OTC Remote
*Activate the programming mode by pushing the button on the left side of the OTC
controller (PROGRAMMING SWITCH) 5 times within 7 seconds.
* Within 2 seconds after pushing the button 5 times, press the single remote button for .5
Seconds. Wait 30 seconds and press the remote to operate the system.
*Repeat the sequence if programming an additional remote.
To USER SWITCH
POWER
To PROGRAMING
SWITCH
Version 8
Page 53
Page 59

SeaT deTecTor locaTion & deScriPTion
Seat Detector Location
Seat Detector Description
The Rollx Vans Seat Detector essentially simulates the functionality of a driver or passenger front seat
in the event where the seats are disconnected from the van (FIG A & B).
The simulated functions are:
Seat Belt Buckle Switches *Seat Position Sensors
*Seat Belt Retractors *Seat Thorax
*Active HeadRests *Occupant Detection
FIG A
FIG B
Driver’s Seat Plug
Passenger’s Seat Plug
Page 54
Page 60

2011-2014 driver’S Side Manual
2011-2014 Chrysler Minivan
C376/I405 With Seat DetectorDriver Side with MANUAL SEAT
BODY SIDE
Body Side
9
1
8
4
3
2
14
19
TOP
22
20
21
15
Body Side Wire
YL/GN
RD
BK
LB/VT
LB/WT
LG/GY
SEA
T
DETECTOR
V 4.40
#11134-001ASM-DR
PK/WT
BK/RD
LG/YL
LG/DG
LB/VT
LG/GY
OR/RD (12 GA.)
GN (20 GA.)
YL/GN (20 GA.) - CAV 17
BK (20 GA.) - CAV 1
PK/WT (20 GA.) - CAV 4 (HEAD REST IN)
LB/WT (20 GA.) - CAV 2 (SEAT POSITION SENSOR DATA)
BK/RD (20 GA.) - CAV 5 (HEAD REST OUT)
LG/GY (20 GA.) - CAV 6 (SEAT BELT BUCKLE SWITCH)
LG/YL (18 GA.) - CAV 18 (DR. SEAT BELT RETRACTOR TENSIONER LINE 2)
ROLLX VANS CIRCUIT BREAKER
25 A
LG/DG (18 GA.) - CAV 19 (DR. SEAT BELT RETRACTOR TENSIONER LINE 1)
LB/VT (18 GA.) - CAV 20 (LEFT SEAT THORAX SQUIB 1 LINE 2)
LG/GY (18 GA.) - CAV 21 (LEFT SEAT THORAX SQUIB 1 LINE1)
TO PASSENGER SIDE
SEAT PLUG
(Seat sensor wire for seat detector)
(GROUND)
SEAT SENSOR
POWER
GROUND
SEAT BELT
SEAT POS SENSOR
SEAT POS SENSOR +
HEADREST +
HEADREST GND
SEAT BELT RETRACTOR Ln2
SEAT BELT RETRACTOR Ln1
SEAT THORAX SQUIB 1 Ln 2
SEAT THORAX SQUIB 1 Ln 1
(FUSED B+)
LB/VT (20 GA.) - CAV 3 (SEAT POSITION SENSOR VOLTAGE)
2.4 OHM
2.4 OHM
1 K
510 ohm
510 ohm
WT (20 GA.)
TO CIGARETE LIGHTER
BODY SIDE CONNECTOR #A16031-ND
Pins: A1648-ND QTY 6
A1650-ND QTY 4
Pins: A25032-ND QTY 1
RD (20 GA.)
Updated on 6/3/2014
Page 55
Page 61

2011-2014 driver’S Side Manual
2011-2014 Chrysler Minivan
C376/I405 with - With Seat DetectorDriver Seat MANUAL SEAT
SEAT SIDE
SEAT SIDE CONNECTOR
TOP
14
1
4
8
2
3
9
15
22
21
20
19
# A16037-ND
PINS: A1661-ND QTY 7
A1341-ND QTY 4
YL/GN
RD
BK
LB/VT
LB/WT
LG/GY
BK/RD
LG/YL
LG/DG
LB/VT
LG/GY
PK/WT (20 GA.) - CAV 4 (HEAD REST IN)
LB/WT (20 GA.) - CAV 2 (SEAT POSITION SENSOR DATA)
BK/RD (20 GA.) - CAV 5 (HEAD REST OUT)
LG/GY (20 GA.) - CAV 6 (SEAT BELT BUCKLE SWITCH)
LG/YL (18 GA.) - CAV 18 (DR. SEAT BELT RETRACTOR TENSIONER LINE 2)
LG/DG (18 GA.) - CAV 19 (DR. SEAT BELT RETRACTOR TENSIONER LINE 1)
LB/VT (18 GA.) - CAV 20 (LEFT SEAT THORAX SQUIB 1 LINE 2)
LG/GY (18 GA.) - CAV 21 (LEFT SEAT THORAX SQUIB 1 LINE1)
LB/VT (20 GA.) - CAV 3 (SEAT POSITION SENSOR VOLTAGE)
4
1
1
5
11
19
4
10
18
24
(GROUND)
BK/RD (20 GA.) - CAV 1
SEAT SENSOR JUMPER
BK (20 GA.) - CAV 17
From OEM 15
Updated on 6/3/2014
Page 56
Page 62

2011-2014 driver’S Side PoWer onlY
LG/GY (20 GA.) - CAV 6 (SEAT BELT BUCKLE SWITCH)
2011-2014 Chrysler Minivan
C376/I405 with - With Seat DetectorDriver Side POWER ONLY
Body Side
BODY SIDE CONNECTOR
# A 16031-ND
9
1
8
4
3
2
14
19
TOP
22
20
21
15
Body Side Wire
YL/GN
RD
BK
LB/VT
LB/WT
LG/GY
SEA
T
DETECTOR
V 4.40
PK/WT
BK/RD
LG/YL
LG/DG
LB/VT
LG/GY
OR/RD (12 GA.)
RD (12 GA.)
RD (12 GA.) - CAV 22
YL/GN (20 GA.) - CAV 17
BK (12 GA.) - CAV 1
RELOCATED OEM CIRCUIT BREAKER
25 A
TO PASSENGER SIDE
SEAT PLUG
YL/GN
RD
BK
LB/VT
LB/WT
LG/GY
BK/RD
LG/YL
LG/DG
LB/VT
LG/GY
SEAT SENSOR
POWER
GROUND
SEAT BELT
SEAT POS SENSOR
SEAT POS SENSOR +
HEADREST +
HEADREST GND
SEAT BELT RETRACTOR Ln2
SEAT BELT RETRACTOR Ln1
SEAT THORAX SQUIB 1 Ln 2
SEAT THORAX SQUIB 1 Ln 1
PK/WT
BODY SIDE
(Seat sensor wire for seat detector)
(GROUND)
LB/WT (20 GA.) - CAV 2 (SEAT POSITION SENSOR DATA)
LB/VT (20 GA.) - CAV 3 (SEAT POSITION SENSOR VOLTAGE)
PK/WT (20 GA.) - CAV 4 (HEAD REST IN)
BK/RD (20 GA.) - CAV 5 (HEAD REST OUT)
LG/YL (18 GA.) - CAV 18 (DR. SEAT BELT RETRACTOR TENSIONER LINE 2)
LG/DG (18 GA.) - CAV 19 (DR. SEAT BELT RETRACTOR TENSIONER LINE 1)
LB/VT (18 GA.) - CAV 20 (LEFT SEAT THORAX SQUIB 1 LINE 2)
LG/GY (18 GA.) - CAV 21 (LEFT SEAT THORAX SQUIB 1 LINE1)
(FUSED B+)
#11134-001ASM-DR
2.4 OHM
2.4 OHM
1 K
510 ohm
510 ohm
Pins: A25032-ND QTY 2
Pins: A1648-ND QTY 6
A1650-ND QTY 4
(FUSED B+)
RD (12 GA.)
OR/RD (12 GA.)
RD (20 GA.)
Updated on 6/3/2014
Page 57
Page 63

2011-2014 driver’S Side PoWer onlY
2011-2014 Chrysler Minivan
C376/I405 with - With Seat DetectorDriver Seat POWER ONLY
SEAT SIDE
SEAT SIDE CONNECTOR
TOP
14
1
4
8
2
3
9
15
22
21
20
19
# A16037-ND
PINS: A25033-ND 2QTY
A1661-ND 6QTY
YL/GN
RD
BK
LB/VT
LB/WT
LG/GY
BK/RD
LG/YL
LG/DG
LB/VT
LG/GY
RD (12 GA.)
BK (12 GA.) - CAV 1
PK/WT (20 GA.) - CAV 4 (HEAD REST IN)
LB/WT (20 GA.) - CAV 2 (SEAT POSITION SENSOR DATA)
BK/RD (20 GA.) - CAV 5 (HEAD REST OUT)
LG/GY (20 GA.) - CAV 6 (SEAT BELT BUCKLE SWITCH)
LG/YL (18 GA.) - CAV 18 (DR. SEAT BELT RETRACTOR TENSIONER LINE 2)
LG/DG (18 GA.) - CAV 19 (DR. SEAT BELT RETRACTOR TENSIONER LINE 1)
LB/VT (18 GA.) - CAV 20 (LEFT SEAT THORAX SQUIB 1 LINE 2)
LG/GY (18 GA.) - CAV 21 (LEFT SEAT THORAX SQUIB 1 LINE1)
(GROUND)
(FUSED B+)
LB/VT (20 GA.) - CAV 3 (SEAT POSITION SENSOR VOLTAGE)
4
1
1
5
11
19
4
10
18
24
- CAV 22
SEAT SENSOR JUMPER
BK (20 GA.) - CAV 17
A1341-ND 4QTY
Updated on 6/3/2014
Page 58
Page 64

2011-2014 driver’S Side PoWer & heaT
2011-2014 Chrysler Minivan
C376/I405 - With Seat DetectorDriver Side with POWER & HEAT
Body Side
BODY SIDE CONNECTOR
# A 16031-ND
9
1
8
4
3
2
14
19
TOP
22
20
21
15
Body Side Wire
YL/GN
RD
BK
LB/VT
LB/WT
LG/GY
SEA
T
DETECTOR
V 4.40
#11134-001ASM-DR
PK/WT
BK/RD
LG/YL
LG/DG
LB/VT
LG/GY
OR/RD (12 GA.)
RD (12 GA.)
RD (12 GA.) - CAV 22
YL/GN (20 GA.) - CAV 17
BK (12 GA.) - CAV 1
PK/WT (20 GA.) - CAV 4 (HEAD REST IN)
LB/WT (20 GA.) - CAV 2 (SEAT POSITION SENSOR DATA)
BK/RD (20 GA.) - CAV 5 (HEAD REST OUT)
LG/GY (20 GA.) - CAV 6 (SEAT BELT BUCKLE SWITCH)
LG/WT (20 GA.) - CAV 7 (HEATED SEAT MODULE SUPPLY)
WT/OR (20 GA.) - CAV 8 (CAN BUS -)
WT/GY (20 GA.) - CAV 9 (CAN BUS +)
TN/DB (20 GA.) - CAV 10 (R.F. HEATED SEAT TEMP SENSE)
TN/WT (20 GA.) - CAV 11 (HEATED SEAT SENSOR RETURN)
DB/LG (20 GA.) - CAV 12 (HEATED STEERING WHEEL FEED)
PK/YL (20 GA.) - CAV 13 (FUSED OUTPUT)
LG/VT (20 GA.) - CAV 14 (RIGHT FRONT SEAT HEATER CONTROL)
GY/DB (20 GA.) - CAV 15 (HEATED STEERING WHEEL RETURN)
LG/YL (18 GA.) - CAV 18 (DR. SEAT BELT RETRACTOR TENSIONER LINE 2)
RELOCATED OEM CIRCUIT BREAKER
25 A
LG/DG (18 GA.) - CAV 19 (DR. SEAT BELT RETRACTOR TENSIONER LINE 1)
LB/VT (18 GA.) - CAV 20 (LEFT SEAT THORAX SQUIB 1 LINE 2)
LG/GY (18 GA.) - CAV 21 (LEFT SEAT THORAX SQUIB 1 LINE1)
TO PASSENGER SIDE
SEAT PLUG
(Seat sensor wire for seat detector)
(GROUND)
SEAT SENSOR
POWER
GROUND
SEAT BELT
SEAT POS SENSOR
SEAT POS SENSOR +
HEADREST +
HEADREST GND
SEAT BELT RETRACTOR Ln2
SEAT BELT RETRACTOR Ln1
SEAT THORAX SQUIB 1 Ln 2
SEAT THORAX SQUIB 1 Ln 1
BODY SIDE
(FUSED B+)
LB/VT (20 GA.) - CAV 3 (SEAT POSITION SENSOR VOLTAGE)
2.4 OHM
2.4 OHM
1 K
510 ohm
510 ohm
Pins: A25032-ND QTY 2
Pins: A1648-ND QTY 15
A1650-ND QTY 4
RD (12 GA.)
OR/RD (12 GA.)
RD (20 GA.)
Updated on 6/3/2014
Page 59
Page 65

2011-2014 driver’S Side PoWer & heaT
SEAT SIDE CONNECTOR
TOP
14
1
4
8
2
3
9
15
22
21
20
19
# A16037-ND
PINS: A25033-ND 2QTY
A1661-ND 12
QTY
A1341-ND 8QTY
2011-2014 Chrysler Minivan
C376/I405 - With Seat DetectorDriver Seat with POWER AND HEAT
SEAT SIDE
YL/GN
RD
BK
LB/VT
LB/WT
LG/GY
BK/RD
LG/YL
LG/DG
LB/VT
LG/GY
RD (12 GA.)
BK (12 GA.) - CAV 1
PK/WT (20 GA.) - CAV 4 (HEAD REST IN)
LB/WT (20 GA.) - CAV 2 (SEAT POSITION SENSOR DATA)
BK/RD (20 GA.) - CAV 5 (HEAD REST OUT)
LG/GY (20 GA.) - CAV 6 (SEAT BELT BUCKLE SWITCH)
LG/WT (20 GA.) - CAV 7 (HEATED SEAT MODULE SUPPLY)
WT/OR (20 GA.) - CAV 8 (CAN BUS -)
WT/GY (20 GA.) - CAV 9 (CAN BUS +)
TN/DB (20 GA.) - CAV 10 (R.F. HEATED SEAT TEMP SENSE)
TN/WT (20 GA.) - CAV 11 (HEATED SEAT SENSOR RETURN)
DB/LG (20 GA.) - CAV 12 (HEATED STEERING WHEEL FEED)
PK/YL (20 GA.) - CAV 13 (FUSED OUTPUT)
LG/VT (20 GA.) - CAV 14 (RIGHT FRONT SEAT HEATER CONTROL)
GY/DB (20 GA.) - CAV 15 (HEATED STEERING WHEEL RETURN)
LG/YL (18 GA.) - CAV 18 (DR. SEAT BELT RETRACTOR TENSIONER LINE 2)
LG/DG (18 GA.) - CAV 19 (DR. SEAT BELT RETRACTOR TENSIONER LINE 1)
LB/VT (18 GA.) - CAV 20 (LEFT SEAT THORAX SQUIB 1 LINE 2)
LG/GY (18 GA.) - CAV 21 (LEFT SEAT THORAX SQUIB 1 LINE1)
(GROUND)
(FUSED B+)
LB/VT (20 GA.) - CAV 3 (SEAT POSITION SENSOR VOLTAGE)
4
1
1
5
11
19
4
10
18
24
- CAV 22
BK (20 GA.) - CAV 17 (SEAT SENSOR JUMPER)
Updated on 6/3/2014
Page 60
Page 66

2011-2014 driver’S Side MeMorY
2011-2014 Chrysler Minivan
I405 with With Seat DetectorDrivers Side POWER & HEAT & MEMORY
Body Side Wire
TO PASSENGER SIDE
SEAT PLUG
12
3
5
1
9
4
10
16
TOP
22
28
37
15
34
29
23
33
BK (12 GA.) - CAV3
OR/RD (12 GA.)
RD (12 GA.)
LG/WT (20 GA.) - CAV 1
LG/YL (18 GA.) - CAV 17
LG/DG (18 GA.) - CAV 18
LB/VT (18 GA.) - CAV 19
OR/LB (20 GA.) - CAV 2
LB/WT (20 GA.) - CAV 11
DB/LG (20 GA.) - CAV 13
RELOCATED OEM CIRCUIT BREAKER
WT/OR (20 GA.) - CAV 3
WT/GY (20 GA.) - CAV 4
TN/DB (20 GA.) - CAV 5
LG/GY (20 GA.) - CAV 6
OR/LG (20 GA.) - CAV 7
TN/WT (20 GA.) - CAV 8
PK/WT (20 GA.) - CAV 9
BK/RD (20 GA.) - CAV 10
PK/YL (20 GA.) - CAV 14
LG/VT (20 GA.) - CAV 15
GY/DB (20 GA.) - CAV 16
LG/GY (18 GA.) - CAV 20
YL/GN (20 GA.) - CAV 21
GN/WT (20 GA.) - CAV 22
GN/LB (20 GA.) - CAV 23
WT/OR (20 GA.) - CAV 24
WT/GY (20 GA.) - CAV 25
VT/GY (20 GA.) - CAV 27
RD (12 GA.) - CAV 1
25 A
BK (12 GA.) - CAV3
OR/RD (14 GA.) - CAV 2
RD (12 GA.)
OR/RD (12 GA.)
VT/LB (20 GA.) - CAV 26
DETECTOR
SEA
T
V 4.40
Cut off of YL plug coming
from under the seat
Cut off from (BLACK)
Memory plug
Cut off of WT plug coming
from under the seat
Cut/Twist & Heat shrink
LB/VT
LB/WT
LG/GY
BK/RD
PK/WT
LG/YL
LG/DG
LB/VT
LG/GY
YL/GN
RD
BK
YL/GN
RD
BK
LB/VT
LB/WT
LG/GY
BK/RD
LG/YL
LG/DG
LB/VT
LG/GY
SEAT SENSOR
SEAT POS SENSOR
SEAT POS SENSOR +
HEADREST +
HEADREST GND
SEAT BELT RETRACTOR Ln2
SEAT BELT RETRACTOR Ln1
SEAT THORAX SQUIB 1 Ln 2
SEAT THORAX SQUIB 1 Ln 1
#11134-001ASM-DR
POWER
GROUND
SEAT BELT
BODY SIDE
PK/WT
(HEATED SEAT MODULE SUPPLY)
(ADJUSTABLE PEDAL SWITCH FORWARD)
(CAN BUS -)
(CAN BUS +)
(R.F. HEATED SEAT TEMP SENSE)
(SEAT BELT BUCKLE SWITCH)
(ADJUSTABLE PEDAL SWITCH REARWARD)
(HEATED SEAT SENSOR RETURN)
(HEAD REST DR. SOLENOID)
(HEAD REST GROUND)
LB/VT (20 GA.) - CAV 12
(SEAT POS SENSOR DATA)
(SEAT POS SENSOR VOLTAGE)
(HEATED STEERING WHEEL)
(FUSED OUTPUT)
(RT. FRONT SEAT HEATER CONTROL)
(HEATED STEERING WHEEL RETURN)
(SEAT BELT RETRACTOR TENSIONER LINE 2)
(SEAT BELT RETRACTOR TENSIONER LINE 1)
(THORAX SQUIB 1 LINE 2)
(THORAX SQUIB 1 LINE 1)
(Seat sensor wire for seat detector)
(CAN BUS -)
(CAN BUS +)
(ADJUSTABLE PEDAL SENSOR )
(SENSOR GROUND)
(ADJUSTABLE PEDALS MORTOR FORWARD)
(ADJUSTABLE PEDALS MORTOR REARWARD)
(FUSED B+)
(GROUND)
2.4 OHM
2.4 OHM
1 K
510 ohm
510 ohm
Pins: A1648-ND QTY 23
A1341-ND QTY 4
BODY SIDE CONNECTOR
# A1364-ND
BODY SIDE CONNECTOR #A16015-ND
Pins: A25033-ND QTY 3
RD (20 GA.)
C376/
Updated on 6/3/2014
Page 61
Page 67

2011-2014 driver’S Side MeMorY
2011-2014 Chrysler Minivan
I405 with With Seat DetectorDrivers Seat POWER & HEAT-& MEMORY
BK (12 GA.) - CAV3
LG/WT (20 GA.) - CAV 1
LG/YL (18 GA.) - CAV 17
LG/DG (18 GA.) - CAV 18
LB/VT (18 GA.) - CAV 19
OR/LB (20 GA.) - CAV 2
LB/WT (20 GA.) - CAV 11
DB/LG (20 GA.) - CAV 13
WT/OR (20 GA.) - CAV 3
WT/GY (20 GA.) - CAV 4
TN/DB (20 GA.) - CAV 5
LG/GY (20 GA.) - CAV 6
OR/LG (20 GA.) - CAV 7
TN/WT (20 GA.) - CAV 8
PK/WT (20 GA.) - CAV 9
BK/RD (20 GA.) - CAV 10
PK/YL (16 GA.) - CAV 14
LG/VT (18 GA.) - CAV 15
GY/DB (20 GA.) - CAV 16
LG/GY (18 GA.) - CAV 20
BK (20 GA.) - CAV 21 (SEAT SENSOR JUMPER)
GN/WT (20 GA.) - CAV 22
GN/LB (20 GA.) - CAV 23
WT/OR (20 GA.) - CAV 24
WT/GY (20 GA.) - CAV 25
VT/GY (20 GA.) - CAV 27
RD (12 GA.) - CAV 1
BK (12 GA.) - CAV3
OR/RD (14 GA.) - CAV 2
VT/LB (20 GA.) - CAV 26
SEAT SIDE
(HEATED SEAT MODULE SUPPLY)
(ADJUSTABLE PEDAL SWITCH FORWARD)
(CAN BUS -)
(CAN BUS +)
(R.F. HEATED SEAT TEMP SENSE)
(SEAT BELT BUCKLE SWITCH)
(ADJUSTABLE PEDAL SWITCH REARWARD)
(HEATED SEAT SENSOR RETURN)
(HEAD REST DR. SOLENOID)
(HEAD REST GROUND)
LB/VT (20 GA.) - CAV 12
(SEAT POS SENSOR DATA)
(SEAT POS SENSOR VOLTAGE)
(HEATED STEERING WHEEL)
(FUSED OUTPUT)
(RT. FRONT SEAT HEATER CONTROL)
(HEATED STEERING WHEEL RETURN)
(SEAT BELT RETRACTOR TENSIONER LINE 2)
(SEAT BELT RETRACTOR TENSIONER LINE 1)
(THORAX SQUIB 1 LINE 2)
(THORAX SQUIB 1 LINE 1)
(CAN BUS -)
(CAN BUS +)
(ADJUSTABLE PEDAL SENSOR )
(SENSOR GROUND)
(ADJUSTABLE PEDALS MORTOR FORWARD)
(ADJUSTABLE PEDALS MORTOR REARWARD)
(FUSED B+)
(GROUND)
SEAT SIDE CONNECTOR
# A 1359-ND
9
4
5
1
15
22
TOP
16
23
34
10
37
33
28
29
PINS:
A1650-ND 9QTY
1
5
4
10
18
24
4
1
21
3
9
13
11
1
3
5
7
2
4
6
8
10
14
12
11
19
SEAT SIDE CONNECTOR
PINS: A25032-ND 3 per van
#A16019-ND
A1661-ND 18
QTY
C376/
Updated on 6/3/2014
Page 62
Page 68

2011-2012 PaSSenger’S Side Manual
2011-2012 Chrysler Minivan
C378 with With Seat DetectorPassenger Side MANUAL SEAT
BODY SIDE
Body Side
9
1
8
4
3
2
14
19
TOP
22
20
21
15
SEA
T
DETECTOR
V 4.40
YL/GN
RD
BK
VT/LB
WT/LB
LB/GY
PK/DB
BK/RD
LB/YL
LB/DG
VT/LB
GY/LG
YL/GN (20 GA.) - CAV 17
BK (12 GA.) CAV 1
PK/DB (20 GA.) - CAV 4
VT/LB (20 GA.) - CAV 3
WT/LB (20 GA.) - CAV 2
BK/RD (20 GA.) - CAV 5
LB/TN (20 GA.) - CAV 6
LB/GY (20 GA.) - CAV 7
LB/DG (20 GA.) - CAV 8
LB/LG (20 GA.) - CAV 9
LB/YL (18 GA.) - CAV 18
LB/DG (18 GA.) - CAV 19
VT/LB (18 GA.) - CAV 20
OR/RD (12 GA.)
Wires
From Drivers
Side seat
GY/LG (18 GA.) - CAV 21
#11134-001ASM-PS
SEAT SENSOR
POWER
GROUND
SEAT BELT
SEAT POS SENSOR
SEAT POS SENSOR +
HEADREST +
HEADREST GND
SEAT BELT RETRACTOR Ln2
SEAT BELT RETRACTOR Ln1
SEAT THORAX SQUIB 1 Ln 2
SEAT THORAX SQUIB 1 Ln 1
(Seat sensor wire for seat detector)
(GROUND)
(PASS SEAT POS SENSOR DATA)
(PASS SEAT POS SENSOR VOTAGE)
(HEAD REST PASS SOLENOID +)
(HEAD REST GROUND)
(SEAT BELT BUCKLE SWICHT SENSE)
(SEAT BELT SWITCH SENSE)
(SEAT OCCUPANT DETECTION SIGNAL)
(SEAT OCCUPANT DETECTION RETURN)
(SEAT BELT RETRACTOR TENSIONER LINE 2)
(SEAT BELT RETRACTOR TENSIONER LINE 1)
(SEAT THORAX SQUIB 1 LINE 2)
(SEAT THORAX SQUIB 1 LINE 1)
2.4 OHM
2.4 OHM
1 K
510 ohm
510 ohm
BODY SIDE CONNECTOR #A16031-ND
Pins: A25032-ND QTY 2
Pins: A1648-ND QTY 12
A1650-ND QTY 4
To Chassis
GND
Updated on 6/3/2014
Page 63
Page 69

2011-2012 PaSSenger’S Side Manual
2011-2012 Chrysler Minivan
C378 with - With Seat DetectorPassenger Seat MANUAL
SEAT SIDESEAT SIDE
PK/DB (20 GA.) - CAV 4
VT/LB (20 GA.) - CAV 3
WT/LB (20 GA.) - CAV 2
BK/RD (20 GA.) - CAV 5
LB/TN (20 GA.) - CAV 6
LB/GY (20 GA.) - CAV 7
LB/DG (20 GA.) - CAV 8
LB/LG (20 GA.) - CAV 9
LB/YL (18 GA.) - CAV 18
LB/DG (18 GA.) - CAV 19
VT/LB (18 GA.) - CAV 20
GY/LG (18 GA.) - CAV 21
(PASS SEAT POS SENSOR DATA)
(PASS SEAT POS SENSOR VOTAGE)
(HEAD REST PASS SOLENOID +)
(HEAD REST GROUND)
(SEAT BELT BUCKLE SWICHT SENSE)
(SEAT BELT SWITCH SENSE)
(SEAT OCCUPANT DETECTION SIGNAL)
(SEAT OCCUPANT DETECTION RETURN)
(SEAT BELT RETRACTOR TENSIONER LINE 2)
(SEAT BELT RETRACTOR TENSIONER LINE 1)
(SEAT THORAX SQUIB 1 LINE 2)
(SEAT THORAX SQUIB 1 LINE 1)
SEAT SIDE CONNECTOR
TOP
14
1
4
8
2
3
9
15
22
21
20
19
# A16037-ND
PINS: A1661- ND 9QTY
A1341- ND 4QTY
BK (20 GA.) - CAV 17
(Seat sensor wire for seat detector)
1
8
7
14
BK/RD
LG/YL
LG/DG
4
1
Updated on 6/3/2014
Page 64
Page 70

2011- (earlY) 2012 PaSSenger’S Side PoWer & heaT
2011-2012 Chrysler Minivan
C378 with - With Seat DetectorPassenger Side POWER & HEAT
BODY SIDE
Body Side
BODY SIDE CONNECTOR #A16031-ND
9
1
8
4
3
2
14
19
TOP
22
20
21
15
SEA
T
DETECTOR
V 4.40
YL/GN
RD
BK
VT/LB
WT/LB
LB/GY
PK/DB
BK/RD
LB/YL
LB/DG
VT/LB
GY/LG
OR/RD (14 GA.) - CAV 22
YL/GN (20 GA.) - CAV 17
BK (12 GA.) - CAV 1
PK/DB (20 GA.) - CAV 4
VT/LB (20 GA.) - CAV 3
WT/LB (20 GA.) - CAV 2
BK/RD (20 GA.) - CAV 5
LB/TN (20 GA.) - CAV 6
LB/GY (20 GA.) - CAV 7
LB/DG (20 GA.) - CAV 8
LB/LG (20 GA.) - CAV 9
TN/WT (20 GA.) - CAV 10
LG/VT (20 GA.) - CAV 11
TN/DB (20 GA.) - CAV 12
LB/YL (18 GA.) - CAV 18
LB/DG (18 GA.) - CAV 19
VT/LB (18 GA.) - CAV 20
RD (20 GA.) - CAV 22
OR/RD (14 GA.)
Wires
From Drivers
Side seat
GY/LG (18 GA.) - CAV 21
#11134-001ASM-PS
SEAT SENSOR
POWER
GROUND
SEAT BELT
SEAT POS SENSOR
SEAT POS SENSOR +
HEADREST +
HEADREST GND
SEAT BELT RETRACTOR Ln2
SEAT BELT RETRACTOR Ln1
SEAT THORAX SQUIB 1 Ln 2
SEAT THORAX SQUIB 1 Ln 1
(Seat sensor wire for seat detector)
(GROUND)
(PASS SEAT POS SENSOR DATA)
(PASS SEAT POS SENSOR VOTAGE)
(HEAD REST PASS SOLENOID +)
(HEAD REST GROUND)
(SEAT BELT BUCKLE SWICHT SENSE)
(SEAT BELT SWITCH SENSE)
(SEAT OCCUPANT DETECTION SIGNAL)
(SEAT OCCUPANT DETECTION RETURN)
(HEATED SEAT SENSOR RETURN)
(RIGHT FRONT SEAT HEATER CONTROL)
(RIGHT FRONT HEATED SEAT TEMP SENSE)
(SEAT BELT RETRACTOR TENSIONER LINE 2)
(SEAT BELT RETRACTOR TENSIONER LINE 1)
(SEAT THORAX SQUIB 1 LINE 2)
(SEAT THORAX SQUIB 1 LINE 1)
(FUSED B+)
2.4 OHM
2.4 OHM
1 K
510 ohm
510 ohm
Pins: A25032-ND QTY 2
Pins: A1648-ND QTY 12
A1650-ND QTY 4
Updated on 6/3/2014
Page 65
Page 71

2011- (earlY)2012 PaSSenger’S Side PoWer & heaT
2011-2012 Chrysler Minivan
C378 with - With Seat DetectorPassenger Seat POWER & HEAT
SEAT SIDESEAT SIDE
OR/RD (14 GA.) - CAV 22
BK (12 GA.) - CAV 1
PK/DB (20 GA.) - CAV 4
VT/LB (20 GA.) - CAV 3
WT/LB (20 GA.) - CAV 2
BK/RD (20 GA.) - CAV 5
LB/TN (20 GA.) - CAV 6
LB/GY (20 GA.) - CAV 7
LB/DG (20 GA.) - CAV 8
LB/LG (20 GA.) - CAV 9
TN/WT (20 GA.) - CAV 10
LG/VT (20 GA.) - CAV 11
TN/DB (20 GA.) - CAV 12
LB/YL (18 GA.) - CAV 18
LB/DG (18 GA.) - CAV 19
VT/LB (18 GA.) - CAV 20
GY/LG (18 GA.) - CAV 21
(GROUND)
(PASS SEAT POS SENSOR DATA)
(PASS SEAT POS SENSOR VOTAGE)
(HEAD REST PASS SOLENOID +)
(HEAD REST GROUND)
(SEAT BELT BUCKLE SWICHT SENSE)
(SEAT BELT SWITCH SENSE)
(SEAT OCCUPANT DETECTION SIGNAL)
(SEAT OCCUPANT DETECTION RETURN)
(HEATED SEAT SENSOR RETURN)
(RIGHT FRONT SEAT HEATER CONTROL)
(RIGHT FRONT HEATED SEAT TEMP SENSE)
(SEAT BELT RETRACTOR TENSIONER LINE 2)
(SEAT BELT RETRACTOR TENSIONER LINE 1)
(SEAT THORAX SQUIB 1 LINE 2)
(SEAT THORAX SQUIB 1 LINE 1)
(FUSED B+)
SEAT SIDE CONNECTOR
TOP
14
1
4
8
2
3
9
15
22
21
20
19
# A16037-ND
PINS: A1661- ND 11QTY
A1341- ND 5QTY
BK (20 GA.) - CAV 17
(Seat sensor wire for seat detector)
1
8
7
14
BK/RD
LG/YL
LG/DG
4
1
A25033-ND 2QTY
Updated on 6/3/2014
Page 66
Page 72

2011- (laTe) 2012 PaSSenger’S Side PoWer & heaT
2011-2012 Chrysler Minivan
C378 with - With Seat DetectorPassenger Side POWER & HEAT
BODY SIDE (W/ OCCUPANT DETECTION CIRCUIT)
Body Side
BODY SIDE CONNECTOR #A16031-ND
9
1
8
4
3
2
14
19
TOP
22
20
21
15
SEAT
DETECTOR
V 4.40
YL/GN
RD
BK
VT/LB
WT/LB
LB/GY
PK/DB
BK/RD
LB/YL
LB/DG
VT/LB
GY/LG
OR/RD (14 GA.) - CAV 22
YL/GN (20 GA.) - CAV 17
BK (12 GA.) - CAV 1
PK/DB (20 GA.) - CAV 4
VT/LB (20 GA.) - CAV 3
WT/LB (20 GA.) - CAV 2
BK/RD (20 GA.) - CAV 5
LB/TN (20 GA.) - CAV 6
LB/GY (20 GA.) - CAV 7
LB/DG (20 GA.) - CAV 8
LB/LG (20 GA.) - CAV 9
TN/WT (20 GA.) - CAV 10
LG/VT (20 GA.) - CAV 11
TN/DB (20 GA.) - CAV 12
LB/YL (18 GA.) - CAV 18
LB/DG (18 GA.) - CAV 19
VT/LB (18 GA.) - CAV 20
RD (20 GA.) - CAV 22
OR/RD (14 GA.)
Wires
From Drivers
Side seat
GY/LG (18 GA.) - CAV 21
#11134-001ASM-PS
SEAT SENSOR
POWER
GROUND
SEAT BELT
SEAT POS SENSOR
SEAT POS SENSOR +
HEADREST +
HEADREST GND
SEAT BELT RETRACTOR Ln2
SEAT BELT RETRACTOR Ln1
SEAT THORAX SQUIB 1 Ln 2
SEAT THORAX SQUIB 1 Ln 1
(Seat sensor wire for seat detector)
(GROUND)
(PASS SEAT POS SENSOR DATA)
(PASS SEAT POS SENSOR VOTAGE)
(HEAD REST PASS SOLENOID +)
(HEAD REST GROUND)
(SEAT BELT BUCKLE SWICHT SENSE)
(SEAT BELT SWITCH SENSE)
(SEAT OCCUPANT DETECTION SIGNAL)
(SEAT OCCUPANT DETECTION RETURN)
(HEATED SEAT SENSOR RETURN)
(RIGHT FRONT SEAT HEATER CONTROL)
(RIGHT FRONT HEATED SEAT TEMP SENSE)
(SEAT BELT RETRACTOR TENSIONER LINE 2)
(SEAT BELT RETRACTOR TENSIONER LINE 1)
(SEAT THORAX SQUIB 1 LINE 2)
(SEAT THORAX SQUIB 1 LINE 1)
(FUSED B+)
2.4 OHM
2.4 OHM
1 K
510 ohm
510 ohm
Pins: A25032-ND QTY 2
Pins: A1648-ND QTY 12
A1650-ND QTY 4
LB/DG
OCCUPANT DETECT SIG
LB/LG
OCCUPANT DETECT RET
1 K
Updated on 6/3/2014
Page 67
Page 73

2011-(laTe) 2012 PaSSenger’S Side PoWer & heaT
2011-2012 Chrysler Minivan
C378 with - With Seat DetectorPassenger Seat POWER & HEAT
SEAT SIDESEAT SIDE
OR/RD (14 GA.) - CAV 22
BK (12 GA.) - CAV 1
PK/DB (20 GA.) - CAV 4
VT/LB (20 GA.) - CAV 3
WT/LB (20 GA.) - CAV 2
BK/RD (20 GA.) - CAV 5
LB/TN (20 GA.) - CAV 6
LB/GY (20 GA.) - CAV 7
LB/DG (20 GA.) - CAV 8
LB/LG (20 GA.) - CAV 9
TN/WT (20 GA.) - CAV 10
LG/VT (20 GA.) - CAV 11
TN/DB (20 GA.) - CAV 12
LB/YL (18 GA.) - CAV 18
LB/DG (18 GA.) - CAV 19
VT/LB (18 GA.) - CAV 20
GY/LG (18 GA.) - CAV 21
(GROUND)
(PASS SEAT POS SENSOR DATA)
(PASS SEAT POS SENSOR VOTAGE)
(HEAD REST PASS SOLENOID +)
(HEAD REST GROUND)
(SEAT BELT BUCKLE SWICHT SENSE)
(SEAT BELT SWITCH SENSE)
(SEAT OCCUPANT DETECTION SIGNAL)
(SEAT OCCUPANT DETECTION RETURN)
(HEATED SEAT SENSOR RETURN)
(RIGHT FRONT SEAT HEATER CONTROL)
(RIGHT FRONT HEATED SEAT TEMP SENSE)
(SEAT BELT RETRACTOR TENSIONER LINE 2)
(SEAT BELT RETRACTOR TENSIONER LINE 1)
(SEAT THORAX SQUIB 1 LINE 2)
(SEAT THORAX SQUIB 1 LINE 1)
(FUSED B+)
SEAT SIDE CONNECTOR
TOP
14
1
4
8
2
3
9
15
22
21
20
19
# A16037-ND
PINS: A1661- ND 11QTY
A1341- ND 5QTY
BK (20 GA.) - CAV 17
(Seat sensor wire for seat detector)
1
8
7
14
BK/RD
LG/YL
LG/DG
4
1
A25033-ND 2QTY
(W/ OCCUPANT DETECTION CIRCUIT)
Updated on 6/3/2014
Page 68
Page 74

2013-2014 PaSSenger’S Side Manual
2013-2014 Chrysler Minivan
I406/C378 with - With Seat DetectorPassenger Side MANUAL
BODY SIDE
(W/ OCCUPANT DETECTION CIRCUIT)
Body Side
BODY SIDE CONNECTOR #A16031-ND
9
1
8
4
3
2
14
19
TOP
22
20
21
15
SEA
T
DETECTOR
V 4.40
YL/GN
RD
BK
VT/LB
WT/LB
LB/GY
PK/DB
BK/RD
LB/YL
LB/DG
VT/LB
GY/LG
OR/RD (14 GA.) - CAV 22
YL/GN (20 GA.) - CAV 17
BK (12 GA.) - CAV 1
PK/DB (20 GA.) - CAV 4
BK/RD (20 GA.) - CAV 5
LB/GY (20 GA.) - CAV 7
LB/DG (20 GA.) - CAV 8
LB/TN (20 GA.) - CAV 9
LB/YL (18 GA.) - CAV 18
LB/DG (18 GA.) - CAV 19
VT/LB (18 GA.) - CAV 20
RD (20 GA.) - CAV 22
OR/RD (14 GA.)
Wires
From Drivers
Side seat
GY/LG (18 GA.) - CAV 21
#11134-001ASM-PS
SEAT SENSOR
POWER
GROUND
SEAT BELT
SEAT POS SENSOR
SEAT POS SENSOR +
HEADREST +
HEADREST GND
SEAT BELT RETRACTOR Ln2
SEAT BELT RETRACTOR Ln1
SEAT THORAX SQUIB 1 Ln 2
SEAT THORAX SQUIB 1 Ln 1
(Seat sensor wire for seat detector)
(GROUND)
(HEAD REST PASS SOLENOID +)
(HEAD REST GROUND)
(SEAT BELT SWITCH SENSE)
(SEAT OCCUPANT DETECTION SIGNAL)
(SEAT OCCUPANT DETECTION RETURN)
(SEAT BELT RETRACTOR TENSIONER LINE 2)
(SEAT BELT RETRACTOR TENSIONER LINE 1)
(SEAT THORAX SQUIB 1 LINE 2)
(SEAT THORAX SQUIB 1 LINE 1)
(FUSED B+)
2.4 OHM
2.4 OHM
1 K
510 ohm
510 ohm
Pins: A25032-ND QTY 2
Pins: A1648-ND QTY 10
LB/DG
OCCUPANT DETECT SIG
LB/TN
OCCUPANT DETECT RET
1 K
Vans built prior to 10/10/2012 have
the LB/TN in CAV6 NOT CAV 9
Stock # 47055 was the 1st van
with LB/TN in CAV 9
To Chassis
GND
RD (20 GA)
Updated on 6/3/2014
Page 69
Page 75

2013-2014 PaSSenger’S Side Manual
2013-2014 Chrysler Minivan
I406A/C378 with - With Seat DetectorPassenger Seat MANUAL
SEAT SIDESEAT SIDE
PK/DB (20 GA.) - CAV 4
BK/RD (20 GA.) - CAV 5
LB/GY (20 GA.) - CAV 7
LB/DG (20 GA.) - CAV 8
LB/TN (20 GA.) - CAV 9
LB/YL (18 GA.) - CAV 18
LB/DG (18 GA.) - CAV 19
VT/LB (18 GA.) - CAV 20
GY/LG (18 GA.) - CAV 21
(HEAD REST PASS SOLENOID +)
(HEAD REST GROUND)
(SEAT BELT SWITCH SENSE)
(SEAT OCCUPANT DETECTION SIGNAL)
(SEAT OCCUPANT DETECTION RETURN)
(SEAT BELT RETRACTOR TENSIONER LINE 2)
(SEAT BELT RETRACTOR TENSIONER LINE 1)
(SEAT THORAX SQUIB 1 LINE 2)
(SEAT THORAX SQUIB 1 LINE 1)
SEAT SIDE CONNECTOR
TOP
14
1
4
8
2
3
9
15
22
21
20
19
# A16037-ND
PINS: A1661- ND QTY 6
A1341- ND QTY 4
BK (20 GA.) - CAV 17
(Seat sensor wire for seat detector)
1
8
7
14
BK/RD
LG/YL
LG/DG
Vans built prior to 10/10/2012 have
the LB/TN in CAV6 NOT CAV 9
Stock # 47055 was the 1st van
with LB/TN in CAV 9
Updated on 6/3/2014
Page 70
Page 76

2013-2014 Chrysler Minivan
I406/C378 with - With Seat DetectorPassenger Side MANUAL
BODY SIDE
(W/ OCCUPANT DETECTION CIRCUIT)
Body Side
BODY SIDE CONNECTOR #A16031-ND
9
1
8
4
3
2
14
19
TOP
22
20
21
15
SEA
T
DETECTOR
V 4.40
YL/GN
RD
BK
VT/LB
WT/LB
LB/GY
PK/DB
BK/RD
LB/YL
LB/DG
VT/LB
GY/LG
OR/RD (14 GA.) - CAV 22
YL/GN (20 GA.) - CAV 17
BK (12 GA.) - CAV 1
PK/DB (20 GA.) - CAV 4
BK/RD (20 GA.) - CAV 5
LB/GY (20 GA.) - CAV 7
LB/DG (20 GA.) - CAV 8
LB/TN (20 GA.) - CAV 9
LB/YL (18 GA.) - CAV 18
LB/DG (18 GA.) - CAV 19
VT/LB (18 GA.) - CAV 20
RD (20 GA.) - CAV 22
OR/RD (14 GA.)
Wires
From Drivers
Side seat
GY/LG (18 GA.) - CAV 21
#11134-001ASM-PS
SEAT SENSOR
POWER
GROUND
SEAT BELT
SEAT POS SENSOR
SEAT POS SENSOR +
HEADREST +
HEADREST GND
SEAT BELT RETRACTOR Ln2
SEAT BELT RETRACTOR Ln1
SEAT THORAX SQUIB 1 Ln 2
SEAT THORAX SQUIB 1 Ln 1
(Seat sensor wire for seat detector)
(GROUND)
(HEAD REST PASS SOLENOID +)
(HEAD REST GROUND)
(SEAT BELT SWITCH SENSE)
(SEAT OCCUPANT DETECTION SIGNAL)
(SEAT OCCUPANT DETECTION RETURN)
(SEAT BELT RETRACTOR TENSIONER LINE 2)
(SEAT BELT RETRACTOR TENSIONER LINE 1)
(SEAT THORAX SQUIB 1 LINE 2)
(SEAT THORAX SQUIB 1 LINE 1)
(FUSED B+)
2.4 OHM
2.4 OHM
1 K
510 ohm
510 ohm
Pins: A25032-ND QTY 2
Pins: A1648-ND QTY 10
LB/DG
OCCUPANT DETECT SIG
LB/TN
OCCUPANT DETECT RET
1 K
Vans built prior to 10/10/2012 have
the LB/TN in CAV6 NOT CAV 9
Stock # 47055 was the 1st van
with LB/TN in CAV 9
To Chassis
GND
RD (20 GA)
Updated on 6/3/2014
2013-2014 PaSSenger’S Side PoWer & heaT
Page 71
Page 77

2013-2014 PaSSenger’S Side PoWer & heaT
2013-2014 Chrysler Minivan
I406A/C378 with - With Seat DetectorPassenger Seat POWER & HEAT
SEAT SIDESEAT SIDE
OR/RD (14 GA.) - CAV 22
BK (12 GA.) - CAV 1
PK/DB (20 GA.) - CAV 4
BK/RD (20 GA.) - CAV 5
LB/GY (20 GA.) - CAV 7
LB/DG (20 GA.) - CAV 8
LB/TN (20 GA.) - CAV 9
TN/WT (20 GA.) - CAV 10
LG/VT (20 GA.) - CAV 11
TN/DB (20 GA.) - CAV 12
LB/YL (18 GA.) - CAV 18
LB/DG (18 GA.) - CAV 19
VT/LB (18 GA.) - CAV 20
GY/LG (18 GA.) - CAV 21
(GROUND)
(HEAD REST PASS SOLENOID +)
(HEAD REST GROUND)
(SEAT BELT SWITCH SENSE)
(SEAT OCCUPANT DETECTION SIGNAL)
(SEAT OCCUPANT DETECTION RETURN)
(HEATED SEAT SENSOR RETURN)
(RIGHT FRONT SEAT HEATER CONTROL)
(RIGHT FRONT HEATED SEAT TEMP SENSE)
(SEAT BELT RETRACTOR TENSIONER LINE 2)
(SEAT BELT RETRACTOR TENSIONER LINE 1)
(SEAT THORAX SQUIB 1 LINE 2)
(SEAT THORAX SQUIB 1 LINE 1)
(FUSED B+)
SEAT SIDE CONNECTOR
TOP
14
1
4
8
2
3
9
15
22
21
20
19
# A16037-ND
PINS: A1661- ND QTY 9
A1341- ND QTY 4
BK (20 GA.) - CAV 17
(Seat sensor wire for seat detector)
1
8
7
14
BK/RD
LG/YL
LG/DG
A25033-ND QTY 2
Vans built prior to 10/10/2012 have
the LB/TN in CAV6 NOT CAV 9
Stock # 47055 was the 1st van
with LB/TN in CAV 9
Updated on 6/3/2014
Page 72
Page 78

oTc Wiring (WiTh The door oPen liMiT SWiTch)
NC
NO
COM
2
3
1
COM
NO
NC
1
2
3
J1
ROLLX VANS ONE TOUCH CONTROLLER WIRING DIAGRAM
N/C
1
14
DASH
RESET SWITCH (8/21/06)
DOWN LIMIT
UP LIMIT
RELAY BOARD #OTCV8 RELAY BD
BK
LG / WT (20 GA.)
RD / DB (20 GA.)
YL / BK (20 GA.)
YL / RD (20 GA.)
RD / BK (20 GA.)
RD (20 GA.)
YL / WT (20 GA.)
YL / DG (20 GA
.)
RD / WT (20 GA.)
RD / DG (20 GA.)
VT / YL (20 GA.)
OR / RD (20 GA.)
DG (20 GA.)
DB (20 GA.)
WT / RD (20 GA.)
ROLLX VANS USER / RESET SWITCHES
YL / DG
KNEEL DISABLE (ON / OFF) SWITCH
(ASM #03220-001)
WT / RD (20 GA.)
BK
BK
BK
RD / WT (20 GA.)
DB / YL (20 GA.)
BK (20 GA. X 3)
BL (20 GA.)
RD (12 GA.)
RD (12 GA.)
YL (12 GA.)
BLACK
BLACK
BLACK
N/C
1
16
BLACK
RAMP MOTOR
OUTPUTS INPUTS
DOOR DISABLE
N/C
N/C
N/C
OR (20 GA.)
RD (20 GA.)
INPUTS
BK
DB
VT
BK
BK
KNEEL SYSTEM
KNEEL LIMIT SWITCHES
(#6X284)
N/C
N/C
BK (20 GA.)
VT (20 GA.)
AUX I/O
DB / YL (20 GA.)
*
*
* = For pictures of location see
Important Information and Location
Section in Service Manual
Italic Font = OEM Wire
YL (12 GA.)
RD/DB
YL / BK
YL/RD
RD / BK
RD
1
BLACK
SHUNT, 2005 HONDA
CAN BUS
#WM4814-ND-H ASM
YL / WT
GY
(+)
BK
(-)
N/C
BACK SIDE
BACK SIDE
16
1
4
N/C
1
4
1
6
5
10
(OEM CAV #4)
OR (20 GA.)
(OEM CAV #1)
OEM B-PILLAR SWITCH
(Rollx Vans uses this to
operate the door)
PASSENGER DOOR MODULE
(Rollx Vans uses this to
unlock the door)
1
8
7
14
TIPM
(Fuse box
under hood)
C309
WT/OR (CAV 5)
WT/GY (CAV 12)
CUT
D M R R
Door Module Right Rear
VT/YL (CAV 11)
Passenger’s side Door snake
(B-Pillar)
Twisted pairs run down B-Pillar
WT/GY
WT/GY
WT/OR
WT/OR
(Door Closed Limit)
(Chrysler Door Ajar Circuit)
(Door Open Limit)
(Neutral Safety)
(Unlock Output)
(Unlock Output)
(User switch)
BK (10 GA.)
1
12
BACK SIDE
ITF Harness V6/ OTC Board V8 MOD E-F ( )W/ Limit Switch
08330-001 INITIAL RELEASE. 11/25/2008
REVISION HISTORY:
COPYRIGHT 2008
CHECKED BY:
Rollx Vans, Inc.
6591 West Highway 13
Savage, MN 55378
952.890.7851
SCALE:
DRAWING #: 12361
REVISION:
NONE
V-8.00 My11 Chrysler
DRAWN BY:
Jason Hodgkins
Lynn Ringdahl
Page 73
Page 79

oTc Wiring (WiTh The door oPen liMiT SWiTch)
1 AMP
REMOTE
DOOR DETECTOR
CONTROLLER PWR
1 AMP
1 AMP
Nuetral
Safety
Ignition
Hot
FUSE PANEL
(BEHIND GLOVE BOX)
BK (20 GA. X 3)
*
J2
J1
RAMP DN
RAMP UP
KNL DN
KNL UP
RAMP
ENABLE
DASH
RELAY BOARD #OTCV8 RELAY BD
2
D
N
R
P
RD (8 GA.)
ROLLX VANS USER / RESET SWITCHES
(ASM #03220-005)
DASH
C-PILLARD-PILLAR
RD / DG (20 GA.)
BK (12 GA.)
RD (12 GA.)
BK (12 GA.)
YL (12 GA.)
RD (10 GA.)
BK (20 GA.)
RD (14 GA.)
BK (8 GA.)
BK (20 GA.)
BK (20 GA.)
DB (20 GA.)
DB (20 GA.)
BL (20 GA.)
OUT
IN
ITF RAMP OVERRIDE SWITCH
(DRIVER SIDE B PILLAR) #05175-001
BK
DB
BK (20 GA.)
POWER OVERRIDE BUS
WT / RD (20 GA.)
OR (20 GA.)
RD (20 GA.)
BL (20 GA.)
RD (20 GA.)
OR (20 GA.)
#310-1059
RD (-)
YL (+)
ITF RAMP
OUTPUTS
INPUTS
PWR OVERRIDES
FUSE
BK
DB
BK
DB
BK
DB
ANTENNA RUNS
UP PASSENGER
“D” PILLAR
D
G
(
2
0
G
A
.
)
RAMP LIMIT SWITCHES
(#6X284)
UP
LIMIT
DOWN
LIMIT
BK
WT / RD (20 GA.) X 3
40A
*
*
RD / BK
RD
1N4007
DIODES
66
WT / RD (20 GA.)
GN/DB
DB (20 GA.)
Neutral Safety
12/27/12
# 08044-002
BK
ASM #03220-005
CM6200
ASM #03295-003
Compustar Remote
11DQ05-ND
DIODE
NC
NO
COM
2
3
1
A
B
COM
NO
NC
1
2
3
1
4
8
13
17
21
3
7
23
20
16
(OEM CAV 9)
*(To Inition Hot)
located under
steering column
Rollx Vans Remote Reciever
BK (20 GA.)
12
1
8
7
14
C309
COM
NO
NC
1
2
3
-
+
DOOR OPEN LIMIT SWITCH
(Passenger side lower door track)
OR/RD (20 GA.)
RD (10 GA.)
BK (10 GA.)
GND (To Body)
DB
BuilT Before 8/26/2013
Page 74
Page 80

oTc Wiring (WiTh The door deTecTor)
(VT/YL)
Twisted pairs run down B-Pillar
WT/OR (20GA.)
WT/GY (20GA.)
LB/WT (20GA.)
LB/VT (20GA.)
Solder
NC
NO
COM
2
3
1
COM
NO
NC
1
2
3
J1
ROLLX VANS ONE TOUCH CONTROLLER WIRING DIAGRAM
N/C
1
14
DOWN LIMIT
UP LIMIT
RELAY BOARD #OTCV8 RELAY BD
BK
LG / WT (20 GA.)
RD / DB (20 GA.)
YL / BK (20 GA.)
YL / RD (20 GA.)
RD / BK (20 GA.)
RD (20 GA.)
YL / WT (20 GA.)
YL / DG (20 GA
.)
RD / DG (20 GA.)
VT / YL (20 GA.)
OR / RD (20 GA.)
DG (20 GA.)
DB (20 GA.)
YL / DG
KNEEL DISABLE (ON / OFF) SWITCH
(ASM #03220-001)
WT / RD (20 GA.)
BK
BK
BK
RD / WT (20 GA.)
BL (20 GA.)
RD (12 GA.)
RD (12 GA.)
YL (12 GA.)
BLACK
N/C
1
16
BLACK
RAMP MOTOR
OUTPUTS
INPUTS
DOOR DISABLE
N/C
N/C
N/C
OR (20 GA.)
RD (20 GA.)
INPUTS
VT
BK
RAMP LIMIT SWITCHES
(#6X284)
BK
KNEEL SYSTEM
KNEEL LIMIT SWITCHES
(#6X284)
UP
LIMIT
DOWN
LIMIT
BK (20 GA.)
N/C
N/C
BK (20 GA.)
VT (20 GA.)
DB / YL (20 GA.)
*
*
*
YL (12 GA.)
RD/DB
YL / BK
YL/RD
RD / BK
RD
BLACK
SHUNT, 2005 HONDA
CAN BUS
#WM4814-ND-H ASM
YL / WT
GY
(+)
BK
(-)
N/C
BACK SIDE
BACK SIDE
16
1
N/C
1
4
1
6
5
10
(OEM CAV #4)
OR (20 GA.)
(CAV #1)
OEM B-PILLAR SWITCH
(Rollx Vans uses this to
operate the door)
PASSENGER DOOR MODULE
(Rollx Vans uses this to
unlock the door)
NC
NO
COM
2
3
1
TIPM
(Fuse box
under hood)
CUT
COM
NO
NC
1
2
3
(Door Closed Limit)
(Door Open Limit)
(Neutral Safety)
(Unlock Output)
(Door Control)
(User switch)
BK (10 GA.)
N/C
WT/GY (CAV 12)
VT/YL (CAV 11)
(Chrysler Door Ajar Circuit)
Solder
12
BACK SIDE
WT/OR (CAV 5)
(GND)
(V BAT)
BL (20 GA.)
(QUAD A + IN)
PK (20 GA.)
1
4
VT (20 GA.)
(QUAD B + IN)
LOCATION:
Passengers D-PILLAR
LOCATION:
Passengers B-PILLAR
LOCATION:
Passengers C-PILLAR
LOCATION:
Passenger front door
1
12
BACK SIDE
BLACK
BLACK
WT / RD (20 GA.)
N/C
N/C
1
P S D M R
Power Sliding Door Module Right
(Door Open Status out)
BL/YL (20 GA.)
BK (20 GA.)
OR/RD (20 GA.)
(Reset)
(GND)
(Door Closed Status In)
1
4
ITF Harness V6/ OTC Board V8 MOD F (W/ Door Detector)
*UNIVERSAL DOOR
DETECTOR
(13104-001ASM)
* = For pictures of location see
Important Information and Location
Section in Service Manual
Italic Font = OEM Wire
08330-001 INITIAL RELEASE. 11/25/2008
REVISION HISTORY:
COPYRIGHT 2008
Rollx Vans, Inc.
6591 West Highway 13
Savage, MN 55378
952.890.7851
Effective Stock # 47397
DRAWING #: 13266
Jason Hodgkins
DRAWN BY:
Effective Start Date: 8/26/2013
ECN # 13196
Page 75
Page 81

oTc Wiring (WiTh The door deTecTor)
1 AMP
REMOTE
DOOR DETECTOR
CONTROLLER PWR
1 AMP
1 AMP
Nuetral
Safety
Ignition
Hot
FUSE PANEL
(BEHIND GLOVE BOX)
BK (20 GA. X 3)
*
J2
J1
RAMP DN
RAMP UP
KNL DN
KNL UP
RAMP
ENABLE
DASH
RESET SWITCH (8/21/06)
RELAY BOARD #OTCV8 RELAY BD
2
D
N
R
P
RD (8 GA.)
ROLLX VANS USER / RESET SWITCHES
(ASM #03220-005)
DASH
C-PILLAR
D-PILLAR
BK (12 GA.)
RD (12 GA.)
YL (12 GA.)
RD (10 GA.)
BK (20 GA.)
RD (14 GA.)
BK (8 GA.)
BK (20 GA.)
DB (20 GA.)
DB / YL (20 GA.)
BK (20 GA. X 3)
BL (20 GA.)
OUT
IN
ITF RAMP OVERRIDE
SWITCH
(DRIVER SIDE B
PILLAR) #05175-001
BK
DB
BK (20 GA.)
POWER OVERRIDE BUS
OR (20 GA.)
RD (20 GA.)
BL (20 GA.)
RD (20 GA.)
OR (20 GA.)
#310-1059
RD (-)
YL (+)
ITF RAMP
OUTPUTS
INPUTS
PWR OVERRIDES
FUSE
BK
DB
BK
DB
BK
DB
ANTENNA RUNS
UP PASSENGER
“D” PILLAR
D
G
(
2
0
G
A
.
)
40A
*
1N4007
DIODES
66
GN/DB
DB (20 GA.)
Neutral Safety
9/23/2013
# 08044-002
BK
ASM #03220-005
CM6200
ASM #03295-003
11DQ05-ND
DIODE
1
4
8
13
17
21
3
7
23
20
16
(OEM CAV 9)
*(To Inition Hot)
located under
steering column
Rollx Vans Remote Reciever
12
D M R R
Door Module Right Rear
Passenger’s side Door snake
(B-Pillar)
-
+
RD (10 GA.)
BK (10 GA.)
GND (To Body)
DB
1
8
7
14
C309
VT/YL (CAV 11)
LOCATION:
Passengers B-PILLAR
LOCATION:
On the transmission
LOCATION:
Passenger’s side D-Pillar
1
4
LOCATION:
Back side of the lower slider door track
BuilT afTer 8/26/2013
Page 76
Page 82

NC
NO
COM
2
3
1
COM
NO
NC
1
2
3
J1
ROLLX VANS ONE TOUCH CONTROLLER WIRING DIAGRAM
N/C
1
14
DOWN LIMIT
UP LIMIT
RELAY BOARD #OTCV8 RELAY BD
BK
LG / WT (20 GA.)
RD / DB (20 GA.)
YL / BK (20 GA.)
YL / RD (20 GA.)
RD / BK (20 GA.)
RD (20 GA.)
YL / WT (20 GA.)
YL / DG (20 GA
.)
RD / DG (20 GA.)
VT / YL (20 GA.)
OR / RD (20 GA.)
DG (20 GA.)
DB (20 GA.)
YL / DG
KNEEL DISABLE (ON / OFF) SWITCH
(ASM #03220-001)
WT / RD (20 GA.)
BK
BK
BK
RD / WT (20 GA.)
BL (20 GA.)
RD (12 GA.)
RD (12 GA.)
YL (12 GA.)
BLACK
RAMP MOTOR
OUTPUTS
INPUTS
N/C
N/C
OR (20 GA.)
RD (20 GA.)
INPUTS
VT
BK
RAMP LIMIT SWITCHES
(#6X284)
BK
KNEEL SYSTEM
KNEEL LIMIT SWITCHES
(#6X284)
UP
LIMIT
DOWN
LIMIT
BK (20 GA.)
N/C
N/C
BK (20 GA.)
VT (20 GA.)
DB / YL (20 GA.)
*
*
*
YL (12 GA.)
RD/DB
YL / BK
YL/RD
RD / BK
RD
YL / WT
GY
(+)
BK
(-)
BACK SIDE
1
4
1
6
5
10
(OEM CAV #4)
OR (20 GA.)
(OEM CAV #1)
OEM B-PILLAR SWITCH
(Rollx Vans uses this to
operate the door)
PASSENGER DOOR MODULE
(Rollx Vans uses this to
unlock the door)
NC
NO
COM
2
3
1
TIPM
(Fuse box
under hood)
COM
NO
NC
1
2
3
(Door Closed Limit)
(Door Open Limit)
(Neutral Safety)
(Unlock Output)
(Door Control)
(User switch)
BK (10 GA.)
*UNIVERSAL DOOR
DETECTOR
(13104-001ASM)
VT/YL (CAV 11)
(Chrysler Door Ajar Circuit)
12
BACK SIDE
(GND)
(V BAT)
BL (20 GA.)
(QUAD A + IN)
PK (20 GA.)
1
4
VT (20 GA.)
(QUAD B + IN)
LOCATION:
Passengers D-PILLAR
LOCATION:
Passengers C-PILLAR
LOCATION:
Passenger front door
1
12
BACK SIDE
BLACK
BLACK
WT / RD (20 GA.)
N/C
N/C
1
P S D M R
Power Sliding Door Module Right
(Door Open Status out)
BL/YL (20 GA.)
BK (20 GA.)
OR/RD (20 GA.)
(Reset)
(GND)
(Door Closed Status In)
1
4
ITF Harness V6/ OTC Board V8 MOD F ( )Dropped the CAN BUS
* = For pictures of location see
Important Information and Location
Section in Service Manual
Italic Font = OEM Wire
08330-001 INITIAL RELEASE. 11/25/2008
REVISION HISTORY:
COPYRIGHT 2008
Rollx Vans, Inc.
6591 West Highway 13
Savage, MN 55378
952.890.7851
Effective Stock # 47655
DRAWING #: 14072
Jason Hodgkins
DRAWN BY:
Effective Start Date: 3/17/2014
ECN # 14078
oTc Wiring (WiTh The door deTecTor no can BuS)
Page 77
Page 83

1 AMP
REMOTE
DOOR DETECTOR
CONTROLLER PWR
1 AMP
1 AMP
Nuetral
Safety
Ignition
Hot
FUSE PANEL
(BEHIND GLOVE BOX)
BK (20 GA. X 3)
*
J2
J1
RAMP DN
RAMP UP
KNL DN
KNL UP
RAMP
ENABLE
DASH
RESET SWITCH (8/21/06)
RELAY BOARD #OTCV8 RELAY BD
2
D
N
R
P
RD (8 GA.)
ROLLX VANS USER / RESET SWITCHES
(ASM #03220-005)
DASH
C-PILLAR
D-PILLAR
BK (12 GA.)
RD (12 GA.)
YL (12 GA.)
RD (10 GA.)
BK (20 GA.)
RD (14 GA.)
BK (8 GA.)
BK (20 GA.)
DB (20 GA.)
DB / YL (20 GA.)
BK (20 GA. X 3)
BL (20 GA.)
OUT
IN
ITF RAMP OVERRIDE
SWITCH
(DRIVER SIDE B
PILLAR) #05175-001
BK
DB
BK (20 GA.)
POWER OVERRIDE BUS
OR (20 GA.)
RD (20 GA.)
BL (20 GA.)
RD (20 GA.)
OR (20 GA.)
#310-1059
RD (-)
YL (+)
ITF RAMP
OUTPUTS
INPUTS
PWR OVERRIDES
FUSE
BK
DB
BK
DB
BK
DB
ANTENNA RUNS
UP PASSENGER
“D” PILLAR
D
G (
2
0
GA
.)
40A
*
1N4007
DIODES
66
GN/DB
DB (20 GA.)
Neutral Safety
3/13/2014
# 08044-002
BK
ASM #03220-005
CM6200
ASM #03295-003
11DQ05-ND
DIODE
1
4
8
13
17
21
3
7
23
20
16
(OEM CAV 9)
*(To Inition Hot)
located under
steering column
Rollx Vans Remote Reciever
12
D M R R
Door Module Right Rear
Passenger’s side Door snake
(B-Pillar)
-
+
RD (10 GA.)
BK (10 GA.)
GND (To Body)
DB
1
8
7
14
C309
VT/YL (CAV 11)
LOCATION:
Passengers B-PILLAR
LOCATION:
On the transmission
LOCATION:
Passenger’s side D-Pillar
1
4
LOCATION:
Back side of the lower slider door track
oTc Wiring (WiTh The door deTecTor no can BuS)
BuilT afTer 3/17/2014
Page 78
Page 84

oTc Wiring (WiTh Wing WindoW inTerface)
NC
NO
COM
2
3
1
COM
NO
NC
1
2
3
ROLLX VANS ONE TOUCH CONTROLLER WIRING DIAGRAM
08330-001 INITIAL RELEASE. 11/25/2008
REVISION HISTORY:
COPYRIGHT 2008
Rollx Vans, Inc.
6591 West Highway 13
Savage, MN 55378
952.890.7851
Effective Stock #: 01060
DRAWING #: 14083
Jason Hodgkins
N/C
1
14
DOWN LIMIT
UP LIMIT
BK (20GA.)
LG / WT (20 GA.)
RD / DB (20 GA.)
YL / BK (20 GA.)
YL / RD (20 GA.)
RD / BK (20 GA.)
RD (20 GA.)
YL / WT (20 GA.)
YL / DG (20 GA
.)
RD / DG (20 GA.)
VT / YL (20 GA.)
OR / RD (20 GA.)
DG (20 GA.)
DB (20 GA.)
ROLLX VANS USER / RESET SWITCHES
(ASM #03220-005)
YL / DG
WT / RD (20 GA.)
BK
RD / WT (20 GA.)
DB (20 GA.)
BL (20 GA.)
RD (12 GA.)
RD (12 GA.)
YL (12 GA.)
BLACK
OBSTACLE DET.
OUTPUTS
INPUTS
N/C
N/C
N/C
OR (20 GA.)
RAMP LIMIT SWITCHES
(#6X284)
BK
KNEEL SYSTEM
KNEEL LIMIT SWITCHES
(#6X284)
UP
LIMIT
DOWN
LIMIT
BK (20 GA.)
*
*
* = For pictures of location see
Important Information and Location
Section in Service Manual
Italic Font = OEM Wire
YL (12 GA.)
YL / WT
GY
(+)
BK
(-)
BACK SIDE
1
4
1
6
5
10
(OEM CAV #4)
OR (20 GA.)
(VT/YL)
OEM B-PILLAR SWITCH
(Rollx Vans uses this to
operate the door)
PASSENGER DOOR MODULE
(Rollx Vans uses this to
unlock the door)
NC
NO
COM
2
3
1
COM
NO
NC
1
2
3
(Door Closed Limit)
(Door Open Limit)
(Neutral Safety)
(Unlock Output)
(Door Control)
(User switch)
BK (10 GA.)
*UNIVERSAL DOOR
DETECTOR
(13104-001ASM)
(GND)
(V BAT)
BL (20 GA.)
(QUAD A + IN)
PK (20 GA.)
VT (20 GA.)
(QUAD B + IN)
LOCATION:
Behind OTC Board
LOCATION:
Passenger front door
1
12
BACK SIDE
BLACK
BLACK
WT / RD (20 GA.)
(Door Open Status out)
BL/YL (20 GA.)
BK (20 GA.)
O
R
/
R
D
(
2
0
G
A
.
)
(Reset)
(GND)
(Door Closed Status In)
BLACK
N/C
1
16
WING WINDOW FLAPPER
N/C
BACK SIDE
N/C
N/C
WT / RD (20 GA.)
12
BACK SIDE
N/C
N/C
1
(V BAT)
(V BAT)
V
T
/
Y
L
(
2
0
G
A
.
)
N/C
N/C
BK (20 GA.)
VT (20 GA.)
1
4
D M R R
Door Module Right Rear
Passenger’s side Door snake
(B-Pillar)
1
8
7
14
C309
VT/YL (CAV 11)
(Chrysler Door Ajar Circuit)
1
4
LOCATION:
Passengers C-PILLAR
1
4
LOCATION:
Back side of the lower slider door track
P S D M R
Power Sliding Door Module Right
Door Detector Extension
66”
BL/YL (20 GA.)
BK
DB
DASH
KNEEL DISABLE (ON / OFF) SWITCH
(ASM #03220-001)
VT
BK
DASH
RESET SWITCH
BK
DB
VT/YL (20 GA.)
VT/BL (20 GA.)
BK (20GA.)
BK (20GA.)
BL/YL (20GA.)
VT (20GA.)
VT (20GA.)
BL (20GA.)
PK (20GA.)
(Ramp Up Limit)
(Ramp Down Limit)
(Ramp Enable)
(Ramp Down)
(Ramp Up)
(Kneel Down)
(Kneel Up)
(Ramp Up)
(Ramp Enable)
BK (20GA.)
(CAV #1)
BK (20GA.)
BK (20GA.)
DRAWN BY:
Effective Start Date: 4/14/2014
ECN # 14112
ITF Harness V7/ OTC Board V8 MOD H ( )W/ Wing Window Interface
Page 79
Page 85

CUT
#310-1059
R
D
(
-
)
Y
L
(
+
)
ITF RAMP
1 AMP
REMOTE
DOOR DETECTOR
1 AMP
1 AMP
Nuetral
Safety
Ignition
Hot
FUSE PANEL
(BEHIND GLOVE BOX)
BK (20 GA. X 3)
*
J2
J1
RAMP DN
RAMP UP
KNL DN
KNL UP
RAMP
ENABLE
RELAY BOARD #OTCV8 RELAY BD
2
D
N
R
P
RD (8 GA.)
ROLLX VANS USER / RESET SWITCHES
(ASM #03220-005)
BK (12 GA.)
RD (12 GA.)
YL (12 GA.)
BK (20 GA.)
RD (14 GA.)
BK (8 GA.)
BK
DB (20 GA.)
BL (20 GA.)
OUT
IN
ITF RAMP OVERRIDE SWITCH
#05175-001
POWER OVERRIDE BUS
OR (20 GA.)
RD (20 GA.)
BL (20 GA.)
RD (20 GA.)
OR (20 GA.)
OUTPUTS
INPUTS
PWR OVERRIDES
FUSE
ANTENNA RUNS
UP PASSENGER
“D” PILLAR
D
G
(
2
0
G
A
.
)
40A
*
RD/DB
YL / BK
YL/RD
RD / BK
RD
1N4007
DIODES
66
GN/DB
DB (20 GA.)
Neutral Safety
3/24/2014
# 08044-002
BK
ASM #03220-005
CM6200
ASM #03295-003
11DQ05-ND
DIODE
1
4
8
13
17
21
3
7
23
20
16
(OEM CAV 9)
*(To Inition Hot)
located under
steering column
Rollx Vans Remote Reciever
12
-
+
RD (10 GA.)
BK (10 GA.)
GND (To Body)
DB
LOCATION:
On the transmission
LOCATION:
Passenger’s side D-Pillar
7
14
D-PILLAR
BK
DB
DASH
BK
DB
C-PILLAR
BK
DB
#14044-001ASM
Wing Window Interface
1
3
Rear Window Signal
Rear Window Return
BL (20 GA. X 3)
RD (12 GA.)
BK (12 GA.)
BK (12 GA.)
Rear Window Signal
Rear Window Return
LOCATION:
Right Rear D-Pillar
OR / BL
OR / YL
OR / BL
OR / YL
BL
BL /YL
BL /YL
OR / YL
BL
VT/BL
VT/YL
RD (20GA.)
BK (20GA.)
BK (20GA.)
BK (10 GA.)
(Ramp Down)
(Ramp Up)
(Ramp Enable)
OR / BL
WT/RD (20GA.X2)
Right Rear Wing
Window Motor
Programming
Switch
To Driver’s side
Window Switch
BK (20GA.)
GN/WT
RD
RD
GN
BK
OTC BOARD
D
G
(
2
0
G
A
.
)
P
K
/
G
N
(
2
0
G
A
.
)
BK (20GA.)
RD (20 GA.)
BK (20 GA.)
(User switch)
(Kneeler -)
(Kneeler +)
(Ramp -)
(Ramp +)
(Remote Pwr.)
(Remote Gnd.)
LOCATION:
Driver’s Side B-Pillar
(Ramp +)
RD (12 GA.)
oTc Wiring (WiTh Wing WindoW inTerface)
Page 80
Page 86

rollX vanS PoWer door (MoTor Bar) Wiring
NC
NO
COM
2
3
1
RD (14 GA.)
BR (14 GA.)
24
25
26
OPEN CLOSE
DOOR
BR
YL (14 GA.)
DG (14 GA.)
BR (14 GA.)
24
25
26
ON
OFF
KNEEL
TN (16 GA.)
BK (14)
GREY WRAP
DOOR LOCK LIMIT SWITCH #6X284 IN
PASSENGER DOOR
(WHEN CLOSED, SENDS POWER TO
HARDWIRED SWITCHES)
ROLLX V
ANS
REMOTE
(BEHIND
GLOVE BOX)
WT (14)
BK (14)
RD (14 GA.)
85
86
87A
87
30
85
86
87A
87
30
WT (14 GA.)
GY
(14 GA.)
BK (14 GA.)
BK (14 GA.)
COM
NC NO
COM
NC NO
RAMP
VT (16 GA.)
DB (14 GA.)
BR (16 GA.)
11
13
12
OPEN
CLOSE
DOOR
C PILLAR
USER SWITCH
DASH USER
SWITCH
#8981K520
Rollx Vans Power Door (Motor Bar) Wiring Diagram v2
Touchtronic Power Touch 1550-R Remote System (Jan. 2011)
KNEEL ON/OFF
SWITCH
#8981K519
GY (16 GA.)
DASH KNEEL
DOWN L.E.D.
BK (16 GA.)
RD (16 GA.)
RMP
DWN
RAMP
POWER SWITCH
10 AMP CIRCUIT BREAKER
OR
15 AMP GLASS FUSE
VT (14)
OEM VT/DG (14)
FOR DOOR AJAR
RD (14)
RD (10 GA.)
RD (10)
TOUCHTRONICS
MODULE (#P1510-R)
WHT/RED #1
GRY/RED #2
BLK #3 (GND)
RED #4
(12V LOGIC)
FUSE
30 A
FUSE
15 A
FIREWALL
DOOR OPEN DOOR CLOSE RAMP DOWN
LOCATED IN OEM SPARE TIRE KIT COMPARTMENT
NEUTRAL
SAFETY 3.3L
PNK #5 (12V IN)
YEL #6 (OUT 1, 5A)
ORG #7
(OUT 2, 5A)
BLU #8
GRN #9
PNK #10 (12V IN)
FUSE
1
A
YL (20)
CHASSIS
GROUND
Soldier all
remote
connections
DG
Fuse Holder
#03220-019(X2)
KIT R0004
RAMP UP
LIMIT SWITCH
#03220-004
-
+
FUSE
10
A
WT (14)
NC
DG/DB (OEM CAV 8)
TRS T3 SIGNAL
1
6
10
5
Page 81
Page 87

rollX vanS PoWer door (MoTor Bar) Wiring
85
86
87
85
86
87A
87
30
85
86
87A
87
30
85
86
87A
87
30
85
86
87A
87
30
TN (16 GA.)
RD (16 GA.)
BK (14 GA.)
YL (14 GA.)
YL (16 GA.)
YL (14 GA.)
PK (14 GA.)
COM
COM
NC
NC
NO
NO
RD
YL
DB (14 GA.)
WT
DB
MOTOR BAR
#310-1059
VT (14)
TO OEM
DOOR AJAR
COM
NC NO
COM
COM
NC
NC
NO
NO
WT (16 GA.)
YL (14 GA.)
OR (16 GA.)
BR (14 GA.)
TO DASH
L.E.D.
DG
YL
11
13
12
OPEN
CLOSE
DOOR
C PILLAR
USER SWITCH
KNEELER
DG (14 GA.)
GY (16 GA.)
BR(16 GA.)
YL (16 GA.)
DG (16 GA.)
BR
DOOR OPEN
LIMIT SWITCH
(CHERRY)
#E19-50H
RAMP UP
KNEEL DOWN
KNEEL UP
RELAYS (#5-1393302-8)
DG
YL
BR
DG
T
oggle Switch
#4X203
JONES BLOCK
#3-142
KNEEL DN
LIMIT SWITCH
#03220-013
*
12
11
13
GY
(+)
BK
(-)
KNEEL UP LIMIT
SWITCH
#03220-014
7/9/2013
Page 82
Page 88

Doors
Door track - Periodically make sure lower door track is free of debris and vacuum track out.
Make certain to clear out any water and ice that may be present. In the front of each door track
there are plugs that can be removed to allow an air hose to be inserted to help remove debri.
Rollx Vans power door (If equipped) - Every 6 months lube the gear rack (bar) with a high
quality white lithium grease. Make sure to clean off any old grease first.
MainTenance inforMaTion
Kneel System
Kneel chain - Every 6 months spray the chain inside the rubber boot with a high quality oil to
lubricate and protect. DO NOT USE WD40.
Ramps
Folding ramp - Every 6 months spray the ramp’s lower and upper hinge with high quality silicon lubricant.
In The Floor ramp - Every 6 months spray the ramp access cover’s flap hinge with a high
quality silicon lubricant. Also spray the two silver strips on the underside of the ramp to reduce
friction.
Page 83
Page 89

WarranTY
New Rollx Vans Van Warranty Coverage Information
Rollx Vans provids a limited warranty on its minivan against defects in material or workmanship
for a period of 3 years or 36,000 miles, whichever comes first. For warranty specifics please
refer to an Owner’s Manual or contact Rollx Vans Customer Service.
For all warranty or reimbursement needs, you must have prior authorization by the Rollx Vans
Service Department.
1. Call 1-800-956-6668, and a Rollx Vans Customer Service Representative will assist you
in any concerns or issues you have with your van.
2. The service representative will evaluate what repair is needed, and either set up
an appointment with an “At Home” Service Technician or direct you to a nearby service
facility. An authorization number must be issued.
Rollx Vans will work with many repair facilities. Rollx Vans reserves the right to approve a repair shop or recommend an alternative.
Rollx Vans may request that defective/damaged parts be returned to our Customer Service Department for inspection. If parts are found to be damaged because of abuse or neglect, reimbursement for the new replacement parts may be denied. Rollx Vans reserves the right to use
rebuilt components.
Rollx Vans will ship all warranted replacement parts by nationwide carrier. In most cases, shipment will be by ground transport and absorbed by Rollx Vans. Any other mode of transportation
will be at the expense of the customer.
Our Mission
To improve the quality of life of people with disabilities of all income levels by delivering the best
modified vehicle.
We intend to keep that customer for life by following up with a level of service that exceeds all of their
expectations.
Our Values
Quality • Compassion • Honesty • Integrity • Fairness
 Loading...