

Page 1
SECTION PAGE
1
INTRODUCTION
2
THINGS TO KNOW BEFORE STARTING YOUR VEHICLE
3
UNDERSTANDING THE FEATURES OF YOUR VEHICLE
4
UNDERSTANDING YOUR INSTRUMENT PANEL
5
STARTING AND OPERATING
6
WHAT TO DO IN EMERGENCIES
7
MAINTAINING YOUR VEHICLE
8
MAINTENANCE SCHEDULES
9
IF YOU NEED CONSUMER ASSISTANCE
TABLE OF CONTENTS
.............................................................3
..............................9
..............................73
...................................171
.................................................247
..............................................349
...............................................371
..................................................441
.........................................469
1
2
3
4
5
6
7
8
9
10
INDEX
....................................................................477
10
Page 2

Page 3

CONTENTS
INTRODUCTION
1
䡵 Introduction ...........................4
䡵 A Message From DaimlerChrysler Corporation . . . 5
䡵 How To Use This Manual ..................5
䡵 Warnings And Cautions ...................5
䡵 Van Conversions/Campers .................6
䡵 Vehicle Identification Number ...............6
䡵 Vehicle Modifications / Alterations ...........7
Page 4
4 INTRODUCTION
INTRODUCTION
This manual has been prepared with the assistance of
service and engineering specialists to acquaint you with
the operation and maintenance of your new vehicle. It is
supplemented by a Warranty Information Booklet and
various customer oriented documents. You are urged to
read these publications carefully. Following the instructions and recommendations in this manual will help
assure safe and enjoyable operation of your vehicle.
NOTE: After you read the manual, it should be stored
in the vehicle for convenient reference and remain with
the vehicle when sold, so that the new owner will be
aware of all safety warnings.
When it comes to service, remember that your dealer
knows your vehicle best, has the factory-trained technicians and genuine Mopar威 parts, and is interested in
your satisfaction.
WARNING!
Engine exhaust, some of its constituents, and certain
vehicle components contain or emit chemicals
known to the State of California to cause cancer and
birth defects or other reproductive harm. In addition,
certain fluids contained in vehicles and certain products of component wear contain or emit chemicals
known to the State of California to cause cancer and
birth defects or other reproductive harm.
Page 5

INTRODUCTION 5
A MESSAGE FROM DAIMLERCHRYSLER
CORPORATION
DaimlerChrysler Corporation and Cummins welcome
you as a new Dodge Ram Cummins Turbo Dieselpowered truck owner.
Almost 100% of the heavy duty trucks in the United
States are diesel powered because of the fuel economy,
rugged durability, and high torque which permits pulling
heavy loads. Cummins engines power well over half of
these trucks. Now this same technology and proven
performance is yours in your new Dodge Ram truck
equipped with the Cummins 5.9 liter, Turbocharged,
Charge Air Cooled, Diesel engine.
Your diesel truck will sound, feel, drive, and operate
differently froma gasoline-powered truck. It is important
that you read and understand this manual. You may find
that some of the starting, operating, and maintenance
procedures are different. However, they are simple to
follow and careful adherence to them will ensure that
you take full advantage of the features of this engine.
Thank you for choosing the Dodge Ram truck with
Cummins Turbo Diesel power.
HOW TO USE THIS MANUAL
Consult the table of contents to determine which section
contains the information you desire.
The detailed index, at the rear of this manual, contains a
complete listing of all subjects.
WARNINGS AND CAUTIONS
This manual contains WARNINGS against operating
procedures which could result in an accident or bodily
injury. It also contains CAUTIONS against procedures
which could result in damage to your vehicle. If you do
not read this entire manual you may miss important
information. Observe all Warnings and Cautions.
1
Page 6

6 INTRODUCTION
VAN CONVERSIONS/CAMPERS
The Manufacturer’s Warranty does not apply to body
modifications or special equipment installed by van
conversion/camper manufacturers/ body builders. See
the Warranty information book, Section 2.1.C. Such
equipment includes video monitors, VCRs, heaters,
stoves, refrigerators, etc. For warranty coverage and
service on these items, contact the applicable manufacturer.
Operating instructions for the special equipment installed by the conversion/camper manufacturer should
also be supplied with your vehicle. If these instructions
are missing, please contact your selling dealer for assistance in obtaining replacement documents from the
applicable manufacturer.
VEHICLE IDENTIFICATION NUMBER
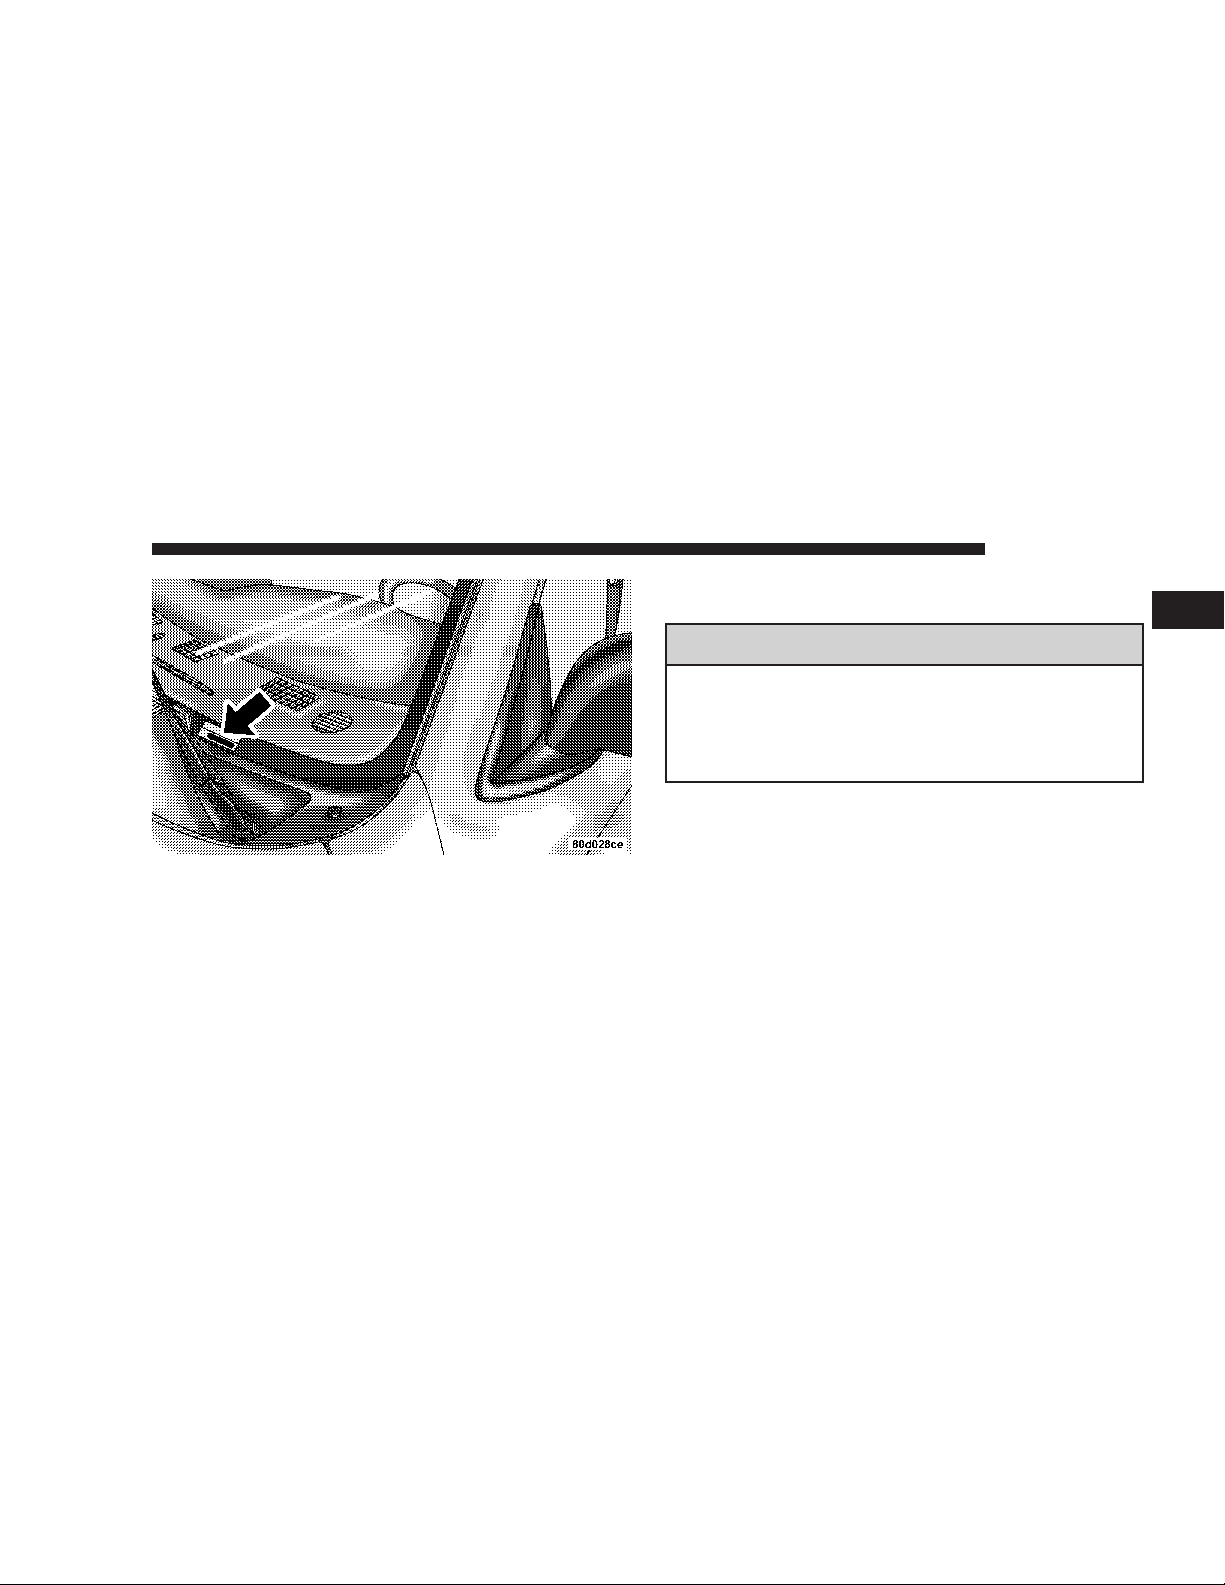
The vehicle identification number (VIN) is found on a
stamped plate located on the left front corner of the
instrument panel pad, visible from outside of the vehicle
through the windshield. This number also appears on the
Automobile Information Disclosure Label affixed to a
window on your vehicle. Save this label for a convenient
record of your vehicle identification number and optional
equipment.
Page 7
Vehicle Identification Number
NOTE: It is illegal to remove the VIN plate.
INTRODUCTION 7
VEHICLE MODIFICATIONS / ALTERATIONS
1
WARNING!
Any modifications or alterations to this vehicle
could seriously affect its roadworthiness and safety
and may lead to an accident resulting in serious
injury or death.
Page 8

Page 9

THINGS TO KNOW BEFORE STARTING YOUR VEHICLE
CONTENTS
䡵 A Word About Your Keys ..................12
▫ Key-In-Ignition Reminder ................12
▫ Sentry Key — If Equipped ................12
䡵 Ignition And Steering Lock .................15
▫ Manual Transmissions ...................15
▫ Automatic Transmissions .................16
䡵 Door Key .............................17
䡵 Door Locks ............................17
▫ Manual Locks .........................17
2
▫ Power Door Locks — If Equipped ..........18
▫ Child Protection Door Lock ...............21
䡵 Remote Keyless Entry — If Equipped .........22
▫ To Unlock The Doors ...................23
▫ To Lock The Doors .....................23
▫ Using The Panic Alarm ..................24
▫ General Information ....................25
▫ Transmitter Battery Service ...............25
䡵 Security Alarm System — If Equipped .........26
Page 10

10 THINGS TO KNOW BEFORE STARTING YOUR VEHICLE
▫ Rearming Of The System .................26
▫ To Set The Alarm ......................27
▫ To Disarm The System ...................27
䡵 Windows .............................28
▫ Power Windows—If Equipped .............28
▫ Power Sliding Rear Window—If Equipped ....29
▫ Sliding Rear Window—If Equipped .........30
▫ Wind Buffeting ........................30
䡵 Occupant Restraints
(2500/3500/Mega Cab Only) ................30
▫ Lap/Shoulder Belts .....................31
▫ Adjustable Upper Shoulder Belt Anchorage ....38
▫ Automatic Locking Restraint (ALR) Mode –
If Equipped ..........................39
▫ Center Lap Belts .......................40
▫ Seat Belt Pretensioners ...................40
▫ Enhanced Driver Seat Belt Reminder System
(BeltAlert) ...........................41
▫ Seat Belts And Pregnant Women ............42
▫ Seat Belt Extender ......................42
▫ Driver And Right Front Passenger Supplemental
Restraint System (SRS)—Airbag ............43
▫ Event Data Recorder (EDR) ...............54
▫ Child Restraint ........................55
䡵 New Engine Break-In .....................69
䡵 Safety Tips ............................70
▫ Transporting Passengers .................70
▫ Lock Your Vehicle ......................70
Page 11

THINGS TO KNOW BEFORE STARTING YOUR VEHICLE 11
▫ Exhaust Gas ..........................71
▫ Safety Checks You Should Make Inside
The Vehicle ..........................72
▫ Safety Checks You Should Make Outside
The Vehicle ..........................72
2
Page 12

12 THINGS TO KNOW BEFORE STARTING YOUR VEHICLE
A WORD ABOUT YOUR KEYS
The double sided keys may be inserted into the locks
with either side up. The keys for your new vehicle are
enclosed in a plastic bag with a bar code label affixed to
the front. The bar code can be used to order duplicate
keys from your dealer or a locksmith. If you received
your keys without the bag, ask your dealer to give you
the number.
Key-In-Ignition Reminder
If you open the driver’s door when the key is in the
ignition switch, a chime will sound to remind you to
remove the key.
CAUTION!
An unlocked vehicle is an invitation to thieves.
Always remove the key from the ignition and lock
all the doors when leaving the vehicle unattended.
SENTRY KEY — IF EQUIPPED
With this system, an electronically coded ignition key
sends a signal to the vehicle electronics. If the electronics
recognizes the signal, the vehicle will start and continue
to run. If the system does not recognize the signal the
vehicle will start and run for a maximum of 2 seconds
after the initial key ON. After six unsuccessful attempts
at starting, the system will shut down until the correct
key is used.
NOTE: The Sentry Key Immobilizer System is not
compatible with remote starting systems. Use of these
systems may result in vehicle starting problems and a
Page 13

THINGS TO KNOW BEFORE STARTING YOUR VEHICLE 13
loss of security protection. Additional Sentry Keys or
Mobil Speed-pass™ devices held against or immediately
adjacent to the ignition key when starting the engine may
cause vehicle starting problems. If a problem occurs,
remove the Sentry Key from the key-ring and attempt to
start the vehicle again. Pagers, cell phones, walkman, etc.
will have no effect on this system.
The ⬙Security Light⬙, located in the instrument cluster,
will illuminate for about 3 seconds when the ignition
switch is first turned to the ON position. If the vehicle
electronics do not receive a valid signal from the ignition
key, the ⬙Security Light⬙ will flash continuously to signal
that the vehicle has been immobilized. If the ⬙Security
Light⬙ remains on during vehicle operation, it indicates a
fault in the system electronics. If this option was ordered,
all of the keys provided with your new vehicle have been
programmed to the vehicle electronics.
Replacement Keys
NOTE: Only keys that have been programmed to the
vehicle electronics can be used to start the vehicle. Once
a Sentry Key has been programmed to a vehicle, it cannot
be programmed to any other vehicle.
At the time of purchase, the original owner is provided
with a four digit PIN. This number is required for dealer
replacement of keys. Duplication of keys may be performed at an authorized dealer or by using the Customer
Key Programming procedure. This procedure consists of
programming a blank key to the vehicle electronics. A
blank key is one which has never been programmed and
needs to be cut.
NOTE: When having the Sentry Key System serviced,
bring all vehicle keys to the dealer.
2
Page 14

14 THINGS TO KNOW BEFORE STARTING YOUR VEHICLE
Customer Key Programming
You can program new keys to the system if you have two
valid keys by doing the following:
1. Insert the first valid key into the ignition and turn the
ignition to the ON position for at least 3 seconds but no
longer than 15 seconds. Turn the ignition back to the OFF
position and remove the first key.
2. Insert the second valid key and switch the ignition to
the ON position within 15 seconds. After 10 seconds the
⬙Security Light⬙ will begin to flash. Turn the ignition back
to the OFF position and remove the second key.
3. Insert a blank Sentry Key into the ignition and switch
the ignition to the ON position within 60 seconds of
having removed the second key. After 10 seconds the
⬙Security Light⬙ will stop flashing, then turn on for 3
seconds; then turn off.
The new Sentry Key has been programmed. The Keyless
Entry Transmitter will also be programmed during this
procedure. Repeat this process to program up to an
additional 6 keys. A maximum of 8 keys can be programmed to the system, including the original keys
provided with the vehicle.
General Information
This device complies with part 15 of FCC rules and with
RS-210 of Industry Canada. Operation is subject to the
following conditions:
1. This device may not cause harmful interference.
2. This device must accept any interference that may be
received including interference that may cause undesired
operation.
NOTE: Changes or modifications not expressly approved by the party responsible for compliance could
void the user’s authority to operate the equipment.
Page 15
IGNITION AND STEERING LOCK
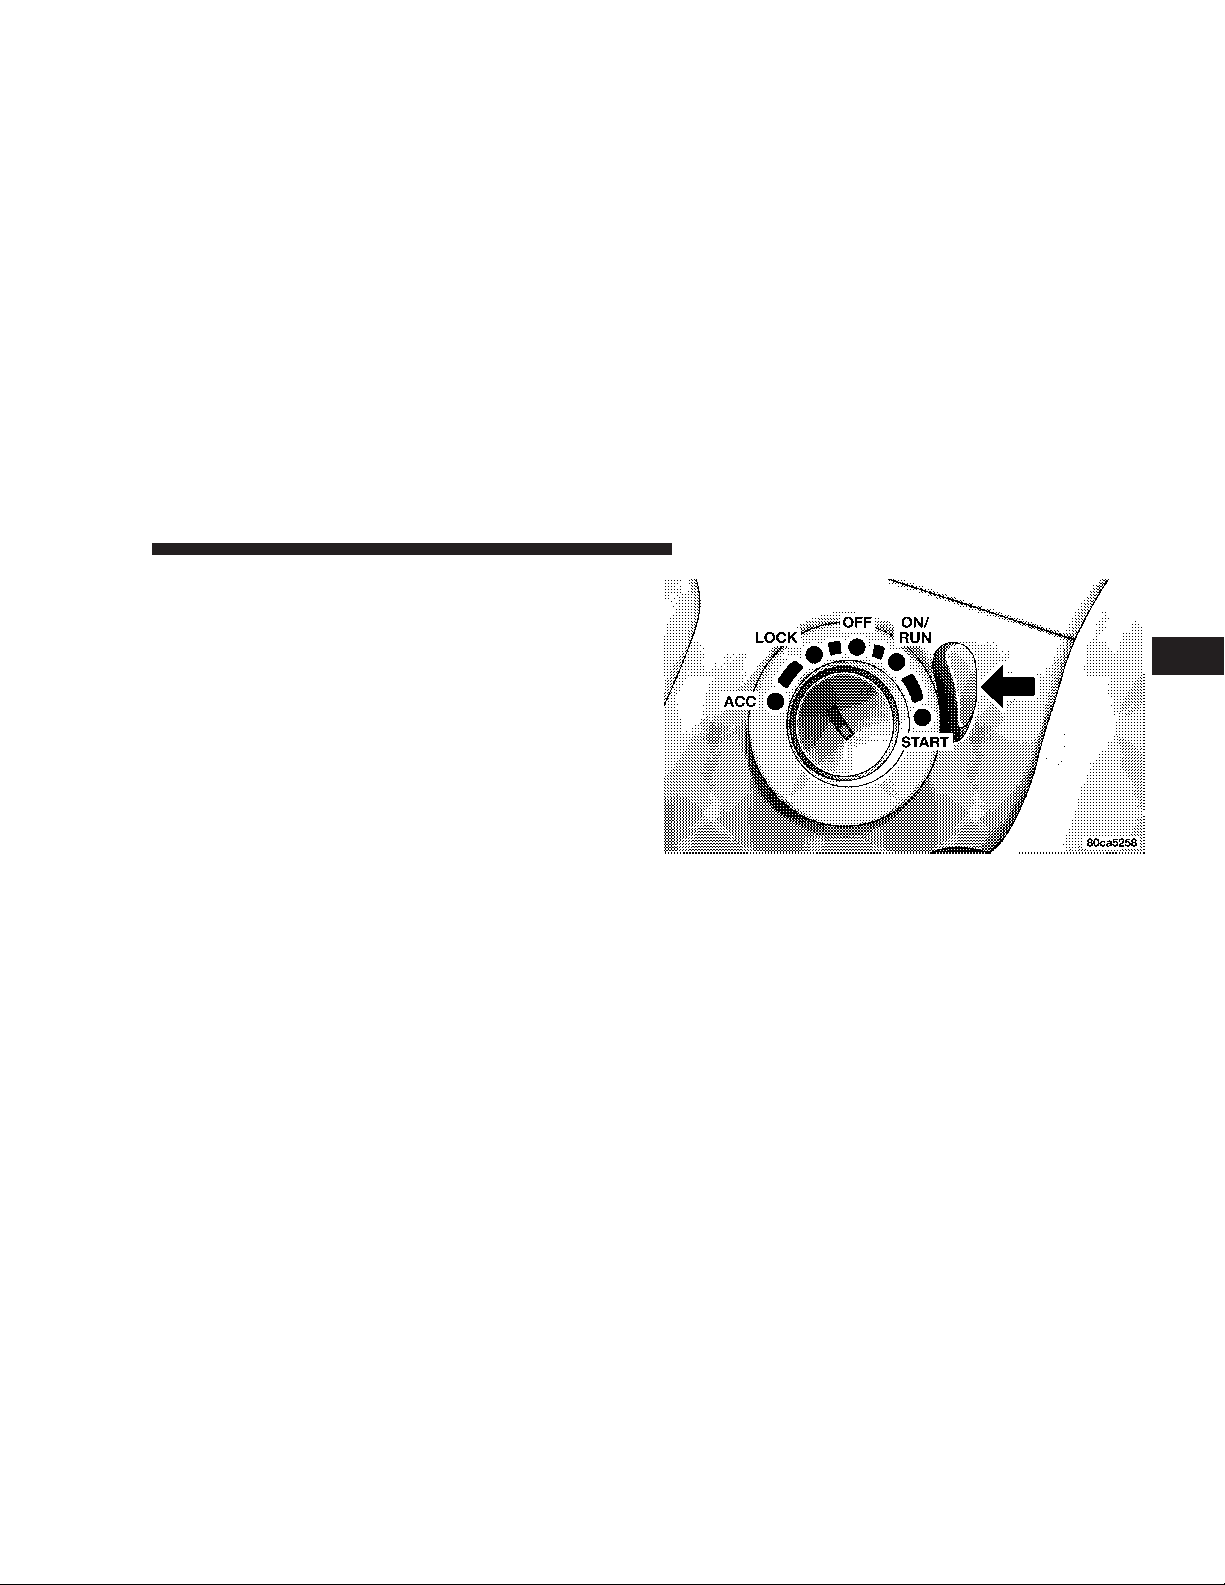
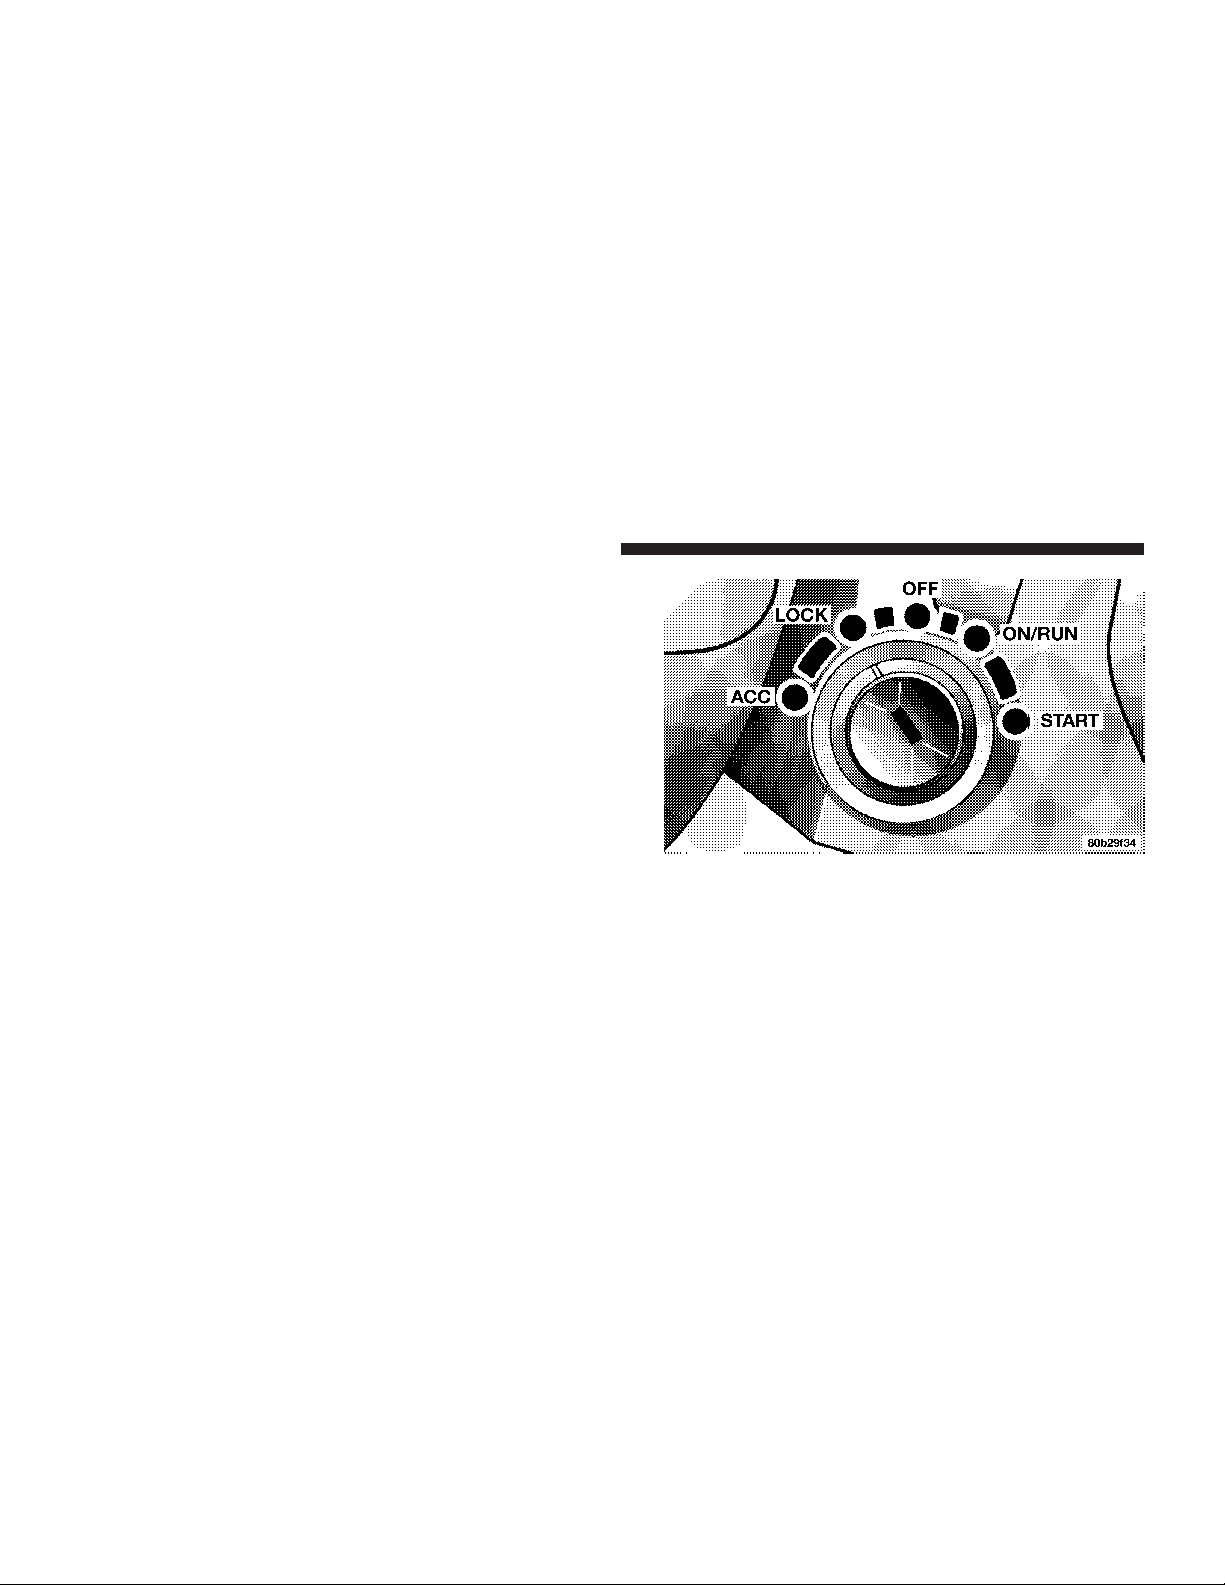
Insert the key fully, and then turn the switch to one of the
five illustrated positions. The key can be inserted or
withdrawn only in the LOCK position.
Manual Transmissions
When the steering wheel is in the LOCK position, the
steering and ignition systems are locked to provide
antitheft protection for your vehicle. It may be difficult to
turn the key from the LOCK position when starting your
vehicle. Move the steering wheel left and right while
turning the key until it turns easily. To remove the key,
depress and hold the release button located between the
ignition switch and the instrument panel. Turn the ignition key to LOCK and remove the key.
THINGS TO KNOW BEFORE STARTING YOUR VEHICLE 15
2
Ignition Switch Positions
Page 16
16 THINGS TO KNOW BEFORE STARTING YOUR VEHICLE
Automatic Transmissions
In the LOCK position, the steering and ignition systems
are locked to provide antitheft protection for your vehicle. It may be difficult to turn the key from the LOCK
position when starting your vehicle. Move the steering
wheel left and right while turning the key until it turns
easily. The key can be inserted or withdrawn only in the
LOCK position. Push in on the key in the ignition lock
cylinder to rotate to the LOCK position.
NOTE: The steering wheel will lock when the key is
removed, and the steering wheel is turned around 115
degrees from center clockwise and around 65 degrees
counterclockwise.
Ignition Switch Positions
NOTE: On vehicles equipped with an automatic trans-
mission, the key cannot be turned to LOCK until the
selector is in the PARK position. Do not attempt to pull
the shift lever out of PARK after the key is in the LOCK
position.
Page 17
THINGS TO KNOW BEFORE STARTING YOUR VEHICLE 17
DOOR KEY
The same key used to start the vehicle is also used to
unlock the doors. To unlock the vehicle doors, insert the
key into the lock and turn.
To lock the doors, insert the key and turn.
DOOR LOCKS
Manual Locks
Front and Rear doors may be locked, by moving the lock
plunger up or down.
All doors may be opened with the inside door handle
without lifting the lock plunger. Doors locked before
closing will remain locked when closed.
The ignition key will unlock all the locks on your vehicle.
WARNING!
For personal security and safety in the event of an
accident, lock the vehicle doors when you drive as
well as when you park and leave the vehicle.
WARNING!
When leaving the vehicle always remove the key
from the ignition lock, and lock your vehicle. Do not
leave children unattended in the vehicle, or with
access to an unlocked vehicle. Unsupervised use of
vehicle equipment may cause severe personal injuries and death.
2
Page 18
18 THINGS TO KNOW BEFORE STARTING YOUR VEHICLE
Power Door Locks — If Equipped
NOTE: Vehicles equipped with remote keyless entry do
not have a passenger side door lock cylinder.
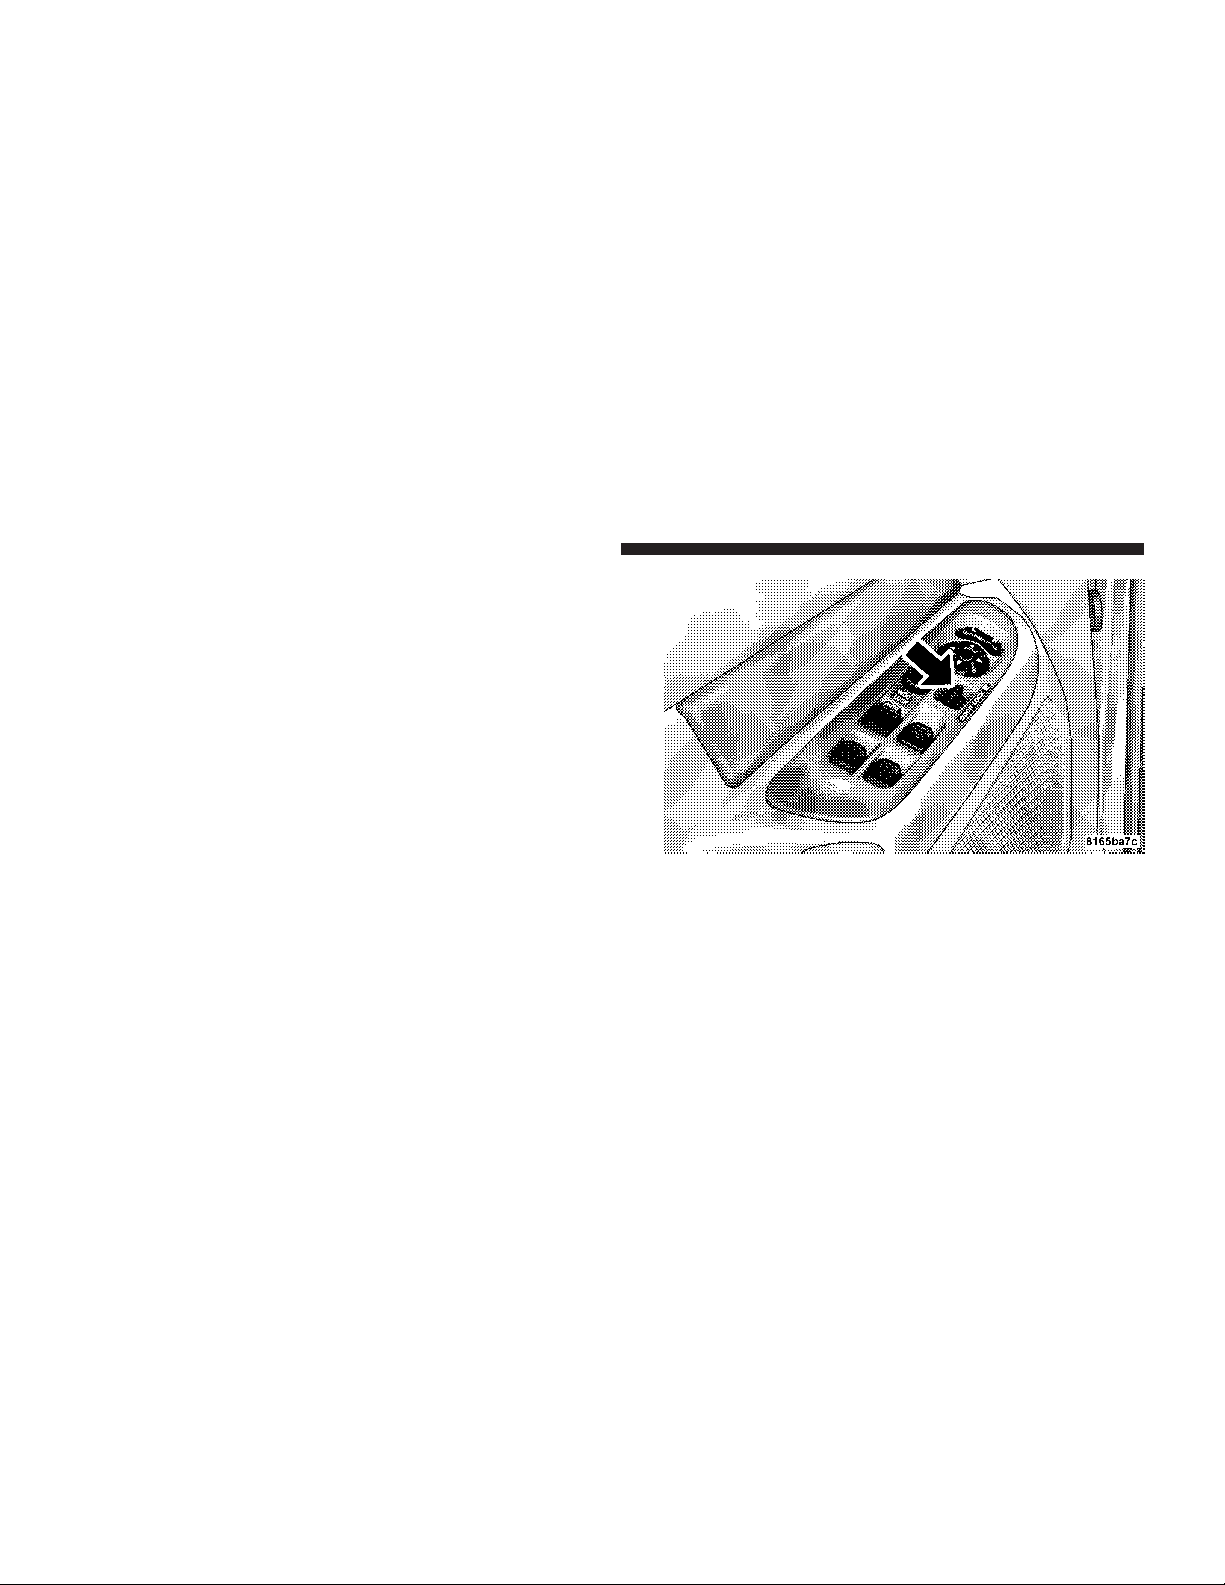
Vehicles equipped with power door locks can be locked
or unlocked from inside by either the use of the door lock
switches located on the front doors or by pressing the
LOCK or UNLOCK buttons on the Remote Keyless Entry
key fob (if equipped).
Power Door Lock Switch Location
As a safety feature the doors will not lock when using the
door lock switches during the following condition:
•
The driver’s door is open while the key is in the
ignition.
Page 19

THINGS TO KNOW BEFORE STARTING YOUR VEHICLE 19
Automatic Door Locks
If this feature is enabled, your door locks will lock
automatically when the vehicle’s speed exceeds 15 mph.
This feature is enabled when your vehicle is shipped
from the assembly plant and can be disabled by using the
following procedure:
1. Enter your vehicle and close all doors.
2. Fasten your seat belt (Fastening the seat belt will
cancel any chiming that may confuse you during this
programming procedure).
3. Place the key into the ignition.
4. Within 15 seconds cycle the key from the LOCK
position to the ON/RUN position a minimum of four
times; ending in the LOCK position ( Do not start the
engine ).
5. Within 30 seconds, press the driver’s door lock switch
in the LOCK direction.
6. Asingle chime will be heardto indicate the feature has
been disabled.
7. To reactivate this feature, repeat the above steps.
8. If a chime is not heard, program mode was canceled
before the feature could be disabled. If necessary, repeat
the above procedure.
Auto Unlock Feature
This feature unlocks all of the doors of the vehicle when
any door is opened. This will occur only after the vehicle
has been shifted into the Park position after the vehicle
has been driven (shifted out of Park and all doors closed).
This feature will not operate if there is any manual
operation of the power door locks (Lock or Unlock).
2
Page 20

20 THINGS TO KNOW BEFORE STARTING YOUR VEHICLE
Auto Unlock Feature Programming
Customer Programming sequence to enable or disable
the Auto Unlock Feature:
1. Enter your vehicle and close all doors.
2. Fasten your seat belt (fastening the seat belt will cancel
any chimes that may be confusing during this programming procedure).
3. Insert the key into the ignition.
4. Within 15 seconds, cycle the key from the LOCK
position to the ON/RUN position a minimum of four
times ending in the LOCK position (do not start the
engine).
5. Within 30 seconds, press the driver’s door lock switch
in the UNLOCK direction.
6. A single chime will sound to indicate the feature has
been changed.
7. Repeat the above steps to alternate the availability of
this feature.
8. If a chime is not heard, program mode was canceled
before the feature could be changed. If necessary repeat
the above procedure.
Page 21
THINGS TO KNOW BEFORE STARTING YOUR VEHICLE 21
Child Protection Door Lock
To provide a safer environment for children riding in the
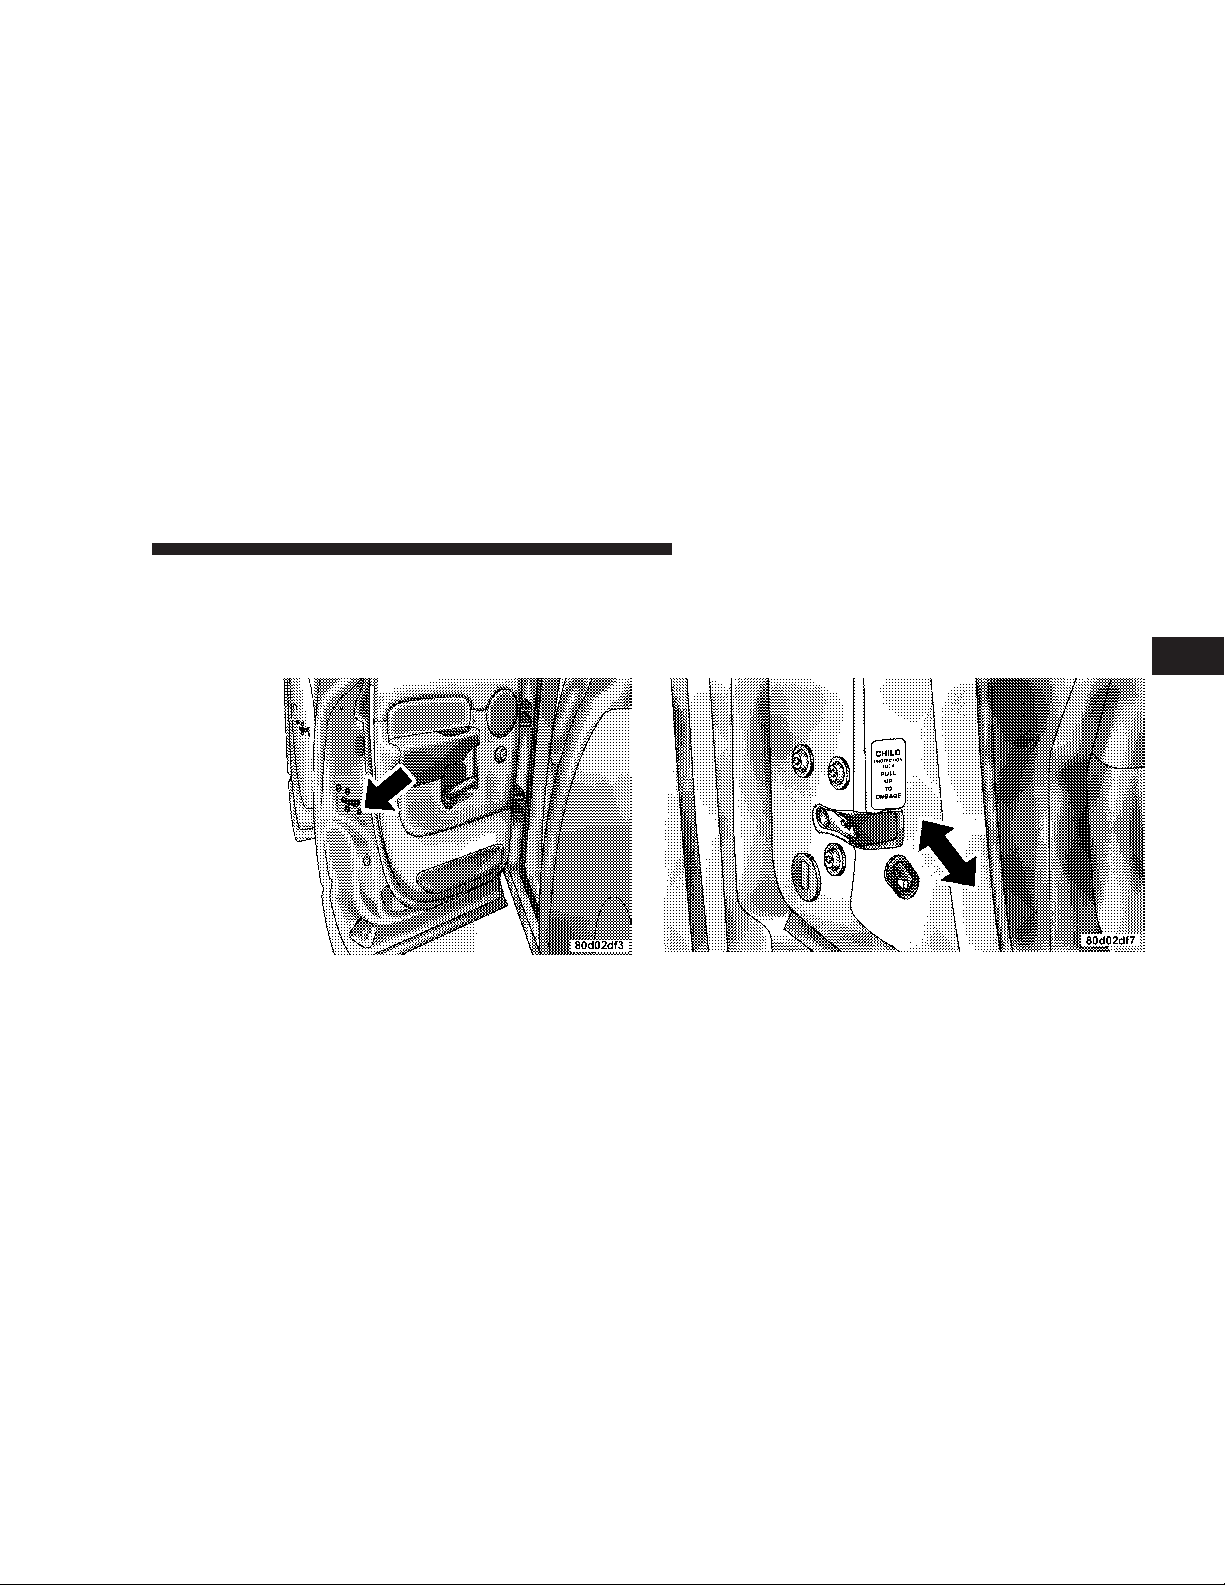
rear seat, the rear doors of your vehicle have the childprotection door lock system.
Child Protection Door Lock Location
To use the system, open each rear door and slide the
control UP to engage the locks and DOWN to disengage
the child-protection locks. When the system on a door is
engaged, that door can only be opened by using the
outside door handle even if the inside door lock is in the
unlocked position.
Child Lock Control
2
Page 22
22 THINGS TO KNOW BEFORE STARTING YOUR VEHICLE
WARNING!
Avoid trapping anyone in a vehicle in a collision.
Remember that the rear doors can only be opened
from the outside when the child protection locks are
engaged.
NOTE: After setting the child protection door lock
system, always test the door from the inside to make
certain it is in the desired position.
NOTE: For emergency exit with the system engaged,
move the door lock switch to the UNLOCK position, roll
down the window and open the door with the outside
door handle.
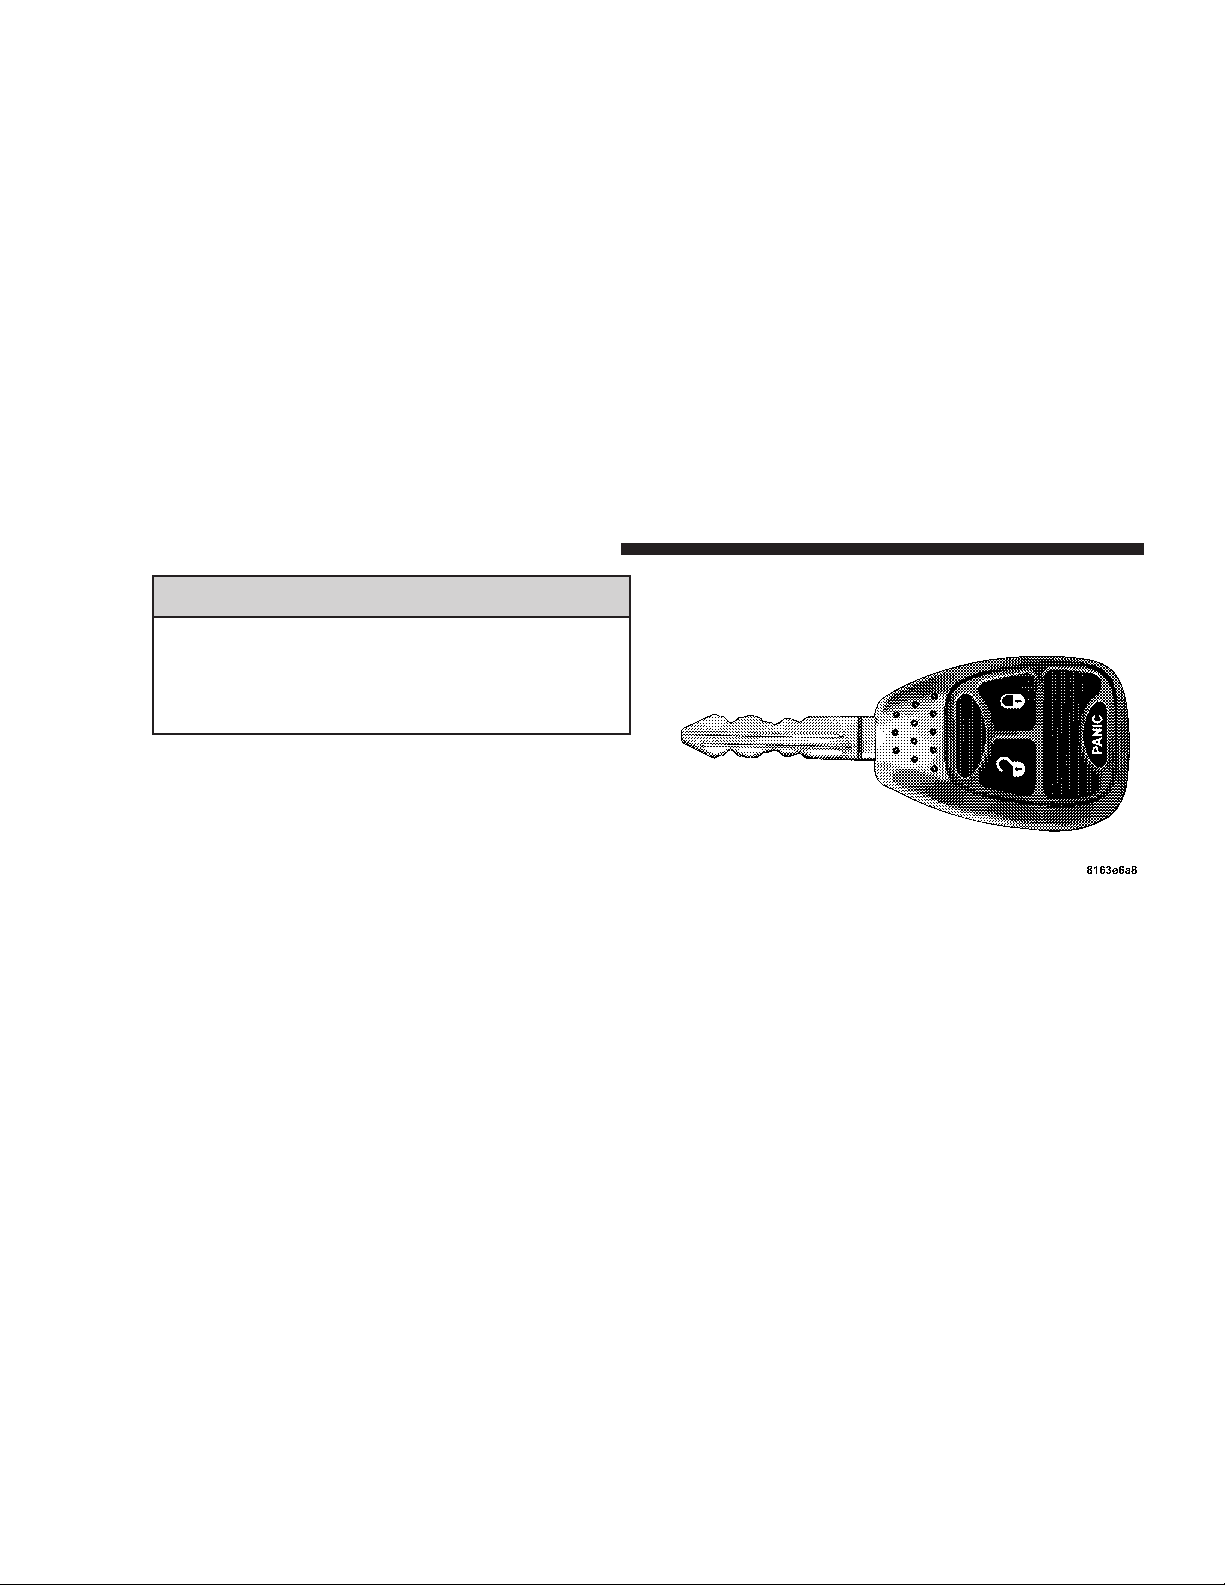
REMOTE KEYLESS ENTRY — IF EQUIPPED
Three Button Transmitter
This system allows you to lock or unlock the doors from
distances up to about 23 feet (7 meters) using a hand held
radio transmitter. The transmitter need not be pointed at
the vehicle to activate the system.
Page 23

THINGS TO KNOW BEFORE STARTING YOUR VEHICLE 23
To unlock the doors:
Press and release the UNLOCK button on the key fob
once to unlock only the driver’s door or twice to unlock
all the doors. When the UNLOCK button is pressed, the
illuminated entry will initiate, the parking lights will
flash on twice and if installed, thecargo lamp will turn on
for 30 seconds.
The system can be programmed to unlock allthe doors or
drivers door only upon the first UNLOCK button press
by using the following procedure:
1. Perform this operation while standing outside the
vehicle.
2. Press and hold the LOCK button on your key.
3. Continue to hold the LOCK button at least 4 seconds,
but no longer than 10 seconds, then press and hold the
UNLOCK button while still holding the LOCK button.
4. Release both buttons at the same time.
5. This will enable you to unlock all doors on the first
press of the UNLOCK button.
To lock the doors:
Press and release the LOCK button on the transmitter to
lock all doors. If the ignition is OFF, when the doors are
locked, the parking lights will flash on once and the horn
will chirp once.
The horn chirp featurewill be shipped from the assembly
plants activated. If desired this feature can be disabled by
using the following procedure:
1. Perform this operation while standing outside the
vehicle.
2. Press and hold the LOCK button on a programmed
(i.e. functional) key fob.
2
Page 24

24 THINGS TO KNOW BEFORE STARTING YOUR VEHICLE
3. Continue to hold the LOCK button, wait at least 4
seconds, but no longer than 10 seconds, then press and
hold the PANIC button. Release both buttons at the same
time.
4. To reactivate this feature, repeat the above steps.
Vehicles will be shipped from the assembly plants with
the park lamp flash feature activated. If desired, this
feature can be disabled by using the following procedure:
1. Perform this operation while standing outside the
vehicle.
2. Press and hold the UNLOCK button on a programmed
(i.e. functional) key fob.
3. Continue to hold the UNLOCK button, wait at least 4
seconds, but no longer than 10 seconds, then press and
hold the LOCK button. Release both buttons at the same
time.
4. To reactivate this feature, repeat the above steps.
Using the Panic Alarm
To activate the Panicmode while the ignitionis OFF press
and release the PANIC button on the transmitter once.
When the Panic mode is activated, the interior lights will
illuminate, the headlamps and parking lights will flash,
and the horn will sound.
To cancel the Panic mode press and release the PANIC
button on the transmitter a second time. Panic mode will
automatically cancel after 3 minutes or if the vehicle is
started and exceeds 15 mph. During the Panic Mode, the
door locks and remote keyless entry systems will function normally. Panic mode will not disarm the security
system on vehicles so equipped.
Page 25
THINGS TO KNOW BEFORE STARTING YOUR VEHICLE 25
General Information
This device complies with part 15 of FCC rules and with
RS-210 of Industry Canada. Operation is subject to the
following conditions:
1. This device may not cause harmful interference.
2. This device must accept any interference that may be
received including interference that may cause undesired
operation.
NOTE: Changes or modifications not expressly approved by the party responsible for compliance could
void the user’s authority to operate the equipment.
If your Keyless Entry Transmitter fails to operate from a
normal distance, check for these two conditions.
1. Weak batteries in transmitter. The expected life of the
batteries is from one to two years.
2. Closeness to a radio transmitter such as a radio station
tower, airport transmitter, and some mobile or CB radios.
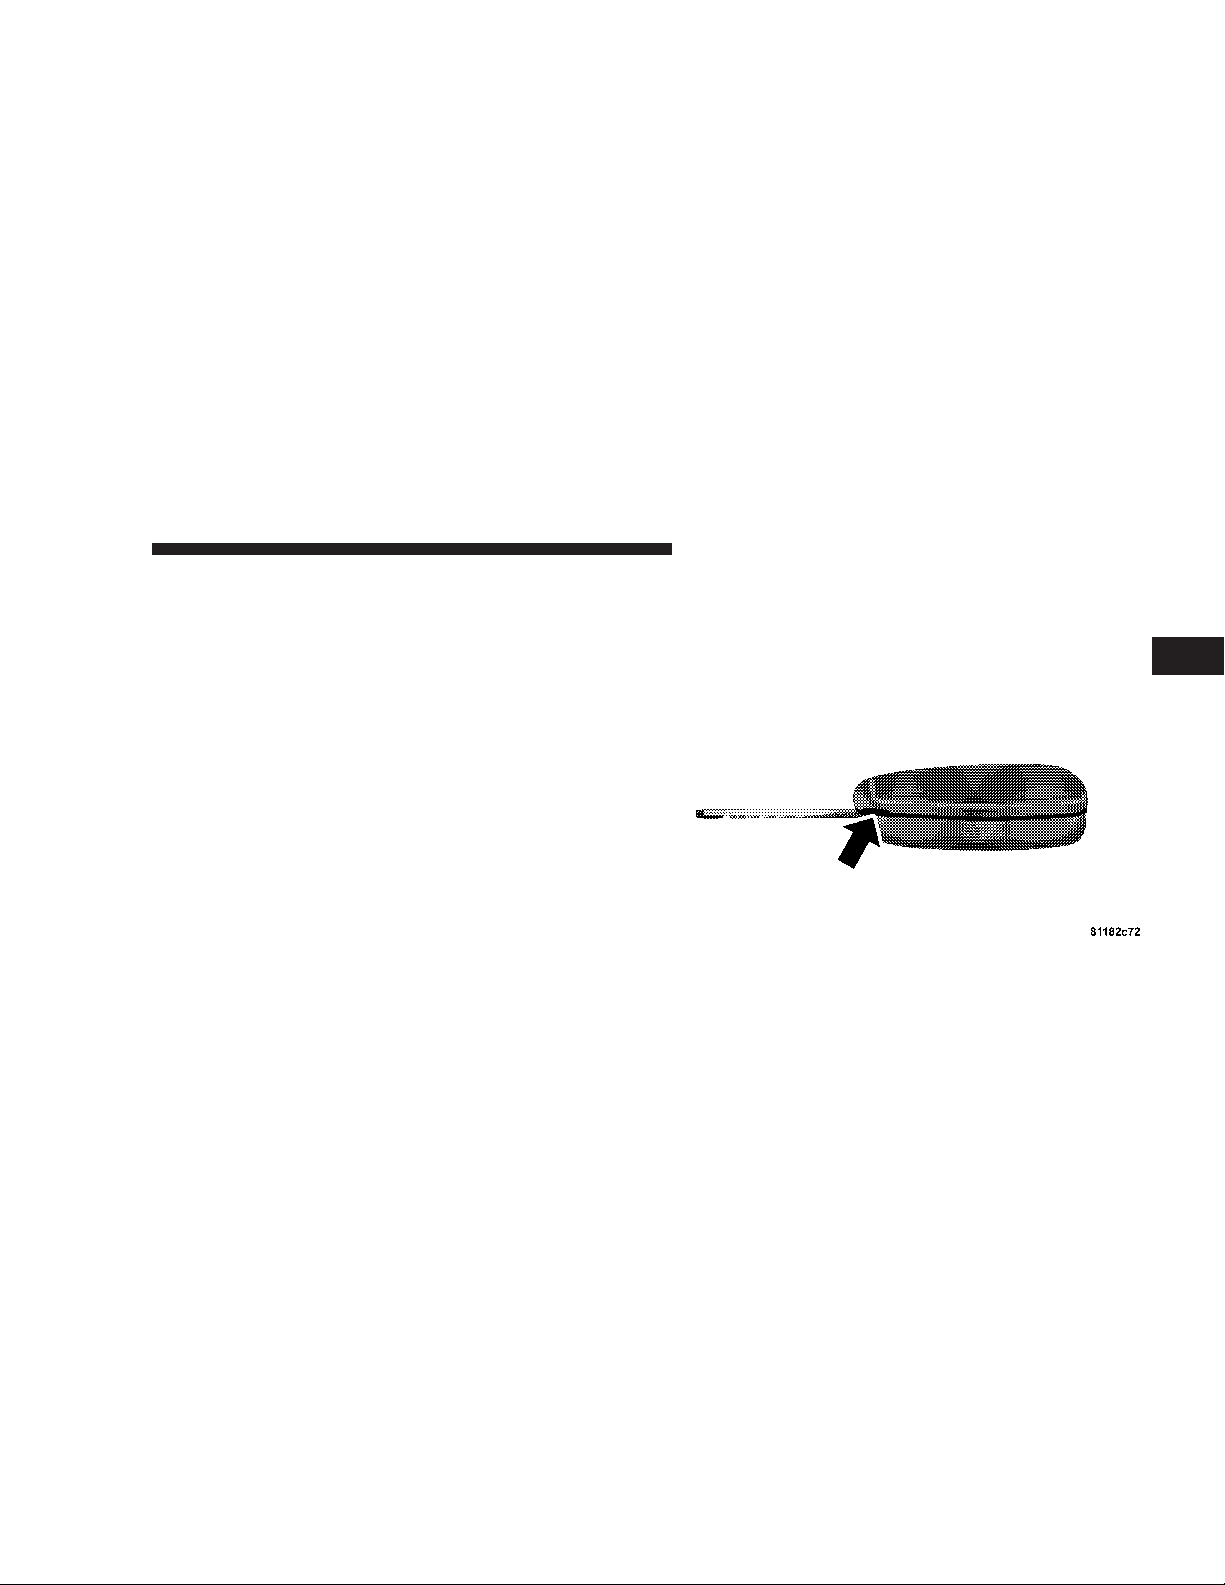
Transmitter Battery Service
Transmitter Battery Replacement
The recommended replacement battery is a 3V lithium
2016 cell. This transmitter requires two batteries.
2
Page 26

26 THINGS TO KNOW BEFORE STARTING YOUR VEHICLE
NOTE: Do not touch the battery terminals that are on
the back housing or the printed circuit board.
1. With transmitter buttons facing down, use a flat blade
or dime to pry the two halves of the transmitter apart.
Make sure not to damage the rubber gasket during
removal.
2. Remove and replace the batteries. Be careful not to
disturb the metal terminal near the batteries. Install the
batteries with the positive terminal up, reference the note
⬙+ SIDE UP⬙ on the inside of the bottom half of the
transmitter case. Avoid touching the new batteries with
your fingers. Skin oils may cause battery deterioration. If
you touch a battery, clean it with rubbing alcohol.
3. To reassemble the transmitter case snap the two halves
together. Make sure there is an even gap between the two
halves. Test transmitter operation.
SECURITY ALARM SYSTEM — IF EQUIPPED
This system monitors the vehicle doors and ignition for
unauthorized operation. When the alarm is activated, the
system provides both audible and visual signals. For the
first 3 minutes the horn will sound and the headlights
and security telltale will flash repeatedly. For an additional 15 minutes only the headlights and security telltale
will flash. The engine will run only if a valid Sentry Key
is used to start the vehicle. Use of the Sentry Key will
disable the alarm.
Rearming of the System:
The security system will rearm itself after the 15 additional minutes of headlights and security telltale flashing,
if the system has not been disabled. If the condition
which initiated the alarm is still present, the system will
ignore that condition and monitor the remaining doors
and ignition.
Page 27

THINGS TO KNOW BEFORE STARTING YOUR VEHICLE 27
To Set the Alarm:
The alarm will set when you use the power door locks, or
use the Keyless Entry transmitter to lock the doors. After
all the doors are locked and closed the SECURITYlight in
the instrument cluster will flash rapidly to signal that the
system is arming. The security light in the instrument
panel cluster will flash rapidly for about 16 seconds to
indicate that the alarm is being set. After the alarm is set,
the security light will flash at a slower rate to indicate
that the system is armed.
NOTE: If the SECURITY light stays on continuously
during vehicle operation, have the system checked by
your dealer.
To Disarm the System:
Use the Keyless Entry transmitter to unlock the door. If
something has triggered the system in your absence, the
horn will sound three times when you unlock the doors
and the security lamp will flash for 30 seconds. Check the
vehicle for tampering.
The Security system will also disarm, if the vehicle is
started with a programmed Sentry Key. If an unprogrammed Sentry Key is used to start a vehicle, the engine
will run for 2 seconds and then the security alarm will be
initiated. To exit alarming mode, press the transmitter
Unlock button, or start the vehicle with a programmed
Sentry Key.
The Security Alarm System is designed to protect your
vehicle; however, you can create conditions where the
system will arm unexpectedly. If you remain in the
vehicle and lock the doors with the transmitter, the alarm
will sound when you pull the door handle to exit. The
door will be locked but the Security Alarm will not arm.
2
Page 28
28 THINGS TO KNOW BEFORE STARTING YOUR VEHICLE
WINDOWS
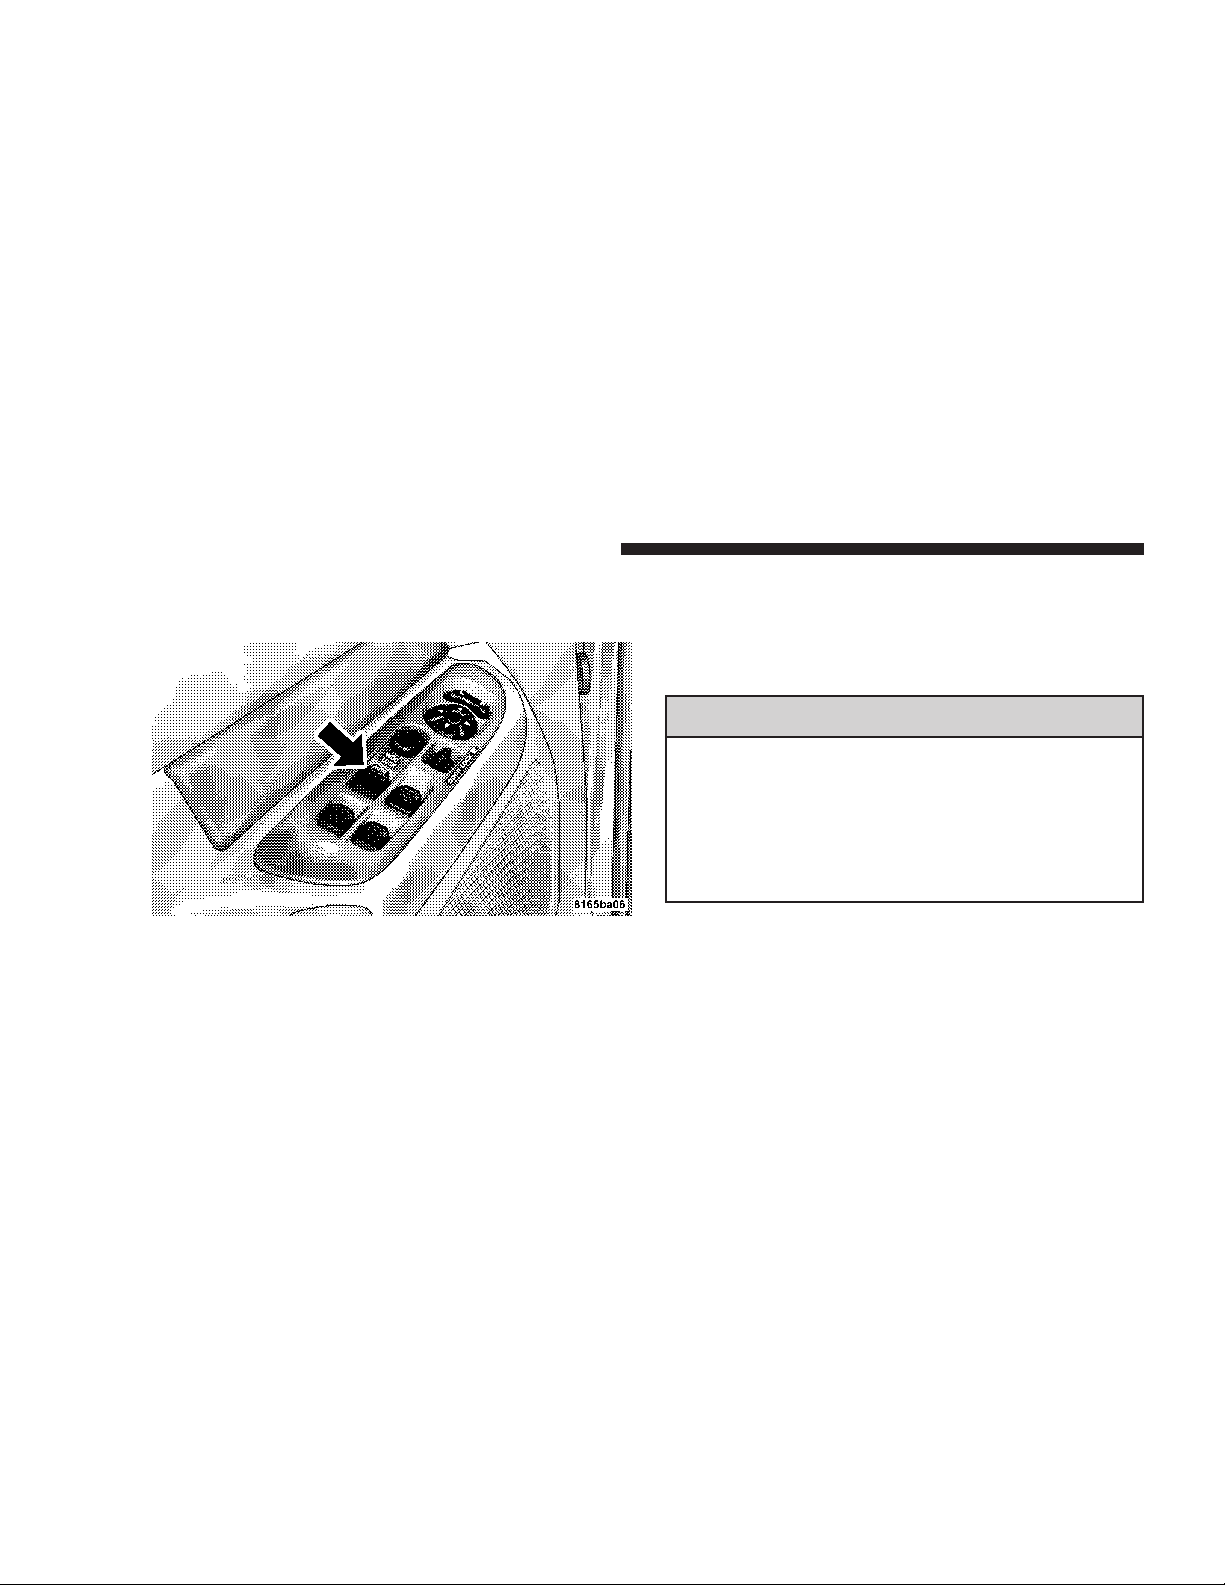
Power Windows—If Equipped
Power Window Switches
The control on the left front door panel has up-down
switches that give you fingertip control of all power
windows. There is a single opening and closing switch on
the front passenger door for passenger window control
and on the rear doors of Quad Cab and Mega Cab
models. The windows will operate only when the ignition switch is turned to the ON or ACC (Accessory)
position.
WARNING!
Never leave children in a vehicle, with the keys in
the ignition switch. Occupants, particularly unattended children, can become entrapped by the windows while operating the power window switches.
Such entrapment may result in serious injury or
death.
Auto Down (Driver’s Side Only)
The driver’s window switch has an Auto Down feature.
Press the window switch past the detent, release, and the
window will go down automatically.
Page 29
THINGS TO KNOW BEFORE STARTING YOUR VEHICLE 29
Window Lockout Switch (4 Door Models Only)
The window lockout switch on the driver’s door allows
you to disable the window control on the other doors. To
disable the window controls on the other doors, press the
window lock button. To enable the window controls,
press the window control button again.
Window Lockout Switch
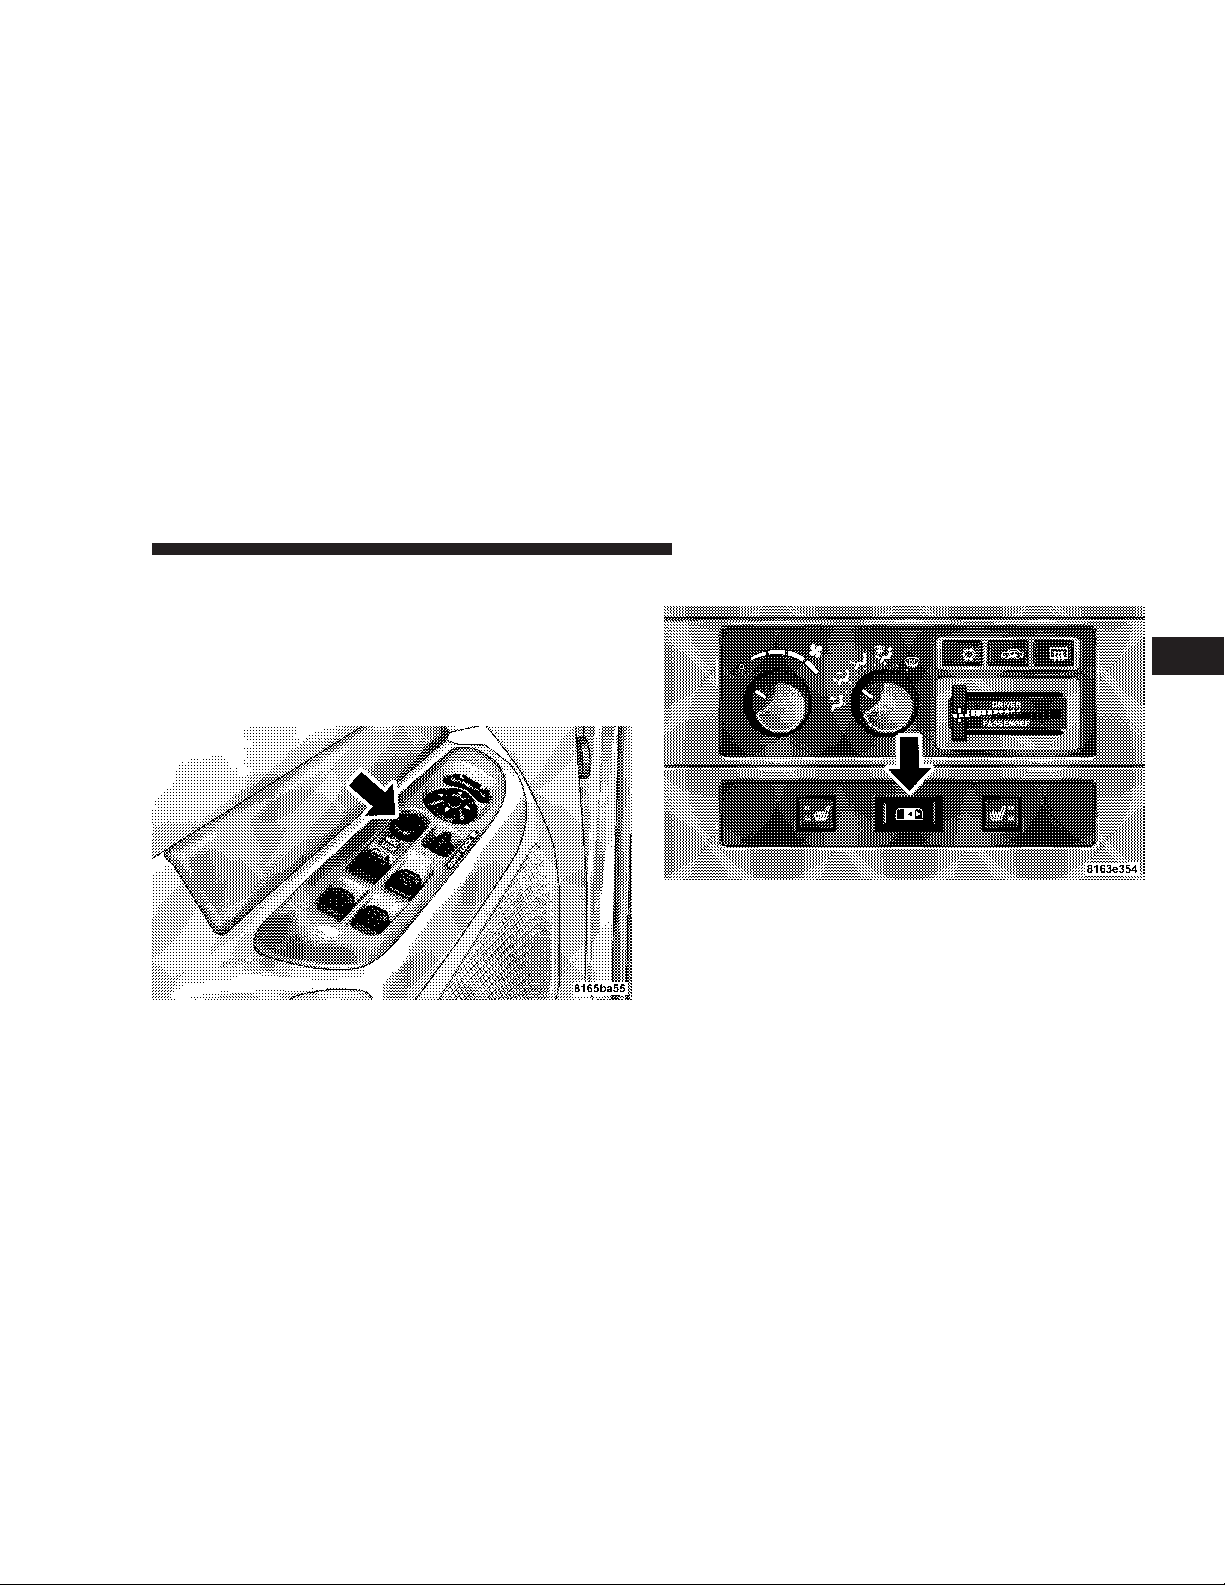
Power Sliding Rear Window—If Equipped
2
Power Sliding Rear Window Switch
The power sliding rear window switch is located on the
instrument panel below the climate controls. Press the
right side of the switch to open the glass and the left side
of the switch to close the glass.
Page 30

30 THINGS TO KNOW BEFORE STARTING YOUR VEHICLE
Sliding Rear Window—If Equipped
A locking device in the center of the window helps to
prevent entry from the rear of the vehicle. Squeeze the
lock to release the window.
Wind Buffeting
Wind buffeting can be described as the perception of
pressure on the ears or a helicopter type sound in the
ears. Your vehicle may exhibit wind buffeting with the
windows down or partially open positions. This is a
normal occurrence and can be minimized. If the buffeting
occurs with the rear windows open, open the front and
rear windows together to minimize the buffeting.
OCCUPANT RESTRAINTS (2500/3500/MEGA CAB
ONLY)
Some of the most important safety features in your
vehicle are the restraint systems. These include the front
and rear seat belts for the driver and all passengers, front
airbags for both the driver and front passenger and, if so
equipped, window bags for the driver and passengers
seated next to a window. If you will be carrying children
too small for adult-size belts, your seat belts also can be
used to hold infant and child restraint systems.
Please pay close attention to the information in this
section. It tells you how to use your restraint system
properly to keep you and your passengers as safe as
possible.
Page 31
THINGS TO KNOW BEFORE STARTING YOUR VEHICLE 31
WARNING!
In a collision, you and your passengers can suffer
much greater injuries if you are not properly buckled up. You can strike the interior of your vehicle or
other passengers, or you can be thrown out of the
vehicle. Always be sure you and others in your
vehicle are buckled up properly.
Buckle up even though you are an excellent driver, even
on short trips. Someone on the road may be a poor driver
and cause a collision that includes you. This can happen
far away from home or on your own street.
Research has shown that seat belts save lives, and that
they can reduce the seriousness of injuries in a collision.
Some of the worst injuries happen when people are
thrown from the vehicle. Seat belts reduce the possibility
of ejection and the risk of injury caused by striking the
inside of the vehicle. Everyone in a motor vehicle should
be belted at all times.
Lap/Shoulder Belts
All seating positions except the Quad Cab front center
seating position have combination lap/shoulder belts.
The belt webbing retractor is designed to lock during
very sudden stops or collisions. This feature allows the
shoulder part of the belt to move freely with you under
normal conditions. But in a collision, the belt will lock
and reduce the risk of your striking the inside of the
vehicle or being thrown out.
2
Page 32

32 THINGS TO KNOW BEFORE STARTING YOUR VEHICLE
WARNING!
It is extremely dangerous to ride in a cargo area,
inside or outside of a vehicle. In a collision, people
riding in these areas are more likely to be seriously
injured or killed.
Do not allow people to ride in any area of your
vehicle that is not equipped with seats and seat belts.
Be sure everyone in your vehicle is in a seat and
using a seat belt properly.
WARNING!
•
Wearing a seat belt incorrectly is dangerous. Seat
belts are designed to go around the large bones of
your body. These are the strongest parts of your
body and can take the forces of a collision the
best. Wearing your belt in the wrong place could
make your injuries in a collision much worse. You
might suffer internal injuries, or you could even
slide out of part of the belt. Follow these instructions to wear your seat belt safely and to keep
your passengers safe, too.
•
Two people should never be belted into a single
seat belt. People belted together can crash into one
another in an accident, hurting one another badly.
Never use a lap/shoulder belt or a lap belt for
more than one person, no matter what their size.
Page 33
THINGS TO KNOW BEFORE STARTING YOUR VEHICLE 33
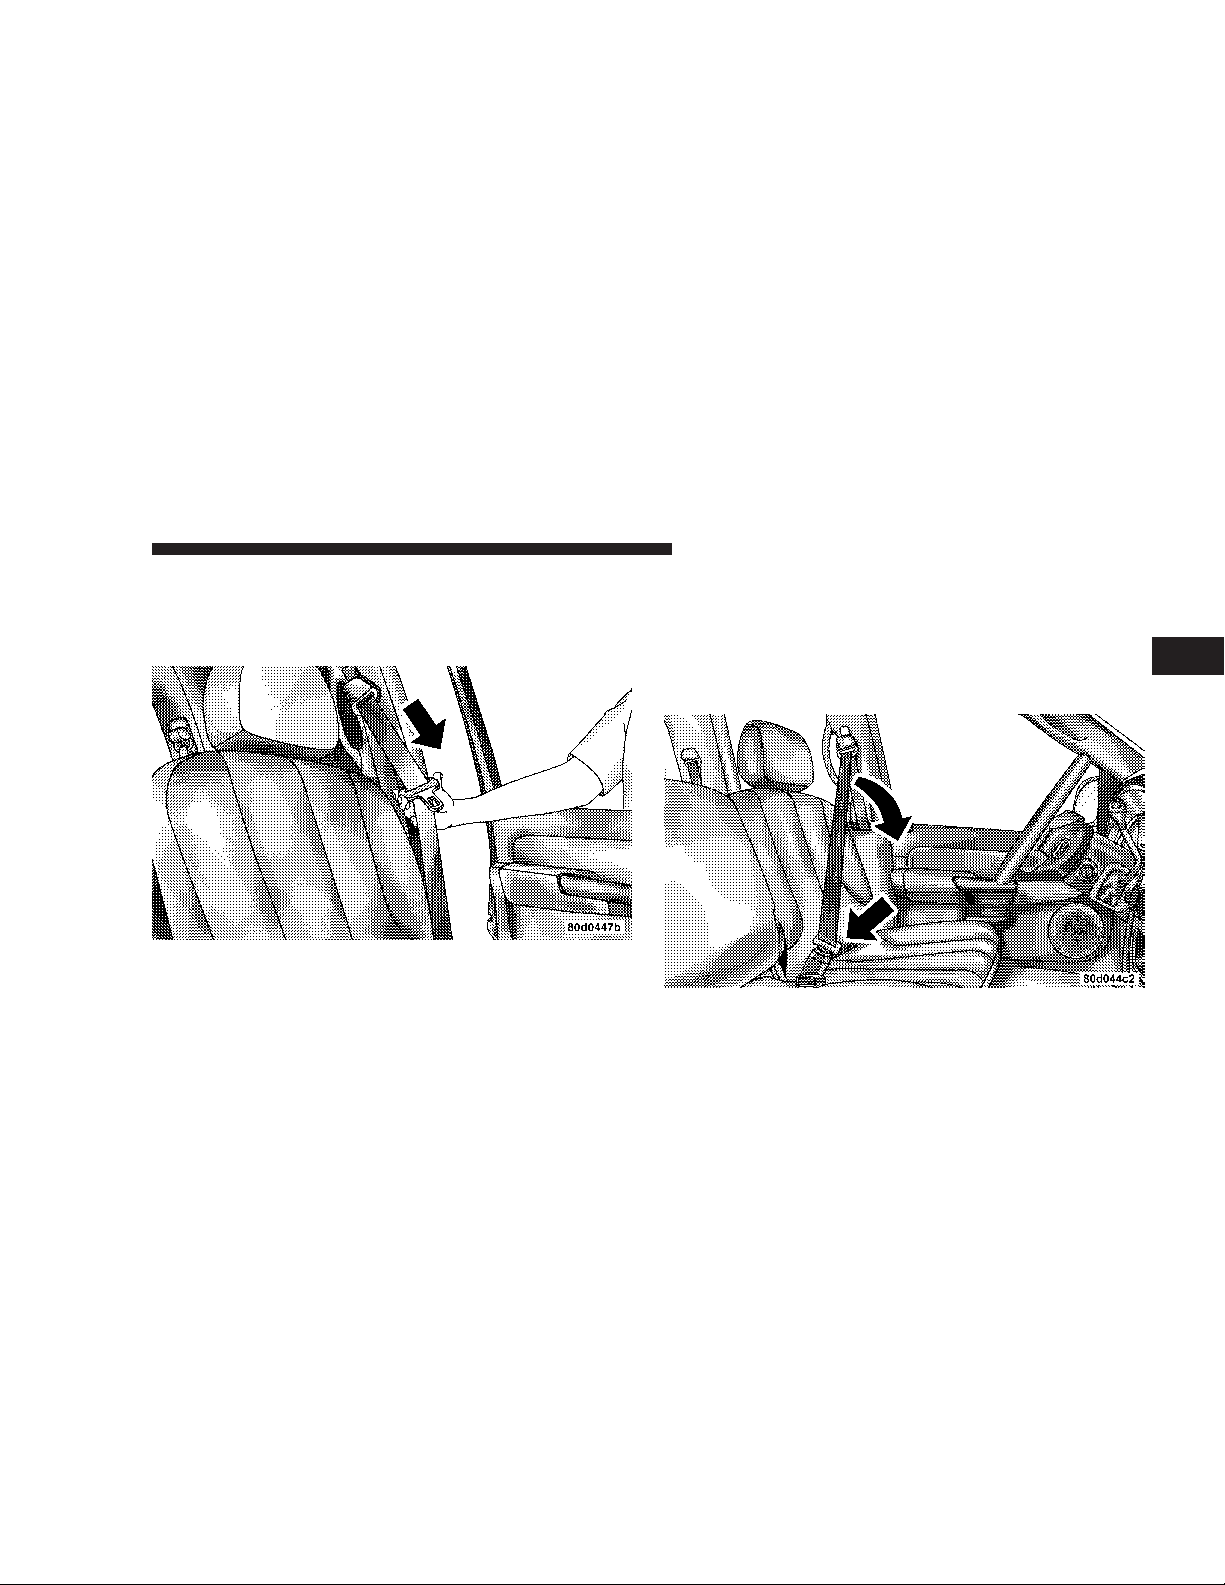
Lap/Shoulder Belt Operating Instructions
1. Enter the vehicle and close the door. Sit back and
adjust the seat.
Latch Plate
2. The seat belt latch plate is above the back of the front
seat, next to your arm in the rear seat. Grasp the latch
plate and pull out the belt. Slide the latch plate up the
webbing as far as necessary to allow the belt to go around
your lap.
3. When the belt is long enough to fit, insert the latch
plate into the buckle until you hear a “click.”
2
Page 34
34 THINGS TO KNOW BEFORE STARTING YOUR VEHICLE
WARNING!
• A belt buckled into the wrong buckle will not protect
you properly. The lap portion could ride too high on your
body, possibly causing internal injuries. Always buckle
your belt into the buckle nearest you.
• A belt that is too loose will not protect you as well. In
a sudden stop you could move too far forward, increasing the possibility of injury. Wear your seat belt snugly.
• A belt that is worn under your arm is very dangerous.
Your body could strike the inside surfaces of the vehicle
in a collision, increasing head and neck injury. And a
belt worn under the arm can cause internal injuries. Ribs
aren’t as strong as shoulder bones. Wear the belt over
your shoulder so that your strongest bones will take the
force in a collision.
• A shoulder belt placed behind will not protect you
from injury during a collision. You are more likely to hit
your head in a collision if you do not wear your shoulder
belt. The lap and shoulder belt are meant to be used
together.
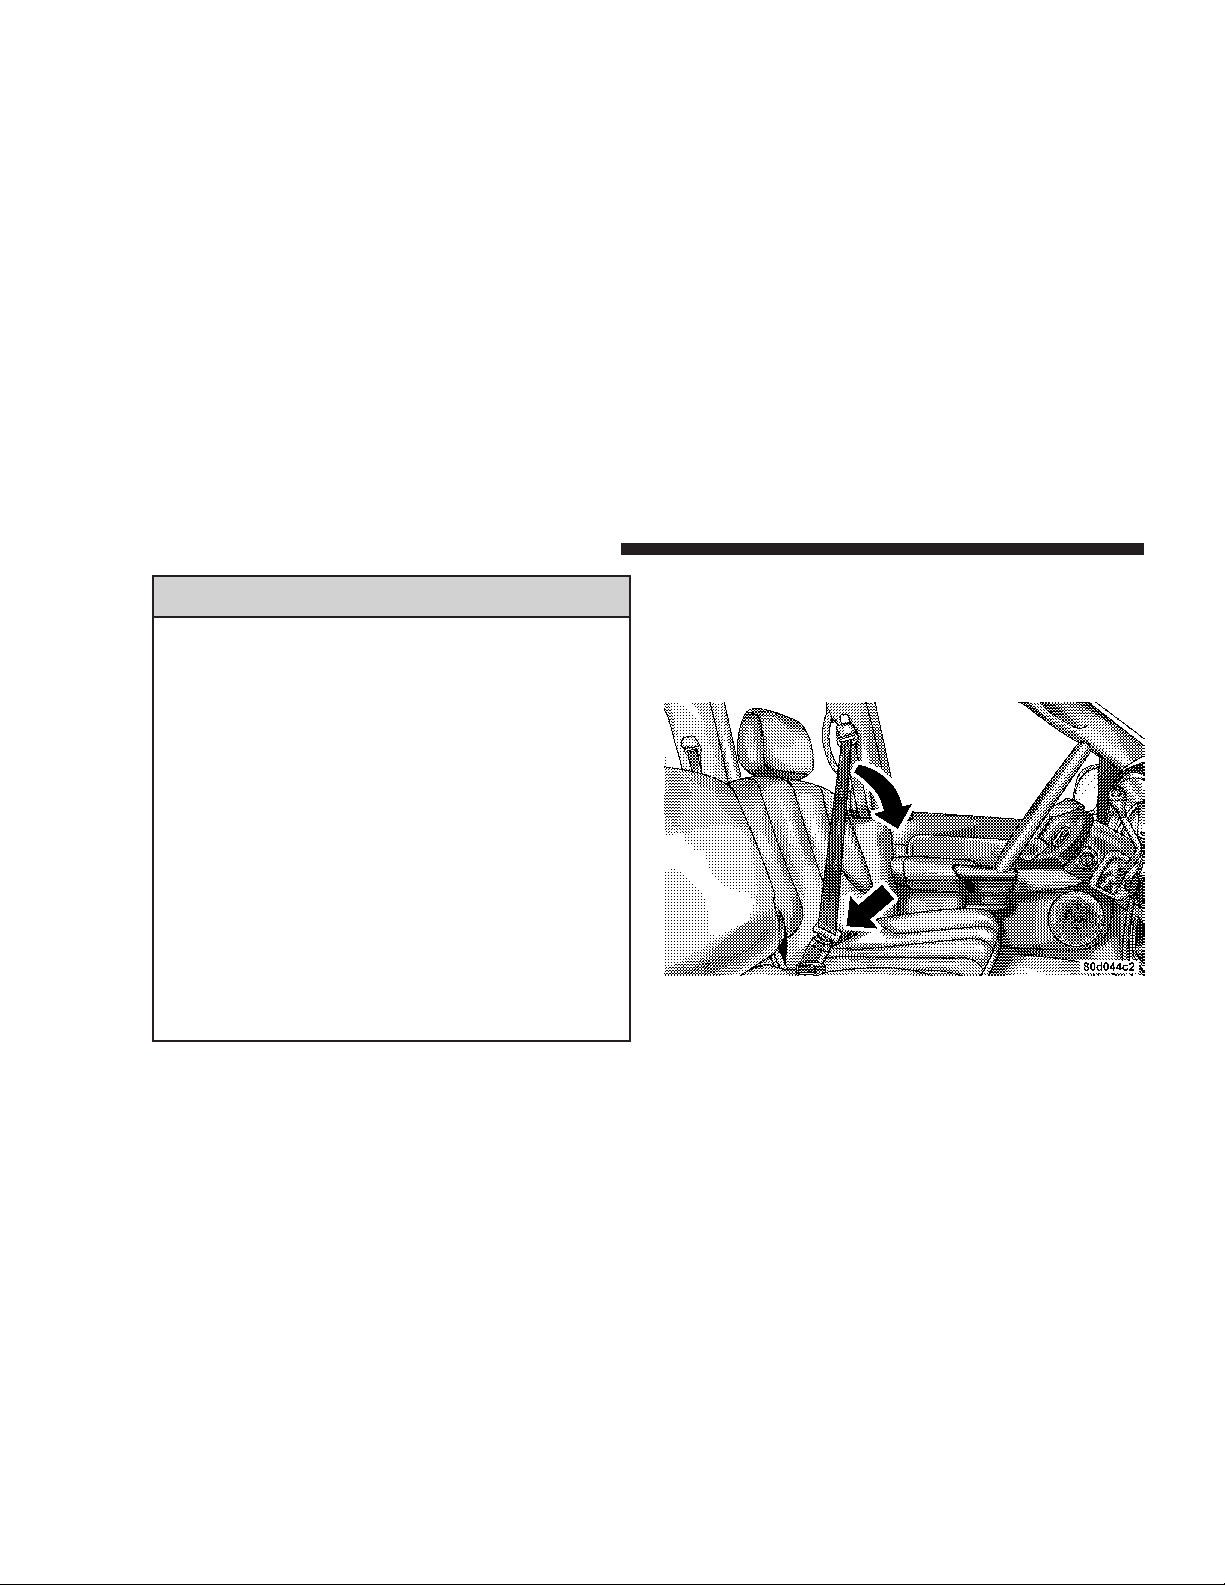
4. Position the lap belt across your thighs, below your
abdomen. To remove slack in the lap belt portion, pull up
on the shoulder belt. To loosen the lapbelt if it is too tight,
tilt the latch plate and pull on the lap belt. A snug belt
reduces the risk of sliding under the belt in a collision.
Removing Slack From Belt
Page 35
THINGS TO KNOW BEFORE STARTING YOUR VEHICLE 35
WARNING!
• A lap belt worn too high can increase the risk of
internal injury in a collision. The belt forces won’t
be at the strong hip and pelvic bones, but across your
abdomen. Always wear the lap belt as low as possible and keep it snug.
• A twisted belt can’t do its job as well. In a collision
it could even cut into you. Be sure the belt is straight.
If you can’t straighten a belt in your vehicle, take it
to your dealer and have it fixed.
5. Position the shoulder belt on your chest so that it is
comfortable and not resting on your neck. The retractor
will withdraw any slack in the belt.
6. To release the belt, push the red button on the buckle.
The belt will automatically retract to its stowed position.
If necessary, slide the latch plate down the webbing to
allow the belt to retract fully.
WARNING!
A frayed or torn belt could rip apart in a collision
and leave you with no protection. Inspect the belt
system periodically, checking for cuts, frays, or loose
parts. Damaged parts must be replaced immediately.
Do not disassemble or modify the system. Seat belt
assemblies must be replaced after a collision if they
have been damaged (bent retractor, torn webbing,
etc.) or if the airbag deployed.
2
Page 36
36 THINGS TO KNOW BEFORE STARTING YOUR VEHICLE
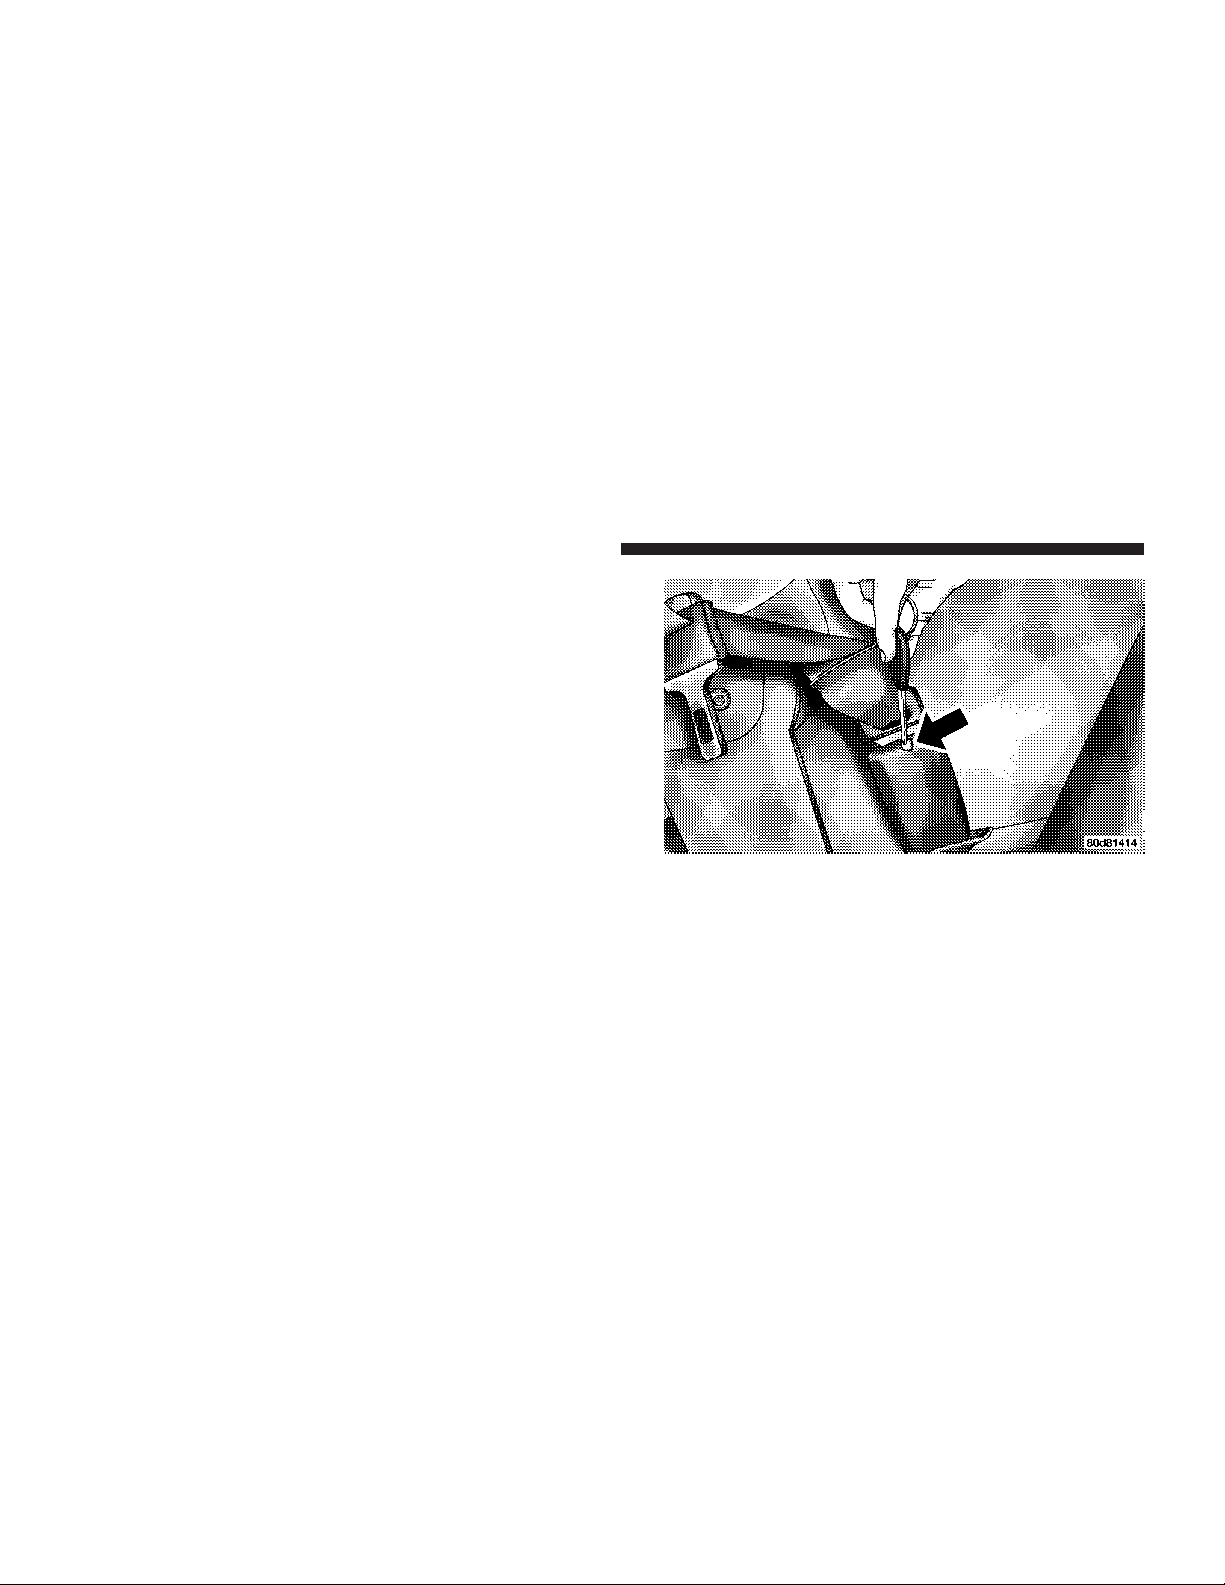
Standard Cab Front Center Three Point Belt
1. The front center seat belt on the Standard Cab may be
disconnected to open up utilization of the storage areas
behind the front seats. The black latch plate can be
detached from the black keyed seat belt bucklelocated on
the inboard side of the passenger seat. Insert the vehicle
ignition key intothe center white slot on the black buckle.
The black buckle latch plate can be removed when the
key is pressed into the buckle. Allow the retractor to take
up the surplus webbing, and the buckles will hang
vertically from the cab back exit bezel, thus freeing up all
the area behind the front seats.
Detaching Buckle with Key
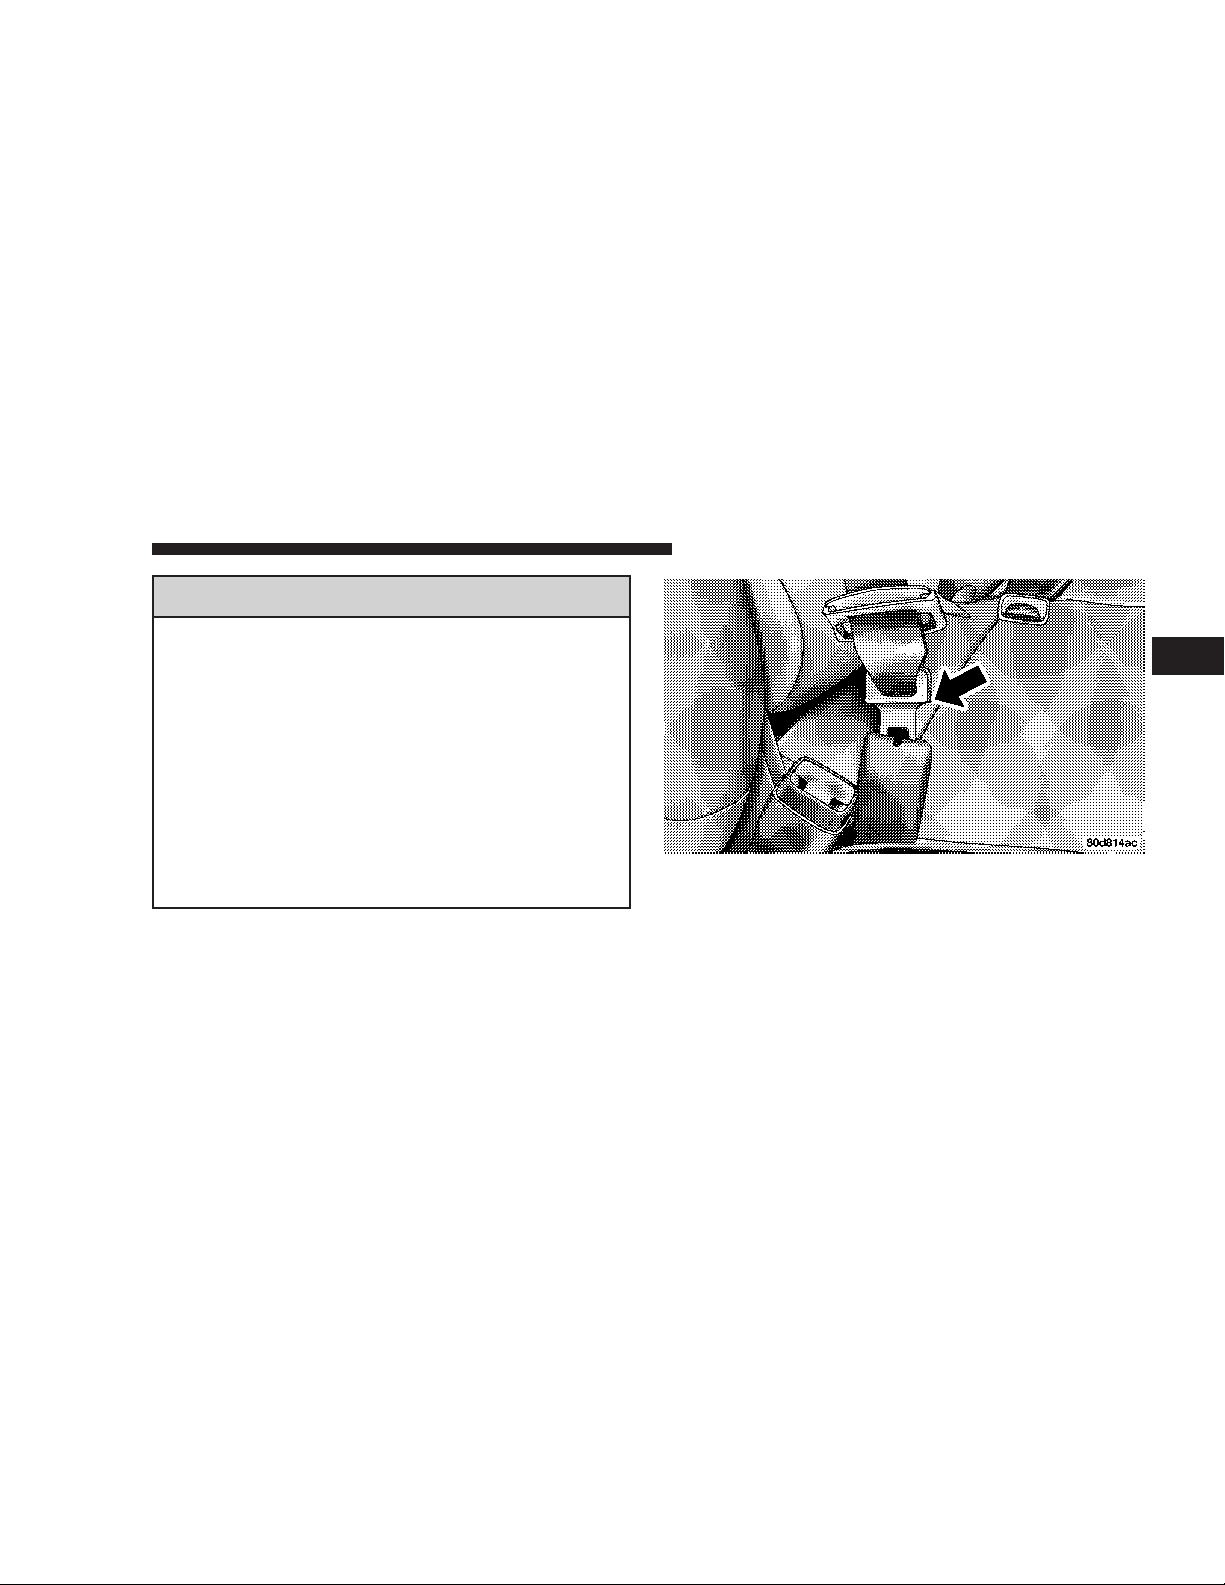
2. To reattach the seat belt to the front center seat, pull
the black buckle latch plate forward from the cab back
panel and insert it into the black keyed buckle until there
is an audible click. Refer to the previous section for the
proper seat belt usage.
Page 37
WARNING!
•
If the black latch and black buckle are not properly connected when the seat belt is used by an
occupant, the seat belt will not be able to provide
proper restraint and will increase the risk of
injury in a collision.
•
When reattaching the black latch and black
buckle, ensure the seat belt webbing is not
twisted. If the webbing is twisted, follow the
preceding procedure to detach the black latch and
black buckle, untwist the webbing, and reattach
the black latch and black buckle.
THINGS TO KNOW BEFORE STARTING YOUR VEHICLE 37
2
Inserting Latch Plate
Page 38
38 THINGS TO KNOW BEFORE STARTING YOUR VEHICLE
In Use Position
WARNING!
If the black latch and buckle are not connected when
the seat belt is used by an occupant, the seat belt will
not restrain you properly.
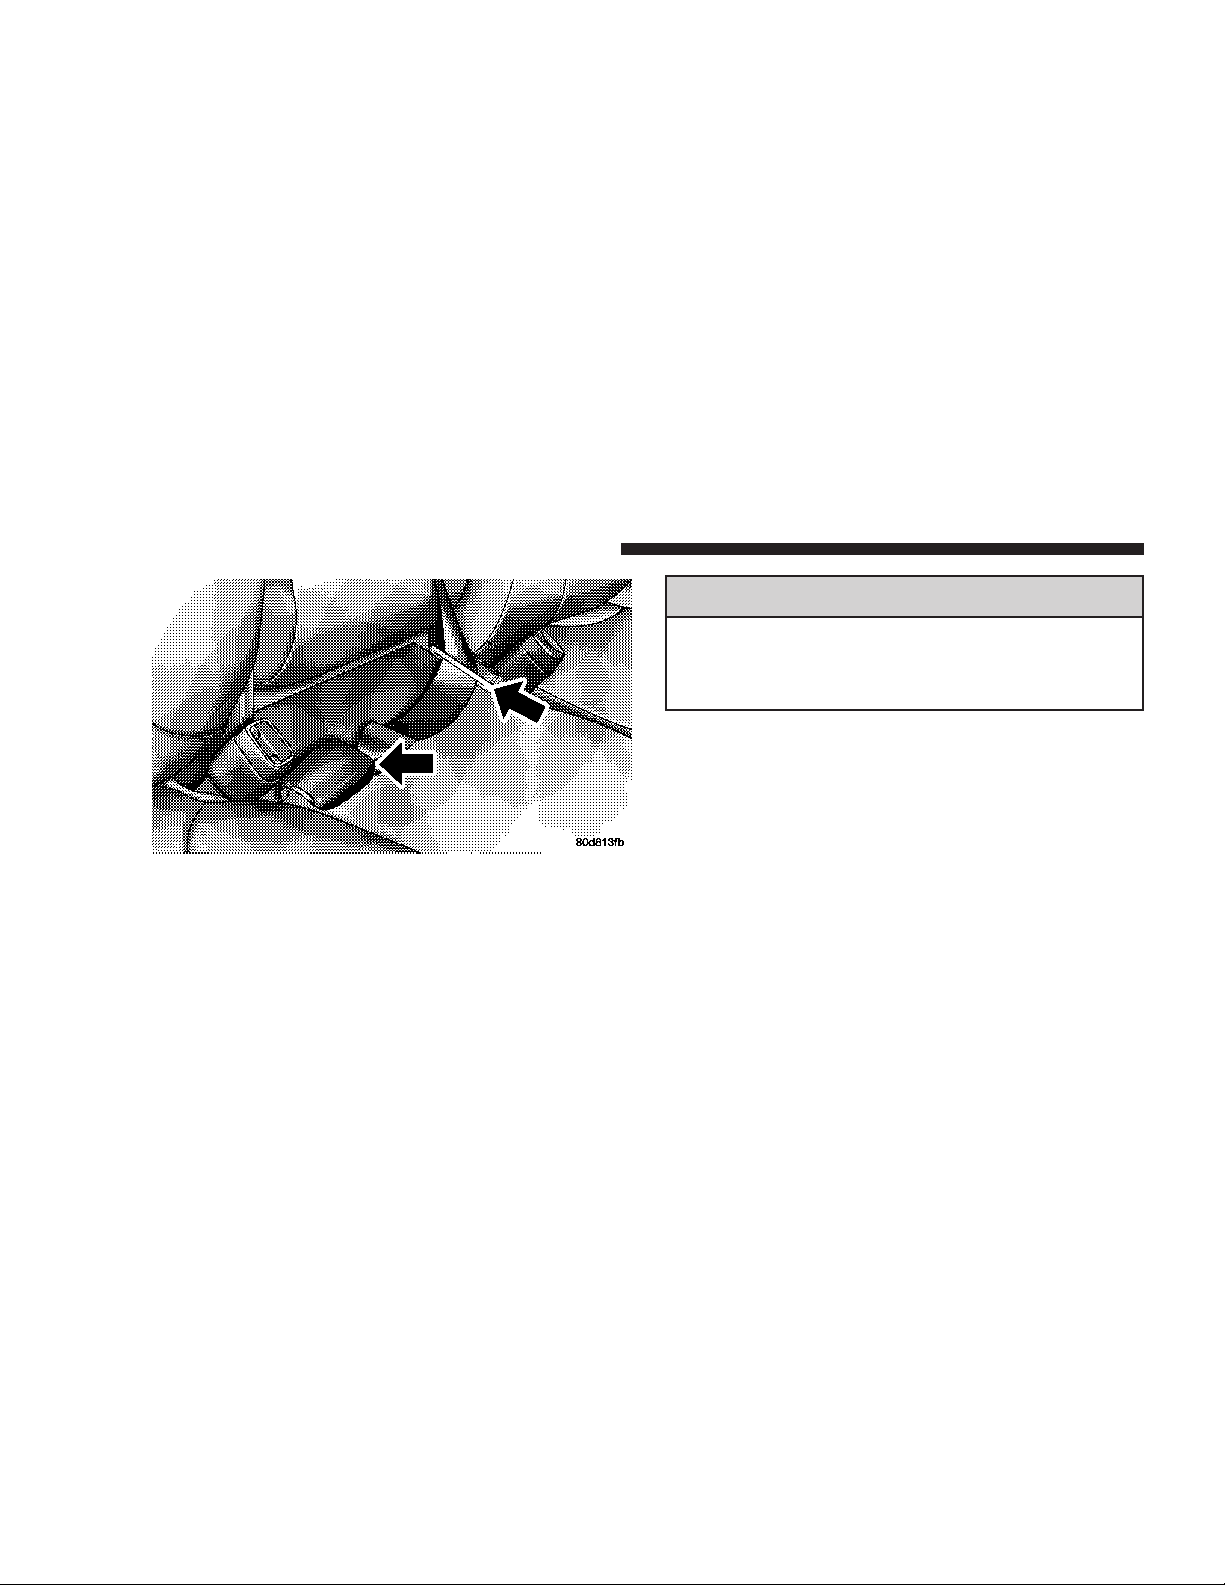
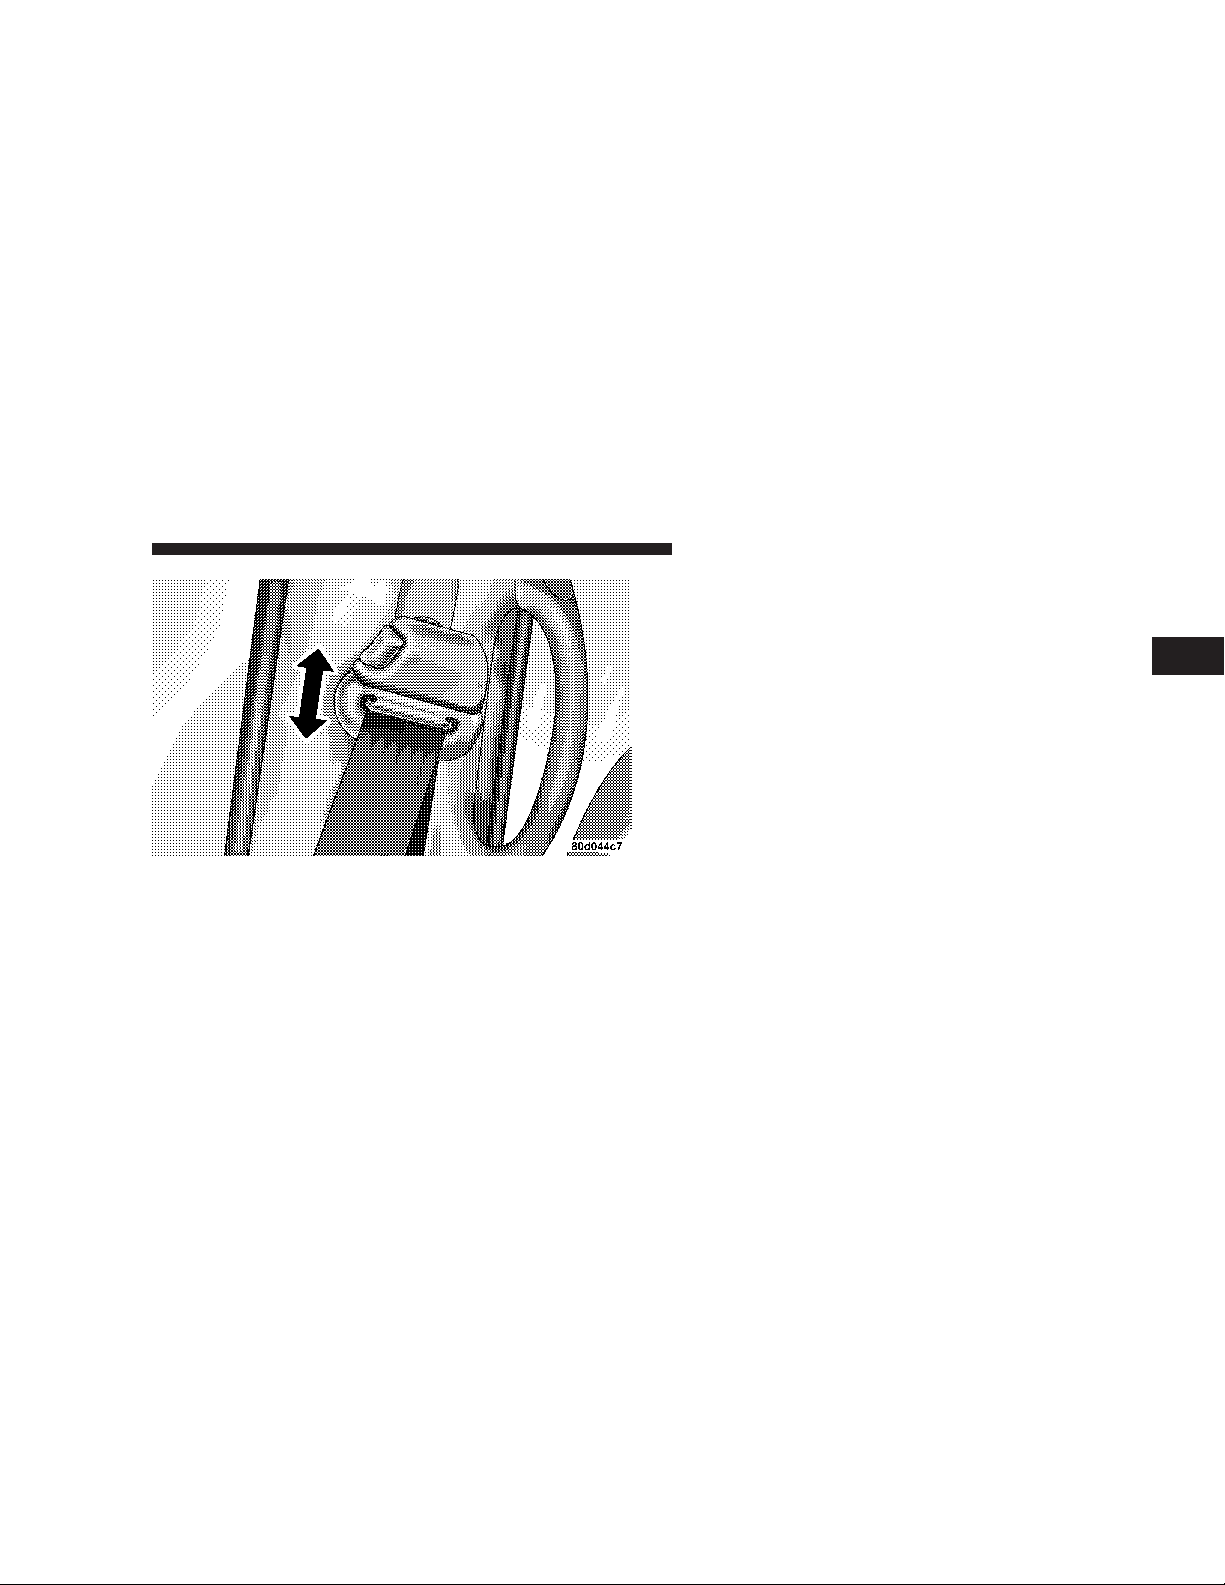
Adjustable Upper Shoulder Belt Anchorage
In the front row outboard seats, the shoulder belt can be
adjusted upward or downward to help position the belt
away from your neck. Press the button located on the
upper belt guide, and then move it up or down to the
position that serves you best.
Page 39
THINGS TO KNOW BEFORE STARTING YOUR VEHICLE 39
Automatic Locking Restraint (ALR) Mode – If
Equipped
In this mode, the shoulder belt is automatically prelocked. The belt will still retract to remove any slack in
the shoulder belt. The automatic locking mode is available on all passenger seating positions with a combination lap/shoulder belt.
When To Use The Automatic Locking Mode
Anytime a child safety seat is installed in a passenger
seating position. Children 12 years old and under should
be properly restrained in the rear seat whenever possible.
2
Adjusting Upper Shoulder Belt
As a guide, if you are shorter than average, you will
prefer a lower position, and if you are taller than average,
you’ll prefer a higher position. When you release the
anchorage, try to move it up or down to make sure that
it is locked in position.
How To Use The Automatic Locking Mode
1. Buckle the combination lap/shoulder belt.
2. Grasp the shoulder portion and pull downward until
the entire belt is extracted.
Page 40

40 THINGS TO KNOW BEFORE STARTING YOUR VEHICLE
3. Allow the belt to retract. As the belt retracts, you will
hear a clicking sound. This indicates the safety belt is
now in the automatic locking mode.
How To Disengage The Automatic Locking Mode
Disconnect the combination lap/shoulder belt and allow
it to retract completely to disengage the automatic locking mode and activate the vehicle sensitive (emergency)
locking mode.
Center Lap Belts
The center seating position for the Quad Cab front seat
has a lap belt only. To fasten the lap belt, slide the latch
plate into the buckle until you hear a ⬙click.⬙ To lengthen
the lap belt, tilt the latch plate and pull. To remove slack,
pull the loose end of the webbing. Wear the lap belt snug
against the hips. Sit back and erect in the seat, then adjust
the belt as tightly as is comfortable.
WARNING!
•
A lap belt worn too loose or too high is dangerous.
•
A belt worn too loose can allow you to slip down
and under the belt in a collision.
•
A belt that is too loose or too high will apply crash
forces to the abdomen, not to the stronger hip
bones. In either case, the risk of internal injuries
is greater. Wear a lap belt low and snug.
Seat Belt Pretensioners
The seat belts for both front seating positions are
equipped with pretensioningdevices that are designed to
remove slack from the seat belt system in the event of a
collision. These devices improve the performance of the
seat belt by assuring that the belt is tight about the
occupant early in a collision. Pretensioners work for all
size occupants, including those in child restraints.
Page 41

THINGS TO KNOW BEFORE STARTING YOUR VEHICLE 41
NOTE: These devices are not a substitute for proper seat
belt placement by the occupant. The seat belt still must be
worn snugly and positioned properly.
The pretensioners are triggered by the airbag control
module. Like the airbags, the pretensioners are single use
items. After a collision that is severe enough to deploy
the airbags and pretensioners, both must be replaced.
Enhanced Driver Seat Belt Reminder System
(BeltAlert)
If the driver’s seat belt has not been buckled within 60
seconds of starting the vehicle and if the vehicle speed is
greater than 5 mph (8 km/h), the Enhanced Warning
System (BeltAlert) will alert the driver to buckle their seat
belt. The driver should also instruct all other occupants to
buckle their seat belts. Once the warning is triggered, the
Enhanced Warning System (BeltAlert) will continue to
chime and flash the Seat Belt Warning Light for 96
seconds or until the driver’s seat belt is buckled. The
Enhanced Warning System (BeltAlert) will be reactivated
if the ignition is cycled, driver’s seat belt is unbuckled for
more than 10 seconds and the vehicle speed is greater
than 5 mph (8 km/h).
The Enhanced Warning System (BeltAlert) can be enabled or disabled by your authorized dealer or by
following these steps:
NOTE: The following steps must occur within the first
60 seconds of the ignition switch being turned to the ON
or START position. DaimlerChrysler does not recommend deactivating the Enhanced Warning System
(BeltAlert).
1. With all doors closed and the ignition switch in any
position except On or Start, buckle the driver’s seat belt.
2. Start the engine and wait for the Seat Belt Warning
Light to turn off.
2
Page 42

42 THINGS TO KNOW BEFORE STARTING YOUR VEHICLE
3. Within 60 seconds of starting the vehicle, unbuckle
and then re-buckle the driver’s seat belt at least three
times within 10 seconds, ending with the seat belt
buckled.
4. Turn off the engine. A single chime will sound to
signify that you have successfully completed the programming.
The Enhanced Warning System (BeltAlert) can be reactivated by repeating this procedure.
NOTE: Although the Enhanced Warning System
(BeltAlert) has been deactivated, the Seat Belt Warning
Light will continue to illuminate while the driver’s seat
belt remains unbuckled.
Seat Belts and Pregnant Women
We recommend that pregnant women use seat belts
throughout their pregnancies. Keeping the mother safe is
the best way to keep the baby safe.
Pregnant women should wear the lap part of the belt
across the thighs and as snug against the hips as possible.
Keep the belt low so that it does not come across the
abdomen. That way the strong bones of the hips will take
the force if there is a collision.
Seat Belt Extender
If a seat belt is too short, even when fully extended, your
dealer can provide you with a seat belt extender. This
extender should be used only if the existing belt is not
long enough. When it is not required, remove the extender and store it.
Page 43
THINGS TO KNOW BEFORE STARTING YOUR VEHICLE 43
WARNING!
Using a seat belt extender when not needed can
increase the risk of injury in a collision. Only use the
seat belt extender when the lap belt is not long
enough when it is worn low and snug, and in the
recommended seating positions. Remove and store
the extender when not needed.
Driver And Right Front Passenger Supplemental
Restraint System (SRS)—Airbag
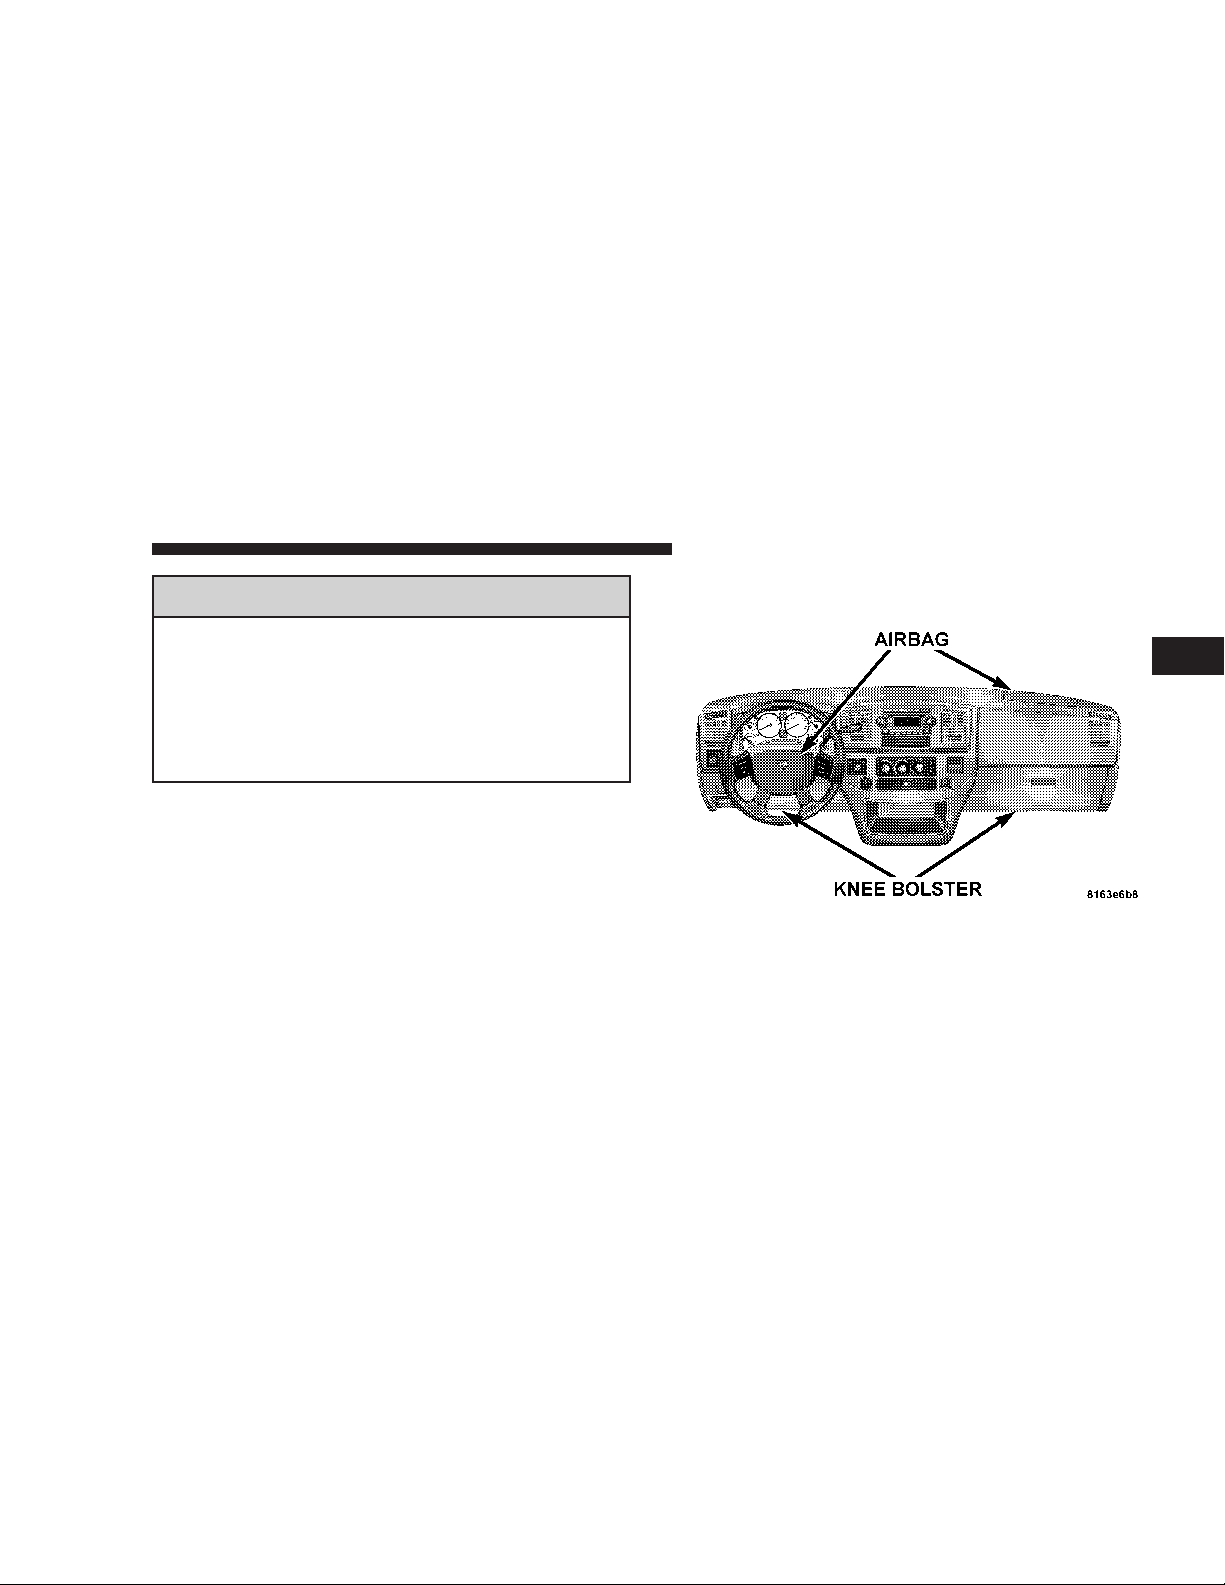
This vehicle has front airbags for both the driver and
front passenger as a supplement to the seat belt restraint
systems. The driver’s front airbag is mounted in the
center of the steering wheel. The passenger’s front airbag
is mounted in the instrument panel, above the glove
compartment. The words SRS AIRBAG are embossed on
the airbag covers.
These airbags are certified to the new Federal regulations
that allow less forceful deployments.
2
This vehicle may also be equipped with window bags to
protect the driver and passengers in the first and second
row sitting next to a window. If the vehicle is equipped
with window bags, they are located above the side
windows. Their covers are also labeled SRS AIRBAG.
Page 44

44 THINGS TO KNOW BEFORE STARTING YOUR VEHICLE
WARNING!
•
Do not put anything on or around the airbag covers or attempt
to manually open them. You may damage the airbags and you
could be injured because the airbags are not there to protect
you. These protective covers for the airbag cushions are designed to open only when the airbags are inflating.
•
Do not mount any aftermarket equipment such as trailer brake
controllers, snowplow controllers, auxiliary light switches, radios, etc. on or behind the knee bolster. Knee bolsters are
designed to work with the air bag and seat belt to protect you.
Mounting any additional equipment on or behind the knee
bolster can cause injury during a crash.
•
If your vehicle is equipped with window bags, do not stack
luggage or other cargo up high enough to block the location of
the window bag. The area where the window bag is located
should remain free from any obstructions.
•
If your vehicle is equipped with window bags, do not have any
accessory items installed which will alter the roof, including
adding a sunroof to your vehicle. Do not add roof racks that
require permanent attachments (bolts or screws) for installation
on the vehicle roof. Do not drill into the roof of the vehicle for
any reason.
Airbags inflate in moderate to high speed impacts.Along
with the seatbelts, front airbags work with the instrument
panel knee bolsters to provide improved protection for
the driver and front passenger. Window bags also work
with seat belts to improve occupant protection.
The seat belts are designed to protect you in many types
of collisions. The front airbags deploy in moderate to
severe frontal collisions. If your vehicle is so equipped,
the window bag on the crash side of the vehicle is
triggered in moderate to severe side collisions. In certain
types of collisions, both the front and side airbags may be
triggered. But even in collisions where the airbags work,
you need the seat belts to keep you in the right position
for the airbags to protect you properly.
Page 45

THINGS TO KNOW BEFORE STARTING YOUR VEHICLE 45
Here are some simple steps you can follow to minimize
the risk of harm from a deploying airbag.
•
Children 12years and under shouldride buckled up in
a rear seat, if available.
•
Infants in rear facing child restraints must NEVER
ride in the front seat of a vehicle with a passenger front
airbag unless the airbag is turned off (Standard Cab
Vehicles Only). An airbag deployment can cause severe injury or death to infants in that position. See the
Passenger Airbag On/Off Switch section.
•
If your vehicle does not have a rear seat, see the
Passenger Airbag On/Off Switch section.
•
Children that are not big enough to properly wear the
vehicle seat belt (see section on Child Restraints)
should be secured in the rear seat in child restraints or
belt-positioning booster seats. Older children who do
not use child restraints or belt-positioning booster
seats should ride properly buckled up in the rear seat.
Never allow children to slide the shoulder belt behind
them or under their arm.
•
All occupants should use their seat belts properly.
•
The driver and front passenger seats should be moved
back as far as practical to allow the airbag room to
inflate.
2
Page 46

46 THINGS TO KNOW BEFORE STARTING YOUR VEHICLE
WARNING!
•
Relying on the airbags alone could lead to more
severe injuries in a collision. The airbags work
with your seat belt to restrain you properly. In
some collisions the airbags won’t deploy at all.
Always wear your seat belts even though you
have airbags.
•
Being too close to the steering wheel or instrument panel during airbag deployment could cause
serious injury. Airbags need room to inflate. Sit
back, comfortably extending your arms to reach
the steering wheel or instrument panel.
•
If the vehicle has window airbags, they also need
room to inflate. Do not lean against the door or
window. Sit upright in the center of the seat.
Airbag System Components
The airbag system consists of the following:
•
Airbag Control Module
•
AIRBAG Readiness Light
•
Driver Airbag
•
Passenger Airbag
•
Steering Wheel and Column
•
Instrument Panel
•
Crash Sensor
•
Interconnecting Wiring
•
Knee Impact Bolsters
•
Passenger Side Frontal Airbag ON/OFF Switch (Standard Cab Vehicles Only)
Page 47

THINGS TO KNOW BEFORE STARTING YOUR VEHICLE 47
The Window Airbag System, on vehicles equipped,
consists of the following:
•
AIRBAG Readiness Light (shared with the front airbag
system)
•
Window Bags Above the Side Windows.
•
Airbag Control Module (shared with the front airbag
system)
•
Side impact sensors
•
Interconnecting Wiring
How The Airbag System Works
•
The airbag control module determines if a frontal
collision is severe enough to require the airbags to
inflate.
•
The airbag control module will not detect roll over, or
rear collisions.
•
The airbag control module also monitors the readiness
of the electronic parts of the system whenever the
ignition switch is in the START or RUN positions.
These include all of the items listed above except the
knee bolsters, the instrument panel, and the steering
wheel and column. If the key is in the ⬙Off⬙ position, in
the ACC position or not in the ignition, the airbags are
not on and will not inflate
•
The airbag control module also turns on the AIR BAG
light in the instrument panel for 6 to 8 seconds when
the ignition is first turned on, then turns the light off.
•
If it detects a malfunction in any part of the
system, it turns on the light either momentarily or continuously. The instrument cluster will flash the seat belt indicator if it
detects a fault with the airbag indicator.
2
Page 48
48 THINGS TO KNOW BEFORE STARTING YOUR VEHICLE
WARNING!
Ignoring the AIR BAG light in your instrument
panel could mean you won’t have the airbags to
protect you in a collision. If the light does not come
on, stays on after you start the vehicle, or if it comes
on as you drive, have the airbag system checked
right away.
•
When the airbag control module detects a collision
requiring the airbags, it signals the inflator units. A
large quantity of nontoxic gas is generated to inflate
the airbags. The airbag covers separate and fold out of
the way as the airbags inflate to their full size. The
airbags fully inflate in milliseconds. This is less time
than it takes you to blink your eyes. The airbags then
quickly deflate while helping to restrain the driver and
front passenger. The driver’s front airbag deflates
through vents towards the instrument panel. The
passenger’s front airbag is deflated through vent holes
in the sides of the airbag. In this way the airbags do
not interfere with your control of the vehicle.
•
The knee impact bolsters help protect the knees and
position you for the best interaction with the front
airbag.
Page 49
THINGS TO KNOW BEFORE STARTING YOUR VEHICLE 49
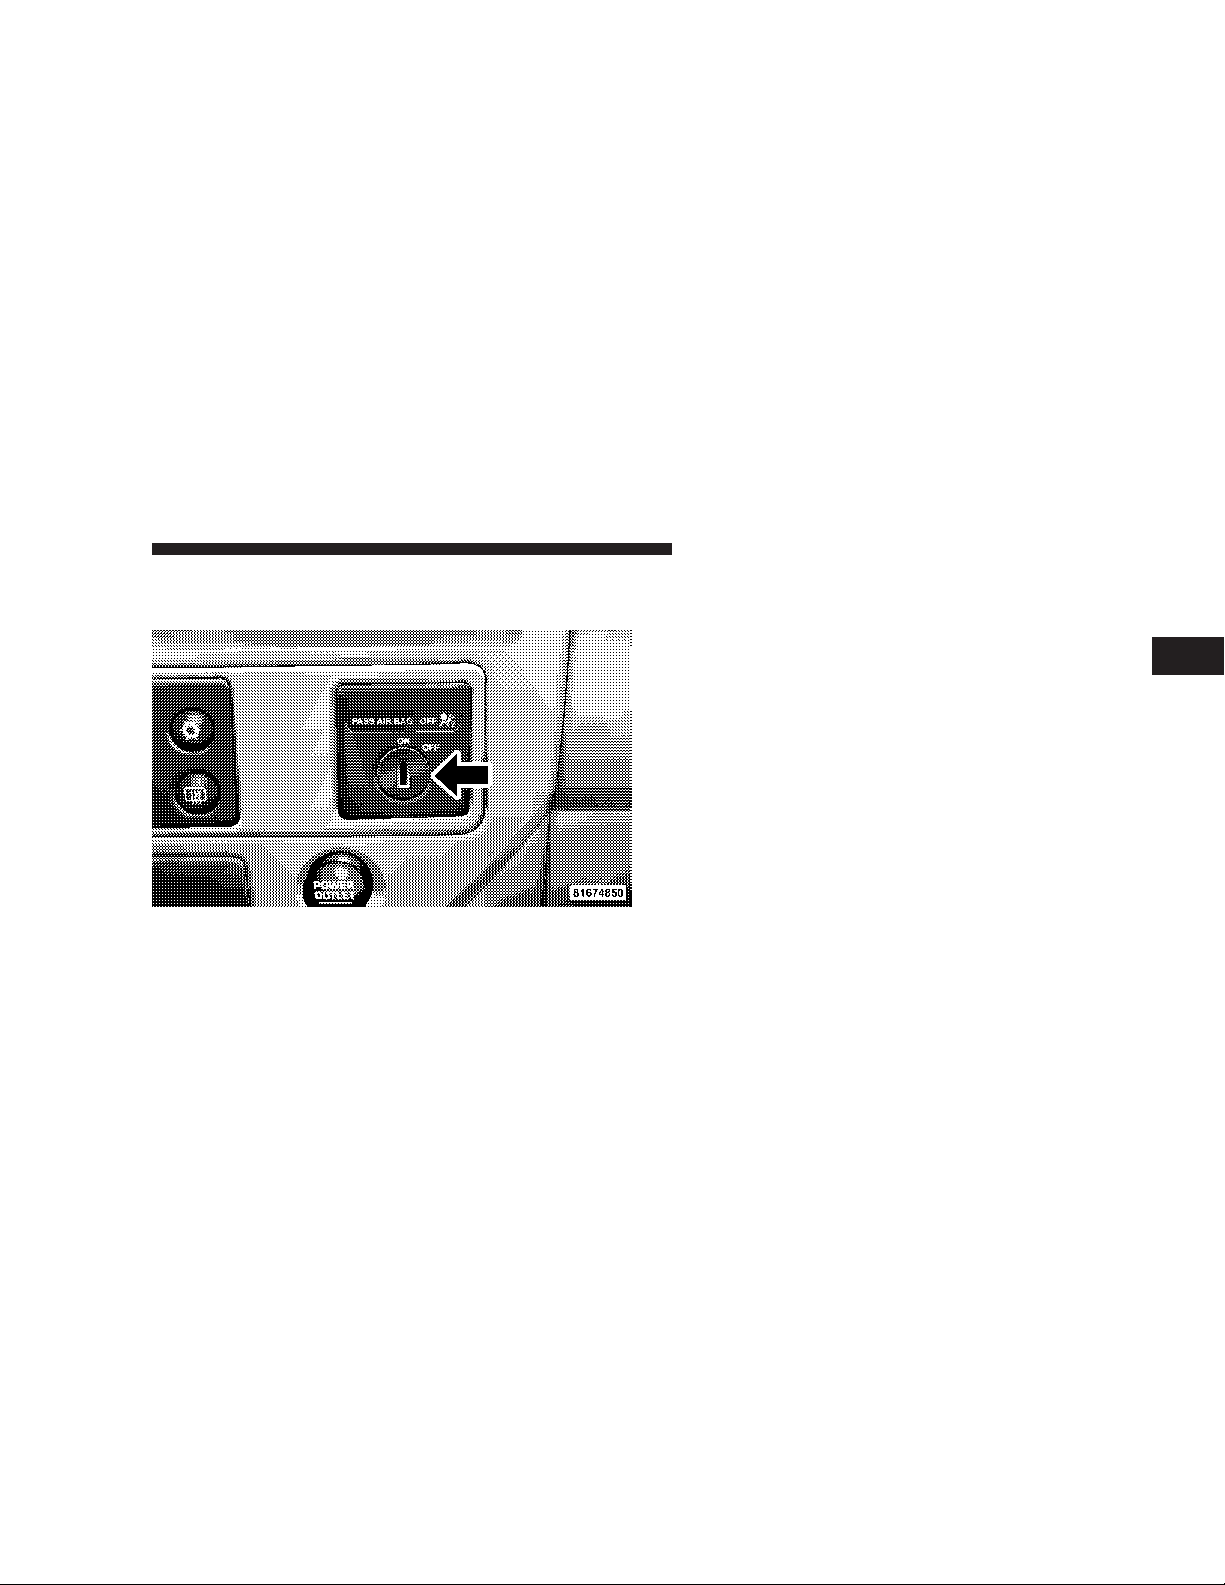
Passenger Airbag On/Off Switch – (Standard Cab
Vehicles Only)
The passenger front airbag is to be turned off only if the
passenger:
•
is an infant (less than 1 year old) who must ride in the
front seat because there is no rear seat, because the rear
seat is too small for a rear-facing infant restraint or
because the infant has a medical condition which
makes it necessary for the driver to be able to see the
infant,
•
is a child, age 1 to 12 who must ride in the front seat
because there is no rear seat, because there is no rear
seat position available, or because the child has a
medical condition which makes it necessary for the
driver to be able to see the child,
•
has a medical condition which makes passenger airbag
inflation (deployment) a greater risk for the passenger
than the risk of hitting the dashboard (instrument
panel) or windshield in a crash.
2
Page 50

50 THINGS TO KNOW BEFORE STARTING YOUR VEHICLE
WARNING!
Whenever an airbag is turned off, even a lap/
shoulder belted passenger may hit their head, neck,
or chest on the dashboard (instrument panel) or
windshield in a crash. This may result in serious
injury or death.
To Shut Off the Passenger Airbag (Standard Cab Vehicles Only)
Place the ignition key in the Passenger Airbag On/Off
Switch, push the key in and turn clockwise, and remove
the key from the switch. This will shut off the passenger
side airbag. The “Off” light near the switch will illuminate when the ignition switch is turned to the ON
position.
To Turn On the Passenger Airbag (Standard Cab Vehicles Only)
Place the ignition key in the Passenger Airbag On/Off
Switch, push the key in and turn counterclockwise, and
remove the key from the switch. This will turn on the
passenger airbag. The “Off” light near the switch will be
off when the ignition switch is turned to the ON position.
If A Deployment Occurs
The airbag system is designed to deploy when the air bag
control module detects a moderate-to-severe frontal collision, and then immediately to deflate.
NOTE: A frontal collision that is not severe enough to
need airbag protection will not activate the system. This
does not mean something is wrong with the airbag
system.
Page 51
THINGS TO KNOW BEFORE STARTING YOUR VEHICLE 51
If you do have a collision which deploys the airbags, any
or all of the following may occur:
•
The nylon airbag material may sometimes cause abrasions and/or skin reddening to the driver and front
passenger as the airbags deploy and unfold. The
abrasions are similar to friction rope burns or those
you might get sliding along a carpet or gymnasium
floor. They are not caused by contact with chemicals.
They are not permanent and normally heal quickly.
However, if you haven’t healed significantly within a
few days, orif you have any blistering, see your doctor
immediately.
•
As the airbags deflate you may see some smoke-like
particles. The particles are a normal by-product of the
process that generates the nontoxic gas used for airbag
inflation. These airborneparticles may irritate the skin,
eyes, nose, or throat. If you have skin or eye irritation,
rinse the area with cool water. For nose or throat
irritation, move to fresh air. If the irritation continues,
see your doctor. If these particles settle on your
clothing, follow the garment manufacturer’s instructions for cleaning.
•
It is not advisable to drive your vehicle after the
airbags have deployed. If you are involved in another
collision, the airbags will not be in place to protectyou.
WARNING!
Deployed airbags can’t protect you in another collision. Have the airbags replaced by an authorized
dealer as soon as possible.
2
Page 52

52 THINGS TO KNOW BEFORE STARTING YOUR VEHICLE
Window Airbags Supplemental Restraint System
(SRS)—If Equipped
The window airbag control module determines if a side
collision is severe enough to require the side airbags to
inflate. The window airbag control module will not
detect roll over, front or rear collisions.
The airbag control module monitors the readiness of the
electronic parts of the system whenever the ignition
switch is in the ⬙START⬙ or ⬙RUN⬙ positions. These
include all of the items listed above. The airbag control
module also turns on theAIRBAG light in the instrument
panel for 6 to 8 seconds when the ignition is first turned
on as a diagnostic or system check, then turns the light
off. If it detects a malfunction in any part of the system,
it turns on the light either momentarily or continuously.
The side (window) impact SRS Airbags are designed to
activate only in certain side collisions. When the airbag
control module detects a collision requiring the window
bags to inflate, it signals the inflators on the crash side of
the vehicle. A quantity of nontoxic gas is generated to
inflate the window bag. The inflating window bag
pushes the side pillar molding out of the way and covers
the window. The airbag inflates in about 30 milliseconds
(about one-quarter of the time it takes to blink your eyes)
with enough force to injure you if you are not belted and
seated properly, or if items are positioned in the area
where the window bag inflates. This especially applies to
1
children. The window bag is only about 3
⁄2inches (8.9
cm) thick when it is inflated.
Enhanced Accident Response System
If the airbags deploy after an impact and the electrical
system remains functional, vehicles equipped with
power door locks will unlock automatically. In addition,
approximately 10 seconds after the vehicle has stopped
moving, the interior lights will light until the ignition
switch is turned off.
Page 53
THINGS TO KNOW BEFORE STARTING YOUR VEHICLE 53
Maintaining Your Airbag Systems
WARNING!
•
Modifications to any part of the airbag system
could cause it to fail when you need it. You could
be injured because the airbags are not there to
protect you. Do not modify the components or
wiring, including adding any kind of badges or
stickers to the steering wheel hub trim cover or
the upper right side of the instrument panel. Do
not modify the front bumper, vehicle body structure, or frame.
•
You need proper knee impact protection in a
collision. Do not mount or locate any aftermarket
equipment on or behind the knee bolster.
•
It is dangerous to try to repair any part of the
airbag system yourself. Be sure to tell anyone who
works on your vehicle that it has airbags.
Airbag Light
You will want to have the airbags ready to
inflate for your protection in an impact. While
the airbag system is designed to be maintenance free, if any of the following occurs, have
an authorized dealer service the system promptly:
•
The airbag light does not come on or flickers during
the 6 to 8 seconds when the ignition switch is first
turned on.
•
The light remains on or flickers after the 6 to 8 second
interval.
•
The light flickers or comes on and remains on while
driving.
NOTE: If the speedometer, tachometer or any engine
related gauges are not working, the airbag control module may also be disabled. The airbags may not be ready
2
Page 54

54 THINGS TO KNOW BEFORE STARTING YOUR VEHICLE
to inflate for your protection. Promptly check fuse numbers 52 and 53 in the fuse and relay center. See your
dealer if the fuse is good.
Event Data Recorder (EDR)
In the event of an airbag deployment, your vehicle is
designed to record up to 2-seconds of specific vehicle
data parameters (see the following list) in the event data
recorder prior to the moment of airbag deployment.
Please note thatsuch data are ONLY recorded if an airbag
deploys, and are otherwise unavailable. In conjunction
with other data gathered during a complete accident
investigation, the electronic data may be used by
DaimlerChrysler Corporation and others to learn more
about the possible causes of crashes and associated
injuries in order to assess and improve vehicle performance. In addition to crash investigations initiated by
DaimlerChrysler Corporation, such investigations may
be requested by customers, insurance carriers, government officials, and professional crash researchers, such as
those associated with universities, and with hospital and
insurance organizations.
In the event that an investigation is undertaken by
DaimlerChrysler Corporation (regardless of initiative),
the company or its designated representative will first
obtain permission of the appropriate custodial entity for
the vehicle (usually the vehicle owner or lessee) before
accessing the electronic data stored, unless ordered to
download data by a court with legal jurisdiction (i.e.,
pursuant to a warrant). A copy of the data will be
provided to the custodial entity upon request. General
data that does not identify particular vehicles or crashes
may be released for incorporation in aggregate crash
databases, such as those maintained by the US government and various states. Data of a potentially sensitive
Page 55

THINGS TO KNOW BEFORE STARTING YOUR VEHICLE 55
nature, such as would identify a particular driver, vehicle, or crash, will be treated confidentially. Confidential
data will not be disclosed by DaimlerChrysler Corporation to any third party except when:
1. Used for research purposes, such as to match data
with a particular crash record in an aggregate database,
provided confidentiality of personal data is thereafter
preserved
2. Used in defense of litigation involving a
DaimlerChrysler Corporation product
3. Requested by police under a legal warrant
4. Otherwise required by law
Data Parameters that May Be Recorded:
•
Diagnostic trouble code(s) and warning lamp status
for electronically-controlled safety systems, including
the airbag system
•
Airbag disable lamp status (if equipped)
•
⬙Time⬙ of airbag deployment (in terms of ignition
cycles and vehicle mileage)
•
Airbag deployment level (if applicable)
•
Seatbelt status
•
Brake status (service and parking brakes)
•
Accelerator status (including vehicle speed)
•
Engine control status (including engine speed)
•
Cruise control status
Child Restraint
Everyone in your vehicle needs to be buckled up all the
time — babies and children, too. Every state in the United
States and all Canadian provinces require that small
children ride in proper restraint systems. This is the law,
and you can be prosecuted for ignoring it.
2
Page 56
56 THINGS TO KNOW BEFORE STARTING YOUR VEHICLE
Children 12 years and under should ride properly buckled up in a rear seat, if available. According to crash
statistics, children are safer when properly restrained in
the rear seats rather than in the front.
WARNING!
In a collision, an unrestrained child, even a tiny
baby, can become a missile inside the vehicle. The
force required to hold even an infant on your lap can
become so great that you could not hold the child, no
matter how strong you are. The child and others
could be badly injured. Any child riding in your
vehicle should be in a proper restraint for the child’s
size.
Infants and Small Children
There are different sizes and types of restraints for
children from newborn size to the child almost large
enough for an adult safety belt. Use the restraint that is
correct for your child:
•
Safety experts recommend that children ride
rearward-facing in the vehicle until they are at least
one year oldand weigh at least 20 lbs (9 kg). Two types
of child restraints can be used rearward-facing: infant
carriers and ⬙convertible⬙ child seats. Both types of
child restraints are held in the vehicle by the lap/
shoulder belt.
•
The infant carrier is only used rearward-facing in the
vehicle. It is recommended for children who weigh up
to about 20 lbs (9 kg). ⬙Convertible⬙ child seats can be
used either rearward-facing or forward-facing in the
vehicle. Convertible child seats often have a higher
weight limit in the rearward-facing direction than
Page 57

THINGS TO KNOW BEFORE STARTING YOUR VEHICLE 57
infant carriers do, so they can be used rearward-facing
by children who weigh more than 20 lbs (9 kg) but are
less than one year old.
•
Rearward-facing child seats must NEVER be used in
the front seat of a vehicle with a front passenger airbag
unless the airbag is turned off. An airbag deployment
could cause severe injury or death to infants in this
position.
•
Children who weigh more than 20 lbs (9 kg) and who
are older than one year can ride forward-facing in the
vehicle. Forward-facing child seats and convertible
child seats used in the forward-facing direction are for
children who weigh 20 to 40 lbs (9 to 18 kg) and who
are older than one year. These child seats are also held
in the vehicle by the lap/shoulder belt.
•
The belt-positioning booster seat is for children weighing more than 40 lbs (18 kg), but who are still too small
to fit the vehicle’s seat belts properly. If the child
cannot sit with knees bent over the vehicle’s seat
cushion while the child’s back is against the seat back,
they should use a belt-positioning-booster seat. The
child and booster seat are held in the vehicle by the
lap/shoulder belt. (Some booster seats are equipped
with a front shield and are held in the vehicle by the
lap portion.) For further information refer to
www.seatcheck.org.
2
Page 58

58 THINGS TO KNOW BEFORE STARTING YOUR VEHICLE
WARNING!
•
Improper installation can lead to failure of an
infant or child restraint. It could come loose in a
collision. The child could be badly injured or
killed. Follow the manufacturer’s directions exactly when installing an infant or child restraint.
•
A rearward facing child restraint should only be
used in a rear seat, or in the front seat if the
passenger’s front airbag is Off. If the airbag is left
On, a rearward facing child restraint in the front
seat may be struck by a deploying passenger
airbag which may cause severe or fatal injury to
the infant.
Here are some tips for getting the most out of your child
restraint:
•
Before buying any restraint system, make sure that it
has a label certifying that it meets all applicable Safety
Standards. We also recommend that you make sure
that you can install the child restraint in the vehicle
where you will use it before you buy it.
•
The restraint must be appropriate for your child’s
weight and height. Check the label on the restraint for
weight and height limits.
•
Carefully follow the instructions that come with the
restraint. If you install the restraint improperly, it may
not work when you need it.
•
The passenger seat belts are equipped with Automatic
Locking Retractors (ALR), which are designed to keep
the lap portion tight around the child restraint so that
it is not necessary to use a locking clip.
Page 59

THINGS TO KNOW BEFORE STARTING YOUR VEHICLE 59
Pull the belt from the retractor until there is enough to
allow you to pass through the child restraint and slide
the latch plate into the buckle. Then pull on the belt
until it is all removed from the retractor. Allow the belt
to return to the retractor, pulling on the excess webbing to tighten the lap portion about the child restraint. Refer to the ⬙Automatic Locking Retractors
(ALR) Mode⬙ earlier in this section.
•
In the rear seat, you may have trouble tightening the
lap/shoulder belt on the child restraint because the
buckle or latch plate is too close to the belt path
opening on the restraint. Disconnect the latch plate
from the buckle and twist the short buckle-end belt
several times to shorten it. Insert the latch plate into
the buckle with the release button facing out.
•
If the belt still can’t be tightened, or if pulling and
pushing on the restraint loosens the belt, disconnect
the latch plate from the buckle, turn the latch plate
around, and insert the latch plate into the buckle
again. If you still can’t make the child restraint secure,
try a different seating position.
•
Buckle the child into the seat according to the child
restraint manufacturer’s directions.
•
When your child restraint is not in use, secure it in the
vehicle with the seat belt or remove it from the vehicle.
Do not leave it loose in the vehicle. In a sudden stop or
collision, it could strike the occupants or seat backs
and cause serious personal injury.
2
Page 60
60 THINGS TO KNOW BEFORE STARTING YOUR VEHICLE
WARNING!
Improper installation can lead to failure of an infant
or child restraint. It could come loose in a collision.
The child could be badly injured or killed. Follow
the manufacturer’s directions exactly when installing an infant or child restraint.
Lower Anchors and Tether for CHildren (LATCH)
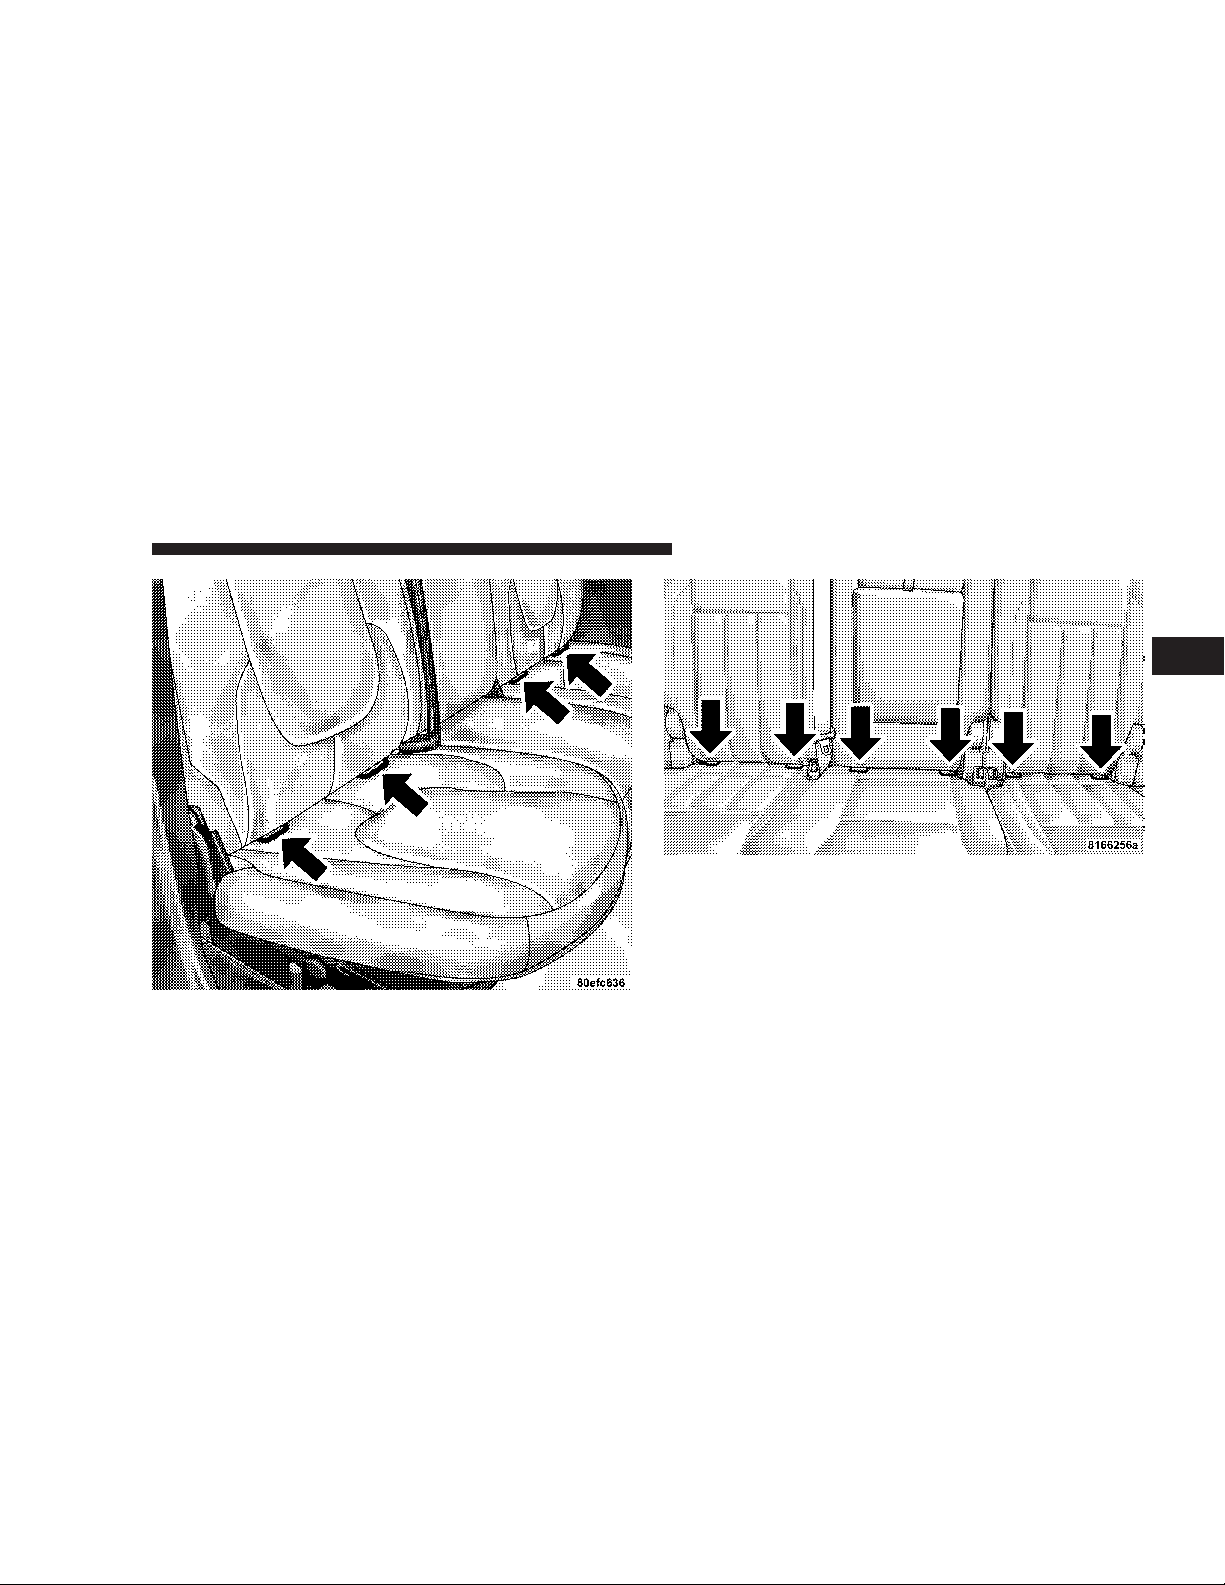
Each vehicle is equipped with the child restraint anchorage system called LATCH, which stands for Lower
Anchors and Tether for CHildren. LATCH child restraint
anchorage systems are installed in the Standard Cab
passenger seat position and the Quad Cab rear seat
outboard positions. LATCH equipped seating positions
feature both lower anchor bars, located at the back of the
seat cushion, and tether strap anchorages, located behind
the seatback (refer to Child Restraint Tether Anchor later
in this section).
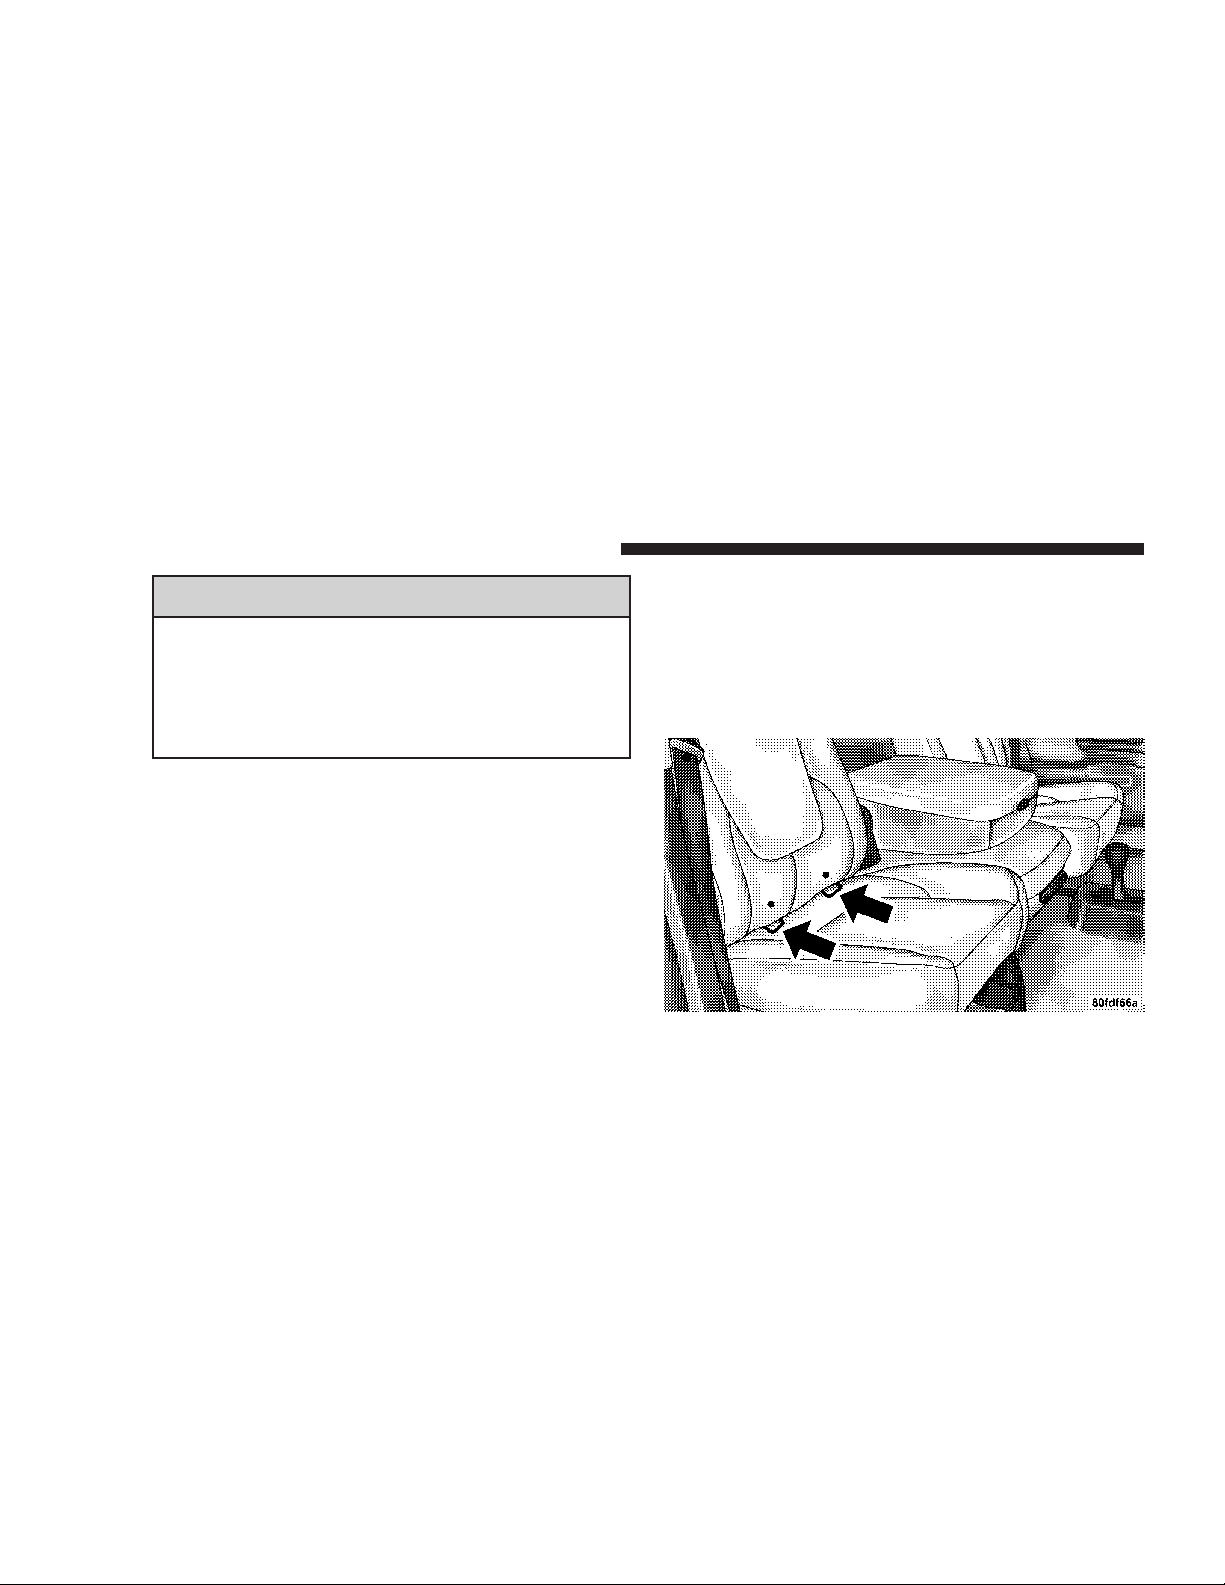
Identification dots are located above the standard cab
front seat lower anchorages as a guide for locating lower
anchors.
NOTE: For children riding in the front seat of a Standard Cab model refer to the “Passenger Airbag On/Off
Switch” located in this section.
Standard Cab Passenger Seat
Page 61
Quad Cab Rear Outboard Seats
THINGS TO KNOW BEFORE STARTING YOUR VEHICLE 61
2
Mega Cab Rear Seats
Child restraint systems having attachments designed to
connect to the lower anchorages are now available. Child
restraints having tether straps and hooks for connection
to the seatback tether anchorage have been available for
Page 62

62 THINGS TO KNOW BEFORE STARTING YOUR VEHICLE
some time. In fact, many child restraint manufacturers
will provide add-on tether strap kits for some of their
older products.
Because the lower anchorages are to be introduced to
passenger carrying vehicles over a period of years, child
restraint systems having attachments for those anchorages will continue to have features for installation in
vehicles using the lap or lap/shoulder belt. They will also
have tether straps, and you are urged to take advantage
of all of the available attachments provided with your
child restraint in any vehicle.
NOTE: When using the LATCH attaching system to
install a child restraint, please ensure that all seat belts
not being used for occupant restraints arestowed and out
of reach of children. It is recommended that before
installing the child restraint, buckle the seat belt so the
seat belt is tucked behind the child restraint and out of
reach. If the buckled seat belt interferes with the child
restraint installation, instead of tucking the seat belt
behind the child restraint, route the seat belt through the
child restraint belt path and then buckle it. This should
stow the seat belt out of the reach of an inquisitive child.
Remind all children in the vehicle that the seat belts are
not toys and should not be played with, and never leave
your child unattended in the vehicle.
NOTE: If your child restraint seat is not LATCH compatible, install the restraint using the vehicle seat belting.
Page 63
THINGS TO KNOW BEFORE STARTING YOUR VEHICLE 63
Installing the Child Restraint System
WARNING!
Do not install child restraint systems equipped with
LATCH attachments in the center position of a Quad
Cab model rear seat. The LATCH anchorages in this
seat are designed for the two outboard seating positions only. A child may be placed in the rear center
seating position of a Quad Cab model using the seat
belt and child tether anchorage. Failure to follow this
may result in serious or fatal injury.
We urge that you carefully follow the directions of the
manufacturer when installing your child restraint. Many,
but not all, restraint systems will be equipped with
separate straps on each side, with each having a hook or
connector and a means for adjusting the tension in the
strap. Forward-facing toddler restraints and some
rearward-facing infant restraints will also be equipped
with a tether strap, a hook and means for adjusting the
tension in the strap.
In general, you will first loosen the adjusters on the lower
straps and tether straps so that you can more easilyattach
the hook or connector to the lower anchorages and tether
anchorages. Then tighten all three straps as you push the
child restraint rearward and downward into the seat.
Not all child restraint systems will be installed as we
have described here. Again, carefully follow the instructions that come with the child restraint system.
2
Page 64
64 THINGS TO KNOW BEFORE STARTING YOUR VEHICLE
WARNING!
Improper installation of a child restraint to the
LATCH anchorages can lead to failure of an infant or
child restraint. The child could be badly injured or
killed. Follow the manufacturer’s directions exactly
when installing an infant or child restraint.
Child Restraint Tether Anchor
Child restraints having tether straps and hooks for connection to tether anchors have been available for some
time. In fact, many child restraint manufacturers will
provide add-on tether strap kits for their older products.
Regular Cab models of Ram Pickups have two tether
anchorages, one each behind the front center and right
seats. Quad Cab and Mega Cab models have three
anchorages, one behind each of the rear seats.
WARNING!
An incorrectly anchored tether strap could lead to
seat failure and injury to the child. In a collision, the
seat could come loose and allow the child to crash
into the inside of the vehicle or other passengers, or
even be thrown from the vehicle. Use only the
anchor positions directly behind the child seat to
secure a child restraint top tether strap. Follow the
instructions below. See your dealer for help if necessary.
Tether Anchorage Points at the Right and Center
Front Seat (Regular Cab - All Seats)
1. Place the child restraint on the seat and adjust the
tether strap so that it will reach over the seat back under
the head restraint to the tether anchor directly behind the
seat.
Page 65
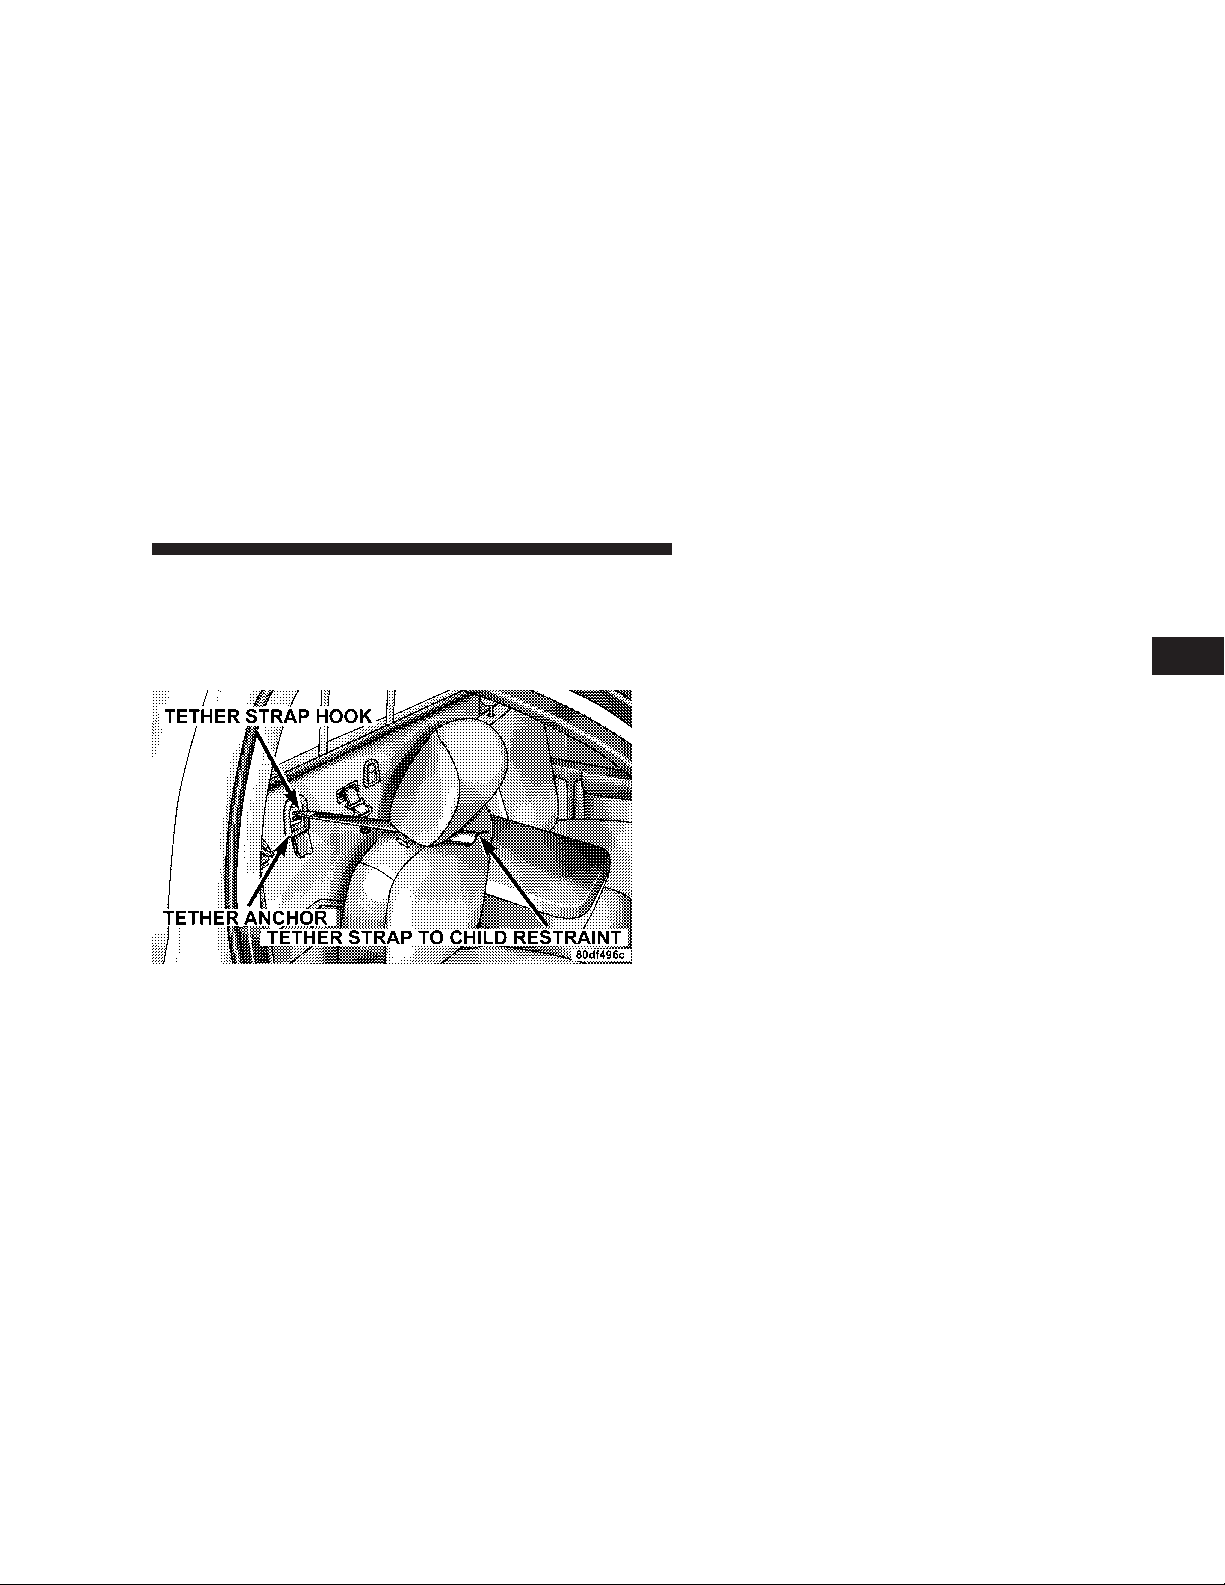
THINGS TO KNOW BEFORE STARTING YOUR VEHICLE 65
2. Lift the cover (if so equipped), and attach the hook to
the square opening in the sheet metal.
3. Install the child restraint and remove the slack in the
tether strap according to the manufacturer’s instructions.
Regular Cab Tether Strap Mounting
Multiple Child Restraint Installation Sequence (Quad Cab Rear Seats)
1. Obtain tether straps by raising the head restraints and
reaching between the rear glass and rear seat. The tether
strap may be retained with an elastic band. Accessibility
to the tether strap is greatly improved by raising the seat
cushion to the “up” position. Remove the elastic before
use.
2. Place a child restraint on each outboard rear seat and
adjust the tether strap so that it will reach under the head
restraint to the tether anchor directly behind the seat and
then to the anchor directly behind the center rear seat.
3. Pass each tether strap hook under the head restraint
and through the loop of webbing behind the child seat.
4. Route each tether strap to the anchor behindthe center
seat, and attach the hooks to the metal ring.
2
Page 66

66 THINGS TO KNOW BEFORE STARTING YOUR VEHICLE
5. Place a child restraint on the center rear seat and
adjust the tether strap so that it will reach under the head
restraint to the tether anchor directly behind the seat and
to the anchor directly behind the right seat.
6. Install each child restraint and remove the slack in the
tether strap according to the child restraint manufacturer’s instructions.
Page 67
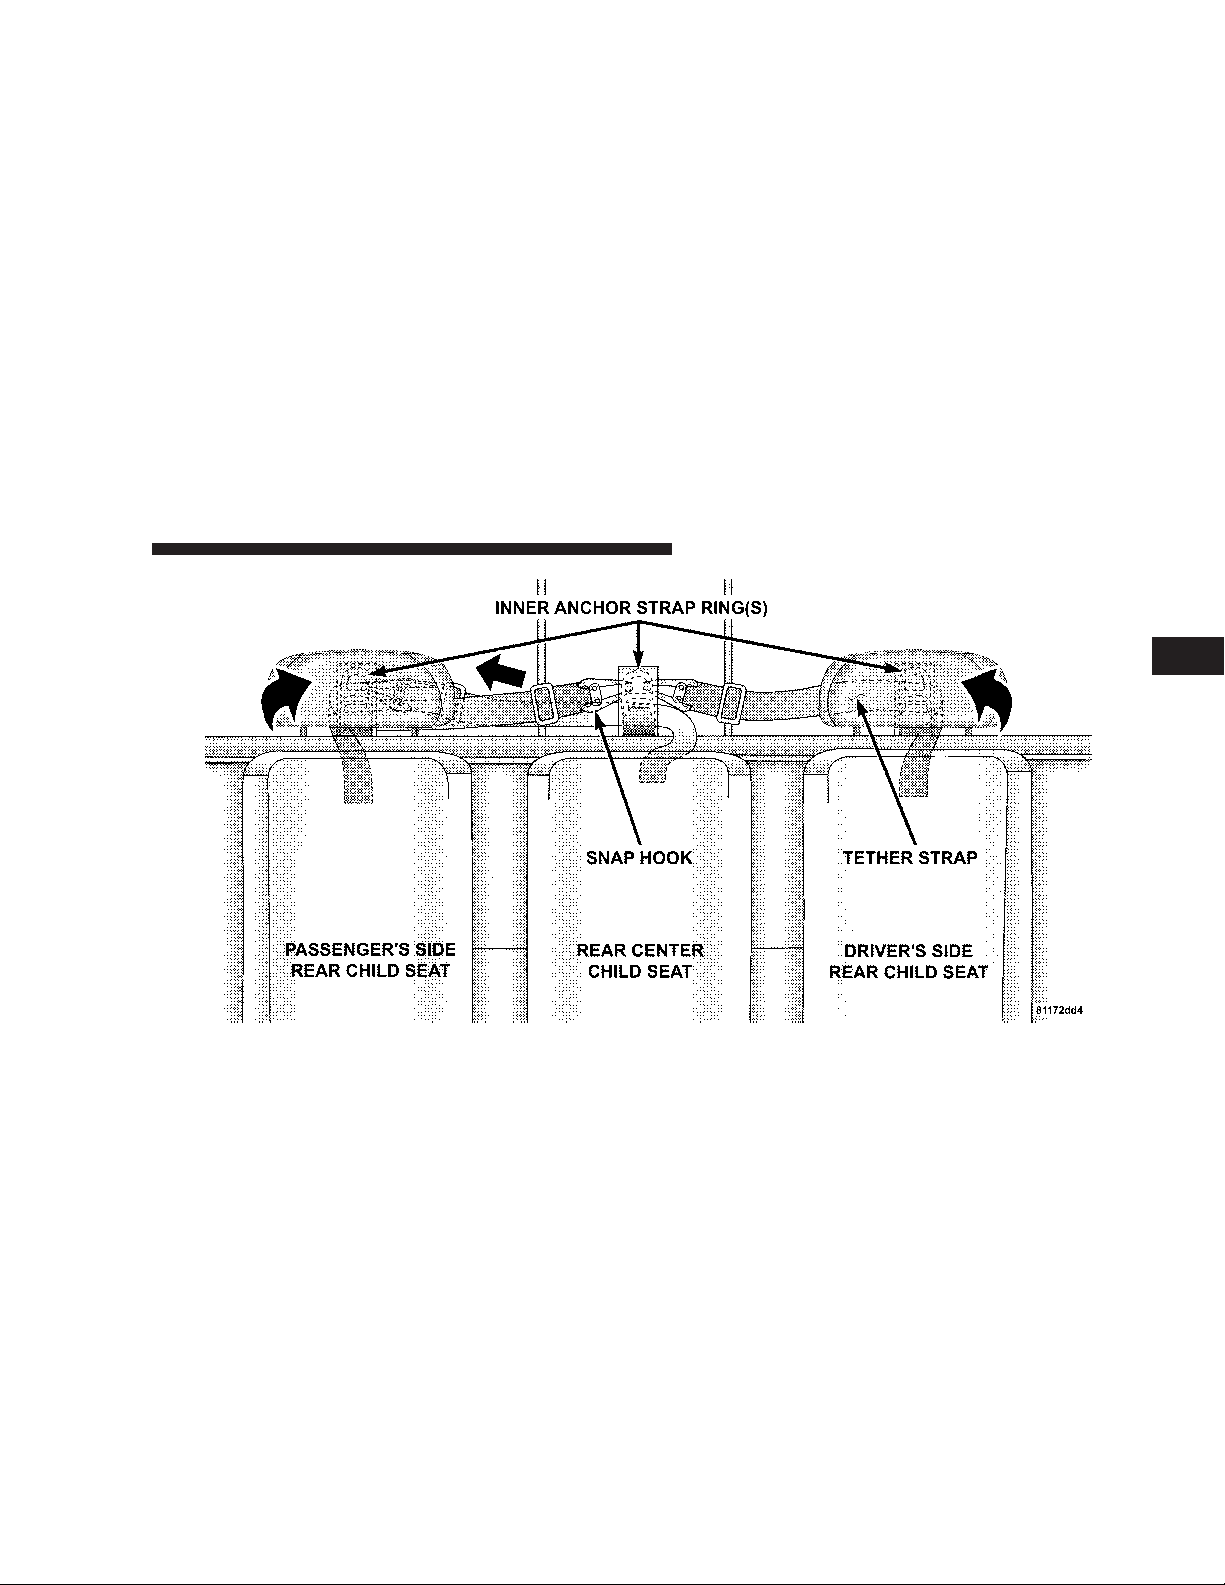
THINGS TO KNOW BEFORE STARTING YOUR VEHICLE 67
Multiple Child Restraint Quad Cab
2
Page 68
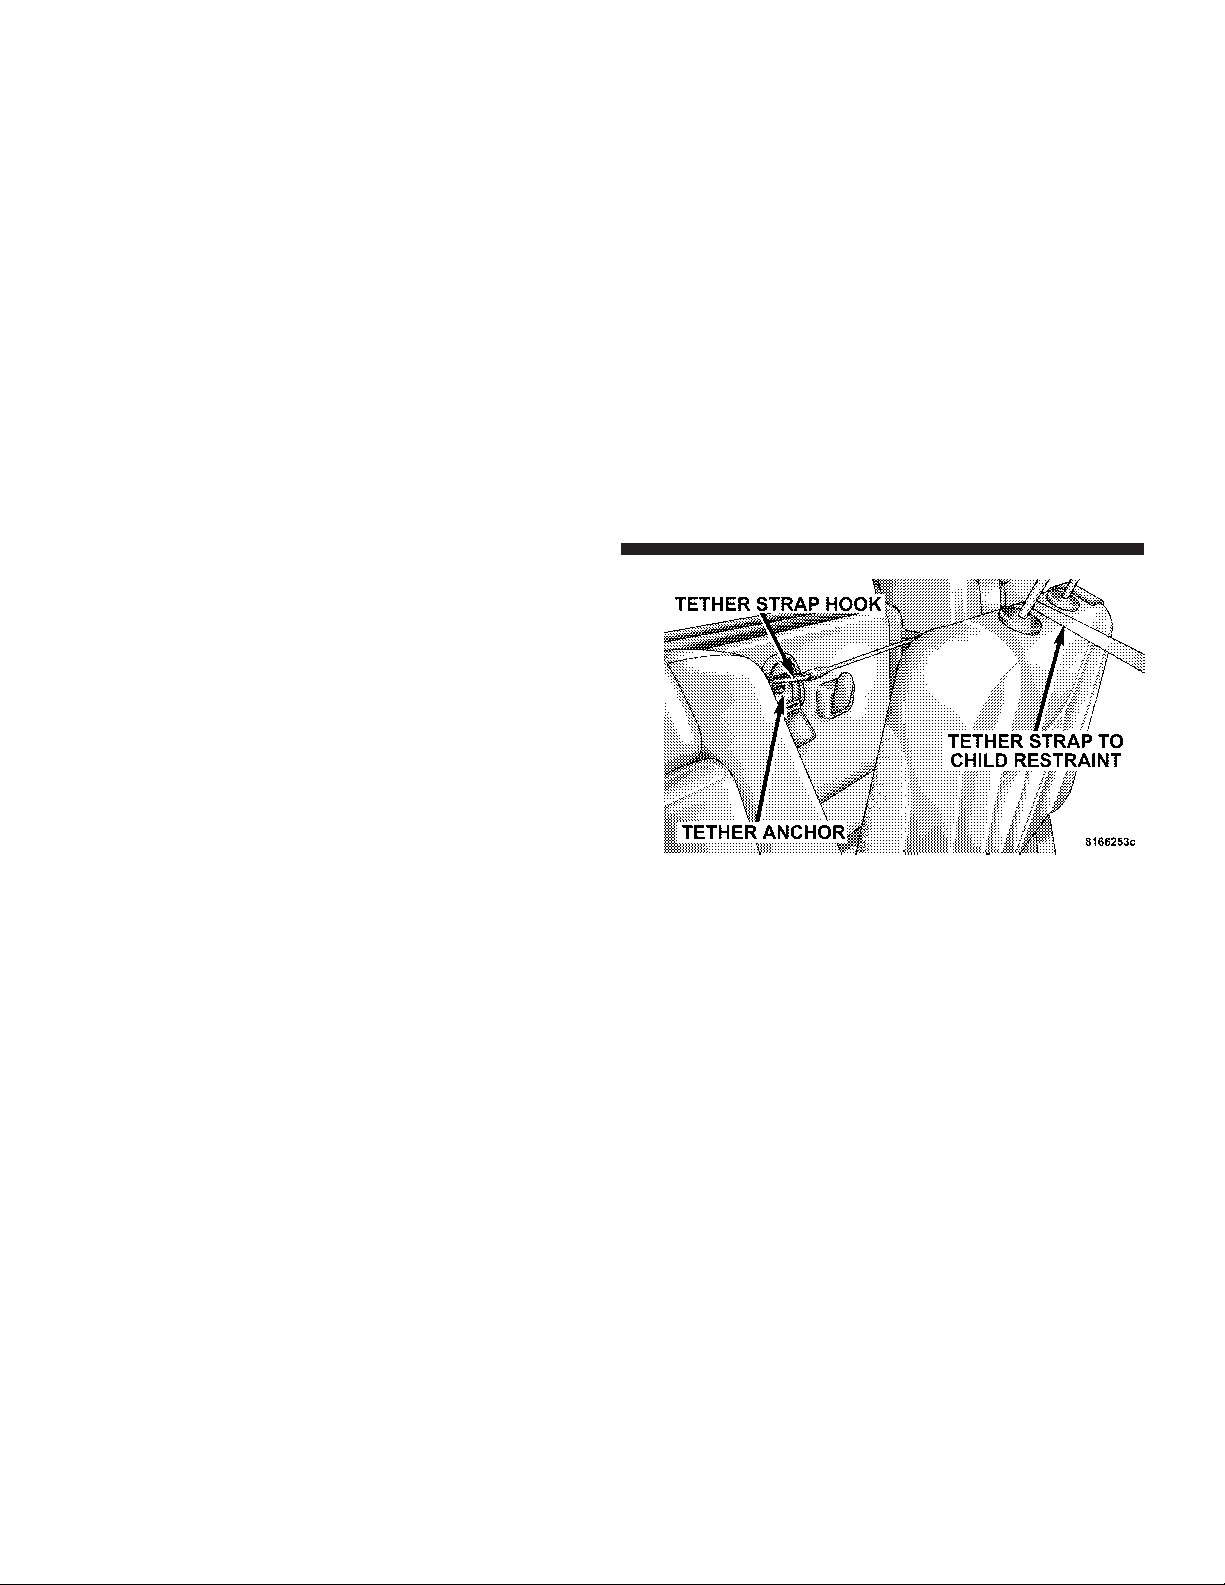
68 THINGS TO KNOW BEFORE STARTING YOUR VEHICLE
Tether Anchorage Points at All Three Seating
Positions (Mega Cab)
1. Place the child restraint on the seat and adjust the
tether strap so that it will reach over the seat back under
the head restraint to the tether anchor directly behind the
seat.
2. Lift the cover, and attach the hook to the square
opening in the sheet metal.
3. Install the child restraint and remove the slack in the
tether strap according to the manufacturer’s instructions.
Mega Cab Tether Strap Mounting
Children Too Large for Booster Seats
Children who are large enough to wear the shoulder belt
comfortably, and whose legs are long enough to bend
over the front of the seat when their back is against the
seat back should use the lap/shoulder belt in a rear seat.
•
Make sure that the child is upright in the seat.
Page 69

•
The lap portion should be low on the hips and as snug
as possible.
•
Check belt fit periodically. A child’s squirming or
slouching can move the belt out of position.
If the shoulder belt contacts the face or neck, move the
child closer to the center of the vehicle. Never allow a
child to put the shoulder belt under an arm or behind
their back.
NEW ENGINE BREAK-IN
Your Cummins 24 Valve Turbo Diesel engine does not
require a break-in period due to its construction. Normal
operation is allowed, provided the following recommendations are followed:
NOTE: Light duty operation such as light trailer towing
or no load operation, will extend the time before the
engine is at full efficiency. Reduced fuel economy and
power may be seen at this time.
THINGS TO KNOW BEFORE STARTING YOUR VEHICLE 69
•
Warm up the engine before placing it under load.
•
Do not operate the engine at idle for prolonged
periods.
•
Use the appropriate transmission gear to prevent
engine lugging.
•
Observe vehicle oil pressure and temperature indicators.
•
Check the coolant and oil levels frequently.
•
Vary throttle position at highway speeds when carrying or towing significant weight.
Because of the construction of the Cummins Diesel
engine, engine run-in is enhanced by loaded operating
conditions which allow the engine parts to achieve final
finish and fit during the first 6,000 miles (10 000 km).
2
Page 70
70 THINGS TO KNOW BEFORE STARTING YOUR VEHICLE
CAUTION!
•
During the first 500 miles (805 km) your new
vehicle is driven, do not tow a trailer. Doing so
may damage your vehicle.
•
Limit your speed to 50 mph (80 km/h) during the
first 500 miles (805 km) of towing.
SAFETY TIPS
Transporting Passengers
This vehicle is designed to carry passengers in the cab
only. For safety reasons, NEVER TRANSPORT PASSENGERS IN THE CARGO AREA.
WARNING!
It is extremely dangerous to ride in a cargo area,
inside or outside of a vehicle. In a collision, people
riding in these areas are more likely to be seriously
injured or killed.
Do not allow people to ride in any area of your
vehicle that is not equipped with seats and seat belts.
Be sure everyone in your vehicle is in a seat and
using a seat belt properly.
Lock Your Vehicle
Always remove the keys from the ignition and lock all
doors when leaving the vehicle unattended, even in your
own driveway or garage. Try to park your vehicle in a
well-lighted area and never invite theft by leaving articles of value exposed.
Page 71
THINGS TO KNOW BEFORE STARTING YOUR VEHICLE 71
Exhaust Gas
WARNING!
Exhaust gases contain carbon monoxide, a potentially toxic gas that by itself is colorless and odorless.
To avoid inhaling these gases, the following precautions should be observed:
•
Do not run the engine in a closed garage or in confined
areas any longer than needed to move your vehicle in
or out of the area.
•
If it is necessary to sit in a parked vehicle with the
engine running for more than a short period, adjust
your climate control system to force outside air into
the vehicle. Set the blower at high speed and the
controls in any position except OFF or MAX A/C.
•
The best protection against carbon monoxide entry
into the vehicle body is a properly maintained engine
exhaust system.
Be aware of changes in the sound of the exhaust system;
exhaust fumes detected inside the vehicle; or damage to
the underside or rear of the vehicle. Have a competent
mechanic inspect the complete exhaust system and adjacent body areas for broken, damaged, deteriorated or
mispositioned parts. Open seams or loose connections
could permit exhaust fumes to seep into the passenger
compartment. In addition, inspect the exhaust system
each time the vehicle is raised for lubrication or oil
change. Replace or adjust as required.
2
Page 72

72 THINGS TO KNOW BEFORE STARTING YOUR VEHICLE
Safety Checks You Should Make Inside The Vehicle
Seat Belts
Inspect the belt system periodically, checking for cuts,
frays and loose parts. Damaged parts must be replaced
immediately. Do not disassemble or modify the system.
Seat belt assemblies must be replaced after an accident if
they have been damaged (bent retractor, torn webbing, etc.)
or if the front airbags have deployed. If there is any question
regarding belt or retractor condition, replace the belt.
Airbag Light
The light should come on and remain on for 6 to 8
seconds as a bulb check when the ignition switch is first
turned ON. If the light is not lit during starting, see you
authorized dealer. If the light stays on, flickers or comes
on while driving, have the system checked by an authorized dealer. If there is a problem with the airbag light the
seatbelt light will flash.
Safety Checks You Should Make Outside The Vehicle
Tires
Examine tires for tread wear or uneven wear patterns.
Check for stones, nails, glass or other objects lodged in
the tread.
Inspect for tread cuts or sidewall cracks. Check wheel
nuts for tightness and tires for proper pressure.
Lights
Check the operation of all exterior lights. Check turn
signal and high beam indicator lights on the instrument
panel.
Door Latches
Check for positive closing, latching and locking.
Fluid Leaks
Check areaunder vehicle after overnight parking for fuel,
water, oil, or other fluid leaks. Also, if fuel fumes are
detected the cause should be located and corrected.
Page 73

UNDERSTANDING THE FEATURES OF YOUR VEHICLE
CONTENTS
䡵 Mirrors ...............................78
▫ Inside Mirror .........................78
▫ Automatic Dimming Mirror— If Equipped ....79
▫ Outside Mirrors .......................79
▫ Exterior Mirrors Folding Feature ...........80
▫ Electronic Power Mirrors — If Equipped ......80
▫ Electric Rear Window Defroster And Heated
Sideview Mirrors — If Equipped ...........81
▫ Trailer Towing Mirrors — If Equipped .......81
䡵 Hands–Free Communication (UConnect™) —
If Equipped ............................83
▫ Operations ...........................85
▫ Phone Call Features ....................92
▫ UConnect™ System Features ..............94
▫ Advanced Phone Connectivity .............99
▫ Things You Should Know About Your
UConnect™ System ....................101
䡵 Seats ................................106
▫ 40-20-40 Front Seat ....................107
3
Page 74

74 UNDERSTANDING THE FEATURES OF YOUR VEHICLE
▫ Reclining Seats .......................108
▫ Adjustable Head Restraints ..............108
▫ Manual Rotary Lumbar Support Adjustment —
If Equipped .........................109
▫ Power Seats — If Equipped ..............110
▫ Rear Seat Features — Mega Cab Models .....112
▫ Heated Seats — If Equipped .............117
䡵 To Open And Close The Hood .............118
䡵 Lights ...............................120
▫ Interior Lights .......................120
▫ Battery Saver ........................121
▫ Headlamp Delay ......................122
▫ Headlights, Parking Lights, Panel Lights .....122
▫ Daytime Running Lights (Canada Only And
Fleet Vehicles) ........................123
▫ Lights-On Reminder ...................123
▫ Fog Lights — If Equipped ...............123
▫ Cargo Light — If Equipped ..............124
䡵 Multifunction Control Lever ...............124
▫ Turn Signals .........................124
▫ Passing Light ........................125
▫ High Beam / Low Beam Select Switch ......125
▫ Windshield Wipers ....................126
▫ Windshield Washers ...................127
䡵 Tilt Steering Column ....................128
䡵 Driver Adjustable Pedals — If Equipped ......129
Page 75

UNDERSTANDING THE FEATURES OF YOUR VEHICLE 75
▫ Adjustment .........................129
䡵 Electronic Speed Control — If Equipped ......130
▫ To Activate ..........................130
▫ To Set At A Desired Speed ...............131
▫ To Deactivate ........................131
▫ To Resume Speed .....................131
▫ To Vary The Speed Setting ...............132
▫ To Accelerate For Passing ...............132
䡵 Overhead Console— If Equipped ...........133
▫ Courtesy/Reading Lights ................134
䡵 Overhead Console With Compass/Temperature
Mini-Trip Computer — If Equipped ..........134
▫ US/M Button ........................135
▫ Reset Button .........................135
▫ Global Reset .........................136
▫ Step Button .........................136
▫ Average Fuel Economy (AVG ECO) ........136
▫ Distance To Empty (DTE) ...............136
▫ Trip Odometer (ODO) ..................137
▫ Elapsed Time (ET) .....................137
▫ C/T Button .........................138
▫ Automatic Compass Calibration ...........138
▫ Manual Compass Calibration .............139
▫ Recalibrating The Compass ..............139
▫ Outside Temperature ...................140
3
Page 76

76 UNDERSTANDING THE FEATURES OF YOUR VEHICLE
䡵 Garage Door Opener — If Equipped .........141
▫ Programming Homelink ................143
▫ Canadian Programming/Gate Programming . . 145
▫ Using Homelink ......................146
▫ Erasing Homelink Buttons ...............146
▫ Reprogramming a Single Homelink Button . . .146
▫ Security ............................147
䡵 Power Sunroof — If Equipped .............147
▫ Open Sunroof - Express Mode ............148
▫ Comfort Stop ........................148
▫ Closing Sunroof - Express ...............149
▫ Pinch Protect Feature ...................149
▫ Pinch Protect Override .................149
▫ Venting Sunroof - Express ...............149
▫ Sunshade Operation ...................149
▫ Wind Buffeting .......................150
▫ Sunroof Maintenance ...................150
▫ Sunroof Fully Closed ...................150
䡵 Electrical Power Outlets ..................150
䡵 Cigar Lighter And Ash Receiver ............152
䡵 Cupholders ...........................153
▫ Front Instrument Panel Cupholders
(40–20–40 Seats) — Automatic Transmission . . 153
▫ Front Instrument Panel Cupholders
(Bucket Seats) — Automatic Transmission ....155
▫ Front Instrument Panel Cupholders —
Manual Transmission ..................155
Page 77

UNDERSTANDING THE FEATURES OF YOUR VEHICLE 77
▫ Rear Cupholder — Quad Cab —
If Equipped .........................156
▫ Rear Cupholder — Mega Cab ............156
䡵 Storage ..............................157
▫ Center Storage Compartment
(40–20–40 Seat) — If Equipped ............157
▫ Center Storage Compartment
(Bucket Seats)— If Equipped .............158
▫ Storage And Seats (Quad Cab Models) ......160
▫ Storage And Seats (Mega Cab Models) ......160
▫ Plastic Grocery Bag Retainers
(Mega Cab Models) ....................162
䡵 Fold Flat Load Floor — If Equipped .........162
▫ Fold Flat Load Floor — If Equipped ........162
䡵 Pickup Box ...........................165
䡵 Slide-In Campers .......................167
▫ Camper Applications ...................167
䡵 Easy-Off Tailgate .......................167
3
Page 78
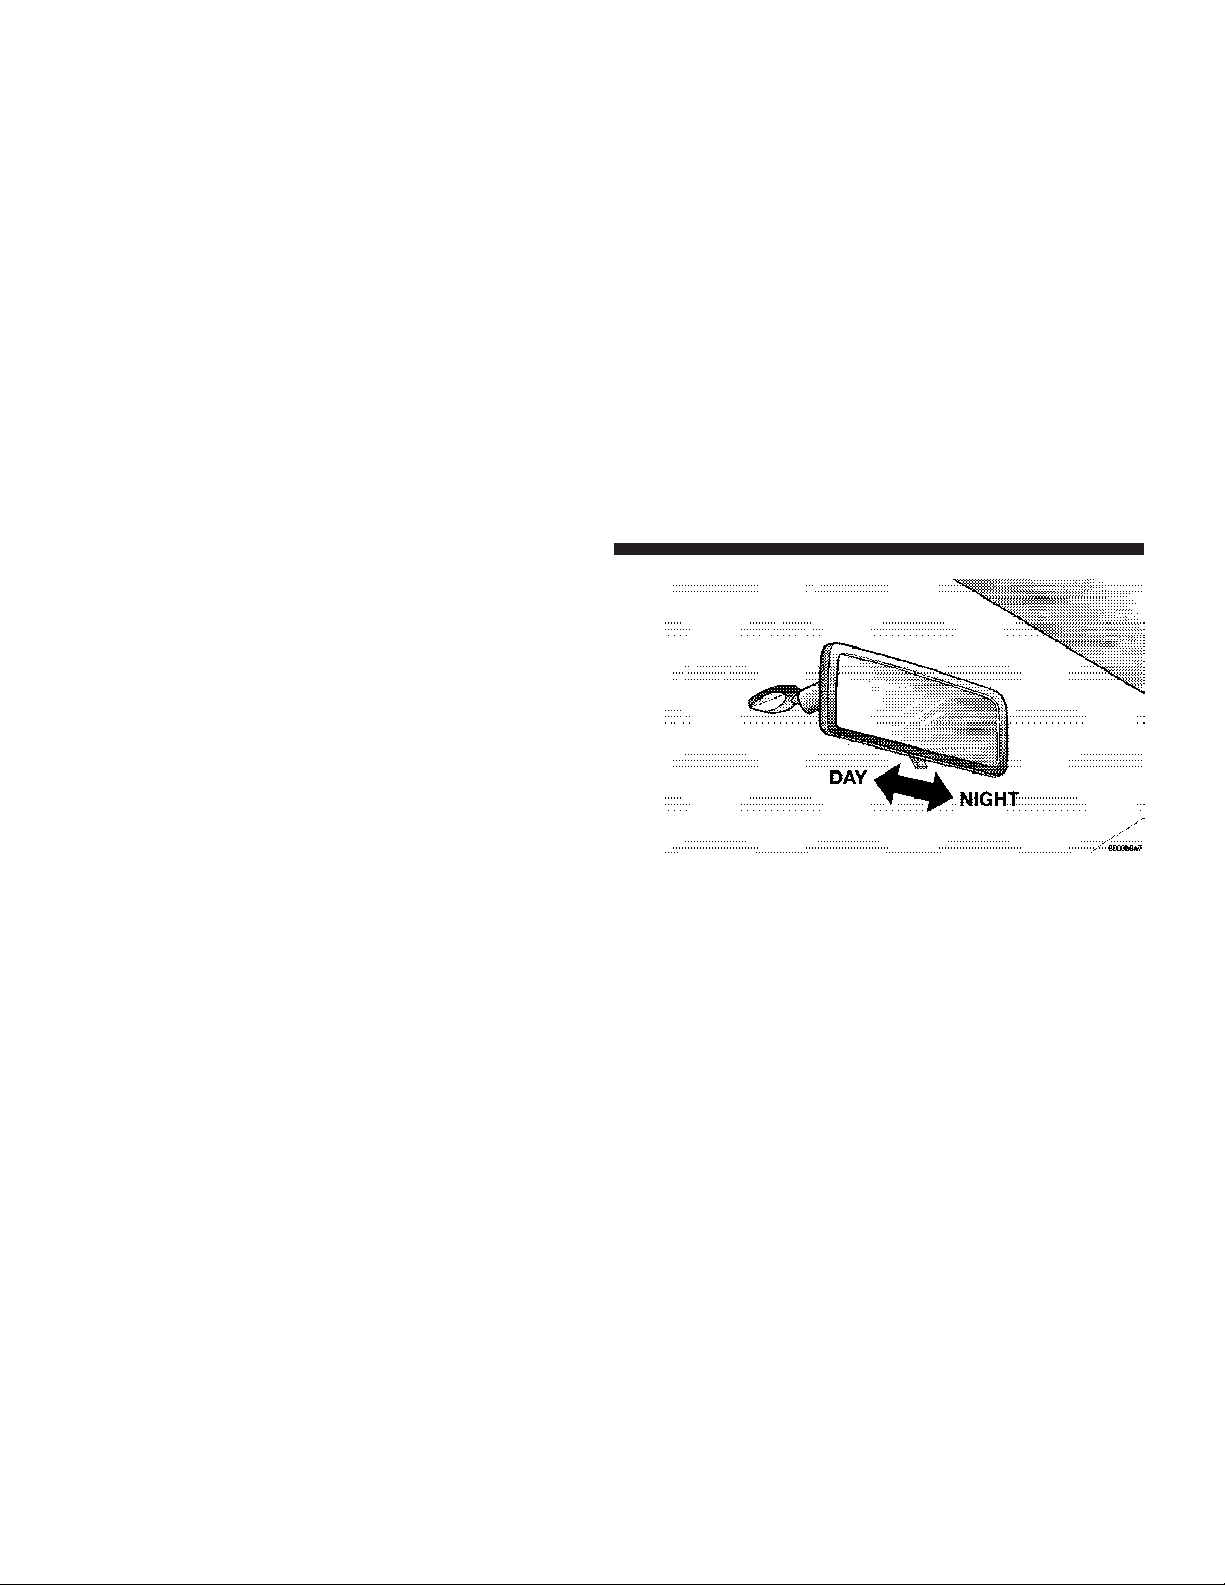
78 UNDERSTANDING THE FEATURES OF YOUR VEHICLE
MIRRORS
Inside Mirror
The mirror should be adjusted to center on the view
through the rear window.
Annoying headlight glare can be reduced by moving the
small control under the mirror to the night position
(toward rear of vehicle). The mirror should be adjusted
while set in the day position (toward windshield).
Adjusting Rear View Mirror
Page 79
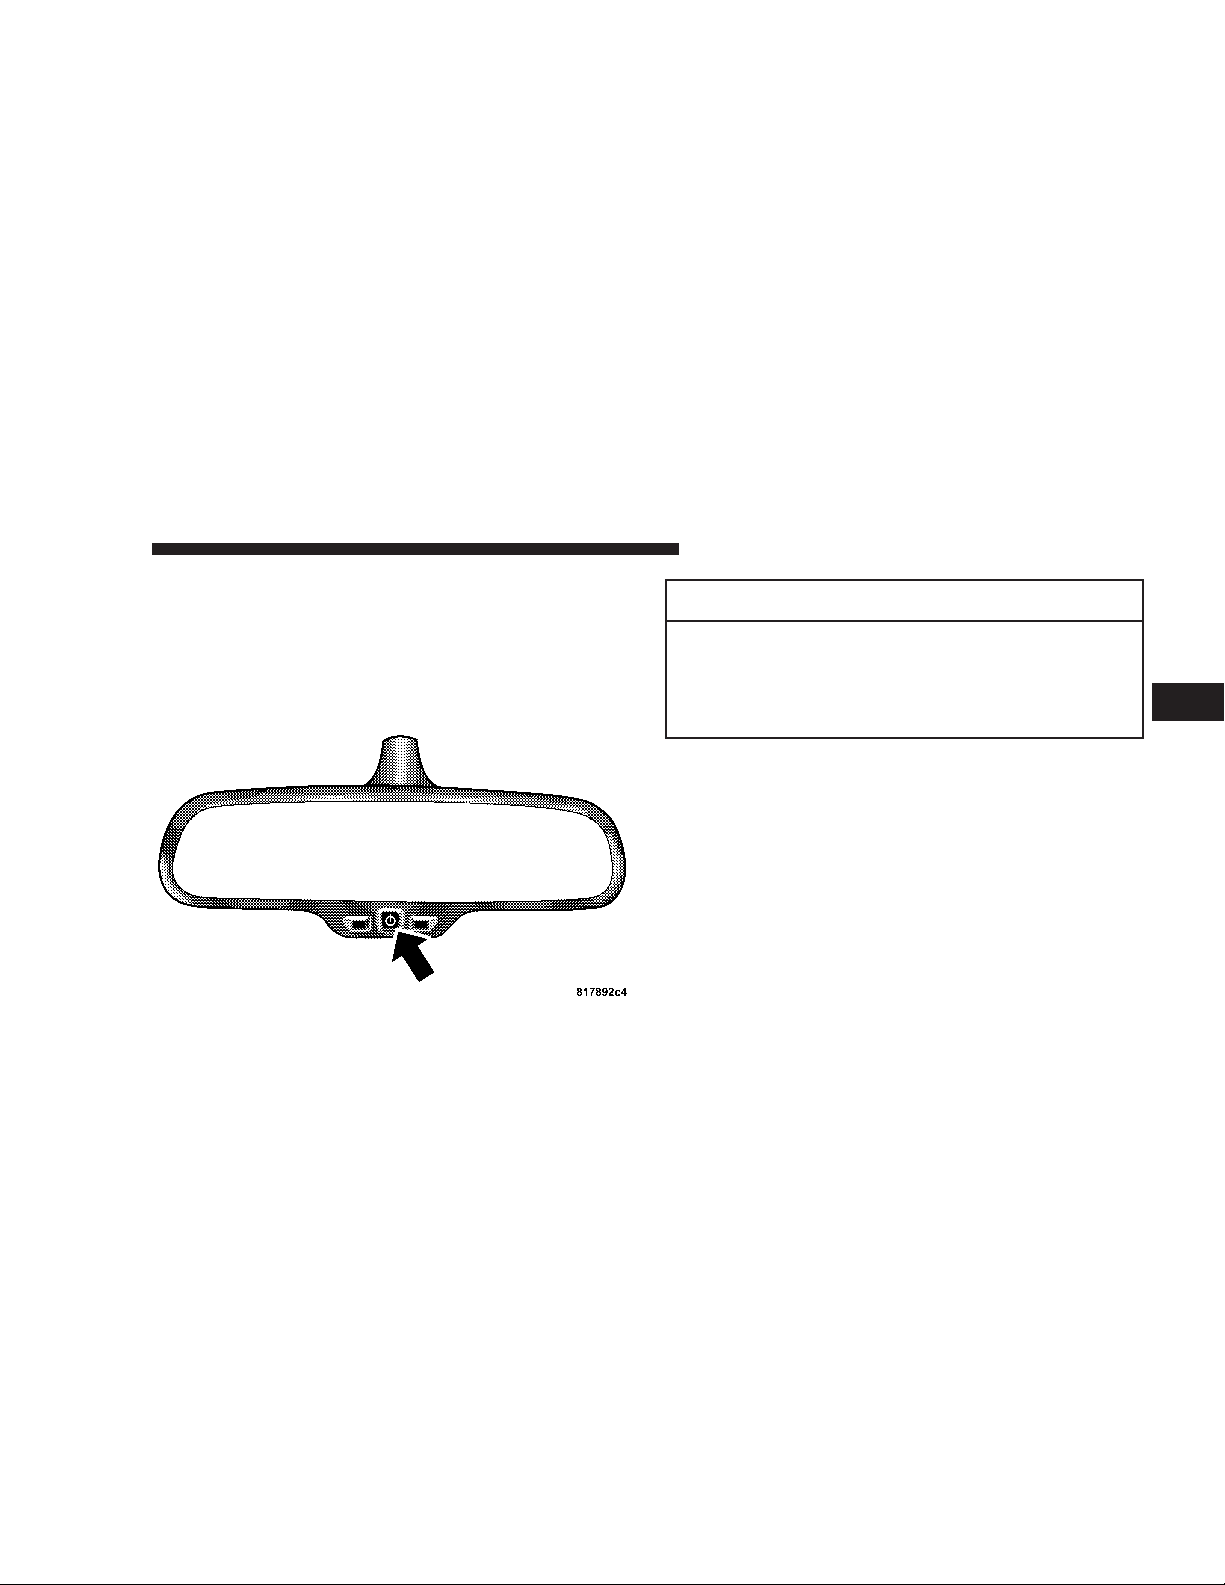
UNDERSTANDING THE FEATURES OF YOUR VEHICLE 79
Automatic Dimming Mirror— If Equipped
This mirror automatically adjusts for annoying headlight
glare from vehicles behind you. You can turn the feature
on or off by pressing the button at the base of the mirror.
A light in the button will indicate when the dimming
feature is activated.
Automatic Dimming Mirror
CAUTION!
To avoid damage to the mirror during cleaning,
never spray any cleaning solution directly onto the
mirror. Apply the solution onto a clean cloth and
wipe the mirror clean.
Outside Mirrors
To receive maximum benefit, adjust the outside mirror(s)
to center on the adjacent lane of traffic with a slight
overlap of the view obtained on the inside mirror.
3
Page 80
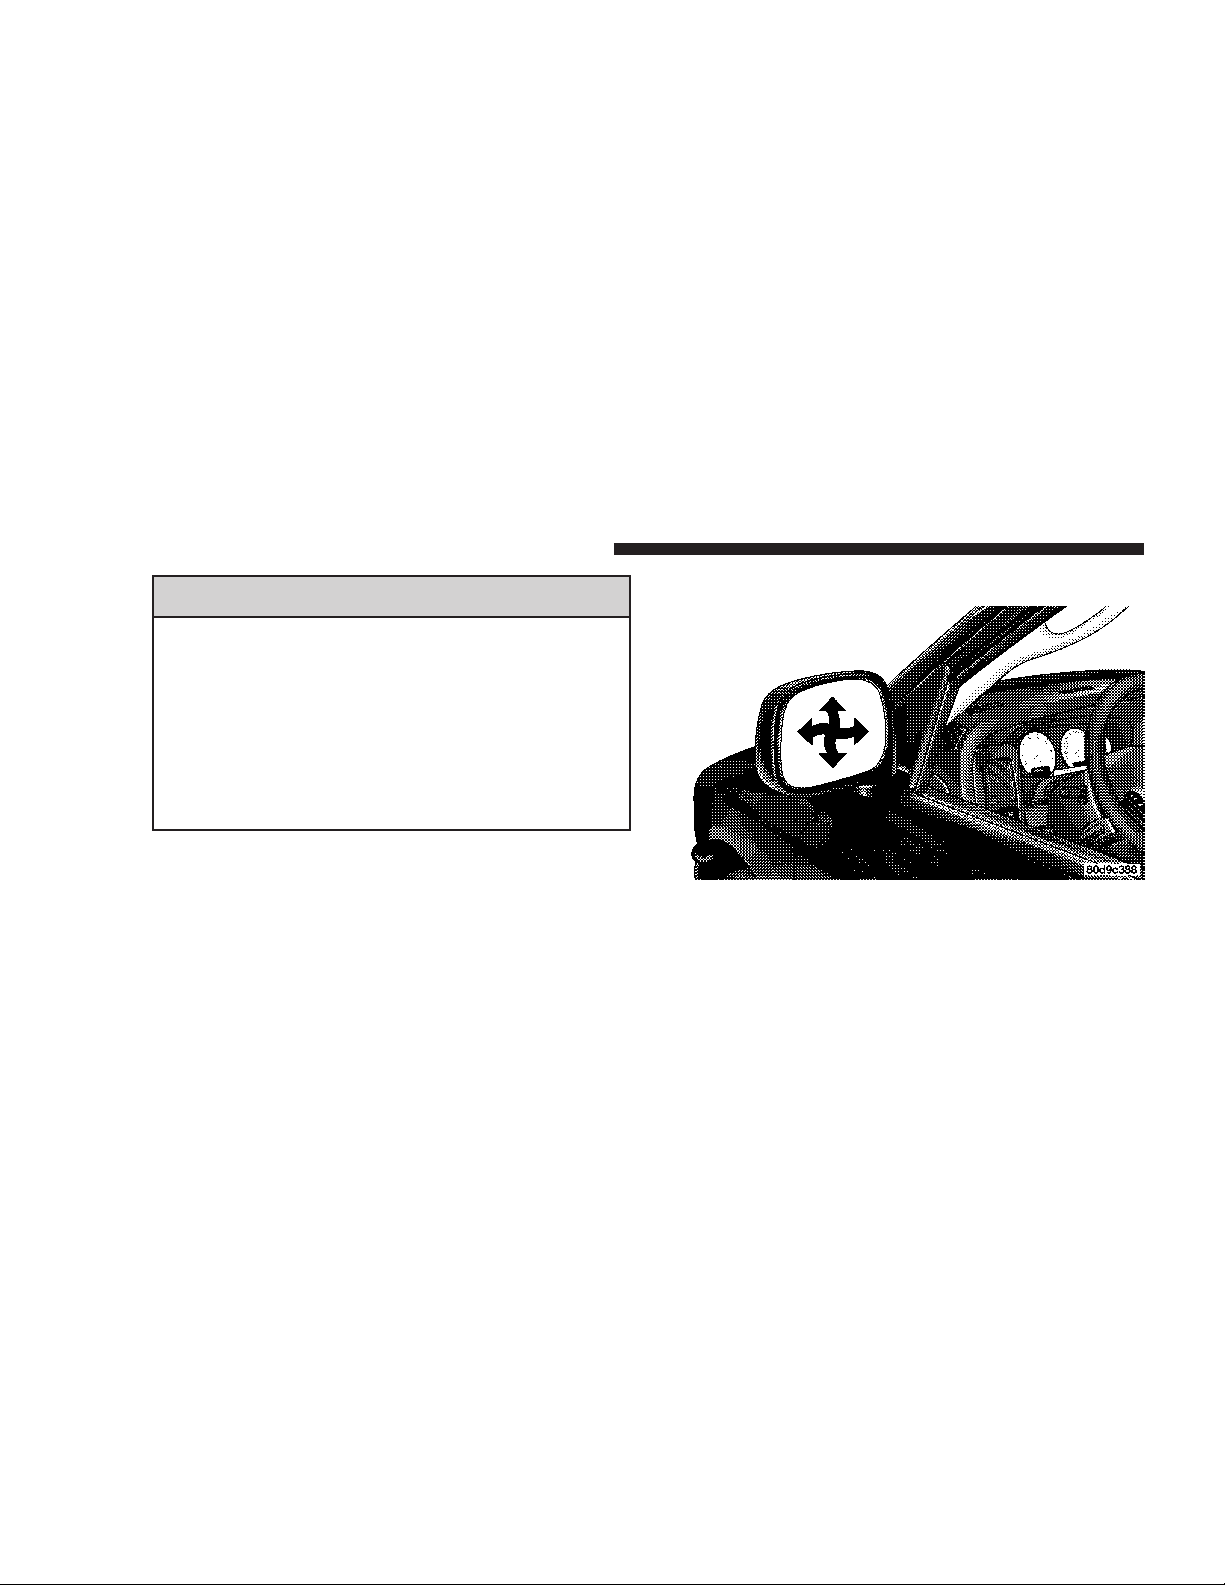
80 UNDERSTANDING THE FEATURES OF YOUR VEHICLE
WARNING!
Vehicles and other objects seen in a right side convex
mirror will look smaller and farther away than they
really are. Relying too much on your right side
convex mirror could cause you to collide with another vehicle or other object. Use your inside mirror
when judging the size or distance of a vehicle seen
in the right side convex mirror. Some vehicles will
not have a convex right side mirror.
Exterior Mirrors Folding Feature
All6x9inch exterior mirrors are hinged and may be
moved either forward or rearward to resist damage. The
hinges have three detent positions; full forward, full
rearward, and normal.
Electronic Power Mirrors — If Equipped
Power Mirror Movement
The controls for the power mirrors are located on the
driver’s door trim panel.
Page 81
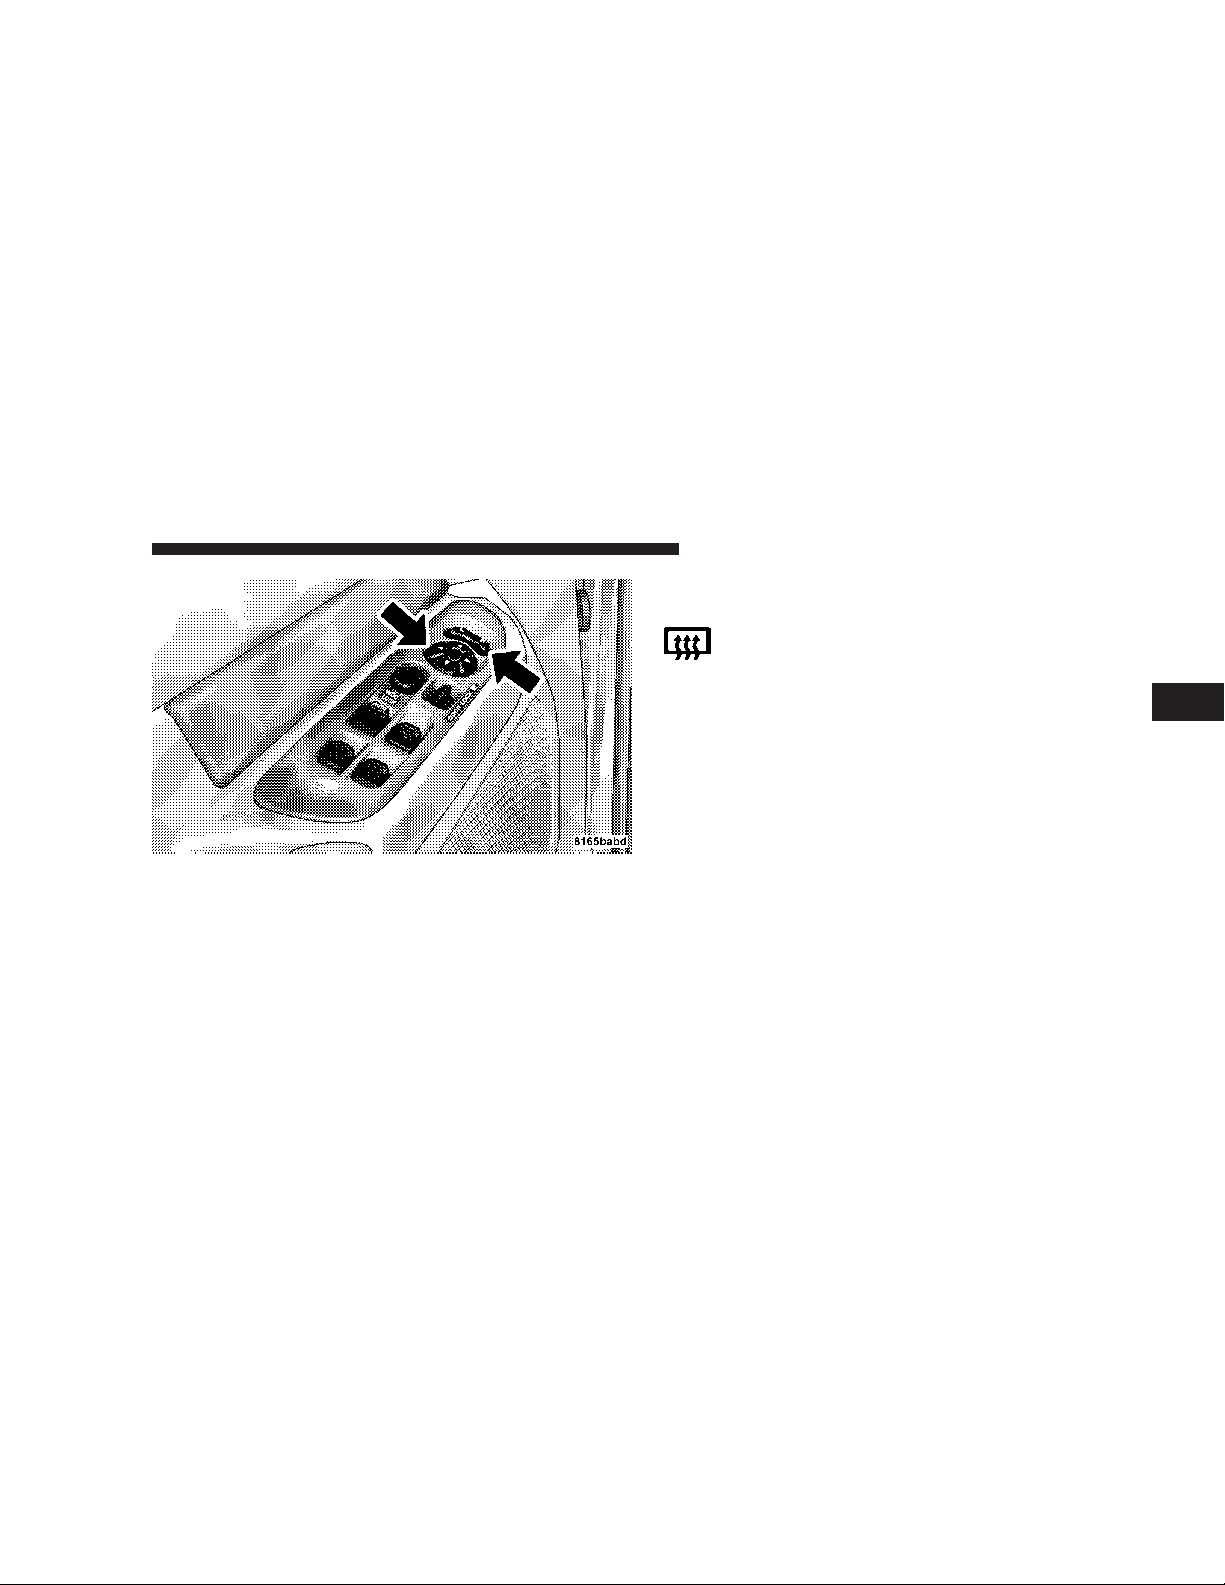
UNDERSTANDING THE FEATURES OF YOUR VEHICLE 81
Electric Rear Window Defroster and Heated
Sideview Mirrors — If Equipped
The Electric Rear Window Defroster and Heated
side view mirrors are activated by pressing the
heated grid button, located on the Climate Control panel,
with the ignition On. Turning Off the rear window
defroster or the ignition will deactivate the Electric Rear
Window Defroster and Heated side view mirrors feature.
These features also turn off after activation, when 15
minutes have elapsed. To reactivate, simply press the
button again.
3
Power Mirror Switches
Set the top switch to the left or right for the left or right
mirror, and set it to the center off position to prevent
accidentally moving a mirror when you are finished
adjusting the mirror. To adjust a mirror, select left or right
with the top switch, and press one of the four arrows for
the direction you want the mirror to move.
Trailer Towing Mirrors — If Equipped
These mirrors are designed with an adjustable mirror
head to provide a greater vision range when towing
extra-wide loads. To change position inboard or outboard, the mirror head should be rotated (flipped Out or
In). A small blindspot mirror is integrated onto the main
mirror surface.
Page 82
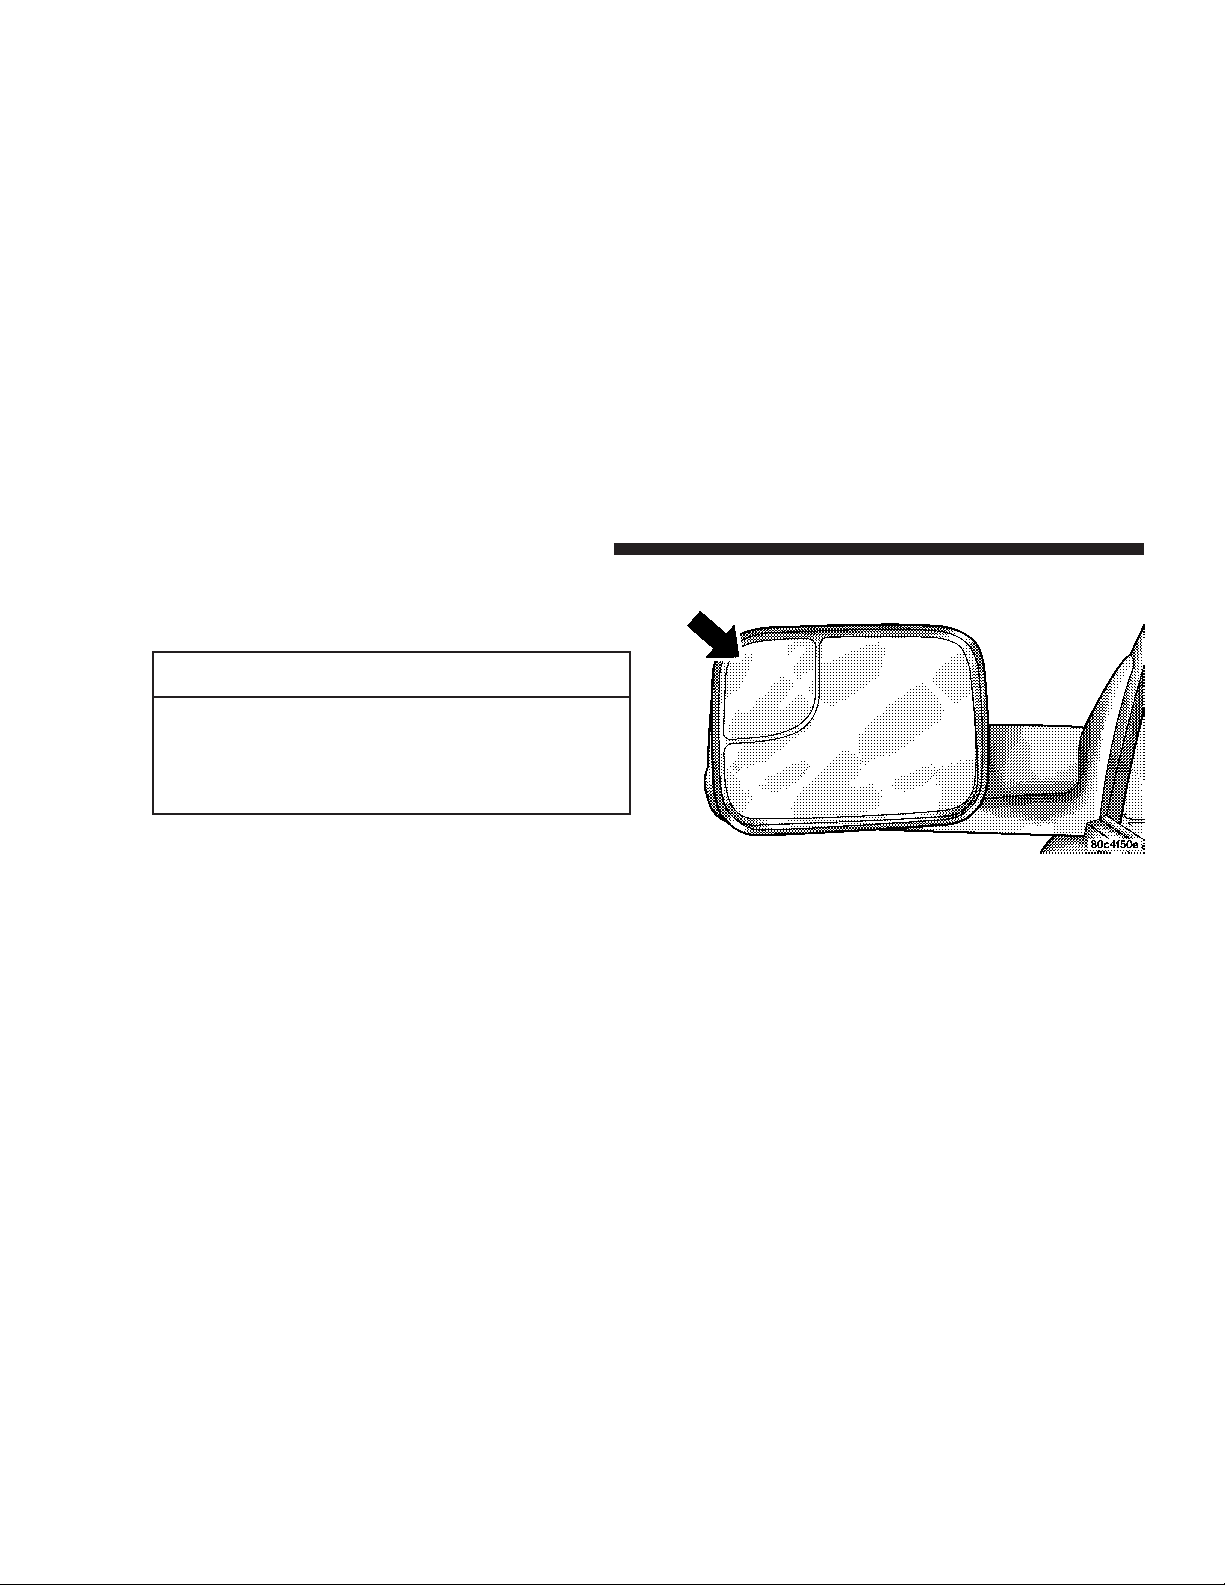
82 UNDERSTANDING THE FEATURES OF YOUR VEHICLE
NOTE: Fold the7x10inch trailer towing mirrors
rearward prior to entering an automated car wash.
CAUTION!
Do not attempt to fold the7x10inch trailer towing
mirrors forward. The7x10inch trailer towing
mirrors are not designed to be folded forward and
doing so will damage the mirrors and/or vehicle.
Blindspot Mirror
Page 83
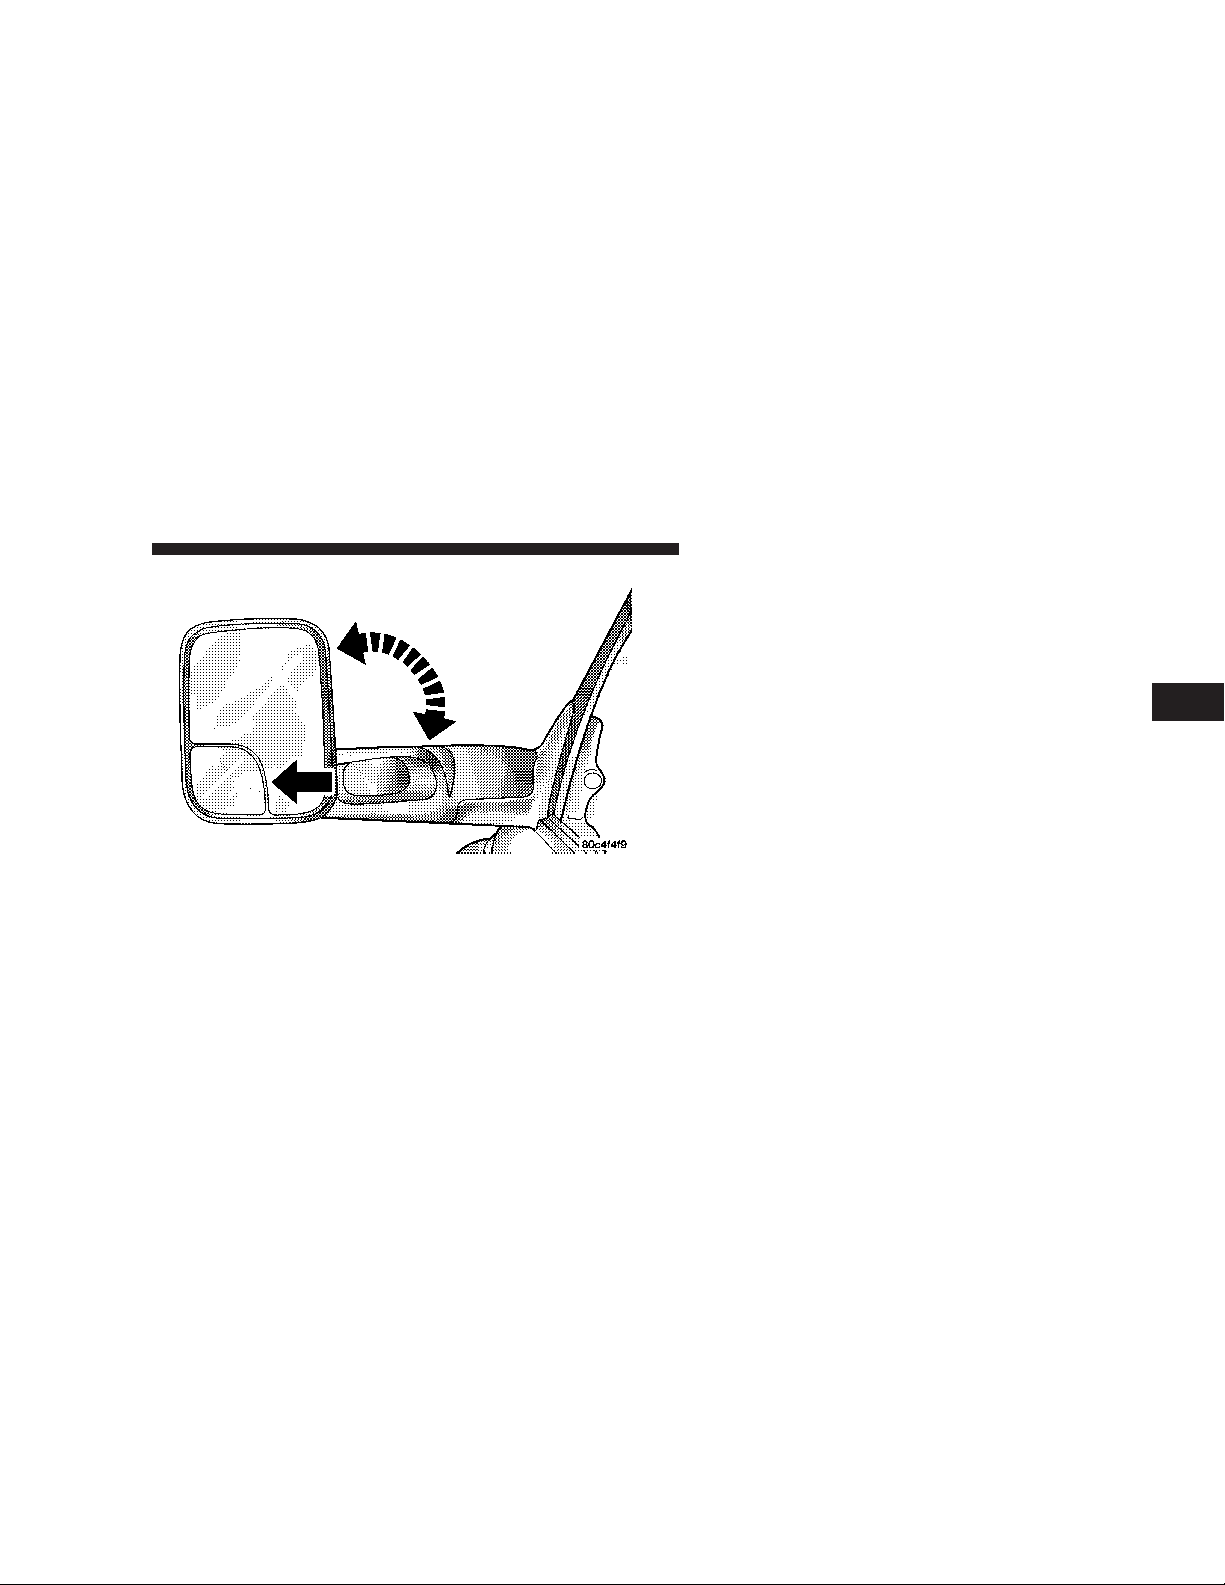
Trailer Towing Position
UNDERSTANDING THE FEATURES OF YOUR VEHICLE 83
HANDS–FREE COMMUNICATION (UConnect™) —
IF EQUIPPED
UConnect™ is a voice-activated, hands-free, in- vehicle
communications system. UConnect™ allows you to dial
a phone number with your cellular phone using simple
voice commands (e.g., ⬙Call” ѧ “Mike” ѧ”Work⬙ or ⬙Dial”
ѧ “248-555-1212⬙). Your cellular phone’s audio is transmitted through your vehicle’s audio system; the system
will automatically mute your radio when using the
UConnect™ system.
NOTE: The UConnect™ system use requires a cellular
phone equipped with the Bluetooth ⬙Hands-Free Profile,⬙
version 0.96 or higher. See www.chrysler.com/uconnect
for supported phones.
UConnect™ allows you to transfer calls between the
system and your cellular phone as you enter or exit your
vehicle, and enables you to mute the system’s microphone for private conversation.
3
Page 84
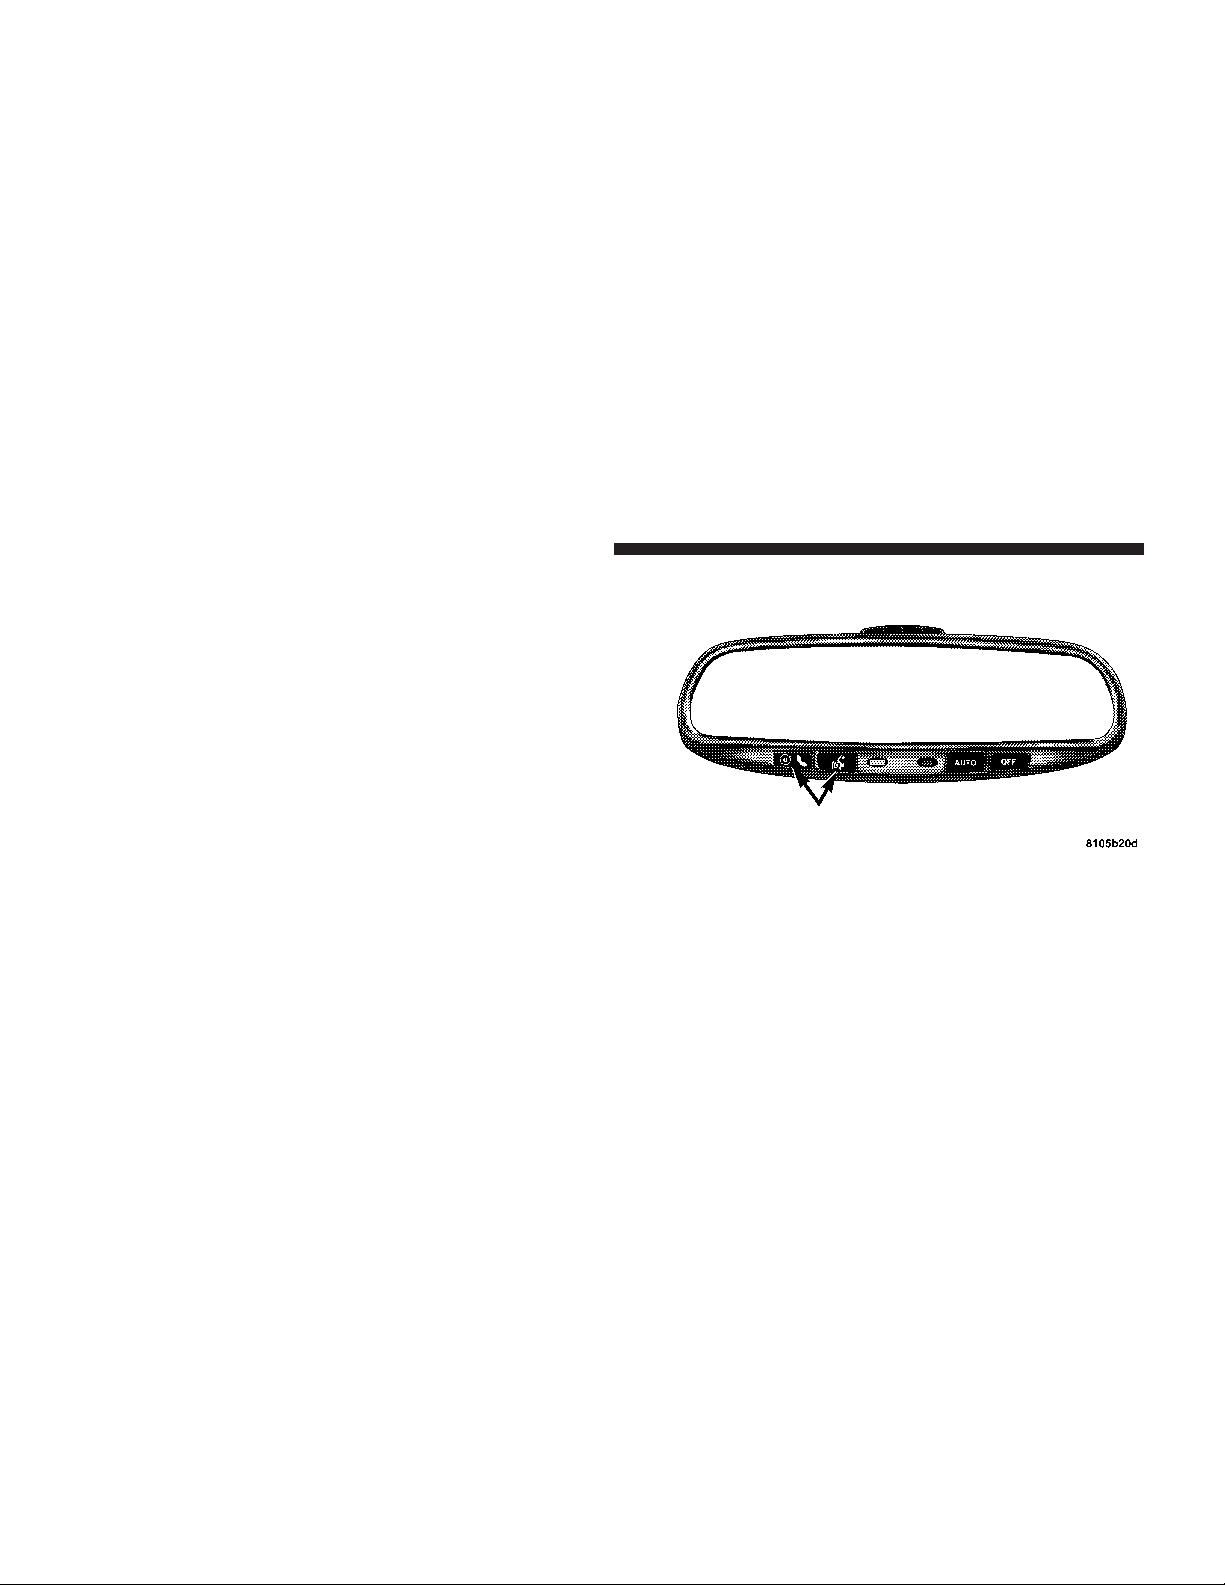
84 UNDERSTANDING THE FEATURES OF YOUR VEHICLE
The UConnect™ phonebook enables you to store up to 32
names and four numbers per name. Each language has a
separate 32 name phonebook accessible only in that
language. This system is driven through your Bluetooth™ Hands-Free profile cellular phone. UConnect™
features Bluetooth™ technology - the global standard
that enables different electronic devices to connect to
each other without wires or a docking station, so UConnect works no matter where you stow your cellular
phone (be it your purse, pocket, or briefcase), as long as
your phone is turned on and has been paired to the
vehicle’s UConnect™ system. The UConnect™ system
allows up to seven cellular phones to be linked to system.
Only one linked (or paired) cellular phone can be used
with the system at a time. The system is available in
English, Spanish, or French languages (as equipped).
The rearview mirror contains the microphone for the
system and the control buttons that will enable you to
access the system.
UConnect™ Switches
The UConnect™ system can be used with any HandsFree Profile certified Bluetooth™ cellular phone. See
www.chrysler.com/uconnect for supported phones. If
your cellular phone supports a different profile (e.g.,
Page 85

UNDERSTANDING THE FEATURES OF YOUR VEHICLE 85
Headset Profile), you may not be able to use any UConnect™ features. Refer to your cellular service provider or
the phone manufacturer for details.
The UConnect™ system is fully integrated with the
vehicle’s audio system. The volume of the UConnect™
system can either be adjusted from the radio volume
control knob, or from the steering wheel radio control
(right switch), if so equipped.
The radio display will be used for visual prompts from
the UConnect™ system such as ⬙CELL⬙ or caller ID on
certain radios.
Operations
Voice commands can be used to operate the UConnect™
system and to navigate through the UConnect™ menu
structure. Voice commands are required after most
UConnect™ system prompts. You will be prompted for a
specific command and then guided through the available
options.
•
Prior to giving a voice command, one must wait for
the voice on beep, which follows the ⬙Ready⬙ prompt
or another prompt.
•
For certain operations, compound commands can be
used. For example, instead of saying ⬙Setup⬙ and then
⬙Phone Pairing,⬙ the following compound command
can be said: ⬙Setup Phone Pairing.⬙
•
For each feature explanation in this section, only the
combined form of the voice command is given. You
can also break the commands into parts and say each
part of the command, when you are asked for it. For
example, you can either use the combined form voice
command ⬙Phonebook New Entry,⬙ or you can break
the combined form command into two voice commands: ⬙Phonebook⬙ and ⬙New Entry.⬙ Please remember, the UConnect™ system works best when you talk
in a normal conversational tone, as if speaking to some
one sitting eight feet away from you.
3
Page 86

86 UNDERSTANDING THE FEATURES OF YOUR VEHICLE
Voice Command Tree
Refer to “Voice Tree” at the end of this section.
Help Command
If you need assistance at any prompt or if you want to
know what your options are at any prompt, say ⬙Help⬙
following the voice on beep. The UConnect™ system will
play all the options at any prompt if you ask for help.
To activate the UConnect™ system from idle, simply
press the ’Phone’ button and follow audible prompts for
directions. All UConnect™ system sessions begin with a
press of the ’Phone’ button on the mirror.
Cancel Command
At any prompt, after the voice on beep, you can say
⬙Cancel⬙ and you will be returned to the main menu.
However, in a few instances the system will take you
back to the previous menu.
Pair (Link) UConnect™ System to a Cellular Phone
To begin using your UConnect™ system, you must pair
your compatible Bluetooth™ enabled cellular phone.
NOTE: The UConnect™ system use requires a cellular
phone equipped with the Bluetooth ⬙Hands-Free Profile,⬙
version 0.96 or higher. See www.chrysler.com/uconnect
for supported phones.
To complete the pairing process, you will need to reference your cellular phone owner’s manual. One of the
following vehicle specific websites may also provide
detailed instructions for pairing with the brand of phone
that you have:
NOTE:
•
www.chrysler.com/uconnect
•
www.dodge.com/uconnect
•
www.jeep.com/uconnect
Page 87

UNDERSTANDING THE FEATURES OF YOUR VEHICLE 87
The following are general phone to UConnect™ System
pairing instructions:
•
Press the ’Phone’ button to begin.
•
After the ⬙Ready⬙ prompt and the following beep, say
⬙Setup Phone Pairing.⬙
•
When prompted, after the voice on beep, say ⬙Pair a
Phone.⬙
•
You will be askedto say a four-digitpin number which
you will later need to enter into your cellular. You can
enter any four-digit pin number. You will not need to
remember this pin number after the initial pairing
process.
•
The UConnect™ system will then prompt you to begin
the cellular phone pairing process on your cellular
phone. Before attempting to pair phone, please see
your cellular phone’s user manual (Bluetooth section)
for instructions on how to complete this step.
•
For identification purposes, you will be prompted to
give the UConnect™ system a name for your cellular
phone. Each cellular phone that is paired should be
given a unique phone name.
•
You will then be asked to give your cellular phone a
priority level between 1 and 7, 1 being the highest
priority. You can pair up to seven cellular phones to
your UConnect™ system. However, at any given time,
only one cellular phone can be in use, connected to
your UConnect™ System. The priority allows the
UConnect™ system to know which cellular phone to
use if multiple cellular phones are in the vehicle at the
same time. For example, if priority 3 and priority 5
phones are present in the vehicle, the UConnect™
system will use the priority 3 cellular phone when you
make a call. You can select to use a lower priority
cellular phone at any time (refer to ⬙Advanced Phone
Connectivity⬙).
3
Page 88

88 UNDERSTANDING THE FEATURES OF YOUR VEHICLE
Dial by Saying a Number
Press the ’Phone’ button to begin.
•
•
After the ⬙Ready⬙ prompt and the following beep, say
⬙Dial.⬙
•
System will prompt you to say the number you want
call.
•
For example, you can say ⬙234-567-8901.⬙ The phone
number that you enter must be of valid length and
combination. The UConnect™ limits the user from
dialing invalid combination of numbers. For example,
234-567-890 is nine digits long, which is not a valid
phone number - the closest valid phone number has
ten digits.
•
The UConnect™ system will confirm the phone number and then dial. The number will appear in the
display of certain radios.
Call by Saying a Name
Press the “Phone” button to begin.
•
•
After the ⬙Ready⬙ prompt and the following beep, say
⬙Call.⬙
•
System will prompt you to say the name of the person
you want call.
•
After the ⬙Ready⬙ prompt and the following beep, say
the name of the person you want to call. For example,
you can say ⬙John Doe,⬙ where John Doe is a previously stored name entry in the UConnect™ phonebook. Refer to ⬙Add Names to Your UConnect™
Phonebook,⬙ to learn how to store a name in the
phonebook.
•
The UConnect™ system will confirm the name and
then dial the corresponding phone number, which
may appear in the display of certain radios.
Page 89

UNDERSTANDING THE FEATURES OF YOUR VEHICLE 89
Add Names to Your UConnect™ Phonebook
NOTE: Adding names to phonebook is recommended
when vehicle is not in motion.
•
Press the “Phone” button to begin.
•
After the ⬙Ready⬙ prompt and the following beep, say
⬙Phonebook New Entry.⬙
•
When prompted, say the name of thenew entry. Use of
long names helps the voice recognition and is recommended. For example, say ⬙Robert Smith⬙ or ⬙Robert⬙
instead of ⬙Bob.⬙
•
When prompted, enter the number designation (e.g.:
⬙Home,⬙⬙Work,⬙⬙Mobile,⬙ or ⬙Pager⬙). This will allow
you to store multiple numbers for each phonebook
entry, if desired.
•
When prompted, recite the phone number for the
phonebook entry that you are adding.
After you are finished adding an entry into the phonebook, you will be given the opportunity to add more
phone numbers to the current entry or to return to the
main menu.
The UConnect™ system will allow you to enter up to 32
names in the phonebook with each name having up to
four associated phone numbers and designations. Each
language has a separate 32 name phonebook accessible
only in that language.
Edit Entries in the UConnect™ Phonebook
NOTE: Editing phonebook entries is recommended
when vehicle is not in motion.
•
Press the ’Phone’ button to begin.
•
After the ⬙Ready⬙ prompt and the following beep, say
⬙Phonebook Edit.⬙
3
Page 90

90 UNDERSTANDING THE FEATURES OF YOUR VEHICLE
•
You will then be asked for the name of the phonebook
entry that you wish to edit.
•
Next, choose the number designation (home, work,
mobile, or pager) that you wish to edit.
•
When prompted, recite the new phone number for the
phonebook entry that you are editing.
After you are finished editing an entry in the phonebook,
you will be given the opportunities to edit another entry
in the phonebook, call the number you just edited, or
return to the main menu.
⬙Phonebook Edit⬙ can be used to add another phone
number to a name entry that already exists in the
phonebook. For example, the entry John Doe may have a
mobile and a home number, but you can add John Doe’s
work number later using the ⬙Phonebook Edit⬙ feature.
Delete Entries in the UConnect™ Phonebook
NOTE: Editing phonebook entries is recommended
when vehicle is not in motion.
•
Press the ’Phone’ button to begin.
•
After the ⬙Ready⬙ prompt and the following beep, say
⬙Phonebook Delete.⬙
•
After you enter the Phonebook Delete menu, you will
then be asked for the name of the entry that you wish
to delete. You can either say the name of a phonebook
entry that you wish to delete or you can say ⬙List
Names⬙ to hear a list of the entries in the phonebook
from which you choose. To select one of the entries
from the list, press the ⬙Voice Recognition⬙ button
while the UConnect™ system is playing the desired
entry and say ⬙Delete.⬙
Page 91

•
After you enter the name, the UConnect™ system will
ask you which designation you wish to delete: home,
work, mobile or pager. Say the designation you wish
to delete.
•
Note that only the phonebook entry in the current
language is deleted.
After confirmation, the phonebook entries will be deleted. Note that only the phonebook in the current
language is deleted.
UNDERSTANDING THE FEATURES OF YOUR VEHICLE 91
•
After confirmation, the phonebook entries will be
deleted.
List All Names in the UConnect™ Phonebook
Press the ’Phone’ button to begin.
•
•
After the ⬙Ready⬙ prompt and the following beep, say
⬙Phonebook List Names.⬙
•
The UConnect™ system will play the names of all the
phonebook entries.
3
Delete All Entries in the UConnect™ Phonebook
Press the ’Phone’ button to begin.
•
•
After the ⬙Ready⬙ prompt and the following beep, say
⬙Phonebook Erase All.⬙
•
The UConnect™ system will ask you to verify that you
wish to delete all the entries from the phonebook.
•
To call one of the names in the list, press the ⬙Voice
Recognition’ button during the playing of the desired
name and say ⬙Call.⬙ NOTE: the user can also exercise
⬙Edit⬙ or ⬙Delete⬙ operations at this point.
•
The UConnect™ system will then prompt you as to
number designation you wish to call.
•
The selected number will be dialed.
Page 92

92 UNDERSTANDING THE FEATURES OF YOUR VEHICLE
Phone Call Features
The following features can be accessed through the
UConnect™ system if the feature(s) are available on your
cellular service plan. For example, if your cellular service
plan provides three-way calling, this feature can be
accessed through the UConnect™ system. Check with
your cellular service provider for the features that you
have.
Answer or Reject an Incoming Call - No Call
Currently in Progress
When you receive a call on your cellular phone, the
UConnect™ system will interrupt the vehicle audio
system, if on, and will ask if you would like to answer the
call. To reject the call, press and hold the ’Phone’ button
until you hear a single beep indicating that the incoming
call was rejected.
Answer or Reject an Incoming Call - Call
Currently in Progress
If a call is currently in progress and you have another
incoming call, you will hear the same network tones for
call waiting that you normally hear when using your cell
phone. Press the ’Phone’ button to place the current call
on hold and answer the incoming call. NOTE: The
UConnect™ system compatible phones in market today
do not support rejecting an incoming call when another
call is in progress. Therefore, the user can only either
answer an incoming call or ignore it.
Making a Second Call while Current Call in
Progress
To make a second call while you are currently in a call,
press the ’Voice Recognition’ button and say ⬙Dial⬙ or
⬙Call⬙ followed by the phone number or phonebook entry
you wish to call. The first call will be on hold while the
Page 93

UNDERSTANDING THE FEATURES OF YOUR VEHICLE 93
second call is in progress. To go back to the first call, refer
to ⬙Toggling Between Calls.⬙ To combine two calls, refer
to ⬙Conference Call.⬙
Place/Retrieve a Call from Hold
To put a call on hold, press the ⬘Phone’ button until you
hear a single beep which will indicate that the call has
been placed on hold. To bring the call back from hold,
press and hold the ⬘Phone’ button until you hear a single
beep.
Toggling Between Calls
If two calls are in progress (one active and one on hold),
press the ’Phone’ button until you hear a single beep
indicating that the active and hold status of the two calls
have switched. Onlyone call can be placed on hold at one
time.
Conference Call
When two calls are in progress (one active and one on
hold), press and hold the ’Phone’ button until you hear a
double beep indicating that the two calls have been
joined into one conference call.
Three-Way Calling
To initiate three-way calling, press the ’Voice Recognition’ button while a call is in progress and make a second
phone call as described under ⬙Making a Second Call
while Current Call in Progress.⬙ After the second call has
established, press and hold the ’Phone’ button until you
hear a double beep indicating that the two calls have
been joined into one conference call.
Call Termination
To end a call in progress, momentarily press the ⬘Phone’
button. Only the active call(s) will be terminated and if
there is a call on hold, it will become the new active call.
3
Page 94

94 UNDERSTANDING THE FEATURES OF YOUR VEHICLE
Redial
Press the ’Phone’ button to begin.
•
•
After the ⬙Ready⬙ prompt and the following beep, say
⬙Redial.⬙
•
The UConnect™ system will call the last number that
was dialed on your cellular phone. Note: this may not
be the last number dialed from the UConnect™ system.
Call Continuation
Call continuation is progression of a phone call on
UConnect™ system after the vehicle ignition key has
been switched to off. Call continuation functionality
available on the vehicle can be any one of three types:
•
After ignition key is switched off, a call can continue
on the UConnect™ system either until the call ends or
until the vehicle battery condition dictates cessation of
the call on the UConnect™ system and transfer of the
call to the mobile phone.
•
After ignition key is switched to off, a call can continue
on the UConnect™ system for certain duration, after
which the call is automatically transferred from the
UConnect™ system to the mobile phone.
•
An active call is automatically transferred to the
mobile phone after ignition key is switched to off.
UConnect™ System Features
Language Selection
To change the language that the UConnect™ system is
using,
•
Press the ’Phone’ button to begin.
Page 95

UNDERSTANDING THE FEATURES OF YOUR VEHICLE 95
•
After the ⬙Ready⬙ prompt and the following beep, say
the name of the language you wish to switch to
(English, Espanol, or Francais, if so equipped).
•
Continue to follow the system prompts to complete
language selection.
After selecting one of the languages, all prompts and
voice commands will be in that language.
NOTE: After every UConnect™ language change operation, only the language specific 32 name phonebook is
usable. The paired phone name is not language specific
and usable across all languages.
Emergency Assistance
If you are in an emergency and the mobile phone is
reachable:
•
Pick up the phone and manually dial the emergency
number for your area.
If the phone is not reachable and the UConnect™ system
is operational, you may reach the emergency number as
follows:
•
Press the ’Phone’ button to begin.
•
After the ⬙Ready⬙ prompt and the following beep, say
⬙Emergency⬙ and the UConnect™ system will instruct
the paired cellular phone to call the emergency number. This feature is only supported in the USA.
NOTE: The emergency number dialed is based on the
Country where the vehicle is purchased (911 for USAand
Canada and 060 for Mexico). The number dialed may not
be applicable with the available cellular service and area.
The UConnect™ system does slightly lower your chances
of successfully making a phone call as to that for the cell
phone directly.
3
Page 96

96 UNDERSTANDING THE FEATURES OF YOUR VEHICLE
Your phone must be turned on and paired to the UConnect™ system to allow use of this vehicle feature in
emergency situations when the cell phone has network
coverage and stays paired to the UConnect™ system.
Towing Assistance
If you need towing assistance,
•
Press the ’Phone’ button to begin.
•
After the ⬙Ready⬙ prompt and the following beep, say
⬙Towing Assistance.⬙
NOTE: The Towing Assistance number dialed is based
on the Country where the vehicle is purchased (1-800528-2069 for USA, 1-877-213-4525 for Canada, 55-14-3454
for Mexico city and 1-800-712-3040 for outside Mexico
city in Mexico).
Please refer to the 24-Hour “Towing Assistance” coverage details in the Warranty information booklet and on
the 24–Hour Towing Assistance Card.
Paging
To learn how to page, refer to ⬙Working with Automated
Systems.⬙ Paging works properly except for pagers of
certain companies which time-out a little too soon to
work properly with the UConnect™ system.
Voice Mail Calling
To learn how to access your voice mail, refer to ⬙Working
with Automated Systems.⬙
Working with Automated Systems
This method is designed to be used in instances where
one generally has to press numbers on the cellular phone
keypad while navigating through an automated telephone system.
You can use your UConnect™ system to access a voicemail system or an automated service, such as, paging
service or automated customer service. Some services
require immediate response selection, in some instances,
that may be too quick for use of UConnect™ system.
Page 97

UNDERSTANDING THE FEATURES OF YOUR VEHICLE 97
When calling a number with your UConnect™ system
that normally requires you to enter in a touch-tone
sequence on your cellular phone keypad, you can push
the ’Voice Recognition’ button and say the sequence you
wish to enter followed by the word ⬙Send.⬙ For example,
if required to enter your pin number followed with a
pound3746#,youcanpressthe’Voice Recognition’
button and say ⬙3746#Send.⬙ Saying a number, or
sequence of numbers, followed by ⬙Send⬙ is also to be
used to navigate through an automated customer service
center menu structure and to leave a number on a pager.
Barge In - Overriding Prompts
The ’Voice Recognition’ button can be used when you
wish to skip part of a prompt and issue your voice
recognition command immediately. For example, if a
prompt is playing ⬙Would you like to pair a phone, clear
aѧ,⬙ you could press the ’Voice Recognition’ button and
say ⬙Pair a Phone⬙ to select that option without having to
listen to the rest of the voice prompt.
Turning Confirmation Prompts On/Off
Turning confirmation prompts off will stop the system
from confirming your choices (e.g. the UConnect™ system will not repeat a phone number before you dial it).
•
Press the ’Phone’ button to begin.
•
After the ⬙Ready⬙ prompt and the following beep, say
⬙Setup Confirmations.⬙ The UConnect™ system will
play the current confirmation prompt status and you
will be given the choice to change it.
Phone and Network Status Indicators
If available on the radio and/or on a premium display
such as the instrument panel cluster, and supported by
your cell phone, the UConnect™ system will provide
notification to inform you of your phone and network
status when you are attempting to make a phone call
using UConnect™. The status is given for roaming network signal strength, phone battery strength, etc.
3
Page 98

98 UNDERSTANDING THE FEATURES OF YOUR VEHICLE
Dialing Using the Cellular Phone Keypad
You can dial a phone number with your cellular phone
keypad and still use the UConnect™ system (while
dialing via the cell phone keypad, the user must exercise
caution and take precautionary safety measures). By
dialing a number with your paired Bluetooth™ cellular
phone, the audio will be played through your vehicle’s
audio system. The UConnect™ system will work the
same as if you dial the number using voice recognition.
NOTE: Certain brands of mobilephones do not send the
dial ring to the UConnect™ system to play it on the
vehicle audio system, so you will not hear it. Under this
situation, after successfully dialing a number, the user
may feel that the call did not go through even though the
call is in progress. Once your call is answered, you will
hear the audio.
Mute/Un-mute (Mute off)
When you mute the UConnect™ system, you will still be
able to hear the conversation coming from the other
party, but the other party will not be able to hear you. In
order to mute the UConnect™ system:
•
Press the ’Voice Recognition’ button.
•
After the ⬙Ready⬙ prompt and the following beep, say
⬙Mute.⬙
In order to un-mute the UConnect™ system:
•
Press the ’Voice Recognition’ button.
•
After the ⬙Ready⬙ prompt and the following beep, say
⬙Mute-off.⬙
Page 99

UNDERSTANDING THE FEATURES OF YOUR VEHICLE 99
Information Service
When using AT&T Wireless Service, dialing to phone
number ⬙#121,⬙ you can access voice activated automated
system to receive news, weather, stocks, traffic, etc.
related information.
Advanced Phone Connectivity
Transfer Call to and from Cellular Phone
The UConnect™ system allows on going calls to be
transferred to your cellular phone to the UConnect™
system without terminating the call. To transfer an ongoing call from your UConnect™ paired cellular phone to
the UConnect™ system or vice-versa, press the ’Voice
Recognition’ button and say ⬙Transfer Call.⬙
Connect or Disconnect Link Between the
UConnect™ System and Cellular Phone
Your cellular phone can be paired with many different
electronic devices, but can only be actively ⬙connected⬙
with one electronic device at a time.
If you would like to connect or disconnect the Bluetooth™ connection between a UConnect™ paired cellular
phone and the UConnect™ system, follow the instruction
described in your cellular phone user’s manual.
List Paired Cellular Phone Names
Press the ’Phone’ button to begin.
•
•
After the “Ready” prompt and the following beep, say
“Setup Phone pairing”.
•
When prompted, say ⬙List Phones.⬙
•
The UConnect™ system will play the phone names of
all paired cellular phones in order from the highest to
the lowest priority. To “select” or “delete” a paired
phone being announced, press the ⬘Voice recognition’
button and say “Select” or “Delete.” Also, see the next
two sections for an alternate way to “select” or “delete” a paired phone.
3
Page 100

100 UNDERSTANDING THE FEATURES OF YOUR VEHICLE
Select another Cellular Phone
This feature allows you to select and start using another
phone with the UConnect™ system. The phone must
have been previously paired to the UConnect™ system
that you want to use it with.
•
Press the ’Phone’ button to begin.
•
After the ⬙Ready⬙ prompt and the following beep, say
⬙Setup Select Phone.⬙
•
The phone names along with priority numbers will be
announced.
•
When prompted say the priority number of the cellular phone you wish to select. You can also press the
⬘Voice Recognition’ button anytime while the list is
being played, then say the priority number of the
phone that you wish to select.
•
The selected phone will be used for the next phone
call. If the selected phone is not available, the UConnect™ system will return to using the highest priority
phone present in or near (approximately with in 30
feet) the vehicle.
Delete UConnect™ Paired Cellular Phones
Press the ’Phone’ button to begin.
•
•
After the ⬙Ready⬙ prompt and the following beep, say
⬙Setup Phone Pairing.⬙
•
At the next prompt, say ⬙Delete.⬙
•
The phone names along with priority numbers will be
announced.
•
When prompted say the priority number of the cellular phone you wish to delete. You can also press the
 Loading...