

Page 1
Operating Manual
DocuPen RC800
PLANON SYSTEM SOLUTIONS INC.
Page 2

Legal and Other Notices
All contents of this publication are subject to change without notice.
No part of this publication may be reproduced or transmitted in any form
Or by any means, electronic or mechanical, for any purpose, without the
express prior written permission of Planon Systems Solutions Inc.
Planon Systems Solutions Inc. makes no representations or warranties regarding any
damages, or benefit expected by using this unit lawfully, or any request from a third
person, which are caused by the inappropriate use of this unit.
IN NO EVENT SHALL SELLER BE LIABLE FOR ANY DIRECT,
INCIDENTALOR CONSEQUENTIALDAMAGES OF ANY NATURE,
OR LOSSES OR EXPENSES RESULTING FROM ANY DEFECTIVE
PRODUCT OR THE USE OF THIS PRODUCT.
Trademarks
Docuport DocuPen™ is a registered trademark of Docuport Incorporated.
PaperPort Copy rights OCR technology by ScanSoft® Inc. All rights reserved.
Copyright Outside In ® Viewer Technology © Inso Corporation All rights reserved
Copyright © 2004 Planon System Solutions Inc. All rights reserved.
All other product or company names are trademarks or registered
trademarks of their respective holders.
Regulatory Information
This device complies with Part 15 of the FCC Rules. Operation is subject to the following two conditions: (1) this device may not cause harmful interference, and (2) this
device must accept any interference received, including interference that may cause
undesired operation.
Canada ICES 003, Issue 3
This Class B digital apparatus complies with Canadian ICES-003.
Planon System Solutions Inc.
5484 Tomken Rd. Unit 19
Mississauga, Ontario. L4W 2Z6
Phone: (905) 507-3926 Fax (905) 624-6629
Email: [email protected] website: www.planon.com
Help Line: 1-877-DOCUPEN (362-8736)
Contents
INTRODUCTION............................................................... 5
Check the Contents…………………………………………. 5
DocuPen RC800 Features ………………………………… 6
Power On/Rez Button...…………………………………..... 6
Color Mode Button........................................................... 6
Driver and Software Installation…………………….......... 7
Software Installation........................................................ . 8
Installing PaperPort........................................................ . 10
Installing the USB driver................................................ 11
Downloading the scanned images................................. 14
Using PaperPort............................................................. 14
Saving the scanned Images.......................................… 16
Erasing DocuPen’s Memory........................................... 17
SCANNING..................................................................... 18
Scan Settings................................................................. 18
LED Indicators................................................................ 19
Profile Configurator ....................................................... 20
CALIBRATION................................................................ 22
Color calibration.............................................................. 22
Roller calibration............................................................. 24
Scratch removal............................................................. 26
Points to Remember Before You Scan…………………. 27
On-board memory and External memory card.............. 28
APPENDIX.................................................................... 29
A. DocuPen RC800 Specifications................................ 29
B. Proper Handling and Safe Use................................. 30
C. Technical Support..................................................... 30
Page 3

Introduction
Thank you for purchasing our DocuPen RC800 portable scanner.
DocuPen RC800 functions as a quick and simple tool that can be taken any-
where to swipe over a smooth flat surface to capture black&white as well as
color images.
We recommend that you fully charge your DocuPen before the first use. You
can charge the DocuPen by simply plugging it into any USB port. It takes
about 50 minutes to fully charge the DocuPen.
This manual provides instructions for scanning documents with the
DocuPen RC800 and downloading the scanned images to your PC.
Please read these instructions carefully to obtain optimum performance and
longer service life from the unit. Retain this manual for future reference.
In case you have any questions, need further information or experience any
kind of difficulties during installation or operation don’t hesitate to contact our
Customer support at:
[email protected]
1-877-DOCUPEN or
1-905-507-3926
Check the Contents
The following components are included in your DocuPen product package:
- The DocuPen RC800 unit
- USB cable for communication with PC (Mac) & recharging.
- Installation CD containing DocuPen PenTwain driver, DocuPen stand-alone
application & PaperPort Software
- Quick Start Guide
- Leather Case
Page 4
Driver and Software Installation
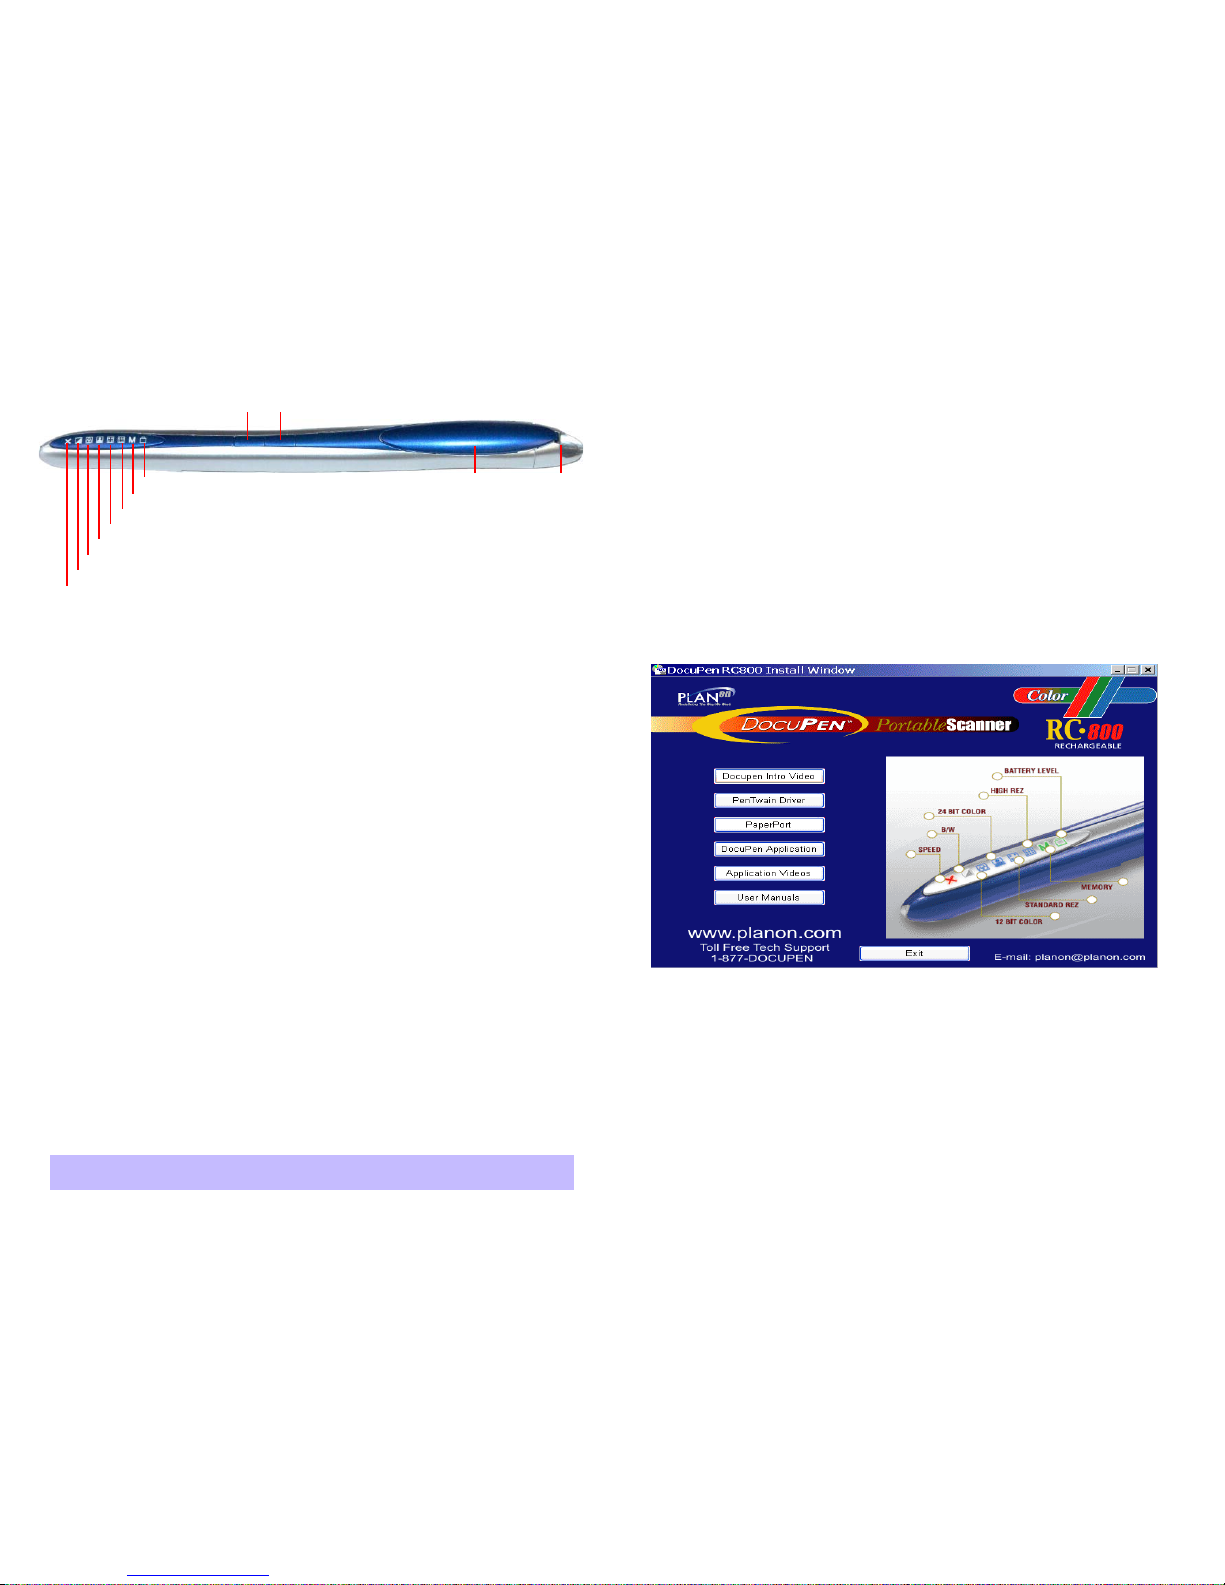
Before starting to work with the DocuPen RC800 you must install the necessary drivers. Please insert the DocuPen RC800 Installation CD in your CD-drive and follow the
on-screen instructions.
The DocuPen interfaces with your computer via a proprietary Twain driver. After installation, the DocuPen driver is made available to all Windows Twain-compatible applications, such as PaperPort, Windows Imaging, etc. This ensures that the scanned
images can be downloaded to your computer.
DocuPen Driver Platform Requirements: Before you install the DocuPen PenTwain
driver, make sure that your computer meets the following minimum system requirements:
Microsoft Windows 2000/NT/ME/XP
CD-ROM for driver installation
After inserting the Installation CD in your CD drive The DocuPen RC800 Installer con-
trol window will appear. (See above)
By clicking on the corresponding button you will install the PenTwain driver (obligatory), the DocuPen Application (recommended) and the PaperPort software (recommended). The Docupen Application will allow you to view the images from your
DocuPen without using any additional graphics software.
ScanSoft’s PaperPort is one of the leading Document Management Software packages
on the market and works seamlessly with our DocuPen. Although you can use any
Twain compatible graphics software we recommend PaperPort due to its document
editing capabilities
DocuPen Operation Manual 7
DocuPen RC800 Features
The DocuPen Scanner has two control buttons on top. On the left-hand side of the
DocuPen you can see eight LEDs indicating the scan settings and on the right you see
the Battery and External memory card cover and the USB port. By pressing the
control buttons you will be able select the desired color mode and scan resolution. The
LEDs on the left-hand side of the scanner will indicate the mode that you have selected.
Power On/Rez (Resolution) Button
Press the Power On/Rez button once to turn the DocuPen on. The DocuPen
will turn itself on in default or last used configuration. The corresponding LEDs
will be on. For details on the various configurations please go to section Scan
Settings - LEDs Indicators, page 19.
Press the Power ON/Rez button again to select between Standard Resolution
and Hi Resolution (Hi Rez) setting.There are two Standard Rez and two Hi
Rez settings which can be set via the Pen Configurator Dialog explained in
Section Scan Settings, p.20. The Resolution LEDs will turn on/off accordingly.
After the scan is completed the DocuPen will save the data into memory and
turn itself off automatically. For safety purposes you can also turn the
DocuPen off manually by pressing and holding the Power ON/Rez button for 5
seconds.
Color Mode Button
Press the Color Mode button to select desired Color mode.There are three
color modes available: Mono, Docucolor and Photocolor . The Color Mode
LEDs will turn on/off accordingly. When both desired Color mode and Rez
setting are selected, you can start gliding the DocuPen down your document.
DocuPen Operation Manual 6
Power On/Resolution
USB Connector
Scan Speed
Mono Mode
Docucolor Mode
Photocolor Mode
Standard Resolution
High Resolution
Battery
Memory
Color Mode
Battery/ External memory
Card Cover
Note: YOU MUST INSTALLTHE DRIVERS BEFORE STARTINGTO WORK WITH
THE DOCUPEN!
Page 5
Software Installation (Continued)
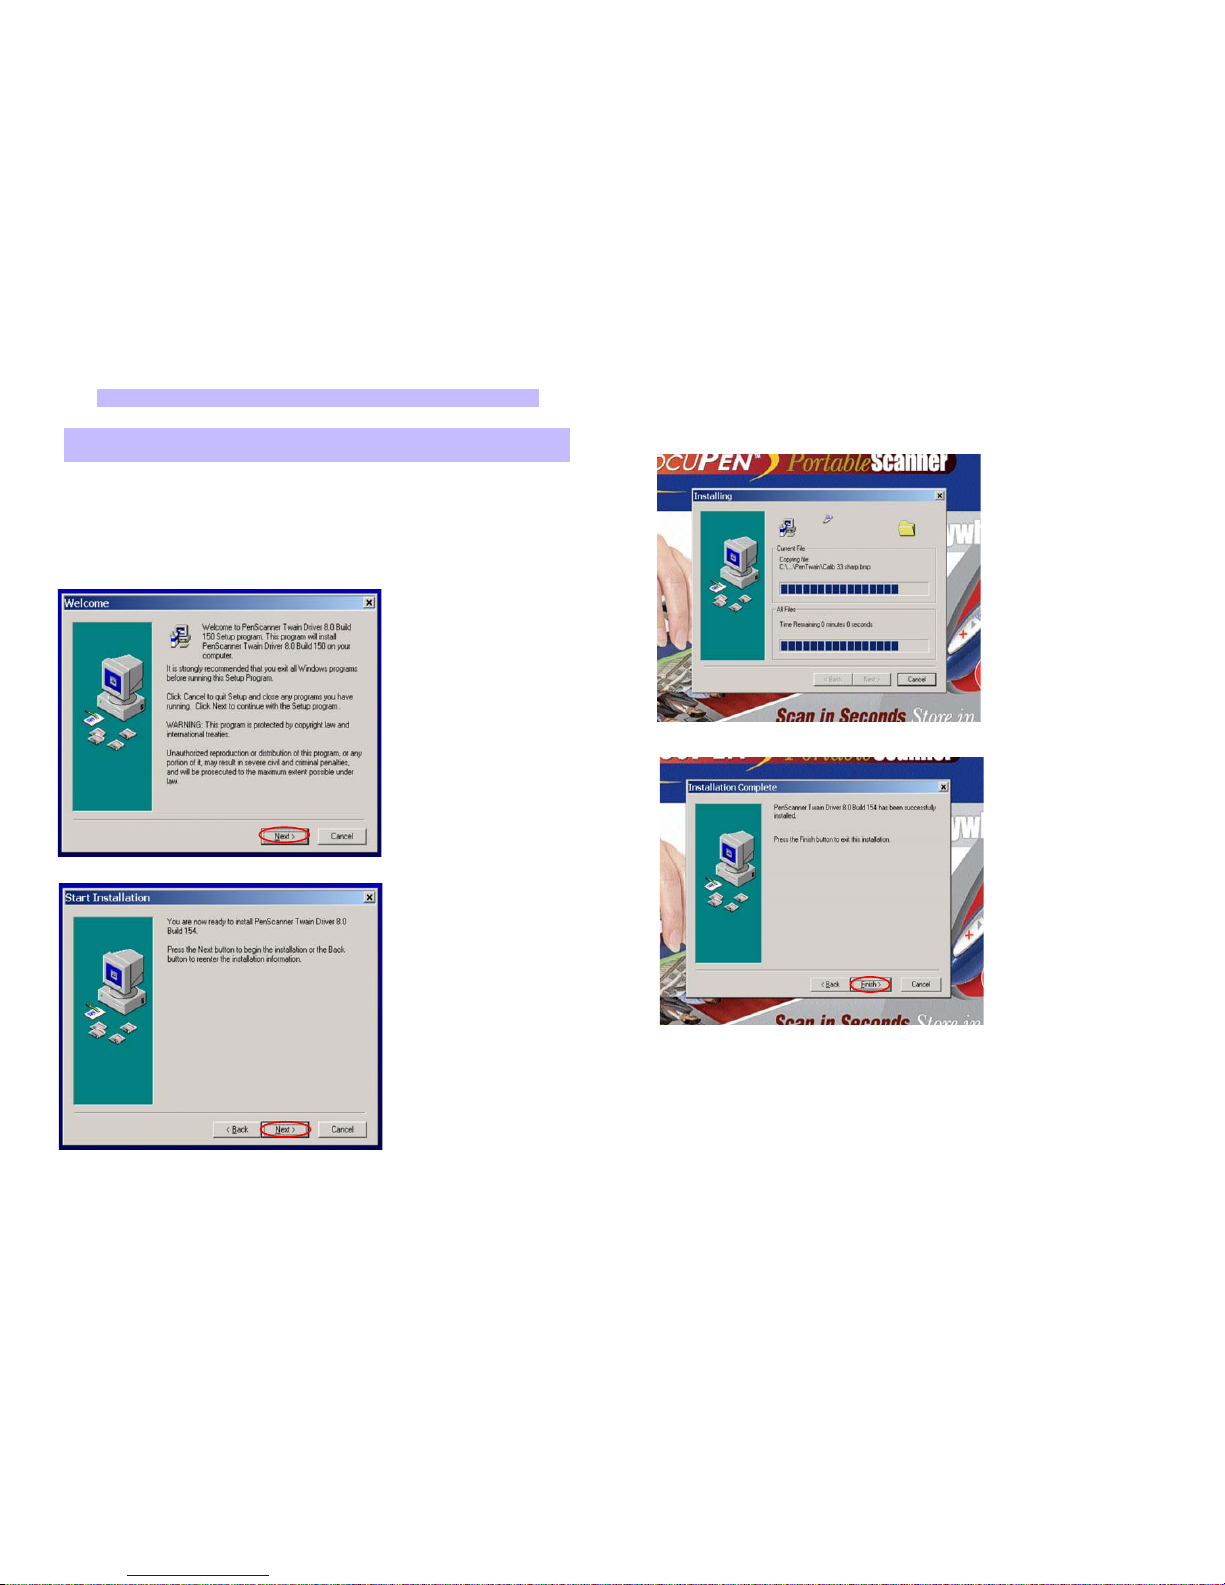
6. The PenTWAIN driver will start installing. You will be prompted to click the
Finish button to complete the Pen Twain installation.
The installation of the Docupen Application (Start by selecting DocuPen Application
button in the DocuPen RC800 Install window) is identical, hence not explained here.
Now you have installed the PenTwain driver and the DocuPen application. You are
almost done! As a next step we recommend installing the ScanSoft’s PaperPort software package.
DocuPen Operation Manual 9
Software Installation (Continued)
We recommend that you close all Windows programs and disable all virus protection
software temporarily during the Pentwain driver & PaperPort installation
1. Insert the DocuPen CD-ROM into your CD drive
2. The CD is auto play, and will self start.
3. In the DocuPen RC800 Install window please click on the button PenTwain Driver
4. In the Welcome window, click
the Next button
5. In the Start Installation window, click the Next button to
begin installation
DocuPen Operation Manual 8
Note: You must be logged on your PC asAdministrator
Note: The DocuPen USB cable must be DISCONNECTED during installation of
the Pentwain driver
Page 6
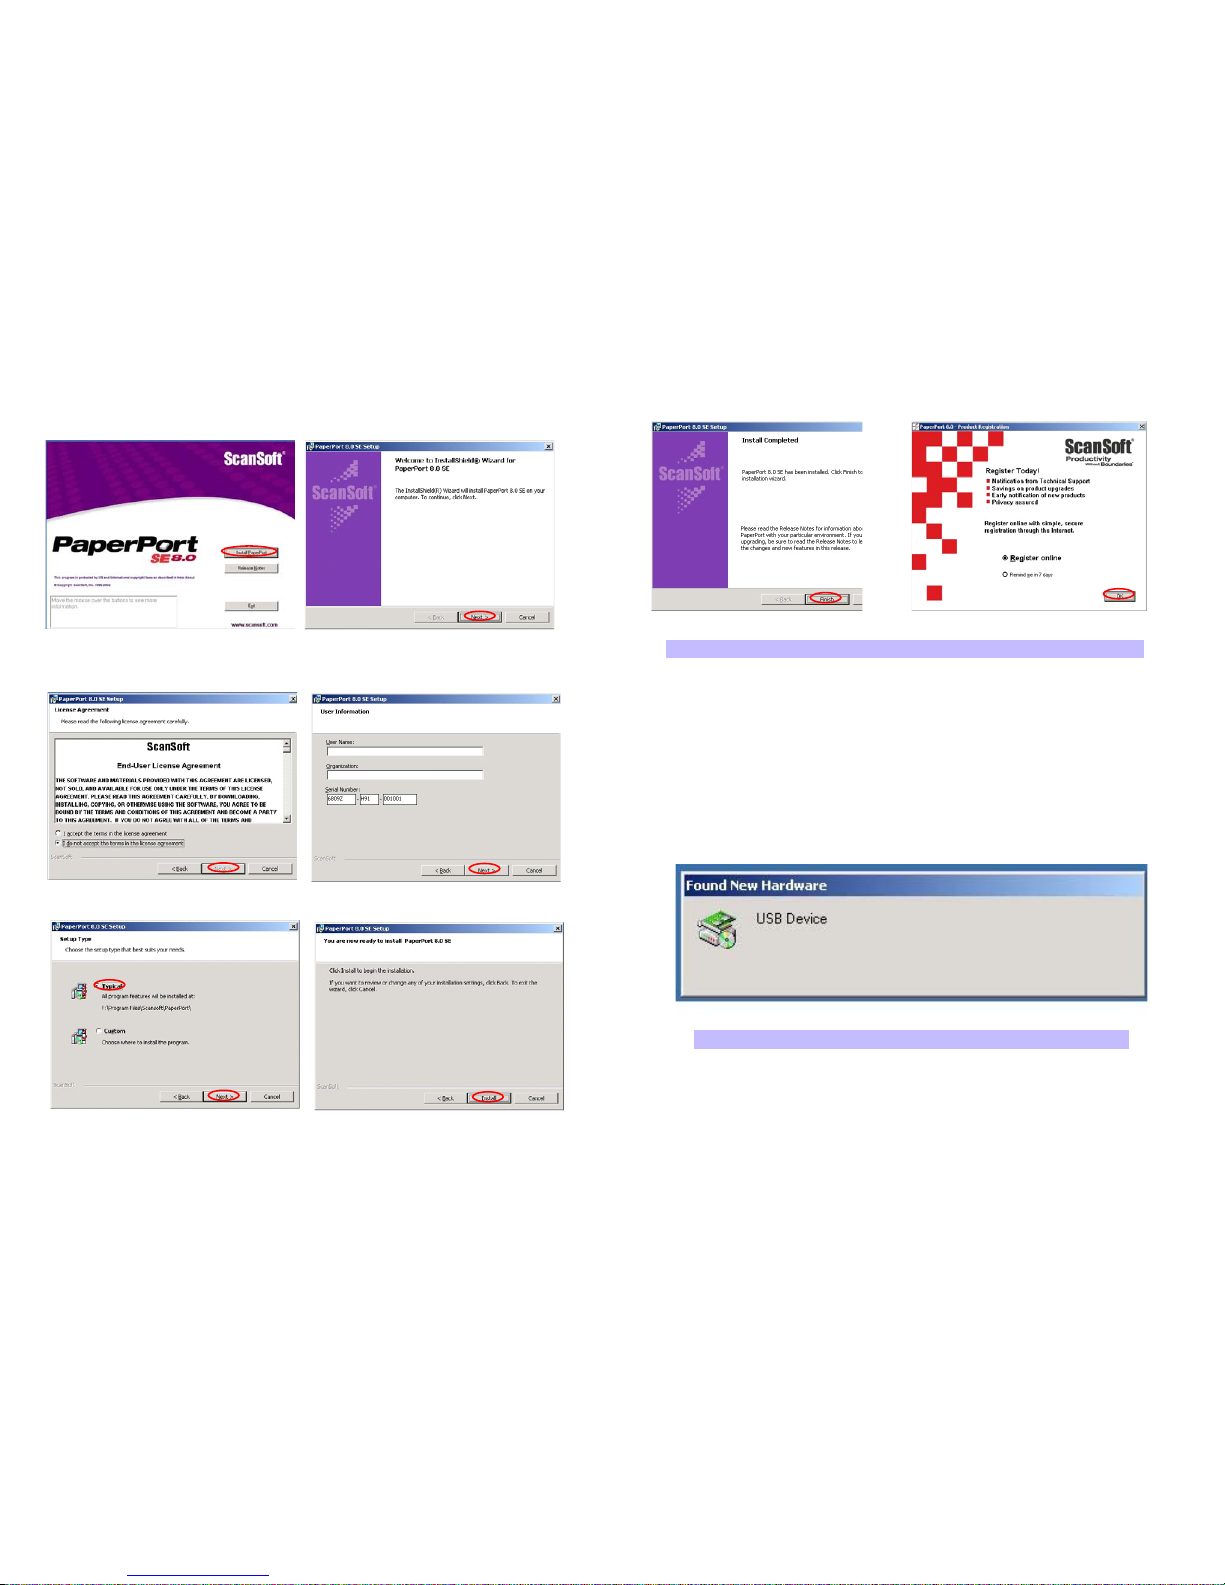
Installing the PaperPort Software (continued)
8. Installation complete,click Finish 9. Registration window
Once your computer is restarted, you must CONNECT the DocuPen with your computer and proceed to the USB Driver Installation.
Installing the USB driver
Connect the DocuPen to your computer and press the Power ON/Rez button to turn it
on. You might briefly see a pop-up message from the Windows Found New Hardware
Wizard.
Windows should self install the USB driver from the Installation CD. Please follow the
on-screen instructions of the Found New Hardware Wizard (shown on the next page)
If you need further assistance don’t hesitate to contact our Customer care:
[email protected]
TOLL FREE 1-877-DOCUPEN
DocuPen Operation Manual 11
Installing the PaperPort Software
1. In the DocuPen RC800 Install window select PaperPort and simply follow the on-
screen instructions
2. In the Welcome window click Install 3. In the Setup window click Next
4. Accept License Agreement, click Next 5. Fill in user information, click Next
6. Installation Setup - Typical, click Next 7. Setup Ready to Install, click Install
DocuPen Operation Manual 10
Note: Make sure that the Installation CD is in your CD drive
Note: Depending on your Operation System a Restart might be required
Page 7
Installing the USB driver (continued)
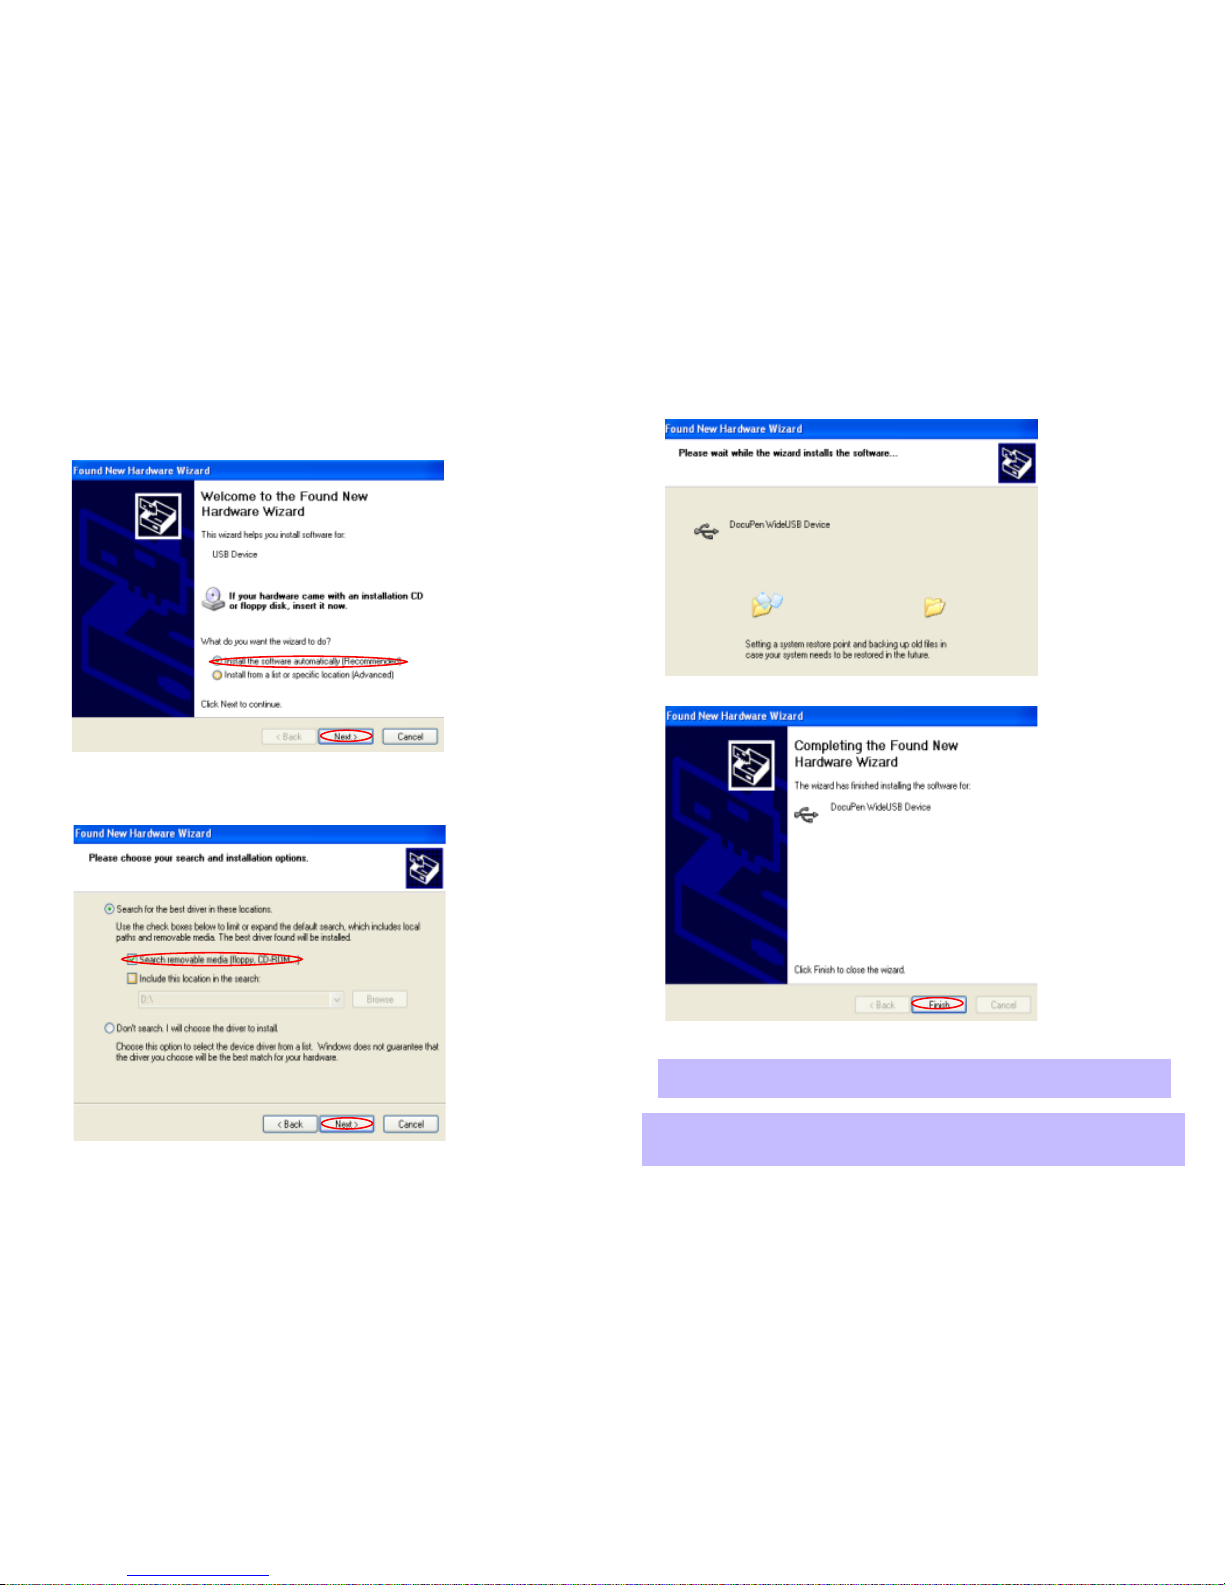
3.Wait a few seconds while driver is being installed
4. Complete the USB installation by clicking on the Finish button
Congratulations! The Software installation is now complete!
Now you are ready to use your DocuPen!
Operation Manual 13
Installing the USB driver (continued)
1. In the Found New Hardware Wizard, select Install the software automaticaly, click Next
2. Select search removable media .. click Next
DocuPen Operation Manual 12
Note: Depending on your Operation System a Restart might be required.
We recommend that you restart your computer after installation is completed
Note: The DocuPen is completely independent from the computer i.e. it should not
(We recommend that it is not) connected to the USB cable while scanning
You need to connect to download, calibrate or simply to charge the battery
Page 8
Download the scanned Images to PaperPort
As mentioned above you can use the DocuPen with any TWAIN compatible software
package. As, however, we provide one of the best Document Management Software
packages, i.e. Scansoft’s PaperPort we will explain in detail how you download the
images from the DocuPen to your computer using the PaperPort software
You can also use the stand-alone DocuPen Application which will allow to view the
thumbnails and save the images without using the PaperPort software. Simply doubleclick on the thumbnails in the DocuPen Scanner Control window and it will open up
with your default graphics software on your desktop.
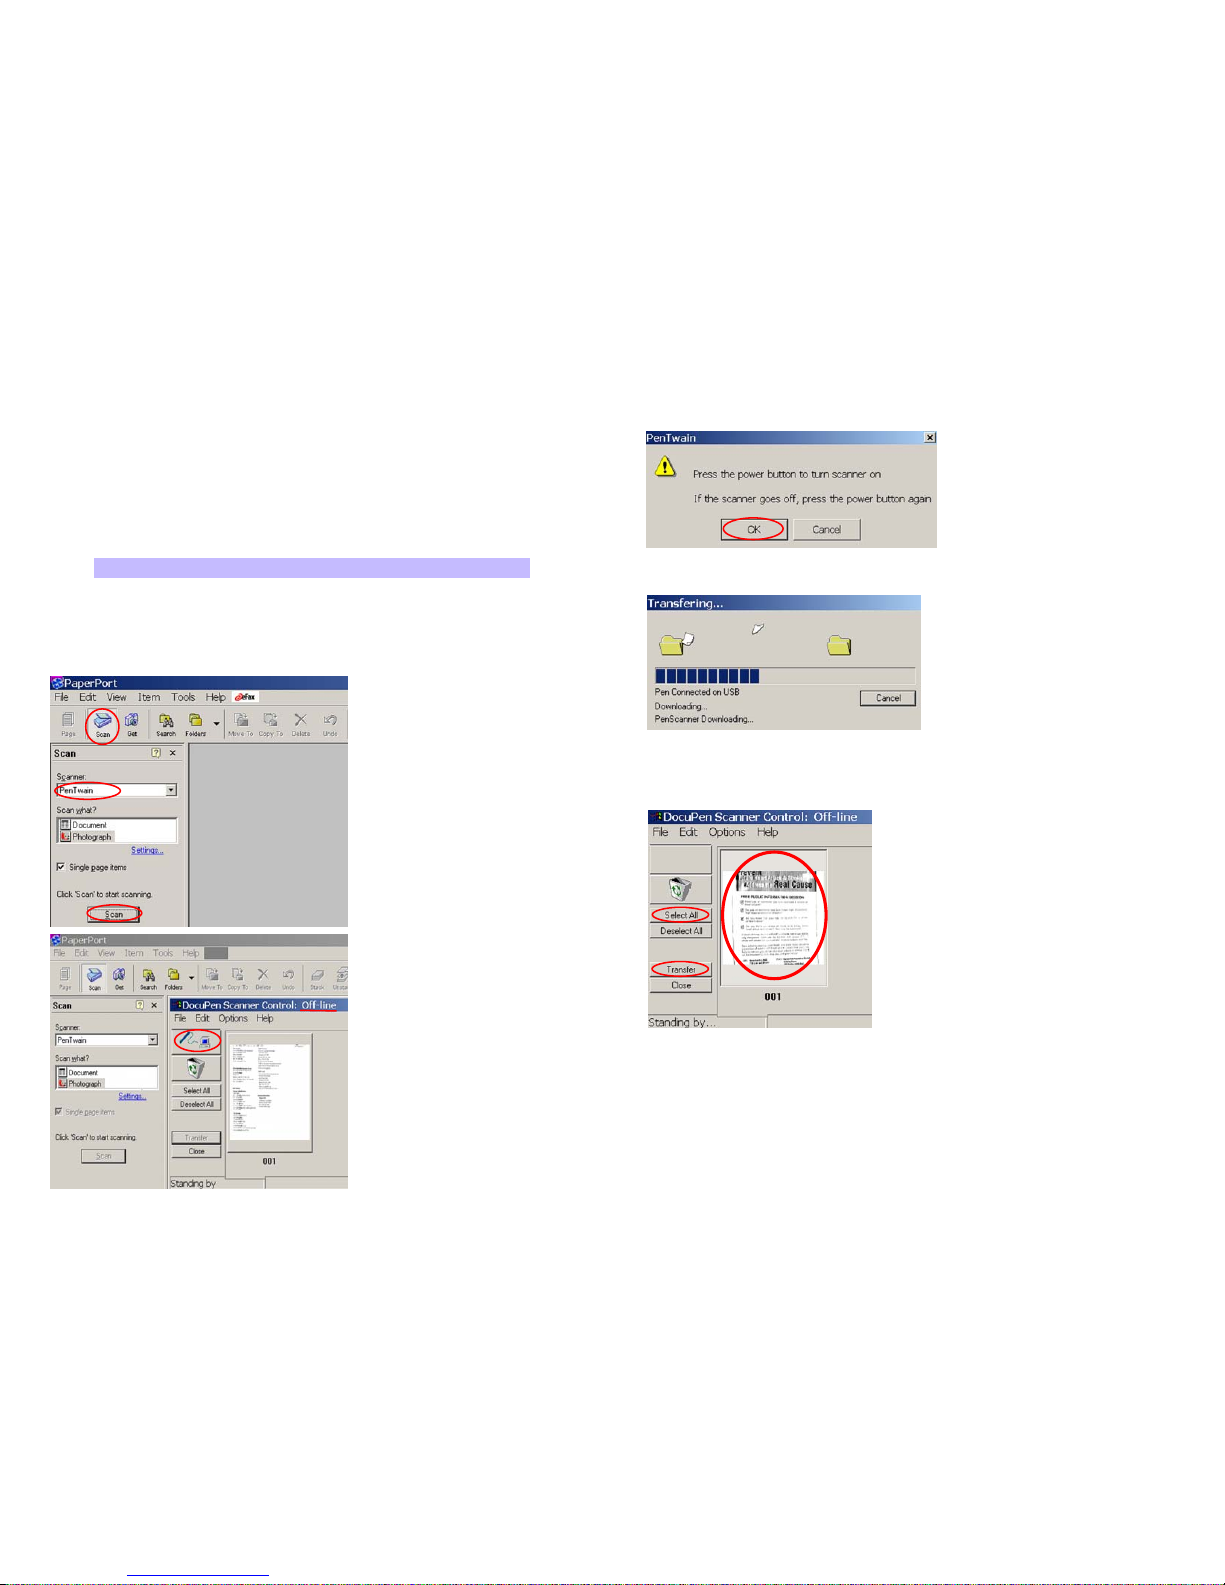
1. Start the PaperPort Software
2. Select Scan (click on the Scan button on the top control menu) and you will see a
vertical menu on the left-hand side of the PaperPort window. Choose PenTwain from
the scroll-down menu under Scanner:
You may have more than one
source in the scroll-down menu, so
PenTwain must be selected when
using the DocuPen.
3. After you’ve selected PenTwain
from the scroll-down menu, you can
click on the Scan button below. This
will open the DocuPen Scanner
Control window.
The window indicates Off-line. This
message changes to On-line only
during download.
4. Click on the download button and
a dialog window will appear prompting you to turn the DocuPen ON.
DocuPen Operation Manual 14
Download the scanned Images to PaperPort (cont.)
5. In the dialog Click OK and press the Power On button on your DocuPen
6. The Transferring... dialog will pop-up, displaying the status of the download process
7. When the download is complete you will see thumbnails of the images in the
Docupen Scanner Control window
8. You can select the images you want to download by clicking on them or you can select all
images by clicking on the Select All button
By clicking on the Transfer button you will transfer the selected thumbnails to the PaperPort
desktop area
DocuPen Operation Manual 15
Note: Make sure that your DocuPen is CONNECTED to your PC
Page 9
Download the scanned Images to PaperPort (cont.)
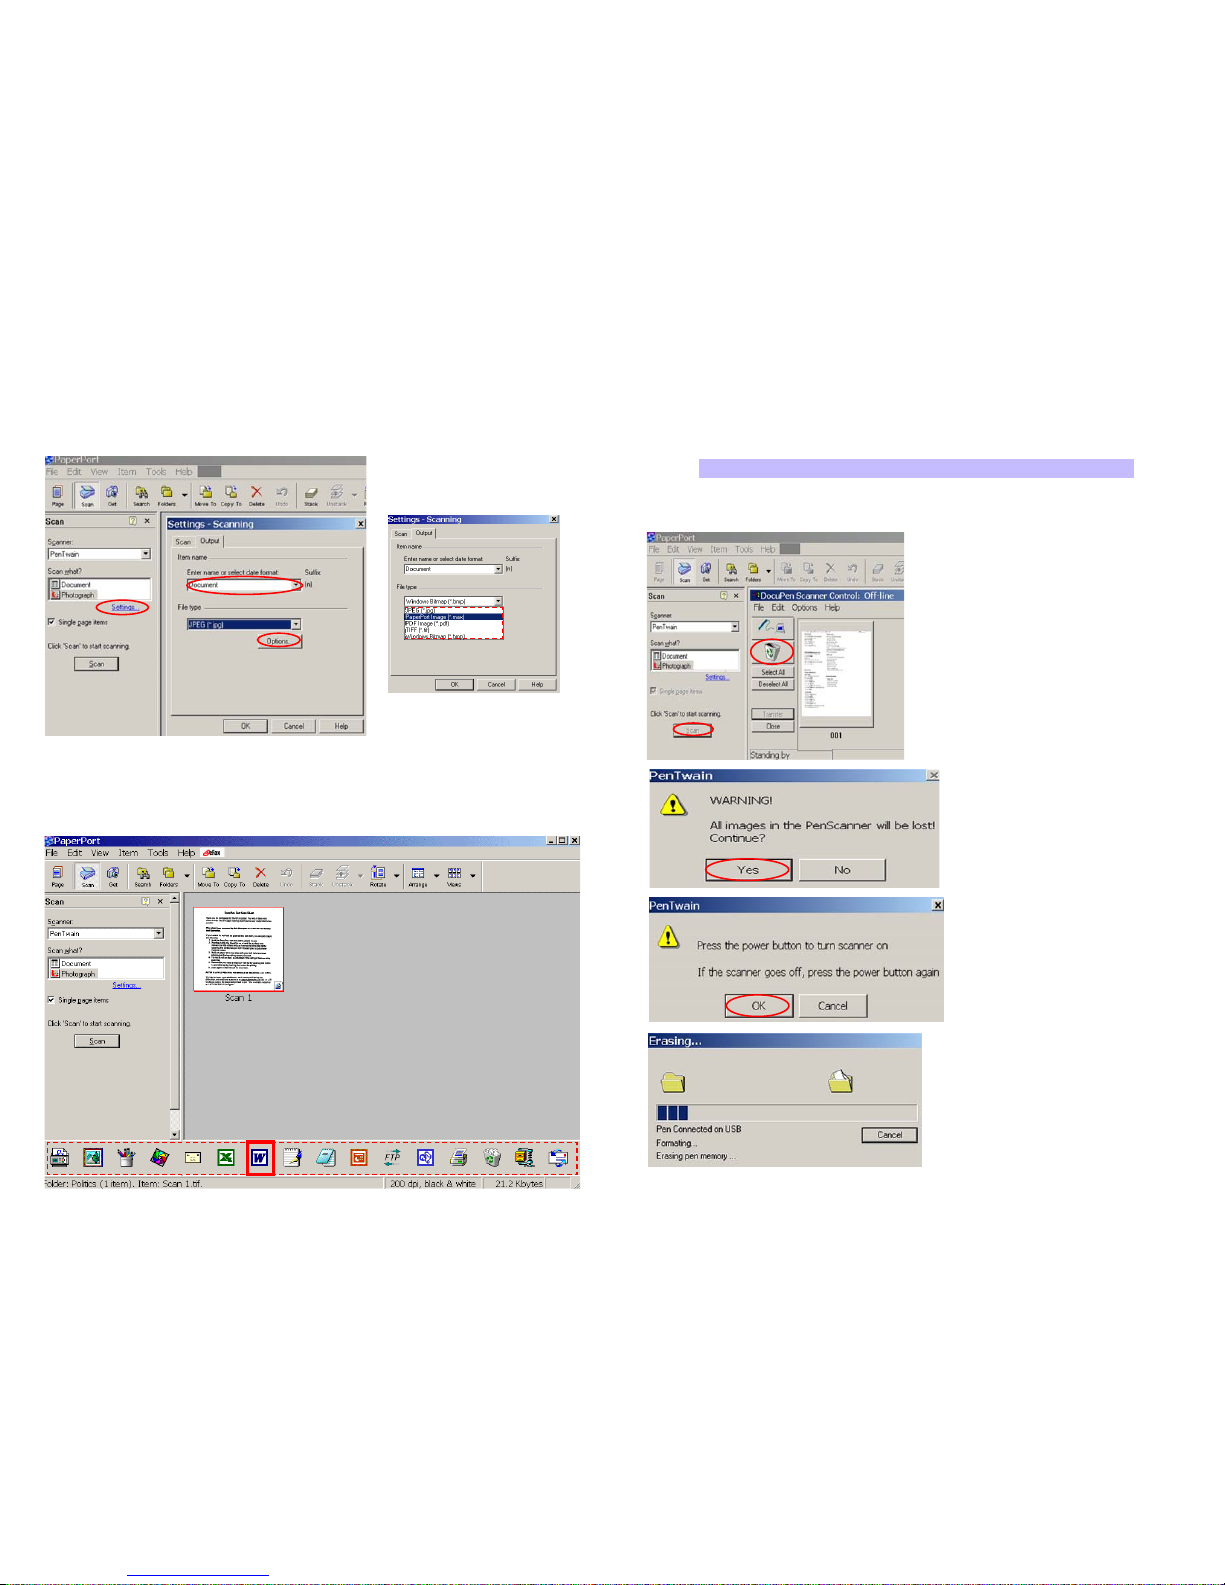
You can download the images in PaperPort’s default file format - .max, which allows
the most editing options. By selecting the Settings.. link, however, you can select other
file formats as well: jpg, tiff or bmp
In the PaperPort desktop area you can select an image and it can be run under all the
applications that the PaperPort software has detected such as Word, or Excel, etc. All
relevant windows applications are automatically listed at the bottom status bar of the
PaperPort window. At this moment you can run the OCR function by simply selecting
the image and clicking on the Word icon (in the bottom Status Bar)
DocuPen Operation Manual 16
Erasing the DocuPen Memory
After you have saved the desired image files on your hard disk, it is recommended that
you empty the DocuPen's memory bank. By doing so, you ensure maximum storage
capacity and optimum download speed.
1. While in PaperPort simply click on the Scan button
2. The DocuPen Scanner Control Window
will open
3. In the DocuPen Scanner Control
Window select the Recycle Bin button
A dialog window will prompt you that
you are about to erasing DocuPen’s
memory bank. Click on the Yes button.
A pop-up dialog prompts you to turn
your DocuPen ON. Press the Power
ON button on the DocuPen and click
on the OK button in the dialog window. The DocuPen memory bank will
be erased.
DocuPen Operation Manual 17
Note: Make sure that your DocuPen is CONNECTED to your PC
Page 10
LED Indicators
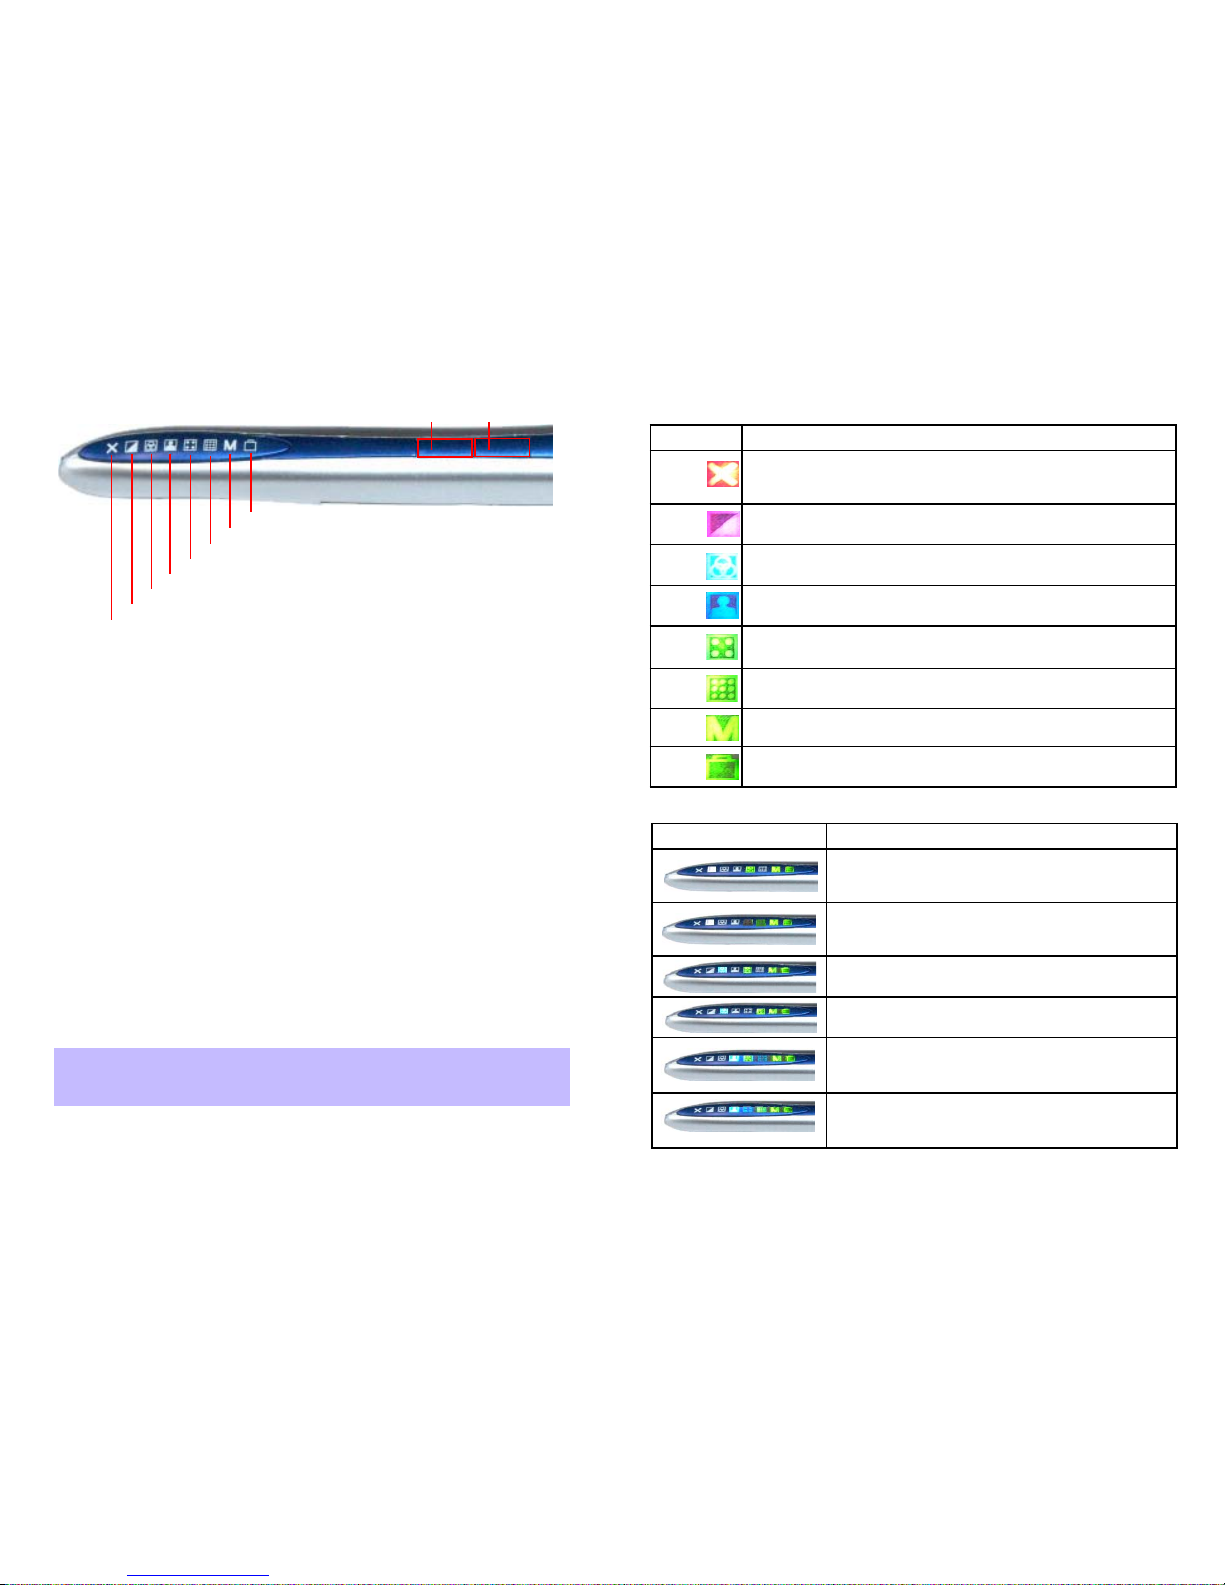
The 8 LED indicators at the top of the DocuPen from left to right indicate the following:
DocuPen Operation Manual 19
LED Explanation
Scan speed indicator - if this LED blinks during scan operation, then
slow down.
This LED indicates that the scan will be performed in Monochrome or
Grayscale mode.
This LED indicates that the scan will be performed in Docucolor
(Standard) mode [12bit color]
This LED indicates that the scan will be performed in Hi Quality
Photocolor mode [24bit color]
This LED indicates that the scan will be performed in standard resolution [100,200 dpi]
This LED indicates that the scan will be performed in high resolution.
[200,400 dpi]
This LED shows the available memory capacity. When it flashes in
Green 75-100%, Yellow/Orange 26-50%, Red <25% Free
This LED shows the available battery capacity on the pen When it
flashes in Green 75-100%, Yellow/Orange 26-50%, Red <25% Free
LED Combination Scan Mode Explained
Monocolor Standard-rez Mode - Takes the least
amount of memory. Best suited for black & white documents, graphics or handwriting.
Monocolor Hi-rez Mode - Best suited for fine print
documents, lower quality faxes or when the result
needs to be printed out.
Docucolor Standard-rez Mode - Best suited for webview of color images (magazines, newspapers)
Docucolor Hi-rez Mode - Same as above but image is
in higher resolution and best suited for print.
Photocolor Standard-rez Mode - Best suited for webviewing and printing of high quality images
Photocolor Hi-rez Mode - Best suited for printing of
high quality images.(NOTE: The images scanned in
this mode are very large in size!)
Scan Settings
As mentioned in the beginning of section (page 6) the DocuPen RC800 has two control
buttons and eight LEDs indicating the selected scan settings
By pushing the Power ON/OFF Resolution (Rez) button you can:
1.Turn scanner ON. The corresponding LEDs will light on, indicating the current scan
settings
2. Change between High Resolution and Standard Resolution setting
3. Turn scanner OFF - The DocuPen is designed to turn itself OFF automatically. You
can also turn it OFF manually by pushing and holding the button for 5 seconds
By pushing the Color Mode button you can switch between Mono, Docucolor
(Standard Color) and Photocolor setting
You have to start the scanning operation within a few seconds after turning the
DocuPen ON. If there is no manipulation, i.e. no movement or no setting-up of the
Scan mode, the scanner will turn itself OFF. You will need to turn it ON again.
Following on the next page you can see a detailed explanation of the different Scan
modes and the corresponding LED configurations.
DocuPen Operation Manual 18
Speed
Mono
Color
Standard
Rez
High
Rez
Memory
Battery
Standard
Color
Photo
Color
Power On/Resolution
Scan Speed
Mono Mode
Docucolor Mode
Photocolor Mode
Standard Resolution
High Resolution
Battery
Memory
Color Mode
Note: For optimal scan quality and memory usage we recommend
scanning in Monomode in 200 dpi or 400 dpi and in Docu- and Photo-
color Modes in 100 or 200 dpi.
Page 11
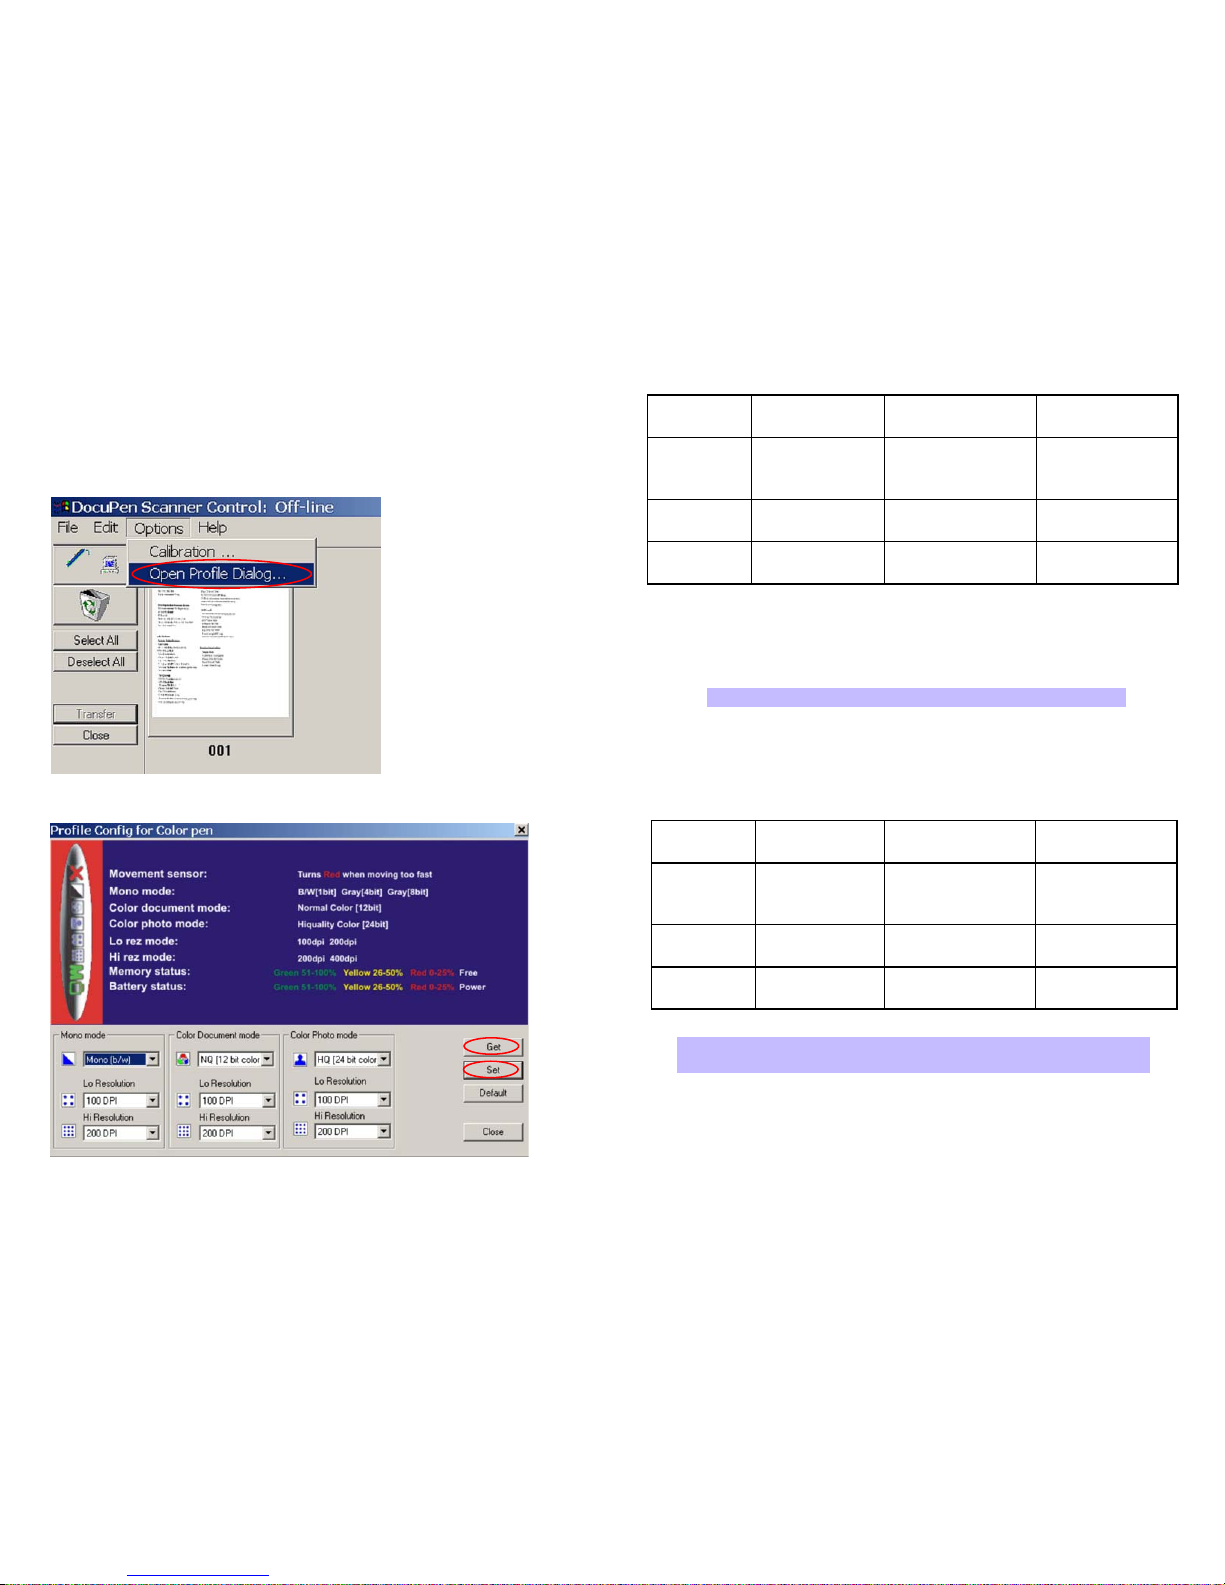
Scan mode - Profile Configurator
You can setup the exact values of the color and resolution modes, using the interactive
Profile Configurator dialog box. The Profile Configurator dialog is part of the
DocuPen Scanner Control window and can be started by selecting the Open Profile
Dialog.. from the pull-down menu in the DocuPen Scanner Control window.
In the Profile Configurator dialog you can choose from: (See table on following page)
DocuPen Operation Manual 20
Scan mode - Profile Configurator (continued)
You can select the desired values from the corresponding pull-down menus in the
Profile Configurator dialog. When desired selection is completed, you can press the
Set button. You will be prompted to turn the DocuPen ON and then the values will be
transferred to the DocuPen.
You can also check the current values in your DocuPen by selecting the Get button.
You will be then prompted to turn the DocuPen on and then the value will be displayed
in the corresponding cell.
By clicking the Default button the values will be automatically set to:
When desired color and resolution values are set and uploaded to DocuPen you can
close the Profile Configurator dialog. Click the Close button within the Profile
Configurator dialog box and resume your scanning operation.
DocuPen Operation Manual 21
Note: Your DocuPen must be CONNECTED to your PC
Mono Mode Standard Color
Document Mode
Hi-Color
Photo Mode
Color Depth
Mono [b/w 1Bpp]
Grayscale [4Bpp]
Grayscale [8Bpp]
Docu Color [12bit] Photo Color [24bit]
Standard
Resolution
100 or 200 dpi 100 or 200 dpi 100 or 200 dpi
Hi Resolution
200 or 400 dpi 200 or 400 dpi 200 or 400 dpi
Mono Mode Standard Color
Document Mode
Hi-Color
Photo Mode
Color Depth
Mono [b/w] Docu Color [12bit] Photo Color [24bit]
Standard
Resolution
200 dpi 100 dpi 100 dpi
Hi Resolution
400 dpi 200 dpi 200 dpi
Note: You must click on the Set button after every manipulation of the
data. Only then will the data be transferred and saved into the DocuPen!
Page 12
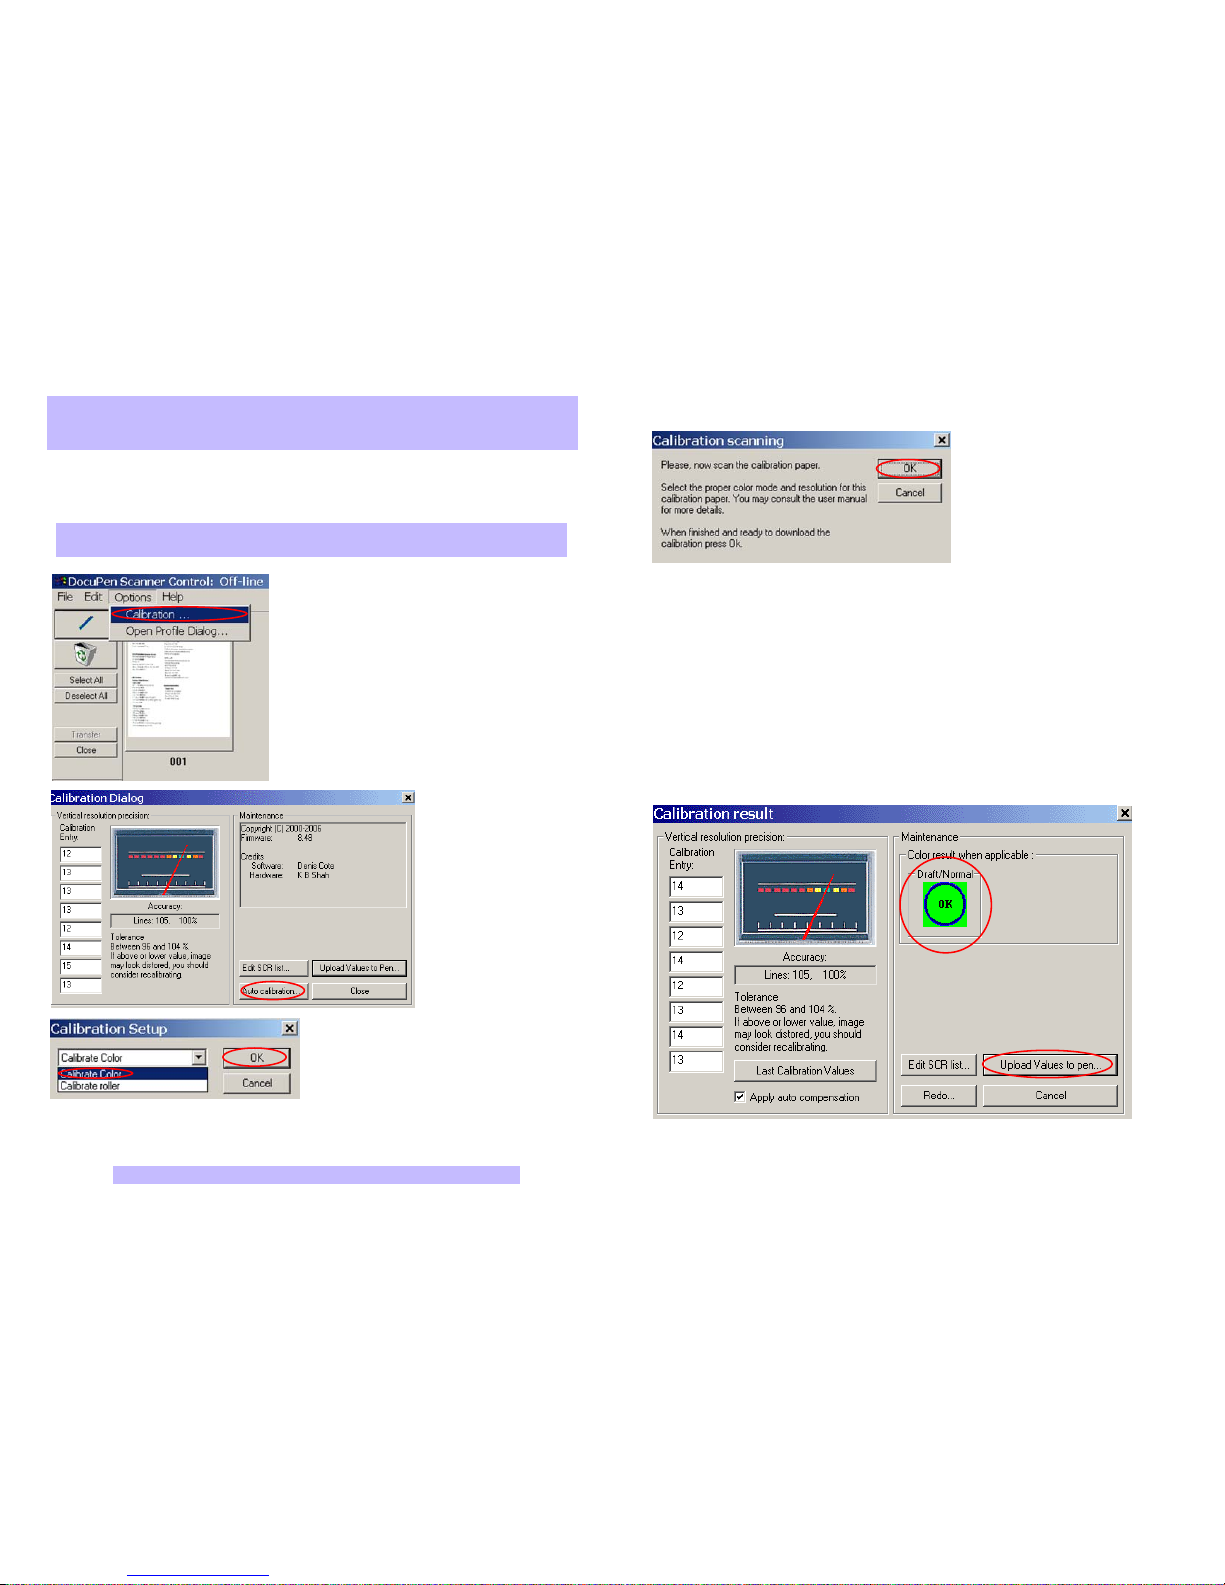
DocuPen Color Calibration procedure
The DocuPen is factory calibrated and there should be no need to re-calibrate. We
advise you to recalibrate only if you experience poor scan quality, e.g. scanned image
appears in white or black - meaning that the color conversion tables have been lost.
1. Open the DocuPen Scanner Control Window.
Click on Options and select Calibration.
2. In the Calibration
Dialog window that
appears click on the Auto
Calibration button
3. In the Calibration Setup window that
appears please Calibrate Color and click
OK.
4. You will be prompted to turn the DocuPen ON. Press the Power On button on your
DocuPen and Click OK in the Dialog window.
DocuPen Operation Manual 22
DocuPen Color Calibration Procedure (continued)
After the memory has been erased the Calibration scanning window will appear.
5. Disconnect the DocuPen and scan the Color Calibration sheet. For optimal
results you must scan in Photo Mode and in Hi-Rez. The Red LED on the DocuPen
will start flashing indicating that the DocuPen is in calibration mode. Position the
DocuPen on top of the Color Calibration sheet and glide it over the image from top to
bottom. Stop the movement about 2 cm below the last gray band.
6. The DocuPen will now save the Calibraton image into memory. After the calibration
image is saved into DocuPen’s memory, connect the DocuPen to your computer and
click OK in the Calibration scanning window. You will be prompted to turn the
DocuPen ON.
You should see the
Green OK sign in the Calibration result window - You have
successfully calibrated your DocuPen!
7. Finally, click Upload Values to pen button in the Calibration result window to send
the calibration result to the DocuPen. You will be prompted to turn the DocuPen ON.
Turn ON the scanner and click OK in the dialog window.
DocuPen Operation Manual 23
Note: You need letter-sized printouts for both Color (photo-paper is recom-
mended for Color calibration) and Roller Calibration. Please download the files
from the CD and print them before starting the calibration procedure
Note: Your DocuPen must be CONNECTED to your PC before starting the
Calibration procedure
Note: Your DocuPen memory will be erased!
Page 13
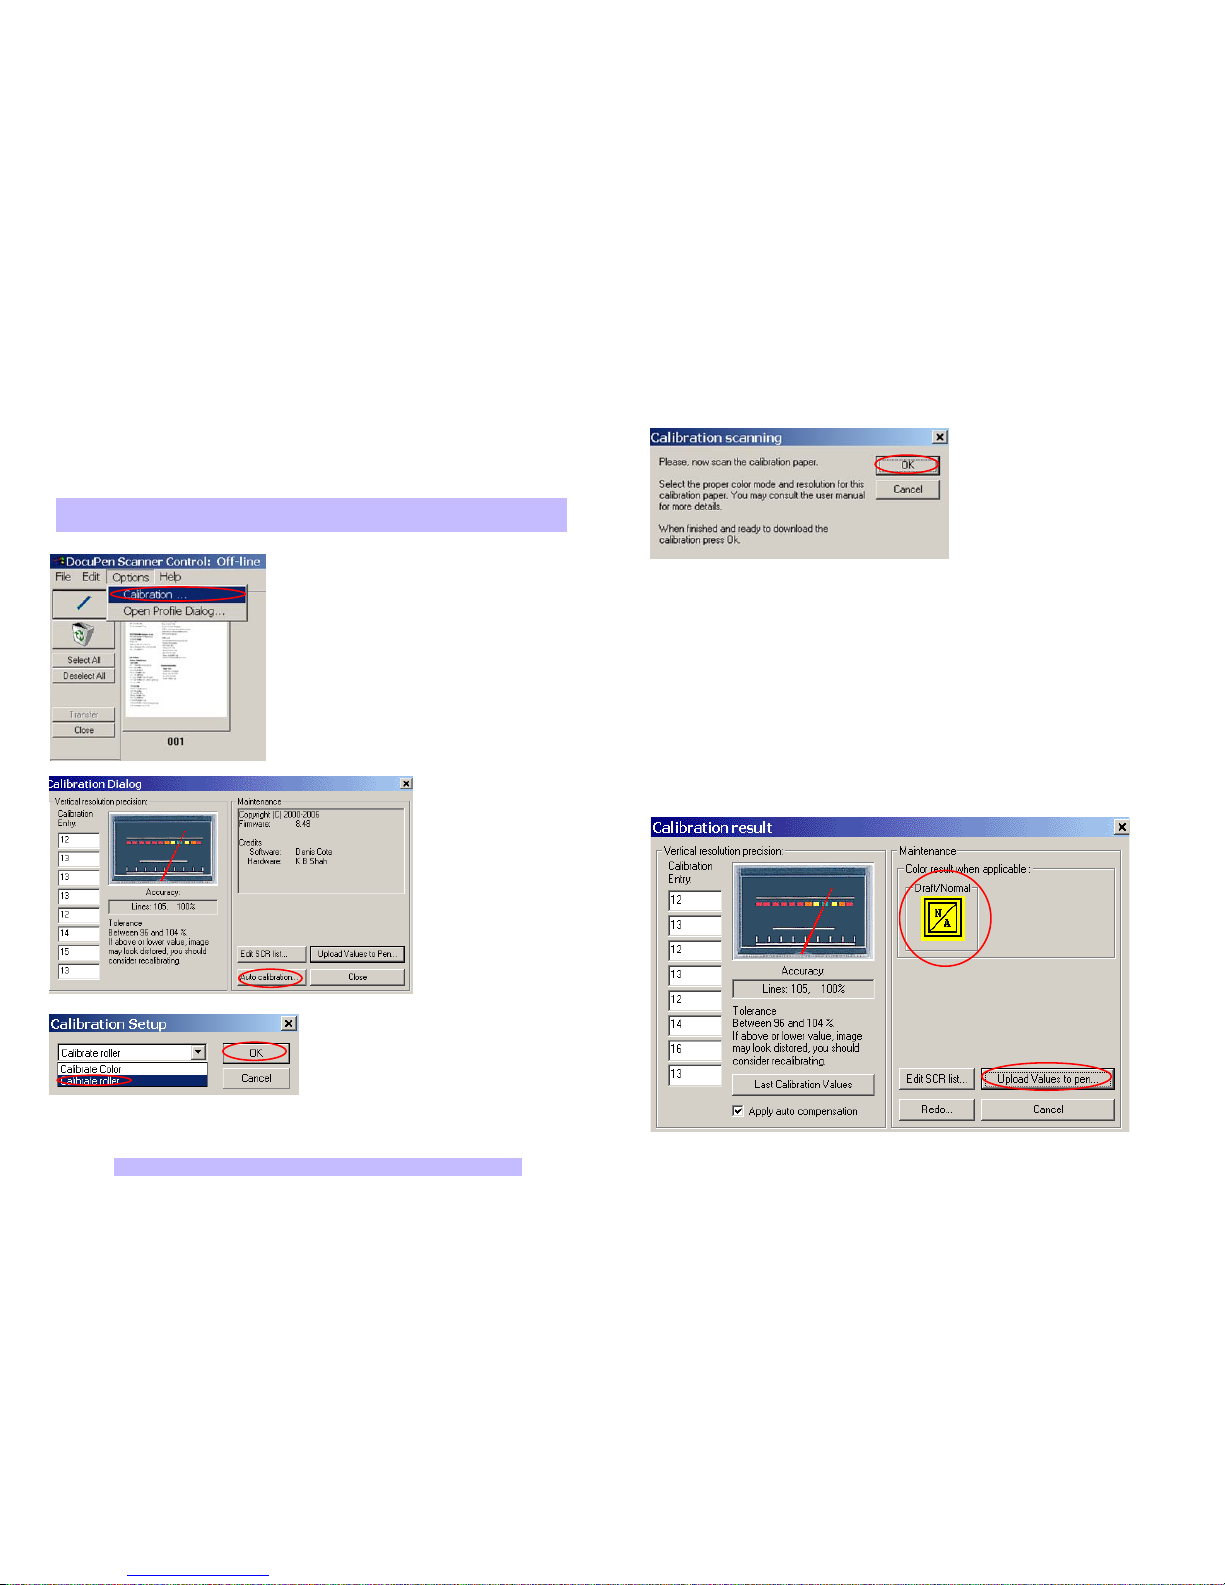
DocuPen Roller Calibration Procedure
If your scanned image looks disproportionally stretched (or shrunk) then you need to
calibrate the rollers.
As a rule, color calibration must be done first, before roller calibration
1. Open the DocuPen Scanner Control window.
Click on Options and select Calibration.
2. In the Calibration
Dialog window that
appears click on the Auto
Calibration button
3. In the Calibration Setup window that
appears please Calibrate Roller and click on
OK.
4. You will be prompted to turn the DocuPen ON. Press the Power On button on your
DocuPen and Click OK in the Dialog window.
DocuPen Operation Manual 24
Note: Your DocuPen memory will be erased!
Note: Your DocuPen must be CONNECTED to your PC before starting the
Calibration procedure
DocuPen Roller Calibration Procedure (continued)
After the memory has been erased the Calibration scanning window will appear.
5. Disconnect the DocuPen and scan the Roller Calibration sheet. For optimal
results we recommend to perform the Roller Calibration in Mono Mode B/W by
Resolution 200dpi. The Red LED on the DocuPen will start flashing indicating that the
DocuPen is in calibration mode. Position the DocuPen on top of the Calibration sheet
and glide it over the image from top to bottom. Stop the movement at the bottom of the
Calibration sheet.
6. The DocuPen will now save the Calibration image into memory. After the calibration
image is saved into DocuPen’s memory, connect the DocuPen to your computer and
click OK in the Calibration scanning window. You will be prompted to turn the
DocuPen ON.
You should see the
yellow
N/A
sign in the Calibration result window - You have
successfully calibrated your DocuPen!
7. Finally, click Upload Values button in the Calibration result window to send the
calibration result to the DocuPen. Turn ON the scanner and click OK.
DocuPen Operation Manual 25
Page 14
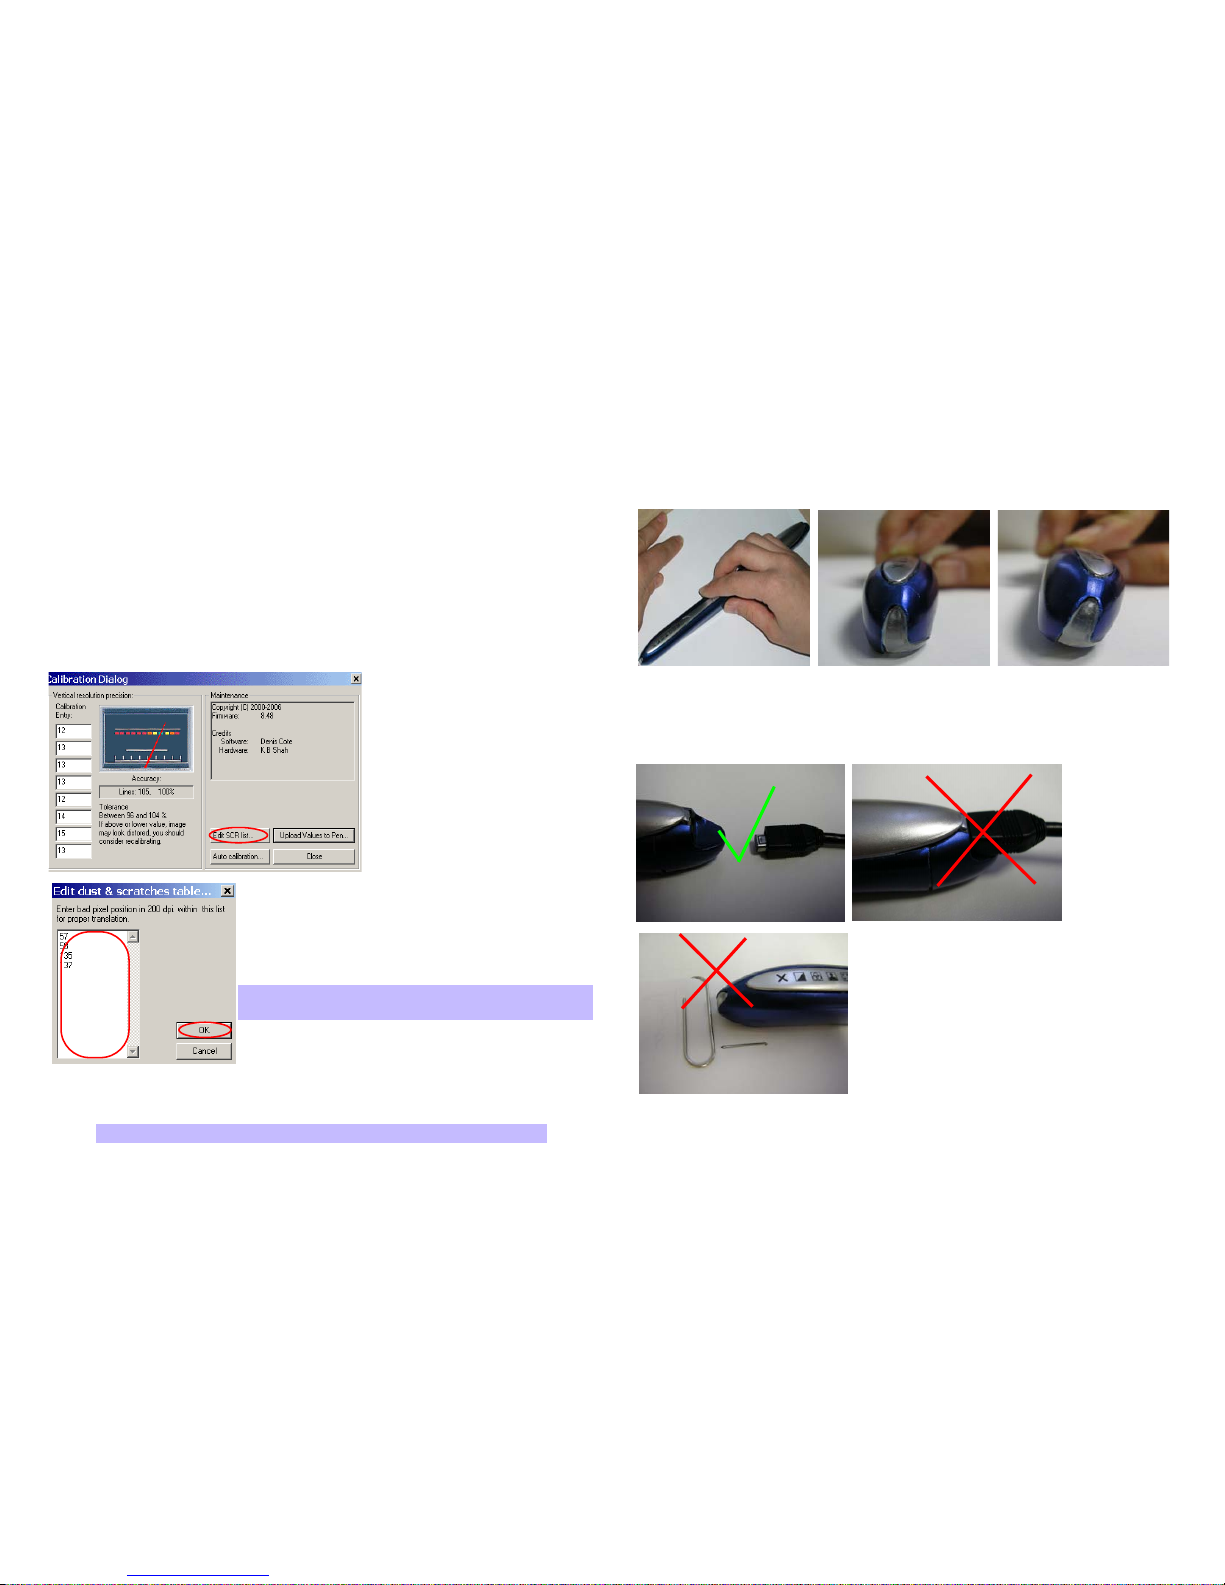
Points to Remember Before You Scan
What you scan is what you get. The DocuPen is sensitive to changes in direction and
scan speed and records every movement you make. The more uniform your scan swipe,
the better your scanned image results. This may take a little practice at first. Scanning
too quickly or abruptly changing acceleration causes the RED X LED to flash, reminding
you to reduce your scanning speed. To obtain the best scan results, note the following:
The document you scan must be well supported on a smooth flat surface. It is recommended that you hold the top of the document with one hand while you scan with the
other. Place the DocuPen just above the area you want to scan, with the LEDs on the
left side of the document to be scanned.
Detach the USB
cable while scanning. It could hinder your gliding
motion by pulling
on one side of the
DocuPen.
Remove staples or clips as they will impede the gliding movement and the resulted scan will be distorted.
Apply even pressure, in the center of the scanner to
allow the rollers to rotate smoothly.
Press the Power ON button, select the desired color and resolution settings and slowly
glide the DocuPen down across the area you want to scan. The unit begins scanning as
soon as you start moving the pen. When you stop moving, the scan light (at the bottom
of the pen) shuts off and the DocuPen saves the data. You must wait momentarily till the
data is stored in memory. The DocuPen will then automatically shut off.
DocuPen Operation Manual 27
Hold document
Keep DocuPen flat
Do Not tilt
DocuPen Scratch Removal Procedure
The DocuPen uses contact image sensors to capture the information you would like to
scan. In case you accidentally scratch the lens surface or dust particles enter within the
lens the scanned image could have a distortion in the location of the scratch.
If the Auto Color Calibration procedure does not solve the problem completely then you
can refer to the Manual Scratch Removal procedure.
The Scratch Removal procedure allows you to manually enter the scratch, dust or dead
pixel(s) location(s) so the DocuPen can correct the distortion.
In order to be able to edit the Scratch list you need to perform an image scan in resolu-
tion 200 dpi. Open the scanned image in Microsoft Paint (standard Windows OS appli-
cation) and place your mouse cursor on the location of the distortion. In the lower right
corner of the Microsoft Paint window you will then see the precise {x,y} coordinates of
the error pixel location in the format e.g. {135,50}. If the distortion covers more than one
pixel please note all error locations.
To correct the error pixels please
open the DocuPen Scanner
Control window. Click on Options
and select Calibration. In the
Calibration Dialog window that
appears click on the Edit SCR
list..button
In the Edit Dust&Scratches dialog window that
appears please enter the error pixel {X} coordinate, e.g. if
the error pixel location is {135,50} enter {135}.
When you enter all error pixel locations please click OK.
Finally, click Upload Values button in the Calibration dialog window to send the values
result to the DocuPen. You will be prompted to turn the DocuPen ON. Turn ON the scanner and click OK in the dialog window.
Perform another test scan to test if the distortion has been corrected. In case there are
still some inaccuracies please perform the procedure again.
DocuPen Operation Manual 26
Note: You can enter maximum 4 consecutive pixels at
a time and a maximum of 128 in total.
Note: Your DocuPen must be CONNECTED to your PC
Page 15
Appendix
A. DocuPen RC 800 Specifications
Size - 8.9”X0.5”x0.5” (227X13x13 mm)
Weight - 2 oz, 57 grams
Resolution - 100-400 dpi
Scan mode - B/W[1bit], Grayscale [4bit/8bit], Standard color [12 bit], Hi color [24 bit]
Scan width - 8" (205mm)
Scan Speed - 4-10 seconds Letter-size page (depending on resolution and color mode)
Memory - 8 MB flash; or external MicroSD (sold separately). MicroSD memory card
slot - 128 MB, 256 MB, 512MB. The number of pages varies depending on
text, graphics, and scanning resolution
Battery - Lithium Ion Rechargeable
Battery Charge - Full Battery Charge 50 min
Software interface - PenTwain driver & DocuPen application, OCR Software
Scanning method - Contact image sensor
Included Accessories - USB Cable, Leather Case, CD - Installation and Manuals,
Quickstart Guides
SOFTWARE SUPPORT
Windows 2000/ME/XP TWAIN driver interface
Windows Imaging or other scan software such as PaperPort OCR
CD-ROM installation disk
DocuPen Operation Manual 29
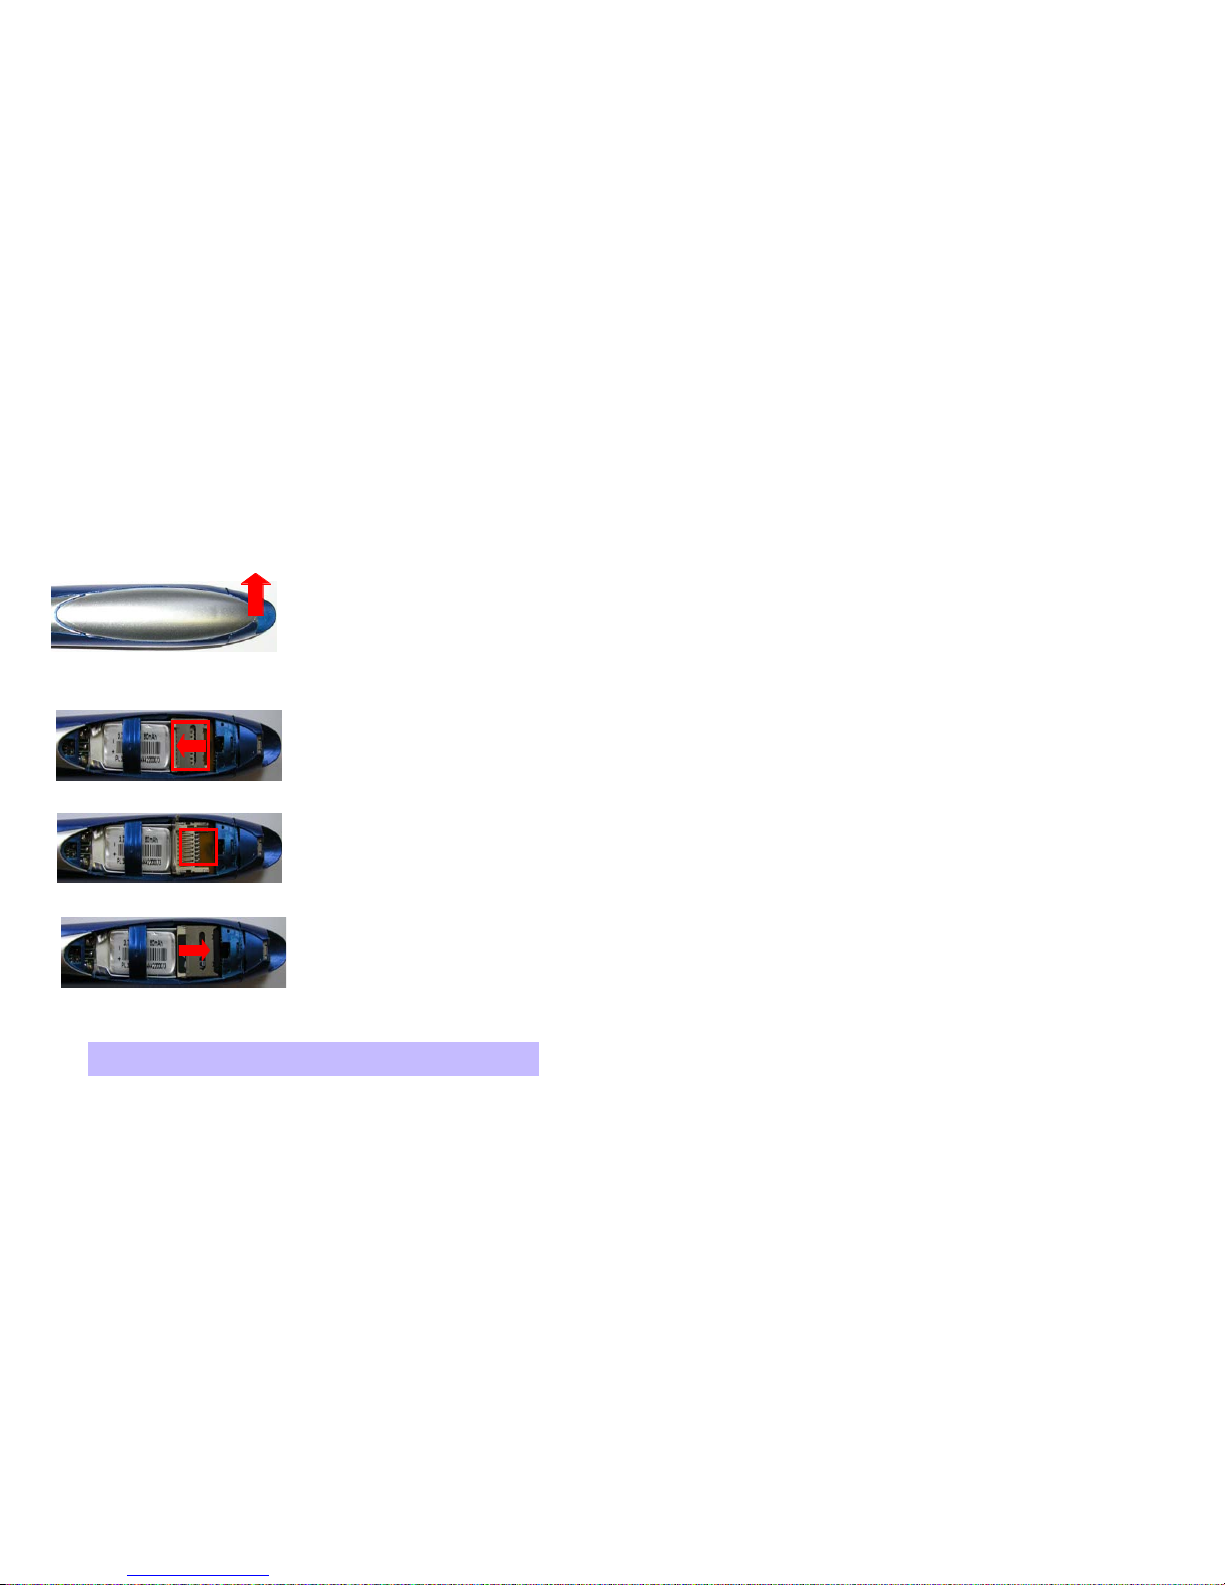
On-board memory and External memory card
DocuPen RC800 is equipped with 8MB on-board Flash-memory and a slot for external
MicroSD memory card which gives you almost unlimited capacity.
The MicroSD memory card slot is located on the right-hand side of the DocuPen under
the removable cover.
To remove the cover you have to place your index finger on the right side of the cover
(just above the USB port) and gently lift up.
The cover detaches and you see the MicroSD
memory slot covered by the cradle.
Slide the cradle to the left and lift it up to open.
Place the MicroSD card in the slot, press lightly
and close the cradle, sliding it to the right until
it clicks. Close the DocuPen cover.
The formatting of the memory is accomplished by choosing the recycle symbol in the
Docupen scanner control window to erase the DocuPen memory which also formats
this new memory. (See Erasing the DocuPen Memory in this manual for more details,
p.17)
DocuPen Operation Manual 28
Closed cover
Open Cover/
External memory slot
Open cradle
MicroSD card inserted
Note: Newly inserted external memory must be formatted before
it is recognized by the Docupen
Page 16

B. Proper Handling and Safe Use
Avoid bending or dropping the DocuPen unit.
Do not scan over sharp objects such as staples, or paper clips
Do not store the unit in high, or very low temperatures, or humid or dusty
places.
Do not place or drag the scanner lens down on a hard abrasive surface.
If you drop the unit in water or get water inside it, contact your Planon
Systems Solutions Inc. representative.
To help keep the scanning area clean, store the unit in the leather pouch when
not in use.
After storing for extended periods of time it is recommended to plug the unit in
to a USB source to recharge the battery for optimum performance.
If the unit becomes dirty, it can be wiped with a soft damp cloth or alcohol
swab.
If unit is left in extreme cold or hot conditions, allow to adjust to normal room
temperatures before proceeding to scan.
Avoid any abrasive or harsh chemicals.
Do not leave this device within the reach of children.
C. Technical Support
Planon Systems Solutions Inc.
1-877-DOCUPEN (1-877-362-8736)
[email protected]
DocuPen Operation Manual 30
 Loading...