

Page 1

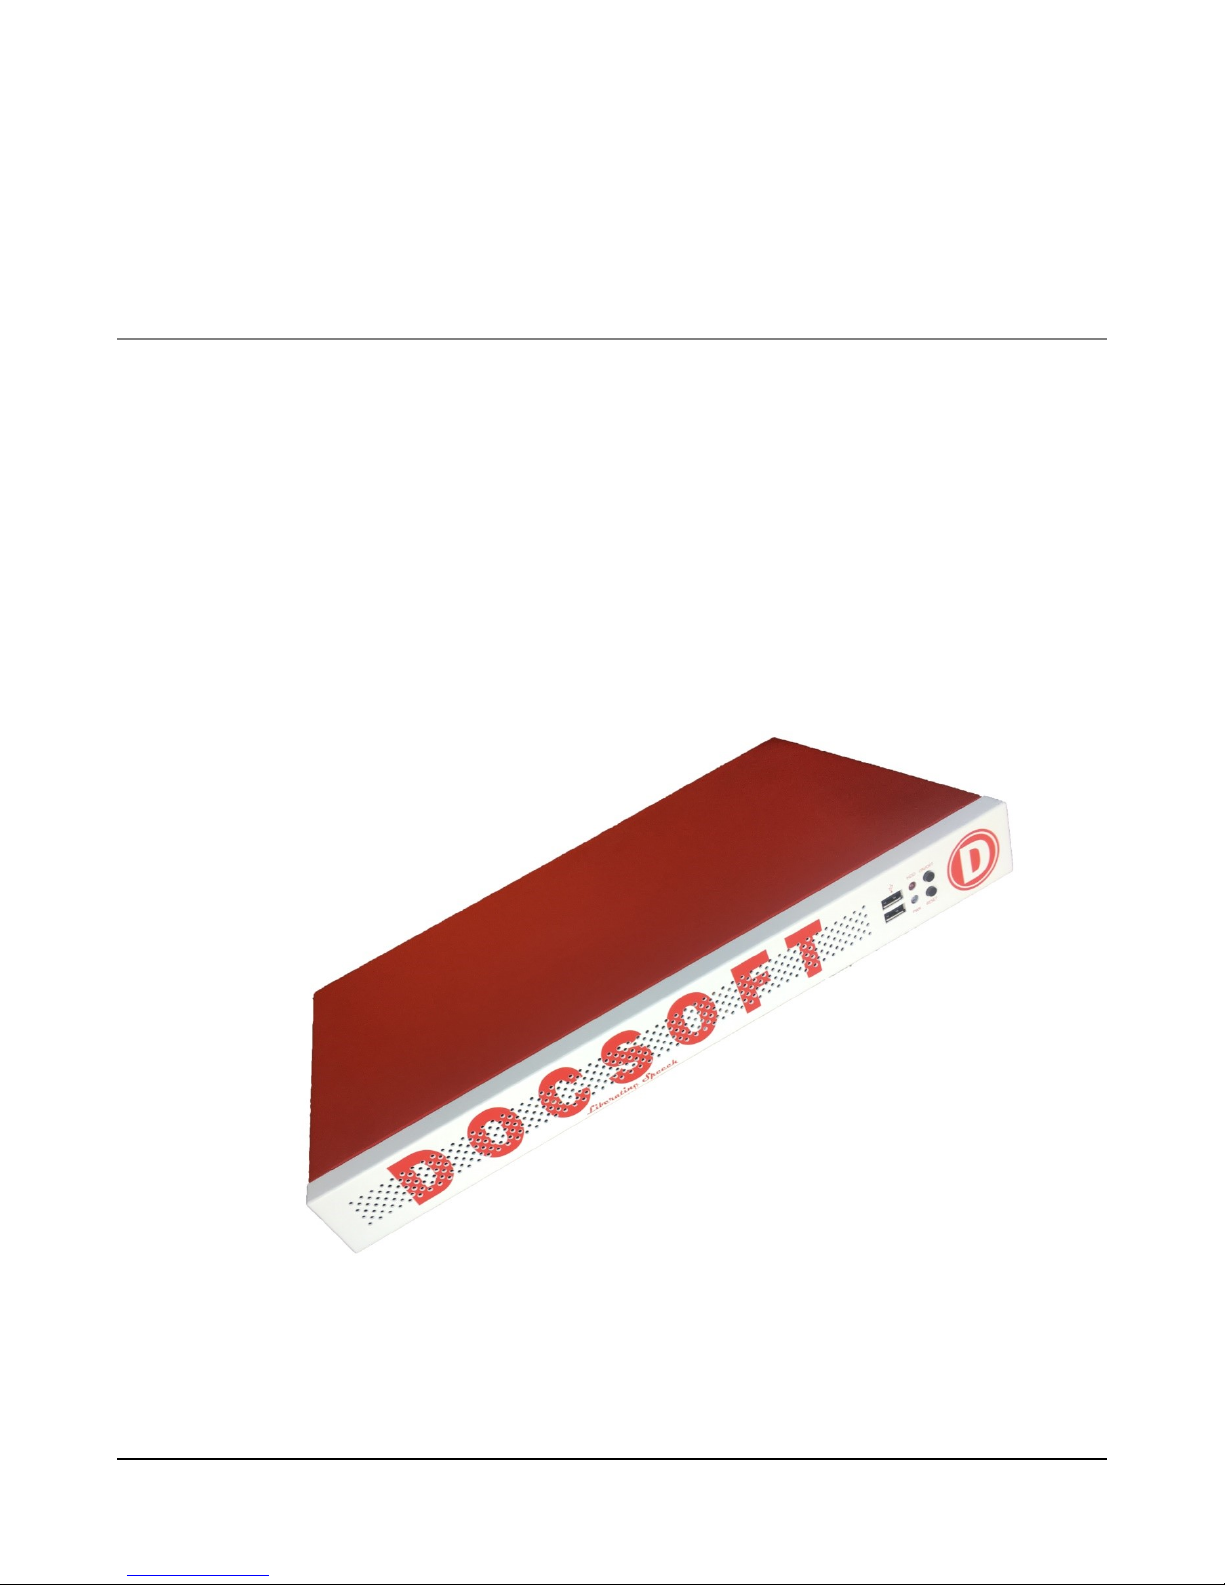
DOCSOFT, INC.
Liberating Speech
Docsoft:AV
User Guide
Page 2
D OC S O F T , I N C O R P O R A T E D
Administrative User Guide
Docsoft, Inc.
115 E California Avenue • Suite 400
Oklahoma City, OK 73104
Phone 405.236.2466 • Fax 405.235.2250
Page 3

Table of Contents
1. Introduction ..................................................................... 1
2. Quick Start Guide ............................................................ 2
2.1 Accessing Docsoft:AV for the first time ................................ 2
2.2 Creating Docsoft:AV User accounts ..................................... 2
2.3 Connecting Docsoft:AV to your network ............................... 2
2.4 Configuring Docsoft:AV Hardware Management for the first
time 3
3.1 Installation Guide ............................................................ 4
3.1.1 Overview .............................................................................. 4
3.1.2 Site Preparation ................................................................... 4
3.2 Mounting Instructions ...................................................... 5
3.2.1 Rack Mount .......................................................................... 5
3.2.2 Wall mount ........................................................................... 5
3.2.3 Table Top / Flat Surface Mount ........................................... 5
4. User Accounts ................................................................. 6
5. User Interface ................................................................. 6
6. General Tasks ................................................................. 7
6.1 Login/Logout......................................................................... 7
7. Speaker Profiles .............................................................. 7
7.1 Creating a speaker profile .................................................... 8
7.2 Edit a Speaker Profile ........................................................... 8
7.3 Delete a Speaker Profile ...................................................... 8
7.4 Export a Speaker Profile ...................................................... 8
7.5 Delete a Speaker Profile ...................................................... 8
8. Training with a Media File and an Exact Transcript ......... 9
8.1 Train a Speaker Profile ......................................................... 9
8.2 Add a New Vocabulary to an Existing Speaker Profile ......... 9
8.3 Delete a Vocabulary from an Existing Speaker Profile ......... 9
8.4 Populate a Vocabulary of a Speaker Profile ......................... 9
Page 4

9. File Repositories ........................................................... 10
9.1 Create a File Repository ..................................................... 11
9.2 Edit a File Repository ......................................................... 11
9.3 Delete a File Repository ..................................................... 11
9.4 Create a Repository From a Hosted Site ............................ 12
9.4.1 Create an Ensemble Repository .................................................... 12
9.4.2 Create a Kaltura Repository .......................................................... 13
9.4.3 Create a Mediasite Repository ...................................................... 14
9.4.4 Create a Panopto Repository ........................................................ 15
10. Uploading Files ................................................................ 16
11. Viewing and Processing Files ........................................... 16
11.1 Manage Uploaded Files ..................................................... 17
11.2 Export a Transcript or a Closed Caption File ...................... 17
11.3 Re-Process Files ................................................................ 17
11.4 Re-Upload a Transcript ...................................................... 18
11.5 Protect Files ....................................................................... 18
12. Transcript Styles.............................................................. 18
12.1 Create a New Transcript Style............................................ 18
12.2 Edit the Transcript Style ..................................................... 19
12.3 Edit a File Repository ......................................................... 19
13. Monitoring Events ............................................................ 19
14. User Profiles .................................................................... 19
14.1 Change Email and Notification Preferences ...................... 19
14.2 Change Password .............................................................. 19
15. Administrative Tasks ....................................................... 20
15.1 User Management ............................................................. 20
15.2 Add a User ......................................................................... 20
15.3 Activate a Registered User ................................................ 20
15.4 Edit a User ......................................................................... 21
15.5 Delete a User ..................................................................... 21
15.6 Impersonate a User ............................................................ 21
16. Monitoring System State/Event ....................................... 22
16.1 Check System State .......................................................... 22
16.2 Check System Events ........................................................ 22
Page 5

17. Managing Hardware ........................................................ 23
17.1 Network Settings ................................................................ 23
17.2 Email Settings .................................................................... 24
17.3 Time Settings ..................................................................... 24
17.4 SSL Settings....................................................................... 24
17.4.1 To generate the SSL certificate request:.......................... 25
17.4.2 To install the Certification file approved by CA request: .. 25
17.4.3 To use a self-signed certificate: ....................................... 25
17.4.4 To delete an installed certificate: ..................................... 25
18. Upgrading the System ..................................................... 26
19. Backing up the System .................................................... 26
19.1 Manual Backup .................................................................. 26
19.2 Scheduled Backup ............................................................. 27
20. Restoring Data ................................................................ 27
21. Power Control ................................................................. 27
22. Appendix ......................................................................... 28
A. Supported Media File Formats ........................................... 28
B. Supported Network Protocols ............................................. 28
C. Word List File Format ......................................................... 29
D. Transcript and Caption Output Formats ............................. 29
E. Docsoft Contact Information ............................................... 30
Page 6

Page 7

D O C S O F T : A V U S E R G U I D E
Section
I
D
1. Introduction
ocsoft:AV is a powerful software solution designed to capture (or audio-mine) the
spoken content in digital audio/video (AV) files. This appliance can then be used
to automatically generate transcripts in various formats, including plain text and
even a native transcript that can be easily edited through our proprietary editing
software, Docsoft:TE. The final output can be automatically transformed to output formats
such as Windows SAMI, Quicktime text, Timed Text for Flash, Web VTT, etc.
U N L E A S H I N G T H E T R U E P O W E R O F T H E A P P L I A N CE
Docsoft:AV is an automated system that monitors locations specified by users that contain
media files, and automatically creates transcripts that can be converted into a closed caption file
format. The core of the system is an Automatic Speech Recognition (ASR) engine. The ASR
will recognize sound waves, and convert them into text.
A standard speaker profile is already built into the system, for speakers who are fluent with the
plain English language. For speakers who have a different accent or talk about a specialized
field, the ASR engine accuracy can be greatly improved by specifying user parameters such as
voice characteristics and topic/vocabulary. The Docsoft:AV system helps to build a speaker
profile for a specific user, and automatically “trains” it to the speaker’s voice using media files
and their exact transcript. The appliance also allows the creation of separate vocabularies for
each speaker profile.
The user may provide media files via an upload process or create a file repository on a server
that is located on their network. A File Repository location can be protected by credentials
(user name and password).
1
Page 8

D O C S O F T : A V U S E R G U I D E
2
Section
II
2. Quick Start Guide
Setup requirements:
2.1 Accessing Docsoft:AV for the first time
1. Connect the internal (marked INT) network port into your laptop.
2. Start the Docsoft:AV appliance
*Note: the appliance has DHCP Server role enabled.
3. Start up your laptop with DHCP enabled.
4. Using any web browser (e.g., Google Chrome), go to http://192.168.7.1.
5. On the bottom right of the login screen, click on “Login as System”. This method will
ALWAYS allow you to log in with administrative privileges.
2.2 Creating Docsoft:AV User accounts
1. Click the “Users” link under the Administration heading.
2. Click the “Create User” button.
3. Enter the information requested.
4. To create an ADMIN account, click the “Allow user administer appliance and users”
checkbox.
*Note: it is recommended that at least one admin account is created, especially for
admin features when accessing the appliance within the network (see below)
5. Leaving this unchecked will create a regular account. These users will see only the “Main” and
“Profile” menus.
*Note: it is recommended that the rest of the users get a regular account
2.3 Connecting Docsoft:AV to your network
1. Connect the external (marked EXT) network port into your network.
2. Verify access to the server through http://<appliance>, where <appliance> is either one of
the following:
a. The name configured for the Docsoft:AV appliance;
b. The static IP address (if assigned);
c. The dynamic IP address
3. Log in using the ADMIN account created above.
Ethernet cable, Laptop
Page 9
D O C S O F T : A V U S E R G U I D E
3
2.4 Configuring Docsoft:AV Hardware Management for the first time
1. Network settings: configure the name of the appliance, IP address, and DNS settings as
specified by your network administrator.
2. Email settings: input the SMTP Server settings of your network to receive transcription
notifications. Admin emails will also receive operations notifications such as appliance reboot.
3. Time settings: input the NTP server and time zone settings in this section.
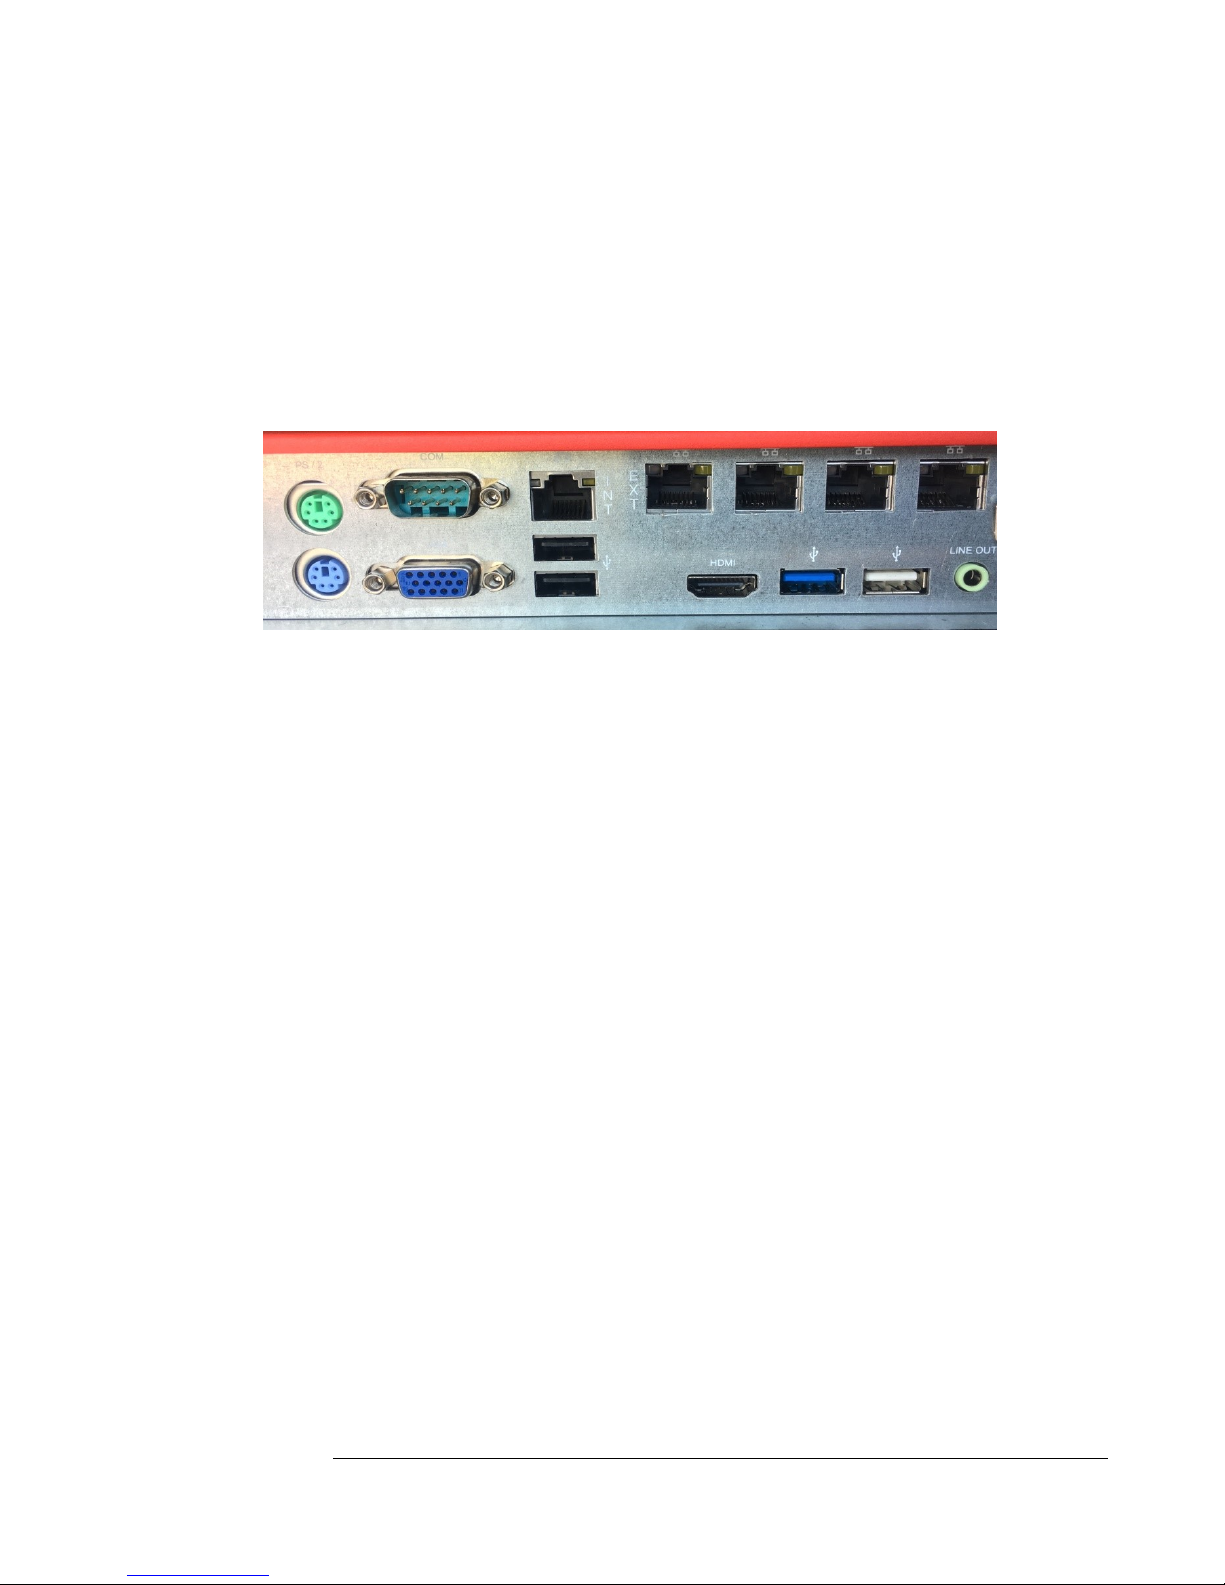
FIGURE 2.1 shows the rear section of the appliance. Note that the left most LAN port is marked “INT”, and the LAN port directly beside
it is marked “EXT”.
Page 10

D O C S O F T : A V U S E R G U I D E
4
ITEM
AMOUNT
Docsoft:AV Appliance
1
U-shaped handles
2
L-shaped Metal plates
2
Power cord
1
Docsoft:TE Installation DVD
1
User Guide
1
Section
III
!
3.1 Installation Guide
3.1.1 Overview
This document provides basic information to install and configure the Docsoft:AV
appliances. For more information or support issues, see Appendix E for Docsoft Inc.’s
full contact information.
3.1.2 Site Preparation
Docsoft:AV Appliances are designed to be mounted in a standard 19 inch (48.26 cm)
equipment rack, placed on a table top, or mounted on a wall. Before installing the
appliances, verify that the chosen location for installation meets the following site
requirements:
Power— The appliances are installed near an easily accessible 100-240 VAC, 50-
60 Hz outlet. After connection, the power LED on the appliance should be lit.
Clearance— There is adequate clearance for operator/maintenance personnel to
access cabling, power connections and for ventilation.
Cabling— The cabling should be routed to avoid sources of electrical noise such
as radio transmitters, broadcast amplifiers, power lines or fl uorescent lighting.
Environmental Requirements— The appliances are designed to operate from
32 to 113°F (0 to 45°C) at a relative humidity of up to 95 percent, noncondensing.
Before unpacking the appliance, inspect the package and immediately
report any evidence of damage.
The Docsoft:AV appliances ships in a single box. Each box will contain:
Page 11
D O C S O F T : A V U S E R G U I D E
5
3.2 Mounting Instructions
To ensure optimal performance, the Docsoft:AV appliance must be correctly installed on
a rack or shelf intended for this type of equipment and purpose.
3.2.1 Rack Mount
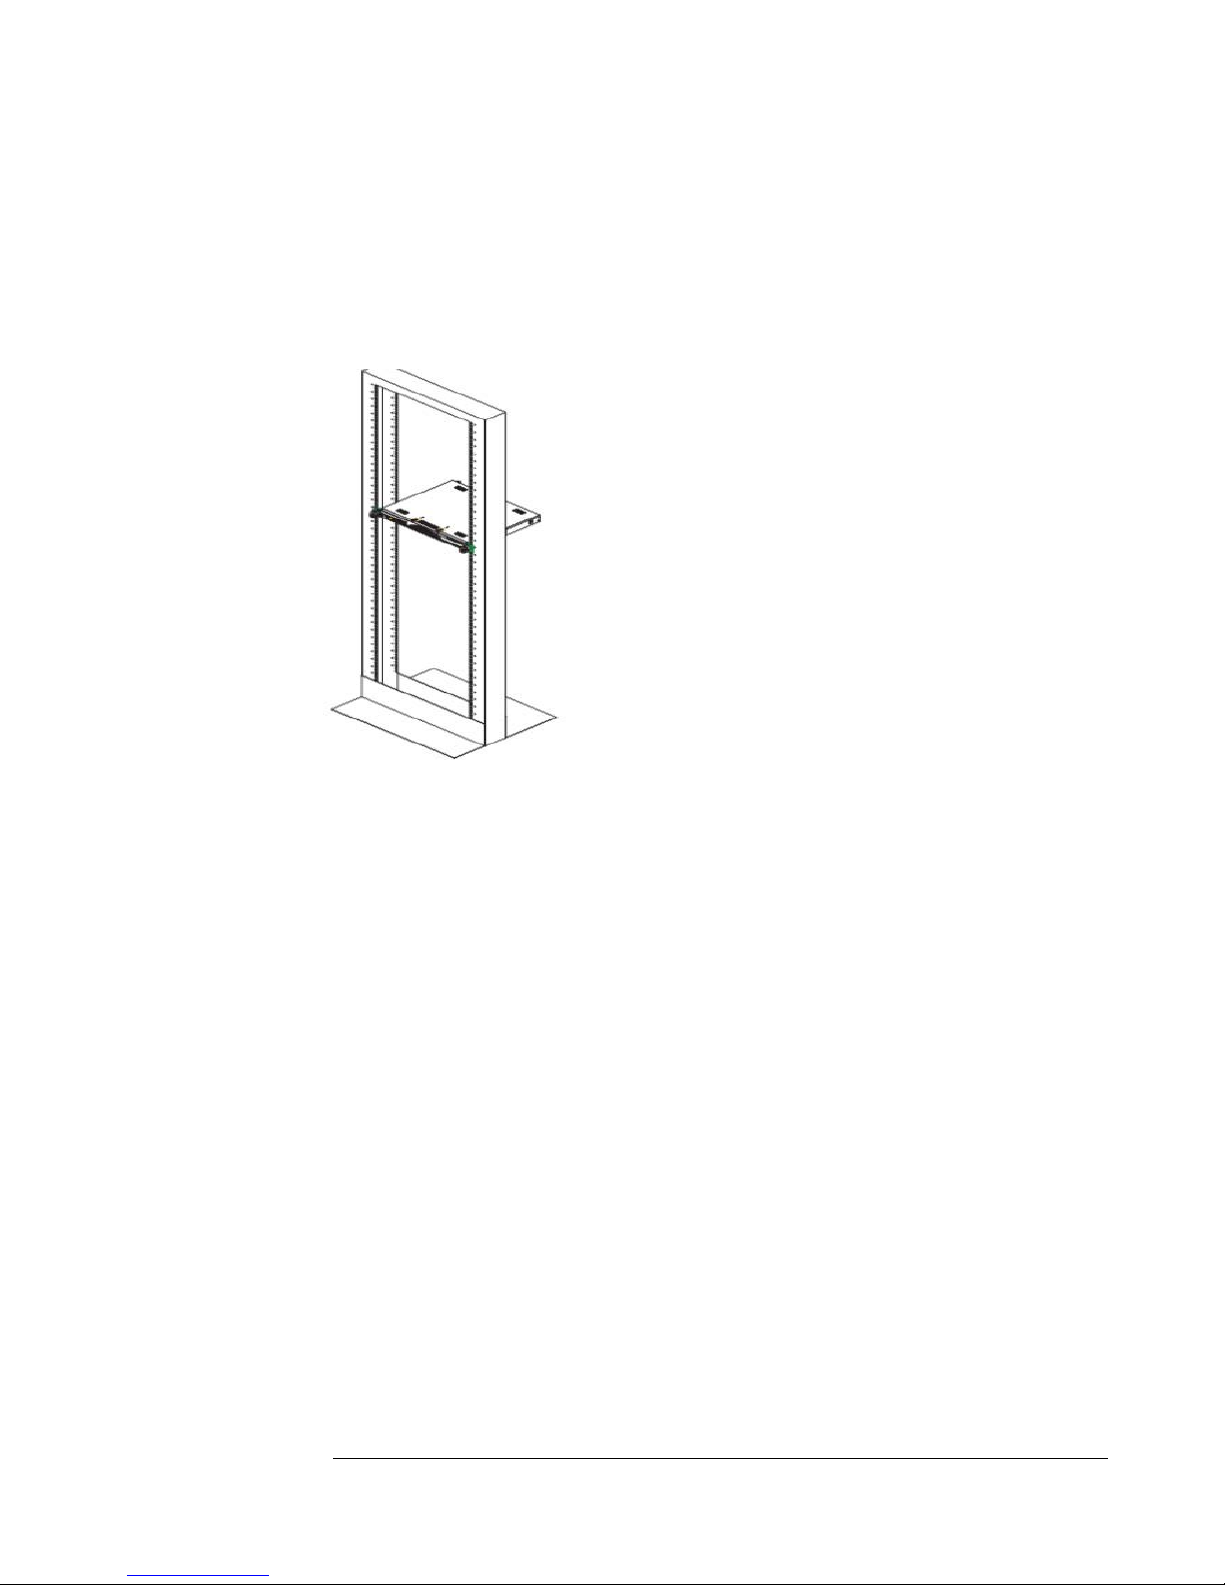
For mounting into a standard 19” rack, ensure
one (1) rack unit is available for each appliance.
Use the mounting handles and plates that were
included with the shipment, and secure with a
minimum of two (2) ¼” screws (not included) for
each bracket.
FIGURE 3.1 shows the installation of an appliance in a typical 19-
inch equipment rack.
3.2.2 Wall mount
For a wall mount application, the installed mounting brackets will require re-orientation by
the customer. Appliances should only be mounted with bottom of appliance against wall.
Ensure wall is sturdy enough to support appliances. Do not obstruct ventilation holes.
3.2.3 Table Top / Flat Surface Mount
The appliances may be mounted on a flat surface or table top, provided that the surface
be able to support the weight of the appliances for an extended period of time.
Place the appliance on a flat surface, ensuring a minimum of 2 inches (5.08 cm) of
clearance on each side and 5 inches (12.7 cm) of clearance at the back to allow for proper
ventilation and accessibility.
Page 12
D O C S O F T : A V U S E R G U I D E
6
Section
IV
4. User Accounts
To perform any task on the appliance, users must be authenticated by entering a user name and
password on the login screen.
There are two kinds of users: regular users and administrators. Every user can either register
themselves or be registered by the appliance administrator.
Every user will have limited amount of disk space on the appliance. The amount of space is
specified by the appliance administrator. This disk space will be used to store uploaded fi les,
speaker profiles, and temporary files (such as files from remote server and transcripts). The
appliance will NOT store media files.
Note: Docsoft recommends backing up the appliance (via the Backup/Restore in the
Hardware Management menu) to another file server
5. User Interface
The appliance is controlled using the web interface. Contact the appliance administrator in
order to acquire its IP address and obtain a user account. Most of the appliance screens will
have five components: header, navigation toolbar, page title, page content, and footer.
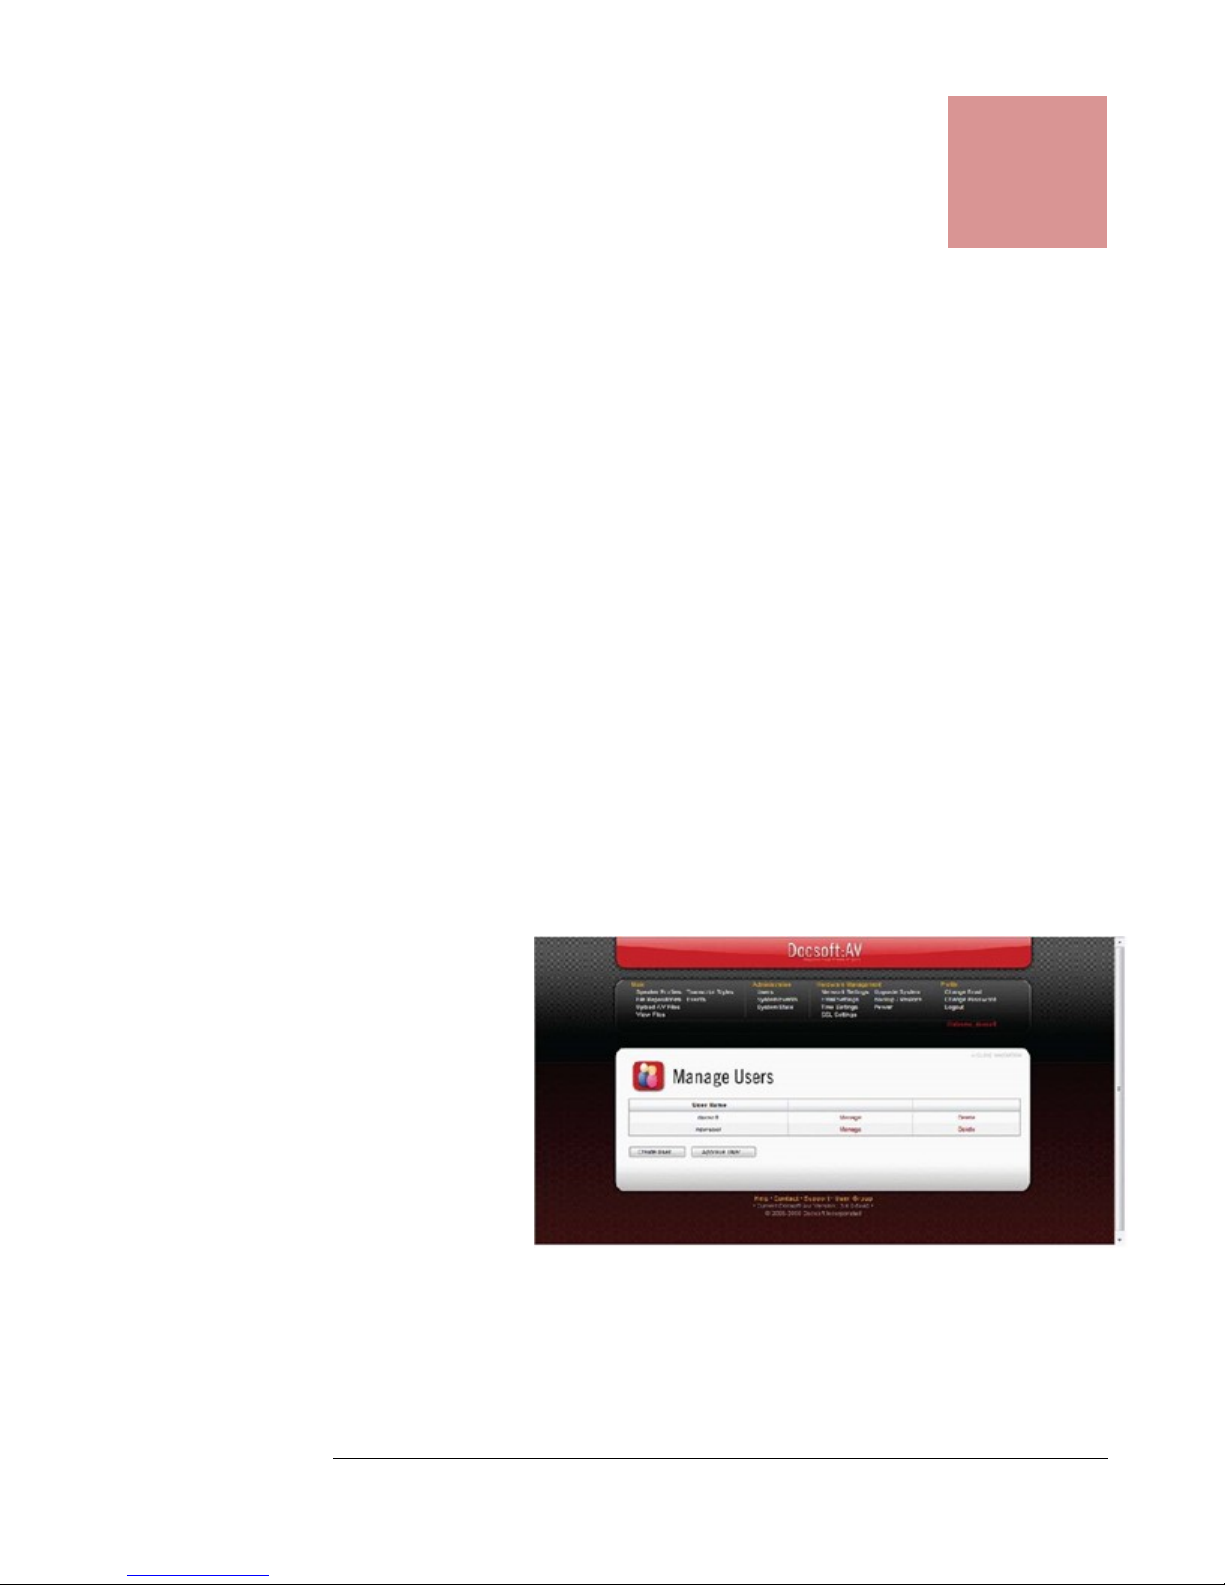
The header, inscribed with
a Docsoft:AV banner, is a
clickable button that will
take you back to the Start
page.
The footer has links that
point to online help and
support web sites, and the
Docsoft : AV appliance
version information.
The navigation toolbar
contains a list of all operations that can be performed by the user according to his role. The
navigation toolbars for a regular user and an appliance administrator are different. The
administrator’s toolbar is in addition to the user’s toolbar and has administrative operations
such as backup, network settings, user management, and appliance state control.
Page 13

7
6. General Tasks
This section gives an overview of basic tasks that can be performed with the Docsoft:AV
application. The installation and initial configuration is out of the scope of this manual. See the
Appliance Installation and Configuration Guide for more information.
6.1 Login/Logout
To access appliance functionality
you have to be authenticated.
Usually, the first screen that you
will see is the Login Screen.
You must provide a correct user
name and password to access the home and other screens. The appliance will lock you out after
5 unsuccessful attempts. If this happens, please contact the appliance administrator to unlock
your account.
If you don’t have an account on the appliance, ask the appliance administrator to register you
or use the registration screen to self-register. Click the “Register account” link and fill in your
information: user name, e-mail address, password, and secret question/ answer. The password
must be greater than seven characters and have at least one non-alphanumeric character.
If you forget or lose your password, it be can reset via the reset password screen. Click the
“Reset Password” link. The reset password screen will prompt you to enter your user name and
then answer the secret question (the one used during registration or as specified by the
administrator).
To close the current session from anywhere in the appliance, click the “Logout” button.
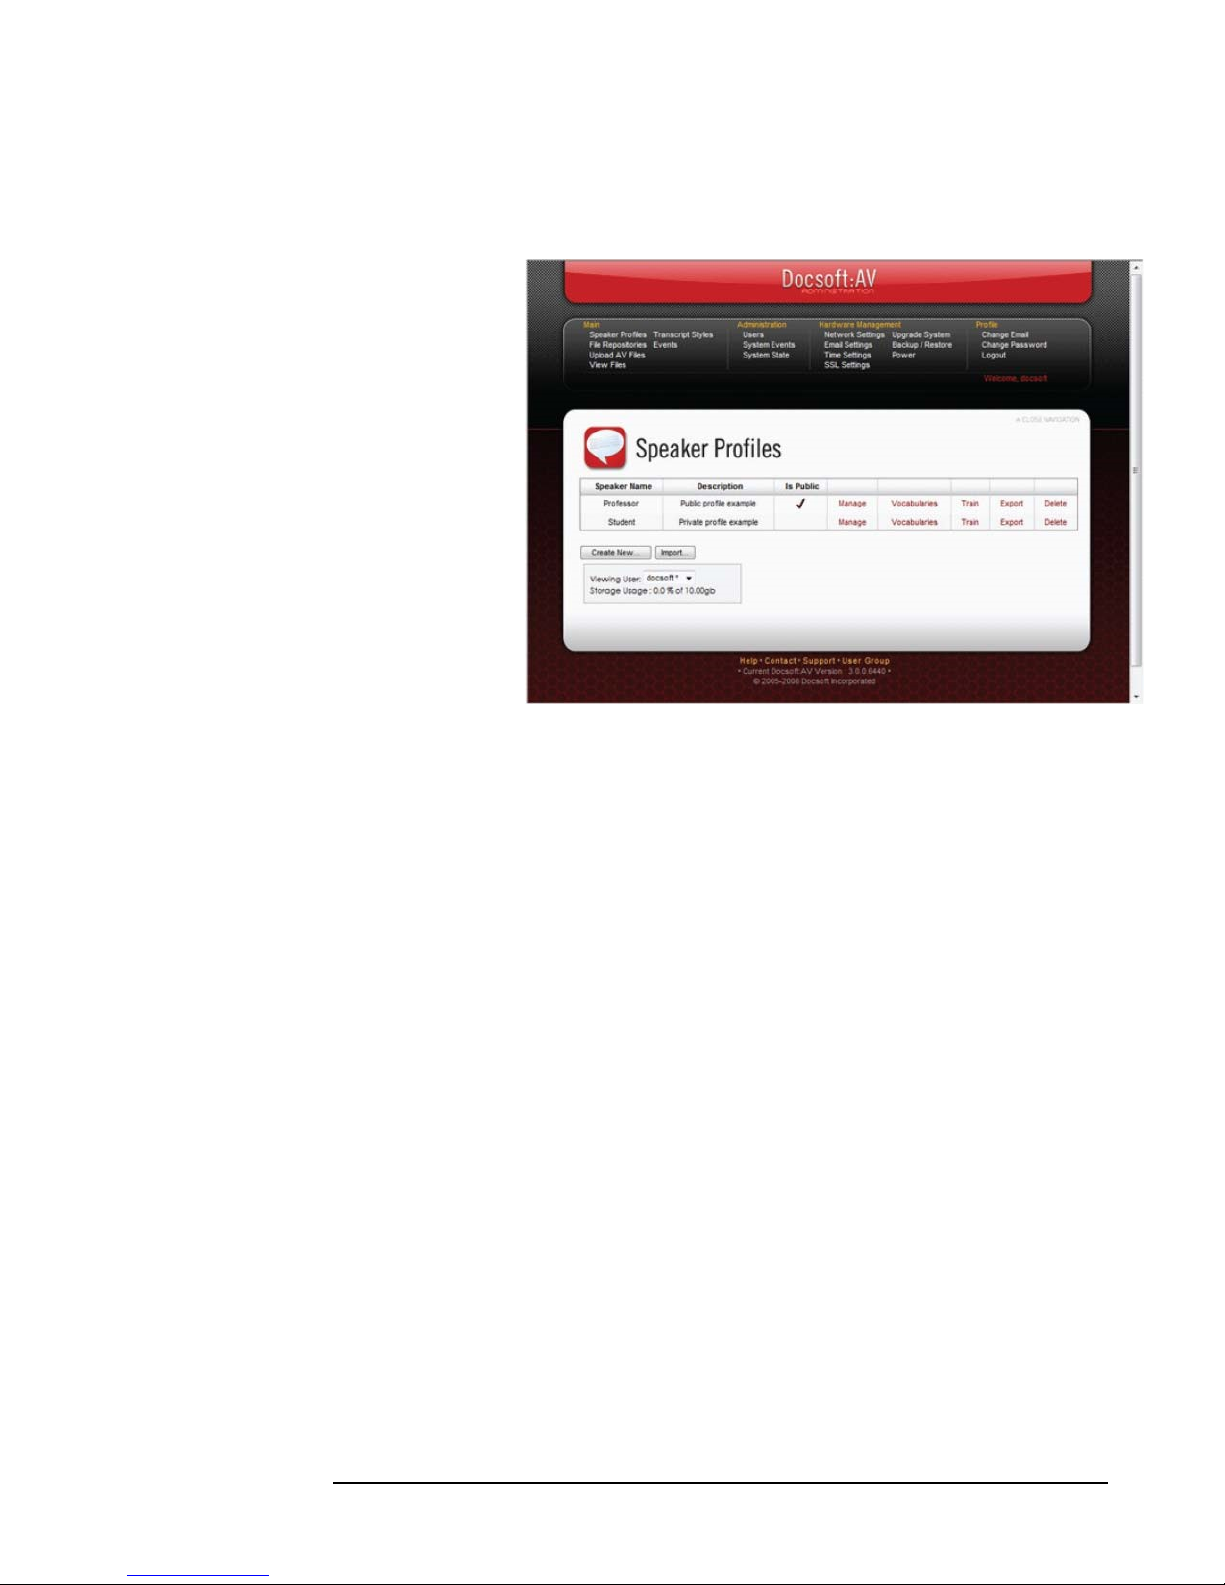
7. Speaker Profiles
To increase the accuracy of the ASR engine, the appliance can be trained for a specific
speaker voice. To do this, a speaker profile has to be created and trained first. There are
two kinds of profiles: public and private. The public profiles will be visible and can be
used by all users of the appliance. The Private speaker profiles will only be visible to the
person who created it.
To navigate to the Speaker Profile page, click on either:
1. The Profiles icon on the main screen, or;
2. Main Speaker Profiles from the toolbar.
Page 14
8
7.1 Creating a speaker profile
To create a new speaker profile:
1. Click the “Create New”
button;
2. Enter the speaker profile
information:
• Name
• Short description
• The English acoustic
model that best matches
the speaker’s accent
• Click on the “Allow
Others to Use This
Profile” checkbox if all
users of the appliance can
use the profile.
3. Click the “Next” button
and enter first vocabulary
information:
• Name
• Select the size of the base vocabulary
• Click the “Finish” button
7.2 Edit a Speaker Profile
1. Click the “Manage” link for the speaker profile you want to edit.
2. Input the new information for the speaker profile.
3. Click the “Submit” button.
7.3 Delete a Speaker Profile
1. Click the “Delete” link for the speaker profile.
2. Confirm the deletion.
7.4 Export a Speaker Profile
1. Click the “Export” link for the speaker profile.
2. The web browser will download and save the speaker profile
7.5 Delete a Speaker Profile
1. Click the “Import” button.
2. Enter the speaker profile information:
Name
Short description
Click on the “Allow others to use this profile” checkbox if the profile is public, or if all
users of the appliance can use it.
3. Browse to the saved speaker profile you wish to import
4. Click the “Finish” button.
Page 15

9
8. Training with a Media File and an
Exact Transcript
To increase the accuracy of the ASR engine, the speaker profile may be trained using a media
file and its exact transcript. Media files have to be in one of the support file formats. The
transcript is a plain text file that contains an exact text transcript of the media file. (See
Appendix A for a list).
Oftentimes, Docsoft:AV users will make use of a previously ran media file, correct the
transcript to near-100% accuracy, and use both the media file and transcript for training. This
is done through the Speaker Profiles page.
8.1 Train a Speaker Profile
1. Click the “Train” link for the speaker profile you wish to train.
2. Browse and select the exact transcript text file.
3. Browse and select the media file.
4. Click the “Add Files” button.
5. Repeat steps 2-4 above to add more media file/transcript pairs.
6. 4. Click the “Finish” button to start training.
8.2 Add a New Vocabulary to an Existing Speaker Profile
1. Click the “Vocabularies” link for the speaker profile you wish to add vocabularies to.
2. Click the “Create New…” button
3. Specify the vocabulary name
4. Specify a base vocabulary
5. Click the “Submit” button
8.3 Delete a Vocabulary from an Existing Speaker Profile
1. Navigate to the Speaker Profiles screen
2. Click the “Vocabularies” link for the speaker profile
3. Click the “Delete” link for the vocabulary.
8.4 Populate a Vocabulary of a Speaker Profile
To increase the accuracy of the ASR engine for a specific topic or subject matter, you may add
new words or acronyms to its vocabulary. A speaker profile vocabulary can be extended many
times. You can populate the vocabulary by using a word list and related documents. The word
list allows you to specify new acronyms and specify how they are pronounced (See Appendix C
for file format details). Related documents not only add new words, but also show the ASR
engine how those words are used.
Page 16
10
To train a speaker Profile vocabulary:
1. Click the “Vocabularies” link for the speaker profile.
2. Click the “Populate” link for the vocabulary
3. Select the type of training document(s) (word list or related documents).
4. Browse and select the text file.
5. Click the “Add” button.
6. Click the “Finish” button
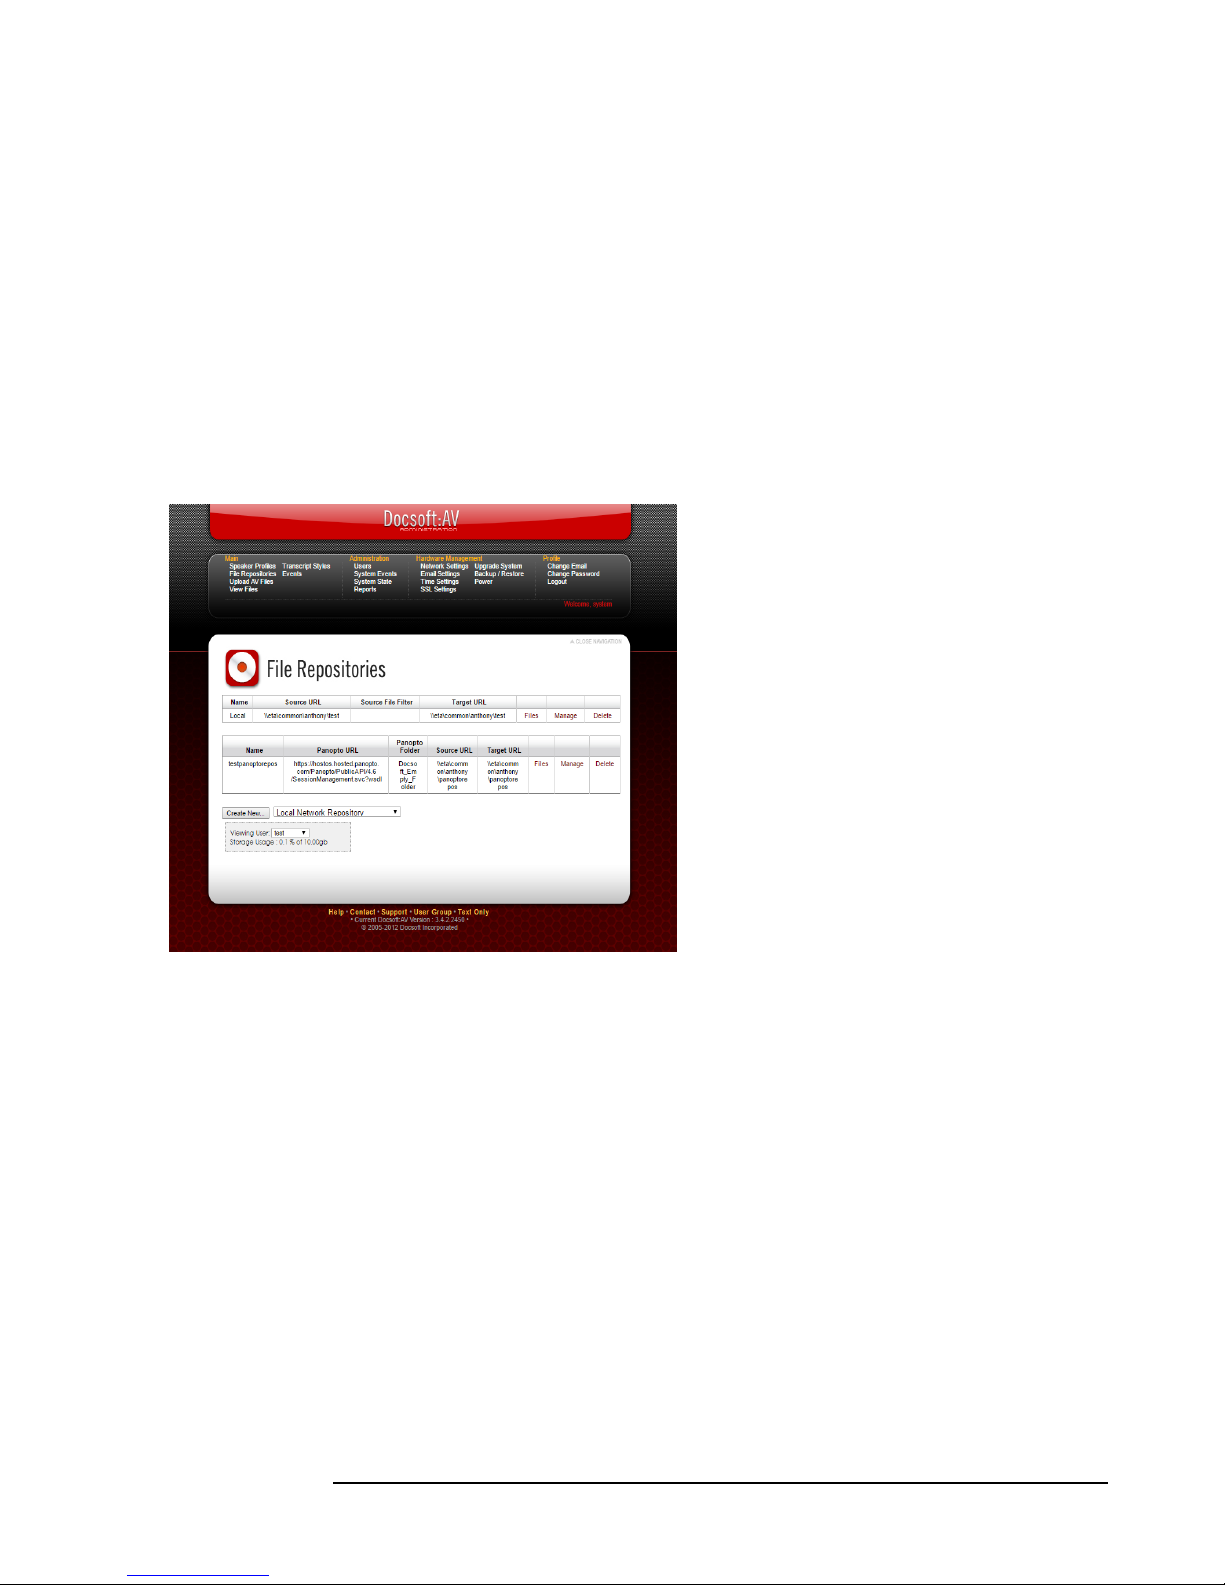
9. File Repositories
A File Repository is an external location that
contains media files to be processed. The
appliance will monitor the location for
changes in the file structure. If the appliance
finds new or changed files, it will schedule
each file for processing. Once the files are
processed, it will create the appropriate
caption files in the specified target location.
The file repository maintains a list of the
media files that were found in the repository.
They can be viewed using the View Files page.
You may protect the file from processing by
selecting the “Protected” options for that
specific file.
If you have an untimed exact transcript for the media files, you may specifically look for them
in the repository. The exact transcript has to in the same location, and have a “.txt” extension.
The rest of the filename must match the media file name (e.g. if “speech.mp3” is the name of
the media file, the exact transcript file name will be “speech.txt”). The appliance supports
widely accepted protocols such as File Share, FTP, and WebDAV via HTTP. See Appendix B
for the full list.
Consult your network administrator for which protocol and credential is needed to access the
required media files. To monitor files, you only need read access, but for creating files,
(transcript and close caption) you need write access. To navigate to the File Repositories page,
you may do either one of the two options:
Click on the Repositories icon on the main screen, or;
Click on Main File Repositories link from the toolbar.
Page 17

11
Before creating a file repository, make sure you have all the required information:
1. The source path, where media files are located. If protected, provide also the user credential to
access them;
2. The target path, where resulting files will be placed (if different from the source path). If
protected, provide also the user credential to access it;
3. Finally, a speaker profile. You may choose the built-in Standard speaker profile, but Docsoft
recommends that you create and train one specifically for this repository. See sections 7 and 8
above for more details.
9.1 Create a File Repository
1. Navigate to the File Repositories screen.
2. Select the appropriate type of repository in the dropdown box beside the “Create New”
button. For local network repositories, proceed to step 3. For repositories from hosted
sites, such as from Kaltura or Panopto, proceed to section 9.4.
3. Click the “Create New..” button.
4. Specify the media file source location and repository information:
Repository name
Source URL and credentials
Files filter. This field can be left blank.
Virtual URL, used primarily for streaming savers, e.g. MMS. This
field can also be left blank.
5. Click on the “Exact transcript present” checkbox if the corrected text transcripts exist for
each media file on the repository.
6. Click the “Next” button.
7. If the target location is the same as the source location, then click the “copy from the
previous page” link. Otherwise, specify the target URL and credentials.
8. Click the “Next” button
9. Select a speaker profile
10. Select a vocabulary
11. Select an output type. You may select more by holding the “Ctrl” button while clicking
on the additional output type choices.
12. Choose predefined transcript style options.
13. Click the “Finish” button.
9.2 Edit a File Repository
1. Navigate to the File Repositories screen.
2. Click the “Manage” link for the file repository you wish to edit.
3. Input the new repository information.
4. Click the “Submit” button to apply changes.
9.3 Delete a File Repository
1. Navigate to the File Repositories screen
2. Click the “Delete” link for the file repository.
3. Confirm the deletion
Page 18

12
9.4 Create a Repository From a Hosted Site
One of the newest features of Docsoft:AV is the ability to link to a hosted site of a
Learning Management System or LMS, especially since more and more organizations are
storing content on the “cloud”. Consequently, more and more LMSs are publishing
application program interface (APIs) that enable companies like Docsoft, Inc. to
automatically access and process content.
Note: As of October 2016, the repository features below are still under beta testing. Once
each feature passes verification, then they will be published as part of an update in our
Docsoft User Group website,
http://dug.docsoft.com
.
9.4.1 Create an Ensemble Repository
1. On the first page, specify the information about the hosted site:
a. The name for repository, as will be shown in the Manage Repositories page;
b. The web address for the Ensemble hosted site, e.g.,
https://cloud.ensemblevideo.com;
c. Select the identity provider for your organization in the Identity Provider
dropdown box;
d. Input the username for the Ensemble account that has access to the
multimedia files that need transcription;
e. Input the password for the above username.
f. Click “Next”.
2. On the second page, specify the information about the local network repository which will
house the temporary copy of the multimedia files from Ensemble:
a. The path of the network folder, e.g., \\docsoft\repositories\ensemble;
b. The username that has access to the network folder above;
c. The password for the above network username.
3. Click “Next”.
4. On the third page, specify the information about the “target” repository or folder in the
local network. This folder will be used to store the resulting transcript and/or caption
files.
a. If the target repository has the same information as in step 2, then click “copy
from the previous page”
b. If the target repository will have different information from step 2, then input
the path, username and password for this folder.
c. Click “Next”.
5. On the last page, specify the following output options:
a. Select the speaker profile available for this Docsoft user;
b. Select the matching speaker vocabulary from the above selection;
c. Select the preferred transcript type. Docsoft recommends any of the
following:
i. Native transcript – may be used with Docsoft:Transcript Editor
ii. Timed Text – this caption file will be in the DFXP format, and is most
compatible with Flash players
iii. Web VTT – this caption file type is what Ensemble prefers, and is
most compatible with HTML5 players
6. Click the “Finish” button.
Page 19

13
9.4.2 Create a Kaltura Repository
Note: unlike some LMSs, Kaltura’s hosted sites that are API-responsive were designed to
be accessible from only one URL: https://kmc.kaltura.com/index.php/kmc. You may
need to log in first to your account using a different URL, and then go to the Admin
Settings page to get the following information.
1. On the first page, specify the information about the hosted site:
a. The name for repository, as will be shown in the Manage Repositories page;
b. The User ID, which is most often your email address;
c. Kaltura Partner ID, a six-digit number given by Kaltura;
d. Kaltura Admin Secret, a hash key value.
2. On the second page, specify the information about the local network repository which will
house the temporary copy of the multimedia files from Kaltura. Note: only media entries
that do not have caption assets will be copied here.
a. The path of the network folder, e.g., \\docsoft\repositories\kaltura;
b. The username that has access to the network folder above;
c. The password for the above network username.
3. Click “Next”.
4. On the third page, specify the information about the “target” repository or folder in the
local network. This folder will be used to store the resulting transcript and/or caption
files.
a. If the target repository has the same information as in step 2, then click “copy
from the previous page”
b. If the target repository will have different information from step 2, then input
the path, username and password for this folder.
5. Click “Next”.
6. On the last page, specify the following output options:
a. Select the speaker profile available for this Docsoft user;
b. Select the matching speaker vocabulary from the above selection;
c. Select the preferred transcript type. Docsoft recommends any of the
following:
i. Native transcript – may be used with Docsoft:Transcript Editor
ii. Timed Text – this caption file will be in the DFXP format, and is most
compatible with Flash players
iii. Web VTT – this caption file type is what Ensemble prefers, and is
most compatible with HTML5 players
iv. Subrip – this is the most widely accepted caption file type, having the
extension .SRT. This is used in popular places like YouTube.
7. Click the “Finish” button.
Page 20

14
9.4.3 Create a Mediasite Repository
Mediasite ensured that only authorized applications may access hosted sites by using API
Keys. Not a lot of Mediasite users know how to create one; if this is the case, please make
sure to approach your Mediasite representative for details. Otherwise, go to
http://<yoursite>.mediasite.com/Mediasite/api/Docs/ApiKeyRegistration.aspx to register an
API Key, if you haven’t done so.
1. On the first page, specify the following information about the hosted site:
a. The name of the repository, as will be shown in the Manage Repositories page;
b. The URL of the hosted site, e.g., http://docsoft.mediasite.com/Mediasite
c. The specific Mediasite folder name that contains the AV files that need
transcription;
d. The Mediasite username that has access to the folder above;
e. The password for the above username.
2. Click “Next”.
3. On the second page, specify the information about the local network repository which will
house the temporary copy of the multimedia files from Mediasite. Note: only media
entries that do not yet have captions will be copied here.
a. The path of the network folder, e.g., \\docsoft\repositories\mediasite;
b. The username that has access to the network folder above;
c. The password for the above network username.
4. Click “Next”.
5. On the third page, specify the information about the “target” repository or folder in the
local network. This folder will be used to store the resulting transcript and/or caption
files.
a. If the target repository has the same information as in step 2, then click “copy
from the previous page”
b. If the target repository will have different information from step 2, then input
the path, username and password for this folder.
6. Click “Next”.
7. On the last page, specify the following output options:
a. Select the speaker profile available for this Docsoft user;
b. Select the matching speaker vocabulary from the above selection;
c. Select the preferred transcript type. Docsoft recommends any of the
following:
i. Native transcript – may be used with Docsoft:Transcript Editor
ii. Timed Text – this caption file will be in the DFXP format, and is most
compatible with Flash players
iii. Web VTT – this caption file type is what Mediasite prefers, and is
most compatible with HTML5 players
iv. Subrip – this is the most widely accepted caption file type, having the
extension .SRT. This is used in popular places like YouTube.
8. Click the “Finish” button.
Page 21

15
9.4.4 Create a Panopto Repository
As of the publishing of this User Guide, Panopto has not yet released the API that will aid
in the uploading of caption files to EDITED sessions. This means that the caption files
have to be timed with the full UNEDITED version of the session, or else it will skew the
time of appearance of the captions, or will not show at all. The Panopto technical support
representatives who were helping Docsoft recommended instead that only UNEDITED
sessions be put through the transcription process. Therefore, Docsoft recommends that
the Panopto folder to be used in this setup (explained further below) should contain only
UNEDITED sessions.
1. On the first page, specify the following information about the hosted site:
a. The name of the repository, as will be shown in the Manage Repositories page;
b. The beginning URL of the hosted site, e.g., “docsoft”. Note that this will be
appended with the remainder of the URL, “hosted.panopto.com/Panopto”, as
all Panopto hosted sites are formatted as such.
c. The specific Panopto folder name that contains the AV files that need
transcription;
d. The Panopto username that has access to the folder above;
e. The password for the above username.
2. Click “Next”.
3. On the second page, specify the information about the local network repository which will
house the temporary copy of the multimedia files from Panopto. Note: only media entries
that have not been previously captioned by Docsoft will be copied here.
a. The path of the network folder, e.g., \\docsoft\repositories\panopto;
b. The username that has access to the network folder above;
c. The password for the above network username.
4. Click “Next”.
5. On the third page, specify the information about the “target” repository or folder in the
local network. This folder will be used to store the resulting transcript and/or caption
files.
a. If the target repository has the same information as in step 2, then click “copy
from the previous page”
b. If the target repository will have different information from step 2, then input
the path, username and password for this folder.
6. Click “Next”.
7. On the last page, specify the following output options:
a. Select the speaker profile available for this Docsoft user;
b. Select the matching speaker vocabulary from the above selection;
c. Select the preferred transcript type. Docsoft recommends any of the
following:
i. Native transcript – may be used with Docsoft:Transcript Editor
ii. Timed Text – this caption file will be in the DFXP format, and is most
compatible with Flash players
iii. Subrip – this is the most widely accepted caption file type, having the
extension .SRT. This is used in popular places like YouTube.
8. Click the “Finish” button.
Page 22
16
10. Uploading Files
If you deal with a small amount of media content, this method will be most appropriate.
You may specify a related document (such as presentation plan, related document) or an
exact transcript when you upload your media file.
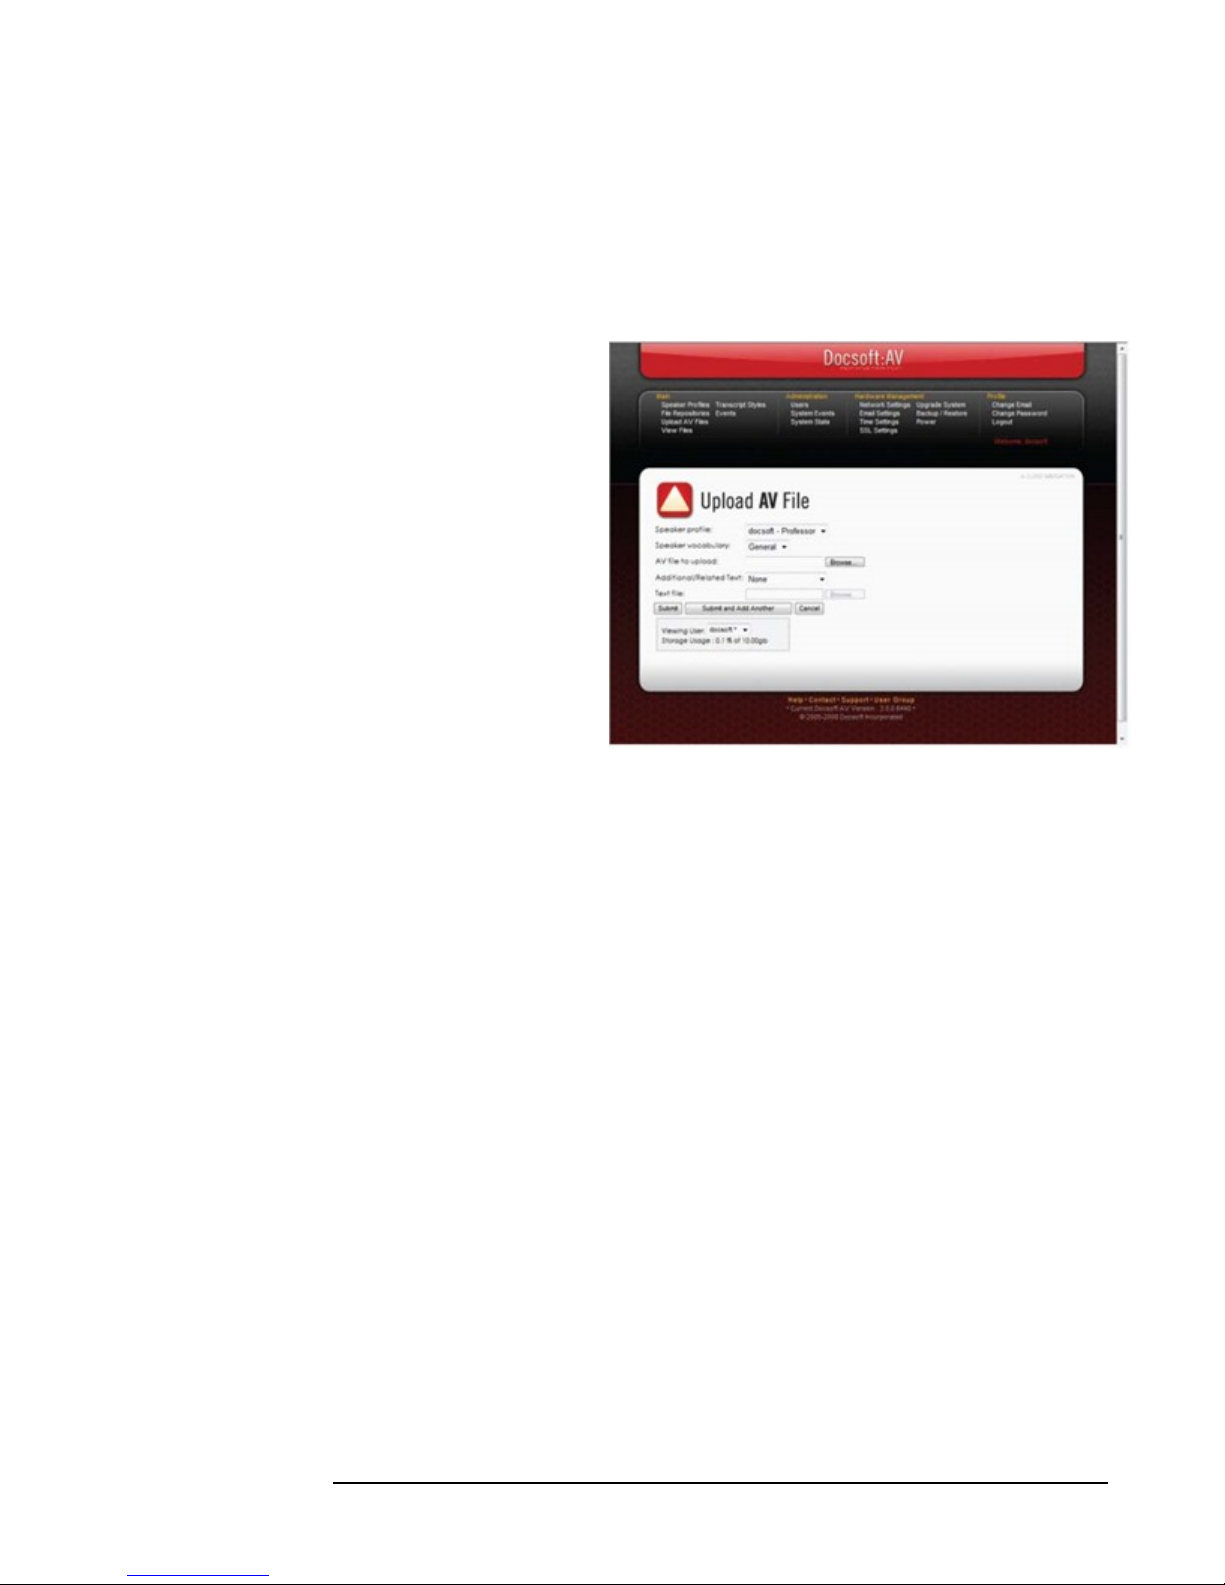
To upload a media file to the
system:
1. Select Main Upload AV Files
link from the toolbar, or the
“Upload” icon on the main screen;
2. Specify a speaker profile and a
vocabulary;
3. Browse to and select media file
4. If you have an additional related
document:
a. Specify document type: related
document and exact transcript;
b. Browse and select text
document;
5. Click the “Submit” button, or
“Submit and Add Another” if you have more files to submit.
11. Viewing and Processing Files
The main function of the View Files page is to monitor the state of your uploaded or
monitored files in different repositories. In addition, you may also do the following:
export a transcript for any file; repeat processing of the selected files; and re-upload
transcripts and closed captions to the target location in the repository files.
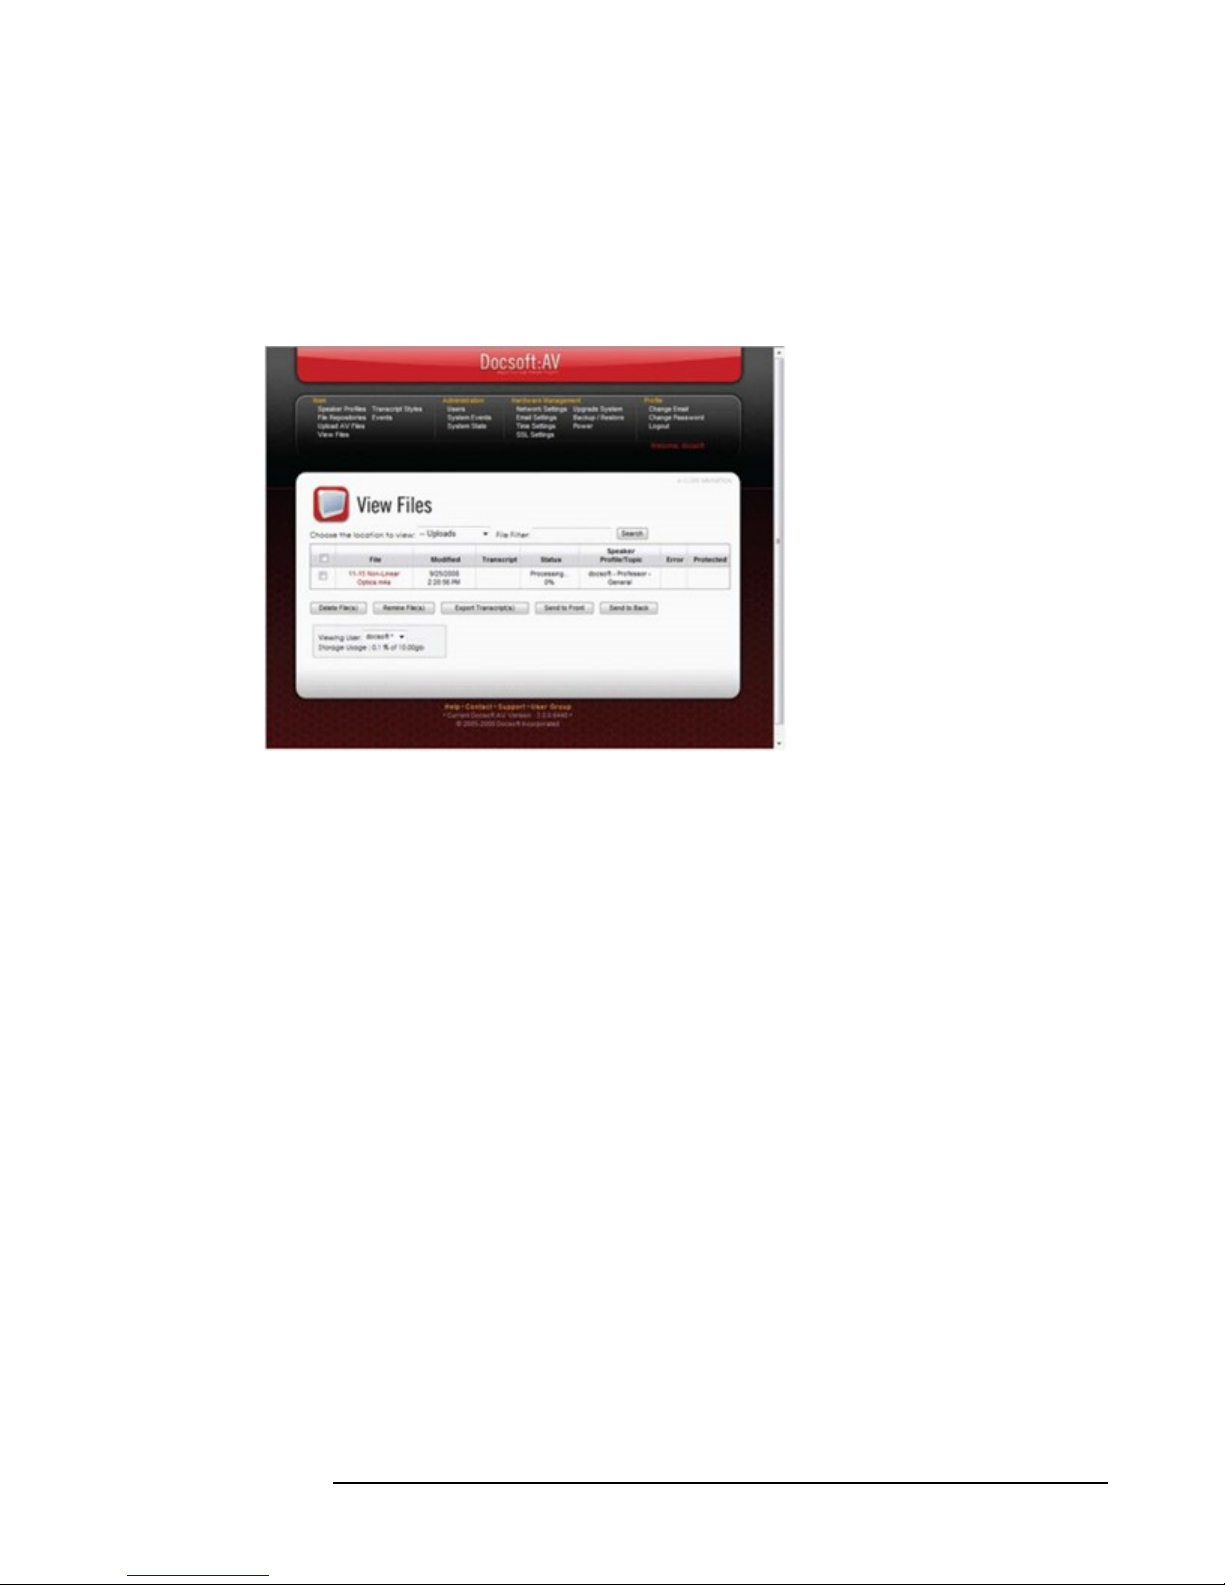
To navigate to the View Files page, you may do either:
Clicking on the View Files icon on the main screen, or;
Clicking on Main View Files from the toolbar.
To change the view between uploaded files and the files in the repositories, change the
value of the “Choose the location to view” dropdown box. Then click the “Files” link for
the file repository. You can search files from the “File Filter” text box and then click the
“Search” button. To view all files again, clear the text box and click the “Search” button
again.
Page 23
17
To perform any operation on the files, you must select the check box from the grid.
Actions can then be performed using the buttons located below the grid. To
select/deselect all files, click the check box located in the header of the grid marked
“Select All”.
11.1 Manage Uploaded Files
Uploaded files can be managed
from the View Files screen.
You can delete or change the
processing priority for each file.
To delete a file, select the file(s)
and then click the “Delete
File(s)” button.
By clicking on the “Send to
Front” or “Send to Back”
buttons, the priority of the
selected files will be increased
or decreased. You will notice
that the selected fi les move up
or down in the grid.
11.2 Export a Transcript or a Closed Caption File
1. Navigate to the “View Files” screen and select location
2. Select file(s) for transcripts or closed captions
3. Click the “Export Transcript(s)…” button
4. Choose the transcript type and style options
5. Click the “Finish” button
6. Click the “Save As” button to save the resulting transcript or closed caption file into your
desired location.
11.3 Re-Process Files
1. Navigate to the View Files screen and select location
2. Select the file(s) to be re-processed
3. Click the “Remine File(s)” button.
The appliance will add those files to the process queue.
Page 24

18
11.4 Re-Upload a Transcript
The Re-upload transcript feature is applicable only for the file repository. If the file
repository target location, style or transcript type has changed, you may choose to update
the target URL with updated transcript and close caption files. To re-upload transcript(s):
1. Navigate to the View Files screen and select location
2. Select which file(s) and transcripts to re-upload
3. Click the “Re-upload Transcripts” button
Note: The process may take anywhere from a few minutes to several hours, depending on
the number of files to be updated.
11.5 Protect Files
A file that is marked as protected will not be monitored or mined by the appliance. Any
previous transcripts are retained. This is useful if you want to upload a correct transcript
back to the target URL and you don’t want the appliance to over write your changes. This
functionality is applicable only for repository files. To set/clear the protect flag:
1. Navigate to the View Files screen and select location
2. Select the file(s) and transcripts has to be re-uploaded
3. Click the “Set Protected” or “Clear Protected” button
12. Transcript Styles
Some of the generated transcripts and closed captions contain style information. These
styles can be modified to suite your needs. To change the font, colors, etc. of the output
file to a style different than the System Default, you have to create a transcription style.
You can manage styles through the Transcript Styles page. To navigate to it, select Main
Transcript Styles link from the toolbar.
These styles can be applied later to any closed caption file produced by the appliance. You
may select the style of the export transcript screen (see section 11.2) or create/edit file
repository (see section 9.1 and 9.2 respectively).
12.1 Create a New Transcript Style
1. Navigate to the Transcript Styles screen.
2. Click the “Create New…” button.
3. Enter the style name and its parameters.
4. Click the “Add” button.
Page 25

19
12.2 Edit the Transcript Style
1. Navigate to the Transcript Styles screen.
2. Click the “Delete” link for the style.
3. Edit its parameters.
4. Click the “Update” button.
12.3 Edit a File Repository
1. Navigate to the Transcript Styles Screen.
2. Click the “Delete” link for the style.
3. Confirm the deletion.
13. Monitoring Events
The appliance automatically processes files. To monitor what files were processed, when
they will be processed, and problems with specific files, you may use the View Files screen
(see section 11).
You also may look at the history of events for your file at the Events screen. To navigate
to that screen select:
• Main Events link on the toolbar OR
• Events icon on the main page.
To monitor the overall state of the appliance, you must be logged in as the administrator.
14. User Profiles
Every user of the appliance has a profile which retains your communication preferences.
The Profile Management Screen allows you to change your e-mail address, manage event
notifications, and reset your password.
14.1 Change Email and Notification Preferences
1. Navigate to the Change E-mail Screen using Profile Change Email link on the toolbar
2. Modify e-mail and events notification preferences
3. Click the “Submit” button
14.2 Change Password
1. Navigate to the Change Password Screen using Profile Change Password link on the
toolbar
2. Type your old and new passwords
3. Click the “Change Password” button
Page 26
20
15. Administrative Tasks
Administrative tasks can be performed only by the appliance administrators. The
administrators can manage users, monitor the appliance, and manage appliance hardware.
By default, the appliance has only one “System” user account. You may only login under
this account when you are physically connected to the internal network via the appliance
port.
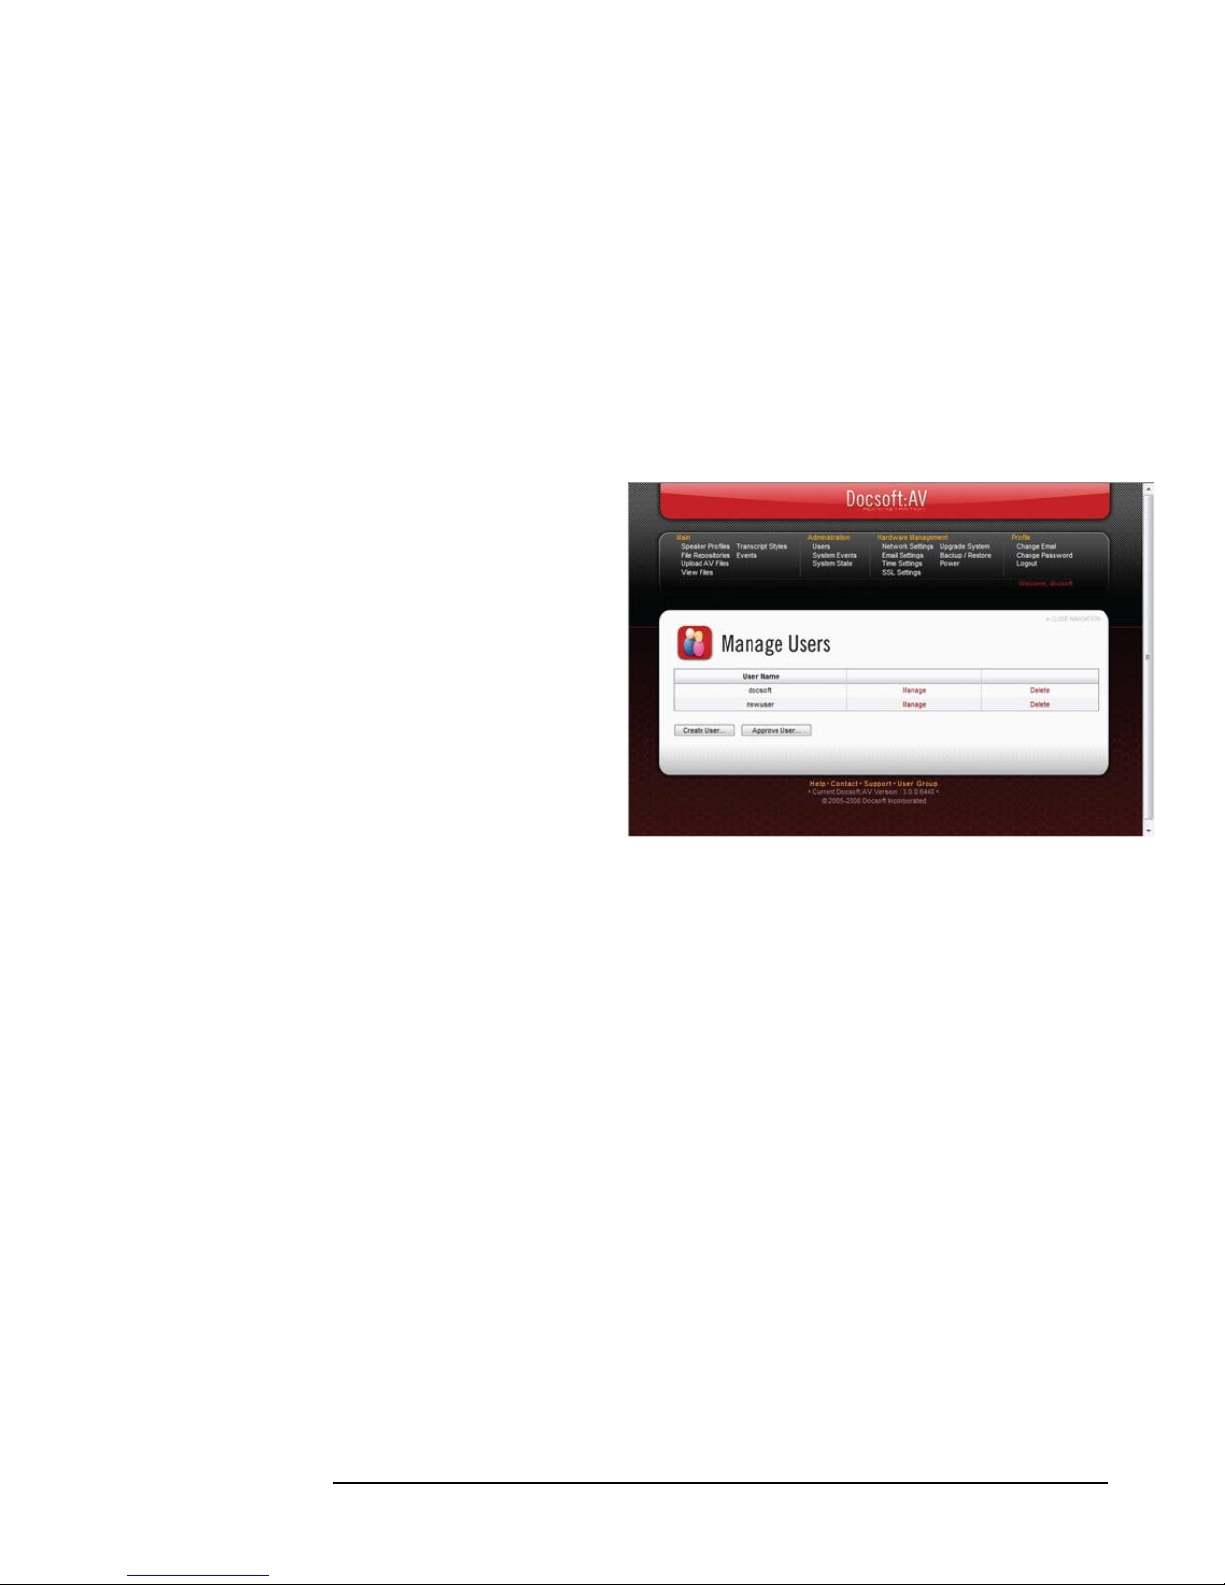
15.1 User Management
One of the administrative tasks is user
management. As administrator, you
can create, delete, and modify users.
You can also assist users in setting up
their accounts.
To navigate to the Manage User screen
select:
• Administration Users link on the
toolbar OR
• Users icon on the main page
15.2 Add a User
1. Navigate to the Manage Users page.
2. Provide the following user
information:
a. User/account name
b. Password
c. E-mail
d. Security Question and Answer
e. Amount of space available for user
3. Specify if user can perform administrative tasks
4. Click the “Create User” button.
15.3 Activate a Registered User
If a user chooses to self-register using the Registration Screen (see section 6.1), the
administrator has the ability to activate the user.
1. Navigate to the Manage Users screen
2. Click the “Approve User…” screen
3. Select the user to be approved
4. Click the “Next” button
5. Provide additional user information
6. Specify the amount of space available for user
7. Specify if user can perform administrative tasks.
8. Click the “Finish” button
Page 27

21
15.4 Edit a User
Some user information can be changed such as space available, password, and
administrative rights. This feature is also used if a user account is locked due to typing the
wrong password multiple times.
1. Navigate to the Manage Users screen.
2. Click the “Manage” link for the user.
3. Change user information.
4. Click the “Submit” button.
15.5 Delete a User
1. Navigate to the Manage Users screen.
2. Click the “Delete” link for the user.
3. Confirm deletion.
15.6 Impersonate a User
When you navigate (as the appliance administrator) to the following screens:
• Speaker Profiles,
• File Repositories,
• Upload AV Files,
• View Files,
• Transcript Styles,
• Events,
you may view the same screen as other users would see them. At the bottom, just above
the footer of the screen, is the “Viewing User” box that allows you to change current
viewed user data. To view other users’ data or operation performed by the user:
1. Navigate to the screen for general tasks you want to perform.
2. Switch to user you want to impersonate.
3. Perform the task you need to do in behalf of the user.
4. Switch to your original account (marked with the asterisk (*) symbol).
Page 28
22
16. Monitoring System State/Event
As the appliance administrator, you have the capability to monitor the system’s current
state as well as its past events. We’ll take a look at each one of these features.
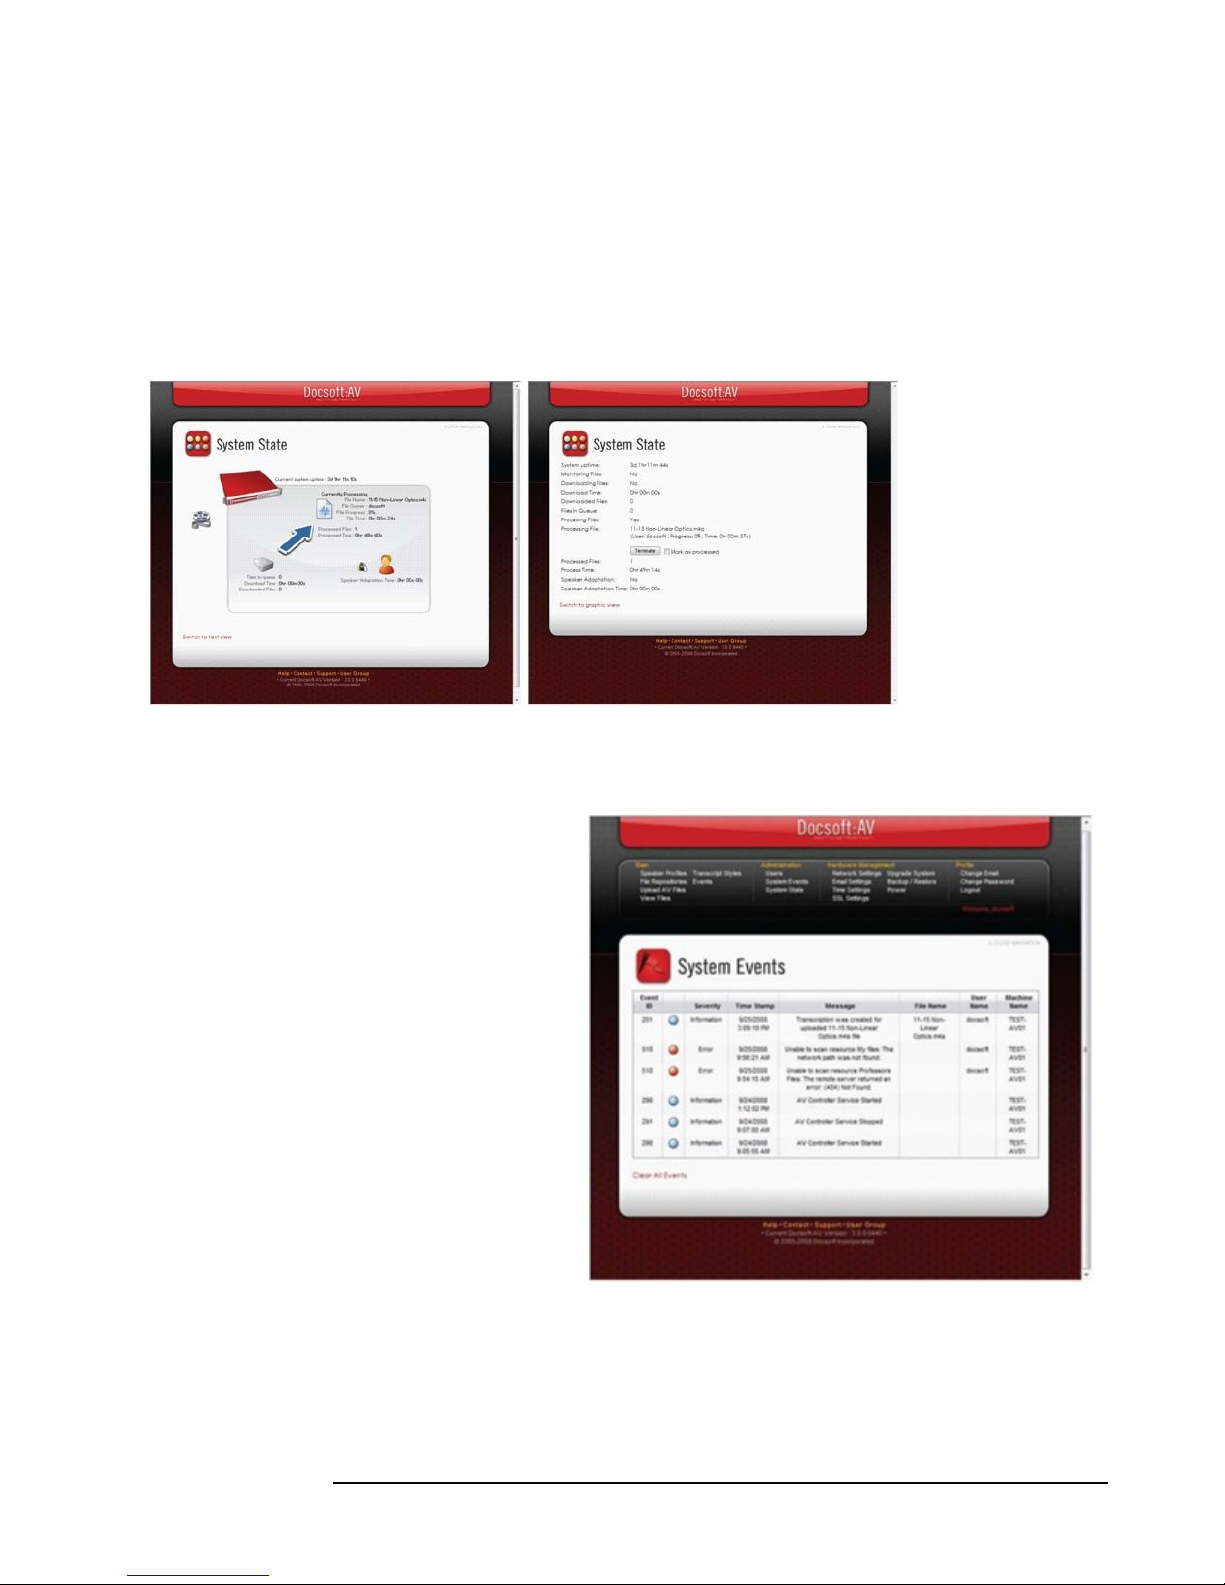
16.1 Check System State
To view the overall
appliance state and
statistics, you may
use one of the
system state screens
(graphical or text).
Text presentation
will allow you to
terminate currently
processed files.
16.2 Check System Events
You also may look at the history
of system events and events
from every user of the appliance
at the Events screen.
To navigate to that screen,
select:
• Administration System
Events link on the toolbar OR
• System Events icon on main
screen
Page 29
23
17. Managing Hardware
The administrator of the appliance has the ability to manage hardware settings such as
network configuration, e-mail notifications, and time zones. Hardware management also
includes backup and restoration of the appliance data.
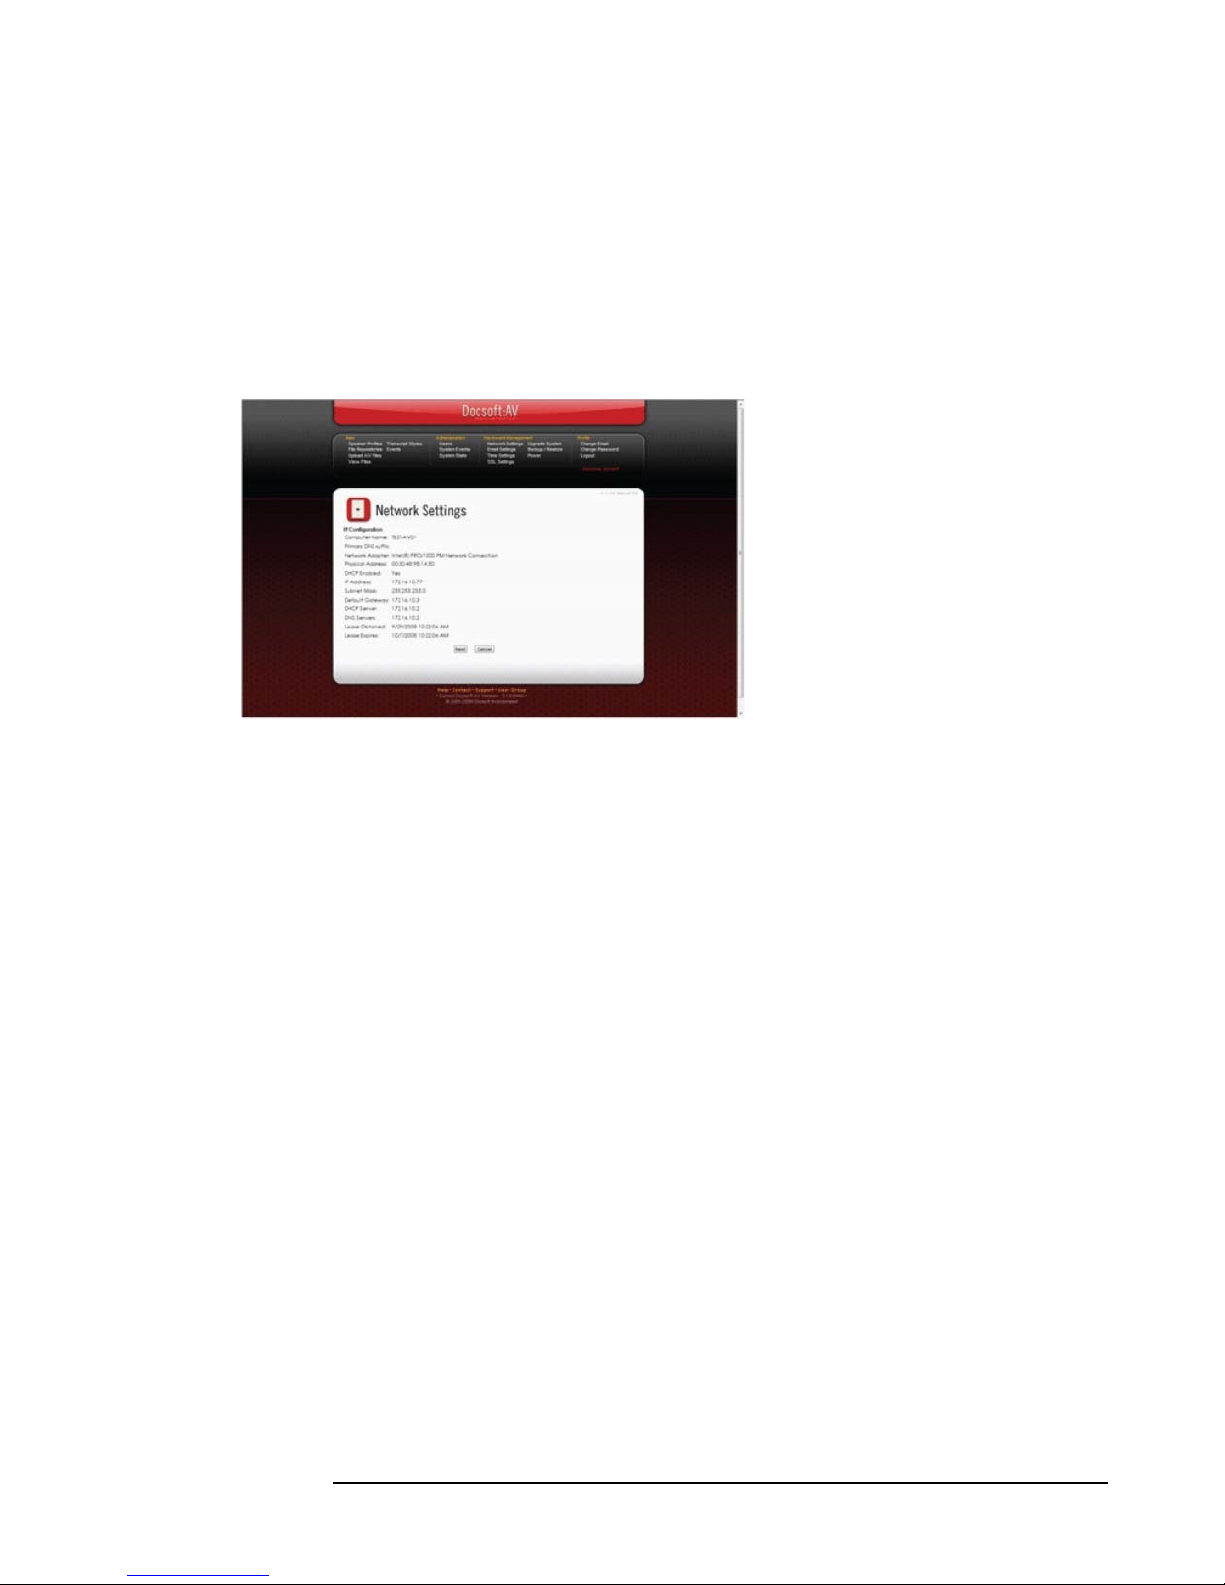
17.1 Network Settings
The network settings of the
appliance can be configured only
when the administrator is connected
to the internal appliance port. If you
are not connected to internal
appliance port, the network settings
screen will show current settings
and will not allow changes to the
settings.
To navigate to the Network Settings
page, select either:
Hardware Network Settings
link on the toolbar OR
Network icon on the main page.
To change the network settings for the appliance:
1. Connect your computer (e.g. laptop) to the internal port of the appliance and open up
a web browser (e.g., Google Chrome).
2. Navigate to the Network Settings screen and view current settings.
3. Click the “Next” button.
4. Specify the new computer name and DNS prefix.
5. Click the “Next” button.
6. Specify how the IP address will be obtained. If a static IP is needed, select “Use the
following IP address:” checkbox and input the IP Address settings.
7. Click the “Next” button.
8. Specify the DNS servers settings. If the “Use the following DNS server addresses:” is
selected, input at least the primary DNS server address.
9. Specify Firewall settings. If firewall will be enabled, you may also select whether
access is allowed from the secured and/or unsecured port. You may also specify a
specific address to be allowed access for.
10. Click the “Finish” button.
If the computer name was changed, you will be required to reboot the appliance.
Page 30
24
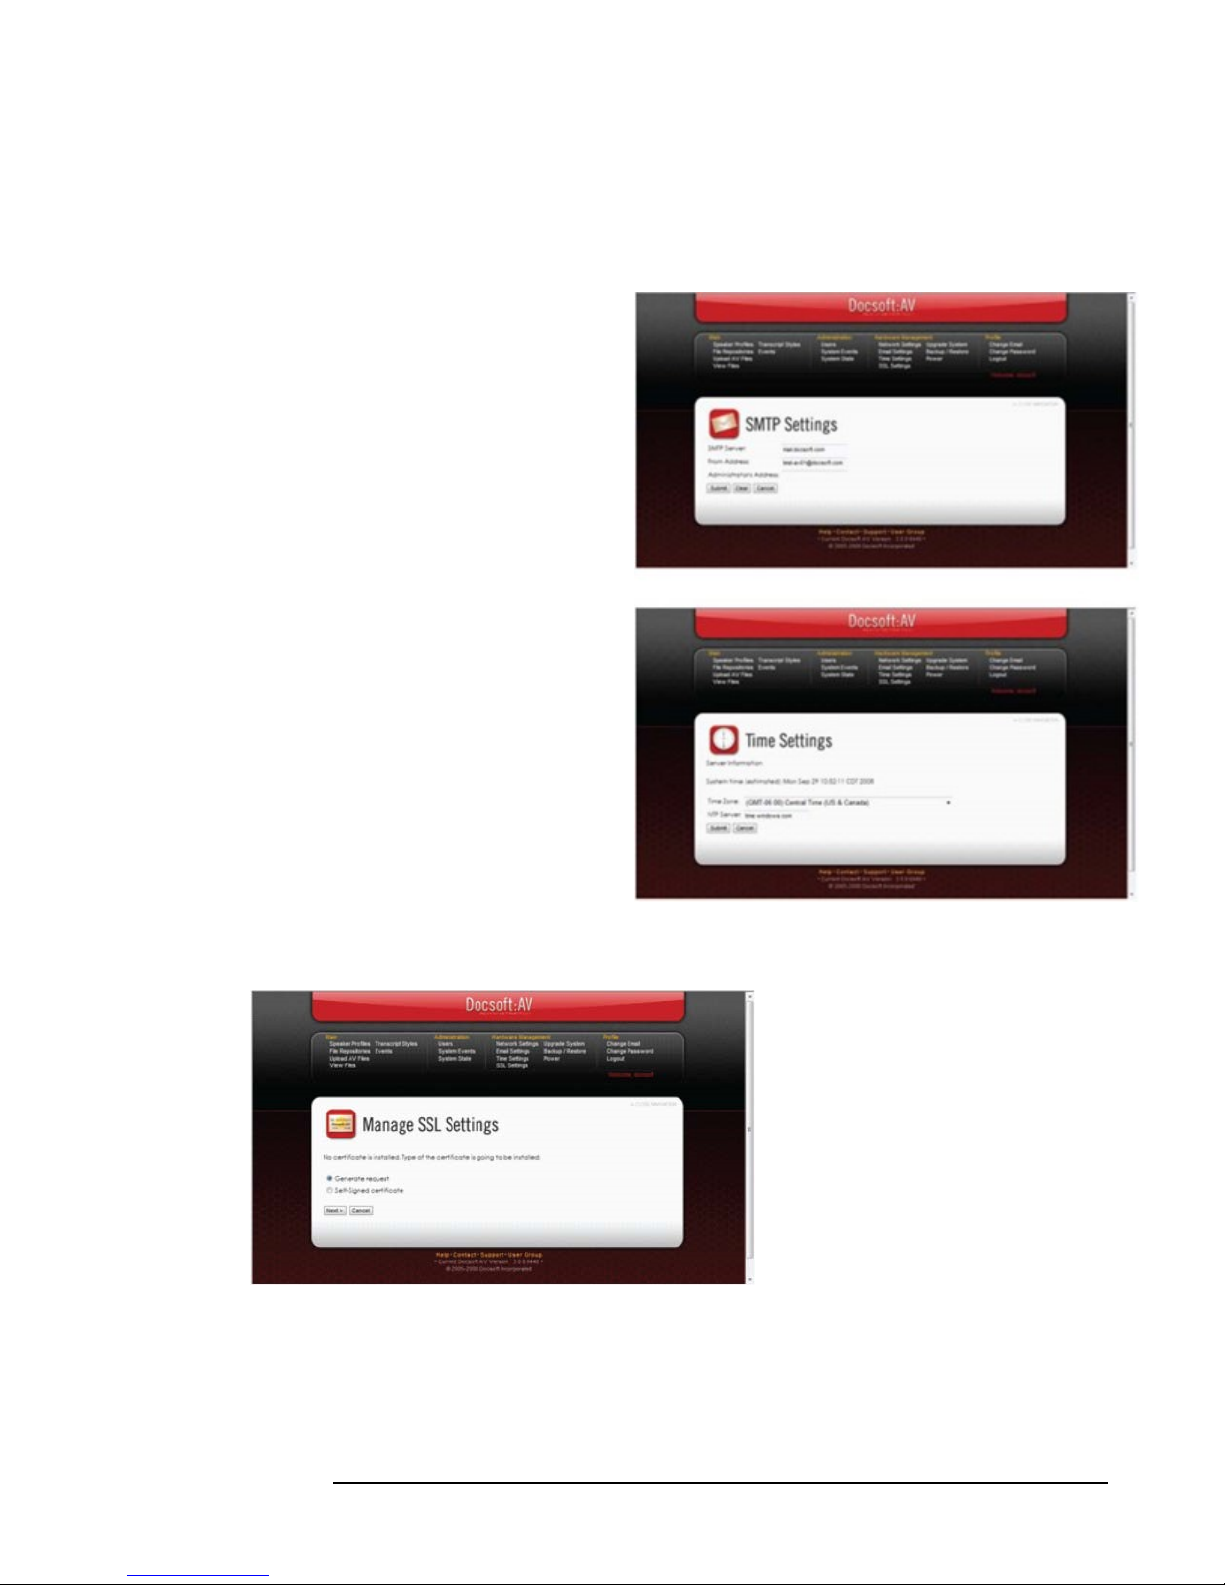
17.2 Email Settings
E-mail communication is essential for password reset and event notifications.
1. Navigate to the E-Mail Settings screen
2. Specify SMTP server
3. Specify From address
4. Specify administrator’s address (if
necessary)
5. Click the “Submit” button.
By specifying the administrator’s
address, you allow the appliance to
send hardware related events to a
specified person (or distribution list).
17.3 Time Settings
If you want to maintain the proper
time for your events, you have to
setup the proper time zone and time
server (NTP) settings. You may use
your internal time server or choose a
public one.
1. Navigate to the Time Settings screen
2. Specify time zone
3. Specify time server
4. Click the “Submit” button
17.4 SSL Settings
To protect communication
between the appliance users’
computers and the appliance,
SSL/TLS protocol may be used.
Two kinds of certificates can be
used: self-signed and certification
agency (CA) issued. The latter is
the recommended choice. To
navigate to the SSL settings screen
select the Hardware->SSL Settings
link on the toolbar.
Page 31

25
To setup CA SSL certification, there are two stages: generate request and install certificate.
17.4.1 To generate the SSL certificate request:
1. Navigate to the SSL Settings screen.
2. Select the “Generate request” box.
3. Click the “Next” button.
4. Fill out the necessary information:
a. Common name (or full computer name)
b. Organization
c. Organization Unit
d. City
e. State
f. Two letter country code
5. Click the “Create Request” button.
6. Paste and copy request to your certification agency.
7. Wait for the approved certificate to arrive.
17.4.2 To install the Certification file approved by CA request:
1. Navigate to the SSL Settings screen.
2. There will be the upload file box to the certificate file. Browse and select the certificate
file.
3. Click the “Install Certificate” button.
17.4.3 To use a self-signed certificate:
1. Navigate to the SSL Settings screen.
2. Select the “Self-Signed certificate” box.
3. Click the “Next” button.
4. Fill out the necessary information:
a. Common name (or full computer name)
b. Organization
c. Organization Unit
d. City
e. State
f. Two letter country code
g. Validity period
5. Click the “Create Certificate” button.
17.4.4 To delete an installed certificate:
1. Navigate to the SSL Settings screen.
2. Click the “Remove Certificate” button.
3. Confirm deletion.
Page 32
26
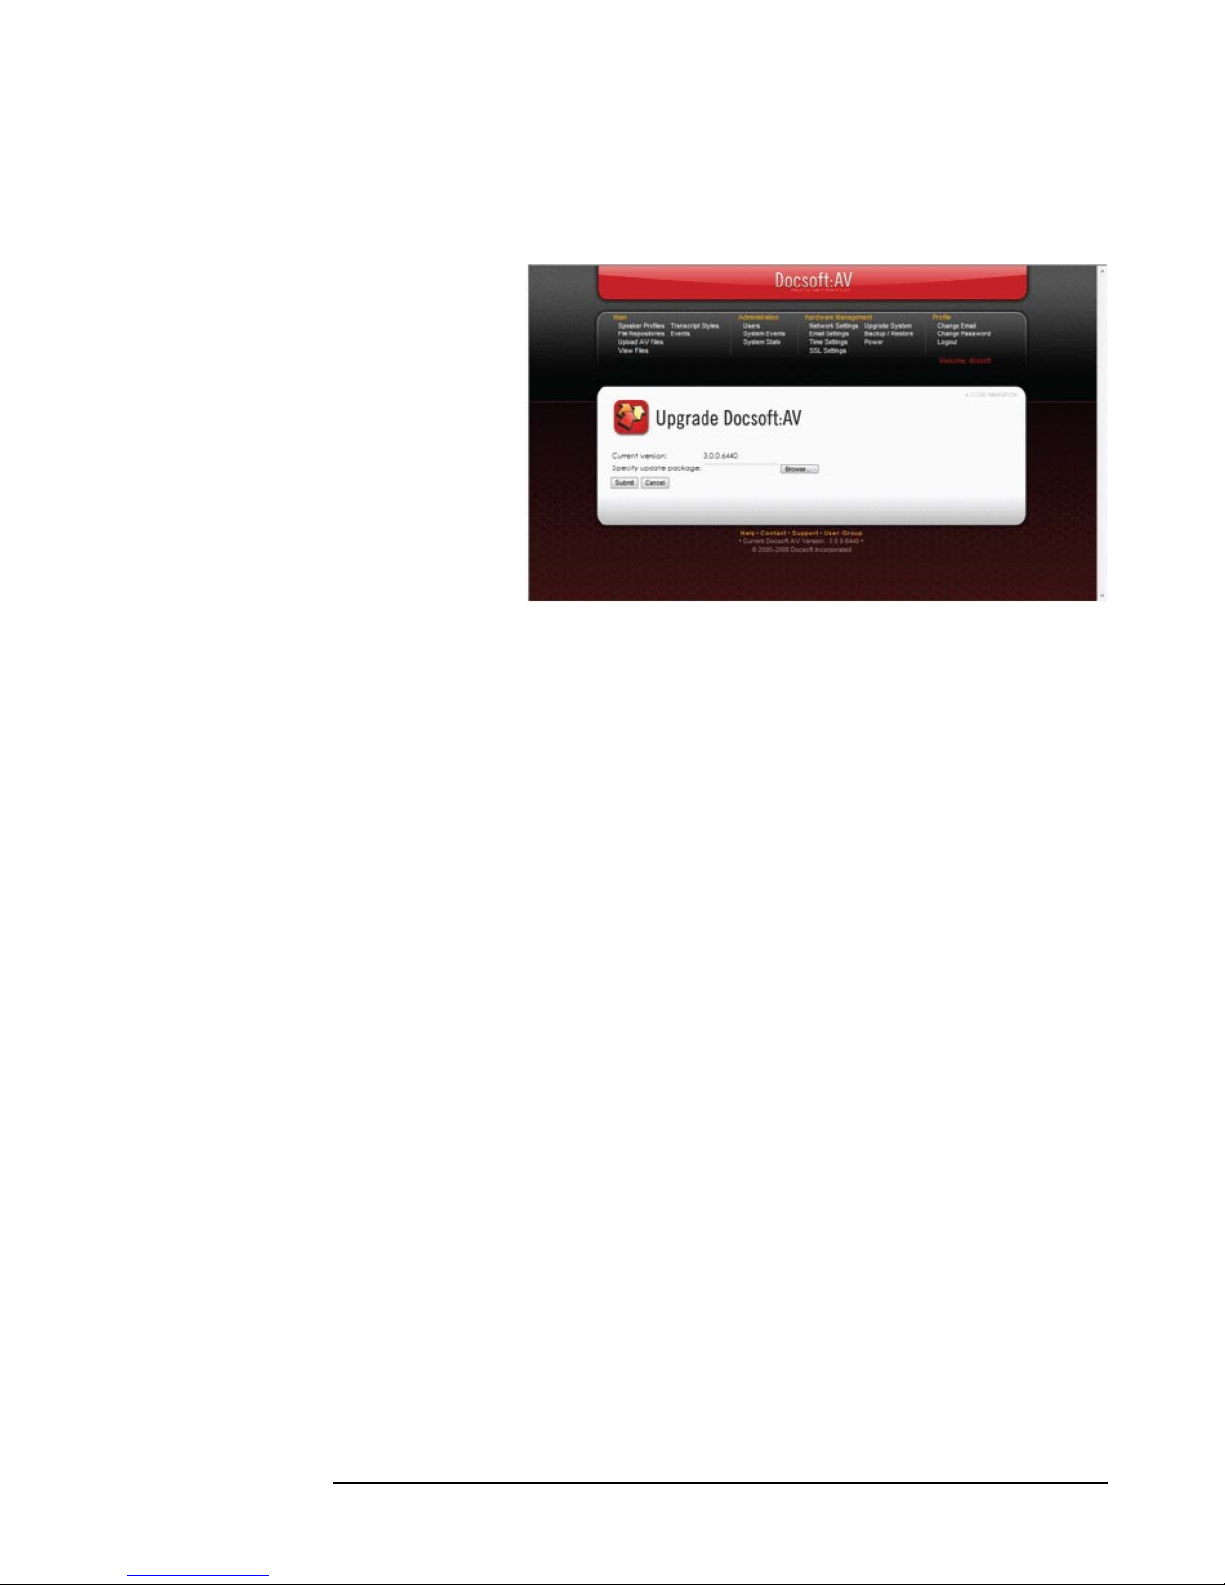
18. Upgrading the System
Docsoft, Inc. provides
updates for the appliance.
The updates can be
installed using the
upgrade system screen.
To upgrade the system
using updates:
1. Navigate to the Upgrade
System screen.
2. Browse and select
upgrade file. (The file will
have the extension
“.update”).
3. Click the “Submit” button.
4. Close the browser
The system will be updated. The upgrade process may take anywhere from 5 minutes to
two hours, depending on the number of updates and upgrades included with this
installation packet.
19. Backing up the System
The administrator may backup user data and account settings. This can be done manually
or using the scheduler.
19.1 Manual Backup
1. Navigate to the Backup/Restore screen.
2. Click the “Backup” link.
3. Enter backup location:
a. URL
b. User name and password (if applicable)
4. Click the “Start Backup” button.
5. Close the browser window.
During backup operations, the appliance will be offline. After backup is performed, the
appliance will resume its regular operations.
Page 33

27
19.2 Scheduled Backup
You may schedule the appliance backup for certain days and specific times of the
week. To schedule a backup operation:
1. Navigate to the Backup/Restore screen.
2. Click the “Schedule Backup” link.
3. Enter backup location and time:
a. Specify days of the week
b. Time
c. URL
d. User name and password (if applicable)
4. Click the “Submit” button.
20. Restoring Data
To restore a previously backed-up data (see above section):
1. Navigate to the Backup/Restore screen.
2. Click the “Restore” link.
3. Enter backup location:
a. URL
b. User name and password (if applicable)
c. Click the “Start Restore” button.
4. Close the browser window.
During the restore operation, the appliance will be offline. After the restore is performed,
the appliance will resume its regular operation.
NOTE: The following data will not be restored:
• Network settings
• User Events and System Events
21. Power Control
As the appliance administrator, you may control hardware power.
To navigate to the Manage Appliance Power page, click the Hardware Power link on
the toolbar. Then choose “Reboot System” or “Shutdown System” to perform the
corresponding action.
Page 34

28
Format Family
File Name Extensions
Raw Audio (PCM)
.wav
MPEG-2
.mpg, .mpeg, .mp2, .m2v, .m2a
MP3
.mp3
MPEG-4
.mp4, .m4a, .m4v, .aac
Windows Media
.asf, .wma, .wmv
AVI
.avi
Quicktime Media
.mov
RealPlayer Media
.ra, .rm, .ram
Ogg Media
.ogv, .oga, .ogg
Flash Video
.flv
Digital Speech Standard
.dss, .ds2
Protocol Name
Examples
File share (Windows Network, SAMBA)
file://server/share/
\\server\share\
FTP
ftp://server/folder/
WebDAV over HTTP
http://server/folder/
webdav://server/folder/
Apache HTTP Index Page
http://server/folder/
Podcast over HTTP
pcast://server/folder/feed.xml
Section
V
22. Appendix
A. Supported Media File Formats
B. Supported Network Protocols
Page 35

29
Format
Caption Format &
Extension
Editable Transcript (for Docsoft:TE)
Native transcript (.transcript)
Searchable Transcript (for Docsoft:SA)
ESX (.esx)
Windows Media
Advanced Stream Redirect (.asx)
SAMI (.smi)
QuickTime Media
Synchronized Multimedia (.smil)
Quicktime (.qt.txt)
Scenarist (.scc)
Real Media
Realtime (.rt.txt)
Real Player
Plain Text
Text file (.txt)
Timed Text
Distribution Format (.dfxp)
Encore
Encore (.encore)
HTML5
WebVTT (.vtt)
YouTube and other popular formats
Subrip (.srt)
Subviewer (.sub)
C. Word List File Format
The speaker profile vocabulary can be trained using word list. The word list file is a plain
text file that contains words or acronym definitions. There must be exactly one word or
acronym definition per text file line. The acronym definition consists of two parts: written
form and spoken form. For Example:
• Docsoft
• 007\double O seven
• & Co,\and Company
D. Transcript and Caption Output Formats
Page 36

30
Contact Method
Website
www.docsoft.com
Toll Free Number
(877) 430-3502
US Number
(405) 236-2466
Fax
(405) 235-2250
General Information
Technical Support
(405) 536-3170
Sales
(405) 536-3130
Physical Address
115 E. California Ave.,
Oklahoma City OK 73104
E. Docsoft Contact Information
 Loading...