

Page 1
Manual
’04.7
Mova
Page 2
NTT DoCoMo 800MHz Digital Mobile Phone
Thank you for your purchase of the new “Mova SO506iC” mobile phone.
Before using the Mova SO506iC, please read “Safety Precautions” carefully and use
the Mova properly.
Read this manual carefully before or when you use the Mova SO506iC. Always refer
to the manual when you need information on using the Mova. The information helps
you to use the Mova properly and more effectively.
The Mova is a useful partner in daily life. Use it correctly and it will serve you as a
highly reliable tool for a long time.
Before Using the Mova
● Because the Mova operates using radio frequencies, it cannot be used inside a tunnel, underground, in a
building or other locations where radio waves do not reach the Mova, in locations with weak radio wave
strength, or outside the service area. The Mova services may not be available on high upper floors of high-rise
apartments or buildings, even if you can see no obstructions around you. On occasion, your calls may become
disconnected even in areas with strong radio wave strength, even if you are not moving, or even if there are
three-antenna marks in the Mova display.
● Please use discretion and mind your manners when using the Mova in public areas or crowded/quiet places to
keep from bothering others.
● Note that because the Mova operates on radio frequencies, your calls are at risk of being intercepted by the
third party. However, the digital system automatically scrambles all calls through a private call feature.
Therefore, even if the third party successfully intercepts your call, they will only hear noise.
● The Mova operates on radio frequencies by converting voice into digital signals. If the caller moves into an area
of adverse radio wave condition, the digital signal may not be restored accurately, and the voice received in the
call may differ slightly from the actual voice.
● Always keep the information you save in the Mova in a separate note. Under no condition will DoCoMo be held
liable for any damaged or lost data saved in the Mova.
● The user hereby agrees that the user shall be solely responsible for the result of the use of SSL. Neither
DoCoMo nor the certifiers as listed herein make any representation and warranty as for the security in the use
of SSL. In the event that the user shall sustain damage or loss due to the use of SSL, neither DoCoMo nor the
certifiers shall be responsible for any such damage or loss.
Certifiers: VeriSign Japan K.K.
● The Mova is exclusively for use in Japan.
Baltimore Technologies Japan Co., Ltd.
Please read this manual carefully prior to using the Mova. For details on the battery pack and the
adapter (including the charger), refer to their respective user’s manuals provided with them. If you
have any further questions, please contact us at any of the numbers below.
For inquiries (in English)
From ordinary phones
0120-005-250
※Can be called from DoCoMo mobile phones and PHSs.
※Check the number you call and dial it correctly.
(toll-free)
For inquiries (in Japanese only)
From DoCoMo mobile phones or PHSs
(No prefix)
※Cannot be called from ordinary phones.
From ordinary phones
0120-800-000
※Can be called from DoCoMo mobile phones and PHSs.
151
(toll-free)
(toll-free)
Please note that “Mova SO506iC” is called “Mova” in this “Mova SO506iC Manual”.
Page 3

Default Lighting time: 15 sec./Adjust light: 3/Charging: OFF
How to Use This Manual Quick Manual (P.428)
Outline and objectives of this function.
Function
name
<Display light>
Section
title
The menu number used as a shortcut for the
menu is shown here.
Setting the Display Backlight
The brightness and lighting time of the display backlight can be set.
• In the Camera mode, the lighting time is enabled only when playing back the recorded images (P.107).
Press (menu) in the stand-by display, then use and
1
to select [Settings] → [Display] → [Display light].
Display light
Lighting time
Adjust light
Charging
Use and to select [Lighting time], turn to enter the
2
lighting time and press
Lighting time
Time 15sec
Use and to select [Adjust light], turn to adjust the
3
brightness and press
Adjust light
Use and to select [Charging], then use and to
4
select [ON]/[OFF].
[ON] : Turn on the display backlight.
[OFF] : Do not turn on the display backlight.
The display backlight is set.
Information
• It may take time to complete the charging when the Charging for the Display light is [ON].
[Lighting time] : Set the time to turn on the display backlight.
15s
[Adjust light] : Set the display brightness.
3
OFF
[Charging] : Set whether to turn on the display backlight when an AC, DC, car
or other adapter is connected to the external connection
terminal.
(ok).
Enter from 15 to 60 seconds.
(15−60)
(ok).
The brightness can be adjusted in 4 levels from level 1 (darkest)
3
to level 4 (brightest).
•Turn the jog to increase the brightness or to decrease it.
To reset to the default brightness
Press
(reset).
The default settings at the time
of purchase are shown here.
Additional notes and
restrictions of this function.
The operation procedure is
described in bold letters.
Perform this procedure
according to the step number
on the left.
Example of the display
Changing the Display Settings
information.
Index
Display light
If there are multiple options
available in the operation, they
are described here.
Useful information, additional
information and points of
141
caution are described here.
Information
• The Quick Manual (P.428) is provided at the end of this manual. Cut and fold the pages into a small
booklet and take it with you for convenient reference.
1
Page 4

Contents
Before Using the Mova
How to Use This Manual ............................................................... 1
Features of the Mova SO506iC..................................................... 4
Part Names and Functions ........................................................... 6
Using the Display........................................................................... 9
Safety Precautions ...................................................................... 10
Handling Precautions.................................................................. 18
Standard Set and Optional Accessories................................... 20
Selecting the Menu ...................................................................... 21
Before Using the Mova................................................................ 23
Battery pack, Charge the Mova, Battery level, FIT cover, Turn to open/close the Mova,
Power ON/OFF, Select language, Initial setting, Date/time, Send own number, Own
number
Placing Calls................................................................................. 37
Place a call, WORLD CALL, Redial, Dial frequency record, 186/184, Short dial, Malicious
Caller Block, Pause, Pager
Receiving Calls ............................................................................ 47
Receive a call, Received, Volume, Phone volume, Accept calls, Reject calls, Denied no ID,
Set mute seconds, Reject unknown
Settings for When Unable to Answer Calls............................... 57
On hold, Driving mode, Missed call, Record message, Quick record message, and so on...
Using the Phonebook.................................................................. 67
Add to phonebook, Group setting, Jog call, Delete phonebook, Secret mode, Memory
status, 2-touch dial, and so on...
Setting the Manner Mode ............................................................ 81
Manner mode, Original manner, Vibrator, Keypad sound, and so on...
Changing the Ring Tone ............................................................. 87
Ring tone, Sound effect, Adjust the volume, Alert time, Earphone
Using the Camera ........................................................................ 97
Record images, Shutter sound, Album, Slideshow, Edit still images, Bar code reader, and
so on...
Changing the Display Settings................................................. 135
Stand-by display, Animation setting, Set call display, Menu icon, Display light, Menu taste,
Visual effect, Jog setting, Font size, Select color, Call light
Restricting the Mova Operations ............................................. 147
Security code, Phonebook lock, Keypad lock, Keydial lock, Record display, Mail security,
Lock key
*
, Hands-free mode
2
Page 5

Using Clock and Schedule........................................................ 157
Auto power on, Auto power off, Alarm, Schedule
Using i-mode .............................................................................. 173
What is i-mode?, i-mode menu, Display sites, Change i-mode password, Internet
connection, Bookmark, Phone To/Mail To/Web To/i-αppli To, i-mode lock, and so on...
Using the Message Service ...................................................... 205
Receive message, Message R/Message F , Protect message, and so on...
Using the Mail Service............................................................... 211
What is i-mode mail?, Compose and send mail, Receive mail, Check new mail, Change
address, Reject mail, Compose and send chat mail, Receive chat mail, and so on...
Using the i-shot Service............................................................ 263
What is i-shot?, Send i-shot, i-shot host, and so on...
Using i-αppli ............................................................................... 271
What is i-αppli?, What is i-αppli DX?, Download, Run i-αppli, i-αppli To setting, i-αppli
stand-by display, Upgrade, Soft description, and so on...
Using FeliCa ............................................................................... 295
What is FeliCa?, FeliCa compatible i-αppli, and so on...
Using the Network Services ..................................................... 299
The Voice Mail Service, The Call Waiting Service, The Call Forwarding Service, The
Three-Way Calling Service, The Number Plus Service, The Caller ID Display Request
Service
Using the Infrared Communication.......................................... 317
What is the infrared communication?, Receive data, Send data, Infrared remote control
Using Other Functions .............................................................. 325
“Memory Stick Duo”, Battery saver, V oice memo, Display call duration/charge, Music
panel, My picture, Melody folder, Calculator, Memo, Reset, and so on...
Entering Text .............................................................................. 371
Input panel, 5-touch (Kana) method, Input method, Common phrases, Cut/Copy/Paste,
Download dictionary, and so on...
Appendix..................................................................................... 387
Kuten codes, Characters assigned to keys, and so on...
Troubleshooting......................................................................... 405
Troubleshooting, Error messages, Warranty and after sales services, Software update
Index............................................................................................ 421
Quick Manual.............................................................................. 428
* The paging service provided by NTT DoCoMo is called QUICKCAST as of January 2001.
3
Page 6
Turning Style
The Mova can be opened with a simple
one-hand operation. You can display
sites and enter text (using the Input
panel) as well as place a call even with
the Mova closed.
Jog Call
You can place a call from the
Phonebook easily with simple
operations of turning and pressing the
disc jog.
“Memory Stick Duo”
Data in the Mova such as the
Phonebook, mail and Album can be
copied and saved in the “Memory Stick
Duo”. Data in the “Memory Stick Duo” can
be also displayed on the Mova.
Album Function
Thumbnail display for conv enient search. The
still images recorded by camera can be enjoyed
as a slideshow.
Bar Code Reader Function
You can scan JAN/QR code recorded
by the camera. You can save the
scanned data in the Phonebook or
use it for mail transmission.
Mobile Movie Compatible
The Mova allows you to play back
moving images in Standard Play,
Long Play 1 and Long Play 2
recorded by Mobile Movie compatible
devices. You can also record moving
images that support Mobile Movie in
Standard Play. A f avorite scene in the
moving image can be saved as a still
image.
Disc Jog
The disc jog makes it much easier to
search the Phonebook, compose
mail, use i-mode, and perform various
other operations.
EV-Link
Mail can be easily sent to a recipient
saved in the record. You can also
place a call easily to the sender of the
received mail.
Prediction Conversion Entry “POBox”
“POBox” (Predictive Operation Based
On eXample) displays a list of
recommended words predicted from
the entered characters. You can select
the word from the list and enter text
quickly with fewer key operations. With
the help of the learning feature of
“POBox”, the more frequently you use
this function, the more smoothly you
can enter text.
Site Connection Service
An online service that allows you to
use the services provided by IPs
(information service providers) with
simple key operations. F or e xample ,
you can check bank balances,
reserve various kind of tickets, and
download games and ring tones on
the display of the Mova.
(The contents of the service vary by
bank. Some services may require a
separate subscription.)
i-mode Mail
A service that allows to exchange
mail with the mobile phone alone.
Mail exchange is available not only
between i-mode subscriber mobile
phones, but also with e-mail over
the Internet.
Internet Connection
Direct input of site address takes
you to the Internet site you wish to
view.
(Note that web sites other than
those compatible with i-mode may
not be displayed correctly.)
Flash
Flash movies improve the quality of
site presentation. You can also set
Flash movie for the stand-by
display.
SSL Compatible
You can access an SSL-enabled
site without any extra operation.
SSL (encryption technology)
assures that services with strict
security requirements such as
home banking service are available
without worry (P.180).
※ i-mode is a paid service that
requires a subscription.
Phonebook
Up to 1,000 phone numbers can be
saved in the Phonebook. Up to 3
phone numbers and mail addresses
can be saved respectively for each
Phonebook entry. If you save an
image in a Phonebook entry, you can
display it when you display the entry, etc.
Music Panel
You can use the Mova to pla y bac k m usic
data saved in the MagicGate-compatible
“Memory Stick Duo”. You can also
perform other functions such as
displaying sites and composing mail
while playing back music data.
Stereo Speaker
The Mova is provided with stereo speakers
that accurately reproduce music data and
the sound linked with moving images.
Camera Function
Clear images can be recorded using the
high-definition camera with about 1.3
million effective number of pixels
(maximum recorded number of pixels is
about 1.23 million). Recorded still images
can be edited and transmitted using i-shot
or the infrared communication.
FIT Cover
A removable cover is supplied with
the Mova.
Features of the Mova SO506iC
It’s amazing
because
it’s i-mode
By subscribing to i-mode, the
following services become
available.
Convenient Features of Simple Operation
Versatile AV Features
P.374P.29
P.75
P.326
P.119P.116
P.132
P.117P.103
P.98
P.8
P.68
P.360
P.375
P.345
P.29
4
Page 7

Versatile Features for Mail
Lineup of Network Servicesi-αppli Full of Amusement
Mail Management Using Folders
Received and sent mail can be sorted
and saved in 15 folders, respectively.
P.249
Send/Receive Ranking
You can select mail addresses from a
list of people you frequently send mail
to or receive mail from.
P.221
Mail List
Up to 10 mail lists of up to 10
addresses can be saved to send mail
at the same time.
P.253
Chat Mail
You can use the i-mode mail function
to exchange chat mail messages with
up to 10 participants as if you are
talking with them.
P.257
i-shot Compatible
Still images recorded by the Mova
can be transmitted to i-mode
compatible mobile phones and PCs
(over the Internet) using mail. An
image of a size other than “i-shot (S)”
or “i-shot (L)” can be sent after being
resized to the i-shot (S) size
automatically.
P.264
i-αppli Stand-by Display
i-αppli can be used as the stand-by
display. For example, you can check
information updated real time such as
stock prices and weather forecasts
any time.
P.286
i-αppli DX
i-αppli DX enables you to enjoy i-αppli
more conveniently by working in
conjunction with the information in the
Mova such as mail, received/redial
record or the Phonebook. You can
compose mail with your favorite
character in the display, or set a
character to notify you of the caller
when receiving a call.
P.272
FeliCa
FeliCa provides versatile features that
help you use the Mova more
conveniently in your daily life. For
example, you can use the Mova as a
substitute for cash to pay your
shopping just by holding it close to
the reader/writer (external device).
P.296P.283
Useful Infrared Features
Infrared Communication
The data such as the Phonebook,
Schedule, Memo, Bookmark and picture
can be sent to/received from other
mobile phones, etc. equipped with the
infrared communication.
also do much more in conjunction with other
devices equipped with the infrared
communication by using the infrared
communication feature of i-αppli.
The Mova can
P.318
Voice Mail Service (paid)
The Voice Mail Service Center
records messages for you.
●
A subscription is required for
this service.
P.300
Call Waiting Service (
The incoming call can be answered
during a call.
A subscription is required for
●
this service.
paid
)
P.304
Call Forwarding Service (free)
The call can be forwarded to
another specified phone number.
A subscription is required for
●
this service.
P.306
Caller ID Display Request Service (free)
When you receive a call and the
caller does not send the caller ID,
the guidance requests the caller to
send the caller ID (phone number).
P.315
Hyper Talk Compatible
The Hyper Talk is a DoCoMo
network service which utilizes the
newest voice processing
technology to provide a better
communication quality for users.
Infrared Remote Control Compatible
The Mova can be used as a remote
control to easily operate TVs and
VCRs.
●
i-αppli for using the Mova as a TV
remote control is pre-installed.
P.323
5
Page 8
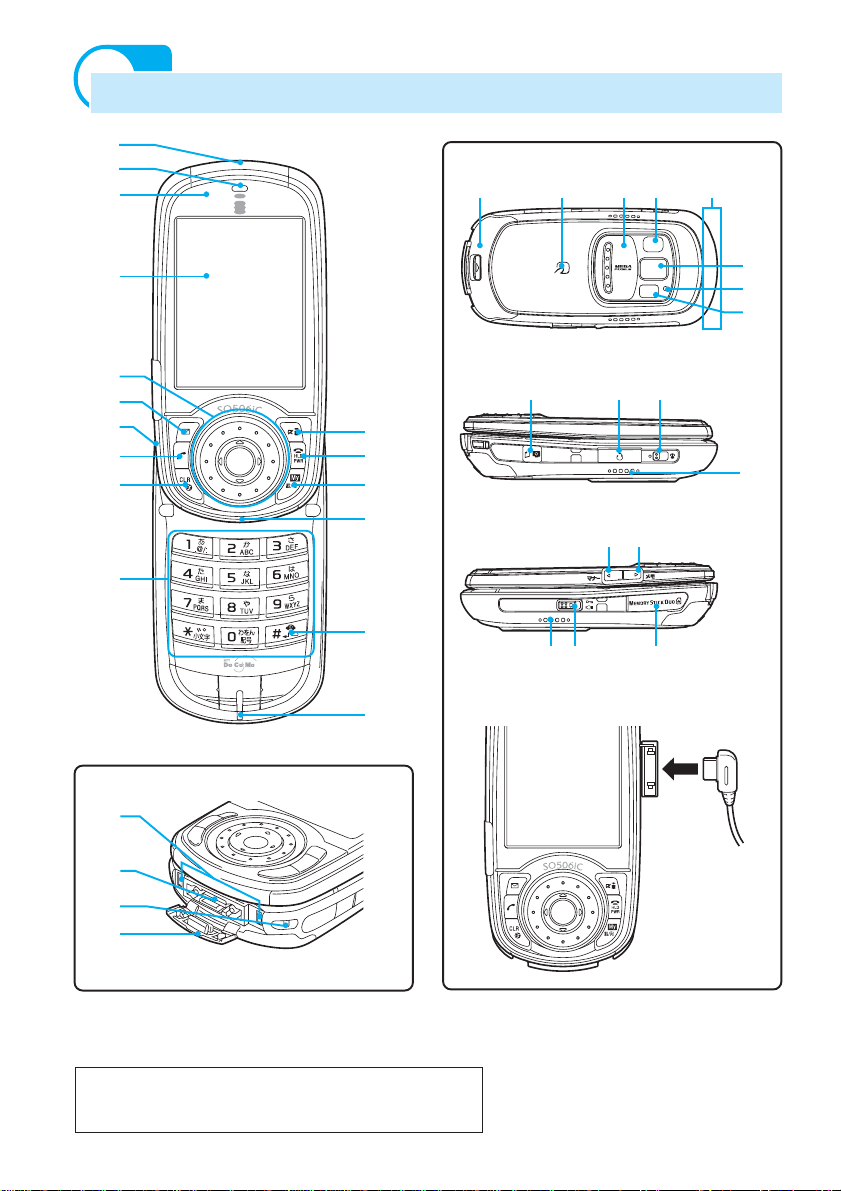
Part Names and Functions
1
2
3
qj
w;qk ql
wa
4
5
6
7
8
9
0
ef
qa
qs
qd
qf
qg
qh
wg
wh wj
e;wl
ea edes
Connecting the Earphone Mic
ws
wd
wf
wk
eg
eh
ej
Mova SO506iC
Dimensions : 50 × 106 × 28 mm (W × H × D)
Weight : About 140 g (with battery pack attached)
6
※
The height and depth reflect the dimensions
when the Mova is closed.
Page 9
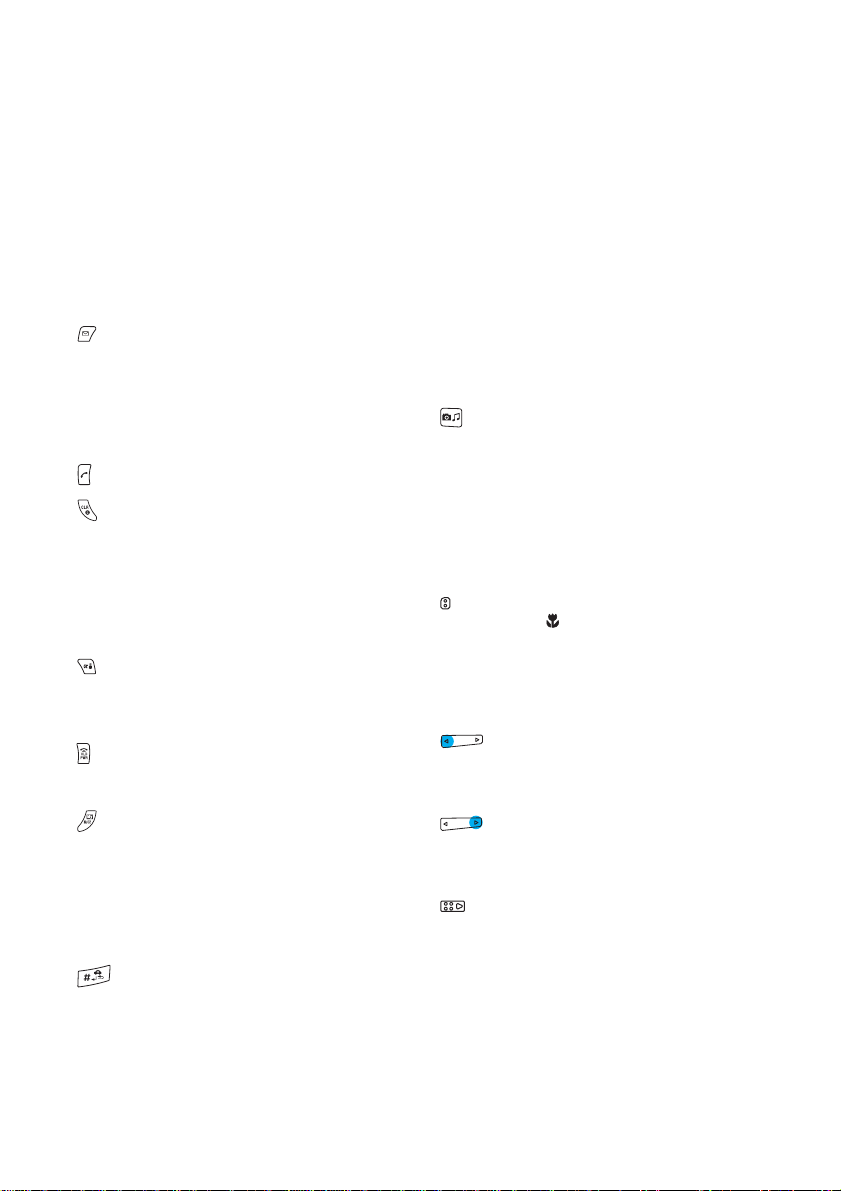
1 Infrared Data Port
To use the infrared communication (P.318) or use the
Mova as a remote control (P.323), point this port to the
target device.
2 Earpiece
The caller’s voice is heard from here.
3 Power Saver Indicator
Flashes in green in the Power saver mode (P.335).
4 Display
Shows information such as the entered phone number and
functions (P.9).
5 Disc Jog
Use to show the menu, redial record, received record,
Phonebook and My picture, and to select menus and other
items.
Use to select an item displayed in the guide display (P.8).
6 Mail Key
Press in the stand-by display to show the Mail menu (P.216).
Press for over a second in the stand-by display for the
Check new message/mail (P.207, 224).
Press to select an item displayed in the guide display (P.8).
7 Microphone
Picks up the sound of your voice (the microphone is located
on the keypad side and invisible behind the display).
8 Call Key
Press to place or receive a call.
9 Clear Key
Press to cancel the current operation and return to the
previous display or delete the entered text (P.373).
Press to operate the software in the i-αppli stand-by
display (P.286).
Press while playing back music data using the Music panel
to enable the background playback (P.345).
q; Keypad
Enter phone numbers or text.
qa i-mode Key
Press in the stand-by display to show the i-mode menu (P.179).
Press for over a second in the stand-by display to show the
folder list of i-αppli (P.277).
Press to select an item displayed in the guide display (P.8).
qs Power/End/Hold Key
Press to power the Mova ON/OFF (P.30).
Press to hang up or return to the stand-by display. Press
while receiving a call to put a call on hold (P.58).
qd MySelection Key
Press in the stand-by display to show MySelection (P.334).
Press while in the Camera mode to switch the display
between the still image recording mode and moving image
recording mode (P.101).
qf Incoming Indicator
Flashes when receiving a call/mail. It keeps flashing when
there is a missed call or new mail/unread message.
Flashes once when you turn to open the Mova (P.29).
qg #/Driving Mode Key
Press while entering text to reverse the text display order
or enter a line feed.
Press for over a second in the stand-by display to set the
Driving mode (P.59).
qh Charge Indicator
Lights in red while charging the battery (P.25).
qj Rear Cover
(P.24).
qk FeliCa Mark
An IC card is incorporated. To use the IC card feature,
hold the Mova with the FeliCa mark close to the reader/
writer (external device). IC card cannot be removed
(P.296).
ql Lens Cover
Slide to open the cover in the stand-by display to activate
the Camera mode. Slide to close the cover in the Camera
mode to exit the Camera mode (P.99).
w; Camera
Record still or moving image from here (P.99).
wa Antenna (invisible built-in antenna)
Do not cover the antenna with your hands for use in better
radio wave condition.
ws Photo Mirror
Check your face, etc. when recording.
wd Auto Timer Indicator
Flashes when recording image with the Auto timer (P.106).
Lights while recording images.
wf Photo Light
Lights when recording images (P.112).
wg AV Key (Shutter/Music)
Press in the stand-by display to show the Music panel (P.345).
Press for over a second in the stand-by display to set the
Camera mode (P.99).
Press to record by the camera (P.103).
wh Earphone Mic Jack
Connect the Flat-Plug Switched Earphone Mic (optional),
etc. Other traditional Switched Earphone Mic is also
available by connecting it through the Earphone Jack
Conversion Adapter (P.362). Do not pull the earphone mic
jack cover forcibly.
wj Macro Switch
Set this switch to the position to activate the Macro
mode (P.106).
wkea Speaker
Sounds the ring tone, the music data, etc. from here.
The Mova supports stereo sound playback. The speaker
ea is assigned to the mainsound-left and the speaker wk to
the subsound-right (P.118).
wl Manner Key
Press for over a second in the stand-by display to set the
Manner mode (P.82).
Press during a call to set the Whisper mode (P.344).
Press to scroll a page to the previous screen.
e; Memo Key
Press for over a second in the stand-by display to set the
Record message (P.63).
Press during a call to set the Voice memo (P.337).
Press to scroll a page to the next screen.
es Lock/Light Key
Slide in the stand-by display or the Music panel to lock the
keypad (P.156).
Slide in the Camera mode to turn on the photo light (P.112).
ed “Memory Stick Duo” Slot
Insert the “Memory Stick Duo” (P.327). Do not pull the slot
cover forcibly.
ef Charge Terminal
The terminal to charge the battery pack.
eg External Connection Terminal
The terminal to connect the AC or DC adapter (P.25, 27).
eh Strap Attachment
Attach the strap here.
ej Terminal Cover
Do not pull the terminal cover forcibly.
7
Page 10
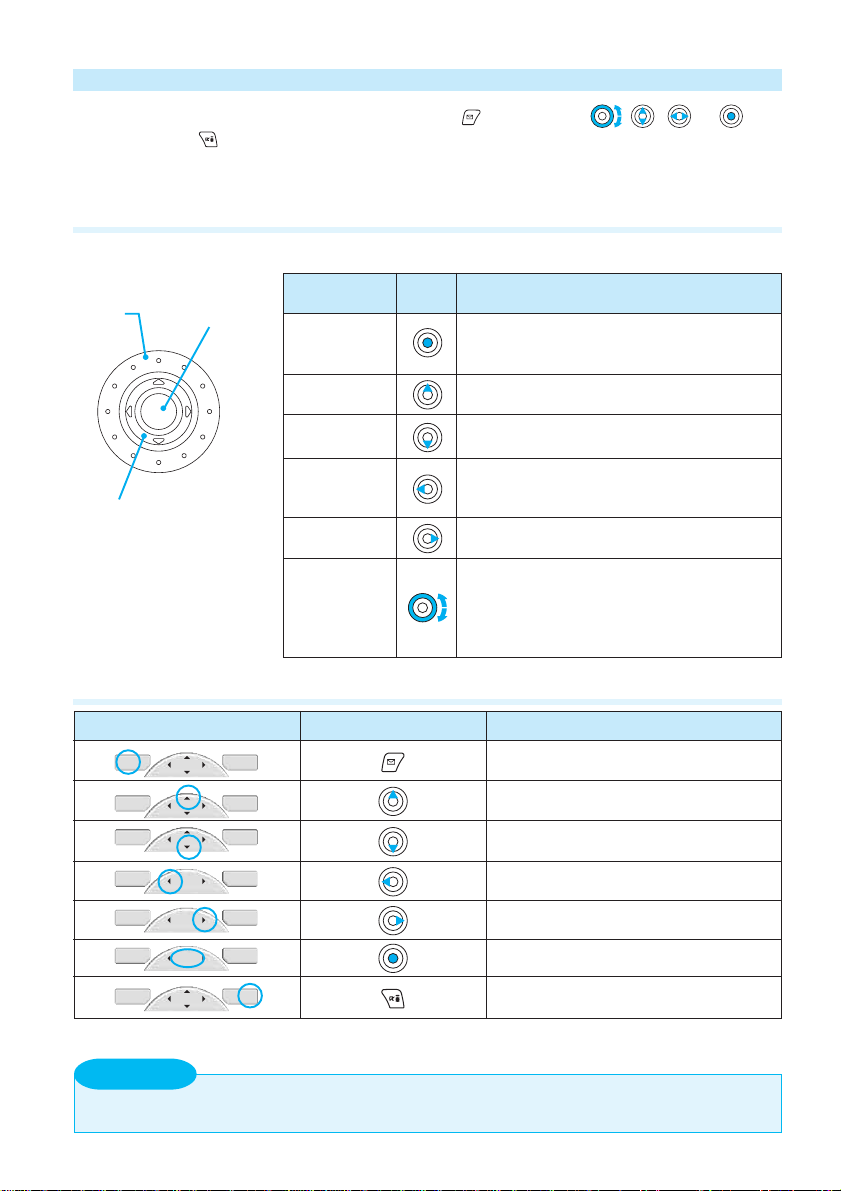
Using the Disc Jog
To utilize the Mova’s function, operate the mail key ( ), the disc jog ( , / , or ) and
the i-mode key (
• For details on the disc jog and guide display in the Camera mode, see P.101.
Disc Jog
The disc jog is comprised of the enter key, up, down, left, and right arrow keys, and jog.
Jog
Up/Down/Left/Right
arrow keys
) in accordance with the instruction shown in the guide display .
Enter key
Operation
Enter key
Up arrow key
Down arrow key
Left arrow key
Right arrow key
Jog
Symbols in
this manual
Set a selected item.
Press in the stand-by display to show the menu
display.
Move the cursor upward.
Press in the stand-by display to show My picture.
Move the cursor downward.
Press in the stand-by display to show the Phonebook.
Move the cursor to the left or return to the
previous display.
Press in the stand-by display to show the received record.
Move the cursor to the right or go to the next display.
Press in the stand-by display to show the redial record.
Move the cursor.
You can change the direction of cursor movement to
your preference (P.143).
Turn the jog in the stand-by display to show the
Phonebook.
Description
Guide Display
Display
newfunc
newfunc
newfunc
new
new
new
newfunc
func
func
func
select
select
select
select
select
select
select
Information
• Key operations may differ from shown on the above depending on how the site is made.
Symbols in this manual
Press the mail key.
Press the up arrow key.
Press the down arrow key.
Press the left arrow key.
Press the right arrow key.
Press the enter key.
Press the i-mode key.
8
Operation
Page 11
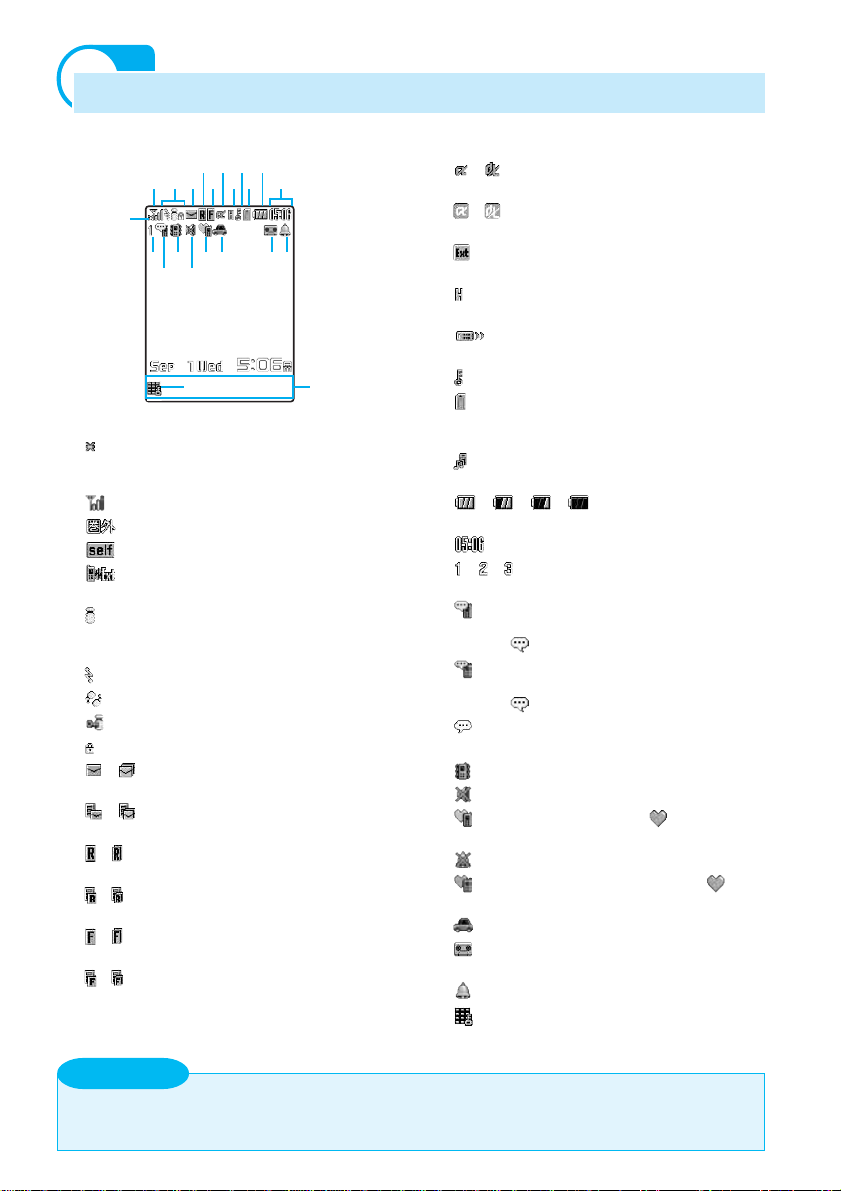
Using the Display
• For details on icons in the Camera mode, see P.100.
579qa
23468q; qs
1
qd qg qj qk qlw;
qf qh
wa ws
1
2
3
4 /
5 /
6 /
Lights within the service area. Flashes
during a call when the Battery saver is
set (P.335).
Radio wave condition
Out of the service area
Self mode is set (P.365)
During infrared communication
(P.318)
Lights when i-mode communication is
enabled. Flashes during i-mode
stand-by (P.184).
During i-mode connection
During i-mode communication
i-mode lock is set (P.204)
While an SSL site is displayed (P.180)
Unread mail (P.222)/The Mova is full
of received mail
/
New mail at the i-mode center/The
i-mode center is full
Unread Message R (P.206)/The Mova
is full of Message R
/
New Message R at the i-mode center/
The i-mode center is full
Unread Message F (P.206)/The Mova
is full of Message F
/
New Message F at the i-mode center/
The i-mode center is full
7 /
8
9
q;
qa / / /
qs
qd / /
qf
qg
qh
qj
qk
ql
w;
wa
ws
While running i-αppli (i-αppli stand-by
display)/While running i-αppli DX
/
i-αppli stand-by display/i-αppli DX
stand-by display is set (P.286)
While an external device is being
connected (P.369)
While the Car Adapter is being
connected (P.46)
While the infrared remote control is
being used (P.323)
Secret mode is [Display ON] (P.79)
Lights when the “Memory Stick Duo”
is inserted. Flashes while data is
loaded (P.327).
While playing back music data
(P.345)
Battery level (P.28)
Current time (24-hour format)
Number of record messages (P.64)
Record message is set (there are
non-played back record messages)
( is yellow) (P.63)
Record message is set (there is no
non-played back record message)
( is white) (P.63)
Record message is OFF (there are
record messages)
Vibrator is set (P.85)
Phone tone volume is OFF (P.91)
Manner mode is set ( is orange)
(P.82)
Silent mode is set (P.82)
Original manner mode is set ( is
blue) (P.82)
Driving mode is set (P.59)
Message at the Voice Mail Service
Center (P.303)
Clock alarm is set (P.162)
Keypad is locked (P.156)
Guide display (P.8)
Information
• The SO506iC display is manufactured based on the leading edge technologies, which may cause some
pixels unlit or lit constantly to appear on the display. This is not a malfunction.
9
Page 12
g
Before Using the Mova
Safety Precautions
■ For safe and proper use of the Mova, please read the “Safety Precautions” prior
to use. Keep the Manual in a safe place for future reference.
■ ALWAYS observe the safety precautions since they intend to prevent personal
injury or property damage.
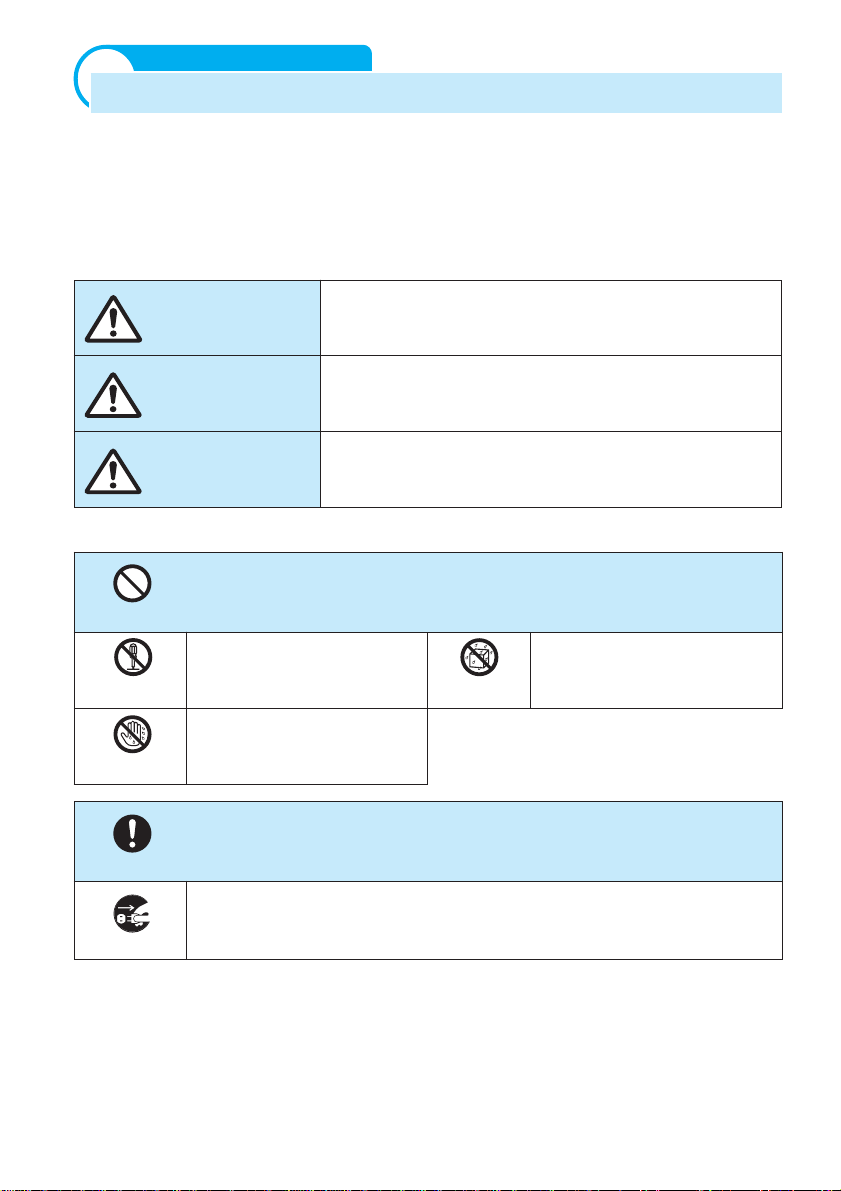
■ The following symbols indicate the different levels of injury or damage that may
result if the guidelines are not observed and the Mova is used improperly.
Failure to observe these guidelines may immediately
DANGER
WARNING
CAUTION
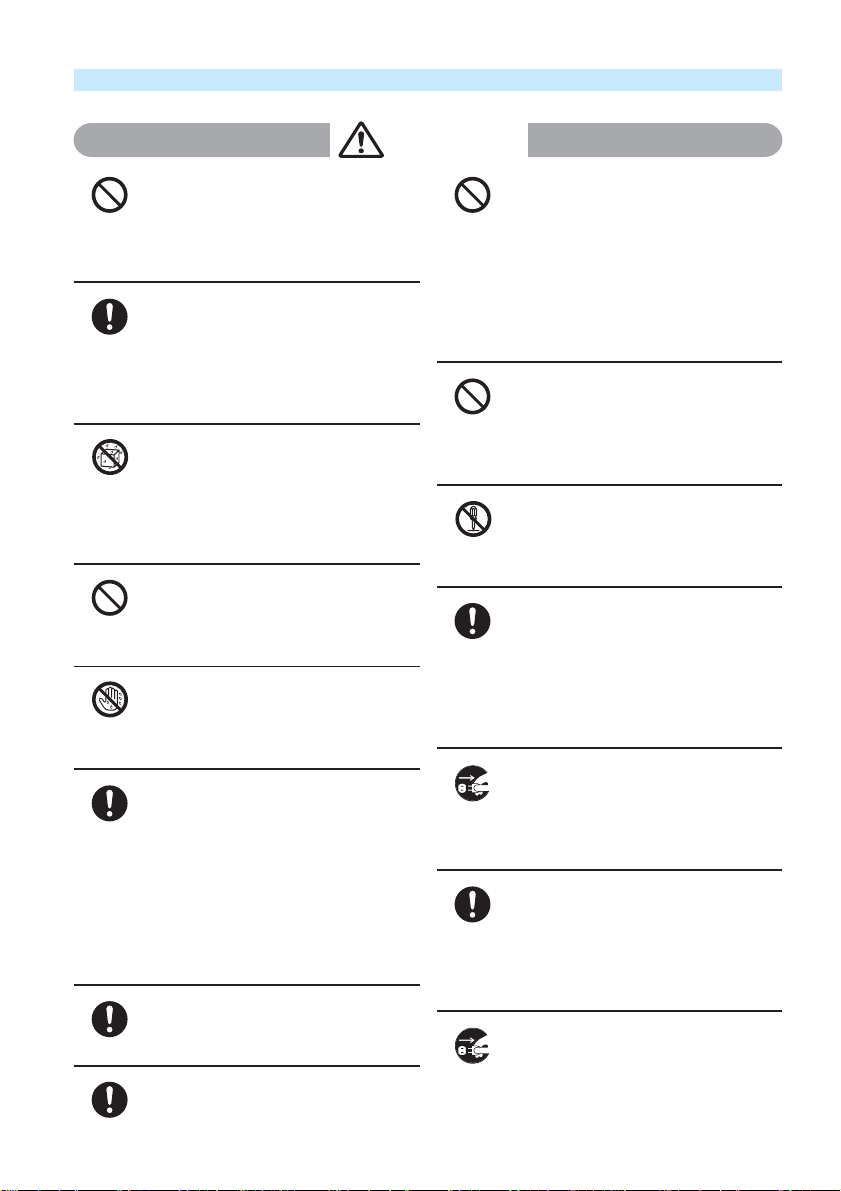
■ The Following symbols indicate specific directions.
Don’t
Don’t
Indicates prohibited actions.
result in death or serious injury.
Failure to observe these guidelines may result in death
or serious injury.
Failure to observe these guidelines may result in injury
and property damage.
No Disassembly
No
Disassembly
No wet
hands
Do
Unplu
■ “Safety Precautions” are described in the following categories:
Handling the Mova, Battery Pack and Adapter (including the charger).........................11
Handling the Mova.......................................................................................................... 12
Handling the Battery Pack ..............................................................................................14
Handling the Adapter (including the charger) ................................................................ 16
Handling the Mova Near Electronic Medical Equipment ............................................... 17
Indicates not to disassemble.
No wet hands
Indicates not to handle with
wet hands.
Do
Indicates compulsory actions in accordance with instructions.
Unplug
Indicates to remove the power plug from the outlet.
No
liquids
No liquids
Indicates not to use where it
could get wet.
10
Page 13
Handling the Mova, Battery Pack and Adapter (including the charger)
DANGER
Use the battery packs and adapters (including chargers) specified for the
Mova by DoCoMo.
Do
The use of products that are not specified may cause the battery pack to leak, overheat,
explode or ignite fire.
Battery Pack: SO009, Desktop Holder: SO011, AC Adapter: SO004, DC Adapter: SO001,
Car Adapter SO002, Battery Holder SO001
※
Contact DoCoMo service counter (DoCoMo shop) for information on other compatible products.
WARNING
Do not place the Mova, battery
pack or adapter (including the
Don’t
charger) inside cooking appliance,
such as a microwave oven or
high-pressure containers.
Doing so may cause the battery pack
to leak, overheat, explode or catch fire
or the Mova and adapter (including
the charger) to overheat, smoke,
catch fire or damage the circuit parts.
Do not allow the charge and
external connection terminals to
Don’t
come in contact with conducting
foreign substances (a piece of
metal, pencil lead, etc.). Never
allow these objects to get into the
Mova, battery pack or adapter.
Doing so may cause fire or
malfunction due to short circuits.
Do not subject the Mova, battery
pack or adapter to excessive
Don’t
force or throw it.
Doing so may cause the battery pack
to leak, overheat, explode or catch fire
or cause the equipment to malfunction
or catch fire.
Power off the mobile phone before
you step into a place where flammable
Do
gas can leak, such as gas stations.
Do not charge the battery as well
because it may cause gas to ignite.
Keep the mobile phone powered off
even when you use the Osaifu-Keitai
in gas station premises or other
similar place.
Do not keep in a place that is
very humid, dusty or subject to
Don’t
high temperature.
Doing so may cause malfunction.
Do not place on an unstable or
inclined platform.
Don’t
Doing so may cause the equipment to
fall and cause injury or malfunction.
Keep the Mova, battery pack and
adapter out of the reach of
Do
babies and infants.
Failure to do so may cause accidental
swallowing or injury.
CAUTION
Don’t
Do
Do not use or leave the Mova,
battery pack or adapter in a place
subject to high temperature,
such as under direct sunlight or
in a car on an extremely hot day.
Doing so may cause the battery pack
to leak, overheat, explode or catch fire.
The phone may become deformed or
damaged as a result. Also, part of the
case may heat up and cause burns.
If children use the Mova, parents or
guardians should give them the
proper instructions for use. Make sure
that they use the Mova as instructed.
Failure to do so cause injury.
11
Page 14
Handling the Mova
WARNING
Do not use the Mova while
driving a vehicle.
Don’t
Doing so may interfere safe driving and
cause accident. Stop the vehicle to park
in a safe place before using the Mova.
Prohibited acts such as mobile phone
usage during driving may be punished by
law.
Do not disassemble or modify
the Mova.
No
Disassembly
Doing so may cause accident such as
fire, injury or electric shock, or
malfunction.
Power OFF the Mova near
electronic equipment operating
Do
on high precision control or weak
signals.
Failure to do so may interfere with the
operation of electronic equipment.
※The following are some electronic equipment
that you should be careful of:
Hearing aids, implantable cardiac
pacemaker, implantable cardioverter
defibrillator, other electronic medical
equipment, fire detector, automatic door and
other automatically controlled equipment.
If you use an implantable cardiac
pacemaker, implantable cardioverter
defibrillator or other electronic medical
equipment, check with the relevant medical
electronic equipment manufacturer or vendor
whether the operation can be affected by
radio waves.
Do not turn on the photo light
with the lighting part close to
Don’t
eyes.
Doing so may cause eye injury or
accident by dazzling eyes or surprising.
Do not turn up the headphone
volume to a level where you
Don’t
cannot hear the sounds around
you while you are walking. Also,
look out for the surrounding
traffic and road surface
conditions.
Doing so may cause accident.
Power OFF the Mova in a place
where the use is prohibited such
Do
as in airplane or hospital.
The Mova may affect electronic
equipment and electronic medical
equipment. If the Mova has the
automatic power-ON function, cancel
the setting before powering OFF the
Mova.
Follow the instructions of each
medical facility for the use of mobile
phones on their premises.
Prohibited acts such as mobile phone
usage on board an airplane may be
punished by law.
Do not put the Mova in your
breast pocket or inside pocket if
Don’t
you are wearing any electronic
medical equipment.
If the Mova is used close to electronic
medical equipment, it may cause
malfunction due to exposure to radio
waves.
If you have a weak heart, set the
vibrator and ring volume
Do
carefully.
Do not aim the Infrared data port
towards eyes when using the
Don’t
infrared communication.
Doing so may affect eyes. Also,
aiming it towards other infrared
devices may interfere with the
operation of these devices.
12
Page 15
CAUTION
In rare cases, using the Mova may
interfere with the operation of
Do
electronic equipment in some types
of vehicle.
If there is any interference, do not
use the Mova when driving for safety
reasons.
Do not get the Mova wet.
If liquids such as water or pet urine get
No
into the Mova, it may cause overheating,
liquids
electric shock, malfunction or injury. Be
careful where and how you use the
Mova.
Do not swing the Mova around by
holding the strap.
Don’t
The Mova may hit you or others or the
strap gets cut away from the Mova. It
may cause accident such as injury, or
damage to the Mova or other property.
Do not place your ear too close
to the speaker while the ring
Don’t
tone sounds or the melody is
played back.
Doing so may cause difficulty in hearing.
Do not let your fingers or other
objects struck in the Mova or do not
Don’t
turn the Mova around in a violent
way when you turn to open it.
Doing so may cause the Mova to hit
others and cause accident such as
injury, malfunction or damage.
The use of the Mova may cause
itching, rashes, eczema or other
Do
symptoms depending on the
user’s physical condition.
Immediately stop using and get
medical treatment in such a case.
The following metal is used in the
Mova.
Areas to note Material
Case on the display side Magnesium
Photo mirror Chrome plated
Strap attachment Stainless steel
If you hear thunder while using
the Mova outdoors, power OFF
Do
immediately and take shelter in a
safe place.
Failure to do so may cause injury or
electric shock from the lightning.
Do not place metal objects such
as magnetic cards, floppy disks
Don’t
or pins near or between the
Mova.
Magnetic data on bankcards, credit
cards, telephone cards, floppy disks,
etc. may be erased.
Do not expose the camera lens to
strong light such as sunlight for
Don’t
a long period of time.
Doing so may cause fire or
malfunction by the light condensation
by lens.
Do not turn up the volume
unnecessarily high when you
Don’t
use the headphones.
If you use the headphones
continuously for a long period of time
with the sound turned up loud, it may
cause hearing impairment, or your
ears may be injured with the sudden
emission of a loud sound.
Do not touch broken glasses if
the display or the camera lens is
Don’t
broken.
The display and the camera lens are
designed not to be shattered when
broken. But it may cause injury if you
touch a cut surface mistakenly.
13
Page 16
Handling the Battery Pack
■ Check the type of the battery by the label on the battery pack.
Display Type of Battery
Li-ion Lithium ion Battery
DANGER
No
Disassembly
Don’t
Don’t
Don’t
Do not disassemble or modify
the battery pack and do not
directly solder it to the Mova.
Doing so may cause the battery pack
to leak, overheat, explode or catch
fire.
Do not throw the battery pack
into fire.
Doing so may cause the battery pack
to leak, overheat, explode or catch
fire.
Do not stick a nail into the
battery pack, hit it with a hammer
or step on it.
Doing so may cause the battery pack
to leak, overheat, explode or catch
fire.
Do not forcibly connect the
battery pack to the Mova. Also
make sure to connect the battery
pack in the correct direction.
Doing so may cause the battery pack
to leak, overheat, explode or catch
fire.
Do not use or leave the battery
pack in a place with high
Don’t
temperature such as close to fire
or heater.
Doing so may cause the battery pack
to leak, overheat explode or catch fire.
Do not connect the battery pack
terminal to metal objects such as
Don’t
wires. Also, do not carry or keep
the battery pack together with
metal objects such as a necklace.
Doing so may cause the battery pack
to leak, overheat, explode or catch
fire.
Do not get the battery pack wet.
If liquids such as water or pet urine
No
get into the battery pack, it may cause
liquids
overheating, electric shock or
malfunction. Be careful where and
how you use the Mova.
If the battery fluid gets into your
eyes, do not rub, rinse with clean
Do
running water and get medical
treatment immediately.
Failure to do so may cause blindness.
14
Page 17

WARNING
Stop charging if the Mova isn’t
charged within the specified
Do
charging time.
Failure to do so may cause the
battery pack to leak, overheat,
explode or catch fire.
If the battery pack leaks or emits
an unusual odor, immediately
Do
move it away from fire.
The leaking liquid may ignite fire,
catch fire or explode.
Do not use or leave the battery
pack in a place subject to high
Don’t
temperature such as under direct
sunlight or in a car on an
extremely hot day.
Doing so may cause the battery pack
to leak, overheat and decrease the
battery performance and life.
Do not dispose of the battery
pack together with other
Don’t
garbage.
The battery pack may become the
source of fire or environmental
destruction. Affix a tape on the
terminal of a used battery pack to
insulate and take it to DoCoMo
service counter (DoCoMo shop) or
follow the instructions of the local
authorities that collect and dispose of
the battery pack.
Don’t
Do
CAUTION
If you notice anything unusual
about the battery pack such as
an unusual odor, overheating,
discoloration or deformation
during operation, charging or
storage, immediately remove the
battery pack from the Mova and
do not use the battery pack.
Failure to do so may cause the battery
pack to leak, overheat, explode or
catch fire.
If the battery fluid gets on your
skin or clothes, immediately stop
using the battery pack and rinse
with clean running water.
Failure to do so may cause injury on
your skin.
15
Page 18
g
g
Handling the Adapter (including the charger)
WARNING
16
Do not use the adapter (including the
charger) if the cord of the adapter or
Don’t
the power cord is damaged.
Doing so may cause electric shock,
overheating or fire.
Place the charger or the desktop holder
on a stable platform while charging. Do
Do
not cover or wrap the charger or the
desktop holder with a cloth or bedding.
The Mova may fall off the charger or
heat up and cause fire or malfunction.
Do not get the adapter (including
the charger) wet.
No
If liquids such as water or pet urine get into the
liquids
adapter (including the charger), it may cause
overheating, electric shock or malfunction. Be
careful where and how you use the Mova.
Do not use the AC adapter or
desktop holder in a very humid or
Don’t
steamy place such as bathroom.
Doing so may cause electric shock.
Do not touch the cord of the
adapter (including the charger) or
No wet
the power outlet with wet hands.
hands
Doing so may cause electric shock.
Use the adapter only on the
specified power supply and voltage.
Do
Failure to do so may cause fire or
malfunction. Using the adapter oversea may
cause malfunction or any other troubles.
AC adapter:AC 100 V (make sure to connect
DC adapter: DC 12 V/24 V (exclusively used for
only to the AC 100 V power
outlet for domestic use in Japan)
vehicles with a negative ground)
Clean dust from the plug.
Failure to do so may cause fire.
Do
Do not touch the Mova and adapter
(including the charger) if you hear thunder.
Do
Failure to do so may cause injury or
electric shock from the lightning.
Don’t
Don’t
No
Disassembly
Do
Unplu
Do
Unplu
Do not short-circuit the charge
terminal of the charger while the
power plug is connected to the
power outlet or cigarette lighter
socket. Do not touch the charge
terminal with your hands, fingers or
any part of your body.
Doing so may cause fire, malfunction,
electric shock or injury.
The DC adapter and car adapter are
for use in vehicles with a negative
ground. Never use them in vehicles
with a positive ground.
Doing so may cause fire.
Do not disassemble or modify the
adapter.
Doing so may cause electric shock,
fire or malfunction.
When you connect the AC adapter
to the power outlet, make sure that
it does not come in contact with
metal objects such as wires and
insert it firmly.
Failure to do so may cause electric
shock, short circuit or fire.
Remove the power plug from the
power outlet when not used for a
long period of time.
Failure to do so may cause electric
shock, fire or malfunction.
If the fuse of the DC adapter or car
adapter is blown, replace it with the
specified fuse.
The use of an incorrect fuse may cause fire or
malfunction. See the user’s manual supplied
with the adapter for the specified fuse.
If liquid such as water get into the
adapter, immediately remove it from
the power outlet or cigarette lighter
socket.
Failure to do so may cause electric
shock, smoking or fire.
Page 19
CAUTION
g
Do not place any heavy objects
on the cord of the adapter
Don’t
(including the charger) or the
power cord.
Doing so may cause electric shock or fire.
Before cleaning, remove the
Hold the plug, not the cord of the
adapter (including the charger) or the
Do
power cord, when you remove the
adapter (including the charger) from the
power outlet or cigarette lighter socket.
Pulling the cord may damage it and
cause electric shock or fire.
power plug from the power outlet
Unplu
or cigarette lighter socket.
Failure to do so may cause electric
shock.
Charge the battery pack that is not wet.
Failure to do so may cause overheating,
Do
fire or explosion.
Handling the Mova Near Electronic Medical Equipment
■ The following instructions observe the guidelines of the Electromagnetic
Compatibility Conference, Japan to protect electronic medical equipment from
radio waves from mobile phones.
WARNING
If you use an implantable cardiac
pacemaker or implantable
Do
cardioverter defibrillator, keep a
mobile phone (0.8 W transmission
output) more than 22 cm away from
the implant at all times. Similarly,
keep a car phone and shoulder phone
(2.0 W transmission output) more
than 30 cm away from the implant.
The radio waves from the Mova may
affect the operation of implantable
cardiac pacemaker or implantable
cardioverter defibrillator.
Please observe the following
guidelines in medical facilities.
Do
• Do not take the Mova into the operating
rooms, ICU (Intensive Care Unit) or
CCU (Coronary Care Unit).
• Power OFF the Mova inside hospital
wards.
• Power OFF the Mova in the lobby and
other places if there are any electronic
medial equipment operating in the
vicinity.
• Follow the instructions of each medical
facility when they specify areas
forbidding to use and carrying a mobile
phone.
• If the Mova has the automatic powerON function, cancel the setting before
powering OFF the Mova.
Power OFF the Mova in crowded
places such as rush-hour trains.
Do
There may be a person with an
implantable cardiac pacemaker
or implantable cardioverter
defibrillator near you.
The radio waves from the Mova may
affect the operation of implantable
cardiac pacemaker or implantable
cardioverter defibrillator.
If you need to use electronic
medical equipment other than
Do
implantable cardiac pacemaker
or implantable cardioverter
defibrillator at home or outside
medical facilities, check with the
relevant medical electronic
equipment manufacturer or
vendor whether the operation
may be affected by radio waves.
17
Page 20

Handling Precautions
◆Common Precautions
●Do not expose to water.
• The Mova, battery pack and adapter (including the charger) are not waterproof. Do not use
them in a humid place such as bathroom or in the rain. If you carry the Mova on your body,
perspiration may corrode the internal parts of the Mova and cause malfunction. Note that if
a trouble is diagnosed as exposure to water or other liquid, repairs of the Mova may not be
covered by the Warranty or it may not be possible to repair such phones.
In that case, if the Mova can be repaired, you must pay for the repairs.
●Do not leave the Mova in a place where it may be subject to excessive force.
• Do not put the Mova in a bag full of items or sit down with the Mova in your hip pocket. This
may damage the LCD screen and internal circuit board and cause the Mova to malfunction.
The Warranty will not apply in such a case.
●Clean the Mova with a dry soft cloth.
• The color liquid crystal display of the Mova has a special coating on it for better visibility. Do
not use unnecessary force to wipe the display when you are cleaning it with a dry cloth. The
display and its coating may be damaged. Handle the display with care and use a dry soft
cloth (such as used for cleaning eyeglasses) to clean it. If the display is left with water drops
or stains, stains may become permanent or the display coating may be peeled off.
• Do not use alcohol, thinner, benzene, cleaning detergent, etc. to clean the Mova. These
chemicals may erase the printing on the Mova or cause discoloration.
●Clean the terminals occasionally with a dry cotton swab.
• Soiled terminals may cause poor connection and loss of power. If the terminals are dirty,
use a dry cloth or cotton swab to wipe them clean.
●Do not leave the Mova near the air conditioning vent.
• Extreme temperature changes may produce condensation and corrode the internal parts of
the Mova, causing it to malfunction.
●Make sure to see the user’s manual supplied with the battery pack and adapter (including
the charger).
◆Mova Precautions
●Do not use the Mova in extremely hot or cold places.
• Use the Mova within a temperature range of 5°C to 35°C and a humidity range of 45% to
85%.
●Using the Mova near ordinary phone, television or radio may cause interference in these
electric appliances. Make sure to move far away from them when using the Mova.
●Always keep the information saved in the Mova in a separate note.
• Under no condition will DoCoMo be held liable for any damaged or lost data saved in the
Mova.
●Do not sit down with the Mova in the hip pocket of your trousers or skirt. Also, do not keep
the Mova in a place where it may be subject to excessive force such as at the bottom of a
bag.
• Failure to do so may cause malfunction to the Mova.
18
Page 21

●Do not turn to close the Mova with the strap or other items caught in between.
• Doing so may cause malfunction or damage to the Mova.
●Do not attach a thick sticker on the back of the display.
• Doing so may cause malfunction or damage to the Mova.
●Do not throw the FIT cover.
• Doing so may cause injury or damage to the FIT cover.
●
Note that if you use the Mova in an inappropriate way as to cause public nuisances, you may
be punished in accordance with the law and other regulations for preventing public nuisances.
●The Mova could become warm while in use and charging. This condition is not abnormal
and you can continue using the Mova.
Please be considerate of the privacy of individuals around you when taking and sending photo
using camera-equipped mobile phone.
◆Battery Pack Precautions
●
Charge the battery pack in an environment with the proper ambient temperature (5°C to 35°C).
●Make sure to charge the battery pack before you use the Mova for the first time or when you
have not been using it for a long period of time.
●The operating time of the battery pack varies depending on the operating environment
and the secular degradation of the battery pack.
●The battery pack is a consumable accessory.
• The operating time of the Mova varies depending on the operating conditions and other
factor even when it is fully charged. When the length of time you can use the phone
(operating time) on a charged battery becomes unusually short, it is time to replace the
battery pack. Purchase the battery pack specified in this manual.
●Do not dispose of the expended battery pack together with other garbage.
• The battery pack may become the source of fire or environmental destruction. Affix a tape
on the terminal of a used battery pack to insulate and take it to DoCoMo service counter
(DoCoMo shop) or follow the instructions of the local authorities that collect and dispose of
the battery pack.
◆Adapter (including the charger) Precautions
●Do not charge in the following places.
• Places where the ambient temperature is lower than 5°C or higher than 35°C.
• Places that are very humid, dusty or exposed to strong vibrations.
• Near ordinary phone, TV or radio.
●The adapter (including the charger) could become warm while charging. This condition is
not abnormal and you can continue charging the battery.
●When you charge the battery pack using the DC adapter or car adapter, keep the car
engine running.
• Charging the battery with the engine turned off may drain your car battery.
●When you use the power outlet with a mechanism to prevent the plug from being
removed, follow the instructions on the outlet’s user’s manual.
◆FIT Cover Precautions
●Do not use or leave the FIT cover in extremely hot or cold places.
•
Use the FIT cover within a temperature range of 5°C to 35°C and a humidity range of 45% to 85%.
19
Page 22
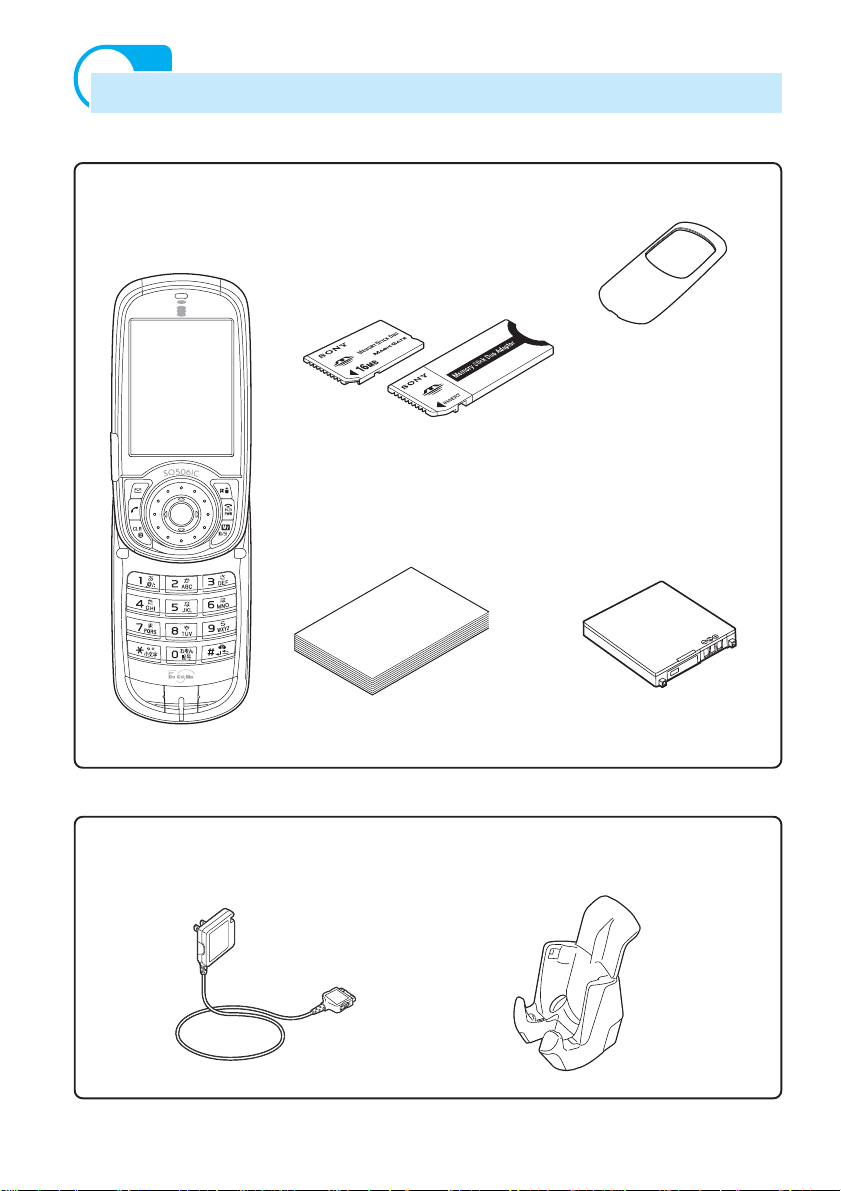
Standard Set and Optional Accessories
■ Standard Set
Mova SO506iC
(w/warranty and
rear cover SO010)
Memory Stick Duo Adapter
(w/user’s manual)
(Samples)
User’s Manual (this manual)
M
an
ual
※This manual contains the Quick
Manual starting at P.428.
FIT Cover SO001“Memory Stick Duo”,
※One FIT cover of a
pattern matched to the
color of the Mova is
supplied.
Battery Pack SO009
(w/user’s manual)
■ Optional Accessories
AC Adapter SO004
(w/user’s manual)
• Information on other optional accessories (P.401)
20
Desktop Holder SO011
(w/user’s manual)
Page 23
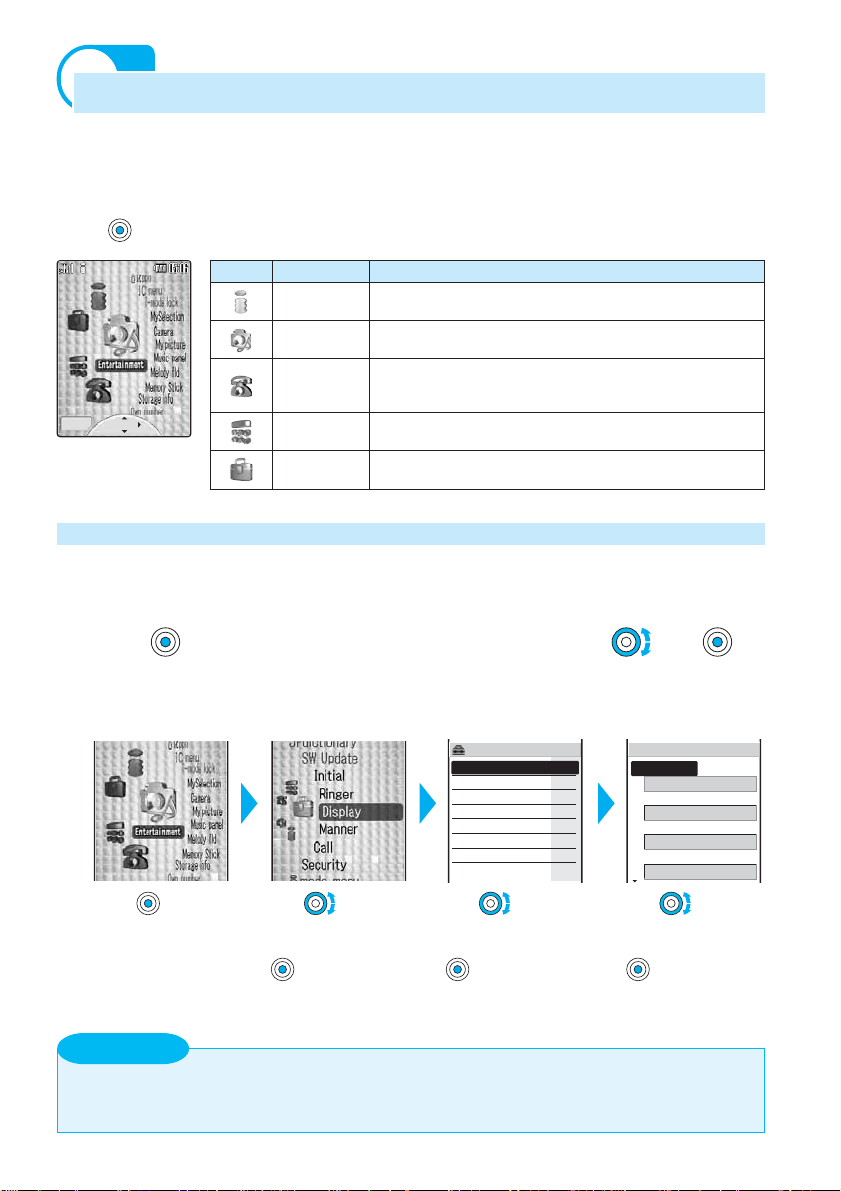
Selecting the Menu
Phone tone
Type1
Transfer tone
None
Mail tone
None
Chat mail tone
None
Ring tone
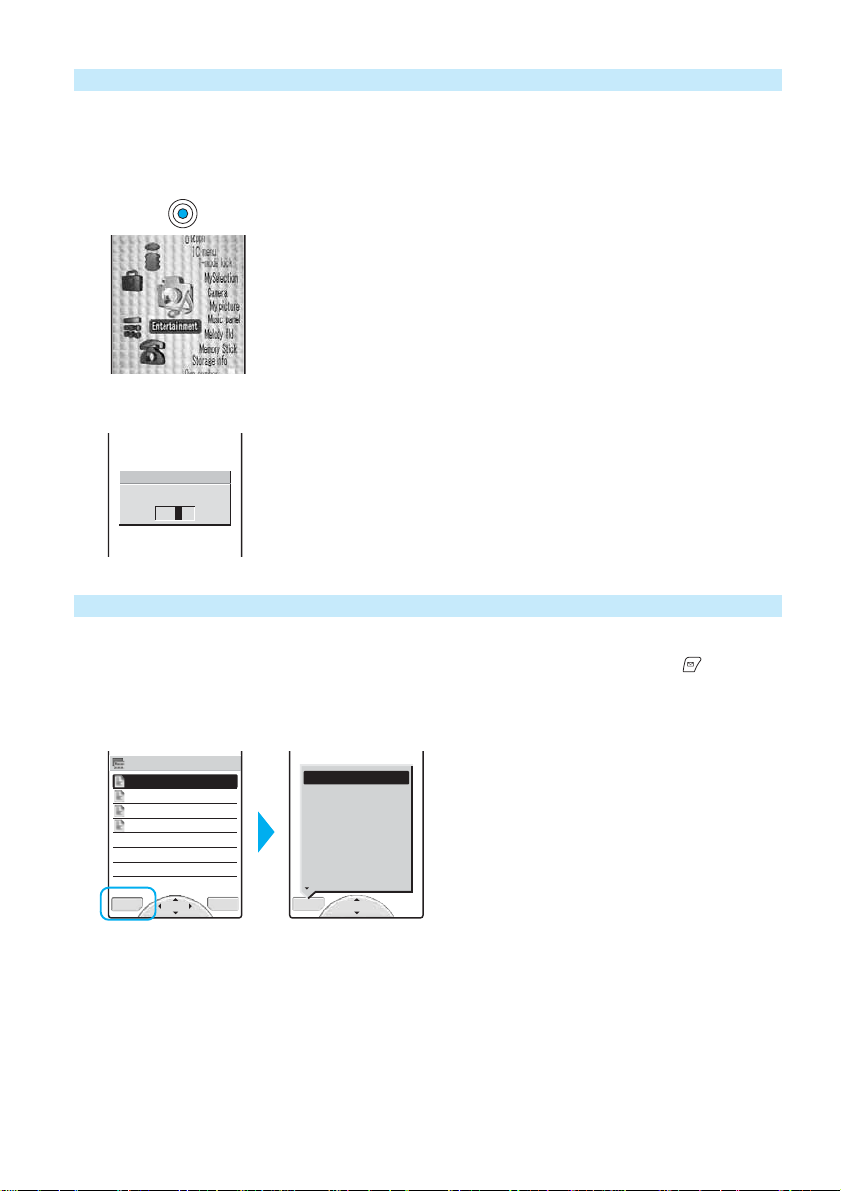
The Mova allows you to select and execute various functions from the menu. You can
change the menu display icons (P.140).
The function can be brought up also by entering the menu number.
Press
return
(menu) in the stand-by display to show the menu display as below.
Icon Menu name Description
select
i mode Used to access the i-mode menu, Mail menu, i-αppli, and IC
Entertainment
Phone Used to access functions mainly related to placing and
Tool Used to access tools such as the Schedule, Memo, Calculator,
Settings Used to set items such as Ringer, Display, Manner, and
menu.
Used to access the camera, My picture, Music panel, and
Memory Stick.
receiving a call such as the Phonebook, Call record, and
Record message.
and bar code reader.
Security.
Using the Menu Display
Throughout this manual the operations for selecting the menu are described as follows.
■ Examples
Press (menu) in the stand-by display, then use and to
select [Settings] → [Ringer] → [Ring tone].
■ Actual operations
Ringer M31
Ring volume
Ring tone
Alert time
Sound effect
Keypad sound
Vibrator
Earphone
Volume
OFF
E+S
3
Press
in the stand-by
display
Information
• Unavailable menu options are displayed in gray.
•You can customize the direction of cursor movement when you turn the jog (P.143).
(menu)
Turn to move
the cursor to
[Settings] and press
(select)
Turn
the cursor to
[Ringer] and press
to move
(select)
Turn
the cursor to
[Ring tone] and press
to move
(select)
21
Page 24
Using the Menu Number
The menu options can be easily accessed by entering the menu numbers.
For the menu number, see the List of Menus (P.397).
Example: Selecting the Memo with the menu number “21”
Press (menu) in the stand-by display.
1
Enter the menu number “21” using the keypad.
2
The Memo list display appears.
Menu no.
2
Using the Submenu
A submenu is a menu that plays an auxiliary role for each menu option.
Whenever a submenu is available, [func] appears in the guide display . Press
a list of available submenus.
• The contents of submenu vary depending on the functions and displays. For details, see the description of
operation for the individual option.
Memo list
Airline ticket to
Milk, sugar, and
090XXXXXXXX
12345
func
select
new
edit
delete one
delete all
copy
send all
save one to M.S.
save all to M.S.
send Ir data
close
select
to display
22
Page 25

Before Using the Mova
Attaching and Removing the Battery Pack............................................................................. 24
Charging the Mova.................................................................................................................. 25
Checking the Battery Level <Battery level> ........................................................................... 28
Attaching and Removing the FIT Cover ................................................................................. 29
Turning to Open/Close the Mova............................................................................................ 29
Powering ON/OFF <Power ON/OFF> .................................................................................... 30
Changing the Screen Display to English <Select language> ................................................ 31
Setting the Basic Functions <Initial setting> .......................................................................... 32
Setting the Date and Time <Date/time>................................................................................. 33
Showing Your Phone Number on the Recipient’s Phone <Send own number> .................... 34
Checking Your Own Phone Number <Own number> ............................................................ 35
23
Page 26
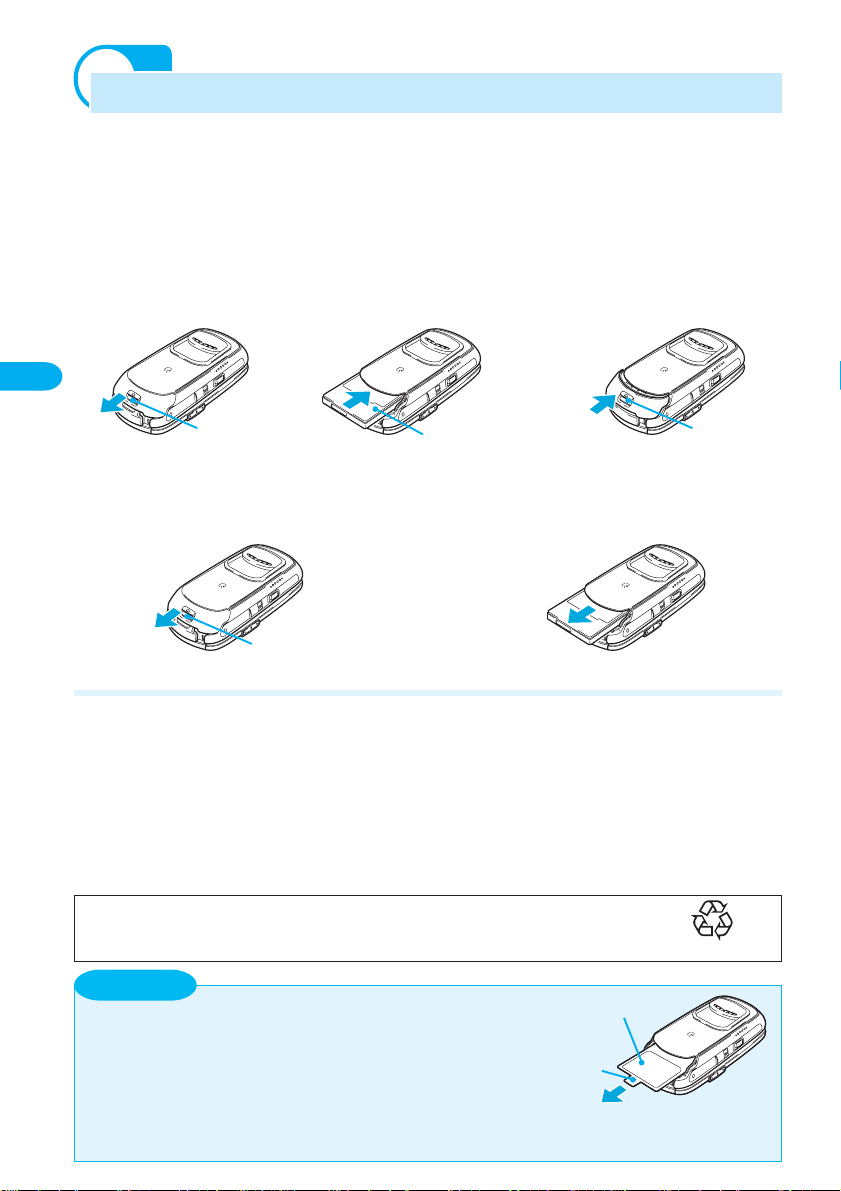
Attaching and Removing the Battery Pack
Always make sure that the Mova is powered OFF when replacing the battery pack.
• The terminal on the Mova may be damaged if you attach the battery pack forcibly.
• Holding too hard or attaching/removing the battery pack in a manner other than described below may
Before Using the Mova
damage the rear cover.
■ Attaching the Battery Pack
Push the part A upwards
1
to unlock and slide to
remove the rear cover in
the direction of the arrow.
Attaching and removing the battery pack
Part A
■ Removing the Battery Pack
Push the part A upwards to unlock and
1
slide to remove the rear cover in the
direction of the arrow.
Part A
With the warning label
2
facing up, insert the
battery pack in the
direction of the arrow.
Warning label
Attach the rear cover
3
and push the part A
downwards until it fits
into place.
Slide to remove the battery pack in the
2
direction of the arrow while holding
both edges.
Part A
The Battery Pack
To make full use of the Mova, make sure to use the specified battery pack.
■ Life of the Battery Pack
The battery pack is a consumable part. The life of any rechargeable battery
decreases each time it is recharged.
When the duration of operation becomes less than half in comparison with a new
battery pack, the life of the battery pack can be considered over.
(The average life of a battery pack is about 1 year. However, depending on the
frequency of use, the life may become shorter.)
Return all spent battery packs to NTT DoCoMo or a dealer, or a recycling
shop to protect the environment.
Information
• The conformity marks indicating that this product conforms to the
“Regulations of the Specified Radio Equipment under the Radio
24
Wave Law” and has obtained the “Technical Standard Conformity
Certification” are found on the model sticker.
To check the
as described above, then pull the part
Being a proof of authorization under the Radio Wave Law, the model sticker must be always attached to
the Mova. If the model sticker is damaged, it is required to be repaired (P.415).
model sticker
, remove the rear cover and battery pack
B
in the direction of the arrow.
Part B
Li-ion
Model sticker
Page 27
Charging the Mova
At the time of purchase, the battery pack is not fully charged. Make sure to fully charge
the battery pack with the specified charger before using the Mova for the first time.
About Charging the Mova
• When connecting the Mova to the AC adapter, desktop holder, DC adapter, car adapter, or battery holder, make
sure to attach the battery pack to the Mova. The battery cannot be charged unless it is attached to the Mova.
• Do not charge the battery pack for a long time (more than 24 hours) with the Mova powered ON. If the Mova
is powered ON when charging is completed, the battery level decreases. This causes the AC or DC adapter
to restart charging, and if you remove the Mova from the AC or DC adapter before completion of charging,
the following conditions may occur.
- The battery level is low. - The battery alarm sounds. - The operation time is short.
• If the charge indicator of the Mova flashes in red, remove and attach the battery pack again (P.24).
If it continues to flash in red, the battery pack may be defective. Stop charging immediately and contact
DoCoMo service counter (DoCoMo shop).
■ Charging Time/Battery Time (guidelines)
Charging time (AC adapter) Continuous call (communication) time Continuous stand-by time
About 125 minutes About 140 minutes About 460 hours
•
The charging time guidelines are for when the battery pack is empty and the Mova is powered OFF. When
charging with the Mova powered ON, the charging time becomes longer. It may take time to complete the
charging when the Charging for the Display light (P.141) is [ON], or the camera, Music panel or any i-αppli
software is being used during charging.
• The continuous call time listed above refers to a condition with the maximum power send and Battery
saver set to [OFF]. The continuous stand-by time refers to a condition in which the Mova is closed and
moving in an area where it has normal reception. Note that the call (communication) time and stand-by
time can be reduced to about half the time shown above, depending on the condition of the battery
charge, function settings such as the Power saver during stand-by, ambient temperature and the radio
wave condition (out of the service area or in an area with weak radio wave strength). Also, i-mode
communication or i-shot transmission reduces the call (communication) time and stand-by time from the
guidelines given above. Besides these actions, recording or editing images, composing mail, running
downloaded i-αppli software, and setting the i-αppli stand-by display also reduce the call
(communication) time and stand-by time. Depending on the i-αppli software, network transmission may
be performed even after downloading. The setting can be made beforehand to prevent it from being
transmitted. Using the camera and Music panel also reduces the call (communication) time and stand-by time.
Before Using the Mova
Charging the Mova
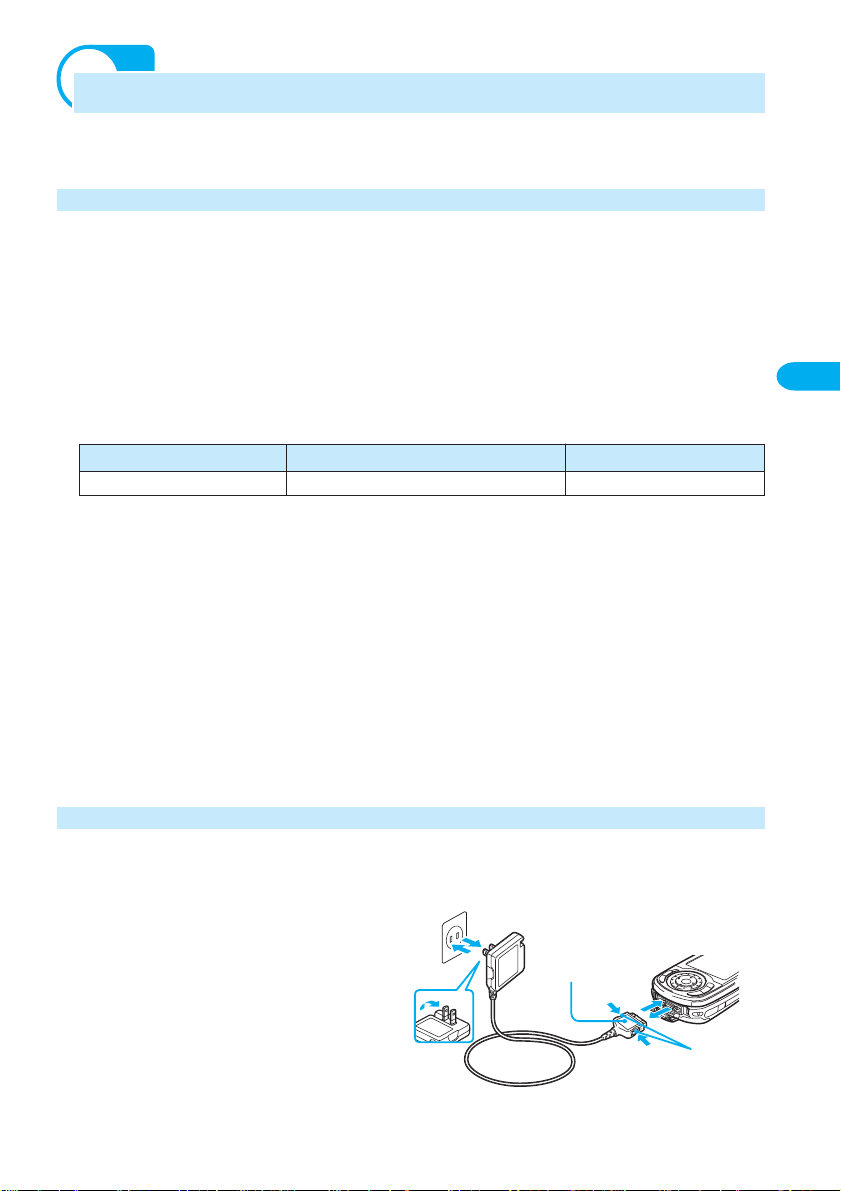
Charging with the AC Adapter
Make sure to see the user’s manual of AC Adapter SO004.
1
Open the terminal cover at the bottom
of the Mova and attach the connector
of the AC adapter to the terminal with
the warning label facing up.
2
Lift the power plug of the AC adapter
and plug it into an AC 100 V outlet.
When charging starts, the red charge
indicator is turned on. The indicator is
turned off when charging is completed.
4
2
Connect the adapter
with the warning label
facing up
1
3
Lock buttons
25
Page 28
When you start charging while the Mova is powered ON
The battery level icon flashes and the Starting charge sound is heard. When charging is
completed, the battery level icon changes from flashing to lighting and the Completed
charge sound is heard.
•You can set to mute the Starting charge sound and Completed charge sound (P.89).
When charging is completed, hold down the lock buttons and remove the connector
3
Before Using the Mova
from the Mova.
※Close the terminal cover.
Remove the power plug of the AC adapter from the AC 100 V outlet.
4
※When not using the AC adapter for a long period of time, remove the power plug of the AC
adapter from the AC outlet.
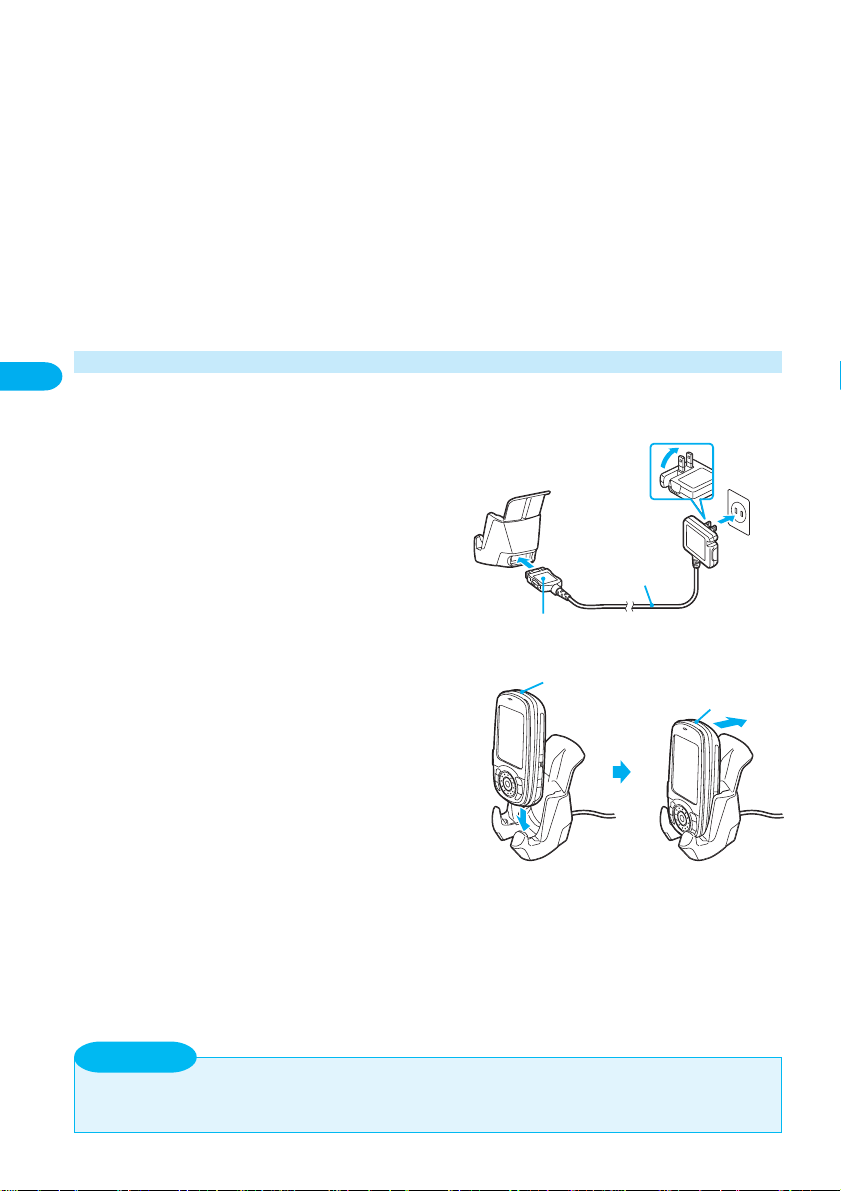
Charging with the Desktop Holder and AC Adapter
Charging the Mova
Make sure to see the user’s manual of AC Adapter SO004 and Desktop Holder SO011.
The battery pack cannot be charged alone.
Attach the connector of the AC adapter to
1
the terminal of the desktop holder with the
warning label facing up.
Lift the power plug of the AC adapter and
2
plug it into an AC 100 V outlet.
Attach the Mova to the desktop holder and
3
push it backwards until it clicks into place.
When charging starts, the red charge indicator
is turned on. The indicator is turned off when
charging is completed.
When you start charging while the Mova is
powered ON
The battery level icon flashes and the
Starting charge sound is heard. When
charging is completed, the battery level icon
changes from flashing to lighting and the
Completed charge sound is heard.
•You can set to mute the Starting charge sound
and Completed charge sound (P.89).
When charging is completed, pull the Mova towards you and lift it off the desktop
4
holder.
3
1
AC adapter
Connect the adapter with
the warning label facing up
Charge indicator
Charge indicator
2
3
Remove the power plug of the AC adapter from the AC 100 V outlet.
5
※When not using the AC adapter for a long period of time, remove the power plug of the AC
adapter from the AC outlet.
Information
• Make sure that the phone strap does not get caught in between the Mova and the desktop holder. With
the strap interfering, the Mova may not be charged properly.
26
Page 29
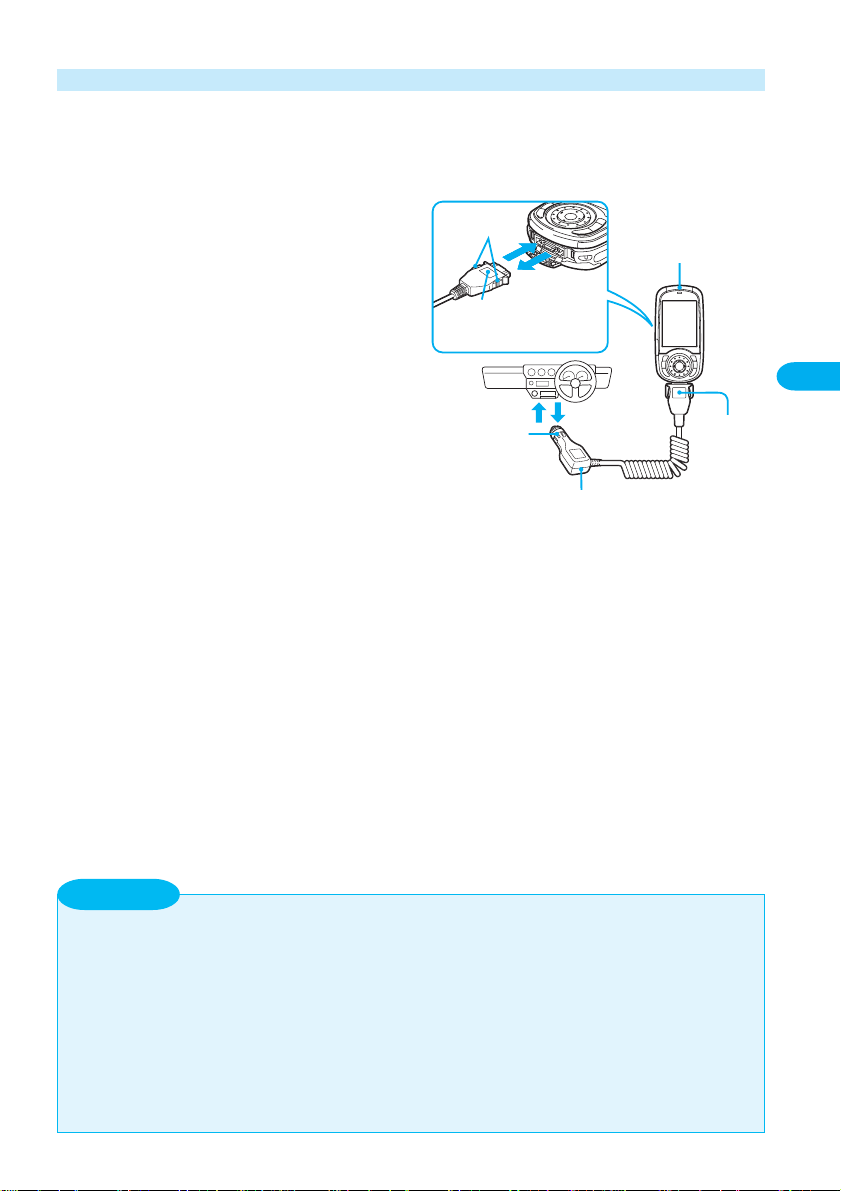
Charging with the DC Adapter
The DC adapter is a DC 12 V/24 V adapter that enables to charge the Mova using the
cigarette lighter socket of a vehicle.
Make sure to see the user’s manual of DC Adapter SO001.
Open the terminal cover at the bottom of
1
the Mova and attach the connector of the
DC adapter to the terminal with the
warning label facing up.
Insert the DC adapter into the cigarette
2
lighter socket.
When charging starts, the green power
indicator of the DC adapter and the red
charge indicator of the Mova are turned on.
The indicator is turned off when charging is
completed.
When you start charging while the Mova is
powered ON
The battery level icon flashes and the
Starting charge sound is heard. When
charging is completed, the battery level
icon changes from flashing to lighting and
the Completed charge sound is heard.
•You can set to mute the Starting charge sound
and Completed charge sound (P.89).
Lock
buttons
1
3
Connect the adapter
with the warning
label facing up
24
Plug
Power indicator
Charge indicator
Connector
DC Adapter SO001
Before Using the Mova
Charging the Mova
When charging is completed, hold down the lock buttons and remove the connector
3
from the Mova.
※Close the terminal cover.
Remove the plug of the DC adapter from the cigarette lighter socket.
4
Information
• The DC adapter is designed exclusively for use on vehicles with a negative ground. Do not use the
adapter in a positively grounded vehicle.
• There are some vehicle models that cannot use the DC adapter. If the plug does not match, please
purchase an optional conversion socket.
• If not in use or when getting out of the vehicle, remove the DC adapter from the cigarette lighter socket
and remove the DC adapter connector from the Mova. If the DC adapter is left connected with the
engine turned off, the car battery may be worn down. When using the DC adapter, be sure to keep the
engine running.
• The fuse (1.0 A) of the DC adapter is a consumable part. Purchase an equivalent fuse from an
automobile parts store when it is necessary to replace the fuse.
27
Page 30
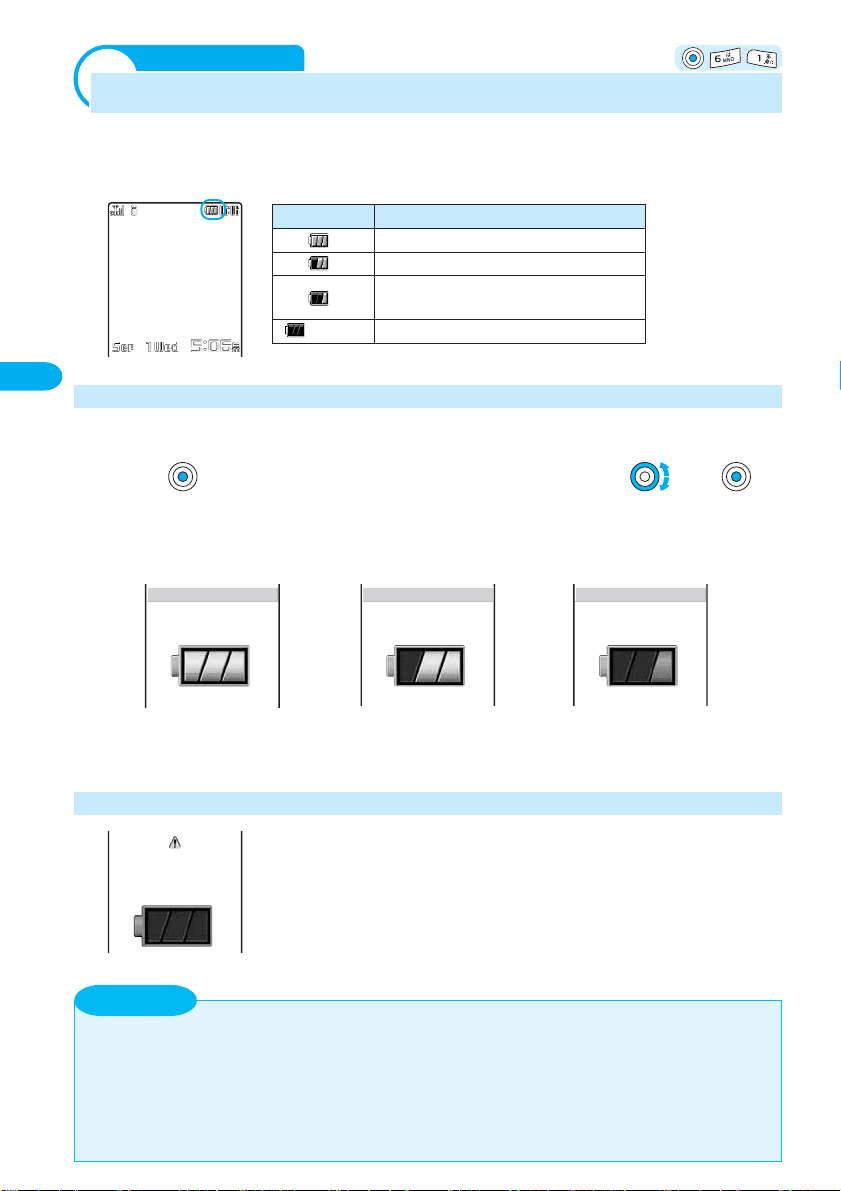
<Battery level>
Battery level
Checking the Battery Level
The estimated battery level is indicated in the display.
• Use this level only estimated.
Before Using the Mova
Display Charge level
Sufficiently charged.
Slightly low.
Very low.
It is recommended to charge.
(Flashes) No battery power remaining. Charge.
Battery level
Checking the Battery Level with the Sound and Display
• The confirmation beep does not sound when the volume of the keypad sound is [OFF] (P.86).
Press (menu) in the stand-by display, then use and
1
to select [Settings] → [Call] → [Battery level].
The current battery level is displayed using bars in the display for about 3 seconds.
The confirmation beep sounds according to the remaining battery level.
Battery level
Battery level
Sufficiently charged
(three beeps)
When the Mova Needs to be Charged
Charge battery
Information
• If you check the battery level during a call, the call is interrupted while the confirmation beep keeps
sounding.
• When charging becomes necessary during a call, the warning sound is heard from the earpiece and the
Mova is automatically powered OFF after about 30 seconds.
•You cannot use the camera, the Music panel, etc. when the battery level is very low. To use these
functions, fully charge the battery.
28
Slightly low
(two beeps)
Very low
(one beep)
When the battery level becomes 0, the message “Charge
battery” appears and short warning beeps sound 3 times. After
about 30 seconds, a long warning beep sounds and the Mova is
automatically powered OFF.
Page 31

Attaching and Removing the FIT Cover
• Attaching/removing the FIT cover in a manner other than described below may damage it.
■ Attaching the FIT Cover ■ Removing the FIT Cover
Part A
FeliCa mark
Align the FIT cover with the FeliCa mark
side of the Mova and press the edge of the
cover with your finger to fix it to the Mova.
Pull the part A in the direction of the
arrow to remove the FIT cover.
Turning to Open/Close the Mova
■ Turning to Open the Mova ■ Turning to Close the Mova
Before Using the Mova
Attaching and removing the FIT cover/Turning to open/close the Mova
The Mova opens automatically by pushing
a side of the display slightly while holding
the Mova with the display facing up.
Turn the Mova by sliding it in the
opposite direction from opening.
Information
• The Mova can be turned 180° to the left or right to open it. The Mova may be damaged if turning it forcibly
over 180° or if opening/closing it in a way other than turning as described above or in a violent way.
• When you turn to open the Mova, the sound effect is heard and the indicator flashes once. The
illumination color of the indicator follows the setting in [Phone] in the Select color (P.145). If you set to
mute the sound effect using the Sound effect (P.89), the indicator also stops flashing.
•You can enter text with the Mova closed (P.374).
• When you open the Mova, be careful of reactions of the Mova, which may cause the Mova to drop.
29
Page 32

<Power ON/OFF>
Powering ON/OFF
Powering ON
Before Using the Mova
When the Mova is powered ON, the display and keypad backlights are turned on.
Press for over a second.
1
The Mova is powered ON and the Wake-up image (animation) is
displayed. After a while, the stand-by display appears.
Power ON/OFF
mail
Powering OFF
Press for over 2 seconds.
1
The Mova is powered OFF after the Power OFF image (animation) appears.
If this is done during a call, the Mova is powered OFF after the call is disconnected.
menu
i−mode
30
Page 33
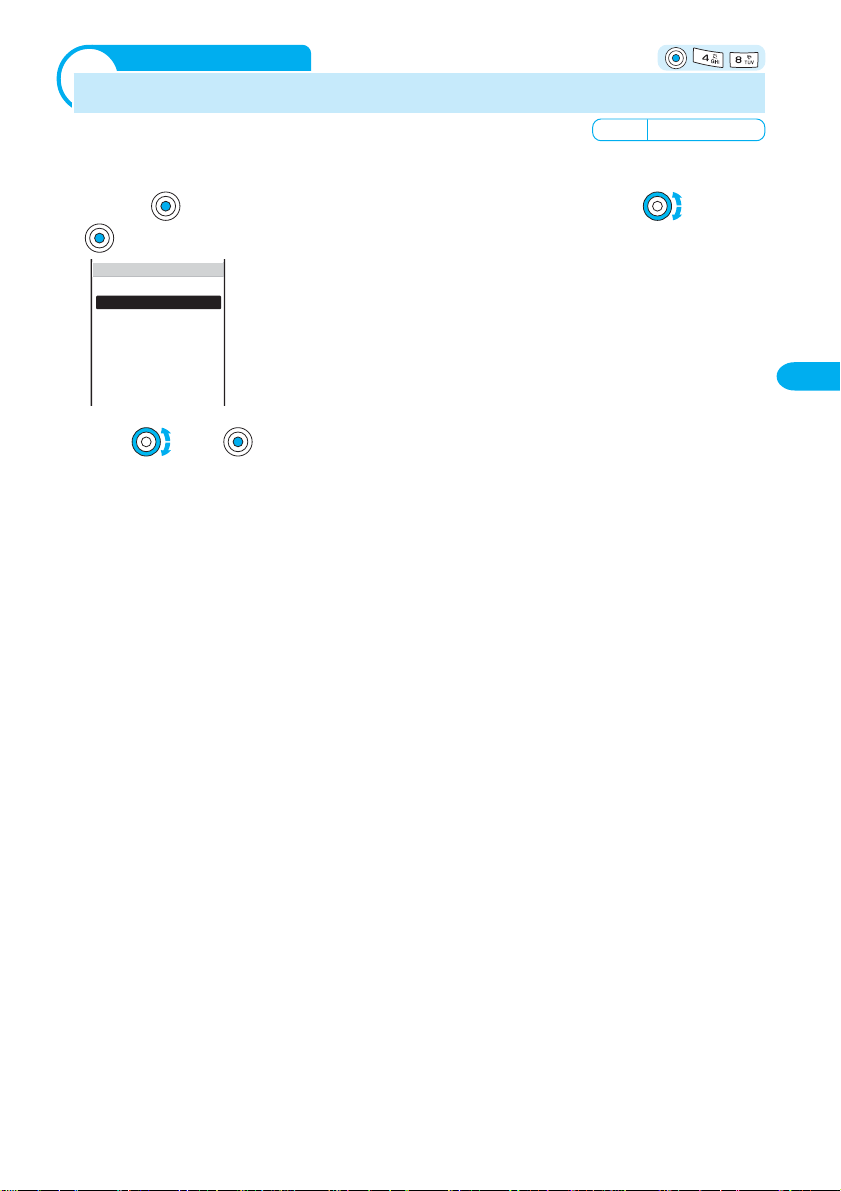
<Select language>
Default 日本語 (Japanese)
Changing the Screen Display to English
Menus, messages and other displays can be displayed in either Japanese or English.
Press (メニュー) in the stand-by display, then use and
1
to select [設定] → [画面設定] → [Bilingual].
Bilingual
日本語
English
Use and to select [English].
2
The display language is set to English.
[日本語]:Set the display language to Japanese.
[English] : Set the display language to English.
When the display language is set to English
Select [Settings] → [Display] → [Select language].
Before Using the Mova
Select language
31
Page 34

<Initial setting>
Initial setting
incompleted.
Execute?
Yes
No
Setting the Basic Functions
The Initial setting can be used to make basic settings such as the Security code, Date/
time and Send own number. See the respective pages for details on the settings.
Before Using the Mova
■ Items you can set
Option Description Page
Change code Change the Security code. P.148
Date/time Set the date and time for the clock. P.33
Phone tone Select and set the favorite ring tone. P.88
Stand-by Set the image and the clock for the stand-by display. P.136
Send own number Set whether to send the phone number. P.34
Initial setting
Edit my data Save your name, address, etc. P.35
Jog setting Set the direction of the cursor movement when you turn the jog. P.143
Press (menu) in the stand-by display, then use and
1
to select [Settings]→ [Initial].
Initial setting
Change code
Date/time
Phone tone
Stand−by
Send own number
Edit my data
Jog setting
The items you can set are displayed.
Yet
Yet
Yet
Use and to select an item and set it up.
2
Information
• If there are any incomplete initial settings, the display on the right appears when
the Mova is powered ON. The display of step 1 appears when selecting [Yes]
and you can set items for the Initial setting.
32
Page 35

<Date/time>
Default 2000/00/00 00:00
Setting the Date and Time
Set the date and time of the Mova.
• The date and time can be set even during a call.
Press (menu) in the stand-by display, then use and
1
to select [Tool] → [Clock] → [Date/time].
Date/time
2000/ 00/00
00:00
Use and to enter the year, date and time.
2
Enter the year and date from 2000/Jan/01 to 2099/Dec/31.
Enter the time in 24-hour format (00:00 to 23:59).
• The number can also be entered using the keypad (if the number is one digit, precede the digit with a
“0”).
• The cursor can also be moved with
Press (cmplt).
3
The date and time are set.
• If the keypad is used for entry, the setting is completed when the 2nd digit of the minute is entered.
.
Before Using the Mova
Date/time
Information
• The date and time settings are retained even when the battery pack is replaced. The date and time may
not be displayed correctly, however, if the Mova has been left for a while with the battery pack removed
or run out. In this case, set the date and time again.
• Features using the clock such as the current-time icon, Schedule and Alarm, Auto power on/off and auto
start of i-αppli are not available unless the date and time are set. In addition, no date and time are saved
for redial records, received records, images recorded by the camera, etc.
33
Page 36

<Send own number>
Default OFF
Showing Your Phone Number on the Recipient’s Phone
When placing a call or sending Short Mail, your phone number (caller ID) can be shown
in the display of the recipient’s phone you are calling.
Before Using the Mova
• Set the Send own number [ON] to use the i-shot service. If you set the Send own number to [OFF], the
screen confirming whether to send your phone number for once appears before sending i-shot.
• The Send own number is only available when the recipient’s phone is equipped with the caller ID display
feature.
•Your caller ID is important information. Decide very carefully whether to change the setting.
Press (menu) in the stand-by display, then use and
1
Send own number
to select [Settings] → [Call] → [Send own number].
Send own number
Input
Security code
Enter the Security code.
2
Send own number
ON
OFF
• The Security code is set to “0000” at the time of purchase.
[ON] : Set the Send own number.
[OFF] : Cancel the Send own number.
34
Use and to select [ON].
3
The Send own number is set.
Information
• When hearing the guidance asking to send the caller ID, call again after setting the Send own number to
[ON].
Page 37

<Own number>
Checking Your Own Phone Number
Your own phone number can be checked. You can also save your name, mail address,
etc.
• If the Own number is saved as Secret, the data other than the own number, phone mail address and My
phone no. is not displayed. Set the Secret mode to [Display ON] to display all data (P.79).
Press (menu) in the stand-by display and press .
1
Own number
Phone Number
Mail Address
docomo.taro.
como.ne.jp
do
Emily Howard
Saving Your Personal Data
Your personal data such as your name, postal address and mail address can be saved
and displayed at any time.
■ Items you can save
Edit my data
090XXXXXXXX
docomo.taro.△△@do
090XXXXXXXX
090XXXXXXXX
Emily Howard
EmilyHoward
3−X−XX Kita−aoyam
03XXXXXXXX
docomo.△△△.taro@d
XXX Co.
1−X−XX Kita−shina
03XXXXXXXX
docomo.taro.△△@do
1975/02/01
Self−portrait
OFF
func
(Overall Image)
select
cmplt
A phone number appears next to . If the data other than a
phone number is saved, that data also appears.
To call an own home or office
△△@
Move the cursor to a phone number and press .
To send i-mode mail to a personal or office mail address
Move the cursor to a mail address and press (mail).
Icon Item Description
Icon
Own number Display the Mova’s phone number. This data is
Phone mail address Enter the obtained mail address.
My phone no. 1, 2 Display set My phone no. such as for the Number
Name Enter the name. Up to 10 full-width or 20 half-width
Reading Enter the reading of the name. Up to 18 half-width
Address Enter the address. Up to 64 full-width or 128
Phone no. Enter the phone number such as for home. Up to
Own mail address Enter the mail address. Up to 50 half-width
Office Enter the office name. Up to 64 full-width or 128
Office address Enter the office address. Up to 64 full-width or 128
Office phone no. Enter the office phone number. Up to 24 digits can
Office mail address Enter the office mail address. Up to 50 half-width
Birthday Enter the birthday.
PHOTO Save the image of My picture.
Secret Set your personal data other than “Own number”,
preset and cannot be changed or deleted.
(No address is displayed at the time of purchase.)
Plus Service (P.313).
characters can be entered.
characters can be entered.
half-width characters can be entered.
24 digits can be entered.
alphanumeric characters can be entered.
half-width characters can be entered.
half-width characters can be entered.
be entered.
alphanumeric characters can be entered.
“Phone mail address”, “My phone no.1, 2” not
shown in the display. Use this function if you do not
wish others to know your personal data.
Before Using the Mova
Own number
35
Page 38

Press (menu) in the stand-by display, press and press
1
(edit).
Edit my data
090XXXXXXXX
Before Using the Mova
Use and to select [ ], enter a mail address and press
2
(ok).
Own number
Enter a mail address using up to 50 half-width alphanumeric characters.
To delete a saved item
Select the item and press in the Text input display to delete.
Use and to select [ ], enter a name and press (ok).
3
Enter a name using up to 10 full-width or 20 half-width characters.
Enter the required items in the same manner and press
4
(cmplt).
Your personal data is saved.
To reset to the default setting
Press (func) in the Own number display, select [delete all] and select [Yes].
Information
• Check your mail address by selecting (i-mode) →[i Menu] → [Options] → [Mail settings] →
[Confirm Mail Address] or
Address). When you change your mail address, correct the Own number display accordingly.
(mail) → [Mail setting] → [Mail center] → [アドレス確認](Confirm Mail
36
Page 39

Placing Calls
Placing a Call .......................................................................................................................... 38
Placing an International Call <WORLD CALL>...................................................................... 39
Redialing Previously Dialed Numbers <Redial> .................................................................... 41
Displaying the Redial in the Order of Most Frequently Dialed Numbers <Dial frequency record> ......
Changing the Caller ID Setting ON/OFF for an Individual Call <186/184> ........................... 42
Useful Functions: Saving Phone Numbers in the DoCoMo Network <Short Dial > and <Malicious Caller Block>.....
Sending Touch-tones <Pause> .............................................................................................. 44
Sending Messages to a Pager*............................................................................................. 45
Talking Hands-free While Driving (optional) <Hands-free mode> ......................................... 46
*The paging service provided by NTT DoCoMo is called QUICKCAST as of January 2001.
42
43
37
Page 40

タダイマタイヘンコミアッテイマ
ス
Placing a Call
Check the radio wave condition and enter a phone number.
• Do not cover the antenna with your hands for a call in better radio wave condition.
Enter a phone number in the stand-by display.
1
Placing Calls
Placing a call
2
Press .
Calling
To call an ordinary phone
To call another mobile phone
To call a Personal Handyphone
System phone (PHS)
•You can enter a phone number of up to 24 digits.
When you press the wrong number
Press . Press for less than a second to delete the entered digits
one by one from the right. Press for over a second to delete all
digits.
A ringing sound is heard when the call is connected.
When a busy tone sounds
The line is busy. Press to hang up and call again after a while.
When you hear a guidance informing that the call cannot be
connected
The recipient’s mobile phone or PHS is powered OFF or outside the
service area.
When hearing the guidance asking to send the caller ID
The Caller ID Display Request Service (P.315) is set to “ON” by the
recipient. Call again after setting the Send own number to [ON]
(P.34).
Area code + City code + Phone number
•
090 + XXXX + XXXX
080 + XXXX + XXXX
070 + XXXX + XXXX
Remember to include the area code, even
for a local call.
3
Information
• The call can also be placed by performing step 2 before step 1. If you press the wrong number, press ,
then wait a few seconds and call again.
•To delete the text message
When the text message on the right appears, the line is very busy. Call again
after a while. Press
38
Press to hang up.
for over a second to delete the message.
Page 41

<WORLD CALL>
Placing an International Call
With WORLD CALL, you can call overseas from a DoCoMo digital mobile phone.
• How to place an international call
009130
※ You can save the above procedure in the Phonebook of the Mova.
※ If an area code begins with “0”, omit the “0” when dialing (except when calling ordinary phones, etc. in
•You can place calls to about 220 countries and regions in the world.
• Charges for this service are billed together with the monthly charges for your mobile phone.
• No application fees or monthly basic charges are required (application is required).
•You can check the approximate duration and charge of the most recent international call on your mobile
phone when using WORLD CALL.
※ For details on operation, see P.342.
• Some charging plans may not be available.
◎ Change in the dial procedure for international calls
Since mobile communications such as mobile phones are beyond the scope of the
“MYLINE” service, “MYLINE” service is not available also for WORLD CALL. With
the introduction of “MYLINE” service, however, the dial procedure for international
calls on mobile phones has been changed. Note that the old dial procedure
(excluding “010” from the above dial procedure) is not available.
This optional service (free) requires application.
For information on WORLD CALL
For inquiries (in English)
From ordinary phones
※Can be called from DoCoMo mobile phones and PHSs.
※Check the number you call and dial it correctly.
+
010
Italy).
0120-005-250
+
Country code
(toll-free)
+
Area code
+
Phone number
For inquiries (in Japanese only)
From DoCoMo mobile phones or PHSs
(No prefix)
※Cannot be called from ordinary phones.
From ordinary phones
0120-800-000
※Can be called from DoCoMo mobile phones and PHSs.
151
(toll-free)
(toll-free)
Placing Calls
WORLD CALL
※ To use an international call service company other than DoCoMo, contact them directly.
※ WORLD CALL is provided as the standard service for users who subscribe to the mobile phone service
after May 23, 2002. Application is required, however, for users who previously refused this service on
subscription, but who now wish to use.
Placing an International Call with Simple Operations
The international call can be placed simply by entering country code, area code and
recipient’s phone number.
Enter country code, area code and recipient’s phone number
1
and press
The call menu selection display appears.
• Country code, area code and recipient’s phone number can also be saved in the Phonebook. To place a
call, select a saved number from the Phonebook (P.75).
(call).
39
Page 42

Use and to select [Int’l call].
Default ① 009130-010
2
Use and to select [009130-010].
3
•To use an international phone service company other than DoCoMo, select other number. In this case,
the settings for the Int’l prefix are required beforehand (P.40).
Setting a Number Other Than WORLD CALL <Int’l prefix>
Placing Calls
Up to 3 numbers can be saved that are prefixed to a phone number when placing an
international call.
• At the time of purchase, the DoCoMo WORLD CALL number “009130-010” is saved.
• If you change the number or add numbers in the Int’l prefix, the default setting cannot be restored even if you
reset the Mova.
WORLD CALL
Press (menu) in the stand-by display, then use and
1
to select [Settings] → [Call] → [Int’l prefix].
Intl prefix
009130−010
To delete a saved number
Move the cursor to the number field, press (func) to select [delete
one] and select [Yes]. To delete all numbers, press (func) to select
[delete all] and select [Yes].
Use and to select the number field, enter a number and
2
press
Intl prefix
• Press to enter “-” (hyphen).
Press (cmplt).
3
The number for international calls is saved.
40
(ok).
Enter a number within 16 digits. “-” (hyphen) can also be
entered.
Page 43

<Redial>
Redialing Previously Dialed Numbers
Up to 30 previously dialed calls are saved in the redial record with their dates/times,
phone numbers and names. This record makes redialing easy.
• If the same phone number has been repeatedly called, only the most recent call is saved in the redial record.
Press ( ) in the stand-by display.
1
Sep 13 10:32
Brian Miller
Sep 12 10:30
090XXXXXXXX
Sep 12 9:35
Anthony Smith
Sep 11 15:15
Mariah Spears
Turn to select the redial record and press .
2
The call is connected with the selected recipient.
Press to hang up.
3
Information
• When the Secret mode is set to [Display ON], the phone number, name and phone type are displayed in
the redial record even if the recipient is saved as Secret in the Phonebook. When the Secret mode is
changed to [Display OFF] later, the redial record still remains.
RedialRecv Freq
The phone numbers or names appear in descending order from
the most recent call.
To display phone numbers
When saved in the Phonebook, the name and phone type of a
recipient are displayed instead of the phone number. Press to
switch the display temporarily between names and phone numbers.
To send mail
You can use EV-Link to send mail to a person whose phone number
and mail address are saved in the Phonebook (P.360).
Placing Calls
Redial
Deleting the Redial Record <Delete redial>
The redial record is retained even when the Mova is powered OFF. If you do not wish
others to know the previously dialed records, delete one or all of the redial records.
• If you delete the redial record, the dial frequency record is also deleted.
Example: Deleting a redial record
Press ( ) in the stand-by display, turn to select the
1
redial record and press
The submenu appears.
Use and to select [delete one], then use and to
2
select [Yes].
The selected redial record is deleted.
To delete all redial records
Select [delete all], enter the Security code and select [Yes]. The Security code is set to
“0000” at the time of purchase.
(func).
41
Page 44

<Dial frequency record>
Displaying the Redial in the Order of Most Frequently Dialed Numbers
The dial frequency record can be displayed to see a listing of the most frequently dialed
numbers.
Press ( ) in the stand-by display and press .
1
DialFreqRecv Redl
Brian Miller
Anthony Smith
Placing Calls
Dial frequency record/186/184
090XXXXXXXX
Carol Wong
Mariah Spears
David Lee
David Brown
03XXXXXXXX
Turn to select the redial record and press .
2
The call is connected with the selected recipient.
Press to hang up.
3
The redial record appears in order of the greatest frequency. If
the number of calls to 2 or more recipients is the same, the most
recent call is listed first.
To display the phone number
When saved in the Phonebook, the name and phone type of a
recipient are displayed instead of the phone number. Press to
switch the display temporarily between names and phone numbers.
<186/184>
Changing the Caller ID Setting ON/OFF for an Individual Call
Regardless of the Send own number [ON]/[OFF] setting, you can choose whether to
show your phone number on the recipient’s phone every time you place a call.
•You cannot prefix “186” or “184” to an international call.
• If the number you dialed proves to be 24 digits or longer including the prefixed number from the call menu,
the call menu does not appear.
Enter a phone number in the stand-by display and press (call).
1
Call
184+call
186+call
Intl call
Use and to select the call menu.
2
[Call] : The call is made in accordance with the Send own number setting
[184+call] : Your phone number (caller ID) is withheld from the recipient.
[186+call] : Your phone number (caller ID) is sent to the recipient.
[Int’l call] : The number for international calls (P.40) is prefixed to the phone
The call is connected in accordance with the selected menu.
Information
• The caller ID ON/OFF can also be changed as follows:
- Enter “186” or “184” before entering a phone number.
- Press
after entering a phone number.
42
(P.34). The Send own number is [OFF] at the time of purchase.
number entered.
Page 45

<Short Dial> and <Malicious Caller Block>
Default Short Dial is enabled
Useful Functions: Saving Phone Numbers in the DoCoMo Network
Short Dial
Up to 20 phone numbers (max. 11 digits) can be saved in the DoCoMo network.
Malicious Caller Block
Up to 19 ordinary phone numbers can be saved in the DoCoMo network from which you wish
to block calls (such as a malicious caller’s numbers).
•You can use either the Short Dial or Malicious Caller Block. Make sure to take notes of the saved
numbers because they are not saved in the Mova.
•You cannot save any numbers while “
• On your itemized billing report (optional), the phone numbers are printed even for calls using the Short
Dial.
” or “ ” appears in the display.
Placing Calls
Saving Short Dial
Enter + XX (2-digit short dial number) + phone number
1
and press
• For “XX”, enter a short dial number between 00 and 19. If you enter “00”, save “9999” and press , the
Malicious Caller Block is enabled and all short dial numbers saved for 00 to 19 are deleted.
The short beeps sound while the Short Dial is being saved. When the beeps sound,
saving is completed.
Press .
2
• If is not pressed, the call is connected to the saved phone number.
.
Placing a Call Using Short Dial
Enter + XX (2-digit short dial number) and press .
1
• The phone number saved in the Short Dial is not displayed.
Using Malicious Caller Block
■ Starting the Malicious Caller Block
Enter + and press .
1
To restore the Short Dial
The Malicious Caller Block is canceled by saving an available phone number other than
9999 for 0 00 (such as your home phone number). The phone number saved is available
as the short dial number “00”.
When the beeps sound, saving is completed.
Short Dial/Malicious Caller Block
43
Page 46

■ Saving the phone number from which you wish to block a call
Enter + XX (01 to 19) + the ordinary phone number from
1
which you wish to block a call and press .
When the beeps sound, saving is completed.
Information
• If you overwrite a phone number with a new one, the old phone number is deleted.
• This function is not available for FOMA if you subscribe to the Dual Network Service.
Placing Calls
• For the Malicious Caller Block, only “ordinary phone numbers” can be saved and “mobile phone
numbers” cannot.
<Pause>
Short Dial/Malicious Caller Block/Pause
Sending Touch-tones
You can send up to 24 digits of touch-tones to perform functions such as reserving
tickets and playing back caller’s messages.
Example: Sending the touch-tones “1234#”
Place a call.
1
Press .
2
Press (call), then use and to select [Send all].
3
Voice notify
Send all
Call
184+call
Information
• It is recommended that you save the touch-tones together with the phone number in the Phonebook.
Note that “P” (pause) is required between the phone number and the touch-tones (P.70).
The touch-tones (“1234#”) are sent.
When all touch-tones are sent, the calling
display appears.
44
Page 47

Sending Messages to a Pager
Numeric or text messages can be sent from the Mova to a pager.
•The guidance can be skipped by sending a message while it is played back.
*
Sending Numeric Messages
The touch-tones can be used to send numeric messages from the Mova to a pager.
• Note that you may not be able to send messages correctly to pagers other than the DoCoMo’s.
Call a pager.
1
The guidance is played back and the beeps sound.
Enter numeric messages.
2
Placing Calls
Press twice.
3
Press when you hear the guidance informing you that the
4
message is going to be sent.
Sending Text Messages
Text messages saved in the Memo can be sent from the Mova to a pager with a display.
• Save text messages you wish to send in the Memo beforehand (P.359).
• Check the recipient’s pager type before sending messages. Text types and numbers that a pager can receive
vary depending on its type.
Call a pager.
1
The guidance is played back and the beeps sound.
Press (menu), then use and to select [Tool] → [Memo].
2
Turn to select the memo and press (func).
3
The submenu appears.
Use and to select [send all], then use and to
4
select [Yes].
The contents of the memo are sent.
When all text messages are sent, the calling display reappears.
Press when you hear the guidance informing you that the
5
message is going to be sent.
Sending messages to a pager
Information
• Full-width characters cannot be sent to the DoCoMo QUICKCAST “02·DO” service.
* The paging service provided by NTT DoCoMo is called QUICKCAST as of January 2001.
45
Page 48

<Hands-free mode>
Default OFF
Talking Hands-free While Driving (optional)
You can use the Car Adapter (optional) to talk on the Mova without using your hand
(hands-free) while driving a vehicle by attaching the Mova to it.
For details, see the user’s manual of the Car Adapter (optional).
•To use the Mova hands-free in a vehicle, the optional Car Holder, Hands-Free Microphone, Power Cable,
Hands-Free Remote Control, and Antenna for Hands-Free Operation are required in addition to the optional
Car Adapter.
Placing Calls
Press (menu) in the stand-by display, then use and
1
to select [Settings] → [Call] → [Hands-free mode].
The Hands-free mode display appears.
[ON] : Set the Hands-free mode.
Hands-free mode
[OFF]: Cancel the Hands-free mode.
Use and to select [ON].
2
The Hands-free mode is set.
46
Information
• This function is available only when using the Car Adapter.
•“
” may not be displayed properly when using the Car Adapter other than SO002.
Page 49

Receiving Calls
Receiving a Call ...................................................................................................................... 48
Using the Received Record <Received> ............................................................................... 49
Adjusting the Volume of Caller’s Voice During a Call <Volume>........................................... 50
Adjusting the Volume of Ring Tone While Receiving a Call <Phone volume> ...................... 50
Receiving Calls Only from Specified Phone Numbers/Groups <Accept calls>..................... 51
Rejecting Calls from Specified Phone Numbers/Groups <Reject calls>............................... 53
Rejecting Calls with No Caller ID <Denied no ID>................................................................. 54
Muting the Ring Tone for Calls with No Phonebook Entry <Set mute seconds> .................. 55
Rejecting Calls from Callers with No Phonebook Entry <Reject unknown> ......................... 56
47
Page 50

Receiving a Call
The Mova notifies you of a call being received by indicator flashes, ring tone, vibrator,
etc.
• The operation of the Mova when receiving a call varies depending on the current settings for the Vibrator,
Manner mode, etc.
When receiving a call, press to answer it.
1
Incoming call
Receiving Calls
Receiving a call
Call duration
Press to hang up.
2
A phone number appears in the display when a caller sends it.
When the caller’s information is saved in the Phonebook
If saved in the Phonebook, the name and phone number of a caller
are displayed (P.68).
When the caller’s phone number is not displayed
The reason appears when the caller’s phone number is not displayed.
“User unset” : Call from a person who intentionally does not notify the caller’s
“Payphone” : Call placed from a payphone.
“Not support”: Call from a network service that cannot notify the caller
00:34
phone number.
phone number.
’s
Information
• The call can also be received by pressing to , , , or (call) (Any Key
Answer).
•You may hear beeps (ring tone during a call) while talking on the Mova.
If “1450” is set with the Voice Mail Service, the Call Forwarding Service, or the Call Waiting Service
subscribed, the beeps (the ring tone during a call) sound and the following operations are available
when there is another incoming call during a call:
<Contents of subscription>
- The Voice Mail Service : Forward a call to the Voice Mail Service Center (P.300).
- The Call Forwarding Service : Forward a call to a forwarding phone number (P.306).
- The Call Waiting Service : Put the active call on hold and answer the incoming call (P.304).
48
Page 51

<Received>
Using the Received Record
Up to 30 previously received calls are saved in the received record with their dates/
times, phone numbers and names.
Press ( ) in the stand-by display.
1
Received Freq Redl
Sep 13 10:32
Brian Miller
Sep 12 10:30
090XXXXXXXX
Sep 12 9:35
Anthony Smith
Sep 11 15:15
Mariah Spears
Missed call
Turn to select the received record.
2
To place a call
Move the cursor to a received record that you want to call and press .
Information
• When a caller uses a “Dial-in” phone number, the phone number displayed may be different from the
caller’s dial-in number.
• When the Secret mode is set to [Display ON], the phone number, name and phone type are displayed in
the received record even if the caller is saved as Secret in the Phonebook. When the Secret mode is
changed to [Display OFF] later, the received record still remains.
The phone numbers or names appear in descending order from
the most recent call.
To display phone numbers
When saved in the Phonebook, the name and phone type of a
recipient are displayed instead of the phone number. Press to
switch the display temporarily between names and phone numbers.
To send mail
You can use EV-Link to send mail to a person whose phone number
and mail address are saved in the Phonebook (P.360).
Receiving Calls
Received
Deleting the Received Record <Delete received>
The received record is retained even when the Mova is powered OFF. If you do not
wish others to know the previously received records, delete one or all of the received
records.
Example: Deleting a received record
Press ( ) in the stand-by display, turn to select the
1
received record and press
The submenu appears.
Use and to select [delete one], then use and to
2
select [Yes].
The selected received record is deleted.
To delete all received records
Select [delete all], enter the Security code and select [Yes]. The Security code is set to
“0000” at the time of purchase.
(func).
49
Page 52
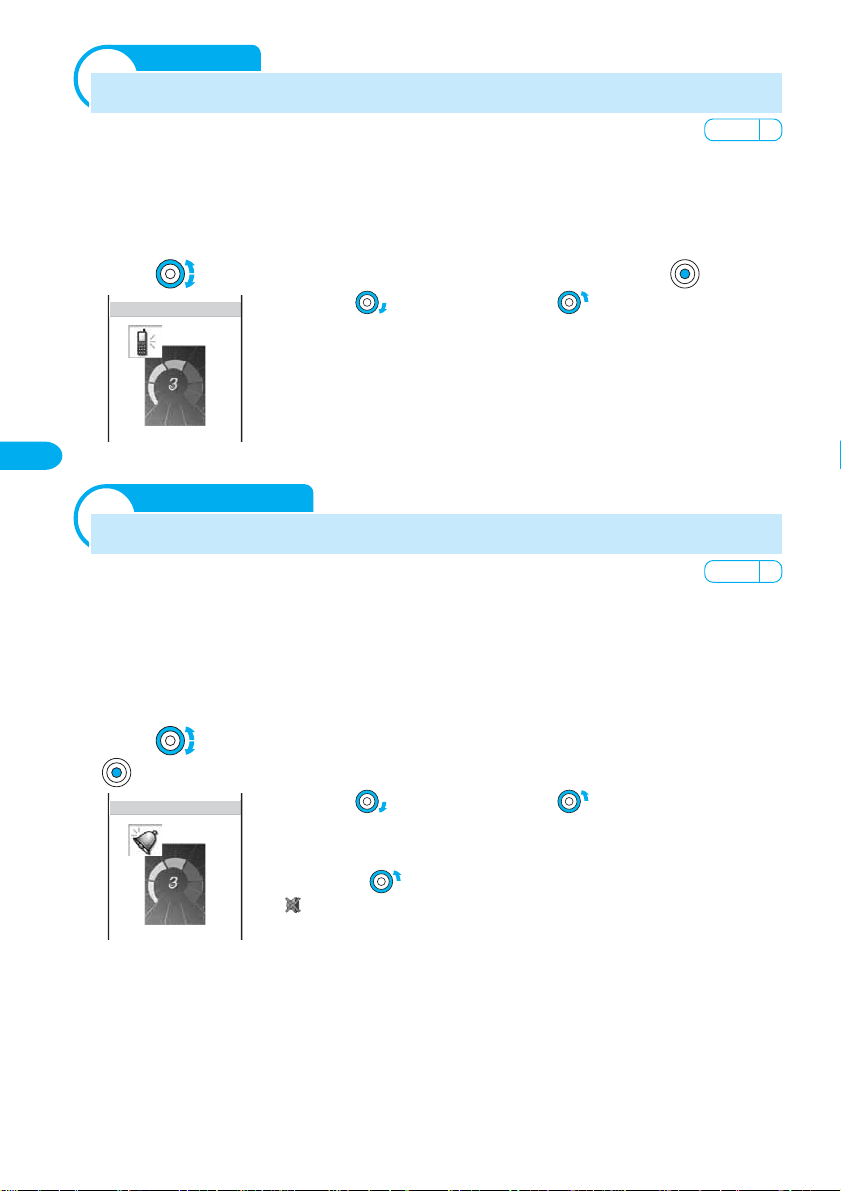
Default 3
Default 3
<Volume>
Adjusting the Volume of Caller’s Voice During a Call
The volume of caller’s voice can be adjusted to 5 levels from level 1 (smallest) to level 5
(largest).
• The set volume is kept even after hanging up the call. The volume of the caller’s voice can also be adjusted
during stand-by (P.92). The volume is set as adjusted last.
Turn to adjust the volume during a call and press (ok).
1
Receiving Calls
Volume/Phone volume
Volume
<Phone volume>
•Turn the jog to increase the volume or to decrease it.
The volume of caller’s voice is set.
Adjusting the Volume of Ring Tone While Receiving a Call
The volume of the phone ring tone can be adjusted to 6 levels: OFF (silent), level 1
(smallest) to level 5 (largest).
• The set volume is kept even after receiving a call. The Phone volume can also be adjusted during stand-by
(P.91). The volume is set as adjusted last.
• The Phone volume cannot be adjusted when the Keypad lock or the Lock key is set.
50
Turn to adjust the volume while receiving a call and press
1
(ok).
Phone volume
•Turn the jog to increase the volume or to decrease it.
The Phone volume is set.
To set the volume [OFF]
Turn the jog further at level 1. When the Phone volume is [OFF],
“ ” appears.
Page 53

Default OFF
<Accept calls>
Receiving Calls Only from Specified Phone Numbers/Groups
You can set to accept calls only from specific phone numbers. Save the phone number
of the caller to be accepted beforehand. Up to 20 phone numbers can be saved
(Number).
The Mova can also be set to accept calls only from specific groups in the Phonebook.
Up to 3 groups can be saved (Group).
This function is valid only when a caller sends the phone number. It is recommended to
set the Caller ID Display Request Service (P.315) and the Denied no ID (P.54) together
with this function.
• Short Mail and i-mode mail can be received regardless of this function.
■ Relationship between the Accept and Reject calls
Accept/Reject calls (Group)
• Specified phone numbers have priority.
• Accept (Reject) calls only from the
phone number set by the Accept
(Reject) calls.
• Cannot be set.
Accept/Reject
calls (Number)
Accept/Reject
calls (Group)
Accept/Reject calls (Number)
• Cannot be set.
• Specified phone numbers have priority.
• Accept (Reject) calls only from the
phone number set by the Accept
(Reject) calls.
Example: Accepting calls only from specified phone numbers
Press (menu) in the stand-by display, then use and
1
to select [Settings] → [Security] → [Accept calls].
The Security code screen appears.
Receiving Calls
Accept calls
2
3
Enter the Security code.
Accept calls
Number
Group
• The Security code is set to “0000” at the time of purchase.
OFF
OFF
Use and to select [Number].
Number
Set
List 0/20
To specify a group
OFF
Select [Group].
51
Page 54

Use and to select [Set], then use and to select
4
[ON].
[ON] : Set the Accept calls. When receiving a call from a phone number other than the specified phone
[OFF] : Cancel the Accept calls.
Use and to select [List].
5
List
Receiving Calls
Use and to select the number field, then use and
6
Accept calls
to select a method to enter a phone number.
numbers (groups when specified), the message “Missed call” appears and the call is not
connected. The call is saved in the received record.
[Phonebook] : Select a number from the Phonebook.
Enter
phone number
Phonebook
Call record
Manually
[Call record] : Select a number from the received/dial frequency/redial record.
[Manually] : Enter a number directly using the keypad.
To specify a group
Select the group field and select a group.
To delete a saved phone number or group
Move the cursor to the number or group field, press (func) to
select [delete one] and select [Yes]. To delete all numbers or groups,
press (func) to select [delete all] and select [Yes].
52
Press (cmplt).
7
The list is saved.
Press (cmplt).
8
The Accept calls from specified phone numbers is set.
Page 55

Default OFF
<Reject calls>
Rejecting Calls from Specified Phone Numbers/Groups
You can set to reject calls from specific phone numbers. Save the phone number of the
caller to be rejected beforehand. Up to 20 phone numbers can be saved (Number).
The Mova can also be set to reject calls from specific groups in the Phonebook. Up to 3
groups can be saved (Group).
This function is valid only when a caller sends the phone number. It is recommended to
set the Caller ID Display Request Service (P.315) and the Denied no ID (P.54) together
with this function.
•When the Reject calls is [ON] and receiving a call from a specified phone number/group, the message
“Missed call” appears and the call is not connected. The call is saved in the received record.
• Short Mail and i-mode mail can be received regardless of this function.
Press (menu) in the stand-by display, then use and
1
to select [Settings] → [Security] → [Reject calls].
The Security code screen appears.
Enter the Security code.
2
• The Security code is set to “0000” at the time of purchase.
The Reject calls display appears.
Specify a phone number or group.
3
• Follow the same steps as in the Accept calls (P.51, step 3 to 8).
The Reject call from specified phone numbers or groups is set.
To delete a saved phone number or group
Move the cursor to the number or group field, press (func) to select [delete one] and
select [Yes]. To delete all numbers or groups, press (func) to select [delete all] and
select [Yes].
Receiving Calls
Reject calls
• For the relationship between the Reject and Accept calls, see the table on P.51.
Information
53
Page 56

Default OFF
<Denied no ID>
Rejecting Calls with No Caller ID
When receiving a call without the caller’s phone number displayed, the reason for not
displaying it is shown. You can decide whether to accept a call based on the reason.
Non-display reason
User unset
Payphone
Not support
Receiving Calls
• Short Mail and i-mode mail can be received regardless of this function.
Press (menu) in the stand-by display, then use and
1
Denied no ID
When a call is received from a person who intentionally does not notify the caller’s
phone number.
When a call is received from a payphone (a call placed from an NTT payphone, etc.).
When a call is received from a network service that cannot notify the caller’s phone
number.
(For example, overseas or through call forwarding services. However, the caller’s
phone number may be provided depending on the telephone company forwarding
the call.)
to select [Settings] → [Security] → [Denied no ID].
The Security code screen appears.
Enter the Security code.
2
Denied no ID
User unset
Payphone
Not support
Use and to select the non-display reason, then use
3
• The Security code is set to “0000” at the time of purchase.
OFF
OFF
OFF
and to select [ON].
[ON] : Set the Denied no ID. When receiving a call with no caller ID, the message “Missed call” appears
and the call is not connected. The call is saved in the received record.
[OFF] : Cancel the Denied no ID.
The Denied no ID is set.
Description
54
Page 57

<Set mute seconds>
Default Time: 00 sec./Recv display: OFF
Muting the Ring Tone for Calls with No Phonebook Entry
You can set not to start the ring tone, indicator and vibrator during the time set
beforehand when receiving calls from callers not saved in the Phonebook and to notify
you of the missed call only in the display. The receiving operations start when the set
time passes. You can also set not to display a missed call in the received record for
which the ring tone sounds shorter than the set time. This function is useful as a
measure against a “Malicious Phone Call”, who makes the Mova ring only once and
immediately hangs up.
This function is valid only when a caller sends the phone number.
Press (menu) in the stand-by display, then use and
1
to select [Settings] → [Call] → [Set mute sec].
Set mute seconds
Time 00sec
Recv display
Use and to select [Time], turn to enter the time and
2
press
Enter from 00 to 99 seconds.
(00−99)
OFF
(ok).
Receiving Calls
Set mute seconds
Use and to select [Recv display], then use and
3
to select [OFF].
[ON] : Display all received calls in the received record.
[OFF] : Do not display the message “Missed call” and the received record of a call which is shorter than
the set time. The call is saved in the received record.
Press (cmplt).
4
The Set mute seconds is set.
Information
• If a phone number that is not saved in the Phonebook is registered in [Number] of the Accept calls
function and this function is set to [ON] (P.51), the Set mute seconds does not operate even when a call
is placed from this phone number.
•
The Set mute seconds is disabled during i-mode communication when the i-mode incoming is set to other
than [Answer].
•To display all received records when the Record display is [OFF], press (func) in the Received record
display and select [display all].
• When the Set mute seconds is set together with the Record message, Auto answer, Voice Mail Service,
or Call Forwarding Service, and if the time you set for the Set mute seconds is longer than the interval
before playing back the answering message or the ring tone duration of these functions or services, the
Mova automatically selects the Record message, Auto answer, Voice Mail Service, or Call Forwarding
Service without ringing. If you want to set the Mova to ring first before switching to these functions or
services, set a shorter time for the Set mute seconds.
55
Page 58

Default OFF
<Reject unknown>
Rejecting Calls from Callers with No Phonebook Entry
You can set to reject calls from callers not saved in the Phonebook.
This function is valid only when a caller sends the phone number. It is recommended to
set the Caller ID Display Request Service (P.315) and the Denied no ID (P.54) together
with this function.
• Short Mail and i-mode mail can be received regardless of this function.
Press (menu) in the stand-by display, then use and
1
Receiving Calls
Reject unknown
to select [Settings] → [Security] → [Reject unknown].
The Security code screen appears.
Enter the Security code, then use and to select [ON].
2
[ON] : Accept calls only from phone numbers saved in the Phonebook. When receiving a call from a
caller not saved in the Phonebook, the message “Missed call” appears and the call is not
connected. The call is saved in the received record.
[OFF] : Accept all calls.
The Reject unknown is set.
56
Information
• If a phone number that is not saved in the Phonebook is saved in [Number] of the Accept calls function
and this function is set to [ON] (P.51), the Reject unknown does not operate even when a call is placed
from this phone number.
Page 59

Settings for When Unable
to Answer Calls
Putting a Call on Hold <On hold>........................................................................................... 58
Rejecting Calls When Driving <Driving mode> ...................................................................... 59
Checking the Missed Calls <Missed call>.............................................................................. 61
Recording Caller’s Messages When Unable to Answer Calls <Record message> .............. 63
Recording Caller’s Messages When Unable to Answer Calls Just Receiving <Quick record message>.....
Playing Back/Deleting a Record Message/Voice Memo........................................................ 66
65
57
Page 60

<On hold>
Putting a Call on Hold
When unable to answer a call immediately, the call can be put on hold.
• Even when the answer is put on hold, the caller is charged for the calling charge.
Settings for When Unable to Answer Calls
Press when receiving a call.
1
The beeps sound and the answer is put on hold. While the
answer is put on hold, the beeps sound about every 30 seconds.
00:03
• The guidance is played back to the caller informing that you are currently
unable to answer the call.
• If you press
• When the Phone volume is [OFF], the beeps do not sound.
while the call is put on hold, the call on hold is disconnected.
On hold
On hold
When ready to answer the call, press .
2
•You can also answer the call using the Any Key Answer function (P.48).
The On hold is canceled and you can talk.
Information
• When you subscribe to the Voice Mail Service or Call Forwarding Service, you can use the service by
pressing
(func) while receiving a call to select [FW to voice mail] or [FW during call].
58
Page 61

Default OFF
<Driving mode>
Rejecting Calls When Driving
The Driving mode (answering message function while driving) is an automated
answering service that supports safe driving. When the Driving mode is set, the
guidance informs the caller that you are unable to answer the call because you are
driving. After the guidance the call is disconnected.
• The Driving mode can only be set or reset during stand-by (it can also be set even when “ ” appears in
the display).
• The call can be placed normally even when the Driving mode is set.
• The Driving mode cannot be used during data and fax communications.
• If the Caller ID Display Request Service is [ON] and you receive a “User unset” call, the caller ID request
guidance is played back (the Driving mode guidance is not played back).
Press for over a second in the stand-by display.
1
The Driving mode is set and “ ” appears.
• When the Manner mode and the Driving mode are set at the same time, the
Driving mode has priority.
To cancel the Driving mode
Press for over a second in the stand-by display. The Driving
mode is canceled and “ ” disappears.
■ When the Driving mode is set
The ring tone does not sound when there is an incoming call. The message “Missed call X”
appears in the display and the call is saved in the received record (P.61).
The guidance informs the caller that you are unable to answer the call because you are driving,
and the call is disconnected. If the Mova is powered OFF or “ ” appears, the guidance is not
played back but the same guidance as provided when “ ” appears is played back.
■ If the Voice Mail Service is “ON” when the Driving mode is set
The ring tone does not sound when there is an incoming call. Instead, the call is forwarded to
the Voice Mail Service Center. The message “Missed call X” appears in the display and the call
is saved in the received record (P.61).
The guidance informs the caller that the call is connected to the Voice Mail Service Center
because you are driving and are unable to answer the call. Then, the call is forwarded
automatically to the Voice Mail Service Center.
■ If the Call Forwarding Service is “ON” when the Driving mode is set
The call is forwarded to a specified phone number without connecting to the Mova. The
message “Missed call X” appears in the display and the call is saved in the received record
(P.61).
The guidance is played back (or not) depending on the setting made by “1429”. If the
forwarding guidance is set “ON”, the guidance informs the caller that the call is forwarded to
another phone number because you are driving and unable to answer the call. If the forwarding
guidance is set “OFF”, the guidance is not played back.
Settings for When Unable to Answer Calls
Driving mode
59
Page 62

■ During i-mode communication (if “1450” is set when subscribing to the Voice
Mail Service or the Call Forwarding Service)
The guidance to be played back during i-mode communication varies depending on the
settings of the i-mode incoming (P.199).
Settings for When Unable to Answer Calls
Driving mode
Settings of the i-mode
incoming
Voice mail Following the guidance informing that packet communication is in progress,
the guidance informs the caller that the call is connected to the Voice Mail
Service Center because you are driving.
Forward w/ msg Following the guidance informing that packet communication is in progress,
the guidance informs the caller that the call is forwarded to the forwarding
phone number because you are driving.
Forward w/o msg The guidance is not played back (the Driving mode guidance is not also
played back).
Notification
Answer
• The settings above are ignored if “1451”, “1452” or “1459” (P.302, 308) is set when subscribing to the
Voice Mail Service or the Call Forwarding Service.
Only the Driving mode guidance is played back (the Voice Mail Service and
the Call Forwarding Service are not activated even if they are set to “ON”).
Only the Driving mode guidance is played back (the Voice Mail Service and
the Call Forwarding Service are not activated even if they are set to “ON”).
Guidance messages
■ When the Keypad lock is set by remote while the Driving mode is set
The guidance informs the caller that the Keypad lock is set, instead of announcing that you are
driving, when the number of missed calls from the authorized number reaches the specified
value (P.152).
Information
•To set the Driving mode, press on the Mova. Do not set the Driving mode using “14151 (ON)” or
“14150 (OFF)” since it is not effective when the Mova is powered ON but only effective when the Mova is
powered OFF or out of the service area. If the Driving mode is set using “14151 (ON)”, cancel the mode
using “14150 (OFF)”.
• When the Driving mode is set, the following tones do not sound.
- Phone tone - Mail/Message tone - Clock alarm - Schedule alarm - Battery alarm
- i-αppli software sound - Wake-up sound - Starting charge sound - Completed charge sound
60
Page 63

<Missed call>
Checking the Missed Calls
If a call is not answered, the message “Missed call X” appears in the stand-by display.
The received record shows the date/time and the person who called.
A ring time for a missed call can be displayed and checked (ringing time).
The message “Missed call” appears.
1
Missed call 2
Press ( ) to check the received record.
2
Received Freq Redl
Sep 1 4:32
Brian Miller
Aug 29 10:30
090XXXXXXXX
Aug 29 9:35
Anthony Smith
Aug 28 15:15
Mariah Spears
If you do not answer a call, the message shows the number of
the missed calls.
To delete the message “Missed call”
Press for over a second.
The caller’s phone number, name, etc. can be checked.
• The following icons show the status of the missed calls in the received record.
There is no record message
To check a ring time for a missed call
Move the cursor to the received record of a missed call and press
•A ring time cannot be checked for a missed call with a record message.
There is a record message
(func) to select [ringing time].
Settings for When Unable to Answer Calls
Missed call
Information
• When a caller uses a “Dial-in” phone number, the phone number displayed may be different from the
caller’s dial-in number.
61
Page 64

Default ON
Informing the Missed Calls with Indicator <Missed call>
The indicator can be set to flash to notify you that there is a missed call or new mail/
unread message. The indicator is turned off after a missed call is checked or mail/
Settings for When Unable to Answer Calls
message is displayed.
Press (menu) in the stand-by display, then use and
1
to select [Settings] → [Display] → [Illumination] → [Missed call].
The Missed call display appears.
[ON] : Set the Missed call.
[OFF] : Cancel the Missed call.
Use and to select [ON].
2
The Missed call is set.
Missed call
62
Information
• The illumination color for a missed call follows the setting in the Select color (P.145). When you select
one of 7 types of illumination patterns, a pair of colors preset for each pattern flashes about every 5
seconds (all colors flash alternately for [ALL]).
• The indicator flashes in the following order of priority when there are mix of missed calls and new mail/
unread messages. In addition, if there are 2 or more missed calls, new mail, or unread messages
independently of each other, the illumination color of the last received call, mail or message has priority.
1. Phone
2. Chat mail
3. Mail
4. Message Request
5. Message Free
Page 65

Default OFF
<Record message>
Recording Caller’s Messages When Unable to Answer Calls
When the Record message is set, the Mova can play back an answering message and
record a caller’s message when you are unable to answer a call.
•When 3 messages are recorded, the Record message no longer operates. Delete unnecessary messages.
• When the Driving mode is set, the Record message dose not operate.
■ Record message and Voice Mail Service
The differences between the Record message and the Voice Mail Service are listed below.
Items
Max. no. of messages/max.
recording time
Holding time
Holding place
Location for playing back
Location/condition for
recording
3 messages (including the Quick
record message)/about 20 seconds
Unlimited
In the Mova
Both within and out of the service area
Only within the service area/only
when the Mova is powered ON
Record message
Voice Mail Service
20 messages/about 3 minutes
Max. 72 hours
At the Voice Mail Service Center
Only within the service area
Both within and out of the service
area/regardless of whether the Mova
is powered ON or OFF
Settings for When Unable to Answer Calls
Setting the Record Message
Press for over a second in the stand-by display.
1
The Record message is set and “ ” ( is white) appears.
To cancel the Record message
Press for over a second in the stand-by display. The Record
message is canceled and “ ” disappears.
If Receiving a Call When Record Message is Set
After the Mova rings for the set duration and the indicator
1
flashes, the Record message automatically answers a call.
The answering message is played back for the caller.
Play answer message
The Mova records the caller’s message.
2
The caller’s voice is heard from the earpiece as the message is
being recorded.
Rec record message
• When the Manner mode is set, the caller’s voice cannot be heard.
00:10
To talk to the caller
Press .
Record message
63
Page 66

After the caller’s message is recorded, the stand-by display
Default Rec answer msg: None/Msg setting: Standard message
Default 10 sec.
3
reappears.
There is a record message that has not been played back ( is yellow)
Settings for When Unable to Answer Calls
Number of record messages
Setting the Duration Before the Answering Message Starts <To answer>
The duration before playing back the answering message after receiving a call can be
set.
Press in the stand-by display, then use and to
1
select [Set message].
Set record message
Set
Record message
To answer 10sec
Rec answer msg
Msg setting
Use and to select [To answer], turn to enter the time
2
and press
Enter from 01 to 29 seconds.
OFF
(01−29)
Std
(ok).
Press (cmplt).
3
The duration before playing back the answering message is set.
Recording the Answering Message <Record answer message>
The answering message used for the Record message can be selected from either the
Standard message or the Original message you recorded with your own voice. To select
the Original message, the answering message must be recorded beforehand. Only 1
answering message of up to about 10 seconds can be recorded.
Press in the stand-by display, then use and to
1
select [Set message].
Set record message
Set
To answer 10sec
Rec answer msg
Msg setting
64
OFF
(01−29)
Std
Page 67

Use and to select [Rec answer msg].
2
Answer message
Original message
Talk into the microphone to record an answering message.
The recording stops automatically after about 10 seconds and
[Msg setting] is automatically set to [Orig].
When the answering message has been recorded before
Recording
Press (cmplt).
3
6sec
The new msg is saved by overwriting the old one.
To play back the answering message
Select [Msg setting], move the cursor to [Original message] and press
(play).
To reset to the default answering message
Select [Msg setting] and select [Standard message].
The answering message is set.
Information
•When the Auto answer, the Voice Mail Service or the Call Forwarding Service are set together with the
Record message and you wish to give priority to the Record message, set the Record message starting
time shorter than that for the other function or service.
Note that the Voice Mail or the Call Forwarding Service operates after 3 messages are recorded.
<Quick record message>
Settings for When Unable to Answer Calls
Record message/Quick record message
Recording Caller’s Message When Unable to Answer Calls Just Receiving
You can set the Record message manually for temporary use while receiving a call
even if the Record message is [OFF].
• When the number of recorded record messages reaches 3, the Quick record message does not work. Delete
unnecessary record messages.
• The characteristics of the Quick record message such as the maximum number, maximum recording time,
location/condition for recording and message type are the same as those of the Record message (P.63).
Press while receiving a call.
1
The answering message automatically
starts and the Mova starts recording the
Play answer message Rec record message
caller’s message.
00:10
The caller’s voice can be heard from the
earpiece as the message is being
recorded.
•When the Manner mode is set, the caller’s voice
cannot be heard.
65
Page 68

Playing Back/Deleting a Record Message/Voice Memo
The record message or voice memo (P.337) can be played back or deleted.
Settings for When Unable to Answer Calls
Playing Back a Record Message/Voice Memo
Example: Playing back a record message
Press in the stand-by display, then use and to
1
select [Play message].
Play record message
Aug 30 10:32
David Lee
Sep 5 22:00
User unset
Sep 12 7:50
Carol Wong
Turn to select the record message and press (play).
2
Play record message
Aug 30 10:32
Playing back/Deleting a record message/voice memo
David Lee
Playing
To play back a voice memo
Select [Play voice memo].
The record message is played back.
To stop the playback on the way
Press (stop).
To play back the next record message
18sec
Press (skip) during the playback.
To delete the record message during the playback
Press (delete) during the playback and select [Yes].
/
Deleting a Record Message/Voice Memo
Up to 3 record messages and 2 voice memos can be recorded. Delete the unnecessary
message or memo.
Example: Deleting a record message
Press in the stand-by display, then use and to
1
select [Play message].
To delete a voice memo
Select [Play voice memo].
Turn to select the record message and press (func).
2
The submenu appears.
Use and to select [delete one], then use and to
3
select [Y es].
The selected record message is deleted.
To delete all record messages
Select [delete all] and select [Yes]. When all record messages are deleted, the number of
66
record messages in the stand-by display disappears.
Page 69

Using the Phonebook
Saving an Entry in the Phonebook <Add to phonebook>...................................................... 68
Setting a Group <Group setting> ........................................................................................... 73
Placing a Call from the Phonebook ........................................................................................ 75
Setting the Display of the Phonebook <Record display> ...................................................... 77
Editing an Entry <Edit phonebook>........................................................................................ 78
Deleting an Entry <Delete phonebook> ................................................................................. 78
Protecting a Secret Entry <Secret mode>.............................................................................. 79
Checking the Number of Entries Saved <Memory status>.................................................... 80
Dialing Quickly to Frequently Called Numbers <2-touch dial> .............................................. 80
67
Page 70

<Add to phonebook>
Saving an Entry in the Phonebook
If you save data such as phone numbers or mail addresses in the Phonebook, you can
place a call or send mail easily by using the Phonebook.
Up to 1,000 entries can be saved in the Phonebook.
One Phonebook entries can save up to 3 phone numbers and mail addresses each.
■Items you can save
• When you enter one of the name, phone number and mail address, (cmplt) appears, indicating you
are ready to save the entry in the Phonebook.
Edit phonebook
Anthony Smith
Using the Phonebook
AnthonySmith
Friends
015
090XXXXXXXX
03XXXXXXXX
03XXXXXXXX
docomo.taro.△△@do
docomo.△△△.taro@d
Add to phonebook
docomotaro@△△.□□□
1−X−XX Kita−shina
Type1
Type3
Mr. Smith
C1
C5
OFF
func
Mobile1
Home
FAX
Mobile1
Mobile2
Office
select
(Overall Image)
cmplt
Icon
Item
Name
Reading
Group
Memory no.
Phone no.
Phone type
Mail address
Mail type
Secret code
Address
Des phone tone
Enter a name. Up to 10 full-width or 20 half-width
characters can be entered.
Enter the reading of the name. Up to 18 half-width
characters can be entered.
Classify entries into 20 different groups.
Set from 000 to 999. Used to make a call using the
disc jog or 2-touch dial.
Enter a phone number. Up to 3 numbers within
24 digits each can be entered per entry.
Select the phone type from 7 icons.
Enter a mail address. Up to 3 addresses of up to
50 half-width alphanumeric characters each can be
entered per entry.
Select the mail address type from 5 icons.
Enter the specified Secret code (P.240) when the
recipient saves it. Used when sending mail.
• If you save a mail address as “phone number +
Secret code@docomo.ne.jp” in the Phonebook,
you cannot send mail or reply mail to this
address. To avoid this problem, change the mail
address to “phone number@docomo.ne.jp” and
save a Secret code.
Enter a postal address. Up to 64 full-width or 128
half-width characters can be entered.
Select the ring tone for a call from the Melody folder.
Description
68
Des mail tone
Call image
Select phone Illum.
Select mail Illum.
Secret
Select the ring tone for mail from the Melody folder.
Select an image to be displayed when placing/
receiving a call, right after receiving mail and when
displaying the Phonebook entry from My picture.
• An image large in size may take time to be
displayed.
Select the illumination color for a call from 12 types
of colors or 7 types of illumination patterns.
Select the illumination color for mail from 12 types
of colors or 7 types of illumination patterns.
Set the Phonebook entry not shown in the display.
Use this function if you do not wish others to know
the Phonebook entry.
Page 71

Turn in the stand-by display and press (new).
1
Edit phonebook
Use and to select [ ], enter a name and press (ok).
2
Name
Anthony Smith
Enter a name using up to 10 full-width or 20 half-width
characters.
When entering a name the reading is automatically entered.
To correct the reading
Select [ ] and enter the correct reading using up to 18 half-width
漢カナ
013/020Byte
Use and to select [ ], then use and to select a
3
Aa12
characters.
group.
Select group
Friends
Company
•Group is automatically entered when entering a name, phone number or
mail address. Change it if necessary.
Group icon
Using the Phonebook
Add to phonebook
Use and to select [ ], turn to enter a memory
4
number and press
• The smallest available memory number is automatically entered when entering
Memory no.
015
•Turn the jog
(ok).
a name, phone number or mail address. Change it if necessary.
to display the largest available number or to display the
smallest available number.
69
Page 72

Use and to select [ ], enter a phone number and press (ok).
5
Phone no.
Enter a phone number within 24 digits. “-” (hyphen) can be also entered.
•
Press once to enter “-” (hyphen) and press twice to enter “P” (pause).
• If an asterisk ( ) or sharp (#) symbol is included in the middle of a saved phone
number, the Mova cannot place a call to that number (however, if these symbols
are at the end of the phone number, a call can be placed).
• If “P” (pause) is included in a phone number, the number up to the “P” is sent.
• If a phone number is saved with a
reach the recipient correctly when you select this phone number as its mail address.
“
184” or “186” prefix, the i-mode mail does not
To enter more than 1 phone number
After the 1st phone number is entered, [ ] for the 2nd phone number
automatically appears. Repeat step 5 to 6.
Using the Phonebook
Use and to select [ ], then use and to select a
6
phone type.
Select phone
Mobile1
Mobile2
Public
Home
Office
FAX
Quick casts
Add to phonebook
Use and to select [ ], enter a mail address and press (ok).
7
Mail address
docomo.taro.△△@docom
o.ne.jp
027/050Byte
Use and to select [ ], then use and to select a
8
mail address type.
Select mail
Mobile1
Mobile2
Public
Home
Office
漢カナ
• After a phone number is entered, the phone type [ Mobile1] is automatically
entered. Change it if necessary.
Enter a mail address using up to 50 half-width alphanumeric
characters.
• When sending mail to an i-mode compatible mobile phone, you need to specify
only the mail address portion before the @ mark.
To save more than 1 mail address
Aa12
After the 1st mail address is entered, [ ] for the 2nd address
automatically appears. Repeat step 7 to 9.
• After a mail address is entered, the mail address type [ Mobile1] is
automatically entered. Change it if necessary.
70
Use and to select [ ] and enter the Secret code
9
specified by the recipient.
This is applicable only when the mail address of a recipient is a
Secret code
“phone number@docomo.ne.jp”.
• Enter the mail address beforehand.
•The Secret code is masked by “
[Display ON], it is displayed in numbers.
To delete the Secret code
Press (ok) in the Secret code screen without entering anything.
”. Only when the Secret mode is set to
Page 73

Use and to select [ ], then use and to select a
10
ring tone from a folder.
Des phone tone
None
Silent
Preset melody
i−melody
Use and to select [ ], then use and to select an
11
To specify the mail tone
Select [ ] and select a ring tone from a folder.
To specify no ring tone
Select [None]. The ring tone saved in the Group setting sounds. If no
tone is saved in the Group setting, the ring tone set in the Ring tone
(P.88) sounds.
To mute the ring tone
Select [Silent].
To check the ring tone
Move the cursor to the ring tone and press (play). Press
(stop) to stop the playback.
image from a folder.
Call image
None
Graphic folder
Album
• An image exceeding 100Kbyte or 600 × 600 dots in size may not be set for the
call image. A moving image and the Flash movie cannot be set for the call image.
To specify no image
Select [None]. The call image saved in the Group setting appears
when placing/receiving a call and right after receiving mail. If no
image is saved in the Group setting, the image set for [Sending]/
[Receiving] in the Animation setting (P.138) appears.
To check the image
Move the cursor to an image and press (play). Press (ok) to
return the previous display.
Using the Phonebook
Add to phonebook
Use and to select [ ], then use and to select an
12
illumination color.
Select phone Illum.
None
C1:Color1
C2:Color2
C3:Color3
C4:Color4
C5:Color5
C6:Color6
C7:Color7
Use and to select [ ], then use and to select [ON].
13
[ON] : Save the entry as Secret and do not display it in the Phonebook.
[OFF] : Do not save the entry as Secret.
To display the entry saved as Secret
Set the Secret mode to [Display ON] (P.79).
Press (cmplt).
14
The entered data is saved in the Phonebook.
To specify the mail illumination color
Select [ ] and select an illumination color.
When you move the cursor to an illumination color, the indicator
flashes in that color or illumination pattern.
To specify no illumination color
Select [None]. The indicator flashes in the color or illumination pattern
saved in the Group setting. If the illumination color is not set in the
Group setting, the indicator flashes in the color or illumination pattern
set for [Phone] in the Select color (P.145).
71
Page 74

Information
• When you receive a call to My phone no. for the Number Plus Service, the ring tone set in My phone no.
(P.313) sounds regardless of the Des phone tone setting.
• When you receive chat mail, the Chat mail tone and illumination color operate regardless of the Des mail
tone and Select mail Illum. settings.
• When a caller is saved as Secret, the regular ring tone, call image and illumination color operate. Set the
Secret mode to [Display ON] to enable the Des phone tone, Call image and Select phone Illum. (P.79).
• If you receive a call when the Phonebook lock is [ON] or the Keypad lock is set, the regular ring tone,
call image, and illumination color operate.
• If you receive mail when the Phonebook lock is [ON] or the Keypad lock is set, the regular ring tone and
illumination color operate. The call image is not displayed.
• It is recommended that you make a separate note of the data saved in the Phonebook or Short Dial or
make a backup copy of it using the “Memory Stick Duo” (P.326).
Using the Phonebook
Add to phonebook
The saved data may be lost as a result of malfunction, repair, change of the Mova or other handling.
Although the data of the Phonebook is kept for about 1 month even after the battery pack is removed or
run out, the data may be lost after the period.
Under no condition will DoCoMo be held liable for any damaged or lost data saved in the Phonebook, etc.
• The following data can be copied to a new mobile phone at the DoCoMo service counter (DoCoMo
shop) when you change the models: “1st phone number”, “katakana and kanji names”, “Group setting”,
“1st mail address”, “bookmarks” and “Secret”. Note that some data of the Mova may not be copied
depending on the specifications of the newer model.
Saving the Redial and Received Record in the Phonebook
A phone number saved in the record can be directly added to the Phonebook.
Example: Saving the received record in the Phonebook as a new entry
Press ( ) in the stand-by display and turn to select the
1
received record.
To save a number from the redial record
Press ( ) in the stand-by display and move the cursor to the redial record.
72
Press (save).
2
[New] : Save as a new entry in the Phonebook.
Select way to
save to
phone book
New
Add
Use and to select [New].
3
[Add] : Select an entry in the Phonebook and save the item in addition.
The Edit phonebook display appears.
When [Add] is selected
The Phonebook appears. Select the name/phone number to save the item in addition.
Save each item and press (cmplt).
4
• Follow the same steps as in the Add to phonebook (P.69, step 2 to 14).
The entered data is saved in the Phonebook.
Page 75

Default Not specified
<Group setting>
Setting a Group
The Group name and icon can be saved for a group in the Phonebook. Up to 20 groups
can be saved.
The ring tone or the illumination color can be set for each group. The images such as
recorded by the camera can also be set for the call image (displayed when placing/
receiving a call or right after receiving mail). You can conveniently distinguish a call/
mail by the ring tone, illumination color or image.
■ Items you can set
Edit group 0
Club members
Type1
Type3
Welcome party
C2
C4
cancel
select
cmplt
Icon Item
Group name
Icon
Des phone tone
Des mail tone
Call image
Select phone Illum.
Select mail Illum.
Enter a group name. Up to 10 full-width or 20
half-width characters can be entered.
Select an icon to classify a group.
Select the ring tone for a call from the Melody
folder.
Select the ring tone for mail from the Melody
folder.
Select an image to be displayed when placing/
receiving a call and right after receiving mail
from My picture.
Select the illumination color for a call from 12
types of colors or 7 types of illumination patterns.
Select the illumination color for mail from 12
types of colors or 7 types of illumination patterns.
Description
Using the Phonebook
Group setting
Example: Setting a group name and icon, phone ring tone, call image and phone
illumination color
Turn in the stand-by display and press (func).
1
The submenu appears.
Use and to select [group setting].
2
Group setting
Friends
Company
To display group numbers
When saved, group icons are displayed instead of group numbers.
Press to switch the display temporarily between group icons and
group numbers.
73
Page 76

Use and to select a group.
3
Edit group 0
Use and to select [ ], enter a group name and press
4
(ok).
Using the Phonebook
Enter a group name using up to 10 full-width or 20 half-width characters.
• The group name is displayed only to the extent of 8 full-width or 16 half-width characters in a screen
other than the Edit group display.
Use and to select [ ], then use and to select an
5
icon.
The Select icon display appears.
Use and to set each item.
6
Group setting
• Follow the same steps as in the Add to phonebook (P.71, step 10 to 12).
Press (cmplt).
7
The Group setting is set.
Information
• When you receive a call to My phone no. for the Number Plus Service, the ring tone set in My phone no.
(P.313) sounds regardless of the Group setting. When the Des phone tone is set in both the Add to
phonebook and the Group setting, the setting in the Add to phonebook has priority.
• When you receive chat mail, the Chat mail tone and illumination color operate regardless of the Group
setting.
• When the person saved as Secret is included in the set group and a call is received from that person,
the regular ring tone, call image, and illumination color operate. Set the Secret mode to [Display ON]
(P.79) to enable the Group setting.
• If you receive a call when the Phonebook lock is [ON] or the Keypad lock is set, the regular ring tone,
call image, and illumination color operate.
• If you receive mail when the Phonebook lock is [ON] or the Keypad lock is set, the regular ring tone and
illumination color operate. The call image is not displayed.
74
Page 77

Placing a Call from the Phonebook
Various methods can be used to place a call by using the Phonebook.
Placing a Call Using the Disc Jog <Jog call>
The call can be placed simply by using the disc jog.
Turn in the stand-by display, then use and to select
1
a name.
Anthony Smit
h
015
090XXXXXXXX
03XXXXXXXX
03XXXXXXXX
docomo.taro.△△@do
como.ne.jp
Use and to select a phone number.
2
Anthony Smith
Call
184+call
186+call
Intl call
To switch display of the image
Press to switch between displaying and not displaying the image
temporarily.
Using the Phonebook
Placing a call from the Phonebook
Use and to select the call menu.
3
The call is connected in accordance with the selected menu.
75
Page 78

Placing a Call by Searching the Phonebook
The call can be placed by searching a person from the Phonebook. One of 5 methods
can be used to search for a person: [Name], [Memory no.], [Group], [E-mail] and
[Phone number].
Turn in the stand-by display and press (func).
1
The submenu appears.
Use and to select [search].
2
Search by
Name
Using the Phonebook
Placing a call from the Phonebook
Memory no.
Group
E−mail
Phone number
Use and to select a search method.
3
Name search
Name
漢カナ
000/018Byte
Aa12
Enter part of the
reading of the name
(from the first letter)
and press (ok).
Enter using up to 18
half-width characters.
Memory number search
Enter a memory
Memory no.
number.
• Without entering, turn
to display the
Phonebook entry in the
format of memory
numbers.
76
Group search
Group
Friends
Company
Phone number search
Phone number
Use and to select a person.
4
Turn to select a phone number and press .
5
Select a group and
press (select).
Enter part of the phone
number and press
(ok).
Enter within 24 digits.
Address search
E−mail
000/050Byte
The call is connected to the selected phone number.
漢カナ
Enter part of the mail
address and press
(ok).
Enter using up to
50 half-width
alphanumeric
characters.
Aa12
Page 79

Default Alphabet
<Record display>
000:Carol Wong
001:Brian Miller
005:Mariah Spears
015:Anthony Smith
Default Display ON
Setting the Display of the Phonebook
Setting the Display Style of the Phonebook <Display style>
The display style of the Phonebook can be selected from 3 types. Set the style as you wish.
Alphabet Group Number
たなはまやらわA
Anthony Smith
Group
Friends
Company
Display in Japanese alphabetical
order of the saved reading.
Turn in the stand-by display and press (func).
1
Display in the order
of groups.
Display in the order
of memory numbers.
Using the Phonebook
The submenu appears.
Use and to select [record display] → [Display style],
2
then use
Display style
Alphabet
Group
Number
and to select the display style.
The Phonebook is displayed in the selected style.
Record display
Information
• When displaying the Phonebook in the Alphabet or Group style, the keypad provides a shortcut to each
label pages (“あ ” to “わ ”) or the first entry of each label. For example, to go to the “ は” label page,
press the key
the keypad.
marked with the letter “は ”. The “A” and “ETC” label pages are not accessible using
Displaying the Image in the Phonebook Entries <Set image display>
You can display the image set for the Call image in the Add to phonebook when
displaying the individual Phonebook entry.
Turn in the stand-by display and press (func).
1
The submenu appears.
Use and to select [record display] → [Set image display],
2
then use
[Display ON] : Display the image set for the Call image when displaying the individual Phonebook entry.
[Display OFF]: Do not display the image set for the Call image when displaying the individual Phonebook
entry.
The Set image display is set.
and to
select [Display ON].
77
Page 80

<Edit phonebook>
Editing an Entry
The data saved in the Phonebook can be edited.
Turn in the stand-by display, then use and to select
1
a name and press
The Edit phonebook display appears.
Edit each item and press (cmplt).
2
• Follow the same steps as in the Add to phonebook (P.69, step 2 to 14).
Using the Phonebook
The edited data is saved in the Phonebook.
<Delete phonebook>
(edit).
Deleting an Entry
You can delete Phonebook entries using the following 3 methods.
delete one Delete a Phonebook entry.
Edit phonebook/Delete phonebook
select&delete Delete selected Phonebook entries. Up to 30 entries can be selected at a time.
delete all Delete all saved Phonebook entries.
Example: Deleting an entry
Turn in the stand-by display.
1
たなはまやらわA
Anthony Smith
Brian Miller
Carol Wong
David Lee
To delete selected Phonebook entries
Press (func) to select [select&delete] and select the entries. Press
(delete) and select [Yes].
To delete all Phonebook entries
Press (func) to select [delete all], enter the Security code and
select [Yes].
78
Turn to select a name and press (func).
2
The submenu appears.
When the display format is set to [Group]
Select a group, move the cursor to a name and press (func).
Use and to select [delete one], then use and to
3
select [Y es].
The selected entry is deleted.
Page 81

Default Display OFF
<Secret mode>
Protecting a Secret Entry
The Phonebook, Own number and Schedule saved as Secret are not displayed unless
the Secret mode is set to [Display ON]. Make sure to save the Phonebook, Own
number and Schedule as Secret if you do not wish others to see them.
• Even if the Secret mode is set to [Display ON], it is changed to [Display OFF] when you power OFF the Mova.
Press (menu) in the stand-by display, then use and
1
to select [Settings] → [Security] → [Secret mode].
The Security code screen appears.
Enter the Security code.
2
The Secret mode display appears.
[Display ON] : Display the data saved as Secret.
[Display OFF]: Do not display the data saved as Secret.
Use and to select [Display ON].
3
The Secret mode is set to [Display ON] and “ ” appears.
Using the Phonebook
Secret mode
Information
• Set the Secret mode to [Display ON] to enable the Des phone tone, Des mail tone, Call image, Select
phone Illum. and Select mail Illum. (P.68, 73) of a Phonebook entry saved as Secret.
• When the Secret mode is set to [Display ON], the phone number, name and phone type are displayed in
the redial/received record even if the caller or recipient is saved as Secret in the Phonebook. When the
Secret mode is changed to [Display OFF] later, the redial/received record still remains.
79
Page 82

<Memory status>
Checking the Number of Entries Saved
The number of entries saved in the Phonebook can be checked as well as the number
of entries still available or saved as Secret.
Turn in the stand-by display and press (func).
1
The submenu appears.
Use and to select [memory status].
2
Memory status
Remained
Using the Phonebook
Used
Secret
[Remained] : Display the number of entries still available.
850
[Used] : Display the number of entries saved (including entries as Secret).
150
[Secret] : Display the number of entries saved as Secret (this data is
5
displayed only when the Secret mode is set to [Display ON]).
<2-touch dial>
Dialing Quickly to Frequently Called Numbers
The call can be placed easily to entries saved in memory numbers from 000 to 009 by
Memory status/2-touch dial
using a shortcut. It is useful to save frequently used phone numbers in memory
numbers from 000 to 009.
• When the Secret mode is set to [Display OFF], the 2-touch dial cannot be used to place a call to a phone
number saved as Secret.
Example: Placing a call to an entry saved in the memory number 001
Enter the memory number in the stand-by display.
1
Enter the last 1 digit of the memory number (0 to 9).
Press .
2
Brian Miller
03XXXXXXXX
090XXXXXXXX
03XXXXXXXX
The call is connected to the 1st phone number of the entry
saved in the memory number 001.
Information
• The call can be placed to entries saved in memory numbers from 010 to 099 by entering the last 2 digits
(10 to 99) of the memory numbers.
80
Page 83

Setting the Manner Mode
Muting the Ring Tone <Manner mode>.................................................................................. 82
Changing the Manner Mode Settings <Manner mode setting> ............................................. 83
Informing Incoming Calls with Vibration <Vibrator>............................................................... 85
Setting the Keypad Sound <Keypad sound> ......................................................................... 86
81
Page 84

<Manner mode>
Muting the Ring Tone
All sounds from the phone can be disabled to avoid disturbing others by using the
Manner mode.
There are 3 types of the Manner mode. Set the mode beforehand in the Manner mode
setting (P.83).
• The shutter sound is heard even when the Manner mode is set.
Press for over a second in the stand-by display.
1
The Manner mode is set and the icon for the current Manner
mode type appears.
Setting the Manner Mode
■ Functions of each mode
Manner mode
Vibrator (P.85)
Phone volume (P.91)
Mail volume (P.91) ※1
Alarm volume (P.160, 169)
Sound effect volume (P.89)
Keypad volume (P.86)
Battery alarm (P.28) ※2
Record message (P.63)
Whisper mode (P.344)
Image sound effect (P.92)
Software volume (P.93)
Music speaker (P.346) ※3
Movie speaker (P.118) ※3
※ 1 The ring volume for the chat mail and Message R/F is the same as that for the mail.
※ 2 The battery alarm sounds during a call regardless of the setting. The Mova vibrates even when the battery
alarm is set to [OFF] (except for the Silent mode during a call).
※ 3 When [OFF] is set, no sound is output from the speakers.
Manner ( isorange)
Silent
Original manner ( isblue)
To cancel the Manner mode
Press for over a second in the stand-by display. The Manner
mode is canceled and “ / / ” disappears.
Manner
Pettern1
OFF
OFF
OFF
OFF
OFF
OFF
−
ON
OFF
OFF
OFF
OFF
OFF
OFF
OFF
OFF
OFF
OFF
OFF
OFF
OFF
OFF
OFF
OFF
Silent
−
Initial setting
OFF
SD (StepDown)
3
3
3
1
ON
OFF
OFF
3
3
OFF
OFF
Original manner
Setting range
OFF/Pattern1/Pattern2/Link melody
OFF/1 to 5/SD (StepDown)/SU (StepUp)
OFF/1 to 5
OFF/1 to 5
OFF/1 to 5
OFF/1 to 2
ON/OFF
ON/OFF
ON/OFF
OFF/1 to 5
OFF/1 to 5
ON/OFF
ON/OFF
82
Page 85

<Manner mode setting>
Default Set: OFF/Mode: Manner
Changing the Manner Mode Settings
The Manner mode can be selected from 3 types: “Manner”, “Silent” and “Original
manner”. Custom settings can be saved in the Original manner.
Example: Setting [Silent]
Press (menu) in the stand-by display, then use and
1
to select [Settings] → [Manner] → [Manner mode].
Manner mode
Set
Mode
Use and to select [Set], then use and to select
2
[ON].
[ON] : Set the Manner mode.
[OFF] : Cancel the Manner mode.
Use and to select [Mode], then use and to select
3
[Silent].
Manner mode
Manner
Silent
Original manner
OFF
Manner
Setting the Manner Mode
Manner mode setting
Press (cmplt).
4
The type of the Manner mode is changed.
83
Page 86

Changing the Original Manner <Original manner>
Default See the table on P.82
The operations of the Original manner can be customized. For the items you can set,
see “Functions of each mode” (P.82).
• The Original manner cannot be saved during a call or when the Manner mode is set.
• The Record message setting is not changed even if you set the Record message to [OFF] in the Original
manner when the Record message is set.
Example: Setting the battery alarm [OFF] in the Original manner
Press (menu) in the stand-by display, then use and
1
to select [Settings] → [Manner] → [Original manner].
Setting the Manner Mode
Manner mode setting
Original manner
Vibrator
Phone volume
Mail volume
Alarm volume
SE volume
Keypad volume
Battery alarm
Record message
Use and to select [Battery alarm], then use and
2
OFF
SD
3
3
3
1
ON
OFF
to select [OFF].
[ON] : Set the battery alarm to sound.
[OFF] : Do not set the battery alarm to sound.
Press (cmplt).
3
The Original manner is changed.
84
Page 87

Default OFF
<Vibrator>
Informing Incoming Calls with Vibration
The vibration can be set to notify you of receiving a call or mail/message.
• The Vibrator cannot be set when the Manner mode is set.
Press (menu) in the stand-by display, then use and
1
to select [Settings] → [Ringer] → [Vibrator].
Vibrator
OFF
Pattern1
Pattern2
Link melody
Use and to select the vibration pattern.
2
The Vibrator is set and “ ” appears.
[OFF] : Do not set the vibrator.
[Pattern1] : Set short intermittent vibration.
[Pattern2] : Set long intermittent vibration.
[Link melody] : Set vibration in accordance with the Phone tone or Mail tone.
When [Silent] is set for the Phone tone or Mail tone, [Pattern1] is
used. When no vibration pattern is set for the melody, [Pattern2] is
used.
To check the vibration
Move the cursor to the type and press (confm). The vibration of
the selected pattern continues for about 10 seconds.
Setting the Manner Mode
Vibrator
• The vibrator does not operate while playing Flash movie (P.185) regardless of the setting of the Vibrator.
Information
85
Page 88

<Keypad sound>
Default Keypad volume: 1/Max alert time: 1 sec./Keypad sound: Keypad(std)
Setting the Keypad Sound
The keypad tone can be set to sound when a key on the Mova is pressed (keypad
sound). The sound can be selected from preset keypad sounds, sound effects (10 types),
melodies downloaded using i-mode, etc. The volume and duration can also be adjusted.
The sound can be also muted to avoid disturbing others.
• The preset ring tones (5 types) and melodies (10 types) (P.88) and a melody exceeding 20Kbyte cannot be
set for the keypad sound.
• The Keypad volume cannot be set when the Manner mode is set.
Example: Setting a sound in the Melody folder as the keypad sound
Press (menu) in the stand-by display, then use and
1
Setting the Manner Mode
Keypad sound
to select [Settings] → [Ringer] → [Keypad sound].
Keypad sound
Keypad volume
Max alert time
Keypad sound
Use and to select [Keypad volume], turn to adjust
2
the volume and press
Keypad sound volume
1
1
Keypad(std)
Select from [OFF] and [1 to 2].
•Turn the jog to increase the volume or to decrease it. Every time
you turn, the keypad sound is heard at the selected volume level.
To set the volume to [OFF]
Turn the jog further at level 1.
(ok).
Use and to select [Max alert time], then use and
3
to select the keypad sound duration.
Max alert time
0.1sec.
0.5sec.
1sec.
5sec.
Use and to select [Keypad sound], then use and
4
If the keypad sound is shorter than the Max alert time
The keypad sound is heard only once.
to select a sound from the folder.
The Keypad sound is set.
To check the keypad sound
Move the cursor to the keypad sound and press (play). Press (stop) to stop the playback.
Information
• The keypad sound is heard when you press to , , or .
• The keypad sound of entering the Security code or i-mode password, during a call, while running i-αppli,
and while the Music panel is displayed cannot be changed.
86
Page 89

Changing the Ring Tone
Changing the Sound ............................................................................................................... 88
Changing the Volume of Sound.............................................................................................. 91
Setting the Duration of Mail/Message Ring Tone <Alert time> .............................................. 94
Setting Earphone Only for the Ring Tone <Earphone> ......................................................... 95
87
Page 90

Changing the Sound
Default Ring tone: Type1/Transfer tone, Mail tone, Chat mail tone, Message R tone, Message F tone: None
You can set the ring tone for receiving a call or the sound effect for operating the Mova
as you wish.
■ The list of preset melodies
Melody name
−
−
Enya
Billy Joel
Astor Piazzolla
Frederic Chopin
Johannes Brahms
Scott Joplin
*
License No.: T-0420230
Changing the Ring Tone
Type 1 to 5
Display
Wild Child
Uptown Girl
Libertango
Polonaise No.6
Brahms’ Lullaby
Blazin’ Night
Smoov Beatz
Tribal Vibration
Mountain of Gods
Pineapple Rag
Sound effect 1 to 10
Wild Child
Uptown Girl
Libertango
Polonaise No.6 As dur Heroique Op.53
Brahms’ Lullaby
Blazin’ Night
Smoov Beatz
Tribal Vibration
Mountain of Gods
Pineapple Rag
Changing the Ring Tone <Ring tone>
Changing the sound
The ring tone can be set depending on what is incoming (a call, mail, Message R/F,
etc.).
You can select a ring tone not only from preset ring tones (5 types), melodies (10 types)
and sound effects (10 types) but also from melodies downloaded using i-mode
(harmonized ringing melodies).
• The ring tone does not sound when the Ring volume is [OFF].
Composer
−
−
−
−
−
−
Example: Setting the Phone tone
Press (menu) in the stand-by display, then use and
1
to select [Settings] → [Ringer] → [Ring tone].
Ring tone
Phone tone
Transfer tone
Mail tone
Chat mail tone
[Phone tone] : Set a ring tone for a call.
[Transfer tone] : Set a ring tone for when the Voice Mail Service or the Call
Type1
None
[Mail tone] : Set a ring tone for mail.
None
[Chat mail tone] : Set a ring tone for chat mail.
[Message R tone] : Set a ring tone for Message R.
None
[Message F tone] : Set a ring tone for Message F.
Forwarding Service is activated.
88
Page 91

Use and to select [Phone tone], then use and to
Default
Volume: 3/Max alert time: 5 sec./Open phone: Sound effect2/ Send mail, Check new message, W ake-up: Silent/Starting charge, Completed charge: Sound effect1
2
select a ring tone from a folder.
Phone tone
Silent
Preset melody
i−melody
The ring tone is set.
To mute the ring tone
Select [Silent].
To set other than [Phone tone]
[None] can also be selected. The ring tone set for the Phone tone
sounds.
• When [None] is selected for [Chat mail tone], the ring tone set for the Mail
tone sounds.
To check the ring tone
Move the cursor to the ring tone and press (play). Press
(stop) to stop the playback.
Information
• If multiple phone tones are set, the following order of priority applies to them.
1. Ring tone of My phone no. (when the Number Plus Service is subscribed and it is set, etc.)
2. Des phone tone of the Add to phonebook
3. Des phone tone of the Group setting
4. Ring tone during i-mode communication
5. Transfer tone
6. Phone tone
• Even if the Mail tone is set in the Ring tone, the setting of the Des mail tone (P.68, 73) has priority.
Changing the Sound Effect <Sound effect>
You can set the sound effect when the Mova is turned to open/powered ON, mail is
sent, etc. The type, volume and duration of the sound effect can be set.
• The preset ring tones (5 types) and melodies (10 types) (P.88) and a melody exceeding 20Kbyte cannot be
set for the sound effect.
• The volume cannot be adjusted when the Manner mode is set.
Example: Setting a sound effect when sending mail
Press (menu) in the stand-by display, then use and
1
to select [Settings] → [Ringer] → [Sound effect].
Sound effect
Volume
Max alert time
Open phone
Sound effect2
Send mail
Check new message
Silent
Silent
[Open phone] : Set a sound effect when turning to open the Mova.
3
[Send mail] : Set a sound effect when sending mail.
5
[Check new message] : Set a sound effect when checking new messages/mail.
[Wake-up] : Set a sound effect when powering ON the Mova.
[Starting charge] : Set a sound effect when charging starts.
[Completed charge] : Set a sound effect when charging is completed.
Changing the Ring Tone
Changing the sound
89
Page 92

Use and to select [Volume], turn to adjust the
2
volume and press
Sound effect volume
Use and to select [Max alert time], turn to enter the
3
sound effect duration and press
Max alert time
Time 05sec
Changing the Ring Tone
Use and to select [Send mail], then use and to
4
select a sound effect from a folder.
Send mail
Silent
Preset melody
Changing the sound
i−melody
Select from [OFF] and [1 to 5].
•Turn the jog to increase the volume or to decrease it.
To set the volume to [OFF]
Enter from 01 to 10 seconds.
(01−10)
When the duration is shorter than the Max alert time
Select a sound effect from 10 sound effects, melodies
downloaded using i-mode, etc.
The sound effect when sending mail is set.
To mute the sound effect
To check the sound effect
(ok).
Turn the jog further at level 1.
(ok).
The sound effect is heard only once.
Select [Silent].
Move the cursor to the sound effect and press (play). Press
(stop) to stop the playback.
Information
• The sound effect is not heard during a call, communications, while recording/playing back a moving
image, while the Music panel is displayed, and while playing back music data (“
• The sound effects set to [Wake-up], [Starting charge] and [Completed charge] are not heard when the
Driving mode is set.
• The sound effect is not heard when [SE volume] for the Manner mode setting is set to [OFF] (P.82).
• If you turn to open the Mova very quickly, the sound effect may not be heard even if a sound effect is set
to [Open phone].
” is displayed).
90
Page 93

Default 3
Changing the Volume of Sound
The volume of caller’s voice during a call can be adjusted as well as the volume of the
ring tone or sound while playing Flash movie or running i-αppli.
Adjusting the Volume of Ring Tone
Depending on what is incoming (a call, mail, etc.), the ring volume can be adjusted to 8
levels: OFF (silent), level 1 (smallest) to level 5 (largest), StepUp (the sound becomes
gradually larger about every 6 seconds) and StepDown (the sound becomes gradually
smaller about every 6 seconds).
• The StepUp and StepDown tones are only available for the Phone tone volume.
• The ring volume cannot be adjusted when the Manner mode is set.
• The Phone tone volume can be adjusted while receiving a call (P.50). The volume is set as adjusted last.
Press (menu) in the stand-by display, use and to
1
select [Settings] → [Ringer] → [Ring volume].
Ring volume
Phone tone
Mail tone
Chat mail tone
Message R tone
Message F tone
[Phone tone] : Adjust the ring volume for a call.
3
[Mail tone] : Adjust the ring volume for mail.
3
3
[Chat mail tone] : Adjust the ring volume for chat mail.
3
[Message R tone] : Adjust the ring volume for Message R.
3
[Message F tone] : Adjust the ring volume for Message F.
Changing the Ring Tone
Changing the volume of sound
Use and to select [Phone tone].
2
Phone volume
Turn to adjust the volume and press (ok).
3
•Turn the jog to increase the volume or to decrease it. Every time you turn, the ring tone
sounds for about 2 seconds at the selected volume level (it sounds at level 5 for [StepDown] and at level
1 for [StepUp]).
The ring volume is set.
To set the volume to [OFF]
Turn the jog further at level 1. When the Phone tone volume is [OFF], “ ” appears.
To set the volume to [StepDown]/[StepUp]
Turn the jog further at level 5 to set the volume to [StepDown] and further from
that state to set to [StepUp].
91
Page 94

Default 3
Default 3
Adjusting the Volume of Caller’s Voice
The volume of caller’s voice can be adjusted to 5 levels from level 1 (smallest) to level 5 (largest).
• The caller’s voice volume can be adjusted during a call (P.50). The volume is set as adjusted last.
Press (menu) in the stand-by display, then use and
1
to select [Settings] → [Ringer] → [Volume].
Volume
Turn to adjust the volume and press (ok).
2
Changing the Ring Tone
•Turn the jog to increase the volume or to decrease it.
The volume of caller’s voice is set.
Adjusting the Volume While Playing Flash Movie
The sound volume while playing Flash movie (Image SE) can be adjusted to 6 levels:
OFF (silent), level 1 (smallest) to level 5 (largest).
• The volume of the sound effect cannot be adjusted when the Manner mode is set.
Changing the volume of sound
Press (i-mode) in the stand-by display, then use and to
1
select [i-mode setting] → [Common setting] → [Sound effect].
Set sound effect
92
Turn to adjust the volume and press (ok).
2
•Turn the jog to increase the volume or to decrease it. Every time you turn, the ring tone
sounds for about 2 seconds at the selected volume level.
The sound volume while playing Flash movie is set.
To set the volume to [OFF]
Turn the jog further at level 1.
Information
• The vibrator does not operate while playing Flash movie (P.185) regardless of the volume setting of the
sound effect.
•
You can also adjust the volume by pressing (func) and selecting [sound effect] while playing Flash movie (P.185).
• The sound effect may not function depending on Flash movie.
Page 95

Adjusting the Volume While Running i-αppli
Default 3
The sound volume while running i-αppli can be adjusted to 6 levels: OFF (silent), level 1
(smallest) to level 5 (largest).
• The software volume cannot be adjusted when the Manner mode is set.
Press (i-mode) for over a second in the stand-by display and
1
press
The submenu appears.
Use and to select [software volume].
2
Software volume
Turn to adjust the volume and press (ok).
3
•Turn the jog to increase the volume or to decrease it. Every time you turn, the ring tone
sounds for about 2 seconds at the selected volume level.
The sound volume while running i-αppli is set.
To set the volume to [OFF]
Turn the jog further at level 1.
(func).
Changing the Ring Tone
Changing the volume of sound
Information
• Sound is not supported depending on i-αppli software.
93
Page 96

Default 4 sec.
<Alert time>
Setting the Duration of Mail/Message Ring Tone
The alert duration of the ring tone when mail or message is received can be set.
Example: Setting the alert duration of the Mail tone
Press (menu) in the stand-by display, then use and
1
to select [Settings] → [Ringer] → [Alert time].
[Mail tone] : Set an alert duration for mail.
04s
[Chat mail tone] : Set an alert duration for chat mail.
04s
04s
[Message R tone] : Set an alert duration for Message R.
04s
[Message F tone] : Set an alert duration for Message F.
OFF
Changing the Ring Tone
2
Alert time
3
Alert time
Mail tone
Chat mail tone
Message R tone
Message F tone
Use and to select [Mail tone].
Mail alert time
Play once
Alert time 04sec
(00−30)
Use and to select [Play once], then use and to
select [OFF].
[ON] : Play the ring tone one cycle. The alert duration cannot be set.
[OFF] : Play the ring tone for the duration set by [Alert time].
4
5
94
Use and to select [Alert time], turn to enter the ring
tone duration and press
Enter from 00 to 30 seconds.
(ok).
Press (cmplt).
The alert duration for the Mail tone is set.
Information
• When the Alert time is set to 0 second, the ring tone does not sound upon reception of mail/chat mail/
message, and the indicator and vibrator do not also operate.
Page 97

Default Earphone+speaker
<Earphone>
Setting Earphone Only for the Ring Tone
You can set the position where the ring tone sounds when the Earphone Mic (optional)
is connected to the Mova.
• Even when [Earphone only] is set, the ring tone sounds from both the Earphone Mic and the speakers after
about 20 seconds.
• Even if the Ring volume is [OFF], the ring tone sounds from the Earphone at the volume level 1 when there
is an incoming call or mail.
Press (menu) in the stand-by display, then use and
1
to select [Settings] → [Ringer] → [Earphone].
The Earphone display appears.
[Earphone+speaker] : The ring tone sounds from both the earphone and the speakers.
[Earphone only] : The ring tone sounds only from the earphone.
Use and to select [Earphone only].
2
The ring tone sounds only from the Earphone Mic.
Changing the Ring Tone
Earphone
95
Page 98

Page 99

Using the Camera
Before Using the Camera ....................................................................................................... 98
Recording Images................................................................................................................. 103
Changing the Camera Settings ............................................................................................ 108
Displaying Images <Album> ................................................................................................. 116
Editing Still Images ............................................................................................................... 126
Using the Bar Code Reader ................................................................................................. 132
97
Page 100

Before Using the Camera
You can record images by the Mova’s built-in camera and use them in many ways.
• The image recorded by the camera may differ from actual color or brightness of object.
Features
● Transmit using i-shot (P.267)
The still images can be sent to i-mode compatible mobile phones and PCs.
● Set for the stand-by display (P.136)
The still image can be displayed as the stand-by display or the call image.
● Display a number of images as a slideshow (P.119)
The still images can be displayed continuously by switching them automatically.
● Edit images (P.126)
The still image can be decorated by adding a frame, stamp or text.
Using the Camera
About Using the Camera
Notes Before Using the Camera
• Clear images cannot be obtained if the camera is stained with fingerprints or grease. Wipe the camera with a
soft clean cloth before recording an image.
• Leaving the Mova in a place exposed to direct sunlight or high temperature for a long period of time may
deteriorate the image quality.
Before using the camera
•You may not be able to start the Camera mode when the battery level is low. To use the camera, charge the
battery sufficiently.
Notes on Using the Camera
•To prevent shaking, hold the Mova firmly or place it on a stable place and use the self-timer when recording.
• When you try to record a strong light source directly, such as the sun or a lamp, the screen may black out or
the image on the screen may be distorted.
• The camera is manufactured based on the leading edge technologies, which may cause black and bright
points or lines to appear constantly on the display. Additionally, increased noise may appear as white lines
when recording in a low-light environment. These are not malfunctions.
• When the battery level becomes low in the Camera mode, the Camera mode is turned off.
About the Copyright
• The copyright laws prohibit the use of the images you have recorded without consent of the copyright holders
except for personal use. For some performances, shows, or exhibitions, photographing is prohibited even for
personal use.
• The transmission of images involving the copyright is not allowed except within the limits defined by the
copyright laws.
Please be considerate of the privacy of individuals around you when taking and sending photo
98
using camera-equipped mobile phone.
 Loading...