

Page 1
Page 2
10
Easy Search/Contents/Precautions
Before use, read these “Precautions” carefully and use your FOMA
properly.
Keep this manual in a safe place for future reference.
These precautions contain information intended to prevent bodily
injury to the user and to surrounding people, as well as damage to
property, and must be observed at all times.
The following symbols indicate the different degrees of
injury or damage that may occur if information provided
is not observed and the FOMA terminal is used
improperly.
The following symbols indicate specific directions.
“Precautions” is explained in the following six sections.
Handling the FOMA terminal, battery pack, adapters (chargers),
and FOMA card (general). . . . . . . . . . . . . . . . . . . . . . . . . . . . . P. 11
Handling the FOMA terminal . . . . . . . . . . . . . . . . . . . . . . . . . . P. 12
Handling battery pack . . . . . . . . . . . . . . . . . . . . . . . . . . . . . . . . P. 15
Handling adapters (chargers) . . . . . . . . . . . . . . . . . . . . . . . . . . P. 16
Handling FOMA card . . . . . . . . . . . . . . . . . . . . . . . . . . . . . . . . P. 17
Handling mobile phones near electronic medical equipment
. . . . . . . . . . . . . . . . . . . . . . . . . . . . . . . . . . . . . . . . . . . . . . . . . P. 17
Precautions (ALWAYS FOLLOW
THESE DIRECTIONS)
Danger
This symbol indicates that
“death or serious bodily injury
may directly and immediately
result from improper use”.
Warning
This symbol indicates that
“death or serious bodily injury
may result from improper use”.
Caution
This symbol indicates that
“bodily injury and/or property
damage may result from
improper use”.
Indicates a prohibited action.
Indicates not to disassemble the device.
Indicates not to handle the device with wet hands.
Indicates not to use the device near water or get it wet.
Indicates that instructions specified are
compulsory (must be followed).
Indicates that the power cord must be unplugged from
the outlet.
Page 3
11
Continued on next page
Easy Search/Contents/Precautions
Do not use, store, or leave the
FOMA terminal, battery pack,
adapters (chargers) or FOMA
card in locations subject to
high temperatures, such as
near a fire, in direct sunlight,
or inside a car on a hot day.
The FOMA terminal may become deformed or
malfunction. In addition, the battery pack may
leak, overheat, explode, catch fire or suffer
performance loss and a reduced service life.
Part of the casing may also become hot and
cause burns.
Do not attempt to
disassemble or modify.
In addition, do not attempt
to solder.
May cause accidents such as fire, bodily
injury, electric shock or malfunction.
In addition, the battery pack may leak,
overheat, explode or catch fire.
Do not get the FOMA terminal,
battery pack, adapters
(chargers) or FOMA card wet.
Contact with water, pet urine, and other
liquids may cause overheating, electric shock,
fire, malfunction or bodily injury. Be attentive
to where and how you use the handset.
Use only the battery packs
and adapters (chargers)
specified by NTT DOCOMO
for use with the FOMA
terminal.
The use of devices other than those specified
may cause the FOMA terminal, battery pack
or other devices to leak, overheat, explode,
catch fire or malfunction.
Battery Pack SH18
Desktop Holder SH24
FOMA AC Adapter 01/02
FOMA DC Adapter 01/02
FOMA Dry Battery Adapter 01
FOMA USB Cable with Charge Function 02
FOMA Portable Charging Adapter 01
ɦ For information on other compatible
products, contact a docomo Shop or
retailer.
Do not place the battery
pack, FOMA terminal,
adapters (chargers), or
FOMA card inside cooking
appliances such as
microwave ovens or
pressure cookers.
The battery pack may leak, overheat,
explode or catch fire, and the FOMA terminal
and adapters (chargers) may overheat, emit
smoke or catch fire. The internal circuitry may
also be damaged.
Do not subject the FOMA
terminal to strong impacts
or throw it.
The battery pack may leak, overheat,
explode or catch fire. Other devices may also
be damaged or cause a fire.
Do not allow conductive
materials (such as metal
objects and pencil lead) to
come into contact with the
charger terminal or external
device terminal. In addition,
do not insert such objects.
The battery pack may short-circuit and cause
a fire or malfunction.
Make sure to turn off the
mobile phone in locations
such as gas stations where
flammable gas is
generated.
In addition, do not charge
the battery. It may cause a
gas explosion or fire.
To use Osaifu-Keitai in locations such as gas
stations, make sure to turn off the power in
advance (If the IC card lock is set, disable the
lock before turning off the power).
Handling the FOMA terminal,
battery pack, adapters (chargers),
and FOMA card (general)
Danger
Warning
Page 4

12
Easy Search/Contents/Precautions
If you notice anything
unusual, such as an unusual
odor, overheating,
discoloration or deformation
during use, charging or
storage, immediately follow
the instructions below.
1. Unplug the power cord
from the outlet or
cigarette lighter socket.
2. Turn off the FOMA
terminal.
3. Remove the battery pack
from the FOMA terminal.
Continued use (charging) may cause
overheating, explosion, or fire. In addition,
the battery pack may leak.
Do not leave the FOMA
terminal on unstable
surfaces, such as on a
wobbling table or sloped
surface.
The FOMA terminal may fall and cause injury
or be damaged.
Do not store the FOMA
terminal in locations that
are subject to humidity,
dust or high temperatures.
May cause a malfunction.
If being used by a child,
have a guardian teach him/
her the proper handling
procedures. In addition,
check that the child is
using the FOMA terminal as
directed.
May result in bodily injury.
Keep the FOMA terminal
out of the reach of young
children.
A young child may swallow components or
suffer other bodily injury.
Be very careful when using
the FOMA terminal
connected to adapters
(chargers) repeatedly or for
long periods of time.
The FOMA terminal, battery pack or adapters
(chargers) may become warm if i-appli,
Videophone, or 1Seg is used for a long time
while charging.
Touch high temperature areas for a
prolonged period of time may cause skin
irritations, itchiness, or low-temperature burn
in some people.
Do not aim the Infrared port
towards the eyes.
May cause eye injury. In addition, do not aim or
direct the Infrared port towards another Ir device
as this may cause the device to malfunction.
Do not point the illuminated
light directly at someone’s
eyes.
May damage eyesight. May also cause
momentary sight loss or startle someone and
cause an accident.
Do not put the FOMA terminal
in the place where it could be
affected by an expanded
airbag, e.g., on the dashboard.
If the air bag inflates, the FOMA terminal may
hit you or others around you, resulting in
bodily injury or damage to the FOMA terminal
or other property.
If you are using electronic
medical equipment, do not
put the FOMA terminal in
your breast pocket or in the
inside pocket of your jacket.
Using the FOMA terminal in close proximity
to electronic medical equipment may cause
the equipment to malfunction.
Caution
Handling the FOMA terminal
Warning
Page 5
13
Continued on next page
Easy Search/Contents/Precautions
Do not allow water or other
liquids, metal, flammable
material, or other foreign
objects to enter the FOMA
card or microSD Card port
on the FOMA terminal.
May cause a fire, electric shock or other
malfunctions.
Do not shine the light at
anyone driving a car or
other vehicles.
This may prevent a driver from driving safely
and cause a traffic accident.
Turn off the FOMA terminal
in areas where the use of
mobile phones is
prohibited, such as in
aircraft or hospitals.
The FOMA terminal may interfere with the
operation of electronic devices and electronic
medical equipment. In addition, if Auto power
ON function is set to ON, disable this function
before turning off your mobile phone.
Follow the instructions given by the
respective medical facilities regarding the
use of mobile phones on their premises.
In addition, actions such as using on a mobile
phone aboard aircraft are prohibited and may
be punishable by law.
During a call in which
Hands-free is set, keep the
FOMA terminal away from
the ears.
When you attach the
earphone/microphone to
the FOMA terminal to play
games or music, do not
make the volume too loud.
Excessive high volume may damage your
hearing. Also it may prevent you from hearing
the ambient sounds and cause an accident.
If you have a weak heart,
take extra precautions when
setting functions such as
the Vibrator and Ring tone
volume for incoming calls.
Various settings may have effects on your heart.
If you hear thunder while
using the FOMA terminal
outdoors, put the antenna
back into the FOMA
terminal, immediately turn
it off and move to a safe
location.
There is a risk of being struck by lightning
and suffering electric shock.
Turn the FOMA terminal off
near high-precision
electronic devices or
devices that use weak
electronic signals.
The FOMA terminal may interfere with the
operation of electronic devices.
Take particular care with the
following devices:
Hearing aids, implanted cardiac pacemakers,
implanted cardioverter-defibrillators, or other
electronic medical equipment. Fire alarms,
automatic doors, and other equipment
controlled by electronic signals. If you use an
implanted cardiac pacemaker, implanted
cardioverter-defibrillator or other electronic
medical equipment, contact the respective
manufacturer or vendor to check whether the
operation of the equipment is affected by
signals.
In case that the display part
or camera lens is damaged,
make sure to pay attention
to a broken glass and the
exposed inside of the
FOMA terminal.
The surface of the display is covered by a
protective film or the surface of camera lens
are covered by a plastic panel so as to
minimize the possibility of glass scattering.
However, touching the broken display or
camera lens may cause injury.
Page 6
14
Easy Search/Contents/Precautions
Do not swing the FOMA
terminal by its antenna,
strap, etc.
The FOMA terminal may hit you or others
around you, resulting in bodily injury or damage
to the FOMA terminal or other property.
Do not use the FOMA
terminal in area with many
people.
The antenna may hit others, resulting in an
accident such as bodily injury.
Do not use the FOMA
terminal with the damaged
antenna.
Touching the antenna may cause an
accident such as burn or other injuries.
When using Motion
tracking, confirm the safety
of surroundings, hold the
FOMA terminal securely
and do not swing it around
more than necessary.
Use Motion tracking to operate by tilting and
shaking (or swinging) the FOMA terminal.
The FOMA terminal may hit people or
objects, if shaken (or swung) too much, and
cause a serious accident or damage, etc.
If using Motion tracking
with the FOMA terminal to
which metallic straps or
others are attached, be
careful not to hit people or
objects with the straps.
May result in bodily injury or damage to the
FOMA terminal or other property.
Never place a magnetic
card near or in the FOMA
terminal.
The stored magnetic data in cash cards,
credit cards, telephone cards, floppy disks,
etc. may be erased.
Never place magnetized
items near the FOMA
terminal.
Putting highly magnetized items closer may
cause a malfunction.
If the display is broken and
the liquid crystal then leaks,
do not lick or inhale the liquid
or get the liquid on your skin.
If the liquid comes into
contact with your eyes or
mouth, immediately rinse
your eyes or mouth with
clean water and see a doctor.
If the liquid comes into
contact with your skin or
clothes, immediately wipe it
off with alcohol, and wash
with water and soap.
May result in loss of eyesight and harmful to
your skin.
While the ring tone is
ringing or a melody is
played on the FOMA
terminal, do not put the
ears closer to the speaker.
This may cause hearing loss.
On the surface of the
display, there is a protective
film for securing the safety
(for preventing the
reinforced glass panel from
shattering) in case of the
damage caused by a drop,
impact, etc. Do not forcibly
peel off or scratch this film.
Using the FOMA terminal with the film removed may
cause a bodily injury when the display is damaged.
Caution
Page 7
15
Continued on next page
Easy Search/Contents/Precautions
Using the FOMA terminal in
an automobile may
sometimes affect the
electronic equipment in
some vehicle models.
In such cases, stop using the FOMA terminal,
as this could impede safe driving.
Use of the FOMA terminal
may cause skin irritations
such as itchiness, rashes
or eczema in some people.
If this occurs, immediately
stop using the FOMA
terminal and seek medical
treatment.
The following parts contain metals.
Do not close the FOMA
terminal on your fingers or
objects such as the strap.
May result in bodily injury or cause a malfunction.
Watch 1Seg in a well-lit
place, keeping a certain
distance from the screen.
Otherwise, eyesight may be decreased.
Check the type of battery using the
information printed on the battery pack label.
Do not touch terminals with
metallic objects such as
wires. In addition, do not
carry or store the battery pack
with metallic necklaces, etc.
The battery pack may leak, overheat,
explode or catch fire.
If you are having difficulty
fitting the battery pack to
the FOMA terminal, do not
use excessive pressure to
force the battery into place.
Check that the battery pack
is facing the correct
direction before you attach
it.
The battery pack may leak, overheat,
explode or catch fire.
Do not throw the battery
pack into a fire.
The battery pack may leak, overheat,
explode or catch fire.
Do not puncture, hit with a
hammer or step on the
battery pack.
The battery pack may leak, overheat,
explode or catch fire.
If the battery fluid comes
into contact with your eyes,
do not rub your eyes but
immediately rinse your
eyes with clean water. Then
seek prompt medical
treatment.
May result in loss of eyesight.
Part Material
Surface
treatment
Surface of FOMA
terminal (back of
display side)
Magnesium
Coating
Surface of FOMA
terminal (slide
hinge section on
the back of
display side)
SUS
Metal section of
1Seg antenna
Brass
Nickel
plating
External
connector terminal
SUSInside microSD
Memory Card slot
Charger terminal Gold plating
Handling battery pack
Label Battery type
Li-ion 00 Lithium-ion
Danger
Page 8
16
Easy Search/Contents/Precautions
If any trouble is found on
the battery pack due to an
external impact such as a
deformation or scratches
caused by a drop,
immediately stop using it.
The battery pack may leak, overheat,
explode or catch fire. Other equipment may
also be damaged or catch fire.
If the battery pack is not
fully charged after the
specified time has elapsed,
stop charging.
The battery pack may leak, overheat,
explode or catch fire.
If the battery pack leaks or
emits an unusual odor,
immediately stop use and
move it away from any
flame or fire.
The battery fluid is flammable and could
ignite, causing a fire or explosion.
Prevent your pet from
biting the battery pack.
The battery pack may leak, overheat,
explode or catch fire. Other equipment may
also be damaged or catch fire.
Do not dispose of used
battery packs in ordinary
garbage.
May cause fires or damage to the
environment. Place tape over the terminals to
insulate unnecessary battery packs, and take
them to a docomo Shop, retailer or institution
that handles used batteries in your area.
Do not charge a wet battery
pack.
The battery pack may overheat, catch fire or
explode.
If the battery fluid comes
into contact with your skin
or clothing, stop using the
FOMA terminal immediately
and rinse it off thoroughly
with clean water.
Battery fluid is harmful to your skin.
Do not use if the adapter’s
(charger’s) cord or power
cord is damaged.
May cause electric shock, overheating or fire.
Never use the AC adapter or
desktop holder in humid
locations such as a bathroom.
May result in electric shock.
The DC adapter should only
be used in negative
grounded vehicles. Never
use these adapters in
positive grounded vehicles.
May cause a fire.
Do not touch the FOMA
terminal or adapters
(chargers) if you hear thunder.
There is a risk of being struck by lightning
and suffering electric shock.
Take care not to short-circuit
the charging terminal when
connected to an outlet or
cigarette lighter socket. Also,
take care not to allow any part
of your body (hands, fingers,
etc.) to come into contact with
the charging terminal.
May result in a fire, equipment malfunction,
electric shock or bodily injury.
Warning Caution
Handling adapters (chargers)
Warning
Page 9
17
Continued on next page
Easy Search/Contents/Precautions
Place the charger and
desktop holder on stable
surfaces when charging. In
addition, do not cover or
wrap the charger or
desktop holder with
clothing or bedding.
The FOMA terminal may detach, overheat, or
cause a fire or malfunction.
Do not place heavy objects
on the adapter’s (charger’s)
cord or power cord.
May cause an electric shock or fire.
Do not handle the cord and
plug of the adapters
(chargers) with wet hands.
May result in electric shock.
Always use the specified
power supply and voltage.
Using the incorrect voltage may cause a fire
or malfunction.
When using overseas, use the AC adapter
that is available overseas.
AC adapter: 100V AC
DC adapter: 12/24V DC (for negative
grounded vehicles only)
AC adapter available overseas: 100 to 240V
AC (Connect only with household AC outlet)
If the fuse in the DC adapter
blows, always replace it
with a fuse of the specified
type.
Using the fuse other than the specified one
may cause a fire or malfunction. Refer to the
respective manuals for information on the
correct fuse specifications.
Wipe off any dust on the
power plug.
May cause a fire.
When plugging the AC
adapter into the outlet,
make sure that no metallic
straps or other metallic
objects are caught between
the plug and the socket.
May cause electric shock, short-circuiting or fire.
Always grasp the power
plug when unplugging the
adapters (chargers) from
the outlet or cigarette lighter
socket. Do not forcibly pull
by the adapter’s (charger’s)
cord or power cord.
Pulling on the cord may damage the cord and
cause an electric shock or fire.
Unplug the power cord
from the outlet when not
using for a long time.
May cause an electric shock, fire, or malfunction.
Should water or other
liquids enter the adapters
(chargers), remove the
power plug from the outlet
or cigarette lighter socket
immediately.
May cause an electric shock, smoke
emission or fire.
Always unplug the power
plug from the outlet or
cigarette lighter socket
before cleaning the
adapters (chargers).
May result in electric shock.
Be careful with the cutting
surface when detaching the
FOMA card (IC).
May cause injuries to your hand or fingers.
The precautions detailed here conform to the
guidelines drawn up by the Electromagnetic
Compatibility Conference Japan, regarding
the protection of electronic medical equipment
from signals emitted by mobile phones.
Handling FOMA card
Caution
Handling mobile phones near
electronic medical equipment
Page 10

18
Easy Search/Contents/Precautions
Observe the following in
hospitals or other medical
facilities.
Do not take your FOMA terminal into
operating rooms, ICUs (Intensive Care
Units) or CCUs (Coronary Care Units).
Turn off your FOMA terminal inside
hospital wards.
Turn off your FOMA terminal even when
you are in an area outside hospital wards,
such as a hospital lobby, since electronic
medical equipment may be in use nearby.
Where a medical facility has specific
instructions prohibiting the carrying and
use of mobile phones, observe those
instructions strictly.
If Auto power ON function is set to ON,
disable this function before turning off your
mobile phone.
Turn off your FOMA
terminal in crowded places
such as rush-hour trains in
case somebody nearby is
using an implanted cardiac
pacemaker or implanted
cardioverter-defibrillator.
Electromagnetic signals may affect the
operation of implanted cardiac pacemakers
and implanted cardioverter-defibrillators.
If you have an implanted
cardiac pacemaker or an
implanted
cardioverter-defibrillator,
always carry or use your
FOMA terminal at least 22
cm away from your implant.
Electromagnetic signals may affect the
operation of implanted cardiac pacemakers
and implanted cardioverter-defibrillators.
Patients receiving medical
treatment away from a
hospital or medical facility
(e.g. home treatment) who
are using electronic
medical equipment other
than implanted cardiac
pacemakers or implanted
cardioverter-defibrillators
should consult the
respective manufacturers
for information regarding
the effects of signals on the
equipment.
Electromagnetic signals may affect the
operation of electronic medical equipment.
Do not expose to water.
FOMA terminal, battery pack, adapters
(chargers) and FOMA card are not
waterproof. Do not use in humid or steamy
areas such as bathrooms and avoid
exposing to rain and other forms of
moisture. If FOMA terminal is carried close
to skin, perspiration may cause internal
components to corrode and result in
malfunction. Note that if problem is found to
be due to moisture, handset and parts are
not covered by warranty and in some cases
may be irreparable. Even where repairs are
possible, repair charges will be incurred
since damage is not covered by warranty.
Clean only with a soft and dry cloth
(such as the type used for
eyeglasses).
The surface of the handset’s LCD has a
special coating to improve the visibility of
the color display. Forceful rubbing of LCD
with a dry cloth may scratch LCD surface.
Handle the handset carefully and clean
using a soft and dry cloth (such as the type
used for eyeglasses). Note also that LCD
coating may peel off or stain if moisture or
soiling is left on the surface for a long
period. Never use chemicals such as
alcohol, thinners, benzene or detergents,
as these agents may erase the printing on
the handset or cause discoloration.
Warning
Handling precautions
General notes
Page 11

19
Continued on next page
Easy Search/Contents/Precautions
Occasionally clean terminals with a
dry cotton swab.
Unclean terminals may result in poor
connections and loss of power.
Additionally, keep terminal clean with a dry
cloth or cotton swab to prevent charge
performance loss.
Do not place the handset near an air
conditioning vent.
Condensation formed due to rapid
changes in temperature may cause
internal corrosion and lead to malfunction.
Do not apply excessive force to the
FOMA terminal and battery pack
when using them.
Carrying the handset in a tightly packed
bag, or sitting on the handset in your pocket
may cause a damage to display, other
internal components or battery pack, or
result in malfunction. Keeping an external
connector device plugged into the external
connector terminal (earphone/microphone
terminal) may cause a damage to the
connector or result in malfunction.
Read the manuals supplied with the
FOMA terminal, adapters (chargers),
and desktop holder carefully.
Do not rub or scratch the display
with metal, etc.
May scratch the handset and cause
malfunction or damage.
Do not forcefully press a surface of
the touch panel, or operate with a
pointed object such as a fingernail,
ballpoint pen, pin, etc.
May damage the touch panel.
Avoid using the handset in
extremely high or low temperatures.
Use the FOMA terminal within the range of
a temperature between 5Ɏ and 35Ɏ and
a humidity between 45% and 85%.
Using the handset close to landline
phones, TVs or radios may affect the
operation of such equipment. Move
as far away as possible from such
items before use.
Keep a separate memo and note
information stored in the FOMA terminal.
DOCOMO shall not be liable for any loss
of content.
Do not drop or otherwise subject the
FOMA terminal to severe impact.
May cause a malfunction.
When connecting an external connector
device to the external connector
terminal (earphone/microphone
terminal), do not put it in obliquely or do
not pull it while it is plugged in.
May damage the handset and cause
malfunction.
Do not close the FOMA terminal on
strap, etc.
May damage the handset and cause
malfunction.
FOMA terminal may become warm
during using or charging but this is
not a malfunction.
Do not leave the camera in direct sunlight.
May cause discoloration or burn-in.
Use the FOMA terminal with the
external connector terminal cover on.
Dust, water and others enter inside and
cause a malfunction.
Do not use the FOMA terminal
without the back cover.
May detach the battery pack or cause
malfunction or damage.
Do not paste a label or sticker on the
back of the FOMA terminal display.
The FOMA terminal is caught by the label
or sticker when opened or closed, and it
may cause malfunction or damage.
While using a microSD Card, do not
remove the card or turn off the
FOMA terminal.
May cause data loss or malfunction.
Battery pack is a consumable product.
Though usage time varies with use,
change battery if battery level is extremely
low even after fully charged. Purchase a
specified new battery pack.
Charge battery in areas where ambient
temperature is between 5°C and 35°C.
Always charge the battery before the
first use or after not using battery for
a long time.
Notes about the FOMA terminal
Notes about battery pack
Page 12

20
Easy Search/Contents/Precautions
The usage time for a battery
depends on the usage and
deterioration of battery pack.
Depending on usage, the battery
may swell as it approaches the end
of its service life but this will not
cause problems.
Do not store or leave the battery
pack with no battery left.
May lower the performance or shorten the
life of the battery pack.
Note the followings when the battery
pack is stored for a long term.
The storage with the battery pack fully
charged (immediately after charging is
completed)
The storage with no battery level
(cannot turn the FOMA terminal on)
May lower the performance or shorten the
life of the battery pack. The second level of
the battery pack icon is recommended as
the battery level for long-term storage.
Charge battery in areas where ambient
temperature is between 5°C and 35°C.
Do not charge battery pack in the
following locations:
Areas with high humidity or dust, or in
areas exposed to strong vibrations
Close to landline phones, TVs, radios, etc.
Adapters (chargers) may become
warm during charging but this is not
a malfunction.
Do not use DC adapter to charge battery
when the car engine is not running.
May cause car battery to run down.
When using an outlet with a feature to
prevent the plug from being removed
accidentally, follow instructions in
the outlet user’s guide.
Do not subject to strong force or
impacts. Also, do not disfigure the
charger terminals.
May cause a malfunction.
When putting back the stand of the
desktop holder, do not catch a finger
or the cord of the adapters (chargers).
May result in bodily injury or cause a
malfunction.
Do not apply unnecessary force when
inserting/removing the FOMA card.
FOMA card may become warm during
using but this is not a malfunction.
Customer is responsible for
malfunctions arising from inserting
FOMA card into a different IC card
reader/writer.
Always keep IC area clean.
Clean only with a soft and dry cloth
(such as the type used for eyeglasses).
Keep a separate memo and note
information stored in the FOMA card.
DOCOMO shall not be liable for any loss
of content.
To protect the environment, please
take any unnecessary FOMA cards to
your local docomo Shop or retailer.
Avoid using in extremely high or low
temperatures.
Do not damage, touch haphazardly
or short-circuit the IC.
May cause data loss or malfunction.
Do not drop or otherwise subject the
FOMA card to severe impact.
May cause a malfunction.
Never bend or place heavy objects
on the FOMA card.
May cause a malfunction.
Do not insert the FOMA card to the
FOMA terminal with a label or sticker
attached on the card.
May cause a malfunction.
FOMA terminal supports the security
function that merity may not be
sufficient depending on the
configuration. Take care of the
security while making communication
using Bluetooth function.
Even if any leak of data or
information occurs while making
communication using Bluetooth
function, DOCOMO shall not be
liable for any loss of content.
Notes about adapters (chargers)
Notes about FOMA card
Notes on using Bluetooth
function
Page 13

23
Before Using the Handset
Component names and functions . . . . . . . . . . . . . . . . . . . . . . . . . . . . . . .24
Viewing display . . . . . . . . . . . . . . . . . . . . . . . . . . . . . . . . . . . . . . . . . . . . .28
Operations with touch panel . . . . . . . . . . . . . . . . . . . . . . .<Touch panel>33
Setting and selecting menu. . . . . . . . . . . . . . . . . . . . . . . . . . . . . . . . . . . . 36
Displaying Support Book. . . . . . . . . . . . . . . . . . . . . . . . . <Support Book>40
Using FOMA card . . . . . . . . . . . . . . . . . . . . . . . . . . . . . . . <FOMA card>40
Attaching/Removing battery pack . . . . . . . . . . . . . . . . . . . . . . . . . . . . . . .44
Charging . . . . . . . . . . . . . . . . . . . . . . . . . . . . . . . . . . . . . . . . . . . . . . . . . .45
Checking battery level. . . . . . . . . . . . . . . . . . . . . . . . . . . . <Battery level>49
Turning power ON/OFF . . . . . . . . . . . . . . . . . . . . . . . <Power ON/OFF>50
Changing screen display to English . . . . . . . . . . . . . .<Select language>50
Making initial setting . . . . . . . . . . . . . . . . . . . . . . . . . . . . .<Initial setting>50
Setting date and time . . . . . . . . . . . . . . . . . . . . . . . . . . . <Date settings>51
Notifying the other party of your phone number . . . . . . <Notify caller ID>52
Checking your own phone number . . . . . . . . . . . . . . . . . <Own number>52
Page 14

24
Before Using the Handset
ɦ Key illustrations are examples and may look different from actual keys.
Component names and functions
Using earphone
Connect an earphone compatible with external
connector terminal (sold separately). When using an
earphone which does not support external connector
terminal, connect with an earphone plug adapter for
external connector terminal (sold separately).
Connector
Flat-plug
earphone
terminal
Flat-plug connector of flat-plug
earphone/microphone with
switch (sold separately)
Connection example for flat-plug earphone/
microphone with switch (sold separately)
1
2
3
4
6
5
7
8
9
a
b
c
c
d
e
f
g
h
l
m
i
k
j
Page 15

25
Before Using the Handset
1 Earpiece
Listen to the other party’s voice.
Listen to Record message/Voice memo.
2 1Seg antenna (nP. 227)
Use to receive 1Seg.
3 Keybord (nP. 26, P. 404)
4 microSD Card slot (nP. 334)
5 Charger terminal (nP. 48)
Terminal for charging with the desktop holder.
6 Strap ring
7 Brightness sensor (nP. 103)
The sensor detects the light of the surrounding area and automatically
adjusts the display brightness and turns on/off the keypad backlight.
Do not cover the sensor area with your hand or a sticker. May
interfere with the sensor.
8 Display (nP. 28)
9 Called/Charging LED
Flashes while receiving a call, etc. (nP. 107).
Illuminates while charging (nP. 45).
a Front clear key z
Press to return to the previous screen.
Use to delete text or phone numbers.
Press to disable the lock of touch panel, side key and front clear key.
Press for 1+ seconds to lock again (nP. 120).
b Mouthpiece/Microphone
Sends out your own voice.
c Speakers
Emits ring tones, music, etc.
Emits the other party’s voice during hands-free operation.
d Picture light
Illuminates while activating the camera (nP. 202).
Illuminates/Flashes during shooting (nP. 207, P. 209).
e Infrared port
Use for the Ir communication (nP. 351).
Use for the Ir remote control (nP. 356).
f Camera
Use to shoot still pictures or movies (nP. 202).
Use to send a camera image shot during a Videophone call to the
othe
r party (nP.
54).
g Back cover (nP. 44)
A radio frequency-preventing sticker is attached on the back of the
back cover. Do not peel off this sticker.
h b mark
The IC card is included (The IC card cannot be removed). Use
Osaifu-Keitai holding the b mark up to the scanning device
(nP. 287).
Use to send and receive data via the iC communication (nP. 356).
i Shutter/PushTalk key & (q)
Press to use the PushTalk phonebook (nP. 78).
Press while using a camera to shoot (nP.000).
Press for 1+ seconds to enable/disable the VeilView (nP. 110).
j Start/Hands-free key s
Press in the close position to display the Dial input screen (nP. 35).
Press to make or receive a voice call.
Press to use Hands-free (nP. 55, P. 76).
Press for 1+ seconds in the close position to turn on/off the picture
light.
Press for 1+ seconds while using a function to use Multi Assistant
(nP. 370).
k Power/End key H
Press for 2+ seconds to turn the power on/off (nP. 50).
Use to end the function being used and return to stand-by display.
l FOMA antenna
An antenna is built in. To speak in better conditions, do not cover the
antenna area by hand.
m External connector terminal
Integrated terminal used while charging, connecting the earphone,
etc.
Connect to an external device such as AC adapter/DC adapter,
FOMA USB Cable with Charge Function 02 (sold separately)
(nP. 47, P. 345).
Page 16

26
Before Using the Handset
The following mainly explains operations in the stand-by display. For
details on inputting text nP. 404
1 Numeric key 0 to 9
Enter a phone number or number.
Press 1, 2, or 3 for 1+ seconds to use assigned functions
(nP. 380).
Press 4 for 1+ seconds to check your present location (nP. 296).
Press 5 for 1+ seconds to set font size collectively (nP. 110).
Press 6 for 1+ seconds to turn on/off the Bluetooth power
(nP. 393).
Press 7 for 1+ seconds to record Voice memos or play Voice
memos/Recorded messages (nP. 70, P. 384).
Press 8 for 1+ seconds to start to use 2in1 or switch modes
(nP. 423, P. 424).
Press 9 for 1+ seconds to reset Kisekae Tool settings or Font style
setting (nP. 105, P. 109).
2 Keys for operation guidance U to P
Press to execute the functions of the operation guidance (nP. 27).
3 Quick search key $
Press to use Quick search (nP. 381).
4 Clear key c
Press to display the i-Channel list (nP. 182).
Press to return to the previous screen.
Use to delete texts and phone numbers.
Press with holding > to work in the same way as H.
5 Multi-guide key wt
Move the cursor to select an item and execute or set (
nP
. 27).
Press to displa
y Menu, Redial list screen, Received calls list screen,
i-Widget screen and Shortcut menu.
Press t for 1+ seconds to use Lock selection (nP. 119).
Press r for 1+ seconds to display the Sent messages history
(nP. 150)
Press q for 1+ seconds to display the Received messages history
(nP. 150).
Press u for 1+ seconds to adjust the earpiece volume (nP. 96).
6 Guidance key |
Press to display the operation guidance (nP. 27).
7 X/MULTI key X
Press to use Multi Assistant (nP.000).
8 S/b key S
Enter
b
.
Press for 1+ seconds in stand-by/while receiving a call to enable/
disable the Public mode (Drive mode) (nP. 67).
9 D/# key D
Enter #.
Press for 1+ seconds in stand-by/while receiving a call to enable/
disable the Manner mode (nP. 99).
To open the FOMA terminal, push its display side up as shown.
Keyboard
143
7 6
5
9
8
2
Opening the FOMA terminal
When making a Videophone call in the open position, use the
earphone/microphone (sold separately) or use hands-free.
Close position Open position
Page 17

27
Before Using the Handset
ɡ Changing vertical/horizontal view
The display is automatically changed between the vertical view and the
horizontal view just by tilting the FOMA terminal as shown. Use the FOMA
terminal with closed and turned sideways or longways.
In the open position, the screen is displayed in the horizontal view
regardless of direction of the FOMA terminal.
The screen may not be changed depending on the function and screen in
use.
The vertical/horizontal view may not work properly immediately after the
screen/power is turned on.
The operation guidance appears at the lower part of the display.
ɡ Close position
Directly touch the keys for operation guidance to select or execute the
menus items in the guidance.
ɡ Open position
Press the keys allotted as follows to select or execute the menus items in
the guidance.
If the operation guidance is not displayed, press | to display. Press |
again to hide.
For inputting texts, press with holding > (nP.000).
ɡ Operation guidance menu
In the operation guidance, menus appear according to the used function
and situation.
The following table describes examples of the main operation guidance
menus that appear.
The display may not be changed depending on the function.
Operation guidance
Rotate 90° to
the left
Rotate 90° to
the right
Longways
Sideways
The operation guidance for i-appli can also be operated by pressing its
allotted keys U to P. Presence or absence of the operation guidance,
or position for the guidance may differ depending on software.
OK Sets the selected item
Submenu Displays the Submenu
Full Displays selected images, etc. in full screen
Show all Displays sorted files, etc. as a list
IrSS Sends via Ir communication
Mail Displays the compose message screen
Send Sends a message
Cancel Cancels the operation such as receiving a message
SelAll/ClrAll Selects/Disables all selectable items
(Up to 50 items can be selected/disabled depending
on the function)
Page F/Page G Scrolls the display by page
I page /H page Switches pages
UI PO
Page 18

28
Before Using the Handset
1 Signal status
When A appears, the handset is outside the service area or in a
place with no signal. Signal icon can be changed (nP. 106).
2 Battery level/Charging (nP. 49)
Battery icon can be changed (nP. 106).
3 i-mode/Full Browser (nP. 164, P. 190)
4 SSL (nP. 166, P. 190)
When o appears while Multi Assistant is used, function such as
i-mode, Full Browser, i-appli or Software update is being used with
Multi Assistant.
5 i-appli (nP. 261)
*i-appli is set as the stand-by display, but cannot be used.
The i-appli icons do not appear in the i-Widget screen.
6 GPS (nP. 296, P. 304)
Viewing display
]
Indication of the signal strength
] no p
Strong Weak
"
Battery level
{
Charging
12345 7
pmlkjihgn
uv
>
b c
q or f e d
s
<z wx
t
6 a8 9
y
7=A A
BNO
Indicates i-mode/Full Browser status
o
SSL compatible sites are viewed
SSL compatible Internet web pages are viewed
SSL/TLS pages are viewed
G
i-appli is being activated
i-appli stand-by is being activated
N
i-appli stand-by is set
*
I
i-appliDX is being activated
i-appliDX stand-by is being activated
Q
i-appliDX stand-by is set
*
A (blue)
Location request menu is set to [Loc. provision:ON]/
[Reject No. unset]
Location request menu is set to [Permission sched.] and
Location provision is permitted
A (gray)
Location request menu is set to [Permission sched.] and
Location provision is rejected
B
GPS positioning
Page 19
29
Continued on next page
Before Using the Handset
7 Ir communication/Bluetooth communication/External device
8 i-mode mail/SMS/Area Mail received (nP. 138)
9 Message R/F received (nP. 155)
a Storage status of i-mode center (nP. 138, P. 155)
The status may not always be indicated even if messages are held at
the i-mode center.
b microSD Card (nP. 334)
c Clock display (nP. 51)
Small clock icon can be changed (nP. 106).
d 1Seg being recorded (nP. 235)
e Record message (nP. 69)
When there are messages, D to P appears, indicating the total
number of both types of messages. When there are three Record
messages (voice calls) and two Record messages (Videophone), k
appears.
f Silent (nP. 95)
g Vibrator (nP. 97)
h Manner mode (nP. 99)
i Public mode (Drive mode) (nP. 67)
j i-appli call (nP. 276)
k IC card lock (nP. 288)
l Restriction indicator (nP. 115, P. 121)
J
Data is communicated with another device using the Ir
communication function (nP. 351)
Data is sent using the Ir remote control (nP. 356)
#
Data is communicated with another device using the
Bluetooth function (nP. 395)
N
Connected to commercially available Bluetooth
compatible keyboard (nP. 394)
t (green)
Connected to an external device and transmitting packets
t (red)
Connected to an external device and sending/receiving
packet data
u
Connected to an external device and transmitting 64K data
UhH
v[
Indicates the status of the i-mode mail/SMS/Area Mail reception
Indicates the status of the memory to store received mail
ABJ
Indicates the reception status of the Message R/F
Indicates the status of the memory to store Message R/F
WGIX
STKL
Indicates the storage status of the mail and
Message R/F
^ (gray)
microSD Card is inserted
^ (pink)
microSD Card is being used
a
1Seg is being recorded
]
Record message is set
[
The phone ring volume [Silent] is set
b
Vibration mode is set
Z
Manner mode is set
_
Public mode (Drive mode) is set
a
New i-appli call
H
IC card is locked
R
Secret mode is set
S
Secret data is being edited
T
Keypad dial lock
U
All lock is set
V
Function lock is set
W
Keypad dial lock and Function lock are set
K (red)
Secret mode, Function lock and Keypad dial lock are set
Page 20
30
Before Using the Handset
m Hands-free (nP. 55, P. 76, P. 393)
n Alarm (nP. 236, P. 372, P. 377)
* Appears only when an Alarm is set for that day.
o Music&Video Channel program reservation (nP. 245)
p i-mode mail send reservation (nP. 138)
q Earphone/microphone connection (nP. 388)
Appears when Auto answer for PushTalk is set even if an earphone/
microphone is not connected.
r USB mode (nP. 345)
s FOMA card error
t Self mode (nP. 117)
u PushTalk (nP. 76)
v Bluetooth (nP. 391)
The Bluetooth icon does not appear during SSL page display.
w VeilView (nP. 110)
The VeilView icon does not appear during International roaming or
while 1Seg is recorded.
x 3G/GSM
K (blue)
Touch panel/Side key lock, Secret mode, Function lock
and Keypad dial lock are set
X
Touch panel/Side key lock is set
; (red)
Hands-free in progress
; (green)
USB hands-free in progress
l
Mute in progress (only when in the open position)
M
Bluetooth hands-free in progress
\
Alarm is set
Schedule alarm is set
*
Reception reserve alarm is set
*
Recording reserve alarm is set
*
Wakeup TV is set
*
0
Appears 12 hours before Music&Video Channel program
distribution
=
Mail with send reservation
;
Mail failed to be automatically sent
s
When voice/Videophone call in Auto answer setting is set
to [ON] and while an earphone/microphone (sold
separately) is connected
When PushTalk in Auto answer setting is set to [ON]
x
FOMA USB Cable with Charge Function 02 (sold
separately) is connected in the Communication mode
R
Appears when FOMA card is malfunctioning or not inserted
B
Appears when a card other than the FOMA card is inserted
g
Self mode is set
a
During PushTalk transmission
L (blue)
Stand-by for Bluetooth registration
Stand-by for Bluetooth connection
Connected to Bluetooth
L (gray)
During power saver mode for Bluetooth (Appears when
data is not transmitted from the FOMA terminal for a set
length of time)
P
VeilView is set
4 (green)
3G network (Packet transmission is available)
4 (red)
3G network (Packet transmission is not available)
K
GSM/GPRS network (Packet transmission is available)
J
GSM/GPRS network (Packet transmission is not
available)
Page 21
31
Before Using the Handset
y Status of Comics setting (nP. 363)
Status of Comics setting icon does not appear during hands-free
operation or receiving information display.
z ToruCa (nP. 290)
The ToruCa icon does not appear during hands-free operation,
receiving information display or e-comic display.
< Receiving information (nP. 185)
Receiving information icon does not appear during hands-free
operation.
> Multitask (nP. 370)
Indicates functions that are running.
I
Frame display is set
H
Page display is set
Q
Unread ToruCa
C
New information
g
Four or more applications
are running
2
Shoot still picture
3
Shoot movie
*
Videophone
4
Character reader (OCR)
h
Voice call
5
Bar code reader
t
Phonebook
]
Card reader
k
PushTalk/
PushTalk phonebook
,
Information reader
)
Shotdeco
#
Modem transmission
(appears during data
transmission)
v
Voice recorder
w
Schedule
i
Software update
y
Text memo, Stand-by memo
C
Map/GPS
z
Calculator
(
Bluetooth function
6
Manga&BookReader
j
Receive via Ir/iC/USB/
Bluetooth communication
=
Quick search
>
ToruCa
l
i-appli
{
Alarm
m
i-mode, i-Channel, WEB Mail
8
Timer
n
Full Browser, Internet movie
player
}
microSD
9
General settings
/
i-concier
0
Voice memo/Record
message
X
Receive information
p
Mail, SMS, Message R/F,
Check new messages
7
Document Viewer
f
1Seg
q
Mail/Decome-Anime/SMS
being composed
^
Reception reserve/
Recording reserve alarm
sounds
|
Received calls
*
Data Security Service
;
Received messages
u
Data box
!
Redial
s
MUSIC
:
Sent messages
"
Own number
microSD Card is referred to as [microSD] or [SD] on the FOMA terminal
(nP. 334).
Some of the screen shots in this manual have been modified or
abbreviated.
The display for the FOMA terminal is manufactured using
high-precision technology, but it may occasionally contain dots that fail
to light or that remains permanently lit. This is not a malfunction.
Page 22
32
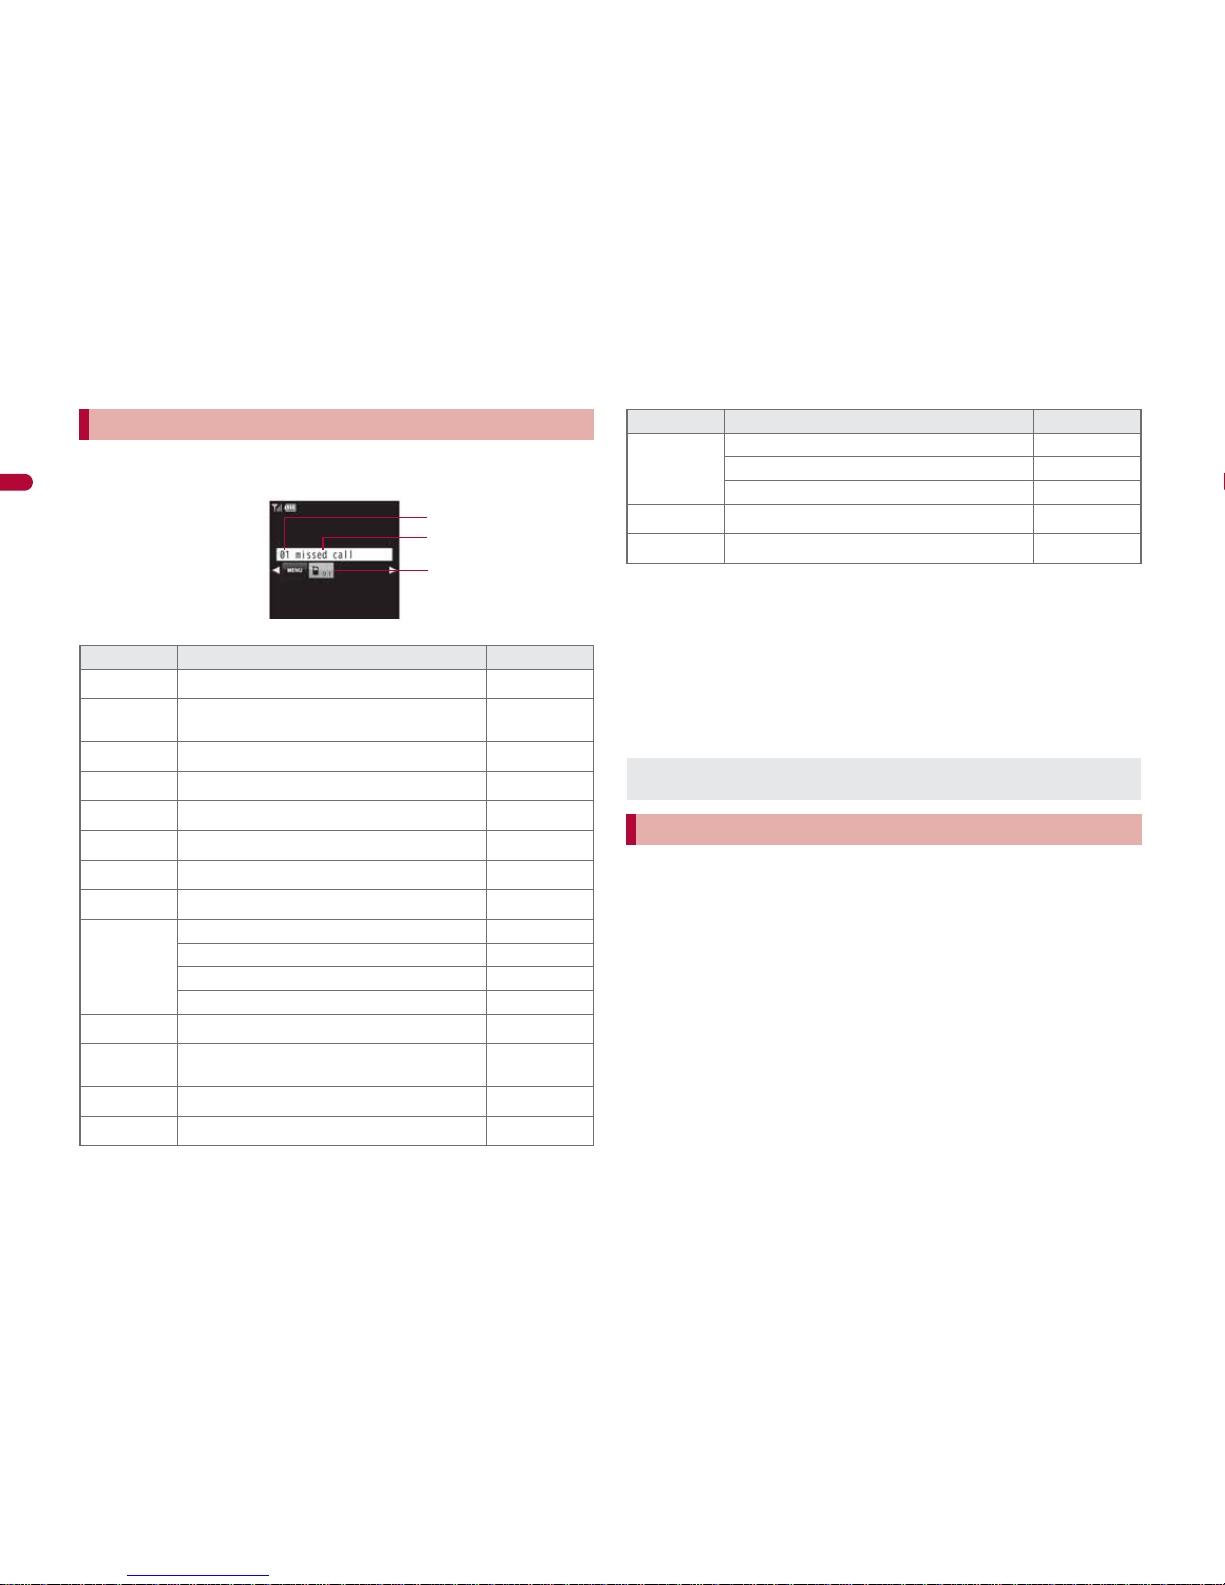
Before Using the Handset
Display stock icons in stand-by when a call is missed or new mail is
received. In stand-by, select stock icons to check notice details.
Stock icon type
*1 When the 2in1 mode is set to [Dual mode], the number of [A mode] and
[B mode] appears each.
*2 The message that appears differs depending on the menu screen or
position of the FOMA terminal.
1
In stand-by, a stock icon appears.
2
Select the stock icon.
: Touch the stock icon to point the cursor and touch again.
: After the details are checked, the stock icon and message disappear.
In the i-Widget screen, multiple i-Widget can be activated simultaneously
and viewed as a list.
For details on operation of i-Widget nP. 282
Checking notices with stock icon
Icon Message Page
B
xx missed call
*1
P. 68
F
Recorded messages Fxx message/Axx
message
P. 70
E
xx voice mail
*1
P. 415
C
xx mail message P. 139, P. 160
L
xx New Message R P. 156
Q
xx New Message F P. 156
D
xx new ToruCa P. 290
5
New auto send result P. 138
6
Update complete P. 497
Check update P. 497
Update required P. 495
Check for update P. 495
D
USB mode setting P. 345
t
Download successful (Music&Video
Channel)
P. 245
g
Download failed (Music&Video Channel) P. 245
4
Charge limit exceeded P. 385
Stock icon
Message
Number of entries
@
Send loc - No resp P. 306
Send loc - Resp P. 306
Send loc - Failed P. 306
a
New i-appli call P. 276
G
Custom menu/Basic menu/Menu
*2
P. 38
Stock icons do not appear while the i-motion set as stand-by is played
or the i-appli stand-by is being activated.
Displaying and operating i-Widget
Icon Message Page
Page 23

33
Continued on next page
Before Using the Handset
Display popup messages in the stand-by display
when information is received. Activate i-concier with
the popup messages to check information details.
1
In stand-by, a popup message appears.
2
Select the popup message.
: Touch the popup message to point the cursor and touch again.
: The popup message disappears after activating i-concier.
Operate by putting the finger on the touch panel (screen).
In this manual, operations with touch panel are mainly explained.
The operations differ depending on the
function and screen in use. The message
stating that the operation is not available
appears when the touch panel cannot be
used.
Operate the touch panel inside the
operating range of touch panel in the
figure. However, the area where the
operation guidance appears cannot be
touched in the open position.
The notation of operation described in this
manual and its meaning are shown as
follows.
Activating i-concier with popup message
Calendar or Stand-by memo does not appear while a popup message
appears.
1 Area where Widget appli is pasted
2 Setting status icons for Widget appli
For details on the setting status icons
nP. 261
3 Operation guidance
Available menus appear.
3
1
i-Widget screen
2
Touch panel
Operations with touch panel
Touch panel
Operating range of touch panel
T
ouc
h
Put the finger on the touch panel
and put it off.
Slid
e
Keep the finger on the touch
panel and slide it.
Page 24

34
Before Using the Handset
When putting the finger on the touch panel, the tone sounds and the
vibrator is activated. However, they may not be activated in some cases,
such as activating a camera, playing music, etc.
• The volume can be changed (nP. 96). The tone cannot be changed.
• The vibrator can be set to ON/OFF (nP. 97).
Select each menu or keys by touching.
ɡ Operations in stand-by
Activate various functions such as activating the Stand-by Display Touch
Launcher, moving the position of clock, changing the stand-by display, etc.
by the touch operation in the stand-by display.
ɡ Selecting menu or item
Select a menu such as the Custom menu or a menu in the Stand-by Display
Touch Launcher, etc. by touching the menu icon.
For a menu in list format, touch the object to point the cursor and touch
again to select.
Example: 1Seg setting menu
When using the touch panel
The touch panel does not work when operated with a gloved finger or
with foreign objects placed on the operation pad.
Note that operating with a wet finger or putting a sticker to the touch
panel (display) may cause a malfunction.
Quick slide
Quickly slide the finger and put
it off.
Putting the distance between
two fingers apart/closer
Put two fingers on the touch
panel and slide them with putting
the distance between two fingers
apart/closer.
Using menus or functions
Page 25

35
Before Using the Handset
ɡ Switching pages
When a menu contains multiple pages, quickly slide to the left/right to switch
pages.
Example: Mail setting
ɡ Submenu (nP. 40)
ɡ Control key
While using the function, touch the screen to display control keys.
Example: MUSIC Player
• Touch the area other than the control keys to hide the control keys
(excluding 1Seg).
Touch [
F] to display next keys.
ɡ Slide operation
The slide operation is available for adjusting the volume or scrolling the
screen.
Be careful not to touch a key displayed on the screen.
ɡ Number entry
When numbers such as the phone number, terminal
security code, or Pin code are required to be entered,
the numeric panel appears in the close position.
Touch the numeric part.
If an input field appears for time setting, etc., touch
the field to move the cursor there and enter numbers
in the position.
ɡ Character entry (nP.000)
Slide to the
left
1/3 page 2/3 page
Slide to the
right
3/3 page
Slide to
the left
Slide to
the right
Slide to the right
Slide to the left
The control keys always appear while camera is activated or music data
is played (excluding while displaying images/lyrics).
Page 26

36
Before Using the Handset
The touch panel is automatically locked while making a voice/Videophone/
PushTalk call, receiving a call, or calling (including while playing a reply
message, recording sounds, and recording Voice memo (during call)) to
prevent from errors.
To temporarily disable the lock: Press z.
• Press z for 1+ seconds to lock again.
Touch panel lock is temporarily disabled when the
FOMA terminal is opened. It is locked again when
the FOMA terminal is closed.
This function is not linked with Touch panel/Side
key lock (nP. 120).
Set, change or save functions from the menu screens.
Set the start menu that displayed when [$] is selected in the Stand-by
Display Touch Launcher.
When Stand-by touch launcher display is set to [OFF], touch the wall
paper on the stand-by display (excluding an area where the clock or
i-Channel ticker is displayed, and the Pict area) to display the start menu.
1
In the Stand-by Display Touch Launcher, select [$]/
[Settings]/[Disp/LED/Power saver]/[Menu priority].
: In the Custom menu/Basic menu: Select [Submenu]/[Menu
priority].
2
Select the start menu/[Yes].
Locking touch panel
Setting and selecting menu
The explanations in this manual are based on how to retrieve a function
from the Custom menu. As for functions retrieved from the Stand-by
Display Touch Launcher and the Quick Settings, how to retrieve from
those menus is individually explained.
Setting start menu <Menu priority>
Locking screen
e.g.) During a ca
ll
Start menu Characteristics
Custom menu The preset Kisekae Tool (nP. 104) can be selected and
set. Each Kisekae Tool consists of different functions and
designs. Kisekae Tools can be downloaded from sites and
used.
Preset Kisekae Tools
Black ڐఱιΣνȜ(Large)
Ώϋίσ(Simple) Θͼτ·ΠιΣνȜ
Basic menu Select the icon displayed on the menu to retrieve the
function.
Page 27

37
Before Using the Handset
ɡ Switching set start menu temporarily
Switch the start menu temporarily. When the stand-by display reappears, the start menu returns to the one set in Menu priority.
Use the Horizontal display menu.
*1 When Stdby toch lnch disp is set to [OFF], the Start menu/Horizontal display menu appears.
*2 Turning is not available in the open position.
Turn
sideways/
Set to open
position
Turn
sideways/
Set to open
position
Touch the stand-by
display (wall paper)
*1
Stand-by Display Touch Launcher
(horizontal)
Stand-by (vertical)
Turn
longways
*2
Basic menuCustom menu
[Basic]
[Custom]
Stand-by Display Touch
Launcher (vertical)
Horizontal display menu
Stand-by (horizontal)
Touch the
stand-by display
(wall paper)
*1
Turn
sideways/
Set to open
position
Turn
longways
*2
[$]
Turn
longways
*2
[$]
t (in the open position)
Page 28

38
Before Using the Handset
For details on operating shortcut menu nP. 380
For details on the available functions nP. 446
All menus can be operated by the touch operation, or with w.
Touch a menu item to select from the Custom menu or Basic menu. For
menus in list format, such as 1Seg setting, touch a menu item to point the
cursor and touch again. When a menu contains multiple pages, quickly
slide to the left/right to change pages. Alternatively, scroll or change
pages with w.
The method for selecting functions may differ depending on the Kisekae
Tool set for the Custom menu.
Press z or c to re-select a function, and the previous screen
reappears. Press H to return to stand-by.
ɡ Retrieving from the Custom menu
ɡ Retrieving from the Basic menu
ɡ Retrieving from the Horizontal display menu
Retrieving a function from each menu
When a stock icon (nP. 32) appears in stand-by, select G to show
the each menu.
Touch operation or the way of activating 1Seg with the Multi-guide key is
explained as an example below.
[1Seg]
Custom menu
When [1Seg]
appears
When 1Seg is
activated
[Acti-
vate
1Seg]
When the Custom menu image is changed by Kisekae Tool, the
operation may differ from the description in this manual. In this case,
switch the menu screen to the Basic menu (nP. 36) or perform the
Reset menu screen (nP. 105).
Basic menu When [1Seg]
appears
When 1Seg is
activated
[1Seg]
[Acti-
vate
1Seg]
[1Seg]
or
wt
[Acti-
vate
1Seg]
or
wt
Horizontal display menu When [1Seg] appears
When 1Seg is activated
Page 29

39
Before Using the Handset
Touch the Pict area in the stand-by display to display the Quick Settings.
Touch each key to point the cursor and touch again to activate related
setting menus.
Press z or touch the area other than the Quick Settings to return to
the stand-by display.
For details on the avialable functions nP.000
Touch the wall paper on the stand-by display (excluding an area where the
clock or i-Channel ticker is displayed, and the Pict area) to display the
Stand-by Display Touch Launcher. Touch each key in the Stand-by Display
Touch Launcher to activate the corresponding function.
For details on the avialable functions nP.000
If no operations are performed for approximately 5 seconds, z, c, or
H is pressed, or the area other than the Stand-by Display Touch
Launcher is touched, the stand-by display reappears.
ɡ Setting whether to display Stand-by Display Touch
Launcher
<Stdby toch lnch disp>
1
In the Custom menu, select [Settings]/[Disp/LED/
Power saver]/[Set screen]/[Stdby toch lnch disp].
2
Select the setting.
Press the key corresponding to the menu item number when
connecting the Bluetooth compatible keyboard to select a function.
However, in the Custom menu/Horizontal display menu, a function may
not be selected by using the menu item numbers.
Retrieving a function from Quick Settings
Touch the
Pict area
Stand-by Quick Settings
Pict
area
Retrieving a function from Stand-by Display
Touch Launcher
Stand-by Stand-by Display
Touch Launcher
Wall
paper
Touch the
wall paper
Page 30

40
Before Using the Handset
While using the function, slide from the upper right to the lower left (or from
the upper left to the lower right) to display the Submenu.
To display the Submenu, touch [
C] of the control key, [Submenu] in
the operation guidance or [
D] on the upper part of the screen, or
press I.
When the Submenu contains multiple pages, slide up/down to scroll the
screen and display items.
To hide the Submenu, touch the area other than the Submenu. Press
z or c to return to the previous screen (menu).
Use this function for unsure operations. After
the Support Book appears, check the
explanation and operation procedures of
each function. In addition, directly start
functions that were looked up in the Support
Book.
1
In the Stand-by Display Touch Launcher, select [9]/
[Support Book].
2
Select a menu or item.
: To start functions directly: Select the function to start/[Yes].
A FOMA card is an IC card that records personal information,
such as phone numbers. A FOMA card can store phonebook data
and SMS. By switching FOMA cards, multiple FOMA terminals
can be used for different purposes as needed.
If a FOMA card is not inserted, transmission functions such as voice/
Videophone/PushTalk calls, i-mode, mail transmission and packet
transmission are not available on the FOMA terminal.
Selecting a function from Submenu
Submenu may not appear depending on the function.
Submenu screen
Support Book
Displaying Support Book
FOMA card
Using FOMA card
Page 31

41
Continued on next page
Before Using the Handset
Before inserting or removing the FOMA card, turn off the power, position
the back facing upwards and remove the battery pack. Close and hold
the FOMA terminal firmly with your both hands.
ɡ Inserting FOMA card
1
Hook a finger on the tab and pull the tray out (1).
: Pull out the tray straight until it stops.
2
Hold the FOMA card with the IC
facing down and set on the tray (2).
3
Push the tray all the way in (3).
ɡ Removing FOMA card
1
Hook a finger on the tab, pull the tray out (1) and
remove the FOMA card (2).
: Do not allow the FOMA card to fall when removing it.
The FOMA card has a “PIN1 code” and a “PIN2 code”.
Both are set to [0000] by default but can be changed to a four- to eight-digit
number by the user (nP. 114).
The FOMA terminal has built-in FOMA card security functions (FOMA card
restriction functions) as functions for protecting personal data and files.
When data or files are retrieved using any of the following methods or
i-appli is running with the FOMA card inserted into the FOMA terminal,
FOMA card security functions are automatically set in the retrieved data
or files.
When a file such as an image, melody or PDF is downloaded from a
site or Internet web page
When a site or Internet web page is saved as a screen memo
When i-mode mail with a file attached is received
When i-appli is running
Data, files or software with FOMA card security functions run only when
in use with the FOMA card inserted at time of acquisition. Display, play,
attach to i-mode mail, run software, send data using Ir communication
function and iC communication function, and copy to microSD Card can
be executed. These operations cannot be performed if a different FOMA
card is inserted.
The following indicates the data for which FOMA card security is set.
Melody
Image (including animation and Flash movie)
Screen memo Chaku-uta®/Chaku-uta full
®
Chara-den File attached to Message R/F
Inserting/Removing FOMA card
Notch
IC (gold)
2
Tray
31
Tab
Fit the notch of the FOMA card to
that of the tray.
1
2
Inserting or removing the FOMA card forcibly may damage the card or
deform the tray. Use caution.
Refer to the FOMA card user’s guide for more information on the FOMA
card.
Do not misplace the FOMA card once it is taken out.
When the tray falls off, slide the tray in straight along the guide rail.
Security codes
FOMA card security functions
<FOMA card security functions>
Page 32

42
Before Using the Handset
i-motion ToruCa (details) image
PDF data Image inserted to Deco-mail or signature
Kisekae Tool Videophone picture memo
Machi-chara i-appli (including i-appli stand-by)
Download dictionary
Download font
Contents transfer compatible data
Image in Message R/F
Music&Video Channel program
Deco-mail template with data which FOMA card security functions are
set
Decome-Anime Template
e-book/e-dictionary/e-comic saved in the [Comic] folder
File attached to i-mode mail other than the following
• ToruCa ȆPhonebook Ȇ Schedule
• Bookmark Ȇ Documents
ɦ “Chaku-uta” is a registered trademark of the Sony Music
Entertainment (Japan) Inc.
The following indicates the settings saved in the FOMA card.
Own number PIN setting
Select language SSL certificates
SMS center SMS expiry
SMS input character
The following explanation refers to the FOMA card inserted at time of
data/files retrieval as “one’s own FOMA card” and other FOMA cards as
“another’s FOMA card”.
When one’s own FOMA card is replaced with another’s FOMA card, the
data or files for which FOMA card security functions are set cannot be
set as stand-by displays or ring tones.
When a FOMA card is replaced with another’s FOMA card, FOMA card
security functions are activated and if data or file retrieved from a site is
set as the stand-by display or ring tone, the setting is reset to the
default. When one’s own FOMA card is re-inserted, the setting returns.
Example: When setting [Melody A], for which FOMA card
security functions are set, as a ring tone
When one’s own FOMA card is taken out or is replaced with another’s
FOMA card, ring tone returns to default setting. When one’s own FOMA
card is put back, the ring tone returns to [Melody A].
FOMA card security functions cannot be set for data received using Ir
communication or data transmission functions, and still pictures/movies,
etc. shot with the FOMA terminal.
It is possible to move or delete data or files for which FOMA card
security functions are set even when another’s FOMA card is inserted.
Running i-appli by selecting highlighted text in i-mode mail details
screen cannot be performed or retrieved when FOMA card security
functions are set.
One’s own FOMA
card security functions
are set for
downloaded data, files
attached to received
mail and i-appli that
have been run,
allowing viewing and
playback of data.
When another’s
FOMA card is
inserted, data with
one’s own FOMA
card security
functions set cannot
be viewed or played
back.
One’s own
FOMA card
Another’s
FOMA card
Different FOMA card
inserted
Page 33

43
Before Using the Handset
Note the following differences between “FOMA card (blue)” and “FOMA
card (green/white)” used on the FOMA terminal.
If the FOMA card is replaced with another’s FOMA card after i-appli
stand-by is set, the set i-appli cannot be activated in stand-by, and the
image set in Stand-by display appears.
FOMA card type
Function
FOMA card
(blue)
FOMA card
(green/white)
Page
Number of phone number digits
available in the FOMA card
phonebook
Up to 20 digits Up to 26 digits P. 86
Client certificate operations for
FirstPass
Not available Available P. 179
Use of WORLD WING Not available Available P. 430
Service Numbers Not available Available P. 421
About WORLD WING
WORLD WING is a DOCOMO’s FOMA international roaming service that
makes it possible to use the mobile phone number registered in Japan to
make and receive calls even overseas by the FOMA card (green/white)
and supported FOMA terminal.
If subscribed to the FOMA service after September 1, 2005,
subscription for “WORLD WING” is not required. However, if
subscription for “WORLD WING” is canceled at or after subscription for
the FOMA service, subscription for “WORLD WING” is required again.
If subscribed to the FOMA service before August 31, 2005 but not
subscribed to “WORLD WING”, subscription for “WORLD WING” is
required.
Some payment plans are not available.
When the FOMA card (green/white) is lost or stolen overseas, promptly
contact DOCOMO and conduct a procedure for canceling the use of
service. Refer to General Inquiries on the back of this manual for
inquiries. Note that transmission/calling charges after the FOMA card
is lost or stolen are incurred to the subscriber.
Page 34

44
Before Using the Handset
Use the Battery Pack SH18 exclusive to the FOMA terminal.
Turn off the power, close the FOMA terminal, and hold it in your both
hands before attaching or removing the battery pack.
ɡ Attaching battery pack
1
Push the catch on the back cover in the direction of
the arrow (1), slide approximately 2 mm (2) and
remove the back cover (3).
2
Attach the battery pack (4).
: The FOMA terminal has tabs that make it easy to attach. Attach the
battery pack with a recycle mark side faced up.
3
Attach the back cover (5).
: Attach the back cover as shown in the illustration and then push the
back cover and slide into place.
ɡ Removing battery pack
1
Follow step 1 of “Attaching battery pack” to remove
the back cover.
2
Remove the battery pack.
: The battery pack has a tab that makes it easy to remove. Hook a
finger on the tab to prevent excessive force on it and remove the
battery pack upward.
Attaching/Removing battery pack
1
3
2
Face the side with a
recycle mark up
4
Tabs
Battery pack
Battery pack connector terminal side
Using unnecessary force when attaching or removing the battery pack
may damage the connector terminal for the battery pack (charger
terminal) on the FOMA terminal.
Firmly close the back cover. If not closed firmly, the back cover may
come off and the battery pack may fall out due to vibration.
5
Tabs
Page 35

45
Continued on next page
Before Using the Handset
The battery pack is not fully charged at the time of purchase. Be
sure to charge the battery using the exclusive AC or DC adapter
(sold separately) before use.
ɡ Cautions while charging
Do not charge for long periods of time with the power left on. If the FOMA
terminal is left on after charging is complete, the battery pack charge
decreases.
In such cases, the AC or DC adapter charges the battery again.
However, depending on when the FOMA terminal is disconnected from
the AC or DC adapter, the battery charge level may be low, the battery
alert tone may sound, or the battery may only be usable for a short time.
When the battery is empty and terminal is recharging, charging LED may
not illuminate immediately.
If the battery empty alert is displayed, the alert tone sounds and the
power cannot be turned on, charge the battery for a while.
If the battery empty alert is displayed and charging begins within 60
seconds of the alert tone, the status returns to normal.
While charging, terminal may not turn on even when charging LED is
illuminated in red. Charge longer and try turning power on again.
Frequently recharging the battery when its power is still remaining
enough may shorten the life of the battery pack. It is recommended to
use the battery to a certain level before recharging.
The battery pack cannot be charged by itself.
ɡ Estimated charge times and LED display
The following figures are estimated times for charging an empty battery
pack with the FOMA terminal turned off.
Charging LED illuminates in red while charging, and it turns off when
charging is completed.
Check that the battery pack has been properly attached when charging
LED flashes red. The LED also flashes red when the battery pack has
reached the end of its service life.
The battery pack can also be charged with the FOMA terminal turned on
({ on the display flashes during charging).
When charging is completed, charging LED turns off, and { on the
display changes to ".
When the battery becomes warm, charging may automatically stop even
if the battery has not been fully charged. Charging resumes after the
temperature lowers to an appropriate temperature. While charging is
stopped, charging LED turns off ({ on the display flashes while
stopped).
ɡ Estimated times of use when fully charged
Charging
FOMA AC Adapter 01/02 Approx. $$ min
FOMA DC Adapter 01/02 Approx. $$ min
Continuous
talk time
FOMA/3G Voice call: Approx. $$ min
Videophone call: Approx. $$ min
GSM Voice call: Approx. $$ min
Continuous
stand-by
time
FOMA/3G3G/GSM
setting: 3G
When mobile: Approx. $$ hr
3G/GSM
setting: AUTO
When mobile: Approx. $$ hr
At rest: Approx. $$ hr
GSM 3G/GSM
setting: AUTO
At rest: Approx. $$ hr
1Seg watching time Approx. $$ min
Page 36

46
Before Using the Handset
Continuous talk time is estimated as the usage time at normal
transmission signal strength, and continuous stand-by time is estimated
as the usage time while moving with the FOMA terminal closed at normal
signal strength. Using i-mode reduces talk (transmission)/stand-by time.
When i-Channel is subscribed, information is automatically received and
updated, so talk (transmission)/stand-by time will be reduced. In addition,
when shooting or editing an image, watching 1Seg, composing i-mode
mail, activating the downloaded i-appli or the i-appli stand-by, or using
MUSIC Player, i-motion player, Bluetooth function or data
communication, the talk (transmission)/stand-by time will be reduced
even if calls or i-mode transmission are not made. Some i-appli software
may continue transmission even after downloading. To avoid this, set not
to connect in advance.
The actual usage time is a combination of stand-by time and talk time,
and the longer the talk time, the shorter the stand-by time becomes.
1Seg watching time is estimated as the watching time at normal
transmission signal strength with the Flat-plug Stereo Earphone set P01
(sold separately) used.
Talk (transmission)/stand-by time may be reduced by about half or 1Seg
watching time may be shortened depending on battery pack status,
function used, temperature and other environmental conditions, or signal
strength (no signal or weak signal).
ɡ Battery pack service life
Battery pack is a consumable product. Service time per charge is
gradually reduced every time the battery is charged.
When service time per charge is reduced to about half of the default time,
this means that the battery pack is approaching the end of its service life.
In such a case, it is recommended to replace the battery pack as soon as
possible. Depending on usage, the battery pack may swell as it
approaches the end of its service life but this will not cause problems.
If i-appli, Videophone, or 1Seg is used while charging for a long time, the
service life of the battery pack may become shorter than estimated.
To protect the environment, return used batteries to NTT
DOCOMO, any DOCOMO retailer, or a recycling agency.
ɡ About charging batteries
Refer to user’s guide of FOMA AC Adapter 01/02 (sold separately),
FOMA AC Adapter 01 for Global use (sold separately), or FOMA DC
Adapter 01/02 (sold separately).
FOMA AC Adapter 01 covers only 100V AC. FOMA AC Adapter 02/
FOMA AC Adapter 01 for Global use covers from 100 to 240V AC.
The shape of the plug for the AC adapter is for 100V AC (for domestic
use). To use the AC adapter of 100 to 240V AC overseas, a conversion
plug adapter that is compatible with the voltage of your country of stay is
required. Do not use a transformer for use overseas to charge the
battery.
Page 37

47
Continued on next page
Before Using the Handset
[Read “FOMA AC Adapter 01/02 (sold separately) and FOMA DC
Adapter 01/02 (sold separately) user’s guide” carefully.]
Battery pack can be charged even in the open position.
1
Open the external connector terminal cover (1) and
insert the AC or DC adapter connector horizontally
into the external connector terminal (2).
: Check the direction (See diagram) of
the connector, keep it parallel with
the FOMA terminal and firmly push
all the way in until it clicks.
2
When inserting the AC adapter power plug into an
outlet or inserting the DC adapter power plug into a
car cigarette lighter socket, Charge start sound is
heard, charging LED illuminates, and charging starts.
3
When Charge end sound is heard and charging LED
turns off, charging is complete.
: When removing the connector, always hold the release buttons on
both sides (1) and unplug it by pulling out horizontally (2).
Charging by using AC adapter/DC adapter
Connector (Face the side with the arrows up)
2
Release buttons
1
Charging LED
External connector
terminal
External connector terminal cover
100V AC
outlet
For AC adapter For DC adapter
Cigarette
lighter socket
1
2
1
Page 38

48
Before Using the Handset
[Read “Desktop Holder SH24 (sold separately) user’s guide”
carefully.]
1
Face the side with the arrows of the AC adapter
connector up and insert it into the connector terminal
of the desktop holder (1).
: Keeping the connector parallel with the desktop holder, firmly push it
all the way in until it clicks.
2
Insert the AC adapter power plug into an outlet (2).
3
When placing the FOMA terminal in the desktop
holder, Charge start sound is heard, charging LED
illuminates, and charging starts.
: Place the FOMA terminal in the direction of the arrow until it clicks as
the figure shows (3).
4
When Charge end sound is heard and charging LED
turns off, charging is complete.
: Hold the desktop holder and lift the FOMA terminal out.
Do not forcibly insert or remove. May cause damage to the external
connector terminal and the connector.
Pull the adapter out of the outlet or cigarette lighter socket if it will not be
used for a long time.
Do not forcefully pull the external connector terminal cover. May
damage the cover.
Do not place objects near the FOMA terminal when charging. May
damage the FOMA terminal.
When using a DC adapter
The DC adapter should only be used in negative grounded vehicles (12
and 24V DC).
Do not use with the car engine shut off. May drain the car battery.
The DC adapter fuse (2A) is a consumable. For replacement, purchase
a new fuse at a local automobile supply shop.
Refer to the FOMA DC Adapter 01/02 user’s guide for details.
Charging by using desktop holder
Connector
(Face the side with
the arrows up)
FOMA AC Adapter
01/02
100V AC
outlet
3
Charging LED
1
2
Charging with the desktop holder stood up
Charging becomes available with the desktop holder stood up by using
the stand behind the desktop holder.
Do not force to make the stand behind stand up.
Page 39

49
Before Using the Handset
1
In the Custom menu, select [Settings]/[General
settings]/[Check status]/[Battery level].
: Wait approximately 2 seconds and the display disappears.
: The battery level sound is heard at the volume set in Key/Touch
sound (nP. 96).
[Battery empty. Unsaved data will be lost. Ending current
operation] appears if battery starts to run out (Select
[Agree] to clear the message). After a while, an alert tone
sounds. The warning screen stating that the battery runs
out appears, handset operations are disabled and power turns off after
approximately 60 seconds.
During a voice/Videophone call, the alert tone sounds and [Battery
empty. Unsaved data will be lost. Ending current operation] appears. The
call is disconnected after approximately 20 seconds. At the same time,
the screen above appears and after approximately 60 seconds, the
power turns off.
Alert tone does not sound when Manner mode or Public mode (Drive
mode) is set (Alert tone sounds during a call).
Pull the AC adapter out of the outlet when left unused for a long period
of time.
When Charge start sound is not heard or when charging LED does not
illuminate, check that the FOMA terminal is placed securely in the
desktop holder (except when terminal is turned off, Manner mode is set
or Charge start sound is Silent).
When placing the FOMA terminal in the desktop holder, be careful that
the strap is not caught in between the handset and the desktop holder.
Battery level
Checking battery level
"
Battery level is still sufficient.
#
Battery level is low.
$
Battery is almost empty. Charge the battery.
%
Battery is empty (Power will turn off soon).
{
Battery pack is being charged.
Checking battery level with sound and display
Graphic
Sound Three beeps Two beeps One beep
Status
Battery is
sufficiently full.
Battery is
running low.
Battery is almost
empty. Charge
the battery.
If battery runs out
Page 40

50
Before Using the Handset
1
Press H (for 2+ seconds).
: It may take some time for the wakeup screen to appear.
: The wakeup screen appears followed by the initial settings screen.
Proceed to Initial setting (nP. 50).
: If initial settings have been completed, the
screen shown on the right appears when power
is turned on. This screen is called the “stand-by
display”.
Welcome mail
: “Welcome$ΟιͺΣι%&”
(Welcome$Decome-Anime%&) and “ݢ௸
༭ȶςͺιȜσȷմඤ” (Information of
Early Warning “Area Mail”) are saved by
default.
: To check a welcome mail: In stand-by, select
the stock icon C (mail message).
• For details on the following operations
nP. 143
1
Press H (for 2+ seconds).
: It may take some time for the power to be turned off (The end screen
appears on the display until the power is turned off).
1
In the Custom menu, select [୭]/[๊֚୭]/
[Bilingual]/[English].
: To switch the display language from English to Japanese: In the
Custom menu, select [Settings]/[General settings]/[Select
language]/[ུࢊ].
The initial settings screen appears automatically when the power
is turned on for the first time. Each setting item can also be set
from Menu (When the initial settings are complete, the stand-by
display appears).
When items that have not been set remain, the setting screen appears
every time the power is turned on.
1
Set the date and time (nP. 51).
2
Register a terminal security code (nP. 113).
3
Set the Key/Touch sound (nP. 96).
Power ON/OFF
Turning power ON/OFF
Turning power ON
If initial settings are not yet completed, the setting screen appears every
time the power is turned on.
If the FOMA card is not inserted, [Insert UIM] and a FOMA card error
appear (nP. 30).
When [Enter PIN1 code] appears, enter the PIN1 code (nP. 114).
When a FOMA card is replaced with a new card, the terminal security
code (four to eight digits) must be entered after turning on the terminal.
If a correct terminal security code is entered, stand-by display appears.
When a wrong terminal security code is entered five times, the power is
turned off. However, turning on the power again is possible.
When A appears, the handset is outside the service area or in a place
with no signal. Move to a place where the icon disappears.
Stand-by display
Turning power OFF
Select language
Changing screen display to English
If a FOMA card is inserted, settings are saved to the FOMA card as
well. When the setting of the FOMA terminal handset and the setting of
the inserted FOMA card are different, the setting in the FOMA card is
prioritized.
Initial setting
Making initial setting
Date and time settings Change terminal security code
Key/Touch sound Location request menu
Font size settings
Page 41

51
Continued on next page
Before Using the Handset
4
Set GPS Location provision ON/OFF (nP. 304).
5
Set the font size (nP. 109).
: When the initial settings are complete, the software update function
confirmation screen appears. Read the description and select
[Agree] (When the initial settings are made from the menu or the
software update is set to other than [auto-update], the confirmation
screen does not appear).
Set the date and time on the FOMA terminal.
1
In the Custom menu, select
[Settings]/[General settings]/[Date
settings].
2
Select the [Auto time correction] field/select the
setting.
; Select [ON]/[Complete].
; Select [OFF]/select the [Date] field/enter the date/[OK]/
select the [Time] field/enter the time (24-hour format)/[OK]/
[Complete].
• When entering month, day and time, add 0 before numbers one
through nine (example: 01, 02, 03, etc.).
• Set the date and time from 00:00 January 1, 2001 to 23:59
December 31, 2050.
Press H to cancel the initial settings.
Date settings
Setting date and time
When Limit settings is set to [Enable], the terminal security code must
be entered in the Date settings.
The date and time that are set are saved even if the battery pack is
removed, but if the battery pack remains removed for approximately 30
seconds or more, the settings are reset. Also, if the battery remains
empty, the settings may be reset. When this happens, set again after
charging the battery.
If the date and time are not set correctly, the following functions cannot
be used properly.
Redial, Received calls Auto power ON/OFF
Alarm Schedule
SSL (authentication) i-appli Auto start
Starting i-appliDX Reception, Recording
Machi-chara Software update
Pattern definitions update
Record message (voice), Record message (Videophone calls)
Camera image titles/shooting date
Playback of i-motion or music data with expiration date/period for
replay
View of e-books/e-dictionaries/e-comics with expiration date/period
for browse
When Auto time correction is set to [ON]
When the power is turned on, the FOMA terminal adjusts the time by
connecting to the network’s time information.
If the FOMA terminal does not adjust the time even when the power is
turned on, turn off the power and restart.
Time may not be adjusted depending on the signal status.
Time may be off by a few seconds.
When time difference is adjusted overseas, the local time and date and
! appear in Redial, Received calls, Received/Sent messages history
(SMS only), and Received/Sent messages list. The received/sent
messages are not displayed in order of the displayed time and date but
the mail reception/send.
! does not appear in the Unsent messages for mail messages. If the
date order display is set for the Unsent messages, unsent messages
are displayed in the order of the displayed time and date.
Time correction may not be performed depending on the overseas
network.
Page 42

52
Before Using the Handset
ɡ Changing time zone manually <City>
1
In the Date settings screen, select the [Auto time
correction] field/[OFF]/[City].
2
Select a time zone/select a city/[Complete].
Display your number (caller ID) on the other party’s phone
(display) when making a voice/Videophone/PushTalk call.
Handset number (caller ID) is important personal information. Be very
careful about your caller ID setting.
The Notify caller ID function is available only on compatible phone
devices.
1
In the Custom menu, select [Settings]/[NW
Services]/[Notify caller ID].
2
Select [Activate/Deactivate].
: To check the setting: Select [Check setting].
3
Select the setting.
: To notify caller ID: Select [Yes].
: To not notify caller ID: Select [No].
When checking your own phone number during a call nP. 55
1
In the Custom menu, select [Phone]/[Owner
Information].
: Alternatively, press 0 in the Horizontal display menu.
: To switch between Number A and Number B (when 2in1 [Dual mode]
is used): Select [Number A]/[Number B].
During overseas use, Japan time and local time (or time set in City)
appear in the dual display except for the following cases.
When Auto time correction is set to [ON] and time correction
information is not being received from an overseas network
When Auto time correction is set to [OFF] and City is set to the city in
the same time zone as Japan
Notify caller ID
Notifying the other party of your phone
number
Setting Notify caller ID/No caller ID in advance
Notify caller ID setting cannot be set from outside the service area.
Own number
Checking your own phone number
When changing the Number B of 2in1, use any of the following methods
to obtain the correct Number B.
Set 2in1 function OFF and then perform 2in1 setting again to set
2in1 function ON
Check the 2in1 subscription
When a FOMA card exchange (2in1 subscriber b 2in1 nonsubscriber)
is performed, set 2in1 function OFF.
When a FOMA card exchange (2in1 subscriber b 2in1 subscriber) is
performed, check the 2in1 subscription.
For details on Owner information nP. 382
Page 43

429
Overseas Use
Outline of international roaming (WORLD WING) . . . . . . . . . . . . . . . . .430
Available services overseas . . . . . . . . . . . . . . . . . . . . . . . . . . . . . . . . . . 431
Before use overseas . . . . . . . . . . . . . . . . . . . . . . . . . . . . . . . . . . . . . . . . 431
Making a call at your country of stay. . . . . . . . . . . . . . . . . . . . . . . . . . . . 434
Receiving a call overseas . . . . . . . . . . . . . . . . . . . . . . . . . . . . . . . . . . . .435
Setting network communication system . . . . . . . . . . <3G/GSM setting>435
Setting a search method of telecommunications carrier
. . . . . . . . . . . . . . . . . . . . . . . . . . . . . . . . . . . <Network search mode>436
Setting a telecommunications carrier to preferentially connect to
. . . . . . . . . . . . . . . . . . . . . . . . . . . . . . . . . . . . . . . . . . <PLMN setting>436
Displaying a telecommunications carrier during roaming
. . . . . . . . . . . . . . . . . . . . . . . . . . . . . . . . . . . . .<Operator name disp>437
Activating roaming guidance. . . . . . . . . . . . . . . . .<Roaming guidance>437
Setting incoming call to reject during roaming . . . . . . . . <Call barring>437
Using Missed Call Notice function during roaming
. . . . . . . . . . . . . . . . . . . . . . . . . . . . . . . . . . . . . .<Missed Call Notice>438
Using network services during roaming . . . . . . . . . . . . . <Int’l services>438
Page 44

430
Overseas Use
International roaming (WORLD WING) is a service that enables
you, using overseas telecommunications carrier’s networks, to
make calls and use i-mode.
Use this FOMA terminal for voice/Videophone calls, i-mode and
SMS with the phone number and mail address used in Japan.
Network services such as Voice Mail and Call Forwarding
Services can also be used.
This service is available in the 3G network and GSM/GPRS network
service areas. Refer to the DOCOMO “International Services website” for
details on the area.
By default, the FOMA terminal is set to automatically switch networks
(nP. 436).
Refer to the following before using the FOMA terminal overseas.
“Mobile Phone User’s Guide [International Services]”
“Mobile Phone User’s Guide [Network Services]”
PDF file “٬ٸ၌ဥ΄ͼΡ” pre-installed in [My Documents] of Data
box
Country codes of major countries
The following shows “Country code” used when making international calls
(nP. 61) or setting International dial assist (nP. 62).
For other country codes and details, refer to the DOCOMO “International
Services website”.
Outline of international roaming
(WORLD WING)
Country/Region Code Country/Region Code
Australia 61 Maldives 960
Austria 43 Netherlands 31
Belgium 32 New Caledonia 687
Brazil 55 New Zealand 64
Canada 1 Norway 47
China 86 Peru 51
Czech 420 Philippines 63
Egypt 20 Russia 7
Fiji 679 Singapore 65
Finland 358 South Korea 82
France 33 Spain 34
Germany 49 Sweden 46
Greece 30 Switzerland 41
Hong Kong 852 Tahiti
(French Polynesia)
689
Hungary 36
India 91 Taiwan 886
Indonesia 62 Thailand 66
Italy 39 Turkey 90
Japan 81 U.K. 44
Macau 853 U.S.A. 1
Malaysia 60 Vietnam 84
Page 45

431
Continued on next page
Overseas Use
The available communication services overseas are as follows.
*1 When the 2in1 is used, calling from Number B is not available overseas.
*2 When Multi Number is used, calling from Additional Number is not
available overseas.
*3 Overseas use settings for i-mode is required.
*4 i-Channel setting is required. Packet transmission charges are incurred
for each i-Channel reception (including Basic channel).
*5 Overseas use settings for i-concier is required. Packet transmission
charges are incurred for each information reception.
*6 Setting for i-Widget roaming is required. Multiple Widget appli may
attempt transmission when i-Widget screen appears. In such case,
packet transmission charges are incurred for each transmission.
*7 Unable to use 64K data communication by connecting a PC, etc.
The following items must be checked before departure, at your
country of stay, and after homecoming.
Prepare below in Japan before using the FOMA terminal overseas.
ɡ About contract
If subscribed to the FOMA service after September 1, 2005, a
subscription for “WORLD WING” is not required. However, if a
subscription for “WORLD WING” is canceled at or after a subscription for
the FOMA service, a subscription for “WORLD WING” is required again.
Available services overseas
Communication
service
Explanation 3G GSM GPRS
Voice call
*1, 2
Make or receive calls in your
country of stay or make
international calls to Japan or to
other countries with the same
phone number as used in Japan
while abroad.
AAA
Videophone
*1, 2
Make international Videophone
calls to users of the specified 3G
telecommunications carriers
overseas and FOMA users in
Japan.
ABB
i-mode mail Send or receive i-mode mail
overseas with the same address
as used in Japan.
ABA
i-mode
*3
Use i-mode overseas. ABA
i-Channel
*3, 4
Use i-Channel overseas. ABA
i-concier
*5
Use i-concier overseas. ABA
i-Widget
*6
Use i-Widget overseas. ABA
SMS Send or receive SMS overseas
with the same phone number as
used in Japan.
AAA
Packet
transmission
by connecting
a PC, etc.
*7
Use packet transmission
overseas.
ABA
Some services are not available depending on the telecommunications
carrier or network. Refer to the DOCOMO “International Services
website” for information on available countries and regions, and
telecommunications carriers.
Overseas packet transmission charges differ from those in Japan (Free
call in Japan does not apply).
םๅཱུ for SH (J-E Speech Translation for SH) is
available overseas (nP. 267).
GPS function is not available overseas. An error screen appears and
packet transmission charges are incurred when the site of GPS Service
settings is accessed overseas.
Before use overseas
Preparation before departure
Page 46

432
Overseas Use
If subscribed to the FOMA service before August 31, 2005 but not
subscribed to “WORLD WING”, a subscription for “WORLD WING” is
required. Some payment plans are not available.
Insert the WORLD WING compatible FOMA card (other than blue) to the
FOMA terminal (nP. 41).
ɡ About charging batteries
Precautions for handling the AC adapter nP. 16
Methods for charging the AC adapter nP. 45
ɡ About browsing i-mode sites
To browse i-mode site overseas, the settings for overseas use must be
made from iMenu in advance.
i-mode site: Select [iMenu]/[English]/[Options]/[International
Settings]/[i-mode services Settings].
Refer to “Mobile Phone User’s Guide [International Services]” and
“Mobile Phone User’s Guide [i-mode] FOMA version” for details.
ɡ About setting network service
If subscribed to network services, Voice Mail Service, Call Forwarding
Service or other services can be used overseas.
Some network services may not be set or checked depending on
overseas telecommunications carrier. In addition, some network services
are available only in Japan. Refer to “Mobile Phone User’s Guide
[International Services]” and “Mobile Phone User’s Guide [Network
Services]” before departure.
To use network services overseas, set Remote Control (nP. 422,
P. 438) to “Activate”.
ɡ About inquiries overseas
For lost, stolen, and cost settlement, or malfunction of the FOMA terminal
overseas, refer to “Loss or theft of FOMA terminal or payment of cumulative
cost overseas” or “Failures encountered overseas” on the back of this
manual. Note that any call or transmission charges incurred after the FOMA
terminal is lost or stolen are charged to the subscriber.
Add the “International call access code (Table 1)” or “International prefix
number for the universal number (Table 2)” that is assigned to your
country of stay, to the head of your phone number for inquiries.
For the latest information of the international call access code and the
international prefix number for the universal number, refer to the
DOCOMO “International Services website”.
International call access codes of major countries (Table 1)
The following shows the International call access codes of major countries.
Communication charges to Japan will apply.
Country/Region Code Country/Region Code
Australia 0011 Monaco 00
Belgium 00 Netherlands 00
Brazil 0021/
0014
New Zealand 00
Norway 00
Canada 011 Philippines 00
China 00 Poland 00
Czech 00 Portugal 00
Denmark 00 Russia 810
Finland 00 Singapore 001
France 00 South Korea 001
Germany 00 Spain 00
Greece 00 Sweden 00
Hong Kong 001 Switzerland 00
Hungary 00 Taiwan 002
India 00 Thailand 001
Indonesia 001 Turkey 00
Ireland 00 U.A.E. 00
Italy 00 U.K. 00
Luxemburg 00 U.S.A. 011
Macau 00 Vietnam 00
Malaysia 00
Page 47

433
Overseas Use
International prefix number for the universal number (Table 2)
The following shows the International prefix number for the universal
number of each country.
Communication charges or other charges to your country of stay will
apply.
Communication charges to your country of stay will apply when calling
from the mobile phone.
Some codes may not be used.
Note that the universal number may not be used for calls from a mobile
phone, payphone or hotel.
The universal number can be used only for countries listed above.
Calling from a hotel may cost you extra call charges requested by the
hotel (You are responsible for the call charges). Confirm with the hotel
before making calls.
The service is available in the 3G network and GSM/GPRS network service
areas.
The FOMA terminal is set to automatically search for the network when the
power is turned on, and to be connected to the available
telecommunications carrier in your country of stay.
When Auto time correction (nP. 51) is set to [ON], if information with
time and time differences is received from overseas telecommunications
carrier which is being connected, time and time differences on the FOMA
terminal clock are corrected. The correction timing differs depending on
the telecommunications carrier.
Auto time correction may not be available overseas. In such case,
correct the time manually (nP. 51).
If the connected telecommunications carrier is changed when Auto time
correction is set to [ON], a screen notifying that time difference is
adjusted may appear.
When Operator name display (nP. 437) is set to [Display on], the
telecommunications carrier connected appears in stand-by.
When Clock display (nP. 100) is set to [ON(Large)], the local time and
Japan time appear (excluding regions keeping the same standard time
as Japan time).
Talk time or stand-by time may be reduced to half the normal time
depending on the network condition of your country of stay.
By default, the FOMA terminal is set to automatically search for the network
and to be connected to the FOMA network when the power is turned on
after homecoming.
If the Network search mode is set to [Manual], switch to the FOMA
network (DOCOMO) manually or change to [Auto].
Set the 3G/GSM setting to [AUTO] or [3G].
Country/Region Code Country/Region Code
Argentina 00 Luxemburg 00
Australia 0011 Malaysia 00
Austria 00 Netherlands 00
Belgium 00 New Zealand 00
Brazil 0021 Norway 00
Bulgaria 00 Peru 00
Canada 011 Philippines 00
China 00 Portugal 00
Columbia 009 Singapore 001
Denmark 00 South Africa 09
Finland 990 South Korea 001
France 00 Spain 00
Germany 00 Sweden 00
Hong Kong 001 Switzerland 00
Hungary 00 Taiwan 00
Ireland 00 Thailand 001
Israel 014 U.K. 00
Italy 00 U.S.A. 011
Using at your country of stay
Setting after homecoming
Page 48

434
Overseas Use
Make a call from overseas using the international roaming
service.
Make a call from your country of stay to Japan or other countries.
1
In stand-by, press s/keep touching [0(+)]/enter
country code, area code (city code) and other party’s
phone number.
: When the area code (city code) begins with 0, omit the 0 when
dialing (However, include 0 when making a call to landline phones in
some countries or regions such as Italy).
2
Select [B] or press s (Phone)/select [V.phone].
ɡ Making an international call outside your country of stay
using Country code conversion
Set Country code conversion (nP. 62) to [ON] and set the country code
frequently called to easily make an international call.
0 at the beginning of a phone number is automatically converted to the
country code set in Country code conversion.
Example: Make a call from phonebook
1
In the Stand-by Display Touch Launcher, select
[6]/select the other party.
2
Select [Phone] or press s (Phone)/select [V.phone].
3
Select [Call].
: To dial a phone number as stored in the phonebook: Select [Original
number].
ɡ Making a call to the phone in country saved in Set country
code
Save a country code using Set country code (nP. 63) to select a country
code before making an international call.
The following operation is available overseas only.
1
In stand-by, press s/enter a phone number/
[Submenu]/[Add prefix setting]/[International Call].
2
Select the country code.
3
Press s (Phone)/select [V.phone].
Make a domestic call at your country of stay in the same way as you do in
Japan.
1
In stand-by, press s/enter a phone number.
2
Press s (Phone)/select [V.phone].
: Always dial the area code (city code), even when the number is in the
same area.
: When making a domestic call at your country of stay using the
phonebook, select [Original number] in step 3 of “Making an
international call outside your country of stay using Country code
conversion” on P. 434.
Making a call at your country of stay
Making a call outside your country of stay
(including Japan)
Making a call in your country of stay
Refer to the DOCOMO “International Services website” for details on
available countries, country codes and telecommunications carriers.
Even when Notify caller ID of the network service (nP. 52) is set to
“Send ID”, [Unavailable] or [User unset] appears depending on the
telecommunications carrier, and the caller ID may not be displayed
correctly.
Page 49

435
Overseas Use
When making a call to a “WORLD WING” subscriber overseas, make an
international call to Japan regardless of your country of stay.
1
In stand-by, press s/keep touching [0(+)]/enter
country code 81 (Japan) and the other party’s mobile
phone number excluding 0.
2
Select [B] or press s (Phone)/select [V.phone].
Receive a call overseas in the same way as you do in Japan.
1
Press s to receive an incoming call.
: Speak to the caller.
ɡ Having calls made to your FOMA terminal from Japan
To receive an international call from Japan, have your phone number dialed
just as a domestic call in Japan.
090 (or 080)-XXXX-XXXX
Calling from Received calls may not be available since the phone
number may not be displayed correctly.
ɡ Having calls made to your FOMA terminal from countries
other than Japan
Have the international call access code and 81 (Japan) added to the
beginning of your phone number, and 0 excluded as an international call to
Japan regardless of your country of stay.
International call access code of the country of the caller-81-90 (or
80)-XXXX-XXXX
Set the communication system supporting your area and
telecommunications carrier.
1
In the Custom menu, select [Settings]/[Phone
settings]/[Other settings]/[International Roam.]/
[3G/GSM setting].
2
Select the communication method.
Making a call to a WORLD WING subscriber
overseas
Receiving a call overseas
Even when a caller tried to notify of caller ID, it might not be notified
depending on the used telecommunications carrier.
When a call is received during international roaming, the call is
forwarded from Japan. Call charges to Japan are incurred by the caller
and receiving charges by the receiver.
Having calls to your FOMA terminal
3G/GSM setting
Setting network communication system
Page 50

436
Overseas Use
Set to manually select a telecommunications carrier.
Re-search a network to set another telecommunications carrier.
Check that the Network search mode is set to [Auto] when A appears
even after homecoming.
If telecommunications carrier is selected with [Manual] set abroad,
manually set to the FOMA network (DOCOMO) again or change to [Auto]
after homecoming.
1
In the Custom menu, select [Settings]/[Phone
settings]/[Other settings]/[International Roam.]/
[Network search mode].
2
Select the setting.
; Select [Auto]/[Yes].
• When [Auto] is set: Select [Auto].
; Select [Manual]/select a telecommunications carrier.
• The telecommunications carrier is changed.
; Select [Network re-search].
• The host network is changed automatically if the Network search
mode is set to [Auto]. If set to [Manual], select a
telecommunications carrier.
Check the status whether making a call, data transmission or packet
transmission is available.
1
In the Custom menu, select [Settings]/[Phone
settings]/[Other settings]/[In-area status]/[Agree].
Specify the priority order of telecommunications carriers
connected to when the Network search mode is set to [Auto].
Save up to 20.
1
In the Custom menu, select [Settings]/[Phone
settings]/[Other settings]/[International Roam.]/
[Network search mode]/[PLMN setting].
: To check the saved telecommunications carrier’s detailed
information: Select the telecommunications carrier.
2
Point the cursor to the priority order/[Submenu].
3
Select the saving method.
; Select [PLMN manual select]/enter a country code (MCC)/
[OK]/enter a network code (MNC)/[OK]/select a
communication method.
; Select [UPLMN by list]/select a telecommunications carrier/
select a communication method.
• To search a telecommunications carrier from country name: Select
[UPLMN by list]/[Search]/select a country name/select a
telecommunications carrier/select a communication method.
; Select [Set VPLMN to PLMN].
• Save the telecommunications carrier currently connected to.
; Select [Change priority]/select a destination.
; Select [Delete]/[Delete one].
; Select [Delete]/[Delete all]/enter the terminal security code/
[OK].
4
Select [Yes].
Network search mode
Setting a search method of
telecommunications carrier
Checking communication services available
<In-area status>
PLMN setting
Setting a telecommunications carrier to
preferentially connect to
Page 51

437
Overseas Use
Set whether to display a telecommunications carrier name
currently connected to in stand-by during international roaming.
1
In the Custom menu, select [Settings]/[Phone
settings]/[Other settings]/[International Roam.]/
[Operator name disp].
2
Select the setting/[Yes].
ɡ When displaying a telecommunications carrier
When a call is received during international roaming, the caller
hears the guidance stating that international roaming is
activated.
Make this setting while still in Japan.
1
In the Custom menu, select [Settings]/[Other NW
Services]/[Roaming guidance].
2
Select an item.
3
Select [Yes].
Set the FOMA terminal to reject calls during roaming. Select
whether to bar all incoming calls or only the Videophone and 64K
data communication calls.
Depending on the overseas telecommunications carrier, the setting
cannot be made.
Unable to use 64K data communication overseas.
1
In the Custom menu, select [Settings]/[Phone
settings]/[Other settings]/[International Roam.]/
[Call barring].
2
Select an item.
; Select [Activate]/[Yes]/select the barring method/enter the
network security code/[OK].
; Select [Deactivate]/[Yes]/enter the network security code/
[OK].
; Select [Check setting].
Operator name disp
Displaying a telecommunications
carrier during roaming
Roaming guidance
Activating roaming guidance
Telecommunications
carrier name
Call barring
Setting incoming call to reject during
roaming
Page 52

438
Overseas Use
When the FOMA terminal is outside the service area, turned off,
or a received call cannot be answered during International
roaming, the information of the call (Received date and time or
caller ID) is notified with SMS.
1
In the Custom menu, select [Settings]/[Phone
settings]/[Other settings]/[International Roam.]/
[Missed Call Notice].
2
Select an item.
; Select [Activate]/[Yes].
; Select [Deactivate]/[Yes].
; Select [Check setting].
Use network services such as Voice Mail and Call Forwarding
from overseas.
Set at a country to stay.
Voice Mail and Call Forwarding subscription are required to use Voice
Mail (Int.) and Call Forward (Int.).
To use network services overseas, set Remote Control (nP. 422) to
“Activate” in advance.
If operated from overseas, international call charges for your country of
stay are incurred.
1
In the Custom menu, select [Settings]/[Phone
settings]/[Other settings]/[International Roam.].
2
Select an item.
; Select [Voice Mail(Int.)]/select an item of Voice Mail Service.
; Select [Call Forward (Int.)]/select an item of Call Forwarding
Service.
; Select [Remote access (Int.)].
; Select [Caller ID req (Int.)].
; Select [Roam. guidance(Int.)].
; Select [MissedCallNoticeInt.].
3
Select [Yes]/operate according to the voice
guidance.
Missed Call Notice
Using Missed Call Notice function
during roaming
Int’l services
Using network services during roaming
Page 53

482
Appendix/Troubleshooting
Combine the FOMA terminal with various optional accessories
(sold separately) for expanded personal and business use.
Some products may not be available in certain areas.
Contact a docomo Shop or retailer for details.
Refer to the user’s guide of each product for more details.
*1 Refer to P. 43 for details on charging with an AC adapter.
*2 Connect Earphone Plug Adapter for External connector terminal
01 and Earphone Plug Adapter to use these options and
accessories.
*3 Connect Earphone Plug Adapter for External connector terminal
01 to use these options and accessories.
*4 The use of USB HUB may not work correctly.
*5 For use only in Japan.
*6 FOMA In-Car Hands-Free Cable 01 is required to charge and
connect with the USB cable.
*7 Activate Touch panel/Side key lock to use the In-Car Holder 01.
Play back movies saved on microSD Cards on the FOMA
terminal by using supported external devices.
*
microSD Cards are sold separately. Purchase microSD Cards
at home electronics shops (nP. 345).
For details on compatible devices, refer to http://
k-tai.sharp.co.jp/support/d/sh-04a/. Or, contact the number
below.
Play i-motion created on external devices (including music data in
AAC format) on the FOMA terminal (nP. 260).
* Some movies cannot be played back depending on the file format
or the type of external device.
Check the phone number carefully before dialing.
Introduction of options and related
devices
FOMA AC Adapter 01*1/02
*1
Battery Pack SH18
Back Cover SH29
Desktop Holder SH24
Earphone Terminal P001
*2
Flat-plug Stereo Earphone Set
P01
*3
Flat-plug Earphone/Microphone
with Switch P01
*3
/P02
*3
Stereo Earphone Set P001
*2
Earphone/Microphone with
Switch P001
*2
/P002
*2
Earphone/Microphone 01
Stereo Earphone Set 01
Earphone Plug Adapter P001
*3
Earphone Plug Adapter for
External connector terminal 01
Earphone Plug Adapter 01
FOMA USB Cable
*4
Wireless Earphone Set 02
FOMA AC Adapter 01 for Global
use
*1
FOMA DC Adapter 01/02
FOMA Indoor Booster Antenna
*5
In-Car Hands-Free Kit 01
*6
FOMA In-Car Hands-free Cable
01
In-Car Holder 01
*7
FOMA Dry Battery Adapter 01
Carry Case L 01
Bone conduction microphone/
receiver 01
*3
/02
FOMA USB Cable with Charge
Function 02
*4
FOMA Portable Charging
Adapter 01
FOMA Indoor Booster Antenna
(Stand Type)
*5
Interfacing to external devices
Sharp Data Communication Support Center
TEL: 03-5396-2351
Hours: 10:00 A.M. to 12:00 noon, 1:00 P.M. to 5:00 P.M.,
Monday through Friday
(Closed on weekends, national holidays, and company
holidays)
Page 54

515
e22_dz10_7e.fm
[515/520]
Appendix/Troubleshooting
This model phone SH-04A meets the MIC’s* technical regulation
for exposure to radio waves.
The technical regulation established permitted levels of radio frequency energy,
based on standards that were developed by independent scientific
organizations through periodic and thorough evaluation of scientific studies. The
regulation employs a unit of measurement known as the Specific Absorption
Rate, or SAR. The SAR limit is 2 watts/kilogram (W/kg)
**
averaged over ten
grams of tissue. The limit includes a substantial safety margin designed to
assure the safety of all persons, regardless of age and health. The value of the
limit is equal to the international guidelines recommended by ICNIRP
***
.
All phone models should be confirmed to comply with the regulation, before
they are available for sale to the public. The highest SAR value for this
model phone is 0.928 W/kg. It was taken by the Telecom Engineering
Center (TELEC), a Registered Certification Agency on the Radio Law. The
test for SAR was conducted in accordance with the MIC testing procedure
using standard operating positions with the phone transmitting at its highest
permitted power level in all tested frequency bands. While there may be
differences between the SAR levels of various phones and at various
positions, they all meet the MIC’s technical regulation. Although the SAR is
determined at the highest certified power level, the actual SAR of the phone
during operation can be well below the maximum value.
For further information about SAR, please see the following websites:
Specific Absorption Rate (SAR) of
mobile phone
World Health Organization (WHO)
http://www.who.int/peh-emf/
ICNIRP
http://www.icnirp.de/
MIC
http://www.tele.soumu.go.jp/e/ele/body/index.htm
TELEC
http://www.telec.or.jp/ENG/Index_e.htm
NTT DOCOMO
http://www.nttdocomo.co.jp/english/product/
SHARP Corporation
http://www.sharp.co.jp/products/menu/phone/cellular/sar/index.html
* Ministry of Internal Affairs and Communications
** The technical regulation is provided in Article 14-2 of the Ministry
Ordinance Regulating Radio Equipment.
*** International Commission on Non-Ionizing Radiation Protection
European RF Exposure Information
Your mobile device is a radio transmitter and receiver. It is designed not to
exceed the limits for exposure to radio waves recommended by international
guidelines. These guidelines were developed by the independent scientific
organization ICNIRP and include safety margins designed to assure the
protection of all persons, regardless of age and health.
The guidelines use a unit of measurement known as the Specific Absorption
Rate, or SAR. The SAR limit for mobile devices is 2 W/kg and the highest
SAR value for this device when tested at the ear was 0.683 W/kg
*
.
As SAR is measured utilizing the devices highest transmitting power the
actual SAR of this device while operating is typically below that indicated
above. This is due to automatic changes to the power level of the device to
ensure it only uses the minimum level required to reach the network.The
World Health Organization has stated that present scientific information
does not indicate the need for any special precautions for the use of
mobile devices. They note that if you want to reduce your exposure then
you can do so by limiting the length of calls or using a hands-free device to
keep the mobile phone away from the head.
* The tests are carried out in accordance with international guidelines for
testing.
Hereby, Sharp Telecommunications of Europe Ltd, declares
that this SH-04A is in compliance with the essential
requirements and other relevant provisions of Directive
1999/5/EC.
A copy of the original declaration of conformity can be
found at the following Internet address:
http://www.sharp.co.jp/k-tai/
Declaration of Conformity
e22_dz10_7e.fm 515 ページ 2008年12月25日 木曜日 午前11時12分
Page 55

516
e22_dz10_7e.fm
[516/520]
Appendix/Troubleshooting
Information to User
This equipment has been tested and found to comply with the limits of a
Class B digital device, pursuant to Part 15 of the FCC Rules. These limits
are designed to provide reasonable protection against harmful interference
in a residential installation. This equipment generates, uses and can radiate
radio frequency energy and, if not installed and used in accordance with the
instructions, may cause harmful interference to radio communications.
However, there is no guarantee that interference will not occur in a
particular installation; if this equipment does cause harmful interference to
radio or television reception, which can be determined by turning the
equipment off and on, the user is encouraged to try to correct the
interference by one or more of the following measures:
1. Reorient/relocate the receiving antenna.
2. Increase the separation between the equipment and receiver.
3. Connect the equipment into an outlet on a circuit different from that to
which the receiver is connected.
4. Consult the dealer or an experienced radio/TV technician for help.
FCC RF Exposure Information
Your handset is a radio transmitter and receiver.
It is designed and manufactured not to exceed the emission limits for
exposure to radio frequency (RF) energy set by the Federal
Communications Commission of the U.S. Government.
The guidelines are based on standards that were developed by independent
scientific organisations through periodic and thorough evaluation of
scientific studies. The standards include a substantial safety margin
designed to assure the safety of all persons, regardless of age and health.
The exposure standard for wireless handsets employs a unit of
measurement known as the Specific Absorption Rate, or SAR. The SAR
limit set by the FCC is 1.6 W/kg.
The tests are performed in positions and locations (e.g., at the ear and worn
on the body) as required by the FCC for each model. The highest SAR
value for this model handset when tested for use at the ear is 0.685 W/kg
and when worn on the body, as described in this user guide, is 0.582 W/kg.
Body-worn Operation; This device was tested for typical body-worn
operations with the back of the handset kept 1.5 cm from the body. To
maintain compliance with FCC RF exposure requirements, use accessories
that maintain a 1.5 cm separation distance between the user’s body and the
back of the handset. The use of beltclips, holsters and similar accessories
should not contain metallic components in its assembly.
The use of accessories that do not satisfy these requirements may not
comply with FCC RF exposure requirements, and should be avoided.
The FCC has granted an Equipment Authorization for this model handset
with all reported SAR levels evaluated as in compliance with the FCC RF
emission guidelines. SAR information on this model handset is on file with
the FCC and can be found under the Display Grant section of http://
www.fcc.gov/oet/fccid after searching on FCC ID APYHRO00088.
Additional information on Specific Absorption Rates (SAR) can be found on
the Cellular Telecommunications & Internet Association (CTIA) Website at
http://www.phonefacts.net.
The Japan Export Administration Regulations (“Foreign
Exchange and International Trade Law” and its related laws) will
be applied to this product and its accessories under certain
conditions. The Export Administration Regulations are also
applied. To export or reexport this terminal and its accessories,
conduct all legally required procedures at your own risk and
expense. For details on the procedures, contact the Ministry of
Economy, Trade and Industry or the US Department of
Commerce.
FCC Notice
This device complies with part 15 of the FCC Rules.
Operation is subject to the following two conditions:
(1) This device may not cause harmful interference, and (2) this device
must accept any interference received, including interference that may
cause undesired operation.
Changes or modifications not expressly approved by the manufacturer
responsible for compliance could void the user’s authority to operate
the equipment.
Export Administration Regulations
e22_dz10_7e.fm 516 ページ 2008年12月25日 木曜日 午前10時41分
Page 56

509
Continued on next page
Appendix/Troubleshooting
Data with third party copyrights such as text, images, music and software
that is downloaded or acquired via Internet web pages, shot by the
FOMA terminal, or acquired from TV or other video cannot be duplicated,
altered or publicly transmitted without rightful party’s consent. Only
duplicating, quoting, etc. for personal use is permitted under copyright
laws.
Even if for personal use, filming and recording may be prohibited for
demonstrations, performances and exhibitions.
Also, shooting another’s image or posting another’s image on Internet
web pages without their consent may constitute a violation of one’s right
to their image.
“FOMA”, “mova”, “ToruCa”, “PushTalk”, “PushTalkPlus”, “mopera”,
“mopera U”, “FirstPass”, “Chara-den”, “Deco-mail”, “Chaku-motion”,
“i-motion mail”, “i-appli”, “i-appliDX”, “i-motion”, “i-mode”, “i-Channel”,
“iD”, “DCMX”, “WORLD WING”, “Public mode”, “DoPa”, “WORLD CALL”,
“Dual Network”, “visualnet”, “V-live”, “Security Scan”, “musea”,
“sigmarion”, “OFFICEED”, “IMCS”, “i-area”, “2in1”, “Chokkan Game”, the
“i-mode” logo, the “FOMA” logo, the “i-appli” logo, the “DCMX” logo, the
“iD” logo, the “HIGH-SPEED” logo are trademarks or registered
trademarks of NTT DOCOMO, INC.
Free Dial logo mark is a registered trademark of NTT Communications
Corporation.
Catch Phone (Call Waiting) is a registered trademark of Nippon
Telegraph and Telephone Corporation.
Multitask is a registered trademark of NEC Corporation.
This product is equipped with NetFront Browser, NetFront Sync Client
and NetFront Browser DTV Profile Wireless Edition by ACCESS Co., Ltd.
for an internet browser or other application software.
This product adopts Media: specifications of ACCESS CO., Ltd. for
activating broadcasting contents.
Copyright © 1996-2008 ACCESS CO., LTD.
ACCESS, NetFront and Media: are trademarks or registered trademarks
of ACCESS Co., Ltd. in the United States, Japan and other countries.
Microsoft
®
, Windows®, Windows Vista®, PowerPoint® and Windows
Media
®
are trademarks or registered trademarks of Microsoft
Corporation in the U.S.A. and other countries.
Microsoft Excel and Microsoft Word are product names of Microsoft
Corporation in the U.S.A.
Java and all Java-based trademarks and logos are trademarks or
registered trademarks of Sun Microsystems, Inc. in the U.S.A. and other
countries.
QuickTime is a registered trademark of Apple Inc., in the US and other
countries.
QR code is a registered trademark of Denso Wave Inc.
microSDHC Logo is a trademark.
Powered by JBlend™ Copyright 2002-2008 Aplix Corporation.
All rights reserved.
JBlend and JBlend related trademarks are registered
trademarks or trademarks of Aplix Corporation in Japan and
other countries.
Intellectual property rights
Copyrights and rights of portrait
Registered trademarks and trademarks
This product includes software licensed from Symbian
Software Ltd.
Symbian, Symbian OS and other associated Symbian marks are all
trademarks of Symbian Software Ltd.
© 1998-2008 Symbian Software Ltd. All rights reserved.
Page 57

510
Appendix/Troubleshooting
“AXISFont” is a trademark of AXIS Inc. in Japan.
This handset features LCFONT, developed by Sharp Corporation, to
make the LCD easier to view and read. LCέϋΠ/LCFONT and
are registered trademarks of Sharp Corporation.
Heisei font is an intellectual property of Font Development and Promotion
Center of Japanese Standards Association, and “SH Heisei Mincho” is a
font developed by DynaComware Corp. with a license.
DynaFont is a registered trademark of DynaComware Taiwan Inc.
McAfee
®
is registered trademarks or trademarks of McAfee, Inc. and/or
its affiliates in the U.S.A. and other countries.
G΄ͼΡ, G-GUIDE, G΄ͼΡκΨͼσ, G-GUIDE
MOBILE and the G-GUIDE related logos are registered
trademarks of Gemstar-TV Guide International, Inc. and/
or its affiliates in Japan.
Google and Google Map for Mobile are trademarks of Google Inc.
IrSimple™, IrSS™ or IrSimpleShot™ are trademarks of Infrared Data
Association
®
.
ˢ˟˽, which uses non-contact IC card technology, was created
by Sony Corporation.
ˢ˟˽ is a registered trademark of Sony Corporation.
b is a registered trademark of FeliCa Networks, Inc.
Napster is a registered trademark of Napster, LLC. and/or its affiliates in
the US and/or other countries.
Dolby and the double-D symbol are registered trademarks of Dolby
Laboratories.
FlashFX
®
Pro™ is a trademark or registered trademark of the Datalight,
Inc. in the US.
(U.S.Patent Office 5,860,082/6,260,156)
PhotoSolid
®
, FaceSolid™, FrameSolid®, ImageScouter™, and
ImageSurf™ are the trademarks or the registered trademarks of Morpho,
Inc.
“AQUOSΉȜΗͼ”, “Desktop clock”, “VeilView”, “Egao focus shutter”,
“Furimuki shutter”, “Shotdeco”, “Wakeup TV”, “Stand-by Display Touch
Launcher”, “Long Touch Menu”, “Quick Settings”, and “Quick Stand-by
Display Setting” are trademarks or registered trademarks of Sharp
Corporation.
All other company names and product names are trademarks or
registered trademarks of the respective companies.
Under the MPEG-4 Visual Patent Portfolio License, customers have
licensed permission for the following use of this product to engage in
non-profit personal use. Other uses are not permitted.
Encoding MPEG-4 standard video (henceforth referred to as MPEG-4
video).
Decoding an MPEG-4 video that a customer not engaged in personal
commercial activities has encoded.
Decoding an MPEG-4 video obtained from a licensed provider.
For details on other intended uses, contact MPEG LA, LLC.
This product is licensed under the MPEG-4 Systems Patent Portfolio
License for encoding in compliance with the MPEG-4 Systems Standard.
An additional license and payment of royalties are necessary in the
following cases.
Data stored or replicated in physical media which is paid for on a title
by title basis.
Data which is paid for on a title by title basis and is transmitted to an
end user for permanent storage and/or use.
Such additional license may be obtained from MPEG LA, LLC. Contact
MPEG LA, LLC for additional details.
Document Viewer is powered by Picsel
Technologies.
Picsel, Picsel Powered, Picsel Viewer, Picsel
Document Viewer and the Picsel cube logo are trademarks or registered
trademarks of Picsel Technologies and/or its affiliates.
Others
Page 58

511
Continued on next page
Appendix/Troubleshooting
This product is licensed under the AVC patent portfolio license for the
personal and noncommercial use of a consumer to (i) encode video in
compliance with the AVC standard (henceforth referred to as AVC video)
and/or (ii) decode AVC video that was encoded by a consumer engaged
in a personal and noncommercial activity and/or was obtained from a
video provider licensed to provide AVC video. No license is granted or
shall be implied for any other use. Additional information may be
obtained from MPEG LA, L.L.C.
See HTTP://WWW.MPEGLA.COM
This product is licensed under the VC-1 Patent Portfolio License for the
personal and noncommercial use of a consumer to (i) encode video in
compliance with the VC-1 standard (henceforth referred to as VC-1
video) and/or (ii) decode VC-1 video that was encoded by a consumer
engaged in a personal and noncommercial activity and/or was obtained
from a video provider licensed to provide VC-1 video. No license is
granted or shall be implied for any other use. Additional information may
be obtained from MPEG LA, L.L.C.
See HTTP://WWW.MPEGLA.COM
Contains Adobe
®
Flash® Lite™ and Adobe Reader
®
LE technology by Adobe Systems Incorporated
Adobe Flash Lite Copyright © 2003-2008 Adobe
System Incorporated. All rights reserved.
Adobe Reader LE Copyright © 1993-2007 Adobe Systems Incorporated.
All rights reserved.
Adobe, Adobe Reader, Flash, and Flash Lite are either registered
trademarks or trademarks of Adobe Systems Incorporated in the United
States and/or other countries.
This product includes modules developed by the Independent JPEG
Group.
This product uses the GestureTek technology.
Copyright © 2006-2008, GestureTek, Inc. All Rights Reserved.
This product is equipped with “Fugue” by Kyoto Software Research, Inc.
for a file system function.
Fugue ©1999-2008 Kyoto Software Research, Inc. All rights reserved.
Manufactured under license from Dolby Laboratories.
Bluetooth software stack of this product is developed by TOSHIBA
CORPORATION, and contains Toshiba Embedded Bluetooth Stack for
Symbian with the copyright of TOSHIBA CORPORATION.
Content owners use Windows Media digital rights management
(WMDRM) technology to protect their intellectual property, including
copyrights. This device uses WMDRM software to access
WMDRM-protected contents. If the WMDRM software fails to protect the
content, content owners may ask Microsoft to revoke the software’s
ability to use WMDRM to play or copy protected content. Revocation
does not affect unprotected content. When you download licenses for
protected content, you agree that Microsoft may include a revocation list
with the licenses. Content owners may require you to upgrade WMDRM
to access their content. If you decline an upgrade, you will not be able to
access content that requires the upgrade.
CP8 PATENT
This manual refers to each OS (Japanese version) as follows.
Windows Vista is an abbreviation of Windows Vista
®
(Home Basic,
Home Premium, Business, Enterprise, Ultimate).
Windows XP is an abbreviation of Microsoft
®
Windows® XP
Professional operating system or Microsoft
®
Windows® XP Home
Edition operating system.
Windows 2000 is an abbreviation of Microsoft
®
Windows® 2000
Professional operating system.
The Bluetooth word mark and logos are owned by Bluetooth SIG, Inc.
and any use of such marks by NTT DOCOMO, INC. is under license.
Other trademarks and trade names are those of their respective owners.
Page 59

512
Appendix/Troubleshooting
Internet dictionary embedded in this product uses the BSD license.
Copyright © 2002,2003, Stefan Haustein, Oberhausen, Rhld., Germany
All rights reserved
• Redistribution and use in source and binary forms, with or without
modification, are permitted provided that the following conditions
are met:
• Redistributions of source code must retain the above copyright
notice, this list of conditions and the following disclaimer.
Redistributions in binary form must reproduce the above copyright
notice, this list of conditions and the following disclaimer in the
documentation and/or other materials provided with the distribution.
• Neither the name of the <ORGANIZATION> nor the names of its
contributors may be used to endorse or promote products derived
from this software without specific prior written permission.
THIS SOFTWARE IS PROVIDED BY THE COPYRIGHT HOLDERS
AND CONTRIBUTORS “AS IS” AND ANY EXPRESS OR IMPLIED
WARRANTIES, INCLUDING, BUT NOT LIMITED TO, THE IMPLIED
WARRANTIES OF MERCHANTABILITY AND FITNESS FOR A
PARTICULAR PURPOSE ARE DISCLAIMED. IN NO EVENT SHALL
THE COPYRIGHT OWNER OR CONTRIBUTORS BE LIABLE FOR
ANY DIRECT, INDIRECT, INCIDENTAL, SPECIAL, EXEMPLARY, OR
CONSEQUENTIAL DAMAGES (INCLUDING, BUT NOT LIMITED TO,
PROCUREMENT OF SUBSTITUTE GOODS OR SERVICES;
LOSS OF USE, DATA, OR PROFITS; OR BUSINESS INTERRUPTION)
HOWEVER CAUSED AND ON ANY THEORY OF LIABILITY,
WHETHER IN CONTRACT, STRICT LIABILITY, OR TORT
(INCLUDING NEGLIGENCE OR OTHERWISE) ARISING IN ANY WAY
OUT OF THE USE OF THIS SOFTWARE, EVEN IF ADVISED OF THE
POSSIBILITY OF SUCH DAMAGE.
Page 60

526
Index/Quick Manual
Remove the Quick Manual attached to the end of this manual by cutting along the perforations and fold it as shown below.
Carry the Quick Manual “Overseas Use” when the mobile phone is used with the International Roaming (WORLD WING) overseas.
ɡ Folding Quick Manual
Be careful of injuries when cutting out the Quick Manual.
Quick Manual
How to use Quick Manual
(Completed)
<Cut here>
Cut along the perforations.
This manual is produced using recyclable material. Please recycle when no longer needed.
Page 61

<Cut here>
General Inquiries <docomo Information Center>
ɦ Service available in: English, Portuguese, Chinese, Spanish, Korean.
ɦ Available from mobile phones an d PHSs.
For DOCOMO mobile phones
(In Japanese only)
ɦ Unavailable from fixed-line telephones, etc.
For fixed-line telephones
(In Japanese only)
ɦ Available from mobile phones an d PHSs.
Please confirm the ph one number before you dial.
For DOCOMO mobile phones
(In Japanese only)
ɦ Unavailable from fixed-line telephones, etc.
For fixed-line telephones
(In Japanese only)
ɦ Available from mobile phones and PHSs.
Please confirm the phone n umber before you dial.
1 In the Stand-by Display Touch Launcher, select
[6]/[Submenu]/[New]/[Phone].
2 Enter a name/[OK]/9/enter a phone
number/[OK]/select a phone type icon/S/
enter a mail address/[OK]/select a mail
address type icon/[Complete]/[OK]/select
Add to PushTalk PB.
ɡ Other save items
Q : Group F : Secret code
a : Company/school < : Select ring tone
q : Department V : Mail ring tone
r : Title q : Called LED color
N : Postal code - : Called LED pattern
O : Postal address : : Mail/Message LED color
j : Location info + : Mail LED pattern
P : Birthday 8 : Picture call set
G : Memo 1 : Substitute image
; : Secret
1 In the Stand-by Display Touch Launcher, select
[2]/[1]/point the cursor to a phone number/
[Submenu]/[Add to phonebook]/[Save new to
phone]/add to the phonebook.
Quick Manual
Registration/Contacts
s
0120-005-250 (toll free)
r
(No prefix) 151 (toll free)
s
0120-800-000 (toll free)
SH-04
A
If you have problems with your FOMA
r
(No prefix) 113 (toll free)
s
0120-800-000 (toll free)
Adding entries to phonebook (Phone)
Adding entries to phonebook from
Redials/Received calls
1
In the Stand-by Display Touch Launcher, select
[6]/point the cursor to a name/[Submenu]/
[Edit data]/[Edit]/select an item/edit.
1 In the text input screen, select [Chara]/select
the input mode.
1 Enter a character/[YZA/a].
1 Point the cursor to the text and press z.
1 In the text input screen, select [Submenu]/
[Phrase(Hold F4)]/select a phrase/[OK].
1 In the text input screen, select [Pict/Sym].
: To enter symbols: Select [Symbol].
: To enter pictographs: Select [Pict].
: To switch between pictograph and Deco-mail
pictograph: Select [Pict]/[Pict-D].
: To switch between single- and double-byte symbols:
Select [Fulpitch]/[Hlfpitch].
1 In the text input screen, select [Submenu]/
[Emoticon(Hold F3)]/select an emoticon.
Ex.) When entering a message
1 In the text input screen, select [Submenu]/
[Copy]/[Cut]/move the cursor to the start
position/[Start].
2 Move the cursor to the end position/[Copy]/
[Cut].
3 Select [Submenu]/[Paste].
4 Move the cursor to the paste position/[Paste].
Ex.) ࣽΞΣΑ3শt
1 In the text input screen,
select [] (twice)/
[Conv]/[ࣽ].
: As each hiragana character is
entered, conversion
candidates appear and they
can be selected.
2 Select [Conv]/[].
3 Select [][][]/[1-tch]/[ΞΣΑ].
: Select [1-tch] for One-touch conversion.
4 Select [Chara]/[1]/[3].
Editing phonebook entries
Text input
Changing input mode
Switching upper/lower case
Deleting text
Using phrases
Entering pictographs/symbols
Entering emoticons
Cutting/Copying/Pasting text
Text input example
–1– –2–
–4––3– –5–
Page 62

<Cut here>
: Select [Chara] (five times) for single-byte
alphanumeric mode.
5 Select [Chara]/[]/[] (twice)/[YZA/a]/
[Conv]/[শ].
: Select [YZA/a] for dakuten mark.
6 Select [Pict/Sym]/t.
1 In the Custom menu, select [Settings]/[Disp/
LED/Power saver]/[Font style]/[Font style
setting]/select the font.
1 In the Custom menu, select [Settings]/[Disp/
LED/Power saver]/[Font style]/[Font size]/
[Individual setting]/select the [Input] field/
select the font size/[Yes].
: To change collectively: In stand-by, press 5 (for 1+
seconds).
1 In the Stand-by Display Touch Launcher, select
[#]/& (q)/& (q).
ɡ Shooting panoramic pictures
1 In the still picture shooting screen, select
[Submenu]/[Select size]/
[Panorama(2560×640)]/& (q)/move the FOMA
terminal to either direction of left or right/&
(q)/& (q).
1 In the still picture shooting screen, select
[Submenu]/[Switch camera-mode]/[Movie]/
& (q)/& (q)/[Save].
1 In the Custom menu, select [Data box]/[My
picture]/select a still picture.
1 In the Custom menu, select [Data box]/
[i-motion]/select a movie.
1 In the Custom menu, select [1Seg]/[Channel
setting].
2 Point the cursor to the save destination/
[Submenu]/[Auto channel set]/[Yes].
Changing font (font style)
Changing font size
Camera
Shooting still pictures
Shooting movies
Displaying still pictures
Playing back movies
Watching 1Seg
Performing Automatic channel setting
3 Select an area/select a prefecture/district/
[OK]/[Yes]/[Yes].
1 In the Custom menu, select [1Seg]/[Channel
setting]/select a channel list.
1 In the Custom menu, select [1Seg]/[Activate
1Seg].
: To record a movie of 1Seg programs: While watching
1Seg, keep touching [
X].
: To record 1Seg programs as a still picture: While
watching 1Seg, touch [
X].
1 In the Custom menu, select [Data box]/[1Seg]/
select a video.
1 In the Custom menu, select [Data box]/
[MUSIC]/select music data.
1 In the Stand-by Display
Touch Launcher, select
[7]/[Compose
message]/select the [To]
field/select the input
method.
; Select [Search
phonebook]/select a
recipient.
; Select [Sent messages]/select a recipient.
; Select [Rcvd messages]/select a recipient.
;
Select [Mail members]/select a mail member.
; Select [Direct input]/enter an address/[OK].
Selecting a channel list
Watching 1Seg
Watching videos
Music playback
Using MUSIC Player
Operations for MUSIC Player
To pause/play
& (q) or [
g]
To stop
[
f]
To adjust the volume
[V]/[W]
To play previous song/return to
the beginning of song
[
d]
To play next song
[c]
To end MUSIC Player H/[Yes]
Mail
Composing and sending i-mode mail
–7–
–10–
–6– –8–
–11––9–
Page 63

<Cut here>
2 Select the [Sub] field/enter a subject/[OK]/
[Msg]/enter the message text/[OK]/[Send].
1 In the text input screen, select [Submenu]/
[Decorate mail]/select a decoration type/
specify decoration/input text/[OK]/[Send].
1 In the Stand-by Display Touch Launcher, select
[7]/[Compose message]/select the
attachment field (No attachment)/select the file
to attach.
;
Select [Image]/point the cursor to the image/[OK].
;
Select [Melody]/point the cursor to the melody
/
[OK].
;
Select [i-motion]/point the cursor to i-motion
/
[OK].
;
Select [ToruCa]/point the cursor to ToruCa/[OK].
;
Select [PDF]/point the cursor to the PDF/[OK].
;
Select [Phonebook]/select a save destination
/
select a name.
;
Select [Schedule]/select a save destination (
/
select a day)*/
select a schedule.
* No operation is needed if [microSD] is selected as the
save destination
;
Select [Bookmark]/select a save destination
/
select a bookmark.
;
Select [Document]/point the cursor to the file
/
[OK].
;
Select [Other]/select a file.
;
Select [Start cam (still)]/[A]/& (q)/[Save]/& (q).
;
Select [Start cam (movie)]/[Rec]/& (q)/[Stop]/
&
(
q)/
[Save].
1 In the Stand-by Display Touch Launcher, select
[7]/[Compose SMS]/select the [To] field/
[Direct input]/enter an address/[OK]/[Msg]/
enter the message/[OK]/[Send].
1 Mail is automatically received.
2 Select [Mail]/select the mail.
1 In the Stand-by Display Touch Launcher, select
[7]/[Check new messages].
:
SMS: In the Stand-by Display Touch Launcher, select
[
7]/
[Check new SMS].
1 In the received message details screen, select
[Submenu]/[Reply/Forward].
2 Select the reply method.
3 Compose and send a mail.
1 In the received message details screen, select
[Submenu]/[Reply/Forward]/[Forward].
2 Enter an address and send a mail.
Sending Deco-mail
Attaching a file
Composing and sending SMS
Receiving mail automatically
Checking new i-mode mail
Replying to i-mode mail
Forwarding i-mode mail
1 In the Stand-by Display Touch Launcher, select
[$].
2 In the Custom menu/Function menu, select the
function.
3 In the Menu list, select the function.
1 In the Custom menu/Basic menu, select [Basic]/
[Custom].
Menu list
Retrieving functions from the Custom menu/
Basic menu
Switching between the Custom menu/Basic menu
Snd/Vibrator/Manner
Select volume Received call volume, phone ring vol,
Mail ring vol, PushTalk tone vol, Key/
Touch sound, Standby i-motion,
Charge start sound, Charge end
sound, Timer sound, GPS volume
Select sound Select ring tone, Select mail tone,
PushTalk tone, Shutter sound, Timer
sound, GPS tone
Vibrator Vibration mode, Mail vibration, GPS
vibrator, Touch vibrator
Manner mode ON (Normal, Silent, Original), OFF
Headset setting
Ring time setting Mail ring time set, PT ring time set,
GPS ring time set
Set mute ring time
Hold/On hold tone Set on hold tone, Set hold tone
Sound playback Melody stereo fx, Melody equalizer,
Pref playback sound
Snd/Vibrator/Manner Disp/LED/Power saver
Set screen Stand-by display, Clock display,
Calendar display, Stand-by memo
disp, Stdby toch lnch disp, Desktop
clock, Stdby slide-link set
Font style Font style setting, Font size
Themes Kisekae Tool, Call/Rcv display, Send/
Rcv display, Animate notices, Signal/
batt/s clock, Machi-chara, Color theme
setting
LED settings Called LED, Mail LED, Notice LED,
In-call LED, Alarm/Timer LED, IC card
LED, Slide-linked LED, GPS LED
Display img
quality
Vibrant image mode, Control by scene
–13– –14–
–16––15– –17–
–12–
Page 64

<Cut here>
Light/Power saver Norm (auto bright), Norm (fixed bright),
Eco mode (Pwr saver), Original Eco
mode
VeilView Linked manner, Pattern, Pattern
density
Menu priority
Disp/LED/Power saver General settings
Check status Owner Information, Check memory,
Battery level, Check settings
Text input setting User dictionary, Dwnld dictionary, Edit
phrase, Clear memory terms
Auto power ON/
OFF
Auto power ON, Auto power OFF, Link
alarm/power ON
Date settings
Select language
USB mode setting
Scanning function Update, Set auto-update, Set scan,
Version
Software update
Reset settings
NW Services
Voice Mail Check messages, Play Messages,
Activate VoiceMail, Set ring time,
Deactivate VoiceMail, Check setting,
Voice Mail setting, Notification setting,
Notification, V.phone Voice Mail
Call waiting Activate, Deactivate, Check setting
Forwarding Activate, Deactivate, Register number,
If FWD number busy, Check setting
Nuis. call blocking Register caller, Register selected No,
Delete all entries, Delete last entry,
Check No of entries
Notify caller ID Check setting, Activate/Deactivate
Caller ID request Activate, Deactivate, Check setting
Talk time/cost
2in1 setting Mode switching, Phonebook 2in1 set,
Stand-by display, Set call/receive No.,
2in1 function OFF, Receive avoidance
In-call arrival act Set arrival act, Arrival Call Act
NW Services Other NW Services
Remote Control Activate, Deactivate, Check setting
Dual network Switching, Check setting
English guidance Guidance setting, Check setting
Service Numbers
Ρκવ࿚ࣣ,
ΡκࣣմඤȆ ັ
Additional service USSD, Reply message
Multi number Set multi number, Check setting,
Number setting
Chaku-moji Create message, Message display
Roaming
guidance
Activate, Deactivate, Check setting
Phone settings
In-call settings Noise reduction, Reconnect signal,
Quality alarm
Headset sw to call
Incoming settings Auto answer setting, Melody Call
setting
Videophone set Redial voice call, Set sending image,
Display setting, Subscreen position,
Visual preference, Notify switch mode,
Hands-free V.phone, V-phone while
packet
Record message Record message, Answering duration,
Reply message, V.phone reply image
Set PushTalk Set PT arrival act, Hands-free PT
Setting when slid
Self mode
Other settings Int’l prefix, Sub address, Int’l dial
assist, International Roam., In-area
status
–19–
–22–
–18– –20–
–23––21–
Page 65

<Cut here>
Security
Secret mode
UIM Settings PIN1 code input set, Change PIN1
code, Change PIN2 code
Accept/Reject
calls
Accept calls, Reject calls, Reject
unknown, User unset, Reject
payphone, Reject not support
Show call/
received
Show rcvd calls, Show redial
Show sent/
received
Show sent messages,
Show rcvd messages
Lock settings All lock, Keypad dial lock,
Function lock, Multi lock set,
IC card lock, Multi lock auto-set
Change security code
Writing authentic
Delete all data Delete user data, Del secret data
i-concier settings
Incoming settings Select volume, Select sound, Vibrator,
Ring time setting, LED setting
Information display
Other settings
Initial setting
Own number
Quick Settings
VeliView Bluetooth
Location Public mode
RcvCall vol Manner mode
Rec msg Self mode
Alarm Lock select
Vibrator Eco mode
Stand-by Display Touch Launcher
9 Quick search
0 Full Browser (Google)
! Mapping appli
( i-concier
$ Start menu
8 i-mode menu
) 1Seg
% i-Widget (longways)
= Program guide i-appli (sideways)
ɦ When the confirmation screen appears, select [Yes].
Voice Mail Service is a paid option (monthly fees apply) that
requires subscription.
1 In the Custom menu, select [Settings]/[NW
Services]/[Voice Mail].
2 Select [Activate VoiceMail]/[Activate
VoiceMail].
: To deactivate: Select [Deactivate VoiceMail].
: To play messages: Select [Play Messages]/
[Play(voice call)]/[Play(videophone)].
: To check messages: Select [Check messages].
Call Waiting is a paid option (monthly fees apply) that requires
subscription.
1 In the Custom menu, select [Settings]/[NW
Services]/[Call waiting].
2 Select [Activate].
: To deactivate: Select [Deactivate].
: To check settings: Select [Check setting].
Call Forwarding Service is a free option (no monthly fees) that
requires subscription.
1 In the Custom menu, select [Settings]/[NW
Services]/[Call Forwarding].
2 Select [Activate]/[Activate].
: To deactivate: Select [Deactivate].
: To check settings: Select [Check setting].
Subscription is not required (no monthly fees).
1 In the Custom menu, select [Settings]/[NW
Services]/[Caller ID request].
2 Select [Activate].
: To deactivate: Select [Deactivate].
: To check settings: Select [Check setting].
# Shoot still picture
7 Mail menu
6 Phonebook
5 Dial input screen
1 Received calls
2 Redial
/ Manner mode setting
Other functions
Activate Multi Assistant
(Multitask)
s (for 1+ seconds)
Network services
Voice Mail Service
Call Waiting
Call Forwarding Service
Caller ID Request Service
–25– –26–
–28––27– –29–
–24–
Page 66

<Cut here>
Icon list
12345 7 b c
pmlkjihgnq or fe
tus
> <z
d
wx
v
6 a89
y
1 ] Signal status
2 "
Battery level
{
Charging
3 7=AABNO i-mode/Full Browser
4 o
SSL
5 GNIQ
i-appli
6 AB GPS
7
J#Ntu
Ir communication/Bluetooth
communication/External device
8
UhHv[
i-mode mail/SMS/Area Mail
received
9 ABJ Message R/F received
a WGIX
STKL
Storage status of i-mode center
b ^ (gray)
microSD Card is inserted
^ (pink) microSD Card is being used
c Clock display
d a
1Seg being recorded
e ]
D to Pk
Record message
f [ Silent
g b
Vibrator
h Z
Manner mode
i _ Public mode (Drive mode)
j a
i-appli call
k H
IC card lock
l RSTUVW
KX
Restriction indicator
m ;
Hands-free
l
Mute in progress (only when in the
open position)
M Bluetooth hands-free
ɦ Refer to P. 28 to P. 31 of the manual for detailed explanations
of displayed icons.
n \ Alarm
o
0
Music&Video Channel program
reservation
p =;
i-mode mail send reservation
q s Earphone/Microphone connection
r x USB mode
s
R
FOMA card is malfunctioning or not
inserted
B Non-FOMA card is inserted
t g Self mode
u a
PushTalk
v L Bluetooth
w P VeilView
x 4KJ 3G/GSM
yIH Status of Comics setting
z Q
ToruCa
< C Receiving information
> Multitask
<Emergency contacts in case of
loss or other accidents>
Omakase Lock
ɦ Omakase Lock is a paid service. However, if Omakase
Lock is subscribed while or at the same time as when
the use of FOMA terminal is suspended, or if the user is
a member of docomo Premier Club, the usage fee of
Omakase Lock is not charged. Additionally, if Keitai
Anshin Pack (Mobile Phone Security Package) is
subscribed, Omakase Lock is available for a flat-rate.
Enable/Disable Omakase Lock
s
0120-524-360 Office hours: 24hours
Other contacts
<Contacts: >
<Contacts: >
<Contacts: >
ɦ Please confirm the phone number before you dial.
–31–
–34–
–30– –32–
–35––33–
Page 67

<Cut here>
For DOCOMO mobile phones
ɦ If you use the SH-04A, you should dial the number
+81-3-5366-3114.
For fixed-line telephones
<Universal number>
ɦ See P.19 to P.20 and P.21 to P.22 for international call access
codes of major countries (Table1) and international prefix
number for the universal number (Table2).
For DOCOMO mobile phones
ɦ If you use the SH-04A, you should dial the number
+81-3-6718-1414.
For fixed-line telephones
<Universal number>
ɦ See P.19 to P.20 and P.21 to P.22 for international call access
codes of major countries (Table1) and international prefix
number for the universal number (Table2).
Refer to the following before using the FOMA terminal overseas.
“Mobile Phone User’s Guide [International Services]”
“Mobile Phone User’s Guide [Network Services]”
PDF file “٬ٸ၌ဥ΄ͼΡ” pre-installed in [My Documents] of
Data box
ɡ Setting in Japan
1 In the Stand-by Display Touch Launcher, select
[8]/[iMenu]/[English]/[Options]/
[International Settings]/[i-mode services
Settings]/[Yes]/select the [Enter i-mode
Password] field/enter the i-mode password/
[OK]/[OK].
ɡ Setting in overseas
1 In the Stand-by Display Touch Launcher, select
[8]/[iMenu]/[English]/[International
Settings]/[i-mode services Settings]/[Yes]/
select the [Enter i-mode Password] field/enter
the i-mode password/[OK]/[OK].
Quick Manual “Overseas Use”
Loss or theft of FOMA terminal or payment of
cumulative cost overseas
<docomo Information Center> (24-hour service)
International call access code
of your country of stay (Table 1)
-81-3-5366-3114* (toll free)
* Communication charges to Japan will apply when you make a call
from a fixed-line telephone.
International prefix number for
the universal number (Table 2)
-800-0120-0151*
*
Communication charges or other charges to your country of stay will apply.
SH-04
A
Failures encountered overseas
<Network Technical Operation Center>
(24-hour service)
International call access code
of your country of stay (Table 1)
-81-3-6718-1414* (toll free)
* Communication charges to Japan will apply when you make a call
from a fixed-line telephone.
International prefix number for
the universal number (Table 2)
-800-5931-8600*
*
Communication charges or other ch arges to your country of stay will apply .
Preparing for overseas use
Setting i-mode
ɡ Setting in Japan
1 In the Custom menu, select [Settings]/[Other
NW Services]/[Remote Control]/[Activate]/
[Yes].
ɡ Setting in overseas
1 In the Custom menu, select [Settings]/[Phone
settings]/[Other settings]/[International
Roam.]/[Remote access (Int.)]/[Yes]/operate
according to the voice guidance.
1 In the Custom menu, select [Settings]/[General
settings]/[Date settings]/select the [Auto time
correction] field/[ON]/[Complete].
1 In the Custom menu, select [Settings]/[General
settings]/[Date settings]/select the [Auto time
correction] field/[OFF].
2 Select [City]/select a city/[Complete].
1 In the Custom menu, select [Settings]/[Phone
settings]/[Other settings]/[International
Roam.]/[3G/GSM setting]/select the
communication method.
Unable to use 64K data communication by connecting a PC,
etc. overseas.
Setting remote access
Correcting date and time automatically
Setting time zone manually
Available network
3G network Available
GSM network Available
GPRS network Available
Setting network communication system
Available services overseas
Communication
service
3G GSM GPRS
Voice call
AAA
Videophone
ABB
i-mode mail
ABA
i-mode
ABA
i-Channel
ABA
i-concier
ABA
i-Widget
ABA
SMS
AAA
Packet transmission by
connecting a PC, etc.
ABA
–1– –2–
–4––3– –5–
Page 68

<Cut here>
Default setting: Auto (Automatically switches telecommunications
carriers)
1 In the Custom menu, select [Settings]/[Phone
settings]/[Other settings]/[International
Roam.]/[Network search mode].
2 Select [Auto]/[Yes].
: To manually switch telecommunications carriers:
Select [Manual]/select a telecommunications carrier.
: To re-search for the host network: Select [Network
re-search].
1 In the Custom menu, select [Settings]/[Phone
settings]/[Other settings]/[International
Roam.]/[Network search mode]/[PLMN
setting]/point the cursor to the number of the
priority order/[Submenu].
2 Select [PLMN manual select]/enter a country
code (MCC)/[OK]/enter a network code
(MNC)/[OK]/select a communication
method/[Yes].
: To save from a telecommunications carrier list: Select
[UPLMN by list]/select a telecommunications
carrier/select a communication method/[Yes].
: To save the telecommunications carrier currently
connected to: Select [Set VPLMN to PLMN]/[Yes].
: To change the priority: Select [Change priority]/
select a destination/[Yes].
1 In the Custom menu, select [Settings]/[Phone
settings]/[Other settings]/[International
Roam.]/[Operator name disp]/[Display on]/
[Yes].
Setting a search method of
telecommunications carrier
Network search mode
Setting a telecommunications carrier to
preferentially connect to
Displaying a telecommunications carrier
name in stand-by
Telecommunications
carrier name
If Network search mode is set to [Auto], reset Network search
mode to the FOMA network (DOCOMO) automatically when the
power is turned on after homecoming.
ɡ Setting to FOMA network (DOCOMO) manually
1 In the Custom menu, select [Settings]/[Phone
settings]/[Other settings]/[International
Roam.]/[Network search mode]/[Manual]/
[DOCOMO].
ɡ Using + to make an international call
1 In stand-by, press s/keep touching [0(+)]/
enter the country code, area code (city code) and
other party’s phone number/[B] or s (Phone)/
[V.phone].
:
When the area code (city code) begins with 0, omit the
0
when dialing. However, include
0
when making a call to
landline phones in some countries or regions such as Italy.
ɡ Making an international call outside your country
of stay using country code conversion
0 at the beginning of a phone number is automatically converted to
the country code set in Country code conversion.
Example: Make a call from the phonebook
1 In the Stand-by Display Touch Launcher, select
[6]/select the other party/ [Phone] or s
(Phone)/[V.phone]/[Call].
ɡ Making an international call
Save a country number using Set country code to select a country
code before making an international call.
The following operation is available overseas only.
1 In stand-by, press s/enter a phone number/
[Submenu]/[Add prefix setting]/[International
Call]/select the country code/[B] or s
(Phone)/[V.phone].
1 In stand-by, press s/enter a phone number/
[B] or s (Phone)/[V.phone].
ɡ Making a call to the phone in your country of
stay using phonebook
1 In the Stand-by Display Touch Launcher, select
[6]/select the other party/[Phone] or s
(Phone)/[V.phone]/[Original number].
Setting after homecoming Making a call
Making a call outside your country of stay
(including Japan)
Making a call in your country of stay
–7–
–10–
–6– –8–
–11––9–
Page 69

<Cut here>
ɡ
Making a call to a WORLD WING subscriber overseas
Even when making a call to the phone in your country of stay,
make an international call to Japan if t he call recipient is a
“WORLD WING” subscriber overseas.
1 In stand-by, press s/keep touching [0(+)]/
enter 81/enter the other party’s mobile phone
number excluding the first 0/[B] or s (Phone)/
[V.phone].
1 Press s to answer an incoming call.
ɡ Having calls made to your FOMA terminal from
Japan
Enter the phone number in the same way as it is entered in Japan
and make a call.
ɡ Having calls made to your FOMA terminal from
countries other than Japan
Enter international call access code of the country of the
caller-81-user’s phone number excluding the first 0 and make a
call.
Make this setting while still in Japan.
ɦ When the confirmation screen appears, select [Yes].
1 In the Custom menu, select [Settings]/[Other
NW Services]/[Roaming guidance].
2 Select [Activate].
: To deactivate: Select [Deactivate].
: To check settings: Select [Check setting].
Depending on the overseas telecommunications carrier, the
setting cannot be made.
1 In the Custom menu, select [Settings]/[Phone
settings]/[Other settings]/[International
Roam.]/[Call barring].
2 Select [Activate]/[Yes]/select the barring
method/enter the network security code/[OK].
: To deactivate: Select [Deactivate]/[Yes]/enter the
network security code/[OK].
: To check settings: Select [Check setting].
1 In the Custom menu, select [Settings]/[Phone
settings]/[Other settings]/[International
Roam.]/[Missed Call Notice].
2 Select [Activate]/[Yes].
: To deactivate: Select [Deactivate]/[Yes].
: To check settings: Select [Check setting].
Receiving calls
Setting roaming guidance Call barring
Missed Call Notice
Set in your country of stay.
To use network service overseas, set Remote Control to
“Activate”.
ɦ When the confirmation screen appears, select [Yes].
ɦ Operate according to the voice guidance.
1 In the Custom menu, select [Settings]/[Phone
settings]/[Other settings]/[International
Roam.]/[Voice Mail(Int.)].
2 Select [Activate Voice Mail].
: To deactivate: Select [Deactivate].
: To play messages: Select [Play Messages].
: To set the service: Select [Voice Mail settings].
1 In the Custom menu, select [Settings]/[Phone
settings]/[Other settings]/[International
Roam.]/[Call Forward (Int.)].
2 Select [Activate].
: To deactivate: Select [Deactivate].
: To set the service: Select [Settings].
1 In the Custom menu, select [Settings]/[Phone
settings]/[Other settings]/[International
Roam.]/[Roam. guidance(Int.)].
1 In the Custom menu, select [Settings]/[Phone
settings]/[Other settings]/[International
Roam.]/[MissedCallNoticeInt.].
The following shows “Country code” used when making
international calls or setting International dial assist.
Using network service
Voice Mail (Int.)
Call Forward (Int.)
Roaming guidance (Int.)
Missed Call Notice (Int.)
Country codes of major countries
Country/Region Code Country/Region Code
Australia 61 Hong Kong 852
Austria 43 Hungary 36
Belgium 32 India 91
Brazil 55 Indonesia 62
Canada 1 Italy 39
China 86 Japan 81
Czech 420 Macau 853
Egypt 20 Malaysia 60
Fiji 679 Maldives 960
Finland 358 Netherlands 31
France 33 New Caledonia 687
Germany 49 New Zealand 64
Greece 30 Norway 47
–13– –14–
–16––15– –17–
–12–
Page 70

<Cut here>
ɦ For other country codes and details, refer to the DOCOMO
“International Services website”.
The following shows the International call access codes of major
countries.
Peru 51 Tahiti
(French Polynesia)
689
Philippines 63
Russia 7 Taiwan 886
Singapore 65 Thailand 66
South Korea 82 Turkey 90
Spain 34 U.K. 44
Sweden 46 U.S.A. 1
Switzerland 41 Vietnam 84
Country/Region Code Country/Region Code
International call access codes of major
countries (Table 1)
Country/Region Code Country/Region Code
Australia 0011 Hungary 00
Belgium 00 India 00
Brazil 0021/
0014
Indonesia 001
Ireland 00
Canada 011 Italy 00
China 00 Luxemburg 00
Czech 00 Macau 00
Denmark 00 Malaysia 00
Finland 00 Monaco 00
France 00 Netherlands 00
Germany 00 New Zealand 00
Greece 00 Norway 00
Hong Kong 001 Philippines 00
Poland 00 Taiwan 002
Portugal 00 Thailand 001
Russia 810 Turkey 00
Singapore 001 U.A.E. 00
South Korea 001 U.K. 00
Spain 00 U.S.A. 011
Sweden 00 Vietnam 00
Switzerland 00
Country/Region Code Country/Region Code
The following shows the International prefix number for the
universal number of each country.
For lost, stolen, and cost settlement, or
malfunction of the FOMA terminal overseas,
refer to “Loss or theft of FOMA terminal or
payment of cumulative cost overseas” on the
cover of Quick Manual “Overseas Use” or
“Failures encountered overseas” on P.1.
Add the “International call access code (Table 1)” or
“International prefix number for the universal
number (Table 2)” that is assigned to your country of
stay, to the head of your phone number for inquiries.
International prefix number for the
universal number (Table 2)
Country/Region Code Country/Region Code
Argentina 00 Hong Kong 001
Australia 0011 Hungary 00
Austria 00 Ireland 00
Belgium 00 Israel 014
Brazil 0021 Italy 00
Bulgaria 00 Luxemburg 00
Canada 011 Malaysia 00
China 00 Netherlands 00
Columbia 009 New Zealand 00
Denmark 00 Norway 00
Finland 990 Peru 00
France 00 Philippines 00
Germany 00 Portugal 00
Singapore 001 Switzerland 00
South Africa 09 Taiwan 00
South Korea 001 Thailand 001
Spain 00 U.K. 00
Sweden 00 U.S.A. 011
Country/Region Code Country/Region Code
About inquiries overseas
–19–
–22–
–18– –20–
–23––21–
Page 71

When using your FOMA terminal, please be considerate of those
around you.
ɡ When in an area where use is prohibited
There are places where the use of mobile phones is prohibited. Be sure to turn
off your FOMA terminal in the following places.
ɚOn an aircraft ɚIn a hospital
ɦ There are people outside hospital wards who also use electric medical
equipment. Please make sure that your FOMA terminal is turned off in the
lobby and waiting room.
ɡ While driving
Using a mobile phone in hand while driving is regarded as a punishable act.
ɦ If there is no choice but to receive a call, use Hands-free and tell the caller
that you will “call back”, and then pull over to a safe place to make a call.
ɡ When in crowded places such as rush-hour trains in case
somebody nearby is using an implanted cardiac pacemaker or
implanted cardioverter-defibrillator
Your FOMA terminal may affect the operation of such equipment.
ɡ When in public places such as theaters, movie theaters, or
museums
Use of your FOMA terminal in quiet public places will annoy others.
ɡ When using your FOMA terminal in a restaurant or a hotel
lobby, lower your voice.
ɡ
In crowded places, be careful not to obstruct other pedestrians.
Check/change the subscription, apply for various services, and request various information materials online.
iMenu/ݖအεȜΠ
(User Support)/૭ࣺȆ
(Applications/Procedures)/ڎ૭ࣺȆ
(Various Applications/Procedures)
My docomo (http://www.mydocomo.com/)/ڎ૭ࣺȆ (Various Applications/Procedures)
ɦ You will need your “Network Security Code” to access the site from i-mode.
ɦ No packet communication charges are incurred when accessing the site from i-mode. Accessing from overseas will incur charges.
ɦ You will need your “docomo ID/Password” to access the site from PC.
ɦ If you do not have or you have forgotten your “Network Security Code” or “docomo ID/Password”, contact the number listed in General Inquiries on the back of this manual.
ɦ The site may not be available depending upon the content of your subscription.
ɦ You may not be able to access some site services due to system maintenance, etc.
From i-mode
Packet communication charges free
From a PC
Please follow proper etiquette
Turn off your FOMA terminal in the following places
Be careful of where you use your FOMA terminal and the
volume of your voice and the ring tone
Be considerate of the privacy of the individuals around you
t
Please be considerate of the privacy of individuals around
you when taking and sending images using a
camera-enabled mobile phones.
The following functions will help you to keep your
manners in public
There are useful functions you can use to set your FOMA
terminal not to answer incoming calls, and to silence all sounds.
ɜ Manner mode (nP. 98)/Original manner mode (nP. 99)
Silences the Key/Touch sound and all the sounds from the FOMA terminal,
and Record message is set (Manner mode). When in the Manner mode,
automatically set functions (Record message, Vibrator, Mic sensitivity up,
Ring tone, Mail ring tone, alarm tone, Key/Touch sound and Low battery
alarm) can be set to ON (enable)/OFF (disable) (Original manner mode).
ɜ Public mode (Drive mode/Power OFF) (nP. 67, P. 68)
The caller hears a guidance message stating that the receiver is driving, or
in the place where the receiver should refrain from using the mobile phone
or turn off the power. The call is disconnected.
ɜ Vibration mode (nP. 97)
Notifies incoming calls by vibration.
ɜ Record message (nP. 68)
When you are unable to take a call, the Record message function records
the caller’s message.
ɦ You can also use optional services such as Voice Mail Service
(nP. 414) and Call Forwarding Service (nP. 417).
 Loading...