

Page 1
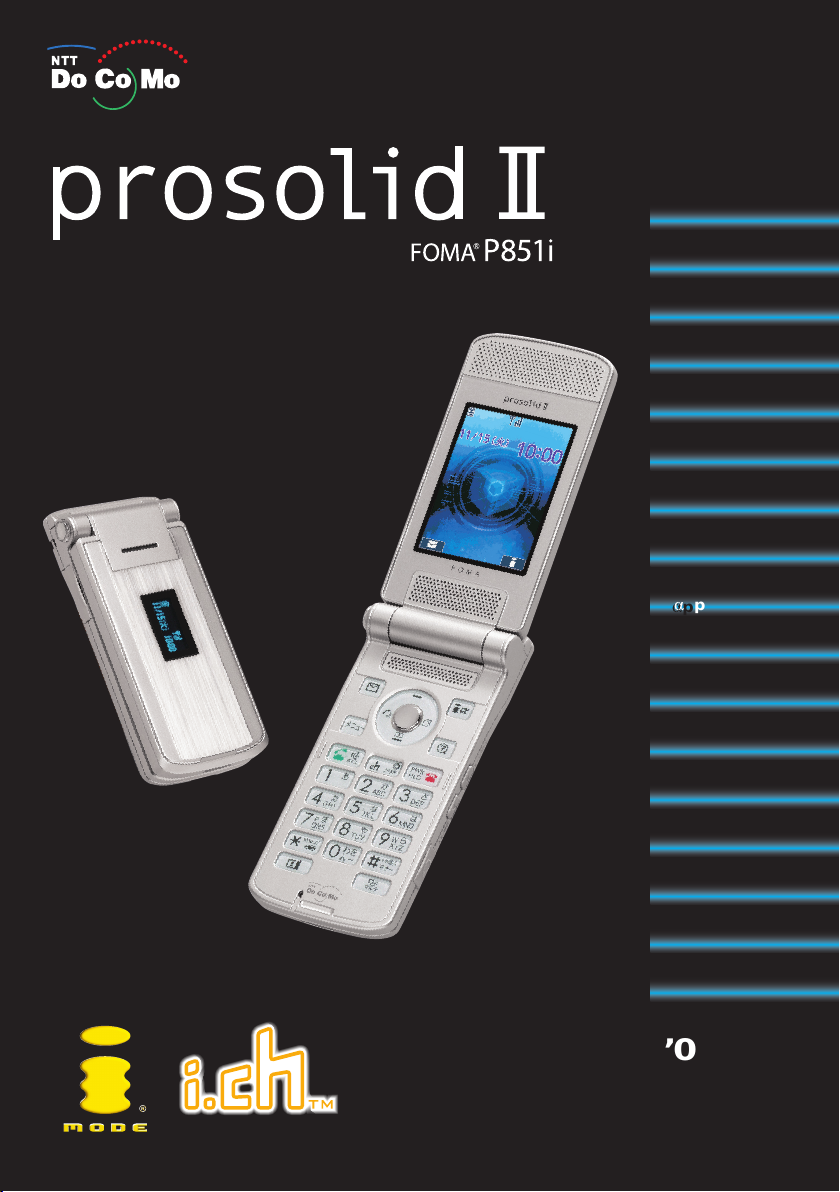
Manual for
Easy Search/
Easy Search/
Contents/Precautions
Contents/Precautions
Confirming before Use
Confirming before Use
Making Calls/
Making Calls/
Receiving Calls
Receiving Calls
Phonebook
Phonebook
Tone/Display/
Tone/Display/
Light Setting
Light Setting
Safety Settings
Safety Settings
i-mode/
i-mode/
i-motion
i-motion
Mail
Mail
i-=ppli
i-=ppli
i-channel
i-channel
Data Display/Edit/
Data Display/Edit/
Management
Management
Other Useful
Other Useful
Functions
Functions
Network Service
Network Service
Data T ransmission
Data T ransmission
Entering Characters
Entering Characters
Appendix/Interfacing to
Appendix/Interfacing to
External Devices/
External Devices/
Troubleshooting
Troubleshooting
Index/
Index/
Quick Manual
Quick Manual
’05.11
Page 2

DoCoMo W-CDMA system
Thank you for selecting the “FOMA P851i”.
Before or during use of the FOMA P851i, make sure that you read this manual and the separate manuals
such as for the battery pack thoroughly so that you can use the FOMA P851i correctly. If you feel any
inconvenience in reading the manual, contact the DoCoMo Information Center listed on the back page of
this manual.
The FOMA P851i is designed to be your close partner.
Treat it carefully at all times to ensure long-term performance.
Before using your FOMA phone
●
Because the FOMA phones use radio waves, they cannot be used in places where radio waves do not reach,
such as inside tunnels, underground, or in buildings; or the outside where radio waves are weak or out of the
FOMA service area. They may not be used in the high-rise buildings even when the antennas are
unobstructed. You may also experience interruption of calls even when using without moving while the radio
waves are strong enough for the three antennas to appear on the display.
●
Use the FOMA phone carefully to avoid disturbing other people when in public, or in crowded or quiet places.
●
Since the FOMA phones use radio waves as the medium of telecommunication, calls may be tapped by the
third party.
However, the W-CDMA system automatically supports tapping prevention, so your conversation will be
incomprehensible to the third party.
●
The FOMA phones change your voice into digital signals and send them to the other party. In places where the
radio waves are weak, the digital signals may not be converted correctly, and in such a case, the voice heard
may sound different from the actual original voice.
●
It is recommended that you take separate notes of the information stored in the FOMA phone and keep such
notes in a safe place. DoCoMo cannot be held responsible in any way for the loss of data stored in the phone.
●
The user hereby agrees that the user shall be solely responsible for the result of the use of SSL. Neither
DoCoMo nor the certifier as listed herein makes any representation and warranty as for the security in the use
of SSL. In the event that the user shall sustain damage or loss due to the use of SSL, neither DoCoMo nor the
certifier shall be responsible for any such damage or loss.
Certifier: VeriSign Japan K.K. Betrusted Japan Co., Ltd. GeoTrust Japan, inc.
●
This FOMA phone supports FOMA Plus-Area.
●
The FOMA phone can be used only via the FOMA network provided by DoCoMo.
For those who use the FOMA phone for the first time
If this is the first time for you to use the FOMA phone, read this manual in the order as described below.
Then you will get acquainted with the outline of preparing and operating procedures for using your
FOMA phone.
1. Attach and then charge the battery pack. (⇒See pages 42 and 43)
2. Turn on the power, set the initial settings, and confirm your phone number.
(⇒See pages 46, 47 and 50)
3. Check the keys on the FOMA phone for their roles. (⇒See page 26)
4. Confirm the meanings of icons that appear on the display. (⇒See page 28)
5. Learn how to operate the menus. (⇒See page 32)
6. Get well acquainted how to make and receive calls. (⇒See page 51)
● Note that “FOMA P851i” is referred to as “FOMA phone” in this manual.
● It is prohibited to copy all or part of this manual without permission.
● The instructions contained in this manual may be changed without notice.
Page 3
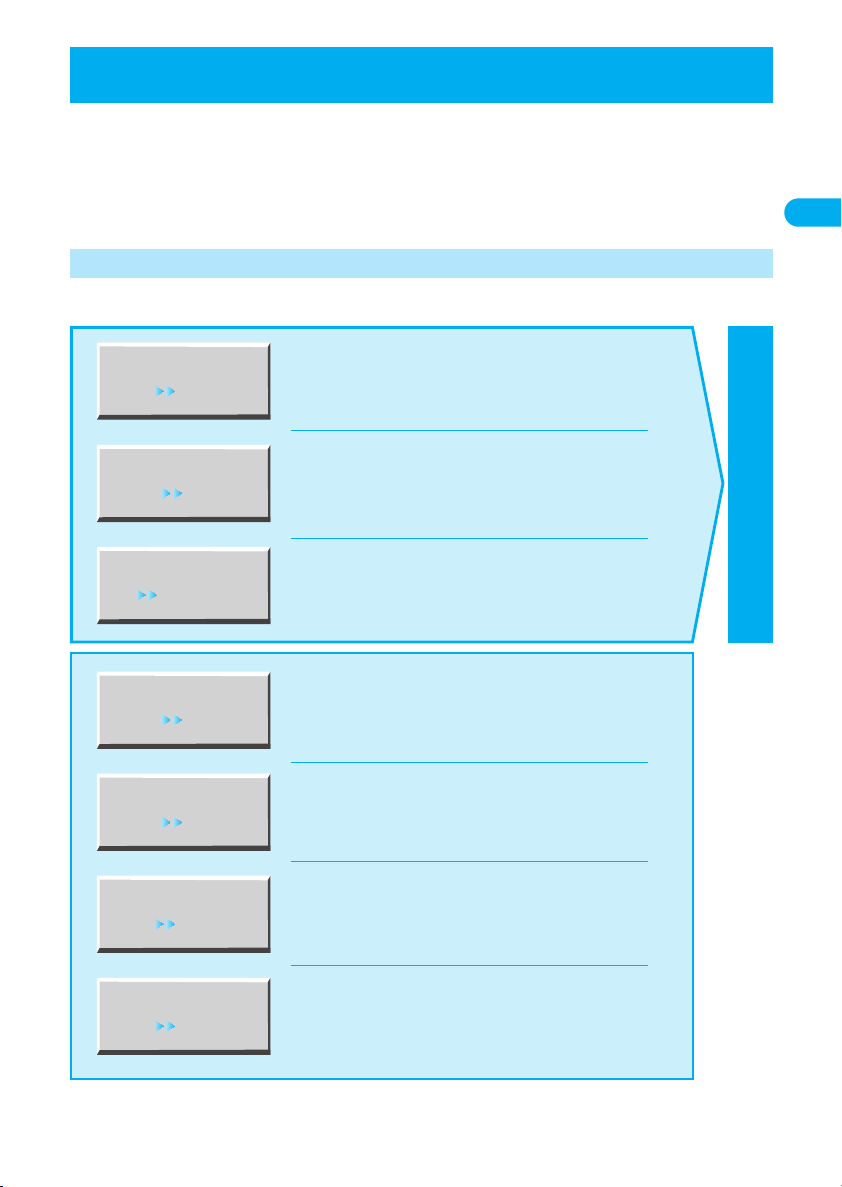
Easy Search/Contents/
How to Read/Refer to This Manual
In this manual, illustrations and symbols are used to explain operations so that you can use your FOMA
phone easily and correctly.
Operation methods are described in “Scroll Selection”. ⇒See page 32
●
Displays and illustrations in this manual are for reference purposes.
●
These may differ from the actual product.
How to Refer to This Manual
By the following search methods, you can find pages where your desired functions and services are
described:
From the Index
P.474
From Easy Search
P.4
From the Tabs on the Cover
Cover page
Search from the index when you know the names of functions
or services.
Search from keywords for the functions you frequently use or
the functions that are convenient if you can know any.
Search from the tabs printed on the cover.
Precautions
How to Read/Refer to This Manual
Details are explained on the next page.
From the Contents
P.6
From Features
P.8
From the Function List
P.430
From Quick Manual
P.480
Search from the contents that categorize functions.
Search from here to use the P851i's distinctive functions such
as new or useful functions.
Menu numbers and function names of P851i are listed.
Quick Manual gives you a clear, brief description about
fundamental functions. You can take it with you when you go
outing.
1
Page 4
2
How to Read/Refer to This manual
Easy Search/Contents/
Precautions
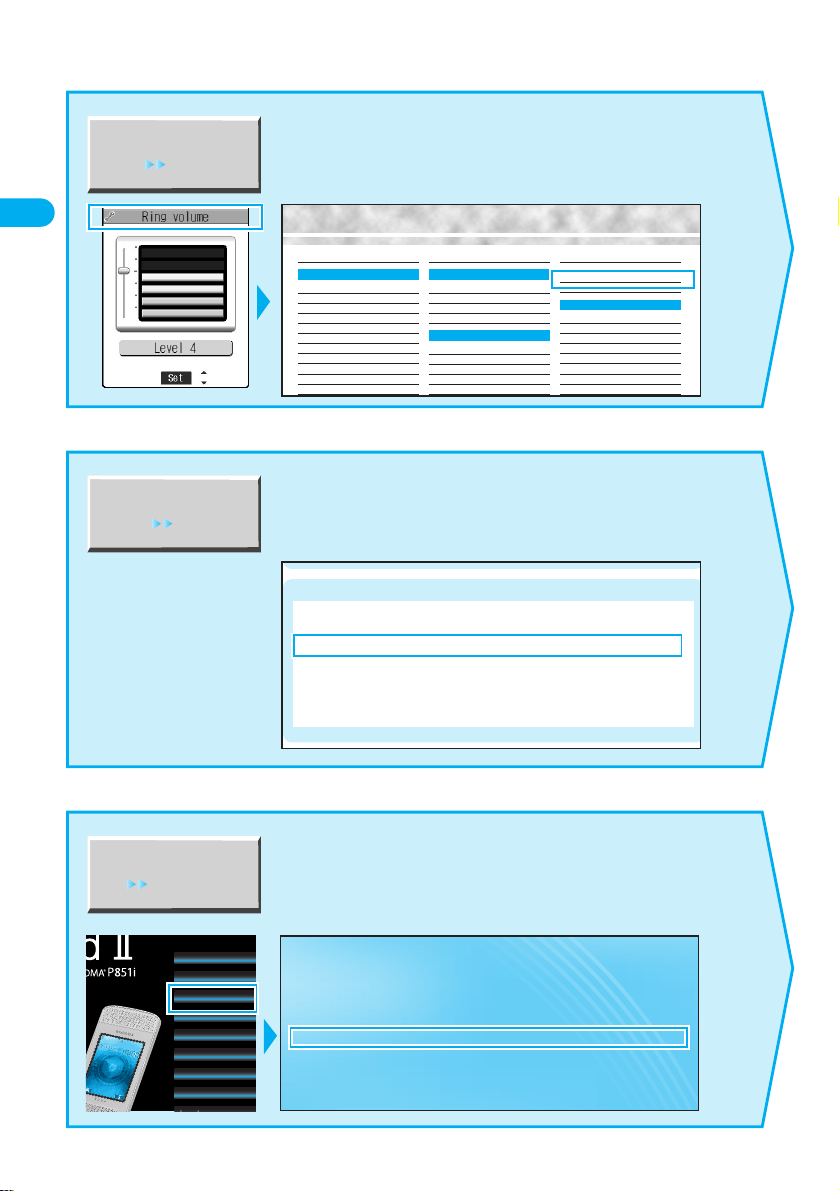
How to search “Ring volume” is explained here as an example of search method.
Search for a function or a service from here when you know its name.
From the Index
P.474
From Easy Search
P.4
Search for the function you frequently use or that is convenient if you can
know any by easy keywords.
Search for the function you want to set in the order of “Cover” →“First
page of Chapter”
→
“Description page”.
From the Tabs on the Cover
Cover page
Easy Search/
Contents/Precautions
Easy Search/
Contents/Precautions
Confirming before Use
Confirming before Use
Making Calls/
Receiving Calls
Making Calls/
Receiving Calls
Phonebook
Phonebook
Tone/Display/
Light Setting
Tone/Display/
Light Setting
Safety Settings
Safety Settings
i-mode/
i-motion
i-mode/
i-motion
Mail
Mail
Receiving a Call ····························································································································· 65
INDEX
Own number display 50, 351
P
Packet transmission 368
Palette 220
Passwords 138
Paste 424
Pattern data update 469
Pause dial 58
Pause dial display 60
Personal information 351
Phone to function 185
Phonebook 90
Phonebook list 100
To change melody or illumination
To silence the keypad sound .......................................115 <Keypad Sound>
To change ring tones....................................................110 <Select Ring Tone>
To adjust the ring volume................................................73 <Ring Volume>
To activate Manner Mode.............................................117 <Manner Mode>
To know incoming calls by vibrator ..............................112 <Vibrator>
To change colors/flickering patterns of Call indicator ...128 <Illumination Setting>
To change ring tones according to callers ...................105 <Utilities>
Pull down menu 166
Q
Quality alarm 116
Quick manual 480
Quick record message 80
Quick silent 71
R
Radio button 166
Radio waves reception level 29
Reason for no caller ID 151
Receive option setting 230
Received address 253
Rights of portrait 22
Ring tone in call 65
Ring volume 73
Rotate 312
S
“S” icons 73
Safety settings 137, 153
SAR 470
Save data (Mail) 234, 235
Save image (i-mode) 181
Save image (Mail) 235
Save i-motion movie 203
Save melody (Mail) 234
Setting for Switching between a Voice Call and Video-phone Call
Setting Rejection of Video-phone Calls·················································<Reject Video-phone> 68
Using Received Call Records··········································································<Received Calls> 69
Setting Response of Key Operation for Answering Incoming Calls ··········<Answer Setting> 71
Setting Response for Opening FOMA Phone during Ringing··························<Open Phone> 71
Setting Response for Closing FOMA Phone during a Call·······························<Fold Setting> 72
Adjusting Earpiece Volume·········································································<Earpiece Volume> 72
Adjusting Ring Volume ······················································································<Ring Volume> 73
When You Cannot or Could not Answer the Call
Putting an Incoming Call on Hold··············································································<On Hold> 73
Putting a Call on Hold during a Call···········································································<Holding> 74
Setting Hold Tone················································································<Call Response Setting> 74
········<Indicate Video-phone> 68
Page 5
Easy Search/Contents/
Ring VolumeMaking Calls/Receiving Calls
Use to adjust the volume
・
Step······················The ring tone is silent for about three seconds, and then the volume steps up
every three seconds, from Level 1 through Level 6.
・
Levels 1 to 6········Level 1 is the weakest volume and Level 6 the loudest.
・
S
ilent····················The ring tone does not sound.
●
F
ollowing icons are displayed while the ring volume is set to “Silent”:
: The ring volume for voice calls or video-phone calls is “Silent”.
: The ring volume for mail, chat mail or Messages R/F is “Silent”.
:
The ring volume for voice calls, video-phone calls, mail, chat mail, and Messages R/F is
“Silent”.
2
●
Y
ou cannot adjust the ring volume during ringing.
●
Even if the ring volume for mail, chat mail, or Messages (R/F) is set to other than “Silent”, “ ” is displayed and the ring tone does
not sound while “Mail/Msg. ring time” (see page 116) is set to “OFF”.
You can adjust the ring volume for incoming calls and mail.
Incoming call Ring volume Select an item to be set
・
Phone (Voice call)
・
Video-phone
・
Mail (the ring volume for incoming i-mode mail and SMS messages.)
・
Chat mail
・
MessageR
・
M
essageF
1
<Ring Volume> Menu 50
Adjusting Ring Volume
I
nformation
Setting at purchase
Level 4
During ringing
1
<On Hold>
Putting an Incoming Call on Hold
International Dial SettingMaking Calls/Receiving Calls
You can store up to three country codes.
Other settings Int’l dial setting Country Code setting
Select <Not recorded> ( )
●
To edit the stored country name, select it.
●
Select a stored item from the display on the left and press ; then its contents are dis-
played.
1
Enter a country name Enter a country code
●
You can enter up to 8 full-pitch or 16 half-pitch characters for a country name.
●
You can enter up to 5 digits for a country code. But you cannot use #, , and +.
2
Storing/Editing Country Code
Setting at purchase
アメリカ
(U.S.A.), +1
Operations
Enter a country name Enter a country code
YES
※
Enter your Terminal Security Code YES
※
While a country code setting item is displayed ( )
Select and operate each function below.
1
Function menu
Edit
Delete this
Delete all
Explanation
●
You can enter up to 8 full-pitch or 16 half-pitch
characters for a country name.
●
You can enter up to 5 digits for a country
name. But you cannot use #, , and +.
●
You cannot delete the country code set by
“Auto assist setting”.
Other settings Int’l dial setting Country Code setting
Select a country name
1
Confirming Country Code
※
To cancel: “NO”
Function Menu while Country Code Setting is Displayed
Next Page
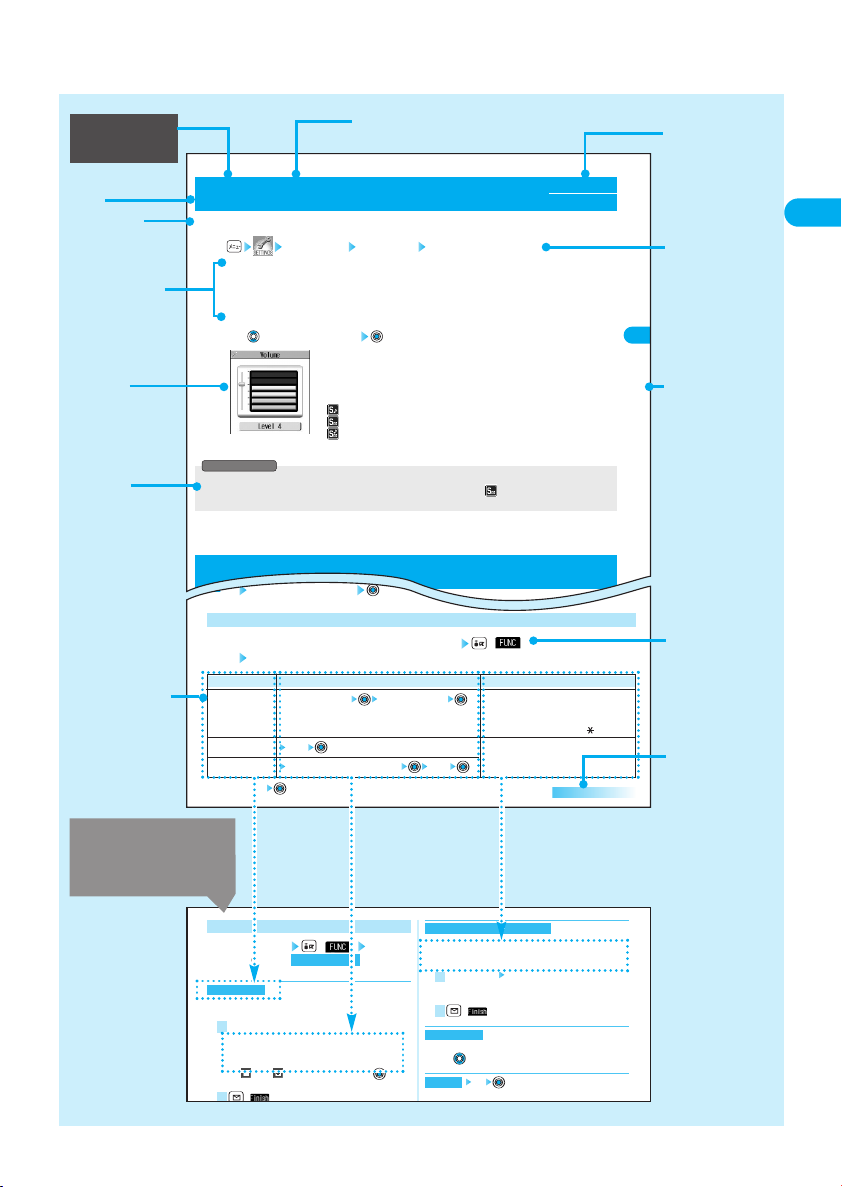
Software list ( ) Select
and operate below.
each function
1
You can set whether to launch the i-αppli from sites or mail.
You can set this for each software program.
Put a check mark for the items to be set
・
Site ”i αppli To”
・
Mail ”i αppli To”
・
Ir ”i αppli To”
●
“ ” and “ ” switch each time you press .
●
Some items might not be set depending on the software.
( )
2
1
Set i
α
ppli To
You can set whether to permit the i-αppli to refer to the
Phonebook, Redial, and Received Calls.
This function is available only for i-αppli DX.
See P.book/hist. Select following
・
ON
・
OFF
( )
You can display the software name and version of the i-αppli.
●
Use to scroll the display.
YES
You can upgrade the version of the software.
Upgrade
Software desc.
2
1
Software setting (See P.book/hist.)
Function Menu of the Software List
Function
name
Indicates the menu
number.
Title
Explains the
function outline.
Describes the
names of the
items on the
display and their
explanations.
Shows an
important display
for operating the
step.
Describes
information related
to the function,
cautions and
limitations, etc.
Shows the names
of the items
displayed on the
display. Some
items may not be
available,
depending on the
operation.
Some pages describe
operations of the
function menu in the
following way.
Note: The above page is a sample.
P.35
⇒
Precautions
Describes the setting
at purchase. The
“Function List” also
lists the settings at
purchase.
See page 430
⇒
How to Read/Refer to This manual
Shows each
operating
procedure.
See page 37
⇒
You can search
for chapters from
the tabs.
Describes the
preparative steps
to set the
functions in the
table.
Indicates that the
operation
procedure
continues.
The page number is
●
displayed on the
bottom left or bottom
right of the page.
3
Page 6
4
Easy Search
Easy Search/Contents/
Precautions
To check the operation for the function you want to know, refer to the following:
To know convenient functions for making calls
To/Not to notify your phone number to the other party
........49 <Notify Caller ID>
To talk facing the FOMA phone .....................................64 <Hands-free>
To change a volume level of the other party’s voice.......72 <Earpiece Volume>
To put a call on hold during a call...................................74 <Holding>
To switch to a video-phone call during a voice call.........58
Making a Call with a Few Touches...............................106 <Two-Touch Dial>
To do the following when you cannot answer calls
To record messages ......................................................78 <Record Message>
To record messages at the Voice Mail Service Center
.......362 <Voice Mail>
To put an incoming call on hold......................................73 <On Hold>
To change melody or illumination
To silence the keypad sound .......................................115 <Keypad Sound>
To change ring tones....................................................110 <Select Ring Tone>
To adjust the ring volume................................................73 <Ring Volume>
To activate Manner Mode.............................................117 <Manner Mode>
To know incoming calls by vibrator ..............................112 <Vibrator>
To change colors/flickering patterns of Call indicator ...128 <Illumination>
To change ring tones according to callers ...................105 <Utilities>
To change/know display settings
To change the Stand-by display (Wallpaper)................119 <Display Setting>
To display a calendar on the Stand-by display.............119
To set the clock...............................................................48 <Set Time>
To change the font size.................................................135 <Font>
To know the meaning of icons on the display.................28
Easy Search
Page 7

5
Easy Search
Easy Search/Contents/
Precautions
To make full use of mail
To send Deco mail........................................................219
To send images ............................................................224 <Attachments>
To sort and save mail automatically..............................254 <Auto-Sort>
To use the FOMA phone with a sense of security
To keep Phonebook entries from prying eyes ..............147 <Secret Mode>
To reject calls without a caller ID..................................151 <Call Setting w/o ID>
To reject calls from the phone numbers not in the Phonebook
.....152 <Reject Unknown>
To lock the FOMA phone that is not at your hand ........142
<Remote Lock Setting>
To lock the side keys ....................................................146 <Side Keys Guard>
Other things you can do
●
TheoperatingproceduresforfrequentlyusedfunctionsaresummarizedintheQuickManual.
⇒
See page 480
To call up frequently used functions .............................349 <Private Menu>
To reduce the battery consumption ..............................122
To use the FOMA phone as a calculator ......................355 <Calculator>
To exchange information using infrared rays................328
To use the FOMA phone as an alarm clock..................337 <Alarm>
Page 8
6
Contents
Easy Search/Contents/
Precautions
Contents
How to Read/Refer to This Manual ···················1
Easy Search························································4
Contents······························································6
Features of FOMA P851i····································8
Making Full Use of FOMA P851i! ····················10
Safety Precautions···········································12
Notes on Handling············································20
Intellectual Property Rights·····························22
Accessories and Main Options·······················24
Confirming before Use
25
Making Calls/Receiving Calls
51
Phonebook
89
Tone/Display/Light Setting
109
Safety Settings
137
i-mode/i-motion
155
Phone Parts and Functions, Display, Icon Descriptions,
Method for Selecting Menu, Guide, UIM (FOMA Card), Battery,
Charging, One-push Open, Power ON/OFF, Select Language, Initial Setting,
Set Time, Notify Caller ID, Own Number, etc.
Making a Call, WORLD CALL, Switching to a Video-phone Call, Redial, Dialed
Calls, Pause Dial, Hands-free, Receiving a Call, Indicate Video-phone, Videophone, Reject Video-phone, Received Calls, Answer Setting, Open Phone,
Fold Setting, Earpiece Volume, Ring Volume, On Hold, Holding, Drive Mode,
Public Mode (Power Off), Record Message, Using Chara-den, Useful
Functions for Video-phone Calls, Moving Image Quality, Video-phone Display
Setting, Select Image, Voice Call Auto Switch, Dialing Speed, etc.
Phonebook, Add to Phonebook, Add to Phonebook (UIM), Storing Displayed
Phone Number/Mail Address in Phonebook Entries, Group Setting, Search
Phonebook, Editing Phonebook Entries, Deleting Phonebook Entries, Number
of Phonebook Entries, Making Full Use of Phonebooks, Utilities, Two-Touch
Dial, Voice Dial
Select Ring Tone, Vibrator, Voice Announce, Manner Mode, Display Setting,
Private Window, Display Light, Color Pattern,
Menu Display Set, Illumination, Desktop, Font, Main Window Clock, etc.
Passwords, Change Security Code, PIN Setting, Releasing PIN Lock,
All Lock, Self Mode, PIM Lock, Keypad Dial Lock, Secret Mode, Mail Security,
Restrictions, Call Setting w/o ID, Ringing Time, Reject Unknown, etc.
What is i-mode?, Menu, Last URL, My Menu, Change i-mode Password,
Enter URL, URL History, Display Home, Bookmark, Screen Memo,
Download, Operations from Highlighted Information, i-mode Settings,
Message R/F, SSL Certificate Operation, User Certificate Operation, What is
i-motion?, Obtain i-motion Movie, etc.
Page 9
i-mode Mail, Deco Mail, Kirari Mail, Mail Receive Option,
Check New Message, i-motion Mail, Inbox, Outbox, Draft Box, Auto-Sort,
Template, Chat Mail, SMS (Short Messages), etc.
What is i-αppli?, i-αppli Download, i-αppli Launch, Starting i-αppli
Automatically, Pre-installed i-αppli, i-αppli Stand-by Display,
Settings for when Running i-αppli
What is i-channel?, Using i-channel, Using Detailed Functions
Data Box, Picture Viewer, Edit Picture, Original Animation, i-motion Player,
Edit i-motion, Chara-den, Melody Player, Infrared Exchange, etc.
Multiaccess, Multitask, Alarm, Schedule, ToDo, Private Menu,
Own Number, Voice Memo during a Call, Voice Memo during Standby,
Call Data, Calculator, Free Memo, UIM Operation, Reset, Initialize, etc.
Check Messages, Voice Mail, Call Waiting, Call Forwarding,
Nuisance Call Barring, Caller ID Notification, Caller ID Request, Dual Network,
English Guidance, Arrival Call Act, Set Arrival Act, Remote Access,
Multi-Number, Additional Service, etc.
Preparation Flow for Data Transmission, Installing Transmission Setup Files,
FOMA PC Setup Software, Setting Transmission, W-TCP Setup, APN Setting,
Dial-up Network, FirstPass PC Software, AT Command, etc.
Character Entry, Common Phrases, Cutting/Copying/Pasting Characters,
Kuten Code, Own Dictionary, Clear Learned, Download Dictionary
Function List, Options and Related Equipment, Data Link Software,
Troubleshooting, Error Messages, Warranty and Maintenance Services,
Software Update, Scanning Function, Specifications, etc.
Index, Quick Manual
7
Contents
Easy Search/Contents/
Precautions
Mail
205
i-αppli
277
i-channel
295
Data Display/Edit/
Management
299
Other Useful Functions
333
Network Service
361
Data Transmission
367
Entering Characters
405
Appendix/Interfacing to External
Devices/Troubleshooting
429
Index/
Quick Manual
473
Page 10
Main Features of the P851i
8
Features of FOMA P851i
Easy Search/Contents/
Precautions
Features of FOMA P851i
i-mode Function
◆
Remarkable i-mode
See page 156
i-mode is the online service that enables you to get useful information from i-mode sites (programs) or web pages supporting
i-mode by using the screen of an i-mode phone. This service also enables you to send or receive messages with ease.
●
i-mode is only available on a subscription basis.
◆
Deco Mail
See page 210
You can change the font color, font size, or
background color of mail text or can insert Deco
mail pictures and so on, so that you can
compose and send enhanced messages. In
addition, as Deco mail supports the template,
you can easily create a Deco mail message by
using the format of the received Deco mail or
downloaded from sites.
◆
Chara-den
See pages 82 and 322
During a video-phone call, you can display a
pre-installed or downloaded graphic
character in place of your own image. You
can add expressions or movements to the
character by key operations.
◆
i-motion Movie/i-motion Mail
See pages 202 and 211
You can obtain images and music from sites
or Internet web pages. You can set the stored
i-motion movie as “Chaku-motion” for a ring
tone or ring image.
Also, you can attach an i-motion movie
obtained from sites or internet web pages to
i-mode mail for sending.
FOMA (Freedom of Mobile multimedia Access) is the name of the DoCoMo service based on
the W-CDMA format, authorized as one of the world’s standards for third-generation mobile
telecommunication systems (IMT-2000).
◆
Video-phone
See page 53
You can talk with the other party watching the
video through the other party's camera. You
can let the other party's voice heard from the
speaker, and switch over to a video-phone call
during a voice call.
◆
Flip Close PIM Lock
See page 145
You can set PIM Lock to work every time you
close the FOMA phone. PIM Lock is the function
that prevents other persons from viewing your
personal information or rewriting it improperly.
◆
i-shot
See page 210
You can display the received i-shot images.
◆
i-αppli/i-αppli DX
See page 278
You can download and use a variety of i-αppli
software programs from sites and set them for
the Stand-by display. In addition, i-
α
ppli DX
enables you to enjoy i-
α
ppli variously by linking
to the information in the i-mode phone such as
the Phonebook entries and mail messages.
◆
i-channel
See page 296
●
i-channel is only available on a subscription
basis.
●
The i-channel service is provided only in
Japanese.
i-channel distributes graphical information
such as news or weather forecast. You
periodically receive information and tickers
flow on the Stand-by display for the latest
information.
You can press to show the
Channel List.
In addition, by selecting a
channel you want to see on the Channel List,
you can obtain more fruitful, detailed
information. Even if you have not applied for ichannel service, a trial service is available for
a certain period with service fee free.
Page 11
9
Features of FOMA P851i
Easy Search/Contents/
Precautions
Various Functions
◆
Infrared Exchange/Infrared
Remote-Controller
See pages 328 and 290
You can exchange data with another FOMA phone
or a device using infrared rays. You can use the
FOMA phone also as a remote-controller for a TV
that supports infrared exchange.
◆
One-push open
See pages 45 and 71
You can open the FOMA phone easily by
pressing the button.
If Open Phone is set to “Answer”, you can start
conversation when you open the FOMA phone
during ringing.
◆
使いかたナビ(
Guide
)
You can search for functions by pressing
to bring up “
使いかたナビ
(
Guide
)”.
※※
This function is available in Japanese Mode
only.
◆
Multiaccess/Multitask
See pages 334 and 336
The FOMA phone comes with the “Multiaccess”
function that enables you to simultaneously
use the voice phone and i-mode (or data
transmission by packet transmission). SMS is
available separately from “Multiaccess”. The
FOMA phone comes with also the “Multitask”
function that enables you to use multiple menu
functions simultaneously.
◆
Safety Settings
See page 137
To prevent unauthorized use, you can use the Lock/Security functions which protect your privacy using the Terminal
Security Code and password, lock the lost FOMA phone from a distant location, and lock the FOMA phone every time
it is closed.
◆
Network Service
See page 362
C
Voice Mail Service (Charged)
・
A separate subscription is required.
C
Call Waiting Service (Charged)
・
A separate subscription is required.
C
Call Forwarding Service (Free)
・
A separate subscription is required.
C
Dual Network Service (Charged)
・
A separate subscription is required.
C
SMS (Short Messages) (Free)
・
No subscription is required.
Page 12
10
Making Full Use of FOMA P851i!
Easy Search/Contents/
Precautions
Making Full Use of FOMA P851i!
i-channel
PIM Lock
◆
Flip Close PIM Lock
See page 145
“PIM” stands for “Personal Information Management program”.
To prevent other persons from viewing your personal information or rewriting it, you can set PIM
Lock which disables the Phonebook, Record Message, Own Number Display, Mail, and other
functions.
In addition, the P851i has the "Flip close PIM lock" function which locks the FOMA phone each
time it is closed.
◆
Chat Mail
See page 264
With Chat Mail, you can enjoy exchanging mail messages on a display
as if you were talking with multiple parties.
◆
i-channel
See page 296
You can periodically receive various pieces of information without operating by yourself. Also,
you can just press to show the Channel List, thus enabling you to access more fruitful,
detailed information.
Before contract After contract
Connected
Page 13
11
Making Full Use of FOMA P851i!
Easy Search/Contents/
Precautions
Pre-installed i-αppli
Video-phone
◆Gガイド番組表リモコン
(G Guide Program List Remote Controller)
See page 290
This is convenient i-αppli that bundles TV program list and the TV
remote-controller function. The monthly fee is free. Anywhere, at any
time, you can easily access the TV program information for the time
zone you want to know. You can check program titles, program
contents, start/end time, and G code® which correspond to the TV
stations in your local area.
The “
おすすめメール
” (recommendation mail)” function enables you to
immediately send information about program titles and their broadcast
schedules to your friends once you have found program information
you like. You can also remotely control your TV set. (Some models are
not supported.)
(You are charged packet transmission fee.)
◆
Countdown Train-P
See page 285
This program shows a countdown by the hour/minute/second until the
time of the departure of the train that you want to ride on.
The alarm function is also provided to notify you of the departure 5 to 30
minutes before.
◆
“Chara-den” that Conveys Your Feelings
See pages 53, 82 and 322
“Chara-den” is the other self character that is sent to the other party.
If you set a Chara-den image as a substitutive image for a video-phone
call, you can give it movements or expressions such as “delighted” or
“feeling sad” and so on by key operations. Also, you can synchronize
the lip of some Chara-den images downloaded from site with your voice.
※
Images on the display are
for reference. They differ
from the actual ones. Local
programs broadcast by
local channels will appear
on your display.
Page 14
Safety Precautions
12
Safety Precautions
Easy Search/Contents/
Precautions
Be sure to observe these safety precautions because they are designed to protect you or
those around you from causing injury and to avoid unnecessary damage to the property.
■
The following symbols indicate the levels of danger or damage that can be caused if the
particular precautions are not observed.
Before using the FOMA phone, read these safety precautions carefully so that you can use
it correctly. After reading the precautions, keep them in a safe place for later reference.
Danger
This symbol indicates that incorrect handling will almost certainly
cause death or serious injury.
Warning
This symbol indicates that incorrect handling poses a risk of causing
death or serious injury.
Caution
This symbol indicates that incorrect handling poses a risk of causing
injury or damage to the product or property.
Denotes things not to do. (Prohibition)
Denotes not to disassemble.
Denotes not to touch with wet
hands.
Denotes not to use where it could
get wet.
Denotes mandatory instructions (matters that must be complied with).
Denotes to pull the power plug out of the outlet.
Pull the power plug out
Do
The following symbols show specific directions:
Always follow the safety precautions.
Don’t
Do not disassemble
No wet hands
Avoid water
■
“Safety Precautions” are divided into the following six sections:
General precautions for FOMA phone, batteries, adapters/chargers, and UIM ···························p.13
Precautions for FOMA phone·······································································································p.14
Precautions for batteries···············································································································p.16
Precautions for adapters/chargers································································································p.17
Precautions for UIM······················································································································p.18
Notes on using near electronic medical equipment······································································p.19
Page 15
13
Safety Precautions
Easy Search/Contents/
Precautions
General precautions for FOMA phone, batteries,
adapters/chargers, and UIM
Use only the batteries and adapters/chargers approved by DoCoMo for the FOMA
phone.
If you use any type of battery, adapter or charger other than the specified one, the FOMA phone or battery may
leak, overheat, burst, catch fire, or get damaged.
Battery Pack P07 FOMA AC Adapter 01 FOMA AC Adapter 01 for both overseas and domestic usage
FOMA DC Adapter 01 Desktop Holder P11
●
For other specified products, contact a handling counter such as a DoCoMo shop.
Do not disassemble, modify or solder the FOMA phone or accessories.
Accidents such as fire, injury, electric shock, or malfunction may result. The battery may leak, overheat, burst or
catch fire.
Do not use or leave the FOMA phone or accessories in places where it is exposed to
direct sunlight, or in extremely high temperatures such as inside a car in the summer
heat.
Otherwise, the devices may deform or malfunction, battery may leak, overheat, burst, or catch fire, or
performance and longevity may deteriorate. Also, part of the case might be heated, causing bare skin burns.
Do not let the FOMA phone or accessories get wet.
If liquids such as water or pet urine get onto them, overheating, electric shock, fire or accessories malfunction,
injuries or others may result. Pay attention to the place of use and the way of handling.
Avoid water
Don’t
Do not
disassemble
Do
If the FOMA phone or accessories
begins to emit an odor, overheat,
discolor, deform, etc., while being
used, charged, or stored, take the
countermeasures as follows:
1. Pull the power plug off the outlet or socket.
2. Shut down the power to the FOMA phone.
3.
Remove the battery pack from the FOMA phone.
If you use devices with these symptoms not
handled, they may overheat, burst, or catch
fire, or the battery may leak.
Do not place the batteries, the
FOMA phone, or adapters/chargers
in microwave ovens or
high-pressure containers.
The battery may leak, overheat, burst, or catch
fire. The FOMA phone or the adapter/charger
may overheat, smoke, or catch fire, or its
circuit parts may burst.
Do not throw the FOMA phone or
accessories, or subject them to
severe shocks.
The battery may leak, overheat, burst, catch
fire, or cause damage to the equipment.
Do not use near places such as gas
stations where there is danger of
fire or explosion.
If used in dusty places or where there are
flammable gases such as propane or gasoline,
explosions or fire may result.
Be careful not to let electroconductive materials
(metal pieces, pencil leads etc.) contact with the
charging terminal or external connecting
terminals. Also, make sure that those are not
entered into the inside of the FOMA phone.
Short-circuit could cause catching fire or
malfunction of the FOMA phone.
Don’t
Don’t
Don’t
Don’t
Do
Danger
Warning
Page 16
Note that the repeated or prolonged use of functions such as charging, moving image playback,
video-phone call, i-mode, and i-
α
ppli may result in high temperature of the FOMA phone, battery,
or adapter/charger.
Prolonged skin contact with any part generating heat at a high temperature may cause reddening, itching,
rashes, or other symptoms, depending on your physical condition or predisposition. Be especially careful during
prolonged use while the FOMA is connected to the adapter/charger.
Do
14
Safety Precautions
Easy Search/Contents/
Precautions
Precautions for FOMA phone
Warning
Turn off the FOMA phone when near high-precision electronic devices or devices
using weak electronic signals.
The FOMA phone may possibly cause these devices to malfunction.
※
Electronic devices that may be affected:
Hearing aids, implanted cardiac pacemakers, implanted defibrillators, other medical electronic devices, fire
alarms, automatic doors and other automatically controlled devices.
If you are using an implanted cardiac pacemaker, implanted defibrillator or any other electronic medical device,
consult the manufacturer or retailer of the device for advice regarding possible effects from the radio waves.
Do
Turn off the FOMA phone in places
where use is prohibited such as in
airplanes and hospitals.
Otherwise, electronic devices and electronic
medical appliances may be adversely affected.
If the Auto Power ON function is set,
deactivate the setting, then turn the power off.
For use inside medical facilities, make sure
that you comply with their regulations.
You may be punished for using the FOMA
phone in airplanes, which is prohibited by law.
If you have any implanted electronic
medical equipment, do not place
your FOMA phone in a chest pocket
or inner pocket.
If the FOMA phone is positioned close to
electronic medical equipment, it may cause
that equipment to malfunction.
Do not operate the FOMA phone
while driving a vehicle.
Operating a mobile phone during driving has
been prohibited since November 1, 2004. Park
your car in a safe place even when you are
using the Hands-Free kit. During driving, make
sure that you activate Drive Mode, Public
Mode or Voice Mail Service.
For those with weak heart
conditions, the vibrator and ring
volume must be adjusted carefully.
Those functions may possibly be affected on
the heart.
Do
Don’t
Don’tDon’t
Do
Keep out of the reach of babies and
infants.
Accidental swallowing or injury may result.
Do not place the FOMA phone or
accessories on unstable locations
such as wobbly tables or slanted
locations.
The FOMA phone or accessories may fall,
resulting in injury or malfunction.
Do not store in humid or dusty
places, or in high temperature
environments.
Malfunction may result.
If children use the FOMA phone or
accessories, a guardian should explain the
safety precautions and correct operations.
The guardian should also make sure that
the instructions are followed during use.
Otherwise, injury may result.
DoDo
Don’t
Don’tDon’t
Do
Caution
General precautions for FOMA phone, batteries,
adapters/chargers, and UIM (continued)
Page 17
15
Safety Precautions
Easy Search/Contents/
Precautions
Electronic devices in some types of
cars can be affected by use of the
FOMA phone.
For safety’s sake, do not use the FOMA phone
inside such cars.
Do not swing the FOMA phone by
its strap.
The FOMA phone may hit you or persons
around you, and accidents such as injury or
malfunction may result.
Do not place magnetic cards or
similar objects near the FOMA
phone or between phone parts.
Information on magnetic cards such as cash
cards, credit cards, telephone cards and floppy
disks may be deleted.
Do not allow liquids such as water,
or foreign materials such as metal
pieces or flammable materials to get
into the UIM insertion slit of the
FOMA phone.
Fire, electric shock or malfunction may occur.
Do not open the FOMA phone by
pressing the one-push open button
near persons around you or your
face.
The FOMA phone may hit you or persons
around you, causing accidents and injuries.
Take care not to get caught your
finger or a strap and so on when
you open or close the FOMA phone.
Accidents such as injury or malfunction may
result.
Do
Don’t
Don’t
Don’t
Don’tDon’t
Do
Itching, rash or eczema may be caused depending on your physical conditions or
predisposition. If an abnormality occurs, stop using the FOMA phone immediately, and
then seek medical attention.
Metals are used for the following parts:
Do
Where it is used Material Surface finish
Command navigation key ABS Nickel plated ground chrome finish
Private window side case Hinge Aluminum Anodized
Caution
Do not put the FOMA phone in the
place where it could be affected by
an expanded airbag, such as on the
dashboard.
If the airbag expands, the FOMA phone could
hit you and others, causing accidents such as
injury and the FOMA phone could become
damaged.
Don’t
When talking over the FOMA phone
with Hands-free activated, be sure to
keep the FOMA phone away from
your ear.
Otherwise, your hearing could be impaired.
Do not directly point the infrared
data port at someone’s eyes during
transmission.
His/her eyes may possibly be affected. Other
infrared devices may operate erroneously if the
infrared data port is pointed at them during
transmission.
Don’tDon’t
Do
Warning
If thunder starts to rumble while you
are using the FOMA phone
outdoors, turn the power off, and
move to a safe place.
Otherwise, you could be struck by lightning or
suffer an electric shock.
DoDo
Page 18
16
Safety Precautions
Easy Search/Contents/
Precautions
An exhausted battery should not be disposed of with other waste.
The battery may catch fire or destroy the environment.
After insulating the battery terminals with tape, bring them to a handling counter such as a DoCoMo shop or
dispose of them in accordance with local waste disposal regulations.
Don’t
Caution
If the battery fluid gets into your
eyes, do not rub them. Flush your
eyes with clean water and get
medical attention immediately.
Otherwise, the loss of eyesight may result.
Do not let any metal such as a wire
contact the terminal. Also do not
carry or store the battery together
with a metal necklace.
The battery may leak, overheat, burst or catch fire.
Do not throw the battery into fire.
The battery may leak, overheat, burst or catch fire.
Do not use excessive force to attach
the battery to the FOMA phone
when you cannot attach it
successfully. Also, check that the
battery is the right way round when
you attach it.
The battery may leak, overheat, burst or catch fire.
Do not pierce it with nails, hit it with
a hammer, or step on it.
The battery may leak, overheat, burst or catch fire.
Don’t
Don’t
Don’t
Don’t
Do
Danger
Warning
If charging is not completed within
the specified charging time, stop
charging.
Otherwise, the battery may leak, overheat,
burst or catch fire.
If the battery fluid comes in contact
with skin or clothes, immediately
stop using, then wash affected
areas thoroughly with clean water.
The battery fluid is harmful to skin.
Immediately stop using the battery if
it leaks or emits an odor, and keep it
away from fire.
The battery fluid, being flammable, may catch
fire and cause an explosion.
Do
Do
Precautions for batteries
■
Check the description on the label of the
battery pack for the type of battery.
Description Type
Li-ion Lithium-ion battery
Do
Page 19
17
Safety Precautions
Easy Search/Contents/
Precautions
Precautions for adapters/chargers
Use the adapter/charger at the
specified VAC.
Otherwise, fire or malfunction may result.
When using the FOMA phone overseas, use
FOMA AC Adapter 01 for both overseas and
domestic usage.
AC adapter: 100 VAC
FOMA AC Adapter for both overseas and
domestic usage: 100 to 240 VAC
(Connect only to home AC outlet)
DC adapter: 12/24 VDC [For negative (-)
grounded vehicles only]
If liquids such as water get in the
charger, unplug the power cord
immediately from the outlet or
cigarette lighter socket.
Liquid inside the charger may cause electric
shock, smoke, or fire.
Keep the power plugs dust-free.
Otherwise, fire may result.
Do not use a damaged
adapter/charger cord or power cord.
Electric shock, overheating or fire may result.
Do not use the AC adapter and
desktop holder in steamy places
such as a bathroom.
Electric shock may occur.
When the adapter/charger is not to
be used for a long period of time,
unplug the power cord from the
outlet.
Otherwise, electric shock, fire, or malfunction
may result.
If a fuse of the DC adapter or In-Car
adapter has blown, replace it with a
specified fuse.
Otherwise, catching fire or malfunction may
result. For the specified fuse, see the user’s
manual.
The DC adapter is for use only in a
negative (-) grounded vehicle. Do
not use it in a positive (+) grounded
vehicle.
Fire may result.
Place the charger and desktop
holder on a stable location during
charging. Do not cover or wrap the
charger and desktop holder in cloth
or bedding.
The FOMA phone may become separated
from the desktop holder, or overheat, leading
to fire or malfunction.
When plugging the AC adapter into
the power outlet, firmly plug it in,
taking care not to contact with metal
straps or the like.
Otherwise, electric shock, short-circuit or fire
may result.
Do not touch the the power cord of
the adapter/charger, or power outlet
with wet hands.
Electric shock may result.
Never short-circuit the charging
terminals when the adapter is
plugged into the power outlet or
cigarette lighter socket. Also, never
touch the charging terminals with
fingers or other bare skin.
Fire, malfunction, electric shock or injury may
result.
If it starts to thunder, do not touch
the FOMA phone and adapter/
charger.
You might be struck by lighting or suffer an
electric shock.
Don’tDon’t
Don’t
No wet
hands
DoDo
Don’t
Don’t
Do
Pull the
power plug
out
Don’t
Don’t
Do
Pull the
power plug
out
Pull the
power plug
out
Do
Warning
Page 20
18
Safety Precautions
Easy Search/Contents/
Precautions
Caution
Always hold the plug when pulling
the adapter/charger out of the power
outlet or cigarette lighter socket.
If you pull the plug out by the cord, the cord
may be damaged, which could result in electric
shock or fire.
Do not place heavy objects on the
adapter/charger cord and power
cord.
Electric shock or fire may result.
Before cleaning, pull the plug out of
the power outlet or cigarette lighter
socket.
Otherwise, electric shock may result.
Pull the
power
plug out
Don’tDo
Precautions for adapters/chargers (continued)
Be careful when removing the UIM (IC portion).
Your hand or finger may be injured.
Do
Caution
Precautions for UIM
Page 21
19
Safety Precautions
Easy Search/Contents/
Precautions
Notes on using near electronic medical equipment
■
The description below meets “Guidelines on the Use of Radio-communication Equipment
such as Cellular Telephones – Safeguards for Electronic Medical Equipment” by the
Electromagnetic Compatibility Conference Japan.
If you use an implanted cardiac pacemaker or implanted defibrillator, use the mobile
phone 22 cm or more away from an implanted cardiac pacemaker or implanted
defibrillator.
Operation of an implanted cardiac pacemaker or implanted defibrillator can be affected by radio waves.
Turn off the phone in crowded areas such as inside trains during rush hour, as
someone with an implanted cardiac pacemaker or implanted defibrillator may be near
you.
Operation of an implanted cardiac pacemaker or implanted defibrillator can be affected by radio waves.
Comply with the following in hospitals or health care facilities:
●
Do not carry the FOMA phone into operating rooms, intensive care units (ICU) or coronary care units (CCU).
●
Turn off the FOMA phone in hospital wards.
●
If there is any electronic medical equipment near you, turn off the FOMA phone even when in a location such
as a lobby.
●
Comply with any regulations of hospital and health care facilities instructing you not to use or carry in a mobile
phone.
●
If the Auto Power On function is set, deactivate the setting, then turn the power off.
Patients using electronic medical equipment other than implanted cardiac pacemakers
or implanted defibrillators (outside medical establishments for treatment at home, etc.)
should check the influence of radio waves upon the equipment by consulting its
manufacturer.
Operation of electronic medical equipment can be affected by radio waves.
Do
Do
Do
DoDo
Warning
Page 22

20
Notes on Handling
Easy Search/Contents/
Precautions
■
Do not let the equipment get wet.
The FOMA phone, battery and adapter/charger are not waterproofed. Do not use them in environments, which are high in
humidity such as in bathrooms, and do not allow them to get wet from rain. Furthermore, if carrying them against your
body, the internal parts may become corroded if exposed to body perspiration.
If the parts are found to have been damaged due to exposure to the liquids, any repairs will not be covered by warranty,
or repairs may not be possible.
This may be repaired at a cost if repairs are possible.
■
Do not place the FOMA phone in places where it may be subjected to excessive pressure.
Do not place the FOMA phone in a bag along with many other articles or in a trouser pocket, because this can damage
the LCD display and internal circuitry. Malfunctions caused by such damage are not covered by the warranty.
■
Use a dry soft cloth to clean the equipment.
C
The screen of the FOMA phone sometimes has a special coating so that they are easier to see. If you rub them roughly
with a dry cloth, it might be scratched. Take care of the way of handling, and use only a dry, soft cloth such as used for
cleaning glasses.
When the FOMA phone is left with water drops or stains on the display, smear might be generated or its coating might
be peeled off.
C
Do not use alcohol, thinner, benzine, detergent or other solvents for cleaning, otherwise the printing may be removed
or discoloration may result.
■
Occasionally clean the connecting terminals of the equipment using a dry cotton swab.
If the connector terminal becomes soiled, the connection might deteriorate so that the power goes off or the battery does
not charge fully. Wipe the connector terminal with a dry cloth or cotton swab.
■
Do not place the FOMA phone near an air conditioner outlets.
Condensation may form due to rapid changes in temperature, and this may corrode internal parts and cause malfunction.
■
Carefully read each instruction manual attached to the battery or adapter/charger.
■
Avoid using in extremely high or low temperatures.
The FOMA phone should be used within a temperature range of 5°C to 35°C and a humidity range of 45% to 85%.
■
It is recommended that you take separate notes of the information stored in the FOMA phone
and keep such notes in a safe place.
We take no responsibility for any loss of the stored data items.
■
The FOMA phone, if operated near ordinary phones, televisions or radios that are in use, may
affect them. You should operate your FOMA phone as far away from such equipment as
possible.
■
Do not sit with the FOMA phone in your trousers or skirts pocket. Do not place the FOMA
phone under heavy objects in a bag.
Malfunction may result.
■
Make sure that nothing, such as a strap, gets caught between the parts of the FOMA phone
when you close it.
Otherwise, malfunction or breakage may result.
■
The FOMA phone may become warm during use or charging but this is not an abnormality.
Use the FOMA phone as it is.
Notes on handling the FOMA phone
General notes
Notes on Handling
Page 23

21
Notes on Handling
Easy Search/Contents/
Precautions
■
Charge the battery in a place with an ambient temperature of 5°C to 35°C.
■
Make sure that the battery is charged when you use the FOMA phone for the first time or have
not used it for a long period of time.
■
The usable time of the battery varies depending on the usage environment or its deterioration.
■
Store the batteries in a well ventilated place out of direct sunlight.
When you do not use the battery for a lengthy period of time, remove it from the FOMA phone or adapter (including the
charger) with the battery power completely drained, and store it the battery pack in the polyethylene bag that comes
with the FOMA phone.
■
Batteries are a consumable.
If the usable time of your FOMA phone is extremely short even when the battery is fully charged, replace the battery.
Make sure that you only purchase the specified battery.
■
Charge the battery in a place with an ambient temperature of 5°C to 35°C.
■
Charge the battery where:
There is very little humidity, vibration, and dust.
There are no ordinary phones, television sets or radios nearby.
■
During charging, the adapter or charger may become warm. This is not an abnormality, so
continue charging.
■
Do not use the DC Adapter for charging the battery when the car engine is not running.
The car battery could go flat.
■
When using the power outlet having the disengaging prevention mechanism, observe the
instructions given in that instruction manual.
■
Do not give a strong shock. Also, do not deform the charging terminal.
Malfunction may result.
■
Never use more force than necessary when detaching the UIM.
■
Avoid using in extremely high or low temperatures.
■
Always keep the IC portion clean.
■
Do not use unnecessary force when inserting it into the phone.
■
The UIM may become warm during use, but this is not a sign of an abnormality. Continue
using it as it is.
■
The warranty does not cover damage caused by inserting the UIM into some other types of IC
card reader/writer.
■
For the environmental protection, bring any unneeded UIMs to a handling counter such as a
DoCoMo shop.
■
It is recommended that you make separate notes of the information stored on the UIM and
keep such notes in a safe place.
We take no responsibility for any loss of the stored data items.
■
Use a dry soft cloth to clean the equipment.
■
Do not damage, carelessly touch, or short-circuit the IC.
Data might be lost or damage to the IC could result.
■
Do not drop the UIM or subject it to strong impacts.
Malfunction may result.
■
Do not bend the UIM or place heavy objects on it.
Malfunction may result.
Notes on handling the UIM
Notes on handling chargers and adapters
Notes on handling batteries
You may be imposed punishment according to the law and rule (such as the nuisance prevention ordinance) if
you use the FOMA phone to give a remarkable nuisance and misdeed to the public.
Page 24

22
Intellectual Property Rights
Easy Search/Contents/
Precautions
You have no right to copy, modify, or distribute the contents such as text, images, music, or software downloaded from web
pages on the Internet without permission from the copyright holder except for when the copy or quote is for personal use that
is allowed by the Copyright Law.
・
“FOMA”, “mova”, “KIRARI MAIL”, “i-mode”, “i-αppli”, “i-αppli DX”, “i-motion”, “i-motion Mail”, “Deco-mail”, “Chaku-motion”,
“Chara-den”, “i-melody”, “mopera”, “mopera U”, “WORLD CALL”, “Dual network”, “FirstPass”, “visualnet”, “V-live”,
“i-channel”, “QUICKCAST”, “Security Scan”, “i-αppli search”, “i-shot”, “i-area”, “i-anime”, “Short Mail”, “WORLD WING”,
“Driving mode”, “Public mode”, “DoPa”, “sigmarion”, “musea”, and the logos of “FOMA”, “i-mode”, and “i-channel” are
trademarks or registered trademarks of NTT DoCoMo, Inc.
・
“Multitask” is a trademark of the NEC Corporation.
・
Catch Phone (Call Waiting Service) is a registered trademark of Nippon Telegraph and Telephone Corporation.
・
使いかたナビ
®
is a registered trademark of CANNAC, Inc.
使いかたナビボタン
TM
is a trademark of CANNAC, Inc.
・
Java and Java related trademarks and logos are trademarks or registered trademarks of Sun Microsystems, Inc. in the
United States and other countries.
・
NetFront and are registered trademarks of ACCESS Co., Ltd. in Japan and other countries.
・
IrFront is a trademark or registered trademark of ACCESS Co., Ltd. in Japan and other countries.
・
LC FONT and LC logo mark are registered trademarks of SHARP Corporation.
・
T9 Text Input®and the T9 logo are registered trademarks of Tegic Communications.
T9 Text Input
®
is patented (Patent No. 3532780, patent No. 3492981) or pending patent in Japan.
T9 Text Input
®
is patented or pending patent worldwide.
・
QuickTime is a trademark of Apple Computer, Inc. in the United States and other countries.
・
Microsoft, MS, and Windows are registered trademarks or trademarks of Microsoft Corporation in the United States and
other countries.
・
The full name of Microsoft®is the Microsoft Windows®Operating System.
・
Windows®98 is an abbreviation for the Microsoft®Windows®98 operating system.
・
Windows®SE is an abbreviation for the Microsoft®Windows®98 operating system Second Edition.
・
Windows®Me is an abbreviation for the Microsoft®Windows®98 Millennium Edition operating system.
・
Windows®2000 Professional is an abbreviation for the Microsoft®Windows®2000 Professional operating system.
・
Windows®XP is an abbreviation for the Microsoft®Windows®XP Professional/Home Edition operating system.
・
Macromedia, Flash, Flash Lite, Macromedia Flash and Macromedia Flash Lite are trademarks
or registered trademarks of Macromedia, Inc. in the United States and other countries.
Trademarks
Intellectual Property Rights
Copyrights and Rights of Portrait
Page 25

23
Intellectual Property Rights
Easy Search/Contents/
Precautions
・
This product is embedded with LC Font technology, which was developed by SHARP Corporation for clearly displaying
easy-to-read characters on an LCD screen. Other fonts are used for displaying some screen pages including, but not
limited to Calculator, Calendar, pictograph symbols, and marks.
・
This product contains the Macromedia®Flash Player technology developed by Macromedia, Inc.
Copyright
©
1995-2005 Macromedia, Inc. All rights reserved.
・
This product contains NetFront of ACCESS Co., Ltd. for Internet browser software.
NetFront is a trademark or registered trademark of ACCESS Co., Ltd. in Japan and other countries.
Copyright
©
1996-2005 ACCESS Co., Ltd.
・
This product contains the IrFront®technology of ACCESS Co., Ltd. as an OBEX protocol.
・
IrFront®is a product of ACCESS Co., Ltd.
Copyright
©
1996-2005 ACCESS Co., Ltd.
・
Some part of this product contains modules developed by Independent JPEG Group.
・
This product is licensed under the MPEG-4 patent portfolio license for the personal and non-commercial use of a
consumer to
C
encode video in compliance with the MPEG-4 Visual Standard (“MPEG-4 Video”) and/or
C
decode MPEG-4 Video that was encoded by a consumer engaged in a personal and non-commercial activity and/or
was obtained from a licensed video provider. No license is granted or implied for any other use.
Additional information may be obtained from MPEG LA, LLC.
・
Licensed by QUALCOMM Incorporated under one or more of the following United States Patents and/or their counterparts
in other nations:
4,901,307 5,490,165 5,056,109 5,504,773 5,101,501 5,506,865 5,109,390 5,511,073
5,228,054 5,535,239 5,267,261 5,544,196 5,267,262 5,568,483 5,337,338 5,600,754
5,414,796 5,657,420 5,416,797 5,659,569 5,710,784 5,778,338
・
The FOMA phone comes with the software licensed from GNU General Public License (GPL), GNU Lesser General
Public License (LGPL), and others.
See “readme.txt” inside the “
GPL・LGPL等について
(about GPL/LGPL and others)” folder on the accessory CD-ROM for
details about that software.
Others
・
is a registered trademark of Tao Group Limited.
・
“G GUIDE MOBILE” and its logo, and “G GUIDE” and its logo are registered trademarks of Gemstar-TV
Guide International, Inc. in the United States and its related company in Japan.
・
McAfee and VirusScan are registered trademarks or trademarks of McAfee, Inc. and/or its affiliates in the US and/or other
countries. All other registered and unregistered trademarks herein are the sole property of their respective owners.
© 2005 Networks Associates Technology, Inc. All Rights Reserved.
・
“Powered by Mascot Capsule®”, “Micro3D EditionTM”, and “Mascot Capsule®” are trademarks of HI corporation.
・
Other company names and product names described in the text are trademarks or registered trademarks of those
companies.
Page 26
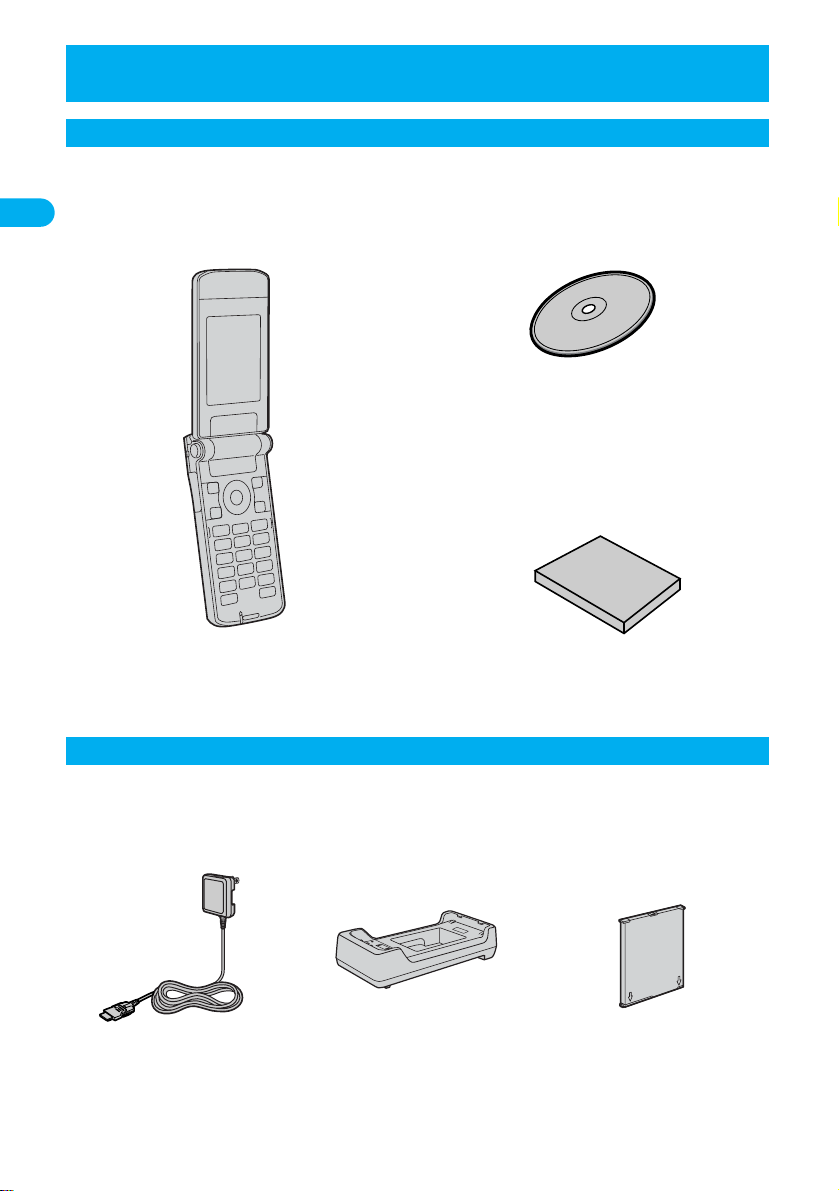
FOMA P851i Handset
(With Warranty and Rear Cover P08)
Instruction Manual
・
Quick Manual included
⇒
See page 480
取扱説明書
Other Options ⇒See page 447
Desktop Holder P11
(With Instruction Manual)
FOMA AC Adapter 01
(With Warranty and
Instruction Manual)
Battery Pack P07
(With Instruction Manual)
Accessories and Main Options
24
Accessories and Main Options
Easy Search/Contents/
Precautions
CD-ROM for FOMA P851i
<Accessories>
<Main Options>
Page 27

Confirming before Use
Phone Parts and Functions ·········································································································· 26
Display············································································································································ 28
Displaying Description of Icons·································································<Icon Descriptions> 30
Navigation Displays······················································································································· 30
Private Window······························································································································ 31
Method for Selecting Menu··········································································································· 32
Displaying Shortcut Menu············································································································· 36
When You do not Remember Key Operation································································<Guide> 37
Using the UIM (FOMA Card)·········································································································· 39
Attach/Remove Batteries ·············································································································· 42
Charging the FOMA Phone··········································································································· 43
Opening the FOMA Phone by Using a Button ·············································<One-push Open> 45
Confirming Battery Level ···················································································<Battery Level> 45
Turning Power On/Off······················································································<Power ON/OFF> 46
Switching to English·····················································································<Select Language> 46
Executing Initial Settings ···················································································<Initial Setting> 47
Setting Date and Time································································································<Set Time> 48
Notifying the Other Party of Your Phone Number········································<Notify Caller ID> 49
Confirming Your Own Number···········································································<Own Number> 50
25
Page 28
26
Phone Parts and Functions Confirming before Use
+
)
#
$
*
,
.
0
For inserting the Flat-plug Earphone/
Microphone Set with Switch (option)
-
%
&
'
(
1
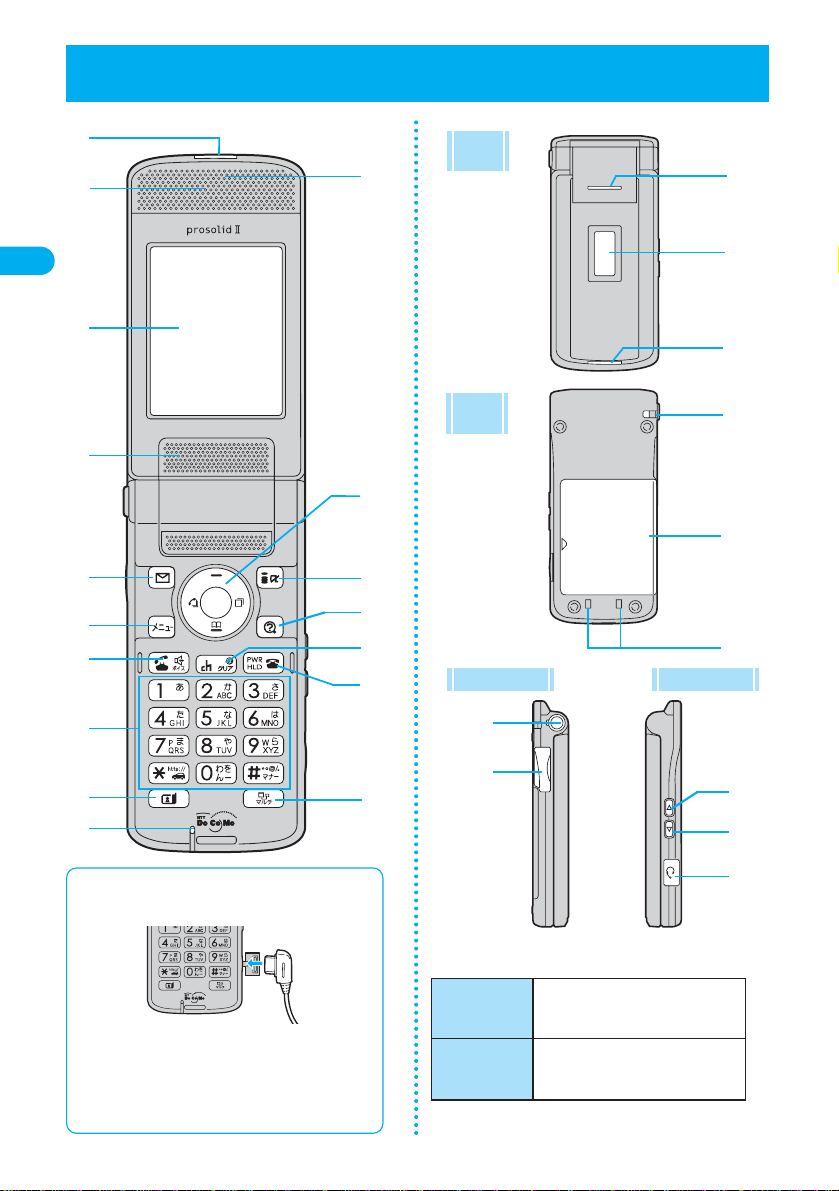
Phone Parts and Functions
2
:
;
-
4
/
●
The antenna is built into the FOMA phone.
Connector Plug
※
Take hold of the plug of the Flat-plug
Earphone/Microphone Set with Switch and insert
or pull it straight into or out. Be careful not to take
hold of the cover and plug together when you pull
it out.
9
<
3
5
6
Front
View
Rear
View
Left Side View
Right Side View
8
7
&
Dimensions
(when closed)
Weight
(with battery
attached)
H: Approx. 106mm
W: Approx. 49mm
D: Approx. 16.7mm
Approx. 99g
FOMA
Page 29

27
Phone Parts and FunctionsConfirming before Use
Infrared data port
For infrared exchange and an infrared remotecontroller.⇒See pages 290 and 328
Earpiece
For listening to the other party’s voice.
Display
⇒
See page 28
Speaker
Sounds for incoming calls. Also, you hear the other
party’s voice through this speaker when Hands-free is
on.
⇒
See page 64
Mail key
Press from the Stand-by display to bring up the Mail
menu.⇒See page 213
Press and hold for at least one second to check new
messages.⇒See page 231
Press to operate the function shown at the lower left of
the display.⇒See page 30
Menu key
Press to bring up the Main menu.
⇒
See page 32
Send/Answer key
Press to make/receive calls.
⇒
See pages 52 and 65
When entering text, press to switch between
uppercase/lowercase.
⇒
See page 418
Press and hold for at least one second to start a new
line.
⇒
See page 418
Numeric keys
Press to enter phone numbers and text.
・
Press and hold for at least one second to
activate Manner Mode.⇒See page 117
・
Press and hold for at least one second to
activate Drive Mode.⇒See page 75
・
Press and hold for at least one second to
switch the display light on/off.⇒See page 126
Video-phone key
Press to make/receive video-phone calls.
⇒
See pages 53 and 66
Microphone
For speaking to the other party.
Call/Charging indicator
Flickers for incoming calls/mail and during calls.
⇒
See pages 128 and 130
Lights in red while charging.
Command Navigation key
For operating functions and menus. ⇒See page 30
.
-
,
+
*
)
(
'
&
%
$
#
i-mode key
Press from the Stand-by display to bring up the
i-mode menu.⇒See page 163
Press and hold for at least one second to bring up
the i-
α
ppli Software List.⇒See page 281
Also, press to operate the function shown at the
lower right of the display.⇒See page 30
使使いいかかたたナナビビ((GGuuiiddee))
key
Press to bring up “
使使いいかかたたナナビビ((GGuuiiddee))
” for finding
functions that you want to know about or you want
to use. ⇒See page 37
Clear/i-channel key
Press to return to the previous operation.
Also, press to clear entered text or a phone number.
Press from the Stand-by display to bring up the
Channel List. ⇒See page 296
Power/End key
Press and hold for at least one second to turn the
power on or two seconds to turn the power off.
⇒
See page 46
Press briefly to end calls, put incoming calls on hold
(see page 73), and end functions.
Multi key
Press to display the Multitask menu. When multiple
functions are running, press and hold for at least
one second to switch functions.
⇒
See pages 336 and 337
Private window
⇒
See page 31
Strap hole
Rear cover
⇒
See page 42
Charging terminal
⇒
See page 44
One-push open button
⇒
See page 45
Connector terminal
For connecting the AC Adapter (option), DC
Adapter (option), or FOMA USB Cable (option).
Mode/Home key (
モード/ホーム
)
Press from the Stand-by display to bring up the
Internet web page set for the home URL.
⇒
See page 175
Press to scroll by page while a site is displayed.
⇒
See page 163
Memo/Check key (
メモ/確認
)
Press to check for missed calls and new mail, and
to use Record Message.⇒See pages 81 and 131
Press to scroll by page while a site is displayed.
⇒
See page 163
Earphone/Microphone terminal
⇒
See pages 26 and 358
<
;
:
9
8
7
6
5
4
3
2
1
0
/
Page 30

28
Display Confirming before Use
#%' )+-
$&( *, .
/ 02468
1357
9
<Private window>
#%' )
$&( *
■
Meanings of icons
&
Displayed when an unread Message R
(Request) exists.⇒See pages 190 and 191
Displayed when the area for
Messages R (Request) in the FOMA
phone is full.
⇒
See pages 190 and 191
'
Displayed when an unread Message F
(Free) exists.
⇒
See pages 190 and 191
Displayed when the area for
Messages F (Free) in the FOMA phone
is full.
⇒
See pages 190 and 191
(
Displayed when i-mode mail remains
at the i-mode Center.⇒See page 231
Displayed when the box for i-mode
mail at the i-mode Center is full.
⇒
See page 209
Displayed when a Message R
(Request) remains at the i-mode
Center.
⇒
See pages 190 and 191
Displayed when the box for Message
R (Request) at the i-mode Center is
full.
⇒
See pages 190 and 191
Displayed when a Message F (Free)
remains at the i-mode Center.
⇒
See pages 190 and 191
Displayed when the box for Messages
F (Free) at the i-mode Center is full.
⇒
See pages 190 and 191
Displayed when i-mode mail is held at
the i-mode Center while Receive
Option Setting is set to “ON”.
⇒
See page 230
Display
#
Shows the battery level (estimate).
⇒
See page 45
$
Displayed during All Lock.
⇒
See page 142
Displayed during PIM Lock.
⇒
See pages 144 and 145
Displayed during Keypad Dial Lock.
⇒
See page 146
Displayed during Secret Mode or
Secret Only Mode.⇒See page 147
Displayed when both Keypad Dial
Lock and PIM Lock are activated.
Displayed when both Keypad Dial
Lock and Secret Mode/Secret Only
Mode are activated.
%
Displayed when an unread i-mode
mail or SMS message exists.
⇒
See pages 226 and 273
Displayed when the area for i-mode
mail and SMS messages in the FOMA
phone is full.⇒See pages 227 and 274
Displayed when the area for SMS
messages in the UIM (FOMA card) is full.
Displayed when both the FOMA
phone and UIM (FOMA card) are full.
Displayed when an unread mail exists,
and the area for SMS messages in the
UIM (FOMA card) is full.
Page 31

)
Shows the level of the received radio
waves.
(Strong) (Weak)
“” is displayed when out of the
FOMA service area or where radio
waves do not reach.
Displayed during Self Mode.
⇒
See page 144
*
Blinks while i-mode is activated. “ ”
is displayed during data transmission
while connecting to i-mode.⇒See
pages 163 and 164
Displayed during packet
transmission. The icons vary
according to the transmission status.
⇒
See page 381
+
Displayed during SSL transmission.
⇒
See page 164
,
Might be displayed while the FOMA USB
Cable (option) is connected in the
Communication Mode.⇒See page 370
Might be displayed when connected to a
hands-free device.
Displayed when a call or
communication is started via a
hands-free device.
-
Displayed during infrared exchange.
⇒
See page 328
Displayed while the infrared remotecontroller is working.⇒See page 290
.
Displayed during a voice call.
Displayed during a video-phone call
(64K).
Displayed during a video-phone call
(32K).
Displayed during 64K data
transmission.
29
DisplayConfirming before Use
/
Displayed during Multitask.
While multiple functions are activated,
“” is displayed.⇒See page 336
0
Displayed while Vibrator is set to
“ON”.⇒See page 112
1
Displayed while Ring Volume is set to
“Silent”.⇒See page 73
“” is displayed even if you set
“Mail/Msg. ring time” to “OFF”.
⇒
See page 116
2
Displayed during Manner Mode.
⇒
See page 117
3
Displayed during Drive Mode.
⇒
See page 75
4
Displayed when the call charge has
exceeded the specified limit.
⇒
See page 354
5
Displayed while an alarm for “Alarm”,
“Schedule”, or “ToDo” is set.
If an alarm is set for that day, “ ” is
displayed.⇒See page 339
6
〜
Shows the number of record
messages (0-5).⇒See page 78
7
〜
Shows the number of voice mail
messages (1–9) held at the Voice Mail
Center. If 10 or more messages are
held, “ ” is displayed.
⇒
See page 362
8
Displayed while Display Light is set to
“OFF”.⇒See page 126
9
Displayed while Side Keys Guard is
set to “ON”.⇒See page 146
■
About the contents displayed:
●
Some characters and symbols on the display and Private window might be modified or abbreviated.
●
The explanations in this manual are mainly based on the settings at purchase so the display on your FOMA phone may
not match the explanations if you changed the settings after purchase.
●
The color liquid crystal display uses high-precision production technology. The slightest change in the environment may
result in unlit or permanently lit pixels, but this is due to the structure of the color liquid crystal display and not a
manufacturing defect.
●
The color display is shown as black and white in this manual, so the actual display looks slightly different.
●
If the FOMA phone has not been operated for a certain time with the power turned on, the display is dimmed and several
minutes after this
※
, the display goes off. The Command Navigation key flickers at about 5-second intervals. When an
operation is performed, the display appears again.
●
When you close the FOMA phone, the information on the Private window goes off after about 15 seconds. When you
operate a side key, the display brings up again.
※
Depends on the light time setting for Power Saver Mode.
Page 32

#
$
%
&
■
Operating Command Navigation key
30
Icon Descriptions Confirming before Use
Display Icons Use to select an icon
1
The symbols on the upper part of the display (such as , and ) are called icons. You can check
the name and function of the displayed icon.
Up
・
Moves the cursor or highlighted display up. (Press and
hold to scroll continuously.)
・
Scrolls while a site or mail text is displayed.
・
Press from the Stand-by display to bring up the display
for selecting a Phonebook function (Phonebook menu).
・
Press and hold for at least one second to raise the
earpiece volume.
⇒
See page 72
・
Converts entered characters to katakana or kanji.
⇒
See page 415
Right/Redial
・
Moves the cursor to the right.
・
Press from the Stand-by display to bring up
the Redial List.
⇒
See page 59
・
Scrolls forward by page. (Press and hold to
scroll continuously.)
・
Moves to the next page while displaying a site.
Left/Received Call Record
・
Moves the cursor to the left.
・
Press from the Stand-by display to bring up
the Received Call Record List.
⇒
See page 69
・
Scrolls back by page. (Press and hold to scroll
continuously.)
・
Returns to the previous page while displaying
a site.
OK key
・
Fixes the operation.
Down
・
Moves the cursor or highlighted display down.
(Press and hold to scroll continuously.)
・
Scrolls while a site or mail text is displayed.
・
Press from the Stand-by display to bring up
the Phonebook Search display.
⇒
See page 97
・
Press and hold for at least one second to
lower the earpiece volume.
⇒
See page 72
・
Converts entered characters to kanji or
katakana.
⇒
See page 415
When you want to execute an operation on the display, press the corresponding key as below.
■
Operation display examples and basic key assignments
Displaying Description of Icons
<Icon Descriptions>
Navigation Displays
Menu 36
Indicates the operation you can perform with
the key.
Indicates the operation you can perform with
the key.
Indicates the direction in which you can scroll
and select items.
Indicates the operation you can perform with
the key.
The description of the selected icon appears.
Page 33

31
Private WindowConfirming before Use
■
Missed calls
When the FOMA phone is closed, “Missed call” appears on the Private window.
Press to display a missed call record.
The name is displayed for the missed call coming from the party stored in the Phonebook.
When there are multiple missed calls, up to three missed call records are displayed each time you press
.
●
I
f you have received 30 or more incoming calls after a missed call, the record for the missed call
disappears.
●
Missed call records are not displayed while a function for Tool Group (see page 336) is activated.
●
After you display a missed call record, “Missed call” disappears.
■
New mail
When the FOMA phone is closed, “New mail” appears on the Private window.
Press to display the received date and time, sender’s address (name), and subject of the received
mail.
The sender’s name is displayed for the mail coming from the party stored in the Phonebook.
When you receive an SMS message, “SMS” is displayed for subject.
When you receive multiple mail messages at a time, up to three mail messages are displayed each time
you press .
●
For this function, you need to trace “Private window” , “Private window setting” , “Display information”,
“Mail” and set to “ON”.
●
The received date and time, sender’s address (name), and subject of the mail in the box or folders
with security are not displayed.
●
After you display the received date and time, sender’s address (name), and subject of the received
mail, “New mail” disappears.
●
Any information does not appear on the Private window when a mail message arrives during a voice
call or video-phone call, or on the display other than the Stand-by display while “Receiving display” is
set to “Operation preferred”.
You can display various information such as a clock and icons on the Private window like the following
examples:
<Receiving a call><Clock>
<Clock + icons> <Enlarged clock>
<Talking>
<Dialing>
<Schedule alarm>
●
The display for the schedule alarm varies depending on the schedule icon you set. ⇒See page 341
●
When you press or with the FOMA phone closed, the information is displayed on the Private window for about 15 seconds.
You can confirm the time also in a dark environment.
You can switch the clock size by pressing while the clock is displayed.
Private Window
Enlarge Clock Display
Information
Page 34

32
Method for Selecting Menu Confirming before Use
Guidance for the icon
Press to bring up the Main menu so that you can execute, set, or check functions.
■
Scroll Selection
The Main menu consists of nine main menu icons indicating respective functions and it is divided into
four groups (Mail, i-mode, Setting, and Tool).
⇒
See page 336
If you select a main menu icon from the Main menu, the display for selecting a sub-menu item is
displayed. If you further select a sub-menu item, the display for selecting a lower sub-menu item is
displayed. By repeating selecting, you can set and check the function.
■
Menu Number Selection
You can display some functions by pressing + the menu number.
●
The FOMA phone provides “Multitask” where you can simultaneously use the multiple functions; maximum three functions from the Mail
group, the i-mode group, the Setting group and the Tool group (one from each group), and a function such as a voice call which does
not belong to any group.
⇒
See page 336
How to select the function of “Quality alarm” is explained here as an example of Scroll Selection.
Select a menu icon from the Main menu.
●
The enlarged icon is the main menu icon currently selected.
●
Press to select the menu icon.
●
Press and hold to scroll the icons continuously.
●
The guidance for the selected menu icon is displayed.
(You can set not to display this guidance by “Menu display set”.
●
If you have not touched any key for about 15 seconds, the Stand-by display returns.
Method for Selecting Menu
Scroll Selection
Select a main menu icon from the menu function
1
Talk Quality alarm
1
Step 1 Step 2 Step 3
Procedures are presented in this manual as shown on the
left. The selection operations using in steps 1 to 3 and
the fixing operation using are omitted and simply
expressed as .
Page 35

33
Method for Selecting MenuConfirming before Use
Current page Total pages
Select “Talk” from “Settings”.
Select “Quality alarm” from “Talk”.
●
Press to select the item below, and to select the item above.
●
Press and hold to scroll the lower sub-menu items continuously.
●
To check the settings of the function from the selection display for the lower sub-menu item
If you set “Menu display” of “Menu display
set” to “Detail”, you can check the settings
and menu number of the function.
Main menu icon
Setting
Menu number
Previous and next
lower sub-menu
items
Function name
●
The selected item is highlighted.
●
Press to select the item below, and to select the item above.
●
Press and hold to scroll the items continuously.
●
When the items are listed over multiple pages, the current page number and the
total number of pages are shown at the upper right of the display.
●
Press or to scroll by page.
Select the sub-menu item from the menu function
2
Select the desired lower sub-menu item (function)
3
Next Page
Page 36

34
Method for Selecting Menu Confirming before Use
■
When the display prompts you to enter your Terminal Security Code
With some items, the prompt for entering your Terminal Security Code appears before the setting display comes up.
You need to enter your Terminal Security Code to set or check
the function.
1
.
Enter your Terminal Security Code and press .
When you enter your Terminal Security Code, this is indicated
by “_” ; the number you enter is not shown.
For Reset
Set or check the selected function.
Some menu items have even more detailed menus.
The example below shows how to set “Low tone” for “Quality alarm”.
■
When the “YES/NO” or “ON/OFF” prompt appears
●
When the “YES/NO” prompt appears
●
When the “ON/OFF” prompt appears
For Reset For Keypad sound
●
There are several methods of setting functions: Selecting from a list as shown in the example of operations, selecting “YES/NO” or
“ON/OFF” and entering a numeric value.
●
The items you cannot select are grayed out.
1
Press to select
“YES” or “NO”.
2
Press .
1
Press to select
“ON” or “OFF”.
2
Press .
●
The selected item is highlighted.
●
Press to select the item below, and to select the item above.
●
Press and hold to scroll the items continuously.
Information
Set or check the function
4
Page 37

35
Method for Selecting MenuConfirming before Use
How to select the function of “Quality alarm (Menu 75)” is explained here as an example of Menu Number
Selection.
●
See “Function List” for details about menu numbers.⇒See page 430
■
Function menu display
●
When “ ” appears at the lower right of the display, press to bring up the Function menu.
The contents of the Function menu depend on the display from which you bring up the Function menu. The items you cannot
select are grayed out.
●
Selectable items such as “Save”, “Edit” or “Delete” in each operation appear on the display.
●
When the items are listed over multiple pages, the current page number and the total number of pages are shown at the upper
right of the display. From the item at the top or bottom of the Function menu, press to go to the previous page or the next
page.
Press or to scroll by page.
■
To select an item quickly <Direct selection>
You can select an item also by simply pressing the numeric key corresponding to the displayed item number.
Item number
From the Stand-by display, press .
Menu Number Selection
Information
Bring up the function using the menu number
1
Page 38

36
Displaying Shortcut Menu Confirming before Use
With the setting for your intended use, you can start the Picture viewer, i-motion player, and so on by
easy operations.
Press three times.
Shortcut menu is displayed.
●
The guidance for the selected icon appears.
(You can set not to display this guidance by “Menu display set”.)
●
Press twice to display the Private menu.
●
If you have not touched any key for 15 seconds, the Stand-by display returns.
1
Shortcut menu
Select an icon
2
■
To finish or cancel the menu operation
●
To finish the menu operation
When you finish setting a function, the selection display for the lower sub-menu item comes up (or the Stand-by display returns in
some cases). When you finish setting the function, press . This ends the menu operation and the Stand-by display returns
(except during Multitask).
●
To cancel the menu operation
Press . The contents of the setting are abandoned and the Stand-by display or former display returns.
In some cases, a prompt comes up to confirm whether you really want to abandone the setting.
You can press to return to the previous operation.
Displaying Shortcut Menu
Type Summary
CALCULATOR You can call up the Calculator function.
GUIDE
This is available in Japanese Mode only.
You can check the operating method for functions you want to know about and use.
FREE MEMO You can call up the Free Memo function.
SELF MODE You can disable the talk and communication functions.
SCHEDULE You can call up the Schedule function.
ToDo You can call up the To Do function.
My picture You can view still pictures downloaded from websites.
IR EXCHANGE
Using infra-red rays, you can receive Phonebook entries, schedule events, and the
like.
i-motion You can view i-motion movies obtained from websites.
Page 39

37
GuideConfirming before Use
You can search for the functions you want to know and use, and then confirm the operating methods.
You can execute some functions from “
使いかたナビ
(Guide)”. This function is available in Japanese Mode
only.
Press in Japanese Mode.
・
基本の操作
(Basic operations)························Displays the basic functions. Go to step 6.
・
おすすめ機能
(Recommended functions) ·······Displays the recommended functions. Go to step 6.
・
機能検索
(Function search)·····························Searches for a function.
・
検索履歴
(Search history) ·······························Displays up to 30 search histories. Go to step 6.
●
You can start up “
使いかたナビ
(Guide)” also by pressing “
使いかたナビ
”.
●
Select an item and press ( ); then the detailed operating methods are displayed.
1
Select a searching method
・
音声入力キーワード検索
(From your voice)·········Vocalize a keyword for search.
・
文字入力キーワード検索
(From your words)········Enter a keyword and retrieve. Go to step 5.
・
索引検索
(From index)··········································Retrieves functions with Japanese syllabic order. Press or to
display the preceding or following column. Go to step 6.
・
機能一覧検索
(From Function List)·······················Retrieves from the function list. Go to step 6.
●
Select an item and press ( ); then the detailed operating methods are displayed.
If you select “
音声入力キーワード検索
(From your voice)” and press ( ), select “
音声入力キーワード検索
(From your voice)” or “
音声入力のしかた
(How to input)” and press .
If you select “
文字入力キーワード検索
(From your words)” and press ( ), select “
文字入力キーワード検索
(From your words)” or “
文字入力のしかた
(How to input)” and press .
2
Vocalize a keyword when the voice recognition start tone sounds.
Start vocalizing the keyword within four seconds after the voice recognition start tone sounds.
Up to nine recognized results are displayed.
●
For voice input⇒See page 108
3
Select a recognized result
・
このキーワードで検索
(Search from this)············Retrieves with the keyword you have selected. Up to 50 searched results are
displayed. Go to step 6.
・
キーワードの追加
(Add keywords)·······················Add a new keyword. Repeat steps 3 to 4.
4
Enter a keyword
Up to 50 search results are displayed.
●
You can enter up to 24 full-pitch or 48 half-pitch characters.
5
When You do not Remember Key Operation
<Guide>
Next Page
Page 40

38
Guide Confirming before Use
●
When “Select language” is set to “英語(English)”, you cannot operate GUIDE.
●
When you use
音声入力キーワード検索
(From your voice):
•
The keywords you can input by voice are limited to the ones that have been pre-installed to the FOMA phone. If the vocalized
keyword is not recognized easily, vocalize a different word.
•
The voice recognition start tone sounds at Level 2 of the sound volume.
•
The voice recognition start tone does not sound during Manner Mode.
•
If the keyword is not recognized, the recognition rate may rise by changing the setting of “Identify as” (see page 108).
While a search history is displayed ( ) Select and operate each
function below.
1
Function Menu while Search History is Displayed
Function menu
1件削除
(Delete this)
全削除
(Delete all)
Operation
YES
※
YES
※
Explanation
The displayed search history is deleted.
All search histories are deleted.
Select a function
・
この機能を使う
(Operate function)·················Executes the function. Operate each function.
・
操作のしかた
(How to operate)·······················Displays the operating method.
・
機能の説明
(Description)·································Displays explanations for the function.
・
関連機能
(Relevant function)···························Displays up to 10 relevant functions. Repeat step 6.
●
For some functions, press several times for selection.
●
Some items are not available depending on the operation. If you select “
基本の操作
(Basic operations)” in step 1, “
関連機能
(Relevant function)” is not displayed.
●
You can display explanations about a function also by pressing ( ) while selecting the function.
6
※
To cancel: “NO”
Information
Page 41

39
Using the UIM (FOMA Card)Confirming before Use
You need to remove the battery before you insert the UIM. ⇒See page 42
The UIM is an IC card that holds your information such as phone numbers. It can hold data such as the
Phonebook entries and SMS messages as well. By replacing the UIM, you can operate multiple FOMA
phones for multiple purposes.
You cannot use the FOMA phone for transmission such as voice and video-phone calls, i-mode,
sending/receiving mail, or packet transmission unless the UIM is inserted.
Refer to the UIM manual for details about how to use it.
When inserting or removing the UIM, take care not to accidentally touch or scratch the IC.
■
Inserting
Pull the claw to pull the
tray out.
●
Pull out the tray straight until it
clicks.
1
Push the tray inwards.
●
Push the tray into the bottom until it
is fixed.
3
Follow step 1 of “Inserting” to pull out the
tray and remove the UIM
.
1
Place the UIM on the tray
with its IC-side facing up.
●
Fit the notch of the UIM and tray in
place.
2
Claw
Notch
IC-side is faced up
■
Removing
●
Make sure that you insert/remove the UIM with the FOMA phone closed and held in your hand after you turn off the power.
●
Make sure that the tray for the UIM is not drawn out when attaching the battery. If the tray is drawn out, the battery cannot be
attached. Note that the UIM or tray may be damaged if the battery is forcibly attached.
●
Take care not to force the UIM into place because this can break it.
●
Take care not to lose the UIM once you remove it.
■
If the tray is
disengaged
Fit and push it straight into the
guide rail.
Using the UIM (FOMA Card)
Insert/Remove UIM (FOMA Card)
Information
Page 42

40
Using the UIM (FOMA Card) Confirming before Use
The UIM has a restriction function to protect your data and files.
If you obtain data and files by the method below with the UIM inserted, restrictions are automatically set
to them.
・
When downloading images or melodies and so on, from sites or Internet web pages
・
When receiving i-mode mail with file attachments
●
Data and files set with the UIM restrictions can be read, played back, started up, edited, attached to mail, and transferred
by the infrared exchange function, only when the UIM that acquired them is inserted.
●
If the UIM used to obtain data and files is not inserted, or if it is replaced with another UIM, the restrictions will protect the
data from being read, played back, started up, edited, attached to mail, and transferred by the infrared exchange function.
In the explanation hereafter, the UIM used to acquire data and files is referred to as “your UIM” and other UIMs as “another
person's UIM”.
You can set two passwords, PIN1 and PIN2, for a UIM. ⇒See page 138
If the UIM used for acquiring
the data or messages is
inserted, you can browse or
play back UIM-restricted data.
Unless the UIM used for
acquiring the data or messages
is inserted, you cannot browse
or play back UIM-restricted
data.
Your UIM
Another person's
UIM
Replacing UIMs
♪
♪
♪
♪
♪
♪
♪
♪
♪
♪
About Password of UIM
Functions Restricted by UIM (FOMA Card)
●
When the UIM is not inserted, or when another
person's
UIM is inserted, the following types of data and files are displayed with the
restrictions symbol, “ ”:
・
Melodies, images, i-motion movies, i-αppli, Chara-den images downloaded, or obtained from sites or Internet web pages
・
Downloaded dictionaries
・
Screen memos containing melodies, images, i-motion movies, Chara-den images or downloaded dictionaries
・
Files (melodies or images) attached or pasted to i-mode mail in the Inbox
・
Files (melodies or images or i-motion movies) attached to i-mode mail in the Outbox, or Draft box
・
Messages R/F with files (melodies or images) attached or pasted
・
Images inserted into Deco mail text
Page 43

41
Using the UIM (FOMA Card)Confirming before Use
●
When the UIM restrictions are set for data and files, you cannot set those data and files for the functions such as “Display setting”
and “Select ring tone” when another person's UIM is inserted instead.
●
If you have set the data and files with the UIM restrictions for the functions such as “Display setting” and “Select ring tone”, these will
work with their default settings if you have removed your UIM or replaced it with another person's UIM. If you insert your UIM, then
your settings will be enabled again.
<Example: When you set downloaded “Melody A” for a ring tone>
When you remove your UIM or replace it with another person's UIM, the default ring tone sounds. If you insert your UIM, “Melody A”
will sound for incoming calls again.
●
UIM restrictions are not set for the data acquired using the infrared exchange function or data transmission (OBEX) function.
●
Even when another person's UIM is inserted, data and files set with the UIM restrictions can be moved or deleted.
●
You cannot launch the i-αppli set with the UIM restrictions even if you select the highlighted text on the detailed i-mode mail display
unless the UIM that was inserted at download is inserted.
●
Tickers do not flow even if you insert your UIM into another i-channel mobile phone. After the information is automatically updated or
you press to receive the latest information, the tickers automatically begin to flow.
●
The setting contents of the following functions are registered into the UIM.
• SMS Validity Period • SMS Center Selection • Bilingual
• DoCoMo Certificate1, Validating/Invalidating User Certificates
• PIN1 Code, PIN2 Code/PIN1 Code Entry Set
If you are using the blue UIM with your FOMA phone, note that some specifications differ from those of
the green UIM.
■
WORLD WING
WORLD WING is a DoCoMo FOMA International Roaming Service that enables you to make or receive calls abroad
with the same phone number by mounting the UIM (green) on a FOMA phone or native mobile phone (W-CDMA or
GSM system) that supports the service.
WORLD WING is available without subscription procedures.
*
If you have signed up for the FOMA service before August 31, 2005 but have not signed up for WORLD WING, you
need to take separate subscription procedures.
*
This service is not available with some billing plans.
Differences of UIM (FOMA Card)
Information
Functions
UIM UIM
Reference
(blue) (green)
Number of digits of the phone number that can be stored
20 max. 26 max. See page 94
in the UIM Phonebook
Operation of user certificate to use FirstPass Cannot be used Can be used See page 197
WORLD WING Cannot be used Can be used
−
Using service dialing of “DoCoMo repair counter” and
“General inquiries”
Cannot be used Can be used See page 365
※
This function applies to the pre-installed i-αppli and Chara-den images if they are reinstalled (upgraded) from a site.
●
The data set with the UIM restrictions appear on the preview display as shown on the right.
Page 44

42
Attach/Remove Batteries Confirming before Use
■
Attaching
While pressing the “ ”
part, slide the rear cover
(2 mm or more) in the
direction of the arrow to
unlock.
1
Insert the battery pack in
the direction A with the
arrow mark facing
upwards and push it in the
direction B.
●
Securely fit the claws of the battery
pack into the grooves of the FOMA
phone.
2
Slide the rear cover in the
direction of the arrow and
attach it in place.
3
■
Removing
●
Turn the power off before replacing the battery.
●
Make sure that the tray for the UIM is not drawn out when attaching the battery. If the tray is drawn out, the battery cannot be
attached. Note that the UIM or tray may be damaged if the battery is forcibly attached.
●
If you try to force the battery pack into place, you could damage the charging terminals of the FOMA phone.
●
For details about the battery, see the manual for Battery Pack P07.
Arrow
Take hold of the projection of the
battery pack to lift it up.
2
Projection
Attach/Remove Batteries
■
Use the FOMA phone’s dedicated Battery Pack P07.
■
About battery life
●
Batteries are consumables. The usable time of all chargeable batteries shortens slightly each time they are charged.
●
When the usable time of the battery becomes about half the time it was at purchase, replacing is recommended because
the battery is nearing the end of its life. Depending on the conditions of use, the battery may swell slightly as it nears the
end of its life, but this is not a problem. (The life of the battery is about one year. However, it may shorten if you repeat
charging and discharging in a short period of time, charge in hot environments, or charge continuously over a long period
of time.)
For environmental protection, bring the exhausted battery to an NTT DoCoMo,
dealer, or recycle shop.
Li-ion
While pressing the “ ” part, slide the rear
cover (2 mm or more) in the direction of
the arrow to unlock.
1
About Battery Pack
Information
Page 45

43
Charging the FOMA PhoneConfirming before Use
The estimated charging time is for when the FOMA phone is
turned off and the battery is being charged from empty. The
charging time will be longer if you charge the battery with the
power turned on.
Charging the FOMA Phone
■
For details, refer to the manuals for the FOMA AC Adapter 01 (option),
FOMA AC Adapter 01 for global use and domestic use (option), and FOMA DC Adapter 01 (option).
■
For charging the battery via the AC or DC Adapter, the battery must be attached to the FOMA phone.
■
During charging, you can still answer calls if the FOMA phone is turned on. This will consume the
charged amount so that charging will take longer.
■
If you have a long time video-phone call during charging, the temperature inside the FOMA phone may rise
and charging may be suspended. In such a case, wait for a while and try charging again.
■
Remove and insert the connector slowly and securely, without using unnecessary force.
■
Do not charge for long periods of time (several days) with the FOMA phone turned on.
Otherwise, when
charging finishes, the FOMA phone will receive power from the battery so that when you actually use the
FOMA phone, you will be able to do so for just a short amount of time before the battery alarm sounds. If
this happens, charge the battery correctly. When charging the battery again, first disconnect the FOMA
phone from the AC Adapter (or Desktop Holder) or DC Adapter and then set it again.
Charging
※
Continuous talk time is the estimated time that the FOMA phone can be used for calls when radio waves can be sent and received normally.
※
Continuous standby time is the estimated time when radio waves can be received normally. The standby time could be about half of this
estimate depending on the battery level, function settings, other ambient conditions such as temperature, and the status of radio waves
in the area (weak or no radio waves, for instance). When you use i-mode communications, the talk/transmission time and standby time
will be shorter. Further, even if you do not make calls or execute i-mode transmission, the talk/transmission time and standby time will
be shorter if you compose i-mode mail, start up a downloaded i-αppli or the i-αppli Stand-by display, execute data transmission or
Multiaccess.
※
The continuous standby time for standstill is the average number of hours you can use the FOMA phone in standstill status when it is
closed and can receive radio waves normally.
※
The continuous standby time for in motion is the average number of hours you can use the FOMA phone in the combined status of
“standstill” “moving” and “out of service area” when it is closed, in an area where it can receive radio waves normally.
Estimated time for charging battery
Estimated usable time for battery
AC Adapter Approx. 130 minutes
DC Adapter Approx. 130 minutes
The usable time for the battery varies
depending on the charging time and
the remaining life of the battery.
Continuous standby time Standstill
.........
Approx. 460 hours
In motion
.........
Approx. 350 hours
Continuous talk time Voice call
................
Approx. 140 minutes
Video-phone call
....
Approx. 100 minutes
(When a substitutive still image is used)
Page 46

44
Charging the FOMA Phone Confirming before Use
■
Charge with the AC Adapter only
*
Check the facing direction (surface or
rear) of the AC adapter plug and then
insert or pull it horizontally into or
from the FOMA phone.
Connect the AC Adapter (option) to the Desktop
Holder (option).
1
Insert the AC Adapter’s plug into an AC
outlet.
2
Set the FOMA phone onto the Desktop Holder.
Push it until it clicks.
Check that the Call/Charging indicator lights in red.
When the Call/Charging indicator flickers, dismount the AC adapter and battery
pack from the FOMA phone and then re-mount them for charging. If the symptom
persists, troubles with the AC Adapter, Desktop Holder or battery pack may be
involved, so consult a handling counter such as a DoCoMo shop.
●
Attach the battery pack to the FOMA phone beforehand.
●
Be sure to set the FOMA phone firmly onto the Desktop Holder. Also, be
careful that the connector cap or a commercial strap is not caught between the
FOMA phone and Desktop Holder.
●
Charging can be done even while the FOMA phone is open.
3
When charging completes, take the FOMA phone off
the Desktop Holder.
●
Unplug the AC Adapter from the AC outlet when not in use it for a long time.
4
Desktop Holder P11
①
②
FOMA AC Adapter 01
100 VAC
Insert horizontally
with engraved
side facing down
■
Indicator and display during charging and when charging is
completed
※
When the FOMA phone is turned off, “ ” does not appear.
If you start charging with the battery flat, the Call/Charging indicator might not light
immediately; however, charging itself has started.
Open the
connector cap
Release
buttons
Plug horizontally
with engraved
side facing up
●
If the power is turned on, you can take calls even during charging. (Charging will take longer in this case.)
●
If the power is turned on, the “Charge sound” beeps at the volume set for “Phone” of “Ring volume” when charging starts and ends.
⇒
See page 115
●
The FOMA AC Adapter 01 uses 100 VAC only.
●
You cannot charge the battery pack by itself. The battery pack must be attached to the FOMA phone for charging.
●
If the fuse blows off when charging with the DC adapter, be sure to use a 2A fuse. The 2A fuse is consumables, so purchase at auto
parts stores in your neighborhood.
■
DC Adapter (option)
With the DC Adapter, you can use a cigarette lighter socket (12 V/24 V) in a car to charge the
FOMA phone with the battery pack attached.
Read the manual for the FOMA DC Adapter 01 for details.
The Call/Charging
indicator (lights in red)
Method of Charging
Information
Call/Charging indicator “ ” display
Charging Lights in red Blinks
Charging completed Off Lights
Page 47

45
One-push OpenConfirming before Use
When the FOMA phone is turned on, an estimate of the battery level is indicated by the icon.
・
Almost full··················································
・
Getting low·················································
・
Almost empty ············································
●
Charge the battery when it is almost empty.
You can check an estimate of the battery level by the display and sound.
Other settings Battery level
1
●
When “Open phone” is set to “Answer”, you can start talking just by opening the FOMA phone during ringing.
⇒
See page 71
●
The FOMA phone might not open fully, depending on its direction.
●
When you open the FOMA phone by pressing the button, be careful not to drop it by its rebound.
●
You need to fold the FOMA phone manually. If it does not close, open it fully and then close it.
You can open the FOMA phone easily by pressing the button. You can open it also manually without
using the button.
Press the one-push open button.
The FOMA phone opens up.
1
■
When the battery is running out
The display on the left appears and the empty battery alarm sounds for about 10 seconds. To stop this
alarm, press any key other than and . About one minute later, the FOMA phone will be turned
off.
●
During a call, the display and a beeping tone notify you of the empty battery. About 20 seconds later
your call will be cut and then one minute later the FOMA phone will be turned off.
●
The battery tone does not sound while “Manner mode” or “Super silent” is activated, or “LVA tone” is
set to “OFF” in “Original”.
Recharge Battery display
Opening the FOMA Phone by Using a Button
<One-push Open>
Confirming Battery Level
<Battery Level>
Confirm by Display and Tone
●
The pictograph disappears in about three seconds.
●
The battery tone does not sound while “Manner mode”,
“Super silent”, or “Original” is activated, or “Keypad sound”
is set to “OFF”.
Pictograh
Sound Battery level
Three beeps Almost full
Two beeps Getting low
One beep
Almost empty
Charge the battery soon.
Information
Menu 71
Page 48

46
Turning Power On/Off Confirming before Use
Press and hold for at least one second.
After the Wake-up display (see page 120) is displayed, the Stand-by display appears.
●
If you have stored many Phonebook entries or mail messages, it may take a while for the display
to appear.
●
If the clock is set, the current date and time are shown. When Set Time is set to “Automatic”, the
time is automatically corrected.
●
When “ ” is displayed, the FOMA phone is out of the service area or in the place where the
radio waves do not reach. Move to a location where “ ” disappears.
●
When “PIN1 code entry set” of “PIN setting” (see page 140) is set to “ON”, enter your four- to
eight-digit PIN1 code after you turn on the power. When your PIN1 code is correctly entered, the
Stand-by display appears. (PIN1 code
⇒
See page 138)
●
When “Auto reset setting” of “Notice call cost” is set to “ON”, enter your four- to eight-digit PIN2
code after you turn on the power. When your correct PIN2 code is correctly entered, the Standby display appears. If you press or without entering your PIN2 code correctly,
“Auto reset setting” is set to “OFF” and the Stand-by display appears. (PIN2 code
⇒
See page
138)
●
If the UIM is not attached or there is something wrong with it, a warning message will come up.
1
Stand-by display
When the UIM is
malfunctioning
When the UIM is not
attached or damaged
■
To turn the power off
Press and hold for at least two seconds.
The exit display appears and the power turns off.
●
You cannot turn on the power immediately after turning off the power. Wait a few seconds.
●
When you turn on the power and “Starting system Wait a minute” is displayed, please wait a moment before operating.
Turning Power On/Off
<Power ON/OFF>
Information
ディスプレイ
(Display)
バイリンガル
(Select language)
Japanese (
日本語
)······Switches to Japanese.
English (
英語
)··············Switches to English.
1
Switching to English
<Select Language> Menu 15
Setting at purchase
Japanese
Page 49

47
Initial SettingConfirming before Use
●
You cannot set the initial settings during All Lock or Keypad Dial Lock.
●
The display for the initial settings is displayed also after you execute “Initialize”.
●
The completed settings are valid even when Initial Setting is interrupted by an incoming call or canceled by pressing or
midway.
●
When the clock is set and the power is automatically turned on by an alarm notification, the display for the initial setting does not
appear even if there is any unset function.
If the date and time, Terminal Security Code, and Keypad Sound are not set, the display for the initial
setting appears when the power is turned on. You can set the initial settings also from each menu
function separately.
●
If any of the date/time, Terminal Security Code, and Keypad Sound is not set, that unset function is displayed every time you turn on
the power.
Executing Initial Settings
<Initial Setting>
Information
Turn on the power YES
●
When “PIN1 code entry set” of “PIN setting” (see page 140) is set to “ON”, enter your four- to eight-digit PIN1 code after you
turn on the power. (PIN1 code
⇒
See page 138)
●
To cancel: “NO”
1
Set the date and time.
●
-You can select “Automatic” or “Manual” for setting the time. ⇒See page 48
2
Set your Terminal Security Code.
●
-You can set your Terminal Security Code required for setting functions.
1. Enter “0000”
2. Enter your new Terminal Security Code (four to eight digits) YES
●
To cancel, select “NO” and press .
3
Set the keypad sound.
●
-You can perform operations confirming whether keys are pressed securely by the sound.
1. Keypad sound
・
ON······Makes the keypad sound.
・
OFF ····Does not make the keypad sound.
●
Keypad Sound ⇒See page 115
4
●
The following functions are different between Japanese display and English display:
Functions Japanese English
“Display” of
日本語
(Japanese) (Not available)
Main Window
英語
(English) ON
Clock OFF OFF
Info Notice
電子音
(Electrical tone)
ON
Setting
ボイス
(Voice) (Not available)
OFF OFF
使いかたナビ
(Available) (Not available)
(Guide)
●
You cannot switch languages while another function is working.
●
When a UIM is inserted, the “
バイリンガル
(Select language)” setting is stored in the UIM.
Information
Page 50

48
Set Time Confirming before Use
Enter year, month, date and time
Use to move the cursor and the numeric keys to enter numbers.
●
Enter the A.D. year.
●
Enter the time in the 24-hour format.
●
To enter one-digit numeral for the date and time, enter two digits beginning with “0” as in “01” to
“09”.
●
If you enter a wrong number (such as “13” for the month), the entry is invalid.
●
The date/time you can set with this function is from 00:00 on January 1, 2005 through 23:59 on
December 31, 2037.
●
The set date and time will appear on the Stand-by and other displays.
■
About time correction function
The time displayed on the FOMA phone is corrected when the power is turned on, according to the clock information obtained from the
DoCoMo network. When the date/time has not been set, the time is set by receiving the clock information. When the date/time has been
set, the time is corrected if “Set time” is set to “Automatic”. Then, the time is corrected at 3 a.m. (during standby). If you want to set the time
with a lag, set the time manually. When you re-set to “Automatic”, turn the power off and on and then set to “Automatic”.
●
You cannot correct the time while another function is working, at power on after software update, when the UIM is not inserted, or while an
animation or Flash movie set for the Stand-by display is played back. In addition, you might not be able to correct the time depending on the radio
wave conditions, the timing the FOMA phone is turned on, or the i-
α
ppli software set for the i-αppli Stand-by display.
●
If the FOMA phone has not obtained any clock information, the time is not corrected by setting “Set time” to “Automatic” or even when 3
a.m. arrives.
●
Some few second errors might occur.
2
Clock Set time
・
Automatic ···············
Corrects the date/time automatically. The setting is completed
.
If the time cannot be automatically corrected such as when the date/time has not been set and
“”
is
displayed, the display for manually correcting the time appears. Follow step 2 to set the date/time. However,
the display for manually correcting the time does not appear when you set the date/time by Initial Setting.
・
Manual ·················Sets the date/time manually.
●
When “Notice call cost” is set to “ON”, the Terminal Security Code Entry display appears. Enter your Terminal Security Code
and press .
1
●
You can set the clock also during a call.
●
You cannot use the following functions unless the clock is set:
Current time display during calls, Calendar, Alarm, Schedule, ToDo, Software update, i-
α
ppli auto start, the pattern data update of
the Scanning function, and Auto Reset Setting of Notice Call Cost.
●
The date/time you have set is retained even when the battery pack is replaced, however, it might be reset if the FOMA phone is left
for more than two weeks with the battery pack removed or empty. In that case, charge the battery and then set the date/time again.
You can select whether to correct the time automatically or set it manually.
To set the date/time manually, set
“Set time”
to
“Manual”
.
Setting Date and Time
<Set Time> Menu 31
Information
Page 51

49
Notify Caller IDConfirming before Use
You can select whether to notify the other party of your phone number also by entering
“186 (or 31#)/184 (or #31#)” before the party’s phone number.
■
To notify your caller ID (Effective when “Activate” of “Caller ID notification” is set to “OFF”)
186 ( 31#) + +
■
Not to notify your caller ID (Effective when “Activate” of “Caller ID notification” is set to “ON”)
184 (#31#)+ +
Destination phone number
Destination phone number
2
2
●
When you dial out and hear a message requesting your caller ID notification, set "Activate" of "Caller ID notification" to "ON" and
redial.
●
“186/184” or “ 31#/#31#” is added to the beginning of a redial item/dialed call record and then stored.
2
Enter a phone number,
or bring up the detailed display of a Phonebook entry, redial item, dialed call
record, or received call record
1
()Notify caller ID
・・
Don’t notify/OFF ······················Does not notify your phone number.
・・
Notify caller/ON························Notifies your phone number.
・・
Cancel prefix····························Activates the setting for “Caller ID Notification” on this page.
2
Caller ID notification Activate
・
ON
..........
Notifies your phone number.
・
OFF
........
Does not notify your phone number.
1
Enter your Network Security Code
●
Network Security Code
⇒
See page 138
2
Each time you dial out, you can set whether to notify your phone number.
Set Caller ID Notification when Making a Call
You can set whether to notify your caller ID on the network.
●
You cannot operate Caller ID Notification if you are out of the service area or out of reach of radio waves.
Connecting to Network Service <Caller ID Notification>
You can set the FOMA phone to send your phone number to the called party’s phone when dialing. Your
phone number is valuable information, so take utmost care when notifying your phone number. This
function is available when the other party’s phone is the digital terminal such as the FOMA phone or
another mobile phone that supports Caller ID.
Notifying the Other Party of Your Phone Number
<Notify Caller ID> Menu 17
Information
Information
Page 52

50
Own Number Confirming before Use
Own number
●
You can bring up the Own Number display also by pressing .
When a mail address is stored, you can switch displays by pressing .
●
Storing/displaying personal data ⇒See page 351
●
You can send your own number data by touch-tone signals during a call by pressing
() from the display on the left and pressing .
●
When personal data is stored, you can display all the data by using after pressing
()→“Display all data” →Enter your Terminal Security Code →.
1
The contract phone number of the currently inserted UIM is displayed as “Own number”.
Confirming Your Own Number
<Own Number>
Menu 0
Own Number display
Page 53

51
Making Calls/Receiving Calls
Making Calls (Voice/Video-phone call)
Making a Call·································································································································· 52
International Calls ·····························································································<WORLD CALL> 55
Making an International Call Easily···············································<International Dial Setting> 56
Switching between a Voice Call and a Video-phone call··························································· 58
Redialing Phone Numbers You have Dialed········································<Redial><Dialed Calls> 59
Sending Touch-tone Signals Quickly····································································<Pause Dial> 60
Storing Prefix Numbers ·····················································································<Prefix Setting> 62
Making a Call with Specified Subaddress·············································<Subaddress Setting> 63
Selecting Alarm for Reconnecting···························································<Reconnect Control> 63
Reducing Surrounding Noise to Make Voice Clear····································<Noise Reduction> 64
Switching to Hands-free·························································································<Hands-free> 64
Using Hands-free Compatible Devices······················································<In-Car Hands-free> 64
Receiving Calls (Voice/Video-phone Call)
Receiving a Call ····························································································································· 65
Setting for Switching between a Voice Call and Video-phone Call
········<Indicate Video-phone> 68
Setting Rejection of Video-phone Calls·················································<Reject Video-phone> 68
Using Received Call Records··········································································<Received Calls> 69
Setting Response of Key Operation for Answering Incoming Calls ··········<Answer Setting> 71
Setting Response for Opening FOMA Phone during Ringing··························<Open Phone> 71
Setting Response for Closing FOMA Phone during a Call·······························<Fold Setting> 72
Adjusting Earpiece Volume·········································································<Earpiece Volume> 72
Adjusting Ring Volume ······················································································<Ring Volume> 73
When You Cannot or Could not Answer the Call
Putting an Incoming Call on Hold··············································································<On Hold> 73
Putting a Call on Hold during a Call···········································································<Holding> 74
Setting Hold Tone················································································<Call Response Setting> 74
Using Drive Mode···································································································<Drive Mode> 75
Using Public Mode (Power off)·······················································<Public Mode (Power Off)> 76
If You could not Answer an Incoming Call·················································································· 77
Recording Messages when You cannot Answer the Call ·························<Record Message> 78
Recording Messages when You cannot Answer the Call while Ringing
·············································································································<Quick Record Message> 80
Playing/Erasing Record Messages/Voice Memo··································<Play/Erase Message> 81
Setting a Video-phone
Using Chara-den···························································································································· 82
Useful Functions for Video-phone Calls······················································································ 84
Setting Image Quality for Video-phone Calls·····································<Moving Image Quality> 86
Changing Image Displays for Video-phone Calls·············································<Select Image> 86
Redialing as a Voice Call when a Video-phone Call cannot be Connected
··············································································································<Voice Call Auto Switch> 87
Set Dialing Speed for Video-phone Calls ························································<Dialing Speed> 88
Page 54

52
Making a Call Making Calls/Receiving Calls
Making a Voice Call
Enter the other party’s phone number or Talking
(End the call)
●
You can enter and display up to 26 digits.
■
When dialing
Even when calling within the same area, always dial starting from the area code.
Dialing a mobile phone
090-xxxx-xxxx, or 080-xxxx-xxxx
Dialing PHS
070-xxxx-xxxx
■
When you enter the wrong phone number
Press . (Each press deletes the rightmost digit.)
If you press and hold for at least one second, the entire phone number is deleted, and the
Stand-by display returns.
●
You can make a call also by entering the other party's phone number and then pressing
.
The call is made five seconds after dialing. If you enter a wrong number,
press to clear the display and make a call again.
■
When you hear a busy tone
The other party is engaged on the phone.
Press , wait for a while, and make a call again.
■
When you hear the guidance to tell that your call cannot be
connected
Press , wait for a while, and make a call again.
■
When you hear the guidance asking you to notify your phone
number
Prefix “186” to the other party’s phone number, or set “Activate” of “Caller ID notification” to
“ON”, and make a call again.
⇒
See page 49
■
If you close the FOMA phone during a call
The FOMA phone works according to “Fold setting”. ⇒See page 72
■
Principal methods of making calls
・
Enter the phone number and make a call (Voice calls ⇒See this page, Video-phone calls ⇒See page 53)
・
Dialing from Phonebooks⇒See page 97
・
Make a call from Redial or Dialed Calls (Redial, Dialed calls ⇒See page 59, Received calls⇒See page 69)
・
Accessing Phonebook entries by voice and dialing ⇒See page 106
Etc.
During a call, the call time
is displayed.
▼
Information
Making a Call
1
You can make voice calls using “Multiaccess” even when using i-mode or exchanging mail.
●
If you have signed up for Multi Number Service, you can make a call after selecting the registered phone number.
●
You cannot make voice calls during 64K data transmission or video-phone calls.
●
Internal phones and other phones that do not support the entry of area codes cannot be used for dialing to the FOMA phones.
●
You cannot make a call by entering a phone number while “Keypad dial lock”, “Restrict dialing” or “Self mode” is activated.
●
If you have brought up a display other than the “Talking” display during a call, you can return to the “Talking” display by pressing
●
The strength of the signal changes if you move during a call. It is a characteristic of digital calls that they can be suddenly cut off. Try
●
to use the phone in the environment
several times. If you press from the “Talking” display, the call ends.
is displayed.
●
⇒
See page 365
Page 55

53
Making a CallMaking Calls/Receiving Calls
Making a Video-phone Call
You can make video-phone calls to the phones supporting DoCoMo video-phones.This FOMA phone
does not have a built-in camera, so the images you can send to the other party are pre-installed Charaden or still images.
⇒
See pages 82 and 322
●
DoCoMo video-phones conform to 3G-324M standardized by the international standard 3GPP.
・
3GPP (Third Generation Partnership Project): This is the regional standards organization for developing common technical specifications for third-generation mobile telecommunication systems (IMT-2000).
・
3G-324M: This is the international standard for the third generation of mobile video-phones.
●
Display of your
FOMA phone
●
Display of the other party’s video-phone
Enter the other party’s phone number Talking (End the call)
●
Press during a call to switch to Hands-free. ⇒See page 64
■
If you close the FOMA phone during a call
The FOMA phone works according to “Fold setting”. ⇒See page 72
Image from the other
party
Image sent to the other party
Upper: Call time
Lower: Current time
During a video-
phone call
Image sent from your FOMA phone
: 64K transmitting
※
1
: 32K transmitting
※
2
: Voice sending/receiving (gray): Voice sending/receiving failed
※
3
: Image sending/receiving (gray): Image sending/receiving failed
※
4
: DTMF transmission mode : Hands-free ON
: Substitutive image sending : Chara-den talking
: Chara-den Whole Action mode
: Chara-den Parts Action mode
※
1
Communication at the speed of 64kbps
※
2
Communication at the speed of 32kbps
※
3
Transmission failure: The other party cannot hear your voice.
Reception failure: You cannot hear the other party's voice.
※
4
Transmission failure:
The other party cannot display the image sent from you.
Reception failure: You cannot display the image sent from the other party.
If you fail in sending or receiving voice/images, make a call again as it is not
automatically recovered.
<Example>
1
When you make a video-phone call, use the optional Flat-plug Earphone/Microphone Set with Switch
(see page 358) or Hands-Free (see page 64).
Page 56

54
Making a Call Making Calls/Receiving Calls
■
Auto-redialing
If the video-phone call is not connected, dialing at 32K or the voice call is automatically made.
●
The video-phone call by 32K speed is provided to connect with PHSs and similar devices that cannot be connected at 64K
depending on the network conditions. When you dial a 64K video-phone call to the phone that can be connected only at 32K, the
dialing speed will be switched automatically to 32K.
※
The same digital transmission charge applies to the 32K video-phone connection and 64K digital connection.
●
Video-phone calls cannot be connected to phones if they do not support the video-phone function, are out of the service area, or
are switched off. If you have set “Voice call auto switch” to “ON” and attempt to dial a phone that does not have the video-phone
function, the video-phone call will be cut off and the number will be redialed as a voice call. Note that this setting might not work if
you call an ISDN synchronous 64K or PIAFS access point or an ISDN video-phone that does not support 3G-324M (as of
November 2005), or if you dial the wrong number. Nevertheless, you could be charged for the call.
●
After the video-phone call start communications, redialing as the voice call will not be made.
●
You can press the numeric keys to send touch-tone signals during a call. However, switch to the DTMF transmission mode if during a
Chara-den call.
⇒
See page
85
●
Note that when you make a video-phone call sending a substitutive image, you will be charged for the digital transmission.
●
During a voice call or during sending/receiving data by packet communications, you cannot make a video-phone call.
●
If you dial 110, 119 or 118 using the video-phone function, the number will be automatically dialed out as a voice call.
●
You cannot receive mail and Messages R/F during a video-phone call. Incoming mail and Messages R/F will be held at the i-mode
Center. You can retrieve them using “Check new message”, after you end the video-phone call.
However, you can receive SMS messages during a video-phone call.
●
During Hands-free use, be sure to keep the FOMA phone away from your ears. Otherwise, you could affect or damage your hearing
with sound from the speaker.
●
If the battery becomes low during a Chara-den call and “Recharge battery” is displayed, the image switches to the pre-installed substitute
image. In this case, if you charge the battery during a video-phone call, the image set for “Substitutive image” of “Select image” is displayed.
●
You cannot make a video-phone call by entering a phone number while “Keypad dial lock”, “Restrict dialing” or “Self mode” is activated.
●
The International video-phone call is available using the DoCoMo International Call Service “WORLD CALL”.
⇒
See page 55
■
When a video-phone call cannot be connected
When a video-phone call cannot be connected, the reason is displayed. (The displayed reason might not be the same as the actual
reason depending on the other party’s phone and contract for network services.)
Messages Reasons
Check the number and retry You have dialed a wrong phone number.
Busy The line is busy or during packet transmission.
Out of service area or power off The other party’s phone is out of the service area or turned off.
Select on for Call ID Notification Your caller ID is not notified.
(when dialing “V-live” or “Visualnet” and so on)
Your call is being forwarded When forwarding.
Please redial phone call
Either the other party activates Voice Mail Service or forwarding destination
phone does not support the video-phone call.
Failed to connect Redial after setting “Activate” of “Caller ID notification” to “ON”.
・
This may appear in the case other than above.
Driving mode The other party activates Drive Mode
.
Information
Voice call auto switch “ON” Voice call auto switch “OFF”
Could not connect by dialing at 64K. Dials again at 32K. Dials again at 32K.
Could not connect by dialing at 32K. Dials again by the voice call. Does not dial again.
• When you hear the busy tone, the other party may set “Reject Video-phone ” to “ON”. In this case, the ring tone does not sound,
and the missed call record remains in the other party’s phone.
Page 57

Explanation
You can set whether to notify your caller ID.
You can add a prefix number.
You can make an international call.
You can use Multi-Number.
You can store the data in the Phonebook.
●
You can store also by pressing ( ) instead of ( ).
You can compose a mail message to send to the phone number set
as the destination address.
You can set the dialing speed of the video-phone call.
You can select an image for the video-phone call.
Function menu
Notify caller ID
Prefix numbers
International dial
Multi number
Add to phonebook
Compose message
Dialing speed
Select image
Operations
⇒
See page 49
⇒
See page 63
⇒
See page 57
⇒
See page 365
⇒
See page 95
⇒⇒
Go to step 3 on page 213
⇒
See page 88
⇒
See page 87
55
WORLD CALLMaking Calls/Receiving Calls
While entering a phone number ( ) Select and operate each function
below.
1
●
When the phone number and mail address are stored in a Phonebook entry together, you can compose a message to send to that mail
address. When multiple mail addresses are stored, you can compose a message to send to the first mail address.
●
The priority order for Dialing Speed is; “Setting by call” →“Setting by phone number” →“Setting by group”.
●
The dialing speed is set for just the one call (dial-out). Redial and Dialed Calls do not store the dialing speed.
●
If you make a voice call after setting the dialing speed, the setting becomes invalid.
Information
<Compose message>
<Dialing speed>
Function Menu while Entering Phone Number
●
You can make calls to 220 countries and regions.
●
The WORLD CALL charges are added to your monthly FOMA bill.
●
Application/monthly fee is free of charge.
●
Changes in procedures for international call
“My Line” service is not available for mobile communications, so cannot be used with WORLD CALL. However, in conjunction with the
launch of “My Line” service, the dialing procedure for international calls from mobile phones has changed. Note that the old way of dialing (without “010” above) no longer works.
●
This service is not available with some billing plans.
WORLD CALL is the international call service available from DoCoMo mobile phones.
※
When you have signed up for FOMA service, you have contracted to use “WORLD CALL” (except those who have applied not to use it).
■
How to make calls
009130 - 010 - Country code - Area code - Destination phone number
※
You can store the procedures above in the FOMA phone’s Phonebook.
※
When the area code begins with “0”, leave this out when dialing.
(However, include “0” for ordinary phones in Italy.)
International Calls
<WORLD CALL>
Next Page
Page 58

56
International Dial Setting Making Calls/Receiving Calls
・
If the other party uses a specific 3G mobile phone overseas, you can make an “International video-phone call” by dialing
out in Video-phone call mode after following the dialing method described above.
●
See the DoCoMo web page for the information about connectable countries and telecommunications carriers.
●
Images sent from the other party may blur on your FOMA phone or you may not be able to connect, depending on the other party’s
phone used for the international video-phone.
●
Contact “DoCoMo Information Center” on the back page of this manual for inquiries about WORLD CALL.
●
When using international carriers other than DoCoMo, please contact them.
Auto Assist Setting
You can set whether to automatically replace the “+” at the beginning of a phone number with the international access code set by “IDD Prefix Setting” for when making a call.
This setting is valid only when the “+” is at the beginning or the telephone number begins with “31#+” or
“#31#+”*.
When you are entering a phone number for dialing or storing it in the Phonebook, press and hold
for at least one second to enter “+”.
Other settings Int’l dial setting Auto assist setting
・
Auto ·······Automatically adds the international access code.
When no country code is registered, the confirmation display appears asking whether to register the country code.
To register··················“YES” Go to step 2 of “Storing/Editing Country Code” on page 57.
To cancel ···················“NO”
・
OFF ········Does not automatically add the international access code. The setting is completed.
1
Setting at purchase
Auto
Making an International Call Easily
<International Dial Setting>
■
When adding international access code automatically
The confirmation display appears asking whether to make a call. Select how to dial and press .
・
Dial ·····································································Dials out with the international access code.
・
Dial with orig. No.(Original phone No.)···········Dials out without adding the international access code.
・
Cancel································································Does not dial.
●
The international access code is not added to emergency call 110/119/118, if you enter 81 (country code of Japan) after “+”.
Select a country name
2
Information
IDD Prefix Setting
You can store the international access code to be added to the beginning of phone number for making
an international call.
Other settings Int’l dial setting IDD Prefix setting ( )
1
Enter the name to store Enter the international access code
●
You can enter up to 8 full-pitch or 16 half-pitch characters for a name.
●
You can enter up to 10 digits for an international access code.
2
Setting at purchase
WORLD CALL (009130010)
Page 59

57
International Dial SettingMaking Calls/Receiving Calls
You can store up to three country codes.
Other settings Int’l dial setting Country Code setting
Select <Not recorded> ( )
●
To edit the stored country name, select it.
●
Select a stored item from the display on the left and press ; then its contents are displayed.
1
Enter a country name Enter a country code
●
You can enter up to 8 full-pitch or 16 half-pitch characters for a country name.
●
You can enter up to 5 digits for a country code. But you cannot use #, , and +.
2
Storing/Editing Country Code
Setting at purchase
アメリカ
(U.S.A.), +1
Operations
Enter a country name Enter a country code
YES
※
Enter your Terminal Security Code YES
※
While a country code setting item is displayed ( )
Select and operate each function below.
1
Function menu
Edit
Delete this
Delete all
Explanation
●
You can enter up to 8 full-pitch or 16 half-pitch
characters for a country name.
●
You can enter up to 5 digits for a country
name. But you cannot use #, , and +.
●
You cannot delete the country code set by
“Auto assist setting”.
Other settings Int’l dial setting Country Code setting
Select a country name
1
Confirming Country Code
※
To cancel: “NO”
Function Menu while Country Code Setting is Displayed
You can make a call by replacing the “+” in the phone number with the international access code.
This setting is valid only when the “+” is at the beginning or the phone number begins with “31#+” or
“#31#+”*.
When you are entering a phone number for dialing or storing it in the Phonebook, press and hold
for at least one second to enter “+”.
Enter a phone number,
or bring up a Phonebook entry, redial item, dialed call record, or received call record.
1
()International dial
●
Press ( ) or to make an international call (or video-phone call).
2
International Dial
Next Page
Page 60

58
Switching between a Voice Call and a Video-phone Call Making Calls/Receiving Calls
●
You can switch between a voice call and a video-phone call repeatedly.
●
When i-mode or packet transmission is in progress, the transmission is disconnected and the voice call is switched to the video-phone call.
With packet transmission, a confirmation display appears asking whether to disconnect the transmission.
Select “YES” →to disconnect it and to switch to the video-phone call. To cancel, select “NO” →.
●
When packet transmission is in progress at the other end, the message to the effect that the transmission cannot be switched is dis-
played and the voice call continues without switching to the video-phone call.
●
You cannot switch from a voice call to a video-phone call while “Multi calling” is displayed during a call if you have signed up for Call Waiting
Service.
●
It takes about five seconds to switch. Switching may take a longer time depending on the radio wave conditions.
●
Depending on how the caller’s phone is working or on the radio wave conditions, switching from a voice call to video-phone call may
fail and the connection may be cut off.
●
If you switch between the voice call and video-phone call during a call, the call duration and call charge are counted respectively for
the calls. You are not charged while “Changing” is displayed.
●
You cannot switch between the video-phone call and voice call unless “Indicate V-phone” is set to “Activate” at the other end.
See page 68 for “Indicate V-phone”.
●
Hands-free is not released even if you switch from the voice call to video-phone call during Hands-free.
You cannot set Hands-free ON/OFF while the display for “Changing” is displayed.
●
An alarm for “Quality alarm” and “Reconnect control” does not sound during switching.
Information
●
When the phone number has “0” at the beginning, “0” is replaced by the international access code and the country code.
■
When the beginning of the phone number is other than “+”, “ 31#+”, or “#31#+”
The display for selecting a country name appears in step 2 of “Storing/Editing Country Code” on
page 57.
If you select a country name, the international access code and the country code are added.
Information
You (caller) can switch between a voice call and a video-phone call during a call (this function is available for the phones that can switch between a voice call and a video-phone call).
●
If the other party has a phone which is capable of switching over, ( ) is displayed at the lower left of the display.
●
While switching over, “Changing” is displayed, and the voice guidance to that effect is played back.
During a voice call
()
・
Change····················Switches from a voice call to video-phone call.
・
Cancel ·····················Cancels switching and returns to the voice call.
・
Select image ···········Selects the image to be sent to the other party.
⇒
Go to step 2 on page 87
1
Switching from a Voice Call to Video-phone Call
Switching between a Voice Call and a Video-phone Call
During a video-phone call
()
CHG to phone call YES
●
To cancel: “NO” (returns to video-phone call)
1
Switching from a Video-phone Call to Voice Call
Page 61

59
Redial/Dialed CallsMaking Calls/Receiving Calls
■
Calling using Redial
Stand-by display Select a redial item or
■
Calling using Dialed Calls
Dialed calls Select a dialed record or
●
Press to make a video-phone call.
1
You can check “Redial” or “Dialed calls” for the other party you have made a call, or you can use it for
redialing.
●
“Redial” ···············Up to 30 dialed records for voice calls/video-phone calls are stored. When you redial the same phone number, the
previous record is deleted.
“Dialed calls”········A total of dialed 60 records including 30 voice calls/video-phone calls and 30 records for data transmission/packet
transmission are stored. Even if you redial the same phone number, the previous record remains.
・
The dialed records for 64K data transmission are stored only when you use the FOMA USB Cable (option).
●
If you switch during a call, the first phone number you dialed is stored in “Redial” and “Dialed calls”
●
To store the dialed date and time, set the date and time by “Set time” in advance.
●
When more than 30 calls are dialed, the the older records are automatically deleted.
●
When the other party you dialed is stored in the Phonebook, the phone number, name and icon are displayed.
●
When you make a call using Multi-Number, the selected
contents are displayed. (except “Cancel prefix”)
●
The latest data is displayed on the top.
●
Press ( ) to display the Sent Address List.
●
Explanation of icons ⇒See page 60
▼
Detailed Redial display
Redial List
Detailed Dialed Call display
Dialed Call List
▼
Redialing Phone Numbers You have Dialed
<Redial> <Dialed Calls>
●
During “PIM lock”, only the phone number is displayed even when the name and icon for the other party are stored in the
Phonebook. The name and icon stored in the Phonebook are displayed after “PIM lock” is deactivated.
●
You can make a voice call (or video-phone call) to the most recently dialed number by pressing ( ) and then from
the Stand-by display.
●
If you activate “PIM lock”, “Keypad dial lock”, or “Restrict dialing”, the redialed records up to that point are all deleted.
All records after “PIM lock”, “Keypad dial lock”, or “Restrict dialing” is activated are retained.
Information
While a redial item/dialed call record is displayed ( )
Select and operate each function below.
1
●
Function menu items of “Notify caller ID”, “Prefix numbers”, “International dial”, “Multi number”, “Add to phonebook”,
“Compose message”, “Dialing speed”, “Select image”
⇒
See page 55
Function Menu while Redial/Dialed Calls are Displayed
Next Page
Page 62

60
Pause Dial Making Calls/Receiving Calls
Other settings Pause dial
●
When the dial data is already stored, it is displayed as shown on the left.
1
Pause Dial display
You can store only one pause dial.
Store Pause Dial
You can send touch-tone signals from your FOMA phone for sending messages to a pager
※
or for using
services such as reserving tickets and checking your bank balance.
If you enter a pause (p) into the dial data, you can send it out with breaks.
<Pause Dial> Menu 84
Sending Touch-tone Signals Quickly
Setting at purchase
Not stored
Explanation
You can paste a phone number icon on the desktop.
You can compose an SMS message to send to the
phone number set as the destination address.
You can display the Sent Address List.
ー
“” and “ ” switch each time you press .
You can check or uncheck all items by pressing
() and selecting “Select all/Release all”.
ー
Operations
⇒
See page 132
⇒⇒
Go to step 3 on page 272
⇒
See page 252
YES
※
Put a check mark for the redial items or dialed
call records to be deleted
()
YES
※
Enter your Terminal Security Code
YES
※
Function menu
Add desktop icon
Compose SMS
Sent address
Delete this
Delete selected
Delete all
<Delete this> <Delete selected> <Delete all>
●
If you execute “Delete all”, all records in both Redial and Dialed Calls are deleted. Note that even if you execute “Delete this” or
“Delete selected” of Redial, those are not deleted from Dialed Calls and the records are retained.
To delete the dialed call records, delete them from the Function menu while “Dialed calls” is displayed.
●
Even if you turn off the power, redial items and dialed call records are not deleted.
Information
Voice call Video-phone call
International call International video-phone call
64K data transmission call Packet transmission call
■
Icons for Redial/Dialed Calls
※
To cancel: “NO”
Page 63

61
Pause DialMaking Calls/Receiving Calls
Other settings Pause dial ( )
●
You can proceed to the display for entering a phone number also by ( )
→→
“Send pause dial” from the Pause Dial
display.
Enter a phone number.
●
You can enter also by displaying
Redial , Received Calls ,
or
Search Phonebook from the display for
entering a phone number.
or
A voice call is made. Once the line is connected, the dial data stored in Pause Dial is displayed up to the first pause (p).
Confirm that the line is connected or
●
The dial data up to the first pause (p) is sent, and the dial data up to the next pause (p) is
displayed. Dial data up to the pause (p) is sent each time you press or .
After sending the last number, the “Talking” display comes up.
4
3
2
1
Send Pause Dial
●
During a call, you can send dial data also by displaying the Function menu of the Pause Dial display.
●
Some devices on the receiving end cannot receive signals.
●
You cannot send pause dial data during a video-phone call.
Information
For at least one second
■
To enter “P”in ordinary number entry
Enter the other party’s phone number from the Stand-by display.
Press and hold for at least one second to enter the pause (p)
→→
Enter the characters you want to send
(repeat step 2 if necessary).
→→
When the other party answers, press and hold for at least one second Select “Send pause dial” from the
menu
The dial data up to the next pause (p) are sent.
3
2
1
■
To send dial data all at once
From the display in step 3, press and hold for at least one second Select “Send at one time”
●
Select “Send pause dial” and press ; then the dial data up to the next pause (p) will be sent.
()Enter the dial data
■
To complete after storing dial data
..........
Press .
■
To send in succession
............................
Go to step 2 of "Send Pause Dial”.
●
You can enter the dial data also by ( ) →→“Edit”.
●
You can enter up to 128 digits. You can use only through , , and the pause (p) to enter the dial
data.
●
Enter the pause (p) by pressing and holding for at least one second. You cannot enter a pause (p) at the beginning of
dial data, or enter it consecutively.
■
To delete a stored pause dial
Pause Dial display ( ) Delete YES
●
To cancel: “NO”
2
※
The name of the DoCoMo pager has been changed to QuickCast since January 2001.
Page 64

Operations
⇒
Go to step 2 on this page
YES
※
Enter your Terminal Security Code YES
※
Function menu
Edit
Delete this
Delete all
Explanation
Stores/Edits the prefix.
Deletes the displayed prefix.
Deletes all the prefixes.
※
To cancel: “NO”
62
Prefix Setting Making Calls/Receiving Calls
You can store prefix numbers such as international access code or “186/184” and add them to the beginning of the phone number for dialing. You can store up to seven prefix numbers.
Other settings Prefix setting Select <Not recorded> ( )
●
To edit a stored prefix, select it.
●
Select a stored item from the display on the left and press ; then its contents are displayed.
1
Enter a name Enter a prefix number
●
You can enter up to 8 full-pitch or 16 half-pitch characters for a name.
●
You can enter up to 10 digits for a prefix number.
The keys for entry are limited to through , and .
2
While a prefix setting item is displayed ( ) Select and operate each
function below.
1
Store/Edit Prefix
<Prefix Setting>
Storing Prefix Numbers
Setting at purchase
WORLD CALL (009130010)
Other settings Prefix setting Select a prefix
1
Check Prefix
Function Menu while Prefix Setting is Displayed
Page 65

The subaddress is the number required for receiving services such as Subaddress Notification Service
of ISDN. If you set “Sub-address” to “ON”, “ ” included in the phone number is regarded as a separator
and subsequent numbers are identified as a subaddress so that you can call a specific phone or connect
to a data terminal.
Further, You can use this function for selecting contents from “V
LIVE
”.
2
Other settings Sub-address
・
ON··········Regards “ ” and onward as a subaddress.
・
OFF ········Does not regard “ ” and onward as a subaddress.
2
2
1
●
Even if you set “Sub-address” to “ON”, “ ” at the top of phone numbers and “ ” immediately after the prefix number or
“186 (or 31#)”/“184 (or #31#)” are not regarded as subaddress mark-off symbols.
2
2
2
You can add a prefix number to the top of phone number when you make a call.
()Prefix numbers Select a prefix item
●
Press ( ) or to make an international call (or video-phone call).
2
Enter a phone number,
or bring up the detailed display of a Phonebook entry, redial item, dialed call record,
or received call record.
1
Prefix Numbers
<Subaddress Setting>
Making a Call with Specified Subaddress
Setting at purchase
ON
Information
63
Subaddress SettingMaking Calls/Receiving Calls
You can select an alarm that sounds until you are reconnected after disconnected owing to bad radio
wave conditions.
Talk Reconnect control
・
No tone····················Does not sound.
・
High tone·················High alarm sounds.
・
Low tone ·················Low alarm sounds.
1
●
The call fee is charged for the time until you are reconnected (up to about 10 seconds).
●
The reconnectable time varies depending on the usage status and radio wave conditions. An estimate is about 10 seconds.
●
While you are disconnected, no sound is transmitted to the other party.
●
An alarm for “Reconnect control” does not sound during switching between a voice call and video-phone call.
<Reconnect Control> Menu 77
Selecting Alarm for Reconnecting
Setting at purchase
No tone
Information
Page 66

64
Noise Reduction Making Calls/Receiving Calls
●
Noise Reduction is always effective during a video-phone call.
You can suppress surrounding noise to make your voice and the other party’s voice from the earpiece clear.
Talk Noise reduction
・
ON··········Validates Noise Reduction.
・
OFF ········Invalidates Noise Reduction.
1
During a call
●
When Hands-free is activated, “ ” is displayed.
●
Press again to switch Hands-free off.
●
You can switch to Hands-free even during Manner Mode.
Manner Mode is reactivated when you switch Hands-free off or
end the call. Also, you still hear sound through the speaker
even if you activate Manner Mode during a Hands-free call.
1
If you set hands free mode during a call, the sound such as the other party’s voice is heard through the speakers.
You can make or receive voice calls from a Hands-free compatible device such as In-Car Hands-Free Kit
01 (option) or a car navigation system by connecting with your FOMA phone.
Refer to the respective instruction manuals for how to operate Hands-free compatible devices. To use
In-Car Hands-Free Kit 01 (option), you need to purchase the FOMA In-Car Hands-Free Cable 01 (option).
●
Keep the FOMA phone well away from your ear when Hands-free is on. Otherwise you could affect or damage your hearing with
sound from the speakers.
●
When noise of your surroundings or of the receiving end is loud, you might hardly hear the other party’s voice. In that case, set
Hands-free to off and then talk.
●
Talk into the FOMA phone within a distance of about 50 cm.
●
A display or ring tone for incoming calls is in accordance with the settings of the FOMA phone.
●
When the ring tone is set to sound from a Hands-free compatible device, the ring tone sounds from that device even when Manner
Mode is activated or “Ring volume” of the FOMA phone is set to “Silent”.
●
The receiving operation in Drive Mode works in accordance with the “Drive mode” setting.
●
The receiving operation while Record Message is activated works in accordance with the “Record message” setting.
●
When the ring tone is set to sound from the FOMA phone, the FOMA phone works in accordance with “Fold setting” if it is closed
during a call. When the ring tone is set to sound from a Hands-free compatible device, the line is still connected even if you close the
FOMA phone, regardless of “Fold setting”.
During a
video-phone call
During a voice call
<Noise Reduction> Menu 76
Reducing Surrounding Noise to Make Voice Clear
Setting at purchase
ON
<Hands-free>
Switching to Hands-free
<In Car Hands-free>
Using Hands-free Compatible Devices
Information
Information
Information
Page 67

When you receive a call, the ring tone sounds and the Call/Charging indicator and
Command Navigation key flicker.
●
You can use “Illumination in talk” to make the Call/Charging indicator flicker during a call.
●
To vibrate the phone for incoming calls, set “Phone” of “Vibrator” to other than “OFF”.
●
While Manner Mode or Super Silent is activated, the ring tone does not sound.
⇒
See pages 117 and 118
●
While receiving a call, information is displayed also on the Private window.
●
“” is displayed at the upper right of the phone number for incoming international calls.
●
If you press during ringing, the incoming call can be placed on answer-hold.⇒See page 73
When you receive a call,
or Talk (End the call)
●
You can use “Illumination in talk” to make the Call/Charging indicator flicker during a call.
●
When “Answer setting” is set to “Any key answer”, the call is placed on hold if you take the call by pressing with the
FOMA phone closed. If you have set “Fold setting” to “No tone” or “End the call”, the other party hears nothing, and if you have
set “Fold setting” to “Tone on”, the call hold tone is played back. You can start talking by opening the FOMA phone. “Holding”
appears on the Private window.
●
If you close the FOMA phone during a call, the FOMA phone works in accordance with “Fold setting”.
⇒
See page 72
1
Receiving a Voice Call
Receiving a Call
65
Receiving a CallMaking Calls/Receiving Calls
■
Display for incoming calls
If the caller’s name, phone number, and image are stored in a Phonebook entry, the name, phone number, and icon (or image) are
displayed.
●
If the same phone number is stored with multiple names in the Phonebook, the name that comes first in the search order (see
page100) is displayed.
●
A phone number instead of a name is displayed during PIM Lock or for the Phonebook entry stored as secret data.
●
For a forwarded call, the forwarder is displayed below the phone number of the caller. (The forwarder’s phone number might not
be displayed in the case of some forwarders.)
●
When you receive a call with the additional phone number, the registered name of the additional phone number is displayed below
the caller. (For a forwarded call, you can press ( ) to switch to display the forwarder.)
When a caller’s phone number is not provided
The caller is not displayed but the reason for no caller ID is displayed.⇒See page 151
Caller
Forwarder/Registered name of the additional phone number
When a call is forwarded from
■
Any Key Answer
You can answer an incoming voice call by pressing any key of through , , , , , (up, down,
left, or right of the Command Navigation key), and in addition to or .
●
When “Answer setting” is set to “Quick silent”, you can stop only the ring tone by pressing a certain key.
Page 68

66
Receiving a Call Making Calls/Receiving Calls
When a call comes in while the FOMA phone is closed, you can answer the call just by pressing the one-push open button or just by
opening the FOMA phone manually.
●
You need to set “Phone” or “Video-phone” of “Open phone” to “Answer” in advance. ⇒See page 71
When you receive a video-phone call
Talk (End the call)
●
You can answer a video-phone call also by or
.
●
You can switch to Hands-free by pressing during a call. ⇒See page 64
●
When you answer a video-phone call, the image through the other party's camera and the substitute image to be sent to the
other party are displayed.
⇒
See page 53
This FOMA phone does not have a built-in camera, so your image cannot be sent to the other party during a video-phone call.
●
If “Answer setting” is set to “Quick silent”, you can stop only the ring tone by pressing a certain key.
●
“Any key answer” is invalid.
●
If you close the FOMA phone during a call, the FOMA phone works in accordance with “Fold setting”.
⇒
See page 72
●
When you press , the call ends and the Stand-by display returns.
1
When you receive a video-phone call, “Incoming V.phone” is displayed, the ring tone
sounds and the Call/Charging indicator and Command Navigation key flicker.
When you make a video-phone call, use the optional Flat-plug Earphone/Microphone Set
with Switch (see page 358) or Hands-free (see page 64).
●
You can use “Illumination” to set an illumination pattern for the Call/Charging indicator.
●
To vibrate the phone for incoming calls, set “Video-phone” of “Vibrator” to other than “OFF”.
●
While Manner Mode or Super Silent is activated, the ring tone does not sound.
⇒
See pages 117 and 118
●
While receiving a call, information is displayed also on the Private window.
●
“”
is displayed at the upper right of the phone number for an incoming international video-phone call.
●
If you press during ringing, the incoming call can be put on answer-hold.⇒See page 73
Receiving a Video-phone Call
One-push Answer
During ringing ( ) Select and operate each function below.
1
※
You cannot transfer incoming video-phone calls to Voice Mail Service.
Function menu
Call rejection
Call forwarding
Voice mail
※
Operations
Press to set Call
Rejection.
⇒
See page 363
⇒
See page 362
Explanation
You can hang up the phone without answering the call.
●
You cannot reject calls if you have set “Phone” of “Open phone”
to “Answer” and the call is received with the FOMA phone closed.
ー
ー
Function Menu during ringing
Page 69

67
Receiving a CallMaking Calls/Receiving Calls
●
If you press or while a voice call is being received, Manner Mode is activated. Record Message is also activated so that
the caller can record a message. You can still take the call during recording by pressing or .
(The message until you press or is recorded. Also, Manner Mode remains activated after the call ends.)
●
You might hear beeps (ring tone in call) during a call.
If you have signed up for any of Voice Mail Service, Call Waiting Service, or Call Forwarding Service and set “Arrival call act” to
“Answer”, the beeps (ring tone in call) will sound for another incoming call, enabling you to do the following operations:
Voice Mail Service················Transfer the call to the Voice Mail Service Center. ⇒See page 362
Call Waiting Service··············Put your current call on hold and take the incoming call. ⇒See page 363
Call Forwarding Service········Transfer the call to the registered forwarding destination. ⇒See page 363
●
During Drive Mode, incoming calls are recorded as missed calls in Received Calls.
●
You cannot receive calls from the phone numbers set for “Call rejection” of “Restrictions”. Also, you cannot receive calls from the
phone numbers except those set for “Call acceptation”.
●
By setting “Ring start time” of “Ringing time”, you can specify the time until ringing starts for when a call comes in from the phone
number not stored in the Phonebook.
●
You can set “Reject unknown” not to accept calls from the phone numbers not stored in the Phonebook.
●
The substitutive image is displayed if the caller’s image is not received during the call because of the caller’s settings.
●
When a video-phone call comes in while Voice Mail Service is set to "Activate", the call is disconnected after the ringing time specified for the service has elapsed.
●
Even if Call Forwarding Service is set to “Activate”, the call is not forwarded unless the forwarding destination is a phone compatible
with the video-phone conforming to 3G-324M (see page 53). Confirm the phone you are forwarding the call to and then activate the
service. The video-phone caller does not hear the guidance to the effect that the call is forwarded.
(The message to the effect that the call is to be forwarded appears, depending on the destination FOMA phone.)
●
If a video-phone call comes in from the phone number to be rejected by “Nuisance Call Blocking Service”, the video guidance is
played back.
●
You cannot receive mail and Messages R/F during video-phone calls. Incoming mail and Messages R/F will be held at the i-mode
Center. You can retrieve them using “Check new message”, after you end the video-phone call. However, you can receive SMS
messages during a video-phone call.
●
During Hands-free use, be sure to keep the FOMA phone away from your ears. Otherwise, you could affect or damage your hearing
with sound from the speaker.
●
If the battery runs low during a Chara-den call and "Recharge battery" is displayed, the pre-installed substitutive image is sent.
If you charge the battery during a video-phone call, the image set for "Substitutive image" of "Select image" is displayed.
Information
<Voice Call>
<Video-phone>
Page 70

68
Indicate Video-phone Making Calls/Receiving Calls
You can let the other party know that your FOMA phone can switch between a voice call and video-phone call. This
function is set to “Activate” at the time of contract.
If you set “Indicate V-phone” to “Activate”, the caller (the other party) can switch between a video-phone call and
voice call.
●
You cannot perform these operations during a voice or video-phone call. Also, you cannot operate when you are out of the service area or
radio waves do not reach.
Video-phone Indicate V-Phone
Activate/Deactivate
YES
※※
OK
※
To cancel: “NO”
1
You can activate/deactivate the function.
You can reject incoming video-phone calls.
Video-phone Reject Video-phone
・
ON
·········
Rejects incoming video-phone calls.
・
OFF
·······
Does not reject incoming video-phone calls.
1
Activate/Deactivate
<Indicate Video-phone>
Setting for Switching between a Voice Call and Video-phone Call
<Reject Video-phone>
Setting Rejection of Video-phone Calls
Video-phone Indicate V-phone
Check indication
1
You can confirm the setting of Indicate Video-phone.
Checking Indication
If Indicate Video-phone is set to “Activate”, the other party can switch over the call from his/her side.
●
While switching, the message to that effect is displayed and the voice guidance is played back.
●
Switching operation can be done only by the caller.
■
Receiving a video-phone call switched from a voice call
During a voice call The other party switches to a video-phone call.
■
Receiving a voice call switched from a video-phone call
During a video-phone call The other party switches to a voice call.
1
1
Setting at purchase
OFF
Page 71

69
Received CallsMaking Calls/Receiving Calls
You can record the phone number of the caller and the received date/time in “Received
calls”.
●
“Received calls”: A total of 60 received records including 30 voice/video-phone calls and 30 records for 64K data transmission/packet
transmission are stored.
●
To store the date and time you received calls, set the date and time by “Set time” in advance.
●
When more than 30 calls are received, the older records are automatically deleted.
●
When the other party switches between a voice call and video-phone call, the call that came in first is stored in “Received calls”.
Stand-by display Select a received call record or
●
The Received Calls List displays all the records including missed calls.
●
Press ( ) to display the Received Address List.⇒See page 252
●
When a caller ID is provided, it is displayed; and if the caller has been stored in the Phonebook,
the phone number, name, and icon are displayed.
●
When there is an incoming packet transmission, the caller's access point name (APN) is
displayed.
●
When the caller’s phone number is not notified, the reason for no caller ID is displayed.
●
For missed calls, the ringing time is displayed at the right of the received date and time on the
Detailed Received Calls display.
●
When a received call is displayed, press ( ) or to make a voice call (or videophone call) to the displayed phone number.
●
You can make a voice call (or video-phone call) to the phone number of the most recent
received call record by pressing ( ) and then from the Stand-by display.
●
When you make a call from the Detailed Received Calls display using Multi-Number,
the selected contents are displayed. (except “Cancel prefix”)
●
You can select "All calls" or "Missed calls" by
→→
“Received calls”.
・
All calls·············Displays all the records including missed calls.
・
Missed calls ·····Displays the records of only the missed calls.
(If unconfirmed missed calls are found, “Unknown calls” is displayed.)
1
Detailed Received Calls
display
Received Calls List
●
If you have set “Missed calls display” of “Ringing time” to “Not display”, missed calls within “Ring start time” are not displayed in
Received Calls.
●
While “PIM lock” is activated, only the phone number is displayed even if the name and icon are stored in the Phonebook.
Further, when “Restrict dialing” is activated, only the phone number is displayed, even when the name and icon are stored in the
Phonebook, unless the Phonebook entry has been specified in “Restrict dialing”. After deactivating “PIM lock” and “Restrict dialing”,
the name and icon stored in the Phonebook are displayed.
●
You can neither save phone numbers of 64K data transmission and packet transmission from Received Calls to the Phonebook, nor
compose new mail messages or SMS (Short Messages) for them.
●
If you activate “PIM lock” or “Keypad dial lock”, the received call records up to that point are all deleted.
Records after “PIM lock” or “Keypad dial lock” is activated are retained.
●
When a call comes in from a party who uses a dial-in phone number, a different phone number might be displayed.
<Received Calls> Menu 24
Using Received Call Records
▼
Information
Page 72

Operations
Press to display the ringing time.
⇒
See page 132
⇒
Go to step 3 on page 272
⇒
See page 252
YES
※
Put a check mark for the received calls to
be deleted ( )
YES
※
Enter your Terminal Security Code
YES
※
1
Explanation
You can display the ringing time for missed calls.
●
Even if you have set “Missed calls display” of
“Ringing time” to “Not display”, you can check
the missed calls which stopped ringing within the
specified ring start time and their ringing time.
●
You can operate only from the Received Calls
List.
You can paste the icon of the phone number to
the desktop.
You can compose an SMS message to send to
the phone number set as the destination address.
You can display the Received Address List.
ー
●
“” and “ ” switch each time you press .
You can check all items or uncheck all items by
pressing ( ) and selecting “Select
all/Release all”.
ー
ー
70
Received Calls Making Calls/Receiving Calls
While a received calls is displayed ( )
Select and operate each function below.
“Notify caller ID”, “Prefix numbers”, “International dial”, “Multi number”, “Add to phonebook”, “Compose message”, “Dialing
speed”, “Select image” in the menu ⇒See page 55
1
■
Icons for Redial, Dialed Calls, and Received Calls
※
Displayed in light purple for unchecked missed calls.
Function menu
Ringing time
Add desktop icon
Compose SMS
Received address
Delete this
Delete selected
Delete all
Voice call Video-phone call
International call International video-phone call
Call for 64K data transmission Call for packet transmission
※
Missed voice call
※
Missed video-phone call
※
Missed international call
※
Missed international video-phone call
※
Missed call for 64K data transmission
※
Missed call for packet transmission
Call for 64K data transmission or packet transmission when a 64K or packet transmission compliant external device such as
a personal computer is not connected
Message recorded in “Record message”
※
To cancel: “NO”
Function Menu while Received Calls are Displayed
2
1
2
Page 73

●
If a video-phone call comes in, “Any key answer” is disabled.
●
While “Manner mode” is activated, “Any key answer” works even if “Quick silent” has been set.
●
If you press and hold for at least one second, the backlight is switched ON/OFF.
●
When “Side keys guard” is set to “ON”, “Any key answer” and “Quick silent” do not work by pressing with the FOMA phone
closed.
●
While the Flat-plug Earphone/Microphone Set with Switch (option) is connected, you can press the switch to receive calls, regardless
of “Answer setting”.
●
If you have set “Open phone” to “Answer”, you can answer calls by opening the FOMA phone regardless of “Answer setting”.
You can change the setting of “Any key answer” to avoid unintentionally receiving a call while
composing a message. You can set “Quick silent” which stops ringing only, or “OFF” which allows you
to answer calls only by , , and .
Incoming call Answer setting
・
Any key answer······You can answer calls by any of
, ,
to , , , , , ,
and .
・
Quick silent·············When a voice call or video-phone call comes in, you can press any of to , , ,
,, , and to stop the ring tone or vibrator. If you set “Open phone” to “Keep ringing”,
you can stop them also by opening the FOMA phone.
Even if you stop the ring tone to sound or vibrator to work, the other party hears a ringing tone.
Press or (including for video-phone call) to answer the call after stopping the ring
tone or vibrator.
・
OFF··························You can answer the call only by or (including for video-phone call).
1
Incoming call Open phone
・
Phone ······················Sets Open Phone for incoming voice calls.
・
Video-phone ···········Sets Open Phone for incoming video-phone calls.
1
Keep ringing or Answer
・
Keep ringing ···········Does not start talking even if the FOMA phone is opened.
・
Answer ····················Starts talking when the FOMA phone is opened. For video-phone calls, the still image set for
“Substitutive image” of “Select image” is sent to the other party.
2
<Answer Setting> Menu 58
Setting Response of Key Operation for Answering Incoming Calls
<Open Phone>
Setting Response for Opening FOMA Phone during Ringing
Information
●
If you have set “Open phone” to “Answer”, you can start talking also by pressing the one-push open button and opening the FOMA
phone.
⇒
See page 45
●
If a call comes in with “Answer” set and the FOMA phone closed, On Hold (see page 73), Call Rejection (see page 66),
Voice Mail Service (see page 362) and Call Forwarding Service (see page 363) during ringing are not available.
●
Even if you have set “Open phone” to “Answer”, “Keep ringing” works for the incoming call within the specified “Ring start time” of
“Ringing time”. “Keep ringing” works also for the incoming call during a call if you have signed up for Call Waiting Service.
Setting at purchase
Any key answer
Information
Setting at purchase
Keep ringing
71
Answer SettingMaking Calls/Receiving Calls
Page 74

72
Fold Setting Making Calls/Receiving Calls
Incoming call Fold setting
・
No tone····················The voice is muted (silenced). The hold tone is not played back. (The setting is completed.)
・
Tone on ···················The other party hears the hold tone set for “Holding tone” of “Call response setting” while the FOMA
phone is closed.
・
End the call·············
The call is finished. This is the same operation as pressing during a call. (The setting is completed.)
1
Speaker ON or Speaker OFF
・
Speaker ON·············The hold tone is played from the speaker.
・
Speaker OFF···········The hold tone is not played from the speaker.
2
<Fold Setting> Menu 18
Setting Response for Closing FOMA Phone during a Call
Setting at purchase
End the call
●
This function is disabled when the Flat-plug Earphone/Microphone Set with Switch (option) is connected. The line is not
disconnected even if you close the FOMA phone during a voice call.
●
If you have selected “Tone on” for when you close the FOMA phone during a video-phone call, the still image set for “Holding” of
“Select image” is sent.
●
Even if you have selected “End the call” and close the FOMA phone, the functions of i-mode group and Tool group working in
Multitask do not end.
●
If you have selected “End the call” and close the FOMA phone to end a call during i-mode, the i-mode display prior to the call returns.
●
Even if you have selected “Tone on”, “No tone” works when you close the FOMA phone while “Multi calling” is displayed during a call
and when you have signed up for Call Waiting Service.
Use to adjust the earpiece volume.
Adjust the earpiece volume to Level 1 (minimum) through 6 (maximum). To raise the volume, press or ; to
lower it, press or .
●
Within two seconds after you bring up the Volume Adjustment display, press or to adjust the volume.
2
Stand-by display (for at least one second)
●
You cannot adjust the volume during ringing. Adjust it during a call or standby.
●
During a voice call, you can press and hold for at least one second or press briefly
to bring up the Volume Adjustment display.
During a video-phone call, you can press or briefly to bring up the Volume
Adjustment display.
1
<Earpiece Volume>
Adjusting Earpiece Volume
Setting at purchase
Level 4
●
The earpiece volume adjusted during a call is retained even after the call ends.
Information
Information
Page 75

73
Ring VolumeMaking Calls/Receiving Calls
Use to adjust the volume
・
Step······················The ring tone is silent for about three seconds, and then the volume steps up
every three seconds, from Level 1 through Level 6.
・
Levels 1 to 6········Level 1 is the weakest volume and Level 6 the loudest.
・
Silent····················The ring tone does not sound.
●
Following icons are displayed while the ring volume is set to “Silent”:
: The ring volume for voice calls or video-phone calls is “Silent”.
: The ring volume for mail, chat mail or Messages R/F is “Silent”.
: The ring volume for voice calls, video-phone calls, mail, chat mail, and Messages R/F is
“Silent”.
2
●
You cannot adjust the ring volume during ringing.
●
Even if the ring volume for mail, chat mail, or Messages (R/F) is set to other than “Silent”, “ ” is displayed and the ring tone does
not sound while “Mail/Msg. ring time” (see page 116) is set to “OFF”.
You can adjust the ring volume for incoming calls and mail.
Incoming call Ring volume Select an item to be set.
・
Phone (Voice call)
・
Video-phone
・
Mail (Ring volume for incoming i-mode mail and SMS messages.)
・
Chat mail
・
MessageR
・
MessageF
1
<Ring Volume> Menu 50
Adjusting Ring Volume
Information
Setting at purchase
Level 4
During ringing
●
The FOMA phone makes three rapid beeps for confirmation and the incoming call is put on
hold.
●
The confirmation tone does not sound when “Phone” of “Ring volume” is “Silent” or while
Manner Mode is activated.
●
The other party hears the hold tone set for “On hold tone” of “Call response setting”.
For video-phone calls, the still image set for “On hold” of “Select image” is displayed.
Press to release hold and answer the call.
●
If a voice call is on hold, you can release hold also by pressing .
●
If “Answer setting” is set to “Any key answer”, you can release hold by pressing any key of
through , , , , , , , , and .
1
●
If you press or the caller on hold hangs up during answer-hold, the call will be disconnected.
●
The caller is charged for the call even during answer-hold.
●
If you have set “Open phone” to “Answer”, you cannot put an incoming call on hold while the FOMA phone is closed.
<On Hold>
Putting an Incoming Call on Hold
Information
Page 76

74
Holding Making Calls/Receiving Calls
During a call
●
The other party hears the hold tone set for “Holding tone” of “Call response setting”.
For video-phone calls, the still image set for “Holding” of “Select image” is displayed.
●
You can put a call on hold also by closing the FOMA phone during the call if you have set “Fold setting” to “Tone on”.
Press or to release hold and answer the call.
●
If you have set “Fold setting” to “Tone on” and put the call on hold with the FOMA phone closed, open the FOMA phone or
connect the Flat-plug Earphone/Microphone Set with Switch (option) to answer the call.
1
<Holding>
Putting a Call on Hold during a Call
●
The caller is charged for the call even while the call is on hold.
●
If the other party on hold hangs up, the call will be disconnected.
●
If a new call comes in while the current call is put on hold, the hold is released.
●
“Fold setting” is set to “End the call” at purchase. Therefore, you can end calls by closing the FOMA phone.
●
If “Illumination in talk” is set to other than “OFF”, the illumination flickers even during call-hold or in mute state.
●
If the Flat-plug Earphone/Microphone Set with Switch (option) is connected, hold (during a voice call) is released when you close the
FOMA phone.
Information
You can set the guidance the other party hears during on hold.
Talk Call response setting On hold tone/Holding tone
1
●
Press ( ) to hear the guidance or melody from the beginning while setting a hold tone. Press to end the demonstration
playback.
<Call Response Setting>
Setting Hold Tone
Setting at purchase
On hold tone ·········Tone 1
Holding tone··········JESU JOY OF MEN’S DESIRING
Information
Type of Hold tone
Tone 1
Tone 2
JESU JOY OF MEN’S
Voice announce 1
Voice announce 2
On hold tone Holding tone
Guidance
The caller hears the guidance “I cannot answer the call. Hold the line, or
redial after a while” in Japanese.
The caller hears the guidance “I cannot answer the call. Redial after a
while” in Japanese.
The other party hears the melody.
The other party hears the voice recorded by “Voice announce”. If it has
not been recorded, these are not displayed.
○
○
○
○
×
○
×
×
○
○
○
= Can be set×= Cannot be set
Page 77

75
Drive ModeMaking Calls/Receiving Calls
Stand-by display (for at least one second)
●
Drive Mode is activated and “ ” is displayed.
●
To deactivate Drive Mode, perform the same operation.
1
Drive Mode (the guidance function during driving) is an automatic answering service for safety driving.
During Drive Mode, callers hear the guidance that you are driving or in the place where mobile phones
should not be used, and the call is disconnected.
●
If you dial emergency call phone numbers “110”, “119”, “118” during Drive Mode, Drive Mode is released.
●
Note that “Record message” is disabled even when it is set to “ON” because the Drive Mode guidance has priority.
●
You can activate/deactivate Drive Mode only from the Stand-by display. You can activate/deactivate Drive Mode even when “ ” is displayed.
●
You can make calls as usual even during Drive Mode.
●
When Drive Mode and Manner Mode are activated simultaneously, Drive Mode has priority.
●
If a “User unset” voice call comes in while “Caller ID request” is set to “Activate”, Drive Mode is deactivated and the caller hears the
Caller ID Request guidance.
<Drive Mode>
Using Drive Mode
Information
■
During Drive Mode
・
Even when a call comes in, the ring tone does not sound. The “Missed call” icon appears on the display and the call is stored in
“Received calls”. The caller hears the guidance to the effect that you cannot answer the call due to driving, and the call is
disconnected. However, when the power is turned off or “ ” is displayed, the caller hears the out-of-service-area message
instead.
・
The ring tone does not sound and the Call/Charging indicator does not flicker even when mail or a message comes in. In addition,
the activated vibrator does not work.
・
The ring tone for 64K data transmission, alarm tone, and charging confirmation tone do not sound, and a melody while i-
α
ppli is
running is not played back.
・
Even when "Ticker ON/OFF" is set to "ON", tickers do not flow.
●
When “Voice Mail Service” is activated during Drive Mode
The FOMA phone does not ring for incoming calls, but calls are connected to the Voice Mail Service Center. The “Missed call”
icon appears on the display and the call is stored in “Received calls”.
The caller hears the guidance to the effect that the call is connected to the Voice Mail Service Center because you are driving or
in the place where mobile phones should not be used, and then the call is connected to the Center automatically.
However, if the ringing time for “Voice Mail Service” is set to 0 seconds, the power is turned off, or the FOMA phone is out of the
service area, the caller does not hear the Drive Mode guidance and Voice Mail Service works. Note that in this case the call is not
indicated by the “Missed call” icon and not kept in “Received calls”.
●
When “Call Forwarding Service” is activated during Drive Mode
The call is forwarded to the specified forwarding phone number without connecting to your FOMA phone. The “Missed call” icon
appears on the display and the call is stored in “Received calls”.
The caller hears the guidance to the effect that the call is forwarded because you are driving or in the place where mobile phones
should not be used, and then the call is forwarded automatically.
However, if the ringing time for Call Forwarding Service is set to 0 seconds, the power is turned off, or the FOMA phone is out of
the service area, the caller does not hear the Drive Mode guidance and Call Forwarding Service works. Note that in this case the
call is not indicated by “Missed call” icon and not kept in “Received calls”.
Page 78

76
Public Mode (Power Off) Making Calls/Receiving Calls
■
Relation between incoming calls during Drive Mode and respective services
Responses to Incoming Voice Calls
Plays back the Public Mode (Drive Mode)
guidance, and then the call is connected to the
Voice Mail Service Center.
Plays back the Public Mode (Drive Mode) guidance,
and then the call is forwarded to the forwarding
destination.
Whether the guidance is played back or not depends
on the setting of Call Forwarding Service.
If “Plays guidance” is set, plays back the Public Mode
(Drive Mode) guidance. If “Does not play guidance” is
set, does not play back the guidance.
Plays back the Public Mode (Drive Mode)
guidance, and then the call is disconnected.
For the call from the phone number registered
to be rejected, plays back the Call Rejection
guidance, and then the call is disconnected.
For the caller without a caller ID, plays back the
Caller ID Request guidance, and then the call is
disconnected.
For the caller with a caller ID, plays back the
Public Mode (Drive mode) guidance, and then
the call is disconnected.
Responses to Incoming Video-phone Calls
The call is disconnected without connecting to
the Voice Mail Service Center.
Does not play back the video guidance for
Public Mode (Drive Mode), and the call is
forwarded to the forwarding destination. If the
destination does not support video-phone call,
the call is disconnected.
Plays back the video guidance for Public Mode
(Drive Mode), and then the call is disconnected.
For the call from the phone number registered
to be rejected, plays back the video guidance
for Call Rejection, and then the call is
disconnected.
For the caller without a caller ID, plays back
the video guidance for Caller ID Request, and
then the call is disconnected.
For the caller with the caller ID, plays back the
video guidance for Public Mode (Drive Mode),
and then the call is disconnected.
Service
Voice Mail Service
Call Forwarding Service
Call Waiting Service
Nuisance Call Blocking Service
Caller ID Display Request Service
■
When Public Mode (Power off) is activated
The setting remains until “ 25250” is dialed to deactivate Public Mode (Power off). Simply turning off the phone will not deactivate
the setting.
The Public Mode (Power off) guidance will be played back even when you are outside the service area or in a location where the
service is unavailable.
The other party hears the guidance that you are driving or in a location where you should not use the mobile phone, and then the
call is ended.
2
Public Mode (Power off) is an automatic response service for good manners in public places. When
Public Mode (Power off) is activated, the call coming in during power off is disconnected after playing
back the guidance that you cannot answer the call as you are in the place where the mobile phones
should be turned off (hospital, airplane, or near priority seats on the train, etc.).
<Public Mode (Power Off)>
Using Public Mode (Power off)
Setting Method
Dial “ 25251”.
Public Mode (Power off) is activated. (There is no change on the Stand-by display.)
●
After Public Mode (Power off) is set, and the power is turned off, the guidance is played back as follows: “The person you are
calling is currently driving or in an area where cellphone should not be used. Please try again later.”
■
To cancel Public Mode (Power off)
Dial “ 25250”. Public Mode (Power off) is deactivated.
■
To check the Public Mode (Power off) setting
Dial “ 25259” to check the setting status of Public Mode (Power off).
22
2
1
Page 79

77
If You could not Answer an Incoming CallMaking Calls/Receiving Calls
■
Relation between incoming calls during Public Mode (Power off) and respective services
When there are multiple icons, use to select an icon
●
When you select an icon, the explanation of the icon appears.
2
Stand-by display
●
The explanation of the icon appears.
●
Press or to return to the former display.
1
When you could not answer calls (Missed calls) or you have new mail, or when a message for record
message or Voice Mail Service is recorded, the “Notification icon” appears on the Stand-by display. You
can skip to that function by selecting the icon.
(For each icon ⇒See page 133)
■
When the FOMA phone is closed
The information is displayed on the Private window.
Press to display a missed call record.
⇒
See page 31
If You could not Answer an Incoming Call
Notification icon
Responses to Incoming Voice Calls
Plays back the Public Mode (Power off)
guidance, and then the call is connected to the
Voice Mail Service Center.
Plays back the Public Mode (Power off) guidance,
and then the call is forwarded to the forwarding
destination.
Whether the guidance is played back or not depends
on the setting of Call Forwarding Service.
If “Plays guidance” is set, plays back the Public Mode
(Power off) guidance. If “Does not play guidance” is
set, does not play back the guidance.
For the call from the phone number registered
to be rejected, plays back the Call Rejection
guidance, and then the call is disconnected.
For the caller without a caller ID, plays back the
Caller ID Request guidance, and then the call is
disconnected.
For the caller with a caller ID, plays back the
Public Mode (Power off) guidance, and then the
call is disconnected.
Responses to Incoming Video-phone Calls
The call is disconnected without connecting to
the Voice Mail Service Center.
Does not play back the video guidance for
Public Mode (Power off), and the call is
forwarded to the forwarding destination. If the
destination does not support video-phone call,
the call is disconnected.
For the call from the phone number registered
to be rejected, plays back the video guidance
for Call Rejection, and then the call is
disconnected.
For the caller without a caller ID, plays back
the video guidance for Caller ID Request, and
then the call is disconnected.
For the caller with the caller ID, plays back the
video guidance for Public Mode (Power off),
and then the call is disconnected.
Service
Voice Mail Service
Call Forwarding Service
Nuisance Call Blocking Service
Caller ID Display Request Service
Next Page
Page 80

78
Record Message Making Calls/Receiving Calls
Type of message
Japanese 1
Japanese 2
English
Voice announce 1
Voice announce 2
Message
The caller hears a message “I cannot take your call now. Please leave your name and message after the
beep within 20 seconds. Even for a video-phone call, you can leave a voice message only.” in Japanese.
The caller hears a more familiar message “I cannot take your call now. Please leave your message
after the beep. Even for a video-phone call, you can leave a voice message only. Sorry.”
in Japanese.
The caller hears an English message “I can’t take your call now. Please leave the message. When you
call by video phone, you can leave a voice message.”.
The caller hears the message and sound recorded by “Voice announce”. If it has not been recorded,
these are
not displayed.
When Record Message is activated, you can play an answer message and can record a caller’s message
even if you have not signed up for Voice Mail Service.
You can record a total of five messages of voice calls and video-phone calls. Each message can be
recorded for up to 20 seconds.
<Record Message> Menu 55
Recording Messages when You cannot Answer the Call
Activate Record Message
Select an answer message
2
●
Press ( ) to play back the answer message. You can stop it by pressing .
Record message
・
ON··········Activates Record Message.
・
OFF ········Deactivates Record Message.
The setting is completed.
●
Record Message does not work when five record messages
have already been recorded. Delete unnecessary messages.
1
Setting at purchase
Record message·······OFF
Answer message······Japanese 1
(when “Record message” is set to “ON”)
Ringing time··············8 seconds
(when “Record message” is set to “ON”)
Enter the ringing time (seconds).
●
Enter from “000” to “120” in three digits.
●
Not to change the set ringing time, just press without entering a time.
●
You cannot set the same ringing (response) time for Automatic Answer and Record Message.
Set a different time for each.
3
●
You cannot make calls in the step for displaying the confirmation display from a “Notification icon”. Similarly, if you have set
“Operation preferred” for “Alarm setting”, the alarm does not work in this step.
Press or to return to the Stand-by display and then perform the operation.
●
Even when the “New mail” icon is not displayed, the i-mode Center may hold new mail that has not been received by the FOMA
phone. Also, even when the “Voice mail” icon is not displayed, the Voice Mail Center may hold a message.
●
A “Notification icon” is deleted when each function is executed.
●
A
“Missed call” icon is not displayed if a missed call stops ringing within the specified ring start time and “Missed calls display” of
“Ringing time” is set to “Not display”.
Information
Page 81

79
Record MessageMaking Calls/Receiving Calls
■
Icons while Record Message is activated
〜
: Indicates the number of recorded messages.
■
Incoming calls when Record Message is set to “ON”
After the ringing time elapses, the caller hears the answer message. For a video-phone call, the still image set for “Preparing” of
“Select image” is displayed on the other party’s display.
Then recording starts. For a video-phone call, the still image set for “Record message” of “Select image” is displayed on the other
party’s display.
When recording ends, the “Missed call” icon and “Record message” icon appear on the desktop. Select the “Recorded message” icon
and press ; then the display for “Play/Erase msg.” appears.
●
Answer message priority: “Setting by phone number”→“Setting by group”→“Record message setting”
■
To answer a call while the answer message is played back or a message is recorded
Press or .
■
Conditions and results while Record Message is activated
■
Important
■
The saved contents may be lost owing to a malfunction, repair, or other mishandling of the FOMA phone. We cannot take any
responsibility for the loss of data, so you are advised to take a note of data stored in the FOMA phone and store them separately.
Condition
When “ ” is displayed
When Drive Mode and Record Message
are simultaneously activated
When there are already five record
messages
During a record message is being
recorded
When Record Message is set with Voice
Mail Service or Call Forwarding Service
When ring start time set for “Ringing
time” is longer than the ring time set for
Record Message
When Manner Mode is set to “Original”,
and “Record message” to “ON” there
When “Voice announce 1” or “Voice
announce 2” is set for an answer
message
Result
Does not work.
Drive Mode has priority and Record Message does not work.
The subsequent callers cannot leave messages and will not hear the answer message.
●
Delete the recorded messages so that new messages can be left.⇒See page 81
You cannot receive a call from a third party.
●
The third party will hear the busy tone.
The priority depends on the ringing time set for Voice Mail Service or Call Forwarding
Service.
●
To give Record Message priority, set its ringing time shorter than that for Voice Mail
Service or Call Forwarding Service. Even when you do this, Voice Mail Service or Call
Forwarding Service will work if there are already five record messages.
The call is switched to Record Message without ringing.
●
To enable ringing before switching to Record Message, set a longer ring time for
Record Message than “Ring start time”.
You can record messages during Manner Mode even when Record Message is not set to
“ON”.
If “Voice announce 1” or “Voice announce 2” is deleted, the answer message will be set
to “Japanese 1”.
Page 82

80
Quick Record Message Making Calls/Receiving Calls
Even if you have an incoming call while Record Message is not activated, you can record the message
for only that call.
<Quick Record Message>
Recording Messages when You cannot Answer the Call while Ringing
During ringing or
Manner Mode is also activated.
The caller will hear the answer message and then can leave you a record message.
●
Record Message does not work when five record messages have already been recorded.
●
When “Side keys guard” is set to “ON”, you cannot activate Record Message by pressing with the FOMA phone closed.
1
You can set an answer message for each phone number stored in the FOMA phone’s Phonebook.
Detailed Phonebook display ( ) Utilities Answer message
Follow step 2 of “Activate Record Message” on page 78.
“Answer message” is indicated by “
★
”.
●
How to search the Phonebook⇒See page 97
●
To release the answer message for the phone number, perform the same operation.
1
●
You cannot set this function for Phonebook entries stored in “Secret mode”, “Secret only mode”, and in the UIM.
●
Note that the setting for “Answer message” of “Utilities” is valid only when the Caller ID is provided. It is advisable to activate “Caller
ID request” in advance.
●
Note that this function is released when you change the set phone number.
●
To change the set answer message, release the current setting and proceed.
●
Use “Utilities” to check which phone number in the Phonebook entry is set, or to release the setting.
Set Answer Message by Phone Number
Information
●
You cannot set an answer message for “Group 00” and groups stored in the UIM.
●
Note that the setting for “Answer message” of “Utilities” is valid only when a caller ID is provided. It is advisable to activate “Caller ID
request” in advance.
●
To change the set answer message, release the current setting and proceed.
●
If you store the same phone number in multiple groups, the answer message set for the group of the phone number which is
accessed initially in the column-search order has priority.
●
You can set this function for either the group in which secret and ordinary Phonebook entries are stored together or the group in
which only secret entries are stored; however this function is disabled if you receive a call from the secret entry.
●
Use “Utilities” to check which group is set, or to release the setting.
You can set an answer message for each group stored in the FOMA phone’s Phonebook.
If you have set the answer message by phone number, that setting has priority.
Group setting Select a group ( ) Utilities
Answer message
Follow step 2 of “Activate Record Message” on page 78.
“Answer message” is indicated by “
★
”.
●
To release the answer message for the group, perform the same operation.
1
Set Answer Message by Group
Information
Menu 26
Page 83

Operations
You can play back the message.
YES
※
YES
※
YES
※
Explanation
You can pause by pressing during playback.
You can erase a message also by pressing ( )
during playback.
You can erase all record messages.
You can erase all record messages and a voice memo.
81
Play/Erase MessageMaking Calls/Receiving Calls
Press from Stand-by display.
●
A beep sounds and the most recent message is played back.
●
When playback ends, a double beep sounds and the message “Playing” is cleared from the display.
●
When a caller's phone number is provided, the caller’s phone number, date and time of the recording, and Record Message
No. are displayed during playback. If the caller is stored in the Phonebook, his/her name is also displayed.
※
The date and time of the recording are displayed only when “Set time” is set.
●
If the caller’s phone number appears on the display while playing back a record message, you can make a voice call
(or video-phone call) to that phone number by pressing
()
.
■
To skip to next message
Each time you press during playback, messages are played back in the following order; the next new message
→…
→
the oldest record message →a voice memo.
■
To cancel playback midway
Press , or .
1
<Play/Erase Message>
Playing/Erasing Record Messages/Voice Memo
■
To play back using menu function
Play/Erase msg.
Select a record message or voice memo
2
1
Function menu
Play
Delete this
Delete rec. msg.
Delete all
Play/Erase msg. ( ) Select and operate each function below.
1
●
While “Received calls” of “Record display set” is set to “OFF”, you cannot play back record messages.
●
Record messages and a voice memo cannot be erased during a call.
※
To cancel: “NO”
Information
●
Recorded items are indicated by “」” (for voice calls) or “ ” (for video-phone calls).
If a voice memo is recorded, “★” is attached.
Function Menu of Playing/Erasing Record Message
Page 84

Set by Group
82
Using Chara-den Making Calls/Receiving Calls
●
You cannot set this function for Phonebook entries stored as “Secret mode”, “Secret only mode”, and in the UIM.
●
Note that this function is released when you change the set phone number.
●
To change the set Chara-den image, release the current setting and proceed.
●
Use “Utilities” to check which phone number in the Phonebook entry is set, or to release the setting.
You can set a Chara-den image for each group
stored in the FOMA phone’s Phonebook
as a substitutive
image for video-phone calls. If you have set a Chara-den image by phone number, that setting has priority.
Group setting Select a group ( )
Utilities Chara-den setting Select a Chara-den image
“Chara-den setting” is indicated by “★”.
●
To release the Chara-den setting for the group, perform the same operation.
1
Information
Menu 26
You can set Chara-den images to be sent to the other party. (Chara-den⇒See page 322)
Using Chara-den
●
The priority order of substitutive images to be sent to the other party is; “Setting by call” →“Setting by phone number”
→
“Setting by group” →“Chara-den image stored in Phonebook entry” →“Select image”.
●
The setting applies just for the one call (dial-out). The settings for “Select image” do not change. Further, the setting is not stored in
Redial/Dialed Calls.
●
The setting will be canceled if you make a voice call after operating for “Chara-den call”.
Information
You can set a Chara-den image for each phone number stored in the FOMA phone’s Phonebook as a
substitutive image for video-phone calls.
Detailed Phonebook display ( ) Utilities Chara-den setting
Select a Chara-den image
“Chara-den setting” is indicated by “★”.
●
How to search the Phonebook ⇒See page 97
●
To release the Chara-den setting for the phone number, perform the same operation.
1
Set by Phone Number
You can make a video-phone call after setting a Chara-den image to be sent to the other party.
Chara-den Select a Chara-den image
Chara-den display/Chara-den List ( ) Chara-den call
Enter the destination phone number and press to make a video-phone call.
●
For operating Chara-den⇒See page 323
2
1
Set by Call
Page 85

83
Using Chara-denMaking Calls/Receiving Calls
●
You cannot set for “Group 00” and groups in the UIM.
●
To change the set Chara-den image, release the current setting and proceed.
●
If you store the same phone number in multiple groups, the Chara-den image set for the group of the phone number initially
accessed Column Search has priority.
●
You can set this function even for the group in which secret and ordinary Phonebook entries are stored together or in which only
secret entries are stored.
●
Use “Utilities” to check which group is set, or to release the setting.
Information
●
While PIM Lock is activated, a “Pre-installed” substitutive image is sent.
●
You can download other than pre-installed Chara-den images from web sites. ⇒See page 185
●
If you have deleted a Chara-den image set as a substitutive image, a “Pre-installed” substitutive image is sent.
Information
※
The Whole Action mode makes an animation character express the actions with the whole body.
The Parts Action mode makes the animation character express the actions with a part of the body.
⇒
See page 324
During a Chara-den call
()
Chara-den setup Select and operate each
item below.
1
Item
Switch chara-den
You can switch Chara-den images
during a Chara-den call.
Action list
You can display the list for actions
that you can operate.
Change action
You can switch the action
between the Whole Action mode
and Parts Action mode.
※
SW subst've image
You can switch a substitutive
image to be sent to the other party
to the still image set for “Original”
of “Select image”.
Explanation
●
It may take a while to switch depending on
the Chara-den image.
●
Actions you can operate
⇒
See page 322
The Parts Action mode is switched to the
Whole Action mode, the Whole Action mode
to the Parts Action mode.
While PIM Lock is activated, a “Preinstalled” substitutive image is sent.
Function Menu during Chara-den Call
Operation
Switch chara-den Select the Chara-den
image to be displayed
Action list
●
You can display the Action List also by
pressing .
●
Select an action and press to execute
the action.
●
You can check the details of the action by
pressing ( ).
Change action
●
You can switch modes also by pressing
.
SW subst’ve image
Substitutive Image
You can set a Chara-den image for “Substitutive image” of “Select image”.
Chara-den Select a Chara-den image
Chara-den display/Chara-den List ( ) Substitute image
2
1
Setting at purchase
ブンブン
(Dimo)
Page 86

During a video-phone call
●
Press to switch displays as follows:
1
84
Useful Functions for Video-phone Calls Making Calls/Receiving Calls
You can switch the display locations of your image and the other party’s image.
Only the sent image
appears.
The sent image appears
on the main display.
The image through the other
party’s camera appears on the
main display.
Only the image through
the other party’s camera
appears.
Switch Image Display Positions
■
You can set the image display position before making a video phone call.
●
You can select “Other image (setting at purchase)”, “Own image”, “Only other image”, or “Only own image” by
→→
“Video-phone” →“Disp. setting V-phone”→“Main display”.
Only other image
Own image
Other image
Only own image
Useful Functions for Video-phone Calls
You can set the substitutive image by following the four functions described below:
・
A Chara-den image set by “Utilities” (set by phone number)
・
A Chara-den image set by “Utilities” (set by group)
・
A Chara-den image stored in a Phonebook entry
・
A still image or Chara-den image set for “Substitutive image” of “Select image”
In addition, you can set a Chara-den image by call.
⇒
See page 87
The priority order of substitutive image to be sent to the other party is; “Setting by call” →“Setting by phone number” →“Setting by group”
→
“Chara-den image stored in Phonebook entry” →“Select image”.
●
Note that “Setting by phone number”, “Setting by group”, and “Chara-den image stored in Phonebook entry” are disabled when a
video-phone call comes in without notifying a caller ID.
●
While PIM Lock is activated, a “Pre-installed” substitutive image is sent.
●
If you have deleted a Chara-den image set as a substitutive image, a “Pre-installed” substitutive image is sent.
Information
About substitutive image to be sent
You can set the image size on the main display for video-phone calls.
Video-phone Disp. setting V-phone Display screen size
・
Fit in display···········Displays the image in size fit to the screen size (232 x 192 dots).
・
Normal ····················Displays the image in original size (equivalent).
●
Press ( ) to select “Screen size” during a video-phone call.
1
Setting Display for Video-phone Calls
<Video-phone Display Setting>
Page 87

Explanation
●
“Prefer motion spd” is effective for moving
images. When there is little motion, the quality
becomes better if you set to “Prefer img qual”.
●
If the radio wave conditions weaken during a
video-phone call, the image may appear like a
mosaic.
You can set this function only during a Chara-den
call.
・
Constant light: Setting at purchase
・
15 seconds light: For turning the light off when no
operation has been done for about 15 seconds.
ー
ー
ー
You can set it only during a Chara-den call.
●
“Send DTMF tone” is displayed when the mode is
not the DTMF transmission mode and “DTMF
tone OFF” is displayed in the DTMF transmission
mode.
●
In the DTMF transmission mode, you cannot
operate a Chara-den image in the Whole Action
and Parts Action mode.
●
During PIM Lock, you cannot operate.
85
Useful Functions for Video-phone CallsMaking Calls/Receiving Calls
<Send DTMF tone>/<DTMF tone OFF>
●
Even in the DTMF transmission mode, you can switch to Manner Mode by pressing and holding for at least one second.
●
The DTMF tone may not be received depending on the device of a receiving end.
During a video-phone call ( )
Select and operate each function below.
1
Function menu
Visual preference
You can set the quality of
the other
party’s
image on
the display and the image to
be sent to the other party.
Chara-den setup
You can select the setting for
the Chara-den call.
Display light
You can set the lighting
duration of the display.
Call time disp.
You can display the call
time during a call.
Screen size
You can select how to display
the image on the main display.
CHG to phone call
You can switch the current videophone call to the voice call.
Send DTMF tone/
DTMF tone OFF
During the Chara-den call,
you can switch to the DTMF
transmission mode that
enables you to enter the
data from the numeric keys
and to send DTMF
(touch-tone signals).
Own number
You can display your phone
number (own number).
Information
Operation
Select from the followings.
・
Normal: Displays images in standard quality and
motion speed.(At video-phone start-up)
・
Prefer img qual: Displays images laying stress
on image quality
.
・
Prefer motion spd: Displays images laying
stress on motion speed
.
⇒
See page 83
Select from the followings.
・
Constant light
・
15 seconds light
⇒
See page 353
⇒
See page 84
⇒
See page 58
Send DTMF tone
Check your own number.
Function Menu during Video-phone Call
Page 88

86
Moving Image Quality Making Calls/Receiving Calls
Video-phone Moving image quality
・
Normal ····················Displays/Sends images in standard quality and motion speed.
・
Prefer img qual·······Displays/Sends images laying stress on image quality.
・
Prefer motion spd··Displays/Sends images laying stress on motion speed.
1
●
You can set the image quality also from the Function menu by pressing ( ) during a video-phone call.⇒See page 85
In that case, the setting will be effective only during that video-phone call.
●
“Prefer motion spd” is effective for moving images. When there is little motion, the quality becomes better if you set to “Prefer img
qual”.
●
If the radio wave conditions weaken during a video-phone call, the image may appear like a mosaic.
You can set the quality of the other party’s image on the display and of your image to be sent.
You can set the image to be sent to the other party during a video-phone call.
Video-phone Select image
・
On hold·····························
Sets the still image to send during answer-hold.
・
Holding·····························Sets the still image to send during call hold.
・
Substitutive image··········Sets the substitutive image (still image or Chara-den image) to
send.
・
Record message ·············Sets the still image to send while recording a record message from callers.
・
Preparing ·························Sets the still image to send while playing back an answer message for a record message.
・
Voice memo·····················Sets the still image to send while recording a voice memo.
1
<Moving Image Quality>
Setting Image Quality for Video-phone Calls
Setting at purchase
Normal
<Select Image>
Changing Image Displays for Video-phone Calls
Setting at purchase
On hold······················Pre-installed
Holding······················Pre-installed
Substitutive image····Pre-installed
Record message·······Pre-installed
Preparing···················Pre-installed
Voice memo ··············Pre-installed
Select an image
・
Pre-installed ······A still image with a message is displayed. You cannot change the still image.
(The setting is completed.)
・
Original ··············A still image stored by “Set image” (see page 306) with a message is
displayed; the message is the same as the one for “Pre-installed”.
To change the settings
⇒
Go to step 3
・
Chara-den··········Chara-den image set by “Substitutive image” (see page 83) is displayed.
To change the settings
⇒
Go to step 3
(This is displayed only when you select "Substitutive image" in step1.)
●
You can play back and check the still image or Chara-den image by pressing ( ).
(When you press , the play ends.)
2
Image Selection display
Information
()Change setting
■
If you have selected “Original”
Select a folder Select a still image
●
Still image folders and lists⇒See page 300
●
You can play back the demonstration and check the still image by pressing ( ). (When you press
, the playback ends.)
■
If you have selected “Chara-den”
Select a Chara-den image
●
You can play back and check a Chara-den image by pressing ( ). (When you press , the
playback ends.)
3
Page 89

87
Voice Call Auto SwitchMaking Calls/Receiving Calls
●
The images to be sent to the other party is preferentially set by “Setting by call”.
●
The settings for “Select image” do not change. Further, the settings are not stored in Redial/Dialed Calls.
●
You cannot select “Chara-den” while you are receiving i-mode mail attached with the JPEG image in excess of 10,000 bytes.
●
The setting will be canceled if you make a voice call after setting “Select image”.
You can select or set the image to be sent to the other party each time you make a video-phone call.
Enter a phone number,
or bring up the detailed display of a Phonebook entry, redial item, dialed call record,
or received call record.
()Select image
・
Chara-den·································Sends the stored Chara-den image to the other party.
⇒
See pages 82 and 322
・
Terminate (Release)·················Cancels the setting by call. (The setting is completed.)
●
During PIM Lock, you cannot select “Chara-den”.
Select a Chara-den image
3
2
1
Set by Call
●
The stored still image is not deleted even when you switch the image from “Original” to “Pre-installed” or “Chara-den”.
●
The still images set for “Substitutive image”, “Holding”, “On hold”, “Record message” and “Voice memo” are displayed both on your
FOMA phone and the other party’s handset. However, a hold tone for “On hold”, and the answer message for Record Message are
only sent to the other party’s handset.
●
Even if you delete the still image selected from “Original”, that still image is displayed to the other party. To change, set by “Change
setting” or “Set (as) display”.
●
While PIM Lock is activated, a “Pre-installed” substitutive image is sent.
●
If you have deleted a Chara-den image set as a substitutive image, a “Pre-installed” substitutive image is sent.
●
Still images you can set ⇒See page 306
Information
Information
●
The charges for calls once switched to voice calls are billed at the rates for the voice calls, not the digital transmission.
●
Once the dialed video-phone is connected, the dialing operation for a voice call cannot be done.
●
“Voice call auto switch” cannot be done when the dialed video-phone is a non-existent number, busy, out of the service area, off, set
to be rejected because of no caller ID, or in Drive Mode.
●
When “Voice call auto switch” has been operated, only the last call is stored in Dialed Calls.
If a video-phone call cannot be connected, it will be automatically redialed as a voice call.
Video-phone Voice call auto switch
・
ON··········Switches automatically to a voice call when a video-phone call is not connected.
・
OFF ········Displays the message that you have failed to connect the video-phone call, and returns to the Stand-by display.
1
<Voice Call Auto Switch>
Redialing as a Voice Call when a Video-phone Call cannot be Connected
Setting at purchase
OFF
Information
Page 90

88
Dialing Speed Making Calls/Receiving Calls
●
You cannot set the dialing speed for “Group 00” and the groups in the UIM.
●
If the same phone number is stored in multiple groups, the dialing speed set for the group of the phone number initially accessed by
Column Search has priority.
●
You can set this function even for the group in which secret and ordinary Phonebook entries are stored together or in which only
secret entries are stored.
You can set dialing speed for each group stored in the FOMA phone’s Phonebook.
If you set the dialing speed by phone number, that setting has priority.
Stand-by display Group setting Select a group ( ) Utilities
Dialing speed
・
64K·········For dialing video-phone calls at 64K.
・
32K·········For dialing video-phone calls at 32K.
“Dialing speed” is indicated by “
★
”.
●
To change the set dialing speed, release the current setting and then proceed.
●
To release the dialing speed for the group, perform the same operation.
●
You can start also by .
1
Set Dialing Speed by Group
You can set dialing speed for each phone number or group stored in the FOMA phone’s Phonebook.
●
Use “Utilities” to check which phone number in the Phonebook entry is set, or to release the setting.
<Dialing Speed>
Set Dialing Speed for Video-phone Calls
Set Dialing Speed by Phone Number
You can set dialing speed for each phone number stored in the FOMA phone’s Phonebook.
Detailed Phonebook display ( ) Utilities Dialing speed
・
64K·········For dialing video-phone calls at 64K.
・
32K·········For dialing video-phone calls at 32K.
“Dialing speed” is indicated by “
★
”.
●
How to search the Phonebook.⇒See page 97
●
To release the dialing speed for the phone number, perform the same operation.
1
●
You cannot set the dialing speed for the Phonebook entries stored in “Secret mode” “Secret only mode”, and in the UIM.
●
This setting will be released if you change the phone number in the Phonebook entry.
●
To change the set dialing speed, release the current setting and then proceed.
Information
Information
Menu 26
Page 91

Phonebook
Phonebooks Available for FOMA Phone····················································································· 90
Storing Phonebook Entries in FOMA Phone···········································<Add to Phonebook> 91
Storing Phonebook Entries in UIM·················································<Add to Phonebook (UIM)> 94
Storing Displayed Phone Number/Mail Address in Phonebook Entries ·································· 95
Changing Group Names····················································································<Group Setting> 96
Dialing from Phonebooks·········································································<Search Phonebook> 97
Editing Phonebook Entries ···········································································<Edit Phonebook> 100
Deleting Phonebook Entries·················································································<Delete Data> 101
Checking Number of Phonebook Entries·················································<No. of Phonebook> 102
Making Full Use of Phonebooks··································································································· 102
Checking/Releasing Phonebook Utility Functions····················································<Utilities> 105
Making a Call with a Few Touches································································<Two-Touch Dial> 106
Accessing Phonebook Entries by Voice································································<Voice Dial> 106
89
Page 92

Phonebooks Available for FOMA Phone Phonebook
90
You can use two types of Phonebook, namely the Phonebook in the FOMA phone itself, and the
Phonebook in the UIM. If you categorize the use of these Phonebooks, you will be able to manage your
data efficiently.
Phonebooks Available for FOMA Phone
●
You can set your UIM into another FOMA phone and use the UIM Phonebook entries.
※
The number of entries you can store in the Phonebook may decrease depending on the stored contents.
Phonebook of UIM
50 entries max. in the Phonebook
Only one name per Phonebook entry
One phone number per Phonebook entry
(up to 50 phone numbers in the whole
Phonebook)
One
address per Phonebook entry
(up to 50 addresses in the whole
Phonebook)
Cannot be set
Cannot be stored
Cannot be stored
Cannot be stored
Cannot be stored
Cannot be stored
Divides into 11 groups from 00 to 10
None
Six ways: By reading, name, phone number, address (mail), group, and column
Not available
Cannot be set
Cannot be set
Cannot be set
Cannot be set
Cannot be stored
Phonebook of FOMA phone
700 entries max.※in the Phonebook
Only one name per Phonebook entry
Up to 4 phone numbers per Phonebook entry
(up to 700 phone numbers in the whole
Phonebook)
Up to 3 addresses per Phonebook entry
(up to 700 addresses in the whole
Phonebook)
Only one icon can be set for each phone
number and each mail address
Only one address per Phonebook entry
Only one birthday per Phonebook entry
Only one memo per Phonebook entry
Up to 100 images. Only one per Phonebook
entry
Up to 100 Chara-den images. Only one per
Phonebook entry
20 groups from 00 to 19
From 000 to 699
Seven ways: By reading, name, phone
number, address (mail), memory No.,
group, and column
Available
(when stored in memory No. 000 to 009)
Can be stored (max. 100 records)
Can be set per stored phone number or
group
Can be set per stored phone number, mail
address, or group
Can be set per stored phone number or
group
Can be set per stored phone number
Can be set per stored phone number or
mail address
Can be stored
Item
Number that can be stored
Name (Reading)
Phone number
Mail address
Icon setting
Postal address (zip code)
Birthday
Memorandums
Still image
Chara-den
Group No.
Memory No.
Search phonebook
Two-touch dial
Voice dial
Ring tone
Vibrator
Illumination
Picture
Answer message
Mail ring tone
Mail vibrator
Mail illumination
Dialing speed
Chara-den setting
Restrict dialing
Call rejection
Call acceptation
Call forwarding
Voice mail
Secret code setting
Storage in Secret Mode or Secret Only Mode
Restrictions
Utilities
Contents
Page 93

Add to PhonebookPhonebook
91
Storing Phonebook Entries in FOMA Phone
<Add to Phonebook>
Stand-by display Add to phonebook Phone
The display for entering a name appears. Go to step 2 and enter the name.
●
You can start also by
→
“Add to phonebook”.
●
You can bring up the display for selecting a storage location also by pressing ( ) from the Phonebook List.
1
Item
(Name)
(Reading)
(Group)
(Phone number)
Operation
Enter a name
●
Number of characters: Up to 16 fullpitch characters
Enter a reading
●
Number of characters: Up to 32 halfpitch characters
Select a group
Enter a phone number
●
Enter starting from the area code.
●
You can enter up to 26 digits.
Select an icon
2
1
Explanation
You can enter the name of the person or company in kanji, hiragana,
katakana, letters of the alphabet, or numerals.
When you finish entering the name, enter the reading in succession.
●
You can enter pictographs as well.
You can enter the reading in half-pitch katakana, letters of the alphabet, or numerals.
●
If the displayed reading is acceptable, you do not need
to edit it. However, depending on the characters
entered for names or entering method, you need to
enter/edit the reading.
20 groups from “Group 00” through “Group 19” are
available, the group names will be changed.
⇒
See page 96
●
When the storage is completed with no group selected, the Phonebook entry is automatically stored in
“Group 00”.
You can store up to 4 phone numbers per Phonebook
entry. However, up to 700 phone numbers can be
stored in the whole Phonebook.
You can set an icon for each phone number to categorize mobile phone numbers, office phone numbers,
and so on.
●
Press and hold for at least one second to insert
a pause (p) into the phone number you store.
However,
you cannot insert the pause (p) to the beginning of phone
number or insert it consecutively. The pause (p) inserted to
the end of phone number is not stored.
●
If you insert “Y” in the middle of a phone number, you
cannot make a call. However, the phone number is
retained in Redial or Dialed Calls.
●
You can store the phone number which includes “#”
such as that for information service as well.
●
Another “ <Not stored>” will appear in the Add-toPhonebook display. To store another phone number,
select “ <Not stored>”.
Next Page
Select and operate each item below.
2
Page 94

Add to Phonebook Phonebook
92
Item
(Mail address)
(Postal address)
(Birthday)
(Memorandums)
(Image)
(Chara-den)
(Memory No.)
Operation
Enter a mail address
●
Characters: Up to 50 characters
(half-pitch letters of the alphabet,
numerals, and symbols)
Select an icon
Enter a ZIP code
●
Entering number: Up to 7digits
Enter a postal address
●
Characters: Up to 50 full-pitch/100
half-pitch characters
Enter a birthday
Enter memorandums
●
Characters: Up to 100 full-pitch/200
half-pitch characters
Select a still image
Select a folder
Select a still image
Select Chara-den
Select a Chara-den image
Enter a memory number
●
Enter a three-digit number of 000
through 699.
2
1
2
1
2
1
2
1
Explanation
You can store up to 3 mail addresses per Phonebook
entry. However, up to 700 mail addresses can be
stored in the whole Phonebook.
You can set an icon for each mail address to categorize mobile phone addresses, home addresses, and
so on.
●
Store the mail address correctly including the domain
(part after @). When the mail address is “phone number@docomo.ne.jp”, store the phone number only.
●
You can set a secret code as well.
⇒
See page 104
●
Another “ <Not stored>” will appear in the Add-toPhonebook display. To store another mail address,
select “ <Not stored>”.
●
You cannot enter “〒” or “-” (hyphen) in the zip code.
●
In the postal address, you can enter pictographs as
well.
●
You can enter the birthday from January 1, 1800
through December 31, 2099.
●
You can enter pictographs as well.
The stored still image is displayed when a call comes
in from the other party whose phone number is
stored in the Phonebook.
You can store up to 100 images out of 700
Phonebook entries.
・
Release this: Releases the stored still image. (The
setting for the still image is completed.)
●
Still image folder and list⇒See page 300
The stored Chara-den image is displayed as a substitutive image for video-phone calls with the other
party stored in the Phonebook.
You can store up to 100 Chara-den images out of 700
Phonebook entries.
・
Cancel Chara-den: Releases the stored Chara-den
image. (The setting for Chara-den image is completed.)
−−
●
The lowest empty memory number 010 through 699 is
entered as a memory number.
If 010 through 699 are filled, the lowest empty memory
number from 000 through 009 is entered.
Press ( ).
●
If you have not entered any name, “ ” is not displayed and you cannot store the entry.
3
Page 95

Add to PhonebookPhonebook
93
●
If you enter Russian or Greek letters, certain symbols, pictographs, or full-pitch characters that are not in the Kuten Code List, for a
name, you cannot display them in the Reading Edit display.
●
If you enter “ゎ(reduced size)” or “ヮ(reduced size)” for a name, “ワ(half-pitch, regular size)” is displayed in the reading field.
●
The file size of a still image that you can store is VGA (640 x 480) or less and an image of up to 100 Kbytes in JPEG format or GIF
format.
●
If you store a still image larger than 128 x 96 dots, it is displayed reduced on the detailed Phonebook display.
●
If you store a still image larger than 176 x 144 dots, it is displayed reduced on the Call Receiving display.
●
If you store a Chara-den image larger than 128 x 96 dots, it is displayed reduced on the detailed Phonebook display.
●
If 700 phone numbers are already stored, “ <Not stored>” is not displayed.
●
If 700 mail addresses are already stored, “ <Not stored>” is not displayed.
Information
■
When you cannot add Phonebook entry
●
If the location (Memory No.) you have selected already contains an entry, the confirmation display appears asking whether to
overwrite it. Select “YES”
→
to replace the existing entry with the new one. Select “NO” →to keep the original entry in
that location (Memory No.) and return to the Add/Edit display. Enter another memory number.
●
In ordinary mode other than “Secret mode” or “Secret only mode”, you cannot overwrite the entry stored in “Secret mode” or
“Secret only mode”. Enter another memory number.
●
You cannot store Phonebook entries while “Keypad dial lock”, “Restrict dialing” or “PIM lock” is set.
■
When Phonebook editing is interrupted
When the battery goes flat
When the battery alarm sounds while you are editing a Phonebook entry, the message “Recharge battery” (see page 45) appears.
The data you are editing will be saved automatically, so you can charge the battery and continue editing, or you can change to a
charged battery and then resume editing as follows:
1. Stand-by display Add to phonebook Phone/UIM
●
If you select the storage location for the interrupted Phonebook entry, the confirmation display appears asking whether to
resume editing.
2. Re-edit.
●
To add a new Phonebook entry, select “New” →. In the case, the data you are editing is retained. If you try to store the
interrupted entry after you finish storing a new one, the confirmation display appears again.
3. Resume editing the interrupted entry.
●
Only the most recently interrupted entry is retained.
●
If you resume editing the data but then cancel editing without storing it, that data will be abandoned. Once you recall the data,
be sure to store it.
If you receive a call or mail
If you receive a call or mail while editing a Phonebook entry, you can respond it leaving the edited data as it is, thanks to
the Multitask function.
To return to the Phonebook Edit display, press and hold for at least one second to switch the menu. You can return to the
Phonebook Edit display also by ending the call or mail function.
■
Important
■
●
The stored contents may be lost due to a malfunction, repair, or other mishandling of the FOMA phone. You are well advised to
take notes of the contents stored in the FOMA phone. If you have a personal computer, you can save them also to the personal
computer by using the FOMA USB Cable (option) and the Data Link Software (see page 448).
●
Note that the handling counters such as a DoCoMo shop might not be able to copy data from your existing FOMA phone to the new
one, depending on the specifications.
Be advised that we cannot be held responsible for the loss of data stored in your FOMA phone.
Page 96

Add to Phonebook (UIM) Phonebook
94
Storing Phonebook Entries in UIM
<Add to Phonebook (UIM)>
Stand-by display Add to phonebook UIM
The display for entering a name appears. Go to step 2 and enter the name.
●
You can start also by
→
“Add to Phonebook”.
●
You can bring up the display for selecting a storage location also by pressing ( ) from the Phonebook List.
●
The UIM ⇒See page 39
1
Select and operate each item below.
2
Item
(Name)
(Reading)
(Group)
(Phone number))
(Mail address)
Operation
Enter a name
●
Number of characters: Up to 10 fullpitch/21 half-pitch alphanumeric characters (half-pitch katakana characters
cannot be entered.)
Enter a reading
●
Number of characters: Up to 12 fullpitch/25 half-pitch alphanumeric characters (half-pitch katakana characters
cannot be entered.)
Select a group
Enter a phone number
●
Enter starting from the area code.
●
You can enter up to 20 digits for blue
UIMs and up to 26 digits for green
UIMs.
Enter a mail address
●
Characters: Up to 50 characters (halfpitch letters of the alphabet, numerals,
and symbols)
Explanation
You can enter the name of the person or company in
kanji, hiragana, katakana, letters of the alphabet, or
numerals.
When you finish entering the name, enter the reading
in succession.
You can enter the reading in half-pitch katakana, letters of the alphabet, or numerals.
●
If the displayed reading is acceptable, you do not need
to edit it. However, depending on the characters
entered for names or entering method, you need to
enter/edit the reading.
11 groups from “Group 00” through “Group 10” are
available, and the group names will be changed.
⇒
See page 96
●
When the storage is completed with no group selected, the Phonebook entry is automatically stored in
“Group 00”.
You can store one phone number per Phonebook
entry.
●
Press and hold for at least one second to insert
a pause (p) into the phone number you store. However,
you cannot insert the pause (p) to the beginning of
phone number or insert it consecutively. The pause (p)
inserted to the end of phone number is not stored.
●
If you insert “Y” in the middle of a phone number, you
cannot make a call. However, the phone number is
retained in Redial or Dialed Calls.
●
You can store the phone number which includes “#”
such as that for information service as well.
You can store one mail address per Phonebook entry.
●
Store the mail address correctly including the domain
(part after @). When the mail address is “phone number@docomo.ne.jp”, store the phone number only.
Page 97

Storing Displayed Phone Number/Mail Address in Phonebook EntriesPhonebook
95
Press ( ).
●
If you have not entered any name, “ ” is not displayed and you cannot store the entry.
3
●
If you enter, for a name, Russian or Greek letters, certain symbols, or full-pitch characters that are not in the Kuten Code List, you
cannot display them in the Reading Edit display.
●
If you enter “ゎ(reduced size)” or “ヮ(reduced size)” for a name, “ワ(regular size)” is displayed in the reading field.
Information
Storing Displayed Phone Number/Mail Address in Phonebook Entries
You can store the displayed or selected phone number, mail address, and still image in the Phonebook.
Operations
While a phone number is entered
While a redial item, dialed call record, or received call record is displayed
While Sent Address or Received Address is displayed
While a site or screen memo is displayed
While the text of Message (R/F) or mail is displayed
In pause state or just after playing back an i-motion movie which includes a ticker of underscored
phone number (mail address).
While the Still Image List is displayed/While a still image is displayed
Storable items
Phone number
Phone number
Phone number/Mail address
Phone number/Mail address
Phone number/Mail address
Phone number/Mail address
Still image
Phone or UIM
・
Phone ····Stores data in the FOMA phone’s Phonebook
・
UIM·········Stores data in the UIM’s Phonebook.
2
New or Add
・
New········Stores data newly in the Phonebook.
⇒⇒
Go to step 2 on page 91 or page 94
・
Add ········Adds data to the existing Phonebook entry. When storing data in the UIM, “Overwrite” is displayed.
3
Select a search method Search the Phonebook
●
How to search the Phonebook⇒See page 97
4
Bring up/Select the item to be stored ( ) Add to phonebook
●
To store the address of the sender (or of another recipient of simultaneous mail) of the received mail or the destination
address of the sent mail into a Phonebook, select “Store address”. When the addresses of the sender and another recipient
of simultaneous mail are found or the multiple destination addresses are found, the display for selecting an address appears.
Press to select the mail address or phone number you want to store and press .
●
To store a still image in a Phonebook entry, select “Add picture to PB”.
●
If the confirmation display appears asking whether to store the image, select “YES” →. To cancel, select “NO”→.
1
Next Page
Select the Phonebook entry to be stored
The phone number or mail address is entered automatically.
●
Edit other items in the Phonebook entry.⇒See step 2 on
pages 91 and 94
●
When you store into the FOMA phone’s Phonebook, you can
remain the original entry and store a new entry into a different location by changing the memory number.
5
Page 98

Group Setting Phonebook
96
()YES
●
To cancel: “NO”
●
When you store the entry in the UIM Phonebook, select “Overwrite” →to overwrite the original entry; or select “Add”
→
to store it as a new entry.
6
■
Auto Search
“Auto search” appears in the Phonebook Search display in step 4, when the highlighted information
(such as a phone number or mail address) on the i-mode site page has the information of the name,
reading, phone number or mail address.
Select “Auto search”
→
; then you can search for Phonebook entries containing the same name
and reading.
●
The Phonebook entry does not store the information of Caller ID Notification included in Redial/Dialed Calls. To set Caller ID
Notification, add 186 (or 31#) or 184 (or #31#) to the phone number and store it.
●
Characters in excess of the number of characters storable in the Phonebook are deleted. In addition, characters that cannot be
stored may be replaced to spaces or deleted, and then stored.
●
You can sometimes store highlighted information other than a phone number or address into the Phonebook.
●
You may not be able to store the information from some sites into the Phonebook.
2
Information
Stand-by display Group setting Select a group
●
You can start also by
→
“Group setting”.
1
Group Setting display
Enter the group name
●
You can store up to 10 full-pitch or 21 half-pitch characters. However, you can store only up 10 characters (irrespective of
full-pitch or half-pitch) as a UIM group name when the entered group name contains both full-pitch and half-pitch characters.
2
Changing Group Names
<Group Setting>
Menu 26
●
The groups in the UIM are indicated by “ ”.
●
You cannot change the group name for “Group 00”.
You can sort Phonebook entries into “Company” or “Friend” etc. according to your relationship or into
“Baseball” or “Ceramic art” etc. according to your interest. You can use the sorted Phonebook entries as
separate Phonebook for easy access to the entry you want to search.
Page 99

Search PhonebookPhonebook
97
Function menu
Edit group name
Utilities
Reset group name
Explanation
−−
・
Ring tone⇒See page 112
・
Vibrator⇒See page 114
・
Illumination⇒See page 129
・
Picture⇒See page 123
・
Answer message⇒See page 80
・
Mail ring tone⇒See page 112
・
Mail vibrator⇒See page 114
・
Mail illumination⇒See page 129
・
Dialing speed⇒See page 88
・
Chara-den setting⇒See page 82
You can reset the group name to the default.
Operation
⇒
Go to step 2 on page 96
Specify utilities by group
YES
※
Group Setting display ( ) Select and operate each function below.
1
●
If you have not changed group names or have deleted (reset) them, “Group 01” through “Group 19” will be displayed for the FOMA
phone (Phone) Phonebook, and “Group 01” through “Group 10” for the UIM Phonebook.
●
The “Utilities” settings for groups are not released even when group names are reset.
Information
Function Menu of the Group Setting Display
You can retrieve stored Phonebook entries by seven search methods.
Stand-by display Select and operate each item below.
●
You can bring up the Search Phonebook display also by
→
“Search phonebook”.
1
Dialing from Phonebooks
<Search Phonebook>
Item
Reading search
●
You can search for the
entry by the reading.
Name search
●
You can search for the
entry by the name.
Explanation
●
If you do not enter a reading but press , the
entire Phonebook is searched, and the list of all
Phonebook entries is displayed.
●
If you do not enter a reading but press , the
entire Phonebook is searched, and the list of all
Phonebook entries is displayed.
Operation
Enter a part of the reading
●
Enter from the first character. (You do not
need to enter the full reading.)
Enter a part of the name
●
Enter from the first character. (You do not
need to enter the full name.)
Next Page
※
To cancel: “NO”
Page 100

Search Phonebook Phonebook
98
Select an entry
●
When an entry contains multiple phone numbers or execute “E-mail search”, use from the detailed display to select a
phone number.
●
You can dial out also by pressing instead of . Also, you can dial a video-phone call by pressing .
2
●
In the Phonebook Search display, the search method selected in the last operation has already been selected.
●
The searched data is listed from the Phonebook of both the FOMA phone (Phone) and UIM.
●
“” is displayed for the UIM Phonebook entries on the list.
●
Entries stored in “Secret mode” or “Secret only mode” can be displayed only in those modes.
Information
Item
Phone No. search
●
You can search for the entry
by the phone number.
E-mail search
●
You can search for the entry
by the mail address.
Memory No. search
●
You can search for the entry
by the memory number
assigned when it was stored in
the Phonebook. (For the UIM
Phonebook, you cannot use
Memory No. search because
the UIM Phonebook does not
have memory number.)
Group search
●
You can call up all
Phonebook entries stored in
the specified group.
Column search
●
You can call up the
Phonebook entry by every
column of the reading.
Explanation
●
If you do not enter a phone number but press
, the entire Phonebook is searched, and the
list of all Phonebook entries is displayed.
●
You can display the Phonebook List also by entering a part of the phone number from the Stand-by
display or the “Talking” display, and pressing
.
●
If you do not enter an address but press , the
entire Phonebook is searched, and the list of all
Phonebook entries is displayed.
●
If you do not enter a memory number but press
, the entire Phonebook is searched, and the
list of all Phonebook entries is displayed.
●
From the Stand-by display, you can press
() and then press to display the
Memory No. Dial display. From there you can
make a voice call (or video-phone call) by entering the memory number of the phone number.
●
If you press ( ) from the Group List,
the Function menu for “Group setting” is displayed.
−−
Operation
Enter a part of the phone number
●
You do not need to enter the full phone number. (You can search for the entry from the
middle of the phone number.)
Enter a part of the mail address
●
You do not need to enter the full mail address.
(You can search for the entry from the middle
of the mail address.)
Enter the memory number.
●
Enter from “000” through “699” in three digits.
Select a group
Press the key corresponding to the col-
umn to be searched.
:
ア・
:
マ
:
カ・
:
ヤ
:
サ・
:
ラ
:
タ・
:
ワ、ヲ、ン
:
ナ・
:
Others (alphanumerics, symbols)
:
ハ・
:
Brings up all Phonebook entries
in order of Japanese syllabary
 Loading...