

Page 1

P-07C
ISSUE DATE:
NAME:
Contents/Precautions
Preliminary Check
Initial Setting
PHONE NUMBER:
MAIL ADDRESS:
INSTRUCTION MANUAL
Phone/Network Services
Various Settings
Mail/Internet
Multimedia
Data Communication
Applications
Overseas Use
Appendix
Page 2

Preface
Thank you for selecting the “P-07C”.
For proper use, read this manual before and when you use the
P-07C.
Notes on Using the FOMA Terminal
P-07C is compatible with W-CDMA, GSM/GPRS and wireless
LAN systems.
Because the FOMA terminal uses radio waves, you cannot
use it in places where the radio waves do not reach such as
inside tunnels, basements and buildings, where the radio
waves are weak even outdoors, or out of FOMA service area.
You might not be able to operate the FOMA terminal even
when you are in a place with a fine view such as on upper
floors of a high-rise building or apartment. Note that you may
experience interruption of calls even when the four-bar
antenna mark is displayed indicating a strong radio wave and
you are not moving.
Since the FOMA terminal uses radio waves as the medium of
telecommunication, calls may be tapped by a third party.
However, the W-CDMA and GSM/GPRS systems automatically support tapping prevention, so your conversation will be
incomprehensible to the third party, because it is recognized
as mere noise.
The FOMA terminals change your voice into digital signals
and send them to the other party. In places where the radio
waves are weak, the digital signals may not be converted
correctly, and in such a case, the voice may sound different
from the actual one.
This FOMA terminal supports FOMA Plus-Area and FOMA
High-Speed Area.
You are advised that you make separate notes of information
stored in the FOMA terminal and keep them in a safe place.
Note that we cannot be held responsible for the unlikely event
of loss of the stored content due to a malfunction, repair,
change of your model, or other mishandling of the FOMA
terminal.
You are advised to save your important data on the microSD
card.
As with PC applications, some applications you have installed
in this FOMA terminal may pose problems: unstable
operations of your FOMA terminal, unauthorized distribution
and use of your location and personal information stored in
the FOMA terminal. Therefore, you need to thoroughly check
the source and behaviors of intended applications before use.
This manual assumes use of a DOCOMO UIM.
SIM Unlock
This FOMA terminal supports SIM unlocking. You can use
another operator’s SIM card once you unlock the SIM.
Contact a docomo Shop for SIM unlocking.
You will be charged a SIM unlocking fee separately.
When you use another operator’s SIM card, available
services and functions are limited. Note that we provide no
warranty of operations with other operator’s SIM cards.
For details of SIM unlocking, refer to DOCOMO website.
Page 3
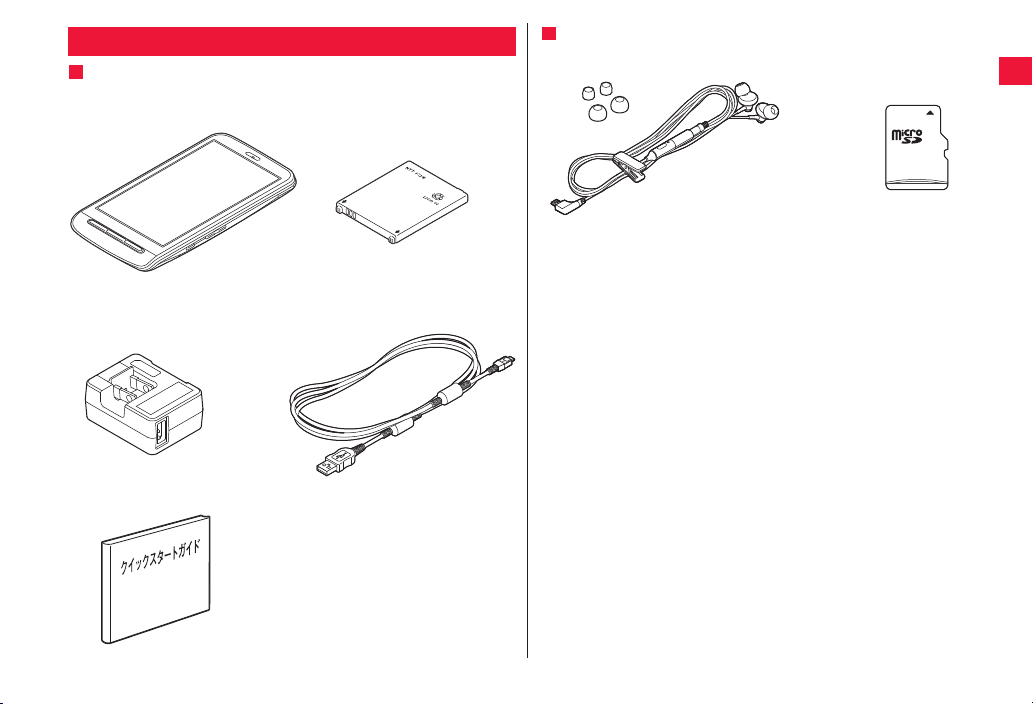
Basic Package/Samples
Basic Package
P-07C
Q
(with warranty and Back Cover P52)
QAC Adapter Cable P01 (with warranty)
<AC adapter> <microUSB cable>
QQuick Start Guide (in Japanese)
QBattery Pack P24
Samples
QStereo Headset with Microphone
(with manual)
Q For other optional items, zZ page 126
microSD card (2 GB)
Q
(with manual)
*Installed in the FOMA
terminal at the time of
purchase
1
Page 4

Descriptions of Operating Procedures
Information
The operating procedures of the P-07C are described in the following
manuals.
■ “Quick Start Guide” (in Japanese only) (supplied with this
phone)
Describes operating procedures of basic functions.
■ “Instruction Manual” (in Japanese only) (installed in your
FOMA terminal)
Describes detailed information of functions and operating procedures.
Home screen W [Preinstall] W [Instruction Manual]
Q Before using Instruction Manual for the first time, install the application
from Android Market.
■ “Instruction Manual” (PDF)
Describes detailed information of functions and operating procedures.
Download from DOCOMO website:
http://www.nttdocomo.co.jp/support/trouble/manual/download/index.html
* Note that the URL and published contents may be modified without
notice.
?
Q Note that “P-07C” is referred to as “FOMA terminal” in this manual.
Q It is prohibited to copy all or part of this manual without permission.
Q The information contained in this manual may be changed without notice.
Q Operating procedures when “Touch Speed Selector” is set as the home
application are explained in this manual. If you change the home
application, some operating steps may differ from those described in this
manual.
Q Screenshots and illustrations shown in this manual are for reference. The
actual ones may differ.
Q Keys are simplified for explaining operating procedures in this manual.
Handling Precautions for P-07C
Q This FOMA terminal is not compatible with i-mode site (program) and
i-αppli.
Q This FOMA terminal is designed to perform communication automatically
for some features such as data synchronization, check for the latest
software version and maintaining a connection with the server.
Communication of a massive amount of data such as application
download and video watching will cost expensive packet communication
fee, so we strongly recommend subscription to the flat-rate packet
service.
Q Public mode (drive mode) is not available for this FOMA terminal.
Q Operation sounds such as shutter sound of the camera, etc. are emitted
from this FOMA terminal even in Silent mode in which phone ringtone,
touch tones and notification ringtone are muted.
Q To confirm your phone number (My Details), zZ page 53
Q To confirm the software version of your FOMA terminal, zZ page 71
Q New features may be added to this FOMA terminal and operation method
is subject to change due to future operating system (OS) upgrading. For
the latest information on additional features and change of operation
method, see DOCOMO website.
Q OS upgrading may disable applications used in the old OS version or
pose unwanted failure.
Q For services provided by Google, Inc., read Google Terms of Service. For
other web services, read the respective terms of service.
Q In the event of loss of your FOMA terminal, be sure to change passwords
for various service accounts from PC in order to prevent others from
accessing your accounts for Google services such as Google Talk, Gmail
and Android Market, Facebook, Twitter, and/or mixi.
Q Providers other than sp-mode, mopera U and business mopera Internet
are not supported.
Q Although you can use the FOMA terminal without installing a microSD
card, there are files that can only be stored on microSD card, such as
images shot by Camera and audio recorded by VoiceRecorder.
Therefore, installing a microSD card is recommended when using the
FOMA terminal.
Q sp-mode subscription is required for using tethering.
2
Page 5

Q When using tethering, packet communication fee varies depending on the
price plan. Using a flat-rate packet service is strongly recommended.
If you subscribe to a flat-rate packet service, packet communication fee is
charged based on “communications made by connecting to a PC or other
external device”. When tethering is enabled, all packet communications
are regarded as “communications made by connecting to a PC or other
external device”, even when the external devices are not connected.
Be sure to disable tethering when communication on the external device
is finished.
Q When subscribed to FOMA flat-rate data plan, packet communication fee
for tethering is set at the monthly upper limit.
Q When tethering is enabled, sp-mode functions are not available except
Internet access and mail service.
Q When an external device is connecting to the Internet by tethering,
applications (browser, games, etc.) may not work correctly on the device
in some situations.
Q No security measure such as password setting is applied between a
smartphone/tablet and external device in the default setting of Wi-Fi
tethering. Setting a password is recommended.
Q For details including usage fees, visit http://www.nttdocomo.co.jp/english/.
3
Page 6
Contents
Basic Package/Samples . . . . . . . . . . . . . . . . . . . . . . . . . . . . . . . . . . .1
Descriptions of Operating Procedures . . . . . . . . . . . . . . . . . . . . . . .2
Handling Precautions for P-07C. . . . . . . . . . . . . . . . . . . . . . . . . . . . .2
Precautions . . . . . . . . . . . . . . . . . . . . . . . . . . . . . . . . . . . . . . . . . . . . .5
Handling Precautions . . . . . . . . . . . . . . . . . . . . . . . . . . . . . . . . . . . .13
Preliminary
Check
17
Initial Setting
41
Phone/
Network Services
47
Various Settings
59
Mail/Internet
73
Part Names and Functions, UIM, microSD
Card, Battery Pack, Charging, Power On/Off,
Basic Operations (How to Use Touch Panel),
Screen Display/Icons, Home Screen, Application Screen, Character Entry
Initial Setting, Changing Screen Display to
English, Google Account, Setting Access
Point, Email Setting, PhoneBookCopy, Wi-Fi,
Online Service Accounts
Phone, Call Log, Phonebook, Available Network Services
Setting Menu, Wireless & Networks, Call Settings, Sound, Display, Location & Security,
Applications, Accounts & Sync, Privacy, Storage, Language & Keyboard, Voice Input &
Output, Accessibility, Date & Time, About
Phone
Email, sp-mode Mail, Gmail, SMS, Google
Talk, Web Browser
Multimedia
83
Data
Communication
91
Applications
97
Overseas Use
119
Appendix
125
Camera, Picture Album, Music Player
Infrared Communication, Bluetooth Communication, VPN (Virtual Private Network) Connection, External Device Connection
Android Market, Using docomo market, Future
Plus, Kabegami Deco, Google Maps, 1Seg,
ToruCa, YouTube, News & Weather, Clock,
Calendar, Notepad, VoiceRecorder, Calculator, ECO NAVI, PriPri Marron Lite for P,
ToruChara, Barcode Reader, Catalyst Reader,
SD backup
Overview of International Roaming (WORLD
WING), Available Services, Confirmation before Use, Settings for Overseas Use, Making/
Receiving Calls in the Country You Stay, Confirmation after Returning Home
Optional and Associated Equipment, Troubleshooting (FAQ), Warranty and After-Sales
Service, Software Update, Main Specifications, Specific Absorption Rate (SAR) of the
Phone, European RF Exposure Information,
Declaration of Conformity, FCC Notice, FCC
RF Exposure Information, Important Safety
Information, Export Administration Regulations, Intellectual Property Right, Index
4
Page 7
Precautions
Do
■Before using the FOMA terminal, read these safety precautions
carefully so that you can use it correctly. After reading the
precautions, keep them in a safe place.
■Be sure to observe these safety precautions to prevent you or
those around you from inflicting injury and to avoid
unnecessary damage to the property.
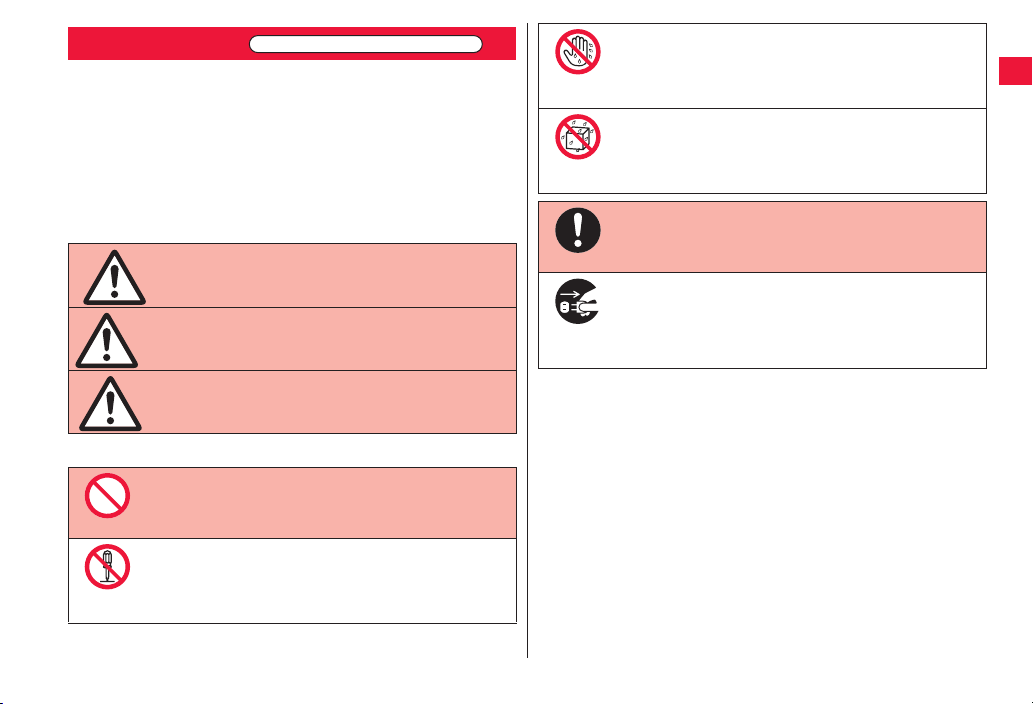
■The symbols below indicate the levels of danger or damage that
can be caused if the particular precautions are not observed and
equipments are not used properly.
Danger
Warning
Caution
■The following symbols show specific directions:
Denotes actions prohibited to do.
Don’t
Denotes not to disassemble the units.
Do not
disassemble
ALWAYS FOLLOW THESE DIRECTIONS
This symbol indicates that incorrect
handling poses an imminent risk of
causing death or serious injury.
This symbol indicates that incorrect
handling poses a potential risk of
causing death or serious injury.
This symbol indicates that incorrect
handling poses a risk of causing an
injury or damage to property.
Denotes not to touch with wet hands.
Not wet
hands
Denotes not to use where the equipment may get wet, and
Avoid
Water
Pull the
power plug
■“Precautions” are divided into the following six sections:
General Precautions for FOMA Terminal, Battery Packs, AC Adapter
Cable, and UIM ...............................................................................P.6
Precautions for FOMA Terminal......................................................P.7
Precautions for Battery Packs.........................................................P.9
Precautions for AC Adapter Cable................................................P.10
Precautions for UIM ......................................................................P.11
Notes on Using near Electronic Medical Equipment.....................P.11
avoid get it wet.
Denotes mandatory instructions (matters that must be
complied with).
Denotes to pull the power plug out of an outlet.
out
5
Page 8
General Precautions for FOMA
Don’t
Do not
disassemble
Terminal, Battery Packs, AC
Adapter Cable, and UIM
Danger
Do not use, store, or leave the
mobile phone or its
accessories in places with a
high temperature (such as near
Don’t
fire, near heating appliances,
inside a kotatsu or near other
furniture with heating elements,
in places exposed to direct
sunlight, or in cars heated by
the sun).
Fire, burns, or injury may result.
Do not place the FOMA
terminal or its accessories
inside cooking appliances such
as microwave ovens or high
pressure containers.
Fire, burns, injury or electric shock
may result.
Do not attempt to disassemble
or remodel the FOMA terminal
or its accessories.
Fire, burns, injury or electric shock
may result.
Do not allow the FOMA terminal
or its accessories to get wet
either from water, drinking
water or pet urine, etc.
Avoid
Fire, burns, injury or electric shock
Water
may result.
With your FOMA terminal, use
the battery packs and AC
adapter cables specified by
NTT DOCOMO, INC.
Do
Fire, burns, injury or electric shock
may result.
Warning
Do not throw the FOMA
terminal or accessories, or
subject them to severe shocks.
Fire, burns, injury or electric shock
Don’t
may result.
Do not allow electrically
conductive foreign objects
(such as metal pieces or pencil
leads) to come into contact with
Don’t
the FOMA terminal’s connector
terminal or AC adapter cable
plug or terminal. Do not allow
such objects to enter into the
FOMA terminal.
Fire, burns, injury or electric shock
may result.
Do not cover or wrap the FOMA
terminal or its accessories with
a cushion, etc. while it is being
used or recharged.
Don’t
Fire or burns may result.
Before entering a gas station or
other places where flammable
gases are generated, be
absolutely sure to turn off the
Do
FOMA terminal and stop
charging if it is being charged.
Otherwise, the flammable gases may
ignite.
If odor, overheat, discoloration,
or deformation is detected
during use, battery charge, or
storage, immediately follow the
Do
instructions below:
Q Pull the power plug out of the
outlet.
Q Turn off the power of the
FOMA terminal.
Q Remove the battery pack from
the FOMA terminal.
Fire, burns, injury or electric shock
may result.
Caution
Do not place the FOMA
terminal or accessories on
unstable locations such as
wobbly tables or slanted
Don’t
locations.
They may fall off and cause injury.
Do not store in humid or dusty
places, or in high temperature
environments.
Fire, burns or electric shock may
Don’t
result.
6
Page 9
If the FOMA terminal and its
Don’t
Don’t
accessories are used by a
child, a guardian should
explain how to operate them
Do
correctly. During use, a
guardian should also check
that they are being used as
instructed.
Otherwise, injury may result.
Keep out of the reach of small
children.
Accidental swallowing or injury may
result.
Do
Take special care when you
use the FOMA terminal for a
long time with the AC adapter
cable connected.
Do
If you watch 1Seg programs and so on
for a prolonged period of time while
charging, the temperature of the
FOMA terminal, battery pack or AC
adapter cable may rise.
If you keep direct contact with hightemperature parts, redness, itching, a
rash or low-temperature skin burns
may result depending on the state of
your physical condition or constitution.
Precautions for FOMA Terminal
Warning
Do not directly point the
infrared data port at someone’s
eyes during transmission.
Doing so may harm the person’s eyes.
Don’t
While using infrared
communication, do not point
the FOMA terminal’s infrared
data port at a home electrical
Don’t
appliance which is equipped
with an infrared device.
The infrared device may malfunction,
and possibly cause an accident.
Do not light the light close to
eyes. Especially when shooting
small children, be sure to stay
at least 1 m away from them.
Don’t
Doing so can damage eyesight. Also,
accidents such as injury might occur if
someone is startled or dazzled by the
light.
Do not allow liquids such as
water, or foreign materials such
as metal pieces or flammable
materials to get into the UIM or
microSD card slot of the FOMA
terminal.
Fire, burns, injury or electric shock
may result.
Do not turn on the light toward
car drivers.
It disturbs driving, and accidents may
result.
Turn off the FOMA terminal in
places where use is prohibited
such as in airplanes and
hospitals.
Do
Otherwise, the electronic devices and
electronic medical equipment in those
places may be adversely affected. If
the Auto power ON function is set,
deactivate the setting, then turn off the
power.
For use inside medical facilities, make
sure that you comply with their
regulations.
Engaging in any prohibited acts such
as using the FOMA terminal in an
airplane is punishable by law.
However, if use of mobile phones in an
airplane is permitted provided that
radio wave transmission is turned off,
you may do so in accordance with
instructions of each airline.
When talking in Hands-free
mode or when a ring tone is
sounding, be absolutely sure to
keep the FOMA terminal away
Do
from your ear.
Further, when you play games
or play back music with the
earphone/microphone etc.
connected, adjust the sound
volume to moderate volume.
The excessive sound volume impairs
your hearing.
Further, accidents may result due to
the hardness of hearing of surrounding
sound.
7
Page 10
For those with weak heart
Don’t
conditions, the vibrator and
ring volume must be adjusted
carefully.
Do
Otherwise, the functions may
adversely affect your heart.
If you are using an electronic
medical device or other type of
device, check with its
manufacturer or vendor
Do
regarding the influence of radio
waves upon the device.
The FOMA terminal may adversely
affect the device.
Turn off the FOMA terminal
when near electronic devices
using high-precision control or
weak signals.
Do
The FOMA terminal may cause the
electronic devices to malfunction and
have other adverse effects.
* Electronic devices that may be
affected:
Hearing aids, implanted cardiac
pacemakers, implanted
defibrillators, other electronic
medical equipment, fire alarms,
automatic doors and other
automatically controlled devices.
If you use an implanted cardiac
pacemaker, implanted defibrillator
or any other electronic medical
equipment, consult the
manufacturer or retailer of the
device for advice regarding
possible effects from the radio
waves.
If the display part or camera
lens is broken, be careful about
broken glasses or the exposed
interior of the FOMA terminal.
Do
The plastic panel is used for the
surface of the display area and camera
lens, making it hard for the glass to
break into pieces. However, if you
touch the damaged or exposed parts
by mistake, you may injure yourself.
Caution
Do not swing around the FOMA
terminal by its antenna.
You may hit yourself or others,
possibly causing injury or other
accidents.
Do not use the FOMA terminal if
it has been damaged.
Fire, burns, injury or electric shock
may result.
Don’t
When using the motion sensor,
ensure that you check around
you for safety, securely take
hold of your FOMA terminal,
Don’t
and do not swing more than
necessitated.
Otherwise, injury or other accidents
may result.
The surface of the display is
coated by a film that prevents
the surface from damage so
that your safety is ensured
Don’t
when you accidentally drop or
give shock to your FOMA
terminal (for preventing the
reinforced glass from
scattering). Do not forcibly peel
off or give damage to the film.
If the display is damaged while you
operate the FOMA terminal with the
film peeled off, you might suffer an
injury.
If you accidentally damage the
display part and the liquid
crystal inside leaks out, keep
your face, hands and skin away
Don’t
from it.
Otherwise, you may impair your
eyesight or damage your skin.
If liquid crystal should get into your
eyes or mouth, immediately rinse them
with clean water, and then seek
medical attention.
If it should adhere to your skin or
clothing, immediately wipe it off with
alcohol or similar liquid, and then rinse
the affected area with soap and water.
Before using the FOMA
terminal inside a car, check
with its manufacturer or dealer
whether the radio waves will
Do
have any adverse effects.
In some vehicle models, the radio
waves may adversely affect the
electronic devices inside the vehicle.
Such cases are rare. However, if this
happens, stop using the FOMA
terminal immediately.
8
Page 11
Itching, rash or eczema may be
caused depending on your
physical conditions or
predisposition. If an
Do
abnormality occurs, stop using
the FOMA terminal
immediately, and then seek
medical attention.
For material of each part, zZ “List of
materials used” on page 12
View the display in a
sufficiently light place keeping
a certain distance from your
eyes.
Do
Otherwise, your eyesight may become
impaired.
Precautions for Battery Packs
■Check the description on the label of the
battery pack for the type of battery.
Description Type
Li-ion 00 Lithium-ion battery
Danger
Do not let any metal object
such as a wire come in contact
with the battery terminals. Also
do not carry or store the battery
Don’t
pack together with any metal
objects like a necklace.
Otherwise, the battery pack may ignite,
burst or overheat and its electrolyte
may leak.
When installing the battery
pack in the FOMA terminal,
check that it is facing the right
way, and if the battery pack
Don’t
cannot be installed easily, do
not force it into place.
Otherwise, the battery pack may ignite,
burst or overheat and its electrolyte
may leak.
Do not throw the battery pack
into fire.
Otherwise, the battery pack may ignite,
burst or overheat and its electrolyte
Don’t
may leak.
Do not pierce it with nails, hit it
with a hammer, or step on it.
Otherwise, the battery pack may ignite,
burst or overheat and its electrolyte
Don’t
may leak.
If the battery fluid or other
material gets into your eyes, do
not rub them. Flush your eyes
with clean water and seek
Do
medical attention immediately.
Otherwise, the loss of eyesight may
result.
Warning
Never use the FOMA terminal if
it has damages such as
deformities or scratches as a
result of dropping it.
Don’t
Otherwise, the battery pack may ignite,
burst or overheat and its electrolyte
may leak.
Immediately stop using the
FOMA terminal and keep it
away from fire if the battery
pack leaks or emits an odor.
Do
The leaked battery fluid may ignite,
causing fire or burst.
Be careful that your pets do not
bite into the battery pack.
Otherwise, the battery pack may ignite,
burst or overheat and its electrolyte
Do
may leak.
Caution
Do not dispose of the battery
pack with other waste.
The battery pack may catch fire or
damage the environment. After
Don’t
insulating the battery terminals with
tape, take the unneeded battery pack
to a handling counter such as a
docomo Shop or dispose of it in
accordance with local waste disposal
regulations.
Do not use or attempt to charge
a wet battery pack.
Otherwise, the battery pack may ignite,
burst or overheat and its electrolyte
Don’t
may leak.
9
Page 12
If the electrolyte fluid or other
material inside the battery pack
has leaked out, do not allow it
to come into contact with the
Do
skin on your face, hands or any
other part of your body.
Contact may result in loss of sight or
skin problems.
If you get the fluid or other material in
your eyes or mouth, or on skin or
clothing, immediately wash the
affected areas with clean water.
If you get it in your eyes or mouth,
immediately seek medical attention
after rinsing.
Precautions for AC Adapter Cable
Danger
Do not connect microUSB
cables other than the supplied
one.
Fire, burns or electric shock may
Don’t
result.
Warning
Do not use the microUSB cable
if it has been damaged.
Fire, burns or electric shock may
result.
Don’t
Don’t
Don’t
Don’t
Don’t
Don’t
Not wet
hands
Do not use the AC adapter
cable in humid places such as
a bathroom.
Fire, burns or electric shock may
result.
If a thunderstorm is nearby, do
not touch the AC adapter cable.
Otherwise, you may receive an electric
shock.
Never short-circuit the AC
adapter cable plug or terminal
when the AC adapter is
plugged into the power outlet.
Also, never touch the plug or
terminal with fingers or other
bare skin.
Fire, burns or electric shock may
result.
Do not place heavy objects on
the microUSB cable.
Fire, burns or electric shock may
result.
When plugging the AC adapter
into the power outlet, or when
unplugging it from the outlet,
do not allow metal objects to
come in contact with it.
Fire, burns or electric shock may
result.
Do not touch the AC adapter
cable or power outlet with wet
hands.
Fire, burns or electric shock may
result.
Do
Do
Do
Do
Pull the
power plug
out
Pull the
power plug
out
Use the adapter at the specified
V AC.
Supplying the wrong voltage to the AC
adapter may result in a fire, burns or
electric shocks.
100 V - 240 V AC
(Connect only to household AC outlet.)
Keep the power plugs dustfree.
Fire, burns or electric shock may
result.
When plugging the AC adapter
into the power outlet, plug it in
securely.
Fire, burns or electric shock may
result.
When unplugging the power
plug from the power outlet, take
hold of the AC adapter to
unplug it.
Fire, burns or electric shock may
result.
When you do not intend to use
the adapter for a long period of
time, disconnect the power
plug from the power outlet.
Fire, burns or electric shock may
result.
If liquids such as water get in
the adapter, unplug the power
plug immediately from the
outlet.
Fire, burns or electric shock may
result.
10
Page 13
Before cleaning, pull the power
Do
plug out of the outlet.
Fire, burns or electric shock may
Pull the
power plug
result.
out
Precautions for UIM
Caution
Be careful not to touch the cut
surface of the UIM when
removing it.
Otherwise, injury may result.
Do
Notes on Using near Electronic
Medical Equipment
■The description below meets “Guidelines
on the Use of Radio-communication
Equipment such as Cellular Telephones
− Safeguards for Electronic Medical
Equipment” by the Electromagnetic
Compatibility Conference Japan.
Warning
Comply with the following in
hospitals or health care
facilities:
Q Do not carry the FOMA terminal
into operating rooms, intensive
care units (ICU) or coronary care
units (CCU).
Q Turn off the FOMA terminal in
hospital wards.
Q If there is any electronic medical
equipment near you, turn off the
FOMA terminal even when in a
location such as a lobby.
Q Comply with any regulations of
hospital and health care facilities
instructing you not to use or carry
in a mobile phone.
Q If the Auto power ON function is
set, deactivate the setting, then
turn off the power.
Turn off the FOMA terminal in
trains during the rush hour or
other crowded areas as there
may be someone near you with
Do
an implanted cardiac
pacemaker or implanted
defibrillator.
The FOMA terminal’s radio waves
may adversely affect the operation of
implanted cardiac pacemakers and
implanted defibrillators.
If you use an implanted cardiac
pacemaker or implanted
defibrillator, carry and use the
FOMA terminal 22 cm or more
Do
away from the implanted
cardiac pacemaker or
implanted defibrillator.
The FOMA terminal’s radio waves
may adversely affect the operation of
implanted cardiac pacemakers and
implanted defibrillators.
Patients using electronic
medical equipment other than
implanted cardiac pacemakers
or implanted defibrillators
Do
(outside medical
establishments for treatment at
home, etc.) should check the
influence of radio waves upon
the equipment by consulting its
manufacturer.
The FOMA terminal’s radio waves
may adversely affect the operation of
electronic medical equipment.
11
Page 14

■ List of materials used
Where it is used Material/Finishing
Outer
casing
Connector
terminal
Connector terminal cover PC, elastomer/UV coating
Camera lens area PMMA/surface hard coating
Cushion (back cover backside) Urethane
Search key, volume keys, infrared
data port area, flash area and power
key
Display panel Glass, PET/surface hard
Battery compartment surface Glass epoxy substrate
Battery
terminal
Battery
pack
UIM tray POM
Display surface, back
cover side surface and
battery surface
Display side surface PC + ABS/UV coating
Back cover PC/UV coating
Resin part PBT + PC
Metal part Stainless steel/nickel plating,
Resin part PPS
Terminal area Beryllium copper/nickel plating,
Resin part PC
Label PET
Terminal area Glass epoxy substrate/nickel
ABS/UV coating
tin plating
PC/UV coating
coating
gold plating
plating, gold plating
Where it is used Material/Finishing
Screws Inside back cover (four
Menu key, home key and back key PC/evaporated aluminium, UV
Label (Battery compartment) Polyester
Label (Battery surface) PC
1Seg
antenna
microSD
card slot
corners)
Inside back cover (other
than four corners)
Tip resin part ABS/UV coating
Metal part (Sleeve
area)
Metal part (Pipe area) Stainless steel
Metal part (Wire area) Nickel-titanium alloy
Hinge area at bottom
part (Lift up area)
Hinge area at bottom
part (Wire connection
area and pin)
Holder area Zinc alloy/nickel plating
Compartment PA
Resin part LCP
Metal part Stainless steel/nickel plating
Iron/nickel plating
Iron/chrome plating
coating
Cadmium-less brass/chrome
plating
Stainless steel/chrome plating
Stainless steel/nickel plating
12
Page 15
Handling Precautions
General Notes
■Do not wet the equipment.
The FOMA terminal, battery pack, AC adapter
cable, and UIM are not waterproofed. Do not
use them in environments, which are high in
humidity such as in bathrooms, and do not
allow them to get wet from rain. Furthermore, if
carrying them against your body, they become
moist due to perspiration and the internal parts
may become corroded, causing malfunction. If
the parts are found to have been damaged due
to exposure to the liquids, any repairs will not
be covered by warranty, or repairs may not be
possible. This may be repaired at a cost if
repairs are possible.
■Use a dry soft cloth such as the one for
cleaning glasses to clean the equipment.
QThe display may be scratched if it is rubbed
hard with a dry cloth.
QStains may result from droplets of water or dirt
if they are left on the display.
QDo not use alcohol, thinner, benzene,
detergent or other solvents for cleaning,
otherwise the printing may be removed or
discoloration may result.
■Occasionally clean the terminals of the
equipment using a dry cotton swab, etc.
The soiled terminals deteriorate the connection
and might cause power discontinuity or
incomplete charging. Wipe the terminals with a
cotton swab, etc.
Take care not to damage the terminals when
cleaning them.
■Do not place the FOMA terminal near an
air conditioner outlets.
Condensation may form due to rapid changes
in temperature, and this may corrode internal
parts and cause malfunction.
■Do not apply excessive force onto the
FOMA terminal and battery pack.
If you put the FOMA terminal in a bag along
with many other articles or sit with the FOMA
terminal in a clothes pocket, the display,
internal circuitry and the battery pack could be
damaged or malfunction.
Also, if an external device is left connected to
the connector terminal, the connector could be
damaged, or malfunction.
■Do not rub or scratch the display part
with metals.
Doing so might cause damage to the part,
resulting in failure or malfunction.
■Carefully read each instruction manual
attached to battery pack or AC adapter
cable.
Notes on Handling the FOMA
Terminal
■Never forcibly press the surface of the
touch panel, or operate it with something
having a sharp point like a claw, ballpoint
pen, or pin.
Damage to the touch panel might result.
■Avoid using in extremely high or low
temperatures.
The FOMA terminal should be used within a
temperature range of 5°C to 35°C and a
humidity range of 45 % to 85 %.
■If the FOMA terminal is operated near a
land-line phone, television set, radio or
other devices in use, it may adversely
affect the devices. Operate the FOMA
terminal as far away from these devices
as possible.
■It is recommended that you make
separate notes of the information stored
in the FOMA terminal and keep such
notes in a safe place.
We take no responsibility for any loss of the
stored data items.
■Do not drop the FOMA terminal or subject
it to strong impacts.
Malfunction or damage may result.
■Do not insert an external device to the
connector terminal at a slant when
connecting, and do not pull it out when it
is inserted.
Malfunction or damage may result.
■The FOMA terminal becomes warm
during use or charging but this is not an
abnormality. Use the FOMA terminal as it
is.
■Do not leave the camera in places
exposed to direct sunlight.
Pixels may be discolored or burns may result.
■When using the FOMA terminal, ensure
that you close the cover for the
connector terminal.
Dust or water might enter into the FOMA
terminal, causing malfunction.
■Do not use the FOMA terminal with the
back cover left removed.
The battery pack might come out, or
malfunction or damage may result.
13
Page 16

■While you are using the microSD card,
never take it off or turn off the power of
the FOMA terminal.
Data may be erased or malfunction may result.
■Do not place magnetic cards or similar
objects near the FOMA terminal.
Magnetic data on cash cards, credit cards,
telephone cards and floppy disks, etc. may be
deleted.
■Do not bring magnetic substances close
to your FOMA terminal.
Problems with operation may result if items
with strong magnetic fields are brought close to
the FOMA terminal.
Notes on Handling Battery Packs
■Battery pack is a consumable item.
Though it depends on the usage state, you are
advised to replace the battery pack if its usable
time is extremely short even when you fully
charge it. Make sure that you buy a specified
battery pack.
■Charge the battery in a place with an
appropriate ambient temperature of 5°C
to 35°C.
■The usable time of the battery pack
differs depending on the usage
environment and its remaining life.
■Depending on how the battery pack is
used, it might swell as its remaining life
becomes short, but this is not a problem.
■Note the following points when you store
a battery pack:
・Storage in a fully charged state (the state
immediately after charging is completed)
・Storage with no battery power left (the state
you cannot turn on the power of the main unit
due to battery drain)
These may lower the battery pack’s
performance and shorten its operating life.
Before storing a battery pack, check its
remaining battery level: it is recommendable,
as a general rule, for its remaining battery level
to be about 40 %.
Notes on Handling AC Adapter
Cable
■Charge the battery in a place with an
appropriate ambient temperature of 5°C
to 35°C.
■Charge the battery where:
・There is very little humidity, vibration, and
dust.
・There are no land-line phones, television sets
or radios nearby.
■While you are charging, the AC adapter
cable may become warm. This is not a
malfunction, so you can keep on using.
■When using the power outlet having the
disengaging prevention mechanism,
observe the instructions given in that
instruction manual.
■Do not give a strong shock. Also, do not
deform the charging terminal.
Malfunction may result.
Notes on Handling the UIM
■Do not apply more force than is
necessary when installing or removing
the UIM.
■The warranty does not cover damage
caused by inserting the UIM into some
other types of IC card reader/writer.
■Always keep the IC portion clean.
■Use a dry soft cloth such as the one for
cleaning glasses to clean the UIM.
■It is recommended that you make
separate notes of the information stored
on the UIM and keep such notes in a safe
place.
We take no responsibility for any loss of the
stored data items.
■For the environmental protection, bring
any unneeded UIMs to a handling counter
such as a docomo Shop.
■Do not damage, carelessly touch, or
shortcircuit the IC.
Data might be lost or malfunction may result.
■Do not drop the UIM or subject it to
strong impacts.
Malfunction may result.
■Do not bend the UIM or place something
heavy on it.
Malfunction may result.
■Into the FOMA terminal, do not insert the
UIM with a label or sticker pasted.
Malfunction may result.
14
Page 17
Notes on Using Bluetooth Function
■The FOMA terminal supports the security
function that meets the Bluetooth
Specification, to secure Bluetooth
communication. However, the security
may not be sufficient depending on the
settings. Take care of the security for
communication when using the
Bluetooth function.
■Note that even if any leak of data or
information occurs while making
connection using the Bluetooth function,
we take no responsibility.
■With the FOMA terminal, you can use the
following: Headset, Hands-Free, Audio,
and Object Push. With Audio, you might
be able to use Audio Video Remote
Control. (Only with the compatible
Bluetooth devices)
■Radio frequencies
The radio frequencies for the Bluetooth
function of the FOMA terminal are as
follows:
2.4FH1
2.4 : Indicates radio facilities that use
2400 MHz frequencies.
FH : Indicates modulation is the FH-SS
system.
1 : Indicates that an estimated
interference distance is 10 meters or
less.
: Indicates that all radio frequencies
2400 MHz through 2483.5 MHz are
used, and that the frequencies for
mobile object identifiers shall not be
avoided.
To use on airplane, confirm with airline
company in advance.
Use of Bluetooth may be prohibited in some
countries. Please confirm laws and regulations
applicable in the country/region before use.
■Cautions on Using Bluetooth Devices
Bluetooth operates at radio frequencies
assigned to the in-house radio stations
for mobile object identifiers that have to
be licensed and are used in production
lines of a factory, specific unlicensed low
power radio stations, and amateur radio
stations (hereafter, referred to “another
radio station”) in addition to scientific,
medical, industrial devices, or home
electric appliances such as microwave
ovens.
1. Before using this product, make sure
that “another radio station” is not
operating nearby.
2. If radio wave interference between this
product and “another radio station”
occurs, move immediately to another
place or turn off power to avoid
interference.
3. For further details, contact “General
Inquiries” on the back page of this
manual.
Notes on Handling Wireless LAN
(WLAN)
■Wireless LAN (WLAN) has an advantage
of any-place LAN connectivity within the
radio wave range as it establishes
communication via radio wave. At the
same time, however, you have a risk that
malicious third party may break into the
network and steal communication
contents without security measures. It is
recommended to take security measures
at your discretion and responsibility.
■Wireless LAN
Do not use Wireless LAN in a place where
magnetized by electric product, AV, OA
equipment, etc. or where electromagnetic
wave is generated.
QIf magnetism or electrostatic noise affects
your mobile phone, noise may be increased
or communication may not be available
(especially when using microwave oven, it
may affect your mobile phone).
QUsing near TV or radio may cause poor
reception or TV screen may be disturbed.
QWhen multiple wireless LAN access points
exist near your mobile phone and they use
the same channel, search may not be
performed correctly.
15
Page 18
■Radio frequencies
The radio frequencies for WLAN devices
are written on battery compartment of
your mobile phone. Label description are
as follows:
2.4DS/OF4
2.4 : Indicates radio facilities that use
2400 MHz frequencies.
DS/OF : Indicates modulation is the DS-SS/
OFDM system.
4 : Indicates that an estimated
interference distance is 40 meters
or less.
: Indicates that all radio frequencies
2400 MHz through 2483.5 MHz are
used, and that the frequencies for
mobile object identifiers shall be
avoided.
Available channels vary depending on
countries.
To use on airplane, confirm with airline
company in advance.
Use of wireless LAN may be prohibited in
some countries. Please confirm laws and
regulations applicable in the country/region
before use.
■Cautions on Using 2.4 GHz Devices
The bandwidth of the WLAN devices is
assigned to the in-plant radio stations for
identification of mobile objects used in
production lines of a factory (a license is
required), specified low power radio
stations (a license is not required), or
amateur radio stations (a license is
required), in addition to home electric
appliances such as a microwave oven,
industrial/scientific/medical devices.
1. Before using this device, confirm that
in-plant radio stations for identification
of mobile objects, specified low power
radio stations or amateur radio stations
are not in operation in your
neighborhood.
2. If this device generates harmful radio
wave interference against in-plant radio
stations for identification of mobile
objects, immediately change the radio
frequency or stop using wireless LAN
function, and contact “General
Inquiries” on the back page of this
manual, then consult about treatment
for prevention of the interference (for
example, installation of partitions etc.).
3. If this device generates harmful radio
wave interference against in-plant radio
stations for identification of mobile
objects or amateur radio stations, or if
any trouble occurs, contact “General
Inquiries” on the back page of this
manual.
Caution
■Do not use the modified FOMA terminal.
Using a modified FOMA terminal
infringes the Radio Law.
The FOMA terminals are granted technical
regulations conformity certification as the
specified radio equipment under the Radio Law
and bear a “technical conformity mark ” on
the nameplate as evidence of conformity.
Unscrewing the FOMA terminal and modifying
internal components void the technical
regulations conformity certification.
Do not use the FOMA terminal in this state,
which infringes the Radio Law.
■Take special care not to operate the
FOMA terminal while driving.
Holding a mobile phone in your hand while
driving is subject to a fine or other penalties.
However, this does not apply in unavoidable
circumstances when, for instance, rescuing
someone who is sick or injured or when
maintaining public order.
16
Page 19

Preliminary Check
Part Names and Functions . . . . . . . . . . . . . . . . . . . . . . . . 18
UIM . . . . . . . . . . . . . . . . . . . . . . . . . . . . . . . . . . . . . . . . . . . 20
Installation/Removal of UIM . . . . . . . . . . . . . . . . . . . . . . . . . . . . 20
About Security Codes for UIM . . . . . . . . . . . . . . . . . . . . . . . . . . 21
microSD Card. . . . . . . . . . . . . . . . . . . . . . . . . . . . . . . . . . . 21
Installation/Removal of microSD Card . . . . . . . . . . . . . . . . . . . . 21
Battery Pack . . . . . . . . . . . . . . . . . . . . . . . . . . . . . . . . . . . . 22
Installation/Removal of Battery Pack . . . . . . . . . . . . . . . . . . . . . 22
Charging . . . . . . . . . . . . . . . . . . . . . . . . . . . . . . . . . . . . . . . 23
Charging by Using AC Adapter Cable . . . . . . . . . . . . . . . . . . . . 23
Charging by Using a PC. . . . . . . . . . . . . . . . . . . . . . . . . . . . . . .24
Power On/Off . . . . . . . . . . . . . . . . . . . . . . . . . . . . . . . . . . . 24
Turning Power On . . . . . . . . . . . . . . . . . . . . . . . . . . . . . . . . . . .24
Turning Power Off . . . . . . . . . . . . . . . . . . . . . . . . . . . . . . . . . . .24
When Display Goes Off . . . . . . . . . . . . . . . . . . . . . . . . . . . . . . .24
Unlocking Lock Screen. . . . . . . . . . . . . . . . . . . . . . . . . . . . . . . . 25
Basic Operations (How to Use Touch Panel) . . . . . . . . . 25
Touch Panel Operations. . . . . . . . . . . . . . . . . . . . . . . . . . . . . . . 25
Switching Vertical/Horizontal Display Modes . . . . . . . . . . . . . . . 26
Screen Display/Icons. . . . . . . . . . . . . . . . . . . . . . . . . . . . . 26
Icon Definitions. . . . . . . . . . . . . . . . . . . . . . . . . . . . . . . . . . . . . . 26
Notification Panel . . . . . . . . . . . . . . . . . . . . . . . . . . . . . . . . . . . .28
Home Screen . . . . . . . . . . . . . . . . . . . . . . . . . . . . . . . . . . . 29
Adding Shortcuts to Grid Home Screen . . . . . . . . . . . . . . . . . . . 29
Adding a Grid Home Screen . . . . . . . . . . . . . . . . . . . . . . . . . . .30
Changing Wallpaper of Home Screen . . . . . . . . . . . . . . . . . . . .30
Searching for FOMA Terminal Applications and Web Page
Information. . . . . . . . . . . . . . . . . . . . . . . . . . . . . . . . . . . . . . . . . 30
Switching Home Applications . . . . . . . . . . . . . . . . . . . . . . . . . . 30
Application Screen . . . . . . . . . . . . . . . . . . . . . . . . . . . . . . 31
Displaying Application List Screen . . . . . . . . . . . . . . . . . . . . . . 31
List of Applications. . . . . . . . . . . . . . . . . . . . . . . . . . . . . . . . . . . 31
Starting a Recently-Used Application . . . . . . . . . . . . . . . . . . . . 35
Checking/Terminating Running Applications. . . . . . . . . . . . . . . 36
Character Entry . . . . . . . . . . . . . . . . . . . . . . . . . . . . . . . . . 36
Entering Characters with Ten-key Keypad . . . . . . . . . . . . . . . . 36
Entering Characters with QWERTY Keypad . . . . . . . . . . . . . . . 37
Character Entry Menu . . . . . . . . . . . . . . . . . . . . . . . . . . . . . . . . 38
Character Entry Settings . . . . . . . . . . . . . . . . . . . . . . . . . . . . . . 38
Fit Key . . . . . . . . . . . . . . . . . . . . . . . . . . . . . . . . . . . . . . . . . . . . 39
17
Page 20
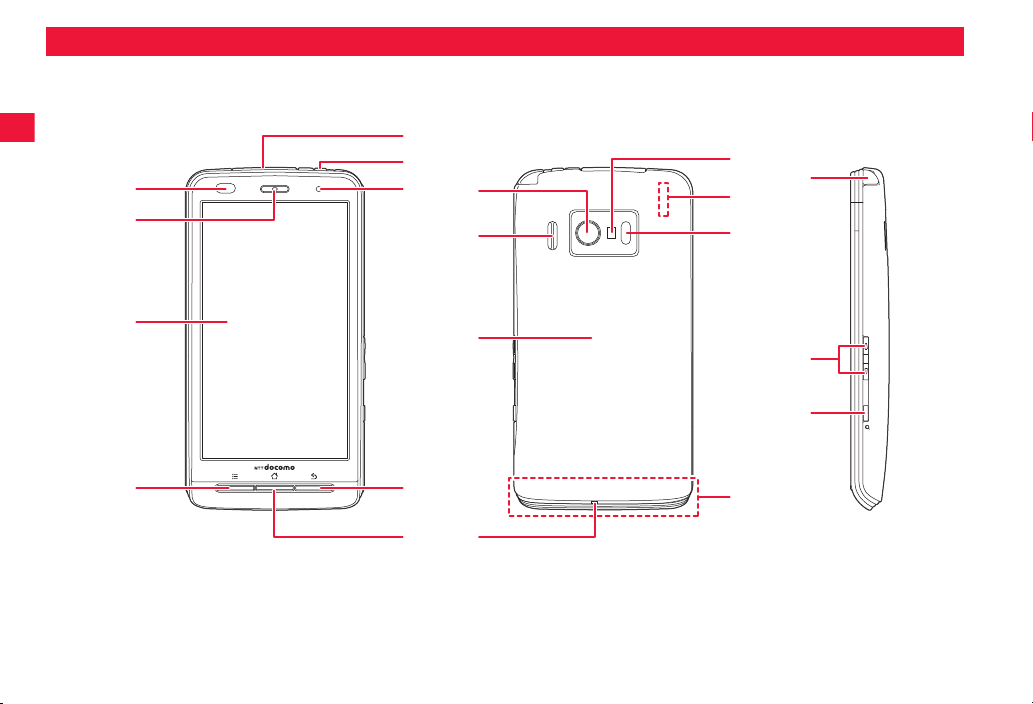
Part Names and Functions
7
1
2
3
4
18 Preliminary Check
8
9
0
!
"
6
#
5
$
(
%
&
)
-
'
Page 21
Name Description
1 Light sensor Detects ambient brightness to automatically
Proximity sensor A sensor that prevents false operation of
2 Earpiece You can hear voice of the other party from
3 Display (Touch
panel)
4 xA Menu key Display the option menu available in the
5 xB Home key Return to the home screen (zZ page 29).
6 xC Back key Return to the previous screen.
7 Connector terminal Connect the included microUSB cable for
8 wD Power key Press and hold this key to turn the power
9 Call/Charging
indicator
adjust the screen brightness. In order for the
sensor to detect the brightness, do not cover
it with your hand or attach a seal on it.
the touch panel during call. Protective seat
or seal attached on the proximity sensor
may cause malfunction of the sensor.
this part.
Slide your finger to scroll the screen, or tap
an item to select it (zZ page 25).
current screen.
Press and hold this key to display recentlyused applications (zZ page 35).
charging or the included Stereo Headset
with Microphone.
on (zZ page 24).
When the power is on, set/cancel the Silent
mode or Airplane mode, or turn the power
off.
Set/cancel the Sleep mode (zZ page 24).
Q Flashes when the FOMA terminal
receives a call or message.
Q Lights during charging.
Name Description
0 Camera Shoot still images and videos (zZ page 84).
! Speaker From this part, you can hear ringtones,
music and the other party’s voice during
hands-free call.
" Back cover -
# Microphone Send your voice from this part. Serves as a
microphone when recording sound.
$ Flash Lights at the time of shooting with the camera.
% GPS antenna The antenna is embedded in the main unit.
Do not cover this part with your hand, as it
may impair antenna quality.
& Infrared data port Used for infrared communication (zZ page
92).
' FOMA antenna The antenna is embedded in the main unit.
Do not cover this part with your hand, as it
may impair antenna quality.
( 1Seg antenna Extend this antenna when you watch 1Seg
(zZ page 105).
) yE / yF Volume keys Adjust the volume of the other party’s voice
or sound from the speaker (zZ page 51,
page 63).
- yG Search key Activate the quick search box (zZ page 30).
Press and hold to start Voice Search.
Preliminary Check 19
Page 22
UIM
The UIM is an IC card that holds your information such as phone
number. Unless the UIM is installed, you cannot use the FOMA
terminal’s communication features such as call, messaging and
data communication.
Q The UIM (blue) is not usable with this FOMA terminal. If you have a
UIM (blue), bring it to a docomo Shop to replace.
Q For details about the UIM, refer to the Instruction Manual of the UIM.
Installation/Removal of UIM
Q Installation/removal of the UIM should be performed with the FOMA
terminal turned off and the battery pack removed (zZ page 22).
Q Be careful not to touch or damage the IC part when handling the UIM.
Attempts to install/remove the UIM forcibly may damage the UIM.
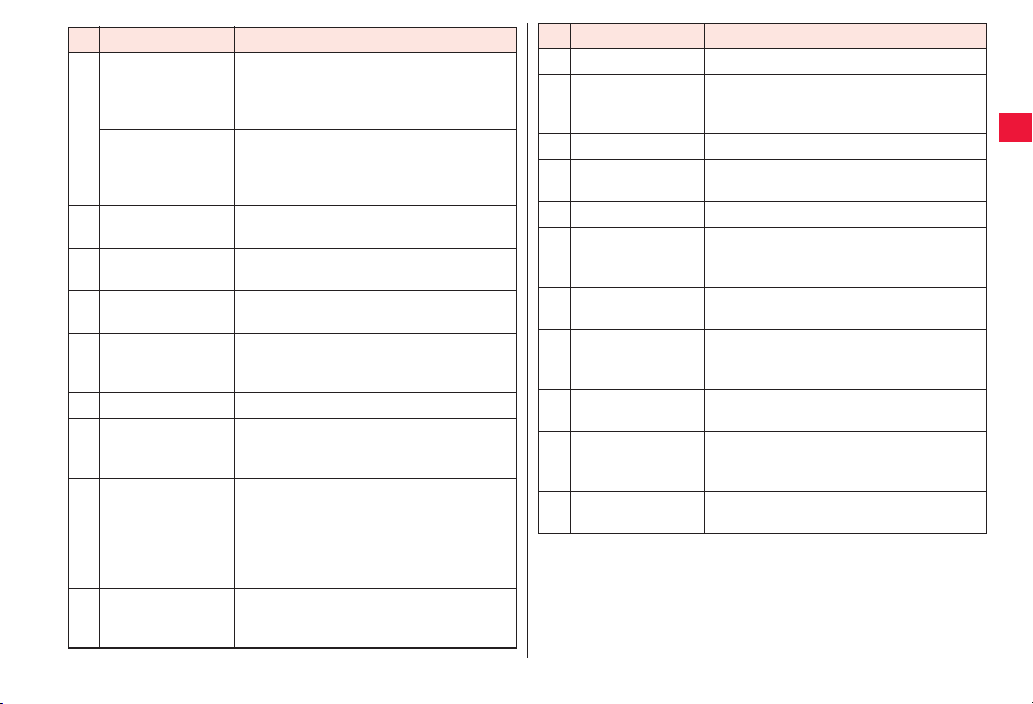
Installing UIM
Pull the tab to draw out the tray
1
Q Pull the tab to line A.
Ta b
A
Place the UIM on the tray with the gold IC part
2
facing down
Q Align the corner cut of the UIM with the tray.
Corner cut
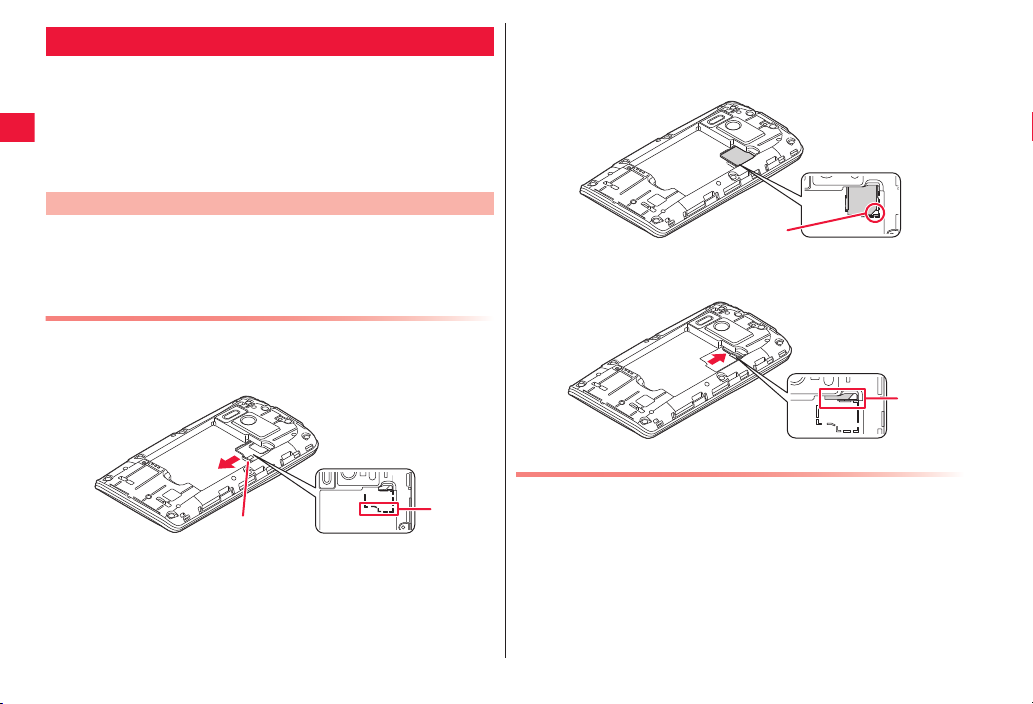
Push the tray all the way in
3
Q Insert the tray securely so that the tab is aligned with line B.
Removing UIM
Draw out the tray in accordance with step 1 in
1
“Installing UIM” on page 20 to remove the UIM
B
20 Preliminary Check
Page 23
When Tray Comes Off
Installing microSD Card
Align the tray with the line on the battery surface
1
and insert it straight
About Security Codes for UIM
Two security codes are provided for the UIM: PIN1 code and PIN2 code
(zZ page 65).
microSD Card
Q This FOMA terminal supports microSD cards of up to 2 Gbytes and
microSDHC cards of up to 32 Gbytes (as of June 2011).
For the latest information on supported microSD cards including
manufacturers and storage capacities, refer to the following website.
Keep in mind that microSD cards other than those listed in the website
may not work.
http://panasonic.jp/mobile/ (in Japanese only)
Note that since the information in the website has been obtained by
checking of some operations, not all operations are guaranteed.
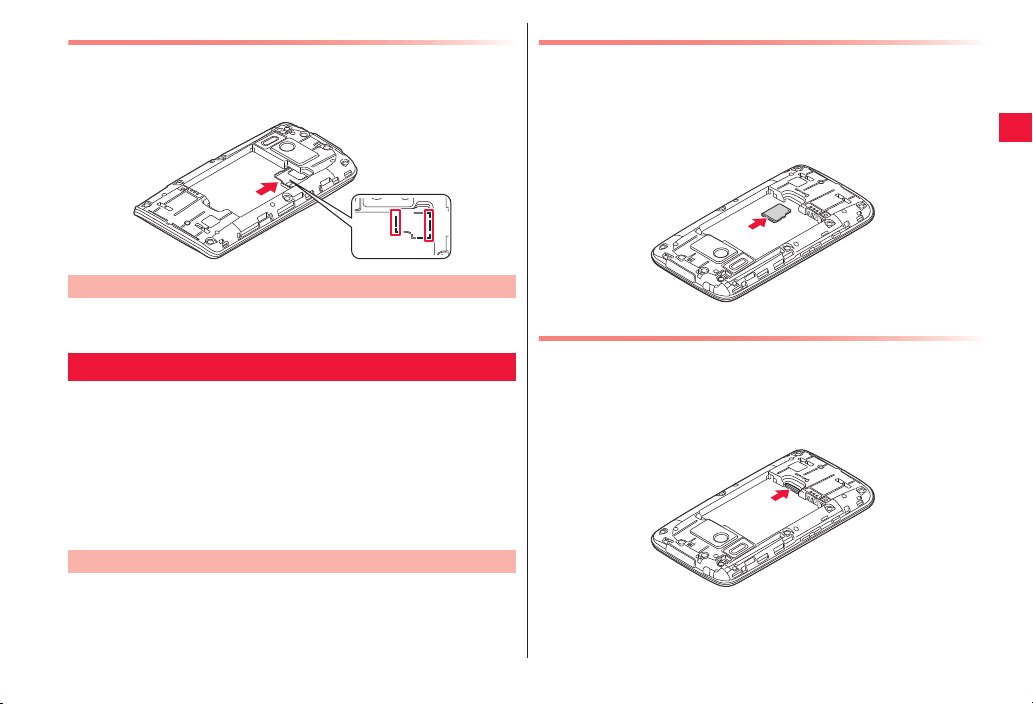
Installation/Removal of microSD Card
Q Installation/removal of a microSD card should be performed with the
FOMA terminal turned off and the battery pack removed (zZ page 22).
Insert the microSD card into the microSD card slot
1
with the metal terminal facing down in the direction
indicated in the figure until it locks
Q Securely insert the card until it clicks.
Removing microSD Card
Q Note that the microSD card may pop out when you remove it from the
FOMA terminal.
Lightly press in the microSD card
1
The microSD card comes out a bit.
Pull out the microSD card straight
2
Preliminary Check 21
Page 24
Battery Pack
Installation/Removal of Battery Pack
Q Installation/removal of the battery pack should be performed with the
FOMA terminal turned off.
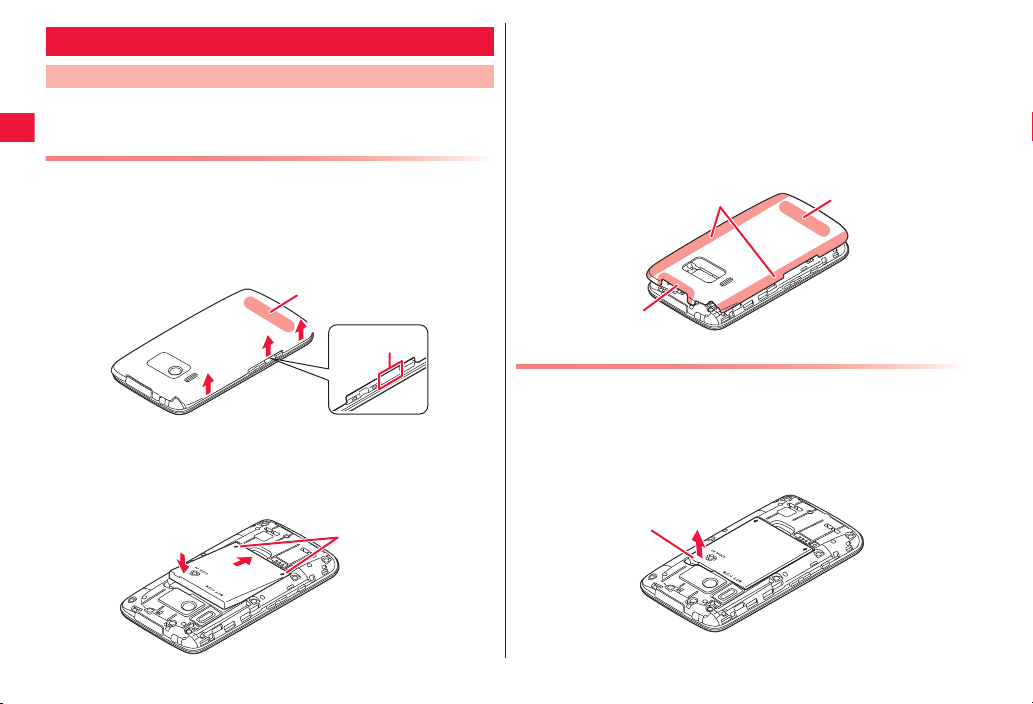
Installing Battery Pack
Putting your finger in the concave between the
1
volume keys and search key, lift the back cover in
direction 1 first and 2 to detach part A. Then lift
the cover in direction 3 to remove it
A
2
1
3
With the arrow mark side facing up, align the tab
2
side of the battery pack with the FOMA terminal.
Then pressing the battery pack in direction 4, push
it down in direction 5
5
4
Concave
Arrow marks
Checking the orientation of the back cover, fit the
3
cover on the main unit. Then press on both sides of
the main unit (B) firmly, and press down on the top
(C) and bottom (D) parts to attach the cover
securely
Q Ensure that there is no gap between the main unit and back
cover.
B
C
D
Removing Battery Pack
Remove the back cover (zZ step 1 in “Installing
1
Battery Pack” on page 22)
Lift the battery pack in the direction of the arrow
2
using its projection
Projection
22 Preliminary Check
Page 25
Charging
To prevent damage to the environment, bring used battery
packs to a docomo service counter, a docomo agent or a
recycle center.
■ Precautions for charging
Q The included AC adapter plug shape is designed for 100V AC (domestic
specification). To charge the battery abroad, a corresponding plug
adapter is required. Do not use an adapter transformer for overseas trip.
Q If you charge the FOMA terminal while using it, it may take more time
to fully charge the battery or charging may not be completed.
Continuous use of functions consuming large current, such as data
communication and call, may decrease battery level even during
charging, leading to battery drain.
Q If you start charging when the battery is empty, the FOMA terminal may
not start up promptly after power-on operation. In this case, start
charging with the FOMA terminal off and turn it on after a while.
Q When the temperature failure icon appears in the status bar, functions
shown in the notification panel are disabled.
Q When the charge failure icon appears in the status bar, open the
notification panel and take appropriate actions.
Q If you leave the FOMA terminal being charged for long time, the
FOMA terminal consumes power from the battery pack after
completion of charging, so the usable time may be shortened and alert
of empty battery may be displayed soon. In such a case, start
charging the battery again in correct manners. For recharging,
disconnect the AC adapter cable from the FOMA terminal and then
connect it again.
■ Battery pack operating life
Q Battery pack is a consumable item. Usable time per charge gradually
decreases with repeated charging.
Q When its usable time per charge is decreased to about a half of that
from the time of purchase, the battery pack is near the end of life. So
you are recommended to replace with new one soon. Depending on
how the battery pack is used, it might swell as its remaining life
becomes short, but this is not a problem.
Q Continuous 1Seg watching while charging may shorten the battery
pack operating life.
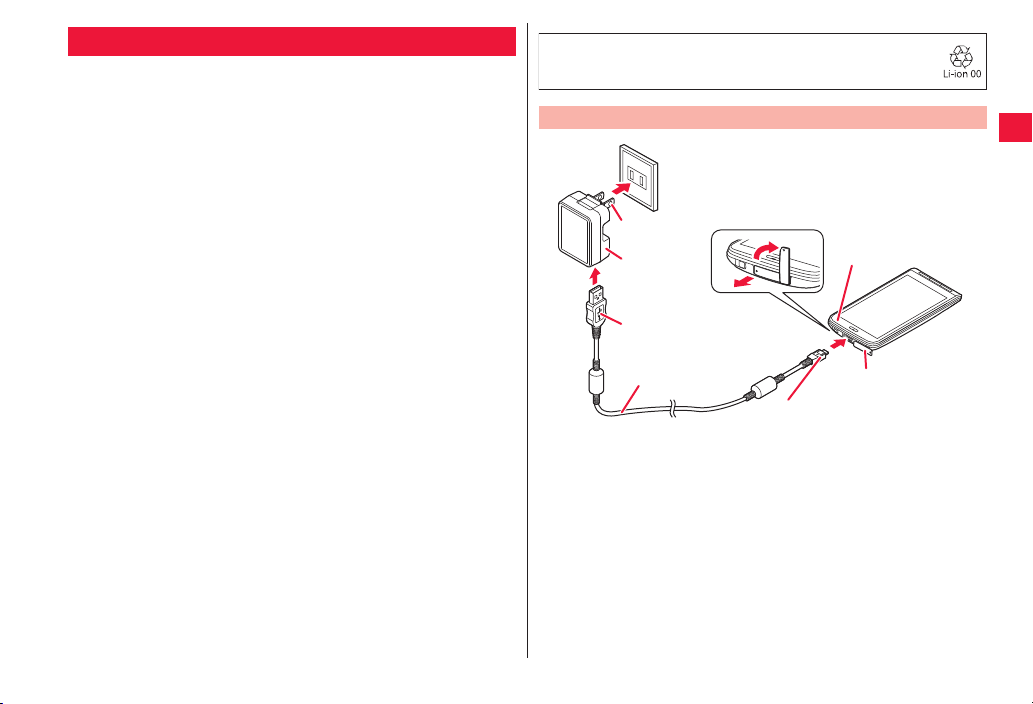
Charging by Using AC Adapter Cable
3
Power plug
AC adapter
2
USB plug
microUSB cable
Insert the microUSB plug of microUSB cable
1
1
horizontally into the connector terminal with USB
*1
mark
facing up
Q Pull out the connector terminal cover in direction 1, and turn the
cover in direction 2.
Insert the USB plug of microUSB cable horizontally
2
into the USB connector of AC adapter with USB
*1
mark
faced with you
Unfold the power plug of AC adapter, and plug it
3
into a household outlet of 100 V AC
2
1
microUSB plug
Call/Charging indicator
Connector
terminal cover
Preliminary Check 23
Page 26
When charging is completed, pull out the power
4
plug of AC adapter from the outlet
Remove the microUSB cable from the AC adapter
5
and the FOMA terminal
*1
USB mark:
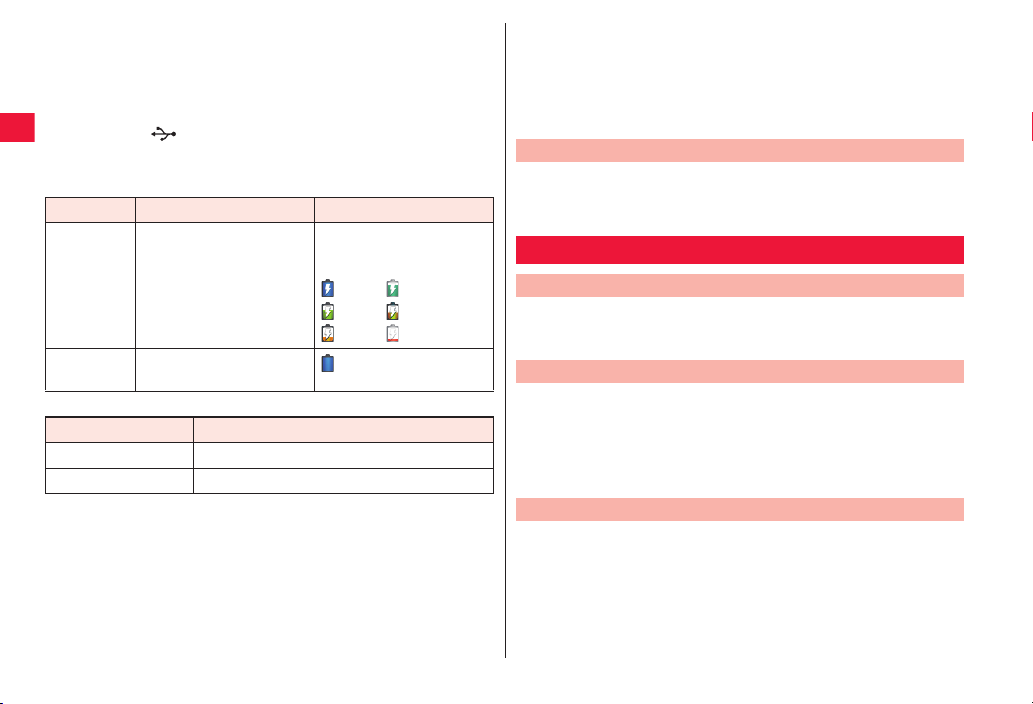
■ Charging and charging completed indications
● When the FOMA terminal is turned on
Call/Charging indicator Battery icon
Charging Lights as follows
Charging
completed
● When the FOMA terminal is turned off
Charging Lights in red
Charging completed Turns off
Q The battery icon is not displayed when the FOMA terminal is turned
off. The call/charging indicator may not light promptly when you start
charging with the battery in empty state. However, charging has been
started. If the call/charging indicator does not light after a while,
remove the battery pack from the FOMA terminal and then reinstall it
before charging again. If the symptom recurs, the AC adapter and
battery pack may be failed. Contact a handling counter such as a
docomo Shop.
24 Preliminary Check
according to the battery
level.
89% or less: Red
90% or more: Green
Lights in green
Call/Charging indicator
Indications are switched
from the current battery
level up to level 6.
Level 6 Level 5
Level 4 Level 3
Level 2 Level 1
■ When the battery has almost run out
When the battery starts running out, a message that prompts you to
charge appears. When the battery level decreases further, the call/
charging indicator flashes slowly in red. When the battery becomes
empty, a message that the power is turned off shortly appears and then
it is turned off.
Charging by Using a PC
The FOMA terminal can be charged from a PC when you connect
the FOMA terminal and a PC using the included microUSB cable.
Q For how to connect the FOMA terminal to a PC, zZ page 95
Power On/Off
Turning Power On
Press and hold wD for at least two seconds
1
The lock screen appears after a while.
Turning Power Off
Press and hold wD until Phone options menu
1
appears
[Power off] W [OK]
2
Q Wait for a while, as it may take some time before the power is turned off.
When Display Goes Off
If the FOMA terminal is not operated for a certain period of time,
the display automatically goes off and the FOMA terminal enters
the Sleep mode.
wD / xB
1
The Sleep mode is canceled and the lock screen appears.
Q To enter the Sleep mode manually, press wD when the display is on.
Page 27
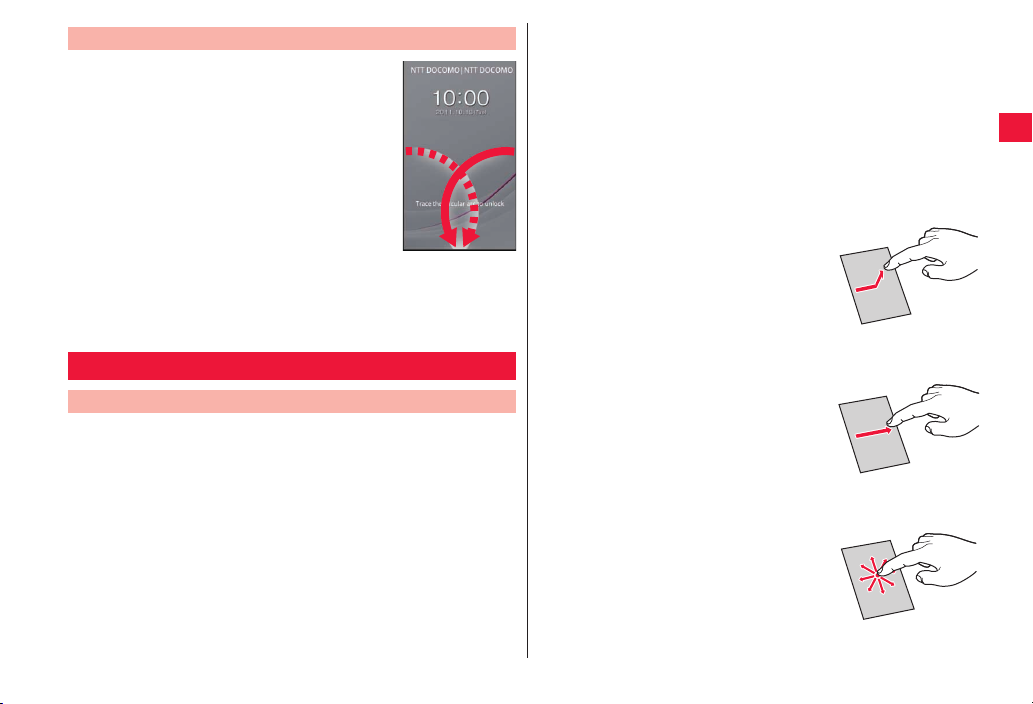
Unlocking Lock Screen
Lock screen
Trace the guide from right side of
1
the screen (solid line indicated in
the screenshot at the right)
Q If you use the FOMA terminal with your left
hand, trace the guide from left side of the
screen (doted line indicated in the screenshot
at the right).
Q When you unlock the lock screen, your
dominant hand used for unlocking is
recognized, and the home screen, Future
Plus, phonebook and 1Seg channel selection
screen are adjusted for the dominant hand. In
addition to using the lock screen to determine the dominant hand,
you can set your dominant hand in Dominant hand setting (zZ
page 63).
Basic Operations (How to Use Touch Panel)
Touch Panel Operations
The display of this FOMA terminal is a touch panel, which is
operated by direct touch with fingers.
Q Before use, peel off the protective sheet which is stuck on the touch
panel at the time of purchase.
Q The touch panel is designed to be touched lightly with a finger. Do not
press it strongly with a finger or pointed objects such as fingernails,
ballpoint pens, and pins.
Q In the following cases, the touch panel may not work even if you touch
it. Also, following operations may cause a malfunction.
· Operation wearing gloves
·Touching with a fingernail
· Operation with foreign objects placed on the operation surface
· Operation on the touch panel on which a protective sheet or a
sticker is put
■ Tap
Tap an item or icon on the screen to select it.
■ Double-tap
Tap the screen twice quickly to zoom in the web page. Double-tap again
to zoom out.
■ Touch and hold
Keep an item or icon on the screen touched with your finger for a while.
Do this to display a pop-up menu, etc.
■ Flick
When there are multiple pages or more
contents outside the screen, quickly move
your finger right or left across the surface of
the screen to show the previous/next screen.
■ Drag
Move an item or icon on the screen while
holding it with your finger.
■ Scroll
Slide your finger up/down or right/left on the
screen to show the hidden part.
Preliminary Check 25
Page 28
■ Pinch (spread apart/pinch together)
Information
Information
Placing two fingers on the screen, spread
them apart to zoom in, or pinch them together
to zoom out, when a web page or still image is
displayed.
?
Q Some multi-touch operations such as rotating the display and
operation with three or more touch points are not possible.
Switching Vertical/Horizontal Display Modes
The motion sensor, which detects orientation and motion of the
FOMA terminal, allows you to switch display modes by holding the
FOMA terminal in vertical or horizontal orientation.
?
Q Operate the FOMA terminal in nearly upright state. If the terminal lies
flat, the sensor cannot detect a change in orientation and motion
properly, and the display modes may not be switched.
Q Changing the FOMA terminal’s orientation may not switch display
modes depending on the screen displayed.
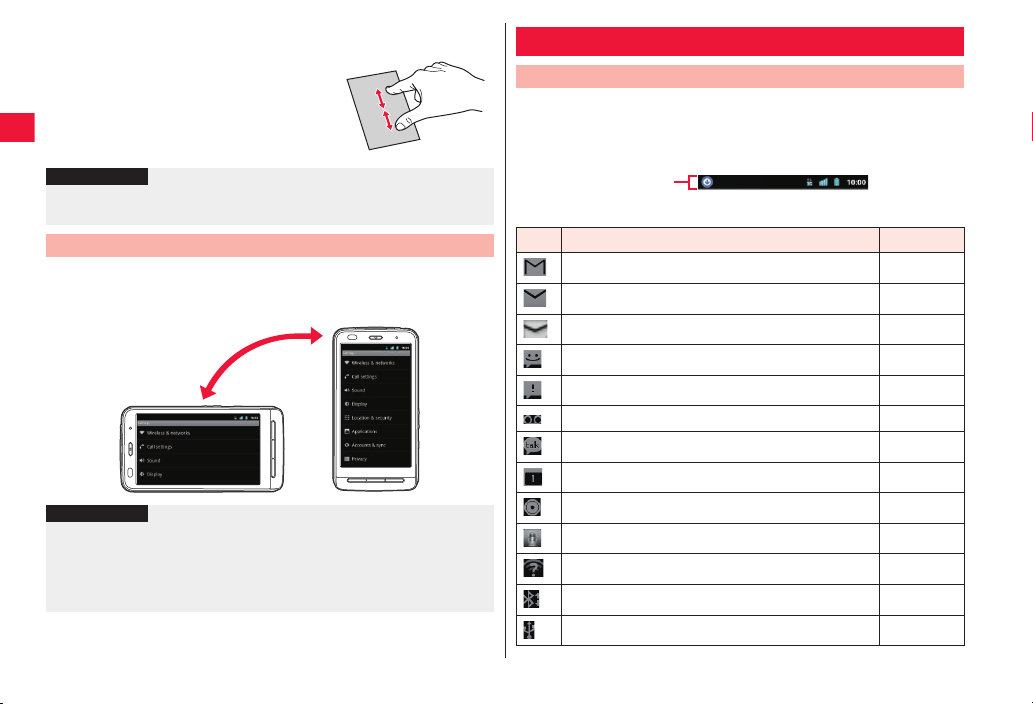
Screen Display/Icons
Icon Definitions
Icons that indicate the FOMA terminal status are displayed in the
status bar.
Notification icons are displayed on the left part while status icons
are displayed on the right part of the status bar.
Status bar
■ Main notification icons
Icon Description Refer to
New Gmail page 75
New Email page 74
New sp-mode mail page 75
New SMS message page 77
Failure to send SMS message page 77
Voice Mail message page 54
New instant message page 78
Calendar event page 112
Music playing page 89
Recording/playing with VoiceRecorder page 113
Wi-Fi open network available page 46
Incoming file via Bluetooth communication page 94
USB connected page 95
26 Preliminary Check
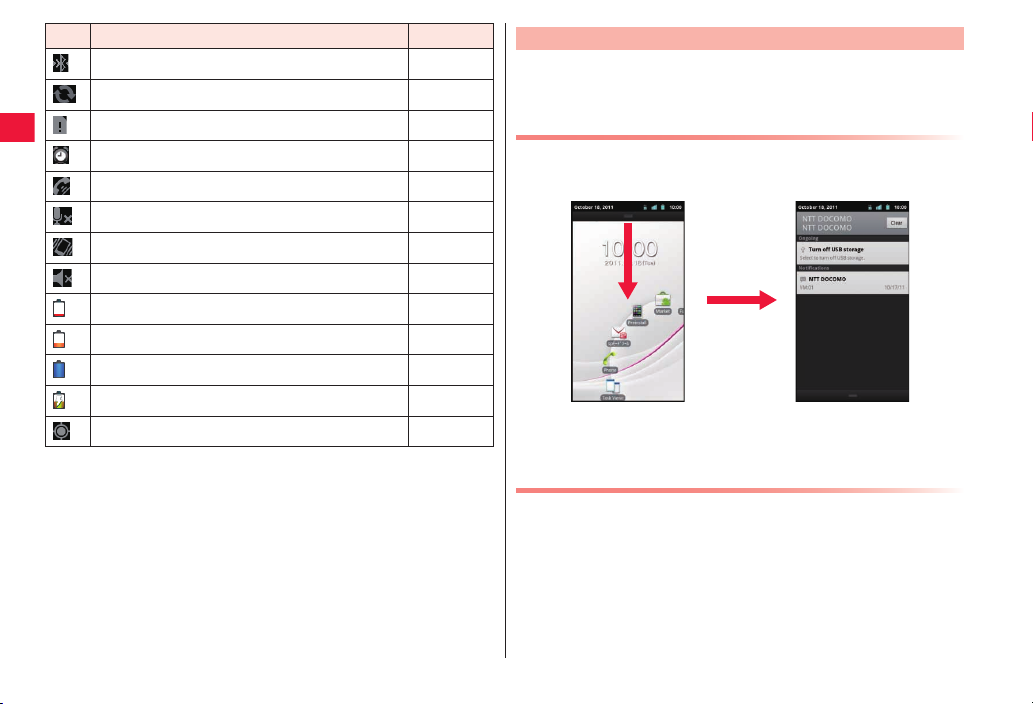
Page 29

Icon Description Refer to
USB tethering in use page 61
Wi-Fi tethering in use page 61
Both USB tethering and Wi-Fi tethering in use page 61
Error message -
During call page 48
Missed call page 51
Call on hold page 50,
page 55
Data upload -
Data download -
Application installed from Android Market page 98
Update of Android Market application available page 98
Hidden notification page 28
microSD card unmounted page 69
1Seg notification page 55
Connecting to data broadcast security page page 106
eco mode page 114
Task management notification page 114
Temperature failure page 23
Charge failure page 23
Icon Description Refer to
Positioning error (failure to get desired
page 101
information)
Communication disabled (failure to get desired
page 101
information)
Communication error (failure to get desired
page 101
information)
Last train alarm set page 101
■ Main status icons
Icon Description Refer to
Radio wave strength -
*1
Roaming page 120
*1
Out of service area -
Connecting to GPRS page 121
*1
GPRS in use page 121
*1
Connecting to EDGE page 121
*1
EDGE in use page 121
*1
Connecting to 3G (packet) page 121
*1
3G (packet) in use page 121
*1
Airplane mode page 60
Connecting to Wi-Fi page 46
*1
Bluetooth ON page 93
Preliminary Check 27
Page 30
Icon Description Refer to
Bluetooth device connected page 93
Data sync page 68
UIM not installed page 20
Alarm set page 111
Speakerphone ON page 50
Microphone mute page 50
Silent mode (vibration ON) page 63
Silent mode (vibration OFF) page 49
Charge required page 23
Low battery page 23
Sufficient battery page 23
Charging page 23
GPS positioning page 64
*1 Network icons appear in white when Google account is not set or
[Background data] in Accounts & sync settings is disabled.
Notification Panel
When notification icons are displayed, you can open the
notification panel to check notifications of messages, Calendar
events, and so on.
Opening Notification Panel
Drag the status bar downward
1
Q Tap a notification to check details or configure necessary settings.
Q Tap [Dismiss all] to clear all items in the notification panel.
However, some items may not be cleared.
Closing Notification Panel
Drag the bar at the bottom of the notification panel
1
upward, or xC
28 Preliminary Check
Page 31

Home Screen
4
Home screen is the start screen from which you can start using
applications. Press xB to display the home screen.
You can choose from the following three home applications:
“Touch Speed Selector”, docomo Palette UI and Launcher. This
section describes how to operate the “Touch Speed Selector”.
“Touch Speed Selector” comprises a touch speed selector screen
and several grid home screens.
1
Tap an indicator
or flick the screen
2
to the left
3
Touch speed selector screen
(Sheet 1)
1 Indicators
Current location (sheet) within the home screen is indicated. The
touch speed selector screen is displayed in sheet 1, and grid home
screens are displayed in sheet 2 through 5 at the time of purchase.
You can switch the screens (sheets) by tapping an indicator or
flicking the screen right and left.
2 Touch speed selector
Icons of application shortcuts and folders in the grid home screens
are displayed.
Flick along the arrow mark indicated in the left screenshot, and tap
a shortcut to start the application. When you tap a folder, second-
layer icons in the folder are displayed.
Grid home screen
(Sheet 2 (to 10))
5
6
3 First-layer select icon
Second-layer icons are displayed in the touch speed selector. Tap
the first-layer select icon to return to the first layer in the touch
speed selector.
4 Quick search box (zZ page 30)
5 Shortcuts, widgets and folders can be freely placed in all grid home
screens.
6 This part is always displayed in all grid home screens to start Task
Viewer, Phone and sp-mode mail, or show the application list
screen.
■ New! icon
New! icon is a mark that notifies of any newly-purchased (downloaded)
application. appears above each new application in the touch
speed selector screen, grid home screens and application list screen.
is cleared once the application is activated.
Adding Shortcuts to Grid Home Screen
Grid home screen W Touch and hold the
1
background
[Shortcuts]/[Widgets]/[Folders]
2
Select an item (e.g. shortcut) to add
3
Touch and hold an item (e.g. shortcut) added to the
4
grid home screen, and drag it to preferred location
Changing Folder Name
Tap a folder W Touch and hold the title bar
1
Enter folder name W [OK]
2
Preliminary Check 29
Page 32

Deleting Shortcuts
Grid home screen W Touch and hold an item (e.g.
1
shortcut) to delete, and drag it into
Adding a Grid Home Screen
You can add up to nine sheets of grid home screens.
Rightmost grid home screen W Touch and hold an
1
item (e.g. shortcut), and drag it to right edge of the
screen
A new grid home screen is added to the right and the shortcut is
moved to the new screen.
Q Deleting all items (e.g. shortcuts) in the rightmost grid home
screen will delete the grid home screen itself.
Changing Wallpaper of Home Screen
Home screen W Touch and hold the background W
1
[Wallpapers]
Tap a wallpaper type W Select an image
2
Q If you select an image from [Wallpaper (Picture album)], tap
after trimming to complete settings.
Q For Wallpapers DECO (Kabegami Deco), zZ page 103
[Set wallpaper]
3
Searching for FOMA Terminal Applications and Web
Page Information
Home screen W yG
1
Q You can do this also by tapping the entry field within the quick
search box in the grid home screen (sheet 2).
Q Press xA W [Search settings] to change search target types
and settings.
W Tap a search target W Enter keyword
2
Search candidates that contain characters you just entered appear.
3
Using Voice Search
Home screen W Press and hold yG for at least one
1
second
Q You can do this also by tapping in the grid home screen
(sheet 2).
Say keyword to the microphone
2
Switching Home Applications
Home screen W [Preinstall] W [Home Switcher] W
1
[Clear default]
[Clear defaults] W xB
2
Mark [Use by default for this action.] checkbox
3
Tap the home application you want to use
4
30 Preliminary Check
Page 33

Application Screen
2
3
1
Displaying Application List Screen
Application list screen is shown for each of the following three
categories: Preinstall, Download and Favorite.
Grid home screen W [App List]
1
1 Indicators
Current location (page) within the application list for each category
is indicated. You can switch the screens (pages) by tapping an
indicator or flicking the screen right and left.
2 Show the application list for each category.
3 Return to the previous grid home screen.
Moving an Application
Touch and hold the target application, and drag it to
1
the destination category icon ([Preinstall]/
[Download]/[Favorite])
Q You can also move an application to previous/next page if you
touch and hold the target application and drag it to right or left
edge of the screen.
Q Touch and hold an application, and drag it to on top of the
screen to add a shortcut to the grid home screen.
Touch and hold the application, and drag it to
2
preferred location
List of Applications
The following is the list of [Preinstall] applications that are
preinstalled in the FOMA terminal at the time of purchase.
Q Before using some [Preinstall] applications for the first time, it may be
necessary to install them from Android Market or docomo market.
Q Some applications do not work without microSD card. Install a
microSD card when using applications.
Icon Application Description Refer to
BeeTV BeeTV is a broadcast station
BOOKスト
ア 2Dfacto
(Book Store
2Dfacto)
Catalyst
Reader
Evernote Evernote is a service that allows
dedicated for mobile phones. Paid
subscription is required to watch
all programs provided by BeeTV.
Electric book store in which you
can buy and view various electric
books including serious literary
works, popular comics, and hot
business books.
View Office documents and PDF
files.
you to save various information
(website contents, photos, idea
memos, etc.) to a server, and
search and view it whenever you
need. You can save and view
information from a PC and other
devices, as well as from your
FOMA terminal.
Q You must create an Evernote
account to use this application.
Preliminary Check 31
-
-
page 116
-
Page 34

Icon Application Description Refer to
Facebook Sign in to Facebook for news feed
Future Plus Check desired information, Twitter
Gmail Exchange mails of Google
Gガイド番
組表 (GGuide EPG)
iチャネル
(i-channel)
Latitude Share location information with
media2U Download and play music and
Mobage You can enjoy playing extremely
NAVITIME You can use transit guide, train
check, posting, message
exchange and photo sharing.
updates, new SMS messages, sp-
mode mails, etc. on the same screen.
account.
View electronic program guide of
terrestrial and BS digital
broadcasts. You can search
programs by keyword and by
category.
Delivers a variety of information
such as weather forecast and
news. Latest information is
automatically received and
displayed on the widget in the
standby screen.
i-channel is a fee-based service
requiring subscription.
friends on a map.
videos.
popular Mobage games.
service information and map
search features.
-
page 99
page 75
-
-
page 104
-
-
-
32 Preliminary Check
Icon Application Description Refer to
Psmart Access the manufacturer’s
SD backup Back up and restore phonebook,
SelfCamera You can shoot yourself b y
spモード
メール (sp-
mode mail)
Twitter A Twitter client application. Post
Twonky
Mobile
Special
YouTubeYou can play videos from and post
イネスシー
クレット
(Ines
Secret)
website to get contents and
information.
SMS messages and bookmarks
to/from microSD card.
following audio guidance of this
application.
Exchange mails using i-mode mail
address (@docomo.ne.jp).
short messages on the website
and communicate with people.
Play videos, photos and songs
stored online or in your
smartphone using wireless
connection to a DLNA-compatible
TV or audio player.
To use online contents, you must
prepare an access point for
connecting to the Internet.
files to YouTube.
An application supervised by Ines
Ligron to make women shining with
beauty within and without. Enhance
your “beauty” with support of lesson
videos, workbooks, food diary and
weight control features.
-
page 117
-
page 75
-
-
page 110
-
Page 35

Icon Application Description Refer to
ウェザー
ニュース
タッチ
(Weather
news touch)
ECO NAVI Switch to low power mode and
Camera Shoot still images and videos. page 84
Calendar Manage schedule. page 111
ぐるなび
(Gurunavi)
Jorte A day planner application for
Downloads Files downloaded from websites
Task Viewer You can check and terminate
Talk You can chat with people using
docomo
market
View weather forecasts throughout
Japan and live shows.
configure settings for task
management in Sleep mode.
Search for restaurants by area,
cuisine and budget, etc.
schedule and ToDo management.
Various display formats are
available. This application can be
synchronized with Google
Calendar.
are listed.
running applications.
Google Talk.
Access docomo market to search
for applications and videos.
-
page 114
-
-
page 80
page 36
page 78
page 98
Icon Application Description Refer to
ドコモ海外
利用
(docomo
Overseas
Use)
ToruCa View, find, and update ToruCa
ToruChara Create pictograms from photos
Navigation Direction to the destination is
News &
Weather
バーコード
リーダー
(Barcode
Reader)
Picture
Album
Fit Key Adjust size and position of the
Browser You can browse web pages as
This application helps you use
packet communication overseas
and configure/confirm settings of
overseas flat-rate packet service.
data containing store information
and coupons.
you took or still images in Picture
Album.
provided.
View weather forecast and news. page 110
Read barcodes and QR codes
with the camera.
View still images and videos. page 87
keypad to fit on your hand. In
addition, you can decorate the
keypad.
you do with a PC.
-
page 109
page 115
page 104
page 115
page 39
page 79
Preliminary Check 33
Page 36

Icon Application Description Refer to
PriPri
Marron Lite
for P
Places Search for stores and facilities
Voice Dialer Just say the name of the other
VoiceRecorder
Home
Switcher
Market Use Android Market. page 98
マクドナルド
(McDonald’s)
Maps You can locate your current
Email Exchange Emails with PCs, etc. page 74
Messaging Exchange SMS messages. page 77
Notepad Create notes. page 113
Decorate photos gorgeously. page 115
near your location by category.
party to call up the contact and
make a call.
You can record sound and play
recorded audio files.
Switch home applications. page 30
An application that allows you to
use coupons for McDonald’s
members and store locator.
position, and search for places
and routes to destinations.
page 104
page 53
page 113
-
page 104
34 Preliminary Check
Icon Application Description Refer to
melodycall Have your caller hear his/her
レコチョク
(Recochoku)
1Seg You can watch 1Seg. page 105
Music Play music. page 89
Voice
Search
楽天オーク
ション
(Rakuten
auction)
Google
Search
Clock On the clock screen, different
Instruction
Manual
favorite melody. Trial listening,
purchase of melodies and setting
melodycall are available.
melodycall is a fee-based service
requiring subscription.
Download and play songs. -
Search for FOMA terminal
applications and web page
information by voice input.
You can easily find bestselling
fashion items on the Rakuten
auction site.
Search for FOMA terminal
applications and web page
information.
types of information and shortcuts
are shown along with the time.
You can also set alarms.
Instruction manual for this FOMA
terminal. You can activate
required functions directly from
relevant descriptions.
-
page 30
-
page 30
page 111
page 2
Page 37

Icon Application Description Refer to
書籍・コミッ
ク E★エブ
リスタ
(Books &
Comics E★
eburista)
Koe no
Takuhaibin
Infrared Receive data via infrared
Settings Configure various settings of the
地図アプリ
(Map appli)
Calculator You can perform calculations such
Phone Make phone calls. page 48
Phonebook Add and manage contacts in the
You can read hot electric books
and comics from original works of
professional writers and celebrities
or popular works posted by
general users. Works of
professional writers and celebrities
will be charged.
You can record a voice message
by making a call, and the voice
message is notified to the other
party by SMS.
This application offers a simple
way of recording/playing voice
messages.
communication.
FOMA terminal.
Map, navigation and transit search
functions provided by docomo
Map Navi support your outings.
You can use this application free
during a trial period.
as addition, subtraction,
multiplication and division.
phonebook.
-
-
page 92
page 60
-
page 114
page 51
Icon Application Description Refer to
PhoneBook
Copy
Phonebook
backup
Kabegami
Deco
毎日新聞
(The
Mainichi
Daily News)
You can copy phonebook data to/
from other FOMA terminals using
microSD card. You can also copy
phonebook data registered to your
Google account to docomo
account.
You can automatically back up
contacts to the Phonebook backup
center on a regular basis, and
restore them in case your FOMA
terminal is lost or the phonebook
data is accidentally deleted.
Q For details on Phonebook
backup, refer to “ご利用ガイド
ブック (spモード<スマートフォ
ン>編) (Mobile Phone User’s
Guide [sp-mode <smartphone>]”
(in Japanese only).
You can attach stamps on the
home screen or change the
background.
View latest news stories provided
by THE MAINICHI NEWSPAPERS.
page 45
-
page 103
-
Starting a Recently-Used Application
Press and hold xB for at least one second
1
Tap an application to start
2
Preliminary Check 35
Page 38

Checking/Terminating Running Applications
1
Home screen W [Task Viewer]
1
To start an application
2
Tap the icon for the application to start
To terminate an application
Tap for the application to terminate
To terminate all running applications
[Terminate all applications]
Character Entry
With this FOMA terminal, you can enter characters by tapping the
text entry field and using the keypad displayed. You can select
from the two keypad types below:
■ Ten-key keypad
Used for Japanese Kana input.
■ QWERTY keypad
Used for Japanese Romaji input.
Entering Characters with Ten-key Keypad
Tap the text entry field W Touch and hold in the
1
keypad
[10-key ⇔ QWERTY]
2
Q To close the keypad, press xC.
2
3
4
5
6
1 Input mode Indicates the currently used input mode.
: Hiragana-Kanji
: Full-width Katakana : Full-width Numeric
: Half-width Katakana
: Full-width Alphabet
2 Custom key Customize the keypad (zZ page 39).
3 Undo k ey Display characters in reverse order.
4 Input select
key 1
Tapping the key right after confirming converted
characters returns the characters to unconverted state.
Alphabet/numeric/Kana input modes are switched
each time the key is tapped.
Touch and hold the key W [10-key ⇔ QWERTY] to
switch between ten-key keypad and QWERTY
keypad for each input mode.
Touch and hold the key W [Input Mode] to switch
Full-width/Half-width.
7
8
9
0
: Half-width Alphabet
: Half-width Numeric
36 Preliminary Check
Page 39
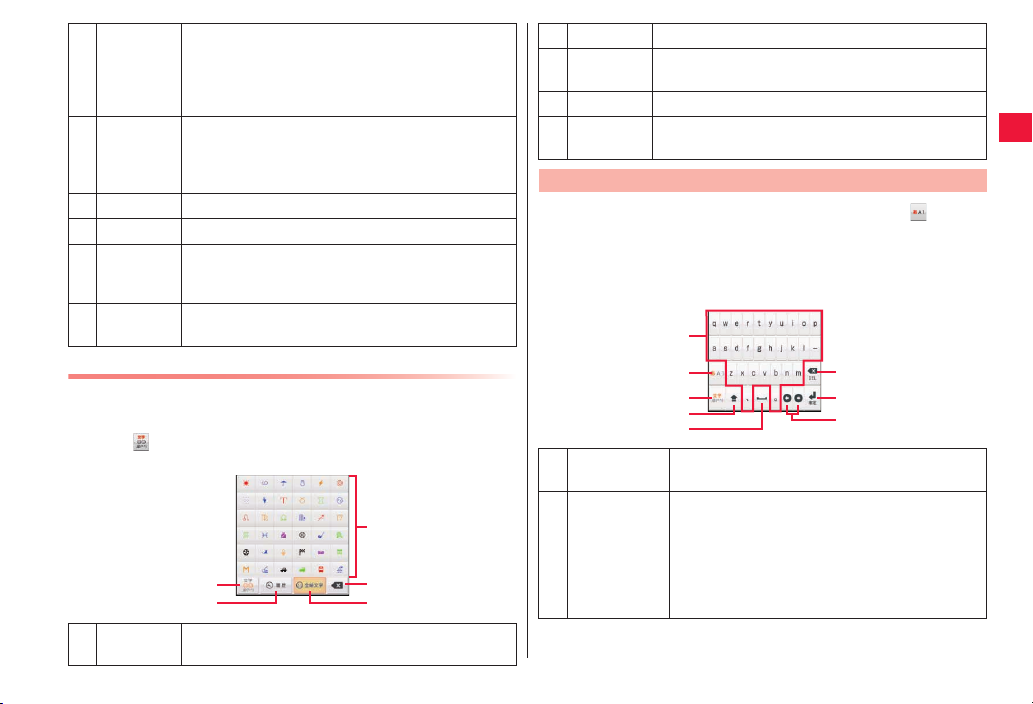
5 Input select
key 2
6 Character
input keys
7 Delete key Delete a character at the left of the cursor.
8 Cursor key Move the cursor in four directions.
9 Space key When this key is tapped with no character entered,
0 End-of-line
key
Pictogram/symbol (emoticon)/character input
modes are switched each time the key is tapped.
Q In text entry fields in which entering pictograms is
forbidden, symbol (emoticon)/character input
modes are switched.
Enter characters indicated on the keys.
Tap a key repeatedly until desired character is
displayed, or touch and hold a key and flick to
desired character.
a space is inserted.
Display conversion candidates.
Confirm entered characters or feed a new line.
Entering Pictograms
You can enter pictograms only in the text entry field that allows
entry of pictograms.
Tap to switch to pictogram input mode
1
3
4
5
1 Input select
key
1
2
Pictogram/symbol (emoticon)/character input
modes are switched each time the key is tapped.
2 History key Display a list of recently used pictograms in 3.
3 Pictogram
list
4 Delete key Delete a pictogram at the left of the cursor.
All pictogram
5
key
Scroll the screen up/down and tap a desired
pictogram.
Display the pictogram list.
Entering Characters with QWERTY Keypad
Tap the text entry field W Touch and hold in the
1
keypad
[10-key ⇔ QWERTY]
2
Q To close the keypad, press xC.
1
6
7
8
Preliminary Check 37
1 Character
input keys
2 Input select
key 1
2
3
4
5
Enter characters indicated on the keys.
Alphabet/numeric/Romaji input modes are
switched each time the key is tapped.
Touch and hold the key W [10-key ⇔ QWERTY]
to switch between ten-key keypad and QWERTY
keypad for each input mode.
Touch and hold the key W [Input Mode] to switch
Full-width/Half-width.
Page 40
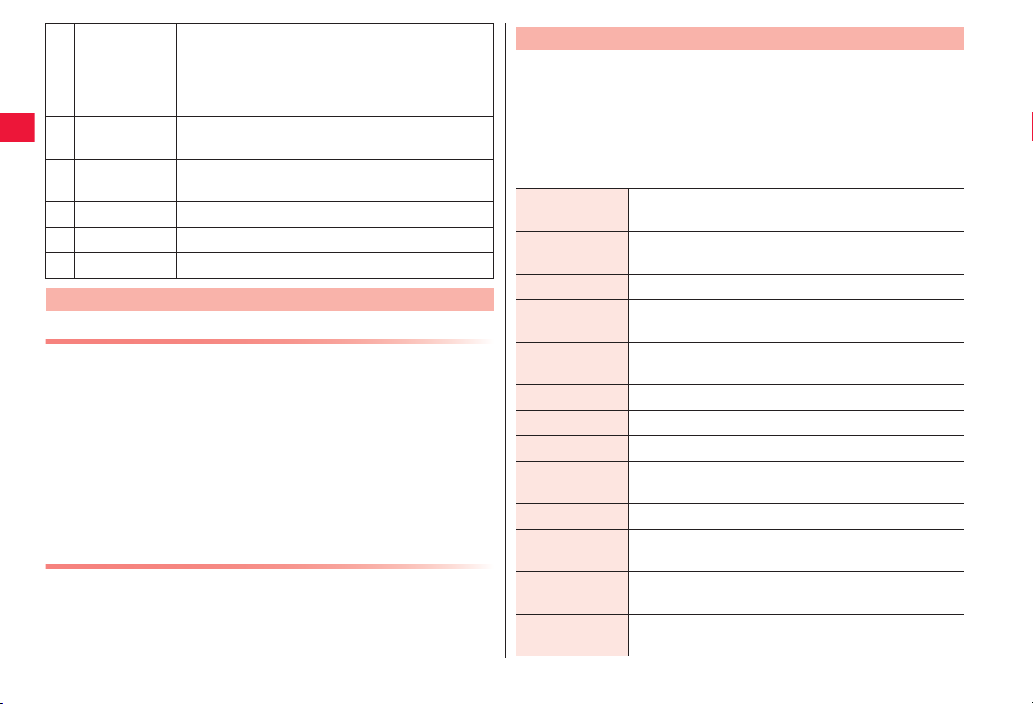
3 Input select
key 2
4 Case switch
key
5 Space key When this key is tapped with/without a character
6 Delete key Delete a character at the left of the cursor.
7 End-of-line key Confirm entered characters or feed a new line.
8 Cursor key Move the cursor right/left.
Pictogram/symbol (emoticon)/character input
modes are switched each time the key is tapped.
Q In text entry fields in which entering pictograms
is forbidden, symbol (emoticon)/character input
modes are switched.
Switch between uppercase and lowercase
characters.
entered, a space is inserted.
Character Entry Menu
Copy/Cut/Paste
Enter characters W Touch and hold the text entry field
1
[Select word]/[Select all]
2
Drag the slider in four directions to select
3
characters W Touch and hold the text entry field
[Cut]/[Copy]
4
Q To paste the copied characters, touch and hold the text entry field
W [Paste].
Switching to Android Keyboard
You can also switch to Android keyboard for character entry.
Touch and hold the text entry field
1
[Input method] W [Android keyboard]
2
38 Preliminary Check
Character Entry Settings
You can configure various settings regarding character entry.
Home screen W xA W [Settings] W [Language
1
& keyboard] W [Fit Key]
Fit Key settings screen is displayed.
Perform operations listed below:
2
Sound on Key
Press
Vibrate on Key
Press
Flick Guide Display flick guide.
Auto
Capitalization
Keyboard Type Set keyboard type for each screen orientation and
Flick Input Enable flick input.
Flick Sensitivity Set flick sensitivity.
Toggle Input Enable toggle input when flick input is enabled.
Input Word
Learning
Word Prediction Display conversion candidates as you enter characters.
Typing Error
Correction
Wildcard
Prediction
Lines of
Candidate Area
Enable key-tapping sound.
Enable key-tapping vibration.
Automatically capitalize the first character of a
sentence in alphabet input mode.
input mode.
Learn converted words.
Display correction candidates for typing errors.
Predict conversion candidates from specified reading
string length.
Set the number of lines to be displayed in the
candidate area.
Page 41

Mushroom Use mushroom applications.
1
2
3
5
4
6
7
8
9
Japanese User
Dictionary
English User
Dictionary
Clear Learning
Dictionary
iWnn IME Version of iWnn IME is displayed.
zZ page 39
Edit words in English User Dictionary.
zZ page 39
Adding Words to User Dictionary
You can add frequently-used words in Kana input mode to
Japanese User Dictionary so that the added words are preferentially
shown as conversion candidates when you enter the reading.
Fit Key settings screen W [Japanese User
1
Dictionary]
Q To add English words used in half-width alphabet input mode, tap
[English User Dictionary].
xA W [Add]
2
Tap the text entry field of [Reading] W Enter
3
reading
Tap the text entry field of [Word] W Enter word
4
[Save]
5
Clearing Learning Dictionary
Words and phrases you entered are automatically learned and
displayed as conversion candidates by predictive conversion
feature. When you clear the learning dictionary, learned words and
phrases are all cleared and the dictionary is reset to the default
status.
Fit Key settings screen W [Clear Learning
1
Dictionary] W [OK]
Fit Key
You can adjust the size and position of the keypad to fit on your
hand. In addition, you can decorate the keypad with stamps and
change the color, background and key shape.
Home screen W [Preinstall] W [Fit Key]
1
1 Pallet
Flick right or left to select.
2 Save the edited data.
3 Switch to the stamp setting screen.
4 Switch to the color setting screen.
5 Keypad preview
6 Undo one operation on the keypad.
7 Switch to the package setting screen.
8 Switch to the key shape setting screen.
9 Switch to the background setting
screen.
Drag inward/outward the guide icons at four
2
corners of the keypad preview to define the size W
Drag the keypad preview to define the position
Q When the text entry field is hidden by the keypad or candidate display,
you can display the text entry field by reducing the size of the keypad.
To attach stamps
3
[デコ (Deco)] W Select a pallet W Select a stamp to
attach by tapping it W Tap preferred location in the
keypad preview to attach the stamp W Perform
stamp operations as necessary (zZ page 40)
Preliminary Check 39
Page 42

To change color
[カラー (Color)] W Select a pallet
Q Drag the slider to adjust color transparency.
Q Tap [グラデーション (Gradation) ON/OFF] to switch gradation/
solid color.
To change background
[ピクチャ (Picture)] W Select a pallet
Q You can also select from still images you recently saved in
microSD card. To select from other still images, tap [すべて見る
(View all)].
Q Tap and select [背景写真をアクティブ (Activate background
photo)] to adjust position of the still image.
Q To shoot a still image for background, tap [カメラ起動 (Activate
camera)] W Display the object in the keypad preview W
To change key shape
[キーパッド (Keypad)] W Select a pallet
To select from packages
[パッケージ (Package)] W Select a pallet
Q Tapping [初期状態に戻す (Initialize)] W [Yes] will reset the
keypad to the default state.
Q You can receive/send the package via infrared communication by
tapping [赤外線受信 (Receive via IrDA)]/[赤外線送信 (Send via
IrDA)].
Q You can load and select a package from microSD card by tapping
[SDから読み込み (Load from SD)].
Q When you tap [SDに保存 (Save in SD)], the package is saved in
Packages folder of KeyboardCustomize folder in microSD card,
and given a file name of the saved date and time (e.g., if a
package is saved at 10:00:05 a.m. October 18, 2011, the file
name of the saved package is “2011-10-18_10_00_05.pkg”).
Q You can delete package files saved in microSD card by
connecting the FOMA terminal to a PC (zZ page 95).
When you finish editing, [保存 (Save)] W [Yes]
4
Edited data is saved in the FOMA terminal and reflected in the
keypad.
Q Up to five packages can be saved in the FOMA terminal.
■ Stamp operations in keypad preview
Operation Procedure
Move Tap a stamp to move and display the stamp
Zoom in/out at the
same magnification
Increase/decrease
height/width
Rotate Tap a stamp to rotate and display the stamp
Copy & paste Tap a stamp to copy and display the stamp
Delete Q Tap a stamp to delete and display the stamp
Delete all
Paste
consecutively
guide W Drag the center of the stamp guide
Tap a stamp to zoom in/out and display the
stamp guide W Put your fingers at the center
and outside of the stamp guide to pinch out/in
Tap a stamp to increase/decrease height/width
and display the stamp guide W Drag the stamp
guide corner to increase/decrease height/width
guide W Trace the outer side of the stamp guide
corner in direction you want to rotate
guide W Touch and hold the center of the stamp
guide W Tap the location you want to attach the
stamp
guide W [削除 (Delete)]
Q Tap and select [削除 (Delete)] W Tap a stamp
to delete
[スタンプ全消し (Erase all stamps)]
Tap [連続貼り付け (Paste consecutively)] to
select (line)/ (curve) W Select a pallet W
Tap and select a stamp to attach W Trace the
keypad preview
40 Preliminary Check
Page 43

Initial Setting
Initial Setting . . . . . . . . . . . . . . . . . . . . . . . . . . . . . . . . . . . 42
Changing Screen Display to English . . . . . . . . . . . . . . . 42
Google Account . . . . . . . . . . . . . . . . . . . . . . . . . . . . . . . . 42
Setting Access Point . . . . . . . . . . . . . . . . . . . . . . . . . . . . 43
Checking Access Point in Use . . . . . . . . . . . . . . . . . . . . . . . . . 43
Setting Additional Access Point . . . . . . . . . . . . . . . . . . . . . . . . 43
Resetting Access Point . . . . . . . . . . . . . . . . . . . . . . . . . . . . . . . 43
sp-mode . . . . . . . . . . . . . . . . . . . . . . . . . . . . . . . . . . . . . . . . . . 43
mopera U . . . . . . . . . . . . . . . . . . . . . . . . . . . . . . . . . . . . . . . . . 43
Email Setting . . . . . . . . . . . . . . . . . . . . . . . . . . . . . . . . . . . 44
Setting mopera U Mail Account. . . . . . . . . . . . . . . . . . . . . . . . . 44
Setting General Provider’s Mail Account. . . . . . . . . . . . . . . . . . 44
PhoneBookCopy . . . . . . . . . . . . . . . . . . . . . . . . . . . . . . . . 45
Exporting Phonebook to microSD Card . . . . . . . . . . . . . . . . . . 45
Importing Phonebook from microSD Card . . . . . . . . . . . . . . . . 45
Copying Contacts in Google Account to docomo Account . . . . 45
Wi-Fi . . . . . . . . . . . . . . . . . . . . . . . . . . . . . . . . . . . . . . . . . . 46
Online Service Accounts . . . . . . . . . . . . . . . . . . . . . . . . . 46
41
Page 44

Initial Setting
When you turn on the power of the FOMA terminal for the first time
after purchase, configure settings for Google account, GPS
positioning, and home application by following the on-screen
instructions.
[言語変更] W [English (United States)]
1
Q If [機能バージョンアップ (Update features)] screen is displayed
during initial setting, tap [OK] to return to the previous screen and
continue operation.
Tap the Android logo W [Create]
2
Q If you already have a Google account, tap [Sign in].
Enter your first name, last name, and desired
3
username (part before @gmail.com) for the Google
account W [Next]
Enter a password W Enter the password again for
4
confirmation W [Next]
Select a security question W Enter answer in the
5
answer field W Enter a mail address you already
have in the secondary Email field
Q In case you forget your password, you can make it sent to your
secondary mail address by matching the security question and
answer in the Google website.
[Create]
6
Read Google Terms of Service W [I agree, Next]
7
Enter characters indicated in the picture W [Next]
8
Read the note about Google location service W
9
[Next]
42 Initial Setting
Q To make your data backed up in the Google server with your
Google account, mark the checkbox.
[Next] W [Finish setup]
10
Home application select screen is displayed.
Mark [Use by default for this action] checkbox
11
Q If this checkbox is unmarked, pressing xB while operating the
FOMA terminal displays the home application select screen.
Tap the desired home application
12
Home screen of the selected home application is displayed.
Changing Screen Display to English
If you have not changed the display language to English in the
initial setting, you can do it by following the steps below.
Home screen W xA W [設定] W [言語とキーボー
1
ド] W [言語を選択] W [English (United States)]
Google Account
Once Google account is set, you can download applications from
Android Market. If you already have your own Google account, you
can use the existing account with the FOMA terminal.
Home screen W xA W [Settings] W [Accounts &
1
sync] W [Add account]
[Google] W [Next] W [Create]
2
Q If you already have your own Google account, tap [Sign in].
Take step 3 to 8 in “Initial Setting” on page 42
3
Mark data items to be synced W[Finish] W[Finish
4
setup]
Page 45

Setting Access Point
Access points for Internet connection (sp-mode and mopera U) are
added by default. You can add and modify access points as
necessary. By default, sp-mode is selected as default access
point.
Checking Access Point in Use
Home screen W xA W [Settings] W [Wireless &
1
networks] W [Mobile networks] W [Access Point
Names]
Setting Additional Access Point
Q Do not change MCC to other than 440, or MNC other than 10. If you
change MCC/MNC, the access point will no longer be displayed on the
screen.
Home screen W xA W [Settings] W [Wireless &
1
networks] W [Mobile networks] W [Access Point
Names]
xA W [New APN]
2
[Name] W Enter the name of network profile to
3
create W [OK]
[APN] W Enter an access point W [OK]
4
Enter other items required by the network operator
5
W xA W [Save]
Q If MCC or MNC has been changed and the access point is not
displayed on the screen, reset access point settings to the default
status, or manually configure the access point.
Resetting Access Point
Resetting the access point restores the default status.
Home screen W xA W [Settings] W [Wireless &
1
networks] W [Mobile networks] W [Access Point
Names]
xA W [Reset to default]
2
sp-mode
sp-mode is an ISP for NTT DOCOMO smartphones. In addition to
the Internet connection, you can use mail service with the same
mail address (@docomo.ne.jp) as that of the i-mode. sp-mode is a
pay service requiring subscription. For details of sp-mode, refer to
DOCOMO website.
mopera U
mopera U is NTT DOCOMO’s ISP. Subscribers for mopera U can
use the Internet with simple settings. mopera U is a pay service
requiring subscription.
Setting mopera U
Home screen W xA W [Settings] W [Wireless &
1
networks] W [Mobile networks] W [Access Point
Names]
Mark [mopera U (スマートフォン定額) (flat-rate for
2
smartphone)]/[mopera U設定 (mopera U setting)]
checkbox
Initial Setting 43
Page 46

Information
?
Information
Q [mopera U設定 (mopera U setting)] is an access point for mopera U
setting. Connection via the access point for mopera U setting costs
no packet communication fee. Note that you cannot access the
screens other than those for initial settings and changing settings. For
details of mopera U setting, refer to mopera U website.
Q To use [mopera U (スマートフォン定額) (flat-rate for smartphone)],
subscription to flat-rate packet service is required. For details of
mopera U (スマートフォン定額) (flat-rate for smartphone), refer to
DOCOMO website.
Email Setting
You can configure mail account provided by mopera U or general
providers to use mail function.
Q Configure access point setting in advance (zZ page 43).
Option setting screen W Set frequency of automatic
6
mail check etc. W [Next]
Mail account register screen W Enter the name
7
displayed for the sent message W [Done]
Setting General Provider’s Mail Account
Q Obtain information required for settings from your service provider in
advance.
Home screen W [Preinstall] W [Email]
1
Enter mail address and password W [Next]
2
Follow on-screen instructions
3
Setting mopera U Mail Account
Subscribers for mopera U can use mopera U mail.
■ To use POP server
Home screen W [Preinstall] W [Email]
1
Enter mopera U mail address and mopera U
2
password W [Next] W [POP3]
Enter mopera U user name and password W Enter
3
[mail.mopera.net] for POP3 server
Select [None] or security type in the security type
4
field W Confirm your entry W [Next]
Enter [mail.mopera.net] for SMTP server W Confirm
5
mopera U user name and password you entered W
[Next]
44 Initial Setting
?
Q If automatic settings of mail account does not complete, tap [Manual
setup] in step 2 to enter the account setting information manually.
Q To add another mail account, display the mail list screen W xA
W [Accounts] W xA W [Add account].
Page 47

PhoneBookCopy
Information
By using microSD card you can exchange phonebook data with
other FOMA terminals. In addition, you can copy the phonebook
data added to your Google account to docomo account.
Home screen W [Preinstall] W [PhoneBookCopy]
1
Q If you use this function for the first time, you need to accept
“License Agreement”.
Exporting Phonebook to microSD Card
Mount microSD card to the FOMA terminal
1
[エクスポート (Export)] tab W [開始 (Start)]
2
Phonebook data saved in the docomo account is saved to microSD
card.
Importing Phonebook from microSD Card
Install microSD card containing phonebook data in
1
the FOMA terminal
[インポート (Import)] tab W Tap a file to import
2
[上書き (Overwrite)]/[追加 (Add)]
3
Imported phonebook data is saved to the docomo account.
Copying Contacts in Google Account to docomo Account
[docomoアカウントへコピー (Copy to docomo
1
account)] tab W Tap Google account to copy
[上書き (Overwrite)]/[追加 (Add)]
2
Copied phonebook data is saved to the docomo account.
?
Q If the phonebook item names (Phone number, etc.) of the other
FOMA terminal are not consistent with those of this FOMA terminal,
item names may be changed or deleted. As characters available for
contact information may vary depending on FOMA terminals, some
characters may be deleted at the destination.
Q When you export the phonebook data to microSD card, data without
names cannot be copied.
Q When you import the phonebook from microSD card, files created
through [Batch backup] are not loaded.
Initial Setting 45
Page 48

Wi-Fi
Information
You can use mail and the Internet by connecting to your home or
corporate network or a public wireless LAN access point using the
Wi-Fi function of the FOMA terminal.
Home screen W xA W [Settings] W [Wireless &
1
networks] W Mark [Wi-Fi] checkbox
Wi-Fi is turned on and available Wi-Fi networks are detected.
[Wi-Fi settings]
2
Network name and security settings (open network or security
protected) of each detected Wi-Fi network are displayed in the Wi-
Fi network list.
Q To manually add a Wi-Fi network, [Add Wi-Fi network] W Enter
required information W Tap [Save].
Select security setting from [Open]/[WEP]/[WPA/WPA2 PSK].
Select Wi-Fi network W [Connect]
3
Q If you select a security-protected Wi-Fi network, enter the
password (security key) and tap [Connect].
?
Q You can also use packet communication when the Wi-Fi function is
enabled. However, Wi-Fi is given priority when the FOMA terminal
connects to Wi-Fi network. If the FOMA terminal is disconnected from
the Wi-Fi network, 3G/GPRS network connection will automatically
take over. Note that packet communication fee will be charged if you
continue using the network connection.
■ Available channels
The Wi-Fi function of this FOMA terminal can use the frequency bands
of channels 1 to 11.
Online Service Accounts
You can set accounts of online services such as mixi and Twitter,
and synchronize and exchange data between the FOMA terminal
and each service server.
Q To set Exchange account, check with your network administrator
about setting information.
Home screen W xA W [Settings] W [Accounts &
1
sync] W [Add account]
Select a type of account to add W Follow on-screen
2
instructions
Q Added account is displayed in the “Manage accounts” list. Tap an
account to configure settings of each account.
46 Initial Setting
Page 49

Phone/Network Services
Phone . . . . . . . . . . . . . . . . . . . . . . . . . . . . . . . . . . . . . . . . . 48
Making a Call . . . . . . . . . . . . . . . . . . . . . . . . . . . . . . . . . . . . . . 48
Receiving a Call . . . . . . . . . . . . . . . . . . . . . . . . . . . . . . . . . . . . 49
Operations during Call . . . . . . . . . . . . . . . . . . . . . . . . . . . . . . . 50
Call Log . . . . . . . . . . . . . . . . . . . . . . . . . . . . . . . . . . . . . . . 51
Phonebook . . . . . . . . . . . . . . . . . . . . . . . . . . . . . . . . . . . . 51
Adding a Contact to Phonebook . . . . . . . . . . . . . . . . . . . . . . . . 51
Checking Contacts . . . . . . . . . . . . . . . . . . . . . . . . . . . . . . . . . . 52
My Details . . . . . . . . . . . . . . . . . . . . . . . . . . . . . . . . . . . . . . . . . 53
Voice Dialer. . . . . . . . . . . . . . . . . . . . . . . . . . . . . . . . . . . . . . . . 53
Available Network Services . . . . . . . . . . . . . . . . . . . . . . . 53
Voice Mail Service. . . . . . . . . . . . . . . . . . . . . . . . . . . . . . . . . . . 54
Call Forwarding Service . . . . . . . . . . . . . . . . . . . . . . . . . . . . . . 55
Call Waiting Service . . . . . . . . . . . . . . . . . . . . . . . . . . . . . . . . . 55
Caller ID Notification Service . . . . . . . . . . . . . . . . . . . . . . . . . . 56
Using Public Mode (Power OFF) . . . . . . . . . . . . . . . . . . . . . . . 56
47
Page 50

Phone
Making a Call
Home screen W [Phone] W Enter the other party’s
1
phone number
Q If you enter a wrong number, tap to clear the entered number.
2
To end the call, [End]
3
Emergency Call
Emergency call Phone number
Call to police 110
Call to fire station and ambulance 119
Call for accidents at sea 118
Q If UIM is not installed, it is not possible to make an emergency call at
110/119/118 in Japan.
Q This FOMA terminal supports “Emergency Location Report”.
When you make an emergency call such as at 110/119/118, information
about the place where you are dialing from (location information) is
automatically notified to emergency-response agencies such as police
stations. It might happen that your correct location is not detected by
emergency-response agencies depending on the location you dial from or
radio wave conditions.
When you do not notify your phone number such as by adding “184” for
each call, your location information and phone number are not notified.
However, when an emergency-response agency has judged that the
location information and phone number should be detected because of
emergency priority such as for protection of human life, it might get location
information and phone number regardless of your setting.
Areas and timing to introduce “Emergency Location Report” vary
depending on the preparation of respective emergency-response agencies.
48 Phone/Network Services
Q When you make a call at 110/119/118 from the FOMA terminal, tell an
operator that you are calling from a mobile phone, as well as your
phone number and exact location, so that police/fire station can make
a confirmation call to you.
In addition, stay at the current location while talking preventing the call
from being disconnected. Do not turn off the power immediately, and
make sure to place your phone standby for at least ten minutes after
the call.
Q You might not be connected to regional police/fire station depending
on the area where you are calling from.
Q When [Emergency call] is displayed on the screen, you can make an
emergency call by tapping [Emergency call]. Note, however, that you
cannot make an emergency call in Japan from the PIN code entry
screen or PIN unblocking key (PUK) entry screen, or when the UIM is
completely locked.
Selecting Whether to Notify or Withhold Caller ID for
Each Call
Q Caller ID is your important information. Be careful about notifying it.
Home screen W [Phone] W Enter
1
the other party’s
phone number
xA W [Set Notify caller ID active] (186 added)/
2
[Set Notify caller ID inactive] (184 added) W
Entering Push Signals
Push signals are used for operating home answer phone or for
using services such as ticket reservation and bank balance check.
Home screen W [Phone] W Enter phone number
1
xA W [Add pause]
2
“,” is entered.
Page 51

Enter push signals to transmit W
Information
Information
3
Push signals are automatically transmitted about two seconds after
connection is made.
Q If you select [Add wait] in step 2, “;” is added and you can transmit
push signals manually. Transmit each signal after step 3.
Using International Call
Q For overseas use, zZ page 119
Q If you have any question about WORLD CALL, contact “General
Inquiries” on the back page of this manual.
Home screen W [Phone]
1
Enter + (touch and hold [0]) W Country code W
2
Area code W Phone number
Q If the area code starts with “0”, omit “0”. However, “0” is
necessary for some countries and regions such as Italy.
3
Receiving a Call
A call comes in W Drag to the extreme right
1
Q To decline the call, drag to the extreme left.
To end the call, [End]
2
?
Q Answer holding feature is not available with this FOMA terminal.
Muting Phone Ringtone Temporarily
Incoming call W yE/yF
1
Silent Mode
When you set the Silent mode, any sound other than music, video
and alarm is muted.
Press and hold wD for at least one second W [Silent
1
mode]
Either or appears in the status bar depending on the
vibration setting (zZ page 63).
Q Setting the ringer volume to 0 by pressing yF also sets the Silent
mode.
■ To cancel Silent mode
In Silent mode W Press and hold wD for at least one
1
second W [Silent mode]
?
Q Shutter sound and recording start/end sounds of Camera are not
muted in Silent mode.
Phone/Network Services 49
Page 52

Using Stereo Headset with Microphone
You can answer incoming calls by pressing the switch on the Stereo
Headset with Microphone (sample) connected to the FOMA terminal.
■ Connecting Stereo Headset with Microphone
Headset plug
2
Connector
microUSB
plug
Insert the headset plug into the headset terminal of
1
terminal cover
Microphone side
the microphone side
Q Insert the headset plug into the headset terminal all the way.
Insert the microUSB plug of the microphone side
2
into the connector terminal
Q To open the connector terminal cover properly, zZ page 23
Q Ensure right orientation of the microUSB plug.
50 Phone/Network Services
1
Headset terminal
Headset side
■ Operations of Stereo Headset with Microphone
Function Operation
Answer
call
Decline
call
End call Press and hold the switch of the Stereo Headset with
Mute call Press the switch of the Stereo Headset with Microphone
Play/pause
music
Press the switch of the Stereo Headset with Microphone
while receiving a call.
Press and hold the switch of the Stereo Headset with
Microphone for at least one second while receiving a call.
Microphone for at least one second during call.
during call. To cancel mute, press the switch.
Press the switch to start playback when it is paused.
When music is being played, press the switch to pause.
Q This operation may not be possible depending on the
function being used at the same time.
Operations during Call
1
1
2
3
4
*1 Subscription to Call Waiting Service (zZ page 55) is required.
*2 Tap again to restore the previous state.
: Hold the call.
: Unhold the call.
: Switch parties.
2 End the call.
3 Make a call to another party.
4 Switch to hands-free call using a
Bluetooth headset.
5 Display the dialpad to transmit push
5
6
6 Mute the microphone so that your
7
7 Turn the speakerphone on for hands-
*2
signals.
voice is not heard by the other party.
free call in which you hear the other
party’s voice from the speaker.
*1
*1
*1*2
*1
*2
*2
*2
Page 53

Information
?
Q Voice input during call may generate noise or not be recognized properly.
Adjusting Volume of Other Party’s Voice
During call W yE (increase)/yF (decrease)
1
Call Log
Home screen W [Phone] W [Call log] tab
1
The call log screen is displayed.
Q To delete a call from the log, touch and hold the call to delete W
[Remove from call log].
To delete all calls from the log, display the call log screen W
A W [Clear call log] W [OK].
1
2
3
Call log screen
1 : Outgoing call
4
: Incoming call
5
: Missed call
: Rejected call
Indicates an incoming call from
the phone number specified in
the Call Reject setting (zZ page
62).
2 Tap to open a group of calls.
Calls that you have made/received
sequentially to/from the same name or
phone number are grouped together
and displayed.
3 Name and phone number
Tap to redial, send an SMS message,
view contact details, or add a contact
to the phonebook.
4 Tap to make a call.
5 Number of calls in a group
Phonebook
Adding a Contact to Phonebook
You can save names, phone numbers and mail addresses in the
phonebook.
Home screen W [Preinstall] W [Phonebook] W
1
[New contact]
Enter necessary items
2
Q Tap the image icon to add an image.
Q Tap / to add/delete entries.
Q To discard the entered contents, tap [Revert]. Pressing xC
does not discard the entered contents, but saves them to the
phonebook.
[Done]
3
Q If no contact is displayed, change marked items in the Display
options setting (zZ page 52).
Adding a Contact to Favorites
Home screen W [Preinstall] W [Phonebook] W Tap
1
a contact to add W (gray) at the right of the
name
turns to blue and the added contact is displayed in the list in
[Favorites] tab.
Q For menu operations in the favorite list screen, zZ page 52
Phone/Network Services 51
Page 54

Checking Contacts
Information
Home screen W [Preinstall] W [Phonebook]
1
Contact list screen is displayed.
1
2
3
4
5
6
Contact list screen
?
Q Contacts containing pictograms or unsupported characters may not
be displayed correctly.
1 Tap the phone number to display My
Details (zZ page 53).
2 Index bar
3 Tap to make a call or send an SMS
message.
7
4 Name
Tap to confirm details of the contact.
Touch and hold to edit/delete the
contact.
5 Tap and select an account and group
to display contacts by group.
6 Tap and enter keyword in the search
box to sort out contacts.
7 Index
Scroll up/down and index bar of the
character highlighted at the center is
displayed at the top.
Contact List Screen/Favorite List Screen Menu
Contact list screen (W [Favorites] tab) W xA W
1
Perform operations listed below:
*1
Display options
Delete Delete contact(s).
Group setting Add/edit/delete group(s).
Accounts Configure settings of Accounts & sync and add/
Import/Export zZ page 52
*1 Unavailable in the favorite list screen.
Select from display options: to show contacts
accompanied by phone numbers only or contacts
of marked items only.
manage online service account(s).
Importing/Exporting Contacts
Contacts can be imported/exported between the UIM and the
FOMA terminal.
■ Importing contacts
Contact list screen W xA W [Import/Export] W
1
[Import]
[Import from SIM card] W Select an account
2
To import a contact
3
Touch and hold a contact to import W [Import]
To import all contacts
xA W [Import all]
52 Phone/Network Services
Page 55

■ Exporting contacts
Contact list screen W xA W [Import/Export] W
1
[Export]
To export visible contacts
2
[Share visible contacts] W Select an application W
Follow on-screen instructions
To export all contacts via infrared communication
[Share all via IrDA] W Enter 4-digit password W
[OK] W [Send]
Q To send all (visible) contacts via infrared communication, the same
4-digit password has to be entered on the receiving terminal.
Q Group names are not sent when exporting contacts by [Share
visible contacts]. To include group names when exporting all
contacts, use [Share all via IrDA], PhoneBookCopy (Z page 45)
or SD backup (Z page 117).
Q The exported contacts are saved to the docomo account on the
receiving terminal.
My Details
The phone number of the FOMA terminal can be confirmed. You
can also enter or edit your own details.
Home screen W [Preinstall] W [Phonebook] W Tap
1
the phone number in the My Details field
xA W Perform operations listed below:
2
Edit contact Edit My Details.
Share Share My Details via infrared communication, etc.
Initialize Restore all items in My Details to the default state
except phone number.
Voice Dialer
You can make a call to a contact of the phonebook by speaking the
name or phone number of the contact.
Q Voice Dialer does not support Japanese.
Q Some words you speak may not be recognized properly depending on
its content.
Home screen W [Preinstall] W [Voice Dialer]
1
Say “Call” followed by the name of a contact, or “dial”
2
followed by a phone number to the microphone
[OK]
3
Available Network Services
You can use the following DOCOMO network services on this
FOMA terminal.
Q Network services are unavailable when you are out of the service area
or out of reach of radio waves.
Q “Deactivating service” does not mean termination of subscription to
services such as Voice Mail Service and Call Forwarding Service.
Q This manual provides instructions for use of each network service
from FOMA terminal menu. For detailed information, refer to “Mobile
Phone User’s Guide [Network Services]”.
Q For application or inquiry, contact “General Inquiries” on the back
page of this manual.
Service name Monthly fee Application Refer to
Voice Mail Service Paid Necessary page 54
Call Forwarding Service Free Necessary page 55
Call Waiting Service Paid Necessary page 55
Caller ID Notification Service Free Unnecessary page 56
Public mode (power OFF) Free Unnecessary page 56
Phone/Network Services 53
Page 56

Voice Mail Service
When you cannot answer a call because the FOMA terminal is
turned off or out of reach of radio waves, or if you do not answer a
call within a set ring time, this service answers the caller with an
answering message and takes a message from the caller.
Q Up to 20 messages can be stored, each of which can be recorded up
to three minutes and stored for 72 hours.
Q If the Voice Mail Service is “activated” and you do not answer a call,
the call is recorded as a missed call in the call log and appears in
the status bar.
Q This FOMA terminal is not compatible with the Videophone Voice Mail
Service. Call “1412” and set it to “Deactivated”.
Basic Flow of Voice Mail Service
Step 1: Activate the service
Step 2: The caller records a message
Step 3: Play the message
*1 If the caller is in a rush and wants to skip the answering message
to record a message immediately, he/she can do so by inputting
“#” while the answering message is being played.
*1
Using Voice Mail Service
Home screen W xA W [Settings] W [Call
1
settings] W [Network service settings]
Network service settings screen is displayed.
54 Phone/Network Services
[Voicemail] W Perform operations listed below:
2
Activate voicemail Activate the Voice Mail Service.
Deactivate
voicemail
Set ring time Enter the ring time (0 to 120 seconds).
Check voicemail
settings
Play messages
Voicemail setting
Check messages
Tone message
notification
Activate missed
call notification
Deactivate missed
call notification
Check missed
call notification
setting
*1 You will receive SMS “NTT DOCOMO VM:XX” after each operation.
Deactivate the Voice Mail Service.
Q When the ring time is set to “0 second”, incoming
calls are not recorded in the incoming call log.
Confirm current settings.
*1
Play the message following audio guidance when
you are connected to the Voice Mail Service center.
*1
Change the settings following audio guidance when
you are connected to the Voice Mail Service center.
*1
Check for messages.
Sound is generated to notify of new message.
If there was an incoming call while the FOMA
terminal was turned off or out of service area, an
SMS message notifies you of the call when the
FOMA terminal is turned on and enters the service
area again.
[For all calls]: Notifications of all incoming calls are
provided.
[For calls with Caller ID]: Notification of calls with
caller ID only are provided.
Deactivate the missed call notification.
Confirm the current missed call notification setting.
Page 57

Call Forwarding Service
Information
Information
When you cannot answer a call because the FOMA terminal is
turned off or out of reach of radio waves, or if you do not answer a
call within a set ring time, this service allows you to have the call
forwarded to another phone number.
Q If the Call Forwarding Service is “activated” and you do not answer a
call, the call is recorded as a missed call in the call log and
appears in the status bar.
Basic Flow of Call Forwarding Service
Step 1: Register a forwarding phone number
Step 2: Activate Call Forwarding Service
Step 3: Your FOMA terminal receives a call
Step 4: The call is automatically forwarded to the forwarding
phone number unless you answer it
Call Charges for Call Forwarding Service
Q Charges for calls from the caller to the service subscriber shall be paid
by the caller.
Q Charges for calls from the service subscriber to a forwarding number
shall be paid by the subscriber.
?
Q Even when the Call Forwarding Service is activated, you can answer
a call while the ringtone is ringing.
Setting Call Forwarding Service
Network service settings screen W [Call
1
forwarding] W Perform operations listed below:
Activate call
forwarding
Enter a forwarding phone number and ring time (0 to
120 seconds) and activate Call Forwarding Service.
Q Tapping will call up the phonebook.
Q When the ring time is set to “0 second”, incoming
calls are not recorded in the incoming call log.
Deactivate call
forwarding
Change forwarding
number
Setting if forwarding
number is busy
Check call
forwarding settings
*1 Subscription to Voice Mail Service is required.
Deactivate the Call Forwarding Service.
Change the forwarding phone number.
Q Tapping will call up the phonebook.
Incoming calls are forwarded to Voice Mail
*1
Service center when the line of the forwarding
number is busy.
Confirm current settings.
Setting Call Forwarding Announcement
You can turn on or off the voice announcement, which informs the
caller that the call is being forwarded.
Home screen W [Phone] W [1][4][2][9] W
1
Q Configure settings following the audio guidance.
Call Waiting Service
If there is another incoming call during a call, this service notifies
of it with a call waiting tone, and allows you to answer the new call
by putting the current call on hold. You can also put the current
call on hold and make a call to another party.
?
Q Even while the caller is put on hold, the caller is charged for the call.
Setting Call Waiting Service
Network service settings screen W [Call waiting]
1
Activate/deactivate/check the settings of Call
2
Waiting Service
Phone/Network Services 55
Page 58

Holding Call to Answer an Incoming Call
Information
During call W Beep sound is generated
1
Incoming call screen appears when you move your face away from
the proximity sensor.
Drag to the extreme right
2
You can answer the second call by putting the first call on hold.
To end the second call
3
[End]x
Connection is switched to the first call.
To hold the second call
(Swap)
Connection is switched to the first call. Calls are switched each
time you tap (Swap).
Holding Call to Make Another Call
During call W Tap (Hold)
1
The first call is put on hold.
[Add call] W Enter another party’s phone number
2
W
You can talk with another party.
To end the second call
3
[End]x
Connection is switched to the first call.
To hold the second call
(Swap)
Connection is switched to the first call. Calls are switched each
time you tap (Swap).
56 Phone/Network Services
Caller ID Notification Service
You can display your phone number on the other party’s phone
when you make a call.
Q Phone number is your important information. Be careful about
notifying it.
Network service settings screen W [Notify caller ID]
1
Activate/deactivate/check the settings of Caller ID
2
Notification Service
?
Q Setting for notifying/withholding caller ID for each call (zZ page 48) is
given priority over setting of caller ID notification.
Using Public Mode (Power OFF)
When the public mode (power OFF) is set and you receive a call
while the power is off or in Airplane mode, an answering message
is played telling the caller that you cannot answer calls since you
are in a place where you must turn off the power (e.g. hospital,
airplane, and near priority seats in a train), and the call
automatically ends.
Q If the public mode (power OFF) and network service are set at the
same time, Voice Mail Service
priority over the public mode (power OFF).
* For calls with the ring time other than “0 second”, the service is
activated after answering message of the public mode (power OFF).
Home screen W [Phone]
1
*
or Call Forwarding Service* is given
Page 59

To set public mode (power OFF)
2
[ ][2][5][2][5][1]
The public mode (power OFF) is set (no change in the home
screen).
To cancel public mode (power OFF)
[ ][2][5][2][5][0]
To confirm public mode (power OFF) setting
[ ][2][5][2][5][9]
3
When Public Mode (Power OFF) Is Set
The setting remains valid until you tap [ ][2][5][2][5][0] W
to cancel public mode (power OFF). Turning the power on will
not cancel the setting. An answering message that says you are in
a place where the power must be turned off is played, and the call
automatically ends.
The public mode (power OFF) answering message is played also
when the FOMA terminal is out of service area or where radio
waves cannot reach.
Phone/Network Services 57
Page 60

58
Page 61

Various Settings
Setting Menu . . . . . . . . . . . . . . . . . . . . . . . . . . . . . . . . . . . 60
Wireless & Networks . . . . . . . . . . . . . . . . . . . . . . . . . . . . . 60
Using USB Tethering . . . . . . . . . . . . . . . . . . . . . . . . . . . . . . . . . 61
Using Wi-Fi Tethering. . . . . . . . . . . . . . . . . . . . . . . . . . . . . . . . . 61
Call Settings . . . . . . . . . . . . . . . . . . . . . . . . . . . . . . . . . . . . 62
Sound . . . . . . . . . . . . . . . . . . . . . . . . . . . . . . . . . . . . . . . . . 63
Adjusting Volume . . . . . . . . . . . . . . . . . . . . . . . . . . . . . . . . . . . .63
Display . . . . . . . . . . . . . . . . . . . . . . . . . . . . . . . . . . . . . . . . 63
Location & Security . . . . . . . . . . . . . . . . . . . . . . . . . . . . . . 64
About GPS . . . . . . . . . . . . . . . . . . . . . . . . . . . . . . . . . . . . . . . . . 64
Security Codes Used in FOMA Terminal . . . . . . . . . . . . . . . . . . 64
Setting PIN Code . . . . . . . . . . . . . . . . . . . . . . . . . . . . . . . . . . . .66
Setting Screen Lock . . . . . . . . . . . . . . . . . . . . . . . . . . . . . . . . . .67
Setting Terminal Password . . . . . . . . . . . . . . . . . . . . . . . . . . . .67
Applications . . . . . . . . . . . . . . . . . . . . . . . . . . . . . . . . . . . . 67
Deleting an Installed Application . . . . . . . . . . . . . . . . . . . . . . . .68
Accounts & Sync . . . . . . . . . . . . . . . . . . . . . . . . . . . . . . . . 68
Changing Items to Synchronize . . . . . . . . . . . . . . . . . . . . . . . . . 68
Starting Manual Synchronization . . . . . . . . . . . . . . . . . . . . . . . . 68
Removing an Account . . . . . . . . . . . . . . . . . . . . . . . . . . . . . . . . 68
Privacy . . . . . . . . . . . . . . . . . . . . . . . . . . . . . . . . . . . . . . . . 69
Resetting FOMA Terminal . . . . . . . . . . . . . . . . . . . . . . . . . . . . .69
Storage . . . . . . . . . . . . . . . . . . . . . . . . . . . . . . . . . . . . . . . . 69
Erasing All Data in microSD Card . . . . . . . . . . . . . . . . . . . . . . . 69
Language & Keyboard. . . . . . . . . . . . . . . . . . . . . . . . . . . . 70
Voice Input & Output . . . . . . . . . . . . . . . . . . . . . . . . . . . . . 70
Accessibility. . . . . . . . . . . . . . . . . . . . . . . . . . . . . . . . . . . . 70
Date & Time . . . . . . . . . . . . . . . . . . . . . . . . . . . . . . . . . . . . 71
About Phone . . . . . . . . . . . . . . . . . . . . . . . . . . . . . . . . . . . 71
59
Page 62

Setting Menu
Display home screen W xA W [Settings] to call up the setting
menu and configure various settings for the FOMA terminal.
Q The setting menu can be displayed by displaying the home screen W
[Preinstall] W [Settings].
Wireless & Networks
Home screen W xA W [Settings] W [Wireless &
1
networks] W Perform operations listed below:
Airplane mode Disable the wireless
Wi-Fi zZ page 46
Wi-Fi settings Network
notification
Add Wi-Fi
network
Bluetooth zZ page 93
communication feature of FOMA
terminal.
Q Though marking [Airplane mode]
checkbox will turn off Wi-Fi and
Bluetooth functions, they can be
turned on again in Airplane mode.
Do not use Wi-Fi or Bluetooth
function in any place where use
of radio wave is prohibited, such
as hospital, airplane, and near the
priority seats in a train.
Configure settings to provide
notification when any open Wi-Fi
network is detected.
zZ page 46
Bluetooth
settings
Tethering &
portable
hotspot
VPN settings Add VPN zZ page 94
Mobile
networks
Device name zZ page 94
Discoverable zZ page 93
Scan for
devices
USB tethering zZ page 61
Portable Wi-Fi
hotspot
Portable Wi-Fi
hotspot
settings
Help Display help information about
Data enabled Enable Internet access via mobile
Data roaming Enable connection to data services
Network Mode zZ page 122
Access Point
Names
Network
operators
zZ page 93
zZ page 61
zZ page 62
tethering.
networks.
during roaming.
zZ page 43
zZ page 122
60 Various Settings
Page 63

Using USB Tethering
Information
Information
You can connect your FOMA terminal to your PC, etc. with the
included microUSB cable, and connect your PC, etc. to the Internet
using mobile network data connection.
Connect the FOMA terminal to a PC using the
1
microUSB cable
Q For how to connect the FOMA terminal to a PC, zZ step 1 to 2 in
“Connecting to a PC” on page 95
Home screen W xA W [Settings] W [Wireless &
2
networks] W [Tethering & portable hotspot]
[USB tethering]
3
Q Read the content of the CAUTION screen.
[Details] W Read the content W xC W [OK]
4
USB tethering is enabled.
?
Q The following PC environments (OS) are required to use USB
tethering. Proper operation is not guaranteed if the OS has been
upgraded, added or modified.
Windows 7, Windows Vista, Windows XP (service pack 3 or later)
Q Depending on the PC environment, it may be difficult to connect to
the Internet or USB tethering may be disabled. In that case, enable
USB tethering again and retry.
Q A special driver is necessary to use USB tethering on a PC running
Windows XP. For information about downloading the driver, etc., visit
the following website:
http://panasonic.jp/mobile/ (in Japanese only)
Q If USB storage is turned on, you cannot use USB tethering. Turn off
USB storage (zZ page 95).
Using Wi-Fi Tethering
You can turn your FOMA terminal into a portable Wi-Fi hotspot to
connect up to five wireless LAN-compatible PCs, etc.
simultaneously to the Internet.
Home screen W xA W [Settings] W [Wireless &
1
networks] W [Tethering & portable hotspot]
[Portable Wi-Fi hotspot]
2
Q Read the content of the CAUTION screen.
[Details] W Read the content W xC W [OK]
3
Portable Wi-Fi hotspot is enabled.
?
Q If you start using Wi-Fi tethering without configuring portable Wi-Fi
hotspot settings, the network SSID is [AndroidAP] and security is
[Open]. You can change the network SSID and configure security
setting as required (zZ page 62).
Q Turning on the Bluetooth fu nction (zZ page 93) disables portable Wi-
Fi hotspot.
Q You can use both USB tethering and Wi-Fi tethering at the same time.
Various Settings 61
Page 64

Setting Portable Wi-Fi Hotspot
Home screen W xA W [Settings] W [Wireless &
1
networks] W [Tethering & portable hotspot]
[Portable Wi-Fi hotspot settings] W [Configure Wi-
2
Fi hotspot]
Enter necessary information
3
Q You can set a password by selecting [WPA2 PSK] in the Security
field.
[Save]
4
Call Settings
Home screen W xA W [Settings] W [Call
1
settings] W Perform operations listed below:
Fixed Dialing
Numbers
Network service
settings
Enable FDN/
*1
Disable FDN
Change PIN2 zZ page 66
FDN list Manage the phone number list.
Voicemail zZ page 54
Call forwarding zZ page 55
Call waiting zZ page 55
Notify caller ID zZ page 56
When FDN is enabled, you can call
the phone numbers added to the
FDN list only.
Q Only single-byte characters and
symbols can be used for names
to be added to the list.
Call Reject Reject call Reject calls from specified phone
Reject unknown Reject calls from phone numbers
Edit Registered
list
International dial assist A selection screen in which you
Accounts Tap [Add account] to set SIP
Use Internet calling Set whether or not to use Internet
*1 Not available with a DOCOMO UIM.
numbers.
not listed in the phonebook.
Add/change/delete item(s) in the
Edit Registered list.
choose whether or not to add
Japan country code appears when
you make a call from outside of
Japan.
account to make an Internet call.
Further, mark [Receive incoming
calls] checkbox to receive Internet
calls.
calling while connected to Wi-Fi
network.
62 Various Settings
Page 65

Sound
Information
Home screen W xA W [Settings] W [Sound]
1
Sound settings screen is displayed.
Perform operations listed below:
2
[OK]
2
?
Q Ringer (ringtone) volume can be adjusted by yE/yF. Note that during
music/video playback or 1Seg watching, these keys are used as
volume keys for the respective functions.
Silent mode Set/cancel the Silent mode.
Vibrate Set whether to keep vibration always on/off, or to
Volume zZ page 63
Phone ringtone Set the phone ringtone.
Notification
ringtone
Audible touch
tones
Audible selection Set the menu selection tones on/off.
Screen lock
sounds
Haptic feedback Set the vibration upon certain screen operations
turn it on only when the Silent mode is set/
canceled.
Set the notification ringtone that sounds upon
reception of an SMS message, etc.
Set the phone dialpad tones on/off.
Set whether or not the tones sound when the
screen is locked/unlocked.
on/off.
Adjusting Volume
Phone ringtone, notification ringtone, media sound and alarm
volume can be adjusted.
Sound settings screen W [Volume] W Drag
1
appropriate sound slider to right/left
Q Notification ringtone volume can be adjusted by unmarking [Use
incoming call volume for notifications] checkbox.
Display
Home screen W xA W [Settings] W [Display] W
1
Perform operations listed below:
Brightness Set the brightness.
Auto-rotate screen Vertical/horizontal display modes are
Animation Set whether or not to use animation to indicate
Screen timeout Set the time length before the FOMA terminal
Font setting Set the font used in the FOMA terminal.
Proximity Sensor Enable the sensor that prevents false operation of
Dominant hand
setting
automatically switched according to the direction
of FOMA terminal.
screens and items.
automatically enters the Sleep mode when it is
not being operated.
Q While the infrared communication function is
running, the FOMA terminal does not enter the
Sleep mode even after the set time has elapsed
without any operation.
the touch panel during call.
Set user’s dominant hand.
Various Settings 63
Page 66

Location & Security
Home screen W xA W [Settings] W [Location &
1
security] W Perform operations listed below:
Use wireless
networks
Use GPS satellites Measure more accurate location information.
Set up screen lock zZ page 67
Set up SIM card
lock
Terminal password
setting
Visible passwords Set whether characters are shown or hidden
Select device
administrators
Use secure
credentials
Install from SD
card
Set password Set/change credentials storage password.
Clear storage Clear all credentials and certificates from the
64 Various Settings
Search for the present location based on
information acquired from Wi-Fi and mobile
network base stations.
Q Excellent visibility is required, and battery
consumption is increased. It is recommended to
use with wireless networks.
zZ page 66
zZ page 67
when you enter the password.
Add/remove device administrators.
Enable credentials and certificates by permitting
FOMA terminal application to access to the
password-protected credentials storage.
Install encrypted certificates from microSD card.
credentials storage and reset the storage
password.
About GPS
Q GPS is a function to obtain location information of the FOMA terminal
by receiving radio waves from GPS satellites.
Q This cannot be used as navigation equipment for airplane, vehicle or
person, or as high-accuracy surveying GPS. Note that we do not take
any responsibility for a loss, such as pure economic loss resulting from
use of GPS function for these purposes, or the facts that you have
missed the chance to check the positioning (communication) results,
which have been caused by external factors such as malfunctions,
erroneous operations, or power failure (including battery shortage) on
the FOMA terminal.
Q GPS is operated by the United States Department of Defense, so the
GPS radio wave conditions might be controlled (accuracy
deterioration, radio wave supply suspension, etc.) depending on the
defense strategy of the United States Department of Defense. Further,
the result may vary even when positioning is performed in the same
location and environment since radio wave conditions change along
with movement of satellites.
Q GPS uses radio waves from artificial earth satellites. Therefore, error
in location information may be larger than 300 m as it may not/poorly
receive radio waves under following conditions:
· Among or under densely planted trees, high-rise buildings and
dense residential area
· Inside or very close to a building
· Underground, tunnel, subterranean area and under water
· Near high-tension wire
·In a vehicle or train
·In bad weather (heavy rain and snow)
·In a bag or box
·Surrounded by objects (including people)
Security Codes Used in FOMA Terminal
Some of the functions for convenient use of the FOMA terminal
requires security codes, including FOMA terminal screen
unlocking code and network security code for network services.
Use appropriate security codes to handle the FOMA terminal.
Page 67

■ Caution on security codes
Q You should avoid using the numbers for security codes such as
denoting your birth date, part of your phone number, local address
number, room number, “1111” or “1234” that is easily decoded by a
third party. Also make sure that you take a note of the security codes
you have selected just in case you forget them.
Q Take care not to let others know your security codes. If your security
codes are known and used by a third party, we at DOCOMO take no
responsibility in any event for the resultant loss.
Q If you do not remember your respective security codes, you need to
bring an identification card such as your driver’s license, the FOMA
terminal and UIM to the handling counter of a docomo Shop. For
details, contact “General Inquiries” on the back page of this manual.
Q The PIN unblocking key (PUK) is described on the application form
(your copy) that is handed over to you at a docomo Shop at the time
of contract. If your contract has been made at a shop other than a
docomo Shop, you need to bring an identification card such as your
driver’s license, and the UIM to the handling counter of a docomo
Shop, or contact “General Inquiries” on the back page of this manual.
Screen Locking PIN/Password
These are security codes for screen lock function for the FOMA
terminal. PIN may be any number with four or more digits while the
password may be any number with four or more digits with at least
one alphabet character (zZ page 67).
Terminal Password
This is a four-to-eight digit number required for FOMA terminal
resetting or when the password manager is launched by other
applications (zZ page 67).
Network Security Code
This is a four-digit number required for your identification when
you place an order at a docomo Shop or docomo Information
Center, or when you use network services. This number is
determined at the time of contract and you can also change the
number later by yourself.
If you have “docomo ID/password” for the general support site for
PC users “My docomo”
from a PC.
*1 For details on “My docomo”, refer to the page just before the
back page of this manual.
*1
, you can set a new network security code
PIN1 Code/PIN2 Code
Two security codes are provided for the UIM, namely the PIN1 code
and PIN2 code. These security codes are set to “0000” by default, but
you can change the numbers later (zZ page 66).
The PIN1 code is a four-to-eight digit number (code) for checking the
user each time the UIM is installed or each time the FOMA terminal is
turned on, to prevent the unauthorized use by a third party.
You can make/receive calls and operate the terminal by entering the
PIN1 code.
Q If you use a UIM that you used for another FOMA terminal in this
FOMA terminal, enter the PIN1/PIN2 codes you set for the old
terminal. The codes are “0000” if you have not changed them.
Q If you fail to enter PIN1/PIN2 code correctly three times in succession,
PIN1/PIN2 code is locked and disabled. In this case, unlock the PIN1/
PIN2 lock with “PIN unblocking key”.
PIN Unblocking Key
The PIN unblocking key (PUK) is the eight-digit number for
releasing the blocked PIN1 code and PIN2 code. You cannot
change this PIN unblocking key by yourself.
Q If you fail to enter PIN unblocking key (PUK) correctly ten times in
succession, the UIM is locked. In this case, contact a docomo Shop.
Various Settings 65
Page 68

Setting PIN Code
Configure settings so that the FOMA terminal prompts you to enter
PIN1 code at startup.
Home screen W xA W [Settings] W [Location &
1
security] W [Set up SIM card lock]
SIM card lock settings screen is displayed.
[Lock SIM card] W Enter PIN1 code W [OK]
2
[Lock SIM card] checkbox is marked.
Changing PIN1 Code
Perform step 1 to 2 in “Setting PIN Code” on page 66
1
[Change SIM PIN]
2
Enter current PIN1 code W [OK]
3
Enter new PIN1 code W [OK]
4
Enter new PIN1 code again W [OK]
5
Unlocking PIN1 Lock
If you fail to enter PIN1 code correctly three times in succession,
PIN1 is locked and [The SIM card is locked with PUK] appears. You
can unlock PIN1 lock by following operations.
Drag it along with the guide from the right side (or
1
left side) of the screen
Q When [Entering wrong number 10 times will cause SIM lock.]
appears, tap [OK].
Enter PIN unblocking key (PUK) W [Next]
2
Enter new PIN1 code W [Next]
3
Enter new PIN1 code again W [Next]
4
Changing PIN2 Code
Home screen W xA W [Settings] W [Call
1
settings] W [Fixed Dialing Numbers]
Fixed Dialing Numbers screen is displayed.
[Change PIN2]
2
Enter current PIN2 code W [OK]
3
Enter new PIN2 code W [OK]
4
Enter new PIN2 code again W [OK]
5
Q If you enter the current PIN2 code wrongly three times in
succession and PIN2 is locked, zZ step 4 in “Unlocking PIN2
Lock” on page 66
Unlocking PIN2 Lock
If you fail PIN2 authentication three times in succession, and
[Password incorrect, please change PIN2 and retry!] is displayed,
perform the following procedure to unlock PIN2 lock.
Fixed Dialing Numbers screen W [Change PIN2]
1
Enter new PIN2 code W [OK]
2
Enter new PIN2 code again W [OK]
3
Enter PIN unblocking key (PUK2) W [OK]
4
66 Various Settings
Page 69

Setting Screen Lock
Information
The FOMA terminal can be locked with unlocking pattern, PIN or
password to prevent unauthorized use by any third party.
Home screen W xA W [Settings] W [Location &
1
security]
Location & security settings screen is displayed.
[Set up screen lock] W [Pattern]/[PIN]/[Password]
2
W Follow on-screen instructions
Q When the screen lock is set, you can set [Use tactile feedback] in
Location & security settings screen. To have the FOMA terminal
vibrate as you enter the pattern, PIN or password, mark the
checkbox. If the pattern is set, you can also set [Use visible
pattern]. Mark the checkbox to show the trace of your finger as it
draws the pattern on the screen.
Disabling Screen Lock Setting
Location & security settings screen W [Change
1
screen lock]
Enter unlocking pattern, PIN or password W [None]
2
?
Q If you fail to enter unlocking pattern correctly five times in succession,
you can create a new pattern by following on-screen instructions after
tapping [Forgot pattern?] in the re-entry screen and logging in to your
Google account. If you forget PIN or password, you cannot unlock the
screen.
Setting Terminal Password
Home screen W xA W [Settings] W [Location &
1
security]
Location & security settings screen is displayed.
[Terminal password setting]
2
Enter terminal password W [OK]
3
Enter terminal password again W [OK]
4
Changing Terminal Password
Location & security settings screen W [Terminal
1
password setting]
Enter current terminal password W [OK]
2
Enter new terminal password W [OK]
3
Enter new terminal password again W [OK]
4
Applications
Home screen W xA W [Settings] W [Applications]
1
Application settings screen is displayed.
Various Settings 67
Page 70

Perform operations listed below:
2
Perform operations listed below:
2
Unknown sources Permit installation of applications obtained from
Manage
applications
Running services Display/manage running services.
Storage use Display application storage usage.
Battery use Battery power consumption of each application
Development Set options available for application development.
websites other than Android Market or by mail.
Q Download applications only from trusted
sources such as Android Market to protect your
FOMA terminal and personal information.
Q zZ page 68
Q Clear data and cache of applications.
can be confirmed.
Deleting an Installed Application
Application settings screen W [Manage
1
applications] W [Downloaded] tab
Tap an application to delete W [Uninstall] W [OK]
2
W [OK]
Accounts & Sync
Home screen W xA W [Settings] W [Accounts &
1
sync]
Accounts & sync settings screen is displayed.
Background data Permit all applications installed in the FOMA
Auto-sync Permit applications to automatically perform data
Add account zZ page 46
terminal to automatically perform data
communication.
synchronization.
Changing Items to Synchronize
Accounts & sync settings screen W Tap the
1
account W Mark item(s) to synchronize only
Starting Manual Synchronization
Accounts & sync settings screen W Tap the
1
account to synchronize W xA W [Sync now]
Stopping Synchronization
Synchronizing W xA W [Cancel sync]
1
Removing an Account
Removing an online service account will also delete the account
data saved in the FOMA terminal (messages, phonebook and
settings).
Q Data on the online service will not be deleted.
Accounts & sync settings screen W Tap the
1
account to remove W [Remove account] W
[Remove account]
68 Various Settings
Page 71

Information
?
Q The Google account that was set first cannot be removed by
[Remove account]. To remove the first Google account, reset the
FOMA terminal (zZ page 69).
Q The docomo account cannot be removed.
Privacy
Home screen W xA W [Settings] W [Privacy]
1
Privacy settings screen is displayed.
Perform operations listed below:
2
Back up my data Back up application data and settings to Google
Automatic restore Restore backup settings and data when an
Factory data reset zZ page 69
Resetting FOMA Terminal
You can reset the FOMA terminal to the default status.
Q This operation deletes all the applications installed and data saved to
the FOMA terminal after purchase, with some exceptions.
Privacy settings screen W [Factory data reset] W
1
Enter terminal password W [OK]
Q If terminal password is not set, zZ step 3 to 4 in “Setting Terminal
Password” on page 67
Q To delete all data in microSD card, mark [Erase SD card]
checkbox.
[Reset phone]
2
Q If the screen lock setting is enabled, enter unlocking pattern, PIN
or password.
server.
application is reinstalled.
[Erase everything]
3
Once reset, the FOMA terminal is restarted.
Storage
Home screen W xA W [Settings] W [Storage]
1
Storage settings screen is displayed.
Perform operations listed below:
2
Total space Display total capacity of microSD card.
Available space Display available space of microSD card memory.
Unmount SD card/
Mount SD card
Erase SD card zZ page 69
Available space Display available space of FOMA terminal
Erasing All Data in microSD Card
Storage settings screen W [Unmount SD card]
1
[Erase SD card] becomes selectable.
[Erase SD card] W [Erase SD card]
2
Q If the screen lock setting is enabled, enter unlocking pattern, PIN
or password.
[Erase everything]
3
Securely remove microSD card from the FOMA
terminal/Make the FOMA terminal recognize
microSD card.
memory.
Various Settings 69
Page 72

Language & Keyboard
Home screen W xA W [Settings] W [Language
1
& keyboard] W Perform operations listed below:
Select language Set a display language.
User dictionary Add words to the user dictionary for Android
Fit Key zZ page 38
Android keyboard Configu re settings for key tones and input assist
keyboard.
W xA W [Add] W Enter a word W [OK]
function for Android keyboard.
Q [Auto-complete] is not enabled even when the
checkbox is marked.
Voice Input & Output
Home screen W xA W [Settings] W [Voice input
1
& output] W Perform operations listed below:
Voice
recognizer
settings
Language Set a language for voice text input.
SafeSearch Apply adult filter to voice search results.
Block
offensive
words
Set to allow no offensive words to be
displayed for voice text input.
Text-tospeech
settings
*1 Not available if any voice data is installed.
Listen to an
example
Always use
my settings
Default
Engine
Install voice
data
Speech rate Set the speed at which the text is spoken.
Language Set a language used for text-to-speech
Pico TTS Confirm the installed voice data.
Play an example of speech synthesis.
The settings configured under [Default
settings] are always used in other
applications.
Set a synthesis engine used for text-tospeech synthesis.
If voice data necessary for text-to-speech
*1
synthesis is not installed, you can install
voice data from Android Market.
Q No Japanese voice data is available.
synthesis.
Accessibility
Home screen W xA W [Settings] W
1
[Accessibility]
Q When [No accessibility related applications found] appears, tap
[OK] to install a screen reader from Android Market, or tap
[Cancel].
70 Various Settings
Page 73

Perform operations listed below:
2
Accessibility Enable accessibility-related applications for audio
Power button ends
call
and vibration responses to user operations and
for text-to-speech service. Mark [Accessibility]
checkbox, and then mark the checkboxes of the
accessibility services you want to enable.
Q To use text-to-speech service, voice data must
be installed (zZ page 70).
Allow to end call by pressing wD.
Date & Time
This is set to [Automatic] by default. It is not necessary to set date
and time manually.
Home screen W xA W [Settings] W [Date &
1
time] W Perform operations listed below:
Automatic Date, time zone and time are acquired from the
Set date Set the date manually.
Select time zone Set the time zone manually.
Set time Set the time manually.
Use 24-hour format Switch the time format to 24-hour format.
Select date format Switch date display format.
network and automatically corrected.
About Phone
Home screen W xA W [Settings] W [About
1
phone] W Perform operations listed below:
Software Update zZ page 132
Upgrade features zZ page 138
Status The remainder of the battery and phone number
Battery use Battery power consumption of each application
Legal information Open source licenses (including GPL/LGPL) and
Model number Model number can be confirmed.
Android version Software version can be confirmed.
Baseband version
Kernel version
Build number
can be confirmed.
can be confirmed.
Google Terms of Service can be confirmed.
Various Settings 71
Page 74

72
Page 75

Mail/Internet
Email . . . . . . . . . . . . . . . . . . . . . . . . . . . . . . . . . . . . . . . . . . 74
Creating and Sending an Email . . . . . . . . . . . . . . . . . . . . . . . . . 74
Receiving and Reading an Email . . . . . . . . . . . . . . . . . . . . . . . .74
Replying to an Email . . . . . . . . . . . . . . . . . . . . . . . . . . . . . . . . .74
Forwarding an Email . . . . . . . . . . . . . . . . . . . . . . . . . . . . . . . . .74
Deleting Emails . . . . . . . . . . . . . . . . . . . . . . . . . . . . . . . . . . . . .75
Switching Folder Display . . . . . . . . . . . . . . . . . . . . . . . . . . . . . . 75
Setting Email Account Options . . . . . . . . . . . . . . . . . . . . . . . . . .75
sp-mode Mail . . . . . . . . . . . . . . . . . . . . . . . . . . . . . . . . . . . 75
Gmail. . . . . . . . . . . . . . . . . . . . . . . . . . . . . . . . . . . . . . . . . . 75
Refreshing Gmail . . . . . . . . . . . . . . . . . . . . . . . . . . . . . . . . . . . . 75
Creating and Sending a Mail . . . . . . . . . . . . . . . . . . . . . . . . . . . 75
Displaying a New Mail . . . . . . . . . . . . . . . . . . . . . . . . . . . . . . . .75
Searching for a Mail . . . . . . . . . . . . . . . . . . . . . . . . . . . . . . . . . .76
Replying to a Mail. . . . . . . . . . . . . . . . . . . . . . . . . . . . . . . . . . . .76
Forwarding a Mail. . . . . . . . . . . . . . . . . . . . . . . . . . . . . . . . . . . .76
Message Thread Operations . . . . . . . . . . . . . . . . . . . . . . . . . . .76
Setting Gmail Options . . . . . . . . . . . . . . . . . . . . . . . . . . . . . . . .76
SMS . . . . . . . . . . . . . . . . . . . . . . . . . . . . . . . . . . . . . . . . . . . 77
Creating and Sending an SMS Message. . . . . . . . . . . . . . . . . .77
Receiving and Reading an SMS Message. . . . . . . . . . . . . . . . . 77
Replying to an SMS Message . . . . . . . . . . . . . . . . . . . . . . . . . . 77
Forwarding an SMS Message . . . . . . . . . . . . . . . . . . . . . . . . . . 77
Deleting SMS Messages . . . . . . . . . . . . . . . . . . . . . . . . . . . . . . 77
Setting SMS Options . . . . . . . . . . . . . . . . . . . . . . . . . . . . . . . . . 78
Google Talk . . . . . . . . . . . . . . . . . . . . . . . . . . . . . . . . . . . . 78
Online Chat . . . . . . . . . . . . . . . . . . . . . . . . . . . . . . . . . . . . . . . . 78
Managing Members . . . . . . . . . . . . . . . . . . . . . . . . . . . . . . . . . . 79
Setting Google Talk Options . . . . . . . . . . . . . . . . . . . . . . . . . . . 79
Signing Out . . . . . . . . . . . . . . . . . . . . . . . . . . . . . . . . . . . . . . . . 79
Web Browser . . . . . . . . . . . . . . . . . . . . . . . . . . . . . . . . . . . 79
Starting Web Browser . . . . . . . . . . . . . . . . . . . . . . . . . . . . . . . . 79
Screen Operations When Web Page Is Displayed . . . . . . . . . . 80
Web Page Link Operations . . . . . . . . . . . . . . . . . . . . . . . . . . . . 80
Menu for Currently Displayed Web Page . . . . . . . . . . . . . . . . . 80
Managing Bookmarks and History. . . . . . . . . . . . . . . . . . . . . . . 81
73
Page 76

Information
You can use Email application by setting mail accounts provided
by mopera U or other Email service providers.
Q Set an access point (zZ page 43) and mail account (zZ page 44) in
advance.
Creating and Sending an Email
Home screen W [Preinstall] W [Email]
1
Q To send Email from another mail account, press xA W
[Accounts] and select a mail account in the account list screen.
Q If the combined inbox is displayed, Email is sent from the mail
account marked in the account list screen.
xA W [Compose]
2
[To] field W Enter mail address
3
Q To add Cc and/or Bcc, press xA W [Add Cc/Bcc].
[Subject] field W Enter subject
4
[Compose Mail] field W Enter message
5
Q To attach a file, press xA W [Add attachment] W select a file.
[Send]
6
?
Q Emails are regarded mails sent from PCs. If a recipient terminal is
rejecting PC mails, you cannot send an Email to the recipient.
Receiving and Reading an Email
Home screen W [Preinstall] W [Email]
1
Email list screen is displayed.
Q If you have more than one mail account, press xA W
[Accounts] and select a mail account in the account list screen.
Q Tapping [Combined Inbox] in the account list screen will show an
inbox for all mail accounts. Mail accounts are distinguished by a
color bar at the left of each Email.
To refresh the inbox, xA W [Refresh]
2
Tap an Email to read
3
Replying to an Email
Email list screen W Tap an Email to reply W [Reply]
1
/[Reply all]
Enter message W [Send]
2
Forwarding an Email
Email list screen W Tap an Email to forward W
1
xA W [Forward]
Enter forwarding mail address in [To] field W [Send]
2
74 Mail/Internet
Page 77

Deleting Emails
Email list screen
1
To delete an Email
2
Touch and hold an Email to delete
To delete multiple Emails
Mark Emails to delete
[Delete]
3
Switching Folder Display
Email list screen W xA W [Folders]
1
Tap a folder to open
2
Setting Email Account Options
Email list screen W xA W [Account settings]
1
Q You can configure settings regarding signature, notification, etc.
sp-mode Mail
Exchange mails using i-mode mail address (@docomo.ne.jp).
Pictograms, Deco-mail, and automatic reception features are
available.
Q For detailed information of sp-mode mail, refer to “ご利用ガイドブッ
ク(spモード<スマートフォン>編) (Mobile Phone User’s Guide [sp-
mode <smartphone>])” (in Japanese only).
Home screen W [sp-mode mail]
1
Follow on-screen instructions
2
Gmail
Gmail is Google’s online Email service. You can exchange Emails
using Gmail application on the FOMA terminal.
Q Set your Google account (zZ page 42) in advance.
Refreshing Gmail
Home screen W [Preinstall] W [Gmail]
1
Inbox is displayed.
xA W [Refresh]
2
Gmail application on the FOMA terminal is synchronized with your
Gmail account to refresh the inbox.
Creating and Sending a Mail
Inbox W xA W [Compose]
1
[To] field W Enter mail address
2
Q To add Cc and/or Bcc, press xA W [Add Cc/Bcc].
[Subject] field W Enter subject
3
[Compose Mail] field W Enter message
4
Q To attach an image, press xA W [Attach] W select an image.
5
Displaying a New Mail
Inbox W Tap a thread with any unread mail
1
Q When a notification icon is displayed in the status bar, you can
display the inbox by opening the notification panel and tapping
the notification.
Mail/Internet 75
Page 78

Searching for a Mail
Inbox W xA W [Search]
1
[Search mail] field W Enter keyword W
2
Replying to a Mail
Display a mail to reply
1
To reply to an address
2
To reply to all addresses
W [Reply all]
[Compose Mail] field W Enter message
3
4
Forwarding a Mail
Display a mail to forward
1
W [Forward]
2
[To] field W Enter mail address
3
Q To add Cc and/or Bcc, press xA W [Add Cc/Bcc].
[Compose Mail] field W Enter message
4
Q To attach an image, press xA W [Attach] W select an image.
5
Message Thread Operations
Inbox W Touch and hold a thread W Perform
1
operations listed below:
Read Unfold the thread.
Archive Archive (store) the thread. Archived thread is not
Mute Hide the thread. It is recommended to hide less
Mark unread/
Mark read
Delete Delete the thread.
Add star/
Remove star
Change labels Add/modify labels of the thread. This helps grouping
Report spam Report received mail as a spam.
Help Google Mobile Help is displayed and you can check
Setting Gmail Options
Inbox W xA W [More] W [Settings]
1
Q You can configure settings regarding signature, font size,
notification, etc.
shown in the inbox.
important or unnecessary threads.
Mark the thread unread/read.
Add or remove a star to/from the thread.
of mails.
information of mobile software provided by Google.
76 Mail/Internet
Page 79

SMS
Information
You can exchange text messages of up to 70 double-byte
characters (160 single-byte characters if the message consists
only of single-byte characters) using mobile phone numbers as
addresses.
Creating and Sending an SMS Message
Home screen W [Preinstall] W [Messaging] W [New
1
message]
[To] field W Enter recipient’s mobile phone number
2
[Type to compose] field W Enter message
3
Q Press xA to insert smileys that can be displayed on Android
terminals.
Q To save an SMS message as a draft, press xC twice after
entering address and part of message.
[Send]
4
Home screen W [Preinstall] W [Messaging]
1
Message list screen is displayed.
Tap a thread to read
2
Replying to an SMS Message
Message list screen W Tap a thread to reply
1
Enter message W [Send]
2
Forwarding an SMS Message
Message list screen W Tap a thread to forward
1
Touch and hold an SMS message to forward W
2
[Forward]
Enter forwarding mobile phone number in [To] field
3
W [Send]
?
Q You can exchange SMS messages with subscribers of overseas
operators other than DOCOMO. For available countries and
overseas operators, refer to “Mobile Phone User’s Guide
[International Services]” or DOCOMO International Services website.
Q To send an SMS message to a subscriber of an overseas operator
other than DOCOMO, enter “+” followed by “country code” and “the
other party’s mobile phone number”. If the mobile phone number
starts with “0”, omit “0”. Alternatively, enter “010” followed by “country
code” and “the other party’s mobile phone number” (when replying to
an SMS message from overseas, always enter “010”).
Receiving and Reading an SMS Message
When you receive a new SMS message, a notification icon is
displayed in the status bar. You can check the message by
opening the notification panel and tapping the notification.
Deleting SMS Messages
Message list screen
1
To delete an SMS message
2
Tap a thread to delete W Touch and hold an SMS
message to delete W [Delete message]
To delete a thread
Tap a thread to delete W xA W [Delete thread]
Q You can also touch and hold a thread to delete W [Delete thread].
To delete all threads
xA W [Delete threads]
[Delete]
3
Mail/Internet 77
Page 80

Setting SMS Options
Message list screen W xA W [Settings]
1
Q You can configure settings regarding automatic deletion of SMS
messages, notification, etc.
Google Talk
Google Talk is Google’s online instant messaging service. You can
enjoy chatting with other members using Talk application on the
FOMA terminal.
Q Set your Google account (zZ page 42) in advance.
Online Chat
Adding a New Member
Home screen W [Preinstall] W [Talk]
1
Friends list is displayed.
Friends list W xA W [Add friend]
2
Enter Google account of the member to add W
3
[Send invitation]
Accepting Invitation
Friends list W [Chat invitation] W [Accept]
1
Setting Online Status
Friends list W Tap your own account
1
Tap the status field
2
Tap an online status to set
3
Q Enter a status message in [Status message] field as necessary.
The status message you entered will be displayed as a custom
message when you select an online status next.
[Done]
4
Starting Chat
Friends list W Tap the name of a friend to chat with
1
Chat screen is displayed.
Enter message in [Type to compose] field
2
Q To enter a smiley, press xA W [More] W [Insert smiley] W
select a smiley.
[Send]
3
Switching Chats
You can switch chats when you are chatting with more than one
friend.
Chat screen W xA W [Switch chats]
1
Tap a friend to chat with
2
78 Mail/Internet
Page 81

Address bar
Setting Chats Off Record
Q Chat messages are saved in [Chats] label folder in Gmail unless you
set chats off record.
Chat screen W xA W [Chat off record]
1
Subsequent messages will be off record.
Ending Chat
Chat screen W xA W [End chat]
1
Managing Members
Members on the friends list are displayed by online status
(Available, Busy, Invisible).
Depending on the setting, only the members that you frequently
exchange Emails with or chat with are preferentially shown. To
display all listed members, press xA W [All friends] in the
friends list.
Friends list W Touch and hold the name of a
1
member to block
Q You can view member information and block the member.
Setting Google Talk Options
Friends list W xA W [Settings]
1
Q You can configure settings regarding automatic sign-in when you
turn on the FOMA terminal, notification, etc.
Signing Out
Friends list W xA W [Sign out]
1
Web Browser
Using the web browser, you can view web pages and play Flash
contents as you do with a PC.
Connection to a Wi-Fi network or wireless mobile network using
packet communication is necessary to use the web browser on the
FOMA terminal.
Starting Web Browser
Home screen W
1
[Preinstall] W [Browser]
Home page is displayed.
Enter URL or keyword in the address bar
2
Q If the address bar is not shown, drag the web page down or press
xA.
Q You can start Voice Search by tapping the address bar and .
Tap or select the web page you want to view
3
from the suggestion list
Mail/Internet 79
Page 82

Screen Operations When Web Page Is Displayed
Operation Description
Switch Vertical/horizontal
display modes
Zoom in/
out
Scroll zZ page 25
Select and copy text Touch and hold a part with no link W
Pinch out/in zZ page 26
Double-tap zZ page 25
zZ page 26
Drag the slider in four directions to select
text range to copy W Tap selected text
Web Page Link Operations
Web page displayed W Touch and hold a link W
1
Perform operations listed below:
Open Open the web page.
Open in new
window
Bookmark link Add the URL to Bookmarks.
Save link Save the web page to the FOMA terminal/microSD
Share link Send the URL via Bluetooth communication or by mail.
Copy link URL Copy the URL.
Save image Save the image to the FOMA terminal/microSD card.
View image View the image.
Set as
wallpaper
Open the web page in a new window.
card.
Set the image as home screen wallpaper.
Menu for Currently Displayed Web Page
Web page displayed W xA W Perform
1
operations listed below:
New window Open the web page in a new
Bookmarks Display the bookmark list.
Windows Display the window list to switch
Refresh Refresh the web page.
Forward Return to the previous page when
More Add bookmark Add the URL to Bookmarks.
Find on page Search for text in the web page.
Page info Display the web page URL.
Share page Send the web page URL via
Downloads Display files downloaded from
Settings You can configure settings
window.
web pages.
the web page is displayed by
pressing xC.
Bluetooth communication or by mail.
websites (applications obtained
from websites other than Android
Market, images, documents, etc.).
Q You can also display downloaded
files by displaying the home screen
W [Preinstall] W [Downloads].
regarding web page display,
privacy, security, etc.
80 Mail/Internet
Page 83

Managing Bookmarks and History
Adding a Bookmark
Display the web page you want to add to
1
Bookmarks W xA W [Bookmarks] W xA W
[Bookmark last-viewed page]
Confirm/change the bookmark name W [OK]
2
Displaying a Web Page from History
Web page displayed W xA W [Bookmarks] W
1
[Most visited] tab/[History] tab
Q Tap (gray) in History to add to Bookmarks.
Tap a web page to display
2
Clearing History
Editing a Bookmark
Web page displayed W xA W [Bookmarks] W
1
Touch and hold a bookmark to edit W [Edit
bookmark]
Enter change W [OK]
2
Deleting Bookmarks
Web page displayed W xA W [Bookmarks]
1
To delete a bookmark
2
Touch and hold a bookmark to delete W [Delete
bookmark]
To delete all bookmarks
xA W [Delete all]
[OK]
3
Web page displayed W xA W [Bookmarks] W
1
[History] tab
To delete a web page from history
2
Touch and hold a web page to delete W [Remove
from history]
To delete all web pages from history
xA W [Clear history]
Q Clearing history will also delete all web pages from [Most visited]
tab.
Mail/Internet 81
Page 84

82
Page 85

Multimedia
Camera. . . . . . . . . . . . . . . . . . . . . . . . . . . . . . . . . . . . . . . . 84
Precautions for Use . . . . . . . . . . . . . . . . . . . . . . . . . . . . . . . . . 84
Displaying Shooting Screen . . . . . . . . . . . . . . . . . . . . . . . . . . . 84
Shooting a Still Image . . . . . . . . . . . . . . . . . . . . . . . . . . . . . . . . 86
Shooting a Video. . . . . . . . . . . . . . . . . . . . . . . . . . . . . . . . . . . . 87
Review Screen Icons . . . . . . . . . . . . . . . . . . . . . . . . . . . . . . . . 87
Picture Album . . . . . . . . . . . . . . . . . . . . . . . . . . . . . . . . . . 87
Displaying a Still Image/Video. . . . . . . . . . . . . . . . . . . . . . . . . . 87
Enlarged View Screen Operations . . . . . . . . . . . . . . . . . . . . . . 88
Thumbnail Screen Menu . . . . . . . . . . . . . . . . . . . . . . . . . . . . . . 88
Creating a Personal Album . . . . . . . . . . . . . . . . . . . . . . . . . . . . 88
Music Player . . . . . . . . . . . . . . . . . . . . . . . . . . . . . . . . . . . 89
Playing Songs . . . . . . . . . . . . . . . . . . . . . . . . . . . . . . . . . . . . . . 89
Creating a Playlist . . . . . . . . . . . . . . . . . . . . . . . . . . . . . . . . . . . 90
83
Page 86

Camera
1
1
Precautions for Use
Q Ensure the lens is clean before shooting. If it is not, clean up with soft
cloth. Any dirt on the lens such as fingerprint or oil content may cause
defocusing or dots in still images and videos.
Q When shooting, take care not to cover the lens with your fingers or
hair.
Q When shooting, stabilize the FOMA terminal securely. Jiggling may
cause defocus. Be careful not to jiggle especially in a poor light.
Q Do not leave the lens in direct sunlight. Otherwise, discoloration and
seizing of elements may occur.
Q Shooting under illumination flickering at high frequencies - fluorescent
lamp, mercury lamp and sodium lamp etc. - may cause “flicker
phenomenon” that striped pattern is displayed as flowing up/down or
right/left in a picture. Further, coloration may be odd depending on
shooting timing.
Q When in images of any object containing extremely bright part such as
a part reflecting sunlight, black spots may be displayed on the bright
part. This is no fault.
Q Colors and brightness of images taken by the camera may be different
from actual objects.
Q When the battery power is low, new still image or video may not be
saved normally.
Q There is certain time lag between tapping the shutter button and
shooting. Therefore, in still images, fast moving object may not be the
place where it was when the shutter button is tapped.
Q Do not remove microSD card while saving data to microSD card.
Otherwise, the FOMA terminal and/or microSD card may be damaged.
Q If the battery pack is removed while saving data to microSD card, the
data will be incomplete.
Q If you make any misconduct that creates a public nuisance by using
this device, you are punishable under laws or ordinances (e.g.
ordinance against disturbing the peace).
Please be considerate of the privacy of individuals around
you when shooting and sending photos using cameraequipped mobile phones.
Displaying Shooting Screen
You can shoot images in either portrait or landscape format.
Home screen W [Preinstall] W [Camera]
1
Still image shooting screen is displayed.
Q To switch to the video shooting screen, tap .
2
3
4
5
6
Still image shooting screen
#
$
4
5
6
Video shooting screen
7
8
9
0
!
"
%
7
9
&
"
84 Multimedia
Page 87

1 zZ “Icons indicating setting status” on page 85
2 zZ “Setting still image shooting mode” on page 85
3 zZ “Setting focus mode” on page 86
4 Set flash mode
5 Adjust exposure (brightness)
6 zZ “Setting from the setting panel” on page 86
7 Display zoom bar (not displayed when the photo resolution is 5M or
3.7MWide)
8 Number of still images that can be shot
9 Still image/video shooting switching button
0 Shutter button
! Focus frame
" Display review screen
# Set scene mode
$ Set resolution mode
% Recording time
& Start/end recording
■ Icons indicating setting status
Item Icon
Flash Mode
Self Timer
Photo Resolution
Scene
Flash Auto, Flash On, Flash Torch,
Flash Off
3 seconds, 5 seconds, 10 seconds
5M, 3.7MWide, 3M, 2M,
FWVGA, VGA
Portrait, Landscape, Night,
Sport, Food, Backlight,
Character, Snow, Sunset, Pet
■ Setting still image shooting mode
Still image shooting screen W Tap 2 icon W
1
Perform operations listed below:
Normal Shot Normal shooting mode
Panorama Shoot and couple multiple still images. Tap the
Smile Shot Smile is detected and shot.
Burst Shot While the shutter bu tton is being touched, up to
Contact ID Shoot a face photo to add to the phonebook.
Frame Shot Shoot an image with a preferred frame.
Collage Shot Fit multiple photos in a preferred template.
Soft Focus Obscure the background of person(s).
Beauty Make the facial color beautiful in photos you
Stabilization Shot Shooting is performed when jiggling stops.
Pinhole Shade four edges.
shutter button and move the camera horizontally
and vertically so that the white frame comes to
the center of the green frame.
seven still images are shot in succession.
shoot.
Multimedia 85
Page 88

■ Setting focus mode
Still image shooting screen W Tap 3 icon W
1
Perform operations listed below:
Auto Tap the shutter button to set focus in the focus
Infinity Focus on distant landscape.
Object The focus frame follows the movement of the
Face Detect and focus on human face(s).
Continue Always focus on objects in the focus frame and
Macro Focus on a close object.
Touch The focus frame moves to the tapped point to be
■ Setting from the setting panel
Still image/video shooting screen W W Perform
1
frame.
selected object to focus on it.
shooting is performed without focusing operation
when the shutter button is tapped. This helps
focusing on a moving object.
focused.
operations listed below:
*1
Scene
Effect Shoot an image with optional effects such as
Self Timer
Photo Resolution
*1
86 Multimedia
Select a mode corresponding to the situation and
object.
monochrome and sepia.
Set the time length to automatic shutter release.
*1
Set photo size (resolution).
Photo Quality/
Video Quality
White Balance Correct color in accordance with surrounding light
*1
ISO
Red Eye Remove
Delighting
GPS Location
Show Grid
Audio Record
Review Set whether to display/hide review screen after
Shot Mode
Reset Restore the default shooting settings.
*1 Still image shooting only
*2 Video shooting only
*1
*1
*2
Set quality.
source.
Set ISO sensitivity.
*1
Turn red eye remove function on/off.
Turn on/off the function to brighten any dark part.
*1
Set whether or not to attach the location
information.
Set whether to display/hide grid lines.
*2
Set whether or not to record sound.
shooting.
Set whether or not to shoot a video to attach to
mail.
Shooting a Still Image
Follow the procedure below when the shooting mode is “Normal
Shot” and the focus mode is “Auto”.
Still image shooting screen W Align the object
1
within the focus frame W
When the object comes into focus, the focus frame turns to green.
Shutter sound is generated and the shot still image is stored in
microSD card.
If [Review] is on, the review screen appears.
Page 89

Shooting a Video
Video shooting screen W Display the object in the
1
screen W
The recording start sound is generated and video shooting starts.
2
Recording end sound is generated and the shot video is stored in
microSD card.
If [Review] is on, the review screen appears.
Review Screen Icons
Icon Description
You can upload the file to Picasa or YouTube, or
send the file via Bluetooth communication or by
Gmail, etc.
/
*1
*1
*1 In case you have activated the camera from PriPri Marron Lite for
P, New contact/Edit contact screen or other functions.
Switch to the previous/next file.
Display picture/video information.
Return to the shooting screen.
Save (set) the shot still image.
Play the video.
Delete the file.
Discard the shot still image and shoot again.
Picture Album
You can use Picture Album to view still images and videos saved
in microSD card.
■ Supported files
Type File format
Still image BMP, JPG, GIF, PNG
Video MP4, 3GP, WebM
Displaying a Still Image/Video
Home screen W [Preinstall] W [Picture Album]
1
Thumbnail screen is displayed.
1
Thumbnail screen
To display a still image
2
Tap a still image to display
Enlarged view screen is displayed.
To play a video
Tap a video to play W Tap the enlarged view screen
The movie player starts to play the video.
1 Index line
Select date or tag to find the target
file quickly. In vertical display mode,
tap the right/left margin to show the
index line.
2
2
3
4
: Memo mark
3
: Video mark
4 Tap to show catalog bar.
In catalog bar, tap [All]/[Favorite]/
[Photo]/[Video]/[Tagging]/[People] to
switch catalogs.
Multimedia 87
Page 90

Enlarged View Screen Operations
Q If icons are not displayed, tap the screen to show them.
Icon Description
Tag mark
Favorite mark
*1
*1
/
*1 Still image only
Show the zoom control to zoom in/out the still
image.
Alternatively, you can pinch out/in or double-tap
to zoom in/out.
Add to [Favorite] catalog.
Enter a memo.
Display previous/next file. Touch and hold and
scroll right/left to find the target file quickly.
Enlarged View Screen Menu
Enlarged view screen W xA W Perform
1
operations listed below:
Share You can upload the file to Picasa or YouTube, or
Tag Tag the file.
*1
Effect
Delete Delete the file.
send the file via Bluetooth communication or by
Gmail, etc.
Tap [Soft Focus] to obscure the background of
the person. Tap [Pinhole] to shade four edges.
Rename Change the file name.
*1
More
*1
Set as
Slideshow
Show on map
Detail Display file information.
*1 Still image only
*1
The items below are displayed by tapping [More].
Set the image as phonebook image or home
screen wallpaper.
Start a slideshow from the currently displayed still
image.
*1
Shooting location is indicated on a map.
Q This item is operable when location information
is attached.
Thumbnail Screen Menu
Thumbnail screen except that of [People] catalog W
1
xA W Perform operations listed below:
Camera Activate the camera.
Slideshow
Mark Mark more than one file to share/delete/tag/add to
Setting
*1 Not displayed in [Video] catalog.
*1
*1
Start a slideshow from the still image on the top.
Favorite.
Set slideshow changeover time and switching
animation.
Creating a Personal Album
You can create a personal album by using the automatic detection
feature of photos with the same face.
Home screen W [Preinstall] W [Picture Album]
1
88 Multimedia
Page 91

Select [People] catalog in catalog bar
2
Photos with people’s faces are automatically collected.
[Unnamed] W Touch and hold a photo to add to the
3
personal album W [Name this person]
Q Tap [Link to contacts] W select a contact to make the album
linked to the phonebook.
[Assign new name] W Enter name W [OK]
4
Photos deemed to show the same face are collected to create a
personal album.
Q If anyone other than the relevant person is included in the
personal album, touch and hold the photo W [Remove] W [OK].
Q If there is any photo accompanied by in the personal album,
tap the photo to display the enlarged view screen W tap the
unsure face W (if this is the person)/ (if this is not the
person).
Q Touch and hold a photo W tap [Set as cover] to set as the cover
photo for the personal album.
Q Open a personal album linked to the phonebook and press xA
to make a call or send an SMS message.
Music Player
Start the music player to play songs stored in microSD card.
Q For copying music data from PC, zZ page 95
■ Supported files
Some songs may not be playable even though they are supported files.
File format (extension)
3gp, mp4, m4a, mp3, mid, xmf, mxmf, rtttl, rtx, ota, imy, ogg, wav
Playing Songs
Home screen W [Preinstall] W [Music]
1
Library screen is displayed.
Q Tap [Artists]/[Albums]/[Songs]/[Playlists] to switch tabs.
Select an artist, album or playlist
2
Song list screen is displayed.
Tap a song to play
3
Playback screen is displayed and playback is started.
: Display the song list screen.
: Tap to enable/disable shuffle feature.
: Tap each time to repeat all songs Y repeat current song Y
cancel repeat.
/ : Skip to the start of song/next song. Touch and hold to
rewind/forward.
/: Pause/play.
Q If the Stereo Headset with Microphone (sample) is connected,
you can alternately pause and play each time you press the
switch (zZ page 50).
Q To return to the library screen, press xA W [Library].
Q Touch and hold the artist name/album name/song name in the
playback screen W [YouTube]/[Browser]/[Music] to search for
associated information.
Q To return to the playback screen from the other applications, open
the notification panel and tap the notification.
Multimedia 89
Page 92

Playing with Party Shuffle
Changing Playlist Name/Deleting a Playlist
Playback screen W xA W [Party shuffle]
1
A playlist that consists of songs randomly extracted from all songs
in the library is created and playback starts.
To abort party shuffle,
2
Setting Present Song as Ringtone
Playback screen W xA W [Use as ringtone]
1
Creating a Playlist
Song list screen W Touch and hold a song to add to
1
a new playlist W [Add to playlist] W [New] W Enter
playlist name W [Save]
Q To add a song to a playlist, display the song list screen W touch
and hold a song to add W [Add to playlist] W tap the destination
playlist.
Editing Songs in a Playlist
Library screen W [Playlists] W Tap a playlist to edit
1
To sort the song list
2
Drag to sort
To dismiss a song
Touch and hold a song to dismiss W [Remove from
playlist]
Library screen W [Playlists] W Touch and hold a
1
playlist which you want to rename/delete W
[Rename]/[Delete]
Q If you select [Rename], enter new playlist name and tap [Save].
Q [Recently added] playlist cannot be renamed or deleted.
90 Multimedia
Page 93

Data Communication
Infrared Communication . . . . . . . . . . . . . . . . . . . . . . . . . 92
Sending Data via Infrared Communication . . . . . . . . . . . . . . . . 92
Receiving Data via Infrared Communication. . . . . . . . . . . . . . . 92
Bluetooth Communication . . . . . . . . . . . . . . . . . . . . . . . . 93
Precautions for Handling Bluetooth Devices. . . . . . . . . . . . . . . 93
Connecting a Bluetooth Device. . . . . . . . . . . . . . . . . . . . . . . . . 93
Sending and Receiving Data via Bluetooth Communication . . . . . . . 94
Disconnecting a Bluetooth Device . . . . . . . . . . . . . . . . . . . . . . 94
VPN (Virtual Private Network) Connection . . . . . . . . . . . 94
Adding VPN . . . . . . . . . . . . . . . . . . . . . . . . . . . . . . . . . . . . . . . 94
Connecting to VPN . . . . . . . . . . . . . . . . . . . . . . . . . . . . . . . . . . 95
Disconnecting VPN . . . . . . . . . . . . . . . . . . . . . . . . . . . . . . . . . . 95
External Device Connection . . . . . . . . . . . . . . . . . . . . . . 95
Connecting to a PC. . . . . . . . . . . . . . . . . . . . . . . . . . . . . . . . . . 95
91
Page 94

Infrared Communication
This FOMA terminal is compliant with IrMC™ version 1.1 standard.
Data transmission with other FOMA terminals, etc. that have
infrared communication feature is possible.
Q Data of phonebook, bookmarks, images, Kabegami Deco, Fit Key and
Odekake features in Future Plus can be sent/received.
Q Depending on the application, even when you select a menu for
sharing data via infrared communication, the data may not be sent, or
received data may be unavailable.
Q If the receiving terminal has an image that has the same file name with
the image to be sent, the file of the receiving terminal may be
overwritten when the image is sent.
Q Keep the infrared port faced to that of the other party until data
communication is completed.
Q If you hold the FOMA terminal by hand, stabilize it securely.
Q Communication may not be established normally in places exposed to
direct sunlight, immediately below fluorescent lamp or near any
infrared device.
Q During communication, the FOMA terminal goes into the same state
as when it is out of service area.
Q While the infrared communication function is running, the FOMA
terminal does not enter the Sleep mode even after the set time has
elapsed without any operation.
Q If you press wD to make the FOMA terminal enter the Sleep mode manually,
the Infrared application or infrared communication function is terminated.
Infrared port
Approx. 20 cm or less
±15 degrees or less
from the center
92 Data Communication
Sending Data via Infrared Communication
Start each application W Select data to send W
1
A W Tap the menu item for sending/sharing via
infrared communication
Q To send a package of Kabegami Deco or Fit Key, display the home
screen W [Preinstall] W [Kabegami Deco]/[Fit Key] W [パッケージ
(Package)] W select a package W [赤外線送信 (Send via IrDA)].
[Send] W After sending, [OK]x
2
Q To send all (visible) contacts via infrared communications,
zZ “Exporting contacts” on page 53
Q Group names are not sent when sending contacts one by one.
Receiving Data via Infrared Communication
Home screen W [Preinstall] W [Infrared]
1
Q To receive a package of Kabegami Deco or Fit Key, display the
home screen W [Preinstall] W [Kabegami Deco]/[Fit Key] W
[パッケージ(Package)] W [赤外線受信(Receive via IrDA)].
To receive a subject
2
[Receive] W [Receive] W After receiving, [Yes] W [OK]
To receive all/multiple subjects
[Receive All] W Enter 4-digit password W [OK] W
[Receive] W After receiving, [Yes] W [OK]
Q To receive all/multiple subjects via infrared communication, the
same 4-digit password has to be entered on the sending terminal.
Q
When a subject is being sent from the sending terminal, select [Receive].
If you select [Receive All], you cannot save the received data.
Q To add the received contacts to the phonebook, tap [Add] after
receiving W [OK].
Q To overwrite your phonebook with the received contacts, tap
[Over write] after receiving W [Yes] W [OK].
Q The received contacts are saved to the docomo account phonebook.
Page 95

Bluetooth Communication
You can wirelessly exchange data with nearby Bluetooth devices
using the Bluetooth function of the FOMA terminal.
Q For Bluetooth supported version and profiles, zZ page 139
Q For detailed information of settings and operation procedures, also
refer to the Instruction Manual for the Bluetooth device to be
connected.
Q Any statement in this manual shall not be construed as warranty for
wireless connection with other Bluetooth devices.
Precautions for Handling Bluetooth Devices
■ Note the following points to ensure good connection:
Q Ensure about 10 m of line-of-sight distance from the other Bluetooth
device. Connectable range may be narrower depending on
surrounding environment (walls and furniture, etc.) and building
structure, or if there is any obstacle between the FOMA terminal and
Bluetooth device to be connected.
They may not be connected if they are in different floors or rooms
divided by ferroconcrete walls. No warranty is given as to the
connection distance stated above.
Q Use Bluetooth devices away from other devices (electric/AV/OA
equipment) as possible. (As the devices are easily affected by
microwave in use, so keep your devices away from any microwave.)
Otherwise, improper connection, TV or radio noise and reception fault
may be caused. (TV picture is distorted for certain channels of UHF
and satellite broadcasting.)
Q When devices are not connected properly due to any broadcasting
station or radio transmitter near you, relocate the counterpart
Bluetooth device. Connection may fail if the device is surrounded by
strong radio wave.
Q Wireless connection is possible with Bluetooth device put in any bag
or pocket. However, decreased transmission speed or noise may
result when your body is in between Bluetooth device and the FOMA
terminal.
■ Radio wave interference with wireless LAN
As Bluetooth and wireless LAN (IEEE802.11b/g) use the same
frequency band (2.4 GHz), use of Bluetooth device around wireless
LAN device may cause radio wave interference, leading to decreased
communication speed, noise or connection failure. In this case, take
actions below:
Q Make sure to keep the FOMA terminal and Bluetooth device to be
connected 10 m away from wireless LAN device.
Q Otherwise, turn off wireless LAN device.
■ Radio wave transmitted from Bluetooth device may affect
operations of medical electronics.
As this may cause an accident in some instances, be sure to turn off
your FOMA terminal and Bluetooth device(s) in the following locations:
Q In train
Q In aircraft
Q In hospital
Q Near auto door or fire alarm
Q Any place where flammable gases may be present (e.g. gas station)
Connecting a Bluetooth Device
You can exchange data with Bluetooth-compliant PCs, mobile
phones, etc. via Bluetooth communication. Furthermore, you can
connect a Bluetooth headset to make a call or listen to music in
hands-free mode.
Q Be sure to turn on the Bluetooth function of the device to be connected
and check it is connectable in advance.
Home screen W xA W [Settings] W [Wireless &
1
networks] W Mark [Bluetooth] checkbox W
[Bluetooth settings]
Bluetooth settings screen is displayed.
[Scan for devices]
2
Q Detected Bluetooth devices are listed in the Bluetooth device list.
Q Mark [Discoverable] checkbox to allow other Bluetooth devices to
detect the FOMA terminal for about 120 seconds.
Data Communication 93
Page 96

Select a detected Bluetooth device and perform
Information
3
pairing with the device
If necessary, enter pass code (PIN) W [OK]
4
Q If the other Bluetooth device also requires pass code (PIN), enter
corresponding pass code (PIN).
Q When pairing is established, status description such as [Paired
but not connected] and [Connected to phone and media audio]
appears below the device name.
?
Q If you do not use Bluetooth communication, turn off the Bluetooth
function to save energy consumption.
Q Bluetooth on/off setting remains unchanged after the power is turned
off.
Q The Bluetooth function is turned off when Portable Wi-Fi hotspot is
enabled (zZ page 61).
Changing Device Name
You can change the name of your FOMA terminal displayed on the
other device during Bluetooth communication.
Bluetooth settings screen W [Device name] W
1
Enter name W [OK]
Sending and Receiving Data via Bluetooth Communication
Q Depending on the application, even when you select a menu for
sharing data via Bluetooth communication, the data may not be sent,
or received data may be unavailable.
Sending Data via Bluetooth Communication
You can send images, web page URLs, etc. to other Bluetooth devices.
Q Do this from the sending/sharing menu of each application.
94 Data Communication
Receiving Data via Bluetooth Communication
Send data from the sending device
1
appears in the status bar to notify of incoming data.
Open notification panel W [Bluetooth share:
2
Incoming file] W [Accept]
Q When appears in the status bar, open the notification panel to
check that reception is completed.
Disconnecting a Bluetooth Device
Bluetooth settings screen W Touch and hold a
1
device to unpair from the Bluetooth device list W
[Unpair]/[Disconnect & unpair]
Q If [Disconnect] appears in the menu, the device can be
disconnected temporarily by tapping it. Temporary disconnection
can also be done by tapping the device in the Bluetooth device list.
VPN (Virtual Private Network) Connection
VPN (Virtual Private Network) refers to a technology that allows for
access to information within a protected local network for a
company, university or the like from outside. To configure settings
for VPN connection from the FOMA terminal, acquire security
information from network administrator.
Adding VPN
Home screen W xA W [Settings] W [Wireless &
1
networks] W [VPN settings]
VPN settings screen is displayed.
[Add VPN] W Tap a type of VPN to add
2
Q If ISP has been set to spモード(sp-mode), PPTP is not available.
Page 97

Set each item by following instructions of network
3
administrator W xA W [Save]
New VPN is added to the list in the VPN settings screen.
Connecting to VPN
VPN settings screen W Tap a VPN to connect
1
Enter necessary credentials W [Connect]
2
Once the VPN is connected, a notification icon is displayed in the
status bar.
Disconnecting VPN
Open the notification panel W Tap the notification
1
that indicates connection with VPN to disconnect
Once the VPN is disconnected, the notification icon in the status
bar is grayed out.
External Device Connection
Connecting to a PC
When you connect the FOMA terminal and a PC using the included
microUSB cable, the microSD card in the FOMA terminal is
recognized as a removable disc of the PC, and you can read and
write data in the microSD card from the PC.
Q If any application that uses microSD card is running in the FOMA
terminal, close the application and mount the microSD card to the PC.
To PC
2
microUSB plug
USB plug
microUSB cable
Insert the microUSB plug of the microUSB cable
1
horizontally into the connector terminal with the
USB mark
Q Place the connector terminal cover as indicated in the figure. For
information on how to open the connector terminal cover, zZ page 23
Insert USB plug of the microUSB cable horizontally
2
*1
facing up
into the USB connector of the PC
USB Mass Storage screen is displayed.
Q If the USB Mass Storage screen is closed, open the notification
panel and tap the notification to display the screen.
[Turn on USB storage]
3
Q If [Turn on USB storage] is displayed, tap [OK]. Terminate the
application that uses microSD card if required (zZ page 36).
1
Connector terminal cover
Data Communication 95
Page 98

PC side W Open [My Computer]/[Computer] W
Information
4
Select [Removable disc]
Files in the microSD card are displayed.
Drag and drop files between the FOMA terminal and PC
5
*1
USB mark:
?
Q Once microSD card is mounted on the PC, you cannot use any
application that uses microSD card such as camera.
Securely Removing microUSB Cable
Q Do not remove microUSB cable while data is being transferred.
Otherwise data may be corrupted.
USB Mass Storage screen W [Turn off USB storage]
1
Remove microUSB cable
2
96 Data Communication
Page 99

Applications
Android Market . . . . . . . . . . . . . . . . . . . . . . . . . . . . . . . . . 98
Installing Applications. . . . . . . . . . . . . . . . . . . . . . . . . . . . . . . . .98
Using docomo market . . . . . . . . . . . . . . . . . . . . . . . . . . . . 98
Future Plus . . . . . . . . . . . . . . . . . . . . . . . . . . . . . . . . . . . . . 99
Configuring Initial Setting . . . . . . . . . . . . . . . . . . . . . . . . . . . . . .99
Displaying Mainline Screen . . . . . . . . . . . . . . . . . . . . . . . . . . . . 99
Future Plus Setting Menu. . . . . . . . . . . . . . . . . . . . . . . . . . . . . 100
About Desired Information . . . . . . . . . . . . . . . . . . . . . . . . . . . . 101
Using Surrounding Search . . . . . . . . . . . . . . . . . . . . . . . . . . . .101
Using Omakase Search . . . . . . . . . . . . . . . . . . . . . . . . . . . . . .101
Using Odekake Function . . . . . . . . . . . . . . . . . . . . . . . . . . . . .102
Using Shop Function . . . . . . . . . . . . . . . . . . . . . . . . . . . . . . . . 102
Kabegami Deco . . . . . . . . . . . . . . . . . . . . . . . . . . . . . . . . 103
Google Maps . . . . . . . . . . . . . . . . . . . . . . . . . . . . . . . . . . 104
Opening Google Maps . . . . . . . . . . . . . . . . . . . . . . . . . . . . . . . 104
Searching for a Route to Destination . . . . . . . . . . . . . . . . . . . . 104
Checking Friend’s Location Using Latitude . . . . . . . . . . . . . . . 104
1Seg . . . . . . . . . . . . . . . . . . . . . . . . . . . . . . . . . . . . . . . . . 105
Starting 1Seg . . . . . . . . . . . . . . . . . . . . . . . . . . . . . . . . . . . . . .106
1Seg Watching Screen. . . . . . . . . . . . . . . . . . . . . . . . . . . . . . . 106
Setting Channels . . . . . . . . . . . . . . . . . . . . . . . . . . . . . . . . . . . 108
Using TV Links . . . . . . . . . . . . . . . . . . . . . . . . . . . . . . . . . . . . .108
ToruCa . . . . . . . . . . . . . . . . . . . . . . . . . . . . . . . . . . . . . . . 109
YouTube . . . . . . . . . . . . . . . . . . . . . . . . . . . . . . . . . . . . . . 110
News & Weather. . . . . . . . . . . . . . . . . . . . . . . . . . . . . . . . 110
Setting Menu for News & Weather . . . . . . . . . . . . . . . . . . . . . . 110
Clock. . . . . . . . . . . . . . . . . . . . . . . . . . . . . . . . . . . . . . . . . 111
Setting an Alarm . . . . . . . . . . . . . . . . . . . . . . . . . . . . . . . . . . . 111
Calendar . . . . . . . . . . . . . . . . . . . . . . . . . . . . . . . . . . . . . . 111
Displaying Calendar . . . . . . . . . . . . . . . . . . . . . . . . . . . . . . . . 111
Adding an Event . . . . . . . . . . . . . . . . . . . . . . . . . . . . . . . . . . . 112
Changing Calendar Settings . . . . . . . . . . . . . . . . . . . . . . . . . . 112
Notepad . . . . . . . . . . . . . . . . . . . . . . . . . . . . . . . . . . . . . . 113
Creating a Note . . . . . . . . . . . . . . . . . . . . . . . . . . . . . . . . . . . . 113
VoiceRecorder . . . . . . . . . . . . . . . . . . . . . . . . . . . . . . . . . 113
Recording Sound. . . . . . . . . . . . . . . . . . . . . . . . . . . . . . . . . . . 113
Calculator . . . . . . . . . . . . . . . . . . . . . . . . . . . . . . . . . . . . . 114
ECO NAVI . . . . . . . . . . . . . . . . . . . . . . . . . . . . . . . . . . . . . 114
Setting eco Mode. . . . . . . . . . . . . . . . . . . . . . . . . . . . . . . . . . . 114
Setting Task Management in Sleep Mode. . . . . . . . . . . . . . . . 114
PriPri Marron Lite for P . . . . . . . . . . . . . . . . . . . . . . . . . . 115
ToruChara. . . . . . . . . . . . . . . . . . . . . . . . . . . . . . . . . . . . . 115
Barcode Reader . . . . . . . . . . . . . . . . . . . . . . . . . . . . . . . . 115
Reading a QR Code/JAN Code. . . . . . . . . . . . . . . . . . . . . . . . 116
Catalyst Reader . . . . . . . . . . . . . . . . . . . . . . . . . . . . . . . . 116
Viewing a Document . . . . . . . . . . . . . . . . . . . . . . . . . . . . . . . . 117
SD backup . . . . . . . . . . . . . . . . . . . . . . . . . . . . . . . . . . . . 117
Backing Up Data to microSD Card . . . . . . . . . . . . . . . . . . . . . 117
Restoring Backup Data to FOMA Terminal . . . . . . . . . . . . . . . 117
Deleting Backup Data . . . . . . . . . . . . . . . . . . . . . . . . . . . . . . . 117
97
Page 100

Android Market
Information
Search for convenient applications and fun games in Android
Market to install to the FOMA terminal.
Q Set your Google account (zZ page 42) in advance.
Installing Applications
Home screen W [Preinstall] W [Market]
1
Q Read Android Market Terms of Service for initial startup and tap
[Accept].
Search for applications
2
Tap an application to install
3
[FREE] (for free applications) or tap the price field
4
(for pay applications) W [OK]
Q Take special care when you install an application that accesses to
many functions or massive data. Tapping [OK] means you accept
responsibilities for consequences of use of the application.
Q Use Google Checkout for payment for pay applications. You are
allowed to return the application to get a refund in the specified
time period from application download (only once per application).
For detailed information on payment method for purchase of
applications and refund policy, press xA in the market screen
W [Help] W refer to the respective articles under [Buying apps].
?
Q Be sure to check the security and safety of the application, then
install it at your own risk. Your FOMA terminal may be infected with a
virus or data may be damaged. It may cause excessive sound
volume.
Q We take no responsibility for any malfunction arising out of
applications you install.
Q We take no responsibility for any disadvantage for you or third party
arising out of applications you install.
Q Some applications automatically perform packet communication for
Internet connection. Note that packet communication fee may be
expensive.
Q We provide no assistance for purchase of applications from Android
Market or refund.
Using docomo market
You can easily access websites recommended by DOCOMO and
useful applications from docomo market.
Home screen W [Preinstall] W [docomo market]
1
The browser is launched and “docomo market” is displayed.
98 Applications
 Loading...