

Page 1

P-01E
INSTRUCTION MANUAL
’12.10
Page 2
Thank you for selecting the “P-01E”.
Read this manual befor
e use to correctly operate your P-01E.
About manual of P-01E
The operating procedures for the P-01E are also published as in
“使いかたガイド (Guide)” on-screen manual installed onto your
FOMA terminal, and “Instruction Manual (Detailed V
PDF. (In Japanese only)
“Instruction Manual” (this manual)◆
◆
Description of the displayed content and operating
ocedures for basic functions
pr
◆“使いかたガイド (Guide)” (installed onto your FOMA terminal)◆
Description of the outline and operations of frequently used
functions
From the P-01E
m▶便利ツール (Tool)▶使いかたガイド (Guide)
※ This function is available in Japanese mode only.
◆“Instruction Manual (Detailed Version)” (PDF)◆
om a PC, download detailed information about all the
Fr
functions and the operating procedur
es. (In Japanese only)(
http://www.nttdocomo.co.jp/support/trouble/manual/
download/index.html)
※ Note that the URL and published contents may be modified
without notice.
ersion)” as a
Basic Package
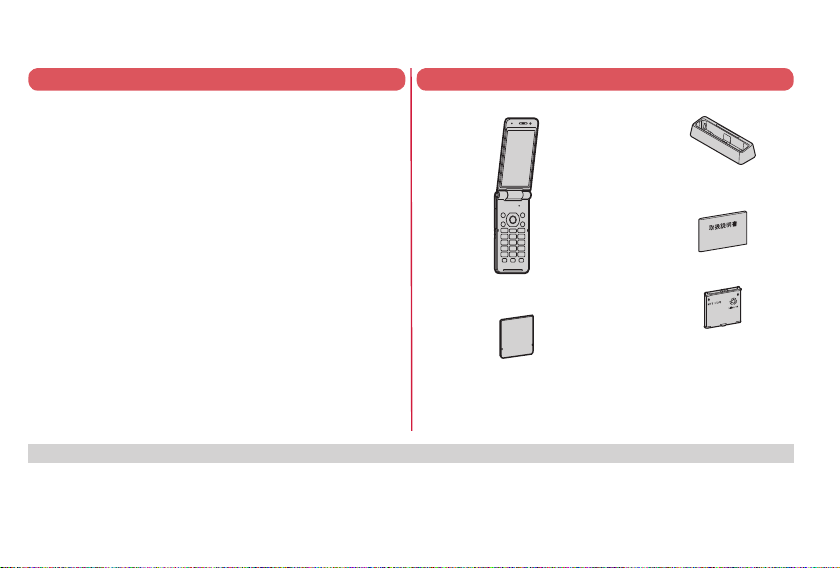
P-01E Handset (With Warranty)
Back Cover P58
See page 71 for optional items that support this FOMA terminal.
Desktop Holder P51
Instruction Manual
(Japanese version)
Battery Pack P23
Note that “P-01E” is referred to as “FOMA terminal” in this manual.
For Using This Manual
Most operating procedures and displays in this manual are shown with the default settings of the “White” handset. Further, displays and
illustrations shown in this manual ar
e for reference. The actual ones might differ.
Page 3

Part Names and Functions ············ 2
Contents
Before Using ················································· 19
Screen Explanation ······································ 22
Character Entry ············································ 29
FOMA Terminal ······························ 4
Precautions ····································5
Handling Precautions ·················· 12
Waterproof/Dust-proof Performance
Sound/Screen Setting
Lock/Security ················································ 33
·································· 30
··· 15
Introduction
▶
P.1 ~
Basic
Operation
▶
P.19 ~~
Call Telephone ·············································· 37
Mail ································································ 43
-
mode/Full Browser
i
Camera ·························································· 50
1Seg ······························································ 52
Music ····························································· 54
-
concier ························································ 58
i
Convenient T
Support ························································· 65
Appendix ······················································· 72
※It is prohibited to copy all or part of this manual without permission. ※The instructions contained in this manual may be changed without notice.
····································· 47 i-channel ·······················································49
ools ·········································· 58
Phonebook
i-αppli/i
i-motion/Movie
Data Management ········································ 61
Index ····························································· 84
··················································· 46
-
Widget ············································· 56
············································· 57
Connect
▶
P.37 ~~
Search
▶
P.47 ~~
Enjoy
▶
P.50 ~~
More
Convenient
▶
P.58 ~~
Others
▶
P.65 ~~
1
Page 4

Part Names and Functions
❶
❷
❸
Introduction
❹
❺
❻
❼
❽
❾
2
❶Air vent
For adjusting the pressure inside the
minal
FOMA ter
❷Earpiece
For listening to the other party’s v
❸Display
❹oCommand navigation key
For operating functions and menus
mMenu key
❺
For showing the Main Menu
lMail key
❻
For showing the Mail Menu
dStart key
❼
For starting to talk
Numeric keys
❽
For entering phone numbers and text
QWEMulti one-touch key
❾
Light sensor
For sensing brightness (Do not cover it
our hands or do not put a sticker on
with y
it. Doing so might disable detecting the
brightness.)
oice
Microphone
F
or speaking to the other party
cCamera key/1Seg key
rClear key/i-channel key
ii-mode key/i-αppli key
hPower/End key
r turning on/off the power or ending a
Fo
call
Call/Charging indicator
Lights while you ar
message, or char
Sub-display
FOMA antenna
Camera
For shooting portraits and/or landscapes
Speaker
e receiving a call or
ging.
※
Page 5
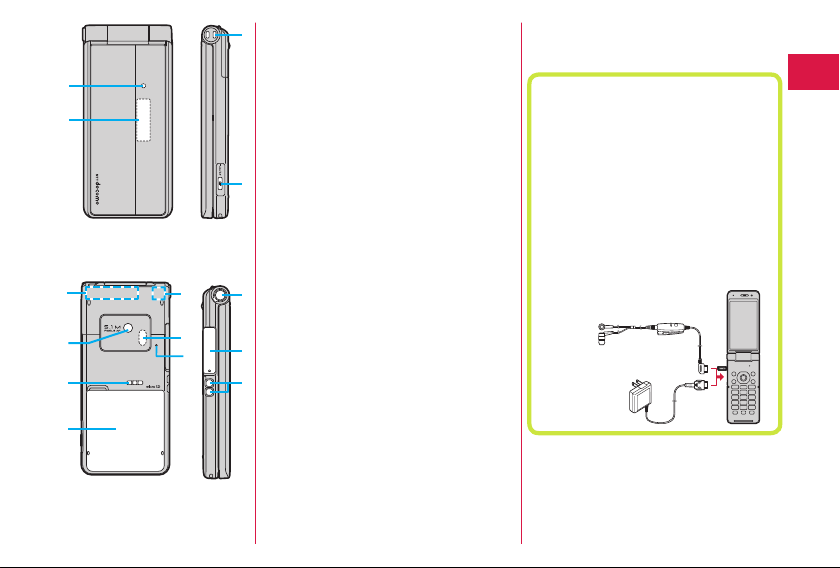
Back cover
Remove this when attaching/removing the
battery pack, docomo mini UIM car
microSD card.
1Seg antenna
※
For receiving 1Seg broadcasting
Infrared data port
or using infrared communication and the
F
infrared remote control
Strap hole
xMulti key
For showing the Task menu
One-push open button
❶
For opening the FOMA terminal (Be careful
op the FOMA terminal by the
not to dr
ebound when opened.)
r
Connector terminal
d, and
Integrated terminal f
earphone or for c
For using earphone
Connect an optional connector-terminalcompatible earphone. When using a
connector-terminal-non-compatible
earphone, use an optional plug adapter for
connection.
Example for connecting the Stereo
Earphone Set 01 (option) to external
connector terminal
This mobile phone serves as the port where
both the AC Adapter (charging) and Stereo
Earphone Set 01 (Earphone/microphone
terminal) are plugged in.
Stereo Earphone Set 01
AC Adapter
or connecting
harging, etc.
Introduction
Charging terminal
※The antenna is embedded in the handset.
Covering the area near the antenna with
y
our hand may adversely affect the quality
of the communication.
3
Page 6
FOMA Terminal
This FOMA terminal supports W-CDMA system.
Because the FOMA terminal uses radio w
places where the radio w
even outdoors, such as inside tunnels, basements, or buildings,
or out-of-service ar
ter
minal even when you are in a place with a fine view such as in
a high-r
ise building or apartment. Note that you may experience
inter
ruption of calls even if the three antennas respond to a strong
radio w
ave, and you remain without moving to use the FOMA
minal.
ter
Introduction
Since the FOMA ter
telecommunication, calls may be tapped b
However, the W-CDMA system automatically suppor
prevention, so your conversation will be incomprehensible to the
d party, because it is recognized as mere noise.
thir
The FOMA ter
them to the other party
the digital signals may not be con
case, the voice ma
The user hereb
for the result of the use of SSL/TLS. Neither DOCOMO nor the
cer
tifiers as listed herein make any representation and warranty as
f
or the security in the use of SSL/TLS. In the event that the user
shall sustain damage or loss due to the use of SSL/TLS, neither
DOCOMO nor the cer
damage or loss.
Certifiers: VeriSign Japan K.K., Cybertrust Japan Co., Ltd.,
GlobalSign K.K., RS
SECOM Trust S
Entrust, Inc., and Go Daddy, Inc.
This FOMA ter
High-Speed Area.
aves do not reach, where they are weak
ea. You might not be able to operate the FOMA
minal uses radio w
minals c
hange your voice into digital signals and send
. In places where the radio waves are weak,
y sound different from the actual one.
y agrees that the user shall be solely responsible
tifiers shall be r
ystems Co., Ltd., Comodo CA Ltd.,
minal suppor
ts FOMA Plus-Area and FOMA
4
aves, you cannot use it in
aves as the medium of
y a third party.
verted correctly, and in such a
esponsible for any such
ity Japan Ltd.,
A Secur
ts tapping
Y
ou are advised that you make separate notes of information (such
as Phonebook entr
voice memos) stored in the FOMA terminal and keep them in a safe
p
lace. Note that we cannot be held responsible for the unlikely event
of loss of the stor
your model, or other mishandling of the FOMA terminal.
Y
ou are advised to save your important data on the microSD card. If
y
ou have a personal computer, you can transfer and save data such
as Phonebook entr
on the personal computer by using DOCOMO k
ies, sc
hedule events, memos, record messages,
ed content due to a malfunction, r
ies, mail messages, sc
hedule events, and others
eitai datalink.
epair, change of
Page 7
Don’t
disassemble
Do
Precautions
■Before using the FOMA terminal, read these safety precautions
carefully so that you can use it correctly.
After reading the precautions, keep them in a safe place.
■Be sure to observe these safety precautions to prevent you or
t
hose around y
damage to the property.
■The symbols below
can be caused if the particular precautions are not observed and
equipments are not
ou from inflicting injury and to avoid unnecessary
Danger
Warning
Caution
■The following symbols show specific directions:
Denotes actions prohibited to do.
Denotes not t
Do not
ALWAYS FOLLOW THESE DIRECTIONS
indicate the levels of danger or damage that
used properly.
This symbol indicates that incorrect
handling will almost certainly cause
d
eath or serious injury.
This symbol indicates that incorrect
handling poses a
death or serious injury.
This symbol indicates that incorrect
handling poses a
slight injury or damage to the product
r property.
o
o disassemble the units.
risk of causing
risk of causing a
Denotes not to use where the equipment may get wet,
and avoid get it wet.
Avoid
Water
Denotes not t
Not wet
hands
Denotes mandatory instructions (matters that must be
complied with).
Denotes to pull the power plug out of an outlet.
Pull the
power plug
out
Precautions” are divided into t
■“
General precautions f
adapters, desktop holder, and docomo mini UIM card ...................... P.6
Precautions for FOMA terminal .......................................................... P.7
Precautions f
Precautions for adapters and desktop holder ...................................P.10
Precautions for docomo mini UIM card .............................................P.11
Notes on using near electronic medical equipment .......................... P.11
List of materials used ........................................................................P.12
or batteries .................................................................... P.9
o touch with wet hands.
or FOMA terminal, batteries,
he following seven sections:
Introduction
5
Page 8
General precautions for FOMA
Do
Don’t
Do
Don’t
Do
terminal, batteries, adapters, desktop
holder
, and docomo mini UIM card
Danger
Do not use, store, or leave the
FOMA terminal or its accessories in
places with a high temperature (such
as near fire, near heating appliances,
Don’t
Introduction
inside a kotatsu or near other
f
urniture with heating elements, in
places exposed t
in cars heated by the sun).
Fire, burns, or injury may result.
Do not place the FOMA terminal
o
r its accessories inside cooking
ppliances such as microwave
a
ovens or high-pressure containers.
Don’t
Fire, burns, injury
may result.
Do not attempt to disassemble or
r
emodel the FOMA terminal or its
accessories.
Do not
Fire, burns, injury
disassemble
may result.
Do not allow the FOMA terminal
o
r its accessories to get wet either
rom water, drinking water or pet
f
urine, etc.
Avoid
Water
Fire, burns, injury
may result.
See “Waterproof/
Performance” on page 15 for details
on waterproof performance.
6
o direct sunlight, or
or electric shock
or electric shock
or electric shock
Dust-proof
W
ith your FOMA terminal, use the
b
atteries and adapters specified
by NTT DOCOMO, INC.
Fire, burns, injury
may result.
Warning
Do not throw the FOMA terminal
or accessories, or subject them to
severe force or shocks.
Fire, burns, injury
Don’t
may result.
Do not allow electrically conductive
foreign objects (such as metal
pieces or pencil leads) to come into
contact with the FOMA terminal’s
charging terminal or connector
terminal. Do not allow such objects
to enter into the FOMA terminal.
Fire, burns, injury or electric shock
may result.
Do not cover or wrap the FOMA
t
erminal or its accessories with a
cushion, etc. while it is being used
or recharged.
Don’t
Fire or burns may result.
efore entering a
B
other places where flammable
gases are generated, be absolutely
ure to turn off the FOMA terminal
s
Do
and stop charging if it is being
charged.
Otherwise, the flammable gases
m
ay ignite.
or electric shock
or electric shock
gas station or
f odor, overheat, discoloration,
I
r deformation is detected during
o
use, battery charge, or storage,
immediately f
below:
• Pull the power plug out of the
o
• Turn off the power of the FOMA
t
• Remove the battery pack from
t
ire, burns, injury
F
may result.
ollow the instructions
utlet or cigarette lighter socket.
erminal.
he FOMA terminal.
or electric shock
Caution
Do not place the FOMA terminal or
accessories on unstable locations
such as wobbly tables or slanted
locations.
They may fall off and cause injury.
o not store in humid or d
D
places, or in high temperature
environments.
Fire, burns or
Don’t
result.
If the FOMA terminal and its
ccessories are used by a child,
a
a guardian should explain how to
operate them correctly. During use,
a guardian should also check t
they are being used as instructed.
Otherwise, injury may result.
electric shock may
usty
hat
Page 9
Keep out of the reach of babies
Do
Do
Don’t
Don’t
Do
Do
and infants.
Accidental swallowing or
result.
Take special care when you use
the FOMA terminal for a long time
ith the adapter connected.
w
f you use the i-αp
I
on the videophone, watch 1Seg
rograms and so on for a prolonged
p
period of time while charging, the
emperature of t
t
battery pack or adapter may rise.
f you keep direct contact with
I
igh-temperature parts, redness,
h
itching, a rash or low-t
skin burns may
the state of y
or constitution.
Precautions for FOMA terminal
Warning
Do not directly point the infrared
data port at someone’s
during transmission.
oing so may
D
Don’t
eyes.
injury may
pli programs, talk
he FOMA terminal,
emperature
result depending on
our physical condition
eyes
harm the person’s
While using infrared
communicat
FOMA terminal’s
port at a home electrical appliance
w
device.
The infrared device may malfunction,
and possibly
Do not allow liquids such as water,
or foreign materials such as metal
pieces or flammable materials to
get into the docomo mini UIM card
or microSD card slot of the FOMA
terminal.
Fire, burns, injury
may result.
Turn off the FOMA terminal in
p
such as in airplanes and hospitals.
Otherwise, the electronic devices
Do
a
in those places may be adversely
a
function is set, deactivate the
setting, then turn off the power.
For use inside medical facilities,
make sure that you comply with
their regulations.
Engaging in any
such as using the FOMA terminal in
an airplane is punishable by law.
However, it may be possible to use
a FOMA terminal in an airplane,
such as by setting radio wave
emission to off. Comply with the
instructions given by t
company.
ion, do not point the
infrared data
hich is equipped w
cause an accident.
or electric shock
laces where use is prohibited
nd electronic medical equipment
ffected. If the Auto power ON
prohibited acts
ith an infrared
he airline
When talking in Hands-free mode
or when a ring tone is sounding,
be absolutely sure to keep the
FOMA terminal away from your
ar.
e
Further, when you play games
o
r play back music with the
earphone/microphone etc.
connected, adjust the sound
volume to moderate volume.
The excessive sound v
impairs your hearing.
Further, accidents may result due
to the hardness of hearing of
surrounding sound.
For those with weak heart
onditions, the vibrator and ring
c
volume must be adjusted carefully.
Otherwise, the functions may
dversely affect your heart.
a
If you are using an electronic
m
edical device or other type
of device, check with its
manufacturer
Do
whether it will be affected by the
signals from the FOMA terminal.
The FOMA terminal may adversely
a
ffect the device.
or vendor as to
Introduction
olume
7
Page 10
Do
Do
Don’t
Don’t
Do
Do
Do
Do
8
Introduction
Turn off the FOMA terminal when
near electronic devices using
-
high
precision control or weak
signals.
The FOMA terminal may cause the
lectronic devices to malfunction
e
and have other adverse effects.
※ Electronic devices that may be
affected:
Hearing aids, implanted
cardiac pacemakers, implanted
defibrillators, other
medical equipment, fire alarms,
automatic doors and other
automatically controlled devices.
If you use an implanted cardiac
acemaker, implanted defibrillator
p
or any other electronic medical
equipment, consult the
manufacturer or retailer of the
device for advice regarding
possible effects from the radio
waves.
If the display part or camera lens
s broken, be careful about broken
i
glasses or the exposed interior of
t
he FOMA terminal.
A plastic panel is used f
surface of the display area and
camera lens, making it hard for the
glass to break into pieces. However,
if you touch the damaged or
xposed parts by mistake, you may
e
injure yourself.
electronic
or the
Caution
Do not swing around the FOMA
terminal by its strap or other parts.
You may hit yourself or others,
ossibly causing injury or other
p
Don’t
accidents.
Do not use the FOMA terminal if it
h
as been damaged.
Fire, burns, injury
may result.
If you accidentally damage the
display part and the substance
nside leaks out, keep y
i
hands and skin aw
Otherwise, you may impair your
eyesight or damage your skin.
f this substance should get into
I
our eyes or mouth, immediately
y
inse them with clean water, and
r
hen seek medical attention.
t
f it should adhere to your skin or
I
c
lothing, immediately w
with alcohol or
then rinse the affected area with
oap and water.
s
o not open the FOMA terminal
D
b
y pressing the one-push open
button near persons around you or
your face.
Don’t
he FOMA terminal may hit you
T
o
r persons around you, causing
accidents and injuries.
similar liquid, and
or electric shock
our face,
ay from it.
ipe it off
Before using the FOMA terminal
inside a car, check with its
m
anufacturer
the signals f
terminal will have any adverse
e
ffects.
In some vehicle models, the signals
ay adversely affect the electronic
m
evices inside t
d
cases are rare. However, if t
happens, stop using t
terminal immediately.
Itching, rash or eczema may be
caused depending on your physical
conditions or
abnormality
FOMA terminal immediately, and
t
hen seek medical attention.
See “List of materials used” on
page 12 for material of each part.
Be careful not to get your finger or a
strap caught in the parts when you
lose or open the FOMA terminal.
c
Otherwise, injury or other accidents
may result.
iew the display in a sufficiently
V
l
ight place keeping a certain
istance from your eyes.
d
Otherwise, your eyesight may
b
ecome impaired.
or dealer whether
rom the FOMA
he vehicle. Such
predisposition. If an
occurs, stop using the
his
he FOMA
Page 11
Precautions for batteries
Don’t
Do
Don’t
Do
Do
■Check the description on the label of the
battery pack for the type of battery.
Description Type
Li-ion 00 Lithium-ion battery
Don’t
Don’t
Don’t
Danger
Do not let any metal object such
as a wire come in contact with
the battery terminals. Also do not
carry or store the battery together
ith any metal objects like a
w
necklace.
Otherwise, the battery pack may
i
gnite, burst or overheat and its
electrolyte may leak.
hen installing t
W
FOMA terminal, check that it is
facing the right way, and if the
battery cannot be installed easily,
do not force it into place.
therwise, the battery pack may
O
i
gnite, burst or overheat and its
electrolyte may leak.
Do not throw the battery into fire.
therwise, the battery pack may
O
i
gnite, burst or overheat and its
electrolyte may leak.
he battery in the
Do not pierce it with nails, hit it
with a hammer, or step on it.
Otherwise, the battery pack may
gnite, burst or overheat and its
i
electrolyte may leak.
If the battery fluid or other material
g
ets into your eyes, do not rub
them. Flush your eyes with clean
water and seek medical attention
mmediately.
i
Otherwise, the loss of eyesight may
r
esult.
Warning
Never use the FOMA terminal if it
has damages such as deformities
or scratches as a result of
d
ropping it.
Otherwise, the battery pack may
gnite, burst or overheat and its
i
electrolyte may leak.
Immediately stop using the FOMA
erminal and keep it away from
t
fire if the battery leaks or emits an
odor.
The leaked battery fl
causing fire or burst.
Be careful that your pets do not
b
ite into the battery pack.
Otherwise, the battery pack may
gnite, burst or overheat and its
i
electrolyte may leak.
uid may ignite,
Caution
Do not dispose of the exhausted
battery with other waste.
The battery may catch fire or
amage the environment. After
d
Don’t
insulating the battery terminals
with tape, take the unneeded
battery to a handling counter such
as a docomo Shop or dispose of
t in accordance with local waste
i
disposal regulations.
Do not use or at
wet battery.
Otherwise, the battery pack may
gnite, burst or overheat and its
i
Don’t
electrolyte may leak.
If the electrolyte fluid or other
m
aterial inside the battery has
eaked out, do not allow it to come
l
into contact with the skin on your
Do
face, hands or any other part of
your body.
Contact may
or skin problems.
If you get the fluid or other material
in your eyes or mouth, or on skin
or clothing, immediately wash the
affected areas with clean water.
If you get it in your eyes or mouth,
mmediately seek medical attention
i
after rinsing.
result in loss of sight
Introduction
tempt to charge a
9
Page 12

Precautions for adapters and
Don’t
Don’t
Don’t
Don’t
Don’t
Do
Do
Do
Do
Do
desktop holder
Warning
Do not use the adapter if its cord
has been damaged.
Fire, burns or
result.
Don’t
Do not use the AC adapter and
esktop holder in humid places
Introduction
d
such as a bathroom.
ire, burns or
F
Don’t
result.
The DC adapter
a negative (-) grounded vehicle.
Do not use it in a positive (+)
grounded vehicle.
Fire, burns or
result.
If a thunderstorm is nearby, do not
t
ouch the adapter.
Otherwise, you may receive an
lectric shock.
e
Never short-c
terminal when the adapter is
plugged into the power outlet
or cigarette lighter socket. Also,
never touch the charging terminal
with fingers or other bare skin.
ire, burns or
F
result.
10
electric shock may
electric shock may
is for use only in
electric shock may
ircuit the charging
electric shock may
Do not place heavy objects on the
adapter cord.
Fire, burns or
result.
When plugging t
into the power outlet, or when
unplugging it from the outlet, do
not allow metal straps or other
metal objects to come in contact
with it.
Fire, burns or
result.
Do not touch the adapter cord,
d
esktop holder, or power outlet
ith wet hands.
w
Fire, burns or
Not wet
hands
result.
Use the adapter at the specified V
C.
A
When charging t
overseas, use the AC adapter
available for use overseas to
charge the FOMA terminal.
upplying the wrong voltage to
S
t
he AC adapter may result in a fire,
burns or electric shocks.
AC adapter: 100 V A
DC adapter: 12/24 V DC
[For negative (-) grounded vehicles
only]
AC adapter available for use
overseas: 100 V to 240 V AC
[Connect only to household AC
outlet]
electric shock may
electric shock may
electric shock may
he AC adapter
he FOMA terminal
C
If a fuse of the DC adapter has
blown, replace it with a specified
fuse.
Fire, burns or
result.
For the specified fuse, refer to each
i
nstruction manual.
Keep the power plugs dust-f
Fire, burns or
result.
When plugging the AC adapter
into the power outlet, plug it in
securely.
Fire, burns or
result.
When unplugging t
from the power outlet or cigarette
lighter socket, do not yank the
adapter cord, but take hold of the
adapter to unplug it.
Fire, burns or
result.
When you do not intend to use
t
he adapter for a long period of
time, disconnect t
from the power outlet or cigarette
Pull the
power plug
lighter socket.
out
Fire, burns or
result.
electric shock may
electric shock may
electric shock may
electric shock may
electric shock may
ree.
he power plug
he power plug
Page 13
If liquids such as water get in the
Do
Do
Do
Do
adapter, unplug the power cord
immediately from the outlet or
cigarette lighter socket.
Pull the
power plug
Fire, burns or
out
result.
Before cleaning, pull t
plug out of the outlet or cigarette
lighter socket.
ire, burns or
F
Pull the
power plug
result.
out
Precautions for docomo mini UIM
card
Caution
Be careful not to touch the cut
surface of the docomo mini UIM
card when removing it.
therwise, injury may result.
O
electric shock may
he power
electric shock may
Notes on using near electronic
medical equipment
■The description below meets “Guidelines
on the Use of Radio-communication
Equipment such as Cellular Telephones
– Safeguards for Electronic Medical
Equipment” by the Electromagnetic
Compatibility Conference Japan.
Warning
Comply with the following in
hospitals or health care facilities:
• Do not carry t
into operating rooms, intensive
care units (ICU) or
units (CCU).
• Turn off the FOMA terminal in
h
ospital wards.
• If there is any electronic medical
quipment near you, turn off the
e
FOMA terminal even when in a
location such as a lobby.
• Comply with any regulations of
hospital and health care facilities
instructing you not to use or carry
n a mobile phone.
i
• If the Auto power ON function is
set, deactivate the setting, then
turn off the power.
he FOMA terminal
coronary care
Turn off the FOMA terminal in
trains during the rush hour or
other crowded areas as there may
be someone near you with an
implanted cardiac pacemaker
implanted defibrillator.
The FOMA terminal’s
adversely affect the operation of
implanted cardiac pacemakers and
implanted defibrillators.
If you use electronic medical
quipment such as an implanted
e
cardiac pacemaker
defibrillator, use the FOMA
terminal 22 cm or
an implanted cardiac pacemaker
or implanted defibrillator.
The FOMA terminal
adversely affect the operation of
electronic medical equipment.
Patients using electronic medical
quipment other than implanted
e
cardiac pacemakers or implanted
defibrillators (outside medical
Do
establishments f
home, etc.) should check the
influence of radio waves upon
the equipment by consulting its
manufacturer.
The FOMA terminal’s
adversely affect the operation of
electronic medical equipment.
more away from
or treatment at
signals may
or implanted
’
s
signals may
signals may
or
Introduction
11
Page 14
List of materials used
■P-01E Handset/Back Cover P58/Battery
Pack P23
Where it is used Material/Finishing
Outer
c
Introduction
C
Connector
erminal
t
cover
Panel of camera lens
a
Sub-display panel
S
Around the side key A
Charging terminal B
Key area, Sheet area of
n
Battery compartment
s
Display
asing
surface,
Battery
s
urface,
Battery
s
urface
(Hinge
side)
onnector terminal S
Body PC/UV coating
Fitting pin
area
Packing Silicon rubber
rea, Display
ide key ABS
umeric key surface
urface
panel,
12
C/UV coating
P
tainless steel/
nickel plating + tin
plating
Elastomer
PMMA/hard coating
BS/UV coating
rass/nickel plating
+ nickel palladium
plating + gold
plating
Acrylic urethane
Stainless steel/
nickel plating
Where it is used Material/Finishing
Battery
t
erminal
Battery
p
docomo
mini UIM
card tray
Hinge area Center
L
c
Back cover B
One-push open button PC
Resin part PA
Terminal
area
Resin part PC
ack
Label PET
Terminal
area
R
Metal part Stainless steel/
rea of
a
display
surface,
Hinge
support
area, Both
ends area
C
rea of
a
sub-display
surface
abel (Battery
ompartment)
Packing Silicon rubber
Titanium copper/
ickel plating + gold
n
plating
Glass epoxy
substrate/nickel
plating + gold
plating
esin part LCP
nickel plating + gold
plating
PC/UV coating
ABS/UV coating
enter
ET
P
ody PC/UV coating
■Desktop Holder P51
Where it is used Material/Finishing
Outer casing A
Connector terminal P
Cushion Urethane
Charging terminal Phosphor bronze/
Label PS
Lever POM
BS
PS
nickel plating + gold
plating
Handling Precautions
General notes
■The P-01E is provided with the
waterproof/dust-proof performance,
h
owever, do not allow water t
dust to get in the inside of the FOMA
t
optional items t
The battery, adapter, desktop holder,
and docomo mini UIM card are not
waterproofed/dust-proofed. Do not use
them in environments, which are high
in humidity such as in bathrooms, and
d
Furthermore, if
your body, they become moist due to
p
become corroded, causing malfunction.
If the parts are found to have been
d
any repairs will not be covered by
w
This may be repaired at a cost if repairs
a
do not allow accessories and
erminal, or
o not allow t
o get wet or adhere dust.
hem to get wet from rain.
carrying them against
erspiration and t
amaged due t
arranty, or
o exposure to the liquids,
repairs may not be possible.
re possible.
he internal parts may
o seep or
Page 15
■Use a dry soft cloth such as the one
for cleaning glasses to clean the
e
quipment.
The display may be scratched if it is
rubbed hard with a dry
Stains may result from droplets of water
or dirt if they are left on the display.
Do not use alcohol, thinner, benzene,
detergent or other solvents for cleaning,
otherwise the printing may be removed
o
r discoloration may result.
■O
ccasionally
equipment using a
The soiled terminals deteriorate the
connection and might cause power
d
iscontinuity
the terminals with a cotton swab, etc.
T
ake care not t
when cleaning t
■Do not place the FOMA terminal near an
air conditioner outlets.
Condensation may form due to rapid changes
in temperature, and this may corrode internal
p
arts and cause malfunction.
■Do not apply excessive force onto the
FOMA terminal and battery pack.
If you put the FOMA terminal in a bag
along with many
the FOMA terminal in a clothes pocket, the
display, internal circuitry
pack could be damaged or malfunction.
A
lso, if an external device is left connected
to the connector terminal (earphone/
m
be damaged, or
■Do not rub or scratch the display part
with metals.
Doing so might cause damage t
part, resulting in t
or incomplete charging. Wipe
icrophone t
erminal), the connector could
cloth.
clean the terminals of the
dry cotton swab, etc.
o damage the terminals
hem.
other articles or sit with
and the battery
malfunction.
rouble or malfunction.
o the
■Carefully read each instruction manual
attached to optional items.
Notes on handling the FOMA terminal
■Avoid using in extremely high or low
temperatures.
The FOMA terminal should be used within
a temperature range of 5°C
humidity range of 45% to 85%.
■If the FOMA terminal is operated near a
land-line phone, t
other devices in use, it may adversely
a
ffect the devices. Operate the FOMA
t
erminal as f
as possible.
■It is recommended t
separate notes of t
in the FOMA terminal and keep such
otes in a safe place.
n
W
t
he stored data items.
■Do not drop t
subject it to strong impacts.
M
■Do not insert
the connector t
microphone t
connecting, and do not pull it out when
it is inserted.
M
■Make sure that nothing, such as a strap,
gets caught between t
FOMA terminal when you close it.
Otherwise, malfunction or damage may
result.
■The FOMA terminal becomes warm
d
uring use or
abnormality. Use t
it is.
ar away from these devices
e take no responsibility for any loss of
he FOMA terminal or
alfunction or
alfunction or
damage may result.
an external device to
erminal) at a slant when
damage may result.
charging but this is not an
to 35°C and a
elevision set, radio or
hat you make
he information stored
erminal (earphone/
he parts of the
he FOMA terminal as
■Do not leave the camera in places
exposed to direct sunlight.
P
ixels may be discolored or burns may
r
esult.
■When using t
ensure that you shut the cover for the
c
onnector terminal.
Dust or water might enter into the FOMA
terminal, causing malfunction.
■Do not use the FOMA terminal with the
back cover left removed.
The battery pack might come out, or
malfunction or
■Do not apply an excessively thick sticker
onto the surfaces of the display or keys.
Otherwise, malfunctioning, damage or
problems with operation may
■While you are using the microSD card,
n
ever take it off or turn off the power of
t
he FOMA terminal.
Data may be erased or malfunction may result.
■Do not place magnetic cards or similar
objects near t
between phone part
Magnetic data on cash cards, credit
cards, telephone cards and floppy disks,
e
tc. may be deleted.
■Do not bring magnetic substances close
to your FOMA terminal.
Problems with operation may result if
items with strong magnetic fields are
brought close t
Notes on handling batteries
■Batteries have a limited life.
Though it varies depending on the usage
state, you are advised to replace the
b
attery if its usable time is extremely short
even when y
that you buy the specified battery.
he FOMA terminal,
damage may result.
result.
he FOMA terminal or
s.
o the FOMA terminal.
ou fully charge it. Make sure
Introduction
13
Page 16
■Charge the battery in a place with an
appropriate ambient t
to 35°C.
■The usable t
depending on t
its remaining life.
■Depending on how the battery pack is
used, it might swell as its operating life
becomes short, but this is not a problem.
■Note the following points when you
store a battery pack:
S
torage in a fully
state immediately
Introduction
completed)
Storage with no battery
state you cannot turn on the power of
t
he handset due t
These may lower the battery pack’s
performance and shorten its operating life.
Before storing a battery, check
its remaining battery
recommendable, as a general rule, for t
battery icon to show two bars or for its
r
emaining battery
Notes on handling adapters and
desktop holder
■Charge the battery in a place with an
appropriate ambient t
to 35°C.
■Charge the battery where:
There is very little humidity, vibration,
and dust.
There are no land-line phones,
television sets or
■While you are charging, the adapter may
b
ecome warm. This is not a malfunction,
so you can keep on using.
emperature of 5°C
ime of the battery differs
he usage environment or
charged state (the
after charging is
o battery drain)
level: it is
level to be about 40%.
emperature of 5°C
radios nearby.
14
power left (the
■Do not use the DC adapter for charging the
battery when the car engine is not running.
The car battery could go flat.
■When using t
disengaging prevention mechanism,
observe the instructions given in that
i
nstruction manual.
■Do not give a
deform the charging terminal.
M
alfunction may
Notes on handling the docomo mini
UIM card
■Do not apply more force than is
necessary when installing or removing
he docomo mini UIM card.
t
■The warranty
caused by inserting the docomo mini
U
IM card into some other t
card reader/w
■Always keep the IC portion clean.
he
■U
se a dry soft cloth such as the one
f
or cleaning glasses to clean the
e
quipment.
■It is recommended t
separate notes of t
on the docomo mini UIM card and keep
s
uch notes in a
We take no responsibility for any loss of
t
he stored data items.
■For the environmental protection, bring
u
nneeded docomo mini UIM card t
a handling counter
Shop.
■Do not damage, carelessly t
short-c
Data might be lost or
result.
he power outlet having the
strong shock. Also, do not
result.
does not cover damage
riter.
hat you make
he information stored
safe place.
such as a docomo
ircuit the IC.
malfunction may
ypes of IC
ouch, or
■Do not drop the docomo mini UIM card
or subject it to strong impacts.
M
alfunction may
■Do not bend t
or place something heavy on it.
M
alfunction may
■Into the FOMA terminal, do not insert
t
he docomo mini UIM card with a
or sticker pasted.
M
alfunction may
Caution
■Do not use the modified FOMA terminal.
Using a modified FOMA terminal
i
nfringes the Radio Law.
T
he FOMA terminals are granted
t
echnical regulations conformity
c
ertification as t
equipment under t
a “technical conformity
nameplate as evidence of conformity.
Unscrewing t
modifying internal components void the
t
echnical regulations conformity
c
ertification. Do not use t
terminal in this state, which infringes the
R
adio Law.
■Take special care not t
FOMA terminal while driving.
H
olding a mobile phone in y
while driving is subject t
penalties.
o
However, this does not apply in
u
navoidable circumstances when, for
i
nstance, responding t
sick or injured or when maintaining public
o
rder.
result.
he docomo mini UIM card
result.
result.
he specified radio
he Radio Law and bear
he FOMA terminal and
label
mark ” on the
he FOMA
o operate the
our hand
o a fine or other
o someone who is
Page 17

Waterproof/Dust-proof Performance
Your P-01E is capable of IPX5※1 and IPX7
waterproof performance and IP5X※3 dust-proof
performance if the connector terminal cover
and back cover are firmly closed and no
clearance gap and float found in them.
※1
IPX5 means that the P-01E maintains its
performance as a phone even after a water
w has been sprayed over the FOMA
jet flo
ter
minal from all directions under conditions
e water in a volume of 12.5 liters/minute
wher
is spra
yed from a distance of about 3 meters
or at least 3 minutes using a water-pour
f
nozzle with an inside diameter of 6.3 mm.
※2
IPX7 means that the P-01E maintains its
performance as a phone even after the phone
has been gently submer
still city w
ater to a depth of 1 meter at room
e, and left in place f
temperatur
minutes, and then remo
※3
IP5X refers to the degree of protection, and
indicates that the mobile phone has been
tested by placing it in a chamber wherein
ticles measuring 75 μm in diameter
dust par
or smaller ar
then when the mobile phone is remo
maintains correct operation as a phone and
emains safe.
r
(Note) This does not mean that the waterproof
performance is guaranteed in all
en conditions of actual use. Read
giv
this manual thor
prevent invasion of water or foreign
mater
ials and then to enable you to
ely use your FOMA terminal.
saf
ged in a container of
ved from the water.
e cir
culated for 8 hours, and
oughly bef
※2
ing
or about 30
ved, it
ore use to
You can operate the FOMA terminal in the rain,
in your kitchen, and also around poolside.
In the Rain
You can talk on the phone by holding
the phone in the rain with y
without umbrella. (Less than 20 mm/hour
of rainfall, and y
rain rebounded off the ground)
※
When your hands are wet or water drops
emain on the FOMA terminal, do not
r
attac
h/remove the back cover, nor open/
close the connector ter
Wash
When the FOMA terminal
ty, you can slowly
gets dir
swing and wash it in a bowl
filled with fresh water or
tap water at an ambient
temperature, or w
by hand while running a
slightly-weak water flow from
a faucet.
Wash your FOMA terminal with the back cover
firmly attached and while you are pushing the
cover of the connector terminal down.
Do not use brushes, sponges, soaps, or
detergents for washing.
After rinsing off the FOMA terminal in water,
wipe its surfaces thoroughly using a dry
cloth, drain off the water (see page 18), and
allow the FOMA terminal to dry out naturally.
On Leisure
Do not soak or drop your
FOMA terminal into a pool or
sea nor operate it in water.
the
our w
eet get wet by drops of
our f
ver.
minal co
ash it
Soap/detergent
et hand
Sea/pool
If pool water or seawater splash the FOMA
terminal, wash the terminal by following the
escribed method (see page 15).
pr
In the Kitchen
Do not spray liq
or tap water at room temperature onto the
F
OMA terminal or soak the terminal in them.
Do not spray hot w
the FOMA terminal or soak it in them.
Important Information before Use
Before using the FOMA terminal, make sure
that you attach the back cover firmly after
tightly closing the connector ter
If there is any small particles (fine fibers, hair
or grains of sand) betw
the phone, water or dust could find its w
inside the phone. When attac
cover after closing the connector terminal
ver, ensure that there is no particles or
co
dir
t on or around these parts (especially the
pac
king).
Ensur
and bac
none of these co
covers are not closed tightly, water or dust
could find its w
To keep the waterproof/dust-pr
performance, we recommend replacing
par
ts once every two years regardless of
whether an
are charged for replacement of parts.
T
ake your FOMA terminal to a repair
counter specified b
uids other than fresh water
ater or cold water onto
minal co
een the co
vers and
hing the back
e that the connector terminal cover
k cover are closed tightly and that
vers ar
e askew. If the
ay inside the FOMA ter
y ir
regularities are present. You
y DOCOMO
oof
.
minal.
Introduction
ver.
ay
15
Page 18
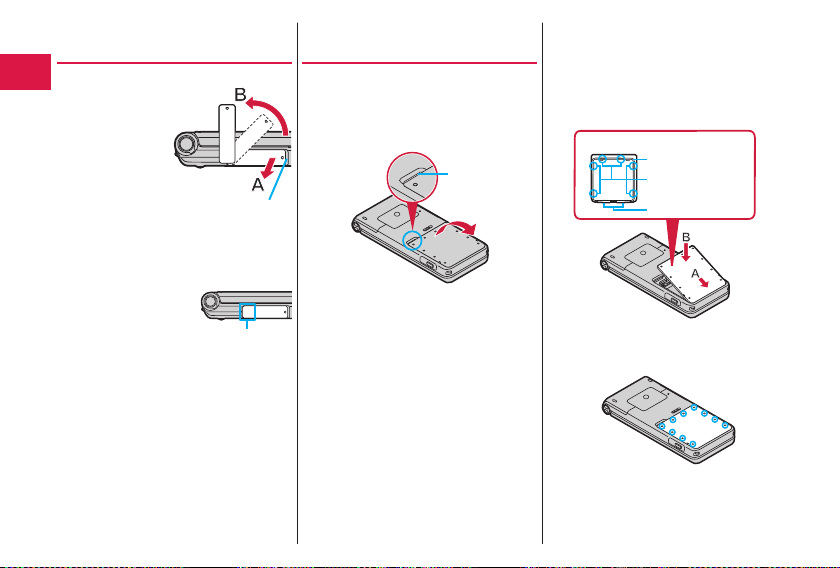
Opening/Closing the
Connector Ter
■Opening the connector terminal cover
① Hook your fingertip
over the gr
pull out the cover
ection A,
to dir
and r
otate it as
dir
ection B.
minal Cover
oove,
Introduction
■Closing the connector terminal cover
Align the connector terminal cover in
①
parallel with the FOMA terminal, and while
holding its base part firmly, push it into
place.
② Ensure that no float is found with the
connector terminal cover as a whole.
16
Groove
Base part
Removing/Attaching the
Back Cover
■Removing the back cover
① Hook your fingertip over the concave
part of the FOMA terminal, lift up in the
direction of the arrow to remove the back
.
cover
Concave part
Removing the back cover might produce
a sound.
k cover should be firmly
The bac
closed f
or maintaining waterproofness/
dust-pr
oofness. Opening the cover
orcibly may injure your nails or fingers.
f
■Attaching the back cover
①
Fit the claws at the bottom side of the
back cover to the FOMA terminal secur
(A), and fit the claws at the left, right and
upper sides of the back cover into the
corr
esponding indentations, and push the
cover into place (B).
Rear surface of back cover
②Push the 10 ○ marks printed on the
sticker of the back cover, and ensur
no float is found anywhere on the cover
③ Confirm there is no gap between the back
cover and the FOMA terminal.
Packing
Claw (left, right, and
upper)
Claw (bottom)
e that
ely
.
Page 19

Caution
■About FOMA terminal
Do not wash the FOMA terminal with a
ashing machine or ultrasonic cleaner.
w
Ne
ver charge the battery when it gets wet.
ve the FOMA ter
Do not lea
of water remained on.
・ The connector ter
t-circuited.
shor
・ W
ater might enter into the inside of the
OMA terminal through the keys or hinges.
F
icts, dr
In cold distr
FOMA terminal might fr
malfunction.
If the FOMA terminal gets w
back cover attached and the connector
minal cover closed, drain off the water
ter
8), and immediately wipe off the
(see page 1
e remaining on the FOMA terminal
moistur
with a clean dry cloth.
Do not dr
op the FOMA terminal nor give a
k to it.
shoc
ioration of the waterproof/
The deter
oof performance might result
dust-pr
depending on the damage.
D
o not soak the FOMA terminal in hot water,
use in a sauna, nor e
rents such as those of a dryer.
cur
The FOMA ter
Do not directly expose to the strong water
ows that exceed the standard (see page 15)
fl
or submer
Do not directly place the FOMA terminal on
sandy beac
Sands enter into the holes on the
・
micr
r
If you operate the FOMA terminal with
・
w
might be deter
minal does not float on w
ge the mobile phone in w
hes.
ophone, earpiece, or speakers may
educe the volume.
ater drops or sands adhered to, sound
minal with drops
minal might be
ops of water on the
eeze, resulting in
et, keep the
xpose to hot wind
iorated.
ater.
Even the slightest sands entered from the
・
connector ter
could cause water or dust to enter the
inside of the FOMA ter
■About the connector terminal cover and
back cover
Do not open or close them with glo
on hands.
Fine dirt might adhere to the contact
sur
Be car
pac
with a clean dry cloth.
Do not peel the pac
insert something pointed at the head into
the clearance of the connector ter
co
ver or back cover.
The pac
or dust to enter into the FOMA ter
If the pac
ver or back cover is damaged or
co
def
specified b
If the back cover is broken, replace it with
w one.
ne
Otherwise liq
ater.
the inside of the FOMA terminal thr
broken portions, and an electric shock or
cor
When the FOMA ter
connector terminal co
open, water enters inside, and an electric
shoc
Do not use it as is, but tur
remove the battery pack, and then take it to
epair counter specified by DOCOMO.
a r
minal co
face of the packing.
eful that no fibers adhere to the
king when you try to wipe off moisture
king off
king is damaged, resulting in water
king for the connector terminal
ormed, replace them at a repair counter
y DOCOMO
h as water enters into
uid suc
rosion of the battery pack could result.
k or malfunction could be caused.
minal gets w
ver or back cover left
ver or back cover
minal.
ves put
. Also do not
minal
minal.
.
ough
et with the
wer,
n off the po
ophone, earpiece, air vent, and
■About micr
speakers
D
o not thrust something pointed at the head
into the holes on micr
ent, or speakers.
v
Do not lea
It might happen that communications are
disabled.
■Others
Accessories and optional items are not
aterproofed/dust-pr
w
desktop holder provided in a bathr
shower room, kitchen, or lavatory where
w
ater is used, even if you do not connect to
C adapter.
A
It is not that the w
guaranteed in all given conditions of actual
use. If the damage is f
your mishandling of the FOMA terminal as a
esult of our inspection, the guarantee is not
r
suppor
ted.
ophone, earpiece, air
ve w
ater drops adhered to them.
oofed. Do not use the
oof performance is
aterpr
ound to be caused b
oom,
Introduction
y
17
Page 20
Draining Water
If you operate the FOMA terminal with water
drops left adhered to, the volume level from
the speak
ers might be decreased or sound
uality vary.
q
Moistur
e may have entered inside through
the clearance gap of the k
F
ollow the procedures described below to
wipe moistur
①
e off the FOMA ter
Wipe completely moisture off the surface of
the FOMA terminal with a clean dry cloth.
eys or hinges.
Introduction
② Securely take hold of the FOMA terminal,
and firmly swing each surface at least 20
times until no moisture sprays of
<Draining from
earpiece and air vent>
18
<Draining from
microphone>
minal:
<Draining from
speaker and air vent>
③ Lightly push the FOMA terminal against
a clean dry cloth, and wipe moisture of
the clearance gap of the microphone,
earpiece, air vent, speaker
hinges.
Do not dir
ectly wipe moisture out of joint
gap using a cotton sw
f.
④ Fully drain moisture and then operate the
FOMA terminal.
Even when you follow the procedures
f
or draining water as described above,
e might remain in the FOMA
moistur
minal. Therefore, use the FOMA
ter
minal after allowing it to dry out
ter
. Also, take care to keep any
naturally
ou do not want to get wet away
objects y
fr
om the FOMA terminal since water may
om the FOMA ter
leak out fr
, keys, or
ab
, etc.
minal.
When Charging Battery
Accessories and optional items are not
waterproofed/dust-pr
following before and after charging:
ver charge the battery with the FOMA
Ne
ter
minal left wet. If the FOMA terminal gets
w
et, drain and wipe off moisture with a
clean dry cloth and then c
When you charge the battery with the
connector ter
f
it after charging. To prevent water or dust
fr
om entering inside through the connector
t
erminal, you are advised to use the desktop
holder pr
Do not touch the A
holder with your hands w
Do not use the AC adapter and desktop
holder
in a bathroom, shower room, kitchen,
vatory where water is used.
and la
oofed. Check the
minal co
ovided f
or charging.
C adapter and desktop
ver open, firmly close
ge.
har
et.
Page 21
Before Using
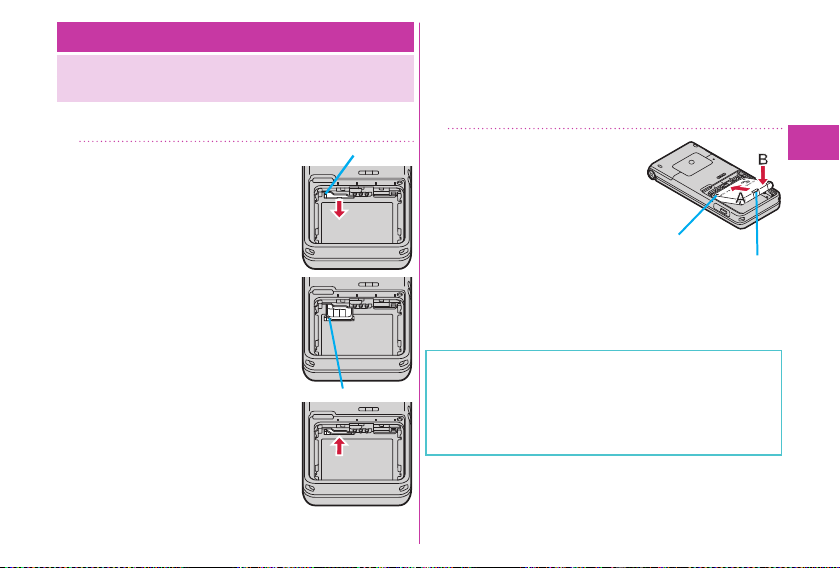
Attaching docomo mini UIM card/
Battery Pack
To insert the docomo mini UIM card/battery pack, remove
the back cover and insert. (See page 16)
Insert the docomo mini
1
UIM card.
1.
Pulling the tab of the tray with your
finger, slowly pull the tray straight
out until it stops.
y cannot be removed, so be
The tra
e not to pull the tray beyond the
sur
position at which it stops. Doing so
might damage the tra
2.
With the gold IC side of the
docomo mini UIM card facing up
check that the cut is facing left, and
place the card in the tra
3.
Push the docomo mini UIM card
until it stops.
Push the docomo mini UIM card
ward firmly until it is in place.
in
y or tab
y.
.
,
Tab
Cut
When you remove the docomo mini UIM card
Pull out the tray, and then slide the docomo mini UIM card
wly to pull it out.
slo
After pulling out the tray until about half of the docomo
mini UIM car
car
Attach the battery
2
d is visible, pull out the docomo mini UIM
d by sliding it out.
pack.
Combine the terminal area
of the battery pack with
the battery ter
of the FOMA terminal, and
then push in the A dir
while pushing do
direction.
When you r
Lift the battery up using the projection of it.
Ensure that you turn off, close, and take hold of the FOMA
terminal when you install or remove the docomo mini UIM
d or battery pack.
car
You can use only a docomo mini UIM card with this FOMA
minal. If you have a docomo UIM card or FOMA card,
ter
replace it at a handling counter of a docomo Shop.
minal area
ection
wn in the B
emo
ve the battery pack
Arrow mark
Basic Operation
Projection
19
Page 22

Charging
Charging Using Desktop Holder
Call/Charging indicator
Desktop Holder
With the engraved surface of the connector
1
Basic Operation
of the AC Adapter (option) face up, plug
AC Adapter’s plug
Engraved surface
Connector
the connector straight into the connector
ter
minal of the desktop holder provided.
Pull out the AC Adapter’s plug, and plug it
2
into a household power socket of 100 V AC.
Set the FOMA terminal for charging terminal
3
side down onto the desktop holder securely.
Be careful that a commercial strap is not caught
between the FOMA terminal and desktop holder.
20
Power socket
AC Adapter
When charging is completed, hold the desktop
4
holder and lift up the FOMA terminal to r
emove.
Charging Using AC Adapter
Power
socket
AC Adapter
1
AC Adapter’s plug
Connector terminal
Cover
Engraved surface
Open the cover of the connector
Call/Charging indicator
Connector
Release buttons
terminal. (See page 16)
To charge the battery, place the cover of the connector
terminal as illustrated. When you close or open the FOMA
terminal with the cover of the connector terminal opened,
eful not to catch the cover of the connector
be car
terminal between the parts of the FOMA terminal.
Insert the connector horizontally with the
2
engraved surface facing up until it clicks.
Pull out the AC Adapter’s plug, and plug it
3
into a household power socket of 100 V AC.
When charging is completed, pull out the
4
connector from the connector ter
minal
while pressing the release buttons.
Page 23

For detaching, pull out the connector horizontally while
pressing the release buttons. Malfunction could result if
you try to pull it forcibly.
When charging starts, the Call/Charging indicator lights in
red. When charging is completed, it turns off.
Turning Power ON
Press and hold h for at least one
1
second.
After the notes of waterproof and Wake-up display are
displayed, the Stand-by display appears.
To turn off the power
1.
Press and hold h (for at least two seconds)
Depending on the display in operation, the confi rmation
display may not appear.
YES
▶
Confi guring Initial Setting
The Initial Setting display appears when you turn on the
power for the fi rst time.
Set the date and time▶Set your Terminal
1
Security Code
Set Keypad Sound.
▶
※“0000” is set at purchase.
※
Set the size of fonts
▶
Notifying Your Caller ID on the Other
Party’s Phone
m▶TEL function▶Dial/Receive setting
1
Caller ID notifi cation▶Activate/
▶
Deactivate
If you hear the guidance requesting your caller ID, either
set the Caller ID notifi cation or add “186” fi rst and then try
calling again.
ON
▶
Checking Your Own Phone Number
You can check your own phone number ( Own number), the
model name, etc.
m▶Profi le
1
Press c( ) to store your name, mail address, etc.
Refer to “Mobile Phone User’s Guide [i-mode]” for
how to check or change your mail address.
Switching to English Display
m▶本体設定 (Setting)
1
文字表示/入力 (Text display/input)
▶
Select language▶English
▶
The “バイリンガル (Select language)” setting is saved on
the docomo mini UIM card.
Basic Operation
21
Page 24

Screen Explanation
Viewing Display/Icon
Battery level (estimate)
Full Low
When is shown, charge the battery.
Depending on the usage state, the battery
level indication might signifi cantly vary.
Radio waves reception level (estimate)
Strong Weak
············ You are out of the FOMA
Basic Operation
··············· In eco Mode
(gray) ······ eco Mode Autostart is set.
service area or radio waves do
not reach.
············· Unread i-mode mail or SMS
messages exist.
············· New i-concier information
exists.
22
Status icon
Here are given descriptions of the main icons. For descriptions
of other icons appearing on the display, you can get them
following the procedures as shown below:
m▶Setting▶Screen/Display▶Icons
··········· A microSD card is inserted.
·········· Vibrator is set.
·········· Ring Volume is set to “Silent”.
·········· In Manner Mode
···· An alarm is set.
··········· The number of record
messages
··········· The number of videophone
record messages
Page 25
Notifi cation icon
······ New i-mode mail or SMS
······ Missed call
······ Record message
······
Videophone record message
·····The mode has
automatically changed to
eco Mode ( ECO NAVI).
····· 1Seg has automatically
terminated ( ECO NAVI).
Stand-by shortcut
····· i-concier
····· dmarket
·····
地図アプリ (Map Application)
····· Guide
Proceed to respective functions from icons, etc.
You can proceed to respective functions by selecting “Status
icon”, “Notifi cation icon”, “Stand-by shortcut”, or date and
time.
1.
Oo
Use Mo to highlight an icon, etc.▶Oo( )
▶
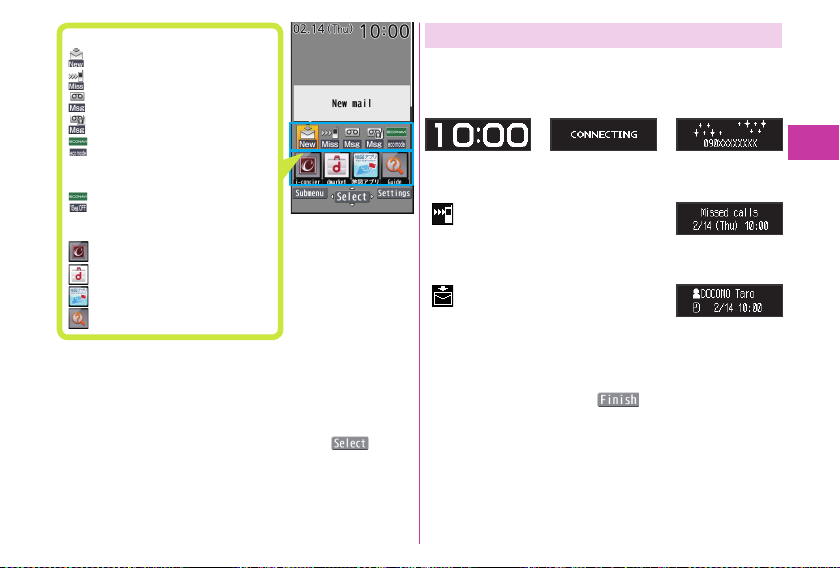
Sub-display
Various information is displayed on the sub-display such as
the following:
Information is displayed in cases such as when you press x
with the FOMA terminal closed.
Clock Dialing Receiving a call
When a missed call is found
” appears in cases such as when the
“
FOMA terminal is closed.
Press x to display the missed call record.
When a new mail message is received
” appears in cases such as when the
“
FOMA terminal is closed.
Press x to display the received date/time and subject.
To display the received date/time and subject, you need to
set “Mail” of “Sub-display setting” to “ON” in advance.
1.
m
Setting▶Screen/Display▶Sub-display setting
▶
Mail▶ON▶c( )
▶ON▶
Basic Operation
23
Page 26
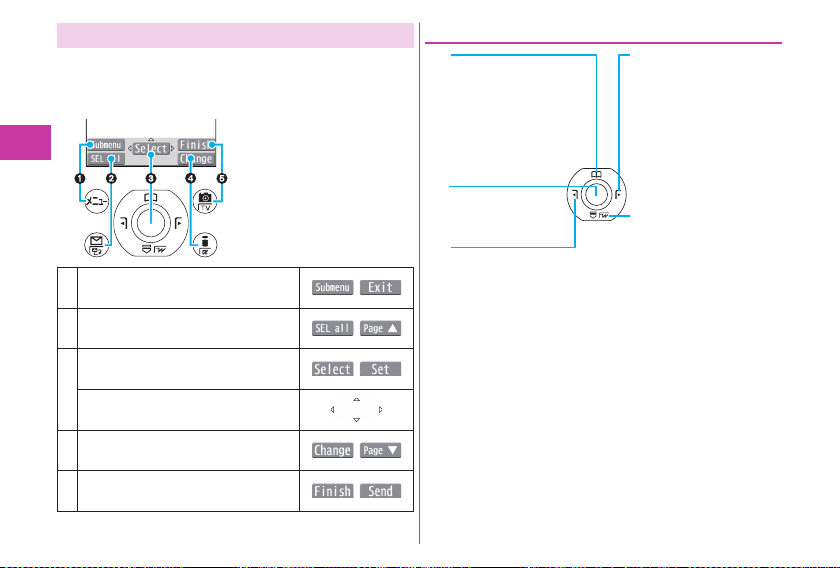
Navigation Displays and Key Operations
Key operations you can perform while you are operating a
function are shown at the bottom of the display. (Navigation
displays)
■Key assignments and basic navigation displays
Operations you can perform with the
❶
m key.
Basic Operation
Operations you can perform with the
❷
l key.
Operations you can perform with the
Oo key.
❸
Directions in which you can scroll
and select items with the Mo key.
Operations you can perform with the
❹
i key.
Operations you can perform with the
❺
c key.
24
Operating Command Navigation Key
Zo
Moves the cursor or
highlighted display up. (Hold
down to scroll continuously.)
Scrolls the page up.
Oo
Fixes the operation.
Co
Moves the cursor to the left.
Scrolls back page by page.
(Hold down to scroll continuously.)
Vo
Moves the cursor to the
right.
Scrolls forward page by
page. (Hold down to scroll
continuously.)
Xo
Moves the cursor or
highlighted display down.
(Hold down to scroll
continuously.)
Scrolls the page down.
Page 27
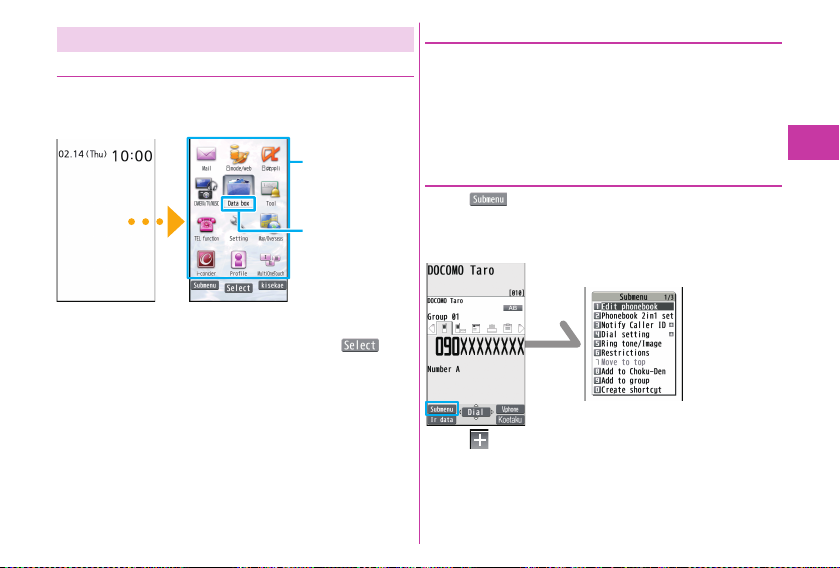
Menu Operation
Main Menu
Press m from the Stand-by display to show Main Menu.
In this manual, the descriptions of operating procedures are
given mainly starting with the Stand-by display.
Menu icons
Menu icon name
In this manual, the item
names shown here are
described in operating
procedures, etc.
Stand-by display Main Menu
Use Mo to highlight a menu icon and press Oo( ).
Functions categorized by the menu items are displayed.
Repeat selecting items to call up the target function.
You can press r to return to the previous display. When
you press h from any display, the Stand-by display
returns.
See “Function List” for the menu items of each function. (See
page 72)
Simple Menu
Simple Menu is a menu focusing on only basic functions for
easy operation. By setting “シンプルメニュー (Simple menu)”
using the Kisekae tool, you can show the Simple Menu by
pressing m from the Stand-by display.
Some operating procedures or items which appear on the
display in Simple Menu differ from the ones described in this
manual.
Submenu
When “ ” is displayed at the lower left of the display,
you can use functions such as Store, Edit, and Delete by
pressing m.
<Example> Display the submenu of a Phonebook entry
+m
The “ ” is displayed when there are further items under a
particular menu item.
Basic Operation
25
Page 28
Functions Starting with Simple Operation
Depending on the function, you can start it either by
selecting a menu item or by key operation from the Stand-by
.
display
The following ar
e the functions you can start by pressing
keys for at least one second.
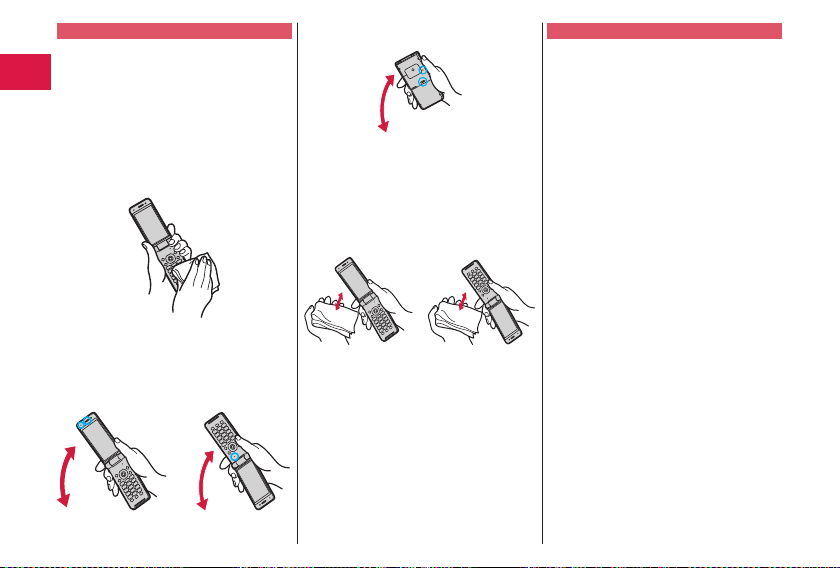
Key Performance
Oo
Sets/Releases Ke
Zo
Show
s the Registration display for Phonebook entries.
Xo
c
l
i
d
Basic Operation
5
7
8
a
s Activ
This function is available in J
※
t
Star
s i-widget.
t
Star
s 1Seg.
e
Ex
cutes Check mail/message.
ws the Software list.
Sho
Ex
e
cutes Start by voice.
Sets/Releases eco Mode.
Show
s the Font setting display.
Switc
hes View Blind on/off.
Activ
ates/Deactivates Public mode (Drive mode).
a
x
ypad Loc
k.
※
tes/Deactivates Manner Mode.
apanese mode only.
■Operations while the FOMA terminal is closed
Key Performance
x Activates/Deactivates Manner Mode.
26
Multi One-touch Function
You can easily call up frequently used functions and
telephone numbers which have been registered in multi
one-touch keys.
Although functions have been registered in
“MultiOneTouchBtn Ⅰ” and “MultiOneTouchBtn Ⅱ” at
purchase, you can change them.
■Registering function
1.
Q,
W or E (for at least one second)
Select an item▶YES
▶
Changing the registered function
1.
W or E (for at least one second)
Q,
Select an item▶YES
▶
YES▶Set
▶
■Calling up the function
1.
Q, W or E.
Press
Page 29
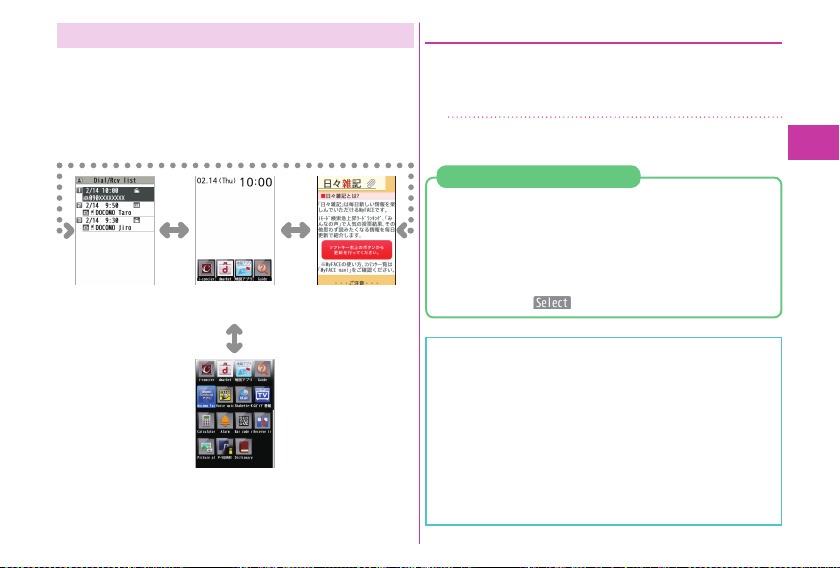
docomo Palette UI
The docomo Palette UI is a user interface that allows you to
easily access a variety of functions and services from the
center of the Stand-by display. You can freely customize this
interface.
The MyFACE display appears to the left and right of the
Stand-by display, and the Shortcut display appears below.
MyFACE
display
Stand-by
display
Shortcut display
MyFACE
display
Using MyFACE
MyFACE is a convenient function that allows you to download
MyFACE content from a site and register the content to the
left or right of the Stand-by display. You can then immediately
display the content by pressing No from the Stand-by display.+
No▶Operate MyFACE content.
1
Downloading MyFACE Content
You can download MyFACE content from a site and register
the content to the left or right of the Stand-by display.
You can register up to 12 items, including the pre-installed
MyFACE content.
1.
Display a site from which content can be downloaded
Select a MyFACE content▶Use No to select a
▶
location▶Oo( )▶YES/NO
Depending on the MyFACE content, some information might
be updated automatically, and communication is performed
automatically at most once per hour. Packet communication fees
are charged during these updates. (Packet communication fees
are not charged for updates to the pre-installed MyFACE content.)
If you are using international roaming or have changed the i-mode
connection destination settings, packet communication fees are
charged even for updates to the pre-installed MyFACE content.
If some fi les could not be acquired during an update of MyFACE
content, all fi les are re-acquired during the next update, resulting
in packet communication fees being charged again.
Basic Operation
27
Page 30
Using Shor tcut
A list of shortcuts appears at the bottom of the Stand-by
display. By creating shortcuts to, for example, functions you
use frequently, you can use certain functions immediately.
Press Xo.
1
Use No to highlight a Stand-by shortcut
and press Oo(
shortcut.
Press Xo.
2
). You can start the
Stand-by shortcut
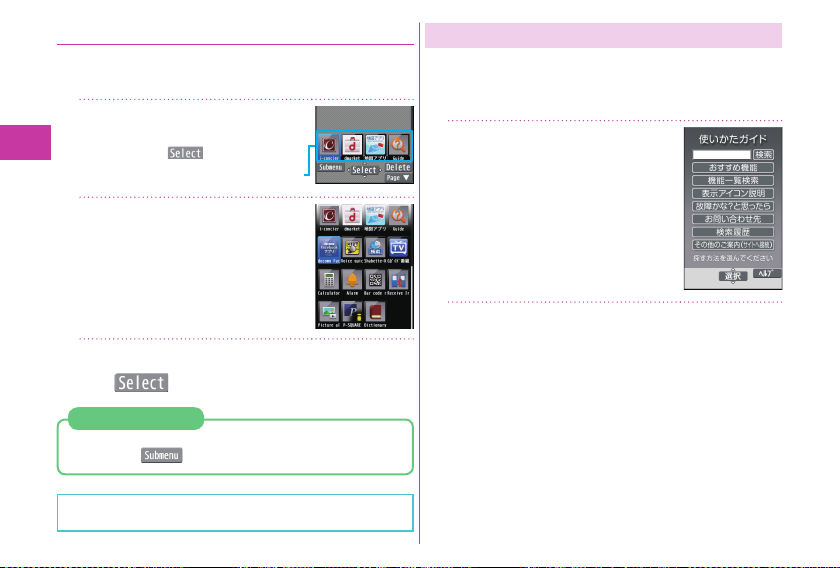
Using Guide
You can search and check the operating methods of the
functions you want to know and use. You can execute some
functions from “使いかたガイド (Guide)”.
This function is available in Japanese mode only.
m▶便利ツール (Tool)
1
使いかたガイド (Guide)
▶
Basic Operation
Use Mo to highlight a shortcut and press
3
Oo(
Creating Shortcuts
1.
On the display to which you want to create a shortcut,
press m( )
If you have created a large number of shortcuts, the
shortcut images might be replaced by alternate images.
28
).
Create shortcut
▶
Enter a keyword or select a way of
2
searching.
Page 31

Character Entry
You can enter characters on the Registration display for
Phonebook entries or the Composition display for mail
messages, etc.
Select a input mode.
1
Press l( ) to select one of the input modes.
Enter characters.
2
By repeatedly pressing a numeric key, you can enter
other characters assigned to the key.
<Example> When you press 2
Kanji/Hiragana input mode
“か→き→く→け→こ”
Katakana input mode
“カ→キ→ク→ケ→コ→2”
Alphabet input mode (Uppercase)
“A→B→C→a→b→c→2”
Alphabet input mode (Lowercase)
“a→b→c→A→B→C→2”
Numeral input mode
“2”
When a character on the same key comes after a
character such as “
cursor, and enter the next character.
You can press Bo to select one of the prediction
conversion candidates while you are entering the
characters.
あ” and “い”, press Vo to move the
Convert/fi x characters.
3
1.
Press No to specify the area to be converted.
2.
Press Bo to move the cursor onto the candidate list.
3.
Press Mo to select a conversion candidate.
4.
Press Oo to fi x the character.
Other key operations
c(
i(
a: Enter a line feed.
d
r: Clear text.
): Enter symbols, smileys, or URLs.
): Enter pictograms, Deco-mail pictograms, or
Deco-mail pictures.
(You can switch between uppercase and lowercase or
enter “゛” and “゜” by pressing this key after you enter a
character.)
(for at least one second): Undo the fi xed/erased characters.
Basic Operation
29
Page 32

Sound/Screen Setting
Changing Ring Tone
<Example> Changing the ring tone for incoming voice calls
m▶Setting▶Sound/Vib./Manner
1
Select ring tone▶Phone
▶
tone
Select a type of ring tone▶Select
▶
a folder
※To set a r ing tone for mail messages, videophone calls,
and so on, select the corresponding item.
Adjusting Ring Volume
<Example> Adjusting the ring volume for incoming voice calls
Basic Operation
m▶Setting▶Sound/Vib./Manner
1
Ring volume▶Phone
▶
adjust the volume.
※To adjust r ing volume for mail messages, videophone
calls, and so on, select the corresponding item.
Setting Vibrator
<Example> Setting the vibrator for incoming voice calls
m▶Setting▶Sound/Vib./Manner▶Vibrator
1
setting
※To set a vibrator for mail messages, videophone calls,
30
and so on, select the corresponding item.
Select a ring tone.
▶
※
▶
Phone
Select a pattern.
▶
※
▶
※
Use Bo to
▶
Select ring
Using Manner Mode
With a single key press, you can set a tone from the FOMA
terminal such as a ring tone, keypad sound, and alarm
sound silent. When you start Manner Mode, not a sound but
the vibration notifi es you of incoming calls or messages.
Press and hold s for at least one
1
second.
“ ” appears on the Stand-by display.
To release
Perform the same operation.
Using Original
You can use “Or iginal” to tailor your FOMA terminal to how
it works while Manner Mode is ON.
1.
m
Setting▶Sound/Vib./Manner
▶
Manner mode setting▶Manner mode set▶Original
▶
Set each item▶c( )
▶
Even in Manner Mode, the shutter tone and focus lock
tone of the camera, and the start/end tones of the voice
recorder sound.
Page 33

Setting Keypad Sound OFF
m▶Setting▶Sound/Vib./Manner
1
Other sound setting▶Keypad sound
▶
OFF
▶
Changing Display Settings
Changing Stand-by display
m▶Setting▶Screen/Display
1
Stand-by display▶Stand-by display
▶
Select a type of image▶Select a folder
▶
Select an image.
▶
You may be able to select a display format depending
on the image.
Changing Display Brightness
You can adjust the brightness of the display. You can also
set to automatically adjust the display brightness according
to the ambient light.
m▶Setting▶Backlight/Illum.
1
Backlight▶Brightness▶ON
▶
Press Bo to adjust the brightness.
▶
Lighting off/Power Saver Mode
You can set the display brightness to OFF. You can also set
the time that elapses before Power Saver Mode activates.
Power Saver Mode activates when the time set for “Time
to saver” has elapsed without any operations on the
FOMA terminal. The display turns off to reduce battery
consumption.
1.
m
Setting▶Backlight/Illum.▶Backlight▶Lighting
▶
OFF▶Enter the time (seconds) for “Time to saver”.
▶
Making Display Hard to See from People
Around
You can set “View blind” to make it harder for the people
around you to see the display from oblique angles.
Press and hold 8 for at least one
1
second.
“ ” appears on the Stand-by display.
To release
Perform the same operation.
Basic Operation
31
Page 34

Changing Font Size
<Example> Changing the size of all the characters to “X-large”
7 (for at least one second)▶Character
1
size
X-large
▶
Select “Separate setting” when you want to set the
character size of each function separately.
Changing Machi-chara Setting
You can change the Machi-chara image which appears
to inform you of missed calls, new mail messages, new
i-concier information and others.
m▶Setting▶Screen/Display
1
Machi-chara setting▶Display setting
▶
Basic Operation
▶ON▶
Select a folder▶Highlight a
Machi-chara image and press c(
Using Kisekae Tool
You can set the ring tone, Stand-by display, menu icons and
others at a time.
m▶Setting▶Screen/Display▶Kisekae
1
Tool setting
Kisekae Tool fi le and press
Some menu confi gurations change according to the
32
usage frequency depending on the type of the menu.
Select a folder▶Highlight a
▶
c( )▶YES
Reset Menu Icons to Default
1.
m
m( )▶Reset menu screen▶Enter your
▶
Ter minal Security Code
Changing Illumination When Receiving
<Example> Changing call Illumination for voice calls
m▶Setting▶Backlight/Illum.
1
Illumination setting▶Illumination in
▶
call
Illumination▶Phone
▶
YES
▶
※
Select an
▶
illumination.
※To set illumination such as for mail messages and
videophone calls, select the corresponding menu.
Switching to the eco Mode
).
With a single key press, you can set the eco Mode that
reduces battery consumption. Changing to eco Mode affects
items specifi ed in “eco mode setting”, e.g. dimming the
.
display
Press and hold 5 for at least one
1
second.
“ ” appears.
To release
Perform the same operation.
Page 35

eco Mode Setting
You can set the items for reducing battery consumption for
when the eco Mode activates.
m▶Setting▶Battery▶eco mode
1
setting
be set
Put a check mark for items to
▶
c( )
▶
eco Mode Autostart
This setting ensures that the mode will be automatically
set to the eco Mode when the remaining battery level has
dropped to the set level or less.
“Battery level” of “eco mode autostart” is set to “40%” in
default.
When the “eco mode autostart” is set to “ON”, “
will be displayed. When the mobile phone automatically
switches to eco Mode, “
be displayed on the desktop.
m▶Setting▶Battery
1
eco mode autostart▶ON▶Set each
▶
item
c( )
▶
” will be displayed and “ ” will
(gray)”
Lock/Security
Various Security Codes
■Caution on security codes
You should avoid using the numbers for security codes
such as denoting your birth date, part of your phone
number, local address number, room number, “1111” or
“1234” that is easily decoded by a third party. Also make
sure that you take a note of the security codes you have
set just in case you forget them.
Take care not to let others know your security codes. Even
if your security codes ar
we at DOCOMO take no responsibility in any event for the
resultant loss.
If you do not remember your respective security codes,
you need to bring an identifi cation card such as your
driver’s license, the FOMA terminal and docomo mini UIM
card to the handling counter of a docomo Shop.
For details, contact “docomo Information Center” on the
back page of this manual.
The PIN unblocking key (PUK) is described on the
application form (your copy) that is handed over to you at
a docomo Shop at the time of contract. If your contract
has been made at a shop other than a docomo Shop,
you need to bring an identifi
driver’s license, and the docomo mini UIM card to the
handling counter of a docomo Shop, or consult “docomo
Information Center” on the back page of this manual.
e known and used by a third party,
cation card such as your
Basic Operation
33
Page 36

Terminal Security Code
This is a four-to-eight digit number for deleting all fi les or
changing settings. When the display for entering the
Terminal Security Code appears, enter your four-to-eight
digit code and press Oo(
To change
1.
Setting▶Lock/Security▶Change security code
m
▶
Network Security Code
This is a four-digit number required for your identifi cation
when you place an order at a docomo Shop, docomo
Information Center, or “お客様サポート (User support)” site,
or when you use respective network services.
“お客様サポート (User support)” is available in Japanese only.
To change
From i-mode, you can change your Network Security Code by
Basic Operation
selecting “iMenu”→“お客様サポート (User support)”→
“各種設定(確認・変更・利用) [Respective settings
(Confi rmation/Change/Use)]”→“ネットワーク暗証番号変更
(Change Network Security Code)”.
i-mode Password
This is a four-digit number required for registering/deleting
My Menu, applying for/canceling Message Services or
i-mode pay services, etc.
To change
From i-mode, you can change your i-mode passw
selecting “iMenu”→“English”→“Options”
→“Change i-mode Password”.
Determining at the time of contract
“000 0” at the time of your contract
“000 0” at purchase
).
34
ord by
PIN1 Code/ PIN2 Code
For the docomo mini UIM card, you can set two security
codes, namely the PIN1 code and PIN2 code.
The PIN1 code is a four-to-eight digit number for checking
the user each time the docomo mini UIM card is inserted
into the FOMA terminal or each time the FOMA terminal is
turned on, to prevent the unauthorized use by a third party.
The PIN2 code is a four-to-eight digit number for executing
otal Charge, etc.
Reset T
When the PIN1 Code/PIN2 Code entry display appears,
enter your four-to-eight digit PIN1 code/PIN2 code and
press Oo(
If you enter a wrong PIN1 code/PIN2 code three times in
succession, the FOMA terminal locks and cannot be used.
To change
1.
m
▶
Ter minal Security Code▶Change PIN1 code or Change
PIN2 code
You need to set “PIN1 code entry set” to “ON” to change
the PIN1 code in advance.
).
Setting▶Lock/Security▶UIM setting▶Enter your
“000 0” at the time of your contract
Page 37

PIN Unblocking Key (PUK)
The PIN unblocking key (PUK) is the eight-digit number for
releasing the blocked PIN1 code and PIN2 code.
ou cannot change this code by yourself.
Y
ou enter a wrong PIN unblocking key (PUK) 10 times in
If y
succession, the docomo mini UIM card is loc
case contact one of docomo Shops.
ked. In that
PIN1 Code Entry Set
You can set the FOMA terminal not to work unless you enter
your PIN1 code when turning on the power
m▶Setting▶Lock/Security
1
UIM setting▶Enter your Terminal
▶
Security Code
Enter the PIN1 code.
▶
To release
Select “OFF”.
PIN1 code entry set▶ON
▶
.
Various Lock Functions
A variety of lock functions is installed on your FOMA terminal
such as preventing illegal use of a thir
your private information.
Dial Lock You can set your FOMA terminal not to be
Omakase
Lock
used by a third party
You can do no operations other than
answering calls and turning on/of
1.
m▶Setting▶Lock/Security▶Lock
Enter your Terminal Secur ity Code
▶
Dial lock
▶
To release, enter your Terminal Security Code
from the Stand-b
When you have lost your FOMA terminal or in
other cases, you can lock your personal data
(such as Phonebook entries) by contacting
DOCOMO.
For details on Omakase Lock, refer to “User’s
Guide [Basic Usage]”.
■Setting/Releasing Omakase Lock
-
524-360 (In Japanese only)
0120
Business hours: 24 hours (open all year round)
Unavailable from some IP phones.
※
Y
ou can set/release also from the My docomo site
via y
our personal computer or other devices. (In
J
apanese only)
d party, or protecting
.
f the power.
y display.
Basic Operation
35
Page 38

Original
Lock
Keypad
Lock
You can lock functions which utilize personal
information such as Phonebook entries or
schedule events.
1.
m▶Setting▶Lock/Security▶Lock
Enter your Terminal Secur ity Code
▶
Select a level for Original Lock.
▶
To release, select “OFF”.
Key operations ar
1.
Press and hold Oo for at least one second.
To release, perform the same operation.
e disabled.
Setting Incoming Call Restriction
You can set whether to receive (accept) or not to receive
(reject) incoming calls depending on the reason, such as
from the parties which has not been registered in Phonebook
or incoming calls fr
Basic Operation
their phone numbers. There ar
ID; “User unset”, “Payphone”, and “Unknown”.
m▶Setting▶Lock/Security
1
Call rejection set.▶Enter your Terminal
▶
Security Code
Accept or Reject
▶
If you select “Accept” for “User unset”, “Payphone” or
“Unknown”, you can set a ring tone or call receiving
displa
36
om any parties who do not notify you of
y.
e three reasons for no caller
Select an item to be set
▶
Resetting to Default
Resetting the Function Settings to Default
You can reset the items on “Function List”, which are
indicated by . (See page 72)
The items indicated by
which do not return to their default settings or state.
m▶Setting▶Other setting
1
Reset settings▶Enter your Terminal
▶
Security Code
might include the functions
YES
▶
Deleting Stored Data at Once
You can delete all the stored files together and each function
setting will retur
m▶Setting▶Other setting▶Initialize
1
▶
▶
n to the default.
Enter your Terminal Security Code
YES▶YES
Page 39

Call Telephone
Making a Call/Videophone Call
Making a Call by Entering the Phone Number
Select a Phonebook entry▶d
2
When an entry contains multiple phone numbers,
press No to select a desired phone number.
Press c(
) to make a videophone call.
Enter a phone number starting with a
1
city code
Press h to end the call.
▶
Press c( ) to make a videophone call.
You can put a call on hold by pressing r during
a call. You can release held call by pressing r.
This FOMA terminal has no inward-facing camera.
Therefore, the image sent to the other party is a Chara-den
image, still image, or image being shot by the
outward-facing camera.
Press d to make a call
▶
Making a Call from Phonebook
<Example> Search a Phonebook entry by the name stored
1
in Phonebook
Zo▶Search name
name
※You can use another search method such as “Search
Bo
▶
phone No.”, and “Search e-mail”.
If you enter nothing and press Bo; then you can display
all Phonebook entries.
※
Enter a part of the
▶
Making a Call with Dial/Received List
Co▶Select a call record▶d
1
Press c( ) to make a videophone call.
Using Koe-no-Takuhaibin
This service keeps voice message on behalf of you.
For details, refer to the DOCOMO website.
Enter a phone number▶l( )
1
Operate following the voice guidance.
▶
Koe-no-Takuhaibin message can be sent from a
Phonebook entry or Dial/Received List as well.
Playing Back Messages
When Koe-no-Takuhaibin message has been received, an
SMS message is given as notice of recording. Select “再生
(Play)” on the detailed display of the SMS message to play
back the received message.
You can also play back messages by following the
operation below:
TEL function▶Koe-no-Takuhaibin
“m
▶
Message confi rm(voice)”.
▶
Connect
37
Page 40

Making an International Call
You can use WORLD CALL to make an international call from
Japan.
Contact “docomo Information Center” on the back page of
this manual for inquiries about details on WORLD CALL.
When using international carriers other than DOCOMO,
contact them.
0 (for at least one second)
1
Enter numbers in order of country code
▶
→area code (city code)
→destination phone number.
You can enter “+” by pressing and holding 0 for at
least one second.
When the area code (city code) begins with “0”, enter
the area code without “0” at the beginning. However,
Connect
include “0” when making a call to some countries or
regions such as Italy.
d▶Dial
2
Press c( ) to make a videophone call.
DOCOMO videophones conform to “3G-324M
standardized by the international standard 3GPP”. You
cannot connect to the videophone using a different format.
38
Receiving a Call/Videophone Call
A call comes in▶Press d to answer the
1
call
Press h to end the call.
▶
When a videophone call comes in
You can receive the videophone call the same way as with
a voice call. The substitute image is sent to the other party.
Adjusting Earpiece Volume
Press Bo to adjust the earpiece volume
1
during a call.
When You cannot Answer a Call
Activate Record Message
You can record a caller’s voice/video message when you
cannot answer the call.
When a call comes in, an answer message is played back
after the ring time elapses. Then, the caller’s voice is
recorded with audio or video.
m▶TEL function▶Rec. msg./Voice
1
memo
▶
▶
※To activate Record Message for videophone calls, select
Record message setting▶ON
▶
※
Phone
Select an answer message
▶
Enter a ring time (seconds).
“Videophone”.
Page 41

Using Public Mode (Drive Mode)
Once you activate Public mode (Drive mode), the guidance
is played back telling that you cannot answer the call as you
are currently driving or in a public place (such as a train, bus
or movie theater) where you should refrain from speaking on
the phone. Then, the call is disconnected automatically.
Press and hold a for at least one
1
second.
“ ” appears on the Stand-by display.
To deactivate
Perform the same operation.
When a call comes in during Public mode (Drive mode),
the ring tone does not sound and the record is stored in
“Received calls”. The alarm does not sound even when the
specifi ed alarm time comes.
Using Public Mode (Power Off)
Once you activate Public mode (Power off), when the FOMA
terminal’s power is OFF, the guidance is played back telling
that you cannot answer the call as you are currently in a public
place (such as a hospital, airplane or near a priority seat on
a train) wher
FOMA terminal. Then, the call is disconnected automatically.
1
e you are required to turn off the power of the
Enter a25251▶d
To deactivate
1.
Enter a25250
d
▶
Using Various Network Services
■Network services available
The following are the DOCOMO network services available
for the FOMA terminal.
Voice Mail Service Required Charged
Missed Call Notifi cation Service
Call Waiting Service Required Charged
Call Forwarding Service Required Free
Nuisance Call Blocking Service
Caller ID Notifi cation Service
Caller ID Display Request Service
English Guidance
Multi Number Required Charged
2in1 Required Charged
P
ublic mode (Drive mode)
Public mode (Power off)
Melody Call Required Charged
Koe-no-Takuhaibin
The network services are not available when you are out of the
service area or out of reach of radio waves.
“Deactivate” does not mean that the contract for Voice Mail Service,
Call Forwarding Service or other services is canceled.
The outlines of the each network service in this manual are
descr
refer to “Mobile Phone User’s Guide [Network Services]”.
For subscriptions and inquiries, contact “docomo Information
Center” on the back page of this manual.
Service Application
Not required
Not required
Not required
Not required
Not required
Not required
Not required
Not required
ibed along with the menus of the FOMA terminal. For details,
Monthly fee
Free
Free
Free
Free
Free
Free
Free
Free
Connect
39
Page 42

Using Voice Mail Service
Using Call Forwarding Service
m▶TEL function▶Voice mail service
1
To activate the service
1.
Activate▶YES
You can also specify a ring time.
o play back the message
T
1.
Play messages▶Play (voice call) or Play (videophone)
YES▶Operate following the voice guidance.
▶
Using Call Waiting Service
m▶TEL function▶Other network serv.
1
Call waiting
▶
Connect
To activate the service
1.
Activate▶YES
Answer an Incoming Call during a Call
Press d. Each time you press d, you can switch the
parties you can talk with.
40
m▶TEL function▶Other network serv.
1
Call forwarding
▶
To activate the service
1.
Activate▶Activate▶YES
You can set the phone number of forwarding destination
ing time as well.
or r
Page 43

Emergency Call
Calls to police 1
Calls to fire station and ambulance 1
Calls for accidents at sea 1
This FOMA terminal supports “Emergency Location Report”. When
you make an emergency call such as at 110/119/118, information
about the place wher
is automatically notified to emergenc
as police stations. It might happen that your cor
not detected by emer
the location you dial fr
not notify your phone number suc
call, your location information and phone number are not notified.
Ho
the location infor
because of emergenc
life, it might get location information and phone number regardless
of y
intr
emer
When you make a call at 110/119/118 from the FOMA terminal,
tell an operator that y
them know your phone number, and then clearly tell where you are
cur
call to y
while talking pr
turn off the power immediately, and make sure to place your phone
standb
ou might not be connected to regional police/fire station depending
Y
on the ar
When using the videophone function of the FOMA ter
an emer
made as a v
Emergency Calls Phone number
10
19
18
e y
ou are dialing from (location information)
gency-response agencies depending on
om or radio wave conditions. When you do
wever, when an emergency-r
our setting. Areas and timing “Emergency Location Report”
oduced vary depending on the preparation of respective
gency-r
rently around, so that police/fire station can make a confirmation
mation and phone number should be detected
y priority such as for protection of human
esponse agencies.
ou ar
our mobile phone. In addition, stay at the current location
eventing the call fr
y for at least 10 minutes after the call.
ea where you are calling from.
gency call to 110, 119 or 118, the call will automatically be
oice call.
y-response agencies such
rect location is
h as by adding “184” by every
esponse agency has judged that
e calling from a mobile phone and let
om being disconnected. Do not
minal to place
Using Overseas
International Roaming (WORLD WING) is a service that
allows you to use the FOMA terminal with the phone number
and mail address you use in Japan, in a service ar
overseas carrier partnered with DOCOMO. It enables you to
continue using the voice call, SMS and i-mode mail settings
without having to make any changes.
Concerning the areas where the service is supported:
This FOMA terminal is the class 2. This FOMA terminal is
available within the service ar
ountries/regions supporting 3G 850MHz. Check the areas
c
e you can use the service.
wher
Refer to the following befor
ea of 3G network, and in the
e you use this FOMA terminal
overseas:
・ “Mobile Phone User’s Guide [International Services]”
・ DOCOMO Inter
For the country codes, inter
national prefix numbers for the universal number, and
inter
national Services website
national call access codes,
connectable countries, regions, and overseas carriers,
efer to “Mobile Phone User’s Guide [International
r
Services]” or the DOCOMO International Services website.
A fee charged for overseas use (call fee, packet
om that of in Japan.
communication fee) dif
fers fr
ea of the
Connect
41
Page 44

Available Service Overseas
Voice call
Videophone call
SMS
i-mode
i-mode mail ○
i-channel
i-concier
i-Widget
Packet communication by connecting with a personal
computer
○: Available
※1 When using 2in1, you cannot make calls using your B number.
When using Multi Number, you cannot make calls using an
additional number.
※2 If the destination is a FOMA terminal, enter the other party’s
phone number as you do in J
※3 You need to establish i-mode International Settings.
Connect
※4 You need to establish i-channel International Settings. You are
charged a packet communication fee for automatically updating
the “ベーシックチャネル (Basic channel)” information as well
(which, in Japan, is included in the i-channel fee).
You need to establish i-concier International Settings. You are charged
※5
a packet communication fee for each information you receive.
※6 You need to establish i-Widget International Settings. When you
show an i-Widget display, multiple Widget Appli programs might
start communication. In that case, you are charged a packet
communication fee for each communication.
Some services are not available depending on the overseas carrier
or network.
※1
※2
※3
※3※4
※5
※6
apan.
Major Communication Service 3G
※1
42
Making a Call to Outside the Country You Stay in
0 (for at least one second)
1
○
○
○
○
○
○
○
○
Enter numbers in order of country code
▶
→area code (city code)
→destination phone number.
You can enter “+” by pressing and holding 0 for at
least one second.
Enter “81” as a country code when you make an
international call to Japan.
When the area code (city code) begins with “0”, enter
the area code without “0” at the beginning. However,
include “0” when making a call to some countries or
egions such as Italy.
r
Press d to make a call.
2
Press c( ) to make a videophone call.
Making a Call in Country You Stay
Enter a phone number▶Press d to
1
make a call.
Press c( ) to make a videophone call.
Making a Call to WORLD WING User Overseas
When you make a call to a person who is also internationally
roaming, make the call the same way as to make
international calls to Japan even if he/she is in the country
you stay at.
Page 45

Sending i-mode Mail
Once you subscribe to i-mode, you can exchange e-mail
messages over the Internet. You can attach within 2 Mbyte
of up to 10 fi les (photos, moving pictures, etc.) with body
text added. For details on i-mode mail, refer to “Mobile
Phone User’s Guide [i-mode]”.
l▶l( )▶Enter each item.
1
Enter a destination
(mail address).
Enter a subject.
Select a fi le such
as an image.
Enter text.
Press c( ).
2
Sending Deco-mail
You can change the color or size of characters or
background color, or insert images or Deco-mail pictograms.
l▶l( )
1
and subject.
※You can also select “Decome-Template” to create
Deco-mail.
Select the text fi eld▶d
2
Select one of decorations
▶
from the palette
Oo( )
▶
When the text fi eld is selected, the
prediction conversion candidates
appear. Press r to close the
conversion candidate display, and
then press d to display the palette.
(In Japanese mode only)
Press c( ).
3
※
Enter an address
▶
Enter text
▶
Palette
Connect
43
Page 46

Sending Decome-Anime
You can create impressive messages by inserting text or
images into a Flash fi le.
l▶Create new Deco-Anime
1
Enter an address and subject.
▶
Select the text fi eld▶Highlight a
2
Decome-Anime template and press
c(
c( )
▶
Press c( ).
3
Connect
Displaying Received i-mode Mail
l▶Inbox▶Select a folder
1
Select an i-mode mail message.
▶
)▶Edit characters and images
Replying to i-mode Mail
Press c( ) while an i-mode mail is
1
displayed
Enter each item▶c( )
▶
44
Forwarding i-mode Mail
1.
m( ) while an i
Reply/Forward▶Forward▶Enter each item
▶
c( )
▶
-
mode mail is displayed
Checking New i-mode Mail
You can check the i-mode Center for a new mail message or
Message R/F.
Press and hold l for at least one second.
1
Sorting i-mode Mail
You can use “Auto-sort” to sort received/sent i-mode mail
messages into a folder such as “Business” or “Friend” which
has been created in advance.
<Example> Sorting mail messages, which come from the
1
address stored in the Phonebook, into a folder
Highlight a folder from Inbox Folder list
and press m(
Address sort▶Look-up address
▶
Phonebook▶Look up for Phonebook
▶
)▶Auto-sort
entries and select a target i-mode mail
address.
Page 47

Early Warning “ Area Mail”
Receiving Area Mail
You can receive information such as about earthquake alerts
that are issued from the Japan Meteorological Agency as an
Area Mail message.
When an Area Mail message arrives, “
buzzer or ring tone for Area Mail sounds.
The received contents of some messages are automatically
displayed. To erase the displayed content, select “OK”.
You can receive Area Mail messages even when you are not
contracted to use i-mode.
” lights and the
Setting Area Mail
l▶Mail setting▶Area Mail setting
1
Select an item to be set
▶
Set each setting.
▶
You can also check “Check ring tone” for how your
FOMA terminal works when you receive an Area Mail
message.
Using SMS
You can send text messages to the mobile phone number at
the other party.
Sending SMS
l▶Compose new SMS▶Enter each
1
item.
Enter a phone number.
Enter text.
Press c( ).
2
Displaying Received SMS Message
l▶Inbox▶Select a folder
1
Select an SMS message.
▶
Connect
45
Page 48

Phonebook
Storing Phonebook Entries
Storing New Phone Numbers/Mail
Addresses, etc.
You can store Phonebook entries in the FOMA terminal
(Phone) or on the docomo mini UIM card.
Zo (for at least one second)▶Phone
1
The display for entering a name appears. Enter a name
and proceed.
When storing entries onto the docomo mini UIM card
Phonebook
Select “UIM”.
Enter each item.
2
Connect
Enter a name.
Enter a reading.
Enter a phone number.
Enter a mail address.
Press c( ).
3
46
Storing Phonebook Entries from Dial/
Received List
Co▶Highlight a call record and press
1
m(
New▶Enter each item▶c( )
▶
)▶Add to phonebook▶Phone
Editing Phonebook Entries
Zo▶Search and select a Phonebook
1
entry
▶
▶
m( )▶Edit phonebook
▶
Select an item to be edited
Edit the contents▶c( )▶YES
Deleting Phonebook Entries
Zo▶Search and select a Phonebook
1
entry
▶
m( )▶Delete data
▶
Delete this▶YES
Page 49

i-mode/Full Browser
Displaying i-mode Sites
i-mode is a service that enables you, by using the display of
the mobile phone supporting i-mode, to use online services
such as site access, Internet access, and i-mode mail.
i-mode is a pay service that is available on a subscription
basis.
For details on i-mode, refer to “Mobile Phone User’s Guide
[i-mode]”.
You can display SSL/TLS
terminal.
※SSL/TLS are the safer data communication systems using
authentication/encryption technology to protect your
privacy.
Press i.
1
You can access the iMenu. Repeat
selecting items (links) to display the
desired site.
While you are online, “
iMenu is available in English. Select
“English” from the display on the right.
※
-
compatible pages via FOMA
” blinks.
■Before using i-mode
Content of sites or websites is in general protected by
copyrights law. You can use data such as text and images
for your entertainment, which you download to your mobile
phone supporting i-mode, but you cannot use them, part
or whole of it as is, or modify them for the purpose of sale
or redistribution, without approval from copyright holders.
If you replace the docomo mini UIM card with another one
n on the power without docomo mini UIM card, you
or tur
cannot display/play back fi les, such as still images/moving
pictures/melodies you download from sites, attached fi les
(still images/moving pictures/melodies and other fi les)
sent/received by mail, Screen Memo, and Messages R/F.
When the fi le has been set for the Stand-by display or
for specifi ed ring tone, of which display or playback is
estricted by the docomo mini UIM card, the settings
r
return to default if you replace it with new one or turn on
the power without docomo mini UIM card.
Search
47
Page 50

Displaying Websites Designed for PC
You can browse Internet websites designed for PCs using
the Full Browser function.
Note that you are charged a high communication fee for
the massive data communication such as browsing Internet
websites having many images or downloading data. For
details on the packet communication fee, refer to “Mobile
Phone User’s Guide [i-mode]”.
You can browse Internet websites composed of frames. You
can select a frame to displa
m▶imode/web▶Full Browser Home
1
By default, a confi rmation display appears asking
whether you want to use Full Browser.
y it as well.
Switching Browsers
You can switch to Full Browser to show the Internet websites
incorrectly displayed by i-mode.
The billing system differs between i-mode and Full Browser.
With the latter, as packet communications fee will be a large
sum, you are advised to use i-mode packet fl at-rate service.
m( ) while the website is
1
displayed by i-mode
Switch to FB▶YES
▶
To switch from Full Browser to i-mode
1.
m(
Full Browser▶imode Browser▶Switch to imode
) while the website is displayed by
Full Browser
▶
You might not correctly display some Internet websites.
Search
48
Viewing and Operating Sites
Scroll display/Move highlighted/
Move the pointer: Mo
Select an item (link): Oo(
Return to previous page: l(
Forward to next page: i(
“ ” or “ ” appears while
accessing by Full Browser.
)
)
)
Pointer
Page 51

Storing Frequently Accessed Sites
Bookmark websites or i-mode sites you frequently visit to
get them displayed easily.
m( ) while the site is displayed
1
Bookmark▶Add bookmark▶OK
▶
Select a destination folder.
▶
To access a site stored in Bookmark
1.
m
imode/web▶Bookmark▶Select a folder
▶
Select a bookmark.
▶
Saving Site Contents
If you save the page once you visited as a screen memo,
you can easily refer to it without connecting to i-mode.
m( ) while the site is displayed
1
Screen Memo▶Save screen memo
▶
Phone▶YES
▶
To display a saved screen memo
1.
m
imode/web▶Screen Memo▶Phone or microSD
▶
Select a screen memo.
▶
Depending on the site, for instance, when saving of screen
memos is disabled at the site, you may not be able to save
screen memos properly.
i-channel
This service distributes information such as news and weather
forecast to i-channel mobile phones. The automatically
received latest information fl ows on the Stand-by display by
tickers. You can read it on the i-channel list by pressing *r.
Further, two types of channels, “ベーシックチャネル (Basic
channel)” provided by DOCOMO and “おこのみチャネル
(Optional channel)” provided by IPs (Information Providers)
e available. You are not charged a packet communication
ar
fee for auto-updates of “ベーシックチャネル (Basic channel)”
information.
You are charged a packet communication fee for auto-updates
of “おこのみチャネル (Optional channel)” information that will
be available by registering your favorite channels. Note that
you are charged separately a packet communication fee for
browsing detailed information for both “ベーシックチャネル
(Basic channel)” and “お
When you use the international roaming service, you are
charged a packet communication fee for both auto-update
and browsing detailed information.
i-channel is a pay service which is available on a subscription
basis (You need to subscr ibe to i-mode to apply for i-channel).
For details on i-channel, refer to “Mobile Phone User’s Guide
[i-mode]”.
The i-channel service is provided in Japanese only.
Displaying i-channel
Press r.
1
Select each channel to browse its detailed information.
このみチャネル (Optional channel)”.
Search
49
Page 52

Camera
Viewing and Operation of Finder Display
For Digicam mode
❶
❷
❸
❹
❷
❺ ❻
Operations for shooting
Shoot/Save still image: Oo
Focus function: Xo
Enjoy
Zoom: Vo(TELE)/Co(WIDE)
You may not be able to zoom depending on the selected
image size.
50
❶MENU
You can check the settings.
❷Key operation guidance
❸Focus frame
When a subject is focused on,
the frame becomes green.
❹Zoom bar
The zooming status is
displayed.
❺ The setting of Image
stabilizer
❻ The number of remaining
recordable still images
Shooting Still Images/Moving Pictures
Shooting Still Images
m▶CAMERA/TV/MUSIC▶Camera
1
Digicam mode
▶
Oo( )▶Oo( )
2
Shooting Moving Pictures
m▶CAMERA/TV/MUSIC▶Camera
1
Movie mode
▶
Press Oo( ) to start recording
2
Press Oo( ) to end the recording
▶
Oo( )
▶
Do not leave the FOMA terminal with the lens pointing to
direct sunlight. Pixels may be discolored or burns may
result.
When the battery level is low, you may not be able to save
still images/moving pictures you shoot.
Page 53

Viewing Still Images/Moving Pictures
after Shooting
You can display the still image or the moving picture you
have shot in Picture Album. You can detect a person’s face
on the still image you have shot and expand it. You can also
play expressive slide shows with the effect function.
m▶Data box▶My picture or imotion/
1
Movie
Select a folder▶Select a fi le.
2
Picture album
▶
Picture Album is also activated by pressing l( )
from the Finder display.
To play a moving picture, press Oo( ).
Shooting in Various Ways
Continuous Shooting Still Images
You can continuously shoot still images within the sizes from
WQVGA (240 x 428) to VGA (480 x 640).
m( )
1
Digicam Mode
Press Oo( )▶Highlight a still image
2
and press Oo(
You can save all the shot images by pressing c( ).
from the Finder display for
Burst Shoot▶Continuous
▶
).
Shooting Still Images Using Auto Timer
m( ) from the Finder display for
1
Digicam Mode
Auto timer▶10 seconds
▶
or 2 seconds
Press Oo( ).
2
The still image is shot after 2 seconds or 10 seconds.
Press Oo( ).
3
When shooting moving pictures using Auto timer
m(
1.
▶
2.
Press Oo( ).
Recording is started after 2 seconds or 10 seconds.
3.
Press Oo(
) from the Finder display for Movie Mode
Auto timer▶2Sec. or 10Sec.
) to end the recording ▶Oo( )
Enjoy
51
Page 54

1Seg
Using 1Seg
■Using 1Seg
1Seg is a service provided by television entrepreneurs
(broadcasting stations). You are not charged a
communication fee for receiving video and audio. For about
fee charged by NHK, contact NHK.
※You are charged a packet communication fee for browsing
“Data broadcasting site” and “i-mode site”. You might be
charged an information fee for using some sites (i-mode
pay sites).
※For details on the 1Seg service, br
websites:
The Association for Promotion of Digital Broadcasting
From personal computer: (http://www.dpa.or.jp/english/)
From i-mode: (http://www.dpa.or.jp/1seg/k/) (In Japanese
only)
■Broadcasting waves
1Seg is one of the broadcasting services receiving radio waves
(broadcasting waves) different from that used for the FOMA
services.
Reception condition might be deteriorated or you might not
be able to r
Enjoy
eceive 1Seg broadcast in places as follows:
Places far away from radio towers that transmit
broadcasting waves
Mountain-ringed regions or behind buildings
In tunnels, underground, or recesses of buildings
52
owse the following
※Channels might be reorganized along with the
discontinuation of analog broadcasting. For this reason,
you might need to reset the channels by using an
automatic scan (see page 53). After resetting the channels,
e to register the channels to the channel list. For
be sur
details about channel changes accompanying terrestrial
digital broadcasting, check resources such as the
following website:
Ministry of Internal Affairs and Communications Television
Receiver Support Center (Digital Support) Channel Changes
Call Center (In Japanese only)
Phone number: 0120-922-303
Personal computer: (http://www.digisuppo.jp/repack/)
i-mode: (http://digisuppo.jp/m/index.php)
■Battery level
If you try to start 1Seg when the battery is low, the battery
alert tone sounds, and a confi rmation display appears asking
whether to start it. When you do nothing on the confi rmation
display for about one minute, 1Seg automatically terminates.
■Messages on the display when you use 1Seg for the fi rst time
When you use 1Seg for the fi rst time after purchase, the
Exemption Clause Confi rmation display appears.
If you select “NO” on a confi rmation display which appears
after pressing *Oo(
does not appear afterward.
), the same confi rmation display
Page 55

Setting Channels
When you activate 1Seg for the fi rst time or change the area
you are in, you need to operate “Channel setting”. Select
“Auto channel setting” to enable you to search automatically
for broadcast stations you can watch.
You need to set this function when you are in a terrestrial
digital TV broadcasting service area.
m▶CAMERA/TV/MUSIC▶1Seg
1
Channel setting▶Auto channel setting
▶
YES▶YES▶Enter a title.
▶
To execute Channel Setting by selecting an area
1.
m
CAMERA/TV/MUSIC▶1Seg▶Channel setting
▶
Select area▶Select an area▶Select a prefecture
▶
YES
▶
Watching 1Seg
Press and hold c for at least one
1
second.
1Seg starts and the viewer display appears.
Viewing and Operating Viewer Display
❹ ❺ ❻ ❼
❶
❷
❸
❽
❾
❶Video ❷Caption
❸Data Broadcasting
❹Program’s name
❺Switch Visual Image/Caption
❻ Displayed while you are
watching a 1Seg program
❼Video being recorded
❽Operation Mode
Video Mode
:
Data Broadcasting Mode
:
❾ Displayed while setting 1Seg
Op-free Auto Off
Starts fl ashing approximately
one minute before automatic
termination.
Channel (Remote-control
number)
When a broadcasting station is
broadcasting multiple services
(programs), “Viewing service
number/Number of all services”
is also displayed.
Airwave Reception Level
(estimate)
Strong Weak
“
” appears out of the
broadcasting area.
Displayed while receiving
caption information
Sound Volume
Enjoy
53
Page 56

The operation on the viewer display
Channel switch: No Sound volume adjustment: Bo
Mute/Unmute: r Switch TV/data BC: l
Video recording: O o(
x (for at least one second)
The recorded video is saved on the microSD card.
) (for at least one second) or
Setting Timer Watching or Recording
1Seg
Set the date and time, a channel, and program name,
and enter them to the TV Timer List or Timer Recording
List. When the set time arrives, you can start watching or
recording.
m▶CAMERA/TV/MUSIC▶1Seg
1
TV timer list or Timer recording list
▶
c( )▶Enter each item
▶
c( )
▶
Playing Recorded Video
Enjoy
m▶Data box▶1Seg▶Video
1
Select a fi le.
▶
54
Music
Saving WMA File
You can save Windows Media® Audio (WMA) fi les from a
personal computer to the microSD card.
For details on MUSIC Player, refer to DOCOMO website.
Connect the personal computer and the
1
FOMA terminal by using the FOMA USB
Cable with Charge Function 02 (option).
m▶Setting▶External connection
2
USB mode▶MTP mode
▶
Start Windows Media Player 10/11/12 and
3
save WMA fi les to the microSD card.
Page 57

You cannot save WMA fi les to the FOMA terminal.
A license protected WMA fi le cannot be saved to the
FOMA terminal or the microSD card.
For how to operate Windows Media Player 10/11/12, refer
to Help for Windows Media Player 10/11/12.
When you fi nish saving, remove the FOMA USB Cable with
Charge Function 02 from the FOMA terminal.
When you remove the FOMA USB Cable with Charge
Function 02, remove it after fi nishing the software in use.
■Handling music fi
You can use music fi les saved on the microSD card for
personal use only. Before using, give enough consideration
not to infringe on the third party’s intellectual property rights
or other rights such as copyright.
les
Playing Music Files
MUSIC Player enables you to play Chaku-uta Full® music
fi les you have downloaded from sites, or to play WMA
fi les you saved on the microSD card using your personal
computer.
“Chaku-uta Full” is a registered trademark of Sony Music
Entertainment Inc.
m▶CAMERA/TV/MUSIC
1
MUSIC Player▶All music
▶
Select a music fi le.
▶
Operations of MUSIC Player display
Halt: c(
Pause: Oo(
Search (fast forward): Press and hold Vo
Search (fast rewind): Press and hold Co
Sound volume adjustment: Bo
Replay next fi le: Vo
Replay previous fi le: Co (When playback time is over
)
)
three seconds, you go back to the
beginning of the fi le.)
Enjoy
55
Page 58

i-αppli/i-Widget
i-αppli is a software program for mobile phone supporting i-mode.
By downloading various software pr
site, you can use your FOMA terminal more conveniently
can automatically update the stock price information or weather
information, and enjoy games without accessing network.
i-Widget is a useful function for gaining easy access to
frequently used contents and tools (Widget Appli programs)
such as the calculator
information. Widget Appli pr
downloading them fr
Depending on the i-α
a communication fee for using.
The packet communication fee for overseas use dif
om the one for domestic use.
fr
A multiple number of Widget Appli pr
communicating when you open the i-Widget display
owse detailed information, you are charged separately a
br
packet communication fee.
For details on i-α
User’s Guide [i-mode]”.
, clock, memo pad and stock market
om the web site.
ppli/i-Widget, refer to “Mobile Phone
Starting i-αppli
i (for at least one second)
1
Select a software program.
▶
Enjoy
Starting Widget Appli
Xo (for at least one second)
1
Select a Widget Appli program.
▶
You can operate Widget Appli program separately.
56
ograms from the i-mode
ograms can be added by
ppli program, you might be charged
ograms may start
. You
fers
. If you
-
Downloading i
Select a software program from a
1
downloadable site
downloading ends
You can delete the pre-installed i-αppli programs. You can
re-download deleted programs from the “P-SQUARE” site.
You can download not only i-α
pre-installed Deco-mail pictograms, Kisekae Tool files,
hi-chara images, Chara-den images, templates,
Mac
dictionaries, and Content packages from the “P-SQU
site (in Japanese only).
Menu→メニューリスト (Menu List)→ケータイ電話メー
i
カー (Mobile Phone Maker)
Deadlines for re-download services
・“リバーシ (REVERSI)”: the end of September, 20
・“ハイパー四川省 (Hyper Sichuan)”: the end of September,
16
20
The re-download services may be halted or closed without
ven in the service period.
notice e
αppli from Sites
Select “OK” when
▶
YES
▶
ppli programs but also the
→P-SQUARE
16
ARE”
Page 59

i-motion/Movie
i-motion is a file consisting from video, audio, and music
which you can download to your FOMA terminal from
i-motion sites that support i-motion. Y
ring tone.
Also, by using high speed communication, you can play
back smooth and high-quality movie files provided by portal
sites, movie specialty sites and other sites on the Inter
Streaming type
(cannot be sa
Normal/Download type
(can be sa
wnloading or streaming an i-motion/mo
When do
you might receive a bulky file. When data size required for
sending or receiving is bulky
will be a large sum.
flat-rate service.
Two types of i-motion/mo
normal/download type are available.
Categories Description
ved)
You are advised to use i-mode packet
vie files, streaming type and
Plays data while receiving.
ved)
When do
the Do
appears.
data.
ou can also set it for a
net.
vie file,
, packet communications fees
wnload is completed,
wnload Completion display
You can then pla
y or save
Downloading i-motion/Movie
Select an i-motion/movie file from a
1
downloadable site
a destination folder
Save▶YES▶Select
▶
.
Playing i-motion/Movie
m▶Data box▶imotion/Movie
1
Select a folder▶Select a file.
▶
Enjoy
57
Page 60
i-concier
i-concier works to serve you with a pleasant life just like a clerk
or concierge does. The service holds your data (area information
about your neighborhood, Memo, Schedule, ToruCa, Phonebook,
etc.) and sends you information, with good timing, about a variety
of things according to the contents of your memo and your
schedule event, your living area, your current location, or your
preference or taste. This service provides related information
about Memos, schedule events, or T
updates schedule events or ToruCa fi les to the latest, and also
automatically adds useful information such as about the opening
hours of various shops to your Phonebook. It also allows you
to share the schedules or images held by the DOCOMO’s Data
Storage Center with friends, family members or other groups. It
also enables you to easily print out the images held. i-concier
information is notifi
that appears on the Stand-by display).
For details on i-concier, refer to “Mobile Phone User’s Guide
[i-mode]”.
i-concier is a pay service which is available on a subscription
basis (You need to subscribe to i-mode to apply for i-concier).
If you have not subscribed to Data Security Service but will
newly subscribe to i-concier
Security Service as well as i-concier.
Depending on the content (information, i-schedule, and others),
More Convenient
you might be charged separately an information fee other than
the i-concier monthly fee.
You are charged a packet communication fee separately for
receiving information except some.
You ar
using detailed information.
You are charged separately a packet communication fee for
auto-updates of i-schedule, Memo, ToruCa, and Phonebook,
etc.
i-concier is available in Japanese only.
58
ed by a Machi-chara image (cartoon character
e charged separately a packet communication fee for
oDo items, and automatically
, you are to subscribe to Data
Receiving Information
When information arrives, blinks and
1
the content is displayed on the Stand-by
display
▶
Select a message
▶
Select a piece of information.
Displaying i-concier
m▶i-concier▶インフォメーション一覧
1
(Information list)
Select a piece of
▶
information.
Convenient Tools
Using Shabette-Kensaku
You can execute i-mode search by voice.
The fi rst time you use this function, select “Use” on the
usage information display.
You are charged separately a packet communication fee.
This function recognizes only Japanese word.
m▶Tool▶Shabette-Kensaku
1
Within 10 seconds after the vibration
▶
begins, speak into the microphone, and
then press Oo(
Even if you do not press Oo( ), your voice input is
accepted automatically within about 3 seconds after you
fi nish speaking.
).
Page 61

Using Start by Voice
You can call up the function by voice.
This function is available in Japanese mode only.
The fi rst time you use this function, select “利用する (Use)”
on the usage information display, or press c(
d (for at least one second)
1
When “それではどうぞ ★★音声受付中
▶
★★ (Please ★★Voice is being
accepted.★★)” is displayed, pronounce
the function into the microphone within
10 seconds.
When the function to be called up cannot be specifi ed,
you can look it up in “使いかたガイド (Guide)”.
■Note when using Shabette-Kensaku or Start by Voice
Speak as clearly as possible, in natural conversation
speed.
Speak in quiet, noise-free locations.
Recognition result may differ depending on pronunciation
and the surrounding environment.
Using Schedule
1
).
2
▶
Using Alarm
1
▶
The alarm does not sound in Public mode (Drive mode),
Dial Lock, “Alarm” locked in Original Lock or Omakase
Lock.
m▶Tool▶Schedule
Select a date to show a schedule event of the selected
date. Select the schedule event to confi rm its details.
m( )▶New▶Enter each item
c( )
m▶Tool▶Alarm▶Highlight an alarm
and press c(
)▶Enter each item
c( )
More Convenient
59
Page 62

Using Bar Code Reader
You can use the camera to scan QR codes and others, and
store them as fi les.
From the scanned data, you can make calls, compose
i-mode mail messages, access Internet websites, and so on.
■When scanning with Bar Code Reader
Scan the code as large as possible within
the guide frame.
Autofocus works when you scan the code
about 10 cm or more away from it.
When you scan the code in the
out-of-f
ocus state, the recognition rate
lowers.
Hold the camera in parallel with the code
when you scan.
■ QR code
QR code is one of the two-dimensional codes
More Convenient
that denotes data in the vertical and horizontal
directions.
“株式会社NTTドコモ (NTT DOCOMO, INC.)”
is displayed when you scan the QR code with
the FOMA terminal.
60
Guide frame
Scan a Code
<Example> Access P-SQUARE by using
1
QR code on the right
QR code for
accessing the site
m▶Tool▶Bar code reader▶Scan code
Fit a code to the guide frame and
▶
press Xo to focus
Press Oo( ) to scan the code.
▶
A URL is displayed as a scanned result.
Select the URL▶i-mode Browser
2
Page 63

Data Management
Using microSD Card
If you do not have a microSD card, you need to purchase it.
P-01E supports a commercial microSD card of up to
2 Gbyte and microSDHC car
September 2012).
For the latest operation, check information such as the
memory capacity and manufacturers of micr
access the following sites (in Japanese only). For the
microSD cards other than published in the sites, contact
each micr
・From i-mode to P-SQUARE (As of September 2012)
iMenu→メニューリスト (Menu List)
→ケータイ電話メーカー (Mobile Phone Maker)
→P-SQUARE
・From personal computers(
http://panasonic.jp/mobile/
Note that the published information is the result obtained
om the operation check, which does not necessarily
fr
guarantee all performances of those micr
Make sure that you turn off the power, and then insert/
emove the microSD card.
r
oSD car
d maker.
d of up to 32 Gbyte (As of
oSD cards,
)
oSD cards.
Inserting/Removing microSD Card
The inserting slot of the microSD card is in the inside of the
back cover.
o insert it, remove the back cover, and then remove the
T
battery pac
1
k.
With the metal
terminal surface facing
do
wnward, make sure
that the cut edge is
positioned at r
then inser
Push it until it clicks.
When you remo
Push the microSD card until it stops and remove it.
Note that the microSD card may pop out when you insert
or remove it.
ight and
t.
ve the microSD card
More Convenient
61
Page 64

Icons on the Display
: A microSD card is inserted.
: Data is being read/written.
(Do not remove the microSD card nor turn off the
FOMA terminal.)
: The microSD card is write-protected.
: The microSD card cannot be used.
(Insert the microSD card again. If “ ” is still displayed,
execute “Check microSD” or “microSD format”.)
Checking microSD Card
Check and repair a microSD card.
Depending on the condition of the microSD card, correctly
repairing the card might not be possible, and data might be
deleted or the card might be initialized.
m▶Tool▶microSD
1
Refer microSD data▶m( )
▶
More Convenient
Check microSD▶YES
▶
62
Formatting microSD Card
When you use the microSD card for the fi rst time, you need
to format (initialize) it.
Be sure to use P-01E for formatting. The microSD card
formatted using other devices such as personal computers
may not work properly.
Note that formatting deletes all content on the microSD
card.
m▶Tool▶microSD
1
Refer microSD data▶m( )
▶
microSD format▶Enter your Terminal
▶
Security Code
YES
▶
Copying Data to microSD Card
<Example> Copying a still image
m▶Data box▶My picture
1
Select a folder▶Highlight a still image
▶
to be copied and press m(
Copy to microSD▶Copy this
▶
Select a destination folder.
▶
)
Page 65

Copying Data to FOMA Terminal
<Example> Copying a still image
m▶Data box▶My picture▶l( )
1
Select a folder▶Highlight a still image
▶
to be copied and press m(
Copy to phone▶Copy this
▶
Select a destination folder.
▶
)
Displaying Data Stored on microSD Card
<Example> Displaying a still image
m▶Data box▶My picture▶l( )
1
Select a folder▶Select an image.
▶
Check Capacity of microSD Card
The total memory and used memory (estimated) in the
microSD card can be displayed.
1.
m
Tool▶microSD▶Refer microSD data
▶
m( )▶microSD info
▶
Backing up Data to microSD Card
You can back up Phonebook entries, schedule events, mail
messages, memos, bookmarks, and the settings on and
information about your FOMA terminal collectively onto the
microSD card. When restoring the backup data onto your
FOMA terminal, they are collectively restored.
Backing up data from the FOMA terminal onto the microSD
card is collectively applied to all data, so emptied fi les in the
minal are also backed up on the microSD card.
FOMA ter
When you restore such data onto your FOMA terminal,
emptied fi les on the microSD card overwrite the data in the
FOMA terminal created later.
m▶Tool▶microSD▶Backup/Restore
1
Backup to microSD▶Enter your
▶
Terminal Security Code
To restore backup data to FOMA terminal
1.
m
Tool▶microSD▶Backup/Restore
▶
Restore to phone▶Enter your Terminal Secur ity Code
▶
YES
▶
YES
▶
More Convenient
63
Page 66

Sending/Receiving Data by Infrared
Communication
You can send or receive data such as Phonebook entries to
or from a device supporting infrared communication function.
You cannot exchange data depending on the other party’s
device or FOMA terminal.
Within ±15°
from the center
Infrared data port
Within about
20 cm
Sending Data
Set the receiving end terminal first, and then start sending
data within 60 seconds.
Submenu of the data to be sent
1
More Convenient
Send Ir data▶YES
▶
Procedure for sending data might differ depending on the data.
Receiving Data
m▶Tool▶Receive Ir data▶Receive
1
YES
▶
64
Connecting to a PC
You can connect the FOMA terminal to a personal computer
to exchange WMA files, images or other files stored on
oSD card.
micr
You can also access the Internet to perform data
communication.
You need the FOMA USB Cable with Charge Function 02
※
(option) or FOMA USB C
To per form data communication, you need to install the
※
“FOMA communication configuration file” (driv
For details, refer to “Manual for PC Connection”.
ou can download the “FOMA communication configuration
Y
file” and “Manual for PC Connection” fr
website. (
http://www.nttdocomo
able (option).
er).
om the DOCOMO
.co.jp/english/support/)
DOCOMO Connection Manager
“DOCOMO Connection Manager” is a software which comes
in handy for DOCOMO’s data communication.
It enables easy PC settings according with the terms and
conditions of the user’s agr
It also makes it possible to check the amount of the data
communication and provides a r
charges using the charge counter function.
For details, refer to the DOCOMO website.
http://www.nttdocomo
service/connection_manager/)(In Japanese only)
eement.
ough estimate of the
(
.co.jp/support/utilization/application/
Page 67

Support
Troubleshooting
First of all, check to see if you need
to update the software program
and then update it if necessary. See
page 68 for how to update softwar
programs.
When symptom persists even after
you check the countermeasur
oblem you suffer, contact
for the pr
the “Repairs” counter listed on the
back page of this manual or a r
counter specified by DOCOMO.
The “Repairs” counter is available in
Japanese only.
Power source
The FOMA terminal does not turn on.
…Make sure the battery pack is attached to
t
he FOMA terminal correctly. (See page 19)
…Make sure the battery is fully charged. (See
page 20)
es
Charging
Cannot charge.
(The Call/Charging indicator does not
light, or it flicker
…Make sure the battery pack is attached to
he FOMA terminal correctly. (See page 19)
t
Make sure the power plug of the adapter
…
e
or cigarette lighter plug is securely inserted
into the outlet or cigar
…
Make sure the adapter and the FOMA
terminal are connected correctly. (See page 20)
…
When you use an AC adapter (option),
make sure its connector is firmly connected
epair
to the FOMA ter
desktop holder. (See page 20)
…
When you use the desktop holder, make
sure the connector terminal of the FOMA
ter
minal is not stained. If it is stained, wipe
he terminal part with a dry cotton swab, etc.
t
…If you talk on the phone, have
communications, or operate other
functions for a long time dur
charge, the temperature of the FOMA
minal may rise to flicker the Call/
ter
Char
ging indicator. In that case, charge
the battery after the FOMA ter
wn. (See page 20)
do
If you are in a location other than the
…
appropriate ambient temperature, charging
ma
y not be started or fully charged. In that
harge the battery again under the
case, c
a
ppropriate ambient temperature. (See page 20)
s.)
ette lighter soc
minal or the pr
ovided
ing battery
minal cools
Operation of terminal
While you operate the FOMA terminal or
charge the battery, they get hot.
…While operating or c
you operate i-α
videophone, or watc
for a long time during battery charge, the
FOMA ter
may become warm, but this is not a safety
ket.
hazar
The usable time of the bat
…Make sure not to leave the FOMA terminal
out-of-service-ar
FOMA ter
it searches for radio waves to establish
communications, consuming mor
…The usable time of the battery pack v
depending on the usage envir
its remaining life.
…Battery pac
usable time slightly shortens eac
you charge the battery. If the usable time
becomes e
with the default state even if fully c
purchase the specified battery pack.
The po
wn and restarts.
do
…If the ter
stained, the connection might deter
to shut do
terminal with a dry cotton swab, etc.
ppli programs, talk on the
minal, battery pac
d, so you can continue to use them.
ea for a long time. If your
minal is left out-of-service ar
ks ar
e consumables. The
xtr
emely short as compared
wer of the FOMA terminal shuts
minal of the battery pack is
wn the po
har
ging, or when
h 1Seg programs
k, or adapter
ter
y is short.
ea,
e po
wer.
aries
onment or
h time
harged,
wer. Wipe the battery
iorate
Others
65
Page 68

Pressing keys is disabled.
…Make sure Dial Lock is deactivated. (See
page 35)
…Make sure Keypad Lock is deactivated.
(See page 36)
…Make sure Side Key Guard is set to “OFF”.
The docomo mini UIM card is not
recognized.
…Make sure you insert the docomo mini
UIM card in the correct direction. (See
page 19)
The clock does not show the correct time.
The clock may not show the correct
…
time when the power has been kept on
or a prolonged period of time. Check
f
whether “Auto time adjust” and “Auto time
difference” of “Set main time” have been
set to “Auto” and then, move to a location
with good signal reception, turn off the
power of FOMA terminal and then back
on.
Call
Cannot make a call by pressing numeric
keys.
…Make sure Restrict Dialing is deactivated.
…Make sure the lock for “Keypad dial” in
Original Lock is released. (See page 36)
…Mak
e sure Dial Lock is deactivated. (See
Others
page 35)
…Make sure Self Mode is deactivated.
66
Cannot talk.
(“
” does not disappear even if you
move to another place.
You cannot make or receive a call, though
the radio wave conditions are not bad.)
…Turn off and on the FOMA terminal, or
remove and attach/insert the battery pack
or docomo mini UIM card. (See page 19,
page 21)
…Depending on the characteristics of the
radio waves, you may not be able to make
or receive a call even if the FOMA terminal
is “within service area” or “
displayed for a radio wave condition. Move
to another place and redial.
…Make sure the call restrictions such as
Call Rejection, Call Acceptation, etc. are
deactivated.
…Depending on the radio wave congestion
state, calls and mail messages may be
congested and hard to be connected
in crowded places. In that case, the
message “Please wait” or “Please wait
for a while” is displayed and a busy tone
sounds. Mo
ve to another place or wait for
a while, and then redial.
” is
Camera
Still images and movies shot by the
camera are blurred.
…When you shoot a subject in a short
distance, set Focus mode to “Macro”.
…When you shoot portraits, set Focus mode
to “FaceDetect”.
…Set Stabilizer to “Auto” and then shoot.
…Make sure the lens of the camera is not
fogged or stained.
Warranty and After-sales Service
Warranty
Make sure that you have received a warranty
card provided at purchase. After checking
the contents of the warranty card as well as
“Shop name and date of purchase”, keep
the warranty card in a safe place. If you
notice that necessary items of the warranty
card are not fi lled in, immediately contact
the shop where you purchased the FOMA
terminal from. The term of the warranty is
ear from the date of purchase.
one y
All or part of this product including
the accessories may be modifi ed for
improvement without notice.
After-sales Services
◎ When there is a problem with the FOMA
terminal
Before asking repairs, check
“Troubleshooting” in this manual or in “使
いかたガイド (Guide)” mounted on the
FOMA terminal. (“使いかたガイド (Guide)”
is available in Japanese mode only.) If the
oblem remains unsolved, contact the
pr
“Repairs” counter listed on the back page
of this manual for malfunction and consult
them.
The “Repairs” counter is available in
Japanese only.
Page 69

◎ When repairs are necessitated as a result
of consultation
Bring your FOMA terminal to a repair
counter specified b
your FOMA terminal is accepted for repair
ing the repair counter’s business hours.
dur
F
urther, note that you may need to wait for
fixing depending on the malfunction state.
■In warranty period
Your FOMA terminal is repaired charge
・
fr
ee in accordance with the terms of
arranty.
w
・
Make sure that you bring the warranty
d to the counter for repair. If you do
car
not sho
oubles or malfunctions are regarded
tr
to be caused b
damages of liquid crystal, connector
etc.), the repair cost is c
within the war
・ The cost for troubles caused by the use
of de
those specified b
even within the warranty period.
■Repairs may not be carried out in the
following cases:
・
When exposure to water is found at
epair counter (Example: When the
our r
moistur
When, as a result of inspection at our
・
r
epair center, corrosion is found due to
xposure to water, dew condensation, or
e
sw
eat, or when damage or deformation is
ound in the circuit board [Repairs might
f
not be car
onnector terminal (earphone/microphone
c
ter
minal) or liquid crystal, or cracks in the
body ar
y DOCOMO
. Note that
w the warranty card, or when
our mishandling (the
y y
harged even
ranty period.
vices and consumables other than
y DOCOMO is c
e detection sticker has reacted)
ried out when damage to the
e found.]
,
harged
※
Even if repair is feasible, the repair cost
is c
harged when the trouble you suffer
matc
hes one of the symptoms listed
ve, which is not supported by the
abo
w
arranty.
■After the warranty period
e will repair your FOMA terminal on
W
equest (charges will apply).
r
■Spar
e parts availability period
The minimum storage per
per
formance spare parts (parts required
or maintaining performance) for the FOMA
f
ter
minal is basically six years after the
e of its production. Note, however,
closur
that y
our FOMA terminal might not be
epaired depending on the troubled portions
r
because of the shor
◎Other points to note
Make sure not to modify the FOMA
ter
minal or its accessories.
We might reject to repair depending on
・
the degr
ees of your modification.
ollowing might be regarded as
The f
modifications:
・
To put stickers, etc. onto the liquid
crystal or k
・
To decorate the FOMA terminal using
es
adhesiv
・
To replace the coverings etc. with
those of other than DOCOMO genuine
oducts
pr
Repairs of troubles or malfunctions
・
r
esulting from the modifications are
harged even within the warranty period.
c
tage of spar
eys
iod of the
e parts.
Do not peel the nameplate off the FOMA
terminal.
Note that when w
contents described on the nameplate
and ther
ormity to the technical standard, it
conf
might happen that w
to repair the malfunction.
The inf
settings, etc. might be r
on the tr
ou handle the FOMA terminal. Set the
y
settings again.
The par
used in the f
FOMA terminal. Note that if y
a magnetism-sensitive object such as a
cash car
car
d might become unusable.
P
ortions: speaker, earpiece
This FOMA ter
w
aterproof performance, however, if the
inside of the FOMA ter
becomes moist, immediately turn off the
power and remove the battery pack; then
visit a repair counter. The FOMA terminal
ma
y not be repaired depending on the
condition.
e cannot ensur
efore cannot verify the product
ormation such as about function
oubles or repairs, or the way
ts generating magnetism are
ollo
wing portions of the
d near the FOMA terminal, the
minal comes with the
e the
e at DOCOMO r
eset depending
ou place
minal gets w
eject
et or
Others
67
Page 70

Error Information Send Setting
When an error occurs on the FOMA terminal, the error
information is created automatically and send it to DOCOMO
if this function is set to “ON”.
m▶Setting▶Other setting
1
Error info send set.▶Enter your
▶
Terminal Security Code
ON/OFF
▶
i-mode Fault Diagnosis Site
You can check on your FOMA terminal whether sending/
receiving mail messages, downloading images/melodies,
and others are normally working. When you think your FOMA
terminal is in tr
“Repairs” counter listed on the back page of this manual.
The “Repairs” counter is available in Japanese only.
To connect to “iモード故障診断サイト (i-mode F
Diagnosis Site)” [in Japanese only]
i-mode site:
ouble as a result of your check, contact the
iMenu→お客様サポート (User support)
→お問い合わせ (Inquiries)
・電波状況お問い合わせ先 (Failures &
→故障
Radio wave condition)
→iモード故障診断 (i-mode Fault Diagnosis)
Others
When you use overseas, you are charged a fee.
68
QR code for accessing the site
ault
Updating Software
This function is to check whether you need to update
software programs in the FOMA terminal by connecting to
the network, and if necessary
of software pr
update the software programs.
If you need to update the software pr
website and “お客様サポート (User support)” in Japanese
iMenu lets you know information about updating software
ograms. There are three kinds for updating software
pr
ograms; “Auto-update”, “Update Now” and “Reserve
pr
Update”.
ou can update software programs, with data retained,
Y
such as Phonebook entries, images shot by the camera,
or downloaded data in the FOMA terminal; however
note that data may not be pr
conditions (such as malfunction, damage, or dr
FOMA terminal is placed in. You ar
important data. Note that data such as downloaded ones
might not be backed up.
■Before using Software Update
Do not r
programs. You may fail to update.
Fully charge the battery befor
programs.
It may take time to update (download or rewrite) softwar
programs.
You cannot make/receive calls, use communication
functions, and other functions while updating softwar
pr
ograms using packet communication, and can
emove the battery pack while updating software
ograms. (You can receive voice calls during download.)
, you can download some parts
ograms, the DOCOMO
otected depending on the
e advised to back up
e updating softwar
ench) your
e
e
e
Page 71

You are advised to update software programs when radio
wave is strong enough with the three antennas displayed
and while you are not moving. If radio wave conditions get
worse while downloading softwar
is suspended, move to a place with better radio wave
conditions and try again to update software pr
When updating software programs, the proprietary
information about your FOMA terminal (model name or
serial number, etc.) is automatically sent to the server
(DOCOMO-managed server for Softwar
DOCOMO never use the sent information for purposes
other than to update software pr
If you fail to update software pr
is displayed and you cannot do all operations. In that
case, you are kindly r
specified by DOCOMO.
equested to come to a repair counter
ograms, or download
e pr
ograms.
e Update). We at
ograms.
ograms, “Rewrite failed”
Start Software Update from Icon
Select “Update notification icon” on the
1
Stand-by display
.
When update is necessary, “Update is
2
needed” is displayed. And you can select
either
“Now update” or “Reserve”.
When you
select “Now
update”, update
immediately
starts.
When rewriting is
completed, your
FOMA terminal
automatically
estarts and the Update Completion Confirmation
r
y appears.
displa
ou select “Reserve”, you can select the date and
When y
time you want.
Start Software Update from Menu
m▶Setting▶Other setting
1
Software Update
▶
Enter your Terminal
▶
Security Code
Update
▶
Others
Update notification icon
Check whether you need to update software programs.
Go to step 2 of “Start Software Update
2
from Icon” on page 69.
69
Page 72

Scanning Function
You can detect data or application programs, which might
cause troubles, from among those downloaded to your
FOMA terminal, and then can delete the data or stop starting
the application programs.
This scan function provides a certain protective measure
to fi lter out data that might cause troubles with your FOMA
terminal at the time when you browse websites or receive
messages. Note that when the virus patter
respective troubles is not yet downloaded to your FOMA
terminal, or when no virus pattern data supporting them
is found, this function does not prevent troubles from
occurring.
Updating pattern dat a
First of all, update the pattern data to obtain the latest.
1.
m
Setting▶Lock/Security▶Scanning function▶Update▶YES
▶
YES
▶
Displays for scanning results
■About the display for scanned problem elements
Others
A warning display appears when problematic
data is found. Press i(
warning display to show the name of the
problem element.
When six or more problem elements are
found, the sixth and later problem element
names are omitted.
” might not appear depending on
“
the detected problem element.
70
n data supporting
) from the
■The displays for scanning result
Alert level 0
Alert level 1
Alert level 2
Alert level 3
Alert level 4
The alert displays differ from shown above may appear.
Press Oo( ) to continue
the operation.
Press Oo( ) to stop
and end the operation.
Press c(
the operation.
Press Oo( ) to stop
and end the operation.
Press c( ) to delete
the data and end the
operation.
Press Oo(
and end the operation.
Press Oo( ) to delete
the data and end the
operation.
) to continue
) to stop
Page 73

Options and Related Devices
Combining various options with the FOMA terminal, you can realize more versatile use from personal purpose to business
purposes. Some products may not be dealt in depending on the ar
docomo Shop. For details on options, refer to the user’s manuals of respective options and related devices.
・Battery Pack P23
・Back Cover P58
・Desktop Holder P51
・FOMA AC Adapter 01/02
・FOMA AC Adapter 01 for Global use
・FOMA DC Adapter 01/02
・FOMA Portable Charging Adapter 01/02/03
・FOMA Dry Battery Adapter 01
・FOMA eco Solar Panel 01
・FOMA USB Cable with Charge Function 02
・FOMA USB Cable
・FOMA Indoor Booster Antenna
・FOMA Indoor Booster Antenna (Stand Type)
・Carry Case L 01
※1 See page 20 for charging batteries using AC adapter.
※
2 If you use a USB hub, outer devices may not work correctly.
※
3 Use it in Japan only.
※
4 If the connector terminal, etc. of the FOMA terminal comes into contact with the In-C
or In-Car Holder. Then, install.
※
5 Earphone Plug Adapter P001 and Earphone Plug Adapter for External connector terminal 01 are required.
6 Earphone Plug Adapter for External connector terminal 01 is required.
※
※
7 To use/charge the P-01E, FOMA In-C
※1
※1
※2
※3
※2
※3
ar Hands-Free Cable 01 is required.
ea. For details, consult a handling counter such as a
・Carry Case 02
・In-Car Holder 01
・Earphone/Microphone 01
・Stereo Earphone Set 01
・Earphone/Microphone with Switch P001/P002
・Flat-plug Earphone/Microphone with Switch P01/P02
・Flat-plug Stereo Earphone Set P01
・Earphone Plug Adapter P001
・Earphone Plug Adapter for External connector terminal 01
・Earphone Plug Adapter 01
・Flat-plug Connector/Stereo Mini-jack Conversion Adapter P01
・Bone conduction microphone/receiver 01
・In-Car Hands-F
・FOMA In-Car Hands-Free Cable 01
※4
※5
※6
※6
ree Kit 01
※6
※6
※7
ar Holder, change the direction of the FOMA terminal
※6
Others
71
Page 74

Appendix
Function List
Execute “Resetting the Function
Settings to Default” on page 36 for the
items indicated by
the respective defaults.
Inbox
Mail
Outbox
Draft
Mail history box
Compose new message
Create new Deco-Anime
-
Decome
emplate
T
Compose new SMS
Check mail/message
Check new SMS
Receive option
Mail setting
Others
72
to return to
Deco-mail
Decome-Anime
Receive setting
Display setting
ext predict
T
e setting
Signatur
Phrases/Stor
Mail box lock
Set check mail/message
Blog/Mail group
e wor
Mail
Mail setting
iMenu/Search
Bookmark
Screen Memo
Br
imode/web
Enter URL
i-Channel
i
web setting
Full Browser Home
d
Software list (phone)
iαppli
iαppli
(microSD)
iαppli call logs
Address/Spam Mail Set.
Auto save setting
SMS setting
Ar
Auto Deco-mail setting
Check settings
Reset
owsing history
Enter URL
URL enter history
i-Channel list
Ticker display setting
Reset i-Channel
imode Browser Set.
Full Br
mode/
Common Settings
Confirm
Reset imode setting
Softwar
i
ea Mail setting
owser Settings
imode setting
e list
αppli data
iαppli run
iαppli
info
iαppli
setting
Camera
CAMERA/TV/MUSIC
1Seg
End stand-by info
End Widget appli info
Security error history
Auto start info
race info
T
Auto-start setting
Disp. software info
i-Widget overseas use
i-Widget sound ef
i-αppli call settings
iαppli volume
Preferred tone
Backlight
α
αPower saver
αVibrator
Check settings
Digicam mode
Photo mode
Movie mode
Picture album
Activate 1Seg
ogram guide
Pr
TV timer list
Timer recording list
ding result
Recor
fect
Page 75

TVlink
1Seg
MUSIC Player
CAMERA/TV/MUSIC
Music&Video Channel
My picture
MUSIC
Music&Video Channel
Data box
imotion/Movie
Melody
Content package
My document
Kisekae Tool
Machi-chara
Chara-den
1Seg
Document viewer
Font
SD other files
Sear
Bar code
Tool
reader
Calculator
Alarm
Channel list
Channel setting
User setting
Image
V
Position memory
ch all history
Scan code
Saved data
ideo
Receive Ir
Tool
data
Schedule
Memo
Data
Security
Service
microSD
Guide
Voice recorder
oice announce
V
Dictionary
Phrases/
Store word
Download dictionary
V
oice quick start
Shabette-Kensaku
oruCa
T
ToruCa
settings
Contact DOCOMO
Receive
Receive all
Data check/Download
Update phonebooks
Update schedule etc.
Update images
Update setting info
Setting/History
Refer micr
Backup/Restor
Enter wor
Reference history
Common phrases
Stor
T
Receive T
oSD data
d
e word
oruCa settings
oruCa
Search phonebook
Phonebook
TEL function
Rec. msg./
Voice memo
Dialed/
Received
e
call
Dial/
Receive
setting
Add to phonebook
UIM operation
Phonebook set./Check
Forwarding image
Play/Delete msg.
Play/Delete VP msg.
Record voice memo
d message setting
Recor
Dialed calls
Received calls
Redial
Nuis. call blocking
Caller ID r
equest
Caller ID notification
Arrival call act
Dial call setting
Receive call setting
In-call setting
Headset function set.
ejection set.
Call r
Missed call notice
Others
73
Page 76

Videophone
setting
TEL function
Call
duration/
charge
Disaster Voice Messaging
Koe-no
T
2in1
Melody call
Voice mail
service
Others
74
-
akuhaibin
Visual preference
Select image
Auto redial as voice
Ntfy switch-mode
Reject videophone
Hands-free switch
.phone while packet
V
Call duration/charge
Notify cost limit
Reset total
eset
Auto r
confirm/set(site)
Msg.
Message confirm(voice)
Settings(voice)
Play messages
Activate
Deactivate
Set ring time
Check setting
oice mail setting
V
Check messages
Message notification
Delete icon
Setting for videophone
Other
network
serv.
TEL function
Choku-Den
Setting
Screen/
Display
Call forwarding
Call waiting
English guidance
Remote access
Multi Number
Additional service
Kisekae Tool setting
Stand-by display
MyF
ACE setting
Color theme setting
Each display setting
Sub-display setting
Machi-chara setting
Soft key
Menu Theme
iewer settings
V
Icons
Icons setting
iew blind
V
Image display mode
LCD AI
Mail ticker display
Information display
Setting
Sound/Vib./
Manner
Backlight/
Illum.
ext
T
display/
input
Time
Lock/
Security
Ring volume
Select ring tone
Other sound setting
Vibrator setting
Manner mode setting
Machi-chara chat set.
Backlight
Illumination setting
Font
Character input set
バイリンガル
Set main time
Sub clock setting
Clock display
Auto power ON
Auto power OFF
Lock
Keypad lock
et mode
Secr
et data only mode
Secr
ejection set.
Call r
Change security code
UIM setting
Scanning function
Timer lock ON at close
Page 77

Setting
Battery
External
connection
Other
setting
imadoco
search
ea
i-ar
Map/Overseas
Overseas
NW sear
ch
eco mode
eco mode setting
eco mode autostart
Use history
Battery level
USB mode
Headset micr
Femtocell
MultiOneT
Side key guard
Camera-button setting
Alarm setting
Self mode
Reset settings
Initialize
Software Update
Err
Quick sear
imadoco kantan sear
imadoco sear
Network sear
PLMN setting
Display operator name
Display ar
Re-sear
ophone
ouch set.
or info send set.
ch URL
ch
ch setting
ea status
ch icon set.
ch
Overseas
Map/Overseas
setting
i-concier
Profile
MultiOneTo
Character input
Others
Inquiries(overseas)
Sub clock setting
Bar incoming when roam
Missed call notice
Roaming guidance
Int’l dial assistance
i
mode service set.
Mail/Message usage set
Network service
uch
Others
75
Page 78

Main Specifications
■Handset
Model P-01E
Dimensions (when closed) Height: Approx. 1
Weight (with the battery
pack attached)
Continuous standby time
(FOMA/3G)
Continuous talk time
(FOMA/3G)
1Seg watching time Approx. 310 minutes
Charging time A
Display Type Displa
Size Displa
Number of pixels D
ype CMOS
Image
T
pickup
Size 1/4.0 inc
device
Camera Number of
Others
fective pixels
ef
Number of
recording pixels
(maximum)
76
Width: Approx. 51 mm
Depth: Appr
Appr
Standstill: Approx. 61
Voice call : Approx. 200 minutes
Videophone call
C adapter: Approx. 120 minutes
DC adapter: Appr
Sub-display: Organic EL 1 color
Sub-displa
isplay: 409,920 pixels (480 dots x 854
dots)
Sub-display: 4,608 pixels (128 dots x
36 dots)
Appr
Approx. 5,000,000 pixels
11 mm
ox. 1
5.1 mm
ox. 118 g
0 hours
: Appr
ox. 1
y: TFT 262,144 colors
y: Approx. 3.4 inches
y: Approx. 0.9 inches
hes
ox. 5,100,000 pixels
ox. 130 minutes
20 minutes
Recording
Number of
recordable still
※1
images
Number of
still images
for continuous
shooting
Music
Continuous
playback
playback time
Memory
Chaku-uta
capacity
Chaku-uta Full
“Chaku-uta” is a registered trademark of Sony Music Entertainment Inc.
※1 Picture size: VGA (480 x 640), Quality: Standard
※2 The continuous playback time is the estimated duration that you
can pla
y back using the Stereo Earphone Set 01 (option) with the
minal closed.
FOMA ter
※
3 File format: AAC
※
4 Shares with still images, i-motion files, melodies, PDF files,
Music&Video Channel pr
images, Content packages, F
and i-αppli programs.
Approx. 1,300 max. (default)
For Digicam Mode in Continuous setting
VGA: 8 Square(S): 8
WQVGA: 8
F
or Photo Mode in
(
Continuous Mode)
VGA: 4 QVGA: 5, 10
0, 1
QCIF: 5, 1
Sub-QCIF: 5, 10, 1
SD-Audio file (supports Play Background):
※2
Approx. 6,500 minutes
Chaku-uta Full® music file (supports Play
Background): Approx. 6,000 minutes
i-motion file (including Chaku-uta®
music file): Approx. 1,260 minutes
WMA file (supports Play Background):
Approx. 4,600 minutes
Music&Video Channel pr
(suppor
Sound: Appr
Moving picture: Approx. 280 minutes
®
Approx. 171 Mbyte (default)
®
ograms, Kisekae
5, 20
ts Play Background)
ox. 6,0
ont, Screen memos, ToruCa files,
Tool files, Machi-chara
Continuous setting
5, 20
※3
※3
※3
ogram
00 minutes
※4
Page 79

■Battery pack
Name of product Battery Pack P23
Battery type Li-ion (lithium ion) battery
Voltage 3.7 V
Capacity 800 mAh
■Specifications of shooting
<Still image (Photo mode)>
File format (Extension) JPEG (jpg)
The number of files that can be
saved to P-01E
The number of files that can be
saved to the microSD car
d (1 Gbyte)
Approx. 1,300 max.
Approx. 10,244 max.
※1※2
※2
<Moving picture (Movie mode)>
File format (Extension) MP4, ASF (3gp, asf)
Recordable time to P-01E
Recordable time to the microSD
card (1 Gbyte)
Approx. 30 seconds max.
Appr
ox. 180 minutes max.
<Zoom>
Still image
(Photo mode)
Moving pictur
(Movie mode)
1 Default setting
※
※
2 The number of files that can be saved under the conditions of
“Pictur
3 Maximum recording duration per shot that can be saved to the
※
main unit under the conditions of “Mo
File size: Mail restriction (L), Quality: Standard, Movie type set:
mal”.
Nor
Level of zoom 21 levels
The maximum
magnifications
e
Level of zoom 21 levels
The maximum
magnifications
Approx. 10.1 times
ox. 10.1 times
Appr
e size: VGA (480 x 640), Quality: Standard.
e: VGA (640 x 480),
vie siz
※
4 Maximum recording duration per shot that can be saved to the
micr
oSD card (1 Gbyte) under the conditions of “Movie size: VGA
(640 x 480), File siz
set: Normal”.
■Recor
dable time of 1Seg
Maximum (total) recordable time to
the microSD card (1 Gbyte)
Maximum (total) r
the microSDHC card (32 Gbyte)
The maximum r
48 kbps of audio, and 52 kbps of data (including captions).
recordable time varies depending on the broadcasting station or
ogram.
pr
The maximum file siz
under SD-VIDEO specifications.
■Number of savable/registerable items in FOMA terminal
※1※3
※4
Phonebook 1,0
e: Long time, Quality: Standar
ox. 320 minutes
Appr
dable time to
ecor
dable time is the estimate for 224 kbps of video,
ecor
e f
or continuous recording is up to 2 Gbyte
Appr
ox. 10,240 minutes
Function
00
Schedule 2,500 max.
Mail Received mail 2,500 max.
Sent mail 1,00 0 max.
Still image 3,500 max.
i-motion file 3,500 max.
Music&Video
Channel
Downloaded
program
Saved pr
ogram 1
2
0 max.
Kisekae Tool 3,500 max.
i-αppli 100 max.
※1 The number of savable/registerable items may decrease
depending on the data volume.
※
2 Includes pre-installed data.
d, Movie type
The
Number of savable/
registerable items
※1
※1※2
※1
※1
※1
※1
※1
※1
Others
77
Page 80

Specific Absorption Rate
(SAR) of Mobile Phones
SAR Certification
Information
This model P-01E mobile phone complies
with Japanese technical regulations and
national guidelines regarding exposure to
inter
radio w
aves.
This mobile phone w
observ
ance of Japanese technical regulations
r
egarding exposure to radio waves* and limits
xposure to radio waves recommended by
to e
a set of eq
This set of international guidelines w
out by the International Commission on
Non-Ionizing Radiation P
whic
h is in collaboration with the World Health
O
rganization (WHO), and the permissible limits
include a substantial saf
to assure the safety of all persons, regardless
of age and health condition.
hnical regulations and international
The tec
guidelines set out limits f
Specific Absorption Rate, or SAR, whic
value of absorbed energy in any 10 grams of
ver a 6-minute per
tissue o
for mobile phones is 2.0 W/kg. The highest
S
AR value for this mobile phone when tested
Others
f
or use at the ear is 0.982 W/kg. There may be
slight diff
eac
h product, but they all satisfy the limit.
as designed in
uiv
alent international guidelines.
rotection (ICNIRP),
ety mar
or radio w
iod. The SAR limit
erences between the SAR levels for
78
as set
gin designed
aves as the
h is the
The actual S
operating can be w
above. This is due to automatic changes to the
p
the minimum r
Therefore in general, the closer you are to a
base station, the lo
the device.
This mobile phone can be used in positions
other than against y
satisfies the international guidelines when
used with a car
accessory approved b
INC.** In case you ar
accessory, please use a product that does not
contain an
mobile phone at least 1.5 cm a
body.
The World Health Organization has stated
that “a lar
p
whether mobile phones pose a potential
health r
ha
mobile phone use.
Please refer to the WHO website if you would
lik
http://www
publications/facts_press/fact_english.htm
AR of this mobile phone while
ell belo
w that indicated
ower level of the device to ensure it only uses
erformed over the last two decades to assess
ve been established as being caused by
e more detailed information. (
uired to reach the network.
eq
wer the po
wer output of
. This mobile phone
our ear
rying case or a w
y metals, and one that positions the
ge number of studies have been
isk. To date, no adverse health effects
”
.int/docstore/peh-emf/
.who
earable
y NTT DOCOMO,
e not using the approved
way fr
om your
)
Please refer to the websites listed below if you
w
ould like more detailed information regarding
S
AR.
Ministry of Internal Affairs and
Communications Website:
http://www.tele.soumu.go
htm)
Association of Radio Industries and
Businesses
http://www.ar
(In Japanese only)
NTT DOCOMO
http://www.nttdocomo
product/sar/)
P
W
http://panasonic.jp/mobile/
(In Japanese only)
*
** Regarding the method of measuring SAR
Website:
ib-emf.org/index02.html)
anasonic Mobile Communications Co., Ltd.
ebsite: (
Technical regulations are defined by the
ial Ordinance Related to Radio
Minister
L
aw (Article 14-2 of Radio Eq
Regulations).
when using mobile phones in positions
other than against the ear
standards (IEC62209-2) w
of 2010. On the other hand, technical
r
egulation is currently being deliberated on
y national council. (As of October, 2011)
b
, INC.
(
.jp/e/sys/ele/index.
(
Website: (
.co.jp/english/
)
uipment
, inter
ere set in March
national
Page 81

European RF Exposure
Information
This mobile phone complies with the EU
requirements for exposure to radio waves.
Y
our mobile phone is a radio transceiver,
designed and manufact
exceed the SAR* limits** for exposure
to radio-fr
equency (RF) energy, which
alue, when tested for compliance
SAR* v
a
gainst the standard is 0.822 W/kg for head
configuration.
While there may be diff
the SAR* levels of v
various positions, they all meet*** the EU
equirements for RF exposure.
r
*
**
The exposure standard for mobile phones
ys a unit of measurement known as
emplo
the Specific Absorption Rate, or S
The SAR limit for mobile phones used
b
y the public is 2.0 watts/kilogram (W/
g) averaged over ten grams of tissue,
k
r
ecommended by The Council of the
Eur
opean Union. The limit incorporates
a substantial mar
additional protection f
and to account for an
measurements.
ed not to
ur
erences between
arious phones and at
AR.
gin of saf
ety to give
or the public
y variations in
*** Tests for SAR have been conducted using
standard operating positions with the
phone transmitting at its highest cer
po
wer level in all tested frequency bands.
Although the S
highest certified po
SAR level of the phone while operating
can be w
This is because the phone is designed to
operate at multiple po
use only the power r
network. In general, the closer you are
to a base station antenna, the lo
po
wer output.
AR is deter
wer level, the actual
ell below the maximum value.
wer le
equired to reach the
tified
mined at the
vels so as to
wer the
Declaration of Conformity
The product “P-01E” is declared to
conform with the essential requirements
of Eur
opean Union Directive 1999/5/EC
Radio and
Telecommunications
Equipment Directi
3.2. The Declaration of Conformit y can
be f
ound on (ht
support/index.html).
※
The European RTTE approval of this
pr
oduct is limited to the use of the P-01E
handset, Battery P
Adapter 01 for Global use (100 to 240 V AC)
only
. Other accessories are not part of the
appr
oval.
ve 3.1(a), 3.1(b) and
tp://panasonic.net/pmc/
ac
Terminal
k and FOMA AC
FCC Notice
This device complies with part 15 of the
FCC Rules.
Operation is subject to the follo
conditions:
(1) This device may not cause harmful
inter
ference, and
(2)
This device must accept any interference
eceived, including interference that may
r
cause undesir
Changes or modifications not expressly
approved by the manufacturer responsible
f
or compliance could void the user’s
author
ed operation.
ity to operate the equipment.
wing two
FCC RF Exposure
Information
This model phone meets the U.S.
government’s r
to radio wav
Your wireless phone contains a radio
transmitter and receiver. Your phone is designed
and manufactur
limits for exposure to radio frequency (RF)
ener
gy set by the Federal Communications
Commission of the U.S. Go
limits are part of comprehensive guidelines and
establish per
general population. The guidelines are based on
standar
scientific or
thorough evaluation of scientific studies.
The exposure standard for wireless mobile
phones employs a unit of measur
known as the Specific Absorption Rate (SAR).
equirements for exposure
es.
xceed the emission
ed not to e
nment. These
ver
mitted le
vels of RF energy for the
ds that were developed by independent
ganizations thr
ough periodic and
ement
Others
79
Page 82

The SAR limit set by the FCC is 1.6 W/kg.*
Tests for SAR are conducted using standard
operating positions accepted b
with the phone transmitting at its highest
cer
tified power level in all tested frequency
bands. Although the S
highest certified po
level of the phone while operating can be well
belo
w the maximum value. This is because
the phone is designed to operate at multiple
po
wer levels so as to use only the power
r
equired to reach the network. In general,
the closer y
antenna, the lower the output.
Bef
ore a phone model is available for sale
to the public, it must be tested and cer
to the FCC that it does not e
established b
requirement for safe exposure. The tests are
per
formed in various positions and locations
(f
or example, at the ear and worn on the
equired by FCC for each model. The
body) as r
highest S
AR value for this model phone as
r
eported to the FCC when tested for use at
the ear is 0.492
body in a holster or carry case, is 0.535
kg. (Body-w
phone models, depending upon available
accessor
ies and FCC requirements). While
ther
e may be differences between the SAR
vels of various phones and at various
le
positions, they all meet the U.S. go
Others
requirement.
AR is deter
wer level, the actual SAR
ou ar
e to a wireless base station
xceed the limit
y the U.S. go
orn measurements differ among
vernment-adopted
W/k
g, and when worn on the
80
y the FCC
mined at the
tified
ver
nment
The FCC has granted an Equipment
Authorization for this model phone with
all r
eported SAR levels evaluated as in
compliance with the FCC RF e
guidelines. SAR inf
phone is on file with the FCC and can be
found under the Display Grant section at
(http://www
on FCC ID UCE112056A.
F
or body worn operation, this phone has
been tested and meets the FCC RF e
guidelines when used with an accessory
designated for this pr
an accessory that contains no metal and that
positions the handset a minimum of 1.5 cm
from the body.
*
In the United States, the SAR limit for
eless mobile phones used by the
wir
public is 1.6 w
over one gram of tissue. SAR values may
v
ary depending upon national reporting
equirements and the network band.
r
ormation on this model
.fcc.go
v/oet/ea/fccid/) after search
oduct or when used with
atts/k
g (W/kg) averaged
Important Safety Information
Aircraft
W/
Switch off your wireless device when boarding
an air
craft or whenever you are instructed to
y airline staff. If your device offers a
do so b
‘flight mode’ or similar f
staff as to whether it can be used on board.
iving
Dr
F
ull attention should be given to driving
at all times and local la
restricting the use of wireless devices while
dr
iving must be observed.
eatur
e consult airline
ws and r
e
xposur
xposur
egulations
Hospit
als
Mobile phones should be switc
wher
ever you are requested to do so in
hospitals, clinics or health car
equests are designed to prevent
These r
possible inter
equipment.
etrol Stations
P
Obey all posted signs with r
of wir
in locations with flammable mater
e
c
hemicals. Switch off your wireless device
whene
author
Inter
are must be taken when using the phone in
C
close pr
suc
acemakers
P
P
acemaker manufacturers recommend that a
minimum separation of 22 cm be maintained
betw
to a
pacemak
the opposite ear to y
not carry it in a breast pocket.
Hear
Some digital wir
with some hearing aids. In the e
such interference, you may want to consult
our hearing aid manufacturer to discuss
y
alter
Other Medical Devices
Please consult y
manufacturer to deter
phone may interfere with the operation of your
medical de
fer
ence with sensitive medical
eless devices or other radio equipment
ver you are instructed to do so by
ized staff.
ference
oximity to personal medical devices,
h as pacemakers and hearing aids.
een a mobile phone and a pacemaker
void potential interference with the
er. To achieve this use the phone on
ing Aids
eless phones ma
natives.
our ph
vice.
hed off
e facilities.
espect to the use
ial and
our pacemak
er and do
y interfere
vent of
ysician and the device
mine if operation of your
Page 83

Export Administration
Regulations
This product and its accessories might be
covered by the Japan Export Administration
Regulations (“F
Trade Law” and its related laws). To expor t this
pr
oduct and its accessories, take the required
measur
e
xpenses. For details on the procedures,
contact the Ministry of Econom
Industry.
or
eign Exchange and Foreign
es on your responsibility and at your
y,
Trade and
Intellectual Property
Right
Copyrights and Portrait
Rights
You have no right to copy, modify, or distribute
the contents such as te
software programs downloaded from websites
n the Internet, or images shot by the cameras
o
oduct without permission from the
of this pr
cop
yright holder except for when the copy or
uote is for personal use that is allowed by the
q
yright law.
cop
Note that it ma
record live performances or exhibitions even
or personal use. Make sure that you refrain
f
om shooting portraits of other persons and
fr
distr
ibuting such portraits over the Internet
without consent, as this violates por
ights.
r
xt, images, music, or
ohibited to shoot or
y be pr
trait
Trademarks
“FOMA”, “i-mode”, “i-αppli”, “i-motion”,
“Deco-mail”, “Chara-den”, “ToruCa”,
“W
ORLD CALL”, “i-ar
“2in1”, “docomo STYLE ser
the logos of “i-mode” and “i-αppli” are
trademarks or r
DOCOMO, INC.
“Catch Phone (Call waiting service)” is a
r
egistered trademark of Nippon Telegraph
Telephone Corporation.
and
®
is registered trademarks or
McAfee
trademarks of McAfee, Inc. and/or its
affiliates in the US and/or other countr
Rovi, G-GUIDE, G-GUIDE
MOBILE and G-Guide r
e trademarks or
logos ar
egistered trademarks of Rovi Corporation
r
and/or its subsidiar
QuickTime is a registered trademark of
Apple Inc., in the US and other countr
Microsoft
and Windows Vista
or registered trademarks of Microsoft
Corporation in the United States and/or
other countr
ea”, “WORLD WING”,
ies”, and
ed trademarks of NTT
egister
elated
ies in J
apan.
®
, Windows®, Windows Media®
®
are trademarks
ies.
Powered by JBlend™ Cop
12 Aplix Corporation. All
2002-20
rights reserved.
JBlend and JBlend-r
trademarks ar
trademarks of Aplix Corporation in Japan
and other countr
microSDHC Logo is a trademark of
SD-3C, LLC.
“Multitask” is a register
Corporation.
“AXIS Font” is a trademark of AXIS Inc., and
AXIS” font is a font developed by Type
the “
roject Inc.
P
ies.
This product contains
NetF
ront Browser,
NetF
ront Document
wer and NetFront Sync
Vie
Client of A
ACCESS, the ACCESS logo, and NetFront
ar
ies.
e registered trademarks or trademarks
CCESS CO., LTD. in the United States,
of A
J
apan and/or other countries.
yright © 2012 ACCESS CO., LTD. All
Cop
r
ights reserved.
This softw
of the Independent JPEG Group
QR code is a register
Wave Inc.
“One-push Open™” is trademark of
Panasonic Corporation.
Google is trademark of Google Inc.
elated
e trademarks or r
ies.
ed trademark of NEC
., LTD.
CCESS CO
ar
e is based in part on the work
ed trademark of Denso
yright
egistered
.
Others
81
Page 84

Powered by Mascot Capsule®/Micro3D
™
Edition
Mascot Capsule
CORPORATION.
“Blu-ray Disc” and “Blu-ra
of the Blu-ray Disc Association.
Other company names and pr
described in the text are trademarks or
r
egistered trademarks of those companies.
®
is a trademark of HI
Others
This product contains IrFront of ACCESS
CO., LTD. IrFront is a registered trademark
or trademark of A
United States, Japan and/or other countries.
The IrDA
the Infrared Data Association and used
under license ther
Contains Adobe
Reader
Systems Incorporated.
A
dobe Flash Lite Copyright © 2003-20
Adobe Systems Incorporated. All rights
eserved.
r
dobe Reader Mobile Copyright ©
A
1
993-20
rights reserved.
dobe, Adobe Reader and Flash Lite are
A
either r
of A
dobe Systems Incorporated in the
Others
United States and/or other countr
CCESS CO
®
Feature Trademark is owned by
om.
efr
®
Flash® Lite® and Adobe
®
Mobile technology by Adobe
12 Adobe Systems Incorporated. All
egistered trademarks or trademarks
82
y” are trademarks
oduct names
., LTD. in the
12
ies.
This product contains software licensed
complying with GNU General Public License,
ersion 2 (GPL v2), GNU Lesser General
V
P
ublic License (LGPL), etc. The program
ee software; you can copy it and/or
is fr
r
edistribute it and/or modify it under the
ms of the GPL v2 or LGPL as published
ter
b
y the Free Software Foundation. At least
ee(3) years from delivery of products,
thr
P
anasonic Mobile Communications Co., Ltd
e to any third party who contact us at
will giv
the contact inf
a charge no more than our cost of physically
per
forming source code distribution, a
complete mac
corresponding source code covered under
GPL v2/LGPL. Contact Inf
(
pmc-cs@gg.jp.panasonic.com
Source code is also freely available to you
and any other member of the public via the
ebsite below.
w
(
http://panasonic.jp/mobile/gpl/english.html
Please note that we cannot respond to any
inquiries regarding the source code. You
cannot do
mobile phone. Use your PC to do
source code.
F
or more details on the relevant software
(including license inf
LGPL),
follow these steps: in Main Menu, →Data
x →My document →imode →GPL/
bo
LGPL
(The first part of “GPL/LGPLライセンス説明”
is only available in Japanese.)
mation provided below, for
or
hine-r
wnload the sour
ライセンス説明.
eadable copy of the
or
mation
)
ce code from a
wnload the
or
mation of GPL v2/
iWnn of OMRON SOFTWARE Co., Ltd. is
used for conversion methods for Japanese
language.
iWnn © OMRON SOFTWARE Co
12 All Rights Reserved.
2008-20
“Text Profiler” is trademark of OMRON
Corporation.
MPEG Layer
licensed from F
This product is licensed under the MPEG-4
patent portfolio license, AVC patent portfolio
license and
the personal use of a consumer or other uses
in whic
(i) encode video in compliance with the
(ii)
)
No license is granted or shall be implied for
an
A
fr
See
This product is manufactured or sold
under license fr
Corporation.
The abbreviations of operating systems
(J
manual.
Windo
7 (Starter, Home Basic, Home Premium,
P
-
3 audio coding technology
raunhofer IIS and Thomson.
VC-1 patent portf
h it does not receive remuneration to
MPEG-4 Visual Standard, AVC Standard
VC-1 Standard (“MPEG-4/A
and
Video”) and/or
decode MPEG-4/A
was encoded by a consumer engaged in
a personal activity and/or w
om a video provider licensed to provide
fr
VC/VC-1
MPEG-4/A
y other use.
dditional information may be obtained
om MPEG LA, L.L.C.
(http://www.mpegla.com
om InterDigital
apanese versions) below are used in this
ws 7 stands for Microsoft
rofessional, Enterprise and Ultimate).
olio license for
VC/VC-1 Video that
Video.
).
., Ltd.
VC/VC-1
as obtained
Technology
®
Windows®
Page 85

Windows Vista stands for Windows Vista®
(Home Basic, Home Premium, Business,
ise and Ultimate).
Enterpr
ws XP indicates the Microsoft
Windo
®
XP Professional operating
Windows
system or Microsoft
Edition operating system.
This product is protected by certain
intellectual pr
Corporation and third par
distribution of such technology outside of
oduct is prohibited without a license
this pr
fr
om Microsoft or an authorized Microsoft
subsidiary and thir
Copyright 2001 Seiko Epson
Corporation. All Rights Reserved.
PRINT Image Matching is a
trademark of Seiko Epson
Corporation.
The PRINT Image Matching logo is a
trademark of Seiko Epson Corporation.
The HMM-Based Speech S
in this product uses the Simplified BSD
License.
-------------------------------------------------The HMM-Based Speech S
(HTS)
hts_engine API developed b
Group(
http://hts-engine.sour
-------------------------------------------------Copyright ©
01-2010 Nagoya Institute of Technology,
20
Depar
tment of Computer Science
01-20 08 Tokyo Institute of Technology,
20
I
nterdisciplinary Graduate School of Science
and Engineer
All rights reserved.
oper
ing
®
Windows® XP Home
ty rights of Microsoft
ties.
d par
cef
®
ties. Use or
ynthesis Engine
ynthesis System
y HTS Working
orge.net/)
ibution and use in source and
Redistr
binary f
orms, with or without modification,
e permitted provided that the following
ar
conditions ar
-
Redistr
-
-
Neither the name of the HTS working
THIS SOFTWARE IS PROVIDED BY
THE COPYRIGHT HOLDERS AND
CONTRIBUTORS “AS IS” AND ANY EXPRESS
OR IMPLIED WARRANTIES, INCLUDING,
BUT NOT LIMITED TO, THE IMPLIED
WARRANTIES OF MERCHANTABILITY AND
FITNESS FOR A P
ARE DISCLAIMED. IN NO EVENT SHALL THE
COPYRIGHT OWNER OR CONTRIBUTORS
BE LIABLE FOR ANY DIRECT, INDIRECT,
INCIDENTAL, SPECIAL, EXEMPLARY, OR
CONSEQUENTIAL DAMA
BUT NOT LIMITED TO, PROCUREMENT OF
SUBSTITUTE GOODS OR SERVICES; LOSS
OF USE, DATA, OR PROFITS; OR BUSINESS
INTERRUPTION) HOWEVER CAUSED AND
ON ANY THEORY OF LIABILITY, WHETHER
IN CONTRACT, STRICT LIABILITY, OR TORT
(INCLUDING NEGLIGENCE OR OTHER
ARISING IN ANY WAY OU T OF THE USE OF
THIS SOFTWARE, EVEN IF ADVISED OF THE
POSSIBILITY OF SUCH DAMAGE.
e met:
ibutions of source code must retain
ve copyright notice, this list of
the abo
conditions and the following disclaimer.
Redistributions in binary form must
reproduce the above copyright notice, this
list of conditions and the following disclaimer
in the documentation and/or other mater
provided with the distribution.
gr
oup nor the names of its contributors
may be used to endorse or promote
products derived from this software
without specific pr
ior written permission.
ARTICULAR PURPOSE
GES (INCLUDING,
WISE)
Unlocking SIM
This FOMA terminal supports SIM unlock.
When the SIM is unlocked, other operator
compan
y’s SIM cards can be used with your
minal.
FOMA ter
Contact y
our nearest docomo Shop for
unloc
king SIM.
Y
ou are charged separately a charge for
king SIM.
unloc
ials
If other operator compan
restrictions may be applied to some of
the services or the functions. Note that
NTT DOCOMO
guarantees for operating the FOMA ter
when using other company’s card.
F
or further details on the SIM unlock, refer
to the DOCOMO w
y’s SIM is used,
, INC. cannot pr
ebsite.
ovide any
minal
Others
83
Page 86

Index
AC adapter ...........................................20
After-sales service ...............................66
.................................................... 59
Alarm
Antenna .............................................. 2, 3
ea mail ..............................................45
Ar
Auto-sort
Auto timer ............................................51
Back cover ............................................. 3
Backlight .............................................. 31
Bar code r
Battery level ......................................... 22
Battery pack
Attaching/removing ........................... 1
Charging ...........................................20
Bookmark
Call/charging indicator .......................... 2
Caller ID notification ............................ 21
Call forwar
Call rejection setting ............................ 36
Call waiting service .............................40
Others
84
............................................. 2, 50
Camera
Channel setting
Character entry .................................... 29
eed ...........................................29
Line f
A
.............................................. 44
B
eader ................................... 60
........................................19
............................................49
C
ding service
........................ 40
.................................... 53
Pictograms ........................................29
Smiley ...............................................29
Symbols ............................................ 29
Character size
Charging
Charging terminal ..................................3
Check mail/message
Command navigation key ...................24
Connector terminal
Connector terminal cover
Continuous shooting ...........................51
Copyrights
......................................32
..............................................20
........................... 44
................................3
...................16
...........................................81
D
Deco-mail ............................................. 43
Decome-Anime .................................... 44
9
Desktop holder ....................................20
...............................................35
Dial lock
Dial/received list .................................. 37
.............................................2, 22
Display
DOCOMO connection manager
docomo mini UIM card ........................19
docomo Palette UI
Draining water
............................... 27
.....................................18
.......... 64
E
Early warning “Area Mail” ...................45
Earphone ................................................ 3
................................................. 2
Earpiece
Earpiece volume .................................. 38
eco mode ............................................. 32
eco mode autostart .............................33
eco mode setting
ECO NA
Emergency call ....................................41
English display
Error information send setting ............68
Export administration r
.................................33
VI ............................................. 23
..................................... 21
egulations
......81
F
Finder display ......................................50
FOMA antenna .......................................2
Full browser .........................................48
Function list
.........................................72
G
Guide ....................................................28
H
Holding .................................................37
I
i-αppli ................................................... 56
i-channel ..............................................49
i-concier ............................................... 58
Illumination setting
.................................................. 47
i-mode
i-mode fault diagnosis site ..................68
i-mode mail
..............................32
.......................................... 43
Page 87

Compose ..........................................43
Forward .............................................44
e .............................................44
Receiv
................................................. 44
Reply
Send .................................................. 43
i-mode passwor
i-motion
Infrared communication ...................... 64
ed data port.............................3, 64
Infrar
Initialize ................................................36
Initial setting
Intellectual pr
International call ..................................38
national roaming ..........................41
Inter
i-Widget
d ................................. 34
................................................ 57
........................................21
operty right .................... 81
...............................................56
K
Keypad lock ......................................... 36
Keypad sound......................................31
Kisekae tool .........................................32
Koe-no-takuhaibin
............................... 37
L
Light sensor ...........................................2
List of materials used .......................... 12
M
Machi-chara setting ............................32
Mail .......................................................43
Main menu ...........................................25
Main specifications
Making a call
.............................76
........................................37
Making a videophone call ...................37
Manner mode.......................................30
Menu icon ............................................25
ophone ............................................2
Micr
microSD card ....................................... 61
k up/restore ................................63
Bac
k ................................................62
Chec
Copy .................................................62
ormat ...............................................62
F
Inserting/removing ............................ 61
...................................................57
Movie
Multi one-touch function
Multi one-touch key.........................2, 26
MUSIC player .......................................55
ACE ...............................................27
MyF
..................... 26
N
Navigation displays .............................24
Network security code ........................34
Network services
Notification icon ..................................23
Numeric keys
................................. 39
......................................... 2
O
Omakase lock ...................................... 35
One-push open button .......................... 3
Options ................................................71
................................................. 30
Original
Original lock
Out-of-service-area indication ............22
Overseas use
......................................... 36
.......................................41
Own number ........................................21
P
Part names and functions ..................... 2
PC connection .....................................64
Phonebook ..........................................46
dd to phonebook ............................ 46
A
Delete data ........................................ 46
Edit phonebook
ch phonebook ...........................37
Sear
Picture album ....................................... 51
PIN1 code
PIN1 code entry set
PIN2 code ............................................34
PIN unblocking key (PUK)
Playing moving picture .................. 51, 57
Portrait rights
Power on/of
Power saver mode ..............................31
ofile ................................................... 21
Pr
Public mode (Drive mode) ...................39
Public mode (Power of
................................46
............................................34
............................. 35
................... 35
....................................... 81
f ........................................21
...................... 39
f)
Q
QR code ............................................... 60
R
Radio waves reception level ............... 22
Receiving a call ...................................38
Receiving a videophone call ............... 38
d message .................................38
Recor
Related devices
................................... 71
Others
85
Page 88

Reset settings ...................................... 36
Ring volume ......................................... 30
S
SAR ......................................................78
Scanning function................................70
Schedule ..............................................59
een memo ....................................... 49
Scr
Security codes ..................................... 33
Security scan function
(Scanning function)..............................70
Select language ................................... 21
Select ring tone
Shabette-Kensaku ............................... 58
Shooting moving pictur
Shooting still images ........................... 50
Shortcut ...............................................28
Simple menu
Site access ..........................................47
......................................................45
SMS
Softwar
Speaker .................................................. 2
Specific absorption rate
Stand-by display ...........................25, 31
Others
Stand-by shortcut................................23
Start by voice
Status icon
Strap hole
86
..........................................45
Compose
Receive .............................................45
.................................................. 45
Send
e update ..................................68
........................................... 22
..............................................3
...................................30
...................50
es
........................................ 25
...................... 78
.......................................59
Sub-display ......................................2, 23
Submenu ..............................................25
T
Terminal security code ........................34
Timer recording ...................................54
rademarks ..........................................81
T
roubleshooting ................................... 65
T
TV timer ................................................ 54
U
Update (Pattern data) .......................... 70
V
Vibrator setting ....................................30
Video ....................................................54
ideo recording ...................................54
V
View blind ............................................31
iewer display......................................53
V
iewing still images ............................. 51
V
Voice mail service ................................40
W
Warranty ............................................... 66
Waterproof/dust-proof performance .. 15
WMA file ...............................................54
WORLD CALL
WORLD WING......................................41
......................................38
Numerics
1Seg .....................................................52
1Seg antenna .........................................3
Page 89

Access the following for checking or changing the contents of your contract, or for applying to respective services, and asking for
related documents:
From i-mode
iMenu
From PC
My docomo (http://www
“お客様サポート (User support)” and My docomo are available in
Japanese only.
You will need your “Network Security Code” for the access from i-mode.
No packet communication charges are incurred for the access
from i-mode. Accessing fr
You will need your “docomo ID/password” for the access from a PC.
▶
お客様サポート (User support) ▶ お申込・お手続き (Applications/Procedures)
▶
各種お申込・お手続き (Respective applications/procedures)
om overseas will incur charges.
.mydocomo.com/) ▶ 各種お申込・お手続き
If you do not have or you have forgotten your “Network Security
Code” or “docomo ID/password”, contact “General Inquiries” listed
on the bac
ou may not be able to access the site depending on the details of
Y
y
our subscription.
You may not be able to access the site due to system maintenance, etc.
Packet communication charges free
k page of this manual.
Using mobile phone with your manners!
When using your mobile phone in a public place, don’t
forget to show common courtesy and consideration for
others ar
In the following cases, be certain to turn off the power.
■Where use is prohibited
Be sure to turn off the power of your mobile phone in airplanes, in
hospitals and around pr
ound you.
iority seat in a train, etc.
In the following cases, be certain to set Public mode.
■While driving
Using the mobile phone in your hand while driving is subject to
punishment. This does not apply in una
when, for instance, responding to someone who is sick, injured or
when maintaining public or
■When in theaters, movie theaters, museums, and similar
der
voidable circumstances
.
venues
Respect the privacy
Please be considerate of the privacy of individuals around you
when shooting and sending photos using camera-equipped
mobile phones.
.
An Environment Protection Program by
DOCOMO
Simplified Version of the Manual
We have edited the traditional instruction manual to simplify
the descriptions of basic operational procedures for respective
functions. A
consumption of paper used.
For the functions frequently used and more detailed descriptions,
y
comes with the FOMA ter
Collection and Recycling of Mobile Phones
s a r
esult, we have succeeded to reduce the
ou can refer to “使いかたガイド (Guide)” (in Japanese only) that
minal and the DOCOMO w
We collect mobile phones and related equipment that
you no longer need even if it is not docomo product.
Please bring them to your local docomo Shop.
*Acceptable Products: Mobile phones, PHS
ter
and desktop holders
(r
egardless of the provider)
ebsite.
minals, battery chargers,
87
Page 90

Loss or theft of FOMA terminal or
payment of cumulative cost o
<docomo Information Center>
(available 24 hours a day)
■From DOCOMO mobile phones
International call access code
for the country you stay at
* You are charged a call fee to Japan when calling from a land-line phone, etc.
※ If you use P-01E, you should dial the number +81-3-6832-660
(to enter “+”, press and hold the “0” k
■From land-line phones
<Universal number>
Universal number
international prefix
* You might be charged a domestic call fee according to the call rate for the
country you stay at.
※
For international call access codes for major countries and universal number
inter
national prefix, refer to the DOCOMO International Services website.
●If you lose your FOMA terminal or have it stolen, immediately take the steps necessary for suspending the use of the FOMA termi
●If the FOMA terminal you purchased is damaged, bring your FOMA terminal to a r
-81-3-6832-6600*
ey for at least one second).
-8000120-0151*
verseas
0
(available 24 hours a day)
■From DOCOMO mobile phones
(toll free)
International call access code
for the country you stay at
* You are charged a call fee to Japan when calling from a land-line phone, etc.
※ If you use P-01E, you should dial the number +81-3-671
(to enter “+”, press and hold the “0” k
■From land-line phones
<Universal number>
Universal number
international prefix
* You might be charged a domestic call fee according to the call rate for the
country you stay at.
※
For international call access codes for major countries and universal number
inter
epair counter specified by DOCOMO after returning to Japan.
Failures encountered overseas
<Network Support and Operation Center>
-8005931-8600*
national prefix, refer to the DOCOMO International Services website.
-81-3-6718-1414*
ey for at least one second).
8-1414
nal.
(toll free)
Page 91

General Inquiries
<docomo Information Center>
0120-005-250
* Service available in English, Portuguese, Chinese, Spanish, and Korean.
* Unavailable from part of IP phones.
(Business hours: 9:0
■ From DOCOMO mobile phones
(In Japanese only)
(No prefix)
* Unavailable from land-line phones, etc.
(Business hours: 9:00 a.m. to 8:00 p.m. (open all year round))
●Please confir m the phone number bef
●For Applications or Repairs and After-Sales Service, please contact the abo
or the i-mode site.
NTT DOCOMO website (http://www.nttdocomo.co.jp/english/)
i-mode site iMenu
0 a.m. to 8:0
151
(toll free)
0 p.m.)
■From land-line phones
(In Japanese only)
(toll free)
お客様サポート (User support) ▶ ドコモショップ (docomo Shop)
▶
0120-800-000
* Unavailable from part of IP phones.
ore you dial.
Repairs
■ From DOCOMO mobile phones
(In Japanese only)
(No prefix)
* Unavailable from land-line phones, etc.
(Business hours: 24 hours (open all year round))
(toll free)
ve-mentioned information center or the docomo Shop etc. near you on the NTT DOCOMO website
(toll free)
113
(In Japanese only)
■From land-line phones
(In Japanese only)
0120-800-000
* Unavailable from part of IP phones.
(toll free)
When using your mobile phone in a public place, don’t forget to show common courtesy and consideration for others around you.
Don’t forget your mobile phone ... or your manners!
Sales:
Manufacturer:
October
’
12 (1st Edition)
3TR1
00569AAA
F091
2-1
Page 92

P-01E
Manual for PC Connection
Data Communication Available from FOMA Terminal . . . . . . . . . . . . . . . . . . . . . . . . . . . . . 1
Before Using Data Communication . . . . . . . . . . . . . . . . . . . . . . . . . . . . . . . . . . . . . . . . . . . . 2
Setup Flow for Data Transfer (OBEX™ Communication) . . . . . . . . . . . . . . . . . . . . . . . . . . 4
Setup Flow for Data Communication . . . . . . . . . . . . . . . . . . . . . . . . . . . . . . . . . . . . . . . . . . . 4
Installing FOMA Communication Configuration File (Driver) . . . . . . . . . . . . . . . . . . . . . . . 6
DOCOMO Connection Manager . . . . . . . . . . . . . . . . . . . . . . . . . . . . . . . . . . . . . . . . . . . . . . . 10
Before Installing DOCOMO Connection Manager . . . . . . . . . . . . . . . . . . . . . . . . . . . . . . . . 11
Installing DOCOMO Connection Manager . . . . . . . . . . . . . . . . . . . . . . . . . . . . . . . . . . . . . . . 12
Starting DOCOMO Connection Manager . . . . . . . . . . . . . . . . . . . . . . . . . . . . . . . . . . . . . . . . 15
Setting Dial-up Network . . . . . . . . . . . . . . . . . . . . . . . . . . . . . . . . . . . . . . . . . . . . . . . . . . . . .16
Making Dial-up Connection . . . . . . . . . . . . . . . . . . . . . . . . . . . . . . . . . . . . . . . . . . . . . . . . . . 30
AT Command . . . . . . . . . . . . . . . . . . . . . . . . . . . . . . . . . . . . . . . . . . . . . . . . . . . . . . . . . . . . . . 34
AT Command List . . . . . . . . . . . . . . . . . . . . . . . . . . . . . . . . . . . . . . . . . . . . . . . . . . . . . . . . . . 35
About Manual for PC Connection
This manual gives you the explanations of details required for having data communication with your P-01E, and
installing “FOMA communication configuration file”/“DOCOMO Connection Manager” on your personal computer
assuming that you are using the one that comes with Windows 7.
Some procedures and displays may differ depending on your operating environment.
Page 93

Data Communication Available from FOMA Terminal
Infrared communication
FOMA USB Cable with Charge Function 02
microSD card
DOCOMO keitai datalink
P-01E
P-01E
The data communication services you can use by connecting the FOMA terminal to a personal computer are
classified as data transfer (OBEX™ communication), packet communication, and 64K data communication.
The FOMA terminal is equipped with the adapter function for packet communication.
≥
To perform the packet communication overseas, perform it via the IP connection. (You cannot perform the packet
communication via the PPP connection.)
≥
64K data communication is not available overseas.
Data Transfer (OBEX™ Communication)
You can exchange data files such as images, melody files, Phonebook entries and mail messages with
another FOMA terminal or a personal computer.
≥
The data files you can exchange vary depending on the transfer methods. For details, confirm each transfer method.
Packet Communication
This communication system requires a communication fee according to the amount of data you sent and
received. (Best effort system with 7.2 Mbps of maximum download speed and 2.0 Mbps of maximum
upload speed)
Internet access service “mopera U”.
Packet communication is available by configuring various settings after connecting the FOMA terminal to
a personal computer via the FOMA USB Cable with Charge Function 02 (option), and is suitable for using
applications which require the high-speed communication.
To carry out the settings and connection, see page 4 and after.
※
The maximum speed is based on the technical specification. The actual communication speed varies depending on the network
congestion state and the communication environment. The communication speed might be lowered when you connect the
FOMA terminal to an access point which does not support HIGH-SPEED or the terminal is outside the FOMA High-Speed Area,
or when you use the device which does not support High-Speed.
≥
The packet communication is charged according to the amount of data you sent and received. Note that you are charged a high
communication fee for the massive data communication such as browsing Internet websites having many images or
downloading data files.
64K Data Communication
This communication system requires a communication fee according to the duration of connection. By
connecting the FOMA terminal to a personal computer via the FOMA USB Cable with Charge Function 02
(option), you can execute communication.
It uses an access point which supports FOMA 64K data communication such as DOCOMO Internet access
service “mopera U”, or an ISDN-synchronous 64K access point. To carry out the settings and connection,
see page 4 and after.
≥
The 64K data communication is charged according to the duration of connection. Note that a communication fee becomes
expensive if you use this service for a long time.
※
It uses an access point which supports FOMA packet communication such as DOCOMO
1
Page 94

Information
≥
The FOMA terminal does not support Remote Wakeup.
≥
The FOMA terminal does not support the FAX communication.
Before Using Data Communication
Charge of Internet service provider
To use the Internet, you need to pay the charge for the Internet service provider you use. Besides the
FOMA service fee, you need to directly pay this charge to the Internet service provider. For details on the
charge, contact the Internet service provider you use.
You can use the DOCOMO Internet access service, “mopera U”. To use “mopera U”, subscription
(charged) is required.
Setting access point (Internet service provider, etc.)
The access points for the packet communication and 64K data communication differ. To use the packet
communication, connect to an access point which supports packet communication. To use the 64K data
communication, connect to an access point which supports FOMA 64K data communication or
ISDN-synchronous 64K.
About user authentication for accessing network
User authentication (ID and password) may be required at connection to some access points. In that case,
enter your ID and password on the communication software (dial-up network). ID and password are
specified by the Internet service provider or network administrator of the access point. For details, contact
the provider or network administrator.
Conditions of packet communication and 64K data communication
To carry out the communication using the FOMA terminal in Japan, the following conditions are required:
・
The personal computer to be used can use the FOMA USB Cable with Charge Function 02 (option).
・
The PDA to be used should support FOMA packet communication and 64K data communication.
・
Within the FOMA service area
・
For packet communication, the access point should support packet communication of the FOMA.
・
For 64K data communication, the access point should support the FOMA 64K data communication or
ISDN-synchronous 64K.
Even when these conditions are satisfied, if the base station is congested or the radio wave conditions are
bad, you may not carry out the communication.
2
Page 95

Operating Environment
Information
For the data communication, the following operating environment is required for your personal computer:
Item Necessary Environment
PC/AT compatible model
When using the FOMA USB Cable with Charge Function 02 (option): USB port (Universal Serial Bus
PC main unit
OS
Memory requirements
Hard disk space size
≥
The following operating environment is required for DOCOMO Connection Manager:
Web-browsing software: Internet Explorer 6.0 or later
E-mail software: Windows Mail or Outlook Express 6.0
≥
For the latest information about the operating environment, refer to the DOCOMO website.
≥
The operation in the added/changed operating environment and on the upgraded OS is not guaranteed.
≥
The memory requirements and hard disk space size may vary depending on the system environment.
Specification Rev1.1/2.0 compliant)
Display resolution 800 x 600 dots, high color 16 bits or more recommended.
≥
For DOCOMO Connection Manager, display resolution 1024 x 600 dots or more (1024 x 768 dots or
more recommended)
Windows 7 32-bit version/64-bit version (Japanese version)
≥
For DOCOMO Connection Manager, Windows 7 (including SP1)
Windows Vista 32-bit version/64-bit version (Japanese version)
≥
For DOCOMO Connection Manager, Windows Vista SP2 only
Windows XP 32-bit version (Japanese version)
≥
For DOCOMO Connection Manager, Windows XP SP3 only
Windows 7 32-bit version: 1 Gbyte or more
Windows 7 64-bit version: 2 Gbytes or more
Windows Vista: 512 Mbytes or more
Windows XP: 128 Mbytes or more (Japanese version in each)
Unused memory space of 5 Mbytes or more
≥
Unused memory space of 10 Mbytes or more for DOCOMO Connection Manager
Necessary Devices
The following hardware and software are required besides the FOMA terminal and personal computer:
・
FOMA USB Cable with Charge Function 02 (option) or FOMA USB Cable (option)
・
“FOMA communication configuration file” (driver)
※
Download the FOMA communication configuration file from the DOCOMO website.
※
≥
Use a dedicated FOMA USB Cable with Charge Function 02 or FOMA USB Cable. The USB cable for personal computers cannot be
used because the shape of the connector differs.
≥
If you use a USB hub, the devices may not work correctly.
3
Page 96

Setup Flow for Data Transfer (OBEX™ Communication)
When you use the FOMA USB Cable with Charge Function 02 (option), install the FOMA communication
configuration file.
Install the “FOMA communication configuration file” (driver). (See page 6)
≥
Download the FOMA communication configuration file from the DOCOMO website and install.
Data transfer
Setup Flow for Data Communication
The following outline shows a setup flow for packet communication or 64K data communication.
Install the “FOMA communication configuration file” (driver). (P.6)
≥
Download the FOMA communication configuration file from the DOCOMO website and install.
Connect a personal computer to the FOMA terminal using the FOMA USB Cable with Charge Function 02 (option).
Check the setting after installation. (P.7)
Download “DOCOMO Connection Manager” from the
DOCOMO website and install. (P.11)
Carry out the setting manually without using “DOCOMO
Connection Manager”. (P.16, P.33)
Connect. (P.15, P.30)
4
Page 97

Connecting PC and the FOMA Terminal
Connector terminal
External connector
(Face up the engraved
surface of the connector
for insertion)
FOMA
terminal
USB terminal
USB connector
FOMA USB Cable with
Charge Function 02
Personal
computer
Information
Release buttons
Information
≥
Do not disconnect the FOMA USB Cable with Charge Function 02 forcibly. Malfunction may result.
≥
Do not disconnect the FOMA USB Cable with Charge Function 02 during data communication. Erroneous operation or malfunction of
the personal computer or FOMA terminal, or loss of data could result.
≥
Do not connect/disconnect the FOMA USB Cable with Charge Function 02 in succession. Once you connect the cable, wait for a
while, then disconnect it and vice versa.
The following steps explain how to connect the FOMA USB Cable with Charge Function 02 (option).
Check the direction of the
1
connector terminal of the FOMA
terminal, then straight insert the
external connector of the FOMA
USB Cable with Charge Function
02 until it clicks.
Connect the USB connector of the FOMA USB Cable with Charge
2
Function 02 to the USB terminal of the personal computer.
≥
Set “USB mode” to “Communication mode” for data communication.
+m1
Operate “
≥
Do not forcibly insert the FOMA USB Cable with Charge Function 02. Malfunction may result. Insert each connector in the correct
direction at the correct angle; otherwise, you will fail connection. When the direction and angle are correct, you can insert a connector
smoothly without the strong force. If you fail to insert a connector, check its shape and direction once more without inserting a connector
forcibly.
≥
Use a dedicated FOMA USB Cable with Charge Function 02. (The USB cable for personal computers cannot be used because the
shape of the connector differs.)
≥
Symbol “ ” appears on the FOMA terminal when the FOMA terminal recognizes the connection with the personal computer after you
install the FOMA communication configuration file (driver) for packet communication or 64K data communication. Before you install the
FOMA communication configuration file (driver), the FOMA terminal does not recognize the connection with the personal computer, and
symbol “ ” does not appear.
Setting1External connection1USB mode1Communication mode”.
■
Removing
1. While holding down the release buttons of the external connector of the FOMA
USB Cable with Charge Function 02, straight pull out the connector.
2. Pull out the FOMA USB Cable with Charge Function 02 from the USB terminal
of the personal computer.
5
Page 98

Installing FOMA Communication Configuration File (Driver)
Installing the FOMA communication configuration file (driver) is required when you connect the FOMA
terminal to your personal computer via the FOMA USB Cable with Charge Function 02 (option) for the first
time.
≥
Operate as the user who has the PC administrator right.
≥
End all the programs resident on your personal computer before installing the FOMA communication configuration file (driver).
Download the FOMA communication configuration file (driver) from the
1
DOCOMO website.
Double-click “exe” file of the downloaded FOMA communication
2
configuration file (driver) to execute. Decompress it into the desired
folder.
Double-click “P01E_ins.exe” in the decompressed folder, and click “
3
(Yes)”.
≥
For Windows Vista, click “続行 (Continue)” instead of “はい (Yes)”.
≥
For Windows XP, the user account control display does not appear.
Click “OK”.
4
Turn on the FOMA terminal’s power, then connect the FOMA terminal to
5
the personal computer using the FOMA USB Cable with Charge Function
はい
02. (See page 5)
Installation starts.
Click “OK”.
6
After the installation of all the “FOMA communication configuration files” (driver) is completed, a pop-up message “
する準備ができましたデバイスドライバーソフトウェアが正しくインストールされました。
device. The device driver software was installed correctly.)” appears for a few seconds from the indicator on the task bar.
(The system is ready to use the
デバイスを使用
6
Page 99

Confirm Installed FOMA Communication Configuration File (Driver)
Confirm that the “FOMA communication configuration file” (driver) is installed correctly.
For Windows 7
“ [
1
2
3
スタート
1
Open “
Open “docomo STYLE series P-01E”
1
Click the “
Confirm the installed driver names.
Confirm that all driver names are displayed.
≥
The COM port number varies depending on the personal
computer you use.
(Start)]”
デバイスとプリンター
ハードウェア
(Hardware)” tab.
(Devices and printers)”.
For Windows Vista, Windows XP
“ [
1
1
<For Windows XP>
“
→“パフォーマンスとメンテナンス
Open “
2
1
<For Windows XP>
Click the “
Open “
スタート
スタート
(Start)”→Open “
(Start)]”1Open “
システムとメンテナンス
コントロールパネル
(Performance and maintenance)”→Open “
ハードウェアとデバイスを表示
Click “
続行
ハードウェア
(Continue)”.
(Hardware)” tab→ Click “
コントロールパネル
(System and maintenance)”.
(Control panel)”
システム
(Show hardwares and devices)”
デバイスマネージャ
(Device manager)”.
7
(Control panel)”
(System)”.
Page 100

Click each device, then confirm the installed FOMA communication
3
configuration file (driver) names.
Confirm that all FOMA communication configuration file
(driver) names are displayed under “
[Port (COM/LPT)]”, “
ユニバーサルシリアルバス コントローラ
“
serial bus controller)”.
≥
The COM port number varies depending on your personal
computer.
モデム
ポート
(Modem)”, and
(COMとLPT)
(Universal
The following drivers are installed by installation of the “FOMA communication configuration file” (driver):
Device name FOMA communication configuration file (driver) name
ポート
(COMとLPT) [Port (COM/LPT)]
モデム
(Modem)
<For Windows 7>
ユニバーサルシリアルバスコントローラー
(Universal serial bus controller)
<For Windows Vista>
ユニバーサルシリアルバスコントローラ
(Universal serial bus controller)
<For Windows XP>
USB (Universal Serial Bus)
[USB (Universal Serial Bus) controller]
コントローラ
・
FOMA P01E Command Port
・
FOMA P01E OBEX Port
・
FOMA P01E
・
FOMA P01E
8
 Loading...