

Page 1
docomo PRIME series
P-01A
INSTRUCTION MANUAL
ISSUE DATE:
‘08.10
NAME:
PHONE NUMBER:
MAIL ADDRESS:
Easy Search/Contents/Precautions
Before Using the Handset
Voice/Videophone Calls/PushTalk
Phonebook
Sound/Screen/Light Settings
Security Settings
Camera
i-mode/i-motion/i-Channel/i-concier
i-αppli/i-Widget
Map/GPS Function
Full Browser/PC Movie
Mail
Osaifu-Keitai/ToruCa
1Seg
Data Management
Music
Convenient Functions
Character Entry
Network Services
PC Connection
Overseas Use
Appendix/Troubleshooting
Index/Quick Manual
Page 2

DOCOMO W-CDMA・GSM/GPRS system
Thank you for selecting the “docomo PRIME series P-01A”.
Before or during use of the P-01A, make sure that you read this manual and the
separate manuals for other optional devices thoroughly so that you can use the
P-01A correctly.
If you feel any inconvenience in reading the manual, contact the docomo
Information Center listed on the back page of this manual.
The P-01A is designed to be your close partner. Treat it carefully at all times to
ensure long-term performance.
●Because the FOMA terminals use radio waves, they cannot be used in places
where radio waves do not reach, such as inside tunnels, underground, or in
buildings; or the outside where radio waves are weak or out of the FOMA
service area. They may not be used in the high-rise buildings even when the
antennas are unobstructed. You may also experience interruption of calls
even when using without moving while the radio waves are strong enough for
the three antennas to appear on the display.
●Use the FOMA terminal carefully to avoid disturbing other people when in
public, or in crowded or quiet places.
●Since the FOMA terminals use radio waves as the medium of
telecommunication, calls may be tapped by the third party. However, the
W-CDMA・GSM/GPRS system automatically supports tapping prevention, so
your conversation will be incomprehensible to the third party.
●The FOMA terminals change your voice into digital signals and send them to
the other party. In places where the radio waves are weak, the digital signals
may not be converted correctly, and in such a case, the voice may sound
different from the actual original voice.
●
The user hereby agrees that the user shall be solely responsible for the result
of the use of SSL. Neither DOCOMO nor the certifiers as listed herein make
any representation and warranty as for the security in the use of SSL. In the
event that the user shall sustain damage or loss due to the use of SSL, neither
DOCOMO nor the certifiers shall be responsible for any such damage or loss.
Certifiers: VeriSign Japan K.K., Cybertrust, Inc., GlobalSign K.K.,
RSA Security Inc., SECOM Trust Systems Co., Ltd., and
Comodo CA Ltd.
●This FOMA terminal supports FOMA Plus-Area and FOMA High-Speed Area.
●The FOMA terminal can be used only via the FOMA network provided by
DOCOMO and in DOCOMO’s roaming area.
●It is recommended that you make separate notes of the information (such as
Phonebook entries, schedule events, text memos, record messages, voice
memos, movie memos) stored in the FOMA terminal and keep them in a safe
place. Note that we cannot be held responsible for the unlikely event of loss of
the stored contents due to a malfunction, repair, change of your model, or
other mishandling of the FOMA terminal.
●You are advised to save your important data files to the microSD card. If you
have a personal computer, you can transfer and save the information such as
Phonebook entries, mail messages, schedule events, and others to the
personal computer by using DOCOMO keitai datalink.
Before using your FOMA terminal
For Using This Manual
This FOMA terminal supports Kisekae Tool (page 118). If you use
Kisekae Tool to change the design of the Menu display, some
menu configurations change according to the usage frequency
depending on the type of the menu. Further, some menu numbers
that are assigned to the menu items do not apply.
You can download the latest information about this manual
from the following DOCOMO website:
・User’s Manual (PDF file) Download
(http://www.nttdocomo.co.jp/english/support/manual/index.html)
※The URL and the content of the website might be modified
without notice.
Page 3
Access the online for checking or changing the content of your subscription, for application of respective services, and
for request of Information materials.
iMenu お客様サポート (user support) お申込・お手続き (Applications/Procedures) 各種お申込・お手続き
(Respective applications/procedures)
My docomo (http://www.mydocomo.com/)
各種お申込・お手続き(Respective applications/procedures)
• You will need your “network ID” to access e-site from i-mode.
• No packet communication charges are incurred when accessing e-site from i-mode.
Accessing from overseas will incur charges.
• You will need your “docomo ID/password” to access e-site from PC.
• If you do not have or you have forgotten your “network ID” or “docomo ID/password”,
contact the docomo Information Center listed on the back cover of this manual.
• DOCOMO e-site may not be available depending upon the content of your subscription.
• You may not be able to access some e-site services due to system maintenance, etc.
From i-mode
Packet communication charges free
From PC
Do not forget your FOMA terminal ... or your manners!
■Where use is prohibited
Be sure to turn off the power to your FOMA terminal in airplanes and in hospitals.
※
Persons with electronic medical equipment are in places other than the actual wards.
Make sure you have the power switched off even if you are in a lobby or waiting room.
■
When in crowded places such as packed trains, where you could be near
a person with an implanted cardiac pacemaker or implanted defibrillator
The implanted cardiac pacemaker or implanted defibrillator operation can be
affected by radio emissions from the FOMA terminal.
■While driving
Using the mobile phone in your hand while driving is subject to punishment.
※If you answer a call out of necessity, tell the caller with Hands-free that you will call
him/her back, park your car to somewhere safe, and then dial.
■When in theaters, movie theaters, museums, and similar venues
If you use your FOMA terminal where you are supposed to be quiet, you will
disturb those around you.
■If you use the FOMA terminal in quiet places such as restaurants and
hotel lobbies, keep the volume of your voice and other sounds down.
■Do not block thoroughfares when using the FOMA terminal.
Please be considerate of the privacy of individuals around you when
shooting and sending photos using camera-equipped mobile phones.
This manual was produced in such a way as to allow easy recycling. Please recycle
this manual when it is no longer needed.
In the following cases, be certain to turn off the power.
In the following cases, be certain to set Public Mode.
Adjust the volume of your voice and ring tone according to where you are.
Respect the privacy.
These functions help you keep your manners in public.
Handy functions are available such as for setting the response
to incoming calls and setting the tones to silent.
●Public Mode (Drive Mode/Power Off) (Page 69 and page 70)
The guidance that you are currently driving or in a place where you
should refrain from using a mobile phone or the guidance that you
are in a place where you should turn off the power is played back to
the caller. Then the call is disconnected.
●Record Message function (Page 71)
Callers can record a message when you cannot come to the phone.
●Vibrator (Page 108)
When the vibrator is set, it vibrates for incoming calls.
●Manner Mode/Super Silent/Original Manner (Page 110)
In Manner Mode or Super Silent, the keypad sound, ring tone and
other sounds from the FOMA terminal are muted.
In Original Manner, you can set whether or not to activate the Record
Message function, and can change the settings for the vibrator and
ring tone.
※The shutter sound cannot be muted.
Optional services are also available, such as Voice Mail Service
(page 440) and Call Forwarding Service (page 444).
Page 4
General inquiries
<docomo Information Center>
Repairs
0120-005-250 (toll free)
★
Service available in English, Portuguese, Chinese, Spanish, and Korean.
★
Available from mobile phones and PHSs.
■From DOCOMO mobile phones
(In Japanese only)
(No prefix)
113 (toll free)
★
Unavailable from land-line phones, etc.
■From land-line phones
(In Japanese only)
0120-800-000 (toll free)
★
Available from mobile phones and PHSs.
■From DOCOMO mobile phones
(In Japanese only)
(No prefix)
151 (toll free)
★
Unavailable from land-line phones, etc.
■From land-line phones
(In Japanese only)
0120-800-000 (toll free)
★
Available from mobile phones and PHSs.
• Please confirm the phone number before you dial.
• For Applications or Repairs and After-Sales Service, please contact the above-mentioned information center or the docomo shop etc. near you on the NTT DOCOMO website or the
i-mode site.
NTT DOCOMO website http://www.nttdocomo.co.jp/english/
i-mode site iMenu
1
お客様サポート (user support) 1 ドコモショップ (docomo Shop) (In Japanese only)
Loss or theft of FOMA terminal or payment of cumulative cost overseas
<docomo Information Center> (available 24 hours a day)
Failures encountered overseas
<Network Technical Operation Center> (available 24 hours a day)
■From DOCOMO mobile phones
-81-3-5366-3114*(toll free)
* You are charged a call fee to Japan whe n calling from a landline phone, etc.
※If you use P-01A, you should dial the number +81-3-5366-3114
(to enter “+”, press and hold the “0” key for at least one second).
■From DOCOMO mobile phones
-81-3-6718-1414*(toll free)
* You are charged a call fee to Japan when calling from a landline phone, etc.
※If you use P-01A, you should dial the number +81-3-6718-1414
(to enter “+”, press and hold the “0” key for at least one second).
■From land-line phones <Universal number>
-800-0120-0151*
* You might be charged a domestic call fee according to the call rate for the country you stay.
※See page 462 and page 463 for international call access codes for major countries (Table 1)
and international prefix numbers for the universal number (Table 2).
■From land-line phones <Universal number>
-800-5931-8600*
* You might be charged a domestic call fee according to the call rate for the country you stay.
※See page 462 and page 463 for international call access codes for major countries (Table 1)
and international prefix numbers for the univer sal number (Table 2).
●If you lose your FOMA terminal or have it stolen, immediately take the steps necessary for suspending the use of the FOMA terminal.
●If the FOMA terminal you purchased malfunctions, bring your FOMA terminal to a repair counter specified by DOCOMO after you return to Japan.
International call access code for
the country you stay (Table 1)
International call access code for
the country you stay (Table 1)
International prefix number for
the universal number (Table 2)
International prefix number for
the universal number (Table 2)
Don’t forget your mobile phone ... or your manners!
When using your mobile phone in a public place, don’t forget to show common courtesy and consideration for others around you.
To prevent damage to the environment, bring used
battery packs to an NTT DOCOMO service counter,
an NTT DOCOMO agent or a recycle center.
This manual is printed using
an ink based on soy bean oil.
November ’08 (1st Edition)
3TR100101AAA
F1008F0-
A
Sales:
Manufacturer:
’08.10
P-01A
INSTRUCTION MANUAL
Page 5
1
Easy Search/Contents/Precautions
Easy Search/Contents/Precautions
In this manual, illustrations and symbols are used in the explanations so
that you can correctly and easily use the FOMA terminal.
The operating procedures and displays in this manual are described with the default
settings of the “Frosty White” (see page 476) handset mainly. However, the following
settings are changed.
・“Display setting” → “Stand-by display/Stand-by disp. Wide”: OFF
・“Display setting” → “Clock” → “Stand-by clock/Stand-by clock Wide” → “Position”:
Pattern 1
・“Display setting” → “Battery icon/Antenna icon”: Pattern 1
・“Menu icon setting”: Visual
The operating procedures and displays in this manual are described with Normal Style
mainly.
Displays and illustrations described in this manual are for reference. The actual ones
might differ.
In this manual, “Osaifu-Keitai compatible i-αppli which supports the IC card function” is
described as “Osaifu-Keitai compatible i-αppli”.
Note that “P-01A” is referred to as “FOMA terminal” in this manual.
In the operating procedures of this manual, key operations are described with
simplified key icons.
The functions which use a microSD card are described in this manual; however, you
need to obtain a microSD card separately to make these functions available. See
page 370 for the microSD card.
Viewing/Searching This Manual
By the following search methods, you can find pages where your desired
functions and services are described:
How to Refer to This Manual
Search from the index when you know the names of functions or services.
Search from keywords for the functions you frequently use or the functions that are
convenient if you can know any.
Search from the tabs printed on the cover.
See the next page for details.
Search from the contents that categorize functions.
Search from here to use the main functions.
Search from the function list.
Quick Manual gives you a clear, brief description about basic functions. You can take it
when you go out. Further, Quick Manual “For Overseas Use” is attached, so refer to it
when you use the FOMA terminal overseas.
From the Index
From Easy Search
From the Tabs on the Cover
From the Contents P.6
From the Main Functions P.8
From the Function List P.476
From Quick Manual P.550
It is prohibited to copy all or part of this manual without permission.
The instructions contained in this manual may be changed without notice.
Page 6
2
Easy Search/Contents/Precautions
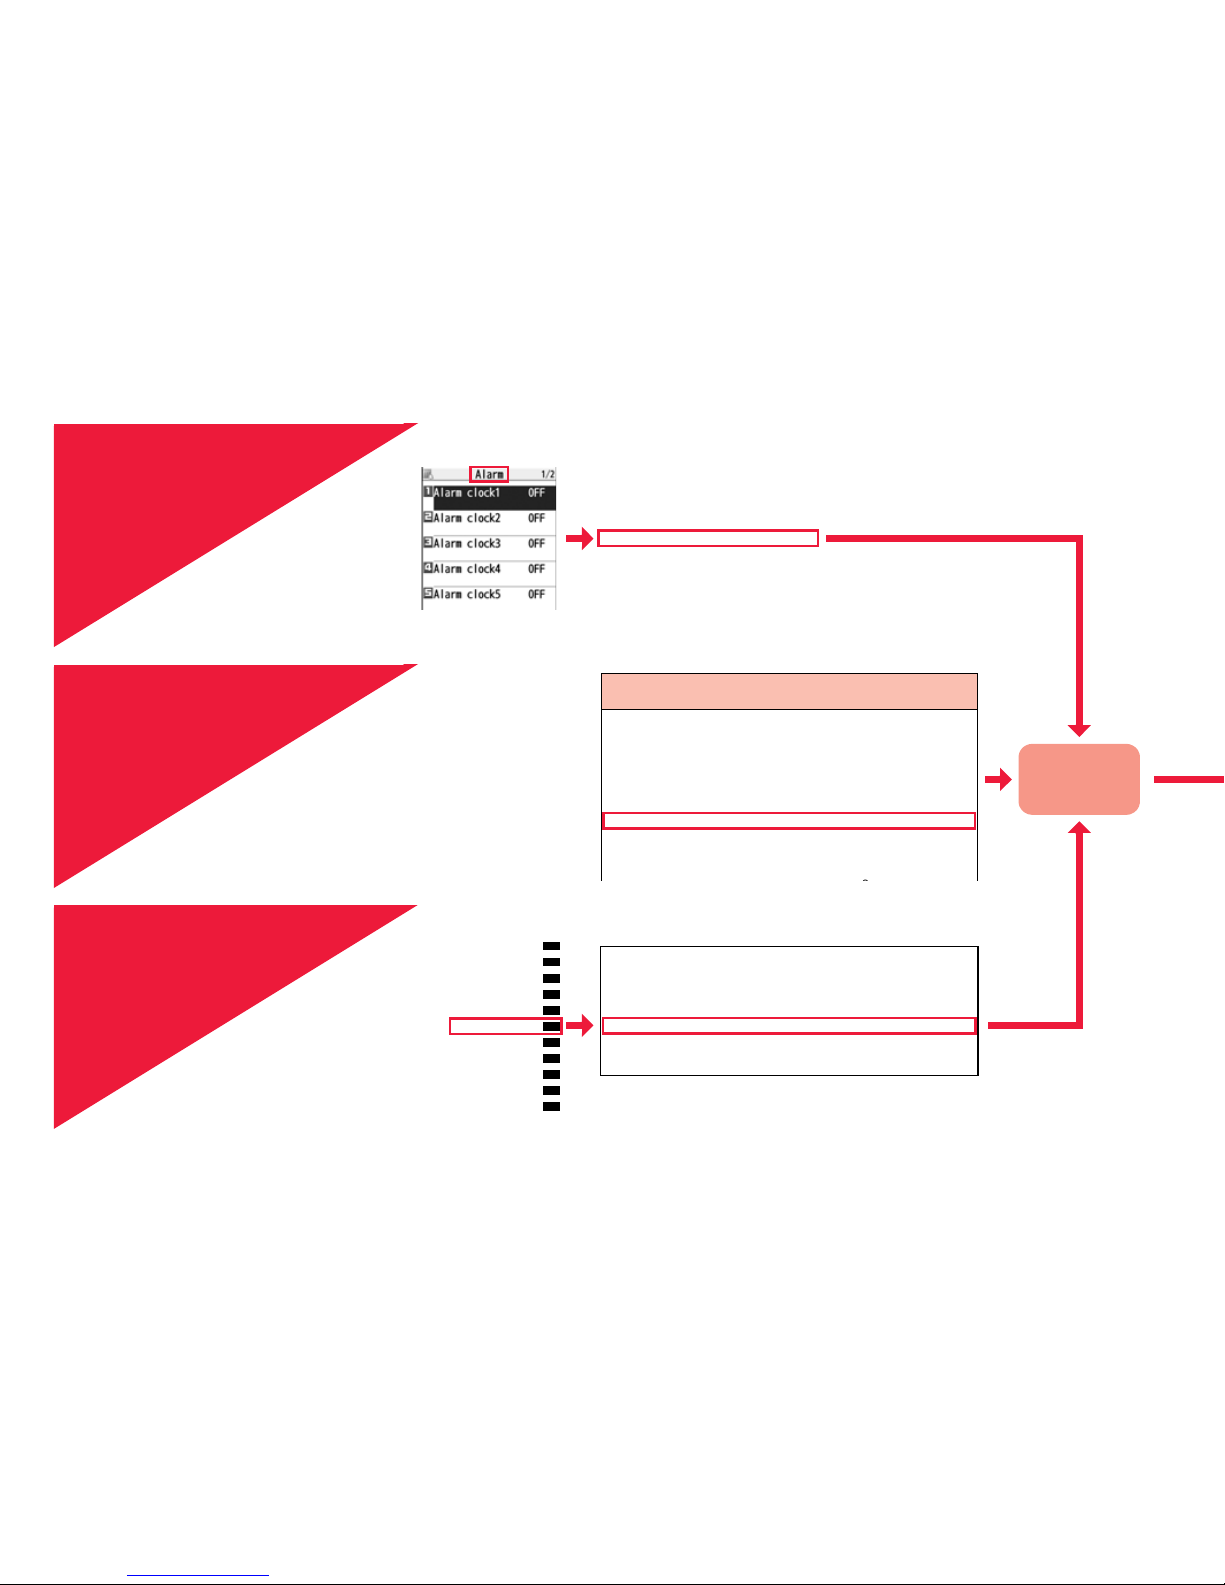
How to search for “Alarm” is explained here as an example of search method.
Additional guidance . . . . . . . . . . .457
Address link function. . . . . . . . . . . .207
After-sales services. . . . . . . . . . . . .519
Alarm. . . . . . . . . . . . . . . . . . . . . . . .404
Alarm setting . . . . . . . . . . . . . . . . . .413
Answer setting . . . . . . . . . . . . . . . . .66
Antenna. . . . . . . . . . . . . . . . . . . . . . .23
From the Index
P.542
Search for a function or a service
name as shown on the right.
Search for the function you
frequently use or that is
convenient if you know any as
shown on the right.
Other things you can do
To reduce the battery consumption .............................. <Power Saver Mode> 116
To scan QR codes or bar codes...................................... <Bar Code Reader> 248
To listen to music.................................................................. <MUSIC Player> 280
To check your location and surroundings......................<Map/GPS Function> 328
To use the microSD card ...................................................... <microSD Card> 370
To exchange information using infrared rays.........<Infrared Communication> 384
To use the FOMA terminal as an alarm clock.....................................<Alarm> 404
To use the FOMA terminal as a calculator ..................................<Calculator> 417
To use the FOMA terminal overseas........................ <International Roaming> 460
To update software programs........................................... <Software Update> 521
Go to page 404
where “Alarm”
is explained.
From Easy Search
P.4
i-αppli/i-Widget
Map/GPS Function
Osaifu-Keitai/ToruCa
Data Management
Music
Convenient Functions
Character Entry
Network Services
PC Connection
Overseas Use
Appendix/Troubleshooting
Multitask . . . . . . . . . . . . . . . . . . . . . . . . . . . . . . . . . . <Multitask> 401
Informing You of an Incoming Call/Mail Message by Vo ice
. . . . . . . . . . . . . . . . . . . . . . . . . . . . . . . . . . . . . <Reading Aloud> 402
Turning Power On/Off Automatically at a Specified T ime
. . . . . . . . . . . . . . . . . . . . . . . . . . . . . . . . <Auto Power ON/OFF> 404
Using Alarm. . . . . . . . . . . . . . . . . . . . . . . . . . . . . . . . . . <Alarm> 404
Using Calendar to Manage Schedule . . . . . . . . . . .<Schedule> 407
Using ToDo to Manage Schedule . . . . . . . . . . . . . . . . . <ToDo> 411
Setting Operating Conditions of Alarm . . . . . <Alarm Setting> 413
From the Tabs on the
Cover
Cover page
Search for the function you want
to set in the order of “Cover”
→ “First page of Chapter”
→ “Description page” as shown
on the right.
Page 7

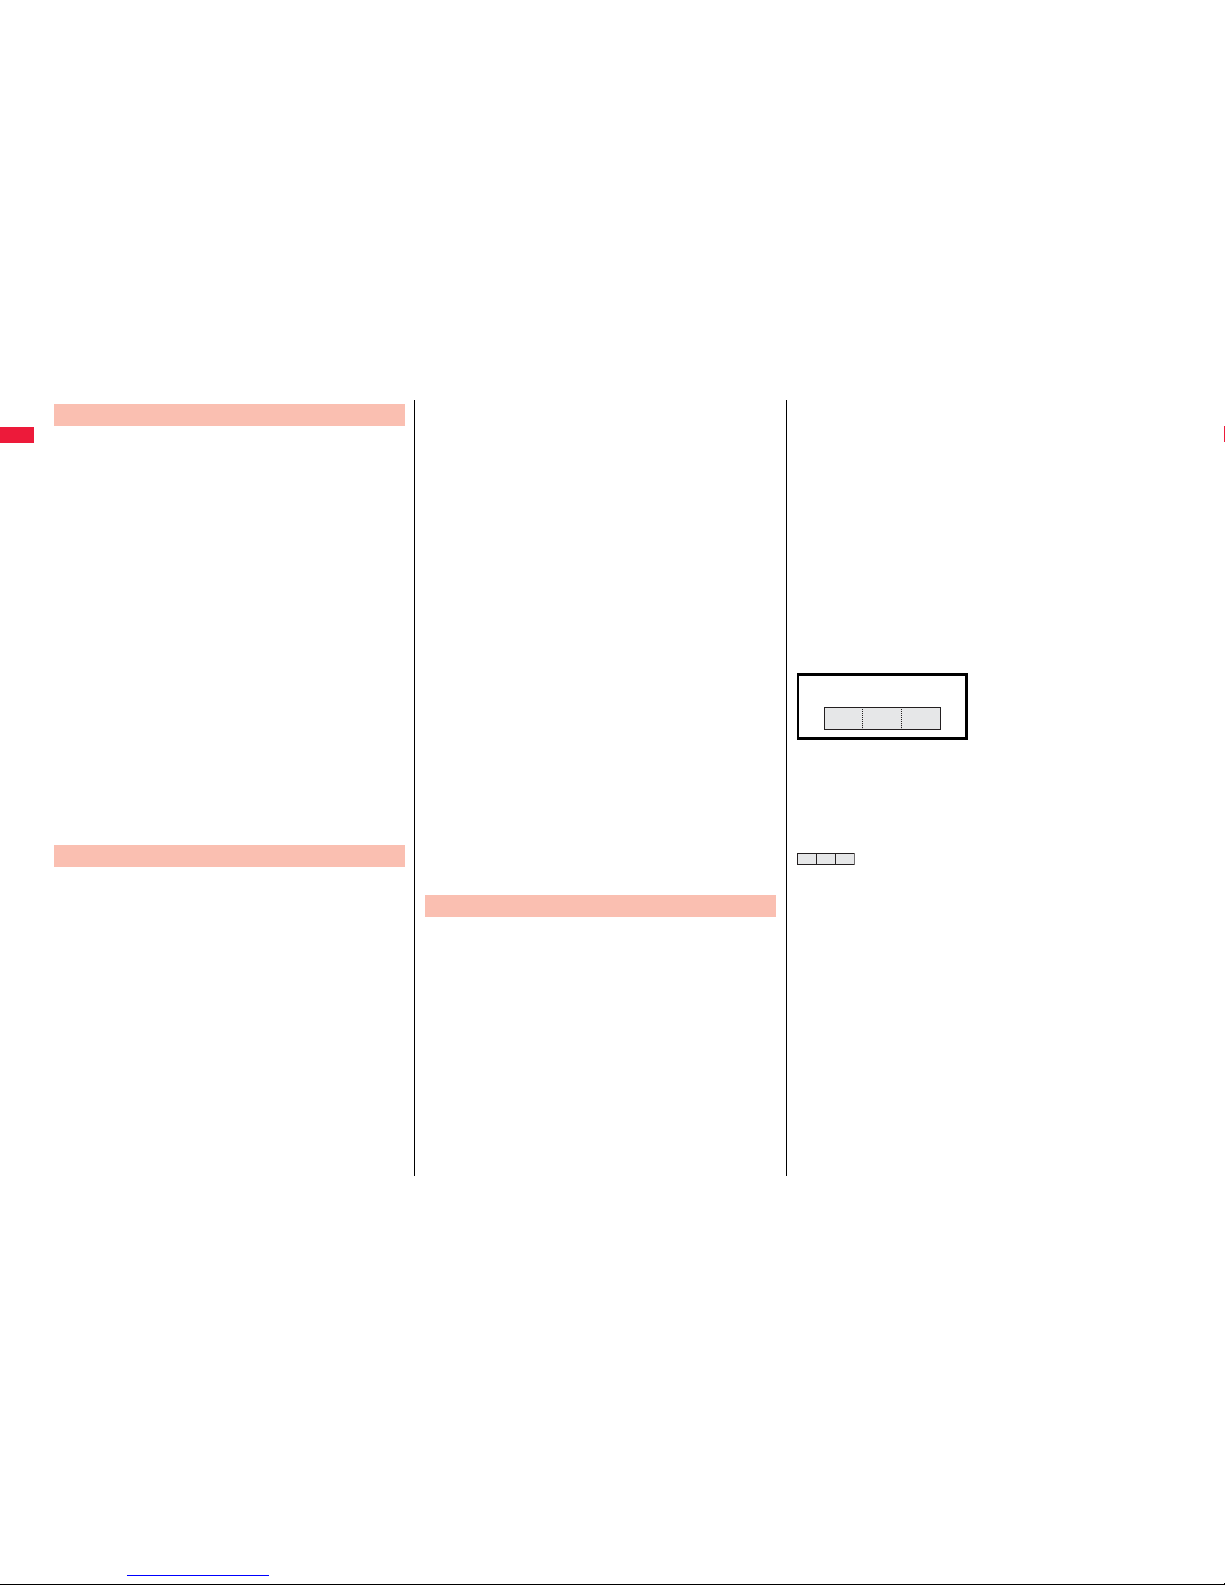
3
Easy Search/Contents/Precautions
404
Convenient Functions
You can set Alarm to alert you at the specified time with an alarm tone,
animation and illumination. You can store up to twelve alarms.
1
mStationeryAlarm
Highlight an alarm and press
l()
Do the following operations.
2
Press l().
+m-4-4
<Alarm>
Using Alarm
Alarm You can set whether to validate or invalidate the alarm.
ON or OFF
Time Enter the time for sounding the alarm.
pYou cannot set the same time as the time set for the stored
alarm.
Tone Select a type of alarm toneSelect a folder
Select an alarm tone.
Volume Use Bo to adjust the volume.
pIf you set “Step”, the alarm tone is silent for about three
seconds, and then the volume steps up every about three
seconds, from Level 1 through Level 6.
Prefer manner
mode
You can set the alarm tone which sounds at the specified time
during Manner Mode.
ON or OFF
ON. . . . . Sounds at the same volume as set for “Alarm volume”.
OFF. . . . Sounds at the volume set for this function.
The icon appears on the desktop.
“” . . . Displayed when an alarm is set for today (except the setting for past time).
“” . . . Displayed when an alarm is set for tomorrow or onward only.
pIf you set “Alarm” of the stored schedule event/ToDo item to “OFF”, the icons are not
displayed.
Function Menu while Alarm is Displayed
Edit Go to step 1 of “Using Alarm” on page 404.
Detail You can display the stored alarm contents.
Set this You can validate the stored alarm.
YES
pYou can validate also by pressing Oo().
Set all You can validate all the stored alarm.
YES
Delete
Delete this YES
Delete all Enter you Terminal Security Code YES
Information
pDuring a call, the alarm tone sounds at the level set for “Volume” (earpiece volume).
pWhen you set the power to automatically turn on and an alarm to sound, the default
alarm tone sounds if the alarm with the UIM security is selected.
pTurn off the FOMA terminal after setting “Auto power ON” to “OFF” when you are near
electronic devices using high-precision control or weak signals, or where the use is
prohibited such as in airplanes and hospitals.
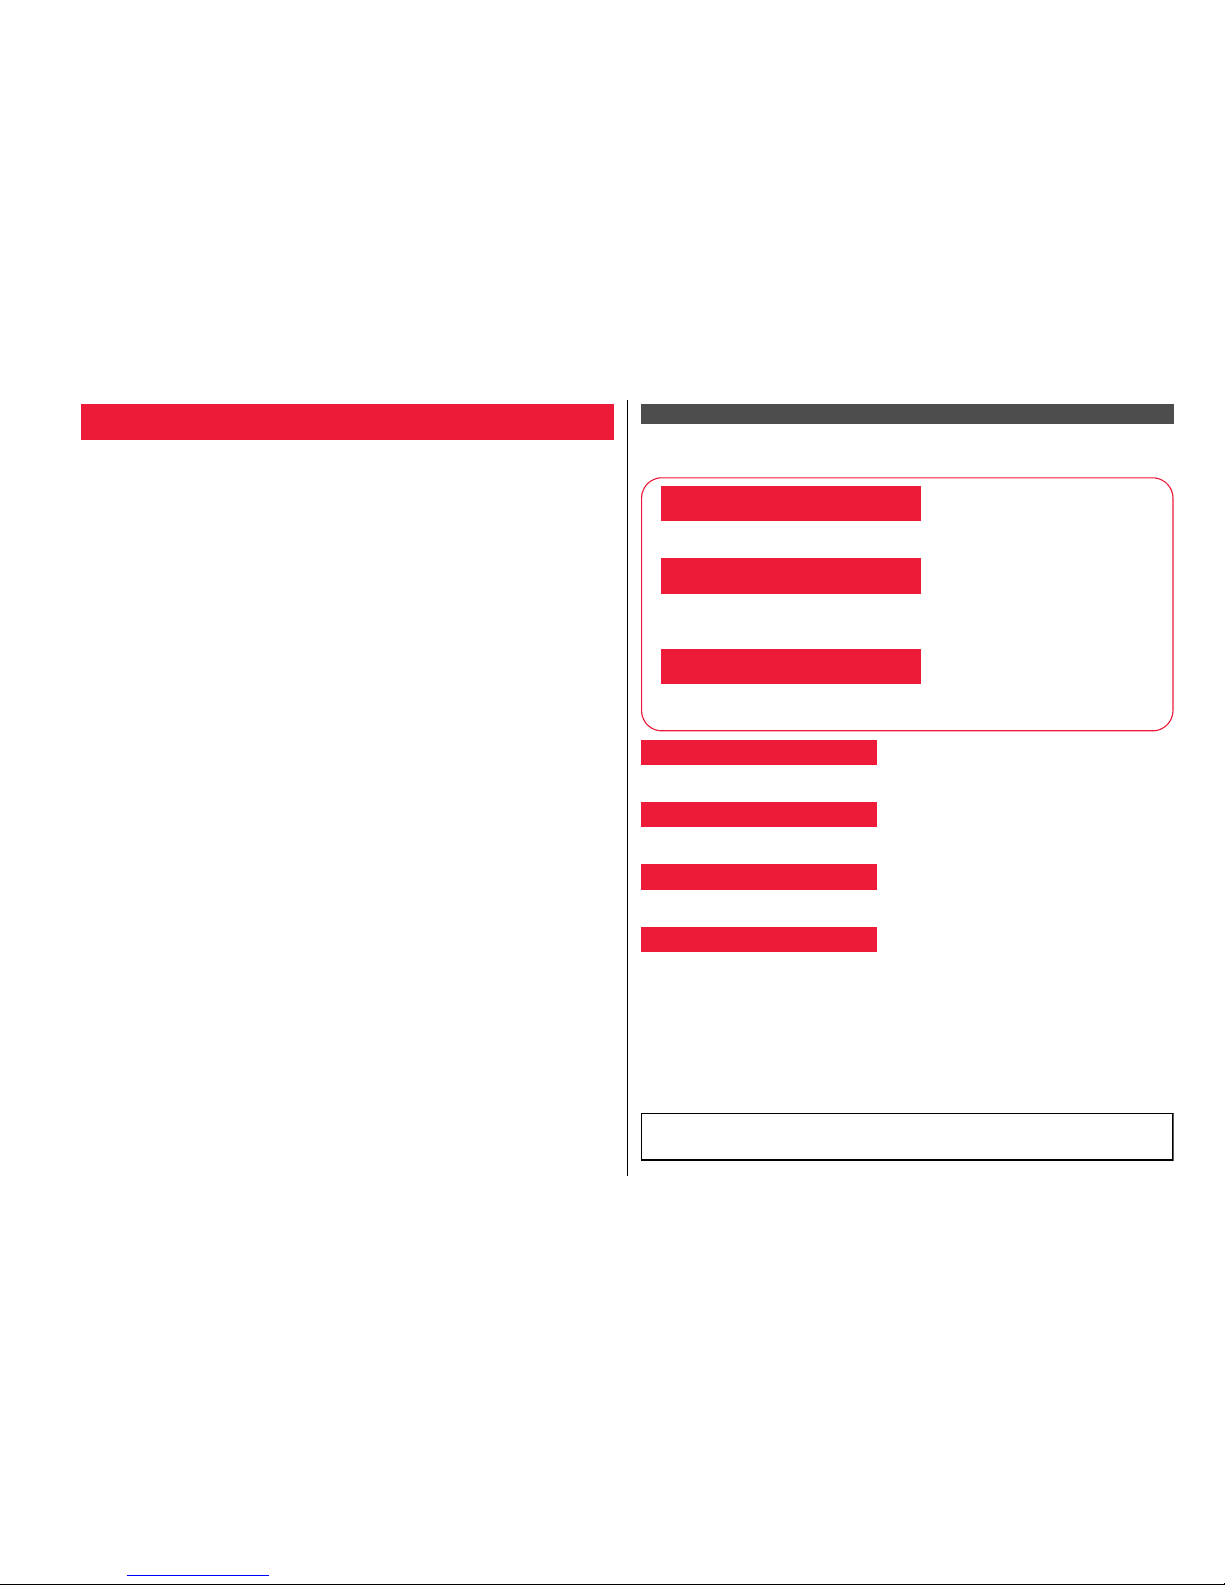
When you set an alarm for “Alarm”, “Schedule”, and “ToDo”
Note: The page above is a sample.
Menu number
(See page 36)
Function name
You can find this in
Index.
Operating
procedure
(See page 34)
Reference display
(Characters and settings
are for reference.)
Options and their
explanations
Items shown on the
display
(Some items cannot
be executed.)
Operation and
supplementary
explanation for each
item
Operations related to
the function and
explanations for
supplementary
operations
Chapter title
You can
search by
chapter.
Cautions or
references for using
each function
Lower sub-menu item
of the Function menu
Page 8
4
Easy Search/Contents/Precautions
To retrieve a desired function with simple words, refer to the following:
Easy Search
To know convenient functions for making calls
To/Not to notify your phone number to the other party
....................................................................................<Caller ID Notification> 48
To switch to a videophone call during a voice call
...........................................................................<Switch to Videophone Call> 53
To change a volume level of the other party’s voice ....................... <Volume> 67
To put a call on hold during a call.................................................... <Holding> 68
To do the following when you cannot answer calls
To put an incoming call on hold before answering......................... <On Hold> 68
To convey the message that you need to refrain from talking on the phone
.....................................................................Using Public Mode (Drive Mode) 69
....................................................................... Using Public Mode (Power Off) 70
To record voice/video messages..........................<Record Message Setting> 71
To change melody or illumination
To adjust the ring volume........................................................<Ring Volume> 68
To change ring tones according to callers......................<Add to Phonebook> 90
To change ring tones........................................................<Select Ring Tone> 106
To know incoming calls by vibrator .................................................<Vibrator> 108
To mute the keypad sound...................................................<Keypad Sound> 109
To activate Manner Mode...................................................... <Manner Mode> 110
To change colors/lighting patterns of Call indicator for incoming calls
.................................................................................................. <Illumination> 120
To change/know display settings
To know the meaning of marks (icons) on the display .....................<Display> 28
To change the Stand-by display (Wallpaper) ...................... <Display Setting> 113
To display a calendar on the Stand-by display..............................<Calendar> 113
To change the menu display .................................................. <Simple Menu> 118
To change the character size ...............................................<Character Size> 123
To make full use of mail
To send Deco-mail ...................................................................... <Deco-mail> 150
To send images ....................................................................... <Attachments> 157
To sort and save mail automatically ..............................................<Auto-sort> 176
To make full use of camera
To change the shooting size...................................................... <Image Size> 244
To save to the microSD card ...........................................................<Store In> 245
To display shot images......................................................... <Picture Viewer> 346
Page 9
5
Easy Search/Contents/Precautions
※1 This is a pay service.
※2 This is a pay service which is available on a subscription basis.
To use the FOMA terminal with a sense of security
To lock the FOMA terminal from away when it gets lost .<Omakase Lock>※1129
To keep Phonebook entries from prying eyes......................... <Secret Mode> 136
To reject calls without a caller ID.............................. <Call Setting without ID> 139
To reject calls from the phone numbers that are not
in the Phonebook ............................................................ <Reject Unknown> 140
To separately store Phonebook and other data
files in preparation for their erasure.................... <Data Security Service>
※2
140
To make full use of 1Seg
To watch 1Seg programs ...................................................... <Activate 1Seg> 255
To record 1Seg programs.................. <Record Video> <Record Still Images> 262
To set TV Timer/Timer Recording for 1Seg programs
.......................................................................<TV Timer> <Timer Recording> 263
To change settings of video and audio...................................<User Settings> 268
Other things you can do
To reduce the battery consumption .............................. <Power Saver Mode> 116
To scan QR codes or bar codes ...................................... <Bar Code Reader> 248
To listen to music.................................................................. <MUSIC Player> 280
To check your location and surroundings......................<Map/GPS Function> 328
To use the microSD card ...................................................... <microSD Card> 370
To exchange information using infrared rays.........<Infrared Communication> 384
To use the FOMA terminal as an alarm clock.....................................<Alarm> 404
To use the FOMA terminal as a calculator .................................. <Calculator> 417
To use the FOMA terminal overseas........................<International Roaming> 460
To update software programs........................................... <Software Update> 521
To update security ......................................................... <Scanning Function> 527
The operating procedures for frequently used functions are summarized in Quick
Manual. (See page 550)
Page 10
6
Easy Search/Contents/Precautions
Contents
Viewing/Searching This Manual . . . . .1
Easy Search . . . . . . . . . . . . . . . . . . . . . .4
Contents . . . . . . . . . . . . . . . . . . . . . . . . .6
Main Functions of P-01A. . . . . . . . . . . .8
Precautions. . . . . . . . . . . . . . . . . . . . . 10
Handling Precautions . . . . . . . . . . . . 16
Accessories and Main Options . . . . 20
Before Using the
Handset
21
Part Names and Functions, Styles, Display,
Desktop Icon, Selecting Menu, Guide,
UIM (FOMA Card), Battery, Charging, Power ON/OFF,
Select Language, Set Time, Caller ID Notification,
Own Number, etc.
Voice/
Videophone Calls/
PushTalk
49
Making a Call/Videophone Call, Call Records,
Chaku-moji, Receiving a Call/Videophone Call, Volume,
Ring Volume, Public Mode, Record Message Setting,
Chara-den, Making a PushTalk Call,
Receiving a PushTalk Call, PushTalk Phonebook, etc.
Phonebook
89
Available Phonebooks,
Add to Phonebook (FOMA terminal/UIM),
Group Setting, Search Phonebook, Edit Phonebook,
Delete Data, No. of Phonebook, 2-touch Dial,
Voice Dial
Sound/Screen/
Light Settings
105
Select Ring Tone, Vibrator, Manner Mode,
Display Setting, Backlight, Menu Icon Setting,
Kisekae Tool, Set to Machi-chara,
Horizontal Open Menu, Illumination, Font, etc.
Security Settings
125
Security Codes, Change Security Code, Releasing PIN
Lock, Lock All, Omakase Lock, Self Mode,
Personal Data Lock, Keypad Dial Lock, Secret Mode,
Call Setting without ID, Reject Unknown,
Reset Settings, Initialize, etc.
Mail
145
i-mode Mail, Deco-mail, Decome-Anime, Template,
Attachments, Mail Auto-receive, Receive Option,
Check New Message, Message R/F,
Early Warning “Area Mail”, Chat Mail, SMS, Web Mail,
etc.
i-mode/i-motion/
i-Channel/i-concier
193
i-mode, iMenu, My Menu,
Change i-mode Password, Enter URL, Bookmark,
Screen Memo, Download, Upload, Certificate, i-motion,
i-Channel, i-concier, etc.
Full Browser/
PC Movie
219
Full Browser, Full Browser Settings, PC Movie,
Downloading PC Movies, PC Movie Player
Camera
235
Before Using Camera, Still Image Shoot, Movie Shoot,
Settings for Shooting, Setting Image Size/Image Quality,
Bar Code Reader
1Seg
251
1Seg, Before Using 1Seg, Channel Setting,
Activate 1Seg, i-αppli Program Guide,
Data Broadcasting, TVlink, Recording 1Seg,
TV Timer/Timer Recording, User Settings
Music
271
Music&Video Channel, Set Program,
Playing/Operating Programs, Playing Music,
Saving Music Files, MUSIC Player, Playlist
Page 11
7
Easy Search/Contents/Precautions
i-αppli/i-Widget
291
i-αppli, i-αppli Download, i-αppli Run, iαppli Settings,
Starting i-αppli Automatically, iαppli Call,
i-αppli Stand-by Display, iαppli, i-Widget,
Start Widget αppli
Osaifu-Keitai/
ToruCa
315
Osaifu-Keitai, iC Transfer Service, IC Card Content,
IC Card Lock, Check IC Owner, ToruCa,
Receive ToruCa Files, ToruCa Viewer,
ToruCa File List/Detailed ToruCa File Display,
ToruCa Settings
Map/GPS Function
327
Using GPS Function, Position Location,
Map/GPS Compatible i-αppli, Provide Location,
Notify of Location, Location History, GPS Settings
Data Management
343
Picture Viewer, i-motion Player, Video Player,
Chara-den, Machi-chara, Melody Player, Kisekae Tool,
microSD Card, Voice Recorder, PDF Viewer,
Document Viewer, etc.
Convenient
Functions
399
Multiaccess, Multitask, Reading Aloud,
Auto Power ON/OFF, Alarm, Schedule, ToDo,
Own Number, Voice Memo, Movie Memo, Call Data,
Calculator, Text Memo, UIM Operation,
Bluetooth Function, etc.
Character Entry
429
Character Entry, Mode 1 (5-touch), Common Phrases,
Cut/Copy/Paste, Own Dictionary, Learned Words,
Download Dictionary, Mode 2 (2-touch),
Mode 3 (NIKO-touch)
Network Services
439
Check New Messages, Voice Mail, Call Waiting,
Call Forwarding, Nuisance Call Blocking,
Caller ID Request, Dual Network, Service Numbers,
Remote Control, Multi Number, 2in1, OFFICEED, etc.
Overseas Use
459
Outline of International Roaming (WORLD WING),
Available Services, Confirmation for Using,
Making a Call at the Country You Stay,
Receiving a Call, Select Networks,
Set Roaming Guidance, Network Services, etc.
PC Connection
469
Available Data Communication,
Before Using Data Communication, Preparation Flow for
Data Transfer (OBEX™ Communication),
Preparation Flow for Data Communication, AT Command,
CD-ROM, DOCOMO Keitai Datalink
Appendix/
Troubleshooting
475
Function List, Options and Related Devices,
Troubleshooting, Error Messages, Warranty and
After-sales Services, i-mode Fault Diagnosis Site,
Software Update, Scanning Function, Main Specifications,
SAR, Export Administration Regulations, etc.
Index/
Quick Manual
541
Index, Quick Manual,
Quick Manual “For Overseas Use”
Page 12
8
Easy Search/Contents/Precautions
Main Functions of P-01A
◆i-concier P.215
i-concier is a service that you can be notified of useful information by character
(Machi-chara image) on the Stand-by display or you can download schedule events
(i-schedule events) from sites and use it.
Downloaded i-schedule events or ToruCa files are updated to the latest information
automatically, and the address information such as shops and companies are added
to Phonebook automatically.
◆i-αppli Call P.309
i-αppli call is a useful function that you can notify of the other party or Content
providers to start the compatible appointed application program such as starting the
other party’s software program to play a network game.
◆i-Widget P.312
i-Widget is a useful function that enables you to easily access any contents or tools
(Widget αppli) you often use such as a calculator, clock, TV program list, and stock
prices information.
You can check the latest information you want just by starting i-Widget display.
◆1Seg P.252
You can watch 1Seg programs of the terrestrial digital broadcasting for mobile objects.
Also, you can shoot a still image or save video while watching a 1Seg program.
◆
International Roaming
P.301, P.460
Your FOMA terminal, phone number, and mail address are available overseas (3G/GSM areas are supported).
Further, your FOMA terminal pre-installs “日英版/日中版 しゃべって翻訳 for P (J-E/J-C Speech Translation for P)” which translates it into English and Chinese if I talk in
Japanese. If you talk in English and Chinese, this application program translates it into Japanese.
◆Bluetooth Function P.421
The wirelessly-connected FOMA terminal and a Bluetooth device enable you to talk or
listen to music while you are carrying the FOMA terminal in your bag.
◆Feel*Mail P.181
Animation of 45 characters and illumination reproduce the atmosphere of mail messages.
Pleasant animation appears and illumination lights according to the contents of mail
message.
◆Wide VGA Display
You can display still images or movies in the Wide VGA (480 dots x 854 dots) display of
approx. 3.1 inches, and you can enjoy watching 1Seg programs on the impressive display.
Also, the light sensor automatically adjusts the backlight in accordance with the ambient
brightness, and the LCD AI compensates the image quality in accordance with the
brightness.
◆Horizontal Open Style P.24
You can watch 1Seg programs and videos on the horizontal full display in Horizontal
Open Style. Further, you can see the Internet web pages with Full Browser without
scrolling sideways.
Page 13
9
Easy Search/Contents/Precautions
◆One-push Open P.24
■One-push Answer P.67
When a call comes in, just press the one-push open button, and you can open the
FOMA terminal to answer the call.
■Recv. Mail/Call at Open P.116
When a missed call or new mail message is found, just press the one-push open
button, and you can open the FOMA terminal to display the detailed Missed Call
display or the Inbox list.
◆View Blind P.117
You can make the display hard to see from an angle. You can use the FOMA terminal
without being gazed at by others.
◆Shikkari Talk P.63
You can make the other party’s voice clear according to surrounding noise.
◆Yuttari Talk P.63
You can slow down the other party’s speaking speed during a call.
◆Face Detection P.243
You can shoot still images adjusting the camera focus on person’s face automatically.
◆Document Viewer P.394
On your FOMA terminal, you can display Microsoft Word files, Microsoft Excel files,
and Microsoft PowerPoint files created by personal computers.
◆Voice Recorder P.389
You can record your voice as a substitute for taking notes. You can repeatedly
play it back, so it is convenient to record the proceedings at a meeting, etc.
◆Chaku-moji P.56
◆Videophone P.50
◆
i-mode mail/Deco-mail/Deco-mail pictogram
P.146, P.150, P.344
◆i-αppli/Mega i-αppli/Intuitive Games P.292
◆High-Speed Area Supported P.470
◆Chaku-uta Full®/Uta-hodai/Music&Video Channel/Video Clips P.212, P.272, P.278, P.280
“Chaku-uta Full” is a registered trademark of Sony Music Entertainment Inc.
◆MUSIC Player P.280
◆GPS P.328
◆Osaifu-Keitai/ToruCa P.316, P.318
◆Kisekae Tool P.118, P.369
◆Respective Network Services P.439
◆Security Settings P.125
Page 14
10
Easy Search/Contents/Precautions
■Before using the FOMA terminal, read these safety precautions carefully so that
you can use it correctly.
After reading the precautions, keep them in a safe place.
■Be sure to observe these safety precautions because they are designed to
protect you or those around you from causing injury and to avoid unnecessary
damage to the property.
■The symbols below indicate the levels of danger or damage that can be caused
if the particular precautions are not observed.
Precautions
Danger
This symbol indicates that incorrect handling
will almost certainly cause death or serious
injury.
Warning
This symbol indicates that incorrect handling
poses a risk of causing death or serious
injury.
Caution
This symbol indicates that incorrect handling
poses a risk of causing injury or damage to
the product or property.
ALWAYS FOLLOW THESE DIRECTIONS
■The following symbols show specific directions:
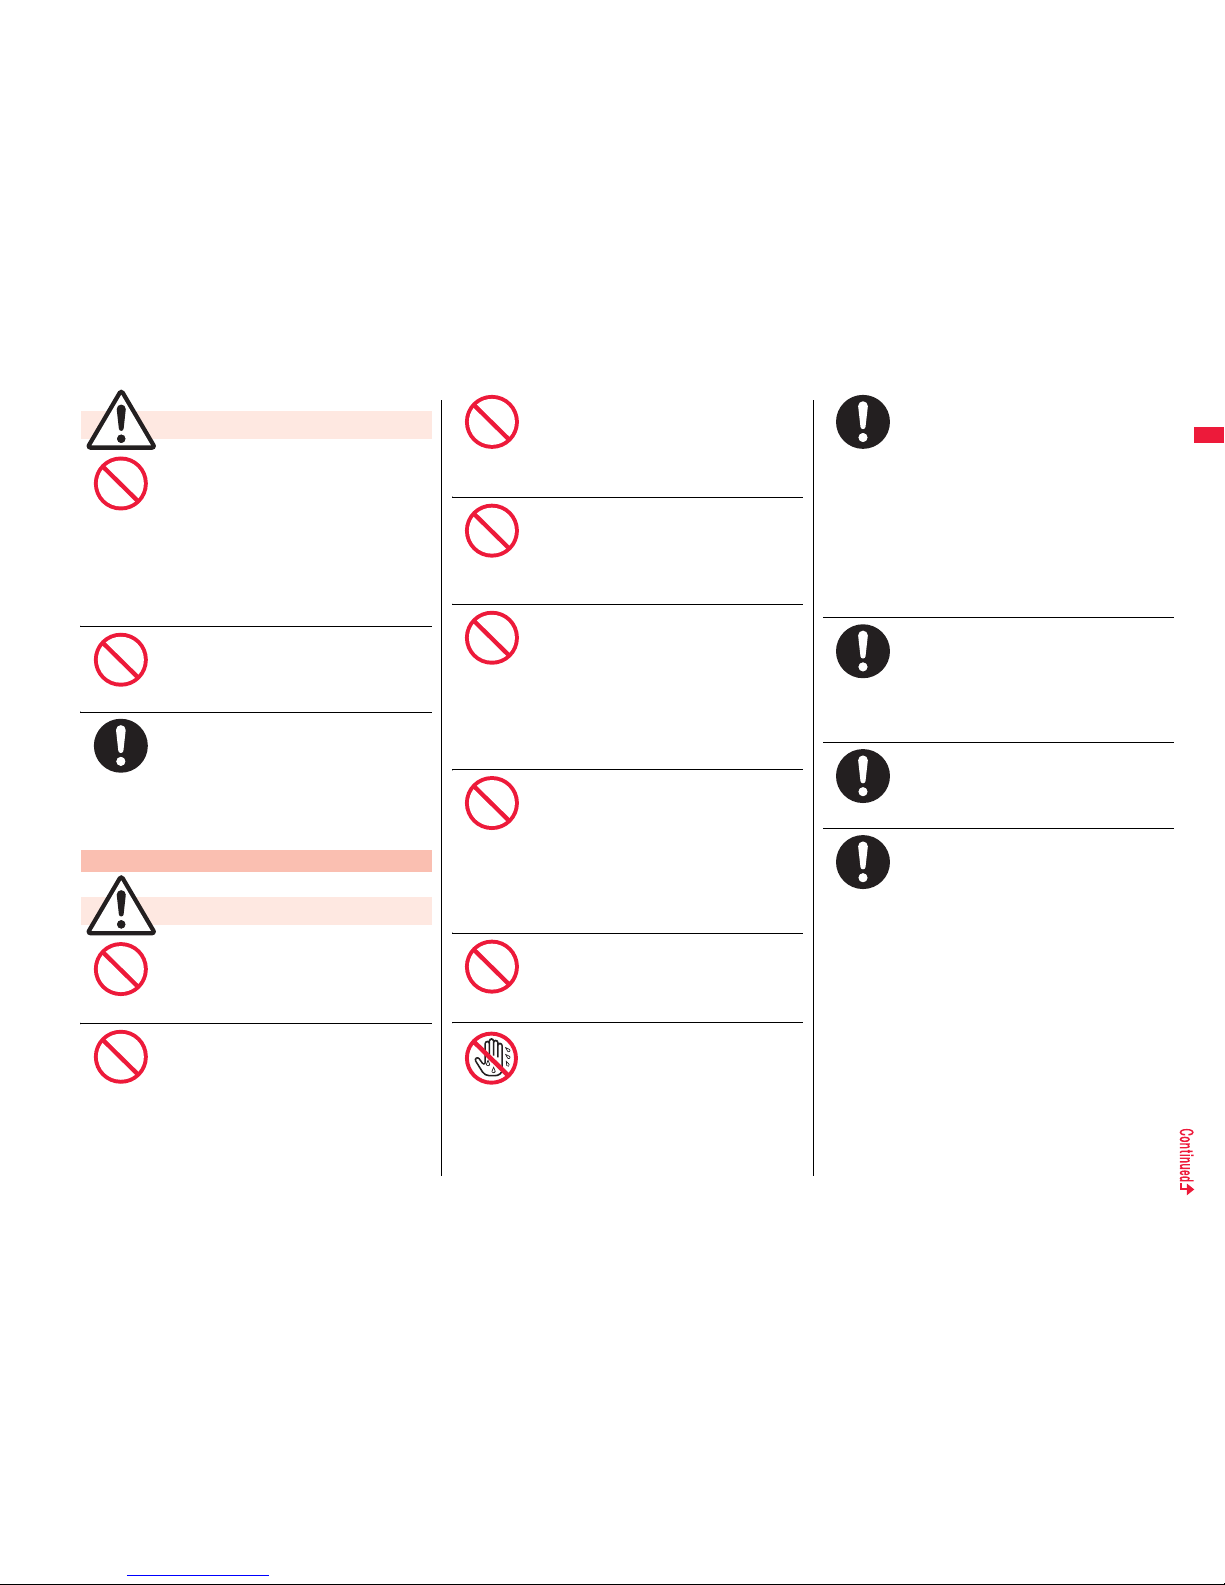
■“Safety Precautions” are divided into the following six sections:
General precautions for FOMA terminal, batteries, adapters/chargers, and
UIM ............................................................................................................. P.11
Precautions for FOMA terminal ................................................................. P.12
Precautions for batteries ............................................................................ P.14
Precautions for adapters/chargers............................................................. P.15
Precautions for UIM.................................................................................... P.16
Notes on using near electronic medical equipment .................................. P.16
Denotes things not to do. (Prohibition)
Denotes not to disassemble.
Denotes not to touch with wet hands.
Denotes not to use where it could get wet or not to wet it.
Denotes mandatory instructions (matters that must be complied
with).
Denotes to pull the power plug out of the outlet.
Don’t
Do not
disassemble
Not wet
hands
Avoid
Water
Do
Pull the
power plug
out
Page 15
11
Easy Search/Contents/Precautions
Do not use, store or leave the
FOMA terminal and its
accessories in places with a high
temperature such as near fire or
places exposed to direct sunlight,
or in cars under the blazing sun.
The devices could be deformed or
malfunction, or the battery may leak,
overheat, burst, or catch fire, thus
resulting in the deterioration of
performance and shortening of the life of
devices. Also, part of the case could get
heated, causing bare skin burns.
Do not disassemble, modify or
solder the FOMA terminal or
accessories.
Accidents such as fire, injury, or electric
shock, or malfunction may result. The
battery may leak, overheat, burst or
catch fire.
Do not wet the FOMA terminal or
accessories.
If liquids such as water or pet urine get
onto them, overheating, electric shock,
fire, malfunction, injury or others may
result. Pay attention to the place of use
and the way of handling.
General precautions for FOMA
terminal, batteries, adapters/
chargers, and UIM
Danger
Don’t
Do not
disassemble
Avoid
Water
With your FOMA terminal, use the
batteries and adapters/chargers
specified by NTT DOCOMO, INC.
If you use any type of battery, adapter or
charger other than the specified one,
your FOMA terminal, battery or other
accessories may leak, overheat, burst,
catch fire or malfunction.
Battery Pack P19
FOMA AC Adapter 01/02
FOMA AC Adapter 01 for Global use
FOMA DC Adapter 01/02
Desktop Holder P28
FOMA Dry Battery Adapter 01
FOMA Portable Charging Adapter 01
FOMA USB Cable with Charge Function
01/02
※For other compatible products,
contact a handling counter such as a
docomo shop.
Do not place the batteries, the
FOMA terminal, adapters/
chargers, or UIM in cooking
appliances such as microwave
ovens or high-pressure
containers.
The battery may leak, overheat, burst, or
catch fire. The FOMA terminal or the
adapter/charger may overheat, smoke,
or catch fire, or its circuit parts may
become damaged.
Do not throw the FOMA terminal
or accessories, or subject them
to severe shocks.
The battery may leak, overheat, burst, or
catch fire. Also, malfunction or fire may
result.
Warning
Do
Don’t
Don’t
Be careful not to let
electroconductive materials
(metal pieces, pencil leads etc.)
contact with the charging
terminal or connector terminal.
Also, make sure that those are
not entered into the inside of the
FOMA terminal.
Short-circuit could cause fire or
malfunction of the FOMA terminal.
When you are in a place such as a
gas station where flammable gas
is generated, turn off the FOMA
terminal, and never do charging.
Otherwise, catching fire may
result.
Ensure that you use Osaifu-Keitai with
the FOMA terminal turned off when you
are in the vicinity of the gas station.
(When IC Card Lock is set, turn off the
power with the lock released.)
If odor, overheat, discoloration,
or deformation is detected during
use, battery charge, or storage,
immediately observe the
following:
1. Pull the power plug out of the
outlet or cigarette lighter
socket.
2. Turn off the power to the FOMA
terminal.
3. Remove the battery pack from
the FOMA terminal.
If you use the FOMA terminal and its
accessories as they are, overheat, burst,
or catching fire could result or the
battery could leak.
Don’t
Do
Do
Page 16
12
Easy Search/Contents/Precautions
Do not place the FOMA terminal
or accessories on unstable
locations such as wobbly tables
or slanted locations.
The FOMA terminal or accessories may
fall, resulting in injury or malfunction.
Do not store in humid or dusty
places, or in high temperature
environments.
Malfunction may result.
If children use the FOMA terminal or
accessories, a guardian should
explain the safety precautions and
correct operations. The guardian
should also make sure that the
instructions are followed during use.
Otherwise, injury may result.
Keep out of the reach of babies
and infants.
Accidental swallowing or injury may result.
Be especially careful when you use
the FOMA terminal for a long time
with the adapter/charger
connected.
If you use i-αppli programs, talk on the
videophone, watch 1Seg programs and
so on for a long time during charging,
the temperature of the FOMA terminal,
battery pack, or adapter/charger might
rise.
If you directly touch the part of high
temperature continuously, redness,
itching, rash, or low-temperature bare
skin burns may result depending on your
physical conditions or predisposition.
Caution
Don’t
Don’t
Do
Do
Do
Do not directly point the infrared
data port at someone’s eyes
during transmission.
His/her eyes may possibly be affected.
Other infrared devices may operate
erroneously if the infrared data port is
pointed at them during transmission.
Do not put the FOMA terminal in
the place where it could be
affected by an expanded airbag,
e.g., on the dashboard.
If the airbag expands, the FOMA
terminal could hit you and others,
causing accidents such as injury and the
FOMA terminal could malfunction and
become damaged.
If you have any implanted
electronic medical equipment, do
not place your FOMA terminal in
a chest pocket or inner pocket.
If the FOMA terminal is positioned close
to electronic medical equipment, it may
cause that equipment to malfunction.
Do not allow liquids such as
water, or foreign materials such
as metal pieces or flammable
materials to get into the UIM or
microSD card slot of the FOMA
terminal.
Fire, electric shock or malfunction may
result.
Precautions for FOMA terminal
Warning
Don’t
Don’t
Don’t
Don’t
Turn off the FOMA terminal in
places where use is prohibited
such as in airplanes and hospitals.
Otherwise, electronic devices and
electronic medical appliances may be
adversely affected. If the Auto Power
ON function is set, deactivate the
setting, then turn the power off.
For use inside medical facilities, make
sure that you comply with their
regulations. You may be punished for
using the FOMA terminal in airplanes,
which is prohibited by law.
When talking with the FOMA
terminal set to Hands-free, be
sure to keep the FOMA terminal
away from your ear.
Further, when you play games or
play back music with the
earphone/microphone
connected, adjust the sound
volume to moderate volume.
The excessive sound volume impairs
your hearing.
Further, accidents may result due to the
hardness of hearing of surrounding
sound.
For those with weak heart
conditions, the vibrator and ring
volume must be adjusted
carefully.
Those functions may cause an effect on
the heart.
If thunder starts to rumble while
you are using the FOMA terminal
outdoors, turn off the power and
move to a safe place.
Otherwise, you could be struck by
lightning or suffer an electric shock.
Do
Do
Do
Do
Page 17
13
Easy Search/Contents/Precautions
Turn off the FOMA terminal when
near electronic devices using
high-precision control or weak
signals.
The FOMA terminal may possibly cause
these devices to malfunction.
※
Electronic devices that may be affected:
Hearing aids, implanted cardiac
pacemakers, implanted defibrillators,
other medical electronic devices, fire
alarms, automatic doors and other
automatically controlled devices. If you
use an implanted cardiac pacemaker,
implanted defibrillator or any other
electronic medical device, consult the
manufacturer or retailer of the device for
advice regarding possible effects from
the radio waves.
If the display part or camera lens
is broken, be careful about
broken glasses or the exposed
interior of the FOMA terminal.
Plastic panels are used for the surfaces
of the display part and camera lens so
that glasses do not easily get scattered,
however, pay attention not to
erroneously touch the broken part or
interior. Otherwise, injury may result.
Do not swing the FOMA terminal
by its strap.
The FOMA terminal may hit you or
persons around you, and accidents such
as injury or malfunction and damage
may result.
Caution
Do
Do
Don’t
When using the motion tracking,
ensure that you check around
you for safety, securely take hold
of your FOMA terminal, and do
not swing to an extent more than
necessitated.
The motion tracking is the function to
incline or swing the FOMA terminal for
operation. If you excessively swing your
FOMA terminal, it might happen that it
hits against persons or objects, resulting
in critical accidents or damage.
When a metallic strap is attached
to your FOMA terminal, be careful
that it does not hit against
persons or objects when using
the motion tracking.
Accidents such as injury or malfunction
and damage may result.
Do not place magnetic cards or
similar objects near the FOMA
terminal or between phone parts.
Magnetic data on cash cards, credit
cards, telephone cards and floppy disks,
etc. may be deleted.
Do not bring magnetic
substances close to your FOMA
terminal.
Strong magnetic items might cause in
erroneous operation.
Don’t
Don’t
Don’t
Don’t
If you erroneously break the
display part and then crystal
liquid gets leaked, never take or
suck the liquid to or into your
mouth, or apply to skin.
If the crystal liquid gets into the
eyes or mouth, immediately rinse
it out with clean water and then
seek medical attention.
When it adheres to your skin or
clothes, immediately wipe it away
with alcohol etc., and then rinse it
out with water and soap.
Otherwise, the loss of eyesight or injury
to your skin may result.
Do not bring your ears close to
the speakers while a ring tone
sounds or a melody is played
back from the FOMA terminal.
Otherwise, your hearing could be
impaired.
Do not open the FOMA terminal
by pressing the one-push open
button near persons around you
or your face.
The FOMA terminal may hit you or
persons around you, causing accidents
and injuries.
Do not use the FOMA terminal
with the hook for Horizontal Open
Style protruded.
Otherwise, injury may result.
Electronic devices in some types
of cars can be affected by use of
the FOMA terminal.
For safety’s sake, make sure not to use
the FOMA terminal inside such cars.
Don’t
Don’t
Don’t
Don’t
Do
Page 18
14
Easy Search/Contents/Precautions
Itching, rash or eczema may be
caused depending on your
physical conditions or
predisposition. If an abnormality
occurs, stop using the FOMA
terminal immediately, and then
seek medical attention.
Metals are used for the following parts:
Be careful not to get your finger
or a strap caught in the parts
when you close or open the
FOMA terminal.
Accidents such as injury or damage may
result.
When you watch a 1Seg program,
watch in a place bright enough
taking a certain distance from the
display.
Otherwise, your visual acuity could be
reduced.
Where it is used Material Finishing
Charging terminal Phosphor
bronze
Gold-plated finish
with nickel-plated
ground
Hook for Horizontal
Open Style
Stainless steel Chrome-plated
finish with
nickel-plated
ground
Metal part of the
one-push open
button
Aluminum Alumite
treatment
Battery pack
installation side
PC+ASA Copper-plated,
Nickel-plated
Do
Do
Do
■Check the description on the label of the
battery pack for the type of battery.
Do not let any metal object such
as a wire come in contact the
battery terminals. Also do not
carry or store the battery together
with any metal objects like a
necklace.
The battery may leak, overheat, burst or
catch fire.
Do not use excessive force to
attach the battery to the FOMA
terminal even when you cannot
attach it successfully. Also,
check that the battery is the right
way round when you attach it.
The battery may leak, overheat, burst or
catch fire.
Do not throw the battery into fire.
The battery may leak, overheat, burst or
catch fire.
Do not pierce it with nails, hit it
with a hammer, or step on it.
The battery may leak, overheat, burst or
catch fire.
Precautions for batteries
Description Type
Li-ion Lithium-ion battery
Danger
Don’t
Don’t
Don’t
Don’t
If the battery fluid gets into your
eyes, do not rub them. Flush your
eyes with clean water and seek
medical attention immediately.
Otherwise, the loss of eyesight may
result.
When any abnormality due to
external shock such as the
deformation or scratches by
dropping is found on the battery
pack, immediately stop using it.
The battery may leak, overheat, burst, or
catch fire. Also, malfunction or fire may
result.
If charging is not completed at
the end of the specified charging
time, stop charging.
Otherwise, the battery may leak,
overheat, become damaged or catch
fire.
Immediately stop using the FOMA
terminal and keep it away from
fire if the battery leaks or emits
an odor
.
The leaked battery fluid may ignite,
causing fire or burst.
Be careful that your pets do not
bite into the battery pack.
The battery may leak, overheat, burst, or
catch fire. Also, malfunction or fire may
result.
Warning
Do
Don’t
Do
Do
Do
Page 19
15
Easy Search/Contents/Precautions
An exhausted battery should not
be disposed of with other waste.
The battery may catch fire or damage
the environment. After insulating the
battery terminals with tape, take the
unneeded battery to a handling counter
such as a docomo shop or dispose of it
in accordance with local waste disposal
regulations.
Do not charge the wet battery.
The battery pack may overheat, catch
fire, or burst.
If the battery fluid comes in
contact with skin or clothes,
immediately stop using, then
rinse it out thoroughly with clean
water.
Skin injury may result.
Do not use a damaged adapter/
charger cord or power cord.
Electric shock, overheating or fire may
result.
Do not use the AC adapter and
desktop holder in steamy places
such as a bathroom.
Electric shock may occur.
Caution
Precautions for adapters/chargers
Warning
Don’t
Don’t
Do
Don’t
Don’t
The DC adapter is for use only in
a negative (-) grounded vehicle.
Do not use it in a positive (+)
grounded vehicle.
Fire may result.
If it starts to thunder, do not
touch the FOMA terminal and
adapter/charger.
You might be struck by lighting or suffer
an electric shock.
Never short-circuit the charging
terminal when the adapter is
plugged into the power outlet or
cigarette lighter socket. Also,
never touch the charging terminal
with fingers or other bare skin.
Fire, malfunction, electric shock or injury
may result.
Place the charger and desktop
holder on a stable location during
charging. Do not cover or wrap
the charger and desktop holder in
cloth or bedding.
The FOMA terminal may drop off, or the
charger and desktop holder may
overheat, causing fire or malfunction.
Do not place something heavy on
the adapter/charger cord and
power cord.
Electric shock or fire may result.
Do not touch the power cord of
the adapter/charger, or power
outlet with wet hands.
Electric shock may result.
Don’t
Don’t
Don’t
Don’t
Don’t
Not wet
hands
Use the adapter/charger at the
specified V AC.
If you use it at a wrong voltage, fire or
malfunction may result. When using the
FOMA terminal overseas, use FOMA
AC adapter available overseas.
AC adapter: 100 V AC
DC adapter: 12/24 V DC
[For negative (-) grounded vehicles only]
AC adapter available overseas: 100 V to
240 V AC
[Connect only to household AC outlet]
If a fuse of the DC adapter has
blown, replace it with a specified
fuse.
If you use an unspecified fuse, fire or
malfunction may result. For the specified
fuse, refer to each instruction manual.
Keep the power plugs dust-free.
Otherwise, fire may result.
When pulling the AC adapter into
the power outlet, firmly plug it in,
taking care not to contact with
metal straps or the like.
Otherwise, electric shock, short-circuit or
fire may result.
Do
Do
Do
Do
Page 20
16
Easy Search/Contents/Precautions
When removing the adapter/
charger out of the outlet or
cigarette lighter socket, do not
forcibly pull the adapter/charger
cord or power cord, instead take
hold of the power plug and then
pull.
If you pull the plug out by the cord, the
cord may be damaged, which could
result in electric shock or fire.
When the adapter/charger is not
to be used for a long period of
time, unplug the power cord from
the outlet.
Otherwise, electric shock, fire, or
malfunction may result.
If liquids such as water get in the
charger, unplug the power cord
immediately from the outlet or
cigarette lighter socket.
Otherwise, electric shock, smoke or fire
may result.
Before cleaning, pull the power
plug out of the outlet or cigarette
lighter socket.
Otherwise, electric shock may result.
Be careful not to touch the cut
surface of the UIM (IC portion)
when removing it.
You may hurt your hand or fingers.
Precautions for UIM
Caution
Do
Pull the
power plug
out
Pull the
power plug
out
Pull the
power plug
out
Do
■The description below meets “Guidelines on
the Use of Radio-communication Equipment
such as Cellular Telephones – Safeguards for
Electronic Medical Equipment” by the
Electromagnetic Compatibility Conference
Japan.
Comply with the following in
hospitals or health care facilities:
•Do not carry the FOMA terminal into
operating rooms, intensive care units
(ICU) or coronary care units (CCU).
•Turn off the FOMA terminal in hospital
wards.
•If there is any electronic medical
equipment near you, turn off the FOMA
terminal even when in a location such
as a lobby.
•Comply with any regulations of hospital
and health care facilities instructing you
not to use or carry in a mobile phone.
•If the Auto Power ON function is set,
deactivate the setting, then turn the
power off.
Turn off the FOMA terminal in
crowded areas such as inside
trains during rush hour, as
someone with an implanted
cardiac pacemaker or implanted
defibrillator may be near you.
Operation of an implanted cardiac
pacemaker or implanted defibrillator can
be affected by radio waves.
Notes on using near electronic
medical equipment
Warning
Do
Do
If you use an implanted cardiac
pacemaker or implanted
defibrillator, use the mobile
phone 22 cm or more away from
an implanted cardiac pacemaker
or implanted defibrillator.
Operation of an implanted cardiac
pacemaker or implanted defibrillator can
be affected by radio waves.
Patients using electronic medical
equipment other than implanted
cardiac pacemakers or implanted
defibrillators (outside medical
establishments for treatment at
home, etc.) should check the
influence of radio waves upon the
equipment by consulting its
manufacturer.
Operation of electronic medical
equipment can be affected by radio
waves.
■Do not wet the equipment.
The FOMA terminal, battery, adapter/charger, and UIM
are not waterproofed. Do not use them in
environments, which are high in humidity such as in
bathrooms, and do not allow them to get wet from rain.
Furthermore, if carrying them against your body, they
become moist due to perspiration and the internal parts
may become corroded, causing malfunction. If the parts
are found to have been damaged due to exposure to
the liquids, any repairs will not be covered by warranty,
or repairs may not be possible. This may be repaired at
a cost if repairs are possible.
Handling Precautions
General notes
Do
Do
Page 21

17
Easy Search/Contents/Precautions
■Use a dry soft cloth such as the one for
cleaning glasses to clean the equipment.
The screen of the FOMA terminal sometimes has a
special coating so that they are easier to see. If you
rub it roughly with a dry cloth, it might be scratched.
Take care of the way of handling, and use only a dry,
soft cloth such as the one for cleaning glasses. If the
screen is left with water drop or stain adhered, smear
may be generated or the coating might peel off.
Do not use alcohol, thinner, benzene, detergent or
other solvents for cleaning, otherwise the printing
may be removed or discoloration may result.
■Occasionally clean the terminals of the
equipment using a dry cotton swab.
If the terminals become soiled, the connection might
deteriorate so that the power turns off or the battery
does not charge fully. Wipe the terminals with a dry
cloth or cotton swab.
■Do not place the FOMA terminal near an air
conditioner outlets.
Condensation may form due to rapid changes in
temperature, and this may corrode internal parts and
cause malfunction.
■Do not apply excessive force onto the FOMA
terminal and battery pack.
If you put the FOMA terminal in a bag along with many
other articles or sit with the FOMA terminal in a clothes
pocket, the display, internal circuitry and the battery
pack could be damaged or malfunction. Also, if an
external device is left connected to the connector
terminal or Earphone-Microphone/AV output terminal,
the connector could be damaged, or malfunction.
■Carefully read each instruction manual
attached to the FOMA terminal, adapter/
charger, or desktop holder.
■Do not rub or scratch the display part with
metals.
Doing so might cause damage to the part, resulting in
trouble or malfunction.
■Avoid using in extremely high or low
temperatures.
The FOMA terminal should be used within a
temperature range of 5°C to 35°C and a humidity range
of 45% to 85%.
■The FOMA terminal, if operated near landline
phones, television sets, radios or other
devices that are in use, may affect them. You
should operate your FOMA terminal as far
away from such equipment as possible.
■It is recommended that you make separate
notes of the information stored in the FOMA
terminal and keep such notes in a safe place.
We take no responsibility for any loss of the stored data
items.
■Do not insert an external device to the
connector terminal, or Earphone-Microphone/
AV output terminal at a slant when
connecting, and do not pull it out when it is
inserted.
Malfunction or damage may result.
■Make sure that nothing, such as a strap, gets
caught between the parts of the FOMA
terminal when you close it.
Otherwise, malfunction or damage may result.
■The FOMA terminal becomes warm during
use or charging but this is not an abnormality.
Use the FOMA terminal as it is.
■Do not leave the camera in places exposed to
direct sunlight.
Pixels may be discolored or burns may result.
■Usually, put the cover of the
Earphone-Microphone/AV output terminal,
connector terminal, and microSD card slot to
use the FOMA terminal.
Dust or water might enter into the FOMA terminal,
causing malfunction.
Notes on handling the FOMA terminal
■Do not use the FOMA terminal with the back
cover left removed.
The battery pack might come out, or malfunction or
damage may result.
■Do not apply an excessively thick sticker onto
the surfaces of the display, keys, or buttons.
Malfunction may result.
■While you are using the microSD card, never
take it off or turn off the power to the FOMA
terminal.
Data may be erased or malfunction may result.
■Batteries have a limited life.
Though it varies depending on the usage state, you are
advised to replace the battery if its usable time is
extremely short even when you fully charge it. Make
sure that you buy the specified battery.
■Charge the battery in a place with an
appropriate ambient temperature of 5°C to
35°C.
■Make sure that the battery is charged when
you use the FOMA terminal for the first time
or have not used it for a long period of time.
■The usable time of the battery differs
depending on the usage environment or its
remaining life.
■Depending on how the battery pack is used, it
might swell as its operating life becomes
short, but this is not a problem.
■Do not store or leave the empty battery pack.
The performance and operating life of the battery pack
might be lowered or shortened.
Notes on handling batteries
Page 22
18
Easy Search/Contents/Precautions
■Charge the battery in a place with an
appropriate ambient temperature of 5°C to
35°C.
■Charge the battery where:
•There is very little humidity, vibration, and dust.
•There are no landline phones, television sets or radios
nearby.
■During charging, the adapter/charger may
become warm. This is not an abnormality, so
continue charging.
■Do not use the DC adapter for charging the
battery when the car engine is not running.
The car battery could go flat.
■When using the power outlet having the
disengaging prevention mechanism, observe
the instructions given in that instruction
manual.
■Do not give a strong shock. Also, do not
deform the charging terminal.
Malfunction may result.
■Never use more force than necessary when
inserting/removing the UIM.
■The UIM may become warm during use, but
this is not a sign of a malfunction. Continue
using it as it is.
■The warranty does not cover damage caused
by inserting the UIM into some other types of
IC card reader/writer.
■Always keep the IC portion clean.
Notes on handling chargers/adapters
Notes on handling the UIM
■Use a dry soft cloth such as the one for
cleaning glasses to clean the equipment.
■It is recommended that you make separate
notes of the information stored on the UIM
and keep such notes in a safe place.
We take no responsibility for any loss of the stored data
items.
■For the environmental protection, bring any
unneeded UIMs to a handling counter such as
a docomo shop.
■Avoid using in extremely high or low
temperatures.
■Do not damage, carelessly touch, or
short-circuit the IC.
Data might be lost or malfunction may result.
■Do not drop the UIM or subject it to strong
impacts.
Malfunction may result.
■Do not bend the UIM or place something
heavy on it.
Malfunction may result.
■Into the FOMA terminal, do not insert the UIM
with a label or sticker pasted.
Malfunction may result.
■As the security for communication using the
Bluetooth function, the FOMA terminal
supports the security function that meets the
Bluetooth Specification. However, the
security may not be sufficient depending on
the configuration. Take care of the security
for communication using the Bluetooth
function.
Notes on using Bluetooth function
■Note that even if any leak of data or
information occurs while making connection
using the Bluetooth function, we take no
responsibility.
■With the FOMA terminal, you can use the
following: Headset, Hands-Free, Audio,
Dial-up Communication, Object Push, and
Serial Port. With Audio, you might be able to
use Audio Video Remote Control. (Only with
the compatible Bluetooth devices)
■Radio frequencies
The radio frequencies the Bluetooth function
of the FOMA terminal uses are as follows:
2.4 FH 1
2.4 : Indicates radio facilities that use 2400 MHz
frequencies.
FH : Indicates the modulation system is the FH-SS
system.
1 : Indicates that a supposed coverage distance is
10 meters or less.
: Indicates that all radio frequencies 2400 MHz
through 2483.5 MHz are used, and that the
frequencies for mobile object identifiers shall
not be avoided.
Page 23
19
Easy Search/Contents/Precautions
■The FeliCa reader/writer function on the
FOMA terminal uses very weak radio waves
which do not require to be licensed as radio
stations.
■The FeliCa reader/writer is operated on the
13.56 MHz frequencies. When you use
another reader/writer nearby, take enough
distance between your FOMA terminal and
the reader/writer. Further, ensure that there
are no radio stations that use the same
frequencies.
■Cautions on Using Bluetooth Devices
Bluetooth operates at radio frequencies assigned to
the in-house radio stations for mobile object
identifiers that have to be licensed and are used in
production lines of a factory, specific unlicensed low
power radio stations, and amateur radio stations
(hereafter, referred to “another radio station”) in
addition to scientific, medical, industrial devices, or
home electric appliances such as microwave ovens.
1. Before using this product, make sure that
“another radio station” is not operating nearby.
2. If radio interference between this product and
“another radio station” occurs, move immediately
to another place or turn off power to avoid
interference.
3. For further details, contact “docomo Information
Center” on the back page of this manual.
Notes on handling the FeliCa reader/
writer
■Do not use the modified FOMA terminal.
Using a modified FOMA terminal infringes the
Radio Law.
The FOMA terminals are granted technical regulations
conformity certification as the specified radio equipment
under the Radio Law and bear a “technical conformity
mark ” on the nameplate as evidence of conformity.
Unscrewing the FOMA terminal and modifying internal
components void the technical regulations conformity
certification. Do not use the FOMA terminal in this state,
which infringes the Radio Law.
■Be especially careful not to operate the FOMA
terminal while driving.
You will be imposed punishment if you use the mobile
phone in your hand while driving. If you answer a call
out of necessity, tell the caller with Hands-free that you
will call him/her back, park your car to somewhere safe,
and then dial.
■Use the Bluetooth functions in Japan only.
The Bluetooth functions on the FOMA terminal have
been authorized in compliance with the radio
transmission standards in Japan.
You might be imposed punishment if you use them
overseas.
■Use the FeliCa reader/writer functions in
Japan only.
The FeliCa reader/writer functions on the FOMA
terminal have been authorized in compliance with the
radio transmission standards in Japan.
You might be imposed punishment if you use them
overseas.
Caution
Page 24
20
Easy Search/Contents/Precautions
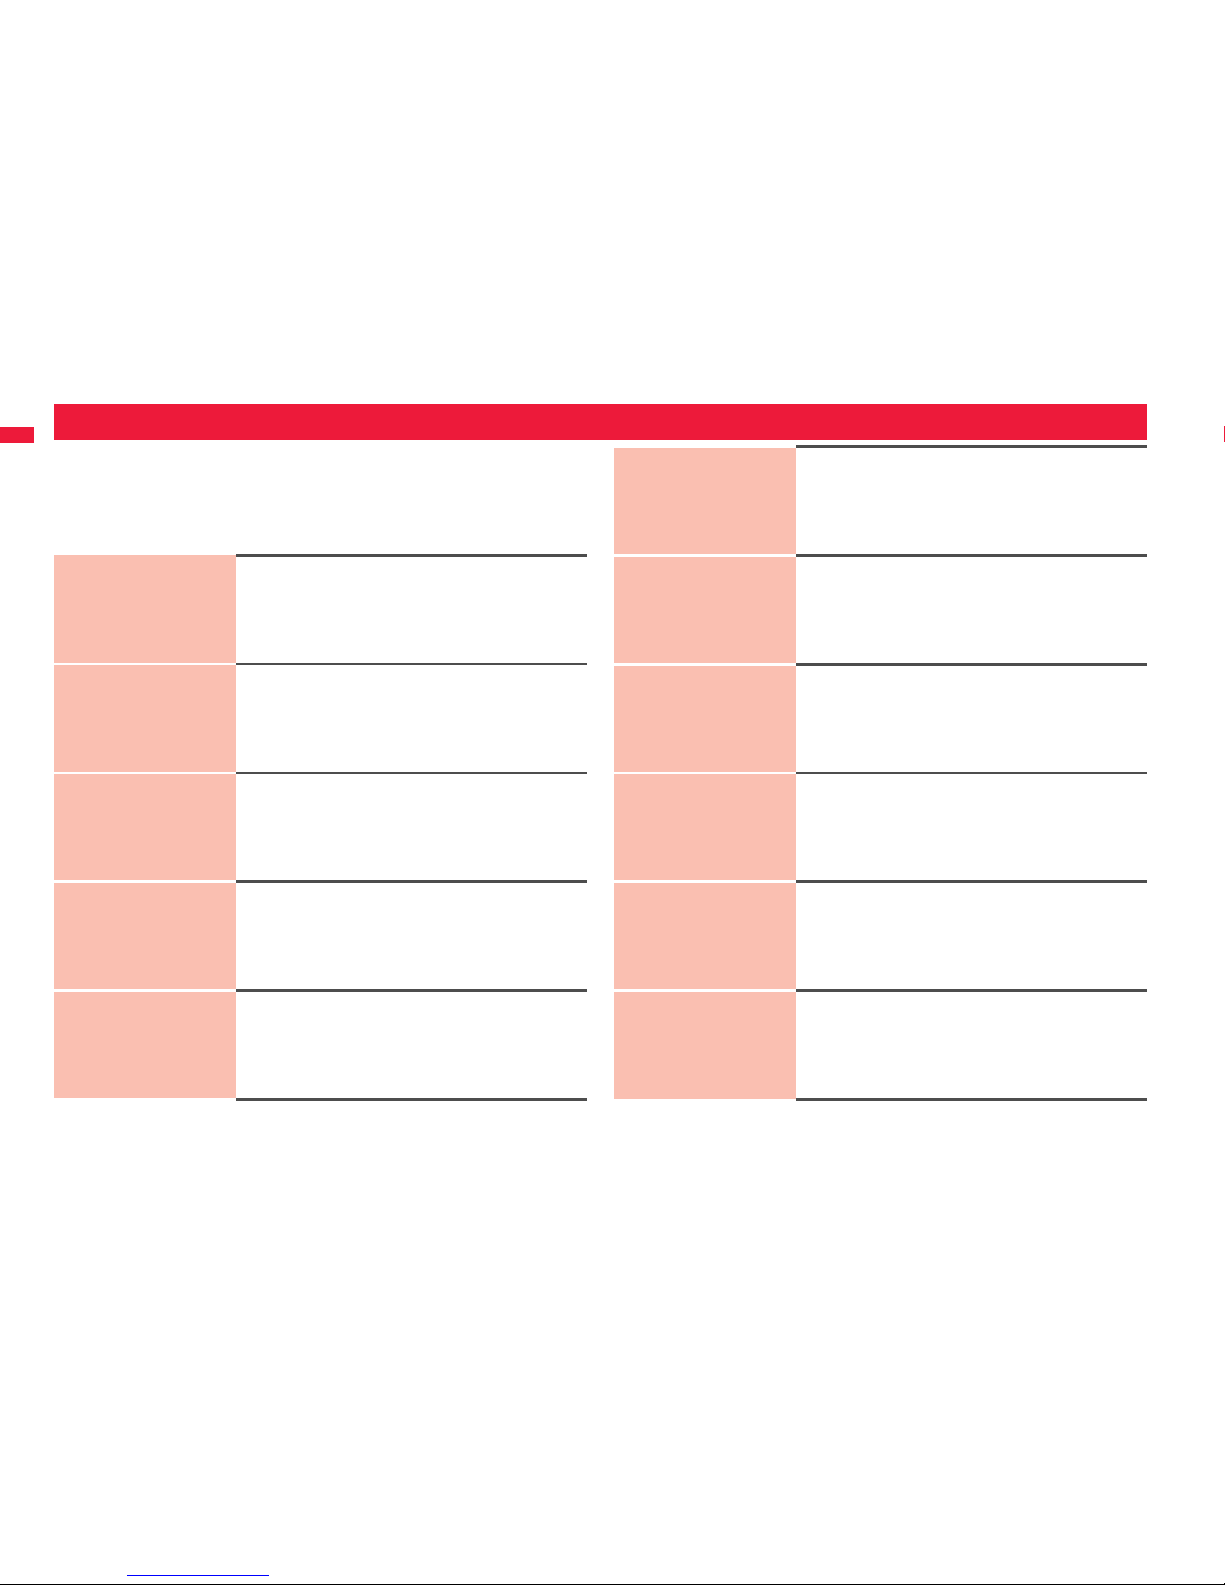
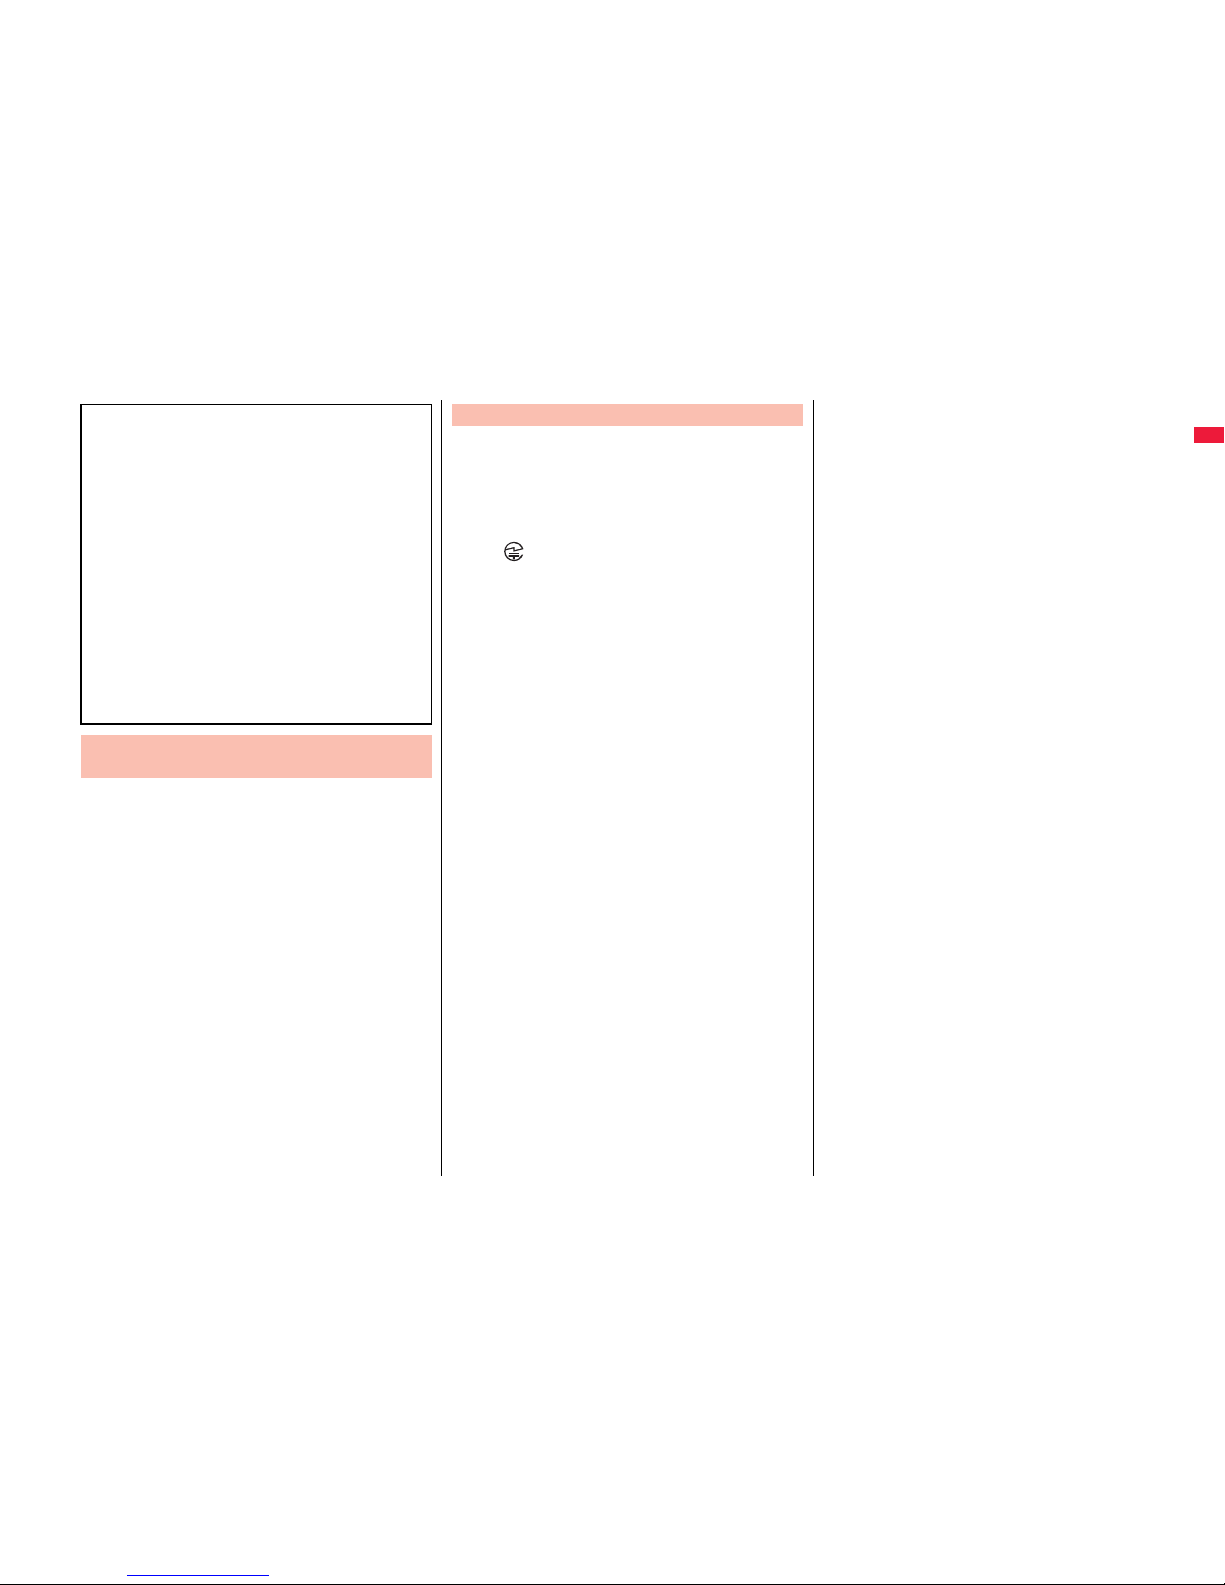
Other Options → See page 508
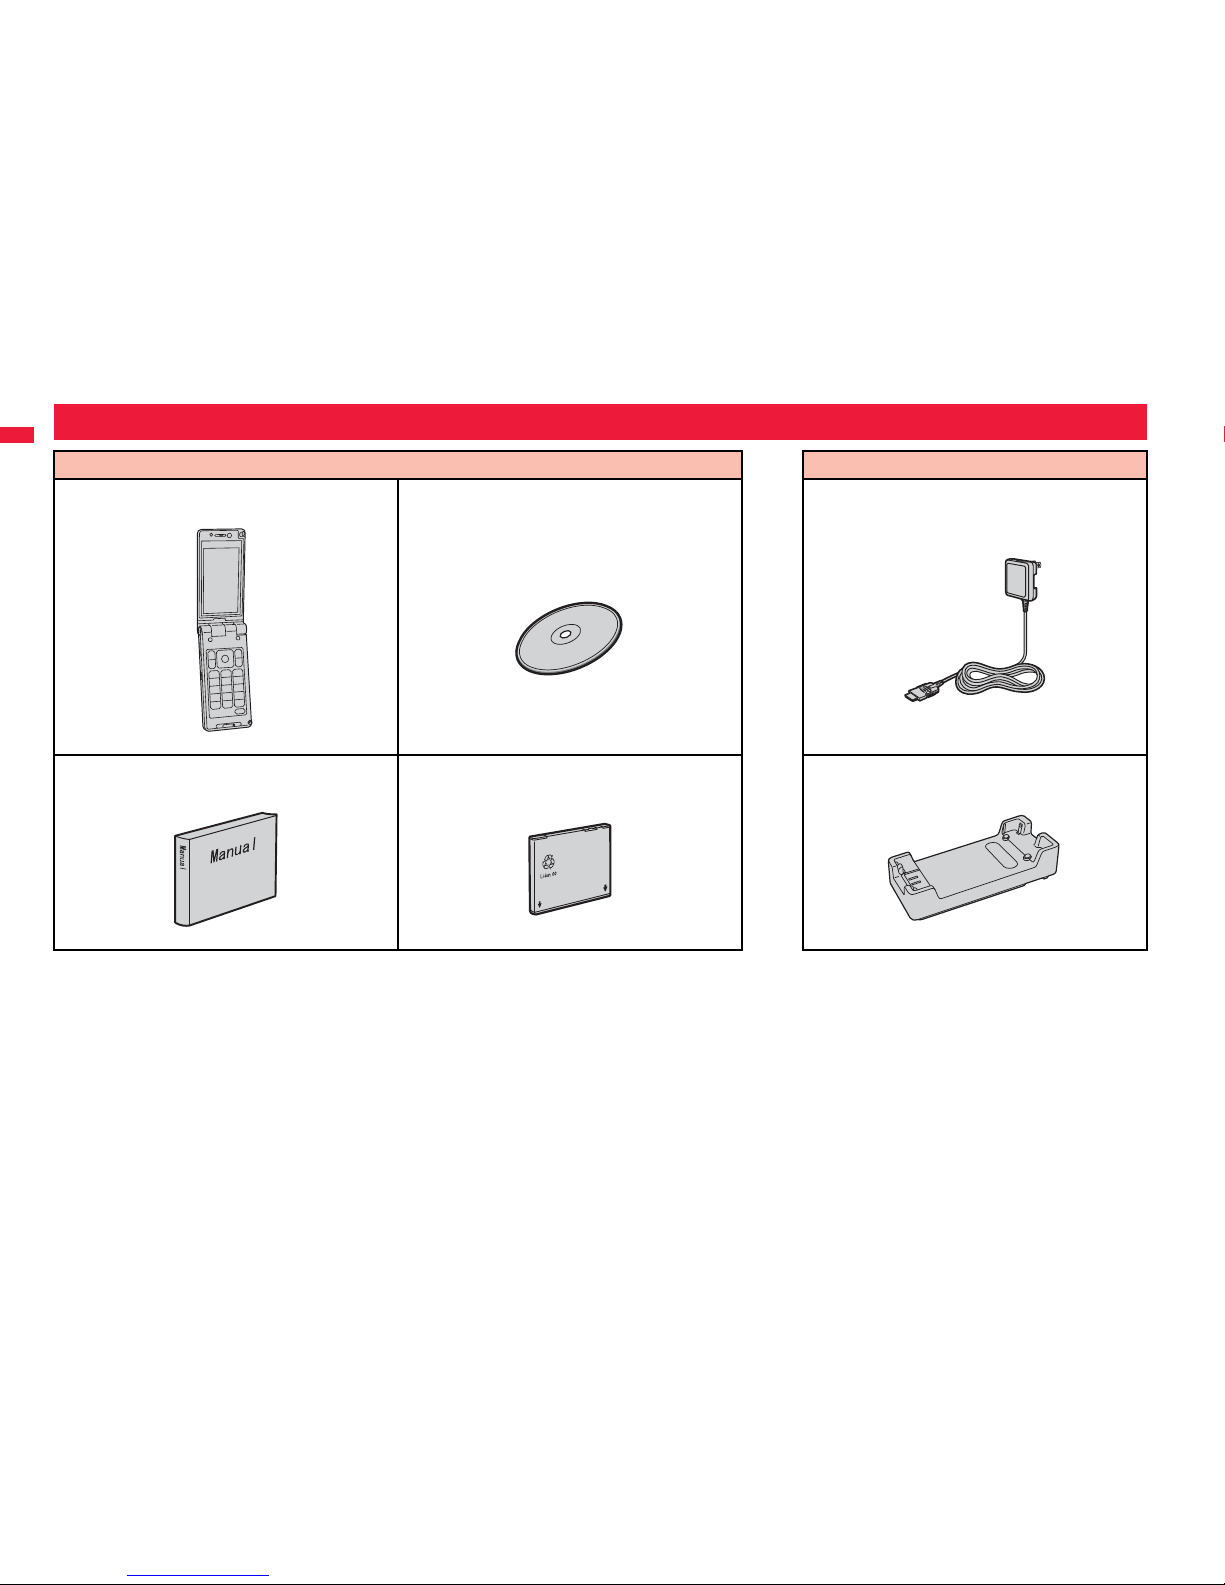
Accessories and Main Options
<Accessories> <Main Options>
P-01A Handset
(With Warranty and Back Cover P29)
P-01A CD-ROM
The PDF versions of “Manual for PC Connection”
and “Kuten Code List” are included.
FOMA AC Adapter 01/02
(With Warranty and Instruction Manual)
Instruction Manual
Quick Manual included (See page 550)
Battery Pack P19 Desktop Holder P28
(With Instruction Manual)
NTTドコモ
Page 25

21
Before Using the Handset
Part Names and Functions . . . . . . . . . . . . . . . . . . . . . . . . . . . . . 22
Styles . . . . . . . . . . . . . . . . . . . . . . . . . . . . . . . . . . . . . . . . . . . . . . 24
Navigation Displays and Key Operations . . . . . . . . . . . . . . . . . 25
Main Key Operations from the Stand-by Display . . . . . . . . . . . 26
Viewing Display . . . . . . . . . . . . . . . . . . . . . . . . . . . . . . . . . . . . . . 28
Using Icons on Desktop . . . . . . . . . . . . . . . . . .<Desktop Icon> 30
i-Widget Display and Operations . . . . . . . . . . . . . . . . . . . . . . . . 33
Displaying Description of Icons . . . . . . . . . . . . . . . . . . <Icons> 33
Private Window . . . . . . . . . . . . . . . . . . . . . . . . . . . . . . . . . . . . . . 33
Selecting Menu. . . . . . . . . . . . . . . . . . . . . . . . . . . . . . . . . . . . . . . 34
When You Forget Key Operation . . . . . . . . . . . . . . . . . <Guide> 38
Using UIM (FOMA Card) . . . . . . . . . . . . . . . . . . . . . . . . . . . . . . . 39
Attaching/Removing Battery Pack . . . . . . . . . . . . . . . . . . . . . . . 41
Charging . . . . . . . . . . . . . . . . . . . . . . . . . . . . . . . . . . . . . . . . . . . . 42
Checking Battery Level . . . . . . . . . . . . . . . . . . .<Battery Level> 44
Turning Power On/Off . . . . . . . . . . . . . . . . . . <Power ON/OFF> 45
Switching Display to English . . . . . . . . . . .<Select Language> 45
Configuring Initial Setting . . . . . . . . . . . . . . . . .<Initial Setting> 46
Setting Date and Time . . . . . . . . . . . . . . . . . . . . . . . <Set Time> 46
Displaying World Time . . . . . . . . . . . . . . <World Time Watch> 47
Notifying the Other Party of Your Phone Number
. . . . . . . . . . . . . . . . . . . . . . . . . . . . . . . . <Caller ID Notification> 48
Checking Your Own Phone Number . . . . . . . .<Own Number> 48
Page 26
Before Using the Handset
22
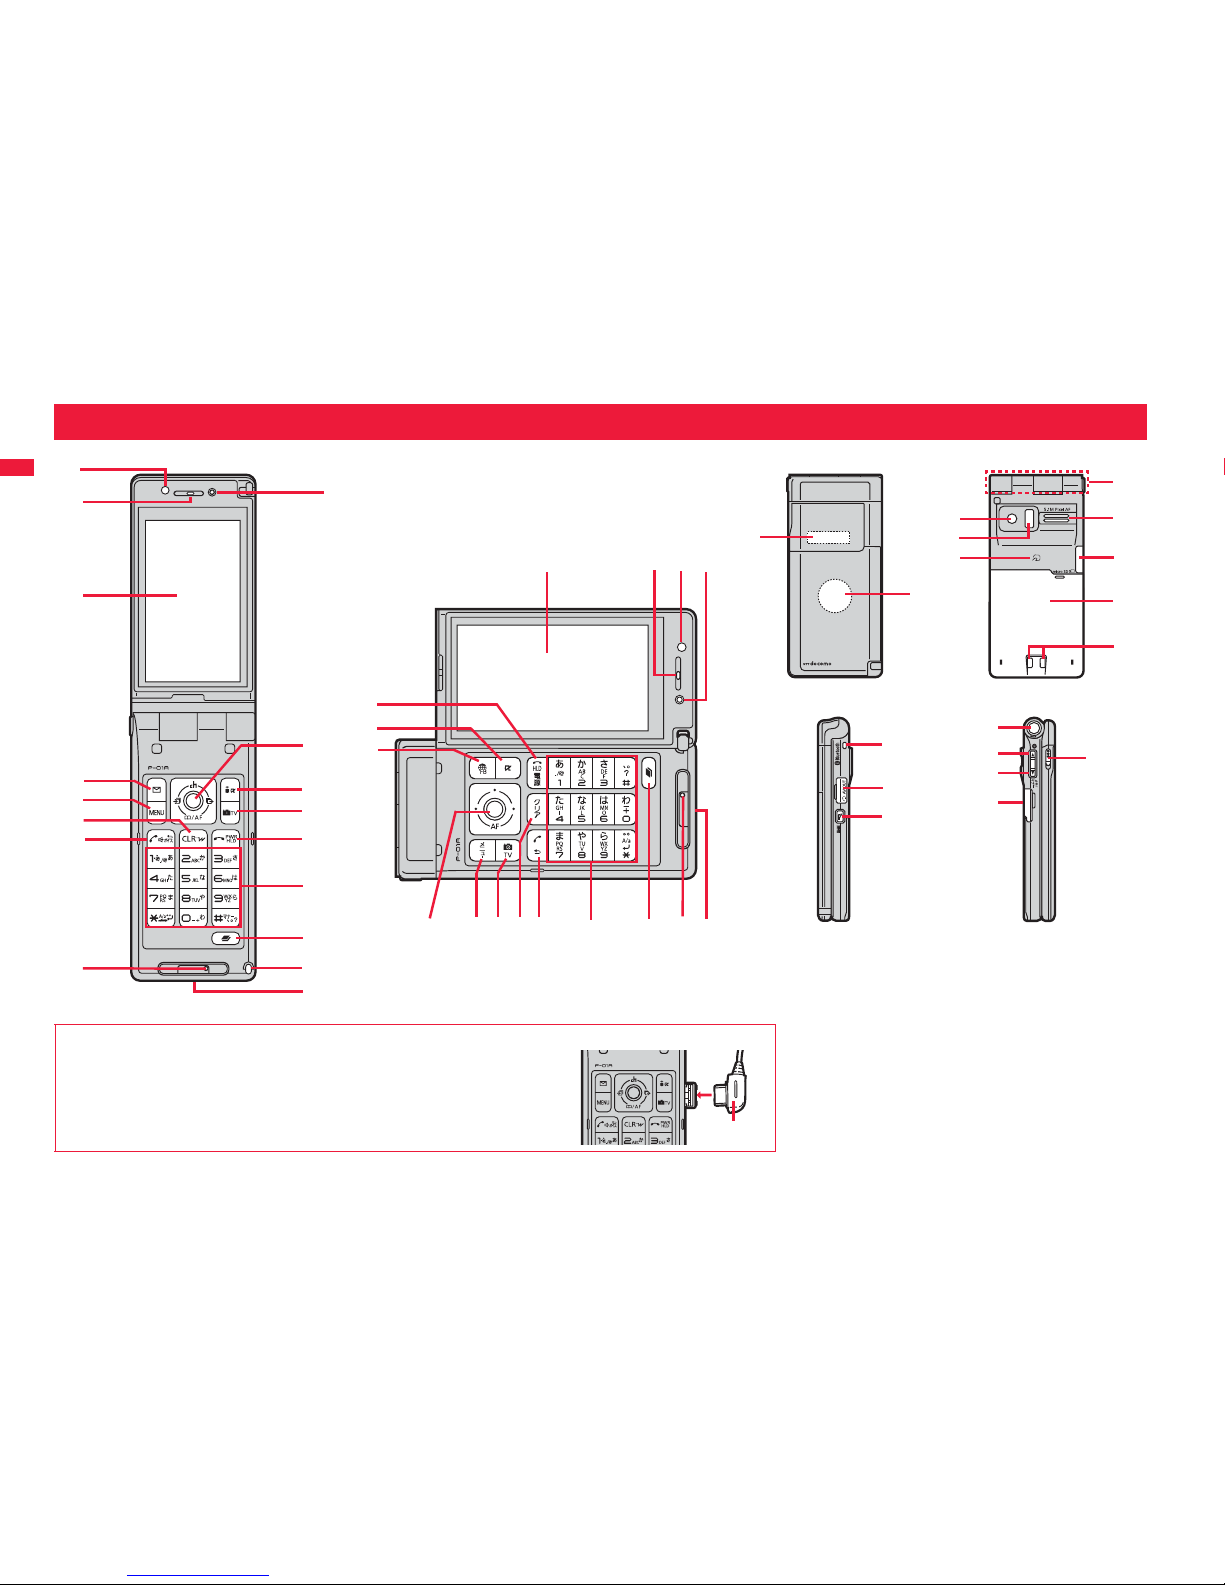
Part Names and Functions
■For inserting or pulling the Flat-plug Earphone/Microphone with Switch (option)
Take hold of the plug and insert or pull it straight into or out. Be careful not to take
hold of the cover and plug together when you pull it out.
Plug
!
"
#
$
'
&
%
The key design in Normal style differs from the one in
Horizontal Open Menu.
Page 27

23
Before Using the Handset
Light sensor
・For sensing brightness (See page 116)
Do not cover the light sensor with your hands or do
not put a sticker on it. Doing so might disable you to
detect the brightness.
・For shooting photos of yourself (See page 236)
・For catching sight of yourself during a videophone call
Earpiece
・For listening to the other party’s voice
Display
(See page 28)
l Mail key/f Full Browser key
m Menu key
r Clear key/i-Widget key
・For returning to the previous operation
・For clearing entered text or a phone number
d Start key, Hands-free key
・For making/receiving calls (See page 50 and page 64)
・For talking with Hands-free (See page 63)
Microphone
・For speaking to the other party
Inside camera
o Command navigation key
i i-mode key/i-αppli key
c Camera key/1Seg key
h Power/End key
・For ending calls
・For ending respective functions
・For turning on the power (for at least one second)/
For turning off the power (for at least two seconds)
(See page 45)
Numeric keys
・For entering phone numbers and text
x Multi key
Hook for Horizontal Open Style
Connector terminal
・For connecting the AC adapter (option), DC adapter
(option), or FOMA USB Cable with Charge Function
01/02 (option)
Private window
(See page 33)
Call/Charging indicator
・Flickers for incoming calls/mail and during a call.
(See page 120)
・Lights in red during charging.
・Lights/Flickers when you shoot with the camera.
The flickering pattern and color tone of the illumination
might look different depending on the type of the
FOMA terminal you use.
Outside camera
・For shooting portraits and/or landscapes
(See page 236)
・For catching sight of persons and/or landscapes
during a videophone call
Infrared data port
・Used for infrared communication and the infrared
remote control. (See page 384 and page 388)
FeliCa mark
・The IC card is mounted.
Use the IC card function placing this mark over the
scanning device. You cannot dismount the IC card.
(See page 317)
FOMA antenna/1Seg antenna
The antenna is embedded in the FOMA terminal. Do
not cover the antenna with your hand for better
communication/receiving.
Speakers
・For sounding ring tones
・For listening to the other party’s voice when
Hands-free is activated (See page 63)
microSD card slot
・For inserting microSD card (See page 370)
Back cover
・Remove this when attaching/removing the battery
pack and UIM. (See page 39 and page 41)
Do not peel off the sticker on the back of the back
cover. If you peel it off, you might not be able to read
and write the IC card.
Charging terminal
!Strap hole
"Earphone-Microphone/AV output terminal
(See page 396 and page 419)
#p PushTalk key
・For making/receiving PushTalk calls
(See page 80 and page 83)
$One-push open button
(See page 24)
%<Side ▲ key
・For scrolling up page by page
&>Side ▼ key
・For scrolling down page by page
・For checking for missed calls and new mail
(See page 121)
<Press and hold for at least one second with the
FOMA terminal closed>
・For activating Manner Mode (See page 110)
'Horizontal open lever
(See page 24)
Page 28
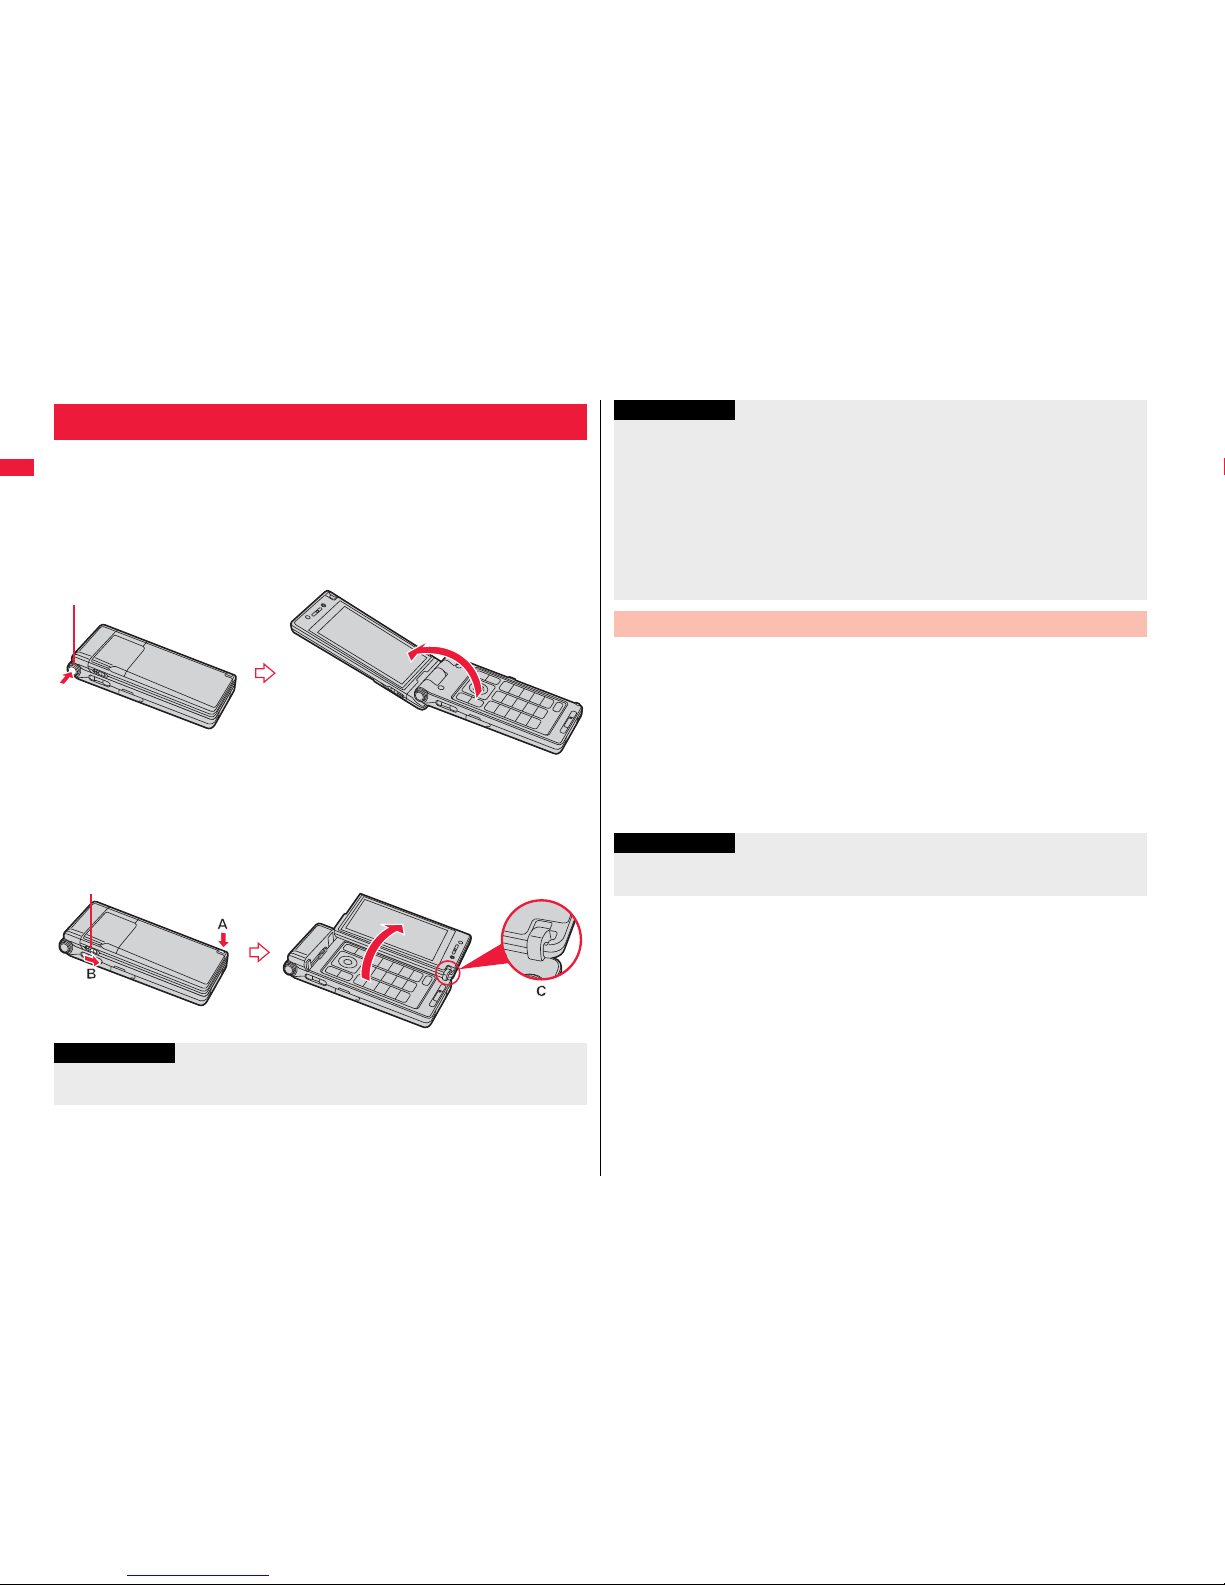
24
Before Using the Handset
The P-01A comes with two styles.
■Normal Style
You can open the FOMA terminal easily by one-push key operation.
(One-push Open)
You can open it also manually without using the button.
You need to close the FOMA terminal manually. If it does not close, open it fully and
then close it.
■Horizontal Open Style
Hold down the part A and open the display part with the horizontal open
lever slid into the direction B. From the horizontal display, you can use
1Seg, Full Browser, and others.
If the latch is not in a state of C when you open the display, re-open the FOMA terminal
after closing it once.
Styles
One-push open button
Horizontal open lever
Information
When you open the FOMA terminal by pressing the one-push open button, it might
not open fully depending on its direction.
You can set which operation starts for when you switch to Horizontal
Open Style from the Stand-by display.
1
mSet./ServiceOther settingsWork with style
Select an item.
Horizontal open menu . . .Shows Horizontal Open Menu. (See page 36)
1Seg . . . . . . . . . . . . . . . . . .Activates 1Seg. (See page 255)
Camera . . . . . . . . . . . . . . . .Activates the camera in Photo Mode. (See page 239)
OFF . . . . . . . . . . . . . . . . . . .Shows the Stand-by display (wide). (See page 113)
When you open the FOMA terminal by pressing the one-push open button, be careful
not to drop it by its rebound.
When you press the one-push open button in Horizontal Open Style, the FOMA
terminal will open in Normal Style after it is closed.
Before switching the styles, be sure to completely close the FOMA terminal. If you
operate the horizontal open lever in Normal Style or with the display part unlatched,
malfunction or damage may result.
When the confirmation display to select “YES/NO” is shown and you switch the style,
the confirmation display may be cleared.
Work with Style
Information
Information
When you switch styles from Main Menu or Horizontal Open Menu, the Stand-by
display appears regardless of the setting of this function.
Page 29
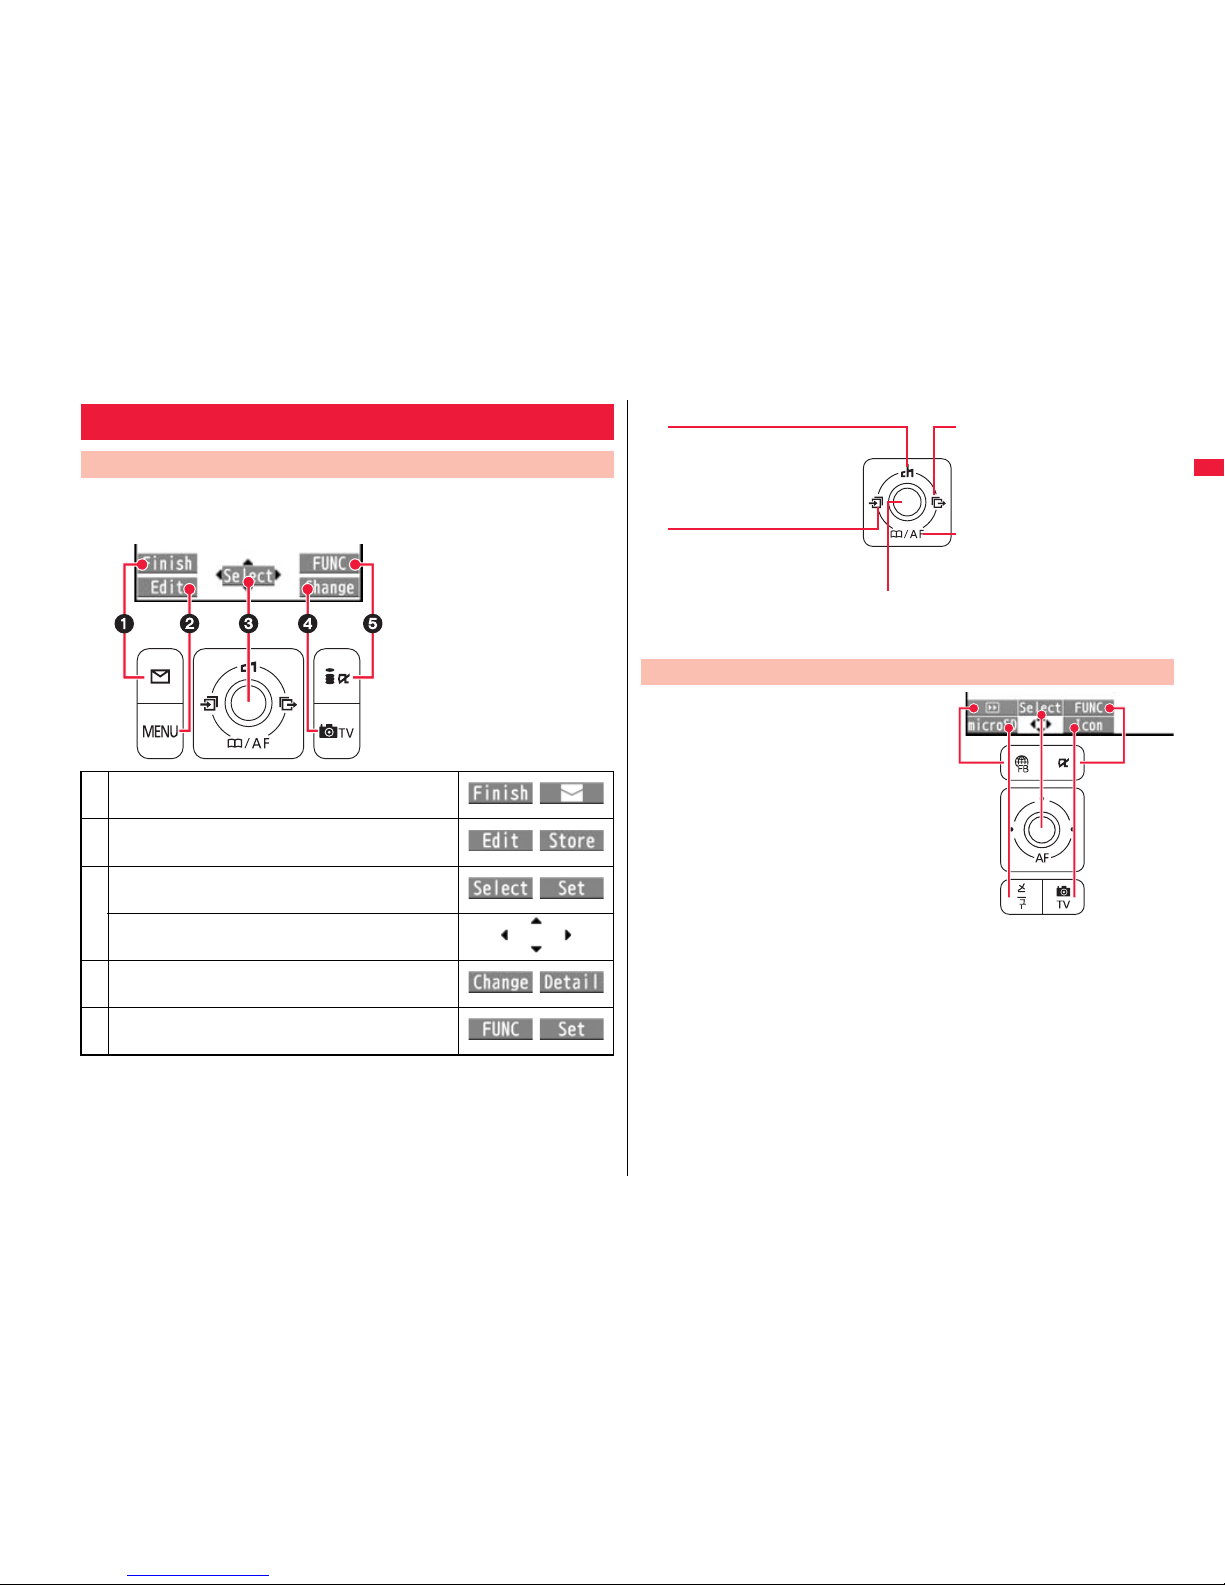
25
Before Using the Handset
When you want to execute the operation shown on the display in Normal
Style, press the corresponding key as below.
■Basic display examples and key assignments
Navigation Displays and Key Operations
Key Operations in Normal Style
Indicates the operation you can perform with
the l key.
Indicates the operation you can perform with
the m key.
Indicates the operation you can perform with
the Oo key.
Indicates the direction in which you can scroll
and select items with the Mo key.
Indicates the operation you can perform with
the c key.
Indicates the operation you can perform with
the i key.
■Operating command navigation key
While the vertical display is shown, you
can operate in the same way as in
Normal Style.
While the horizontal display is shown,
press the corresponding key on the
right.
Key Operations in Horizontal Open Style
Zo
display up. (Press and hold to scroll
continuously.)
Vo
・Moves the cursor to the right.
・Scrolls forward page by page.
(Press and hold to scroll
continuously.)
Oo
・Fixes the operation.
Co
and hold to scroll continuously.)
Xo
・Moves the cursor or highlighted
display down. (Press and hold to
scroll continuously.)
・Scrolls the page down.
Page 30

26
Before Using the Handset
From the vertical Stand-by display in Normal Style or the horizontal
Stand-by display in Horizontal Open Style, you can execute the following
actions by operating the each key:
Main Key Operations from the Stand-by
Display
Key operation
Action in Normal Style
(on the vertical display)
Action in Horizontal Open Style
(on the horizontal display)
+Oo
for a short time
Shows the display for selecting
the icons on the Stand-by
display, etc. (See page 32,
page 70, page 113)
Shows the display for selecting
the notification icons.
(See page 32, page 70)
for at least one
second
Sets/Releases Key Lock. (See page 135)
+Zo
for a short time
Shows the Channel list.
(See page 214)
—
for at least one
second
—
+Xo
for a short time
Shows the Search Phonebook
display. (See page 96)
—
for at least one
second
Shows the registration display
for the Phonebook entries.
(See page 90)
—
+Co
for a short time
Shows the Received Call list.
(See page 55)
—
for at least one
second
Shows the Received Address
list. (See page 175)
—
+Vo
for a short time
Shows the Redial list.
(See page 54)
—
for at least one
second
Shows the Sent Address list.
(See page 175)
—
+l
+f
※
for a short time
Shows the Mail menu.
(See page 166)
Shows the Full Browser
Function Selection display.
(See page 220)
for at least one
second
Executes Check New
Message. (See page 161)
Shows the Internet web page
set as Home URL by Full
Browser. (See page 220)
+i
+=
※
for a short time
Shows the i-mode menu.
(See page 194)
Shows the Software list.
(See page 293)
for at least one
second
Shows the Software list. (See page 293)
+m
+~
※
for a short time
Shows Main Menu.
(See page 34)
Shows Horizontal Open Menu.
(See page 36)
for at least one
second
Sets/Releases IC Card Lock. (See page 318)
+c
for a short time Activates the camera in Photo Mode. (See page 239)
for at least one
second
Starts 1Seg. (See page 255)
-d
for a short time Makes a call. (See page 50) —
for at least one
second
Accesses a voice dial entry.
(See page 102)
—
-h
for a short time
Sets whether to display the icons on the Stand-by display.
(See page 114)
for at least two
seconds
Turns off the power. (See page 45)
+r
+|
※
for a short time
Executes i-Widget.
(See page 312)
—
for at least one
second
Resets Main Menu.
(See page 119)
—
Key operation
Action in Normal Style
(on the vertical display)
Action in Horizontal Open Style
(on the horizontal display)
Page 31

27
Before Using the Handset
-0
for a short time Enters “0”. —
for at least one
second
Enters “+”. —
-1
for a short time Enters “1”. —
for at least one
second
Measures your current location
and executes the GPS
function. (See page 328)
—
-2
for a short time
Enters “2”. —
for at least one
second
-3
for a short time
Enters “3”. —
for at least one
second
-4
for a short time
Enters “4”. —
for at least one
second
-5
for a short time Enters “5”. —
for at least one
second
Switches the backlight on/off. (See page 116)
-6
for a short time
Enters “6”. —
for at least one
second
-7
for a short time
Enters “7”. —
for at least one
second
-8
for a short time Enters “8”. —
for at least one
second
Switches View Blind on/off. (See page 117)
-9
for a short time
Enters “9”. —
for at least one
second
Key operation
Action in Normal Style
(on the vertical display)
Action in Horizontal Open Style
(on the horizontal display)
※In this manual, each key is described with l, i, m, and r regardless of the
style.
-a
for a short time Enters “:”. —
for at least one
second
Activates/Deactivates Public Mode (Drive Mode).
(See page 69)
-s
for a short time Enters “#”. —
for at least one
second
Activates/Deactivates Manner Mode. (See page 110)
-x
for a short time Shows the Multitask Menu. (See page 402)
for at least one
second
Shows the display for setting
Select Networks.
(See page 465)
Switches menu functions.
(See page 402)
Switches menu functions.
(See page 402)
.<
for a short time
Switches between the i-αppli
Stand-by display and normal
i-αppli program.
(See page 311)
—
for at least one
second
Activates 2in1. (See page 450) —
.>
for a short time
Plays back a record message/
voice memo. (See page 72)
—
for at least one
second
Plays back a videophone
record message/movie memo.
(See page 73)
—
.p
for a short time
Shows the PushTalk
Phonebook list. (See page 84)
—
for at least one
second
Activates MUSIC Player (See page 281)
Key operation
Action in Normal Style
(on the vertical display)
Action in Horizontal Open Style
(on the horizontal display)
Page 32
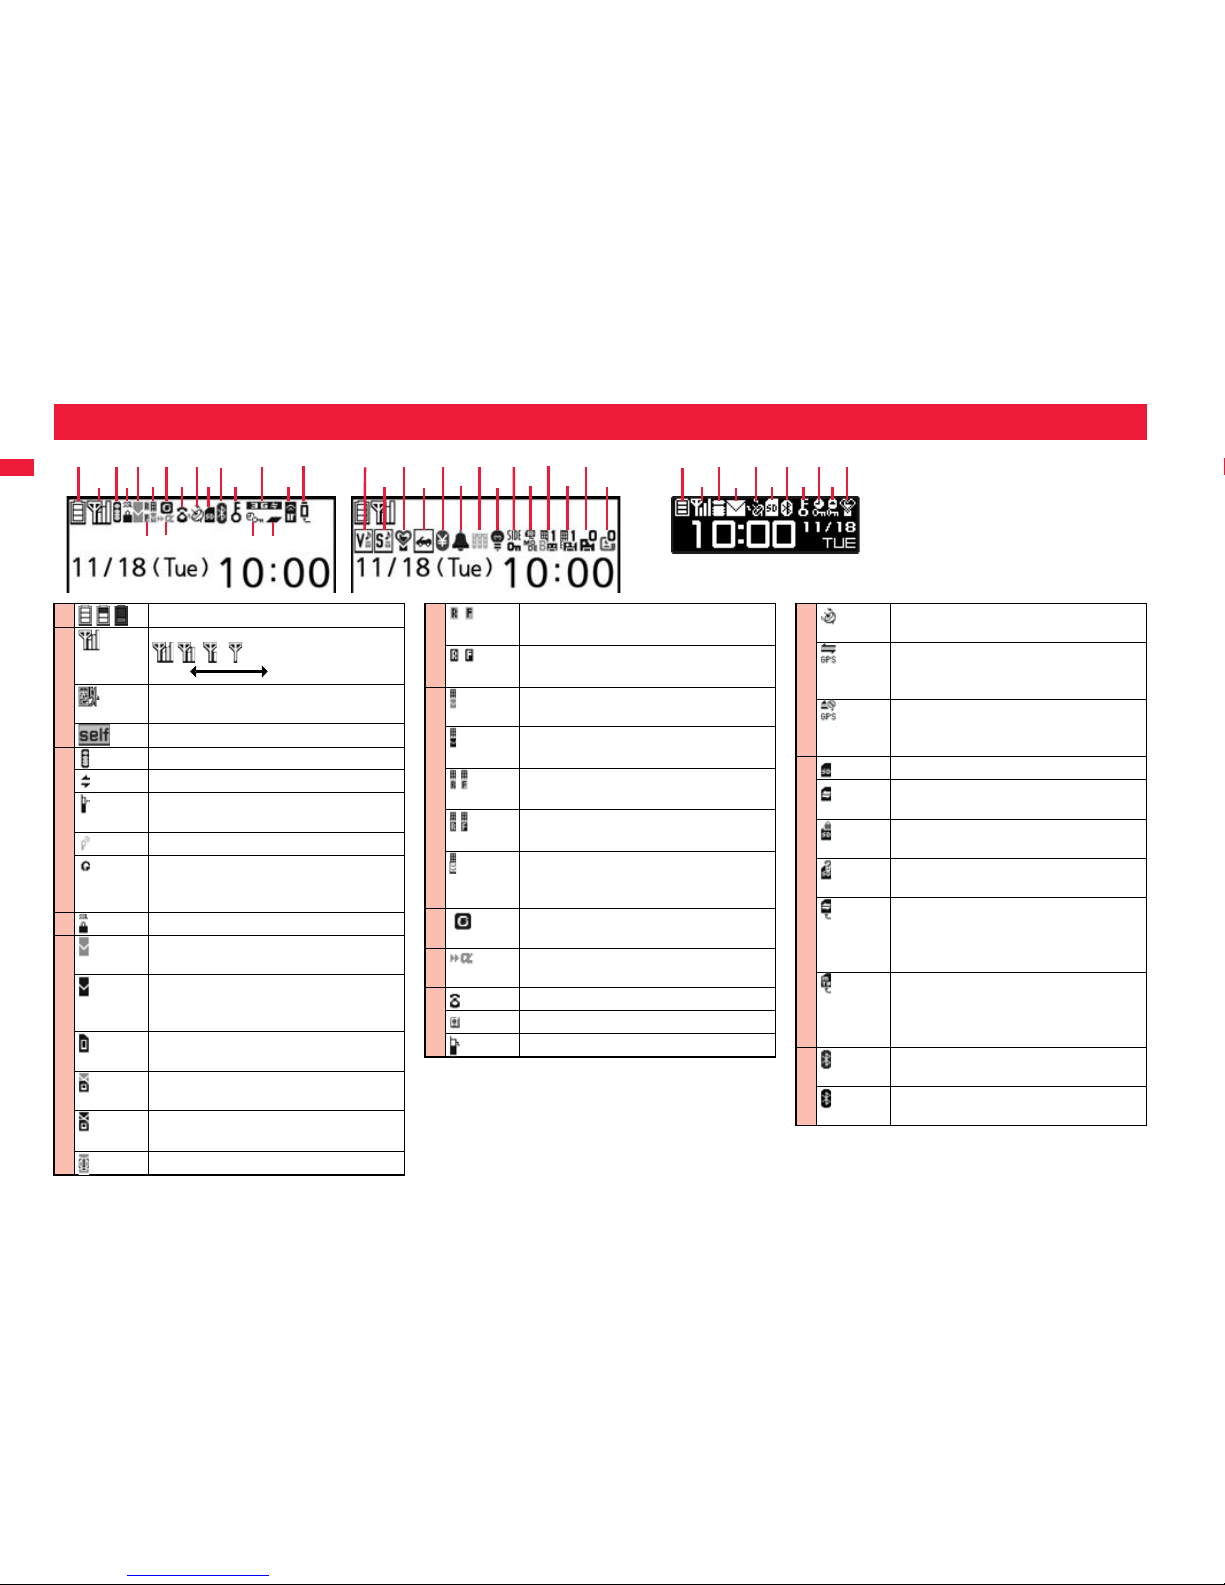
Before Using the Handset
28
Viewing Display
<Private window>
%
&
!
"
#
$
!
Battery level (estimate) (See page 44)
Radio waves reception level (estimate)
Strong Weak
You are out of the FOMA service area or
radio waves do not reach.
During Self Mode (See page 130)
During i-mode (See page 194)
During i-mode communication (See page 194)
During packet communication (The icon differs
depending on the communication status.)
During PushTalk communication (See page 80)
You get out of the service area while
Network Search Mode is set to “Manual”.
(See page 465)
During SSL communication (See page 195)
(pink)
Unread i-mode mail or an SMS message
exists. (See page 159 and page 191)
(dark blue)
The area for i-mode mail and SMS
messages in the FOMA terminal is full.
(See page 159 and page 191)
The area for SMS messages on the UIM
(FOMA card) is full.
(pink)
Unread mail exists, and the area for SMS
messages on the UIM (FOMA card) is full.
(dark blue)
Both the FOMA terminal and UIM (FOMA
card) are full.
Area Mail exists. (See page 184)
(yellow)
Unread Messages R/F exist.
(See page 181)
(dark blue)
The area for Messages R/F in the FOMA
terminal is full. (See page 182)
(pink)
i-mode mail is held at the i-mode Center.
(See page 161)
(dark blue)
The box for i-mode mail at the i-mode
Center is full. (See page 159)
(yellow)
Messages R/F are held at the i-mode
Center. (See page 182)
(dark blue)
The box for Messages R/F at the i-mode
Center is full. (See page 182)
i-mode mail is held at the i-mode Center
while Receive Option Setting is set to “ON”.
(See page 160)
New i-concier information exists.
(See page 216)
Not replied i-αppli call exists.
(See page 309)
During a voice call
During a videophone call
During 64K data communication
During measuring the current location
(See page 328)
Location Request Menu is set to “ON” or
“Reject numbers unset”, and it is within the
validity period. (See page 340)
Location Request Menu is set to “ON” or
“Reject numbers unset” and it is out of the
validity period. (See page 340)
A microSD card is inserted.(See page 371)
Data is being read to/written from the
microSD card.
A write-protected microSD card is inserted.
(See page 371)
The inserted microSD card cannot be used.
(See page 371)
A microSD card is inserted, and the FOMA
USB Cable with Charge Function 01/02
(option) is connected in microSD Mode.
(See page 379)
A microSD card is inserted, and the FOMA
USB Cable with Charge Function 01/02
(option) is connected in MTP Mode.
(See page 379)
(blue)
A Bluetooth device is connected.
(See page 424 and page 426)
(black)
A Bluetooth device is connected and power
consumption is low. (See page 424)
Page 33
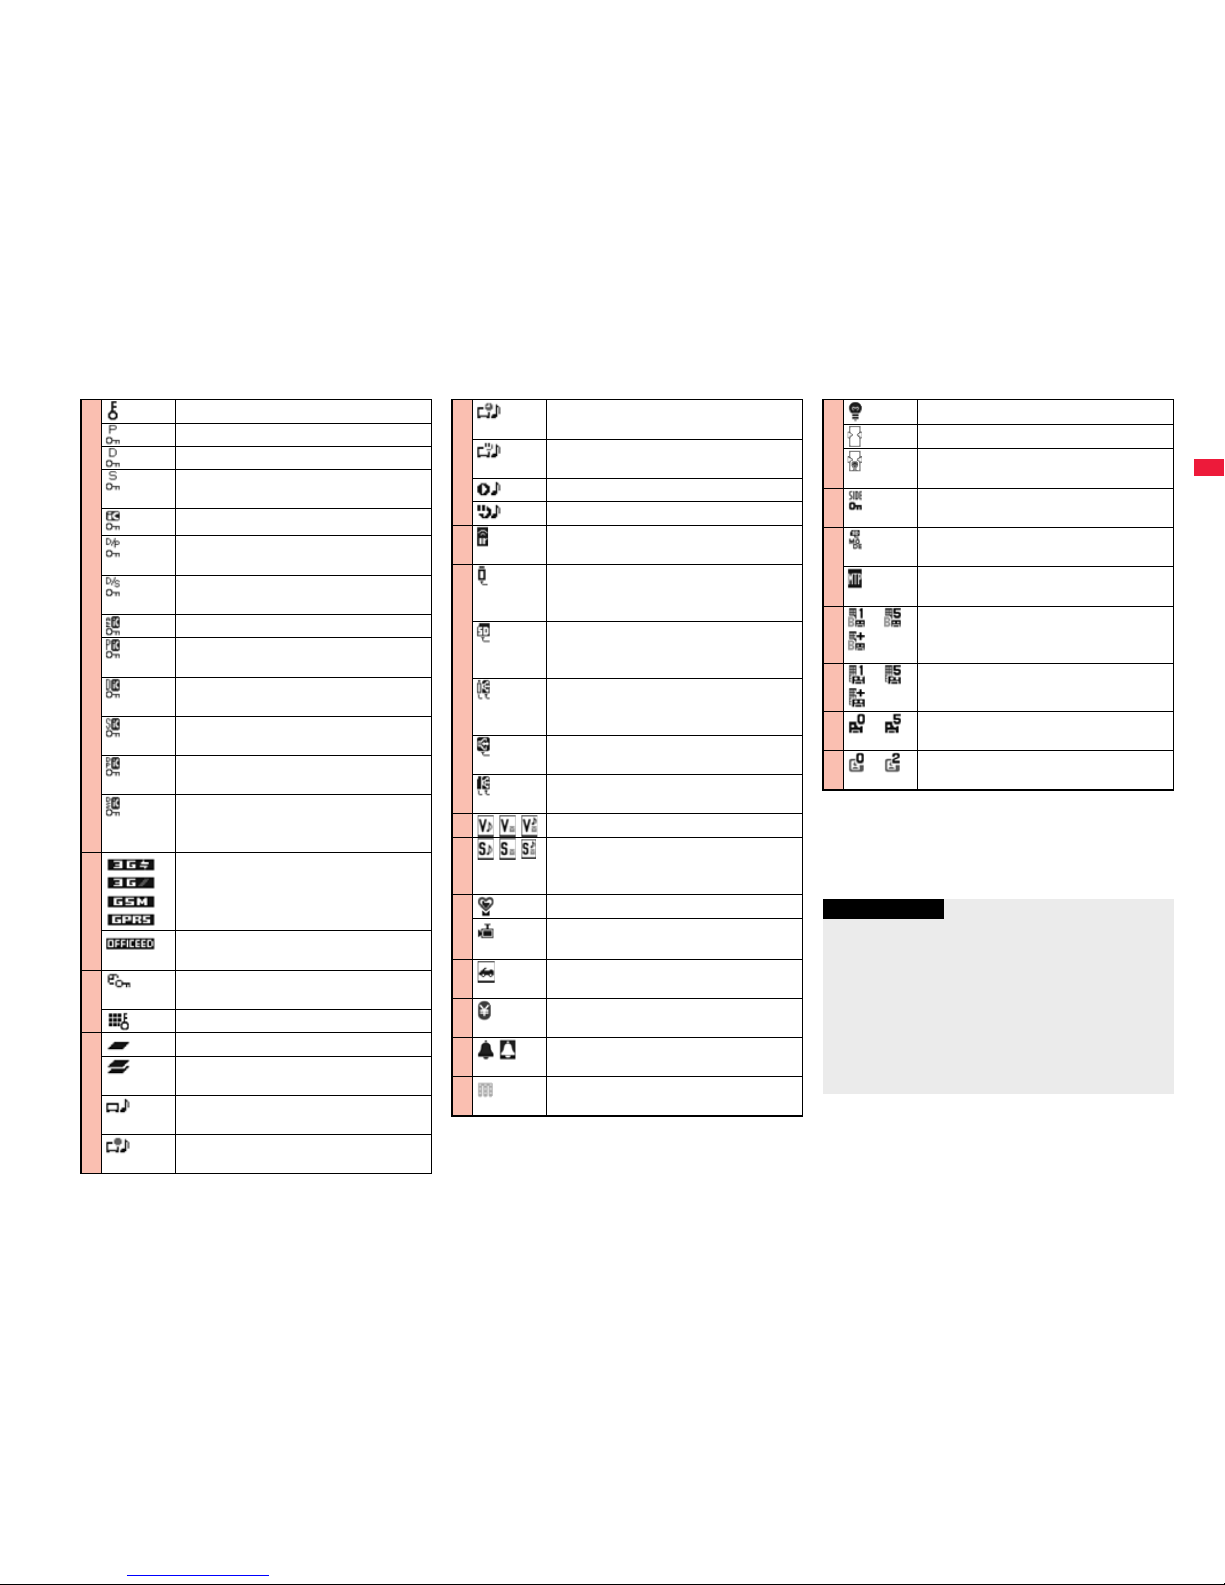
29
Before Using the Handset
For the horizontal display, icons appear at the lower right
of the display.
The clock at the upper right of the display (at the lower
right of the horizontal display) does not appear when the
icon or is displayed.
During Lock All (See page 128)
During Personal Data Lock (See page 131)
During Keypad Dial Lock (See page 135)
During Secret Mode or Secret Data Only
(See page 136)
During IC Card Lock (See page 318)
Both Keypad Dial Lock and Personal Data
Lock are set.
Both Keypad Dial Lock and Secret Mode/
Secret Data Only are set.
Both IC Card Lock and Lock All are set.
Both IC Card Lock and Personal Data Lock
are set.
Both IC Card Lock and Keypad Dial Lock
are set.
Both IC Card Lock and Secret Mode/Secret
Data Only are set.
IC Card Lock, Keypad Dial Lock, and
Personal Data Lock are simultaneously set.
IC Card Lock, Keypad Dial Lock, and Secret
Mode/Secret Data Only are simultaneously
set.
Type of in-use network (See page 461)
You are in the OFFICEED area.
(See page 456)
Timer Lock ON At Close is set.
(See page 131)
During Key Lock. (See page 135)
During Multitask (See page 401)
Multiple functions are activated.
(See page 401)
While watching a 1Seg program
(See page 255)
During recording of a 1Seg program
(See page 262)
During recording of a 1Seg program by
Timer Recording (See page 266)
During pause of 1Seg program recording
(See page 263)
During music playback (See page 281)
During music pause (See page 281)
During infrared communication
(See page 384 and page 388)
The FOMA USB Cable with Charge
Function 01/02 (option) is connected in
Communication Mode.
The FOMA USB Cable with Charge
Function 01/02 (option) is connected in
microSD Mode. (See page 379)
During talk or communication through a
USB Hands-free compatible device
(See page 63)
A USB Hands-free compatible device is
connected. (See page 63)
A USB Hands-free compatible device is
connected in microSD Mode. (See page 63)
Vibrator is set. (See page 108)
Ring Volume is set to “Silent” or
Mail/Msg. Ring Time is set to “OFF”.
(See page 68 and page 109)
During Manner Mode (See page 110)
Remote Monitoring is set to “ON”.
(See page 79)
During Public Mode (Drive Mode)
(See page 69)
The call cost has exceeded the specified
limit. (See page 417)
An alarm is set.
(See page 266 and page 405)
A Music&Video Channel program is booked.
(See page 272)
Backlight is set to “OFF”. (See page 116)
View Blind is set to “ON”. (See page 117)
Backlight is set to “OFF” and View Blind is
set to “ON”.
!
Side Keys Guard is set to “ON”.
(See page 135)
"
USB Mode Setting is set to “microSD
mode”. (See page 379)
USB Mode Setting is set to “MTP mode”.
(See page 379)
#
〜・
Voice mail messages for Number B are held
at the Voice Mail Center in Dual Mode of
2in1. (See page 455)
$
〜・
Voice mail messages are held at the Voice
Mail Center. (See page 440)
%
〜
The number of record messages
(See page 71)
&
〜
The number of videophone record
messages (See page 71)
Information
Some characters and symbols on the display and
Private window might be modified or abbreviated. In
addition, the Private window is displayed in
monochrome.
The color liquid crystal display uses high-precision
production technology. The slightest change in the
environment or other factors may result in unlit or
permanently lit pixels, but this is not a manufacturing
defect.
Page 34
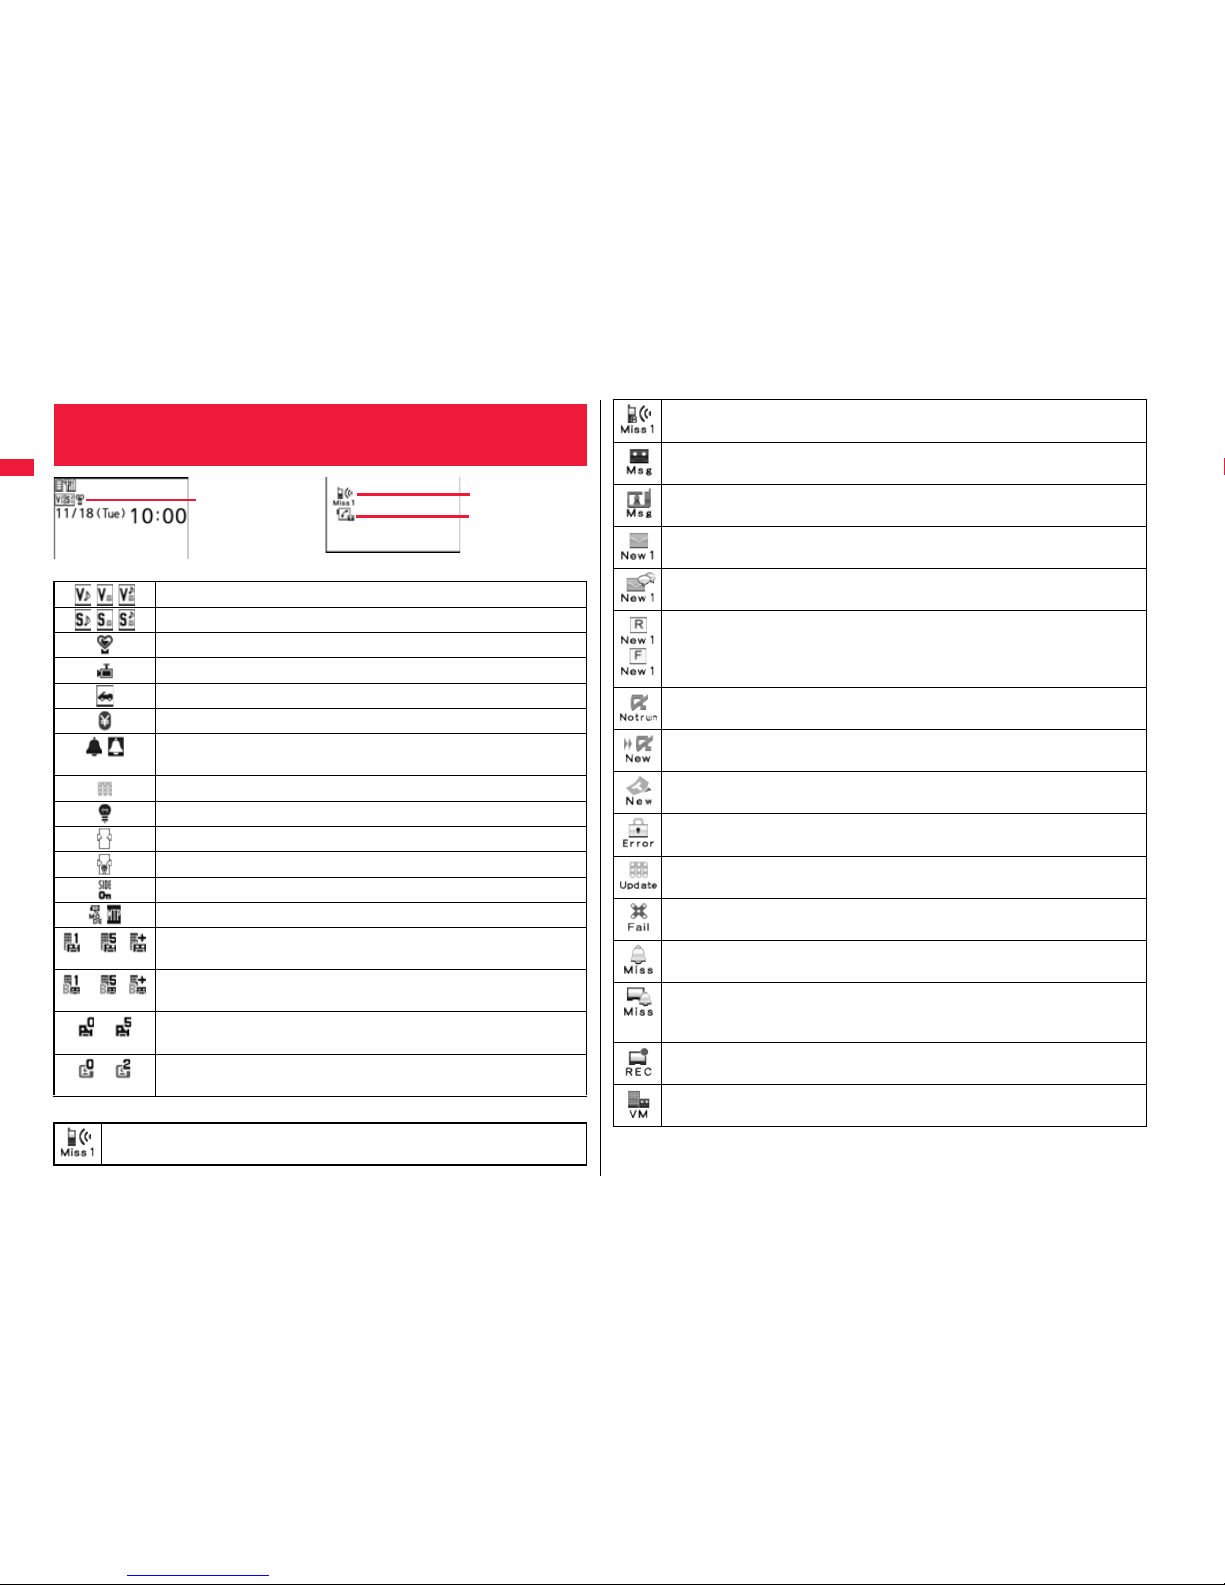
30
Before Using the Handset
■Operation when a status icon is selected
■Operation when a notification icon is selected
<Desktop Icon>
Using Icons on Desktop
Status icon
Notification icon
Desktop icon
Shows the display for Vibrator. (See page 108)
Shows the display for Ring Volume. (See page 68)
Shows the display for Manner Mode Set. (See page 112)
Shows the display for Remoto Monitoring. (See
page 79
)
Shows the display for releasing Public Mode (Drive Mode). (See page 69)
Shows the display for Notice Call Cost. (See page 417)
Shows the list of Alarm, Schedule, ToDo, TV Timer, or Timer Recording.
(See page 263, page 264, page 404, page 407 or page 411)
Shows the Music&Video Channel display. (See page 272)
Shows the display for Backlight. (See page 116)
Shows the display for View Blind. (See page 117)
Shows the display for “Set./Service” → “Display”.
Shows the display for Side Key Guard. (See page 135)
Shows the display for USB Mode Setting. (See page 379)
〜・
Shows the display for playing back Voice Mail messages.
(See page 441)
〜・
Shows the display for playing back Voice Mail messages.
(See page 441)
〜
Shows the display for Rec. Msg/Voice Memo.
(See page 71, page 72, page 108 and page 415)
〜
Shows the display for Rec. Msg/Voice Memo.
(See page 71, page 72, page 108 and page 415)
Missed call
Shows the Missed Call list. (See page 55)
Missed call to Number B of 2in1
Shows the Missed Call list. (See page 55)
Record message
Shows the Record Message list. (See page 72)
Videophone record message
Shows the Videophone Record Message list. (See page 73)
New i-mode mail or SMS
Shows the Inbox list. (See page 164)
New chat mail
Starts Chat Mail. (See page 188)
New Message R/F
Shows the Message R/F list. (See page 182)
i-αppli did not start automatically
Shows the i-αppli Auto Start Info. (See page 308)
Not replied i-αppli call
Shows the i-αppli Call Logs diaplay. (Seepage 310 )
A ToruCa file is received from a scanning device
Shows the ToruCa File list. (See page 322)
A security error occurred on the i-αppli Stand-by display
Shows the Security Error History. (See page 295)
Success in downloading a Music&Video Channel program
Activates Music&Video Channel. (See page 272)
Failure in downloading a Music&Video Channel program
Activates Music&Video Channel. (See page 273)
Missed alarm
Shows the contents of the alarm that could not be notified. (See page 407)
Missed TV timer
Shows the contents of the TV timer that could not be notified.
(See page 267)
Timer recording was completed
Shows the contents and results of the timer recording. (See page 267)
Messages are held at the Voice Mail Center
Shows the display for playing back Voice Mail messages. (See page 441)
Page 35
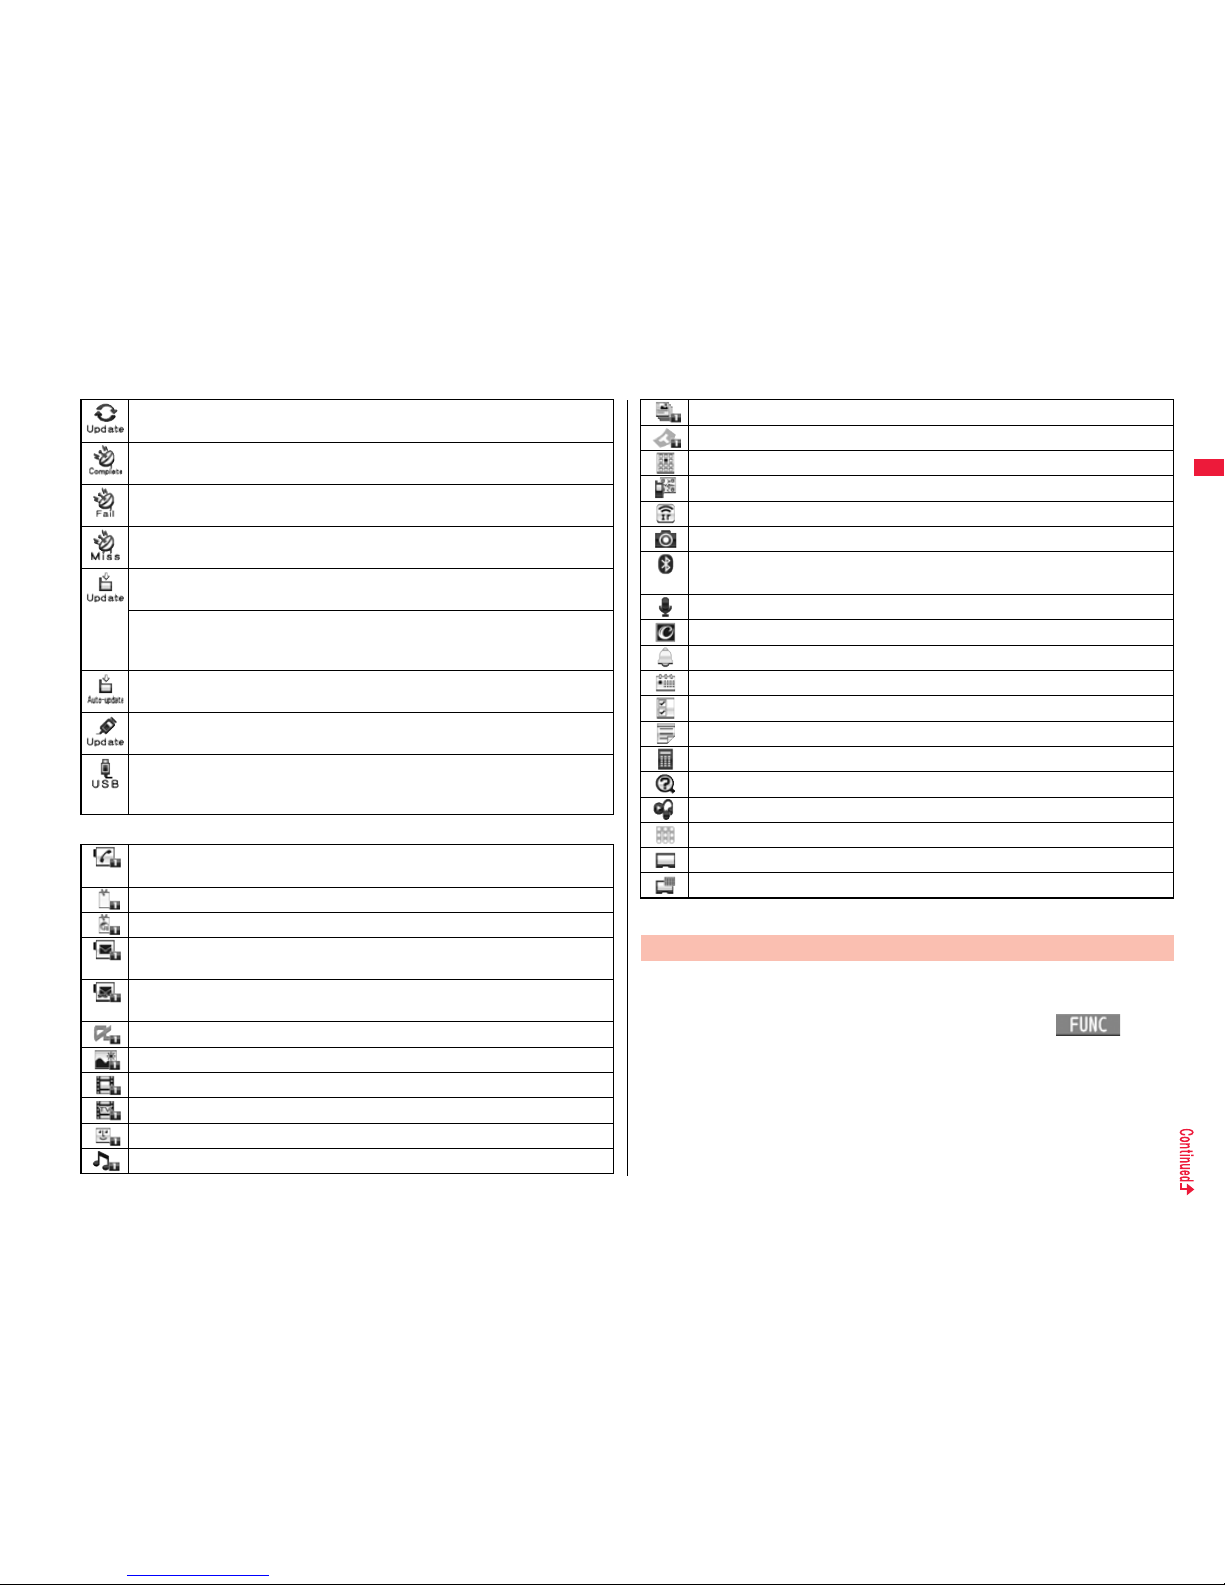
31
Before Using the Handset
■Operation when a desktop icon is selected
The Phonebook could not be updated by Data Security Service
Shows the update display for Data Security Service. (See page 141)
Provide Location was executed automatically
Shows Location History. (See page 337)
Provide Location could not be executed automatically
Shows Location History. (See page 337)
You did not respond to a location provision request
Shows Location History. (See page 337)
Software Update is needed
Starts Software Update. (See page 524)
Software Update was executed
Shows the Update Completion display or the reason for not completing.
(See page 523)
Software rewriting is possible
Shows the rewriting confirmation display. (See page 522)
Pattern data was updated automatically
Shows the updated result. (See page 528)
The FOMA terminal and a personal computer are connected by the FOMA
USB Cable with Charge Function 01/02 (option)
Shows the display for USB Mode Setting. (See page 379)
Shows the dialing display with the phone number entered.
(See page 50 and page 80)
Shows the site of that URL. (See page 194)
Shows the site of that URL by Full Browser. (See page 220)
Shows the Message Composition display with the mail address entered.
(See page 146)
Shows the SMS Composition display with the mail address entered.
(See page 190)
Starts the i-αppli program.
※
(See page 293)
Shows it on the Picture viewer.※ (See page 346)
Plays it back by the i-motion player.
※
(See page 353)
Plays it back by the Video player.※ (See page 360)
Plays it back by the Chara-den player.※ (See page 363)
Plays it back by the Melody player.※ (See page 366)
※ When the original data is deleted or overwritten, the desktop icon is disabled.
You can paste up to 15 desktop icons of such as phone numbers, mail
addresses, etc.
1
The display for an item to be pasted i()
Add desktop iconYES
When the addresses of the sender and another recipient of simultaneous mail are
found or the multiple destination addresses are found, select a mail address or
phone number to be pasted.
Shows it on the PDF viewer.
※
(See page 390)
Shows it on the ToruCa viewer.
※
(See page 320)
Shows the Private menu. (See page 413)
Shows the Bar Code Reader menu. (See page 248)
Shows the Ir Data Receiving display. (See page 386 and page 387)
Shows the Camera menu. (See page 239 and page 241)
Shows the Bluetooth Function Selection display.
(See page 424, page 426, and page 428)
Starts Voice Recorder. (See page 389)
Shows the i-concier menu display. (See page 216)
Shows the list of Alarm. (See page 404)
Shows the Calendar display. (See page 408)
Shows the ToDo list. (See page 411)
Shows the list of Text Memo. (See page 417)
Shows the calculator. (See page 417)
Shows the display for 使いかたナビ (Guide). (See page 38)
Starts MUSIC Player. (See page 280)
Shows the Music&Video Channel display. (See page 274)
Shows the Viewer display. (See page 255)
Starts i-αppli Program Guide. (See page 260)
Paste Icons to Desktop
Page 36
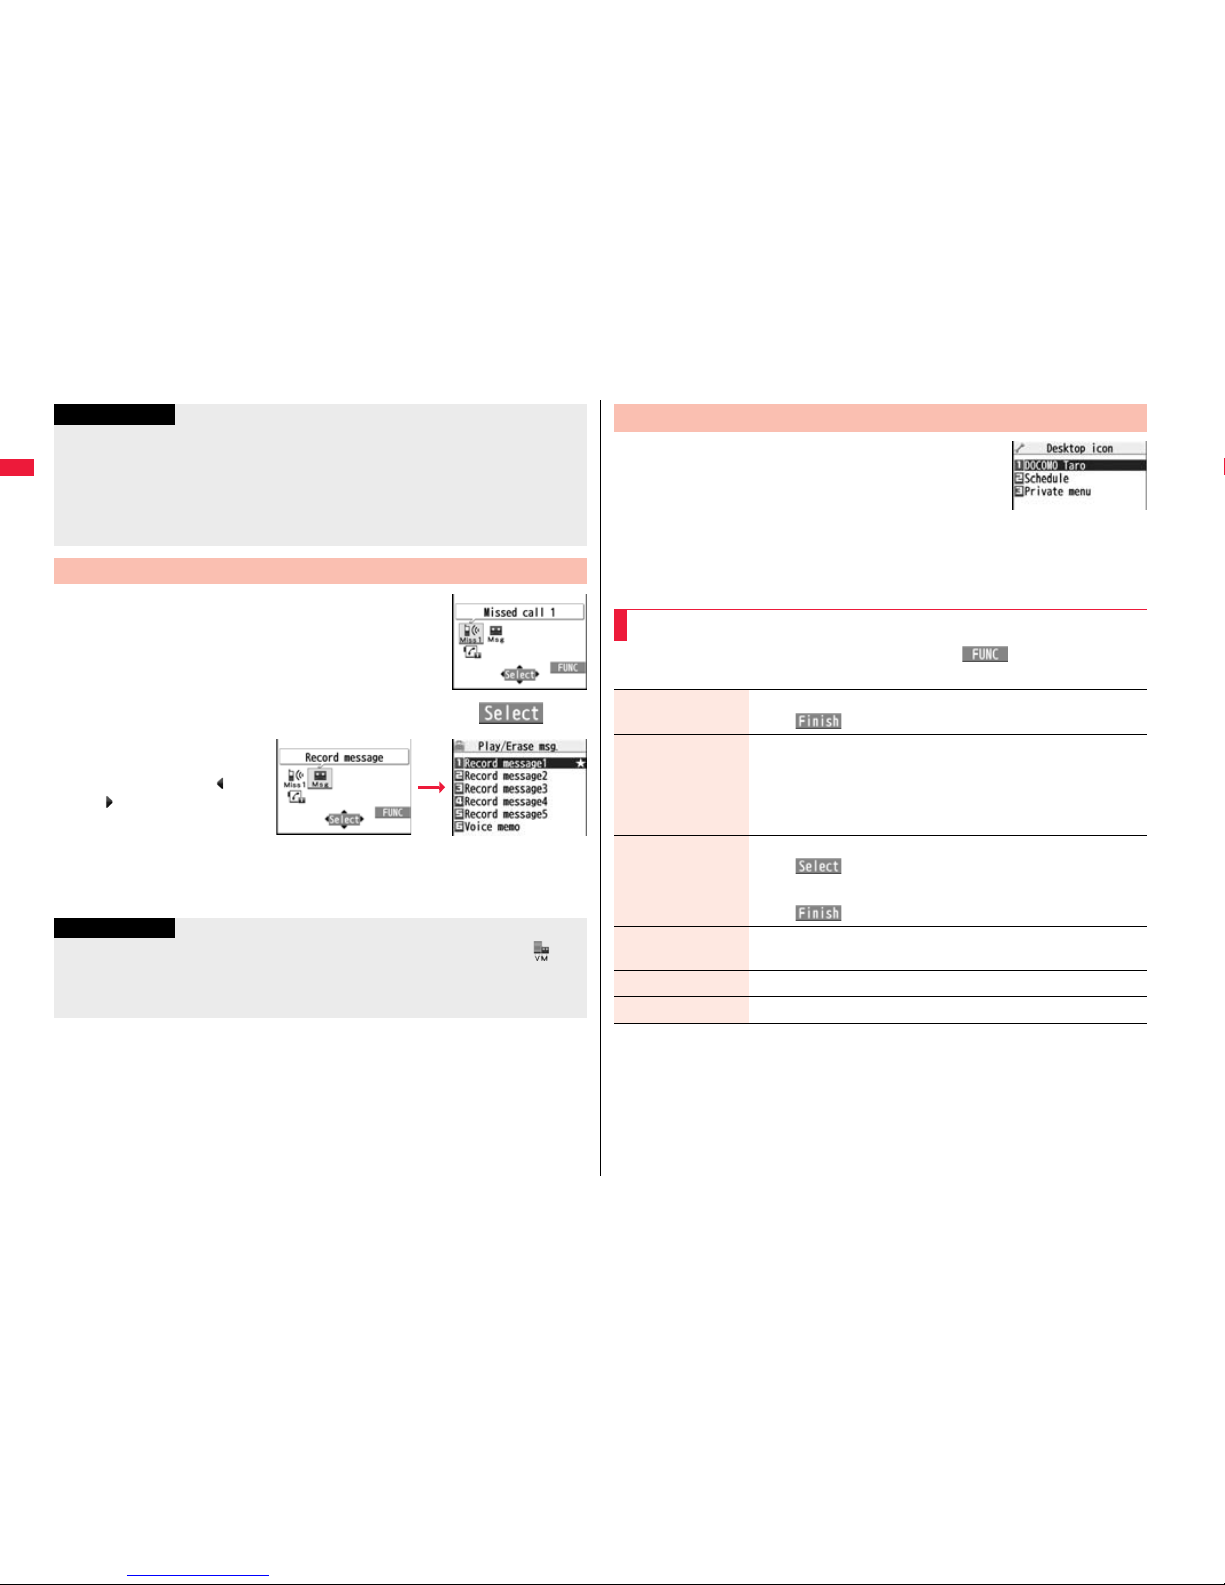
32
Before Using the Handset
1
PressOo.
Desktop icons are not displayed on the horizontal
Stand-by display. Further, you cannot select status
icons by pressing Oo.
2
Use Mo to highlight an icon, and press Oo().
Up to five “Desktop icons”
are displayed. If there are
six or more icons, “ ” and
“ ” are displayed.
A “Notification icon” is
deleted when each function
is executed. To delete all
“Notification icons”, press
and hold r for at least one second from the display in step 1.
Information
You may not be able to paste the URL to the desktop depending on the site.
You can store the title for URL of up to 16 full-pitch/32 half-pitch characters. When the
number of characters for the title exceeds that much, the characters in excess are
deleted. If no title exists for a site, up to 22 half-pitch characters of the URL excluding
“http://” or “https://” is displayed.
Some files and data might not be pasted to the desktop.
Proceed to Respective Functions from Icons on Desktop
When a record message
icon is selected
Information
When the notification icon of “Messages are held at the Voice Mail Center” ( )
appears while you are overseas, you cannot operate the Voice Mail function from the
notification icon. Follow the steps of “Operate Voice Mail Service at the Country You
Stay” on page 468.
1
mSet./ServiceDisplay
Desktop icon
The list of desktop icons pasted to the desktop is
displayed.
2
Select the icon whose details are to be displayed.
You can show the Function menu also by pressing i( ), while highlighting an
icon from the Stand-by display.
+m-6-3
Check Details of Desktop Icon
Desktop Icon list
Function Menu of the Desktop Icon List
Add to desktop Put a check mark for the function to be added
l()
Edit title Enter a title.
You can enter up to 16 full-pitch/32 half-pitch characters.
However, the number of characters for the title displayed when
you highlight the icon is up to 11 full-pitch/ 22 half-pitch
characters from the beginning of the title.
Sort Select a desktop iconUse Bo to change the order
Oo()
To change the order in succession, repeat the above steps.
l()YES
Reset desktop The desktop icons are reset to the default.
YES
Delete this YES
Delete all YES
Page 37
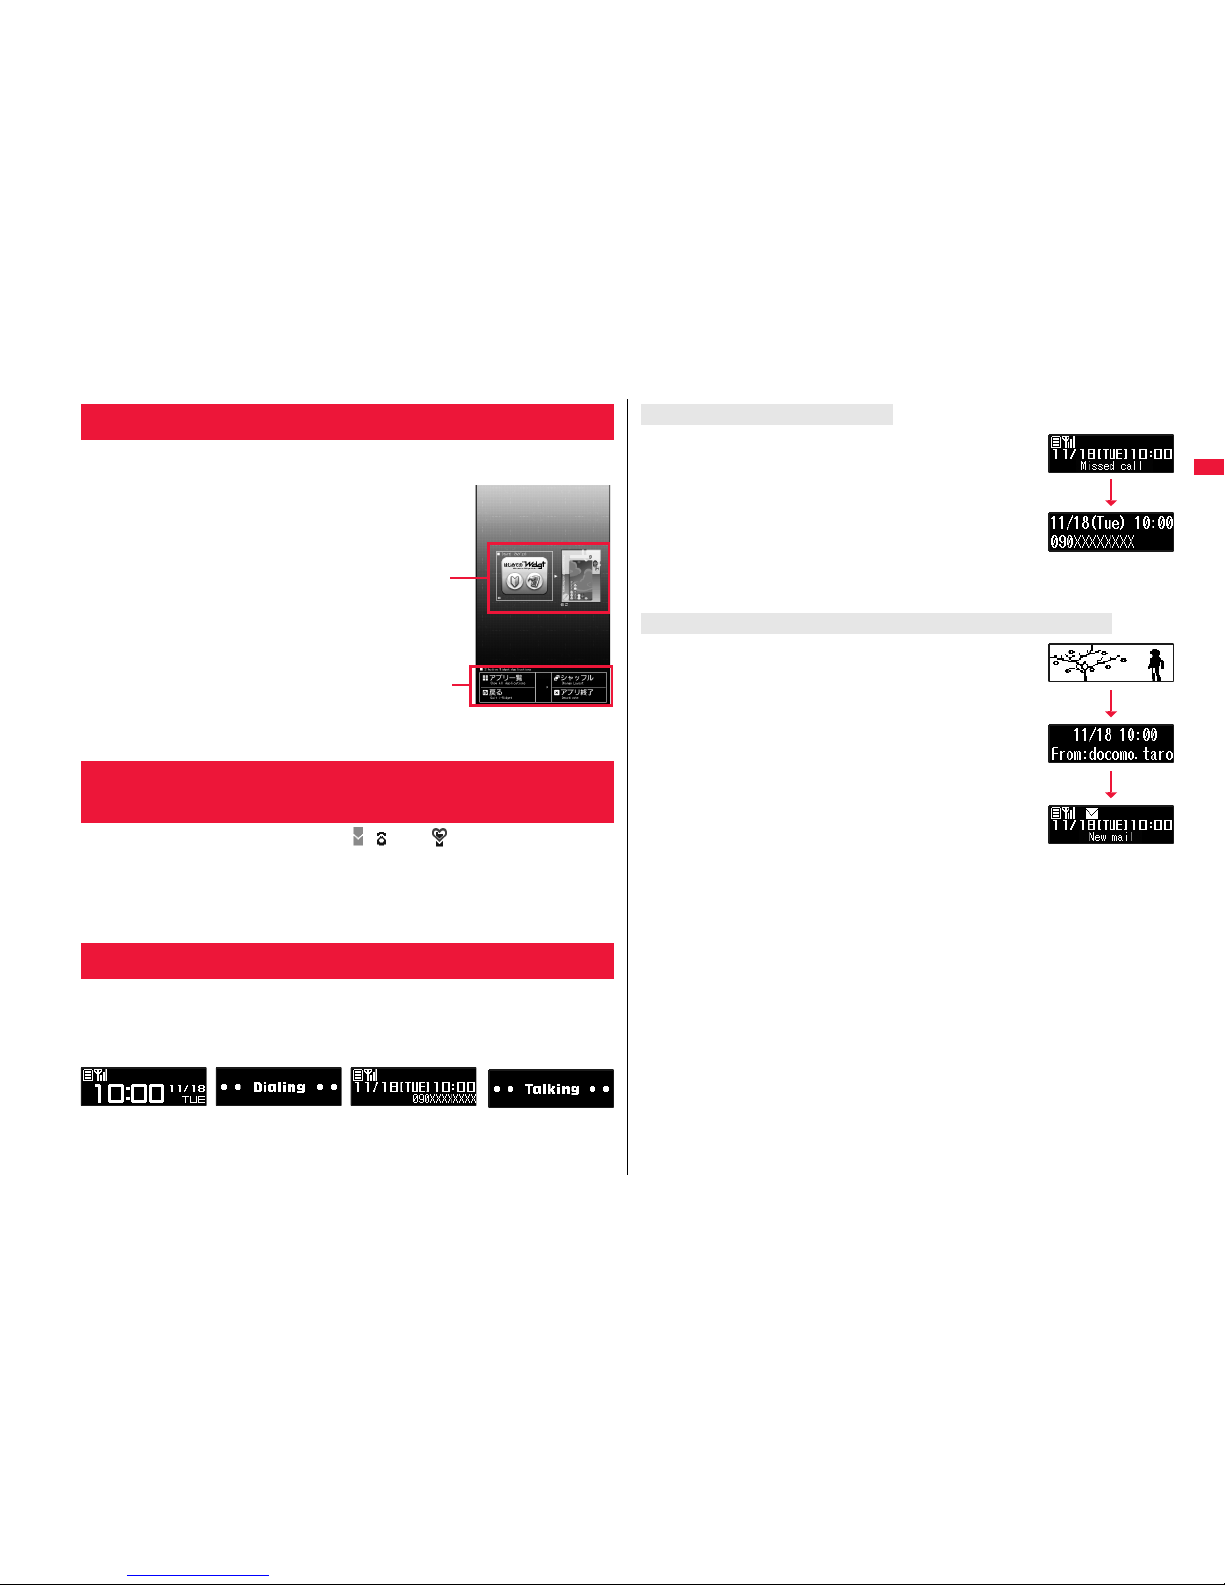
33
Before Using the Handset
You can simultaneously start multiple Widget αppli programs, and can
display as Widget αppli list on the i-Widget display.
1Widget αppli
Widget αppli that is already starting is displayed.
If you select a Widget αppli program, you can display it
individually.
2Navigation displays
Navigation that corresponds to the button operation is
displayed.
≥If you press i[シャッフル (Shuffle)] on the i-Widget
display, you can randomly change the indication order
of Widgt αppli.
≥See P.312 for detailed operations of i-Widget.
The symbols on the display (such as , , and ) are called icons. You
can check the meanings of them on the display.
1
m1Set./Service1Display1Icons
1Use Mo to highlight an icon.
Various information is displayed on the Private window like the following
examples:
Information is displayed for about 15 seconds in cases such as when you
press </> or p with the FOMA terminal closed.
i-Widget Display and Operations
+m-3-6
<Icons>
Displaying Description of Icons
i-Widget display
1
2
Private Window
Clock Receiving a call
During a voice call
Dialing
When the FOMA terminal is closed, “Missed call” appears.
Press < to display the missed call record. The name is
displayed for the missed call coming from the party stored in the
Phonebook. When there are multiple missed calls, up to three
missed call records are displayed each time you press <.
≥If you have received 30 or more incoming calls after a missed
call, the missed call record disappears.
≥Missed call records might not be displayed while another function is activated.
≥After you display a missed call record, “Missed call” disappears.
When the FOMA terminal is closed, a Feel*Mail image is played
back, and then “New mail” appears.
When you press <, the latest Feel*Mail image is played back.
(For Messages R/F, the Feel*Mail image is not played back.)
When “Mail” on page 115 is set to “ON”, the received date/time,
sender’s address (name), and subject of the mail or the received
date/time and subject of the Message R/F are displayed. The
sender’s name is displayed for the mail coming from the party
stored in the Phonebook. When multiple mail messages or
Messages R/F are received, up to three mail messages or
Messages R/F appear each time you press < with “New mail”
displayed.
≥Press < to end the playback of the Feel*Mail image or to clear the received date/
time, and others.
≥For the mail messages and Messages R/F sorted to the box or folder with security set,
the Feel*Mail images, received date/time, and others are not played back/displayed.
≥When a mail message or Message R/F comes in while “Receiving display” is set to
“Operation preferred” and a display other than the Stand-by display is shown, “New
mail” appears without showing any information.
≥Depending on the setting of “Auto-display”, “New mail” appears without showing any
information when a Message R/F comes in.
≥After you display the received date/time and others of the received mail or Message
R/F, “New mail” disappears.
≥When a mail message or Message R/F comes in during a voice call or a videophone
call, information is not displayed even when “Receiving display” is set to “Alarm
preferred”.
≥When you set “Secret mail display” to “OFF” and you receive a secret mail message in
Normal Mode, a Feel*Mail image is not played back.
When a missed call is found
When a new mail message or Message R/F is received
Page 38
34
Before Using the Handset
When “i-Channel ticker” on page 115 is set to “ON” and the
FOMA terminal is closed, tickers flow on the Private window.
Press </> or p to end the tickers’ flow.
You can change displayed contents by pressing < while clock is shown.
Press m of the FOMA terminal to show Main Menu and then execute,
set, or check respective functions.
Some functions can be selected also by the operation other than pressing m. In this
manual, the operation by the easier way is described.
You can also switch to Simple Menu focusing on only basic functions for easy
operation. (See page 118)
This FOMA terminal supports Kisekae Tool (see page 118). If you use Kisekae Tool to
change the design of the Menu display, some menu configurations change according
to the usage frequency depending on the type of the menu.
Further, some menu numbers that are assigned to the menu items do not apply.
■Scroll Selection
Main Menu is composed of 12 main menu icons indicating each function.
If you select a main menu icon, the Sub-menu Item Selection display appears. If you
further select a sub-menu item, the Lower Sub-menu Item Selection display appears.
By repeating selecting, you can set and check the function.
■Menu Number Selection
You can display some functions by pressing m + menu number (see page 476).
■Multitask is Supported
You can simultaneously use some functions in Main Menu. (See page 401)
When i-Channel is received
Change Clock Display
Selecting Menu
Time only Icons and Date/time
In this manual, the description of the command navigation key operation
(selection of top/bottom/left/right, and press of Oo after selecting/
entering a function item) is omitted. Scroll selection is explained below
using the example of selecting the function “Quality alarm”:
Scroll Selection
Description Example of Steps
1
Main menu icon
Sub-menu item
Function name of lower sub-menu item
Items which appear on the display
No tone . . . . . . . . .
Does not sound.
High tone
. . . . . . . .
High alarm sounds.
Low tone
. . . . . . . .
Low alarm sounds.
m
Set./ServiceTalkQuality alarmSelect an alarm.
Page 39
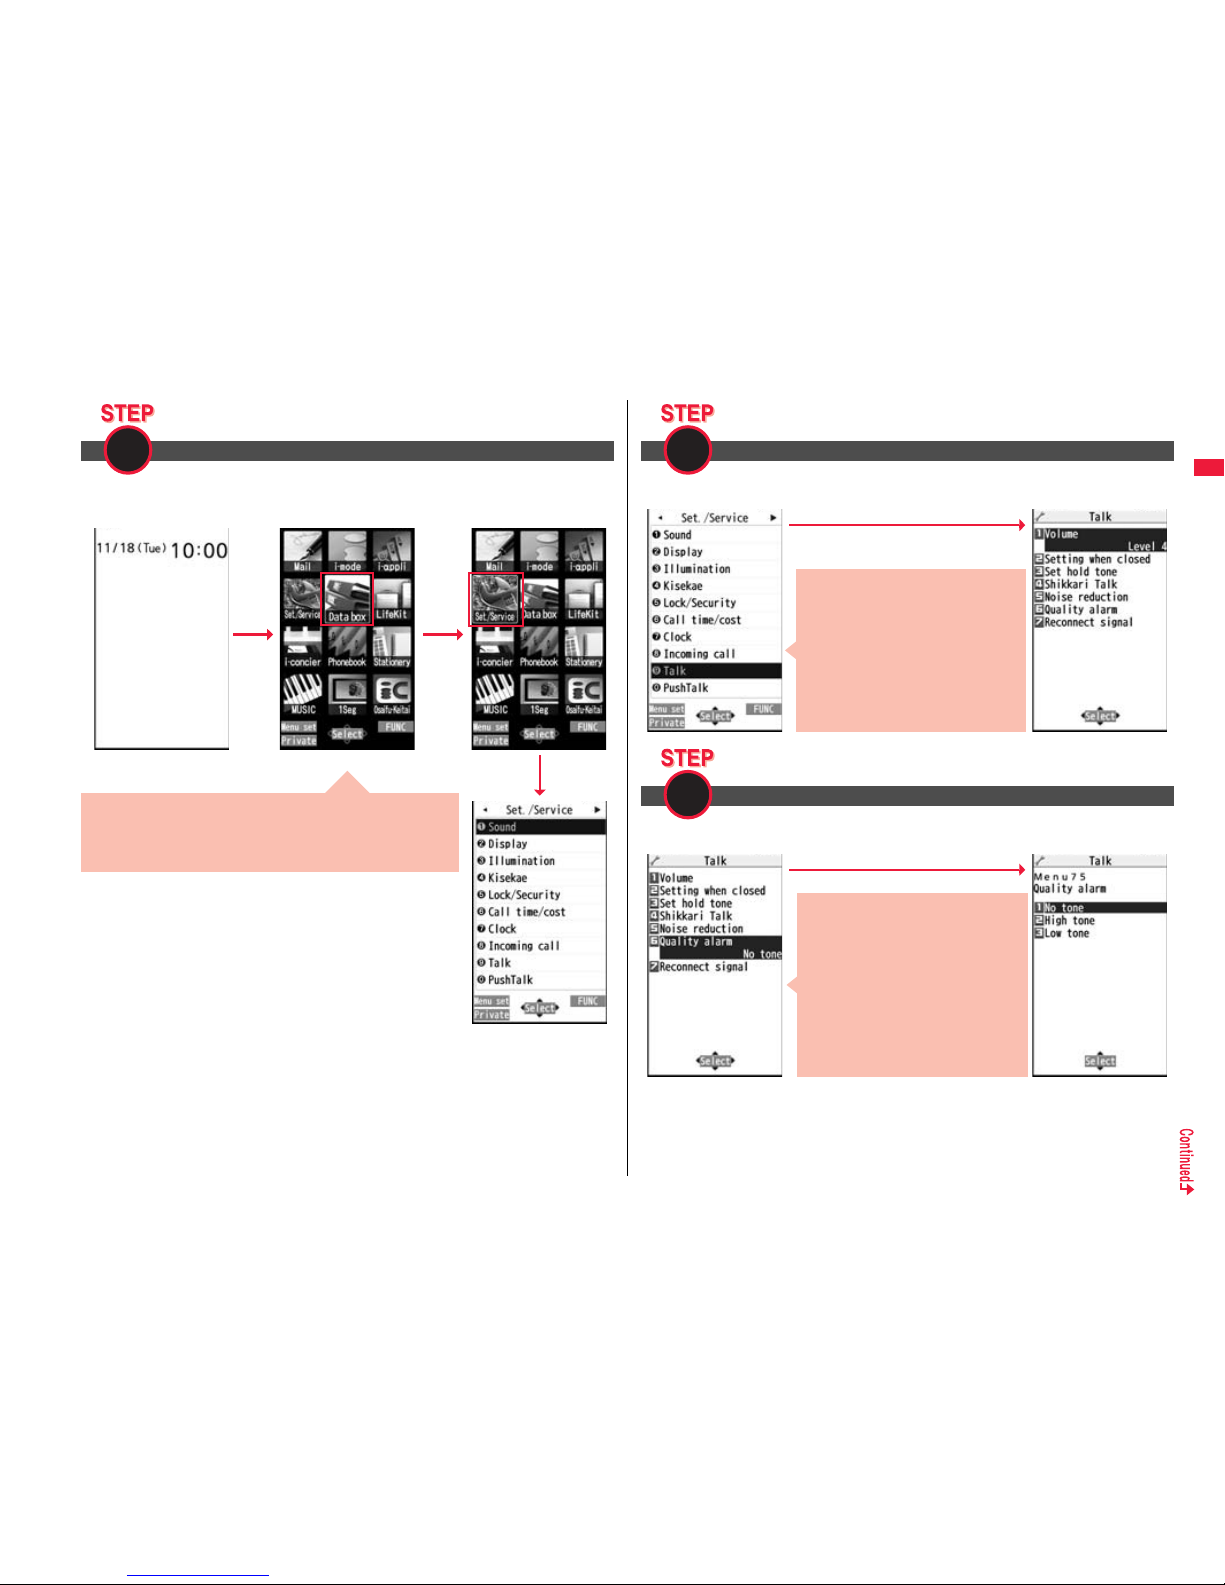
35
Before Using the Handset
Select “Set./Service” from Main Menu. Main Menu at purchase differs depending on the
body color. (See page 481)
Select a main menu icon from the menu function
1
Press +Mo to highlight the icon. Press and hold +Mo to scroll
the icons continuously.
If you have not touched any key for 15 seconds, the
Stand-by display returns.
+m
+Mo
+Oo
Main Menu
Select “Talk” from “Set/Service”.
Select “Quality alarm” from “Talk”.
Select a sub-menu item from the menu function
2
Select a desired lower sub-menu item (function)
+Oo
The highlighted item is the currently
selected one.
Press +Xo to highlight the item
below, and +Zo to highlight the item
above.
Press and hold +Bo to scroll the
items continuously.
Press +No to scroll page by page.
3
+Oo
Press
+Xo
to highlight the item below,
and
+Zo
to highlight the item above.
Press and hold
+Bo
to scroll the items
continuously.
When the items are listed over
multiple pages, the total number of
pages and the current page number
are shown at the upper right of the
display.
Page 40
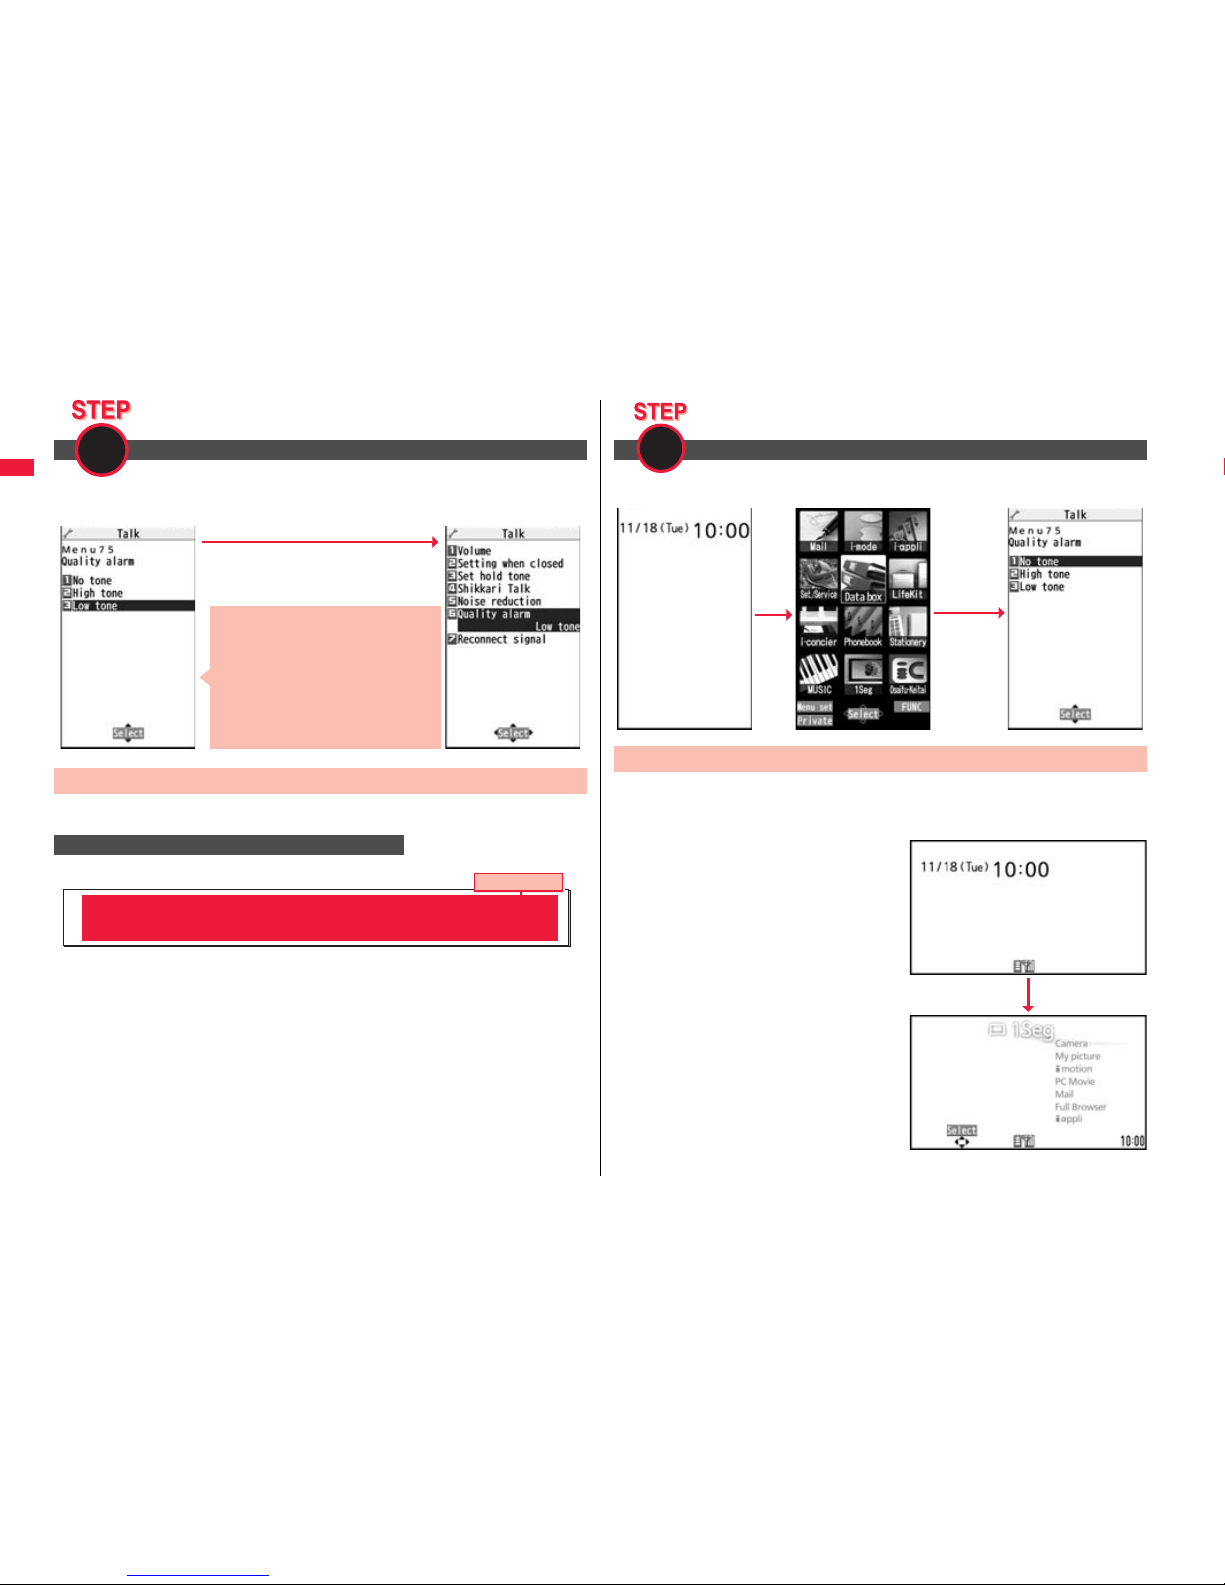
36
Before Using the Handset
Some menu items have even more detailed menus.
The example below shows how to set “Low tone” for “Quality alarm”.
Menu Number Selection is explained below using the following example:
Set or check the function
4
Menu Number Selection
Description Example of Menu Number
+Oo
The highlighted item is the currently
selected one.
Press +Xo to highlight the item
below, and +Zo to highlight the item
above.
Press and hold +Bo to scroll the
items continuously.
Menu number
<Quality Alarm>
Sounding Alarm when a Line is Nearly Disconnecting
+m-7-5
From the Stand-by display, press m75.
Horizontal Open Menu enables you to quickly access the functions that
are available for the horizontal display. To show Horizontal Open Menu,
press m from the horizontal Stand-by display.
Horizontal Open Menu at purchase differs
depending on the body color.
(See page 481)
When “Work with style” is set to “Horizontal
Open Menu”, Horizontal Open Menu
automatically appears just by switching to
Horizontal Open Style.
If you have not touched any key for 15
seconds, the Stand-by display returns.
Some operating procedures or items which
appears on the display in Horizontal Open
Menu differ from the ones described in this
manual.
Call up the function using the menu number
1
Horizontal Open Menu
+m
-7-5
+m
Page 41

37
Before Using the Handset
If you press i when “ ” is shown at the lower right of the display,
the Function menu including selectable items such as “Save”, “Edit”,
and “Delete” appears in each operation. The contents of the Function
menu depend on the display from which you show the Function menu.
When the items are listed
over multiple pages, the total
number of pages and the
current page number are
shown at the upper right of
the Function Menu display.
In this manual, the operation of the Function menu is described as
follows:
Function Menu
Description Example for Function Menu
+i
Delete all You can delete all files.
Enter your Terminal Security CodeYES
Item displayed in the Function menu
Operating procedures after selecting
an item in the Function menu
An actual operation is done as follows:
Press the numeric key corresponding to the
displayed item number.
When menu items are listed over multiple pages, you can show the previous/next page
by pressing Bo with the uppermost/lowermost item highlighted. You can press No to
scroll through page by page. When / is displayed on the display, you can
scroll through page by page also by pressing m()/c().
Depending on the display being shown, such as lower sub-menu items, you might be
able to scroll through page by page also by pressing </> instead of No.
To select an item quickly <Direct selection>
Item scroll
Press +i().
Use +Mo to highlight
“Delete all” and press
+Oo().
Enter your Terminal
Security Code and press
+Oo().
Use +Bo to highlight
“YES” and press
+Oo().
Item number
Page 42

38
Before Using the Handset
With the functions you can select multiple items, put a check
mark for check boxes to select them. Each time you press
Oo( ), you can switch
“”
and
“”
.
With some functions, you can put or clear check marks at a
time by pressingi()and selecting “Select all/Release all”or by pressing
m(/).
“”
is placed to the selected item depending on the function.
The Lower Sub-menu Item Selection display is shown. When you press h, the
Stand-by display returns (except during Multitask). The Stand-by display or the former
display automatically returns depending on the function.
Press h. The contents of the setting are abandoned and the Stand-by display or the
former display returns. The confirmation display appears asking whether to abandon the
setting contents depending on the function. You can press r to return to the previous
operation.
Press Bo to highlight “YES” or “NO”, then press Oo().
Check box
After finishing the operation
To cancel the operation midway
When the “YES/NO” selection display appears
For Reset Settings
You can search for the functions you want to know and use, and then
check the operating methods. You can execute some functions from
“
使いかたナビ
(Guide)”. This function is available in Japanese Mode only.
1
mステーショナリー
(Stationery)
使いかたナビ
(Guide)Select an item.
おすすめ機能 (Recommendable functions)
. . . Displays the recommendable functions. Go to step 3.
キーワード検索 (From keywords)
. . . Enter keywords and retrieve. Go to step 2
機能一覧検索 (From Function list)
. . . Retrieves from the function list. Go to step 3.
検索履歴 (Search history)
. . . Displays up to 30 search histories. Go to step 3.
Highlight each item and press l( ); then the
detailed operating methods are displayed.
The 使いかたナビ
(Guide) display appears also by selecting the 使いかたナビ
(Guide) icon “ ” pasted on the desktop at purchase.
2
Enter a keyword.
Up to 50 search results are displayed.
You can enter up to 24 full-pitch/48 half-pitch characters.
3
Select a functionSelect an item.
機能の説明 (Description) . . . . . . . . Displays explanations for the function.
操作のしかた (How to operate) . . . Displays the operating method.
この機能を使う (Operate function)
. . . . . . . . . . . . . . . . . . . . . . . . . . . . . .Executes the function. Operate each function.
For some functions, press Oo( ) several times for selection.
You can display explanations about the function also by pressing l()
while highlighting the function.
To delete search history, press i( ) and select “1件削除 (Delete this)” or
“全削除 (Delete all)”, then select “YES”.
<Guide>
When You Forget Key Operation
Page 43

39
Before Using the Handset
The UIM is an IC card that holds your information such as phone
numbers. It can hold data such as Phonebook entries and SMS
messages as well. By sharing a UIM, you can operate multiple FOMA
terminals for multiple purposes.
You cannot use the FOMA terminal for communication such as voice and
videophone calls, i-mode, sending/receiving mail, or packet
communication unless the UIM is inserted.
For details on how to use the UIM, refer to the UIM instruction manual.
When inserting or removing the UIM, take care not to accidentally touch
or scratch the IC.
You need to turn off the power and then remove the battery before you
insert the UIM. (See page 41)
■Inserting
1
With the golden IC surface
downward, push the UIM slowly
to the end while pressing the
surface of it.
■Removing
1
While sliding the UIM, pull it out
slowly.
Using UIM (FOMA Card)
Insert/Remove
Cut
You can set two security codes, PIN1 and PIN2, for a UIM. (See page 126)
The FOMA terminal has the UIM security function (UIM restriction
function) as a security function to protect your data files.
If you obtain data files by the method below with the UIM inserted, UIM
security function is automatically set to them.
・When downloading images or melodies and so on, from sites or
Internet web pages
・When receiving i-mode mail with file attachments
The data files with the UIM security can be browsed, played back, started,
edited, attached to mail, or transferred via infrared rays only when the
UIM used for obtaining is inserted. When the UIM used for obtaining the
data or files is not inserted, or when another UIM is inserted, these
functions are not operable.
In the explanation hereafter, the UIM used to obtain data and files is referred to
as “your UIM” and other UIMs as “another person’s UIM”.
Information
Make sure that you insert/remove the UIM with the FOMA terminal closed and held in
your hand.
Take care not to force the UIM into place because this can break it.
Take care not to lose the UIM once you remove it.
When you replace your UIM (except during Omakase Lock), you need to enter the
four- to eight-digit Terminal Security Code after turning on the power. When you enter
the correct Terminal Security Code, the Stand-by display appears. If you enter the
incorrect Terminal Security Code five times in succession, the power turns off.
(However, you can turn on the power again.)
Security Code
Security Function of UIM
Page 44

40
Before Using the Handset
When the UIM is not inserted or when another person’s UIM is inserted, the following
types of data and files are displayed with the restrictions symbol, “ ”:
・Videophone record messages ・Movie memos ・Screen memos
・Templates ・i-αppli programs ・Images
・i-motion movies ・Chara-den images ・Melodies
・Machi-chara images ・Kisekae Tool files ・PDF files
・Chaku-uta
®
/Chaku-uta Full® music files
・Downloaded dictionaries
・Files attached or pasted to i-mode mail in the Inbox
・Files attached to i-mode mail in the Outbox/Draft (except the data shot or edited
with the FOMA terminal)
・Messages R/F with files (melodies or images) attached or pasted
・Images inserted into Deco-mail text
※This function applies to the pre-installed i-αppli programs, Chara-den images,
Deco-mail pictograms, etc. if they are reinstalled (upgraded) from a site.
※“Chaku-uta” is a registered trademark of Sony Music Entertainment Inc.
The preview image for the data file with the UIM security appears as
shown on the right.
♪
♪
♪
♪
♪
If the UIM used for
obtaining data files
or mail messages is
inserted, you can
browse/play back the
data files with the UIM
security.
♪
♪
♪
♪
♪
Unless the UIM used
for obtaining data files
or mail messages is
inserted, you cannot
browse/play back the
data files with the UIM
security.
Your UIM
Another
person’s UIM
Replacing UIMs
If you use the blue UIM with your FOMA terminal, note that following
specifications differ from those of the green/white UIM:
Information
When the UIM security is set for data files, you cannot set them for the functions such
as “Display setting” and “Select ring tone” when another person’s UIM is inserted.
When the data files with the UIM security is set for “Display setting” or “Select ring
tone”, the FOMA terminal works with their default settings if you replace your UIM with
another person’s UIM. If you insert your UIM again, your settings are enabled again.
The UIM security function is not set for the data files received using the infrared
communication function or data transmission (OBEX™ communication) function and
the still images/movies shot or edited with the FOMA terminal.
Even when another person’s UIM is inserted, you can move/delete data files with the
UIM security.
The settings of the following functions are stored on the UIM:
・SMS validity period ・SMS center selection ・Select language
・PLMN setting ・PIN1 code, PIN2 code ・PIN1 code entry set
・Validating/Invalidating DOCOMO Certificate 1 and user certificate
Types of UIM (FOMA Card)
Functions
UIM
Reference
(blue)
(green/white)
Number of digits of the phone number
that can be stored in the UIM Phonebook
20 max. 26 max. 91
Operation of user certificate to use
FirstPass
Not available Available 210
Use of WORLD WING Not available Available 460
Use of Service Numbers for “DOCOMO
repair counter” and “General inquiries
<docomo Information Center>”
Not available Available 447
Page 45

41
Before Using the Handset
Use the FOMA terminal’s dedicated Battery Pack P19.
■Attaching
1
While pressing the “ ” part of
the back cover in the direction A,
slide the back cover (2 mm or
more) in the direction B to
unlock.
2
With the arrow mark facing up, fit
the tab side of the battery pack to
the FOMA terminal securely, and
then push the battery pack into
the direction B while pressing it
against the direction A.
■WORLD WING
WORLD WING is the DOCOMO FOMA international roaming service that enables
you to use the current phone number overseas for making and receiving calls using
the UIM (green/white) and service compatible mobile phone.
You do not need to subscribe to WORLD WING if you have subscribed to the FOMA
service after September 1, 2005. If you offered that you did not need WORLD WING
at the time you signed up for the FOMA service, or when you have midway canceled
WORLD WING, you are required to take the procedures to newly subscribe to
WORLD WING.
If you have signed up for the FOMA service before August 31, 2005, and have not
yet subscribed to WORLD WING, you are required to subscribe to it.
This service is not available with some billing plans.
If you lose your UIM (green/white) or have it stolen overseas, immediately contact
DOCOMO to take the steps necessary for suspending the use of the UIM. For
inquiries, see “docomo Information Center” on the back page of this manual. Note
that you are still charged the call and communication fees incurred after you lose it or
have it stolen.
Attaching/Removing Battery Pack
Arrow mark
3
Slide the back cover in the
direction of the arrow and attach
it in place.
■Removing
1
Remove the back cover
following step 1 of
“■Attaching”, and take hold of
the projection of the battery pack
to lift it up.
Projection
Information
Make sure that you attach/remove the battery with the FOMA terminal closed and
held in your hand after you turn off the power. Also, make sure not to press the
one-push open button when you attach/remove the battery.
If you try to force the battery into place, you could damage the UIM or the charging
terminal of the FOMA terminal.
Page 46

42
Before Using the Handset
Use the FOMA terminal’s dedicated Battery Pack P19.
Life of battery pack
Battery packs are consumables. The usable time shortens slightly each time they are
charged.
When the usable time of the battery pack becomes half the time it was purchased,
replacing is recommended because the battery pack is nearing the end of its life.
Depending on the use conditions, the battery pack may swell as it nears the end of its
life, but this is not a problem.
The life of the battery pack may shorten if you use i-αppli programs, talk on the
videophone, watch 1Seg programs and so on for a long time during charging.
Charging
For details, refer to the instruction manuals for the FOMA AC Adapter 01/02 (option),
FOMA AC Adapter 01 for Global use (option), and FOMA DC Adapter 01/02 (option).
The FOMA AC Adapter 01 supports 100 V AC only. The FOMA AC Adapter 02 and
FOMA AC Adapter 01 for Global use support from 100 V AC through 240 V AC.
The shape of the plug for the AC adapter is for 100 V AC (for domestic use). To use the
AC adapter that supports from 100 V AC through 240 V AC overseas, you need to
have a conversion plug adapter that is compatible with the voltage of the country you
stay. Do not use a transformer for overseas travel to charge the battery pack.
Even during charging, you can still answer calls if the FOMA terminal is turned on. This
will consume the charged amount so that charging will take longer. Also, the standby
time or talk time might be shorter if you charge the battery pack with your FOMA
terminal open.
If you have a long time videophone call during charging, the temperature in the FOMA
terminal may rise and charging may be suspended. In such a case, wait for a while and
try charging again.
Remove and insert the connector slowly and carefully, without using unnecessary
force.
Do not remove the battery pack during charging.
Charging
For environmental protection, bring the unneeded battery
pack to an NTT docomo shop, dealer, or recycle shop.
Li-ion 00
Do not charge for long periods of time (several days) with the FOMA
terminal turned on.
If you leave the FOMA terminal powered on for long periods of time during charging,
you may not be able to use the FOMA terminal for long duration as expected and the
low battery alarm may sound soon, because the FOMA terminal receives the power
from the battery pack after charging is completed. If this happens, charge the battery
pack correctly. When charging the battery pack again, first remove the FOMA terminal
from the AC adapter (or desktop holder) or DC adapter and then set it again.
Estimated usable time for battery pack (The usable time for the battery pack
varies with the charging time and the remaining life of the battery pack.)
※The continuous talk time is the estimated time that the FOMA terminal can be used for
calls when radio waves can be sent and received normally.
※The continuous standby time is the estimated time when radio waves can be received
normally. The standby time could be about half of this estimate depending on the
charge level of the battery pack, function settings, other ambient conditions such as
temperature, and the status of radio waves in the area (weak or no radio waves, for
instance). When you use i-mode communication, the talk/communication time and
standby time will be shorter. Further, even if you do not make calls or not execute
i-mode communication, the talk/communication time and standby time will be shorter if
you watch 1Seg programs, compose i-mode mail, start up a downloaded i-αppli
program or the i-αppli Stand-by display, execute data communication or Multiaccess,
use the camera, play back music, or use Bluetooth connections.
※The continuous talk time and the continuous standby time may be shortened
depending on the network environment in the country you stay.
※
The continuous standby time for standstill is the average number of hours you can use the
FOMA terminal in standstill status when it is closed and can receive radio waves normally.
※The continuous standby time for in motion is the average number of hours you can
use the FOMA terminal in the combined status of “standstill” “moving” and “out of the
service area” when it is closed, in an area where it can receive radio waves normally.
Continuous
standby time
FOMA/3G
Select networks
[3G]
In motion: Approx. 410 hours
Select networks
[Auto]
Standstill: Approx. 580 hours
In motion: Approx. 400 hours
GSM
Select networks
[Auto]
Standstill: Approx. 260 hours
Continuous
talk time
FOMA/3G Voice call: Approx. 200 minutes
Videophone call: Approx. 110 minutes
GSM Voice call: Approx. 190 minutes
1Seg watching time
Approx. 200 minutes
(Mobile W-Speed is OFF: Approx. 260 minutes)
(In ECO Mode: Approx. 360 minutes)
Page 47

43
Before Using the Handset
※The 1Seg watching time is the estimated time for when radio waves can be received
normally with the Flat-plug Stereo Earphone Set P01 (option) connected. The
watching time might be shortened depending on the charge level of the battery pack,
function settings, other ambient conditions such as temperature, and the status of
radio waves in the area (weak or no radio waves, for instance).
Estimated time for charging battery pack
※The charging time is an estimate of time for when empty battery pack is charged with
the FOMA terminal turned off. The charging time will be longer if you charge the
battery pack with the power of the FOMA terminal turned on.
AC adapter Approx. 130 minutes DC adapter Approx. 130 minutes
Charge with AC Adapter and Desktop Holder
1
Plug in horizontally with
engraved side of connector
of AC Adapter (option) facing
down.
2
Up to AC Adapter’s plug into a
power socket of 100 V AC such
as the family use.
Call/Charging
indicator
Desktop Holder
Engraved surface
(down side)
AC Adapter
Stopper
Power
socket
Lock claw
AC Adapter’s
plug
Connector
3
Put the bottom of the FOMA terminal into the stopper of
the desktop holder (A) to fit the head to the lock claw,
and then depress the FOMA terminal until it clicks (B).
Check that the Call/Charging indicator lights in red.
When the Call/Charging indicator flickers, dismount the AC adapter and battery
pack from the FOMA terminal and then re-mount them for charging.
If the symptom persists, troubles with the AC adapter, desktop holder or battery
pack may be involved, so consult a handling counter such as a docomo shop.
Be sure to charge the FOMA terminal with the FOMA terminal closed.
The charging confirmation tone (see page 109) sounds when charging starts and
ends. However, it does not sound when the power is off or during Manner Mode
or Public Mode (Drive Mode).
Be sure to set the FOMA terminal firmly onto the desktop holder. Also, be careful
that the connector cover or a commercial strap is not caught between the FOMA
terminal and desktop holder.
4
When charging is completed, hold the desktop holder
with fingers and lift up the head of FOMA terminal to
remove.
Unplug the AC adapter from the power socket when you are not going to use it for
a long time.
■Indicator and display during charging and when charging is completed
When the FOMA terminal is turned off, “ ” does not appear.
If you start charging with the battery flat, the Call/Charging indicator might not light
immediately; however, charging itself has started.
Call/Charging indicator “ ” display
Charging Lights in red Blinks
Charging completed Off Lights
Page 48
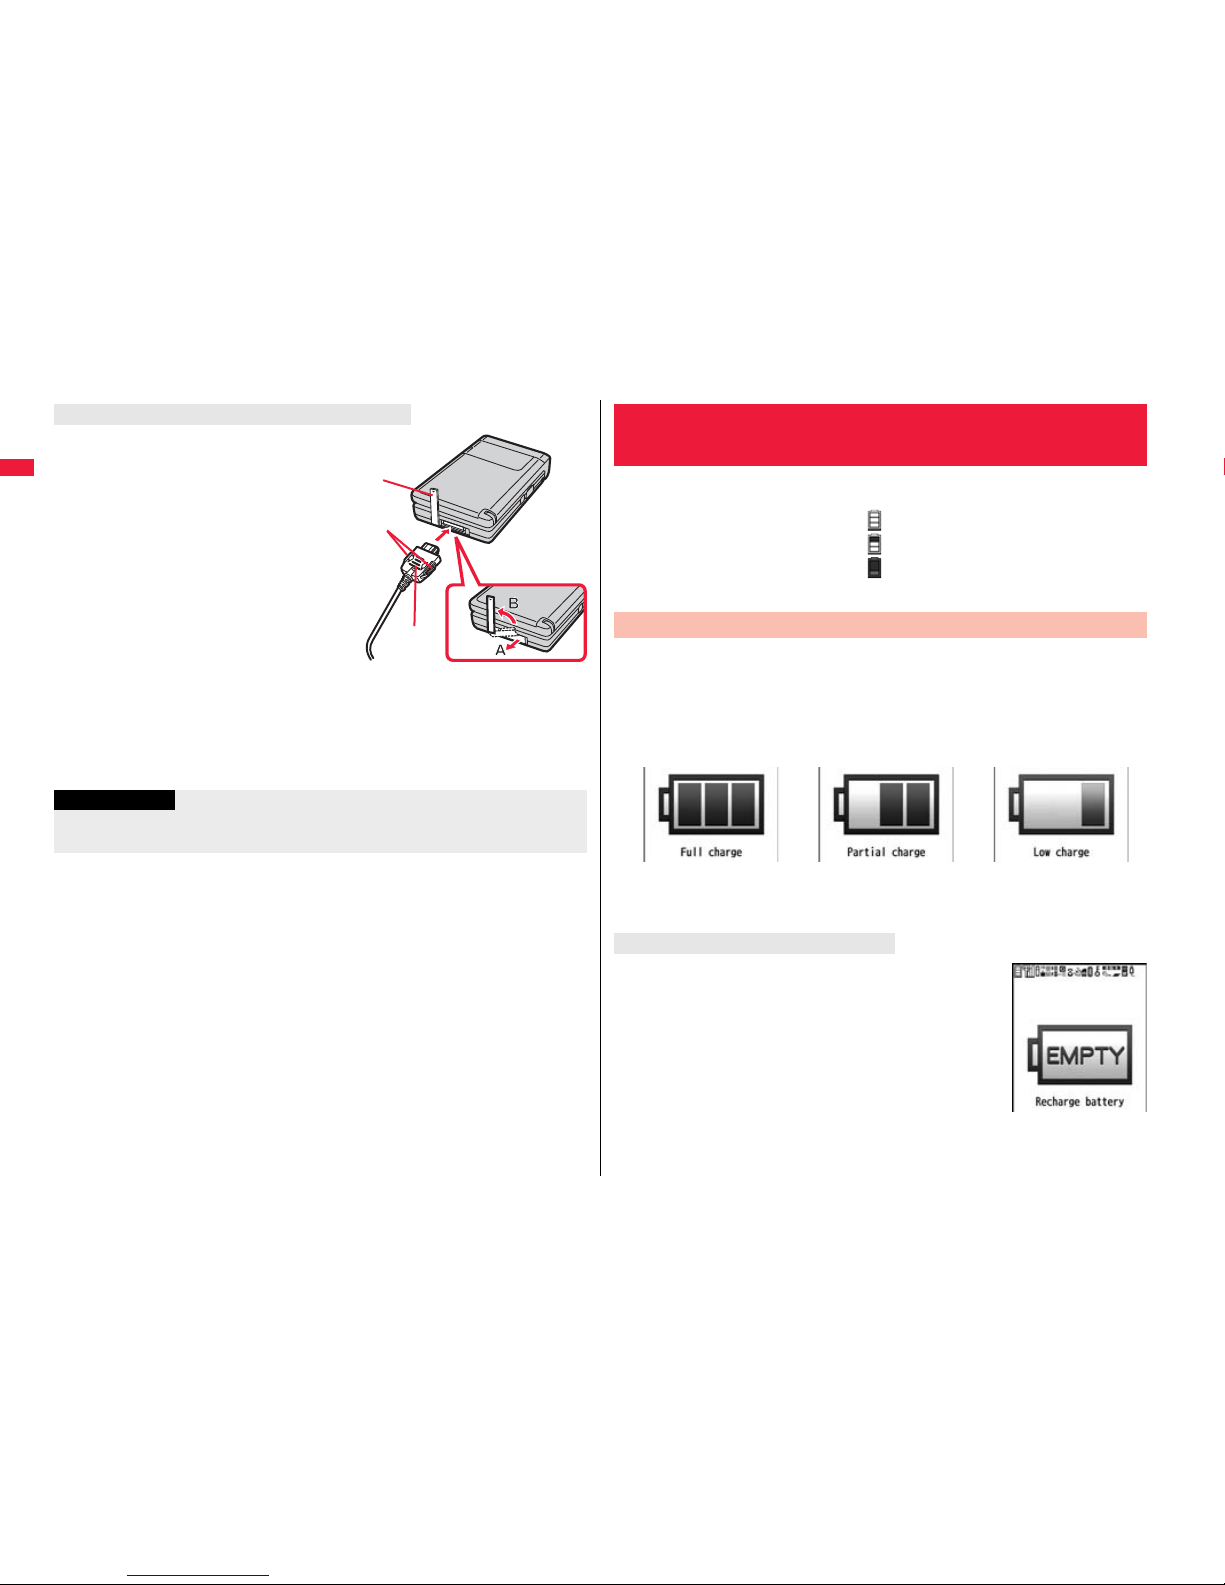
44
Before Using the Handset
Insert the connector with the engraved
surface facing up until it clicks. Pull straight
the connector out while pressing the
release buttons.
To charge the battery, place the cover of
the connector terminal as illustrated. Pull
out the cover of the connector terminal to
direction A, and turn it as direction B.
※Check the facing direction (front or rear)
of the AC adapter plug and then insert
or pull it horizontally into or out of the
FOMA terminal.
Malfunction could result if you try to pull
it forcibly.
■DC adapter (option)
With the DC adapter, you can use a cigarette lighter socket (12 V/24 V) of cars to
charge the FOMA terminal with the battery pack attached.
For details, refer to the instruction manual for the FOMA DC Adapter 01/02.
When charging only with the AC adapter
Cover
Release
buttons
Engraved
surface
Information
If the fuse blows off when charging with the DC adapter, be sure to use a 2A fuse. The
2A fuse is consumables, so purchase at auto parts stores in your neighborhood.
When the FOMA terminal is turned on, an estimate of the battery level is
indicated by the icon.
・Almost full . . . . . . . . . . . . . . . . . . .
・Getting low. . . . . . . . . . . . . . . . . . .
・Almost empty . . . . . . . . . . . . . . . .
Charge the battery when it is almost empty.
You can check an estimate of the battery level by the display and sound.
1
mSet./ServiceOther settingsBattery
Battery level
The pictograph disappears in about three seconds.
The display on the right appears and the low battery alarm
sounds for about 10 seconds. To stop this alarm, press any
key other than < and >. About one minute later, the FOMA
terminal will be turned off.
During a call, a beeping tone from the earpiece notifies you of
the low battery. About 20 seconds later your call will be cut
and then one minute later the FOMA terminal will be turned
off.
<Battery Level>
Checking Battery Level
Check by Display and Tone
Almost full Getting low Almost empty
※Almost empty.
Charge the battery.
Three beeps Two beeps One beep
When the battery is running out
Recharge Battery
display
Page 49

45
Before Using the Handset
1
Press and hold h for at least one
second.
After the Wake-up display (see page 114) is displayed,
the Stand-by display appears.
If you have stored many Phonebook entries or mail
messages, it may take a while for the display to appear.
If Set Time is set, the current date and time are shown.
When “ ” is displayed, the FOMA terminal is out of
the service area or in the place where the radio waves
do not reach. Move to a location where “ ”
disappears.
If “Starting System Wait a minute” is displayed when
you turn on the power, wait for a while and then
proceed.
Enter the four- to eight-digit Terminal Security Code after turning on the power. When
you enter the correct Terminal Security Code, the Stand-by display appears. If you enter
the incorrect Terminal Security Code five times in succession, the power turns off.
(However, you can turn on the power again.)
Enter the four- to eight-digit PIN1 code after you turn on the power. When you enter the
correct PIN1 code, the Stand-by display appears. See page 126 for PIN1 code.
Enter the four- to eight-digit PIN2 code after you turn on the power. When you enter the
correct PIN2 code, the Stand-by display appears. If you press r or h without
entering the correct PIN2 code, “Auto reset setting” is set to “OFF” and the Stand-by
display appears. See page 126 for PIN2 code.
<Power ON/OFF>
Turning Power On/Off
Turn Power On
Stand-by display
When your UIM is replaced (except during Omakase Lock)
When “PIN1 code entry set” of “UIM setting” is set to “ON”
When “Auto reset setting” of “Notice call cost” is set to “ON”
(except during Omakase Lock)
Welcome mail messages have been saved by default. Press +Oo twice or perform the
operation of “Display Mail from Inbox” on page 164 to show the mail message.
1
Press and hold h for at least two seconds.
The exit display appears and the power turns off.
You cannot turn on the power immediately after turning off the power. Wait a few
seconds.
1
m
設定/サービス
(Set./Service)
ディスプレイ
(Display)バイリンガル
(Select language)
Japanese (
日本語
) or English (英語)
The following functions are different between Japanese display and English
display:
Check Welcome Mail
Information
Each entry display appears in the order of “PIN1 code” → “Terminal Security Code”
→ “PIN2 code”.
Turn Power Off
+m-1-5
<Select Language>
Switching Display to English
Functions Japanese English
Info Notice Setting 電子音 (Electrical tone)
ボイス (Voice)
OFF
ON
Not available
OFF
“Clock” of Display Setting
→ “Stand-by clock/Stand-by clock Wide”
→“Day of week”
Available Not available
使いかたナビ (Guide) Available Not available
Voice Guidance Available Not available
Information
When you insert the UIM, the “バイリンガル (Select language)” setting is stored on
the UIM.
Page 50
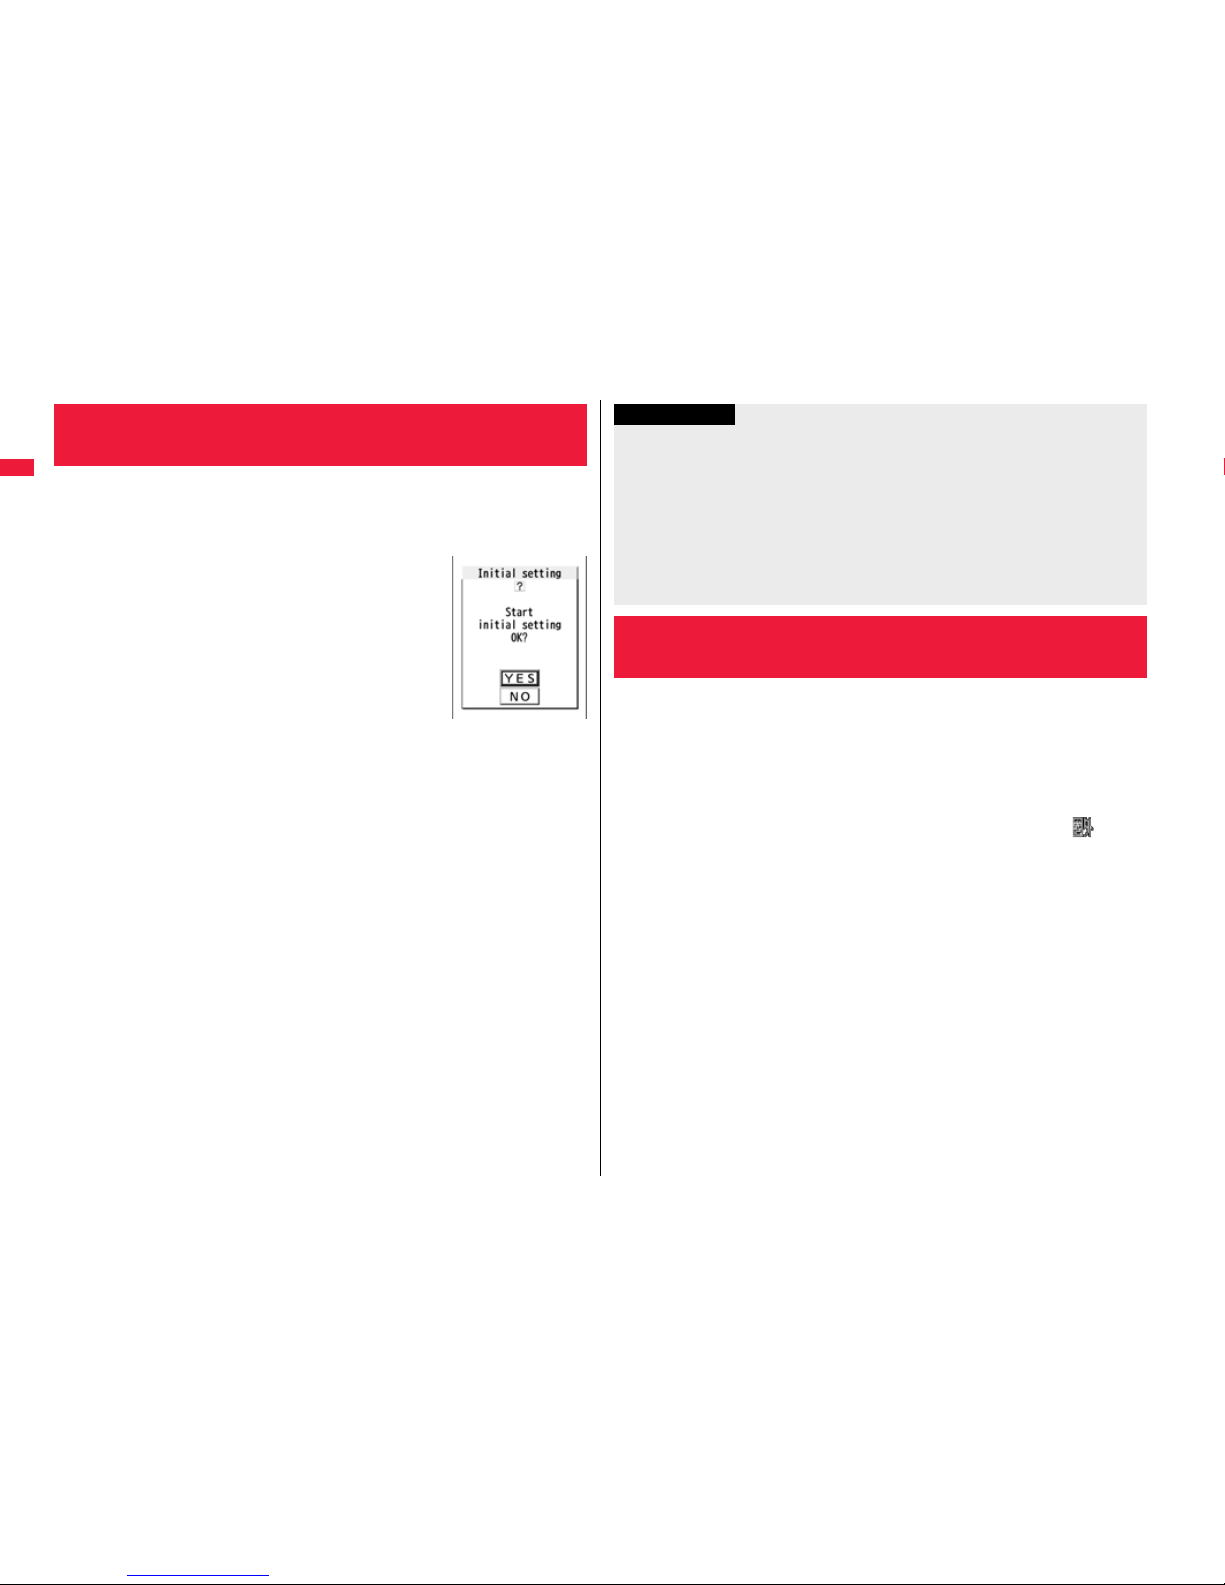
46
Before Using the Handset
If the date and time, Terminal Security Code, Keypad Sound, Location
Request Menu, or Character Size is not set, the Initial Setting display
appears when you turn on the power. You can set the initial settings also
from each menu function separately.
1
Turn on the powerYES
When the display for entering your Terminal Security
Code, PIN1 code, or PIN2 code appears, follow the
operation on page 45.
2
Set the date and time.
You can select “Auto time adjust ON” or “Auto time adjust OFF” for setting the time.
(See page 46)
3
Set your Terminal Security Code.
You can set your Terminal Security Code required for setting functions.
(See page 126)
1. Enter “0000”Enter your new Terminal Security Code (four to eight digits)
YES
4
Set Keypad Sound.
You can set whether to make a keypad sound. (See page 109)
5
Set Location Request Menu.
You can set whether to notify your current location for when a GPS location
provision request arrives. (See page 340)
6
Set the size of characters.
You can set the size of characters on the display at a time. (See page 123)
<Initial Setting>
Configuring Initial Setting
You can select whether to correct the time automatically or set it
manually. The time is set/displayed on the 24-hour basis.
1
mSet./ServiceClockSet time
Auto time adjust ON or Auto time adjust OFF
Auto time adjust ON
. . . . Corrects the date/time automatically. The setting is completed.
When the time cannot be corrected automatically such as when “ ” is
displayed and the date/time has not been set, the Manual Time Setting
display appears. Follow step 2 to set the date/time.
Auto time adjust OFF
. . . . Sets the date/time manually.
When “Notice call cost” is set to “ON”, you need to enter your Terminal Security
Code.
Information
When an unset function is found, the Initial Setting display for the unset function
appears each time you turn on the power.
The completed settings are valid even when total setting is interrupted by an incoming
call or canceled by pressing -h or -r midway.
When the power is automatically turned on by alarm notification, the Initial Setting
display does not appear even if there is any unset function.
When you finish the initial settings, the confirmation display appears telling that
updating software is executed automatically. This display appears only at the first
time, and after that, does not appear until you execute Reset Settings or Initialize.
+m-3-1
<Set Time>
Setting Date and Time
Page 51

47
Before Using the Handset
2
Enter year, month, date and time.
Use Mo to move the cursor and enter numbers by the
numeric keys.
To enter one-digit numeral for the date and time, enter
two digits beginning with “0” as in “01” through “09”.
Highlight “Time zone” and press l( ) to set the
time zone. Use Mo to select a region and press Oo().
The time displayed on the FOMA terminal is corrected according to the clock information
obtained from the network when the power is turned on.
The time is corrected when you show the Stand-by display with “Auto time adjust ON”
set.
If the time is not corrected for a while even after turning on the power, turn off and on the
FOMA terminal.
Some few second errors might occur. You might not be able to correct the time depending
on the radio wave conditions, or the i-αppli program set for the i-αppli Stand-by display.
When you receive the clock information overseas and the time difference correction
information differs from the previously received one, “Time is adjusted” is displayed and
the time difference is corrected automatically. Press “OK” to update the time and show
Redial, Dialed Calls, Received Calls, sent/received mail messages and others in local
time.
Depending on the networks overseas, the time difference might not be corrected.
About date/time correction function
Information
Unless Set Time is set, the functions which use the clock such as Schedule do not
work correctly. Further, the date/time for redial items and received call records are not
stored.
The set time is retained even when the battery pack is replaced, however, it might be
reset if the battery pack is left removed for a long time. In that case, charge the FOMA
terminal and then perform the clock setting.
When “Time zone” is set to other than “GMT +9” or the time difference is corrected
overseas, the sub clock (Japanese date/time, etc.) is displayed on the Stand-by
display.
This function supports clock settings from 00:00 on January 1, 2008 through 23:59 on
December 31, 2037.
You can display the time of the specified area on the Stand-by display.
1
mSet./ServiceClockWorld time watch
ON or OFF
Use Mo to select an area and press Oo().
You can advance the time displayed for the overseas country you stay
and for a region of World Time Watch by one hour.
1
mSet./ServiceClockSummer timeON or OFF
<World Time Watch>
Displaying World Time
Information
World Time Watch does not appear when “Display setting” → “Clock” → “Stand-by
clock/Stand-by clock Wide” → “Position” is set to “OFF”, or when you use the FOMA
terminal overseas.
Summer Time
Page 52
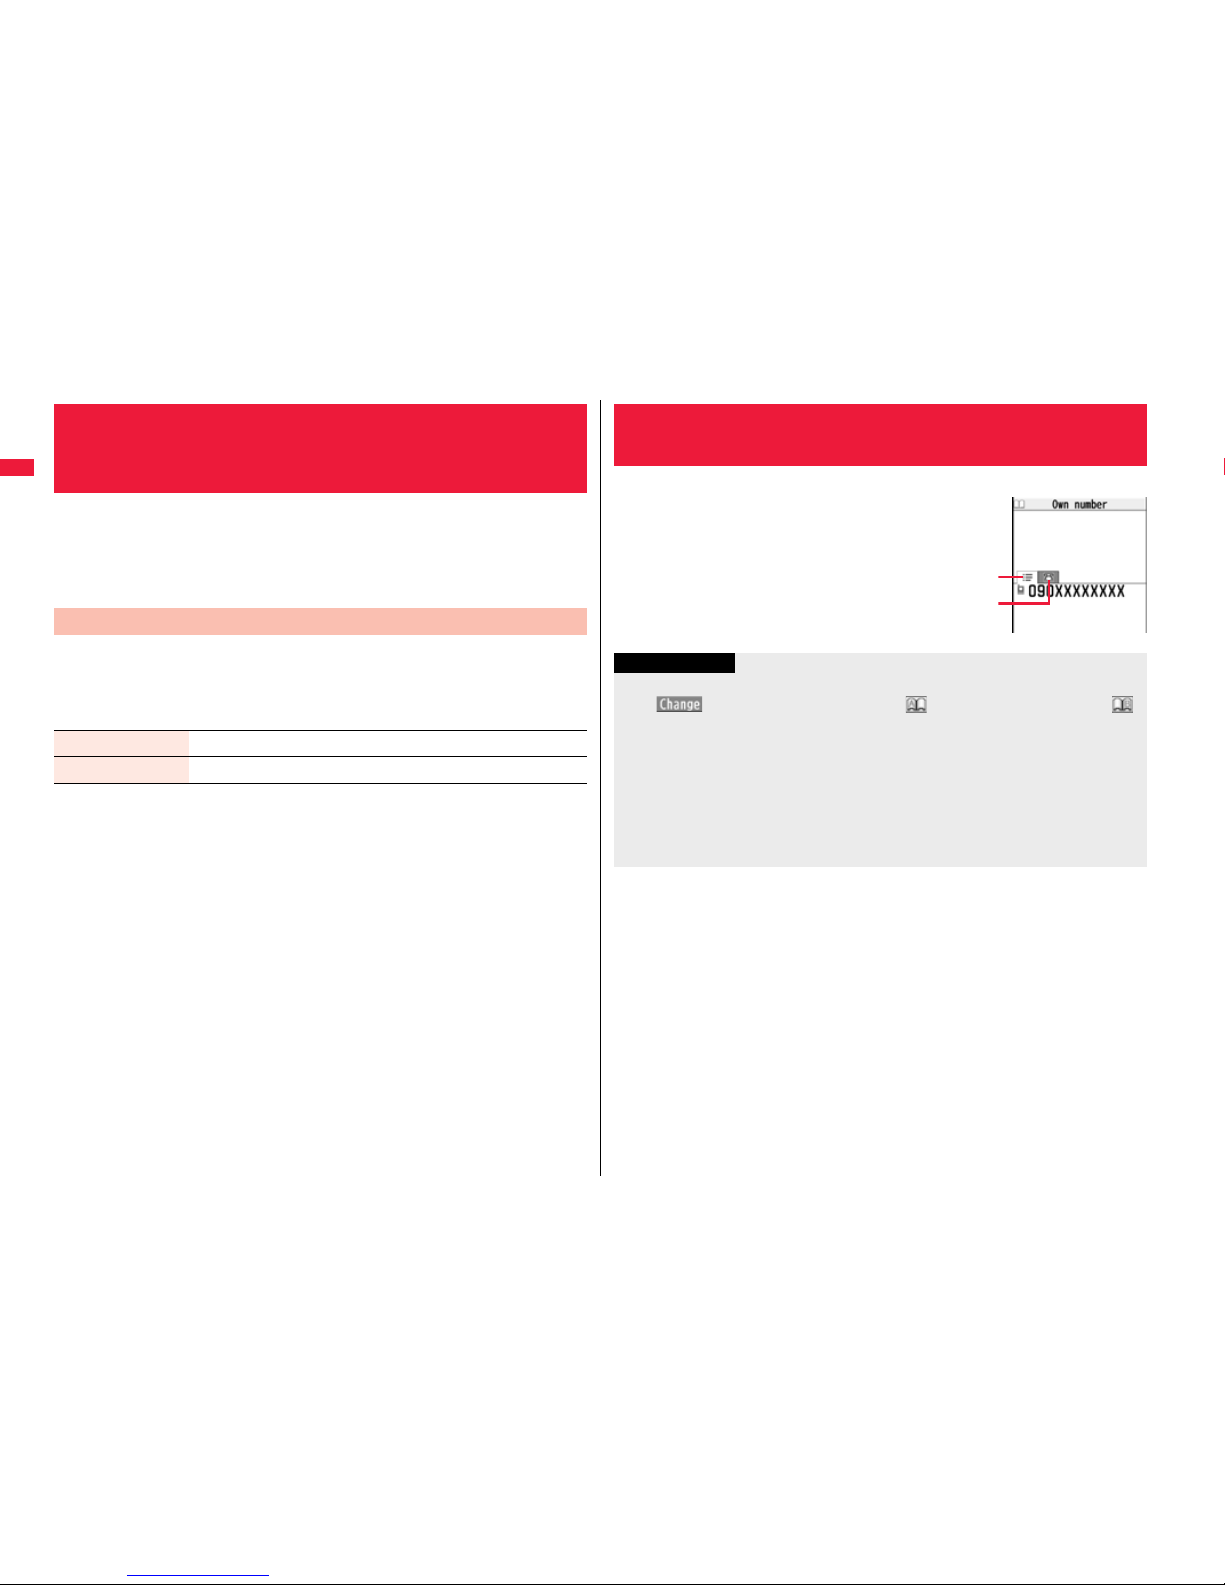
48
Before Using the Handset
You can set the FOMA terminal to send your phone number to the called
party’s phone when dialing. Your phone number is important
information, so take utmost care when notifying your phone number.
This function is available only when the other party’s phone supports
Caller ID.
You can set whether to notify your caller ID on the network.
1
mSet./ServiceNW servicesCaller ID notification
Do the following operations.
<Caller ID Notification>
Notifying the Other Party of Your Phone
Number
+m-1-7
Set Caller ID Notification to Network
Activate ON or OFF
Check setting You can check the setting contents of “Activate”.
Your phone number (own number) is stored on the UIM.
1
mPhonebookOwn number
You can press No to switch the tabs.
See page 414 for storing/displaying personal data.
+m-0
<Own Number>
Checking Your Own Phone Number
Own Number display
Phone number tab
List tab
Information
In Dual Mode of 2in1, you can switch between Number A and Number B by pressing
+Oo( ) from the Own Number display. “ ” appears for Number A, and “ ”
appears for Number B.
When you replace a UIM with another one (2in1 contractor → 2in1 contractor) while
using 2in1, perform “2in1 function OFF” (see page 451) and then set “2in1 setting” to
“YES”, or perform “Auto acquire No. B” (see page 415), to acquire the correct Number
B.
When you replace a UIM with another one (
2in1 contractor → 2in1 non-contractor
),
perform “2in1 function OFF” as well to update the owner’s information to the correct
one.
Page 53

49
Voice/Videophone Calls/PushTalk
Making Calls/Videophone Calls
Videophone Calls . . . . . . . . . . . . . . . . . . . . . . . . . . . . . . . . . . . . . . . . . . . 50
Making a Call/Videophone Call. . . . . . . . . . . . . . . . . . . . . . . . . . . . . . . . 50
Switching a Voice/Videophone Call . . . . . . . . . . . . . . . . . . . . . . . . . . . . 53
Using Call Records . . . . . . <Redial> <Dialed Calls> <Received Calls> 54
Using Chaku-moji. . . . . . . . . . . . . . . . . . . . . . . . . . . . . . . <Chaku-moji> 56
Setting Caller ID to Send/Not to Send for Each Call . . . . . . .<186/184> 58
Sending Touch-tone Signals. . . . . . . . . . . . . . . . . . . . . . . <Pause Dial> 59
Making International Calls. . . . . . . . . . . . . . . . . . . . . . <WORLD CALL> 60
Setting for International Calls. . . . . . . . . . .<International Dial Assist> 61
Storing Numbers to be Added to the Beginning of a Phone Number
. . . . . . . . . . . . . . . . . . . . . . . . . . . . . . . . . . . . . . . . . . . . .<Prefix Setting> 62
Making a Call Specifying a Sub-address . . . . . <Sub-address Setting> 62
Setting Alarm for Reconnecting . . . . . . . . . . . . . . <Reconnect Signal> 62
Reducing Surrounding Noise to Make Voice Clear . . <Shikkari Talk> 63
Reducing Surrounding Noise to Make Voice Clear . . . <Noise Reduction> 63
Slowing Down the Other Party’s Speaking Speed . . . . <Yuttari Talk> 63
Switching to Hands-free . . . . . . . . . . . . . . . . . . . . . . . . . .<Hands-free> 63
Using Hands-free Compatible Devices . . . . . . . . <In-Car Hands-free> 63
Receiving Calls/Videophone Calls
Receiving a Call/Videophone Call . . . . . . . . . . . . . . . . . . . . . . . . . . . . . 64
Switched between a Call and a Videophone Call by the Other Party. . . 65
Setting Response of Key Operation for Answering Incoming Calls
. . . . . . . . . . . . . . . . . . . . . . . . . . . . . . . . . . . . . . . . . . . <Answer Setting> 66
Setting Response for when Opening FOMA Terminal during Ringing
. . . . . . . . . . . . . . . . . . . . . . . . . . . . . . . . . . . . . . <Setting when Opened> 67
Setting Response for when Closing FOMA Terminal during a Call
. . . . . . . . . . . . . . . . . . . . . . . . . . . . . . . . . . . . . . <Setting when Closed> 67
Adjusting Earpiece Volume. . . . . . . . . . . . . . . . . . . . . . . . . . .<Volume> 67
Adjusting Ring Volume . . . . . . . . . . . . . . . . . . . . . . . . . <Ring Volume> 68
When You cannot/could not Answer a Voice/Videophone Call
Putting a Call on Hold when You cannot Answer Immediately
. . . . . . . . . . . . . . . . . . . . . . . . . . . . . . . . . . . . . . . . . . . . . . . . . <On Hold> 68
Putting a Call on Hold during a Call. . . . . . . . . . . . . . . . . . . <Holding> 68
Setting Hold Tone . . . . . . . . . . . . . . . . . . . . . . . . . . . . <Set Hold Tone> 69
Using Public Mode . . . . . . . . . . . . . . . . . . . . . . . . . . . . . . . . . . . . . . . . . . 69
If You could not Answer an Incoming Call. . . . . . . . . . <Missed Calls> 70
Recording Voice/Video Messages when You cannot Answer a Call
. . . . . . . . . . . . . . . . . . . . . . . . . . . . . . . . . . . <Record Message Setting> 71
Recording a Message when You cannot Answer Incoming Call
. . . . . . . . . . . . . . . . . . . . . . . . . . . . . . . . . . . . <Quick Record Message> 72
Playing/Erasing Record Messages/a Voice Memo/Videophone Record
Messages/Movie Memos
. . . . . . <Play/Erase Messages> <Play/Erase Videophone Messages> 72
Making Full Use of Videophone Calls
Using Chara-den. . . . . . . . . . . . . . . . . . . . . . . . . . . . . . . . . . . . . . . . . . . . 73
Useful Functions for Videophone Calls . . . . . . . . . . . . . . . . . . . . . . . . . 74
Setting Hands-free Videophone . . . . .<Hands-free with Videophone> 76
Setting Image Quality for Videophone Calls . . . . <Visual Preference> 76
Changing Image Displays for Videophone Calls . . . . . <Select Image> 77
Redialing as a Voice Call when a Videophone Call cannot be Connected
. . . . . . . . . . . . . . . . . . . . . . . . . . . . . . . . . . . . . <Voice Call Auto Redial> 77
Setting for Switching a Voice/Videophone Call during a Call
. . . . . . . . . . . . . . . . . . . . . . . . . . . . . . . . . . . .<Notify Switchable Mode> 78
Setting Answer Method of a Videophone Call during i-mode
. . . . . . . . . . . . . . . . . . . . . . . . . . . . . . . . . . <Videophone while Packet> 78
Using Videophone Calls by Interfacing to External Devices . . . . . . . . 78
Checking inside of a Room when You are Out
. . . . . . . . . . . . . . . . . . . . . . . . . . . . . . . . . . . . . . . <Remote Monitoring> 79
PushTalk
PushTalk . . . . . . . . . . . . . . . . . . . . . . . . . . . . . . . . . . . . . . . . . . . . . . . . . . 80
Making a PushTalk Call . . . . . . . . . . . . . . . . . . . . . . . . . . . . . . . . . . . . . . 80
Adding a Member during a PushTalk Call . . . . . . . . . . . . . . . . . . . . . . . 82
Receiving a PushTalk Call . . . . . . . . . . . . . . . . . . . . . . . . . . . . . . . . . . . . 83
Adding Entries to PushTalk Phonebook
. . . . . . . . . . . . . . . . . . . . . . . . . . . . . . <Store in PushTalk Phonebook> 84
Making a Call from PushTalk Phonebook . . . . . . . . . . . . . . . . . . . . . . . 85
Deleting PushTalk Phonebook Entries
. . . . . . . . . . . . . . . . . . . . . . . . . . . <Delete from PushTalk Phonebook> 86
Setting for Making/Receiving a PushTalk Call. . . . . . . . . . . . . . . . . . . . 87
Page 54
50
Voice/Videophone Calls/PushTalk
You and the other party can talk viewing each other’s images.
DOCOMO videophones conform to 3G-324M, standardized by the international
standard 3GPP. You cannot connect to the videophone that uses a different format.
3GPP (3rd Generation Partnership Project):
This is the regional standards organization for developing common technical
specifications for third-generation mobile telecommunication systems (IMT-2000).
3G-324M:
This is the international standard for the third generation of mobile videophones.
P-01A supports only 64 kbps communication speed of the videophone.
You cannot talk on the videophone at 32 kbps communication speed.
■Display during videophone calls
…Received image (The other party’s image through the
camera or substitute image)
…Sent image (Image through your camera or substitute
image)
…Call duration
※1 When voice sending fails, the other party cannot hear your voice.
When voice receiving fails, you cannot hear the other party’s voice.
※2 When image sending fails, the sent image is not displayed at the other end.
When image receiving fails, the received image is not displayed.
When voice or image sending/receiving fails, it does not recover automatically. You need
to make a videophone call again.
Videophone Calls
…Status
: Voice sending/receiving
(gray): Voice sending/
receiving failed
※1
: Image sending/receiving
(gray): Image sending/
receiving failed
※2
: Camera image sending
: Still image sending
: Chara-den talking
: Hands-free activated
: AV output
: Bluetooth
communicating
: Portrait
: Close-up
: Landscape
: Night Mode
: Chara-den Whole
Action Mode
: Chara-den Parts Action
Mode
: DTMF Transmission
Mode
1
Enter the other party’s phone number,
starting with the city code.
When 27 or more digits are entered, the lower 26 digits
only are displayed.
To store an entered phone number in the Phonebook,
press m( ). Go to step 2 of “Storing Displayed
Phone Number/Mail Address in Phonebook” on
page 95.
Even when you are dialing within the same area, you
need to enter the city code before the phone number.
2
Press d or Oo().
“ ” blinks during dialing, and lights during a call.
Making a Call/Videophone Call
When Making a Voice Call
Page 55
51
Voice/Videophone Calls/PushTalk
Press l().
“ ” blinks during dialing and lights during the call.
Press m during a videophone call to switch between
the image through your camera and substitute image
for sending to the other party.
3
Press h to end the call after talking.
When Making a Videophone Call
The digital communication
charging starts from this
display.
Information
If you hear the guidance requesting your caller ID (see page 446), follow the steps of
“To notify your caller ID” on page 59 to enter “186” and redial.
When the Flat-plug Earphone/Microphone with Switch (option) is connected, you can
hear the other party’s voice from the earphone. (See page 419)
If you close the FOMA terminal during a call, the FOMA terminal works in accordance
with the setting of “Setting when closed”. (See page 67)
If you switch to Horizontal Open Style during a call, the FOMA terminal is set to “No
tone”. (See page 67)
You can press numeric keys to send touch-tone signals during a call. During a
Chara-den call, you need to switch to DTMF Transmission Mode. (See page 75)
You cannot make a call in Horizontal Open Style. However, when the Flat-plug
Earphone/Microphone with Switch (option) is connected, you can make a voice call in
Horizontal Open Style.
In Dual Mode of 2in1, you can make a call after selecting Number A or Number B.
(See page 452)
The other party’s name and icon are displayed if the party’s phone number and name
are stored in the Phonebook. However, the image is not displayed even if it is stored in
the Phonebook.
If the same phone number is stored with multiple names in the Phonebook, the name
that comes first in the search order (see page 96) is displayed.
The phone number instead of the name is displayed when you make a call during
Personal Data Lock or to the party stored as secret data in the Phonebook.
Each time you press r, the digit on the far right is cleared. If you press and hold r
for at least one second, all the digits are cleared and the Stand-by display returns.
Press No to move the cursor to the digit you want to clear, and then press r to clear
it. To clear all the digits on and to the right of the cursor, press and hold r for at least
one second.
<For Voice Calls>
You can make a voice call also by pressing -d and then entering the party’s phone
number. If you enter a wrong number, press -h to clear the display and then redial.
<For Videophone Calls>
Just after purchase, Hands-free is automatically activated by “Hands-free
w/ V. phone” (see page 76). However, Hands-free is deactivated during Manner Mode
regardless of “Hands-free w/ V. phone”.
When you make a videophone call with substitute image, note that you will still be
charged for the digital communication, not the voice calls.
If you make a videophone call at 110/119/118 from the FOMA terminal, it is
automatically dialed out as a voice call.
During a videophone call, you can send a Chara-den image to the other party instead
of the image through your camera. (See page 73)
The international videophone call is available using the DOCOMO international call
service “WORLD CALL”. (See page 60)
Display during dialing
If you entered a wrong phone number
Information
Page 56
52
Voice/Videophone Calls/PushTalk
The reason why it could not be connected is displayed. (The displayed reason might not
be the same as the actual reason depending on the type of the other party’s phone and
contract for network services.)
If a videophone call could not be connected
Messages Reasons
Check number, then
redial
You have dialed a non-existent phone number.
Busy The other party is busy. (Depending on the receiver’s
phone, this message might be displayed during packet
communication as well.)
Busy with packet
transmission
The packet communication is progress at the other end.
Out of service area/power
off
The other party’s phone is out of the service area or turned
off.
Set caller ID to ON Your caller ID is not notified. (when dialing “visualnet”, etc.)
Your call is being
forwarded
During forwarding
Redial using voice call The other party activates Call Forwarding Service but the
forwarding destination phone does not support videophone
calls.
Upper limit has been
exceeded
Connection failed
The upper limit for the plan with the limit function (Type
Limit, Family Wide Limit) is exceeded.
Please make your call
from the i-mode web page
You did not make a videophone call from the IP (Information
Provider) site among i-mode official sites (at dialing to
V-live).
Connection failed Redial after setting “Activate” of “Caller ID notification” to
“ON”.
This may appear in the case other than above.
If “Voice call auto redial” is set to “ON”, and a videophone call is not connected, a voice
call is automatically made.
Videophone calls cannot be connected to the phones that do not support the
videophone function, or to the phones that are out of the service area or turned off even
if they are videophones. If you have set “Voice call auto redial” to “ON” and attempt to
dial a phone that does not have the videophone function, the number will be redialed
as a voice call. However, this operation might not work if you call the phone connected
with ISDN-synchronous 64K or the ISDN videophone that does not support 3G-324M
(as of October 2008), or if you dial the wrong number. Note that you could be charged
for the communication.
Auto-redialing
Function Menu while Entering Phone Number
Notify caller ID See page 58.
Prefix numbers See page 62.
Int’l dial assist See page 61.
Select image See page 77.
Multi number You can select a phone number to be notified to the other party.
(See page 449.)
Add to phonebook See page 94.
Compose message You can compose a mail message to send to the phone number
set as the destination address.
Go to step 3 on page 146.
Chaku-moji See page 57.
Page 57
53
Voice/Videophone Calls/PushTalk
You (caller) can switch between a voice call and a videophone call. This
function is available for the mobile phones that can switch between a
voice call and a videophone call.
When the other party’s phone has a function to switch between the calls,
“ ” is displayed on your phone and you can switch from the voice
call to videophone call.
1
During a voice callc()Change
When you select an image
to be sent to the other
party, select “Select
image”. Go to step 2 of “Set
by Call” on page 77.
When “Cancel” is selected,
the FOMA terminal cancels
switching and returns to the
voice call.
While switching, the voice
guidance is played back.
Switching a Voice/Videophone Call
Switch from a Voice Call to a Videophone Call
When the other party’s phone has a function to switch between calls, you
can switch from a videophone call to a voice call by selecting “CHG to
voice call” from the Function menu.
1
During a videophone calli()
CHG to voice callYES
Select “NO” on the
confirmation display to stop
switching and to resume
the videophone call.
While switching, the voice
guidance is played back.
Switch from a Videophone Call to a Voice Call
Information
You can switch between a voice call and a videophone call repeatedly.
When i-mode or packet communication is in progress, the communication is
disconnected and then the voice call is switched to the videophone call.
When packet communication is in progress at the other end, the message to the
effect that the communication cannot be switched is displayed and the voice call
continues without switching to the videophone call.
You cannot switch from a voice call to a videophone call while “Multi calling” is
displayed during a call if you have signed up for Call Waiting Service.
It takes about five seconds to switch. Switching may take a longer time depending on
the radio wave conditions.
Depending on how the caller’s phone is working or on the radio wave conditions, switching
between a voice call and a videophone call may fail and the connection may be cut off.
If you switch between a voice call and a videophone call during a call, the call duration
and call cost are counted respectively for each call. You are not charged while
“Changing” is displayed.
You cannot switch between a videophone call and a voice call unless “Notify
switchable mode” on page 78 is set to “Indication ON” at the other end.
When you switch from a videophone call to a voice call, Hands-free is deactivated.
Page 58

54
Voice/Videophone Calls/PushTalk
The FOMA terminal can store the other party’s phone number and date/
time you have dialed or received. You can call back to the other party.
■Redial
Up to 30 records of dialed voice calls, videophone calls and PushTalk calls are stored in
total, and the older record of dialing to the same phone number is deleted. However, the
dialing by PushTalk is retained in Redial separately from that of the voice call or
videophone call even if you dial to the same phone number.
■Dialed Calls
Up to 30 records of dialed voice calls, videophone calls and PushTalk calls are stored in
total, and up to 30 records of 64K data and packet communications are stored in total as
well. The older records of dialing to the same phone number are also retained.
■Received Calls
Up to 30 records of incoming voice calls, videophone calls and PushTalk calls are stored
in total, and up to 30 records of 64K data and packet communications are stored in total
as well. The older records coming from the same phone number are also retained.
When a call is switched between a voice call and a videophone call, the call that is
dialed/received first is stored.
When more than 30 calls are dialed, the older records are automatically deleted. Even
if you turn off the FOMA terminal, call records are not deleted.
In Dual Mode of 2in1, up to 60 redial items, 120 dialed call records, and 120 received
call records for Number A and Number B are stored in total.
■Icons for Redial, Dialed Calls, and Received Calls
<Redial> <Dialed Calls> <Received Calls>
Using Call Records
/
※
Dialed and received calls/missed calls of voice call
/
※
Dialed and received calls/missed calls of videophone call
/
※
Dialed and received calls/missed calls of PushTalk
/
※
Dialed and received group calls/missed group calls of PushTalk
/
※
Dialed and received calls/missed calls of PushTalk via server’s
phonebook
Voice/Video messages are recorded on Record Message
Incoming calls of Remote Monitoring
/
※
Dialed and received calls/missed calls of international call
/
※
Dialed and received calls/missed calls of international videophone
call
Dialed calls of 64K data communication
※ The unchecked missed call icons are highlighted.
1
Press Vo.
mPhonebookDialed/recv. calls
Dialed calls
The list for call records is displayed.
For redial items of PushTalk, press Oo() to
show the Redial list of the group. Highlight a party and press p to make a
PushTalk call. If you do not highlight any party and press p, you can make a
group call.
Press m( ) to display the Sent Address list.
You cannot show the Redial list even by pressing Vo from the horizontal
Stand-by display.
2
Select a call record.
The detailed display for the call record is displayed.
When the other party is stored in the Phonebook, the
phone number, name, and icon are displayed. If the
same phone number is stored with multiple names in
the Phonebook, the name and icon that come first in the
search order (see page 96) are displayed.
/
※
Received calls/missed calls of 64K data communication
Dialed calls of packet communication
/
※
Received calls/missed calls of packet communication
Received calls of 64K data communication and packet
communication when no external device is connected
Received Chaku-moji message
Records with time difference corrected
Records for Number B (only in Dual Mode of 2in1)
Use Redial/Dialed Calls
When Using Redial
When Using Dialed Calls
For Redial
For Redial
Page 59

55
Voice/Videophone Calls/PushTalk
1
Press Co.
You can display the Received Call list also by
mPhonebookDialed/recv. callsReceived calls
All calls or Missed calls.
All calls . . . . . . All the records including missed calls
Missed calls. . . The records of missed calls only
In Dual Mode of 2in1, the number of missed calls for
Number A and Number B is displayed respectively.
(If unchecked missed calls are found, the number of them is displayed.)
For received call records of PushTalk, press Oo( ) to show the Received
Call list of the group with “★” mark added to the caller. Highlight a party and
press p to make a PushTalk call. If you do not highlight any party and press p,
you can make a group call.
Press m( ) to display the Received Address list.
You cannot show the Received Call list even by pressing Co from the horizontal
Stand-by display.
2
Select a received call record.
The other party’s phone number is displayed if it is
provided. If this caller is stored in the Phonebook, the
phone number, name, and icon are displayed.
If the same phone number is stored with multiple names
in the Phonebook, the name and icon that come first in
search order (see page 96) are displayed. If there is a
call for packet communication, the sender’s access
point name (APN) is displayed.
When the other party’s phone number is not notified, the reason for no caller ID is
displayed.
For missed calls, the ring time is displayed on the right of the received date/time.
When a Chaku-moji message is received, it is displayed.
+m-2-4
Use Received Calls
Received Call list
Detailed Received
Call display
Press d to make a voice call. You can make a voice call also by pressing
Oo( ) from the detailed display. Press l( ) to make a videophone call
and press p to make a PushTalk call.
To make a call to a displayed redial item, dialed call record, or
received call record
Information
You can make a voice call to the most recently dialed or received number by pressing
-d from the Stand-by display and then +No.
When you make/receive a call with an additional number of Multi Number, the stored
name for the additional number is displayed below the phone number on the detailed
display. If you store a phone number for “Number setting” of “Multi number”, the
phone number is displayed as well.
Dialed call records of 64K data communication are not stored when you use a
Bluetooth device.
Even if you make a voice call (or videophone call) to the phone number in a received
call record with a Chaku-moji message displayed, the received message is not sent.
When a call comes in from a party who uses a dial-in phone number, a different
phone number might be displayed.
Function Menu while Redial/Dialed Calls/Received Calls is Displayed
Notify caller ID See page 58.
Prefix numbers See page 62.
Int’l dial assist See page 61.
Select image See page 77.
2in1 dial You can select a phone number to be notified to the other
party in Dual Mode of 2in1. (See page 452)
Multi number You can select a phone number to notify the other party. (See
page 449)
Chaku-moji See page 57.
Search location You can connect to a site for “imadocokantan search”.
YES
Page 60

56
Voice/Videophone Calls/PushTalk
Add to phonebook See page 94.
You can store the phone number in the Phonebook also by
pressing m( ) from the detailed display. Go to
step 2 of “Storing Displayed Phone Number/Mail Address in
Phonebook” on page 95.
Add to PushTalk
Store in P-Talk PB YES
Store P-Talk group Select a group.
When members who are not stored in the PushTalk
Phonebook are found, the confirmation display appears
asking whether to store them.
Enter a group name.
You can enter up to 16 full-pitch/32 half-pitch characters.
Mail
Compose message You can compose a mail message to send to the phone
number set as the destination address.
Go to step 3 on page 146.
Compose SMS You can compose an SMS message to send to the phone
number set as the destination address.
Go to step 3 on page 190.
Ring time
[Received Call list only]
You can display the ring time for missed calls. Even if you
have set “Missed calls display” of “Ring time” to “Not display”,
the missed calls which stopped ringing within the ring start
time and their ring times are displayed.
Character size You can switch the character size for Redial, Dialed Calls,
Received Calls, Sent Address, and Received Address. (See
“Dialed/recv. calls” on page 123)
Add desktop icon See page 31.
Sent address
[Redial/Dialed Calls only]
See page 175.
Received address
[Received Calls only]
See page 175.
Delete
When making a voice call or videophone call, you can send your text
message to tell the subject during calling.
For details on Chaku-moji or compatible models, refer to DOCOMO website or “Mobile
Phone User’s Guide [Network Services]”.
The sending end is charged, but the receiving end is not charged.
A Chaku-moji message is displayed below a caller. The
Chaku-moji message is stored in Received Calls as well.
The Chaku-moji message is displayed only during ringing. It
is not displayed during a call.
Even when a Chaku-moji message comes in within the ring
start time set by “Ring time”, it is received and recorded in
Received Calls.
The Chaku-moji message is displayed on the Private window when “Chaku-moji” of
“Called” on page 115 is set to “ON”.
The Chaku-moji message is not displayed during Lock All, Omakase Lock, or Personal
Data Lock. However, you can check the Chaku-moji message from Received Calls
after the lock is released.
Delete this YES
Delete selected Put a check mark for redial items, dialed call records, or
received call records to be deletedl()YES
Delete all Enter your Terminal Security CodeYES
Information
<Store in P-Talk PB>
You cannot store from the call record for the party who is not stored in the Phonebook.
<Store P-Talk group>
You cannot store in a PushTalk group unless all the members are stored in the FOMA
terminal’s Phonebook.
<Delete this> <Delete selected> <Delete all>
If you execute “Delete all” from the Function menu of Redial/Dialed Calls, all records
in both Redial and Dialed Calls are deleted. Even if you execute “Delete this” or
“Delete selected” of Redial, the records are not deleted from Dialed Calls and they are
retained. To delete the dialed call records, delete them from the Function menu while
“Dialed calls” is displayed.
<Chaku-moji>
Using Chaku-moji
When a message is received
Page 61

57
Voice/Videophone Calls/PushTalk
You can store up to 10 Chaku-moji messages in the Message list.
1
mSet./ServiceNW servicesChaku-moji
Create message
Highlight <Not stored> and press l()
Enter a message.
To edit a stored message, highlight it and press l().
You can enter up to 10 characters regardless of whether they are pictographs,
symbols, or full-pitch/half-pitch characters.
1
Enter a phone number
or
call up the detailed display of a Phonebook entry, redial
item, dialed call record, or received call record.
2
i
()
Chaku-mojiDo the following operations.
3
Press d or Oo().
Press l( ) to make a videophone call.
The Chaku-moji message being sent is displayed during dialing.
Store Messages
Make a Call with a Message
Create message You can create a Chaku-moji message just before dialing.
Enter a message.
You can enter up to 10 characters regardless of whether they
are pictographs, symbols, or full-pitch/half-pitch characters.
The Chaku-moji message created using this function is not
stored in the Message list.
Select message From the Message list, you can select a stored message.
Select a message.
Sent messages From the Sent Message list, you can select a Chaku-moji
message to be sent. Up to 10 sent Chaku-moji messages only
are stored in the Sent Message list. If you send the same
Chaku-moji message, the older one is deleted. When the number
of sent Chaku-moji messages exceeds 10, the messages are
deleted from the oldest one.
Select a sent message.
Up to 10 sent Chaku-moji messages are stored in Sent Messages, and
you can check for the other party’s phone number and the date/time the
Chaku-moji messages were sent. Older messages sent to the same
phone number are also retained.
In Dual Mode of 2in1, up to 10 records for Number A and Number B can be displayed
in total.
1
mSet./ServiceNW services
Chaku-mojiSent messages
. . . . Chaku-moji message successfully sent
. . . . Chaku-moji message unsuccessfully sent
. . . . . . . Chaku-moji message for Number B (only in Dual Mode of 2in1)
When the transmission result is not displayed, “ ” or “ ” is not
displayed.
Depending on the radio wave conditions, the transmission result might not be
displayed correctly.
Information
When a Chaku-moji message has arrived at the other party’s phone, “Transmission
completed” is displayed, and you are charged a transmission fee.
When a Chaku-moji message does not arrive at the other party’s phone such as when
the other party’s phone is not a Chaku-moji compatible mobile phone or the call is not
allowed by “Message disp. settings” at the receiving end, “Transmission failed” is
displayed. In this case, you are not charged a transmission fee.
Depending on the radio wave conditions, the transmission result may not be
displayed at the sending end even if a Chaku-moji message has arrived at the other
party’s phone. In this case, you are charged a transmission fee.
Even if you make a call sending a Chaku-moji message, the Chaku-moji message is
not displayed and you are not charged a transmission fee (the call is not recorded in
Received Calls at the receiving end) when the other party’s phone is out of the service
area, turned off, during Public Mode (Drive Mode), or the ring time for Record
Message Setting is set to zero seconds. Also, the transmission result is not displayed
at the sending end.
When a videophone call is not connected and automatically dialed as a voice call, the
Chaku-moji message is resent as well.
Chaku-moji does not support PushTalk.
You cannot send/receive Chaku-moji messages overseas.
Detailed Sent Message
Page 62

58
Voice/Videophone Calls/PushTalk
2
Select a sent message.
When the other party’s phone number is stored in the
Phonebook, the phone number, name, and icon are
displayed.
You can set how incoming Chaku-moji messages are displayed.
1
mSet./ServiceNW servicesChaku-moji
Message disp. settingsSelect an item.
Display all messages . . . . Displays Chaku-moji messages from all callers.
Numbers stored in PB . . .Displays Chaku-moji messages only from the callers
stored in the Phonebook.
Calls with callerID. . . . . . . Displays Chaku-moji messages only from the caller
notifying his/her phone number.
Hide all messages. . . . . . .Does not display Chaku-moji messages.
Function Menu while Detailed Sent Message is Displayed
Store You can store a sent Chaku-moji message in the Message list.
<Not stored>
You can store also by pressing l().
Delete this YES
Delete all Enter your Terminal Security CodeYES
Message Display Settings
Information
When you set to “Numbers stored in PB”, you cannot receive Chaku-moji messages
from the callers stored in the Phonebook B in A Mode of 2in1 (and vice versa).
You can set how your FOMA terminal works for incoming Chaku-moji
messages for when “Setting when opened” is set to “Answer”.
1
mSet./ServiceNW servicesChaku-moji
Prefer Chaku-mojiON or OFF
ON . . . . Does not answer by opening the FOMA terminal during ringing, so you
can check a Chaku-moji message.
OFF . . . Answers by opening the FOMA terminal during ringing.
Each time you dial out, you can set whether to notify your caller ID.
1
Enter a phone number
or
bring up the detailed display of a Phonebook entry,
redial item, dialed call record, or received call record.
2
i()Notify caller ID
Don’t notify or Notify caller
To release “Notify caller ID”, select “Cancel prefix”. Whether to notify or not
follows the setting for “Activate” of “Caller ID notification”.
Prefer Chaku-moji
<186/184>
Setting Caller ID to Send/Not to Send for
Each Call
Set Caller ID Notification when Making a Call
Page 63

59
Voice/Videophone Calls/PushTalk
You can select whether to notify the other party of your phone number
also by entering “186”/“184” before the other party’s phone number.
1
186→Destination phone numberd or Oo()
Press l( ) to make a videophone call.
1
184→Destination phone numberd or Oo()
Press l( ) to make a videophone call.
Set “Notify/Not Notify” by Entering “186/184”
To notify your caller ID
Not to notify your caller ID
Information
When you make a call and hear the guidance requesting your caller ID (see
page 446), follow the steps of “To notify your caller ID” to enter “186” and redial.
When you make a PushTalk call, “Activate” of “Caller ID notification” or “Notify caller
ID” is valid, but “notify/not notify” by adding “186”/ “184” is invalid.
You cannot set “Caller ID notification” while “ ” is displayed.
You can send touch-tone signals from your FOMA terminal to use
services such as reserving tickets, checking bank balance, etc.
You need to store a number string to be sent as a touch-tone signal in the
Pause Dial list. If you have inserted a pause (p), you can send a number
string breaking at the point where the pause is inserted.
1
mSet./Service
Other settingsPause dial
l
()
When a number string is already stored, it is displayed.
To delete a stored pause dial, press i( ) and select “Delete”, then select
“YES”.
2
Enter a number string.
Enter the pause (p) by pressing and holding a for at least one second.
You can use only 0 through 9, s, a to enter a number string and the
pause (p).
You can enter up to 128 digits.
You cannot enter a pause (p) at the beginning and end of a number string, or
enter it consecutively.
1
mSet./Service
Other settingsPause dial
Oo
()
Enter a phone number
d
or Oo()
A voice call is made. Once the line is connected, a number string stored in Pause
Dial is displayed up to the first pause (p).
When the other party’s phone number is stored in the Phonebook, you can
retrieve it selecting from the Search Phonebook display by pressing Bo.
You can search for the phone number also from Received Calls by pressing Co
or from Redial by pressing Vo.
+m-8-4
<Pause Dial>
Sending Touch-tone Signals
Store Pause Dial
Send Pause Dial
Page 64
60
Voice/Videophone Calls/PushTalk
2
Check that the line is connectedd or Oo()
A number string up to the first pause (p) is sent, and a number string up to the next
pause (p) is displayed.
A number string up to the pause (p) is sent each time you press d or
Oo().
When you have finished sending the last number, the “Talking” display appears.
To send multiple pieces of a number string at a time, press and hold Vo for at
least one second, and select “Send at one time”.
WORLD CALL is the international call service available from DOCOMO
mobile phones.
When you have signed up for FOMA service, you have contracted to use
“WORLD CALL” (except those who have applied not to use it).
You can call about 240 countries and regions.
The WORLD CALL charges are added to your monthly FOMA bill.
The application/monthly fee is free of charge.
The service is not available with some billing plans.
Contact “docomo Information Center” on the back page of this manual for inquiries
about WORLD CALL.
When using international carriers other than DOCOMO, contact them.
Even if the other party makes a call with the setting notifies his/her phone number, the
caller ID might not be notified, or might not be displayed correctly depending on the
caller’s network. In this case, you cannot call by using the Received Call.
Information
During a call, you can send a number string also by displaying the Function menu of
the Pause Dial display.
Some devices on the receiving end cannot receive signals.
You cannot send a number string with pauses during a videophone call.
<WORLD CALL>
Making International Calls
You can make international videophone calls to the other party who uses a specific 3G
mobile phone overseas. Press l( ) instead of d or Oo( ) in the steps
of “Enter a Phone Number to Make an International Call”. (See page 60)
For the information about connectable countries and telecommunications carriers, refer
to the DOCOMO Global Service web page.
Images sent from the other party may blur on your FOMA terminal or you may not be
able to connect, depending on the other party’s phone used for the international
videophone call.
1
Enter numbers in order of 010→country/area code
→area code (city code)→destination phone number
d or Oo()
You can make an international call also by entering 009130→010
→country code/area code→area code (city code)→destination phone number.
When the area code (city code) begins with “0”, enter it except for the “0”. However,
include “0” when making a call to some countries or regions such as Italy.
Press l( ) to make an international videophone call.
When you enter a phone number for dialing or storing it in the
Phonebook, press and hold 0 for at least one second to enter “+”. You
can use “+” to make international calls without entering an international
call access code.
If you set “Auto assist setting” of “Int’l dial assist” to “ON”, an international call access
code of “IDD prefix setting” is automatically entered.
1
0(for at least one second)
Enter numbers in order of country/area code
→area code (city code)→destination phone number
d or Oo()Dial
When the area code (city code) begins with “0”, enter it except for the “0”. However,
include “0” when making a call to some countries or regions such as Italy.
Press l( ) to make an international videophone call.
When you select “Dial with orig. No.”, you can make a call without adding an
international call access code.
About international videophone calls
Enter a Phone Number to Make an International Call
Use “+” to Make an International Call
Page 65

61
Voice/Videophone Calls/PushTalk
You can make a call adding a country/area code or international call
access code to a phone number. (Except for some countries and regions,
if the phone number starts with “0”, the “0” at the beginning is
automatically deleted.)
1
Enter a phone number
or
call up the detailed display of a Phonebook entry, redial
item, dialed call record, or received call record.
2
i()Int’l dial assist
Select a country/area nameSelect a name
d or Oo()
Press l( ) to make an international videophone call.
When the beginning of the phone number is “+”, you can select only an
international call access code.
When “Japan” is selected as a country/area name, the display for selecting a
name is not displayed.
You can set whether to replace “+” at the beginning of a phone number
with an international call access code for when you make an international
call from Japan.
1
mSet./ServiceNetwork settingInt’l dial assist
Auto assist settingON or OFF
Select a country/area nameSelect a name.
When no country/area code or international call access code is stored, the
confirmation display appears asking whether to store it. Select “YES” and go to
step 2 of “Country/Area Code” on page 61 for a country/area code, and go to
step 2 of “IDD Prefix Setting” on page 61 for an international call access code.
International Dial Assist
<International Dial Assist>
Setting for International Calls
Auto Assist Setting
You can store up to 27 country/area codes to be added for making
international calls from overseas.
1
mSet./ServiceNetwork settingInt’l dial assist
Country/Area Code
Highlight <Not recorded> and press l().
If you select a stored country/area name, you can check the stored contents.
2
Enter a country/area name Enter a country/area code.
You can enter a country/area name of up to 8 full-pitch/16 half-pitch characters.
You can enter a country/area code of up to 5 digits. But you cannot use #, :, and
+.
You can store up to three international call access codes to be added to
the beginning of a phone number for making an international call.
1
mSet./ServiceNetwork settingInt’l dial assist
IDD prefix setting
Highlight <Not recorded> and press l().
If you select the stored item, you can check the stored contents.
2
Enter a nameEnter an international call access code.
You can enter a name of up to 8 full-pitch/16 half-pitch characters.
You can enter an international call access code of up to 16 digits.
Country/Area Code
IDD Prefix Setting
Function Menu while Country/Area Code /IDD Prefix
Setting is Displayed
Edit Go to step 2 of “Country/Area Code” on page 61 for Country/Area
Code, and go to step 2 of “IDD Prefix Setting” on page 61 for IDD
Prefix Setting.
You can edit the item also by pressing l().
Delete this YES
Page 66

62
Voice/Videophone Calls/PushTalk
You can store prefix numbers such as international call access codes or
“186”/“184” and add them to the phone number for dialing. You can store
up to seven prefix numbers.
1
mSet./ServiceNetwork settingPrefix setting
Highlight <Not recorded> and press l().
If you select a stored prefix, you can check the stored contents.
To delete a stored prefix, press i( ) and select “Delete this” or “Delete
all” then select “YES”. If you select “Delete all”, you need to enter your Terminal
Security Code.
2
Enter a nameEnter a prefix number.
You can enter a name of up to 8 full-pitch/16 half-pitch characters.
You can enter a prefix number of up to 16 digits. The keys for entry are limited to
0 through 9, s and a.
You can add a prefix number to the beginning of phone number when
you make a call.
1
Enter a phone number
or
call up the detailed display of a Phonebook entry, redial
item, dialed call record, or received call record.
Delete all Enter your Terminal Security CodeYES
Information
<Delete this> <Delete all>
You cannot delete the country/area code or international call access code set by
“Auto assist setting”.
<Prefix Setting>
Storing Numbers to be Added to the
Beginning of a Phone Number
Prefix Numbers
2
i()Prefix numbersSelect a name
d or Oo()
Press l( ) to make a videophone call and press p to make a PushTalk
call.
For making a PushTalk call, adding a prefix number such as “186” or “184” to the
beginning of the phone number is disabled.
You can set whether to regard the numbers after “:” of a phone number
as a sub-address to access the specified phones or data terminals.
The sub-address is a number assigned to identify each ISDN terminal connected to an
ISDN line. It is also used for selecting contents on “V-live”.
1
mSet./ServiceOther settings
Sub-address settingON or OFF
You can set an alarm that sounds until a voice call, videophone call, or
PushTalk communication is reconnected after disconnected owing to
bad radio wave conditions.
1
mSet./ServiceTalkReconnect signal
Select an alarm.
<Sub-address Setting>
Making a Call Specifying a Sub-address
Information
Even if you set “Sub-address setting” to “ON”, “:” at the top of phone numbers and
“:” immediately after the prefix number or “186”/“184” are not regarded as
sub-address mark-off symbols.
+m-7-7
<Reconnect Signal>
Setting Alarm for Reconnecting
Page 67
63
Voice/Videophone Calls/PushTalk
The volume of the other party’s voice is turned up according to the
surrounding noise during a call. This setting is effective only when the
other party's voice is output from the earpiece.
1
mSet./ServiceTalkShikkari TalkON or OFF
The noise sent to the other party is reduced according to the surrounding
noise during a call.
1
mSet./ServiceTalkNoise reductionON or OFF
1
During a voice callm()
When Yuttari Talk is activated, “ ” is displayed.
Press m( ) again to return to the normal speed.
Information
The reconnectable time differs depending on the usage status and radio wave conditions.
An estimate is about 10 seconds and the call charge is applied also for that duration.
While you are disconnected, no sound is transmitted to the other party.
<Shikkari Talk>
Reducing Surrounding Noise to Make
Voice Clear
+m-7-6
<Noise Reduction>
Reducing Surrounding Noise to Make
Voice Clear
<Yuttari Talk>
Slowing Down the Other Party’s Speaking
Speed
Information
Yuttari Talk is effective only during a current voice call. The speaking speed returns to
normal one when you end the call, switch calling parties during Multi calling, or switch
from the voice call to a videophone call.
When you switch to Hands-free, sound such as the other party’s voice is
audible over the speaker.
1
During a call, dialing, or connectingd
When Hands-free is activated, “ ” is displayed.
Press d again to deactivate Hands-free.
The sound volume during a Hands-free call follows the setting specified by
“Volume” (earpiece volume).
You can switch to Hands-free even during Manner Mode. Also, you will still hear
voice through the speaker even when you activate Manner Mode during a
Hands-free call.
You can make or receive voice calls from a Hands-free compatible device
such as In-Car Hands-Free Kit 01 (option) or a car navigation system by
connecting with your FOMA terminal.
You can connect your FOMA terminal to a Hands-free compatible device
using two ways of connections as follows:
Connect using a cable (USB connection):
To use/charge via the In-Car Hands-Free Kit 01 (option), you need to have the FOMA
In-Car Hands-Free Cable 01 (option).
Connect using Bluetooth (wireless):
To connect to a Bluetooth communication compatible Hands-free device, you need to
register and connect it to the FOMA terminal.
※For how to operate Hands-free compatible devices, refer to the respective instruction
manuals.
<Hands-free>
Switching to Hands-free
Information
While the Flat-plug Earphone/Microphone with Switch (option) is connected, you
cannot hear voice through the speaker even if you switch to Hands-free.
Keep the FOMA terminal well away from your ear during a Hands-free call. Otherwise
you could affect or damage your hearing.
Talk into the FOMA terminal within a distance of about 50 cm.
<In-Car Hands-free>
Using Hands-free Compatible Devices
Page 68
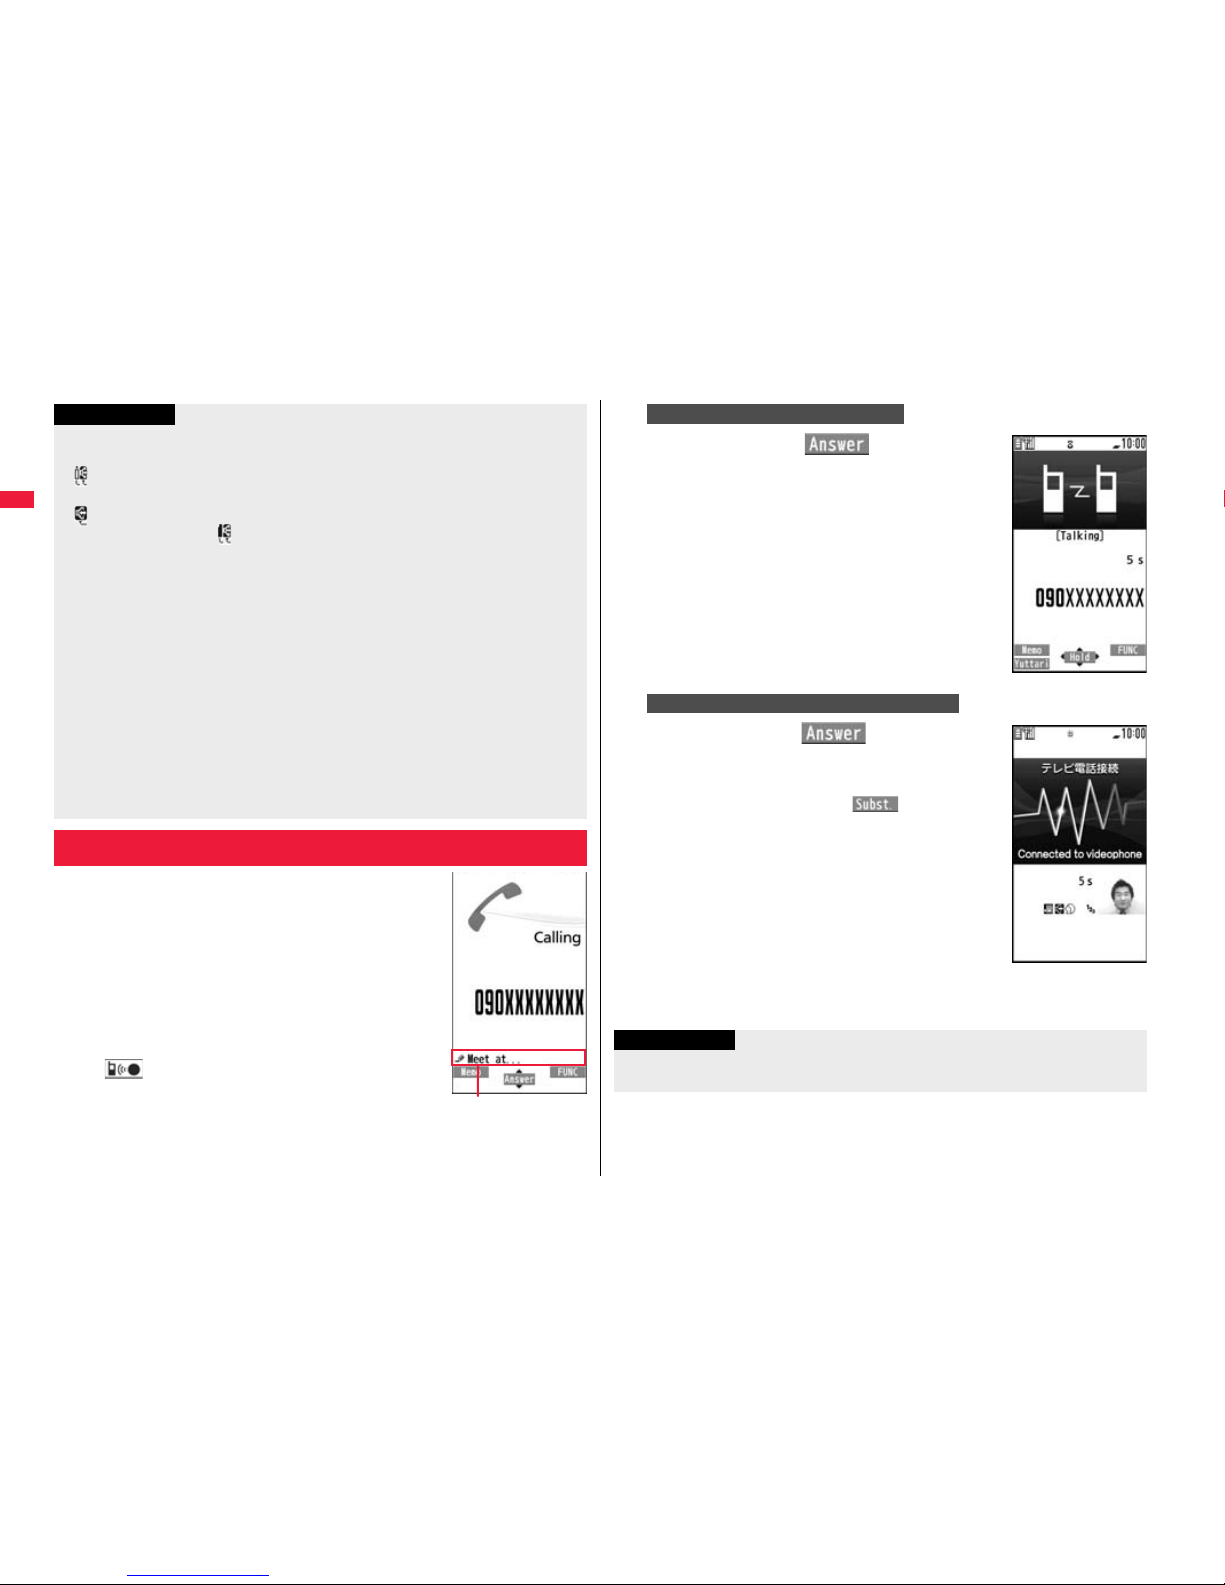
64
Voice/Videophone Calls/PushTalk
1
When you receive a call, the ring tone
sounds and the Call/Charging indicator
flickers.
To vibrate the FOMA terminal for incoming calls, set
“Phone” or “Videophone” of “Vibrator” to other than
“OFF”.
During ringing a videophone call, “Incoming V.phone” is
displayed. However, during ringing a voice call, nothing
is displayed in particular.
“ ” is displayed at the upper left of the phone
number for incoming international calls.
Information
To connect using a cable (USB connection), set “USB mode setting” to
“Communication mode”.
“ ” appears while you are talking or communicating using a USB Hands-free
compatible device.
“ ” might appear while the FOMA terminal is connected to a USB Hands-free
compatible device, and “ ” while “USB mode setting” is set to “microSD mode”,
depending on the Hands-free device connected.
The display or ring tone for incoming calls follows the settings of the FOMA terminal.
When the sound is set to output from a Hands-free compatible device, the ring tone
sounds from that device even when Manner Mode is activated or “Ring volume” of the
FOMA terminal is set to “Silent”.
The receiving operation in Public Mode (Drive Mode) following the setting of “Public
(Drive) mode”.
The receiving operation while Record Message is activated follows the setting of
“Record message setting”.
When the sound is set to output from the FOMA terminal, the operation for when the
FOMA terminal is closed during a call follows the setting of “Setting when closed”.
When the sound is set to output from a Hands-free device, the communication state
does not change regardless of “Setting when closed” even if you close the FOMA
terminal.
Receiving a Call/Videophone Call
Chaku-moji message
(See page 56)
2
Press d or Oo( ) to answer
the call.
Press d
or Oo()
to answer
the videophone call.
You can send the image through your camera to the
other party. When you press m( ) to answer the
videophone call, the substitute image is sent to the other
party. (Substitute image answering)
Press m during a videophone call to switch between
the image through your camera and substitute image
for sending to the other party.
3
Press h to end the call after talking.
For Answering a Voice Call
For Answering a Videophone Call
Information
If you close the FOMA terminal during a call, the FOMA terminal works in accordance
with the setting of “Setting when closed”. (See page 67)
Page 69
65
Voice/Videophone Calls/PushTalk
You might hear beeps (in-call ring tone) during a call.
If you have signed up for any of Voice Mail Service, Call Waiting Service, or Call
Forwarding Service and set “Arrival call act” to “Answer”, the beeps (in-call ring tone)
will sound for another incoming call, enabling you to do the following operations:
Voice Mail Service
. . . . Transfer the call to the Voice Mail Service Center. (See page 442)
Call Waiting Service
. . . . Put your current call on hold and answer the incoming call. (See page 442)
Call Forwarding Service
. . . . Transfer the call to the registered forwarding destination. (See page 445)
You can set “Reject unknown” not to accept calls from the phone numbers that are not
stored in the Phonebook.
You cannot answer a call in Horizontal Open Style. However, when the Flat-plug
Earphone/Microphone with Switch (option) is connected, you can answer a call in
Horizontal Open Style.
<For Voice Calls>
When “Answer setting” is set to “Any key answer”, the call is placed on hold if you
answer the call by pressing .< with the FOMA terminal closed. If you have set
“Setting when closed” to “No tone” or “End the call”, the other party hears nothing, and
if you have set “Setting when closed” to “Hold”, the call hold tone is played back. You
can start talking by opening the FOMA terminal.
<For Videophone Calls>
Just after purchase, Hands-free is automatically activated during a videophone call as
“Hands-free w/ V. phone” has been set to “ON”. (See page 76) However, Hands-free
is deactivated during Manner Mode regardless of “Hands-free w/ V. phone”.
Even if Call Forwarding Service is set to “Activate”, the call is not forwarded unless the
forwarding destination is a phone compatible with the videophone conforming to
3G-324M (see page 50). Check the phone you are forwarding the call to and then
activate the service. The videophone caller does not hear the guidance to the effect
that the call is forwarded. (The message to the effect that the call is to be forwarded
appears, depending on the receiver’s FOMA terminal.)
If a videophone call comes in from the phone number to be rejected by Nuisance Call
Blocking Service, the video guidance for Call Rejection is played back and the call is
disconnected.
You can send a Chara-den image to the other party instead of the image through your
camera. (See page 73)
Information
When a caller’s phone number is provided
If you store the caller’s name, phone number, and image in the Phonebook, the name,
phone number, and icon (or image) are displayed.
If the same phone number is stored with multiple names in the Phonebook, the name
that comes first in the search order (see page 96) is displayed.
The phone number but not the name is displayed during Personal Data Lock.
For a forwarded call, the forwarder’s phone number is displayed below the caller. (It
might not be displayed in the case of some forwarders.)
When you receive a call to an additional number of Multi Number, the stored name for
the additional number is displayed below the caller. (With a forwarded call, you can
press c( ) to switch to display of the forwarder.)
When a caller’s phone number is not provided
The reason for no caller ID is displayed. (See page 139)
When you have set “Notify switchable mode” to “Indication ON”, a caller
(the other party) can switch between a voice call and a videophone call.
You (receiving end) cannot switch between a voice call and a videophone call.
Display for incoming calls
Function Menu while a Call is Ringing
Call rejection You can disconnect the call without answering.
Call forwarding See page 445.
Voice mail See page 442.
Switched between a Call and a
Videophone Call by the Other Party
Page 70
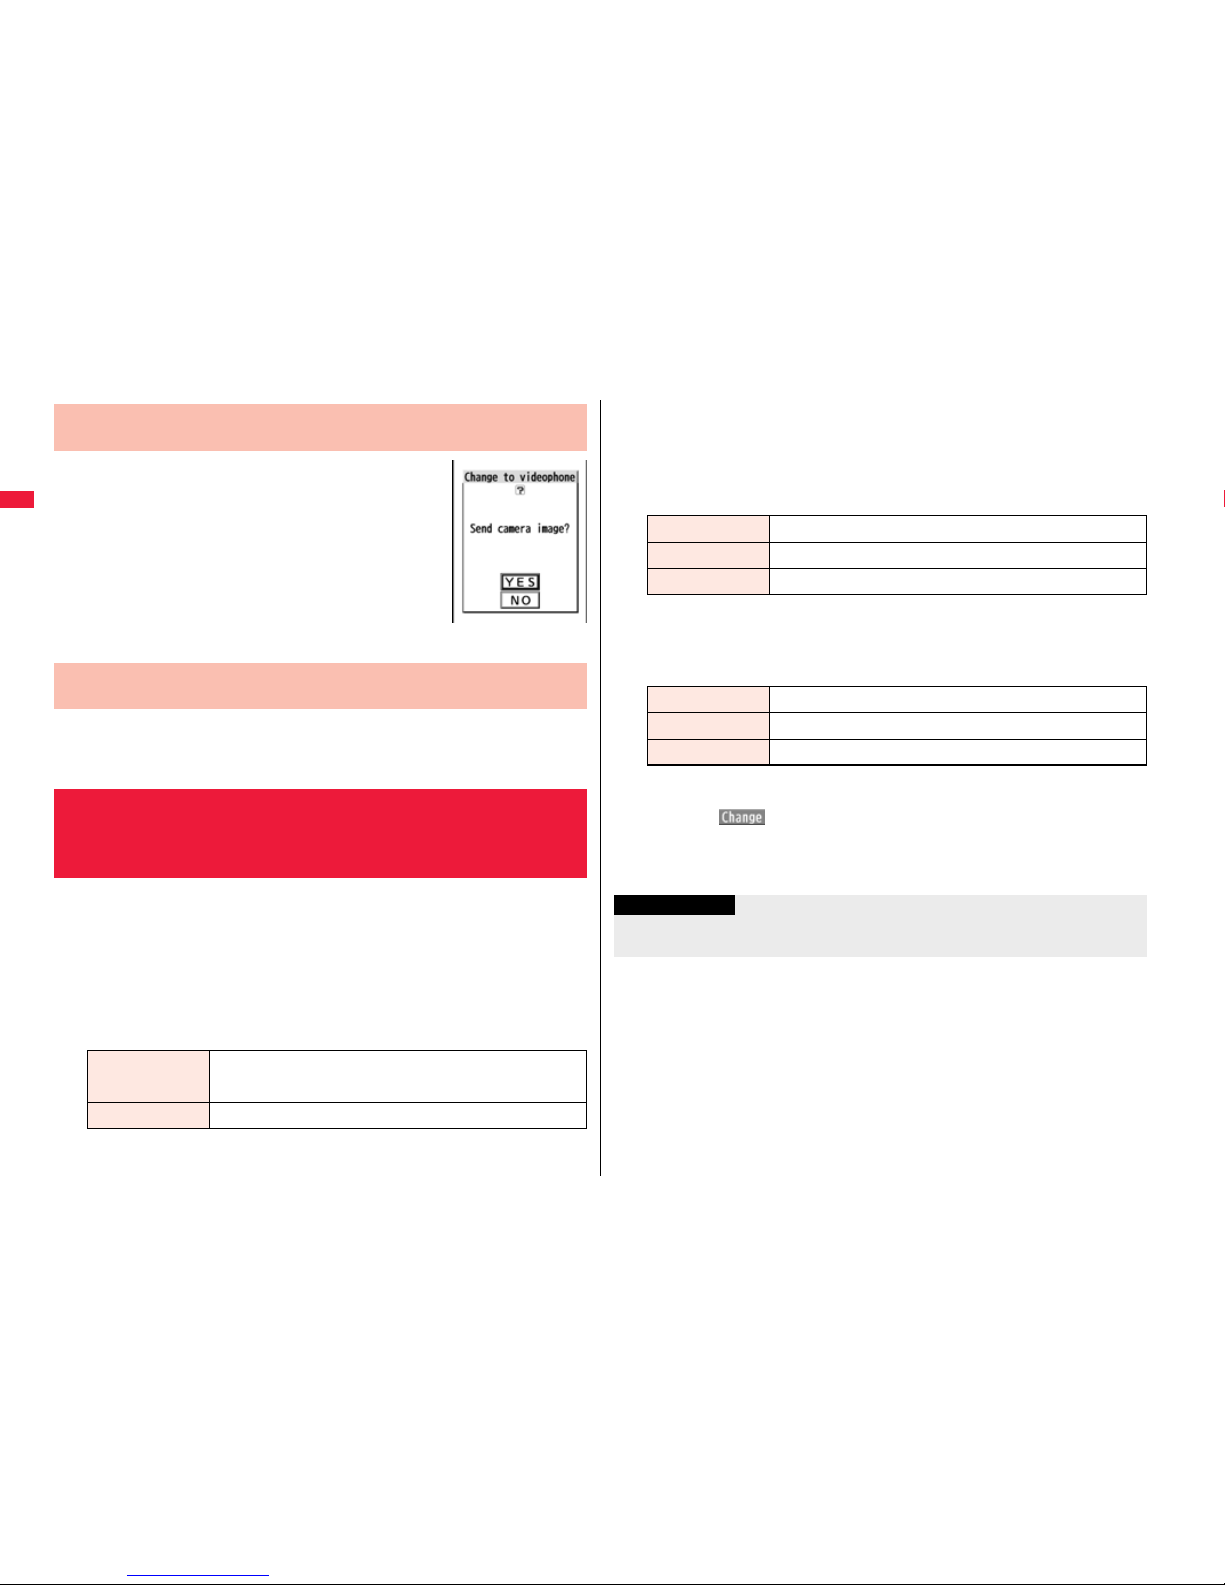
66
Voice/Videophone Calls/PushTalk
1
The display for switching to a
videophone call appears during a voice
call.
YES . . . Sends the image through your camera to the
caller.
NO . . . . Sends a pre-installed substitute image to the
caller.
While switching, the message to that effect is displayed
and the voice guidance is played back.
When the caller (the other party) switches a videophone call to a voice
call, the message telling that the call is being switched appears, the voice
guidance is played back, and then the call is switched to a voice call.
You can set to start talking (Any key answer) or to stop the ring tone
(Quick silent) by pressing a key besides d, Oo, m (for videophone
call), or p (for PushTalk call) for when a call or PushTalk call comes in.
1
mSet./ServiceIncoming callAnswer setting
Select a key operation.
Any key answer
You can start talking by pressing any key shown below:
When receiving a videophone call, you can start talking by pressing d, Oo or
m.
Switched from a Voice Call to Videophone Call by the
Other Party
Switched from a Videophone Call to Voice Call by the
Other Party
+m-5-8
<Answer Setting>
Setting Response of Key Operation for
Answering Incoming Calls
Voice call
※1
d, Oo, 0 through 9, a, s, r, m, c※2, No,
<
PushTalk call d, Oo, p, 0 through 9, a, r, l, c, Bo, <
Quick silent
The following are the keys you can press to stop the ring tone, vibrator or voice
guidance:
When “Setting when opened” is set to “Keep ringing”, you can open the FOMA
terminal in Normal Style to stop the ring tone, vibrator or voice guidance. Even if
you stop it, the other party still hears a ringback tone.
After you stop the ring tone, vibrator or voice guidance, you can start talking by
pressing d, Oo, m (for videophone call), or p (for PushTalk call).
OFF
You can start talking by pressing a key shown below:
※1 You can activate Any Key Answer or Quick Silent also by pressing l when
five record messages have already been recorded.
※2 While “ ” is displayed, you cannot start talking or stop the ring tone,
vibrator or voice guidance.
※3 During Key Lock, you can activate Quick Silent by pressing and holding < for
at least one second.
Voice call
※1※3
0 through 9, a, s, r, m, c※2, No, <
Videophone call※30 through 9, a, s, r, c※2, No, <
PushTalk call 0 through 9, a, r, l, c, Bo, <
Voice call d, Oo
Videophone call d, Oo, m
PushTalk call d, Oo, p
Information
While the Flat-plug Earphone/Microphone with Switch (option) is connected, you can
press the switch to start talking, regardless of “Answer setting”. (See page 420)
Page 71

67
Voice/Videophone Calls/PushTalk
1
mSet./ServiceIncoming call
Setting when openedSelect an incoming type
Keep ringing or Answer
1
mSet./ServiceTalkSetting when closed
Phone/VideophoneSelect an item.
No tone . . . . . . . The voice is muted. The hold tone does not sound. The setting is
completed.
Hold . . . . . . . . . .The other party hears the hold tone set for “Holding tone” of “Set
hold tone” while the FOMA terminal is closed.
End the call. . . . The call is finished. This is the same operation as pressing h
during a call. The setting is completed.
2
Speaker ON or Speaker OFF
Speaker ON . . . . The hold tone sounds from the speaker.
Speaker OFF . . . The hold tone does not sound from the speaker.
<Setting when Opened>
Setting Response for when Opening
FOMA Terminal during Ringing
Information
If you receive a videophone call with “Answer” set, the still image set for “Substitute
image” of “Select image” is sent to the other party.
You cannot answer calls by opening the FOMA terminal in Horizontal Open Style
even when “Answer” is set.
+m-1-8
<Setting when Closed>
Setting Response for when Closing FOMA
Terminal during a Call
Set Response for when Closing FOMA Terminal during a
Voice Call/Videophone Call
1
mSet./ServiceTalkSetting when closed
PushTalkSpeaker call or End the call
1
mSet./ServiceTalkVolumeUse Bo or </> to
adjust the earpiece volume.
Adjust the earpiece volume to Level 1 (minimum) through Level 6 (maximum).
During a voice call, you can press Zo or </>, during a videophone call,
PushTalk call, or calling, you can press Bo or </> to adjust the volume, and
while entering phone number, you can press and hold Bo(for at least one
second) to adjust it. Press Bo or </> within two seconds to adjust it.
Set Response for when Closing FOMA Terminal during
PushTalk
Information
This function is disabled when the Flat-plug Earphone/Microphone with Switch
(option) is connected. The communication state does not change even if you close the
FOMA terminal during a voice call or PushTalk communication. If you close the
FOMA terminal during a videophone call, the substitute image is sent to the other
party with the line connected.
If you close the FOMA terminal during a videophone call with “No tone” set, the
substitute image is sent to the other party. When “Hold” is set, the still image set for
“Holding” of “Select image” is sent.
If you set to “No tone” or “Hold”, “Holding” is displayed on the Private window when
the FOMA terminal is closed.
Even when “End the call” has been set, the call does not end if you close your FOMA
terminal from Horizontal Open Style. “No tone” works for a voice call/videophone call,
and “Speaker call” works for a PushTalk call.
<Volume>
Adjusting Earpiece Volume
Information
The earpiece volume adjusted during a call is retained even after the call ends.
Page 72
68
Voice/Videophone Calls/PushTalk
You can adjust the ring volume for incoming calls and mail.
1
mSet./ServiceSoundRing volume
Select an incoming type
Use Bo to adjust the volume.
The following icons are displayed on the Stand-by display while “Ring volume” is
set to “Silent”:
: You set “Phone”, “PushTalk”, or “Videophone”.
: You set “Mail”, “Chat mail”, “MessageR”, “MessageF”, or “i-concier”.
: You set “Phone”, “PushTalk”, or “Videophone”, and set “Mail”, “Chat mail”,
“MessageR”, “MessageF”, or “i-concier”.
If you have set “Step”, the ring tone is silent for about three seconds, and then the
volume steps up every three seconds, from Level 1 through Level 6.
During ringing of a voice call or videophone call, you can adjust the ring volume
also by pressing Bo. However, you cannot adjust the ring volume in the
following cases:
・When “Ring volume” is set to “Step”
・When “Answer setting” is set to “Quick silent” and you stop the ring tone or
voice guidance
・During Manner Mode
・When a call is cut off within the ring start time specified by “Ring time”
When you adjust the earpiece volume, the sound volume during a Hands-free call or
speaker call for PushTalk is also adjusted.
+m-5-0
<Ring Volume>
Adjusting Ring Volume
Information
1
During ringingh
The FOMA terminal makes three rapid beeps for confirmation and the call is put on
answer-hold (On Hold).
The confirmation tone does not sound during Manner Mode or when “Ring
volume” is “Silent”.
The other party hears the hold tone set for “On hold tone” of “Set hold tone”. For
videophone calls, the still image set for “On hold” of “Select image” is displayed.
2
Press d or Oo( ) to release hold and answer
the call.
If “Answer setting” is set to “Any key answer”, you can release hold of voice calls
by pressing any key of 0 through 9, a, s, r, m, c, Mo, <, >,
l, or i.
If a videophone call is on hold, the image through your camera is sent to the other
party by pressing d or Oo( ) to release hold. If you press m()
to release hold, the substitute image is sent.
1
During a callOo ()
The other party hears the hold tone set for “Holding tone” of “Set hold tone”. For
videophone calls, the still image set for “Holding” of “Select image” is displayed.
You can put the call on hold by closing the FOMA terminal during the call if you
have set “Setting when closed” to “Hold”.
<On Hold>
Putting a Call on Hold when You cannot
Answer Immediately
Information
The caller is charged for the call even during answer-hold (On Hold).
If you press -h during answer-hold (On Hold), the call will be disconnected.
<Holding>
Putting a Call on Hold during a Call
Page 73
69
Voice/Videophone Calls/PushTalk
2
Press d or Oo( ) to release hold and answer
the call.
If a videophone call is on hold, the image through your camera is sent to the other
party by pressing d or Oo( ) to release hold. If you press m()
to release hold, the substitute image is sent.
If you have set “Setting when closed” to “Hold” and put the call on hold by closing
the FOMA terminal, open the FOMA terminal or connect the Flat-plug Earphone/
Microphone with Switch (option) to answer the call.
If you connect the Flat-plug Earphone/Microphone with Switch to answer the
videophone call, the substitute image is sent to the other party.
You can set the guidance the other party hears during on hold.
1
mSet./ServiceTalkSet hold tone
On hold tone or Holding toneSelect a hold tone.
Tone 1/2 . . .The caller hears the pre-installed guidance in Japanese.
RHAPSODY ON A THEME OF PAGANINI OP 43
. . . . . . . . . . .The caller hears the melody. You can set this for “Holding tone” only.
Voice announce
. . . . . . . . . . .The caller hears the sound recorded by “Voice announce”. If it has
not been recorded, this is not displayed.
Press l( ) to play back a hold tone. Press r to end the demo
playback.
Information
The caller is charged for the call even while the call is on hold.
If a new call comes in while the current call is put on hold, the hold (Holding) is
released.
<Set Hold Tone>
Setting Hold Tone
Public Mode is an auto-answer service that puts importance on manners
in public spaces. Once you activate Public Mode, the guidance is played
back telling that you cannot answer the call as you are currently driving
or in a place (a train, bus, movie theater, etc.) where you should refrain
from answering the call. Then the call is disconnected.
Voice Mail Service※1, Call Forwarding Service※1, and Caller ID Display Request
Service
※2
are activated taking priority over Public Mode.
※1When you receive a voice call and the ring time is set to other than 0 seconds,
services are activated after Public Mode guidance.
※2When the other party notifies the phone number, Public Mode is activated.
When a voice call comes in from the other party whose phone number is rejected by
Nuisance Call Blocking Service, Public Mode is not activated.
1
Press and hold a for at least one second.
Public Mode is activated and “ ” is displayed.
When a call comes in, the guidance “The person you are calling is currently driving
or in an area where cell phone should not be used. Please try again later.” is played
back for incoming calls.
To deactivate Public Mode, perform the same operation. Then, Public Mode is
deactivated and “ ” disappears.
Using Public Mode
Using Public Mode (Drive Mode)
Information
You can activate/deactivate Public Mode only from the Stand-by display. You can
activate/deactivate Public Mode even when “ ” is displayed.
You can make calls as usual even during Public Mode.
If you make an emergency call at 110/119/118, Public Mode is released.
When Public Mode and Manner Mode are activated simultaneously, Public Mode has
priority.
If a “User unset” call comes in while “Caller ID request” is set to “Activate”, the Caller
ID Request guidance is played back. (The Public Mode guidance is not played back.)
You cannot use this function during data communication.
Page 74

70
Voice/Videophone Calls/PushTalk
・Even when a call comes in, the ring tone does not sound. The “Missed call” icon
appears on the display and the call is stored in “Received calls”. The guidance is
played back to the caller to the effect that you are currently driving or in an area where
mobile phones should not be used. Then the call is disconnected. When a PushTalk
call comes in, no answer is made and the message “Connection failed” appears on the
caller’s display. For the talk among three or more members, the message to the effect
that you are driving is conveyed to them.
However, when the power is off or “ ” is displayed, the caller hears the
out-of-service area guidance instead of the Public Mode guidance.
・The ring tone does not sound and the Call/Charging indicator does not flicker even
when mail or a message comes in. In addition, the set vibrator does not work.
・The ring tone for 64K data communication, alarm tone, charging confirmation tone, the
ring tone for i-αppli call and start tone for i-Widget do not sound, and a melody while an
i-αppli program is running is not played back.
・The tickers of i-Channel are not displayed.
・See page 69 for how Public Mode (Drive Mode) and each network service work for
incoming calls when they are simultaneously activated.
Public Mode (Power Off) is an auto-answer service that puts importance
on manners in public spaces. Once you activate Public Mode (Power Off),
the guidance is played back telling that you cannot answer the call as
you are currently in a place (hospital, airplane, around priority seat in a
train, etc.) where use is prohibited. Then the call is disconnected.
1
Enter “:25251”d
Public Mode (Power Off) is set. (Nothing is changed on the Stand-by display.)
After setting Public Mode (Power Off) and turning off the power, the guidance “The
person you are calling is currently in an area where use is prohibited. Please try
again later.” is played back for incoming calls.
To release Public Mode (Power Off), dial “:25250”.
To check the setting for Public Mode (Power Off), dial “:25259”.
When Public Mode (Drive Mode) is activated
Using Public Mode (Power Off)
The setting stays activated until you dial “:25250” to deactivate Public Mode (Power
Off). You cannot deactivate the setting just by turning on the power.
The guidance is played back to the caller telling that you are currently in a place where
you should turn off the power. Then the call is disconnected. When a PushTalk call
comes in, no answer is made and the message “Connection failed” appears on the
caller’s display. For the talk among three or more members, the message to the effect
that you do not participate is conveyed to them.
The Public Mode (Power Off) guidance is played back even when you are out of the
service area or out of reach of radio waves.
・See page 69 for how Public Mode (Power Off) and each network service work for
incoming calls when they are simultaneously activated.
When you could not answer calls (Missed calls), the “Notification icon”
appears on the Stand-by display. You can check Received Calls by
selecting the icon.
1
OoOo()
Press h or r to return
to the former display.
When multiple icons are
found, use Mo to highlight
an icon and press
Oo().
See page 33 for when the FOMA terminal is closed.
When Public Mode (Power Off) is activated
<Missed Calls>
If You could not Answer an Incoming Call
Notification icon
Page 75

71
Voice/Videophone Calls/PushTalk
By activating Record Message, you can play back an answer message to
incoming calls and record callers’ voice/video messages when you
cannot answer them even if you have not signed up for Voice Mail
Service.
You can record up to five messages for voice calls and up to two
messages for videophone calls. Each message can be recorded for up to
20 seconds.
1
mLifeKitRec. msg/voice memo
Record message settingON or OFF
Select an answer message.
Press l( ) to play back the answer message. Press r to end the
demo playback.
When “Japanese 1”, “Japanese 2”, or “English” is set, a beep sounds after
playing back the answer message to the other party. If “Voice announce” is set,
the beep does not sound.
2
Enter a ring time (seconds).
Enter from “000” through “120” in three digits.
You cannot set the same ring time for Remote Monitoring, Auto Answer Setting
and Record Message Setting. Set a different time for each.
While Record Message is activated, “ ”〜“ ” (the number of recorded
messages for voice calls) and “ ”〜“ ” (the number of recorded messages
for videophone calls) are displayed.
+m-5-5
<Record Message Setting>
Recording Voice/Video Messages when
You cannot Answer a Call
Activate Record Message
For videophone calls, the still image set for “Preparing” of
“Select image” is displayed on the other party’s display while
playing back the answer message, and the still image set for
“Record message” of “Select image” is displayed while
recording.
To answer a call while the answer message is being played
back or a voice/video message is being recorded, press
d or Oo().
For videophone calls, press d or Oo( ) to send
the image through your camera, or press m( ) to
send a substitute image.
You can answer a call also by pressing the switch on the
Flat-plug Earphone/Microphone with Switch (option). For videophone calls, the image
through your camera is sent to the other party.
Incoming calls when Record Message Setting is set to “ON”
Incoming Call Playing back the
answer message
Recording a voice/
video message
The ring time
elapses
Displaying an icon on the
desktop (See page 30)
Information
Record Message does not work when “ ” is displayed.
When Public Mode (Drive Mode) and Record Message are simultaneously activated,
the former has priority and the latter does not work.
The priority order of answer messages is as follows: “Setting for Phonebook entry” →
“Group setting” → “Record message setting”.
If “Voice announce” selected as an answer message is deleted, the answer message
will be set to “Japanese 1”.
Page 76

72
Voice/Videophone Calls/PushTalk
Even if a call comes in while Record Message is not activated, you can
record the caller’s voice/video message just for that incoming call.
1
During ringingl() or >
Manner Mode is also activated.
The caller will hear the answer message and then can leave you a voice/video
message.
During Key Lock, press and hold > for at least one second.
Record Message does not work when five messages for voice calls and two
messages for videophone calls have already been recorded or when a PushTalk
call comes in. Only Manner Mode is set when you operate by pressing >.
When “Side keys guard” is set to “ON”, you cannot activate Record Message or
Manner Mode by pressing > with the FOMA terminal closed.
When Voice Mail Service or Call Forwarding Service is set at the same time as
Record Message, the priority depends on the ring time set for Voice Mail Service or
Call Forwarding Service. To give Record Message priority, set the ring time for
Record Message Setting shorter than that for Voice Mail Service or Call Forwarding
Service. Even when you do this, Voice Mail Service or Call Forwarding Service works
if there are already five record messages for voice calls and two record messages for
videophone calls.
You cannot receive a call from a third party while a voice/video message is being
recorded. The third party will hear the busy tone.
<Quick Record Message>
Recording a Message when You cannot
Answer Incoming Call
Information
1
mLifeKitRec. msg/voice memo
Play/Erase msg.
Select a record message or voice
memo.
A beep sounds and playback starts.
On the Record Message list, recorded items are indicated by “★”.
It is played back at the volume set for “Volume” (earpiece volume).
When playback ends, a double-beep sounds and the message “Playing” is
cleared from the display.
The date and time the message/memo was recorded are displayed during
playback. When a caller’s phone number is provided, it is displayed. If the caller is
stored in the Phonebook, his/her name is also displayed.
However, the name is not displayed and the phone number only is displayed in
the following cases:
・When you play back a record message from the caller stored as secret data in
Normal Mode
・When you play back a record message for Number A in B Mode (or vice versa)
while using 2in1
If the caller’s phone number is displayed during playback, you can make a voice
call to that phone number by pressing d. Press l( ) to make a
videophone call and press p to make a PushTalk call.
From the vertical Stand-by display, press > to play back the latest record message.
When record messages are not recorded, a voice memo is played back.
+m-5-5
<Play/Erase Messages>
<Play/Erase Videophone Messages>
Playing/Erasing Record Messages/a Voice
Memo/Videophone Record Messages/
Movie Memos
Play Back/Erase Record Messages/a Voice Memo
Record Message list
To play back using .>
Page 77

73
Voice/Videophone Calls/PushTalk
Each time you press > during playback, messages are played back in the following
order: the next new record message → the oldest record message → a voice memo.
Press Oo() or r.
1
mLifeKitRec. msg/voice memo
Play/Erase VP msg.
Select a videophone record message
or movie memo.
On the Videophone Record Message list, recorded
items are indicated by “★”.
It is played back at the same volume of the playback
sound of i-motion movies.
The date and time the message/memo was recorded are displayed during
playback.
From the vertical Stand-by display, press and hold > for at least one second to play
back the latest videophone record message. When videophone record messages are
not recorded, the latest movie memo is played back.
Press Oo() or r.
To skip to next message
To cancel playback midway
Play Back/Erase Videophone Record Messages/Movie Memos
Videophone Record
Message list
To play back using .>
To cancel playback midway
Function Menu of the Record Message List/Videophone
Record Message List
Play You can play back the message.
Erase this YES
You can erase the message/memo also by pressing
i( ) during playback.
You can set up for sending a Chara-den image to the other party.
See page 363 for Chara-den images.
You can set a Chara-den image to be sent to the other party for making a
videophone call.
1
Chara-den display/Chara-den listl()
Enter the destination phone number and press l( ) to make a
videophone call.
When the other party’s phone number is stored in the Phonebook, you can
retrieve it selecting from the Search Phonebook display by pressing Bo.
You can search for the phone number also from Received Calls by pressing Co
or from Redial by pressing Vo.
Erase rec. msg. You can erase all record messages from the Record Message
list, and can erase all videophone record messages from the
Videophone Record Message list.
YES
Erase movie memo
[Videophone Record
Message list only]
You can erase all movie memos.
YES
Erase all You can erase all record messages and a voice memo from the
Record Message list, and can erase all videophone record
messages and movie memos from the Videophone Record
Message list.
YES
Using Chara-den
Set by Call
Information
The priority order of substitute images to be sent to the other party is as follows:
“Setting by call” → “Setting for Phonebook entry” →“Group setting” → “Select image”.
Page 78

74
Voice/Videophone Calls/PushTalk
You can set a Chara-den image for “Substitute image” of “Select image”.
1
Chara-den display/Chara-den list/Chara-den Recording
displayi()Substitute image
From the Chara-den list, you can set it also by pressing m().
You can perform settings for a Chara-den call. These settings are
effective only for during a videophone call.
1
During a Chara-den calli()
Chara-den setupDo the following operations.
Substitute Image
Chara-den Setup
Switch Chara-den Select a Chara-den image.
If you switch Chara-den images, the action mode switches to
Whole Action Mode.
Action list You can display the list for actions that you can operate.
Highlight an action and press Oo( ) to execute the
action. Press l( ) to check the details of the action.
You can display the Action list also by pressing a.
Change action You can switch the action mode between Whole Action Mode
( ) and Parts Action Mode ( ).
You can switch modes also by pressing l.
SW substitute img. You can switch a substitute image to be sent to the other party to
the still image set for “Pre-installed” of “Select image”.
SW org. subst. img. You can switch a substitute image to be sent to the other party to
the still image set for “Original” of “Select image”.
At videophone
start-up
Whole Action
Mode
You can switch images to be sent to the other party from through the
inside camera to through the outside camera.
1
During a videophone calll()
Press l( ) again to switch to the image through the inside camera.
The setting here is effective only for the current videophone call.
You can switch images to be sent to the other party from the image
through your camera to the still image or Chara-den image set as the
substitute image.
See page 363 for Chara-den.
1
During a videophone callm()
The substitute image is sent to the other party.
“ ” is displayed while the still substitute image is being sent, and “ ” is
displayed if you have set a Chara-den image as a substitute image (during a
Chara-den call).
Press m( ) again to switch from the substitute image to the image
through your camera.
Useful Functions for Videophone Calls
Switching Cameras
At videophone start-up Inside camera
Send Substitute Images
Information
The priority order of substitute images to be sent to the other party is as follows:
“Setting by call” → “Setting for Phonebook entry” → “Group setting” → “Select image”.
Note that “Setting for Phonebook entry” and “Group setting” are disabled when a
videophone call comes in without notifying the caller ID.
Even when you make a videophone call sending a substitute image, you are charged
for the digital communication.
Page 79

75
Voice/Videophone Calls/PushTalk
You can switch the display locations of the received image and the sent
image.
1
During a videophone call, press c().
Each time you press
c( ), the displays
switch.
Switch Image Display Positions
+c
c
+cc
You can adjust the magnification for the camera image to be sent to the
other party.
1
During a videophone call
Use No to adjust the magnification.
The former zoom setting returns when the videophone call ends.
Zoom
At videophone start-up Wide
Function Menu during Videophone Call
CHG to voice call See page 53.
Talk on BT/Phone You can set whether to communicate through the FOMA
terminal or a Bluetooth device. (See page 426)
Send DTMF tone/
DTMF tone OFF
During a Chara-den call, you can switch to the DTMF
Transmission Mode that enables you to enter the data from
the numeric keys and to send DTMF (touch-tone signals). You
can operate it only during a Chara-den call.
“Send DTMF tone” is displayed when the mode is not DTMF
Transmission Mode and “DTMF tone OFF” is displayed in
DTMF Transmission Mode.
In DTMF Transmission Mode, you cannot operate the action
of Chara-den images.
The DTMF tone may not be received depending on the
device of a receiving end.
V.phone settings
Visual preference See page 76.
Brightness You can adjust the brightness of the camera image to be sent
to other party to -3 (dark) through +3 (bright).
Select a brightness level.
At videophone
start-up
0
Page 80
76
Voice/Videophone Calls/PushTalk
White balance You can adjust the colors of the camera image to be sent to
the other party, to make the colors look more natural.
Select an item.
Fine weather . . . . . For talking outdoors in fine weather
Cloudy weather . . . For talking in cloudy weather or in the
shade
Automatic. . . . . . . . For adjusting white balance
automatically
Light bulb . . . . . . . . For talking under incandescent light
Color mode set You can switch the color tone of the camera image to be sent
to the other party.
Select a color tone.
Night mode You can lengthen the camera’s exposure time to make the
camera image to be sent clear in a dark place.
ON or OFF
Focus You can set the focus for the outside camera during a
videophone call.
Close-up or Landscape
The focus for the inside camera is fixed to “Portrait” (suitable
mode to shoot portraits), so you cannot change the setting.
Chara-den setup See page 74.
Backlight You can select whether to light the display constantly or light
for about 15 seconds after an operation.
Constant light or 15 seconds light
LCD AI See page 117.
Own number You can display your phone number.
Key guide You can display the guide of key operation during a
videophone call.
At videophone
start-up
Automatic
At videophone
start-up
Normal
At videophone
start-up
OFF
At videophone
start-up
Landscape
You can set whether to switch to Hands-free automatically for when a
videophone call starts.
1
mSet./ServiceVideophone
Hands-free w/ V. phoneON or OFF
See page 63 for the operation while Hands-free is activated and how to switch to
Hands-free.
You can set the quality of both the received image and sent image on the
display.
1
mSet./ServiceVideophoneVisual preference
Select an image quality.
“Prefer motion spd” is effective for moving images. When there is little motion, the
quality becomes better if you set to “Prefer img qual”.
If you operate from the Function menu during a videophone call, the setting is
effective only for the current videophone call.
<Hands-free with Videophone>
Setting Hands-free Videophone
<Visual Preference>
Setting Image Quality for Videophone
Calls
Information
If the radio wave conditions weaken during a videophone call, the image may appear
like a mosaic.
Page 81
77
Voice/Videophone Calls/PushTalk
You can set an image to be sent to the other party.
1
mSet./ServiceVideophoneSelect image
Select an item.
On hold . . . . . Sets an image for during answer-hold (On hold).
Holding . . . . . Sets an image for while a call is on hold (Holding).
Substitute image
. . . . . . . . . . . . Sets a substitute image (still image or Chara-den) for when the
camera is off.
Record message
. . . . . . . . . . . . Sets an image while recording a record message.
Preparing . . . Sets an image for while playing back an answer message.
Movie memo
. . . . . . . . . . . . Sets an image for while recording a movie memo.
2
Select an image.
Pre-installed . . . For sending a pre-installed still image to the other party.
Original . . . . . . . For sending an appropriate message with a still image stored
using “Set display”.
Chara-den. . . . . For sending a Chara-den image selected by “Substitute image”
from the Function menu while a Chara-den image is displayed.
(See page 74)
(Displayed only when “Substitute image” has been selected in
step 1.)
Press l( ) to play back a demo to check the still image or Chara-den
image.
To change the setting of “Original” or “Chara-den”, press i( ), select
“Change setting”, then select a still image or Chara-den image. If you have
selected “Original”, select a still image after selecting a folder. See “Set display”
for settable still images.
<Select Image>
Changing Image Displays for Videophone
Calls
Information
Even if you delete the still image selected from “Original”, that still image is displayed
to the other party. To change, set by “Change setting” or “Set display”.
You can set an image to be sent to the other party for making a
videophone call.
1
Enter a phone number
or
call up the detailed display of a Phonebook entry, redial
item, dialed call record, or received call record.
2
i()Select imageMe or Chara-den
The setting is completed when you select “Me”.
To cancel the setting by call, select “Release”. The setting is completed.
3
Select a Chara-den image.
If a videophone call cannot be connected, it will be automatically redialed
as a voice call.
1
mSet./ServiceVideophoneVoice call auto redial
ON or OFF
Set by Call
<Voice Call Auto Redial>
Redialing as a Voice Call when a
Videophone Call cannot be Connected
Information
The charges for calls once switched to voice calls are billed at the rates for the voice
calls.
Voice Call Auto Redial does not work when a videophone call cannot be connected
such as when the line is busy or the other party’s phone is in Public Mode (Drive
Mode). However, Voice Call Auto Redial works when you make a videophone call to a
phone that does not support the videophone function.
Page 82

78
Voice/Videophone Calls/PushTalk
You can let the other party know that your FOMA terminal can switch
between a voice call and a videophone call.
This function is set to “Indication ON” at the time of contract. When
“Notify switchable mode” is set to “Indication ON”, the caller can switch
between the videophone call and voice call.
You cannot operate “Notify switchable mode” when you are out of the service area or
radio waves do not reach, or during a call.
1
mSet./ServiceVideophone
Notify switchable modeDo the following operations.
1
mSet./ServiceIncoming call
V-phone while packetSelect an item.
V-phone priority
. . . .Shows the Videophone Call Receiving display. When you answer the
videophone call, packet communication is disconnected.
Packet downld priority
. . . .Rejects the videophone call and continues the communication.
V-phone answerphone
. . . .Connects the incoming videophone call to the Voice Mail Service Center.
Call forwarding
. . . .Forwards the incoming videophone call to the forwarding destination.
<Notify Switchable Mode>
Setting for Switching a Voice/Videophone
Call during a Call
Indication ON YESOK
Indication OFF YESOK
Check indication You can check the setting of the function.
OK
<Videophone while Packet>
Setting Answer Method of a Videophone
Call during i-mode
You can operate your FOMA terminal from an external device such as
your personal computer for making or receiving videophone calls by
connecting them using the FOMA USB Cable with Charge Function 01/02
(option).
To use this function, you need to install a videophone application
program on a dedicated external device or personal computer, and
further, you need to prepare equipment (commercial item) such as an
earphone/microphone or USB compatible web camera.
For operating environments for a videophone application program and how to set or
operate it, refer to the instruction manual or other literature for an external device.
You can use “ドコモテレビ電話ソフト (DOCOMO Videophone Software)” for the
application program that supports this function.
Download it from the DOCOMO Videophone Software website.
(For details such as operating environment for the personal computers, refer to the
support web page.)
http://videophonesoft.nttdocomo.co.jp/ (In Japanese only)
Information
If you have not signed up for Voice Mail Service or Call Forwarding Service, “Packet
downld priority” works even if you set to “V-phone answerphone” or “Call forwarding”.
Using Videophone Calls by Interfacing to
External Devices
Information
You cannot make a videophone call from the external device during a voice call.
When you have signed up for Call Waiting Service, an incoming videophone call from
an external device during a voice call is recorded as a missed call in Received Calls.
The same applies for an incoming voice call, videophone call, and 64K data
communication during a videophone call from an external device.
Page 83
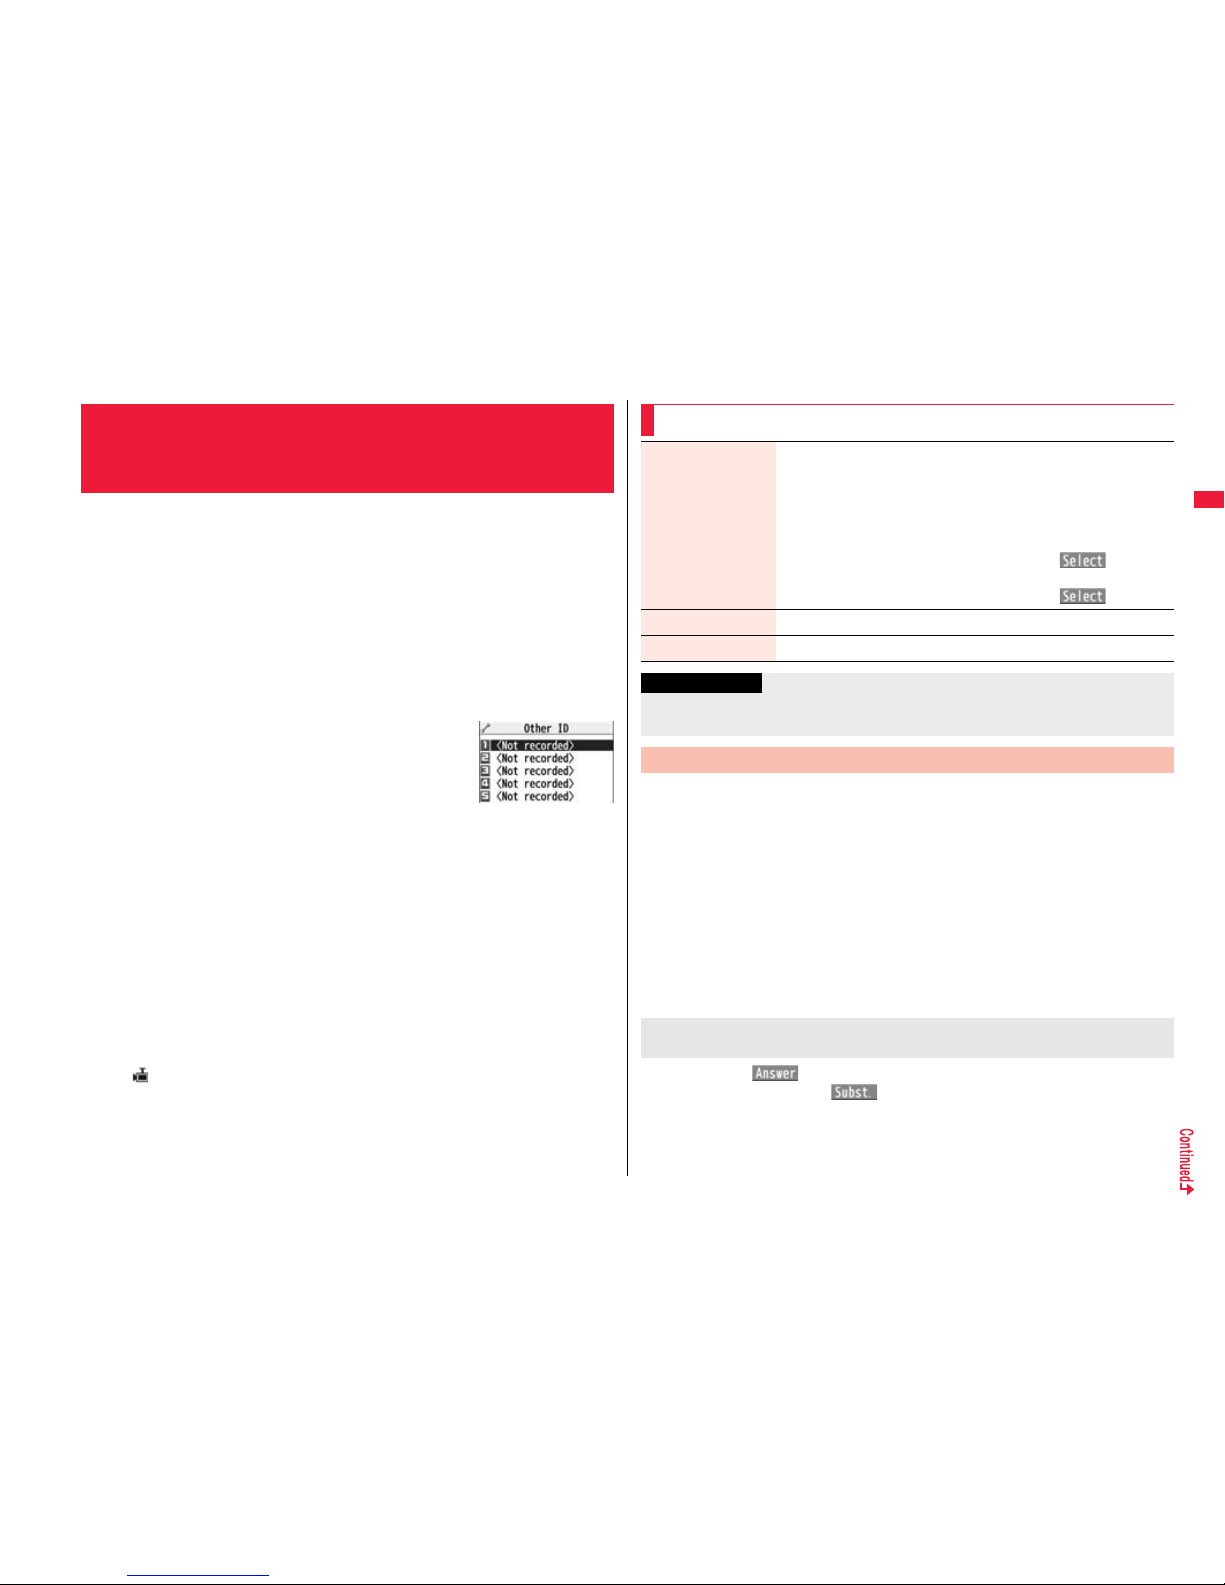
79
Voice/Videophone Calls/PushTalk
You can use the inside camera of the FOMA terminal as a monitoring
camera to observe the remote location from a phone that has the
videophone function based on 3G-324M. While “Remote monitoring” is
set to “ON”, the FOMA terminal automatically starts Remote Monitoring
when it receives a videophone call from a phone number stored as
“Other ID” of “Remote monitoring”.
(The FOMA terminal needs to be set to Normal Style.)
1
mSet./ServiceVideophoneRemote monitoring
Enter your Terminal Security Code.
To release Remote Monitoring, select “Set”, then select “OFF”.
2
Other ID<Not recorded>
Enter a phone number.
To change, select the stored phone number.
You can store up to five phone numbers that can enter
up to 26 digits by using numerals, #, :, or +.
To return to the setting display for Remote Monitoring, press r from the Other
ID list after storing phone number.
3
Ring timeEnter a ring time (seconds).
You can enter the time from “003” through “120” in three digits until Remote
Monitoring starts after receiving a videophone call.
You cannot set the same ring time for Remote Monitoring, Auto Answer Setting
and Record Message Setting. Set a different time for each.
4
SetON
When receiving videophone calls from the phone numbers stored as “Other ID”,
the FOMA terminal automatically answers to start Remote Monitoring after the
ring time elapses.
“ ” is displayed while this function is set to “ON”.
You cannot set to “ON” in Manner Mode.
<Remote Monitoring>
Checking inside of a Room when You are
Out
Other ID list
1
Make a videophone call from a stored phone number.
After the ring time set for “Remote monitoring” elapses, Remote Monitoring
automatically starts.
The image through the receiving end’s camera appears on the display and the
sound comes out of the speaker.
You cannot set Voice-only Remote Monitoring.
Make a videophone call notifying your caller ID. If the caller ID is not notified,
Remote Monitoring will not start and the call will be handled as an ordinary
incoming videophone call.
2
Remote Monitoring ends when the calling end or
receiving end presses
h.
Press d or Oo( ) before the FOMA terminal answers a videophone call
automatically. If you press m( ), the videophone call starts sending the
substitute image to the other party.
When a remote monitoring call comes in, “Setting when opened” is disabled.
If you press h when a remote monitoring call comes in, the call will be cut and
Remote Monitoring will not start.
Function Menu of the Other ID List
Look-up address You can call up a phone number in the Phonebook, Dialed Calls,
or Received Calls to enter it.
Select an item.
Phonebook
. . . Call up a Phonebook entry and select a phone number.
Dialed calls
. . . Highlight a phone number and press Oo().
Received calls
. . . Highlight a phone number and press Oo().
Delete this YES
Delete all YES
Information
<Delete this> <Delete all>
If you delete all phone numbers stored as “Other ID”, “Remote monitoring” is set to “OFF”.
Perform Remote Monitoring
For answering a videophone call without starting Remote
Monitoring at the receiving end
Page 84
80
Voice/Videophone Calls/PushTalk
You may be imposed punishment according to the law and rule (such as the
nuisance prevention ordinance) if you use the FOMA terminal to give a
remarkable nuisance and misdeed to the public.
Information
When your FOMA terminal is used for the receiving end, an image through the caller’s
camera appears, and sound comes out. (You cannot switch to a substitute image.)
Remote Monitoring does not start during Manner Mode and Public Mode (Drive
Mode). However, it starts even during Lock All.
When Remote Monitoring is set to “ON” and a videophone call comes in from the
phone number set as “Other ID”, Remote Monitoring starts after the set ring time,
even when “Ring time”, “Auto answer setting”, or “Record message setting” is set and
regardless of their ring times.
When Remote Monitoring is not performed, it is recorded in Received Calls as a
missed videophone call.
If the Flat-plug Earphone/Microphone with Switch (option) is connected when a
remote monitoring call comes in, the ring tone will sound from both the earphone and
the speaker, even when “Headset usage setting” is set to “Headset only”.
The ring tone for Remote Monitoring sounds. (You cannot change the ring tone for
Remote Monitoring.)
The ring tone sounds at the volume set for “Videophone” of “Ring volume”, but at
“Level 2” if you have set “Step”, “Level 1” or below. The color is “Gradation”, and its
lighting pattern is “Standard”, regardless of the Incoming Illumination setting.
You cannot put incoming remote monitoring calls on answer-hold (On Hold).
If you set both Call Forwarding Service and Remote Monitoring, and give priority to
Remote Monitoring, set its ring time shorter than that for Call Forwarding Service.
To use Call Forwarding Service for Remote Monitoring, store the phone number of
dialing side as “Other ID” and set a 3G-324M videophone as the forwarding destination.
Please be considerate of the privacy of individuals around you
when shooting and sending photos using camera-equipped
mobile phones.
PushTalk is a service that enables you to enjoy communicating with
multiple persons (from two to up to five persons including yourself). You
can talk with the other party by pressing the PushTalk key respectively.
※Each time of pressing the PushTalk key (talking), the talker is charged a
communication fee.
For details on PushTalk or compatible models, refer to DOCOMO website or “Mobile
Phone User’s Guide [Network Services]”.
■PushTalkPlus
※
This service enables you to have a PushTalk call with up to 20 persons including you.
You can use the shared Phonebook on the network, and can check the members for
their status, thus PushTalk becomes more useful.
※You need to subscribe separately.
For details such as how to operate, refer to the booklet which is supplied at
subscription.
1
Enter the other party’s phone number
p
When you are dialing, a confirmation tone for starting a
PushTalk call sounds for a few seconds, and then the
same ringback tone as the voice (videophone) call
sounds.
You can make a group call to multiple persons using
the PushTalk Phonebook. (See page 84 and page 85)
PushTalk
Making a PushTalk Call
Page 85

81
Voice/Videophone Calls/PushTalk
2
When the other party answers, talk
while pressing p.
When the other party answers, a confirmation tone for
starting communication sounds.
“ ” blinks during dialing and lights during
communication.
When you get the talker’s right, the talker’s right
obtained tone sounds. The other party hears your voice
only while you are pressing p and having the talker’s
right. When you release p, the talker’s right is
released, and a confirmation tone sounds.
You cannot get the talker’s right and an error tone
sounds even if you press p when another member has
it.
Press l( ) or press i( ) and select “Add member” to add a
member. Go to step 1 on page 82.
3
Press h to end the communication after talking.
A tone to notify the disconnection of communication sounds at the other end.
When the call you made is a group call, the PushTalk communication itself
continues even if you press h, and the icon indicating that you are not
participating appears on each member’s display and a confirmation tone sounds.
However, when all the members exit, the PushTalk communication itself ends.
Information
The talker is charged a communication fee from when he/she presses .p and the
talker’s right obtained tone sounds.
You cannot make emergency calls at 110/119/118 from PushTalk.
The duration you can talk per talker’s right is limited. The talker’s right release notice
tone sounds before the limited time arrives, and the talker’s right is released. In
addition, the PushTalk communication itself ends when no one gets the talker’s right
in a certain period of time.
Just after purchase, Hands-free is automatically activated by “Hands-free w/
PushTalk”. (See page 87) However, Hands-free is deactivated during Manner Mode
regardless of “Hands-free w/ PushTalk”.
The FOMA terminal works according to “Setting when closed” if you close it during
communication. You can set also by pressing +i( ) and selecting “Set. when
closed”. (See page 67)
You can use the PushTalk Phonebook or Redial/Dialed Calls/Received Calls to
communicate with multiple members.
While making or receiving a PushTalk group call, the group name and the members in
the group are displayed. Press No to confirm other members. When a call is received
with the other party’s phone number not provided, “User unset” is displayed.
Use Redial/Dialed Calls/Received Calls to make a PushTalk call while the PushTalk
communication continues among other members.
If the PushTalk communication has already been finished, your call is dialed as a new
PushTalk call.
Whether to notify others of your phone number when you make PushTalk calls follows
the setting for “Activate” of “Caller ID notification” (see page 48). However, when you
set “Notify caller ID” from the Function menu for dialing, or when “Notify”/“Not notify” is
displayed in the detailed Redial/Dialed Call/Received Call display, each of those
settings will work.
When you make a PushTalk call with your phone number notified, your phone
number as well as all members’ phone numbers are notified to all members including
added members. When you make a PushTalk call without notifying your phone
number, “User unset” appears in the caller’s and member’s fields on the displays of all
the members including added members. Your phone number is very important
information, so take the utmost care to notify others of it.
If you make a PushTalk call during i-mode communication, the i-mode communication
is disconnected.
You cannot use PushTalk by Number B of 2in1.
Making/Receiving a PushTalk group call
Re-participating or participating midway in PushTalk
communication
Information
Page 86
82
Voice/Videophone Calls/PushTalk
■Display while dialing/communicating
The phone number of the member who has the talker’s
right is displayed, and the state of the talker’s right is
displayed in color of the round icon at the upper left.
When the name of that member, phone number, and
image are stored in the Phonebook, his/her name and
image are displayed. However, when you cannot receive
a member’s information correctly, “?” is displayed.
When the FOMA terminal is closed, the phone number
(name) of the member who has the talker’s right is
displayed on the Private window.
The state of members is shown by icons during dialing or communicating.
(Characters other than shown below might appear.)
※
Displayed only for the PushTalk communication among three or more members.
The number of times you have got the talker’s right is the total of the number of “ ”
and the number shown in “ ”. When 999 times are exceeded, the counting is reset
to 0.
During group
communication
Color of the
round icon at the
upper left
State of the talker’s rights
Blue Calling
Green You can get the talker’s right.
Blinking in green You have the talker’s right.
Blinking in yellow Another member has the talker’s right.
Blinking in green
and red
The talker’s right will be released automatically in a few seconds
because it has long been retained (A release notice tone
sounds).
Icon State of members
※
Calling
Has participated in the PushTalk call.
※
Does not answer, has ended the PushTalk call, out of the service
area, or the power is off.
※
Has activated Public Mode (Drive Mode).
You can make a PushTalk call to another member during PushTalk
communication and add that member to the communication.
You can add a person to the members by accessing the PushTalk
Phonebook, Phonebook, or Dialed Calls/Received Calls, or by directly
entering a phone number.
You can add up to five members (including yourself), and can repeat
adding up to that number.
Members can be added from the calling end only.
You can add even the members who use the PushTalk compatible models which do
not have this function.
If you have already made a call to four members, you cannot add a new member
though you can call up a member who has exited the call again.
The added members are not stored in Redial/Dialed Calls.
1
During PushTalk communicationl()
Do the following operations.
Adding a Member during a PushTalk Call
View PushTalk PB You can call up a PushTalk Phonebook entry to make a PushTalk
call. (See page 85)
Instead of pressingp, press l( ) to call.
Press c to switch between the PushTalk Phonebook list and
PushTalk Group list.
View phonebook You can call up a Phonebook entry to make a PushTalk call.
Call up a Phonebook entryHighlight a phone number
and press l().
Direct input You can enter a phone number to make a PushTalk call.
Enter a phone numberl()
View call records You can call up Dialed Calls/Received Calls to make a PushTalk
call.
Dialed calls or Received callsSelect a record
Select a phone numberl()
Information
The caller cannot add members if he/she uses a PushTalk compatible model which
does not have this function.
Page 87

83
Voice/Videophone Calls/PushTalk
1
When a PushTalk call comes in,
“PushTalk call” is displayed, the ring
tone sounds, and the Call/Charging
indicator flickers.
“PushTalk group call” is displayed for an incoming
group call.
To reject a call, press i( ) during ringing and
select “Call rejection”. You can reject the call also by
pressing h.
2
Press p to answer a PushTalk call
Talk while pressing p.
You can answer also by pressing d or Oo()
instead of p. You can answer also by pressing p with
the FOMA terminal closed.
When you get talker’s right, the talker’s right obtained
tone is played back. The other party hears your voice
only while you are pressing p and having the talker’s
right. When you release p, the talker’s right is released
and a confirmation tone sounds.
You cannot get the talker’s right and an error tone
sounds, even if you press p when another member
has it.
“Setting when opened” and “Record message setting” become invalid.
For a member who uses a PushTalk compatible model which does not have this
function, the members added during PushTalk communication are not shown and a
confirmation tone does not sound.
Receiving a PushTalk Call
Information
3
Press h to end the communication after talking.
A tone for confirming the end of communication sounds at the other end.
When the call you received is a group call, the PushTalk communication itself
continues even if you press h, and the icon indicating that you are not
participating appears on each member’s display and a confirmation tone sounds.
However, when all the members exit, the PushTalk communication itself ends.
Information
The talker is charged a communication fee from when he/she presses .p and the
talker’s right obtained tone sounds.
The duration you can talk per talker’s right is limited. The talker’s right release notice
tone sounds before the limited time arrives, and the talker’s right is released. In
addition, the PushTalk communication itself ends when no one gets the talker’s right
in a certain period of time.
Just after purchase, Hands-free is automatically activated by “Hands-free w/
PushTalk”. (See page 87) However, Hands-free is deactivated during Manner Mode
regardless of “Hands-free w/ PushTalk”.
The FOMA terminal works according to “Setting when closed” if you close it during
communication. You can set also by pressing +i( ) and selecting “Set. when
closed”. (See page 67)
You cannot use “On hold” or “Holding” function for PushTalk.
A PushTalk call that comes in during a voice call, a PushTalk call that comes in during
Public Mode (Drive Mode), and a voice call (when “PushTalk arrival act” is set to other
than “Answer”), a videophone call, data communication, or a PushTalk call that
comes in during PushTalk communication are recorded as missed calls in Received
Calls.
A PushTalk call that comes in during a videophone call or during data communication
does not work and is not recorded in Received Calls.
After you finish PushTalk communication or when you cannot answer to a PushTalk
call, you can use a received call record to make a PushTalk call and to re-participate
or participate midway in the communication so long as the PushTalk communication
continues among other members. If the PushTalk communication among other
members has already been finished, your call is dialed as a new PushTalk call.
When a caller adds members during PushTalk communication, the added members
are not stored in Received Calls.
See page 87 for how to respond to the PushTalk call during i-mode communication.
When the caller is defined as the one to be rejected, the call is rejected. The setting of
call rejection applies to the setting for both voice calls and videophone calls.
Page 88

84
Voice/Videophone Calls/PushTalk
From the items stored in a FOMA terminal’s Phonebook entry, you need
to store a name (reading) and a phone number in the PushTalk
Phonebook. You can store up to 1,000 entries in the PushTalk
Phonebook.
1
pm()
Do the following operations.
You can store also by selecting <New>.
If you store multiple phone numbers from a Phonebook
entry, the phone number previously stored in the
PushTalk Phonebook is overwritten.
You cannot show the PushTalk Phonebook list even by pressing p from the
horizontal Stand-by display.
When a PushTalk call comes in during Lock All or Omakase Lock, “ ” appears
after the lock is released.
<Store in PushTalk Phonebook>
Adding Entries to PushTalk Phonebook
Information
PushTalk
Phonebook list
View phonebook You can access an entry already stored in the FOMA terminal’s
Phonebook and store it in the PushTalk Phonebook.
Call up a Phonebook entrySelect a phone numberYES
Direct input You can store the entry in the PushTalk Phonebook after storing it
in the FOMA terminal’s Phonebook.
PhoneSelect a storing method.
New. . . Go to step 2 on page 90.
Add . . . Go to step 3 of “Storing Displayed Phone Number/Mail
Address in Phonebook” on page 95.
When multiple phone numbers are stored in a Phonebook
entry, press l( ) and select the phone number you
want to store in the PushTalk Phonebook. The “★” mark is
added to the phone number that has already been stored in the
PushTalk Phonebook.
You can store PushTalk Phonebook entries in groups. You can store up
to 19 members per group and create up to 10 groups.
1
PushTalk Phonebook list
c()
Press c( ) to show the PushTalk Phonebook
list.
2
Select a groupm
()
Put a check mark for members to be stored
l()
You can store also by
selecting <Edit group
members> from the Group
Member list.
View call records You can access a dialed call record or received call record to
store it in the PushTalk Phonebook. You cannot store in the
PushTalk Phonebook from the dialed/received call record of the
party who is not stored in the FOMA terminal’s Phonebook.
Dialed calls or Received callsSelect a record
Select a phone numberYES
Information
In the PushTalk Phonebook, you cannot store the Phonebook entries set to B by
Phonebook 2in1 Setting.
Store in Group
PushTalk Group list
Group Member list Group Member
Selection display
Function Menu of the Group Member Selection Display
Members to store You can display only members applied with a check mark.
Press Oo( ) to store the members to the group.
Page 89
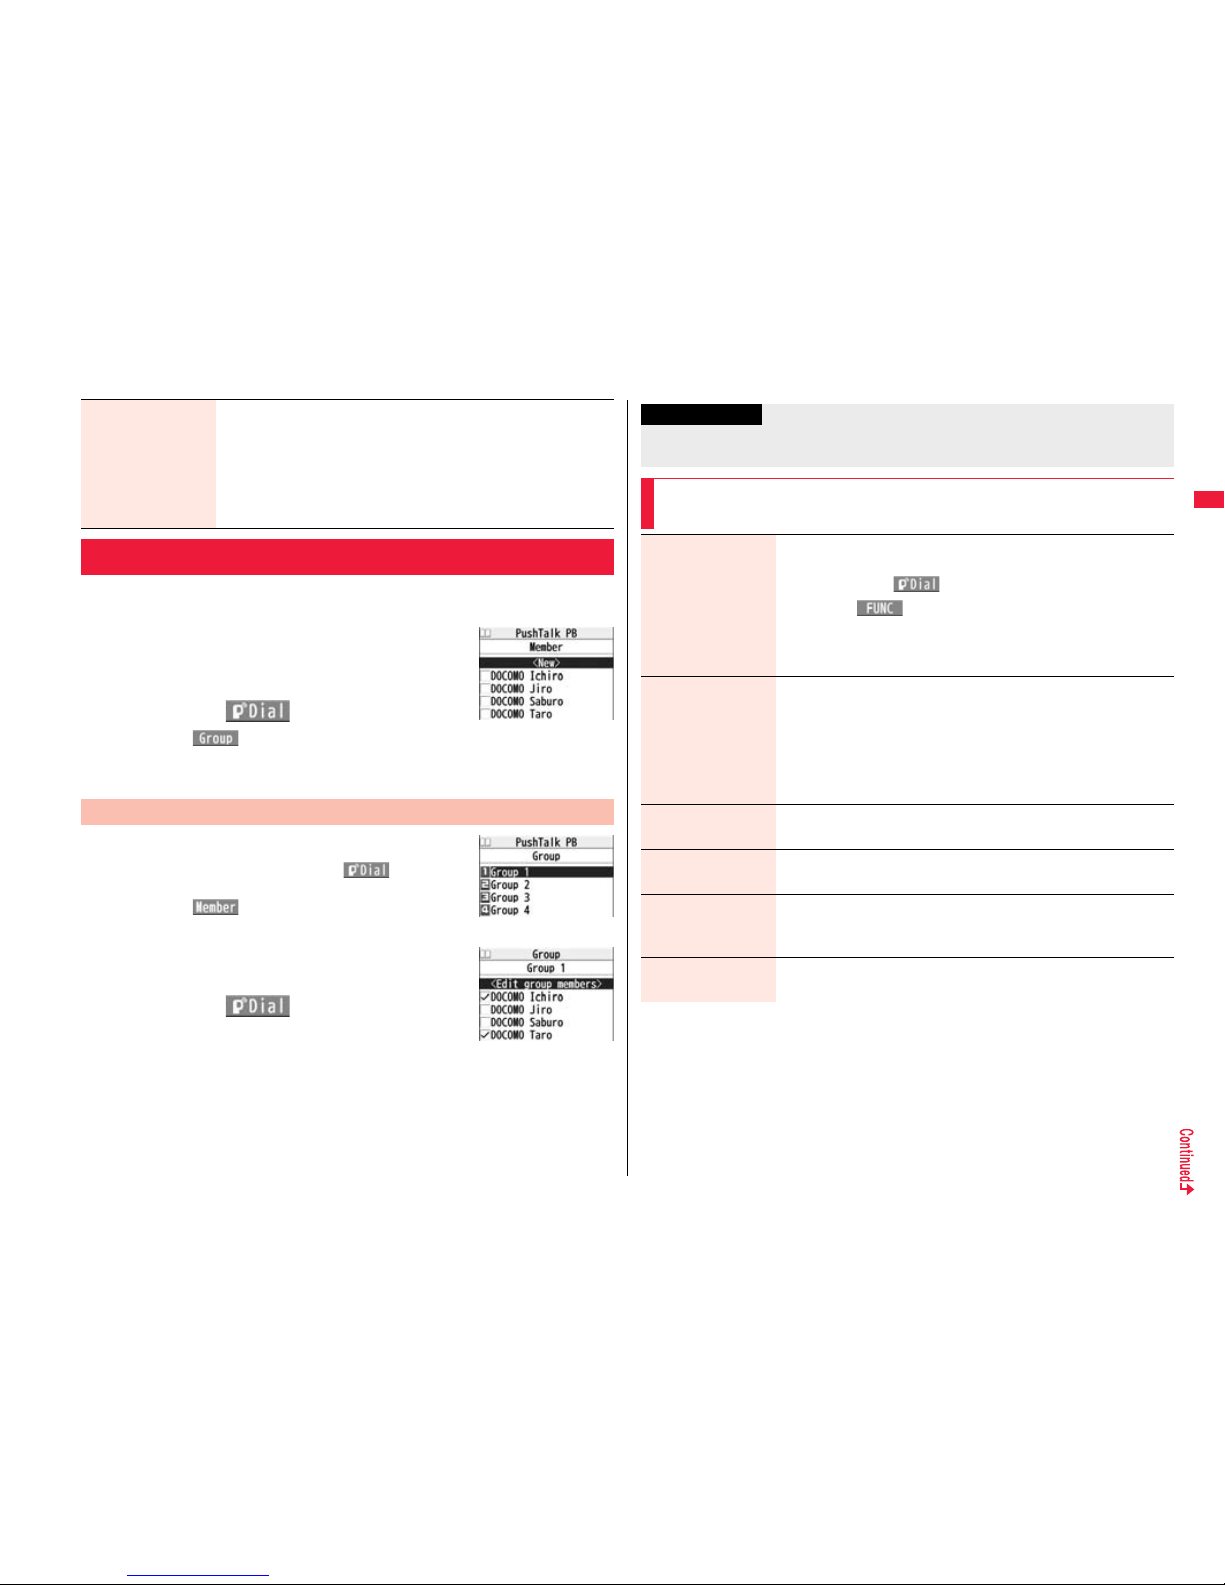
85
Voice/Videophone Calls/PushTalk
You can make a group call to up to four members using the PushTalk
Phonebook or PushTalk group.
1
PushTalk Phonebook list
Put a check mark for members you
want to make a call to
p or l()
Press c( ) to show the PushTalk Group list.
When you do not check any members, the call is made
to the highlighted member.
1
PushTalk Group listSelect a group.
Select a group and press p or l() to make a
call to all the members in the group.
Press c( ) to show the PushTalk Phonebook
list.
2
Put a check mark for members you
want to make a call to
p or l()
When you do not check any members, the call is made
to the highlighted member.
Search Select a search method.
Reading? . . .See page 96.
Group? . . . . .See page 96.
Select a member.
You can display the Group Member Selection display with the
searched members selected.
Making a Call from PushTalk Phonebook
PushTalk
Phonebook list
Make a Call from PushTalk Group
PushTalk Group list
Group Member list
Information
When five or more members are stored in a group, you cannot make a call to all the
members by selecting the group.
Function Menu of the PushTalk Phonebook List/PushTalk
Group List/Group Member List
Members to call When the PushTalk Phonebook list or Group Member list is
displayed, you can display the checked members only.
Press p or Oo( ) to make a PushTalk call.
Press i( ) to select “Notify caller ID” and then you can
select whether to notify your phone number. When “Cancel
prefix” is selected, the FOMA terminal works according to the
setting by “Caller ID notification”.
Search PushTalk
PB
[Phonebook list only]
Select a search method.
Reading? . . . See page 96.
Group? . . . . . See page 96.
Select a member.
You can display the PushTalk Phonebook list with the searched
members selected.
Store in P-Talk PB
[Phonebook list only]
See page 84.
DEL from P-Talk PB
[Phonebook list only]
See page 86.
Edit group members
[Group list/Member
list]
You can edit the members in the group.
Go to step 2 on page 84.
Edit group name
[Group list only]
Enter a group name.
You can enter up to 16 full-pitch/32 half-pitch characters.
Page 90

86
Voice/Videophone Calls/PushTalk
DEL from PT group
[Group list only]
See page 86.
DEL group
members
[Member list only]
See page 86.
Sound setting See page 87.
Vibration setting See page 87.
Auto answer set. See page 87.
Ring time setting See page 87.
Hands-Free See page 87.
Set. when closed See page 67.
i-mode arrival act See page 87.
P-Talk arrival act See page 87.
Network connection You can connect to the network to use PushTalkPlus. This is
available only when you have singed up for PushTalkPlus.
(See page 80)
1
PushTalk Phonebook listi()
DEL from P-Talk PBDo the following operations.
1
PushTalk Group listi()DEL from PT group
YES
1
Group Member listi()DEL group members
Do the following operations.
<Delete from PushTalk Phonebook>
Deleting PushTalk Phonebook Entries
Delete this Select a deleting method.
DEL from P-Talk PB
. . . .Deletes an entry in the PushTalk Phonebook only. Does not
delete the entry in the FOMA terminal’s Phonebook.
DEL from all PBs
. . . .Deletes an entry in both the PushTalk Phonebook and
FOMA terminal’s Phonebook.
YES
Delete all Enter your Terminal Security CodeYES
The FOMA terminal’s Phonebook entries are not deleted.
Delete from PushTalk Group
Delete Group Members
Delete this YES
Delete all Enter your Terminal Security CodeYES
Information
Even when you delete PushTalk groups or group members, the PushTalk Phonebook
entries and FOMA terminal’s Phonebook entries are not deleted.
Page 91
87
Voice/Videophone Calls/PushTalk
1
mSet./ServicePushTalk
Do the following operations.
Setting for Making/Receiving a PushTalk
Call
Auto answer setting
Select an item.
ON . . . . . Automatically answers immediately after receiving
regardless of “Ring time setting”.
OFF . . . . Does not answer automatically.
Ring time setting Enter a ring time (seconds).
Enter two digits from “01” through “60”.
“Disconnected” is displayed at the other end after the ring time
has elapsed.
Hands-free w/
PushTalk
You can set whether to hear the other party’s voice from the
speaker or from the earpiece for when PushTalk communication
starts.
ON or OFF
See page 63 for how the FOMA terminal works while
Hands-free is activated and how to switch to Hands-free during
communication.
PushTalk arrival act Select an item.
Voice mail. . . . . . . . Connects an incoming voice call to the
Voice Mail Service Center.
Call forwarding . . . Forwards an incoming voice call to the
forwarding destination.
Call rejection . . . . . Rejects an incoming voice call and does not
answer.
Answer . . . . . . . . . . Shows the Voice Call Receiving display.
Sound setting You can set a pattern for the confirmation tones which sound
during PushTalk communication.
Select a pattern.
Vibration setting You can set whether to be notified by vibration for when you try to
get the talker’s right or when a member’s state changes to
“Connected”.
ON or OFF
You can set whether to show the PushTalk Call Receiving display for
when a PushTalk call comes in during i-mode communication.
1
i
i-mode settingsi-mode arrival actSelect an item.
PushTalk preferred . . . Ends i-mode communication and brings up the PushTalk
Call Receiving display.
i-mode preferred . . . . . Rejects receiving a PushTalk call and continues i-mode
communication. The call is not recorded in Received
Calls.
Information
<Auto answer setting>
When you set to “ON”, calls are automatically answered even when the FOMA
terminal is closed regardless of “Setting when closed”.
When you set to “ON”, calls are automatically answered after switching to Hands-free
regardless of “Hands-free w/ PushTalk”. However, the FOMA terminal works
according to the setting of “Hands-free w/ PushTalk” if you open the FOMA terminal
after you answer a call with the FOMA terminal closed.
When you set to “ON”, the ring tone, vibrator, Call/Charging indicator, and backlight
do not work. Calls are not automatically answered during Manner Mode.
<PushTalk arrival act>
If you press -h for an incoming voice call while “Answer” is set, the Call Receiving
display appears after you finish the PushTalk communication, and then you can
answer the voice call. To continue the PushTalk communication, press +i()
and select “Call rejection”, “Call forwarding”, or “Voice mail”.
<Sound setting>
In the “Simple” mode, some confirmation tones (talking right obtained tone, etc.)
during PushTalk communication become silent.
i-mode Arrival Act
Page 92

88
Page 93

89
Phonebook
Phonebook Available for the FOMA Terminal . . . . . . . . . . . . . . . 90
Storing Phonebook Entries . . . . . . . . . . . .<Add to Phonebook> 90
Storing Displayed Phone Number/Mail Address in Phonebook
. . . . . . . . . . . . . . . . . . . . . . . . . . . . . . . . . . . . . . . . . . . . . . . . . . . . . 94
Setting Groups . . . . . . . . . . . . . . . . . . . . . . . . . .<Group Setting> 95
Dialing from Phonebooks . . . . . . . . . . . . <Search Phonebook> 96
Editing Phonebook Entries . . . . . . . . . . . . . . <Edit Phonebook> 100
Deleting Phonebook Entries . . . . . . . . . . . . . . . . .<Delete Data> 101
Checking Phonebook Storage Status . . . . <No. of Phonebook> 101
Making a Call with a Few Keys Operation . . . . . <2-touch Dial> 101
Accessing Phonebook Entries by Voice . . . . . . . . <Voice Dial> 102
Page 94

90
Phonebook
You can use two types of Phonebook, namely the Phonebook in the
FOMA terminal itself, and the Phonebook on the UIM.
Phonebook Available for the FOMA
Terminal
FOMA terminal UIM
Number of entries 1,000 entries 50 entries
Contents of Phonebook
Basic item
Name (Reading)
○○
Group 19 groups 10 groups
Phone number 4 phone numbers 1 phone number
Phone number icon
○
—
Mail address 3 mail addresses 1 mail address
Mail address icon
○
—
Address
○
—
Location information
○
—
Birthday
○
—
Memo
○
—
Image 100 images —
Memory No. From 000 to 999 —
Setting item
Ring tone
○
—
Vibrator
○
Illumination
○
Picture
○
Chara-den 100 Chara-den
images
Mail ring tone
○
Mail vibrator
○
Mail illumination
○
Answer message
○
Restrictions
Restrict dialing
○
—
Call rejection
Call acceptance
Call forwarding
Voice mail
Secret code
○
—
Storage in Secret Mode or
Secret Data Only
○
—
○: Can be stored. —: Cannot be stored.
You can set your UIM into another FOMA terminal and use the UIM Phonebook
entries.
You can store Phonebook entries in the FOMA terminal (Phone) or on the
UIM.
1
Xo(for at least one second)Phone or UIM
The Edit Name display appears. Go to step 2 and enter a name.
You cannot show the registration display for the Phonebook entries even by
pressing and holding Xo for at least one second from the horizontal Stand-by
display.
2
Do the following
operations.
You can press No to switch
between the “Basic item” tab and
“Settings” tab for the FOMA
terminal’s Phonebook.
Contents of Group
Name
○○
Ring tone
○
—
Vibrator
Illumination
Picture
Chara-den
Mail ring tone
Mail vibrator
Mail illumination
Answer message
<Add to Phonebook>
Storing Phonebook Entries
FOMA terminal UIM
For the FOMA
terminal
For the UIM
Page 95

91
Phonebook
Name You can enter the name of the person or company in kanji,
hiragana, katakana, alphabetic characters, or numerals.
Enter a name.
For the FOMA terminal, you can enter up to 16 full-pitch/32
half-pitch characters. You can enter pictographs and symbols
as well.
For the UIM, you can enter up to 10 full-pitch characters/21
half-pitch alphanumeric characters. (Half-pitch katakana
characters cannot be entered.) When the entry contains both
full-pitch and half-pitch characters, you can store up to 10
characters from the beginning regardless of full-pitch or
half-pitch characters.
Reading You can enter the reading in half-pitch katakana, alphabetic
characters, or numerals.
Enter a reading.
For the FOMA terminal, you can enter up to 32 half-pitch
characters. You can enter half-pitch symbols as well.
For the UIM, you can enter up to 12 full-pitch characters/25
half-pitch alphanumeric characters. (Half-pitch katakana
characters cannot be entered.) When the entry contains both
full-pitch and half-pitch characters, you can store up to 12
characters from the beginning regardless of full-pitch or
half-pitch characters.
If the displayed reading is acceptable, you do not need to edit it.
However, depending on the characters entered for names or
entering method, they are not reflected in the reading.
If you enter “ゎ (reduced size)” or “ヮ(reduced size)” for a name,
“ワ (half-pitch, regular size)” (for the FOMA terminal) and “ワ
(regular size)” (for the UIM) are displayed in the reading field.
Group In the FOMA terminal, 19 groups are available. On the UIM, 10
groups are available.
Select a group.
When the storage is completed with no group selected, the
Phonebook entry is stored in “No setting”.
Phone number You can store up to four phone numbers per Phonebook entry in
the FOMA terminal. You can set an icon for each phone number
to categorize mobile phone numbers, office phone numbers, and
so on.
You can store only one phone number per Phonebook entry on
the UIM.
Enter a phone number.
Enter from the city code for the phone numbers.
You can enter up to 26 digits. However, you can enter up to 20
digits for blue UIMs.
Press and hold a for at least one second to insert a pause (p)
into the phone number you store. However, you cannot insert
the pause (p) to the beginning of phone number or insert it
consecutively. The pause (p) inserted to the end of phone
number is not stored.
If you insert “:” in the middle of a phone number, you cannot
make a call. However, the phone number is recorded in Redial
or Dialed Calls.
You can store the phone number which includes “#” such as
that for information service as well.
Select an icon.
If you have stored a phone number in the FOMA terminal,
another “ <Phone number>” will appear in the
Add-to-Phonebook display. To store another phone number,
select “ <Phone number>”.
Page 96

92
Phonebook
Mail address You can store up to three mail addresses per Phonebook entry in
the FOMA terminal. You can set an icon for each mail address to
categorize mobile phone addresses, home addresses, and so on.
You can store only one mail address per Phonebook entry on the
UIM.
Enter a mail address.
The mail address can consist of up to 50 half-pitch alphabets,
numerals or symbol characters.
When the mail address is “phone number@docomo.ne.jp”,
store the phone number only.
For the FOMA terminal, you can set a secret code as well. (See
page 100)
Select an icon.
If you have stored a mail address in the FOMA terminal, another
“ <Mail address>” will appear in the Add-to-Phonebook
display. To store another mail address, select “ <Mail
address>”.
Address Enter a ZIP codeEnter a postal address.
You can enter up to 7 digits for the zip code.
You can enter up to 50 full-pitch/100 half-pitch characters for the
postal address. Further, you can enter pictographs as well.
You cannot enter “〒” or “-” (hyphen) in the zip code.
Location
information
Select an item.
By position loc.
. . . .Measures the current location (see page 328) and store the
location information. After checking the location information,
press Oo().
From loc. history
. . . .Select a piece of location information from Location History
(see page 337) and store it.
Attach from image
. . . .Stores the location information from an image. Select a
folder, then the image.
From own number
. . . .Stores the location information from “Own number”. Enter
your Terminal Security Code and press Oo().
To delete the stored location information, select “Delete location
info”.
Birthday Enter a birthday
You can enter the birthday from January 1, 1800 through
December 31, 2099.
You can check the birthday from Schedule. (See page 408)
Memo Enter a memo.
You can enter up to 100 full-pitch/200 half-pitch characters.
Further, you can enter pictographs as well.
Page 97
93
Phonebook
Image The stored still image is displayed when you call up the
Phonebook entry.
Select an item.
Select image . . . You can store a still image in Data Box.
Shoot image. . . . You can store the shot still image.
Perform step 2 through step 3 on page 239.
To release the stored still image, select “Release image”.
The size of a still image you can store is Stand-by (480 x 854) or
smaller and up to 300 Kbytes in JPEG format or GIF format.
If you store a still image larger than 72 x 54 dots, it is displayed
shrunk on the detailed Phonebook display.
If you store a still image larger than 240 x 180 dots, it is
displayed shrunk on the Call Receiving display.
When “Disp. PH-book image” is set to “ON”, the stored still
image is displayed for an incoming call. However, when another
image is stored in the “Picture” field, that image is preferentially
displayed for the incoming call.
Memory No. Enter a memory number.
Enter a three-digit number of “000” through “999”.
The lowest empty memory number “010” through “999” is
entered in advance.
If “010” through “999” are all occupied, the lowest empty
memory number from “000” through “009” is entered.
Ring tone You can set a ring tone for when a voice call or videophone call
comes in from the person stored in the Phonebook.
Select ring tone
Go to step 2 on page 106.
To release the stored ring tone, select “Release ring tone”.
Vibrator You can set a vibration pattern for when a voice call or
videophone call comes in from the person stored in the
Phonebook.
Select vibratorSelect a vibration pattern.
To release the stored vibrator, select “Release vibrator”.
Illumination You can set an illumination pattern for when a voice call or
videophone call comes in from the person stored in the
Phonebook.
Select illuminationSelect an item.
To release the stored illumination, select “Release illumination”.
Picture You can set an image to be displayed for when a call comes in
from the person stored in the Phonebook.
Select pictureSelect a type of imageSelect a folder
Select an image.
To release the stored image, select “Release picture”.
Chara-den The stored Chara-den image is displayed as a substitute image
for videophone calls with the person stored in the Phonebook.
Select Chara-denSelect a Chara-den image.
To release the stored Chara-den image, select “Release
Chara-den”.
Mail ring tone You can set a ring tone for when a mail message comes in from
the person stored in the Phonebook.
Select ring tone
Go to step 2 on page 106.
To release the stored mail ring tone, select “Release ring tone”.
Mail vibrator You can set a vibration pattern for when a mail message comes
in from the person stored in the Phonebook.
Select vibratorSelect a vibration pattern.
To release the stored mail vibrator, select “Release vibrator”.
Mail illumination You can set an illumination pattern for when a mail message
comes in from the person stored in the Phonebook.
Select illuminationSelect an item.
To release the stored mail illumination, select “Release
illumination”.
Page 98
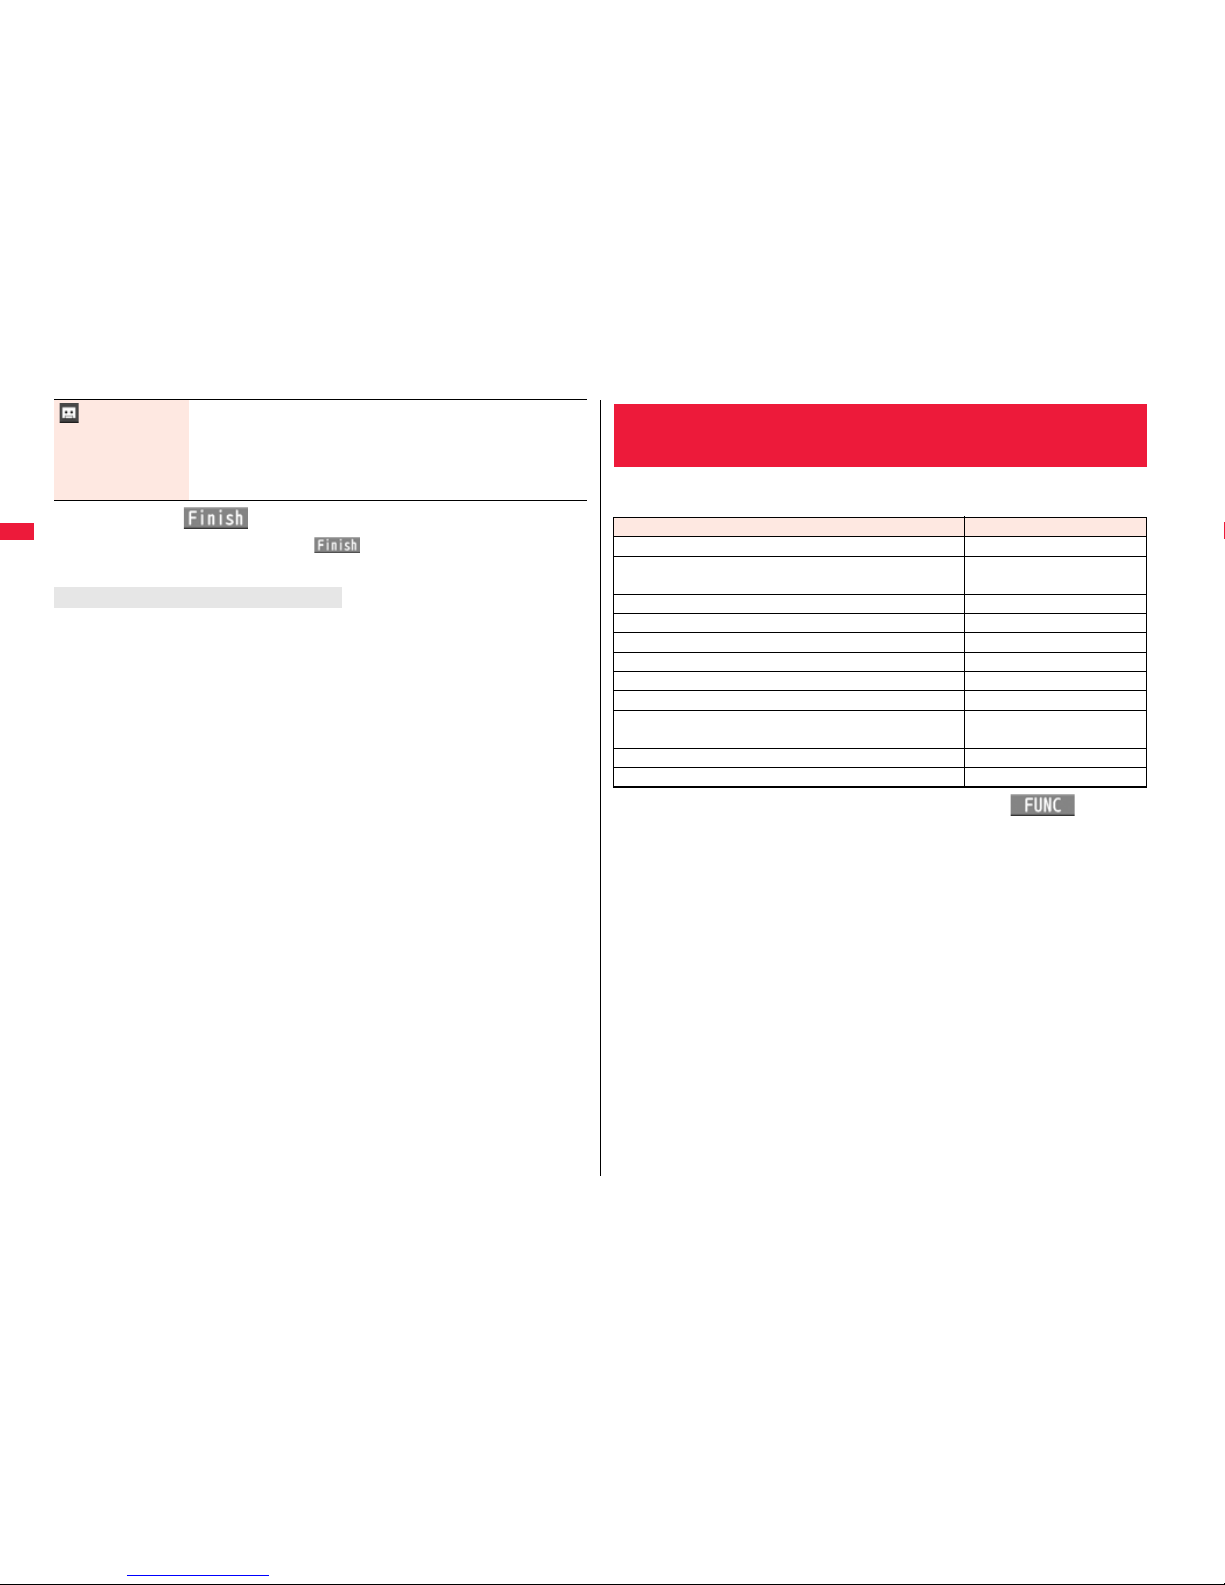
94
Phonebook
3
Press l().
If you have not entered any name, “ ” is not displayed and you cannot
store the entry.
When the low battery alarm sounds
The Phonebook entry you are editing is saved automatically. The confirmation display
appears asking whether to resume editing when you continue editing after charging the
battery or when you operate step 1 on page 90 and select the storage location for the
interrupted Phonebook entry after changing to a charged battery.
Recall . . . You can resume editing the Phonebook entry.
New . . . . You can edit a new Phonebook entry. In this case, the interrupted data is
retained. If you execute “Add to phonebook” after storing the new Phonebook
entry, the confirmation display appears again.
Only the most recently interrupted entry is retained.
If you resume editing the data but then cancel editing without storing it, that data will be
abandoned. Once you recall the data, be sure to store it.
If you receive a call or mail
You can respond it leaving the edited data as it is, thanks to the Multitask function.
To return to the Phonebook Edit display, press and hold x for at least one second to
switch the menu. You can return to the Phonebook Edit display also by ending the call or
mail function.
Answer
message
You can set an answer message for Record Message by
Phonebook entry.
Select answer messageSelect an answer message.
To release the stored answer message, select “Release answer
message”.
Phonebook entries while editing
You can store the displayed or selected phone number, mail address,
and still image in the FOMA terminal’s or UIM’s Phonebook.
1
Call up/Select an item to be storedi()
Add to phonebook
To store the address of the sender (or of another recipient of simultaneous mail)
of the received mail or the destination address of the sent mail into the
Phonebook, select “Store address”.
When the addresses of the sender and another recipient of simultaneous mail are
found or the multiple destination addresses are found, the display for selecting an
address appears. Use Bo to select the mail address or phone number you want
to store.
To store a still image in the Phonebook, select “Phonebook” from “Set display”.
When “Add to phonebook” is displayed on the Scanned Code Result display for
Bar Code Reader, select “Add to phonebook”; then other information in the
scanned code besides the phone number or mail address is entered into each
field.
Storing Displayed Phone Number/Mail
Address in Phonebook
Operation Storable items
While a phone number is entered Phone number
While a redial item, dialed call record, or received call
record is displayed
Phone number
While Sent Address or Received Address is displayed Phone number/Mail address
While a site or screen memo is displayed Phone number/Mail address
While the text of Message R/F or mail is displayed Phone number/Mail address
While the data scanned by Bar Code Reader is displayed Phone number/Mail address
While a ToruCa file is displayed Phone number/Mail address
While your current location is displayed Location information
While the location history is displayed Location information/
Phone number/Mail address
While a registered LCS client is displayed Name/Phone number
While the Still Image list or a still image is displayed Still image
Page 99
95
Phonebook
2
Phone or UIMSelect a storing method.
New . . . Go to step 2 on page 90.
Add . . . Adds data to the existing Phonebook entry. When storing data on the
UIM, “Overwrite” is displayed.
3
Select a search methodSearch the Phonebook
Select a Phonebook entry to be storedOo()
The phone number or mail address is entered automatically.
See step 2 on page 90 to edit other items in the Phonebook entry.
When you store into the FOMA terminal’s Phonebook, you can remain the
original entry and store a new entry into a different location by changing the
memory number.
4
l()YES
If you store the entry in the UIM Phonebook, select “Overwrite” to overwrite the
original entry, or select “Add” to store it as a new entry.
Information
The Phonebook entry does not store the information of “Notify caller ID” included in
Redial/Dialed Calls. To set Caller ID Notification, add “186”/“184” to the phone
number and store it.
Characters that cannot be stored may be replaced by spaces or deleted, and then
stored.
You may not be able to store the information from some sites into the Phonebook.
You can utilize the Phonebook by sorting the entries by group such as
“Company” or “Friend”, or by your interest such as “Baseball” or
“Ceramic art”. You can set a ring tone, vibration pattern, or illumination
by group.
1
mPhonebookGroup setting
The groups on the UIM are indicated by “ ”.
To reset the group names and respective settings by group, which have already
been stored, press i( ), select “Reset group”, and then select “YES”.
2
Highlight a group and press l()
Select an item to be setSet the contents.
When you select “ Group name”, enter a group name. You can store up to 10
full-pitch/21 half-pitch characters. However, you can store only up to 10
characters (regardless of full-pitch or half-pitch characters) when you enter both
full-pitch and half-pitch characters for a UIM group name.
See step 2 on page 90 for the operations of the other items. However, you cannot
set for groups on the UIM.
Select a stored group, or press i( ) and select “Check setting” to check
its settings. However, you cannot check the settings of the groups on the UIM.
3
Press l().
<Group Setting>
Setting Groups
Page 100
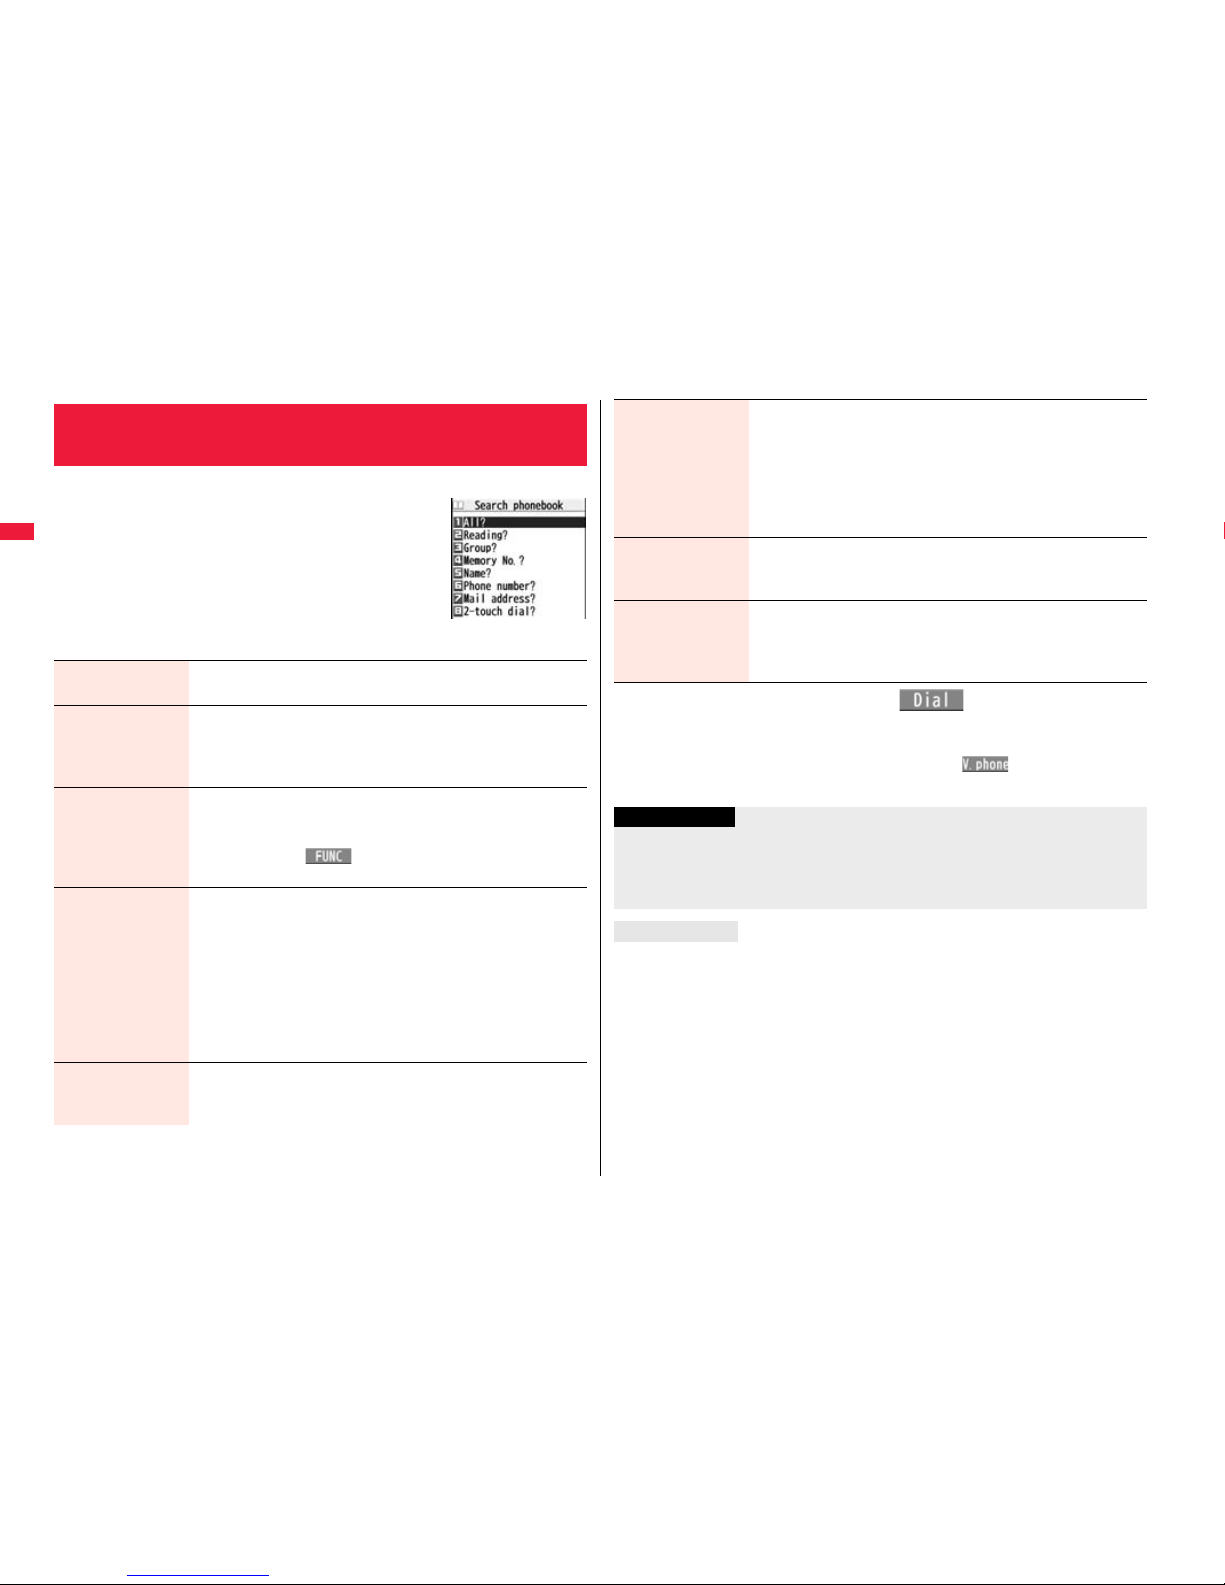
96
Phonebook
You can retrieve stored Phonebook entries by eight search methods.
1
XoDo the following operations.
The display for the same search method as the
previous one appears once you have carried out a
search. Press r to show the Search Phonebook
display.
You cannot show the Search Phonebook display even
by pressing Xo from the horizontal Stand-by display.
<Search Phonebook>
Dialing from Phonebooks
Search Phonebook
display
All? You can show all Phonebook entries.
The tabs appear on the top of the Phonebook list. (See page 97)
Reading? You can enter the reading of the other party’s name from the first
character and search. You do not need to enter the full reading.
Enter a part of the readingBo
The tabs appear on the top of the Phonebook list. (See page 97)
Group? You can show Phonebook entries stored in a specified group.
Select a group.
The tabs appear on the top of the Phonebook list. (See page 97)
If you press i( ) on the Group list, the Function menu
for “Group setting” is displayed.
Memory No.?
[FOMA terminal only]
You can search for the entry by the memory number assigned
when it was stored in the Phonebook.
Enter the memory number.
Enter from “000” through “999” in three digits.
The tabs appear on the top of the Phonebook list. (See page 97)
From the Stand-by display, you can press d and then press
Bo to display the Memory No. Dial display. From there you can
make a voice call by entering the memory number of the phone
number.
Name? You can enter the other party’s name from the first character and
search. You do not need to enter the full name.
Enter a part of the nameBo
2
Select an entryd or Oo()
When the entry contains multiple phone numbers, or when you searched by “Mail
address?”, press Mo from the detailed display to select a phone number.
You can make a videophone call by pressing l( ) or PushTalk call by
pressing p.
The Phonebook entries are searched in the order of readings you entered for storing, as
follows:
“Space at the beginning of the reading” → “Japanese syllabary (
ア、イ、ウ、エ、オ、...ン
)”
→
“Alphabet (A, a, B, b, ...Z, z)” → “Numerals (0 through 9)” → “Symbols” → “No reading”.
For “All?” and “Reading?”, searching is done in the following order:
“Japanese syllabary (
ア、イ、ウ、エ、オ、...ン
)” → “Alphabet (A, a, B, b, ...Z, z)” → “Space
at the beginning of the reading”
→
“Numerals (0 through 9)” → “Symbols” → “No reading”.
※The Memory No. Search searches in the order of the memory numbers.
Phone number? You can enter a part of the other party’s phone number and
search. You can search for the entry even from the middle of
phone number.
Enter a part of the phone numberBo
You can display the Phonebook list also by entering a part of
the phone number from the Stand-by display or the “Talking”
display, and pressing Bo.
Mail address?
You can enter a part of the other party’s mail address and search.
You can search for the entry even from the middle of mail address.
Enter a part of the mail addressBo
2-touch dial?
[FOMA terminal only]
You can show the list of Phonebook entries in memory number
000 through 009.
Phonebook entries not yet stored or being set with secret are
displayed as <−−−>.
Information
In a search method other than “Group?” and “2-touch dial?”, enter nothing and press
+Bo; then you can search all through the Phonebook.
When no Phonebook entry is found that matches the condition you entered by
“Reading?” or “Memory No.?”, the entry that is the closest to the condition is displayed.
Search order
 Loading...