

Page 1

N-05A
Easy Search/Contents/Precautions
Before Using the Handset
Voice/Videophone Calls
Phonebook
Sound/Screen/Light Settings
Security Settings
Camera
i-mode/i-motion/i-Channel
ISSUE DATE:
NAME:
PHONE NUMBER:
MAIL ADDRESS:
‘09.3
INSTRUCTION MANUAL
Mail
i-αppli
Osaifu-Keitai/ToruCa
TV (1Seg)
Full Browser
Data Display/Edit/Management
Music&Video Channel/
Music Playback
Convenient Functions
Character Entry
Network Services
PC Connection
Overseas Use
Appendix/External Devices/
Troubleshooting
Index/Quick Manual
Page 2

DOCOMO
W-CDMA System
Thank you for purchasing the “docomo STYLE series N-05A”.
Please read this manual and separate manuals supplied for other optional equipments
before and during use to use the N-05A correctly. If you have further questions regarding
manuals, contact the inquiries number provided on the back of this manual.
The N-05A is your capable partner. Handle the N-05A with care and we hope you use the
N-05A as long as possible.
Before using your FOMA terminal
● The FOMA network operates using radio waves. In a place where the reception is very poor, such
as in a tunnel, in a building and under the ground, or in an out-of-service area, you cannot make a
phone call. You may also have difficulty making a phone call from the upper floors of tall buildings,
even if there is no obvious physical obstruction. And even if the reception is good with 3 antenna
bars indicated and you do not move during the call, you may still find that your call is cut off.
●
When you use your FOMA terminal in public places, particularly where it is crowded or quiet, take care
not to disturb the people around you.
● Since the FOMA terminal uses radio waves to communicate, there is always a risk that your call is
wiretapped by the third party.
However, the W-CDMA system automatically supports the tapping prevention for all calls. Even if a
third party succeeds in intercepting your call, only incomprehensible noise will be heard.
● The FOMA terminal communicates via radio waves by converting voices into digital signals. If you
move into an area where the reception is poor, the digital signals may not be accurately decoded
and what you hear may differ slightly from what it actually is.
● The user hereby agrees that the user shall be solely responsible for the result of the use of SSL/
TLS. Neither DOCOMO nor the certifier as listed herein makes any representation or warranty as for
security in the use of SSL/TLS. In the event that the user shall sustain damage or loss due to the
use of SSL/TLS, neither DOCOMO nor the certifier shall be responsible for any damage or loss.
Certifier: VeriSign Japan K.K., Cybertrust Japan Co., Ltd., GlobalSign.K.K, RSA Security
SECOM Trust Systems Co., Ltd. and Comodo CA Ltd.
● This FOMA terminal is available in FOMA Plus-Area and FOMA High-speed area.
● The FOMA terminal can be used only via the FOMA network provided by DOCOMO and
DOCOMO’s roaming area.
● It is your responsibility to keep a separate record of all data (such as phonebook, schedule, memo,
record message, voice memo or VP msg.) stored on your FOMA terminal. Under no circumstances
shall NTT DOCOMO be liable for any loss or damage to the data stored on your FOMA terminal,
caused by malfunction, repair, model change, etc.
● It is recommended to back up the important data to the microSD card. If you own a PC, you can also
transfer and save the data such as the phonebook, mail or schedule to your PC by using DOCOMO
keitai datalink.
Before using this manual
This FOMA terminal supports Kisekae Tool (P.129). When you change the design of the menu display
using Kisekae Tool, the menu structure may change in accordance with frequency of using functions.
Also, you cannot access some functions entering the menu number (P.463) assigned to the functions.
Japan Ltd.,
You can download the latest information about this manual from the DOCOMO website.
•“User’s Manual Download”
http://www.nttdocomo.co.jp/english/support/manual/index.html
* The URL and the contents may change without prior notification.
Page 3

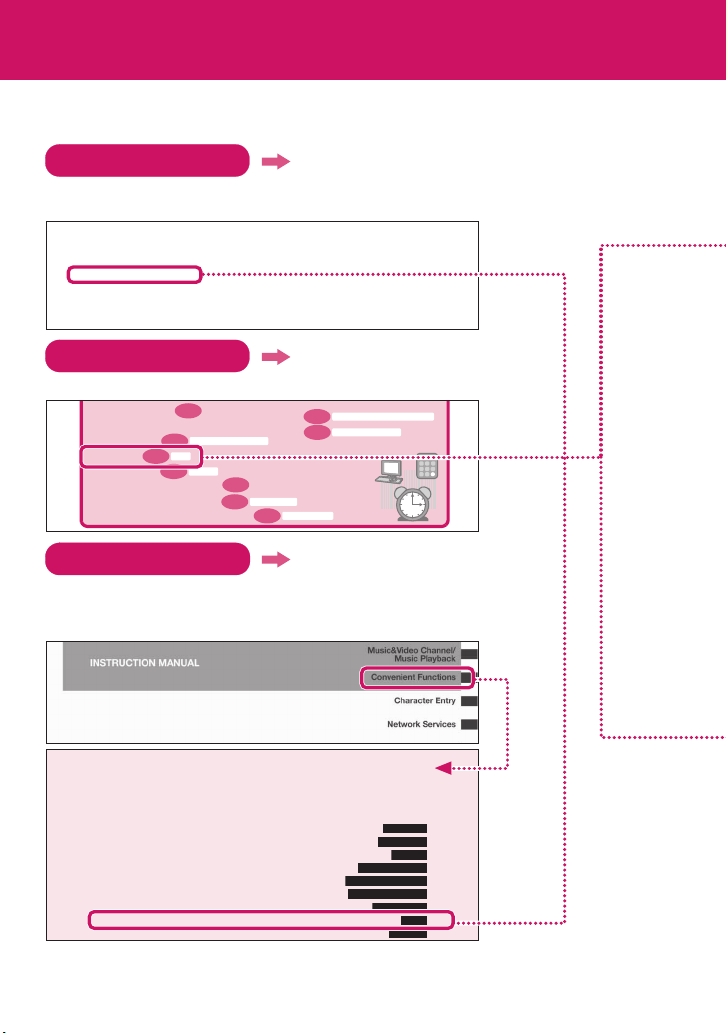
How to Refer to This Manual
In this manual, following methods are available to find the descriptions of functions
and services.
Index P.522
You can fine keywords and functions displayed on the
display of the FOMA terminal.
Easy Search P. 4
You can find often-used functions and convenient
functions in simple terms.
Index on the front cover Cover
You can find the table of contents for each chapter by
using the Index on the front cover.
Contents
You can find descriptions using the Table of Contents which is divided by the function.
Main Functions P. 8
You can find main functions of the N-05A, such as new functions and convenient
functions.
Menu Function List P.450
You can find menu displayed on the display of the N-05A and default settings.
Quick Manual P.536
You can find brief descriptions of the basic functions. You can also remove the pages
to take along. Take Quick Manual (For Overseas Use) when using your FOMA terminal
abroad.
P. 6
See the
next page
for details.
z In this manual for N-05A, the “N-05A” is described as the “FOMA terminal”.
z This manual describes functions that use the microSD card. To use these functions, the
microSD card is required. microSD card→ P. 3 2 6
z It is prohibited to reprint a part or all of the contents of this manual without permission.
z The contents of this manual may change without prior notification.
z The color patterns for the main menu and the screen are described in the default setting
for the terminal of which body color is Platinum Silver.
1
Page 4
How to Refer to This Manual (continued)
Following example shows how to look up the alarm function using “Index”, “Easy Search”
and “Index on the front cover”
Index P.522
You can fine keywords and functions displayed on the display of the
FOMA terminal.
i-αppli sound. . . . . . . . . . . . . . . . . . .255
Ring tone. . . . . . . . . . . . . . . . . . . . . . .77
After returning to Japan . . . . . . . . . .443
After-sales service . . . . . . . . . . . . . . .496
Alarm . . . . . . . . . . . . . . . . . . . . . . . . . . .379
Alarm notification
Priority . . . . . . . . . . . . . . . . . . . . . . . .387
Reconnection. . . . . . . . . . . . . . . . . . .73
Signal quality . . . . . . . . . . . . . . . . . .110
Easy Search P. 4
You can find often-used functions and convenient functions in simple terms.
• Use microSD card
•
Exchange information with PC or other FOMA terminal
• Listen to music
• Use Alarm
• Use Calculator
• Use FOMA terminal overseas
• Update for the latest software
• Update for the latest security settings
Index on the front cover Cover
Refer to “Cover”, “Chapter title page” and “Description pages” sequentially
to find the descriptions of the function you want to set. You can find the
detailed table of contents on the chapter title page.
P.3 7 9
P.3 26
P.3 5 3
Music/Music&Video Channel
Alarm
P.3 9 4
Calculator
Attach file
Download selectively . . . . . . . . . . 220
Save. . . . . . . . . . . . . . . . . . . . . . . . . . 219
Send. . . . . . . . . . . . . . . . . . . . . . . . . . 211
Start attachment(auto) (Mail) . . .234
Start attachment(auto) (Message)
Auto answer setting. . . . . . . . . . . . . .398
Auto Deco mail. . . . . . . . . . . . . . . . . . . 209
Auto Decomail-picture (download)
P.4 3 9
P.4 9 9
Software Update
P.5 0 7
. . . 193
. . . 192
Scanning function
AV Phone To Function. . . . . . . . . . . 192
Available services overseas. . . . . . 441
K
B
B mode (2in1). . . . . . . . . . . . . . . . . . . 427
Background play . . . . . . . . . . . . . . . . 369
Bar code reader. . . . . . . . . . . . . . . . . 168
Bar incoming when roam (Overseas)
Basic channel (i-Channel) . . . . . . . 200
P.340
Infrared data exchange/iC communication
P.3 4 6
OBEXTM communication
. . 447
Convenient Functions
Using Pedometer................................................................................ 372
Multi Access ..................................................................................... 374
Multitask ................................................................................................ 375
Displaying the Data in the Time Series ................................... 376
Setting the Operation for Opening the FOMA Terminal........ 378
Turning the FOMA Ter minal On/Off Automatically................. 378
Changing the Short Cut Key Function of Channel Key ................. 379
Using Alarm............................................................................................... 379
Managing Schedule.............................................................................. 380
* The contents above differ from the actual ones in this manual.
2
Pedometer
Multi access
Multitask
Life history viewer
Setting when opened
Auto power ON/OFF
ch-key setting
Alarm
Schedule
Page 5
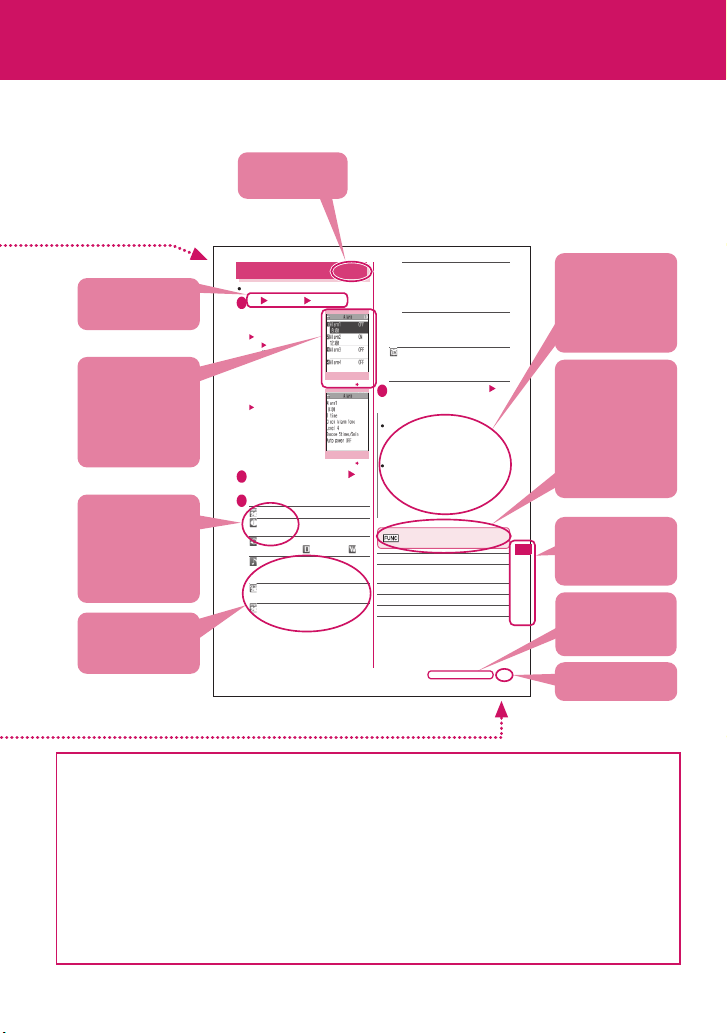
This manual uses illustrations and marks to explain how to operate the function so that
you can use the FOMA terminal correctly.
Describes the
function name.
ON……Enter the number of times for
ringing (01 to 10 times) and the ringing
interval (01 to 10 minutes).
The alarm tone (about 1 minute) rings
repeatedly for the set number of times in
the set interval.
OFF……Enter the ringing time (01 to 10
minutes).
Sounds the alarm tone continuously for
the specified time.
Auto power O N……Specifies whether
the FOMA terminal is automatically turned
on or not when the time for an alarm is
reached.
Set the respective items o
4
(Finish)
N
When the FOMA terminal is automatically
turned on to notify you of an alarm, if you set a
melody, i-motion or music downloaded from
sites as alarm tone, the “Clock Alarm Tone” is
played.
Before entering an area such as an aircraft or
hospital where there is electronic equipment
that uses extremely precise control systems or
very low signal levels and the use of mobile
phones is prohibited, set the “Auto power ON”
setting to “OFF” and then turn the FOMA
terminal off.
Alarm screen (list/detail)
(P.379)
Edit……Edits the alarm.
Display detail*……Displays the content of the
alarm.
Finish (Set this)……Activates the alarm.
Release this……Disables one alarm.
Release all……Disables all set alarms.
* : Available only with the alarm screen (list).
Continued on next page
Describes the
necessary settings,
notes or useful
information about
the function.
The function menu
title is described
with the icon of the
function menu and
the screen name
on which the
function menu is
displayed.
You can search
the chapters
using the index.
vnoC
ne
ei
n
t
uF
n
c
t
i
Indicates that the
no
s
descriptions go on
to the next page.
379
Page number
Describes the
operation on
each step.
Describes the
screen at the time
of the operation.
Compare it with
the screen when
you operate.
Describes the items
displayed on the
screen (some items
cannot be operated
depending on the
operation).
Describes the
explanation of
each item.
Using Alarm
You can store up to 10 alarms.
i “LifeKit” “Alarm”
1
■To switch ON/OFF
with the last
settings
Highlight the setting
item
p (ON/OFF)
“ON/OFF” switches
each time you press p.
■To check the
previous settings
Select the setting item
Highlight the item to set o
2
(Edit)
Select any item:
3
Edit title……Enters the title of the alarm.
Time setting……Enters the time at
which the alarm will sound.
Repeat……Selects the alarm repetitions
from “1 time, Daily ( ), Select day ( )”.
Alarm tone……Selects the alarm tone
from clock alarm tone or folders of melody,
i-motion, music, etc.
Volu me ……Sets the alarm tone volume
with c.
Snooze setting……Specifies whether a
snooze (repeating) alarm is set or not.
Function menu P.37 9
Function menu P.37 9
<Alarm>
Alarm (list)
Alarm (detail)
* The contents above differ from the actual
ones in this manual.
z The screens shown as examples in this manual are displayed when “English” is set for “バイリン
ガル” (Select language). Set “English” for “バイリンガル ” (Select language) in advance.→ P. 5 3
z In this manual, “Stand-by display” is set to “OFF”, back color is set to white and font color is set to
black in order to make the screens clear. Also, the parts of the operating instruction screens that
need an explanation are closed up.
z In this manual, descriptions are basically based on the default settings, and screens displayed on
the FOMA terminal may differ from the descriptions in this manual.
z
The screens inserted in this manual are only the image, which looks different from the actual screens.
z In this manual, “Osaifu-Keitai i-αppli compatible with IC card function” is described as “Osaifu-
Keitai i-αppli”.
z In the operation explanation in this manual, simple key illustrations are used to indicate the
operation to press the key.
3
Page 6
Easy Search
Easy Search
Easy Search/Contents/Precautions
Find out a function with easy words from the Easy Search index below.
Useful functions for talking
• Do/do not notify your party of your caller ID
• Switch voice/videophone call during call
• Adjust the volume during a call
P.7 8
• Hold the current call
Holding
When you cannot answer incoming call
• Hold the ringing call without answering
• Notify that you cannot answer the call
P.7 8
Public mode (Driving mode)
Have your party record voice/videophone message
•
P. 79
Change melody or illumination
P. 77
• Adjust the ring volume
• Set ring tone to specify party
• Change ring tone
P. 10 6
Ring volume
P. 10 0
Select ring tone
• Set vibration to notify incoming call or mail
P.109
P.110
Keypad sound
Manner mode
• Mute keypad tone
• Set silent mode
• Change color or pattern of incoming call lamp
P.6 2
P. 77
Vol ume
P. 78
Public mode (Power OFF)
Ring tone/Image
P.5 5
On hold
P. 81
P.108
P. 12 1
Caller ID Notification
Record message
Vibrator
Illumination
Change/understand display
• Mark (icon) on the display
• Switch menu display
P.2 8
P.3 8
• Change standby screen (wallpaper)
• Display calendar on the standby screen
P.123
• Change font size
Font
4
View display
P.114
Standby screen
P. 11 4
Page 7
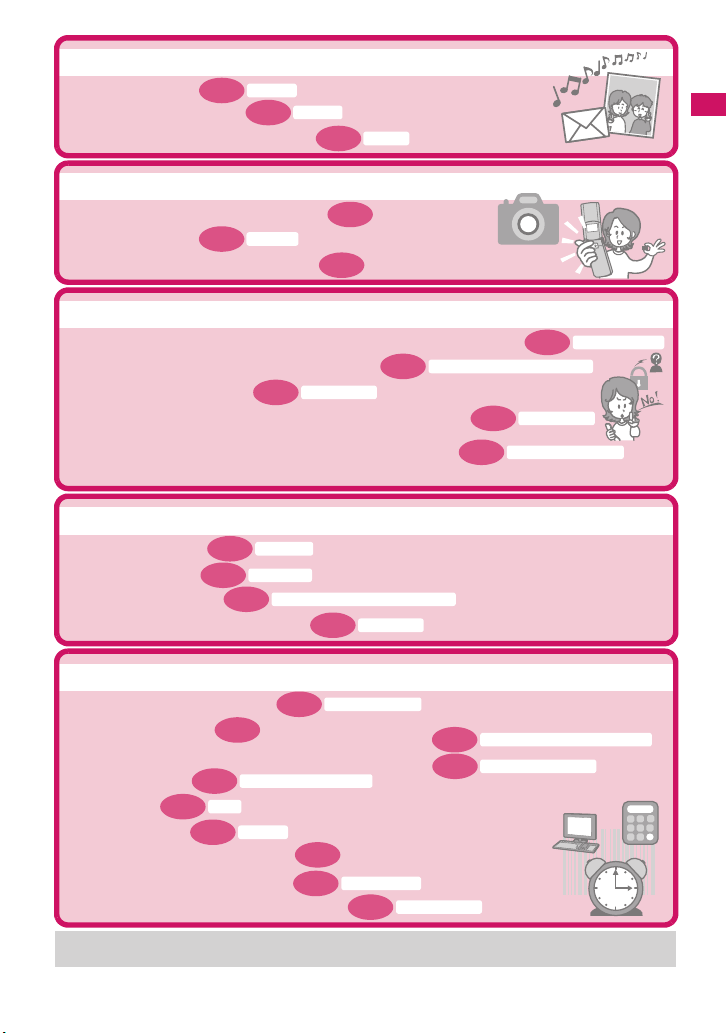
Master mail
• Send Deco-mail
• Send image or melody
• Sort and save mail automatically
P.207
Deco-mail
P. 21 1
Attach file
P.228
Auto-s ort
Master camera
• Change the size of image to shoot
P.304
• Display the shot
My picture
• Save image on the microSD card
P.159
P. 33 1
Use your phone without worries
P.150
Reject unknown
Data Security Service
P.134
•
Lock the FOMA terminal from remote location when the FOMA terminal is lost
P.136
•
Preventing others from viewing the phonebook
P.149
• Reject unidentified calls
Reject calls from callers who are not stored in phonebook
•
Call set. w/o ID
• Save data such as phonebook in case of loss of data
*1: Omakase Lock is a pay service.
*2: Data Security Service is a pay service you need to apply for. (i-mode subscri ption is necessary to apply for this serv ice.)
Secret mode/Secret data only mode
P.151
Master TV (1Seg)
P. 28 3
P. 28 7
Activate TV
TV recording
P.288
Booking program list/Timer recording list
P. 29 0
User settings
• Watch TV (1Seg)
• Record program
•Program TV (1Seg)
• Change video or sound settings
Omakase Lock
*2
Easy Search/Contents/Precautions
*1
Miscellaneous
P. 16 8
• Read QR code or bar code
P. 37 9
P.326
P.353
Music/Music&Video Channel
Alarm
P. 39 4
Calculator
• Use microSD card
•
Exchange information with PC or other FOMA terminal
• Listen to music
•Use Alarm
• Use Calculator
• Use FOMA terminal overseas
• Update for the latest software
• Update for the latest security settings
For more information about other operation guides, see “How to Refer to This Manual”. →P. 1
Also, “Quick Manual” instructs you how to operate the functions used often. →P.536
Bar code reader
P.439
P. 49 9
Software Update
P.507
Scanning function
P.340
Infrared data exchange/iC communication
P.346
OBEXTM communication
5
Page 8
Easy Search/Contents/Precautions
Contents
How to Refer to This Manual ..................................................1
Easy Search ...........................................................................4
Contents .................................................................................6
Main Functions of the N-05A ..................................................8
Mastering the N-05A!............................................................10
Precautions...........................................................................12
Handling with Care ...............................................................19
Intellectual property right ......................................................21
Main Components and Optional Equipment .........................24
Before Using the
Handset
P.25
Voice/Videophone
Calls
P.57
Phonebook
P.91
Sound/Screen/Light
Settings
P.105
Security Settings
P.131
Camera
P.153
i-mode/i-motion/
i-Channel
P.177
Mail
P.203
i-αppli
P.249
aNames and functions aHow to view the display
a
Selecting the menu aBasic operations aFOMA card (UIM)
aAttaching/removing the battery pack aCharging
aTurning on the FOMA terminal aInitial setting aSet time
aCaller ID notification, etc.
aMaking a voice/videophone call
aSwitching between voice/videophone calls a
aHandsfree aRedial/Received calls aChaku-moji
a
Receiving a voice/videophone call aVolume aRing volume
aOn hold aPublic mode (Driving mode/Power off)
aRecord message aVideophone settings, etc.
aAdd to phonebook aGroup setting aSearch phonebook
aEditing/deleting phonebook entries aRing tone/Image
aChoku-Den aData Security Service, etc.
aRing tone aVibrator aManner mode aDisplay setting
aPrivacy angle aBacklight aDisplay design
aMenu display set aIndicator display aIllumination
aKisekae Tool, etc.
aSecurity code aPIN code aDial lock aOmakase Lock
a
Secret mode a
a
IC card authentication a
aPhoto mode aMovie mode aSettings for shooting
aKeitai-Loupe aBar code reader aText reader, etc.
aWhat is i-mode? aViewing sites
aHow to view sites and operations aQuick Search
ai-mode password aInternet access aBookmark
aPhone To/AV Phone To, Mail To, Web To and Media To
aDownloading i-motion aUsing i-Channel, etc.
aWhat is i-mode mail? aComposing/sending i-mode mail
aDeco-mail/Auto Deco-mail aAttaching files
aReceiving mails aCheck new messages
aReplying/Forwarding mails aSaving attached files
aUsing mail box aMail setting aMessage service
aWhat Early Warning “Area Mai”? aChat mail aSMS, etc.
aWhat is an i-αppli? aDownloading an i-αppli
aLaunching an i-αppli aPre-installed softwares
ai-αppli standby screen aUpgrading an i-αppli, etc.
Secret folder a
Side keys guard a
Original lock a
WORLD CALL
Keypad lock
Self mode
, etc.
6
Page 9
Osaifu-Keitai/ToruCa
P.269
TV (1Seg)
P.279
Full Browser
P.293
Data Display/Edit/
Management
P.301
Music&Video
Channel/Music
Playback
P.353
Convenient
Functions
P.371
Character Entry
P.401
Network Services
P.415
PC Connection
P.433
Overseas Use
P.439
Appendix/
External Devices/
Troubleshooting
P.449
Index/Quick Manual
P.521
aWhat is Osaifu-Keitai? aWhat is iC transfer service?
aUsing Osaifu-Keitai aIC card lock aCheck IC owner
aWhat is ToruCa? a
aWhat is TV (1Seg)? aSetting Channels
aWatching TV Programs aData Broadcasting aTV link
aRecording TV (1Seg) aBooking program/Timer recording
aSetting TV (1Seg), etc.
aDisplaying website designed for PC
aOperation on the Full Browser screen
aFull Browser settings, etc.
aData box aImage aMovie/i-motion aPlaying Video
aChara-den aMelody aKisekae Tool
a
microSD card aMovable contents aUIM operation
a
Infrared data exchange/IrSSTM transmission/iC communication a
aWhat is Music&Video Channel
aDownloading Chaku-Uta-Full
aUsing playlist aUsing the Music Player, etc.
* “Chaku-Uta-Full” is a registered trademark of Sony Music
Entertainment (Japan) Inc.
aPedometer aMulti access aMulti task
aLife history viewer
aAuto power ON/OFF ach-key setting aAlarm
aSchedule
a
Auto voice memo aChecking Call data aCalculator
aText memo aDictionary a
aReset settings aInitialize, etc.
aCharacter entry a5-touch input aFixed common phrases
a
Copying/cutting/pasting text a
aDL dictionary a2-touch input aT9 input, etc.
aVoice Mail service aCall Waiting a
aNuisance Call Blocking aCaller ID Request service
aDual Network Service a2in1, etc.
aData communication, etc.
* The details are described in “Manual for PC Connection” (PDF
format) in the provided CD-ROM.
aWORLD WING aAvailable overseas service
aChecking before using overseas
aMaking/Receiving a call abroad
aMenu function list aCharacter assignment to dial keys
aSymbols/pictographs/face marks/fixed common phrases list
aMulti access/Multitask combination patterns
aOptions/Accessories aTroubleshooting
aError message aSoftware Update aSpecifications, etc.
aIndex aQuick Manual
aQuick Manual (For Overseas Use)
Acquiring ToruCa
aSetting when opened
aTo Do list aAlarm setting aMy Profile
aViewing ToruCa, etc.
Viewing PDF data
®
aPlaying music
Earphone/microphone with switch
Own dictionary a
Call Forwarding service
aNW search mode, etc.
Clear learned
Easy Search/Contents/Precautions
7
Page 10

Main Functions of the N-05A
FOMA is the name of DOCOMO’s service based on the W-CDMA system approved as one of
the global standards for third-generation mobile telecommunication systems (IMT-2000).
Easy Search/Contents/Precautions
■ i-mode →P. 1 7 7
i-mode is an online service that you can use to send e-mail as well as using the useful information from
the i-mode menu site and i-mode compatible website.
■ i-mode mail/Deco-mail/Decorate PI
In addition to the message body, you can attach
photos or movies files. As the FOMA terminal is
compatible with Deco-mail/Decorate PI, you can
change the character color, size, or background
color of the message body or insert images or
moving pictographs.
■ International roaming →P. 44 0
The FOMA terminal, phone number and mail
address you use in Japan are also available
overseas (in 3G areas). You can use voice call,
videophone call, i-mode, i-mode mail, SMS and
network services.
■ High-speed communication →P. 43 4
The data is received at the maximum speed of 3.6
Mbps and sent at the maximum speed of 384 kbps
in the FOMA high speed communication area.
* The maximum speed of 3.6 Mbps/384 kbps is the
maximum in the technical standard, and the real
transmission rate is different by congestion and the
communication environment of the network. The
communication speed is 384kbps at maximum for
both sending and receiving when you use the
access point which is not supported by HIGHSPEED such as outside of FOMA HIGH-SPEED
area.
■ Kisekae Tool →P. 12 9
Your favorite standby screen or menu screen can
be replaced at a time. In this N-05A, the sort of
displaying the menu is additionally possible in the
use frequency, and you can also customize the
menu screens to your own preferences.
→PP.204, 207, 205
Wide variety of functions
■ 3.0 inch Full Wide QVGA LCD
With wide full LCD (240 dots × 427 dots), you can
enjoy TV images and images shot using the FOMA
terminal’s camera.
■ Camera →P. 15 3
The CMOS (rear camera) of effective 200 million
pixels enables you to shoot large images of 2M
bytes (1,200 dots × 1,600 dots).
Features of N-05A
■ Mega i-αppli/Chokkan Games →P. 2 4 9
An i-αppli enables you to enjoy a game or
automatically update information such as share
prices or weather report. You can also enjoy
Chokkan games by the sense operation “Inclining”,
“Shake” and “Talk” with the motion control.
■ Chaku-Uta-Full®/Uta-hodai/Music&Video
* : This is a pay service you need to apply for.
You can download the entire track (Chaku-UtaFull
you can download the entire track as many as you
want with fixed monthly charge.
Music&Video Channel is also available, that you
can enjoy the music programs and the movie
program downloaded by the automatic operation at
nighttime only by setting it beforehand. The FOMA
terminal also supports i-motion up to 10M bytes.
*
Channel
®
) and use another service (Uta-hodai) that
→PP.358, 353
■ Osaifu-Keitai/ToruCa → PP.269, 260
By downloading an Osaifu-Keitai i-αppli, you can
transmit electric money from the site into the IC
card in your FOMA terminal or check the
accountant balance or transaction history. The
i-αppli of the DOCOMO credit service “DCMX” is
pre-installed in your FOMA terminal. “iC transfer
service” is also supported so that you can easily
move your IC card data to a new terminal when
replacing your FOMA terminal.
ToruCa can be acquired via a reader/writer unit or
websites and easily exchanged via mail or Infrared
data exchange.
■ Keitai-Loupe (Magnifying glass) →P. 1 6 8
With a magnifying glass, you can display and
enlarge a picture reflected in the camera lens as a
loupe.
■ One-Touch Open button →P. 52
Pressing the One-Touch Open button, you can
easily open the FOMA terminal.
8
Page 11

■ Functions when opened →P.378
By only opening the FOMA terminal, you can
answer the call, check the caller’s name, of a
missed call or contents of new mail immediately.
■ Pedometer →P.372
With Pedometer, you can make use for your health
care by measuring steps, walk time, walk distance,
and a consumption calorie.
■ IC Card Authentication → P.145
In substitution for password input, you can release
Dial lock or Keypad lock only by placing the FOMA
terminal on a FeliCa-compatible contactless IC card.
■ Original lock/Keypad lock →PP.140, 144
• You can lock the functions which use your personal
information such as phonebook and mails, or
restrict making/receiving calls or sending mails
(Original lock).
• You can lock the key operations automatically when
the FOMA terminal is folded or no operation is
performed for a certain period of time (Keypad lock).
■ PDF viewer →P.347
With the PDF viewer, you can easily view useful
information such as a map, catalogue or timetable
on your i-mode terminal easily.
■ Full Browser →P.293
With Full Browser, you can view websites for PC
which provide you with more information.
■ Multi window/One-touch multi window
→PP.183, 188
• You can connect sites up to five by the operation at
a time.
• You can inspect it by switching the connected site
page in the tab.
Security
■ Omakase Lock →P.134
You can lock the FOMA terminal when you lost it
and can release the lock at your request. Refer to
the back of this manual for the inquiries numbers.
* Omakase Lock is a pay service. If you subscribe to
the service at the same time with the subscription of
suspending the service or while the service is
suspended, no charge applies.
* Omakase Lock is the service to lock the FOMA
terminal by the request from the subscriber. Note
that the FOMA terminal is locked if the subscriber
requests to lock the FOMA terminal even if the
subscriber and the user of the FOMA terminal are
different.
Wide variety of network services (→ P.415)
• Voice Mail (charged)
• Call Waiting (charged)
• Call Forwarding (free)
*: You need to apply for.
*
*
*
• Nuisance Call Blocking (free)
• Caller ID Request (free)
• Dual Network (charged)
■ Choku-Den → P.102
By storing frequently used phonebook to ChokuDen, you can make a call or send a mail quickly.
■ Privacy angle →P.117
You can set the screen difficult to be seen from an
angle, and can use the FOMA terminal without
worrying about the others.
■ Auto Deco-mail →P.209
The FOMA terminal detects the emotion from the
mail text and automatically converts the mail to
Deco-mail with most suitable decorations such as
pictographs.
■ Emotion-expressing mail →P.215
An icon pops up and displays the emotion
matching the contents of the received mail.
■ iC Communication →P.344
You can exchange data by putting the e marks of
sending and receiving FOMA terminals close to
each other.
■ Multi access/Multitask → PP.374, 375
You can use the voice call, packet communication
and SMS at the same time (Multi access). Also,
You can run and use the multiple functions by
switching them (Multitask).
■ Quick Search →P.184
The FOMA terminal can search information you
want to know while viewing i-mode sites, Mail and
schedule, etc. by an easy operation.
■ Data Security Service →P.151
The Data Security Service enables you to store the
phonebook entries, images or mails on the FOMA
terminal to the Data Security Center and retrieve
the data to the FOMA terminal when you lost the
FOMA terminal, etc. Besides, you can edit or
manage the data stored at the Data Security
Center using a PC and save the edited data on the
FOMA terminal.
* For notes on using the “Data Security Service” and
details on how to use the service, refer to “Mobile
Phone User’s Guide [i-mode] FOMA version” and
refer to the back of this manual for the inquiries
numbers.
* This is a pay service you need to apply for.
• English Guidance (free)
*
• Multi Number (charged)
• 2in1(charged)
*
*
Easy Search/Contents/Precautions
9
Page 12
Mastering the N-05A!
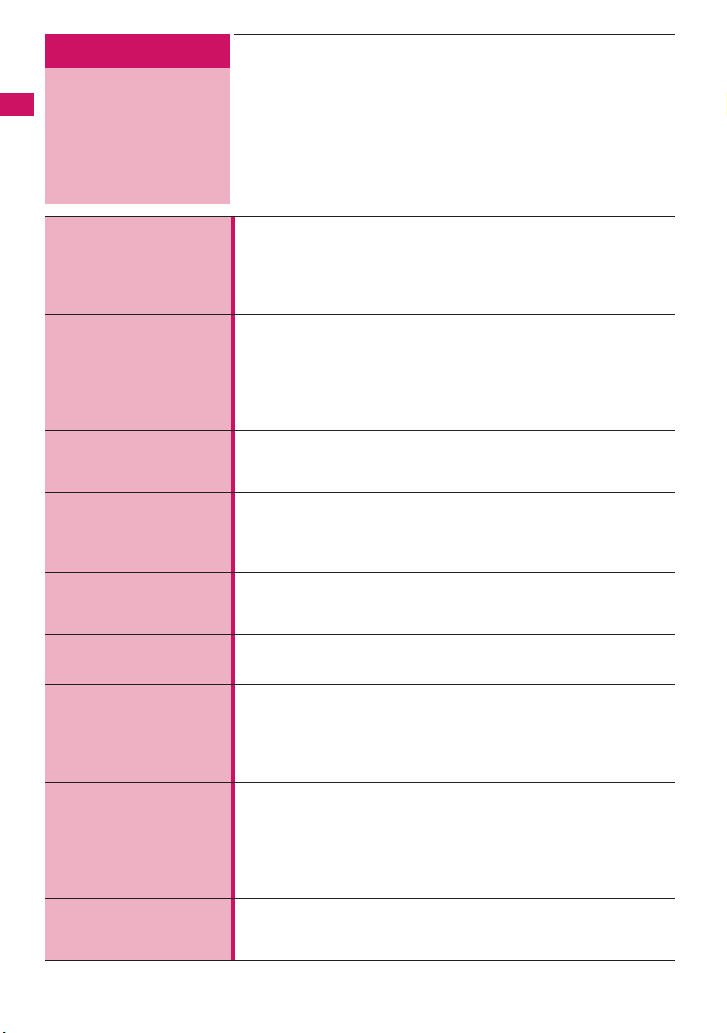
Send and receive real-time movie while talking
Videophone → P. 5 8
Easy Search/Contents/Precautions
You can talk to the other party seeing his/her face.
Your FOMA terminal is set to emit other party’s voice through the speaker by
default so that you can start talking immediately when making or answering
a call. Furthermore, you can change the call mode from voice to videophone
without having to end the call.
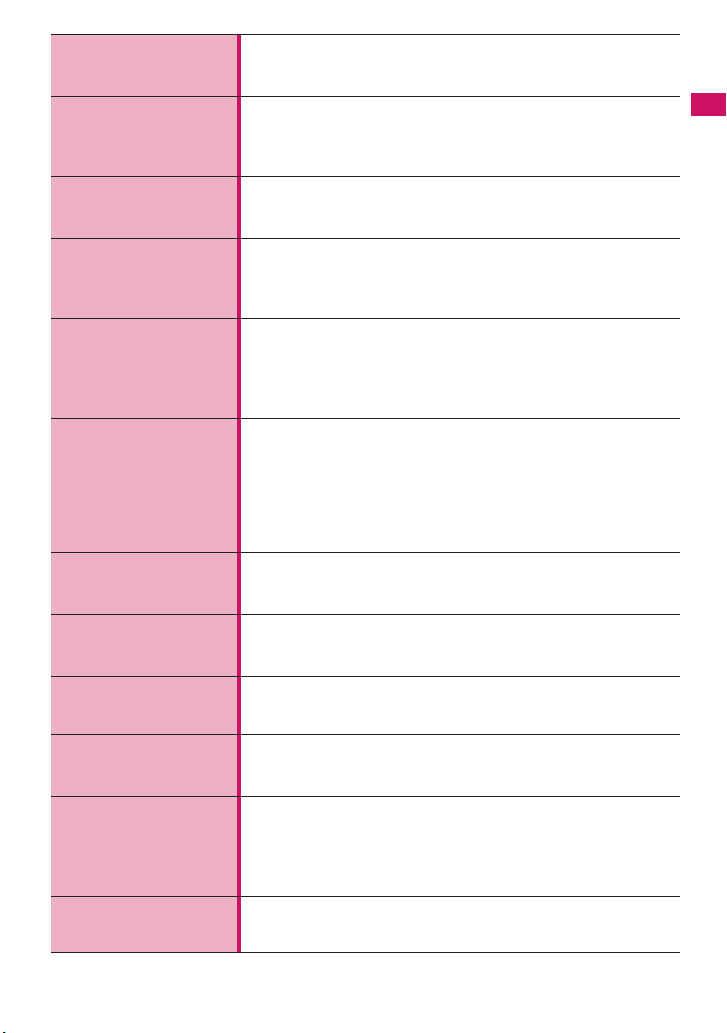
Display design can be set all at once
Kisekae Tool/Direct Menu → P. 1 2 9
“Direct Menu” that is often-used functions and convenient functions is installed in
your FOMA terminal.
Divides menus into four categories and arranges it in top, bottom, right and left. In
addition, “LAST10” button is at the center to automatically display ten functions or
services that you used just before. You can easily operate the functions because 5
categories are arranged and link to the Multi-function keys.
h: SERVICES (Mail, i-mode, i-αppli, Full Browser, Osaifu-Keitai or 1Seg, etc.)
j: TOOLS (Alarm, Calculator, Text memo, Schedule or Receive Ir data, etc.)
g: SETTINGS (Settings/Network services/Profile)
f: DATABOX (My picture, etc.)
d: LAST10 (Auto-display ten menu items that you used just before)
* Functions are stored at the time of purchase.
The ticker appears on the standby screen when the latest information is distributed
i-Channel→P. 2 00
You can receive news or weather
report as graphical information.
You can also select favorite channels
on the channel list screen to receive
rich, detailed information which was
created by Flash (more detail→P.184).
* This is a pay service you need to apply
for.
* The screens are image. The actual
screen may look different.
Before subscription
あすの天気:東京
After subscription
Menu display
Connect
Image at the
Image at the
other side
other side
Image at
Image at
your side
your side
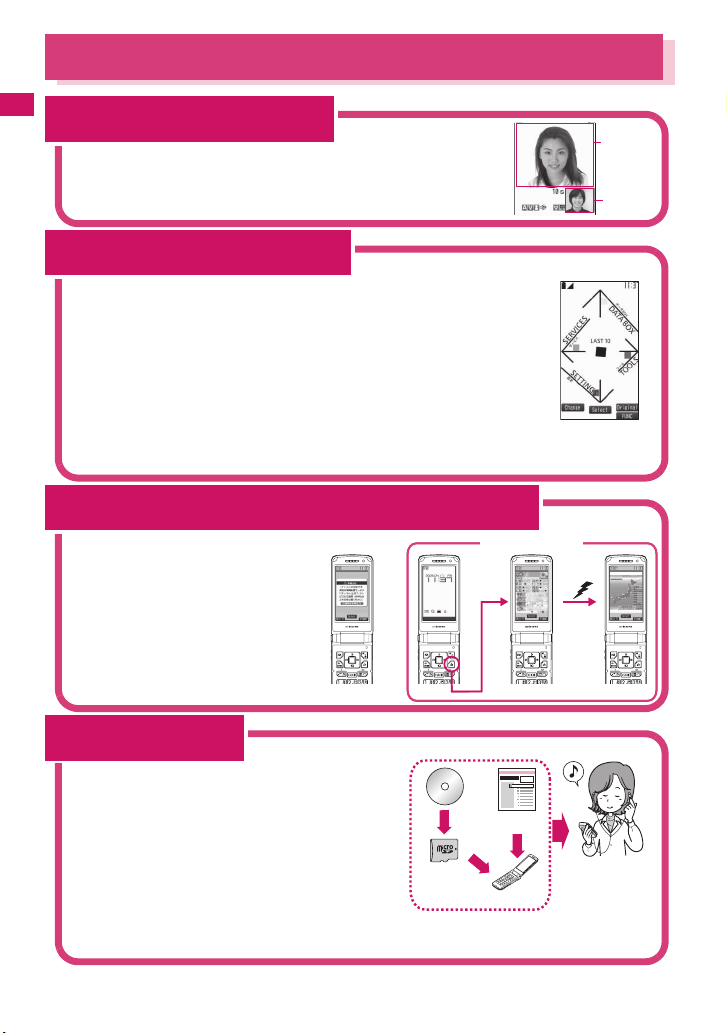
“Napster® ” compatible
Music Player→ P. 3 6 6
“Napster®” service provides you of copying songs
downloaded from sites or on music CDs to the microSD
card using a PC and play music on the FOMA terminal.
Since “Chaku-Uta-Full
the entire track from an online music distribution site to
play it.
Other functions include BGM playback, which allows you
to listen to music while you use other functions, display of
album cover images and lyric sheets, and creation of the
playlist on the FOMA terminal.
You can also play the i-motion and use Music&Video
Channel that downloads the specified program
automatically during the night.
10
®
” is supported, you can download
Music
CD
microSD
card
Music distribution
website
FOMA terminal
Connect a stereo
earphone (optional).
You can use the
FOMA terminal as a
portable audio player.
Page 13
涼やかな風鈴の音色が響いています
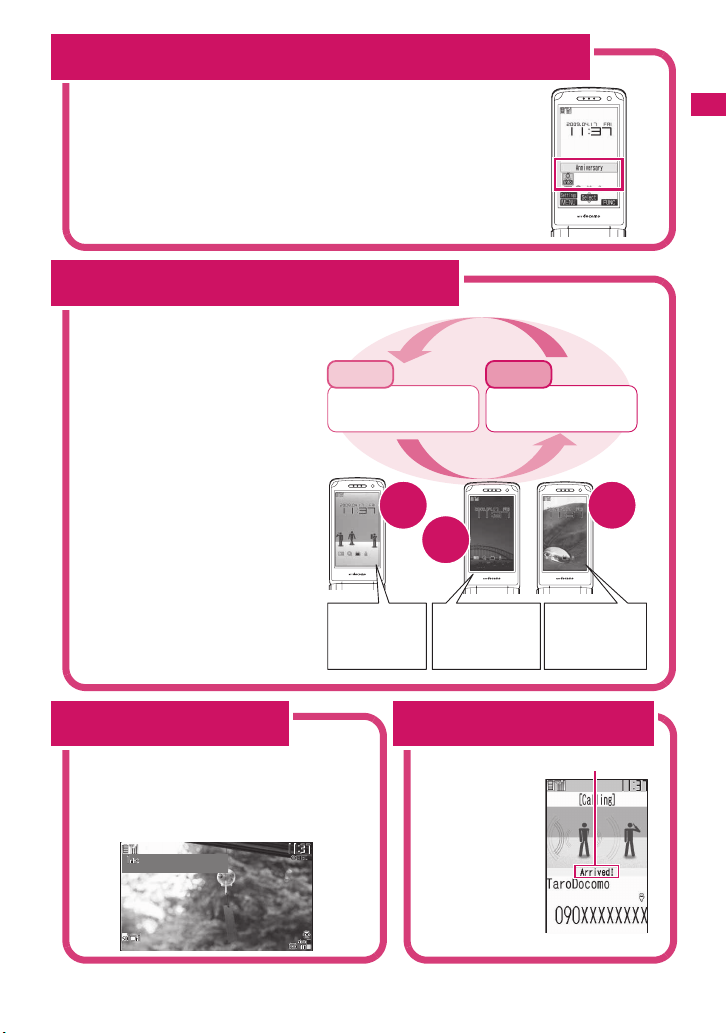
Notify the important date
Birthday/Anniversary notification function→PP.93, 382, 389
Registered birthday in the phonebook or scheduled anniversary is
notified with the desktop icons. You can set the notification repeatedly
from One week before, Three days before, One day before, or Today, so
that you won’t miss an important event. In addition, the FOMA terminal
celebrates your birthday by an image and a melody if you register your
birthday with My Profile.
Use 2 phone numbers and e-mail addresses for your FOMA terminal
2in1→P. 4 27
You can separately use 2 phone
numbers and 2 mail addresses on
your FOMA terminal as if you have 2
terminals.
You can manage the data in your
FOMA terminal, such as Phonebook,
mail boxes, Dialed calls or standby
screen, separately in “A mode” and “B
mode”, or all together of A/B mode in
“Dual mode”.
* This is a pay service you need to apply
for.
A mode
Phone number: 090-AAAA-AAAA
Mail address: xxA@docomo.ne.jp
Phonebook: For A mode
Make a call/send
a mail in A mode
A
mode
mode
B mode
Phone number: 090-BBBB-BBBB
Mail address: xxB@docomo.ne.jp
Phonebook: For B mode
Dual
Make a call/send
a mail in B mode
B
mode
Easy Search/Contents/Precautions
Digital terrestrial broadcasting service
TV (1Seg)→P. 2 79
You can watch and record “1Seg” (digital terrestrial
broadcasting service for mobile handsets). While
watching 1Seg, you can read and compose mail,
and record a TV program.
ドキュメンタリー
11:00−11:30
涼やかな風鈴の音色が響いています
涼やかな風鈴の音色が響いています
涼やかな風鈴の音色が響いています
涼やかな風鈴の音色が響いています
涼やかな風鈴の音色が響いています
。
。
。
。
。
Phonebook A
Mail box A
Dialed/received calls A
Voice mail A
・・・・・
Notify the arrival of your phone call before answering
Chaku-moji→ P. 6 8
Phonebook A/B
Mail box A/B
Dialed/received calls A/B
Voice mail A/B
・・・・・
When calling
someone, you can
show a message
on the screen of
the other party’s
phone. The other
party can see your
business or feeling
from the message
before answering
the call.
Phonebook B
Mail box B
Dialed/received calls B
Voice mail B
・・・・・
Chaku-moji
11
Page 14

Precautions
(ALLWAYS FOLLOW THESE DIRECTIONS)
■ To ensure that you use your FOMA terminal
Easy Search/Contents/Precautions
correctly, read the Precautions carefully
before use. Keep this manual after reading
for future reference.
■ The precautions must be observed at all
times since they contain the information
intended to prevent the bodily injuries or
the damage to the property.
■ The following symbols indicate the
different degrees of injuries and damage
that may occur if the information provided
is not observed and the FOMA terminal is
used incorrectly:
Indicates that the death or
serious bodily injury may
result directly and
DANGER
WARNING
CAUTION
■ The following symbols indicate the specific
directions:
Don’t
No disassembly
No wet hands
No liquids
Do
immediately from the
improper use.
Indicates that the death or
serious bodily injury may
result from the improper use.
Indicates that the bodily
injury and/or damage to the
property may result from the
improper use.
Indicates that it is prohibited.
Indicates that it must not be
disassembled.
Indicates that you must not touch
it with your wet hand.
Indicates that it must not be used
near the water, which means that
you must not wet it.
Indicates that you must do it
following the instructions.
Indicates that you must unplug
the power code from the outlet.
Unplug
■ Safety Precautions are explained in the
following categories:
1. Handling the FOMA terminal, Battery Pack,
Adapter (including the Charger) and FOMA
card (Common) ............................................12
2. Handling the FOMA terminal ......................14
3. Handling the Battery Pack .........................16
4. Handling the Adapter (including the
Charger) .......................................................17
5. Handling the FOMA card (UIM) ..................18
6. Handling Mobile Phones near Electronic
Medical Equipment .....................................18
1. Handling the FOMA terminal,
Battery Pack, Adapter
(including the Charger) and
FOMA card (Common)
DANGER
Do not use, keep or leave the devices
in locations subject to high
temperatures, such as near the fire or
Don’t
heater, in direct sunlight or inside a
car on a hot day.
This may cause the battery pack to leak,
overheat, explode or ignite, cause the
devices to malfunction or be deformed, or
suffer performance loss and a reduced
service life. Also, this may cause a part of
the case to become hot and burn you.
Do not disassemble or rebuild. Also,
do not solder the devices.
This may cause fire, injury, electric shock or
No disassembly
malfunction.
This also may cause the battery pack to
leak, overheat, explode or ignite.
Do not wet the devices.
Exposing the FOMA terminal and other
devices to liquids such as water or pet urine
No liquids
may cause overheating, electric shock, fire,
malfunction, injury, etc. Be careful where
and how you use the devices.
12
Page 15
Use the battery pack and adapter
(including the charger) specified by
NTT DOCOMO for the FOMA terminal.
Do
Using the devices other than those specified
by NTT DOCOMO may cause the FOMA
terminal, battery pack and other devices to
leak, overheat, explode, ignite or
malfunction.
Battery Pack N20
Desktop Holder N19
FOMA AC Adapter 01/02
FOMA DC Adapter 01/02
Data Communications Adapter N01
FOMA AC Adapter 01 for Global use
FOMA Dry Battery Adapter 01
FOMA USB Cable with Charge Function 01/
02
FOMA Portable Charging Adapter 01
* For the information on other compatible
products, contact a docomo shop or
service counter.
WARNING
Do not place the FOMA terminal,
battery pack, adapters (including the
charger) or FOMA card in cooking
Don’t
appliances such as microwave ovens
or in a pressure cooker.
This may cause the battery pack to leak,
overheat, explode or ignite, cause the FOMA
terminal or adapter (including the charger) to
overheat, smoke or ignite, or damage the IC.
Do not shock or throw the FOMA
terminal.
This may cause the battery pack to leak,
Don’t
overheat, explode or ignite, or cause the
devices to malfunction or ignite.
Keep the conductive foreign materials
(metal, pencil lead, etc.) away from the
charge terminal or external connector.
Don’t
Do not insert those matters inside.
This may result in the short-circuit causing the
FOMA terminal to ignite or malfunction.
Turn off the FOMA terminal, when you
are near the flammable gas such as at
the gas station. Do not also charge. It
Do
may cause to ignite to the gas.
Turn off the FOMA terminal, when you use
Osaifu-keitai at the gas station (if IC card
lock is set, turn the FOMA Terminal off after
lock is released).
If you find extraordinary happenings,
such as an unusual odor, overheating,
discoloration or deformation during
Do
the use, charge or storage, make sure
to:
1. Unplug the power code from the power
outlet or the cigar lighter outlet.
2. Turn off the FOMA terminal.
3. Remove the battery pack from the
FOMA terminal.
Continuing to use or charge the FOMA
terminal may cause it to overheat, explode,
ignite or leak of battery.
CAUTION
Do not leave the FOMA terminal on a
slope or unstable surface.
This may fall the FOMA terminal and cause
Don’t
the injury or malfunction.
Keep the FOMA terminal away from
the humid, dusty or hot places.
This may cause malfunction.
Don’t
If your child uses the FOMA terminal,
instruct him/her how to use it. Make
sure that he/she always uses the
Do
FOMA terminal correctly as you
instruct.
Improper usage could result in the bodily
injury.
Keep the FOMA terminal out of young
children’s reach.
A young child may swallow it or suffer from
Do
the injury.
Pay a special attention when you use
the FOMA terminal connected to the
adapter (including the charger) for a
Do
long duration.
If you use i-αppli or videophone or watch TV
programs for a long time while charging the
FOMA terminal, the temperature of the
FOMA terminal, battery pack or adapter
(including charger) may rise.
If you touch the warm part of these devices
for a long period of time, it may cause
redness, itch, skin irritation, or burns
depending on your constitution or physical
condition.
Easy Search/Contents/Precautions
13
Page 16
2. Handling the FOMA terminal
WARNING
Easy Search/Contents/Precautions
Do not direct the infrared data port
towards your or another person’s
eyes.
Don’t
This may cause the eye injury. Do not aim or
direct the infrared data port towards another
infrared device as this may interfere with the
operation of the device.
Do not put the FOMA terminal on the
dashboard, etc. as a problem may
occur due to air bag inflation.
Don’t
The air bag inflation may cause the FOMA
terminal to hit you or another person, which
may lead to injury, malfunction, breakage,
etc.
If you are wearing electronic medical
equipment, do not put the FOMA
terminal in your breast pocket or in
Don’t
the inside pocket.
Using the FOMA terminal in close proximity
to electronic medical equipment may cause
the equipment to malfunction.
Do not put fluids such as water or
objects such as pieces of metal or
flammable materials into the FOMA
Don’t
card inserting slots or microSD card
slots inside of the FOMA terminal.
Such actions could cause fire, electric shock
or malfunction.
Turn off the FOMA terminal in a place
where it is prohibited to use the
mobile phone, such as in an airplane
Do
or in a hospital.
This may affect the electric or medical
equipment. If the FOMA terminal is set with
the Auto power function, make sure to
disable the function before turning off the
FOMA terminal.
Follow the instructions provided by the
medical facility about using the mobile
phone.
If you use the phone in an airplane, which is
prohibited, you may be punished by law.
Make sure to hold the FOMA terminal
off your ear and keep enough distance
from it when you talk in the handsfree
Do
mode. When you also play games or
music with an earphone-microphone
connected to the FOMA terminal,
adjust the volume properly.
If the volume is too high, it may cause an
auditory disturbance.
Also, it may cause an accident if you have
difficulty in hearing the sound of your
surroundings.
If you have a weak heart, take
precautions when setting the Vibrator
or Ring volume.
Do
This may affect your heart.
If you hear thunder while using the
FOMA terminal outdoors, immediately
turn off the FOMA terminal and take
Do
shelter in a safe location.
There is a risk of being struck by the
lightning and suffering an electric shock.
Turn off the FOMA terminal near the
electric equipment using the highprecision control or weak signals.
Do
This may interfere with the operation of
sensitive electronic equipment.
* Take great care on the following electric
devices:
Hearing aids, implantable cardiac
pacemakers, implantable cardioverterdefibrillators, and other electronic medical
equipment, fire alarms, automatic doors and
other equipment controlled by electronic
signals.
If you use an implantable cardiac
pacemaker, implantable cardioverterdefibrillator or other electronic medical
equipment, contact the respective
manufacturer or vendor to check whether the
operation of the equipment is affected by
radio waves.
If the display or camera lens is broken,
be careful of the broken glass and the
inside of exposed FOMA terminal.
Do
The surface of the display or camera lens is
covered by a plastic panel to minimize the
possibility of glass scattering. However,
touching the broken or exposed parts cause
the injury.
14
Page 17
CAUTION
Do not swing the FOMA terminal by its
strap or other parts.
The FOMA terminal may strike you or others
Don’t
around you, resulting in body injury,
malfunction or damage to the FOMA
terminal or other property.
When you use the motion tracking, be
sure to confirm surrounding safety,
grasp the FOMA terminal firmly and
Don’t
do not swing the FOMA terminal more
than the necessity.
Motion tracking is a function to operate the
FOMA terminal by inclining and shaking it. It
hits the person and others because of the
shake too much, and there is a possibility of
causing a serious accident and damage.
With metallic straps or other metallic
objects in the FOMA terminal and
applying the motion tracking, be sure
Don’t
to not hit the person or others.
It causes injury, malfunction or breakage.
Do not let the FOMA terminal come
close to or sandwich magnetic cards,
etc. between the FOMA terminal.
Don’t
The magnetic data stored on cash cards,
credit cards, telephone cards, floppy disks,
etc. may be erased.
Do not let the FOMA terminal come
close to magnetism.
If strong magnetism is brought close,
Don’t
operation may fail.
If the display is broken and the liquid
crystal leaks, do not take it in, draw it
in or put it on your skin.
Don’t
If the liquid crystal comes into your
eyes or mouth, immediately rinse your
eyes or mouth with clean water and
see a doctor. If the liquid crystal
adheres to your skin or clothing,
immediately wipe it off with alcohol
and rinse it off with water and soap.
It may cause a loss of eyesight or damage
your skin.
When the FOMA terminal plays the
ring tone or plays a melody, do not
bring the speaker close to your ear.
Don’t
It may cause a hearing defect.
Do not open the FOMA terminal with
One-Touch Open button near people
or a face.
Don’t
It may cause the FOMA terminal to hit you or
another person, and may lead to injury.
In some types of vehicle, using the
FOMA terminal in the vehicle may
interfere with the operation of the
Do
vehicle’s electronic equipment.
Do not use the FOMA terminal if the terminal
may impair the safe driving.
Using the FOMA terminal may cause
skin irritations such as itch, rashes or
eczema. If this occurs, immediately
Do
stop using the FOMA terminal and see
a doctor.
Metal components are used for the
following parts.
Part s Material Finish
Hinge side
(One-Touch Open
button)
Take care not to pinch your finger or
strap when opening or folding the
FOMA terminal.
Do
It causes injury or breakage.
When you watch the TV programs, be
sure to have some distance from the
screen and use it in a very bright
Do
place.
This may affect his/her eyes and cause
impaired vision.
Polycarbonate Tin vapor
deposition,
UV coating
Easy Search/Contents/Precautions
15
Page 18

3. Handling the Battery Pack
■ Refer to the information shown on
the battery pack label to check the
type of battery pack you have.
Easy Search/Contents/Precautions
Display Battery type
Li-ion00 Lithium-ion
DANGER
Do not let wire or other metals touch
the terminal. Also, do not carry or
store the battery pack with metallic
Don’t
necklaces, etc.
This may cause the battery pack to leak,
overheat, explode or ignite.
If you have difficulty in attaching the
battery pack to the FOMA terminal, do
not use the excessive pressure to
Don’t
force the battery into place. Check that
the battery pack is facing in the
correct direction before you try to
attach it.
This may cause the battery pack to leak,
overheat, explode or ignite.
Do not throw the battery pack into a
fire.
This may cause the battery pack to leak,
Don’t
overheat, explode or ignite.
Do not puncture the battery pack, hit it
with a hammer or step on it.
This may cause the battery pack to leak,
Don’t
overheat, explode or ignite.
If battery fluid comes into your eyes,
do not rub your eyes but immediately
rinse your eyes with clean water and
Do
see a doctor.
This may result in loss of eyesight.
WARNING
If a malfunction is found due to an
external shock such as deformation or
damage by a fall, immediately stop
Don’t
using the FOMA terminal.
This may cause the battery pack to leak,
overheat, explode or ignite, or cause the
devices to malfunction or ignite.
If the battery pack is not fully charged
after the specified charging time has
elapsed, stop charging.
Do
This may cause the battery pack to leak,
overheat, explode or ignite.
If the battery pack leaks or emits an
unusual odor, stop using it
immediately and move it away from
Do
any flame or fire.
The battery fluid is flammable and could
ignite, causing a fire or explosion.
Be sure that your pet doesn’t bite to
the battery pack.
This may cause the battery pack to leak,
Do
overheat, explode or ignite, or cause the
devices to malfunction or ignite.
CAUTION
Do not dispose of used battery packs
with ordinary garbage.
This causes a fire and constitute an
Don’t
environmental hazard. Apply insulation tape
to the terminal of used battery pack and
return it to a docomo shop or service
counter, or dispose the battery pack in
accordance with your local regulations.
Do not charge the wet battery pack.
This causes the battery pack to overheat,
ignite, or explode.
Don’t
If battery fluid comes into contact with
your skin or clothing, stop using the
FOMA terminal immediately and rinse
Do
it off with clean water.
Battery fluid is harmful to your skin.
16
Page 19
4. Handling the Adapter
(including the Charger)
WARNING
Do not use the adapter (including
charger) of which the cord or power
cord is damaged.
Don’t
This may cause electric shock, overheat or
fire.
Do not use the AC adapter or desktop
holder in humid locations such as
bathroom.
Don’t
This may cause an electric shock.
The DC adapter must be used only for
vehicles with a negative ground. Do
not use the adapter in positively
Don’t
grounded vehicles.
This may cause a fire.
Do not touch the FOMA terminal,
adapter (including charger) when you
hear a crash of thunder.
Don’t
There is a risk of being struck by the
lightning and suffering an electric shock.
Do not short-circuit the charging
terminal when the adapter or charger
is plugged to the power outlet or the
Don’t
socket in a vehicle. Also, do not let the
charging terminal contact with your
body (hand, finger, etc.).
This may cause fire, malfunction, electric
shock or injury.
Place the charger or desktop holder
on a stable surface during charging.
Also, do not cover or wrap the charger
Don’t
or desktop holder with clothing or
bedding.
This may cause the FOMA terminal to fall
out of the charger or heat to build up,
resulting in a fire or malfunction.
Do not put heavy objects on the power
cord of the adapter (including
charger).
Don’t
This may cause electric shock or fire.
Do not touch the power cords of the
adapter (including charger) or the
power outlet with wet hands.
No wet hands
This may cause an electric shock.
Use the specified power supply and
voltage.
Using the adapters with incorrect voltage
Do
may cause a fire or malfunction. Use the AC
adapter for global use to charge the terminal
overseas.
AC adapter: AC 100V
DC adapter:
DC12V/24V (specific to vehicle with
negative ground)
AC Adapter for global use:
100V to 240V AC (should be plugged to
AC power outlet for home use only)
If the fuse in the DC adapter blows,
always replace it with the specified
type of fuse.
Do
Using the unspecified fuse may cause a fire
or malfunction.
Refer to the respective manuals for the
information on the specified fuse.
Wipe off any dust on the plug.
This may cause a fire.
Do
When plugging the AC adapter into a
power outlet, make sure that no
metallic straps or other metallic
Do
objects are caught between the plug
and the socket.
This may result in an electric shock, shortcircuit or fire.
Always grasp the plug when
unplugging the adapter or charger
from the power outlet or cigar lighter
Do
socket. Do not pull the cord itself.
Pulling the cord may damage the cord and
cause an electric shock or fire.
Unplug the power code from the
power outlet when it will be left
unused for a long period.
Unplug
This may cause electrical shock, fire or
malfunction.
If any water or other liquid gets into
the adapter or charger, immediately
unplug it from the power outlet or
Unplug
socket.
This may cause an electric shock, smoke
emission or fire.
Unplug the adapter or charger from
the power outlet or cigar lighter socket
before cleaning.
Unplug
This may cause an electric shock.
Easy Search/Contents/Precautions
17
Page 20
5. Handling the FOMA card
(UIM)
Easy Search/Contents/Precautions
Do
Be careful about a cut surface when
dismounting the FOMA card (IC part).
This may injure your hands or fingers.
CAUTION
6. Handling Mobile Phones
near Electronic Medical
Equipment
■ The following precautions conform
to the guidelines drawn up during
the Electromagnetic Compatibility
Conference Japan, regarding how
to protect electronic medical
equipment from radio waves
emitted by mobile phones.
WARNING
Observe the following in hospitals or
other medical facilities:
a Do not take your FOMA terminal into
Do
operating rooms, ICUs (Intensive Care
Units) or CCUs (Coronary Care Units).
a Turn off your FOMA terminal inside
hospital wards.
a Turn off the FOMA terminal even if you
are in a hospital lobby when electronic
medical equipments are in use nearby.
a If a medical facility gives specific
instructions prohibiting you from carrying
or using mobile phones, follow those
instructions.
a If the FOMA terminal is set with the Auto
power function, make sure to disable the
function before turning off the FOMA
terminal.
Turn off the FOMA terminal in crowded
places such as rush-hour trains in case
somebody nearby is using an
Do
implantable cardiac pacemaker or
implantable cardioverter-defibrillator.
Radio waves may affect the operation of
implantable cardiac pacemakers or
implantable cardioverter-defibrillators.
If you use an implantable cardiac
pacemaker or implantable cardioverterdefibrillator, keep the FOMA terminal at
Do
least 22 cm away from the devices.
Radio waves may affect the operation of
implantable cardiac pacemakers or
implantable cardioverter-defibrillators.
If you use the electronic medical
equipment other than implantable
cardiac pacemakers or implantable
Do
cardioverter-defibrillators out of the
medical facility due to the home
treatment, etc., consult the respective
manufacturers for the information
about the effects of radio waves on
the equipment.
Radio waves may affect the operations of
the electronic medical equipment.
18
Page 21

Handling with Care
General Notes
c Do not water the devices.
The FOMA terminal, battery pack, adapter
(including the charger) and the FOMA card (UIM)
are not water-proof. Do not use them in humid
locations such as bathrooms, and avoid exposing
them to rain. If you carry your FOMA terminal close
to your skin, sweat may cause internal components
to corrode and result in a malfunction. If the
problem is found to be due to moisture, it will not be
covered by the warranty and in some cases may be
irreparable. Even if it can be fixed, you will be
charged since the damage is not covered by the
warranty.
c Wipe with a soft, dry cloth (such as a cloth
for glasses).
aThe surface of the FOMA terminal’s LCD has a
specific coating to improve the visibility of the
color display. Rubbing the LCD of the FOMA
terminal with a dry cloth to clean it may scratch
the LCD surface. Handle the FOMA terminal
carefully and clean it using a soft dry cloth (of a
type used for eyeglasses). The LCD coating may
peel off or stain if moisture or soiling is left on the
surface for a long period.
aNever use chemicals such as alcohol, thinners,
benzene or detergents as these agents may
erase the printing on the FOMA terminal or
cause discoloration.
c Occasionally clean the connection
terminals with a dry cotton bud.
Soiled connection terminals may result in poor
connections and loss of power. Also, as it may
cause insufficient charging, clean the terminal with
a dry cloth or cotton bud when it is dirty.
c Do not place the FOMA terminal near an air
conditioning vent.
Condensation may form due to rapid changes in
temperature, and this may cause internal corrosion
and malfunction.
c Do not apply an excessive pressure or
weight to the FOMA terminal and battery
pack.
Do not put the FOMA terminal in a bag filled with
many objects or in the hip pocket of clothing as you
sit down. This may result in faults or damage to the
LCD, other internal components or battery pack.
When an external device is connected to external
connector (earphone/microphone terminal), it may
cause connecting breakage or malfunction.
c Read the separate manuals supplied with
the FOMA terminal, adapter and charger
carefully.
c Do not scrabble the display with metallic
objects.
This may cause scratch, malfunction or damage.
Handling the FOMA Terminal
c Avoid using the FOMA terminal in extremely
high or low temperatures.
Use the FOMA terminal within a temperature range
between 5°C and 35°C with humidity between 45%
and 85%.
c Using the FOMA terminal close to ordinary
phones, TVs or radios may affect the
operation of such devices. Use the FOMA
terminal away from such devices.
c
It is your responsibility to keep a separate record
of all data stored on your FOMA terminal.
Under no circumstances shall NTT DOCOMO be
liable for any loss or damage to the data stored on
your FOMA terminal.
c Be careful neither to drop the FOMA
terminal nor to apply an impact force to it.
Otherwise, your FOMA terminal may malfunction
or be damaged.
c When connecting an external device to the
external connector (earphone/microphone
terminal), do not plug inclined in the
connector or pull the code.
This may cause malfunction or damage.
c Do not fold the FOMA terminal with its strap
caught between the folding parts.
This may cause malfunction or damage.
c
It is normal for the FOMA terminal to become
warm while being used or charged. It is not a
malfunction and you can keep on using.
c Do not leave the camera exposed to direct
sunlight.
This may discolor or burn the element.
c Usually fit the external connector cap and
microSD card slot cap before use.
Failing to fit these covers may cause the FOMA
terminal to malfunction due to the dust or water
getting in.
c Do not use FOMA terminal when the back
cover is removed.
This may cause of removing the battery pack,
malfunction or damage.
c
Do not put a sticker with an extreme thickness,
etc. on the face of the display or keys.
This may cause malfunction.
c Do not remove the microSD card or turn off
the FOMA terminal when using the microSD
card.
Otherwise, loss of data or malfunction may result.
Handling the Battery Pack
c The battery pack is consumable.
If the battery pack does not work for enough time
even when it is fully charged, it is time to exchange
it. Exchange it for a specified new battery pack.
c Charge the battery pack within the proper
ambient temperature range (5°C to 35°C).
Continued on next page
19
Easy Search/Contents/Precautions
Page 22

c
Make sure to charge the battery when you use
the FOMA terminal for the first time or if you
have not used it for a long period of time.
c The available operating time of the battery
pack depends on the conditions in which
you use it and the condition of the battery
Easy Search/Contents/Precautions
pack itself.
c When the life of the battery pack is near
end, the battery pack may expand a little
according to the usage condition, but this is
not a malfunction.
c In order to keep a battery pack for a long
time, note the following:
aIf a battery pack is kept fully charged
(immediately after charging is completed
aIf a battery pack is kept empty (in a state that
battery life is too poor for the FOMA terminal to
be turned on)
The performance and life of the battery pack may
deteriorate.
It is recommended that battery level should be
seen in a state that, just for a reference as to what
battery level is proper for a longer battery life, two
battery icons are shown.
Handling the Adapter (including the
Charger)
c Charge the battery pack within the proper
ambient temperature range (5°C to 35°C).
c Do not charge the battery pack in the
following places:
aIn a humid, dusty or shaky place
aNear your home phone, TV or radio
c
It is normal for the adapter or charger to
become warm while being charged. It is not a
malfunction and you can keep on using. It is
not a malfunction and you can keep on using.
c Do not use the DC adapter to charge the battery
pack when the car engine is not running.
This may drain the car battery.
c If you use an electrical outlet with a
disconnection prevention mechanism,
follow the instructions of the user’s manual
of the outlet.
Do not shock the adapter or charger. Do not
c
deform the charging terminal.
This may cause malfunction.
Handling the FOMA card
c Do not apply unnecessary force to attach or
remove the FOMA card.
c It is normal for the FOMA card to become
warm while being used. It is not a
malfunction and you can keep on using.
c The warranty does not cover damage
caused by inserting the FOMA card into
some other type of IC Card reader/writer.
20
c Always keep the IC part clean.
c Wipe with a soft, dry cloth (such as a cloth
for glasses).
c It is the user’s responsibility to keep a
separate record of all data stored on your
FOMA card.
Under no circumstances shall NTT DOCOMO be
liable for any loss or damage to the data stored on
your FOMA terminal.
c To preserve the environment, take
discarded FOMA card to a docomo shop or
service counter.
c Avoid using the FOMA card in extremely
high or low temperatures.
c Do not damage, scratch, touch imprudently,
or short circuit the IC.
Otherwise, loss of data or malfunction may result.
c Be careful not to drop the FOMA card or
apply an impact to it.
This may cause malfunction.
c Do not bend the FOMA card or place a
heavy object on it.
This may cause malfunction.
c Do not attach the FOMA card to the FOMA
terminal with a label or sticker is pasted.
This may cause malfunction.
Handling the FeliCa Reader/Writer
c The FeliCa reader/writer function of the
FOMA terminal uses very weak radio waves
that require no licensing of radio stations.
c The 13.56MHz frequency band is used. If
there is another reader/writer around, keep
enough distance between the FOMA
terminal and that reader/writer. Also, make
sure that there is no radio equipment using
the same frequency band nearby.
Caution
c Do not use the altered FOMA terminal.
Using the altered device is a violation of the
Radio Law.
The FOMA terminal is certified to conform to
technical regulations for specified radio
equipments that are based on the Radio Law, and
“Technical Conformity Mark ” is affixed on the
model name seal as the certification. If you remove
the screw and alter inside of the FOMA terminal,
the technical regulations conformity certification
becomes invalid. Do not use the FOMA terminal
with the certification invalid, as it is a violation of
the Radio Law.
Page 23

c Be careful when you use the FOMA terminal
while driving a vehicle.
The penalty is imposed on using a mobile phone
while driving. Unwillingly receiving a call, use the
Handsfree to tell the caller that you will call back,
then stop the car in a safe place before using the
phone.
c Use the FeliCa reader/writer function in
Japan.
The FeliCa reader/writer function of the FOMA
terminal complies with radio standard in Japan.
You may be punished if you use it overseas.
c Use the IC card authentication function in
Japan.
The IC card authentication function of the FOMA
terminal complies with radio standard in Japan and
is certified. You may be punished if you use it
overseas.
Intellectual property right
Copyright and Portrait Right
It is prohibited to duplicate, modify or publicly transmit
content such as text, images, music or software that was
photographed using the FOMA terminal or downloaded
from Internet website and that is subject to third-party
copyright without the permission of the copyright folder,
except where the duplication or quoting of the content for
personal use is permitted under copyright law.
It may be prohibited to shoot or record the stage
performance, entertainment or exhibition even if it is
for personal use.
Shooting a photo of someone by the FOMA terminal
without his or her permission, or displaying a photo of
someone shot by the FOMA terminal on the website
without his or her permission is a breach of portrait
right.
Trademarks
a“FOMA”, “mova”, “i-mode”, “i-αppli”, “i-αppli DX”,
“i-motion”, “Deco-mail”, “Chaku-motion”, “Charaden”, “ToruCa”, “mopera”, “mopera U”, “WORLD
CALL”, “Dual Network”, “FirstPass”, “visualnet”,
“V-live”, “i-Channel”, “DCMX”, “iD”, “Security Scan”,
“i-shot”, “i-motion mail”, “i-area”, “Short Mail”,
“WORLD WING”, “Public mode”, “DoPa”,
“sigmarion”, “musea”, “IMCS”, “OFFICEED”, “2in1”,
“Chokkan Game”, “docomo STYLE series” and
“FOMA” logo, “i-mode” logo, “i-αppli” logo, “ToruCa”
logo, “DCMX” logo, “iD” logo, “Choku-Den” logo,
“Music&Video Channel” logo and “HIGH-SPEED”
logo are trademarks or registered trademarks of
NTT DOCOMO, INC.
aFree Dial logo mark is a registered trademark of
NTT Communications Corporation.
a“Catch Phone (Call waiting service)” is a registered
trademark of Nippon Telegraph and Telephone
Corporation.
aNapster is a registered trademark of Napster, LLC.
and/or its affiliates in the US and/or other countries.
®
aMcAfee
aG-GUIDE, G-GUIDE MOBILE and their logos are
is registered trademarks or trademarks of
McAfee, Inc. and/or its affiliates in the US and/or
other countries.
registered trademarks in Japan of U.S. Gemstar-TV
Guide International, Inc. and/or its affiliates.
Easy Search/Contents/Precautions
aPowered by JBlend
Aplix Corporation. All rights reserved.
JBlend and all JBlend-related trademarks
are trademarks or registered trademarks of
Aplix Corporation in Japan and other
countries.
ae is a registered trademark of FeliCa Networks, Inc.
TM
Copyright 2002-2009
Continued on next page
21
Page 24
aQR code is a registered trademark of Denso Wave
Inc.
amicroSD logo is a trademark.
a“PictMagic”, “Emotion-expressing mail”, “みんな Nら
んど”, “Life history viewer”, “Quick Info”, “One Touch
Open” and “FontAvenue” are trademarks or registered
Easy Search/Contents/Precautions
trademarks of NEC Corporation.
aQuickTime is a registered trademark of Apple Inc., in
the US and other countries.
®
aMicrosoft
Windows Vista
trademarks of Microsoft Corporation in the United
States and/or other countries.
aJava and all Java-related trademarks and logos are
trademarks or registered trademarks of US Sun
Microsystems, Inc. in the United States and other
countries.
aT9
trademark of Nuance Communications,
Inc., and entities held by Nuance in the
United States and other countries.
Powered By Mascot Capsule®/Micro3D EditionTM
a
MASCOT CAPSULE® are registered trademarks of
HI CORPORATION.
aIrSimple
are trademarks of Infrared Data
Association
aThe other company names and brand names
described in this manual are trademarks or
registered trademarks of the respective companies.
, Windows®, Windows Media® and
®
are either registered trademarks or
®
is a trademark or registered
TM
, IrSSTM or IrSimpleShotTM
®
.
Others
aThis product is licensed complying with MPEG-4
Visual Patent Portfolio License, and you are
permitted to use personally and for the nonprofit
purpose in the following situations:
aTo record a movie based on the standard of
MPEG-4 Visual (MPEG-4 Video)
aTo play MPEG-4 Video recorded by the consumer
engaged in the nonprofit activities
aTo play MPEG-4 Video provided by the provider
licensed by MPEG-LA
When you use it for other purposes, such as
promotion, in-house information and profit activity,
contact the U.S. corporation MPEG LA, LLC.
aFeliCa is a contactless IC card technology
developed by Sony Corporation. FeliCa is a
registered trademark of Sony Corporation.
®
aContains Adobe
Reader
Incorporated.
Adobe Flash Lite copyright© 2003-2008 Adobe
Systems Incorporated. All rights reserved.
Adobe Reader LE Copyright© 1993-2007 Adobe
Systems Incorporated. All rights reserved.
Adobe, Adobe Reader, Flash and Flash Lite are
either registered trademarks or trademarks of
Adobe Systems Incorporated in the
United States and/or other countries.
aContent owners protect copyrighted intellectual
properties by WMDRM (Windows Media digital
rights management) technology. This product uses
the WMDRM software to access WMDRMprotected contents. If the WMDRM software is
unable to protect contents, the content owners
request Microsoft to disable the WMDRM function
of the software for playing or copying protected
contents. No contents other than protected ones
are affected by disabling the function. Please note
that, if downloading the license to use protected
contents, Microsoft may include the revocation list
in the license. Content owners may request
upgrading of the WMDRM software when you
access the contents. If rejecting the upgrade,
contents requiring the upgrade cannot be
accessed.
aThis product contains ACCESS CO., LTD’s
NetFront Browser and NetFront Sync Client.
ACCESS and NetFront are trademarks or
registered trademarks of ACCESS CO., LTD. In
Japan, the United States and other countries.
Copyright© 2009 ACCESS
CO., LTD. All rights
reserved.
aThis product contains the
module developed by Independent JPEG Group.
aThis product is equipped with IrFront by ACCESS
CO,. LTD.
©2008 ACCESS CO., LTD. All rights reserved.
ACCESS and IrFront are trademarks or registered
trademarks of ACCESS CO., LTD. in Japan and/or
other countries.
aHyper Clear Voice is industrialized based on the
SRS VIP+ technology licensed from SRS Labs, Inc.
SRS, VIP+, and the symbol are trademarks
of SRS Labs, Inc.
aTruMedia and Dialog Clarity technologies are
manufactured based on the license from SRS Labs,
Inc.
TruMedia, Dialog Clarity, SRS and the mark
are trademarks of SRS Labs, Inc.
Flash® LiteTM and Adobe
®
LE technology by Adobe Systems
22
Page 25

aThis product contains software licensed complying
with GNU General Public License (GPL), GNU
Lesser General Public License (LGPL), etc. For
more details, see “readme.txt” in the “GPL・LGPL
等について” folder on the bundled CD-ROM.
(“readme.txt” is only available in Japanese version.)
aThis product contains NetFront DTV Profile
Wireless Edition of ACCESS CO., LTD. as the data
broadcast BML browser.
This product contains Media: of ACCESS CO., LTD.
as the contents activating function.
Copyright© 1996-2009 ACCESS CO., LTD.
ACCESS and Media:/Media colon are trademarks
or registered trademarks of ACCESS CO., LTD. in
Japan and/or other countries.
aThis product equipped with the font “FontAvenue”
product by NEC Corporation.
aThis product is equipped with GestureTek
technology.
Copyright© 2006-2009 GestureTek, Inc. All Rights
Reserved.
aThis product is anti bacterial-coated.
Antibacterial part is covering materials of Phone
body (excluding the display, keys/buttons and
terminals)
Inorganic antimicrobial agent, coating,
JP0122112A0003N
The SIAA brand mark is borne on
products evaluated according to ISO
22196 and they are under quality control
and information disclosure by the guidelines of the
Society of Industrial Technology for Antimicrobial
Articles.
a©2009 ZENRIN DataCom CO., LTD.
a©2009 ZENRIN CO., LTD.
a©2009 Google - Map data ©2009 Geocentre
Consulting, NFGIS, ZENRIN, Europa Technologies
Description of Windows
aIn this manual, each OS (Japanese Edition) is
described as follows:
aWindows Vista stands for Windows Vista
Basic, Home Premium, Business, Enterprise,
Ultimate).
aWindows XP stands for Microsoft
Professional operating system or Microsoft
®
Windows
aWindows 2000 stands for Microsoft
2000 Professional operating system.
XP Home Edition operating system.
®
(Home
®
Windows® XP
®
Windows®
Easy Search/Contents/Precautions
®
23
Page 26
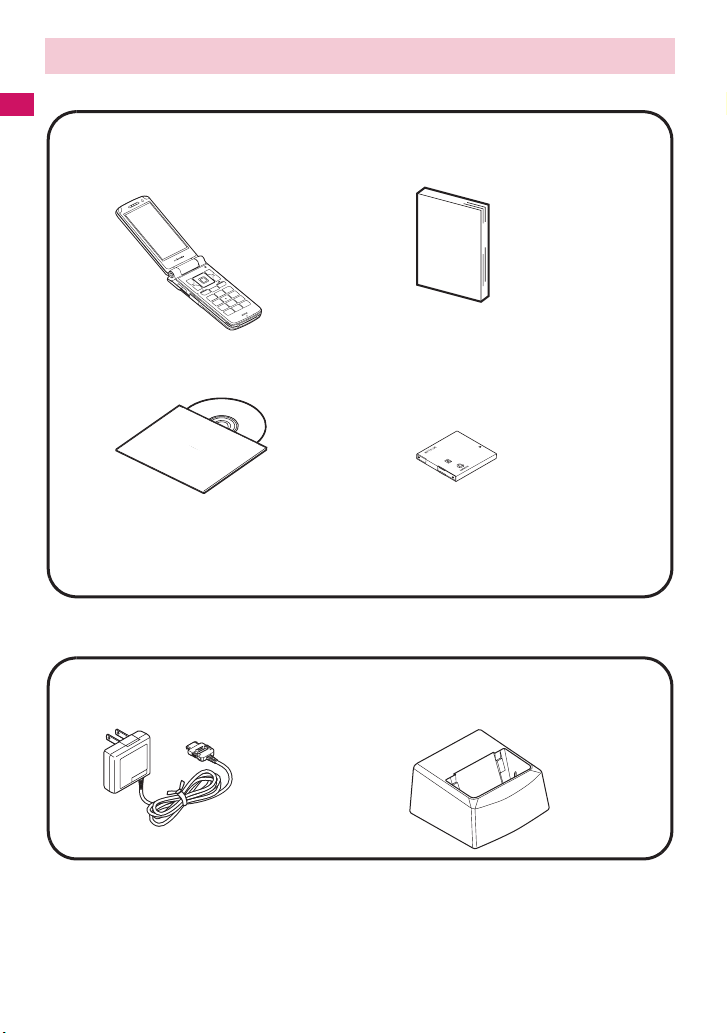
Main Components and Optional Equipment
<Main Components>
Easy Search/Contents/Precautions
N-05A
(Including the warranty and Back
Cover N36)
CD-ROM for N-05A
* This CD-ROM contains the PDF files of
“Manual for PC Connection” and “Kuten
Code List”.
<Optional Equipment>
FOMA AC Adapter 01/02
(Including warranty and manual)
Manual for N-05A
(This manual)
* The Quick Manual starts on P.536.
Battery Pack N20
Desktop Holder N19
(Including manual)
Other options and accessories→P. 4 8 0
24
Page 27

Before Using the Handset
Component Names and Functions...................................................................... 26
How to View the Display...................................................................................... 28
How to View the Rear Panel Display (Indicator Display) .................................... 31
Selecting the Menu.............................................................................................. 33
Changing the Main Menu .................................................................................... 38
The Basic Operations on the Screens................................................................. 39
Description of the Operations.............................................................................. 41
Function Menu..................................................................................................... 42
Setting the FOMA Card ....................................................................................... 45
Attaching/Removing the Battery Pack................................................................. 47
Charging the Battery Pack .................................................................................. 48
Checking the Battery Level.............................................................. 52
Opening the FOMA terminal by Using a Button ........................ 52
Turning the FOMA Terminal On/Off............................................. 53
Switching between Japanese and English .................................. 53
Setting the Default........................................................................... 54
Setting the Clock ................................................................................................. 54
Notifying the Other Party of Your Phone Number................. 55
Checking Your Own Phone Number.................................................... 56
Battery level
One-Touch Open
Power ON/OFF
Select language
Initial setting
Caller ID Notification
My Profile
25
Page 28
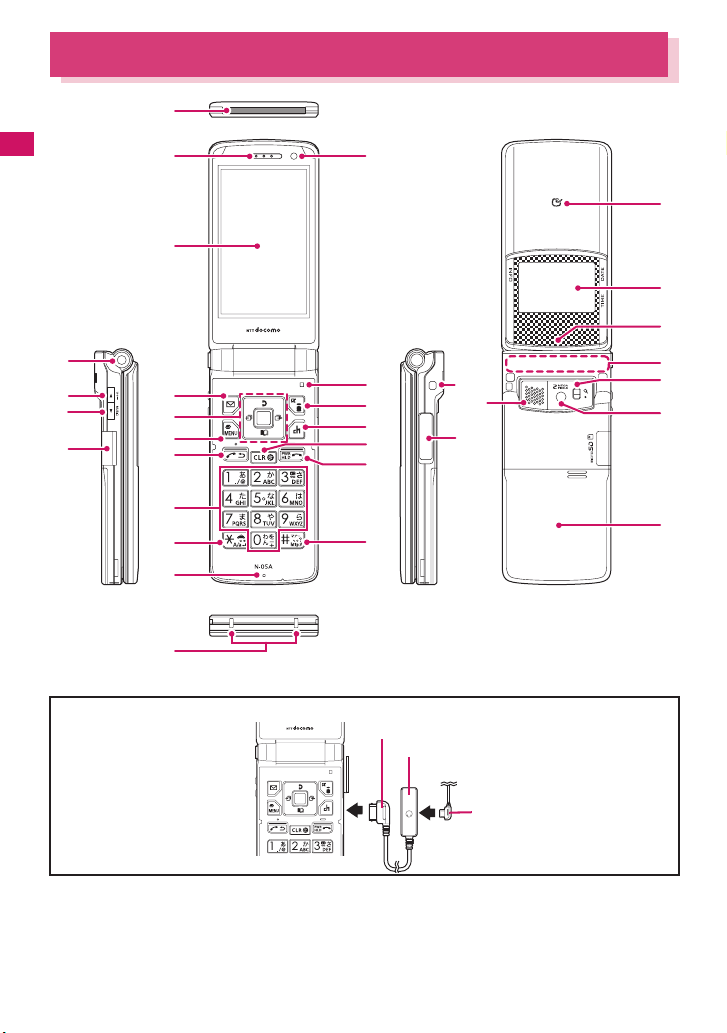
Component Names and Functions
1
Before Using the Handset
2
3
4
(
e
o
r
w
)
q
6
8
9
!
5
7
0
@
#
$
%
^
&
*
* The built-in TV antenna enables the entire FOMA terminal to function as an antenna.
<Using Earphone>
Connect an externalconnector-compatible
earphone (optional).
To use an incompatible
earphone, connect an
adapter converter
(optional).
Flat-plug earphone/microphone with switch (optional) connection example
Phone plug
Earphone connector (flat)
Flat-plug of earphone/
microphone with
switch
t
y
u
i
p
a
s
■Functions
1 Infrared data port→P.342
2 Earpiece
26
3 Front camera
• Shoots the image of yourself using camera function
• Shoots the movie of yourself during
videophone calls
Page 29

4 Display
5 Illuminance sensor → P. 1 17
6 oFunction key 1
• Performs the displayed function→P. 3 5
• Displays the mail menu →P.204
• Makes videophone calls→P. 5 8
7
pFunction key 2
• Performs the displayed function→P. 3 5
• Displays the i-mode menu → P. 1 7 8
• Switches the character type when
entering characters → P. 4 0 7
Multi-function keys
8
f/g
• Moves the cursor or the displayed
contents, etc. up or down (scrolls
continuously when the key is held down)
• f: Displays Choku-Den→P. 1 0 2
• g: Displays the search phonebook
menu screen→P. 9 6
h/j
• Moves the cursor to the left or right
• Scrolls the display to the previous or next
screens by pages→ P. 3 9
• h: Displays the Received calls record
→P. 6 5
• j: Displays the Redial → P. 6 5
d
• Performs the displayed function (“Select”
or “Set”, mainly) →P. 3 5
9 iFunction key 3
• Performs the displayed function→P. 3 5
• Displays the main menu→P. 3 3
• Displays the task change screen → P. 3 7 6
0
uFunction key 4
• Performs the displayed function (function
menus, mainly) → P. 3 5
• Activates the function in “ch-key setting”
→P. 3 7 9
* Displays the Channel list of i-Channel at the
time of purchase.
! r Send key
• Makes voice calls→ P. 5 8
• Receives voice/videophone calls →P. 7 4
t Back (Clear) key
@
•
Undoes the last step in the operation
• Puts a call on hold → P. 7 8
• Deletes the entered phone number or
characters→ PP.58, 409
y Power/End of operation/Hold key
#
• Turns on the power (1 second or longer)/turns
off the power (2 seconds or longer)
• Ends each function → P. 4 0
• Ends a call → P. 5 9
• Puts an incoming call on hold→P. 7 8
$
0 to 9 Dial keys
• Enters phone numbers, characters and
numbers
→
→P. 4 0
P. 5 3
%
w/Public mode (Driving mode) key
• Sets Public mode (Driving mode)
(1 second or longer)→ P. 7 8
^
q/Manner key
• Sets Manner mode (1 second or longer)
→P. 1 1 0
Mouthpiece/Microphone
&
* Charging terminal
( One-Touch Open button→ P. 5 2
)
Volume up key/(マナー)
a
• Sets Manner mode (1 second or longer)
→P. 1 1 0
• Raises the earpiece volume during a call
→P. 7 7
• Scrolls back the display to the previous
screens by pages→ P. 3 9
• Connects to the site of “Home URL”
→P. 1 9 3
Volume down key/(MUSIC)
q
s
• Lowers the earpiece volume during a call
→P. 7 7
• Scrolls the display to the next screens by
pages→ P. 3 9
• Reads out the current time (Voice clock)
(Japanese mode) →P. 8 0
• Plays recorded messages → P. 8 3
microSD card slot→ P. 3 2 6
w
e Through-hole for strap
r External connecter
• Use when charging, connecting an
earphone, etc.
• Connects an AC adapter (optional), DC
adapter (optional), FOMA USB Cable with
Charge Function 01/02 (optional),
Earphone Plug Adapter (optional), or
Earphone Plug Adapter 01 for External
connector terminal* etc.
* : Connects the flat-plug stereo earphone set
(optional) or the flat-plug earphone/
microphone with switch (optional), etc.
t e mark (FeliCa mark)
• Reads the IC card → P. 2 7 1
• iC communication → P. 3 4 4
Rear Panel Display
y
• Displays the clock or various information
about the FOMA terminal→ P. 3 1
Illumination lamp
u
•
Flashes in the selected color while receiving
a call or when there is a missed call
• Flashes in the selected color while
receiving a mail or when there is a new
mail→P. 8 0
• Lights in red while charging→ P. 5 0
Flashes in red during shooting mode
•
• Flashes in blue while the auto timer is
activated→ P.155
• Flashes in red while using a communication
→P.155
function→PP.271, 336
Continued on next page
Before Using the Handset
→P. 8 0
27
Page 30
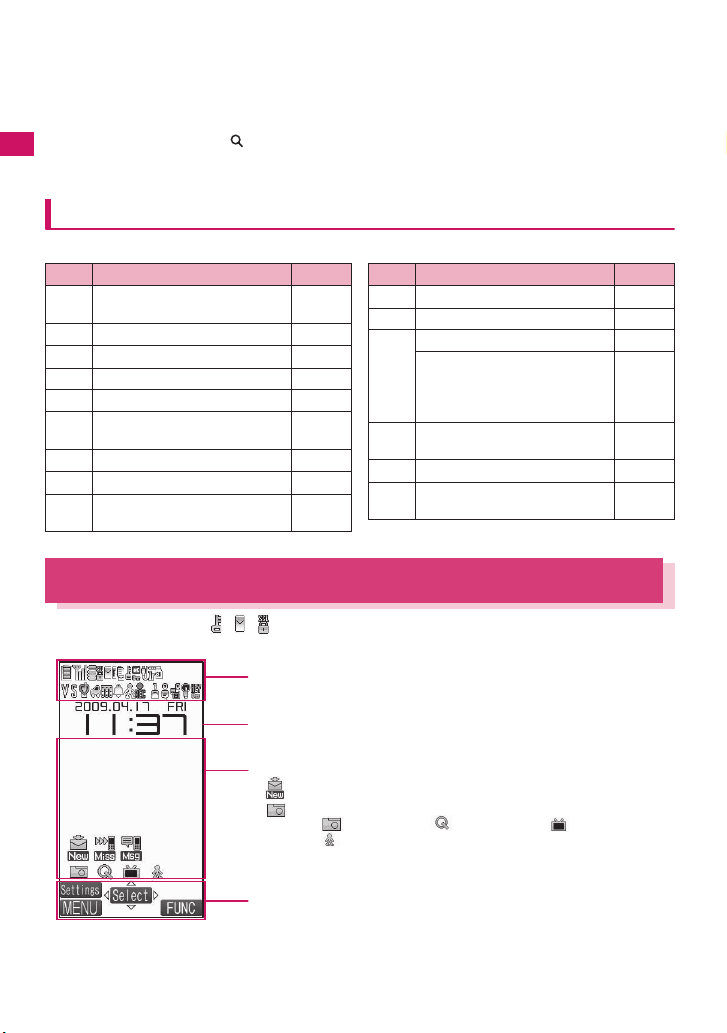
i FOMA antenna
• The FOMA antenna is built-in. To make calls
under better condition, do not cover the
antenna part with your hands.
o Speaker
p Lens selector switch
• Switches ● (Standard)/ (Macro) for the
rear camera→ P. 1 5 4
Before Using the Handset
F
unctions that involve holding down keys for 1 second or longer
• Displays the close-up menu
→PP.168, 169, 173
a
Rear camera
• Shoots photos and movies
• Shoots the movie of scenery during
videophone calls
s
Back cover
* a (マナー ) and s (MUSIC) are referred to as side
keys in this manual.
The functions available by holding down each key for 1 second or longer in the standby screen are as follows:
Key Function
Displays the Received
h
address list
Displays the Sent address list P.232
j
2 Changes the mode of 2in1 P.427
3 Sets the IC card lock P.272
5 Turns the display light on/off P.117
Switches Main menu
7
(Standard or Other menu)
8 Switches Privacy angle P.117
0 Enters “+” P.63
Sets/Releases Public mode
w
(Driving mode)
Ref. page
P.232
P. 3 8
P. 7 8
Key Function
q Sets/Releases Manner mode P.110
c Adjusts the earpiece volume P.77
Sets/Releases Manner mode P.110
Uses the IC card
a
authentication
(
マナー
)
(when Dial lock/Keypad lock is
set)
Activates/Quits the music
s
(MUSIC)
player (During BGM play)
o Check new messages P.217
Displays the i-αppli software
p
list screen
How to View the Display
Ref. page
P.145
P.370
P.251
z The symbols (such as , , , etc.) displayed on the screen are referred to as icons.
z A calendar, etc. can be set to the display. → P. 1 1 4
The status of the FOMA terminal is indicated with icons in this area
→P. 2 9
Clock display→ P.123
Desktop icon display area
• etc. : Desktop icons providing information→ P. 1 2 4
• etc. : Pasted desktop icons→ P.124
Function/i-Channel ticker display area→ PP.35, 200
(Photo mode), (Quick Search), (1Seg) and
(Pedometer) are the default settings.
28
Page 31

● Icons that indicates the status of the FOMA terminal
Icon Description
/
7
(Red)
Icon Description
1
2
Battery level→ P. 5 2
Signal strength→ P. 5 3
Out of service area/Radio
wave does not reach→P. 5 3
Self mode → P.151
/ i-mode/i-mode communication
3
in progress → P. 1 7 8
/ / Packet communication in
/ Packet communication in
4
progress (no data exchange/
sending/receiving)
progress (sending/receiving)
SSL-compatible page
displayed→ P. 1 8 1
5
/
(Red)
Unread mail/Inbox is full
→P.214
SMS in the FOMA card (UIM)
is full →P.338
Unread mail/SMS in the
FOMA card (UIM) is full
→PP.214, 338
Inbox is full/SMS in the FOMA
(Red)
card (UIM) is full
→PP.214, 338
Unread Area Mail→ P. 2 3 9
/
6
(Red)
/
(Red)
/ / / Unread messageR and
Unread MessageR/Full
→P.236
Unread MessageF/Full
→P.236
messageF (in red when each
of them is full) → P. 2 3 6
/
(Red)
/
(Red)
8
/
/
9
/ microSD mode/MTP mode set
0
//
//
//
!
Mail kept at the i-mode Center/
Full→ P.217
“Receive option setting” of
“Mail Setting” is set to ON and
a mail is kept at the i-mode
Center →P.216
MessageR kept at the i-mode
Center/Full → P.236
MessageF kept at the i-mode
Center/Full → P.236
Dial lock→ P.134
Secret mode/Secret data only
mode→P.136
Original lock/Original lock
released temporarily
→PP.140, 141
Secret mode or Secret data
only mode and Original lock is
set or released temporarily
→PP.136, 140, 141
IC card lock→P.272
→P.335
USB cable connected and
Communication mode/
microSD mode/MTP mode set
→P.335
Handsfree compatible device
connected and
Communication mode/
microSD mode/MTP mode set
→PP.73, 335
USB cable/Handsfree
compatible device connected
and Communication mode/
microSD mode/MTP mode set
→PP.73, 335
Infrared data exchange in
progress →P. 3 4 2
Infrared remote control
operated → P.347
Before Using the Handset
Continued on next page
29
Page 32

Icon Description
!
Before Using the Handset
@
#
$
%
/ Auto manner mode Activate/
/ Remote monitoring (Auto
^
&
*
(
IC card authentication in
progress→ P.145
iC communication in progress
(sending/receiving data)
→P. 3 4 4
microSD card inserted →P. 3 2 6
microSD card (invalid)
inserted →P.326
microSD reader/writer
operated→ P.335
microSD being accessed
→P. 3 2 9
Vibrator→ P.108
Ring volume is set to “Silent”
→P. 7 7
Mail/Msg. ring time is set to
“OFF”→P.110
Manner mode→ P.110
Release is set to ON→ P. 1 1 1
manner mode is set to ON/
OFF) →PP.88, 112
Public mode (Driving mode)
→P. 7 8
Music&Video Channel
program reservation set
→P. 3 5 5
Alarm notification function
→P. 3 8 6
Measuring steps as
“Pedometer”→ P. 3 7 2
Icon Description
)
q
〜 Voice mail message →P.416
w
〜
〜
e
〜 Record VP message→ P. 8 2
r
t
Timer recording on TV→ P. 2 8 8
[Record message: ON/Auto
voice memo: ON]
No Record message/Auto
voice memo
Record message only
Auto voice memo only
Record message and Auto
voice memo
[Record message: ON/Auto
voice memo: OFF]
No Record message
Record message
[Record message: OFF/Auto
voice memo: ON]
No Auto voice memo
Auto voice memo
→P. 8 2
Backlight is set to OFF
→P. 1 1 8
Privacy angle is set to ON
→P. 1 1 7
Privacy angle is set to ON,
and Backlight is set to OFF
→P. 1 1 7
Side key guard is set to ON
→P. 1 4 6
* “ (During a voice call)”, “ (During 64K data communication)”, “ (During a videophone call)”, and
“ (Switching between voice call and videophone call)”
above icons by the Standard menu.
(Keypad lock set) are displayed besides
N
z The display adopts state-of-the-art technology; some dots (points) may not light up while others
may constantly light up due to its characteristics. Note that this phenomenon is not a failure.
z You can check the name of the displayed icons by selecting i“Settings”“Display”“Other
settings”“Icons”.
30
Page 33

How to View the Rear Panel Display (Indicator Display)
The clock is displayed in the rear panel display during standby mode. Various information
animations are also displayed when you receive a voice call or a mail.
● Clock display patterns
z You can select one of four clock display patterns during standby mode. → P. 1 2 0
Time
Battery level/Reception level
Date
Clock 1
Battery level Signal strength
Missed call/new mail: Shows “>” on the bottom when
there is either a missed call or a new mail. Show “>”
on the top and bottom when there are both of them.
Before Using the Handset
〜
Level 1 Level 3 Out of
①
②
Clock 2 Clock 3 Clo ck 4
service area
Level 0 Level 3
①
〜
Level 1
①: Icon display
: Battery level : Signal strength : Missed call : New mail
/ : Alarm/The set date and before the set time
* : Displayed only with Clock 2.
*
: Manner mode
*
②: Cat animation
: Missed call : New mail
: Missed call/New mail
③:Steps→P. 3 7 3
■To turn the rear panel display on and display the clock
z Press a (マナー ) or s (MUSIC) with the FOMA terminal folded to turn the rear panel display
on and display the clock.
z When you press s (MUSIC), the clock is displayed and the current time is read out at the
same time (when there is no missed call, new mail, etc.). →P. 8 1
Continued on next page
③
①
31
Page 34

N
z The rear panel display described in this manual is example of body color “Platinum Silver” and
“Lupinus Pink”. The monochrome reversing display appears for the other body color “Primary
Black”.
z You can set the display time of the clock for “15 seconds, 1 minute, All time ON”. →P.121
● Examples of the providing information screen
Before Using the Handset
Receiving a voice call Chaku-moji Receiving mail
Alarm notification Alarm (Schedule) Manner mode
Emotion-expressing mail
Dial lock is set
● To check the missed call/new mail and examples
Pressing a ( マナー ) enables you to check the callers and senders with the FOMA terminal
folded when there is a missed call or new mail (i-mode mail and SMS) or new chat mail.
z When you have a missed call, the date, time and the caller name is displayed. When the caller
is not stored in the phonebook, the phone number is displayed. “User unset” or “Payphone”
may also be displayed.
z If “Mail” in “Indicator display”(P.120) is set to “ON”, the date, time and the sender name is
displayed when you have a new mail or a new chat mail. When the sender is not stored in the
phonebook, the mail address is displayed.
Missed call New mail
N
z When there are several missed calls and new mails, you can check the content of only the latest
call or mail.
z The content of the missed info is not displayed when you lock the activation of the received calls or
the mail function in “Original lock”.
32
Page 35

Selecting the Menu
You can run, set, and check the FOMA terminal’s functions in a variety of ways. There are
various methods of the rest though the method of selecting the function from the main menu is
general.
z This manual focuses on describing how to access functions from the Main Menu.
Selecting functions from the main menu
You can select the functions of the FOMA terminal from the main menu displayed by pressing
i in the standby screen. The menus are sorted by function. → P. 4 5 0
<Example: Changing the Ring Tone>
Press i on the standby screen to display the main menu
1
Before Using the Handset
i
If you do not press any key for 30 seconds
while the main menu is displayed, the main
menu is turned off and returns to the
previous screen.
Tip
Use c to move the highlight, then press d (Select) to select
2
the displayed menu sequentially
cdcd
d
Tip
Holding down c
moves the highlight
in sequence.
33
Page 36

Accessing functions with the short cut keys
You can access functions easily by pressing the function keys pre-assigned to the function.
Press the function key on the standby screen
1
Before Using the Handset
Pressing f displays
the Choku-Den
screen.→ P. 1 0 2
Pressing o
displays the mail
menu.→ P.204
Pressing g displays
the Search phonebook
screen.→ P. 9 6
Pressing p
displays the i-mode
menu.→P. 1 7 8
Pressing h displays
the Received calls
screen.→ P. 6 6
Pressing u displays
the Channel list.
→P.200
Pressing j
displays the Redial
screen.→ P. 6 6
N
z When using the Simple Menu (P.38), pressing o or p on the standby screen displays the Simple
Menu.
z You can change the function accessed with u key.→ P. 3 7 9
34
Page 37

The operation icons (Function display) corresponding to o, d, p, i, u and the
4
5
direction icons corresponding to b are displayed on the screen. Only when the
corresponding keys can be used, those icons are displayed.
■ Performing the functions assigned to the function key
Press the key for
1 to 5, the function is activated.
2
1
1……(Settings), (Edit), (Finish), (Play), (Send), (New), etc.
Press o while (Play) is displayed to display the
highlighted setting.
2
……(Select), (Set), (Play), (Dial) etc.
3
……(Disp SW), (Ir data), (Chrct) and (Guide), etc.
(Guide) is displayed on the mail detail screen. In this
4
2
1
time, press p (Guide) to display the operation
guidance is displayed.
4
……(MENU) and (MULTI) etc.
5
……(ch), (FUNC), (Close) etc.
Press u while (FUNC) is displayed to display the
function menu.→ P. 4 2
■ Moving or scrolling the screen
Press b in the direction you want to scroll.
[Notation]
■Description of the function display
In this manual, operations related to the keys for the function display are generally
described with the function display in the parenthesis, such as Xd (Select) and Vu
(FUNC).
How to use the function keys
3
Before Using the Handset
5
3
35
Page 38

Other operations to access functions
You can use the following functions when you switch the main menu to the Standard menu
(P.38).
• Access to the desired function by menu numbers
• Search menu items
• Use the original menu
Before Using the Handset
● Accessing functions by selecting menu numbers
You can access functions quickly by pressing the keys pre-assigned to the menu numbers
(P.463).
<Example: To access “Select ring tone”>
Press i on the standby screen to display the main menu,
1
then press 13 in sequence
i13
● Searching menu items to access functions
Even if you do not know the procedure to access the menu, you can still access the desired
function by entering key words to search menu items.
<Example: To access “Select ring tone”>
Press i on the standby screen to display the main menu,
1
then press u (FUNC) in sequence. Then highlight “Search”,
and press d (Select)
36
iu d
Page 39

Enter “ring” and press d (Set), then select the displayed
2
menu
dp d
The search result is
displayed with an
underline.
If there are two or
more search
results, press p
(Next) to move the
frame.
● Accessing functions by switching the Original menu
By storing your frequently used functions (P.120), you can access the menus easily.
Press i on the standby screen to display the main menu,
1
then press p (Original) in sequence
Pressing p switches between the main menu and the original menu.
i
p
p
Before Using the Handset
37
Page 40

Changing the Main Menu
You can change the design of the main menu (style for background or icon, etc.) as you want.
z When you change the design of the menu display using Kisekae Tool, the menu structure may
change in accordance with frequency of using functions. Also, you cannot access some
functions entering the menu number (P. 462) assigned to the functions.
Before Using the Handset
z You can also switch Main menu (Standard or Other menu) when you press 7 (1 second or
longer) in the standby screen.
Press i on the standby screen, then press o (Change) in
1
sequence
Switching pages→ P. 3 9
io
Main Menu Theme selection
Select an item
2
“Pictogram” to “Season”
Switches the display design in each menu.
“Standard”
You can access functions quickly by pressing the keys pre-assigned to
the menu numbers in the icons menu. → P. 4 6 3
“Simple Menu”
Simple Menu consists of frequently used menus, and its character size
is large and operation procedure is simple.→P. 4 6 6
Sets the character size of the screens to “X-large” all at once. → P. 1 2 3
“Original theme” → P. 1 1 9
You can change the icons and background image used on “Standard”. You can also set
the photo you shot as the background.
“Kisekae Tool” → P. 1 2 9
You can change various design of the FOMA terminal such as the main menu all at once
with the Kisekae Tool package. “Direct Menu” (P.10) that divides a menu into four
categories and arrange it in top, bottom, right and left is pre-installed at the time of
purchase.
■ Changing the Main Menu temporarily
Highlight an item on the theme screen and press o (Change) to change the main menu
temporarily. When the main menu is displayed again, the main menu before it sets is
displayed. However, in some themes, the main menu is not changed temporarily.
Simple Menu
38
Page 41

The Basic Operations on the Screens
● When items appear in multiple pages
Press v to display other pages
1
To switch the page, press h (or a ( マナー )) for the previous page and press j (or s
(MUSIC)) for the next page.
Current page/Total pages
j
h
■ To display other pages using c
Pressing f displays the previous page when the highlight is located at the top of the list,
and pressing g displays the next page when the highlight is located at the bottom of the
list.
● Using the dial keys to select items
Press 1 to 90wq corresponding to the menu
1
numbers
3
The number corresponding to the dial key
● Selecting “YES/NO” or “ON/OFF”
Before Using the Handset
Press c to move the frame, then press d (Select)
1
39
Page 42

● To display an image in the picture list
Press b to move the frame, then press d (Disp.)
1
Before Using the Handset
● Entering a security code
Enter the 4 to 8 digit security code, then press d (Set)
1
● Entering numbers
Enter numbers by pressing 0 to 9
1
● To cancel operations, and to return to the standby screen
■t
Press t to cancel the last operation, such as when you select wrong menu item. Though the
previous screen appears basically, another screen may appear depending on the function.
■y
Press y to complete operations such as settings and to return to the standby screen. Though
the function is completed and the standby screen appears basically, another screen may
appear depending on the current displayed screen and function. If you press y during setting
operation, the setting operation is canceled and the standby screen reappears.
The numbers of the entered security code is displayed as “_”.
The detail screen of the function is displayed when the security code is
successfully entered.
■ If the entered security code is incorrect
A message notifying that the security code is wrong is displayed. Reenter the security code from the beginning.
To enter a 1-digit number or 2-digit number in a 3-digit number entry
screen, press 0 twice or once before entering a number.
■ To enter “3”
003
40
Page 43

Description of the Operations
In this manual, instructions for menu operations are briefly described in almost all cases as follows:
The example of description of operations and the actual operations
① ② ③ ④ ⑤
i
1
“LifeKit”“Alarm”Highlight the item to set
①: Press i on the standby screen.
②:
Press b to move the highlight to the menu in the double quotation mark, then press d (Select).
③: Press b to move the highlight to the item in the double quotation mark, and then
press d (Select).
Or, press 1 to
④: Press b to move the highlight.
⑤: Press the key for the function displayed in parentheses.
90wq
for the menu number in the double quotation mark.
[Notation]
■Omission of Xd in the “Select” and “Set” operations
• When a target function is selected from the main menu or list, such as example ② and ③,
Xd (Select) is omitted.
• In the cases such as “Select an item” or “Enter your security code”, Xd (Select) and Xd
(Set) are omitted in the same way.
• When you are supposed to move to the next step without pressing Xd (Select), “Highlight
xxx” is used, such as example ④.
■Easy operations are preferred
• Though the operation of the main menu has been described, this manual gives priority to
the operations by short cut keys operations (P.34).
• If you select the function from the Standard Menu or the Simple Menu, refer to “Standard
Menu” (P.463) or “Simple Menu” (P.466) on Menu Function List.
■Omission of the descriptions after completing the operations
• The descriptions for the operations after completing the function are omitted.
“To cancel operations, and to return to the standby screen”→P. 4 0
■Brief description of keys and menus
• Brief description of keys and menus in this manual, instructions for key illustrations/menu
displays/holding down keys are simply described as follows:
Key Menu display Holding down keys
Actual display/
operation
Description in this
manual
■Describing multiple menus together
When multiple menus are described together, “, ” is used between the items as follows:
<Example: Function menu of the Choku-Den screen>
Release this, Release all……Releases one or all Choku-Den.
1 iMenu q (1 second or longer)
Menu
o
(Edit)
Press and hold down q
for 1 second or longer
Before Using the Handset
41
Page 44

Function Menu
“Function Menu” is one of the menus of the FOMA terminal that can be accessed from the
function display. The function menu activates supplementary functions of each screen.
For example, you can use the function menu to delete a mail after reading it, or to select the
folder to save an image you shot with the camera.
Before Using the Handset
● How to use the function menu
There are mainly three ways to use the function menus. Use the appropriate method depending
on the situation.
① Refer to the explanation of the function menu items from the reference page stated with the
operation screen.
② Refer to the explanation of the function menu items from the function menu index.
③ Find the procedure to display the operation screen from the reference page of the function
menu.
Operation screen with the reference page for the function menu is illustrated
in a shaded colored frame and differentiated from others.
Function menu
Mail
Folder list screen . . . . . . . . . . . . . . 228
List screen . . . . . . . . . . . . . . . . . . . . 230
Message screen. . . . . . . . . . . . . . . 207
New mail screen. . . . . . . . . . . . . . . 206
Unread mail list screen . . . . . . . . 230
New mail
Function menuP. 20 6
①
③②
New mail screen (P.204)
Send……Sends i-mode mail.
Save→ P.2 1 2
Delete receiver……If there are 2 or more
addresses entered, you can delete the
highlighted address.
Change rcv. type……Changes the address type
with an address highlighted.
* “Function menu items” and “Function menu index” in the above illustration are only excerpts.
● Operation target on the list screen
In the function menu on the list screen, either data highlighted in the list or all the data in the list
is targeted by the function. For example, “Edit title” or “Delete this” targets a highlighted title or
data, and “Delete all” targets all the data.
When you select a function menu which targets one data in the list, such as “Edit title” or “Delete
this”, highlight the data, then press u (FUNC).
<Example: To edit the bookmark title on the list screen>
Highlight the
bookmark
u (FUNC)
“Edit title” E dit the title
d (Set)
The bookmark title
changes.
42
Page 45

● About multiple-choice
When you delete unnecessary data, protect important data or move the data you do not want to
be viewed by others to the secret folder, etc., you can select not only one data or all data but
also multiple data. In this case, perform the following operation.
<Example: To delete multiple mails on the received mail list screen>
Before Using the Handset
“Delete
selected”
Check mails to
delete
o (Finish) “YES”
Marking a checkbox
When you use b to move the frame to the item to select and press d (Select), the
checkbox changes from to . This means that the item is selected. Pressing d (Select)
switches between and .
In the picture list, appears when the item is selected. Nothing appears when unselected.
d
d
• When “ ” appears on the function display area, pressing u (FUNC) allows you to
use “Select all” or “Release all”.
d
d
43
Page 46

● Menus which switch alternately
Depending on the menu, menu items switches alternately as follows:
<Example 1> <Example 2>
When rear camera
is used
When front camera
is used
When the shooting screen is displayed on the
FOMA terminal and “Rear camera” is used,
“Front camera” appears as in <Example 1>. If
you select “Front camera” at this point, the
Before Using the Handset
FOMA terminal switches to “Front camera”
mode, and “Rear camera” appears the next
time the function menu is displayed.
[Notation]
■Description of the menus which switch alternately
Such menus are described as “Front camera⇔Rear camera”.
N
z When the displayed menu contains sub menus, “ ” appears on the right.
z The displayed contents of the function menu may vary or you may not be able to select the item of
function menu depending on the operating function and settings. The function menu items you
cannot select are displayed in gray.
44
Page 47

Setting the FOMA Card
The FOMA card is an IC card that contains
private information such as your phone
number.
Before inserting or removing the FOMA card,
first turn the power off and remove the battery
pack. →P. 4 7
Note also that when you try to insert or
remove the FOMA card, keep the FOMA
terminal folded and held in your hand.
● Attaching/Removing the FOMA
card
The illustration shows how to attach the
FOMA card.
Put the FOMA card into the
1
card inserting slot with the IC
side downward as shown in
the illustration
Cut corner
IC
FOMA card
(UIM)
FOMA card
inserting slot
Gold colored IC
side down
Insert the FOMA card until it
2
is fixed
To remove the FOMA card, carefully pull it
out straight from the following status.
When properly inserted
Security codes for the FOMA card
You can set two security codes of PIN1 code
and PIN2 code for the FOMA card (UIM).
→P. 1 3 3
Security functions for FOMA card
(UIM)
The FOMA terminal incorporates the FOMA
card security function (the FOMA card
operational restriction function) to protect your
data and files.
z When you download data or files from sites
or receive data attached to mails, the FOMA
card security function is automatically set to
these data and files.
z Data and files with this function set are
accessible only when the same FOMA card
(UIM) used when downloading these data or
files is used.
z Target data and files for the FOMA card
security function are as follows:
• File attached to i-mode mail (except for
To ru C a )
• Screen memo
• Image inserted into Deco-mail or
signature
•i-αppli (including i-αppli standby screen)
• Image (including the animation and Flash
movie)
• Melody
• Image of ToruCa (detail)
• Image downloaded from the Data Security
Center
• Program of the Music&Video Channel
• Movable contents data
• i-motion
• Chara-den
Continued on next page
45
Before Using the Handset
Page 48

•Chaku-Uta®*/Chaku-Uta-Full
®
• PDF data
• Kisekae Tool
• Record Videophone message
• Mail template including data with security
functions
• DL dictionary
Before Using the Handset
• MessageR/F with attached file (melody/
image)
* : “Chaku-Uta” is a registered trademark of Sony
Music Entertainment (Japan) Inc.
z The FOMA card (UIM) that was inserted
when you downloaded or received data or
files is referred to as “your FOMA card
(UIM)” and other FOMA cards as “other
FOMA card (UIM)” hereinafter.
When the inserted FOMA
card (UIM) was used to
download data or receive
mails, you can view or play
the data which has had the
FOMA card security
function applied to it.
Changing the FOMA card
When the inserted FOMA
card (UIM) was not used to
download data or receive
mails, you cannot view or
play the data which has
had the FOMA card
security function applied to
it.
Your FOMA card
Other
FOMA card
N
z If the FOMA card (UIM) is not attached or you
replace the FOMA card (UIM) with another
one, “ ” is attached to data and files with this
function set and you cannot set these data to
“Stand-by display” or “Select ring tone”.
46
N
z Data and files with this function set are
accessible only can be moved and deleted
with other FOMA cards (UIM).
z If you remove the FOMA card (UIM) or change
to other FOMA card (UIM) when data or a file
with this function set is set to “Stand-by
display” or “Select ring tone”, these settings
are reset to the default settings. When your
FOMA card (UIM) is inserted again, the
settings return to your settings.
Settings for replacing the FOMA
card
When you replace the FOMA card (UIM)
inserted to the FOMA terminal with other
FOMA card (UIM), the following settings are
changed:
z Functions of which settings are changed to
settings stored on the newly inserted FOMA
card (UIM)
• Select language • SMS center
selection
• SMS validity period • PIN setting
• Host selection of Connection setting
z Functions that are reverted to the default
setting
• i-Channel setting
• Access setting for Full Browser
z Functions that are set to “Invalid”
• Cookie settings for Full Browser
(Cookie information is kept)
z Functions of which current settings of the
FOMA card (UIM) become invalid
• Program setting of the Music&Video
Channel
(Set the program again)
FOMA card types
The FOMA card (UIM) (blue) has the following
functional differences from the FOMA card
(green/white).
Function Blue Green/White
Max number of digits
for phone number to
be stored in the UIM
phonebook
20 digits 26 digits
Page 49

Function Blue Green/White
User certificate
operation to use
FirstPass
WORLD WING Not
Service Dialing
Number
Not
available
available
Not
available
Available
Available
Available
WORLD WING
WORLD WING is the FOMA international
roaming service that enables you to make
and receive calls in overseas with the same
mobile phone number you use in Japan with
the FOMA card (green/white) and the
mobile phone which is compatible with the
service.
N-05A can be used within DOCOMO’s 3G
roaming service area. If you insert your
FOMA card to the GSM compatible
terminal, you can use the roaming service
in the GSM service area.
z For the customers who have subscribed
to the FOMA service on September 1,
2005 or after, a separate subscription is
not necessary. However, customers who
declared that they did not require this
service at the FOMA service subscription
or who unsubscribe from this service
need a separate subscription.
z For the customers who have subscribed
to the FOMA service on August 31, 2005
or before without subscribing to “WORLD
WING”, a separate subscription is
necessary.
z This service is not available in some
payment plans.
z In case the FOMA card (UIM) (green/
white) is lost or stolen in overseas,
contact to DOCOMO as soon as possible
and take the course of service
interruption. Refer to the back of this
manual for the inquiries numbers. Note
that you are charged for the call and
communication even after the FOMA card
(UIM) (green/white) is lost or stolen.
Attaching/Removing the Battery Pack
z Make sure to turn the FOMA terminal off
before removing the battery pack. Note also
that keep the FOMA terminal folded and
held in your hand.
z Take care not to press One-Touch Button
with inserting or removing the FOMA card.
● Attaching
Remove the back cover
1
Pressing the back cover in direction ① ,
slide it in direction ② to remove the back
cover.
Attach the battery pack
2
With the “ ” side of the battery pack
facing up, attach the battery pack in
direction ③ making sure that the “▲”
mark of battery pack and the FOMA
terminal (Phone) fit together, then press
the battery pack down in direction ④.
A
Fit the “▲” mark
Before Using the Handset
Continued on next page
47
Page 50

Attach the back cover
3
Lift the back cover about 3mm and align it
to the groove in the FOMA terminal
(Phone). Pressing the back cover in
direction ⑤, slide it in direction ⑥ and
press the back cover until the catch clicks
shut.
Before Using the Handset
About 3 mm
Make sure that there is no space between the
Back cover and the FOMA terminal (Phone).
● Removing
Remove the back cover
1
Remove the battery pack
2
Press the tab on the side of the battery
pack in direction ①, then lift upwards in
direction ② to remove the battery pack.
Finger tab
N
z Do not use excessive force when the tip of the
back cover is inserted into the FOMA terminal.
The finger tab of the back cover may be
broken.
Charging the Battery Pack
Use the specified Battery Pack N20 for the
FOMA terminal.
■ Battery pack life
• The battery pack is consumable. The
amount of usable time decreases every time
the battery pack is recharged.
• When a fully charged battery pack only lasts
half as long as it did at the time of purchase,
the battery pack life is almost over, so it is
recommended to replace it with a new one.
When the life of the battery pack is near
end, the battery pack may expand a little
according to the usage condition, but this is
not a malfunction.
• The battery pack life may be shortened if
i-αppli, videophone or TV is used for a long
time while charging.
To protect the environment,
take used battery packs to
NTT DOCOMO, the
agency, the recycle shop,
etc.
■ Battery pack charging
• For details, refer to the manuals for the
FOMA AC Adapter 01/02 (optional), FOMA
AC Adapter for Global use 01 (optional) and
FOMA DC Adapter 01/02 (optional).
• FOMA AC Adapter 01 supports voltage of
100V AC only and FOMA AC Adapter 02 and
FOMA AC Adapter 01 for Global use supports
voltage from 100V AC to 240V AC.
• The plug shape of the AC adapter is for 100V
AC (domestic). When you use the AC adapter
which supports voltage from 100V AC to 240V
AC for overseas use, the compatible
conversion plug adapter is required. Do not
charge the battery using the transformer for
travel.
• When charging the battery pack, the battery
pack must be attached to the FOMA
terminal.
48
Page 51

• You can receive calls during charging if the
FOMA terminal is turned on. However, the
battery level will fall during the call and the
time required for charging will increase.
Charging time also increases when
“Charging” of “Backlight” setting is set to “All
time ON”.
• When plugging in or out the connector, do it
slowly and securely not to apply an
excessive force.
• When you make a call or perform packet
communication during charging in a hightemperature environment, the FOMA
terminal’s temperature may rise and the
charging may be stopped. If this occurs,
stop a running function and wait for the
temperature of the FOMA terminal to fall
before you retry charging.
■ Do not charge the battery pack for a long
period of time (several days) with the
FOMA terminal turned on
• If you charge the battery pack for a long
period of time with the FOMA terminal
turned on, power to the FOMA terminal will
be supplied from the battery pack once
charging ends. As a result, you will only be
able to use the FOMA terminal for a short
time and the low-voltage alarm may sound
immediately. In this case, recharge the
battery pack correctly. Disconnect the
FOMA terminal from the AC adapter (or
desktop holder) or DC adapter, then set it
again for recharging.
■ Battery pack charging time
The charging time is the time required to
charge a completely empty battery pack, with
the FOMA terminal power OFF.
ACadapter
DCadapter
Approx. 130 min.
Approx. 130 min.
■ Battery usage time (The duration varies
depending on the charging time and the
deterioration of the battery pack.)
The continuous standby time
[FOMA/3G]
Stationary: Approx. 700 hours (Approx. 520 hours)
Moving: Approx. 530 hours (Approx. 400 hours)
* The time in the parenthesis is an approximation
under the condition that “Indicator display”
setting is “ON” and “Display Time” is set to “All
time ON”.
Continuous talk time
[FOMA/3G]
Voice call: Approx. 250 min. (Approx. 240 min.)
Videophone call: Approx. 110 min.
* The time in the parenthesis is an approximation
under the condition that “Hyper Clear Voice” is
set to other than “OFF”.
TV (1Seg) viewing time
Watching: Approx. 300 min.
ECO mode: Approx. 400 min.
• The continuous standby time in stationary is
the average usage time when the FOMA
terminal is folded and standing still while
radio waves can be normally received.
• The continuous standby time in moving is
the average usage time when the FOMA
terminal is folded under condition of
“stationary”, “moving”, and “out of service
area” within the area where radio waves can
be normally received.
• TV viewing time is an approximate viewable
time using a Stereo Earphone/Microphone
01 (optional) in the area where radio
reception is normal.
• In certain circumstances, talk,
communications and standby times may
drop to as low as half the times shown as
well as TV viewing time may be shortened
due to the battery charge, function settings,
temperature, or radio reception in the area
(weak or no reception).
• Frequent use of functions such as i-mode,
mail, data communication, multi access,
i-αppli, i-αppli standby screen, camera,
video/i-motion/music, TV and Pedometer
may reduce the actual usage time.
Before Using the Handset
Continued on next page
49
Page 52

• Depending on the network condition of the
country, talk (communications) and standby
times may decrease.
Charging the battery pack with the
AC/DC adapter
Before Using the Handset
■AC adapter (optional)
100V AC power outlet
Connector cap
Plug
3
FOMA AC Adapter 01/02
■DC adapter (optional)
Cigarette lighter socket
3
Connector
Plug the connector with arrows
side facing upward
Plug
FOMA DC Adapter 01/02
Release
button
12
Open the external connector
1
cap of the FOMA terminal
Plug the AC/DC adapter
2
connector horizontally into
the FOMA terminal’s external
connector
Plug the AC adapter into the
3
outlet
Plug the DC adapter into the
cigarette lighter socket in
your car
The illumination lamp lights up in red
during charging. The illumination lamp
turns off when charging ends (Full
charge). If the FOMA terminal is turned
on, “ ” flashes during charging and “ ”
lights when charging ends.
When charging is completed,
4
remove the AC adapter/DC
adapter connector
horizontally from the FOMA
terminal while pressing the
release button
Do not pull the connector with excessive
force because this may cause a
malfunction.
Unplug the AC adapter from
5
the outlet
Unplug the DC adapter from
the cigarette lighter socket in
your car
Close the external connector
6
cap of the FOMA terminal
50
Page 53

Charging the battery pack with the
desktop holder
Plug the connector
with arrows side
facing upward
100V AC
power outlet
Connector
2
1
Illumination
lamp
When charging is completed,
4
hold down the desktop
holder, then lift the FOMA
3
terminal up in the direction
of the arrow
Before Using the Handset
Plug
Desktop Holder N19
FOMA AC Adapter 01/02
Plug the connector of the AC
1
adapter (optional)
horizontally to the terminal
on the back of the desktop
holder (optional)
Plug the AC adapter into the
2
outlet
Hold down the desktop
3
holder and place the FOMA
terminal securely in the
direction of the arrow
Charging starts.
N
z The battery pack cannot be charged
separately. Always charge the battery pack
while it is attached to the FOMA terminal.
z If the battery runs out, the illumination lamp
may not lights up right away, but the charging
itself has started.
<AC adapter/DC adapter>
z When the illumination lamp of the FOMA
terminal (Phone) and “ ” on the display
disappears, and the message “Charge
unusual Stop charge” is displayed, disconnect
the FOMA terminal from the AC adapter or DC
adapter and remove the battery pack. Then
set them again for recharging. If the same
error occurs again, there may be a problem or
fault on the AC adapter or DC adapter. Contact
a docomo shop or service counter.
z The DC Adapter uses a 2A fuse. If the fuse
(2A) blows, always use a fuse with the same
specifications. Fuses (2A) are consumable
items. Purchase a replacement fuse at your
local car accessory shop, etc.
<Desktop holder>
z Attach the FOMA terminal to the desktop
holder securely. Also, take care not to pinch
the strap.
51
Page 54

Checking the Battery Level
<Battery level>
The indicated battery level is only a reference.
Checking the battery level with
Before Using the Handset
icon
When the FOMA terminal is turned on, the
icon indicating the remaining battery level is
displayed.
: Full charge.
: Partial charge.
: The battery is almost
running out. Recharge
the battery.
Checking the battery level with
sound and animation
The current battery level is indicated by sound
and animation.
i“Settings”“Other
1
settings”“Battery level”
The check screen is displayed, and beeps
sound in accordance with the level. The
battery level animation disappears in
about 3 seconds.
“3 short beeps” : Full charge.
“2 short beeps” : Partial charge.
“1 short beep” : The battery is almost
running out. Recharge
the battery.
N
z The recharge battery screen and 3 short
beeps sound during a voice call and the
recharge battery screen (“Camera Off”
message to the other party) appears during a
videophone call to notify. Note that the call will
be disconnected in about 20 seconds and the
power turns off in about one minute.
Opening the FOMA terminal by Using a Button
<One-Touch Open>
You can also open the FOMA terminal (N-05A)
by not only your hands but also the One-Touch
Open button.
z Use your hands when folding the FOMA
terminal. If you cannot fold the FOMA
terminal, please fold it once after completely
opened.
Press One-Touch Open
1
button.
One-Touch
Open button
When the battery runs out
The screen as shown on the
left appears and the lowvoltage alarm sounds. The
alarm sounds for about 10
seconds and the power is
turned off in about 1 minute.
To stop this alarm, press any
key (except for side keys).
52
N
z The FOMA terminal may not open by One-
Touch Open button depending on the direction
of the FOMA terminal.
z Please be careful not to drop the FOMA
terminal as a reaction to press the One-Touch
Open button.
z Setting the operation for opening the FOMA
terminal enables you to answer a received call
immediately. You can also check the caller’s
name or mail contents immediately when there
is a missed call or new mail.→P. 3 7 8
Page 55

Turning the FOMA Terminal On/Off
<Power ON/OFF>
Turning the FOMA terminal on
z Before turning the FOMA terminal on, make
sure that the FOMA card is inserted
correctly.
y (1 second or longer)
1
After Wake-up screen displays at the
same time of Wake-up tone rings, the
standby screen or initial settings screen
appears. If you have just attached the
battery pack and you turn the FOMA
terminal back on immediately after turning
it off, “WAIT A MINUTE” message may
appear for a short time.
■ When “ ” appears
You are outside the
FOMA service area or in
a place where radio
waves do not reach.
Move to a place where
the radio reception level
icon such as “ ”
appears. The reception
level is displayed as follows:
Good Poor
■ If the Initial setting screen appears
→ P. 5 4
■ If the PIN1 code/PIN2 code entry
screen appears → P. 13 3
N
z Wake-up tone rings when the “wake-up” is set
besides “OFF”.
Standby
N
z When you change the FOMA card (UIM), you
have to enter the 4 to 8 digit security code
after turning on the FOMA terminal. The
standby screen appears when the security
code is successfully entered. When you enter
wrong security code for 5 times, the FOMA
terminal turns off (however, you can turn on
the FOMA terminal again).
z If the FOMA terminal turns off by the battery
run out or by setting Auto power OFF, the
notification screen appears.
z When you set the Auto power function, the
power supply automatically on or off at the
specified time. →P. 3 7 8
Turning the FOMA terminal off
y (2 seconds or longer)
1
The shutdown screen “SEE YOU”
appears and the power is turned off.
Switching between Japanese and English
You can switch the languages between
Japanese and English to display function
names and messages on the display.
i“設定”“ 画面表示”“ そ
1
<Select language>
の他の設定”“バイリンガ
ル”
“English”
■ To change from English to Japanese
i“Settings”“Display”“Other
settings”“Select language”“ 日本語”
N
z When the FOMA card (UIM) is inserted, Select
language setting is stored on the FOMA card
(UIM).
Before Using the Handset
You can switch announcement language
between Japanese and English for outgoing
and incoming calls in some
announcements. →P. 4 2 2
53
Page 56

Setting the Default
<Initial setting>
Setting the Clock
After turning the FOMA terminal on, you can
set “Set main time”, “Change security code”,
“Character size” and “Keypad sound” as initial
settings.
Before Using the Handset
Initial setting screen“YES”
1
Initial setting
Set the main time→ P. 5 4
2
Change the security code
3
→P. 1 33
The default setting is “0000” (4 zeros).
Set the character size→ P. 1 23
4
Set the keypad sound
5
→P. 1 09
Check the contents about
6
Software Update, then select
“OK”
N
z When you set all functions, the initial setting
screen no longer appears when you turn on
the FOMA terminal.
You can set the FOMA terminal to correct the
date and time by the function of Set main time.
In the function of the sub clock, you can
specify the display mode view/close of the sub
clock.
z The FOMA terminal can automatically
correct the clock based on the time
information (Greenwich Mean Time GMT)
and the time zone (the local time).
z The time difference to Greenwich Mean
Time is set as for the time zone every hour.
When another city or area is registered by
the same time difference, “ ” is
displayed in the function display, and it can
switch the city or the area with o.
Set the main time
i“Settings”“Display”
1
“Stand-by display” “Clock”
<Set main clock>
“Set main time”“Auto
time adjust”
■ To set the summer time
“Summer time”
When set to “ON”, time is displayed with 1
hour added.
Select any item:
2
Auto……The date and time are set
automatically.
Auto……The time information and the
time zone information are retrieved and
the date and time are set automatically.
The local time is displayed during
international roaming.
Manual (Time zone set)……Selects the
time zone, and the local time is
displayed.
Manual (Date time set)……Enters the date
and time manually. Select the time zone,
then enters the date and time.
■To enter the date and time
Using b to move the highlight, then use the
dial keys to enter the numbers.
54
Page 57

N
z After you set the date and time, you can use
functions such as “Alarm” or “Schedule” which
manages the date and time.
z The adjustable range of the date and time is
between 00:00 on January 1, 2004 and 23:59
on December 31, 2037.
<Auto time adjust>
z Auto time adjust is performed when FOMA
terminal is turned on with FOMA card (UIM).
z If time is not adjusted for long periods after the
power is turned on, reboot the power.
z There may occur a time lag for some seconds.
Auto time adjust may not be performed
depending on the signal condition.
z Auto time difference may not be performed
depending on the network of roaming service
operator overseas. In this case, select the time
zone manually.
Setting the sub clock
i“Settings”“Display”
1
“Stand-by display”“Clock”
<Set sub clock>
“World clock time”
“display method”
■ To set the summer time
“Summer time”
When set to “ON”, time is displayed with 1
hour added.
Select any item:
2
Auto……The sub clock is automatically
displayed during international roaming. For
example, the main clock is automatically
switched to the local time when Auto time
difference is set to “Auto”, but the sub clock
displays the Japan standard time.
Always……Selects the Time zone and sets
the sub clock to display the local time at all
times.
OFF……Sub clock is not displayed.
N
z The sub clock is displayed only when “Size” of
“Clock display” is set to “Small”.
N
z When you set “Auto” in this function, the sub
clock displays the Japan time except when the
time zone of “Set main time” is “GMT+09” (the
sub clock is not displayed for “GMT+09” in
Japan).
Notifying the Other Party of Your Phone Number
<Caller ID Notification>
The FOMA terminal can send your phone
number (caller ID) to the other party’s phone
(Display) when you make a call.
z Since the phone number is important
information, please take care when you
send your caller ID.
z You cannot perform the setting when “ ”
is displayed.
z You can set whether to send your caller ID
or not for each call. →P. 7 0
i“Phone”“Check
1
Phone setting”“Service”
“Caller ID Notification”
Select any item:
Activate/Deactivate……Sets whether to
send your caller ID or not.
Check setting……Checks the current Caller
ID Notification settings.
N
z This function is available only when the other
party’s phone is capable of displaying the
caller ID.
z If you hear a message requesting your caller
ID, make a call again after setting your caller
ID activated.
Before Using the Handset
55
Page 58

Checking Your Own Phone Number
You can display and check your phone number
(own number) stored in your FOMA card
(UIM).
Before Using the Handset
i0
1
N
z You can easily quote the information stored in
“My Profile” when entering the owner
information (such as name or mail address) on
websites, etc. → P. 4 0 9
z
You can check your i-mode address by
p
selecting
“Mail Settings”
z When 2in1 is in Dual mode, press c to switch
the My Profile display.
z Reset My Profile for Number B first before you
exchange FOMA cards (UIM) while using 2in1.
→P.388
“iMenu”“English”“Options”
“Confirm Settings”.
<My Profile>
56
Page 59

Voice/Videophone Calls
■Making a Voice/Videophone Call
Making a Voice/Videophone Call......................................................................... 58
Switching a Voice/Videophone Call during a Call (Caller)................................... 62
Making International Calls ............................................................. 62
Using Handsfree Call during a Call .................................................... 64
Clearing Earpiece Volume........................................................ 65
Using the Redial/Dialed Calls/Received Calls Record
.................................................................................. 65
Redial/Dialed calls/Received calls
Using Chaku-moji .............................................................................. 68
Setting Caller ID Notification When Making Calls ............................................... 70
Sending Push Signals ......................................................................... 71
Using the Prefix Function .................................................................................... 72
Setting Sub-addresses When Making Calls .......................... 72
Setting the Alarm Used for Reconnection ................................. 73
Blocking Out Ambient Noise......................................................... 73
Making Handsfree Calls in the Car............................................ 73
■Receiving a Voice/Videophone Call
Receiving a Voice/Videophone Call .................................................................... 74
When the Other Party Switches a Voice/Videophone Call (Caller) ..................... 75
Using the Dial Keys to Answer a Call ........................................... 76
Ending/Holding Calls with the FOMA Terminal Folded........... 76
Adjusting the Earpiece Volume .............................................................. 77
Adjusting the Ring Volume ............................................................... 77
■Settings for when you cannot take calls
Holding the Ringing/Current Call................................................ 78
Using the Public Mode (Driving Mode)....................... 78
Using the Public Mode (Power OFF)............................. 79
When You Cannot Answer a Received Call........................................ 80
Having the Caller Leave a Message........................................... 81
Having Callers Leave a Message during an Incoming Call......... 82
Playing/Erasing Recorded Messages and Voice Memos .................................... 83
Public mode (Driving mode)
Public mode (Power OFF)
■Setting the Videophone
Using Chara-den ................................................................................................. 84
Setting Functions for the Videophone ................................................................. 85
Using the Videophone Connecting to External Devices...................................... 87
Setting Remote Monitoring...................................................... 88
WORLD CALL
Handsfree
Hyper Clear Voice
Chaku-moji
Pause dial
Sub-address setting
Reconnect signal
Noise reduction
In-car Hands-free
Answer setting
Setting when folded
Volume
Ring volume
On hold/Holding
Missed call
Record message
Quick message
Remote monitoring
57
Page 60

Making a Voice/Videophone Call
Enter the phone number of
1
the other party
Always start by entering
the area code, even for
Voice/Videophone Calls
calls within the same
area.
You can enter up to 80
digits for the phone
number. However, only
the last 26 digits are
displayed.
<When you enter a wrong number>
■ To insert a number
Press v to move the cursor to the
number to the left of the position where
you want to insert the number, then enter
the number.
■ To de l e te a numb e r
Press v to move the cursor to the
number you want to delete, then press
t.
Hold down t for 1 second or longer to
delete all the numbers to the left of the
cursor and the number in the cursor
position.
■ To re-enter the number
Move the cursor to the beginning or end of
the number and hold down t for 1
second or longer to return to the standby
screen.
<Videophone>
■ To make a videophone call with
Chara-den
Vu (FUNC)“Select image”“Chara-
den”Select Chara-den
r (voice call) /o (V.
2
phone)
Enter phone number
Function menuP. 6 0
<Voice call>
■ If you hear the
busy tone
The line is busy. Call
again after a while.
In-call
■ If you hear a message saying that
the other party cannot be reached
The other party’s mobile phone is not
turned on or is out of signal range. Call
again after a while.
■ If you hear a message requesting
your caller ID
Call again with caller ID notification
enabled. →PP.55, 70
<Videophone>
■ If a videophone
call is not
connected →P. 61
■ To sw i tch b etw e en
camera image and
substitute image
Vu (FUNC)
“Substitute image”⇔
“My side”
■ To send video
from the rear camera
Xd (Change)
Each time you press Xd (Change), the
front camera/rear camera switches.
■ To switch the main screen
Xd (1 second or longer)
“Change main disp.”→P. 6 0
■ To enlarge the camera image to be
sent
Adjust the zoom using Xv
Zoom→P. 1 6 7
Videophone in-call
Function menuP. 6 0
58
Page 61

■ To mute the voice to send
22
Ya (マナー ) (1 second or longer)
The “ ” icon is displayed.
To cancel muting, press
Ya (マナー ) for
1 second or longer again.
■ To switch the setting of Hyper Clear
Voi ce → P. 6 5
■ To switch a voice/videophone call
during a call→P. 62
■ To put the current voice/videophone
call on hold→ P. 7 8
■ When the 2in1 is in Dual mode
The Outgoing number selection screen
appears. Select a phone number.
To end the call, press y
3
What is the Videophone
You can use the videophone call function
between the terminals that support the
DOCOMO videophone system.
z
DOCOMO videophone conforms to “the 3G-
*2
324M
standard set down in the international
*1
standards”. Your FOMA terminal cannot
3GPP
connect to a videophone terminal that uses a
different system from DOCOMO videophones.
*1: 3GPP (3rd Generation Partnership
Project)
A regional standardization body
established to develop commonly applied
technical specifications for 3rd-generation
mobile communications systems (IMT-
2000).
*2: 3G-324M
An international standard for 3rdgeneration mobile videophones.
■How to view the videophone screen
Voice/Videophone Calls
N
<Videophone>
z If you make a videophone call to an
emergency number (110, 119 or 118) from the
FOMA terminal, the call is automatically
changed to a voice call.
z You cannot receive i-mode mail or a
MessageR/F during a videophone call (you
can receive SMS). Received mail is kept at the
i-mode Center and can be retrieved using
“Check new messages” after the videophone
call.
z When you are using the videophone and the
record TV with the rear camera during
charging at the same time, the “Camera Off”
message may appear and the camera may
turn off depending on the temperature of the
FOMA terminal.
z Digital communication charges are still applied
to the caller when the substitute image is
displayed during a videophone call.
11
33
44
①
Main screen (Camera image of the other
party is displayed at the time of purchase)
② Sub-screen (Your own camera image is
displayed at the time of purchase)
③ Last call duration
④ Settings
: Hyper Clear Voice (Low/High)
: Sending or receiving voice/
Transmission error
: Sending or receiving video/
Transmission error
: Camera image/Substitute
image/Sending Chara-den
: Handsfree ON/OFF
: Muting
: Visual check in progress
: Photo mode (Portrait/
Scenery/Close-up)
: Key operation mode (DTMF
*1: “Send DTMF tone/DTMF tone OFF” →P. 6 0
*2: “Using Chara-den”→ P. 8 4
*1
/Whole action mode*2/
mode
Parts action mode
*2
)
59
Page 62

Enter phone number
screen (P.58)
Notify Caller ID→ P. 7 0
Prefix numbers → P. 7 2
Chaku-moji→ P. 6 9
Int’l call→P. 6 2
Voice/Videophone Calls
Multi Number →P.425
Add to phonebook→P. 9 3
Compose message*→P. 2 0 4
Select image……Selects the image used during
a videophone call from “My side, Chara-den”.
Select “Release settings” to cancel the setting.
* : Unavailable when 2in1 is in B mode.
Videophone in-call screen
(P.58)
Substitute image ⇔My side……Switches
between the camera image and the substitute
image.
Rear camera⇔ Front camera……Switches
between the front and rear cameras. This setting
is only retained during the call.
Change main disp.……Changes the main
display.
The screen changes in the order of “Displaying
the image from the other party’s camera on your
main screen.”→ “Displaying the image from your
own camera on your main screen.” → “Displaying
only the image from the other party’s camera.” →
“Displaying only the image from your own
camera.”
Visual check ⇔Visual check off……Checks
your appearance with the front camera during a
videophone call. Or ends checking. “ ” appears
and the substitute image is sent to the other party
during the Visual check.
V.phone settings……Sets the screen for
videophone call.
Visual prefer.……Sets the image sent to
and received from the other party from
“Normal, Prefer img qual, Prefer motion spd”.
This setting is only retained during the call.
Brightness……Five brightness levels (-2 to
+2) are available.
White balance……Sets image color tones.
→P.160
This setting is also applied to the equivalent
camera functions.
Color mode set……Selects the image effect
from “Normal, Sepia, Monochrome”. This
setting is only retained during the call.
Photo mode……Sets modes suited to the
scene being shot. →P. 1 6 0
This setting cannot be set for the front
camera.
Chara-den set.……You can set the followings
when Chara-den is used. This setting cannot be
set for the camera images.
Switch Chara-den……Selects the character
to be displayed.
Action List……Checks the available actions
and the corresponding keys. You can also
view the action list by pressing w.
Change Action……Changes the Action
mode.
Switch image……Displays the image
selected in “Substitute image” (P.86) on the
other party’s display.
Display light……Sets lighting of backlight.
All time ON……Turns the backlight on all the
time.
Same as backlight……The backlight lights
up with the setting time of “Lighting” in
“Backlight”. →P.117
FrontCamera Rev.……Sets whether to display
your camera image as a mirror image (ON) or
normal image (OFF) on the FOMA terminal
during a call.
Own number……Displays your phone number
during a videophone call.
Send DTMF tone⇔DTMF tone OFF……Sets/
cancels push signal transmission mode during
Chara-den.
Except for Chara-den, videophone calls are
always in push signal transmission mode.
Change to voice→ P. 6 2
60
Page 63

● If a videophone call is not
connected
When a videophone call is not connected, the
cause of the failure appears.
z The cause may not appear depending on
the situation.
z Depending on the type of other par ty’s
phone or the possible lack of a network
service subscription, the reason may not
accurately reflect the other party’s actual
status.
Display Cause
Check number
then redial
Busy The line is busy
Busy with packet
transmission
Out of service
area/power off
Your call is being
forwarded
Redial using
voice call
Please activate
caller ID before
dialing again
This number is
not available.
Upper limit has
been exceeded
Connection failed
Connection failed You connected without
The called phone number
is not used
• This message may also
appear during packet
communication.
The other party is using
packet communication
The other party is out of
service area or the phone
is turned off
The call is being forwarded
(A Videophone call is made
when the forwarding
number is for a 3G-324Mcompatible videophone)
The phone for the
forwarding number is not
compatible with
videophone calls
The other party sets the
Caller ID request service
The other party sets the
Nuisance call blocking
service
The upper limit set for a
Limit billing plan (Type Limit
and Family Wide Limit) is
exceeded
notifying your caller ID
(when dialing into
visualnet, etc.)
• This message may also
appear in other situations.
Set the caller ID notification
to “ON” and retry
Display Cause
Please make your
call from the
i-mode web page
z If the videophone call is not connected, your
You attempted to make a
videophone call to watch Vlive without browsing the
i-mode official site
call is automatically switched to a voice call
when you set “Auto redial as voice” to “ON”.
However, the call may not be handled in this
way if you call an ISDN synchronous 64K or
ISDN videophone which does not support
the 3G-324M standard (as of February,
2009) or if you dial a wrong number. Note
that call charge may be applied in some
cases.
Voice/Videophone Calls
61
Page 64

Switching a Voice/ Videophone Call during a Call (Caller)
z You can use this function with the terminals
compatible with voice call/videophone call
switch.
z You can switch the voice call only when you
Voice/Videophone Calls
are the caller.
z To switch the call, the receiver needs to set
“Ntfy switch-mode” to notify the switch
beforehand. →P. 8 6
<Example: To switch a voice call to a
videophone call>
In-call screen (P.58)d (V.
1
phone) “YES”
While switching, the screen which
indicates that the calls are being switched
appears and the voice guidance is played.
N
z You cannot switch the calls during calling in
the following cases:
• When the other party is holding the call
• When the other party activates Record
message
z The displayed call duration is reset to 0
second each time the calls are switched.
However, the total time for voice and
videophone call is displayed after ending a
call.
z Depending on the other party’s communication
conditions or the signal quality, you may not be
able to switch the calls and the call may be
canceled.
z When the call is switched, the first dialed or
received call is registered to the Redial/Dialed
calls records or Received calls records.
<When switching from voice call to
videophone call>
z If the caller is using i-mode, the i-mode
communication is canceled to switch to
videophone.
z If the other party is using packet communication
(including i-mode), you receive the message
“No Switch” meaning you cannot switch the
calls.
z You cannot switch the calls when “Call
Waiting” is activated.
The digital
communication fee
is charged after the
appearance of this
screen.
■ To switch a videophone call to a
voice call
Videophone in-call screen (P.58)u
“Change to voice”
(FUNC)
N
z It takes about 5 seconds to switch the calls.
Note that the signal quality may affect how
long it takes.
62
Making International Calls
<WORLD CALL>
WORLD CALL is an international dialing
service that can be used from DOCOMO
mobile phones.
FOMA service subscribers are also
subscribed to “WORLD CALL” when they
subscribe to the FOMA service. (This
excludes subscribers who declared that they
did not require the service.)
z WORLD CALL can be used to call around
240 countries and regions worldwide.
z The “WORLD CALL” is charged with your
monthly call charges.
Page 65

z In addition to dialing a phone number, you
can make an international call by adding “+”
or selecting “Int’l call” or “Prefix numbers”
from the function menu in the enter phone
number screen, Redial/Dialed calls screen,
Received calls screen or Phonebook detail
screen.
z This service is not available in some
payment plans.
For additional information regarding
WORLD CALL, refer to the contact
information provided on the back of the
manual.
“International videophone calls” can be
made to users of some specific overseas
3G mobile terminals by pressing o (V.
phone) to make the call after using the
dialing procedure below.
z See the DOCOMO website for information on
accessible countries and operators.
z Depending on the other party’s terminal, the
image of the other party displayed on your
FOMA terminal may be distorted or the
connection may fail when making a
international videophone.
Using dial keys to make
international calls
Dial the number in the
1
following order: 010→
Country code→Area code
(Long distance code)→The
other party’s phone number
You can also dial the number in the
following order: 009130 → 010 → Country
code→Area code (Long distance code)→
The other party’s phone number.
If the area code (long distance code)
begins with “0”, omit the first “0”. However,
to call to ordinary phones in the countries
or region such as Italy, “0” is required.
r
2
The international call is made.
Quick and simple procedures for
making an international call
z You can store the country codes and IDD
prefix codes in “Int’l dial assistance”.
● Using “+” to make an international
call
By using the “+” that is automatically replaced
with the “IDD Prefix Code” set in the “Auto int’l
call set.”, you can make international calls
without dialing the IDD prefix code.
z As “Auto int’l call set.” in “Int’l dial
assistance” is set to “ON” (automatically
added) at the time of purchase, the FOMA
terminal automatically dials the IDD prefix
code.
On the standby screen, dial
1
the following; + (0 (1
second or longer))→Country
code→Area code (Long
distance code)→The other
party’s phone number
If the area code (long distance code)
begins with “0”, omit the first “0”. However,
to call to ordinary phones in the countries
or region such as Italy, “0” is required.
rX“Dial”
2
The international call is made.
■ To make a call without converting
“+” into the IDD prefix code
X“Original phone No.”
■ To cancel the call
X“Cancel”
● Making an international call from
the function menu
You can make an international call by adding a
country code and IDD prefix code from the
function menu.
z You can use the international dial function
from the “Enter phone number screen” and
the detail screens of “Phonebook/Received
calls/Dialed calls/Redial” screens.
Voice/Videophone Calls
Continued on next page
63
Page 66

<Example: To use the international dial
function from the enter phone number screen>
Enter the phone number of
1
the other party
u (FUNC)“Int’l call”
2
Select the country code
Select the IDD prefix code
Voice/Videophone Calls
The selected country code and IDD prefix
code are added. If the area code (long
distance code) begins with “0”, the first “0”
is automatically deleted (except when
“Italy” is selected for the country code).
r
3
The international call is made.
N
z Even if Caller ID Notification is active, the caller ID
may not appear properly depending on the operator.
In this case, calls cannot be made from the
Received calls screen.
Country Code setting
……Stores up to 22
country names and
country codes used when
you make an international
call. See the DOCOMO
website for information on
country codes.
Highlight an itemo
(Edit)Enter the
country nameEnter
the country code
IDD Prefix setting……
Stores the IDD prefix
name and IDD prefix code
used when you make an
international call. Up to 3
entries can be stored.
Highlight an item to be
stored or changed
(Edit)Enter the IDD prefix nameEnter
the IDD prefix code
o
Country Code setting
Function menuP. 6 4
IDD Prefix setting
Function menuP. 7 2
Making the setting for the
international call
You can set the automatic conversion of “+”,
and also edit and store the country codes and
IDD prefix code for international calls.
i“Phone”“Check
1
Phone setting”“Other
settings”
<Int’l dial assistance>
“Int’l dial
assistance”Select any
item:
Auto int’l call set.……You can set the
automatic conversion of “+” when you make
an international call.
“ON”Select a country codeSelect an
IDD prefix code
■When you do not convert automatically
“OFF”
64
Country Code setting
screen (P.64)
Edit……Edits the country code.
Delete……Selects the deleting method from
“Delete this, Delete selected, Delete all”.
Using Handsfree Call during a Call
You can hear the other party’s voice from the
speaker while talking.
In-call screen (P.58)o
1
()
“ ” appears and you can hear other
party’s voice through a speaker during a
handsfree call.
While your terminal is ringing, you can
switch to handsfree operation by pressing
o (/).
<Handsfree>
Page 67

Ex. Voice call Ex. Videophone call
■ To cancel the handsfree operation
Press o ( ) during a handsfree
call
“ ” disappears when you make a voice
call. “ ” is changed to “ ” in case of
videophone.
● Notes on using the handsfree
operation
It is recommended to keep a distance of about
30 cm from the FOMA terminal during a
handsfree call. If the distance is longer or
shorter than 30 cm, the other party may find it
difficult to hear you or your voice may sound
differently.
N
z Move to an area where your call will not
disturb other people before switching to a
handsfree call.
z When a call is finished, the handsfree setting is
canceled.
Clearing Earpiece Volume
<Hyper Clear Voice>
In-call screen (P.58)
1
p(//)
The mode switches as follows each time
you press p; “High”→“OFF”→“Low”.
Ex. Voice call Ex. Videophone call
High…… Regardless of ambient noise level,
the function activates even in the quiet
environment.
Low……The function activates only when
the ambient noise level is high.
OFF……This function does not apply.
■ To set from the main menu
You can also set from “Hyper Clear Voice”
of “Phone” or “Settings” in the main menu.
→PP.451,462
N
z The sound quality or volume changes by this
function, so set it depending on preference.
z The effects may be different depending on the
other party’s voice or the individual.
z This function works by the ambient noise that
is detected with a microphone in the FOMA
terminal (Phone), so it may work by your own
voice.
Voice/Videophone Calls
This function detects ambient noise and
enables you to hear the other party’s voice
clearly.
z When Handsfree is “ON” or an earphone/
microphone (optional) is connected, this
function is disabled.
Using the Redial/Dialed Calls/ Received Calls Record
<Redial/Dialed calls/Received calls>
Information on dialed or received calls,
including the caller’s phone number and the
date and time are stored in the Redial/Dialed
calls/Received calls record. You can make a
call to the other party easily by using these
records.
z When you make calls to the same phone
number repeatedly, the latest entry is stored
Continued on next page
65
Page 68

as the Redial record and separate entries
are stored for the Dialed calls record.
z The Redial record can hold up to 30 phone
numbers for voice/videophone calls.
z The Dialed calls/Received calls record
stores up to 30 voice/videophone call entries
and 30 packet communication or 64K data
communication entries.
z If the maximum number of logs is exceeded,
Voice/Videophone Calls
logs are overwritten starting with the oldest
one.
<Example: To make a call from the Redial/
Received calls list screen>
On the standby screenj
1
(Redial)/h (Received calls)
■ To check the Dialed
calls
i“Phone”“Call/
Receive history”
“Dialed calls”
Ex. Redial (list)
Function menuP. 6 7
Highlight the Redial/
2
Received calls record entry
■ To make a call after
checking the details
of the Redial/
Received calls
record
Select the Redial/
Received calls record
entry
r(voice call) /o (V.
3
phone)
Ex. Redial (detail)
Function menuP. 6 7
● Checking the number of missed
calls
■ To confirm only the missed calls from
the Received calls record
i“Phone”“Call/Receive history”
“Received calls”
Total number of received calls, the number of
missed calls and the number of unconfirmed
missed calls appear.
When you select “Missed calls”, only the
missed calls appears.
■Redial/Dialed calls/Received calls record
icons
*1
Icon
//
//
//
//
*2
/
・ //
//
Description
Incoming and outgoing/
missed/unconfirmed missed
voice calls
Incoming and outgoing/
missed/unconfirmed missed
international voice calls
Incoming and outgoing/
missed/unconfirmed missed
videophone calls
Incoming and outgoing/
missed/unconfirmed missed
international videophone
calls
Incoming and outgoing calls
to B mode for 2in1 setting
Recorded voice record
message/videophone
message
Received calls with Chakumoji
Incoming and outgoing/
missed/unconfirmed missed
packet communication
Incoming and outgoing/
missed/unconfirmed missed
64K data communication
Incoming remote monitoring
calls
Incoming packet
communication or 64K data
communication that is
received without external
device connected
Incoming and outgoing calls
when the Time zone is other
than “GMT+09” regardless of
the “Auto time adjust” (P.54)
setting (the summer time is
displayed when you set the
summer time)
66
Page 69

*1: Some icons look different between the detail
screen and the list screen.
*2: Displayed only when the 2in1 is in Dual mode.
N
z If you use 2in1, up to 30 records are stored for
each phone number. Also, when set to Dual
mode, up to 30 Redial/Dialed calls/Received
calls records for both phone numbers and total
of the 60 records are displayed.
<Redial/Dialed calls>
z Setting “Restrict dialing” deletes all the Redial/
Dialed calls records.
z If you make a call by selecting Multi number
from the function menu, the registered name
and number of the additional number are
displayed under the phone number in the
Redial screen (detail)/Dialed calls record
screen (detail). If you make a call without
using the function menu, nothing is displayed
even when “Set Multi Number” (P.425) is set to
additional number.
<Received calls>
z When “Missed calls display” in the “Ring time
(sec.)” is set to “Not display” and you receive a
call of which ring tone sounded for shorter
time than the time set in the “Set mute
seconds”, the call is not displayed on the
Received calls record.
z If the caller is using “Dial-in”, a number
different from the “Dial-in” number may be
displayed.
z When you have subscribed to Multi number
and make a call from the Received calls record
screen, the phone call is made from the
number which received the call regardless of
the “Set Multi Number” (P.425) setting.
z When you receive a call for additional number
of Multi number, the registered name of the
additional number is displayed under the
phone number in the Received calls record
screen (detail).
z If the same phone number is registered in the
multiple phonebook entries with different
names, the name retrieved by the phonebook
search in the order of reading is displayed in
the Received calls record.
Redial/Dialed calls/
Received calls screen
(P.66)
Notify Caller ID*1→P. 7 0
Prefix numbers*1→P. 7 2
Chaku-moji*1→P. 6 9
Int’l call*1→P. 6 2
2in1/Multi Num. *1……When 2in1 is set to ON
and Dual mode, selects from “Number A, Number
B, Cancel number” (P.431) (not available when A
mode or B mode is set).
Selects from “Basic number, Additional number 1,
Additional number 2, Cancel number” (P.426) at
the Multi Number when 2in1 set to OFF.
Ring time
entries with the ringing times.
Add to phonebook→P. 9 4
Look-up phonebook……“Accessing the
phonebook from the Redial or Dialed Calls
record”→P. 9 7
Add desktop icon→ P.124
Compose message*4→P. 2 0 4
Compose SMS*4→P. 2 4 6
Sent address
list.
Received address*2……Displays the received
address list.
Select image……Selects the image used during
a videophone call from “My side, Chara-den”.
Select “Release settings” to cancel the setting.
Big font⇔ Standard font……Switches the
character size of the displayed name. →P. 1 2 3
Delete……Selects the deleting method from
“Delete this, Delete selected, Delete all”.
*1: Available only for the detail screen.
*2: Available only for the Received calls screen.
*3: Available only for the list screen.
*4: Available only when 2in1 is in A mode or Dual
*5: Available only for the Redial/Dialed calls screen.
*6: Unavailable when 2in1 is in B mode.
*2*3
……Displays the missed call record
*5*6
……Displays the sent address
mode, and selecting the record screen for the A
mode.
Voice/Videophone Calls
Continued on next page
67
Page 70

N
z Selecting “Delete all” from the Redial/Dialed
calls record deletes all the Redial and Dialed
calls records. Note that selecting “Delete this”
or “Delete selected” for the Redial record does
not delete the entries of Dialed calls record,
and selecting “Delete this” or “Delete selected”
for the Dialed calls record does not delete the
entries of the Redial record.
Voice/Videophone Calls
z When 2in1 is set to ON, selecting “Delete all”
on the Redial/Dialed calls/Received calls
screen deletes all Redial/Dialed calls/
Received calls entries in A or B mode
regardless of the 2in1 mode.
<Compose message>
z Compose mail with a mail address specified
as the recipient when the mail address is
stored in the phonebook together with the
phone number. If multiple mail addresses are
stored, the first address is used.
Using Chaku-moji
<Chaku-moji>
When making a voice call or videophone call,
you can send a message (Chaku-moji) to the
other party to show the summary of the call,
etc. beforehand.
z 5 Chaku-moji messages are stored at the
time of purchase. You can change the preinstalled Chaku-moji messages.
z You can include pictographs or face marks
in Chaku-moji, and you can send a Chakumoji message of up to 10 characters
including pictograph/symbol/double-byte
character/single-byte character.
z For details on Chaku-moji and the
compatible models, refer to the DOCOMO
website or “Mobile Phone User’s Guide
[Network Services]”.
Storing/Editing and setting
Message
i“Phone”“Check
1
Phone setting”“Service”
“Chaku-moji”Select any
item:
Create message……
Stores or edits frequently
used Chaku-moji. You can
store up to 30 Chaku-moji
(including 5 pre-installed).
Highlight an item to be
stored or editedo
Enter the Chaku-
(Edit)
moji
MSG display settings……Sets the
message display setting when you receive a
call with Chaku-moji message.
Display all messages……Displays all
Chaku-moji messages.
Only number in PH-book……Displays
only the Chaku-moji messages from
senders stored in the phonebook.
Create message list
Function menuP. 6 9
68
Page 71

Calls with Caller ID……Displays only
the Chaku-moji messages from senders
providing the caller ID.
Hide all messages……Hides all
Chaku-moji messages.
3D message display……Sets whether to
display Chaku-moji in 3D animation.
■ To delete the entered Chaku-moji (to
make a call without Chaku-moji)
u (FUNC)“Chaku-moji”“Create
message”Clear all the entered Chakumoji
r (voice call) /o (V.
2
phone)
Create message list screen
(P.68)
Edit……Edits a Chaku-moji.
Delete……Selects the deleting method from
“Delete this, Delete selected, Delete all”.
N
z You cannot delete the pre-installed Chaku-
moji. Even when you change a pre-installed
Chaku-moji and delete the Chaku-moji, it is
restored to the default.
Making a call with a message
You can add Chaku-moji when making a voice
or videophone call from the “Enter phone
number screen” and the detail screen of the
“Phonebook” or “Redial/Dialed calls/Received
calls”.
<Example: To make a call with Chaku-moji
from the Enter phone number screen>
Enter phone number screen
1
(P.58)u (FUNC)“Chaku-
moji”
Select any item:
Create message……Enters a Chaku-moji.
You can enter up to 10 characters.
Select message……Selects from the stored
Chaku-moji. You can edit Chaku-moji by
pressing o (Edit) on the message selection
screen.
Sent messages……Selects from the
previously sent Chaku-moji. You can edit
Chaku-moji by pressing o (Edit) on the sent
message screen.
When the other party’s terminal receives Message, the
result “Transmission completed” appears.
N
z Sending Chaku-moji is charged. Receiving
Chaku-moji is not charged.
z You can store up to 30 Chaku-moji in the sent
messages record (if you use 2in1, up to 30
sent messages records when set to each
mode, and up to 30 sent messages records for
each and total of the 60 records are stored
when set to Dual mode). When you send
same Chaku-moji repeatedly, only the latest
one is recorded. When the entries exceed the
maximum number, entries are overwritten from
the oldest entry.
z If the receiver’s terminal is under conditions
such as followings, Chaku-moji cannot be
sent. In this case, no sending charges apply.
• The terminal is not compatible with Chakumoji (“Transmission failed” appears)
• Chaku-moji does not appear on the screen
of the receiver terminal because of the “MSG
display settings” on the receiver terminal
(“Transmission failed” appears)
• When Public mode (Driving mode) is set
• The ringing time for Record message is set
to 0 second.
“”
or the FOMA terminal is turned off.
•
z Depending on the signal status, sending result
does not appear on the sender terminal even
when the receiver terminal receives Chakumoji. In this case, sending charges apply.
z You cannot send or receive Chaku-moji when
using the FOMA terminal overseas.
69
Voice/Videophone Calls
Page 72

● When you receive a voice or
videophone call with message
The Chaku-moji appears on the ringing
screen. The Chaku-moji disappears when you
answer the call.
z The received Chaku-moji is displayed in 3D
animation.
Voice/Videophone Calls
Chaku-moji
Ex. Voice call
N
z Even when you receive a call whose ring tone
sounded for shorter time than the time set in
the “Set mute seconds” of “Ring time(sec.)”,
Chaku-moji is displayed and recorded in the
Received calls record.
z Some pictographs are not displayed in 3D
animation.
z Depending on the status of the sender or
receiver, Chaku-moji may not be displayed
even if you receive a call with Chaku-moji.
z When the Original lock is set to “Chaku-moji”,
Chaku-moji is not displayed even if you receive
a call with Chaku-moji. You can view the
Chaku-moji in Received calls after releasing
the lock.
● Displaying message from the
received calls record
When you receive Chaku-moji, the “ ” icon
appears on the Received calls record, and you
can check the Chaku-moji on the “Received
calls screen (detail)”.
N
z Even when you make a call using the
Received calls record, the Chaku-moji in the
record is not sent.
Setting Caller ID Notification When Making Calls
You can set whether to send your phone
number (caller ID) to the other party’s phone
(Display)or not for each call.
z Since the phone number is important
information, please take care when you
send your caller ID.
z You can set the caller ID notification all at
once. →P. 5 5
Adding the “186”/“184” prefix to
the other party’s phone number
To provide your caller ID, add the “186” prefix
when you dial the phone number. To withhold
your caller ID, use the “184” prefix.
■To provide your phone number
186−(The other party’s phone number)
r (voice call)/o (videophone call)
■To withhold your phone number
184−(The other party’s phone number)
r (voice call)/o (videophone call)
Selecting to notify/withhold your
caller ID from the function menu
Select notify/withhold your caller ID from the
function menu of the detail screen such as
“Enter phone number screen” and
“Phonebook/Received calls/Dialed calls/
Redial”.
<Example: To make a voice call from the Enter
phone number screen>
Enter the phone number of
1
the other party
u (FUNC)“Notify Caller
2
ID”“OFF” or “ON”
■ To cancel “Notify Caller ID”
“Cancel prefix”
When “Cancel prefix” is selected, the
“Caller ID Notification” setting is applied.
70
Page 73

r (voice call) /o (V.
3
phone)
N
z This function is available only when the other
party’s phone is capable of displaying the
caller ID.
z If you hear a message requesting your caller
ID, make a call again after setting your caller
ID activated.
z Even if you add “186”/“184” when making an
international call, the setting is disabled.
Select “Notify Caller ID” from the function
menu.
z If you make a call with the “186”/“184” prefix,
the phone number including this prefix is
recorded in the Redial/Dialed calls.
i“Phone”“Check
1
Phone setting”“Other
settings”
■ If there is dialing
data already stored
The stored dialing data
appears.
o (Edit)Enter
2
the dialing data
Press 0 to 9, q and w to enter
the dialing data.
■ To enter p (pause)
w (1 second or longer)
“Pause dial”
Pause dial
Function menuP. 7 1
Pause dial screen (P.71)
Voice/Videophone Calls
Sending Push Signals
<Pause dial>
By sending push signals from the FOMA
terminal, you can use services such as ticket
ordering and bank balance requests.
Storing dialing data as pause dial
record entries
You can store the dialing data used as push
signals to Pause dial beforehand. Inserting p
(pause) into the dialing data allows you to
send data with a separation where a pause
lies.
z You can store only 1 dialing data.
z You can enter numbers from 0 to 9, the #
and * symbols, and p (pause) for dialing
data.
z You cannot enter p (pause) in succession or
at the beginning of the dialing data.
Edit……Edits the dialing data.
Send pause dial……Enters the phone number of
the other party and sends the dialing data.
Each time you press r, the dialing data up to p
(pause) is transmitted.
Delete……Deletes the stored dialing data.
Transmitting the dialing data as a
pause dial
i“Phone”“Check
1
Phone setting”“Other
settings”
“Pause dial”d
(Send)
Dial the phone number of the
2
destinationr
The FOMA terminal calls the entered
phone number and displays the dialing
data up to the first p (pause) while the
dialed phone is ringing. p (pause) is not
displayed.
r
3
Each time you press r, the dialing data
up to p (pause) is transmitted. Once the
FOMA terminal has finished sending the
last number, the in-call screen reappears.
Continued on next page
71
Page 74

■ To transmit all the dialing data at
once
j (1 second or longer)“Send at one
time”
It may not be possible to send all the data
at once to some recipients.
N
z Some phones may be unable to receive push
signals.
Voice/Videophone Calls
Using the Prefix Function
You can store the prefix numbers such as IDD
prefix code (WORLD CALL) and 186/184 for
notifying/withholding your caller ID beforehand
and add these prefix numbers when you make
calls.
Storing the prefix numbers
<Prefix setting>
z You can store up to 7 prefix numbers.
z You can enter numbers from 0 to 9 and the
#, * and + symbols.
i“Phone”“Check
1
Phone setting”“Other
settings”
“Prefix”
Prefix setting screen (P.72)/
IDD Prefix setting screen
(P.64)
Edit……Edits the prefix number or IDD prefix
code.
Delete this*1……Deletes one prefix number.
Delete*2……Deletes one IDD prefix code.
Delete all……Deletes all prefix numbers or IDD
prefix code.
*1: Available only with the Prefix setting screen.
*2: Available only with the IDD prefix setting screen.
Making a call with the Prefix
numbers
z You can add the prefix numbers from the
“Enter phone number screen” and the detail
screens of “Phonebook/Received calls/
Dialed calls/Redial” screens.
<Example: To make a voice call by adding
prefix numbers from the enter phone number
screen>
Enter the phone number of
1
the other party
u (FUNC) “Prefix
2
numbers”Select the stored
name
r
<Prefix numbers>
Prefix setting
Function menuP. 7 2
Highlight the item to store or
2
changeo (Edit)
Enter the name to be stored
3
Enter the numbers (prefix)
4
72
Setting Sub-addresses When Making Calls
You can set whether to specify “*” in the
phone number as a separator so that the
numbers following “*” are recognized as a
sub-address (ON/OFF).
z Sub-addresses are used in ISDN to identify
calls made from specific communications
devices and to select content in “V-live”.
<Sub-address setting>
Page 75

i“Phone”“Check
1
Phone setting”“Other
settings”
“Sub-address”
“ON” or “OFF”
N
z In the following cases, “*” does not function
as a sub-address separator. The entered
number including “*” is recognized as an
ordinary phone number:
• When the “*” is entered at the beginning of
a phone number
• When “*” immediately follows “186”/“184” at
the beginning of a phone number
• When “*” immediately follows a number
entered using “Prefix numbers”
• When the phone number contains “*590#/
*591#/*592#”
Setting the Alarm Used for Reconnection
When the signal quality deteriorates during a
voice/videophone call and the call drops out,
the FOMA terminal will automatically
reconnect the call if the signal quality quickly
improves. Set the type of alarm when a call is
reconnected for this function.
z The interval for reconnection varies
depending on communication conditions or
the signal quality. It takes about 10 seconds.
i“Phone”“Check
1
Phone setting”“Talk”
<Reconnect signal>
“Reconnect signal”
Select an alarm tone
Select from “No tone, High tone, Low
tone”.
N
z Call charges apply in the interval (up to about
10 seconds) for reconnection.
Blocking Out Ambient Noise
<Noise reduction>
This function suppresses ambient noise and
makes it easier for the other party in a voice or
videophone call to hear you.
i“Phone”“Check
1
Phone setting”“Talk”
“Noise reduction”“ON”
or “OFF”
Making Handsfree Calls in the Car
You can make or receive voice calls with
handsfree compatible devices by connecting
the FOMA terminal to handsfree compatible
devices such as the In-Car Hands-Free Kit 01
(optional) or a car navigation system.
For information on how to use the handsfree
device, refer to the manual provided with the
device. The FOMA In-Car Hands-Free Cable
01 (optional) is required to use the In-Car
Hands-Free Kit 01 (optional).
N
z To operate from the handsfree device, set the
USB mode to “Communication mode”.
z The display and ring tones used for incoming
calls and mail are as specified in the FOMA
terminal settings.
z When the handsfree device is set to emit the
sound from the handsfree device, the ring tone
still sound through the handsfree device even
when the FOMA terminal is set to Manner
mode or the ring volume is set to “Silent”.
z When the Public mode (Driving mode) is set,
operation for incoming calls and messages is
as specified in the “Public mode (Driving
mode)” settings.
z When the Record message is set, operation
for incoming calls is as specified in the
“Record message” settings.
<In-car Hands-free>
Voice/Videophone Calls
Continued on next page
73
Page 76

N
z When the handsfree device is set to emit the
sound from the FOMA terminal, operation
when the FOMA terminal is folded during a call
is as specified in “Setting when folded”. When
the handsfree device is set to emit sound from
the handsfree device, folding the FOMA
terminal does not affect the call status
regardless of the “Setting when folded” setting.
Voice/Videophone Calls
Receiving a Voice/ Videophone Call
z When “Setting when opened” (P.378) is
“ON”, opening the FOMA terminal enables
you to answer a received call immediately.
Voice/Videophone call is
1
received
The ring tone sounds and the illumination
lamp flashes.
■ When you receive a call with Chaku-
moji
The Chaku-moji appears on the ringing
screen/videophone ringing screen. → P. 7 0
Ringing Videophone ringing
Function menuP.74 Function menuP. 74
■ To put a voice/videophone call on
hold while the FOMA terminal is
ringing →P. 7 8
r
2
■ To answer a videophone call with
the substitute image
d (Subst.)
■ Operations during a videophone call
You can perform various operations such
as changing the camera image to the
substitute image, changing the front
camera to rear camera, muting the sound.
→P. 5 8
■ When the other party switches a
voice/videophone call during a call
→P. 75
■ To put the current voice/videophone
call on hold→P. 7 8
To end the call, press y
3
Display while receiving a call
■When the other party’s phone
number is notified
The other party’s phone number appears
on the screen. When the caller is stored in
the phonebook, the name stored in the
phonebook appears (only the name is
displayed while Keypad lock is set).
→P.92
z If the same phone number is registered
in the multiple phonebook entries with
different names, the first name retrieved
by the phonebook search in the order of
reading appears. → P. 9 6
z If the caller is stored as secret data, the
name or other information does not
appear and only the phone number
appears.
z When you receive a call for additional
number of Multi number, the registered
name of the additional number is
displayed on the ringing screen.
■When the other party’s phone
number is not notified
The reason of not notifying appears.
Ringing screen/
Videophone ringing screen
(P.74)
Call Rejection……Terminates the receiving call
without answering.
74
Page 77

Call Forwarding……Forwards the call.
The call is forwarded regardless of the “Call
Forwarding” setting “Activate/Deactivate”.
Voice Mail……Connects the call to the voice mail
service center.
The call is connected to the voice mail service
center regardless of the “Voice Mail” setting
“Activate/Deactivate”.
Change Display……Switches the display from
additional number 1 or 2 to the number from
which the call is forwarded. This can be selected
when receiving multi number call (for additional
number 1 or 2) and the call is forwarded at the
same time.
N
z You can receive a call using an earphone/
microphone (optional).→ P.397
z If you have subscribed to the Call waiting,
Voice mail or Call forwarding service, activate
“Set in-call arrival” and set “Incoming Call
Mng” to “Answer”, you will hear a short doublebeep (“bibip”) when you receive a call when
you are already on a call.
• If you subscribe to the Voice mail or Call
forwarding service, you can answer the call
by ending the current call.
• If you subscribe to the Call waiting service,
you can answer the voice call by putting the
current call on hold and you can answer the
videophone call by ending the current call.
z You can set the incoming call management
from the caller who is not stored in the
phonebook.→ P. 1 5 0
z You can set the restriction for each phone
number stored in the phonebook.
→P. 1 4 7
<Videophone>
z You can also answer the call by pressing o
(V. phone).
z It may take a few seconds to switch from a
camera image to a substitute image (Charaden) depending on the Chara-den.
When the Other Party Switches a Voice/Videophone Call (Caller)
When you receive a voice/videophone call, the
other party can switch the call between voice
call and videophone call.
z The receiver cannot switch a voice call to a
videophone call.
z To switch the call, the receiver needs to set
“Ntfy switch-mode” to notify the switch
beforehand. →P. 8 6
z You can use this function with the terminals
compatible with voice call/videophone call
switch.
<Example: When the other party switched a
voice call to a videophone call>
In-call screen (P.58)The
1
other party switches to a
videophone call
While switching, the screen which
indicates that the calls are being switched
appears and the voice guidance is played.
When the voice call is switched to the
videophone call, the camera image is sent
to the other party.
■ To send substitute image to the
caller
“NO”
“YES”
Voice/Videophone Calls
Continued on next page
75
Page 78

■ When the other party switched a
videophone call to a voice call
Videophone in-call screen (P.58)The
other party switches to a voice call
The videophone call is switched to the
voice call.
Using the Dial Keys to Answer a Call
Voice/Videophone Calls
You can use this setting to turn off the ring
tone or answer the phone quickly when you
receive a call.
i“Phone”“Check
1
Phone setting”“Other
settings”
<Answer setting>
“Answer setting”
Select any item:
Any key answer……Valid for voice calls.
You can answer the call by pressing any of
the following keys.
r, d (Answer) , 0 to 9, w, t,
o, p, a (マナー ), b
* For videophone calls, you can answer the
call only by ordinary key operations (r,
d (Subst.) or o (V. phone)).
Quick silent……Pressing any of the
following keys or opening the FOMA terminal
stops the ring tone while the caller continues
to hear the ring tone.
0 to 9, w, t, b, p, a (マナー )
or o (for voice calls only)
To answer the call, press r, d (Answer/
Subst.), o (V. phone) (for videophone calls
only).
OFF……You can answer the call only with
the ordinary key operations.
r, d (Answer/Subst.) or o (V. phone)
(for videophone calls only)
N
z Even when “Quick silent” is set, the “Any key
answer” function is used in Manner mode.
N
z When “Any key answer” is set and you press a
(マナー ) during the FOMA terminal folded, a
voice call is put on hold. In this time, the other
party hears the hold tone when “Setting when
folded” set to “Tone on”, but the other party
does not hear the hold tone when “No tone” or
“End the call” is set
Ending/Holding Calls with the FOMA Terminal Folded
<Setting when folded>
You can set how your FOMA terminal
operates when it is folded during a voice or
videophone call.
i“Phone”“Check
1
Phone setting”“Talk”
“Setting when folded”
Select any item:
No tone……Mutes the sound. For
videophone calls, the “Substitute image” is
sent to the other party. The other party does
not hear the hold tone.
Tone on……Puts a call on hold (holding).
While the FOMA terminal is folded, the other
party hears the hold tone. For videophone
calls, the image for holding is sent to the
other party.
Speaker ON……The hold tone is sent
to the other party and also plays through
the speaker.
Speaker OFF……Only the other party
hears the hold tone.
End the call……Ends the call. It is the same
operation as pressing y.
N
z When Manner mode is set, no sound is played
through the speaker even if “Speaker ON” is
set.
z
When an earphone/microphone (optional) is
connected, this function is disabled.
76
Page 79

N
z Even if the “Tone on” setting is selected,
folding the FOMA terminal activates the “No
tone” setting if “Call Waiting” is switched on.
Adjusting the Earpiece Volume
On the standby screenc
1
<Volume>
(1 second or longer)Adjust
the volume with c
Pressing c (1 second
or longer) displays the
earpiece volume screen.
If no operation is
conducted for 2 seconds
or longer when the
earpiece volume screen
is displayed, the
earpiece volume screen
You can adjust the volume in 6 steps from
“Level 1” (quietest) to “Level 6” (loudest).
■ To adjust the earpiece volume
during a call
During a voice call: c(1 second or
During a videophone call: c
• You can also adjust with a (マナー )/s
(MUSIC).
N
z If you adjust the volume during a call, the
adjusted setting is retained after you end the
call.
is expired.
longer)
Adjusting the Ring Volume
<Ring volume>
You can adjust the volume of the ring tone for
an incoming call, mail, chat mail or MessageR/
F in 6 steps for each type of call. You can also
set to silent or to gradually get louder.
i“Settings”“Ring tone”
1
“Ring volume”Select an
item to adjust its volume:
Select “Phone” to adjust the ring tone
volume for voice calls and 64K data
communication.
Select “Mail” to adjust the ring tone volume
for i-mode mail, Area Mail, SMS or packet
communication.
Use c to adjust the ring
2
volumed (Set)
■ To raise the volume gradually
Press f in “Level 6”
When set to “Step”, the ring volume
becomes louder and louder in every 3
seconds.
■ To set to silent
Press g in “Level 1”
N
z The ring volume setting specified for “Phone”
in this function is also applied to the “Select
ring tone” setting for a voice call, the alarm
tones for “Schedule” and “To Do list”.
Voice/Videophone Calls
77
Page 80

Holding the Ringing/Current Call
<Example: To put the ringing call on hold>
While ringingy
1
Voice/Videophone Calls
■ To put the current call on hold
During a callt
■ To end the call during answer hold/
holding
y
Press r to resume the call
2
You can also use t to cancel holding
when you put the current call on hold.
N
z Call charges apply while putting the ringing
call or current call on hold.
Setting the hold tone
You can set the guidance messages to the
other party during the answer hold.
z You cannot change the hold tone that is
played during a call
i“Phone”“Check
1
Phone setting”“Talk”“On
hold tone”
<On hold/Holding>
The FOMA terminal
makes three rapid beeps
and puts the call on
hold.
The caller hears a
message saying that you
cannot answer at the
moment and the call is
held without hanging up.
<On hold tone>
Select a hold
tone
Select from “Tone 1, Tone 2, Voice
announce 1
* : Not available when no Voice announce is
recorded.
*
, Voice announce 2*”.
Using the Public Mode (Driving Mode)
<Public mode (Driving mode)>
The Public mode is an automatic answering
service provided to keep manner in public
circumstances. During Public mode, a caller
hears a message that you cannot answer the
call because you are driving or you are in the
place you have to refrain from calling (on the
train or bus, in the theater, etc.), then the call
ends.
z Public mode can only be set/released from
the standby screen. (It can also be set/
released when the “ ” icon is displayed.)
z You can still make calls when the FOMA
terminal is in Public mode.
z This function is not available during data
communication.
z When you receive a call of “User unset”
while Caller ID Request is set to “Activate”,
caller ID request message is announced.
(The Public mode message is not
announced.)
On the standby screenw
1
(1 second or longer)
Public mode is set and “ ” appears.
When you receive a call, the caller hears
the message “I can’t answer the call
because I am driving or I have to refrain
from calling now. Please call back later.”
■ To release the Public mode (Driving
mode)
On the standby screenw (1 second
or longer)
Public mode is canceled and “ ”
disappears.
N
z The Public mode setting takes priority when
“Record message” is “ON”.
z The Public mode setting takes priority when
Manner mode is set at the same time.
78
Page 81

N
z If you make a voice call to an emergency
number (110, 119 or 118) while Public mode is
set, Public mode is released.
z The following tones do not sound in Public
mode:
• Ring tone for voice/videophone call
• Ring tone for mail or message
• Alarm tone
• Wake-up tone
• Charge sound
• Software tone for i-αppli
• Ring tone for packet communication/64k
data communication
● When Public mode (Driving mode)
is set
The FOMA terminal does not ring when you
receive a voice or videophone call. Calls are
logged in the “Received calls” record as
“Missed calls” record, and the “Missed call”
desktop icon appears on the standby screen.
z A caller making a voice call hears a
message that you cannot answer the call
because you are driving or you are in the
place you have to refrain from using mobile
phones, then the call ends.
z A caller making a videophone call sees the
Public mode video message on his or her
display, then the call ends.
z When you receive a mail, the ring tone does
not sound and the “New mail” desktop icon
appears on the standby screen.
N
z If the power is off or “ ” is displayed, the
message for “ ” is announced instead of
the Public mode message even when Public
mode is set.
Using the Public Mode (Power OFF)
The Public mode (Power OFF) is an automatic
answering service provided to keep manner in
public circumstances. During Public mode
(Power OFF), a caller who made a call while
the FOMA terminal is turned off hears a
message that you cannot answer the call
because you are in the place you have to turn
off the mobile phone (in the hospital, on the
airplane, around the priority seat on the train,
etc.), then the call ends.
On the standby screen
1
<Public mode (Power OFF)>
w25251
r
Public mode (Power OFF) is set. (Nothing
changes on the standby screen.)
When you receive a call after setting
Public mode (Power OFF) and turning off
the FOMA terminal, the caller hears the
message “The person you are calling is in
an area where cell phone should not be
used. Please call back later.”
■ To cancel the Public mode (Power
OFF)
On the standby screen
w25250r
■ To check Public mode (Power OFF)
setting
On the standby screen
w25259r
Voice/Videophone Calls
79
Page 82

● When Public mode (Power OFF) is
set
The setting is valid until “*25250” is dialed to
release the Public mode (Power OFF). The
setting is not canceled only by turning on the
FOMA terminal.
The Public mode (Power OFF) message is
announced even when you are in an out-ofservice area or where the reception is very
Voice/Videophone Calls
poor.
z A caller making a voice call hears a
message that you cannot answer the call
because you are in the place you have to
turn off the mobile phone, then the call ends.
z A caller making a videophone call sees the
Public mode (Power OFF) video message
on his or her display, then the call ends.
When You Cannot Answer a Received Call
When you cannot answer a received call, the
“ ” appears on the standby screen. When
you select “ ”, you can check the date, time
and the caller ID about the call.
z When “Setting when opened” (P.378) is
“ON”, opening the FOMA terminal enables
you to check the caller’s name immediately.
On the standby screen
1
dSelect “ ”
The Check a missed call list screen
appears.
<Missed call>
To check the information with the
FOMA terminal folded
When there is a missed call or new mail
(i-mode mail, Area Mail and SMS), new chat
mail, the illumination lamp keeps on flashing.
When you press s (MUSIC), you can confirm
the callers and senders by voice.
Press s (MUSIC) with the
1
FOMA terminal folded
The information is noticed by voice
according to the setting of “Info notice
setting”.
● Flashing of the illumination lamp
When there is a missed call, new mail, or new
chat mail, the illumination lamp keeps on
flashing in the each color set.
z When there is a missed call, new mail and
new chat mail, the lamp lights up following
rules; the lamp light is up once for one, the
lamp lights up two times for two, and the
lamp lights up three times for three in the
each color set.
■Flashing color and conditions
• The lamp does not flash when the Missed
info of “Illumination” is set to “OFF”.
• The lamp flashes in the default color when
Gradation is set in “Illumination”.
• You can set the specified color for the caller/
sender in the phonebook. → P. 1 0 0
• The lamp does not flash in Public mode
(Driving mode).
■To turn off the lamp
• Select the icon for “Missed call”, “New mail”
or “Chat mail” in the display to check the
description or press t (1 second or
longer).
80
Page 83

Setting the notification method for
missed calls
You can set the notification method when s
(MUSIC) is pressed.
z The notification method for details on each
setting item is as follows:
When there is a
Item
missed call, new
mail, etc.
ON “Bibip bibip” tone. “Bibip” tone.
OFF The Confirmation Tone does not
sound.
i“Phone”“Check
1
Phone setting”“Other
settings”
<Info notice setting>
When there is no
missed call, new
mail, etc.
“Info notice
setting”“ON” or “OFF”
■ When ボイス (Voice) is selected
If you set “日本語” (Japanese) in the
setting of “Select language”, you can
select “電子音 ” (electronic sound), “ボイ
ス” (voice) and “OFF”.
You can set the voice to read out (ON) the
name or not (OFF) when the caller is
stored in the phonebook or when the
recording of the message.
N
z This function alerts you using a “YES”
indication when the “Missed call”, “New mail”,
“Chat mail”, etc. desktop icon is displayed on
the standby screen. →P.124
z You cannot use s (MUSIC) to check for missed
calls or new mail in the following cases:
• When “Side key guard” is set to “ON”
• When playing music with the Music player/
Music&Video Channel
z The volume set in the “Phone” in the “Ring
volume” setting is used (if “Phone” is set to
“Silent” or “Step”, the volume is set to “Level
2”).
z Opening the FOMA terminal during the
notification stops the notification.
N
z If the reading of caller’s name is not stored in
the phonebook or the name stored in the
phonebook is not displayed, the caller’s name
is not read out even when “名前通知” (name
notification) of “ボイス” (voice) is set to “ON” in
Japanese language mode.
z When “Select language” is set to “English”,
selects from “ON/OFF”.
Having the Caller Leave a Message
When you cannot answer a voice or
videophone call, this function allows you to
record a message from the caller on your
FOMA terminal.
z The voice call can record 5 messages up to
20 seconds, and the videophone call can
record 2 messages up to 20 seconds for
each 1 case.
<Record message>
Setting Record message
i“Phone”“Record
1
message”“Record
message”
ON……Select the desired type of answer
message from “Japanese 1, Japanese 2,
English, Voice announce 1
*
”, then set the record message.
2
OFF……Cancels the Record message
setting.
* : Not available when no Voice announce is
recorded.
Enter the ringing time (000 to
2
120 seconds in 3 digits)
■ When the record message is set to
ON
Icons are displayed at the standby screen.
→P. 3 0
Select any item:
*
, Voice announce
Voice/Videophone Calls
Continued on next page
81
Page 84

N
z To give priority to “Record message” function
when “Voice Mail”, “Call Forwarding” and
“Record message” are set at the same time,
set the ringing time of Record message
shorter than that of Voice mail and Call
forwarding.
z If the mute time set in “Ring time(sec.)” is
longer than the ringing time set for the Record
Voice/Videophone Calls
message function, the FOMA terminal
switches directly to Record message without
ringing first. To have the FOMA terminal ring
before it records a message, make sure that
the ringing time for Record message is longer
than the mute time.
z You can use “Ring tone/Image” (for each
phonebook entry) to set an answer message
for each phone number and “Ring tone/Image”
(for the phonebook group) to set an answer
message for each group.
When you receive a call with
“Record message” set to “ON”
The record message activates when the set
time is elapsed.
z To the caller of a voice call, the answer
message is played and the recording starts.
z To the caller of a videophone call, the
“Preparing” image is sent and the answer
message is played, then the “Recording”
image is sent and the recording starts.
■When message recording starts
z The recording screen appears. The caller’s
voice can be heard through the FOMA
terminal earpiece during message
recording.
■To answer the voice
call while recording
r
■To answer the
videophone call while
recording
Ex. Voice call
r to answer with the
camera image or d
(Subst.) to answer with the
substitute image
■When message recording ends
zThe original screen
reappears and the
“Missed call” desktop
icon and “Record
message” desktop icon
appear on the standby
screen. You can check
the contents by selecting
the one of the desktop
icons.→P. 8 3
z Number of recordings is displayed with
icons on the icon display area at the top of
the screen.
to : Voice call record messages (the
number indicates the number of
recorded messages)
: Videophone call record messages
(the number indicates the number of
recorded messages)
* When the Auto voice memo is set to ON, the
following icons are displayed and the number of
recorded messages is not displayed.
: Voice call record messages
: Voice call record messages and Auto
voice memo
N
z When Manner mode is set, you cannot hear
the caller’s voice during a message recording.
z You cannot answer another call while
recording a message.
Having Callers Leave a Message during an Incoming Call
Even when the “Record message” function is
not set to “ON”, you can record messages
while receiving a call by pressing a key.
While ringings (MUSIC)
1
The recording of the message star ts.
■ To set the FOMA terminal to Manner
mode at the same time recording is
started
While ringingq
<Quick message>
82
Page 85

N
z You cannot set “Record message” to “ON” with
this operation.
z When you receive a voice or videophone call
when the messages are full, the record
message is not activated and the FOMA
terminal keeps on ringing (when q is
pressed, the ringing continues at the setting of
“Manner mode set (select manner mode)”).
Playing/Erasing Recorded Messages and Voice Memos
You can play or erase the Recorded message,
Record Videophone message, Voice memo or
Auto voice memo.
z When there is a recorded message which
has not been played, “ ” (for a recorded
message) or “ ” (for a recorded
videophone message) appears on the
standby screen.
<Example: To check the recorded message
which has not been played>
On the standby screen
1
dSelect “ ” (for a
recorded message) or “ ”
(for a recorded video
message)
“★” appears for the
recorded item.
■ To pla y the
message with the
menu operation
i“Phone”
“Record message”
“Play/Erase msg.” or
“Play/Erase VP msg.”
Play/Erase msg.
Function menuP. 8 4
Select the item to play
2
<Record message/Voice memo/Auto
voice memo>
The FOMA terminal beeps and playback
begins. When the playback ends, the
FOMA terminal gives 2 short beeps and
the “Play/Erase msg. screen” reappears.
You can also play the messages by
pressing
screen.
■ To play the next message while
Ys(MUSIC)
Each time you press
played with the new message in order of
Record message → Voice memo →
Auto voice memo.
■ To stop the playback
Xd (Stop) or Wt
The “Play/Erase msg. screen”
reappears.
<Record Videophone message>
The playback starts. When the playback
ends, the “Play/Erase VP msg. screen”
reappears.
■ To play another message while
Xv
■ To adjust volume while playing a
Xc
■ To switch ON/OFF of the speaker
Vu (FUNC)“Speaker ON” or
“Speaker OFF”
■ To pause the playback
Xd (Stop)
To resume playback, press Xd (Play).
■ To stop the playback
Wt
The “Play/Erase VP msg. screen”
reappears.
Ys (MUSIC) on the standby
playing a message
Ys (MUSIC), it is
playing a message
message
while playing a message
Voice/Videophone Calls
Continued on next page
83
Page 86

■ To make a voice/videophone call to
the phone number displayed while
playing a message
r (voice call) /o (V. phone)
■ To erase the playing message
u (FUNC)“Erase”“YES”
N
z When 2in1 is in A mode or B mode, “★ ” does
not appear for the recorded message recorded
Voice/Videophone Calls
in the unused phone number. When set to
“Dual mode”, “★ ” appears for the recorded
message recorded in the both phone
numbers.
Play/Erase msg. screen
(voice/video) (P.83)
Play……Plays the message.
Delete this……Erases one recorded message,
voice memo or auto voice memo.
Delete rec. msg.*……Erases all the recorded
messages. Voice memo or Auto voice memo are
not erased.
Delete all……Erases all the recorded messages,
voice memos and auto voice memo.
* : Available only with the Play/Erase msg. screen.
Using Chara-den
This function sends a cartoon character
instead of your own image when you make a
videophone call. “What is Chara-den?”
→P. 3 1 8
z You can display your favorite Chara-den if
you set “Substitute image” of “Select image”
to “Chara-den” beforehand.
You can also use Chara-den by setting
Chara-den in the “Phonebook” or “Ring
tone/Image” function.
z To switch from the camera image to Chara-
den during a videophone call, select
“Substitute image” from the function menu.
When you receive a
1
videophone call, press d
(Subst.)
Control your character by
2
pressing the dial keys
Chara-den
84
Pressing a dial key makes the character
perform the action assigned to that key.
“Using Chara-den characters” →P.319
Page 87

Setting Functions for the Videophone
i“Phone”“Check
1
Phone setting”
“Videophone”“Other
settings”
Videophone setting
Select any item:
2
Visual preference……Selects the image
quality of videophone calls from “Normal/
Prefer img qual/Prefer motion spd”.
Select image→ P. 8 6
Auto redial as voice……Sets whether to
switch to a voice call when a videophone call
cannot be made (ON/OFF).
Remote monitoring→ P. 8 8
Ntfy switch-mode →P. 8 6
Main display……Selects the image
displayed on the main display from “Other
side/My side”.
Front camera Reverse……Sets whether to
display your camera image as a mirror image
(ON) or normal image (OFF) on your FOMA
terminal.
Chara-den→P.318
Hands-free switch……Sets whether to
switch to handsfree automatically when
starting a videophone call (ON/OFF).
V-phone while packet→ P. 8 7
N
<Visual preference>
z If the signal quality deteriorates during a
videophone call, the image may become
grainy or patchy regardless of the settings in
“Visual preference”.
<Auto redial as voice>
z When a videophone call is switched and
redialed as a voice call, the call is charged as
a voice call and digital communication charges
are not applied.
z When a call is redialed, only the voice call
records are logged in the “Redial/Dialed calls”
record.
z Even if “Auto redial as voice” is set to “ON”, it
may not be possible to redial due to the
conditions of the network or the other party,
such as busy.
<Hands-free switch>
z The FOMA terminal does not switch to hands-
free mode automatically in the following cases
even when “Hands-free switch” is set to “ON”:
• While Manner mode is set
• When an earphone/microphone (optional) is
connected (however, the microphone
operation follows the “Select microphone”
setting)
• When holding a call or Record message is
activated for the incoming call
Voice/Videophone Calls
85
Page 88

Setting the image sent during
videophone calls
You can select the image sent instead of the
camera image.
z You can set a JPEG image whose file size is
100K bytes or less and not larger than 854
dots wide × 854 dots high, or a GIF image
whose file size is 100K bytes or less and not
Voice/Videophone Calls
larger than 854 dots wide × 480 dots high or
480 dots wide × 854 dots high (except for
the files with restrictions).
Videophone setting screen
1
(P.85)“Select image”
<Select image>
Select any item:
On hold……Sets the image sent for a call on
answer hold.
Holding……Sets the image sent while
holding a call.
Substitute image……Sets the image sent
as a substitute image.
Record message……You can set the image
sent while recording videophone messages.
Preparing……You can set the image sent
while preparing for recording videophone
messages.
Voice memo……Sets the image sent while
recording the voice memo.
Select the image to be sent:
2
Pre-installed……Sends only a message.
Original……Sends an image and a
message.
To change the image, select an image from
My picture from “Change setting” of the
function menu.
Chara-den*……Sends the image selected in
“Substitute image”.
Function menu of Chara-den list screen
→P.320
Priority order for Chara-den setting→ P. 9 4
To change the Chara-den, select a Charaden from Chara-den list from “Change
setting” of the function menu.
* : Available only when “Substitute image” is
selected.
N
z If you delete the original image, the “Pre-
installed” image is displayed (sent).
z When the Chara-den character set as the
substitute image is deleted and the “Charaden” substitute image cannot be displayed, the
pre-installed “ビーンズ (Beans)” is sent. If you
delete the pre-installed “ビーンズ (Beans)”,
the “Pre-installed” substitute image is sent.
Setting for Switching between
Voice Call and Videophone Call
<Ntfy switch-mode>
You can set whether to notify the other party
that your FOMA terminal supports the switch
between a voice call and a videophone call.
z The other party cannot switch the call when
set to “Indication OFF”.
z You cannot set this function during a call or
while “ ” appears.
Videophone setting screen
1
(P.85)“Ntfy switchmode”
Indication ON, Indication OFF……
Activates or deactivates the Ntfy switchmode.
Check Indication……Displays the “Ntfy
switch-mode” setting.
Select any item:
86
Page 89

Setting the answer mode when
you receive a videophone call
during i-mode
z As the multi access function cannot be used
for videophone, incoming videophone calls
during i-mode communication or while
sending or receiving mails are handled
according to this setting. → P. 4 7 7
Videophone setting screen
1
(P.85)“V-phone while
packet”
V-phone priority……Switches to the
videophone ringing screen. When you
answer the incoming videophone, i-mode
communication is disconnected.
Packet downld priority……Rejects the
incoming videophone call.
V-phone answerphone……If you have
subscribed to the “Voice Mail Service”, the
videophone call is connected to the Voice
Mail service center regardless of “Activate/
Deactivate” setting of Voice Mail. When you
have not subscribed to this service, “Packet
downld priority” is activated.
Call forwarding……If you have subscribed
to the Call Forwarding Service, the
videophone call is forwarded regardless of
“Activate/Deactivate” setting of “Call
Forwarding”. When you have not subscribed
to this service, “Packet downld priority” is
activated.
N
z Even when set to “V-phone priority”, you
cannot answer the videophone call if you are
using multi access such as using the i-mode
communication during a voice call.
z When set to “Packet downld priority”, “V-phone
answerphone” or “Call forwarding”, the
received videophone calls are recorded as
“Missed calls” in the “Received calls”.
z Even when set to “V-phone priority” or “Packet
downld priority”, “Voice Mail” or “Call
Forwarding” service is activated if the ring time
for the “Voice Mail” or “Call Forwarding”
service is set to 0 second.
<V-phone while packet>
Select any item:
Using the Videophone Connecting to External Devices
You can make or receive videophone calls
from external devices such as the PC by
connecting to the FOMA terminal with the
FOMA USB Cable with Charge Function 01/
02 (Optional).
To use this function, you have to install a
videophone application on the dedicated
external device or PC and prepare
commercially available devices such as an
earphone/microphone and USB compatible
Web camera.
z Set the USB mode setting to
“Communication mode”. There is no specific
setting for connecting external devices.
z For details on the operational environment,
settings, operations of the videophone
application, refer to the manuals supplied
with the external terminals.
z “ドコモテレビ電話ソフト (DOCOMO
Videophone Software)” (Japanese) is
available as the application which is
compatible with this function.
You can download the Software from the
website of DOCOMO Videophone Software
(Japanese).
(For details of the PC operating
environment, etc., refer to the support
website.)
http://videophonesoft.nttdocomo.co.jp/
(Japanese)
Voice/Videophone Calls
Continued on next page
87
Page 90

N
z You cannot make a videophone call from the
external device during a voice call.
z When you have subscribed to either of the Call
Waiting service, Voice Mail Service or Call
Forwarding and you receive a videophone call
from an external device during a voice call,
you can answer the call after ending the
current call. When you receive a voice call,
Voice/Videophone Calls
videophone call or 64K data communication
during a videophone call from the external
device, you can answer these calls in the
same way
Setting Remote Monitoring
<Remote monitoring>
Remote monitoring is only available between
FOMA terminals or between a FOMA terminal
and a phone equipped with a 3G-324Mcompatible videophone function. N-05A can
be used as either the dialing or receiving
phone for remote monitoring.
Preparing the receiving phone
Set the phone number of the dialing phone
(Other ID) and the delay until remote
monitoring begins (Ringing time) on the phone
performing the remote monitoring (receiving
phone).
z Up to 5 Other ID can be stored.
Videophone setting screen
1
(P.85)“Remote monitoring”
Enter your security code
2
“Other ID”
Other ID
Function menuP. 8 9
Select an item to store or
3
changeEnter the phone
number of the monitoring
phone
Press t to return to the
4
remote monitoring screen
“Ringing time”Enter the
5
ring time (003 to 120 seconds
in 3 digits)
The ringing time is set.
88
Page 91

“Set”“ON”
6
“ ” or “ ” appears on the standby
screen.
■ To turn remote
monitoring off
“OFF”
Position the FOMA terminal
7
In remote monitoring, the image from the
front camera is sent to the dialing phone.
Put the receiving FOMA terminal on the
monitoring position, ensuring that it is
switched on and unfolded.
If the FOMA terminal is left folded, only
the voice is sent and the camera image is
not sent. The substitute image is sent with
“Camera Off” written on the image.
Front
camera
N
z When positioning the FOMA terminal, set
“Videophone” in “Vibrator” to “OFF” to prevent
the FOMA terminal from moving when
receiving calls.
z If the ringing time set for “Voice Mail Service”
and “Call Forwarding” on the receiver side is
shorter than the ringing time set for remote
monitoring, “Voice Mail Service” and “Call
forwarding” take priority.
Other ID screen (P.88)
Look-up address……Enters the address
referring to the phonebook, Dialed or Received
calls records.
Delete this, Delete all……Deletes one or all
common other ID(s). When all IDs are deleted,
the “Set” setting is set to “OFF”.
Starting/ending the remote
monitoring
z To perform remote monitoring, you should
always make a videophone call with caller
ID (phone number) notification provided
from the FOMA terminal registered as the
other ID on the receiving phone.
Make a videophone call to
1
the receiving phone
After the ringing time set
on the receiving phone
has elapsed, remote
monitoring begins.
The video image from
the receiving phone is
displayed and the sound
Dialing phone
■ To answer a videophone call on the
receiving phone without triggering
remote monitoring
Press r before the set ringing time is
not elapsed
To answer with a substitute image, press
d (Subst.).
To end the call, press y
2
The call duration is displayed and remote
monitoring ends. You can also end remote
monitoring by pressing y on the
receiving phone.
N
z Calls can be received as a remote monitoring
call even when Dial lock or Omakase Lock is
set.
z Remote monitoring is not available when the
following functions are set:
• Public mode (Driving mode)
• Manner mode
• Call rejection/acceptation
• Reject unknown
* : When “Call acceptation” is set for a phone
number other than the other ID phone
number or “Call rejection” is set for the
other ID phone number, or when “Reject
unknown” is set and the other ID phone
number is not stored in the phonebook
comes from the speaker
on the dialing phone.
*
*
Voice/Videophone Calls
Continued on next page
89
Page 92

N
z Specific ring tone for Remote monitoring is
used and cannot be modified.
z Ring tone is played at the volume set in
“Videophone” in “Ring volume” (if the ring
volume is set to “Silent”, “Level 1” or “Step”,
the volume is set to “Level 2”).
z You cannot put the call on hold while receiving
a call for remote monitoring. Press y to end
Voice/Videophone Calls
the call.
z You cannot switch cameras from the receiver
during remote monitoring.
Please be considerate of the privacy
of individuals around you when taking
and sending photos using cameraequipped mobile phones. Improper
use of the FOMA terminal in ways that
constitute a serious public nuisance
may be punishable under laws or
ordinances intended to prevent such
behavior (privacy protection laws,
etc.).
90
Page 93

Phonebook
Phonebooks Available with the FOMA Terminal.................................................. 92
Adding Information to the Phonebook ..................................... 93
Adding Phonebook Entries from the Redial, Dialed Calls and Other Records .... 94
Renaming Groups ........................................................................... 95
Making a Call from the Phonebook ......................................... 95
Editing the Phonebook ................................................................. 99
Deleting a Phonebook Entry ............................................................. 99
Checking the Phonebook Storage Status ................................. 100
Setting Different FOMA Terminal Actions for Each Phone Number and Mail Address
................................................................................................... 100
Using Choku-Den .............................................................................. 102
Using Dialing Shortcuts ............................................................ 103
Storing the Phonebook at the Data Security Center ............... 103
Add to phonebook
Group setting
Search phonebook
Edit phonebook
Delete data
No. of phonebook
Ring tone/Image
Choku-Den
Two-touch dialing
Data security serv.
91
Page 94

Phonebooks Available with the FOMA Terminal
Your FOMA terminal contains two
phonebooks. One is the phonebook in the
FOMA terminal (Phone) itself, for which you
can set a range of functions, and the other is
the UIM phonebook, which can also be used
in other FOMA terminals. Each phonebook
can be used differently depending on the
Phonebook
purpose.
Differences between the FOMA
terminal (Phone) phonebook and
UIM phonebook
■Data stored
Stored
item
Number
of
entries
Group No Group, Group 01
Phone
number
storage
E-mail
address
storage
Image
storage
Other
data
storage
FOMA terminal
(Phone) phonebook
Up to 1,000 entries Up to 50
to 19
4 numbers per entry
(4,000 numbers in
total in the
phonebook)
You can select from
23 icons
3 addresses per
entry (3,000
addresses in total in
the phonebook)
You can select from
5 icons
1 image and 1
Chara-den per entry
(respectively 100 in
total in the
phonebook)
Name, Reading, ZIP
code, Address,
Birthday (Up to 100
Reminder entries),
Memo
phonebook
entries
No Group,
Group 01 to
10
1 number per
entry
“ ” only
1 address per
entry
“” only
−
Name,
Reading
UIM
■Features of the FOMA terminal (Phone)
phonebook
The following utility functions can be used with
entries stored in the FOMA terminal (Phone)
phonebook:
• “Choku-Den” → P. 1 0 2
• “Two-touch dialing”→P. 1 0 3
• “Ring tone/Image” → P.100
• “Restrictions” → P. 1 4 7
• Storing as secret data→P. 1 3 6
• Secret code setting → P. 9 9
■Features of the UIM phonebook
As phonebook entries are stored on the
FOMA card (UIM), you can transfer your
phonebook entries to another FOMA terminal
simply by switching the FOMA card (UIM).
This makes the UIM phonebook very useful
when you use multiple FOMA terminals.
Displaying names
■Voice and videophone calls
When receiving a call with
caller ID notified from
someone who is stored in
the phonebook, the phone
number and caller’s name
is displayed.
When an image is stored
in the phonebook, the
image is displayed.
However, depending on
the size and amount of
data of the stored image, it
may take time to display
the image.
The caller’s name is also displayed in the
“Received calls”, “Dialed calls” and “Redial”
records.
■Displaying names for i-mode mail and
SMS
When you send/receive i-mode mail or SMS
to/from someone who is stored in the
phonebook, his/her name is displayed in the
sent/received mail list/detail screen or address
list.
92
Page 95

Adding Information to the Phonebook
z The entry cannot be stored unless the
“Name” field is filled.
i“Phone”“Add to
1
phonebook”Select a
phonebook
You can enter kanji characters, hiragana,
katakana, alphabets, numbers, symbols
and pictographs (Phone only).
You can store up to 16 double-byte or 32
single-byte characters for “Phone” and 10
double-byte or 21 single-byte
alphanumeric characters only (including
some single-byte symbols) for “UIM”.
Check the readingd (Set)
2
■ When the reading is incorrect
Correct the reading using katakana
(single-byte for “Phone” and double-byte
for “UIM”), single-byte alphabet, numbers
and symbols.
You can store up to 32 single-byte
characters for “Phone” and 12 doublebyte or 25 single-byte alphanumeric
characters only (including some singlebyte symbols) for “UIM”.
Select any item:
3
Select group……Selects a group
number among “Group 01-19” for “Phone” or
among “Group 01-10” for “UIM”. If no group
is selected, the entry is automatically
assigned to “No Group”.
Enter phone number……Enters the
phone number.
• Also select an icon for “Phone”. You can
enter up to 26 digits for the phone number.
• Select “Add” to store an additional
phone number.
• You can enter 20 digits for a blue FOMA
card (UIM), and 26 digits for a green/white
FOMA card (UIM).
<Add to phonebook>
Enter a name
Edit mail address……Enters the e-mail
address. You can enter single-byte
alphabets, numbers and symbols.
• Also select an icon for “Phone”.
• Select “<Add>” to store an additional email address.
Edit ZIP code, Edit address……Enters
the ZIP code and street address. Enter the
single-byte numbers for ZIP codes. You can
enter kanji characters, hiragana, katakana,
alphabets, numbers and pictographs for the
address.
Enter birthday……Stored the birthday
and the anniversary notification function, and
press t.
Enter birthday……Enters the birthday
(year, month and day). You can set year
from 1800 to 2099.
Reminder……Select the checkbox to
set the day (1week before, 3days before,
1day before, or on the day) to notify the
birthday. When it is 0:00 a.m. of the day
you stored, the desktop icon is
displayed. →P. 1 2 5
Edit memorandums……Enters a memo
(short note). You can enter kanji characters,
hiragana, katakana, alphabets, numbers and
pictographs.
Set image……Shoots the photo
displayed when you receive a call from the
contact, or selects the images from My
picture.
Select Chara-den……Selects the
“Chara-den” character displayed as the
substitute image for videophone calls.
Enter memory No.……Memory numbers
are automatically
stored in the phonebook, but can be changed
to any number between 000 and 999.
* : Assigned to the available number between
010 to 999 from the smallest number. If no
number is available from 010 to 999, it is
assigned to the available number between
000 to 009.
o (Finish)
4
*
assigned when an entry is
Phonebook
Continued on next page
93
Page 96

N
z Phonebook entries stored using symbols or
pictographs may not be displayed correctly
when data are transferred by the infrared
communication, etc.
z Enter the correct domain when storing e-mail
addresses. The domain is the part of the
address that follows the “@” symbol.
However, if the contact’s e-mail address is in
the “[phone number]@docomo.ne.jp” format,
store just the phone number as the e-mail
Phonebook
address.
z When you set the Phonebook during use 2in1,
“Phonebook 2in1 setting” (P.429) is also set
automatically (B mode is set to “B”, and other
mode is set to “A”.)
The setting of “Phonebook 2in1 setting” ( /
/ ) is displayed on the Phonebook list
screen or Phonebook detail screen (only when
2in1 mode is in Dual mode).
<Enter birthday (Reminder)>
z Reminder is not given for phonebooks stored
as secret data.
z When Restrict dialing is set, Reminder is not
given for the phonebook without setting
Restrict dialing.
<Chara-den settings priority sequence>
z The priority order for Chara-den settings is as
follows:
① Chara-den setting of “Ring tone/Image” (for
individual)
② Chara-den setting of “Ring tone/Image” (for
group)
③ Chara-den stored in the phonebook entry
④ Substitute image in Select image
When phonebook editing is
interrupted
You can resume editing the phonebook entry
which is stopped being edited because of the
running out of battery or activation of a task of
Tool groups using Multitask, etc.
94
i“Phone”“Add to
1
phonebook”Select the
destination
■ To add a new phonebook entry
“New”
“Recall”
When you are re-editing
the entry, if you cancel
editing without storing the
changes, the data being
edited is erased.
Adding Phonebook Entries from the Redial, Dialed Calls and Other Records
You can add information to the phonebook
from the “Received calls”, “Dialed calls”,
“Redial”, “Received address”, “Sent address”,
“Text reader”, Site screen or enter phone
number screen, etc.
<Example: Adding information from the
“Received calls” record to the FOMA terminal
(Phone) phonebook>
Received calls screen (P.66)
1
u (FUNC)“Add to
phonebook”
■ To add to the FOMA card (UIM)
“UIM”
“Add”Search for the
2
phonebook entry to add the
“Phone”
information
How to search the phonebook → P. 9 6
■ To add a new phonebook entry
“New”
■ To add information to the UIM
“New” or “Overwrite”
Display the phonebook detail
3
screend (Select)
Phone number is automatically entered
and the phonebook editing screen
appears.
Editing the phonebook → P. 9 9
Page 97

After completing the
4
changes, press o (Finish)
■ If a message appears asking
whether to overwrite existing data
“YES”
N
z The “Notify Caller ID” setting (Notify or Not
notify) displayed in the “Dialed calls” and
“Redial” records is not stored in the
phonebook.
Group setting screen (P.95)
Edit group name……Edits the group name.
Ring tone/Image→P.100
Reset group name……The changed group
name is reset to the default name assigned at the
time of purchase.
N
z Resetting the group name does not clear the
“Ring tone/Image” setting.
Phonebook
Renaming Groups
<Group setting>
You can assign your stored phonebook entries
to groups according to the contact role
(“Work”, “Friends”, etc.) or by hobby
(“Baseball”, “Football”, etc.). This allows you to
use the phonebook as if it were divided into
different volumes according to purpose.
z “No Group” cannot be renamed.
i“Phone”“Check
1
Phone setting”“Group
setting”
Group setting
Function menuP. 9 5
Select a groupEnter the
2
new group name
The “ ” icon appears next to UIM
groups.
If the same names is used for group on
the FOMA terminal (Phone) and UIM,
they are displayed as separate group.
Making a Call from the Phonebook
You can make a call by searching for the
phonebook entry from the FOMA terminal
(Phone) phonebook or the UIM phonebook.
z When tabs appear on the phonebook list
screen, you can switch the display as
follows:
<Example: To switch tabs from “他 (Others)” to
“Ta-column” in the Alphabet display>
Tab
List of “ 他 (Others)”
N
z You can use v to switch pages within the
same tab.
z You cannot switch the tab with o ()
when you store to the Choku-Den or compose
a message with using the Look-up phonebook.
<Search phonebook>
p
[]
Four times
o
[]
Four times
List of “Ta-column”
95
Page 98

Searching for the phonebook
entry of the person you want to
make a call
i“Phone”“Phonebook”
1
■ To make a voice call
from the list screen
Highlight the
phonebook entry you
want to callr
(voice call)
Phonebook
If the phonebook entry
contains multiple phone
numbers, the call is
made to the first phone
number stored for that entry.
■ To switch the tab display
u (FUNC)“Change Display”Select
from “Alphabet, Memory No., Group”.
Alphabet Memory No.
Group
Select the phonebook entry
2
you want
Use v to display the phone
3
number you wantr
(voice call) or o (V. phone)
Phonebook list
Function menuP. 9 7
Phonebook detail
Function menuP. 9 8
■ To send a mail
Use v to display the e-mail address
you wantd (MAIL)
“Composing and Sending i-mode Mail”
→P. 2 0 4
N
z Pressing f during a call displays the group
search screen and pressing g displays the
column search screen.
Searching for the phonebook
entry by specifying the search
method
You can search for a phonebook entry using
any of 8 search criteria; reading, name, phone
number, e-mail address, memory number,
group or “column” in Japanese phonetics (a,
ka, sa, ta, na, etc.) or all.
z Search results are displayed in the
sequence shown below based on the
reading entered when the entry was stored
(except for memory number search).
katakana → alphabets → numbers
→ symbols → the reading of caller’s
name is not stored
* If a space is placed at the beginning, it is
searched first.
On the standby screeng
1
Pressing g on the standby screen
displays the phonebook search screen
with your preferred method.
■ To cancel your preferred search
method setting
On the standby screengt
Highlight the search method with the
star “★”o (Reset)
■ To display your
preferred search
method first
Highlight the search
method that you want to
display first
(Prefer)
“★” appears next to the
preferred search
method.
o
“OK”
96
Page 99

Select the search method:
2
Search reading……Enter the reading
c
Enter the reading from the beginning. You do
not need to enter the entire name.
Search name……Enter the namec
Enter the name from the beginning. You do
not need to enter the entire name.
Search phone No.……Enter the phone
numberc
Enter some digits numbers of the phone
number.
You can also search the phone number by
entering a part of the phone number and
press c on the “Enter phone number
screen” (P.58).
Search e-mail……Enter the e-mail
addressc
You do not need to enter the entire address.
Search memory No.……Enter the 3
digits memory number.
You cannot search the UIM phonebook by
memory number.
Search group……Select the group you
want
Note that the UIM phonebook uses different
groups from the FOMA terminal (Phone)
phonebook.
Search column……Press the key for the
“column” (tab) you want to search
1: “a” column 2: “ka” column
3: “sa” column 4: “ta” column
5: “na” column 6: “ha” column
7: “ma” column 8: “ya” column
9: “ra” column 0: “wa” column
w: Others (alphabet or number, etc.)
Search all……All the stored phonebook
entries are displayed in the “Alphabet” tab.
When the search ends, the
“Phonebook list screen” that
meets the searching
conditions appears. “ ” is
displayed for the UIM
phonebook.
Phonebook list
Function menuP. 9 7
● Accessing the phonebook from the
Redial or Dialed Calls record
You can access the stored phonebook detail
screen from the function menu of “Received
calls”, “Dialed calls”, “Redial”, “Received
address” or “Sent address” screen by
selecting “Look-up phonebook”.
Phonebook list screen
(P.96)
z The available functions vary depending on
the searching method and display method.
Add to phonebook→P. 9 3
Connect to Center……Stores the phonebook
data at the DOCOMO Data Security Center.
→P.103
Sort……Sorts the phonebook list in a selected
criteria when you display the search result by
“reading”, “name”, “phone number”, “e-mail
address” or “memory number”.
Change Display……Select from “Alphabet,
Memory No., Group”.
Ring tone/Image→P.101
Restrictions→ P.147
Group setting→ P. 9 5
Copy to microSD*1→P. 3 3 1
• When “Copy all” is selected, you can select
whether to copy the My Profile data in addition
to the phonebook data.
iC transmission*1→P. 3 4 5
iC trans. all*1→P.345
Send Ir data*1→P. 3 4 3
Send all Ir data*1→P. 3 4 4
No. of phonebook →P.100
Continued on next page
97
Phonebook
Page 100

Attach to mail
*1*2
……Displays a new mail
screen with the phonebook data attached.
Big font⇔ Standard font……Switches the
displayed font size between “Big font, Standard
font”. → P. 1 2 3
microSD phonebook⇔ Original phonebook
……Refer to the phonebook in the microSD card
or the FOMA terminal (Phone).
Birthday reminder……Displays the phonebook
list in which “Reminder” in the birthday are stored.
Phonebook
Delete data……Selects the deleting method from
“Delete this, Delete selected, Delete all”.
• “Delete all” also deletes the phonebook on the
FOMA card (UIM).
*1: Unavailable for the UIM phonebook.
*2: Unavailable when 2in1 is in B mode.
Phonebook detail screen
(P.96)
Edit phonebook →P. 9 9
Notify Caller ID→ P. 7 0
Chaku-moji→ P. 6 9
Dial setting
Prefix numbers→ P. 7 2
Int’l call→ P. 5 8
2in1/Multi Num.……When 2in1 is set to ON
and Dual mode, selects from “Number A,
Number B, Cancel number” (P.431) (not
available when A mode or B mode is set).
Selects from “Basic number, Additional
number 1, Additional number 2, Cancel
number” (P.426) at the Multi Number when
2in1 set to OFF.
Select image……Selects the image used
during a videophone call from “My side,
Chara-den”.
Select “Release settings” to cancel the
setting.
Ring tone/Image*1→P. 1 0 0
Restrictions*1→P. 1 4 7
Move to top*1……Moves the displayed phone
number/mail address to the top when multiple
phone numbers/mail addresses are stored in one
phonebook entry.
98
Add to Choku-Den*1→P.102
Add desktop icon→P. 1 2 4
Compose message*2→P.204
Attach to mail
*1*2
……Displays a new mail
screen with the phonebook data attached.
Compose SMS*2→P.246
iC transmission*1→P. 3 4 5
iC trans. all*1→P. 3 4 5
Send Ir data*1→P. 3 4 3
Send all Ir data*1→P.344
Copy to microSD*1→P. 3 3 1
Copy
Name……Copies the name. The copied
name can be pasted into input and other
screens. →P.410
Phone number*3……Copies the phone
number. The copied phone number can be
pasted into input and other screens. →P. 4 1 0
Secret code*1→P. 9 9
Set code……Sets the secret code (4 digits).
Check code……Confirms the set secret
code.
Release settings……Cancels the set secret
code.
Set secret
*1*4
→P. 1 3 6
Copy to UIM*5→P.339
Big font⇔ Standard font……Switches the
displayed font size between “Big font, Standard
font”. → P. 1 2 3
Delete data→ P. 9 9
*1: Unavailable for the UIM phonebook.
*2: Unavailable when 2in1 is in B mode.
*3: Depending on the selected item, one of “Mail
address, Address, Birthday, Memorandums”
appears.
*4: “Release secret” when referring to the
phonebook of the secret data.
*5: “Copy from UIM” when referring to the UIM
phonebook.
N
<Add to Choku-Den>
z When stored to Choku-Den, “★ ” appears on
the function menu.
 Loading...