

Page 1

‘10.7
Page 2

DOCOMO
W-CDMA and Wireless LAN System
Make sure thoroughly read this manual and the manuals included
with optional accessories before and during use to ensure proper
operation. If any of the contents in this manual are unclear,
please contact number listed in “docomo Smartphone Care” on
the back of this manual.
SH-10B is designed to make your everyday life more convenient.
Careful use will ensure a long service life.
Because the FOMA terminal relies on radio signals, it cannot be used in
Make sure not to disturb others when using the FOMA terminal in public
Because the FOMA terminal uses electrical signals, it is possible for a
The FOMA terminal converts conversations into a digital signal and
Thank you for purchasing “LYNX SH-10B”.
Using the FOMA terminal
places with no signal (such as tunnels, underground, or in buildings), in
places with a weak signal or outside the FOMA service area. You may
not use the FOMA terminal in the upper floors of a building even with no
obstructions in sight. There may also be times when the signal is strong
and you are not moving but the call is interrupted.
places, places with many people or quiet places.
third party to listen in on a conversation. However, since the W-CDMA
and wireless LAN system automatically applies privacy to every call, a
third party that tries to listen in only hears static.
sends it to the other party over the radio. If the signal cannot be
reconverted properly by such as moving to an area with a weak signal,
the voice may not be heard correctly.
Keep a separate memo and note information (e.g. phonebook, schedule,
notepad, answering memo, voice memo) stored in the FOMA terminal.
DOCOMO shall not be liable for any loss of content due to a failure,
repair, upgrade or other handling of the FOMA terminal.
As with PCs, some use-installed applications may disrupt the stability of
your FOMA terminal performance, or unexpectedly transmit information
via the Internet causing improper use of your location information and
personal information stored in the FOMA terminal. Therefore, verify the
supplier and operating conditions of the applications to be used before
using them.
It is recommended to save the important data to the microSD Card.
The FOMA terminal supports the FOMA Plus-Area and the FOMA
HIGH-SPEED area.
The FOMA terminal can be used only via the FOMA network provided by
DOCOMO and DOCOMO’s roaming area.
Download the latest information on this manual from the DOCOMO
website.
“User’s Manual (in PDF format)” Download
http://www.nttdocomo.co.jp/english/support/trouble/manual/download/
index.html
※ The URL and contents of this manual are subject to change without
prior notice.
Page 3
Viewing/Searching this manual
This manual uses illustrations and icons to explain operations for
proper phone use.
The screens and illustrations in this manual are shown as examples. The
actual screens and illustrations may differ.
Searching this manual
You can use the following ways to find explanations in this manual.
Index (nP. 294)
Indexed pages
(nCover)
(See the next page for details)
Contents
Main functions
Application list
Note that “SH-10B” is referred to as “FOMA terminal” in this manual.
This manual refers to microSD Card as “microSD Card” or “microSD”.
Reproduction of this manual in part or in whole is prohibited.
The contents of this manual are subject to change without prior notice.
Search for function names or service names.
Search this manual using the index on the
cover and the sides of pages.
nP. 4
nP. 6
nP. 256
Notation of keys and operation procedure
This manual refers to keys as simplified icons.
Actual key Notation in this manual
/
The notation and meaning of operation procedure are shown below.
In the main menu,
[Settings]/[Sound/vibration/
lamp]/[Lamp setting]
This manual describes the touch panel operation when operation is
available with touch panel or keyboard.
For details on default settings nP. 256
Viewing the display
The explanations in this manual are based on default settings. The
actual screens may differ depending on settings changed after
purchase.
When icons featuring animation effects are displayed, screens may
differ from those described in this manual.
+ (Refer to “Part names and functions” on P. 22)
Notation Meaning
In the main menu, touch [Settings] b
touch [Sound/vibration/lamp] b touch
[Lamp setting]
1
Page 4

As an example, how to look up Voice Recorder using the Index and Indexed pages is explained below.
Use i-mode.net mobile mode
. . . . . . . . . . . . . . . . . . . . . . . . . 104
Use information in site . . . . . . . 110
Use information in subject or
message . . . . . . . . . . . . . . . . . . . 92
Use kitchen timer . . . . . . . . . . . 211
Use mail address . . . . . . . . . . . . 92
Use music data . . . . . . . . . . . . . 152
Use Nuisance Call Blocking Service
. . . . . . . . . . . . . . . . . . . . . . . . . 243
Use playlist . . . . . . . . . . . . . . . . 152
Use secure credentials . . . . . . . . 73
Use software update. . . . . . . . . 281
Use speed dial . . . . . . . . . . . . . . 63
eesutscee 5
View site . . . . . . . . . . . . . . . . . . 107
View this manual . . . . . . . . . . . . . . 1
Viewing reservation setting . . . . 159
Voice Mail . . . . . . . . . . . . . . . . . 240
Voice player. . . . . . . . . . . . . . . . 185
Voice Recorder . . . . . . . . . . . . . 184
Volume. . . . . . . . . . . . . . . . . . . . 212
W
Wallpaper. . . . . . . . . . . . . . . . . . 214
Warranty . . . . . . . . . . . . . . . . . . 279
Warranty and After-Sales Service
. . . . . . . . . . . . . . . . . . . . . . . . . . 279
Co
Multi Assistant (Multitask) . . . . . . . . . . . . . <Multi Assistant (Multitask)>182
Entering memo . . . . . . . . . . . . . . . . . . . . . . . . . . . . . . . . . . <Notepad>182
Using the FOMA terminal as voice recorder . . . . . . . <Voice Recorder>184
Using the FOMA terminal as calculator. . . . . . . . . . . . . . . <Calculator>186
Displaying/Editing/Creating Word and Excel files
. . . . . . . . . . . . . . . . . . . . . . . . . . . . . . . . . . . . . .<Documents To Go>187
Displaying e-books/e-comics. . . . . . . . . . . . . . . . . . . . . <Book viewer>187
Searching in dictionary
Searching in e-dictionary. . . . . . . . . . . . . . . . . . . . .<Built-in dictionary>190
Searching in Net Dictionary. . . . . . . . . . . . . . . . . . . . . <Net Dictionary>193
Using location information
Content differs from actual pages in this manual.
Index nP. 294
Use this when you know the function or service name, or to search for function names that appear on the display.
Indexed pages nCover
Search for functions going in the order of “cover” b “beginning of the chapter” b “description page”. The beginning of each
chapter shows a table of contents.
P. 184
Page that explains
“Using the FOMA
terminal as voice
recorder”
2
Page 5
184
Convenient Functions
You can use the FOMA terminal as a voice recorder.
You cannot record when the available space of the save destination is
less than 300 KB.
1
In the main menu, [Voice Recorder]
2
[p]
: Recording start sound is heard and recording starts. Incoming lamp
flashes during recording.
3
[q]
: Recording stop sound is heard and recorded data is saved.
ɡ Touch panel operation in Vo ice Recorder screen
The following operations are available with displayed keys.
* Contents Manager is activated by operating before recording. Data
previously recorded is played by operating after recording.
ɡ Key operation in Voice Recorder screen
* Contents Manager is activated by operating before recording.
ɡ Menu operation in Voice Recorder screen
[Mode]/select the recording time
[Play] nP. 185
[Phone->SD]/[SD->phone]
Voice Recorder
Using the FOMA terminal as voice
recorder
Recording
Recording start/stop sounds are enabled regardless of the setting of the
FOMA terminal.
The maximum recording time differs depending on the mode. When
[Attach to Mail mode] is set, the limit of the recording time is set to the
size that can be attached to mail. When [Long time mode] is set, you
can record up to 6 hours per recording.
Recording stops automatically when recording time reaches the
maximum or when the save destination has no available space.
When a call is received during recording, recording automatically stops,
recorded data is saved, and the call can be answered. After the call
ends, the save completion notification screen appears.
Recording time Maximum recording time
[p]/[q] Start/Stop recording
[Mode] Select the recording time mode
[Play] Play the recorded data
*
[Phone->SD]/
[SD->phone]
Switch the save destination
To select the recording time mode z+M
To play the recorded data*z+P
To select the save destination z+D
[Phone->SD], [SD->phone]
When the free space of the specified save destination is less than 300
KB, the save destination is changed automatically at recording.
This is the function
name as it appears in
the index.
Page number
Content differs from actual pages in this manual.
The outline of each
function and additional
information are
explained.
Necessary information,
precautions and other
information for using
functions are explained.
The operation is detailed
in steps.
Additional information,
precautions, and advice
relating to operations
are explained.
Each operation
separated with “;” is
explained when
operations are different
depending on the
selected item.
The explanations of
screen display are
shown. Refer to the
screens while using the
FOMA terminal (Text
which is input, numbers
and settings are
examples).
Search by chapter from
the index.
3
Page 6
Contents/Precautions
Contents
Contents/Precautions
Viewing/Searching this manual . . . . . . . . . . . . . . . . . . . . . . . . 1
Main functions of SH-10B. . . . . . . . . . . . . . . . . . . . . . . . . . . . . 6
Precautions (ALWAYS FOLLOW THESE DIRECTIONS) . . . . 8
Handling precautions . . . . . . . . . . . . . . . . . . . . . . . . . . . . . . . 15
Basic package and main optional parts . . . . . . . . . . . . . . . . 20
Before Using
the Handset
P. 21
Call
P. 43
Phonebook
P. 55
Part names and functions, Display, Retrieve a
function, Touch panel, Trackball, UIM (FOMA
card), Battery pack, Power on/off, Select
language, Set up Google account, Date/time
settings, Caller ID Notification, Profile, etc.
Make a call, Redial/Incoming History, WORLD
CALL, In-car hands-free, Receive a call,
Any-key settings, Adjust in-call volume, On hold,
Public mode (Power off), Answering Memo,
Manner mode, Earphone, etc.
Add, Group setting, Search, Edit, Speed dial/
Speed mail, Import contacts, etc.
Security
Settings
P. 65
Mail
P. 75
Browser
P. 105
Application
P. 113
Multimedia
P. 125
Security code, Lock no., Unlock method, Finger
list pattern, SIM card lock, Close lock, Restrict
address book, Restrict calls, Offline mode,
Reject calls, Save incoming call history, Network
security setting, Reset, etc.
Compose and send, Attached file, Save,
Receive, Check new mail, Reply/Forward,
Check attached file, Mailbox, Mail setting,
mopera U mail, SMS, Gmail, Google Talk,
i-mode.net mobile mode, etc.
View and operate sites, Bookmark or history,
Upload, Settings, etc.
Google Maps, Google Latitude, UkiUkiView, twit
SH, YouTube, RSS Reader, mixi for SH, millmo
for SH, Book store, Data synchronization,
Android Market, docomo market, Manage
applications, etc.
Shoot still pictures, Shoot moving pictures,
Change settings, Business Card Reader,
Information Reader, Text Reader, Barcode
Reader, Photo, Media Player, Use playlist, etc.
4
Page 7
1Seg
P. 153
File
Management
P. 165
Convenient
Functions
P. 181
Wi-Fi/Data
Communication/
Connection
P. 217
Character Entry
P. 229
Channel setting, DigitalTV, Record, Viewing
Reservation Setting/Recording Reservation
Setting, Use data broadcasting, Use TVlink,
Settings, TVPlayer, etc.
Contents Manager, App setting, Register,
microSD Card, Post to blog, Infrared
communication, Cooperation with Blu-ray Disc
recorder, DLNA server settings, etc.
Multi Assistant (Multitask), Notepad, Voice
Recorder, Calculator, Documents To Go, Book
viewer, Dictionary function, GPS function,
Compass, Use/Manage calendar, Use Google
Calendar, Alarm, StopWatch, KitchenTimer,
Sound setting, Screen setting, Lamp setting,
Font setting, VeilView, etc.
Wi-Fi, Bluetooth® function, mopera U,
Pake-hodai, etc.
Change settings, Dictionary, etc.
Network
Services
P. 239
Overseas Use
P. 245
PC Connection
P. 249
Appendix/
Troubleshooting
P. 255
Index
P. 293
Voice Mail, Call Waiting, Call Forwarding,
Nuisance Call Blocking, USSD, etc.
International roaming (WORLD WING), Make a
call, Receive a call, Data Roaming, Network
Operators, Access Point Names, etc.
USB setting, microSD reader/writer, MTP mode,
Major Update, etc.
Application list, Romaji input list, Multiaccess,
Options and related devices, Troubleshooting,
List of error messages, Warranty and
After-Sales Service, Software Update, Main
specifications, Intellectual property right, etc.
Index
Contents/Precautions
5
Page 8
Main functions of SH-10B
Contents/Precautions
■ Use of stand-by display nP. 26
The stand-by display appears when the FOMA terminal power is turned on.
You can paste widget or activate applications by selecting shortcuts or
application icons.
■ Convenient operation with touch panel, trackball and keyboard
nP. 32
Use touch panel, trackball and keyboard depending on the function.
■ Phonebook nP. 56
Save various personal data in addition to name, phone number and mail
address to a phonebook.
■ Mail nP. 76
Exchange mail via Internet.
■ Browser nP. 106
View Internet websites designed for PC.
■ Approx. 5.3 million effective pixels multifunctional camera
nP. 126
(Recorded pixels: approximately 5.0 million pixels)
Shoot still pictures/moving pictures and play them using a digital camera
with Picture Light/auto-focus function.
■ 1Seg nP. 154
Watch a terrestrial digital TV broadcasting for mobile devices. Also, record a
program.
■ Contents Manager nP. 166
Manage data stored to the FOMA terminal and microSD Card and display
them sorted by category.
■ Cooperation with Blu-ray Disc recorder nP. 179
Transfer videos that recorded on Blu-ray Disc recorder to microSD Card and
play them with Media Player.
■ Use of DLNA server nP. 180
Watch images or music data in the FOMA terminal or microSD Card on a
DLNA compatible TV, etc.
■ Schedule function nP. 198
Use a calendar to manage a schedule. Synchronize the FOMA terminal
calendar with Google Calendar on the site.
■ Documents To Go nP. 187
Display Word, Excel, PowerPoint and PDF files created with PCs. Also, edit
Word, Excel, PowerPoint files.
■ e-dictionary nP. 190
Enter a word to search in Built-in dictionary.
■ Wi-Fi nP. 218
Use wireless LAN function to connect to the network wireless access point
in your home or office, or use Internet over the public wireless LAN service
access point.
■ International roaming nP. 246
The same FOMA terminal, phone number and mail address as those used
in Japan are available overseas (supporting only 3G area).
Check the present location using the GPS function even overseas.
6
Page 9
■ Media Player nP. 147
■ GPS function nP. 196
■ Various network services nP. 240
■ Security Settings nP. 66
HIGH-SPEED area supported
FOMA HIGH-SPEED area is supported and the data can be received and
sent at speeds up to 7.2 Mbps and 5.7 Mbps respectively.
The maximum values (7.2 Mbps and 5.7 Mbps) are the values based on
the technical standard, and not the actual transmission speed. The
actual transmission speed varies depending on the network congestion
or transmission environment.
The transmission speeds may slow outside the FOMA HIGH-SPEED
area or when connecting to the access point that does not support
HIGH-SPEED.
Notes on using SH-10B
This FOMA terminal does not support i-mode functions (i-mode mail,
connection to i-mode site (broadcast), i-appli, etc.).
Google applications and its service contents are subject to change
without prior notice.
This FOMA terminal automatically performs communication for some
functions, for example, to synchronize data, check the latest software
version or maintain connection with the server. Also, operations such
as watching videos cause a large volume of packet to be transmitted.
Subscription to “Pake-hodai double/Pake-hodai simple” or other
flat-rate packet transmission services is highly recommended (In
subscribing to “Pake-hodai double/Pake-hodai simple”, the maximum
charge is reached in a short period of time).
If flat-plug earphone/microphone with switch (sold separately), etc. is
not connected to this FOMA terminal, you hear the other party’s voice
from a speaker.
Setting this FOMA terminal to manner mode does not mute sounds
(camera shutter sound, etc.) other than the ring tone, operation
sound, and various notification sounds.
For details on checking your phone number (own number) nP. 41
For details on software version of your FOMA terminal nP. 42
New functions may be added to this FOMA terminal and the
operation method may change by upgrading the OS version. Check
the DOCOMO website for the latest information of additions and
changes.
If the OS is upgraded, some applications that used in the previous OS
version may not be available or some unintended bugs may occur.
Read the terms of use of Google Inc. for details on Google services.
Also, read each terms of use for details on other web services.
If your FOMA terminal is lost, change your each account password
using a PC to prevent other persons from using Google services such
as Google Talk, Gmail, Android Market, etc., Twitter and mixi.
The FOMA terminal does not support providers other than mopera U
and Business mopera Internet (URL restriction).
Contents/Precautions
7
Page 10
Precautions (ALWAYS FOLLOW THESE
Contents/Precautions
DIRECTIONS)
Before use, read these “Precautions” carefully and use your FOMA
terminal properly.
Keep this manual in a safe place for future reference.
These precautions contain information intended to prevent bodily injury
to the user and to surrounding people, as well as damage to property,
and must be observed at all times.
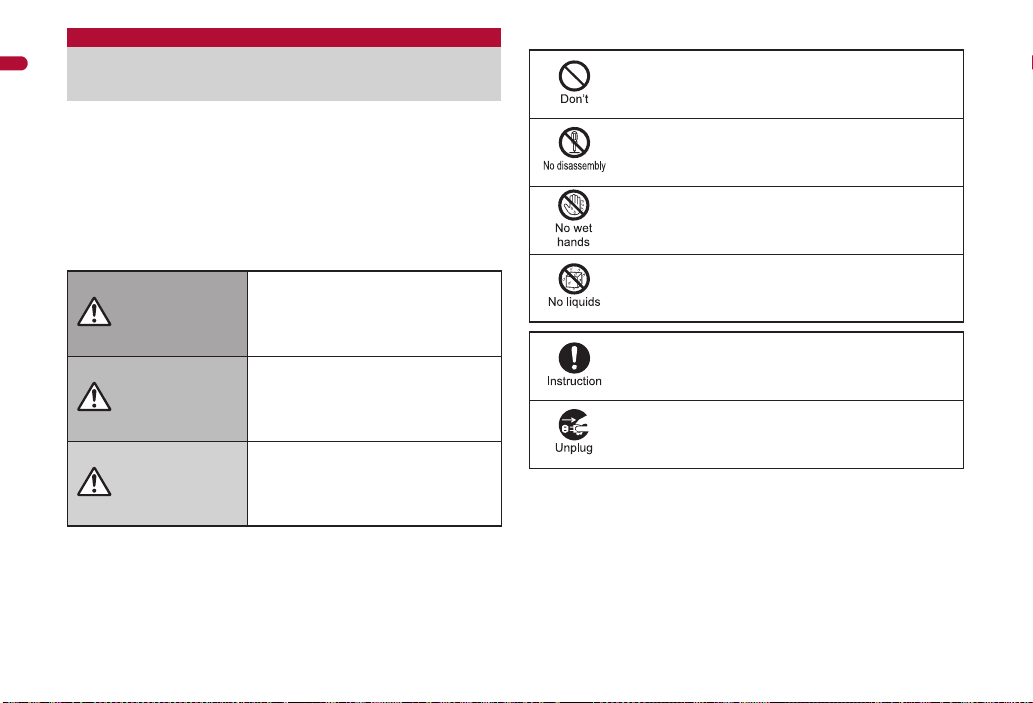
The following symbols indicate the different degrees of
injury or damage that may occur if information provided is
not observed and the FOMA terminal is used improperly.
This symbol indicates that “death
Danger
Warning
Caution
or serious bodily injury may directly
and immediately result from
improper use”.
This symbol indicates that “death
or serious bodily injury may result
from improper use”.
This symbol indicates that “bodily
injury and/or property damage may
result from improper use”.
The following symbols indicate specific directions.
Indicates a prohibited action.
Indicates not to disassemble the device.
Indicates not to handle the device with wet hands.
Indicates not to use the device near water or get it wet.
Indicates that instructions specified are compulsory
(must be followed).
Indicates that the power cord must be unplugged from the
outlet.
“Precautions” is explained in the following six sections.
Handling the FOMA terminal, battery pack, adapters, and UIM (general)
. . . . . . . . . . . . . . . . . . . . . . . . . . . . . . . . . . . . . . . . . . . . . . . . . . . . . . P. 9
Handling the FOMA terminal . . . . . . . . . . . . . . . . . . . . . . . . . . . . . . P. 10
Handling battery pack . . . . . . . . . . . . . . . . . . . . . . . . . . . . . . . . . . . P. 12
Handling adapters . . . . . . . . . . . . . . . . . . . . . . . . . . . . . . . . . . . . . . P. 13
Handling UIM . . . . . . . . . . . . . . . . . . . . . . . . . . . . . . . . . . . . . . . . . . P. 14
Handling mobile phones near electronic medical equipment . . . . . P. 14
8
Page 11

Handling the FOMA terminal,
Danger
Warning
Caution
battery pack, adapters, and
UIM (general)
Do not use, store, or leave
the FOMA terminal, battery
pack, adapters, and UIM in
locations subject to high
temperatures, such as near a
fire, in direct sunlight, or
May cause fires, burns or bodily injury.
May cause fires, burns, bodily injury or electric
shock.
May cause fires, burns, bodily injury or electric
shock.
May cause fires, burns, bodily injury or electric
shock.
inside a car on a hot day.
Do not place the FOMA
terminal, battery pack,
adapters, and UIM inside
cooking appliances such as
microwave ovens or pressure
cookers.
Do not attempt to
disassemble or modify.
Do not get the FOMA
terminal, battery pack,
adapters, and UIM wet with
water, drinking water, pet
urine, etc.
Use only the battery packs
and adapters specified by
NTT DOCOMO for use with
May cause fires, burns, bodily injury or electric
shock.
May cause fires, burns, bodily injury or electric
shock.
May cause fires, burns, bodily injury or electric
shock.
May cause fires or burns.
May cause a gas explosion or fire.
the FOMA terminal.
Do not subject the FOMA
terminal to strong impacts or
throw it.
Do not allow conductive
materials (such as metal
objects and pencil lead) to
come into contact with the
charger terminal or external
device terminal. In addition,
do not insert such objects.
Do not cover or wrap the
FOMA terminal with bedding,
etc. when using or charging.
Make sure to turn off the
FOMA terminal and not to
charge the battery in
locations such as gas
stations where flammable
gas is generated.
If you notice anything
unusual, such as an unusual
odor, overheating,
discoloration or deformation
during use, charging or
storage, immediately follow
the instructions below.
Unplug the power cord
from the outlet or cigarette
lighter socket.
Turn off the FOMA terminal.
Remove the battery pack
May cause fires, burns, bodily injury or electric
shock.
The FOMA terminal may fall and cause injury.
May cause fires, burns or electric shock.
May result in bodily injury.
from the FOMA terminal.
Do not leave the FOMA
terminal on unstable surfaces,
such as on a wobbling table
or sloped surface.
Do not store the FOMA
terminal in locations that are
subject to humidity, dust or
high temperatures.
If being used by a child, have
a guardian teach him/her the
proper handling procedures.
In addition, check that the
child is using the FOMA
terminal as directed.
Continued on next page
Contents/Precautions
9
Page 12
Keep the FOMA terminal out
Warning
Picture Light
of the reach of young
Contents/Precautions
A young child may swallow components or suffer
other bodily injury.
children.
Be very careful when using
the FOMA terminal connected
to adapters repeatedly or for
The FOMA terminal, battery pack or adapters
may become warm if 1Seg is used for a long
time while charging.
Touch high temperature areas for a prolonged
period of time may cause skin irritations,
itchiness, or low-temperature burn in some
people.
long periods of time.
Handling the FOMA terminal
Do not aim the infrared port
towards the eyes.
May cause eye injury.
Do not aim the infrared port
towards home electric
appliances with an infrared
device during infrared
The FOMA terminal may interfere with the
operation of infrared devices and cause an
accident.
communication.
Do not point the illuminated
light directly at someone’s
Do not use Picture Light near people’s faces.
Eyesight may be temporarily affected leading to
accidents.
Precautions:
The picture light source used for this product
may emit the light over the safety level for eyes
when operations such as undirected adjustments
are intentionally made. Therefore, do not
disassemble the terminal.
eyes.
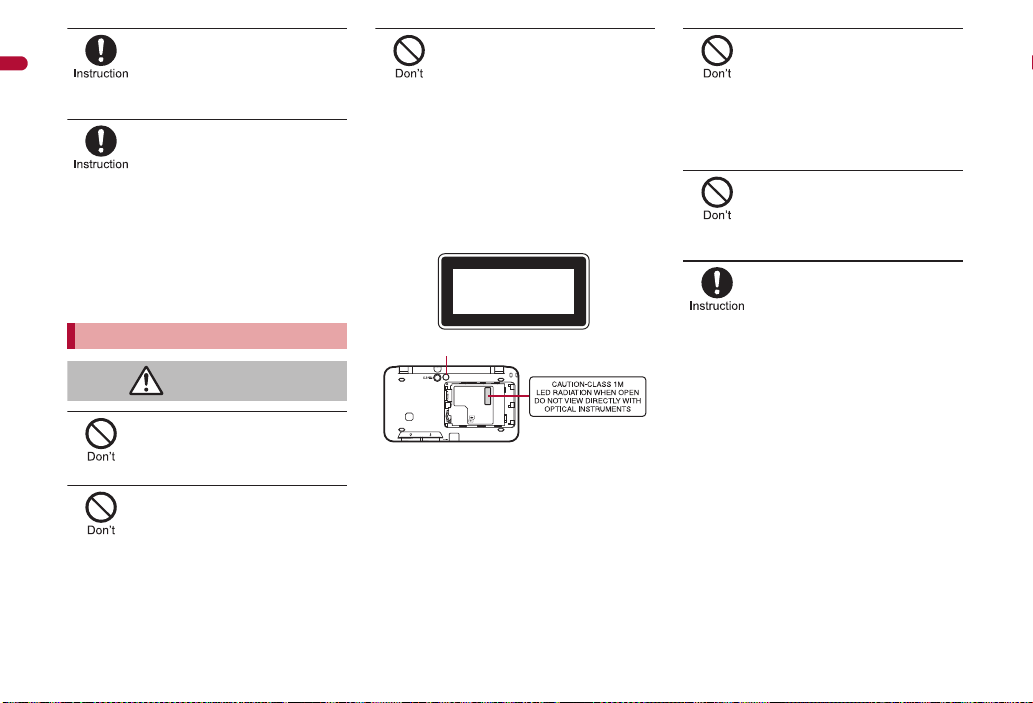
EN60825-1:1994 A1:2002 & A2:2001
CLASS1
LED Product
CAUTION:
Use of controls, adjustments or performance of
procedure other than those specified herein may
result in hazardous radiation exposure. As the
emission level from Picture Light LED used in
this product is harmful to the eyes, do not
attempt to disassemble the cabinet. Servicing is
limited to qualified servicing station only.
Do not allow water or other
liquids, metal, flammable
material, or other foreign
objects to enter the UIM or
microSD Card port on the
May cause fires, burns, bodily injury or electric
shock.
FOMA terminal.
Do not shine the light at
anyone driving a car or other
This may prevent a driver from driving safely and
cause a traffic accident.
vehicles.
Turn off the FOMA terminal in
areas where the use of
mobile phones is prohibited,
such as in aircraft or
The FOMA terminal may interfere with the
operation of electronic devices and electronic
medical equipment.
Follow the instructions given by the respective
medical facilities regarding the use of mobile
phones on their premises.
In addition, actions such as using on a mobile
phone aboard aircraft are prohibited and
punishable by law.
hospitals.
10
Page 13

Keep the FOMA terminal
Caution
away from the ears during a
hands-free call or while the
ring tone is ringing.
When you attach the
earphone/microphone to the
FOMA terminal to play games
or music, do not make the
Excessive high volume may damage your
hearing.
Also it may prevent you from hearing the
ambient sounds and cause an accident.
volume too loud.
Earphone Signal Level
The maximum output voltage for the music
player function, measured in accordance with
EN 50332-2, is 36.0 mV.
If you have a weak heart, take
extra precautions when
setting functions such as the
vibrator and ring tone volume
Various settings may have harmful effects on
your heart.
for incoming calls.
If you are using electronic
medical equipment, contact
the respective manufacturer
or vendor to check whether
the operation of the
equipment is affected by
The FOMA terminal may interfere with the
operation of electronic medical equipment, etc.
signals.
Turn the FOMA terminal off
near high-precision
electronic devices or devices
that use weak electronic
The FOMA terminal may interfere with the
operation of electronic devices.
signals.
Take particular care with the following
devices
Hearing aids, implanted cardiac pacemakers,
implanted cardioverter-defibrillators, or other
electronic medical equipment. Fire alarms,
automatic doors, and other equipment controlled
by electronic signals. If you use an implanted
cardiac pacemaker, implanted
cardioverter-defibrillator or other electronic
medical equipment, contact the respective
manufacturer or vendor to check whether the
operation of the equipment is affected by signals.
In case that the display part
or camera lens is damaged,
make sure to pay attention to
a broken glass and the
exposed inside of the FOMA
The surface of the display is covered by a
protective film or the surface of camera lens are
covered by a plastic panel so as to minimize the
possibility of glass scattering. However, touching
the broken or exposed parts may cause injury.
terminal.
Do not swing the FOMA
terminal by its strap, etc.
The FOMA terminal may hit you or others around
you, resulting in bodily injury.
Do not use the damaged
FOMA terminal.
May cause fires, burns, bodily injury or electric
shock.
If the display is broken and
the liquid crystal then leaks,
do not get the liquid on your
May result in loss of eyesight and harm to your
skin.
If the liquid comes into contact with your eyes or
mouth, immediately rinse your eyes or mouth
with clean water and see a doctor.
If the liquid comes into contact with your skin or
clothes, immediately wipe it off with alcohol, and
wash with water and soap.
skin (face, hands, etc.).
Contents/Precautions
Continued on next page
11
Page 14
On the surface of the display,
Danger
Warning
there is a protective film for
Contents/Precautions
securing the safety (for
preventing the reinforced
glass panel from shattering)
in case of the damage caused
by a drop, impact, etc. Do not
forcibly peel off or scratch
Using the FOMA terminal with the film removed
may cause a bodily injury when the display is
damaged.
this film.
If you use the FOMA terminal
in an automobile, contact the
automobile manufacturer or
vendor to check whether the
operation of the electronic
equipment is affected by
The FOMA terminal may interfere with the
operation of electronic equipment in some
vehicle models. In such cases, stop using the
FOMA terminal.
signals.
Use of the FOMA terminal
may cause skin irritations
such as itchiness, rashes or
eczema in some people. If
this occurs, immediately stop
using the FOMA terminal and
seek medical treatment.
n“Material list” on P. 15
Do not close the FOMA
terminal on your fingers or
May result in bodily injury.
objects such as the strap.
Look at the display in a
well-lit place, keeping a
certain distance from the
Otherwise, eyesight may be decreased.
screen.
Handling battery pack
Check the type of battery using the information
printed on the battery pack label.
Label Battery type
Li-ion00 Lithium-ion
Do not touch terminals with
metallic objects such as
wires. In addition, do not
carry or store the battery
pack with metallic necklaces,
The battery pack may catch fire, explode,
overheat or leak.
The battery pack may catch fire, explode,
overheat or leak.
etc.
Check that the battery pack is
facing the correct direction
before you attach it to the
FOMA terminal. If you are
having difficulty fitting the
battery pack to the FOMA
terminal, do not use
excessive pressure to force
the battery into place.
Do not throw the battery pack
into a fire.
The battery pack may catch fire, explode,
overheat or leak.
Do not puncture, hit with a
hammer or step on the
The battery pack may catch fire, explode,
overheat or leak.
battery pack.
If the battery fluid comes into
contact with your eyes, do
not rub your eyes but
immediately rinse your eyes
with clean water. Then seek
May result in loss of eyesight.
prompt medical treatment.
If any trouble such as a
deformation or scratches
caused by a drop is found,
The battery pack may catch fire, explode,
overheat or leak.
never use it.
If the battery pack leaks or
emits an unusual odor,
immediately stop use and
move it away from any flame
The battery fluid is flammable and could ignite,
causing a fire or explosion.
or fire.
12
Page 15
Prevent your pet from biting
Caution
Warning
the battery pack.
The battery pack may catch fire, explode,
overheat or leak.
Do not dispose of used
battery packs in ordinary
May cause fires or damage to the environment.
Place tape over the terminals to insulate
unnecessary battery packs, and take them to a
docomo Shop, retailer or institution that handles
used batteries in your area.
garbage.
Do not use or charge a wet
battery pack.
The battery pack may catch fire, explode,
overheat or leak.
If the battery fluid leaks, do
not get the liquid on your
May result in loss of eyesight and harm to your
skin.
If the liquid comes into contact with your eyes,
mouth, skin or clothes, immediately rinse them
with clean water.
If the liquid comes into contact with your eyes or
mouth, see a doctor immediately after rinsing
your eyes or mouth.
skin (face, hands, etc.).
Handling adapters
Do not use if the adapter’s
cord is damaged.
May cause fires, burns or electric shock.
Never use the AC adapter in
humid locations such as a
May cause fires, burns or electric shock.
May cause fires, burns or electric shock.
May cause electric shock.
May cause fires, burns or electric shock.
bathroom.
The DC adapter should only
be used in negative grounded
vehicles. Never use this
adapter in positive grounded
vehicles.
Do not touch adapters if you
hear thunder.
Take care not to short-circuit
the charging terminal when
connected to an outlet or
cigarette lighter socket. Also,
take care not to allow any
part of your body (hands,
fingers, etc.) to come into
contact with the charging
terminal.
Do not place heavy objects
on the adapter’s cord.
May cause fires, burns or electric shock.
When plugging/unplugging
the AC adapter into/from the
outlet, do not allow metallic
straps or other metallic
objects to come into contact
May cause fires, burns or electric shock.
with the terminal.
Do not handle the cord and
plug of the adapters with wet
hands.
May cause fires, burns or electric shock.
Always use the specified
power supply and voltage.
When using overseas, use
the AC adapter that is
Using the incorrect voltage may cause fire, burns
or electric shock.
AC adapter: 100V AC
DC adapter: 12/24V DC (for negative grounded
vehicles only)
AC adapter available overseas: 100 to 240V AC
(Connect only with household AC outlet)
available overseas.
If the fuse in the DC adapter
blows, always replace it with
May cause fires, burns or electric shock. Refer to
the respective manuals for information on the
correct fuse specifications.
a fuse of the specified type.
Contents/Precautions
Continued on next page
13
Page 16
Wipe off any dust on the
Caution
Warning
power plug.
Contents/Precautions
May cause fires, burns or electric shock.
Fully plug the AC adapter into
the outlet.
May cause fires, burns or electric shock.
Always grasp the power plug
when unplugging the
adapters from the outlet or
cigarette lighter socket. Do
not forcibly pull by the
May cause fires, burns or electric shock.
adapter’s cord.
Unplug the power cord from
the outlet or cigarette lighter
socket when not using for a
May cause fires, burns or electric shock.
long time.
Should water or other liquids
enter the adapters, remove
the power plug from the
outlet or cigarette lighter
May cause fires, burns or electric shock.
socket immediately.
Always unplug the power
plug from the outlet or
cigarette lighter socket
May cause fires, burns or electric shock.
14
before cleaning the adapters.
Handling UIM
Be careful with the cutting
surface when detaching the
May cause bodily injury.
UIM.
Handling mobile phones near
electronic medical equipment
The precautions detailed here conform to the
guidelines drawn up by the Electromagnetic
Compatibility Conference Japan, regarding the
protection of electronic medical equipment from
signals emitted by mobile phones.
Observe the following in
hospitals or other medical
Do not take your FOMA terminal into
Turn off your FOMA terminal inside hospital
Turn off your FOMA terminal even when you
facilities.
operating rooms, ICUs (Intensive Care Units)
or CCUs (Coronary Care Units).
wards.
are in an area outside hospital wards, such as
a hospital lobby, since electronic medical
equipment may be in use nearby.
Where a medical facility has specific instructions
prohibiting the carrying and use of mobile
phones, observe those instructions strictly.
Turn off your FOMA terminal
in crowded places such as
rush-hour trains in case
somebody nearby is using an
implanted cardiac pacemaker
or implanted
Electromagnetic signals may have harmful effects
on the operation of implanted cardiac pacemakers
and implanted cardioverter-defibrillators.
cardioverter-defibrillator.
If you have an implanted
cardiac pacemaker or an
implanted
cardioverter-defibrillator,
always carry or use your
FOMA terminal at least 22 cm
Electromagnetic signals may have harmful effects
on the operation of implanted cardiac pacemakers
and implanted cardioverter-defibrillators.
away from your implant.
Patients receiving medical
treatment away from a
hospital or medical facility
(e.g. home treatment) who are
using electronic medical
equipment other than
implanted cardiac
pacemakers or implanted
cardioverter-defibrillators
should consult the respective
manufacturers for
information regarding the
effects of signals on the
Electromagnetic signals may have harmful effects
on the operation of electronic medical equipment.
equipment.
Page 17
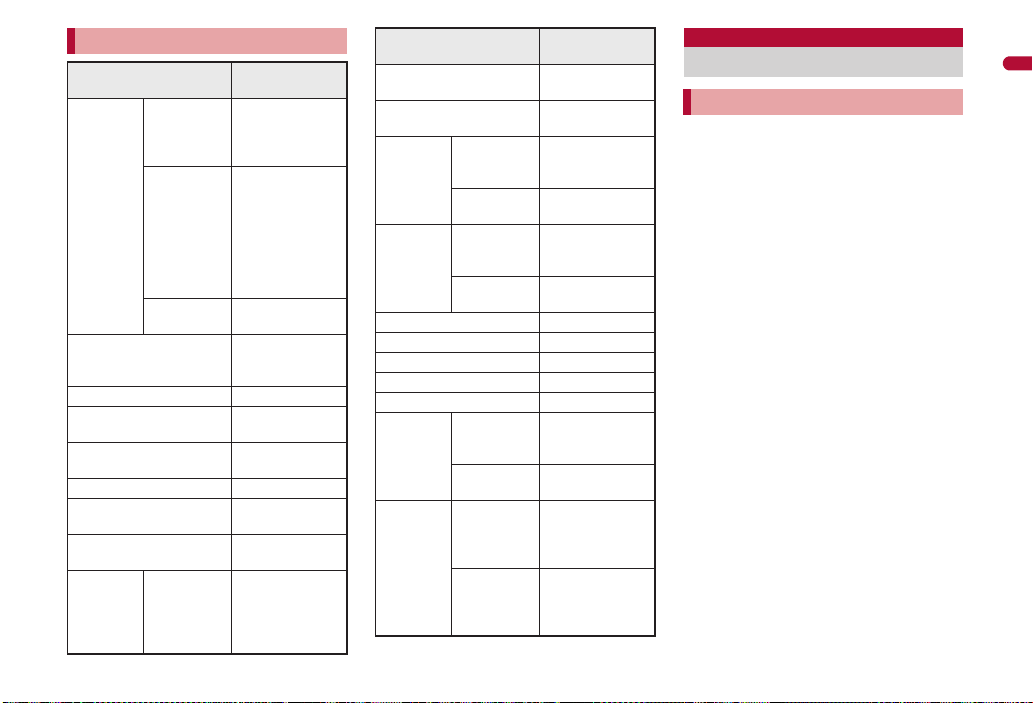
Material list
Part
Back of hinge
section, Metal
section of
display side
Display side,
Surface of
FOMA
terminal
Display
Incoming/Charging lamp ABS/Material
Camera window
Back cover
Picture Light PC/Material
Protective cover
Antiskid section
Operation
key
Back of
display side,
Keyboard
side, Back of
keyboard
side, Front of
hinge section
Sides
Power/End
key, Home
key, Back
key, Menu
key
Material/Surface
treatment
Magnesium/
Coating
ABS/Coating,
Hard coating
RENY/Coating,
Hard coating
Polyester
(antiscattering
film)/Hard coating
PMMA/Hard
coating
ABS/Coating,
Hard coating
Elastomer/
Material
Elastomer/
Material
PC/Coating, Hard
coating
Part
Keyboard
Trackball
External
External
connector
terminal
Earphone/
Microphone
terminal
Infrared port ABS/Material
Inside microSD Card slot SUS/Nickel plating
UIM tray POM/Grain finish
Battery storage side PET/Material
Battery storage section ABS/Material
Battery
terminal
Battery
pack
connector
terminal
Cover
Earphone/
Microphone
terminal
Cover
Battery
terminal
connector
Battery
terminal
Battery pack
Terminal
section
Material/Surface
treatment
ABS/Coating,
Hard coating
Fluorine-contained
rubber/Material
SUS/Nickel plating
PC/Coating, Hard
coating
SUS/Tin plating
PC/Coating, Hard
coating
LCP/Material
Copper alloy/Gold
plating
PA (Polyamide),
PC
(Polycarbonate)/
Spark erosion
Copper alloy/Full
surface nickel with
plating base, Gold
plating
Handling precautions
General notes
Do not expose to water.
The FOMA terminal, battery pack, adapter
and UIM are not waterproof. Do not use in
humid or steamy areas such as bathrooms
and avoid exposing to rain and other forms of
moisture. If the FOMA terminal is carried
close to skin, perspiration may cause internal
components to corrode and result in
malfunction. Note that if problem is found to
be due to moisture, handset and parts are not
covered by warranty and in some cases may
be irreparable. Even where repairs are
possible, repair charges will be incurred since
damage is not covered by warranty.
Clean only with a soft and dry cloth
(such as the type used for eyeglasses).
• Forceful rubbing of LCD with a dry cloth
may scratch LCD surface.
• Note also that LCD coating may stain if
moisture or soiling is left on the surface for a
long period.
• Never use chemicals such as alcohol,
thinners, benzene or detergents, as these
agents may erase the printing on the
handset or cause discoloration.
Occasionally clean terminals with a dry
cotton swab, etc.
Unclean terminals may result in poor
connections and loss of power. Keep terminal
clean with a dry cotton swab, etc.
Take care of the terminal while cleaning it.
Continued on next page
Contents/Precautions
15
Page 18

Do not place the handset near an air
conditioning vent.
Contents/Precautions
Condensation formed due to rapid changes in
temperature may cause internal corrosion
and lead to malfunction.
Do not apply excessive force to the
FOMA terminal and battery pack when
using them.
Carrying the handset in a tightly packed bag,
or sitting on the handset in your pocket may
cause a damage to display, other internal
components or battery pack, or result in
malfunction.
Keeping an external connector device
plugged into the external connector terminal
or earphone/microphone terminal may cause
a damage to the connector or result in
malfunction.
Read the respective manuals supplied
with the FOMA terminal and adapters
carefully.
Do not rub or scratch the display with
metal, etc.
May scratch the handset and cause
malfunction or damage.
Notes about the FOMA
terminal
Do not forcefully press a surface of the
touch panel, or operate with a pointed
object such as a fingernail, ballpoint
pen, pin, etc.
May damage the touch panel.
Avoid using the handset in extremely
high or low temperatures.
Use the FOMA terminal within the range of a
temperature between 5°C and 35°C and a
humidity between 45% and 85%.
Using the handset close to landline
phones, TVs or radios may have
harmful effects on the operation of
such equipment. Move as far away as
possible from such items before use.
Keep a separate memo and note
information stored in the FOMA
terminal.
DOCOMO shall not be liable for any loss of
content.
Do not drop or otherwise subject the
FOMA terminal to severe impact.
May damage the handset and cause
malfunction.
When connecting an external
connector device to the external
connector terminal or earphone/
microphone terminal, do not put it in
obliquely or do not pull it while it is
plugged in.
May damage the handset and cause
malfunction.
Do not close the FOMA terminal on
strap, etc.
May damage the handset and cause
malfunction.
The FOMA terminal becomes warm
during using or charging but this is not
a malfunction.
Do not leave the camera in direct
sunlight.
May cause discoloration or burn-in.
Use the FOMA terminal with the
earphone/microphone terminal cover
and external connector terminal cover
on.
Dust, water and others enter inside and cause
a malfunction.
Do not use the FOMA terminal without
the back cover.
May detach the battery pack or cause
malfunction or damage.
Do not cover the surface of the display
or keys with an extremely thick sticker.
May cause malfunction, damage or error.
While using a microSD Card, do not
remove the card or turn off the FOMA
terminal.
May cause data loss or malfunction.
Never place a magnetic card near or in
the FOMA terminal.
The stored magnetic data in cash cards,
credit cards, telephone cards, floppy disks,
etc. may be erased.
Never place magnetized items near the
FOMA terminal.
Putting highly magnetized items closer may
cause an error.
Never place magnetized items near the
trackball.
May cause an error.
Wipe off any dust on the keyboard with
a soft and dry cloth or remove it with a
soft brush.
16
Page 19

Notes about battery pack
Battery pack is a consumable product.
Though usage time varies with use, change
battery if battery level is extremely low even
after fully charged. Purchase a specified new
battery pack.
Charge battery in areas where ambient
temperature is between 5°C and 35°C.
The usage time for a battery pack
depends on the usage and
deterioration of battery pack.
Depending on usage, the battery pack
may swell as it approaches the end of
its service life but this will not cause
problems.
Note the followings when the battery
pack is stored.
The storage with the battery pack fully
charged (immediately after charging is
completed)
The storage with no battery level (cannot
turn the FOMA terminal on)
May lower the performance or shorten the life
of the battery pack.
Approximately 40% is recommended as the
battery level for storage.
Notes about adapters
Charge battery in areas where ambient
temperature is between 5°C and 35°C.
Do not charge battery pack in the
following locations.
Areas with high humidity or dust, or in
areas exposed to strong vibrations
Close to landline phones, TVs, radios, etc.
Adapters may become warm during
charging but this is not a malfunction.
Do not use DC adapter to charge
battery when the car engine is not
running.
May cause car battery to run down.
When using an outlet with a feature to
prevent the plug from being removed
accidentally, follow instructions in the
outlet user’s guide.
Do not subject to strong force or
impacts. Also, do not disfigure the
charger terminals.
May cause a malfunction.
Notes about UIM
Do not apply unnecessary force when
inserting/removing the UIM.
Customer is responsible for
malfunctions arising from inserting UIM
into a different IC card reader/writer.
Always keep IC area clean.
Clean only with a soft and dry cloth
(such as the type used for eyeglasses).
Keep a separate memo and note
information stored in the UIM.
DOCOMO shall not be liable for any loss of
content.
To protect the environment, please take
any unnecessary UIMs to a docomo
Shop or retailer.
Do not damage, touch haphazardly or
short-circuit the IC.
May cause data loss or malfunction.
Do not drop or otherwise subject the
UIM to severe impact.
May cause a malfunction.
Never bend the UIM or place heavy
objects on it.
May cause a malfunction.
Do not insert the UIM to the FOMA
terminal with a label or sticker attached
on the card.
May cause a malfunction.
Notes on using Bluetooth
function
The FOMA terminal supports the
security function that meets the
Bluetooth specification for the security
during communication using Bluetooth
function. However, the security may
not be sufficient depending on the
configuration. Take care of the security
while making communication using
Bluetooth function.
Even if any leak of data or information
occurs while making communication
using Bluetooth function, DOCOMO
shall not be liable for any loss of
content.
With the FOMA terminal, use headset,
hands-free, audio and object push.
Also, the audio/video remote-control
may be available depending on the
audio (only with compatible Bluetooth
devices).
Continued on next page
Contents/Precautions
17
Page 20

Radio frequencies
The radio frequencies the Bluetooth
Contents/Precautions
function of the FOMA terminal uses are
as follows.
This wireless device uses 2.4 GHz band. The
modulation system is the FH-SS system and
a coverage distance is 10 m or less. All radio
frequencies are used and the frequencies for
mobile object identifiers shall not be avoided.
Cautions on using Bluetooth devices
Bluetooth operates at radio frequencies
assigned to the in-house radio stations
for a mobile object identifier that have
to be licensed and is used in
production lines of a factory, specific
unlicensed low power radio stations,
and amateur radio stations (hereafter,
referred to “another radio station”) in
addition to industrial, scientific,
medical devices, or home electric
appliances such as microwave ovens.
1. Before using this product, make
2. If radio interference between this
3. Contact the number listed in “docomo
sure that “another radio station” is
not operating nearby.
product and “another radio station”
occurs, avoid interference by
moving immediately to another
place or “turning off the power”.
Smartphone Care” on the back of this
manual for further details.
Notes about wireless LAN
(WLAN)
Wireless LAN
Do not use wireless LAN near magnetic
devices such as electric appliances or AV/OA
devices, or in radio waves.
• Magnetism or radio waves may increase
noises or disable communications
(especially when using a microwave oven).
• When used near TV, radio, etc., reception
interference may occur, or channels on the
TV screen may be disturbed.
• If there are multiple wireless LAN access
points nearby and the same channel is
used, search may not work correctly.
Radio frequencies
The radio frequencies the
WLAN-installed devices use are
indicated on the battery storage
section. The following are the
descriptions:
2.4: This radio equipment uses the 2400 MHz
band.
DS/OF: The modulation system is the DS-SS
or OFDM system.
4: The estimated coverage distance is 40 m
or less.
: All radio frequencies
between 2400 MHz and 2483.5 MHz are used
and the frequencies for mobile object
identifiers shall not be avoided.
Available channels for SH-10B’s wireless
LAN are between 1 to 13. Note that other
channel access points cannot be connected.
Available channels vary depending on the
country.
For use in an aircraft, contact the airline
beforehand.
There are restrictions on the use of wireless
LAN in some countries or regions such as
France. If you intend to use wireless LAN
overseas, check the local laws and
regulations beforehand.
18
Page 21
Cautions on using 2.4 GHz devices
WLAN-installed devices operate at
radio frequencies assigned to the
in-house radio stations for a mobile
object identifier (radio stations
requiring a license) used in production
lines of a factory, specific unlicensed
low power radio stations (radio
stations requiring no license), and
amateur radio stations (radio stations
requiring a license) in addition to
industrial, scientific, medical devices
such as microwave ovens.
1. Before using this device, make sure
that the in-house radio stations for
a mobile object identifier, specific
unlicensed low power radio
stations and amateur radio stations
are not operating nearby.
2. If the device causes harmful radio
interference to the in-house radio
stations for a mobile object
identifier, immediately change the
radio frequency or stop use, and
contact the number listed in
“docomo Smartphone Care” on the
back of this manual for crosstalk
avoidance, etc. (e.g. partition setup).
3. If the device causes radio
interference to specific unlicensed
low power radio stations for a
mobile object identifier or amateur
radio stations, contact the number
listed in “docomo Smartphone
Care” on the back of this manual
for further details.
Caution
Never use the FOMA terminal that is
modified. Using a modified device
violates the Radio Law.
The FOMA terminal has acquired the
certification of conformity with technical
regulations for the specified radio station
based on the Radio Law, and the “Technical
Conformity Mark ” is printed on the model
nameplate of the FOMA terminal as a proof. If
the screws of FOMA terminal are removed
and a modification is given to the inside, the
certification of conformity with technical
regulations will become invalid. Never use the
FOMA terminal without the valid certification.
Doing so violates the Radio Law.
Be careful when using the FOMA
terminal while driving a motor vehicle.
While driving, using a mobile phone in hand is
regarded as a punishable act. If there is no
choice but to receive a call, use hands-free
and tell the caller that you will “call back” and
then pull over to a safe place to make a call.
Use the Bluetooth function only in
Japan.
The Bluetooth function in the FOMA terminal
conforms to the domestic radio wave
standards and is authorized. Using the
function overseas may result in punishment.
Use the wireless LAN (WLAN) function
only in Japan.
The wireless LAN function in the FOMA
terminal conforms to the domestic radio wave
standards and is authorized. Using the
function overseas may result in punishment.
Use the FOMA terminal at least 15 mm
away from your body during
communication.
Contents/Precautions
19
Page 22
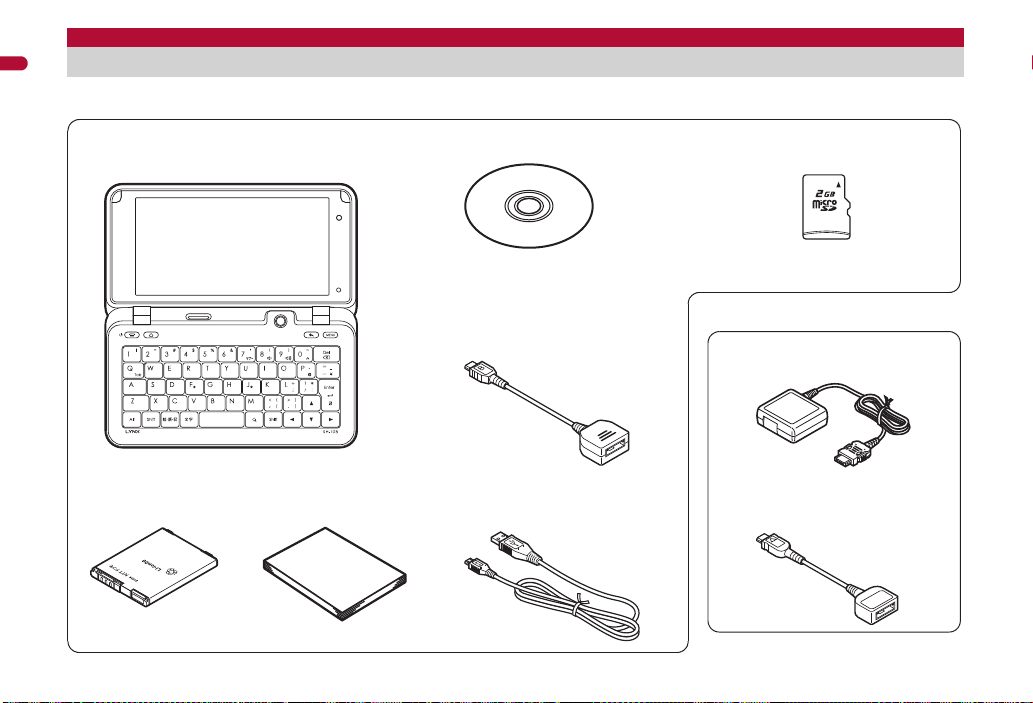
Basic package and main optional parts
SH-10B terminal
(includes warranty and Back Cover SH43)
“Manual for USB Driver Installation” in the
PDF format is contained.
■ Basic package
microSD Card (2 GB) (sample)
(includes user’s guide)
Battery Pack SH24
SH-10B CD-ROM
Manual
(Japanese version)
microUSB adapter for charge (sample)
(includes user’s guide)
microUSB cable for PC (sample)
(includes user’s guide)
FOMA AC Adapter 01/02
(includes warranty and user’s guide)
■ Main optional parts
For details on other optional parts nP. 273
microSD Card is inserted to the
FOMA terminal by default.
FOMA charging micro USB
adapter T01
(includes user’s guide)
Contents/Precautions
20
Manual
Page 23

Before Using the Handset
Part names and functions . . . . . . . . . . . . . . . . . . . . . . . . . . . . . . . . . . . . .22
Icons that appear on display . . . . . . . . . . . . . . . . . . . . . . . . . . . . . . . . . . . 24
Retrieving a function from stand-by display . . . . . . . . . . . . . . . . . . . . . . . 26
Searching information in the FOMA terminal and sites. . . . . . . . . . . . . . . 31
Operation of touch panel. . . . . . . . . . . . . . . . . . . . . . . . . . <Touch panel>32
Using trackball . . . . . . . . . . . . . . . . . . . . . . . . . . . . . . . . . . . <Trackball>34
Using UIM (FOMA card) . . . . . . . . . . . . . . . . . . . . . . . . . . . . . . . . <UIM>34
Attaching/Removing battery pack . . . . . . . . . . . . . . . . . . . . . . . . . . . . . . .35
Charging . . . . . . . . . . . . . . . . . . . . . . . . . . . . . . . . . . . . . . . . . . . . . . . . . .36
Checking battery level. . . . . . . . . . . . . . . . . . . . . . . . . . . . <Battery level>39
Turning power on/off . . . . . . . . . . . . . . . . . . . . . . . . . . . . <Power on/off>39
Changing screen display to English . . . . . . . . . . . . . . <Select language>40
Setting up Google account . . . . . . . . . . . . . . . . . . . . . . . . . . . . . . . . . . . . 40
Setting date and time . . . . . . . . . . . . . . . . . . . . . . . <Date/time settings>40
Notifying the other party of your phone number
. . . . . . . . . . . . . . . . . . . . . . . . . . . . . . . . . . . . . <Caller ID Notification>41
Saving your own name and image . . . . . . . . . . . . . . . . . . . . . . <Profile>41
Checking information about the FOMA terminal . . . <Device information>42
21
Page 24
Part names and functions
2
6
3
7
9
8
c
d
e
f
l
k
j
n
o
p
q
h
m
i
g
1
5 b
4
a
Before Using the Handset
Key illustrations are examples and may look different from actual keys.
22
Page 25
11Seg antenna (nP. 154)
1Seg antenna is built in. To receive in better conditions, do not cover
the antenna area with your hand.
2Display/Touch panel (nP. 24, P. 32)
3Speaker
Emits ring tones, music, etc.
Emits the other party’s voice during a call.
4|: Home key
Displays the stand-by display.
5H: Power/End key
Use to turn the power on/off (nP. 39).
Use to end the displayed application or a call.
6Keyboard
For details on operation when entering characters nP. 230
7In-camera
Use to shoot still pictures or moving pictures of yourself.
8Trackball (nP. 34)
9Brightness sensor (nP. 214)
Sensor detects brightness of the surrounding area and adjusts the
brightness of backlight.
Do not cover the sensor area with your hand or a sticker. May
interfere with the sensor.
a{: Back key
Returns to the previous screen.
bz: Menu key
Displays available functions (menus) in a screen.
c+: Enter key
Execute or set a selected item.
d#$%&: Cursor keys
Move the cursor up/down/left/right.
e\: Search key
Displays the quick search box (nP. 31).
fIncoming/Charging lamp
Flashes while receiving a call, etc. (nP. 215).
Illuminates while charging (nP. 37).
gRESET button (nP. 74)
Press when an error occurs such as when data is not displayed
properly, and when operation does not work properly.
hmicroSD Card slot (nP.
171)
iInfrared port
Use for the infrared communicatio
(nP. 177).
jMouthpiece/Microphone
Sends out your own voice.
kExternal connector terminal
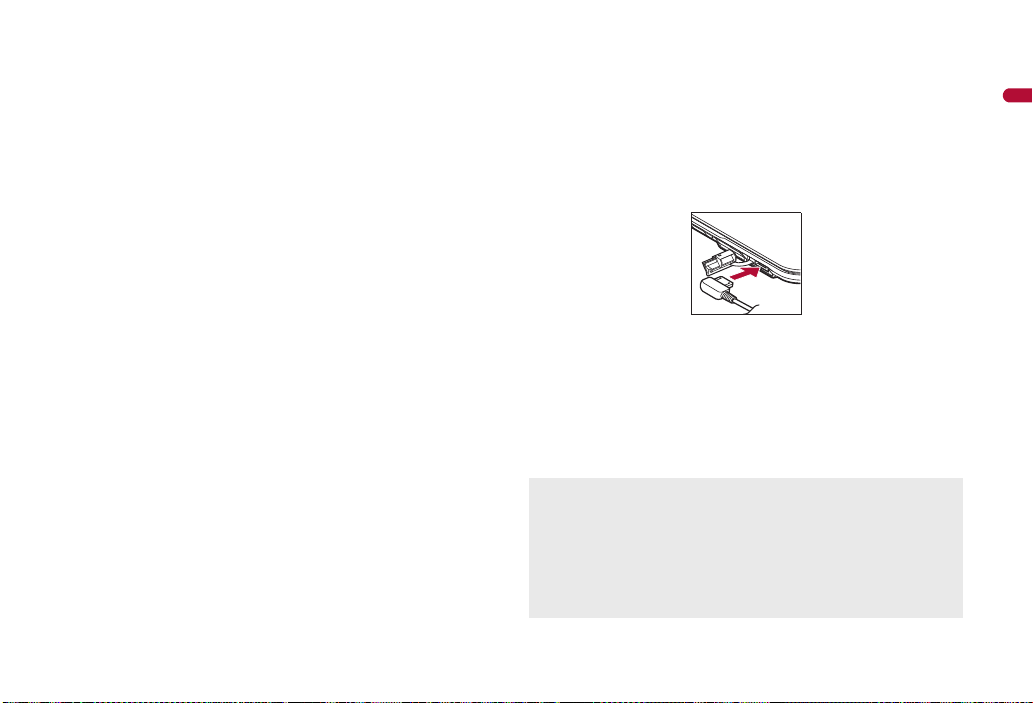
Use for charging and connecting a PC, etc.
Connect the microUSB adapter for charge (sample), microUSB cable
for PC (sample), etc. (nP. 38, P. 250).
lEarphone/Microphone terminal
Connect flat-plug earphone/microphone with switch (sold separately),
etc.
mFOMA antenna
FOMA antenna is built in. To receive in better conditions, do not cover
the antenna area with your hand.
nOut-camera
Use to shoot still pictures or moving pictures (nP. 126).
oPicture Light
Illuminates while shooting (nP. 132, P. 135).
pStrap hole
qBack cover (nP. 35)
n or IrSS™ communication
Display
microSD Card is referred to as [microSD] or [SD] on the FOMA
terminal.
Some of the screen shots in this manual have been modified or
abbreviated.
The display for the FOMA terminal is manufactured using
high-precision technology, but it may occasionally contain dots that fail
to light or that remain permanently lit. This is not a malfunction.
Before Using the Handset
Continued on next page
23
Page 26
The display may become the vertical view depending on the
Status bar
applications to use. In addition, it may automatically switch to
horizontal/vertical view just by tilting the FOMA terminal. In this case,
you can set whether to switch to horizontal/vertical view by tilting the
Before Using the Handset
FOMA terminal (nP. 214).
Icons that appear on display
Various icons appear in the status bar on the upper part of the
screen. There are two kinds of icons. One is the status icon which
shows the status of the FOMA terminal such as current time or
the battery level. And the other is the notification icon which
notifies you of missed calls or new mails, etc.
Status icons appear in the right side of the status bar (status
area) and notification icons in the left side of the status bar
(notification area).
Status icons
Notify the status of the FOMA terminal such as current time, battery level
and signal status.
The following table describes icons that mainly appear.
Icon Details
Alarm is set
\
[
Snooze is set
Icon Details
Battery level
p
0247
While charging, the battery icon appears with [w]
superimposed.
Signal strength
!
(
C
A
B
+
*
z
{
|
%
$
(
#
$
d
a
b
c
!#$%&
Strong Weak
Outside the service area or in a place with no signal
International roaming
3G is available
Sending or receiving 3G data
UIM is not inserted
Offline mode is set
Character entry mode
Standard manner mode is set
Silent manner mode is set
Driving mode is set
Mute
Talking through a speaker without using an external
device
Wi-Fi signal strength
Stand-by for Bluetooth
Bluetooth connecting
Data communicating with another device via infrared
communication
External memory transfer mode with USB connection
Fast transfer mode with USB connection
MTP mode with USB connection
24
Page 27
Icon Details
1
2
3
GPS positioning
#
GPS positioning is completed
$
Synchronizing data
#
VeilView is set
}
microSD Card is inserted
)
Restrict calls is set
Z
There is no message when Answering Memo is set
]
There are one to nine messages when Answering
^
Memo is set
There are ten messages when Answering Memo is set
_
Two or more applications are running
@
DLNA
!
■ Using status panel <Status panel>
You can check the status of the FOMA terminal or activate an application
corresponding to a status icon.
Touch the status area
1
: Alternatively, keep touching the status area and slide down.
: Or, ]+^+N depending on the application in use.
1Status panel
2Status icon
Details appear when you point the cursor to the icon.
When [Start] is displayed on the status panel, activate an
application corresponding to a status icon by selecting the icon or
pointing the cursor to the icon/[Start].
3Close key
Touch or keep touching and slide up to close the status panel.
Notification icons
Notify you of missed calls or new mails, etc. In addition, display details as
the call-out on the side of the icon.
When there are the same kinds of notifications, the number of
notifications appears on the right side of the notification icon.
Touch [R] displayed in the right side of the call-out to delete the call-out.
[*] appears when not all notification icons are displayed.
The following table describes icons that mainly appear.
Icon Details
Missed call
+
Answering memo
]
Voice call message
Y
New SMS
#
New PC-mail
$
New Gmail
D
1Seg information
/
Downloading/Downloaded data
(
Installed application
F
Update for installed application
E
System error
A
Playing music/Fast reversing/Fast forwarding in the
a
background
microSD Card is unmounted
-
Before Using the Handset
Continued on next page
25
Page 28
Icon Details
1
2
3
4 5
Wi-Fi connection status
0
Wi-Fi authenticating
Before Using the Handset
1
Wi-Fi authentication error
3
Wi-Fi authentication is completed (Logoff available)
5
Registration request/Connection request from Bluetooth
#
device
Available to use as a microSD reader/writer
%
Notification for major update
&
Software update is available
a
Software update is completed
b
Depending on the application in use, notification icons or call-out may
not appear.
The following indicates the maximum number of the items that you can
save as notification.
Missed call: 20 SMS: 100 PC-mail: 100
Answering memo: 10 1Seg: 50 Download: 50
For other than answering memo, if you have exceeded the maximum
number of notifications, they are deleted starting with the oldest.
■ Using notification panel <Notification panel>
Check details of a notification or activate the application corresponding to
the notification icon.
Touch the notification area
1
: Alternatively, keep touching the notification area and slide down.
: Or, ]+N depending on the application in use.
1Notification panel
A notification appears by category.
Select [Delete] to delete the notification. Select [Delete All] to
delete all notifications.
[More] appears when a notification is not entirely displayed. When
you select [More], the corresponding application is activated.
2Notification icon
When you select an icon or a notification, you can activate the
application corresponding to them.
For some icons, the number of the notification appears at the
upper right of the icon, or [A] appears at the upper left of the icon
when there is an error.
3Category
Type and number of notification appear.
4Notification details
Details of a notification appear.
5Close key
Touch or keep touching and slide up to close the notification
panel.
Retrieving a function from stand-by
display
The stand-by display appears when the FOMA terminal power is
turned on. You can paste widget or activate applications by
selecting shortcuts or application icons.
The explanations in this manual are based on the method for activating
an application from the main menu.
26
Page 29
The following shows three statuses of the stand-by display.
Wallpaper display
Touch the wallpaper
or H, etc.
Touch the wallpaper
or H
Desktop display
[U]
or quickly slide up
[V]
or quickly slide down
Main menu display
2
6
5
3
1
2
4
4
Wallpaper display Only wallpaper image is displayed.
Desktop display Quick menu, shortcut, or widget is superimposed
Main menu display Main menu is displayed.
You can retrieve various functions from the stand-by display using
following menu or shortcut.
Main menu Installed applications are displayed as icons in the
Quick menu Move an icon in the main menu to quick menu
Shortcut Create a shortcut in the stand-by display to quickly
Widget Place widget in the stand-by display to use easy
If you delete the applications and widgets installed by default, you can
download them from the site (http://3sh.jp) (in Japanese only).
on wallpaper image.
In desktop display, you can create up to five
stand-by displays and place a shortcut or
widget to each page.
main menu. Select an icon to activate an
application.
If you install a new application, an icon is added
For details on the preset applications nP. 256
to quickly activate an application from desktop
display.
You can register up to four icons for the quick
activate a frequently used function.
functions such as schedule or compass, etc. in the
stand-by display.
to the main menu.
menu.
Before Using the Handset
Continued on next page
27
Page 30
1Widget
In the quick menu, touch [Mail] for a
while
Slide the icon to the position where to
place as main menu
2Quick menu
3Shortcut
4Running application key
Before Using the Handset
Touch to display functions being activated as a list.
5Main menu
6Indicator
Indicates the page of the displayed main menu.
■ Menu operation in stand-by display
[Wallpaper change] (except for main menu display)
/[Select data]/select data
/[OFF]
Disable the setting of wallpaper.
[Add] (only for desktop display)
/[Shortcuts] nP. 29
/[Widgets] nP. 30
[Sort] (except for wallpaper display)/select a display area of target
for sorting/select the target with #$%&/+/select
a move destination with #$%&/+
[Desktop] (only for desktop display)
/[Settings]/select the setting
/[Add]/select the setting
/[Delete]
[Information]
[Display status]
[Light Navigation] (except for wallpaper display)/select the setting
[Delete All Cookie Data of Widget] (only for desktop display)
[Wallpaper change]
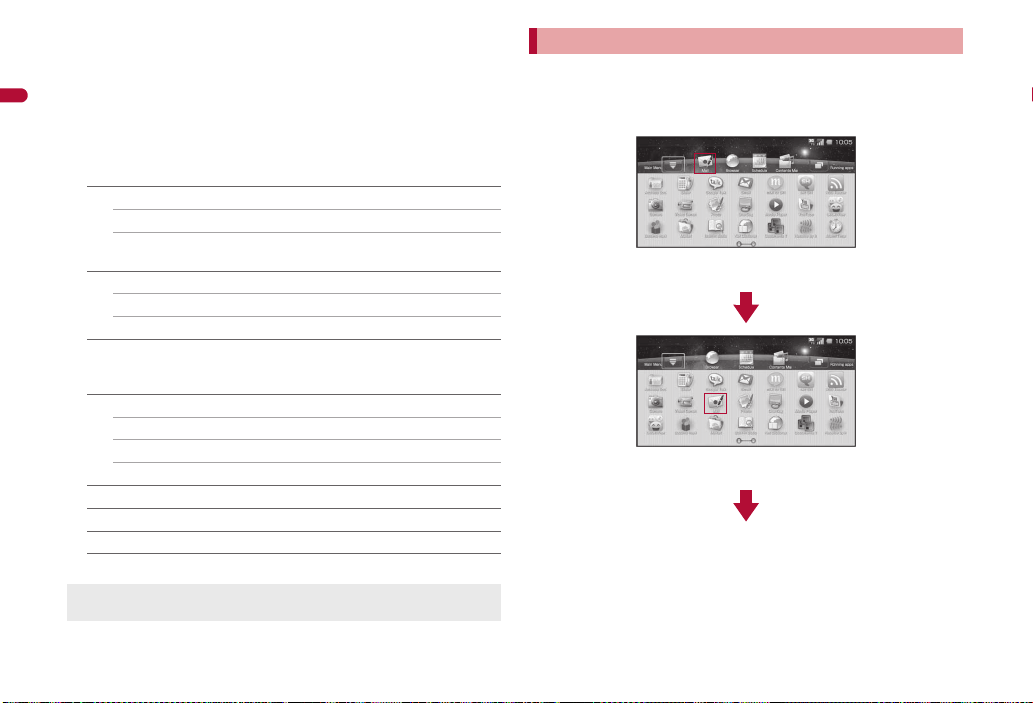
You can set a JPEG, PNG, still GIF image as a wallpaper.
Registering quick menu and sorting icons
If you touch an application icon for a while, you can move the icon. You can
place an icon to quick menu or sort icons.
Example: When changing [Mail] in the quick menu for [Camera] in
the main menu
28
Page 31

The same operation can be used for sorting icons of quick menu and
In the main menu, touch [Camera] for
a while
Slide the icon to the position where to
place as quick menu
In the main menu, touch [Camera] for
a while
Slide the icon to wallpaper and slide to
the position where to create a shortcut
main menu.
If you want to move icons in the main menu to another page, slide to the
right/left edge of the page to switch the page.
Creating shortcut
In stand-by (desktop display), z/[Add]/
1
[Shortcuts]
Select an item
2
■ Creating shortcut from application icon
You can create shortcuts by moving application icons to wallpaper.
Example: When creating shortcut from [Camera] in the main
menu
Before Using the Handset
29
Page 32

Pasting widget
3
1
2
In stand-by (desktop display), z/[Add]/
1
Before Using the Handset
[Widgets]
: Installed widgets are displayed as a list.
Select widget
2
The FOMA terminal supports Droidget besides Android standard
widget. For Droidget compatible widget, [N] ([O] when widget is
pasted on the stand-by display) appears in the widget selection screen.
A confirmation screen appears when Droidget compatible widget is
selected in the widget selection screen. Select [Set] to add widget to the
stand-by display.
You cannot add widget when the displayed stand-by display has no
space. However, you can add Droidget compatible widget by placing it
on another widget.
Managing stand-by display (desktop display)
using navigation bar
You can add pages of the stand-by display (desktop display) and delete a
widget or shortcut.
■ Displaying navigation bar
In stand-by, touch the widget/shortcut for a while
1
: Alternatively, slide to the left/right in the desktop display.
1Navigation bar
The page numbers of the registered stand-by display appear.
Select the page number to open that page.
2Page number of current stand-by display (shown in a blue box)
3Trash box
Deletes a widget, shortcut or stand-by display.
■ Adding a page of stand-by display
While displaying the navigation bar, [S]/[T]
1
■ Changing order of stand-by displays
While displaying the navigation bar, touch the page
1
number for a while
Keep touching the page number and slide to the page
2
number of the move destination
■ Deleting a stand-by display
While displaying the navigation bar, touch the page
1
number for a while
Keep touching the page number and slide to the trash
2
box
■ Moving widget/shortcut
In stand-by, touch the widget/shortcut for a while
1
Keep touching the widget/shortcut and slide to the
2
move destination
: If you keep touching the widget/shortcut and slide to the left/right
edge of the page number and stop, the previous/next page is
displayed and you can move the widget/shortcut to another page.
If you perform this operation on the endmost page, a new page is
created.
: Alternatively, keep touching the widget/shortcut and slide to the page
number of navigation bar to move the widget/shortcut to another
page.
If you slide to [S]/[T] of navigation bar, a new page is created.
30
Page 33

■ Deleting widget/shortcut
In stand-by, touch the widget/shortcut for a while
1
Keep touching the widget/shortcut and slide to the
2
trash box
Searching information in the FOMA terminal and sites
You can search information in the FOMA terminal and sites by
entering characters in the quick search box or by voice.
Searching in the FOMA terminal and sites by
entering characters
In stand-by, \
1
: When the service is used for the first time, the confirmation screen of
sharing with Google appears. Follow the instructions on the screen.
Enter the keyword in the quick search box
2
: Search applications and data that start with the entered character
and display a list of them.
Select the search result
3
: Select a search result to activate the corresponding application.
: To search sites: [Search the web]
Searching sites by voice
In the main menu, [Voice Search]
1
: Alternatively, [!] in the quick search box.
Enter the keyword by voice
2
: Browser is activated.
When voice is not recognized properly, touch the keyword entry field in
the quick search box to display a list of sound-alike keywords.
Google search setting
You can set whether to display search options when characters are entered,
or whether to reflect the search histories in the search options. You can also
open the site search history settings by browser.
When a Google account is not set, the account setup screen appears.
For details on setting the account nP. 40
In the main menu, [Settings]/[Search]/[Google
1
search settings]
Select an item
2
; [Show web suggestions]
• Each time you select, the setting is enabled/disabled.
; [Search history]
• Each time you select, the setting is enabled/disabled.
; [Manage search history]
■ Setting search objectives <Searchable items>
You can select data types in the FOMA terminal to search.
In the main menu, [Settings]/[Search]/[Searchable
1
items]
Select a search objective
2
: Each time you select, the setting is enabled/disabled.
■ Deleting search results <Clear search shortcuts>
You can delete the previous selected search results in the quick search box.
In the main menu, [Settings]/[Search]/[Clear
1
search shortcuts]/[OK]
Before Using the Handset
31
Page 34

Touch panel
Operating range of touch panel
Operation of touch panel
Operate by touching the touch panel (screen) directly with your
Before Using the Handset
finger.
In this manual, operations with touch panel are mainly explained.
The operating range of touch panel is as follows (The operating range
differs depending on the function).
Cautions when using the touch panel
The touch panel is designed to lightly touch with your finger. Do not
forcefully press with your finger, or press with a pointed object
(fingernail, ballpoint pen, pin, etc.).
In the following cases, the touch panel may not work even if you touch
it. May cause a malfunction.
Operation with a gloved finger
Operation with a fingernail
Operation with foreign objects placed on the operation pad
Operation on the touch panel on which a protective sheet or a
sticker is put
Basic operation of touch panel
The following shows the operation of touch panel and its main purpose, and
example key operation which fulfills the same function.
Operation Main purpose
Touch
Put your finger on the
touch panel and put it
off.
Touch for a while
Keep your finger on the
touch panel.
Slide
Keep your finger on the
touch panel and slide it.
Select/OK
Touch a key displayed on
Move the cursor and select
For a list screen, etc.,
Display the menu
When you touch the
Scroll the screen
Slide up/down while a
Cancel the selection
When you touch a menu
the screen.
touch the object to point
the cursor and touch
again.
screen for a while, a menu
may appear depending on
the function and screen in
use.
menu is displayed, etc.
or item by mistake, slide
away from the menu or
item.
Example key
operation
+
#/$/
%/&/
+
–
#/$
–
32
Page 35

Operation Main purpose
Quickly slide
Quickly slide your finger
and put it off.
Put a distance between
two fingers apart/closer
Put two fingers on the
touch panel and slide
them with putting a
distance between two
fingers apart/closer.
Operations differ depending on the function and screen in use.
Switch pages
Quickly slide to the left/
right in the main menu,
etc.
Zoom in/out
Put a distance between
two fingers apart/closer
while displaying an image,
etc.
Example key
operation
%/&
9/0,
etc.
Operation while using function
■ Keys displayed on screen
You can perform various operations by touching a key displayed on the right
side of the screen while using a function.
The following describes examples of the main keys that appear.
Example: Still picture shooting screen
[Home] Display the stand-by display
[Back] Return to the previous screen
[MENU] Display a menu
[Search] Display the quick search box
[OK] Set the selected item
[Check All Item]/
[Check All]
[Clear All Item]/
[Uncheck All]
[Do]/[Execute] Execute selected item
Same operation is available with |.
Same operation is available with {.
Same operation is available with z.
Same operation is available with \.
Select all items in the data selection screen when
moving or deleting multiple data
Same operation is available with ]+A.
Release all items selected in the data selection screen
when moving or deleting multiple data
Same operation is available with ]+^+A.
Same operation is available with ]+O.
Before Using the Handset
33
Page 36

■ Operating with touch operation
Quickly slide to the left
Main menu Page 1/2 Main menu Page 2/2
You can operate with your finger without displaying a menu or key.
Available touch operations differ depending on the function or screen.
Operate not to touch a key shown in the screen.
Before Using the Handset
■ Retrieving menu by touching for a while
When you touch the screen for a while, a menu may appear depending on
the function and screen in use.
This manual describes the operation method when a function can be
retrieved only with touching for a while.
■ Other operations
Switching pages
When the stand-by display or main menu, etc. contains multiple pages,
quickly slide to the left/right to switch pages.
Quickly slide to the right to return.
Example: When switching from page 1/2 to 2/2 of the main menu
Entering numbers
Number panel appears when you are required to enter
numbers such as date and time. Touch [+]/[–] to enter
numbers.
Touch for a while to increase/decrease numbers
continuously.
You can also select the number entry field and directly enter numbers.
Adjusting touch panel <Adjust touch panel>
In the main menu, [Settings]/[System]/[Adjust
1
touch panel]
Touch the center of the six displayed circles
2
Trackball
Using trackball
You can move a cursor and set an item with the trackball in the
same way as touch panel and keyboard operations.
To move a cursor: Roll the trackball
To execute/set the selected item: Press the trackball
UIM
Using UIM (FOMA card)
A UIM is an IC card that records personal information, such as
phone numbers, etc. Load the phonebook data stored in the UIM
(nP. 63).
You cannot make a voice call, send/receive a mail and use
communication functions such as packet transmission on the FOMA
terminal without inserting a UIM.
34
Page 37

Inserting/Removing UIM
Notch
IC (gold)
23
Fit the notch of the UIM to that of
the tray.
1
Tab
Tray
1
2
1
2
3
Before inserting or removing the UIM, turn off the power, position the
back facing upwards and remove the battery pack. Close and hold the
FOMA terminal securely with your both hands.
■ Inserting UIM
Hook a finger on the tab and pull out the tray (1)
1
: Pull out the tray straight until it stops.
Hold the UIM with the IC (gold)
2
turned up and set on the tray (2)
Push the tray all the way in (3)
3
■ Removing UIM
Hook a finger on the tab, pull the tray out (1) and
1
remove the UIM (2)
: Do not allow the UIM to fall when removing it.
Note that inserting or removing the UIM forcibly may damage the UIM
or deform the tray.
Refer to the UIM user’s guide for more information on the UIM.
Do not misplace the UIM once it is taken out.
When the tray falls off, slide the tray in straight along the guide rail.
Security codes
The UIM has a “PIN code”.
[0000] is set at the time of subscription but you can change to a four- to
eight-digit number (nP. 69).
Attaching/Removing battery pack
Use the Battery Pack SH24 exclusive to the FOMA terminal.
Perform with the FOMA terminal turned off and closed while holding with
your both hands.
■ Attaching battery pack
Push the catch on the back cover in the direction of
1
the arrow (1), slide approximately 3 mm (2) and
remove the back cover (3)
Continued on next page
Before Using the Handset
35
Page 38

Attach the battery pack (4)
With recycle mark
side up
Connector terminal
Battery pack
Battery pack connector terminal
4
5
6
Tab
2
Before Using the Handset
Place the back cover to the FOMA terminal slot with
3
the back cover open approximately 3 mm, push it (5)
and slide it to the direction of arrow to insert (6)
■ Removing battery pack
Follow step 1 of “Attaching battery pack” to remove
1
the back cover
Remove the battery pack
2
36
: With the recycle mark side turned up, place the connector terminal of
the FOMA terminal to that of the battery pack and attach the battery
pack.
: The battery pack has a tab that makes it easy to remove. Hook a
finger on the tab to prevent excessive force on it and remove the
battery pack upward.
Using unnecessary force when attaching or removing the battery pack
may damage the connector terminal for the battery pack (charger
terminal) on the FOMA terminal.
Securely close the back cover. If not closed securely, the back cover
may come off and the battery pack may fall out due to vibration.
Charging
The battery pack is not fully charged at the time of purchase. Be
sure to charge the battery using the microUSB adapter for charge
(sample) or FOMA charging micro USB adapter T01 (sold separately)
and the exclusive AC or DC adapter (sold separately) before use.
■ Cautions while charging
Do not charge for long periods of time with the power left on. If the FOMA
terminal is left on after charging is complete, the battery pack charge
decreases.
In such cases, the AC or DC adapter charges the battery again.
However, depending on when the FOMA terminal is disconnected from
the AC or DC adapter, the battery charge level may be low, the battery
alert tone may sound, or the battery may only be usable for a short time.
When the battery is empty and terminal is recharging, charging lamp may
not illuminate immediately.
If the battery empty alert is displayed and the power cannot be turned on,
charge the battery for a while.
If charging begins within 60 seconds after the battery empty alert is
displayed, the status returns to normal.
Page 39

While charging, terminal may not turn on even when charging lamp is
illuminated in red. Charge longer and try turning power on again.
Frequently recharging the battery when its power is still remaining
enough may shorten the life of the battery pack. It is recommended to
use the battery to a certain level before recharging.
■ Estimated charge times and lamp display
The following figures are estimated times for charging an empty battery
pack with the FOMA terminal turned off.
FOMA AC Adapter 01/02 Approx. 200 min
FOMA DC Adapter 01/02 Approx. 200 min
Charging lamp illuminates in red while charging, and it turns off when
charging is completed.
Check that the battery pack has been properly attached when charging
lamp flashes red. The lamp also flashes red when the battery pack has
reached the end of its service life.
The battery pack can also be charged with the FOMA terminal turned on
(While charging, the battery icon appears with [w] superimposed).
When the battery becomes warm, charging may automatically stop even
if the battery has not been fully charged. Charging resumes after the
temperature lowers to an appropriate temperature. While charging is
stopped, charging lamp turns off (Even while charging is stopped, the
battery icon appears with [w] superimposed).
■ Estimated times of use when fully charged
Continuous talk time FOMA/3G Approx. 270 min
Continuous stand-by time FOMA/3G When mobile: Approx. 360 hr
At rest: Approx. 410 hr
1Seg watching time Approx. 310 min
Continuous talk time is estimated as the usage time at normal
transmission signal strength, and continuous stand-by time is estimated
as the usage time while moving with the FOMA terminal folded at normal
signal strength. When shooting or editing an image, watching 1Seg,
composing mail, or using Media Player, Bluetooth function or data
communication, the talk (transmission)/stand-by time will be reduced.
The actual usage time is a combination of stand-by time and talk time,
and the longer the talk time, the shorter the stand-by time becomes.
1Seg watching time is estimated as the watching time at normal
transmission signal strength with the Flat-plug Stereo Earphone Set P01
(sold separately) used.
Talk (transmission)/stand-by time may be reduced by about half or 1Seg
watching time may be shortened depending on battery pack status,
function used, temperature and other environmental conditions, or signal
strength (no signal or weak signal).
■ Battery pack service life
Battery pack is a consumable product. Service time per charge is
gradually reduced every time the battery is charged.
When service time per charge is reduced to about half of the default time,
this means that the battery pack is approaching the end of its service life.
In such a case, it is recommended to replace the battery pack as soon as
possible. Depending on usage, the battery pack may swell as it
approaches the end of its service life but this will not cause problems.
If 1Seg, etc. is used while charging for a long time, the service life of the
battery pack may become shorter than estimated.
To prevent damage to the environment, bring used
battery packs to a docomo service counter, a docomo
agent or a recycle center.
■ About charging batteries
Refer to user’s guide of FOMA AC Adapter 01/02 (sold separately),
FOMA AC Adapter 01 for Global use (sold separately), or FOMA DC
Adapter 01/02 (sold separately).
FOMA AC Adapter 01 covers only 100V AC. FOMA AC Adapter 02/
FOMA AC Adapter 01 for Global use covers from 100 to 240V AC.
The shape of the plug for the AC adapter is for 100V AC (for domestic
use). To use the AC adapter of 100 to 240V AC overseas, a conversion
plug adapter that is compatible with the voltage of your country of stay is
required. Do not use a transformer for use overseas to charge the
battery.
Before Using the Handset
37
Page 40

Charging by using AC adapter/DC adapter
External connector terminal cover
2
microUSB plug
(with the mark side up)
External connector terminal
Charging lamp
1
External connector terminal
(with the screw side down)
Connector (with the arrows side up)
100V AC
outlet
For AC adapter
For DC adapter
Cigarette
lighter socket
2
3
2
Release buttons
1
[Read the user’s guides of FOMA AC Adapter 01/02 (sold
separately) and FOMA DC Adapter 01/02 (sold separately)]
Battery pack can be charged even with the FOMA terminal opened.
Before Using the Handset
Insert the AC or DC adapter connector horizontally
1
into the external connector terminal of the microUSB
adapter for charge (1)
: Check the direction (front or rear) of the connector, keep it parallel
with the microUSB adapter for charge and securely push all the way
in until it clicks.
Open the external connector terminal cover of the
2
FOMA terminal and insert the microUSB plug of the
microUSB adapter for charge horizontally into the
external connector terminal (2)
: Insert the microUSB plug horizontally with the mark side turned up.
38
When inserting the AC adapter power plug into an
3
outlet or inserting the DC adapter power plug into a
car cigarette lighter socket, charging lamp illuminates
and charging starts
When charging lamp turns off, charging is complete
4
: When charging is complete, remove the microUSB plug horizontally
from the FOMA terminal (1).
: When removing the connector from the microUSB adapter for
charge, always hold the release buttons on both sides (2) and
unplug it horizontally (3).
Page 41

Do not forcibly insert or remove. May cause damage to the external
connector terminal, the microUSB plug and the connector.
Pull the adapter out of the outlet or cigarette lighter socket if it will not be
used for a long time.
Do not forcefully pull the external connector terminal cover. May
damage the cover.
Do not place objects near the FOMA terminal when charging. May
damage the FOMA terminal.
When using a DC adapter
The DC adapter should only be used in negative grounded vehicles (12
and 24V DC).
Do not use with the car engine shut off. May drain the car battery.
The DC adapter fuse (2A) is a consumable. For replacement, purchase
a new fuse at a local automobile supply shop.
Refer to the user’s guide of FOMA DC Adapter 01/02 for details.
Charging by using microUSB cable for PC
When the FOMA terminal is turned on, charge the FOMA terminal by
connecting the FOMA terminal to a PC with the microUSB cable for PC
(sample).
Install the USB driver to the PC in advance. And also enable USB battery
charge (nP. 250).
• Refer to “Manual for USB Driver Installation” in PDF format in the
accompanying CD-ROM or in SHARP website for details on installing
USB driver.
For details on connecting to a PC nP. 250
Battery level
Checking battery level
The battery icon is a rough indication.
The battery level may change a lot depending on the conditions of use.
If the FOMA terminal is left for a long period or without turning off the
power even after the charging is completed, the battery level may
decrease.
90 to 100% Battery is sufficiently remaining.
p
70 to 80% Battery is remaining.
q
50 to 60% Battery level is low.
r
30 to 40% Battery level is very low.
s
20% Battery is almost empty.
t
10% Battery is almost empty. Charge the battery.
u
0% Battery is empty (Power will turn off soon).
v
If battery runs out
[The battery is getting low: less than 10% remaining.] appears if battery
starts to run out (Touch [OK] or start charging to clear the message).
[Your phone will shut down soon. Unsaved data will be lost.] appears if the
battery level gets much more lower (Touch [OK] or start charging to clear
the message). Power turns off after approximately 30 seconds.
Select [Why?] to display the battery use screen (nP. 42).
Alert tone sounds during a call. The confirmation screen appears after
the call is ended.
Power on/off
Turning power on/off
Turning power on
H (for at least 4 seconds)
1
: It may take some time for the wakeup screen to appear.
: When you turn the power on for the first time, the touch panel
adjusting screen appears. Touch the center of the six displayed
circles with your finger which is normally used for operation.
Welcome mail
: “SHARPからのお知らせ” is saved by default.
: To check a welcome mail: In the main menu, [Mail]/[Inbox]
• For subsequent operations nP. 84
Before Using the Handset
Continued on next page
39
Page 42

When [(] appears, the handset is outside the service area or in a place
with no signal. Move to a place where the icon disappears.
Turning power off
Before Using the Handset
H (for at least 1 second)/[Power off]/[OK]
1
: It may take some time for the power to be turned off (The end screen
appears on the display until the power is turned off).
Sleep mode
The screen is automatically off and the sleep mode is activated when the
FOMA terminal is not in use for a set length of time.
Press any key in the sleep mode to deactivate the sleep mode.
For details on setting a time before activating the sleep mode nP. 214
For details on setting to stay awake nP. 123
Select language
Changing screen display to English
In the main menu, [設定]/[地域/言語 & 文字入力]/[地
1
域/言語を選択]/[English]
: To switch from English to Japanese: In the main menu, [Settings]/
[Locale & text]/[Select locale]/[日本語]
: If you already have an account: [Sign in]/follow the instructions on
the screen
When Google account is set, [Background data] and [Auto-sync] are
enabled. For details on data synchronization nP. 120
You can use this FOMA terminal without setting a Google account, but
Google services such as Google Talk, Gmail, Android Market, etc. will
not be available.
When you set another Google account after setting a Google account,
you are required to perform Reset all.
Keep a separate memo of the set Google account and password.
Resetting your Google account password
A Google password is required to set up a Google account. If you forget
your password, retrieve it.
In the main menu, [Browser]/z/[Enter URL]
1
Select the URL entry field/enter “http://
2
www.google.com”/[Go]/[Sign in]/[Can’t access
your account?]
[I forgot my password] in [Google Accounts:
3
Problems signing in to your account]/follow the
instructions on the screen
Setting up Google account
When activating the application that requires a Google account
without setting the account, the setup screen appears.
Check if data connection is available before signing in with Google
account. For details on data connection status nP. 24
In the setup screen, [Next]
1
Set up a Google account
2
: If you do not have an account: [Create]/follow the instructions on
the screen
40
Date/time settings
Setting date and time
Set the date and time on the FOMA terminal.
In the main menu, [Settings]/[System]/[Date/time
1
settings]
[Auto clock adjustment]
2
: Each time you select, the setting is enabled/disabled.
Page 43

: When [Auto clock adjustment] is disabled: [Date setting]/enter a
date/[Set]/[Time zone]/select a time zone/[Time setting]/
enter a time/[Set]
: To switch 12-hour format/24-hour format: [24-hour clock]
• Each time you select, the setting is enabled/disabled.
: To switch date format: [Date format]/select a date format
When [Auto clock adjustment] is enabled
When the power is turned on, the FOMA terminal adjusts the time by
connecting to the network’s time information.
If the FOMA terminal does not adjust the time sometime after the power
is turned on, turn off the power and restart.
Time may not be adjusted depending on the signal status.
Time may be off by a few seconds.
When [Auto clock adjustment] is disabled
Even if you disable Auto clock adjustment, the date and time is
automatically adjusted when you set the date and time more than 7
days before/after the current date and time.
Caller ID Notification
Notifying the other party of your phone number
You can display your number (caller ID) on the other party’s
phone (display) when you make a voice call.
Caller ID is important personal information. Be very careful about your
caller ID setting.
The caller ID notification function is available only on compatible phone
devices.
If you hear a message asking you to notify caller ID, enable the caller ID
notification function or add “186” and call again.
Setting caller ID notification function in advance
<Activate/Deactivate Caller ID Notification>
In the main menu, [Settings]/[Call Settings]/
1
[NWService]/[Caller ID Notification]/[Activate/
Deactivate Caller ID Notification]
Select the setting
2
Checking current setting
<Check Caller ID Notification setting>
In the main menu, [Settings]/[Call Settings]/
1
[NWService]/[Caller ID Notification]/[Check Caller
ID Notification setting]
Profile
Saving your own name and image
By default, the phone number of the inserted UIM is saved. In addition,
save the following items.
Item Details
Image Save data displayed when you check your
Name Enter a name. One
Phonetic name Enter a reading. One
Memo Save a memo. One
Phone number Save phone numbers. Select one of six icons
Mail address Save mail addresses. Select one of four icons
Chat address Save chat addresses. Select one of eight
profile.
for each phone number.
for each mail address.
icons for each chat address.
Continued on next page
Entry
status
One
Three
Three
Three
Before Using the Handset
41
Page 44

Item Details
Residence Save a residence. Select one of four icons for
Before Using the Handset
Work address Save company name, department and post.
GPS
information
Birthday Save a birthday. One
In the main menu, [Settings]/[Profile]/[Edit]
1
Enter/Select an item/[Save]/[Yes]
2
: For details on entering/selecting nP. 56
■ Key operation in profile display screen
To edit z+E
To send via infrared communication z+I
To send via Bluetooth z+B
To attach to mail z+J
■ Menu operation in profile display screen
Refer to menu operations in the phonebook details screen (nP. 61) for
the following functions.
Phone number menu Create mail
Display GoogleMap
GPS information menu (Create GPS mail, Display GoogleMap)
[Edit] nP. 41
[Send by Infrared] nP. 178
[Send by Bluetooth] nP. 225
[Attach to mail]/follow the instructions on the screen/compose
and send a mail
each residence.
Select one of three icons for each work
address.
Save location information.
Entry
status
One
One
One
Device information
Checking information about the FOMA terminal
You can check the FOMA terminal status, legal information,
software version, etc.
In the main menu, [Settings]/[System]/[Device
1
information]
Checking the FOMA terminal status <Device status>
You can check the battery level, phone number, network in use, etc.
In the main menu, [Settings]/[System]/[Device
1
information]/[Device status]
Checking the battery usage <Battery use>
You can check the battery usage per application.
In the main menu, [Settings]/[System]/[Device
1
information]/[Battery use]
: To update the contents: [MENU]/[Refresh]
Checking legal information <Legal information>
You can check copyright notice, terms of service, etc.
In the main menu, [Settings]/[System]/[Device
1
information]/[Legal information]
Select an item
2
42
Page 45

Call
Making calls
Making a call . . . . . . . . . . . . . . . . . . . . . . . . . . . . . . . . . . . . . . . . . . . . . . 44
Using redials/incoming call history . . . . . . . . <Redial/Incoming History>46
Setting caller ID to send/not to send for each call . . . . . . . . . . . . . . . . . . 47
Sending touch-tone signal . . . . . . . . . . . . . . . . . . . . . . . . . . <Pause dial>48
Making an international call . . . . . . . . . . . . . . . . . . . . . .<WORLD CALL>48
Talking hands-free while driving . . . . . . . . . . . . . . . .<In-car hands-free>49
Receiving calls
Receiving a call . . . . . . . . . . . . . . . . . . . . . . . . . . . . . . . . . . . . . . . . . . . . 49
Assigning receiving operations to keys . . . . . . . . . . . <Any-key settings>50
Adjusting in-call volume. . . . . . . . . . . . . . . . . . . . <Adjust in-call volume>50
When calls cannot be answered/could not be
answered
Placing a call on hold when you cannot answer call immediately
. . . . . . . . . . . . . . . . . . . . . . . . . . . . . . . . . . . . . . . . . . . . . . . <On hold>50
Using Public mode (Power off) . . . . . . . . . . . <Public mode (Power off)>50
Checking missed call . . . . . . . . . . . . . . . . . . . . . . . . . . . . <Missed Call>51
Recording message when call cannot be answered
. . . . . . . . . . . . . . . . . . . . . . . . . . . . . . . . . . . . . . . .<Answering Memo>51
Playing answering memo or voice memo
. . . . . . . . . . . . . . . . . . . . . . . . . .<Play answering memo/voice memo>52
Manner mode
Muting ring tone from the FOMA terminal. . . . . . . . . . . <Manner mode>53
Using earphone
Using an earphone/microphone with switch
. . . . . . . . . . . . . . . . . . . . . . . . . . .<Earphone/Microphone with switch>54
Setting earphone type. . . . . . . . . . . . . . . . . . . . . . . . . . <Earphone type>54
Receiving a call automatically when earphone is connected
. . . . . . . . . . . . . . . . . . . . . . . . . . . . . . . . . . . . . . . . . <Auto call arrival>54
43
Page 46

Making a call
In the main menu, [Dialer]
1
Enter a phone number
2
Call
: You can enter up to 32 digits.
: To delete entered phone number by one digit: *
• The digit on the left of the cursor is deleted.
: To delete all of entered phone number: * (for at least 1 second)
• All digits on the left of the cursor are deleted.
[Call]
3
[Disconnect] to end the call
4
If flat-plug earphone/microphone with switch (sold separately), etc. is
not connected, you hear the other party’s voice from a speaker. Note
the following when using hands-free.
• Speak approximately 20 to 40 cm away from the mouthpiece. When
the surroundings are noisy, the sound may break up and the call may
not be satisfactory.
• When calling outdoors, in a location where surroundings are noisy
and where the sound echoes loudly, use the flat-plug earphone/
microphone with switch.
• If the sound breaks up during a hands-free call, lower the in-call
volume.
■ Touch panel operation in call screen
Phone number entry screen
The following operations are available with displayed keys.
[Call] Call
[Add to Addr Book] Add to the phonebook
[Add P] Add “P”
[Add +] Add “+”
During-call screen
The following operations are available with displayed keys.
[Voice Memo] Record the other party’s voice during a call
[Microphone ON]/
[Microphone OFF]
Turn on/off the microphone
■ Key operation in call screen
Phone number entry screen
To call ]+D
To call to Japan
To compose SMS ]+M
To add to the phonebook ]+S
To add “184” z+H
To add “186” z+T
To add “P” P
To add “+” ]+L
Restrict calls setting z+L
* Available only during international roaming.
*
]+J
44
Page 47

During-call screen
To change the in-call volume # /$
To turn on/off the microphone ]+O
To use a Bluetooth device z+B
Voice memo ]+M
Redial z+O
Incoming call history z+I
To display the phone number entry
screen
To quote from the phonebook z+R
To quote from the profile z+P
To swap calls
* Available only for Call Waiting.
*
z+D
z+S
■ Menu operation in phone number entry screen
[Call]
/[Call]
/[Dial to Japan] (only for international roaming)
Add “+81” to the beginning of the phone number.
/[Create Mail] nP. 63
/[Create SMS]/compose and send SMS
[Add to Address Book]/add to the phonebook
[Add Prefix]
/[Add 184]
Add “184” to the beginning of the phone number.
/[Add 186]
Add “186” to the beginning of the phone number.
/[Add P]
For details on sending touch-tone signal nP. 48
/[Add +]
For details on making an international call using “+” nP. 48
[Restrict Calls Setting]/enter the lock no./[OK]/select the
setting/[OK]
■ Menu operation in during-call screen
[Microphone ON]/[Microphone OFF]
[Bluetooth] (only for connecting to a Bluetooth device)
For details on calls using Bluetooth devices nP. 225
[Voice Memo]
To stop recording: [Stop]
To disconnect a call: [Disconnect]
[Dialer]
The phone number entry screen is displayed.
[Quote to Call log]
/[Redial] nP. 46
/[Incoming Call History] nP. 46
[Quote from Address Book]
For subsequent operations nstep 2 of “Making a call from
phonebook” on P. 59
[Quote from profile]
[Swap Calls] (only for Call Waiting)
Switch between callers.
Call
45
Page 48

Redial/Incoming History
Redials list screen
Outgoing call
status icon
Incoming calls history list screen
Incoming call
ring time
Incoming call
status icon
Using redials/incoming call history
The FOMA terminal keeps a record of the 20 most recent phone
numbers to which calls were made.
When “186” or “184” is added to a phone number, the call is recorded as
Call
a separate redial.
Name, etc. appear if they are saved in the phonebook. However, those
items are not displayed when the phonebook is restricted.
In the main menu, [Dialer]/[Redial]/[Incoming
1
History]
Outgoing and incoming call status icon
F (green)
F (red)
46
Outgoing voice calls
G
Calls that were answered
Calls that were not answered within 3 seconds ring time
Incoming calls that were rejected
D
Calls that were not answered, calls that were forwarded,
E
or calls with a recorded message left
Select a phone number
2
[Call]
3
When an image is registered in the phonebook, the registered image is
displayed in the redials/incoming call history screen. If no image is
registered in the phonebook, a substitute image is displayed.
■ Touch panel operation in each redials/incoming call
history screen
Redials/Incoming call history list screen
The following operations are available with displayed keys.
[Delete All] Delete all
[Delete One] Delete one
[Details] Display the details screen
Redials/Incoming call history details screen
The following operations are available with displayed keys.
[Delete] Delete the displayed history
[Call] Make a voice call
■ Key operation in each redials/incoming call history screen
To make a voice call ]+D
To call to Japan
To compose mail
To compose SMS ]+M
To edit and call ]+H
To add prefix ]+T
To add to the phonebook ]+R
To register to Reject calls
To delete one *
To delete all
*1
*2
*4
*3
]+J
z+M
]+I
^+]+*
Page 49

To display the next/previous
*5
history
*1 Available only during international roaming.
*2 Available when the selected mail address is registered in the
phonebook.
*3 Available in the incoming call history list screen/incoming call history
details screen. Enable rejection of call to reject an incoming call from
registered number (nP. 71).
*4 Available in the redials/incoming call history list screen.
*5 Available in the redials/incoming call history details screen.
&/%
■ Menu operation in redials list screen
[Call]
/[Call]
/[Dial to Japan] (only for international roaming)
Add “+81” to the beginning of the phone number.
/[Create Mail]/compose and send a mail
/[Create SMS]/compose and send SMS
/[Edit and call]/edit the phone number/[Call]
/[Add Prefix]
The phone number entry screen is displayed.
[Add to Address Book]/add to the phonebook
[Delete One]/[Yes]
[Delete All]/enter the lock no./[OK]/[Yes]
[Create Mail]
Available when the selected mail address is added to the phonebook.
■ Menu operation in incoming call history list screen
Refer to menu operations in the redials list screen (nP. 47) for the
following functions.
Call Add to Address Book Delete One Delete All
[Add to Block List]/enter the lock no./[OK]/select the number
to register
[Add to Block List]
Enable rejection of call to reject an incoming call from registered
number (nP. 71).
■ Menu operation in redials details screen
Refer to menu operations in the redials list screen (nP. 47) for the
following functions.
Call Add to Address Book
[Delete]/[Yes]
■ Menu operation in incoming call history details screen
Refer to menu operations in the redials list screen (nP. 47) for the
following functions.
Call Add to Address Book
[Add to Block List]/enter the lock no./[OK]/select the number
to register
For details on [Add to Block List] nP. 47
[Delete]/[Yes]
Setting caller ID to send/not to send for each call
You can set whether to notify the other party of your phone
number for each call.
■ Adding “186” when dialing (Number sent)
In the main menu, [Dialer]
1
Enter “186”/enter a phone number
2
[Call]
3
Call
47
Page 50

■ Adding “184” when dialing (Number not sent)
In the main menu, [Dialer]
1
Enter “184”/enter a phone number
2
[Call]
3
Call
Pause dial
Sending touch-tone signal
Use services such as ticket reservations and bank balance
inquiries, with simple operations by saving the combinations of
phone numbers and messages (numbers) in the phonebook.
Send touch-tone signals of the pressed number one at a time by pressing
the numbers on the keyboard.
Saving touch-tone signal to phonebook
Enter a phone number in the phonebook/^+P
1
Enter the number to send
2
: You can enter numbers continuously by pressing ^+P after
entering the number.
Save the phonebook entry
3
Sending message using touch-tone signal
Make a voice call from the phonebook with a
1
touch-tone signal
: The numbers after “P” appear on the screen.
[Send] at the appropriate time to send
2
: The numbers after “P” are sent with touch-tone signals.
: When multiple numbers separated by “P” are saved, touch [Send] for
each number.
: Some equipment may not be able to receive signals properly.
WORLD CALL
Making an international call
WORLD CALL is an international calling service available from
DOCOMO mobile phones.
WORLD CALL is registered when FOMA services are registered
(excluding users who did not apply for WORLD CALL).
[Calling Method] 010/Country code/Area code (city code)/Other
party’s phone number/[Call]
Alternatively, call with 009130/010/Country code/Area code (city
code)/Other party’s phone number/[Call].
The calling method shown above can be saved on the FOMA terminal
phonebook.
For area codes (city codes) that begin with “0”, omit the “0” when
entering (Include the “0” when making a call to some countries or
regions such as Italy).
Call to about 240 countries and regions worldwide.
WORLD CALL charges are billed with the monthly mobile phone
charges.
Commission and monthly usage fees are free.
Contact “docomo Smartphone Care” on the back of this manual for
WORLD CALL.
To make an international call through a company other than DOCOMO,
contact the representative companies directly for instructions.
This service is not available for some payment plans.
■ Entering “+” to make an international call
When making an international call from Japan, you can enter “+” before
dialing the overseas number, instead of entering the international call
access code.
In the main menu, [Dialer]
1
[Add +]/enter the country code, area code (city code)
2
and other party’s phone number
[Call]
3
48
Page 51

In-car hands-free
Talking hands-free while driving
Connect the In-Car Hands-Free Kit 01 (sold separately) or
hands-free devices such as car navigation to the FOMA terminal,
and make/receive voice calls from the device.
Only available with Bluetooth connection (wireless) (nP. 225).
Refer to the user’s guide of each product for details on hands-free
devices.
The operations such as display or ring tones for incoming call follow the
settings of the FOMA terminal.
If a hands-free device has sound enabled, the device plays a ring tone
even when the FOMA terminal is in Manner mode or the ring volume is
set to [0].
Answering memo settings are followed even when the handset is
connected to the device.
Some handset functions may not be available depending on the
hands-free device characteristics and specifications.
Receiving a call
When receiving a call, you can verify it by the ring tone, incoming
lamp, vibrator, and others.
When a call is received, the ring tone sounds and the
1
incoming lamp flashes
: [Incoming Call] appears while receiving a call.
: When the caller ID is sent, the phone number appears. If the other
party’s phone number is saved in the phonebook, the other party’s
name also appears on the screen. When receiving calls from
emergency numbers, [Emergency number] is displayed.
: When the caller does not send the caller ID, a non-disclosure reason
message appears.
• [ID Unsent]: When the caller purposely withholds caller ID
• [Pay phone]: When the call is received from a payphone
• [Unknown]: When the caller cannot send a caller ID, such as when
the call is received from overseas or ordinary (landline) telephones
via various transfer services (However, a caller ID may still appear
depending on the company)
[Answer]
2
[Disconnect] to end the call
3
If flat-plug earphone/microphone with switch (sold separately), etc. is
not connected, you hear the other party’s voice from a speaker. For the
precautions when using hands-free nP. 44
■ Touch panel operation in call receive screen
The following operations are available with displayed keys.
[Answer] Answer
[Hold] Hold the call
[Ans. Memo] Answer with the answering memo
[Reject] Reject the call
[Silent] Stop the ring tone
* A message can be recorded even when Answering Memo is not set.
*
■ Key operation in call receive screen
To change the ring volume #/$
On hold H
To reject the call ]+D
Answering memo ]+M
To stop the ring tone ]+7
Call
49
Page 52

Any-key settings
Assigning receiving operations to keys
Assign the following keys to answer the call or stop the ring tone
temporarily when receiving a call.
Answer 1 to 9, 0, A to Z, -, /, ,,
Call
Silent Keys other than H, +
In the main menu, [Settings]/[Call Settings]/
1
[Any-key settings]
Select the setting
2
When you set to [Answer], you can operate in 1 second after receiving.
Adjust in-call volume
., *, (, ), _ (space)
Adjusting in-call volume
During a call, adjust the volume with #/$
1
On hold
Placing a call on hold when you cannot answer call immediately
The other party is charged for the call while on hold.
If subscribed to Voice Mail Service or Call Forwarding Service, a
received call is connected to the Voice Mail Service center or forwarded
to the set destination (nP. 240, P. 242).
During an incoming call, [Hold]
1
: The call is disconnected when you touch [Disconnect], press H or
when the other party disconnects the call.
[Answer] when ready to answer
2
Public mode (Power off)
Using Public mode (Power off)
Public mode (Power off) is an automatic answering service used
to ensure the manner in public places. Set Public mode (Power
off) to play a message for the caller stating that the power is off
and you are unable to speak (in a hospital, on the airplane, near
the priority seats on the train, etc.), and the call is disconnected.
Voice Mail Service* and Call Forwarding Service* are activated in priority
to Public mode (Power off).
* For voice calls whose ringing time is other than 0 seconds, the service
is activated after the Public mode (Power off) guidance.
For calls from callers rejected by Nuisance Call Blocking Service, Public
mode (Power off) is not activated.
In the main menu, [Dialer]
1
Enter “b25251”
2
[Call]
3
: Public mode (Power off) is set (Nothing changes in the stand-by
display).
: When a call is received while Public mode (Power off) is set and the
handset is turned off, a message stating that you are currently in a
place that does not allow the use of mobile phone is played.
Disabling Public mode (Power off)
: In the main menu, [Dialer]/enter “b25250”/[Call]
• Public mode (Power off) is disabled.
Checking Public mode (Power off) setting
: In the main menu, [Dialer]/enter “b25259”/[Call]
• Check the current setting.
■ When Public mode (Power off) is set
Public mode (Power off) remains set until disabled. The setting is not
canceled just by turning on the power. Public mode (Power off) message is
played when the handset is outside the service area or in a place with no
signal. When a call is received, a message stating that you are in a place
that does not allow the use of mobile phone is played and the call is
disconnected.
50
Page 53

Missed Call
Checking missed call
If an incoming call is not answered, the icon [+] indicating
missed call is displayed.
Touch the notification area/[Missed Call]
1
Answering Memo
Recording message when call cannot be answered
If you set Answering Memo, the FOMA terminal answers a call
and records the caller’s message when you cannot answer. When
receiving a voice call, a voice message is played, and the
message from the caller is recorded.
Answering Memo is not available when the FOMA terminal is turned off
or outside the service area. This function is convenient when used in
conjunction with the Voice Mail Service.
Record up to ten answering memos (approximately 60 seconds each).
Voice memos are not included.
Answering Memo is enabled in Manner mode regardless of Answering
memo setting.
Recorded contents may be lost due to malfunctions, repairs or other
handling of the FOMA terminal. DOCOMO shall not be liable for any
loss of content. It is recommended that a memo be kept of contents for
answering memo.
Setting Answering Memo <Answering memo setting>
In the main menu, [Settings]/[Call Settings]/[Call/
1
Ans Memo]/[Answering memo setting]
: Each time you select, the setting is enabled/disabled.
: The Answering Memo is set, and []] appears on the display.
: When one to nine answering memos are recorded, [^] appears.
: If ten answering memos are recorded, [_] appears, and from the
next incoming voice call, the answering memos are deleted starting
with the checked and oldest.
The setting is enabled when Manner mode is set to [OFF].
For the Voice Mail Service, record up to 20 messages of up to
approximately 3 minutes each. When the Voice Mail Service is set,
messages are saved at the Voice Mail Service center even if there are
ten answering memos.
Setting answering message response time
<Answer time setting>
In the main menu, [Settings]/[Call Settings]/[Call/
1
Ans Memo]/[Answer time setting]
Enter the answering duration/[Set]
2
■ Key operation in answering duration setting screen
To increase the number #
To decrease the number $
When set to the same time as Auto call arrival, Answering Memo has
priority.
Setting answering message
<Answering message setting>
In the main menu, [Settings]/[Call Settings]/[Call/
1
Ans Memo]/[Answering message setting]
Select the answering message
2
■ Touch panel operation in answering message screen
The following operation is available with a displayed key.
[Play] Play
Call
51
Page 54

■ Touch panel operation in answering message playback
Recording message
Indicator
screen
The following operations are available with displayed keys.
[Stop] Stop
[Setting] Set as answering message
Call
■ Key operation in answering message screen
To play ]+P
■ Key operation in answering message playback screen
To stop ]+S
To turn up the volume #
To turn down the volume $
The following guidance messages (in Japanese only) are preset for the
answering message.
[NORMAL]
ただいま電話に出ることができません。ピーッという発信音のあと
に、お名前、ご用件をお話しください。
(I cannot take your call now. Please leave your name and message
after the beep.)
[DRIVE]
ただいま運転中です。ピーッという発信音のあとに、お名前、ご用件
をお話しください。
(I am driving now. Please leave your name and message after the
beep.)
[PUBLIC]
ただいま電話の利用を、控えなければならない場所にいます。ピーッ
という発信音のあとに、お名前、ご用件をお話しください。
(I am in an area where mobile phones should not be used now.
Please leave your name and message after the beep.)
Answering messages cannot be deleted.
When Answering Memo is set
When a call is received, Answering Memo is activated
1
after the set answering duration
52
: The answering screen appears. The caller hears a voice guidance
message.
: Answer a call with [Answer] while replying with answering message
or recording.
Record the caller’s message
2
: The caller hears a beep when the recording starts.
: The indicator is an estimate.
: During the recording, select [Rcv. ON] to hear the caller’s voice
through the speaker.
Play answering memo/voice memo
Playing answering memo or voice memo
Play messages of answering memo or contents of voice memo.
When Restrict address book is enabled, not the names but only the
phone numbers registered in the phonebook are displayed (excepting
non-disclosure reasons).
In the main menu, [Settings]/[Call Settings]/[Call/
1
Ans Memo]/[Answering Memo List]/[Voice Memo
List]
Answering memo types
O (red)
: Small [/] appears on the protected items.
Select a memo
2
Answering memo
O (green)
Checked answering
memo
Page 55

: The playback of answering memo or voice memo automatically
Memo playback screen
for answering memo
pauses when a call is received, the alarm is activated or another
function starts. The playback restarts after another function stops.
If you delete answering memo or voice memo, protected ones are also
deleted.
■ Touch panel operation in answering memo list/voice
memo list screen
The following operations are available with displayed keys.
[Delete All] Delete all
[Delete One] Delete one
[Protect/Unprotect] Protect/Unprotect
[Play] Play
■ Touch panel operation in answering memo/voice memo
playback screen
The following operations are available with displayed keys.
[9]/[L] Play the previous/next memo
[Delete] Delete
[Protect/Unprotect] Protect/Unprotect
[Stop] Stop
■ Key operation in answering memo list/voice memo list
screen
To delete all ^+]+*
To delete one *
To protect/unprotect ]+L
To play +
■ Key operation in answering memo/voice memo playback
screen
To delete *
To protect/unprotect ]+L
To stop +
To turn up the volume #
To turn down the volume $
To play the next memo &
To play the previous memo %
■ Menu operation in answering memo list/voice memo list
screen
[Delete One]/[Yes]
[Delete All]/enter the lock no./[OK]/[Yes]
Manner mode
Muting ring tone from the FOMA terminal
Use Manner mode to avoid disturbing others when in public. You
can switch the mode to silence the FOMA terminal.
The camera shutter sound and record start/end sound are not silenced
even while Manner mode is set.
In the main menu, [Settings]/[Manner mode]
1
: Alternatively, ]+7 in the stand-by display.
Select the setting
2
: To confirm settings: Point the cursor to the setting/[Function]
Answering Memo is enabled when Manner mode is set.
Answering duration of answering memo follows Answer time setting.
However, when Driving mode is set, the answering duration is set to
approximately 3 seconds.
Call
Continued on next page
53
Page 56

Media Player sound is silenced during Manner mode. However, when
the volume of Media Player is changed after setting Manner mode, the
sound is played even without canceling Manner mode.
Setting/Disabling Manner mode by one-touch
operation
Call
In stand-by, ]+7 (for at least 1 second)
1
: Alternatively, H (for at least 1 second)/[Manner Mode].
: Manner mode selected previously is set.
Earphone/Microphone with switch
Using an earphone/microphone with switch
Connect a Flat-plug Earphone/Microphone with Switch P01/P02
(sold separately), etc. to answer by pressing a switch.
Do not forcefully pull the earphone/microphone terminal cover. It may
damage the cover.
Operation sound is heard from the earphone when the flat-plug
earphone/microphone with switch is connected.
The in-call volume for the earphone is the same as the volume set for
adjusting in-call volume (nP. 50).
Do not wind the cord of the flat-plug earphone/microphone with switch
around the FOMA terminal. The internal antenna may not work properly.
Placing the cord of the flat-plug earphone/microphone with switch near
the internal antenna may cause noise.
Secure plug. Sound may not be audible if the plug is not completely
inserted.
A beep sounds when the plug is inserted only halfway during a call. This
is not a malfunction.
A pop may sound when the power is turned on or the handset is
operated. This is not a malfunction.
Connect the flat-plug earphone/microphone with
1
switch
When a call is received, press the switch
2
: Each time you press a switch during a call, you can switch
microphone on/off.
Press the switch for at least 2 seconds to finish call
3
Calls may be answered accidentally if the earphone/microphone with
switch is connected while the ring tone sounds. Disconnect when not in
use.
Earphone type
Setting earphone type
When connecting Flat-plug Earphone/Microphone with Switch
P01/P02 (sold separately), etc., you can use the earphone-side
microphone by setting Earphone type to [With microphone].
In the main menu, [Settings]/[Sound/vibration/
1
lamp]/[Earphone setting]/[Earphone type]
Select a type
2
When connecting the earphone without microphone, set the type to
[Without microphone].
Auto call arrival
Receiving a call automatically when earphone is connected
You can set the handset to automatically answer calls received
while Flat-plug Earphone/Microphone with Switch P01/P02 (sold
separately), etc. are connected.
In the main menu, [Settings]/[Sound/vibration/
1
lamp]/[Earphone setting]/[Auto call arrival]
Set the receiving duration/[Set]
2
54
Page 57

Phonebook
Phonebook available for the FOMA terminal . . . . . . . . . . . . . . . . . . . . . .56
Adding entries to phonebook . . . . . . . . . . . . . . . . . <Add to phonebook>56
Setting groups. . . . . . . . . . . . . . . . . . . . . . . . . . . . . <Create new group>58
Making a call from phonebook . . . . . . . . . . . . . . . <Search phonebook>59
Editing phonebook entry . . . . . . . . . . . . . . . . . . . . . . . <Edit phonebook>62
Deleting phonebook entry . . . . . . . . . . . . . . . . . . . . <Delete phonebook>62
Making a call or sending mail with a few key operations
. . . . . . . . . . . . . . . . . . . . . . . . . . . . . . . . . . . .<Speed dial/Speed mail>62
Using contacts of UIM phonebook . . . . . . . . . . . . . . . <Import contacts>63
Registering vCard format file to phonebook . . . . . . . . . . . . . . . . . . . . . . . 63
55
Page 58

Phonebook available for the FOMA
Image display
field
Name entry
field
Reading entry
field
Phonebook editing screen
terminal
You can save items such as names, phone numbers and mail
addresses in the FOMA terminal phonebook.
You can use contacts added to UIM phonebook on other FOMA
Phonebook
terminals by loading the data (nP. 63). However, you cannot add new
entries to the UIM phonebook with this FOMA terminal, neither edit or
delete the UIM phonebook contents.
■ Entry items for one contact
Item Details
Image
Name Enter a name.
Reading Enter a reading.
Memo Save a memo.
Phone number
Group setting Entries can be sorted in groups.
Mail address
Chat address
Residence
Work address
GPS
information
Birthday Save a birthday.
Incoming voice
call
Save the data to display when making a call and
confirming the phonebook.
Save phone numbers. Select one of six icons for each
phone number.
Save mail addresses. Select one of four icons for each
mail address.
Save chat addresses. Select one of eight icons for each
chat address.
Save a residence. Select one of four icons for each
residence.
Save company name, department and post. Select one
of three icons for each work address.
Save location information.
Differentiate incoming calls using specific ring tones,
lamp colors, lamp patterns or vibration patterns.
Item Details
Mail arrival
Add to phonebook
Differentiate incoming mail from the mail application
installed by default using specific ring tones, lamp colors,
lamp patterns or vibration patterns.
Adding entries to phonebook
In the main menu, [Address Book]/[Add]
1
Enter/Select an item/[Save]/[Yes]
2
■ Entering/Selecting items
An entry can be saved by entering just one of the followings; name, phone
number, mail address, chat address, residence.
Select/Shoot image
Select the image display field/select an item
; [Camera]/shoot a still picture
; [Contents Manager]/select an image
; [OFF]
• When an image is already set, clear the setting.
Enter name
Select the name entry field/enter a name
Enter reading
Select the reading entry field/enter a reading
: Reading is automatically entered when you enter a name.
Save memo
Select the [Memo] field/enter a memo
56
Page 59

Save phone number and phone number type
1. Select the [Phone number] field/enter a phone number
: To add a [Phone number] field: [I] of the phone number
: To delete a phone number: [J] of the phone number to delete
: To set to the usually-used phone number: [H] of the usually-used
phone number
2. Select a phone number type icon/select a phone number type
: You can enter arbitrary text and save when you select [Custom...].
Set group
Select the [Group setting] field/select a group/[Set]
: When no group is saved, the group cannot be set.
Save mail address and mail address type
1. Select the [Mail address] field/enter a mail address
: To add a [Mail address] field: [I] of the mail address
: To delete a mail address: [J] of the mail address to delete
: To set to the usually-used mail address: [H] of the usually-used
mail address
2. Select a mail address type icon/select a mail address type
: You can enter arbitrary text and save when you select [Custom...].
Save chat address and chat address type
1. Select the [Chat address] field/enter a chat address
: To add a [Chat address] field: [I] of the chat address
: To delete a chat address: [J] of the chat address to delete
2. Select a chat address type icon/select a chat address type
Save residence
1. Select the [Residence] field/enter a residence
: To add a [Residence] field: [I] of the residence
: To delete a residence: [J] of the residence to delete
2. Select a residence type icon/select a residence type
: You can enter arbitrary text and save when you select [Custom...].
Save work address
1. Select the [Work address] field/enter a work address
: To enter the department: Select the [Dept.] field/enter a
department
: To enter the post: Select the [Post] field/enter a post
: To add a [Work address] field: [I] of the work address
: To delete a work address: [J] of the work address to delete
2. Select a work address type icon/select a work address type
: You can enter arbitrary text and save when you select [Custom...].
Save GPS information
Select the [GPS information] field/save GPS information
: To position the present location and save GPS information: [Get
current location]/[OK]
• Select [Map] to display the map of positioned location information.
: To save GPS information from the history of positioned present
location: [From location history]/select the history
• Select [Detail] after pointing the cursor to the history to check the
date of positioning, latitude, or longitude of history.
: To update saved GPS information: [Update]
: To delete saved GPS information: [Delete]/[Yes]
: To display Google Maps from saved GPS information: [Display
GoogleMap]
Save birthday
Select the [Birthday] field/enter a birthday/[Set]
: Enter a birthday between January 1, 1900 and December 31, 2100.
: To delete a birthday: [J] of Birthday
Set incoming voice call
Set each item of the [Incoming voice call] field
: To set the ring tone: Select the [h] field/select a ring tone
: To set the lamp color: Select the [i] field/select a lamp color
: To set the lamp pattern: Select the [j] field/select a lamp pattern
: To set the vibration pattern: Select the [k] field/select a vibration
pattern
Set mail arrival
Set each item of the [Mail arrival] field
: To set the ring tone: Select the [l] field/select a ring tone
: To set the lamp color: Select the [m] field/select a lamp color
: To set the lamp pattern: Select the [n] field/select a lamp pattern
: To set the vibration pattern: Select the [o] field/select a
vibration pattern
Continued on next page
Phonebook
57
Page 60

Image
Image in JPEG, PNG, GIF or BMP format can be saved.
When animated GIF is set, the first frame of the image is displayed in
the phonebook.
Group settings
For details on group settings nP. 58
GPS
Enable location information services in advance to measure the present
Phonebook
location (nP. 114).
Ring tone/Incoming lamp
For details on setting ring tone and incoming lamp nP. 212
Create new group
Setting groups
You can set groups in the phonebook to set group names, icons,
ring tones and incoming lamps.
In the main menu, [Address Book]
1
In the group search screen, point the cursor to the
2
tab/z/[Create new group]
: For details on the group search screen nP. 59
Enter/Select an item/[Save]/[Yes]
3
■ Entering/Selecting items
Select an icon
Select the icon display filed/select a group icon
Enter a group name
Point the cursor to the [Group name] field/enter a group name
Set incoming voice call
: For details on setting the incoming voice call nP. 56
Set mail arrival
: For details on setting the mail arrival nP. 56
Incoming voice call and mail arrival settings
When incoming voice call or mail arrival is set in individual phonebook,
the individual phonebook setting has priority.
When one entry is set to multiple groups, setting of group displayed
high on the phonebook list screen (group search) has priority.
Saving entries to groups <Register user>
In the group search screen, point the cursor to the
1
tab/z/[Edit group]/[Register user]
Select a name/[Save]
2
Editing group settings <Edit group information>
In the group search screen, point the cursor to the
1
tab/z/[Edit group]/[Edit group information]
Edit data/[Save]/[Yes]
2
Sorting groups <Rearrange groups>
In the group search screen, point the cursor to the
1
group/z/[Edit group]/[Rearrange groups]
Select a move destination/[Set]
2
58
Page 61

Deleting groups <Delete group>
Search by reading
2
3 4
Search by group
2
3 4
1
1
The saved phonebook data are not deleted even if a group is deleted.
In the group search screen, point the cursor to the
1
tab/z/[Delete group]
Select a deletion method
2
; [Delete One]
; [Delete Selected]/select the group/[Do]
; [Delete All]/enter the lock no./[OK]
[Yes]
3
Search phonebook
Making a call from phonebook
You can retrieve phone numbers from the phonebook to make
calls and send mail.
You can search phonebook in the following two ways.
To search by
reading
To search by
group
In the main menu, [Address Book]
1
Point the cursor to the name
2
: To switch between search methods: [Group]/[Reading]
Entries are displayed by the reading of the name
(Japanese syllabary row, alphanumeric characters
and symbols) when added to the phonebook. You
can search by reading.
For the tab of alphanumeric characters and
symbols, entries are displayed in order of no
reading b spaces b numbers b alphabet.
Entries are displayed by the specified group when
added to the phonebook. You can search by group.
1Search area
Enter characters one by one to display the closest entries each
time.
2Tab
The tabs of Japanese syllabary row, alphanumeric characters and
symbols are displayed for the search by reading and the tabs of
the saved group names for the search by group.
3List
A list of entries for the selected tab is displayed.
4Simple display
Contents saved in the phonebook are partially displayed.
Select [Detail] to display all items saved in the phonebook. Select
an item to display available functions.
Select a phone number/select a calling method
3
; [Voice call]
; [Edit and call]/edit the phone number/[Call]
; [Create SMS]/compose and send SMS
; [Append special number to call]/[Add 184]/[Add 186]/[Call]
; [Dial to Japan]
Continued on next page
Phonebook
59
Page 62

• It is displayed only when using overseas. Add “+81” to the
beginning of the phone number.
■ Key operation in phonebook screen
To switch the search method ] +T
To add a new item z+N
To edit the entry z+E
To create a new group
Phonebook
To add entries to group
To edit the group information
To rearrange groups
To delete one
To delete selected
To delete all
*1
*1
*1
*1
*2
*3
*3
To set speed dial/mail ^+]+S
To lock phonebook
To display the number of registered
*5
entries
To send one via infrared
communication
To send selected via infrared
communication
To send all via infrared
communication
To send one via Bluetooth
*4
*6
*7
*7
*6
To send selected via Bluetooth*7^+B
To send all via Bluetooth
To attach one to the mail
To attach selected to the mail
To attach all to the mail
*6
Voice call
To edit and call
To compose SMS
*7
*6
*7
*7
*6
*6
60
z+G
z+U
^+E
z+R
*
^+*
^+]+*
z+L
z+K
z+I
^+I
^+]+I
z+B
^+]+B
z+J
^+J
^+]+J
]+D
^+]+D
]+M
To call appending special number*6^+D
To compose a mail
To start chat
*1 Available only when the group tab is selected.
*2 Available only when the group tab, list or simple display is selected.
*3 Available only when the group tab or list is selected.
*4 Available only when the tab or list is selected.
*5 Available only when the tab is selected.
*6 Available only when the list or simple display is selected.
*7 Available only when the list is selected.
*8 Available only when the simple display is selected.
*6
*8
z+M
z+C
■ Menu operation in phonebook display screen (when tab is
selected)
[Add New Item] nP. 56
[Edit] nP. 62
[Create new group] (only for searching by group) nP. 58
[Edit group] (only for searching by group)
/[Register user] nP. 58
/[Edit group information] nP. 58
/[Rearrange groups] nP. 58
[Delete group] (only for searching by group) nP. 59
[Speed dial/mail setting] nP. 62
[AddressBook Lock]
For subsequent operations nstep 2 of “Restricting use of
phonebook” on P. 70
[Items registered in memory]
Check the number of phonebook entries.
[Import contacts] nP. 63
Page 63

■ Menu operation in phonebook display screen (when list is
selected)
Refer to menu operations in the phonebook display screen (when the tab
is selected) (nP. 60) for the following functions.
Add New Item Edit AddressBook Lock Import contacts
[Delete] nP. 62
[Send by Infrared] nP. 178
[Send by Bluetooth] nP. 225
[Attach to Mail]
/[Attach One]/follow the instructions on the screen/
compose and send a mail
/[Attach Selected]/select a name/[Do]/follow the
instructions on the screen/compose and send a mail
/[Attach All]/enter the lock no./[OK]/follow the
instructions on the screen/compose and send a mail
[Phone number menu]
For subsequent operations nstep 3 of “Making a call from
phonebook” on P. 59
[Create mail]/compose and send a mail
[Send by Infrared], [Send by Bluetooth]
Profile is also sent when Send All is performed.
■ Menu operation in phonebook display screen (when
simple display is selected)
Refer to menu operations in the phonebook display screen (when the tab
is selected) (nP. 60) for the following functions.
Add New Item Edit
Refer to menu operations in the phonebook display screen (when the list
is selected) (nP. 61) for the following functions.
Phone number menu Create mail
[Delete One]/[Yes]
[Send One by Infrared]/follow the instructions on the screen
[Send One by Bluetooth]/follow the instructions on the screen
[Attach One to mail]/follow the instructions on the screen/
compose and send a mail
[Start chat]
For details on chat nP. 102
■ Menu operation in phonebook details screen
Refer to menu operations in the phonebook display screen (when the
simple display is selected) (nP. 61) for the following functions.
Delete One Send One by Infrared
Send One by Bluetooth Attach One to mail
Start chat
[Create GPS mail] (only for GPS information)/compose and send
a mail
[Display GoogleMap] (only for residence and GPS information)
[Add New Item] nP. 56
[Edit] nP. 62
[Phone number menu]
For subsequent operations nstep 3 of “Making a call from
phonebook” on P. 59
[Create mail]/compose and send a mail
[Create GPS mail]
URL which shows the latitude and longitude is inserted in message.
Location URL is counted as characters.
Phonebook
61
Page 64

Edit phonebook
Editing phonebook entry
You can edit items saved/set in the phonebook entry.
In the main menu, [Address Book]/point the cursor
1
to the name/[Edit]
Edit the phonebook/[Save]/[Yes]
2
Phonebook
Delete phonebook
Deleting phonebook entry
In the main menu, [Address Book]/point the cursor
1
to the name/z/[Delete]
Select a deletion method
2
; [Delete One]
; [Delete Selected]/select the name/[Do]
; [Delete All]/enter the lock no./[OK]
[Yes]
3
Speed dial/Speed mail
Making a call or sending mail with a few key operations
Easily call or compose and send mail or SMS by saving entries to
speed dial/speed mail.
You can save up to 20 entries.
Saving to speed dial/speed mail
<Speed dial/mail setting>
In the main menu, [Address Book]/point the cursor
1
to the tab/z/[Speed dial/mail setting]
Select a number to set
2
Select a name
3
: To overwrite the item: Select a name/[Yes]
■ Touch panel operation in speed dial/speed mail list screen
The following operations are available with displayed keys.
[Edit] Edit
[Cancel one] Cancel one
■ Key operation in speed dial/speed mail list screen
To cancel one *
To cancel selected ^+*
To cancel all ^+]+*
62
Page 65

■ Menu operation in speed dial/speed mail list screen
[Cancel one]/[Yes]
[Cancel selection]/select a number to cancel/[Do]/[Yes]
[Cancel all]/enter the lock no./[OK]/[Yes]
Using speed dial/speed mail
In the main menu, [Dialer]
1
Enter the number between 1 to 20
2
Select a function
3
: To make a voice call: [Call]
: To send a mail: z/[Call]/[Create Mail]/compose and send a
mail
• Alternatively, z+M/compose and send a mail.
: To send SMS: z/[Call]/[Create SMS]/compose and send
SMS
Import contacts
Using contacts of UIM phonebook
Use contacts added to UIM phonebook on other FOMA terminals
by loading them.
In the main menu, [Address Book]/z/[Import
1
contacts]
Select a name/[Save]
2
: To load all: [MENU]/[Import All]
: To edit and save: Select a name/enter/select an item/[Save]/
[Yes]
Registering vCard format file to phonebook
Example: When registering from Contents Manager
In the Contents Manager screen, select a vCard format
1
file/z
Select a registration method
2
; [Register an item]
; [Select and register items]/select the name/[Do]
; [Register All]
[Yes]
3
The data which contains any of the following items can be displayed. If
the loaded list contains the data that cannot be displayed, only the data
before the invalid data is displayed.
Name Phone number Mail address
Chat address Residence
The data with Secret setting is also displayed.
Registering is canceled when the available memory space of the FOMA
terminal is insufficient while registering.
■ Touch panel operation in vCard display screen
The following operations are available with displayed keys.
[Register an item] Register one
[Register all] Register all
*1 Available only when the details is selected.
*2 Available only when the list is selected.
*1
*2
Phonebook
63
Page 66

■ Key operation in vCard display screen
To register one z+A
To register selected
To register all
* Available only when the list is selected.
*
*
^+A
^+]+A
■ Menu operation in vCard display screen (when list is
Phonebook
selected)
[Register an item] nP. 63
[Select and register items] nP. 63
[Register All] nP. 63
■ Menu operation in vCard display screen (when details is
selected)
[Register an item] nP. 63
64
Page 67

Security Settings
Security code
Security codes used on the FOMA terminal . . . . . . . . . . . . . . . . . . . . . . 66
Changing lock no. . . . . . . . . . . . . . . . . . . . . . . . . . . . . . . . . . <Lock No.>67
Changing unlock method. . . . . . . . . . . . . . . . . . . . . . . <Unlock method>67
Setting finger list pattern . . . . . . . . . . . . . . . . . . . . . <Finger list pattern>68
Setting PIN code . . . . . . . . . . . . . . . . . . . . . . . . . . . . . . <SIM card lock>68
Setting password display for entering . . . . . . . . . . . <Display Password>69
Restricting phone operations and functions on
mobile phone
Various lock functions . . . . . . . . . . . . . . . . . . . . . . . . . . . . . . . . . . . . . . . 69
Locking when the FOMA terminal is closed . . . . . . . . . . . . <Close lock>69
Restricting use of phonebook . . . . . . . . . . . . . . <Restrict address book>70
Restricting calls . . . . . . . . . . . . . . . . . . . . . . . . . . . . . . . . <Restrict calls>70
Using Offline mode . . . . . . . . . . . . . . . . . . . . . . . . . . . . . <Offline mode>70
Restricting outgoing/incoming calls and messages
Rejecting a call from specified phone number . . . . . . . . . <Reject calls>71
Rejecting a call with no caller ID
. . . . . . . . . . . . . . . . . . . . . . <Reject calls by reason of non-disclosure>72
Rejecting a call from a caller unset in phonebook . . . <Reject unknown>72
Saving incoming call history from rejected callers
. . . . . . . . . . . . . . . . . . . . . . . . . . . . . . . . . <Save incoming call history>72
Setting network security . . . . . . . . . . . . . . . . . . . . . . . . . . . . . . . . . . . . . .73
Returning to default settings
Resetting the FOMA terminal and settings . . . . . . . . . . . . . . . . . . . . . . . .73
Other security settings
Other security settings . . . . . . . . . . . . . . . . . . . . . . . . . . . . . . . . . . . . . . .74
65
Page 68

Security codes used on the FOMA terminal
Some functions for convenient use of the FOMA terminal require
security codes. In addition to the lock no. used for various
handset operations, use security codes such as the network
security code when using network services. Use security codes
with various functions to fully utilize the FOMA terminal.
Entered lock no. (security code for each function) and PIN code are
Security Settings
marked with [|] or [・].
Precautions for various security codes
Do not use easily estimated numbers for security codes to be set such
as “birthday”, “part of a phone number”, “address or room number”,
“1111” or “1234”. Keep a separate memo of security codes.
Keep security codes private. If the security codes are found and
improperly used by others, DOCOMO shall not be liable for any loss of
the users.
If you forget your security codes, you are required to bring your
identification (a driver’s license, etc.), your FOMA terminal and your
UIM to a docomo Shop.
For details, contact “docomo Smartphone Care” on the back of this
manual.
PUK (PIN Unlock Key) is described in the agreement form (customer
copy) you received at the time of subscription at a docomo Shop. If you
made a subscription outside a docomo Shop, bring your identification (a
driver’s license, etc.) and your UIM to a docomo Shop or contact
“docomo Smartphone Care” on the back of this manual.
Lock no. (for various functions)
Lock no. is set to [0000] by default but you can change the number
(nP. 67).
If you enter the lock no. incorrectly, [Wrong lock no.] appears. Enter the
correct lock no.
If you enter the wrong lock no. five times continuously, you cannot enter
it for 30 seconds.
Network security code
Network security code is a four-digit code required for confirming the
subscriber’s identity when an order is received at a docomo Shop or
docomo Smartphone Care, or used for accessing various network services.
You set arbitrary code at the time of subscription but you can change the
code.
For those with “docomo ID/password” of the general support site “My
docomo” designed for PC (in Japanese only), the registration procedure for
a new network security code is available from PC.
Refer to the inside back cover of this manual for details on “My docomo”.
PIN1 code/PIN2 code
A UIM has two security codes, PIN1 code and PIN2 code. These security
codes are set to [0000] by default but you can change the code (nP. 69).
The PIN1 code is a four- to eight-digit security code that is entered when a
UIM is inserted or when the FOMA terminal is turned on to prevent
unauthorized use by a third party.
※ This FOMA terminal does not support PIN2 code.
Use the previously set PIN1/PIN2 code when inserting a UIM that has
been used in another FOMA terminal. It is [0000] if the setting has not
been changed.
If you enter the wrong PIN1/PIN2 code three times continuously, it is
locked. In this case, unlock with “PUK” (PIN Unlock Key).
66
Page 69

PUK (PIN Unlock Key)
PUK (PIN Unlock Key) is an eight-digit number used to disable the PIN code
lock. You cannot change the code.
If you enter the wrong code ten times continuously, the UIM is completely
locked. In this case, contact a docomo Shop.
Lock No.
Changing lock no.
You can change the lock no. (four to eight digits).
In the main menu, [Settings]/[Security & location
1
information]/[Change unlock pattern]/[Lock No.]
Enter the lock no./[OK]
2
Enter the new lock no./[OK]
3
Enter the new lock no. again/[Confirm]
4
[Confirm]
5
Unlock method
Changing unlock method
■ Changing unlock method to finger list pattern
The finger list pattern is a function used to enable/disable lock by sliding
your finger vertically, horizontally, or diagonally to connect four dots or
more.
In the main menu, [Settings]/[Security & location
1
information]/[Unlock method]/[Finger list]
Enter the lock no./[OK]
2
: The handset protection screen appears for the first setting of finger
list pattern. Follow the instructions on the screen.
Enter the finger list pattern/[Continue]
3
: To display help: z
• To exit the help: [OK]
Enter the finger list pattern again
4
: To re-enter: [Retry]
[Confirm]
5
■ Changing unlock method to lock no.
In the main menu, [Settings]/[Security & location
1
information]/[Unlock method]/[Lock No.]
Enter the finger list pattern
2
Enter the lock no./[OK]
3
Enter the lock no. again/[Confirm]
4
[Confirm]
5
Enter four to eight digits number for the lock no.
Security Settings
67
Page 70

Finger list pattern
Setting finger list pattern
When you set the finger list pattern, set Unlock method to [Finger list] in
advance (nP. 67).
Changing finger list pattern
In the main menu, [Settings]/[Security & location
1
Security Settings
information]/[Change unlock pattern]/[Finger list]
Enter the finger list pattern
2
Enter the new finger list pattern/[Continue]
3
Enter the finger list pattern again
4
[Confirm]
5
Executing finger list pattern
In the finger list pattern authentication screen, enter
1
the registered finger list pattern
If you enter the wrong finger list pattern five times continuously, you
cannot enter it for 30 seconds.
Displaying track for entering finger list pattern
with line <Use visible pattern>
In the main menu, [Settings]/[Security & location
1
information]
[Use visible pattern]
2
: Each time you select, the setting is enabled/disabled.
Setting vibration for entering
<Vibration while inputting>
In the main menu, [Settings]/[Security & location
1
information]
[Vibration while inputting]
2
: Each time you select, the setting is enabled/disabled.
SIM card lock
Setting PIN code
In Japan, you cannot call to the emergency number (110, 119, or 118)
from the PIN code entry screen and PUK (PIN Unlock Key) entry screen,
with a UIM locked.
Setting handset to require PIN code entry at
power on <Lock SIM card>
Use the same steps to disable it.
In the main menu, [Settings]/[Security & location
1
information]/[SIM card lock]/[Lock SIM card]
Enter the PIN code/[OK]
2
The setting is saved in the UIM.
■ Entering PIN code at power on
If Lock SIM card is enabled, the PIN code entry screen appears when the
power is turned on.
In the PIN code entry screen, enter the PIN code/
1
[OK]
68
Page 71

Changing PIN code <Change SIM PIN>
In the main menu, [Settings]/[Security & location
1
information]/[SIM card lock]/[Change SIM PIN]
Enter the current PIN code/[OK]
2
Enter the new PIN code/[OK]/enter the new PIN
3
code again/[OK]
The setting is saved in the UIM.
You cannot change the PIN code when Lock SIM card is disabled.
Disabling PIN lock
In the PIN locking screen, [Emergency call]
1
Enter “**05*”/enter PUK (PIN Unlock Key)/enter
2
“*”/enter the new PIN code/enter “*”/enter the
new PIN code again/enter “#”
: Enter “**05*88888888*7777*7777#” to change PIN code to “7777”
when PUK (PIN Unlock Key) is “88888888”.
Display Password
Setting password display for entering
When you enter a password, you can display the entered number
before displaying with [・].
The setting is enabled when entering the following passwords.
PIN code Password for Wi-Fi connection
Credential storage password
In the main menu, [Settings]/[Security & location
1
information]
[Display Password]
2
: Each time you select, the setting is enabled/disabled.
Various lock functions
You can restrict phonebook operations such as retrieving,
registering, deleting, and calling.
Lock function Operation/Restrictions Page
Close lock Lock the FOMA terminal according to
Restrict address book Restrict the use of phonebook. P. 70
Restrict calls Restrict calls excluding emergency
Offline mode Restrict the use of all functions using
Close lock
open/close of the FOMA terminal or
power on/off.
number (110, 119, or 118).
communication such as call/mail
function.
P. 69
P. 70
P. 70
Locking when the FOMA terminal is
closed
Lock the FOMA terminal according to opening/closing of the
FOMA terminal, etc. When Close lock is set, you can only perform
the operations of the power on/off and call to the emergency
number (110, 119, or 118).
The FOMA terminal is locked in the following cases.
When the FOMA terminal is closed
When the power is turned on
When the backlight is turned off
In the main menu, [Settings]/[Security & location
1
information]/[Close lock]
Enter the lock no./[OK]
2
To disable Close lock
: During Close lock, enter the lock no. in the unlock screen/[OK]
Security Settings
69
Page 72

Disabling Close lock by signing in to your
Google account
If you failed to disable Close lock five times continuously, it can be disabled
by signing in to your Google account.
Set the Google account in advance.
In the unlock screen, [Forget?]
1
[Username (email)]/enter the user name
2
[Password]/enter the password
3
Security Settings
[Sign in]
4
: Close lock is disabled and the lock no. is initialized. Register the lock
no. again.
Restrict address book
Restricting use of phonebook
Restrict making a call from phonebook or editing of phonebook.
In the main menu, [Settings]/[Security & location
1
information]/[Restrict function]/[Restrict address
book]
Enter the lock no./[OK]
2
: Disabling procedures are the same as when setting.
When Restrict address book is set, any information registered in
phonebook (such as name) does not appear on the screen of making/
receiving a call, redial or incoming call histories.
To use phonebook while Restrict address book is set, enter the lock no.
to temporarily disable the restriction.
Restrict calls
Restricting calls
Restrict making a call to other than emergency number (110, 119,
or 118).
In the main menu, [Settings]/[Security & location
1
information]/[Restrict function]/[Restrict calls]
Enter the lock no./[OK]
2
: Disabling procedures are the same as when setting.
To make a call while Restrict calls is set, enter the lock no. to
temporarily disable the restriction.
Offline mode
Using Offline mode
Restrict the use of all functions using communication such as
call/mail function.
When Lock SIM card of SIM card lock is enabled, you cannot call to the
emergency number (110, 119, or 118).
When Lock SIM card is disabled, you can call to the emergency number
(110, 119, or 118) in Offline mode. If you call to the emergency number,
Offline mode is disabled and the call is made.
In the main menu, [Settings]/[Transmission]
1
[Offline mode]
2
: Each time you select, the setting is enabled/disabled.
• If Lock SIM card of SIM card lock is enabled, you are required to
enter PIN code when disabling Offline mode.
70
Page 73

Reject calls
Rejecting a call from specified phone number
You can set the handset to reject calls from specified callers.
This setting is available only when a caller sends notify of the caller ID. It
is recommended to also set Reject calls by reason of non-disclosure.
SMS is received regardless of the setting of this function.
Registering phone numbers to reject
You can register up to 20 phone numbers to the reject calls list.
In the main menu, [Settings]/[Call Settings]/[Call
1
blocking]
Enter the lock no./[OK]/point the cursor to
2
[Specified numbers]/[Edit]
[Add new]
3
: To change a registered phone number: Point the cursor to the phone
number/[Change]/[Yes]
: To delete a registered phone number: Point the cursor to the phone
number/[Delete]/select the deletion method/[Yes]
Select the entry method of phone number
4
; [Use address book]/select a phone number
; [Direct entry]/enter a phone number/ [Done]
Enabling rejection of call
In the main menu, [Settings]/[Call Settings]/[Call
1
blocking]
Enter the lock no./[OK]/[Specified numbers]
2
Select the setting
3
: To check the rejection message: Point the cursor to the message/
[Play]
: To disable rejection of call: [OFF]
■ Touch panel operation in rejection message playback
screen
The following operation is available with a displayed key.
[Stop] Stop
■ Key operation in rejection message playback screen
To stop ]+S
To turn volume up #
To turn volume down $
Security Settings
71
Page 74

Reject calls by reason of non-disclosure
Rejecting a call with no caller ID
You can set the handset to reject a call when its caller ID is not
sent, depending on reason.
The following are the types of non-disclosure reason. For details
nP. 49
No notification Payphone Notification not possible
Calls received from a caller who is set to be rejected due to a
Security Settings
non-disclosure reason will not be connected. Calls of other
non-disclosure reasons will be connected.
SMS is received regardless of the setting of this function.
In the main menu, [Settings]/[Call Settings]/[Call
1
blocking]
Enter the lock no./[OK]
2
Select a reason
3
Select the setting
4
: To check the rejection message: Point the cursor to the message/
[Play]
: For details on operations in the rejection message playback screen
nP. 71
: To disable rejection of call: [OFF]
72
Reject unknown
Rejecting a call from a caller unset in phonebook
You can set the handset to reject calls from callers not in the
phonebook.
This setting is available only when a caller sends notify of the caller ID.
SMS is received regardless of the setting of this function.
In the main menu, [Settings]/[Call Settings]/[Call
1
blocking]
Enter the lock no./[OK]/[Not registered in address
2
book]
Select the setting
3
: To check the rejection message: Point the cursor to the message/
[Play]
: For details on operations in the rejection message playback screen
nP. 71
: To record the voice message of the caller: [Record ans memo]
• When there are ten answering memos which are not played, the
same operation with [Disconnect on no answer] is performed.
: To disable rejection of call: [OFF]
Save incoming call history
Saving incoming call history from rejected callers
You can set the handset to save the calls from the rejected callers
in the incoming call histories.
In the main menu, [Settings]/[Call Settings]/[Call
1
blocking]
Enter the lock no./[OK]
2
[Save incoming call history]
3
: Each time you select, the setting is enabled/disabled.
Page 75

Setting network security
Using secure credential <Use secure credentials>
Set the credential storage password in advance (nP. 73).
In the main menu, [Settings]/[Security & location
1
information]
[Use secure credentials]/enter the credential storage
2
password/[OK]
: To disable: [Use secure credentials]
Setting credential storage password
<Set password>
Set credential storage password with more than eight characters.
In the main menu, [Settings]/[Security & location
1
information]/[Set password]
Point the cursor to the [New password] field/enter
2
the new password
Point the cursor to the [Confirm new password]
3
field/enter the new password again/[OK]
Clearing storage <Clear storage>
Delete all credentials and reset the credential storage password.
In the main menu, [Settings]/[Security & location
1
information]/[Clear storage]/[OK]
Resetting the FOMA terminal and settings
Resetting settings <Reset settings>
Restore items you set in [Settings] of application to their default settings.
For details on the default settings nP. 256
In the main menu, [Settings]/[Reset]/[Reset
1
settings]/[Yes]
Enter the lock no./[OK]
2
: If Lock SIM card of SIM card lock is enabled, you are required to
enter PIN code after Reset settings.
Initializing the FOMA terminal <Reset all>
Delete saved data and reset the settings.
In addition, Droidget compatible widget is deleted.
In the main menu, [Settings]/[Reset]/[Reset all]/
1
[Yes]
Enter the lock no./[OK]/[Reset phone]/[Erase
2
everything]
: Restart and reset the FOMA terminal.
Security Settings
73
Page 76

Resetting power/end key setting <End key setting>
You can restore the power/end key operation to the default if it is changed
using downloaded applications.
In the main menu, [Settings]/[System]/[End key
1
setting]/[Yes]
Resetting the FOMA terminal
Reset the FOMA terminal when an error occurs such as when data is not
Security Settings
displayed properly, and when operation does not work properly.
Remove the back cover
1
Press the RESET button with a thin stick, etc. for at
2
least 2 seconds
: The FOMA terminal is restart.
The data being edited may be deleted. The saved data is not deleted.
Do not reset while using a microSD Card or saving data.
Other security settings
You can use the following settings and functions to secure your
FOMA terminal.
Function/
Service name
Nuisance Call
Blocking Service
Software Update Update software of the FOMA terminal if
Reject “nuisance calls” such as prank
calls, unsolicited sales calls, etc.
necessary.
Intent Ref.
P. 243
P. 281
74
Page 77

Displaying mail main screen . . . . . . . . . . . . . . . . . . . . . . . . . . . . . . . . . . 76
Composing mail
Setting up PC-mail account . . . . . . . . . . . . . . . . . . . . <Account settings>76
Composing and sending PC-mail . . . . . . . . . . . . . . . . <Create PC-mail>78
Using template to compose . . . . . . . . . . . . . . . . . . . . . . . . . . . . . . . . . . . 81
Attaching file . . . . . . . . . . . . . . . . . . . . . . . . . . . . . . . . . . <Attached file>82
Saving mail then, sending later . . . . . . . . . . . . . . . . . . . . . . <Save mail>82
Receiving and operating mail
When mail is received . . . . . . . . . . . . . . . . . . . . . . . . . . . <Auto receive>82
Checking new mail . . . . . . . . . . . . . . . . . . . . . . . . . . .<Check new mail>83
Replying to mail . . . . . . . . . . . . . . . . . . . . . . . . . . . . . . . . . . . . . . <Reply>83
Forwarding mail to other destinations . . . . . . . . . . . . . . . . . . . <Forward>83
Checking/Saving attached file . . . . . . . . . . . . . . . . . . . . . . . . . . . . . . . . . 83
Operating mailbox
Displaying mail in Inbox/Outbox/Unsent box
. . . . . . . . . . . . . . . . . . . . . . . . . . . . . . . . . <Inbox/Outbox/Unsent box>84
Displaying address information . . . . . . . . . . . .<Display address details>90
Searching mail. . . . . . . . . . . . . . . . . . . . . . . . . . . . . . . . . . . . . . . . . . . . . 90
Using mail address in mail. . . . . . . . . . . . . . . . . . . . . . . . . . . . . . . . . . . . 92
Using information in subject or message. . . . . . . . . . . . . . . . . . . . . . . . . 92
Managing mail . . . . . . . . . . . . . . . . . . . . . . . . . . . . . . . . . . . . . . . . . . . . . 93
Setting mail
Setting common functions of PC-mail and SMS . . . . <General settings>95
Setting PC-mail . . . . . . . . . . . . . . . . . . . . . . . . . . . . . <PC-mail settings>98
Setting mail software to be activated
. . . . . . . . . . . . . . . . . . . . . . . . . . . . . . <Mail software startup setting>100
Using mopera U mail
Using mopera U mail . . . . . . . . . . . . . . . . . . . . . . . . . . . . . . . . . . . . . . .100
Using SMS
Using SMS . . . . . . . . . . . . . . . . . . . . . . . . . . . . . . . . . . . . . . . . . . . . . . . 100
Using Gmail
Using Gmail . . . . . . . . . . . . . . . . . . . . . . . . . . . . . . . . . . . . . . . . . . . . . .101
Using Google Talk
Using Google Talk . . . . . . . . . . . . . . . . . . . . . . . . . . . . . . . . . . . . . . . . .102
Using i-mode.net mobile mode
i-mode.net mobile mode . . . . . . . . . . . . . . . . . . . . . . . . . . . . . . . . . . . . .104
75
Page 78

Displaying mail main screen
In the main menu, [Mail]
1
: The number of unopened mails is displayed in Inbox.
: The number of mails which failed to be sent is displayed in Unsent
box.
: When activating Restrict Mail Functions, the screen to enter the lock
no. appears. Enter the lock no. to unlock temporarily.
■ Menu operation in mail main screen
Mail
[Rearrange] nP. 76
[Reset rearrangement]/[Yes]
[Item count display setting]/select the setting
You can set the number of mails to be displayed in Inbox and Unsent
box.
To display only the number of SMS, select [Cellphone mail only].
Sorting menus in mail main screen <Rearrange>
In the mail main screen, point the cursor to the menu
1
to move/z/[Rearrange]
Select a move destination
2
76
Account settings
Setting up PC-mail account
You can register up to three accounts.
In the mail main screen, [Settings]/[PC-mail
1
settings]/[Account settings]
Select a register destination
2
: To register new: [(Not registered)]
: To change account: Select the account to change
: To delete account: Point the cursor to the account to delete/
[Delete]/[Yes]
[Displayed name settings]/enter the displayed
3
name/[OK]
: You can enter up to 20 single/double-byte characters.
[Receive settings]
4
Enter/Select an item
5
; [Username]/enter the user name/[OK]
• You can enter up to 128 single-byte characters (alphanumeric
characters and symbols).
; [password]/enter the password/[OK]
• You can enter up to 32 single-byte characters.
; [Receiving mail server]/enter the server address/[OK]
• You can enter up to 128 single-byte characters (alphanumeric
characters and symbols).
; [port number (1 - 65535)]/enter the port number/[OK]
• Enter the number between 1 to 65535.
; [Receiving authentication method]/select the authentication
method
; [Security (SSL)]
• Each time you select, the setting is enabled/disabled.
; [Leave mail on the server]
• Each time you select, the setting is enabled/disabled.
[Return]
6
[Send settings]
7
Page 79

Enter/Select an item
8
; [Sender name]/enter the sender name/[OK]
• You can enter up to 20 single/double-byte characters.
; [Mail address]/enter the mail address/[OK]
• You can enter up to 128 single-byte characters (alphanumeric
characters and symbols).
; [Sending mail server]/enter the server address/[OK]
• You can enter up to 128 single-byte characters (alphanumeric
characters and symbols).
; [port number(1~65535)]/enter the port number/[OK]
• Enter the number between 1 to 65535.
; [Sending authentication method]/select the authentication
method
• When selecting [SMTP authentication], for subsequent operations
nstep 2 of “Setting SMTP authentication” on P. 77
; [Security (SSL)]
• Each time you select, the setting is enabled/disabled.
; [Reply address]/enter the address/[OK]
• You can enter up to 128 single-byte characters (alphanumeric
characters and symbols).
• When the address has been entered, each time you select, the
setting is enabled/disabled.
• To edit the address which has been entered: Point the cursor to
[Reply address]/[Edit]/edit the address/[OK]
[Return]
9
[Done]/[OK]
10
Even if you change the SSL setting, the port number is not
automatically changed. Refer to the mail server setting and change.
The account which is registered first is automatically given priority to
normal use. To change the priority, set priority account for creating mail.
When you delete an account, all mails delivered to that account are
deleted. When there is any protected mail, the account cannot be
deleted.
■ Touch panel operation in set account screen
The following operation is available with a displayed key.
[Delete] Delete
■ Key operation in set account screen
To delete *
Setting SMTP authentication <SMTP authentication>
In the sending authentication method selection
1
screen, [SMTP authentication]
Select the setting method
2
: When [Use receive settings] is selected, this operation is completed.
[Username]/enter the user name/[OK]
3
: You can enter up to 128 single-byte characters (alphanumeric
characters and symbols).
[password]/enter the password/[OK]
4
: You can enter up to 32 single-byte characters.
[Done]
5
■ Touch panel operation in individual setting screen
The following operations are available with displayed keys.
[Edit] Edit
[Done] Complete
■ Key operation in individual setting screen
To complete ]+S
Mail
77
Page 80

Setting up account of Gmail, Yahoo! or mopera U
Compose mail screen
When the account is Gmail, Yahoo! or mopera U, you can set the account
by simple registration.
In the account setting screen, [Easy PC mail settings]
1
Select an account
2
[Mail address]/enter the mail address/[OK]
3
: You can enter up to 128 single-byte characters (alphanumeric
characters and symbols).
: When entering the mail address, the characters after “@” can be
Mail
skipped.
: When Gmail or Yahoo! account is set, proceed to step 5
[Username]/enter the user name/[OK]
4
: You can enter up to 128 single-byte characters (alphanumeric
characters and symbols).
[password]/enter the password/[OK]
5
: You can enter up to 32 single-byte characters.
[Done]/[OK]
6
■ Touch panel operation in easy PC-mail settings screen
The following operations are available with displayed keys.
[Edit] Edit
[Done] Complete
■ Key operation in easy PC-mail settings screen
To complete ]+S
Create PC-mail
Composing and sending PC-mail
Set the account in advance (nP. 76).
In the mail main screen, [Create PC-mail]
1
Select the [Q] field/select the entry method
2
; [Use phonebook]/select a recipient
; [Insert send/receive history]/select a recipient
• This does not appear while setting secrecy. Q/enter the lock
no./[OK] to display this temporarily.
; [Quote mail group]/proceed to step 2 of “Setting mail group as
destination” on P. 80
; [Use profile]/select a destination
; [Direct entry]/enter a destination/[OK]
: Point the cursor to the [Q] field and enter the destination or recipient
name. The recipient which is automatically searched in send/receive
history or phonebook will be displayed. Select a recipient to set as
the destination. After setting the destination, enter another
destination to add to the destination.
: To add destination: Select the [Q] field/select the [Q] field
• You can set up to 30 destinations.
: To change the mail type: Select the [Q] field/point the cursor to the
destination/z/select the mail type
: To edit destination: Select the [Q] field/select a destination/enter
a destination/[OK]
: To delete destination: Select the [Q] field/point the cursor to the
destination/[Delete]
: When the recipient is saved in the phonebook, the name appears.
78
Page 81

Point the cursor to the [t] field/enter a subject
3
: [K] (Line breaks) cannot be entered in the subject.
Point the cursor to the message entry field/enter
4
messages
: You can enter up to 10,000 single-byte characters (approximately 10
KB).
[Send]
5
: To cancel sending: [Cancel]
• Sending may occur depending on the timing.
Add destination
You can send an identical mail to up to 30 recipients simultaneously
(Broadcast).
To : Recipient’s destination. Addresses entered in [To] appear on the
other recipient’s screen.
Cc : Used to send carbon copy to a third party.
Bcc : Used to send blind carbon copy to a third party. Unlike [Cc],
addresses are invisible to other recipients.
Some receiving models may not be able to receive the subject
completely.
Mails sent from a Gmail account are treated as ones from a PC. When
receiving models set PC-mail rejection, mails cannot be sent.
Mail that could not be sent by an unspecified reason is saved as unsent
mail.
Text for recipient may not appear correctly depending on signal status.
When sent mails saved in the FOMA terminal exceed the maximum
number/capacity of saved mails, they are deleted starting with the
oldest.
■ Touch panel operation in compose mail screen
The following operations are available with displayed keys.
[Save] Save
[Template] Retrieve template
[Send] Send
The following touch operations are available.
To select all Touch the message for a while/[Select all]
To cut/copy all Touch the message for a while/[Cut all]/[Copy all]
To cut/copy
selection
To paste Touch the pasting position for a while/[Paste]
To search
selection in
dictionary
To select entry
method
Move to the start position/move to the end
position while pressing ^/touch the selected
texts for a while/[Cut]/[Copy]
Move to the start position/move to the end
position while pressing ^/touch the selected
texts for a while/[Search]/select a dictionary
Touch the message for a while/[Input Method]/
select an entry method
■ Touch panel operation in destination list screen
The following operation is available with a displayed key.
[Delete] Delete
■ Key operation in destination list screen
To delete *
■ Menu operation in compose mail screen
[Send]
[Retrieve template]/select a template
[Remove decoration] (only for using template)/[Yes]
[Quote]/select the source to quote/select information
[Font Size]/select a font size
[Save]
/[Store template]
/[Save as New]/enter the template name/[OK]
/[Overwrite]
/[Save to unsent box]/select a saving method
Mail
Continued on next page
79
Page 82

[Change mail type]
/[Change to SMS]/[Yes]/[Yes]
Information other than text in the message will be deleted.
/[Change to xxx]/[Yes]
In “xxx”, the displayed name of the registered account
appears.
[Send options]
/[Priority]/select the priority
/[Reply address] nP. 81
[Help]
Mail
[Store template]
You can enter up to 40 single/double-byte characters for template
name.
[Change mail type]
If you change the mail type from PC-mail to SMS after entering the
destination, the destination will be deleted.
If you change the mail type from SMS to PC-mail after entering the
destination, the entered phone number is automatically searched in
phonebook and replaced with the registered mail address.
If multiple mail addresses are registered to the phonebook, the top mail
address is set. If no mail address is registered, the destination will be
deleted.
If you change the mail type from SMS to PC-mail after entering the
message, the single-byte katakana will be converted to double-byte
katakana.
■ Menu operation in send/receive history list screen
[Delete]
[Delete All]/enter the lock no./[OK]/[Yes]
[Set secrecy]/[Remove secrecy]/enter the lock no./[OK]/[OK]
[Set secrecy], [Remove secrecy]
If you set secrecy, send/receive history cannot be used.
■ Menu operation in destination list screen
[Change to To]
[Change to Cc]
[Change to Bcc]
[Delete One]
[Delete all]/[Yes]
Setting mail group as destination
<Quote mail group>
Set the mail group (nP. 97) in advance.
In the compose mail screen, select the [Q] field/
1
[Quote mail group]
Select the mail group
2
: To select a recipient registered in mail group: Point the cursor to the
mail group/[Display]/[Add destination]
■ Touch panel operation in mail group selection screen
The following operation is available with a displayed key.
[Display] Display member
■ Touch panel operation in member display screen
The following operation is available with a displayed key.
[Add destination] Add group destination
■ Key operation in mail group selection screen
To display details of mail group z+P
■ Key operation in member display screen
To add group destination z+A
■ Menu operation in mail group selection screen
[Display]
80
Page 83

■ Menu operation in member display screen
[Add destination]
Setting reply address <Reply address>
Set this setting if you want to get reply not to the sender address but to
another address.
The reply address is saved within the mail being composed as Reply-TO.
In the compose mail screen, z/[Send options]/
1
[Reply address]
[On/Off settings]/[On]
2
: If you select [Off] or if you have already registered a reply address,
this operation is completed.
: To edit reply address: [Reply address]
Enter the address/[OK]
3
When the On/Off settings is set to [Off], you cannot edit the reply
address. If you delete the set address, the On/Off settings turns to [Off].
Using template to compose
Templates are mail models with set layout. The composed, sent
or received mails can be saved as templates.
You can save up to 200 templates in total.
In the mail main screen, [Template box]
1
Select a template
2
■ Touch panel operation in template box screen
The following operations are available with displayed keys.
[Property] Display the property
[Preview] Preview
[Select] Select the template
Preview screen
The following operations are available with displayed keys.
[Forward] Display previous template
[Next] Display next template
[Select] Select template
■ Key operation in template box screen
To preview z+V
To change title name z+E
To display property z+P
To delete one *
To delete all ^+]+*
To display previous page ^+_ (space)
To display next page _ (space)
To point the cursor to first template ]+#
To point the cursor to last template ]+$
■ Menu operation in template box screen
[Preview]
[Change title name]/edit the title
[Delete]
/[Delete One]/[Yes]
/[Delete All]/enter the lock no./[OK]/[Yes]
[Sort]/select the sort method
[Property]
[Change title name]
You can enter up to 40 single/double-byte characters.
Mail
81
Page 84

Attached file
Attaching file
You can send a mail attached still pictures or videos, etc.
You can attach up to 20 files in a total size of up to 500 KB.
You cannot send templates and files with restrictions for mail attachment
and output from the FOMA terminal.
In the compose mail screen, [Attachment]
1
Select a file to attach
2
; [Content manager]/select a file
Mail
; [Camera]/select a camera mode/shoot
; [User data]/select a file type/select a file
; [Other]/select an application/select a file
: To add an attached file: [Attachment]/[Add attach file.]
: To check the attached file: [Attachment]/select a file
Depending on the receiving side terminal, files may not be received nor
correctly displayed/played. Also, the quality of videos may deteriorate
or videos may be converted to continuous still pictures.
When the attached file is JPEG, PNG, GIF, BMP or other image and its
size exceeds the available size to attach, the image size may be
reduced automatically.
■ Touch panel operation in attached file list screen
The following operations are available with displayed keys.
[Delete] Delete attached file
[Add] Add attached file
■ Key operation in attached file list screen
To delete attached file *
To delete all attached files ^+]+*
To add attached file ]+P
■ Menu operation in attached file list screen
[Add]
For subsequent operations nstep 2 of “Attaching file” on P. 82
[Delete]
[Delete all]/[Yes]
[Display/play]
Save mail
Saving mail then, sending later
You can save a composed mail and send it later.
Saving mail <Save>
In the compose mail screen, [Save]
1
Editing and sending saved mail
In the Unsent box list screen, select mail
1
Edit the mail/[Send]
2
Auto receive
When mail is received
When a mail is received, the reception notification caption is
displayed and mail ring tone sounds.
When received mails saved in the FOMA terminal exceed the maximum
number/capacity of saved mails, they are deleted starting with the oldest
and opened. When no opened mail exists, old unopened mails are
deleted.
When the size of the received mail including the attached file exceeds 1
MB, only the subject, sender and destination information are retrieved.
Receiving a pile of mails may cut the connection when you receive
PC-mails using Wi-Fi. In this case, set Wi-Fi sleep policy (nP. 219) to
[Never].
82
Page 85

When you cannot receive some mails during Gmail use, see Gmail site
help.
Check new mail
Checking new mail
Received mail is held at the mail server while the handset is
outside the service area or turned off. You can check and receive
mail from the mail server.
In the mail main screen, [Check new mail]
1
When the number of mails stored in the PC-mail server exceeds the
specified value, a confirmation screen appears asking whether to delete
old mail on the server.
When checking PC-mail, mails are retrieved for each registered
account. If any error occurs during retrieving, the confirmation screen
appears asking whether to retrieve mails for the next account.
Reply
Replying to mail
You can reply to mail with received message quoted (nP. 96).
In the received mail details screen, [Reply]
1
: When sending to multiple destinations, z/[Reply/Forward]/
[Reply] to select a reply address.
Compose and send a mail
2
Forward
Forwarding mail to other destinations
In the received mail details screen, [Forward]
1
Enter a destination and send a mail
2
Attached files must be totally retrieved before forwarded.
The unrecognized file can also be forwarded.
In case the original SMS contains pictograms, pictograms are changed
to spaces when sending.
Checking/Saving attached file
Check and save the attached file received.
Some attached files may not be played or displayed correctly.
Checking attached file
Select an attached file/[Display/play]
1
: To check the property of attached file: Select an attached file/
[Property]
The application to display/play the selected file is activated.
Saving attached file <Save>
Select an attached file/[Save]
1
: Depending on the file type, a screen to enter the file name appears or
an application to save it is activated.
Save a file
2
■ Saving images or Deco-mail pictograms inserted to
message <Save file>
In the mail details screen, z/[Move/save]/[Save
1
file]
Save a file
2
Mail
83
Page 86

Inbox/Outbox/Unsent box
2
3 64
9 a
1
7
8
5
2
64
9 b
1
7
8
5
c
975b
8
Displaying mail in Inbox/Outbox/Unsent box
Each of these mailboxes can contain the following numbers of PC-mail
and SMS entries. However, capacity varies depending on the size of
mail.
Received mail Up to 9,999
Sent/Unsent mail Up to 3,000 in total
Welcome mail “SHARPからのお知らせ” is saved in Inbox by default.
Mail
Transmission charges do not apply. Also, replies cannot be sent to
Welcome mail.
In the mail main screen, select a box
1
Select a mail
2
■ Mailbox list screen layout
Inbox list
Outbox list
Unsent box list
1Search box
2Folder icons
SMS folder
,
3Number of unopened mails
4Folder name
5Received date and time (received mail)/Sent date and time (sent
mail)/Save date and time (unsent mail)
6Mail number/Number of mails saved in folder
The mail number/number of mails saved in the selected folder appears.
7Message
8Mail type
Small [2] appears on the replied mails.
Small [3] appears on the forwarded mails.
Small [0] appears on the protected mails.
Small [1] appears on the PC-mails with file attached.
-
PC-mail folder
84
Page 87

Received mail
3
1
4
5
8
7
6
3
2
4
5
8
7
6
Unopened PC-mail
)
Unopened SMS
(
Unopened PC-mail with rest
8
on server
Sent mail
% (white)
& (white)
Unsent mail
% (gray)
& (gray)
9Subject
aSender
bDestination
cMail number/Number of mails saved
PC-mail
SMS
SMS with delivery report
5
PC-mail
SMS
PC-mail failed to be sent
7
SMS failed to be sent
6
■ Details screen layout
Received mail details
Opened PC-mail
+
Opened SMS
*
Opened PC-mail with rest
9
on server
Sent mail details
1Sender
2Destination
3Subject
4Received date and time (received mail)/Sent date and time (sent
mail)
When you set to receive a delivery report with send option for SMS,
[/] appears on the right side of the sent date and time. If you select
[/], the delivery report appears.
5Mail number
6Address details display key
Appears when multiple destinations exist. Select [:] to display the
address details display screen (nP. 90).
7Message
8Attached file name
■ Touch panel operation in each mail screen
Mailbox list screen
When the cursor is pointed to a folder, the following operations are
available with displayed keys.
[Receive new mails] Receive new
[Open] Open all mails in folder
[Fold]/[Expand] Fold/Expand folder
*1 Available only for PC-mail folder in Inbox.
When you cannot receive some mails during Gmail use, see Gmail
site help.
*2 Available only for Inbox.
*1
*2
Mail
Continued on next page
85
Page 88

When the cursor is pointed to a mail, the following operations are
available with displayed keys.
[Protect]/
[Release]
Protect/Release
[Receive] Receive rest
*1
[Reply] Reply
[Resend] Resend
*2
[Edit] Edit
[Delete] Delete one [Error details] Display error
*3
Mail
[Forward] Forward
*1 Unavailable for unsent mail.
*2 Available only for mail whose entire text is not received.
*3 Available only for received mail.
*4 Available only for sent mail.
*5 Available only for sent mail or unsent mail.
*6 Available only for unsent mail failed to be sent.
The following touch operations are available.
To fold/expand folder Touch folder
To switch opened/unopened Touch [+]/[)]
Mail details screen
The following operations are available with displayed keys.
*1
[Protect]/
[Remove
protection]
Protect/Release
[Receive] Receive rest
[Reply] Reply
[Resend] Resend
[Edit] Edit
*2
[Error details] Display error
[Delete] Delete
[Forward] Forward
*1 Unavailable for unsent mail.
*2 Available only for mail whose entire text is not received.
*3 Available only for received mail.
*4 Available only for sent mail.
*5 Available only for sent mail or unsent mail failed to be sent.
*6 Available only for unsent mail failed to be sent.
*3
The following touch operations are available.
To zoom in/out Put a distance between two fingers apart/closer
details
details
To display delivery
Touch [/]
report
*3
*4
*5
*6
*3
*4
*5
*6
■ Key operation in each mail screen
Mailbox list screen
To receive new
To open all mails in
folder
To fold/expand
folder
*3
Help
To delete one
To delete selected
*5
mail
To delete all
*1
*2
*3
*4
*5
z+R To move one
z+K
]+F
To move selected
mail
To move all
z+H To resend
* To edit
^+*
^+]+*To display the
To display error
details
previous page
*6
*6
*6
*9
*10
*11
z+M
^+M
^+]+
M
z+S
z+E
]+V
^
_
To protect/release*6z+P To display next page _
To receive rest
To add to phonebook*6z+A
To forward
To reply to sender*8]+R
*7
z+R To point the cursor to
first mail
*8
]+W To point the cursor to
last mail
]+#
]+$
*1 Available only for PC-mail folder in the Inbox list screen.
When you cannot receive some mails during Gmail use, see Gmail site
help.
*2 Available only for folder in the Inbox list screen.
*3 Available only for folder.
*4 Available only for user folder or the mail.
*5 Available only for mail.
*6 Available only for received mail or sent mail.
*7 Available only for mail whose entire text is not received.
*8 Available only for received mail.
*9 Available only for sent mail.
*10 Available only for sent mail or unsent mail.
*11 Available only for unsent mail failed to be sent.
+
(space)
(space)
86
Page 89

Mail details screen
To protect/release*1z+P To display error
To delete *
To receive rest
To forward
To reply
To move one
To resend
To edit
*1 Available only for received mail or sent mail.
*2 Available only for mail whose entire text is not received.
*3 Available only for received mail.
*4 Available only for sent mail.
*5 Available only for sent mail or unsent mail.
*6 Available only for unsent mail failed to be sent.
*2
*3
*3
*1
*4
*5
z+R To display previous
]+W
]+R To display next page _
z+M To display first page ]+#
z+S To display last page ]+$
z+E
details
page
*6
]+V
^
_
■ Menu operation in Inbox list screen
When pointing the cursor to folder
[Receive new PC-mail] (only for PC-mail folder)
Receive new mails with the account set on PC-mail folder to which
the cursor points.
[Register sorting] (only for user folder) nP. 95
[Search] nP. 90
[Mark all as opened]
[Manage folders]
/[Create new folder] nP. 93
/[Edit folder name]/edit the folder name
If you edit the main folder of PC-mail, the displayed name set
in the account is edited.
/[Rearrange folders] nP. 93
+
(space)
(space)
/[Folder secrecy]/[Remove folder secrecy] (only for user
folder)/enter the lock no./[OK]/[OK]
When setting Set folder reception notification, a confirmation
screen asking whether to get notification of reception appears.
Select [Yes] to select the folder reception notification setting.
/[Set folder reception notification] (only for user folder)/
select the setting/[OK]
/[Delete folder] (only for user folder) nP. 93
[Help]
When pointing the cursor to mail
[Continue to receive] (only for mail whose entire text is not
received)
/[Receive one]
/[Receive multiple]/select mail/[Execute]
/[Receive All]
[Reply/Forward]
/[Reply] nP. 83
/[Forward] nP. 83
[Delete]
/[Delete One]/select an item/[Yes]
/[Delete Selected]/select mail/[Execute]/select an item/
[Yes]
/[Delete All]/enter the lock no./[OK]/[Yes]
[Move/save]
/[Move folder] nP. 93
/[Save to Phone] nP. 94
/[Save to microSD] nP. 94
[Mail operation]
/[Protect]/[Release] nP. 94
/[Mark as opened]/[Mark as unopened] nP. 94
Mail
Continued on next page
87
Page 90

/[Data transfer]
/[Send by Infrared] nP. 178
/[Send by IrSS] nP. 178
/[Send by Bluetooth] nP. 225
[Search] nP. 90
[Register to phonebook]/add to the phonebook
[Sort]/select a sort method
[Display mail information]
/[Display address details]
Mail
/[Mail property]
[Receive new PC-mail]
When you cannot receive some mails during Gmail use, see Gmail site
help.
[Mark all as opened]
All mails including ones saved in folded folder are opened.
Also mails which are not retrieved entirely from the server are opened.
Mails in the folder with Folder secrecy set cannot be opened.
[Folder secrecy]
The folder with Folder secrecy set disappears.
To disable Folder secrecy temporarily, press z+Q in the mailbox
list screen, and then enter the lock no.
[Register to phonebook]
You can add the sender of a received mail or the first destination of a
sent mail to the phonebook.
■ Menu operation in Outbox list screen
When pointing the cursor to folder
Refer to menu operations in the Inbox list screen (nP. 87) for the
following functions.
Register sorting Search
Manage folders (Create new folder, Edit folder name, Rearrange
folders, Folder secrecy, Delete folder)
Help
When pointing the cursor to mail
Refer to menu operations in the Inbox list screen (nP. 87) for the
following functions.
Delete Move/save
Mail operation (Protect/Release, Data transfer) Search
Register to phonebook Sort
Display mail information (Display address details, Mail property)
[Edit]/compose and send a mail
[Resend]
[Display mail information]
/[View delivery report] (only for SMS with delivery report)
■ Menu operation in Unsent box list screen
[Edit]/compose and send a mail
[Delete]
/[Delete One]/[Yes]
/[Delete Selected]/select mail/[Execute]/[Yes]
/[Delete All]/enter the lock no./[OK]/[Yes]
[Error details] (only for unsent mail failed to be sent)
[Mail property]
88
Page 91

■ Menu operation in received mail details screen
Refer to menu operations in the Inbox list screen (nP. 87) for the
following functions.
Reply/Forward Move/save (Move folder)
Mail operation (Data transfer) Register to phonebook
Display mail information
[Continue to receive] (only for displaying a mail whose entire text is
not received)
[Delete One]/[Yes]
[Move/save]
/[Save file] nP. 83
/[Store template]/enter the template name/[OK]
/[Save to Phone] nP. 94
/[Save to microSD] nP. 94
[Copy] nP. 94
[Mail operation]
/[Search dictionary] nP. 93
/[Protect]/[Release]
/[Register to scheduler] nP. 92
[Display setting]
/[Set font size]/select a font size
/[Convert character encoding]/select the character
encoding
[Store template]
You can enter up to 40 single/double-byte characters for the template
name.
■ Menu operation in sent mail details screen
Refer to menu operations in the Inbox list screen (nP. 87) for the
following functions.
Move/save (Move folder) Mail operation (Data transfer)
Register to phonebook
Display mail information (Display address details, Mail property)
Refer to menu operations in the Outbox list screen (nP. 88) for the
following functions.
Edit Resend
Display mail information (View delivery report)
Refer to menu operations in the received mail details screen (nP. 89)
for the following functions.
Delete One
Move/save (Save file, Store template, Save to Phone, Save to
microSD)
Copy
Mail operation (Search dictionary, Protect/Release, Register to
scheduler)
Display setting
■ Menu operation in unsent mail details screen
Refer to menu operations in the Unsent box list screen (nP. 88) for the
following functions.
Edit Error Detail Mail property
[Delete One]/[Yes]
Mail
89
Page 92

Display address details
Displaying address information
You can display FROM, TO, CC, BCC and Reply-TO of mail as a
list. You can also display detail of each address.
In the mail details screen, z/[Display mail
1
information]/[Display address details]
Select an address
2
■ Touch panel operation in address details display screen
The following operations are available with displayed keys.
Mail
[Register sort] Register a sort rule
[Add to Phonebook] Add to phonebook
[Create Message] Compose mail
[Details] Display address details
■ Key operation in address details display screen
To register sort rule z+D
To add to phonebook z+A
To compose mail ]+N
■ Menu operation in address details display screen
[Create mail]/compose and send a mail
[Register to phonebook]/add to the phonebook
[Register sorting]/select an item/select a folder/[OK]
To create a new folder: [New]/enter a folder name/[OK]
For details on sorting mail nP. 95
[Copy address]
Searching mail
Searching mail with specified condition <Search>
In the Inbox/Outbox list screen, z/[Search]
1
Select a search condition
2
; [Search addresses]/select the entry method/ select/enter a
mail address
• For entering the mail address, select [OK] after entering.
• Point the cursor to [Search addresses] and enter a recipient name
to search the address added in the phonebook. When the recipient
data to be searched appears, select it and select [OK].
; [Search attached mail]
; [Search subjects]/enter a keyword/[OK]
; [Search body text]/enter a keyword/[OK]
; [Search body subjects]/enter a keyword/[OK]
; [Search target]/select a search subject
[Execute]
3
You can edit the set search condition by selecting it again.
■ Touch panel operation in search condition selection
screen
The following operations are available with displayed keys.
[Add conditions] Add search conditions
[Switch target] Switch search subject
[Delete conditions] Delete search conditions
90
Page 93

■ Touch panel operation in search result list screen
The following operations are available with displayed keys.
[Protect]/[Remove
protection]
[Delete] Delete
[Forward] Forward
[Reply] Reply
[Resend] Resend
[Edit ]Edit
*1 Available only for received mails.
*2 Available only for sent mails.
Protect/Release protect
*1
*1
*2
*2
■ Key operation in search condition selection screen
To add search conditions z+A
To switch search subject ]+C
To delete search conditions *
To execute searching with set
conditions
]+O
■ Key operation in search result list screen
To protect/unprotect z+P To edit
To delete one * To resend
To delete selected ^+* To move one z+M
To delete all ^+]+*To move selected ^+M
To forward
To reply
*1 Available only for received mails.
*2 Available only for sent mails.
*1
*1
]+W
]+R To add to phonebook z+A
*2
*2
To move all ^+]+
z+E
z+S
M
■ Menu operation in search condition selection screen
[Search method]/select the search method
Depending on the saved search condition, the condition is deleted
and a confirmation screen may appear by changing the search
method.
[Execute]
[Delete conditions]
[Switch target]
[Add conditions]/select a search condition
If two or more conditions are saved, operation is available by
selecting [=Add search condition].
For details on setting the search conditions nstep 2 of “Searching
mail with specified condition” on P. 90
The displayed items differ depending on the selected conditions and
saved number.
■ Menu operation in search result list screen
Refer to menu operations in the Inbox list screen (nP. 87) for the
following functions.
Continue to receive Reply/Forward Delete
Move/save Mail operation Register to phonebook
Display mail information
Refer to menu operations in the Outbox list screen (nP. 88) for the
following functions.
Edit Resend
Using search function
Search mails which include entered texts.
In the Inbox/Outbox list screen, point the cursor to a
1
folder to be searched
Enter a keyword
2
Mail
91
Page 94

Using mail address in mail
You can add a mail address in the mail details screen to the
phonebook or send a mail to the address.
In the mail details screen, select a mail address
1
Select an item
2
; [Create mail]/[Create SMS]/compose and send a mail
; [Register to phonebook]/add to the phonebook
; [Register sorting]/select an item/select a folder/[OK]
Mail
• To create a new folder: [New]/enter a folder name/[OK]
• For details on sorting mail n P. 95
; [Copy address]
Using information in subject or message
You can use information (phone numbers, mail addresses, URLs,
date, time, etc.) in mail and easily make a call, send mail, access
an Internet website, or add data to phonebook or schedule.
In addition, search a word in message by using dictionary.
Using phone number information
Select phone number information
1
Select a usage
2
; [Make voice call]/make a call
; [Create SMS]/compose and send a mail
; [Register to phonebook]/add to the phonebook
; [Register sorting]/select an item/select a folder/[OK]
• To create a new folder: [New]/enter a folder name/[OK]
• For details on sorting mail nP. 95
; [Copy phone number]
Using mail address information
Select a mail address
1
Select a usage
2
; [Create mail]/compose and send a mail
; [Register to phonebook]/add to the phonebook
; [Register sorting]/select an item/select a folder/ [OK]
• To create a new folder: [New]/enter a folder name/[OK]
• For details on sorting mail nP. 95
; [Copy address]
Using URL
Select a URL
1
Select a usage
2
; [Browser connection]/[Yes]
; [Copy URL]
Saving schedules from date and time
<Register to scheduler>
You can save schedules with date keywords in subject or message of mail.
Date keywords are such as “Today”, “Tomorrow”, and “Day of week” in
addition to date, or date and time.
In the mail details screen, z/[Mail operation]/
1
[Register to scheduler]
: When [a] appears, alternatively touch [a].
Save schedules
2
: Each subject of mail, date/time based on date keywords, and
message of mail is entered automatically in the title, start date/time,
and details respectively.
: For subsequent operations nstep 2 of “Saving schedule” on P. 201
When a date keyword is included in a mail, [a] appears.
Only by time, it cannot be recognized as a date keyword.
92
Page 95

Depending on contents or expressions in mail, automatic entering may
not work properly.
Searching word in message by using dictionary
<Search dictionary>
In the mail details screen, z/[Mail operation]/
1
[Search dictionary]
Move to the start position/move to the end position
2
while pressing ^/+
Select a dictionary
3
Search in the dictionary
4
You can search up to 15 single/double-byte characters.
Managing mail
Managing folders
■ Creating user folders <Create new folder>
You can create a new user folder in the Inbox/Outbox list screen. You can
create up to 20 user folders each.
In the Inbox/Outbox list screen, point the cursor to the
1
folder/z/[Manage folders]/[Create new folder]
Enter a folder name/[OK]
2
: You can enter up to eight single/double-byte characters.
■ Sorting folders <Rearrange folders>
Point the cursor to the folder/z/[Manage
1
folders]/[Rearrange folders]
Select a move destination
2
If Folder secrecy is set, invisible folders cannot be moved.
■ Deleting user folders <Delete folder>
Point the cursor to the user folder/z/[Manage
1
folders]/[Delete folder]
Enter the lock no./[OK]/[Yes]
2
Protected mails or folders which have protected mails cannot be
deleted. However, the sort rule which is set to the folder is deleted.
Managing mail
■ Moving mail to another folder <Move folder>
Point the cursor to the mail/z/[Move/save]/
1
[Move folder]
Select the transfer method
2
; [Move One]
; [Move Selected]/select mail/[Execute]
; [Move All]
Select a folder/[OK]
3
: To create a new folder: [New]/enter a folder name/[OK]
SMS cannot be moved to PC-mail folder. Also, PC-mail cannot be
moved to SMS folder or folder of another account.
■ Touch panel operation in multiple selection screen
The following operations are available with displayed keys.
[Display] Display the mail which the cursor points
[Check]/[Uncheck] Select/Release
Mail
93
Page 96

■ Key operation in multiple selection screen
To display mail which the cursor points ]+V
To display previous page ^+_ (space)
To display next page _ (space)
To display first page ]+#
To display last page ]+$
■ Menu operation in multiple selection screen
[Display]
[Execute]
■ Saving mail to phone or microSD Card
Mail
<Save to Phone/Save to microSD>
Point the cursor to the mail/z/[Move/save]/
1
[Save to Phone]/[Save to microSD]
Select a saving format
2
: When selecting [Save to microSD], the operation ends.
Select a saving method
3
; [Save one]/[OK]
; [Select and save]/[OK]/select mail/[Execute]
For Select and save, you can select up to 50 mails.
Some functions such as protection are not available for mails saved in
vmg format.
This option is not available for mail which is restricted for outputting
from the FOMA terminal.
■ Copying and using message of mail <Copy>
In the mail details screen, z/[Copy]
1
Move to the start position/move to the end position
2
while pressing ^/+
■ Protecting/Unprotecting mail <Protect/Release>
You can protect up to 5,000 received mails and all sent mails.
Point the cursor to the mail/z/[Mail
1
operation]/[Protect]/[Release]
Select the protecting/unprotecting method
2
; [Protect one]/[Unprotect One]
; [Select mail to protect]/[Cancel selection]/select mail/
[Execute]
; [Protect all]/[Cancel all]
■ Making mail opened/unopened
<Mark as opened/Mark as unopened>
Point the cursor to the mail/z/[Mail
1
operation]/[Mark as opened]/[Mark as unopened]
Select the making opened/unopened method
2
; [Single]
; [Multiple]/select mail/[Execute]
; [All items]
94
Page 97

General settings
Setting common functions of PC-mail and SMS
You can set sort rules, display methods, etc.
Sorting mail to folder automatically
<Register sorting>
If you set sort rules for user folders, mails can be sorted automatically.
You can set up to 20 sort rules for one folder.
While setting the sort rules, icons below appear depending on the set
rules.
Sender mail address (unregistered in phonebook)
r
Sender mail address (registered in phonebook)
The registered image appears when an image is registered in
Q
phonebook.
Domain
s
Subject
t
Not registered in phonebook
u
Select a user folder/z/[Register sorting]
1
[Add new]
2
Select the sort rules
3
; [Sender]/specify the sender
; [Specify domain]/specify the domain
; [Subject]/enter a subject/[OK]
; [No address book registration]
To set multiple sort rules, repeat steps 2 and 3
4
[Done]
5
■ Touch panel operation in sort rules screen
The following operations are available with displayed keys.
[Delete] Delete
[Done] Complete
■ Key operation in sort rules screen
To delete one *
To delete selected ^+*
To delete all ^+]+*
To complete ]+S
■ Menu operation in sort rules screen
[Delete one]/[Yes]
[Cancel selection]/select the sort rules/[Execute]/[Yes]
[Cancel all]/[Yes]
[Done]
Setting display size of inserted image
<Image zoom setting>
In the mail main screen, [Settings]/[General
1
settings]/[Receive/display settings]/[Image zoom
setting]
Select a display size
2
Setting contents displayed in notification of
incoming mail <Reception notification caption>
In the mail main screen, [Settings]/[General
1
settings]/[Receive/display settings]/[Reception
notification caption]
Select the display method
2
Mail
95
Page 98

Setting message quoted for replying
<Quote and reply>
In the mail main screen, [Settings]/[General
1
settings]/[Send/create settings]
[Quote and reply]
2
: Each time you select, the setting is enabled/disabled.
Setting priority type for composing mail
<Preferred format setting>
Mail
Change a mail type to be used for composing mail from a notepad.
In the mail main screen, [Settings]/[General
1
settings]/[Send/create settings]/[Preferred format
setting]
Select a mail type
2
Limiting destinations that can be sent to
<Restrict destination settings>
If any destination is registered, the Restrict destination settings are
enabled. If all destinations are deleted, the setting is disabled.
You can register up to 20 destinations.
In the mail main screen, [Settings]/[General
1
settings]/[Send/create settings]/[Restrict
destination settings]
Enter the lock no./[OK]/[Add]
2
Select a registration method
3
; [Use address book]/select a mail address
; [Quote Send/Receive History]/select a mail address
• This does not appear while setting secrecy. Q/enter the lock
no./[OK] to display this temporarily.
; [Mail group]/select a mail group
• To select a mail address registered in a mail group: Point the
cursor to the mail group/[Member]/select a mail address
; [Direct entry]/enter the mail address/[OK]
■ Touch panel operation in limit destination list screen
The following operations are available with displayed keys.
[Delete] Delete
[Change] Change
[Add] Add new item
■ Key operation in limit destination list screen
To delete *
■ Menu operation in limit destination list screen
[Add] nP. 96
[Change]
For subsequent operations nstep 3 of “Limiting destinations that
can be sent to” on P. 96
[Delete]
/[Delete one]/[Yes]
/[Cancel selection]/select a mail address/[Execute]/[Yes]
/[Cancel all]/[Yes]
Restricting mail functions <Restrict Mail Functions>
Restrict sending mail, checking new mail or displaying mail.
In the mail main screen, [Settings]/[General
1
settings]/[Restrict Mail Functions]
Enter the lock no./[OK]/[Yes]
2
: Disabling procedures are the same as when setting.
When you send a mail or display the sent/received mail during Restrict
Mail Functions, enter the lock no. to disable Restrict Mail Functions
temporarily.
96
Page 99

You can automatically receive PC-mail or SMS during Restrict Mail
Functions.
Registering mail groups <Mail group settings>
You can send mail to multiple destinations collectively by registering mail
groups.
You can register up to 20 mail groups. You can register up to 20
destinations for one mail group.
Charges are the same as when sending one mail. However, charges
increase according to the amount of information of added destination.
In the mail main screen, [Settings]/[Mail group
1
settings]/[Add]
Enter a group name/[OK]
2
: You can enter up to 16 single/double-byte characters.
Select a group to register destinations
3
[Add]
4
: To change members in mail groups: Select the member to change
Select a registration method
5
; [Use address book]/select a mail address
; [Quote Send/Receive History]/select a mail address
• This does not appear while setting secrecy. Q/enter the lock
no./[OK] to display this temporarily.
; [Direct entry]/enter the mail address/ [OK]
• You can enter up to 128 single-byte characters (alphanumeric
characters and symbols).
■ Touch panel operation in mail group list screen
The following operations are available with displayed keys.
[Delete] Delete group
[Change] Change group name
[Add] Add new group
■ Touch panel operation in member list screen
The following operations are available with displayed keys.
[Delete] Delete member
[Change] Change member
[Add] Add new member
■
Key operation in mail group list screen/member list screen
To delete *
To create new group
To change group name
* Available only in the mail group list screen.
*
*
z+N
z+E
■ Menu operation in mail group list screen
[Add] nP. 97
[Delete]
/[Delete one]/enter the lock no./[OK]/[Yes]
/[Cancel selection]/select a mail group/[Execute]/enter
the lock no./[OK]/[Yes]
/[Cancel all]/enter the lock no./[OK]/[Yes]
[Change member]
For subsequent operations nstep 4 of “Registering mail groups” on
P. 97
[Change group name]/edit a group name/[OK]
■ Menu operation in member list screen
[Add] nP. 97
[Change]
For subsequent operations nstep 5 of “Registering mail groups” on
P. 97
[Delete]
/[Delete one]/[Yes]
/[Cancel selection]/select a member/[Execute]/[Yes]
/[Cancel all]/[Yes]
Mail
97
Page 100

Checking capacity of mailbox <MailStorage>
You can also check capacity of templates saved in a template box.
In the mail main screen, [MailStorage]
1
: Alternatively, [Settings]/[Check mail capacity].
PC-mail settings
Setting PC-mail
Maintaining PC-mail server <Server maintenance>
Maintain the PC-mail server for each account.
Mail
In the mail main screen, [Settings]/[PC-mail
1
settings]/[Account settings]
Select an account/[Server maintenance]
2
Select a maintenance method/enter the lock no./
3
[OK]/[Yes]
Changing account preferentially used
<priority account for creating mail>
Set an account to be used preferentially for composing PC-mail.
In the mail main screen, [Settings]/[PC-mail
1
settings]/[priority account for creating mail]
Select an account
2
98
Changing receiving methods of PC-mail
<Units for receiving>
In the mail main screen, [Settings]/[PC-mail
1
settings]/[Units for receiving]
Select the receiving method
2
Select the setting
3
: When selecting [Receive all specified], for subsequent operations
nstep 2 of “Specifying receiving methods of PC-mail” on P. 98
■ Touch panel operation in receiving unit screen
The following operation is available with a displayed key.
[Details] Set details
* Appears when [Receive all specified] is selected.
■ Key operation in receiving unit screen
To set details ]+P
■ Specifying receiving methods of PC-mail
In the receiving unit screen, point the cursor to [Units
1
for receiving]/[Details]
Select the unit
2
; [Add to phonebook]
• Each time you select, the setting is enabled/disabled.
; [Address book group]/[Specify more]/select a phonebook
group/{
; [Mail group]/[Specify more]/select a mail group/{
• To check members registered in mail groups: Select a mail group
; [Domain]/[Specify more]/select/enter a domain/{
• To enter a domain: [Direct entry]/enter a domain/[OK]/{
; [Subject]/[Specify more]/enter a subject/[OK]/{
; [Individual address]/[Specify more]/select/enter an
address/{
• To enter an address: [Direct entry]/enter an address/[OK]/
{
*
 Loading...