

Page 1

L-03C
INSTRUCTION MANUAL
’10.12
Page 2
取扱説明書
DOCOMO W-CDMA and GSM/GPRS Systems
Thank you for selecting the "docomo PRO series L-03C".
Read this manual before use to correctly operate your L-03C.
Operation Description of L-03C
Operations of L-03C are described in this manual as well as "Guide" (installed in this FOMA terminal, Japanese only) and
"Instruction Manual (Detailed version, Japanese only)" (in PDF format).
■ "Instruction Manual" (This Manual): Describes screen displays and operating procedures of basic functions.
■ "Guide" (installed in this FOMA terminal, Japanese only): Describes the overview or operating procedures of
frequently used functions.
In L-03C, u "Guide"
■ "Instruction Manual (Detailed version, Japanese only)" (in PDF format): Describes detailed information and
operating procedures of all functions.
From a PC, download it from the following DOCOMO website.
http://www.nttdocomo.co.jp/support/trouble/manual/download/index.html
* The URL and contents of the manual are subject to change without prior notice.
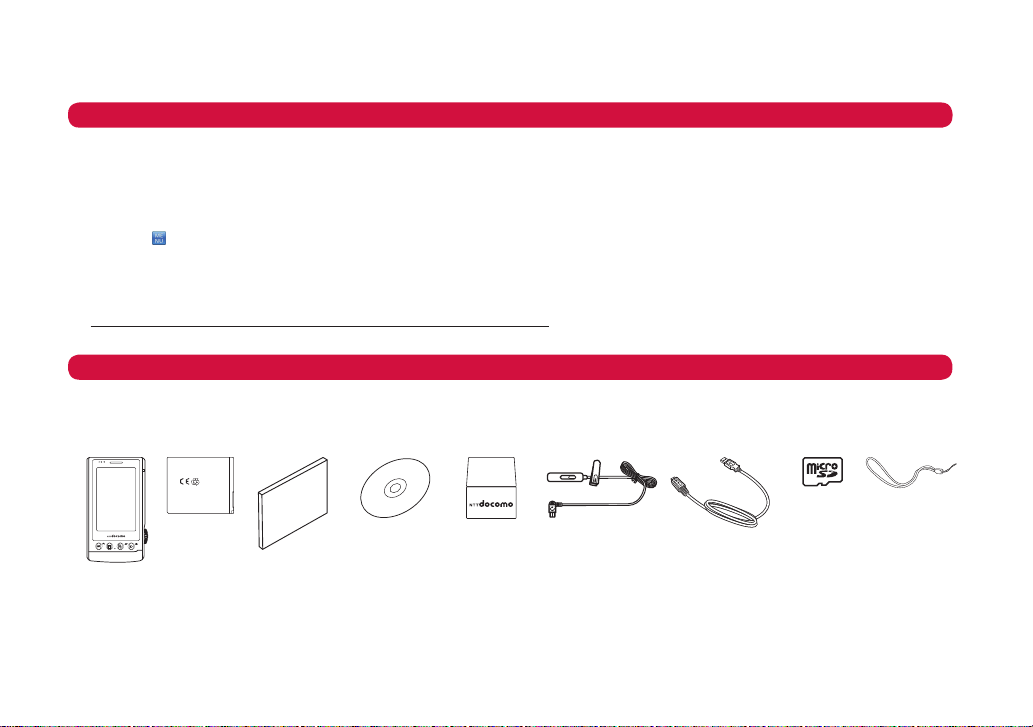
Accessories
L-03C FOMA
terminal (With
Warranty)
*1 FOMA Charging microUSB Plug Adapter L01 is only for charging. During data communication, please use USB Cable for Data
Communication (trial). Also, when charging, FOMA AC Adapter 01/02 is required.
*2 microSD card is pre-installed into the mobile phone.
Options compatible with this FOMA terminal →P93
• Note that "L-03C" is referred to as "FOMA terminal" in this manual.
• It is prohibited to copy all or part of this manual without permission.
• The screens or illustrations used in this manual are examples. The actual screens and illustrations may differ.
• In this manual, the descriptions are all based on the pre-installed settings (when setting "Line scroll" in menu type).
If settings are changed, screen displays or operations may differ from those described in this manual.
Battery
Pack
L09
Instruction Manual
(Japanese
version)
CD-ROM
for L-03C
FOMA Charging
microUSB Plug
Adapter L01*1
(With Warranty)
Earphone Plug
Adapter L01
USB Cable for Data
Communication
(trial)
microSD
Card (2GB)
2
(trial)
*
Strap (trial)
Page 3
Contents
Introduction
P2
Basic Operation
P20
Shooting
P44
Connect
P50
Enjoy
P70
More Convenient
P76
Others
P84
FOMA Terminal →P2 What You Can Do with L-03C →P3 Part Names and Functions →P4
Precautions →P6 Handling Precautions →P16
Before Using →P20 Screen Explanation →P23 Character Entry →P35
Sound/Screen Setting →P37 Lock/Security →P39
Camera →P44
Call Telephone →P50 Mail →P57 Phonebook →P63 i-mode/Full Browser →P65
i-Channel →P69
MUSIC →P70 i-αppli →P73 i-motion →P74
Convenient Tools →P76 Data Management →P80
Support →P84 Appendix →P94 Index →P109
1
Page 4

FOMA Terminal
• The FOMA terminal uses radio waves, therefore, it may
not function in locations where radio waves cannot reach,
such as in tunnels, underground, or in buildings; outside
the building where radio waves are weak or out of FOMA
service area. Even when you are in an upper floor of a
tall building and nothing blocks your view outside, your
FOMA terminal may not be able to receive or transmit
signals. Also, even when radio waves are strong with
three antenna bars displayed, and you are not moving,
Introduction
communication may still be interrupted.
• Be considerate of other people around you in public or
where it is especially crowded or quiet.
• The FOMA terminal uses radio waves to communicate,
therefore, there is a possibility that calls may be
intercepted by third par
GPRS systems automatically encode signals for all calls
so even if third parties should intercept calls with the
r
eceiver, they will hear only noise.
• The FOMA terminal sends and receives voice
communication as encoded digital data. When you are
operating the FOMA terminal while moving, sometimes
you may encounter weaker radio waves and the
transmitted digital data may not be correctly decoded
resulting in sound distortions.
• It is recommended that you save important data on a
microSD card. If you use a PC, use DOCOMO keitai
datalink to send and save data such as Phonebook
entries, mail messages, Schedule events, etc. to the PC.
2
ties. The W-CDMA and GSM/
• When you use SSL/TLS for a secure connection, you
agr
ee that you are responsible for any actions you
take. DOCOMO and the certifiers listed below do not
guarantee the safety of SSL/TLS for any activities of
customers while using SSL/TLS, and are not liable for any
damages incurr
Certifiers: V
Cybertrust Japan Co., Ltd.,
GlobalSign K.K.,
RSA Security Japan Ltd.,
SECOM Trust Systems Co., Ltd.
COMODO JAPAN INC.
• The FOMA terminal supports FOMA Plus-Area and FOMA
HIGH-SPEED Area.
• The FOMA terminal can be used only via the FOMA
network provided by DOCOMO and DOCOMO's roaming
area.
• It is r
ecommended that you make a backup of user
defined data (Phonebook entries, Schedule events, text
memos, Record messages, voice memos, or moving
picture memos) saved in the FOMA terminal by keeping
the separate r
them at a separate location. DOCOMO is not responsible
for lost data due to failure, repair, or replacement of the
model of your FOMA terminal.
ed through using SSL/TLS.
eriSign Japan K.K.,
ecord or note of
those data, etc. and storing
Page 5
What You Can Do with L-03C
Guide (Japanese only) →P34
Guide pre-installed in the FOMA terminal allows you to look for
operating instructions of a desired function. When you cannot
refer to this manual, you can search functions with Guide
quickly.
Camera functions →P44
You can capture still images with 3X optical zoom (auto focus
supported) and HD moving pictures using the camera with
approx. 12.1 Mega effective pixels (approx. 12 Mega recorded
pixels).
International roaming →P54
Your FOMA terminal, phone number, and mail address that are used
in Japan are available overseas (supporting 3G and GSM areas).
i-mode →P65
It becomes easier to operate and more convenient to use
the information on home page. Also it supports Flash Video,
Windows Media Video and colorful moving pictures.
Full browser →P67
You can browse web pages incompatible with i-mode on the
FOMA terminal in the same way as on a PC.
i-Channel (Japanese only) →P69
You can receive graphic information such as news or weather
forecasts.Also, you can obtain rich content created with Flash by
selecting your favorite channels from the Channel list.
* This service is a fee-based service that requires subscription.
Bluetooth communication →P76
You can exchange Phonebook data with any devices that
support Bluetooth. Also you can use handset that supports
Bluetooth.
Google →P77
You can search website, use YouTube or Picasa through Google.
Introduction
3
Page 6
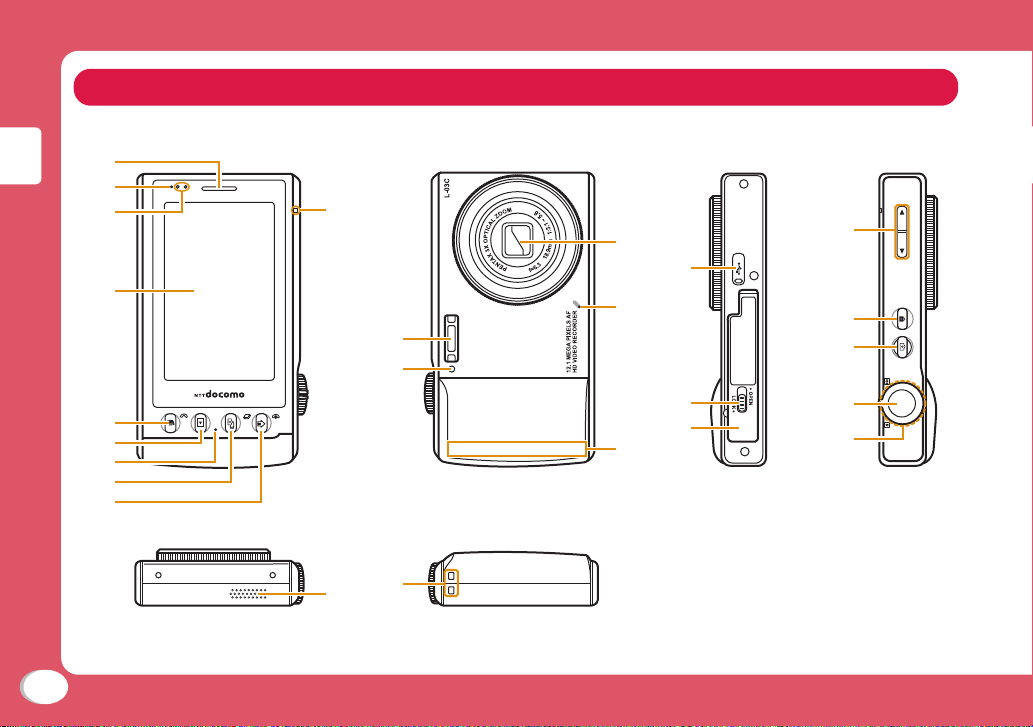
Part Names and Functions
a
b
c
Introduction
d
e
f
g
h
i
4
●Face with Display
●Face with Camera
j
k
l
●Top ●Bottom
y
x
●Left side ●Right side
マナー
s
-
p
n
q
r
o
m
メモ
t
u
v
w
Page 7
a Earpiece
b Charging light
This light is on/blinking when
an incoming call arrives.
Proximity sensor
c
d Display (Touch panel)
e G Start key
Make/receive a call. If press in
Album display screen, the file
will be deleted.
F Album display key
f
Display still images or moving
pictures.
Mouthpiece
g
h D Multi-tasking key/
Switching between still image
and moving picture key
Display task list screen. If press
under camera mode, switch
between photo mode and video
mode.
i S Power / Exit key
End a call or exit a function.
jShooting light (face with
display)
Flash
k
lShooting light (face with
camera)
Camera
m
n Microphone
FOMA antenna
o
The FOMA antenna is inside the
FOMA terminal.
p microUSB connector terminal
q Battery pack cover lever
r Battery pack cover
sW (マナー) E (メモ)
Volume key
Adjust volume. Zoom in/out Full
browser page.
R Lock key
t
Set/cancel the key lock.
u T Switch mode key
Switch between Keitai mode
and camera mode.
Shutter key
v
Press when shooting still
images or moving pictures.
Zoom wheel
w
Changing magnification when
shooting still images or moving
pictures.
Speaker
x
yStrap hole
Keitai mode and camera mode
Keitai mode enables you to use the
basic mobile functions.
Camera mode enables you to shoot/
preview images or moving pictures.
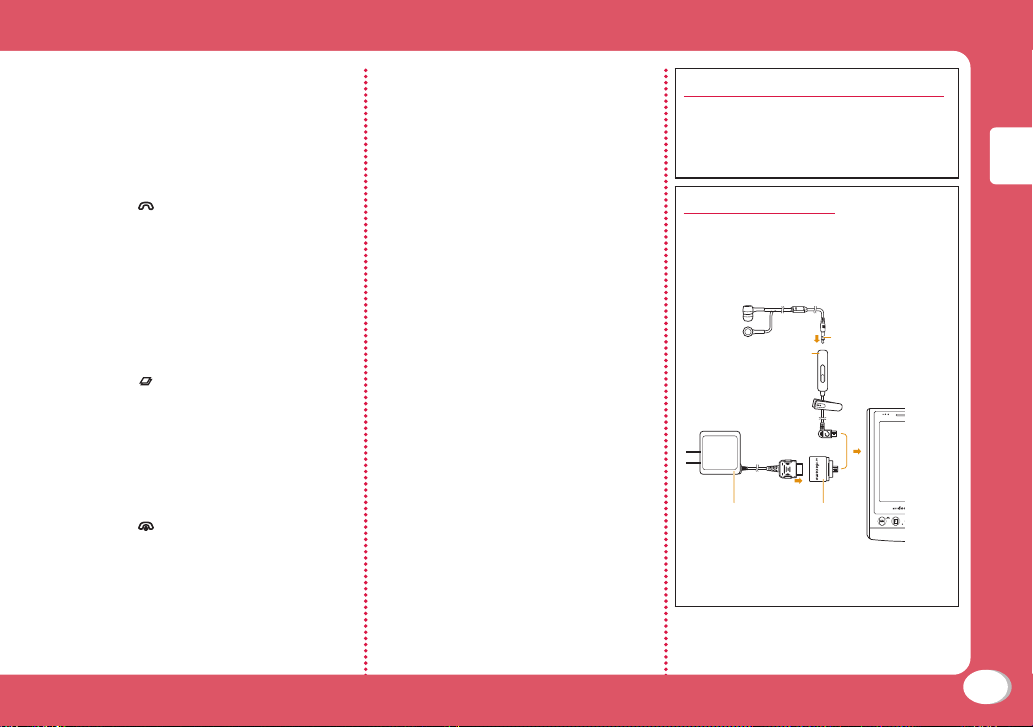
Using earphones
Connect* with Earphone Plug Adapter
L01.
FOMA Charging microUSB Plug Adapter
L01 (charging) and Earphone Plug
Adapter L01 have the same slot.
Earphone
Earphone Plug
Adapter L01
FOMA AC
Adapter 01/02
Ex.: Connection of Earphone Plug
Adapter L01 and FOMA Charging
microUSB Plug Adapter L01
* When using earphone to listen to sound,
those support stereo mini plug(3.5φ) are
required.
supports stereo
mini plug(3.5φ)
FOMA Charging
microUSB Plug
Adapter L01
Introduction
5
Page 8
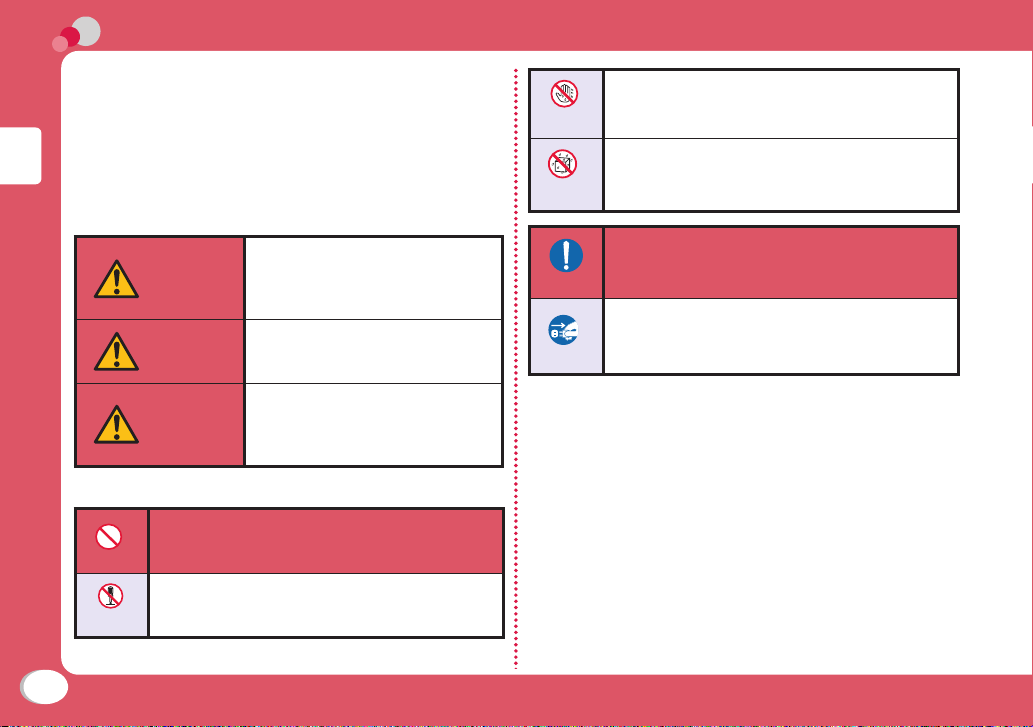
Don’t
Precautions (ALWAYS FOLLOW THESE PRECAUTIONS)
■ Before using your FOMA terminal, read these "Precautions"
carefully so that you can use it correctly. After reading these
precautions, keep this manual for later reference.
■ Be sure to observe these precautions because they are
intended to protect you or others around you from causing
injury and to avoid damag
■ The symbols below indicate the levels of danger or damage
that may occur if the particular precaution is not observed
and the FOMA terminal is used improperly.
Introduction
DANGER
WARNING
CAUTION
■ The following symbols indicate specific directions:
Denotes things not to do (Prohibitions).
e to the property.
This symbol indicates that
incorrect handling may directly
or immediately cause death or
serious injury.
This symbol indicates poses a risk
of causing that incorrect handling
Unplug death or serious injury.
This symbol indicates that
incorrect handling poses a risk of
causing slight injury or damage to
the product or property.
No
wet hands
Denotes not to touch with wet hands.
Denotes not to use where it could get
No
liquids
wet or not to wet it.
Denotes mandatory instructions (matters
Do
Unplug
■ "Precautions" are explained in the following six sections:
General Precautions for FOMA Terminal, Battery Pack, Adapter,
and UIM …………………………………………………………… P7
Precautions for FOMA Terminal ………………………………… P8
Precautions for Batter
Precautions for Adapter ……………………………………… P12
recautions for UIM …………………………………………… P13
P
recautions on Using near Electronic Medical Equipment
P
…………………………………………………………………… P14
that must be complied with).
Denotes to unplug from the outlet.
y Pack ………………………………… P11
No
disassembly
Denotes not to disassemble.
6
Page 9
General Precautions for
Don’t
Don’t
Don’t
Don’t
Don’t
FOMA Terminal, Battery
Pack, Adapter, and UIM
DANGER
Do not use, store, or leave
the FOMA terminal and its
accessories in locations
subject to high temperatures,
such as near fire, in direct
sunlight, or inside a car under
the hot sun.
e, burns, or injury may result.
Fir
Do not put the battery pack,
FOMA terminal, adapter, or
UIM in heating appliances
such as microwaves or high
pressure containers.
Fire, burns, injury, or electric
shock may result.
Do not disassemble or remodel
the FOMA terminal and its
No
disassembly
accessorie
Fire, burns, injury, or electric
shock may result.
s.
Do not get the FOMA terminal
and its accessories wet with
water, drinking water, pet
No
urine, etc.
liquids
Fire, burns, injury, or electric
shock may result.
Use battery packs and
adapters specified by NTT
DOCOMO.
Do
Fire, burns, injury, or electric
shock may result.
WARNING
Do not subject the FOMA
terminal and its accessories to
severe shocks, or throw them.
Fire, burns, injury, or electric
shock may result.
Keep conductive foreign
objects (metal, pencil lead,
etc.) away from the charging
terminals or microUSB
connector. Do not insert such
objects inside the FOMA
terminal.
Fire, burns, injury, or electric
shock may result.
Do not cover or wrap
the FOMA terminal or its
accessories with bedding, etc.
while using or charging.
Fire or burns may result.
Make sure to turn off the
FOMA terminal before you
go to a place such as a gas
Do
station where flammable gas is
generated, and do not charg
the FOMA terminal.
Catching fire may result.
If you notice any strange
smells, overheating,
discoloration, or deformation
Do
while using, charging, or
storing the FOMA terminal,
immediately take the following
actions:
● Remove the po
from the outlet or cigarette
lighter socket.
● Turn the FOMA terminal
power off.
● Remove the batter
om the FOMA terminal.
fr
Fire, burns, injur
shock may result.
Introduction
e
wer plug
y pack
y, or electric
7
Page 10
Introduction
Don’t
Don’t
Don’t
Don’t
Don’t
Do
Do
CAUTION
Do not place the FOMA
terminal and its accessories
in unstable places such as
wobbly tables or sloping
shelves.
The FOMA terminal or its
accessories may fall, resulting
in injury.
Do not store the FOMA
terminal and its accessories
in humid or dusty places, or in
high temperatures.
Fire, burns, or electric shock
may result.
If children use the FOMA
terminal, a guardian should
explain the safety instructions
and correct operations. The
guardian should also make
sure that the instructions are
followed during use
Injury
Keep out of the reach of
babies and infants.
Accidental swallowing or injury
may result
may
result.
.
.
Pay extra attention when you
use the FOMA terminal for an
extended period of time while
Do
it is connected to the adapter.
If you use i-αppli, make a
videophone call for a long
time while charging, the
FOMA terminal, battery pack,
or adapter may become hot.
Some users who continuously
or repeatedly touch a hot FOMA
terminal may develop rashes,
itching, or eczema depending
on their physical health or
existing medical conditions, or a
low temperature bare skin burn
may result.
Precautions for FOMA
Terminal
WARNING
Do not shine the light close
to eyes.
Eyesight damage may result.
Also, accidents such as injury
might occur if someone is
startled or dazzled by the light.
Do not get liquids such as
water or foreign objects such
as metal pieces or flammable
materials into the UIM or
microSD card slot of the FOMA
terminal.
s, injury, or electric
Fire, burn
shock may
Do not turn on the light to
drivers of cars, and others.
It disturbs driving, and accidents
may result.
Turn the FOMA terminal off in
places where use is prohibited
such as in
Do
hospitals.
Electr
medical devices may be
adversely affected. If the FOMA
terminal is set to be turned
on automatically, cancel the
setting before turning it off. For
use in medical facilities, follow
instructions of each medical
facility. You will be punished if
you take activity prohibited by
law such as use of the FOMA
ter
result.
airplanes or
onic devices or electronic
minal in airplanes.
8
Page 11

When you use Hands-free,
Don’t
Don’t
or a ring tone is sounding,
make sure to keep the FOMA
Do
terminal a
When you use the headphone/
microphone connected to the
FOMA termi
or music,
The excessive sound volume
may result
if you cannot hear ambient
sounds, an accident may result.
For those who suffer from
heart ailments, the vibrator or
ring tone
Do
adjusted c
Their hearts may be adversely
affected.
If you wear any implanted
electronic medical devices,
contact the manufacturer or
Do
dealer of
device to
from radio
Electronic medical devices may
be adverse
way from your ear.
nal to play a game
adjust the volume.
in hearing loss. Also,
volume should be
arefully.
the electronic medical
ask about the effect
waves.
ly affected.
Turn the FOMA terminal off
in places near high-precision
electronic
Do
Do use weak electronic
signals.
Electronic devices may be
adversely af
causing malfunction.
* Electronic devices that may be
affected:
Heari
pacemakers and implanted
defibrillators, other medical
electronic devices, fire alarms,
automatic doors, and other
automatically controlled devices.
If you are using an implanted
cardiac pacemaker and
implanted defibrillator, or any
other electronic medical
devices, consult the
manufacturer or retailer of the
device for advice regarding
devices or devices.
fected such as Don't
ng aids, implanted cardiac
possible effects from radio waves.
If the display glass or camera
lens is broken, avoid touching
the broken glass or exposed
Do
parts inside the FOMA
terminal.
The surface of the display is
covered with a protective film
and the camera lens is cover
with a plastic panel so that
shattered glass pieces do
not scatter easily, however, if
you touch the broken glass or
exposed parts, injury may r
CAUTION
Do not swing the FOMA
terminal by strap, etc.
It may hit you or others, resulting
in an accident such as injury.
Do not use the broken FOMA
terminal.
Fire, burns, injury, or electric
shock may result.
ed
esult.
Introduction
9
Page 12
Introduction
Don’t
Don’t
Don’t
When you use motion control,
make sure that nobody is
close to you and have a good
grip of the terminal. Do not
swing the FOMA terminal.
Injury may result.
If the display is broken and the
LCD liquid leaks, do not apply
the liquid to your skin such as
face or hand.
Blindness or injury to your skin
may result.
If the LCD liquid gets into your
eyes or mouth, immediately flush
with clean water and consult a
doctor.
Also, if the liquid gets on your
skin or clothes, immediately
wipe it off with alcohol and wash
with soap and water.
There is a piece of film on the
surface of display in order to
protect the display surface
from damage (shatterproof
plastic panel). Do not peel
off the film forcedly or get it
ged.
dama
Injury may result
terminal with the film peeled of
If you use the FOMA terminal
in a car, contact the car
manufacturer or dealer to ask
Do
about the effect from radio
waves.
Depending on the type of a
car, in-car electronic devices
could be adversely affected. In
this case, stop using the FOMA
terminal immediately.
if use the FOMA
f.
Itching, rash or eczema may
be caused depending on
your physi
Do
or predisp
abnormalit
the FOMA t
and consul
For materials used on each part
→ P15 "Material List"
Look at the display in a well
lit place, keeping a certain
distance from the screen.
Do
Failure of
cal conditions
osition. If an
y occurs, stop using
erminal immediately
t a doctor.
eyesight may result.
10
Page 13
Precautions for
Don’t
Don’t
Don’t
Don’t
Don’t
Don’t
Don’t
Battery Pack
■ Check the battery type by the
label attached to the battery pack.
Description Type
Li-ion00 Lithium-ion battery
DANGER
Do not get any metal objects
such as wire come into
contact with the battery
terminal. Do not carry or store
the FOMA terminal together
with any metal objects such as
a necklace.
ition,
explosion, overheating, or
Ign
leakage of the battery pack may
result.
When attaching the battery
pack, check the direction
of the battery pack. If you
cannot attach the battery
pack properly,
forcib
tion,
Igni
or leakage of the battery pack
may result.
do not attach it
ly.
explosion, overheating,
Do not throw the battery pack
into fire.
Do ignition, explosion,
overheating, or leakage of the
battery pack may result.
Do not pierce the battery
pack with a nail, hit it with a
hammer, or step on it.
n, explosion,
Do ignitio
overheating, or leakage of the
battery pack may result.
If the battery fluid gets into
your eyes, do not rub them.
Immediately flush with clean
Do
water and consult a doctor.
Blindness may result.
WARNING
If you found any trouble on
the battery pack such as
deformation caused by a drop
or scratches, never use the
battery pack.
explosion, overheating,
ion,
Ignit
or leakage of the battery pack
may result.
If the battery leaks or emits
strange smell, immediately
stop using the FOMA terminal
Do
and keep it away from fire.
ked battery fluid may
The lea
ignite, resulting in fire or burst.
Make sure that your pets do
not bite the battery pack.
ition, explosion, overheating,
Ign
Do
or leakage of the battery pack
may result.
CAUTION
Do not dispose of exhausted
batteries with ordinary
household waste.
Ignition or environmental
damage may result. Cover the
battery terminals with a nonconductive tape and take them
to the docomo Shop, etc. or
dispose of them in accordance
with local waste disposal
regulations.
Do not use or charge a wet
battery pack.
Ignition, explosion, overheating,
or leakage of the battery pack
may result.
Introduction
11
Page 14
If the liquid inside the battery
Don’t
Don’t
Don’t
Don’t
Don’t
Don’t
Don’t
pack leaks, do not apply the
liquid to
Do
or hand.
Blindness or injury to your skin
may result.
If the liquid gets into your eyes
or mouth, or attach to your skin
or clothes, flush with clean water
immediately
into your eyes or mouth, consult
a doctor immediately after
Introduction
flushing with water.
Precautions for
Adapter
Do not use a damaged adapter
cord.
Fire, burns, or electric shock
may result.
Do not use the AC adapter in a
place with high humidity such
as a bath room.
Fire, burns, or electric shock
may result.
your skin such as face
. If the liquid gets
WARNING
The DC adapter is for use only
in a negative (-) grounded
vehicle. Do not use it in a
positive (+) grounded vehicle.
Fire, burns, or electric shock
may result.
If it starts to thunder, do not
touch the adapter.
Electric shock may result.
Do not short-circuit the
charging terminals when
the adapter is plugged into
an outlet or cigarette lighter
socket. Also, never touch
the charging terminals with
fingers or other bare skin.
Fire, burns, or electric shock
may result.
Do not place heavy objects on
the adapter cord.
Do Fire, burns, or electric shock
may result.
No
wet hands
Do
When inserting the AC adapter
into an outlet or removing it,
do not contact metal object
such as me
Fire, burns, or electric shock
may result.
Do not touch the adapter cord
or outlet with wet hands.
Fire, burns, or electric shock
may result.
Use the adapter at the
specified power source and
voltage. Also, if charging the
FOMA terminal o
use an AC adapter available
overseas.
Using at the wrong voltage may
esult in fire, burns, or electric
r
shock.
AC adapter: 100V AC
DC adapter: 12/24V DC (for
negative grounded vehicles
only)
AC adapter available overseas:
100 to 240V AC (Connect only
with household AC
tal strap.
verseas,
outlet)
12
Page 15
Use the specified plug adapter
to charge the terminal.
Fire, burn or electrical shock
Do
may result if do not use the
specified plug adapter.
Plug adapter: FOMA Charging
microUSB Plug Adapter L01
If the fuse of the DC adapter
blows, replace it with the
specified fuse.
Do
Fire, burns, or electric shock
may result. See each instruction
manual for the specified fuse.
Keep the power plug dust free.
Fire, burns, or electric shock
may result.
Do
When plugging the AC adapter
into an outlet, plug it in firmly.
Fire, burns, or electric shock
Do
may result.
Do
Unplug
Unplug
Unplug
When removing the adapter
from the outlet or cigarette
lighter socket, do not forcibly
pull the adapter cord, instead
hold the power plug and pull
it out.
e, burns, or electric shock
Fir
may result.
If you do not use the adapter
for a long time, unplug the
power plug from the outlet or
cigarette lighter socket.
Fire, burns, or electric shock
may result.
If liquids such as water get
into the adapter, unplug the
Unplug power plug from the
outlet or cigarette lighter
socket.
Fire, burns, or electric shock
may result.
Before cleaning the adapter,
pull the plug out of the outlet
or cigarette lighter socket.
Fire, burns, or electric shock
may result.
Precautions for UIM
CAUTION
Be careful not to touch the
edge of UIM when removing it.
Injury may result.
Do
Introduction
13
Page 16
Precautions on
Using near Electronic
Medical Equipment
■ The following description meets
"Guideline on the Use of Radio
communication Equipment such as
Cellular Telephones - Safeguards for
Electronic Medical Equipment" by
the Electromagnetic Compatibility
Introduction
Conference Japan.
WARNING
Comply with the following
instructions inside medical
:
facilities
Do
● Do not bring the FOMA
terminal in operating
rooms, intensive care
units (ICU), or coronary
care units (CCU).
● Turn the FOMA terminal
off in hospital wards.
● Turn the FOMA terminal
off in hospital lobbies
and corridors if electronic
medical devices could be
nearby
.
● If the medical facility has
specific zones where use
or possession of mobile
phones is prohibited,
follow those regulations.
● If the FOMA terminal
is set to be turned on
automatically, cancel the
setting befor
off.
e turning it
Turn the FOMA terminal off in
crowded places such as on a
train where implanted cardiac
Do
pacemaker or defibrillator
wearers could be nearby.
Operat
cardiac pacemaker or implanted
defibrillator may be adversely
affected by radio waves.
If you use an implanted
cardiac pacemaker or
implanted defibrillator, use
Do
or carry the FOMA terminal
22cm or more away from the
implanted car
or implanted defibrillator.
Operations of an implanted
cardiac pacemaker or implanted
defibrillator may be adversely
af
Patients using electronic
medical equipment other than
implanted cardiac pacemakers
Do
or implanted defibrillators
(outside medical facilities
for treatment at home, etc.)
should check the influence
of radio waves upon the
equipment by consulting the
manufacturer.
Operations of electr
equipment may be adversely
affected by radio waves.
of an implanted
ion
diac pacemaker
fected by radio waves.
onic medical
14
Page 17
Material List
Part Material/Surface
Outer case
Display Aluminum/
Display
(holding
portion)
Left side Polycarbonate+Glass
Right side
Camera side
Camera part
(fixed ring)
Camera part
(mount)
Camera part
(embossed
nameplate)
Camera side
(holding port
ion)
treatment
SANDBLAST+
ANODIZING
PC/EUREKA
LAC+EUREKA
THANE+EUREKA
RUBBER
fiber/UV coating
Polycarbonate+Glass
fiber/UV coating
Aluminum/
SANDBLAST+
ANODIZING
PC/UV coat
Aluminum/ANODIZING
Aluminum/
SANDBLAST+
ANODIZING
PC/EUREKA
LAC+EUREKA
THANE+EUREKA
RUBBER
ing
Part Material/Surface
Operation key
Vo
lume key
Lock key/Mode
switch key
Zoom wheel
Shutter key
USB connector
term
inal area
USB connector
terminal
USB connector
term
inal cover
Display panel
Cap (battery
cover part)
Camera light
(display)
Camera part
(protective
shutter)
Flash
Camera light
(camera side)
Battery
cover
lever
Battery
cover
(surface)
Battery
cover
(inner side)
PC/UV coating
PC/UV coat
PC/UV coating
PC/UV coating
PC/UV coating
Stainless steel
PC/UV coat
Te
mpered glass/
BOTTOM PRINTING
SILICONE
PC
Polycarbonate+Glass
fiber
Acry
PC
POM
PC
/UV coat
Mg/UV coat
treatment
le
ing
ing
ing
ing
Part Material/Surface
Battery storage
side
Scre
ws
Scre
w cap
Frame
Batter
y pack
Battery pack
PET
Te
minals
r
microSD card
insertion part
Guide
Fixing plate
Metal contacts
FOMA car
insertion part
d
Guide
Fixing plate
Metal contacts
Mg/UV coat
Carbon steel/Zinc
plating
PC/BOTTOM PRINTING
Mg+(PPA
coating
PC Injection
PE
Phosphor bronze+Ni
plating+Au plating
Stainless steel
LCP 6040GM-MD
Corson Alloy
Stainless steel
LCP re
Corson Alloy
treatment
ing
Introduction
+GF50%)/UV
sin
15
Page 18

Handling Precautions
General notes
■ Do not have water entered inside
the FOMA terminal.
The FOMA terminal, battery pack,
adapter, and UIM are not waterproof. Do
not use them in places with high humidity
such as a bathroom or where rain may
get them wet. If you are carrying them
against your body, moisture from water
ode the internal parts, causing
may corr
malfunction. Note that malfunction
deemed to be caused due to exposure
Introduction
to liquids is not covered by the warranty,
epair may be impossible.
and r
They may be r
even if repairs are possible.
epaired at your expense
■ Use a dry soft cloth (lens cleaning
cloth) to clean the equipment.
• If you rub the display strongly with
a dry cloth, the display may be
scratched.
• If the display is left with water drop
or stain adhered, smear may be
generated.
• Do not use alcohol, thinner, benzene,
detergent or other solvents for
cleaning, otherwise the printed images
or text may disappear or discoloration
may result.
16
■ Occasionally clean the terminals
with a dry cotton swab.
If the terminals become dirty, the contact
may become loose and the FOMA
terminal power may be turned off, or the
terminal may not be fully charged.
Be careful not to damage the terminals
when you clean them.
■ Do not place the equipment near
air conditioner outlets.
Condensation may form due to rapid
changes in temperature, and this
may corrode internal parts and cause
malfunction.
■ Do not place excessive force on
the FOMA terminal or the battery
pack.
If the FOMA terminal is put under heavy
objects in a bag, or if it is sat upon while
in your pocket, the display, internal circuit
board, or battery pack may be damaged
or malfunction.
While external devices are inserted
to the external connector ter
microUSB connector, the connector may
be damaged or malfunction.
minal or
■ Do not rub or scratch the display
with a metal object.
Doing so may cause damage or
malfunction.
■ Carefully read each manual
attached to the battery pack and
adapter.
Notes on the FOMA terminal
■ Do not place excessive force on
touch panel, or use a sharp object
such as nail tip, ball pen or pin to
touch panel.
Touch panel may get damaged.
■ Avoid using in extremely high or
low temperatures.
Use the FOMA terminal within a
temperature range of 5 ℃ to 35 ℃ and a
humidity range of 45% to 85%.
■ The FOMA terminal may adversely
affect general phones, televisions,
or radios, etc. in use nearby. Use
the FOMA terminal as far away
from such equipment as possible.
■ Keep a separate record of any
information stored on the FOMA
terminal and store the copies in a
safe location.
DOCOMO assumes no responsibility for
any loss of your data.
■ This FOMA terminal uses precise
optical devices. Do not drop the
FOMA terminal or subject it to
shocks.
Damage or malfunction may result.
■ Do not insert an external device to
microUSB connector crookedly or
do not pull it when it is inserted.
Damage or malfunction may result.
Page 19

■ It is normal for the FOMA terminal
to become warm during use or
being charged. You can continue
using it.
■ Do not leave the camera in a place
exposed to direct sunlight.
Pixels may be discolored or burns may
result.
■ Make sure to switch to Keitai mode
while camera is not being used.
The lens may get hurt or damaged.
■ Do not touch a lens cover.
The lens may get smear or hurt.
■ Usually close microUSB
connector terminal cover.
Dust or moisture may seep in and cause
malfunction.
■ Do not use the FOMA terminal
with the battery pack cover
opened.
The battery pack may fall out or
malfunction or damage may result.
■ Do not apply an excessively thick
sticker onto the surfaces of the
display or keys.
Malfunction, damage or problems with
operation may result.
■ While using a microSD card, do
not remove it or turn the FOMA
terminal power off.
Data loss or malfunction may result.
■ Do not place magnetic card near
the FOMA terminal.
Data on magnetic media such as cash
cards, credit cards, telephone cards or
floppy disks may be lost.
■ Do not place a magnetized item
near the FOMA terminal.
A strong magnetic field may cause
malfunction of the FOMA terminal.
Notes on the battery pack
■ The battery pack is a consumable.
Depending on the usage, a battery pack
may run out of its charge extremely
quickly even if it is fully charged.
Purchase a new battery pack specified in
this manual.
■ Charge the battery pack in a place
with an ambient temperature of 5
℃ to 35 ℃.
■ The actual usage time of the
battery pack depends on the
usage environment or the
deterioration level of the battery
pack.
■
The battery pack may swell
as the battery life is near its
end depending on the battery
pack condition, but it is not a
malfunction.
■ When you store the battery pac
k,
avoid the following conditions.
• Fully charged (immediately after
charge is completed)
• No battery (the state where the power
cannot be turned on due to battery
drain)
The performance or life of the battery
pack may be reduced.
It is recommended that you store the
y pack when the battery level icon
batter
shows two bars or when 40% of the
battery is left.
Notes on the adapter
■ Charge the battery pack in a place
with an ambient temperature of 5
℃ to 35 ℃.
■ Charge the battery pack where:
• There is very little humidity, vibration,
and dust.
• There are no land-line phones,
television sets or radios nearby.
■ It is normal for the adapters to
become warm while using or
charging the FOMA terminal. You
can continue to use it.
■ Use the DC adapter only when the
car engine is not running.
The car battery may be exhausted.
Introduction
17
Page 20

■ When using an outlet with a latch
mechanism, follow the instruction
manual of the outlet.
■ Do not place strong impacts.
Also, do not deform the charging
terminals.
Malfunction may result.
Notes on the UIM
■ Do not use excessive force to
insert/remove the UIM.
Introduction
■ Note that you are responsible for
malfunction caused by inserting
the UIM into a different IC card
reader/ writer.
■ Always keep the IC por
UIM clean.
■ Clean the UIM with a soft, dry
cloth (lens cleaning cloth).
■ K
eep a separate record of any
information stored on the UIM and
store the copies in a saf
DOCOMO assumes no responsibility for
any loss of your data.
■ To protect the environment,
please bring unnecessary UIM
to a service counter such as the
docomo Shop.
■ Do not scratch, carelessly touch,
or short-circuit the IC portion.
Data loss or malfunction may result.
tion of the
e location.
■ Do not drop the UIM or subject it
to shocks.
Malfunction may result.
■ Do not bend the UIM or put heavy
objects on it.
Malfunction may result.
■ Do not insert the UIM with labels
or stickers attached into the
FOMA terminal.
Malfunction may result.
Notes on using Bluetooth function
■ As the security for
communication using the
Bluetooth function, the FOMA
terminal supports the security
function that meets the Bluetooth
Specification. However, the
security may not be sufficient
depending on the configuration.
Take care of the security for
communication using the
Bluetooth function.
■ Note that even if any leak of
data or information occurs while
making connection using the
Bluetooth function, we take no
responsibility.
■ With the FOMA terminal, you can
use the following:
Audio, Dial-up Communication,
Object Pus
With Audio, you might be able
to use Audio Video Remote
Control (Only with the compatible
Bluetooth devices).
For Object Push, only Phonebook
*1
data is available to send and receive.
For Serial Port, only LG On-Screen
*2
Phone (OSP) is available.
Hands-Free,
h*1, and Serial Port*2.
18
Page 21
■ Radio frequencies
The radio frequencies the Bluetooth
function of the FOMA terminal uses are
as follows:
2.4 : Indicates radio facilities that
use 2400 MHz frequencies.
FH : Indicates the modulation
system is the FH-SS system.
1 : Indicates that a supposed
coverage distance is 10
meter or less.
: Indicates that all radio
frequencies 2400 MHz
through 2483.5 MHz
are used, and that the
frequencies for mobile
object identifiers shall not be
avoided.
■ Caution on Using Bluetooth
Devices
Bluetooth operates at radio frequencies
assigned to the in-house radio stations
for mobile object identifiers that have to
be licensed and are used in production
lines of a factory, specific unlicensed low
power radio stations, and amateur radio
stations (hereafter, referred to "another
radio station") in addition to scientific,
medical, industrial devices, or home
electric appliances such as microwave
ovens.
1. Before using this product, make sure
that "another radio station" is not
operating nearby.
2. If radio interference between this
product and "another radio station"
occurs, move immediately to another
place or turn off power to avoid
interference.
3. For further details, contact "docomo
Infor
mation Center" on the back page
of this manual.
Cautions
■ Never use a modified FOMA
terminal. Using a modified device
violates the Radio Law.
The FOMA terminal acquires the
certification of conformity with technical
standards of specified radio equipment
based on the Radio Law. As a proof,
"Technical conformity mark " is printed
on the nameplate of the FOMA terminal.
If you remove screws to modify the
internal components of the FOMA
terminal, the certification of conformity
with technical standards becomes
invalid.
Do not use the FOMA terminal with the
invalid certification of conformity with
technical standards. Doing so violates
the Radio Law
■ Be careful when using the FOMA
terminal while driving.
Using a handheld mobile phone while
driving will result in a penalty.
However, unavoidable circumstances
such as rescuing injured and sick people
or holding public's safety will not result in
a penalty.
■ Only use Bluetooth in Japan.
Bluetooth on this FOMA terminal got
certified based on the wireless standard
of Japan.
Using overseas may get fined.
.
Introduction
19
Page 22

Before Using
Attaching UIM (FOMA Card)/Battery Pack
The UIM is an IC card that contains subscription
information such as your phone number.
• Turn the FOMA terminal power off and hold it with both
hands.
Slide the lever
1
on battery pack
cover in the
Basic Operation
direction of a
• Battery pack
cover opens.
With the gold
2
IC side down,
insert the UIM
slowly in the
direction of
arrow till it
clicks
Notch
a
Battery pack
cover lever
Notch
IC (Gold)
Place the terminal
3
part of battery
Battery pack lock
pack on the right
side farthest from
you and insert
the battery pack
straight
• Insert the battery
pack till the battery
pack is locked.
Close the battery
4
pack cover and
slide the lever
of battery pack
cover in the
a
direction of a
Information
• Trying to attach the battery pack forcibly may cause the
damage of battery pack lock.
20
Page 23
Charging
Charging with AC adapter
Open the microUSB connection terminal cover
of FOMA terminal (a). Insert the connector of
AC adapter into FOMA Charging microUSB Plug
Adapter L01 horizontally with the inscribed arrow
side up. Then insert into the microUSB connector
terminal of FOMA terminal. Connect the AC
adapter plug to an electric outlet.
• The charging light turns on and charging starts. When
charging completes, the charging light turns off.
After charging finishes, pull out the FOMA
Charging microUSB Plug Adapter L01 horizontally.
Then pull out the connector while holding the
release buttons on AC adapter connector.
Charging light
Inscription
FOMA Charging microUSB
Plug Adapter L01
Connector
Release buttons
Information
• Make sure to insert/pull out the AC adapter connector straight
with the correct side up. Forcibly trying to pull it out may cause
damage.
Turning Power ON
Turning power ON
With the power turned OFF, S (for over
1
2 seconds)
After the Wake-up screen is displayed, the Stand-by
display appears.
Basic Stand-by
Turning power OFF
With the power turned ON, S (for over 2
1
seconds) in Stand-by
The Exit screen appears and the power is turned OFF.
Basic Operation
21
Page 24
Configuring Default Settings
After turning the power ON for the first time,
set "Set date&time", "Touch setting" as default
settings.
Turn the power ON
1
Set the date and time u [Next]
2
Set touch setting u [Next]
3
Playback Intro animation u "Yes"/"No"
4
[USE PHONE]
5
Basic Operation
[OK]
6
Checking Your Own Phone Number
View your phone number (own number) saved on
the UIM.
• For procedures on checking/changing your mail address,
see "Mobile Phone User's Guide [i-mode] FOMA version".
1
Editing own number
1
2
3
"Own number"
u
"Own number"u [Edit]
u
Enter Terminal security code
Edit each item u [Save]
22
Page 25
Screen Explanation
Viewing Display/Icon
The meanings of icons displayed at the top of the screen
are as follows.
a b cdefg
jk l mno spqr t
h
i
Signal strength
a
Strong Weak
Out of service area or no signal reception
Voice call in progress
b
i-mode connection in progress while blinking
c
i-mode mail stored at the i-mode center
d
Unread i-mode mail
e
Unread MessageR/F
f
Bluetooth function is being activated.
g
Battery level
h
~
Lock all set
i
Manner mode set
j
A ring tone for voice/videophone call inactive and
k
vibration active
A ring tone for mail/MessageR/F inactive and vibration
l
active
Public mode (Drive mode) set
m
Basic Operation
23
Page 26

Record message set
n
Alarm set
o
Today's schedule or To do set
p
microSD card inserted
q
Outgoing voice/videophone calls restricted
r
Outgoing mails restricted
s
Data access lock set
t
Notication icons
A number displayed on each icon indicates the
number of entries.
Basic Operation
u v w x
Missed call
u
Unread mail
v
Voice mail message
w
Record message
x
Touch Panel
This FOMA terminal has a touch panel which
enables you to operate with your finger.
●
Precautions on using touch panel
• Touch panel is designed to operate easily through
touching by your finger. Do not press the panel strongly
by finger or sharp objects, such as nail, ball pen or pin.
• For the following situations, operations may not be
successfully conducted. Beware that malfunctions may
result.
•
Operating with gloves
• Operating with nail tip
• Operating with object on the panel
• Operating with protected sheet or seal
• Some operations may not be available by touching, such
as Flash content, site or Internet home page, etc.
A key is displayed on the screen after touching [Key on].
Touch the key to execute operations.
24
Page 27
Operations of touch panel
● Touch
Touch is a movement that you slightly touch the panel once
and release your finger from display.
Touch when selecting the displayed icon or menu item, or
when executing the selected item.
Also, "touch (for over 1 second)" is the expression when
touching an icon for over 1 second to activate a function.
● Slide
Slide is a movement that you move your finger from a start
point to an end point with your finger touching the panel like
tracing.
Trace on the volume bar to adjust volume.
Basic Operation
● Drag
Drag is a movement that you move your finger from a start
point with it touching the panel, then release your finger
from the panel.
Drag when you want to move an icon.
25
Page 28
● Flick
Flick is a movement that you slightly touch the panel, then
flick to upward, downward, rightward or leftward.
When all the items cannot be displayed fully within a
display, use the speedy scroll.
Examples of touch panel operation
● Switching displays
If * are displayed on screen, such as Schedule display,
touch to switch the displays or data.
*Icons may differ according to displays.
● Pinch
Basic Operation
Pinch is a movement that you use two fingers to slide
towards different directions.
To zoom in or zoom out a document in Document viewer.
26
● Pull-down menu
If an item has pull-down menu, touch to display the sub
menu.
Page 29
Using Motion Control
The motion sensor installed in the FOMA terminal
enables you to rotate the terminal to switch
vertical/horizontal view, or shake it to play games.
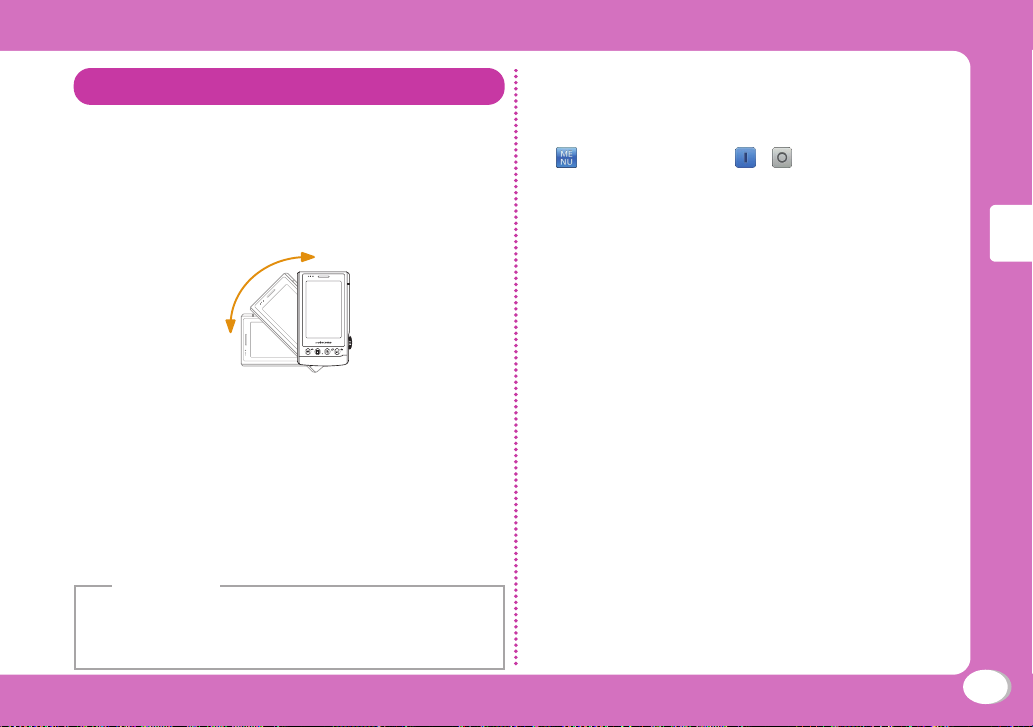
Switching vertical/horizontal view
Holding this FOMA terminal with different angle
enables to switch vertical/horizontal view.
• Only when the top part of the FOMA terminal is rotated
counterclockwise can switch the view.
• The following functions in this FOMA terminal support
vertical/horizontal view.
- Main menu screen
- Full browser
- Preview of pictures in Data Box (My picture, i-motion/Movie,
MUSIC)
- MUSIC Player
Information
• Please operate your FOMA terminal with it being nearly vertical
to the ground. If the display of the FOMA terminal and the
ground are nearly horizontal, rotating the FOMA terminal cannot
switch vertical/horizontal view.
Rotating screen automatically
Screen is rotated automatically according to the
changes in slope of the FOMA terminal.
u "Display" u [ / ] in "Auto screen
1
rotation"
Basic Operation
27
Page 30
Selecting Menu
You can execute functions, settings and
registration through main menu, sub menu, etc.
on this FOMA terminal.
• Menus are sorted by different functions.
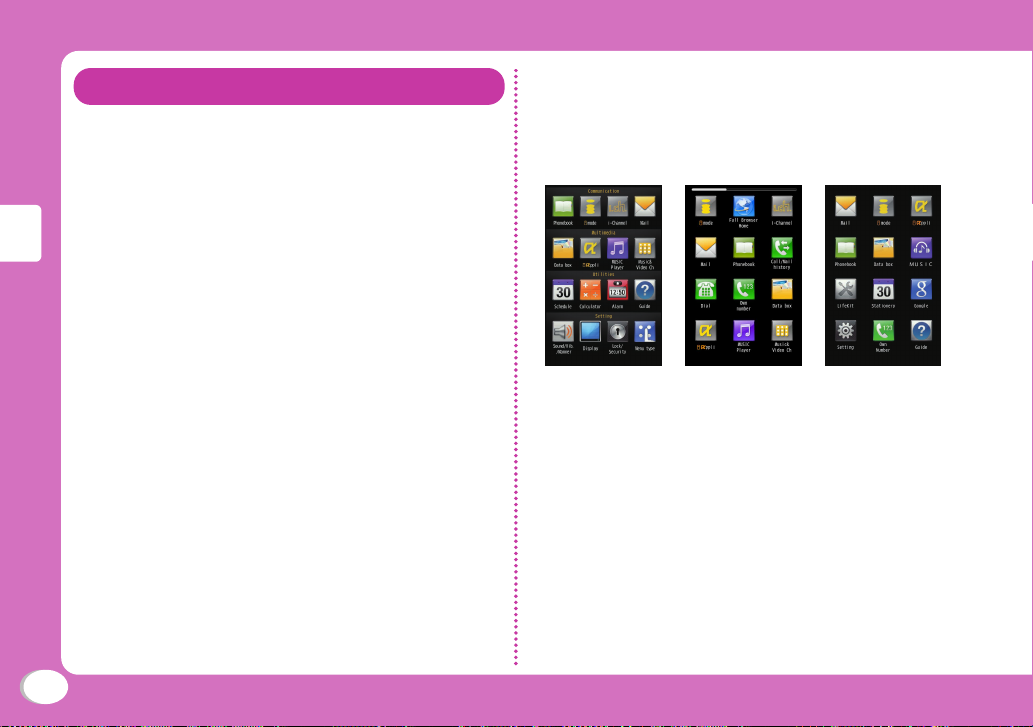
Selecting a Function from Main Menu
You can touch menu icon to select a function.
Also, in this FOMA terminal you have a selection
of three types of menu.
• Line scroll: Icons are categorized per index.
• Area scroll: Icons are displayed on three screens.
• Basic: 12 icons are displayed in one image.
Basic Operation
The operations of calling main menu from Standby display and displaying "Menu type" setting
screen is described.
• Since "Line scroll" is pre-installed in this terminal, all the
description will be based upon the function called from
"Line scroll" in this manual.
Main menu
(Line scroll)
Main menu
(Area scroll)
Main menu
(Basic)
28
Page 31

● Main menu list of line scroll
Scroll the menu in indexes of "Communication", "Multimedia", "Utilities" and "Setting" to display the menu of line scroll.
Communication
a
Multimedia
b
Utilities
c
Setting
d
Basic Operation
a Communication
b Multimedia
c Utilities
d Setting
Phonebook i-mode i-Channel Mail Full Browser
Data box i-αppli MUSIC Player Music&Video Ch Google Document
Schedule Calculator Alarm Guide Bluetooth Dictionary FOMA HIGH
Sound/Vib.
/Manner
Display Lock/
Security
Menu type NW
Home
Services
Call/Mail
history
viewer
Call/
Dialing
Dial Own
Muvee
Studio
-SPEED
USB mode
setting
number
Game
Other
tools
Other
setting
29
Page 32

● Using Line scroll
● Using Area scroll
Basic Operation
30
In Stand-by, touch to display main
1
menu
Touch "Menu type"
2
In Stand-by, touch to display main menu
1
Double slide the main menu to left to
2
display "Menu type"
Touch "Menu type"
3
Page 33

● Using Basic
In Stand-by, touch to display main menu
1
Touch "Setting" to display the setting
2
screen
Touch "Display" to display the display
3
screen
Touch "Menu type"
4
Selecting a Function from User Stand-by
User Stand-by display has three pages including
shortcut and Widget icon. Also, the following
three types of icons can be added, deleted and
moved.
• Shortcut : Speedy way to access each menu.
• Widget : Tools such as Clock, Calendar,etc. are
• Contact : Access personal Phonebook and make an
● Displaying user Stand-by display
Slide left on basic Stand-by (P21)
1
• User Stand-by is displayed.
• Slide to display other users' Stand-by.
available.
outgoing call or send a mail.
User Stand-by
Basic Operation
31
Page 34

● Selecting a Function from User Stand-by
Touch an icon
1
Shortcut, Widget or Contact is activated.
Selecting a Function from Power Launcher
Four icons are displayed on Stand-by Power Launcher.
Touch an icon
1
Power launcher
Basic Operation
32
Operation Description
"Recent calls" in call/message log is displayed.
Switch "Received calls"/"Redial"/"Received
mails/"Sent mails"/"Recent mails”.
(for over 1 second)
(for over 1 second)
(for over 1 second)
Public mode (Drive mode) is displayed.
"Show all data" in Phonebook is displayed.
Switch "Group?"/"Reading?"/"Memory
No?"/"Phone number?"/"Domain?". Also, you can
create new message.
The Phonebook registration screen is displayed.
Mail menu screen is displayed.
i-mode inquiring is operated.
Main menu screen is displayed.
Page 35
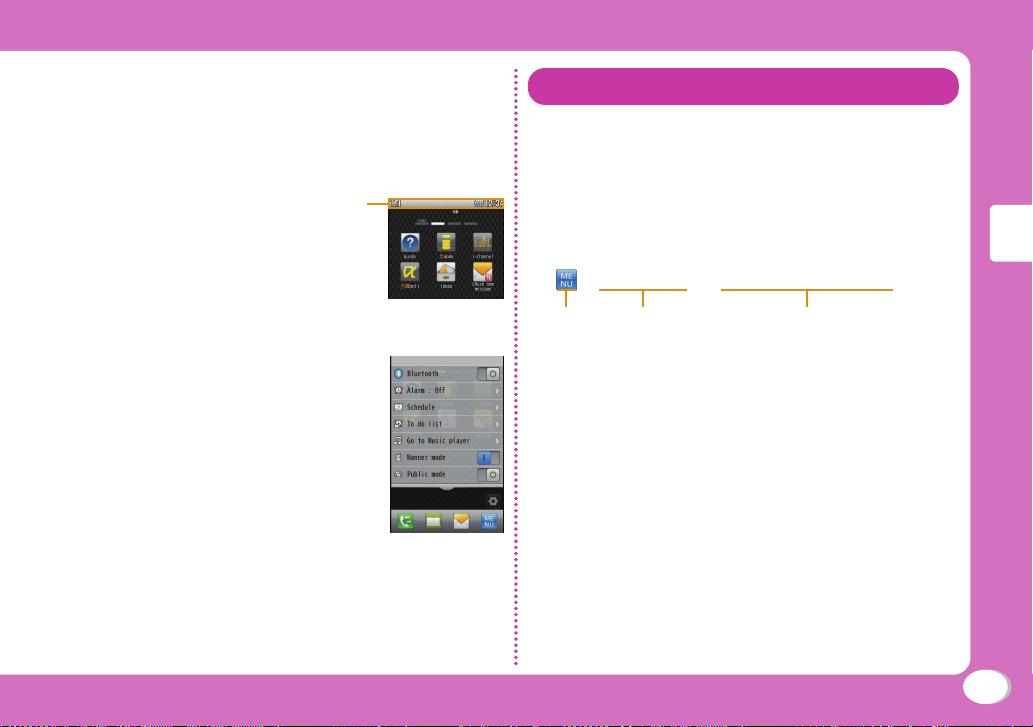
Selecting from Indicator List
Touch the top part of the user Stand-by to display the
indicator list.
Touch a
1
• Indicator list screen is displayed.
a
Select an item
2
Indicator list
screen
Writing Menu Operations
In this manual, descriptions are based on the
operations start from Stand-by screen. Stand-by
refers to both basic Stand-by and user Standby. However, for common operations, Stand-by
is used in this manual. Also, as a general rule,
operation procedures are simplified as follows.
Example
u"Display" u "Call&Mail image"
1
a b c
The illustration of an icon touched to operate.
a
Function names of main menu (P29). Touch the icon.
b
Names of menu items. Expressions such as "Touch ●●●" may be
c
included. Touch or double touch an item to select.
Basic Operation
33
Page 36

Writing Rules
■ Statement of operations start from other than Stand-
by display
At the beginning of the operations, statements of status
of the FOMA terminal or the displayed screen such as
"Incoming call" or "List screen" are written.
■ O
peration of [Select] is skipped
bandc in "Example"(P33), when selecting a function
Like
from icons or a list, the operation [Select] to is skipped.
Also the operation of touching [OK] is skipped when being
asked to enter the Terminal security code or confirm the
characters.
■ Operation of "Touch" is skipped when changing
"Check the check box" is the expression which means
select the item with and touch it to set to . "Touch" is
Basic Operation
skipped here.
to
Using Guide
Search a function and confirm the operation.
Some operations can be executed after confirming
the contract.
• Since "Line scroll" is pre-installed in this terminal, all the
description will be based upon the function called from
"Line scroll" in this Guide.
u "Guide"
1
"Menu search"/"Useful guide"/"Intro
2
animation"/"Trouble shooting"
Enter a menu item or a keyword in "Menu search" to
search a function. Touch to switch input mode. In
"Useful guide", select the guide list to confirm. Intro
animation is displayed in "Intro animation". Touch [戻
る (Previous)] or [次へ (Next)] to switch animation. In
"Trouble shooting", confirm the Inquiries and symptom
from the list.
Information
• If [Start] is displayed on Search result screen, touch [Start] to
execute the function.
34
Page 37

Character Entry
Entering Characters
Character entry is required in various situations
such as when saving entries to Phonebook or
creating mail. Learn how to enter characters
beforehand to make use of the FOMA terminal.
Character entry screen
On the Character entry screen, the current input
mode and operation guide are displayed.
Available number of characters
or bytes to be input
Current input
mode display
Character
entry screen
Switching input mode
Switch the input mode according to the character
type to be input.
Character entry screen u [Mode]
1
Select input mode
2
The input mode is set.
• Touch [Pict/Sym] to select pictograms/full symbols/half
symbols/emoticons.
Hiragana and Kanji input mode
:
Two-byte Katakana input mode
:
One-byte Katakana input mode
:
Two-byte alphanumeric input mode
:
(lower case)
Two-byte alphanumeric input mode
:
(upper case)
One-byte alphanumeric input mode
:
(lower case)
One-byte alphanumeric input mode
:
(upper case)
Two-byte numeric input mode
:
One-byte numeric input mode
:
*
Korean input mode
:
* Appears when SMS input character is set to " JP/KR
(70Chara) ".
Basic Operation
35
Page 38

Character entry method
In Hiragana and Kanji input mode, enter characters
using the following two prediction functions.
Prediction input function: predicts conversion
options. Next phrase prediction function: predicts
the next phrase from the characters being entered.
Example: Entering characters "ドコモ太郎 (DOCOMO
Taro)" in Hiragana and Kanji input mode
On the Character entry screen, enter "どこ
1
も (DOCOMO)"
"ど": [た] five timesu
once
"こ": [か] five times
Basic Operation
"も": [ま] five times
Conversion (Prediction) options predicted by the
Prediction input function appear.
Touch Prediction option field
2
Double touch "ドコモ (DOCOMO)"
3
Character
input field
Prediction
option field
Enter "たろう (Taro)"
4
"た": [た] once
"ろ": [ら] five times
"う": [あ] three times
Touch Prediction option field
5
Double touch "太郎 (Taro)"
6
Entering pictograms/symbols/emoticons
Pictograms, symbols, and emoticons pre-installed in the
FOMA terminal can be used when entering characters.
Character entry screen u [Pict/Sym]
1
Select input mode
2
Picto./Picto.D : input mode to input pictograms
Half symbol/
Full symbol
Emoticon : input mode to input emotions
Switch types
3
Select pictograms/symbols/emoticons to enter
4
Information
• Depending on the entry screen, pictograms, symbols, or
emoticons may not be entered.
: input mode to input symbols
36
Page 39

Sound/Screen Setting
Changing Ring Tone
u "Sound/Vib./Manner" u "Select ring
1
tone"
Touch an item and select a file
2
Adjusting Volume
u "Sound/Vib./Manner" u "Volume"
1
Touch an item / and adjust volume
2
Setting Vibrator
u "Sound/Vib./Manner" u "Vibrator"
1
Touch an item and select a pattern
2
[Set]
3
Using Manner Mode
Stand-by display u W (マナー) (for over
1
1 second)
When Manner mode is set,
screen.
• Even while the manner mode is set, the camera
shutter tone, shooting start tone and end tone sound.
■ To cancel the Manner mode
In Stand-by, press W (マナー
Information
• Alternatively, press G and touch [#] for over 1 second in
Stand-by to set/cancel manner mode.
appears at the top of the
)
(for over 1 second).
Setting Sound OFF When Touch to Operate
u "Sound/Vib./Manner" u "Touch
1
setting"
[Touch type] u "OFF"
2
Basic Operation
37
Page 40

Changing Screen Settings
Changing basic Stand-by display
u "Display" u "Stand-by display" u
1
"Top stand-by display"
Set each item
2
Changing user Stand-by display
u "Display" u "Stand-by display" u
1
"My stand-by display"
Changing display brightness
Set the backlight duration and brightness of the
display.
u "Display" u "Backlight"
1
Set each item
2
Changing main menu type
Set the display type of main menu.
u "Menu type u "Line scroll"/"Area
1
scroll"/"Basic"
Basic Operation
38
Touch / to select wallpaper u [Set]
2
Changing key locked image display
u "Display" u "Lock screen image"
1
Touch / to select image u [Set]
2
Setting Eco Mode
Set the backlight brightness of the display to the
lowest power saving level, and set to turn off the
backlight when 10 seconds elapsed after the last
operation.
u "Other setting" u "eco mode" u
1
"ON/"OFF"
Information
• Alternatively, press G and touch [5] for over 1 second in
Stand-by to set/cancel the eco mode.
Page 41

Lock/Security
Various Security Codes
● Cautions on security codes
• Avoid setting security codes using your birthday, part of
your phone number, your address or room number, "1111"
or "1234" that can be easily guessed by others. Be sure
to write down the set security codes and store them in a
separate location.
• Do not reveal your security codes to others. DOCOMO
is not responsible for damage caused by misuse of your
security codes by others.
• If you forget your security codes, you need to bring your
identification document (driver's license, etc.), the FOMA
terminal, and UIM to the docomo Shop. For details,
contact "General Inquiries" at the back of this manual.
• PUK code is written in the application for
subscriber) given at the time of contract. If you have
subscribed at a place other than the docomo Shop, bring
your identification document (driver's license, etc.) and
UIM to the docomo Shop or contact "General Inquiries" at
the back of this manual.
Terminal security code (Default: 0000)
You can change the Terminal security code by yourself.
u "Lock/Security" u "Change security code"
m (copy for
Network security code
(At the time of contract: any number)
The Network security code is a 4-digit number to be used
for your identification at an acceptance of order at the
docomo Shop, docomo Information Center, or "お客様サポ
ート (user support)", or for accessing network services. You
can change the code by yourself.
If you have "docomo ID and Password" for "My docomo",
a total support site for a PC, you can change the Network
security code from a PC. From i-mode, you can change
it by accessing "i Menu/Search" u "お客様サポート (user
support)" u "各種設定 (確認・変更・利用) (settings (check/
change/use))" u "ネットワーク暗証番号変更 (Change
Network security code)"
• F
or "My docomo" and "お客様サポート (user support)",
see the back side of the back cover of this manual
(Japanese only).
i-mode password
(At the time of contract: 0000)
The "i-mode password" is a 4-digit number required to
register/remove contents in My Menu, and subscribe to/
cancel the message service or fee-based i-mode services.
(Some other information service providers may set
individual passwords.)
You can change the password by yourself.
From i-mode, you can change it by accessing "i Menu/
Search" u "ENGLISH" u "Options" u "Change i-mode
Password".
Basic Operation
39
Page 42

PIN1 code/PIN2 code
(At the time of contract: 0000)
You can set PIN1 and PIN2 codes to the UIM. PIN1 code
is a 4- to 8-digit number to be entered to identify the user
every time UIM is inserted into the FOMA terminal or the
terminal power is turned on in order to prevent unauthorized
use by third party. PIN2 code is a 4- to 8-digit number used
to reset accumulated call charges, etc. You can change
them by yourself. To change PIN1 code, set "PIN1 code
request" to beforehand.
u "Lock/Security" u "PIN code" u Enter the Terminal
security code u "Change PIN1 code" / "Change PIN2 code"
Basic Operation
PUK code (PIN unblock code)
PUK code is an 8-digit number used to unblock PIN1
code or PIN2 code. You cannot change it by yourself.
• If you failed to enter PUK code10 times in a row, UIM is
locked.
Enter
PIN1 code
times in a row
PIN2 code
Failed 3
Enter
OK
Enter PUK
code (PIN
unblock code)
Failed 10
times in a row
Set new PIN1/
PIN2 code
Contact the
docomo Shop.
40
Page 43

Various Lock Functions
Lock function Description
Lock all Locks the FOMA terminal to prevent
operations by others.
• If Lock all is set to On, operations other
than Power ON/OFF, Emergency calls,
voice call/videophone call, Unlock all
and key lock setting are not available.
1
u "Lock/Security" u "Lock" u
"Lock all" u Enter the Terminal
security code u "Yes"
■ To cancel Lock all
While Lock all is set, [Unlock] u Enter
the Terminal security code.
If failed to enter the correct Terminal
security code five times in a row, the
power automatically turns off.
• Emergency numbers (110, 119, 118) can
be called during Lock all.
While Lock all is set,
[EmergencyCall] u Touch to enter an
emergency number u Touch [Yes].
However, [EmergencyCall] is not
displayed on basic Stand-by if UIM is
not inserted.
Lock function Description
Omakase Lock Locks your personal data such as
Call/Mail lock Disables outgoing calls, address entries
Phonebook by calling DOCOMO when
you lost the FOMA terminal.
Setting/Canceling Omakase Lock
0120-524-360*
Available 24 hours a day (open all
year round)
(Japanese only)
* Unavailable from part of IP phones.
• Can be set/canceled from the My
docomo site (Japanese only) using a
PC.
• For details on Omakase Lock, see
"Mobile Phone User's Guide [Basic]".
with dial icon, incoming calls or display
of mail messages, etc.
1
u "Lock/Security" u "Lock" u
"Call/Mail lock" u Enter the Terminal
security code
2 Set [
3 [Done]
/ ] in "Call/Mail lock" to
u
Check the items to lock
Basic Operation
41
Page 44

Lock function Description
Self mode Disables all functions that require
communication, such as making/
receiving calls, using i-mode, or sending/
receiving mails. Sending and receiving
data through Bluetooth function is not
available.
u "Call/Dialing" u [ / ] in
1
"Self mode" u "Yes"
Data access
lock
Enables to set restriction to the specified
functions. The Terminal security code is
required after being locked.
u "Lock/Security" u "Lock" u
1
"Data access lock" u Enter the
Basic Operation
Terminal security code
2 Set [
/ ] in "Data access lock"
to
u Mark functions to lock
3 [Done]
Lock function Description
Lock key Lock the touch panel and keys to disable
their functions.
Also key is locked after the display
duration set in "Backlight" plus five
seconds.
1 R
■ When unlocking key
Press R for over 1 second.
- Touch [Press & hold to unlock] for over
1 second u Key is unlocked if leave
your finger from [Leave the button].
When the display is lights-out, press
R/S to turn on the display light
and display [Press & hold to unlock].
Display Call/
Mail logs
Hides redial call, received call, sent mail,
and received mail logs.
1
u "Lock/Security" u "Display
Call/Mail logs" u Enter the Terminal
security code
2 Set [
/ ] to the item
42
Page 45

Restricting Incoming Calls
Resetting to Default
Setting actions when anonymous calls
arrive
Reject incoming calls without caller ID per reason
for anonymous call.
u "Call/Dialing" u "Incoming call" u
1
"Anonymous caller" u Enter the Terminal
security code u "User unset"/"Pay
phone"/"Not support" u Set each item
Rejecting calls from callers unset in
Phonebook
Set to reject calls from callers not saved to
Phonebook or without caller ID.
u "Call/Dialing" u "Incoming call" u
1
"Accept/Reject call" u Enter the Terminal
security code u [
unknown"
/
] in "Reject
Resetting various function settings to
defaults
Reset the settings you have changed in functions
to defaults.
u "Other setting" u "Reset/Clear" u
1
"Reset settings" u "Reset settings" u
"Yes" u Enter the Terminal security code
Deleting all saved data at once
Delete saved data.
u "Other setting" u "Reset/Clear" u
1
"Clear memory"
Touch an item to delete u Touch the item
2
to delete u "Yes" u Enter the Terminal
security code
Basic Operation
43
Page 46

Camera
How to use
Use this camera to shoot still images or moving
pictures.
Shooting light (Light/blink
when shooting still images or
moving pictures)
Flash
Shooting
Information
• The camera cannot be activated when the battery power is not
enough. Also the camera may turn off automatically.
• The still images and moving pictures cannot be saved when the
battery power is not enough.
• When microSD card is not inserted, shooting still images/
moving pictures is not available. Insert microSD card before
shooting.
• If a still image/moving picture shot by camera is set to
ook image or basic Stand-by, it will not be displayed
Phoneb
after removing the microSD card.
Camera
Shooting
In order not to drop the FOMA terminal, attach the
strap (trial) on the FOMA terminal and take the
wrist through the strap.
.
I
I
b
a
Strap
44
Page 47

Viewing and Operating Shooting Screen
b d f h j
c e g i
a
k
l
m
n
Still image shooting
a
k
t
m
n
Moving picture shooting
screen
b s d h
c k g i
screen
o
p
q
r
u
v
p
q
r
● Key operations on shooting screen
Operation Description
Shutter key Shutter/Start recording
Zoom wheel Zoom
R
T / S
D
F
Key/Touch panel lock
Exit Photo mode/Movie mode
Switch between Photo mode and Movie mode
Display images saved in "My picture"
folder/"i-motion/Movie" folder of "Data box"
● Marks (icons) displayed on shooting screen
aPhoto-mode/Movie-mode
Photo-mode Movie-mode
bSelect size
12M (4000×3000) 8M (3264×2448)
5M (2560×1920) Wide 4M (2560×1440)
Full HD (1920×1080) 2M (1600×1200)
1M (1280×960) HD (1280×72)
Wallpaper (800×480) VGA (640×480)
QVGA (320×240) QCIF (176×144)
cImage quality/Video quality
Super fine Fine Normal
dAuto Timer
3sec 5sec 10sec
eShot mode
Normal Smile shot Beauty shot
Continuous mode High speed shot Panorama shot
Shoot with frame Photo with audio Art shot
Shooting
45
Page 48
fISO
ISO64 ISO100 ISO200 ISO400
ISO800 ISO1600 ISO3200
gImage stabilization
ON
hMemory in use
microSD card No microSD card
iRemaining battery level display
jNumber of available shot
kScene
Auto Intelligent shot Portrait
Sports Landscape Night Night portrait
Lamp Fireworks Food
lFlash
Auto Redeye Reduction OFF ON
mFocus
Auto Macro Pan
Face detection Manual
nCamera help
Shooting
oFocus area
Frame color changes to indicate status during auto focus.
pZoom in
qZoom out
rSetting menu
sAudio recording
Mute
tBrightness
uElapsed time
vTotal recordable time
Information
• Under camera mode, the icon of showing the FOMA terminal
condition (status icon) is not displayed except for battery level.
Shooting Still Images/Moving Pictures
Shooting Still Images
Stand-by display u T
1
■ When a moving picture screen is displayed
Press D.
Point the camera to a subject u Shutter
2
key
Shooting Moving Pictures
Stand-by display u T
1
■ When a still image screen is displayed
Press D.
Point the camera to a subject u Shutter
2
key
The tone sounds and recording a moving picture starts.
Shutter key
3
The tone sounds and recording a moving picture ends.
46
Page 49

Shooting Still Images by Touch Focus
If you touch the display, the place you touched
will focus automatically. Then start shooting.
Stand-by display u T
1
Point the camera to a subject u Touch
2
display (for over 1 second)
Release your finger from the display
3
Starts shooting still images when the shutter rings.
Shooting Still Images in Various Modes
Smile shot
Automatically shoot when smile is sensed.
Still image shooting screen u u "Shot
1
mode" u "Smile shot" u [X]
Point the camera to a subject
2
When smile is sensed, it will shoot automatically.
Beauty shot
Enables to adjust automatically to make face
expressions brightly and clearly before shooting.
Still image shooting screen u u "Shot
1
mode" u "Beauty shot" u [X]
Shutter key
2
Continuous mode
Continuously shoot while shutter key is being
pressed.
Still image shooting screen u u "Shot
1
mode" u "Continuous mode"/"High
speed shot" u [X]
Hold down the shutter key
2
Shoot still images while shutter key is being pressed.
Information
• It takes time to save the still images shot under "Continuous
mode" or "High speed shot". Photo light (face with display) is
blinking. The next shooting starts when it stops blinking.
Shooting
47
Page 50

Panorama shot
Move the FOMA terminal to upward, downward,
leftward and rightward to shoot still images. Up to
six still images can be made into one panorama
image.
Still image shooting screen u u "Shot
1
mode" u "Panorama shot"
Shutter key
2
Move the FOMA terminal towards the
3
shooting direction u Focus the white
round on the red one located on the
center of display
Shooting
48
• Automatically shoot if focus on the red round.
• A panoramic image made of shot images is
displayed.
Information
• While shooting, if touch , a panoramic image made of images
shot so far will be displayed.
• While shooting, if touch [CANCEL], shooting will start from the
beginning.
Shooting with frame
Shoot while displaying the selected frame.
Still image shooting screen u u "Shot
1
mode" u "Shoot with frame"
Select a frame u [OK]
2
Shutter key
3
Photo with audio
After shooting still images, sound can be
recorded with a duration of around 10 seconds.
Still image shooting screen u u "Shot
1
mode" u "Photo with audio" u [X]
Shutter key
2
Voice record starts after shooting. Around 10 seconds
will be recorded.
Art shot
Add other effects before shooting.
Still image shooting screen u u "Shot
1
mode" u "Art shot" u Touch a shooting
mode u [X]
Shutter key
2
Page 51

Displaying Album
Displaying Slide Show
Stand-by display/Still image shooting
1
screen/Moving picture shooting screen u
F
Slide leftward or rightward
2
Information
• If set a still image as basic Stand-by, select a still image and
touch "Set as" u "Stand-by display"
• The edited moving pictures cannot be played from Album. Use
moving pictures/i-motion player (P74) to play.
Enlarging still images
In displaying a still image of album u
1
Turning zoom wheel
Playing moving pictures
In displaying moving pictures of album u
1
In still image display u [Slide show]
1
Operating Slide Show
In slide show display u
1
[Mail]/[Set as]/
2
Setting Slide Show
In slide show display u
1
[Durations]/[Sounds]/[Transitions]
2
Shooting
49
Page 52

Call Telephone
This FOMA terminal is not equipped with Inner
camera. So the image sent to the other party
during videophone call is a still image.
Making a Call/Videophone Call
Entering a phone number to make a call
Stand-by display u G u Enter a phone
1
number
• Start with a city code even for a local call.
[Call] (or G)
2
A ring tone sounds from the earpiece, and the Dialing
screen is displayed until the other party answers the
call.
■ To make a videophone call
Touch [V. phone].
To end the call, S
3
Connect
Making a call from Phonebook
1
Touch the entry to call u [Call] (or G)
2
■ To make a videophone call
Touch [V. phone].
Making a call using redial logs or received
call logs
Up to 30 entries each can be saved.
• If exceeded 30 entries, the entry is deleted from the
oldest.
u u "Redial" or "Received calls"
1
Touch the entry to call
2
[Call] (or G)
3
■ To make a videophone call
Touch [V. phone].
Notifying other party of your phone number
Set whether or not to notify other party of your
caller ID on the network beforehand.
u "NW Services" u "Caller ID
1
notification" u "Activate/Deactivate"
"Notify"/"Not notify"
2
Information
• If you hear a guidance asking to notify of your caller ID, set the
caller ID notification or prefix 186 to the other party's phone
number and call again.
50
Page 53

Making an international call
WORLD CALL is an international call service
available from DOCOMO mobile phones.
When having subscribed to the FOMA service,
you have also subscribed to "WORLD CALL"
(except for those who have applied not to use the
service).
• You can make calls to approximately 240 countries and
regions.
• Charges for "WORLD CALL" are added to the monthly bill
for the FOMA service.
• The application/monthly fee is free of charge.
• Some billing plans are not available for this service.
• Even if the caller ID notification is set, it may not be
notified or phone number may not be displayed correctly
depending on the telecommunication carrier
you cannot make a call from the Received calls scr
• For details on WORLD CALL, contact "General Inquiries"
at the back of this manual.
• If you use international carriers other than DOCOMO,
contact them directly.
Stand-by display u G u Enter "010
1
- Country code - Area code (City code) Other party's phone number"
[Call] (or G)
2
■ To make an international videophone call
Touch [V. phone].
. In this case,
een.
Receiving a Call/Videophone Call
A call arrives
1
[Answer] (or G)
2
Answer a call.
To end the call, S
3
Adjusting Earpiece Volume
During a call, W (マナー) / E (メモ)
1
,
Connect
51
Page 54

When You cannot Answer a Call
Setting Record message
If the Record message is activated, the voice
guidance is played when you cannot answer
a voice call and the other party's message is
recorded.
• The Record message does not activate when a
videophone call arrives. The call arrives in a normal way.
u "Other tools" u "Record message"
1
u "Record msg. setting"
Setting Public mode (Drive mode)
The guidance is played announcing that you
cannot answer the call because you are currently
driving or in a place where you should refrain
from talking on the phone (train, bus, or movie
theater), and then the call is disconnected.
(for over 1 second)
1
When the Public mode (Drive mode) is set, appears
at the top of the screen.
■ To cancel the Public mode (Drive mode)
Touch
(for over 1 second)
[
2
• Set to to select/set each item.
[OK]
3
When the Record message is set, appears at the top
of the screen.
Connect
Playing Record message
1
"Record msg. list"
Double touch a record message
2
] in "Activate record msg."
/
u "Other tools" u "Record message"u
52
Setting Public mode (Power OFF)
When a call arrives while the power is turned
OFF, the guidance is played announcing that you
cannot answer the call because you are in a place
where you should turn the power OFF (hospital,
airplane, near priority seats on a train), and then
the call is disconnected.
Stand-by display u G u Enter "*25251"
1
u [Call] (or G)
■ To cancel the Public mode (Power OFF)
In phone number entry screen, enter "*25250" and
touch [Call] (or G).
Page 55

Using Various Network Services
Available network services
The following DOCOMO network services are
available for the FOMA terminal.
Service name Subscription Monthly fee
Voice Mail Service Required Charged
Call Waiting Required Charged
Call Forwarding Service Required Free
Nuisance Call Blocking Not required Free
Caller ID Notification
Service
Caller ID Request
Service
Dual Network Service Required Charged
English Guidance Not required Free
Multi Number Required Charged
Public mode
(Drive mode)
Public mode
(Power OFF)
Melody Call Required Charged
Not required Free
Not required Free
Not required Free
Not required Free
Information
• You cannot use network services while you are out of service
area or where there is no signal reception.
• For subscription or inquiries, contact "General Inquiries" at the
back of this manual.
• For details on network services, see "Mobile Phone User's
Guide [Network Services]".
Setting Voice mail service
u "NW Services" u "Voice mail" u
1
Select an item
Setting Call waiting
u "NW Services" u "Call waiting" u
1
Select an item
Setting Call forwarding service
u "NW Services" u "Call forwarding"
1
u Select an item
Connect
53
Page 56

Emergency call
Emergency call Phone number
Calls to police 110
Calls to fire station and ambulance 119
Calls for accidents at sea 118
Information
• This FOMA terminal supports "緊急通報位置通知 (Emergency
Location Report)". When making emergency calls to 110, 119, or
118, your current location (location information) will automatically
be notified to emergency report reception agencies such as the
Police. The agency may not receive accurate location information
depending on your current location or signal conditions. When you
do not notify of your caller ID by dialing such as with "184" added,
your location information and caller ID are not notified. However,
when the agency judges that the location information and caller ID
are necessary to protect a human life, it may acquire your location
information and caller ID regardless of your setting. The region and
timing "Emergency Location Report" is introduced vary depending on
the preparation of respective emergency report reception agencies.
• When making a call to 110, 119, or 118 from the FOMA terminal, inform
Connect
an operator that you are calling from a mobile phone and your caller
ID and actual location in case the calls from police or fire station come.
Do not move around while you are talking during an emergency call
to prevent the call from being disconnected unexpectedly. Do not turn
the power off immediately after the call is over; and keep the FOMA
terminal r
• Depending on the area where you are calling, you may not be
• When you make a videophone call at 110/119/118 from the FOMA
eady to receive calls for approximately 10 minutes.
connected to the local police or fire station.
terminal, the call will turn into a voice call automatically.
Using Overseas
International roaming (WORLD WING) is a service
that allows you to use the FOMA terminal used
domestically in a service area of international
carrier associated with DOCOMO, with the same
phone number and mail address. You can use
voice call, SMS, and i-mode mail functions without
changing settings
Available areas
●
This FOMA terminal can be used in 3G network and
GSM/GPRS network service areas. Check available
areas.
● Before using the FOMA terminal overseas, see
the following items.
• "Int'l Service Guide" pre-installed on the FOMA
terminal (Japanese only)
• "Mobile Phone User's Guide [International Services]"
• DOCOMO International Services website
Information
• For a country code, international call access code, and
universal number international prefix, see "Mobile Phone User's
Guide [International Services]" or DOCOMO International
Services website.
54
Page 57

Available services
Communication service 3G GSM GPRS
Voice call
Videophone
SMS (short message
service)
i-mode site
i-mode mail
i-Channel
Packet communication by
connecting to a PC
1 When you use Multi number, you cannot make a call
*
*2 If you send a message to the FOMA terminal user,
*3 You need to make overseas usage settings for i-mode.
*4 You need to make i-Channel usage settings for
*1
*1
*2
*3
*3*4
using additional number.
enter the other party's phone number by the same
operation as in Japan.
overseas. Packet communication charges when Basic
channel information is updated automatically. (In
Japan, it is included in i-Chanel usage fee.)
○ ○ ○
○ × ×
○ ○ ○
○ × ○
○ × ○
○ × ○
○ × ○
Information
• Some services are unavailable depending on the international
carrier or network you access.
For countries, regions, and international carriers you can
access, see "Mobile Phone User's Guide [International
Services] or DOCOMO International Services website.
Making a call to Japan while staying overseas
Make a call with "+81" prefixed to the other
party's phone number.
Stand-by display u G u [0] (for over
1
1 second) u [8][1] u Enter other party's
phone number excluding the first "0"
[Call] (or G)
2
■ To make a videophone call
Touch [V. phone].
Making a call to outside the country you
stay (except for Japan)
Make a call with "+" and a country code prefixed
to the other party's phone number.
• To make a call to a WORLD WING user overseas, enter "81"
as a country code to make an international call to Japan.
• Touch [0] for over 1 second, "+" is entered.
Stand-by display u G u [0] (for over 1
1
second) u Enter "Country code - Area code
(City code) - Other party's phone number"
• If an area code (city code) starts with "0", remove "0". (When
calling some countries such as Italy, "0" may be required.)
[Call] (or G)
2
■ To make a videophone call
Touch [V. phone].
Connect
55
Page 58

Making a call to a person in the country you
stay
Make a call by dialing the other party's phone number
from the area code (city code).
Stand-by display u G u Enter "Area
1
code (City code) - Other party's phone
number"
[Call] (or G)
2
■ To make a videophone call
Touch [V. phone].
Making a call to WORLD WING user
overseas
To make a call to a WORLD WING user overseas,
make a call as an international call to Japan
regardless of in or out of the country you stay.
Stand-by display u G u [0] (for over 1
1
Connect
second) u [8] [1] u Enter the other party's
phone number excluding the first "0"
[Call] (or G)
2
■ To make a videophone call
Touch [V. phone].
Receiving a call overseas
A call arrives
1
[Answer] (or G)
2
Answer a call.
To end the call, S
3
Information
• When a call arrives during the international roaming, the call is
internationally forwarded from Japan. The caller is charged for
call fees to Japan, and the receiver is charged for receiving the
call.
56
Page 59

Sending i-mode Mail
Upon subscription to i-mode, you can exchange
e-mail via the Internet, as well as between i-mode
terminals.
• For details on i-mode mail, see "Mobile Phone User's
Guide [i-mode] FOMA version".
u "Compose message"
1
Address
Subject
Message
Touch field u "Direct input" u Enter an
2
address
Double touch field u Enter a subject
3
Double touch [Message] field u Enter a
4
message
[Send]
5
Attaching and sending a file
Attaching and sending a file with images or
melodies attached.
• Up to 10 files, a total of 2MB, can be attached.
u "Compose message"
1
2
3
4
5
6
u Select an item and a file
Touch field u "Direct input" u Enter an
address
Double touch field u Enter a subject
Double touch [Message] field u Enter a
message
[Send]
Connect
57
Page 60

Sending Deco-mail/Decome-Anime
Sending Deco-mail
Create your designed mail by adding decorations
such as changing font size, font color or
background color, or inserting images when
editing i-mode mail.
u "Compose message"
1
Enter an address and a subject
2
Connect
Double touch [Message] field u u
3
[Decorate mail]
Use the palette to decorate a message
4
If the palette is open,
5
■ To preview the Deco-mail message
Touch
[Set] u [Send]
6
u "Preview".
58
Page 61

Sending Decome-Anime
Decome-Anime is a mail service that allows you
to use Decome-Anime templates in which Flash
images with messages or pictures are included to
make mails rich.
You can use the pre-installed templates or
templates purchased from IP (Information
provider) site.
u"Create new Decome-Anime"
1
Enter an address and a subject
2
Double touch "Edit" field u Touch a
3
template u [Edit]
• [Preview]: Confirm the
selected Decome-Anime template.
Double touch "Character" u Enter a
4
message u [Done]
[Send]
5
Information
• You can also compose a mail by u "Template" u "DecomeAnime" u Double touch a template u [Mail]
Connect
59
Page 62

Viewing Received i-mode Mail
When the FOMA terminal is in the service area,
i-mode mail is automatically sent from the i-mode
center.
When i-mode mail arrives, appears at
1
the top of the screen
When the reception completes, the
Receive results screen appears.
"Mail" u Double touch a folder
2
Connect
Double touch a mail to view
3
Replying to i-mode mail
Reply to the sender of i-mode mail. Replying can
be made by entering new text or quoting the text
of the received i-mode mail.
Received mail detail screen u u
1
"Reply/Forward" u "Reply"/"Reply with
quote"
If "Reply" is selected, select "i-mode mail" or "DecomeAnime".
Enter a subject and a message
2
[Send]
3
60
Page 63

Checking for new i-mode mail
When the FOMA terminal is out of service area,
etc. and therefore i-mode mails are failed to be
received, they are stored in the i-mode center.
Check with the i-mode center for new messages
to receive stored i-mode mails.
u"Check new messages"
1
Sorting mails
Set sorting criteria to automatically save mails to
specified folders.
• Create sorting folders in "Inbox" and "Outbox" beforehand.
u "Mail setting" u "Auto sort"
1
"Sort inbox"/"Sort outbox"
2
Double touch the Sorting rule setting field
3
Double touch the Sorting criteria field u
4
Set the sorting criteria
Touch the Folder to sort into field u
5
Double touch the folder for sorting mails
u [Save]
Connect
61
Page 64

Using SMS
Sending SMS
Send a message addressed to a mobile phone
number.
u "Compose SMS"
1
Touch field u "Direct input" u Enter a
2
phone number
Connect
Double touch [Message] field u Enter a
3
message
[Send]
4
Viewing received SMS
SMS messages are sent automatically when the
FOMA terminal is in the service area.
When an SMS arrives, appears at the
1
top of the screen
When the reception completes, the
Receive results screen appears.
Double touch the receive results screen u
2
Double touch a folder
Double touch an SMS to display
3
62
Page 65

Phonebook
Two types of Phonebooks are available with the
FOMA terminal: FOMA terminal Phonebook to be
saved on the FOMA terminal and UIM Phonebook
to be saved on the UIM. Entry items that can be
saved/ set for each Phonebook are as follows.
Entry
details
Item
Name (Reading) 1 entry 1 entry
Phone number 5 entries 1 entry
Mail address 3 entries 1 entry
Group 31 groups 11 groups
Image 1 entry Not available
Other settings Secret code,
FOMA terminal
Phonebook
Ringtone, Mail
ring tone, etc.
UIM
Phonebook
Not available
Adding Phonebook Entries
Adding new phone number, mail address,
etc.
(for over 1 second)
1
Touch "Registered memory" field u
2
"Phone"/"UIM"
Set each item
3
[Save]
4
Connect
63
Page 66

Adding Phonebook entries from redial or
received calls
u u "Redial" or "Received calls"
1
Touch the phone number to add u u
2
"Add to phonebook"
Editing Phonebook Entries
u Double touch the entry to edit u
1
[Edit] u Edit each item
After finishing edit, [Save] u "Yes"
2
Connect
64
"New registration"
3
Add Phonebook u [Save]
4
Deleting Phonebook Entries
u Double touch the Phonebook entry
1
to delete u u "Delete"
"Yes"
2
Checking Phonebook Storage Status
Check the Phonebook storage status of the FOMA
terminal and UIM.
u "Phonebook" u "No. of phonebook"
1
Viewing Call/Mail History
u "Call/Mail history" u Touch the log
1
to view
Page 67
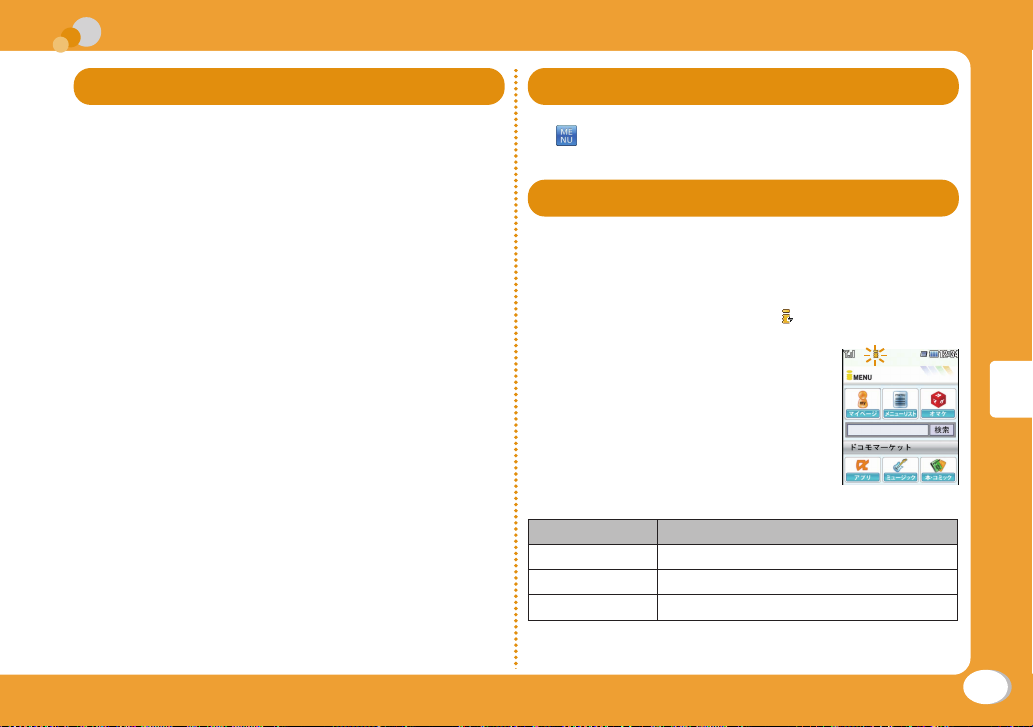
i-mode/Full Browser
i-mode
i-mode is a service that makes use of the display
of the FOMA terminal supporting i-mode (i-mode
terminal) to enable you to use online services
such as site access, Internet access, and i-mode
mail.
• i-mode is a fee-based service requiring a subscription.
• For details on i-mode, see "Mobile Phone User's Guide
[i-mode] FOMA version".
● Before using i-mode
• Contents of sites or Internet websites are generally
protected by copyright law. Data, such as text or images
you download to the i-mode terminal from sites or web
pages, can be used only for personal entertainment,
but cannot be used, in whole or in part, as it is or after
modification, for sale or redistribution, without the consent
of the copyright holders.
• If you replace the UIM with another one or turn the power
ON with the UIM not inserted, you cannot display/play
files, depending on the model, such as still images,
moving pictures, melodies obtained from sites, attached
files (still images/moving pictures/melodies, etc.) sent/
received by mail, screen memos, or Message R/F.
• When a file with the UIM restriction is set as the basic
Stand-by or ring tone, the setting will revert to default if a
dif
ferent UIM is inserted or the power is turned ON with
the UIM not inserted.
Displaying i-mode Site
u "i-mode"u "i Menu/Search"
1
Viewing and Operating Sites
Selecting a site to display
While viewing a site u Double touch an item
1
(link)
During i-mode communication, blinks at the top of the
screen.
● Operations while viewing a site
Operation Description
Touch Select a link/move pointer*
Double touch Display a destination link
Slide Scroll a screen/ move pointer
f set "Pointer display setting" to "ON", pointer can be
* I
operated.
Connect
65
Page 68

Saving frequently accessed sites as
bookmarks
Save sites as bookmarks to display your favorite
pages quickly.
While viewing a site u u "Bookmark"
1
u "Add"
Touch Title field u Edit a title u [OK] u
2
Double touch a destination folder
Saving Screen memos
Save the currently displayed page as a Screen
memo. Saved Screen memo pages can be
displayed without connecting to i-mode.
• Some sites are set to disable saving Screen memos. In
this case, a page cannot be saved as a Screen memo.
While viewing a site u u "Screen
1
Memo" u "Add" u "Yes"
Displaying Screen memos
Displaying homepages or sites from
bookmarks
u "i-mode" u "Bookmark"
1
Double touch a folder u Double touch
2
of a bookmark to view
Connect
66
u "i-mode" u "Screen Memo"
1
Double touch a Screen memo to view
2
Page 69

Full Browser
Using Full browser, you can browse web pages
designed for PCs on the FOMA terminal.
• Some pages may not be displayed correctly.
• Note that you are charged a high communication fee
for massive data communication such as browsing web
pages containing many images or downloading data
files. For details on packet communication fee and billing
plan, see "Mobile Phone User's Guide [i-mode] FOMA
version".
Displaying Web Pages Designed for PC
u "Full Browser Home"
1
Information
• SSL/TLS-compatible web pages can be displayed with Full
browser.
• SSL/TLS are the methods to communicate safely with
authentication/encryption technologies. SSL/TLS pages
prevent others from eavesdropping, spoofing, and altering
information during communication by exchanging encrypted
data, and enable you to exchange your personal information
such as credit card number and address safely.
Connect
67
Page 70

Saving frequently accessed web pages as
bookmarks
Save sites as bookmarks to display your favorite
pages quickly.
While viewing a web page u u
1
"Bookmark" u "Add"
Touch Title field u Edit a title u [OK] u
2
Double touch a destination folder
Displaying web pages from bookmarks
u "i-mode"u "Bookmark"
1
Double touch a folder u Double touch
2
to view u "Yes"
Connect
Switching i-mode to Full browser
While viewing an i-mode site u u "Full
1
Browser" u "Switch to Full Browser" u
"Yes"/"Yes (default)"
Information
• The billing system for Full browser is different from the one
for i-mode. Packet communication charges may be highly
increased when Full browser is used, depending on the data
communication volume, so, it is recommended to subscribe to
i-mode packet flat-rate service.
68
Page 71

i-Channel
This service distributes information such as news
and weather forecast to i-Channel compatible
terminals. The automatically received latest
information appears as a ticker on the basic
Stand-by. Double touch the ticker to display the
latest information in the channel list.
• i-Channel is a fee-based service requiring a subscription
(the i-mode contract is necessary for this subscription).
i-Channel has two types of channels: "Basic
channel" provided by DOCOMO and "Okonomi
(Optional) Channel" provided by IP (Information
Provider). For "Basic channel", no packet
communication charges apply for automatically
updating information. For "Okonomi (Optional)
Channel" in which you can save and use your
favorite channels, packet communication charges
apply for automatically updating information.
Note that packet communication charges apply
for browsing detailed information for both "Basic
channel" and "Okonomi (Optional) Channel".
When you use the international roaming service,
packet communication charges apply for both
automatically updating information and browsing
detailed information.
• For details on i-Channel, see "Mobile Phone User's Guide
[i-mode] FOMA version".
• The i-Channel service is provided in Japanese only.
Displaying i-Channel
If you subscribe to i-Channel, information
automatically appears as a ticker on the basic
Stand-by when the information is received.
• While the Public mode (Drive mode) is set, the ticker does
not appear.
u "i-Channel" u "i-Channel list"
1
Double touch
a ticker
Ticker
Channel list screen
Select a channel item screen
2
Connect the FOMA terminal with a site. The detailed
information is displayed.
Information
• On the Channel list screen, items cannot be selected by
touching the screen. After touching [Key on], operations are
available by touching the key displayed.
Connect
69
Page 72

MUSIC
Music&Video Channel
Music&Video Channel is a service which
automatically delivers up to about one-hour
programs at night just by selecting your favorite
music programs in advance. Further, you can
enjoy high-quality video program of up to about
30 minutes. Programs are updated regularly which
enables you to enjoy the delivered programs
while commuting.
• Music&Video Channel is a fee-based service requiring a
subscription (You also need to subscribe to i-mode and
i-mode packet flat-rate service).
• In addition to the usage fee for the Music&Video Channel,
some programs may require additional information fees.
• After subscribing to Music&Video Channel, if you insert
the UIM into a Music&Video Channel-incompatible FOMA
terminal, the service becomes unavailable. However
service fees will still apply unless you cancel the
Music&Video Channel subscription.
• You cannot set or obtain programs during international
roaming*. When you go overseas, halt the distribution of
programs befor
resume starting distribution.
Enjoy
* Packet communication charges apply if trying to set or
obtain programs during international r
• For details on Music&Video Channel, see "Mobile Phone
User's Guide [i-mode] FOMA version".
• The Music&Video Channel service is provided in
Japanese only.
70
ehand. When you come back to Japan,
oaming.
Setting Programs
u "Music&Video Ch"
1
"Set program" u "Yes"
2
Follow on-screen instructions to set
3
programs
Playing Programs
u "Music&Video Ch" u Double touch a
1
program
● Operations on Music&Video Channel player
screen
,
Operation Description
/
/
(for over 1 second)
W (マナー) /
E (メモ) /
/
/
(for over 1 second)
S
Pause/play
Find the beginning of the program
and pause
Adjust volume
Play from the beginning of the key current
chapter or play the previous/next chapter
While touching, rewind/fast-forward
Exit Music&Video Channel player
Page 73

Viewing and Operating Music
Player Screen
Title (song name)
Jacket
image/lyrics
Artist name
Album name
Elapsed time
Volume
● Operations on Music player screen
Operation Description
/
/
(for over 1 second)
W (マナー) /
E (メモ) /
/
Pause/play
Find the beginning of the current
program and pause
Adjust volume
Play from the beginning of the
key current chapter or play the
previous/next chapter
Playback
progress bar
Total time
/
(
for over 1 second
Touch image Display the previous/next image
u "Jacket image"
u "Lyric"
[List]
[BGM]
S
While touching, rewind/fast-forward
)
Switch the setting to shuffle
Switch the setting to repeat
Switch equalizer between ON and
OFF
Switch between the settings of
equalizer
Switch the Jacket image/save the
jacket image in "Data box"
Display/hide lyrics
Display Music data list screen
is displayed on the upper right
of the Jacket of the song being
played on the list screen
Back to basic Stand-by and play
as BGM
Exit Music player
Information
• When "Auto screen rotation" (P27) is set to , rotate the top
part of the FOMA terminal to left to switch Music playback to
horizontal screen.
Enjoy
71
Page 74

Downloading Chaku-Uta Full
Display a site that contains Chaku-Uta
1
Full® songs u Select a Chaku-Uta Full®
song to download
"Save"
2
"to handset"/"to microSD"
3
• When selecting "to handset", touch a folder to save u
Touch [Select].
• The selection of microSD card is available only when
microSD card is inserted.
Information
• Before downloading music data from websites, read the license
agreement (license and prohibited activities, etc.) carefully.
• Music data saved on the FOMA terminal or on a microSD card
can be used for personal use only. When using, do not violate
a third party's intellectual property right such as copyright, and
other rights. Do not copy or move music data saved on the
FOMA terminal or on a micr
PC.
• The packet communications charges for updating the time limit
Enjoy
of international roaming is out of i-mode packet flat-rate service.
* "Chaku-Uta Full" is a registered trademark of Sony Music
Entertainment Inc.
oSD card to other media such as a
®
Playing Music Data
Example: To play music in "All songs"
u "MUSIC Player"
1
Double touch the music data
2
72
Page 75

i-αppli
"i-αppli" is a software for i-mode compatible
mobile phones. Download various software from
i-mode sites to use the FOMA terminal more
conveniently by updating stock price or weather
information automatically, or enjoying games
without connecting to network, etc.
• Packet communication charges apply.
• For overseas use, packet communication charges differ
from domestic charges.
• For details on i[i-mode] FOMA version".
αppli, see "Mobile Phone User's Guide
Downloading i-αppli from Sites
Download software from a site and save it to the
FOMA terminal.
While viewing a site u Select a software u
1
"Yes"
Download completes u "Yes"
2
The downloaded software starts.
Starting i-αppli
u "i-αppli" u "Software list"
1
Double touch a software
2
■ To exit i-αppli
Press
S u "Yes".
Deleting i-αppli
u "i-αppli" u "Software list" u Touch
1
a software u
"Yes"
Information
• If a pre-installed i-αppli is deleted, you can download
from "WOW LG" site (Japanese only). From this site, you
can download pre-installed Deco-mail picture, Deco-mail
pictogram, Decome-Anime, wallpaper, melody, i-motion, etc. as
well as i-αppli.
u "i-mode" u "i Menu/Search" u"メニューリスト (Menu
List)" u "ケータイ電話メーカー (Mobile Phone Maker)" u
"WOW LG"
* Packet communication charge applies for downloading.
u "Delete" u "One" u
Enjoy
73
Page 76

i-motion
i-motion is a moving picture data with video and
sound. i-motion can be downloaded from i-motion
sites and can be played, saved, and set as the
basic Stand-by or ring tone, etc.
i-motion types
● Standard type
There are following two formats.
a
Format to be played back after downloading (Up to 10MB)
b
Format to be played back while downloading (Up to 10MB)
• Some standard-type i-motion may not be saved,
depending on i-motion.
● Streaming type
This type allows you to play back i-motion while
downloading. Up to 10MB of i-motion can be played
back. Data is deleted after playback and cannot be saved
on the FOMA terminal.
Downloading i-motion from sites
.
• Downloaded i-motion is saved to "i-mode" folder in
"i-motion" of "Data box" or a microSD card.
While viewing a site u Select i-motion
1
Enjoy
After playback or downloading, "Save"
2
"to handset"/"to microSD"
3
• When selecting "to handset", touch a folder to save u
Touch [Select].
• The selection of microSD card is available only when
microSD card is inserted.
74
Playing i-motion
Play moving pictures you recorded or i-motion
downloaded from sites or i-mode mails.
u "Data box" u "i-motion/Movie"
1
Double touch a folder
2
Double touch a file
3
• When playing back moving picture/i-motion (with
video) for the first time, a confirmation appears
asking whether to play i-motion in full screen at any
time. Select "Yes" to play in full screen (horizontal).
File display name
Playback progress bar
Elapsed time
Volume
i-motion playback
screen
Total time
Page 77

● Operations on i-motion playback screen
Operation Description
/
/
/
(for over 1 second)
W (マナー) /
E (メモ) /
[Stop] Stop
Information
• When "Auto screen rotation" (P27) is set to , rotate the top
part of the FOMA terminal to left to switch Music playback to
horizontal screen.
• The moving pictures shot by HD (1280X720) cannot be played
on moving pictures/i-motion player. Use Album (P49) to play.
Pause/play
Play from the beginning of the
key current chapter or play the
previous/next chapter
While touching, rewind/fast-forward
Adjust volume
Using Playlist
Specify the playback order of moving pictures/imotion on a playlist. Choose your favorite moving
pictures/i-motion saved on a microSD card or
FOMA terminal to play them in your favorite order.
Creating a playlist
u "Data box" u "i-motion/Movie" u
1
"Playlist"
[New] u Enter a playlist name
2
[Add] u Double touch a folder
3
Touch a moving picture/i-motion u
4
[Select]
Check moving pictures/i-motion to save
5
to a playlist u [Done]
Playing a playlist
u "Data box" u "i-motion/Movie" u
1
"Playlists"
Double touch a playlist to play
2
Enjoy
75
Page 78

Convenient Tools
Using Schedule
Save schedules such as meetings or
appointments.
u "Schedule" u Touch a date to save
1
to Schedule u [Add new]
Set each item
2
[Save]
3
Using Alarm
Use the FOMA terminal as an alarm clock.
u "Alarm"
1
Touch an alarm to edit u [Edit]
2
More Convenient
Set each item
3
[Save]
4
Bluetooth Function
If connect the FOMA terminal and wireless
earphone set 02 (optional) with Bluetooth
communication, you can make a call or listen to
music while putting the terminal into your bag.
Registering Bluetooth device into the FOMA
terminal
Register Bluetooth device into the FOMA terminal. Set the
Bluetooth device to Stand-by condition beforehand.
Example: Register wireless earphone set 02 and connect
1
2
through hands free service
u "Bluetooth" u Set [
"Bluetooth" u "Register New Devices"
Select wireless earphone set 02 u "Yes"
• When register devices other than wireless earphone
set 02, Bluetooth pass key is required to enter.
/
] to in
76
Page 79

Connecting with Bluetooth device
u "Bluetooth" u Set [
1
"Bluetooth" u "Device list"
Select Bluetooth device u "Connect" u
2
Select connected service
• While connecting with Bluetooth device, blinks in
Stand-by.
/
] to in
Operating from PC to FOMA terminal
Connect a PC supported Bluetooth communication and FOMA
terminal through Bluetooth communication, and operate on PC.
u "Bluetooth" u "Accept OSP Device"
1
u "Yes"
• Touch [Cancel] to disconnect the communication.
● LG On-Screen Phone (OSP)
LG On-Screen Phone is a function that enables to
display the FOMA terminal screen and operate FOMA
terminal through mouse and keyboard.
You can use PC keyboard to enter characters, use
alarm, schedule and make a call through PC, or deal
with files between PC and the FOMA terminal by
dragging and dropping.
● OSP
For downloading operation method, PC software or
other detailed information, please refer to the following
home page.
- From PC http://www.lg.com/jp/mobile-phones/
download-page/index.jsp
Using Google
Before using Google, check the precautions first.
u "Google"
1
Check the precautions on display.
"Agree and continue"
2
Using Google Search
Use Google to enable search via Internet.
u "Google"
1
"Search" u Enter a word to search
2
More Convenient
77
Page 80

Using YouTube
Connect YouTube and watch movies.
Using Google Map
Connect Google Map and check map.
u "Google"
1
"YouTube"
2
Using Picasa
Connect Picasa and view still images.
u "Google"
1
"Picasa"
2
More Convenient
78
u "Google"
1
"Map"
2
For following operations, follow the instructions on
screen.
Using Gmail
Use Gmail to send mails.
u "Google"
1
"Gmail"
2
Follow the instructions on screen.
Page 81

Using Various Convenient Tools
Using dictionary
Use Japanese dictionary, English-Japanese
dictionary, and Japanese-English dictionary.
u "Dictionary" u "JPN dict."/"ENG-
1
JPN dict."/"JPN-ENG dict."
Enter a word to search
2
Touch the word
3
Search result list
screen
Viewing a document
View a document file saved on a microSD card.
•
Available file types are Microsoft Word, Microsoft Excel,
Microsoft PowerPoint, and PDF. However, Word 2007 or
later, Excel 2007 or later, PowerPoint 2007 or later files
cannot be viewed. Also, some files may not be viewed
depending on the file type.
u "Document viewer" u Double touch
1
a document
More Convenient
79
Page 82

Data Management
Using microSD Card
Copy files saved in Data box on the FOMA
terminal, such as images, moving pictures/imotion, to a microSD card. Also, display files
saved from a PC to a microSD card on the FOMA
terminal.
•
L-03C supports a microSD card of up to 2GB and a
microSDHC card of up to 16GB (commercially available)
(as of Dec, 2010). For the latest information on operation
check including manufacturer and capacity of microSD
card, visit the following site (Japanese only). Other than
microSD cards, those which are not listed on the site may
not function.
- From i-mode: "i Menu/Search" u "メニューリスト
(Menu List)" u "ケータイ電話メーカー (Mobile Phone
Maker)" u "WOW LG"
- From a PC: http://www.lg.com/jp/
Note that information on the sites shows the results of
operation checks and all the operations are not always
guaranteed.
More Convenient
•
Before inserting or removing a microSD card, perform the
operation of "Turning power OFF", and, with the face with
display up, remove the back cover and battery pack.
Inserting a microSD card
Hold the FOMA terminal with both hands when
inserting the microSD card.
With the microSD card metal contact
1
side down, insert it slowly in direction of
arrow till it clicks.
Information
• When inserting a microSD card, pay attention to the direction
and insert it correctly. If inserted in the wrong direction,
damage to the microSD card and the guide may result.
A microSD card cannot be used if inserted incorrectly.
•
80
Page 83

Removing a microSD card
b
Hold the FOMA terminal with both hands when
removing the microSD card.
Slightly press the microSD card in
1
direction a
Remove the microSD card straight in
2
direction of b
a
Resetting a microSD card
Reset (initialize) a microSD card so that it can be
used on the FOMA terminal.
u "Other tools" u "microSD" u "Reset
1
microSD card"
"Yes" u Enter the Terminal security code
2
Information
• Make sure to use this FOMA terminal when resetting a microSD
card.
• Note that all data on the microSD card is deleted when
resetting.
More Convenient
81
Page 84

Viewing/playing files on a microSD card
View/play files on a microSD card in the same way
as on the FOMA terminal using "Data box".
u "Data box" u "My picture"
1
/"MUSIC"/"i-motion/Movie"/"Melody"
Double touch "microSD"
2
• If you select "Music" in Step 1, "Movable contents" is
displayed instead of "microSD".
More Convenient
Copying/moving files between the FOMA
terminal and a microSD card
Copy/move files between the FOMA terminal and
a microSD card by copying/moving files between
the "microSD" folder and other folders in Data
box.
Example: To move a Deco-mail picture on the FOMA
1
2
3
4
5
terminal to a microSD card
u "Data box" u "My picture"
Double touch a folder
• Select another folder other than "microSD".
Touch a file u u "Move" u "One"
"microSD"
Touch a destination folder u [Select]
82
Page 85

Backing up data to a microSD card
Select a data type and copy personal data saved
on the FOMA terminal to a microSD card at once.
Personal data includes the following items.
• Phonebook
• Schedule
• Memo
• To do list
u "Other tools" u "microSD" u "PIM"
1
[Backup] u Select a type of data to copy
2
Enter the Terminal security code u "Yes"
3
• Inbox
• Outbox
• Unsent message
• Bookmark
Connecting to a PC
Connect the FOMA terminal to a PC and exchange
WMA/MP3 files or images on a microSD card.
In addition, access the Internet and perform data
communication.
• USB Cable for Data Communication (trial) is required.
• To perform data communication, install L-03C
communication setting files from the supplied CDROM. For details, see "Manual for PC connection" in the
supplied CD-ROM.
Information
• If you use a USB HUB, the FOMA terminal may not work
properly.
More Convenient
83
Page 86

Support
Troubleshooting
• First, check whether the software update is required. If
required, update the software. (Updating Software →P88)
• When the conditions are not improved even after you
checked the following symptoms, contact "Repairs
(Japanese only)" at the back of this manual or a repair
counter specified by DOCOMO.
Others
Category
Power Power
Charge Cannot
Symptom Check
does not
turn ON
charge
(Charging
light does
not turns
on or
blinks)
• Is the battery pack inserted
correctly?
• Is the battery pack charged?
• Is the battery pack inserted
correctly?
• Is the ad
• Is the adapter connected to the
• If the AC adapter (optional)
• If a call or communication is
apter power plug
correctly
outlet or cigarette lighter socket?
FOMA terminal correctly?
is used, are the AC adapter
connector and FOMA Charging
microUSB Plug Adapter L01
connected to the FOMA terminal
firmly?
made or operations of other
functions are perfor
long time while charging, the
FOMA terminal may become hot
and the charging light may blink.
In this case, charge again after
the FOMA ter
connected to an electric
med for a
minal cools down.
84
Page 87

Category
Terminal
operation
Symptom Check
Becomes
hot during
operations
or charging
Battery
usage
time is
short
• The FOMA terminal, battery
pack, or adapter may become
hot during operations or
charging, or when using i-αppli,
videophone function, etc. for a
long time while charging. This is
not a safety hazard, so, you can
continue to use them.
• Is the FOMA terminal left with
the out of service area condition
for a long time? As the FOMA
terminal searches for radio
wave to make communication
possible under the out of service
area condition, more electricity
is consumed than usual.
The battery pack usage time
•
differs depending on the
ambient environment or the
degradation level.
• The battery pack is a
consumable. The available
usage time shortens every time
the battery pack is recharged.
If the usage time becomes
extremely shorter than at the
time of purchase even if the
battery pack is fully charged,
purchase the specified batter
pack.
y
Category
Terminal
operation
Call Calls
Symptom Check
Power
turns off or
automatic
restart
occurs
Keys
do not
respond
UIM is not
recognized
Clock is
off
cannot
be made
even if
touch the
dial icon
• If the battery pack terminal is
dirty, the contact may become
poor and the power may be
turned off. If it is dirty, clean with
dry cotton swabs.
• Is Lock all set?
• Is the UIM installed in the right
direction?
• The clock may be off if the
power stays on for a long time.
Confirm if Auto time adjust is
set to ON, and then turn the
power on at a place with a good
reception.
• Is Dialing call lock set?
• Is Lock all set?
• Is Self mode set?
Others
85
Page 88

Others
Category
Call
Symptom Check
Cannot talk
("圏外 (Out
of service)"
does not
disappear
even when
you move,
or making/
receiving
calls is
unavailable
although
radio wave
is strong
enough)
• Turn the power off and on, or
remove and install battery pack
or the UIM.
• Even when "FOMA terminal is
not out of service area" or "signal
strength is shown as
may not be made or received
due to the type of radio waves.
Move to other place and call
again.
• Is incoming restriction such as
Reject on list or Accept/Reject
call set?
• Depending on crossing of
radio waves, calls or mails are
crossed at the crowded places
and connection status may not
be good. In this case, "Please
wait for a while" appears and the
caller hears a busy tone. Move
to other place or call again later.
", calls
Warranty and After-Sales Service
Warranty
• Be sure to receive a warranty at the time of purchase
of the FOMA terminal. Read contents of the warranty
and confirm information such as "shop name and date
of purchase" and keep it in a safe place. If necessary
items are not described, immediately contact the shop
of purchase. The warranty for free repair is valid for one
year from the date of purchase.
• This product and its accessories are subject to change,
in part or whole, for improvement without prior notice.
After-sales service
● For problems with your FOMA terminal
Before asking repairs, check "Troubleshooting" in this
manual or "Guide (Japanese only)" installed in this
FOMA terminal. If the problem still persists, contact
"Repairs (Japanese only)" at the back of this manual
and consult them.
For repairs after inquiry
●
Bring your FOMA terminal to a repair counter
specified by DOCOMO. Repairs are accepted during
business hours of a repair counter. Note that it may
take some days to repair the terminal depending on
the malfunction state.
86
Page 89

■ During the warranty period
• The FOMA terminal is repaired at no charge under the
conditions of the warranty.
• Make sure to bring the warranty for repair. You will be
charged even during the warranty period if the warranty is
not presented or the trouble or damage is caused by your
inappropriate handling (such as damage to LCD or connector
etc.).
• You will be charged even during the warranty period if
malfunction is caused by the use of devices and consumables
other than those specified by DOCOMO.
■ Repair may not be possib
• When a repair counter judges the cause of malfunction is
exposure to water (Example: when the waterpr
reacts)
• When, as the result of inspection, corrosion is found due
to exposure to water, condensation or sweat, or any of the
internal boar
external connector terminal (headphone/microphone terminal),
LCD, or cracked body could be the case as well)
* Since these conditions ar
any repairs, if at all possible, will be charged.
■ After expiration of the warranty
• All repairs that are requested ar
■ Replacement parts
• Replacement par
function) will be kept in stock for four years in principle after
mination of production. However, r
ter
due to a lack of replacement parts depending on the failure
part.
ds are damaged or deformed (damage to the
le in the following cases
oof sticker
e outside the scope of the warranty,
e charged.
ts (parts required to maintain production
epair may not be possible
● Notes
• Do not modify the FOMA terminal or its accessories.
- Depending on the details of modification, repair may
be refused. Modifications may include the following
cases:
• Put a sticker on LCD or keys
,
• Add a decoration to the FOMA terminal with adhesive
• Replace exterior with one other than DOCOMO genuine
products
- Repair of malfunction or damage caused by
modification is charged even during the warranty
period.
• Do not remove the nameplate placed on the FOMA
terminal. If the details described on the nameplate cannot
be checked, repair may be refused as we cannot verify
the conformity of the product to the technical standard.
• The settings of various functions and information such
as total call time may be cleared (reset) by malfunction,
repair or other handling of FOMA ter
case, make settings again.
• The parts generating magnetism are used in the following
portions of the FOMA terminal. Note that the card may
become unusable if placing a magnetism sensitive object
such as cash car
d near the FOMA terminal.
Portions: Speaker and earpiece
• If the inner side of the FOMA terminal gets wet or moist,
immediately tur
n the power off and remove the battery
pack, and then visit a repair counter. Depending on
the conditions of the FOMA terminal, repair may not be
possible.
minal. In such a
Others
87
Page 90

i-mode Fault Diagnosis site
Check whether your FOMA terminal is properly
sending/receiving mails, downloading images/
melodies. As a result of your check, if you think
that the FOMA terminal is malfunctioning, contact
"Repairs (Japanese only)" at the back of this
manual.
• How to access "iモード故障診断サイト (i-mode fault
diagnosis site)" (Japanese only)
i-mode site: i Menu u お知らせ (Note) u サポート情報
(Support information) u お問い合わせ (Inquiries) u 故
障・電波状況お問い合わせ先
and signal) u iモード故障診断 (i-mode fault diagnosis)
* Charges apply when accessing from overseas.
Others
(Inquiries for malfunction
Updating Software
You can connect to network to check if your
FOMA terminal needs an update, and if necessary,
download part of the software through packet
communication to update the required software
* Camera functions are not updated during software
update. Refer to "Updating Camera Functions" (P90) for
details.
When the software is required to update, check
the DOCOMO website and "お客様サポート (user
support)" in i Menu (Japanese only). "autoupdate", "Now update", and "Reserve" are
available for updating software.
• Software can be updated with data such as Phonebook
entries, camera images, downloaded data retained in the
FOMA terminal. Note that, however, such data may not
be protected depending on the conditions of the FOMA
terminal (malfunction, damage, exposure to water, etc.).
It is recommended that you make a backup of important
data. Note that some data such as downloaded data
cannot be backed up.
*
.
88
Page 91

Before updating software
• Do not remove the battery pack while updating software.
Failure of updating software may result.
• Fully charge the battery pack before updating software.
• Software update (downloading or rewriting) may take
time.
• You cannot make or receive calls, use communication
functions or other functions while updating software. (You
can receive voice calls while downloading.)
•
It is recommended to update software in a location with
str
ong signal reception with three antenna bars displayed
while you are not moving. During softwar
signals become weak, or download is suspended, retry
software update in a location with strong signal r
• When updating software, the information of your FOMA
terminal (such as model name or serial number) is
automatically sent to the server (software update server
managed by DOCOMO). DOCOMO does not use the
sent information for other purposes than for software
update.
• If software update fails, the message, "Rewrite failed",
appears and all operations become unavailable. In this
case, you need to bring the FOMA terminal to a repair
counter specified by DOCOMO.
e download, if
eception.
How to update software
To start software update, select (update notice
icon) displayed on the basic Stand-by, or perform
from the menu screen.
To select (update notice icon)
1
Basic Stand-by u Touch (Update
notification icon) u "Yes" u Enter the
Terminal security code
Others
89
Page 92

Others
To perform from the menu screen
u "Other setting"
u "Software
Update"u Enter the Terminal security
code u "Update"
Communication starts and check for software update.
• If update is necessary, the software update
confirmation screen appears.
• If update is not required, "No update is needed.
Continue to use as before" appears.
Updating Camera Functions
When camera function of this FOMA terminal is required to
update, use microSD card to update the part of the software
that downloaded by PC to make the camera easier to
operate.
Please view DOCOMO website and "お客さまサポート
(user support)" in i Menu (Japanese only) if camera function
is required to update.
Refer to the following home page for detailed information
about downloading camera function software and
installation procedures.
http://www.lg.com/jp/mobile-phones/download-page/index.
jsp
Information
• Note that although during updating camera function, data
registered in FOMA terminal such as Phonebook, camera
images or downloaded data can be saved, depending on
the condition of your FOMA terminal (malfunction, damage,
getting wet, etc.) , data may not be able to protected. Backup
of the necessary data is recommended. However, note that the
downloaded data may not be able to backup.
90
Page 93

Checking Harmful Data
In data or programs downloaded to the FOMA
terminal, detect and delete data that could
cause operational malfunction or stop activating
applications.
• The scanning function helps to protect the FOMA terminal
from invasion of data that cause failure when browsing
web pages or receiving mail, etc. If the pattern definition
corresponding to each failure is not downloaded or
found, the scanning function cannot protect the FOMA
terminal.
• Pattern definitions vary depending on the FOMA terminal
model. Therefore, DOCOMO may discontinue distribution
of pattern definitions for models three years after the
release date.
Updating pattern definitions
First, update the pattern definition to the latest one.
1
u "Lock/Security" u "Scanning
function" u "Update" u "Yes" u "Yes"
Updating starts. After update completes, the notification
screen appears.
• If the pattern definition is the latest one, the screen
notifying that it is the latest appears.
[OK]
2
Others
91
Page 94

Displaying scanned result
● Displaying scanned problem factors
Select "Detail" on the alert level screen to display the problem factor list screen shown on the right.
• The screen image is an example. On the actual screen, the detected data name is displayed in the
place of "XXXXXXXX".
• Depending on the type of the detected data, "Detail" may not be displayed.
• When six or mor
only the total number of factors is displayed.
● Displaying scanned result
Alert level 0 Alert level 1 Alert level 2 Alert level 3 Alert level 4
e problem factors are detected, subsequent factors after sixth one are omitted and
"OK": Continue the
Others
operation.
• The screen may be different from the above depending on the scanned result.
"Yes": Stop the operation
and exit.
"No": Continue the
operation.
"OK": Stop the
operation and exit.
92
"Yes": Delete data and
exit.
"No": Stop the
operation and exit.
"OK": Delete data and
exit.
Page 95

Introduction of Options and Related
Devices
Combine the FOMA terminal with various optional
devices to make it more convenient for expanded
purposes, from personal to business. Some
products may not be available depending on the
area. For details, contact a service counter such
as the docomo Shop. For details on optional
devices, see the related instruction manuals.
• Battery Pack L09
• FOMA Charging microUSB Plug Adapter L01
• Earphone Plug Adapter L01
• FOMA AC Adapter 01
• FOMA AC Adapter 01 for Global use
• FOMA DC Adapter 01*1/02
• FOMA Dry Battery Adapter 01
• FOMA Portable Charging Adapter 02
• Wireless Earphone Set 02
• Bone Conduction Microphone/Receiver 02
• Carry Case 02
*1 The supplied FOMA Charging microUSB Plug Adapter
L01 is required to connect L-03C.
*2 Charging with AC adapter → P21
*1*2
/02
*1*2
*1*2
*1
*1
*1
Others
93
Page 96

Appendix
Menu List
Items indicated by return to the default when
executing "Reset settings". →P43
Communication
● Phonebook
Add to phonebook
Search phonebook
No. of phonebook
Phonebook setting Default mode
Create domain list
Accept/Reject list
Set image display
Group setting
Call duration
Call costs Check call costs
Set call cost limit
Delete call cost icon
Others
● i-mode
i Menu/Search
Bookmark
Screen Memo
Last URL
Enter URL Input Address
URL enter history
i-mode setting i-mode Browser Settings
Full Browser Settings
Common Settings
Confirm i-mode setting
Reset i-mode setting
Internet search
● i-Channel
i-Channel list
i-Channel setting
Reset i-Channel
94
Page 97

● Mail
Inbox Inbox
MessageR
MessageF
Outbox Outbox
Unsent message
Compose message
Create new Decome-Anime
Compose SMS
Template
Check new messages
Check new SMS
Receive option
Mail setting Receive option set
Receive attach file
Check new messages setting
Font size
Folder lock
Melody auto play
Receiving display
Auto-display setting
Mail group
Mail setting Auto sort
SMS setting
Phone information use setting
Edit
Check settings
Reset settings
● Full Browser Home
Full Browser Home
● Call/Mail history
Received calls
Redial
Recent calls
Received mails
Sent mails
Recent mails
● Dial
Dial
● Own number
Own number
Others
95
Page 98

Multimedia
● Data box
My picture
MUSIC
Music&Video Ch
i-motion/Movie
Others
96
i-mode
Camera(microSD)
Decomail picture
Decomail picto.
Preinstalled
Frame
Data transfer
Slide show
microSD
Search by i-mode
Playlist
i-mode
Movable contents
Resume play
Transferred from PC
Search by i-mode
Distributed program
i-mode
Camera(microSD)
Preinstalled
Playlist
Data transfer
microSD
Search by i-mode
Melody
Other
● i-αppli
Software list
i-αppli info
i-αppli setting
● MUSIC Player
All songs
Playlist
Artist
Genre
Album
i-mode
Preinstalled
Data transfer
microSD
Search by i-mode
Security error history
Auto start info
Trace info
Stand-by error info
Display SW info
Auto start set
End stand-by display
Page 99

● Music & Video Ch
Channel 1
Channel 2
Set program
Program list
About this service
● Google
Google
● Document viewer
Document viewer
● Muvee Studio
Muvee Studio
● Game
Omikuji
M-toy Dart
M-toy Homerun derby
Real Motion Fishing
Hidden Catch
Utilities
● Schedule
Schedule
● Calculator
Calculator
● Alarm
Alarm
● Guide
Menu search
Useful guide
Intro animation
Trouble shooting
● Bluetooth
Bluetooth
Device list
Register New Devices
Receive Data
Accept Any Dial-up Devices
Accept OSP Device
Accept Registered
Bluetooth Settings
Others
97
Page 100

● Dictionary
Dictionary
● FOMA HIGH-SPEED
FOMA HIGH-SPEED
● Other tools
microSD PIM
Data update
Memory info.
Reset microSD card
Date security service Connect to Data Storage Center
Exchanging history
sndg img in Phonebook
Text memo
Record message Record msg. setting
Record msg. list
To Do list
World clock
Others
Stopwatch
Unit converter
Settings
● Sounds & Vib./Manner
Select ring tone
Touch setting
Select effect tone
Volume
Vibrator
Manner mode set
Mail ring duration
Set mute ring time(sec.)
Headset usage setting
● Display
Stand-by display Top stand-by display
My stand-by display
Menu type
Lock screen image
Call & Mail image
Wake-up display
Quick dial
Auto screen rotation
Illumination
Backlight
98
 Loading...