

Page 1
‘08.5
Page 2

DoCoMo
W-CDMA and GSM/GPRS System
Thank you for purchasing the FOMA SH906i.
Make sure thoroughly read this manual and the manuals
included with optional accessories before and during use to
ensure proper operation. If any of the contents in this manual
are unclear, please contact number listed in “General
Inquiries” on the back of this manual.
The FOMA SH906i is designed to make your everyday life
more convenient. Careful use will ensure a long service life.
Using the FOMA terminal
Because it relies on radio signals, the FOMA terminal cannot be
used in places with no signal (such as tunnels, underground, or in
buildings), in places with a weak signal or outside the FOMA
service area. There may be times when the terminal cannot be
used in the upper floors of a building even with no obstructions in
sight. There may also be times when the signal is strong and you
are not moving but the call is interrupted.
Make sure not to disturb others when using in public places, places
with many people or quiet places.
Because the FOMA terminal uses electrical signals, it is possible for
a third party to listen in on a conversation. However, the W-CDMA
and GSM/GPRS system automatically applies privacy to every call,
a third party that tries to listen in only hears static.
The FOMA terminal converts conversations into a digital signal and
sends it to the other party over the radio. If the signal cannot be
reconverted properly by such as moving to an area with a weak
signal, the voice may not be heard correctly.
Keep a separate memo and note information (e.g. phonebook,
schedule, Text memo, Record message, Voice memo, Movie
memo) stored in the FOMA terminal. DoCoMo shall not be liable for
any loss of content due to a failure, repair, upgrade or other
handling of the FOMA terminal.
Save the important data to the microSD Card. Or, forward and store
the information such as a phonebook, mail and schedule to a PC
using DoCoMo keitai datalink.
The user hereby agrees that the user shall be solely responsible for
the result of the use of SSL. Neither DoCoMo nor the certifier as
listed herein makes any representation and warranty as for the
security in the use of SSL. In the event that the user shall sustain
damage or loss due to the use of SSL, neither DoCoMo nor the
certifier shall be liable for any such damage or loss.
Certifier: VeriSign Japan K.K., Cybertrust Japan, Inc., GlobalSign
This FOMA terminal supports the FOMA Plus-Area and the FOMA
The FOMA terminal can be used only via the FOMA network
K.K., RSA Security Japan Ltd., Secom Trust Systems Co.,
Ltd.
HIGH-SPEED area.
provided by DoCoMo and DoCoMo’s roaming area.
Using this manual
This FOMA terminal supports Kisekae Tool (nP. 119). When the
Custom menu image is changed by Kisekae Tool, some items in the
Custom menu may be changed according to the menu history. In
addition, some items cannot be selected even if the function numbers
are entered.
In this case, operation may not run as explained in this manual. Switch
the menu screen to the Basic menu (nP. 44) or perform the Reset
menu screen (nP. 120).
Download the latest information on this manual from the DoCoMo
website.
“User’s Manual (in PDF format)” Download
http://www.nttdocomo.co.jp/english/support/manual/
index.html
※ The URL and contents of this manual are subject to change
without prior notice.
Page 3
Viewing/Searching this manual
This manual uses illustrations and icons to explain
operations for proper phone use.
Icons and screens that appear on the display have been set by
default in accordance with the handset color (Kisekae Tool
nP. 119). Refer to “Menu list” on P. 458 for the default settings in
each handset color. The explanations in this manual are based on
the case when Kisekae Tool is set for the handset color “White”.
The screens and illustrations in this manual are shown as
examples. The actual screens and illustrations may differ.
Searching this manual
Use the following ways to find explanations in this manual.
Index (nP. 520)
Easy search
(nP. 4)
Indexed pages
(nCover)
(See the next page for details)
Contents
Main functions
Menu list
Quick manual
The basic functions are explained briefly. Cut the Quick manual to
keep as a reference when away from home.
In addition, the Quick Manual “Overseas Use” is available. Use it
when using the FOMA terminal overseas.
Search for function names or service names.
Search for frequently used or convenient
functions using easy-to-understand language.
Search this manual using the index on the
cover and the sides of pages.
nP. 6
nP. 8
nP. 458
nP. 534
Note that “FOMA SH906i” is referred to as the “FOMA terminal” in
this manual.
This manual describes functions using the microSD Card. Please
note that microSD Card are sold separately. For details on microSD
Card nP. 332
This manual refers to microSD Card as “microSD Card” or
“microSD”.
This manual refers to “Osaifu-Keitai compatible i-appli with IC card
function” as “Osaifu-Keitai compatible i-appli”.
Reproduction of this manual in part or in whole is prohibited.
The contents of this manual are subject to change without prior
notice.
Notation of keys and operation procedure
This manual refers to keys as simplified icons.
Actual key Notation in this manual
/
The notation and meaning of operation procedure are shown below.
In the Custom menu,
select [Settings]/[Disp/
LED/Power saver].
For details on default settings nP. 458
Viewing the display
The explanations in this manual are based on default settings.
The actual screens may differ depending on settings changed
after purchase.
When Flash movies and icons featuring animation effects are
displayed, screens may differ from those described in this manual.
1 (Refer to “Component names and functions”
on P. 30)
Notation Meaning
In the Custom menu, select [Settings]
with w and press t b select [Disp/
LED/Power saver] with w and press
t.
1
Page 4
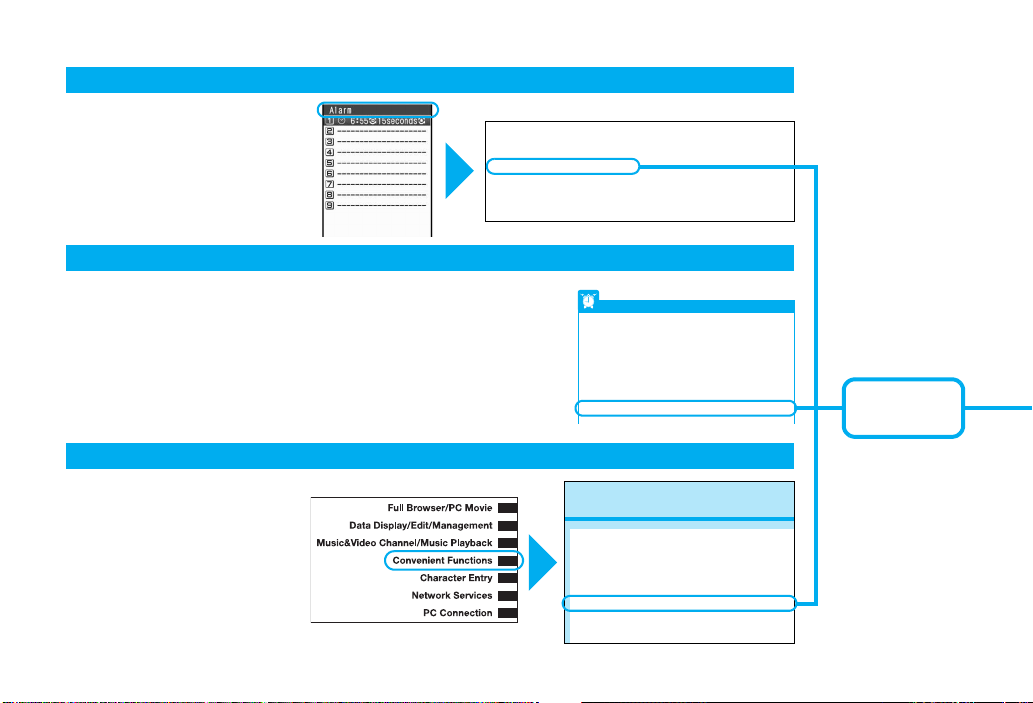
As an example, how to look up the Alarm function using the Index, Easy search, and Indexed pages are explained below.
Settings . . . . . . . . . . . . . . . . . . . 138
Additional services . . . . . . . . . . . . . 440
Reply message . . . . . . . . . . . . . 440
After-sales service . . . . . . . . . . . . . 502
Alarm . . . . . . . . . . . . . . . . . . . . . . . 385
Quick alarm . . . . . . . . . . . . . . . . 386
Reception/Recording reserve alarm
. . . . . . . . . . . . . . . . . . . . . . . 293
Schedule alarm . . . . . . . . . . . . . 390
All lock enable/disable . . . . . . . . . . 132
p
Basic menu
Icon image . . . . . . . . . . . . . . . . 122
Key list . . . . . . . . . . . . . . . . . . . 122
Reset menu screen . . . . . . . . . 122
Set background . . . . . . . . . . . . 122
Battery
Battery pack . . . . . . . . . . . . . . . . 50
Charging. . . . . . . . . . . . . . . . . . . 51
Check battery level. . . . . . . . . . . 54
Times of use. . . . . . . . . . . . . . . . 51
Other features
Using the desktop clock . . . . . . . . . . . . . . . . . . (Desktop clock) 116
Saving battery power . . . . . . . . . . . . . . . . . (Light/Power saver) 117
Scanning QR codes and bar codes . . . . . . . (Bar code reader) 164
Using GPS function . . . . . . . . . . . . . . . . . . . . . .(GPS function) 265
Playing back PC movie. . . . . . . . . . . . . (Internet movie player) 309
Using microSD Card . . . . . . . . . . . . . . . . . . . . . (microSD Card) 332
Ir-exchanging information . . . . . . . . . . . . . . . . . . .(Ir exchange) 349
Listening to music. . . .(Music&Video Channel/Music playback) 363
Setting the alarm. . . . . . . . . . . . . . . . . . . . . . . . . . . . . . (Alarm) 385
Using the calculator . . . . . . . . . . . . . . . . . . . . . . . . (Calculator) 398
Co
Checking settings for various functions . . . . . . <Check settings>382
Multiaccess . . . . . . . . . . . . . . . . . . . . . . . . . . . . . . . <Multiaccess>382
Using Multi Assistant (Multitask). . . . <Multi Assistant (Multitask)>382
Turning power on automatically . . . . . . . . . . . . <Auto power ON>383
Turning power off automatically . . . . . . . . . . . <Auto power OFF>384
Sounding alarm after set time passes. . . . . . . . . . . . . . . .<Timer>384
Sounding alarm at set time. . . . . . . . . . . . . . . . . . . . . . . .<Alarm>385
Managing schedules. . . . . . . . . . . . . . . . . . . . . . . . . . <Schedule>387
Accessing functions quickly . . . . . . . . . . . . . . . .<Shortcut menu>393
Searching by various methods . . . . . . . . . . . . . . . <Quick search>394
Content differs from actual pages in this manual.
Index nP. 520
Use this when you know the function
or service name, or to search for
function names that appear on the
display.
Easy search nP. 4
Search for frequently used or convenient functions using easy-to-understand
language.
Indexed pages nCover
Search for functions going in the order
of “cover” b “beginning of the
chapter” b “description page”. The
beginning of each chapter shows a
table of contents.
2
P. 3 85
Page that
explains “Alarm”
Page 5
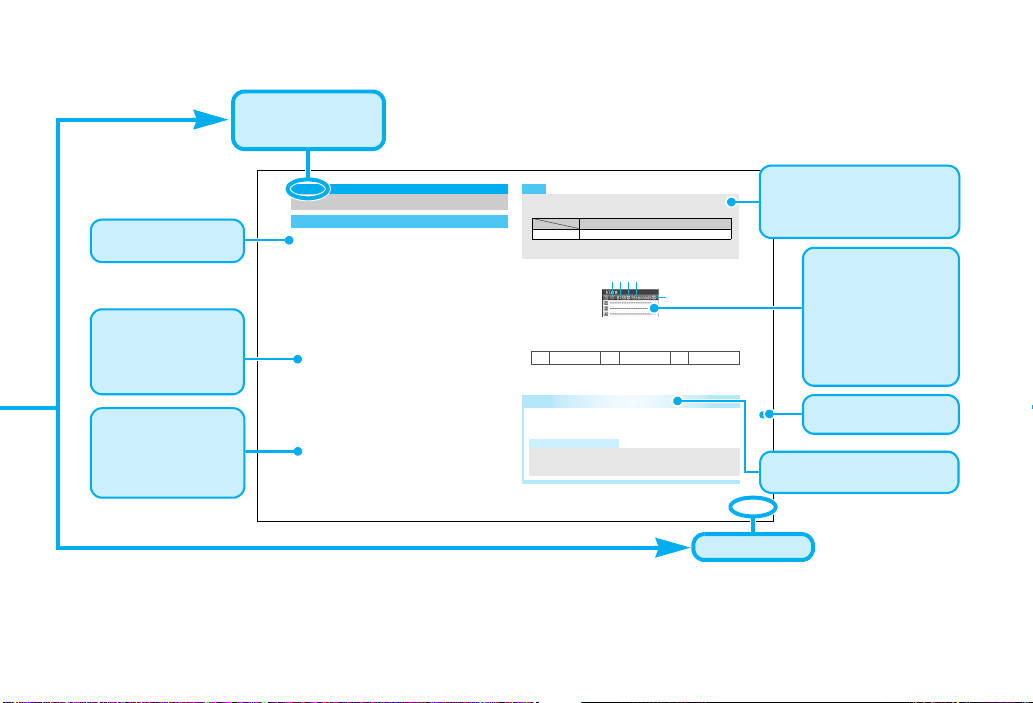
385
Convenient Functions
1
In the Custom menu, select [LifeKit]/[Timer/
Alarm]/[Alarm].
2
Select a number to register/t.
3
Select [Enter Time]/enter a time (24-hour
format)/t.
4
Select [Set repeat]/select the repeat method/
t.
5
Select [Message]/enter a message/t.
Enter up to 60 single-byte (30 double-byte) characters.
6
Select [Contacts]/select the entry method.
Select [Search phonebook]/select a name/t.
Select [Direct input]/enter a phone number/t.
7
Select [Alarm tone]/select an alarm tone/i.
To check an alarm tone: Select an alarm tone/t.
To not sound an alarm: Select [Alarm tone]/[Not set].
8
Select [Alarm volume]/adjust the volume with
u/t.
9
Select [Snooze setting]/[ON]/enter the interval
/
t/
enter the number of times to ring alarm/t.
Set the alarm’s interval and the number of times to ring the alarm.
10
Select [Ring duration]/enter the ring duration/
t.
11
Press i.
ɡ Setting details screen layout
1Alarm set icon
2Time
3Repeat frequency
4Duration of alarm
5Snooze set icon
Alarm
Sounding alarm at set time
Setting alarms
Note
When multiple alarms are set to the same time, they are prioritized
in the following order.
• If the timer for starting or recording 1Seg programs are set for
the same time, Reception reserve alarm is not activated.
l
Once onlykSet day of weekjDaily
Related Operations
Set alarm from stand-by
<Quick alarm>
In stand-by, enter a time (four digits: 24-hour format) /
t/[Quick alarm].
Note (Related operations)
Schedule is registered for the current day (following day if the
time has already passed), [No category] for the category, and
[Quick alarm] as the message.
Priority (high b low)
Alarm function
Recording b Reception b Alarm b Schedule
5
1234
This is the function
name as it appears
in the index.
※ Content differs from actual pages in this manual.
Page number
Necessary information,
precautions and other
information for using functions
are explained.
The explanations of
screen display are
shown. Refer to the
screens while using the
FOMA terminal (Text
which is input,
numbers and settings
are examples).
The operation is
detailed in steps.
Search by chapter
from the index.
Related operations are
explained in a simplified style.
Each operation is
explained when the
operations are
different depending on
the selected items.
Additional information,
precautions, and
advice relating to
operations are
explained.
3
Page 6
Easy Search
Easy Search/Contents/Precautions
Use this feature to find simple description for any function.
Useful functions for making calls
Notifying/Hiding caller ID . . . . . . . . . . . . . . . . . . (Notify caller ID) 58
Putting a call on hold while talking . . . . . . . . . . .(Hold active call) 62
Switching to Videophone during voice call
. . . . . . . . (Switching between a voice call and a Videophone) 62
Adjusting the volume of the other party’s voice
. . . . . . . . . . . . . . . . . . . . . . . . . . . . . . . . . . (Earpiece volume) 73
When unable to take a call
Placing a call on hold without answering the call. . . . . (On hold) 73
Indicating that it is necessary to refrain from talking on the mobile phone
. . . . . . . . . . . . . . . . . . . . . . . . . . . (Public mode (Drive mode)) 74
. . . . . . . . . . . . . . . . . . . . . . . . . . . (Public mode (Power OFF)) 75
Recording phone messages
. . . . . . . . . . . . . . (Record message (voice/Videophone calls)) 77
Changing melody and illumination
Setting the ring tone for the caller. . . . . . . . . . .(Select ring tone) 99
Changing the ring tone . . . . . . . . . . . . . . . . . . (Select ring tone) 108
Adjusting the ring tone volume . . . . . . . . . (Phone ring volume) 109
Muting the tone of keys pressed . . . . . . (Key/Standby i-motion) 110
Notifying incoming calls with vibration . . . . . . . . . . . . (Vibrator) 111
Setting Manner mode . . . . . . . . . . . . . . . . . . . . (Manner mode) 113
Changing the light color and pattern for incoming calls
. . . . . . . . . . . . . . . (LED color settings/LED pattern settings) 123
Changing/Knowing the display
Meanings of display icons . . . . . . . . . . . . . . . . (View the display) 34
Switching the menu display . . . . (Menu settings and selections) 44
Changing stand-by wallpaper . . . . . . . . . . . . (Stand-by display) 114
Displaying the calendar. . . . . . . . . . . . . . . . . (Calendar display) 115
Changing the font (font style) . . . . . . . . . . . .(Font style setting) 124
Changing the font size . . . . . . . . . . . . . . . . . . . . . . . (Font size) 124
Keeping the display private . . . . . . . . . . . . . . . . . . . . (VeilView) 125
Using mail
Sending Deco-mail . . . . . . . . . . . . . . . . . . . . . . . . . (Deco-mail) 198
Sending images . . . . . . . . . . . . . . . . . . . . . . . (File attachment) 203
Sorting and saving mail automatically. . . . . . . . . . . (Sort rules) 217
4
Page 7

Using the camera
Shooting panoramic pictures . . . . . . . . . . . . . . . . . (Panorama) 154
Changing the image size . . . . . . . . . . . . . . . . . . . . (Select size) 157
Saving to the microSD Card. . . . . . . . . . . .(Switch phone#SD) 162
Showing shot images . . . . . . . . . . . . . . . . . . . . . (Image Viewer) 318
Using the 1Seg
Watching 1Seg. . . . . . . . . . . . . . . . . . . . . . . . . .(Activate 1Seg) 285
Changing settings for video, voice, and sound
Recording a 1Seg program . . . . . . . . . . . . . . . . (Record 1Seg) 291
Setting timer to start or record a 1Seg program. . .(Booking list) 293
. . . (1Seg settings) 290
Securing the FOMA terminal
Keeping phonebook contents secret . . . . . . . . . . . . .(Set secret) 98
Locking the FOMA terminal remotely in case of loss
. . . . . . . . . . . . . . . . . . . . . . . . . . . . . . . . . (Omakase Lock)
Rejecting calls without caller ID
. . . . . . . . . . . . . . . (Reject calls by reason of non-disclosure) 139
Rejecting callers not saved in the phonebook
. . . . . . . . . . . . . . . . . . . . . . . . . . . . . . . . . . (Reject unknown) 140
Saving terminal data, such as phonebook from unexpected loss
. . . . . . . . . . . . . . . . . . . . . . . . . . . . (Data Security Service)
*1
*2
133
141
Other features
Using the desktop clock . . . . . . . . . . . . . . . . . . (Desktop clock) 116
Saving battery power . . . . . . . . . . . . . . . . . (Light/Power saver) 117
Scanning QR codes and bar codes . . . . . . . (Bar code reader) 164
Using GPS function . . . . . . . . . . . . . . . . . . . . . .(GPS function) 265
Playing back PC movie . . . . . . . . . . . . . (Internet movie player) 309
Using microSD Card . . . . . . . . . . . . . . . . . . . . . (microSD Card) 332
Ir-exchanging information . . . . . . . . . . . . . . . . . . .(Ir exchange) 349
Listening to music . . . .(Music&Video Channel/Music playback) 363
Setting the alarm. . . . . . . . . . . . . . . . . . . . . . . . . . . . . . (Alarm) 385
Using the calculator . . . . . . . . . . . . . . . . . . . . . . . . (Calculator) 398
Using the mobile phone overseas. . . . . . . . . . . (Overseas use) 447
Updating the software . . . . . . . . . . . . . . . . . . (Software update) 504
Updating the security . . . . . . . . . . . . . . . . . (Scanning function) 509
*1 This service is a paid service.
*2 This service is a paid service that requires subscription.
Frequently used functions are described in the Quick manual
(nP. 534).
Easy Search/Contents/Precautions
5
Page 8

Contents/Precautions
Contents
Easy Search/Contents/Precautions
Viewing/Searching this manual . . . . . . . . . . . . . . . . . . . . 1
Easy Search . . . . . . . . . . . . . . . . . . . . . . . . . . . . . . . . . . . . 4
Main functions of the FOMA SH906i . . . . . . . . . . . . . . . . 8
Maximizing use of the FOMA SH906i . . . . . . . . . . . . . . . 10
Safety precautions (to be strictly followed). . . . . . . . . . 12
Handling precautions . . . . . . . . . . . . . . . . . . . . . . . . . . . 20
Intellectual property. . . . . . . . . . . . . . . . . . . . . . . . . . . . . 24
Standard parts packaged with unit and main optional
parts . . . . . . . . . . . . . . . . . . . . . . . . . . . . . . . . . . . . . . . . . 28
Component names and functions, Display,
Before Using
the Handset
P. 29
Voice/
Videophone
Calls
P. 59
PushTalk
P. 85
Phonebook
P. 95
Optical TOUCH CRUISER, Touch panel,
Menu, Supportbook, FOMA card, Battery
pack, Power ON/OFF, Select language,
Initial setting, Date settings, Notify caller ID,
Own number, etc.
Make calls, Switch between voice call and
Videophone, Redial/Received calls,
Chaku-moji, WORLD CALL, In-car
hands-free, Answer calls, Any key answer,
Set when folded, Earpiece volume,
Answering hold/On hold, Public mode (Drive
mode/Power OFF), Record message,
Chara-den, Videophone settings, etc.
Send, Receive, PushTalk phonebook, Set
PushTalk, etc.
Add, Group settings, Search, Edit, 2-touch
dialing/2-touch mail, etc.
Sound/Screen/
Light Settings
P. 107
Security
Settings
P. 127
Camera
P. 143
i-mode/
i-motion/
i-Channel
P. 169
Mail
P. 195
i-appli
P. 229
Osaifu-Keitai/
ToruCa
P. 253
Sound settings, Vibrator, Melody Call
setting, Manner mode, Display setting,
Power saver set, Kisekae Tool, Machi-chara
setting, Themes, Change the Basic menu
design, Illumination settings, Display image
quality, Font setting, VeilView, etc.
Security code, Writing authentic, UIM Settings,
Disable PIN lock, All lock, Omakase Lock, Self
mode, Function lock, Keypad dial lock, Multi
easy lock, Side key guard, Secret mode, Accept
calls/Reject calls, Data Security Service, etc.
Shoot still picture, Shoot movie, Change settings,
Bar code reader, Character Reader (OCR), Card
reader, Cameraloupe, Shotdeco, etc.
View/Operate sites, i-mode password, Login
information, Internet access, Bookmark,
Screen Memo, Download, Upload, Set
i-mode, SSL certificates, i-motion, i-Channel,
etc.
Compose and send, Deco-mail,
Decome-Anime, File attachment, Save,
Receive, Check new message, Reply/
Forward, Acquire/Check attached file,
Mailbox, Mail setting, Message R/F, Early
Warning “Area Mail”, SMS, etc.
Download, Activate i-appli, Auto start, i-appli
stand-by, Manage i-appli, etc.
iC transfer service, Start compatible i-appli,
IC owner, Retrieve ToruCa, ToruCa Viewer,
ToruCa settings, IC card lock, etc.
6
Page 9

GPS Function
P. 265
1Seg
P. 281
Full Browser/
PC Movie
P. 301
Data Display/
Edit/
Management
P. 311
Music&Video
Channel/Music
Playback
P. 363
Convenient
Functions
P. 381
Position location, Compatible i-appli,
Location request menu, Location notification,
Location history, Use location information,
etc.
Channel setting, Activate 1Seg, Program
guide, Record 1Seg, Booking list, Use data
broadcasting, TVlink, 1Seg settings, etc.
View web pages designed for PC, Set Full
Browser, Internet movie player, etc.
Image Viewer, Edit image, i-motion player,
Edit movie, Video player, Chara-den player,
Machi-chara, Melody player, microSD Card,
Manage data, Ir exchange, iC transmission,
Voice recorder, PDF Viewer, Document
Viewer, Manga&BookReader, etc.
Music&Video Channel, Play back music,
MUSIC Player, Manage data, Playback
settings, etc.
Check settings, Multiaccess, Multi Assistant
(Multitask), Auto power ON/OFF, Timer,
Alarm, Schedule, Shortcut menu, Quick
search, Owner information, Voice memo,
Talk time/cost, Calculator, Text memo,
Earphone/Microphone with switch,
®
Bluetooth
user data, etc.
function, Reset settings, Delete
Character
Entry
P. 415
Network
Services
P. 425
PC Connection
P. 441
Overseas Use
P. 447
Appendix/
External
Devices/
Troubleshooting
P. 457
Index/Quick
Manual
P. 519
5-touch, Save phrases, Copy text, User
dictionary, Download dictionary, Guess
conversion, 2-touch, etc.
Voice Mail, Call Waiting, Call Forwarding,
Nuisance Call Blocking, Caller ID request,
Dual Network, English guidance, Service
number, Arrival Call Action, Remote control,
Multi Number, 2in1, OFFICEED, Additional
services (USSD), etc.
Prepare for data communication, Prepare for
data transfer (OBEX™ communication), AT
commands, CD-ROM, DoCoMo keitai
datalink, etc.
International roaming (WORLD WING),
Make calls, Answer calls, 3G/GSM setting,
Network search mode, PLMN setting,
Operator name display, Roaming guidance,
etc.
Menu list, Dial key assignments, Multiaccess
combinations, Multi Assistant (Multitask)
combinations, Options and accessories,
Troubleshooting, List of error messages,
Warranty and after-sales services, Software
update, Scanning function, Main
specifications, etc.
Index, Quick manual, Quick manual
“Overseas use”
Easy Search/Contents/Precautions
7
Page 10

Main functions of the FOMA SH906i
Easy Search/Contents/Precautions
FOMA is the name of DoCoMo’s service based on W-CDMA,
which is recognized as a global standard for third generation
mobile communications system (IMT-2000).
The world of i-mode nP. 170
i-mode is an online service used to access useful information from
i-mode menu sites (programs) or i-mode supported sites, or easily
send and receive e-mail.
i-mode mail/Deco-mail/Deco-mail pictograph
nP. 198, P. 200, P. 419
Attach pictures, movie files, etc. to a message. Deco-mail/Deco-mail
pictograph is available. Change text color, character size, and background
color and insert images or moving pictographs. Also, for Decome-Anime,
compose and send expressive mail by inserting texts to the template.
Mega i-appli/Chokkan Game nP. 230, P. 234
Use i-appli to play games and automatically update stock prices
and weather information. Also, Chokkan Games to enjoy
operations such as “tilting”, “shaking (or swing)” and “speaking” the
mobile phone are supported.
HIGH-SPEED area supported nP. 442
FOMA HIGH-SPEED area is supported so that high speed
communication is available with download speed of up to 3.6 Mbps
and upload speed of up to 384 kbps.
The maximum values mentioned above are the values based on the
※
technical standard. The actual connection speed varies depending
on the network congestion or transmission environment. The data is
sent and received at the maximum speed of 384 kbps outside the
FOMA HIGH-SPEED area or when a connection is made to an
access point that does not support HIGH-SPEED such as mopera.
International roaming nP. 240, P. 448
The same FOMA terminal, phone number and mail address as
those used in Japan are available overseas (supporting GSM and
3G areas). In addition, voice/Videophone calls, i-mode, i-mode
mail, SMS and network services are available. Moreover, J-E/J-C
Speech Translation for SH, which translates the voice spoken in
Japanese to English/Chinese and the voice spoken in English/
Chinese to Japanese, is pre-installed.
Chaku-uta full®/Uta-hodai/Music&Video Channel*/
Video clip nP. 364, P. 370, P. 376
* This service is a paid service that requires subscription.
Supporting Chaku-uta full
downloaded in whole and Uta-hodai with which you can enjoy your
favorite songs as much as you like at flat rate using only the mobile
phone. Also, Music&Video Channel is supported so that music
programs or the programs with movies can be automatically
downloaded at night and enjoyed if the setting is made in advance.
In addition, i-motion of up to 10 MB is supported so that a video clip
to enjoy a music clip of one entire song is also supported.
“Chaku-uta full” is a registered trademark of the Sony Music
Entertainment (Japan) Inc.
®
with which one song can be
Osaifu-Keitai/ToruCa nP. 242, P. 254, P. 256
Download Osaifu-Keitai compatible i-appli to deposit electronic
money to the IC card in the FOMA terminal, check your balance or
view usage history from sites. Moreover, i-appli for “DCMX”, a
DoCoMo’s credit service, is pre-installed. This terminal also
supports “iC transfer service” that makes transferring data in the IC
card easier when the FOMA terminal is changed into a new model.
ToruCa is an electronic card available from scanning device and
sites. Easily share using mail or Ir exchange.
8
Page 11
Kisekae Tool nP. 119
Change the screens such as your favorite stand-by display and
menu screens collectively. With FOMA SH906i, sort the order to
display the menus according to the usage frequency and
customize the menu screens.
GPS nP. 266
Based on the acquired location information with GPS, display the
map or search peripheral area information of the present location,
or navigate to a destination. A mapping appli is pre-installed so that
high-resolution maps can easily be used.
Numerous network services
SMS nP. 226 Voice Mail Service (monthly fees apply) nP. 426 Call Waiting (monthly fees apply) nP. 428
Call Forwarding Service nP. 429 Nuisance Call Blocking Service nP. 430
Dual Network Service (monthly fees apply) nP. 432 2in1 (monthly fees apply) nP. 435
Security Settings
■ Omakase Lock*1 nP. 133
The FOMA terminal can be locked by request when it is lost. The lock
can be disabled also by request. Refer to the back cover of this
manual for details on inquiries. Omakase Lock is a paid service
*1 Omakase Lock is a service to lock the handset by the request of
the subscriber. Please note that the lock service can be applied
by a request of the subscriber even if the subscriber is not a user
of the FOMA terminal.
*2 If Omakase Lock is subscribed while or at the same time as when
the use of FOMA terminal is suspended, the usage fee of
Omakase Lock is not charged.
■ Data Security Service nP. 105, P. 141
By using this service, phonebook, images, or messages in the FOMA terminal
can be saved in the Data Storage Center, and the lost data can be restored
*2
.
from the data saved on the network when the FOMA terminal is lost. In
addition, the data saved in the Data Storage Center can be edited and
managed using a PC. The edited data can be reflected to the FOMA terminal.
Refer to “Mobile Phone User’s Guide [i-mode] FOMA version” for
precautions and details on the Data Security Service and the back
cover of this manual for inquiries. This service is a paid service that
requires subscription.
Easy Search/Contents/Precautions
■ Quick search nP. 394
Search using registered or set e-dictionaries, search by i-mode or
access a search engine by Full Browser. For Full Browser, search by
setting search engine.
Also, activate i-appli “Internet dictionary” (nP. 237).
■ Touch panel nP. 40
In the viewer position, touch the display (touch panel) and operate.
In addition, Writing authentication (nP. 130) is available.
■ Optical TOUCH CRUISER nP. 39
In the Custom menu, i-mode or Full Browser, put a finger on the
Optical TOUCH CRUISER and move the pointer to select an item.
Alternatively, move the cursor or scroll the screen instead of using w
of Multi-guide key.
■ Bluetooth connection nP. 402
Connect the FOMA terminal wirelessly to the Bluetooth device. Play
music and sound of 1Seg wirelessly and use commercially available
Bluetooth compatible keyboard.
9
Page 12
Maximizing use of the FOMA SH906i
During Videophone calls
ut
c
(J)
Easy Search/Contents/Precautions
The functions of the FOMA SH906i are described below.
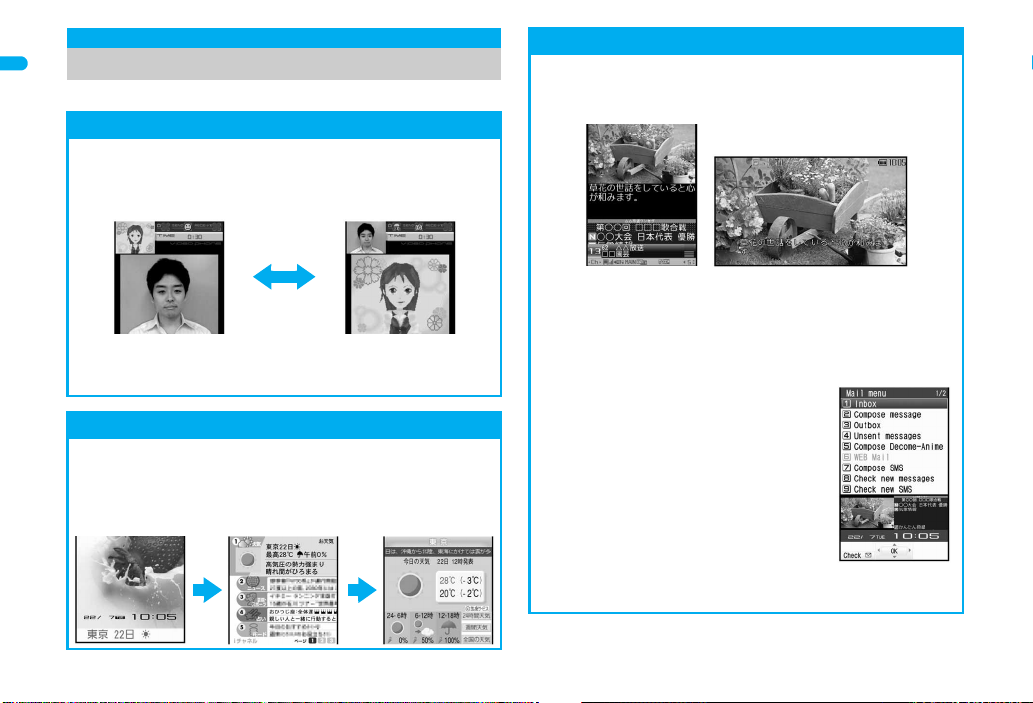
Videophone nP. 60, P. 62
Have conversations with the other party who is far away while
viewing each other’s image. In default settings, the other party’s
voice is played through the speakers. Start conversation as it is. In
addition, switch a voice call to a Videophone call during a call.
To send your face image to the other party, rotate the display
and make the camera face you (nP. 81).
i-Channel nP. 192
Receive graphical information such as news and weather. Select a
channel from the list to retrieve detailed information made with
Flash (nP. 172).
This service is a paid service that requires subscription.
※ The i-Channel is only available in Japanese.
1Seg
■ 1Seg nP. 285
Watch “1Seg”, which is digital terrestrial broadcasting for mobile
devices.
■ Video nP. 291, P. 329
Record movies and a scene as a still picture for 1Seg program
being played. Watch the recorded movies and still pictures with the
FOMA terminal.
■ Multi Window nP. 290
While watching 1Seg on Multi Window, use
another function.
■
Timer for starting or recording 1Seg programs nP. 293
Set timer for starting or recording 1Seg programs.
10
Page 13
2in1 nP. 435
2in1 is a service that two phone numbers and two mail addresses
can be used on one mobile phone with dedicated mode function as
if two different mobile phones are used. Phonebook, mailbox, call/
received history, stand-by display, etc. can be used separately in
“A mode” and “B mode” on one mobile phone and also be used in
“Dual mode” that can control both A and B modes simultaneously.
This service is a paid service that requires subscription.
A mode
Phone number: 090-AAAA-AAAA
Address: XXA@docomo.ne.jp
Phonebook: For A mode
Make a call
or send a
mail in A mode
Phonebook A
Mail BOX A
Redial A
Voice Mail A
...
Dual mode
B mode
Phone number: 090-BBBB-BBBB
Address: XXB@docomo.ne.jp
Phonebook: For B mode
Make a call
or send a
mail in B mode
Phonebook B
Mail BOX B
Redial B
Voice Mail B
...
Phonebook A/B
Mail BOX A/B
Redial A/B
Voice Mail A/B
...
Music playback
■ Music&Video Channel nP. 364
Your favorite music programs are automatically distributed at night.
The programs are automatically updated on a regular basis. Enjoy
the latest music information at any time.
■ MUSIC Player nP. 370
Play back Chaku-uta full® downloaded from
sites or Internet web pages and WMA file
transferred with Napster
®
using MUSIC
Player. Uta-hodai is available. Also play back
the data saved to the [Multimedia] folder of
i-motion.
Kisekae Tool/Direct menu nP. 119
“Direct menu” accessible to frequently used
functions and services is installed.
“LAST10” button, which is dividing the menu
into four categories and setting them up/
down/left/right and also automatically
displaying the last ten function and service
items, is located in the center. For the
alignment of five categories is linked with w/
t, operate the menu easily.
Easy Search/Contents/Precautions
Chaku-moji nP. 65
While making a call and ringing the other party,
display a message on the other party’s receive
display. Viewing the message, the receiver side
can know the points and feeling of the other
party in advance.
Left (q) : SERVICES (Mail, i-mode, i-appli,
Right (r) : TOOLS (Alarm, Calculator, Text memo, Schedule, Receive Ir
Down (p) : SETTINGS (Settings, NW services and Owner Information)
Up (o) : DATABOX (My picture, etc.)
Center (t) : LAST10 (Automatically display last ten menu items)
MUSIC, 1Seg, Osaifu-Keitai, etc.)
data, etc.)
Functions are registered at the time of purchase.
11
Page 14
Safety precautions (to be strictly
Easy Search/Contents/Precautions
followed)
Before use, read these “Safety precautions” carefully and use your
FOMA properly.
Keep this manual in a safe place for future reference.
These safety precautions contain information intended to prevent
bodily injury to the user and to surrounding people, as well as
damage to property, and must be observed at all times.
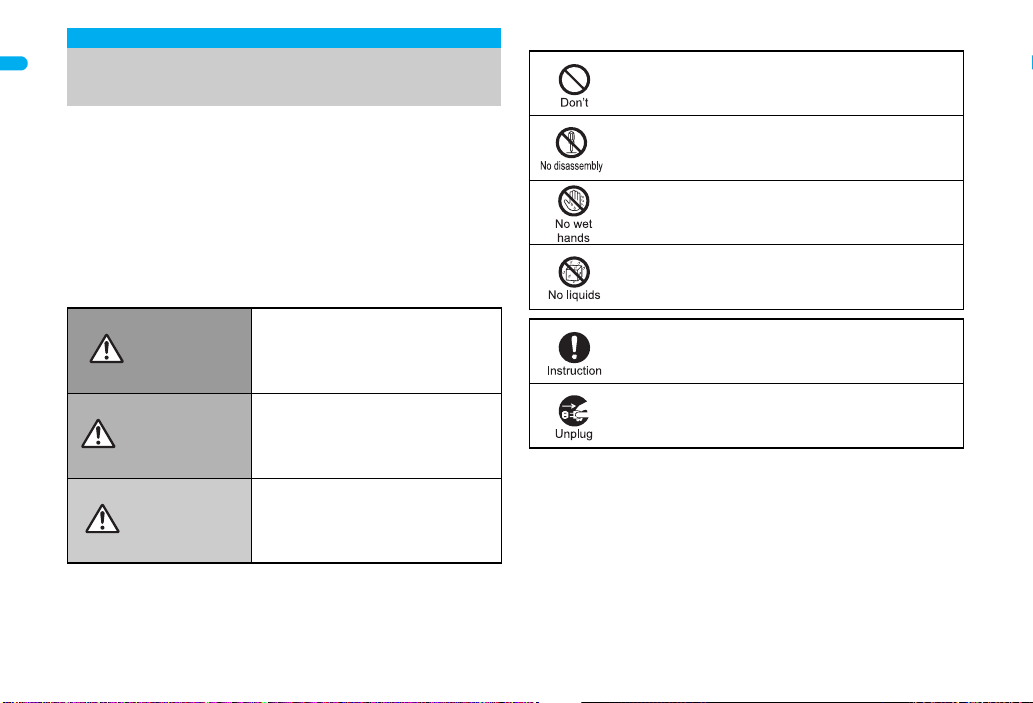
The following symbols indicate the different degrees of
injury or damage that may occur if information provided
is not observed and the FOMA terminal is used
improperly.
This symbol indicates that
Danger
Warning
Caution
“death or serious bodily injury
may directly and immediately
result from improper use”.
This symbol indicates that
“death or serious bodily injury
may result from improper use”.
This symbol indicates that
“bodily injury and/or property
damage may result from
improper use”.
The following symbols indicate specific directions.
Indicates a prohibited action.
Indicates not to disassemble the device.
Indicates not to handle the device with wet hands.
Indicates not to use the device near water or get it wet.
Indicates that instructions specified are
compulsory (must be followed).
Indicates that the power cord must be unplugged from
the power outlet.
“Safety precautions” is explained in the following six
sections.
Handling the FOMA terminal, battery pack, adapters (chargers),
and FOMA card (general). . . . . . . . . . . . . . . . . . . . . . . . . . . . . P. 13
Handling the FOMA terminal . . . . . . . . . . . . . . . . . . . . . . . . . . P. 14
Handling the battery pack . . . . . . . . . . . . . . . . . . . . . . . . . . . . . P. 17
Handling the adapters (chargers) . . . . . . . . . . . . . . . . . . . . . . . P. 18
Handling the FOMA card . . . . . . . . . . . . . . . . . . . . . . . . . . . . . P. 19
Handling mobile phones near electronic medical equipment
. . . . . . . . . . . . . . . . . . . . . . . . . . . . . . . . . . . . . . . . . . . . . . . . . P. 19
12
Page 15
Handling the FOMA terminal,
Danger
Warning
battery pack, adapters (chargers),
and FOMA card (general)
Do not use, store, or leave the
FOMA terminal, battery pack,
adapters (chargers) or FOMA
card in locations subject to
high temperatures, such as
near a fire, in direct sunlight,
The FOMA terminal may malfunction or
become deformed. In addition, the battery pack
may leak, overheat, explode, catch fire or suffer
performance loss and a reduced service life.
Part of the casing may also become hot and
cause burns.
May cause accidents such as fire, bodily
injury, electric shock or malfunction.
In addition, the battery pack may leak,
overheat, explode or catch fire.
Contact with water, pet urine, and other
liquids may cause overheating, electric shock,
fire, malfunction or bodily injury. Be attentive
to where and how you use the handset.
or inside a car on a hot day.
Do not attempt to
disassemble or modify.
In addition, do not attempt
to solder.
Do not get the FOMA terminal,
battery pack, adapters
(chargers) or FOMA card wet.
Use only the battery packs
and adapters (chargers)
specified by the DoCoMo
group companies for use
with the FOMA terminal.
The use of devices other than those specified
may cause the FOMA terminal, battery pack
or other devices to leak, overheat, explode,
catch fire or malfunction.
Battery Pack SH17
Desktop Holder SH19
FOMA AC Adapter 01/02
FOMA DC Adapter 01/02
FOMA Dry Battery Adapter 01
FOMA USB Cable with Charge Function 01/02
FOMA Portable Charging Adapter 01
※ For information on other compatible
products, contact a DoCoMo Shop or
retailer.
Do not place the battery
pack, FOMA terminal,
adapters (chargers), or
FOMA card inside cooking
appliances such as
microwave ovens or
pressure cookers.
The battery pack may leak, overheat,
explode or catch fire, and the FOMA terminal
and adapters (chargers) may overheat, emit
smoke or catch fire. The internal circuitry may
also be damaged.
Do not throw or otherwise
subject to strong force or
impacts.
The battery pack may leak, overheat,
explode or catch fire. Other equipment may
also be damaged or cause a fire.
Do not allow conductive
materials (such as metal
objects and pencil lead) to
come into contact with the
charger terminal or external
device terminal. In addition,
do not insert such objects.
The battery pack may short-circuit and cause
a fire or malfunction.
Make sure to turn off the
mobile phone in locations
such as gas stations where
flammable gas is
generated.
In addition, do not charge
the battery. It may cause a
gas explosion or fire.
To use Osaifu-Keitai in locations such as gas
stations, make sure to turn off the power in
advance (If the IC card lock is set, disable the
lock before turning off the power).
Continued on next page
Easy Search/Contents/Precautions
13
Page 16
If you notice anything
Caution
Warning
Easy Search/Contents/Precautions
unusual, such as an unusual
odor, overheating,
discoloration or deformation
during use, charging or
storage, immediately follow
the instructions below.
1. Unplug the power cord
from the outlet or
cigarette lighter socket.
2. Turn off the FOMA
terminal.
3. Remove the battery pack
from the FOMA terminal.
Continued use (charging) may cause
overheating, explosion, or fire. In addition,
the battery pack may leak.
Do not leave the FOMA
terminal on unstable
surfaces, such as on a
wobbling table or sloped
surface.
The FOMA terminal may fall and cause injury
or be damaged.
Do not store the FOMA
terminal in locations that
are subject to humidity,
dust or high temperatures.
May cause a malfunction.
14
If being used by a child, have
a guardian teach him/her the
proper handling procedures.
In addition, check that the
child is using the FOMA
terminal as directed.
May result in bodily injury.
Keep the FOMA terminal
out of the reach of young
children.
A young child may swallow components or
suffer other bodily injury.
Be very careful when using the
FOMA terminal connected to
adapters (chargers) repeatedly
or for long periods of time.
The FOMA terminal, battery pack or adapters
(chargers) may become warm if ior 1Seg is used for a long time while charging.
Exposure to high temperature areas for a
prolonged period of time may cause skin irritations,
itchiness, or low-temperature burn in some people.
a
ppli, Videophone,
Handling the FOMA terminal
Do not aim the Infrared port
towards the eyes.
May cause eye injury. In addition, do not aim or
direct the Infrared port towards another Ir device
as this may cause the device to malfunction.
Do not point the illuminated
light directly at someone’s
eyes.
May damage eyesight. May also cause
momentary sight loss or startle someone and
cause an accident.
Do not put the FOMA
terminal in the place where
it could be affected by an
expanded airbag, e.g., on
the dashboard.
If the air bag inflates, the FOMA terminal may
strike you or others around you, resulting in
bodily injury or damage to the FOMA terminal
or other property.
If you are using electronic
medical equipment, do not
put the FOMA terminal in
your breast pocket or in the
inside pocket of your
jacket.
Using the FOMA terminal in close proximity
to electronic medical equipment may cause
the equipment to malfunction.
Do not allow water or other
liquids, metal, flammable
material, or other foreign
objects to enter the FOMA
card or microSD Card port
on the FOMA terminal.
May cause a fire, electric shock or other
malfunctions.
Page 17
Do not shine the light at
Caution
anyone driving a car or
other vehicles.
This may prevent a driver from driving safely
and cause a traffic accident.
Turn off the FOMA terminal in
areas where the use of mobile
phones is prohibited, such as
in aircraft or hospitals.
The FOMA terminal may interfere with the
operation of sensitive devices and electronic
medical equipment. In addition, if Auto power
ON function is set to ON, disable this function
before turning off your mobile phone.
Follow the instructions given by the
respective medical facilities regarding the
use of mobile phones on their premises.
In addition, actions such as speaking on a
mobile phone aboard aircraft are prohibited
and may be punishable by law.
During a call in which
Hands-free is set, keep the
FOMA terminal away from
the ears.
When you attach the
earphone/microphone to
the FOMA terminal to play
games or music, do not
make the volume too loud.
Excessive high volume may damage your
hearing. Also it may prevent you from hearing
the ambient sounds and cause an accident.
If you have a weak heart,
take extra precautions when
setting functions such as
the Vibrator and Ring tone
volume for incoming calls.
Various settings may have effects on your heart.
If you hear thunder while
using the FOMA terminal
outdoors, put the antenna
back into the FOMA terminal,
immediately turn it off and
move to a safe location.
There is a risk of being struck by lightning
and suffering electric shock.
Turn the FOMA terminal off
near high-precision
electronic devices or
devices that use weak
electronic signals.
The FOMA terminal may interfere with the
operation of sensitive electronic equipment.
Take particular care with the
following devices:
Hearing aids, implanted cardiac pacemakers,
implanted cardioverter-defibrillators, or other
electronic medical equipment. Fire alarms,
automatic doors, and other equipment
controlled by electronic signals. If you use an
implanted cardiac pacemaker, implanted
cardioverter-defibrillator or other medical
equipment, contact the respective
manufacturer or vendor to check whether the
operation of the equipment is affected by
signals.
In case that the display part
or camera lens is damaged,
make sure to pay attention
to a broken glass and the
exposed inside of the
FOMA terminal.
The surface of the display is covered by a
protective film or the surface of camera lens
is covered by a plastic panel so as to
minimize the possibility of glass scattering.
However, touching the broken display or
camera lens may cause injury.
Do not swing the FOMA
terminal by its antenna,
strap, etc.
The FOMA terminal may strike you or others
around you, resulting in bodily injury or
damage to the FOMA terminal or other
property.
Do not use the FOMA
terminal in area with many
people.
The antenna may strike others, resulting in
an accident such as bodily injury.
Do not use the FOMA
terminal with the damaged
antenna.
Touching the antenna may cause an accident
such as burn or other injuries.
Continued on next page
Easy Search/Contents/Precautions
15
Page 18
When using Motion
Easy Search/Contents/Precautions
tracking, confirm the safety
of surroundings, hold the
FOMA terminal securely
and do not swing it around
more than necessary.
Use Motion tracking to operate by tilting and
shaking (or swinging) the FOMA terminal.
The FOMA terminal may hit people or
objects, if shaken (or swung) too much, and
cause a serious accident or damage, etc.
If using Motion tracking
with the FOMA terminal to
which metallic straps or
others are attached, be
careful not to hit people or
objects with the straps.
Resulting in bodily injury or damage to the
FOMA terminal or other property.
Never place a magnetic
card near or in the FOMA
terminal.
The stored magnetic data in cash cards,
credit cards, telephone cards, floppy disks,
etc. may be erased.
Never place magnetized
items near the FOMA
terminal.
Putting highly magnetized items closer may
cause a malfunction.
16
If the display is broken and
the liquid crystal then leaks,
do not lick or inhale the liquid
or get the liquid on your skin.
If the liquid comes into
contact with your eyes or
mouth, immediately rinse
your eyes or mouth with
clean water and see a doctor.
If the liquid comes into
contact with your skin or
clothes, immediately wipe it
off with alcohol, and wash
with water and soap.
May result in loss of eyesight and harmful to
your skin.
While the ring tone is ringing
or a melody is played on the
FOMA terminal, do not put the
ears closer to the speaker.
This may cause hearing loss.
On the surface of the display,
there is a protective film for
securing the safety (for
preventing the reinforced
glass panel from shattering)
in case of the damage
caused by a drop, impact,
etc. Do not forcibly peel off
or scratch this film.
Using the FOMA terminal with the film
removed may cause a bodily injury when the
display is damaged.
Using the FOMA terminal in an
automobile may sometimes
affect the electronic equipment
in some vehicle models.
In such cases, stop using the FOMA terminal,
as this could impede safe driving.
Use of the FOMA terminal
may cause skin irritations
such as itchiness, rashes or
eczema in some people. If
this occurs, immediately stop
using the FOMA terminal and
seek medical treatment.
The following parts contain metals.
Part Material
Metal section of
1Seg antenna
External connector
terminal
Inside microSD
Card slot
Charger terminal Gold plating
Stainless
steel
Surface
treatment
Nickel
plating
Tin plating
Do not close the FOMA
terminal on your fingers or
objects such as the strap.
May result in bodily injury or cause a
malfunction.
Watch 1Seg in a well-lit
place, keeping a certain
distance from the screen.
Otherwise, eyesight may be decreased.
Page 19
Handling the battery pack
Danger
Warning
Caution
Check the type of battery using the
information printed on the battery pack label.
Label Battery type
Li-ion 00 Lithium-ion
Do not touch terminals with
metallic objects such as
wires. In addition, do not
carry or store the battery
pack with metallic
necklaces, etc.
The battery pack may leak, overheat,
explode or catch fire.
If you are having difficulty
fitting the battery pack to the
FOMA terminal, do not use
excessive pressure to force
the battery into place. Check
that the battery pack is
facing the correct direction
before you attach it.
The battery pack may leak, overheat,
explode or catch fire.
Do not throw the battery
pack into a fire.
The battery pack may leak, overheat,
explode or catch fire.
Do not puncture, hit with a
hammer or step on the
battery pack.
The battery pack may leak, overheat,
explode or catch fire.
If the battery fluid comes
into contact with your eyes,
do not rub your eyes but
immediately rinse your
eyes with clean water. Then
seek prompt medical
treatment.
May result in loss of eyesight.
If any trouble is found on
the battery pack due to an
external impact such as a
deformation or scratches
caused by a drop,
immediately stop using it.
The battery pack may leak, overheat,
explode or catch fire. Other equipment may
also be damaged or catch fire.
If the battery pack is not
fully charged after the
specified time has elapsed,
stop charging.
The battery pack may leak, overheat,
explode or catch fire.
If the battery pack leaks or
emits an unusual odor,
immediately stop use and
move it away from any
flame or fire.
The battery fluid is flammable and could
ignite, causing a fire or explosion.
Prevent your pet from
biting the battery pack.
The battery pack may leak, overheat,
explode or catch fire. Other equipment may
also be damaged or catch fire.
Do not dispose of used
battery packs in ordinary
garbage.
May cause fires or damage to the
environment. Place tape over the terminals to
insulate unnecessary battery packs, and take
them to a DoCoMo Shop, retailer or
institution that handles used batteries in your
area.
Do not charge a wet battery
pack.
The battery pack may overheat, catch fire or
explode.
Easy Search/Contents/Precautions
Continued on next page
17
Page 20
If the battery fluid comes
Warning
Easy Search/Contents/Precautions
into contact with your skin
or clothing, stop using the
FOMA terminal immediately
and rinse it off thoroughly
with clean water.
Battery fluid is harmful to your skin.
Handling the adapters (chargers)
Do not use if the adapter’s
(charger’s) cord or power
May cause electric shock, overheating or fire.
May result in electric shock.
May cause a fire.
There is a risk of being struck by lightning
and suffering electric shock.
18
cord is damaged.
Never use the AC adapter
or desktop holder in humid
locations such as a
bathroom.
The DC adapter should only
be used in negative
grounded vehicles. Never
use these adapters in
positive grounded vehicles.
Do not touch the FOMA
terminal or adapters
(chargers) if you hear thunder.
Take care not to
short-circuit the charging
terminal when connected to
a power outlet or cigarette
lighter socket. Also, take
care not to allow any part of
your body (hands, fingers,
etc.) to come into contact
with the charging terminal.
May result in a fire, equipment malfunction,
electric shock or bodily injury.
Place the charger and
desktop holder on stable
surfaces when charging. In
addition, do not cover or
wrap the charger or
desktop holder with
clothing or bedding.
The FOMA terminal may detach, overheat, or
cause a fire or malfunction.
Do not place heavy objects
on the adapter’s (charger’s)
cord or power cord.
May cause an electric shock or fire.
Do not handle the cord and
plug of the adapters
(chargers) with wet hands.
May result in electric shock.
Always use the specified
power supply and voltage.
Using the incorrect voltage may cause a fire
or malfunction.
When using overseas, use the AC adapter
that is available overseas.
AC adapter: 100 VAC
DC adapter: 12/24 VDC (for negative
grounded vehicles only)
AC adapter available overseas: 100 to 240
VAC (Connect only with household AC outlet)
If the fuse in the DC adapter
blows, always replace it
with a fuse of the specified
type.
Using the fuse other than the specified one
may cause a fire or malfunction. Refer to the
respective manuals for information on the
correct fuse specifications.
Wipe off any dust on the
power plug.
May cause a fire.
When plugging the AC
adapter into the power
outlet, make sure that no
metallic straps or other
metallic objects are caught
between the plug and the
socket.
May cause electric shock, short-circuiting or
fire.
Page 21
Always grasp the power
Caution
Warning
plug when unplugging the
adapters (chargers) from
the power outlet or
cigarette lighter socket. Do
not forcibly pull by the cord
or power cord.
Pulling on the cord may damage the cord and
cause an electric shock or fire.
Unplug the power cord
from the outlet when not
using for a long time.
May cause an electric shock, fire, or
equipment malfunction.
Should water or other
liquids enter the adapters
(chargers), remove the
power plug from the outlet
or cigarette lighter socket
immediately.
May cause an electric shock, smoke
emission or fire.
Always unplug the power
plug from the outlet or
cigarette lighter socket
before cleaning the
adapters (chargers).
May result in electric shock.
Handling the FOMA card
Be careful with the cutting
surface when detaching the
FOMA card (IC).
May cause injuries to your hand or fingers.
Handling mobile phones near
electronic medical equipment
The safety precautions detailed here conform
to the guidelines drawn up by the
Electromagnetic Compatibility Conference
Japan, regarding the protection of electronic
medical equipment from signals emitted by
mobile phones.
Observe the following in
hospitals or other medical
facilities.
Do not take your FOMA terminal into
operating rooms, ICUs (Intensive Care
Units) or CCUs (Coronary Care Units).
Turn off your FOMA terminal inside
hospital wards.
Turn off your FOMA terminal even when
you are in an area outside hospital wards,
such as a hospital lobby, since electronic
medical equipment may be in use nearby.
Where a medical facility has specific
instructions prohibiting the carrying and
use of mobile phones, observe those
instructions strictly.
If Auto power ON function is set to ON,
disable this function before turning off your
mobile phone.
Turn off your FOMA
terminal in crowded places
such as rush-hour trains in
case somebody nearby is
using an implanted cardiac
pacemaker or implanted
cardioverter-defibrillator.
Electromagnetic signals may affect the
operation of implanted cardiac pacemakers
and implanted cardioverter-defibrillators.
If you have an implanted
cardiac pacemaker or an
implanted
cardioverter-defibrillator,
always carry or use your
FOMA terminal at least 22
cm away from your implant.
Electromagnetic signals may affect the
operation of implanted cardiac pacemakers
and implanted cardioverter-defibrillators.
Easy Search/Contents/Precautions
Continued on next page
19
Page 22
Patients receiving medical
Easy Search/Contents/Precautions
treatment away from a
hospital or medical facility
(e.g. home treatment) who
are using electronic
medical equipment other
than implanted cardiac
pacemakers or implanted
cardioverter-defibrillators
should consult the
respective manufacturers
for information regarding
the effects of signals on the
equipment.
Electromagnetic signals may affect the
operation of electronic medical equipment.
Handling precautions
General notes
Do not expose to water.
FOMA terminal, battery pack, adapters
(chargers) and FOMA card are not
waterproof. Do not use in humid or steamy
areas such as bathrooms and avoid
exposing to rain and other forms of
moisture. If FOMA terminal is carried close
to skin, perspiration may cause internal
components to corrode and result in
malfunction. Note that if problem is found
to be due to moisture, handset and parts
are not covered by warranty and in some
cases may be irreparable. Even where
repairs are possible, repair charges will be
incurred since damage is not covered by
warranty.
Clean only with a soft and dry cloth
(such as the type used for
eyeglasses).
The surface of the handset’s LCD has a
special coating to improve the visibility of
the color display. Forceful rubbing of LCD
with a dry cloth may scratch LCD surface.
Handle the handset carefully and clean
using a soft and dry cloth (such as the type
used for eyeglasses). Note also that LCD
coating may peel off or stain if moisture or
soiling is left on the surface for a long
period. Never use chemicals such as
alcohol, thinners, benzene or detergents,
as these agents may erase the printing on
the handset or cause discoloration.
Occasionally clean terminals with a
dry cotton swab.
Unclean terminals may result in poor
connections and loss of power.
Additionally, keep terminal clean with a dry
cloth or cotton swab to prevent charge
performance loss.
Do not place the handset near an air
conditioning vent.
Condensation formed due to rapid
changes in temperature may cause
internal corrosion and lead to malfunction.
Do not apply excessive force to the
FOMA terminal and battery pack
when using them.
Carrying the handset in a tightly packed
bag, or sitting on the handset in your
pocket may cause a damage to display,
other internal components or battery pack,
or result in malfunction. Keeping an
external connector device plugged into the
external connector terminal (earphone/
microphone terminal) may cause a
damage to the connector or result in
malfunction.
Read the manuals supplied with the
FOMA terminal, adapters (chargers),
and desktop holder carefully.
Do not rub or scratch the display
with metal, etc.
May scratch the handset and cause
malfunction or damage.
20
Page 23

Notes about FOMA terminal
Avoid using the handset in
extremely high or low temperatures.
Use the FOMA terminal within the range of
a temperature between 5℃ and 35℃ and
a humidity between 45% and 85%.
Using the handset close to landline
phones, TVs or radios may affect the
operation of such equipment. Move
as far away as possible from such
items before use.
Keep a separate memo and note
information stored in the FOMA
terminal.
DoCoMo shall not be liable for any loss of
content.
When connecting an external
connector device to the external
connector terminal (earphone/
microphone terminal), do not put it
in obliquely or do not pull it while it
is plugged in.
May damage the handset and cause
malfunction.
Do not fold FOMA terminal on strap.
May damage the handset and cause
malfunction.
FOMA terminal may become warm
during using or charging but this is
normal. This is not a malfunction.
Do not leave the camera in direct
sunlight.
May cause discoloration or burn-in.
Use the FOMA terminal with the
external connector terminal cover
and microSD Card slot cover on.
Dust, water and others enter inside and
cause a malfunction.
Do not use the FOMA terminal
without the back cover.
May detach the battery pack or cause
malfunction or damage.
Do not cover the surface of the
display, keys, or buttons with an
extremely thick sticker.
May cause malfunction.
While using a microSD Card, do not
remove the card or turn off the
FOMA terminal.
May cause data loss or malfunction.
Notes about battery pack
Battery pack is a consumable
product.
Though usage time varies with use,
change battery if battery level is extremely
low even after fully charged. Purchase a
new battery pack for specified handset.
Charge battery in areas where
ambient temperature is between 5°C
and 35°C.
Always charge the battery before the
first use or after not using battery for
a long time.
The usage time for a battery
depends on the usage and
deterioration of battery pack.
Depending on usage, the battery
may swell as it approaches the end
of its service life but this will not
cause problems.
Do not store or leave the battery
pack with no battery left.
May lower the performance or shorten the
life of the battery pack.
Notes about the adapters
(chargers)
Charge battery in areas where
ambient temperature is between 5°C
and 35°C.
Do not charge battery pack in the
following locations:
Areas with high humidity or dust, or in
areas exposed to strong vibrations
Close to landline phones, TVs, radios,
etc.
Adapters (chargers) may become
warm during charging but this is
normal. This is not a malfunction.
Do not use DC adapter to charge
battery when the car engine is not
running.
May cause car battery to run down.
When using a power outlet with a
feature to prevent the plug from
being removed accidentally, follow
instructions in the outlet user’s
guide.
Easy Search/Contents/Precautions
Continued on next page
21
Page 24

Do not subject to strong force or
impacts. Also, do not disfigure the
Easy Search/Contents/Precautions
charger terminals.
May cause a malfunction.
When folding the stand of the
desktop holder, prevent the cord for
the adapters (chargers) and your
fingers from being caught.
May result in bodily injury or damage.
Notes about FOMA card
Do not apply unnecessary force
when inserting/removing the FOMA
card.
FOMA card may become warm
during using but this is normal. This
is not a malfunction.
Customer is responsible for
malfunctions arising from inserting
FOMA card into a different IC card
reader/writer.
Always keep IC area clean.
Clean only with a soft and dry cloth
(such as the type used for
eyeglasses).
Keep a separate memo and note
information stored in the FOMA card.
DoCoMo shall not be liable for any loss of
content.
To protect the environment, please
take any unnecessary FOMA cards
to your local DoCoMo Shop or
retailer.
Avoid using in extremely high or low
temperatures.
Do not damage, touch haphazardly
or short-circuit the IC.
May cause data loss or malfunction.
Do not drop or otherwise subject the
FOMA card to severe impact.
May cause a malfunction.
Never bend or place heavy objects
on the FOMA card.
May cause a malfunction.
Do not insert the FOMA card to the
FOMA terminal with a label or sticker
attached on the card.
May cause a malfunction.
Notes on using Bluetooth
function
FOMA terminal supports the security
function that meets the Bluetooth
specification for the security during
communication using Bluetooth
function. However, the security may
not be sufficient depending on the
configuration. Take care of the
security while making
communication using Bluetooth
function.
Even if any leak of data or
information occurs while making
communication using Bluetooth
function, DoCoMo shall not be liable
for any loss of content.
With FOMA terminal, use headset,
hands-free, audio, keyboard, dial-up
communication, and object push.
Also, the audio/video remote-control
may be available depending on the
audio (Only with compatible
Bluetooth devices).
Radio frequencies
The radio frequencies the Bluetooth
function of the FOMA terminal uses
are as follows:
This wireless device uses 2.4 GHz band.
The modulation system is the FH-SS
system and a coverage distance is 10 m or
less. All radio frequencies are used and
the frequencies for mobile object
identifiers shall not be avoided.
22
Page 25
Cautions on using Bluetooth
devices Bluetooth operates at radio
frequencies assigned to the
in-house radio stations for a mobile
object identifier that have to be
licensed and is used in production
lines of a factory, specific
unlicensed low power radio
stations, and amateur radio
stations (hereafter, referred to
“another radio station”) in addition
to industrial, scientific or medical
devices, or home electric
appliances such as microwave
ovens.
1. Before using this product, make
sure that “another radio station”
is not operating nearby.
2. If radio interference between this
product and “another radio
station” occurs, avoid
interference by moving
immediately to another place or
“turning off the power”.
3. Contact the number listed in
“General Inquiries” on the back
of this manual for further details.
FeliCa reader/writer
The FeliCa reader/writer function in
the FOMA terminal uses weak
electric waves in the handling of
which does not require a license of
radio station.
The frequency in use is the 13.56
MHz band. When another reader/
writer is being used nearby, keep
enough distance from it. Make sure
that there is no radio station using
the same frequency band in the
nearby area.
Caution
Never use the FOMA terminal that is
modified. Using a modified device
violates the Radio Law.
The FOMA terminal has acquired the
certification of conformity with technical
regulations for the specified radio station
based on the Radio Law, and the
“Technical Conformity Mark ” is printed
on the model nameplate of the FOMA
terminal as a proof. If the screws of FOMA
terminal are removed and a modification is
given to the inside, the certification of
conformity with technical regulations will
become invalid. Never use the FOMA
terminal without the valid certification.
Doing so violates the Radio Law.
Be careful when using the FOMA
terminal while driving a motor
vehicle.
While driving, using a mobile phone in
hand is regarded as a punishable act. If
there is no choice but to receive a call, use
Hands-free and tell the caller that you will
“call back” and then pull over to a safe
place to make a call.
Use the Bluetooth function only in
Japan.
The Bluetooth function in the FOMA
terminal conforms to the domestic radio
wave standards and is authorized. Using
the function overseas may result in
punishment.
Use the FeliCa reader/writer function
only in Japan.
The FeliCa reader/writer function in the
FOMA terminal conforms to the domestic
radio wave standards. Using the function
overseas may result in punishment.
Easy Search/Contents/Precautions
23
Page 26

Intellectual property
Easy Search/Contents/Precautions
Copyrights and rights of portrait
Data with third party copyrights such as text, images, music and
software that is downloaded or acquired via Internet web pages,
shot by the FOMA terminal, or acquired from TV or other video
cannot be duplicated, altered or publicly transmitted without rightful
party’s consent. Only duplicating, quoting, etc. for personal use is
permitted under copyright laws.
Even if for personal use, filming and recording may be prohibited for
demonstrations, performances and exhibitions.
Also, shooting another’s image or posting another’s image on
Internet web pages without their consent may constitute a violation
of one’s right to their image.
Registered trademarks and trademarks
“FOMA”, “mova”, “ToruCa”, “PushTalk”, “PushTalkPlus”, “mopera”,
“mopera U”, “FirstPass”, “Chara-den”, “Deco-mail”, “Chaku-motion”,
“i-motion mail”, “i-appli”, “i-appliDX”, “i-motion”, “i-mode”,
“i-Channel”, “iD”, “DCMX”, “WORLD WING”, “Public mode”, “DoPa”,
“WORLD CALL”, “Dual Network”, “visualnet”, “V-live”, “Security
Scan”, “musea”, “sigmarion”, “OFFICEED”, “IMCS”, “i-area”, “2in1”,
“Chokkan Game”, the “i-mode” logo, the “FOMA” logo, the “i-appli”
logo, the “DCMX” logo, the “iD” logo, the “HIGH-SPEED” logo are
trademarks or registered trademarks of NTT DoCoMo, Inc.
Free Dial logo mark is a registered trademark of NTT
Communications Corporation.
This product includes software licensed from
Symbian Software Ltd.
Symbian, Symbian OS and other associated Symbian marks are all
trademarks of Symbian Software Ltd.
© 1998-2008 Symbian Software Ltd. All rights reserved.
Catch Phone (Call Waiting) is a registered trademark of Nippon
Telegraph and Telephone Corporation.
Multitask is a registered trademark of NEC Corporation.
This product is equipped with NetFront Browser, NetFront Sync
Client and NetFront Browser DTV Profile Wireless Edition by
ACCESS Co., Ltd. for an internet browser or other application
software.
This product adopts Media: specifications of ACCESS CO., Ltd. for
activating broadcasting contents.
Copyright © 1996-2008 ACCESS CO., LTD.
ACCESS, NetFront and Media: are trademarks or registered
trademarks of ACCESS Co., Ltd. in the United States, Japan and
other countries.
Microsoft
Microsoft Excel and Microsoft Word are product names of Microsoft
Java and all Java-based trademarks and logos are trademarks or
QuickTime is a registered trademark of Apple Inc., in the US and
QR code is a registered trademark of Denso Wave Inc.
®
, Windows®, Windows Vista®, PowerPoint® and
Windows Media
Microsoft Corporation in the U.S.A. and other countries.
Corporation in the U.S.A.
registered trademarks of Sun Microsystems, Inc. in the U.S.A. and
other countries.
other countries.
®
are trademarks or registered trademarks of
24
Page 27

microSDHC Logo is a trademark.
Document Viewer is powered by Picsel
Technologies.
Picsel, Picsel Powered, Picsel Viewer, Picsel
Document Viewer and the Picsel cube logo are trademarks or
registered trademarks of Picsel Technologies and/or its affiliates.
Powered by JBlend™ Copyright 2002-2008 Aplix
Corporation. All rights reserved.
JBlend and JBlend related trademarks are registered
trademarks or trademarks of Aplix Corporation in Japan
and other countries.
This handset features LCFONT, developed by Sharp Corporation,
to make the LCD easier to view and read. LCフォント/LCFONT
and are registered trademarks of Sharp Corporation.
Heisei font is an intellectual property of Font Development and
Promotion Center of Japanese Standards Association, and “SH
Heisei Mincho” is a font developed by DynaComware Corp. with a
license.
DynaFont is a registered trademark of DynaComware Taiwan Inc.
McAfee
Gガイド, G-GUIDE, Gガイドモバイル, G-GUIDE
Google and Google Map for Mobile are trademarks of Google Inc.
IrSimple™, IrSS™ or IrSimpleShot™ are trademarks of Infrared
FeliCa, which uses non-contact IC card technology, was
FeliCa is a registered trademark of Sony Corporation.
b is a registered trademark of FeliCa Networks, Inc.
®
is registered trademarks or trademarks of McAfee, Inc.
and/or its affiliates in the U.S.A. and other countries.
MOBILE and the G-GUIDE related logos are
registered trademarks of Gemstar-TV Guide
International, Inc. and/or its affiliates in Japan.
Data Association
created by Sony Corporation.
®
.
Napster is a registered trademark of Napster, LLC. and/or its
affiliates in the US and/or other countries.
Dolby and the double-D symbol are registered trademarks of Dolby
Laboratories.
FlashFX
PhotoSolid
“TOUCH CRUISER”, “Desktop clock”, “VeilView”, “Cameraloupe”,
All other company names and product names are trademarks or
®
Datalight, Inc. in the US.
(U.S.Patent Office 5,860,082/6,260,156)
marks of Morpho, Inc.
“Shotdeco” and “Wakeup TV” are trademarks or registered
trademarks of Sharp Corporation.
registered trademarks of the respective companies.
Pro™ is a trademark or registered trademark of the
®
and FaceSolid™ are the trademarks or the registered
Others
Under the MPEG-4 Visual Patent Portfolio License, customers have
licensed permission for the following use of this product to engage
in non-profit personal use. Other uses are not permitted.
Encoding MPEG-4 standard video (henceforth referred to as
MPEG-4 video).
Decoding an MPEG-4 video that a customer not engaged in
personal commercial activities has encoded.
Decoding an MPEG-4 video obtained from a licensed provider.
For details on other intended uses, contact MPEG LA, LLC.
Continued on next page
Easy Search/Contents/Precautions
25
Page 28

This product is licensed under the MPEG-4 Systems Patent
Portfolio License for encoding in compliance with the MPEG-4
Easy Search/Contents/Precautions
Systems Standard. An additional license and payment of royalties
are necessary in the following cases.
Data stored or replicated in physical media which is paid for on a
title by title basis.
Data which is paid for on a title by title basis and is transmitted to
an end user for permanent storage and/or use.
Such additional license may be obtained from MPEG LA, LLC.
Contact MPEG LA, LLC for additional details.
This product is licensed under the AVC patent portfolio license for
the personal and noncommercial use of a consumer to (i) encode
video in compliance with the AVC standard (henceforth referred to
as AVC video) and/or (ii) decode AVC video that was encoded by a
consumer engaged in a personal and noncommercial activity and/or
was obtained from a video provider licensed to provide AVC video.
No license is granted or shall be implied for any other use.
Additional information may be obtained from MPEG LA, L.L.C.
See HTTP://WWW.MPEGLA.COM
This product is licensed under the VC-1 Patent Portfolio License for
the personal and noncommercial use of a consumer to (i) encode
video in compliance with the VC-1 standard (henceforth referred to
as VC-1 video) and/or (ii) decode VC-1 video that was encoded by
a consumer engaged in a personal and noncommercial activity and/
or was obtained from a video provider licensed to provide VC-1
video. No license is granted or shall be implied for any other use.
Additional information may be obtained from MPEG LA, L.L.C.
See HTTP://WWW.MPEGLA.COM
Contains Adobe
Reader
Incorporated
Adobe Flash Lite Copyright © 2003-2007 Adobe System
Incorporated. All rights reserved.
Adobe Reader LE Copyright © 1993-2007 Adobe Systems
Incorporated. All rights reserved.
Adobe, Adobe Reader, Flash, and Flash Lite are either registered
trademarks or trademarks of Adobe Systems Incorporated in the
United States and/or other countries.
This product includes modules developed by the Independent
JPEG Group.
This product uses the GestureTek technology.
Copyright © 2006-2008, GestureTek, Inc. All Rights Reserved.
This product is equipped with “Fugue” by Kyoto Software Research,
Inc. for a file system function.
Fugue ©1999-2008 Kyoto Software Research, Inc. All rights
reserved.
Manufactured under license from Dolby Laboratories.
Licensed by QUALCOMM Incorporated under one or more of the
following United States Patents and/or their counterparts in other
nations;
4,901,307 5,490,165 5,056,109 5,504,773
5,101,501 5,506,865 5,109,390 5,511,073
5,228,054 5,535,239 5,267,261 5,544,196
5,267,262 5,568,483 5,337,338 5,600,754
5,414,796 5,657,420 5,416,797 5,659,569
5,710,784 5,778,338
®
®
Flash® Lite™ and Adobe
LE technology by Adobe Systems
26
Page 29

Bluetooth software stack of this product is developed by TOSHIBA
CORPORATION, and contains Toshiba Embedded Bluetooth Stack
for Symbian with the copyright of TOSHIBA CORPORATION.
Content owners use Windows Media digital rights management
(WMDRM) technology to protect their intellectual property, including
copyrights. This device uses WMDRM software to access
WMDRM-protected contents. If the WMDRM software fails to
protect the content, content owners may ask Microsoft to revoke the
software’s ability to use WMDRM to play or copy protected content.
Revocation does not affect unprotected content. When you
download licenses for protected content, you agree that Microsoft
may include a revocation list with the licenses. Content owners may
require you to upgrade WMDRM to access their content. If you
decline an upgrade, you will not be able to access content that
requires the upgrade.
CP8 PATENT
This manual refers to each OS (Japanese version) as follows.
Windows Vista is an abbreviation of Windows Vista
Basic, Home Premium, Business, Enterprise, Ultimate).
Windows XP is an abbreviation of Microsoft
Professional operating system or Microsoft
Home Edition operating system.
Windows 2000 is an abbreviation of Microsoft
®
(Home
®
Windows® XP
®
Windows® XP
®
Windows® 2000
Professional operating system.
The Bluetooth word mark and logos are owned by Bluetooth SIG,
Inc. and any use of such marks by NTT DoCoMo, Inc. is under
license. Other trademarks and trade names are those of their
respective owners.
Internet dictionary embedded in this product uses the BSD license.
Copyright © 2002,2003, Stefan Haustein, Oberhausen, Rhld.,
Germany All rights reserved
• Redistribution and use in source and binary forms, with or
without modification, are permitted provided that the following
conditions are met:
• Redistributions of source code must retain the above copyright
notice, this list of conditions and the following disclaimer.
Redistributions in binary form must reproduce the above
copyright notice, this list of conditions and the following
disclaimer in the documentation and/or other materials
provided with the distribution.
• Neither the name of the <ORGANIZATION> nor the names of
its contributors may be used to endorse or promote products
derived from this software without specific prior written
permission.
THIS SOFTWARE IS PROVIDED BY THE COPYRIGHT
HOLDERS AND CONTRIBUTORS “AS IS” AND ANY EXPRESS
OR IMPLIED WARRANTIES, INCLUDING, BUT NOT LIMITED TO,
THE IMPLIED WARRANTIES OF MERCHANTABILITY AND
FITNESS FOR A PARTICULAR PURPOSE ARE DISCLAIMED. IN
NO EVENT SHALL THE COPYRIGHT OWNER OR
CONTRIBUTORS BE LIABLE FOR ANY DIRECT, INDIRECT,
INCIDENTAL, SPECIAL, EXEMPLARY, OR CONSEQUENTIAL
DAMAGES (INCLUDING, BUT NOT LIMITED TO,
PROCUREMENT OF SUBSTITUTE GOODS OR SERVICES;
LOSS OF USE, DATA, OR PROFITS; OR BUSINESS
INTERRUPTION) HOWEVER CAUSED AND ON ANY THEORY
OF LIABILITY, WHETHER IN CONTRACT, STRICT LIABILITY, OR
TORT (INCLUDING NEGLIGENCE OR OTHERWISE) ARISING IN
ANY WAY OUT OF THE USE OF THIS SOFTWARE, EVEN IF
ADVISED OF THE POSSIBILITY OF SUCH DAMAGE.
Easy Search/Contents/Precautions
27
Page 30
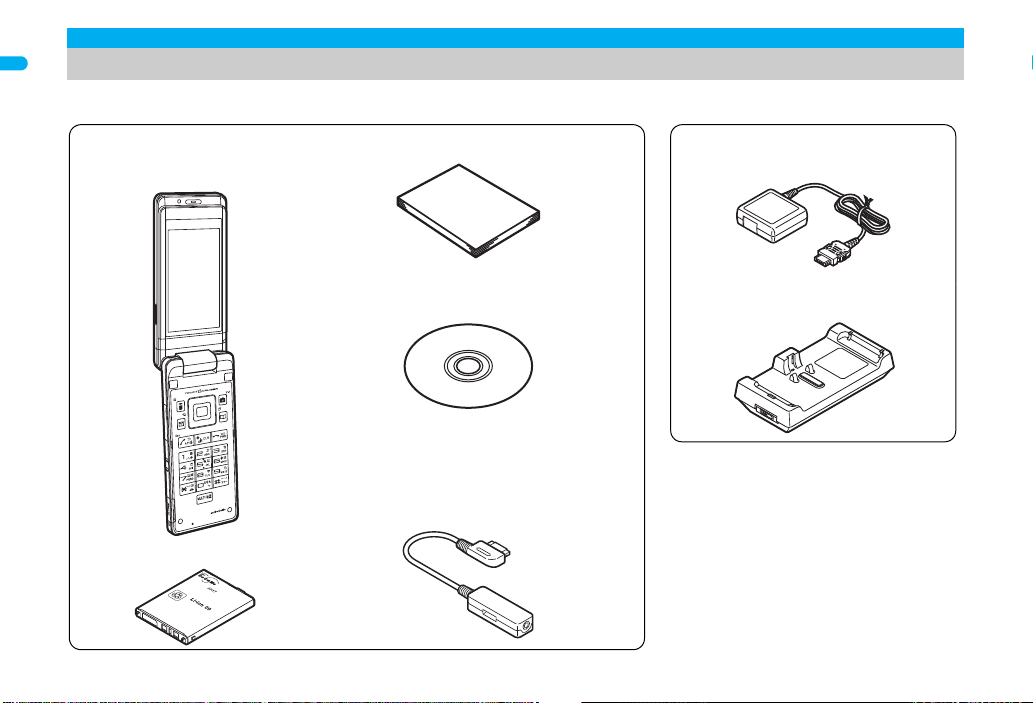
Standard parts packaged with unit and main optional parts
FOMA SH906i terminal
(includes warranty and Back
Cover SH21)
※ “Manual for PC Connection” and “Kuten
Code List” in the PDF format are contained.
※ Quick manual can be found on P. 534.
■ Standard package
FOMA AC Adapter 01/02
(includes warranty and user’s guide)
Desktop Holder SH19
(includes user’s guide)
Battery Pack SH17
■ Main optional parts
Manual (this manual)
FOMA SH906i CD-ROM
For details on other optional parts nP. 485
Earphone Plug Adapter for External
connector terminal (sample)
(includes user’s guide)
Easy Search/Contents/Precautions
28
Manual
Page 31

Before Using the Handset
Component names and functions . . . . . . . . . . . . . . . . . . . . . . . . . . 30
Viewing the display . . . . . . . . . . . . . . . . . . . . . . . . . . . . . . . . . . . . . 34
Optical TOUCH CRUISER . . . . . . . . . . . . . . . . . . . . . . . . . . . . . . . 39
Touch panel. . . . . . . . . . . . . . . . . . . . . . . . . . . . . . . . . . . . . . . . . . . 40
Menu settings and selections . . . . . . . . . . . . . . . . . . . . . . . . . . . . . 44
Displaying the Supportbook. . . . . . . . . . . . . . . . . . .<Supportbook>46
Using a FOMA card . . . . . . . . . . . . . . . . . . . . . . . . . . <FOMA card>47
Inserting and removing the battery pack . . . . . . . . . . . . . . . . . . . . . 50
Charging . . . . . . . . . . . . . . . . . . . . . . . . . . . . . . . . . . . . . . . . . . . . . 51
How to check the battery level. . . . . . . . . . . . . . . . . <Battery level>54
Turning the power on and off. . . . . . . . . . . . . . . .<Power ON/OFF>55
Switching the display to English . . . . . . . . . . . . <Select language>56
Making the initial setting . . . . . . . . . . . . . . . . . . . . . <Initial setting>56
Setting the date and time. . . . . . . . . . . . . . . . . . . . <Date settings>57
Sending your own phone number to the other party
. . . . . . . . . . . . . . . . . . . . . . . . . . . . . . . . . . . . . <Notify caller ID>58
Checking your phone number . . . . . . . . . . . . . . . . .<Own number>58
29
Page 32

Component names and functions
r
f
e
g
d
c
3
1
8
6
7
5
u
t
2
b
q
a
9
h
j
j
p
o
m
i
s
n
4
k
l
Before Using the Handset
※ Key illustrations are examples and may look different from actual keys.
30
Page 33

1Earpiece
Listen to the other party’s voice.
Listen to Record message/Voice memo.
2Brightness sensor (nP. 118)
The sensor detects the light of the surrounding area and
automatically adjusts the display brightness and turns on/off the
keypad backlight.
Do not cover the sensor area with your hand or a sticker. May
interfere with the sensor.
3Display/Touch panel (nP. 34, P. 40)
4Optical TOUCH CRUISER , (nP. 39)
Slide the finger to perform the same operations as those for w
of Multi-guide key.
5i-mode/Operation guidance key i (,)
Press to use i-mode (nP. 170).
Press to execute the functions of the operation guidance
(nP. 34).
Press for 1+ seconds to display the i-appli software list screen
(nP. 231).
6External connector terminal
Connect to an external device such as AC adapter/DC adapter,
FOMA USB Cable with Charge Function 01/02 (sold separately)
(nP. 52, P. 342).
Use a flat-plug earphone/microphone with switch (sold
separately), etc. by connecting to an Earphone Plug Adapter for
External connector terminal (nP. 400).
7Mail/Operation guidance key m
Press to use mail functions (nP. 196).
Press to execute the functions of the operation guidance
(nP. 34).
Press twice to check new messages (nP. 207).
Press for 1+ seconds to display a compose message screen
(nP. 196).
8Start/Hands-free key s
Press to make or receive a voice call.
Press to use Hands-free (nP. 61).
Press for 1+ seconds to use the Eco mode (Power saver)
P. 117).
(n
ger terminal (nP. 53)
har
9C
Terminal for recharging with the desktop holder.
amicroSD Card slot (nP. 333)
bMouthpiece
Sends out your own voice.
cMulti-guide key wt
Move the cursor to select an item and execute or set (nP. 34).
Press to display Menu, Redial list screen, Received calls list
screen, Shortcut menu and Quick search.
Press t for 1+ seconds to use Multi easy lock (nP. 136).
Press r for 1+ seconds to use IC card lock (nP. 263).
Press q for 1+ seconds to use Side key guard (nP. 137).
Press u for 1+ seconds to adjust the earpiece volume
(nP. 110).
dCamera/Operation guidance key C
Press to activate the camera (nP. 151).
Press to execute the functions of the operation guidance
(nP. 34).
Press for 1+ seconds to activate 1Seg (nP. 285).
ePhonebook/Operation guidance key a
Press to use the phonebook (nP. 96).
Press to execute the functions of the operation guidance
(nP. 34).
Press for 1+ seconds to display the phonebook entry screen
(nP. 97).
fi-Channel/Clear key c (J)
Press to show the channel list (nP. 192).
Press to return to the previous screen.
Use to delete phone numbers and text.
Power/End key H
g
ress
for 2+ seconds to turn the power on/off (nP. 55).
P
Use to end the function being used and return to stand-by
display.
Before Using the Handset
Continued on next page
31
Page 34

hDial/Text entry keys 1 to 9, 0, *, #
Press to enter a phone number or text.
Press * for 1+ seconds to use the Public mode (Drive mode)
(nP. 74).
Before Using the Handset
Press # for 1+ seconds to use the Manner mode (nP. 113).
Press 1 to 3 for 1+ seconds to use assigned functions
(nP. 393).
Press 5 for 1+ seconds to set font size collectively (nP. 125).
Press 6 for 1+ seconds to place the Bluetooth on stand-by
(nP. 406).
Press 7 for 1+ seconds to record Voice memos or play Voice
memos/Recorded messages (nP. 79, P. 396).
Press 8 for 1+ seconds to start to use 2in1 or switch modes
(nP. 435, P. 436).
Press 9 for 1+ seconds to reset Kisekae Tool settings
(nP. 120).
iMulti/GPS/Supportbook key $
Press to view Supportbook (nP. 46).
Press to use Multi Assistant (nP. 382).
Press for 1+ seconds to check your present location (nP. 266).
jSpeakers
Emits ring tones, music, etc.
Emits the other party’s voice during hands-free operation.
k/lCalled LED/Charging LED
Flashes while receiving a call, etc. (nP. 123).
Onl
Called LED/Charging LED is looked different depending on the
handset color.
mShutter/PushTalk key < (q)
Press to use the PushTalk phonebook (nP. 90).
Press for 1+ seconds with the FOMA terminal closed to turn on/
off the picture light.
Press in the viewer position to activate the camera (nP. 151).
Press for 1+ seconds in the viewer position to activate 1Seg
(nP. 286).
ays lit while charging (nP. 51).
y l st
nFOMA antenna
An antenna is built in. To speak in better conditions, do not cover
the antenna area by hand.
o1Seg antenna (nP. 283)
Use to receive 1Seg.
pCamera
Use to shoot still pictures or movies (nP. 144).
Use to send a camera image shot during a Videophone call to
the other party (nP. 60).
qPicture light
Lights while activating the camera (nP. 151).
Lights/Flashes during shooting (nP. 153, P. 155).
rInfrared port
Use for the Ir exchange (nP. 349).
Use for the Ir remote control (nP. 353).
sStrap ring
tFeliCa mark
The IC card is included (The IC card cannot be removed). Use
Osaifu-Keitai holding the FeliCa mark up to the scanning device
(nP. 255).
Use to send and receive data via the iC transmission
(nP. 354).
uBack cover (nP. 50)
A radio frequency-preventing sticker is attached on the back of
the back cover. Do not peel off this sticker.
32
Page 35

How to open the FOMA terminal
Note
Cautions when rotating
To use the FOMA terminal, open it (normal position) or use it in the
viewer position.
When carrying, keeping the FOMA terminal closed as shown in the
diagram for step 1 is recommended.
■ Viewer position
5
Before Using the Handset
1
Open carefully with both
3
Rotate the display 180°
hands.
to the right.
2
Open the display until it
stops midway.
4
Flip the display forward.
Note the following when rotating the FOMA terminal display.
Do not hit the key surface, etc. May damage the key surface
(See “Cautions when rotating” above).
Do not rotate in the opposite direction or further than 180°.
33
Page 36

How to use the Multi-guide key and Operation
i
t
u
C
avm
12345 789
olkjihgfm
tu v
<
a b
p nq e d c
r
zy w6x
s
guidance key
Use to select or execute the menus that appear in the operation
Before Using the Handset
guidance. The following shows the keys allotted to select or execute
the menus items that appear in the guidance.
■ Operation guidance menu
In the operation guidance, menus appear according to the used
function and situation.
The following table describes examples of the main operation
guidance menus that appear.
OK Sets the selected item
Submenu Displays the Submenu
Agree Checks selected image, music, etc.
Back Returns to the previous screen
Play/Stop Plays/Stops i-motion, music, etc.
Full Displays selected images, etc. in full screen
Show all Displays sorted files, etc. as a list
1/1 or Zoome Displays selected images, etc. in actual/reduced
Mail Displays the compose message screen
Send Sends a message
Cancel
size
Cancels the operation such as receiving a message
SelAll/ClrAll Selects/Disables all selectable items
Page ▲/Page
Close Closes the Submenu, etc.
(Up to 50 items can be selected/disabled
depending on the function)
▼
Scrolls the display by page
Viewing the display
1Signal status
Indication of the signal strength
] no p
]
Strong Weak
When A appears, the handset is outside the service area or in
a place with no signal. Signal icon can be changed (nP. 121).
34
Page 37

2Battery level/Charging (nP. 54)
Battery level
"
{
Battery icon can be changed (nP. 121).
3i-mode/Full Browser (nP. 170, P. 303)
7 = A A
4SSL (nP. 171)
When o appears while Multi Assistant is used, function such as
i-mode, Full Browser, i-appli or Software update is being used
with Multi Assistant.
5i-appli (nP. 231)
* Indicates that i-appli is set as the stand-by display, but cannot be
used.
6GPS (nP. 266, P. 273)
A (blue)
A (black)
Charging
B N O
o
G
N
I
Q
B
Indicates i-mode/Full browser status
SSL compatible sites are viewed
SSL compatible Internet web pages are viewed
i-appli is being activated
i-appli stand-by is being activated
i-appli stand-by is set
i-appliDX is being activated
i-appliDX stand-by is being activated
i-appliDX stand-by is set
Location request menu is set to [Loc. provision:ON]
Location request menu is set to [Permission sched.]
and Location provision is permitted
Location request menu is set to [Permission sched.]
and Location provision is rejected
GPS positioning
*
*
7Shortcut menu (nP. 393)
Appears when the function can be added to the
m
Shortcut menu
8i-mode mail/SMS/Area Mail received (nP. 205)
Indicates the status of the i-mode mail/SMS/Area
U h H
v [
9Message R/F (nP. 221)
ABGIST
z8<9>0
The status may not always be indicated even if messages are
held at the i-mode center.
amicroSD Card (nP. 332)
^ (gray)
^ (pink)
bClock display (nP. 57)
Small clock icon can be changed (nP. 121).
c1Seg being recorded (nP. 291)
dRecord message (nP. 77)
When there are messages, D to P appears, indicating the total
number of both types of messages. When there are three Record
messages (voice calls) and two Record messages (Videophone),
k appears.
Mail reception
Indicates the status of the memory to store received
mail
Indicates the reception status of the Message
R/F
7!
a
]
Indicates the storage status of the Message
R/F
microSD Card is inserted
microSD Card is being used
1Seg is being recorded
Record message is set
Continued on next page
Before Using the Handset
35
Page 38

eSilent (nP. 109)
The phone ring volume [Silent] is set
[
fVibrator (nP. 111)
Before Using the Handset
gManner mode (nP. 113)
hPublic mode (Drive mode) (nP. 74)
iStorage status of i-mode center (nP. 205)
jIC card lock (nP. 263)
kRestriction indicator (nP. 132, P. 138)
K (red)
K (blue)
Vibration mode is set
b
Manner mode is set
Z
Public mode (Drive mode) is set
_
Mail being held at the center
W
Mail being held at the center full
X
IC card is locked
H
Secret mode is set
R
Secret data is being edited
S
Keypad dial lock
T
All lock is set
U
Function lock is set
V
Keypad dial lock and Function lock are set
W
Secret mode, Function lock and Keypad dial lock are
set
Side key guard, Secret mode, Function lock and
Keypad dial lock are set
Side key guard is set
X
lHands-free (nP. 61, P. 81, P. 87, P. 407)
; (red)
; (green)
mAlarm (nP. 293, P. 294, P. 385, P. 390)
* Appears only when an Alarm is set for that day.
nMusic&Video Channel program reservation (nP. 365)
oi-mode mail send reservation (nP. 204)
pEarphone/microphone connection (nP. 401)
Appears when Auto answer for PushTalk is set even if a flat-plug
earphone/microphone with switch is not connected.
qUSB mode (nP. 342)
Hands-free in progress
USB hands-free in progress
Mute in progress (only when rotated the display)
l
Bluetooth hands-free in progress
M
Alarm is set
Schedule alarm is set
Reception reserve alarm is set
\
Recording reserve alarm is set
Wakeup TV is set
Appears 12 hours before Music&Video Channel
0
program distribution
Mail with send reservation
=
Mail failed to be automatically sent
;
When voice/Videophone call in Auto answer setting is
set to [ON] and while a flat-plug earphone/microphone
s
with switch (sold separately) is connected
When PushTalk in Auto answer setting is set to [ON]
FOMA USB Cable with Charge Function 01/02 (sold
separately) is connected in the Communication
x
mode
*
*
*
*
36
Page 39

rFOMA card error
Appears when FOMA card is malfunctioning or not
R
inserted
Appears when a card other than the FOMA card is
B
inserted
sSelf mode (nP. 134)
Self mode is set
g
tPushTalk (nP. 87)
During PushTalk transmission
a
uBluetooth (nP. 405, P. 406)
Stand-by for Bluetooth registration
Stand-by for Bluetooth connection
L
Connected to Bluetooth
The Bluetooth icon does not appear during SSL page display.
vIr exchange/Bluetooth communication/External device
Data is communicated with another device using the
Ir exchange function (nP. 349)
J
Data is sent using the Ir remote control (nP. 353)
Data is communicated with another device using the
#
Bluetooth function (nP. 409)
Connected to commercially available Bluetooth
N
compatible keyboard (nP. 408)
t (green)
t (red)
wVeilView (nP. 125)
Connected to an external device and transmitting packets
Connected to an external device and sending/
receiving packet data
Connected to an external device and transmitting
u
64K data
VeilView is set
P
The VeilView icon does not appear during International roaming
or while 1Seg is recorded.
x3G/GSM (nP. 453)
4 (green)
4 (red)
yStatus of Comics setting (nP. 359)
Status of Comics setting icon does not appear during hands-free
operation.
zToruCa (nP. 257)
The ToruCa icon does not appear during hands-free operation or
e-comic display.
<Multitask (nP. 382)
Indicates functions that are running.
g
*
h
t
k
3G network (Packet transmission available)
3G network (Packet transmission not available)
GSM/GPRS network (Packet transmission available)
K
GSM/GPRS network (Packet transmission not
J
available)
Frame display is set
I
Page display is set
H
Unread ToruCa
Q
Camera (still picture)
Four or more applications
are running
Videophone
Voice call
Phonebook
PushTalk/PushTalk
phonebook
2
Camera (movie)
3
Character reader (OCR)
4
Bar code reader
5
Card reader
]
Voice recorder
v
Schedule
w
Before Using the Handset
Continued on next page
37
Page 40

Note
Stoc k icon
Message
Number of entries
Modem transmission
(appears during data
#
transmission)
Software update
Before Using the Handset
i
GPS
C
Shotdeco
)
Bluetooth function
(
Receive via Ir exchange,
iC transmission, USB and
j
Bluetooth communication
i-appli
l
i-mode, i-Channel, WEB
m
mail
Mail, SMS, Message R/F,
p
Check new message
Mail/Decome-Anime/SMS
q
being composed
Received calls/Received
|
messages history
Redial/Sent messages
!
history
microSD Card is referred to as [microSD] or [SD] on the FOMA
terminal (nP. 332).
Some of the screen shots in this manual have been modified or
abbreviated.
The display for the FOMA terminal is manufactured using
high-precision technology, but it may occasionally contain dots that
fail to light or that remains permanently lit. This is not a malfunction.
Text memo
y
Calculator
z
Manga&BookReader
6
Quick search
=
Full Browser, Internet
n
movie player
To ru C a
>
Alarm
{
Timer
8
microSD manager
}
General settings
9
Record message/Voice memo
0
Document Viewer
7
Own number
"
1Seg
f
Reception reserve/Recording
^
reserve alarm sounds
Data box, Music&Video
u
Channel
38
Checking notices with stock icon
Display stock icons in stand-by when a call is missed or new mail is
received. In stand-by, select stock icons to check notice details.
Stock icon type
Icon Message Page
xx missed call
B
Recorded messages Fxx message/
F
Axx message
xx voice mail
E
xx mail message
C
xx New Message R P. 222
L
xx New Message F P. 222
Q
xx new ToruCa P. 257
D
New auto send result P. 204
5
Update complete P. 508
Check update P. 508
6
Update required P. 505
Check for update
USB mode setting P. 342
D
Download successful (Music&Video
t
Channel)
Download failed (Music&Video Channel) P. 365
g
*1
*1
*2
P. 7 6
P. 7 9
P. 427
P. 205, P. 227
P. 506
P. 365
Page 41

Note
Icon Message Page
Note
Operating range of
Optical TOUCH
CRUISER
Send loc - No resp P. 276
Send loc - Resp P. 276
@
Send loc - Failed P. 276
Charge limit exceeded P. 398
4
G
*1 When the 2in1 mode is set to [Dual mode], the number of [A mode]
and [B mode] appears each.
*2 When the 2in1 mode is set to [Dual mode], the total number of [A
mode] and [B mode] appears.
*3 The message that appears differs depending on the menu screen.
In stand-by, a stock icon appears/t.
1
Select the stock icon/t.
2
After the details are checked, the stock icon and message
Stock icons do not appear while the i-motion set as stand-by is
played or the i-appli stand-by is being activated.
In the viewer position, the messages and the notice details can be
checked by using Bluetooth compatible keyboard.
Custom menu/Basic menu/Menu
disappear.
*3
P. 4 5
Optical TOUCH CRUISER
Use the Optical TOUCH CRUISER to perform the same
operations as those for w of Multi-guide key (e.g. moving
the cursor or scrolling the screen).
Move the pointer or cursor just as covering the whole operating
range of the Optical TOUCH CRUISER with finger.
The pointer or cursor moves in conjunction with sliding of the finger.
Before Using the Handset
In the following cases (screens), the Optical TOUCH CRUISER is
not available. However, when the Submenu appears, the pad can
be operated.
Stand-by i-appli Dial input screen
Character reader, Bar code reader, Card reader screen
While making, receiving or during the voice call/Videophone
call/PushTalk, etc.
39
Page 42

■ Moving the pointer
e.g.) Custom
menu screen
e.g.) Basic menu
screen
In the Custom menu screen or while i-mode or
Full Browser is connected, move the pointer (L,
M, K, etc.) up/down, left/right or diagonally to
Before Using the Handset
select an item.
In some Custom menus, the pointer shape
varies or the pointer is not supported.
Move the pointer to the edge of the screen
while i-mode or Full Browser is connected to
show
G, R/\, Z
direction of the arrow. If Link is set,
and press
The pointer moving speed varies depending
on the finger sliding speed.
and scroll the screen to the
t
to move to the linked page.
■ Moving the cursor
In the Basic menu or Submenu, move the cursor
up/down and left/right in the same way as w of
Multi-guide key.
When there are multiple pages, move the
cursor to switch the pages.
When using the Optical TOUCH CRUISER
Do not operate the Optical TOUCH CRUISER using a pointed
metallic object such as a pen tip. May cause scratches or a failure
of the sensor.
Note that putting a sticker, etc. to the operating range may cause
a malfunction.
40
M
appears,
Setting the Optical TOUCH CRUISER
<TOUCH CRUISER set>
■ Setting whether to use the Optical TOUCH
CRUISER
In the Custom menu, select [Settings]/[General
1
settings]/[TOUCH CRUISER set]/[Usage
settings].
Select the setting/t.
2
■ Setting the pointer speed/scroll speed
In the Custom menu, select [Settings]/[General
1
settings]/[TOUCH CRUISER set].
Select an item/t.
2
Select the speed/t.
3
Touch panel
If the screen is switched from the normal position to the
viewer position, operate by putting your finger on the touch
panel (screen).
The operations differ depending on the function and screen in use.
Page 43

Operate the touch panel inside the following operating range of
Note
Example: Selecting
Touch the touch panel.
Example: Adjusting the zoom
Touch the touch panel and slide
the finger left/right.
Operating range of touch panel
touch panel. However, when a substitute image appears in the right
side of the screen, operate in the left side of the screen where
functions are shown.
When the touch panel is touched, the tone sounds and the vibrator
is activated (excluding while activating a camera (still picture/
movie)).
• For details on setting the volume nP. 110
• For details on setting the vibrator nP. 111
• The tone cannot be changed.
The message indicating the operation is not available appears
when the touch panel cannot be used.
Other than the viewer position, the touch panel is available in the
following cases.
During Videophone (nP. 81)
During Writing authentication entry (nP. 130)
■ Selecting keys
In the touch menu, control keys and others, touch the displayed keys
to select it.
■ Selecting data and items
In list and data list screens, select the data or items by touching,
moving the cursor and re-touching them.
When scrolling the screen or when switching the page in the folder
list screen or the data list screen, slide the finger up/down or touch
A/B at the bottom of the screen to move pages.
■ Canceling the selection
When having touched data by mistake, keep the finger on the touch
panel and slide it away from the selected data to cancel the selection.
Touch the “CLR” key to return to the previous screen.
When using the touch panel
This product is designed to be operated with one finger. In the
following cases, the touch panel is not activated.
When operated with a gloved finger
When operated with two or more fingers
When operated with a fingernail
When operated with a pen, ballpoint pen, pencil, etc.
When operated with foreign objects placed on the operation
pad
Note that the following cases may cause a malfunction.
When operated with a wet finger
When operated with the touch panel pressed forcefully
When putting a sticker to the touch panel (display)
Before Using the Handset
41
Page 44

Touch menu
Control key
The following functions can be activated from the touch menu.
Full Browser 1Seg Camera Mail
Before Using the Handset
Manga&BookReader Data box
For details on touch menu nP. 46, P. 476
Control key
Set or change the channel using the
control key while the camera is
activated, 1Seg is watched, etc.
Touch the touch panel and the
control key appears.
If no operations are performed for
approximately 6 seconds with the
control key shown, the control
key disappears. Also, touch other
than the control key to hide the control key (excluding 1Seg).
For Full Browser, touch D and the control key appears. Touch
the display area other than control keys to hide.
When the control keys appear, only those are available. However,
in the camera (still picture/movie) shooting screen, adjusting the
brightness and digital zoom are available by using the touch panel
even while the control keys are displayed.
■ Using the control keys
The control key appears when the following functions are activated.
Common keys for all functions
*1
E/T
*1 While multiple windows are displayed in Full Browser, close the
displayed window.
*2 This key does not appear when there is no extra key.
42
To end the running function/return to a data list screen
To view the following keys
F
To return to previous
9
*2
While the camera (still picture/movie) is activated
Image size
J
AF mode
G
Picture light
K
Shoot by scene
Q
White balance
N
Common replay mode
O
*1 Touch after selecting the size (For still pictures, QCIF: 176×144
cannot be viewed).
*2 Select a mode from
still pictures)/
(Manual focus) to touch.
•
When | is touched, touch the face detection frame and adjust the focus.
• When > is touched, touch the focus area and adjust the focus.
• When
right and adjust the focus.
*3 White balance appears only for still pictures, and the Common
replay mode appears only for movies.
*4 Appears even in the movie shooting screen.
The settings other than AF mode and image size change each time
the key is touched.
In the preview screen after shooting, the following keys appear.
S
* Only movie is displayed.
While 1Seg is being watched
To turn up the volume
V
To turn down the volume
W
*1
*2
*3
*3
Fix camera shake
P
To zoom in
H
To zoom out
I
Switch phone#SD
R
To turn up the brightness
L
To turn down the brightness
M
*4
*4
< (Standard)/| (Def (people first)) (only for
> (Spot AF) (only for still pictures)/{ (Closeup)/}
} is touched, touch the touch panel, slide the finger left/
To save
U
*1
To play
*1
*
To select a station with DOWN
Z
To select a station by
[
searching a frequency (UP)
9
To dele t e
*4
*4
*2
Page 45

To display ChannelView
X
To select a station with UP
Y
*1 Keep key touched to adjust the volume continuously.
Double-touch the touch panel while selecting a station by searching
*2
a frequency to stop selecting a station by searching a frequency.
While an image is displayed from My picture/1Seg of Data box
To rotate (JPEG image)
a
To play/stop (Flash movie)
g
To display in actual size/full
b
screen (excluding Flash movie)
For JPEG images,
when touching
screen simultaneously with the control key.
• In the image display screen, which was zoomed up by touching
(, touch the touch panel and slide the finger up/down/left/
right to change the display position.
While i-motion is displayed from i-motion of Data box/
While a video is played back from 1Seg of Data box
To turn up the volume
V
To turn down the volume
W
To pause/play
g
To n e x t
j
*1 Keep key touched to adjust the volume continuously.
*2 Appears only for i-motion.
*3 Appears only for video.
While e-book, etc. is displayed
To go to the next line/frame
d
To return to the previous
c
line/frame
( (zoom in)/) (zoom out) appears
= which is displayed at the bottom of the
*1
*1
*2
To select a station by
searching a frequency
\
1
]
^
h
k
i
5
*2
(DOWN)
To retry (Flash movie)
To next
To previous
To fast forward
To previous
To fast rewind
To the top page/To view
previous pages in backward
order (when there is a history)
*2
*3
*3
While Full Browser is displayed
To cancel connection
m
Visual history
z
To view Bookmark list
n
*1 Touch the history screen on the right/left or touch the touch panel
and slide the finger right/left to move the cursor to next/previous
history in the Visual history screen.
• Touch the tab on the upper part of the screen or touch the touch
panel and slide the finger up/down to switch windows in the
Visual history screen.
*2 Touch #/$ or touch the touch panel and slide the finger right/left
to view the next/previous page in the Bookmark list screen.
*3 Check the site URL, touch [OK], select a folder and touch it to save
to bookmark.
x (Keitai mode) and y (PC mode) are switched.
*4
Zoom bar appears at the bottom of the screen simultaneously with the
control key. Touch the slider of zoom bar and slide the finger left/right or
touch +/- on the both ends of the zoom bar to zoom up/down the screen.
While a PC movie is played back
To pause/play
g
To turn up the volume
V
* Keep key touched to adjust the volume continuously.
While a message details screen is displayed
To the next mail/message
]
To the previous mail/
^
message
To play Decome-Anime
9
*1 Does not appear when there is no next/previous mail or message
and unread mail.
*2 Appears only for received mail.
*1
*2
*
*1
To save Bookmark
o
Display Mode
x
To turn down the volume
W
*1
To the next unread mail
r
To the previous unread
s
mail
*1, 2
*3
*4
*
*1, 2
Before Using the Handset
43
Page 46

Menu settings and selections
Stand-by
t
Shortcut menu
a
Basic menuCustom menu
o
Set, change or save functions from the menu screens.
Before Using the Handset
The explanations in this manual are based on how to retrieve a
function from the Custom menu.
Setting the start menu <Menu priority>
Set the start menu that displayed when t is pressed in stand-by.
Start menu Characteristics
Custom menu
Basic menu In the Basic menu, input the function number, which is
In stand-by, press t/[Settings]/[Disp/LED/
1
Power saver]/[Menu priority].
In the Custom menu/Basic menu: Press C/[Menu priority].
Select the start menu/t/[Yes].
2
The preset Kisekae Tool (nP. 119) can be selected
and set. Each Kisekae Tool consists of different
functions and designs. Kisekae Tools can be
downloaded from sites and used.
Preset Kisekae Tools
White Black Pink Blue
拡大メニュー (Large) シンプル (Simple)
ダイレクトメニュー
※ Preset Kisekae Tools differ depending on the
FOMA terminal handset color.
assigned to each function, to quickly retrieve the
function to be used.
Assigned function numbers nP. 45 8
■ Switching the set start menu temporarily
Switch the start menu temporarily. When the stand-by display
reappears, the start menu returns to the one set in Menu priority.
Use the Shortcut menu to retrieve saved functions quickly. Other
functions can also be saved in the Shortcut menu (nP. 393).
44
Page 47

Retrieving a function from each start menu
,
t
Custom menu When [1Seg] is
displayed
When 1Seg is
activated
,
t
or
w
t
or
w
t
Note
Basic menu When 1Seg is
activated
961
For details on the available functions nP. 458
Use w and the Optical TOUCH CRUISER in either start menu.
Press the dial key corresponding to the menu item number (U, V,
W, etc.) to select a function. However, in the Custom menu, a
function may not be selected by using the menu item numbers.
The method for selecting functions may differ depending on the
Kisekae Tool set for the Custom menu.
Press c to re-select a function, and the previous screen
reappears. Press H to return to stand-by.
When a stock icon (nP. 38) appears in stand-by, select G to
show the start menu.
■ Retrieving from the Custom menu
Example: Activating 1Seg with Multi guide key or Optical TOUCH
For the ,, use the Optical TOUCH CRUISER to select an item.
The following shows the screen operated with the Optical TOUCH
CRUISER
CRUISER.
■ Retrieving from the Basic menu
Example: Activating 1Seg by entering function numbers
Before Using the Handset
When the Custom menu image is changed by Kisekae Tool, the
operation may differ from the description in this manual. In this
case, switch the menu screen to the Basic menu (nP. 44) or
perform Reset menu screen (nP. 120).
45
Page 48

Menu (touch menu) when in the viewer position
When 1Seg is activated
Touch menu
Related Operations
If the screen is switched from the normal position to the viewer position
in the stand-by display, Custom menu, Basic menu, Shortcut menu or
Before Using the Handset
others, the touch menu appears.
When the stand-by display appears in the viewer position, touch the
touch panel to show the touch menu.
Touch the touch panel to select a menu.
Available functions to select from the touch menu are limited
(nP. 476).
The images and items in the touch menu cannot be changed.
Touch the “CLR” key to return to the previous screen and re-select
the function. If the key is touched in the touch menu, the stand-by
display appears.
Example: Activating 1Seg by touching the touch panel
Supportbook
Displaying the Supportbook
Use this function for unsure operations.
After the Supportbook appears, check the
explanation and operation procedures of
each function. In addition, directly start
functions that were looked up in the
Supportbook.
In stand-by, press $.
1
Select a menu or item/t.
2
Start functions directly from the Supportbook
In the details screen, select the function to start/t/
[Yes].
46
Page 49

Notch
IC (gold)
2
Tray
3
Fit the notch of the FOMA card
to that of the tray.
1
Ta b
Note
1
2
FOMA card
Using a FOMA card
A FOMA card is an IC card that records personal information,
such as phone numbers. A FOMA card can store phonebook
data and SMS. By switching FOMA cards, multiple FOMA
terminals can be used for different purposes as needed.
If a FOMA card is not inserted, transmission functions such as
voice/Videophone calls, PushTalk transmission, i-mode, mail
transmission and packet transmission are not available on the
FOMA terminal. In addition, 1Seg cannot be watched.
Inserting and removing
Before inserting or removing the FOMA card, turn off the power,
position the back facing upwards and remove the battery pack.
Close and hold the FOMA terminal firmly with your both hands.
■ Inserting
Hook a finger on the tab and pull the tray out (1).
1
Pull out the tray straight until it stops.
Hold the FOMA card with the IC
2
facing up and set on the tray (2).
Push the tray all the way in (3).
3
■ Removing
Hook a finger on the tab, pull the tray out (1) and
1
remove the FOMA card (2).
Do not allow the FOMA card to fall when removing it.
Inserting or removing the FOMA card forcibly may damage the
card or deform the tray. Use caution.
Refer to the FOMA card user’s guide for more information on the
FOMA card.
Do not misplace the FOMA card once it is taken out.
When the tray falls off, slide the tray in straight along the guide rail.
Security codes
The FOMA card has a “PIN1 code” and a “PIN2 code”.
Both are set to [0000] by default but can be changed to a four- to
eight-digit number by the user (nP. 131).
Before Using the Handset
47
Page 50

FOMA card security functions
One’s own FOMA
card security
functions are set for
downloaded data,
files attached to
received mail and
i-
a
ppli that have been
run, allowing viewing
and playback of data.
When another’s
FOMA card is
inserted, data with
one’s own FOMA
card security
functions set cannot
be viewed or played
back.
One’s own
FOMA card
Another’s
FOMA card
Different FOMA card
inserted
<FOMA card security functions>
The FOMA terminal has built-in FOMA card security functions (FOMA
Before Using the Handset
card restriction functions) as functions for protecting personal data and
files.
When the FOMA card is inserted into the FOMA terminal and data
or files are retrieved using any of the following methods or when
i-appli is running, FOMA card security functions are automatically
set in the retrieved data or files.
When a file such as an image, melody or PDF is downloaded
from a site or Internet web page
When a site or Internet web page is saved as a screen memo
When i-mode mail with a file attached is received
When i-appli is running
Data, files or software with FOMA card security functions run only
when in use with the FOMA card inserted at time of acquisition.
Display, play, attach to i-mode mail, run software, send data using Ir
function and iC transmission function, and copy to microSD Card
can be executed.
The following indicates the data for which FOMA card security is set.
Melody
Screen memo Chaku-uta®/Chaku-uta full
Chara-den File attached to Message R/F
i-motion ToruCa (details) image
PDF data Image inserted to Deco-mail or signature
Kisekae Tool Videophone picture memo
Machi-chara i-appli (including i-appli stand-by)
Download dictionary
Contents transfer compatible data
Image in Message R/F
Music&Video Channel program
Deco-mail template with data which FOMA card security
functions are set
48
Image (including animation and Flash movie)
Decome-Anime Template
e-book/e-dictionary/e-comic saved in the [Comic] folder
File attached to i-mode mail other than the following
• ToruCa ・Phonebook ・Schedule
•Bookmark ・Documents
※“Chaku-uta” is a registered trademark of the Sony Music
Entertainment (Japan) Inc.
The following indicates the settings saved in FOMA card.
Own number PIN setting
Select language SSL certificates
SMS center SMS expiry
SMS input character
The above operations cannot be performed if the FOMA card
inserted at time of data/file retrieval or i-appli startup is replaced
with a different FOMA card.
Explanation that follows refers to the FOMA card inserted at time of
data/files retrieval as “one’s own FOMA card” and other FOMA
cards as “another’s FOMA card”.
®
Page 51

Note
When one’s own FOMA card is replaced with another’s FOMA
card, the data or files for which FOMA card security functions are
set cannot be set as stand-by displays or ring tones.
When a FOMA card is replaced with another’s FOMA card, FOMA
card security functions are activated and if data or file retrieved
from a site is set as the stand-by display or ring tone, the setting is
reset to the default. When one’s own FOMA card is re-inserted,
the setting returns.
Example: When setting [Melody A], for which FOMA card
security functions are set, as a ring tone
When one’s own FOMA card is taken out or is replaced with
another’s FOMA card, ring tone returns to default setting. When
one’s own FOMA card is put back, the ring tone returns to [Melody
A].
FOMA card security functions cannot be set for data received
using Ir exchange or data transmission functions, and still pictures/
movies, etc. shot with the FOMA terminal.
It is possible to move or delete data or files for which FOMA card
security functions are set even when another’s FOMA card is
inserted.
Running i-appli by selecting highlighted text in i-mode mail details
screen cannot be performed or retrieved when FOMA card
security functions are set.
If the FOMA card is replaced with another’s FOMA card after
i-appli stand-by is set, the set i-appli cannot be activated in
stand-by, and the image set in Stand-by display appears.
FOMA card type
Note the following differences between “FOMA card (blue)” and
“FOMA card (green/white)” used on the FOMA terminal.
Function
Number of phone number
digits available in the FOMA
card phonebook
Client certificate operations
for FirstPass
Use of WORLD WING Not available Available P. 448
Service number Not available Available P. 433
FOMA card
(blue)
Up to 20 digits Up to 26 digits P. 97
Not available Available P. 188
About WORLD WING
WORLD WING is a DoCoMo FOMA international roaming service
that makes it possible to use the mobile phone number registered in
Japan to make and receive calls even overseas by the FOMA card
(green/white) and supported FOMA terminal.
If subscribed to the FOMA service after September 1, 2005,
subscription for “WORLD WING” is not required. However, if
subscription for “WORLD WING” is canceled at or after
subscription for the FOMA service, subscription for “WORLD
WING” is required again.
If subscribed to the FOMA service before August 31, 2005 but not
subscribed to “WORLD WING”, subscription for “WORLD WING”
is required.
Some payment plans are not available.
When the FOMA card (green/white) is lost or stolen overseas,
promptly contact DoCoMo and conduct a procedure for canceling
the use of service. Refer to General Inquiries on the back of this
manual for inquiries. Note that transmission/calling charges after
the FOMA card is lost or stolen are incurred to the subscriber.
FOMA card
(green/white)
Page
Before Using the Handset
49
Page 52

1
3
2
Face the side with
a recycle mark up
4
Ta bs
Tabs
Battery pack
Battery pack connector terminal side
Note
5
Ta b
Inserting and removing the battery pack
Before Using the Handset
Use the battery pack SH17 exclusive to the FOMA terminal.
Turn off the power, close the FOMA terminal, and hold it in your
both hands before inserting or removing the battery pack.
■ Inserting
Lightly push the back cover in the direction of the
1
arrow (1), slide approximately 2 mm (2) and
remove the back cover (3).
Insert the battery pack (4).
2
The battery pack has tabs that make it easy to insert. Attach the
battery pack with a recycle mark side faced up.
50
Reattach the back cover (5).
3
Position the back cover as shown in the illustration and then
push the back cover and slide into place.
■ Removing
Follow step 1 of “Inserting” to remove the back
1
cover.
Remove the battery pack.
2
The battery pack has a tab that makes it easy to remove. Press
the tab with your fingers without placing too much force. Lift the
battery pack to remove.
Using unnecessary force when inserting or removing the battery
pack may damage the connector terminal for the battery pack
(charger terminal) on the FOMA terminal.
Firmly close the back cover. If not closed firmly, the back cover
may come off and the battery pack may fall out due to vibration.
Page 53

Charging
Cautions when charging
The battery pack is not fully charged at the time of purchase. Be sure
to charge the battery using the exclusive AC or DC adapter (sold
separately) before use.
■ Estimated charge times and LED display
The following figures are estimated times for charging an empty
battery pack with the FOMA terminal turned off.
FOMA AC Adapter 01/02 Approx. 120 min
FOMA DC Adapter 01/02 Approx. 120 min
Charging LED illuminates in red when charging and turn off when
charging is completed.
Check that the battery pack has been properly inserted when
charging LED flashes red. The LED also flashes red when the
battery pack has reached the end of its service life.
The battery pack can also be charged with the FOMA terminal
turned on ({ on the display flashes during charging).
When charging is complete, charging LED turns off, and { on the
display changes to ".
When the battery becomes warm, charging may automatically stop
even if the battery has not been fully charged. Charging resumes
after the temperature lowers to an appropriate temperature. While
charging is stopped, charging LED turns off ({ on the display
flashes while stopped).
■ Estimated times of use when fully charged
Continuous
talk time
FOMA/3G Voice call: Approx. 215 min
Videophone call: Approx. 100 min
GSM Voice call: Approx. 195 min
Continuous
stand-by
time
1Seg watching time Approx. 250 min
Continuous talk time is estimated as the usage time at normal
transmission signal strength, and continuous stand-by time is
estimated as the usage time while moving with the FOMA terminal
folded at normal signal strength. Talk/stand-by time may be
reduced by about half depending on conditions including battery
level status, stand-by display, Power saver mode, Missed call
notice and New unread mail notice settings, temperature and other
environmental conditions, and signal strength (no signal or weak
signal). Using i-mode reduces talk (transmission)/stand-by time.
When i-Channel is subscribed, information is automatically received
and updated, so talk (transmission)/stand-by time will be reduced.
In addition, when shooting or editing an image, watching 1Seg,
composing i-mode mail, activating the downloaded i-appli or the
i-appli stand-by, or using MUSIC Player or Bluetooth function, the
talk (transmission)/stand-by time will be shorten even if calls or
i-mode transmission are not made. Some i-appli software may
continue transmission even after downloading. To avoid this, set
not to connect in advance.
The actual usage time is a combination of stand-by time and talk
time, and the longer the talk time, the shorter the stand-by time
becomes.
1Seg watching time depends on conditions including battery level
status, functions used, temperature and other environmental
conditions.
FOMA/3G3G/GSM setting: 3GWhen mobile: Approx. 395 hr
3G/GSM setting:
AUTO
GSM 3G/GSM setting:
AUTO
When mobile: Approx. 365 hr
At rest: Approx. 565 hr
At rest: Approx. 290 hr
Before Using the Handset
51
Page 54

■ Battery pack service life
Connector (Face the side with the arrows up)
2
Release
buttons
1
External
connector terminal cover
Charging/Called LED
External connector
terminal
Battery pack is a consumable product. Service time per charge is
gradually reduced every time the battery is charged.
When service time per charge is reduced to about half of the default time,
Before Using the Handset
this means that the battery pack is approaching the end of its service life.
In such a case, it is recommended to replace the battery pack as soon as
possible. Depending on usage, the battery pack may swell as it
approaches the end of its service life but this will not cause problems.
If i-appli, Videophone, or 1Seg is used while charging for a long
time, the service life of the battery pack may become shorter than
estimated.
To protect the environment, return used batteries to NTT
DoCoMo, any DoCoMo retailer, or a recycling agency.
■ About charging batteries
Refer to user’s guide of FOMA AC Adapter 01/02 (sold separately),
FOMA AC Adapter 01 for Global use (sold separately), or FOMA
DC Adapter 01/02 (sold separately).
FOMA AC Adapter 01 covers only 100 VAC. FOMA AC Adapter 02/
FOMA AC Adapter 01 for Global use covers from 100 VAC to 240 VAC.
The shape of the plug for the AC adapter is for 100 VAC (for
domestic use). To use the AC adapter of 100 VAC to 240 VAC
overseas, a conversion plug adapter that is compatible with the
voltage of your country of stay is required. Do not use a transformer
for use overseas to charge the battery.
■ Cautions when charging
Do not charge for long periods of time with the power left on. If the
FOMA terminal is left on after charging is complete, the battery pack
charge decreases.
In such cases, the AC or DC adapter charges the battery again.
However, depending on when the FOMA terminal is disconnected from
the AC or DC adapter, the battery charge level may be low, the battery
alert tone may sound, or the battery may only be usable for a short time.
When the battery is empty and terminal is recharging, charging LED
If the alert tone sounds and the power cannot be turned on, charge
52
may not illuminate immediately.
the battery for a while.
If the battery empty alert is displayed and charging begins within 60
seconds of the alert tone, the status returns to normal.
While charging, terminal may not turn on even when charging LED
is illuminated in red. Charge longer and try turning power on again.
Frequently recharging the battery when its power is still remaining
enough may shorten the life of the battery pack. It is recommended
to use the battery to a certain level before recharging.
The battery pack cannot be charged by itself.
Charging using the AC adapter/DC adapter
[Read “FOMA AC adapter 01/02 (sold separately) and FOMA
DC adapter 01/02 (sold separately) user’s guide” carefully.]
Battery pack can be charged with FOMA terminal open or in the
viewer position.
Open the external connector terminal cover (1) and
1
insert the AC or DC adapter connector horizontally
2
into the external connector terminal (
Check the direction (see
diagram) of the connector, keep it
parallel with the FOMA terminal
and firmly push all the way in
until it clicks.
).
Page 55

2
Note
100 VAC
outlet
For AC adapter
2
For DC adapter
Cigarette
lighter socket
2
1
2
1
3
Do not forcibly insert or remove. May cause damage to the
When insert the AC adapter power plug into an
outlet or insert the DC adapter power plug into a
car cigarette lighter socket, charge start sound is
heard, charging LED illuminates, and charging
starts.
When Charge end sound is heard and charging
LED turns off, charging is complete.
When removing the connector, always hold the release buttons
on both sides (1) and unplug it by pulling out horizontally (2).
external connector terminal and the connector.
Pull the adapter out of the outlet or cigarette lighter socket if it will
not be used for a long time.
Do not forcefully pull the external connector terminal cover. May
damage the cover.
Do not place objects near the FOMA terminal when charging. The
FOMA terminal may be damaged. In addition, a display may be
damaged when charged in the viewer position.
When using a DC adapter
The DC adapter should only be used in negative grounded
vehicles (12 and 24 VDC).
Do not use with the car engine shut off. May drain the car battery.
The DC adapter fuse (2A) is a consumable. For replacement,
purchase a new fuse at a local automobile supply shop.
Refer to the FOMA DC Adapter 01/02 user’s guide for details.
Charging using the desktop holder
[Read “Desktop holder SH19 (sold separately) user’s
guide” carefully.]
Battery pack can be charged in the viewer position.
Charging is not available with the FOMA terminal open.
Face the side with the arrows of the AC adapter
1
connector up and insert it into the connector
terminal of the desktop holder.
Keeping the connector parallel with the desktop holder, firmly
push it all the way in until it clicks.
Insert the AC adapter power plug into an outlet.
2
Continued on next page
Before Using the Handset
53
Page 56

Place the FOMA terminal into the desktop holder.
3
Connector
(Face the side with the arrows up)
1
2
FOMA AC Adapter 01/02
100 VAC outlet
Charging/Called LED
Note
Making the desktop holder stand up
Make the stand behind the desktop holder stand up so that
charging becomes available with the desktop holder stood up.
Do not force to make the stand behind stand up.
"
Battery level is still sufficient.
#
Battery level is low.
$
Battery is almost empty. Charge the
battery.
%
Battery is empty (Power will turn off
soon).
{
Battery pack is being charged.
3
Charge start sound is heard, Charging LED
illuminates, and charging starts.
Before Using the Handset
Keeping the connector parallel with the desktop holder as
shown below, firmly push it all the way in until it clicks.
Do not open the FOMA terminal with the terminal placed in the
desktop holder.
When Charge end sound is heard and charging
4
LED turns off, charging is complete.
Hold the desktop holder and lift the FOMA terminal out.
54
Pull the AC adapter out of the outlet when left unused for a long
period of time.
When Charge start sound is not heard or when charging LED does
not illuminate, check that the FOMA terminal is placed securely in
the desktop holder (except when terminal is turned off, Manner
mode is set or Charge start sound is Silent).
When placing the FOMA terminal in the desktop holder, be careful
that the strap is not caught in between the handset and the
desktop holder.
Battery level
How to check the battery level
Page 57

Checking the battery level with sound and display
Note
Initial settings
screen
Stand-by display
In the Custom menu, select [Settings]/[General
1
settings]/[Check status]/[Battery level].
Graphic
Sound Three beeps Two beeps One beep
Status
Wait approximately 2 seconds and the display disappears.
The battery level sound is heard at the volume set in Key/
Standby i-motion (nP. 110).
Battery is
sufficiently full.
Battery is
running low.
Battery is almost
empty. Charge
the battery.
If the battery runs out
[Battery empty. Unsaved data will be lost. Ending
current operation] appears if battery starts to run out
(Press t to clear the message). After a while, an
alert tone sounds. The warning screen stating that
the battery runs out appears, handset operations are disabled and
power turns off after approximately 60 seconds.
During a voice/Videophone call, the alert tone sounds and [Battery
empty. Unsaved data will be lost. Ending current operation]
appears. The call is disconnected after approximately 20 seconds.
At the same time, the screen above appears and after
approximately 60 seconds, the power turns off.
Alert tone does not sound when Manner mode or Public mode
(Drive mode) is set (Alert tone sounds during a call).
Power ON/OFF
Turning the power on and off
Turning the power on
Press H (for 2+ seconds).
1
It may take some time for the wakeup
screen to appear.
The wakeup screen appears followed by the
initial settings screen. Proceed to Initial
setting (nP. 56).
If initial settings have been completed, the
screen shown on the right appears when
power is turned on. This screen is called the
“stand-by display”.
Welcome mail
“Welcome$SH906i%&” is saved by
default.
To check a welcome mail: In stand-by, press
t/select the stock icon C (mail
message)/t.
• For details on the following operations
nP. 209
If initial settings are not yet completed, the setting screen appears
every time the power is turned on.
If the FOMA card is not inserted, [Insert UIM] and a FOMA card
error appear (nP. 37).
When [Enter PIN1 code] appears, enter the PIN1 code
(nP. 131).
Before Using the Handset
Continued on next page
55
Page 58

When a FOMA card is replaced with a new card, the terminal
Note
Note
security code (four to eight digits) must be entered after turning on
the terminal. If a correct terminal security code is entered,
Before Using the Handset
stand-by display appears. When a wrong terminal security code is
entered five times, the power is turned off. However, turning on the
power again is possible.
When A appears, the handset is outside the service area or in a
place with no signal. Move to a place where the icon disappears.
Turning the power off
Press H (for 2+ seconds).
1
It may take some time for the power to be turned off (The end
screen appears on the display until the power is turned off).
Select language
Switching the display to English
In the Custom menu, select [Settings]/[一般設
1
定]/[Bilingual]/[English].
To switch the display language from English to Japanese: In the
Custom menu, select [Settings]/[General settings]/[Select
language]/[日本語].
If a FOMA card is inserted, settings are saved to the FOMA card
as well. When the setting of the FOMA terminal handset and the
setting of the inserted FOMA card are different, the setting in the
FOMA card is prioritized.
Initial setting
Making the initial setting
The initial settings screen appears automatically when the
power is turned on for the first time. Each setting item can
also be set from Menu (When the initial settings are
complete, the stand-by display appears).
Date and time settings Change terminal security code
Key/Standby i-motion Location provision
Font size settings
When items that have not been set remain, the setting screen
appears every time the power is turned on.
Set the date and time (nP. 57).
1
Set the date and time from 00:00 January 1, 2001 to 23:59
December 31, 2050.
Register a terminal security code (nP. 129).
2
Set the Key/Standby i-motion (nP. 110).
3
Set GPS Location provision ON/OFF (nP. 273).
4
Set the font size (nP. 124).
5
When the initial settings are complete, the software update
function confirmation screen appears. Read the description and
select [Agree] (When the initial settings are made from the
menu or the software update is set to other than [auto-update],
the confirmation screen does not appear).
Press H to cancel the initial settings.
56
Page 59

Date settings
Note
Setting the date and time
Set the date and time on the FOMA terminal. Set to
automatically correct the date and time.
In the Custom menu, select
1
[Settings]/[General settings]/
[Date settings].
Select the [Auto time correction] field/t/select
2
the setting.
Select [ON]/i.
Select [OFF]/select the [Date] field/t/enter the date/
t/select the [Time] field/t/enter the time (24-hour
format)/t/i.
When entering month, day and time, add 0 before numbers one
through nine (example: 01, 02, 03, etc.).
The date and time that are set are saved even if the battery pack is
removed, but if the battery pack remains removed for
approximately a week or more or the battery remains empty, the
settings may be reset. When this happens, set again after
charging the battery.
If the date and time are not set correctly, the following functions
cannot be used properly.
Redial, Received calls Auto power ON/OFF
Alarm Schedule
SSL (authentication) i-appli Auto start
Starting i-appliDX Reception, Recording
Machi-chara
Record message (voice), Record message (Videophone calls)
Camera image titles/shooting date
Playback or view of i-motion/music data/e-comic with replay
restrictions
When Auto time correction is set to [ON]
The FOMA automatically adjusts the time by connecting to the
DoCoMo network’s time information.
When time difference is adjusted, [Time adjusted] appears. When
Auto time correction is set to [ON], the time is sometimes not
adjusted for a while. To activate Auto time correction, turn off
FOMA terminal power and restart.
Time is not adjusted depending on the signal status.
Time may be off by a few seconds.
When time difference is adjusted overseas, the local time and date
and ! appear in Redial, Received calls, Received/Sent messages
history (SMS only), and Received/Sent messages list. The
received/sent messages are not displayed in order of the
displayed time and date but the mail reception/send.
! does not appear in the Unsent messages for mail messages. If
the date order display is set for the Unsent messages, unsent
messages are displayed in the order of the displayed time and
date.
Time correction may not be performed depending on the overseas
network.
Before Using the Handset
Continued on next page
57
Page 60

During overseas use, Japan time and local time (or time set in
Related Operations
Note
Related Operations
Note
Related Operations
City) appear in the dual display except for the following cases.
When Auto time correction is set to [ON] and time correction
Before Using the Handset
information is not being received from an overseas network
When Auto time correction is set to [OFF] and City is set to the
city in the same time zone as Japan
Change the time zone manually <City>
In the Date settings screen, select the [Auto time
correction] field/t/[OFF]/C/select a time zone/
t/select a city/t/i.
Notify caller ID
Sending your own phone number to the other party
Display your number (caller ID) on the other party’s phone
(display) when making a voice/Videophone call or
transmission PushTalk.
Handset number (caller ID) is important personal information. Be
very careful about your caller ID setting.
The Notify caller ID function is available only on compatible phone
devices.
Setting up Notify caller ID/No caller ID in advance
In the Custom menu, select [Settings]/[NW
1
Services]/[Notify caller ID]/[Notify caller ID].
Select the setting.
2
To notify caller ID: Select [Yes].
To not notify caller ID: Select [No].
Notify caller ID cannot be set from outside the service area.
Check the Notify caller ID setting
In the Custom menu, select [Settings]/[NW Services]/
[Notify caller ID]/[Check setting].
Own number
Checking your phone number
In the Custom menu, press 0.
1
When a change for the Number B of 2in1 or a FOMA card
exchange (2in1 subscriber b 2in1 subscriber) is performed, use
any of the following methods to obtain the correct Number B.
Set 2in1 function OFF and then perform 2in1 setting again to
set 2in1 function ON
Check the 2in1 subscription
When a FOMA card exchange (2in1 subscriber b 2in1
nonsubscriber) is performed, set 2in1 function OFF.
Show a phone number during voice call
During a voice call, press C/[Own number].
Show a phone number during a Videophone call
During a Videophone call, press C/[Own number].
In the Dual mode (while using 2in1), switch between
own numbers of Number A and Number B
In the Own number screen, press i.
58
Page 61

Voice/Videophone Calls
Making calls/Videophone calls
Using Videophone. . . . . . . . . . . . . . . . . . . . . . . . . . . . . . . . . . . . . . 60
Making calls/Videophone calls . . . . . . . . . . . . . . . . . . . . . . . . . . . . 61
Switching between a voice call and a Videophone. . . . . . . . . . . . . 62
Using Redials/Received calls . . . . . . . . . . <Redial/Received calls>63
Using Chaku-moji . . . . . . . . . . . . . . . . . . . . . . . . . . . <Chaku-moji>65
Setting caller ID to send/not send for a single call
. . . . . . . . . . . . . . . . . . . . . . . . . . . . <Send own no./No caller ID>67
Sending touch-tone signals. . . . . . . . . . . . . . . . . . . . . <Pause dial>67
Making international calls . . . . . . . . . . . . . . . . . . .<WORLD CALL>68
Setting an international call. . . . . . . . . . . . . . . . . . <Int’l dial assist>68
Setting a first number to phone numbers . . . . . . . . . . .<Int’l prefix>69
Making calls with sub address set . . . . . . . . . . . . . <Sub address>70
Reconnecting disconnected calls automatically
. . . . . . . . . . . . . . . . . . . . . . . . . . . . . . . . . . . <Reconnect signal>70
Reducing noise interference to hear calls clearly
. . . . . . . . . . . . . . . . . . . . . . . . . . . . . . . . . . . . .<Noise reduction>70
Using the handset in a car . . . . . . . . . . . . . . . .<In-car hands-free>70
Answering calls/Videophone calls
Answering calls/Videophone calls. . . . . . . . . . . . . . . . . . . . . . . . . . 71
Switching between a voice call and a Videophone. . . . . . . . . . . . . 72
Answering calls by pressing any key . . . . . . . . .<Any key answer>72
Closing the FOMA terminal to end/hold calls . . .
Adjusting the volume. . . . . . . . . . . . . . . . . . . . . <Earpiece volume>73
<Set when folded>73
When calls/Videophone calls cannot be answered/
could not be answered
Placing calls on hold . . . . . . . . . . . . . . . . . . . . . . . . . . . .<On hold>73
Setting the On hold/Hold tone . . .<Set on hold tone/Set hold tone>74
Using the Public mode (Drive mode) . . . . <Public mode (Drive mode)>74
Using the Public mode (Power OFF) . . . . <Public mode (Power OFF)>75
Checking Missed calls . . . . . . . . . . . . . . . . . . . . . . . <Missed calls>76
Recording messages when calls cannot be answered
. . . . . . . . . . . . . . . <Record message (voice/Videophone calls)>77
Recording messages when incoming calls cannot be answered
. . . . . . . . . . . . . . . . . . . . . . . . . . . . . . . . . . . . .<Quick message>79
Playing/Deleting Recorded messages or Voice memos
. . . . . . . . . <Play/Delete Recorded messages or Voice memos>79
Chara-den . . . . . . . . . . . . . . . . . . . . . . . . . . . . . . . . . . . . . . . . . . . . 80
Setting the image to send . . . . . . . . . . . . . . . . . . . . . . . . . . . . . . . . 80
Setting Hands-free Videophone . . . . . . . . . <Hands-free V.phone>82
Setting the image during Videophone calls. . . . . . . . . . . . . . . . . . . 83
Changing the Videophone settings . . . . . . . . . . . . . . . . . . . . . . . . . 83
Setting to switch between a voice call and a Videophone
. . . . . . . . . . . . . . . . . . . . . . . . . . . . . . . . . . <Notify switch mode>84
Selecting actions for incoming Videophone calls during i-mode
. . . . . . . . . . . . . . . . . . . . . . . . . . . . . . . .<V-phone while packet>84
Saving the other party’s image as a still picture
. . . . . . . . . . . . . . . . . . . . . . . . . . . . . . . . . . . . . . <Picture memo>84
59
Page 62

Note
The screen shown is only an example.
The actual screen may differ.
1Main screen: Other party’s image
(default)
2Subscreen: Your image (default)
3The brightness of your camera
image
S
QRSTU
Dark c Normal b Bright
3 4
2
1
5
6
Using Videophone
A Chara-den or still picture is sent to the other party as your
image. The camera on the rear side can be used to send
Voice/Videophone Calls
surroundings and your own image.
When using Videophone call, the [キャラ(女性)] of Chara-den is sent
to the other party as default setting. When making a Videophone call
while viewing each other’s face, refer to “When making a
Videophone call while viewing each other’s face” on P. 81.
To change the substitute image to be sent nP. 82
Videophone transmits at 64K (kbps).
When the other party answers the phone, [Connected to
videophone press l key to enable/disable hands-free] appears.
Digital transmission fees are incurred from this point.
Videophone calls cannot be made to emergency numbers (110,
119, and 118).
A Videophone communication is available only between terminals
compatible with the DoCoMo Videophone.
To talk while viewing each other’s image during a Videophone call,
use the flat-plug earphone/microphone with switch (sold separately)
(nP. 400) or use Hands-free.
DoCoMo Videophones comply with “3G-324M
international 3GPP
Videophones using other standards.
*1 3G-324M: International standard for Videophone systems for
third-generation mobile Videophones.
*2 3GPP (3rd-Generation Partnership Project): A regional
standardization organization to establish the common technical
specifications for third-generation mobile telecommunication
systems (IMT-2000).
60
*2
standard”. Connection is not available with
*1
as defined by the
Viewing the screen during Videophone calls
4Send image icon
Appears while sending Chara-den in the Full-action mode
7
Appears while sending Chara-den in the Part-action mode
8
Appears while sending a still picture as a substitute image
6
Appears while sending a camera image
5
Appears while pausing a camera image
0
Appears while sending a still picture from My picture of Data
9
box
5Receive image icon
Appears when shooting and saving images of the other
!
party
6Call duration
An approximate call duration appears on the screen. When the
call duration exceeds 9:59:59, the display resets to 0:00.
The display brightness during a Videophone call follows the
setting of the Original Eco mode in Light/Power saver.
Page 63

Making calls/Videophone calls
Note
Calls may be interrupted even when the signal is strong (]
appears) and you are not moving.
To call selecting a Multi Number nP. 435
To call selecting a phone number when the 2in1 is used nP. 436
In stand-by, enter a phone
1
number.
Always enter the area code even when the
number is in the same area.
Enter up to 80 digits.
To erase the last digit: Press c.
To erase all digits: Press c (for 1+
seconds).
Press s (Phone)/i (V.phone).
2
Unlike ordinary telephones, mobile phones send call tones in
short beeps before the standard ring tone.
When the other party is busy, there is a busy signal. Disconnect
and try again later.
Operation during a voice call
To display your own phone number: Press C/[Own number].
To enable/disable Hands-free: Press s (for 1+ seconds).
Operation during a Videophone call
To display your own phone number: Press C/[Own number].
To enable/disable Hands-free: Press s.
To switch between My side and Substitute image: Press i.
To set the light: Press C/[Videophone]/[Lighting]/select
the setting/t.
Press H to end the call.
3
When the 2in1 mode is set to [Dual mode], the screen for selecting
a phone number appears after step 2. Select the phone number
from [Number A]/[Number B].
Voice calls
Calls can be made even when steps 1 and 2 are reversed. If no
operations are performed for approximately 5 seconds after
entering the phone number, the call is made.
Videophone calls
A Videophone call is not connected when placed to an
unsupported handset. In addition, it is not connected to devices for
which 64K cannot be used due to network conditions.
If Call Waiting is subscribed to, the number is recorded in
Received calls and the stock icon B (missed call) appears when
a voice/Videophone call is received during a Videophone call.
When the sending/receiving of audio or video fails, the
Videophone call is not automatically restored. Make the
Videophone call again.
When the Videophone call does not connect
When the Videophone call does not connect, a message
explaining the reason appears. The other party’s actual conditions
may vary depending on the type of phone and network service
subscriptions.
[Check number, then redial]: A call is made to unused phone
number.
[Busy]: The other party is engaged in a call (The message may
appear during a packet transmission depending on the other
party’s terminal).
[Your call is being forwarded]: The other party’s handset is set
to forward Videophone calls.
[Out of service area/power off]: The other party is outside the
service area, or their mobile phone is turned off.
[Set caller ID to on]: Connected without notifying the caller ID
(When calling the visualnet, etc.).
Voice/Videophone Calls
Continued on next page
61
Page 64

[Redial using voice call]: The other party’s handset is set to the
Related Operations
Note (Related operations)
Call Forwarding Service and the forwarding destination does
not support Videophone.
[Busy with packet transmission]: The other party is performing a
Voice/Videophone Calls
packet transmission.
[Upper limit has been exceeded. Connection failed]: Upper limit
that has been set by payment plans with limit function (Type
Limit or Family Wide Limit) has been exceeded.
[Please make your call from the i-mode web page]: A
Videophone call is directly made to the V-live which should be
accessed after connecting to i-mode. Access a site run by the
contents provider and view it by making a Videophone call from
the link.
[Connection failed]: Appears in cases other than those any
reasons.
Hands-free
For precautions on using Hands-free n“Setting Hands-free
Videophone” on P. 82
Hands-free is available while making a voice call or calling. Not
available while receiving a call.
Hands-free is disabled when a call ends.
Place calls on hold <Hold Active Call>
1 During a call, press C/[Hold Active Call].
Alternatively, press t during a Videophone call.
2 To resume a call, press s.
Alternatively, press C during a voice call.
Press i during a Videophone call to resume with a
camera image.
Add to the phonebook during a voice call
<Add to phonebook>
During a voice call, press C/[Add to phonebook]/add
to the phonebook.
Hold Active Call
The other party hears the hold tone, and the call is placed on
hold. For Videophone calls, the image set in Hold image is sent
to the other party. The image is sent to the other party with
[Hold] superimposed.
Calls stay on hold even when the FOMA terminal is closed. Set
when folded does not apply.
Switching between a voice call and
a Videophone
Switch between a voice call and a Videophone for placed
calls.
The Notify switch mode must be set to “Activate” for the other
party’s FOMA terminal.
Received calls cannot be switched. Have the other party switch.
Press C during a call/[Switch to v.phone]/[chg to
1
voice call]/[Yes].
Alternatively, press a to switch.
Switching takes approximately 5 seconds. Switching may take
more time depending on the signal status. [Please wait for a
while] appears and a guidance message is played.
62
Page 65

Note
Calls cannot be switched while 1Seg is being activated.
Switching from a voice call to a Videophone
Redial list Received calls list
Types of
calls
Types of received calls
When switching between a voice call and a Videophone, the call
duration resets to 0 seconds.
Calls may not be switched from a voice call to a Videophone nor
from a Videophone to a voice call and may be disconnected
depending on the signal status.
Switching is not included in the talk time and charges are not incurred.
Switching from a voice call to a Videophone
The other party’s camera image does not appear if the other party
selects to not show image.
When performing packet transmissions, disconnect the packet
transmission before switching to Videophone.
If a call is switched to Videophone, Hands-free is activated
regardless of the call status before the switching.
Calls received with Call Waiting cannot be switched from a voice
call to a Videophone.
Switching from a Videophone to a voice call
Hands-free is disabled.
Redial/Received calls
Using Redials/Received calls
The FOMA terminal keeps a record of the 30 most recent phone
numbers to which calls were made (including PushTalk).
If the same number was called multiple times, only the most recent
is recorded. However, when 186 or 184 are added to a phone
number, the call is recorded as a separate redial.
Each call is recorded in Redial if the PushTalk transmission is sent
to multiple parties or the call is made using the PushTalk group or
PushTalkPlus.
When 2in1 is used, up to 30 Redials of each Number A and Number
B are saved respectively.
Name appears if saved in the phonebook.
For PushTalk, the other party’s name or the PushTalk group name
appears.
In stand-by, press r (I) (Redial)/q (M)
1
(Received calls).
To display the details screen: Select a phone number/t.
To switch between the Redial and Received calls list screens:
Press i.
To switch between Next and Previous: Press v.
Continued on next page
Voice/Videophone Calls
63
Page 66

Types of calls
Note
Related Operations
No icon Voice call
Videophone call
B
64K data communications (Only for Received calls)
Voice/Videophone Calls
x
International call
w
1 to 3
ab
ac
ad
Types of received calls
Select a phone number and dial.
2
Voice call: Press s.
Videophone: Press t/i.
PushTalk: Press < (q).
Multi Number outgoing/incoming call (Only when
Multi Number is set)
Number B outgoing/incoming call (Only when the
a
2in1 [Dual mode] is used)
Chaku-moji (Only for Received calls)
e
PushTalk (When transmitted to one person)
PushTalk (When transmitted to multiple people)
PushTalk (Using PushTalkPlus)
Calls that were answered or put on hold
g
Calls that left a recorded message
I
Calls that were not answered, calls that forwarded
to a forwarding number or Voice Mail Service
center, or calls that were rejected because of Reject
calls (nP. 138), Accept calls (nP. 138), Reject
D
unknown (nP. 140), Reject calls by reason of
non-disclosure (nP. 139), Public mode (Drive
mode) (nP. 74)
Even if a call is switched between a voice call and a Videophone,
the received call type depends on the type used when the call was
made or answered.
When a call is received from a caller using Dial-in, a number
different from the caller’s Dial-in number may appear.
If a call is made from Received calls with Chaku-moji, the received
Chaku-moji is not sent.
If the same number is saved in the phonebook, the name with the
smallest memory number appears.
Add to the phonebook from Redials/Received calls
<Add to phonebook>
1 In the list screen, select a phone number/C.
In the details screen: Press C.
2 Select [Add to phonebook]/add to the phonebook.
Delete Redials/Received calls <Delete>
1 In the list screen, select a phone number/C/
[Delete].
In the details screen: Press C/[Delete one]/[Yes].
2 Select the deletion method.
Select [Delete one].
Select [Delete all]/enter the terminal security code/
t.
3 Select [Yes].
Compose a message from Redials/Received calls
<Compose message>
1 In the list screen, select a phone number/C.
In the details screen: Press C.
2 Select [Compose message]/compose and send a
message.
64
Page 67

Add a phone number and the date and time of Redials/
Note (Related operations)
Chaku-moji
Received calls in the schedule
1 In the list screen, select a phone number/C.
In the details screen: Press C.
2 Select [Create schedule]/save a schedule.
Perform Display all/Limit display
In the list screen/details screen, press C/[Display all]/
[Limit display].
Check the ringing time from Received calls
In the details screen, press C/[Ringing time].
Deleting
If all Redials are deleted, Chaku-moji Sent messages are also
deleted.
If all Redials/Received calls are deleted, all Redials/Received
calls of Number A and Number B are also deleted respectively.
Display all/Limit display
When Set mute ring time is set to [ON] and Missed call history is
set to [OFF] and the following call not saved in phonebook is
received, the number does not appear in Received calls.
The call is disconnected during mute seconds duration
The call is disconnected due to weak signal strength
However, select [Display all] to show Received calls.
Ringing time
Ringing time cannot be checked for items with g in the
received calls list screen.
A ringing time of [0:00] appears when a call is rejected due to
Reject calls, Accept calls, Reject unknown, Reject calls by
reason of non-disclosure and Public mode (Drive mode)
settings.
<Create schedule>
<Display all/Limit display>
<Ringing time>
Chaku-moji
Using Chaku-moji
Send a message (Chaku-moji) at the same time when making
a voice call or Videophone call to display it on the other
party’s ringing phone and to previously tell the points.
Send up to 10 single/double-byte characters, pictographs or symbols.
Charges are applied to the sender side. Not applied to the receiver side.
Refer to the DoCoMo website or “Mobile Phone User’s Guide
[Network Services]” for details and compatible models of Chaku-moji.
While All lock is set or Function lock is applied to Chaku-moji,
Chaku-moji is not displayed even if it is received. When the lock is
disabled, the message contents can be checked in the received
calls details screen.
Chaku-moji appears only while a call is receiving (calling). When
the call is answered, Chaku-moji disappears.
Example: When Chaku-moji is received for a voice call
Editing and setting message
■ Saving a message <Create message>
Save up to ten messages.
In the Custom menu, select [Settings]/[Other NW
1
Services]/[Chaku-moji]/[Create message].
Select a number/ i.
2
To check a saved message: Select a number/t.
Continued on next page
Voice/Videophone Calls
65
Page 68

Enter a message/t.
Note
Related Operations
3
■ Enabling/Disabling a message display
<Message display>
In the Custom menu, select [Settings]/[Other NW
1
Voice/Videophone Calls
Services]/[Chaku-moji]/[Message display].
Select the display method/t.
2
Dialing with message <Chaku-moji>
In stand-by, enter a phone number/m (or C/
1
[Chaku-moji]).
Select a message.
2
Select [Create message]/enter a message/t.
Select [Select message]/select a message/t.
Select [Sent messages]/select a message/t.
Press s (Phone)/i (V.phone).
3
On Redial voice call, Chaku-moji used when a Videophone was
dialed will be automatically sent.
In the following setting, transmission charges are applied.
When the sending result does not appear even if the other party
has sent Chaku-moji, due to the signal strength
When a call is shorter than the set ringing time of the Set mute
ring time
When the call recipient is in the following setting, Chaku-moji does
not appear and transmission charges are not incurred even if
dialed with Chaku-moji.
When the recipient’s terminal does not support Chaku-moji
When a call is received from numbers rejected by the message
display settings
In addition, when the call recipient is in the following setting or status,
the send results do not appear on the sender side display
(Chaku-moji is not recorded in Received calls on the receiver side).
When the handset is outside the service area or the power is
turned off
When the Public mode (Drive mode) is set
When the answering duration for Record message is set to [0
seconds]
The ten most recently sent messages are recorded as Sent
messages.
For overseas usage, Chaku-moji cannot be sent or received.
Chaku-moji does not support PushTalk.
If Chaku-moji reaches the recipient, [Transmission completed]
appears and transmission charges are incurred.
Alternatively, press m or display Submenus in the Phonebook,
Redial or Received calls details screen to make calls with
messages.
66
Delete Sent messages
1 In step 2 of “Dialing with message”, select [Sent
messages]/select a message/C.
2 Select the deletion method.
Select [Delete one].
Select [Delete all]/enter the terminal security code/t.
3 Select [Yes].
Page 69

Note
Related Operations
Send own no./No caller ID
Setting caller ID to send/not send for a single call
Specifications made when making a call take priority over the
method for setting in advance (nP. 58).
In stand-by, enter a phone number/C/[Caller ID
1
setting].
Select the setting.
2
To notify caller ID: Select [Send own no.].
To not notify caller ID: Select [No caller ID].
To follow the Notify caller ID of the network service (nP. 5 8 ) :
Select [As NW setting].
Press s (Phone)/i (V.phone)/< (q) (PushTalk).
3
Alternatively, set caller ID from Submenus in the Phonebook,
Redial or Received calls details screen.
The method for specifying the caller ID setting when making a
voice call is available for PushTalk transmissions. However, the
setting cannot be made by entering a phone number after 186 or
184 is selected.
Add 186 when dialing (Send own no.)
In stand-by, press 186/enter a phone number/
s (Phone)/i (V.phone).
Add 184 when dialing (No caller ID)
In stand-by, press 184/enter a phone number/
s (Phone)/i (V.phone).
Pause dial
Sending touch-tone signals
Use services such as ticket reservations and bank balance
inquiries, with simple operations by saving the combinations
of phone numbers and messages (numbers) in the phonebook.
Send touch-tone signals of the pressed number one at a time
during a call by pressing the dial keys.
• While sending Chara-den: Press C/[DTMF mode]/[ON]/
enter numbers to send.
• To send touch-tone signals while sending your face image to the
other party nP. 81
Saving touch-tone signals to the phonebook
Enter a phone number in the phonebook/o.
1
Press o to enter a pause [P]. Alternatively, slide the finger up
on the Optical TOUCH CRUISER to enter it.
Enter the number to send/t.
2
Enter the number and press o to continue adding numbers.
Save the phonebook entry.
3
Sending messages using touch-tone signals
Pause dial is available only for voice calls.
Make a voice call from the phonebook with a
1
touch-tone signal.
The numbers after [P] appear on the screen.
Press i at the appropriate time to send.
2
The numbers after [P] are sent with touch-tone signals.
When multiple numbers separated by [P] are saved, press i
for each number.
Some equipment may not be able to receive signals properly.
Voice/Videophone Calls
67
Page 70

WORLD CALL
Making international calls
WORLD CALL is an international calling service available
from DoCoMo mobile phones.
Voice/Videophone Calls
“WORLD CALL” is registered when FOMA services are
registered (Registration for “WORLD CALL” is optional).
[Calling Method] 010 O Country code O Area code (city code)
O Other party’s phone number O s
Alternatively, call with 009130 O 010 O Country code O Area
code (city code) O Other party’s phone number O s.
The calling method shown above can be saved on the FOMA
terminal phonebook.
For area codes (city codes) that begin with 0, omit the 0 when
entering (However, include the 0 when making a call to landline
phones in some countries or regions such as Italy).
Call to about 240 countries and regions worldwide.
“WORLD CALL” charges are billed with the monthly mobile phone charges.
Subscription and monthly usage fees are free.
Check an estimate of the most recent call duration on the display
when using the WORLD CALL (nP. 397).
For further details on WORLD CALL, contact the number listed in
“General Inquiries” on the back of this manual.
To make an international call through a company other than DoCoMo,
contact the representative companies directly for instructions.
Some payment plans may not be available.
When calling Videophone compatible specific overseas 3G mobile
phone customers, use “International Videophone” by making the call
in Videophone mode after the entering method above.
Refer to the DoCoMo website for information on available
countries and telecommunications carriers.
Depending on the other party’s international Videophone terminal,
the image that appears on the FOMA terminal may be distorted, or
the connection may not be possible.
Int’l dial assist
Setting an international call
Automatically adding the international access
code/country code <Auto conversion>
When making an international call from Japan, enter [+] before dialing
the overseas number to automatically place the international access
code. When making an international call to Japan, convert the first [0] in
the phone number to the country code automatically and make a call.
In the Custom menu, select [Settings]/[Phone
1
settings]/[Other settings]/[Int’l dial assist]/
[Auto conversion].
Select the [Int’l prefix conv] field/t/[ON].
2
Set international access codes as auto prefix in the IDD prefix setting.
Select the [Country code conv] field/t/[ON]/
3
select the country to add/t.
Select among country codes saved in the Set country code.
Press i.
4
■ Entering [+] to make an international call
Press 0 for 1+ seconds to enter [+].
In stand-by, press 0 (for 1+ seconds)/enter the
1
country code, area code (city code) and other
party’s phone number/s.
The number with the international access code, which is
converted from [+], appears.
Select [Call].
2
To not convert [+] to the international access code: Select
[Original number].
68
Page 71

Setting numbers other than WORLD CALL
<IDD prefix setting>
Save up to ten international access codes used when international
calls are made from Japan.
In the Custom menu, select [Settings]/[Phone
1
settings]/[Other settings]/[Int’l dial assist]/
[IDD prefix setting].
Select a number to save as a new entry/t.
2
To change a saved number: Select a number/t/[Change].
To delete a saved number: Select a number/t/[Delete]/
[Yes].
To set/disable Auto prefix: Select a number/t/[Prefix/
cancel].
• w appears to the right of the name.
Enter a name/t.
3
Enter up to 14 single-byte (7 double-byte) characters.
Enter a prefix/t.
4
Press 0 for 1+ seconds to enter [+].
Enter up to 16 digits.
■
Selecting an international access code
Enter only the country code, area code (city code) and the phone
number to make international calls.
In stand-by, enter the country code, area code (city
1
code) and other party’s phone number/C.
In the phonebook entry details screen: Press C/[Number
settings].
In the details screen of Redials/Received calls: Press C.
Select [Add prefix setting]/[International Call].
2
Select the international access code/t/s.
3
<International Call>
Setting country codes <Set country code>
Save up to 30 country codes to make international calls from overseas.
In the Custom menu, select [Settings]/[Phone
1
settings]/[Other settings]/[Int’l dial assist]/[Set
country code].
Select a number to save as a new entry/t.
2
To change a saved country code: Select a number/t/[Edit].
To delete a saved country code: Select a number/t/
[Delete]/[Yes].
Enter a country name/t.
3
Enter up to 14 single-byte (7 double-byte) characters.
Enter a country code/t.
4
Enter up to six digits including [+].
Int’l prefix
Setting a first number to phone numbers
Save up to five prefixes, including international access codes, to
place at the beginning of phone numbers. The numbers are also
available when calls are made from a phonebook, Redial or
Received calls.
In the Custom menu, select [Settings]/[Phone
1
settings]/[Other settings]/[Int’l prefix].
Select a number to save as a new entry/t.
2
To change a saved number: Select a number/t/[Change].
To delete a saved number: Select a number
Enter a prefix/t.
3
Press 0 for 1+ seconds to enter [+].
Enter up to 16 digits.
/t/
[Delete]/[Yes].
Voice/Videophone Calls
69
Page 72

Note
Note
Calling with prefixes <Select prefix>
In stand-by, enter a phone number/C.
1
In the phonebook entry details screen: Press C/[Number
Voice/Videophone Calls
settings].
In the details screen of Redials/Received calls: Press C.
Select [Add prefix setting]/[Select prefix].
2
Select a prefix/t/s.
3
Sub address
Making calls with sub address set
Using a sub address allows calls to be made to specific
terminals when calling an ISDN terminal.
A sub address is a number assigned to a terminal when there are
multiple ISDN terminals for a single ISDN line. It is used in selecting
contents for V-live.
In the Custom menu, select [Settings]/[Phone
1
settings]/[Other settings]/[Sub address]/[ON].
■ Making calls with sub address set
Ask the other party for their phone number and sub address.
In stand-by, enter a phone number, press * and
1
enter a sub address/s.
If b is entered at the beginning of a phone number or after 186,
184 or a prefix, the numbers after
number.
70
b
are recognized as the phone
Reconnect signal
Reconnecting disconnected calls automatically
Reconnect signal is also available for PushTalk transmissions.
The amount of time that can elapse to reconnect varies depending on
the signal strength. The estimated time is approximately 10 seconds.
The other party hears no sound until the call is reconnected (up to
approximately 10 seconds). Charges are incurred for this duration.
In the Custom menu, select [Settings]/[Phone
1
settings]/[In-call settings]/[Reconnect signal].
Select an alarm tone/ t.
2
Noise reduction
Reducing noise interference to hear calls clearly
It is recommended that this function be kept set to [ON].
In the Custom menu, select [Settings]/[Phone
1
settings]
Noise reduction processes sound to make conversations clearer.
Sound quality may vary depending on the surrounding noise and
the tone of the voice.
In-car hands-free
/
[In-call settings]/[Noise reduction]/[ON].
Using the handset in a car
Connect the In-Car Hands-Free Kit 01 (sold separately) or
hands-free devices such as car navigation to the FOMA
terminal, and make/receive voice calls from the device.
Page 73

Bluetooth connection (wireless) is also available (nP. 407).
Note
Note
Refer to the user’s guide of each product for details on hands-free
devices.
Use a FOMA In-Car Hands-Free Cable 01 (sold separately) for the
In-Car Hands-Free Kit 01.
Functions such as display settings, ring tones and Public mode
(Drive mode) call functions follow the FOMA terminal settings for
incoming calls.
If a hands-free device has sound enabled, the device plays a ring
tone even when the FOMA terminal is set to the Manner mode or
[Silent].
When the FOMA terminal sound is enabled, Set when folded is
followed if the handset is closed during a call. If the device sound
is enabled, the call continues when the FOMA terminal is closed
regardless of Set when folded.
Record message settings are followed even when the handset is
connected to the device.
Some handset functions may not be available depending on the
device characteristics and specifications.
When the caller does not send a caller ID, a non-disclosure
reason message appears.
• [User unset]: When the caller purposely withholds caller ID
• [Payphone]: When the call is received from a payphone
• [Unavailable]: When the caller cannot send a caller ID, such
as when the call is received from overseas or ordinary
(landline) telephones via various transfer services (However,
a caller ID may still appear depending on the company)
Operation while receiving a call
On hold (nP. 7 3)
Quick message (nP. 7 9)
Quick silent (nP. 11 3 )
Manner mode set/disable (nP. 11 3 )
Forwarding with Call Forwarding Service: Press C/[Forward calls].
Forwarding with Voice Mail Service: Press C/[Auto forward].
Call Rejection: Press C/[Call Rejection].
Press s.
2
For voice calls, calls can be received with Any key answer
(nP. 7 2 ).
To answer with a camera image (Videophone): Press i.
Press H to end the call.
3
Voice/Videophone Calls
Answering calls/Videophone calls
When receiving a call, verify it using the ring tone, called
LED, vibrator, and others.
When a call is received, the ring tone sounds and
1
the called LED flashes.
[Calling]/[Incoming videophone] appears while receiving a call.
When a caller ID is sent, the phone number appears. If the other
party’s name and phone number are saved in the phonebook,
they appear on the screen. When Picture call is saved in the
phonebook, the image appears on the screen.
For a Videophone call, when images are not received from the
other party, a black screen appears.
When Multi Number is used, a Multi Number name appears to the
right of [Calling]/[Incoming videophone] if a call is received from a
saved Multi Number.
Continued on next page
71
Page 74

When the handset beeps during a voice call indicating an
Switching from a voice call to a Videophone
Note
incoming call
When any of services such as Voice Mail, Call Waiting or Call
Forwarding is subscribed to and Set arrival act is set to “Activate”
Voice/Videophone Calls
while Arrival call act is set to [Answer], the following services can
be used when the handset beeps during a call.
Voice Mail Service (nP. 426)
Call Waiting (nP. 428)
Call Forwarding Service (nP. 429)
Switching between a voice call and a Videophone
The caller (other party) selects to switch between a voice call
and a Videophone.
The call recipient cannot switch (Available with models that support
switching between a voice call and a Videophone).
The Notify switch mode (nP. 84) must be set to “Activate” for the
recipient’s FOMA terminal.
The caller switches between a Videophone and a
1
voice call during a call.
Switching takes approximately 5 seconds. Switching may take
more time depending on the signal status. [Please wait for a
while] appears and a guidance message is played.
Switching from voice call to Videophone
A guidance message is played and the screen above appears.
Select [Yes] to send your image to the other party. Select [No] to
send an image of [テレビ電話代替] with [Camera Off]
superimposed.
Switching from Videophone to voice call
A guidance message is played before switching. Start
conversation in voice call.
Switching is not available when another screen is displayed from
the Multi Assistant, while a call is on hold, during a packet
transmission call, or when the FOMA terminal is closed. When any
function is activated from the Submenu, switching may not be
available.
Any key answer
Answering calls by pressing any key
Set Any key answer so that calls can be answered with the
keys other than the ones normally used.
Normal Any key answer
Voice ca ll s1 to 9, 0, *, t, w, i, m, a, c
Videophone s, i –
PushTalk s,
In the Custom menu, select [Settings]/[Phone
1
settings]/[Incoming settings]/[Any key
< (q)
answer]/[ON].
1 to 9, 0, *, t, i, C, m, a,
c, $
72
Page 75

Note
Set when folded
Closing the FOMA terminal to end/ hold calls
In the Custom menu, select [Settings]/[Phone
1
settings]/[Set when folded].
Select an item/t.
2
Select the setting/t.
3
When set to [Hold sound], the set hold tone plays. Hold tone can
be changed. For Videophone calls, the image set in Hold image is
sent to the other party.
When set to [Silent], the set hold tone does not play. For
Videophone calls, the Chara-den or still picture set in Substitute
image is sent to the other party.
When set to [Hold sound] or [Silent], open the FOMA terminal to
resume the call.
If a device such as a flat-plug earphone/microphone with switch
(sold separately) is connected, the call can continue while the
handset is closed regardless of Set when folded.
For voice/Videophone calls, if the earphone/microphone is
disconnected while the FOMA terminal is closed, the call will
become mute when [Silent] or [Finish call] is set, or the call is put
on hold when [Hold sound] is set. The call resumes when the
earphone/microphone is reconnected or the handset is open. For
PushTalk, if the earphone/microphone is disconnected while the
FOMA terminal is closed, the call can be continued through the
speaker whether set to Set when folded.
For PushTalk, when [Speaker phone] is set, open the FOMA
terminal to retrieve the transmission status of PT hands-free.
Set when folded is followed if the handset is switched to the viewer
position during a call.
Earpiece volume
Adjusting the volume
Select from [Volume 1] to [Volume 10].
The volume remains at an adjusted level even when the handset is
turned off or the battery pack is removed.
For details on adjusting the earpiece volume when in stand-by
nP. 110
During a call, press o/p.
1
Alternatively, select [Earpiece volume] from Submenu during a
Videophone call.
Adjust the volume with u.
2
After adjusting the volume, wait approximately 2 seconds and
the call display reappears.
On hold
Placing calls on hold
The other party is charged for the call while on hold.
If subscribed to Call Forwarding Service or Voice Mail Service, a
received call is forwarded to the set destination or connected to the
Voice Mail Service center (nP. 72).
During an incoming call, press H.
1
When a voice call is received, the other party hears the On hold tone.
When a Videophone call is received, the On hold image set by
your FOMA terminal is sent to the other party with [On hold]
superimposed.
The call is disconnected when H is pressed while on hold, or
when the other party disconnects the call (The call is saved in
Received calls).
Press s when ready to answer.
2
Press i during a Videophone call to answer with a camera image.
Voice/Videophone Calls
73
Page 76

Set on hold tone/Set hold tone
Setting the On hold/Hold tone
Set the on hold guidance and hold tone that the other party
hears.
Voice/Videophone Calls
The following guidances are preset as on hold tones.
[On hold tone 1]
ただいま電話に出ることができません。そのままお待ちになるか、
しばらくたってからおかけ直しください。
[On hold tone 2]
I can’t take your call now. Please hold the line for a moment or call
me back later, thank you.
In the Custom menu, select [Settings]/[Snd/
1
Vibrator/Manner]/[Hold/On hold tone].
Select an item/t.
2
Select an on hold tone/hold tone.
3
To select the preset on hold tone: Select [On hold tone 1]/[On
hold tone 2].
To select the preset hold tone: Select [Hold melody 1]/[Hold
melody 2].
To check the on hold tone/hold tone: Select an on hold tone/hold
tone/i.
To record and set the Voice memo: Select [Original]/
[Record]/record/[Play]/select a memo/i.
• To stop the recording: During recording, press t.
To set the recorded Voice memo: Select [Original]/[Play]/
select a memo/i.
Public mode (Drive mode)
Using the Public mode (Drive mode)
The Public mode is an automatic answering service used to
ensure the manner in public places. When a voice call is
received, the caller hears a message indicating you are
driving or otherwise unable to speak (on the train, bus, in a
movie theater, and others) and the call is disconnected.
Activating/Deactivating the Public mode is only available in
stand-by (Available even when A is showing on the screen).
Calls can be made normally in the Public mode.
This function is not available during data transmissions.
In stand-by, press * (for 1+ seconds).
1
The Public mode is set and _ appears.
If the Manner mode is also set, the Public mode setting is prioritized.
Disabling the Public mode (Drive mode)
In stand-by, press * (for 1+ seconds).
• The Public mode is disabled and _ disappears.
■ When the Public mode (Drive mode) is set
A ring tone does not sound when a voice/Videophone or PushTalk call
is received. The stock icon B (missed call) appears on the display
and the call is saved in Received calls (nP. 63).
When a voice call is received, the caller hears a message indicating
that you are driving or otherwise unable to speak and the call is
disconnected. When a Videophone call is received, the Public
mode video guidance is played to the other party and the call is
disconnected. If the handset is turned off or in a place with no
signal, the guidance for outside service area plays.
74
Page 77

The FOMA terminal will not vibrate when i-mode mail, SMS, or
Note
Message R/F is received even if the Vibration mode is set. Although
a ring tone does not sound, the message is received automatically,
and the received mail icon appears. When an Area Mail is received,
the dedicated alarm tone (beep sound), vibrator and called LED are
not activated.
When a data transmission is received, the vibrator, ring tone and
called LED are not activated.
An incoming PushTalk is automatically disconnected and
[Connection failed] appears on the caller’s display. The Driving
mode status can be notified to all connecting members if 3+ people
have participated.
If Location provision is set to [許可] for usage settings of each
service when location information provision, supported by GPS
function, is requested, a confirmation screen for location provision
is displayed, the GPS positioning screen appears, and the location
is provided after GPS positioning. However, Location provision/
accept, Location provision/notify, vibrator or called LED does not
operate. When Location provision is set to [毎回確認] for usage
settings of each service, location information is not provided.
For arrival call actions when the Public mode (Drive mode) and
various network services are set at the same time n“Arrival call
actions while the Public mode (Drive mode/Power OFF) and
various network services are set” on P. 76
Even if the alarm time arrives in the Public mode, the alarm does
not sound. The Called LED and vibrator are not activated.
Public mode (Power OFF)
Using the Public mode (Power OFF)
The Public mode (Power OFF) is an automatic answering
service used to ensure manner in public places. Set the Public
mode (Power OFF) to play a message for the caller indicating
that the power is off and you are unable to speak (in a hospital,
airplane, train near the priority seats), and the call ends.
In stand-by, press *25251/s.
1
The Public mode (Power OFF) is set (Nothing changes in stand-by).
When a call is received while the Public mode (Power OFF) is
set, a message indicating that the owner of the phone is currently
in a place that does not allow the mobile phone use is played.
Disabling the Public mode (Power OFF)
In stand-by, press *25250/s.
• The Public mode (Power OFF) is disabled.
Checking the Public mode (Power OFF) setting
In stand-by, press *25259/s.
• Check the current setting.
■ When the Public mode (Power OFF) is set
The Public mode (Power OFF) remains set until disabled. The setting is
not canceled when the power is just turned ON. The Public mode (Power
OFF) message is played when the handset is outside the service area or
in a place with no signal. When a call is received, a message indicating
that the owner of the phone is in a place that does not allow mobile phone
use is played and the call is disconnected. An incoming PushTalk is
automatically disconnected and [Connection failed] appears on the
caller’s display. Members are notified that the owner of the phone is not a
participant in the call when 3+ people have participated.
For arrival call actions when the Public mode (Power OFF) and
various network services are set at the same time, refer to “Arrival
call actions while the Public mode (Drive mode/Power OFF) and
various network services are set” below.
Voice/Videophone Calls
75
Page 78

Arrival call actions while the Public mode (Drive mode/
Power OFF) and various network services are set
Arrival call actions while the Public mode (Drive mode/Power OFF) is
set are as follows.
Voice/Videophone Calls
Service
Voice Mail
Service
Call
Forwarding
Service
Nuisance
Call
Blocking
Service
When a voice call
is received
The Public mode guidance
message is played to the
other party and the call is
connected to the Voice
Mail Service center.
The Public mode
guidance message is
played to the other party
and the call is forwarded
to the destination.
The Public mode guidance
message that the other
party hears follows the Call
Forwarding Service
guidance settings.
When a call is received
from a number registered
to the Nuisance Call
Blocking Service, the call
rejection message is
played to the other party
and the call is
disconnected.
When calls are received
from all other numbers,
the Public mode
guidance message is
played to the other party
and the call is
disconnected.
*
*
When a Videophone call
is received
The Public mode video
guidance is not played to
the other party and the
call is connected to the
Voice Mail Service center.
The Public mode video
guidance is not played to
the other party and the
Videophone is forwarded
to destination.
If the forwarding number
is not a 3G-324M
compliant Videophone,
the call is not
connected.
When a call is received
from a number
registered to the
Nuisance Call Blocking
Service, the call
rejection video guidance
is played to the other
party and the call is
disconnected.
When calls are received
from all other numbers,
the Public mode video
guidance is played to
the other party and the
call is disconnected.
76
Service
Caller ID
Request
Service
*
The Public mode guidance message is not played when the ring time is
set to 0 seconds and the call is connected to “Voice Mail Service” or
“Call Forwarding Service”. The call is not saved in “Received calls” and
the stock icon
Missed calls
When a voice call
is received
When the caller ID is not
sent, the Caller ID
request message plays
and the call is
disconnected.
When the caller ID is
sent, the Public mode
guidance message is
played to the other party
and the call is
disconnected.
B
(missed call) does not appear in the stand-by display.
When a Videophone call
is received
When the caller ID is not
sent, the Caller ID
request video guidance
is played to the other
party and the call is
disconnected.
When the caller ID is
sent, the Public mode
video guidance is played
to the other party and the
call is disconnected.
Checking Missed calls
If an incoming call is not answered, the stock icon B
(missed calls) and the number of missed calls appear in the
stand-by display (missed calls).
If missed calls are checked or the stock icon
is selected and c is pressed for 1+ seconds,
the stock icon disappears.
In stand-by, press t.
1
Alternatively, press q (M) to check Received calls.
Select the stock icon B (missed call)/t.
2
The Received calls list screen appears. D appears next to
missed calls.
Use the same operations as Received calls to check the details.
Page 79

Record message (voice/Videophone calls)
Note
Recording messages when calls cannot be answered
Set Record message to record messages when a call cannot
be answered. When a voice call is received, a voice message
is played and the caller’s message is recorded. When a
Videophone call is received, a reply image is sent and the
caller’s message and image are recorded.
Record message is not available when the FOMA terminal is turned
off or outside the service area. This function is convenient when
used in conjunction with the Voice Mail Service.
Record up to three Record messages for voice calls (approximately 15
seconds each). Voice memos recorded during a voice call or in stand-by
are also included in these three Record messages for voice calls.
Record up to two Record messages for Videophone calls
(approximately 15 seconds each).
The number of recorded message icons appearing in stand-by is
the total number of Record messages (voice/Videophone calls) and
Voice memos.
Record message cannot be set/disabled in the Manner mode.
Setting Record message (voice/Videophone calls)
In the Custom menu, select [Settings]/[Phone
1
settings]/[Record message]/[Record
message]/[ON].
Record message is set and ] appears on
the display.
When a message is recorded, an icon
appears to show the number of messages.
Example: D (for one message), E (for two
messages), and others.
When there are three Record messages (voice calls) and two
Record messages (Videophone), k appears and Record
message does not respond when a voice/Videophone call is
received. Delete unnecessary messages to reactivate Record
message.
Disabling the Record message
Set Record message to [OFF].
For the Voice Mail Service, record up to 20 messages of up to
approximately 3 minutes each. When the Voice Mail Service is set,
messages are saved at the Voice Mail Service center even if there
are three Record messages (voice calls) or two Record messages
(Videophone).
When Record message (voice/Videophone calls) is set
When a call is received, Record message is
1
activated after the set answering duration
(nP. 78).
The reply image appears. When a voice call is received, the
caller hears a voice guidance message. When a Videophone
call is received, the caller hears a reply message and the image
set in Videophone reply image is sent.
Press s to answer a call while playing a reply message,
recording sounds or movies. Press i to answer a Videophone
call with a camera image sent.
Record the caller’s message.
2
The caller hears a beep when the recording starts.
The indicator and time are estimates.
While a message is recorded (voice call), the caller’s voice can
be heard through the earpiece. When the Manner mode is set,
the caller’s voice cannot be heard through the earpiece.
Voice/Videophone Calls
Continued on next page
77
Page 80

Voice/Videophone Calls
Note
Related Operations
Indicator
Time
Voice call record
message
Videophone record
message
Note (Related operations)
Record message (voice/Videophone call) may not be saved if
approximately 3 seconds or less.
Saved contents may be lost due to malfunctions, repairs or other
handling of the FOMA terminal. DoCoMo shall not be liable for any
loss of content. It is recommended that a memo be kept of
contents for Record message (voice/Videophone calls).
While Record message is activated (Videophone) or a
Videophone message is recorded, the reply image set on your
FOMA terminal is sent to the other party with [Msg answering] or
[Recording message] superimposed.
During a recording, another call cannot be answered. The other
party hears a busy signal.
Record message is not available when the Public mode (Drive
mode) is set.
Set the message response time <Answering duration>
In the Custom menu, select [Settings]/[Phone
settings]/[Record message]/[Answering duration]/
enter the answering duration/t.
To set the response time for Record message immediately
started: Enter [000 seconds].
78
Set reply messages <Reply message>
1 In the Custom menu, select [Settings]/[Phone
settings]/[Record message]/[Reply message].
2 Select the type of messages.
To select the preset Reply message: Select [Reply
message 1]/[Reply msg 2(Eng)].
• To check the Reply message: Select the Reply
message/i.
To set after recording the Voice memo: Select [Original]/
[Record]/record/[Play]/select the memo/i.
• To stop the recording: While recording, press t.
To set the recorded Voice memo: Select [Original]/
[Play]/select the memo/i.
Set the reply image for Videophone Record message
<V.phone reply image>
1
In the Custom menu, select [Settings]/[Phone
settings]/[Record message]/[V.phone reply image].
2 Select a still picture/i.
To check the still picture: Select the still picture/t.
Answering duration
Cannot be set to the same time as the Auto answer setting.
When Record message is set simultaneously with the Voice
Mail Service or Call Forwarding Service, the priority will depend
on the set ringing time.
To prioritize Record message, set answering duration shorter
than for the Voice Mail Service and Call Forwarding Service.
Reply message
The following guidance messages are preset for the Reply message.
[Reply message 1]
ただいま電話に出ることができません。ピーッという発信音
のあとに、お名前とご用件をお話しください。
[Reply msg 2(Eng)]
I can’t take your call now. Please leave your message, thank you.
Page 81

Returns to default setting when the original reply message is
Memo list
Related Operations
2
Select a memo/t.
To stop the playback: Press t.
The playback of Recorded messages or
Voice memos automatically stops when a
call is received or the alarm is activated.
Indicator
Record message
for voice calls
deleted (nP. 79).
Videophone reply image
For images that can be sent n“Setting the image to send” on P. 80
Quick message
Recording messages when incoming calls cannot be answered
Record a message for an incoming voice/Videophone call
when Record message is not set.
During an incoming call, press C/[Record
1
message].
Alternatively, press 7 (for 1+ seconds) during an incoming call
to record.
Record messages nP. 7 7
Play/Delete Recorded messages or Voice memos
Playing/Deleting Recorded messages or Voice memos
When Show received calls is set to [OFF], the memo list screen
does not appear and Recorded messages and Voice memos
cannot be played/deleted.
Playing Recorded messages or Voice memos
The playback volume follows the Earpiece volume settings.
In the Custom menu, select [Media
1
/
[Voice memo/Rec msg]/[Play].
tool]
In stand-by: Press 7 (for 1+ seconds)/
[Play].
When the stock icon F (message) appears
In stand-by, press t/select the stock icon F (Record
message)/t/[Play].
w appears for memos that have not been played.
Types of message/memo Types of phone
Record message No icon Voice call
I
g
(
Voice memo
during call
Voice memo in
stand-by
B
Videophone call
Deleting Recorded messages or Voice memos
In the memo list screen, select a memo/C/
1
select the deletion method/t/[Yes].
Lock Recorded message and Voice memo
<Function lock>
In the Custom menu, select [Media tool]/[Voice memo/
Rec msg]/[Function lock]/enter the terminal security
code/t/[ON].
Continued on next page
Voice/Videophone Calls
79
Page 82

Note (Related operations)
For details on Function lock nP. 134
Note
Voice/Videophone Calls
Chara-den
Chara-den nP. 330
Switching Chara-den during a Videophone call
<Change Chara-den>
Switch to send different Chara-den during a Videophone call.
While sending Chara-den as a substitute image,
1
press C/[Chara-den set]/[Change Chara-den]/
select Chara-den/i.
Switching between Full-action and Part-action
<Change action>
While sending Chara-den as the substitute image,
1
press C/[Chara-den set]/[Change action].
Alternatively, press o (for 1+ seconds) to switch.
Modes are switched between Full-action and Part-action.
Making Chara-den perform actions <Action list>
Alternatively, enter the action number by pressing 1 to 9 to have
the character perform an action.
When the DTMF mode is set to [ON], the Chara-den key operations become
unavailable because of the touch-tone signals sent with the dial keys.
Perform different actions together in the Part-action mode.
Depending on the Chara-den, some actions are performed
automatically or may not be performed.
80
While sending Chara-den as the
1
substitute image, press C/
[Chara-den set]/[Action list].
Alternatively, press m or p (for 1+
seconds) to display the action list.
Select an action/t.
2
To end the action: Press 0.
To display details: Select an action/i.
Setting the image to send
The following images can be sent during a Videophone call.
Use JPEG or GIF images saved in My picture of Data box that are
set to QCIF: 176×144. However, animated GIFs are not available.
Still pictures that are restricted for output from the FOMA terminal are
not available. Still pictures shot with the FOMA terminal are available
regardless of the File restriction (Picture memo is not available).
Changing the image to send during a call
Change the image to send during a Videophone call.
Images set by Change send img are disabled when a Videophone ends.
During a Videophone call, press C/[Change send img].
1
Press i during a Videophone call to switch between a
substitute image and a camera image.
Select the image to send.
2
Select [My side] (to switch to a camera image).
Select [Substitute image]/select a still picture/i.
Select [Chara-den]/select Chara-den/i.
Still pictures saved onto a microSD Card are not available directly.
Copy to the FOMA terminal handset in advance.
<Change send img>
Page 83

Related Operations
Zoom in and zoom out
Note (Related operations)
Note
Operation panel
• Operation panel also appears. Touch it
to operate the submenu.
• To hide submenu: Press <.
• When in Hold active call, press < to
resume a call.
• [Change send img] (switching to My
side image/Substitute image/
Chara-den, playing a file, or pausing a
camera) cannot be selected.
• When [Picture memo] is selected,
press < to shot.
• When switching to a voice call, return to
the normal position to use.
• Touch numbers to send touch-tone
signals.
• To hide the DTMF panel: Press <.
• When the DTMF mode is [OFF], the
DTMF panel does not appear.
DTMF panel
1 While sending a camera image, press r/q.
2 Press v to adjust the zoom.
For the maximum zoom: Press a./For the minimum zoom: Press m.
Send a still picture from Data box <File playback>
During a Videophone call, press C/[Change send
img]/[File playback]/select a still picture/i.
Adjust the brightness
While sending a camera image, press u (for 1+
seconds) to adjust the brightness.
Zoom in/Zoom out
Set up to 24 zoom levels.
■ When making a Videophone call while viewing
each other’s face
To send your face image to the other party, rotate the display and
make the camera face you.
During a Videophone call, rotate the display.
1
While sending a substitute image, switch to send camera image.
Make the camera face you.
2
Operations while sending your own image
To display Submenu: Press <.
Voice/Videophone Calls
To display the DTMF panel: Press < (for 1+ seconds).
The submenu or the DTMF panel does not appear when
sending other than camera image.
Some screens cannot be operated using < or the touch panel.
When Hands-free is deactivated in this condition, the sound from
the mouthpiece and the earpiece becomes silent. During a call,
use a flat-plug earphone/microphone with switch (sold separately)
(nP. 400) or Hands-free (nP. 82) (same for a voice call).
81
Page 84

Changing an image when making a call
Note
Priority (high b low)
Image Set a substitute image in the phonebook b Set a
substitute image in the Videophone setting
Note
Note
The Videophone image is only enabled for one time.
In stand-by, enter a phone number/C.
1
Voice/Videophone Calls
In the phonebook entry details screen: Press C.
In the details screen of Redials/Received calls: Press C.
Select [V.phone image].
2
Select the image to send.
3
Select [My side] (camera image).
Select [Chara-den]/select Chara-den/i.
Setting a substitute image, on hold image or hold
<Substitute image/On hold image/Hold image>
image
In the Custom menu, select [Settings]/[Phone
1
settings]/[Videophone set]/[Set sending image].
Select an item/t.
2
Select an image/i.
3
While sending a still picture as substitute image, the still picture is
sent to the other party with [Camera Off] superimposed. If
Chara-den is set, [Camera Off] does not appear.
Substitute images are sent in the following order.
Setting the outgoing image quality
Set whether to prefer image quality or prefer motion speed.
82
<V.phone image>
<Visual preference>
Prefer img qual To place an emphasis on shape and color
Normal To create a balance of clarity and movement
Prefer motion spd To place an emphasis on movement
In the Custom menu, select [Settings]/[Phone
1
settings]/[Videophone set]/[Visual preference].
During a Videophone call: Press C/[Videophone set]/[Visual
preference].
Select the image quality/t.
2
The image quality settings for the sender and receiver during a
Videophone call differ.
When the setting is made during a Videophone call, the setting is
only enabled for one time.
Hands-free V.phone
Setting Hands-free Videophone
Set whether to automatically switch to Hands-free for
Videophone calls.
When switching to Hands-free during a call nP. 61
In the Custom menu, select [Settings]/[Phone
1
settings]
Select a setting/t.
2
Speak from approximately 20 to 40 cm away from the mouthpiece.
When the surroundings are noisy, the sound may break up and
the call may not be satisfactory.
When using Hands-free outdoors, in a location where
surroundings are noisy and where the sound echoes loudly, use
the flat-plug earphone/microphone with switch (sold separately).
/
[Videophone set]/[Hands-free V.phone].
Page 85

If the sound breaks up during a Hands-free call, lower the
Show me small Other
Show me big
Me
Upper left
Lower right
Related Operations
Note (Related operations)
Earpiece volume.
Setting the image during Videophone calls
Change the image displayed during Videophone calls.
■ Setting the Videophone display
<Display setting/Subscreen disp>
The Videophone display setting and the subscreen display setting
remain even after a Videophone call ends.
Videophone display setting Subscreen display
setting
During a Videophone call, press C/
1
[Videophone]/[Display setting]/[Subscreen disp].
In the Custom menu: Select [Settings]/[Phone settings]/
[Videophone set]/[Display setting]/[Subscreen position].
Select the display method/t.
2
Pause your camera image to send the image
<Pause camera>
While sending a camera image, press C/[Change send
img]/[Pause camera].
To disable Pause camera: Press i/c.
A paused camera image can be sent.
While pausing camera, your image is sent to the other party
with [Stopped] superimposed.
When a Videophone call ends, the setting is reset.
Changing the Videophone settings
Voice/Videophone Calls
Redialing as a voice call automatically
When a Videophone call is not connected, the call is automatically
switched to the voice call and made again.
If a Videophone communication is started, Redial voice call is not
performed.
In the Custom menu, select [Settings]/[Phone
1
settings]/[Videophone set]/[Redial voice call]/
<Redial voice call>
[ON].
Continued on next page
83
Page 86

Note
If a call is redialed as a voice call, the voice call charges are incurred.
Note that Redial voice call may not work if a call is placed to an
ISDN synchronous 64K access point or an ISDN Videophone that
Voice/Videophone Calls
does not support the 3G-324M standard (nP. 60) (as of April
2008), or if an invalid phone number is dialed by mistake. In
addition, charges may be incurred.
Notify switch mode
Setting to switch between a voice call and a Videophone
This setting lets the other party know whether the FOMA
terminal can be switched between a voice call and a
Videophone.
When the Notify switch mode is set to “Deactivate”, the other party
cannot switch the call.
The Notify switch mode cannot be changed during voice calls,
Videophone calls or outside the service area.
In the Custom menu, select [Settings]/[Phone
1
settings]
Select a setting/t/[Yes].
2
To check settings: Select [Check Indication].
V-phone while packet
/
[Videophone set]/[Notify switch mode].
Selecting actions for incoming Videophone calls during i-mode
Set the following answering methods.
V-phone priority Answers incoming Videophone calls.
Packet priority Rejects incoming Videophone calls.
84
Voice mail Automatically connects to Voice Mail Service.
Call forwarding Automatically connects to Call Forwarding
Videophone calls, during PushTalk transmissions, Software
updates, Pattern definitions updates or data transmissions using a
packet transmission, are rejected.
In the Custom menu, select [Settings]/[Phone
1
settings]/[Videophone set]/[V-phone while
Service.
packet]/select an answering method/t.
[V-phone priority] setting does not automatically end the packet
transmission unless the Videophone is answered (The packet
transmission is disconnected when the call is answered).
To set to [Voice mail] or [Call forwarding], applying for the
respective service is required. If [Voice mail] or [Call forwarding]
is set without a subscription, the Videophone call is set to
[Packet priority].
Picture memo
Saving the other party’s image as a still picture
During a Videophone call, take a still picture of the other party.
When Display setting is set to [Me], this operation is not possible.
The shot size applicable to a still picture is QCIF: 176×144.
The picture is saved to the [Camera] folder in My picture of Data
box.
The shot still picture cannot be output from the FOMA terminal.
During a Videophone call, press C/[Picture
1
memo]/t.
The shutter does not sound.
While still pictures are being shot, your image is sent to the
other party with [Recording] superimposed.
Page 87

PushTalk
What is PushTalk?. . . . . . . . . . . . . . . . . . . . . . . . . . . . . . . . . . . . . . 86
Sending PushTalk transmissions . . . . . . . . . . . . . . . . . . . . . . . . . . 87
Adding a member during PushTalk transmission
. . . . . . . . . . . . . . . . . . . . . . . . . . . . . . . . . . . . . . . <Add member>88
Receiving PushTalk transmissions . . . . . . . . . . . . . . . . . . . . . . . . . 89
Adding to the PushTalk phonebook. . . . . . . <Add to PushTalk PB>90
Using the PushTalk phonebook to send . . . . . . . . . . . . . . . . . . . . . 92
Deleting PushTalk phonebook entries. . . . . . . . . . . . . . . . . . . . . . . 93
Setting PushTalk send/receive options . . . . . . . . . <Set PushTalk>94
85
Page 88

What is PushTalk?
1
2
3
4
Press the PushTalk key, recall PushTalk phonebook entries,
select the other party, and press the PushTalk key again to
easily communicate with multiple people at once (up to five
including yourself). Transmission fees are incurred each
PushTalk
time the key is pressed (transmission is sent).
Refer to the DoCoMo website or “Mobile Phone User’s Guide
[Network Services]” for details and compatible models of PushTalk.
■ PushTalkPlus*
PushTalkPlus is a service to access a phonebook saved on the
network and to communicate with up to 20 people (including yourself)
at once. In addition, enjoy other useful functions such as checking the
status of members with more convenient use than PushTalk.
Refer to the PushTalkPlus guide provided at the time of
subscription for details of the service.
* Subscription is required.
PushTalk transmission screen layout
2Group name
Group name saved in the PushTalk phonebook or the network
phonebook appears.
3Members
Name appears if saved in the phonebook. If the call is
transmitted from PushTalkPlus, the name saved in the network
phonebook appears. Phone number appears for unregistered
participants.
4Status of members
Transmission status of each member appears. When a status
changes while connected, a tone indicating that the user is
connected or disconnected (leaving PushTalk) sounds and the
status shown changes.
Connected: Participating in PushTalk.
Disconnected
PushTalk, the other party is out of the service area, or the
other party has power turned off.
Driving
Calling: Ringing the other party.
Scroll bar appears when all members cannot be shown on the
screen at once. Scroll with v to view members.
*1 Phone number appears for unregistered participants. Image also
appears if phonebook Picture call is set. If the call is transmitted
from PushTalkPlus, the name saved in the network phonebook
appears, and the image does not appear even if Picture call is set.
*2 Appears only when PushTalk transmission is in progress with
three or more participants.
*2
: No reply, the other party has ended
*2
: The other party has Public mode (Drive mode) set.
1Speaker’s name
Name of the person who is currently speaking
Myself: When you are the speaker (have the right to speak)
No display: Nobody is speaking
?: When the speaker is not identified
86
*1
appears.
Page 89

Note
Sending PushTalk transmissions
Press the PushTalk key to communicate easily using packet
transmissions.
Only one person can speak at once. Press < (q) to get the right to
speak.
Voice can only be transmitted when granted the right to speak.
When granted the right to speak, other people’s voices are
inaudible.
PushTalk transmission fees are incurred for the caller while < (q)
is pressed and the right to speak is being granted.
PushTalk and PushTalkPlus cannot be used with the Number B of
2in1.
In stand-by, enter a phone number.
1
Alternatively, use one of the following methods.
From the PushTalk phonebook (nP. 92)
From the phonebook (nP. 101)
From Redial (nP. 63)
From Received calls (nP. 63)
With Notify caller ID/No caller ID (nP. 67)
Using Phone To function (nP. 184)
Press < (q).
2
a flashes at the upper left of the display while dialing. When the
other party replies, a tone indicating that the user is connected
sounds, a lights and the PushTalk transmission screen
appears.
To activate/deactivate Hands-free: Press s/i.
For details on adjusting the earpiece volume nP. 7 3
To speak, speak while pressing < (q) when
3
speaker’s name is blank.
The right to speak is granted, a right-obtained tone sounds, and
[Myself] appears for the speaker’s name.
An error tone sounds if < (q) is pressed while another person
is speaking.
Release < (q) when finished speaking. A right-released tone
sounds.
Press H to end the transmissions.
4
The number of times the right to speak was granted is shown.
PushTalk calls cannot be made to emergency numbers (110, 119,
and 118).
Even if the transmission of some members (including sender) is
disconnected, other members can continue PushTalk transmission.
There is a time limit when speaking. If the right to speak keeps
obtained for a set time, a tone indicating that the speaking time is
over sounds and the right to speak is terminated.
i-mode transmission is disconnected if PushTalk transmission is
sent during i-mode.
When Set PushTalk arrival action is set to [Answer], press s to
end PushTalk transmission and answer voice calls received during
PushTalk transmission.
When a voice call is received while a hands-free call is in
progress, hands-free is disabled if the voice call is answered.
PushTalk is automatically disconnected when no one speaks for a
set length of time.
When the PushTalk sender has sent PushTalk transmission with
caller ID (nP. 58, P. 67), phone numbers for the caller and all
members are notified. If the PushTalk sender has sent without
caller ID, [No ID] appears for speaker and members’ fields on the
handsets of all the members who received the transmission. The
phone number is important personal information. Be careful when
sending caller ID.
Approximate number of times the right to speak was obtained
appears when PushTalk transmission is ended. 999 is the
maximum value that appears. When exceeded, [|||] appears.
Continued on next page
PushTalk
87
Page 90

During PushTalk transmission, i-mode mail and Message R/F are
Related Operations
Note (Related operations)
Note
held at the i-mode center. However, SMS are received
automatically even during PushTalk transmission.
Return to a PushTalk conversation with multiple
PushTalk
members after disconnecting
Select Redials/Received calls/< (q).
When a PushTalk call is disconnected, or when a PushTalk call
cannot be answered after the PushTalk transmissions with
multiple members, the transmissions can only be rejoined by
calling the member from the Redials/Received calls if the
PushTalk transmissions are still in progress.
If the PushTalk transmission has been ended, a new
transmission is sent from you.
Add member
Adding a member during PushTalk transmission
When a PushTalk sender is Myself, add a member during
PushTalk transmission.
When calling from PushTalkPlus, a member cannot be added.
Even if a member is added during transmission, it is not recorded in
Redial. It is not recorded in Received calls on the other party’s
terminal that has been already in transmission.
Add up to four members to send a transmission as many times as
necessary. When the transmissions are already sent to four
members, re-calling a disconnected member is available, but a new
member cannot be added.
Press C during PushTalk transmission/[Add
1
member].
Alternatively, press m during PushTalk transmission to add a
member.
Select the adding method and send a transmission.
2
Select [View phonebook]/select a name/t.
Select [View PT phonebook]/select a name i
(repeatable)/C.
Select [Direct input]/enter a phone number/C.
When the other party on the PushTalk transmission uses a model
which does not support the Add member function, the other party’s
terminal may operate as follows.
When a member is added, the added member does not appear
and a tone indicating that the member is connected does not
sound.
When an added member speaks, [?] appears for the speaker
name field.
When an added member leaves PushTalk, a tone indicating
that the member is disconnected does not sound.
When a PushTalk sender has sent PushTalk transmission with
caller ID (nP. 58, P. 67), the sender and all members’ phone
numbers are sent to all the members including the added
members. If the PushTalk sender has sent without caller ID, [No
ID] appears for speaker and members’ fields on the handsets of all
the members including the added members.
However, when the other party on the PushTalk transmission uses
a model which does not support the Add member function, the
added members do not appear on the other party’s screen
regardless of the caller ID setting.
When the 2in1 mode is set to [A mode], the entries saved in the
phonebook whose Phonebook 2in1 set is set to [B] cannot be
displayed.
88
Page 91

Receiving PushTalk transmissions
Note
When PushTalk is received, the ring tone sounds
1
and the called LED flashes.
The following operations can be performed during an incoming
call.
Quick silent (nP. 113)
Manner mode enable/disable (nP. 113)
To disconnect: Press H.
Press < (q)/s.
2
A PushTalk call can also be received with Any key answer
(nP. 7 2 ) .
A call is answered with hands-free if the FOMA terminal is
closed. The operation follows Hands-free PT when the FOMA
terminal is open (nP. 94).
a at the upper left of the display lights and the PushTalk
transmission screen appears.
The transmission procedures are the same as those of
“Sending PushTalk transmissions” on P. 87.
Press H to end the transmissions.
3
When Set auto answer is set to [ON], received PushTalk calls are
automatically answered with hands-free. However, calls are not
answered automatically even if Set auto answer is set to [ON]
while in the Manner mode.
To accept/reject calls from specified callers, set Accept calls,
Reject calls, and Reject unknown. The settings are common with
voice/Videophone call. However, they are not applied to
transmissions from PushTalkPlus.
PushTalk calls received during a voice/Videophone call or data
communication are not connected. During a voice call, the call is
recorded in Received calls, and the stock icon B (missed call)
appears. During a Videophone call or data communication, the call
is not recorded.
When a Videophone call, 64K data communication, or different
PushTalk call is received during PushTalk transmission, the call is
recorded in Received calls and the PushTalk transmission is
continued. When Set PushTalk arrival action is set to [Answer],
press s to end PushTalk transmission and answer voice calls
received during PushTalk transmission. If Set PushTalk arrival
action is set to other than [Answer], the call is recorded in
Received calls and the PushTalk transmission is continued.
When i-mode arrival action is set to [PushTalk preferred], i-mode
transmission is disconnected and PushTalk is connected if
PushTalk is received during i-mode. When set to [i-mode
preferred], PushTalk is not connected nor recorded in Received
calls.
When a PushTalk call is received while Public mode (Drive mode)
is set and the handset is turned on, the call is not connected but is
recorded in Received calls and the stock icon B (missed call)
appears. [Driving] appears for the status on the other member’s
transmission screen. The message does not appear if the other
party is one person.
PushTalk
89
Page 92

PushTalk
PushTalk group list
m
PushTalk member list
Group members screen
< (q)
*
t
Add to PushTalk PB
Adding to the PushTalk phonebook
Entries saved to the PushTalk phonebook are also saved to
the FOMA terminal handset phonebook.
Save an entry to the FOMA terminal handset phonebook and
save the name, reading and one phone number to the
PushTalk phonebook.
Save entries already saved in the FOMA terminal handset
phonebook to the PushTalk phonebook. Up to 1,000 entries
can be saved in the PushTalk phonebook (nP. 96).
When the 2in1 mode is set to [B mode], saving to the PushTalk
phonebook is not available.
When the 2in1 mode is set to [Dual mode], the entries saved in the
phonebook whose Phonebook 2in1 set is set to [B] cannot be saved
in the PushTalk phonebook.
When the 2in1 mode is set to [A mode], the entries saved in the
phonebook whose Phonebook 2in1 set is set to [B] cannot be
displayed.
■ Entry items that can be saved in one PushTalk
phonebook entry
Icon Item Details
Name Enter a name.
=
Reading Reading is entered automatically.
B
%
$
PushTalk group
PushTalk phone
number
Entries can be sorted and saved in 1
to 9 PushTalk groups.
Save a phone number for PushTalk.
■ PushTalk phonebook
Select a group from the PushTalk group list or select members from
the PushTalk member list to send a transmission to the members
saved in the PushTalk phonebook.
* Alternatively, press < (q) (halfway).
■ Adding
In the PushTalk member list screen, press C/
1
[New].
Add to the PushTalk phonebook.
2
Select [View phonebook]/select a name/t.
• When multiple phone numbers are saved, select a name,
press i, select a phone number to use for PushTalk, and
press t.
Select [Direct input]/add to the phonebook.
• The FOMA terminal handset phonebook name entry screen
appears.
• For details on saving n“Adding to the phonebook” on P. 97
90
Page 93

Registering to the PushTalk group
Related Operations
Related Operations
Set groups in the PushTalk phonebook to easily call all members of a
PushTalk group.
Save up to 19 members per group. Up to four people can be called
simultaneously.
Save up to nine groups. Also, editing group names is available.
■ Creating a new PushTalk group <New group>
To create a new group, delete an already registered group from [グ
ループ1] to [グループ9] in advance (nP. 93).
In the PushTalk member list screen/PushTalk
1
group list screen, press C/[Set PushTalk
group]/[New group].
Enter a PushTalk group name/t.
2
Enter up to 20 single-byte (10 double-byte) characters.
Edit the PushTalk group name <Edit group name>
1 In the PushTalk group list screen, select a group/
C/[Set PushTalk group]/[Edit group name].
In the PushTalk member list screen: Press C/[Set
PushTalk group]/[Edit group name]/select a group/
t.
2 Edit the group name/t.
■ Adding to the PushTalk group from the PushTalk
member list screen
Save PushTalk phonebook entries that are already saved as PushTalk
members.
In the PushTalk member list screen, select a
1
name/i.
Repeat step 1 to select multiple names.
When nothing is checked, only the entry at the position of the
cursor is selected.
Press C/[Add PushTalk group].
2
Select the PushTalk group/t/select a save
3
location/t.
If the selected location already has a member saved, the
member is overwritten. The same phone number cannot be
saved more than once to the same group.
Selecting a save location is not necessary if multiple names are
selected in step 1.
Add to the PushTalk group from the PushTalk group
list screen
<Add PushTalk group>
<Add PushTalk group>
1 In the PushTalk group list screen, select a group/C.
In the Group members screen: Press C.
2 Select [Set PushTalk group]/[Add PushTalk
group]/select a name t (repeatable)/i.
PushTalk
91
Page 94

■ Editing PushTalk phonebook entries <Edit data>
Related Operations
Change phone numbers and groups of saved PushTalk phonebook
entries.
In the PushTalk member list screen, select a
1
name/C/[Edit data].
PushTalk
Select an item/t/edit the PushTalk phonebook
2
entry.
To change phone numbers, select a phone number and select
other phone numbers saved in the FOMA terminal handset
phonebook entry.
To change the group to save, select in order of the group to be
changed, the group to change and the save list.
To add and save to other groups, select [No groups], select the
group to save, and select the save list.
Press i/[Yes].
3
Using the PushTalk phonebook to send
Save members in the PushTalk phonebook in advance.
When the 2in1 mode is set to [B mode], the PushTalk phonebook
cannot be used.
When the 2in1 mode is set to [Dual mode], the phonebook whose
Phonebook 2in1 set is set to [B] cannot be used.
■ Sending from PushTalk groups
Transmit to up to four people at once.
In the PushTalk group list screen, select the other party.
1
To send PushTalk transmissions to all members of a group:
Select a group.
To send PushTalk transmissions to some members of a group:
Select a group/t/select a name i (repeatable).
• E appears for selected entries, and H appears for
unselected entries.
• When nothing is checked, only the party at the position of the
cursor is selected.
Press < (q).
2
For details on transmission procedures n“Sending PushTalk
transmissions” on P. 87
■
Selecting the other party and sending a transmission
In the PushTalk member list screen, select a name
1
i (repeatable).
Quick search: Enter each character to view the closest entry
sequentially.
Press < (q).
2
Receive transmissions automatically <Set auto answer>
In the PushTalk member list screen, press C/[Set
PushTalk]/[Set auto answer]/[ON].
Set the ring duration <Ring time setting>
In the PushTalk member list screen, press C/[Set
PushTalk]/[Ring time setting]/enter the duration of
ring tone/t.
Set the operation when the FOMA terminal is closed
during PushTalk transmission
In the PushTalk member list screen, press C/[Set
PushTalk]/[Set when folded]/select the setting/t.
Select Send own no. or No caller ID when send a
transmission
In the PushTalk member list screen, press C/[Caller ID
setting]/select the setting/t.
<Caller ID setting>
<Set when folded>
92
Page 95

Note (Related operations)
Set auto answer
When a call is received with Auto answer, the call is
automatically switched to hands-free. Auto answer is not
available while in the Manner mode.
The Set auto answer in the PushTalk phonebook is linked with
the PushTalk in Auto answer setting.
Ring time setting
When calls are not answered within the set duration in a
transmission with multiple people, [Disconnected] appears on
the other members’ transmission screens.
The Ring time setting in the PushTalk phonebook is linked with
PT ring time set in Ring time setting.
Ring time setting cannot be selected when Set auto answer is
set to [ON].
Set when folded
Select to end the transmission or activate speakers when the
FOMA terminal is closed.
The Set when folded in the PushTalk phonebook is linked with
the PushTalk in the Set when folded.
Caller ID setting
When Caller ID setting is set to [Send own no.], phone numbers
for the caller and all members are notified. If set to [No caller
ID], [No ID] appears for the speaker and member fields on the
handsets of all the members who received the transmission.
If Caller ID setting is set when PushTalk transmission is sent, it is
prioritized than the network service’s Notify caller ID (
When Caller ID setting is set to [As NW setting], a call is made
according to the network service’s Notify caller ID.
Network connection
A PushTalkPlus subscription is required to use the network
connection.
n
P. 58).
Deleting PushTalk phonebook entries
In the PushTalk member list screen, select a
1
name/C/[Delete].
Select the deletion method.
2
Select [Delete one].
Select [Delete selected]/select a name t (repeatable)/C.
Select [Delete all]/enter the terminal security code/t.
Select the phonebook type to delete/t/[Yes].
3
Deleting the PushTalk group <Delete>
In the PushTalk group list screen, select a group/
1
C/[Delete].
Select the deletion method/t/[Yes].
2
Deleting members from PushTalk groups
<Delete from group>
In the PushTalk group list screen, select a group
1
Select a name/C/[Delete from group].
2
Select the deletion method.
3
Select [Delete one].
Select [Delete selected]/select a name t (repeatable)/
C.
Select [Del all in group].
Select [Yes].
4
/t
PushTalk
.
93
Page 96

Set PushTalk
Note
Setting PushTalk send/receive options
Set the following items.
Item Setting details Page
Ring time setting Set the duration to sound the PushTalk
PushTalk
Set auto answer Set whether to automatically answer
Set PT arrival
act
i-mode arrival
act
Hands-free PT Set whether to automatically switch to
Set when folded Set [Finish call] or [Speaker phone] (other
Set mute ring
time
Reconnect
signal
ring tone.
PushTalk transmissions.
Set actions for voice calls received during
PushTalk transmissions.
Set to receive/reject PushTalk
transmissions received during i-mode
transmissions.
Hands-free when PushTalk transmissions
start.
party’s voice is heard through the
speakers) to engage when the FOMA
terminal is closed during PushTalk
transmission.
Set the number of seconds to delay the
start of ring tone for calls from unknown
callers and calls with no ID. This setting is
applied to both voice/Videophone calls.
Set to automatically reconnect when a
transmission is disconnected due to signal
conditions. This setting is applied to both
voice/Videophone calls.
P. 11 2
P. 401
P. 9 4
P. 187
P. 9 4
P. 7 3
P. 140
P. 7 0
Selecting actions for incoming calls during a
transmission
Set the following response methods.
Voice Mail Automatically connect to Voice Mail Service*.
Call Forwarding
Call Rejection Reject calls.
Answer Select to continue PushTalk transmission or end
* Subscription is required to use these services. If Set PT arrival
act is set without subscription, the setting is set to [Answer].
In the Custom menu, select [Settings]/[Phone
1
settings]/[Set PushTalk]/[Set PT arrival act].
In the PushTalk member list screen: Press C/[Set
PushTalk]/[Set PT arrival act].
Select the response method/t.
2
<Set PT arrival act>
Automatically connect to Call Forwarding Service*.
and answer the incoming voice call.
Setting the PushTalk hands-free operation
<Hands-free PT>
The setting is switched to hands-free regardless of Hands-free PT if
the FOMA terminal is closed.
In the Custom menu, select [Settings]/[Phone
1
settings]/[Set PushTalk]/[Hands-free PT].
In the PushTalk member list screen: Press C/[Set
PushTalk]/[Hands-free PT].
Select the setting/t.
2
The setting cannot be switched to hands-free while in the Manner
mode even if Hands-free PT is set to [ON].
94
Page 97

Phonebook
Phonebooks available on the FOMA terminal. . . . . . . . . . . . . . . . . 96
Adding to the phonebook
. . . . . . . . . . . . . . . <Add to phonebook/FOMA card phonebook>97
Setting groups . . . . . . . . . . . . . . . . . . . . . . . . . . <Group settings>100
Making calls from the phonebook . . . . . . . . <Search phonebook>101
Editing phonebook entries. . . . . . . . . . . . . . . . . . . . <Edit entries>104
Deleting phonebook entries. . . . . . . . . . . . . . . . . <Delete entries>104
Calling and sending mail with a few key strokes
. . . . . . . . . . . . . . . . . . . . . . . . . . <2-touch dialing/2-touch mail>105
Saving (restoring/updating) the phonebook to the Data Storage
Center. . . . . . . . . . . . . . . . . . . . . . . . . . . . . <Data Sec. Service>105
95
Page 98

Phonebooks available on the FOMA terminal
Use FOMA terminal handset phonebook and FOMA card
phonebook. Save items such as names, phone numbers and
mail addresses for FOMA terminal handset and FOMA card
Phonebook
phonebooks.
FOMA terminal handset phonebook, FOMA card
phonebook and PushTalk phonebook
Entries saved in FOMA card phonebook are available even if your
FOMA card is inserted into other FOMA terminals. To use phonebook
on other FOMA terminals, save numbers in FOMA card phonebook.
For details on PushTalk phonebook nP. 90
■ Number of entries in phonebook
Phonebook Number of entries
FOMA terminal handset phonebook 1,000
FOMA card phonebook 50
PushTalk phonebook 1,000
■ Entry items for one phonebook
Entry status
FOMA
terminal
handset
One One
20
groups
96
Icon Item Details
Name Enter a name. One One
=
B
Q
Reading
Group
Reading is entered
automatically.
Entries can be sorted in
groups.
FOMA
card
11
groups
Icon Item Details
Save phone numbers. In
9/S
S/T
a
q
r
N
O
j
P
G
;
Phone
*
number
Mail
*
address
Company/
school
Department
Title Enter title. One –
Postal
code
Postal
address
Location
info
Birthday Enter a birthday. One –
Memo Save memos. One –
Secret
the FOMA terminal
handset phonebook, select
from one of nine icons for
each phone number.
Save mail addresses. In
the FOMA terminal
handset phonebook,
select from one of six
icons for each address.
Enter company/school
name.
Enter department. One –
Enter postal code. One –
Enter postal address. One –
Enter location information
(date of positioning,
latitude, longitude,
geographical coordinate
system, accuracy level).
Keep privacy by hiding
phonebook entries. Set
to keep phonebook
entries private.
Entry status
FOMA
terminal
handset
Three One
Three One
One –
A –
A –
FOMA
card
Page 99

Icon Item Details
Note
Secret
F
code
Select
8
1
ring
tone/Mail
ring tone
Called
LED
color/
Mail LED
color
Called
LED
pattern/
Mail LED
pattern
Picture
call set
Substitute
image
</V
q/:
-/+
* Displayed in the FOMA card phonebook.
Enter secret code
specified by the other
party. Use when sending
mail.
Differentiate incoming
calls or incoming mail
using specific ring tones
or Chaku-motion.
Differentiate incoming
calls or incoming mail
using specific LED
colors.
Set Called LED/Mail
LED flashing pattern.
Images appear when calls
are made or received.
Specific image appears in
phonebook list.
Set still picture or
Chara-den for when
sending a substitute
image during a
Videophone call.
Entry status
FOMA
terminal
handset
A –
A –
A –
A –
A –
A –
FOMA
card
When upgrading the handset at a DoCoMo Shop or retailer, data
saved in the FOMA terminal may not be copied depending on
specifications of the new model.
Add to phonebook/FOMA card phonebook
Adding to the phonebook
Save entries to the FOMA terminal handset phonebook or
FOMA card phonebook.
Save to the PushTalk phonebook when saving to the FOMA
terminal handset phonebook.
In stand-by, press a/C/[New]/[Phone]/[UIM].
1
Enter/Select an item/i.
2
For details on entering/selecting nP. 98
When saving to FOMA card phonebook, the operation ends.
Add to the phonebook.
3
To save to specify a memory number: Enter the number (three
digits: 000 to 999).
To save to an available memory number: Press t.
• Open memory numbers are allocated from 010 to 999, then
000 to 009.
Use 2-touch dialing to save to memory numbers from 000 to
099.
Select whether to save to the PushTalk
4
phonebook/t.
When two or more phone numbers are saved, select a phone
number to use for PushTalk.
Phonebook
97
Page 100

■ Entering/Selecting items
An entry can be saved by only entering a name. After entering a name,
freely select other items to save. Edit items after saving.
Enter name
Select =/enter a name/t.
Enter up to 32 single-byte (16 double-byte) characters.
In the FOMA card phonebook, enter up to 10 characters (21
Phonebook
single-byte characters for single-byte alphanumerics).
Enter/Edit reading
Select B/enter/edit reading/t.
Enter up to 32 single-byte characters.
In the FOMA card phonebook, enter up to 12 characters (25
single-byte characters for single-byte alphanumerics).
Reading is automatically entered when a name is entered.
Reading may not be automatically entered depending on the
conditions.
Set group
Select Q/select a group/t.
Phonebook entries with no group settings are grouped in [No
groups].
Save phone number and phone number type
Select 9/enter a phone number/t/select a phone
number type icon/t.
For the FOMA card phonebook: Select S/enter a phone
number/t.
Enter up to 26 digits.
Always enter from the area code of the phone number.
Phone number may include [b] or [#] but call may not connect.
Press o to enter a pause [P]. Alternatively, slide the finger up
on the Optical TOUCH CRUISER to enter it.
For the FOMA card phonebook, enter up to 26 digits for FOMA
card (green/white) and 20 digits for FOMA card (blue).
Save mail address and mail address type
Select S/enter a mail address/t/select a mail address
type icon/t.
For the FOMA card phonebook: Select T/enter a mail
address/t.
En
up to 50 single-byte alphanumeric characters or certain
ter
symbols.
Save company/school
Select a/enter a company/school name/t.
Enter up to 40 single-byte (20 double-byte) characters.
Save department
Select q/enter a department/t.
Enter up to 60 single-byte (30 double-byte) characters.
Save title
Select r/enter a title/t.
Enter up to 40 single-byte (20 double-byte) characters.
Save postal code
Select N/enter a postal code/t.
Save postal address
Select O/enter a postal address/t.
Enter up to 100 single-byte (50 double-byte) characters.
Save location information
Select j.
For details on the following operations nP. 280
Save birthday
Select P/enter a birthday/t.
Enter a birthday between January 1, 1900 and December 31,
2099.
Save memo
Select G/enter a memo/t.
Enter up to 200 single-byte (100 double-byte) characters.
Save entries as secret data
Select |/[ON].
98
 Loading...