

Page 1
Manual for
’05.10
Quick Search/
Contents/Cautions
Before Using D902i
Making/
Receiving Calls
Making/Receiving
Video-phone Calls
PushTalk
Phonebook
Sounds/Displays/Lights
Settings
Safety settings
Camera
i-mode/i-motion
Mail
i-αppli
i-channel
Mobile Wallet/ToruCa
Displaying/Editing/
Managing Data
Other Convenient Functions
Network Services
Data Communication
Character Entry
Appendix/Data Interchange/
Troubleshooting
INDEX/
Quick Reference Manual
Page 2

DoCoMo W-CDMA System
Thank you for selecting the FOMA D902i.
Carefully read this manual, as well as the individual manuals for other devices such
as the battery pack, before using your FOMA D902i, and consult the corresponding
manuals while using the phone so that you are able to use it correctly and effectively.
If you are unclear as to any point indicated in any of these manuals, contact the
DoCoMo Information Center that is listed on the back of this manual.
Your FOMA D902i is a valuable asset. Handle it with care and it will be your trusted
partner for years to come.
Before using your FOMA terminal
●The FOMA terminal is cordless so you may not be able to use it in certain locations where
signals cannot penetrate, such as in tunnels, underground, in some buildings or outdoors if the
signal is weak or you are outside the service area. You also may not be able to use your FOMA
terminal on the upper floors of some highrise building, even though there is nothing around you
that interferes with the signal. Please note that your call may be disconnected even when the
signal is strong (when the signal strength indication shows three bars) and you are not moving.
When using the FOMA terminal in public, busy or quiet places, be careful not to disturb others.
Since the FOMA terminal relies on radio transmission, it is theoretically possible for third
parties to intercept a call; however, because the W-CDMA system automatically employs a
secrecy function for all calls, a third party will pick up nothing but signal noise.
Since the FOMA terminal operates by the wireless transmission of voices converted to digital
signals, if you are in a location where the signal is weak, the original voice may not be
accurately reproduced from the received digital signal, therefore, the voice you hear may differ
from the original sound of the speaker’s voice.
DoCoMo asks that you keep a separate record (e.g. written copy) of all information you store
in your FOMA terminal. DoCoMo accepts no responsibility whatsoever for any loss that occurs
should the contents of the FOMA terminal’s memory be lost or altered.
The user hereby agrees that the user shall be solely responsible for the result of the use of
SSL. Neither DoCoMo nor the certifier as listed herein makes any representation and warranty
as for the security in the use of SSL. In the event that the user shall sustain damage or loss
due to the use of SSL, neither DoCoMo nor the certifier shall be responsible for any such
damage or loss.
Certifier: VeriSign Japan K.K., Betrusted Japan Co., Ltd., GeoTrust Japan, inc.
The FOMA terminal can be used in the FOMA Plus-Area.
The FOMA terminal can be used only via the FOMA network provided by DoCoMo.
Using a FOMA terminal for the first time
When you use a FOMA terminal for the first time, read this manual in the following order. You
can understand the preparations for using the FOMA terminal and its basic operations.
1. Install the battery pack and charge it. ☛P39
2. Turn the power on and make initial settings, and then confirm your phone number. ☛P44, P47
3. Understand the functions of keys on the terminal. ☛P26
4. Understand the meaning of icons displayed on the screen. ☛P28
5. Understand how to use the menus. ☛P30
6. Understand how to make and receive calls. ☛P50, P60
●In the manual for FOMA D902i, the FOMA D902i is usually referred to as “FOMA terminal”.
This manual explains functions performed with a miniSD memory card. A miniSD memory card is required
separately.
miniSD memory card ☛P339
Unauthorized copying of a part or all of the contents of this manual is prohibited.
The contents of this manual are subject to change without prior notice.
Page 3
How to use and refer to this manual
You can look for functions or operation procedures that you want to know using
various searching ways.
Contents/Cautions
Quick Search/
Refer to INDEX P488
Search for a function name or service name.
Use Quick Search P4
Search for frequently-used or useful functions using easy-to-understand words.
Use Front Cover Indexes
Search by turning over the pages on this manual using the front cover indexes.
Front Cover
For details, see the next page.
Use Contents P6
Refer to the contents classified into chapters on an objective basis.
Refer to Features P8
Search for the features using typical or new functions of D902i.
Use Menu List P446
Search using the menu of D902i.
Use Quick Reference Manual P492
This manual describes how to operate frequently-used functions. Use it by separating from this
instruction manual.
Explanatory note on procedures and keys
● The operation procedure is mainly explained in shortcut operations. When there are two or more possible
procedures, the simplest one is mentioned.
● In this manual, the operation procedures are described as follows:
Description Meaning
0 z o z Enter the terminal
m
security code
● If there is especially no notice, the operation procedures from the stand-by display are mentioned.
● In this manual, to place the cursor at an item with
addition, to select an item by placing the cursor with O (Easy Selector Plus) and pressing o (Enter key)
is referred to as “select”.
The step of pressing o which requires after entering characters in the entry field is omitted in description.
● The procedure for entering characters is mainly explained by in-line entry (direct insertion of text into the
entry field). ☛P436
● In this manual, the keys are simplified.
Actual key
Description in
this manual
1
・ The typestyle of key characters is different depending on the color of the
Press m0 on the stand-by display and then press o.
Continuously, enter the terminal security code and press o.
O
(Easy Selector Plus) is reffered to as “highlight”. In
terminal. (Example: , )
How to use and refer to this manual
1
Page 4
Contents/Cautions
V
Vibrator Setting ..........................129
i-αppli..................................... 295
Video-phone ................................ 78
Brightness/color density........... 86
Camera Settings ......................86
Change images (Image Setting)
................................................. 90
How to change
melodies or
lighting
patterns
• Mute the sound heard when pressing keypads..... 130 Keypad Sound
• Use your favorite ring tones............................... 126 Sound Setting
• Adjust the volume of ring tones ...........................66 Ring Volume Setting
• Turn Silent Mode on ..........................................131 Silent Mode
• Use the vibrator for incoming calls .................... 129 Vibrator Setting
• Customize the call indicator’s color and pattern.... 145 Alert Lighting Setting
• Use a personal ring tone for each caller............ 107
Phonebook New Entry
Sounds/Displays/Lights
Settings
Sound Setting
Changing the FOMA terminal ring tone ............................. Soun d Setting 126
Using vibrator to signal incoming calls and alarms ....... Vibrator Setting 129
Setting a sound heard when the keys are pressed .......... Keypad Sound 130
Setting a alert sound for charging ........................................ Charge Alert 130
Setting an alarm announcing that the call is about to be cut off
................................................................................................ Quality Alarm 130
Making FOMA terminal silent .................................................. Silent Mode 131
Customizing Silent Mode . .................................... Customize Silent Mode 131
/gnikaM
sllaC gnivieceR
koobenohP
sthgiL/syalpsiD/sdnuoS
sgnitteS
sgni
tte s
yte
faS
klaThsuP
gnivieceR/gnikaM
sllaC enohp-oediV
Quick Search/
How to use and refer to this manual
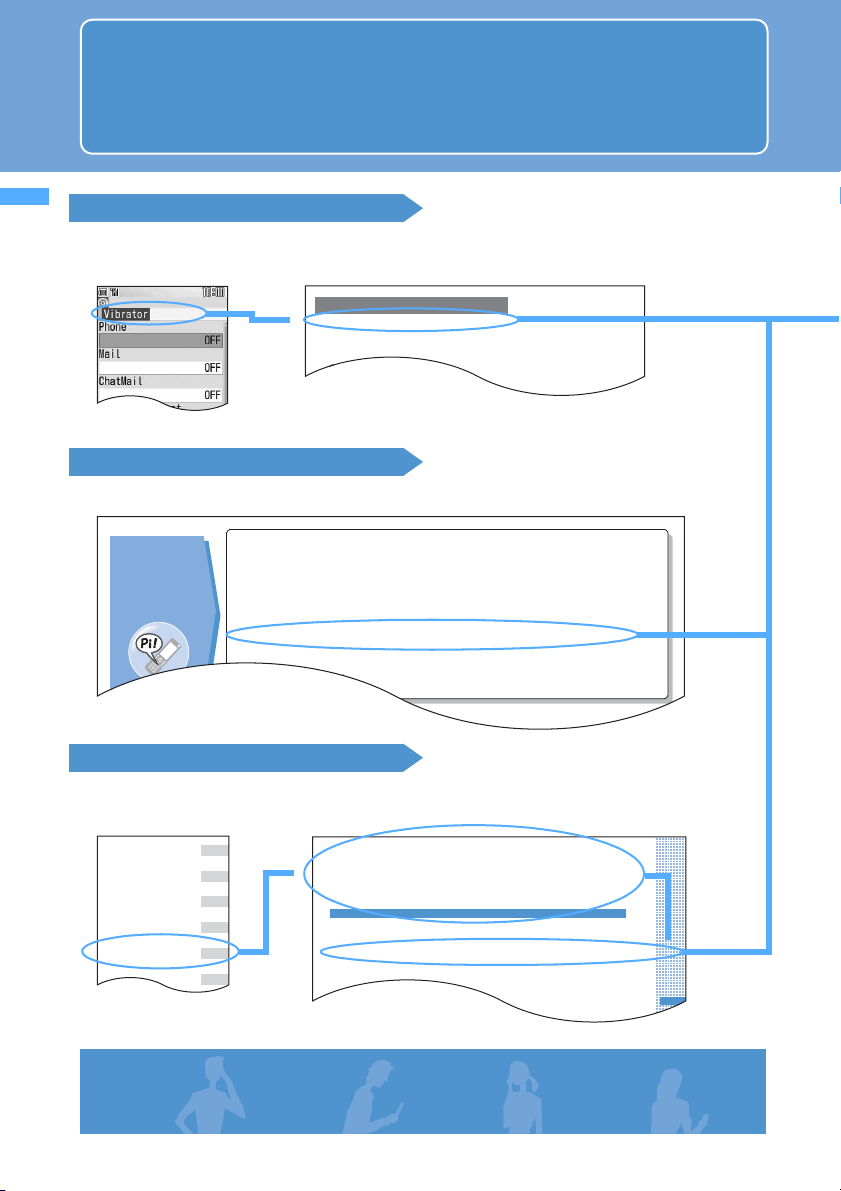
Shown below is an example when you search for the page where “Vibrator Setting” is
described.
How to use and refer to this manual
Searching on INDEX
Use INDEX if you have already known a function or service name.
▲
Using Quick Search
You can easily search for frequently-used or useful functions.
Using Front Cover Indexes
You can find a target page by proceeding from the front cover to the cover of a chapter (the first page of
the chapter) and the page where a function is described.
▲
2
▲
Page 5
Contents/Cautions
s
gnit
te
S s
t
h
giL/s
y
a
lp
s
iD/
s
dn
u
o
Sg
nitt
e
S
ro
ta
rbiV
Using vibrator to signal incoming calls and alarms Vibrator Setting
1
m817
2
3
Default all OFF
The reception of call, PushTalk call, mail, Message R/F, etc. or the schedule alarm notice is
indicated by vibration.
・
The settings in this function are reflected to the setting for the vibrator in Incoming Call Setting,
Incoming Videophone Setting, Incoming PushTalk Setting, Incoming Msg.Setting, Inco ming Chat
Mail Setting and Incoming Msg. Alert.
・ Note that if FOMA terminal is placed on a desk, etc. with Vibrator Setting on, the vibrations of the
vibrator operation may cause it to fall off.
・ Note that if FOMA terminal is placed on a desk, etc. with Vibrator Setting on, the vibrations of the
vibrator operation may cause it to fall off.
Select an item
・ If the incoming setting for Incoming Chat Mail Setting is set to Same : Msg setting, ChatMail cannot
be set.
・ As for a schedule alarm, the terminal vibrates as set in Phone setting.
1 to 5
・ If you set to Pattern A, the terminal vibrates as follows: about 0.7 second vibration → about 0.7
second pause → about 0.7 second vibration → about 1.5 second pause (repeated)
Menu 894
Preventing making/receiving calls Self Mode
Disable all functions that require communications such as making or receiving calls/PushTalk
calls or sending or receiving mails. Infrared data communication and infrared remote control are
also disabled.
Quick Search/
▲
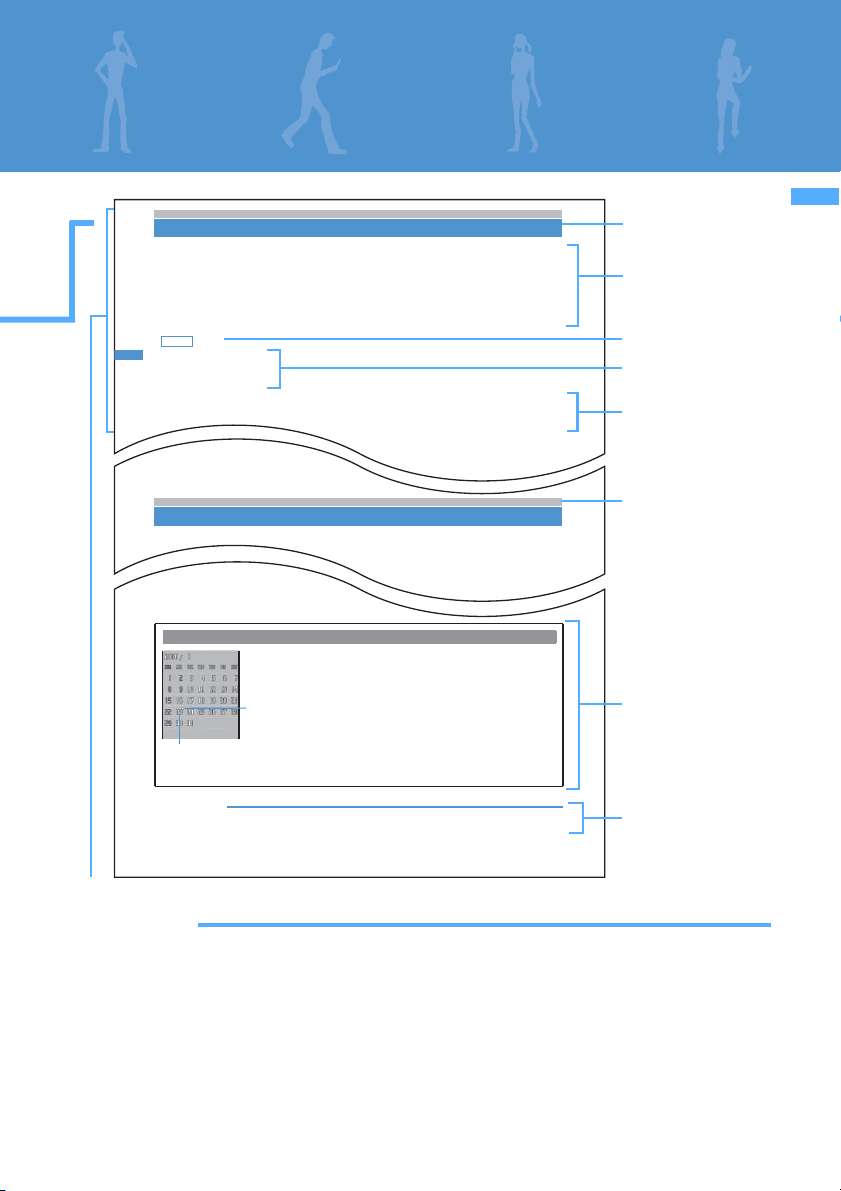
When a calendar is set
The day is displayed
in yellow.
●The days-off and holidays are displayed in red, Saturdays are displayed in
blue. The settings for the days-off and holidays follow Day Off Setting or
the setting for holidays for Scheduler. Note that when Privacy Mode is on
(Authorized access set for Schedule) or PIM Lock is on, the day set as dayoff in Day Off Setting is not displayed in red and reset to the default display.
Dot
●When a schedule is set, a dot is displayed on the upper right of the date.
Note that all schedules with Secret Attribute set are displaye d only when
Secret Mode is on. In addition, they are not displayed when Privacy Mode
is on (Authorized access set for Schedule) or PIM Lock is on.
●Each press of f on the stand-by display switches between displaying
and not displaying the calendar.
Title & Function name:
Function names are
listed on INDEX.
Functional overview
and notes for
operation
Default setting
Operation procedure
Supplement to the
operation
Shortcut operation
☛P32
Column:
Useful information
How to use and refer to this manual
INFORMATION
● An image and a calendar can be set simultaneously. However, if an animation, Created animation or Flash
movie is set, the calendar is displayed when pressing f af ter the playback is stopped or paused.
129
Index
INFORMATION
● The page shown above is an example. It may be different from the actual page.
● The displays or illustrations provided in this manual are for information purposes only and may be different
from the actual products.
● In this manual, “Mobile Wallet compatible i-
Wallet compatible i-
● The design of the screen which appears on the display have been initialized according to the color of FOMA
terminal from the combinations preset in FOMA terminal (Style Theme). ☛P148
In this manual, it is explaining mainly in case that Style Theme is set to LusterWhite.
● Some screens do not support the bilingual function and items or buttons may be displayed in Japanese. In this
manual, these Japanese words are written by both in Japanese and English only for the first time in a chapter
or a section.
α
ppli”.
α
ppli supporting the IC card function” is described as “Mobile
INFORMATION:
Details of functions
3
Page 6
Contents/Cautions
Quick Search/
Quick Search
Use this Quick Search to look for the frequently-used or convenient functions directly.
Quick Search
Useful
functions for
phone calls
When unable
to answer an
incoming call
How to change
melodies or
lighting
patterns
• Notify/not notify your phone number.................... 46 Caller ID Notification
• Talk facing the phone screen .............................. 79 Speakerphone function
• Adjust the volume of caller’s voice ...................... 66 Volume Setting
• Put the current call on hold .................................. 51 On-hold
• Switch to video-phone call during voice call ........53
• Record caller’s messages ................................... 73 Answer Machine
• Use Voice Mail Service...................................... 392 Voice Mail
• Put the incoming call on hold............................... 69 Response and Hold
• Mute the sound heard when pressing keypads..... 130 Keypad Sound
• Use your favorite ring tones............................... 126 Sound Setting
• Adjust the volume of ring tones ........................... 66 Ring Volume Setting
• Turn Silent Mode on .......................................... 131 Silent Mode
• Use the vibrator for incoming calls .................... 129 Vibrator Setting
• Customize the call indicator’s color and pattern .... 145 Alert Lighting Setting
• Use a personal ring tone for each caller............ 107
Switch to video-phone
Phonebook New Entry
How to change
the screen
display
Note: The miniSD memory card is not included in the bundle and needs to be purchased. ☛P339
4
• Customize the stand-by display (wallpaper)...... 132
• Show a calendar on the stand-by display ......... 136 Stand-by calendar
• Adjust the date and time...................................... 45 Date and Time Setting
• Change the size of characters ........................... 146 Font Size
• Learn the meaning of icons on the screen .......... 28 Reading display
Stand-by Display Setting
Page 7
Contents/Cautions
Quick Search/
Advanced
functions for
mail
Advanced
functions for
camera
Settings for
your phone
safety
Other
useful
functions
• Send your original Deco-mail ............................ 235 Deco-mail
• Send images with mail....................................... 241 Attachment
• Sort and save mail automatically ....................... 269 Sort Criteria
• Change the size of image to shoot .................... 180 Image size
• Change the shutter sound ................................. 180 Shutter sound
• Turn the compact light on when shooting .......... 173 Compact light
• Save data into the miniSD memory card ...........180 Save to
• Display the shot images .................................... 320 My Picture
• Keep your phonebook data secret..................... 123 Secret Attribute
• Reject calls without caller ID.............................. 163 Anonymous Caller
• Reject callers not registered in the phonebook ..... 165
Reject non-Reg. Caller
• Lock your phone when you don’t carry it ........... 155 Remote Lock
• Disable the key operation ..................................160 Key Lock
• Call up function menus simply ............................. 32 Shortcut operations
• Use your phone as a calculator .........................384 Calculator
• Read a QR code or barcode.............................. 189 Bar Code Reader
• Send/receive data via infrared communication...... 351
Infrared communication
• Use your phone as an alarm clock .................... 369 Alarm Clock
• Use the miniSD memory card............................ 339 miniSD memory card
• Update software ................................................ 478 Software Update
• Update the security............................................ 483 Virus Scan Function
Quick Search
5
Page 8
Contents/Cautions
Quick Search/
Before using your FOMA terminal ............. Inside front cover
Using a FOMA terminal for the first time..... Inside front cover
How to use and refer to this manual ................................... 1
Contents
Quick Search....................................................................... 4
Features of FOMA D902i .................................................... 8
Making full use of D902i .................................................... 10
SAFETY PRECAUTIONS (Always follow these directions) ..... 12
Handling instructions ......................................................... 19
About intellectual property rights ....................................... 21
Basic package and optional accessories .......................... 23
Before Using D902i 25
Names and functions of parts Reading the display Menu selection
Using the UIM (FOMA card) Attaching/removing the battery pack
Charging Battery Level Power ON/OFF Select Language Date and Time Setting
Caller ID Notification Own Number etc.
Making/Receiving Calls 49
Making calls Redial 186/184 Call WORLD CALL Receiving calls Any Key Answer
Open Answer Close Setting Received Calls Volume Setting Ring Volume Setting
Response and Hold Public mode (Driving mode/power off) Answer Machine etc.
Making/Receiving Video-phone Calls 77
Making video-phone calls Receiving video-phone calls Using Chara-den
Setting images to send Customizing video-phone call display Videophone Settings etc.
PushTalk 93
PushTalk Making PushTalk calls Receiving PushTalk calls
PushTalk Phonebook etc.
Phonebook 105
Phonebook New Entry Group Setting Phonebook Search Edit Phonebook
Delete Phonebook Secret Attribute Quick Dial etc.
Sounds/Displays/Lights Settings 125
Sound Setting Vibrator Setting Silent Mode Stand-by Display Setting
Mail/Call Image Setting Alert Lighting Setting Clock Display Format
Style Theme etc.
Safety settings 149
Security Code Change Terminal Security Code PIN code All Lock Remote Lock
Self Mode PIM Lock Keypad Dial Lock Privacy Mode Setting
Key Lock Secret Mode etc.
Camera 167
Still Camera Movie Camera Setting for shooting Bar Code Reader etc.
i-mode/i-motion 193
What’s i-mode? Site display Change i-mode Password Internet Connection
Bookmark Screen Memo Save Image i-melody Downloading PDF data i-mode Setting
Message R/F Certificate i-motion Downloading i-motion i-motion Setting etc.
6
Page 9
Contents
Mail 227
Composing and sending i-mode Mail Deco-mail Attachment Saving i-mode Mail
Receiving i-mode Mail Check i-mode Message Display
Play/Save Melody Mail Setting Chat Mail Composing and sending SMS etc.
/
Save Image i-motion Mail
i-αppli 289
Downloading Starting i-αppli i-αppli To i-αppli Stand-by Display etc.
i-channel 307
i-channel Displaying i-channel Ticker Setting
Mobile Wallet/ToruCa 311
Mobile Wallet Starting Mobile Wallet compatible i-αppli ToruCa
Obtaining ToruCa Displaying ToruCa ToruCa Setting IC Card Lock
Displaying/Editing/Managing Data 319
Displaying/Editing images Playing/Editing video/i-motion Chara-den Playing melodies
miniSD memory card Managing data Infrared communication
Sound Recorder Displaying PDF data Music Player etc.
Other Convenient Functions 365
Multiaccess Multitask Edit by Slide Auto Power ON/OFF Alarm Clock
Scheduler Custom Menu Own Number Call Duration/Call Cost
Rest Call Cost Call Cost Limit Calculator Notepad
Earphone/Microphone Set with Switch Quick Start-up Reset Delete All Data etc.
Contents/Cautions
Quick Search/
Network Services 391
Voice Mail Call Waiting Call Forwarding Nuisance Call Blocking
Caller ID Request Dual Network English Guidance Service Dialing Number
Arrival Call Act Remote Control Multi Number etc.
Data Communication 403
Data communication Connecting PC Installing communication configuration file
Using FOMA PC configuration software AT command etc.
Character Entry 435
Entering characters 5-touch Input Method Save Phrase Copy Character
KUTEN Code Input Save Word Slot Input Method Input Method Setting
Appendix/Data Interchange/Troubleshooting
Menu list List of dial keys and character assignments Play Sound
Troubleshooting Error Message Warranty and After-Sales Service
Software Update Virus Scan Function etc.
445
INDEX/Quick Reference Manual 487
INDEX Quick Reference Manual
7
Page 10
Contents/Cautions
Quick Search/
Features of FOMA D902i
FOMA is the name of a set of services provided by DoCoMo based on W-CDMA, which is
recognized as one of the systems compliant to the global standard for third generation mobile
communications (IMT-2000).
Features of FOMA D902i
i-mode is an online service used with i-mode terminals. This service supports connection to i-mode
Sites (Programs) or i-mode compatible Internet websites that provide a variety of useful information
and allows you to exchange i-mode Mail.
It’s amazing because it’s i-mode!
Main functions of FOMA D902i
PushTalk
You can talk with multiple persons (up to 5
persons including yourself) by easy operation of
selecting a partner from the PushTalk phonebook
and pressing the PushTalk button (g). You can
use conveniently in connection within a group or
a short call which tells business. ☛P95
i-channel
This allows you to receive graphical information
about news and weather conditions. You can get
information on a regular basis and the latest
information is run on the stand-by display as
tickers. Also, the information can be displayed in
the channel list by pressing the i-channel
compatible key (c). Furthermore, you can
get rich, detailed information by selecting your
desired channel in the i-channel list. ☛P308 In
addition, our free trial service is available over the
fixed period of time for customers who have not
applied to i-channel service.
・ i-channel is a pay service and requires a subscription.
PDF compatible viewer
Allows you to view PDF. You can check easily
useful information such as maps, catalogs and
schedules on your i-mode terminal. You don't
need to bring books. ☛P210, P359
High-capacity i-αppli/i-αppli DX
Downloading i-αppli from sites allows you to enjoy
various games and automatically review stock
prices and weather information on your phone.
In addition, the 3D graphics and 3D sounds allow
you to enjoy realistic i-αppli games such as car
race games in the contents compatible to 3D x 3D.
i-αppli DX provides better uses in conjunction with
i-mode terminal information such as the
phonebook and mail. ☛P290
Mobile Wallet i-mode FeliCa
Downloading the Mobile Wallet compatible
i-αppli enables you to charge electronic money
from sites to the IC card of your FOMA terminal
or check the balance and usage history. Also you
can use it as an airplane ticket or a reward point
card. The Mobile Wallet makes your phone more
convenient in daily life. ☛P312
ToruCa
ToruCa is an electronic card obtained by Mobile
Wallet, and you can use conveniently as a flier, a
restaurant card, a coupon, etc. ToruCa can be
obtained from the reader/writer or sites and can be
easily exchanged using mail, infrared rays or the
miniSD memory card. ☛P314
Video-phone
Allows you to see and talk with the partner in the
distance place and show the surrounding scenery to
the other party by switching to the out-camera. This
function also supports Chara-den which displays a
character instead of your self image. In addition,
you can switch to a video-phone call without
disconnecting the call even while making a usual
voice call. At the time of purchase, you can begin to
talk immediately because the partner’s voice is set
to be heard from the speaker. ☛P78
Deco-mail
Allows you to compose and send your original
messages. Enjoy expressive decorated mail by
changing the character color and size or
background color, and by pasting images such
as Deco-mail pictures or still images shot with the
built-in camera in the text. Using templates, you
can also create Deco-mail in the same style as
for Deco-mail you have received or downloaded
form Internet websites. ☛P235
Wide array of network services
●Voice Mail Service (charged)
●Call Forwarding Service (free of charge)
●
SMS (Short Message Service) (free of charge) ☛P283
Note: The miniSD memory card is not included in the bundle and needs to be purchased. ☛P339
8
*1
☛P392
*1
☛P395
●Call Waiting Service (charged)
●Dual Network Service (charged)
*1 Separate application is required.
*1
☛P394
*1
☛P398
Page 11
Useful functions
Contents/Cautions
Quick Search/
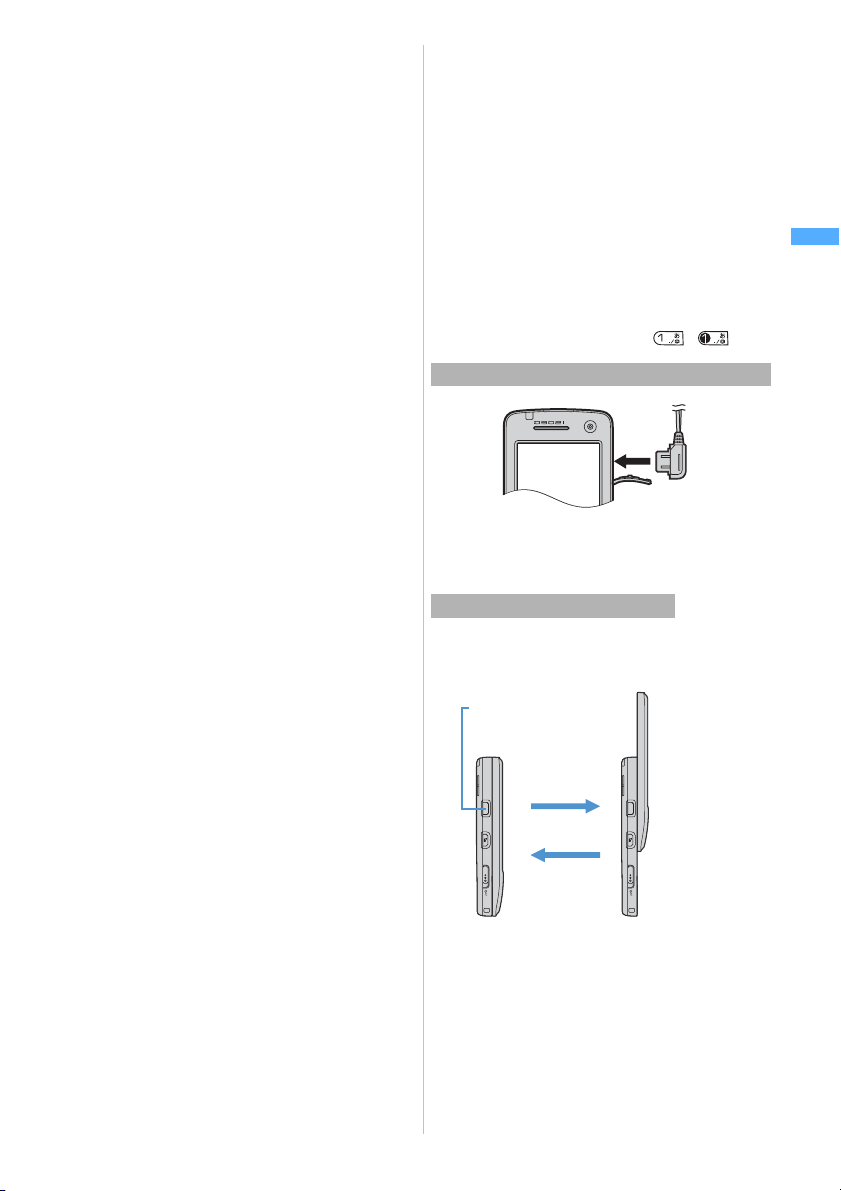
One-push open
You can quickly slide and open your FOMA
terminal with one hand at the touch of the onepush open button on the side of the terminal.
Functions working with slide operation
●To receive an incoming call, open FOMA
terminal by slide operation. ☛P63
To put the call on hold or end the conversation,
close it. ☛P63
●The reply screen or the edit screen can be
displayed by only opening FOMA terminal while a
received mail or schedule is displayed. ☛P368
Built-in camera
●FOMA terminal contains an out-camera and in-
camera, which allow you to take images while
viewing the large display. You can shoot a still
image of up to 4M pixels using auto focus. In
addition to Max 28 x zoom, various modes are
available for shooting including close-up,
framed shooting and continuous shooting. You
can activate or deactivate Camera by opening/
closing the lens cover. ☛P168
Out-camera : Effective pixels: 2M
In-camera : Effective pixels: 320K
●Allows you to record or play video with smooth
motion and high quality. ☛P178, P327
(Max record pixels: 4M)
(Max record pixels: 310K)
Multiaccess/Multitask
Multiaccess which can use voice call and packet
communication simultaneously is supported,
allowing you to talk during an i-mode connection.
In addition, Multiaccess which can execute
several functions at the same time and perform
operations by switching the screen is supported.
For example, you can read received mail or
register phonebook entries while making a call.
☛P366, P367
Safety settings
You can use FOMA terminal safely by various
lock functions.
● Key Lock ☛P160 ● Secret Mode ☛P161
● Privacy Mode ☛P159
For details on other Safety settings ☛P149
Simple menu
In addition to the normal menu, you can use another
menu to display frequently-used functions such as
でんわ
(phone),
メール
(mail),
カメラ
i
モード
(i-mode) in large size of characters. ☛P31
(camera) and
High-definition large display
The 2.8-inch large TFT LCD (240 x 400 dots) is
provided for the display. It clearly displays fine
images and characters on the large screen.
High-quality melody playback
FOMA terminal also supports ring tones such as
PCM generated 64-note harmonic, voice and
sound effects (ADPCM sounds), etc.
Automatic time correction
The time in FOMA terminal is automatically
corrected by the information from DoCoMo
network. Also you can set the time on your phone
ahead or back, if you want. ☛P45
Bar Code Reader
JAN codes or QR codes can be scanned with the
built-in camera. Using scan results, you can perform
a variety of operations such as registering
phonebook entries, connecting to sites and sending
mail. ☛P189
Infrared communication/infrared remote control
Exchange data between two FOMA terminals
using infrared communication. Also, you can
operate devices that support TV infrared remote
control from your FOMA terminal. ☛P351, P355
Support for miniSD memory card
●A miniSD memory card enables you to back up
data stored in your FOMA terminal such as
images, melodies, phonebook entries and mail
messages. ☛P339
●You can save video files and music data
(i-motion with no image) created by external
devices to the miniSD memory card and play
them on your FOMA terminal. (Some files may
not be played.) ☛P466, P467
●By connecting your FOMA terminal to a PC
with the FOMA USB cable (optional), the
miniSD memory card in FOMA terminal can be
used as an external memory of a PC. ☛P406
Music Player
It becomes easier to play the music data
(i-motion without image) in the miniSD memory
card. Shuffle play, intro play, etc. can also be
performed. ☛P363
Animation Menu
The menu of the animation by Flash movie
(FlashTM menu) is provided. ☛P30
More usable mail functions
● When you move from outside the service area to inside the service area, unsent mail set to auto-
send is sent automatically. ☛P247
● If the text of reply mail is registered beforehand, you can reply mail easily (Quick Reply). ☛P274
● You can search mail from the phonebook or the calendar easily. ☛P114, P376
● The characters are efficiently convertible with ATOK+APOT provided.
Features of FOMA D902i
9
Page 12
Contents/Cautions
Quick Search/
Making full use of D902i
A variety of functions of D902i visual communications are explained here.
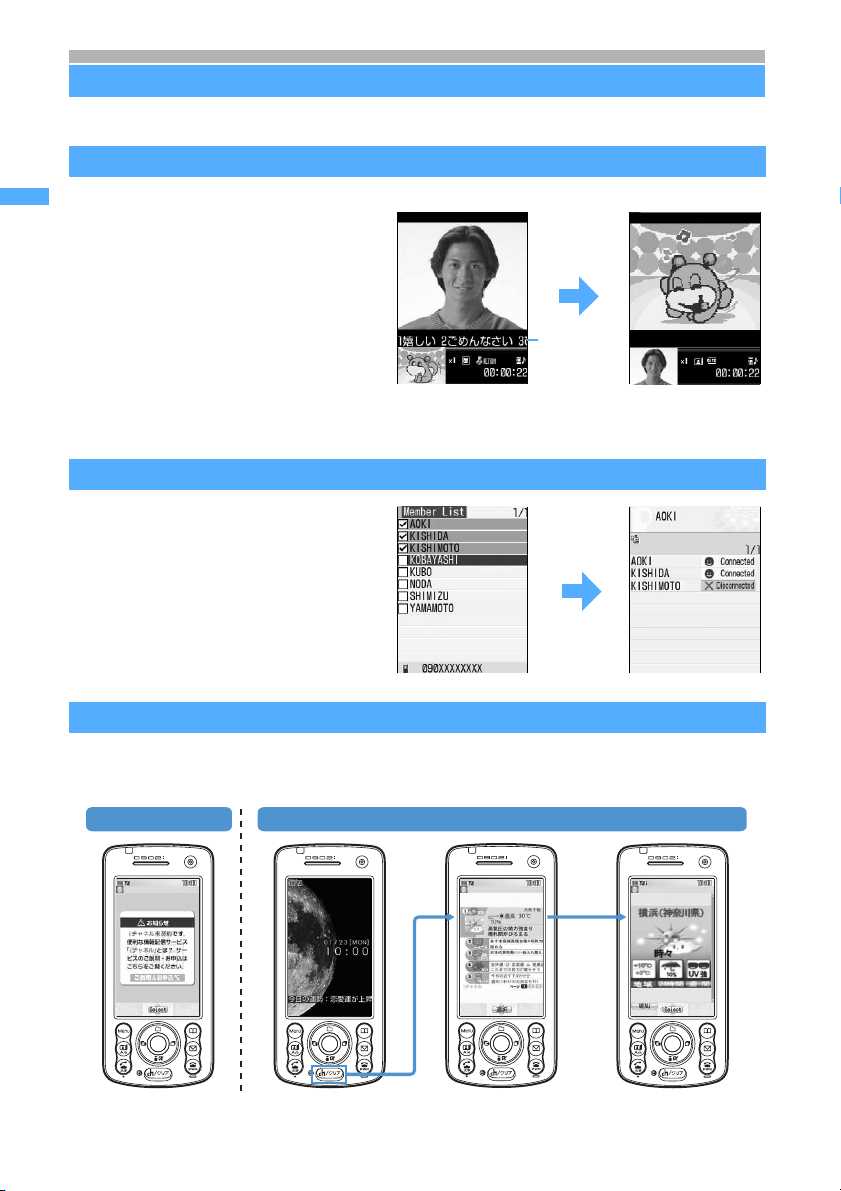
Telling feelings by Chara-den
When talking by video-phone, a character
Making full use of D902i
can be displayed on the other party’s screen
instead of your self image. If the action
(movement or expression) is put by the key
operation, your feeling can also be
expressed. ☛P83, P334
Your screen The other party’s screen
Action list
displayed in
ticker
Press the key to
indicate actions.
©BVIG
The character moves.
©BVIG
PushTalk
You can talk with multiple persons (up to 5
persons including yourself) by easy
operations of only pressing the PushTalk
button (g) for over a second to activate
PushTalk Phonebook and pressing g after
selecting a partner. ☛P95
i-channel
You can receive a variety of information on a regular basis without additional operations.
In addition, press the i-channel compatible key (c) to display the channel list so that you can get
more richly detailed information. ☛P308
Not subscribed After subscription
Connected
Note: The miniSD memory card is not included in the bundle and needs to be purchased. ☛P339
10
Page 13
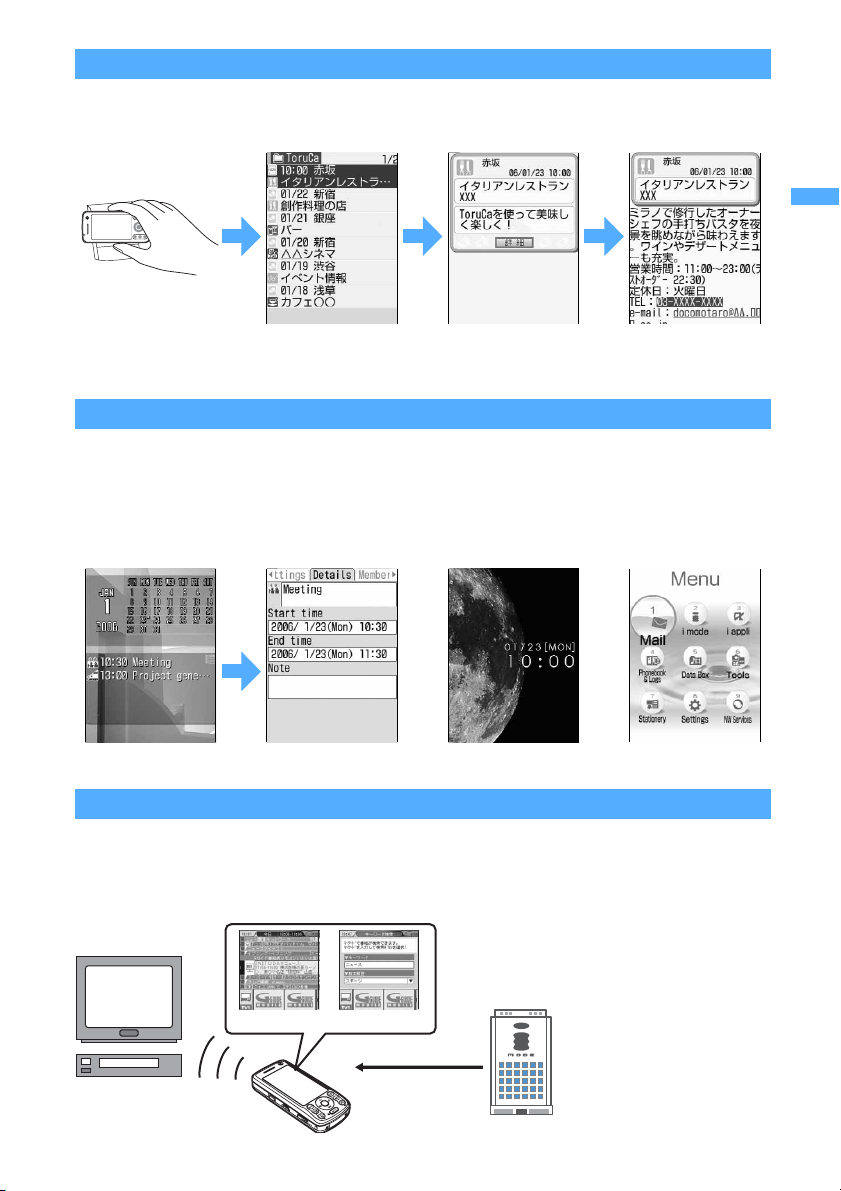
ToruCa
pp
ToruCa can be obtained from the reader/writer or sites and can be easily exchanged using mail, infrared
rays or the miniSD memory card.
The obtained ToruCa is saved in
ToruCa
in
Tools
menu. ☛P314
Contents/Cautions
Quick Search/
Making full use of D902i
Obtain ToruCa by
holding up Mobile Wallet
to the reader/writer.
Select obtained ToruCa from the ToruCa list. Press 詳細(Details) button to
view more detailed information.
Customizing the screen
・ You can display new arrived information such as unread mail, missed call, calendar or schedule on the
stand-by display and check the contents by simple operations (Custom stand-by display). In addition,
images in the folder you have selected can also be displayed at random on the stand-by display.
☛P137, P135
・ By Style Theme, the stand-by display or color scheme suitable for the color of FOMA terminal can be
set in total. ☛P148
Custom stand-by display
Press o to select. You can check the contents.
Example of Style Theme (Luster White)
G-GUIDE TV Remote Controller
The FOMA terminal is equipped with an i-αppli “G-GUIDE TV Remote Controller” for operating the TV,
video deck and DVD player remotely while viewing the TV program information. You can search for TV
programs using keywords such as the program category or your favorite entertainer. In addition, it allows
to register a TV program in the FOMA terminal’s Scheduler and sound an alarm when the TV program
starts. ☛P297
TV/Video deck/
DVD player
Program*
1
Keyword Search
Program
information
i-
α
li server
*1 The screen shown here
is for information
purpose only and may
differ from the actual
screen. The actual
screen displays the
program in your area.
11
Page 14
Contents/Cautions
Quick Search/
SAFETY PRECAUTIONS
SAFETY PRECAUTIONS (Always follow these directions)
● Read the following SAFETY PRECAUTIONS to ensure that the phone is used correctly. Also,
store this manual in a convenient location for future reference.
● It is essential that these precautions be observed to prevent injury to the user and third parties as
well as damage to property.
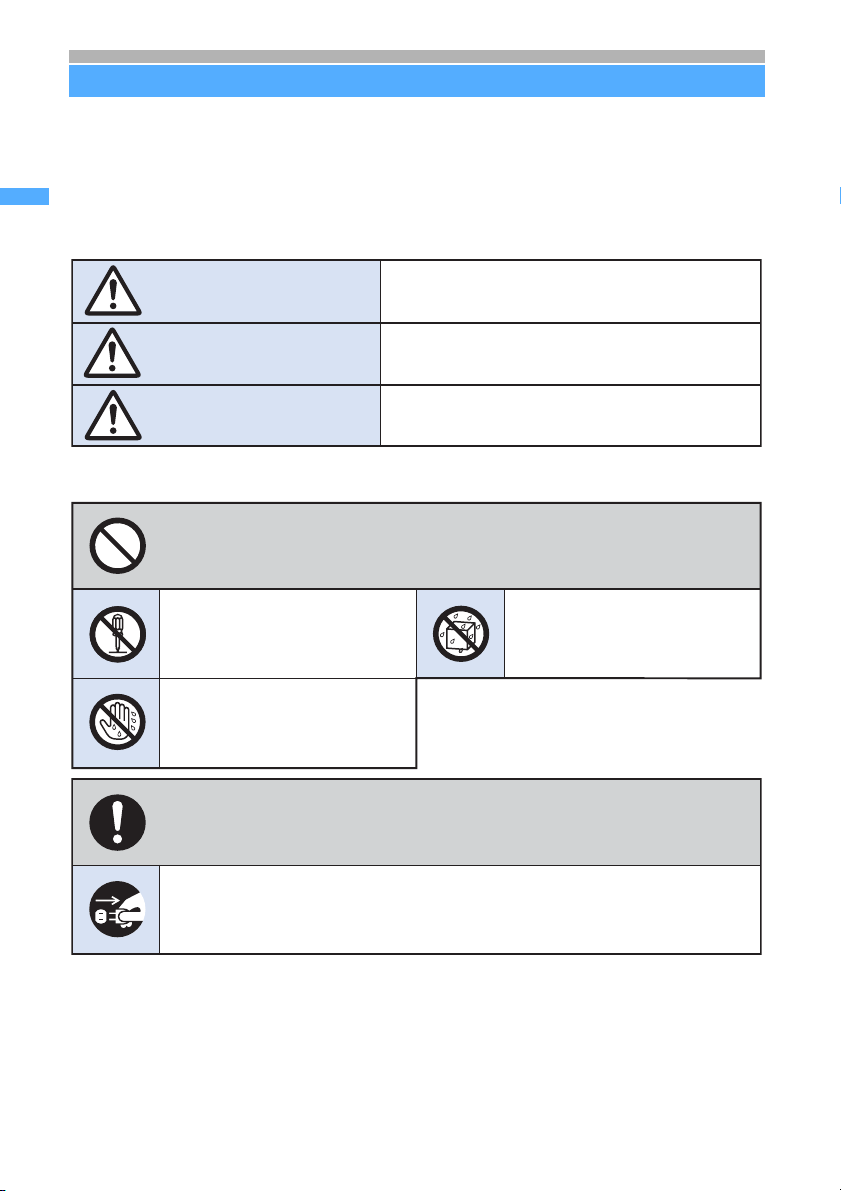
● The following symbols are used to indicate the degree of danger or damage that may
result from failing to follow the specified precautions.
Indicates an imminently hazardous situation, which, if
DANGER
WARNING
CAUTION
●
The following symbols are used to highlight instructions that are very important
and that must be strictly followed.
This indicates the action is prohibited.
not avoided, will result in death or serious injury.
Indicates a potentially hazardous situation, which, if
not avoided, could result in death or serious injury.
Indicates a potentially hazardous situation, which, if
not avoided, may result in injury or property damage.
This indicates disassembly is
prohibited.
This indicates that handling
with wet hands is prohibited.
This indicates an action that must be performed in accordance with
the directions.
This indicates you must remove the plug from the power outlet.
● SAFETY PRECAUTIONS is separated into six categories.
Handling the FOMA terminal, battery pack, adapter (and charger) and the UIM (general information) ....
Handling the FOMA terminal................................................................................................... P14
Handling the battery pack .......................................................................................................P15
Handling optional devices (AC adapter/DC adapter/desktop holder) ..................................... P17
Handling the UIM (FOMA card) .............................................................................................. P18
Handling the FOMA terminal in the vicinity of medical devices .............................................. P18
This indicates the part must not
be exposed to water.
12
P13
Page 15

Handling the FOMA terminal, battery pack, adapter (and charger) and the UIM (general information)
DANGER
Use only DoCoMo-certified battery packs, adapters (and chargers) with the FOMA
terminal.
Use of non-specified items could cause the FOMA terminal, battery pack or other devices to leak,
overheat, rupture, catch fire or malfunction.
Battery pack: D06 Desktop holder: D06 Rear cover: D06
FOMA AC adapter: 01 FOMA DC adapter: 01
・For additional items related to the compatible products, contact the nearest DoCoMo Shop.
Do not disassemble or remodel the components. Also, do not solder them.
Attempting to do so will lead to an accident, such as a fire, injury, or electrical shock and damage
the equipment. Doing so may also cause the battery pack to leak, overheat, rupture, or ignite.
Do not use or leave the components in a place near fire or heaters. Also avoid a hightemperature place exposed to direct sunlight or a car under the scorching sun.
Otherwise, your equipment will get deformed or troubled. The battery pack may leak, overheat,
rupture, or ignite. Other possible pro blems include a reducti on in perfor mance and li fe. Som etimes,
the casing will partly get heated, resulting in an extremely high temperature to get you burnt.
Do not expose the components to water.
The components may overheat, cause electric shock, fire or damage if exposed to wate r, pet urin e
or other liquids. Do not use the equipment in locations where it could get wet.
WARNING
Contents/Cautions
Quick Search/
SAFETY PRECAUTIONS
Be sure to turn off the FOMA
terminal before entering a place
such as a gas station that is
subject to flammable gases.
Do not charge in such a place.
Charging could cause fire.
When using Osaifu-Keitai inside a gas
station, make sure to turn off the FOMA
terminal in advance. (If IC Card Lock is
set, cancel the lock and then turn the
power off.)
Do not place the battery pack,
FOMA terminal, adapter (and
charger) or UIM in the
microwave oven, high-pressure
cooker or other cooking
appliances.
Doing so could cause the battery pack
to leak, overheat, rupture or ignite, and
could damage the circuitry of the FOMA
terminal and adapter (and charger),
causing overheat, smoke or fire.
Do not expose the components
to strong shocks by dropping or
throwing them.
Doing so could cause the battery pack
to leak, overheat, rupture or ignite, and
damage the equipment, resulting in fire.
Do not let the recharging terminal
and external device terminal
touch any conductive material,
such as a piece of metal or lead.
Also do not put any conductive
material into the recharging
terminal and external device
terminal.
The battery can short-circuit, causing
fire and damage.
If there is anything wrong (such
as strange odor, heat generation,
color change, deformation, or the
like) with the components while
you are using or charging them or
when they are being stored, you
should take the following steps
immediately.
1. Remove the power plug from
the outlet.
2. Turn off your FOMA terminal.
3. Remove the battery pack
from your FOMA terminal.
Continuing to use the equipment
without taking these steps will cause it
to overheat, rupture, or ignite or cause
its battery pack to leak.
Next
13
Page 16
Contents/Cautions
Quick Search/
CAUTION
SAFETY PRECAUTIONS
When a child uses the FOMA
terminal, first be sure an
experienced adult teaches
proper usage methods and
techniques. Observe the child
to determine that they are using
the FOMA terminal correctly.
Failure to do so could result in injury.
Keep out of the reach of small
children.
The components can be accidentally
swallowed, resulting in injury.
The temperature of FOMA terminal or the battery pack adapter (and charger) may
become high during charging the battery, recording a video, playing it, repeating of
making video-phone calls, performing i-mode or ia long time.
If you touch the part with a high temperature directly for a long time, redness, itchiness, rash, etc.
may arise in your skin depending on your constitution or condition.
Especially note that if you use it continuously for a long time while FOMA terminal is connected to
an adapter (and charger).
Handling the FOMA terminal
Turn off the FOMA terminal inside an aircraft, hospital or other location where
use of mobile phones is prohibited.
The FOMA terminal may interfere with the correct functioning of electronic equipment. If the
automatic power on function is used, cancel the setting and turn the power off. Observe any
regulations posted in medical facilities.
If you have done prohibition acts such as using the FOMA terminal inside an aircraft, you may be
punished as stipulated by law.
Turn off the FOMA terminal in
the vicinity of electronic
equipment that relies on highprecision control or faint
signals.
The FOMA terminal may interfere
・
with the correct functioning of such
electronic equipment.
Examples: hearing aids, implanted
cardiac pacemakers, implanted
defibrillators, other medical devices,
fire alarms, automatic doors and
other automatically controlled
equipment.
Users of such medical equipments
should check with the electronic
equipment or device manufacturer
with respect to the effect of
electromagnetic interference.
Do not place the components
on an unstable or tilted surface.
Doing so could cause the equipment to
slide off, possibly causing personal
injury or damaging the equipment.
Do not store in locations subject
to high temperature and humidity
or excessive dust.
Doing so could damage the equipment.
α
WARNING
Do not place the FOMA terminal
in a breast or inner pocket if you
are carrying or using electronic
medical equipment.
The FOMA terminal could cause any
medical equipment in its vicinity to
malfunction.
People with weak hearts should
take care with respect to setting
the incoming vibrator and ring
volume.
The FOMA terminal may interfere
hearts.
ppli, or using it continuously for
14
Page 17
Do not aim the infrared port at
eyes and attempt to transmit.
Eyes could be affected. Aiming at other
infrared devices and transmitting could
cause other devices to malfunction.
When you talk under hands-free
settings (with the speakerphone
function), be sure to keep a
distance between FOMA
terminal and your ear.
Doing so could cause the hearing loss.
Do not place your FOMA terminal
in an area over an air bag or in an
air bag deployment area such as
on a dashboard in a vehicle.
If the air bag inflates, the FOMA
terminal may hit you and injury and
damage to itself could result.
Do not use the FOMA terminal
while driving.
From November 1, 2004, using mobile
phones while driving is set as the object
of penal regulations. Even if you use
the handsfree device, park the car in a
safe place before using the phone. Set
Public mode (Driving mode/power off)
or Voice Mail Service while driving.
Do not turn on the compact light
toward eyes at close range.
Taking a look at the light directly affects
eyes damage. He or she may be blinded
by it and injury could result.
If you hear thunder while using
the FOMA terminal outdoors,
immediately turn the power off
and move to a safe location.
Use of the phone in such a situation
could expose you to lightning strikes or
electric shock.
CAUTION
Rarely, some FOMA terminal users may develop itching, skin irritation or eczema. If
such a condition occurs, stop using the FOMA terminal immediately and seek
medical attention.
Metal is used in the following components:
Part Material
Easy Selector Plus (the center key), b, C, One-push open button Chromium plating
The side of the display side case Magnesium alloy MD1D
(JIS) equivalents*
*1 Although painted, the skin may be touched if it separates.
Do not swing the FOMA
terminal around by the strap.
Doing so could cause injury to yourself
or a third party or damage the phone.
Use in certain makes of cars
may affect onboard electronic
equipment.
Continued use under such conditions
could cause unsafe driving. Do not use
the FOMA terminal in such a case.
Do not allow water or other
liquids, pieces of metal or other
foreign material to enter into the
UIM slot and a miniSD memory
card slot of the FOMA terminal.
Doing so could cause fire, electric
shock, or damage to the FOMA terminal.
Do not bring magnetic cards
near the FOMA terminal.
Magnetic data stored on bank cards,
credit cards, telephone cards, and
floppy disks may be corrupted or lost.
1
Contents/Cautions
Quick Search/
SAFETY PRECAUTIONS
Handling the battery pack
■Check the battery type indicated on the
battery pack label.
Indication Battery type
Li-ion Lithium ion battery
Next
15
Page 18
Contents/Cautions
Quick Search/
DANGER
SAFETY PRECAUTIONS
If electrolyte from the battery
pack gets in your eyes, do not
rub; instead, rinse immediately
with copious amounts of clean
water and seek medical attention.
Doing so could cause the loss of vision.
Do not attach metallic materials
such as wire to the port. Do not
carry or store the battery pack
together with a necklace or
other metallic items.
Doing so could cause the battery pack
to leak, overheat, rupture or catch fire.
Do not pierce the battery pack
with nails, hammer on it or step
on it.
Doing so could cause the battery pack
to leak, overheat, rupture or catch fire.
Do not throw the battery pack
into a fire.
Doing so could cause the battery pack
to leak, overheat, rupture or catch fire.
When you attach the battery
pack to the FOMA terminal,
never attempt to forcefully
insert, because it should slide
in easily and fit correctly. Check
the direction of the battery pack
and try again.
Doing so could cause the battery pack
to leak, overheat, rupture or catch fire.
WARNING
Should any electrolyte from the
battery pack come into contact
with your skin or clothing,
immediately stop using the
battery and rinse with clean water.
Failure to do so could cause skin injuries.
If the battery pack leaks or emits strange odors, immediately stop using it, and
always keep away from sources of fire.
Failure to do so could cause the battery liquid to catch fire, and the battery pack itself to rupture.
Stop charging if it is not possible
to fully charge the battery pack
within the specified time.
Failure to do so could cause the battery
pack to leak, overheat, rupture or catch
fire.
16
CAUTION
Do not dispose of the battery pack with other regular household waste.
Failure to properly dispose of the battery pack in an environmentally sensitive manner could cause
the battery pack to catch fire and damage the environment. Use adhesive tape to cover the terminal
of battery pack when it is no longer used and bring it to a DoCoMo Shop after the insulation.
Alternatively, you can also dispose of the battery pack in accordance with local regulations.
Page 19
Handling optional devices (AC adapter/DC adapter/desktop holder)
WARNING
Contents/Cautions
Quick Search/
Use care not to short circuit the
recharging terminal when the
adapter (and charger) is connected
to a wall outlet or cigarette lighter
socket. Do not touch the recharging
terminal with your hands or fingers,
or some other part of the body.
Doing so could cause fire, equipment
failure, electric shock or other injury.
Do not use th
e AC adapter and
desktop holder in bathrooms or
other potentially high humidity
locations.
Doing so could cause electric shock.
Never use the adapter (and
charger) when it has a damaged
power cord.
Failure to do so could result in electric
shock, overheat or fire.
If the adapter (and charger) or
holder is exposed to water or
other liquid, immediately
disconnect the power plug from
the wall outlet or cigarette lighter
socket.
Failure to do so could result in electric
shock, smoke or fire.
Be sure the power plug is free of
dust.
Failure to do so could cause the
equipment to catch fire.
During charging, place the adapter
(and charger) and desktop holder in
a stable location. Do not cover or
wrap the adapter (and charger) and
desktop holder with a cloth or
blanket, etc.
Using the equipment under such
conditions could cause the FOMA
terminal to be detached from the
holder, or cause a heat buildup that
leads to fire or equipment failure.
Do not touch the FOMA terminal
and AC/DC adapter when hearing
thunder.
Contact with the FOMA terminal and
adapter could cause you lightning
strikes or electric shock.
Do not touch the adapter (and
charger) cord or wall outlet with
wet hands.
Doing so could cause electric shock.
When the adapter (and charger)
is not to be used for a prolonged
period, disconnect the power
plug from the wall outlet.
Failure to do so could result in electric
shock, fire, or equipment failure.
When connected to a wall outlet,
make sure that the AC adapter
does not come into contact with
metallic straps or other metal
objects and the plug is properly
seated.
Failure to do so could result in electric
shock, short circuit, or fire.
Use the designated power source
and correct voltage.
Use of incorrect voltage could cause fire
or equipment failure. When using your
FOMA terminal overseas, use the FOMA
domestic/overseas AC adapter 01.
AC adapter: 100V AC
FOMA domestic/overseas AC adapter:
(Always connect to the outlet for internal
household use.)
DC adapter: 12V DC, 24V DC
100V to 240V AC
(specific for negative ground )
vehicle)
Use only the specified fuse for
the DC adapter.
Use of the incorrect fuse could cause
fire or equipment failure. Check the
instruction manual for details of the
correct fuse to use.
The DC adapter is for use with
negative ground cars. Do not use
it with positive ground cars.
Doing so could result in fire.
SAFETY PRECAUTIONS
Next
17
Page 20
Contents/Cautions
Quick Search/
CAUTION
SAFETY PRECAUTIONS
Disconnect the power plug before
beginning any maintenance.
Failure to do so could cause electric
shock.
Do not place heavy objects on
the adapter (and charger) cord or
power cord.
Doing so could cause electric shock or
fire.
Do not yank on the adapter (and
charger) cord or power cord when
disconnecting the adapter (and
charger) from the wall outlet.
Doing so could damage the cord,
resulting in electric shock or fire.
Handling the UIM (FOMA card)
CAUTION
Take care when removing the UIM (the IC).
Failure to do so could cause injury to hand and fingers.
Handling the FOMA terminal in the vicinity of medical devices
The information given below conforms to the guidelines set forth by the Electromagnetic Compatibility
Conference regarding the protection of electronic medical equipment from radio waves emitted by
mobile phone units.
WARNING
Turn off the FOMA terminal on packed trains or in crowded places as someone with
an implanted cardiac pacemaker or implanted defibrillator may be nearby.
The electromagnetic waves emitted by your phone could affect the function of an implanted
cardiac pacemaker or implanted defibrillator.
When inside a medical institution, always remember the following guidelines:
・
Never take the FOMA terminal inside an operating room, intensive care unit (ICU) or coronary
care unit (CCU).
・ Always turn off the FOMA terminal in hospital wards.
・ Even in the lobby and other areas, always turn off the FOMA terminal when electronic medical
equipment is nearby.
・Follow the directives of the medical institution. There may be specific regulations as to items that
are prohibited or use of which is restricted.
・ If you are using the automatic power on function, cancel the setting and turn off the power.
If you have an implanted cardiac pacemaker or implanted defibrillator, keep your
FOMA terminal at least 22 cm away from it.
The electromagnetic waves emitted by your phone could affect the function of an implanted
cardiac pacemaker or implanted defibrillator.
If you are using electronic medical equipment other than implanted cardiac
pacemakers or implanted defibrillators at your home or outside the confines of a
medical institution, be sure to check with the manufacturer about possible adverse
effects caused by electromagnetic interference.
The electromagnetic waves emitted by your phone could affect the function of electronic medical
equipment.
18
Page 21

Handling instructions
General
●Do not get the components wet.
The FOMA terminal, battery pack and adapter (and charger) are not waterproof. Avoid using the components
in a bathroom or other high humidity areas or locations exposed to rain. If you carry the components, sweat
could cause internal corrosion that leads to equipment failure. As a result of investigation, if component failure
is found to be water-related, repair is not covered by the warranty and may not be able to be performed.
In such a case, should it be found to be possible to repair the unit, you will be billed for all repairs.
●Clean the components with a soft, dry cloth.
• Clean the components using a soft, dry cloth (such as a lens cloth).
• Using alcohol, thinner, benzene or detergents could cause the printed text to fade or disappear, or the
equipment to become discolored.
●Occasionally clean the terminals with a dry cotton swab.
Dirty terminals could cause intermittent contact that could interrupt the flow of power to the unit. Such a
situation also causes insufficient charging. Use a dry cloth or cotton swab to clean the terminal.
●Do not place the components near an air conditioner vent.
Sudden changes in temperature could cause condensation, leading to corrosion inside the components and
equipment failure.
●Do not place the FOMA terminal in locations where it could be exposed to excessive pressure.
Do not place it in a bag together with many other things or in your pocket when you sit down as this could
exert pressure on the LCD or damage the internal boards, resulting in equipment failure. Damage arising
from such causes is not covered by the warranty.
●Carefully read the instruction manuals supplied with the battery and adapter (and charger) before use.
FOMA terminal
Contents/Cautions
Quick Search/
Handling instructions
●Avoid extremely high or low temperatures.
Use in an environment with a temperature of 5-35 °C and relative humidity of 45 to 85 %.
●If the FOMA terminal is used near a radio, television or general subscriber phone, it could affect such
equipment. Use the phone as far away from such equipment as possible.
●With regard to data stored in the FOMA terminal, keep it separately in a memo, etc. so as not to
permanently lose important data.
NTT DoCoMo cannot be held responsible in any way for the loss of stored data.
●Do not put the FOMA terminal in your back pocket and sit on it. Avoid putting the phone in the bottom
of a bag, etc. where it is subject to excessive pressure.
Damage may result.
●Do not close the FOMA terminal with the strap held inside.
Malfunction or damage may result.
●It is normal for the FOMA terminal to become warm during using or recharging. You can continue to
use it while warm.
●Do not aim the camera directly at the sun and leave it.
Elements may be discolored or baked.
Battery pack
●The battery pack will gradually wear out.
Battery life also depends on how you use the battery pack; you know it is time to replace it when the usage
time is very short even though you fully charge it. The specified battery pack can be purchased separately.
Next
19
Page 22

Contents/Cautions
Quick Search/
Handling instructions
●Recharge the battery pack in locations where the ambient temperature is between 5 °C and 35 °C.
●When using for the first time or after a long period of non-use, be sure to fully charge the battery pack
before use.
●The time of use provided by the battery pack depends on the ambient conditions and the condition of
the battery pack itself.
●Do not expose to the direct sunlight and high temperature. Please keep your battery in an airy and
cool place.
When you do not use your phone for a long time, please detach the battery from the FOMA terminal in the
state where it used up and put into a plastic bag etc. and keep it.
Adapter (and charger)
●Recharge the battery pack in a location where the ambient temperature is between 5 °C and 35 °C.
Do not recharge in the following locations:
• Locations that are subject to high humidity, dust or excessive vibration
• Near general subscriber phones, TVs or radios
●It is normal for the adapter (and charger) to become warm during recharging. You can continue
charging with a warm adapter.
●When the battery pack is recharged using the DC adapter, always keep the car engine running.
Failure to do so could cause the car battery to run down more quickly than normal.
●When an outlet with falling prevention mechanism is used, check the instruction manual for the outlet
before use.
●Do not expose to the strong shock and deform the recharging terminal.
Giving the strong shock on an adapter can cause damage.
UIM (FOMA card)
●Do not use excessive force to remove the UIM.
●Do not place an excessive load on the UIM when inserting it into the terminal.
●The UIM becomes warm during use. This is normal and not a cause for concern.
●Note that any card failures resulting from inserting the UIM in an IC card reader/writer not designated
by NTT DoCoMo are the responsibility of the customer.
●Make sure that the ICs are kept clean.
●Use a clean dry cloth for cleaning the UIM.
●It is recommended that users maintain data stored on the UIM in some other form.
If the data should be erased, NTT DoCoMo assumes no responsibility for the loss of any data.
●The UIMs that are no longer used should be returned to a DoCoMo Shop for environmental protection.
●Avoid extremely high or low temperature.
●Take care not to damage, touch, or short-circuit the ICs to prevent them from losing their data or from
malfunctioning.
●Take care not to drop the UIM or give shock to the UIM to prevent it from malfunctioning.
●Do not bend the UIM and place heavy stuff on it to avoid a failure.
Camera
If you should use the FOMA terminal to make a public nuisance, you might be punished under
the laws and bylaws such as Japan’s nuisance prevention ordinance.
20
Page 23

Please be considerate of the privacy of individuals around you when taking and
sending images using camera-equipped mobile phones.
Contents/Cautions
Quick Search/
About intellectual property rights
Copyrights and portrait rights
Except in cases where reproduction and quoting for private use is sanctioned under copyright laws, the
reproduction, alteration and public transmission of such content as text, images, music or software for which
another party owns the copyrights, whether accomplished by using this product to photograph or record that
content or by downloading it from Internet websites, is prohibited without the permission of the owner.
Taking photographs or recordings of such events as performances and exhibitions may be prohibited
even for purposes of private use.
In addition, if you use this product to take another person’s photograph without their permission, or
display such a photograph without their permission on an Internet website and make that content public
to an indeterminate number of people, you may be in violation of portrait rights.
Trademarks
Company names and trade names used in this manual are the trademarks or registered trademarks of their
respective companies.
・ “FOMA”, “mova”, “i-motion”, “i-mode”, “i-
“i-anime”, “DoPa”, “mopera”, “mopera U”, “WORLD CALL”, “WORLD WING”, “Short Mail”,
“QUICKCAST”, “Chaku-motion”, “Deco-mail”, “V-Live”, “i-area”, “Mobile Wallet” “Chara-den”, “i-αppli
DX”, “i-channel”, “Dual Network”, “FirstPass”, “sigmarion”, “Security Scan”, “musea”, “visualnet”,
“Public mode”, “ToruCa”, “Push Talk”, “PushTalkPlus” and FOMA, i-mode, Mobile Wallet and
PushTalk logos are trademarks or registered trademarks of NTT DoCoMo.
・ “ キャッチホン (Call Waiting)” is a registered trademark of Nippon Telegraph and Telephone Corporation.
・ Microsoft
countries.
®
and Windows® are registered trademarks of Microsoft Corporation in the US and other
・ Java and all Java-related trademarks are trademarks or registered trademarks of Sun Microsystems, Inc.
in the US and other countries.
・ Powered by JBlend
JBlend and all JBlend-based trademarks and logs are trademarks or registered
trademarks of Aplix Corporation in Japan and other countries.
TM
Copyright 2002-2005 Aplix Corporation. All rights reserved.
・ “Multitask” is a registered trademark of NEC Corporation.
・ FeliCa is a registered trademark of Sony Corporation.
・ is a trademark of FeliCa Networks Inc.
・ NetFront and are registered trademarks of ACCESS CO., LTD. in Japan and other
countries.
・ Contains Macromedia
Copyright© 1995-2005 Macromedia, Inc. All rights reserved.
Macromedia, Flash, and Macromedia Flash are trademarks or registered trademarks of Macromedia,
Inc. in the US and other countries.
®
FlashTM Player technology by Macromedia, Inc.
・ McAfee and VirusScan are registered trademarks or trademarks of McAfee, Inc. and/or its affiliates in
the US and/or other countries.
All other registered and unregistered trademarks herein are the sole property of their respective owners.
©2005 Networks Associates Technology, Inc. All Rights Reserved.
・ QR code is a registered trademark of DENSO WAVE INCORPORATED.
α
ppli”, “i-αppli search”, “i-motion mail”, “i-shot”, “i-melody”,
Next
21
About intellectual property rights
Page 24

Contents/Cautions
About intellectual property rights
・ Contains Adobe Reader of Adobe Systems Incorporated.
Copyright© 2005 Adobe Systems Incorporated. All rights reserved. Patents pending.
Quick Search/
Adobe, the Adobe logo and Reader are either registered trademarks or trademarks of Adobe Systems
Incorporated.
Adobe and Reader are trademarks or registered trademarks of Adobe Systems Incorporated in the US
and other countries.
TM
・ miniSD
・ Powered By Mascot Capsule
and are trademarks of the SD Card Association.
®
/Micro3D Edition
TM
Mascot Capsule® is a registered trademark of HI CORPORATION.
・ “ATOK” and “APOT”(Advanced Prediction Optimization Technology)are registered trademarks of
Justsystem Corporation.
・ “G-GUIDE Mobile”, the G-GUIDE Mobile logo, “G-GUIDE” and the G-GUIDE logo are registered
trademarks of Gemstar-TV Guide International, Inc. in the US or the affiliated company in Japan.
・ QuickTime is a registered trademark of Apple Computer, Inc. in the US and other countries.
・ “Privacy Mode” is a registered trademark of FUJITSU.
・
This product includes software licensed from Symbian Software Ltd.
‘Symbian’, ‘Symbian OS’ and other associated Symbian marks are all trademarks of Symbian
Software Ltd. ©1998-2005 Symbian Software Ltd. All rights reserved.
・ In addition to the above, company names and trade names used in this manual are the trademarks or
registered trademarks of their respective companies.
Other rights and responsibilities
・ FeliCa is a contactless IC card technology developed by Sony Corporation.
・ “Edy” is a brand of the prepaid type electronic money service provided by bitWallet, Inc.
・ This product is licensed based on MPEG-4 Visual Patent Portfolio License. The use of MPEG-4 Video
Codec function is allowed for personal and nonprofit use only in the following cases:
・Recording videos that conform to MPEG-4 Visual Standard (hereinafter referred to as MPEG-4
Video)
・Playing MPEG-4 Videos recorded personally by consumers not engaged in profit activities
・Playing MPEG-4 Videos supplied from the provider licensed from MPEG LA
For further utilizing such as promotion, in-house use or profit-making business, please contact MPEG
LA, LLC in the US.
・ Licensed by QUALCOMM Incorporated under one or more of the following United States Patents and/
or their counterparts in other nations:
4,901,307 5,600,754 5,267,261 5,506,865 5,710,784
5,504,773 5,416,797 5,568,483 5,228,054 5,778,338
5,109,390 5,490,165 5,414,796 5,544,196
5,535,239 5,101,501 5,659,569 5,337,338
5,267,262 5,511,073 5,056,109 5,657,420
・ This product contains NetFront of ACCESS CO.,LTD. to provide Internet function.
NetFront is a trademark or registered trademark of ACCESS CO.,LTD. in Japan and other countries.
Copyright© 1996-2005 ACCESS CO., LTD.
This product contains a module developed by the Independent JPEG Group.
・ In this manual, each OS (Japanese version) is written for short as follows:
・Windows XP is the abbreviation for Microsoft
Microsoft® Windows® XP Home Edition operating system.
・Windows 2000 is the abbreviation for Microsoft
・Windows Me is the abbreviation for Microsoft
・Windows 98 is the abbreviation for Microsoft
・Windows 98SE is the abbreviation for Microsoft
EDITION.
®
Windows® XP Professional operating system or
®
Windows® 2000 Professional operating system.
®
Windows® Millennium Edition operating system.
®
Windows® 98 operating system.
®
Windows® 98 operating system SECOND
22
Page 25
・Windows NT Server is the abbreviation for Microsoft
system Version 4.0.
・It may describe like Windows XP, 2000, Me, 98 in parallel.
・Windows 98 and Windows 98SE are described as Windows 98 in all.
®
Windows NT® Server Network operating
Contents/Cautions
Quick Search/
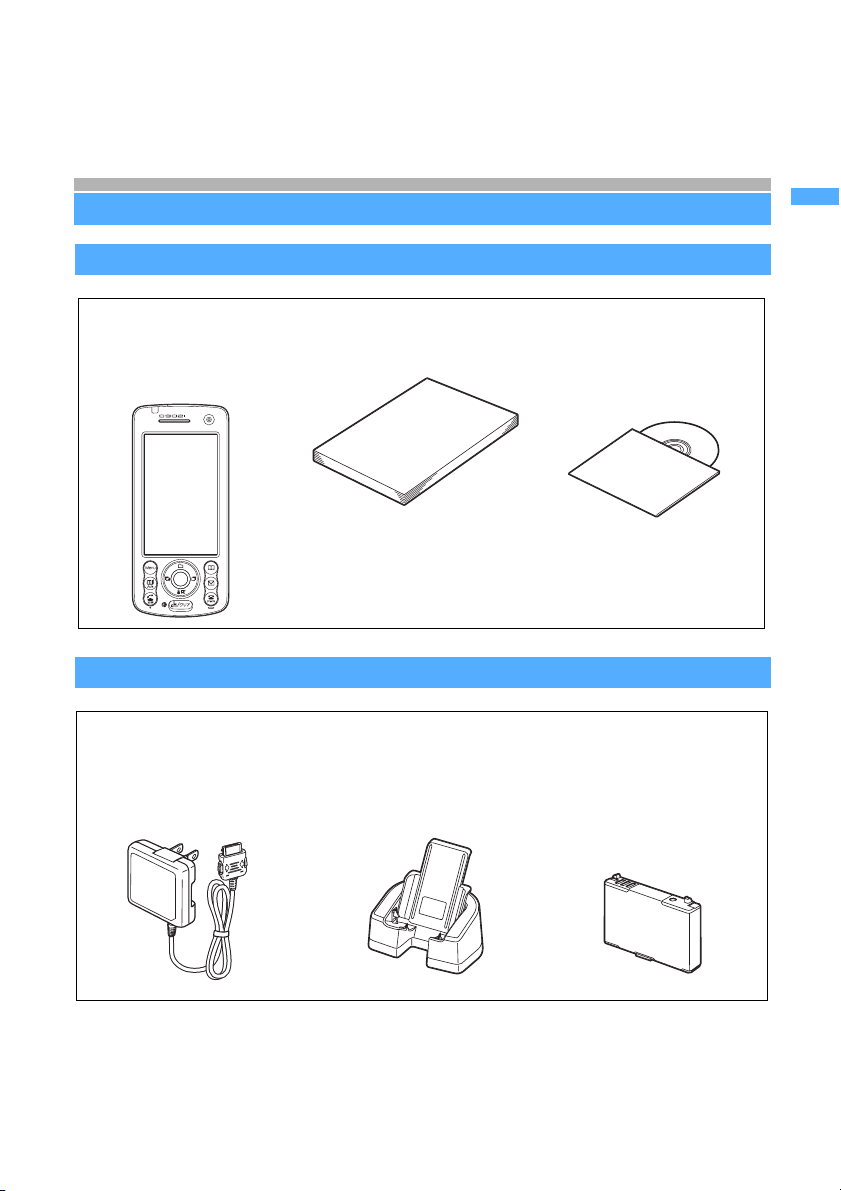
Basic package and optional accessories
Basic package
FOMA D902i
(including the written
warranty and the rear
cover D06)
Optional accessories
FOMA AC adapter 01
(including the written
warranty and the instruction
manual)
Instruction manual
(this book)
Manual
Quick Reference Manual P492
Desktop holder D06
(including the instruction
manual)
Basic package and optional accessories
CD-ROM for FOMA
D902i
Battery pack D06
(including the
instruction manual)
・Other optional accessories ☛P465
23
Page 26

MEMO
24
Page 27

Before Using D902i
Names and functions of parts .........................................................................26
Reading the display ..........................................................................................28
Selecting the menu............................................................................................30
Number of saved, registered and protected items in FOMA terminal .........36
Using the UIM (FOMA card) .............................................................................36
Attaching/removing the battery pack .............................................................39
Charging the battery of FOMA terminal .......................................................... 40
Checking the remaining battery level ..................................... Battery Level 43
Turning the power on/off ...................................................... Power ON/OFF 44
Switching to English display ............................................. Select Language 45
Setting the date and time .......................................... Date and Time Setting 45
Notifying your phone number to the other party ...... Caller ID Notification 46
Checking your own phone number......................................... Own Number 47
25
Page 28
Before Using D902i
k
t
x y z
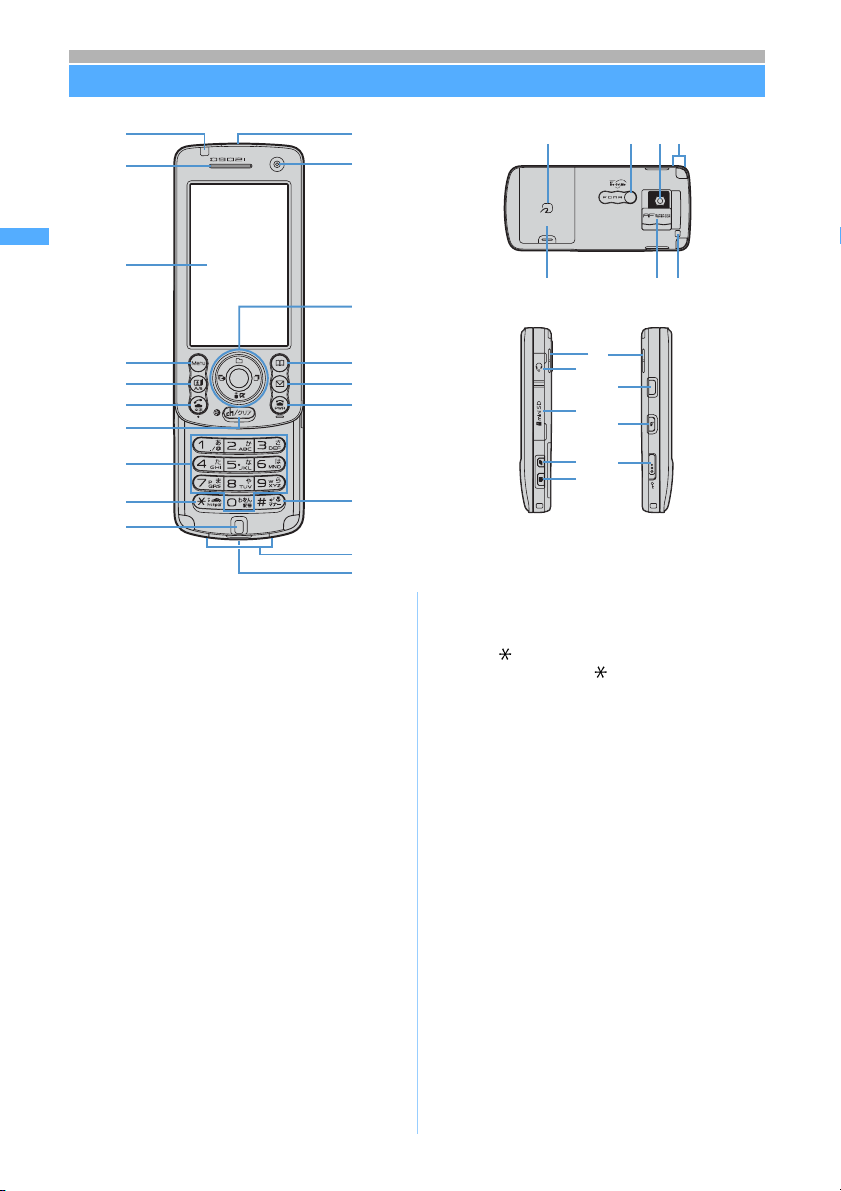
Names and functions of parts
a
b
l
u
v
w
Names and functions of parts
c
d
e
f
g
h
i
j
a Call indicator
Lights or flashes when a call or mail is received,
FOMA terminal is opened/closed, shooting with
the camera, etc. The lighting color and pattern
can be set (☛P145). Lights or flashes for new
information. Lights in red during charging.
b
Earpiece
Caller’s voice comes out of here.
c Display ☛P28
d m MENU/upper left soft/ Silent Mode key
Use this key to display menus, perform the
operation shown in the upper left part of the guide
row, set/cancel Silent Mode, etc.
e t Start video-phone/scroll/lower left soft key
Use this key to make/answer video-phone calls,
scroll mail or site display by a page, switch
between upper/lower cases when entering
characters, perform the operation shown in the
lower left part of the guide row, etc.
f n Start voice call/speakerphone/character key
Use this key to make/answer voice calls, switch
between ordinary and speakerphone calls, switch
input modes for entering characters, etc.
g c i-channel/Clear key
Use this key to display the i-channel list, delete
entry, return to the previous screen, set/cancel
Self Mode, etc. On the i-
press this key to start i-
Note: The miniSD memory card is not included in the bundle and needs to be purchased. ☛P339
26
α
ppli stand-by display,
α
ppli.
m
n
o
p
q
r
s
A
B
F
C
G
D
H
E
Size (mm):109 (H) x50 (W) x19.5 (D)
Weight (g):Approx. 116 (with battery pack)
h Dial keys*
(when closed)
1
Used to enter phone numbers and text and to
select menu items.
i ( /Public mode (Driving mode) key*
Use this key to enter “ ”, set/cancel Public mode
(Driving mode), switch screen modes during the
camera use, etc.
j Microphone
Picks up your voice.
k Infrared data port ☛P352
Exchange data with the infrared communication.
l In-camera ☛P87, P168
Used to shoot yourself or send your image during
a video-phone call.
w
m
Easy Selector Plus
Enter key
o
Use this key to perform the selected operation,
activate Focus Mode, start itouch Button, etc.
u Data Box/ ↑ key
Use this key to display Data Box menu, activate
Camera when shooting with the in-camera, move
the cursor upward, adjust volume, etc.
d i-mode/i-
Use this key to display i-mode menu or ifolder list, move the cursor downward, adjust
volume, etc.
l Received Calls/ ←(previous) Key
Use this key to display the received call history,
switch between pages, move the cursor leftward,
set/cancel Privacy Mode, etc.
α
ppli/ ↓ key
α
ppli set for One-
1
α
ppli
Page 29
r Redial/ → (next) key
Use this key to display the redial data, switch
between pages, move the cursor rightward, set/
cancel IC Card Lock etc.
n p Phonebook/ schedule/upper right soft key
Use this key to display the phonebook or
schedule, perform the operation shown in the
upper right part of the guide row, etc.
o a Mail/scroll/lower right soft key
Use this key to display Mail menu, compose new
mail, scroll mail or site display by a page, perform
the operation shown in the lower right part of the
guide row, etc.
p f Power/End/Hold key
Use this key to turn the power on/off, end calls or
functions in operation, place incoming calls on
hold, cancel Secret Mode, etc. Also, use this key
to switch displaying/not displaying the custom
stand-by display or calendar.
q # #/Silent Mode/line-feed key*
Use this key to enter “#”, set/cancel Silent Mode,
start a new line when entering characters, etc.
Switches between the standard mode and the
macro mode during the out-camera use.
1
r Charging terminals
Used when charging FOMA terminal in the
desktop holder.
s External connection terminals ☛P42, P407
Used to connect various optional accessories.
t FeliCa mark
The mark means that a piece of IC card is
mounted. Use IC card functions by placing the
FeliCa mark over the external device (reader/
writer). The IC card cannot be detached.
u Compact light ☛P88, P173, P178
Used during the out-camera use. Lights or
flashes in red when shooting still images or
videos (however, when the compact light is
turned on for shooting, the red light may be
difficult to see).
v Out-camera ☛P87, P168
Used to shoot still images or videos or send
images during a video-phone call.
w Antenna (built-in)
Take care not to cover the built-in antenna with
your hand so that you can use FOMA terminal on
better conditions.
x Rear cover
y Lens cover ☛P169
z Strap opening
A Speaker
Ring tone and other sounds come out of here.
When the speakerphone function is used, the
voice of the other party comes out.
B Earphone/microphone jack
Used to connect a flat type earphone/microphone
set with switch (optional).
C miniSD memory card slot ☛P342
Insert the miniSD memory card in this slot to use it.
D b TASK key
Use this key during Multiaccess or Multitask.
E C Answer Machine/shutter key
Use this key to display Answer Machine/Voice
Memo menu, start Quick Record Message, activate
Camera and shoot images, stop ring tone/alarm
sound, etc.
・ C has 2 positions: half press and full press
for shooting images with auto focus, so the feel
of pressing this key is different from other keys.
F One-push open button
Use this button to open FOMA terminal.
G g PushTalk button ☛P95
Use this button to display the PushTalk phonebook
or make/answer PushTalk calls/speak to by
PushTalk.
H Keylock switch ☛P160
Use this key to set/cancel Key Lock.
*1: The style of the key character changes with the
color of the terminal. (Example: , )
Connecting to earphone/microphone set with switch
・ You can plug in a flat type earphone/microphone set
with switch (optional) and use it. Using the earphone
jack converter adapter P001 (optional) allows you to
use an existing earphone/microphone set.
Opening/closing FOMA terminal
To open FOMA terminal, press the one-push
open button. To close it, slide the front face (with
the display) downward.
One-push open button
Open
Close
・ Operations such as accessing the screen to
reply to mail or to edit schedules or notes are
made easily by opening FOMA terminal.
☛P252, P372, P385
・ FOMA terminal allows you to make calls
without opening it. You can also answer an
incoming call by opening FOMA terminal and
end or put on hold the call by closing it. ☛P63
・ Please note that if you open the terminal by
force without pressing the one-push open
button or open and close it violently, it will
cause the damage of the terminal.
Before Using D902i
Names and functions of parts
27
Page 30
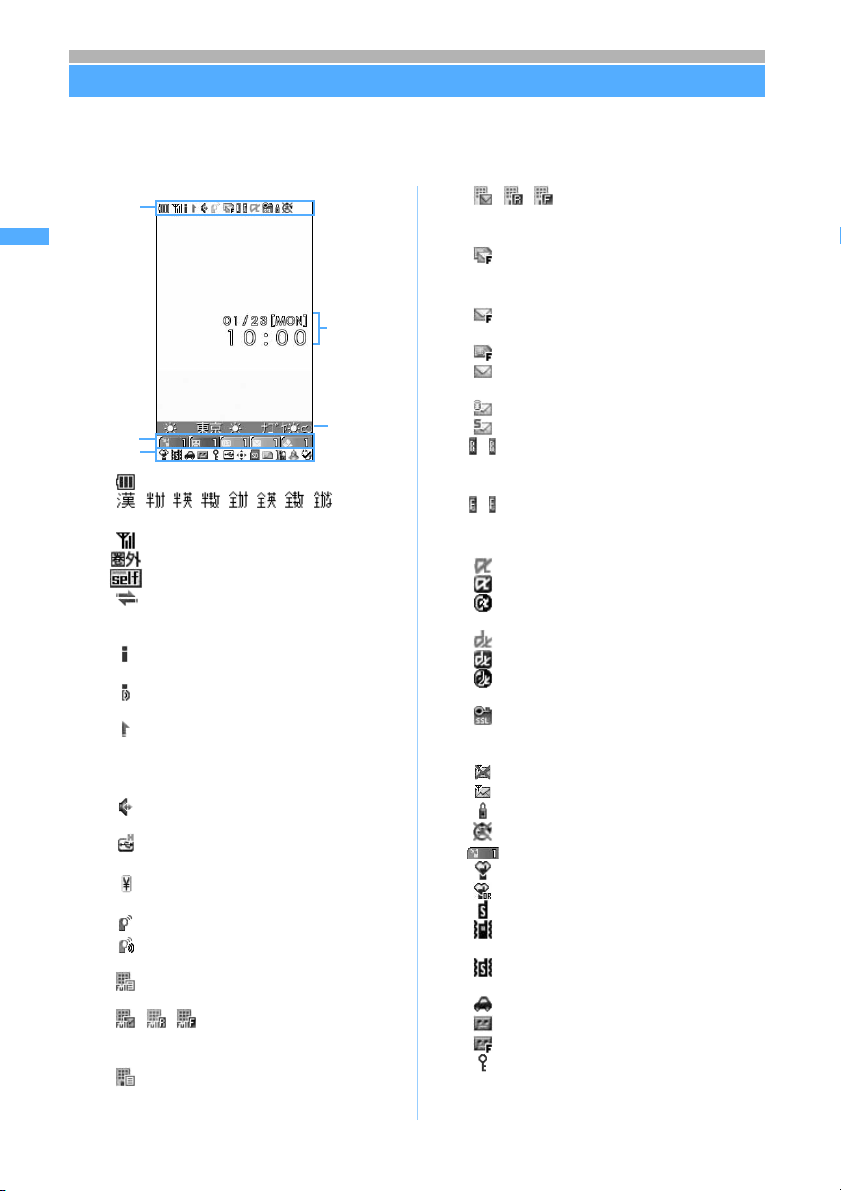
Before Using D902i
Reading the display
The description of icons displayed at the top or the bottom of the display are shown below:
When you use the i-channel service, if Show ticker is set to Yes in Ticker Setting, the i-channel
・
received information is displayed as ticker on the stand-by display. ☛P309
a - m
//
: Unreceived i-mode Mail or Message R/F
in the Center ☛P250, P217
Reading display
g : Unread i-mode Mail or SMS storage
*1
space is full and SMS storage space is
full on UIM ☛P285
Date, day
of the
week and
time
i-channel
receiving
information
o - z
n
a : Battery level ☛P43
///////
: Character input mode ☛P437
b : Received signal level ☛P44
: Out of service area ☛P44
: Self Mode is set ☛P156
: During data transfer ☛P339, P351
In the miniSD mode ☛P406
Data link software in progress ☛P466
c : In i-mode communication (during
i-mode connection) ☛P198
: In i-mode communication (during packet
communication) ☛P216, P249
d : Infrared communication in progress
☛P351
Infrared remote control function in
operation ☛P355
e : Speakerphone function in operation
*1
☛P51
: Communication USB by hands-free
compatible equipment in progress ☛P60
:Total call cost exceeds the maximum limit
☛P383
f :During PushTalk calls ☛P94
*1
:During accessing the phonebook data on
the network ☛P94
: i-mode Mail and Message R/F storage
space is full in the Center *2 ☛P250, P217
//
: i-mode Mail or Message R/F storage
space is full in the Center ☛P250, P217
: Unreceived i-mode Mail and Message
R/F in the Center ☛P250, P217
: Unread i-mode Mail or SMS storage
space is full ☛P250, P285
: SMS full on UIM ☛P285
: Unread i-mode Mail and SMS exist
☛P249,
: Unread i-mode Mail exists ☛P249
: Unread SMS exists ☛P284
h
(blue/red)
/
: Unread Message R exists/unread
P284
Message R storage space is full ☛P216
i/(green/red)
: Unread Message F exists/unread
Message F storage space is full ☛P216
j : i-αppli running ☛P293
: i-
α
ppli stand-by display on ☛P136
: Starting i-
α
ppli from the i-αppli stand-by
display ☛P302
: i-
α
ppli DX running ☛P293
: i-
α
ppli DX stand-by display on ☛P136
: Starting i-
α
ppli from the i-αppli DX stand-
by display ☛P302
k : Displaying SSL page, using i-αppli
*1
downloaded from SSL pages and in
SSL communication with i-αppli ☛P199
: Auto-send mail failed exists ☛P247
: Auto-send mail exists ☛P247
l : Secret Mode is set ☛P161
m : i-αppli auto start failed ☛P301
n : Focus Mode icon ☛P35
o : Silent Mode is set ☛P131
: Personalized silent mode is set ☛P131
p : Ring alert volume is silent ☛P67
: Vibrator for incoming voice call is set
☛P129
: Ring alert volume is silent and vibrator
for incoming voice call is set ☛P67, P129
q : Public mode (Driving mode) is set ☛P71
r : Answer Machine is set ☛P74
: Recorded messages full ☛P74
s : Key Lock is set (in gray when Key Lock
is temporarily released) ☛P160
Note: The miniSD memory card is not included in the bundle and needs to be purchased. ☛P339
28
Page 31

t : Connecting to the external devices by
*1*1*1
o
the FOMA USB connection cable
(optional) ☛P92, P407
u /
: Effective Easy Selector Plus keys in Focus
Mode ☛P35
v : miniSD memory card inserted ☛P342
w : Reading the UIM ☛P44
: IC Card Lock is set ☛P318
x : PIM Lock is set ☛P157
: Keypad Dial Lock is set ☛P158
y : Alarm Clock is set ☛P369
: Schedule alarm is set ☛P372
: Alarm Clock and schedule alarm are set
simultaneously
z : Software Update reserved ☛P481
: Auto-update of the latest pattern
definition is failed ☛P484
: Auto-update of the latest pattern
definition is succeeded ☛P484
*1 The current highest priority item is displayed. These icons are listed in the order of priority from the top.
*2 Displayed when the storage space for either i-mode Mail or Message R/F is full and other unreceived mail/
messages exist.
Reading the guide row
Operations that can be executed by pressing m, t, o, p and a are displayed in the guide row.
Example
Guide row for the mail composition screen
Guide
row
Display positions and keys correspond as shown in the figure. In this
manual, the operations displayed in the guide row are explained using
the corresponding keys (mtopa).
The operations displayed in the guide row differ depending on the
screen.
・ on the guide row corresponds to O of the Easy Selector Plus (it
may be different depending on the used function or site).
Before Using D902i Reading display
Reading the task bar
The icon for the function (task) in progress is displayed on the task bar (up to 9 icons). You can confirm
functions being used and run. In addition, when receiving mails/messages, the reception result is scrolled.
Task bar (Example when schedule calendar is displayed during a voice call)
: Voice call
/
: Video-phone (64 K/32 K)
: Video-phone call through
external device
: PushTalk
: 64K data communication
/
: Originating/communicating/
sending/receiving packet via
USB
: Mail
: Receiving i-mode Mail
: Receiving SMS
: Chat Mail
: Message R/F
: Checking for i-mode Mail/SMS
: i-mode/i-channel
: Bookmark/Internet
Connection/Last Visited
URL/Screen Memo/i-mode
Shortcut
: i-αppli
: ToruCa
: My Picture (Image)
: i-motion
: Melody
: Chara-den
: My Document
: Camera
: Movie Camera
: Sound Recorder
: Bar Code Reader
: Music Player
: Phonebook
: Received Calls
: Redial
: Answer Machine/Voice Mem
: Own Number
: Setting an alarm/alarm
sounding
: Scheduler
: Schedule alarm sounding
: Notepad
: Calculator
: Data exchanging with
external device
: Saving to INBOX/setting
reception method for infrared
communication
/ (dark blue/gray)
: Accessing/waiting for access
to the miniSD memory card
Next
29
Page 32

Before Using D902i Selecting the menu
/ (dark blue/gray)
: In the miniSD mode
(communication is possible)/
(USB cable unconnected/no
miniSD memory card inserted)
/ (dark blue/gray)
: Setting/holding each function
: Software Update activated
: Software Update notified
: Update Definition activated/
version display
: Setting each network service
Reading the list screen
Example
Color scheme screen
The number of the currently displayed page and the total number of pages
(when a list extends over multiple pages)
indicates that other selectable items exist above and below the selected item.
%
・
to move the cursor
・ If you press
you press u on the first item of the page, the previous page appears.
on the last item of the page, the next page appears, and if
d
indicates that selectable items exist over multiple pages.
・ & to switch between pages
(You cannot switch between pages on the icon selection screen, etc.)
・ Color scheme names are named based on imagery.
INFORMATION
● Note that the following cases may occur due to the characteristics of liquid crystal display (LCD) and they are
not defects in FOMA terminal.
・ FOMA terminal display is manufactured by taking advantage of highly advanced technology but some dots
may be always or never lit.
・ When the battery pack is removed from FOMA terminal with the power turned on, residual images may
remain for some time. Remove the battery pack with the power turned off.
・ When a screen has been displayed for a certain time, if you change it to another screen with some
operations performed, residual images of the previous screen may remain.
Selecting the menu
In addition to the normal menu, the simple menu which offers popular features is provided. (You
can switch to the simple menu only when Japanese is set in Select Language.)
In the simple menu, the menu items are displayed in large letters. Also, you can create your
original menu (Custom Menu ☛P378).
Display format for the normal menu and the custom menu
“Animation” in the normal menu is set by default. Select from the following types (Menu Setting ☛P143).
・The screen is the display example of the normal menu.
List view Tile display 3D display Animation
(Only the normal menu)
30
Page 33

Switching to the simple menu
m
1
Press a
2
■ Switching to the normal menu: ma on the stand-by display
・ To switch the custom menu: m
Functions available on the simple menu
Some menus cannot be accessed from the simple menu.
Menu Item Shortcut Menu Item Shortcut
でんわ 電話帳検索
電話帳登録
リダイヤル
着信履歴
伝言メモ一覧
自局番号
メール 受信メール
送信メール
未送信メール
新規メール
i モード問合せ
カメラ カメラ
マイピクチャ
待受画面設定
The normal menu is displayed.
・ When the custom menu is displayed: p
The simple menu is displayed.
on the stand-by display
p
m11
m12
m13
m14
m15
m16
m0
m21
m22
m23
m24
m25
m31
m32
m33
iモード
iアプリ ソフト一覧
/
データ BOX
設定/
ステー
ショナ
リー
iMenu
Bookmark
ラスト URL
画面メモ
待受画面設定
i アプリ設定
音/バイブ
ディスプレイ
アラーム
電卓
伝言メモ設定
情報表示/リセット
留守番電話
Before Using D902i
Selecting the menu
m41
m42
m43
m44
m51
m52
m53
m6
m71
m72
m73
m74
m75
m76
m77
Next
31
Page 34

Before Using D902i
When the simple menu is set
● During calling or talking, you can see how to adjust the volume of caller’s voice.
● In stand-by display, enter the phonebook No. (1 to 9) to see the registered names and telephone
numbers. Key operations for making voice calls/video-phone calls are also shown. During voice calls, you
can also press m, select
information.
ダイヤル入力
(Dial up) and enter a phonebook number to see the same
INFORMATION
● You cannot switch FOMA terminal to the simple menu when English is set in Select Language. Also, when you
Selecting the menu
choose the simple menu, the setting for Select Language is not available.
● Even if you selected the simple menu before turning your FOMA terminal off, the menu will change to the
normal one when you insert the UIM for which English display is specified as language and then turn the power
on again.
Selecting functions from the menu
Select menu items by the dial keys (Shortcut operations). Also, use the Easy Selector Plus to select
menu items.
・When any lock function is set or the UIM is not inserted, some functions are disabled. The disabled
functions are indicated by or dimmed, and cannot be selected.
Selecting menu items with the dial keys (Shortcut operations)
Each menu item has a number (item number) and can be selected by pressing the corresponding key.
・In this manual, the operation procedure is mainly explained in shortcut operations of the normal
menu.
Example
1
Executing Volume from the normal menu
m813
The screen for adjusting the volume is displayed.
813
When several shortcuts are available
When there are multiple shortcut operations, the shortcut operations other than the operation described in the
operating procedure are shown at the far right of the title in the body text.
Example
ly called numbers Redial
lls including PushTalk calls that you made as call history (Redial).
r party is busy, etc., you can redial by simple operation.
up to 30 entries. When the number exceeds 30, the oldest one is deleted.
For redialing
Menu 46
Press m to show the menu, then press 4 then 6 to
show the redial list.
・
means pressing a, and ? means pressing d.
!
32
Page 35

Selecting menu items with Easy Selector Plus
%
・The menu selecting method in the tile icon display is the same as the method of the animation
display (Type1).
Before Using D902i
Example
1
2
3
4
Selecting menu items (List view)
Executing Volume from the normal menu (Type1 of animation display)
m
・ Select the desired menu item when other than displaying animations to
display the description of the item’s function.
・ In case of the animation display, in the guide row is not displayed.
O to highlight Settings z o
・ In the simple menu: % to highlight the desired item z o or r
・ In case of the animation display, the operations of O differ depending on the animation design.
O to highlight Sounds/Vibrate z o
% to highlight Volume z o
The screen for adjusting the volume is displayed.
・ The menus after the 3rd class are displayed in a list. The operation method is the same as the
selecting method in the list view.
Menu item that has been
selected
Menu item that cannot be
selected (Dimmed)
to highlight a menu item and press o or r.
・You can also select an item by the dial key for the
item number.
・To return to the previous menu: l or c
Selecting the menu
Lower-level menu exists.
Selecting menu items (3D display)
& to move the icon ring to bring the desired item to the front and press o.
・ % to move the the icon at the rear to the front.
・ You can select an item by the dial key for the item number. Check the item
numbers in the tile display or list view menu.
Returning to the stand-by display or previous screen
f
:Returns to the stand-by display.
c
:Returns to the previous screen.
33
Page 36

Before Using D902i
Selecting functions from the submenu
When MENU is displayed at the upper left of the guide row, you can use the submenu to perform
various operations.
Example
1
Selecting the menu
2
Setting each item on the screen
Selecting Yes or No on the confirmation screen
1
Displaying the Redial submenu
m in the redial list
Item that has been highlighted
Lower-level menu exists
Show that a submenu exists
% to highlight a submenu item z o or r
・ You can select an item by the dial key for the item number. Even for the same function, the item
numbers may differ depending on the screen.
・ To return to the previous menu: l or c
・ To close the submenu: m
% to highlight Yes or No z o
・ For some functions, items other than Yes and No may appear.
Selecting an item from the pulldown menu
% to highlight an item
1
o to display the pulldown menu z % to highlight an item
2
34
・ You can select an item by the dial key for the item number.
Pulldown menu
Page 37

Press o
3
Selecting an item from the check box
% to highlight a check box z o
1
The check box changes from to , and is selected.
・ Select the selected item ( ) to cancel the selection ( ).
・ Depending on the function, select/cancel all items by pressing m.
・ You can select an item by the dial key for the item number.
Displaying information quickly Focus Mode
When the icons such as or are displayed on the stand-by display, you can quickly display
the information.
・You can also perform the same operation when the icon or indicating that auto-update of the
latest pattern definition is succeeded or it is failed is displayed.
o z O to highlight an icon
1
・ The number of stored items is displayed at the right of each icon.
・ To cancel Focus Mode: c or f
Missed call (unanswered call) exists.
Unplayed recorded message exists.
Voice mail message exists.
Unread received mail exists.
Unread ToruCa exists.
Data updated automatically of the pattern definition exists.
Effective Easy Selector Plus keys
The color of the selected icon changes.
Before Using D902i
Selecting the menu
Press o
2
The screen for the selected icon is displayed.
: The received call list is displayed, letting you check the date and time, the caller
information, etc.
: The recorded message list is displayed, letting you play the recorded messages.
: The confirmation screen for playing voice mail messages is displayed, letting you play the
messages.
: The Inbox folder list is displayed. You can display unread mail.
: The folder list of ToruCa is displayed and unread ToruCa can be checked.
/ : The data updated automatically of the pattern definition can be checked.
INFORMATION
● When you select an icon and hold down c for over a second, the icon temporarily disappears from the
screen. It reappears when information is viewed and the number of items changes.
35
Page 38

Before Using D902i
Number of saved, registered and protected items in FOMA terminal
Type
Mail
Received mail*
Sent mail
*
Unsent mail
Number of saved, registered and protected items in FOMA terminal
Template*
SMS in the UIM*
Message R*
Message F*
1
1
Bookmark 100
Screen memo*
Maximum number of
saved/registered
items
,
1
2
*
,
1
2
*
,
1
2
*
*
1
3
1000 500 i-αppli*
200 100 Image*
200 100 Melody*
100
20
100 50
50 25
1
100 50 ToruCa*
Maximum number
of protected
items
−
−
−
Type
4
1
1
PDF data*
1
Video/i-motion/
sound recorded with
Sound Recorder*
Chara-den*
1
1
1
Maximum number of
saved/registered
items
100 100
1000
500
100
100
50
100 50
*1 Depending on the size of data, the actual number of items that can be saved and registered may be fewer.
*2 The total number of i-mode Mail and SMS.
*3 The total number of sent and received SMS. The number of delivery report is not included.
α
*4 Up to 5 items of Message i-
be saved. Depending on the i-
ppli (as part of the 100 items, maximum number of i-αppli that can be saved) can
α
ppli size, the actual number of items that can be saved may be fewer.
INFORMATION
● Because the data saved in FOMA terminal may be lost due to failure, repair or other handlings of FOMA
terminal, it is recommended that you maintain a separate record of the important data in FOMA terminal.
Please note that we are not responsible for any lost data.
● It is recommended that you save the data stored in FOMA terminal such as mail, bookmarks, images, melodies
or video/i-motion to the miniSD memory card. Exchangeable data ☛P343
● If you have a PC, you can use the FOMA D series data link software contained in the attached CD-ROM and the
FOMA USB connection cable (optional) to transfer and save the data such as mail, bookmarks, images,
melodies, video/i-motion to your PC.
● Depending on the function, the displayed file size of data in FOMA terminal may differ slightly.
Maximum number
of protected
items
−
−
−
−
−
Using the UIM (FOMA card)
Use the UIM (FOMA card) to store your phone number and other information.
Insert the UIM into FOMA terminal to use it.
・
For details on handling the UIM, refer to the UIM manual.
Inserting/removing the UIM
Use your FOMA terminal with the UIM inserted. If the UIM is not inserted in your FOMA terminal, first insert it.
・Before inserting or removing the UIM, turn the power off and remove the rear cover and battery pack.
Attaching/removing the rear cover and battery pack ☛P39
・Insert or remove the UIM with FOMA terminal closed using both hands.
Note: The miniSD memory card is not included in the bundle and needs to be purchased. ☛P339
36
Page 39

Inserting the UIM
Cut corner
Removing the UIM
Locked
section
Cut corner
IC
UIM
Locked
section
View with the UIM attached
correctly
Locked
section
aSlide the locked section in the
Before Using D902i
direction of the arrow.
bInsert the UIM into the slot in the
direction shown in the figure with the
IC side of the UIM facing down.
Using the UIM (FOMA card)
cPush the UIM fully until it is locked
after the locked section is returned to
its original position.
aSlide the locked section in the
direction of the arrow.
The UIM comes out of the slot.
bPull the UIM out of the slot straightly.
INFORMATION
● Insert or remove the UIM carefully as forcing it may damage the card.
● Carefully handle the removed UIM so that it does not become lost.
● Please note that the UIM might be darted out of the slot when removing the UIM.
● When you remove the UIM, if you cannot remove it easily because the UIM dashed out only a few, insert the
UIM into deep again and remove it.
UIM security codes
The PIN1 and PIN2 codes are used for the UIM.
The both codes are set to “0000” at the time of subscription to the FOMA service. You can change this to
any code (4 to 8 digits). ☛P152
UIM operation restriction function
FOMA terminal is provided with the UIM operation restriction function for protecting your data and files.
・When the data or files downloaded from sites or the data attached to mail are saved in FOMA
terminal with the UIM inserted, the UIM operation restriction function is automatically set to these
data or files.
・If the UIM is replaced by another UIM or is removed from FOMA terminal, the data or files with the
UIM operation restriction function set cannot be displayed or played.
Next
37
Page 40

・The data or files with the UIM operation restriction function set cannot be moved/copied to the
Before Using D902i
miniSD memory card or cannot be exchanged by infrared communication.
・The data which is subject to the restriction is as follows:
・Screen memo ・Message R/F
・Image inserted in the Deco-mail text ・File attached to i-mode Mail
・i-
α
ppli (including the i-
α
ppli stand-by display) ・i-motion
・Image (including animation and Flash movie) ・Chara-den
・Melody ・PDF data
・Recorded message for video-phone ・Movie memo
・Image of ToruCa (details)
Using the UIM (FOMA card)
・For i-
α
ppli with the UIM operation restriction set, the following operations are disabled when the UIM
is replaced by another UIM or is removed from FOMA terminal:
・Start ・Displaying the detail information of i-
・Operation setting for i-αppli ・Automatic start
・Changing the auto start function ・Setting the i-
α
ppli stand-by display
・Upgrade
INFORMATION
● When the data with the UIM operation restriction function enabled is set for the stand-by display, call image or
ring tone, the settings for the image and sound return to the default if the UIM is replaced by another UIM or is
removed from FOMA terminal. In this case, the sound and image that are actually generated/displayed may
differ from the settings. Inserting the UIM that was used when the data was downloaded cancels the operation
restriction of the data and restores the original settings. (Note that the setting may be canceled if the data was
used for Random Display Image.)
● The UIM operation restriction function is not set to the data obtained via infrared communication, the miniSD
memory card or data link software or to the still images videos taken with the built-in camera.
● When the UIM is replaced to the other i-channel compatible terminal, the i-channel information is not displayed
as ticker on the stand-by display. After that, the information is updated automatically or if you press c on
the stand-by display to display the channel list, the latest information is received and then displayed as ticker
on the stand-by display.
● When the UIM is not inserted, the i-channel information is not displayed as ticker on the stand-by display.
α
ppli
The settings saved into the UIM
The following settings are saved into the UIM. If the UIM is replaced, the settings saved in the replaced UIM
become available.
・Font type, Keep in SMS center, SMSC, Address and Type of Number of SMS Setting
・DoCoMo Cert, User Certificate of Certificate Setting ・ My phone number of Own number ・ Select Language
・The PIN1/PIN2 cord of the UIM, PIN1 Cord ON/OFF
・The phone number setting of Multi Number (the phone number of basic contract number)
Note: The miniSD memory card is not included in the bundle and needs to be purchased. ☛P339
38
Page 41

Functional differences between the UIM types
There are two types of the UIM: green and blue. The functions differ depending on the type as shown
below:
Item UIM (green) UIM (blue) Page
Number of digits of phone number
that can be registered in the UIM
phonebook
Certificate Download for using
FirstPass
WORLD WING service Available Unavailable P39
Service Dialing Number Calling DoCoMo for Repairs and
WORLD WING
WORLD WING is the DoCoMo FOMA international roaming service. By taking out the UIM (green) from the
FOMA terminal you normally use and inserting it into FOMA terminal corresponding to the service or an
overseas mobile phone (W-CDMA or GSM handset), you can make/receive calls usually in foreign countries
with your own mobile phone number.
You can use WORLD WING without subscription.
● If you have not contracted WORLD WING for the FOMA service in the contract before August 31, 2005, a
separate subscription is required to use WORLD WING.
● Some charge plan cannot be used in part.
Up to 26 digits Up to 20 digits P110
Available Unavailable P221
Unavailable P399
DoCoMo for General Inquiries available
・Connecting to DoCoMo for Repairs
and DoCoMo Information Center
Before Using D902i
Attaching/removing the battery pack
Attaching/removing the battery pack
・Turn the power off and close FOMA terminal before attaching or removing the battery pack.
・Be careful not to touch the camera lens.
Attaching the battery pack
Press this part
aRemove the rear cover.
While pressing the top of the rear cover with your
thumb, slide it in the direction of the arrow until it is
removed.
bWith the surface with DoCoMo logo and the recycle
mark of the battery pack facing up, insert the battery
pack terminal into FOMA terminal at the angle as
shown in the figure.
Do not force the battery pack terminal into FOMA
terminal. Doing so could damage the battery pack
terminal or the body connector.
cPush the battery pack in.
Next
39
Page 42

dPlace the rear cover plate so that it is shifted
Before Using D902i
Charging the battery of FOMA terminal
Removing the battery pack
about
2 mm on from FOMA terminal.
eSlide the rear cover in the direction of the arrow
pushing its center by fingers so that FOMA
terminal and the rear cover do not gap.
Failure to follow the correct procedure could damage
the rear cover.
aRemove the rear cover.
bLift the projection part of the battery pack with your
finger and remove it.
Battery recycling
FOMA terminal uses a lithium ion battery containing valuable materials that should be recycled. To protect the
environment, return used batteries to an NTT DoCoMo service counter, NTT DoCoMo agent or recycling center.
● Please take the following precautions when recycling batteries:
・ Attach a piece of adhesive tape on the terminals of used battery packs
・ Do not disassemble or modify battery packs
INFORMATION
● The FOMA terminal display uses an active LCD. Due to the characteristics of the active LCD, residual images
or crossbar may remain for a while when the battery pack is attached or removed. This is not a fault
of FOMA terminal.
Li-ion
Charging the battery of FOMA terminal
When the battery level is low, charge the battery.
・
The battery level icon shows how much charge remains in the battery. ☛P43
Charging time and operation time on full charge (estimates)
Charging time Continuous call time Continuous stand-by time
Approx.
120 minutes
・ Continuous call time is an estimate of call time for FOMA terminal when it can send or receive signals
normally.
・ Continuous stand-by time is an estimate of operation time of FOMA terminal when it is closed and able to
receive signals normally. The call/stand-by time may be reduced to about half, depending on the amount of
charge in the battery, the function settings, the ambient temperature and signal conditions (radio waves do
not or hardly reach). Using i-mode communication reduces the call (communication)/stand-by time. Even if
you do not make a call or use i-mode, the call (communication)/stand-by time will be reduced by composing
i-mode Mail, or starting downloaded i-αppli software or the i-αppli stand-by display.
・ Continuous stand-by time (while standing still) is the average operation time of FOMA terminal when it
is standing still, closed and able to receive signals normally.
40
During a voice call: Approx. 165 minutes
During a video-phone call: Approx. 90 minutes
While standing still: Approx. 550 hours
While moving: Approx. 380 hours
Page 43

・ Continuous stand-by time (while moving) is the average operation time of FOMA terminal that is standing
still, moving and outside the service area when it is closed and able to receive signals normally.
・ Alternatively, if you perform data communication or Multiaccess, use Camera or play video/i-motion
(including music data), the call (communication)/stand-by time will also be reduced.
Battery pack
● Use the battery pack D06.
● The battery pack is a consumable part and will gradually wear out. Each time it is charged, it will accept
slightly less charge than the previous time. When the battery charge lasts only half as long as when it was
new, replace it with a new one. The battery pack’s life is about one year. This life may be shorter
depending on the frequency of use.
Starting/ending charging and other items to note
The battery pack can be charged regardless of whether FOMA terminal is turned on or off. However,
charging takes longer with the power turned on.
・ When charging starts, the call indicator lights in red.
When FOMA terminal is turned on, the charge alert sounds and the battery level icon blinks.
Charging: Blinks
(
Charged: Lights
・The icon design can be changed in Battery Icon. ☛P144
・If the call indicator does not light in red at the start of charging or it flashes in red, charging is
unsuccessful. If the battery pack still cannot be charged even after charging again, contact “Repairs”
on the back of this manual.
Icon Call indicator Meaning
)
Charging: Lights in red
Charged: Goes off
Charging normally.
・ When charging is completed, the call indicator goes off.
When FOMA terminal is turned on, the charge alert sounds and the battery level icon lights. (If the
battery level icon blinks, charging is not completed.)
・ You can set the charge alert not to sound. ☛P130
・ Do not charge the battery for an extended period (longer than a full day) with FOMA terminal turned
on. FOMA terminal uses power so the adapter continues charging until FOMA terminal is unplugged
from the adapter. In such a case, the AC or DC adapter charges again but when FOMA terminal is
removed in the middle of charging, the following could occur:
・Low battery level
・Message appears indicating that the battery runs down.
・FOMA terminal is operational for a short time.
・ If the battery is sufficiently charged, connecting FOMA terminal to the AC or DC adapter may not start
charging.
・ If you use FOMA terminal while charging the battery for an extended period with the AC or DC adapter
connected, there is a case where it becomes impossible to charge temporarily by temperature rise.
・ Insert or remove the connector to/from FOMA terminal slowly and firmly without forcing it.
・ Insert or remove the AC adapter connector straight to/from FOMA terminal.
Before Using D902i
Charging the battery of FOMA terminal
Charging from a wall outlet
Use the FOMA AC adapter 01 (optional) to charge the battery. Also it can be used with the desktop
holder D06 (optional).
You can charge the battery with FOMA terminal either closed or open.
・The battery pack can only be charged when it is attached to FOMA terminal.
・For details, refer to the manuals for the AC adapter and the desktop holder.
Next
41
Page 44

■ Charging the battery with the AC adapter alone
Before Using D902i
Call indicator
100 V AC outlet
Power plug
aUnfold the power plug from the AC
adapter and plug it into a 100V AC
outlet.
bOpen the external connection
terminal cap of FOMA terminal.
cInsert the AC adapter connector in
Connector
( up)
Charging the battery of FOMA terminal
Release button
AC
adapter
firmly until it clicks.
dCheck that charging starts.
Check that the call indicator lights in red.
When charging is completed, remove
the AC adapter connector from FOMA
terminal while pressing the release
buttons on both sides of the connector,
and unplug the AC adapter from the
outlet. Then close the terminal cap.
■ Charging the battery in the desktop holder
aUnfold the power plug from the AC
adapter and plug it into a 100V AC
outlet.
Call indicator
100 V AC outlet
Power plug
bInsert the AC adapter connector in
the desktop holder until it clicks.
cAlong with the desktop holder,
insert FOMA terminal at an angle as
Connector
( up)
AC
adapter
shown in the figure.
dCheck that charging starts.
Check that the call indicator lights in red.
Desktop holder
When charging is completed, remove
FOMA terminal from the desktop holder
by tilting it to the front while pressing the
desktop holder by hand.
・ When inserting FOMA terminal into the desktop holder, be careful not to put a strap in the holder.
・ When FOMA terminal is not inserted firmly or it leans, the battery is not charged normally. Insert
FOMA terminal until it is locked certainly.
Charging in a car
Use the FOMA DC adapter 01 (optional) to charge the battery in a car. It can be used with negative
ground cars (both 12 V and 24 V).
・For details, refer to the DC adapter manual.
aInsert the cigarette lighter plug of the DC adapter into the cigarette lighter socket of the car.
bTurn off the power of FOMA terminal and open the external connection terminal cap.
cInsert the DC adapter connector firmly until it clicks.
dCheck that charging starts.
When charging is completed, remove the DC adapter connector from FOMA terminal while pressing the
release buttons on both sides of the connector, and remove the cigarette lighter plug from the cigarette
lighter socket. Then, close the terminal cap.
42
Page 45

Call indicator
Cigarette lighter plug
Before Using D902i
Connector
( up)
Release button
Cigarette lighter socket
DC adapter
INFORMATION
● If you charge FOMA terminal with the car engine off, the car battery may be discharged. Charge the battery
when the car engine is running.
● When not charging, remove the DC adapter from the cigarette lighter socket.
● The DC adapter fuses (DC adapter: 2A) are consumable items. New fuses are available at automotive supply
stores.
Checking the remaining battery level Battery Level
The display indicates rough standard of the remaining battery level in 3 levels.
(Remaining battery level 3): Amply charged
(Remaining battery level 2): Charging is decreased.
Battery level icon
Checking the remaining battery level by sound and display
m843
1
(Level 3) (Level 2)
(Remaining battery level 1): Recharging recommended
・ The icon can be changed by Battery Icon. ☛P144
(Level 1)
The remaining battery level is
displayed. The confirmation sound
rings by the sound set in Keypad
Sound.
Battery Level
Sounds 3 times.
Sounds twice.
Sounds once.
When the battery almost runs down
A message appears or a low battery alert sounds to indicate that the battery level is low. Charging the
battery stops the low battery alert. If you want to stop it immediately, press f.
・In stand-by, a message indicating low battery appears. The message disappears by pressing o,
but after a period of time, it reappears and the low battery alert sounds. At this time, all the icons on
the top of the screen blink and after approximately one minute, the power turns off automatically.
・During a call, the low battery alert sounds from the earpiece and a message indicating low battery
appears. The message disappears by pressing o, c or f. When approximately 20 seconds
elapses after the low battery alert is heard, the call is cut off and the stand-by display reappears.
Then, after approximately one minute, the power turns off automatically.
43
Page 46

Before Using D902i
Power ON/OFF
Setting the low battery alert not to sound Low Battery Alert
Default ON
m815
1
Press 2
2
・ To set the alert: 1
INFORMATION
● When the battery almost runs down during a call, even if OFF is set, the low battery alert sounds from the
earpiece.
Turning the power on/off Power ON/OFF
・If the power is turned on for the first time, a confirmation screen is displayed asking whether to
perform Software Update. Note that the battery needs to be charged enough when performing.
Please be sure to refer to “Updating Software” before performing. ☛P478
Turning the power on
f (for over 2 seconds)
1
The wake-up screen appears and then the stand-by display is displayed. Displaying the wake-up
screen may take some time.
・ If Quick Start-up is set to ON, the time until the stand-by display is displayed becomes short.
Battery
level icon
Received
signal level
Date/day/time
The stand-by
image is
displayed.
is indicated while reading the UIM
and disappears when reading is
completed.
Display of received
signal level
Status
・ If the date and time have not been set, a message indicating
that is displayed. Press o to set the date and time.
・ If no UIM is inserted, a message indicating that insertion
of the UIM is required is displayed. Turn the power off,
insert the UIM and then turn the power back on.
・
When PIN1 Code ON/OFF is set to ON, enter the PIN1 code.
・ The following items can be changed:
・ Stand-by image ☛P132 ・ Battery level icon ☛P144
・ Display format of the time ☛P147
Strong
Medium
Weak
Outside the service
area and where radio
waves are hard to
reach
Turning the power off
f (for over 2 seconds)
1
INFORMATION
● Calls may be cut off even when is indicated and you are not moving.
● When Reset Call Cost is set to ON, entry of the PIN2 code is required.
44
Page 47

● In the following cases, if you do not press any keys for about 90 seconds, the display disappears (except while
shooting with the camera, etc.). It is the same also during a voice call. The display appears again if there is any
key operation or incoming call.
・When Turn light on is set to other than Always in Display Light Setting
・During charging (when Turn light on is set to other than Always, and AC adapter connected is set to Terminal
settings in Display Light setting)
Before Using D902i
Switching to English display Select Language
Default Japanese
m8272
1
Press 2
2
・ To switch to Japanese display: 1
INFORMATION
● The setting is saved to the UIM.
半英
● In English display, the character input mode changes in the following order:
(hiragana/kanji) →
半カナ
(katakana)
(alphabet) → 半数 (numeric) →
Setting the date and time Date and Time Setting
The time setting can be performed in two ways: obtaining the time information from DoCoMo network to
adjust the time setting of your FOMA terminal, or manually entering the current time to your terminal.
Default Auto time adjust: ON Offset: +,00h00m
m851
1
Select each item to set
2
・ When you set Auto time adjust to ON, Offset can be set. Date and Time
cannot be set.
Select Language
漢
Auto time adjust:Set whether to perform the automatic time correction.
・ To enter the date and time manually, set Auto time adjust to OFF.
Offset :Specify the amount of time advance (+) or delay (-) so that your terminal's clock
advances from/delays to the time obtained for a given length of time.
・ Enter the time between 00h00m and 23h59m.
・ Prefix 0 if the time and/or minute is single digit (0 to 9).
Next
45
Page 48

Date, Time :Set the date and time.
Before Using D902i
・Enter the year by the last 2 digits of the year. From January 1, 2000 to
December 31, 2050 can be set.
・Enter the time in the 24-hour clock (00h00m - 23h59m).
・Prefix 0 if the month, date, time and/or minute is single digit (0 to 9).
・ The entered numbers can also be increased or decreased by %. Also, & to highlight the
number to change to enter it.
Press p
Caller ID Notification
3
When the automatic time correction is set
The automatic time correction takes place when the UIM is inserted and you turn the power on in a
location where radio waves reach.
・The automatic time correction sometimes causes a time error of several seconds. In addition, it may
fail to correct the time depending on the radio wave condition.
・Even if the time information is received while i-
corrected depending on i-αppli.
α
ppli is running, the time may not be able to be
・When Auto time adjust is set to ON, the time may not be corrected for a while. To enable the
automatic time correction, turn the power off and then on.
・When no UIM is inserted or FOMA terminal is out of the service area, the automatic time correction is
not performed even if you turn the power off and then on.
INFORMATION
● You cannot use the following functions when the date and time are not set:
・ Random Display Image (When the timing switch is set to other than Open slide)
・ Auto Power ON/OFF ・Alarm Clock
・ Scheduler ・Certificate Download ☛P221
・ i-
α
ppli auto start function ☛P300 ・i-
α
ppli DX requiring the time setting ☛P290
・ Downloading i-motion with replay restrictions set ☛P329
・ Data (schedule) transfer ☛P352, P353 ・Software Update
・ Update Definition ・SSL communication (authentication)
● If the date and time are not set, the date and time are not recorded for the following functions and
“----/--/--” or “----------------” is displayed. A number to segmentalize (segmental number) may be appended.
・ Redial/Received Calls ・Answer Machine/Voice Memo ・ Notepad
・ Date and time of the still image/video shot with the camera ☛P171
・ Date and time of sent mail/unsent mail ☛P260
・ Date and time in the file name of the data scanned by Bar Code Reader ☛P190
・ Date and time of downloaded i-
α
ppli ☛P294 ・ Date and time of receiving ToruCa ☛P315
・ Date and time of downloaded still image, melody, Chara-den, i-motion or mail template ☛P349, P246
● The set time is retained even when the battery pack is replaced, but may be reset if the battery pack is
removed for an extended period. In that case, set the date and time again.
● When Reset Call Cost is set to ON, entry of the terminal security code is required.
Notifying your phone number to the other party Caller ID Notification
Set FOMA terminal to send your phone number (caller ID) to be displayed on the other party’s phone
every time you make a call.
・
The caller ID is your important information. Carefully consider whether to send your caller ID.
・The caller ID is displayed only when the other party’s phone can display the caller ID.
46
Page 49

・Caller ID Notification cannot be set in a location outside the service area. Set it in a location with
good radio wave condition.
・For details, see “Network Services User’s Guide”.
m951
1
・ To check the current setting: m952 z Select Yes
Enter the network security code z 1
2
・ The network security code entered is masked with “
・ To hide the caller ID: 2
INFORMATION
● You can use the following ways to show/hide the caller ID.
・Setting to show/hide the caller ID for each phonebook entry ☛P121
・Setting to show/hide the caller ID when making a call ☛P56
● If you hear a guidance to request to show your caller ID when you make a call, call back after setting FOMA
terminal to send your caller ID.
● When setting/operating the multiple caller ID notification methods at the same time, the caller ID is notified in the
following priority. However, the setting of showing/hiding the caller ID shown on the display may be different from the
actual setting.
a
When you set the caller ID notification method in the dialing condition when making a call ☛P56
b
When “186”/“184” is appended before the other party’s phone number
c
When Caller ID Setting is set to the phonebook data
d
When Caller ID Notification is set
● Set Caller ID Notification for PushTalk calls in PT Caller ID Notification.
*
”.
Menu 48
Checking your own phone number Own Number
Before Using D902i
Own Number
Check your phone number (My phone number), name, mail address, etc.
Default My phone number: Phone number by default Other than that: Not recorded
m0
1
・ The phone number of the UIM inserted in FOMA terminal is displayed for My phone number.
・ To check your i-mode Mail address: d1 to display iMenu z Select English → d Options →
aMail Settings → Confirm Mail Address
INFORMATION
● To check your phone number during a call: b0
47
Page 50

MEMO
48
Page 51

Making/Receiving Calls
Making calls
Making calls ......................................................................................................50
Switching from a voice call to a video-phone call ..........................................53
Calling back previously called numbers ........................................... Redial 54
Setting whether to send your phone number for each call ... 186/184 Call 56
Making calls by setting the conditions ......................................................... 56
Using international calls ........................................................ WORLD CALL 57
Making a call by specifying a sub-address ............................ Sub Address 59
Setting the alarm indicating reconnection of the interrupted call
............................................................................................ Reconnect Alarm 59
Suppressing ambient noises to improve the call quality
............................................................................................. Noise Reduction 59
Talking without using hands in a car ............................... In-car Handsfree 60
Receiving calls
Receiving calls ..................................................................................................60
Receiving a call by switching from a voice call to a video-phone call ........62
Enabling use of dial keys to answer a call ...................... Any Key Answer 63
Setting to start talking by opening FOMA terminal .............. Open Answer 63
Disconnecting/continuing/holding a call by closing FOMA terminal
................................................................................................... Close Setting 63
Using Received Calls ........................................................... Received Calls 64
Adjusting the volume of the caller’s voice ......................... Volume Setting 66
Adjusting the ring volume .......................................... Ring Volume Setting 66
Setting operations for incoming voice/video-phone/PushTalk calls
.............
Setting the priority screen for incoming calls during a call or packet
communication ............................................................ Priority Comm Mode 68
When you can/could not answer a call
Putting incoming calls on hold when you cannot answer right away
......................................................................................... Response and Hold 69
Setting a response hold guidance ..................................... Status Message 69
Setting an on-hold tone .......................................................... On-hold Tone 70
Using Public mode (Driving mode) ............... Public mode (Driving mode) 71
Using Public mode (power off) ....................................................................... 72
Allowing the caller to leave message when you cannot answer the call
.............................................................................................. Answer Machine 73
Incoming Call Setting/Incoming Videophone Setting/Incoming PushTalk Setting
67
49
Page 52

Making calls
Making/Receiving Calls
Making calls
Making calls
The procedures for making voice calls and the common operations for voice calls and videophone calls are explained here.
・
Do not cover the built-in antenna with your hands during a call.
Enter a phone number
1
2
Calling general subscriber
phone
Calling mobile phone 090 - XXXX - XXXX, 080 - XXXX - XXXX
Calling PHS phone 070 - XXXX - XXXX
・ You can enter up to 80 digits for the phone number. However, only 24
digits are displayed.
・ To correct the phone number: c
・ To return to the stand-by display: c (for over a second)
n
You will hear a dial tone. You can start talking when the call is answered.
・ If the phone of the other party is busy, you will hear a busy signal. Press
f to end the call and make a call again later. You can call back quickly
using Redial.
・ If the power of the other party’s mobile phone or PHS is turned off or the
other party is in an area where radio waves are hard to reach, a guidance
informs that the connection is unavailable.
Always include the area code even when
calling from the same city.
f when you finish the call
3
・ To end the call by closing FOMA terminal, change the setting in Close Setting.
INFORMATION
● You can also make a call in order of Step 2, Step 1. A voice call will be made automatically about 5 seconds
after you have pressed n and entered the phone number.
● When a call is made to the other party with a video/i-motion set for the image of the phonebook data, the first
frame of the video/i-motion is displayed on the dialing screen. ☛P108
● If a guidance to request your caller ID is heard when a call is made, call again after you have set FOMA
terminal to send your caller ID.
● When you subscribe to the Multi Number service, you can call by specifying a registered multi number. ☛P400
50
Page 53

Putting calls on hold while talking On-hold
Putting the call on hold while talking allows you to talk without the caller hearing your voice.
・Callers are charged for the time spent on hold.
o during a call
1
Flashes
The call is put on hold and a guidance (onhold tone) is played. For video-phone calls,
the on-hold image is displayed on your and
the other party’s terminals.
On-hold image
Making/Receiving Calls
Making calls
On-hold during a
voice call
・ Press o or n while a voice call is on hold to cancel the hold.
・ Press o while a video-phone call is on hold to cancel the hold and send the image that has been
sent before the hold. Press t or n to cancel the hold and send your image to the other party
and press a to cancel the hold and send a substitute image.
INFORMATION
● To put the call on hold by closing FOMA terminal, change the setting in Close Setting.
On-hold during a
video-phone call
Using the speakerphone function
You can make a call allowing the voice of the other party to be heard from the speaker.
・When you make a video-phone call, the speakerphone function is automatically turned on. To make
a video-phone call without turning on the speakerphone function, change the setting in Videophone
Settings.
Enter a phone number z n (for over a second) or t
1
・ To make a video-phone call with the speakerphone function on when Speakerphone is set to OFF
in Videophone Settings, press t for over a second.
・ You can turn on/off the speakerphone function by pressing n while dialing or n or a during a
call.
・ is displayed while the speakerphone function is on.
・ The operation is the same as when operating from the list of the phonebook, redials, received
calls, recorded messages and voice memos.
・ To make a PushTalk call: Enter a phone number z g (for over a second)
INFORMATION
● When the speakerphone function is turned on, the volume may suddenly increase and damage your ears, so
use it with FOMA terminal away from your ears.
● If a call is hard to hear with a large amount of noise around you or the other party, turn off the speakerphone
function.
● Talk to FOMA terminal within about 30 cm.
● The speakerphone function can be used even when Silent Mode is on.
● When a flat type earphone/microphone set with switch (optional) or the In-Car Hands-Free Kit 01 (optional) is
connected to FOMA terminal, use the connected device to communicate.
51
Page 54

Operation during voice calls
Making/Receiving Calls
Making calls
The following operations can be performed from the submenu:
Submenu item Description Page
a
Switch to V-phone Switches from a voice call to a video-phone call. P53
b
Received calls Displays received calls. P64
c
Redial Displays redials. P54
d
Set time Sets the date and time. P45
e
Reconnect alarm*
f
Quality alarm*
g
Terminal close Sets the operations (whether the call is disconnected, continued or held)
h
Dial up Allows making a call to another party during a call using Call Waiting Service. P395
i
Volume Adjusts the earpiece volume. P66
*1 The setting can be changed while an alarm sounds. It becomes effective when the alarm is stopped.
1
Allows setting an alarm sound indicating reconnection of a call under
improved signal quality which has been cut off due to poor signal quality.
1
Sets whether to sound an alarm when your call is about to be cut off due to
poor signal quality.
when FOMA terminal is closed during a call.
・The following key operations are available during a call:
・p: Start the phonebook
・C (for over a second): Record the other party’s voice (Talking Voice Memo)
%
・
: Adjust the volume
・l: Display received calls
・r: Display redials
・
: Activate Camera
t
P59
P130
P63
Entering pauses or timed pauses
Pauses and timed pauses apply only to voice calls.
Example
Calling to “03XXXXXXXXP12345” (P=Entered pause)
When you press o after the call is connected, the numbers after the pause are dialed.
Entering a pause “P”
A pause (P) is used for sending messages to beepers*, operating the answering system at home,
reserving tickets, etc. At the point the pause (P) is entered, the dial digits are separated and a tone
signal (DTMF) is sent.
( (for over a second)
1
・ You cannot make a call if a pause is entered at the beginning of the phone number.
52
Page 55

Entering a timed pause “T”
A timed pause (T) is used to dial outside line numbers with extensions. Enter “T” between the outside
line and extension number to dial the extension number after a set number of seconds following the
outside line number.
# (for over a second)
1
・ Timed pauses can be entered in succession.
・ Each timed pause is followed by a second interval.
・ You cannot make a call if a timed pause is entered at the beginning of the phone number.
Making/Receiving Calls
INFORMATION
● Tone signals (DTMF) may not be received depending on the receiving device.
● When it is necessary to send tone signals (DTMF) following voice prompts as in making ticket reservations, the
speakerphone function is useful. In this case, input tone signals (DTMF) after switching to the speakerphone.
● You cannot make a call to another party by putting the current call on hold and entering a pause (P) or timed
pause (T).
Switching from a voice call to a video-phone call
You can switch to a video-phone call by operating from the submenu during a voice call when the
other terminal is compatible with switching calls. Switching can be performed only from the
terminal which made the voice call.
・
This operation can be performed between the terminals that support switching between voice call/
video-phone call.
・To switch to a video-phone call, the other party needs to set Indication ON of Notify Switchable Mode
in advance. ☛P91
m1 during a voice call z Select YES
1
Switching from a voice call to a video-phone call
・ A guidance informing that the call is switched is played during switching.
・ Select NO to return to the voice call talking screen.
・ When Speakerphone is set to ON in Videophone Settings, the speakerphone function is
automatically turned on when the call is switched to a video-phone call.
INFORMATION
● During packet communication, disconnect the packet communication and switch to a video-phone call.
● When the other party is during packet communication, the call cannot be switched to a video-phone call.
● While talking on the phone using Call Waiting Service, you cannot switch the call to a video-phone call.
● It takes about 5 seconds to switch. In addition, it may take time to switch depending on radio wave conditions.
● Depending on radio wave conditions, a voice call may not be switched to a video-phone call or may be
disconnected.
* From January 2001, the DoCoMo display beeper name has changed to “QUICKCAST”.
Next
53
Page 56

● The call is not charged while Modifying is displayed.
● Switching from a video-phone call to a voice call ☛P81
● A second call received while switching calls is rejected.
Making/Receiving Calls
● The speakerphone function is turned off every time a voice call and video-phone call are switched.
● The settings (such as switching the cameras or selecting the frame) during a video-phone call are canceled
every time a voice call and video-phone call are switched.
● According to the call duration of a voice call and video-phone call, the call charges are added, respectively.
Calling back previously called numbers Redial
Menu 46
Redial
This function records the calls and PushTalk calls that you made as dialed calls (Redial). When
the other party is busy, etc., you can redial by simple operation.
Up to 30 calls are recorded. When the number exceeds 30, the oldest one is deleted chronologically.
・
・When the date and time have not been set, the date and time are not recorded in the redial data.
・When the same number is dialed, only the most recent call is recorded for each caller ID preference:
show, hide or no setting.
・While not in Secret Mode, the phone numbers you dialed are displayed in the redial data even if they
are registered in the phonebook with Secret Attribute.
r z Highlight a party in the redial list
1
Phone number, name*1, group name*2
: Call with the caller ID set to show
: Call with the caller ID set to hide
Date and time of dialing, phone number, image*3 of the highlighted party
Name of the multi number specified*
PushTalk type
:PushTalk call (one party)
:PushTalk call (more than one party)
:PushTalk call using PushTalkPlus (one party) ☛P94
:PushTalk call using PushTalkPlus (more than one party) ☛P94
: Video-phone call : PushTalk call
: International call
*1 When the phone number is registered in the phonebook
*2 When a PushTalk call was made to a group (the first member’s name when the call was made by
selecting multiple parties)
*3 When the image is registered in the phonebook (the first member’s image for PushTalk call)
*4 When you subscribe to the Multi Number service (the name of Basic Number or Additional Number
specified for the call)
4
・ To switch between the redial/received call list: p
・ To display the list of PushTalk call parties: Highlight a PushTalk redial z o
・ You can also perform the following operations such as phonebook registration from the list of
PushTalk call parties.
■ Registering an entry in the phonebook:
a Highlight a redial z m1
・ To add to an existing phonebook entry: m2
54
Page 57

b 1 or 2 z Register the name or address ☛P107, P110
・ To add to an existing phonebook entry: 1 or 2 z Select an entry ☛P118
■ Registering an entry in the PushTalk phonebook: Highlight a redial z m3 z
Select Yes
・ The party cannot be registered if not registered in the FOMA terminal phonebook.
・ When a PushTalk redial made to multiple parties or a PushTalk group is highlighted, press
m3, select a party, press p and then select Yes.
■ Registering entries in a group in the PushTalk phonebook:
When you made a PushTalk call to multiple parties who are registered in the PushTalk
phonebook, you can register these parties as a PushTalk group from the redial data.
a Highlight a redial z m4
b Enter a group name z p
■ Composing SMS: Highlight a redial z a (for over a second)
The SMS composition screen with the redial phone number specified as the address is
displayed.
・ If the redial phone number is saved in the phonebook together with mail addresses, pressing
a displays the i-mode Mail composition screen with the first mail address specified as the
address. If not, the mail composition screen is displayed with the redial phone number
specified as the address.
・For PushTalk redial, the above applies when there is only one party.
Press n
2
A voice call is made.
・ To make a video-phone call: t
・ To make a PushTalk call: g
Press g in the list of PushTalk call parties to make a PushTalk call to all the parties.
・ To make a call with the same call type as the highlighted redial: o
・The redial dialed by 32K video-phone call is dialed by 64K video-phone call.
Making/Receiving Calls
Redial
INFORMATION
● When you switch between a voice call and video-phone call during a call, the call type (voice call/video-phone
call) that was specified when you dialed will be recorded in the redial data.
● You can make calls by setting conditions. ☛P56
● Selecting a multi number registered for the Multi Number service ☛P400
Deleting redials Delete Redial
r
1
Highlight a redial z m61
2
・ To delete all: m62
・ You can also perform the same operation from the list of PushTalk call parties.
Select Yes
3
55
Page 58

Making/Receiving Calls
Setting whether to send your phone number for each call
Set whether to make your phone number (caller ID) to be displayed on the other party’s terminal
when you make a call.
・
The caller ID is your important information. Carefully consider whether to send your caller ID.
・The caller ID is displayed only when the other party’s terminal has the ability to display caller ID.
Making calls by adding “186”/“184” to the phone numbers
Prefix a specific number to the beginning of the phone number when you make a call.
186/184 Call
■ Showing your caller ID: 186 z Enter the other party’s phone number z n (for
voice call) or t (for video-phone call)
■ Hiding your caller ID: 184 z Enter the other party’s phone number z n (for voice
call) or t (for video-phone call)
INFORMATION
● You can make a call with the same setting by adding “ 31#” instead of “186” and “#31#” instead of “184”.
● If a guidance to request your caller ID is heard when you make a call, call again by adding “186” or “ 31#”.
● When making an international call, the caller ID may not be notified depending on the going phone company
even if “186” is added.
● When making a call by adding “186”/“184” to the other party’s phone number, the phone number with “186”/“184”
added is recorded in the redial data.
● Caller ID notification priority ☛P47
Making calls by setting the conditions
186/184 Call
This function allows you to select the call type, show/hide your caller ID, select a multi number
and append a prefix for each voice/video-phone call.
・
When calling to a PushTalk group, you can set only the call type and whether to show/hide your
caller ID.
・Setting Additional Numbers (multi number) ☛P400
Enter a phone number z m3
1
・ The operation is the same as when operating from the list of recorded messages or voice memos.
Select each item to set the dialing conditions
2
Call Type:Select from Voice call, 64K V.phone, 32K V.phone or PushTalk.
・ When PushTalk is selected, Multi No. and Prefix cannot be set.
Caller ID:Set to show/hide caller ID.
・ Caller ID notification priority ☛P47, Caller ID notification priority for PushTalk ☛P101
Multi No.:Select from Basic Number and Additional Numbers. When No specified is selected, the
Multi Number setting is used.
・ When Multi number call is set to Disable in the phone number setting, Multi No.
cannot be set.
Prefix :Select the number (prefix) appended before the phone number.
・ Prefix ☛P58
56
Page 59

m z Select Yes
3
A call is made by the settings.
・ When you select 64K V.phone or 32K V.phone in Call Type, you can select Chara-den call to select
Chara-den to be displayed during a video-phone call.
INFORMATION
● In the redial list, the received call list, the list/details (TOP/Phone) screen of FOMA terminal phonebook, the list/
details screen of UIM phonebook, the details screen of Own Number, the member list/group list screen of
PushTalk phonebook or the member list screen for schedule, press m and select Call or Phone/Msg → Call.
● In case of international call, the caller ID may not be notified depending on the going phone company even
when Notify is selected for Caller ID.
Using international calls WORLD CALL
DoCoMo international call service “WORLD CALL”
・ The international call service “WORLD CALL” is available for DoCoMo mobile phones.
・ How to call
009130 z 010 z Enter the other party’s country code z area code z
phone number z n
・The above phone number can be registered in the FOMA terminal phonebook.
・When the area code begins with “0”, dial without “0”. (When calling to a general subscriber phone
and other phones in Italy, you need to dial “0”.)
・ You can call to approximately 220 countries and regions around the world.
・ WORLD CALL charges are added to the FOMA service charges every month.
・ No subscription charges or monthly fee is required.
・You were subscribed to “WORLD CALL” as one of standard services at the time of subscription to
the FOMA service (unless you request not to subscribe to it).
・ Changes in international call dial procedure
MY LINE service is not applicable to mobile telephone communications, including WORLD CALL
service. However, along with the introduction of MY LINE service, the dialing procedure for
international communications using a mobile telephone was changed. Consequently, the previous dial
procedure (without prefix “010”) no longer be used.
・ Contact “General Inquiries” on the back of this manual for details.
・To use international call services other than the DoCoMo service, contact each carrier for details.
・ Some billing plans are not available.
“International video-phone” calls to parties using specific overseas 3G mobile phone terminals can be made by
dialing as described above and placing a call in the video-phone mode.
・For the countries and overseas carriers you can connect to, visit the DoCoMo website.
・The image of the other party displayed on FOMA terminal may be distorted or connection may not be
established depending on the terminal at the other end of the international video-phone line.
Making/Receiving Calls
WORLD CALL
57
Page 60

Making/Receiving Calls
WORLD CALL
Using “WORLD CALL” by simplified dialing Auto Assist Setting
When Auto is set for this setting, entering “+” followed by a country code and phone number makes an
international call easily by automatically appending “009130010” for international call.
・If “+” is prefixed to dial followed by the country code of Japan “81”, “009130010” for international call
is not appended even when Auto is set for this setting.
Default Auto
m8683
1
Press 1
2
・ To cancel the setting: 2
■ Making a call using Auto Assist Setting: 0 (for over a second) z Enter a country code
z phone number z n
Setting numbers other than “WORLD CALL” Prefix
By registering a number to add to the beginning of the phone number (prefix) in advance, you can add a
prefix even after entering the phone number to make an international call easily.
・The default setting is “009130010” for international calls. “009130010” can be changed to another
prefix.
Default 009130010
m8682
1
Select Prefix1 to 3 field z Enter a number
2
・ Up to 3 numbers in total and up to 10 digits for each number can be entered.
・ Do not include a pause or timed pause in the number (prefix). If you set a prefix containing a
pause or timed pause, you cannot add the prefix when making a call.
Press p
3
■ Selecting a prefix when making a call:
a Enter a country code z phone number
b m3 z Select Prefix field
c Select a prefix number
d m z Select Yes
58
Page 61

Making a call by specifying a sub-address Sub Address
Specify a sub-address to call a specific phone or communication device.
・
This setting is also used to select the contents in a video delivery service, “V-Live”.
Default ON
m8684
1
Press 1
2
・ To cancel the setting: 2
■ Making a call by specifying a sub-address: Enter a phone number z ( z Enter a sub-
address z n (for a voice call) or t (for a video-phone call)
・ The sub-address needs to be set for the other party’s terminal or communication device.
INFORMATION
● Even when Sub Address is ON, if “ ” is entered after entering a pause, timed pause or “#”, it is not recognized
as a sub-address delimiter and sent as tone signals (DTMF) containing “ ”.
Making/Receiving Calls
Sub Address
Setting the alarm indicating reconnection of the interrupted call
Set an alarm that is heard at the time of reconnecting a voice call, video-phone call or PushTalk
call interrupted by poor signal conditions in a tunnel or behind a building when signal conditions
improve.
・
The other party’s voice is not heard while signals are disrupted.
・The time until the call is reconnected depends on line use or signal conditions. (The approximate
time is a maximum of 10 seconds.)
・Note that the call is charged for the time until the call is reconnected (up to 10 seconds).
・The call may be cut off before the alarm sounds depending on line use or signal conditions.
Default High alarm
m8692 z 1 to 3
1
Reconnect Alarm
Suppressing ambient noises to improve the call quality Noise Reduction
By suppressing ambient noises during a call, the other party can hear your voice clearly and you
can also hear the other party’s voice clearly.
・
It is recommended that this function be usually set to ON.
Default ON
m8691
1
Press 1
2
・ To cancel the setting: 2
59
Page 62

Making/Receiving Calls
In-car Handsfree
Talking without using hands in a car In-car Handsfree
You can make and receive voice calls from a handsfree compatible device by connecting FOMA
terminal via USB to such device as the In-Car Hands-Free Kit 01 (optional) or car navigation system.
・
For operations of handsfree devices, refer to the instruction manual for each handsfree device. Note
that the FOMA In-Car Hands-Free Cable 01 (optional) is required to use the In-Car Hands-Free Kit
01 (optional).
INFORMATION
● The display and ring tone for incoming calls follow the FOMA terminal settings.
● If the setting is made to play sounds from a handsfree device, the ring tone sounds from a handsfree device
regardless of whether Silent Mode is on or the ring tone settings on FOMA terminal.
● The operation during incoming calls in Public mode (Driving mode) follows the Public mode (Driving mode)
settings.
● If a video-phone call is made from a handsfree compatible device using the phonebook or redial data, the
communication speed set from the handsfree compatible device is used. If it is not set, the video-phone call is
made at fixed 64K.
● When a video-phone call is made/received from a handsfree compatible device, a substitute image is sent to
the other party.
● The operation during incoming calls when Answer Machine is set follows the Answer Machine settings.
● If the setting is made to play sounds from FOMA terminal, the operation when FOMA terminal is closed during
a call follows Close Setting. If the setting is made to play sounds from a handsfree device, the call continues
even if FOMA terminal is closed, regardless of Close Setting.
Receiving calls
Receiving calls
The procedures for receiving voice calls and the common operations for voice calls and videophone calls are explained here.
・
For voice calls, calls can also be answered by pressing 0 to 9, (, and # other than n
(Any Key Answer). ☛P63
A call is received
1
The ring tone sounds, the display light turns on and the call indicator lights/flashes.
・ To put the call on hold (Response and Hold): f
n
2
f when you finish the call
3
・ To end the call by closing FOMA terminal, change the setting in Close Setting.
You can talk. The call duration is displayed.
・ To put the call on hold (On-hold): o
・ To turn on the speakerphone function: a or n
・ You can also answer the call by opening FOMA terminal. ☛P63
60
Page 63

Display information
The caller’s phone number, name, image or video/i-motion will be displayed on the screen according to
the dialing condition of the caller and the FOMA terminal settings. The name or phone number can be
set not to be displayed. ☛P141
■ When the other party has sent their caller ID
When the phone number of the other party is not registered in your phonebook,
the phone number and the image set in Incoming Call Setting or Incoming
Videophone Setting are displayed.
If the phone number of the other party is already registered in your phonebook,
the name and phone number are displayed. In addition, when Contact Image is
ON, the image or video/i-motion set in the phonebook is also displayed. ☛P140
■ When the other party’s caller ID is not notified
The reason why no caller ID is sent is displayed.
Reason for no
caller ID
User unset The caller selected not to send the caller ID.
Payphone The call was made from a payphone, etc.
Not support The call was made from a party who cannot send caller ID,
such as a call from overseas or from a general subscriber
phone via forwarding service (however, caller ID may be
displayed depending on connecting phone companies.)
Description
When a voice call arrives, an incoming operation or image set in Anonymous Caller is prioritized. When
a video-phone call comes in, an incoming image operates according to Incoming Videophone Setting.
Operations while receiving calls
When there is an incoming voice call, you can perform the following operations from the submenu.
(When you set Arrival Call Act to Answer, the same operation can also work when there is another
incoming call during a call.)
Submenu item Description
aCall Rejection Disconnects the call (the caller does not pay for the call).
bVoice Mail
cCall Forwarding
* 1 Valid when you use Voice Mail Service and have received a voice call.
* 2 Valid when you use Call Forwarding Service and have set a forwarding phone number.
*1
*2
Connects the incoming call to the Voice Mail Service Center.
Forwards the incoming call to the forwarding phone number.
・C (for over a second): Answer by Answer Machine (Quick Record Message)
・C: Stop the ring tone/vibrator
・% : Adjust the ring volume
Next
61
Making/Receiving Calls
Receiving calls
Page 64

When you hear beeps (call waiting ring tone) while talking
Making/Receiving Calls
Receiving a call by switching from a voice call to a video-phone call
If you subscribe to Voice Mail, Call Waiting or Call Forwarding Service, you will hear beeps (call waiting ring
tone) when you receive another incoming call while talking and the following operations can be performed:
Service Operation Page
Voice Mail Service
Call Waiting Service Puts the current call on hold and answers the second call. P394
Call Forwarding Service
*1 This service can be selected when you set Arrival Call Act to Answer and activate it in Arrival Act Setting.
・If you do not subscribe to Call Waiting Service, you cannot answer calls even if you hear beeps.
INFORMATION
● For calls received from callers not registered in the phonebook, you can reject calls, or set the ring tone or
vibrator ringer action not to start immediately. ☛P165, P164
● Call rejection can be set for some parties registered in the phonebook. ☛P162
● Telephones that do not support dialing out-of-town calls such as in-building phones and PBX cannot be used to
make calls to FOMA terminals.
● When a call forwarded from FOMA terminal arrives, the phone number from which it was forwarded is
displayed if it is not registered in the phonebook. If it is registered, the name is displayed. However, the phone
number or name may not be displayed depending on the forwarding source.
● Even if video/i-motion is set to the image for incoming calls in the phonebook or Incoming Call Setting, it is not
played and the first frame of the video/i-motion is displayed when there is an incoming voice call during a voice call.
● When you receive an international call, a plus sign (+) appears at the beginning of the caller ID.
*1
Connects the incoming call to the Voice Mail Service Center. P392
*1
Forwards the incoming call to the forwarding phone number. P395
Receiving a call by switching from a voice call to a video-phone call
・The switching operation can be performed only from the side which made the voice call. It cannot be
performed from the side which received the voice call.
・To receive the request of switching to a video-phone call, set Indication ON of Notify Switchable
Mode. ☛P91
Receive the request of switching to a video-phone call during a voice call
1
Select YES
2
The call is switched to a video-phone call and your self image is sent to the other party.
・ To send the substitute image to the other party: Select NO
・ When you select YES, your self image is sent for the first time.
・ A guidance informing that the call is switched is
played during switching.
62
Page 65

Enabling use of dial keys to answer a call Any Key Answer
Allows you to answer a call by pressing 0 to 9, ( or # other than n.
・
This function is available for voice calls and PushTalk calls. However, it is unavailable when
receiving a call while talking.
Default ON
m865
1
Press 1
2
・ To cancel the setting: 2
Setting to start talking by opening FOMA terminal Open Answer
・This function is available only for voice calls (available even while Key Lock is on).
Default OFF
m8685
1
Press 1
2
・ To cancel the setting: 2
Making/Receiving Calls
Any Key Answer
Disconnecting/continuing/holding a call by closing FOMA terminal
・This function does not operate during 64K data communication or packet communication.
・You can end a PushTalk call by closing FOMA terminal. Use PushTalk Close Setting to set it.
Default Continue
m8695
1
1 to 3
2
End the call : Ends the call.
Continue : Continues the call.
On hold : Puts the call on hold. The other party hears a guidance (on-hold tone).
INFORMATION
● When Continue is set, the same image will be sent even if you close FOMA terminal.
● When On hold is set, the operations are as follows:
・If you close FOMA terminal during a video-phone call while sending a still image or your image with frame on
it, the still image or frame will be canceled after the hold is released.
・If you close FOMA terminal while sending tone signals (DTMF), the call is not put on hold.
・If you close FOMA terminal while switching between a voice call and video-phone call, the call is not put on
hold.
Close Setting
Next
63
Page 66

● When you close FOMA terminal during a call using a flat type earphone/microphone set with switch (optional)
or other handsfree compatible devices (available in market) connected, the call continues regardless of this
Making/Receiving Calls
function’s setting if the settings is made to play sounds from the connected device. Even if you remove the flat
type earphone/microphone set with switch (optional) or handsfree compatible device in this state, the call will
continue.
● When you close FOMA terminal while recording a message, the recording is continued regardless of this
setting.
● This setting is applied when FOMA terminal is closed while recording a talking voice memo/movie memo.
When On hold is set, the contents which were being recorded by just before putting on hold are saved.
Received Calls
Using Received Calls Received Calls
Menu 45
The calls and PushTalk calls that you received, and unanswered calls (missed calls) are recorded
in memory. Recorded messages are also included in the list.
・
Up to 30 calls are recorded. When the number exceeds 30, the oldest one is deleted chronologically.
・When the date and time have not been not set, the date and time are not recorded in the received
call history.
Example
1
Making a call from the received call history
l z Highlight a received call in the list
Phone number, name*1, reason for no caller ID ☛P61
Date and time of receiving, phone number (the ringing time is also displayed for
missed calls), image*
Name of the multi number specified*
PushTalk type
: Received PushTalk call (one party)
: Received PushTalk call (more than one party)
:Received PushTalk call using PushTalkPlus (one party) ☛P94
:Received PushTalk call using PushTalkPlus (more than one party) ☛P94
: Received video-phone call : Received PushTalk call
: Received 64K data communication
: Received international call
: Missed call (unread) : Recorded message exists
: Missed call (read) : Recorded message is deleted
*1 When the phone number is registered in the phonebook
*2 When the image is registered in the phonebook (the first member’s image for PushTalk call)
*3 When you subscribe to the Multi Number service (the name of Basic Number or Additional Number
specified for the received call)
2
of the highlighted party
3
・ To switch between the received call/redial list: p
・ To display the list of PushTalk call parties: Highlight a received PushTalk call z o
・ You can also perform the following operations such as phonebook registration from the list of
PushTalk call parties.
■ Registering an entry in the phonebook:
a Highlight a received call z m1
・ To add to an existing phonebook entry: m2
b 1 or 2 z Register the name or address ☛P107, P110
・ To add to an existing phonebook entry: 1 or 2 z Select an entry ☛P118
64
Page 67

■ Registering an entry in the PushTalk phonebook: Highlight a received call z m3 z
Select Yes
・ The party cannot be registered if not registered in the FOMA terminal phonebook.
・ When a received PushTalk call made to multiple parties is highlighted, press m3, select a
party, press p and then select Yes.
■ Registering entries in a group in the PushTalk phonebook:
When you received a PushTalk call made to multiple parties who are registered in the PushTalk
phonebook, you can register these parties as a PushTalk group from the received call history.
a Highlight a received call z m4
b Enter a group name z p
■ Composing SMS: Highlight a received call z a (for over a second)
The SMS composition screen with the phone number of the received call specified as the
address appears.
・ If the phone number of the received call is registered in the phonebook together with the mail
address, pressing a displays the i-mode Mail composition screen with the first mail address
specified as the address. If not, the mail composition screen is displayed with the phone
number of the received call specified as the address.
・ For received PushTalk call, the above applies when there is only one party.
n or t
2
・ To make a call with the same call type as the highlighted received call: o
・ To make a PushTalk call: g
Press g in the list of PushTalk call parties to make a PushTalk call to all the parties.
Unanswered calls including PushTalk calls (missed calls)
with the number of missed calls is indicated and the call is recorded in the received call history.
☛P35
・When Indicator light in Alert Lighting Setting is set to ON, the call indicator flashes until the received
calls are displayed.
・When there is a missed call from an unknown phone number, the ringing time enables you to check
whether the call is a malicious call (One-Ring Call, etc.) made for the sole purpose of leaving the
phone number in the received call history.
Making/Receiving Calls
Received Calls
INFORMATION
● If only missed calls within the delay time set in Mute Ring Time Setting are recorded as received calls, pressing
l on the stand-by display displays a confirmation screen notifying you of received calls not displayed. When
Yes is selected, the missed calls within the set delay time are displayed.
● Press m73 on the received call list to display the missed calls within the delay time set in Mute Ring
Time Setting. To return to the previous received calls, press m72 and to display all the received calls,
press m71.
● Calls received from callers using dial-in services in such as office may display different numbers from the
caller’s dial-in number.
● When Keypad Dial Lock or PIM Lock is set, the numbers stored in the received call history up to that point are
deleted. However, the calls received after that are recorded in the received call history, and calls can be made
using the received call history during PIM Lock.
● When you switch between the voice call and video-phone call during a call, the call type (voice call/video-
phone call) that was specified when you received it will be recorded in the received call history.
● You can make calls by setting conditions.
● Selecting a multi number registered for the Multi Number service ☛P400
☛P56
65
Page 68

Making/Receiving Calls
Volume Setting
Deleting received calls Delete Received Calls
l
1
Highlight a received call z m61
2
・ To delete all: m62
・ You can also perform the same operation from the list of PushTalk call parties.
Select Yes
3
Adjusting the volume of the caller’s voice Volume Setting
The volume of the caller’s voice can be adjusted from level 1 (lowest volume) to level 6 (highest volume).
・The set volume is also reflected to the volume of keypad sounds and playback sounds of recorded
messages and voice memos.
・The volume changed while talking is retained even after the call is ended.
・The set volume is retained even if the power is turned off.
Default LEVEL 4
Adjusting during a call
% during a call
1
The volume is set automatically by pressing o or waiting for a while after you stopped key
operations.
・ When the speakerphone function is on, the volume of the speakerphone is adjusted.
・ To turn up the volume: u or r
・ To turn down the volume: d or l
・ To adjust the volume during a video-phone call: m0
Adjusting in stand-by
m813 z O to adjust the volume z o
1
Adjusting the ring volume Ring Volume Setting
Adjust the ring volume for call, mail and Message R/F, and the volume of alert that plays when
ToruCa is received.
・
The ring volume can be adjusted from 7 levels, Silent and level 1 to level 6. You can also set
STEPTONE (the volume of ring tone changes into Silent → level 1 →
seconds) in stand-by.
・For the alert volume for ToruCa, STEPTONE cannot be set.
・The ring volume changed while receiving a call is reset to the original volume when the call is ended.
・The ring volume changed while in stand-by is retained even if the power is turned off.
66
...
→ level 6 about every 3
Page 69

・The ring volume for calls is also reflected to the volume of the sound that plays when confirming the
battery level, ibattery level confirmation sound and i-αppli sound is level 4.
Default Ring alert: LEVEL 4 Msg. alert: LEVEL 4 ToruCa receive alert: LEVEL 4
α
ppli sound and schedule alarm. Note that when STEPTONE is set, the volume of the
Adjusting the ring volume while receiving a call
% while receiving a call
1
The volume is set automatically by pressing o or waiting for a while after you stopped key operations.
・ To turn up the volume: u or r
・ To turn down the volume: d or l
INFORMATION
● To stop the ring tone and vibrator: C while receiving a call
● If STEPTONE is set for the ring volume for calls, the change begins with
while receiving a call.
level 6 when you adjust the volume
Adjusting in stand-by
Making/Receiving Calls
Incoming Call Setting/Incoming Videophone Setting/Incoming PushTalk Setting
Example
1
2
3
INFORMATION
● is indicated on the stand-by display when the ring volume for calls is set to Silent. If the vibrator for voice call
is set at the same time, is indicated.
● When the alert volume for ToruCa is changed in this setting, the setting for Receive alert volume in ToruCa
Setting is also changed.
Setting operations for incoming voice/video-phone/PushTalk calls
・The settings of this function are also reflected to the voice/video-phone/PushTalk call in Sound
Setting and Vibrator Setting, and the incoming voice/video-phone/PushTalk call in Alert Lighting
Setting.
・For Incoming PushTalk Setting, Show image cannot be set.
Defa ult Ring alert: Melody/ パターン1(Pattern 1) (Incoming Call Setting), Melody/ 電話・メロディ A(Phone, melody A)
Adjusting the ring volume for calls
m8121
■ Adjusting the ring volume for mail: m8122
■ Adjusting the alert volume for ToruCa: m8123
O
・ To set to STEPTONE: u or r when the volume is level 6
・ To set to Silent: d or l when the volume is level 1
Press o
Incoming Call Setting/Incoming Videophone Setting/Incoming PushTalk Setting
(Incoming Videophone Setting), Melody/ パターン 3(Pattern 3) (Incoming PushTalk Setting)
Show image: Standard image Vibrator/Vibrate alert: OFF Lighting: Flash/Ocean
Menu 8222 / Menu 8224
Next
67
Page 70

Example
Making/Receiving Calls
1
2
Priority Comm Mode
3
INFORMATION
● Setting Created animation for the image displays the first frame.
● When the video/i-motion with sound only (i-motion without image such as singer’s vocals) is set for the ring
alert, if the incoming image is reset to the video/i-motion with image only or Flash movie, the ring alert sounds
by
● Some video/i-motion may be unable to be set for the image. Also, the video/i-motion with sound cannot be set.
● Even if Sync melody is set for Lighting, synchronization may not occur depending on the melody.
● For Incoming PushTalk Setting, only the video/i-motion with sound only can be set for the ring alert.
Setting operations when receiving a voice call
m862
■ Setting operations when receiving a video-phone call: m872
■ Setting operations when receiving a PushTalk call: m881
Select each item to set
Ring alert :Sets a ring tone for an incoming call.
・ When you select OFF, no ring tone emits.
・ When you select Melody or Movie ringtone, select a melody or video/i-motion.
Show image:Sets an image displayed for an incoming call.
・ When Select image is selected, select Select image in List images field to set an image.
・ When i-motion is selected, select a video/i-motion from the folder list. If the folder list
is not displayed, select Select image in List images field.
Vibrator/Vibrate alert:
Sets operation of the vibrator for an incoming call.
Lighting
・ Playing and checking a melody or video/i-motion when selecting ☛P126
:Sets the lighting pattern and color of the call indicator.
Press p
パターン1
(for voice call) or
電話・メロディ
A (for video-phone call).
Setting the priority screen for incoming calls during a call or packet communication
This function allows you to select the voice call or packet communication screen to be given
priority when a packet communication (or voice) call is received during a voice (or packet
communication) call.
・
A screen change caused by this function does not interrupt the call or packet communication.
Default No Set Up
m8681
1
1 to 3
2
No Set Up : Displays the screen for the latest incoming call/communication without setting the
priority.
Voice call : Displays the voice call talking screen by priority.
Packet : Displays the packet communication screen by priority.
・ When there is incoming packet communication in i-mode, the voice call talking screen is
displayed by priority regardless of this setting.
Priority Comm Mode
68
Page 71

Screen display
The following screen is displayed depending on the setting for Priority Comm Mode:
Setting
No Set Up Screen displayed during a voice call Screen displayed during incoming voice call
Voice call
Packet Screen displayed during incoming packet
*1 The screen displayed during incoming calls depends on Arrival Call Act. ☛P399
*2 Packet communication in modes other than i-mode does not include receiving of i-mode Mail, SMS and
Message R/F.
*3 Packet communications in modes other than i-mode cannot be received during i-mode communication.
☛P461
When you can/could not answer a call
Incoming packet communication during
voice call (other than i-mode)*
communication
,
1
2
*
Incoming voice call during
packet communication*
Screen displayed during i-mode
communication
Making/Receiving Calls
3
Response and Hold
Putting incoming calls on hold when you cannot answer right away
Response and Hold
・Callers are charged for the time spent on hold.
f while receiving a call
1
Incoming voice
call on hold
n when you are ready to answer the call
2
・ For a voice call, you can answer the call also by opening FOMA terminal. ☛P63
Incoming video-phone
call on hold
The incoming call is put on hold (Response and
Hold). The other party hears the response hold
guidance.
For video-phone calls, the response hold image is
displayed on your and the other party’s terminals.
・ Press t or n for a video-phone call. Press a to send the substitute image to the other party.
☛P90
・ If f is pressed or the other party hangs up during Response and Hold, the call is ended.
INFORMATION
● When you use Voice Mail Service or Call Forwarding Service, you can switch to Voice Mail or Call Forwarding by
pressing m and selecting Voice Mail or Call Forwarding while receiving a call.
Setting a response hold guidance Status Message
You can record your own voice as a response hold guidance.
・
One guidance of up to about 10 seconds long can be recorded.
・While a voice or video-phone call is during Response and Hold, the guidance set by this function is
played.
Next
69
Page 72

Default Standard
R
ill
Making/Receiving Calls
Example
1
2
3
On-hold Tone
4
INFORMATION
● If Standard is set, the guidance “I cannot answer the phone right now. Please wait or call back later (in
Japanese)” is played for the other party during Response and Hold.
● If you delete the recorded guidance, the default guidance is returned.
Setting a recorded guidance
m864
Select On-hold tone field z 2
・ To reset to the default guidance: 1 z Go to Step 4
Select Record in Edit message field z Speak a response hold guidance after a start tone
ecording w
・ An end tone (beep) sounds in about 10 seconds
from the start of recording.
・ To stop the recording: o
・ To check the recorded guidance: Select Play
・ Record cannot be selected when a recorded
guidance has already been registered. Select
Delete, select Yes and record after deleting the
recorded guidance.
Indication of the
allowable recording time
Press p
start after a message is displayed.
Setting an on-hold tone On-hold Tone
While a voice or video-phone call is during On-hold, the melody set by this function is played.
・The setting of this function is also reflected to the on-hold tone in Sound Setting.
Default
保留音・ボイス (On-hold tone, voice)
m8693
1
2 or 3
2
・ To reset to the default melody: 1
・ To play a melody: p
INFORMATION
● The volume of the on-hold tone cannot be changed.
● The melody applicable to 3D sound set as on-hold tone may be heard deteriorated to the other party.
70
Page 73

Using Public mode (Driving mode) Public mode (Driving mode)
Public mode (Driving mode) is an automatic answering service considering etiquette in highly
public places. When Public mode (Driving mode) is activated and a call is received, a guidance is
played and informs the caller that the called party is driving or in an area (bus, train, movie
theater, etc.) where use of the phone should be refrained and cannot answer the call. Then the
call is disconnected.
Public mode (Driving mode) can be activated/canceled only in stand-by (including when 圏外 is
・
displayed on the screen).
・Even in Public mode (Driving mode) you can make calls as normal.
・This function cannot be used during data communication.
Activating Public mode (Driving mode)
( (for over a second)
1
Public mode (Driving mode) is activated and appears.
When a call is received, a guidance is played saying “The person you are calling is currently driving
or in an area where cellphone should not be used. Please try again later”.
・ When Silent Mode is activated at the same time, Public mode (Driving mode) takes precedence.
■ Canceling: ( (for over a second)
■ When Public mode (Driving mode) is activated
No ring tone plays when your FOMA terminal receives a call. appears on the screen and the
call is recorded in the received call history.
The caller hears a guidance informing that you are driving or in an area where use of the mobile
phone should be refrained and the call is then ended.
・When a PushTalk call is received, FOMA terminal does not answer it and the connected members are
informed that you are driving.
■ Receiving calls in Public mode (Driving mode) with network services activated
Service Receiving voice calls Receiving video-phone calls
Voice Mail
Service
Call
Forwarding
Service
Call Waiting
Service
Nuisance Call
Blocking
Service
The other party hears the Public mode
(Driving mode) guidance and the call is
then connected to the Voice Mail Service
Center.
The other party hears the Public mode
(Driving mode) guidance and the call is then
forwarded to the specified destination.
Whether the caller hears the guidance or not
depends on the setting for Call Forwarding
Service.
When the guidance has been set to on, the
Public mode (Driving mode) guidance is
played. When the guidance has been set to
off, no guidance is played.
The Public mode (Driving mode) guidance
is played and the call is then disconnected.
If the other party is registered as nuisance
caller, a guidance indicating that the call
was not connected is played and the call is
then disconnected.
The call is disconnected without being
connected to the Voice Mail Service Center.
The other party does not receive a message
with image indicating that Public mode
(Driving mode) is on and the call is forwarded
to the specified destination.
If the destination party uses the phone not
compatible with video-phone, the call is
disconnected.
The Public mode message with image is
played and the call is then disconnected.
If the other party is registered as nuisance
caller, a message with image indicating that
the call was not connected is played and the
call is then disconnected.
Making/Receiving Calls
Public mode (Driving mode)
Next
71
Page 74

Service Receiving voice calls Receiving video-phone calls
Making/Receiving Calls
Caller ID
Request
Service
・If the other party does not notify the caller
ID, a guidance requesting caller ID is
played and the call is then disconnected.
・If the other party notifies the caller ID, the
Public mode (Driving mode) guidance is
played and the call is then disconnected.
・If the other party does not notify the caller
ID, a message with image requesting caller
ID is played and the call is then
disconnected.
・If the other party notifies the caller ID, the
Public mode (Driving mode) message with
image is played and the call is then
disconnected.
INFORMATION
● In Public mode (Driving mode), the vibrator and call indicator operation are disabled as well as the following
Using Public mode (power off)
sounds:
・ Ring tones ・ Alarms ・Schedule alarms ・ Low battery alert
・ i-
α
ppli sounds ・Charge alert ・ Alarm for Call Cost Limit*
1
・ The sound that plays when data is obtained by holding the FeliCa mark over a reader/writer*
*1 Even if Alert for Call Cost Limit is set to ON and an alarm is set, a message is not displayed.
*2 When IC card in Alert Lighting Setting is set to ON, the call indicator lights.
● The following sounds are played even in Public mode (Driving mode):
・ Keypad sound ・ Open slide/close slide sound when opening/closing FOMA terminal
・ Shutter sound when shooting with the camera
● In Public mode (Driving mode), the i-channel information does not scroll on the stand-by display.
● Even if mail or Message R/F is received, the receiving screen or reception result screen is not displayed. But,
when Check i-mode Message is performed, the receiving screen or reception result screen is displayed. In
addition, if mail or Message R/F is received at this time, the receiving screen is displayed and the reception
result is updated when receiving is completed.
● When FOMA terminal is turned off or you are outside the service area, the caller hears a guidance informing
out-of-service area instead of the Public mode (Driving mode) guidance.
● Making emergency calls (110, 119 or 118) in Public mode (Driving mode) cancels Public mode (Driving mode).
However, it is not canceled when emergency calls are made using video-phone.
2
Using Public mode (power off)
Public mode (power off) is an automatic answering service considering etiquettes in highly public
places. When Public mode (power off) is set and then a call is received with FOMA terminal
switched off, a guidance is played and informs the caller that the called party is in an area
(hospital, airplane, priority seat area on a train, etc) where the phone should be turned off and
cannot answer the call. Then the call is disconnected.
Activating Public mode (power off)
(25251 z n
1
Public mode (power off) is set. (There will be no change on the display.)
When you subsequently turn the power off, Public mode (power off) is activated.
In Public mode (power off) if a call is received with FOMA terminal off, a guidance is played saying
“The person you are calling is currently in an area where use is prohibited. Please try again later”.
■ Canceling: (25250 z n
■ Checking the setting: (25259 z n
72
Page 75

■ When Public mode (power off) is activated
The setting is retained until Public mode (power off) is canceled by dialing “ 25250”. The setting is
not canceled by turning the power on.
The Public mode (power off) guidance is played even in locations outside the service area or where
radio waves are hard to reach.
The caller hears a guidance informing that you are in an area where the phone should be turned off
and the call is then ended.
・When a PushTalk call is received, FOMA terminal does not answer it and the connected members are
informed that you cannot be connected.
■ Receiving calls in Public mode (power off) with network services activated
Service Receiving voice calls Receiving video-phone calls
Voice Mail
Service
Call
Forwarding
Service
Nuisance Call
Blocking
Service
Caller ID
Request
Service
The other party hears the Public mode
(power off) guidance and the call is then
connected to the Voice Mail Service Center.
The other party hears the Public mode
(power off) guidance and the call is then
forwarded to the specified destination.
Whether the caller hears the guidance or
not depends on the setting for Call
Forwarding Service.
When the guidance has been set to on, the
Public mode (Driving mode) guidance is
played. When the guidance has been set to
off, no guidance is played.
If the other party is registered as nuisance
caller, a guidance indicating that the call
was not connected is played and the call is
then disconnected.
・
If the other party does not notify the caller
ID, a guidance requesting caller ID is
played and the call is then disconnected.
・
If the other party notifies the caller ID, the
Public mode (power off) guidance is
played and the call is then disconnected.
The call is disconnected without being
connected to the Voice Mail Service Center.
The other party does not receive a message
with image indicating that Public mode
(power off) is on and the call is then
forwarded to the specified destination.
If the destination party uses the phone not
compatible with video-phone, the call is
disconnected.
If the other party is registered as nuisance
caller, he/she receives a message with
image indicating that the call was not
connected and the call is then disconnected.
・
If the other party does not notify the caller
ID, he/she receives a message with image
requesting caller ID and the call is then
disconnected.
・
If the other party notifies the caller ID, he/
she receives a message with image
indicating that Public mode (power off) is
on and the call is then disconnected.
Making/Receiving Calls
Answer Machine
Allowing the caller to leave message when you cannot answer the c all
Answer Machine
By setting Answer Machine, the greeting will be played and the caller can leave a recorded
message when you cannot answer the call.
・
Up to 4 messages can be recorded for voice/video-phone calls in total, a maximum of about 30
seconds for each.
・For voice calls, the caller’s voice is recorded. For video-phone calls, the caller’s voice and image are
recorded.
・The recording date and time and the phone number are also recorded. However, when the date and
time have not been set or the phone number is not notified, they are not recorded.
・You can set the time interval between the reception of the call and the start of the greeting.
・The greeting in your own voice can be recorded.
Next
73
Page 76

・Incoming PushTalk calls cannot be answered by Answer Machine.
Making/Receiving Calls
・It is advisable that the contents of recorded messages be separately written down in a notebook, etc.
Recorded data may be lost due to failure, repair, change of model or other handlings of FOMA
terminal. If the data should be erased, DoCoMo assumes no responsibility for the loss of any data.
Setting Answer Machine
Default Deactivate
C11
1
appears on the stand-by display.
Answer Machine
■ Canceling: C12 while Answer Machine is set
Replying with Quick Record Message
When Answer Machine has not been set to start, you can activate this function only once by holding down
C for over a second while the phone is ringing. This operation does not set Answer Machine to start.
・For incoming PushTalk calls, you cannot activate Quick Record Message.
INFORMATION
● When the number of recorded messages becomes 4, is indicated on the stand-by display. The icon does
not disappear even if Answer Machine is canceled.
● If there are already 4 recorded messages, Answer Machine cannot be set. If you attempt to activate Quick
Record Message by holding down C for over a second while the phone is ringing, a warning tone (bleep)
sounds and the ring tone keeps sounding. Delete unnecessary recorded messages and set again.
Receiving a call while Answer Machine is set
Menu 4711
A call is received
1
After the ring tone sounds according to Greeting Response Time, the greeting screen is displayed.
・ When the greeting message is set to Preinstalled, the caller hears the guidance “I cannot answer
the phone right now, please leave your name and message after the beep (in Japanese)”. Set
Personalized to play a recorded guidance.
Recording the other party’s message starts
2
Indication of the
allowable recording
time
Recording a message
of voice call
When the recording is completed, the call is disconnected
3
with the number of recorded messages is indicated.
Recording a message
of video-phone call
・ A beep announces the other
party the start and end of
the recording. And when
about 25 seconds have
elapsed since the start of
recording, rapid beeps are
heard to warn that the end
of recording is approaching.
74
Page 77

INFORMATION
● You can answer a call even while playing the greeting or recording a message. Press n to answer a voice call.
For a video-phone call, press n or t to answer by sending your image or a to answer by sending the
substitute image. For a voice call, you can also answer the call by opening FOMA terminal. ☛P63
If the message is being recorded at this time, the contents before receiving the call will not be recorded.
● When you are outside the service area, Answer Machine does not operate. Use Voice Mail Service (pay service).
● Answer Machine cannot be started and the ring tone keeps sounding when 4 messages have already been
recorded. If Voice Mail Service or Call Forwarding Service is set to start, each service starts its operation.
● Public mode (Driving mode) takes precedence over Answer Machine. In Public mode (Driving mode), Answer
Machine does not operate.
● The recording may be disrupted or the recording screen may be distorted if the signal conditions are poor.
● Another call received while recording a message is rejected and recording continues. In this case, the rejected
incoming call is recorded in the received call history.
● When Indicator light is set to ON in Alert Lighting Setting, the call indicator flashes until the unplayed recorded
message is played.
Menu 4713
Setting the response time until the greeting starts Greeting Response Time
Default 008 Sec
C13
1
Enter the response time (between 0 and 120 seconds)
2
・ To increase or decrease the entered values: %
INFORMATION
● When Auto Answer (when a flat type earphone/microphone set with switch (optional) is connected), Voice Mail
Service or Call Forwarding Service and this function are set simultaneously, those priorities change with the
ringing times set for each service and function. To give priority to Answer Machine, the response time for this
function should be set shorter than the ringing times set for Auto Answer, Voice Mail Service and Call
Forwarding Service. Note that Answer Machine may not be given priority depending on the signal conditions.
In this case, answer a call with Quick Record Message.
● The same time period cannot be set for both the delayed time of Auto Answer and the response time of Answer
Machine.
Making/Receiving Calls
Answer Machine
Menu 4714
Setting a greeting message Greeting Setting
You can record your own voice as a greeting message.
・One greeting of up to about 10 seconds long can be recorded.
Default Preinstalled
Example
1
2
3
Setting a recorded greeting
C14
Select Set Greeting field z 2
・ To reset to the default greeting: 1 z Go to Step 4
Select Record in Edit greeting field z Speak a greeting message after a start tone
・ The operation procedure is the same as when recording a response hold guidance. ☛P69
Next
75
Page 78

Press p
4
Making/Receiving Calls
INFORMATION
● If you delete the recorded greeting, the default greeting is returned.
Playing recorded messages
You can play or delete recorded messages from the list.
・Unplayed recorded messages, if any, can be played quickly from the stand-by display. ☛P35
Menu 472
Answer Machine
C2
1
Select a recorded message to play
2
Indication of the
playing time
Playing a message
of voice call
On the recorded message list screen, the date and time of recording and
the other party’s phone number appear.
: Unplayed recorded message of a voice call
: Unplayed recorded message of a video-phone call
: Played recorded message of a voice call
: Played recorded message of a video-phone call
・ When the caller’s phone number is notified, the phone number is
displayed and when the caller’s phone number is not notified, the reason
for no caller ID is displayed. When the caller is registered in the
phonebook, the name is displayed.
・ During playback, the following operations are available:
%
n:Speakerphone on/off (for messages of voice calls only)
■ Deleting:
a Highlight a recorded message z m21
b Select Yes
■ Registering an entry in the phonebook:
a Highlight a recorded message z m4
b 1 or 2 z Register the name or address ☛P107, P110
:Adjust volume
・ To delete all: m22
・ To add to an existing phonebook entry: m5
・ To add to an existing phonebook entry: 1 or 2 z Select an
entry ☛P118
o
:Stop
Select whether to delete the played recorded message
3
・ To delete the recorded message: Select Yes
INFORMATION
● Highlight an entry in the recorded message list, and press n to make a voice call or t to make a video-
phone call. Also, you can make calls by setting conditions. ☛P56
76
Page 79

Making/Receiving Video-phone Calls
Video-phone ......................................................................................................78
Making video-phone calls ................................................................................78
Receiving video-phone calls ...........................................................................82
Using Chara-den ...............................................................................................83
Setting images to be sent to the other party .................................................. 84
Customizing the display settings during a video-phone call ....................... 88
Changing the video-phone settings .......................... Videophone Settings 89
Setting of switching between a voice call and a video-phone call
.................................................................................. Notify Switchable Mode 91
Using the video-phone by connecting with the external device
................................................................................................ External Device 92
77
Page 80

Making/Receiving Video-phone Calls
Video-phone
The video-phone function is available between terminals that support DoCoMo’s video-phone. By
using the video-phone, you can talk on the phone while looking each other images. It is also
possible to display a still image, substitute image, Chara-den, etc. instead of your self image.
DoCoMo video-phone specifications are compliant with “3G-324M*1 that has been standardized by the
international standard 3GPP*2”. Note that the connection with the video-phones of different
specifications can not be established.
*1 3G-324M…An international standard for the 3rd generation mobile video-phone
*2 3GPP (3rd Generation Partnership Project)…Area standardization organization established to
develop the standard technology specification for 3rd generation mobile communications systems
(IMT-2000).
Video-phone
・ The following 2 communication speeds are provided for the video-phone:
・64K: Connects at communication speed of 64 kbps.・32K: Connects at communication speed of 32 kbps.
Screen display during a video-phone call
cb
a
d
e-l
m
a Main screen Image of the other party is displayed by default.
b Communication
speed
c Speakerphone
function
d Sub screen Your image is displayed by default.
e Zoom to : Normal to 16 x (out-camera)
f Status : Sending your self image
Action mode : Action : Action of parts
g Scene mode/
effect
h Compact light No icon: Turn light off : Turn light on
i Quality of
outgoing image
j Sound/image
sending and
receiving status
k Macro mode No icon: Off : On (out-camera)
Switch to v-phone
l
m Call duration Displayed in the HH:MM:SS format
: 64K : 32K
No icon: Off : On
to : Normal to 2 x (in-camera)
: Sending the camera-off image
: Sending Chara-den : Sending a frame
: Sending a still image : On-hold
: On Response and Hold : Recording a message
: Recording a movie memo
: Full auto, etc.
The icons for other modes/effects ☛P85
No icon: Normal : Prefer image quality
: Prefer motion speed
: Sending and receiving sound
: Sending and receiving image
: Sending and receiving sound/image
No icon: Switching is not available. : Switching is available.
Making video-phone calls
・International video-phone calls are available by using the DoCoMo’s international call service
“WORLD CALL”. ☛P57
・If the message indicating that the call cannot be connected is displayed when making a video-phone
call, set Caller ID Notification on and dial again.
78
Page 81

Enter a phone number
1
・ Entering method is the same as for the voice calls.
t
2
Talk with the other party
3
f when you finish the call
4
・ To end the video-phone call by closing FOMA terminal, change the settings in Close Setting.
Your image is displayed while being connected.
・ If the phone of the other party is busy, you will hear a busy signal. The
message, Busy. or Connection failed. is displayed on the screen. Press
f to end the call and call again later. You can call back quickly by using
Redial.
・ When the substitute image is Chara-den, Chara-den may not be
displayed. If this happens, the default image for the substitute image
setting is sent to the other party. ☛P90
・ The charging begins when Connected to videophone. is displayed.
The other party’s voice comes out of the speaker (Speakerphone function).
・ To put the call on hold: o
・ To turn on/off the speakerphone function: a or n
・ Depending on the other party’s settings, the substitute image may be
displayed.
・ To disable turning on the speakerphone function automatically, change
the setting in Videophone Settings or activate Silent Mode.
Making/Receiving Video-phone Calls
Making video-phone calls
Operations during video-phone calls
The following operations can be performed from the submenu. Hold down C for over a second during a
video-phone call to record the other party’s voice and image (Movie Memo).
Submenu item Description Page
a
Change to voice Switches from a video-phone call to a voice call. P81
b
Camera settings Applies effects to the image to be sent and adjusts its brightness, color density
and flicker.
c
Frame/
Subst. image
d
Macro ON/
Macro OFF
e
Light ON/Light
OFF
f
Switch camera
view
g
Image quality Sets the quality of sent and received images. P84
h
V. phone settings Changes settings for the screen to be displayed during video-phone calls. P88
i
Send DTMF Transmits tone signals (DTMF) during video-phone calls. P81
0Volume Adjusts the earpiece volume. P66
Adds a frame on the image to be sent or sends Chara-den or a still image. P83
Switches between the macro mode and normal mode.
Switches the compact light on/off.
Switches between the in-camera and out-camera.
Next
P85
P86
P85
P86
P87
P88
P87
79
Page 82

Making/Receiving Video-phone Calls
INFORMATION
● You can also make a video-phone call by performing in order of Steps 2, Step 1. When t is pressed and the
phone number is entered, the video-phone call is made automatically after about 5 seconds.
● When Speakerphone is set to ON in Videophone Settings and Silent Mode is active, if you make a video-phone
call, a confirmation screen appears asking whether to switch to the speakerphone call. Select YES or NO.
● When you talk on a video-phone call while a flat type earphone/microphone set with switch (optional) is
connected, the voice sounds from the connected earphone/microphone regardless of the setting of
Speakerphone in Videophone Settings.
● Please note that digital communication charges apply for video-phone calls instead of voice call charges even
if the substitute image or Chara-den is used.
● If a video-phone call cannot be made, the following message is displayed on the screen and then the stand-by
display returns. Note that the displayed message may not reflect the status of the other party’s terminal correctly,
depending on the type of the terminal and/or the network service used by the other party.
Making video-phone calls
Check number, then redial. You dialed the phone number not used.
Busy. The other party is busy or during a packet communication.
Out of service area/power off. The other party is outside the service area or the other party’s terminal is
Set caller ID to ON. This message is displayed in case connecting without notifying the caller ID
Redial using voice call. This message is displayed when the other party sets Voice Mail Service or
Connection failed. Set Caller ID Notification to Notify and dial again.
Message Description
turned off.
(when accessing to V-Live or visualnet).
sets Call Forwarding Service and the forwarding destination is the terminal
which is not compatible with video-phone.
・ The message may appear in cases other than the above.
● Video-phone via 32K line is intended for connection with devices such as PHS with which video-phone calls via
64K line may not be available depending on the network condition. When a video-phone call is made via 64K
line, the call type is automatically switched to via 32K for redialing if the communication environment of the
other party is found to be 32K area. When ON is set for Auto redial as voice, redialing via 32K line is also given
priority. ☛P89
・ If a call is made via 32K line, the charge is the same as digital communication charge via 64K.
● If a video-phone call made is not connected, redialing is automatically performed as described below:
Call type Auto redial as voice setting Redialing operation
64K ON 64K → 32K → Voice call
32K ON 32K → Voice call
When a video-phone call has been made by specifying a multi number, redialing will be made with the
specified number.
● The auto redial as voice function is provided to ensure the connection to the other party. ☛P89
OFF 64K → 32K → Disconnection
OFF 32K → Disconnection
・ If redialing as voice call occurs, voice call charges apply.
● If a video-phone call is made to emergency calls (110, 119 or 118) from FOMA terminal while Auto redial as
voice is set to ON, the call automatically switches to a voice call.
● You can make video-phone calls by setting conditions. ☛P56
● When there is an incoming call during dialing or redialing a video-phone call, the dialing may be interrupted and
the ring tone may sound.
● Even if sending/receiving the voice or image is aborted and (only voice) or (only image) is displayed
during a video-phone call, the call may be continued as it is.
80
Page 83

Switching from a video-phone call to a voice call
You can switch to a voice call by operating from the submenu during a video-phone call when the
other terminal is compatible with switching calls. Switching can be performed only from the
terminal which made the video-phone call.
This operation can be performed between the terminals that support switching between voice call/
・
video-phone call.
・To switch to a voice call, the other party needs to set Indication ON of Notify Switchable Mode in
advance. ☛P91
m1 during a video-phone call z Select YES
1
・ A guidance informing that the call is switched is played during switching.
・ Select NO to return to the video-phone talking screen.
INFORMATION
● For precautions when switching between a voice and video-phone call, see INFORMATION in “Switching from
a voice call to a video-phone call”. ☛P53
● Switching from a voice call to a video-phone call ☛P53
Making/Receiving Video-phone Calls
Making video-phone calls
Transmitting tone signals (DTMF) Send DTMF
You can input tone signals (DTMF) while sending your self image ( ), the camera-off image ( ) or
Chara-den ( ).
・The signals may not be received depending on the device of receiver side.
m9 during a call z Enter with dial keys
1
The entered number is displayed and the tone signals (DTMF) are transmitted.
・ To cancel transmitting tone signals (DTMF): c
・ The tone signals (DTMF) are transmitted by pressing dial keys only even without pressing
m9 while your self image is being sent.
・ When the tone signals (DTMF) are transmitted, the set frame and still image are canceled.
・ Because tone signals (DTMF) are transmitted using dial keys, you cannot use dial keys to make
actions while sending Chara-den.
81
Page 84

Making/Receiving Video-phone Calls
Receiving video-phone calls
・You cannot receive a video-phone call by pressing the keys other than t or n (Any Key Answer is
unavailable).
A call is received
1
Receiving video-phone calls
t or n
2
The ring tone sounds, the display light turns on and the call indicator lights/
flashes.
・ The other party’s phone number, name, image or video/i-motion will be
displayed on the screen according to the dialing condition of the caller or
the FOMA terminal settings.
・ To put the incoming call on hold: f
Your image is displayed while being connected.
■ Receiving a video-phone call with the substitute image: a
The substitute image is sent to the other party when the video-phone call
is connected.
・ When Chara-den is set as the substitute image, Chara-den may not
be displayed. If this happens, the default image for the substitute
image setting is sent to the other party.
Talk with the other party
3
f when you finish the call
4
・ To end the video-phone call by closing FOMA terminal, change the settings in Close Setting.
Operations while receiving calls
You can perform the following operations from the submenu:
Submenu item Description
a
Call Rejection Disconnects the call (the caller does not pay for the call).
b
Call Forwarding*
*1 Valid when you use Call Forwarding Service and the forwarding phone number has been set.
・You can operate FOMA terminal with the following keys while receiving a call:
・C (for over a second): Record a message (Quick Record Message)
・C: Stop the ring tone/vibrator
・% : Adjust the ring volume
The other party’s voice comes out of the speaker (Speakerphone function).
・ To put the call on hold: o
・ To turn on/off the speakerphone function: a or n
・ Depending on the other party’s settings, the substitute image may be
displayed.
・ To disable turning on the speakerphone function automatically, change
the setting in Videophone Settings or activate Silent Mode.
1
Forwards the incoming call to the forwarding phone number.
82
Page 85

INFORMATION
● When Speakerphone is set to ON in Videophone Settings and Silent Mode is active, if you receive a video-phone
call, a confirmation screen appears asking whether to switch to the speakerphone call. Select YES or NO.
● When a video-phone call arrives while a flat type earphone/microphone set with switch (optional) is connected,
the voice sounds from the connected earphone/microphone regardless of the setting for Speakerphone in
Videophone Settings.
● When a video-phone call arrives, it is not connected if the forwarding destination is not set to a video-phone
terminal compliant with the 3G-324M even if Call Forwarding Service is activated. Check the specifications of
the forwarding destination when setting it.
● Changing the operation when a video-phone call arrives ☛P67
Receiving a call by switching from a video-phone call to a voice call
Making/Receiving Video-phone Calls
・The switching operation can be performed only from the side which made the video-phone call. It
cannot be performed from the side which received the video-phone call.
・To receive the request of switching to a voice call, set Indication ON of Notify Switchable Mode in
advance. ☛P91
Receive the request of switching to a voice call during a video-phone call
1
The video-phone call is switched to a voice call automatically.
・ A guidance informing that the call is switched is played during switching.
Menu 54
Using Chara-den
A character can be sent instead of your image when making a video-phone call. The character
can be moved by pressing dial keys during a video-phone call. Some characters move their
mouth in time with the sounds picked up by the microphone.
m321 during a call
1
Select a folder z Select Chara-den
2
Action list scrolls.
©BVIG
Chara-den
・ If you press dial keys while sending Chara-den as the substitute image,
the character performs the action in accordance with the number of the
keys. The following operations can also be performed:
0 :Cancel action
( :Display the action list (Selecting action moves
the character.)
( (for over a second):Switch action modes (Action/Action of parts)
・ The action list of Chara-den set by default ☛P335
Next
Using Chara-den
83
Page 86

Making/Receiving Video-phone Calls
INFORMATION
● For details on making a video-phone call after displaying Chara-den or on setting Chara-den as the video-
phone substitute image, see “Displaying Chara-den”. ☛P334
● Some Chara-den has no actions.
Setting images to be sent to the other party
The following items can be set:
Item Page Item Page
Setting images to be sent to the other party
Switching the outgoing image between
your self image and the substitute image
Setting the quality of outgoing and
incoming images
Setting a frame on the outgoing image P85 Switching the in-camera and out-camera P87
Applying special effects to outgoing images P85 Switching the camera to the macro mode P87
Adjusting the brightness/color density/
flicker of outgoing images
Switching the outgoing image between your self image and the substitute image
t during a call
1
・ Each press switches the image between your self image( ) and the
substitute image ( or ). ☛P90
・ When Chara-den is set as the substitute image, Chara-den may not be
displayed. If this happens, the default image for the substitute image in
Image Setting is sent to the other party. ☛P90
P84 Sending the still image/camera-off image P86
P84 Switching display magnifications P87
P86 Turning the compact light on P88
©BVIG
The substitute image
Setting the quality of outgoing and incoming images
・Setting Prefer img qual makes motions a little slower in a higher-definition image.
・Setting Prefer motion spd makes motions smoother in a little lower-definition image.
Default Normal
Example
1
2
Setting the quality of outgoing image
m71 during a call
・ Pressing & during a call also switches the quality of outgoing images.
■ Setting the quality of incoming image: m72 during a call
1 to 3
84
Page 87

Setting a frame on the outgoing image Frame
The frame can be set while sending your self image.
・Only the frame with the display size of 176 x 144 (QCIF) or smaller can be selected. As for the
downloaded frames, only the frame with the display size of 176 x 144 (QCIF) can be selected.
m31 during a call
1
Select a frame
2
Frames set by default
・ While the in-camera is used, the mirror image (left-right reversed image)
is displayed on the screen and the normal image (right directed image) is
sent to the other party. While the out-camera is used, the same image as
displayed on the screen is sent to the other party.
・ To cancel sending the frame: o
Making/Receiving Video-phone Calls
Setting images to be sent to the other party
・You can download the default frames from the i-mode site “My D-style”, if you have deleted them.
☛P295
Applying special effects to outgoing images Scene Mode/Effect
You can apply the following effects to outgoing images. These settings can be changed only while
sending your self image.
Item Icon Item Icon Item Icon Item Icon
Full auto Night Letter Soft touch
Sensitivity up Twilight Color reversal Mono tone (red)
Super sensitivity up Surf&Snow Painting Mono tone (green)
Adjust backlight Sport Woodcut Mono tone (blue)
Spot photometry Pet Whiten Monochrome
Scenery Gourmet Suntan Sepia
・For details ☛P185
Defa ult Full auto
m21 during a call
1
Next
85
Page 88

Making/Receiving Video-phone Calls
1 to 9, 0, ( or #
2
Adjusting the brightness/color density/flicker of outgoing images Camera Settings
・ Press
The effect currently applied
to switch the pages.
&
Setting images to be sent to the other party
You can adjust the brightness and color density in 5 levels. Also, you may be able to control the flicker of
images, if it occurs, by making settings according to the power supply frequency in your area.
・This setting can be changed only while sending your self image.
・The brightness and color density may be unable to be changed depending on the setting for Screen
Mode/Effect.
・The settings are retained even after the call is finished.
Default Brightness: Level 3 Density: Level 3 Flicker adjustment: Auto
m2 during a call z Select an item
1
■ Adjusting brightness and color density:
a 2 z Highlight Brightness slider z &
b d to highlight Density slider z & z p
・ Your self image is displayed on the main screen while adjusting.
You can check the change of brightness or color density as you
shift the slider’s position.
・ If you do nothing on the terminal for some time after adjusting, the
settings are not changed and the talking screen reappears.
■ Adjusting flicker: 3 z 1 to 3
・ The flicker adjustment setting for Camera will reflect changes in this setting.
Sending the still image/camera-off image
Select a still image or the image displayed as Camera off (camera-off image).
・This setting is not available while the frame is being sent (☛P85).
・Only the still image that is 176 x 144 (QCIF) or smaller and permitted to output from FOMA terminal
can be set. Images prohibited from being output from FOMA terminal (File restriction) ☛P350
m3 during a call z Select an item
1
■ Sending the camera-off image: 3
・ When the camera-off image is set, the substitute image set in Image Setting is sent.
However, if Chara-den is set as the substitute image, the default image (camera-off image) is
sent.
86
Page 89

■ Sending a still image: 4 z Select a folder z Select a still image
p
・ To display a still image: Highlight a still image z
・ To display the previous image: o while sending a still image
Switching display magnifications Zoom
Making/Receiving Video-phone Calls
・Available only while your self image is being sent.
Default Normal ( )
% during a call
1
・ Each press of u switches the magnification of image as follows. Press d to switch in the
reverse order.
Out-camera: Normal ( ) → 2 x ( ) → 4 x ( ) →6 x ( ) → 8 x ( )
→ 10 x ( ) → 12 x ( ) → 16 x ( )
In-camera : Normal ( ) → 2 x ( )
INFORMATION
● Zooming will be canceled if you switch between the in-camera and out-camera.
Switching the in-camera and out-camera
・Available only while your self image is being sent.
Default In-camera
m 6 during a call
1
The image through the switched camera is sent.
・ Each press switches between the in-camera
and out-camera.
・ Even if you switch the cameras, the frame and
the brightness/color density/flicker settings of
outgoing image are kept.
・ Open the lens cover when switching to the out-
camera. If you close the lens cover while using
the out-camera, the substitute image is sent to
In-camera selected Out-camera selected
the other party. If you open the lens cover while
Open lens cover. is being displayed, your self
image is sent.
Setting images to be sent to the other party
Switching the camera to the macro mode
You can switch to the macro mode and adjust the focus of the image when sending the image of objects
about 7 to 11 cm away.
・You can switch the camera to the macro mode only when the out-camera is used.
Next
87
Page 90

Making/Receiving Video-phone Calls
Default Macro OFF
m4 during a call
1
・ To turn off the macro mode: m4
INFORMATION
● If you switch the camera to the in-camera in the macro mode, the camera returns to the normal mode.
Turning the compact light on
・You can switch the compact light on only when the out-camera is used.
・The compact light may go out temporarily depending on the setting operation while talking.
Customizing the display settings during a video-phone call
m5 during a call
1
The compact light is turned on. If the light has been turned on, it goes out.
・ Each press switches the compact light between on ( ) and off (no icon).
Customizing the display settings during a video-phone call
Switching between the main screen and sub screen
・The settings are retained after the call is finished.
Default Main screen image: Other party’s image Sub screen image: Your self image
p during a call
1
・ Each press switches the main screen and sub screen by turns.
Main screen : Other party’s image Main screen : Your self image
Sub screen : Your self image Sub screen : Other party’s image
Changing the main screen size
・The settings are retained after the call is finished.
Default Large
p (for over a second) during a call
1
・ Each press switches the screen size in the following order: Large →standard →small → large →
.
…
Setting the screen to be displayed during a call Videophone Settings during a call
・The settings are retained after the call is finished.
Default Display setting: Both sides Sub screen: My side Screen size: Large Display light: Always on (normal)
m8 during a call
1
Select each item to set
2
・ For setting each item, follow Step 2 in “Changing the video-phone settings”. ☛P89
Press p
3
88
Page 91

Changing the video-phone settings Videophone Settings
Set the operation to be performed when a video-phone call is not connected and the screen
displayed during a video-phone call. You can also set whether to send your self image to the
other party for outgoing calls.
・
The auto redial as voice function is provided to make the access to the other party for sure. Setting
this function on switches the call type to voice call by redialing automatically when the other party’s
terminal does not support the video-phone function or cannot receive a video-phone call while using
the mova service through Dual Network Service. Redialing does not occur, however, if you call an
ISDN-sync 64 kbps or PIAFS access point, or an ISDN video-phone incompatible with 3G-324M (as
of October, 2005), or if you dial the wrong number. Note that some calls may require the call charge.
Default Auto redial as voice: OFF Display setting: Both sides Sub screen: My side Screen size : Large
Send camera image: ON Visual preference: Normal Display light: Always on (normal)
Speakerphone: ON
m873
1
Select each item to set
2
Auto redial as voice:Sets whether to redial a voice call automatically when a video-phone call is
not connected.
Display setting :Specifies whether to display either your self image or the other party’s image
or both images during a video-phone call.
・ If you set other than Both sides, Sub screen cannot be set.
Sub screen :Specifies whether to display your self image or the other party’s image on the
sub screen during a video-phone call.
Screen size :Sets the main screen view size.
Send camera image:Specifies whether to send your self image to the other party for outgoing calls.
・ When OFF is set, the image set in the substitute image setting will be sent.
Visual preference :Sets the image quality on the other party’s screen.
Display light :Sets the display light during a video-phone call.
・ When Terminal settings is set, it operates according to the setting for Display
Light Setting (☛P141).
Speakerphone :Specifies whether to turn on the speakerphone function automatically once a
video-phone call is connected.
Making/Receiving Video-phone Calls
Videophone Settings
Press p
3
INFORMATION
● Even when Auto redial as voice is set to ON, redialing may not be performed depending on the situation of the
other party or network.
● When Auto redial as voice is set to ON, if you make a video-phone call during a packet communication with a PC
connected, the call is redialed as voice call without connecting to a video-phone call. During a voice call or 64K
data communication, the call is not connected to a video-phone call and redialing is not performed, either.
● If redialing as voice call occurs with Auto redial as voice set to ON, voice call charges apply instead of digital
communication charges.
● When Speakerphone is set to ON in this setting and Silent Mode is active, if you make a video-phone call, a
confirmation screen appears asking whether to switch to the speakerphone call. Select YES or NO.
89
Page 92

Making/Receiving Video-phone Calls
Setting the image to be displayed during video-phone calls Image Setting
Change the images to be sent to the other party during a video-phone call such as the substitute image,
answer machine image, response hold image, on-hold image and movie memo image.
・You cannot set the following images:
・Still image with a size larger than 176 x 144 (QCIF)
・Animation and Created animation
・Still image in the format other than JPEG and GIF formats
・Image that is prohibited from being output from FOMA terminal (File restriction) ☛P350
Setting the substitute image
Default Default Chara-den
Videophone Settings
m874
1
1 z Select Image field
2
■ Setting other still images:
a 4 z Select Select image
b Select a folder z Select a still image
・ To display a still image: Highlight a still image z p
・ The selected image overlapped with text message is displayed on the other party’s
terminal.
Chara-den
©BVIG
■ Setting the default Chara-den: 1
Default Chara-den ( ブンブン (Dimo)) is set.
■ Setting the default still image: 2
Default image (camera-off image) is set.
■ Setting other Chara-den:
a 3 z Select Select image
b Select a folder z Select Chara-den
・ To display Chara-den: Highlight Chara-den z p
Press p
3
INFORMATION
● If the Chara-den set as the substitute image is deleted, the substitute image is reset to Default Chara-den. If the
still image or the default Chara-den is deleted, the substitute image is reset to Default image.
Changing the answer machine/response hold/on-hold/movie memo images
Default Answer machine image, Response hold image, On-hold image, Movie memo image: Default
m874
1
2 to 5
2
90
Page 93

Select Image field z 2
3
In case of the answer
machine image
Select Select image in List images field z Select a folder z Select an image
4
・ The operation procedure is same as when setting other still images. ☛P90, Step 2 in “Setting the
substitute image”
Press p
5
・ To reset to the default image: 1 z Go to Step 5
Making/Receiving Video-phone Calls
Notify Switchable Mode
Setting of switching between a voice call and a video-phone call
Set whether to notify the other party’s terminal that your terminal can switch between a voice call
and a video-phone call.
You cannot change the setting during a voice call or video-phone call.
・
・This setting cannot be made outside the service area. Operate the terminal in locations with good
radio wave condition.
Default Indication ON: active
m8761
1
■ Deactivating: m8762
■ Checking the current setting: m8763
Select Yes
2
Notify Switchable Mode
91
Page 94

Making/Receiving Video-phone Calls
Using the video-phone by connecting with the external device External Device
By connecting FOMA terminal to an external device such as PC by the FOMA USB cable
(optional), you can make and receive video-phone calls from the external device.
If you want to use this function, install a video-phone application in a dedicated external device or
a PC, and prepare devices such as an earphone/microphone or USB-compatible Web camera
(available in market).
・
This function is not available when FOMA terminal is not connected to an external device.
・Refer to the instruction manual of external devices for hardware requirements or setting/operating
instructions of video-phone applications.
・The application called “ドコモテレビ電話ソフト 2005 (DoCoMo video-phone software 2005)” that is
compatible with this function is available on the DoCoMo video-phone software website. Visit the site
External Device
below and download it:
http://videophonesoft.nttdocomo.co.jp/
Default Terminal
m875
1
1 or 2
2
FOMA video-phone
communication
speed: 64K or 32K
Base station
FOMA
network
INFORMATION
● A video-phone call cannot be made from an external device during a voice call.
● When you subscribe to Call Waiting Service, if a video-phone call is received through an external device during
a voice call, it is recorded as a missed call in the received call history. The same applies when a voice call,
video-phone call or 64K data communication is received during a video-phone call using an external device.
92
Page 95

PushTalk
What’s PushTalk?..............................................................................................94
Making PushTalk calls ......................................................................................94
Receiving PushTalk calls..................................................................................96
Registering entries into the PushTalk phonebook
.................................................................... PushTalk Phonebook New Entry 97
Making a PushTalk call by using the PushTalk phonebook .......................... 99
Deleting members from the PushTalk phonebook
........................................................................ Delete PushTalk Phonebook 100
Setting for incoming/outgoing PushTalk calls .............................................101
93
Page 96

PushTalk
音の設定
What’s PushTalk?
The PushTalk button (g) allows you to communicate with multiple people (up to 5 including
yourself) by simple operation. Press the PushTalk button for over a second to make access to the
PushTalk phonebook, highlight the parties to talk to and press g. PushTalk communication fee is
charged every time you press g and speak.
Hold down g while you are speaking and the other parties only listen to you.
On the screen, you can see who is speaking and the states of the other members. This function is
very useful for communication within a group or a brief conversation only to deliver a message.
・
This function is only available between DoCoMo terminals that support PushTalk.
・For details about the PushTalk service, see the PushTalk booklet.
Talk between two persons
What’s PushTalk?
Speak while holding
down g.
Hello.
ReceiverCaller
Talk among multiple persons
Receiver
Callout
Receiver Receiver
I’ll arrive
soon.
ReceiverCaller
Speak while holding
down g.
PushTalkPlus
PushTalkPlus is a service in which you can talk to up to 20 persons including you by using a phonebook on
the network registered in advance. (☛P99) This service also provides some useful functions such as allowing
you to check the member’s state. Note that the optional subscription is needed if you use PushTalkPlus.
● For details about how to operate PushTalkPlus, see the separately-provided booklet.
Making PushTalk calls
PushTalk communication screen
Member that is speaking now (a name*1, a phone number, User unset, Myself, a blank
(when no party is speaking), or (when the speaking party cannot be identified))
Group name (indicated only on the screen of the party who started group calling)
The other party’s status
: Waiting for a response from the other party*
: Participating in PushTalk
: Not answered during the ringing time/Disconnected PushTalk*
: No response due to Public mode (Driving mode)*
2
2
2
Member (a name*1, a phone number, User unset)
*1 When the member is registered in the FOMA terminal phonebook (Name displays ☛P107)
*2 Displayed when 3 or more parties are talking.
94
Page 97

Communicating on PushTalk
Enter a phone number
1
・ Do the same as you enter a number for a voice call.
g
2
When the other party answers, the answering tone
sounds like “pico-pico” and PushTalk starts.
PushTalk
PushTalk button
■ Making a call with the speakerphone function: g (for over a second)
Communicate on PushTalk
3
・ When a member answers while 3 or more parties are talking, the connection tone sounds like
“picop-pi”.
・ When a member exits from PushTalk while 3 or more parties are talking, the disconnection tone
sounds like “pipop-po”.
■ Switching to the speakerphone function: a or n
■ Speaking:
a Hold down g and speak
・ When you press g, you hear the floor acquisition sound “pico-pico”.
・ While another party is speaking, pressing g makes the floor acquisition failure sound
“picou” and you cannot speak.
b Release g when you finish speaking
・ When you release g, a tone sounds like “pico-pico” to indicate the end of floor acquisition.
・ When the limit of time for the floor acquisition approaches, a tone sounds like “picot-picot” to
indicate the floor acquisition is ending.
f when you end PushTalk
4
・ To end a PushTalk call by closing the FOMA terminal, change the setting of PushTalk Close
Setting.
INFORMATION
● You can make a PushTalk call from the FOMA terminal phonebook, UIM phonebook, redial data, received call
α
history, iPhone To) in mail, sites, or ToruCa.
● You cannot make a PushTalk call during a voice call, videophone call or data communication. During
PushTalk, you cannot make a voice call or video-phone call to a different party.
● When you make a PushTalk call during i-mode, i-mode is disconnected.
● When you make a PushTalk call when i-
● Speaking time with a single floor acquisition is limited. When the time limit arrives, the floor acquisition is
canceled.
● If no party acquires the floor for a certain period of time, PushTalk ends.
● If you set Answer in PushTalk Arrival Act, a voice call coming in while you are speaking cancels the floor
acquisition.
● You cannot call an emergency number (110, 119, or 118) during PushTalk.
● You can make a PushTalk call by setting conditions. ☛P56
ppli, or scan result of Bar Code Reader. You can also make a PushTalk call from Phone To (AV
α
ppli is running, i-αppli is suspended.
95
Making PushTalk calls
Page 98

PushTalk
Operation during PushTalk
The following operations can be performed from the submenu. You can change the volume during
PushTalk with %.
Submenu item Description Page
a Reconnect alarm*
b Setting when folded Set whether to end PushTalk by closing FOMA terminal. P103
c PushTalk arv. act Set the action against an incoming voice call during PushTalk. P102
*1 You can change this setting even while the alarm is sounding. The new setting takes effect after the alarm
stops.
1
Set an alarm sound indicating reconnection of a PushTalk call
under improved signal quality which has been cut off due to poor
signal quality.
P59
Receiving PushTalk calls
Receiving PushTalk calls
・You can answer a PushTalk call by pressing 0 to 9, (, or # as well as g or n (Any
Key Answer). ☛P63
An incoming PushTalk call is received
1
The PushTalk ring tone sounds, the display lights, and the call indicator lights or blinks.
Blinking
appears on the caller’s screen.
Phone number, name (if registered in the FOMA
terminal phonebook), and User unset
g or n
2
You can answer the PushTalk call and Connected is notified to the other party.
・ Pressing f disconnects the call without answering it. For a group call, Disconnected is notified to
each group member before disconnecting the call.
・ When PushTalk Auto Answer is set to ON, incoming PushTalk calls are automatically answered.
Your FOMA terminal is switched to the communication that uses the speakerphone function.
In Silent Mode, however, the auto answering function does not work. Answer by pressing g or n.
Communicate on PushTalk
3
・ For details ☛P95, Step 3 of “Communicating on PushTalk”.
f when you end PushTalk
4
・ To end a PushTalk call by closing the FOMA terminal, change the setting of PushTalk Close
Setting.
96
Page 99

INFORMATION
● Even after you exit from the PushTalk communication, you can rejoin the communication from the received call
history while the caller is communicating on PushTalk.
● You cannot answer incoming calls during a video-phone call, video-phone call through an external device, data
communication, software update, or pattern definition update. The missed calls are not registered in the
received call history.
● If you receive a PushTalk call during i-mode, the action will be subject to the setting of i-mode Arrival Act: PT.
● i-mode cannot be used during PushTalk.
● Response and Hold is not possible for PushTalk. Pressing f disconnects the incoming call.
● Even if there is a video-phone call, PushTalk call or incoming data communication during PushTalk, you
cannot answer. They are registered in the received call list.
● When no answer is received within the duration (in seconds) set in PushTalk Ring Time, Disconnected is
notified to the caller and the incoming PushTalk call is terminated.
● When PushTalk Arrival Act is set to Answer, and when an incoming voice call is received during PushTalk, the
operation is the same as that for an incoming call during a voice call. ☛P60
● When an incoming PushTalk call is received during Public mode (Driving mode), the ring alert does not sound
and incoming call screen does not appear either. is displayed on the screen and you cannot answer the
call. In this case, Driving is notified to the caller.
● Changing the operation when a PushTalk call arrives ☛P67
Menu 44
Registering entries into the PushTalk phonebook PushTalk Phonebook New Entry
Register members to call on PushTalk. You can register them in different groups.
・
Up to 700 entries can be registered (or fewer depending on the type of data registered).
・The phone numbers must be registered in the FOMA terminal phonebook in advance to be
registered in the PushTalk phonebook.
・If you delete or change a phone number in the FOMA terminal phonebook, the same phone number
in the PushTalk phonebook is automatically changed in the same way. The setting for Secret
Attribute will also be reflected.
PushTalk
PushTalk Phonebook New Entry
Example
1
2
3
4
Registering by searching the FOMA terminal phonebook
g (for over a second)
・ If the members are already registered, all the members are displayed in
order of Japanese syllabary.
・ Pressing 1 to 9 or 0 highlights the first member of the column
corresponding to the character assigned to each dial key. Pressing (
or # highlights
・ If there is more than one page, use & to change the page.
その他
(other) column.
a
Select View phonebook
・ When registering a phone number that is not registered in FOMA phonebook, select Direct input.
The FOMA phonebook registration screen is displayed. Set the required items and save them.
The phone number will be registered in both the PushTalk phonebook and the FOMA phonebook.
If you register more than one phone number, select the phone numbers you want to register in the
PushTalk phonebook. Then registration to the PushTalk phonebook is completed.
Search the phonebook z Select the party z Select a phone number
Next
97
Page 100

Select Yes
5
・ To register additional members: a z Repeat Steps 2 to 5.
INFORMATION
● To register a member from the FOMA terminal phonebook to the PushTalk phonebook, select a party from the
phonebook list, press m7, and select Yes. When multiple phone numbers are registered, select the
desired phone number and select Yes. You can also make the same registration by selecting a phone number
on the phonebook details (Phone) screen, pressing m6, and selecting Yes. In this case the first phone
number on the phonebook details (TOP) screen is registered.
● When multiple phone numbers are registered in the FOMA terminal phonebook, only one of them can be
PushTalk
PushTalk Phonebook New Entry
registered.
Registering members into groups
You can register members registered in the PushTalk phonebook into different groups.
・Up to 30 groups can be registered.
・Up to 19 members can be registered in one group. However, a PushTalk communication can include
up to 5 members. When you make a PushTalk call, select up to 4 parties other than yourself.
g (for over a second) z p
1
a z Enter the group name (up to 20 one-byte or 10 two-byte characters) z p
2
Select the group
3
・ When the already registered group is selected, its members are displayed.
・ To register members in a registered group, go to Step 3.
・ Changing the group name: Highlight the group z m3 z Enter the
group name z p
a
4
The members registered in the PushTalk phonebook are displayed in a list.
・ Pressing 1 to 9 or 0 highlights the first member of the column corresponding to the
character assigned to each dial key. Pressing ( or # highlights
・ If there is more than one page, use & to change the page.
Select the member
5
・ To switch selecting/canceling: o
Press p
6
INFORMATION
● The same member can be registered in different groups.
その他
(other) column.
98
 Loading...