

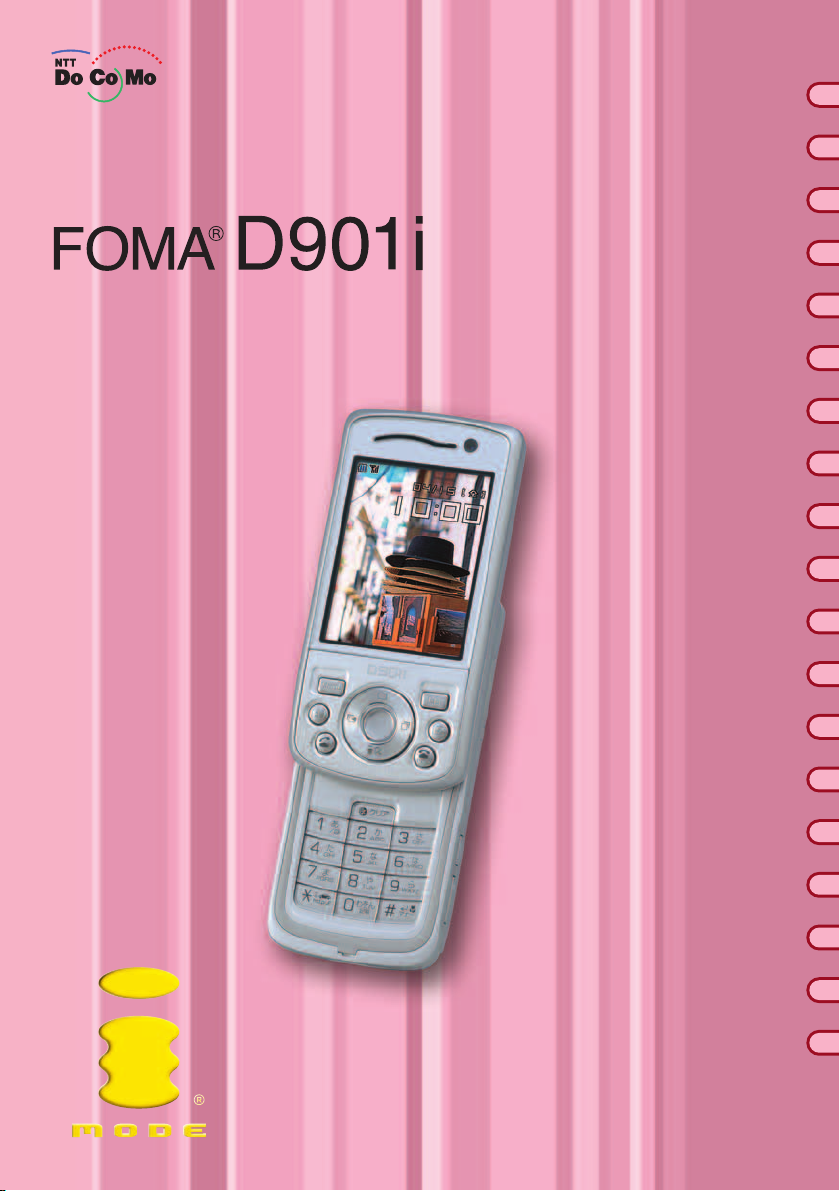
Page 1
Contents/Cautions
Before Using D901i
Manual for
’05.1
Making/Receiving Calls
Video-phone Calls
Phonebook
Sounds/Displays/Lights
Safety Settings
Camera
i-mode
Mail
i-αppli
i-motion
Data Management
Other Convenient Functions
Network Services
Data Communication
Character Entry
Appendix
INDEX/Quick Reference
Page 2

DoCoMo W-CDMA System
Thank you for selecting the FOMA D901i.
Carefully read this manual, as well as the individual manuals for other devices such as the
battery pack, before using your FOMA D901i, and consult the corresponding manuals
while using the phone and those other related devices so that you are able to use them
correctly and effectively. If y ou are unclear as to any point indicated in any of these
manuals, call the number for General Inquiries that is listed on the back of this manual.
Your FOMA D901i is a valuab le asset. Handle it with care and it will be y our trusted
partner for years to come.
Before using your FOMA terminal
・The FOMA terminal is cordless so you may not be able to use it in certain locations where signals
cannot penetrate, such as in tunnels, underground, in som e b uilding s or ou tdoo rs if the sig nal is
weak or you are outside the service area. You also m ay not be able t o u se yo ur FOMA term in al
on the upper floors of some highrise building, even though the re is not hing a round you that
interferes with the signal. Please note that your call may be disconnected even wh en the sign al is
strong (when the signal strength indication shows three bars) an d you are n ot movin g.
・When using the FOMA terminal in public, busy or quiet places, be careful not to disturb others.
・Since the FOMA terminal relies on radio transmission, it is theoretically possible for third parties
to intercept a call; however, because the W-CDMA system automatically employs a secrecy
function for all calls, a third party will pick up nothing but signal noise.
・Since the FOMA terminal operates by the wireless transmission of voices converted to digital
signals, if you are in a location where the signal is weak, the original voice may not be
accurately reproduced from the received digital signal, therefore, the voice you hear may differ
from the original sound of the speaker’s voice.
・DoCoMo asks that you keep a separate record (e.g. written copy) of all information you store in
your FOMA terminal. DoCoMo accepts no responsibility whatsoever for any loss that occurs
should the contents of the FOMA terminal’s memory be lost or altered.
・The user hereby agrees that the user shall be solely responsible for the result of the use of SSL.
Neither DoCoMo nor the certifier as listed herein makes any representation and warranty as for
the security in the use of SSL. In the event that the user shall sustain damage or loss due to the
use of SSL, neither DoCoMo nor the certifier shall be responsible for any such damage or loss.
Certifier: VeriSign Japan K.K., Betrusted Japan Co., Ltd., GeoTrust Japan, inc.
・ The FOMA terminal can be used only via the FOMA network provided by DoCoMo.
Before using this manual
Be sure to thoroughly read th is manu al before usin g you r FOMA t ermi nal and UI M (FOM A
card). Use with care when storing the manual to avoid losing or misplacing it.
How to refer this manual
・Refer to the front cover and side indexes:
Select to look at operation items or functions of the front cover or side indexes.
・Refer to the Contents:
Select to look at operation items or functions of the Contents.
・Refer to the Index:
Select to look at operation items or functions of the Index.
・Refer to the features.
・Use Quick Reference Manual.
・In the manual for FOMA D901i, the FOMA D901i is usually referred to as “FOMA terminal”.
・This manual explains functions performed with a miniSD memory card. A miniSD memory card is required
separately.
Before using the miniSD memory card
・Unauthorized copying of parts of or this entire manual is prohibited.
・The contents of this manual are subject to change without prior notice.
Note: Before using your FOMA terminal, or when necessary, read “SAFETY PRECAUTIONS” on P8.
☛P4
☛P588
☛P387
☛P2
☛P580
Page 3

How to use this manual [ Quick Reference Manual ☛P588 ]
The structure of this manual and the manner of description are explained here.
The operation procedure is mainly explained in shortcut operations. ☛P29
・
For shortcut operations for the each menu item, see the menu list. ☛P524
・ In this manual, to select an item by placing th e cursor with O (Easy S electo r Plus ) and pr essing o
(enter key) is referred to as “s elect”. Also, the step of pressing o which requires after entering
characters in the entry field is omitted in description.
・ When there are two or more possible operation procedures, the simplest one is mentione d.
・ The procedure for entering characters is mainly explained by in-line entry (direct insertion of text into
the entry field). ☛P512
・ The images or illustration provided in this manual are for information purposes only and may differ
from the actual displays or pr oducts.
Title
Notes for
operation
INDEX
Chapter title
Important
screens
displayed while
in operation or
performing
steps
Supplement to
operation
Status Message
Setting Status Message
Default On-hold tone: Standard
You can record a response hold guidance in your own voice.
・
One guidance up to 10 seconds long can be recorded.
・
While a voice or a video-phone call is on Response and Hold, the status message set by this function
is played.
Making/Receiving Calls
Setting a recorded data for guidance
Example
Press m867 on the stand-by display.
1
Select On-hold tone field and press 2.
2
・
Press 1 and go to Step 4 to reset t o the default message.
Select “Record” in Edit message field and speak the response hold guidance
3
after the beep.
An approximate guide
of the remaining time
for recording is
displayed.
Recording will start after the message is displayed.
・
An end tone (beep) sounds approximately 10 seconds after the start of recording.
・
Press o to stop in the middle of the guidance recording.
・
“Record” cannot be selected when a recorded data has already been registered. Select
“Delete”, select “Yes” and record after deleting the recorded data.
・
Select “Play” to check the recorded status message.
Press p.
4
INFORMATION
● If “Standard” is set for On-hold tone, the guidance “I cannot answer to the phone right now. Please wait
or call back later (in Japanese)” is played for the other party while on Response and Hold.
● When a recorded status message is deleted, the default status guidance is reset.
72
Default setting
Functional
overview
Basic operating
procedure
Indicates the
following screen
exists
INFORMATION
Useful information
or reference pages
INFORMATION
● Some screens do not support bilingual function and are displayed in Japanes e. The Japanese terms
which are used in this manual are described both in Japanese and English only for the first time in a
chapter or a section.
1
Page 4

Contents/Cautions
Contents
Before using your FOMA terminal............. Inside front cover
Before using this manual........................... Inside front cover
How to use this manual.......................................................1
Features of FOMA D901i ....................................................4
Making full use of D901i......................................................6
SAFETY PRECAU TIO N S (Always follow these directions)......8
Handling instructions.........................................................18
About intellectual property rights.......................................20
Basic package and optional accessories .......................... 22
Before Using D901i 23
Names and functions of parts Reading display Menu selection
Using UIM (FOMA card) Attaching/removing battery pack Charging
Battery Level Check Power ON/OFF Select Language Date and Time Setting
Caller ID Notification Own Number etc.
Making/Receiving Calls 49
Making calls Redial 186/184 WORLD CALL Receiving calls Any Key Answer
Open Answer Close Setting Received Calls Volume Ring volume
Response and Hold Driving Mode Answer Machine etc.
Making/Receiving Video-phone Calls 81
Making video-phone calls Receiving video-phone calls Chara-den
Setting images to send Customizing video-phone call display
Video-phone Setting etc.
Phonebook 101
Phonebook New Entry Group Setting Phonebook Search Edit Phonebook
Delete Phonebook Secret Attribute Quick Dial etc.
Sounds/Displays/Lights Settings 127
Sound Setting Vibrator Setting Silent Mode Stand-by Display
Mail/Call Image Illumination Setting Clock Display Format etc.
Safety settings 151
Security Code Change Terminal Security Code PIN code All Lock
Self Mode PIM Lock Keypad Dial Lock Privacy Mode Setting
Key Lock Remote Lock Secret Mode etc.
Camera 173
Still Camera Movie Camera Setting for shooting Bar Code Reader etc.
i-mode 197
What’s i-mode? Site display Change i-mode Password Internet Connection
Bookmark Screen Memo Save Image i-melody i-mode Setting Message R/F
Certificate etc.
2
Page 5
Contents
Mail 241
Composing and sending i-mode Mail Deco-mail Saving i-mode Mail
Receiving i-mode Mail Check i-mode Message Mail Setting Chat Mail
Composing and sending SMS etc.
i-αppli 319
Download Starting software i-αppli To function i-αppli Stand-by Display etc.
i-motion 345
i-motion Downloading i-motion i-motion Setting
Displaying/Editing/Managing Data 351
Displaying image Playing video/i-motion Chara-den Playing melody
miniSD memory card Managing data Infrared communication
Sound Recorder etc.
Other Convenient Functions 419
Multiaccess Multitask Edit by Slide Auto Power ON/OFF Alarm
Scheduler Custom Menu Own Number Call Duration/Call Cost
Calculator Notepad Earphone/Microphone Set with Switch
Reset Delete All Data etc.
Network Services 461
Voice Mail Call Waiting Call Forwarding Nuisance Call Blocking
Caller ID Request Dual Network English Guidance Service Dialing Number
Arrival Call Act Remote Control etc.
Contents/Cautions
Data Communication 475
Data communication Connecting PC Installing communication configuration file
Using FOMA PC configuration software AT command etc.
Character Entry 511
Entering characters 5-touch Input Method Save Phrase Copy Character
KUTEN Code Input Save Word Slot Input Method Input Method Setting
Appendix 523
Menu list List of dial keys and character assignments Troubleshooting
Error Message Warranty and After-Sales Service Software Update
Virus Scan Function etc.
INDEX/Quick Reference Manual 579
3
Page 6
Features of FOMA D901i
Contents/Cautions
FOMA is the name of a set of services provided by DoCoMo based on W-CDMA, which is
recognized as one of the systems compliant to the global standard for third generation wireless
communications (IMT-2000).
It’s amazing
because it’s
i-mode!
i-mode is an online service used with i-mode devices. This service supports
connection to i-mode Sites (Programs) or i-mode compatible Internet web
sites that provide a variety of useful information and allows you to exchan ge
i-mode mail.
Main functions of FOMA D901i
3D x 3D
The powerful 3D sounds and beautiful 3D
graphics allow you to enjoy re al istic games such
as car race games. Your FOMA terminal
provides the preinstalled game “ 電車で GO!
3D サウンド山手線一周 (Go by Train! 3D
Sound: Going round in Yamanote line)”.
☛P129, P325, P329
Chara-den
You can choose to display a preset character or
a downloaded character inste ad of your image
during video-phone call. A motion and
expression can also be attached to the character
by key operation. ☛P88, P376
You can compose and send your original messages
by changing the character color and size or
background color, and by pasting images such as
Deco-mail pictures o r still images shot with th e built-in
camera in the text. Enjoy expressive decorated mail.
☛
P253
Infrared communication and infrared remote control
You can use the infrared communication function
to exchange data between two FOMA terminals.
In addition, devices that s upport TV infrared
remote control can be operated from your FOMA
terminal. ☛P406, P413
Deco-mail
Safety settings
Key Lock
Prevents from the wrong operation of keys when
FOMA terminal is closed. ☛P163
Secret Mode
The phonebook data and the schedule data that
have set a secret attribute can not be displayed
except when Secret Mode is ON. ☛P166
Note: For details on other Safety settings, see P151
By setting Privacy Mode, access to phonebook
entries, mail messages, images, schedules,
received call list, redial list is prevented without
entering the terminal security code. You can also
set Privacy Mode automatically when you do
nothing for a certain period of time on FOMA
terminal. ☛P161
Privacy Mode
Wide array of network services
●Voice Mail Service (paid s ervice)*1 ☛P463
●Call Forwarding Service (free of charge)*1 ☛P466
●Short Message Service (SMS) (free of charge)*2
☛P310
*1 Separate application is required.
Note: The miniSD memory card is not included in the bundle and needs to be purchased. ☛P387
4
●Call Waiting Service (paid service)*1 ☛P465
●Dual Network Service (paid service)*1 ☛P470
*2 Separate application is not required.
Page 7
Useful functions
Functions interlocked with slide operation
●To receive an incoming call, open FOMA
terminal by slide operation . ☛P64
To put the call on hold or end the
conversation, close it. ☛P64
●The received message reply screen or the
schedule edit screen can be displayed by only
opening FOMA terminal. ☛P426
Video-phone
Phone conversations can be made while displaying both
your image and the other party’s image simultaneously.
Instead of your image, you can send another image such
as scenery by switching to the out-camera. ☛P82
High resolution video rec o rding/playing
You can record or play smooth motion video.
Moreover, recording and repl aying video on the
display of the QVGA size (240 x 320 dots) are
possible. ☛P184, P366
High-quality melody playback
The FOMA terminal also suppor ts ring tones
such as PCM generated 64-note harmonic, voice
and sound effects, etc. (ADPCM soun ds).
Built-in camera
An out-camera and in-camera, which is useful for
shooting yourself, are provi ded and can be
switched when shooting. You can take images
with the out-camera or in-camera while viewing
the large display with FOMA terminal closed.
You can shoot a still image of up to 2M pixels
using Auto Focus. In addition to Max 20 x zoom,
various modes are available for shooting
including close-up, framed shooting and
continuous shooting. ☛P174
[Out-camera] Effective pixel s: 2M
[In-camera] Effective pixels: 320K
(Max record pixels: 2M)
(Max record pixels: 310K)
Support for i-αppli/i-αppli DX
You can conveniently use FOMA terminal by
downloading software from sites. FOMA terminal
also supports the i-αppli stand-by display and
the i-αppli DX. ☛P320
Multi-indicator
When a call arrives, the multi-indica tor flash es in
the lighting pattern you set. You can choose from
various lighting patterns. ☛P147
Large high-definition display
The 2.4-inch TFT LCD (240 x 320 dots) is
provided for the display. It clearly displays fine
images and characters.
i-motion
Video/sound can be downloaded from sites or
Internet to enjoy them. i-motion obtained can be set
to a ring tone or incoming image (Movie ringtone).
☛P346
i-motion Mail
Video taken with the built-in camera or i-motion
downloaded from sites can be attached to
i-mode Mail to send them. ☛P260
i-shot
Still images shot with the built-in camera can be
attached to i-mode Mail to send them. ☛P260
Chat mail
You can send and receive mail like making
conversation by registering chat members. ☛P303
Multiaccess function
Voice call and packet communication can be
used simultaneously. This allows you to talk
during an i-mode connection or send/receive
mail while talking. ☛P420
Multitask function
Multitask allows you to execute se v e ra l functions at
the same time and perform operations by switching
the screen. For example, you can read mail or register
phonebook entries while making a call. ☛P423
Bar Code Reader
JAN codes or QR codes can be scanned using
the built-in camera. You can perform a variety of
operations such as registering phonebook
entries, connecting to sites and sending mail.
☛P194
Contents/Cautions
Advanced functions for external data interchange
Support for miniSD memory card
A miniSD memory card enables you to back up data
stored in your FOMA terminal such as images, melodies,
phonebook entries and mail messages. ☛P387
By connecting your FOMA terminal to a PC with the FOMA
USB cable (optional), the miniSD memory card in FOMA
terminal can be used as an external memory of a PC. ☛P479
USB storage
5
Page 8
Making full use of D901i
Contents/Cautions
A variety of functions of D901i visual communications are explained here.
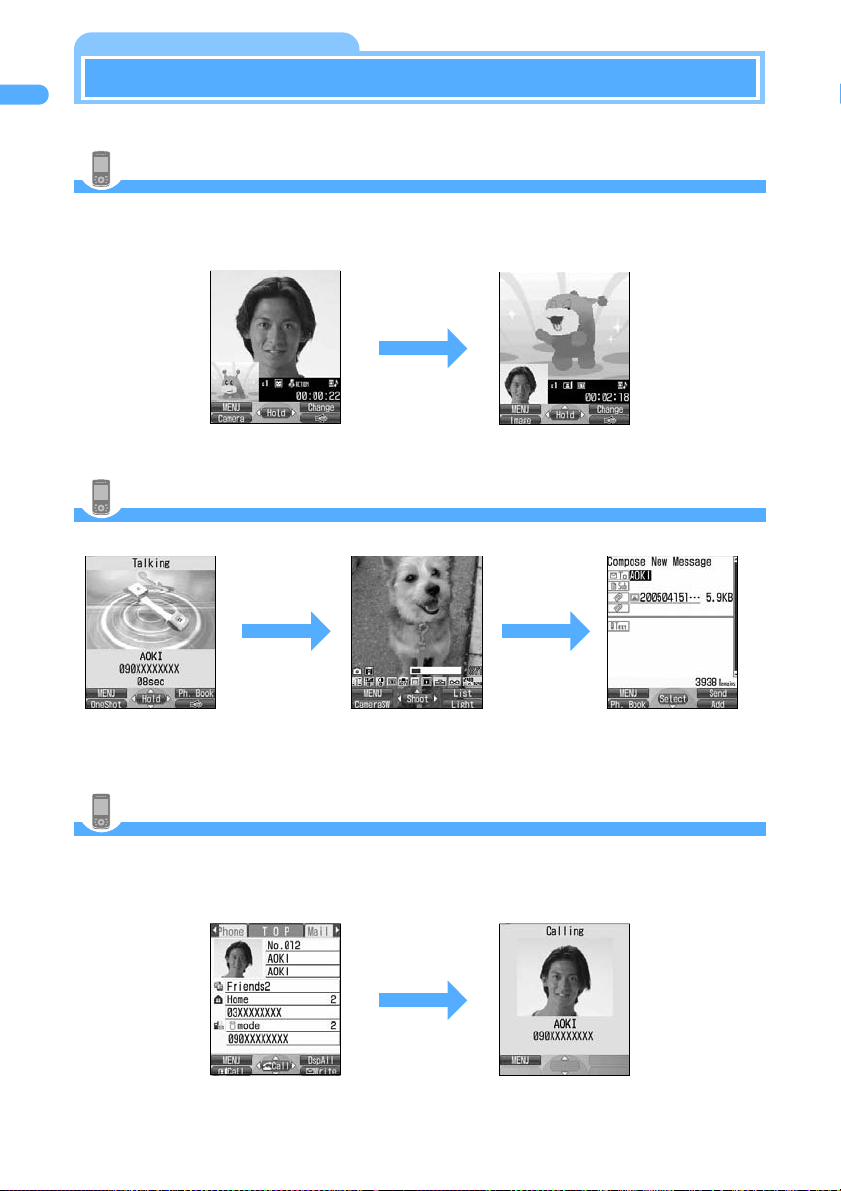
Chara-den to express your feeling
During video-phone call, you can send a character instead of your image to have it display on the other party’s screen. Actions
such as movement and expression can be attached to the character by key operation to express your feeling. ☛P88, P376
Your screen Other party’s screen
Press dial keys to have a
character make actions
©BVIG ©BVIG
A character moves
One-shot Message to send images
You can shoot an image with the camera du rin g a voice call a nd ma il it imme diat ely to t he oth er party. ☛P193
While talking
Shoot an image
while talking
Mail address stored in
the phonebook is set
and you can easily
compose and send mail
Movie ringtone (Chaku-motion) to signal incoming calls and alarms
If i-motion or video recorded with D901i is set for ring alert, incoming calls are notified by the video with
image and voice/sound. You can also register the other party’s vide o in the phonebook. ☛P369
If i-motion or video is set for an alarm, the set time is informed by the video with image and voice/sound.
☛P428, P433
Set video in the
phonebook
6
Video with image and voice/sound
is played when a call arrives
Page 9
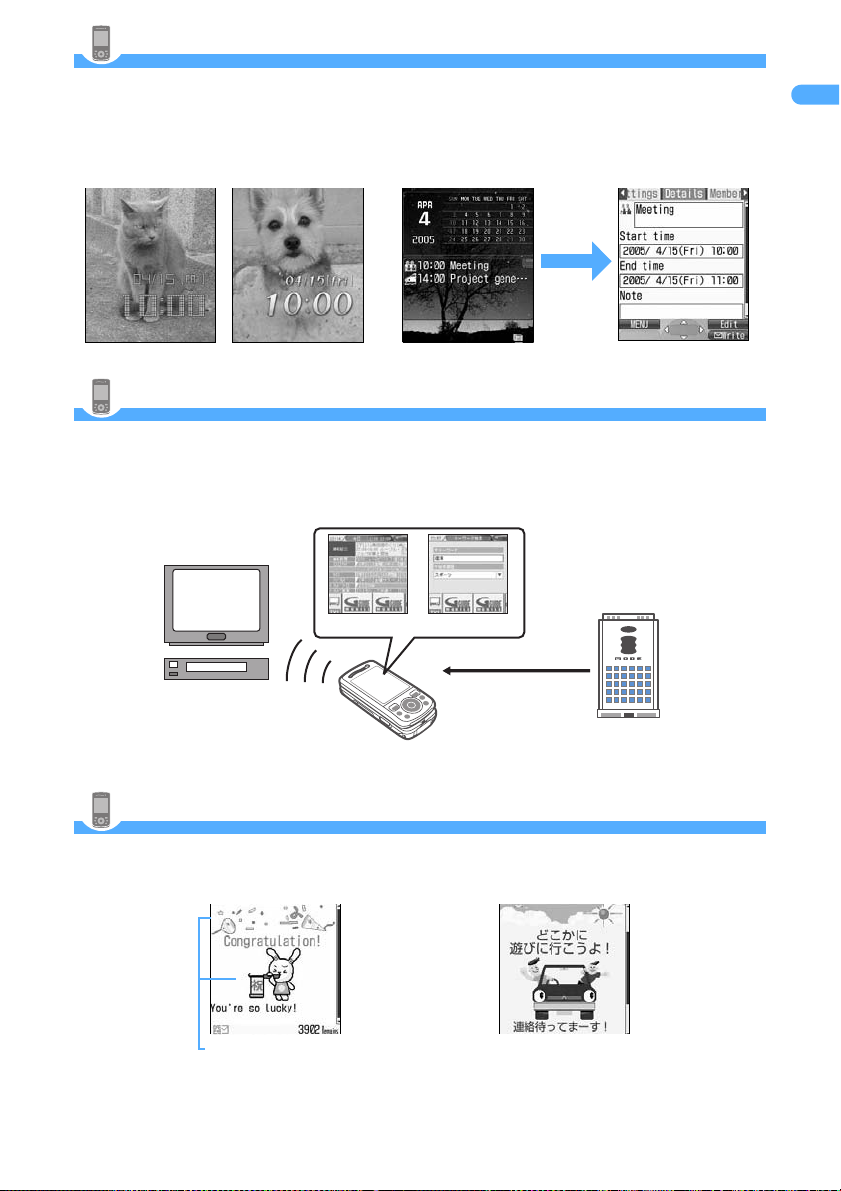
Plentiful stand-by display
The FOMA terminal allows you to view and check the disp lay quickly on the la rge screen beca use of the slide
system. Also, you can choose from various types of clock display . ☛P149
By displaying information on unread mail, missed calls, calendars or schedules on the stand-by display,
those detailed screens can be opened with simple operations (Custom stand- by display). ☛P138
Example of the
clock display
Custom stand-by
display
Press o to se l e c t an are a Check the contents
G-GUIDE TV Remote Controller
The FOMA terminal is equipped with an i-αppli “G-GUIDE TV Remote Controll er ” for op erat ing th e TV,
video deck and DVD recorder remotely while viewing the TV program information. In addition, you can
search for TV program information using keywords such as the program category or your favorite
entertainer. It allows to register a TV program in the FOMA terminal’s Schedule r and sound an alarm
when the TV program starts. ☛P332
Contents/Cautions
TV Guide*
TV/Video deck,
DVD recorder
* The display shown here represents an e xample and m ay differ f rom the actu al display. Ch annels accordin g to
the home area are displayed.
Keyword Search
Program information
i-
α
ppli server
Deco-mail
This function allows you to cr eate your original message by changing the character color and
background color or by pasting images in the text. Deco-mail picture is preinstalled to quickly set an
image in the text. ☛P253 You can also use Deco-mail template. ☛P262
Example of
Deco-mail picture
Example of
Deco-mail template
7
Page 10
SAFETY PRECAUTIONS (Always follow these directions)
Contents/Cautions
● Read the following SAF ETY PRECAUTIONS to ensure that the phone is used correctly. Also,
store this manual in a convenient location for future reference.
● It is essential that these precautions be ob served to prevent injury to the user and third parties
as well as damage to property.
● The foll owing symbols are used to indicate the degree of danger or dam age that may
result from failing to follow the specified precautions.
Indicates an imminently hazardous situation, which, if not
DANGER
WARNING
CAUTION
●
The following symbols are used to highlight instructions that are very important
and that must be strictly followed.
This indicates the action is prohibited.
This indicates disassembly
is prohibited.
avoided, will result in death or serious injury.
Indicates a potentially hazardous situation, which, if not avoided,
could result in death or serious injury.
Indicates a potentially hazardous situation, which, if not avoided,
may result in injury or property damage.
This indicates the part must
not be exposed to water.
This indicates that handling
with wet hands is
prohibited.
This indicates an action that must be performed in accordance
with the directions.
This indicates you must remove the plug from the power outlet.
● The SAFETY PRECAUTIONS are separated into six categories.
Handling FOMA terminal, battery pack, adapter (and charger) and UIM (general information)...P9
Handling FOMA terminal ........................................................................................................ P10
Handling battery pack............................................................................................................. P12
Handling optional devices (AC adapter/DC adapter/desktop holder/In-car holder)................ P14
Handling UIM (FOMA card).................................................................................................... P16
Handling FOMA terminal in the vicinity of medical devices .................................................... P17
8
Page 11
Handling FOMA terminal, battery pack, adapter (and charger) and UIM (general information)
DANGER
Use only DoCoMo-certified battery packs, adapters (and chargers)
with the FOMA terminal.
● Use of non-specified items could cause the FOMA terminal, battery pack or other devices to
leak, overheat, rupture, catch fire or malfunction.
Battery pack: D03 Desktop holder: D03 Rear cover: D03
FOMA AC adapter: 01 FOMA DC adapter: 01
For additional details about compatible products, check with your nearest DoCoMo service center.
WARNING
Do not use in
environments exposed to
combustible or explosive
materials, such as a gas
station.
● Using the equipment in locations
exposed to flammable gases or
liquids such as propane or
gasoline could cause fire or
explosion.
Do not expose the
components to strong
shocks by dropping or
throwing them.
● Doing so could cause the battery
pack to leak, overheat, rupture or
ignite, and damage the
equipment, resulting in fire.
Do not use or place the
components close to a
fire, stove or other
heating device.
● Doing so could cause to overheat,
rupture or catch fire.
Do not place the battery
pack, FOMA terminal or
adapter (and charger) in a
microwave oven, pressure
cooker or other cooking
device.
● Doing so could cause the battery
pack to leak, overheat, rupture or
ignite, and could damage the
circuitry of the FOMA terminal and
adapter (and charger), causing
overheat, smoke or fire.
Carry out the following
immediately should you
detect smoke, strange
smells or some other
malfunction.
1. Remove the power plug
from the power outlet or
power socket.
2. Turn off the FOMA
terminal.
3. Remove the battery
pack from the FOMA
terminal.
● In such a situation, continuing to
use (charge) the equipment could
cause fire or other failure.
Remove the battery pack and
contact your nearest DoCoMo
service center.
Contents/Cautions
9
Page 12
CAUTION
Contents/Cautions
Keep out of the reach of
small children.
● The components can be accidentally
swallowed, resulting in injury.
When a child uses the FOMA
terminal, first be sure an
experienced adult teaches
proper usage methods and
techniques. Observe the child
to determine that they are using
the FOMA terminal correctly.
● Failure to do so could result in injury.
Do not store in locations
subject to high
temperature and humidity
or excessive dust.
●
Doing so could damage the equipment.
Do not place the
components on an unstable
or tilted surface.
● Doing so could cause the
equipment to slide off, possibly
causing personal injury or
damaging the equipment.
Do not use or leave the components in locations exposed to direct
sunlight or other hot locations such as a car exposed to the hot sun.
● Doing so could cause the battery pack to leak, overheat, rupture or catch fire, and the equipment
to malfunction or deform. Part of the case may become very hot, causing burn injuries, etc.
Handling FOMA terminal
WARNING
Turn off the FOMA terminal inside an aircraft, hospital or other
location where use of mobile phones is prohibited.
● The FOMA terminal may interfere with the correct functioning of electronic equipments. If the
auto power on function is used, cancel the setting and turn the power off. Observe any
regulations posted in medical facilities.
If you have done prohibition acts such as using the FOMA terminal inside an aircraft, you
may be punished as stipulated by law.
10
Turn off the FOMA terminal in the
vicinity of electronic equipment
that relies on high-precision
control or faint signals.
●
The F
OMA terminal may interfere
with the correct functioning of
such electronic equipment.
Examples: hearing aids, implanted
cardiac pacemakers, implanted
defibrillators, other medical
devices, fire alarms, automatic
doors and other automatically
controlled equipment.
Users of such medical equipments
should check with the electronic
equipment or device manufacturer
with respect to the effect of
electromagnetic interference.
Do not place the FOMA
terminal in a breast or inner
pocket if you are carrying
or using electronic medical
equipment.
● The FOMA terminal could cause
any medical equipment in its
vicinity to malfunction.
People with weak hearts
should take care with respect
to setting the incoming
vibrator and ring volume.
●
The FOMA terminal may interfere hearts.
Page 13

WARNING
Do not use the FOMA
terminal while driving.
● Use of the FOMA terminal in
vehicles could cause unsafe
driving conditions. Park the car in
a safe place before using the
phone or use Driving Mode.
From November 1, 2004, the
Road Traffic Law has been
revised and using mobile phones
while driving is set as the object of
penal regulations.
Do not hold the FOMA
Do not disassemble or
alter.
● Doing so could cause fire, injury,
electric shock or damage to the
equipment.
Do not aim the infrared port
at your eyes and attempt to
transmit.
● Eyes could be affected. Aiming at
other infrared devices and
transmitting could cause other
devices to malfunction.
terminal close to your ear
during speakerphone
operation.
● Doing so could cause the hearing
loss.
Do not aim the Compact
light toward oncoming
vehicles or other drivers.
● The other driver could be
temporarily blinded or momentarily
startled, causing an accident.
CAUTION
Rarely, some FOMA terminal users may develop itching, skin
irritation or eczema. If such a condition occurs, stop using the
FOMA terminal immediately and seek medical attention.
● Metal is used in the following components:
Part Material
Slide rails on the back side of the display,
surroundings of the out-camera, and surroundings
of Easy Selector Plus and other keys (display side)
Easy Selector Plus except the center key, m,
p, t, a, n, f
b, C
Aluminum
Chromium plating
(The metallic paint is used in the part
of blue color.)
Chromium plating
Contents/Cautions
If you hear thunder while
using the FOMA terminal
outdoors, immediately
turn the power off and
move to a safe location.
● Use of the phone in such a
situation could expose you to
lightning strikes or electric shock.
Do not swing the FOMA
terminal around by the
strap.
● Doing so could cause injury to
yourself or a third party or damage
the phone.
11
Page 14
CAUTION
Contents/Cautions
Do not expose the FOMA
terminal to water.
●
The FOMA terminal may overheat, cause
electric shock, damage or injury if exposed
to water, pet urine or other liquids. Do not
use the FOMA terminal in locations where
it could get wet.
Do not bring magnetic cards,
etc. near the FOMA terminal.
● Magnetic data stored on bank
cards, credit cards, telephone
cards, and floppy disks may be
corrupted or lost.
Do not use the Compact
light for purposes other than
for use with the camera.
●
The Compact light is turned off if no
action is taken. In such a case, the
surrounding environment could
suddenly become dark, possibly
inadvertently causing an accident.
Use in certain makes of cars may
affect onboard electronic
equipment.
● As use of the FOMA terminal while
driving could cause unsafe driving
conditions, do not use the FOMA
terminal in such a case.
Do not aim the Compact light
at your eyes and attempt to
transmit. When the Compact
light is on, do not look at the
lighting part directly.
● Your vision could be adversely
affected.
Do not allow water or other
liquids, pieces of metal or other
foreign material to enter into the
UIM slot and a miniSD memory
card slot of the FOMA terminal.
●
Doing so could cause fire, electric shock,
or damage to the FOMA terminal.
Do not hold your finger inside
when closing the FOMA terminal.
● Doing so could cause injury.
Handling battery pack
■Check the battery type indicated on the
battery pack label.
DANGER
If electrolyte from the battery
pack gets in your eyes, do not
rub; instead, rinse immediately
with copious amounts of clean
water and seek medical attention.
●
Doing so could cause the los s of vision.
Do not pierce the battery
pack with nails, hammer
on it or step on it.
●
Doing so could cause the battery pack
to leak, overheat, rupture or catch fire.
12
Indication Battery type
リチウムポリマー
Lithium polymer battery
Do not throw the battery
pack into a fire.
● Doing so could cause the battery
pack to leak, overheat, rupture or
catch fire.
Do not use or place the
battery pack close to a fire,
stove or other heating
device.
● Doing so could cause the battery
pack to leak, overheat, rupture or
catch fire.
Page 15

DANGER
Do not attach metallic materials
such as wire to the port. Do not
carry or store the battery pack
together with a necklace or
other metallic items.
● Doing so could cause the battery pack to
leak, overheat, rupture or catch fire.
Do not expose the battery
pack to water.
● The battery pack could overheat, cause
electric shock or be damaged if exposed
to water, pet urine or other liquids. Do
not use the battery pack in locations
where it could be exposed to li qu ids.
WARNING
Should any electrolyte from
the battery pack come into
contact with your skin or
clothing, immediately stop
using the battery and rinse
with clean water.
●
Failure to do so could cause skin injuries.
If you notice any unusual
conditions such as
strange odors,
overheating, discoloration
or deformation while
using, charging or storing
the battery pack,
immediately detach it from
the FOMA terminal and
stop using it.
● Continued use under such conditions
could cause the battery pack to leak,
overheat, rupture or catch fire.
When you attach the battery
pack to the FOMA terminal,
never attempt to forcefully
insert, because it should slide in
easily and fit correctly. Check
the direction of the battery pack
and try again.
● Doing so could cause the battery pack
to leak, overheat, rupture or catch fire.
Do not disassemble or
alter. Do not directly solder.
●
Doing so could cause the battery pack
to leak, overheat, rupture or catch fire.
Stop charging if it is not possible
to fully charge the battery pack
within the specified time.
● Failure to do so could cause the
battery pack to leak, overheat,
rupture or catch fire.
If the battery pack leaks or emits
strange odors, immediately stop
using it, and always keep away
from sources of fire.
● Failure to do so could cause the
battery liquid to catch fire, and the
battery pack itself to rupture.
Do not use or leave the battery
pack in areas exposed to direct
sunlight or other hot locations
such as in a car left in the hot sun.
● Doing so could cause the battery pack to
leak or overheat, and lead to loss of
performance or shorten battery life.
Contents/Cautions
CAUTION
Do not dispose of the battery pack with other regular household waste.
● Failure to properly dispose of the battery pack in an environmentally sensitive manner could
cause the battery pack to catch fire and damage the environment. Use tape to cover the
terminal of battery pack when it is no longer in use and take it to any DoCoMo service center.
Alternatively, you can also dispose of the battery pack in accordance with local regulations.
13
Page 16
Handling optional devices (AC adapter/DC adapter/desktop holder/In-car holder)
Contents/Cautions
Use care to not short circuit
the recharging terminal when
the adapter (and charger) is
connected to a wall outlet or
cigarette lighter socket. Do
not touch the recharging
terminal with your hands or
fingers, or some other part of
the body.
● Doing so could cause fire,
equipment failure, electric shock
or other injury.
Do not use th
and desktop holder in
bathrooms or other potentially
high humidity locations.
● Doing so could cause electric
shock.
When the adapter (and
charger) is not to be used
for a prolonged period,
disconnect the power plug
from the wall outlet.
● Failure to do so could result in
electric shock, fire, or equipment
failure.
If the adapter ( a n d c h a r g e r )
or holder is exposed to
water or other liquid,
immediately disconnect the
power plug from the wall
outlet or cigarette lighter
socket.
● Failure to do so could result in
electric shock, smoke or fire.
Do not disassemble or
alter the adapter (and
charger) or holder.
● Doing so could result in electric
shock, fire, or equipment failure.
WARNING
Do not touch the adapter
(and charger) cord or wall
outlet with wet hands.
● Doing so could cause electric
shock.
Do not expose the adap t er
(and charger) to water.
● The adapter may overheat, cause
electric shock or be damaged if
exposed to water, pet urine or
other liquids. Do not use the
adapter in locations where it could
get wet.
e AC adapter
Never use the adapter (or
charger) when it has a
damaged power cord.
● Failure to do so could result in
electric shock, overheat or fire.
When connected to a wall
outlet, make sure that the
AC adapter does not come
into contact with metallic
straps or other metal
objects and the plug is
properly seated.
● Failure to do so could result in
electric shock, short circuit, or fire.
Use the designated power
source and correct voltage.
● Use of incorrect voltage could
cause fire or equipment failure.
When using your FOMA terminal
overseas, use the FOMA domestic/
overseas AC adapter 01.
AC adapter: 100V AC
FOMA domestic/overseas AC adapter
: 100V to 240V
(Always connect to the outlet for internal
household use.)
DC adapter: 12V DC, 24V DC
(specific for negative ground)
vehicle)
14
Page 17
WARNING
Use only the specified fuse
for the DC adapter.
● Use of the incorrect fuse could
cause fire or equipment failure.
Check the instruction manual for
details of the correct fuse to use.
The DC adapter is for use
with negative ground cars.
Never use them with
positive ground cars.
● Doing so could result in fire.
During charging, place the
adapter (and charger) and
desktop holder in a stable
location. Do not cover or
wrap the adapter (and
charger) and desktop holder
with a cloth or blanket, etc.
● Using the equipment under such
conditions could cause the FOMA
terminal to be detached from the
holder, or cause a heat buildup
that leads to fire or equipment
failure.
Be sure the power plug is
free of dust.
● Failure to do so could cause the
equipment to catch fire.
If it is difficult to
disconnect the power plug
from the wall outlet, do not
attempt to forcefully
disconnect.
● Doing so could damage the
equipment, resulting in electric
shock or accident.
Do not carry out using
beyond the rating of a wall
outlet or wiring
accessories.
● Using in excess of rating such as
plugging too many leads int o a
single socket could cause
overheat or fire.
Contents/Cautions
CAUTION
Disconnect the power plug
before beginning any
maintenance.
● Failure to do so could cause
electric shock.
Do not place heavy objects
on the adapter (and
charger) cord or power
cord.
● Doing so could cause electric
shock or fire.
Do not yank on the adapter
(and charger) cord or
power cord when
disconnecting the adapter
(and charger) from the wall
outlet.
● Doing so could damage the cord,
resulting in electric shock or fire.
Never attempt to charge the
battery pack when it is wet.
● Doing so could cause the battery
pack to overheat, rupture or catch
fire.
15
Page 18
Handling UIM (FOMA card)
Contents/Cautions
WARNING
Do not place the UIM in a microwave oven, pressure cooker or other
heating device.
● Doing so could cause the UIM to melt, overheat, generate smoke, resulting in failure and
loss of data.
CAUTION
Store the UIM out of reach
of small children.
● The UIM can be accidentally
swallowed, resulting in injury.
Do not expose the UIM to the
heat or throw it into a fire.
● Doing so could cause the UIM to
melt, overheat, generate smoke,
resulting in failure and loss of
data.
Do not to damage the IC.
● Doing so could cause the UIM to
fail.
Take care when removing
the UIM (IC section).
● Failure to do so could cause injury
to hand and fingers.
Do not use or place the UIM
close to a fire, stove or
other heating device.
● Doing so could cause the UIM to
melt, overheat, generate smoke,
resulting in failure and loss of data.
Do not touch the IC or
short-circuit it.
● Doing so could cause data loss and
failure.
16
Do not drop the UIM or
expose it to shock.
● Doing so could cause the UIM to
fail.
Do not expose the UIM to
water.
● Exposing the UIM to water, urine
from pet and other liquids could
cause the UIM to fail.
Do not store the UIM in a
location exposed to direct
sunlight, high temperature
and high humidity.
● Doing so could cause the UIM to
fail.
Do not bend or place heavy
objects on the UIM.
● Doing so could cause the UIM to
fail.
Do not disassemble or alter
the UIM.
● Doing so could cause data loss or
damage.
Do not store the UIM in a
dusty location.
● Doing so could cause the UIM to
fail.
Page 19
CAUTION
Use the UIM only with devices designated by NTT DoCoMo.
● Using the UIM with other devices could lead to data loss or failure. Consult a DoCoMo
service center for details on what devices the UIM can be used with.
Using FOMA terminal in the vicinity of medical devices
The information given below conforms to the guidelines set forth by the Electromagnetic
Compatibility Conference regarding the protection of electronic medical equipment from
radio waves emitted by mobile phone units.
WARNING
Turn off the FOMA terminal on packed trains or in crowded places
as someone with an implanted cardiac pacemaker or implanted
defibrillator may be nearby.
● The electromagnetic waves emitted by your phone could affect the function of an implanted
cardiac pacemaker or implanted defibrillator.
When inside a medical institution, always remember the following
guidelines:
● Never take the FOMA terminal inside an operating room, intensive care unit (ICU) or
coronary care unit (CCU).
● Always turn off the FOMA terminal in hospital wards.
● Even in the lobby and other areas, always turn off the FOMA terminal when electronic
medical equipment is nearby.
● Follow the directives of the medical institu tion. The re may be specific r egulation s as to items
that are prohibited or use of which is restricted.
● If you are using the auto power on function, cancel the setting and turn off the power.
Contents/Cautions
If you have an implanted cardiac pacemaker or implanted
defibrillator, keep your FOMA terminal at least 22 cm away from it.
● The electromagnetic waves emitted by your phone could affect the function of an implanted
cardiac pacemaker or implanted defibrillator.
If you are using electronic medical equipment other than implanted
cardiac pacemakers or implanted defibrillators at your home or
outside the confines of a medical institution, be sure to check with
the manufacturer about possible adverse effects caused by
electromagnetic interference.
● The electromagnetic waves emitted by your phone could affect the function of an implanted
cardiac pacemaker or implanted defibrillator.
17
Page 20

Handling instructions
Contents/Cautions
General
●Do not get the components wet.
The FOMA terminal, battery pack and adapter (and charger) are not waterproof. Avoid using the compon ents
in a bathroom or other high humidity areas or locations exposed to rain. If you carry the components, sweat
could cause internal corrosion t hat l ead s to equi pme nt f a ilure. As a re su lt of invest ig atio n, if compon en t f ai lur e
is found to be water-related, r epair is not cover ed by th e war ra nty and may not be abl e to be per forme d.
In such a case, should it be found to be possible to repair the unit, you will be billed for all repairs.
●Clean the components with a soft, dry cloth.
• Clean the components using a soft, dry cloth (such as a lens cloth).
• Using alcohol, thinner, benzene or detergents could cause the printed text to fade or disappear, or the
equipment to become discolored.
●Occasionally clean the terminals with a dry cotton swab.
Dirty terminals could cause intermittent contact that could interrupt the flow of power to the unit. Such a
situation also causes insufficient charging. Use a dry cloth or cotton swab to clean the terminal.
●Do not place the components near an air conditioner vent.
Sudden changes in temperature could cause condensation, leading to corrosion inside the components
and equipment failure.
●Do not place the FOMA terminal in locatio ns where it could be exposed to excessive pressure.
Do not place it in a bag together with many other things or in your pocket when you sit down as this could
exert pressure on the LCD or damage the internal boa rds, resulting in eq uipment failure. D amage arising
from such causes is not covered by the warranty.
●Carefully read the instruction manuals supplied with the battery and adapter (and charger) before use.
FOMA terminal
●Avoid extremely high or low temperatur es.
Use in an environment with an ambient temperature of 5-35°C and relative humidity of 45-85%.
●If the FOMA terminal is used near a radios, televisions or general subscriber phone, it could affect
such equipments. Use the phone as far away from such equipments as possible.
●With regard to data stored in the FO MA terminal, keep it separately in a memo, etc. so as not to
permanently lose important data.
NTT DoCoMo cannot be held responsible in any way for the loss of stored data.
●Do not put the FOMA terminal in your back pocket and sit on it. Avoid putting the phone in the
bottom of a bag, etc. where it is subject to excessive pressure.
Doing so could damage the equipment.
●Do not close the FOMA terminal with the strap held inside.
Doing so could damage the equipment and result in malfunction.
●Use the hand strap while holding the FOMA terminal.
Failure to do so could cause you to drop the phone, resulting in equipment failure.
●Usually, use the FOMA terminal with th e earphone/microphone terminal cap, external device
terminal cap, and the miniSD memory card slot cover closed.
Failure to do so could allow water or other contaminants to get inside the unit, causing equi pment failure.
●Do not aim the camera directly at the sun.
Elements may be discolored or baked.
●It is normal for the FOMA terminal to become warm during using or recharging. You can continue to
use it while warm.
●Do not attach a thick seal on the back side of the display or on the keypad face.
Malfunction or damage may result.
Note: The miniSD memory card is not included in the bundle and needs to be purchased. ☛P387
18
Page 21

Battery pack
●The battery pack will gradually wear out.
Battery life also depends on how you use the battery pack; you know it is time to replace it when the usage
time is very short even though you fully charge it. The specified battery pack can be purchased separately.
●Recharge the battery pack in locat ions where the ambient temperature is between 5 °C and 35°C.
●When using for the first time or after a long period of non-use, be sure to fully charge the battery
pack before use.
●The time of use provided by the battery pack depends on the ambient condition s and the condition
of the battery pack itself.
●Do not dispose of the battery pack with other regular household waste.
Tape the terminals of battery packs that are no longer needed and t ake the m to an DoCoMo service cent er.
Alternately, you can also dispose of the battery pack in accordance with local regulations.
●Recharge the battery pack once every 6 months even when you do not use the battery for a long time.
Failure to fully charge the battery pack periodically could negatively impact battery performance and
service life.
Adaptor (and charger)
●Recharge the battery pack in a location where the ambient temperature is between 5°C and 35°C.
Do not recharge in the followi ng locations:
• Locations that are subject to high humidity, dust or excessive vibration
• Near general subscriber phones, TVs or radios
●It is normal for the adapter (and cha rger) to become warm during recharging. Yo u can continue
charging with a warm adapter.
●When the battery pack is recharged using the DC adapter, always keep the car engine running.
Failure to do so could cause the car battery to run down more quickly than normal.
●When an outlet with falling preventi on mechanism is used, check the instruction manual for the
outlet before use.
Contents/Cautions
UIM (FOMA card)
●Do not use excessive force to remove the card’s IC section.
●Do not place an excessive load on the UIM when inserting it into the terminal.
●The UIM becomes warm during use. This is normal and not a cause for concern.
●Note that any card failures resulting from inserting the UIM in an IC card reader/writer (external
device) not designated by NTT DoCoMo are the responsibility of the customer.
●Make sure that the IC is kept clean.
●Use a clean dry cloth for cleaning the UIM.
●It is recommended that users maintain data stored on the UIM in some other form.
If the data should be erased, NTT DoCoMo assumes no responsibility for the loss of any data.
●Any UIMs that are no longer needed should be returned to an DoCoMo service center for proper
disposal.
●Avoid extremely high or low temperatur e.
miniSD memory card
●Do not remove the miniSD memory card, turn the power off or apply impact while using it.
The data may be corrupted.
19
Page 22
[Shooting and sending images]
When you shoot images or send those images as mail attachments, pay careful attention to
not infringe intellectual property rights such as copyrights and other rights including the right
Contents/Cautions
of portrait and right to privacy. If you infringe other’s rights or shoot or send images as mail
attachments that cause a nuisance or are against public order or morality, you may be
punished as stipulated by law or be the subject of legal action claiming compensation.
If you should use the FOMA terminal to make a pu blic nuisa nce, you might be punishe d under
the laws and bylaws such as Japan’s nuisance prevention ordinance.
Please be considerate of the privacy of individuals around you when taking and
sending photos using camera-equipped mobile phones.
About intellectual property rights
Copyrights and portrait rights
Except in cases where reproduction and quoting for private use is sanctioned under copyright laws, the
reproduction, alteration and public transmission of such content as text, images or music for which another
party owns the copyrights to, whether accomplished by using this product to photograph or record that
content or by downloading it from Internet web sites, is prohibited without the permission of the owner.
Taking photographs or recordi ngs of such events as performances and exhibitions may be prohibited
even for purposes of private use.
In addition, if you use this product to take a another person’s photograph without their permission, or
display such a photograph without their permission on an Internet web site and make that content
public to an indeterminate number of people, you may be in violation of portrait rights.
Trademarks
・ Company names and trade names used in th is manual are the trademarks or registered trademarks
of their respective companies.
・ “FOMA”, “mova”, “i-motion”, “i-mode”, “i-
“WORLD CALL”, “WORLD WING”, “i-motion mail”, “Deco-mail”, “Chaku-motion”, “Chara-den”,
“Multiaccess”, “i-αppli DX”, “i-shot”, “i-area”, “D ual Network” , “QUICKCAS T”, “Firs tPass”, “sigmar ion”,
“Security Scan”, and the FOMA and i- mode logos are trademarks or registered trademarks of NTT
DoCoMo.
・ “キャッチホン (Call Waiting)” is a registered trademark of Nippon Telegraph and Telephone Corpora tion.
・ Microsoft
®
and Windows® are registered trademark of Microsoft Corporation in th e USA and othe r countries.
・ Java and all Java-related trademarks are trademarks or registe red trademarks of Sun Microsystems, Inc . in
the USA and other countries.
・ “Multitask” is a registered trademark of NEC Corporation.
・ This product contains NetFront v3.0 for FOMA to provide Internet functionality.
NetFront v3.0 is a product of ACCESS CO., LTD. Copyright© 1996-2004, ACCESS CO., LTD.
NetFront and are trademarks or registered trademarks of ACCESS CO., LTD. in
Japan and other countries.
This software contains a module developed by the Independent JPEG Group.
Note: The miniSD memory card is not included in the bundle and needs to be purchased. ☛P387
20
α
ppli”, “i-αppli search”, “i-melody”, “i-anime”, “mopera”,
Page 23

・ This product contains Macromedia
®
FlashTM Player technology of Macromedia, Inc.
Copyright© 1995-2004 Macromedia, Inc. All rights reserved.
Macromedia, Flash, and Macrome dia Fl ash are trad emark s or reg ister ed tr ad emar ks o f Macr omed ia,
Inc. in the USA and other countries.
・ McAfee and VirusScan are registere d trade marks or tradema rks of McAfe e, Inc. and/or i ts affilia tes in
the US and/or other countries.
All other registered and unregi stered trademarks herein are the sole property of their respective
owners.
©2004 Networks Associates Technology, Inc. All Rights Reserved.
・ QR code is a registered trademark of DENSO WAVE INCORPORATED.
TM
・ miniSD
・ Powered By Mascot Capsule
and are trademarks of the SD Card Association.
®
/Micro3D Edition
TM
Mascot Capsule® is a registered trademark of HI Corporation.
・ G-GUIDE Mobile and G-GUIDE Mobile logo are trademarks of Gemstar-TV Guide International, Inc. in
Japan. G-GUIDE, G-Code and G-GUIDE logo are registered trademarks of Gemstar-TV Guide
International, Inc. in Japan.
・ “ 電車で GO! ” is a trademark of TAITO CORPORATION.
©TAITO CORPORATION 1996, 2005 ALL RIGHTS RESERVED.
Commercialization is licensed by JR East Japan, JR West Japan, JR KYUSHU, and Hokuetsu express.
・ “FLIPULL” is a trademark of TAITO CORPORATION.
©TAITO CORPORATION 1989, 2004 ALL RIGHTS RESERVED.
・ In addition to the above, company names and trade names used in this manual are the trademarks or
registered trademarks of their respective companies.
Other rights and responsibilities
・ This product is licensed based on MPEG-4 Visual Patent Portfolio License. The use of MPEG-4 Video
Codec function is allowed for personal and nonprofit use only in the following cases:
・Recording videos that conform to MPEG-4 Visual Standard (hereinafter referred to as MPEG-4
Video)
・Playing MPEG-4 Videos recorded personally by consumers not engaged in profit activities
・Playing MPEG-4 Videos supplied fr om the provider licensed from MPEG-LA
For further utilizing such as promotion, in-house use or profit-making business, please contact MPEG
LA, LLC in the USA.
・ Coding by the video function of this produ ct in compl iance with the MPEG-4 Systems standards has
been permitted under the license for MPEG-4 Systems. Note that, however, additi onal licenses and
payment for the royalty are required for the following cases:
・When carrying out coding of data which is saved or copied in physical media, requiring payment for
each title.
・When carrying out coding of data which is transmitted to, saved and used by end users, requiring
payment for each title.
Additional licenses are availab le f rom MPEG LA, LLC in t he US A. For detai ls, c ontact MPEG LA, LL C
in the USA.
・ Licensed by QUALCOMM Incorporated under one or more of the following United States Patents and/
or their counterparts in other nations:
Licensed by QUALCOMM Incorporated under one or more of the following United States
Patents and/or their counterparts in other nations:
4,901,307 5,600,754 5,267,261 5,506,865 5,710,784
5,504,773 5,416,797 5,568,483 5,228,054 5,778,338
5,109,390 5,490,165 5,414,796 5,544,196
5,535,239 5,101,501 5,659,569 5,337,338
5,267,262 5,511,073 5,056,109 5,657,420
Contents/Cautions
21
Page 24
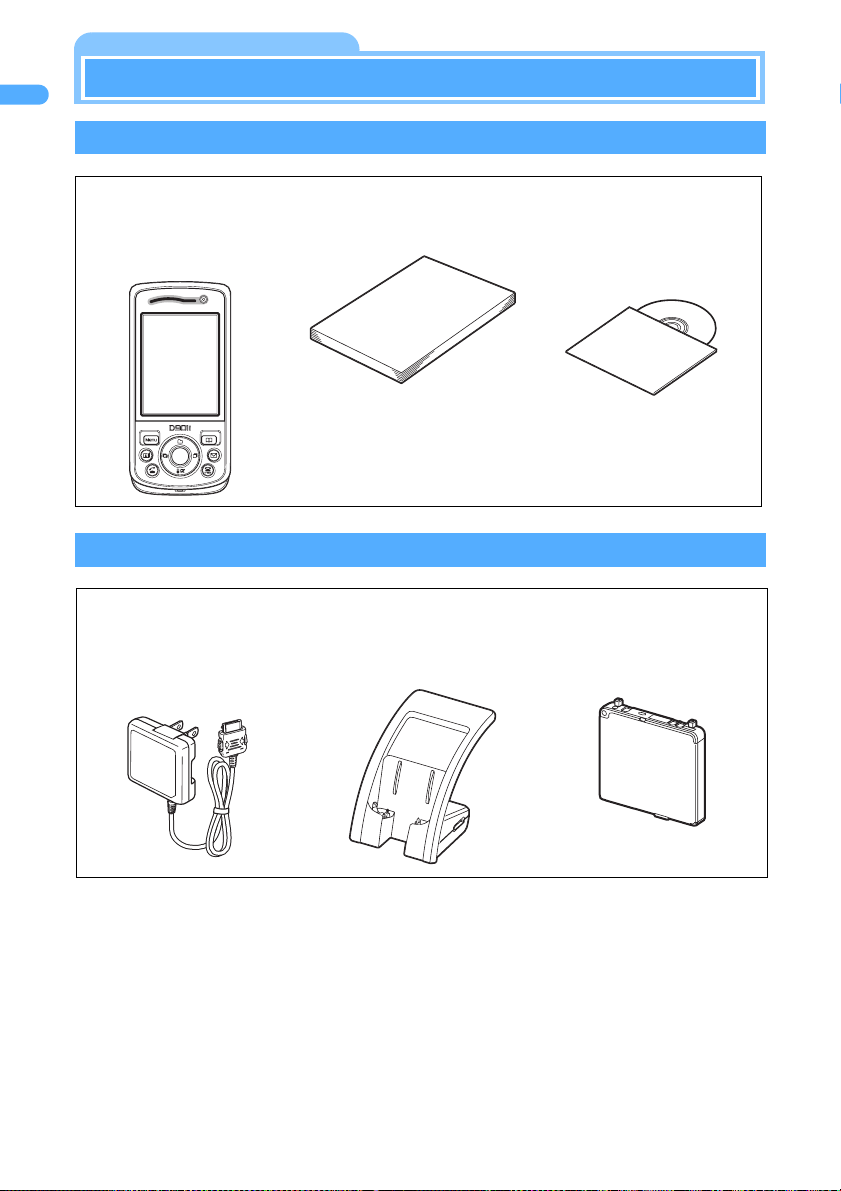
Basic package and optional accessories
Contents/Cautions
Basic package
FOMA D901i
(including the written
warranty and the rear
cover D03)
Optional accessories
FOMA AC adapter 01
− optional −
(including the written
warranty and the instruction
manual)
Instruction manual
(this book)
Manual
Quick Reference Manual is
appended on P588.
Desktop holder D03
− optional −
(including the instruction
manual)
CD-ROM for FOMA
D901i
Battery pack D03
(including the
instruction manual)
・Other optional accessories ☛P550
22
Page 25

Before Using D901i
Names and functions of parts .......................................................................................24
Reading display ..............................................................................................................26
Selecting functions from menu ....................................................................................29
Number of saved, registered and protected items in FOMA terminal .......................36
Using UIM (FOMA card) .................................................................................................37
Attaching/removing battery pack .................................................................................40
Charging battery ............................................................................................................41
Checking remaining battery level......................................... [ Battery Level Check ] 44
Turning power ON/OFF................................................................... [ Power ON/OFF ] 45
Switching to English.................................................................... [ Select Language ] 46
Setting date and time.......................................................... [ Date and Time Setting ] 46
Notifying your phone number to other party...................... [ Caller ID Notification ] 47
Checking your own phone number.................................................. [ Own Number ] 48
23
Page 26
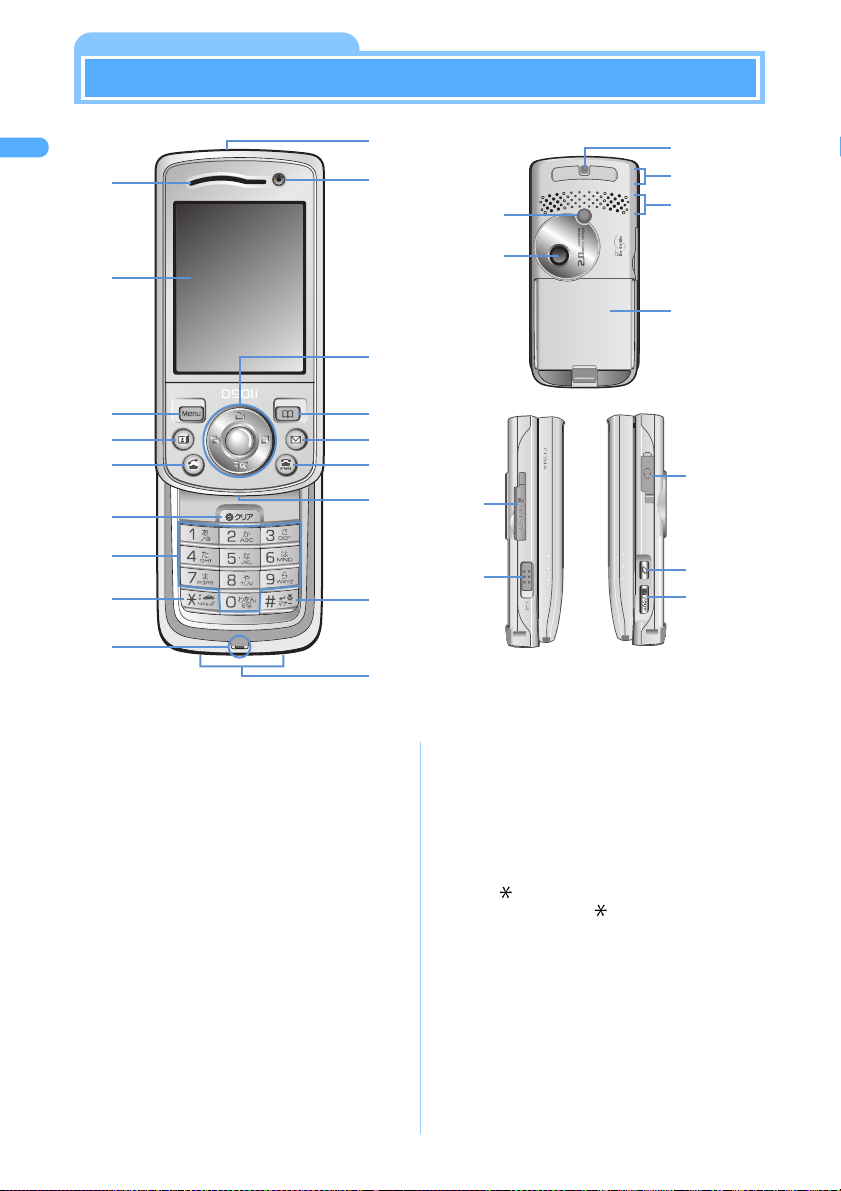
Names and functions of parts
rs
j
v
Before Using D901i
a
k
b
l
c
d
e
m
n
o
p
f
g
h
i
a
Earpiece
Caller’s voice comes out of here.
q
b Display ☛P26
c m MENU/upper left soft/Silent Mode key
Use this key to display menus, perform the
operation shown in the upper left part of the
guide row, set/cancel Silent Mode, etc.
d t Start video-phone/scroll/lower left soft key
Use this key to make/answer video-phone calls,
make video-phone calls using the speakerphone
function, scroll mail or site display by a page,
switch between cases when entering chara cters,
perform the operation shown in the lo wer left part
of the guide row, etc.
e n Start voice call/speakerphone/character
key
Use this key to make/answer voice calls, make
voice calls using the speakerphone function,
switch between ordinary and speakerphone
calls, switch between entry modes for entering
characters, etc.
w
t
x
u
y
z
A
Size (mm): 106 x50 x26
Weight (g): Approx. 136
(when closed)
(with battery pack)
f c Clear key
Use this key to delete entry when entering
characters, return to the previous screen, set/
cancel Self Mode, etc. On the idisplay, press this key to start i-
α
ppli stand-by
α
ppli software.
g Dial keys
Used to enter phone numbers and text and to
select menu items.
h ( /Driving Mode key
Use this key to enter “ ”, set/cancel Driving Mode,
switch screen modes during camera use, etc.
i Microphone
Picks up your voice.
j Infrared data port ☛P407
Used for data exchange with the infrared
communication function.
k In-camera ☛P94, P174
Used to shoot still images or videos or send your
image during a video-phone call.
B
C
D
Note: The miniSD memory card is not included in the bundle and needs to be purchased. ☛P387
24
Page 27
w
l
Easy Selector Plus
Enter key
o
Use this key to perform the selected operation,
activate Focus Mode, start ifor One-touch Button, etc.
u Data Box/Movie Camera/↑key
Use this key to display Data Box menu, activate
Movie Camera, move the cursor upward, adjust
volume, etc.
d i-mode/i-
Use this key to display i-mode menu or ifolder list, move the cursor downward, adjust
volume, etc.
l Received Calls/←(previous) Key
Use this key to display Received Calls, switch
between pages, move the cursor leftward, set/
cancel Privacy Mode, etc.
r Redial/→(next) key
Use this key to display Redial, switch between
pages, move the cursor rightward, etc.
α
ppli/↓key
α
ppli software set
α
ppli
m p Phonebook/schedule/upper right soft
key
Use this key to display the phonebook or
schedule, perform the operation shown in the
upper right part of the guide row, etc.
n a Mail/scroll/lower right soft key
Use this key to display Mail menu, compose new
mail, scroll mail or site di splay by a page, per form
the operation shown in the lower right part of the
guide row, etc.
o f Power/End/Hold key
Use this key to turn on/off power, end calls or
functions in operation, place incoming calls on
hold, cancel Secret Mode, etc.
p Multi-indicator
Flashes in blue when a call or mail is received,
FOMA terminal is opened/closed, Camera is
activated, etc. Whether or not to flash and the
flashing pattern can be set (☛P147). Also lights
in red during charging.
Lights or flashes in blue for new information
when Indicator light is set to “ON” in Illumination
Setting.
q # #/Silent Mode/line-feed key
Use this key to enter “#”, set/cancel Silent Mode,
start a new line when entering characters, etc.
Switches between Standard mode and Macro
mode during camera use.
r Charging terminals
Used when charging FOMA terminal in the
desktop holder.
s External connection terminal ☛P42, P479
Used to connect various optional accessories.
t Compact light ☛P96, P174
Used during camera use or a video-phone call.
Lights or flashes in red when shooting still
images or videos (however, when the Compact
light is turned ON for shooting, the red light may
be difficult to see).
u Out-camera ☛P94, P174
Used to shoot still images or videos or send a
landscape image during a video-phone call.
v Strap opening
Attach a strap.
w Antenna (built-in)
Use care not to cover the built-in antenna with
your hand so that you can use FOMA terminal on
better conditions.
x Speaker
Ring tone and other sounds come out of here.
When the speakerphone function is used, the
voice of the other party comes out.
y Rear cover
z miniSD memory card slot ☛P390
Insert the miniSD me mory c ard in this slot to use it.
A Keylock switch ☛P163
Use this key to set/cancel Key Lock.
B Earphone/microphone jack
Used to connect an earphone/microphone set
with switch (optional).
C b TASK key ☛P420, P423
Switches the screen when using Multiaccess or
Multitask. Executes another function while talking on
the phone or performing an operation.
D C Answer Machine/shutter/clear key
Use this key to display Answer Machine/Voice
Memo menu, record quick messages, activate
Camera and shoot images, stop ring tone/alarm,
return to the previous screen, delete entered
characters, etc.
Note: C has two positions: half press and full
press for shooting images with Auto Focus,
so the feel of pressing this key is different
from other keys.
Connecting to earphone/microphone set
with switch
Note: You can plug in a flat type earphone/
microphone set with switch (optional) and
use it. Using earphone jack converter
adapter P001 allows you to use existing
earphone/microphone set.
INFORMATION
● The font used on keys depends on the color of
FOMA terminal.
(Example) 1, ,
In this manual, the illustrations of the keys on
P24 is used for explanations purpose.
Next
Before Using D901i
25
Page 28
Before Using D901i
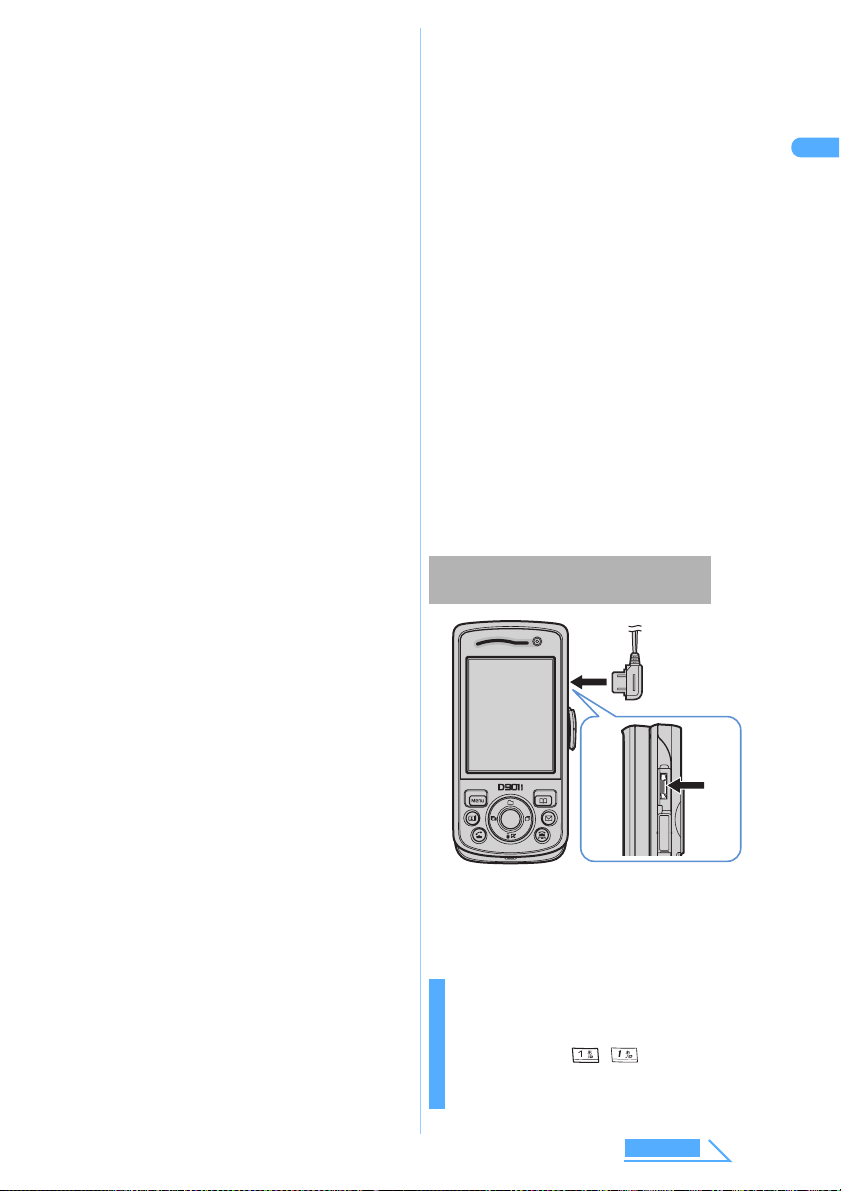
Opening/closing FOMA terminal
To open FOMA terminal, simply slide the front face (with t he d ispla y) up ward. To close it, s lide t he fa ce
in the opposite direction.
・ Operations such as accessing the screen to
Open
Open
reply to mail or to edit schedules or notes are
made easily by opening FOMA terminal.
☛P271, P433, P452
・ You can answer an incoming call by opening
FOMA terminal and end or put on hold the call
by closing it. You can also set not to e nd the
Close
Close
call by closing FOMA terminal during a call.
☛P64
Reading display
The description of icons displayed at the top or the bottom of the display are shown below:
abcdefghijklm
n
opqr
stuvwxyzABCD
Note: The background images on the stand-by
display shown in this manual are for example
purposes only. You can change the stand-by
display to your favorite image.
☛P135
a : Battery level ☛P44
///////
: Character input mode ☛P513
b : Received signal level ☛P45
: Out of service area ☛P45
: Self Mode is set ☛P159
: During data transfer/Data link software in
progress ☛P476, P550
Note: The miniSD memory card is not included in the bundle and needs to be purchased. ☛P387
26
Infrared communication in progress
☛P408
Copying to/moving to/deleting from/
backing up/restoring/formatting/updating
miniSD memory card ☛P391, P394,
P397
In miniSD mode ☛P479
c : In i-mode communication (during
i-mode connection) ☛P204
: In i-mode communication (d uring packet
communication) ☛P230, P267
d : Infrared communication in progress/
Infrared remote control function in
operation ☛P408, P413
e : Speakerphone function in operati on
☛P51
: USB hands-free co mmunication in
progress ☛P60
f : i-mode Mail and Message R/F storage
*1
space is full in the Center *2 ☛P268,
P231
//
: i-mode Mail or Message R/F s torage
space is full in the Center ☛P268, P231
: Unreceived i-mode Mail and Message
R/F in the Center ☛P268, P231
//
: Unreceived i-mode Mail or Message R/F
in the Center ☛P268, P231
Page 29

g : Unread i-mode Mail or Short Message
*1
*1
(SMS) storage space is full and Short
Message (SMS) storage space is full
on UIM ☛P313
: Unread i-mode Mail or S hort Message
(SMS) storage space is full ☛P268, P313
: Short Message (SMS) full on UIM
☛P313
: Unread i-mode Mail and Short Message
(SMS) exist ☛
: Unread i-mode Mail exis ts ☛
: Unread Short Message (SMS) exists
☛
h
P312
: Unread Message R exists/unread
/
P267, P312
P267
Message R storage space is full
☛P230
i
: Unread Message F exists/unread
/
Message F storage space is full
☛P230
j : In i-αppli execution ☛P324
: i-
α
ppli stand-by display ON ☛P137
: Blinking while starting softw are from the
i-αppli stand-by display ☛P337
: In i-
α
ppli DX execution ☛P324
: i-
α
ppli DX stand-by display ON ☛P137
: Blinking while starting softw are from the
i-αppli DX stand-by display ☛P337
k : Displaying SSL page and in SSL
communication with software
downloaded from SSL page
☛P205
l : Secret Mode is set ☛P166
n Date and time ☛P46
o : Number of missed calls ☛P35
p : Number of recorded messages ☛P35
q : Number of new voice mail messages
☛P35
r : Number of unread mail ☛P35
s : Silent Mode is set ☛P133
: Customize Silent Mode is se t ☛P134
t : Ring alert volume is Silent ☛P68
: Vibrator for voice call is set ☛P131
: Ri n g alert volume is Silent and vi b r a t o r
for voice call is set ☛P68, P131
u : Driving Mode is set ☛P74
v : Answer Machine is set ☛P76
: Recorded messages fu ll ☛P76
w : Key Lock is set (in gray when Key Lock
is temporarily released) ☛P163
x : Using video-phone from external
device via USB ☛P100
USB cable connected ☛P479
y /
: Effective Easy Selector Plus keys in
Focus Mode ☛P35
z : miniSD memory card inserted ☛P390
A : Reading UIM ☛P45
B
: PIM Lock ON ☛P160
: Keypad Dial Lock O N ☛P161
C
: Alarm is set ☛P428
: Schedule alarm is set ☛P433
: Alarm and schedule alarm are set
simultaneously
D : Software Update reserved ☛P567
m : i-αppli Auto Start failed ☛P336
*1 The current highest priority item is displayed. These icons are listed in the order of priority from the top.
*2 Displayed when the storage space for either i-mode Mail or Message R/F is full and other unreceived mail/
messages exist.
Before Using D901i
Reading guide row
Operations that can be executed by pressing m, t, o, p and a are displayed in the guide row.
Example
Guide row for the mail composition screen
Display positions and keys correspond as shown in the figure. In this
manual, the operations displayed in the guide row are explained using
the corresponding keys (mtopa).
The operations displayed in th e guide row differ depending on the
screen.
・ on the guide row corresponds to O of the Easy Selector Plu s (it may
be different depending on the used function or site).
Guide row
27
Page 30
Before Using D901i
Reading task bar
The icon for the function (task) in use or in progress is displayed on the task bar (up to 9 icons).
During Multiaccess and Multitask, two or more icons are displayed to show which functions are being
used or run because multiple functions are running simultaneously.
When mail/message is received, the reception result is displayed as ticker on the task bar.
Example
Icons displayed on the task bar
: Receiving/talking voice call
: Receiving/talking video-phone (64 K)
: Receiving/talking video-phone (32 K)
: During 64K data communication
: Composing/displaying mail
: Receiving i-mode Mail
: Receiving Short Message (SMS)
: Chat mail activated
: Displaying Message R/F
: Checking for i-mode Mail/Short Message
(SMS)
: i-mode activated
: Bookmark/Enter URL/URL History/Last Visited
URL/Screen Memo/i-mode Shortcut displayed
: i-αppli activated/Software list displayed
: Origination/communicating via USB
: Sending/receiving packet via USB
: My Picture (Image) activated
: i-motion activated
: Melody activated
: Chara-den activated
: Sound Recorder activated
: Camera activated
: Movie Camera activated
: Bar Code Reader activated
Task bar when schedule calendar is displayed during a video-phone call
Task bar
: Phonebook displayed
: Answer Machine and Voice Memo activated
: Notepad displayed
: Scheduler displayed
: Schedule alarm activated
: Calculator displayed
: Received Calls displayed
: Redial displayed
: Accessing external data
: Saving to INBOX/setting operations for
infrared communication
/ (dark blue/gray):
Accessing/waiting for access to miniSD
memory card
/ (dark blue/gray):
In miniSD mode via USB/not via USB
: Alarm set/activated
: Own Number displayed
/ (dark blue/gray):
Setting/holding each function
: Software Update activated
: Software Update notified
: Update Definition/Version Display activated
: Setting each network service
: Communicating by video-phone through
external device
Note: The miniSD memory card is not included in the bundle and needs to be purchased. ☛P387
28
Page 31

Reading list screen
Example
Color scheme screen
When a list extends to multiple pages, the number of the currently
displayed page and the total number of pages are displayed.
at the cursor.
indicates that other selectable items exist above and below the item
%
・ Press
・ When
and when u is pressed on the first item of the page, the previous page
appears.
indicates that selectable items exist over multiple pages.
to move the cursor.
is pressed on the last item of the page, the next page appears,
d
・ Press & to switch between pages.
Note: You cannot switch between pages on the icon selection screen, etc.
INFORMATION
● Note that the following cases may occur due to the characteristics of liquid crystal display (LCD) and they
are not defects in FOMA terminal.
・FOMA terminal display is manufactured by taking advantage of highly advanced technology but some
dots may be always or never lit.
・When the battery pack is removed from FOMA terminal with the power turned on, residual images may
remain for some time. Remove the battery pack with the power turned off.
・When a screen is changed to another screen after being displayed for a certain time with some
operations performed, residual images of the previous screen may remain.
Selecting functions from menu
Before Using D901i
Selecting functions
There are two ways to select functions. Th e fir st method involves using the dial keys corresponding to
menu items. In the other method, use the Easy Selector Plus to select from among menu items.
・ When any lock function is set or t he UIM is not inserted, some functions are disabled. The disabled
functions are indicated by or dimmed, and cannot be selected.
Selecting menu items with dial keys (Shortcut operations)
Each menu item has a number (item number) and can be selected by pressing the corresponding key
(1 to 9). The item position for each key is shown as follows:
In this manual, the operation procedure is mainly explained in this method.
Next
29
Page 32

Before Using D901i
Adjust th
Example
1
Selecting menu items with the Easy Selector Plus
Example
1
2
3
Executing “Volume”
Press m813 on the stand-by display.
Adjust the volume. ☛P67
813
Executing “Volume”
Press m on the stand-by display.
・ When custom menu is displayed, press p to display normal menu. ☛P441
Press O and select “Settings”.
The color of the icon at the cursor changes.
Press O to select “Sounds/Vibrate”.
Press O to select “Volume”.
4
e volume.
Displaying description of menu items (Describe function)
Press O to place the cursor at the desired menu item. Aft er a brief interval, description of the item’s
function is displayed.
・ The function description disappears automatically after a brief interval.
・ You can set FOMA terminal not to display the function description of menu
items. ☛P31
Description of “Mail” menu is displayed.
30
Page 33

Returning to stand-by display or previous screen
: Returns to the stand-by display.
f
: Returns to the previous screen.
c
: Returns to the previous screen.*
C
* Depending on the screen (such as the shoot ing sc reen), pressi ng C may not return to the pr evious
screen.
Setting menu display format [ Menu Setting ]
Default Normal: Tile display Custom: Tile display Describe function: ON
Type of icons: Type1 Icon display effect: OFF Default MENU: Normal
Active shortcut: Custom
The menu display format can be selected from 3 types. Whether to display the f unction description
when a menu item is selected can be set as well.
Before Using D901i
List view
Press mt on the stand-by display.
1
Select each item to set.
2
Normal : Sets the menu display format for normal menu.
Custom : Sets the menu display format for custom menu.
Describe function : Sets whe ther to display the function descripti on when menu items are
selected.
Type of icons : Sets the design of icons displayed for Tile display normal menu.
Icon display effect: Sets whether to magnify an icon when it is selected.
Default MENU : Sets whether to use normal menu or custom menu for displaying menus.
Active shortcut : Sets the shortcut operations to be used for custom menu.
・“Normal”: the same item numbers as normal menu can be used for
shortcut operations.
・“Custom”: the item numbers for the positions of the respective functions
on custom menu can be used for shortcut operations.
Tile display
3D display
Next
31
Page 34

Before Using D901i
r
Press p.
3
The settings are registered.
Selecting menu items (List view)
In List view, a list of menu item numbers and names are displayed.
Press % to place the cursor at an item and press o.
The color of the icon at the cursor changes.
Dimmed text indicates that item cannot be selected.
indicates that lower-level menu exists.
・ You can select an item by pressing the dial key for the item number.
・ You can also select an item by pressing % to place the cursor at the item and pressing r.
・ Press l, c or C while a menu is displayed to return to the previous screen.
Selecting menu items (3D display)
In 3D display, menu item icons are arranged in a ring.
Press & to rotate the icon ring to bring the desired item to the front and press o.
・ Press
・ Press l to rotate the ring counterclockwise.
・ Press % to rotate the ring to bring the icon at the rear to the front (u rotates it
counterclockwise and d rotates it clockwise).
・ You can select an item by pressing the dial key for the item number. Check
the item numbers in Tile display or List view menu.
・ Press c or C while a menu is displayed to return to the previous
screen.
to rotate the ring clockwise.
Type of icon design
The icon design for normal menu in Tile displa y ca n be sele cted from 3 types.
Type1
・ The selected icon design applies to the first-level menu that appears first when you press m.
・ “Custom1” and “Custom2” are used to create an original menu by changing menu icons. ☛P145
Type2
Type3
32
Page 35

Selecting functions from submenu
In some functions, “MENU” is displayed at the upper left of the guide row. You can select submenu
items and perform various operations.
Example
1
2
3
INFORMATION
● The submenu item numbers may differ depending on the screen.
Selecting Redial submenu
Press r on the stand-by display.
“MENU” is displayed at the upper left of the guide row.
Press m.
The color of the item at the cursor changes.
indicates that lower-level menu exists.
Press % and select a submenu item.
・ You can select an item by pressing the dial key for the item number.
・ You can also select an item by pressing % to place the cursor at the item and pre ssing r.
・ Press m while the submenu is displayed to close it.
Before Using D901i
33
Page 36

Before Using D901i
Selecting items on the screen
Selecting “Yes” or “No” on a confirmation screen
When deleting or setting information, a confirmation screen (pop-up screen) may appear to confirm
whether to perform an operation.
Example
1
Selecting item from pulldown menu
An item can be selected from a pulldown menu.
Deleting phonebook data
Press % and select “Yes” or “No”.
・ When “Yes” is selected, the desired operation is performed. Select “No”
to cancel the operation.
・ For some operations, items other than “Yes” and “No” may ap pe ar .
Example
1
2
3
Setting ring tone for incoming call
Press % to place the cursor at an item to set.
Press o to display a pulldown menu and press % to place the cursor at an
item.
・ You can select an item by pressing the dial key for the item number.
Pulldown menu
Press o.
34
Page 37

Selecting item from check box
An item can be selected by marking a check box.
Example
1
Setting repeat for schedules
Press % to place the cursor at a check box and press o.
The check box changes from to and is selected.
・ Select the selected item ( ) to cancel the selection ( ).
・ Press m to select/cancel all items. Depending on the function,
selecting/canceling all items may not be available.
・ You can select an item by pressing the dial key for the item number.
Displaying information quickly [ Focus Mode ]
When any of the icons below is displayed on the stand-by display, you can select it and quickly display
the information it stands for.
: Missed call (unanswered call) exists. : New voice mail message exists.
: Unplayed recorded message exists. : Unread received mail exists.
・ The number of stored items is displayed to the right of each icon.
・ When the custom stand-by display is set, information is displayed on the stand-by display. You can
check the details quickly by sel ecting the displayed information. ☛P138, P139
Press o on the stand-by display and press & to place the cursor at an icon.
1
Before Using D901i
The color of the icon at the cursor changes.
Indicates the effective Easy Selector Plus keys.
Press o.
2
The screen for the selected icon is displayed.
■
The received call list is display ed, letting y ou check the date and time of recei ved call s. If the ca ller
ID was sent, the other party’s phone n umber is a lso di splaye d a nd can b e called direc tly. ☛P6 5
■
The recorded message list is displayed, letting you play the recorded mess ages. ☛P79
■
The confirmation screen for playing voice mail messages is displayed, letting you play the
messages. ☛P464
■
The Inbox folder list is displayed. You can display unread mail from this folder list. ☛P278
Next
35
Page 38

Before Using D901i
INFORMATION
● When you select an icon and hold down c for over a second, the icon temporarily disappears from the
screen. It reappears when information is viewed and the number of items changes.
● Depending on the setting of lock functions such as PIM Lock, the screen for some icons may not be
displayed.
● If you have set a calendar for the stand-by display or set a calendar in an area for the custom stand-by display,
press o on the stand-by display and select the calendar to display the scheduler calendar. ☛P430
To select an icon, press o, press % and select the icon by moving the cursor with &.
Number of saved, registered and protected items in FOMA terminal
Type
Mail Received mail*
Sent mail*
1, *2
Unsent mail*
Template*
1
Short Message (SMS) in UIM*
Message R*
Message F*
4
4
1, *2
1, *2
3
No. of saved/
registered items
Up to 1,000 Up t o 500
Up to 200 Up to 100
Up to 200 Up to 100
Up to 100
Up to 20
Up to 100 Up to 50
Up to 50 Up to 25
Bookmark Up to 100
Screen memo*
α
ppli software*
iImage*
Melody*
1
5
1
1
Video/i-motion/sound recorded with Sound Recorder*
Chara-den*
1
Up to 100 Up to 50
Up to 100 Up to 100
Up to 1,000
Up to 500
1
Up to 100
Up to 50
No. of protected
items
−
−
−
−
−
−
−
*1 Depending on the size of data saved and registere d, the actual number of items that can be saved and
registered may be fewer.
*2 The total number of i-mode Mail and Short Message (SMS).
*3 The total number of sent and received Short Message (SMS).
*4 The number of Message R/F that can be saved depends on their size.
α
*5 Up to 5 items for Message i-
ppli (as part of the 100 items, maximum number of software that can be saved)
can be saved. Depending on the software size, the actual number of items you can save may be fewer.
INFORMATION
● Data saved/registered in FOMA terminal remains about 1 month with the battery pack removed or battery
empty, but may be lost after this amount of time. Because dat a may be l ost du e to fa ilure , repair or ot her
handling of FOMA terminal, it is recommended that you maintain a separate record of the data saved/
registered in FOMA terminal. We are not responsible for any lost data.
● It is recommended that you save the images, melodies or video/i-motion, etc. saved in FOMA terminal, to
the miniSD memory card. Exchangeable data ☛P391
● If you have a PC, you can use FOMA D series data link software contained in the attached CD-ROM to
transfer and save the data such as mail, bookmarks, images, melodies, video/i-motion to your PC. ☛P550
● Depending on the function, the displaye d file size of dat a may diff e r slight ly.
Note: The miniSD memory card is not included in the bundle and needs to be purchased. ☛P387
36
Page 39

Using UIM (FOMA card)
Use the UIM (FOMA card) to store your phone number and other information.
Insert the UIM into a FOMA-compatible terminal to use the card.
・
For details on handling the UIM, refer t o the UIM manual.
Inserting/removing UIM
Use your FOMA terminal with the UIM inserted. If the UIM is not inserted in your FOMA terminal, first
insert it.
・ Before inserting or removing the UIM, turn the power off.
・ Insert or remove the UIM with FOMA terminal closed using both hands.
Inserting card
Before Using D901i
Tray is pulled out until it stops.
Slot
tray
Cut corner of slot
tray
aRemove the rear cover an d then the
battery pack. ☛P40
bPull out the UIM slot tray.
Place your finger on the cut corner of the
slot tray and slide it out until it stops.
cInsert the UIM into the slot with the IC
Cut
corner
UIM
IC
side of the card facing down.
dLift the bottom of the slot tray until the
UIM fits into place.
Align the cut corner of the slot tray to the cut
corner of the UIM.
ePush the slot tray in until it fits into
place.
fReattach the batter y pack and then the
rear cover. ☛P40
Removing card
aPull out the UIM slot tray.
・ The operations to follow are the same as a to b in “Inserting card”.
bRemove the UIM by sliding it out.
When UIM slot tray is removed
Tab
Align the tab of the slot tray to the UIM slot and insert the tray straight in.
● Remove the UIM before replacing the slot tray.
Next
37
Page 40

Before Using D901i
INFORMATION
● Insert or remove the UIM carefully as forcing it may damage it.
● Carefully handle the removed UIM so it does not become lost.
● When attaching the battery pack, make sure that the UIM slot tray is in place. If not, do not attach the
battery pack. Forcibly attaching the battery pack may damage the UIM or the UIM slot tray.
● When pushing the UIM slot tray in, make sure that the UIM is properly placed in the tray. Forcibly
pushing the slot tray into FOMA terminal may cause an operation error.
UIM security codes
The PIN1 and PIN2 codes are used for the UIM.
Both codes are set to “0000” at time of subscription to the FOMA service. You can change this to any
code (4 to 8 digits). ☛P152, P155
PUK (PIN Unblocking Key)
・ The PUK (PIN Unblocking Key) is the 8-digit number used to unblock the PIN1 and PIN2. It is given to
you at time of purchase.
・ If you enter the PUK incorrectly 10 times in a row, FOMA terminal is automatically locked. Be sure to
keep a separate note of the number. Please be notified, if you forget your PUK or ca nnot release the
lock of FOMA terminal, you need to bring your FOMA terminal, UIM an d identificati on (driver’s li cense
etc.) to a DoCoMo Shop. Unblocking PIN ☛P156
UIM operation restriction function
FOMA terminal is provided with the UIM operation restriction function for pro tecting your data and files.
・ When data or files downloaded from sites or data attach ed to mail are sav ed in FOMA termina l with
the UIM inserted, the UIM operation restriction function is automatically set to these data or files.
・ If the UIM is replaced by another UIM or is removed from FOMA terminal, data or files with the UIM
operation restriction function set cannot be displayed or played.
・ Restricted data types are as foll ows:
・Image (including Animation and Flash graphic) ・Screen memo
・i-motion and melody ・Message R/F
・Chara-den ・File attached to i-mode Mail
・i-αppli (including i-αppli stand-by display) ・Image inserted in Deco-mail text
・ For i-
α
ppli with the UIM operation restrict ion function, the following operations are disabled whe n the
UIM is replaced by another UIM or is removed from FOMA terminal:
・Start ・Software Description ・Software Setting
・Auto Start ・Changing Auto Start setting
・Upgrade ・i-αppli Shortcut registration
・i-αppli stand-by display setting
Note: The miniSD memory card is not included in the bundle and needs to be purchased. ☛P387
38
Page 41

INFORMATION
● When data with the UIM operation restrict ion fu nction enabled is set for t he stand-by d isplay, call i mages
or ring tone, the image and sound settings returns to default if the UIM is replaced by another UIM or is
removed from FOMA terminal. In this case, the images and sound that are actually displayed/generated
may differ from the settings. Inserting the UIM that was used when the data was receive d/downloaded
restores the original settings.
● The UIM operation restriction function is not set to data obtained through infrared communication, the
miniSD memory card or data link software or for images taken with the built-in camera.
● Data or files with the UIM operation restriction function set cannot be moved/copied to the miniSD
memory card or cannot be exchanged through infrared communication.
Functional differences between UIM types
There are two types of UIMs: green and blue. The functio ns diffe r depending on the type as shown
below:
Item UIM (green) UIM (blue) Page
Number of digits of phone numbers
that can be registered in the UIM
phonebook
Certificate Download for using
FirstPass
WORLD WING service Available Unavailable P39
Service Dialing Number Calling DoCoMo for General Inquiries
WORLD WING
WORLD WING is the DoCoMo FOMA international roaming service. By taking out the UIM (green) from the
FOMA terminal you normally use and inserting it into an overseas mobile phon e ( GSM handset), you can
make/receive a call in foreign countries with your own mobile phone number. A separate subscription is
required to use WORLD WING. Contact DoCoMo for General Inquiries on the back of this manual for details.
Up to 26 digits Up to 20 digits P108
Available Unavailable P238
Unavailable P471
and DoCoMo for Repairs is available.
Before Using D901i
39
Page 42

Before Using D901i
Attaching/removing battery pack
・ Turn the power off and close FOMA termi nal before attaching or removing the battery pack.
・ Be careful not to touch the camera lens.
Attaching battery pack
aSlide the stopper in the direction of the arrow.
bWhen the rear cover is lifted, remove it.
Stopper
cWith the printed surface of the battery pack facing up,
insert the battery pack into FOMA terminal in t he angle
as shown.
Do not force the battery pack terminals into FOMA
terminal. Doing so could damag e these termina ls or th e
body connector.
dPush the battery pack in.
eAlign the top of the rear cover with the top of
battery pack compartment and push th e cover in
the direction of the arrow until it clicks.
Failure to follow the correct procedure could damage
the rear cover.
Removing battery pack
aRemove the rear cover.
・ The operations to follow are the same as a to b in
“Attaching battery pack”.
bRemove the battery pack.
Lift the edge of the battery pack (encircled part in the
illustration) with your finger and remove it.
Battery recycling
FOMA terminal uses a lithium polymer battery containing valuable materials that should be recycled. To
protect the environment, return used batteries to an NTT DoCoMo service center, NTT DoCoMo agent or
recycling center.
● Please take the following precautions when recycling batteries:
・Attach a piece of adhesive tape on the terminals of used battery packs
・Do not disassemble or modify battery packs
(Li-polymer)
40
Li-ion
Page 43

INFORMATION
● The FOMA terminal display uses an active LCD. Due to the characteristics of the active LCD, residual
images or crossbar may remain for several seconds when the battery pack is attached or removed. This
is not a fault of FOMA terminal.
Charging battery
When the battery level is low, charge the battery.
The battery level icon shows how much charge remains in the battery.
・
: Ample charge.
: Low charge.
: Almost discharged. Charge the battery.
Note: The icon design can be changed in Battery Icon. ☛P146
Charging time and operation time on full charge (estimates)
Charging time Continuous call time Continuous stand-by time
Approx. 140 minutes
During a voice call: Approx. 170 minutes
During a video-phone call: Approx. 100
minutes
・ Continuous call time is an estima te of ca ll time fo r FOMA ter minal wh en it ca n send or rec eive sig nals
normally.
・ Continuous stand-by time is an es timate of operation time of FOMA terminal when it is closed and
able to receive signals normal ly. The call/stand-by time may be reduced to about half, depending on
the amount of charge in the battery, the function settings, the ambient temperature and signal
conditions (radio waves do not or hardly reach). Using i-mode communication reduces the call
(communication)/stand-by time. Even if you do not make a call or use i-mode, the call
(communication)/stand-by time will be reduced by composing i-mode Mail, or starting downloaded
i-αppli software or the i-αppli stand-by display.
・ Continuous stand-by time (while standing still) is the average operation time of FOMA terminal when
it is standing still, closed and able to receive signals normally.
・ Continuous stand-by time (while movi ng) is the average operation time of FOMA termina l that is
standing still, moving and outside the area when it is closed and able to receive signals normally.
・ Alternatively, if you use data communicatio n, Multia cce ss or Camer a, the ca ll (commu nica tion) /stan d-
by time will also be reduced.
While standing still: Approx. 600 hours
While moving: Approx. 450 hours
Before Using D901i
Notes on battery pack
● Use the battery pack D03.
● The battery pack is a consumable part and will gradually wear out. Each time it is charged, it will accept
slightly less charge than the previous time. When the ba ttery charge lasts only ha lf as long a s when it was
new, replace it with a new one. The battery pack’s life is about 1 year. This life may be shorter depending
on the frequency of use.
Next
41
Page 44

Before Using D901i
Starting/ending charging and other items to note
The battery pack can be charged regardless of whether FOMA terminal is tur ned on or off. However,
charging takes longer with the power turned on.
・ When charging starts, the multi-indicator lights in red.
When FOMA terminal is turned on, the charge alert sounds and the battery level icon blinks.
Charging: Blinks
(
Charged: Lights
Note: The icon design can be changed in Battery Icon. ☛P146
・If the multi-indicator does not light in red at the start of charging or it flashes in red, charging is
unsuccessful. If the battery pack still cannot be charged even after charging again, contact DoCoMo
for Repairs on the back of this manual.
・You can set the charge alert no t to sound. ☛P132
Icon Multi-indicator Meaning
)
Charging: Lights in red
Charged: Goes off
Charging normally.
・ When charging is completed, the multi-indicator goes off.
When FOMA terminal is turned on, the charge alert sounds and the battery level icon lights. (If the
battery level icon flashes, cha rging is not completed.)
・You can set the charge alert no t to sound. ☛P132
・ Do not charge the battery for an extended period (longer than a full day) with FOMA terminal turned
on. FOMA terminal uses power so the adapter continues charging until FOMA terminal is unplugged
from the adapter. In such a case, the AC or DC adapter charges again but when FOMA terminal is
removed in the middle of charging , the following could occur:
・Low battery level
・Message appears indicating t hat the battery runs out
・FOMA terminal is operational for a short time
・ If the battery is sufficiently charged, connecting FOMA terminal to the AC or DC adapter may not start
charging.
・ If you charge the battery for an extended period with the AC or DC adapter connected, the ambient
temperature may rise above the acceptab le rang e .
・ Insert or remove the connector from FOMA terminal slowly and firmly without forcing it.
Charging from wall outlet
Use the FOMA AC adapter 01 (optional) and the desktop holder D03 (optional) to charge the battery.
You can charge the battery with FOMA terminal either closed or open.
・ The battery pack can only be charged when it is attached to FOMA terminal.
・ Be careful not to touch the camera lens.
■ To charge battery with AC adapter
aUnfold the power plug from
the AC adapter and plug it into
a 100V AC outlet.
bOpen the cap on the external
connection terminal.
cInsert the AC adapter
connector in firmly until it
clicks.
dCheck that charging starts.
Multi-indicator
Release button
Connector
( up)
100V AC outlet
Power plug
AC adapter
42
Page 45

When charging is completed, remove the AC adapter connector from FOMA terminal while pressing the
release buttons on both sides of the connector, and unplug the AC adapter from the outlet. Then close
the terminal cap.
・ Insert or remove the AC adapter connector straight from FOMA terminal.
■ To charge battery in desktop holder
100V AC outlet
Power plug
aUnfold the power plug
from the AC adapter and
plug it into a 100V AC
outlet.
bInsert the AC adapter
Multi-indicator
Desktop holder
Connector
( up)
AC adapter
connector in the desktop
holder until it clicks.
cInsert FOMA termina l
vertically into the desktop
holder and then tilt back.
dCheck that charging
starts.
Check that the multiindicator lights in red.
When charging is
completed, remove FOMA
terminal from the desktop
holder by tilting to front.
・ Insert or remove the AC adapter connector straight from FOMA terminal.
・ When inserting FOMA terminal into the desktop holder, be careful not to put a strap in the holder.
INFORMATION
● For details, refer to the manuals for the AC adapter and desktop holder.
Before Using D901i
Charging in car
Use the FOMA DC adapter 01 (optional) to charge the battery in a car. It can be used with negative
ground cars (both 12V and 24V).
aInsert the cigarette lighter plug of the DC adapter into the cigarette lighter socket of the car.
bTurn off FOMA terminal and open the cap on the external connection terminal.
cInsert the DC adapter connector in firmly until it clicks.
dCheck that charging starts.
When charging is completed, remove the DC adapter connector from FOMA terminal while pres sing
the release buttons on both sides of the connector, and remove the cigarette lighter plug from the
cigarette lighter socket. Then close the terminal cap.
Multi-indicator
Release button
Connector
( up)
Cigarette lighter plug
Cigarette lighter socket
DC adapter
Next
43
Page 46

Before Using D901i
INFORMATION
● For details, refer to the DC adapter manual.
● The car battery may be discharged if you charge FOMA terminal with the engine off. Use the DC adapter
when the car engine is running.
● When not in use, remove the DC adapter from the cigarette lighter socket.
● The DC adapter fuses (DC adapter: 2A) are consumable items. New fuses are available at automotive
supply stores.
Battery Level Check
Checking remaining battery level
The display indicates the approximate remaining battery level.
・
Battery level is displayed in 3 levels.
・ The remaining battery level display should be used as a rough indication.
Remaining battery
level 1
(recharging
recommended)
Battery level icon
Default
Other icons
☛P146
Remaining battery
level 3
(ample charge)
Remaining battery
level 2
(low charge)
Checking remaining battery level by sound and display
・ The sound does not ring in the following situations:
・Keypad Sound is set to “OFF”
・Silent Mode is set
・Ring alert volume is set to “Silent”
Press m843 on the stand-by display.
1
The remaining battery level is displayed. After a brief interval, the screen returns to the menu list.
(Remaining battery level 3)
Sound rings 3 times.
(Remaining battery level 2)
Sound rings twice.
(Remaining battery level 1)
Sound rings once.
When battery is almost exhausted
When the battery almost runs out, a message appears on the display or an alert sound (low battery
alert) rings indicating low battery. Charging the battery stops the low battery alert. If you want to stop it
immediately, press f.
Example
A message indicating low battery appears on the display. The message disappears by pressing o.
After a brief interval, it reappears and the low battery alert sounds. At this time, all the icons on top of
the display blink and after approximately one minute the power turns off automatically.
In stand-by
44
Page 47

Example
The low battery alert sounds fr om the earpiece and a message indicating low battery appears on the
display. The message disappears by pressing o, c or f. When approximately 20 seconds
elapses after the low battery alert, the call is cu t off and the stand-by display reappears. Then, after
approximately one minute the power turns off automatically.
During a call
Setting low battery alert not to sound [ Low Battery Alert ]
Default ON
・ The low battery alert does not sound in the following cases, regardle ss of this function settings:
・Silent Mode is set
・Driving Mode is set
Press m815 on the stand-by display.
1
Press 2.
2
・ To set the low battery alert, press 1.
INFORMATION
● Even if Low Battery Alert is set to “OFF”, when the battery almost runs out during a call the low battery
alert sounds from the earpiece and a message indicating low battery is displayed.
Power ON/OFF
Before Using D901i
Turning power ON/OFF
Turning power ON
Hold down f for over 2 seconds.
1
The wake-up screen is displayed an d the stand-by display appears.
is displayed
while reading the
UIM and disappears
when reading is
completed.
Battery
level icon
Received
signal level
Date/day/time
Stand-by
image
Strong Weak
・ If the date and time have not been set, a message appears
informing you that the date and time are not set. Press o
and perform from Step 2 in “Setting date and time”. ☛P46
・ If no UIM is inserted, a message informing you that
attachment of UIM is required is displayed. Turn t he
power OFF, insert the UIM and turn the power back ON.
・ You can change the stand-by image, display format of
date and time and battery level icon. ☛P135, P146, P149
The background image on the display shown on the left
is for example purposes only (and differs from the
default).
Received signal level status
→→
Outside the service area and where
radio waves are hard to reach
Next
45
Page 48

Turning power OFF
Hold down f for over 2 seconds.
1
・ When Key Lock is set with FOMA terminal closed, you cannot turn the power OFF. Cancel Key
Lock or open FOMA terminal and then turn the power OFF.
Before Using D901i
INFORMATION
● When is displayed in locations outside the service area or where radio waves are hard to reach, move to
another locations where the icon is not displayed. However, calls may be cut off even when is displayed or
you are not moving.
● If you do not press any keys for 90 seconds when the lighting time is set to other than “Always” in Display
Light, the display light is turned off automatically (except while shooting with th e camera, etc.). The
display light is turned on again if there is any key operation or incoming call.
Select Language
Switching to English
Default use UIM settings
Press m828 on the stand-by display.
1
Press 2.
2
The screen is set to English mode.
・ In English mode, the character input mode changes in the following order: “
“半数(Numeric)” → “ 漢 (Hiragana/kanji)” → “
■ Switching to Japanese mode
a Press 1.
Date and Time Setting
半カナ
(Katakana)”
半英
(Alphabet)”→
Setting date and time
Press m851 on the stand-by display.
1
Select Date field and enter the date.
2
Enter the last two digits of the year. When there is only one digit for the
year, month or day, precede it with 0.
・ The date can be set from January 1, 2000 to December 31, 2050.
・ You can increase or decrease the entered value by pressing
・ You can press & to place the cursor at the digit to change and enter
a new value for that digit.
Select Time field and enter the time.
3
Enter the time in the 24-hour clock. For single-digit hours or minutes, precede the digit with 0.
・ The time can be set from 0:00 to 23:59.
・ You can increase or decrease the entered value by pressing
・ You can press & to place the cursor at the digit to change and enter a new value for that digit.
%
.
46
%
.
Page 49

Press p.
4
INFORMATION
● The set time remains even when the battery pack is replaced, but may be reset if the battery pack is
removed for an extended period. In this case, set the date and time again .
● You cannot use the following functions when the date and time are not set:
・Scheduler ☛P430, P433 ・Auto Power ON ☛P427
・Auto Power OFF ☛P427 ・Alarm Clock ☛P428
・i-
α
ppli Auto Start ☛P335 ・i-αppli DX requiring time setting ☛P320
・Downloading i-motion with playback restrictions set ☛P368
・Data (schedule) transfer ☛P408, P410 ・Software Update ☛P564
・Update Definition ☛P571 ・Certificate Download ☛P238
● If the date and time are not set, the date and time are not recorded for the following functions and
“----/--/--” or “-------------- -- ” is displa yed. A numbe r t o segmen ta lize (seg men tal nu mbe r) may be ap pe nded.
・Redial/Received Calls ☛P53, P65 ・ Answer Machine, Voice Memo ☛P77, P448
・Date and time of image/video shot with the camera ☛P177
・Date and time of data read by Bar Code Reader ☛P196
・Date and time of downloaded software ☛P326 ・Date and time of sent mail, unsent mail ☛P282
・Date and time of downloaded still image, melody, i-motion, mail template ☛P402, P259
● You can set the date and time by pressing m3 during a voice call.
Caller ID Notification
Notifying your phone number to other party
Set FOMA terminal to send your number (caller ID) to be displayed on the other party’s phone every
time you make a call.
・
Caller ID is your important information. Carefully consider whether to send your caller ID.
・ Caller ID is displayed only when the other party’s phone has the ability to display caller ID such as
digital mobile phones.
・ You do not need to apply to use Caller ID Notification. No monthly fee is required.
・ Caller ID Notification cannot be set in a location outside the service area or where radio waves are
hard to reach. Move to another loc ation with good radio reception.
・ For details, see “FOMA Network Services User’s Guide”.
Before Using D901i
Press m951 on the stand-by display.
1
■ Checking current setting
a Press m952 on the stand-by display and select “Yes”.
The current setting is displayed.
b Press o.
Enter the network security code.
2
Next
47
Page 50

Before Using D901i
Press 1.
3
Caller ID Notification is set.
■ Not sending your caller ID
a Press 2.
Press o.
4
INFORMATION
● If you hear a guidance to request your caller ID when you make a call, call back after setting FOMA
terminal to send your caller ID.
● Network security code ☛P152
Own Number
Checking your own phone number
Check your phone number (My phone number), name, mail address, etc.
Press m0 on the stand-by display.
1
・ Only your phone number is disp layed by default.
・ To check your i-mode Mail address, press d1 on the stand-by display to display iMenu,
then select “ENGLISH” → “Options” → “Mail Settings” → “Confirm Mail Address”.
You can also check your i-mode Mail address using a preinstalled bookmark. Press d2 on
the stand-by display and select “Fo lder1” → “ アドレス確認 (Confirm Mail Address)”.
INFORMATION
● Press b0 to check your own phone number (My phone number) during a call.
● Changing the mail address in Own Number does not change your i-mode Mail address. Similarly, changing
your i-mode Mail address does not automatically change the address in Own Number. For details on how to
check and change your i-mode Mail address, refer to “FOMA i-mode User’s Manual”.
● Saving information other than phone number ☛P446
● You can exchange the Own Number information between other FOMA term inals with infrared
communication function. ☛P408, P410
48
Page 51

Making/Receiving Calls
Making calls
Making calls ...................................................................... .... ... .......................................50
Calling back previously called numbers ..................................................... [ Redial ] 53
Setting whether to send your phone number for each call .................... [ 186/184 ] 55
Making a call by setting the condition ...................................... [ Customized Call ] 56
Using international calls ................................................................. [ WORLD CALL ] 57
Making a call by specifying a sub address ..................................... [ Sub Address ] 59
Setting the alarm for reconnecting the interrupted call ......... [ Reconnect Alarm ] 59
Suppressing ambient noise to improve call quality ................ [ Noise Reduction ] 60
Talking without using a hand in a car ....................................... [ In-car Handsfree ] 60
Receiving Calls
Receiving calls ...............................................................................................................61
Enabling use of dial keys to answer call .................................. [ Any Key Answer ] 63
Setting to start a call by opening FOMA terminal ......................... [ Open Answer ] 64
Ending/holding call by closing FOMA terminal ............................. [ Close Setting ] 64
Using Received Calls ..................................................................... [ Received Calls ] 65
Adjusting volume of the caller’s voice ..................................................... [ Volume ] 67
Adjusting ring volume ...................................................................... [ Ring Volume ] 68
Setting actions at call arrival ............................................. [ Incoming & Outgoing ] 69
Setting priority screen displa ye d fo r incoming calls during call or packet
communication ................................................................. [ Priority Comm Mode ] 70
When you can/could not answer the call
Putting calls on hold when you cannot answer rig ht away
.............................................................................................. [ Response and Hold ] 71
Setting Status Message ............................................................... [ Status Message ] 72
Setting On-hold Tone ....................................................................... [ On-hold Tone ] 73
Setting not to receive calls during driving ..................................... [ Driving Mode ] 74
Allowing the caller to leave message when you cannot answer the call
................................................................................................... [ Answer Machine ] 76
49
Page 52

Making calls
Making calls
The procedures for making voice call and common operations for voice calls and video-phone
calls are explained here.
・
You cannot make calls by pressing the dial keys when Keypad dial lock is ON. ☛P161
・ Do not cover the built-in antenna with your hand during a talk.
Making/Receiving Calls
Enter the phone number on the stand-by display.
1
Calling general subscriber
phone
Calling mobile phone 090 - XXXX - XXXX
Calling PHS phone 070 - XXXX - XXXX
・ You can enter up to 80 digits for the phone number. However, only 24
digits are displayed.
・ To correct phone number, press c or C .
・ To go back to the stand-by display, hold down c or C (half press)
for over a second.
Press n.
2
Press f, when a call is finished.
3
・ You can also disconnect calls by closing FOMA terminal. To end the call by closing, change the
setting in “Close Setting”. ☛P64
You will hear the dial tone. You can start talking as soon as the call is
answered.
・ If the phone on the other party is busy, you will hear the busy signal.
Press f to end the call and make a call again later. You can call back
quickly using Redial. ☛P53
・ If other party’s mobile phone or PHS is turned off or in an area where
radio waves are hard to reach, a guidance informs that the connection
is not available.
Area code - prefix - number
・ Always include the area code even when
calling from the same city.
080 - XXXX - XXXX
INFORMATION
● You can make calls by performing Step 2 followed by 1. Voice call will be made automatically about five
seconds after you have pressed n and entered the phone number.
● You may not be able to make a call while executing another function. ☛P547
● When a call is made to the other party with video set for Image of the phonebook data, the first frame of
the video is played on Calling screen. ☛P105
● Two communication functions can be used simultaneously. ☛P420, P545
● If a guidance to request your caller ID is played when a call is made, call back after you have set FOMA
terminal to send your caller ID is set.
● When you make a call entering the phone number without appending “186” or “184” and dialed without
setting “Caller ID” request in Customized Call, the operation depends on the setting for Caller ID
Notification. ☛P47
● When there is an incoming packet during voice Call, the inco ming call screen app ears dep ending on t he
Priority Comm Mode. ☛P70
● The earphone/microphone set (optional) with switch can be used to make calls. ☛P454
50
Page 53

Putting calls on hold [ On-hold ]
Putting the caller on hold while talking lets you talk without the caller hearing your voice.
・ Callers are charged for time spent on hold.
Press o during a call.
1
The call is placed on hold and a guidance is played. For video-phone cal ls, the video-phone onhold image is displayed on the phone of the other party and yourself.
The video-phone call Onhold image
On-hold during a
voice call
・ Press o or n while voice calls are on hold to cancel the hold.
・ Press o while video-phone calls are on hold to cancel the hold and send the image similar to
that has been sent before on hold. Pr ess t to cancel the hold and send the camera image.
Press n to cancel the hold and send a substitutive image to the other party. ☛P92
INFORMATION
● You can put the call on hold by closing FOMA te rminal. To make the call hol d by closing FOMA t erminal,
change the setting in “Close Setting”. ☛P64
● When a call is on hold by closing FOMA terminal, on hold can be released by opening FOMA terminal.
● The melody can be played while on hold. ☛P73
● Video-phone on-hold image can be changed. ☛P93
● The melody applicable to 3D sound set as on-hold tone may be heard deteriorated to other party.
On-hold during a
video-phone call
Making/Receiving Calls
Using speakerphone function
You can make a phone call allowing the voice of the ot h er par ty to be heard from the speaker.
Enter the phone number on the stand-by and hold down n or t for over a
1
second.
・ While making calls, you can switch between ordinar y ca ll an d ca ll us in g the spe ak e rph o ne
function by pressing n. While talking, you can switch by pressing n or a.
・ is displayed during use of the speaker phon e function.
・ The same applies when operating from phonebook list, redial list, received call list, recorded
message list and voice memo list.
INFORMATION
● When switching to the speakerphone function, the volume may suddenly increase and damage your
ears, so use it with FOMA terminal away from your ears.
● If a call may be hard to hear with a large amount of noise around you or other party, make the call
normally.
● Talk to FOMA terminal within approximately 30 cm.
● Speakerphone function can also be used even when Silent Mode is set.
51
Page 54

Making/Receiving Calls
Operation during voice calls
・ The following operations can be performed from the submenu while voice calls are taking place:
Submenu item Description Page
a
Received calls Displays Received Calls. P65
b
Redial Displays redial. P53
c
Set time Sets the date and time. P46
d
Reconnect alarm* Allows setting an alarm sound indicating reconnection of a call
e
Quality alarm
f
Terminal close Sets whether to hang up by closing FOMA terminal. P64
g
Dial up Subscribers to Call Waiting can make a call to another party during
h
Volume Adjust the ring volume. P67
* Setting can be changed when the alarm sounds. The change is effective when the alarm once stopped.
* Sets an alarm to ring when your call is about to be cut off due to
under improved signal quality that has been cut off due to poor
signal quality.
poor signal quality.
a call.
P59
P133
P466
・ The operation can be performed by following keys during a call.
・Press p to start the phonebook.
・The other party’s voice can be recorded with Talking Voice Memo by holding down C for over a
second. ☛P448
・The volume can be adjusted by pressing %.
・Press l for Received Calls or r for Redial to display.
Entering pause, timed pause or “+”
Pauses, timed pauses or “+” can be entered when making a call.
・ Pauses and timed pauses apply only to voice calls.
Example
When you call to “03XXXXXXXXP12345” (“P”=Entering pause)
When you press o after the call is connected, all phone numbers after the pause ar e dialed.
Entering pause “P”
Pause (P) is used for sending messages to beepers*, operating the answering system at home,
reserving tickets, etc. At the point a pause (P) is entered, the dial digits are separated and a tone
signals (DTMF) is sent.
Hold down ( for over a second.
1
・ You cannot make calls with a pause at the beginning of the phone number.
*From January 2001, the DoCoMo display beeper name has changed to “QUICKCAST”.
52
Page 55

Entering timed pause “T”
Timed pause (T) is used to dial outside line number with extensions. The exte nsion number is dialed
after placing a pause of a set number of seconds to enter “T” between the outsid e line and extension
number.
Hold down # for over a second.
1
・ Timed pauses can be entered in succession.
・ Each timed pause is followed by a second interval.
・ You cannot make calls with a timed pause at the beginning of the phone number.
Entering “+”
You can make international calls easily by entering “+” at the top of phone number.
Hold down 0 for over a second.
1
・ If Auto assist Setting is “Auto”, “009130010” for international calls is appended to make a call.
INFORMATION
● Sent tone (DTMF) signals may not be received depending on the receiving device.
● When it is necessary to send signals (DTMF) following voice prompts as in making ticket reservations,
the speakerphone function is useful. In this case, input tone signals (DTMF) after switching to the
speakerphone.
● A subscriber to Call Waiting cannot make a call to another party, putting the current call on hold, by
entering a pause (“P”) or timed pause (“T”).
Redial
Calling back previously called numbers
Making/Receiving Calls
This function is to record the number you dialed as call history (Redial). When the phone of other
party is busy, etc., you can redial by simple operation.
・
The redial list can contain up to 30 entries. When the number of the calls exceeds 30, the oldest one
is deleted.
・ When the date and time have not been set to FOMA terminal, the date and time is not recorded for
redial data.
・ When the same number is redialed, only the most recent call is recorded for each of “N o specified”,
“Notify”, “Not notify” of Caller ID setting.
・ Calls in Secret Mode are also logged in the redial list including the phone numbers of the other party.
Press r on the stand-by display and place the cursor at the person to redial
1
from redial list.
\
When the other party’s phone number is registered in the phonebook,
the party’s name is displayed. ☛P103
: Voice/video-phone customized call with Caller ID
: Voice/video-phone customized call without Caller ID
The date and time and phone number of outgoing calls to the selected
party are displayed. When the other party’s image is saved in the
phonebook, the image is displayed.
: Making a video-phone call
: Making an international call
Next
53
Page 56

Making/Receiving Calls
■ Registering an entry from the redial list to the phonebook
a Place the cursor at the redial number to register and press m1.
・ When adding to the data of phonebook already registered, press m2 and press 1
or 2 to select the phonebook data of the registration destination. ☛P116
b Register the names or addresses by pressing 1 or 2. ☛P104
■ Composing Short Message (SMS) from redial list
a Place the cursor at the redial number to set for an address, and hold down a for
over a second.
The Short Message (SMS) composition screen with the redial phone number specified as the
address is displayed.
・ If the redial phone number is saved in the phonebook together with mail addresses,
pressing a displays the i-mode Mail composition screen with the first mail address
specified as the address. If not, the screen is displayed with the redial phone number
specified as the address.
■ Swi tc hi ng to th e re ce ived calls list
a Press p .
・ The redial/received calls list screen are switched each time p is pressed.
Press n.
2
The voice call is made.
・ Press t to make a video-phone call.
・ Pressing o makes a call in the same way as the selected redial call type (voice call/video-pho ne call).
INFORMATION
● When Privacy Mode is active (“Authorized access” set for Phonebook & Logs), entry of the terminal
security code is required.
● When Keypad Dial Lock or PIM Lock is set, the numbers stored in the redial list up to that point are
deleted. Calls made after setting Keypad Dial Lock or PIM Lock are recorded in the redi al list and ca n be
called from it.
● To change show/hide caller ID when making a call ☛P56
● To append a number set in Prefix to the start of the phone number to cal l ☛P56, P58
Deleting redial numbers
Press r on the stand-by display.
1
Place the cursor at the redial number to delete and press m41.
2
・ Press m42 to delete all redi al numbers.
Select “Yes”.
3
54
Page 57

186/184
Setting whether to send your phone number for each call
When you make phone calls, you set whether to display your number (Caller ID) on the other
party’s terminal.
・
Caller ID is your important information. Carefully consider whether you want to include this
information.
・ The caller ID is displayed only when the phone of the other party has the ability to display the caller ID
such as digital mobile phones.
・ You can use the following ways to show/hide caller ID to the other party.
Setting at one time Sets to either show/hide Caller ID at one time for all the calls you
make.
Setting into
phonebook entries
Setting when dialing Sets to either show/hide Caller ID for each call you actually make. P55, P56
Sets to either show/hide Caller ID for each phonebook entry. P121
Dialing by adding “186 ( 31#)”/“184 (#31#)” to the phone numbers
Prefix a specific number to a phone number when you make a call.
■ Sending your caller ID
“186 + phone number + n” or “(31# + phone number + n”
・To make a video-phone call, press “186 (or (31#) + phone number + t”.
■ Not sending your caller ID
“184 + phone number + n” or “#31# + phone number + n”.
・To make a video-phone call, press “184 (or #31#) + the other party’s phone
number + t”.
P47
Making/Receiving Calls
INFORMATION
● If a guidance to request your caller ID is played when a call is made, call back after you have set FOMA
terminal to send your caller ID.
● When setting/operating the “show/hide caller ID” methods simultaneously, the caller ID is notified in the
following order (a to c).
a
If you select the caller ID notification method from Customized Call in the submenu when making a call
b
In case of the phone number appending “186 ( 31#)”/“184 (#31#)”
c
When setting Caller ID Notification ON/OFF
Also, when setting/operating the above “show/hide caller ID” methods simultaneously, actual number
notification (with or without Notification) and the notification displayed on the screen may differ.
● In case of international call, caller ID may not be notified d epending on the connecti ng phone comp anies
even if “186 ( 31#)” is added.
● When making a call adding “186 ( 31#)”/“184 (#31)”, “186 (31#)”/“184 (#31#)” is recorded on the redial.
55
Page 58

Making/Receiving Calls
Customized Call
Making a call by setting the condition
Dialing method, show/hide caller ID or your phone number can be selected and whether to
append a prefix can be set for each voice/video-phone call.
Enter the phone number on the stand-by display and press m3.
1
・ It is same as for when operati ng from the list of redial phone number, received calls, recorded
messages or voice memo.
・ Customized Call can also be made by pressing m5 on the phonebook list.
Select each item to set a condition for dialing.
2
Call Type : Select voice call, 64K or 32K video-phone call.
Caller ID : Set show/hide caller ID. When “No specified” is set, the se tti ng for Calle r ID
Notification is used. ☛P47
Multi No. :☛P473
Prefix : Select the number appending before phone number (Prefix).
・The default setting is “009130010” for in ternational calls. Prefix setting ☛P58
Press m and select “Yes”.
3
A voice call/video-phone call is made by the settings.
・ When you select 64K or 32K video -phone call at “Call Type”, you can also sele ct “Chara-den
call” to enable to choose a chara-den bein g dis played while talking on the video-phone.
INFORMATION
● Even if the number “186 ( 31#)”/“184 (#31#)” are added to the phone number in the phonebook, the
number notification of this function have the priority.
hen operating from the details (Top
● W
of the UIM phonebook or the details (Phone) screen of Ow n Number, press m and se lect “Customized
call”.
● If a guidance to request your caller ID is played when a call is made, call back after you have set FOMA
terminal to send your caller ID.
● In case of international call, caller ID may not be notified depending on connecting phone companies
even when “Notify” is selected in “Caller ID”.
/Phone) screen of the FOMA terminal phonebook, the details screen
56
Page 59

WORLD CALL
Using international calls
DoCoMo international call service “WORLD CALL”
・ This international call service is available for DoCoMo mobile phones.
・ How to call
009130 010 country code area code phone number n
* The above phone number can be registered in the FOMA terminal phonebook.
* When the area code begins with “0”, dial without “0”. (When calling to general subscriber phones and
other phones in Italy, you need to dial “0”).
・ You can call approximately 220 co untries and regions around the world.
・ WORLD CALL charges are added to the FOMA service charges every month.
・ No subscription charges or monthly fee is required.
Note: You were subscribed to “WORLD CALL” as one of standard services at the time of subscription
to the FOMA service (unless you request not to subscribe to it).
・ Change international call dial procedure
MY LINE service is not applicable to mobile telephone communications, including WORLD CALL
service. Along with the introducing of MY LINE service, the dialing procedure for international
communications using a mobile telephone was changed. Consequently, the previous dial procedure
(without Prefix “010”) no longer be used.
・ Contact “General Inquiries” on the back of this manual for details.
Note: To use international call services other than the DoCoMo service, contact the carrier for details.
・ “International video-phone” calls to parties using specific overseas 3G mobile phone terminals*
made by dialing as described above and placi ng a call in the video- phone mode*
website.
*1 As of December, 2004, communication can be made with Hutchison 3G HK terminals (Hong Kong), Sing
Tel terminals (Singapore), Starhub terminals (Singapore), Hutchison 3G Australia (Aust r alia) and
Hutchison 3G UK (United Kingdom).
*2 The image of the other party displayed on FOMA terminal may be distorted or connection may not be
established depending on the terminal at the other end of the international video-phone line.
2
. For details, visit DoCoMo
1
can be
Making/Receiving Calls
Using “WORLD CALL” by simplified dialing [ Auto assist Setting ]
Default Auto
If “Auto” is set for Auto assist Setting, entering “+” followed by phone number from a country code
makes an international call easily appendin g “009 1 30 01 0” for in ternational call automatically.
・ If “+” is prefixed to dial followed by a country code of Japan “81”, “009130010” for international call is
not appended even when “Auto” is set for Auto assist Setting.
Press m876 on the stand-by display.
1
Press 1.
2
■ Canceling Auto assist Setting
a Press 2.
Next
57
Page 60

Making/Receiving Calls
■ When an international call is made using Auto assist Setting
a Set “Auto” for Auto assist Setting.
b Enter a phone number by entering “+” before a country code.
・ “+” can be entered by holding down 0 for over a second.
c Press n.
Setting numbers other than “WORLD CALL” [ Prefix ]
Default 009130010
By recording a number (Prefix) to add before a phone number in advance, you can easily add a prefix
even after entering the phone number to make an international calls.
・ The default setting is “00913 0010” for international calls. “00913 0010” can be changed to another
prefix.
Press m875 on the stand-by display.
1
Select the Prefix field and enter a number.
2
・ Up to 3 numbers in total, a maximum of 10 digits for each number, can be entered.
・ Do not include pause or timed pause in the phone number. If you set a prefix containing a pause
or timed pause, you cannot add the prefix when making a call.
Press p.
3
■ Selecting a prefix when making an international call
a Enter a phone number including the country code on the stand-by display.
b Press m3 and select the Prefix field.
c Select a prefix number to use.
58
d Press m and select “Yes”.
Page 61

Sub Address
Making a call by specifying a sub address
You can set a sub address to call a specific phone or communication device.
・
It is also used to select contents in a video delivery service, “M-stage V live”.
Default ON
Press m877 on the stand-by display.
1
Press 1.
2
■ Not setting a sub address
a Press 2.
Making a call by specifying a sub address
After the phone number, press ( to enter “ ” (sub address delimiter), enter sub address, and press
n for a voice call or t for a video-phone call. Note that the communication device or telephone set to
be called must have a sub address assigned.
INFORMATION
● If a phone number begins with “ ” or an added prefix contains “ ”, the digits after “ ” is not
recognized as a sub address even when this setting is "ON", and called as the number contain i ng “ ”.
● If “ ” is pressed after entering pause or timed pause, it is not recognized as a sub-address delimiter,
and sent as tone signals (DTMF) containing “ ”.
Reconnect Alarm
Setting the alarm for reconnecting the interrupted call
Default High alarm
This function sets an alarm that is heard when signal conditions improve and a voice call or
video-phone call disrupted by poor signal quality in a tunnel or behind a building is reconnected.
・
The voice of the other party is not heard when the call is disrupted.
・ The time required to make a reconnection depends on line use and signal conditi ons. (up to 10 sec)
・ Note that you are charged for the t ime used to make a reconnection (up to 10 sec).
・ The call may be cut off before the al arm sounds depending on line use and signal co nditions.
Making/Receiving Calls
Press m872 on the stand-by display.
1
Press 1 to 3.
2
59
Page 62

Making/Receiving Calls
Noise Reduction
Suppressing ambient noise to improve call quality
Default ON
FOMA terminal is provided with a function for suppressing ambient noise during a call (Noise
Reduction). When Noise Reduction is set, the other party can hear your voice clearly during a
call. It also makes it easier for you to hear the voice of the other party.
・
It is recommended that this function be turned “ON” when using normally.
Press m871 on the stand-by display.
1
Press 1.
2
■ Canceling Noise Reduction
a Press 2.
In-car Handsfree
Talking without using a hand in a car
Connecting FOMA terminal with a handsfree device (car navigation system, etc.), which is
available in market, through FOMA USB connection cable (optional) in advance, allows making
and answering phone calls from the device without using a hand during driving.
For operations of handsfree devices, refer to the instruction manual for the respective handsfree
devices.
Note: This function is an optional function that will be available when the compatible device is
released.
INFORMATION
● Operations such as display and ring alert for incoming calls are according to FOMA terminal settings.
However, if the setting is made to activate ring alert of a handsfree device while the device is connected,
the ring alert of a handsfree device sounds f or incoming call s even if Silen t Mode is set or “OFF” is set for
Sound Setting on FOMA terminal.
● Incoming operations while Driving Mode is set are according to FOMA terminal settings. ☛P74
● If a video-phone call is made with a handsfree device using the phonebook or Redial , it depends on the
connection speed setting of the handsfree device. If no data rat e setti ng is ma de, t he vid eo-phone ca ll is
made at fixed 64K.
● When a video-phone call is made/received with a handsfree device, a substitute image is sent to the
other party. ☛P92
● If the setting is made to activate ring alert of FOMA terminal while a handsfree device is connected, the
operation performed when FOMA terminal is closed is according to Close Setting. If the setting is made
to activate ring alert of a handsfree device, the call continues ev en if FOMA terminal is closed,
regardless of Close Setting.
● When Answer Machine is set, it is operated according to Answer Machine setting even if a handsfree
device is connected. ☛P77
● Ring volume or volume cannot be adjusted from handsfree devices.
Note: The compatible device has not been released as of December, 2004.
60
Page 63

Receiving Calls
If th
Receiving calls
The procedures for receiving voice calls and common operations for voice calls and video-phone
calls are explained here.
・
For a voice call, calls can also be answered by pressing 0 to 9, (, and # other than n.
(Any Key Answer) ☛P63
A call is received.
1
The ring tone sounds, the display backlight lights up and the multi-indicator blinks.
・ Press f to put the call on Response and Hold. ☛P71
Press n.
2
Please talk. The call duration is displayed.
・ Press o to put the call On-hold. ☛P51
・ You can switch to calls using the speakerphone function by pressing
n or a.☛P51
・ You can also answer the calls by opening FOMA terminal. ☛P64
Press f, when a call is finished .
3
・ You can also disconnect calls by closing FOMA terminal. To end the call by closing, change the
setting in “Close Setting”. ☛P64
Display information
The caller’s phone number, name or s til l ima g e/v id eo may be displayed on the screen according to the
terminal condition of the caller and FO MA termina l setting . Settin g can be ma de to hide name or ph one
number and to change the name size. ☛P144
■ When the other party has sent their caller ID
When the phone number of the other party is not registered in your
phonebook, the phone number and the image set in Call Image is
displayed. When “Movie ringtone (Chaku-motion)” is set for Phone/Videophone in Sound Setting, the Movie ringtone image is played. ☛P128
However, if the Movie ringtone contains voice only (i-motion without imag e
such as singer’s voices), the incoming image set by default is displayed, but
image can be changed on Call Image.
e phone number of the other party has been already registered in your
phonebook, the name or the still image/movie set in the ph on eb o ok is
displayed. ☛P103
If “Movie ringtone” is set for the fo llo win g e ac h r in g to n e sett ing, the pre-set
Movie ringtone image is played in the following order: 1. Phonebook
(phonebook No.) → 2. Phonebook (group) → 3. Phone/Video-phone of
Sound Setting. If you do not set Movie ringtone or phonebook image, the
image set for Call Image is displayed.
Making/Receiving Calls
Next
61
Page 64

Making/Receiving Calls
■ If the other party’s caller ID is not notified
Displays reason why no caller ID is sent.
Reason of no
caller ID
User unset The caller selected not to send the caller ID.
Payphone The call was made from a payphone, etc.
Not supported The call was made from a party who cannot send caller ID,
such as a call from overseas or from a general subscriber
phone via forwarding service (however, caller ID may be
displayed depending on connecting phone companies.)
Description
When a voice call comes in, Arrival act or Show image set in Anonymous
Caller is prioritized.
When a video-phone call comes in, an incoming image operates according
to Video-phone Incoming & Outgoing.
Operations while receiving calls
・ While the ring tone is sounding to indicate an incoming call, you can perform following operations
from submenus.
With the setting of “Answer” in the “Arrival Call Act”, the same operation can also work when there is
another incoming call during a call.
Submenu item Description
aVoice mail*
bCall rejection The call is disconnected. (The caller does not pay for the call.)
cCall forwarding*
* 1 Valid only when you subscribe to Voice Mail Service and have received a voice call.
* 2 Valid when you subscribe to Call Forwarding Service and have set a forwarding phone number.
1
2
The incoming call is transferred to the Voice Mail Service Center.
Makes incoming calls transferred to the forwarding phone number.
・ You can respond a call with Answer Machine by holding down C for over a second (Quick Record
Message). ☛P76
・ You can also adjust the ring volume or stop the vibrator. ☛P68
When you hear beeps (call waiting ring tone) while talking
If you subscribe to Voice Mail, Call Waiting or Call Forwarding Service, you will hear beeps (the call
waiting ring tone) when you receive another incoming call while talking and the following operations can
be performed:
Service Operation Page
Voice Mail Service The incoming call is transferred to the Voice Mail Service
Center.
Call Waiting Service Puts current call on hold and answers second call. P465
Call Forwarding Service Forwards the incoming call to other phone number. P466
P463
・ If you subscribe to any of Voice Mail Service or Call Forwarding Service, each operation above can
be selected only with the settings of “Yes” in Arrival Act Setting and “Answer” in Arrival Call Act.
☛P472
62
Page 65

INFORMATION
● For calls received from callers not registered in the phone book, you can reject calls, or set the ring tone
or vibrator ringer action not to start immediately. ☛P169, P170
● By setting Call Rejection for some parties registered in the phonebook, ca lls from such parties can be
rejected.☛P166
● Telephones that do not su pport dial ed long-d istance call s such as in-bu ilding phone s and PBX cann ot be
used to make calls to FOMA terminals.
● When there is an incoming packet communication during voice ca ll, the incoming screen appears
according to the Priority C om m M o de s et ti n g . ☛P70
● Two communication functions can be used simultaneously.☛P420, P545
● When a forwarded call from the other FOMA terminal arrives, the phone number from which it was
forwarded is displayed at the lower lef t part of t he incoming screen. The n ame is not displ ayed even if the
phone number is saved in the phonebook. The phone number from the forwarding source may not be
displayed depending on the forwarding source.
● If video/i-motion is set for Ring alert (for phone) of phonebook data or for Phone/Video-phone of Sound
Setting, the video/i-motion (image and sound) set as the ring tone is played regardless of Image setting
(Movie ringtone). However, if the movie/i-motion set as the ring tone contains voice only (i-motion without
image such as singer’s voices), the image that was set for Call Image is shown on the display while
receiving a call.
● Even if the i-motion is set to play for call arrival on the phonebook or Call Image, i-motion is not played
and the first image is displayed when an incoming call arrives during the call.
● If a voice call arrives during software update, any video/i-motion set as the ring tone is not played.
● An i-motion set as the ring tone in S ound Setting may change to “ パターン 1” if an incoming call arrives
while the i-motion being deleted or saved regardless of the settings. If a melody or outgoing/incoming
image is set, when a call arrives while a melody or image is moved, deleted and saved, the melody may
be “ パターン 1” or the image may be “Standard image”.
● When you receive an international call, a plus sign (+) appears at the beginning of the caller ID.
● The earphone/microphone set with switch (optional) can be used to make calls. ☛P454
Making/Receiving Calls
Any Key Answer
Enabling use of dial keys to answer call
Default ON
This function allows you to answer a call by pressing the keys from 0 to 9, ( and #
except for n.
・
The Any Key Answer function applies only to a voice call. However, this function is invalid when
received the call while on the phone.
Press m868 on the stand-by display.
1
Press 1.
2
■ Canceling Any Key Answer
a Press 2.
63
Page 66

Open Answer
Setting to start a call by opening FOMA terminal
Set FOMA terminal to receive the voice call by opening FOMA terminal.
・
This function applies only to voice calls.
Default OFF
Making/Receiving Calls
Press m879 on the stand-by display.
1
Press 1.
2
■ Canceling Open Answer
a Press 2.
INFORMATION
● This function does not operate when opening FOMA terminal while the submenu is di splayed or the
screen except for the incoming screen is displayed during the Multitask.
Close Setting
Ending/holding call by closing FOMA terminal
Default Continue
You can set to end, continue or hold a voice/video-phone call by closing FOMA terminal.
・
This function does not operate during 64K data communication or packet communication.
Press m878 on the stand-by display.
1
Press 1 to 3.
2
INFORMATION
● When “Continue” is set, closing FOMA terminal does not make the call to terminate while making a call/
video-phone call. In case of during the video-phone call, you can continue to call with the same image.
● When set as “End the call” is set, closing FOMA terminal while on hold terminates the call.
● When the screen except for the talking screen (submenu screen or Multitask screen) is displayed, the
call continues regardless of the Close Settings (“End the call”, “Continue the call,” and “On hold”).
● When FOMA terminal is closed during a call by connecting an earphone/microphone set with switch
(optional) or hands free devices (available in market), the call continues regardless of the Close Setting
when set to sound from the device which is connected.
64
Page 67

Received Calls
Using Received Calls
Received Calls record all the incoming calls both answered and missed calls in memory.
Recorded messages are also included in the list.
・
Up to 30 calls are recorded for Received Calls. When the number exceeds 30, the oldest one is
deleted chronologically.
・ When the date and time is not set on FOMA terminal, the date and time is not recorded in Received Calls.
Displaying Received Calls
Press l on the stand-by display and place the cursor at a received call from a
1
list.
Making/Receiving Calls
The phone number or the reason for no caller ID is displayed.
When the other party’s phone number is registered in the phonebook,
the party’s name is displayed. ☛P103
The date and time and phone number of the selected incoming call are
displayed. The ringing time is displayed in case of missed calls. An
image is displayed when the other party’s phone number is saved in the
phonebook.
: Received video-phone call/ : Received 64K data communication
: Received International calls
: Missed calls (unread)
: Missed calls (read)
: Recorded message exists
: Recorded messages are deleted
■ Registering an entry from the received calls list to the phonebook
a Place the cursor at a received call to register and press m1.
・ To add data to an existing phonebook entry, press m2.
b Register the names or address by pressing 1 or 2. ☛P104
・ When adding to registered dat a of phonebook, press 1 or 2 and select the
phonebook data of registrati on destination. ☛P116
■ Composing Short Message (SMS) from the received call list
a Place the cursor at a received call to set as an address and hold down a for over a
second.
The Short Message (SMS) composition screen with the received call phone number
specified as the address appear s.
・ When the cursor is placed on a received call with no caller ID, Short Message (SMS)
composition screen without the address appears by holding down a for over a second .
・ If the phone number of received calls is saved in the phonebook togeth er with mail
addresses, pressing a displays the i-mode Mail composition screen with the first mail
address specified as the address. If not, the screen is displayed with the phone number of
Received Calls specified as the address.
When the cursor is placed on a received call with no caller ID, i-mode Mail co mposition
screen without the address appears by pressing a.
■ Switching to the redial list
a Press p.
・ Pressing p switches the Received Calls/redial list display.
☛P62
Next
65
Page 68

Making calls from Received Calls
a Place the cursor at the entry in received call list and press n or t.
・Pressing o make a call in the same way as in the Call type of the selected received call (voice
call/video-phone call).
・To change show/hide caller ID when making a call ☛P56
・To append a number set in Prefix to the phone nu mbe r to call ☛P56, P58
Making/Receiving Calls
Unanswered calls (missed calls)
When you cannot answer calls, is indicated on the stand-by display with a number of missed
calls.
・ When the Indicator light in Illumination Setting is set to “ON”, the multi-indicator blinks until the
received calls are displayed.
・ You can select the icon on the stand-by display to check the date and time of an incoming call. ☛P35
・ When a missed calls from an unknown phone number exists, the ringing time enables you to check
whether a malicious (one-ring ph one scam) call is received for the sole purpose of recording the
phone number in Received Calls.
INFORMATION
● If Missed call is set to “Not display” with Ring Alert Delay set to “ON”, missed calls within the set delay
time are not displayed. ☛P169
Press m53 on the received call list to display the corresponding missed calls. To return to the
normal received call list, press m52. Press m51 on the received call list to display all
the received calls.
● When only missed calls shorter than the set delay time are recorded as received calls, pressing l on
the stand-by display shows a confirmation screen notifying you of received ca lls not displayed. When
“Yes” is selected, missed calls shorter than the set delay time are displayed.
● Calls received from callers using dial-in servi ces in such as off ice may display differ ent numbers th an the
caller’s dial-in number.
● When Privacy Mode is active (“Authorized access” set for Phonebook & Logs), entry of the terminal
security code is required.
● When Keypad Dial Lock or PIM Lock is set, the numbers stored in the received call list up to that point
are deleted. Calls made after setting Keypad Dial Lock or PIM Lock are recorded in the received call list
and can be called from it even PIM Lock is “ON”.
● When Reject Non-Reg. Caller is set, any call from the other party that is not registered in the phonebook
is rejected and recorded in the received call list.
Deleting received calls [ Delete Received Calls ]
Press l on the stand-by display.
1
Place the cursor at the received call number to delete and press
2
m41.
・ Press m42 to delete all Received Calls. All the received call records are deleted
including missed calls shorter than the set delay time. ☛P169
Select “Yes”.
3
66
Page 69

Volume
Adjusting volume of the caller’s voice
Default Level 4
・ You set the volume of the caller’s voice from Level 1 (lowest volume) to Level 6 (highest volume).
・ Volume Setting is also synchronized with the volume of Keypad Sound, the playback volume of
Answer Machine and Voice Memos.
・ The volume level set while talking remains after your call is finished.
・ Volume keeps in effect even if you turn OFF the power.
Adjusting during a call
Press % during a call to adjust the volume.
1
The volume is set automatically when you press o or after you stopped key operations and wait
for a while.
・ To increase the volume, press u or r. To decrease the volume, press d or l.
・ Press m9 to adjust a video-phone call’s sound volume.
Adjust during the stand-by
Press m813 on the stand-by display.
1
Press O to adjust the volume.
2
Making/Receiving Calls
Press o.
3
67
Page 70

Making/Receiving Calls
Ring Volume
Adjusting ring volume
Default Level4
Adjust the ring volume of the phone, the mail and message R/Fs.
・
The ring volume can be adjusted at 7 levels, Silent and Levels 1 to 6. You can a lso set Ascending
(step tones): (the volume of ring tone changes into “Silent” → “Level1”→
seconds) in stand-by.
・ When the volume of ring tone is changed during a call, the screen returns to the setting of Ring
Volume when the call is finished.
・ The ring volume adjusted while in stand-by is kept in effect even when the power is turned OFF.
Adjusting while receiving a call
...
→ “Level6” every 3
Example
1
INFORMATION
● Pressing C when a call comes in, the ring tone becomes silent and stops the vibrator operation.
● When Ascending is set for ring tone, the change begins with Level 6 when adjustment is done while a
Adjusting during the stand-by
Example
1
2
Adjusting the ring tone volume
Press % to adjust the volume while receiving a call.
The volume is set automatically b y pressing o or waiting for a while
after you stopped key operations.
call is arriving.
Adjusting the ring tone volume
Press m8121 on the stand-by display.
■ Adjusting the message reception ring tone
a Press m8122 on the stand-by display.
Press O to adjust the volume.
・ When the volume is “Level6”, pres sing u or r sets “Ascending”. When the volume is
“Level1”, pressing d or l sets the phone “Silent”.
3
68
Press o.
Page 71

INFORMATION
● is indicated on the stand-by display when the ring tone is set to Silent. If the vibrator for voice call is
set at the same time, is indicated.
● Even when ring tone is set to Silent, incoming calls and mail reception can be indicated by vibrator
operation, or blinking of the multi-indicator, in addition to message display on the scre en. ☛P131, P147
● Ring volume is also synchronized with the volume of schedule alarm sound.
Incoming & Outgoing
Setting actions at call arrival
Default Ring alert: Melody/ パターン 1 Show portrait: ON Show image: Standard image
Vibrator: OFF Lighting : Pattern 4
・ The settings in this function are reflected to the ring alert for phone in Sound Setting, lighting pattern
for incoming call in Illumination Setting, vibrator for phone in Vibrator Setting, and portrait display and
image display in Call Image.
Press m861 on the stand-by display.
1
Select each item to set.
2
Ring alert : Sets a ring tone for incoming calls.
・ When “OFF” is set, no ring ton e emits.
・ When you select “Melody”, select a melody in Ri ng ale rt fie ld.
・ When you select “Movie ring tone”, select a video/i-motion in Ring alert field.
Show portrait : Sets whether to display the image for incoming calls from the number registered
in the phonebook.
・ It is not reflected to the setting for Call image in Group Setting of the phonebook.
Show image : Sets an image displayed for incoming calls.
・ When “Selelct image” is selected, select “Select image” for List images to set
an image.
・ When “ motion” is selected, select “Select image” for List images to select a
video/i-motion.
Vibrator :Sets operation of the vibrator for incoming voice call.
Lighting : Sets the blinking pattern of multi-indicator.
Making/Receiving Calls
Press p.
3
Next
69
Page 72

Making/Receiving Calls
INFORMATION
● If a video/i-motion with a sound and image is set for “Movie ringtone” in Ring alert, Movie ringt one is
played with Show image switched to “Sync ring alert”. At this ti me, the out going image is set to “Sta ndard
image”.
● Show image is switched to “Standard image” when the video/i-motion cont ains voice only (i-motion
without image such as singer’s voices) is set for “Movie ringtone” in Ring alert and a Flash graphics or
video/i-motion is set for Show image, but image can be changed by selecting “Select image” in Show
image field.
● When video/i-motion with sound an d image is set for Ri ng alert an d “Sync ring a lert” is set for Call Image,
resetting Ring alert to “OFF” will replay the Movie ringtone but silence the ring tone volume.
● If no image is registered in a phonebook entr y, the image set in Sh ow image field is displayed r egardless
of the setting of Show portrait. However, the image set in Group Setting, if any is displayed.
Priority Comm Mode
Setting priority screen displayed for incoming calls during call or packet communication
Default No Set Up
This function allows you to select the voice call or packet communication screen to be given
priority when a packet communication (or voice) call is received during a voice (or packet
communication) call.
・
A screen change caused by this function does not interrupt the call or p acket communication.
Press m869 on the stand-by display.
1
Press 1 to 3.
2
・ To display the last incoming screen received without giving display
priority, press 1.
・ Press 2 to display the voice call screen or 3 to display the packet
communication screen by priority .
Screen displayed
The following screen is displayed depending on the settings.
・ During voice call
Setting Incoming packet communication other than i-mode
No Set Up Screen displayed during a voice call
Voice call Screen displayed during a voice call
Packet Screen displayed during incoming packet communication
Note1: The screen displayed during incoming calls depends on Arrival Call Act. ☛P472
Note2: Receiving a packet communication other than i-mode does no t include re ceiving of i-mode Mai l, Short
Message (SMS) and Message R/Fs.
70
Page 73

・ During packet communication
Setting Incoming call
No Set Up Screen displayed during a voice call
Voice call Screen displayed during a voice call
Packet Screen displayed in i-mode
Note: Packet communications in modes other than i-mode cannot be received during i-mode
communications. ☛P545
When you can/could not answer the call
Response and Hold
Putting calls on hold when you cannot answer right away
・ The caller will be charged for the time spent on hold.
Press f while receiving an incoming call.
1
FOMA terminal is put on Response and Hold . The other party hears a response hold guidance.
When a video-phone call is received, the response hold image for video-phone is sent to you and
the other party.
Incoming voice call
is on hold
Press n, when you are ready to answer the call.
2
・ In case of a voice call, you can answer the incoming call also by opening FOMA terminal. ☛P64
・ Press t for a video-phone call. Press n instead of t to send a substitut e imag e to the other
party. ☛P92
・ If f is pressed or the other party hangs up while on Response and Hold, the call is
disconnected.
Incoming video-phone
call is on hold
Making/Receiving Calls
INFORMATION
● When you use the Voice Mail Service or Call Forwarding Service and a voice call is received, you can
switch to the Voice Mail Service or Call Forwarding Service by selecting “Voice mail” or “Call forwarding”
from the submenu.
● Response and hold image for video-phone can be changed. ☛P93
71
Page 74

Making/Receiving Calls
Status Message
Setting Status Message
Default On-hold tone: Standard
You can record a response hold guidance in your own voice.
・
One guidance up to 10 seconds long can be recorded.
・ While a voice or a video-phone call is on Response and Hold, the status message set by this function
is played.
Example
1
2
3
Setting a recorded data for guidance
Press m867 on the stand-by display.
Select On-hold tone field and press 2.
・ Press 1 and go to Step 4 to reset to the default message.
Select “Record” in Edit message field and speak the response hold guidance
after the beep.
An approximate guide
of the remaining time
for recording is
displayed.
Recording will start after the message is displayed.
・ An end tone (beep) sounds approximately 10 seconds after the start of recording.
・ Press o to stop in the middle of the guidance recording.
・ “Record” cannot be selected when a recorded data has already been reg istered. Select
“Delete”, select “Yes” and rec o rd after deleting the recorded data.
・ Select “Play” to check the recorded status message.
Press p.
4
INFORMATION
● If “Standard” is set for On-hold tone, the guidance “I cannot answer to the phone right now. Please wait
or call back later (in Japanese)” is played for the other party while on Response and Hold.
● When a recorded status message is deleted, the defau lt status guidance is reset.
72
Page 75

On-hold Tone
Setting On-hold Tone
Default On-hold tone (Preinstalled on-hold tone, voice)
・ You can set a melody not only the default melody registered in FOMA terminal but the melody saved
from i-mode sites or mail.
・ The melody set by this function is played while voice or video-phone calls are on-hold.
Press m873 on the stand-by display.
1
Select On-hold tone field and press 1.
2
・ Press 2 and go to Step 4 to reset to the default melody.
Set the on-hold melody.
3
a Select On-hold melody field.
The folder list of “Melody” is displayed.
b Select a folder to select a melody from a list.
The melody is set and the On-hold tone screen returns.
・ A melody is played by selecting the melody and pressing p. While a melody is playing,
pressing & adjusts the vo lume and % plays the previous or next melody. Press o to set
the melody.
Press p.
4
Making/Receiving Calls
INFORMATION
● The sound volume of the on-hold tone cannot be changed.
● If you set PIM Lock after you change the on-hold tone, the preinstalled tone is played except the case
when you set a melody in the “Preinstalled” folder as the on-hold melody.
73
Page 76

Making/Receiving Calls
Driving Mode
Setting not to receive calls during driving
Driving mode is an automatic answering service considering safety driving. With Driving Mode
ON, callers hear a guidance informing that you are driving and cannot answer the call and the
call is disconnected.
・
If you receive calls, mails or Message R/F s or schedule/alarm are started during Driving Mode,
neither the ring tone, schedule alarm nor alarm sounds and neither the vibrator nor the multi-indicator
operates. Also, even if you receive mail or Message R/Fs during Drive Mode, the receiving screen or
reception result screen is not displayed.
・ When FOMA terminal is turned OFF or outside the service area, the caller hears an out-of-range
guidance and the Driving Mode guidance is not played.
・ The following sounds are played e ven in Driving Mode.
・ Keypad sound
・ Open slide/close slide sound when opening/closing FOMA terminal.
・ The shooting confirmation sound for shooting with the camera.(shutter sound)
・ Driving Mode can be set or canceled even when is indicated.
・ You do not need to apply to use Driving Mode. No monthly fee is required.
・ For details, see “Network Services Use r’ s Gu ide”.
Activating Driving Mode
Hold down ( for over a second on the stand-by display.
1
・ is indicated in the stand-by display while Driving Mode is ON.
■ Cancel ing Dr iv ing Mode
a Hold down ( for over a second in Driving Mo de.
Driving Mode is canceled and disappears from the stand-by
display.
74
Page 77

INFORMATION
● If an incoming call is received while Driving Mode is being set on stand-by, the following takes place:
・The terminal of the other party who has made a voice call is given a guidance and the call is
disconnected. Your FOMA terminal does not process the incoming call. The stand-by display shows
the icon ( ) and the number of missed calls, which is recorded in Received Calls.
・A message that the call cannot be answered because you are driving is displayed on the terminal of
the other party who has made a video-phone call and the call is disconnected. Your FOMA terminal
does not process the incoming call. The stand-by display shows the icon ( ) and the number of
missed calls, which is recorded in Received Calls.
● Calls can be made even when Driving Mode is set.
● When Silent Mode is also set, Driving Mode takes precedence.
● Calls that arrive when Driving Mode is set relate to the network services as shown below:
Network Service ☛P462
Service Operation
Voice Mail
Service
・ The terminal of the other party who has made a voice call receives a Driving Mode
announcement and the call is connected to the Voice Mail Service Center. Your FOMA
terminal does not process the incoming call.
The icon ( ) which shows the number of missed calls appears on the stand-by
display and the call will be recorded in the Received Calls. However, if the ringing time of
Voice Mail Service is set to “0 sec”, the other party’s terminal does not receive a Driving
Mode announcement but an announcement that the call is connected to the voice mail
service center. Your FOMA terminal does not process the incoming call and the call is not
recorded in the Received Calls.
・ For a video-phone call, the terminal of the other party displays a message that the
call cannot be answered because you are driving and the call is not connected to
your FOMA terminal.
Call Forwarding
Service
・ The terminal of the other party who has made a voice call receives a Driving Mode
announcement and the call is connected to the specified destination. Your FOMA terminal
does not process the incoming call. The icon ( ) which shows the number of missed
calls appears on the stand-by display and the call will be recorded in the Received Calls.
However, if the ringing time of Call Forwarding Service is set to “0 sec”, the other party’s
terminal does not receive a Driving Mode announcement but the call is forwarded to the
specified destination. Your FOMA terminal does not process the incoming call and the call
is not recorded in the Received Calls.
・ For a video-phone call, the terminal of the other party does not receive a Driving Mode
announcement and then the call is forwarded to the specified destination. Your FOMA
terminal does not process the incoming call. The stand-by display shows the icon
( ) (which shows number of missed calls), and the call is recorded in Received
Calls. If the ringing time of Call Forwarding Service is set to “0 sec”, the call is not recorded
in Received Calls.
Call Waiting
Service
Nuisance Call
Blocking
Service
Caller ID
Request
Service
・ During voice calls, the terminal of the other party who has made a voice call receives a
Driving Mode announcement. During voice/ video-p ho ne calls, a message inf orming
that the connection was failed is displayed on th e term ina l of t he o ther party who has
made a video-phone call. During video-phone calls, the terminal of the other party who
has made a voice call receives busy tone. Your FOMA te rmi nal does not pr ocess the
incoming call. The icon ( ) which shows the number of missed calls appears on
the stand-by display and the call will be recorded in the R eceived Calls.
・ If the other party who has made a voice call is registered as the nuisance caller, his/
her terminal receives a call reject announcement. Your FOMA terminal does not
process the incoming call and the call is not recorded in the Received Calls.
・ For a video-phone call, the terminal of the other party displays a message informing that
the connection was failed, and the call is not connected to your FOMA terminal.
・ If the other party who has made a call does not noti fy hi s/ her pho ne nu mber, hi s/her
terminal will hear an announcement telling him to request caller ID display. Your
FOMA terminal does not process the incoming call and the call is not recorded in
Received Calls.
・ For a video-phone call, the terminal of the other party displays a message that the
call cannot be connected, and the call is not connected to your FOMA terminal.
Next
Making/Receiving Calls
75
Page 78

● In Driving Mode, a call from a number set for Sender in Remote Lock is counted as an incoming call to
activate Remote Lock.
● This function cannot be set during data communication.
● Any call that arrives during i-mode with Driving Mode activated is rejected and recorded in Received
Calls. Voice Mail Service or Call Forwarding Service performs its own incoming operation.
Answer Machine
Making/Receiving Calls
Allowing the caller to leave message when you cannot answer the call
By setting Answer Machine, a greeting will be played and the caller can leave a recorded
message when you cannot answer the call.
You can record up to 4 voice and video-phone calls in total, a maximum of approximately 30 seconds
・
for each call.
・ The date and time and the phone number of recorded message are also recorded. However, when
the date and time have not been set to FOMA terminal, or the phone number is not notified, they are
not recorded.
・ Answer Machine can respond a video-phone call, but it records only voice messages as when
answering a voice call and the imag e is not recorded.
・ You can set the time interval bet w een the reception of the call and the start of the greeting. ☛P78
・ The greeting in your own voice can be created. ☛P78
・ It is advisable that the contents of recorded messages be separately written down in a notebook, etc.
Data may be lost due to failure, re pair or modifications of FOMA terminal. If data should be erased,
DoCoMo assumes no responsibility for the loss of any data.
Setting Answer Machine
Press C11 on the stand-by display.
1
・ is indicated in the stand-by display while setting Answer Machine.
■ Canceling Answer Machine
a Press C12 on the stand-by display during Answer Machine is set.
・ disappears on the stand-b y display.
Replying with Quick Record Message
When Answer Machine has not been se t to start, you can activate the function onl y once by holding
down C for over a second while the phone is ringin g. This operation does not set the Answer
Machine to start.
INFORMATION
● When the total recorded numbers of the recorded message become 4, is indicated on the stand-by
display. The icon does not disappear even if the Answer Machine is canceled.
● If there are already 4 record messages, Answer Machine cannot be set. If you attempt to activate Quick
Record Message by holding down C for over a second, while the phone is ringing, a warning tone
(bleep) sounds and the ring tone keeps sounding. If Voice Mail Service and Call Forwardin g Service
functions are set to start, each services start their operation. Delete unnecessary recorded messages
and set again. ☛P80
76
Page 79

Receiving a call while Answer Machine is set
When there is an incoming call while Answer Machine is set, it operates in the steps given below.
A call is received.
1
After the ring tone sounds according to the Greeting Response Time setting, “Greeting” screen is
displayed and the Answer Machine automatically answers the call.
・ When the greeting is set to “Preinstalled”, the caller hears the message, “I cannot answer the
phone right now, please leave your name and message after the beep(in Japanese)”. When
“Personalized” is set for the greeting, the message recorded with your voice is played.
The other party’s message is recorded.
2
An approximate
guide of the
remaining time
for recording is
displayed.
Recording the message
of the voice call
・ A beep announces the other party the start and end of the recording. And when about 25
seconds have elapsed since the start of recording, rapid beeps are heard to warn that the end of
recording is approaching.
When the recording is completed, the call is disconnected.
3
・ If there is any recorded message not checked, the icon ( ) which indicates the number of
recorded messages is indicated on the stand-by display. If is selected, the recorded
message list is displayed.
Recording the message of
video-phone call
Making/Receiving Calls
INFORMATION
● You can answer a call while the phon e is ringi ng, pl aying, respon se gu ida nce or reco rd ing a messag e.
Pressing n answers the call as a normal voice or video-phone call (sub stit ut e image is sent to th e ot her
party) and pressing t sends your portrait and answers the call as a video-phone. In case of a voice call ,
you can also answer the call by opening FOMA terminal.
If the message is on recording at this time, the contents before receiving the call will not be recorded.
● When is indicated, the Answer Machine does not operate. Use Voice Mail Service (paid service)
when you would like to record a message in the out-of-service area. ☛P463
● Answer Machine cannot be started and the ring tone keeps sounding when 4 messages have already
been recorded. If Voice Mail Service and Call Forwarding Service functio ns are set t o star t, each service
start their operation. ☛P80
● Driving Mode has priority over Answer Machine and does not operate in Driving Mode.
● The recording may be disrupted if the signal conditions are poor.
● Calls replied by Answer Machine are recorded in Received Calls.
● Incoming calls received while recording a message are rejected and recording continues. If you
subscribe to Call Waiting Service, such incoming calls are recorded in Received Calls.
● When video-phone is answered with Answer Machine, the image for recording video-phone message is
sent to the other party.
The image during the video-phone message recording can be changed. ☛P93
☛P64
77
Page 80

Making/Receiving Calls
Setting the response time to the greeting starts [ Greeting Response Time ]
Default 008 Sec
Press C13 on the stand-by display.
1
Enter the response time.
2
・ Enter a greeting response time between 0 and 120 seconds.
・ You can also increase or decrease the entered values by pressing %.
INFORMATION
● When Auto Answer (when an earphone /microph one set wi th a switch (o ptional) is conne cted), V oice Mail
Service, Call Forwarding Service and this function are all set, the function given the priority varies from
the ringing times set for each services and functions. To give p riority to Answer Machine, t he ringing time
set for this function should be shorter than those set for Auto Answer, Voice Mail Service and Call
Forwarding Service functions. Note that Answer Machine may not be given the priorit y depending on the
signal conditions. In this case, respond a call with Quick Record Message. ☛P76
● The same time period cannot be set for both Auto answering time f or Auto Answer and Greeting
Response Time for Answer Machine. ☛P455
Setting the greeting message [ Greeting Setting ]
Default Set Greeting: Preinstalled
You can record your own voice as greeting.
・ One message up to 10 seconds long can be recorded.
Example
1
2
Setting a recorded data for greeting message
Press C14 on the stand-by display.
Select Set Greeting field and press 2.
・ Press 1 and go to Step 4 to reset to the default message.
78
Page 81

Select “Record” in Edit greeting field and speak a greeting message after a dial
3
tone.
An approximate guide of
the remaining time for
recording is displayed.
Recording will start after the message is displayed.
・ An end tone (beep) sounds approximately 10 seconds after the recording starts.
・ Press o to stop in the middle of the greeting recording.
・ “Record” cannot be selected when a recorded data has already been reg istered. Select
“Delete”, select “Yes” to delete the reco rd ed data.
・ Select “Play” to check the recorded greeting.
Press p.
4
INFORMATION
● When a recorded greeting is deleted, the defaul t greeting is reset.
Playing the recorded messages
You can play and delete recorded messages from the list.
・ Recorded messages, if any, can easily be played from the stand-by display. ☛P35
Press C2 on the stand-by display.
1
On the recorded message list screen, the date and time of a recorded
message and other party’s phone number appear.
・ The reason for no caller ID is displayed when the caller’s phone
number is not notified. When the phone number is registered in the
phonebook, the name of the caller is displayed.
・ Icon definitions:
: Recorded message of a voice call not played
: Recorded message of a video-phone call not played
: Played recorded message of a voice call
: Played recorded message of a video-phone call
Making/Receiving Calls
Next
79
Page 82

Select a recorded message to play.
2
The recorded message is played back.
・ During playback, the following operations are enabled:
%
o
: Adjust volume
: Stop playing
Making/Receiving Calls
An approximate
guide of the playing
time is displayed.
■ Deleting a recorded message
a Place the cursor at the recorded message to delete and press m21.
・ Press m22 to delete all recorded messages.
b Select “Yes”.
■ Registering an entry from the recorded message list to the phonebook
a Place the cursor at a recorded messa ge to register and press m4.
・ When adding to the registered phonebook data, press m5.
b Register the names or addresses by pressing 1 or 2. ☛P104
・ To add to the registered pho nebook data, press 1 or 2 to select the phonebook
data of registration destination. ☛P116
Determine whether to delete the played recorded message.
3
・ Select “Yes” to delete a recorded message.
INFORMATION
● When Indicator light is “ON” in Illumination Setting, the multi-indicator blinks until unplayed message is
played.
● Focus to the recorded message list an d pr ess n to make a voice call, press t to make a video-phone
call. Customized Call can be used from the submenu to make voice or video-phone calls by specifying
show/hide caller ID or to make video-phone calls by specifying data rate.
● When Privacy Mode is active (“Authorized access” set for Phonebook & Logs), entry of the terminal
security code is required.
80
Page 83

Making/Receiving Video-phone Calls
Video-phone ...................................................................................................................82
Making video-phone calls ........................................ .... .................................................83
Receiving video-phone calls .........................................................................................86
Using Chara-den ............................................................................................................88
Setting images to be sent to the other party ...............................................................89
Customizing the display settings during a video-phone call ................................ ....96
Changing the video-phone settings ................................... [ Video-phone Setting ] 98
Setting operations for the outgoing/incoming video-phone calls
.................................................................... [ Video-phone Incoming & Outgoing ] 99
Using the video-phone by connecting with the exte rnal device
................................................................................................... [ External Device ] 100
81
Page 84

Making/Receiving Video-phone Calls
Video-phone
The video-phone function is available between terminals that support DoCoMo’s video-phone.
By using the video-phone, you can talk on the phone while looking each other images from the
camera. It is also possible to display still images, substitute images, Chara-den, etc. instead of
your own image.
DoCoMo video-phone specifications are compliant with “3G-324M*1 that has been standardized by the
international standard 3GPP*2”. Note that the connection with the video-phones of different
specifications can not be established.
*1 3G-324M
An international standard for the 3rd-generation mobile video-phone.
*2 3GPP (3rd Generation Partnership Project)
Area standardization organiza tio n established to develop the standard technology spe ci fic ation for
3rd generation mobile communications systems (IMT-2000).
・ The following two connection speeds are provided for the video-phone:
・64K: Connects at connection sp eed of 64kbps.
・32K: Connects at connection sp eed of 32kbps.
Screen display during a video-phone call
b
ac
defghijk l
a Main screen Image of the other party is displayed by default.
b Connection
speed
c$Video-phone
status
d Sub screen Your own image is displayed by default.
e Zoom : Standard to : 16 x (out-camera)
f Macro mode No icon: Normal mode
g Status : Sending your own image
Action mode : Full motion : Semi motion
h Camera effects : Normal : Backlight : Sepia
i Compact light No icon: Turn light OFF : Turn light ON
j Sending image
quality
k Channel
establishment
l Call duration Displayed in the HH:M M : SS format
: 64K : 32K
No icon: Normal communication
: With the speakerphone function operating
: Standard to : 2 x (in-camera)
: Macro mode (Close-up mode) (out-camera)
: Sending the substitute image
: Using Chara-den : Sending frame
: Sending the still image : On-hold
: On Response and Hold
: Recording a message
: Recording a voice memo
: Monotone : Sea/Snow : Sunset
No icon: Standard : Prefer img qual
: Prefer motion spd
: Sound channel established
: Video channel established
: Sound/video channel established
82
Page 85

Making video-phone calls
・ If you make a video-phone call while viewing the face of other party, use a speakerphone function or
connect to an earphone/microphone with a switch (option). ☛P51, P454
・ International video-phone calls are available by using DoCoMo’s internatio nal call service “WORLD
CALL”. ☛P57
・ If the message of “Failed to connect” is displayed when making a video-phone call , set Caller ID
Notification and dial again.
Enter the phone number on the stand-by display.
1
・ Entering method is the same as for the voice calls. ☛P50
・ You can make a video-phone call by specifying the data rate (64K or 32K) from Customized call
if you enter the phone number and press m3. ☛P56
Press t.
2
Talk with the other party.
3
Your image is displayed while on the video-phone call.
・ If the phone on the other party is busy, you will hear the busy signal.
The message of “Busy” or “Failed to connect.” is displayed on the
screen. Press f to cancel the call and dial again after for a while. You
can call back quickly by using Redial. ☛P53
・ When Chara-den is set as the substitute image, Chara-den may not be
displayed. If this happens, “Default image” set for the substitute image
is sent to the other party’s terminal. ☛P92
・ The charging begins when “Connected video-phone” is displayed on
the screen.
The image of the other party is displayed on the screen.
・ Putting calls on hold (☛P51) sends a video-phone on-hold image. The
video-phone on-hold image can be changed. ☛P92
・ Depending on the other party’s settings, the substitute image may be
displayed.
・ You can switch calls for usi ng the speakerphone function by pressing
n or a. ☛P51
・ While talking, the image to be sent to the other party is switched
between your self image and the substitute image every time t is
pressed. ☛P89
Making/Receiving Video-phone Calls
When you finish a call, press f.
4
・ You can also end the video-phone call by closing FOMA terminal. To end the video-phone call
by closing the terminal, change the settings in “Close Setting”. ☛P64
83
Page 86

Making/Receiving Video-phone Calls
Operations during video-phone calls
・ The following operations can be performed from the submenu during video-phone calls:
Submenu item Description Page
a
Switch cameras Switches between the in-camera/out-camera. P94
b
Compact light ON/OFF Switches between the Compact light ON or OFF. P96
c
Camera settings Applying effects on images which is displayed, setting brightness
and color density for the camera images to be sent during videophone calls and switching to Macro Mode.
d
Receive quality Set the quality of received images. This setti ng may not be
enabled depending on the function of the other party’s terminal.
e
V-phone settings Changing settings for the screen to be displayed during
video-phone calls.
f
Chara-den settings Changing the Chara-den character, switching between full and
semi motion and selecting actions. In addition , a still image set in
Substitute Image of Image Setting: V-Phone can be displayed.
g
Play file Change frame and still image to send to the other party. P90, P91
h
Send DTMF Transmits tone signals (DTMF) during video-phone calls. P95
i
Volume Adjusts Earpiece Volume. P67
・ You can record the other party’s voice with In-call Voice Memo while making a call by holding down
C for over a second. ☛P448
INFORMATION
● You can make a video-phone call by performing Steps 2 and Step 1 in the reverse order. When t is
pressed and the phone number is pressed, the video-phone call can be made automatically after 5
seconds.
● You may not be able to make a call while executing another function. ☛P547
● Please note that the communication cha rges ar e based on t he r ate for digi tal commu nication r ath er t han
the voice calls even if the substitute image or Chara-den is used.
● While using video-phone, dialing operat ion to a voice call can no t be perf ormed. A lso , “Unabl e to call. ” i s
displayed.
● If a video-phone call attempt fails, the following message (text information) will be displayed on the
screen. The display returns to the stand-by display automatically. No te that displayed message s may not
reflect the status on the other party correctly, depending on t he type of the terminal and/or conditions of
the network service contract of the other party.
Check the number and retry You dialed the phone number not used.
Busy The other party is busy or during packet communication.
Disconnected due to outside of
service/power off
Driving mode The phone of the other party is in Driving Mode.
Select on for Call ID Notification This message is displayed in case connecting without
Failed to connect Set Caller ID Notification “Notify” and dial again.
Message Description
The other party is outside the service area or the other
party’s phone terminal is turned OFF.
notifying the caller ID (when accessing to the V live or visua l
site).
・ The message may be also displayed for cases other than
the above.
P90, P95
P97
P97
P376
84
Page 87

● When a video-phone call is forwarded, the message “Your call is being forwarded.” is displayed.
● Video-phone via 32K line is intended for connection with devices such as PHS with which video-phone
calls via 64K line may not be available depending on the network condition. When a video-phone call is
made via 64K line, the call type is automatically switched to via 32K for redialing if the communication
environment of the other party is found to be 32K. When “ON” is set for Voice call auto switch, redialing
via 32K line is also given priority.
Note: If a call is made via 32K line, the charge is the same as the digital communication charge via 64K.
● If a video-phone call is made and is not established, redialing is automatically performed as described
below.
Call type Voice call auto switch setting Switching operation
64K ON 64K → 32K → Sound
32K ON 32K → Sound
● If you pre-register the communication speed (64K or 32K) in the phonebook, you can change the
communication speed depending on the other party you are making a call.
● If you specify the data rate from Customized call in the submenu after entering phone number to make a
call, the specification for Customized Call is effective. If nothing has been specifie d for the d ata rate, 64K
connection is attempted.
● When “ON” is set for Voice call auto switch, the call type is automatically switched to voice call for
redialing if the other party’s terminal does not suppor t the video-ph one function or uses the mova service
through the Dual Network Service, hence, making the more certain connection to the other party.
Note: If you redial as a voice call, the charge is placed as a voice call.
● If the video-phone call is made to 110, 119 or 118 when Voice call auto switch is set to “ON”, the videophone call automatically switches to a voice call.
● New voice or video-phone calls cannot be made during video-phone calls. i-mode connection, i-mode Mail,
Message R/F or Short Message (SMS) exchange is not available.
● A video-phone call is not available to the phones not supporting the video-phone function, or to the
phones without power or located outside the service are a. If you set t he Voice call auto switch function to
“ON” and attempt to make a video-phone call with an unsupported device, the other party will abort the
communications before connected. For this case, voice call redialing will automatically begin. The
redialing function cannot work as written above if you attempt the video-phone calls with inapplicable
conditions such as at ISDN-sync 64kbps or via PIAFS access points, with ISDN video-phones
incompatible with 3G-324M (
that some calls may require the call charge.
● You can switch Show caller ID/Hide caller ID when making a video-phone call.
● If a pause or timed pause is entered (
all the phone numbers dialed after the pause or timed pause are ignored.
● While you are dialing or redialing video-phone call, incomi ng calls will abort t he dialing and ring tone may
sound.
● Incoming calls during a video-phone call.
● Even if sending/receiving the voice or image is aborted and (only voice) or (only image) is
displayed during a video-phone call, the call may be continued as it is.
● If the radio wave conditions are poor during a video-phone call, the image may be displayed as mosaic.
OFF 64K → 32K → Disconnection
OFF 32K → Disconnection
☛P122
☛P82) (as of December, 2004), or dialing the wrong phone number. Note
☛P56
☛P52), dialing before the pause and the ti med pause i s made and
☛P545
Making/Receiving Video-phone Calls
85
Page 88

Making/Receiving Video-phone Calls
Receiving video-phone calls
・ You cannot accept a call by pressing the keys except for t,n.
・ When a video-phone call is receiv ed, Any Key Answer is unavailable.
Receive a call.
1
Press t.
2
Talk with the other party.
3
The ring alert sounds, the displ ay backlight lights up and the multiindicator blinks.
・ The other party’s phone number, name or still image/video may be
displayed on the screen according to the terminal condition of the caller
or FOMA terminal settings. Display information. ☛P61
・ Press f to hold your answer and the video-phone response hold
image is displayed on the screen of the other party’s terminal. ☛P71
Your image is displayed while on the video-phone call.
■ Answering a video-phone call with the substitute image
a Press n
The substitute image instead of your image is sent to the other
party when the video-phone call is connected.
・ When Chara-den is set as the su bstitute image, Chara-den may
not be displayed. If this happens, the standard image set for the
substitute image is sent to the other party. ☛P92
The image of the other party is displayed on the screen.
・ Putting calls on hold (☛P51) sends a video-phone on-hold image. The
video-phone on-hold image can be changed. ☛P92
・ Depending on the other party’s settings, the substitute image may be
displayed.
・ You can switch calls for usi ng the speakerphone function by pressing
n or a. ☛P51
・ While talking, the image to be sent to the other party is switched
between your self image and the subs titute image every time t is
pressed. ☛P89
When you finish a call, press f.
4
・ You can also end the video-phone calls by closing FOMA terminal. To end the video-phone call
by closing the terminal, change the settings in “Close Setting”. ☛P64
Operations while receiving calls
・ You can perform the following operations from the submenu when you received the video-phone calls
or while the ring alert is sounding.
Submenu item Description
a
Call forwarding* Makes incoming calls transferred to the forwarding phone number.
b
Call rejection A call is disconnected. Caller does not pay for calling.
* Valid when you subscribe to Call Forwarding Service and the p hone numbers fo r fo rward ing ha ve been set.
86
Page 89

・ You can respond a call with the Record message by holding down C for over a second (Quick
Record Message). ☛P76
・ You can also adjust the ring volume or stop the vibrator. ☛P68
INFORMATION
● When a video-phone call arrives while an earphone/microphone set with swit ch (option) is connected,
holding down the headset switch for over a second allows you to answer the call with a substitute image.
☛P455
● While an earphone/microphone set with switch (option) is conne cted, the terminal operates according to
Auto Answer Setting so that you can response by sending a substitute image to the caller automatically.
● Voice Mail Service does not cover video-phone calls.
● When a video-phone call arrives, it is not connected if the forwarding destination is not set to the video-
phone possible terminal which is compatible with the 3G-324M (
is activated. Check the specifications of the forwarding destination when making the forward settings.
● If a video-phone call from a phone number registered in Nuisance Call Blocking Service arrives, the call
is rejected without sending the announcement of call rejection.
● Even if sending/receiving the voice or image is aborted and (only voice) or (only image) is
displayed during a video-phone call, the call may be continued as it is.
● Any video-phone call that arrives during software update is rejected and recorded as a received call.
● You can operate for the incoming video-phone call from the external device connected to FOMA
terminal.
● When you end a video-phone call, an image during phone disconnecti on may not appear depending on
your terminal condition.
● Call Waiting Service is unavailable during a video-phone call.
☛P100
☛P82) even if Call Forwarding Service
☛P468
☛P465
Making/Receiving Video-phone Calls
87
Page 90

Using Chara-den
During a video-phone call, a character can be sent instead of your image. The character can be
activated by pressing dial keys during a video-phone call. Some character move their mouth in
time with the sounds picked up by the microphone.
Press u4 on the stand-by display and select the folder.
1
The Chara-den list is displaye d.
Making/Receiving Video-phone Calls
Select a Chara-den and press t.
2
Enter a phone number and press t.
3
Chara-den
©BVIG
Setting as video-phone substitute images
A Chara-den can be set as a substitute image for the video-phone call beforehand.
Press u4 on the stand-by display and select the folder.
1
The Chara-den list is displaye d.
Place the cursor at Chara-den and press a.
2
The selected Chara-den is set as a substitute image for the video-phone call.
A video-phone call is made with Chara-den set as a substitute image.
・ The parties to make video-phone calls can be selected from the
phonebook by pressing p.
・ If you press dial keys while sending Chara-den as the substitute image,
the character performs the action in accordance with the number of the
keys. The following operations ca n be also performed.
0 : Canceling action
( : Displaying Action List (Selecting action
activates characters.)
( for over a second: Switching Actions (Full motion/semi motion)
・ Action List of Chara-den set by default ☛P377
INFORMATION
● Holding down t for over a second while Chara-den is displayed also sets Chara-den as the video-
phone substitute image.
● You can also change Chara-den to set as a substitute image in the substi tute image selection for the
video-phone.
☛P92
☛P377
88
Page 91

Setting images to be sent to the other party
・ The following items can be set.
Item Page Item Page
Switching outgoing images between
“Your self image” and “Substitute
image”
Setting the quality of outgoing
images
Laying frames over outgoing
images
Applying special effects to outgoing
images
Adjusting the brightness and color
density of outgoing images*
* The settings are retained after the call.
Switching outgoing images between your self image and the substitute image
Press t during a call.
1
・ Displaying outgoing images ☛P82
・ Each time you press t, the image switches between your self image( )
and the substitute image ( or ). ☛P86
・ When Chara-den is set as a substitute image, Chara-den may not be
displayed. If this happens, the standard image set for the substitute
image is sent to the other party. ☛P92
The substitute
image
©BVIG
・ Operations when sending Chara-den as a substitute image ☛P88
P89 Sending still images P91
Changing the image to be displayed
during a video-phone call
P89 Switching display magnifications P94
P90 Switching the in-camera/out-camera P94
P90 Switching the camera to Macro
Mode (Close-up Mode)
P91 Transmitting tone signals P95
P92
Making/Receiving Video-phone Calls
P95
Default Me
Setting the quality of outgoing images
・ Setting “Prefer motion spd” makes motions smoother in a little lower-definition image.
・ Setting “Prefer img qual” makes motions a little slower in a higher-definition image.
Press & during a call.
1
The quality of outgoing images change.
・ Each time you press r, the quality of outgoing image switches as follows. Pressing l,
switches to the reverse order.
Standard (no icon) → Prefer img qual ( ) →Prefer motion spd ( ) →Standard (no icon) →…
Default Standard
89
Page 92

Making/Receiving Video-phone Calls
Laying frames over outgoing images [ Select Frame ]
Lay the image for the frame saved in FOMA terminal over your image to send to the other pa rty.
・ The frame can be added only when sending your self image.
・ Only the frames of 176 x 144 (QCIF) or smaller can be selected. However, among the downloaded
frames, you can select only the frames with the display size of 176 x 144 (QCIF).
Press m71 during a call.
1
Select a frame.
2
Your image is sent to the other party in the same manner.
・ While the in-camera is used, a mirror image is displayed on the screen
and a normal image is sent to the other party. While the out-camera is
used, the image same as on the screen is sent to the other party.
・ Pressing o while sending your self image cancels the frame send ing.
Frames set by default
・ You can download the above default frames from the i-mode site, “My D-style”, if you have deleted
them. ☛P328
Applying special effects to
You can apply the following effects to the outgoing images:
Item Icon Description
a
Normal The image with the standard quality is sent.
b
Backlight Used when shooting subjects against the light.
c
Sepia Used for Sepia tone.
d
Monotone Used for Monotone.
e
Sea/Snow Shooting beautiful light reflection in sceneries such as the sea and snowy
f
Sunset Used when shooting subjects against sunset glow.
・ This setting can be changed only wh en sending your self image.
Press m31 during a call.
1
outgoing
surface.
images [ Camera Effects ]
Default Normal
90
Page 93

Press 1 to 6.
2
・ Press 1 to cancel the effect.
The icon for the effect currently applied is indicated.
Adjusting the brightness and color density of
・ You can adjust the brightness and color density at 5 levels.
・ This setting can be changed only while your image is being sent.
Press m32 during a call.
1
Press % to select Brightness slider and press &.
2
Your image is displayed on the main screen while adjusting the
brightness. You can check the changing of the brightness as you shift the
slider’s position.
Press % to select Density slider and press &.
3
Your image is displayed on the main screen while adjusting the density. You can check the
changing of the density as you shift the slider’s position.
Press p.
4
・ If you do nothing on the terminal for some time after adjusting the brightness/color density, the
setting is not changed and goes back to the Talking screen.
Sending still images [ Select Image ]
outgoing
images
Default Brightness: Level 3 Density: Level 3
Making/Receiving Video-phone Calls
Select an image to be sent to the other party from the saved still images. You can show the selected
still image to the other party during a video-phone call.
・ This setting is not available whil e the frame is being sent (☛P90).
・ Only the still images that are 176 x 144 (QCIF) or smaller and permitted to output from FOMA terminal
can be set. Outputting the still images from FOMA terminal (File Restriction) ☛P403
Press m72 during a call.
1
The image folders list is displayed.
Next
91
Page 94

Select a folder and select the still image from a list.
2
The still image is sent to the other party in the same manner.
・ You can display a still image by placing the cursor at it and pressing
p.
・ The setting is released and the previous image is displayed if you press
o while sending still images.
Changing the image to be displayed during a video-phone call [ Image Settings ]
Making/Receiving Video-phone Calls
Change the images displayed during video-phone calls such as the substi tute image, video-phone call
answer machine image, video-phone call response image and video-phone cal l on-hold image.
Changed images are displayed during video-phone calls, while recording the messages, during
Response and Hold or during On-hold and they are also sent to the other party.
・ You cannot set the following still images:
・Still images with a size of more than 176 x 144 (QCIF)
・Animation, create animatio n and continuous shots
・Still images in formats other than JPEG and GIF format
・Still images that must not be output from FOMA terminal
Outputting the still images from FOMA terminal (File Restriction) ☛P403
Changing the substitute image
Default Default Chara-den
Press m883 on the stand-by display.
1
Press 1 and select the image field.
2
Chara-den
©BVIG
■ Setting the standard Chara-den
a Press 1.
“Default Chara-den (bunbun (Dimo))” is set.
■ Setting the standard still image
a Press 2.
“Default image (Camera off)” is set.
■ Setting other Chara-den
a Press 3.
b Select “Select image”.
The Chara-den folder list is displayed.
c Select a folder to select a still image from the Chara-den list.
Chara-den is set and the “Substitutiv e Imag e” scr ee n re appears.
・ Place the cursor at Chara-den to set and press p to display Chara-den.
92
Page 95

■ Setting other still images
a Press 4.
b Select “Select image”.
“Image” folders list is displayed.
c Select a folder and select a still image from the list.
Still image is set and the “Substitutive Image” screen reappears.
・ Place the cursor at the sti ll image to set and press p to display the still image.
Press p.
3
INFORMATION
● If Chara-den set as the substitute image is deleted, the substitute image is reset to “Default Chara-den”
substitute image and if a still image is deleted, the substitute image is reset to “Defaul t image”.
● After you change the substitute image by selecting “Selected image” in Image field, if you activate PIM
Lock or Privacy Mode(when “Authorized access” is set for My picture), “Default image” is displayed and
sent.
Changing the answer machine/response hold/on-hold images
Default Answer machine image: Standard image Response hold image: Standard image
On-hold image: Standard image
Example
1
2
3
4
Changing the image for recording video-phone call message
Press m883 on the stand-by display.
Press 2 to 4.
Select Image field and press 2.
・ Press 1 and go to Step 5 to reset to the default image.
Select “Select image” to select images.
・ The operation procedure is the same as when setting “Selected image” in Image field in the
substitute image setting. ☛P92
Making/Receiving Video-phone Calls
Press p.
5
INFORMATION
● After you change the answer mach ine/respon se hold/o n-hold i mage by se lecting “Se lect i mage” in Ima ge
field, if you activate PIM Lock or Privacy Mode (when “Authorized access” is set for My picture),
“Standard image” is displayed and sent.
93
Page 96

Making/Receiving Video-phone Calls
Switching display magnifications [ Zoom ]
Default Standard
Switch display magnifications for your image to be sent to the other party.
・ Available only while your image is being sent.
Press % during a call.
1
The zoom magnification is changed.
・ Each time you press u, the magnification of outgoing image switches as follows. Pressing d,
switches to the reverse order.
Out-camera: Standard ( ) → 2 x ( ) → 4 x ( ) → 6 x ( ) → 8 x ( )
→ 10 x ( ) → 12 x ( ) → 16 x ( )
In-camera : Standard ( ) → 2 x ( )
INFORMATION
● Zooming will be canceled if switches between the in-camera and out-camera.
Switching the in-camera/out-camera
Default In-camera
Switch the camera used during a video-phone call.
・ Available only while your image is being sent.
Press m 1 during a call.
1
The image is displayed throug h the switched camera.
When the in-camera
is selected
・ Each time you press m1, the camera switched between the in-camera and out-camera.
INFORMATION
● If you switch cameras, the setting of Camera Effects setting is kept.
When the outcamera is selected
94
Page 97

Switching the camera to Macro Mode (Close-up Mode)
Default Normal mode
Switching over to Macro Mode will allow you to adjust the focus when sending images of objects about
7 to 11 cm away.
・ You can switch the camera to Macro Mode onl y when the out-camera is being used.
Press m33 during a call.
1
■ Resetting to the standard mode.
a Press m33.
INFORMATION
● If you switch the camera to the in-camera in Macro Mode, the camera returns to the standard mode.
Transmitting tone signals [ Send DTMF ]
The tone signals (DTMF) are transmitte d du rin g a ca ll.
・ The signals may not be received depending on the device of receiver side.
・ DTMF input is available only while your image or substitute image being sent or using Chara-
den during a video-phone call.
Press m8 during a video-phone call and press the dial keys.
1
The number you pressed is displayed and the tone signal is transmitted.
・ To cancel transmitting tone signals (DTMF), press c.
・ The tone signals (DTMF) are transmitted only by pushing dial keys even if you do not push m
8 while your image is being sent.
Making/Receiving Video-phone Calls
INFORMATION
● If the tone signals (DTMF) are transmitted, the frame selection and image selection are canceled.
95
Page 98

Making/Receiving Video-phone Calls
Customizing the display settings during a video-phone call
・ The following items can be set.
Item Page Item Page
Switching between main screen and
sub screen*
Changing the main screen size* P96 Setting the screen to be displayed
Turning the Compact light ON P96
* The settings are retained after the call.
Switching between main screen and sub screen
The screen is switched between the main screen and the sub screen.
Press p during a call.
1
・ Press p to change the main/sub screens.
Main : Other party’s image Main: Your self image
Sub: Your self image Sub: Other party’s image
Changing the main screen size
Hold down p for over a second during a call.
1
The main screen display size is changed.
・ Every time p is holded down for over a second, the screen size changes in the following
order, Large → Standard → Small → Large→ .
P96 Setting the quality of the incoming
images
during a call*
Default Main Screen Image: Other Sub Screen Image: Me
…
P97
P97
Default Large
Turning the Compact light ON
・ You can switch the Compact light between ON and OFF only when the out-camera is being used.
Press m 2 during a call.
1
The Compact light is lit. If the light has been lit, it goes out.
・ Each time you press m 2, the Compact light switches between ON ( ) and OFF (No
icon).
INFORMATION
● The Compact light may go out temporarily depending on the setting ope ration while talking.
96
Page 99

Setting the quality of the incoming images
Default Standard
You can change the quality of the image sent from the other party. Setting “Prefer motion spd” makes
motions smoother in a little lower-definition image and setting “Prefer img qual” makes motions a little
slower in a higher-definition i m age.
・ This setting may not be enabled dep ending on the function of the other party’s terminal.
Press m4 during a call.
1
Press 1 to 3.
2
Setting the screen to be displayed during a call [ Video-phone Setting during a call ]
Default Display setting: Both Sub Screen: Me Display screen size: Large Display light : Always on ( normal)
Press m5 during a call.
1
Select each item to set.
2
・ For settings (Display setting, Sub screen, Display screen size, Display
light), refer to Step 2 in “Changing the video-phone settings”. ☛P98
Press p.
3
Making/Receiving Video-phone Calls
97
Page 100

Making/Receiving Video-phone Calls
Video-phone Setting
Changing the video-phone settings
Default Voice call auto switch: OFF Display setting: Both Sub screen: Me Display sc reen size : Large
Send camera image: ON Sending image quality: Normal Display light: Always on (normal)
Set the operation to be performed when video-phone calls have failed to get through and the
image to be displayed during video-phone calls.
“Voice call auto switch” is provi ded in Video-phone Setting to make the access to the other party for
・
sure. Voice call auto switch is the function to switch the call type to voice by redialing automatically
when the other party’s terminal does not support the video-phone function or cannot receive a videophone call while using the mova service through Dual Network Service.
Press m882 on the stand-by display.
1
Select each item to set.
2
Voice call auto switch
: Sets this function if you want to automatic ally redial a voice call for
unsuccessful video-phone attempt.
Display setting : Specifies whether to display one of the imag es (yo ur self ima ge or ot her party ’s
image) or both of images to be displayed while on the video-phone call.
・If you set other than “Both”, “Sub screen” cannot be set.
Sub screen : Specifies whether to display your self image or other party’s image in the sub
screen while on the video-phone call.
Display screen size
: Sets the main screen view size.
Send camera image
: Specifies whether to send your image to the other par ty.
Sending image quality
: Sets th e image quality on the other party’s scre en.
Display light : Select lighting of the display during video-phone calls.
・If you set “Terminal settings”, it operates as in the Display Light settings.
☛P144
Press p.
3
INFORMATION
● Even if the Voice call auto switch function is set to “ON”, redialing may not be attempted depending on
the other party and/or network conditions.
● Even if the Voice call auto switch function is set to “ON”, redialing for a video- phone call is not made
during a voice call or 64K data commu nica tion.
● If you redial voice calls with the Voice call auto switch function is set to “ON”, the voice call rate will be
applied instead of digital communication rate.
● If the video-phone communication is started, redialing as a voice call is not made.
98
 Loading...