

Page 1

F-04B
INSTRUCTION MANUAL
’10.3
Page 2
DOCOMO W-CDMA, GSM/GPRS System
Thank you for purchasing "docomo PRIME series F-04B" mobile terminal.
Before using F-04B, read this manual to ensure safe use and handling.
Instruction manuals for F-04B
The operations of F-04B are described in this manual, "
(PDF file).
Instruction manual (this
manual)
"
使いかたガイド
(installed in FOMA terminal)
"Instruction manual
(detailed version)" (PDF file)
・
In this "F-04B INSTRUCTION MANUAL", "F-04B" mobile terminal is usually referred to as "FOMA terminal".
・
The images or illustration used in this manual are examples. They may differ from the actual displays.
・
In this manual, "authenticate" indicates the operating procedure for entering the terminal security code in 4-8 digits. ⇒P40
(Guide)"
This manual provides information about screens and operations of basic functions.
*
is index term for "
This guide provides overviews and operations of frequently-used functions. (In Japanese only)
In F-04B Stand-by display,
This manual provides detailed information and operations of all the functions. (In Japanese only)
<From a PC> This manual can be downloaded from NTT DOCOMO website.
http://www.nttdocomo.co.jp/support/trouble/manual/download/index.html
*
The URL and contents are subject to change without prior notice.
使いかたガイド
使いかたガイド
mef
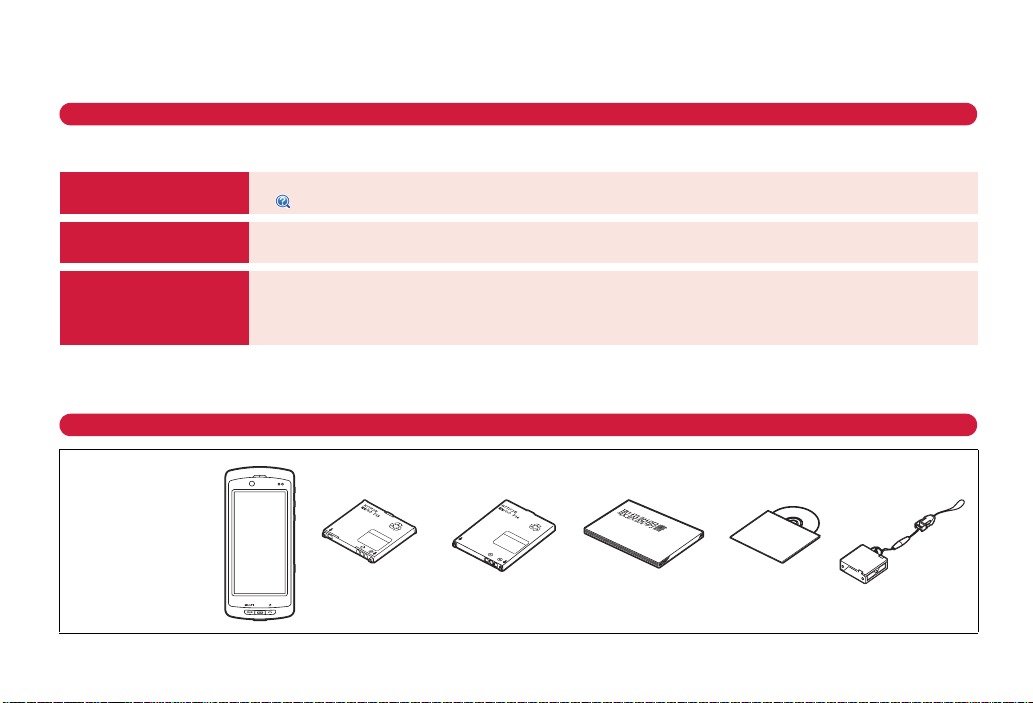
Basic package
(Guide)” (installed in FOMA terminal) and "Instruction manual (detailed version)"
(Guide)".
LifeKite0 GuideeSelect a search method
F-04B
(including Back Cover F45
(for display unit),
Back Cover F46
(for keypad unit)
and warranty)
・
Unauthorized copying of parts of or this entire manual is prohibited.
・
The contents in this manual, URL and contents are subject to change without prior notice.
Battery Pack F13
(for display unit)
Battery Pack F14
(for keypad unit)
Instruction manual CD-ROM for F-04B
Compatible options
STAND STRAP
(SAMPLE)
⇒
P93
Page 3
Contents
Introduction
FOMA terminal ...............................................................
What you can do with F-04B .........................................
Part names and functions..............................................
Usage Styles ...................................................................
Precautions (ALWAYS FOLLOW THESE DIRECTIONS)
Handling precautions .....................................................
Basic Operation
Before Using...................................
Screen Explanation........................
Character Entry ..............................
Sound/Screen Setting...................
Lock/Security .................................
Connect
Call Telephone................................
Mail..................................................
Phonebook......................................
Search
i-mode/Full Browser......................
i-Channel.........................................
Map/GPS ........................................
Enjoy
2
3
4
8
9
16
Camera ............................................
1Seg.................................................
Music ...............................................
i-αppli ..............................................
i-motion/Movie...............................
More convenient
Osaifu-Keitai ...................................
20
26
31
34
40
46
55
58
60
63
64
Others
Support ............................................................................
Appendix..........................................................................
Index.................................................................................
i-concier...........................................
Convenient tools ............................
Data Management..........................
66
68
70
72
73
74
75
76
81
85
95
109
Introduction
Basic
Operation
Connect
Search
Enjoy
More
Convenient
Others
1
Page 4
FOMA terminal
・
Because your FOMA terminal uses wireless transmission, it may
Introduction
not function in locations where it is difficult for radio waves to
penetrate, such as tunnels, underground passages and some
buildings, in areas where radio waves are weak, or out of service
area. Even when you are high up in a tall building or condominium
and nothing blocks your view outside, your FOMA terminal may
not be able to receive or transmit signals. Also, communication
may be interrupted even when the signal meter on your FOMA
terminal indicates there are strong radio waves and you are not
moving (traveling).
・
Use your FOMA terminal in a way that does not disturb others in
public spaces, crowded locations or quiet places.
・
Because your FOMA terminal uses radio waves to communicate,
it is possible that a third party may attempt to tap your calls.
However, the W-CDMA, GSM/GPRS system automatically applies
a confidential communication function to all calls, so even if a third
party could somehow tap a call, they only hear noise.
・
Your FOMA terminal encodes voice communication as digital
data. When you are operating your FOMA terminal while moving
to a location subject to weaker radio wave conditions, the
transmitted digital data may not be correctly decoded and as a
result the decoded voice may differ somewhat from the actual
voice.
・
Maintain a separate record of the data (phonebook, schedule,
notepad, recorded messages, voice memos, moving picture
memos, etc.) you registered in your FOMA terminal. Note that
DOCOMO assumes no responsibility for any loss of saved
contents of data resulting from malfunction, repair, changing of
the model or other handling of FOMA terminal.
2
・
You are recommended to save important data to microSD card.
Using DOCOMO keitai datalink, you can transfer and save
phonebook, mail, schedule and other data to a PC.
・
The user hereby agrees that the user shall be solely responsible
for the result of the use of SSL/TLS.
Neither DOCOMO nor the certifier as listed herein makes any
representation and warranty as for the security in the use of SSL/
TLS. If the data should be erased, DOCOMO assumes no
responsibility for the loss of any data.
Certifier : VeriSign Japan K.K., Cybertrust Japan Co., Ltd.,
GlobalSign K.K., RSA Security Japan Ltd., SECOM Trust Systems
Co., Ltd., Comodo CA Ltd., Entrust, Inc.
・
This FOMA terminal supports FOMA Plus-Area and FOMA HIGHSPEED Area.
・
FOMA terminal can be used only via the FOMA network provided
by DOCOMO and DOCOMO's roaming area.
Page 5
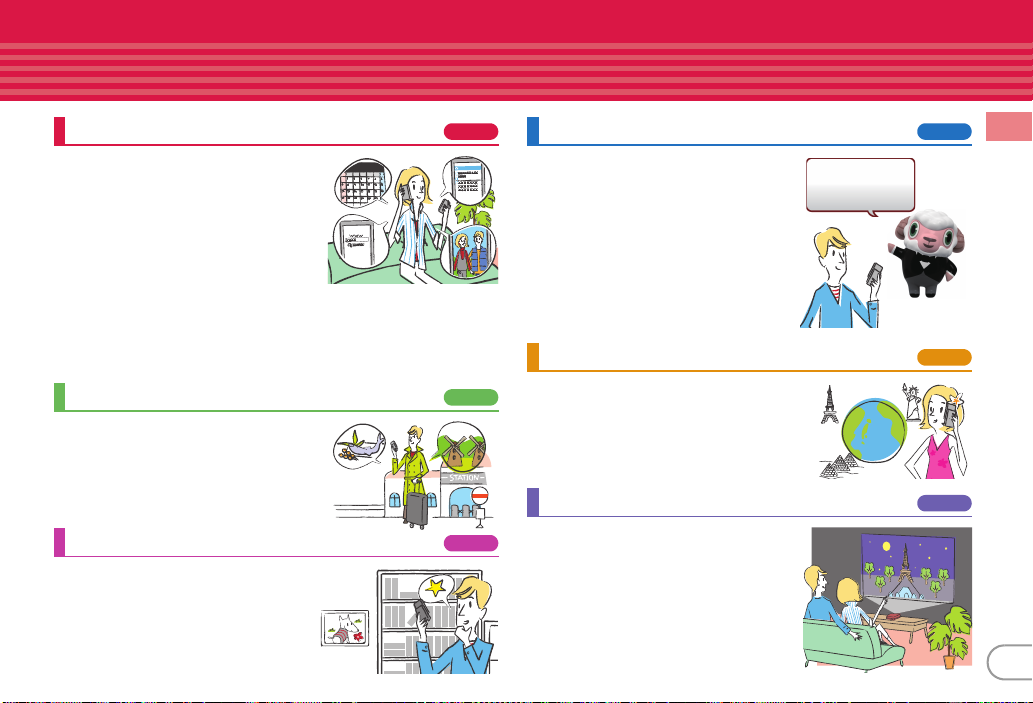
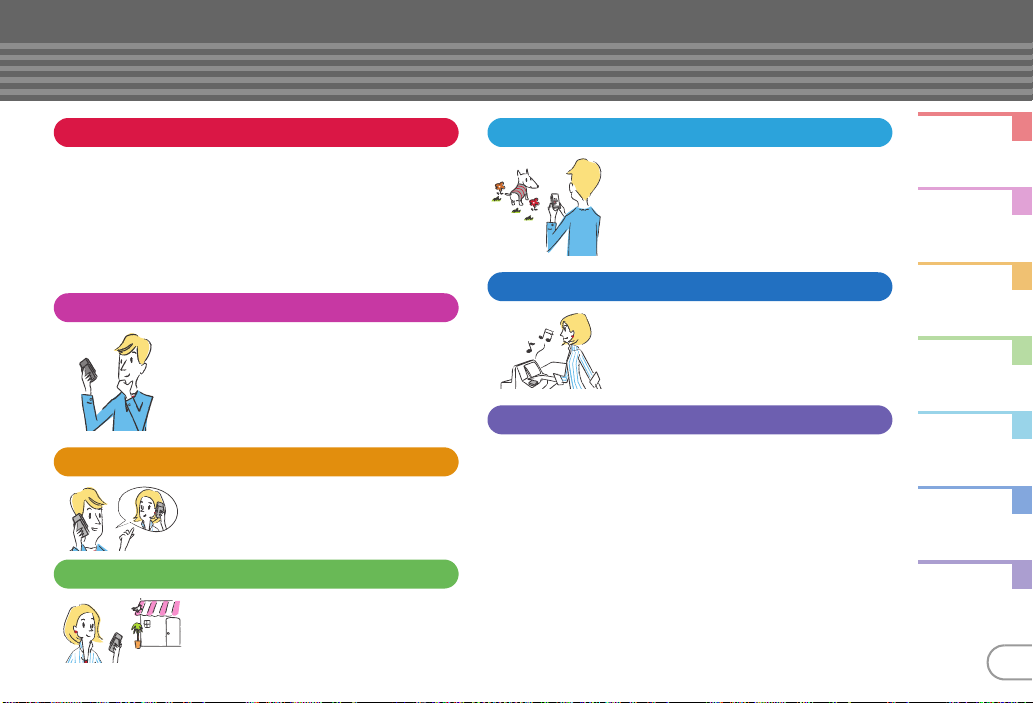
What you can do with F-04B
Style-flexible, Separatable Keitai
This FOMA terminal is separatable and
you can choose the usage style according
to the scene, for example, using only with
the display unit or calling with the keypad
unit while watching 1Seg, receiving mails,
viewing sites, checking schedules, etc.
with the display unit. Furthermore, making
videophone call without emitting sound from the speaker or using the
keypad unit as a remote controlled shutter when camera shooting is
available. You can even enter characters with the QWERTY keypad and
perform i-αppli lightly in a game mode.
AUTO-GPS
AUTO-GPS function allows you to use
convenient services that deliver such
information as weather, neighboring
shops, sightseeing, etc. around your
location.
使いかたガイド
It is convenient function to check
operations of function on FOMA terminal.
You can check it immediately without
Instruction manual at hand. (In Japanese
only)
(Guide)
8
65
30
i-concier
A character on stand-by display (Machichara) delivers useful information
(Information) and schedules are
automatically downloaded from sites (ischedule) so that you can use the service
for your convenience. (In Japanese only)
iコンシェルは
あなたの欲しい情報を
お届けします。
International Roaming (WORLD WING)
While staying overseas, you can use the
same FOMA terminal, phone number and
mail address as those used in Japan (3G/
GSM Areas are supported).
Projector unit
By using Projector unit F01 (optional),
1Seg, i-αppli, images, document data, etc.
can be projected widely.
75
"
ひつじのしつじくん®
(Butler Sheep)"
©
NTT DOCOMO
53
94
Introduction
3
Page 6
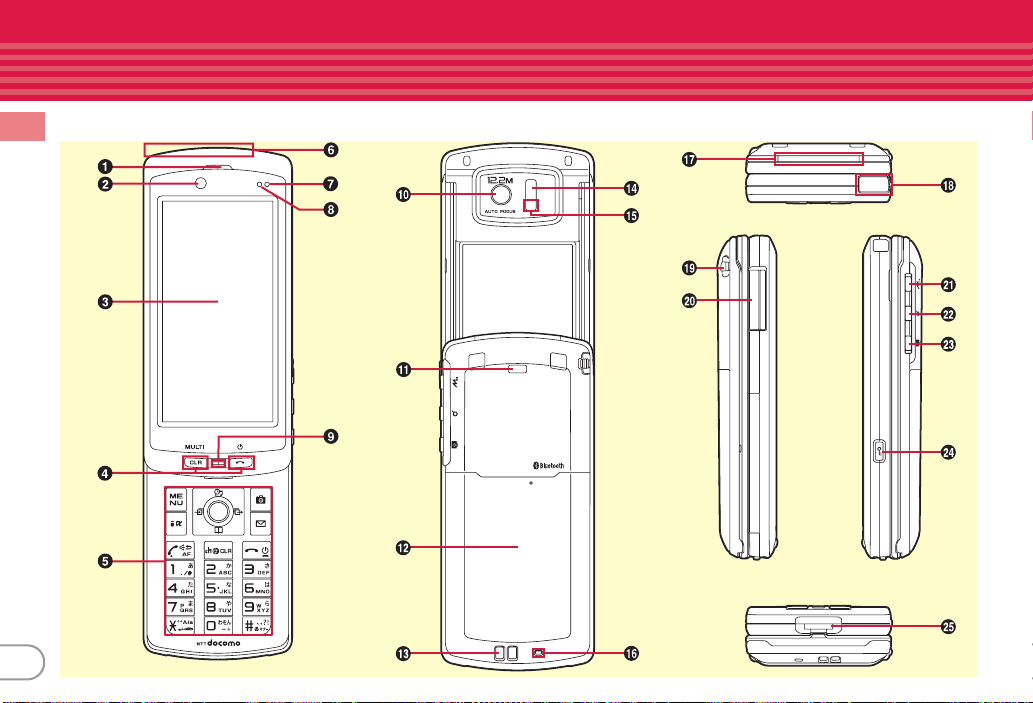
Part names and functions
Part names of F-04B and major functions assigned to each part are as follows.
Introduction
4
Page 7
a
Earpiece
Hear other party's voice from here.
b
In-camera
Send your image via videophone.
c
Display (touch panel) ⇒P26, 29
d
Front keypad⇒P7
e
Numeric keypad⇒P7
f
FOMA antenna (built into FOMA terminal)
For a call in better conditions, do not cover
the antenna with your hand.
g
Light sensor
Sense the ambient luminance to
automatically adjust the brightness of the
display. Do not cover the sensor with your
hand or a sticker.
h
Indicator light
The light turns on or blinks when there is
any incoming call, receiving mail or during
a call.
i
Microphone
Send your voice from here. Do not cover
the microphone during a call or sound
recording.
j
Out-camera
Shoot still images or moving pictures.
k
Light
Use as a camera light.
l
Back cover (keypad unit)
m
Charging jack
n
Infrared data port
Use the port for infrared communication or
infrared remote control function.
o
Shooting indication light
The light turns on or blinks when camera
shooting.
p
Microphone (keypad unit)
Send your voice from here when talking
with the keypad unit.
q
Arch light⇒P27
The light turns on or blinks when
detaching/attaching the unit, charging or
checking the battery level of keypad unit.
r
1Seg antenna
Pull out for better signal reception when
watching 1Seg.
s
Strap opening
t
External connection jack
Available to connect an optional AC
adapter, DC adapter, FOMA USB Cable
with Charge Function, Earphone Plug
Adapter for External connector terminal
etc.
uT
i-Widget/TV key
Start/Exit i-Widget or start 1Seg.
vU
Search key
Start Quick search.
wZ
Camera key
Operate camera while activating, save still
image on 1Seg, or stop ring alert.
xz
Lock key
Activate Operation lock or touch lock, or
operate camera while activating or Music
Player.
y
Separating button
Press the button when detaching the unit.
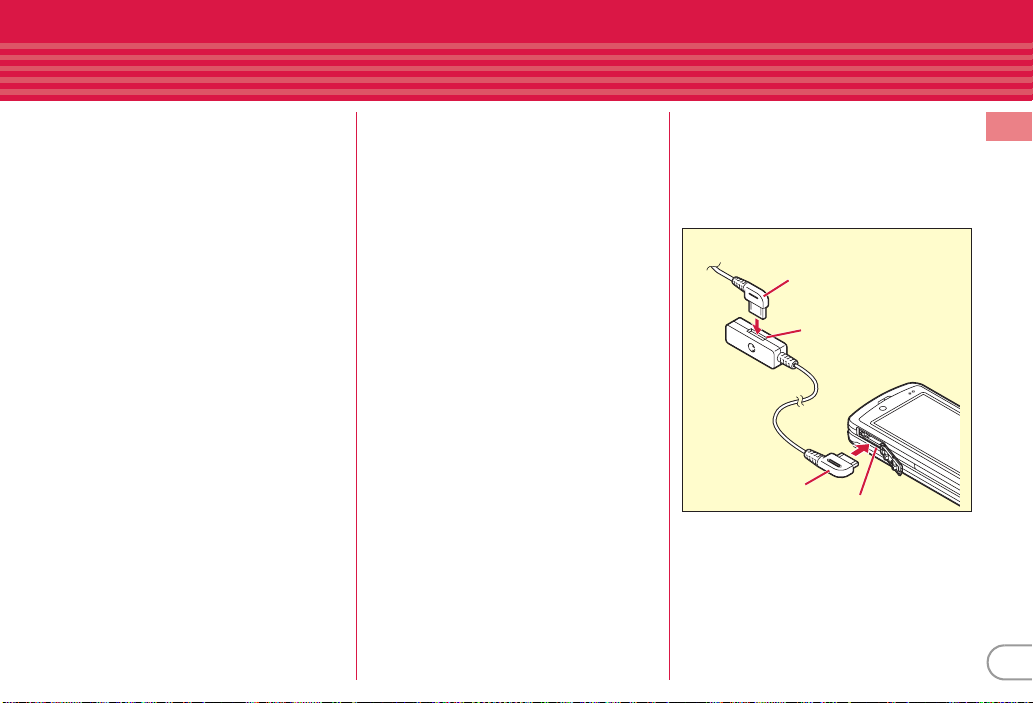
Example of connecting Flat-Plug Earphone/
Microphone with Switch (optional)
Connecting plug of Flat-Plug
Earphone/Microphone with Switch
Flat-plug earphone jack
Plug for the terminal
External connection jack
Introduction
5
Page 8
Introduction
6
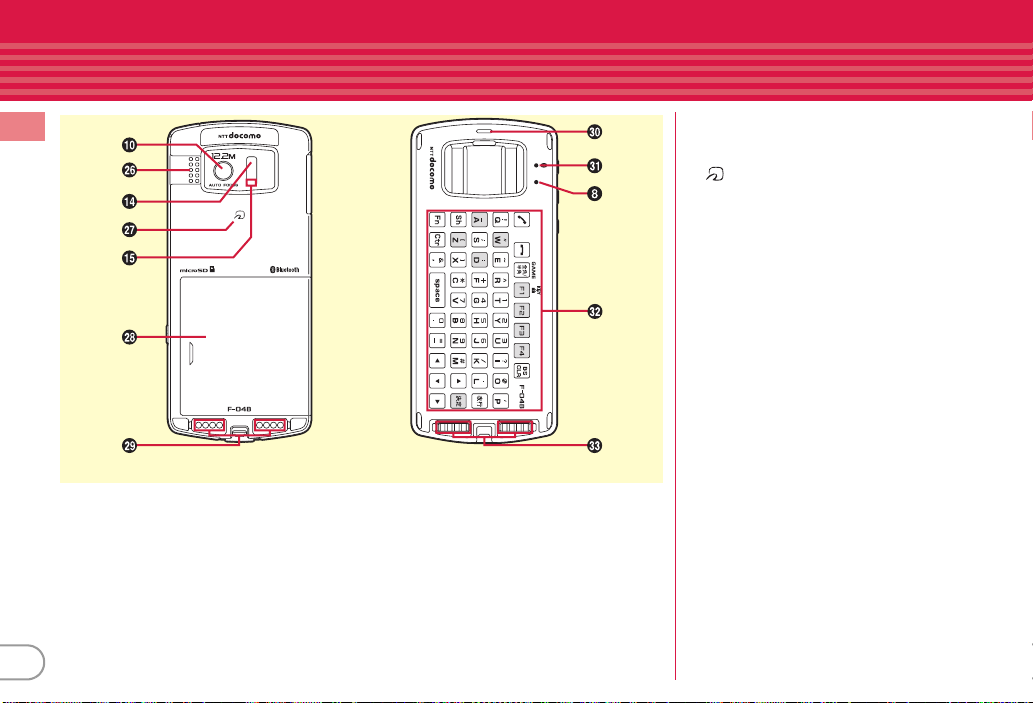
Display unit
(Back side)
Keypad unit
(Front side)
z
Speaker
Hear ring alert or voice of the caller using
the handsfree function.
A
Mark
Use Osaifu-Keitai or send/receive data by
iC transmission.
B
Back cover (display unit)
*
To access the UIM slot and microSD card slot,
remove the back cover and then remove the
battery pack.
C
Unit attaching terminal (display unit)
Connect to the keypad unit or Projector unit
F01 (optional)
D
Earpiece (keypad unit)
Hear other party's voice from here when
talking with keypad unit.
E
Bluetooth light⇒P27
Check Bluetooth connection status on the
unit.
F
QWERTY keypad⇒P7
G
Unit attaching terminal (keypad unit)
Connect to the display unit.
Page 9
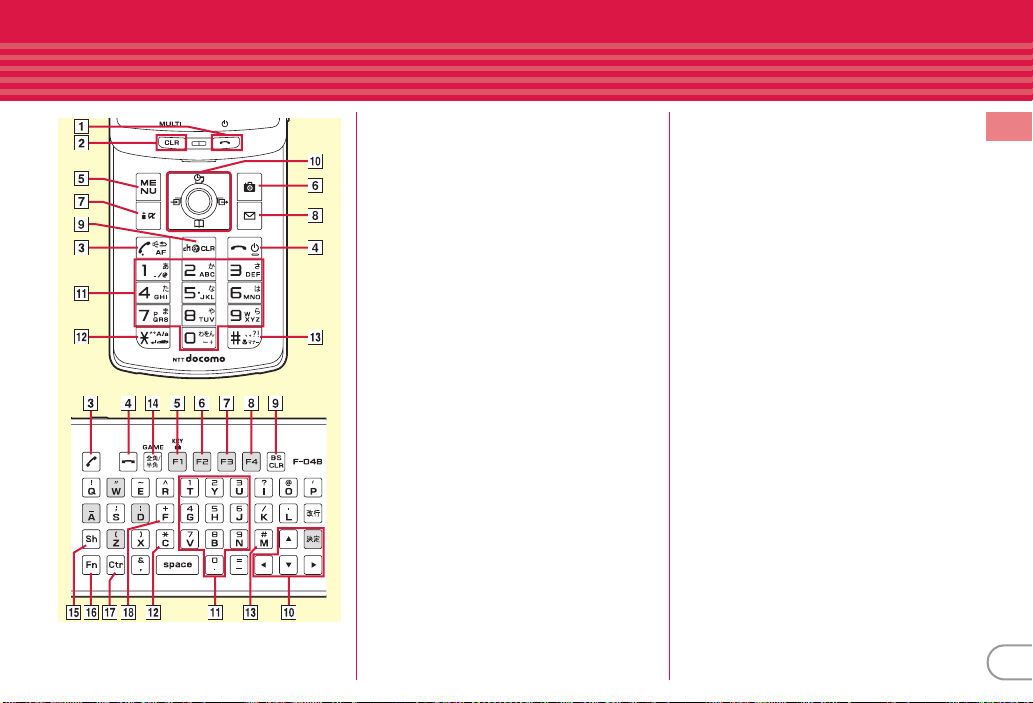
Front key/Numeric key/QWERTY key
ai
Turn ON/OFF FOMA terminal, or exit an
operating function.
bs
Return to the previous screen or activate/
perform other function.
cn
(Start a voice call key)/
Start a voice call.
df
(Power/End key)/
End talking or exit an operating function.
Use f to turn ON/OFF the power.
em
(MENU key)/
Display a menu. 1 to activate QWERTY
keypad lock.
fC
(Camera key)/
Shoot still images or moving pictures.
gI
(i-mode/i-αppli/Character key)/
Display iMenu or i-αppli folder, or switch
character input modes.
ha
(Mail key)/
Display the mail menu.
ic
(ch/Clear key)/
Display i-Channel or return to the previous screen.
jgk
(Multi-cursor key)/
Move the cursor, or operate a menu.
g
/ [ :
u
volume.
d
sound volume.
Perform an operation.
/ U :
Display Scheduler or adjust sound
/ D :
Display Phonebook or adjust
6
1
2
4
8
[UDLR
5
3
l
/ L :
r
k0-9
Enter phone number or characters, or
select an item.
l*
Display Received calls.
/ R :
Display Redial.
(Numeric keys)/ .-
n
(*/Public mode (Drive mode) key)/
c
Enter "*" or start/cancel Public mode (Drive
mode). Use * to add voiced/semivoiced sound mark.
m#
(#/Silent mode key)/
Enter "#" or start/cancel Silent mode. Use
#
to enter punctuation.
m
n7
Switch one-byte/two-byte characters for
Roman letters input, or switch to game mode.
oA
Press with an alphabet key or
the same time to enter capital alphabet
character or select range.
UDLR
pZ
Press with an alphabet key or a symbol key
at the same time to enter the symbol or the
number shown on the upper section.
qX
Press with a specific key at the same time to
activate a function.
rf
Enter prefix "+" for international call.
Introduction
at
7
Page 10
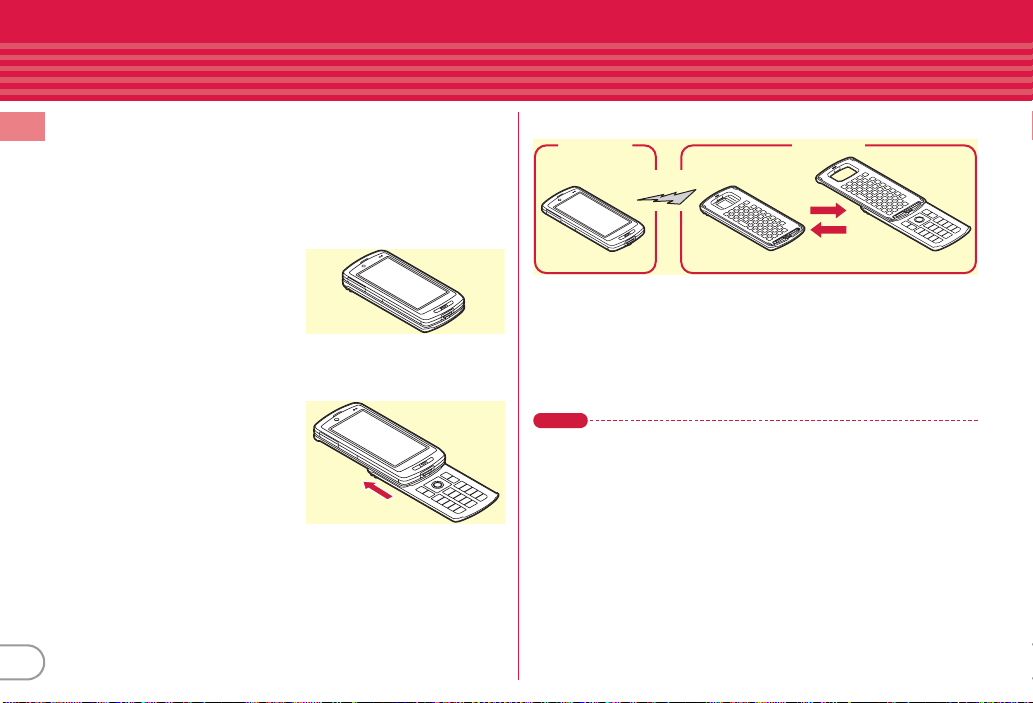
Usage Styles
You can use FOMA terminal in three styles.
・
Unless otherwise noted, operations in slide style are explained
Introduction
in this manual.
・
The terminal supports motion sensor in basic style and
⇒
separated style.
✜
Basic style
Touch operation is available with
FOMA terminal closed.
*
Only in-camera is available to shoot
still image/moving picture. To shoot
with out-camera, change the style.
*
Osaifu-Keitai, infrared communication,
and iC transmission are unavailable.
✜
Slide style
It is FOMA terminal opened style
which supports numeric keypad
operation and touch operation.
*
Osaifu-Keitai and iC transmission are
unavailable.
P25
8
✜
Separated style
Display unit
Bluetooth connection
Separate FOMA terminal into display unit and keypad unit (⇒P20) and
then operate the terminal with the keypad unit via Bluetooth
communication or use only the display unit. While talking with the
keypad unit, watching 1Seg, sending/receiving mail, viewing sites, etc.
are available with the display unit. When the keypad unit is closed,
entering characters in Roman letters or operating i-αppli in game
mode are available with QWERTY keypad.
Point
・
Do not apply excessive force when opening/closing the terminal or
detaching/attaching the unit, or opening/closing the keypad unit. It may
cause damages on the keypad or the display.
・
Before carrying FOMA terminal, activate Operation lock or QWERTY
keypad lock to prevent inadvertent operations or to save battery power
consumption.
・
Vibrator operates in the display unit. Please be careful not to drop the
terminal from a desk etc. by the vibration.
・
In slide style, center of gravity comes to the display unit. For using, hold
FOMA terminal in your hand firmly.
Keypad unit
Using Numeric keypadUsing QWERTY keypad
Page 11
Precautions (ALWAYS FOLLOW THESE DIRECTIONS)
・
Before using your FOMA terminal, or when necessary, read the
following precautions to ensure safe use and handling. After
reading this manual, keep it in a safe place.
・
These precautions are intended to protect you and others around
you. Read and follow them carefully to avoid injury, damage to the
product or damage to property.
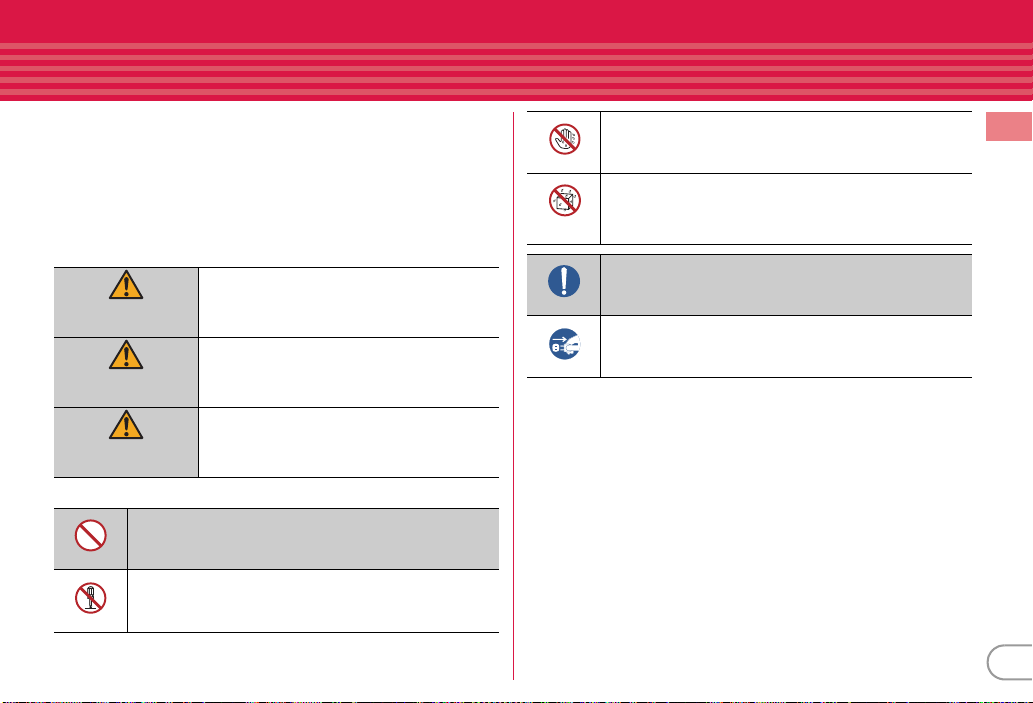
・
The signs below differentiate between the levels of danger that can
occur if the product is not used within the specified guidelines.
This sign denotes that death or serious
injury may directly result from improper use.
DANGER
This sign denotes that death or serious
injury may result from improper use.
WARNING
This sign denotes that bodily injury or
CAUTION
・
The symbols below show specific directions.
damage to property may result from
improper use.
No wet hands
No liquids
Unplug
■
Precautions contain the description below.
Handling FOMA terminal, battery pack, adapter and UIM (common) ............ 10
Handling FOMA terminal .................................................................................... 11
Handling battery pack ......................................................................................... 13
Handling adapter ................................................................................................. 14
Handling UIM....................................................................................................... 15
Handling mobile phones near electronic medical equipment ........................ 15
This symbol denotes that using the phone or its
components with wet hands is not allowed.
This symbol denotes that using the phone or its
components in a bathroom or other highly humid area is
not allowed.
This symbol denotes that an instruction must be obeyed at
all times.
Do
This symbol denotes that the equipment should be
unplugged.
Introduction
Don’t
No disassembly
This symbol denotes that the action is prohibited.
This symbol denotes that disassembling the phone or its
components is not allowed.
9
Page 12
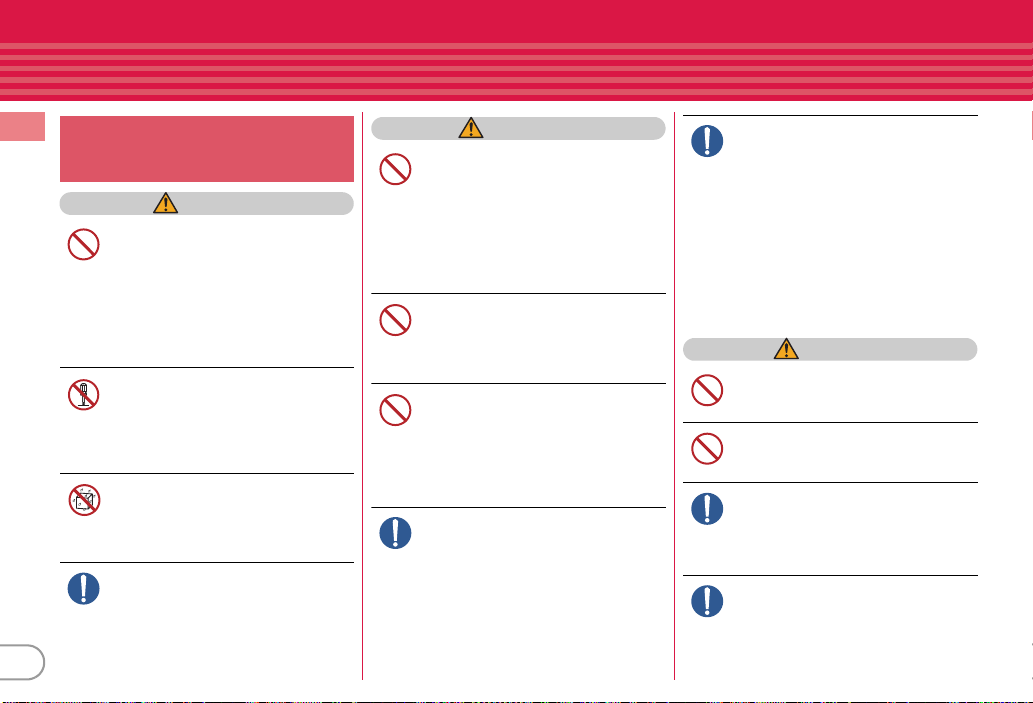
Handling FOMA terminal,
Introduction
battery pack, adapter and UIM
(common)
DANGER
Do not use, store, or leave the
equipment in hot areas such as near
flames or in areas under strong direct
Don’t
sunlight such as inside a vehicle.
May cause the equipment to be deformed or
malfunction, and battery pack to leak, heat,
burst or ignite, and the capability or life to be
reduced or shortened. Overheating on parts
of the case may cause burns or injuries.
Do not disassemble or remodel the
equipment. Do not solder items onto
the equipment.
No disassembly
May cause fire, injuries, electric shock, or
malfunction. It may also cause the battery
pack to leak, heat, burst or ignite.
Do not let the equipment get wet.
Contact with water or other liquids may cause
heating, electric shock, fire, malfunctions or
No liquids
injuries. Take care of the place for use and
treatment of the equipment.
Use the battery pack and adapter
specified by NTT DOCOMO for your
FOMA terminal.
Do
Use of equipment not specified by DOCOMO
can cause FOMA terminal, battery pack and
10
other parts to leak, heat, burst, catch fire or
malfunction.
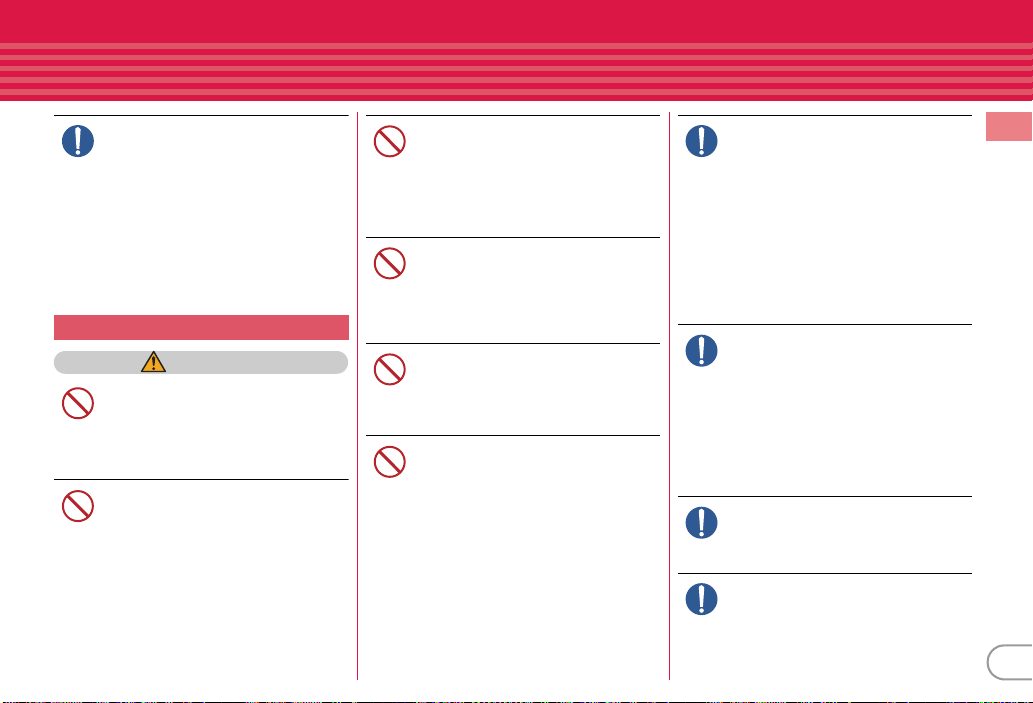
WARNING
Do not put the battery pack, FOMA
terminal, adapter or UIM in
microwave ovens or other heating
Don’t
appliances or high-pressure
containers.
May cause the battery pack to leak, heat, burst
or ignite, may cause FOMA terminal or
adapter to heat, smoke, ignite, or may
damage circuits.
Do not throw the equipment or give
hard shock to it.
May cause the battery pack to leak, heat, burst
Don’t
or ignite, and the equipment to malfunction
or catch fire.
Keep conductive materials (metal
pieces, pencil lead, etc.) from coming
in contact with the charging jack or
Don’t
external connection jack. Do not put
those materials inside the terminal.
May be subject to electrical short and could
cause fire or malfunction.
Turn FOMA terminal OFF before
entering a place such as a gas station
where flammable gases are
Do
generated.
Do not charge the battery. The gas
may catch fire.
When using Osaifu-Keitai in a place as a gas
station, turn OFF the terminal before using it.
(When IC card lock is activated, deactivate it
before turning OFF the terminal.)
If the equipment starts giving off a
strange smell, overheats, becomes
discolored or deformed during use,
Do
charging or in storage, immediately
perform the following operations.
1. Remove the power plug from the wall
outlet or cigarette lighter socket.
2. Turn FOMA terminal OFF.
3. Remove the battery pack from FOMA
terminal.
May cause the equipment to heat, burst or
ignite or the battery pack to leak if you keep
using the equipment.
CAUTION
Do not leave the equipment on
unstable or sloping surfaces.
May cause malfunction or injuries.
Don’t
Do not store the equipment in
extremely humid, dusty or hot areas.
May cause malfunction.
Don’t
Children using the equipment should
be instructed in proper operation by
an adult. Do not allow them to use the
Do
equipment without adult supervision.
May cause injuries.
Store the equipment out of reach of
small children.
May be accidentally swallowed or cause
Do
injuries.
Page 13
Be careful especially when using
FOMA terminal connected to the
adapter continuously for a long time.
Do
If you use i-αppli, a videophone call or 1Seg
watching while charging the battery for a
long time, FOMA terminal, battery pack and
adapter may be heated.
Directly touching a hot part for a long time,
you may have redness, itching or rash on
your skin, or it may result in low-temperature
burns depending on your constitution and/or
health condition.
Handling FOMA terminal
WARNING
Do not direct the infrared data port
toward your eye and transmit signals.
May affect your eyes. Faulty operation could
Don’t
result from directing the infrared data port
toward other infrared equipment and
transmitting signals.
Do not turn on the light by getting the
lighting part closer to other person's
eyes.
Don’t
May impair eyesight. And may cause
accidents like injury etc., by dazzling or
astounding other people.
Do not put FOMA terminal in the place
such as the dashboard near the airbag, where the influence of air-bag
Don’t
explosion is expected.
When the air-bag explodes, FOMA terminal
may hit yourself or others and could cause
injury, equipment malfunction or damage.
When you use electronic medical
equipment, do not keep the terminal
in your chest pocket or inside pocket.
Don’t
Using your FOMA terminal near medical
electronic equipment could cause equipment
failure.
Do not put foreign objects such as
liquid like water, metal pieces or
burnable things into UIM or microSD
Don’t
card slot.
May cause fire, electric shock or malfunction.
Do not turn on the light aiming
directly at the driver of the car etc.
May disturb driving and cause an accident.
Don’t
Turn FOMA terminal OFF in areas
where use is prohibited, such as in
airplanes and hospitals.
Do
May cause electronic equipment or electronic
medical equipment to fail or malfunction. If
the function which automatically turns the
power ON is set, cancel the setting before
turning the power OFF.
When using the phone in a medical faci lity, be
sure to observe the regulations of the facility.
If you do prohibited act such as using the
phone in an airplane, you may be punished
according to law.
When you talk by setting handsfree,
always keep FOMA terminal away
from your ear.
Do
And, when connecting the earphone/
microphone to FOMA terminal and
play a game or music, adjust the
volume moderately.
Too loud volume may cause a hearing loss.
And, if you cannot hear the sound around you
clearly, it may cause an accident.
If you have weak heart, be careful
when setting the Vibrate alert
(vibration) or alert volume setting.
Do
Could affect heart function.
If it starts thunder while using the
terminal outdoors, turn the power
OFF immediately, and move to a safe
Do
location.
May be subject to lightning strike and could
cause electric shock.
Introduction
11
Page 14
12
Introduction
Turn FOMA terminal OFF near highprecision electronic control
equipment or electronic equipment
Do
using low-power signals.
May cause the equipment to fail or
malfunction.
*
Examples of electronic equipment to avoid.
Hearing aids, implanted pacemakers or
defibrillators, other electronic medical equipment,
fire alarms, automatic doors and other automatic
control equipment.
Users wearing implanted pacemakers or
defibrillators or other electronic medical
equipment should check with the manufacturer or
sales outlet about the effect of radio frequencies
on the equipment.
When the display or camera lens is
accidentally broken, be careful of
broken glass or exposed internal parts
Do
of FOMA terminal.
Surfaces of display and camera lens are made
of plastic panels and they are structured for
the glass not to scatter, however, if you
mistakenly touch broken or exposed parts,
you may be injured.
To sound the high-pitched alarm,
always keep FOMA terminal away
from your ears.
Do
May cause hearing loss.
CAUTION
Do not swing FOMA terminal by its
strap.
May cause the terminal damage or failure, or
Don’t
injury to yourself or others.
When using the motion tracking or
motion sensor, check the safety
around you, hold FOMA terminal
Don’t
firmly, and do not shake it
unnecessarily.
The motion tracking and motion sensor are
functions to operate by tilting or shaking
FOMA terminal. There is a risk that FOMA
terminal hits people or objects around you by
shaking it too much, causing a serious
accident or damage.
If you put a metal strap or the like to
FOMA terminal, be careful not to let
the strap hit people or objects around
Don’t
you when performing motion tracking
or using motion sensor.
Accidents such as injury, malfunction or
damage may result.
If the display part is accidentally
broken and liquid crystal leaks out, do
not put the liquid in your mouth,
Don’t
inhale, or make contact with your skin.
If the liquid gets into your eyes or
mouth, rinse it with clean water and
see a doctor immediately.
And, if the liquid adheres to skin or
clothing, use alcohol etc. to wipe it off,
then wash with soap.
May cause loss of sight or skin problems.
Do not bring the speaker close to your
ear when the ring alert is sounding or
you are playing a melody with FOMA
Don’t
terminal.
May cause hearing loss.
In rare cases, using the phone in some
vehicle models can cause the vehicle's
electronic equipment to malfunction
Do
or fail.
In this case, do not use the phone because it
may hamper safe driving.
Page 15
Mobile phones can give some users
skin problems such as itching, allergic
reactions or rashes. If you develop skin
Do
problems, stop using the phone
immediately, and see a doctor.
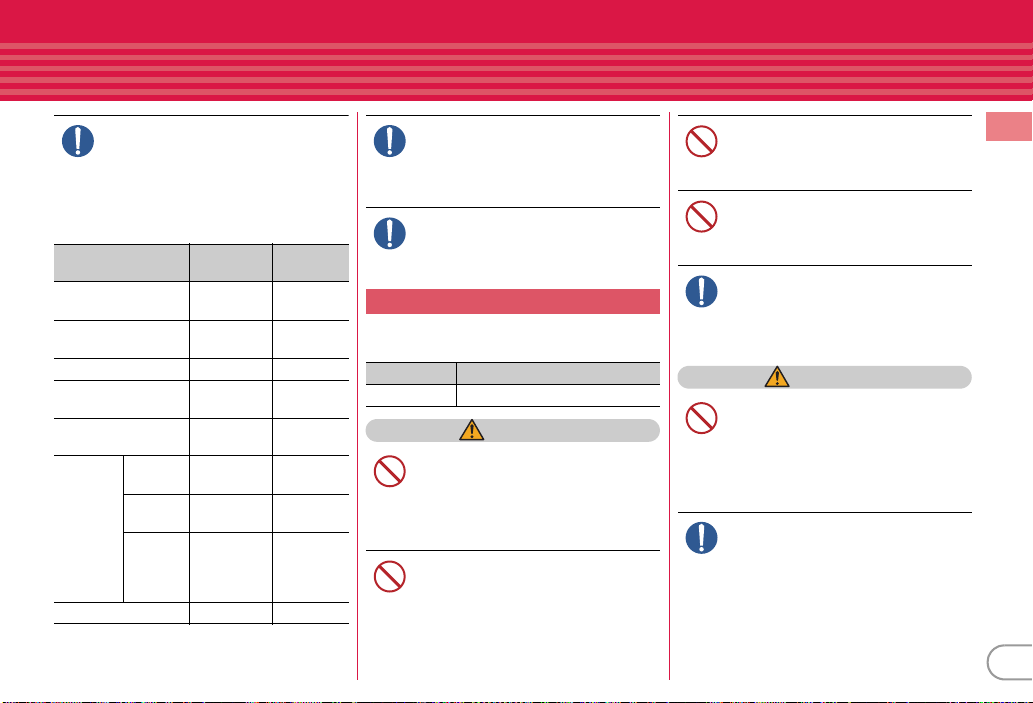
FOMA terminal contains metal in the
parts below.
Part Material
Charging jack SUS Gold
Battery pack
connector jack
Screw Steel Zinc plating
External connection
jack
Nameplate attach
section
Metal part
of TV
antenna
Slide module SUS Coating
Top end Copper alloy Sn-Co
Retracting
long shaft
Hinge
upper
part/lower
part
Beryllium
copper
SUS Gold
SUS None
Ni-Ti None
SUS Sn-Co
Surface
treatment
plating
Gold
plating
plating
plating
plating
When opening or closing FOMA
terminal, take care not to have your
fingers or strap caught by the
Do
terminal.
May cause injuries or damages.
When watching 1Seg, take a certain
distance from the display in a fully
bright place.
Do
May cause your eyesight to be impaired.
Handling battery pack
■
Check that the battery type matches the
type displayed on the battery pack label.
Display Battery type
Li-ion 00 Li-ion battery
DANGER
Do not connect a wire or other metal
objects to the jack. And, do not carry
or store FOMA terminal with objects
Don’t
like a metal necklace.
May cause the battery pack to leak, heat, burst
or ignite.
Do not try to force the battery pack
onto FOMA terminal if you are having
trouble installing it. Always install it
Don’t
after checking that it is correctly
oriented.
May cause the battery pack to leak, heat, burst
or ignite.
Do not throw the battery pack into the
fire.
May cause the battery pack to leak, heat, burst
Don’t
or ignite.
Do not nail the battery pack, hit with a
hammer or step on it.
May cause the battery pack to leak, heat, burst
Don’t
or ignite.
If the battery pack's fluid contacts
eyes, immediately flush the eyes with
clean water and see a doctor right
Do
away. Do not rub the eyes.
May cause loss of sight.
WARNING
If the battery pack seems to have
abnormalities such as deformation or
scratches due to an external impact or
Don’t
falling, stop using it immediately.
May cause the battery pack to leak, heat, burst
or ignite, and the equipment to malfunction
or catch fire.
If the battery pack does not have a full
charge after being charged for the
specified time, stop charging it.
Do
May cause the battery pack to leak, heat, burst
or ignite.
Introduction
13
Page 16
14
Introduction
If the battery pack leaks or gives off a
strange smell, immediately remove it
from the vicinity of open flames.
Do
The vapors from leaking battery pack fluid
may ignite or explode.
Be careful not to let your pet bite the
battery pack.
May cause the battery pack to leak, heat, burst
Do
or ignite, and the equipment to malfunction
or catch fire.
CAUTION
Do not discard old battery packs
together with other garbage.
May cause igniting or environmental
Don’t
destruction. Tape the terminals of old battery
packs to insulate them, and then bring them
into a sales outlet such as docomo Shop. If
your local municipality has a battery recycli ng
program, dispose of them as provided for.
Do not charge a wet battery pack.
May cause heat generation, ignition or
rupture of the battery pack.
Don’t
If the battery pack's fluid contacts skin
or clothes, immediately flush the
contacted area thoroughly with clean
Do
water.
May hurt the skin.
Handling adapter
WARNING
Do not use the adapter cord or power
cord if it gets damaged.
May cause electric shock, heat or fire.
Don’t
Do not use the AC adapter or desktop
holder in a bathroom or other highly
humid area.
Don’t
May cause electric shock.
Always use the DC adapter with a
negative-ground vehicle. Do not plug
it into a positive-ground vehicle.
Don’t
May cause fire.
When it starts to thunder, do not
touch FOMA terminal and adapter.
May be subject to lightning strike and coul d
Don’t
cause electric shock.
Do not short the charging jack while it
is connected to the outlet or cigarette
lighter socket. Do not touch the
Don’t
charging jack with a part of your body
such as your hand or finger.
May cause fire, malfunction, electric shock or
injuries.
Place the adapter and desktop holder
in a stable location while charging. Do
not cover or wrap the adapter and
Don’t
desktop holder with a cloth or blanket.
May cause FOMA terminal to be removed or
the optional devices t o be heated, resulting in
fire or troubles.
Do not place heavy objects on the
adapter cord or power cord.
May cause electric shock or fire.
Don’t
Do not touch the adapter cord or
outlet with wet hands.
May cause electric shock.
No wet hands
Only use with the specified power
source and voltage.
If incorrect voltage is used, this may cause fire
Do
or failure. When using FOMA terminal
overseas, use AC Adapter for global use.
AC adapter : AC100V
DC adapter : 12 or 24V DC (specific for
negative ground vehicle)
AC adapter for global use : Between 100V and
240V AC (connect to the AC outlet for
internal household use)
If the DC adapter's fuse blows, replace
it only with the specified fuse.
Using other fuses may cause fire or
Do
equipment failure. For the specified fuse, see
the instructions that come with the DC
adapter.
Page 17
Wipe off any dust that accumulates on
the power plug.
May cause fire.
Do
When you connect the AC adapter to
an outlet, make sure not to touch with
metal such as metal straps and firmly
Do
connect to the outlet.
May cause electric shock, electrical short or
fire.
When you disconnect the adapter
from the outlet or cigarette lighter
socket, do not pull the adapter cord or
Do
power cord with excessive force.
Instead, hold the power plug to
disconnect.
Pulling the cord could damage it, possibly
leading to electric shock or fire.
Always remove the power plug from
the outlet when not using the adapter
for an extended period.
Unplug
May cause electric shock, fire or malfunction.
Immediately remove the power plug
from the outlet or cigarette lighter
socket if water or other fluids get into
Unplug
the adapter.
May cause electric shock, smoke or fire.
Always remove the power plug from
the cigarette lighter socket when
cleaning the equipment.
Unplug
May cause electric shock.
Handling UIM
CAUTION
Be careful of the cut surface when
removing UIM (ICs).
May hurt hands or fingers.
Do
Handling mobile phones near
electronic medical equipment
■
These precautions are based on the
guidelines produced at the Electromagnetic
Compatibility Conference Japan, regarding
the protection of electronic medical
equipment from radio waves emitted by
mobile phone units.
WARNING
Obey the following rules inside
medical facilities.
・
Do not bring FOMA ter minal into operating
Do
rooms (ORs), intensive care units (ICUs) or
coronary care units (CCUs).
・
Turn FOMA terminal OFF in hospital wards.
・
Turn FOMA terminal OFF in hospital
lobbies and corridors if electronic medical
equipment could be nearby.
・
If the medical facility has specified zones
where use or possession of mobile devices
is prohibited, obey those instructions.
・
If the function to automatically turn ON the
power is set, cancel the setting before
turning the power OFF.
Turn FOMA terminal OFF in crowded
trains or other public places where
pacemaker or defibrillator wearers
Do
could be nearby.
FOMA terminal's signals may affect the
operation of implanted pacemakers or
defibrillators, and other devices.
Wearers of implanted pacemakers or
defibrillators must carry and use
FOMA terminal at least 22 cm away
Do
from the implanted device.
FOMA terminal's signals may affect the
operation of implanted pacemakers or
defibrillators, and other devices.
When electronic medical equipment
other than implanted pacemakers or
defibrillators are in use outside of
Do
medical facilities (such as in home care
settings), check with the device
manufacturer to determine how the
device is affected by electrical signals.
FOMA terminal's signals may affect the
performance of electronic medical
equipment.
Introduction
15
Page 18
Handling precautions
General FOMA terminal
Introduction
・
Keep water away from FOMA terminal.
- FOMA terminal, battery pack, adapter and UIM are not waterproof. Do not use
FOMA terminal in bathrooms or other high-humidity areas, or in the rain. When
carrying FOMA terminal in a pocket nea r your body, sweat may corrode the inner
components, causing malfunction. Malfunctions deemed to be caused by water
are not covered by the warranty, and may be impossible to repair. Since these
conditions are outside the scope of the warranty, a repair, if at all possible, is
charged.
・
Clean FOMA terminal with a dry soft cloth (such as a cloth for eyeglasses).
- The display of FOMA terminal may have been applied special coating to impro ve
clearness of the color LCD. When cleaning FOMA terminal, rubbing it roughly
with a dry cloth can scratch the display. Take care when handling the unit, and
clean it with a dry soft cloth (such as a cloth for eyeglasses). Drops of water or
dirt left on the display can cause stains or remove the coating.
- If FOMA terminal is wiped with alcohol, paint thinner, benzine or detergent, the
printing may disappear or color may fade.
・
Clean the jack occasionally with a dry cotton swab etc.
- If the jack is soiled, connection gets worse and it may cause power to be turned
off or insufficient battery charge, so clean the jack with a dry cotton swab etc.
Also, be careful never to damage the jack when cleaning it.
・
Do not place FOMA terminal near an air-conditioner outlet.
- The rapid change in temperature may cause condensation, causing internal
corrosion and malfunction.
・
When using, be careful not to subject excessive force to FOMA terminal or the
battery.
- If FOMA terminal is crammed into a brimming bag or placed in a pocket and sat
on, display, internal PCBs or battery pack may be damaged or malfunction. And,
if external devices are plugged into the external connection jack (earphone/
microphone jack), the breakage of the connector or malfunction may result.
・
Carefully read the separate instructions that come with FOMA terminal, adapter
and desktop holder.
・
Do not rub or scrape the display with a metal piece etc.
16
- It may scratch the display, causing malfunction or damage.
・
Do not press the surface of the touch panel strongly or operate it with sharp
objects such as a nail, a ballpoint pen and a pin.
- It may damage the touch panel.
・
Avoid extreme temperature.
- Use FOMA terminal where the temperature ranges between 5 and 35℃ and
humidity ranges between 45 and 85%.
・
FOMA terminal may affect land-line phones, TVs or radios in use nearby, so use
it as far as possible from these appliances.
・
Maintain a separate record of the data you saved in your FOMA terminal.
- If the data is deleted, DOCOMO assumes no responsibility for the loss of any
data.
・
Do not drop FOMA terminal or subject it to shocks.
- May cause malfunction or damage.
・
Do not plug external devices into the external connection jack (earphone/
microphone jack) at a slant, or do not pull it forcibly while it is plugged.
- May cause malfunction or damage.
・
Do not close FOMA terminal with the strap etc. held inside.
- May cause malfunction or damage.
・
It is normal for FOMA terminal to become warm during use or charging.
Continue to use it.
・
Do not leave FOMA terminal with the camera in areas under strong direct
sunlight.
- May cause discoloring or burn-in of materials.
・
FOMA terminal should normally be used with the external connection jack cap
closed.
- Dust and/or water brought into FOMA terminal cause troubles.
・
Do not use FOMA terminal with the back cover removed.
- May cause the battery to come off, or may cause a malfunction or damage.
・
Do not put label or sticker on the backside or keypad side of display unit, or
backside of QWERTY keypad unit.
- Getting stuck with the label or sticker when opening/closing FOMA termi nal may
cause malfunction or damage.
Page 19

・
While microSD card is being used, do not take the card out and do not turn OFF
FOMA terminal.
- May cause data loss or malfunction.
・
Do not bring magnetic cards etc. close to FOMA terminal.
- Magnetic data in cash cards, credit cards, telephone cards, floppy disks, etc. may
be erased.
・
Do not bring magnetized objects close to FOMA terminal.
- Bringing strong magnetism close may cause a malfunction.
Battery pack
・
The battery pack is a consumable part.
- Replace the battery pack if FOMA terminal has extremely short operation time
on a full charge, though it may vary by operating conditions. Purchase a new
battery pack of the specified type.
・
Charge the battery in an area within the proper ambient temperature range (535
℃
).
・
Always charge before using it for the first time or after extended disuse.
・
The operation time provided by the battery pack varies by the operating
environment and battery pack's deterioration.
・
The battery pack may swell out as it comes to near the end of its lifetime
depending on the usage conditions, but it is not a problem.
・
Be careful especially about the following points when preserving or leaving the
battery pack for a long time.
- Keeping under the state of the full charge (right after charging ends)
- Keeping under the state of the empty charge (too exhausted to turn on FOMA
terminal)
They may cause the battery pack performance to be degraded or its lifetime to be
shortened.
For recommended battery level to keep for a long time, the display of battery icon
is in a state of 2 cells as a guide.
Adapter
・
Charge the battery in an area within the proper ambient temperature range (535
℃
).
・
Do not charge the battery in the areas below.
- In areas of excessive humidity, dust or vibrations
- Near land-line phones or TVs/radios
・
It is normal for the adapter to become hot while charging. Continue to use it.
・
When using the DC adapter for charging, keep the vehicle engine running.
- The vehicle's battery could become flat.
・
When using an outlet with a mechanism preventing unplugging, follow the
handling instructions for that outlet.
・
Do not give strong shock. Do not deform the charging jack.
- May cause malfunction.
Introduction
17
Page 20
UIM Bluetooth devices
Introduction
・
Do not use excessive force to install/remove UIM.
・
It is normal for UIM to become warm during use. Continue to use it.
・
Note that DOCOMO assumes no responsibility for malfunctions occurring as the
result of inserting and using a UIM with another IC card reader/writer.
・
Always keep UIM ICs clean.
・
Clean UIM with a soft, dry cloth (such as a cloth for eyeglasses).
・
Maintain a separate record of the data you saved in UIM.
- If the data is deleted, DOCOMO assumes no responsibility for the loss of any
data.
・
To preserve the environment, bring the old UIM to a sales outlet such as
docomo Shop.
・
Avoid extreme temperature.
・
Take care not to scratch, touch accidentally or short IC.
- May cause data loss or malfunction.
・
Do not drop UIM or subject it to shocks.
- May cause malfunction.
・
Do not bend UIM or place heavy objects on it.
- May cause malfunction.
・
Do not install UIM into FOMA terminal with a label or sticker put on UIM.
- May cause malfunction.
・
This FOMA terminal is equipped with the security features, that are compliant
with Bluetooth standards for communication via Bluetooth. However,
depending on the settings, there may not be enough security. Be aware of
security risks when using Bluetooth.
・
DOCOMO assumes no responsibility for any information which may be leaked
during communication via Bluetooth.
・
You can use handsfree, headset, audio, keyboard, dial-up connection, object
push and serial port devices with FOMA terminal. An audio/video remote
control may be available with an audio device (only Bluetooth compatible
devices).
・
To use FOMA terminal with separated into the display unit and the ke ypad unit,
Bluetooth function is used.
・
Frequency bands
Frequency bands used by FOMA terminal Bluetooth function are as below.
a
2.4 : Radio equipment that uses the 2400 MHz band.
b
FH : The modulation is the FH-SS method.
c
1 : The expected interference di stance is 10 m or shorter.
d
and the bandwidth used by mobile object identification devices cannot be
avoided.
18
abdc
2.4FH1
: All bandwidths between 2400 MHz and 2483.5 MHz are used,
Page 21
Cautions on using Bluetooth devices
In the bandwidth used by this terminal, in addition to home electric appliances
such as a microwave oven and industrial/scientific/medical devices, in-plant
radio stations used to identify mobile objects used in production lines of a
factory that require a license, specified low power radio stations, or amateur
radio stations that do not require a license (hereafter "other radio stations") can
be in operation.
1. Before using this terminal, check whether other radio stations are in
operation in your neighborhood.
2. If radio wave interference occurs between the terminal and "other radio
stations", use the terminal in a different location or "Turn the power OFF" to
avoid the radio wave interference.
3. For more detailed information, contact the numbers for "General Inquiries"
on the last page of this manual.
FeliCa reader/writer
・
FeliCa reader/writer function of FOMA terminal uses weak waves requiring no
licenses for radio stations.
・
It uses 13.56 MHz frequency band. When using other reader/writers in your
surroundings, keep FOMA terminal away sufficiently from them. Before using
the FeliCa reader/writer, confirm that there are no radio statio ns using the same
frequency band nearby.
CAUTION
・
Do not use a remodeled FOMA terminal. Using a remodeled terminal violates
the Radio Law.
FOMA terminal is certified according to technical standard conformance of
specified wireless equipment based on the Radio Law, and as a proof of it, the
"Technical Compliance Mark " is depicted on the nameplate sticker of FOMA
terminal.
If you remodel FOMA terminal by removing its screws, your certification of
technical standard conformance becomes invalid.
Do not use FOMA terminal with its certification of technical standard conformance
invalid as it violates the Radio Law.
・
Be careful when you use FOMA terminal while driving a car etc.
Using a mobile phone while driving is subject to penal regulations.
If you inevitably receive a call, tell the caller that you will "call back" by handsfree,
then park in a safe place and call back.
・
Use the Bluetooth function only in Japan.
The Bluetooth function of the FOMA terminal is compliant with wireless standards
and is authorized for use only in Japan.
If you use this function overseas, you may be punished.
・
Use FeliCa reader/writer function only in Japan.
FeliCa reader/writer function of FOMA terminal conforms to Japanese radio
standards.
If you use this function overseas, you may be punished.
Introduction
19
Page 22
Before Using
Operating in separated style
To operate from the keypad unit in separated style, the keypad unit
should be registered as a Bluetooth device. Registration is
automatically performed when you joined the FOMA terminal and
turns it ON for the first time.
*
For detaching/attaching FOMA terminal's unit, hold the FOMA terminal
in hand.
Basic Operation
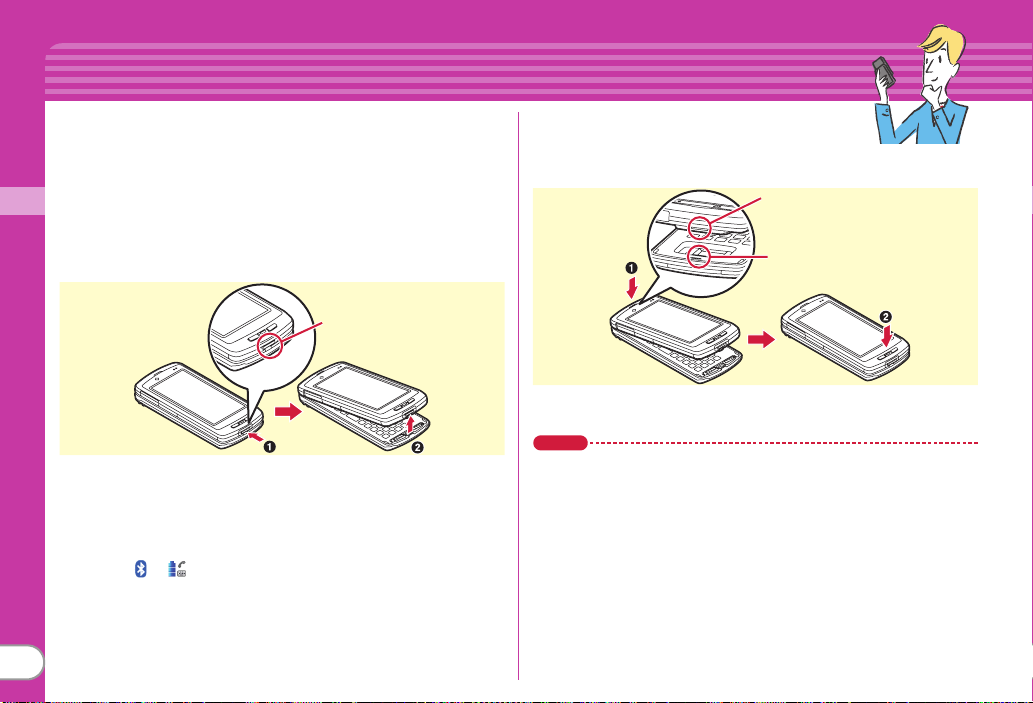
✜
Detaching
Press separating button (a) and hold the display unit up (b).
Separating button
When the terminal is separated, the arch light blinks and start a
Bluetooth connection between the display unit and the keypad unit
automatically.
It takes approximately 4-5 seconds for using the keypad unit (except
for when separating while calling and when Action when detached is
set to "Always connected"). When the Bluetooth connection is
completed, or appears on the display and the Bluetooth light of
the keypad unit blinks.
20
✜
Attaching
Join the units with fitting convex part of the
keypad unit and concave part of the display
unit (a) and push until the separating button clicks to fix them (b).
Concave part of display unit
Convex part of keypad unit
The arch light blinks when the units are attached, and after a while, the
Bluetooth connection is disconnected.
Point
・
To operate FOMA terminal with the keypad unit, turn the power of both
units ON. If the power of keypad unit is turned off or the unit is not
recognized as a Bluetooth device, Bluetooth connection does not start
when separating FOMA terminal.
・
In separated style, by turning power OFF of the display unit, some lock
functions, software update, etc., the power of the keypad unit turns OFF
automatically and the Bluetooth connection stops. For using the keypad
unit in separated style again, turn the display unit ON or cancel the lock,
then once join the FOMA terminal.
・
If the units are attached when power ON/OFF status of each unit differ, the
keypad unit status is switched to the one of display unit.
Page 23
Before Using
Attaching UIM (FOMA card)/battery pack
Simultaneous use of Bluetooth device
when separating
While using the detached keypad unit, HID support device (for key
entering) or HFP and HSP support device (for call) cannot be used
at the same time. To use those Bluetooth devices, perform any of
following procedures.
【
Procedure 1
Join the keypad unit and the display unit (available when Action
when detached is set to "Auto connected").
【
Procedure 2
When the keypad unit is detached,
cursor to "F04B-S" on the device list,
connection of keypad unit, then select a Bluetooth device to use
and connect it. Note that this operation turns OFF the power of
keypad unit.
Point
・
Please confirm the power of the keypad unit OFF after turning the power
of display unit OFF in areas where use is prohibited, such as in airplanes
and hospitals.
・
When Action when detached is set to "Always connected", battery power
consumes much.
・
When you detach the keypad unit while using HFP/HSP/HID device, some
keypad functions are unavailable because those profiles cannot be used
at the same time. While using HFP or HSP device, key operation by the
keypad unit is available and while using HID device, only voice call with
keypad unit is available. When you detach the keypad unit while using two
Bluetooth devices at the same time, the power of keypad unit turns OFF.
】
】
mef*be
md
move the
to disconnect the
Attaching to display unit
Set UIM (FOMA card) to the display unit. For attaching/removing
the battery pack or UIM, separate the FOMA terminal, turn off the
power of display unit and perform properly with holding the
display unit in hand.
✜
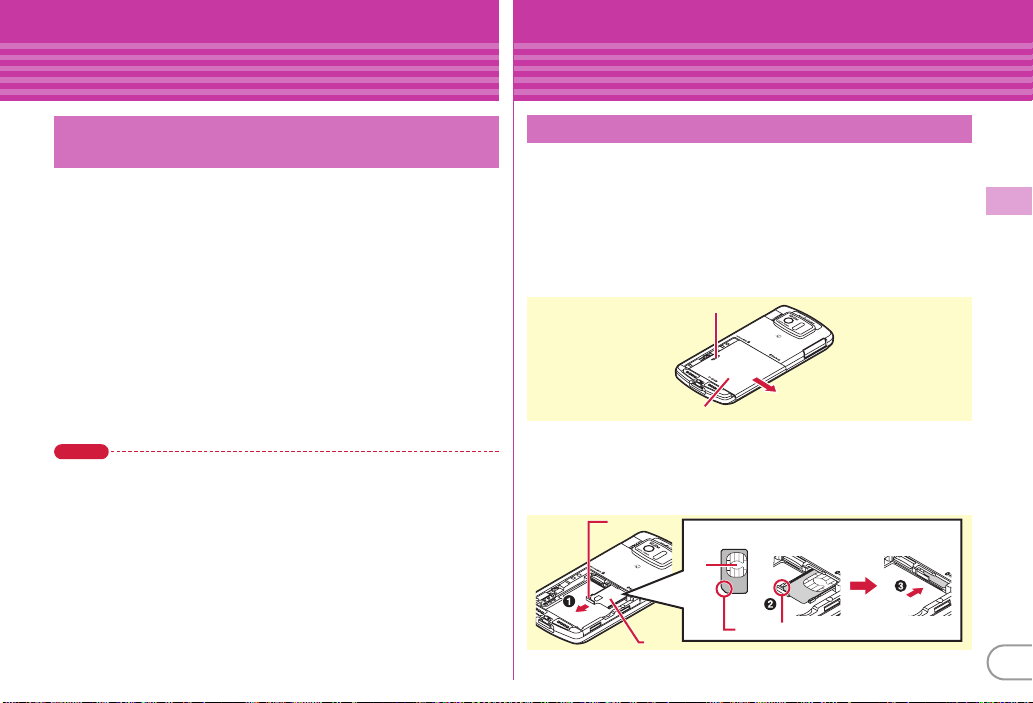
Removing Back Cover F45
With pressing the back cover with your thumb, slide approximately 3
mm in the direction of the arrow to remove it.
Press here with your thumb
Back cover
✜
Installing UIM
Pull the tab with your nail and pull out the tray until it clicks (a). Hold
UIM with the IC side up, align the beveled corner with the tray (b)
and push into the tray until it stops (c).
Tab
Tray
UIM
IC
Corner cut
Basic Operation
21
Page 24
✜
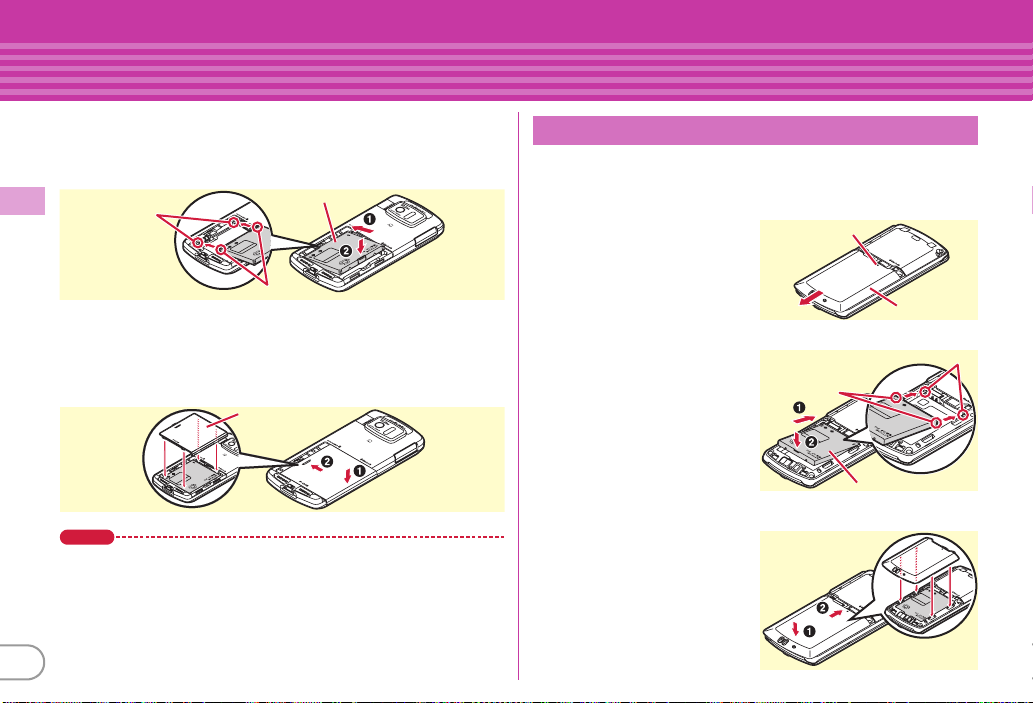
Attaching Battery Pack F13
With label side of the battery pack up, align convex parts of the battery
pack with concave parts of the display unit, slide the battery pack in
the direction of a and then press it in the direction of b to set in.
Convex parts
Basic Operation
✜
Attaching Back Cover F45
Place the 4 tabs of back cover to the notches of the display unit, press
the back cover in the direction of a to avoid forming any clearance
between the display unit and the back cover, then slide it in the
direction of b to attach it.
Point
・
UIM (blue) is not available for this FOMA terminal. If you have the UIM
(blue), bring it to a docomo Shop.
Battery pack
Concave parts
Back cover
22
Attaching to keypad unit
Separate FOMA terminal and turn off the power of keypad unit,
and then perform properly with holding the keypad unit in hand.
✜
Removing Back Cover F46
Hold the keypad unit in one hand
not to slide and with pressing a
round mark of the back cover with
your thumb of the other hand, and
slide in the direction of the arrow
approximately 3 mm to remove it.
✜
Attaching Battery Pack F14
With label side of battery pack
up, align convex parts of the
battery pack with concave parts
of the keypad unit, slide the
battery pack in the direction of
a
and then press it in the
direction of b to set in.
✜
Attaching Back Cover F46
Place the 4 tabs of back cover to
the notches of the keypad unit,
press the back cover in the
direction of a to avoid forming
any clearance between the keypad
unit and the back cover, then slide
it in the direction of b to attach it.
Press here with
your thumb
Concave parts
Back cover
Convex parts
Battery pack
Page 25
Before Using
Charging
Attach the battery packs to both the display unit and the keypad
unit when charging. Always join FOMA terminal to charge the
keypad unit.
When FOMA terminal turned OFF, charge of the display unit takes
precedence when using AC adapter or DC adapter and charge of
the keypad unit takes precedence when using the desktop holder.
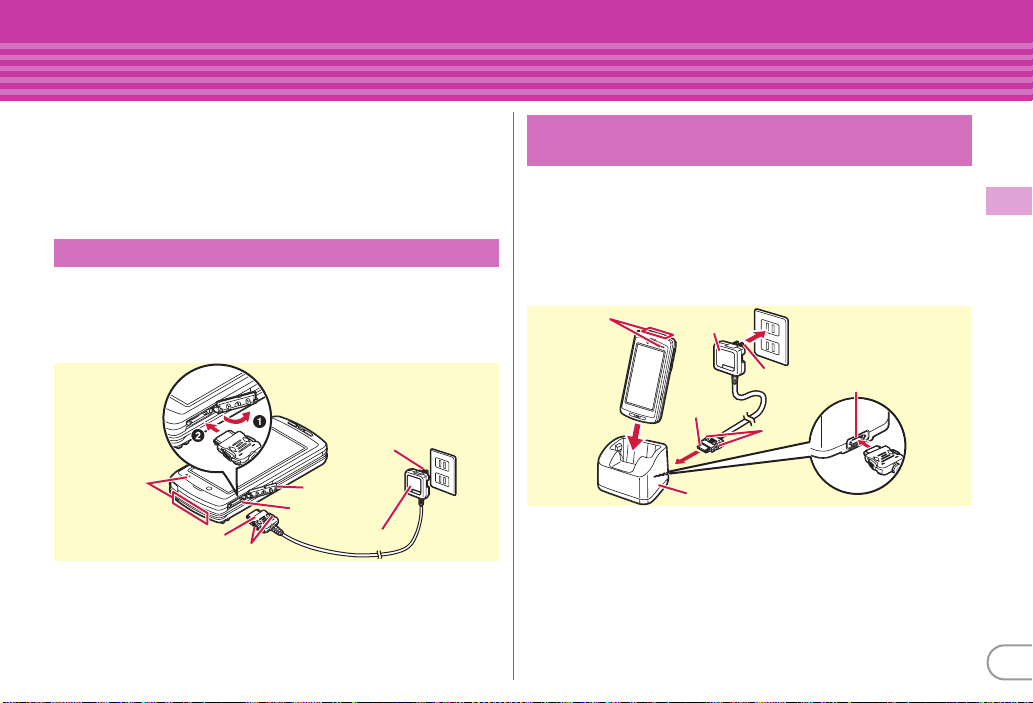
Charging using AC adapter
a
Open jack cap (a) of FOMA terminal, hold the
connector horizontally with the arrow side upward and
insert it to the jack. (
b
Unfold the power plug and insert it into a 100V AC outlet.
Check that
Indicator
light and
Arch light
turns on
c
When charging is over, pull out the power plug from
Connector
the outlet, and pull out from FOMA terminal
horizontally while pressing the release buttons on both
sides of the connector.
b
Release buttons
)
External
connection jack
Power plug
Jack cap
100V AC outlet
AC adapter
Using desktop holder and AC adapter in
combination for charging
a
Insert the connector of AC adapter horizontally to the
desktop holder, with the arrow mark side upward.
b
Unfold the AC adapters power plug and insert it into a
100V AC outlet.
c
Join FOMA terminal units into basic style and insert it
into the desktop holder.
Check that
Indicator
light and
Arch light
turns on
d
After charging is completed, remove FOMA terminal
AC adapter
Connector
Desktop holder
from the desktop holder.
✜
Operations for charging
・
When both units turn ON, a unit selection screen for charging with priority appears. If
there is no operation for a certain time, the display unit takes precedence.
・
When charging starts, a charge start alert sounds. While charging, the indicator
light or arch light turns on and the battery icons blink. When charging is ended, a
charge completion alert sounds.
100V AC outlet
Power plug
Release
buttons
Insert at the back side
Basic Operation
23
Page 26

Before Using
Before Using
Battery level
Battery level is always displayed on the display, but you can check
it by menu operation etc.
Display unit
a meh
Other
Basic Operation
Keypad unit
a meh
unit
In separated style, while pressing X on QWERTY keypad,
press
Display unit
Keypad unit
Sounding by menu
operation
Arch light
Point
・
When FOMA terminal turns ON and the units are joined, if battery level of
either unit becomes 1 (including the status that the battery is almost
exhausted) and the other unit is in battery level 3, power feeding is
executed automatically (interunit power feeding).
24
Settings & NWserviceseg Clock &
ee
Info & Reseted Battery level
Settings & NWservicesei Keypad
ec
Keypad battery level
b
. You can check it by the color of arch light.
Indication
Ample charge
3 times Twice Once
Green Yellow Red
(Charge the battery)
Almost exhausted
Turning power ON - Configuring default setting
Perform the following operations after turning the power ON for
the first time.
a
On numeric keypad, f (2 sec. or
more) or on front keypad,
sec. or more)
b
"Yes" or "No" on a confirmation
screen of enlarged menu setting
The screen shown to the right appears.
c
Set required items
eC
[Complete]
Always set Terminal security code and Request
permit/deny. If you exit without setting, Initial
setting screen reappears when the power is turned ON the next time.
d g
on a confirmation screen of software update function
The stand-by display appears.
Point
・
When FOMA terminal turn ON with the units joined, after initial settings,
the keypad unit is automatically registered as a Bluetooth device and
appears on the display.
・
In separated style, turning OFF the display unit turns OFF the keypad unit.
However, even if you turns OFF the keypad unit, the power of the display
unit does not turn OFF.
・
If no operation is performed, the display light is turned off automatically
according to the settings in Light time-out or Power saving mode. The
display light turns on again if there is any operation or incoming call.
Turning the power off :
front key,
Changing initial settings :
Changing screen display to English :
i
On numeric keypad, f (2 sec. or more) or on
(2 sec. or more)
mehgeg
i
(2
mehbfce
<Initial setting screen>
Select "English"
Page 27

Before Using
Before Using
Motion sensor
You can operate FOMA terminal by double-tapping (tapping it
twice) or tilting it.
✜
Stopping alarm sound
While alarm is sounding with FOMA terminal closed, double-tapping
the FOMA terminal stops the sound. The alarm stops or starts snooze.
✜
Auto rotation
In basic style or separated style, vertical and horizontal display, or
vertical/horizontal orientation or size of images (JPEG format)
switches according to the tilt of FOMA terminal or display unit.
✜
Auto switching of still images
When saving a shot still image, Sense orientation is executed and
vertically long/horizontally long or up side/down side switches
according to the tilt of the FOMA terminal.
✜
Scrolling Browser screen
By tilting FOMA terminal while pressing Z, the screen can be scrolled
up/down/right/left/slantwise. Scrolling speed becomes faster as the
FOMA terminal is tilted greatly.
✜
Varying Flash images
Motion sensor compatible Flash image which is set to stand-by
display varies according to the tilt of FOMA terminal.
✜
Operating i-αppli intuitively
By moving FOMA terminal, intuitive operation of i-αppli is available.
In separated style, the unit for operation differs depending on the i-
α
ppli.
Information
・
You can disable Motion sensor, or select Valid/Invalid for each function.
【 モーションセンサー設定
(Setting Motion sensor)
】
User information
You can check your own phone number.
For details of checking/changing a mail address, refer to "Mobile
Phone User's Guide [i-mode] FOMA version".
a me0
The screen shown to the right appears.
Point
Editing user information :
Ce
Checking a phone number during a call :
more)
User information
AuthenticateeEdit
e0
<User information
screen>
On User information edit screen,
eC
Front key s (1 sec. or
Basic Operation
25
Page 28
Screen Explanation
Viewing display
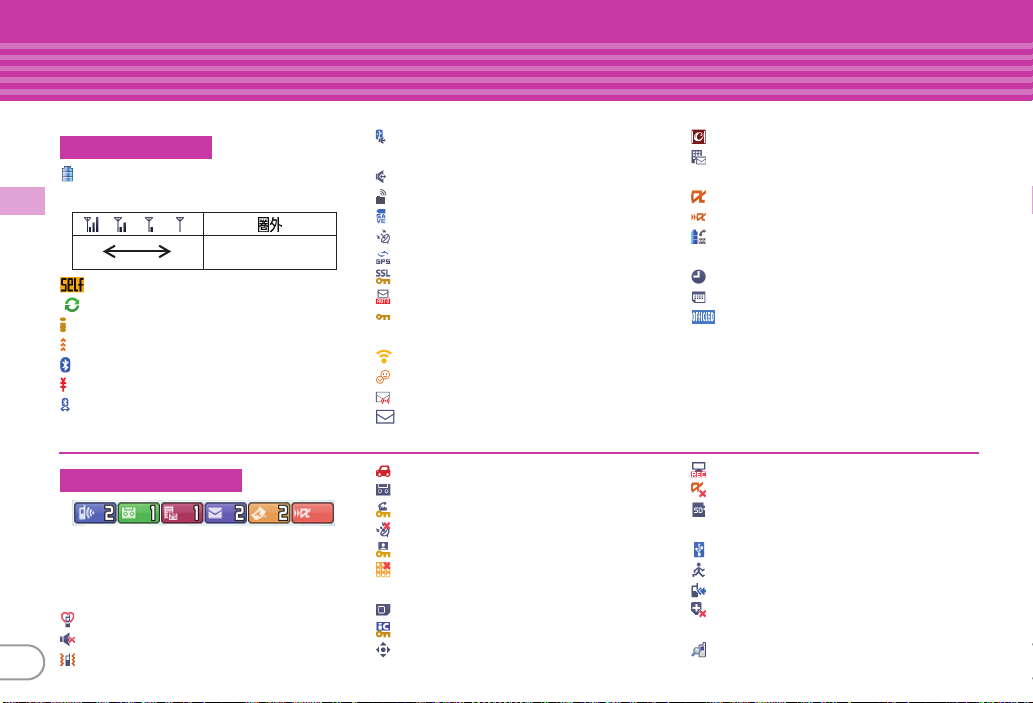
The current state can be checked by the icon appearing on the display. Major icons are as follows.
Top of the display
:
Battery icon of the display unit ⇒P24
Signal strength (Antenna icon)
Basic Operation
Strong
:
Self mode ON
:
In data transfer mode
:
Connecting to i-mode
:
Infrared communication in operation
:
Bluetooth ON
:
The total calls cost exceeds the limit
:
Bluetooth connection being
established
Out of service area or where
Weak
radio waves do not reach
Bottom of the display
Arrival information (Starting from the left,
missed call, recorded message, voice mail
service, unread message, unread ToruCa,
i-
α
ppli call)
:
Silent mode ON
:
Call alert volume OFF
:
26
Vibrator for voice call ON
:
Communication using handsfree-
compatible device in progress
:
Handsfree ON
:
Femtocell setting available
:
Power saving mode activated
:
Positioning with GPS
:
Location request setting
:
Displaying SSL/TLS page etc.
:
Auto-send mail exists
:
A phonebook entry or schedule has
secret attribute
:
High-pitched alarm ON
:
Kid-safe mode ON
:
Unread Area Mail exists
:
Unread i-mode mail exists
:
In Public mode (Drive mode)
:
Record message ON
:
Keypad dial lock ON
:
GPS Location request failed
:
Personal data lock ON
:
Music&Video Channel program
obtaining failure
:
Reading UIM
:
IC card lock ON
:
Available multi-cursor key
:
Arrival i-concier information exists
:
Unreceived i-mode mail exists in i-
mode Center
:
During i-αppli operation
: i-α
ppli call received
:
Interunit communication status,
battery icon of the keypad unit
:
Alarm clock ON
:
Schedule reminder ON
:
Inside OFFICEED area
:
Recording 1Seg
: i-α
ppli Auto start failed
:
microSD card installed during
Communication mode
:
Connected to external device using USB cable
:
Pedometer/ACT monitor is set
:
Software update rewrite notice
:
Auto-update of latest pattern definition
failure
:
Unit search available
⇒
P24
Page 29
Screen Explanation
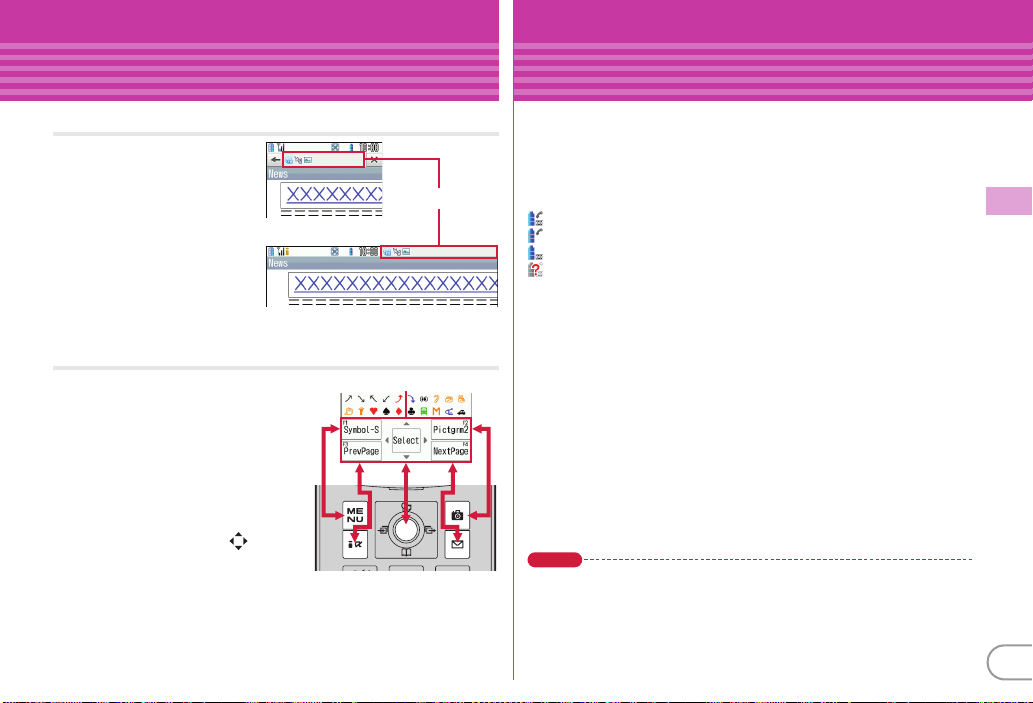
Status in separated style
Task area
The icon indicating the
function (task) in progress
appears in the task area.
<Vertical display>
Guide area and key operation
Operations that can be performed
by pressing
and
area. To perform an operation in the
guide area, press the corresponding
key.
"F1" - "F4" on the upper left or upper
right on the guide area correspond
to QWERTY keys
guide area corresponds to multicursor keys
m, I, g, C
a
are displayed in the guide
1
- 4. on the
k
.
<Horizontal display>
Task area
Guide area
In separated style, you can check the status of FOMA terminal by
indicator on the display or lights of the keypad unit.
✜
Display
In addition to battery level of the keypad unit (⇒P24), available
functions for the keypad unit are displayed.
:
Calling and key operation available
:
Only calling available
:
Only key operation available
:
Keypad unit unavailable
✜
Bluetooth light
The color of blinking indicates one of the following states.
Blue :
Connected to Bluetooth
Red :
Disconnected from Bluetooth
*
Without any operation for approximately 10 minutes, light blinking stops
temporarily.
✜
Arch light
The following colors indicate the status as follows.
Blinking in red and white :
Turning on in green tone stream :
Turning on in blue tone stream :
Blinking in red :
In addition, the arch light turns on or blinks in conjunction with the
indicator light of display for phone call or mail receiving.
Point
・
When receiving a call and while calling, light of the display unit turns on
according to Light alert settings and lights of the keypad unit and the arch
light operate accordingly. However, color etc. cannot be changed. If you
press a key when activating QWERTY key lock and during the lock, a light
of the keypad unit turns in yellow.
Keypad unit battery almost runs down
Unit search activated
Game mode activated
Game mode ended
Basic Operation
27
Page 30
Screen Explanation
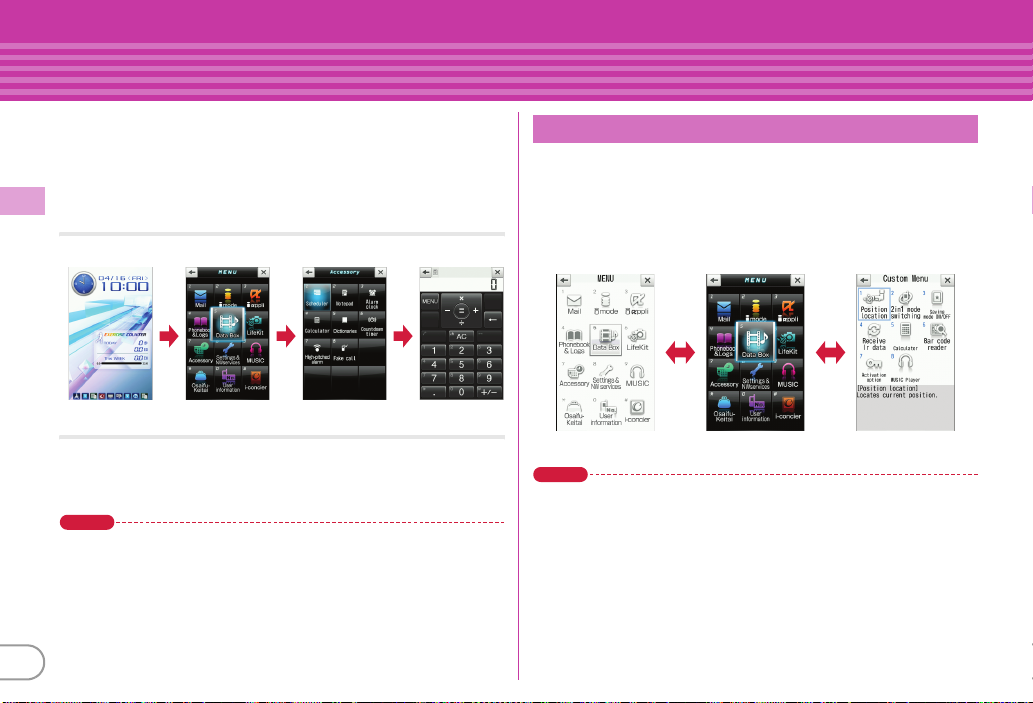
Menu operation
On the stand-by display, press m and then perform the functions
from the menu. You can select a menu item with shortcut operations,
which use the keypad,
*
and #, or with multi-cursor operation,
which uses the multi-cursor key to move the cursor.
<Example> Selecting "Calculator"
Shortcut operations
Basic Operation
a me7e4
m 7 4
Multi-cursor key operations
a me
Move the cursor to "g Accessory"
e
[Select]
Move the cursor to "d Calculator"
eg
[Select]
Point
・
Even when a function is running, you can perform the same operation if
"MENU" is displayed on the guide area.
・
To return to the previous screen, press c. To return to the stand-by
display, press
・
On the stand-by display with Info/calendar layout, Shortcut icons set, or
with arrival information icon or i-concier information displayed, press
to change the display to Focus mode that allows you to quickly display the
related information.
28
f
.
eg
Switching menu screens
You can switch among "Kisekae menu", the design of which can be
changed using Kisekae Tool (
fixed menu numbers, and "Custom menu", to which menu items
can be saved freely.
A Kisekae menu matched with the color of FOMA terminal is set by
default.
IC
<Basic menu>
g
Point
・
In some types of Kisekae menus, the menu structure is changed according
to usage frequency, or the number assigned to menu item (item number)
may not be applicable.
・
The menu that appears when m is pressed on the stand-by display can
be changed from Select startup menu.
⇒
P39), "Basic menu", which has the
<Custom menu><Kisekae menu>
⇒
P36
Page 31

Screen Explanation
Using touch panel
You can use the display as touch panel. You can perform the same
operation by touch operation as on the screen to move the cursor
with key operation.
Types of touch operations
Touch
Doubletouch
Slide
Slide
quickly
Touch the display lightly once and release the finger. The
operation becomes effective when you release your finger
from the display. This operation is mainly for selecting
menus, items, etc.
Touch the display lightly twice and release the finger. The
operation becomes effective when you release your finger
from the display. This operation is mainly for zooming in/
out or switching the display.
Keep touching the display, move your finger up, down,
right or left. This operation is for scrolling a screen,
rewinding/fast-forwarding a video, etc.
Touch the display lightly and flick your finger up, down,
right or left. This operation is for switching pages or
images, or moving to a different chapter or tune, etc.
e.g.: Slidee.g.: Touch
Touch-specific operations
Major touch operations are as follows.
Function selection from the
stand-by display
Use stand-by touch buttons (4
buttons at the bottom of the
screen) and stand-by launcher
(shown to the lower right).
Menu buttons for touch
operation
Buttons that correspond to a
function are displayed.
Menu buttons for touch operation
e.g. : Outgoing call screen e.g. : My document
Guidance button
Return to the previous screen
(a), exit a function (b), or
operate a function displayed in
the guide area (c).
Moving focus and selecting
menu/item
Touch a menu or item to select,
move the focus for touch
operation, then touch the menu
or item again.
Slide on the list
Basic Operation
a
b
c
Touch an item
directly
29
Page 32

Screen Explanation
Link items or confirmation
screens
Directly touch an item.
Basic Operation
Direction/Determination buttons
When using i-mode browser in
other than slide style, use the
direction/determination buttons
to operate menus or items on the
screen.
Switching tabs and scrolling
Switch tabs of phonebook etc. by
touching or sliding, or scroll by
sliding.
30
Numeric value setting roller
Set numeric values
such as date and
time, rotate the roller
by slide operation.
Channel switch panel/Volume
adjust panel
While playing 1Seg or a moving
picture, slide vertically or
horizontally to display a panel,
and then touch or slide.
Temporary zooming
In mail or Full Browser function
etc., double-touch the screen to
zoom in.
使いかたガイド
(Guide)
You can check overviews and operations of functions, and
troubleshooting. (In Japanese only)
a mef
LifeKite0 GuideeSelect
a search method
目次
(Contents) :
functions.
索引
(Index) :
sorted according to Japanese syllabary.
フリーワード検索
Enter a keyword to search for.
ブックマーク
list of registered bookmarks.
困ったときには
troubles or error messages.
Point
・
On a description screen, select "
perform a function. Selecting a link item in "
→コチラ
or "
・
Terms indicated with
Information
・
You can also access
Search from a list of
Search from a list of words
(Free word search) :
(Bookmark) :
(Troubleshooting) :
(See more)" displays a corresponding description screen.
【】
フリーワード検索
Search from a
<Guide screen>
Search from lists of
この機能を使う
in this manual are index terms in "Guide".
(Use this function)" to
関連機能
(Related functions)",
from Quick search. ⇒P79
Page 33

Character Entry
Entering characters
To enter characters, key operation and touch operation are
available.
On the character entry screen, each time you touch an input mode
switch button ( , etc), the input modes and the icons switch.
Entering characters with key operation
Entering characters with numeric keypad
Kana input mode 2-touch input mode
Outline
Example
(in
hiragana
/kanji
mode)
Operations
during
entry (in
hiragana/
kanji
mode)
Multiple characters are
assigned to each key and the
character is switched every
time a key is pressed.
"ろ" : 9 (5 times)
"っ" : 4 (3 times)
"ぽ" : 6 (5 times)
(twice)
"ん" : 0 (3 times)
"ぎ" : 2 (Twice)
n
:
Return to the previous
character. (e.g. : お⇒え⇒
う
⇒…)
c
:
Cancel or delete entered characters (after the entry is
fixed).
*
:
Add voiced/semi-voiced sound, switch upper/lower
case or insert a line feed (e.g. : ほ⇒ぼ⇒ぽ⇒ほ⇒…, つ⇒
⇒づ⇒つ⇒…), or insert a line feed (only after the entry is
fixed).
e*
e*
A character is entered by
pressing a combination of 2
keys.
"ろ" :
e*
95
"っ" :
8043
"ぽ" :
8065
05Å@
"ん" :
03
"ぎ" :
2204
-
っ
*
To enter Chinese characters, set Multilingual usage setting to "ON" and use "T9
input method".
Entering characters with QWERTY keypad
Roman letters input mode
Outline
Example
(in
hiragana
/kanji
mode)
Operations
during
entry
Enter characters by pressing alphabet keys as Romanized
spelling corresponding to the reading. (For entering
Japanese)
When entering "
an example of character entry, entering each character
separately is explained here.
"ろ" :
ro
"っ" :
ltu
"ぽ" :
po
"ん" : nn /
"ぎ" :
gi
Z
+Symbol or number printed key on the upper section :
Enter symbol or number
A+a-z
X+A
* Operation of backing to the previous character by 5 is
not available.
六本木
" as one word, input "ropponngi". As
/
xtu
/
ltsu
xn
:
Enter capital alphabet
:
Keep capital letter entering
Basic Operation
31
Page 34

Entering characters with touch operation
Handwriting input Touch key input
Outline
Basic Operation
Example
(in
hiragana
/kanji
mode)
Operations
during
entry
Write characters with your
finger in the hand writing
entry area
Write "六", "本", and 木" in
order in the hand writing
entry area.
[Clear] or :
the entry is fixed)
[Clear] :
characters
[Close] :
conversion options list
[Corr] :
Delete 1 character at the cursor position (after
Delete recognized
Close the
Rewrite a character
32
Select a character with touch
operation
"ろ" : [ら9]e[ろ
"っ" : [た4]e[っ
"ぽ" : [は6]e[゛゜
[ぽ]
"ん" : [わ0]e[ん
"ぎ" : [か2]e[゛゜]e[ぎ
[A/a] :
Switch upper/lower
case
[Back] :
level of each input mode on
the character entry screen
[PrevPage]/[NextPage] :
Display the previous/next
symbol list
]
]
] (twice)
]
Return to the first
e
]
Switching input modes
Switching input modes varies by the input method.
5-touch or 2-touch input method
Each time you press I on the character entry screen, the input
⇒
mode switches as "One-byte number"
byte katakana"
・
j
switches two-byte or one-byte characters.
⇒
"One-byte alphabet" ⇒ "One-byte number"….
Roman letters input (for entering Japanese)
Each time you press 3 on the character entry screen, the input
mode switches as "One-byte number"
byte katakana"
・
Any of U, D, 7 switches two-byte or one-byte characters.
・
For Roman letters input, input mode icon for "Hiragana/Kanji",
⇒
"One-byte alphabet" ⇒ "One-byte number"….
"One-byte katakana" and "Two-byte katakana" accompany "R".
Input with touch keys
When [TextMode] is touched, the input mode list is displayed, and
touch any of [Kana] [Alphameric] [Num] [Katakana] [Symbol S]
[Symbol L] to switch the input mode.
・
When input mode is [Kana], [Alphameric], [Num] or [Katakana],
[
A
/A] switches one-byte or two-byte characters.
"Hiragana/Kanji" ⇒ "One-
⇒
"Hiragana/Kanji" ⇒ "One-
Page 35

Text input
Set a text input method or operation during text entry.
a meh
Other
required items
Settings & NWserviceseg Clock &
ec
Text inputee Text input methodeSet
eC
[Set]
Entering pictograms/smileys
Entering pictograms
a
On the character entry screen, when [Pict/Sym] is
displayed,
Information
・
You can save often-used sentences and words.
・
You can copy, cut and paste entered characters.
・
You can register authentication information such as user names and passwords.
C
[Pict/Sym]
The type of pictogram list is indicated.
The pictogram list switches to [Pictgrm1],
[Pictgrm2], [PictgrmD] each time you press
Recently used pictograms appear as input logs.
When there are multiple pages, press
[PrevFldr] or
For Pictogram D, a folder is switched.
a
[NextFldr] to switch pages.
I
C
.
【 文字入力
【 文字入力
(Character entry)
(Character entry)
b
Select a pictogram
Press c to close the pictogram list.
Point
・
When Roman letter input mode is performed, pressing 2 displays
pictogram list. The pictogram list switches by each pressing
contains multiple pages, press
3
or 4 to switch them.
2
Entering smileys
a
On the character entry screen,
Smileyec Smileyea
mee
入力履歴
Pict/Symbol/
- i
すべてeSelect a
smiley
Entering smileys on the mail edit screen :
ie
Select a smiley
定型文登録
【 パスワードマネージャー
(Save phrase)
コピー|切り取り|貼り付け
|単語登録
(Copying/Cutting/Pasting characters)
(Password manager)
(Save word)
meeaea
】
】
. If there
】
Basic Operation
-
33
Page 36

Sound/Screen Setting
Sound settings
You can set sound, such as changing a ring alert, adjusting the
volume, or muting the sound emitted from FOMA terminal.
Setting ring alerts and sound
You can set your favorite melody for a ring alert or alarm.
<Example> Setting Call ring alert (Call ring alert/V.phone ring alert)
Basic Operation
a meh
NWservices
Sounds
In addition to ring alerts, you can set alerts
such as mail ring alert, messages ring
alert, i-concier ring alert, etc.
b a
or
required items
Point
・
When Call ring alert is set, the setting applies to Call alert and Videophone
alert.
・
Some music or moving pictures/i-motion may not be set to the ring alert.
Information
・
You can set a call ring alert and image, a call vibrator operation pattern, and a light alert.
(Videophone alert)
34
・
Incoming calls or alarms can be notified with vibration, instead of sound.
Settings &
ea
ea
Alerts &
Ring alerts & Sounds
Call ring alertea Call ring alert
b
V.phone ring alerteSet
eC
[Set]
】
<Sound setting screen>
Adjusting volume
You can set the volume of a ring alert, alarm sound, etc.
<Example> Setting call alert volume
a meh
NWservices
Sounds
In addition to the volume of the ring alert,
you can set the volume of the alerts such
as mail ring alert, message ring alert, iconcier ring alert, etc.
b a
volume
The volume can be selected from "Silent",
"Level 1" - "Level 6" or "Steptone".
Point
・
appears on the stand-by display when "Silent" is set. appears when
a vibrator for Call vibrate alert is also set.
【 バイブレータ設定
Settings &
ea
Alerts &
eb
Adjust volume
Alert/Call volumeea Call alert
ejeg
【 電話着信設定
[Select]
(Call alert)】
(Vibrate alert/effect)
【 テレビ電話着信設定
】
<Volume setting screen>
Page 37

Silent mode
This function cancels the sound emitted from FOMA terminal such
as ring alert, Key/touch sound, Open/Close sound, Slide sound,
Detach/Attach sound, Alarm sound, or the sound for reading a
code with Bar code reader, and an incoming call is notified with
vibrator (vibration). Also, microphone is sensitized so that you can
call in a small voice.
a #
・
(1 sec. or more)
appears on the stand-by display in
Silent mode.
Canceling Silent mode : # (1 sec. or
more)
<Stand-by screen while
Silent mode is ON>
Point
Shutter sound and Unit search sound are emitted even in Silent mode.
Information
・
You can set Silent mode operations to each incoming call and alarm.
【 オリジナルマナーモード
Muting key/touch sound
You can turn off a sound to be emitted when pressing keys or
touching the touch panel.
a meh
a
& Sounds
In addition to Key/touch sound, you can
mute Slide sound or Detach/Attach sound
or change Shutter sound.
b a
A message indicating key/touch sound is
to be turned off appears, and then the
screen shown to the right appears.
The tone can be selected from "
1" - "
Settings & NWservices
e
Alerts & Soundsea Ring alerts
ef
System sound
Key/touch soundee OFF
a
Sound
d
Sol-fa".
(Personalized silent mode)
】
<System sound
setting screen>
Basic Operation
35
Page 38

Sound/Screen Setting
Display settings
You can change the stand-by display, light, font size, etc.
Stand-by display
The default stand-by display is set according to Kisekae Tool, but
you can customize the display by changing each display element
such as stand-by display image, clock display or battery icon.
Basic Operation
Image/i-αppli
<Example> Setting a preinstalled image to the stand-by display
a meh
Stand-by display
position or
When Kisekae Tool is set, a confirmation screen for canceling
Kisekae Tool appears.
b
"Yes"ef PreinstalledeSelect an imagee"Yes"
Clock display format
Set clock to/not to display or specify clock position and the pattern,
or display language for day of the week.
a meh
Other
required items
Information
・
The stand-by display can be divided into several areas, to each of which you can make settings to display arrival information, schedule, calendar, list of
36
notes or contents of a note.
Settings & NWserviceseb Displayea
ea
b
Image/i-αppliea Vertical
Horizontal positionea Set image
Settings & NWserviceseg Clock &
eb
Clocked Clock display formateSet
eC
[Set]
【 待受画面設定
(Stand-by display)
カレンダー/待受カスタマイズ
When Style is set to "World time clock", time in Japan is
displayed on the left, and the local time and the area name
which is set in Time zone is displayed on the right.
Battery icon
a meh
b
c
The screen shown to the right appears.
b a
When Kisekae Tool is set, if other than
"Kisekae Tool" is selected, a confirmation
screen for canceling Kisekae Tool appears. When pressing
"Yes", the selected icon is set.
Settings & NWservices
Displayea Stand-by display
Battery icon
-
f
e
e
Select startup menu
Set the menu displayed when pressing
display.
a meh
b
a
menu -
Settings & NWservices
Displayeb Menu preference
Select startup menuea Kisekae
c
Shortcut menu
(Info/calendar layout)
m
e
e
】
on the stand-by
<Battery icon setting
screen>
<Startup menu setting
screen>
Page 39

Font size Font style
You can change a size of the characters in i-mode site, the mail
creation screen, phonebook, etc.
<Example> Changing font size collectively
a meh
Font & Language
g
-
For some font sizes selected, a confirmation screen for
changing the menu font size appears. When pressing "Yes",
Kisekae Tool applicable to the selected font size can be
selected.
Point
・
When you change the font size at once but the items do not support the
font size that is selected in All, the closest font size is set.
Settings & NWserviceseb Displayef
ea
Font sizeea Allea Smallest
Largest
You can change the font which is displayed in menu, mail text, etc.
For hiragana and katakana, downloaded font is also available.
a meh
Font & Language
b
Select Kanji/Alphameric fieldea Maru_Gothic - c
Maru Folk
c
Select Hiragana/Katakana fieldea Kanji/Alphameric
or b
プリティー桃
Privacy view
This function allows the display to be less-visible to the people
around you. You can start/cancel Privacy view on screens
including the stand-by display.
a U
(1 sec. or more)
Canceling Privacy view : U (1 sec. or more)
Information
・
You can set a visibility level in Privacy view.
(Privacy view)
Settings & NWserviceseb Displayef
eb
Font style
eC
[Set]
レベル設定
(Privacy view level)
【 プライバシービュー
】
Basic Operation
37
Page 40

Sound/Screen Setting
Light settings
Display Machi-chara
You can set a character to be displayed on the stand-by display,
menu screen, etc.
a meh
Basic Operation
Display Machi-chara
Point
・
Machi-chara does not appear when moving picture/i-motion or i-αppli is
set for the stand-by display.
・
Some Machi-chara change its actions according to time, arrival
information, call duration, etc.
Settings & NWserviceseb Displayeg
e
Set required items
eC
Display light time
You can set the duration, for which the display light is turned on.
<Example> Setting "Normal use"
a meh
Display & Key light
b a
Point
・
When setting to "Phone setting" by selecting other than "Normal use" in
Step 2, the lighting time set in "Normal use" applies.
Information
・
You can set an idling time for turning the display off or a brightness of
the display light. You can also turn on/off the keypad light or select the
light color.
るさ調整|画面オフ時間設定|キーバックライト設定
38
time-out
Settings & NWserviceseb Displayed
ea
Display light time
Normal useea 0 sec - g Always on
【 照明/キーバックライト設定
|
Keypad light)
】
(Display & Key light)
(Brightness|Light
[Set]
明
You can set light alerts for incoming calls or mails, new arrivals
and missed calls.
Light alert
Set the lighting pattern and color for incoming call/mail or while
talking.
<Example> Setting a light alert
a meh
NWservices
Settings &
eb
Displayee Light
alert
In addition to light alert for incoming call/
mail, you can set it while talking or for
closing FOMA terminal.
b a
Light alerteSet required items
C
[Set]
e
<Light setting screen>
Indicator light
The light alerts you when missed calls, unread messages (i-mode
mail, SMS) or arrival information exists.
a meh
Color & Action image
Indicator light
Settings & NWserviceseb Displayec
ee
ea
Info display & lighteb
ON or b OFF
Page 41

Sound/Screen Setting
Sound/Screen Setting
Kisekae Tool
You can set the stand-by display, menu, incoming/outgoing call
screens, etc. at once with a predefined combination.
<Example> Setting preinstalled Kisekae Tool
a mee
e
To display the details, move the cursor to the Kisekae Tool, and
then press
To enlarge the images of the stand-by display and menu,
move the cursor to a Kisekae Tool, and then press
b
"Yes"
Information
・
You can set FOMA terminal so that the stand-by displays switch, or
Silent mode and Privacy mode switch at a specified time.
タイル設定
Data Boxeg Kisekae Tooleb Preinstalled
Move the cursor to a Kisekae Tool
a
.
<Details screen> <Combination image
(Timed theme)
】
screen>
eC
[Set]
g
.
【 ライフス
Power saving mode
You can set each light to "OFF" or shorten the lighting time to save
battery consumption.
a meh
Power saving mode
Each time you select the option, ON/OFF switches. When ON
is selected, appears on the stand-by display.
Saving mode options
You can set options for Power saving mode.
a meh
Power saving mode
Std. saving or
Std. saving :
display or keypad light, or light alerts are adjusted to save
battery consumption.
Full saving :
such as motion sensor, immobile sensor of Security lock,
AUTO-GPS, Pedometer/ACT monitor, etc. are restricted to
save battery consumption.
Settings & NWserviceseb Displayeh
ea
Saving mode ON/OFF
Settings & NWserviceseb Displayeh
eb
Saving mode optionsea
b
Full saving
Display settings such as the brightness of the
In addition to items in Std. saving, some functions
Basic Operation
39
Page 42

Lock/Security
Security code of FOMA terminal
Security codes vary by functions. Be careful never to reveal your
security code to others. To set a security code, avoid imaginable
numbers and maintain a separate record not to forget the
numbers. If a security code is known to and misused by others,
DOCOMO assumes no responsibility for damages resulted from it.
If you forget your security codes, you need to bring a document (a
Basic Operation
drivers license etc.) to identify your subscription, FOMA terminal
and UIM to a docomo Shop. For details, contact the numbers for
"General Inquiries" on the last page of this manual.
Terminal security code
The code is the security code to be used when changing settings
or deleting all the items at once. To change the code, perform the
following operation.
a meh
Locks
code
code
security code - check field
Point
・
If a wrong terminal security code is entered 5 times consecutively, the
power is turned OFF.
Settings & NWservicesed Security &
ef
Change terminal security
e
AuthenticateeEnter a new terminal security
e
Enter the new terminal security code in New
(Default : 0000)
eC
[Save]
40
PIN1/PIN2 code
The PIN1 code is the security code to be used when installing UIM
or turning FOMA terminal on.
The PIN2 code is the security code to be used when requesting the
issuance of a user certificate, resetting Total calls cost or resetting
the total call costs.
To change either code, perform the following operation. When
changing PIN1 code, set PIN1 code ON/OFF to "ON".
a meh
Locks
PIN2 code
code
and New PIN/PIN2 code - check field
Point
・
To display the PIN1 code entry screen when turning power on,
mehdeca
・
Even if PIN2 code is locked by entering incorrect PIN2 code 3 times
consecutively, making/receiving calls or sending/receiving mail is
available; if PIN1 code is locked by entering incorrect PIN1 code 3 times
consecutively, these operations are unavailable.
・
If the PIN1/PIN2 code is locked by entering an incorrect code 3 times
consecutively, enter the PIN unblocking key (PUK) provided at
subscription. If UIM is locked after entering an incorrect PUK code 10
times consecutively, contact a docomo Shop.
・
PUK code is written on a subscription form (copy for user) handed at
subscription in a docomo Shop. For users subscribed in other than
docomo Shop, bring a document (a drivers license etc.) to identify your
subscription and FOMA terminal to a docomo Shop, or contact "General
Inquiries" on the last page of this manual.
Settings & NWservicesed Security &
ee
e
e
Enter new PIN code in New PIN/PIN2 code field
(At subscription : 0000)
UIMea Change PIN code or b Change
AuthenticateeEnter the current PIN
eC
[Save]
, and then set PIN1 code ON/OFF to "ON".
Page 43

Lock/Security
Various lock functions
✜
Network security code
Network security code is required when DOCOMO identifies the
subscriber at docomo Shop, docomo Information Center or "
ポート
(User support)" or when you subscribe Network Services.
To change the code, "iMenu" in i-mode site ⇒ "
support)" ⇒ "
Use))" (In Japanese only).
✜
i-mode password
i-mode password is required to register/delete site in My Menu, use
Message Service, subscribe/cancel i-mode charged services, etc.
To change the code, "iMenu" in i-mode site ⇒ "
support)" ⇒ "
Use))" (In Japanese only).
✜
microSD password
You can set a password to microSD card. When using another
terminal with the password-protected microSD card installed, setting
a password to that terminal is also required. On PCs or terminals that
do not have ability to set passwords, data in the microSD card cannot
be used and the card cannot be formatted.
However, some microSD cards may not support this function.
✜
Password (for children)
This password is used as the password for children in Kid-safe mode.
When entering password is required, you can alternatively enter the
terminal security code.
Kid-safe mode ⇒P45
各種設定 (確認・変更・利用
各種設定 (確認・変更・利用
(At subscription : Set any code)
お客様サポート
) (Settings (Check/Change/
(At subscription : 0000)
お客様サポート
) (Settings (Check/Change/
(Default : 1111)
お客様サ
(User
(User
Use various lock functions for your purpose.
All lock
Any operations other than answering calls, receiving messages
and turning power ON/OFF are unavailable.
Activate :
Deactivate :
mehdace
In slide style, enter terminal security code
Authenticate
Self mode
All functions requiring communication are unavailable. If you
separate FOMA terminal in Self mode or set Self mode in
separated style, the power of the keypad unit turns OFF.
Activate/Deactivate : c (1 sec. or more)e"Yes"
Personal data lock
Personal information such as phonebook entries, messages or
schedules is not displayed.
Activate/Deactivate :
mehdade
Authenticateea or
Keypad dial lock
Calls can be made only by using phonebook.
Activate/Deactivate :
mehdafe
Authenticateea or
Basic Operation
b
b
41
Page 44

Operation lock
The display turns off and the touch operation is locked. In basic
style,
T, U, Z
and front keys of s and i are locked, and in
separated style, front keys of
Activate/Deactivate : z (Other than key operation, activates at set
Basic Operation
time in Light time-out)
s
and i are locked.
Security lock
Touch operation or keypad operation is automatically locked when
no operations are performed for the specified time after screen
display turns off.
Set :
mehdabe
Temporary deactivate :
ze
Authenticate
AuthenticateeSet required time
When screen display turns off,
Touch lock
Touch lock is automatically activated when making a call or talking
on the phone to prevent inadvertent touch operations.
Activate/Deactivate :
more)
On calling or talking screen, z (1 sec. or
QWERTY keypad lock
To prevent inadvertent operations, lock QWERTY keypad when
FOMA terminal is separated.
Activate/Deactivate :
On QWERTY keypad, 1 (1 sec. or more)
42
eC
IC card lock
Osaifu-Keitai, obtainment of ToruCa from IC card reader, iC
transmission, etc. are unavailable.
Activate : r (1 sec. or more)e"Yes"
Deactivate : r (1 sec. or more)eAuthenticate
Omakase Lock
The personal data of phonebook etc. or IC card function of OsaifuKeitai is locked only by contacting DOCOMO in case FOMA
terminal is misplaced etc.
■
Setting/Canceling Omakase Lock
0120-524-360 Office hours : 24 hours In Japanese only
*
Omakase Lock can be set/canceled from My docomo site using a PC etc.
(In Japanese only)
・
For details, refer to "Mobile Phone User's Guide [i-mode] FOMA
version".
Information
・
You can set to require authentication when using personal information,
or to hide specified phonebook entries or schedule, received calls, sent/
received mails, etc.
【 プライバシーモード
(Privacy mode)
】
Page 45

Lock/Security
Incoming call restriction
There are some ways to restrict incoming calls.
Accept/Reject call for each phone number
Set Accept/Reject call to each phonebook entry, and then activate
the settings (in Specified caller).
When using this function, it is recommended that you use both
Caller ID request and Anonymous caller.
a de
b
Search the phonebookeMove the cursor to a
phonebook entry
Advanced settings
AuthenticateeSelect a phone numberea Accept call
-
c
No setting
Following the operation above, on the stand-by
display,
Answer
Authenticateea Cancel settings - c Accept call
meh
ee
emec
ec
Settings & NWservicesee Call &
Reject/Accept callea Specified caller
Edit/Settingsed
Accept/Reject call
e
e
Anonymous caller
For each reason for hiding caller ID, you can set a receiving
operation.
a meh
Answer
Anonymous -
C
Settings & NWservicesee Call &
eb
Anonymous callereAuthenticateea
c
[Set]
UnavailableeSet required items
e
Ring alert delay
To prevent prank calls such as one-ring phone scam or calls from
anonymous callers, you can set FOMA terminal so that you will
not answer calls from the party not saved in phonebook.
a meh
Sounds
C
Settings & NWservicesea Alerts &
ee
Ring alert delayeSet required items
[Set]
e
Unregistered caller
You can reject calls from phone numbers not saved in phonebook.
a meh
ee
Authenticateea ON or b OFF
Settings & NWservicesee Call & Answer
Reject/Accept calleb Unregistered caller
e
Basic Operation
43
Page 46

Lock/Security
Lock/Security
Reset to default
Reset
You can restore functions in red characters on the menu list to the
default settings.
a meh
Other
Basic Operation
Select items to reset
Delete all data
You can delete data, and restore settings to default.
a meh
Other
data
All data is deleted while restarting. Do not turn power OFF until
the stand-by display is re-displayed. In separated style, the
power of the keypad unit turns OFF at restarting, and once
joining the FOMA terminal is needed.
Point
・
Even after all data is deleted, the data registered by default is not deleted.
・
Among Osaifu-Keitai compatible i-αppli, data of which is not saved to the
IC card, "iD appli" is restored to the default by deleting all data, but the
α
other
・
i-αppli other than Osaifu-Keitai compatible i-αppli are restored to the
default by deleting all data, however, upgraded i-
⇒
P95
Settings & NWserviceseg Clock &
ee
Info & Resetee ReseteAuthenticate
eC
[Reset]e"Yes"
Settings & NWserviceseg Clock &
ee
Info & Resetef Delete all
e
Authenticatee"Yes"
ppli are deleted.
α
ppli is deleted.
e
Restricting usage by remote control
There are two services to restrict the functions of FOMA terminal
by remote control.
Inquiries
DOCOMO business website
docomo Business Online
・
From a PC
http://www.docomo.biz (In Japanese only)
*
May be unavailable for system maintenance.
✜
Initializing remotely
With subscription to use this function (Business mopera anshin
manager), this service allows an administrator to request to initialize
data (memory in phone/microSD card/UIM) in the target FOMA
terminal.
✜
Remote customization
With subscription to use this function (Business mopera anshin
manager), this service allows an administrator to request to remotely
restrict or set ON/OFF to functions (camera function, lock setting, etc.)
in the target FOMA terminal.
Point
Check remote setting :
mehgeb
44
Page 47

Lock/Security
Kid-safe mode
You can restrict available functions so that you can let your
children use FOMA terminal without anxiety.
Setting Kid-safe mode
You can set whether to use Kid-safe mode.
When Kid-safe mode is set to "ON", menu operations of PIN code
settings are restricted. If you do not use PIN1 code entry, set PIN1
code ON/OFF to "OFF" in advance.
a meh
Locks
mode
When "ON" is set, appears at the top of the display.
Settings & NWservicesed Security &
ec
Kid-safe modeeAuthenticateea Kid-safe
ea
ON or b OFF
Changing password (for children)
Before operating, set Kid-safe mode to "ON". The password that is
the same as the terminal security code cannot be set.
a meh
Locks
code
the new password in Re-enter password field
Settings & NWservicesed Security &
ef
Change terminal security
e
AuthenticateeEnter a new passwordeEnter
eC
[Save]
Function lock
You can lock outgoing calls, messages, 1Seg, the camera, i-mode/
full browser, iBefore operating, set Kid-safe mode to "ON".
a meh
ed
mode
α
ppli, etc.
Settings & NWservices
Security & Locksec Kid-safe
e
Authenticateeb Function
lock
The screen shown to the right appears.
b
Set required items
Call/Mail :
i-αppli :
c C
Point
・
Even when Mail lock is set to "ON", incoming mails are automatically
received. In this case, no incoming operation with sounds or images is
performed, or no arrival information is displayed.
When "Phonebook contacts" is
set, calls/mails can be made/sent only to
the parties registered to phonebook.
When "Saved only" is set, i-αppli
cannot be downloaded. Only ibe used.
α
ppli in FOMA terminal can
[Set]
<Function lock screen>
Basic Operation
45
Page 48

Call Telephone
Making a call/videophone call
To specify a phone number to call, you can directly enter a phone
number, or select it from Redial/Received calls, Recorded
messages, voice memo while talking or phonebook.
Entering a phone number
Always enter area code even when calling from the same city.
a
Enter a phone number (up to 80 digits)
en
call) or C (Videophone call)
Touch the stand-by touch button , e Phone
Connect
number
e
or touch [VP Call] to make a call.
b
When ending the call,
f
Using redial/received calls
Up to 30 items are recorded in each of Redial and Received calls.
When the maximum is exceeded, older records are overwritten
first.
a r
(Redial) or l
(Received calls)
Icons in the list
represent types of
incoming/outgoing
calls. Followings are
major icons and their definitions.
:
Voice call
/ :
<Redial screen> <Received call screen>
Missed call/Unchecked missed call
46
(Voice
:
Videophone call
Recorded message/Unchecked
recorded message
*
If recorded message is deleted, this icon changes to missed call icon.
b
Move the cursor to the party
I
(Videophone calls)
To display the details of a party, move the cursor to the party,
and then press
Point
・
DOCOMO videophone specifications conform to "3G-324M, an
international standard prepared by 3GPP". The connection with the
videophones of different specifications cannot be established.
g
/ :
*
en
(Voice calls) or
.
Using phonebook
a d
The phonebook list of the Show all names
is displayed by default.
To switch lines, press
b
Move the cursor to the party
(Voice calls) or
calls)
To create an i-mode mail, move the cursor to a party, and then
press
a
.
Point
・
You can make calls using logs of mails, GPS, etc if phone numbers are
saved in phonebook.
h
I
(Videophone
.
en
<Phonebook search
result screen>
Page 49

a
International calls
You can make international calls from Japan using WORLD CALL.
✜
WORLD CALL
"WORLD CALL" is the international call service available from
DOCOMO mobile phones. You are subscribed to "WORLD CALL" at the
time of subscription to the FOMA service (unless you request not to
subscribe to it).
・
No subscription or monthly charges apply.
・
For details of "WORLD CALL" charges, available charging plans, etc,
contact the numbers for "General Inquiries" on the last page of this
manual.
・
To use international call services except DOCOMO service, contact
the carrier for details.
・
For countries and overseas telecommunications carriers available,
refer to "Mobile Phone User's Guide [International Services]" or
DOCOMO International Services website.
・
The image of the other party displayed on FOMA terminal may be
distorted or connection may not be established depending on the
other party's terminal connected through the international
videophone line.
Information
・
You can set whether to automatically convert an international prefix number, or whether to add a country code for a call made from overseas. Also, you
can save/edit international prefix numbers and country codes.
・
You can notify/not notify your caller ID on the other party's terminal for each call.
・
You can set calling conditions each time you make a call.
【 国際ダイヤルアシスト設定
【 発信オプション
Enter "010"eCountry codeeEnter a phone number
without the leading "0" of the area code (City code)
n
(Voice calls) or C (Videophone calls)
In some countries and areas such as Italy, "0" is required.
Caller ID notification
(Default : Notify)
You can notify your phone number (caller ID) to the other party's
terminal when making a voice call.
a meh
d
Settings & NWserviceseh NW Services
Caller IDea Caller ID notificationea Activate/
Deactivateea Notify
Select "b Not notify" if you do not want to notify.
Point
・
Caller ID is your important personal information. Carefully consider
whether you want to include caller ID information when making a call.
・
If you hear an announcement of requesting caller ID when making a call,
set Caller ID notification or add prefix "186" to the phone number to call
again.
【 発信者番号通知/非通知
(Call option)
(Int'l call assist)
】
】
(Notify/Not notify) 186/184
】
e
e
Connect
47
Page 50

Call Telephone
Call Telephone
Receiving a call
Basic operation for receiving incoming calls is described here.
・
Incoming call restriction ⇒P43
a
An incoming call
You are notified of an incoming call with ring alert, light alert,
the display, etc.
j
:
Adjust the alert volume
Z
/ z :
Stop ring alert sounding or vibration
Press
z
to activate Operation lock.⇒P42
Connect
48
b n
c
・
(Voice/Videophone calls) or I (Videophone
calls)
You can answer a call by pressing front key z, or touching the
screen and then touching .
When ending the call,
Point
When you cannot answer an incoming call, (the digit indicates the
number of missed calls) appears on the stand-by display. The incoming
calls are recorded as missed calls in Received calls.
Information
・
You can set FOMA terminal so that you can answer an incoming voice
call by pressing any key other than
(Any key answer)
・
You can set to answer a call by opening FOMA terminal when receiving
voice call.
】
【 着信中オープン応答
f
n.【 エニーキーアンサー設定
(Slide and answer)
Calls in separated style
In separated style, you can call with viewing a mail or make a
videophone call without emitting voice from the speaker. The
other party's voice is emitted from the keypad unit if you separate
during a call, or from the unit used for making/receiving the call
when FOMA terminal is already separated.
Switching unit for voice call
a
During a call, n (1 sec. or more)
To operate in the display unit, touch the screen and then touch
.
In-call Launcher
You can use the other function during a call by using Multitask
function (
a
・
】
⇒
P80).
Separate FOMA terminal during
voice call
In-call Launcher is displayed on the
display unit. When In-call Launcher is
displayed, the other party's voice is
emitted from the keypad unit.
Point
For talking with keypad unit, close the unit. If the keypad unit is opened,
the listening voice from earpiece may be smaller. And, because talking
with the keypad unit is performed via Bluetooth communication, listening
voice may be interrupted depending on the communication environment.
Page 51

Call Telephone
Operation during a call
You can use useful functions during a call.
On hold
A melody is played while on hold. For a videophone call, the
videophone on-hold image is displayed on the phone of the other
party and yourself.
a
During a call, g [OnHold]
Point
Canceling the voice call on hold : g or
Canceling the videophone call on hold (send the image before on hold) :
Canceling hold for videophone call (send the camera image) : I /
Canceling hold for videophone call (send the substitute image) :
Information
・
According to the volume of the other party or ambient noise, the other party's voice becomes easier to hear with
the voice slows down with
n
【 ゆっくりボイス
n
a
(Voice slowing)】.
Listening volume
You can adjust listening volume during a call.
a
During a call,
Point
・
This setting applies to Listen volume in Adjust volume.
j
Voice memo during call/Movie memo
You can record the other party's voice or image during a call.
g
a
During a call, Z (1 sec. or more)
Point
・
You can record voice memo during a call up to 30 seconds per one, and in
total, up to 4 memos combining with voice memo in stand-by.
・
You can record movie memo up to 30 seconds per one. Recording is not
available when memory space is not enough due to saving to "Camera" of
i-motion/Movie, or when exceeding the savable number.
・
When remaining recording time reaches approximately 5 seconds, a
notifying alert sounds, and when the recording ends, an ending alert
(beep) sounds.
Stopping voice memo during call/movie memo :
sec. or more)
Playing voice memo :
delete or not
medgede
During recording, Z (1
Select a memoeSelect if you
【 はっきりボイス
(Voice clear)】, or
Connect
49
Page 52

Call Telephone
When you cannot answer a call
Use an appropriate function according to a situation or place
where you cannot answer a call.
Record message
When Record message is set to "ON", a greeting message is played
and the caller can record message when you cannot answer the call.
a med
Phonebook & Logseg Record msg.&Voice
memoea Record messageea ON
Connect
appears on the stand-by display.
Point
・
You can record up to 4 voice/videophone calls in total, approximately 30
seconds for each call. When reaching the savable number, appears on
the stand-by display and Record message does not work. Delete
unnecessary recorded messages.
・
Even when Record message is not set to "ON", you can activate it only
once by pressing
・
Even when the greeting message is being played or a message is being
recorded, a call can be answered by pressing
However, the message before the call was answered is not recorded.
Playing recorded message :
whether to delete
Z
for 1 second or more while receiving a call.
n
or front key s.
medgebe
Select memoeSelect
Public mode
Public mode is an automatic answering service putting emphasis
Public mode (Drive mode)
When there is an incoming call, an announcement is played to
inform the other party of the reason you cannot answer the call
and request to call back before the call is disconnected.
a *
(1 sec. or more)
appears on the stand-by display.
Point
・
In Public mode (Drive mode), no receiving action is performed, and calls
are recorded as Missed call.
Canceling : * (1 sec. or more)
Public mode (Power OFF)
When there is an incoming call while you are turning power off, an
announcement is played to inform the other party of the reason
you cannot answer the call and request to call back before the call
is disconnected.
a
Enter "*25251"
Even when Public mode (Power OFF) is set, no indicators such
as icons appear on the display.
Point
Canceling :
Checking the settings :
Enter "*25250"
en
en
Enter "*25259"
en
on manners in a highly public place or while driving a car.
Information
・
When you cannot immediately answer a call, press f while receiving the call to put it on hold. When the call is put on hold, the other party hears a
50
status message. For a videophone call, the videophone on-hold image is displayed on the phone of the other party and yourself.
【 応答保留
(On-hold)
】
Page 53

Call Telephone
Network Services
You can use the DOCOMO network services below with FOMA
terminal.
Service Application Monthly charge
Voice Mail service
Call Waiting Service
Call Forwarding Service
Nuisance Call Blocking Service
Caller ID Request Service
Dual Network Service
English guidance
Multi Number
2in1
OFFICEED
Public mode (Drive mode)
Public mode (Power OFF)
Melody Call
・
Network services are not available out of service area or where
Required Charged
Required Charged
Required Free
Not required Free
Not required Free
Required Charged
Not required Free
Required Charged
Required Charged
Required Charged
Not required Free
Not required Free
Required Charged
radio waves are hard to reach.
・
For subscription and details of the services, contact the numbers
for "General Inquiries" on the last page of this manual.
・
For details, refer to "Mobile Phone User's Guide [Network
Services]".
・
"OFFICEED" is a service requiring subscription. For details, refer
to DOCOMO's business website (http://www.docomo.biz/html/
product/officeed/ (In Japanese only)).
Setting network service
The operations for major network services are as follows.
Service Operating procedure
Voice Mail service
Call Waiting
Call Forwarding Service
Point
・
When ring time is set to "0 sec." for Voice Mail service or Call Forwarding
service, incoming calls are not recorded in Received calls.
・
To answer a call from another party during a call when call waiting is
activated, press
I
to switch the parties to talk to.
meh
Servicesea Voice Mailea Voice Mail
serviceePerform the next operation
Activate : ae"Yes"e"Yes"eEnter ring
Deactivate : ce"Yes"
Play messages :
meh
Serviceseb Call waiting/forwardea Call
waitingePerform the next operation
Activate : ae"Yes"
Deactivate : be"Yes"
meh
Serviceseb Call waiting/forwardeb Call
forwardingePerform the next operation
Activate : ae"Yes"e"Yes"eEnter a phone
Deactivate : be"Yes"
n
or front key s. When a party is put on hold, press
Settings & NWserviceseh NW
time
eea
Follow the guidance to operate
Settings & NWserviceseh NW
Settings & NWserviceseh NW
number
eCe
or be"Yes"
"Yes"eEnter ring time
e
Connect
51
Page 54

Call Telephone
Services available for the FOMA terminal
Services available for the FOMA terminal Phone No.
Directory assistance service (charged : service
fee + call fee) (Not provided for those who do
not require Directory assistance service)
Sending telegrams (charged : telegram)
Time (charged)
Weather (charged)
Police emergencies
Fire and ambulance
Connect
Marine emergencies and accident reports
Disaster recorded message service (charged)
Collect call (charged : service + call)
・
Customers who use Call forwarding from a land-line phone
whose forwarding destination is a mobile phone, may still hear
the ring tone even when the mobile phone is busy, out of service
area or turned OFF due to the settings.
・
Note that dial services such as 116 (NTT information), Dial Q2,
message service, credit call, etc. are not available. However,
auto-credit call when calling from a land-line phone or public
phone to FOMA terminal is available.
・
This FOMA terminal is applicable to "Emergency Location
Report". When making an emergency call to 110, 119, 118, etc.,
information of your location (location information) is
automatically informed to an emergency call receiving
organization such as police. For some locations and/or wave
reception conditions, the emergency call receiving organization
52
104 (no area code)
115 (no area code)
117 (no area code)
Area code + 177
110 (no area code)
119 (no area code)
118 (no area code)
171 (no area code)
106 (no area code)
cannot recognize the correct location. When location
information is notified, the name of the emergency call receiving
organization the information is sent to appears on the stand-by
display.
When the caller ID is hidden for the call, i.e., by appending "184"
to the dialed number, none of location information or your
phone number is notified; however, the organization may
acquire the location information and phone number regardless
of your settings, if they have determined that such information
is necessary for the protection of life etc. The area and timing of
implementing "Emergency Location Report" vary by the
preparatory state of respective emergency call receiving
organizations.
・
When calling to 110, 119 or 118 from FOMA terminal, inform
them that you are calling from a mobile phone and give your
phone number and your current location precisely since the
police or fire department has to call you back for confirmation.
To make sure that you are not cut off during the call, do not
move when making the call and do not turn OFF the phone after
the call, but keep it on for about 10 minutes.
・
For some areas you are calling from, you are not connected to
the local police or fire department. Use a public payphone or
land-line phone in that case.
Page 55

Call Telephone
Overseas use
You can use phone call or i-mode overseas.
✜
International roaming (WORLD WING)
International roaming (WORLD WING) is a service that allows you
to make voice calls and access i-mode using network of affiliated
telecommunications carriers even overseas. Before using this
service, check its subscription status.
・
The service is available in areas that 3G Network or GSM/GPRS
Network covers. Also, it is available in countries or districts where
3G 850 MHz is applied. Check the service area.
・
If you subscribed to FOMA service on or after September 1, 2005,
separate subscription is not required to use WORLD WING.
However, if you meet a following condition, subscription is
required.
- You declined to use WORLD WING at subscription to FOMA
service or canceled it.
- You subscribed to FOMA service on or before August 31, 2005 but
not to WORLD WING.
・
There are some unavailable charging plans.
・
To use FOMA terminal overseas, refer to "Mobile Phone User's
Guide [International Services]", "Mobile Phone User's Guide
[Network Services]", DOCOMO International Services website, and "
海外ご利用ガイド
document under Data Box in advance (In Japanese only).
Point
・
If you use Bluetooth function overseas, you may be punished. Just by
separating the terminal, a Bluetooth communication starts. Set Bluetooth
ON/OFF to "OFF" and Action when detached to "Connection disabled" in
advance.
(Guide for using overseas)" preinstalled in My
Available services overseas
Available communication services vary by the telecommunications
carrier and the network of the country you stay.
・
Overseas usage fees (call fee and packet communication fee)
differ from those in Japan.
・
Some services may be unavailable depending on the
telecommunications carrier or area. For details, refer to "Mobile
Phone User's Guide [International Services]" or DOCOMO
International Services website.
Network
Communication services
Voice call
Videophone call
i-mode/Full Browser
i-mode mail
SMS
i-Channel
i-concier
i-Widget
Position location of GPS
Packet communication (PC connection)
*1
When appears, sending/receiving a voice call/SMS and Position
location of GPS without packet communication are available. When
appears, all communication services except voice calls are available.
*3
*4
*5
*5, 6
*5, 7
*8
3G GPRS GSM
*1 *2
○○○
××
○
○○
○○
○○○
○○
○○
○○
○○
*9
○○
×
×
×
×
×
×
×
Connect
53
Page 56

*2
When appears, all communication services except voice and
videophone calls are available.
*3
Make and receive international videophone calls to/from parties using
certain overseas 3G telecommunications carriers or those using FOMA
terminals overseas.
*4
i-mode services settings are required.
Connections from TVlink list to the data broadcasting site are included.
Note that Activate 1Seg is unavailable overseas.
*5
Connect
Packet communication fee is charged each time you receive
information. Also, auto update for Basic channel of i-Channel and
communications by multiple applications of i-Widget are included.
*6
International Settings of i-concier is required.
*7
i-Widget roaming set is required.
*8
Using packet communication, the position is highly accurately located.
*9
64K data communication connecting (PC connection) is unavailable
overseas.
Making a call from overseas
Making an international call (including Japan)
a 0
b
(1 sec. or more)
"+" is entered.
Country code ("81" to Japan)eEnter a phone number
without the leading "0" of the area code (City
code)
en
(Voice calls) or C (Videophone calls)
In some countries and areas such as Italy, "0" is required.
54
Making a call inside the country you stay
a
Enter a phone number
(Videophone calls)
The call may be made with no message displayed.
en
(Voice calls) or C
e
"No, use original"
Making a call to WORLD WING user overseas
a 0
(1 sec. or more)eEnter "81"eEnter a phone
number without the leading "0" of the area code (City
en
code)
Point
・
The call is forwarded internationally from Japan even when staying in the
same country as the party to be called, so enter "+" and the country code
of Japan, "81".
(Voice calls) or C (Videophone calls)
Receiving a call inside the country you stay
a
A call is received
en
(Voice calls) or I
(Videophone calls)
You can also answer a call by pressing front key s.
Point
・
Regardless of the country, from which the call is made, the call is
internationally forwarded from Japan. The caller is charged for call fees to
Japan, and the receiver is charged for receiving the call.
Setting after returning to Japan
If FOMA terminal is not automatically connected to FOMA network
after turning power ON when you return to Japan, set Network
search setting to "Auto" and 3G/GSM setting to "AUTO".
Page 57

Sending mails
Sending i-mode mails
Only by subscribing to i-mode, i-mode mails can be exchanged
not only with i-mode terminals but also via Internet.
・
For details of i-mode mail, refer to "Mobile Phone User's Guide
[i-mode] FOMA version".
a a
b
Adding addresses (Simultaneous sending) :
(1 sec. or more)
The screen shown below appears.
Receiver field
Subject field
Attachment field
Message text field
Total bytes of characters
and decoration entered
to text
<Mail creation screen>
Enter an address, title and text
When sending is completed correctly, the mail is automatically
saved in a folder of Outbox.
Point
move the cursor to the receiver field
Information
・
You can automatically add your signature to the mail.
eC
[Send]
On the mail creation screen,
ea
【署名
(Signature)
Attachments
You can attach up to 10 files (images, sound, moving picture files/
i-motion, etc.) of up to 2 Mbytes in total to a mail.
a
On the mail creation screen, select the attachment field
e
Select a file to attacheEdit a mail
Point
・
Attachments not supported by the receivers' terminals may be deleted or
may not be displayed/played correctly.
・
Sending an attachment file of a big size may take time. After sending such
file, a lot of mail in Outbox may be deleted.
Removing attachment :
Changing attachment :
Move the cursor to the attachment
Move the cursor to the attachment
eC
eI
[Send]
eae
"Yes"
Sending SMS
If you do not know the receiver's mail address, you can send a text
message by enter his/her phone number as the address.
a aeg
SMS
b
Enter an address and text
】
SMS/Area Mailea SMSea Compose
eC
[Send]
Connect
55
Page 58

Mail
Deco-mail/Decome-Anime
You can create amusing mails using decoration or images.
Deco-mail
You can change a font size or background color, or insert still
images, Deco-mail picture or Deco-mail pict. To decorate
characters, specify decoration and then enter characters, or vice
versa.
<Example> Specifying decoration before entering characters
a
Select the message text field on the mail creation
Connect
screen
ea
[Deco.]
b
Select a decoration iconeDecorate
Decoration types are as follows.
Insert image Change a font
Change a
background color
Swing Word alignment Insert line
c
Edit a mail
Point
・
On the character entry screen, press
decoration result. The bytes of the remaining data amount you can enter
is displayed in the lower-right corner of the preview screen. To return to
the previous screen, press
Information
・
You can easily create Deco-mail or Decome-Anime using templates stored by default.
56
eC
color
Blink Ticker
[Send]
me0
g
.
Change a font
size
to preview the
Decome-Anime
You can create expressive mails using Flash graphics with
messages or images inserted.
a aec
b
Select Decome-Anime message text
field
To preview, press g.
c C
d
Edit the text or image
Changing a template :
e C
[Send]
Point
・
To preview, load the template, move the cursor to the Decome-Anime text
field or the Decome-Anime edit screen, and then press
the previous screen, press
Compose Decome-Anime
e
Move the cursor to template
[Load]
Anime
e
template
"Yes"eMove the cursor to
eC
mea
[Load]
[Complete]eEdit a mail
a
.
【 メールテンプレート
(Mail template)
Decome-
eC
】
<Mail template list
screen>
a
. To return to
Page 59

Mail
Receiving mails
No specific operations or settings are required for receiving mails
(mail automatic reception).
a
Receive an i-mode mail
The screen shown to the right
appears.
b a
MaileSelect a folder
Blinking
e
Select a mail
Replying to mails
a
Move the cursor to a mail on the list screen of Inbox
eC
[Reply]ea Compose Message - f OK
e
Edit a mail
eC
[Send]
Auto-sort method
Sent/Received mails can be automatically sorted.
a aei
Mail settingseb Sort methodea Auto-
sort ON/OFFeSet each option to "ON"
b b
Inbox sort or c Outbox sort
methodeSelect the folder to sorteSelect a priority
Point
Checking a mail in the mailbox :
Select a mail
aea
<Reception result
screen>
or d or eeSelect a folder
e
Checking new messages
You can make inquiry for any i-mode mail delivered while you
were out of service area or the power was turned OFF.
a aea
Information
・
You can check the subject of a mail in the i-mode Center and then specify if you receive the mail or delete it without receiving.
(Receive option setting)
[CheckMsg]
】
eC
eC
[Add]eSet sort
【 メール選択受信
[Set]
Connect
57
Page 60

Mail
Phonebook
Early warning "Area Mail"
This is a service that you can receive emergency earthquake flash
report etc. delivered by the Meteorological Agency. i-mode
subscription is not required.
Receiving Area Mail
When there is an incoming Area Mail, turns on, and you are
notified of the reception with blinking light alert, the dedicated
buzzer alarm, vibrate alert, etc.
Point
Connect
・
Area mail cannot be received during a call or when Omakase Lock is
activated.
Receive setting
You can set if you receive Area Mail.
a aeg
Mail" settingea Receive settingeRead the notice
Select the option fieldea YES or b NO
Information
・
You can set the beep time, or the alert method when receiving Area
Mail in Silent mode or Public mode (Drive mode).
メール」
58
SMS/Area Maileb Early warning "Area
(Early warning "Area Mail")設定 (Settings)
【 緊急速報「エリア
】
eC
e
[Set]
Managing phonebook entries
There are two types of phonebook: FOMA terminal phonebook
and UIM phonebook.
Adding to phonebook entries
The instruction to save information to FOMA terminal phonebook,
which can contain more information, is explained here.
a d
(1 sec. or more)eEnter a name
The screen shown to the right appears.
b
Set required items
In addition to items in the screen shown to
the right, you can save "Job title" and
"URL".
c C
Saving UIM phonebook entries :
[Save]
<New data entry of
phonebook>
Point
eC
items
Information
・
You can set receiving actions for each phone number or mail address
in FOMA terminal phonebook.
・
You can add/delete a group, and set calling/receiving actions for each
phonebook group (except for "No group").
(Alert/Image by group)
medde
【 個別着信設定
】
Enter a nameeSet required
(Alert by contact)
【 グループ別発着信設定
】
Page 61

Phonebook
To display the phonebook list, following search methods are
available.
Show all names
Group search
Ranking search
Search by:
Number search
Secrecy search
*
*
Unavailable in UIM phonebook
a med
b
Specify search method
Point
・
To switch FOMA terminal phonebook and UIM phonebook, press C on
the phonebook search screen or phonebook list.
Rocket search :
line etc.)
ed
All entries displayed by Japanese syllabary
order. h switches line of Japanese syllabary,
and narrow down the selection as entering
character of reading one by one.
Search entries by group such as "Family",
"Company", etc. that you created.
*
Displayed in order of descending made/
received calls and sent/received i-mode mails.
Search by entering phonebook No. added at
saving the entry.
Search by entering a part of phone number.
*
Entries with secret attribute set are displayed in
order of phonebook No.
Phonebook & Logsea Phonebook
On the stand-by display, press any dial key (2 for "か"
Setting default search method of
phonebook
You can set search method displayed when pressing d on standby display. By default, Show all names is displayed.
a med
the cursor to search method
The search method set to default is displayed with .
Phonebook & Logsea Phonebooke Move
em
[Default]
Editing phonebook entries
You can edit or add information to saved phonebook entries.
a de
b mec
c
d
PhonebookeMove the cursor to an entry
Edit/Settingsea Edit
Set required items
eC
[Save]
"Overwrite" or "New entry"
Deleting phonebook entries
a de
b med
PhonebookeMove to the cursor to an entry
Deleteea One contact or b All contacts
(eAuthenticate to delete all items)e"Yes"
Connect
59
Page 62

i-mode/Full Browser
Displaying i-mode site/website
With i-mode, you can use services such as site connection,
Internet connection or i-mode mail by the display of i-mode
terminal. You can use Full Browser to view websites created for a
PC.
・
i-mode is a charged service requiring subscription.
・
For details, refer to "Mobile Phone User's Guide [i-mode] FOMA
version".
・
The contents of sites and Internet websites are generally protected
by copyright laws. All or any portion of text, image or other data
imported to your i-mode terminal from a site or website cannot be
altered except for personal use, and cannot be sold or
redistributed in any form without the express permission of the
copyright holder.
Search
・
When installing a UIM except yours or you turn ON FOMA
terminal without UIM, still images/i-motion/melodies downloaded
from sites, attached files sent/received by mail, screen memos and
MessageR/F for some models cannot be displayed or played.
・
When data with UIM operation restriction is set for the stand-by
display or ring alert, replacing UIM with another one or turning the
power ON with no UIM installed changes the settings back to the
default.
・
i-mode and Full Browser have different charging systems. It is
recommended that you subscribe to i-mode packet flat-rate
service because a high packet communication fee is required to
use Full Browser according to data communication volume.
Information
・
You can change actions of i-mode and Full Browser in i-mode settings.
60
settings)
】
Displaying i-mode site
a Ie
b
Select an item to view
During i-mode communication, blinks at
the top of the display. To display English
iMenu, scroll down the screen and select
"English".
When quitting viewing a site,
fe
"Yes"
Displaying web pages designed for PC
a meb
A confirmation screen for using Full Browser appears by
default.
b
After reading a website,
i-modee* Full Browser Home
fe
"Yes"
Switching browsers
Switching i-mode to Full Browser :
eeb
Switching Full Browser to i-mode :
megb
【 iモード/フルブラウザ
(i-mode/Full Browser)
While a site is displayed,
While a website is displayed,
iモード設定
m
(i-mode
Page 63

i-mode/Full Browser
Useful functions
URL entry
a meb
Enter a URL (up to 2,048 one-byte characters)
a
Browser
When you select "Yes (default)" on the confirmation screen,
the confirmation screen does not appear again.
i-modeee Enter URLea Enter URL
e
e
i-mode Browser in the Browser type field or b Full
eC
[Connct]
Bookmark
You can bookmark frequently visited sites or websites to quickly
display them the next time you want to visit.
Saving :
While a site or website is displayed,
a title (up to 12 two-byte (24 one-byte)
characters)
added
Displaying :
eCe
mebbe
Select a folder where the bookmark is
Select a foldereSelect a bookmark
meabe
Enter
Screen memo
Currently displayed contents of a site or website can be saved as
a screen memo or captured image.
Saving :
While a site or website is displayed,
Displaying :
Point
・
To save the captured image only, select "Only displayed" in the last step
of saving the screen memo.
mebce
Select a screen memo
mebbe
"Yes"
RSS reader
You can collect the latest information of websites by saving RSS
to RSS reader.
Saving :
While a website is displayed,
e
"Yes"
Displaying :
mebie
Select a channeleSelect an item
me0be
Select RSS
Using link functions
You can make calls or send mail from link items.
a
Display a site or websiteeMove the cursor to a link
eg
item
Depending on the selected item, you can do the following
operations.
Phone number (Phone To (AV Phone To)) :
Mail address (Mail To) :
Phone number (SMS To) :
URL (Web To) :
1Seg information (Media To) :
[Select]
Make a call with
some conditions.
Create an i-mode mail and send it to
the selected mail address.
Create SMS and send it to the
selected phone number.
Connect to the site or website.
Watch 1Seg or make a
recording reservation.
Search
61
Page 64

i-mode/Full Browser
Viewing and operating screen
In sites and websites, as with Internet websites on your PC, you
can enter characters, jump to the linked page, select radio buttons
or check boxes.
Scrolling :
Scrolling successively : k (1 sec. or
k
Status,
Title/URL
more)
Changing pages : I [Back]/ a
[Next]
Switching tabs : I (1 sec. or
more)
or a (1 sec. or
more)
ejeg
Closing a tab/Ending a browser :
ce
Search
"Yes"
Pointer
<Full Browser screen>
Operating the browser screen
When a site or website is displayed, you can perform operations
by pressing
Connect to the previously
displayed page
Connect to iMenu or Full
Browser
Reload information
Display a URL
Show/Hide the pointer
Show/Hide the guide area
m
or C.
To do Operation
mece
med
mef*1 or
meg*1 or
meheea
mehh
Select a URL
*2
e
f*2ec
or
b
62
To do Operation
Set the displayed website to
*2
Home
Send a URL with i-mode
mail
Open/Close/Switch tabs
Switch pages, zoom*2, drag,
select text scope or paste,
etc.
Change a font size
Search for a character string
Display the visit history/a
list of tabs
Display PagePilot screen
(the entire page)
Switch the vertical/
horizontal display
Add to phonebook
Save an image
*1
When using i-mode
*2
When using Full Browser
mefde
meiea
Ceaea
Cebea
Cece
Cede
entry field (up to 25 two-byte (50 onebyte) characters)
Cee
Cef
Cegea
Move the cursor to a phone number or
mail address
Ceiea
"Yes"
or
b
-
c
-
i*1 or a -
Select a font size
Enter text in the search text
eC
-
c
eCehea
-
e
0
or
*2
b
Page 65

i-Channel
Using i-Channel
This is a service that the information such as news or weather is
distributed to terminals compatible with i-Channel. The information
is automatically received, and a ticker appears on the stand-by
display. You can display the channel list by pressing c. Two
types of i-Channel shown below are available. (In Japanese only)
●
Basic Channel
The channel is provided by DOCOMO, and the packet
communication fee for automatically updating the distributed
information is not charged.
●
Okonomi (Favorite) Channel
The channel is provided by an IP (Information Provider), and the
packet communication fee for automatically updating the distributed
information is separately charged.
When viewing detail information in Basic Channel or Okonomi
Channel, a packet communication fee is separately charged. For
overseas use, packet communication fee is charged for both
automatic update and viewing detail information.
・
i-Channel is a charged service requiring subscription. i-mode
subscription is required for the service.
・
For details, refer to "Mobile Phone User's Guide [i-mode] FOMA
version".
Information
・
You can change the display options of the i-Channel ticker.
【 iチャネル
To view the detail information of the ticker, perform the following
operation.
a
On the character entry screen,
ce
Select a channel
The site is connected and the detail information appears.
Point
・
When the detail information of i-Channel is displayed, the same
operations as the ones when i-mode sites or websites are available.
(i-Channel)
iチャネル設定
(i-Channel setting)
】
Search
⇒
P62
63
Page 66

Map/GPS
Using Map/GPS function
・
This function is unavailable as a navigation device for aircraft,
vehicles or persons or as high-precision location surveying GPS.
DOCOMO is not liable to any purely economic damages including
troubles, if any, caused by missing opportunities of viewing
positioning results or making communications due to failures or
malfunctions of FOMA terminal or external events such as power
interruption (including battery exhaustion) in using FOMA
terminal for purposes including but not limited to the above.
・
Because GPS is managed by U.S. Department of Defense, GPS
wave conditions may be controlled (accuracy degraded or wave
stopped) for security reasons of the U.S. And, wave conditions
differ by satellite locations; therefore, positioning operations in
the same location under the same environmental conditions may
not yield the same result.
Search
・
Because GPS uses waves transmitted from satellites, waves may
not be received or become hard to be received, resulting in an
error of 300 m or more in location information.
・
When using Location request and Notify location functions, check
instructions and precautions given in website of GPS service
providers and NTT DOCOMO. And, you may be charged for using
these functions.
・
The GPS function except Position location is unavailable out of
service area.
Map
You can start GPS compatible i-αppli to display maps.
a mef
Point
・
i-αppli set in Select map in Map setting starts. "
Application)" is set by default.
LifeKiteg Map/GPSea Map
Position location
You can check where you are. No packet communication fee
applies for positioning of Position location, but a packet
communication fee is required separately with map displayed
using location information.
a mef
Position location
When positioning is in progress, blinks.
When positioning is completed, the
position location menu appears.
From the menu, you can select options to
read map, use GPS compatible idisplay the mail creation screen on which
LifeKiteg Map/GPSef
α
ppli,
location information is pasted, add to phonebook, etc.
Information
・
You can set FOMA terminal so that location information can be provided upon request from other set parties. This service requires a separate
subscription to use. And, you may be charged for using the service.
64
・
Various i-αppli that are compatible with Map/GPS function are stored by default. 【GPS
【
GPS
位置提供
(Location request)
対応iアプリ
】
(GPS compatible i-αppli)
地図アプリ
(Map
<Location information
usage menu>
】
Page 67

Map/GPS
AUTO-GPS
Your current location is automatically sent to service providers on a
regular basis (approximately once in every 5 minutes), which allows
you to services that deliver information about the weather or shops
around where you are, or sightseeing information. (In Japanese
only)
・
Set an AUTO-GPS compatible service from its AUTO-GPS
compatible i-αppli.
・
When All lock, Personal data lock, Self mode, or Omakase Lock is
activated, etc. the AUTO-GPS function is unavailable.
・
When using the AUTO-GPS function, check instructions and
precautions given in website of GPS service providers and NTT
DOCOMO. And, you may be charged for using these services.
・
Note that more power is consumed in FOMA terminal due to a
regular communication depending on your usage.
DOCOMO service set
To use AUTO-GPS service linked with i-concier or services
provided by DOCOMO, set whether to send your location
information to DOCOMO on a regular basis. A separate
subscription is required to use the service.
a mef
LifeKiteg Map/GPSe0 AUTO-GPSea
DOCOMO service sete"ON" or "OFF"
AUTO-GPS setting
You can set whether to use the AUTO-GPS function.
a mef
LifeKiteg Map/GPSe0 AUTO-GPSeb
AUTO-GPS settingea ON or b OFF
Setup service list
This function display a list of the names of i-αppli (the service
name), to which AUTO-GPS service information is set, and its
status.
a mef
LifeKiteg Map/GPSe0 AUTO-GPSec
Setup service list
Canceling the service (including the AUTO-GPS function) :
Move the cursor to the name of i-αppli (the service name)
mea
Information
・
You can set FOMA terminal to stop AUTO-GPS function when the battery level of display unit becomes low for reducing power consumption.
【
GPS
低電力時動作設定
(Low battery setting)
】
Cancele"Yes"
Search
e
65
Page 68

Camera
Camera
Viewing shooting screen
In slide style, shoot in vertical display; in basic style or separated style, shoot in
horizontal display. In basic style, shooting with out-camera is not available.
<Example>
Enjoy
66
a
<Still image shooting screen>
a
Auto optimized shooting mode icon
・
To fix the currently detected
scene, touch the icon.
c
:
Save to
:
Recording Type
:
Light
:
Macro shooting
:
Auto timer
:
Face detection/Smile
finder
:
Compatible mode
Indicator, Counter
b
c
d
<Moving picture shooting screen>
b
Zoom ratio
・
With j, display the zooming
adjustment panel to zoom in/out.
d
:
Scene mode/effect
:
Brightness
:
White balance
:
Frame
:
Shake reduce
:
Skew correction
:
Continuous/Panorama
:
Image quality
:
Quality
:
Size restrictions
:
Image size
・
You can change the settings
by pressing h on the
shooting screen.
*Shown images
are in slide
style
Shooting still images/moving pictures
You can shoot still images/moving pictures with
the camera in FOMA terminal.
Shooting procedures with out-camera are as follows.
Shooting still images
a C
b
c g
a C
b
c
d g
・
・
・
・
Switching still camera/movie camera :
or Z (1 sec. or more)
Point the camera at an object, g [Shoot] or Z or
In horizontal display, touch [Shoot].
The touched location is focused.
[Save] or Z or
z
z
Shooting moving pictures
(1 sec. or more)
Point the camera at an object, g [Shoot] or Z or
When you want to stop shooting, g [Stop] or Z or
[Save] or Z or
Point
If battery power is exhausted on confirmation screen of shot still image,
the image is saved automatically.
If FOMA terminal is left in a warm place or exposed to direct sunlight for
a long time, shooting images may be deteriorated.
If no operations are performed for approximately 3 minutes during
shooting stand-by, the camera ends.
In separated style, you can use the keypad unit as a remote controlled
shutter.
or more)
z
On the shooting screen, I (1 sec.
z
z
Page 69

Camera
Camera
Shooting still images in various procedures
On the still image shooting screen, you can switch shooting
procedures from the submenu.
Major shooting procedures are as follows.
Shooting
procedure
Scene
mode/effect
Smile finder
Auto timer
Continuous/
4 frames/
Panorama
shooting
・
The camera can track the subject
(Tracking focus)
(Search me focus)
・
You can change various shooting settings such as image size, image
quality, number of images for continuous shooting, auto-save, location
to save or shutter tone.
settings)
The camera detects a subject, switches to the optimized
scene and then focus the subject (Auto optimized
shooting mode).
Setting Scene mode/effect :
required items
When a SmileRate of shooting subjects reaches
specified rate, a still image is shot.
Setting SmileRate :
Use this function for not only shooting yourself but also
preventing hand shake.
Setting the remaining time in seconds before shutter
clicks :
You can specify the number of frames for continuous
and 4 frames shooting, and shoot a panorama view
using the camera's auto-connecting technology.
Selecting a shooting procedure :
shooting procedure
Information
】
or detect a registered face
】
】
Effects and procedures
mecbe
meee
【 トラッキングフォーカス
.
【 カメラ
meae
Select SmileRate
Select seconds
mefe
【 サーチミーフォーカス
(Camera)
静止画詳細設定
Select
Select a
(Image
Viewing and editing still images/moving pictures
Still images/Moving pictures are saved to Data Box.
a mee
for moving pictures,
a created foldereSelect data
Point
Creating a mail with attachment :
data
ea
Setting a file to the stand-by display :
move the cursor to data
Graffiti
You can decorate still images or characters with stamps, etc.
a mee
created foldereSelect data
b C
Decoration types are as follows.
c
Touch or slide to specify a locationeTouch [完了 (Complete)]
Information
・
You can save still images/moving pictures to microSD card (⇒P82),
and sort them in created folders or albums.
加/削除
Data BoxeFor still images, a My Picture or
d
i-motion/Moviee"Camera" or
On the list screen, move the cursor to
emeba
On the list screen or displayed screen,
Data Boxea My Picturee"Camera" or a
[Graffiti]eTouch the palette to operate
Select the font size and color
before touching [確定 (OK)]
Select the thickness and color
before touching [確定 (OK)]
(Add/Delete)
】
Select the stamp or the
image in My Picture before
touching [確定 (OK)]
Delete the decoration
【 フォルダ
(Folder)
追
Enjoy
67
Page 70

1Seg
Watching 1Seg
●
Using 1Seg
1Seg is a service provided by TV broadcasting enterprises (stations),
etc. A communication fee for receiving video picture and sound is
not required. Contact NHK for details on your NHK viewing fees.
*
For viewing "Data broadcasting site", "i-mode site", etc., packet
communication fees are charged. Some sites require information fees (i-mode
pay sites).
*
For details of "1Seg" service, refer to the following websites.
The Association for Promotion of Digital Broadcasting
From a PC : http://www.dpa.or.jp/english/
From i-mode : http://www.dpa.or.jp/1seg/k/ (in Japanese only)
*
1Seg is unavailable overseas.
●
Radio waves
1Seg is one of the broadcast services and a different type of radio
waves (airwaves) from that of FOMA service is received. In the
following cases, 1Seg may not work correctly.
・
A place far from the tower that the airwaves are sent from
・
Mountain-ringed regions or a place between buildings
Enjoy
・
Tunnel, underground or far back from a building
*
To make the reception condition better, stretch out the 1Seg antenna.
●
Screen appearing when using 1Seg for the first time
A confirmation screen for disclaimers appears. If you agree and then
select "OK", the confirmation screen does not appear again.
To watch 1Seg, you need to create a channel list and select the
area you watch 1Seg.
Creating a channel list using preset
A list of broadcasting stations and channels that are pre-registered
to FOMA terminal is loaded.
68
(for the first-time creation)
a mef
e
Selecting "Auto setting" searches for broadcasting stations
and channels that can be received in your current location.
b
Select an areae"Yes"
LifeKitei 1Segeg Channel list
"Yes"e"Use preset"
Setting a channel list
When you have multiple channel lists or move to another area,
switch the channel lists.
a mef
the cursor to a channel list
A list of channel numbers appears. To watch a channel, move
the cursor to the channel, and then press
LifeKitei 1Segeg Channel listeMove
ea
[Set]
g
.
Starting 1Seg
a T
(1 sec. or more)
Point
・
Set Auto setting by stretching 1Seg antenna in the terrestrial digital TV
broadcasting service area.
・
Storage area is an area dedicated to 1Seg only in the terminal.
Information, which is saved according to instructions of data
broadcasting, may be displayed when viewing data broadcasting sites or
sent to TV broadcasting enterprises (stations). When "No" is selected in a
confirmation screen for initializing the storage area, services using the
storage area are unavailable.
Page 71

1Seg
Viewing and operating watching screen
You can watch 1Seg in full screen, or divide the screen to watch
the data broadcasting.
<Horizontal display (movie with data
broadcasting)>
Selecting a channel : 0 - 9, *,
Switching the watching screen :
Adjusting volume : I [Low]/ a [High]
Starting/Stopping video recording : Z (1 sec. or more)
*
When you press f when you end recording, you are prompted to
select the option to end watching (but recording continues) or the option
to end watching/recording.
Recording still image :
Point
・
Pressing m while watching displays the submenu, from which you can
reserve watching/recording, set OFF timer, use Smooth image, turn 1Seg
Eco-mode on/off, etc.
Displaying key function help :
Z
While watching,
#
n
mei
Watching reservation/Recording
reservation
You can automatically activate 1Seg watching or recording, or set
the alarm to notify you of start of a program.
a mef
b mea
LifeKitei 1Seged Set/Timer list
Set new timereSelect timer option
eC
[Save]
When selecting "Manual reception" or "Manual recording",
you proceed to set the reservation details such as time and
date or channel.
Selecting "By program guide" activates program guide iWhen you reserve watching or recording a program by
selecting it in the program guide iinformation is saved and displayed on the setting screen.
c C
・
[Save]
Point
When recording a long program, specify the saving location that has more
free space in "REC setting" on the recording reservation screen.
α
ppli, the reservation
α
ppli.
Playing a recorded program
a mee
the recorded program
Data Boxe* 1SegeSelect the location of
e
Select the data
Enjoy
69
Page 72

Music
Music&Video Channel
Music&Video Channel is a service which automatically distributes
a program of up to approximately 1 hour at night. You can also
enjoy high-quality video program of up to approximately 30
minutes. (In Japanese only)
・
Music&Video Channel is a charged service requiring subscription.
Subscriptions to i-mode and i-mode packet flat-rate services are
required for the service.
・
Information fee may be required additionally for some programs
besides Music&Video Channel service fee.
・
If UIM is used on a Music&Video Channel incompatible FOMA
terminal after subscribing to Music&Video Channel, Music&Video
Channel cannot be used. Note that the service fee is charged
unless Music&Video Channel is unsubscribed.
・
Program setting and downloading are unavailable during
international roaming*. Stop distribution of programs before
leaving Japan. When you return to Japan, resume distribution of
programs.
Enjoy
*
Note that attempting program setting or downloading during international
roaming requires packet communication fee for i-mode connection.
・
For details, refer to "Mobile Phone User's Guide [i-mode] FOMA
version".
Setting programs
To set programs, registering Music&Video Channel program site
in My Menu may be required.
70
a mei
MUSICeb Music&Video
Channel
The screen shown to the right appears.
b
"Set program"eSet a program
according to instructions on the
screen
Playing a program
a mei
ChanneleSelect a program
The following operations are available on
the player screen.
Pausing/Playing : g [PAUSE/PLAY]
Adjusting volume :
Rewinding/Fast forwarding : h (1 sec. or
Jumping to the beginning of chapter :
Jumping to the previous chapter :
Next chapter :
MUSICeb Music&Video
j
more)
After a lapse of 3 seconds in play time,
l
time,
l
r
<Music&Video
Channel screen>
<Music&Video Channel
player screen>
Within 3 seconds in play
Page 73

Music
MUSIC Player
You can play Chaku-uta full downloaded from a site and Windows
Media
Audio (WMA) files imported from music CDs, the Internet,
etc. to a PC. For details of MUSIC Player, refer to NTT DOCOMO
website. For Windows Media Player, contact the manufacturer of
your PC.
Downloading Chaku-uta full
a
Display a siteeSelect Chaku-uta fulle"Save"eEnter a
name to display (up to 25 two-byte (50 one-byte)
eC
characters)
[Set]
Saving WMA file on a PC to microSD
For connection to a PC, FOMA USB Cable (optional) is required.
For details, refer to "Manual for PC Connection" in the attached CDROM.
a mef
mode settingsec MTP modee"Yes"
b
With Windows Media Player activated, connect FOMA
terminal to a PC using USB cableeSend WMA file from
the PC
LifeKiteb Ir/iC/PC connectionee USB
Playing music data
a mei
PlayereSelect a folder or
playlisteSelect the music data
The following operations are available on
the player screen.
Pausing/Playing : g [PAUSE/PLAY]
Z
Adjusting volume :
Rewinding/Fast forwarding : h (1 sec.
or more)
Jumping to the beginning of song :
in play time,
Jumping to the previous song :
l
Next song :
Adding to Quick playlist :
(quickly twice)
Stopping : Z (1 sec. or more)
Point
・
When downloading music data from Internet websites etc., check the use
conditions.
・
Music data saved in FOMA terminal or microSD card is allowed for
personal use only. When using the music data, take extreme care not to
infringe intellectual property rights of a third party such as copyrights etc.
MUSICea MUSIC
j
l
Within 3 seconds in play time,
r
Double-touch the display
or
<MUSIC Player screen>
After a lapse of 3 seconds
or Z
Enjoy
71
Page 74

i-αppli
i-αppli/i-Widget
i-αppli is a software for i-mode compatible mobile phones, which
updates the information of stock price or weather automatically, or
provides games that can be played without connecting to sites. iWidget is a convenient function that allows you to easily access
frequently-used contents (Widget Appli) such as calculator, clock
and stock price information with the i-Widget key (T). Either i-αppli
or i-Widget can be downloaded from i-mode site or sites provided by
IPs (Information Providers). For details, refer to "Mobile Phone
User's Guide [i-mode] FOMA version".
・
When downloading or displaying i-Widget screen, etc. a packet
communication fee is separately charged.
・
When i-Widget screen is displayed, multiple Widget Appli may
communicate.
・
A packet communication fee for overseas use differs from the one
in Japan.
・
DOCOMO assumes no responsibility for the information set in
Osaifu-Keitai compatible i-αppli (IC card).
Enjoy
Information
・
In separated style, you can switch to
using QWERTY keypad as a game controller. In addition, even if touch operation does not support the i-
チャルキー
・
If you delete stored i-αppli, you can download the software from "@F
"@F
iMenu
mobile phone supporters) (In Japanese only)
72
*The access method may be changed without previous notice.
(Virtual keypad)】 supports the i-αppli.
ケータイ応援団
⇒ メニューリスト
(@F mobile phone supporters)" (as of February, 2010)
(Menu list) ⇒
【 ゲームモード
ケータイ電話メーカー
(Game mode)】 by pressing 7 on QWERTY keypad for 1 second or more and operate i-αppli etc.
(Mobile phone manufacturer) ⇒ @F
Downloading
a
Display a siteeSelect i-αpplieAfter completion of
downloading, "Yes" or "No"
Downloaded i-αppli is saved to "My folder" of Software list.
When Message ii-
α
Starting i-αppli
a I
Point
Starting Osaifu-Keitai compatible i-αppli :
Starting GPS compatible i-αppli :
Start i-Widget
a Te
ケータイ応援団
(@F mobile phone supporters)" site.
α
ppli is downloaded, the folders for Message
ppli are automatically created in the folder list.
(1 sec. or more)eSelect a foldereSelect i-αppli
me*ae
mefgee
Select i-αppli
Select i-αppli
Select Widget Appli
α
ppli, touch operation is available if
ケータイ応援団
(@F
QR code for site
access
【バー
Page 75

i-motion/Movie
Playing i-motion/movie
You can obtain i-motion/movie (images, sound, etc) from sites or
websites.
✜
Playable i-motion
Type Playing action
Standard
type (can be
saved*)
Streaming
type (cannot
be saved)
*
Some i-motion cannot be saved.
✜
Playable movies
Type
Streaming
type (cannot
be saved)
・
You can set whether to automatically play normal type i-motion while downloading or after it is downloaded.
・
Up to 100 titles of i-motion that is saved to FOMA terminal without replay restriction applied can be saved to playlist at once.
(Movie/i-motion)
・
You can save programs recorded in a Blu-ray Disc recorder to a microSD card in FOMA terminal.
a Blu-ray Disc recorder)
While the i-motion data is downloaded, it is played.
・
The downloaded i-motion can be operated in the same
way as the i-motion which is played after entire data is
downloaded.
After the entire i-motion data is downloaded, it is played.
While the i-motion data is downloaded, it is played.
・
After the i-motion data is played, it is deleted.
Distribution
Real-time
distribution
On-demand
distribution
Information
method
The movie is distributed in real time.
・
Pausing/Resuming play/Moving play
position are unavailable.
Distribute movies that are prepared in
advance.
プレイリスト作成/削除
】
Playing action
(Create/delete playlist)
】
Downloading i-motion/movies
a
Select i-motion/movie while site or website is
displayed
Playback starts while data is downloaded or when the
download is completed.
Point
・
Note that communication of a large amount of data, such as downloading
a movie, requires high charges.
Playing moving picture/i-motion
a mee
folder
The following operations are available during playback.
Adjusting volume :
Rewinding/Fast forwarding :
Pausing/Playing/Playing from the beginning (while stopping)
:
Setting a bookmark :
Stopping the movie :
Data Boxed i-motion/MovieeSelect a
e
Select a moving picture/i-motion
j
h
g
Ie
"Yes"
C
【 動画自動再生設定
【 ブルーレイディスクレコーダー連携
(Movie auto play)
【 動画/iモーション
(Linkage with
Enjoy
】
73
Page 76

Osaifu-Keitai
Using Osaifu-Keitai
Osaifu-Keitai is equipped with IC card and allows you to pay money
only by holding FOMA terminal over the IC card reader in stores etc.
Moreover, by using communication, you can also credit electronic
money in a bank account and check the balance or usage history, etc.
Various security systems are also equipped for your safe usage. For
details, refer to "Mobile Phone User's Guide [i-mode] FOMA
version".
・
The data (including electronic money, points, etc.) in the IC card
may be lost or modified because of the malfunction of FOMA
terminal (When we take your Osaifu-Keitai for repair etc., as we
cannot take it with data remained, you are required to erase the
data by yourself). For support such as reissuance, restoration,
temporary preservation or transfer of data except transfer by iC
transfer service, confirm with Osaifu-Keitai compatible service
provider. For important data, be sure to use a service with backup
service.
・
If the data in the IC card is lost, modified or damaged by any
means related to Osaifu-Keitai compatible service such as
malfunction or model change, DOCOMO assumes no
responsibility for the loss of data.
・
If FOMA terminal is stolen or misplaced, immediately contact
Osaifu-Keitai compatible service provider for an advice.
More Convenient
Information
・
You can disable IC card function. ⇒P42
・
When replacing Osaifu-Keitai in such cases as model change or repair, data in an IC card can be transferred collectively to a new Osaifu-Keitai. 【iC
お引っこしサービス
・
Electronic cards
74
be exchanged between FOMA terminals using mails or infrared communication.
(iC transfer service)
【 トルカ
(ToruCa)】 such as coupon tickets can be obtained from an IC card reader or a site using Osaifu-Keitai. Obtained ToruCa can
】
Downloading Osaifu-Keitai compatible i-αppli
"iD
設定アプリ
appli)", "
α
ppli)" and "
TOKUSURU KEITAI application)" are stored by default. For other
Osaifu-Keitai compatible ifollows.
a me*
(iD appli)", "DCMX
モバイル
Suica
登録用iアプリ
マクドナルド トクするアプリ
クレジットアプリ
(Mobile Suica Setup i-
(McDonald's
α
ppli, connect a site to download as
Osaifu-Keitaieh Search by i-mode
Making initial setting of the service
a me*
Osaifu-Keitai compatible iinstruction on the screen
Osaifu-Keitaiea IC card contenteSelect
α
pplieFollow the
Using Osaifu-Keitai
Separate FOMA terminal and
hold mark on the back side
of display unit over IC card
reader. In this case, you do not
need to activate Osaifu-Keitai
compatible i-
α
ppli.
mark
Back side of Display unit (separated)
(DCMX credit
IC card reader
Page 77

i-concier
Using i-concier
i-concier is a service that Machi-chara (a character on the stand-by
display) supports your life like a butler or concierge. It stores a
variety of your information (area information of your residence,
schedule, ToruCa, phonebook, bookmarks, etc.) and offers you
information that suits your preferences of your living area and
hobby in the right time. Also, it can automatically update schedules
and ToruCa stored in FOMA terminal, etc., and automatically add
useful information such as shop hours to the phonebook. (In
Japanese only)
・
i-concier is a charged service requiring subscription (i-mode
subscription is required).
・
If you do not subscribe Data Security Service, when you subscribe
i-concier, you subscribe Data Security Service, too.
・
A packet communication fee is separately required to receive
information except for some information.
・
A packet communication fee is separately required to use detail
information.
・
To use i-concier overseas, International Settings require to be set.
For using i-concier overseas, a packet communication fee is
charged for both receiving and viewing detail information.
・
Information fee may be additionally required for some contents
besides i-concier monthly service fee.
・
Automatic updating i-schedule/ToruCa/phonebook, etc. requires a
packet communication fee separately.
・
For details, refer to "Mobile Phone User's Guide [i-mode] FOMA
version".
Receiving information and displaying details
Information is sent automatically.
When Information is received, the
screen shown on the right
appears.
"
ひつじのしつじくん®
(Butler Sheep)"
©
NTT DOCOMO
a me#
i-conciereSelect a piece of information
Some pieces of information may have schedule or ToruCa
attached or contain a link to a site. To display details, select its
icon.
Using overseas
a me#
b me"設定
settings)"e"
(Default : No)
i-concier
(Settings)"e"
基本設定
プロフィール設定/海外利用設定
International service settings)"e"
(International service settings)"
Information
・
You can set whether to display Information on the stand-by display
when i-concier Information is received.
定
(Information display)
】
e
【 インフォメーション表示設
<Information reception
screen>
(Basic
(Profile/
海外利用設定
Change the setting
More Convenient
75
Page 78

Convenient tools
Convenient tools
Scheduler
You can manage schedules with FOMA terminal.
Saving schedule
a uemea
The screen shown to the right appears.
b h
to switch Main (New) screen,
Sched. contact screen, Reminder
screen, or Other settings screen, and
then set required items
c C
Saving quickly from the stand-by display (Quick schedule) :
[Save]
Point
by display, enter date (for 10:00 on April 16, enter
"04161000")
Checking a schedule
More Convenient
76
a ue
Select the date on which a schedule is saved
Select the schedule
Information
・
Two types of schedulers are available : "Normal" in which i-schedule
downloaded from i-concier, birthdays saved in the phonebook, etc. can
be displayed and "Classic" in which you can scroll and enlarge the
calendar.
【 スケジュール帳
(Scheduler view type)
eue
Save the schedule
New entry
(Scheduler)
】
スケジュール帳表示設定
<Main (new) screen
of schedule>
On the stand-
e
Alarm clock
Alarm clock sounds at a specified time. You can set 1Seg to start
after the alarm sounds.
a u
(1 sec. or more)eSelect any of
1
-
7
The screen shown to the right appears.
b h
to switch Set alarm screen, Set
sound screen, 1Seg alarm screen or
Set others screen, and then set
required items
c C
・
・
・
[Set]
Point
When "Repeat"on Set alarm screen is set to "Day of week", the alarm
sounds at specified days of the week. In "Snooze (Snz)", set the intervals,
at which the alarm sounds for 30 minutes.
When "Activate 1Seg" on 1Seg alarm screen is set to "Yes", 1Seg starts
when the alarm is turned off or stopped (1Seg alarm clock), and ends at
the time specified in "Time out".
While alarm clock is sounding, it stops or starts snooze with no operations
for approximately 1 minute, by pressing a key other than
by pressing a key on QWERTY keypad other than
operation or double-tap. Press
Information
・
You can set FOMA terminal so that even when it is turned off, it can be
turned on when the alarm sounds.
(Alarm auto power ON)
f
to terminate the alarm clock.
】
【 アラーム自動電源ON設定
<Alarm setting screen>
f, z
A, Z, X
, or by touch
and T,
Page 79

Convenient tools
Convenient tools
Bar code reader
You can read and use information of JAN code, QR code, NW7
code, CODE39 code and CODE128 code.
a mef
b
Move out-camera over the code
When scanning is completed, a
confirmation sound is made and the
scanned data appears. On the screen after
scanning, you can copy or save the data
from the submenu. For some data, you
can save certain types of data to
phonebook, or create mails, or connect to
sites or websites.
Point
・
Press # to switch to Macro OFF before scanning large size codes. The
readability of code may be raised by pressing
・
Scratches, dirt, damages, low print quality and the strong reflection of
light may disable code reading.
・
If the code is not scanned well, try changing the distance between the
code and camera, the angle or direction of camera, or using auto focus.
LifeKitea Bar code reader
d
to set zoom to OFF.
<Scanning screen>
Shortcut icons
You can paste shortcut icons for frequently-used functions,
folders, files, etc. on the stand-by display (Shortcut). Select the
shortcut to start them immediately.
<Example> Pasting shortcuts of functions
a ge
b C
<Example> Pasting a shortcut of My Picture folder
a mee
b C
・
Move the cursor to a shortcut
Shortcut icons screen appears.
em
[Add]eMove the cursor to a function on Select
eC
function. screen
[Add icon]
Data Boxea My
Picture
e
Move the cursor to a
em
folder
When the cursor is placed on a file or
folder and the submenu appears, "Add
icon" appears in the guide area,
indicating that the shortcut icon of the
file or folder can be created.
[Add icon]
Point
From the submenu on the shortcut icon list screen, you can change the
order of the shortcuts, the icons or titles.
Information
・
You can create your own menus by freely selecting functions or
phonebook.
【 セレクトメニュー
(Shortcut menu)
This is selectable when
you can create the
shortcut icon of an item
you highlight
】
More Convenient
77
Page 80

Convenient tools
Pedometer/ACT monitor
You can check the number of steps, walked distance, consumed
calories or quantity of burnt fat with Pedometer/ACT monitor. You
can also measure "Activity amount" that is calculated by exercise
duration and exercise intensity of your physical activity, "Brisk
walk" and "Brisk activity amount" that are measures of your
aerobic exercise.
✜
Caution
・
To count steps accurately, it is recommended that you wear the
pedometer correctly (place it in Carry Case L 01 (optional) and attach
the case to waist belt etc. or when putting FOMA terminal in a bag,
put it in a pocket or between partitions), and walk at the speed of
100-120 steps per minute.
・
The countdown of steps or measurement of activity amount is not
performed when power is turned OFF, Pedometer/ACT monitor is
set to "Not use", Full saving is activated, Vibrator is in operation, or
software update is being executed.
・
When opening/closing FOMA terminal, performing key operation or
adding shake or swing to FOMA terminal, counting steps or
measuring activity amount may not be performed accurately.
・
By malfunction, repair or other treatments of FOMA terminal, the
information of steps/activity/calories may be lost. And, the
information of steps/activity/calories are retained for about a month
More Convenient
even with the battery removed or vacant, but they may be lost if
more time passes. Note that, even if the information of steps/
activity/calories are lost, DOCOMO assumes no responsibility.
Information
・
i-αppli
【 ヘルスチェッカー
body compositions, is installed by default.
(Health checker)】, which manages data of the number of steps, activity amount, frequency of pulse, blood pressure, and
78
Setting Pedometer/ACT monitor
a mef
Set Pedometer/Activity monitor
items
When "Use" is set, appears on the stand-by display, so that
you can check the measured volume of physical activity of that
day, such as walking distance or steps.
Point
・
At the beginning of walking, the figure is not changed because the
Pedometer is judging to prevent miscount whether you started walking.
As a guide, when you walked for 4 seconds, the steps to there is added at
a time.
・
Counted number of steps and measured activity are saved every 60
minutes. If the battery pack of the display unit is removed without turning
the FOMA terminal OFF, unsaved steps and activity amount may be lost.
LifeKiteh Pedometer/ACT monitoreb
e
Set required
eC
[Set]
Displaying Steps/Activity/Calories info
When 00:00 AM comes with the time of FOMA terminal,
information of the day such as steps or activity amount are
automatically saved as the log. Information for the past 1,098 days
including the current day can be recorded.
a mef
Steps/Activity/Calories info
LifeKiteh Pedometer/ACT monitorea
eh
to check the log
Page 81

Convenient tools
Convenient tools
Quick search
On the stand-by display or while performing a function, you can
use search functions.
a
On the stand-by display or while performing a function,
Ueh
to switch search functions
The instructions for each search function are as follows.
i-mode
Full Browser
Map Searching by Vicinity viewer :
Guide
Dictionaries
Reading search
Mail Searching by subject/message text :
b
"Search"
The search results appear.
Enter a keyword in the entry field
Select Search engine fieldeSelect search
engineeEnter a keyword in the entry field
category selection fieldea - e (eFor
e
, enter a keyword in the entry field)
Searching by Map :
e
Enter a keyword in the entry field
Enter a keyword in the entry field
Select the dictionary selection fieldea -
e
Enter a keyword in the entry field
Enter a keyword in the entry field
the mail search selection fieldea or
e
Enter a keyword in the entry field
Searching by phonebook reading :
mail search selection fieldec or
de
Enter a keyword in the entry field
"Map ← Vicinity viewer"
Select the
Select
Select the
c
b
Dictionaries
You can search word meanings, spelling of English word, etc. with
Dictionaries.
a meg
b a
Mobile EJ Dic)
c
Enter a word (up to 20
two-byte (40 onebyte))
d
Select a word from the
search result list
Point
・
To search "Today's trivia" or "Today in history", press d or e in Step 2.
Searching a word again :
word
Accessoryee Dictionaries
Jpn Dic (Gakken Mobile Jpn Dic) - c EJ Dic (Gakken
Entry field
Search result list
Detailed
information of
the word you
highlight
megeea
-
cemeae
<Search result screen>
Select a
More Convenient
79
Page 82

Convenient tools
Convenient tools
Multitask
This function allows you to operate two functions at the same time
by switching screens.
<Example> Displaying Scheduler while creating mail
a
While creating mail, front key s (1 sec. or
more)eg
SchedulereCheck the schedule
To terminate the displayed function, press f. To terminate
all active functions, press front key
and then press
Point
・
Quick search, Dial, User information, Guide, Dictionaries, Silent mode ON/
OFF or PrivacyView ON/OFF may be available even if other two functions
are activated.
Switching Multitask
Switch the screens that are activated at the same time.
<Example> Switching to Scheduler screen from mail creation screen
a
While creating mail, front key s (1 sec. or
more)
You can select a function to activate by pressing m while
More Convenient
displaying the multitask menu or select [New task].
アクセサリー
C
e
[Scheduler]
.
/MUSICea
s
for 1 second or more,
Unit search
This function allows you to search either one unit from the other
while using FOMA terminal in separated style.
Searching keypad unit from display unit
a meh
unit
When the search is succeeded, a notification alert sounds from
the keypad unit and the indicator light, the arch light and
numeric keypad light blink in red, and QWERTY keypad light
blinks in white.
To stop sounding alert, remain with no operation
approximately 30 seconds or press any key other than
the display unit or any key other than
the keypad unit.
Searching display unit from keypad unit
a
On QWERTY keypad, with pressing X, press
When the search is succeeded, a notification alert sounds from
the display unit, the indicator light blinks in red, and the
vibrator vibrates according to the settings in Alarm clock.
To stop sounding alert, remain with no operation
approximately 30 seconds or press any key other than
the display unit or press any key of
keypad unit.
Point
・
If Bluetooth communication is unavailable, this function cannot be used.
Settings & NWservicesei Keypad
ea
Unit search
A, Z, X, T
6, 8, f, c
z
on
and U on
-
z
on
on the
80
Page 83

Data Management
Using microSD card
You can save still images, moving pictures, melodies, etc. or back
up the phonebook entries or schedule data to microSD card.
・
F-04B supports microSD card of up to 2 Gbytes, and microSDHC
card of up to 16 Gbytes (as of February, 2010). For the latest
operating information, refer to the following site.
From i-mode : iMenu ⇒
話メーカー
(@F mobile phone supporters)
(Memory card support information) (In Japanese only)
From PC :
(Mobile phone)
(microSD support/microSDHC support information) (In Japanese
only)
*
✜
・
・
(Mobile phone manufacturer) ⇒ @F
FMWORLD (http://www.fmworld.net/) ⇒
⇒
The access method may be changed without previous notice.
Notes on using microSD card
Do not give a strong impact such as dropping etc. to the FOMA
terminal installed microSD card. The data may be damaged.
Data saved from the other device such as PC may not be displayed
or played in the FOMA terminal. And the data saved to microSD
card from the FOMA terminal may not be displayed or played on the
other devices.
メニューリスト
QR code for site
access
microSD
(Menulist) ⇒
ケータイ応援団
⇒ メモリーカード対応情報
対応状況、
microSDHC
ケータイ電
携帯電話
対応状況
・
Please maintain a separate record of the data you saved in the
microSD card, for example, by backing up to PC etc. If the saved
data is deleted or changed, DOCOMO assumes no responsibility for
the loss of any data.
Installing
a
Turn FOMA terminal OFF in
separated style and
remove the battery pack
b
Insert the microSD card
slowly into the slot with
metal connectors side
down (as shown right), and insert it further until it
clicks
*
To remove the microSD card, push it lightly to pop it out, and then pull
it out.
Formatting
Format microSD card with FOMA terminal before using.
a mef
Regular formateAuthenticatee"Yes"
Point
・
You can minimize processing to format a formatted microSD card by
selecting "Quick format". Formatting microSD card deletes all the data in
the card.
LifeKitec microSD
eC
[Format]
e
More Convenient
81
Page 84

Data Management
Exchanging data between the FOMA terminal and microSD card
Save important data in FOMA terminal to microSD card.
Moving/Copying to microSD card
<Example> Moving/Copying images
a mee
b
Move the cursor to data
Move to microSD or
Data Boxea My PictureeSelect a folder
emee
e
Copy to microSDea One item
Move/Copyed
- c All itemse"Yes"
Point
・
You cannot move or copy the data that is inhibited to output from FOMA
terminal.
Moving/Copying to FOMA terminal
<Example> Moving/Copying My Document
a mef
Select a folder
b
Move the cursor to data
Move to phone or b Copy to phoneea One item - c
All itemse"Yes"
More Convenient
Information
・
From a PC, you can operate data in a microSD card in FOMA terminal.【USB
・
There are menu options for checking the memory status of microSD card or synchronizing the data which is changed, added or deleted in another device
correctly.
82
・
You can store the data saved in FOMA terminal to DOCOMO Data Security.
LifeKitec microSDec My Document
【
microSD
カード
(microSD card)
emec
Move/Copyea
使用状況|情報更新
e
(Memory Status/Sync data info)
Displaying data in microSD card
a mef
Other
LifeKitec microSDea Multimedia - i
e
Select a foldereSelect data
Backing up at once
You can back up Phonebook, Schedule, mail, Notepad, Bookmark
and setting item data all at once in microSD card. Data is
overwritten for the second-time backup or later.
a mef
ea
b
"Yes"eAuthenticate
When phonebook is not saved, omit Step 3.
c
"Yes" or "No"
Point
・
Some restrictions apply, such as moving pictures saved in phonebook or
the part of the attachment files in excess of 100 Kbytes are not backed up.
・
Select "b Restore to phone" at the end of Step 1 to delete the latest data
in FOMA terminal and overwrite save it.
モード設定
【 ケータイデータお預かりサービス
LifeKitec microSDeh Backup/Restore
Backup to microSD
(USB mode settings)
】
】
(Data Security)
】
Page 85

Data Management
Bluetooth function
You can establish a wireless connection between FOMA terminal
and a Bluetooth device. For operations of the Bluetooth device,
refer to the operation manual of your Bluetooth device.
*
Wireless communication is not guaranteed for all Bluetooth devices.
*
For Bluetooth communication of the keypad unit, refer to "Simultaneous
⇒
use of Bluetooth device when separating".
✜
Compatible version
Bluetooth standard Version 2.0+EDR
✜
Functions available with Bluetooth
・
Handsfree call by using a Bluetooth car navigation system
(commercially available) etc. via Bluetooth connection. You can call
wirelessly by connecting to Bluetooth Headset F01 (optional).
・
Playing sounds or music wirelessly or performing remote control
via Bluetooth connection with Wireless Earphone Set 02 (optional)
or a Bluetooth audio device (commercially available).
・
Character entry from a Bluetooth keyboard (commercially available)
via Bluetooth connection.
・
Performing packet communication or 64K data transmission on a
Bluetooth support PC by using FOMA terminal as a modem via
Bluetooth connection.
・
Sending/Receiving the phonebook entries (User information) by
using a Bluetooth device via Bluetooth connection.
・
Performing a versus game of i-αppli or exchanging data with
connecting other terminal or a Bluetooth device via Bluetooth
connection.
・
Watching still images or document data in wide screen with using
Projector unit F01 (optional). ⇒P94
P21
Registering Bluetooth devices
Set a Bluetooth device to registration stand-by mode in advance.
a mef
Register new devices
When Bluetooth device is searched, the
screen shown to the right appears.
b
Select a Bluetooth device to register
e
The profile selection screen appears. To connect the Bluetooth device,
go to Step 2 in "Connecting with registered Bluetooth devices".
Point
・
For details of Bluetooth passkey, refer to the operation manual for the
Bluetooth device. To connect FOMA terminals with each other, enter the
same Bluetooth passkey on those terminals (determine any 4-16 digit
numbers as Bluetooth passkey). Bluetooth passkey is not required to
register Wireless Earphone Set 02.
LifeKite* Bluetoothec
e
"OK"
Enter the Bluetooth passkey
<Device list screen>
Connecting with registered Bluetooth
devices
a mef
Device list
to connect
The screen shown to the right appears.
b
Select a profile to connect
[Connect]
LifeKite* Bluetootheb
e
Select Bluetooth device
eC
<Profile selection
screen>
More Convenient
83
Page 86

Data Management
Infrared communication/iC transmission
You can send or receive data to/from FOMA terminal equipped with
the function of infrared communication or iC transmission.
Infrared data port and IC card of F-04B are equipped on the back side
of display unit. Perform infrared communication in slide style or in
separated style, and perform iC transmission in separated style.
15°
15°
Infrared
data port
Approx.
20 cm or less
Infrared communication iC transmission
Point
・
When sending/receiving all data items, the sender and receiver need to determine
a 4-digit authentication password in advance. For infrared communications, the
receiver's terminal must be ready for communications before the sender's terminal.
・
When sending/receiving all data items, the data saved in the receiver is
deleted, and the received data is saved. However, some data (data in
More Convenient
"Preinstalled" folder, etc.) may not be deleted, or the saving locations, folder
names or the orders of data may be different from those in the sender.
marks
Approx.1 cm
distant or less
Sending a phonebook entry via infrared
communication/iC transmission
a
Move the cursor to the phonebook entry to send
84
transmission
meh
Send via Ir/iC/BTea Send Ir data or c iC
e
"Yes"
e
Sending all data items via infrared communication/iC transmission
a mef
data or
LifeKiteb Ir/iC/PC connectioneb Send all Ir
c
Send all via iCeSelect an item to send
e
AuthenticateeEnter an authentication passworde"Yes"
Receiving a data item via infrared communication
a mef
Receive Ir data
from the sender
LifeKiteb Ir/iC/PC connectionea
ea
Receivee"Yes"eSend a data item
e
Upon completion of reception, "Yes"
Receiving a data item via iC transmission
a
Send a data item from the sendereDisplay the standby display on the receiver and place marks close to
each othereUpon completion of reception, "Yes"
Receiving all data items via infrared communication
a mef
Ir data
authentication password
the sender
LifeKiteb Ir/iC/PC connectionea Receive
eb
Receive alleAuthenticateeEnter an
e
"Yes"eSend a data item from
e
Upon completion of reception, "Yes"
Receiving all data items via iC transmission
a
Send data items from the sendereDisplay the stand-by
display on the receiver and place marks close to each
other
e
AuthenticateeEnter an authentication password
e
Place the marks close to each other
e
Upon completion of reception, "Yes"
Page 87

Support
Troubleshooting
Check for the necessity of software update first, and update the software if necessary. ⇒P89
If the problem still persists, contact the numbers for "Repairs" on the last page of this manual (in Japanese only) or DOCOMO-specified
repair office.
●
✜
Power supply and charging
●
FOMA terminal cannot be turned ON.
・
Is the battery pack installed correctly?
・
Is the battery exhausted?
●
FOMA terminal cannot be charged (the charging
light does not turn on).
・
Is the battery pack installed correctly?
・
Are the adapter and FOMA terminal set
correctly?
・
Is the AC adapter connector securely inserted to
FOMA terminal or to the desktop holder
(optional) when you use AC adapter (optional)?
・
Is AC adapter's power plug or cigarette lighter
plug inserted to the outlet or cigarette lighter
socket correctly?
・
Is the charging jack of FOMA terminal dirty when
you use desktop holder? If it is dirty, clean with a
dry cloth or cotton swab.
・
If you execute calls, communications or other
function operations while charging the battery
pack, FOMA terminal may become hot. For
safety, charging may not start when FOMA
terminal is hot. Wait until the temperature drops
after using and charge again.
✜
Terminal operation
●
Turning the power OFF or restarting
automatically happens.
If the jack of battery pack or unit attaching terminal
is dirty, the contact may become poor and the
power may shut off. If it is dirty, clean with a dry
cloth or cotton swab.
No operations are performed even by keypad and
touch operations.
Have you activated All lock, Omakase Lock,
Operation lock, Security lock, Touch operation lock
or QWERTY keypad lock?
●
The operation time provided by the battery pack
is short.
・
Is your terminal left for a long time under the
state of out of service area? Out of service area,
many powers are consumed to search available
radio waves.
・
The operation time provided by the battery pack
varies by the operating environment and battery
pack's deterioration.
・
The battery pack is a consumable part. Each time
it is charged, time available with each charging
reduces. Even the full charge state, when the
operation time is too short, purchase a new
battery pack of the specified type.
・
Out of Bluetooth area, the operation times of the
display unit and the keypad unit are reduced.
・
In separated style, the operation time is reduced
by Bluetooth connection.
・
When Action when detached is set to "Always
connected", the operation time is reduced.
●
The recognition of UIM is not performed
successfully.
・
Is UIM installed in the right direction?
・
Is UIM (blue) inserted?
●
FOMA terminal etc. become hot while operating/
charging.
While operating or charging, or if you use i-αppli,
videophone call, 1Seg watching, etc. for a long
time while charging the battery, FOMA terminal,
battery pack and adapter may become hot. There is
no problem about safety and continue to use it.
✜
Calls
●
Calls are not connected (Even when moving, "
外
(out of service area)" does not disappear or
although radio waves are enough, making/
receiving calls is unavailable).
・
Turn the power off and on, or remove and attach
battery pack or UIM.
・
Even when the signal meter on your FOMA
terminal indicates there are strong radio waves,
due to the type of radio waves, making/receiving
calls may be unavailable. Move to call again.
・
Is Specified caller, Anonymous caller,
Unregistered caller or 3G/GSM setting set?
・
Due to the crossing of radio waves, at the
crowded public places, calls/mails are crossed
and the connection status may not be good. In
this case, "Please wait for a while" appears and
the caller hears a busy tone. Move to other place
or call again at other time.
●
Calls cannot be made using the keypads.
Have you activated All lock, Omakase Lock, Self
mode, Keypad dial lock or Security lock?
圏
Others
85
Page 88

✜
Osaifu-Keitai
●
Osaifu-Keitai function is unavailable.
・
When removing the battery pack of displ ay unit,
IC card functions are unavailable regardless of
the IC card lock settings.
・
Do you separate FOMA terminal and place
mark on the back of display unit over IC card
reader?
・
Have you activated Omakase Lock or IC card
lock?
✜
Keypad unit/Separated style
●
A battery icon blinks even when FOMA terminal is
not charging.
When FOMA terminal is joined, if the battery level
of either unit becomes 1 (including the status that
the battery is almost exhausted) and if the other
unit is in battery level 3, power feeding is executed
automatically. While power feeding, a battery icon
on the unit being power fed blinks.
●
The keypad unit is not charged.
・
When both units turn ON and start charging, a
unit selection screen for charging with priority
appears. If "Keypad unit" is selected, charging
the keypad unit starts in first. Without any
operation for a certain period of time, charging
Others
the display unit continues.
・
When FOMA terminal turned OFF, charging the
display unit takes precedence when using AC
adapter or DC adapter. And charging the keypad
unit takes precedence when using the desktop
holder.
86
●
When FOMA terminal is separated, the keypad
unit is not available.
・
Is Action when detached set to "Connection
disabled"?
・
When FOMA terminal is separated, it takes
approximately 4-5 seconds for preparing the
keypad unit (except for when separating while
calling and when Action when detached is set to
"Always connected").
・
If the power of keypad unit is turned off or the
unit is not recognized as a Bluetooth device,
Bluetooth connection does not start even when
separating FOMA terminal.
・
When In-call Launcher is displayed, key
operation of the keypad unit is not available. To
use function other than In-call Launcher, press
front key
s
・
QWERTY keypad is not available with the keypad
unit opened.
・
If the keypad unit is detached while operating
another Bluetooth device, the keypad unit may
not be available.
●
Even by separating FOMA terminal during a call,
the voice call does not switch to the keypad unit.
・
Is Action when detached set to "Connection
disabled"?
・
Is Stereo Earphone Set 01 (optional) or handset
or headset support device connected?
●
When using in separated style, pressing power
key of the keypad unit cannot turn the power ON/
OFF.
When using FOMA terminal in separated style,
f
of the keypad unit cannot turn the power of
display unit ON/OFF.
for 1 second or more.
●
When using FOMA terminal in separated style,
calling or key operation in the keypad unit is not
available.
・
When you detach the keypad unit while using
another Bluetooth device, some keypad
functions are unavailable because those profiles
cannot be used at the same time.
●
Unit search is unavailable.
・
This function is not available when Bluetooth
communication cannot be performed under such
condition as in Self mode, out of Bluetooth area,
when the keypad unit is not registered to Device
list, or when Bluetooth OFF is set.
・
If no operation time in the keypad unit continues
for a while in separated style, the keypad unit
repeats Bluetooth ON/OFF at regular interval to
reduce the power consumption. For that reason,
the keypad unit cannot be connected to the
display unit up to approximately 5 minutes and
searching from the display unit may not be
available even when the keypad unit is near.
Also, if there is no operation for more than 24
hours in the keypad unit, the power of keypad
unit turns OFF and searching is not available.
Page 89

Support
Warranty and After-Sales Service
Warranty
・
FOMA terminal is provided with a written warranty. Make sure
that you receive it. Check the written contents and items such as
"shop name/date of purchase" and keep it in a safe place. If it
does not contain the necessary information, immediately
contact the shop where you bought it. The warranty is valid for
a period of one year from the date of purchase.
・
This product and all accessories are subject to change, in part or
whole, for the sake of improvement without prior notice.
After-Sales Service
✜
When problems occur
Before requesting repair, read the section on "Troubleshooting" in this
manual or "
only). If the problem still persists, contact the numbers for "Repairs"
on the last page of this manual (in Japanese only).
✜
Take your FOMA terminal to DOCOMO-specified repair office. Be sure
to check the opening hours of the office before you go. Note that,
repair may take longer time depending on the state of damage.
使いかたガイド
(Guide)" in FOMA terminal (in Japanese
If the result of inquiries indicates that a repair is
required
In the warranty period
・
FOMA terminal is repaired at no charge subject to the conditions of
the warranty.
・
The warranty must be presented to receive warranty service. The
subscriber is charged for the repair of items not covered in the
warranty or repairs of defects resulting from misuse (damage of the
color LCD or connector, etc.), accident, neglect, etc. even during the
warranty period.
・
The subscriber is charged even during the warranty period for the
repair of failures caused by the use of devices or consumable items
that are not DOCOMO-specified.
Repairs may not be possible in the following cases.
・
When judged as malfunction due to moisture at the repair office
(e.g. when detected in a moisture seal reaction)
・
When corrosion due to moisture, condensation, perspiration, etc. is
detected, or if any of the internal boards are damaged or deformed
(repairs may not be possible if external connection jack, earphone/
microphone jack or liquid crystal panel is damaged, or the terminal
outer case is lifted)
*
Even in case that a repair is possible, since those conditions are outside the
range of the warranty, a repair is charged.
After expiration of the warranty
All repairs that are requested are charged.
Replacement parts
Replacement parts (parts required to maintain the product functions)
are basically kept in stock for at least 6 years after termination of
production. However, repair may not be possible due to lack of repair
parts etc.
Others
87
Page 90

Support
i-mode fault diagnosis site
✜
Notes
・
Do not modify FOMA terminal or its accessories.
- Repair may be refused depending on the nature of modification.
The following cases may be regarded as modifications.
- A sticker etc. is put on the LCD or keypad part
- FOMA terminal is embellished with adhesive material etc.
- Exteriors are replaced with other than DOCOMO's genuine parts
- Repair of failures or damage caused by modification is charged
even during the warranty period.
・
Do not remove any inscription stickers attached to FOMA terminal.
If confirmation of the inscription sticker content is impossible,
determination of whether specific technical standards are satisfied
cannot be made. Therefore, repair may be refused
・
Function settings and information such as total calls may be cleared
(reset) by malfunctions, repair or other handling of FOMA terminal.
Should that happen, set up the functions again.
・
Magnetic components are used in the earpiece, speaker, etc. of
FOMA terminal. Do not allow cash cards or other devices that are
vulnerable to magnetism to come into contact with the phone.
・
If inside of FOMA terminal gets wet or moist, turn the power off,
remove the battery pack immediately, and bring the terminal to a
Others
repair office as soon as possible. However, repair may not be
possible depending on the condition of FOMA terminal.
88
Using your FOMA terminal, you can check whether sending/
receiving of messages and downloading of images and melodies
are normally performed. When FOMA terminal is assumed to have
malfunctions as the result of the diagnosis, contact the numbers
for "Repairs" on the last page of this manual (in Japanese only).
Accessing to “
iモード故障診断サイト
(i-
mode fault diagnosis site)”
i-mode site :
Function)
diagnosis site) (In Japanese only)
・
The access method may be changed without previous notice.
・
Packet communication for i-mode fault diagnosis site is free.
However, accessing from overseas is charged.
iMenu⇒お知らせ
⇒
iモード
(i-mode)⇒iモード故障診断
QR code for site
access
(Notice)⇒サービス・機能
(i-mode fault
(Services/
Page 91

Support
Updating software
This function allows you to update software in FOMA terminal
using packet communication when update is required.
Update information is posted in "
on NTT DOCOMO website or iMenu (In Japanese only). Software
may be updated in 3 methods: "Auto-update", "Immediate update"
and "Reserved update".
*
Packet communication for software update is free.
*
Software update can be done even when various data, such as a
phonebook registered in FOMA terminal, camera images, downloaded
data, are remaining; note that data protection sometimes cannot be
secured according to the conditions of your FOMA terminal (such as
malfunction, damage, or water leak). DOCOMO recommends backing up
necessary data. However some data such as downloaded data may not be
backed up.
✜
When updating software
・
Do not remove the battery pack while updating software. The
update may fail.
・
Software update should be done with battery fully charged.
・
Software update (downloading or rewriting) may take time.
・
Making/Receiving calls, communications functions and other
functions are disabled during software update (only incoming voice
calls can be answered while downloading).
お客様サポート
(User support)"
・
It is recommended that software update be executed in good radio
wave conditions with three bars of the antenna icon displayed and
the terminal not moved. If radio wave conditions become weaker
during software download or the download is stopped, retry
software update in a place with strong radio wave conditions.
・
When updating software, your private information concerning
FOMA terminal (model, serial number, etc.) is automatically sent to
the server (the server for software update managed by DOCOMO).
DOCOMO does not use the sent information for purposes except
software update.
・
When software update has failed, "Rewrite failed" appears and all
operation becomes unavailable. In that case, please bring FOMA
terminal to DOCOMO-specified repair office.
・
Software cannot be updated overseas.
Set auto-update
You can select automatic update of software or alert notification of
the necessity of update.
a meh
Settings & NWserviceseg Clock &
(Default : Auto-update)
Othered Software updateeAuthenticatee"Set
auto-update"eSet required items
When "Auto-update" is set and update is required, the update
file is automatically downloaded, and (rewrite notice icon)
appears on the stand-by display. Select the icon to confirm or
change the start time of update.
When "Only notification" is set and update is required,
(update notification icon) appears.
eC
[Set]
Others
89
Page 92

Immediate update
You can select (update notification icon) on the stand-by
display or an item on the menu.
Immediate update may not be available when the server is busy.
<Example> Selecting the notification icon to update
a
On the stand-by display,
(update notification icon)
e
Authenticate
b
"Now update"eAfter about 5
ge
Select
e
"Yes"
seconds, download starts
automatically
Canceling download :
screen,
When the server is busy, a selection screen prompts you to
reserve the update time or cancel update.
c
Download is completed and after about 5 seconds,
software update is automatically startedeUpdate is
Others
completed and restart is automatically madee"OK"
g
On the downloading
<Software update
screen>
Reserved update
When download takes time, or the server is busy, reserve the
update time.
90
<Example> Selecting from displayed options
a
On Software Update screen,
"Reserve"
Available dates for reservation are shown
by the time of the server.
b
Select preferred day and timee"Yes"
e
"OK"
Selecting "Others" allows you to select
other date and time options than
displayed ones. When setting is
completed, (reservation icon) appears
on the stand-by display.
<Preferred date and
time selection screen>
Checking software update reservation
You can check or change the reserved date and time.
a meh
ed
A reservation confirmation screen appears.
b
Check the reservatione"OK"
Point
Changing the reservation :
e
Select a dateeSelect a time periodeSelect a date and timee"Yes"
"OK"
Canceling the reservation :
e
"Yes"e"OK"
Settings & NWserviceseg Clock & Other
Software updateeAuthenticatee"Update"
On a reservation confirmation screen, "Change"
On a reservation confirmation screen, "Cancel"
e
Page 93

Support
Scanning function (Security Scan)
Software update of keypad unit
F-04B may require software update of the keypad unit. If software
update of the keypad unit is required, a screen for starting update
appears when FOMA terminal is joined.
a
A screen for starting software update of the keypad
unit appearseAfter about 5 seconds, a update file is
transferred automatically to the keypad unit from the
display unit
Canceling transferring file :
b
After completion of transferring the update file,
software update starts automatically
Point
・
Do not separate FOMA terminal or remove the battery pack while
executing keypad unit software update.
・
If "Failed to update keypad unit software." appears, once join the display
unit and the keypad unit and execute keypad unit software update.
・
If "Keypad unit software update failed. Contact your nearest customer
support center." appears, please bring FOMA terminal to DOCOMOspecified repair office.
・
If "Software version of connected units is different. Recommend updating
through MENU+874 "Software update"." appears, execute Software
⇒
P90
update.
On the data transfer screen,
e
"OK"
g
For the data or programs that are imported to FOMA terminal, this
function detects data and deletes data or inhibits activation of
applications that may cause troubles.
✜
Before using Scanning function
・
The Scanning function provides a certain countermeasure against
invasion of data which causes some trouble in the mobile phone,
when viewing website, receiving messages, etc. Note that, if pattern
definition corresponding to specific troubles has not been
downloaded to the mobile phone or such pattern definition does not
exist, this function cannot prevent those troubles from occurring.
・
Different pattern definition is used for different FOMA terminal
models. Also, note that DOCOMO may stop distribution of pattern
definition for models that have been on the market for 3 years or
more.
Update pattern definition first, then keep the pattern definition up-todate.
Set scan
To scan data or programs automatically when they are executed,
set this function to "Valid". Scan result is displayed in 5 warning
level on the next page.
a meh
Locks
required items
Settings & NWservicesed Security &
eg
Scanning functionec Set scaneSet
eC
[Set]e"Yes"
Others
91
Page 94

Set auto-update
You can set FOMA terminal so that pattern definitions can be
automatically updated.
a meh
Lockseg Scanning functioneb Set auto-updatee
"Enable"
When the Auto-updating pattern definitions is completed,
appears on the stand-by display.
Settings & NWservicesed Security &
e
"Yes"e"Yes"e"OK"
Warning
level
1
2
Scan result
screen
Actions
"Yes" :
Stop processing of the application
that may cause troubles
"No" :
Continue processing of the started
application
"OK" :
Stop processing of the application
that may cause troubles
Updating pattern definition
When Set auto-update is set to Disable or (Auto-update of the
latest pattern definition data failed) appears on the stand-by
display, manually update the pattern definition data.
a meh
Locks
Settings & NWservicesed Security &
eg
Scanning functionea Updatee"Yes"
"Yes"e"OK"
When updating pattern definition is not necessary, "Pattern
Others
definitions are up-to-date." is displayed.
Warning
level
0
Scan result
screen
Actions
"OK" :
Continue processing of the started
application
92
e
"Yes" :
Delete data that may cause troubles
"No" :
3
4
*
Selecting "Detail" on each screen displays a list of names of the detected
problem elements. When 6 or more problem elements have been detected, the
names of the 6th and subsequent problem names are omitted.
Stop processing of the application
that may cause troubles
"OK" :
Delete data that may cause troubles
Page 95

Support
Introduction of options and related devices
Combining FOMA terminal with optional accessories supports a
wide variety of uses from personal use to business use. Some
products are unavailable depending on the area.
For details, contact a sales outlet such as docomo Shop. For
details about the optional devices, refer to the instruction manual
for each device.
・
FOMA AC Adapter 01/02
・
FOMA DC Adapter 01/02
・
FOMA Dry Battery Adapter 01
・
In-Car Hands-Free Kit 01
・
FOMA In-Car Hands-Free Cable 01
・
Battery Pack F13
・
Battery Pack F14
・
In-Car Holder 01
・
Desktop Holder F30
・
Back Cover F45
・
Back Cover F46
・
Carry Case L 01
・
FOMA USB Cable
・
FOMA USB Cable with Charge Function 02
・
FOMA Portable Charging Adapter 01
・
Bluetooth Headset F01
・
AC adapter for Bluetooth Headset F01
・
Wireless Earphone Set P01
・
Wireless Earphone Set 02
・
Flat-plug Earphone/Microphone with Switch P01
*5
*6
*1
*2
*3, 4
*5
*6
*7
*8
*8
*2, 9
*4
*4
*4
*10
*10
/P02
*11
*10
*12
*10
*11
*11
/P002
*10
*1
*12
*10
*4
/02
・
Flat-plug Stereo Earphone Set P01
・
Earphone Plug Adapter 01
・
Earphone Plug Adapter P001
・
Earphone/Microphone with Switch P001
・
Stereo Earphone Set P001
・
Earphone/Microphone 01
・
Stereo Earphone Set 01
・
Remote controller with microphone F01
・
Earphone Terminal P001
・
Earphone Plug Adapter for External connector terminal 01
・
FOMA AC Adapter 01 for Global use
・
FOMA Indoor Booster Antenna
・
FOMA Indoor Booster Antenna (Stand Type)
・
Bone conduction microphone/receiver 01
・
Projector unit F01
*1
When using FOMA terminal overseas, use the adapter plug that is
*11
suitable for use in your travel destination. Also, do not charge the
battery with a transformer for overseas travel.
*2
Cannot be used with Desktop Holder F30.
*3
To charge F-04B, use FOMA In-Car Hands-Free Cable 01.
*4
For simultaneous use of Bluetooth device when detaching the keypad
⇒
P21
unit
*5
For display unit.
*6
For keypad unit.
*7
Use it with FOMA terminal joined.
Others
93
Page 96

Support
Projector unit F01
*8
If you use USB HUB, operations may not be performed correctly.
*9
Only selected unit on the screen appeared when charging starts can be
charged.
*10
Use Earphone Plug Adapter for External connector terminal 01 to
connect to F-04B.
*11
Use Earphone Plug Adapter for External connector terminal 01 and
Earphone Plug Adapter P001 to connect to F-04B.
*12
Use this only in Japan.
Others
You can watch widely projected 1Seg, i-αppli, still image, moving
picture/i-motion, document data, etc. of the display by using
Projector unit F01 (optional). Projector unit F01 can be used with
connecting to F-04B via Bluetooth or attaching to the display unit,
however the data that can be output varies by the connection.
For details of connection, settings or operations, refer to the
operation manual for Projector unit F01 (in Japanese only).
a mef
b
Perform an operation
Switching output to Projector unit : a Output to projector
Sending My Picture data via Bluetooth : b Send via
Sending Word, Excel, PowerPoint data via Bluetooth : b
LifeKite# Projector unit
Bluetooth
Send via Bluetooth
ea
My Picture
eb
Others
94
Page 97

Appendix
Menu list
・
Menu list for the case Select startup menu is set to "Basic menu" is described.
・
Settings of menus indicated in red can be restored to the default in Reset.
・
Set Kisekae Tool by default varies by terminal color.
aic
■
Mail
aa
Inbox
ab
Compose message
ac
Compose Decome-Anime
ad
Unsent messages
ae
Outbox
af
Check new message
ag
SMS/Area Mail
aga
SMS
agaa
Compose SMS
agab
UIM Inbox
agac
UIM Outbox
agad
SMS settings
agae
Check new SMS
agb
Early warning "Area Mail" setting
agba
Receive setting
agbb
Beep time
agbc
Manner/Public mode setting
agbd
Check ring tone
agbe
Other
agbea
Receive entry
ah
Receive option
ai
Mail settings
aia
Alert settings
aiaa
Mail alert
aiab
MessageR alert
aiac
MessageF alert
aib
Sort method
Signature
aid
Reply setting
aida
Reply format
aidb
Activate quick reply
aidc
Quick reply presets
aie
Mail group
aif
Display settings
aifa
Display priority
aifb
Receive option setting
aifc
Incoming msg. attach
aifd
Attachment auto play
aife
Message list
aiff
Auto-display
aifg
Address/Spam Mail Settings
aig
Auto save setting when editing
aih
Check msg. option
a*
Template
a*a
Decome
a*b
Decome-Anime
■
i-mode
ba
iMenu Search
bb
Bookmark
bc
Screen memo
bd
Last URL
be
Enter URL
bf
i-Channel
bg
i-mode settings
bh
Access shortcuts
bi
RSS reader
b*
Full Browser Home
b0
Search engine
■i-α
ppli
ca
Software list
cb
i-αppli call log
cc
i-αppli settings
cca
ccb
ccc
ccd
cce
ccf
ccg
ccga
ccgb
cch
cci
cd
Display history
ce
i-αppli shortcuts
cf
About i-αppli
■
Phonebook & Logs
da
Phonebook
db
Phonebook new entry
dc
Add group
Sort software
Auto-start
Software info disp.
Display light time
Vibrate effect
Sound effect volume
i-Widget settings
i-Widget sound effect
i-Widget roaming set
i-αppli call DL set
AUTO-GPS preferred setting
dd
Phonebook(UIM) new entry
de
Received calls
df
Redial
dg
Record msg. & Voice memo
dga
Record message
dgb
Recorded messages
dgc
Record voice memo
dgd
Voice memos
dh
Mail logs
dha
Sent msg. log
dhb
Received msg. log
di
User information
■
Data Box
ea
My Picture
eb
MUSIC
ec
Music&Video Channel
ed
i-motion/Movie
ee
Melody
ef
My Document
eg
Kisekae Tool
eh
Machi-chara
ei
Chara-den
e*
1Seg
e0
Other
■
Life Kit
fa
Bar code reader
Others
95
Page 98

96
Others
fb
Ir/iC/PC connection
fba
Receive Ir data
fbb
Send all Ir data
fbc
Send all via iC
fbd
Data exchange settings
fbe
USB mode settings
fc
microSD
fd
Camera
fda
Still camera
fdb
Movie camera
fe
Sound recorder
ff
Data Security
ffa
Data check/How to update etc.
ffb
Exchanging history
ffc
Send img in Phonebook
ffd
Backup phonebooks etc./Update
ffe
Backup settings/Update
fff
Backup images
fg
Map/GPS
fga
Map
fgb
imadoco search
fgc
imadoco kantan search
fgd
i-area
fge
Map/GPS αppli
fgf
Position location
fgg
Loc. history
fgh
Notify location
fgi
Map&GPS setting
fgia
Map setting
fgiaa
fgiab
fgib
Select Map
Map activate setting
Position settings
fgiba
Post-Position task
fgibb
Position accuracy
fgibc
Positioning alert
fgic
Notification setting
fgica
*1
LCS clients list
fgicb
Position accuracy
fgicc
Positioning alert
fgid
Request setting
fgida
Request permit/deny
fgidb
Position accuracy
fgidc
Service settings
fgidd
Service host URL
fgide
Positioning alert
fgidea
fgideb
fg0
fg0a
fg0b
fg0c
fg0d
fg0e
fh
fha
fhb
fi
fia
fib
fic
fid
fie
fif
fig
Loc. request-accept
Loc. request-verify
AUTO-GPS
DOCOMO service set
AUTO-GPS setting
Setup service list
AUTO-GPS history
Low battery setting
Pedometer/ACT monitor
Steps/Activity/Calories info
Set Pedometer/Activity monitor
1Seg
Activate 1Seg
Program guide
1Seg image/video
Set/Timer list
Recording result
TVlink
Channel list
fih
User setting
fiha
Display setting
fihb
Sound setting
fihc
Data broadcasting
fihca
Image & Effect
fihcb
ToruCa from 1Seg
fihcc
Restore storage area
fihcd
Reset permit status
fihd
Play setting
fihe
Record setting
f*
Bluetooth
f*a
Bluetooth ON/ OFF
f*b
Device list
f*c
Register new devices
f*d
Accept registered
f*e
Accept dial-up device
f*f
Receive data
f*g
Bluetooth settings
f*ga
Time-out to search
f*gb
Bluetooth info
f*gc
Set authentications
f*gd
Forward ring ale rt
f*ge
Session number
f*gf
Start MUSIC Player
f*h
Connecting devices
f0
Guide
f#
Projector unit
f#a
Output to projector/Output to
*2
display
f#b
Send via Bluetooth
f#ba
My Picture
f#bb
Others
■
Accessory
ga
Scheduler
gb
Notepad
gc
Alarm clock
gd
Calculator
ge
Dictionaries
gea
Jpn Dic (Gakken Mobile Jpn Dic)
geb
JE Dic (Gakken Mobile JE Dic)
gec
EJ Dic (Gakken Mobile EJ Dic)
ged
Today's trivia
gee
Today in history
gf
Countdown timer
gg
High-pitched alarm
gh
Fake call
gha
Activate
ghb
Alert&Time settings
■
Settings & NWservices
ha
Alerts & Sounds
haa
Ring alerts & Sounds
haaa
Call ring alert
haaaa
haaab
haaac
haab
haaba
haabb
haabc
haac
haad
haada
haadb
Call ring alert
V.phone ring alert
Anonymous caller
Mail/Msg. ring alert
Mail ring alert
Msg.R ring alert
Msg.F ring alert
i-concier ring alert
GPS alert
Positioning alert
Loc. notify alert
*3
Page 99

haadc
haadd
haae
haaea
haaeb
haaf
haafa
haafb
haafc
haafd
haafe
haag
haah
haaha
haahb
haahc
haahd
haahe
haai
hab
Adjust volume
haba
habaa
habab
habb
habc
habd
habe
habea
habeb
habec
habf
habg
Loc. request-accept
Loc. request-verify
Alarm sound
Alarm clock sound
Schedule reminder
System sound
Key/touch sound
Slide sound
Detach/Attach sound
Shutter sound
Movie camera sound
Charge alert
Call session
Status message
On-hold tone
Quality alarm
Reconnect alarm
Low Battery alert
Melody Call
Alert/Call volume
Call alert volume
Listen volume
Mail/Msg. alert vol.
GPS alert volume
i-concier ring alert
Alarm volume
Alarm clock sound
1Seg alarm sound
Schedule reminder
i-αppli effect sound
ToruCa receive alert
habh
habi
hac
Vibrate alert/effec t
haca
hacaa
hacab
hacb
hacba
hacbb
hacbc
hacc
hacca
haccb
haccc
haccd
hacd
hace
hacea
haceb
hacf
had
Silent mode
hae
Ring alert delay
haf
Stereo sound effect
hafa
hafb
hafc
hafd
hafe
hag
BGM play
hb
Display
hba
Stand-by display
hbaa
Operation sound
Melody effect sound
Call vibrate alert
Call vibrate alert
V.phone vibe alert
Mail/Msg. vibe alert
Mail vibrate alert
Msg.R vibrate alert
Msg.F vibrate alert
GPS vibrate alert
Positioning vibrate
Loc. notify vibrate
Loc. request-accept
Loc. request-verify
i-concier vibe alert
Alarm vibrate
Alarm clock
Schedule reminder
i-αppli effect
Movie(i-motion/movie)
Melody
MUSIC Player
1Seg
Music&Video Channel
Image/i-αppli
hbab
Clock format
hbac
Battery icon
hbad
Antenna icon
hbae
Info/calendar layout
hbaf
i-Channel setting
hbag
Shortcut icons
hbah
Animated-notice
hbai
Information display
hba0
Attach/detach effect
hbb
Menu preference
hbba
Select startup menu
hbbb
My shortcut
hbbc
Reset
hbbca
hbbcb
hbc
Color & Action image
hbca
Color scheme
hbcb
Call image
hbcba
hbcbb
hbcbc
hbcbd
hbcbe
hbcc
Mail image
hbcca
hbccb
hbccc
hbccd
hbcd
Videophone image
hbce
Info display & light
hbcea
hbceb
Operation history
Menu design
Outgoing call
Incoming call
Videophone dialing
Videophone receiving
Anonymous caller
Outgoing message
Incoming message
Image message alert
Check msg.
Caller/Sender info
Indicator light
hbcf
Contact image
hbd
Display & Key light
hbda
Display light time
hbdb
Light time-out
hbdc
Brightness
hbdd
Keypad light
hbde
Close settings
hbe
Light alert
hbea
Light alert
hbeb
Call session light
hbec
GPS light alert
hbed
IC card light
hbee
Slide light
hbef
Detach/Attach light
hbf
Font & Language
hbfa
Font size
hbfb
Font style
hbfc バイリンガル
hbg
Display Machi-chara
hbh
Power saving mode
hbha
Saving mode ON/OFF
hbhb
Saving mode options
hbi
Privacy view level
hb0
Row height of list
hc
Kisekae/Themes
hca
Kisekae Tool
hcb
Style theme
hcc
Timed theme
hd
Security & Locks
hda
Locks
hdaa
Operation lock
hdab
Security lock
Others
97
Page 100

98
Others
hdac
All lock
hdad
Personal data lock
hdae
IC card lock
hdaea
hdaeb
hdaec
hdaed
hdaee
hdaf
hdb
hdba
hdbb
hdbc
hdbd
hdc
hdd
hde
hdf
hdg
hdga
hdgb
hdgc
hdgd
hdh
hdi
hdia
hdib
hdic
hdid
he
hea
heaa
Lock/Unlock
Lock preference
Timed lock
Programed activation
IC lock(power-off)
Keypad dial loc k
Privacy mode
Call/Mail privacy
Other item privacy
Activation option
Contact setting
Kid-safe mode
Receive display option
UIM
Change terminal security code
Scanning function
Update
Set auto-update
Set scan
Version
Password manager
microSD password setting
Register password
Change password
Delete password
Forcible microSD initialization
Call & Answer
Sound & Image
Outgoing call
heab
Call alert
heac
Set call/receive No.
heb
Anonymous caller
hec
Any key answer
hed
Headset
heda
Alert preference
hedb
Auto answer setting
hedc
Headset key control
hee
Reject/Accept call
heea
Specified caller
heeb
Unregistered caller
hef
Make/Receive call
hefa
Show PrioritySetting
hefb
Prefix dialing
hefc
Sub address
hefd
Slide and answer
heg
Call session
hega
Noise reduction
hegb
Close settings
heh
Self mode
hf
Videophone
hfa
V.phone dialing img.
hfb
Videophone alert
hfc
Operation
hfd
Data session arv. act
hfe
Image setting
hff
External device
hfg
Notify switchable mode
hg
Clock & Other
hga
Slide and edit
hgb
Clock
hgba
Date & time
hgbb
Auto power ON
hgbc
Auto power OFF
hgbd
Clock display format
hgbe
Alarm auto power ON
hgbf
Timed theme
hgbg
Two time zone clocks
hgc
Text input
hgca
Save word
hgcb
DL dictionary
hgcc
Reset prediction
hgcd
Save phrase
hgce
Text input method
hgcf
Multilingual usage setting
hgd
Software update
hge
Info & Reset
hgea
Call cost/duration
hgeaa
hgeab
hgeaba
hgeabb
hgeabc
hgeabd
hgeb
Check remote setting
hgec
Memory status
hged
Battery level
hgee
Reset
hgef
Delete all data
hgeg
Initial setting
hgf
Search key shortcut
hgg
Motion sensor
hgh
*4
hh
NW Services
Femtocell setting
*5
Call duration
Call cost
Last call cost
Call cost limit
Hide call cost icon
Reset call cost
hha
Voice Mail
hhaa
Voice Mail service
hhab
Tone/Vibration message
notification
hhac
Notify missed call
hhad
Hide Voice Mail icon
hhb
Call waiting/forward
hhba
Call waiting
hhbb
Call forwarding
hhc
Chaku-moji
hhca
Create message
hhcb
Message display settings
hhd
Caller ID
hhda
Caller ID notification
hhdb
Caller ID request
hhe
OFFICEED
hhea
Area display setting
hheb
Start forwarding
hhec
Stop forwarding
hhed
Check fwd setting
hhf
2in1 setting
hhfa
2in1 mode switching
hhfb
Ph.book 2in1 setting
hhfc
Stand-by display
hhfca
hhfcb
hhfcc
hhfd
Call/receive settings
hhfda
hhfdaa
hhfdab
hhfdb
Dual mode
A mode
B mode
Arrival act setting
Number A
Number B
Set call/receive No.
 Loading...