

Page 1

Introduction
Chapter
1
Congratulations on your purchase of DOAR’s Digital Evidence Presentation
System
never been so compelling and easy to use.
With the DEPS Integrated Remote Control system you can instantly select the
desired input sources and which monitors will display your evidence, in addition to
controlling the integrated components. Annotating exhibits is easy using DOAR’s
Illustrator. Emphasizing evidence areas or having witnesses demonstrate situations
right before the jurors’ eyes is an invaluable asset. In conjunction, the Visual Image
Printer allows you to create instant color photos from DOAR’s Communicator,
computer, or any video source. The Visual Image Printer will instantly preserve your
evidence. You can even capture and annotate a particular frame from video and print
it out as a new exhibit. These integrated features allows the user to maintain the jury’s
interest throughout the trial, thus the focus of the jury’s attention is placed on the key
facts contained in the documents, photos, graphics or depositions.
Evidence and courtroom presentation is maturing into a powerful new capability for
judges, attorneys and court administrators. DOAR’s Digital Evidence Presentation
System represents a technological philosophy and implementation methodology that
will grow with the judicial system. DEPS relies on the integration of video and digital
display technology with options to combine real time reporting, video conferencing,
and computer-based evidence system. DOAR’s Communicator document camera and
presentation enhancement equipment completes this coherent presentation facility.
DEPS is housed in a handsome, portable cabinet that is controlled by a state-of-theart (and easy to use) remote control system. Installing DEPS takes minutes. The
system comes with training, on-call support and complete service. This total solution
is being used throughout U.S. Attorney Offices, Federal and State Courts.
(DEPS). You will find that the display of video and digital information has
Copyright 2002 by DOAR Communications Inc. All Rights Reserved. (800) 875-8705
1
Page 2

The Core
At the center of a versatile trial presentation system is DOAR’s Communicator
document camera. This unit has been specifically developed for the trial attorney.
Complete with zoom, optional built-in preview monitor, and integrated computer
graphics display. Special adapter lenses are also available for very close inspection of
small objects. Combined with our 24-hour/7 days a week on-call trial support, this
system is the preferred choice over “box-generic” solutions. Once you have had the
pleasure of using the Communicator, you will find it to be an invaluable resource for
evidence presentation.
The Integration
The components of DEPS have been carefully selected for future growth, high
resolution monitor support and systems integration. Some of these advances include:
1. Custom portable cabinet with external connections to all computers,
Communicator and display devices. An alternative option is the Winged Cabinet
(with elegant wood finish) including extended side panels for evidence
organization and optional rotating podium capabilities.
2. Integrated switcher, which controls all inputs into the system, both video and
computer.
3. Illustrator for on screen annotation of any input.
4. Courtroom Director for display distribution to individual monitors or courtroom
projector (Optional).
5. Visual Image Printer to produce hard copy color prints for evidence
preservation.
6. Custom control system to manage inputs, outputs, VCR and audio. System may
also be configured to control courtroom lighting and other requirements
(contact DOAR for additional information).
7. On call support and service.
8. Upgrade path for video conferencing, or real time court reporting.
9. Universal interface panel to support multiple computer and video inputs,
outputs, tablets, light pen and many other options.
Copyright 2002 by DOAR Communications Inc. All Rights Reserved. (800) 875-8705
2
Page 3

The Service
DOAR prides itself on providing “full solution” trial presentation technologies. We
work closely with attorneys, prosecutors and the courts. We service and support
all systems, provide training videos, and on-site, in-depth training programs. We
exclusively install the systems and stand behind everything we provide. We are the
only providers of this unique, personal and supportive service. DOAR becomes an
extension of your organization, ready to help you
persuasion”
TM
.
DOAR is also available to consult on trials, generate demonstrative evidence graphics,
create imaging solutions for digital trials, and support clients with our litigation
associates at trial. This is especially useful in complex litigation. Please do not hesitate
to call DOAR at (800) 875-8705 for information on any of these products and
services.
“elevate the art and science of
Copyright 2002 by DOAR Communications Inc. All Rights Reserved. (800) 875-8705
3
Page 4
DEPS Component Overview
Each DEPS component offers a specific feature and has been custom configured by
DOAR to provide the most effective courtroom presentations. The following chapters
describe in greater detail how each individual component operates and how to connect
DEPS with the outside world.
DEPS Cabinet
Chapter
2
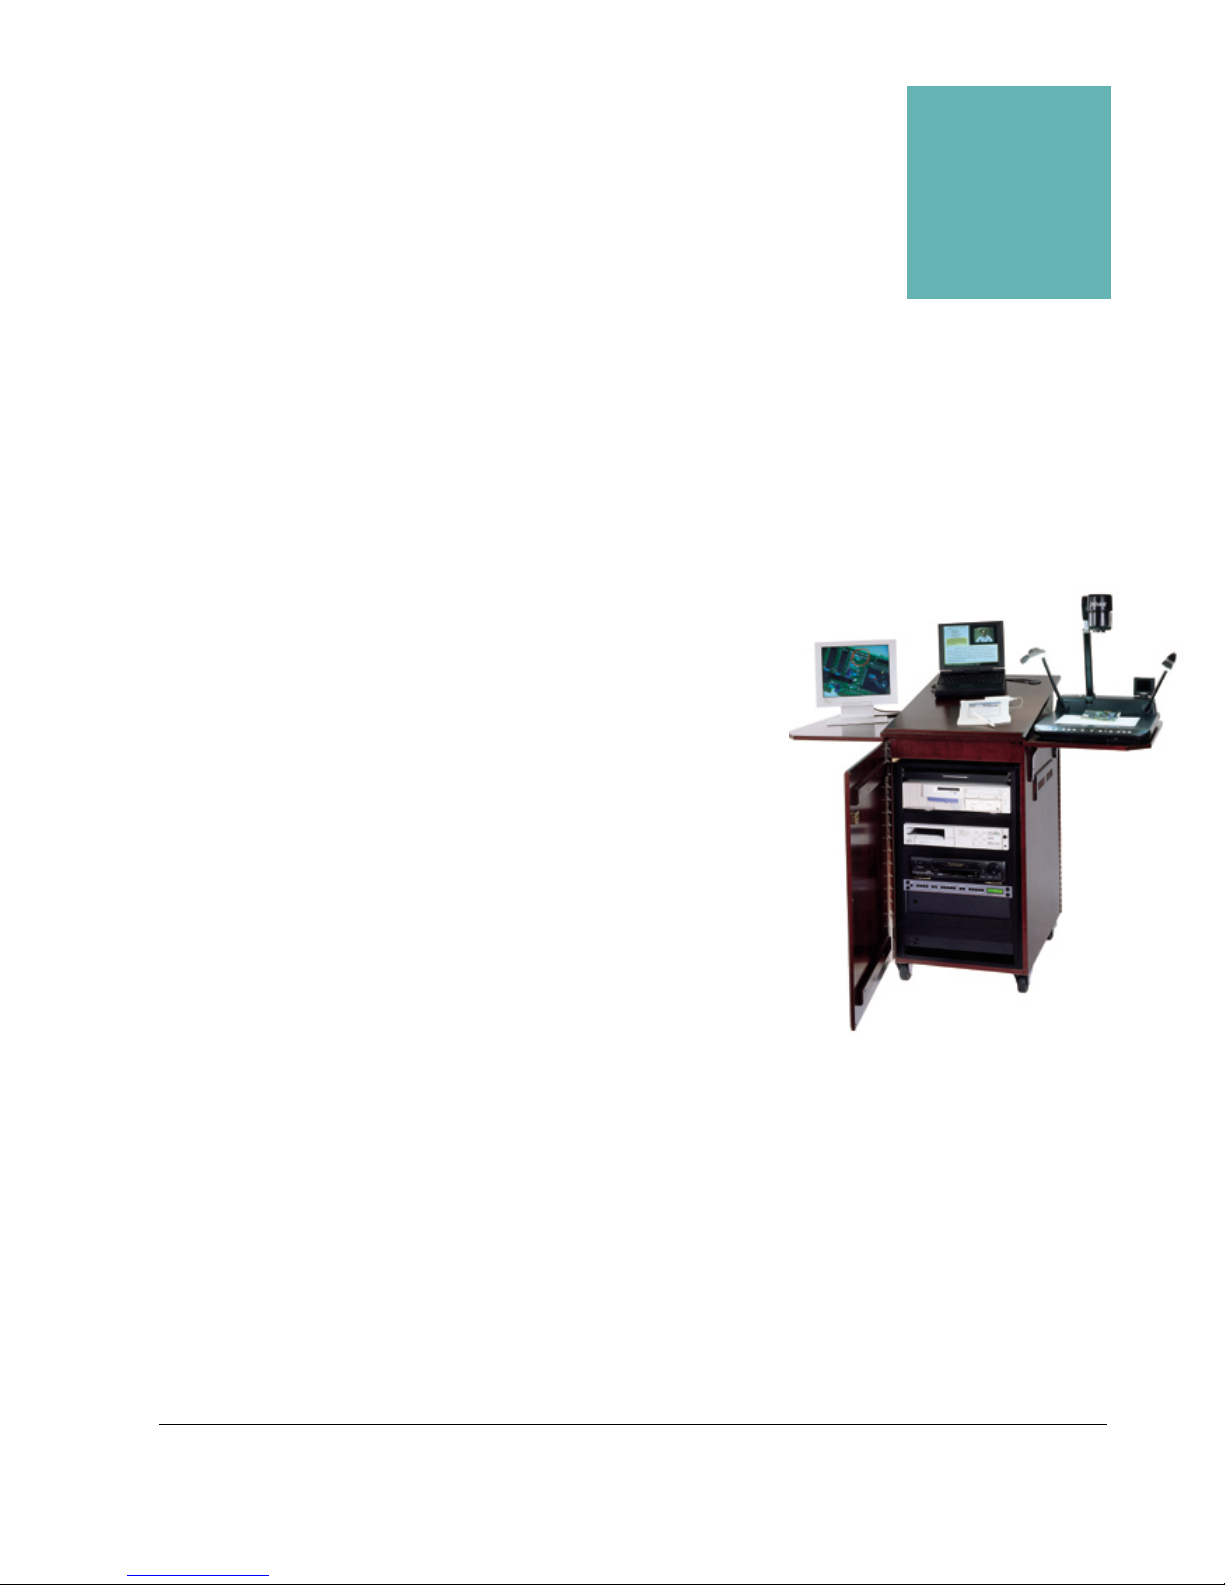
The DEPS cabinet was specifically designed to
house multiple presentation technologies in a single,
compact and elegant unit. This design gives the user
easy access and mobility.
DOAR’s DEPS cabinet offers elegant style and
technical efficiency. Composed of high-grade steel
(or optional reinforced wood design as seen here),
the cabinet has been custom built by the finest
engineers and craftsmen to insure both sturdy
construction and minimal intrusion in the
courtroom setting. The top of the cabinet can be
used to support the Communicator (or as an
optional podium). If the Communicator is placed elsewhere in the courtroom, then the
cabinet can be positioned in an unobtrusive area, or in an infrastructure closet. Please call
DOAR regarding possible courtroom design arrangements, especially if one is
contemplating using DEPS in a new or redesigned courtroom facility.
Copyright 2002 by DOAR Communications Inc. All Rights Reserved. (800) 875-8705
4
Page 5
The Interface Panel
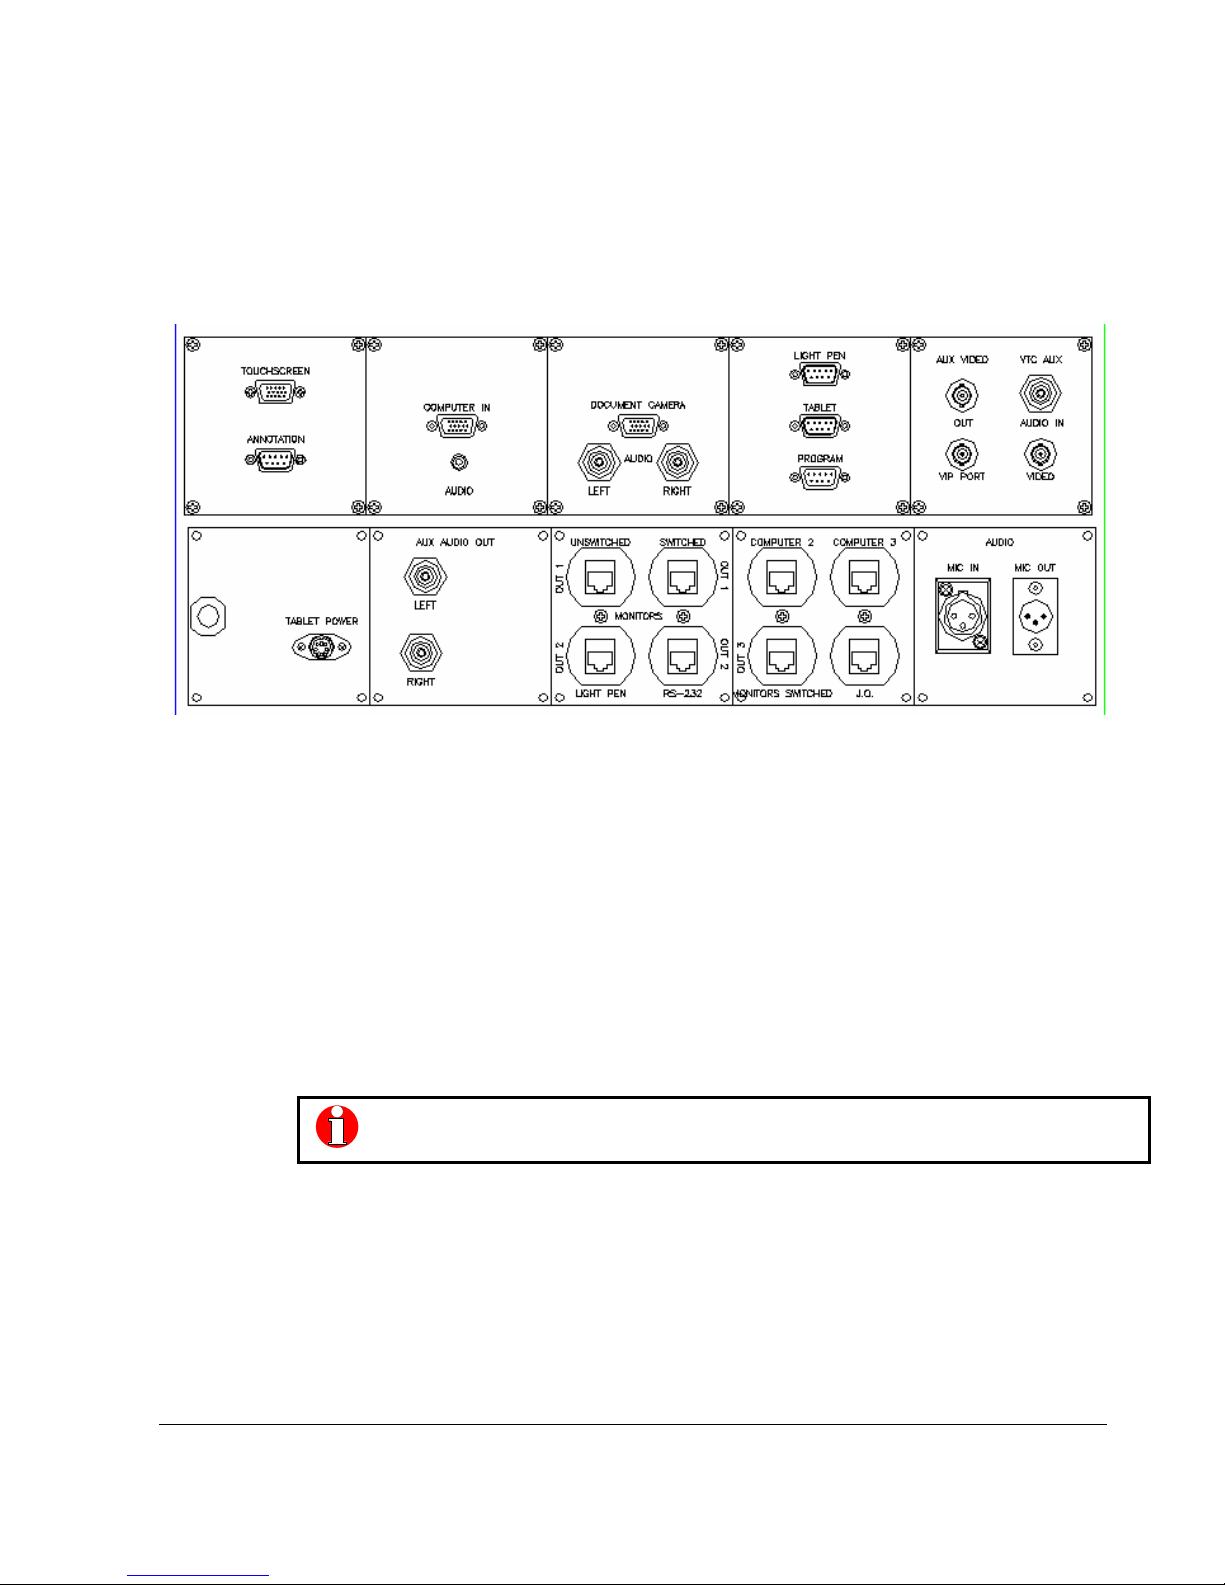
The back interface panel is the gateway to the DEPS. Shown here to illustrate the detail
that DOAR has undertaken to make connections in the courtroom. Each system panel is
unique, as the DEPS has been specifically built for your installation, and therefore requires
specific connection configurations. Dependant of the options you have chosen, the actual
panel layout will differ. However, each connection will be clearly labeled to make
installation quick and easy.
Example of Custom DEPS Panel Layout
The interface panel layout may vary dependant on the DEPS chosen. All functions operate
as described below independent of selected options.
Copyright 2002 by DOAR Communications Inc. All Rights Reserved. (800) 875-8705
5
Page 6

DOAR’s Communicator
DOAR’s Communicator has the capability to project photos, documents, books,
3-D objects, x-rays (positive & negative) fingerprints, DNA autorads, transparencies,
etc. The Communicator boasts many advanced features including negative/positive
switching and additional input sources for video. The zoom function allows you to
quickly magnify the most critical areas of an exhibit for display. The Communicator is
the most practical presentation system for pre-trial discovery, depositions, settlement
conferences, ADR and trials. DOAR’s Communicator has been designed with a
number of key functions to make it more effective for courtrooms and attorneys. The
Communicator can include an optional 3” color monitor (15” monitor is also
available) for previewing exhibits, and is connected to DEPS via a single cable.
VCR Tape System
DOAR offers a state of the art 4-head VCR system with accurate freeze frame
control. An interface to our Remote Control System is used for simple deck control,
such as forward, reverse, pause, etc. The VCR has its own input into DEPS so images
may be displayed and printed.
DOAR’s Cassette Deck (optional equipment)
The optional audio cassette player in the DEPS unit allows the playback of audiocassette tapes. The remote control system allows for easy operation using standard
buttons (forward, reverse, pause, etc.)
DOAR’s Integrated Switcher
The Integrated Switcher is designed to convert DOAR’s Communicator input,
and regular video (such as a VCR or broadcast television), into a higher quality
output. The concept of DOAR’s switcher is to increase the quality of video output to
that which is more comparable to VGA computer quality, without the
Copyright 2002 by DOAR Communications Inc. All Rights Reserved. (800) 875-8705
6
Page 7

noticeable scan lines. This device cleans-up low quality videotape playback so that the
image is insured to be stable and sharp in the highest resolution possible.
Also this device acts as a multi-input switcher. It accepts inputs from the
Communicator, VCR, computers, and Aux Inputs. As the inputs are accepted, all
resolutions are adjusted and maximum quality output is attained. This device also
switches and rebalances audio (to provide a single audio output feed to your sound
system).
DOAR’s Illustrator
The illustrator is used to draw, annotate and place emphasis on evidence displays in
vivid color. A tablet is used to make these markings with a “screen area” on the
tablet corresponding to an area on the display. The standard Illustrator supports two
annotation devices: One for the attorney and the other for the witness. The DEPS
unit can be customized in various configurations including one, or combinations of
the following:
-Tablet.
-Light Pen.
-Touch Screen Annotation.
DOAR’s Visual Image Printer
The Visual Image Printer allows you to create 3” x 5” instant color photos from
DOAR’s Communicator, VCR or computer source. This is very useful for evidence
preservation or handouts to the jury.
Copyright 2002 by DOAR Communications Inc. All Rights Reserved. (800) 875-8705
7
Page 8

DOAR’s Courtroom Director (Optional equipment)
The Courtroom Director is an optional multi-output monitor control system.
DOAR’s Control Director allows the judge or the clerk to control what is viewed on
each and every monitor in the court room. For instance, during a side bar, the clerk
can limit the video publication of evidence to the judge’s monitor only. The remote
control can be customized to allow different configurations of monitor outputs. The
Court room Director also permits long runs of cable between DEPS and monitors in
the court room.
DOAR’s Judge Override (Optional equipment)
The Judge Override switch gives the ability to have one person, the Judge, stop the
video from being displayed at all monitors except “unswitched” outputs. This gives
the Judge control to stop evidence from being presented while someone else selects
the evidence being shown.
Copyright 2002 by DOAR Communications Inc. All Rights Reserved. (800) 875-8705
8
Page 9
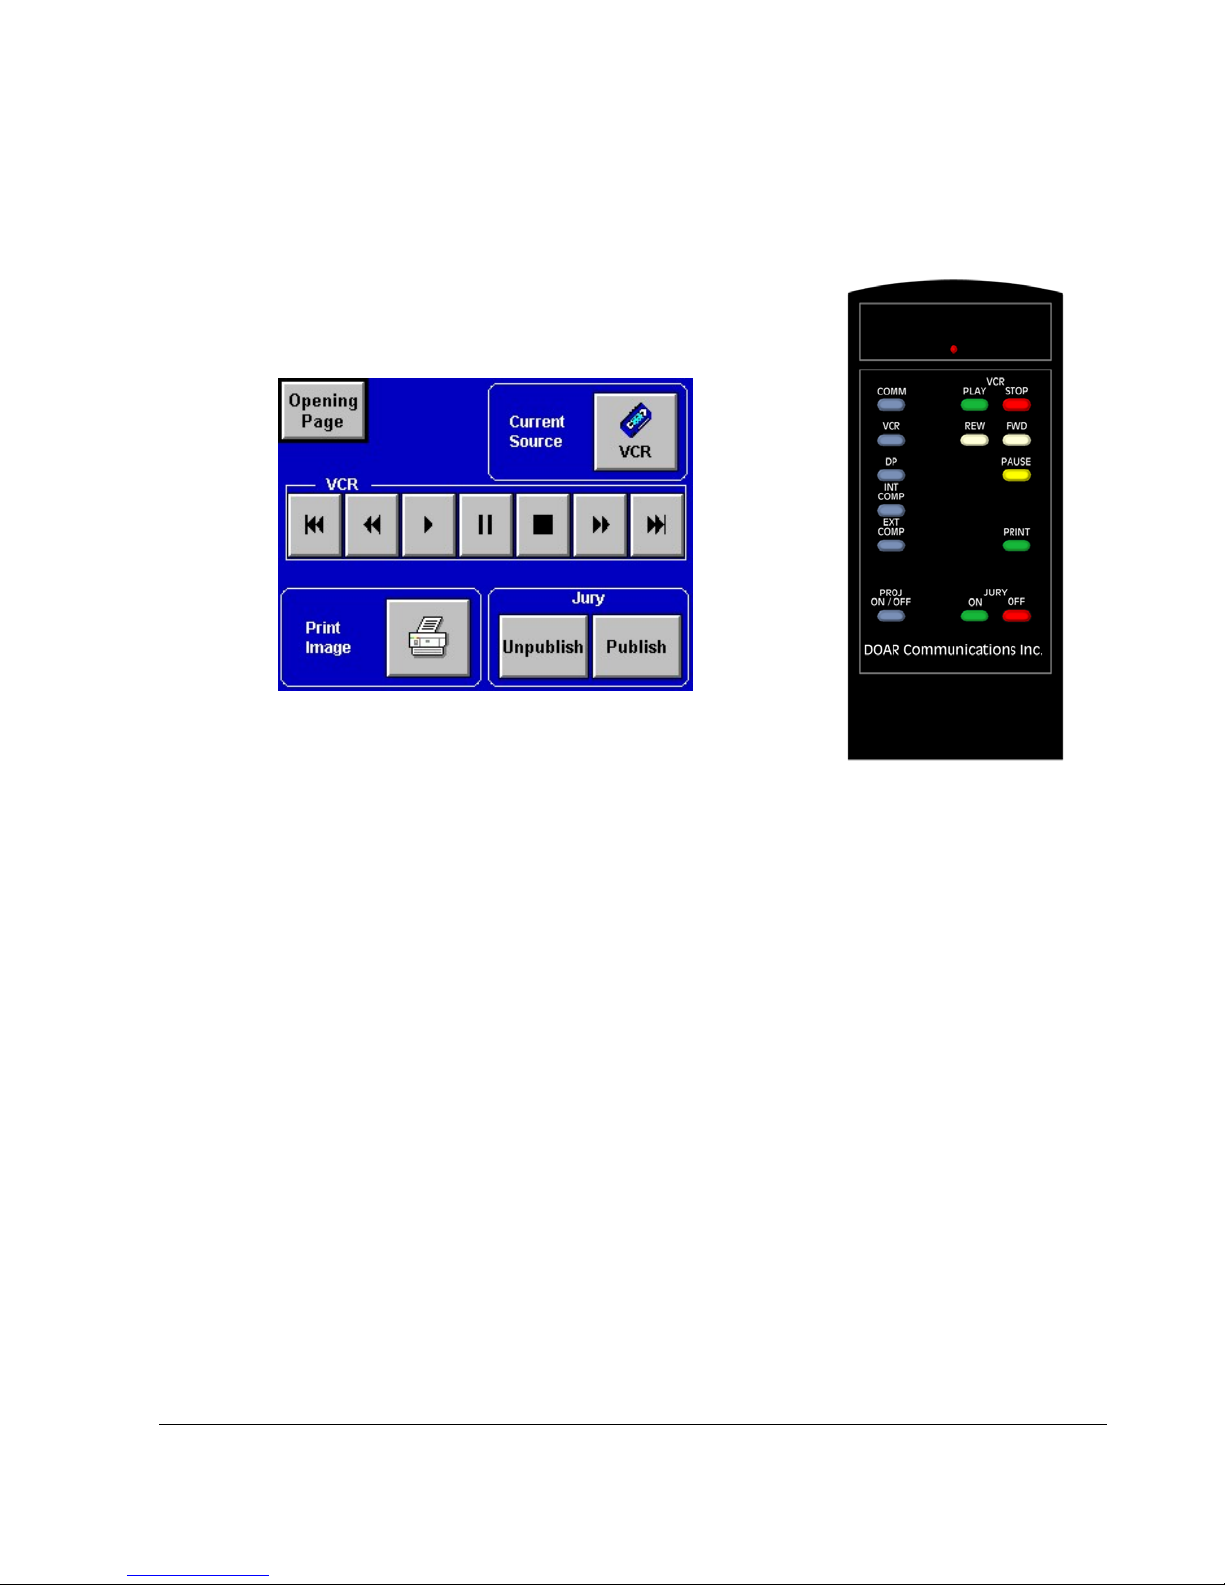
EXAMPLE OF TOUCH-PANEL REMOTE
PUSH-BUTTON REMOTE
DOAR’s Control System
The Control System provides the interface between the wireless remote control and
the operation of a number of key DEPS features. The Control System operates input
selection, output selection, VCR control, and printer control. Multiple Remotes may
be used (DOAR is able to customize remotes for specific use, such as lighting
control).
following are examples of our standard pushbutton remote and LCD touch-panel
remote controls. Dependant on your system options, the controls may vary slightly.
Copyright 2002 by DOAR Communications Inc. All Rights Reserved. (800) 875-8705
Call DOAR for more details on customizing the Control System. The
9
Page 10
Connecting the DEPS
IMPORTANT – PLEASE READ
Chapter
3
It is important that you completely POWER DOWN DEPS before connecting
anything to the back panel. You must then re-power everything back up again to
regain all the settings. If a change is made to the back panel, especially items such
as the Illustrator pad, you must COMPLETELY RE-POWER DEPS with the
master switch to recognize all the changes.
Copyright 2002 by DOAR Communications Inc. All Rights Reserved. (800) 875-8705
10
Page 11
Typical Set-up
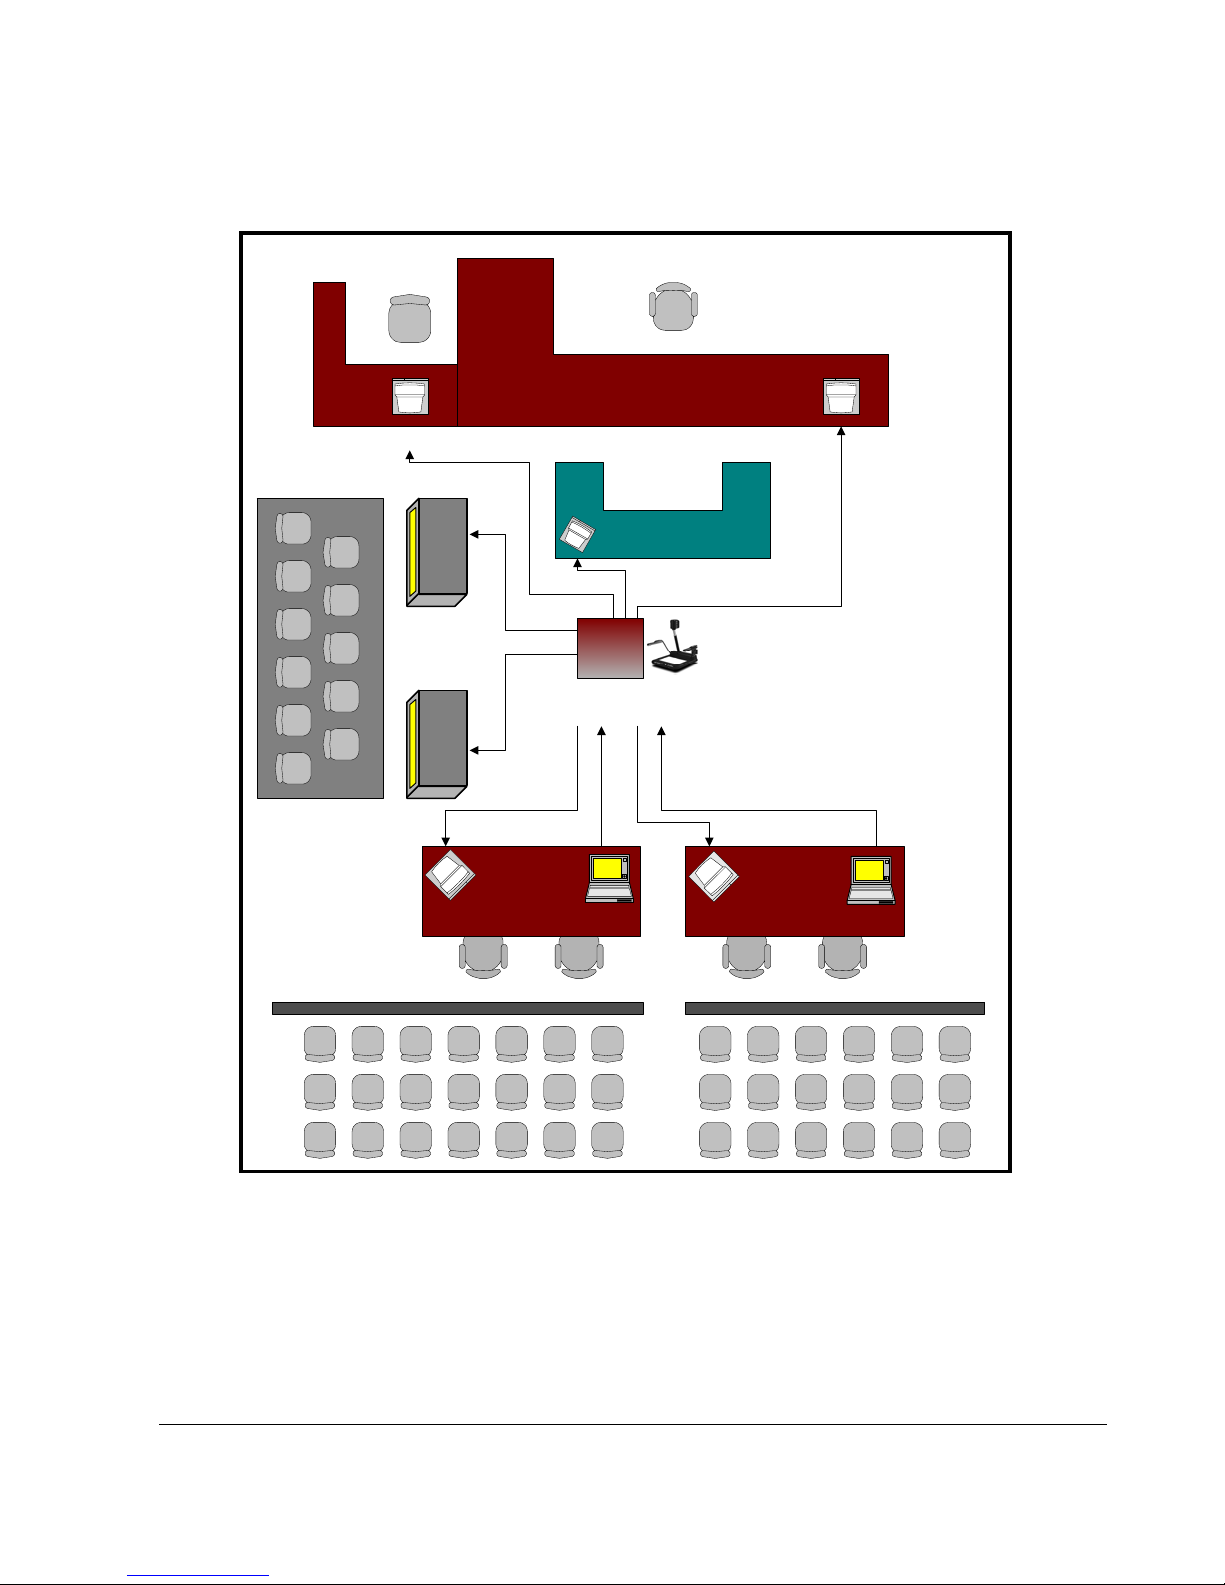
The diagram on the following page illustrates a standard portable courtroom DEPS setup.
In this design, the DEPS is considered the courtroom podium with the Communicator
adjacent to the cabinet. Each counsel table has an attorney computer and monitor
connected to DEPS as well as a display monitor from the DEPS system. In addition,
monitors exist for the jury, judge and witness. The VCR and Printer are contained within
DEPS and are controlled by the Remote Control.
A typical alternative to this approach is it to utilize a digital projector in the courtroom.
This is very common in fixed installations, and lends itself to portable systems.
This is only a possible approach to designing the courtroom layout and DEPS integration.
Additional options greatly increase the possible functionality. Please contact DOAR to
discuss additional functionality choices, and layout scenarios.
It is important to understand the difference between the DEPS monitors
by counsel. All evidence is displayed throughout the courtroom on DEPS monitors as depicted on the
following page. In addition, an attorney may connect a computer to DEPS and this computer may have its
own monitor. This monitor will only show what is on the computer and may not necessarily show what is
now being presented with DEPS. If an external monitor is used by the attorney (as opposed to just using a
laptop), DOAR can provide a ‘pass through’ connection to attach the external monitors and provide a feed
to DEPS. In addition, dependent on the cable length, you may require a signal amplifier device to connect
the computer to the DEPS. Please call DOAR at (800)875-8705 to discuss the various options for
connecting an external computer
and a computer and monitor used
Copyright 2002 by DOAR Communications Inc. All Rights Reserved. (800) 875-8705
11
Page 12
Judge
Witness
Clerk
Jury
DEPS
Podium
Plaintiff Defense
Plaintiff
Computer
Defense
Computer
- Typical Portable Set-up-
Copyright 2002 by DOAR Communications Inc. All Rights Reserved. (800) 875-8705
12
Page 13

DOAR’s Communicator
Accessories
1. DOAR’s Communicator
2. Power Supply Cable
3. Video Cable
4. 3” monitor, power supply and video cable. (optional)
Power Connection
Connect the supplied power cable to the AC IN connector. The other end of the
cable is connected to the power outlet.
Be sure to turn the power off before making connections (in order to protect
the Communicator and the DEPS).
Hold the cable plug firmly when disconnecting the video cable.
Copyright 2002 by DOAR Communications Inc. All Rights Reserved. (800) 875-8705
13
Page 14
Audio and video Connection
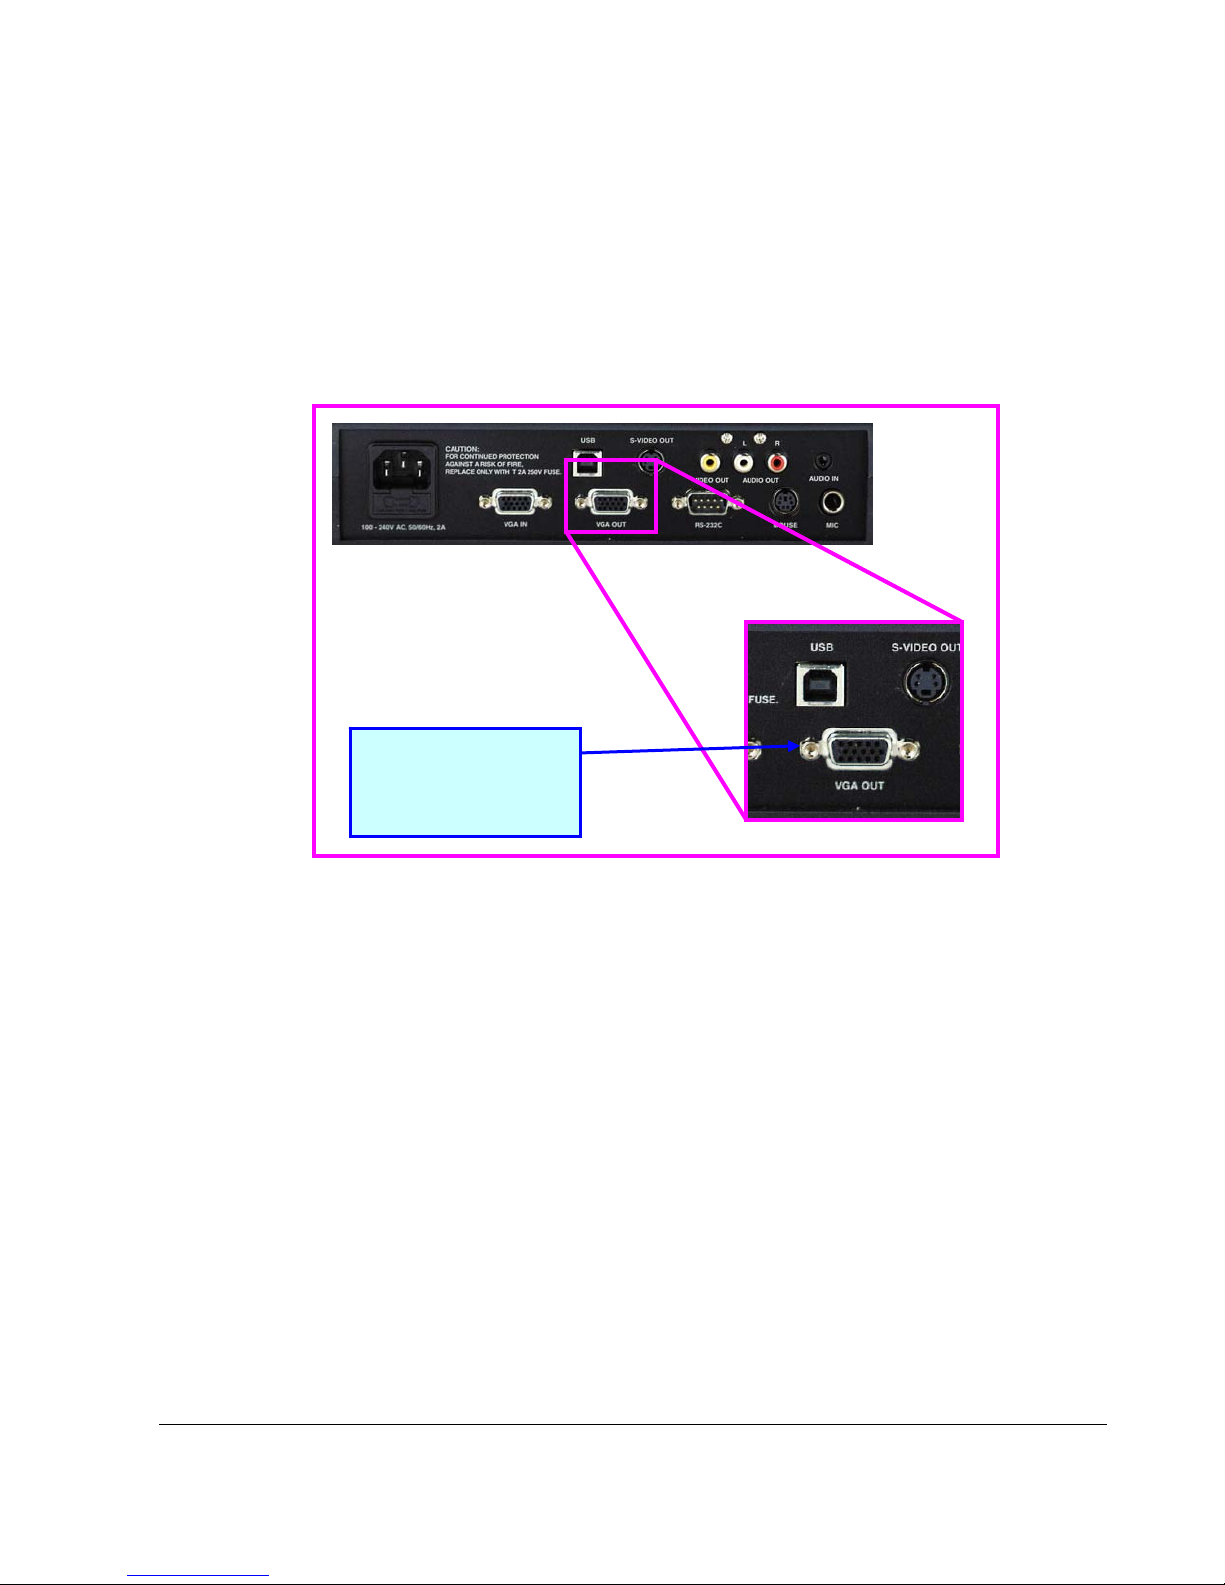
Connect one end of the VGA output cable to the VGA output terminal of
the Communicator and the other end to the Communicator VGA Input of
the DEPS.
Connects to DEPS
Communicator VGA
Input Port.
3” Podium TV Monitor (optional equipment)
The 3” TV attaches to the bracket on the back of the Communicator. The yellow
video cable connects to the video out (a BNC to RCA connector may be necessary)
on the back of the Communicator and the video in plug on the monitor. Use the
brightness knob to adjust for contrast. Contrast is affected by viewing angle, so you
may need to adjust the brightness knob once the Communicator is set up for
courtroom use.
Plaintiff or Defense Laptop Connection (optional equipment)
Use a VGA cable to connect the Laptop to the DEPS unit. Locate VGA OUT on the
back of the laptop. Connect one side of the VGA cable to VGA OUT on the laptop.
Connect the other side of the VGA cable to the VGA video input on the back of the
DEPS unit. If Audio is to be used, connect Audio mini plug from the back of the
laptop to COMPUTER IN AUDIO on the back of the DEPS unit.
Copyright 2002 by DOAR Communications Inc. All Rights Reserved. (800) 875-8705
14
Page 15

Auxiliary Audio Connection (optional equipment)
An optional speaker can be connected to the DEPS unit using an RCA connecting
cable. Connect the RCA cable from HOUSE AUDIO OUT on the back of the DEPS
unit to the RCA input on the speaker.
15” LCD Touch screen Monitor Connection (optional
equipment)
Use one VGA cable to connect the LCD monitor to the DEPS unit. Locate VGA IN
on the back of LCD monitor. Connect one side of the VGA cable to VGA IN on the
Monitor. Connect the other side of the VGA cable to UNSWITCHED MONITOR
on the back of the DEPS unit. Use one 9 PIN connector cable to connect the 9 PIN
OUT (Monitor) to TOUCHSCREEN on the back of the DEPS unit for touch screen
annotation capabilities.
DOAR’s Illustrator
Because the Illustrator can accept multiple configurations between the tablet pad,
light pen, and annotation touch screen, the connections to the DEPS vary. The
connections are clearly labeled on the back-panel of the system.
DOAR’s Visual Image Printer
The DOAR Visual Image Printer (VIP) has been designed to provide quick, high
quality prints of your evidence. All connections are factory installed internally.
Therefore, by simply pressing “PRINT” on the Remote Control, a vivid photo of the
currently displayed item will be produced.
The VIP generates these photos by using special ink and paper. Your system may
come pre-installed with a small amount of supplies used during testing of the DEPS.
For information on installing additional supplies, please refer to page 28 of this
manual for details.
Copyright 2002 by DOAR Communications Inc. All Rights Reserved. (800) 875-8705
15
Page 16

To obtain additional supplies, call DOAR at (800) 875-8705.
DOAR’S Judge Override (optional equipment)
Plug the Judge Override (JO) switch to the labeled connection on the back of the
DEPS. At set-up be sure the switch is in the “I” position.
Safety Instructions
Carefully review the following guidelines to protect yourself from possible injury or from
damaging the Digital Evidence Presentation System (DEPS).
1.) Always unplug the system from all power supplies when connecting any cables.
2.) Always make sure the power is turned off on every component before plugging the
DEPS into a power outlet.
3.) Never open the casings of any component.
4.) Never remove the back steel shielding of the DEPS.
Copyright 2002 by DOAR Communications Inc. All Rights Reserved. (800) 875-8705
16
Page 17
DEPS produces high voltage energy, which can cause bodily injury.
Only certified DOAR service personnel are authorized to maintain this
unit or remove component covers.
Opening the back of the DEPS electronic cabinet, which has been
sealed for the client’s and DOAR’s protection, is considered a violation
of DOAR’s warranty of service and support and a violation of the
Customer License Agreement. In addition, DOAR has invested significant capital
and personnel resources in the design of DEPS, its components, connectivity and
integration and thus represents significant and valuable intellectual property. Any
copying, imitating, or designing based upon DOAR’s proprietary implementation
of DEPS is a violation of intellectual property rights. The seals and plate covers to
this unit represent our protection of those rights and can only be opened by
qualified and authorized DOAR personnel. If you have any questions, please call
DOAR at 800/875-8705. Thank you.
Copyright 2002 by DOAR Communications Inc. All Rights Reserved. (800) 875-8705
17
Page 18

Operating the System
Powering ON the System
Please follow these instructions in order to power the system.
1) Press the power button on the podium monitor and any other monitor(s)
connected to the DEPS unit. The Power buttons are typically located on the front
of the respective monitor.
2) Power On the DEPS with the Master switch located on the back of the
DEPS unit.
3) Power On the Communicator with its Power button.
4) Power On the VCR with its power button.
5) Power ON the optional Cassette Deck.
6) Be sure the Judge Override switch is in the “I” position in order to view the
selected source.
Control System
Chapter
4
The Remote Control has been designed for anyone to easily control the functions of
the DEPS. After the DEPS System has been powered ON, use the remote to control
functionality.
Press a source button to view the desired source such as communicator, VCR,
Computer input, etc. The source buttons on the remote are specific to each DEPS
and are clearly labeled. Additional buttons on the remote will control the device as
listed.
VCR Play, Stop, Pause, Rev, FF to control VCR after the tape has been loaded into
the VCR. Press the PRINT button in order to print a hard copy of the image that is
being displayed. The printout is automatic and will occur at the time the PRINT
button is pressed.
Copyright 2002 by DOAR Communications Inc. All Rights Reserved. (800) 875-8705
18
Page 19
Control Details
Initially, the Opening Page will be shown (see fig. below). Press anywhere on the
screen to open the Main Page.
Copyright 2002 by DOAR Communications Inc. All Rights Reserved. (800) 875-8705
19
Page 20
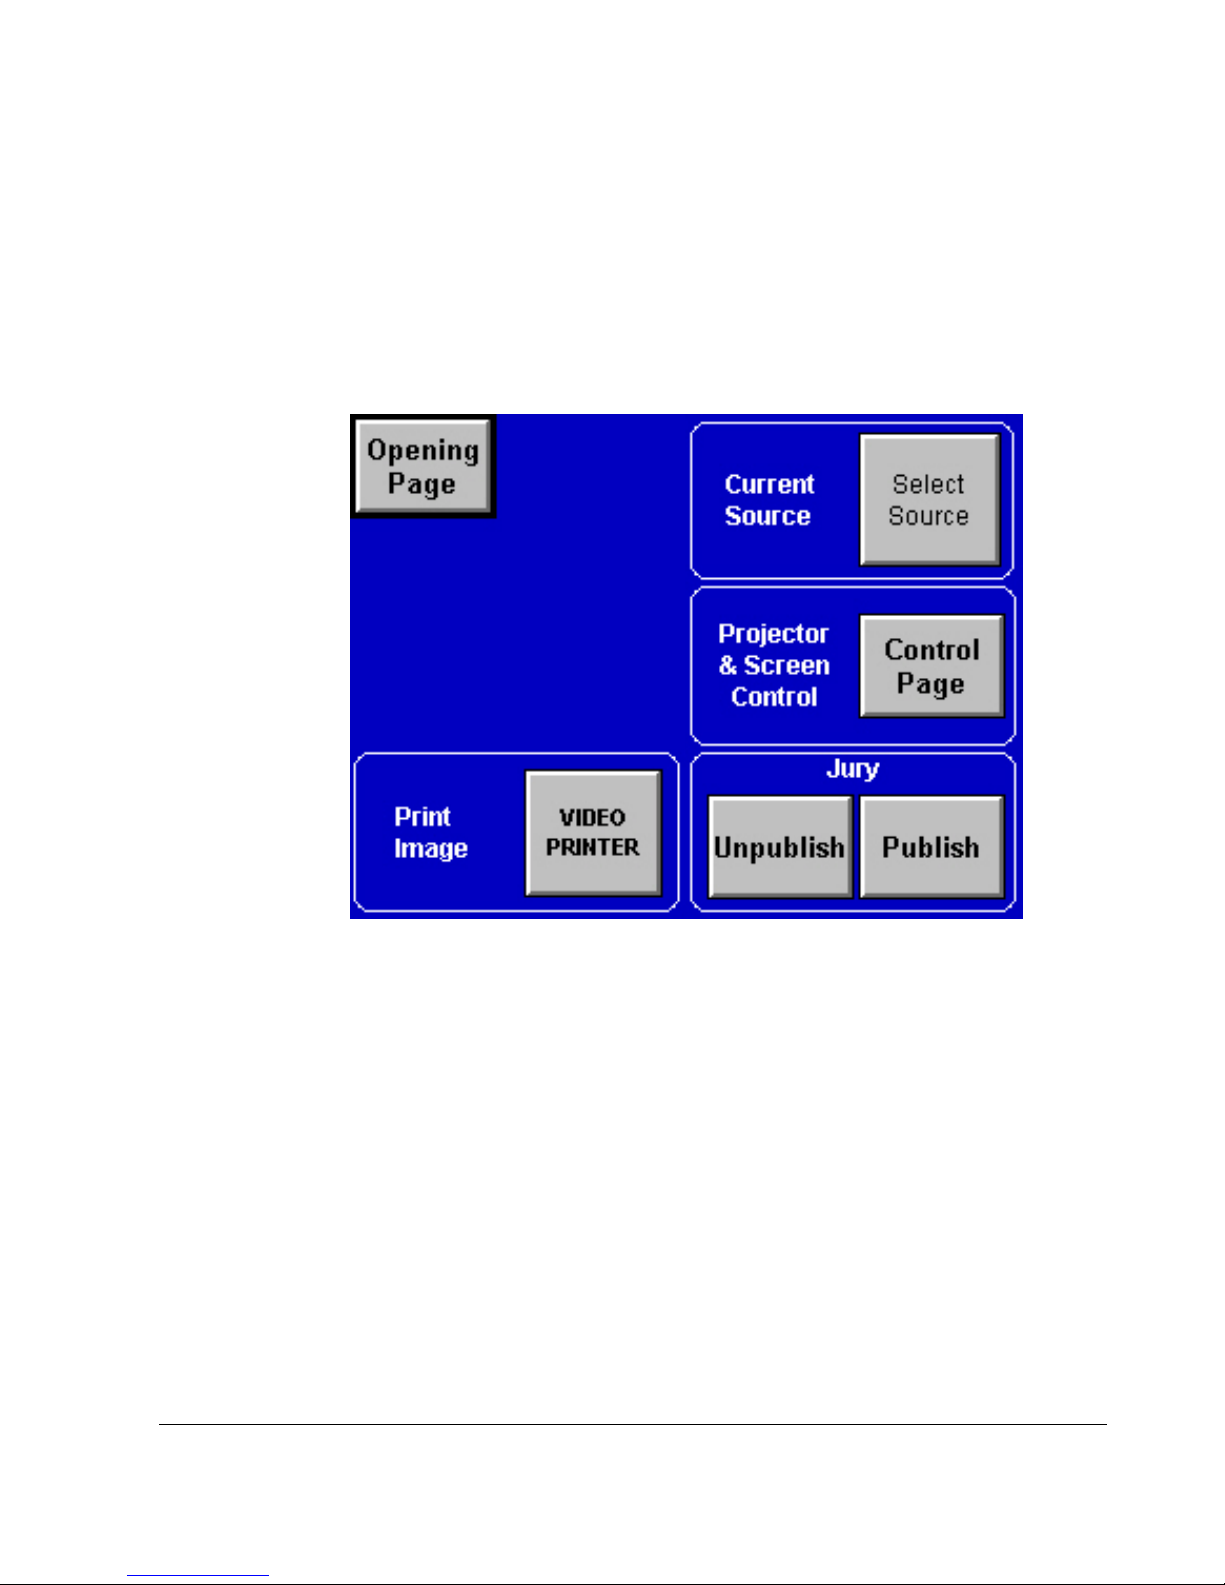
Main page
This page will be available after the Opening Page has been touched anywhere. This
page
* Press the OPENING PAGE button in order to return to the opening page
location.
* Press the SELECT SOURCE button in order to open the monitor source select
page. Please read the following page for more details.
* Press the CONTROL PAGE button in order to control and operate the projector
and its screen.
* Press the VIDEO PRINTER button in order to create a hard copy of the image
being displayed at the monitor.
* Press the PUBLISH/UNPUBLISH button in order to show or hide the image
being displayed at the court monitors.
Copyright 2002 by DOAR Communications Inc. All Rights Reserved. (800) 875-8705
20
Page 21
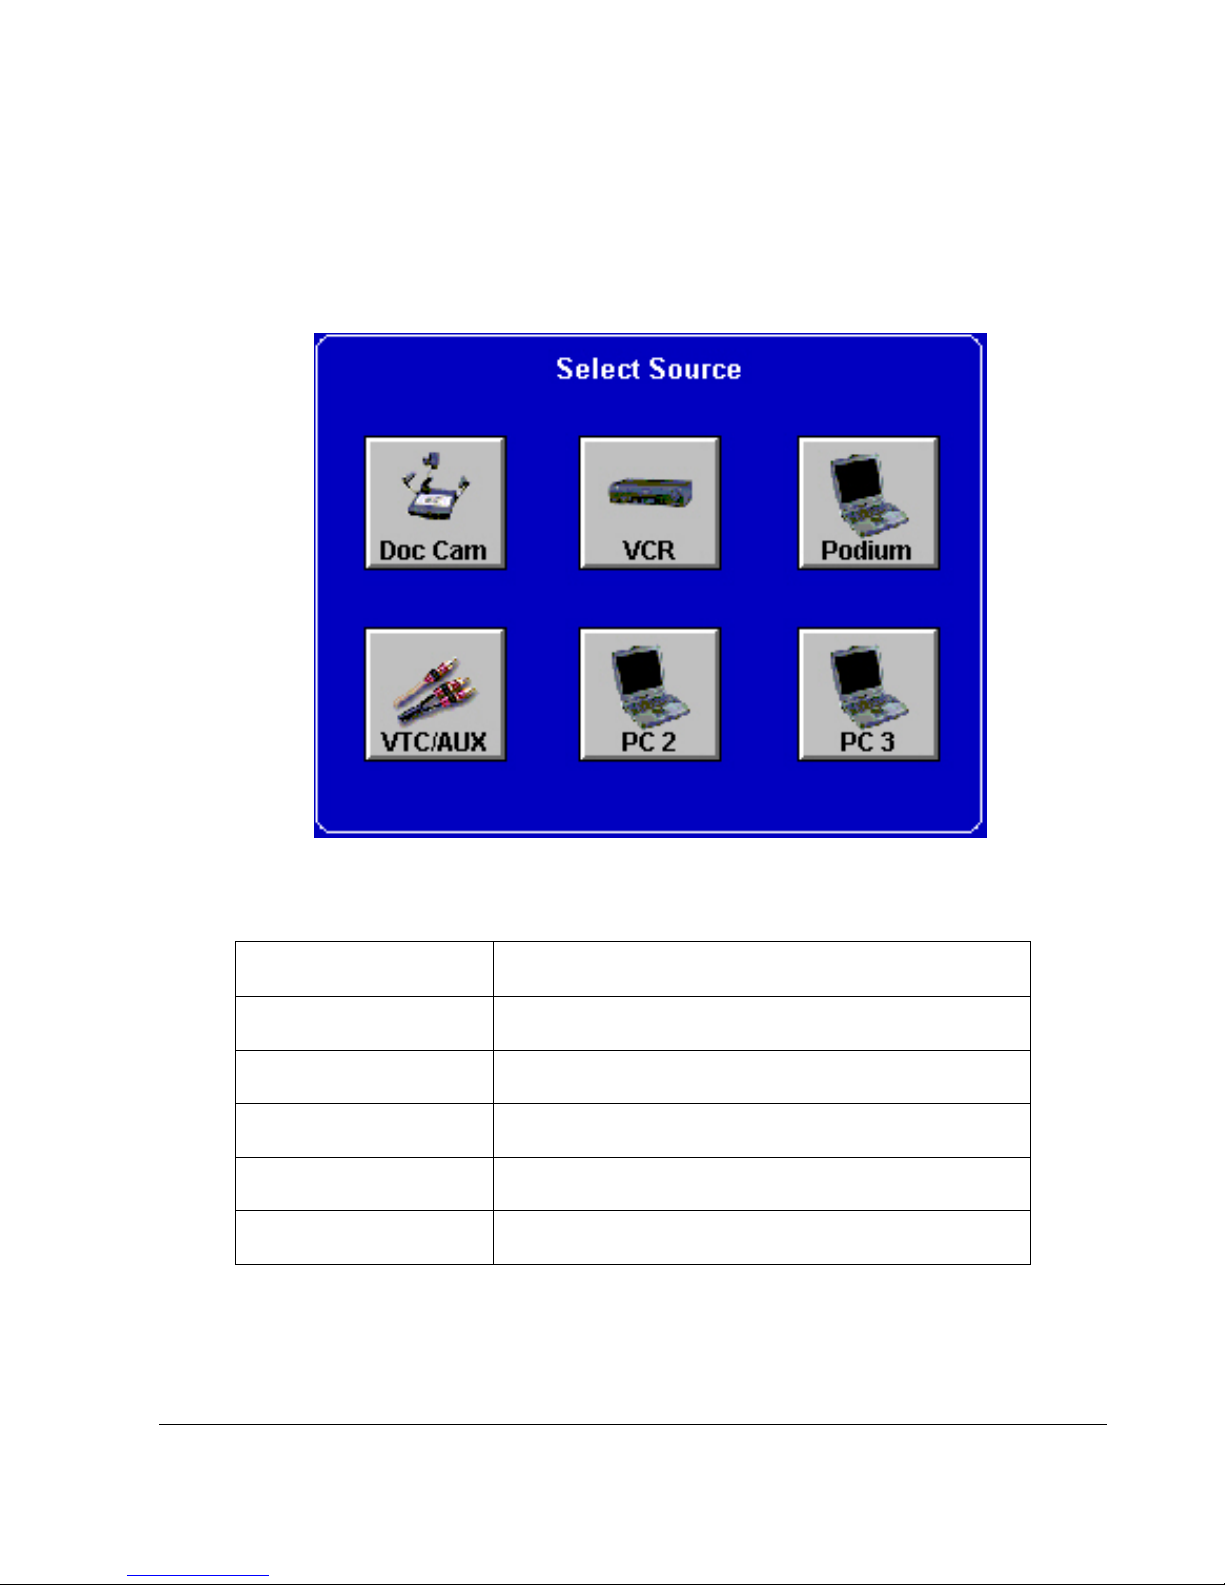
Source Selection
This screen will be the first page shown. From here, the source to be displayed to the
monitors is selected.
Document Camera
VCR The VCR input will be selected as the source.
Podium PC The Podium PC input will be selected as the source.
Auxiliary The respective Aux input will be selected as the source.
PC 2 The PC 2 input will be selected as the source.
PC 3 The PC 3 input will be selected as the source.
The document camera will be selected as the active video
source.
Copyright 2002 by DOAR Communications Inc. All Rights Reserved. (800) 875-8705
21
Page 22

VCR Controls page
This page will be available after the VCR has been selected as the current source. Use
the controls in this page to the control the VCR.
* Press the OPENING PAGE button in order to return to the opening page
location.
* Press the SELECT SOURCE button in order to open the monitor source select
page. Please read the following page for more details.
* Press the CONTROL PAGE button in order to control and operate the projector
and its screen.
* Press the VIDEO PRINTER button in order to create a hard copy of the image
being displayed at the monitor.
Press the PUBLISH/UNPUBLISH button in order to show or hide
the image being displayed at the court monitors.
Copyright 2002 by DOAR Communications Inc. All Rights Reserved. (800) 875-8705
22
Page 23
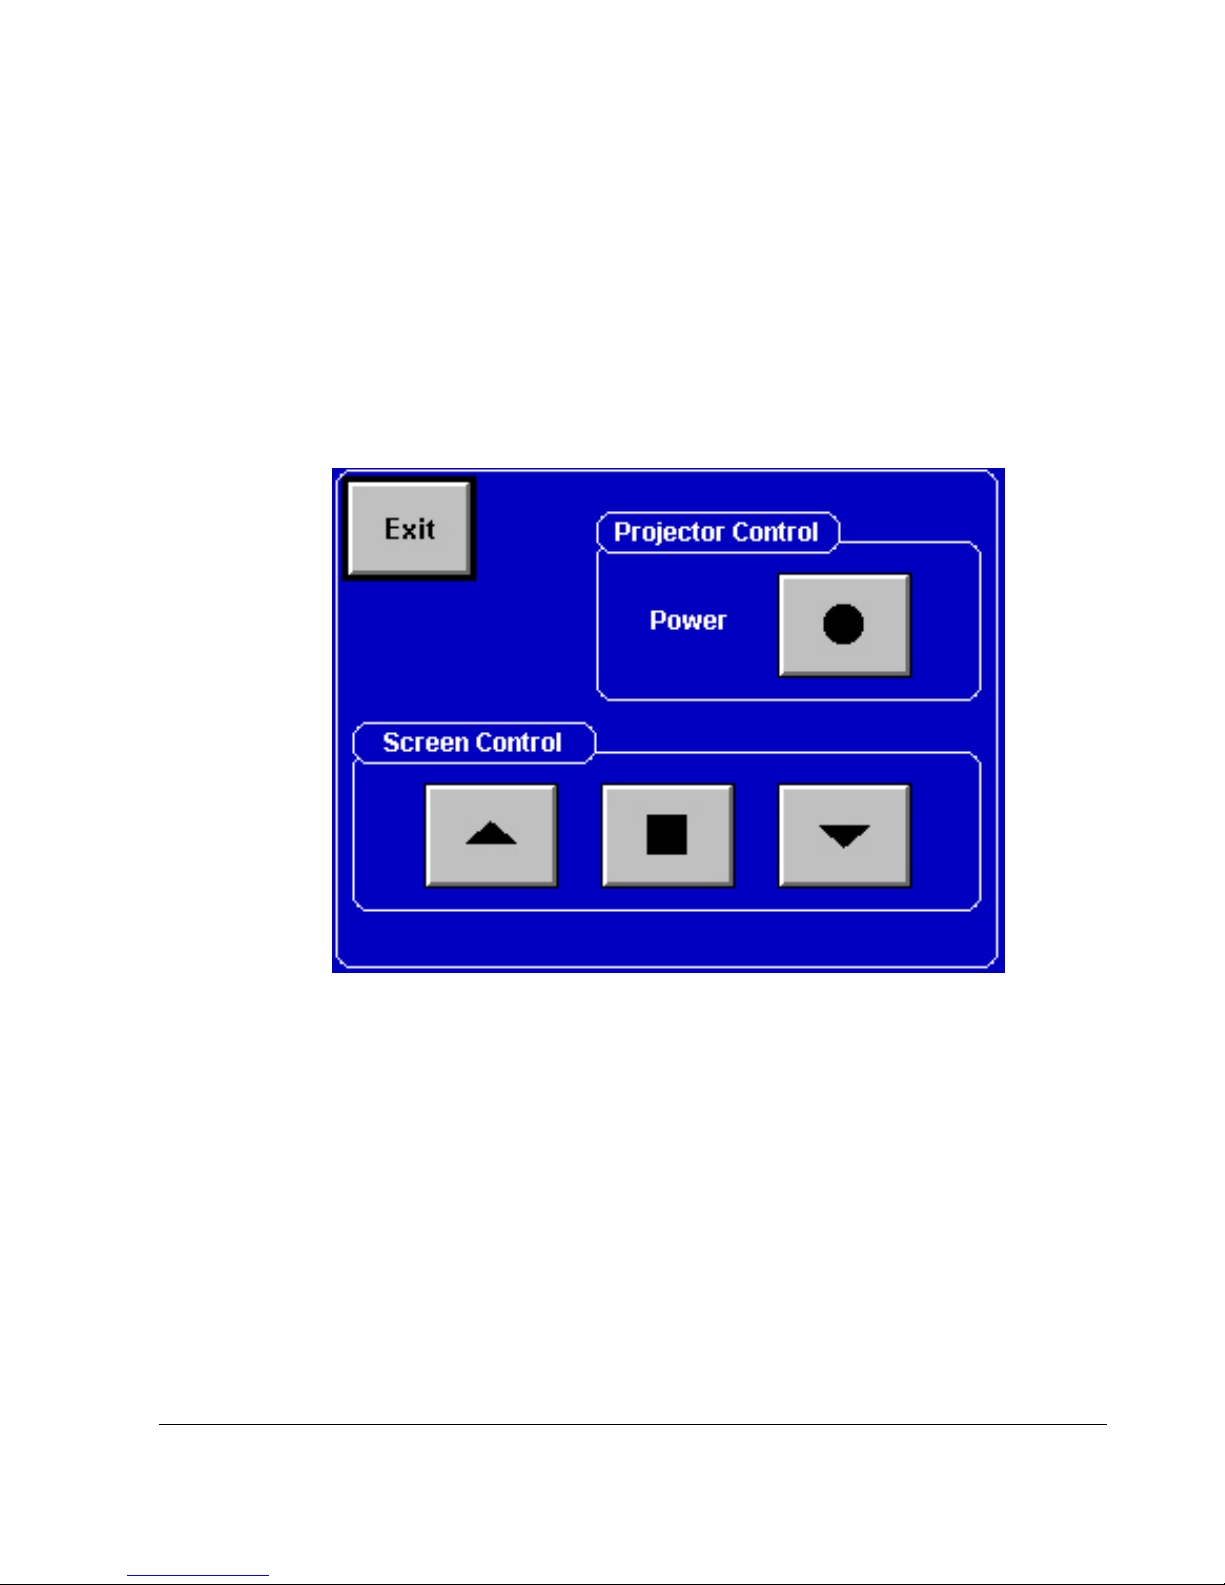
Projector and Screen Controls page
This page will be available after the CONTROL PAGE button has been selected at
the Main Page location. Use the buttons in this page to control the Projector and the
Screen.
* Press the EXIT button in order to return to the Main page location.
* Press the POWER button in order to turn ON or OFF the Projector.
* Press the UP arrow in order to raise the projector’s screen.
* Press the DOWN arrow in order to lower the projector’s screen.
* Press the SQUARE icon in order to stop the projector’s screen.
Copyright 2002 by DOAR Communications Inc. All Rights Reserved. (800) 875-8705
23
Page 24
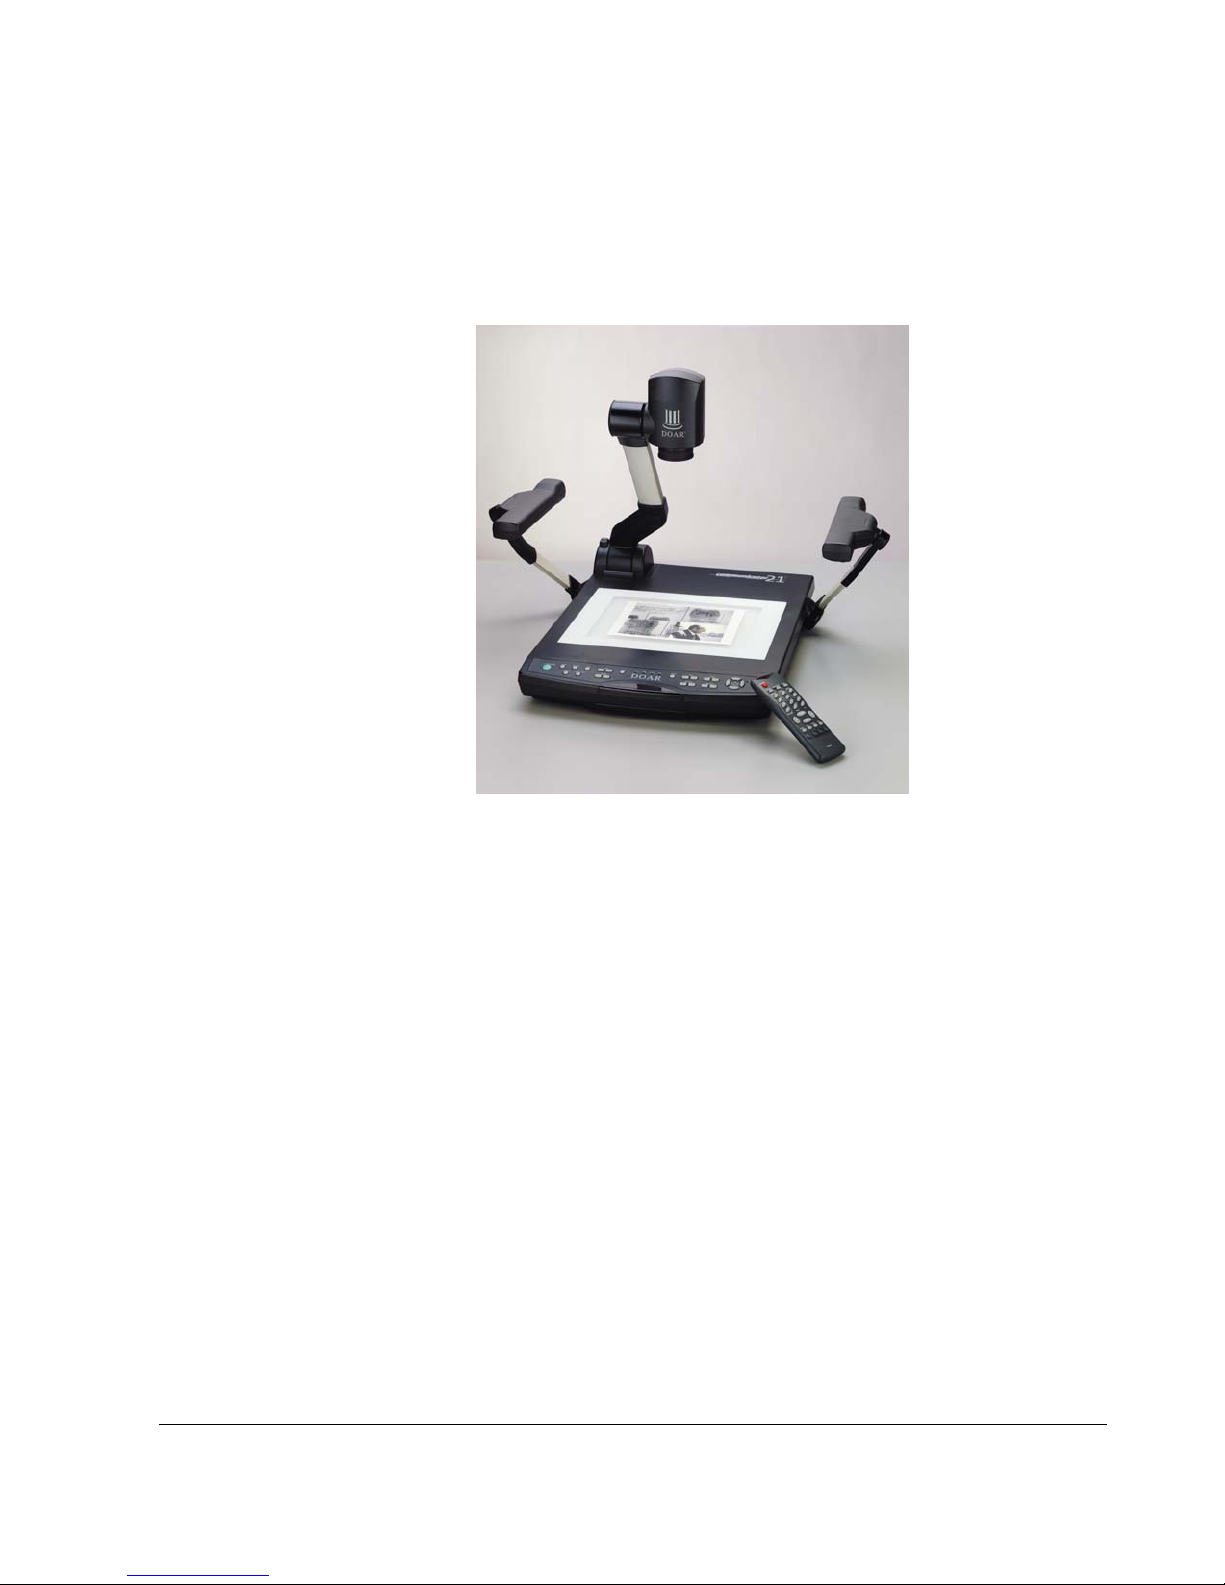
DOAR’s Communicator
DOAR’s Communicator is an easy-to-operate and portable evidence presentation
system. This unit is equipped with a high-resolution CCD camera and features an 810X magnification zoom lens and a high accuracy auto focusing system. The
Communicator presents all types of materials to view or record through monitors,
e.g. 3-D objects, paper documents, transparencies, x-rays, etc.
Using the Communicator
1) If not already powered ON, turn ‘ON’ the power switch of your Communicator.
Connection to the monitor should be previously executed.
The initial settings are displayed by their respective indicators.
2) Select communicator by pressing the COMMUNICATOR button on the remote
control.
Copyright 2002 by DOAR Communications Inc. All Rights Reserved. (800) 875-8705
24
Page 25

3) Place the object on the white stage. While you observe the image adjust the zoom
to obtain the optimum size.
4) Fine-tune the image using the manual focus.
Pay attention to depth of field with 3-Dimensional objects. You may need
to focus again, or even to rotate the camera head and remove the close-up
lens to focus from a distance (this is only for a very large object.)
Simple Steps for Viewing Transparencies or Slide Film
1) When you press the lamp button (BASE), the lighting switches from the
“UPPER” lamps to the built-in base-light lamp.
2) For 35mm negatives, press and hold the column lock button (located in the
middle of the camera arm), then set the camera head to its lowest position.
3) Press the nega/posi conversion button. The indicator will show (N) (negative)
mode. You may want to adjust the Iris to over expose for a better color
reproduction.
4) When turning off the base light, press the lighting button (UPPER) again.
For Use as a Conventional Video Camera
1) The close-up lens should be removed when you are shooting the object at a
distance.
2) The camera head can be rotated to the horizontal position. This allows you to
present images from far away.
Copyright 2002 by DOAR Communications Inc. All Rights Reserved. (800) 875-8705
25
Page 26
Communicator Functions
Lighting
These buttons are used to turn on/off the lights. There are two lighting units. They
are as follows:
Upper: The upper lighting unit is used for viewing materials such as printed matter
and 3-D objects.
Base: The Base light unit is used for viewing slides, transparencies, X-rays etc.
When the lighting button is pressed, the indicator flashes, and after a
few seconds, the upper fluorescent lamps turn on. To turn the lamps
off, press the lighting button again. Select the (UPPER) or (BASE) mode.
(It is not possible to use both the upper lighting unit and
the base light). It is advisable to use the upper lighting unit to obtain a clear image
with better color rendering especially when the stage is not sufficiently lighted.
Input Selection
Input selection lets you select the input you would like to show on the monitors or to
change input line. There are three input selector options. They are as follows:
Internal: Displays whatever is in the view of the Communicator.
AV1 & AV2: Inputs from two separate AV sources are available to be projected on
the monitors by pressing one of the input selection buttons.
Nega/Posi Conversion
Copyright 2002 by DOAR Communications Inc. All Rights Reserved. (800) 875-8705
26
Page 27
This function is used to view negative film as a positive image. Press the Posi/Nega
conversion button, and the indicator shows (N) (negative). If you press the button
again, it changes to normal (P) (positive) mode. This is a very useful function for
35mm slides, x-rays, MRIs and auto-rads.
Color/B&W Selection
This button is used for viewing black and white material, such as documents. This
function allows you to select color or black and white images on the monitors.
It is advisable to use this mode for viewing the B&W button so that
materials such as documents have a clear image with no color blur. For
normal use, set to (C) (Color) mode.
Zoom
Zoom function lets you adjust the image size and zoom into a specific section. When
(TELE) is pressed, the image gets larger (zoom in). When (WIDE) is pressed, the
image gets smaller (zoom out).
Focus
It is difficult to focus on objects under the following conditions. You need to
manually focus in order to clearly view objects in these conditions.
Objects bearing little contrast.
Objects with a fine repeated pattern such as lateral stripes, or a checkered pattern.
Bright objects or ones reflecting strong light.
The background of the object is bright.
Copyright 2002 by DOAR Communications Inc. All Rights Reserved. (800) 875-8705
27
Page 28
Picture itself is dark.
Moving objects.
Manual Focus:
. Press the focus button (N) or (F) for manual focusing. This function is used to view
3-D objects of which any part can be focused.
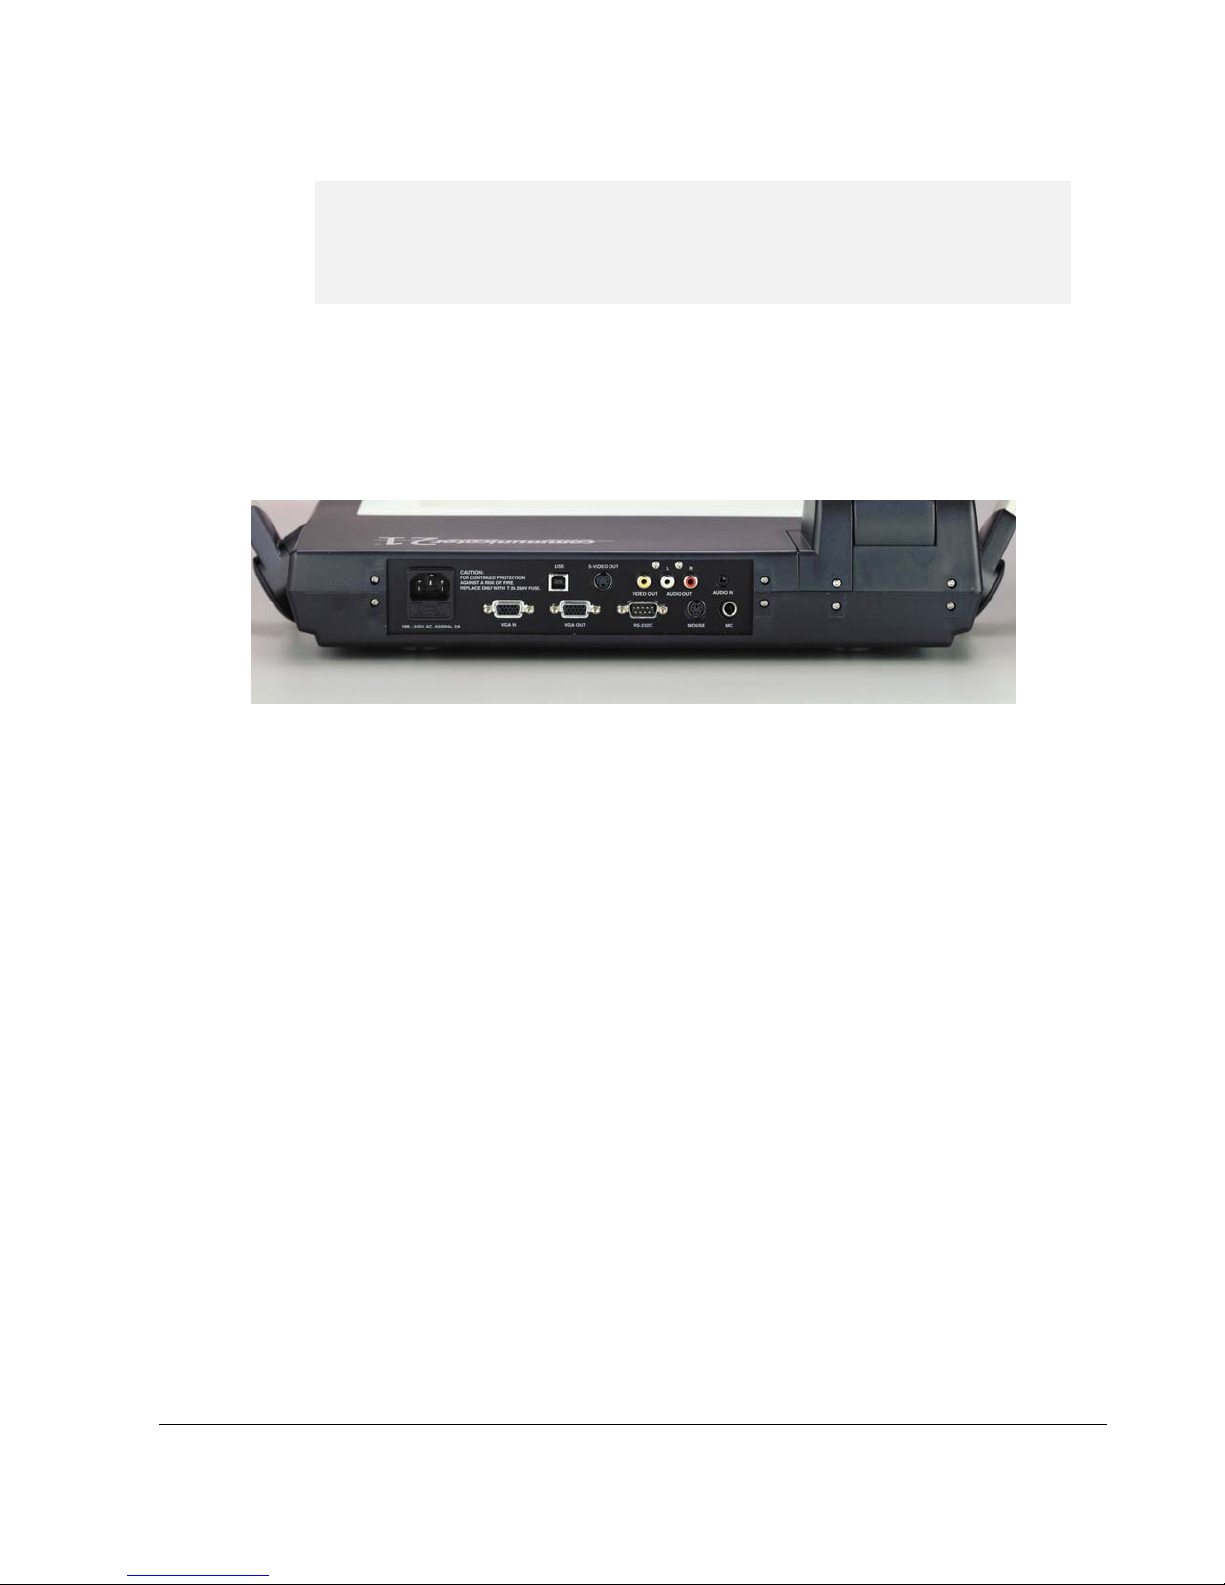
BACK PANEL OF THE DOCUMENT CAMERA
Copyright 2002 by DOAR Communications Inc. All Rights Reserved. (800) 875-8705
28
Page 29
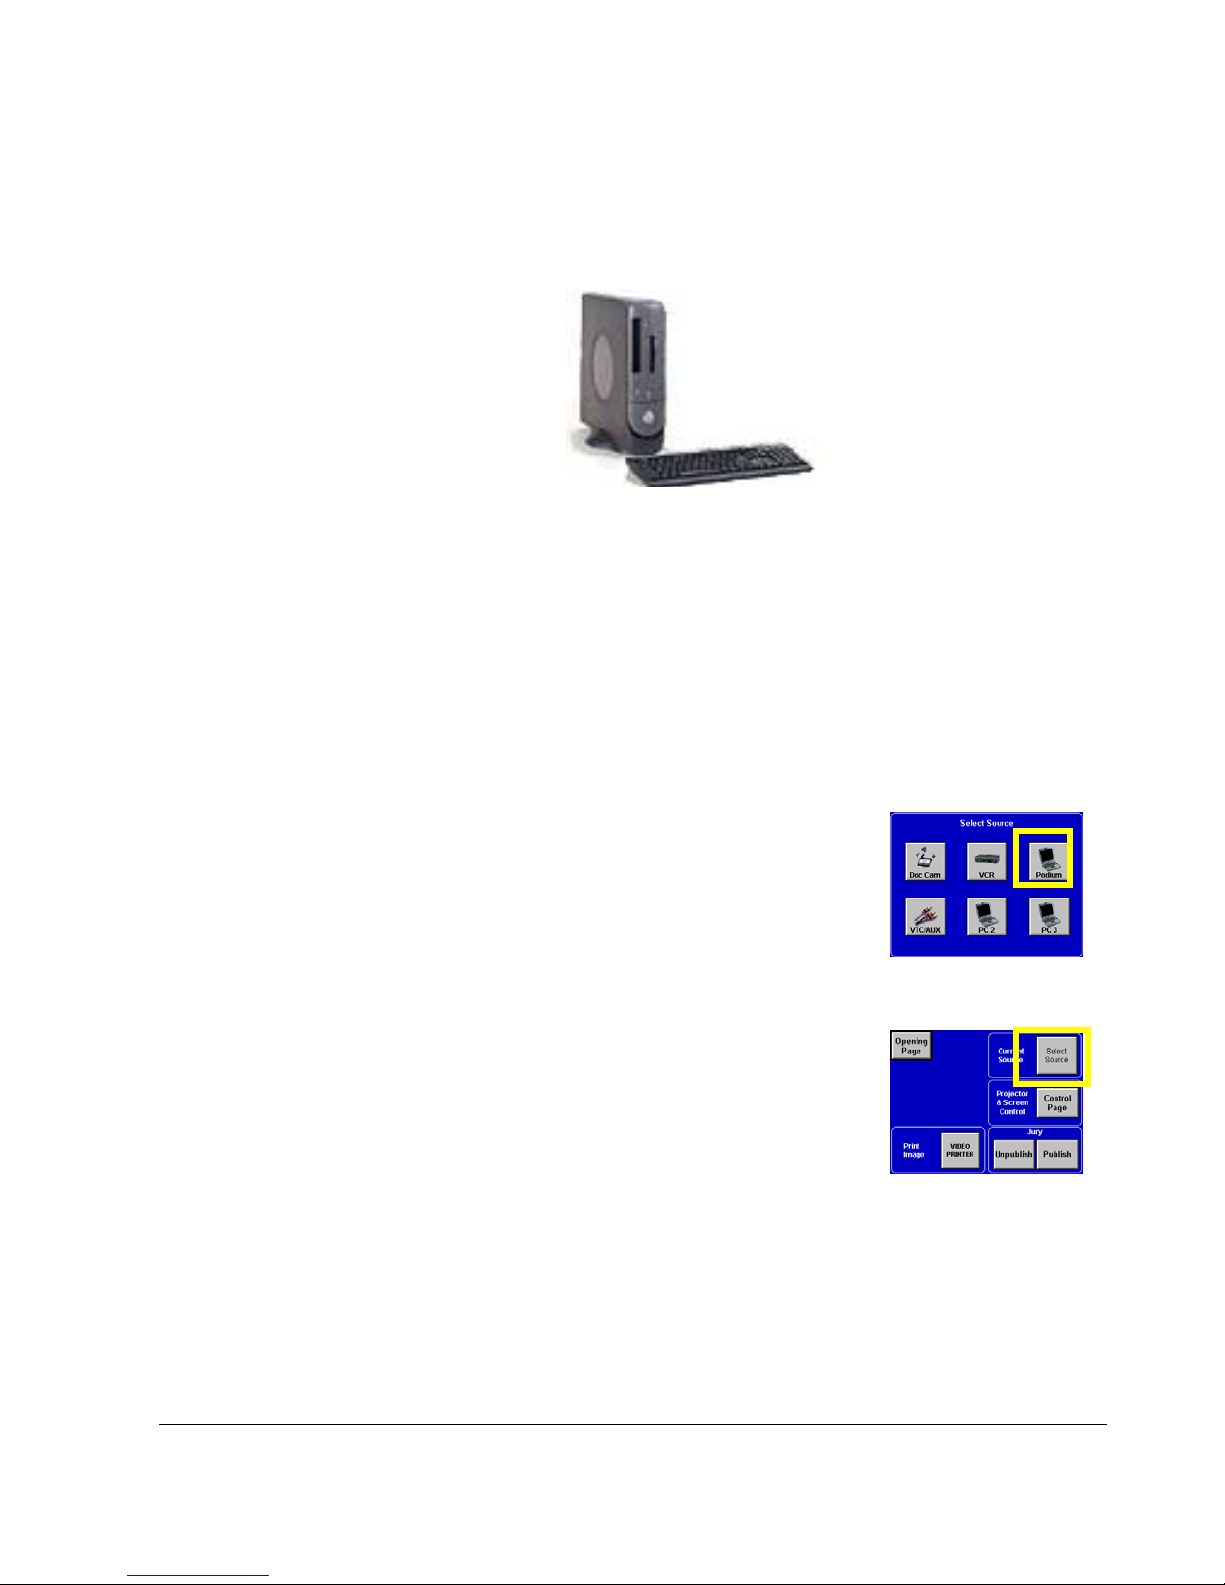
DELL Computer
The DELL Computer is an easy-to-operate desk-top evidence presentation device.
This unit is equipped with a high-resolution LCD screen used to switch between
evidence and the computer.
Using the Computer
1) If not already powered ON, turn ‘ON’ the power switch of your Computer ,
located at the tower (inside the lectern).
Connection to the computer should be previously executed.
Run the Video Capture, CD/DVD, or Power Point program to be
presented.
2) At the lectern location, select the Computer by pressing
the PODIUM button on the Select Source page (see fig.
on right).
3) The previous action will select the Podium PC input as
the current source (the Video Capture, CD/DVD or Power Point presentation
will be displayed as the current video source.
4) To exit or to cancel, simply either exit the current
program being run by the computer, or change the
current source at the Main Page location (see fig. on
right). Be sure to turn the PC OFF properly before the
lectern is un-plugged.
Copyright 2002 by DOAR Communications Inc. All Rights Reserved. (800) 875-8705
29
Page 30
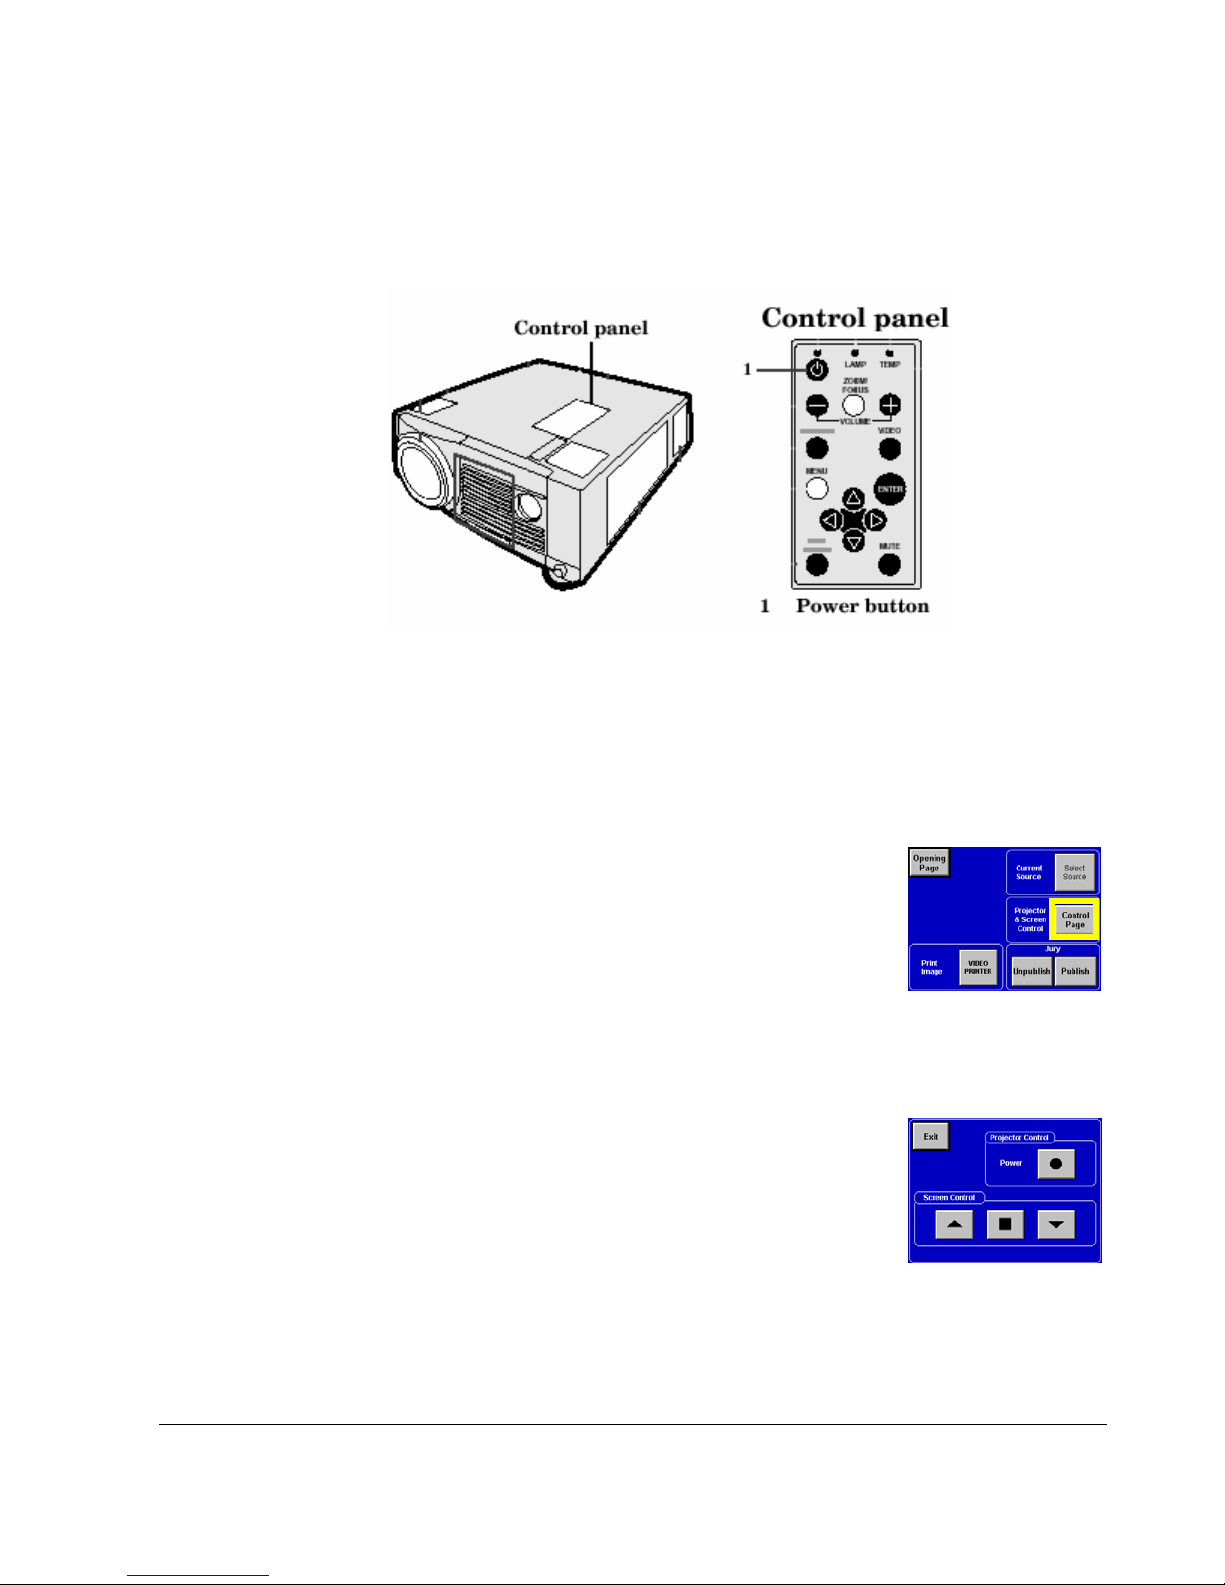
LCD Projector
Using the LCD Projector
Mitsubishi’s LCD Projector is an easy-to-operate portable evidence presentation
device.
1) If not already powered ON, turn ‘ON’ the power switch of your Projector (see
the figure above).
Connection to the projector should be previously executed.
The initial settings are already pre-set.
2) At the lectern location, select the projector by pressing the
PROJECTOR AND SCREEN CONTROL PAGE
button on the Main page menu (see fig. on right).
3) At the PROJECTOR AND SCREEN CONTROL PAGE you can perform the
following commands:
Press the EXIT button in order to return to the Main page location.
Press the POWER button in order to turn ON or
OFF the Projector.
Press the UP arrow in order to raise the projector’s
screen.
Press the DOWN arrow in order to lower the projector’s screen.
Press the SQUARE icon in order to stop the projector’s screen.
Copyright 2002 by DOAR Communications Inc. All Rights Reserved. (800) 875-8705
30
Page 31
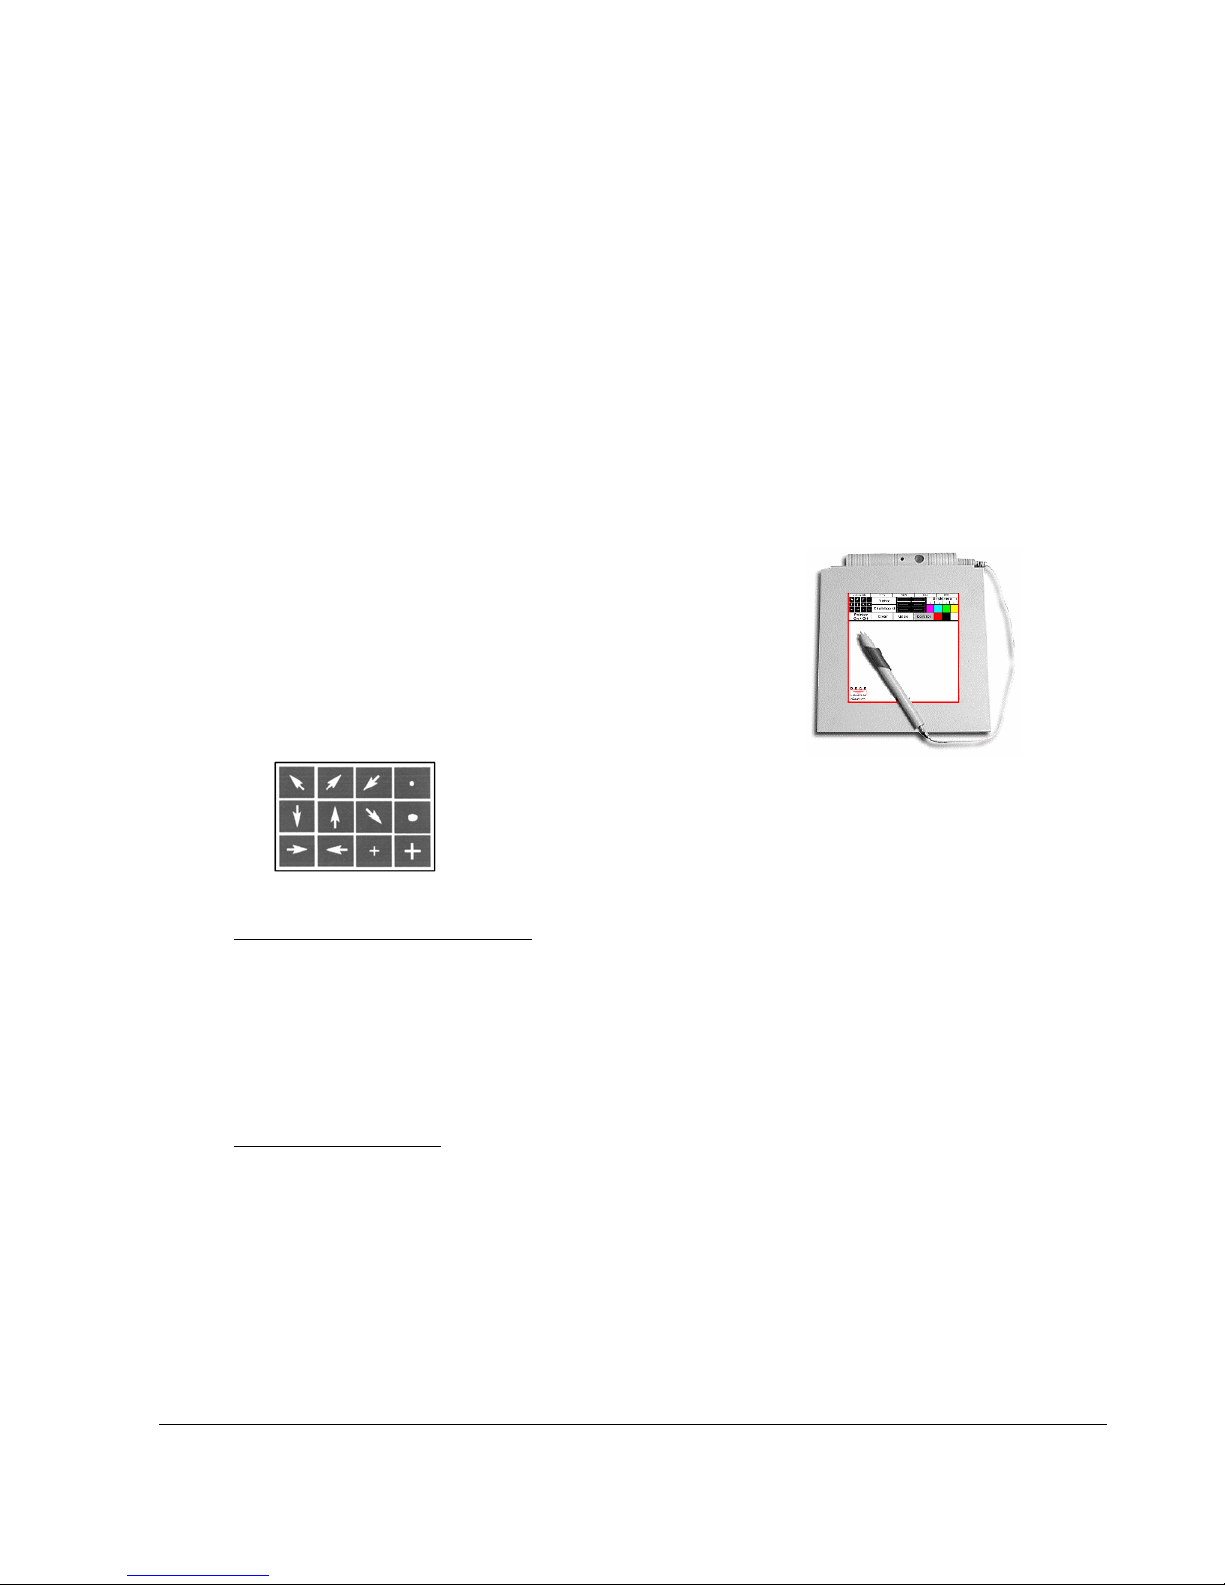
DOAR’s Illustrator
DOAR’s Illustrator is used to draw, annotate or position pointers onto information that is
represented on the monitor or screen. Each area of the tablet is described in the following
sections.
Tablet
Input Sources: These icons or buttons are used to change
video standards. DOAR sets this up at the time of system
configuration, and it usually does not need to be changed.
Pointers: These icons will set the cursor to a ‘pointer’ type. When
you click the desired pointer with the tablet pen the pointer will be
‘set’ on the screen. You can set the pointer as many times as you
want. In order to turn off the pointer you should choose the
pointer on/off icon.
To position an active pointer:
1. Position the pointer anywhere on the tablet to make your point. Lightly drag the tip
across the screen until the active pointer is at the desired location.
2. Reposition the same active pointer anywhere on the video image to make your second
point, and continue as often as desired.
To anchor a pointer:
1. Once a pointer type and pointer color is selected and the active pointer has been
positioned, you can anchor the active pointer in its current position. To do this, click the
button on the pen while positioning it on your tablet. The pointer will be anchored, and a
new active pointer will appear on screen identical to the first.
2. If desired, you can position multiple pointers and anchor them.
Copyright 2002 by DOAR Communications Inc. All Rights Reserved. (800) 875-8705
31
Page 32
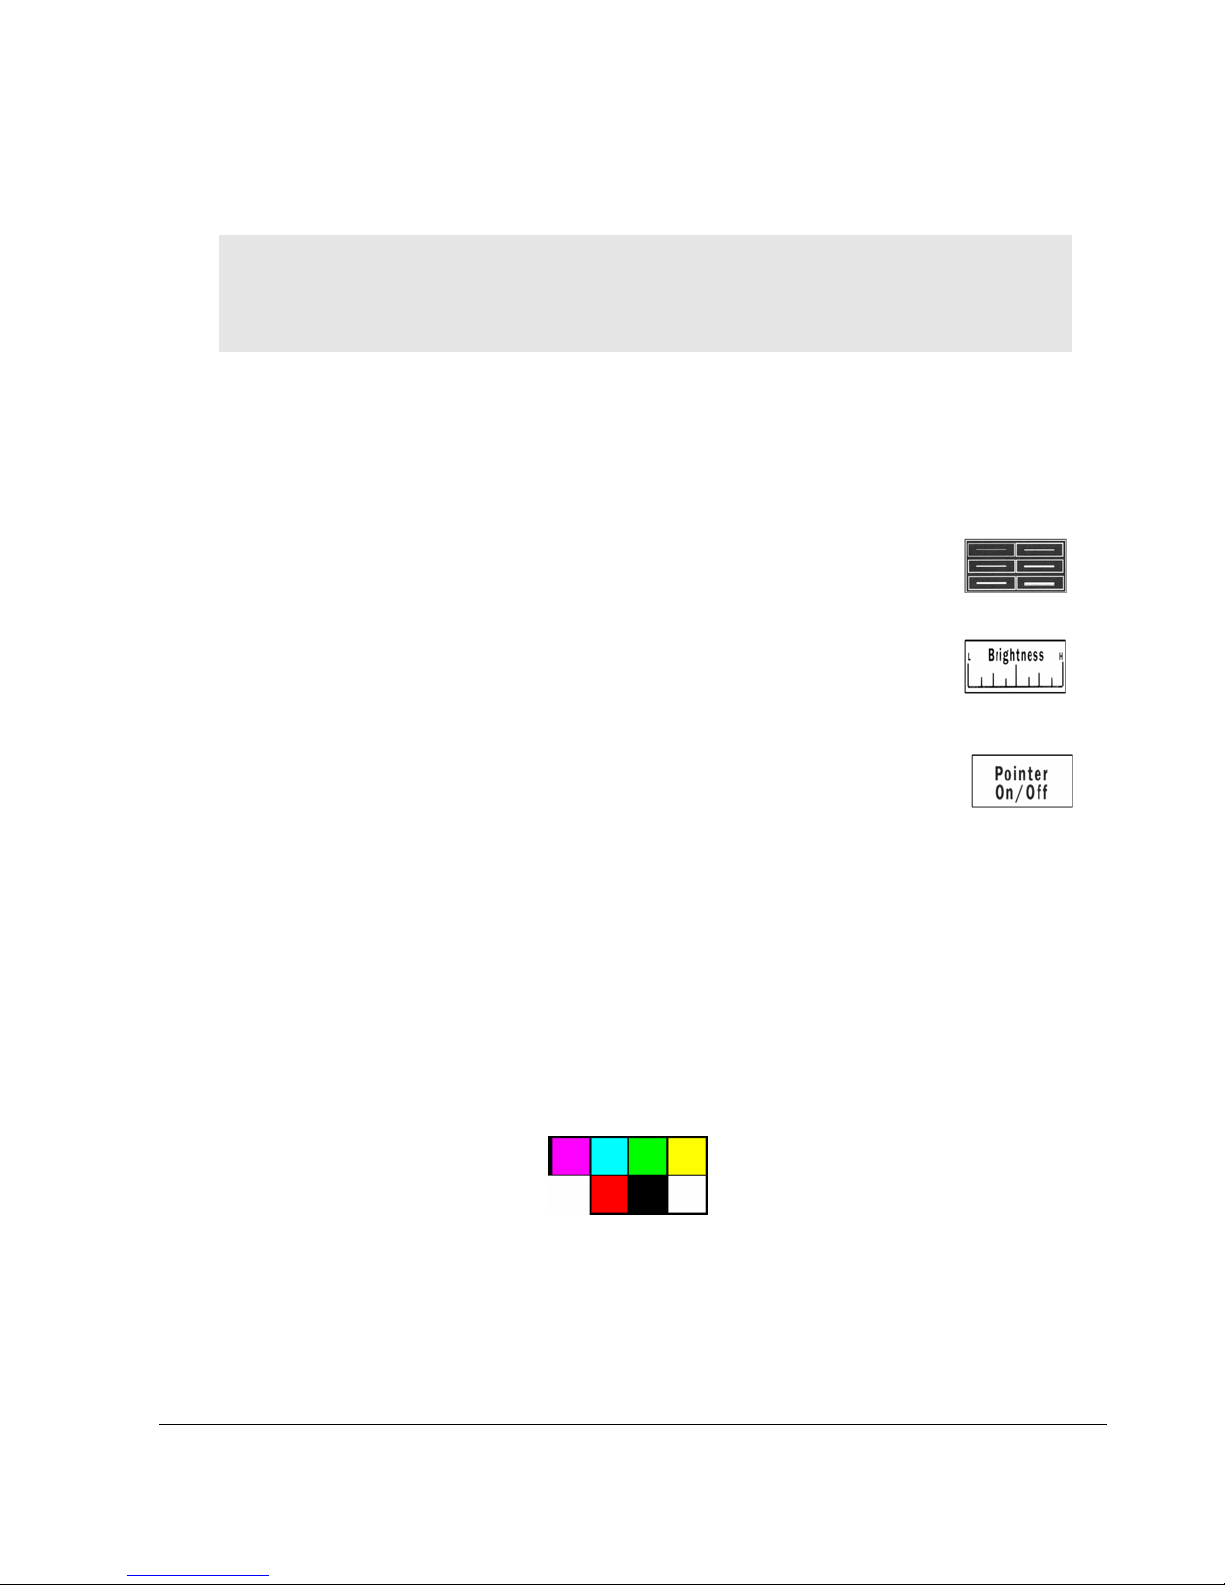
You can anchor as many pointers or drawing lines as desired. Also, each pointer may be changed
to a different pointer type before anchoring, or the pointer may be changed to a different color
before anchoring.
Switch: These two icons switch between the video or digital inputs and the Chalkboard.
When Video icon is pressed the video input will show on screen. If Chalkboard is chosen, a
blank screen will appear, allowing you to freely write on the screen. (You may preserve any
markings with prints from the Visual Image Printer.)
Thickness: These icons are used to change the thickness of the lines
created by the tablet pen. You may change the thickness while highlight by
simply clicking on a different area in the bar.
Brightness: This icon controls the brightness of your annotations on the
screen. The left of the bar is the darkest and the right is the brightest.
Various degrees of brightness may be chosen between.
Pointer On/Off: This icon is used to turn the pointer on or off. If the
pointer is turned on, you will see the pointer on the screen. If the pointer is
not desired just click on the icon and it will disappear. To get the pointer
back, click the Pointer On/Off icon again.
Clear: This icon clears the screen of all illustrations or text. The underlying video or
chalkboard is not affected.
Undo: This icon deletes the last illustration or text from the screen.
Control: The control icon allows multiple tablets to take or release control. When you want
to ‘take control’ of the Illustrator from the other pads, you click on Control and start to
illustrate. This feature is usually not implemented. To take control, one-person must stop
using a tablet and the other begin to use one.
Color Pad: These seven colors may be used to set the color for freehand drawing. Clicking on the color pad will set the chosen color for
pointers and freehand drawing. You may change the color while highlight by clicking on a different color on the Color Pad.
Copyright 2002 by DOAR Communications Inc. All Rights Reserved. (800) 875-8705
32
Page 33
Change
Color
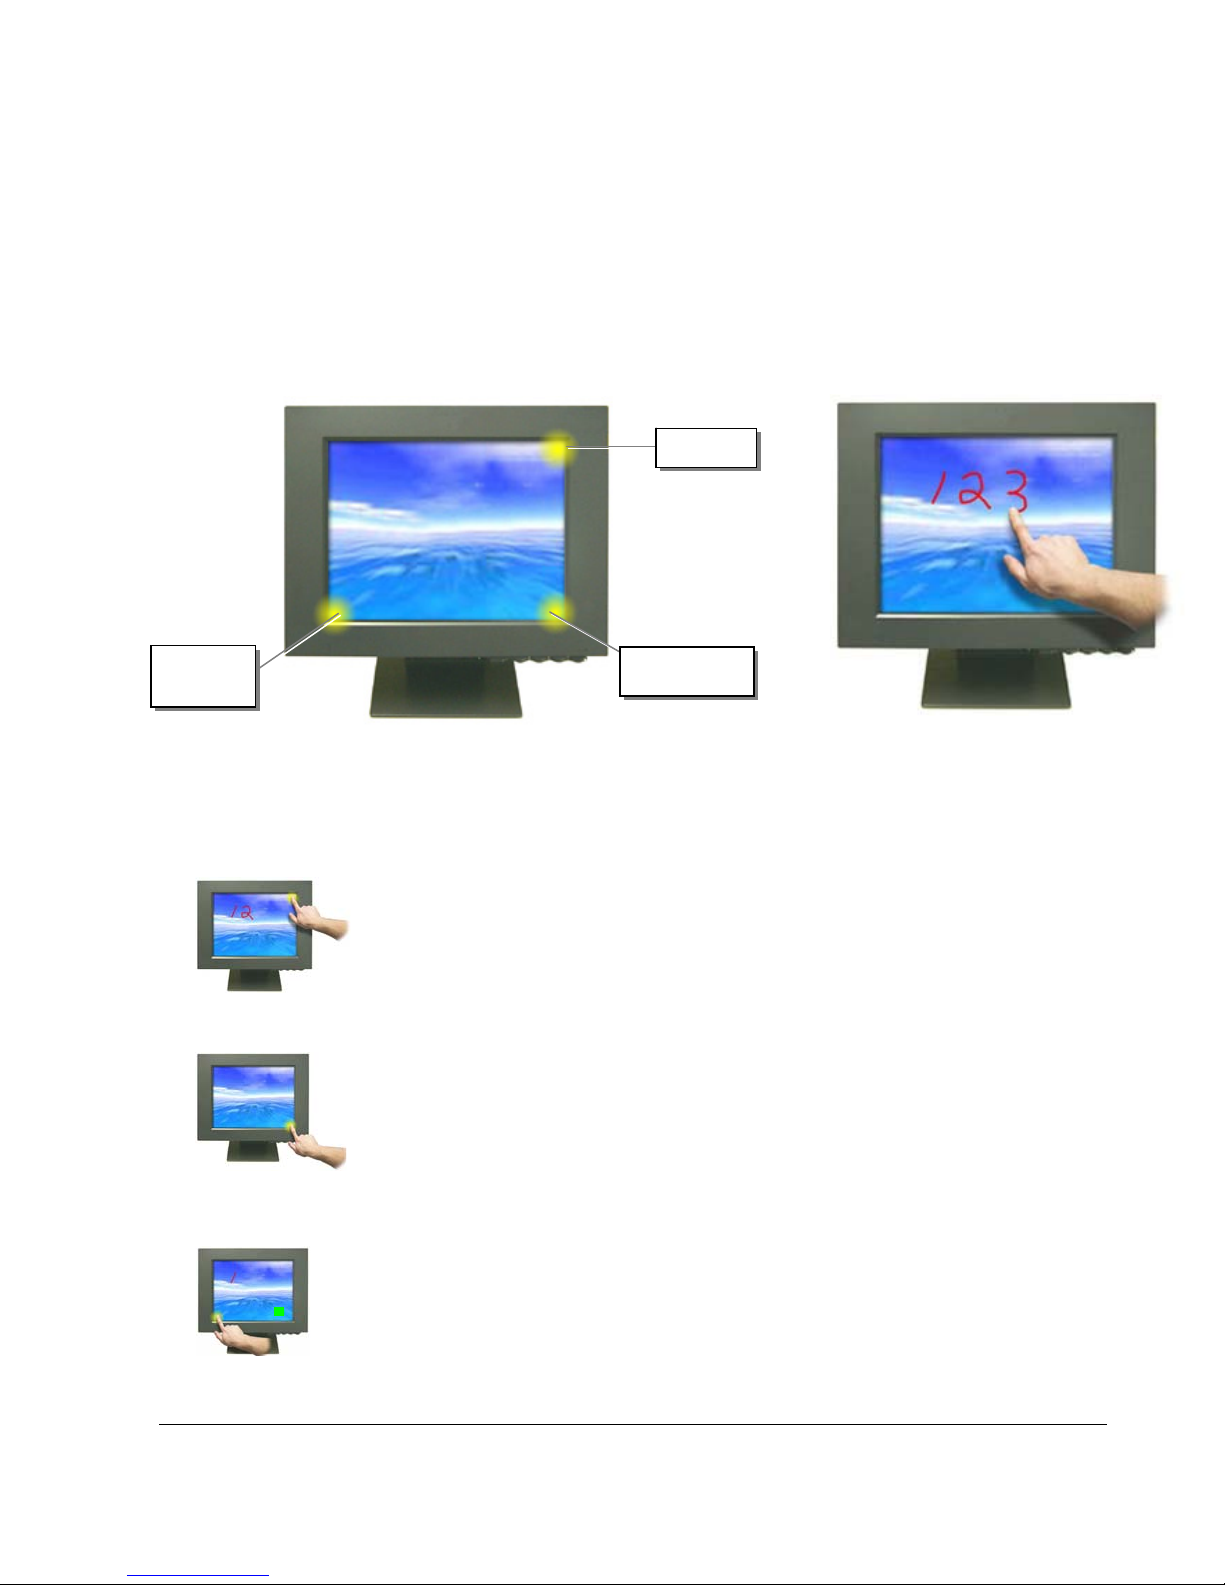
DOAR’s Touch Screen
The touch screen can be used to make on-screen annotations. It allows a witness to easily make
annotations with the touch of a finger.
Undo
Clear Screen
Annotations can be made by pressing lightly and dragging with your finger similarly to using a pen.
The touch screen’s corners activate special functions as described below.
UNDO
Tapping the top right corner of the screen will delete the annotations one at
a time, beginning with the most recent.
CLEAR SCREEN
Tapping the lower right corner of the touch screen will remove all
annotations.
CHANGE COLOR
Tapping the lower left corner of the screen will cycle through the available
colors that can be used for annotations. The colored swatch that appears on
the screen will be the active color, and will change as the corner is tapped.
Copyright 2002 by DOAR Communications Inc. All Rights Reserved. (800) 875-8705
33
Page 34
DOAR’s Visual Image Printer
The DOAR Visual Image Printer (VIP) is an integrated component of the DEPS controlled
though the Remote Control system. Under normal operation, you should utilize the quick
“one-touch” operation on the remote to produce a hard copy of the currently displayed
image
The DEPS VIP requires paper and ink supplies to operate. Instructions for changing paper and
installing new ink cartridges are included with the supplies.
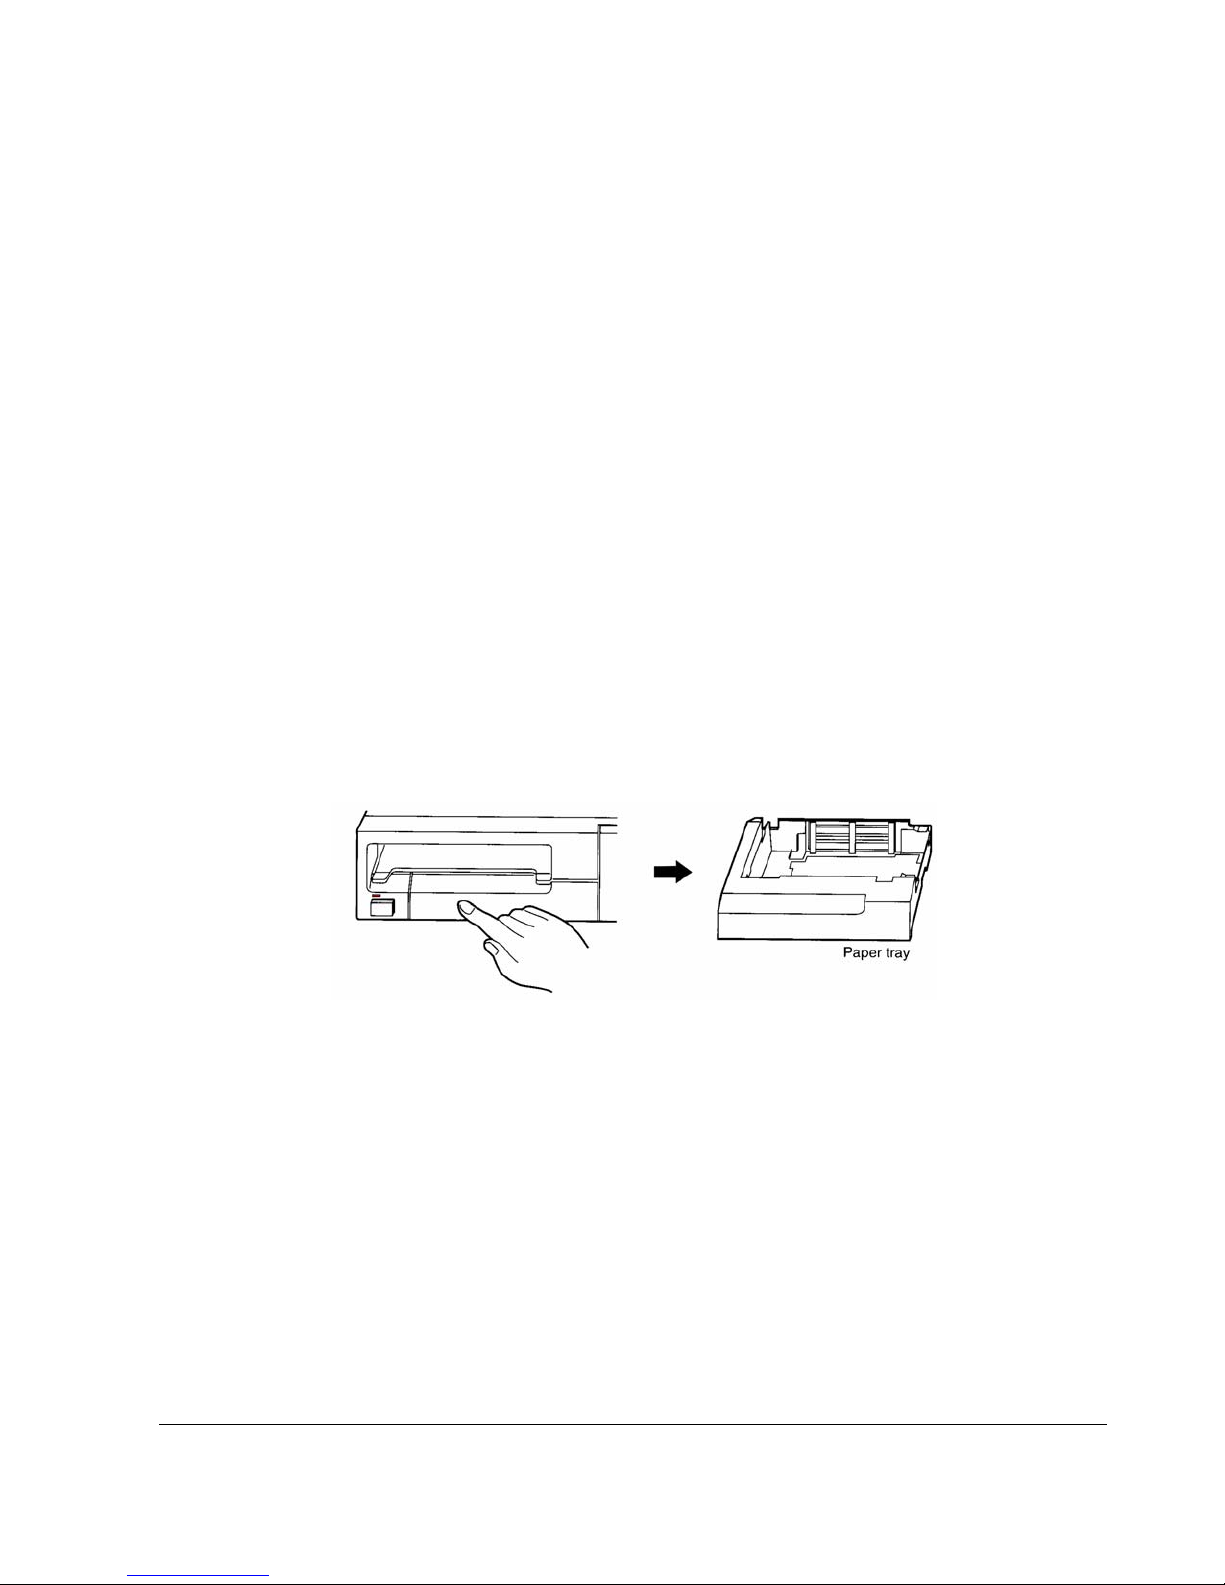
Changing the Printer Paper
The VIP contains cartridge loaded printer paper. It has been designed for simple
replacement, and can be quickly changed during courtroom operation.
1. Push in the paper tray and then release to eject.
Copyright 2002 by DOAR Communications Inc. All Rights Reserved. (800) 875-8705
34
Page 35
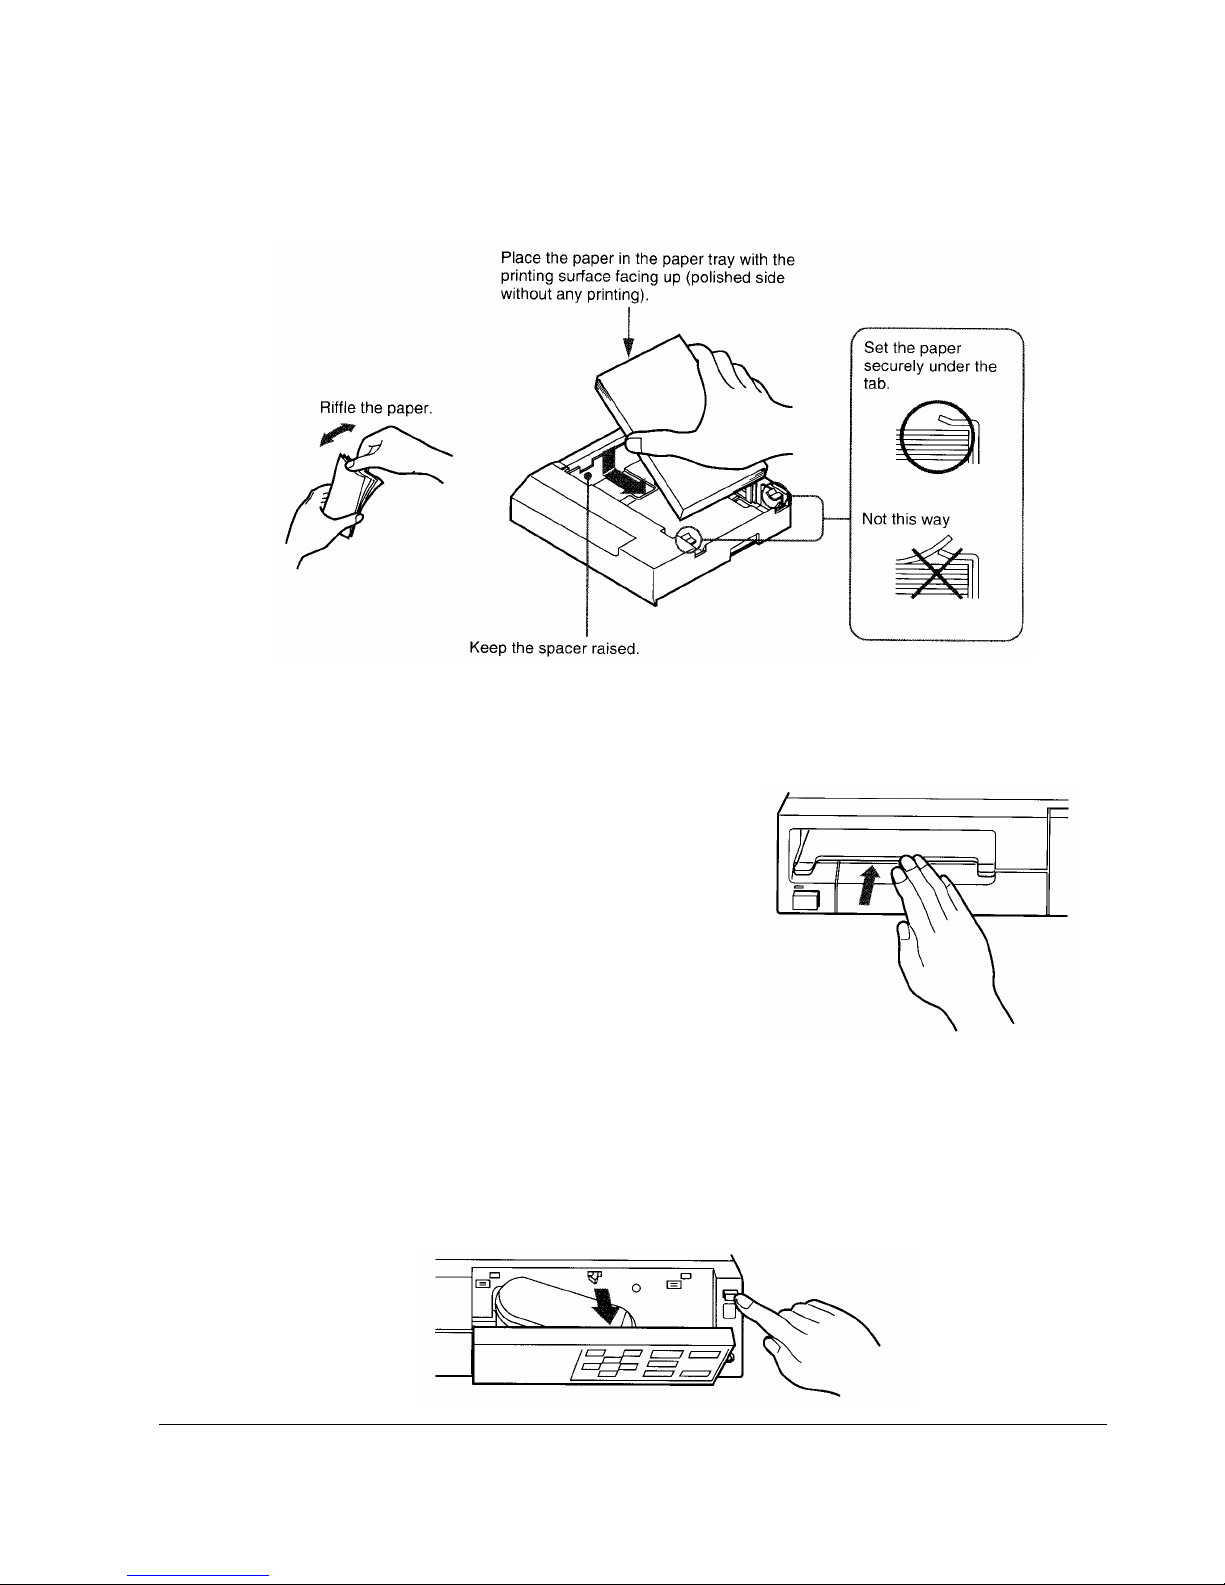
2. Place the new paper into the tray. Be sure to load the paper so it lays flat in the tray. If
the paper is somewhat curled reduce the number of sheets inserted to ensure proper
loading.
3. Slide the paper tray back into the printer and
slowly push in, until it clicks in place.
Changing the Ribbon Cassette
The VIP contains a cartridge loaded ribbon cassette,
which has also been designed for simple replacement, and can be quickly changed during
courtroom operation.
1. To open the front panel control door, thus revealing the ribbon cassette, simply press the
top right hand button on the VIP.
Copyright 2002 by DOAR Communications Inc. All Rights Reserved. (800) 875-8705
35
Page 36
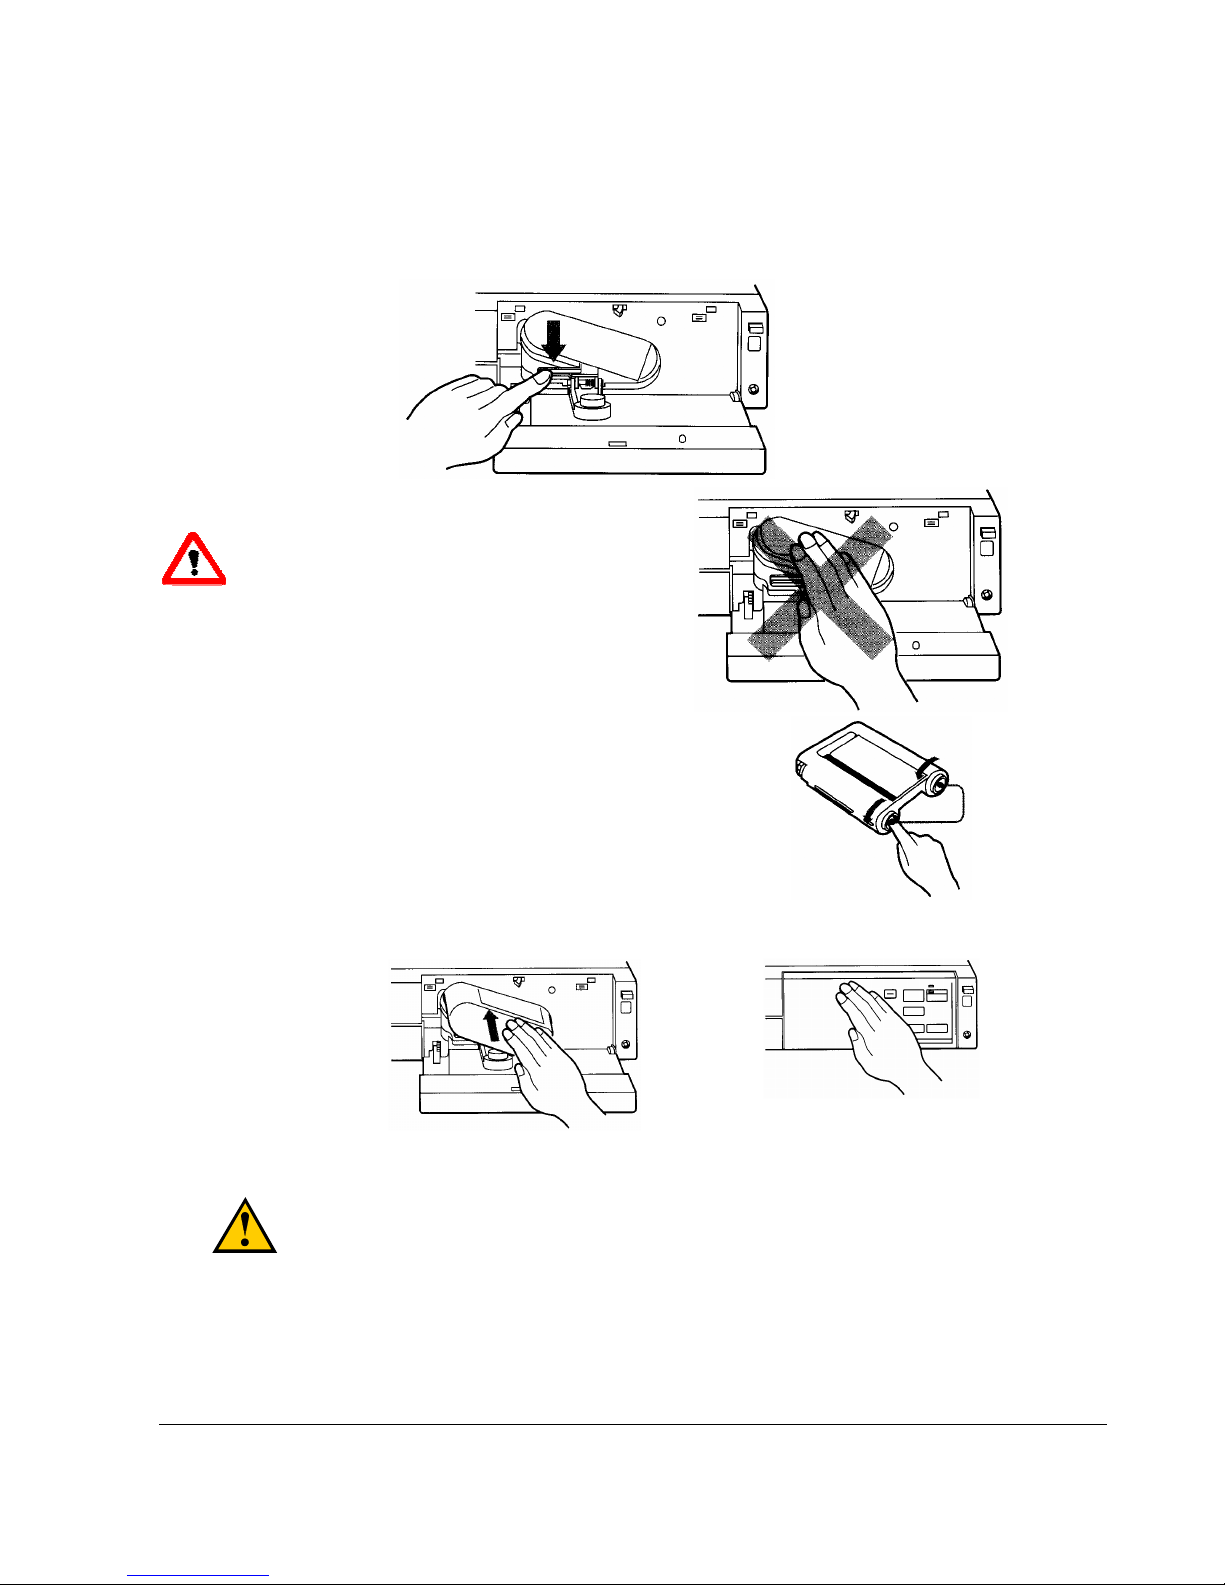
2. Remove the ink ribbon cassette by pulling down the eject lever.
Never put your hand into the ink ribbon
cassette dock. The thermal head becomes
very hot, and can burn if touched.
3. Take up any slack in the ink ribbon. This is critical,
as any ribbon left slacked, may crumple and damage
the VIP.
4. Insert the ink ribbon cassette firmly until it stops.
5. Close the front panel.
Be sure to only use genuine DOAR replacement paper and ribbons. Failure to do so may void
user’s warranty. Please call DOAR at (800) 875-8705 for supplies.
Copyright 2002 by DOAR Communications Inc. All Rights Reserved. (800) 875-8705
36
Page 37

Service & Support
DOAR is available to assist in operating DEPS. Our on-call consultants will work with you to
explain how to operate the system. Feel free to call us at (800) 875-8705 with any questions or
ideas on how to improve the system. Thank you for purchasing the DOAR Digital Evidence
Presentation System.
Trouble shooting
Chapter
5
If any minor problems are encountered with the system, these pages may help. If more
serious problems arise, please contact DOAR Communications.
The troubleshooting guide is set in this format:
Problem Encountered
- Possible solution
- Possible solution
No Video Seen on any Monitor
-Verify that DEPS is powered ON
-Select Source from remote control
-Try selecting another source from the remote control
-Verify that the Judge Override switch is connected and in the “I” position.
Video Images only Seen on “Unswitched” Outputs
-Verify that the Judge Override switch is connected and in the “I” position
-Press PUBLISH on the remote control
Remote Control is not Working
-Verify that the battery is charged
-Verify that the DEPS is powered ON
Copyright 2002 by DOAR Communications Inc. All Rights Reserved. (800) 875-8705
37
Page 38

Annotation does not function
-Power OFF the DEPS unit, reconnect cable , power ON the DEPS
(Be sure the Monitor is powered ON before DEPS)
-Verify that the cables are plugged into the correct port(s) on the DEPS
Printing does not Function
-Verify that paper is loaded in the machine
-Verify that there is ink in the cartridge
-Verify that you see an image on the monitor when you press PRINT from the remote control.
Copyright 2002 by DOAR Communications Inc. All Rights Reserved. (800) 875-8705
38
Page 39

Copyright 2002 by DOAR Communications Inc. All Rights Reserved. (800) 875-8705
39
Page 40

COURTROOM PRESENTATION, ANNOTATION & PRESERVATION
HIGH RESOLUTION DIGITAL IMAGE CONTROL AND DISTRIBUTION
Digital Evidence Presentation System
User’s Guide
SUPERIOR COURT OF CALIFORNIA
C
OUNTY OF ALAMEDA
H
AYWARD HALL OF JUSTICE
2002 DOAR Communications Inc. All Rights Reserved
170 Earle Avenue • Lynbrook, NY 11563
Phone 516-536-6400 • Fax 516-823-4400
For Service and Support (800) 875-8705
www.DOAR.com [email protected]
Copyright 2002 by DOAR Communications Inc. All Rights Reserved. (800) 875-8705
40
Page 41

About the User’s Manual
This manual provides the owner and operator of the Digital Evidence Presentation
System with the basic information needed to operate the DEPS in court, arbitration,
settlement conference, etc. DOAR has made every effort to compile a comprehensive
guide for the user. This manual covers the overall functionality, operation and
control of the DEPS. If you should encounter situations beyond the scope of this
manual, please call DOAR’s 24-hour /7 days a week service and support line at
(800) 875-8705.
Copyright 2002 by DOAR Communications Inc. All Rights Reserved. (800) 875-8705
41
Page 42

T ABLE OF CONTENTS
CHAPTER 1- INTRODUCTION
HE CORE 2
T
T
HE INTEGRATION 2
T
HE SERVICE 3
CHAPTER 2 - DEPS COMPONENT OVERVIEW
CABINET 4
DEPS
I
NTERFACE PANEL 5
DOAR’
VCR
DOAR’
DOAR’
DOAR’
DOAR’
DOAR’
DOAR'
DOAR’
S COMMUNICATOR 6
TAPE SYSTEM (OPTIONAL EQUIPMENT) 6
S CASSETTE DECK (OPTIONAL EQUIPMENT) 6
S INTEGRATED SWITCHER 6
S ILLUSTRATOR 7
S VISUAL IMAGE PRINTER 7
S COURTROOM DIRECTOR (OPTIONAL EQUIPMENT) 8
S JUDGE OVERRIDE 8
S CONTROL SYSTEM 9
CHAPTER 3 - CONNECTING THE DEPS
HYSICAL CONNECTIONS WARNING 10
P
T
YPICAL SETUP 11
DOAR’
L
M
DOAR’
DOAR’
J
UDGE OVERRIDE 16
S
AFETY INSTRUCTIONS 16
S COMMUNICATOR 13
APTOP 14
ONITOR 15
S ILLUSTRATOR 15
S VISUAL IMAGE PRINTER 15
Copyright 2002 by DOAR Communications Inc. All Rights Reserved. (800) 875-8705
42
Page 43

CHAPTER 4 - OPERATING THE SYSTEM
OWER ON 18
P
C
ONTROL SYSTEM 18
DOAR'S
COMMUNICATOR FUNCTIONS 26
DELL
LCD
DOAR’
DOAR’S TOUCH SCREEN 33
DOAR’
COMMUNICATOR 24
COMPUTER 29
PROJECTOR 30
S ILLUSTRATOR 31
S VISUAL IMAGE PRINTER 34
CHAPTER 5 - SERVICE AND SUPPORT
ROUBLE SHOOTING 37
T
Copyright 2002 by DOAR Communications Inc. All Rights Reserved. (800) 875-8705
43
 Loading...