

Page 1
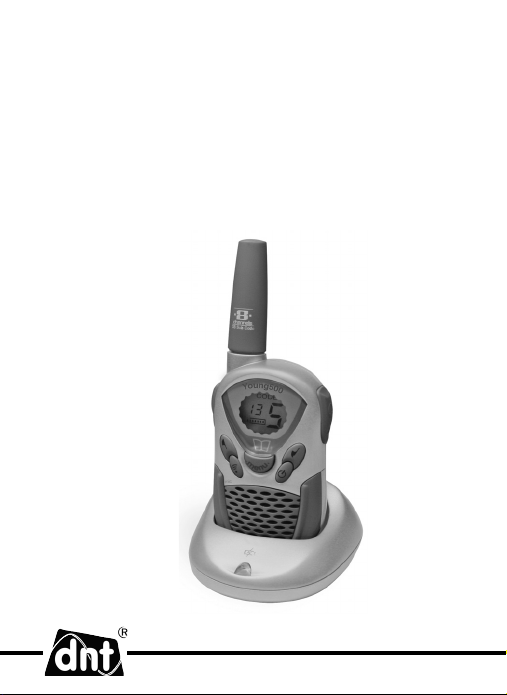
Young500
Bedienungsanleitung
user manual
Page 2

Security instructions ....................................................................... 22
Product information
Features/Delivery content .............................................................. 24
Name of each part ..............….………............................................25
Name of displayed features .............. ..............................................26
Starting operation
Install belt clip ................................................................................27
Replace the batteries ..................................................................... 27
Recharge batteries......................................................................... 27
Check battery condition .................................................................28
External earset ...............................................................................28
Turn the radio on .............. ..............................................................27
Turn the radio off .............. ..............................................................27
General operation
General .................... ......................................................................29
Transmitting .............. ......................................................................30
Channel selection .........................................................................30
CTCSS code ............. .....................................................................30
VOX / Hands-Free Operation .........................................................31
Transmitting VOX / Hands-Free ......................................................31
Call-Ring tone ................................................................................32
Rogerbeep ..................................................................................... 32
Key tone .........................................................................................32
Receiving ............. ..........................................................................33
Volume control ............. ..................................................................33
Monitor function .............................................................................33
Channel scan. ................................................................................ 33
key lock .......................................................................................... 34
Dual Watch........................................................................ .............34
Power Hi/Low........................................................................ .......... 35
Out of range function.................................................................... .. 35
Indications for the application.........................................................36
Specifi cation/CTCSS Table ............................................................37
Declaration of Conformity ............. ................................................38
Warranty regulations .....................................................................39
Contents
English
- 21 -
Page 3

Security instructions
Please read this information carefully before you use the
two way radio.
General instructions
Don’t use the unit while driving a car or riding a bike.
Don’t place the unit on unstable location, if it falls down, people may be
English
injured.
The unit is not a toy, please beware of small children.
If you connect the unit to other electronic devices, please study also the
security instruction of this device.
If you have any question regarding the unit, how it works, the safety or
the correct connection please contact our technical support or ask any
specialist.
The seller will not be liable for any damages caused by misuse of the
product and any claim from third parties.
The rubber buttons at the bottom of the charger contains softner and
may leave stains on furniture surfaces, so please, avoid direct con-
tact.
Environmental conditions
Don‘t leave the product close to magnetic cards like credit cards. The
magnet of the loudspeaker can damage the information on this card.
Don‘t drop or shake the unit, it might be damaged.
Avoid too high pressure to the LC-display, it might be damaged.
Don‘t leave the unit where the temperature is higher than 60°C, e.g.
in cars with closed windows in the summertime, near heaters or any
other type of heat source.
Don‘t use the unit in rooms with high humidity e.g. bathrooms.
Don‘t use the unit at dusty places.
If you use the unit close to electromagnetic fi elds or mobile phones,
- 22 -
Page 4

ContentsSecurity instructions
unwanted noise could be recorded.
If you connect the unit to other electronic devices, please study also the
security instruction of this device.
Batteries
Don’t leave empty batteries in the unit.
Don’t try to recharge Alkaline batteries.
Batteries can be extremely dangerous if accidentally swallowed.
Therefore keep the unit out of reach of small children.
Please do not throw the batteries into the regular garbage.
Please also do not throw them into fi re or any heat source.
Technical problems
In case any foreign material or liquid gets into the product, please
immediately remove the battery. Before you use it again, ask your au-
thorised dealer to check the product carefully.
Please do not hesitate to contact our service center.
Packaging material
Please don’t keep any packaging material within reach of small chil-
dren. It can become a dangerous toy.
Maintenance
Please remove the battery in case you don’t use the product for a
longer period of time. Leaking batteries can damage the product. Store
English
- 23 -
Page 5

Features
the product at a clean and dry place.
For cleaning use dry and soft cloth.
Features
38 CTCSS Codes
key lock
English
Up to 3-5 km Range, depending on the environment
Auto Squelch
Auto Monitor
Auto Power Save Circuit
VOX (Baby Room Monitor) / Handsfree Use
Channel Scan
Channel / CTCSS Tone Memory
5 Selectable Call Tone Melodies
Out of range function
LCD Last Used Channel Memory
Back Lighted LCD Display
Battery Status / Charge Indicator
External Earset-Microphone Jack
NiMH Batteries (600 mAh) Included
Delivery content
2 x Young500 (incl. NiMH rechargeable battery), 2 x AC Adaptor, 2 x
Desktop charger, user manual
- 24 -
Page 6
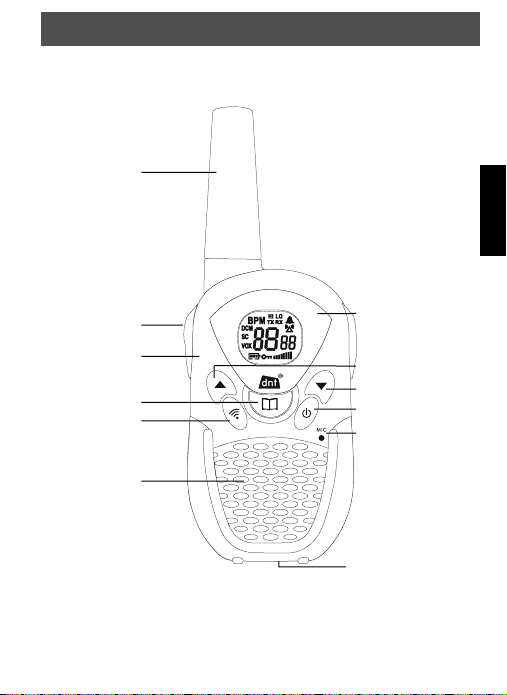
View of the appliance
Antenna
Product information
English
PTT button
Menu button
Call button
Speaker
Display
Up-/
Down button
On/off button
Microphone
charger pins
(on bottom side)
- 25 -
Page 7
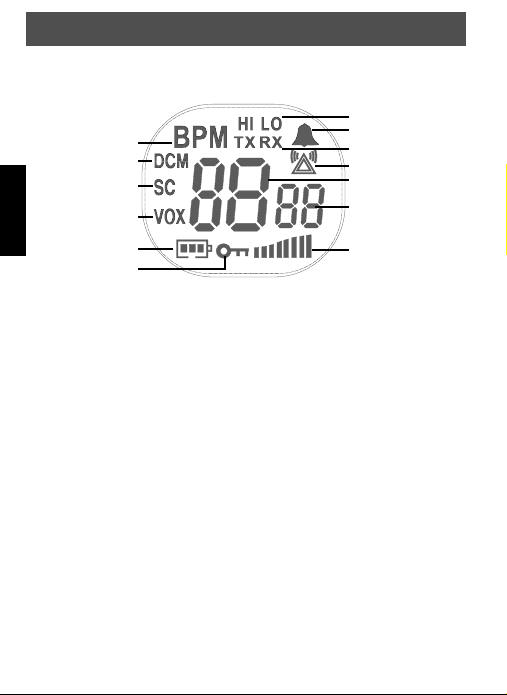
Product information
View of the appliance-Display
Mode
English
Dual watch
Scan icon
VOX icon
Battery condition
Key lock icon
TX: This icon appears, if transmitting is in process
RX: This icon appears, when the radio receives a
signal on the current channel.
P: PMR mode is selected.
M: Mama mode is selected.
B: Baby Mode is selected.
TX power
Alarm icon
TX/RX indicator
Out of range
channel
Sub channel
(CTCSS)
Volume
- 26 -
Page 8

Getting started
Remove/Install the belt clip
Pull the belt clip latch away from the unit and push up on the belt clip
to remove it.
Install the belt clip vice versa. During
installation a click indicates that the belt
clip is locked.
Replace the batteries
The Young500 has rechargeable NiMH
batteries. If it is necessary to replace the
batteries, proceed as follows:
Turn the unit off.
Remove the belt clip and open the battery
door.
Insert the batteries under consideration of
the polarity and close the battery door.
Wrong polarity of batteries can
damage the two way radio.
In case you do not know clearly
how to proceed, please ask your
authorised dealer.
If the unit is not used for a long
period of time e.g several weeks,
please remove the batteries.
Otherwise it will erode and damage the batteries.
Recharge the batteries
Don’t charge alcaline batteries.
English
When LCD display battery level is low, the battery needs charging with
- 27 -
Page 9

Getting started
the enclosed desktop charger. Charging takes about 10-12 hours.
Plug the adaptor into the desk top charger.
Place the radio into the charger.
During charging, the LED of the charger is on, the radio remains on.
Take the radio out if charging is fi nished.
During charging the unit can be used.
English
Check battery condition
If the display showes only 1 bar in the battery icon,the battery has to be
recharged.
External earset (not in the delivery content)
Earsets can be connected to the radio on to Headset jack on the top of
the radio.
To avoid damage to the radio use only original dnt acces-
sories.
Turn off the radio before connecting external accessories.
Adjust the volume to a low level to avoid injuries by hearing
a loud signal.
Turn the radio on
To switch the radio on, press the On/Off button for 3 seconds until the
display shows ON and all icons and a tone is heard. After half a second
the display changes to normal mode. At PMR mode the display shows
the channel, CTCSS , volume level and battery icon.
Turn the radio off
To switch the radio off, press the On/Off button for 3 seconds, until the
display shows of and then turns off.
- 28 -
Page 10

Getting started
General
The Young500 has 3 modes:
1. PMR mode(P), 2. Mama mode(M), 3. Baby mode(B)
Not all menu items are available in each mode. For example
Dual watch is not available in B mode.
To switch between the modes press 1x the menu button and then the
up-/down button to select the desired mode.
PMR mode:
-Channel and CTCSS unchanged, or Channel1, CTCSS0
-VOX off
-Power Hi
-Roger beep on
-Call tone 1
-Key lock off
-Out of range function off
-Out of range Alarm off
M mode:
- Speaker on
-VOX off
-Out of range function on
-Out of range Alarm on
B mode:
- Speaker off
-VOX on, VOX level 3
-Out of range function on
-Out of range Alarm off
All settings made in the menu are stored and the radio
returns to standard mode if no button is pressed within 3
seconds.
English
- 29 -
Page 11

General operation
Don’t touch the antenna during transmission, to avoid mal-
function of the radio.
Transmitting
To transmit, press and hold the PTT (PUSH-TO-TALK) button and speak
with a normal voice from a distance of 5-8 cm away from the microphone.
English
The TX icon is on while transmitting. Release the PTT button at the end
of transmission.
Channel selection
The Young500 offers 8 channels in the PMR band.
To change the channel proceed as follows:
Press the Menu button 2x, the channel no. fl ashes on the display.
Use the Up-/Down button to select the channel.
Press the PTT button to confi rm or wait 3 seconds, the changes are
stored automatically.
CTCSS code
The Young500 has altogether 38 sub-channels which work in the CTCSS
standard. A private sub-audible tone may be programmed and associated
with every channel, to protect the radio from unwanted calls or interference from other operators on the same channel. Squelch will open and
incoming messages will be received only from radios using the same
CTCSS tone on that channel.
To change the CTCSS code proceed as follows:
Press the Menu button twice , CTCSS code display fl ashes.
Press Up-/Down button to select your desired the CTCSS code (1~38,
" 0 " is off)
Press the PTT button to confi rm.
- 30 -
Page 12

General operation
VOX / HANDS-FREE OPERATION
VOX allows to switch automatically between transmitting and receiving by voice operation. The radio has a built-in Voice Activated
Circuit(VOX)function. You can connect the radio with the earphone for
hands-free talking and listening without pressing PTT button.
To enable VOX mode proceed as follows:
Press Menu button 5x until LCD displays VOX icon and VOX sensitivity
digit display is fl ashing.
Press Up-/Down button to select 1, 2, 3 for low, medium & high
sensitivity. (0 is off)
After turn on VOX, you need to connect the earphone to use the
hands-free function. See below steps.
To turn off the VOX mode proceed as follows:
Press Menü / Lock button three times until LCD displays VOX icon
and VOX sensitivity digit display fl ashes.
Press Up-/Down button to select 0 to switch the VOX to off.
Press the PTT button to confi rm or wait about 3 seconds, the changes
are stored automatically.
Transmitting VOX/HANDS-FREE (headset not in the delivery content)
Press Power On/Off button to turn off the radio.
Plug the earphone into the earphone jack
Press Power On/Off button to turn on the radio, LCD display VOX
icon.
Set the earphone microphone close to your mouth (1~3 cm) and
speak into the microphone, the radio transmits automatically.
Stop speaking, the radio stops transmiting and goes into receiving
status.
- 31 -
English
Page 13

General operation
Adjust the volume to comfortable level if necessary.
You must turn off the unit before plug the earphone in oth-
erwise the unit will keep on transmitting.
Call-Ring tone
You can use call tones to get the attention of other people with radios on
English
the same channel and CTCSS tone. You can also use call tones as the
signal of the start or end of a transmission.
Press CALL button, the LCD display TX icon and your call tone will be
transmitted to nearby receivers set at the same channel. The call tones
have 5 kinds of sound for personal selection.
Select call tones
Press Menu button 6x LCD display CL icon and call tone number
fl ashes.
Press Up-/Down button to select your desired call tone
Press the PTT button to confi rm.
Rogerbeep
The rogerbeep is a tone which is automatically transmitted whenever the
PTT button is released. This lets the other person know that you have
fi nished talking and you are now in receiving mode.
Press Menu button 7x LCD display icon and ON or OFF.
Press Up-/Down button to select rogerbeep, the display shows ON, or
deselect the roger beep, the display shows OF.
Press the PTT button to confi rm.
Key tone
This feature allows the handset to sound a confi rmation tone whenever
keys are pressed.
Press Menu button 8x, LCD display icon and ON or OFF.
- 32 -
Page 14

General operation
Press Up-/Down button to select the key tone, the display shows ON,
or deselect the key tone, the display shows OF.
Press the PTT button to confi rm.
Receiving
If the radio is turned on, it is automatically set into receiving mode.
To communicate with other radios all radios must have the
same channel and sub-channel.
Volume control
The volume can be adjusted in 7 steps.
To change the volume proceed as follows:
Press the Up-/Down button to change the volume.
The display shows the current volume level.
Monitor function
With the monitor function you can switch off the automatic squelch to
listen to the weakest signals, which are cut from the automatic squelch. To
activate the monitor press Menu button and the Down button at the same
time. A noise of weak signals is heard. To switch off the monitor function
press Menu button and Down button once again.
Channel scan
Busy channels can be automatically scanned.
To start the scan function proceed as follows:
Press the Menu button and Down button at the same time. The chan-
nel scanning starts immediately.
Press the PTT button again to stop scanning.
When the radio detects channel activity, it stops scanning and stays at
that channel. Scanning is continued if the there is no activity.
English
- 33 -
Page 15

General operation
Press the UP button to scan the channels 1-8.
Press the DOWN button to scan the sub-channels.
When the radio detects channel activity, it stops scanning and stays at
that channel. If you press the PTT button you can talk on this channel
but if the talking stops for more than 4 seconds, the scanning starts
again.
English
Key lock
This function allows to lock the buttonpad, to avoid accidental unwanted
commands. To enable / disable the button lock function proceed as follows:
Press the Menu button for approx. 3 second until the key lock icon
appears/disappears on the display.
If the button lock function is activated, only the PTT and Call
button can be used. To disable the function proceed in the
same way.
Dual Watch(PMR mode only)
The dual watch allows listening to a second channel
Set main channel fi rst (example channel 2)
Press Menu button 9 times, LCD display shows the DCM icon and the
channel number display fl ashes.
Press Up-/Down button to select your desired watch channel (example
channel 6) .
Press the PTT button to confi rm, the unit will watch channel 2 and 6
by shift. LCD fl ashes between channel 2 and 6.
To turn the dual watch off press Menu button 9 times. LCD display
shows the DCM icon and the channel number display fl ashes.
Press Up-/Down button to select channel number to 0F to turn off this
function.
- 34 -
Page 16

Specifi cations
Power High/Low
To save battery power the unit can be setup to low power if you want to
communicate in a short distance.
Press Menu button 4x, LCD display shows the current power HI or LO
icon
Press Up-/Down button to select the desired power.
Press the PTT button to confi rm.
Out of range function
This function makes sure that the mama device is within the operating
distance of the baby device. If the mama device is longer than 30 seconds
beyond reach of the baby device, until
acoustical alarm is aroused, provided that this is programmed.
To switch on the function, proceed as follows:
M mode and B mode: Press 9x the menu button until fl ashes in
the display
Switch on the function with Up-/Down button.
Out-of-Range-Funktion steht auch im normalen P-Mode zur
Verfügung.
P mode: Press 10x the Menu button until fl ashes in the display .
Switch on the function with Up-/Down button.
Press Menu button once again until BP or PM fl ashes in the display.
Select now BP in one device and PM in the other device.
Out of range alarm(only available if Out of range function is on)
If the Out of range function is set to On an acoustic alarm is aroused, if
mama and baby device are not within operating distance.
P mode: Press 11x the menu button until
fl ashes in the display and an
fl ashes in the display .
English
- 35 -
Page 17

General operation
M mode and B mode: Press 10x the menu button until fl ashes in
the display
Switch on the function with Up-/Down button.
Indications for the application
1 . Babyphone
English
One device must be set to M mode(mama mode) the other one to B
mode(baby mode). The baby device should be placed nearby the baby,
the other can be used mobile. The equipment has an Out of range
function which causes a signal as soon as the equipment is not within
the operation distance any more. The range is dependent on the buildings
and the location where the baby device is operated. It depends on the
Output power HI (high) or LO (low) and the positioning lying or standing.
The equipment has a built-in VOX which activates the device automatically
if you speak or noises sound (e.g. baby screaming). The VOX is activated,
a certain distance between the built-in microphone and the acoustic
source may be not exceeded. You should test the placing of the "baby
device" in suffi cient measure carefully.
2. General
The units are PMR Two way radios which emit a radio signal. This radio
signal can be received by everybody which has a similar device or a similar two way radio. Also so-called "radio scanner" can receive and represent such signals without reservation. You should turn off the baby device
adversably, if it is not needed, otherwise it can lead to the involuntary
conversation of your neighbourhood.
- 36 -
Page 18

Techn. Specifi cations
Frequency range 446.00625 - 446.09375 MHz
Channels 8 PMR Kanäle (12.5 KHz channel space)
Modulation FM (F3E)
Frequency Control PLL
Power Supply 4.5V (3 x AAA 1.5V alkaline cells)
3.6V (3 x AAA 1.2V NiMH rechargable batteries)
Temperature Range -20/+55°C
Antenna Integrated
Jacks External Earset-Microphone, charging jack
Dimension 46 x 31 x 120 mm (L x B x H) incl. Antenna
Weight 66 g
Transmitter:
RF Output Power 500 mW / 50 mW e.r.p.
Spurious
& Harmonics entsprechend ETS 300 296 & EN 300 220-1
CTCSS Table
NrNoFreq.
(Hz)NrNo
1 67 11 97,4 21 136,5 31 192,8
2 71,9 12 100,0 22 141,3 32 203,5
3 74,4 13 103,5 23 146,2 33 210,7
4 77,0 14 107,2 24 151,4 34 218,1
5 79,7 15 110,9 25 156,7 35 225,7
6 82,5 16 114,8 26 162,2 36 233,6
7 85,4 17 118,8 27 167,9 37 241,8
8 88,5 18 123,0 28 173,8 38 250,3
9 91,5 19 127,3 29 179,9
10 94,8 20 131,8 30 186,2
Freq.
(Hz)NrNo
Freq.
(Hz)NrNo
- 37 -
Freq.
(Hz)
English
Page 19

Hiermit erklärt dnt GmbH, dass sich das Gerät YoungStar in Übereinstim-
Deutsch
mung mit den grundlegenden Anforderungen und den übrigen einschlägigen Bestimmungen der Richtlinie 1999/5/EG (R&TTE) befi ndet. Die Konformitätserklärung können Sie von der nachfolgenden Seite als PDF-Datei
herunterladen:
http://www.dnt.de/konformitaet
Hereby, dnt GmbH, declares that this
essential requirements and other relevant provisions of Directive 1999/5/EC
(R&TTE). The declaration of conformity for this product can be downloaded
from:
http://www.dnt.de/conformity
Umweltgerechte Entsorgung
Dieses Gerät ist entsprechend der europäischen Richtlinie
2002/96/EG über Elektro- und Elektronik- Altgeräte gekennzeichnet. Nutzen Sie die von Ihrer Kommune eingerichtete
Sammelstelle zur Rückgabe und Verwertung elektrischer und
elektronischer Altgeräte.
Disposal of old electrical & electronic equipment
This symbol on the product indicates that this product shall not
be treated as household waste. Instead it shall be handed over
to the applicable collection point for recycling of electrical and
electronic equpment. For more detailed information about recycling of this product, please contact your local city offi ce or your
household waste disposal service.
YoungStar
is in compliance with the
- 38 -
Page 20

Garantiebedingungen
1. Es gelten grundsätzlich die gesetzlichen Garantiebestimungen. Die Garantiezeit beginnt mit der Übergabe des Gerätes. Im
Garantiefall ist das Gerät mit dem Kaufbeleg (Kassenzettel, Rechnung o.ä.), dem korrekt ausgefüllten Gerätepass und einer
genauen Fehlerbeschreibung einzureichen. Ohne diese Belege sind wir nicht zur Garantieleistung verpfl ichtet.
2. Während der Garantiezeit beheben wir kostenlos alle Mängel, soweit sie auf Material oder Fabrikationsfehler zurückzuführen
sind. Es bleibt dem Hersteller überlassen, defekte Teile / Geräte auszutauschen oder durch andere zu ersetzen. Weitergehende
Ansprüche, gleich welcher Art, sind ausgeschlossen. Ausgetauschte Teile gehen in unser Eigentum über. Haftung für Folgeschäden übernehmen wir nicht.
3.
Eingriffe am Gerät durch nicht von uns autorisierte Firmen / Personen führen automatisch zum Erlöschen des Garantieanspruches.
4. Vom Garantieanspruch ausgenommen sind alle Schäden, die durch unsachgemäße Behandlung, Nichtbeachtung der Bedienungsanleitung, ausgelaufene Akkus/Batterien und betriebsbedingte Abnutzung entstehen.
5. Durch Reparatur oder Teileersatz wird die ursprüngliche Garantiezeit nicht verlängert.
6. Diese Garantiebedingungen gelten in der Bundesrepublik Deutschland.
Warranty regulations
1. In general the European warranty regulations are valid. Warranty starts with receipt of unit. In a warranty case, please submit
the unit together with invoice, unit pass and error description. Without these documentary evidence we are not obliged to a
warranty performance.
2. During warranty period we repair all constructional or mater ial defects which are caused by a manufacturing fault. It is in
the decision of the manufacturer to change or replace defective parts/units. Further claims are excluded. Changed parts will
automatically go over into our property. We will not be held responsible for future damages.
3. Manipulation on the unit through non-authorized companies/persons automatically leads to an end of warranty period.
4.
Excluded of warranty claims are damages due to improper treatment, not following the manual, oxidation of batteries, permanent usage.
5. The initial warranty period is not extended because of repair or replacement of parts.
6. These warranty regulations are valid in the Federal Republik of Germany.
Application de la garantie
1. L‘application de la garantie est soumise aux dispositions légales. La période de garantie débute à la remise de l‘appareil. En
cas d‘application de la garantie, nous demandons que soit restitué l‘appareil accompagné de son justifi catif d‘achat (ticket de
caisse, facture ou autres), la carte de l‘appareil dûment renseignée et une description précise du défaut. Sans ces éléments,
nous ne sommes pas tenus d‘assurer les prestations de garantie.
2. Pendant la période de garantie, nous réparons gratuitement tous les défauts, dans la mesure où il s‘agit de défauts matériels
ou de fabrication. Le fabricant est libre de réparer les pièces / appareils défectueux ou de les remplacer. Aucune autre requête,
de quelque nature que ce soit, ne sera prise en compte. Les pièces remplacées sont notre propriété. Nous déclinons toute
responsabilité pour les éventuels dommages consécutifs.
3. Toute intervention sur l‘appareil, effectuée par des sociétés / ou des personnes non autorisées par nos soins, entraîne automatiquement l‘annulation de la garantie.
4. Sont exclus de la garantie, tous les dommages résultant d‘une utilisation non conforme, du non respect de la notice d‘utilisation, de l‘épuisement des piles/ou du déchargement des accus et de l‘usure normale liée à l‘utilisation.
5. La réparation ou le remplacement des pièces ne prolonge en aucun cas la période de garantie initiale.
6. Les présentes conditions de garantie s‘appliquent à l‘Allemagne fédérale.
Condizioni di garanzia
1. Fondamentalmente valgono le norme di garanzia legali. Il periodo di garanzia inizia dalla consegna dell’apparecchio. Nel caso
in cui si debba ricorrere alla garanzia, bisogna consegnare l’apparecchio munito di ricevuta d’acquisto (scontrino fi scale, fattura
o altro), di certifi cato di garanzia compilato correttamente e di una precisa descrizione del difetto. Senza questa documentazione non siamo tenuti ad assicurare le prestazioni previste dalla garanzia.
2. Nel periodo di garanzia ripariamo gratuitamente tutti i difetti riconducibili al materiale o ai difetti di fabbricazione. È a discrezione
della casa produttrice riparare pezzi/apparecchi difettosi o sostituirli. Ulteriori diritti – indipendentemente dal genere – sono
esclusi. I pezzi sostituiti rimangono di nostra proprietà. Decliniamo ogni responsabilità per eventuali danni successivi.
3. Interventi sull’apparecchio da parte di aziende / persone da noi non autorizzate comportano automaticamente la perdita dei
diritti di garanzia.
4. Esclusi dal diritto di garanzia sono tutti i danni derivanti da un uso non appropriato, dall‘inosservanza delle istruzioni d’uso, da
pile e batterie esaurite e dalla normale usura.
5. La riparazione o la sostituzione di pezzi non implica la proroga del periodo di garanzia originale.
6. Le presenti condizioni di garanzia valgono nella Repubblica Federale Tedesca.
- 39 -
Page 21

Young500
Garantiekarte Warranty card
Drahtlose Nachrichtentechnik
Entwicklungs- und Vertriebs GmbH
Voltastraße 4
D-63128 Dietzenbach
Tel. +49 (0)6074 3714-0
Fax +49 (0)6074 3714-37
Internet http://www.dnt.de
Email dnt@dnt.de
Serien Nr.
Serial no.
Kaufdatum:
Date of purchase:
Stempel und Unterschrift des Händlers
Stamp and signature of the dealer
 Loading...