

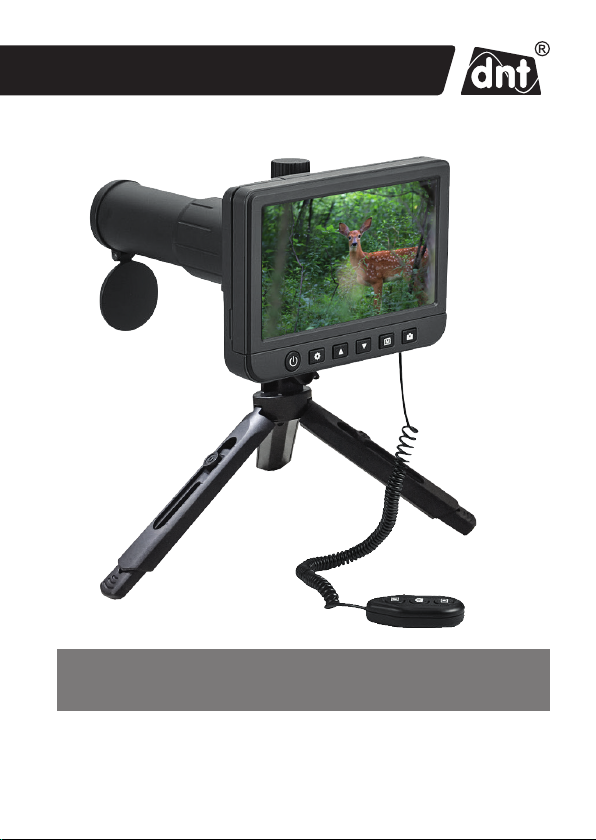
Digitales Teleskop DigiTele PRO
Artikelnummer: DNT000009 Bedienungsanleitung
Bitte lesen Sie diese Bedienungsanleitung vor der Installation und Inbetriebnahme komplet t durch und
bewahren Sie die Bedienungsanleitung für späteres Nachlesen auf. Wenn Sie das Gerät anderen Personen
zur Nutzung überlassen, übergeben Sie auch diese Bedienungsanleitung.
Importeur: dnt Innovation GmbH
Maiburger Straße 29 · 26789 Leer · Germany
www.dnt.de

Inhalt
1 Funktion ........................................................................................................3
2 Bestimmungsgemäßer Einsatz, Lieferumfang ................................................4
3 Betriebs-, Wartungs- und Sicherheitshinweise ...............................................4
4 Übersicht, Beschreibung ................................................................................6
5 Bedienung .....................................................................................................7
5.1 Inbetriebnahme .............................................................................................7
Akku laden, SD-Karte einlegen ......................................................................7
Displaysymbole .............................................................................................8
Ein- und Ausschalten, Bildschirm ausklappen ................................................8
5.2 Grundeinstellungen/Menüfunktionen .............................................................9
Sprache auswählen .......................................................................................9
SD-Karte formatieren ....................................................................................9
Datum einstellen .........................................................................................10
Einzelbildauflösung einstellen ......................................................................10
Videoauflösung einstellen ............................................................................11
Selbstauslöser für Einzelbilder einstellen .....................................................11
Belichtungskorrekturwert einstellen .............................................................12
Datumsstempel einstellen, Datumsstempel bei Videoaufnahme ...................12
Loop-Aufnahme ...........................................................................................13
HDR ein-/ausschalten ..................................................................................14
TV-Norm einstellen ......................................................................................14
Automatische Abschaltung einstellen ...........................................................15
Werkseinstellung wiederherstellen ..............................................................15
5.3 Bedienung/Aufnahme/Abspielen
Bild scharfstellen (Fokussieren) ...................................................................16
Zoomfunktion ..............................................................................................16
Einzelbilder/Videos aufzeichnen ...................................................................17
Einzelbilder/Videos abspielen .......................................................................17
Aufnahmen löschen .....................................................................................18
Aufnahmen schützen ...................................................................................18
5.4 Aufnahmen auf einen PC kopieren ............................................................... 19
5.5 Monitor/Fernsehgerät anschließen ...............................................................19
6. Fehlerhinweise ............................................................................................20
7. Pflege und Wartung .....................................................................................21
8. Technische Daten ........................................................................................21
9. Konformitätserklärung .................................................................................22
10. Entsorgung .................................................................................................. 22
11. Kontakt ........................................................................................................22
2 3

1. Funktion
Das digitale Teleskop dient zu Beobachtungsaufgaben aus großer Entfernung bis zu
mehreren hundert Metern, z. B. bei Tierbeobachtungen oder Sportveranstaltungen. Dabei wird durch die bis zu 50fache Vergrößerung eine sehr hohe Bildauflösung erreicht.
Das Beobachtungsbild kann sowohl auf dem großen, ausklappbaren 12,7-cm-Farbbildschirm dargestellt als auch auf einer microSD-Speicherkarte gespeichert werden.
Dabei ist wahlweise die Aufnahme von Einzelbildern oder Videosequenzen in wählbarer
Auflösung möglich.
Die Wiedergabe von Aufnahmen kann entweder über den internen Bildschirm als
auch über USB auf einem Computer oder via HDMI- bzw. FBAS-Kabel (Cinchkabel)
auf einem Monitor oder Fernsehgerät erfolgen.
Der Betrieb erfolgt über einen internen, nicht auswechselbaren Li-Ion-Akku, der über
einen USB-Port geladen wird.
- Hochauflösendes Digital-Teleskop mit bis zu 50facher Vergrößerung
- Integriertes, ausklappbares 12,7-cm-Farbdisplay, 960 x 540 Pixel
- Aufnahme von Einzelbildern mit bis zu 15 Megapixel Auflösung, JPEG-Format
- Aufnahme von Videosequenzen in HD-/Full-HD-Auflösung, MP4-Format
- Exakte Fokussierung durch manuelle Feinfokussierung
- Digitaler Zoom für die detaillierte Betrachtung auf dem Farbdisplay
- Belichtungsanpassung in weiten Grenzen möglich
- Kabelfernbedienung für verwacklungsfreie Aufnahmen
- Einstellbare Selbstauslöserfunktion 2/5/10/20 s
- Einzelbildspeicherung mit Zeitstempel möglich
- Aufnahmelänge für Videosequenzen wählbar
- HDR-Videofunktion (erweiterter Dynamikbereich) z. B. für Gegenlicht aufnahmen und Landschaftsaufnahmen mit störender Sonneneinstrahlung
- Speicherung der Aufnahmen auf microSD-Karte
- Foto-/Videoausgabe per USB-, FBAS- (Cinch-) oder HDMI-Verbindung
- Spannungsversorgung mit per USB-Port wiederaufladbarem Li-Ion-Akku
Hinweis
Bitte nutzen Sie immer ein Stativ für den ruhigen Stand des digitalen
Teleskops. Aufgrund der hohen Brennweite erhalten Sie nur dann
verwacklungsfreie Bilder! Nutzen Sie für die Bedienung während einer
Aufnahme die Kabelfernbedienung.
2. Bestimmungsgemäßer Einsatz, Lieferumfang
Das digitale Teleskop ist für Beobachtungsaufgaben und die digitale Video-/Einzelbildaufzeichnung auf größere Entfernung vorgesehen. Die Spannungsversorgung darf
ausschließlich nur über den eingebauten Li-Ion-Akku erfolgen, das Aufladen darf nur
mit dem mitgelieferten USB-Ladegerät erfolgen. Der Li-Ion-Akku ist fest eingebaut
und nicht auswechselbar.
Jeder andere Einsatz ist nicht bestimmungsgemäß und führt zu Gewährleistungs- und
Haftungsausschluss. Dies gilt auch für Umbauten und Veränderungen.
Hinweis:
Beachten Sie bei Aufnahmen die Persönlichkeits- und Urheberrechte und
halten Sie die dafür geltenden gesetzlichen Bestimmungen ein.
Lieferumfang:
- Digitales Teleskop DigiTele PRO
- Kabelfernbedienung
- 5-V-USB-Netzteil
- USB-Kabel für Netzteil- und PC-Anschluss
- Videokabel, Klinkenstecker 3,5 mm auf 1x Cinch/RCA
- Fotostativ
- Schutztasche
- Bedienungsanleitung
3. Betriebs-, Wartungs- und Sicherheitshinweise
Warnung
Wird verwendet, um Sicherheitshinweise zu kennzeichnen oder um die
Aufmerksamkeit auf besondere Gefahren und Risiken zu lenken.
Hinweis
Wird verwendet, um zusätzliche Informationen oder wichtige Hinweise
zu kennzeichnen.
4 5

- Verpackungsmaterial nicht achtlos liegen lassen! Plastikfolien/-tüten, Styroporteile
etc. können für Kinder zu einem gefährlichen Spielzeug werden.
- Die Geräte sind kein Spielzeug. Sie dürfen nicht im Zugriffsbereich von Kindern
aufbewahrt oder betrieben werden.
- Starke mechanische Beanspruchungen wie Stoß, Druck oder Vibration sind zu
vermeiden.
- Das Gerät darf nur in trockener Umgebung bei Umgebungstemperaturen zwischen
-5 und +50°C eingesetzt werden, es ist nicht gegen das Eindringen von Wasser
geschützt. Es darf auch nicht in Räumen mit hoher Luftfeuchte eingesetzt und
aufbewahrt werden.
- Nach einem schnellen Wechsel der Umgebungstemperatur, z. B. bei Einsatz in
kalter Umgebung und Wechsel in einen warmen Innenraum, kann es zu Betauung/
Kondenswasserbildung im Gerät kommen. Transportieren Sie es deshalb immer
in der Schutztasche und schalten Sie es nach einem solchen Temperaturwechsel
erst ein, wenn es die Umgebungstemperatur angenommen hat.
- Richten Sie das Objektiv nicht längere Zeit auf die Sonne oder andere starke
Lichtquellen. Linsen und Aufnahmeelektronik könnten Schaden nehmen.
- Berühren Sie die Linsen nicht. Wenn Sie das Gerät nicht benutzen, setzen Sie immer
die Schutzkappe auf das Objektiv.
- D
as Gerät nur mit einem trockenen Leinentuch reinigen, das bei starken Verschmutzungen leicht angefeuchtet sein darf. Zur Reinigung keine löse mittelhaltigen Reinigungsmittel verwenden. Darauf achten, dass keine Feuchtigkeit in das Geräteinnere
gelangt.
- Zur Reinigung der Objektivlinse spezielle Linsenreinigungswerkzeuge wie z. B.
Reinigungspinsel und Spezial-Reinigungstücher verwenden.
- Das Gerät darf nur mit der in den technischen Daten aufgeführten Stromversorgung
betrieben werden.
Bei Sach- oder Personenschäden, die durch unsachgemäße Handhabung oder
Nichtbeachten der Sicherheitshinweise und der Bedienungsanleitung verursacht werden, übernehmen wir keine Haftung. In solchen Fällen erlischt jeder
Gewährleistungsanspruch! Für Folgeschäden übernehmen wir keine Haftung.
Öffnen Sie das Gerät nicht, unternehmen Sie keine Reparaturversuche, nehmen
Sie keine Umbauten oder Veränderungen vor – dies führt zum Verlust des
Gewährleistungsanspruchs. Für Folgeschäden übernehmen wir keine Haftung.
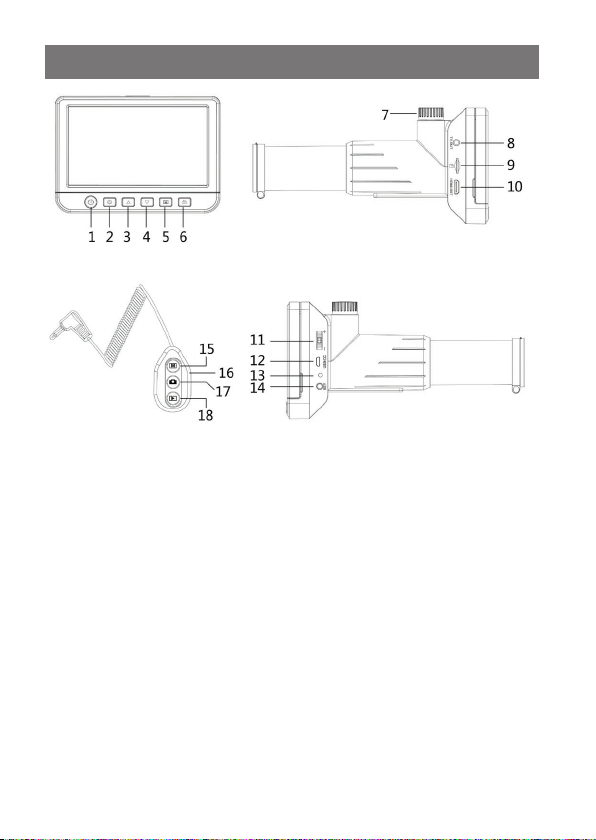
4. Übersicht, Beschreibung
1 Ein-/Aus-Taste
2 Set-up-Taste
3 Belichtungstaste
4 Belichtungstaste
5 Wiedergabetaste
6 Aufnahmetaste
7 Fokus-Einstellung
8 Videoausgang (FBAS, PAL/NTSC)
9 microSD-Kartenslot
10 HDMI-Ausgang
11 Zoomtaste
12 USB-Port für Akku-Laden (5 V/USB) und PC-Verbindung
13 Ladeanzeige
14 Anschluss für Kabelfernbedienung
15 Wahltaste Foto/Video/Wiedergabe Fernbedienung
16 Zoomtaste Fernbedienung
17 Aufnahmetaste Fernbedienung
18 Wiedergabetaste Fernbedienung
6 7
5. Bedienung
5.1 Inbetriebnahme
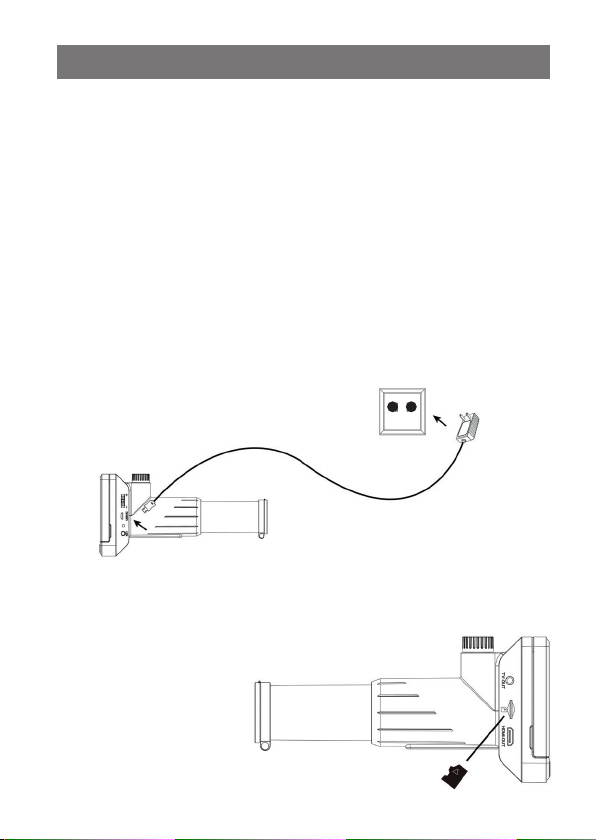
Akku laden
- Vor der ersten Benutzung laden Sie den internen Akku mit dem mitgelieferten
Ladegerät.
- Verbinden Sie dazu den USB-Port (12) des Geräts über das mitgelieferte USB-Kabel
mit dem 5-V-USB-Ladeausgang des Ladegeräts und stecken Sie dieses in eine
Netzsteckdose.
- Lassen Sie das Gerät während des Ladens ausgeschaltet.
- Der aktive Ladevorgang wird durch die rote Ladeanzeige (13) angezeigt:
Rot leuchtend: Ladevorgang läuft
Aus: Akku vollgeladen
- Trennen Sie nach dem Laden das Ladekabel vom Gerät.
- Die Ladezeit beträgt für eine Vollladung ca. 3 h. Mit einem vollgeladenen Akku sind
bis zu 3 h Betrieb möglich.
SD-Karte einlegen
- Schalten Sie das Gerät aus und schieben Sie eine microSD-Karte in exakter
Lage entsprechend der Grafik in den Kartenslot ein, bis sie einrastet. Nicht mit
Gewalt einschieben, eine
falsche Lage kann Karte und
Slot-Mechanik beschädigen!
- Vor der Nutzung muss die
Speicherkarte formatiert
werden. Wie dies erfolgt,
finden Sie im Kapitel „Menü“
→ „SD-Karte formatieren“.

Displaysymbole
Einzelbild-Modus (Foto-Mode)
Video-Modus
Belichtungseinstellung
01:27:06 Verbleibende Aufnahmezeit bzw. Einzelbildanzahl je nach Auflösung
1080HD Gewählte Auflösung
microSD-Karte erkannt
Akku-Ladezustand (3x blau = voll, leeres Symbol = entladen)
Die Symbole im Display werden 10 s nach der letzten Tastenbetätigung abgeschaltet.
Ein- und Ausschalten, Bildschirm ausklappen
- Drücken Sie die Ein-/Aus-Taste (1) ca. 3 s lang, bis die Startmeldung im Display
erscheint.
- Drücken Sie die Taste kurz, um das
Gerät auszuschalten.
- Bei Bedarf können Sie den Bildschirm nach oben ausklappen, um
so optimale Sicht auf das Bild zu
haben.
8 9
5.2 Grundeinstellungen/Menüfunktionen
- Wählen Sie das Menü des Geräts mit der Taste an. Jetzt erscheint die erste
Menüseite, das Symbol
- Die zweite Menüseite erreichen Sie durch nochmaliges Drücken der Taste
jetzt wechselt das Menü zur zweiten Seite:
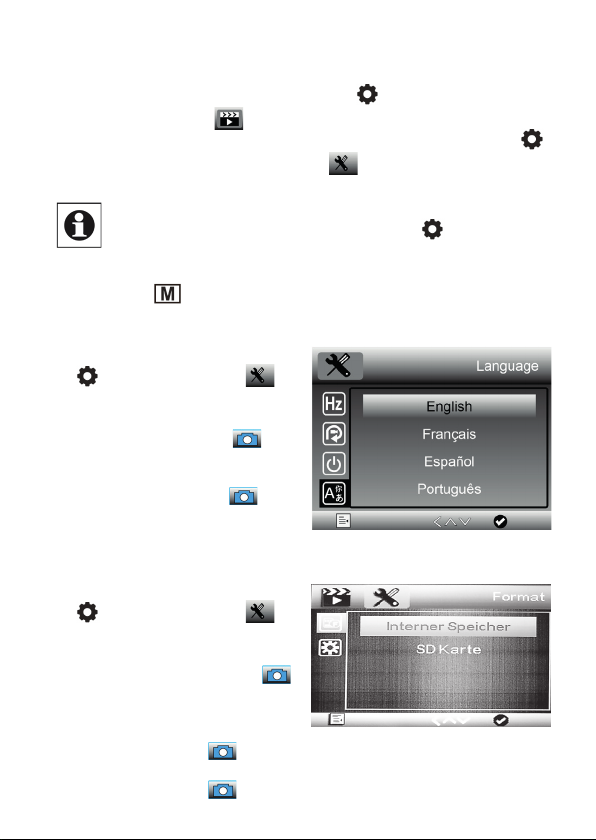
Sprache auswählen
- Gehen Sie mit 2x Drücken der Taste
- Hier wählen Sie mit den Pfeiltasten /
- Jetzt wählen Sie mit den Pfeiltasten /
- Jetzt wechselt die Menüsprache zu
SD-Karte formatieren
- Gehen Sie mit 2x Drücken der Taste
- Hier wählen Sie mit den Pfeiltasten
- Jetzt wählen Sie mit den Pfeiltasten
- Jetzt wählen Sie mit den Pfeiltasten/ die Zeile „OK“ an und bestätigen die
Hinweis:
Aus allen Untermenüs können Sie mit der Taste
den normalen Betriebsmodus gelangen, wenn Änderungen gespeichert
werden sollen. Sollen Änderungen verworfen werden, gehen Sie mit der
Taste
zur zweiten Menüseite: .
die Zeile „Language“ an und bestätigen
die Auswahl mit der Taste .
die Zeile „Deutsch“ an und bestätigen
die Auswahl mit der Taste .
Deutsch.
zur zweiten Menüseite: .
/ die Zeile „Format“ an und bestätigen die Auswahl mit der Taste .
/ die Zeile „Interner Speicher“
oder „SD-Karte“ an und bestätigen die
Auswahl mit der Taste
Auswahl mit der Taste
zurück.
ist blau hinterlegt.
.
wieder zurück in
.
.
.
- Jetzt werden alle eventuell bereits vorhandenen Daten auf der Speicherkarte
bzw. dem internen Speicher gelöscht und die Karte/der Speicher wird für den
Gebrauch formatiert.
- Wollen Sie die Karte jetzt doch nicht löschen und formatieren, wählen Sie statt
„OK“ die Option „Abbrechen“ und bestätigen die Auswahl mit der Taste .
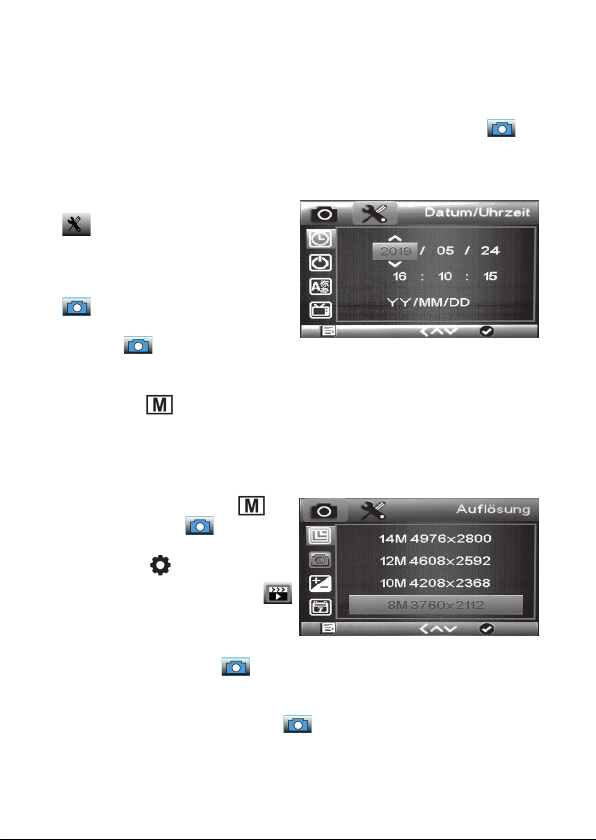
Datum einstellen
- Wählen Sie die zweite Menüseite an:
.
- Hier wählen Sie mit den Pfeiltasten
/ die Zeile „Datum/Uhrzeit“ an und
bestätigen die Auswahl mit der Taste
.
- Im Einstellmenü wechseln Sie nun mit
der Taste die jeweils hinterlegte
Anzeigestelle und stellen jeweils die Stelle mit den Pfeiltasten / ein. In der
unteren Zeile stellen Sie das Datumsformat ein.
- Mit der Taste
dem Menü.
Einzelbildauflösung einstellen
- Wählen Sie mit der Taste
Einzelbildaufnahme (
- Wählen Sie dann das Menü des Geräts
mit der Taste
die erste Menüseite, das Symbol
ist blau hinterlegt.
- Hier wählen Sie mit den Pfeiltasten /
die Zeile „Auflösung“ an und bestätigen
die Auswahl mit der Taste .
gelangen Sie nach Abschluss aller Einstellungen zurück aus
die
) aus.
an. Jetzt erscheint
- Jetzt wählen Sie mit den Pfeiltasten / die gewünschte Bildauflösung an und
bestätigen die Auswahl mit der Taste .
10 11
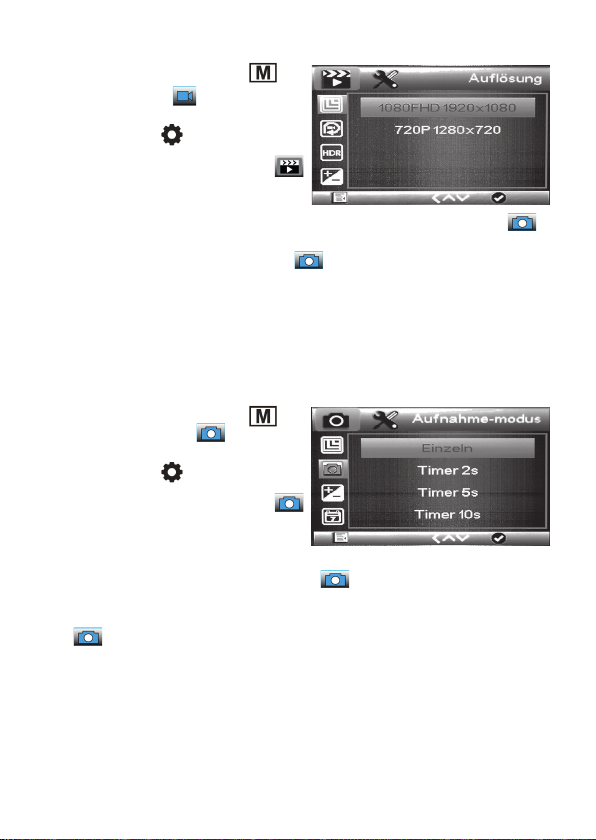
Videoauflösung einstellen
- Wählen Sie mit der Taste
Videoaufnahme (
- Wählen Sie dann das Menü des Geräts
mit der Taste
die erste Menüseite, das Symbol
ist blau hinterlegt.
- Hier wählen Sie mit den Pfeiltasten
/ die Zeile „Auflösung“ an und bestätigen die Auswahl mit der Taste .
- Jetzt wählen Sie mit den Pfeiltasten / die gewünschte Videoauflösung an und
bestätigen die Auswahl mit der Taste .
Selbstauslöser für Einzelbilder einstellen
Mit dieser Einstellung können Sie eine Selbstauslöserzeit einstellen, nach deren Ablauf
das Gerät ein Einzelbild automatisch aufnimmt. So kann man Verwacklungen bei der
Auslösung über die Aufnahmetaste vermeiden.
- Wählen Sie mit der Taste
Einzelbildaufnahme (
- Wählen Sie dann das Menü des Geräts
mit der Taste
die erste Menüseite, das Symbol
ist blau hinterlegt.
- Hier wählen Sie mit den Pfeiltasten
/ die Zeile „Aufnahmemodus“ an
und bestätigen die Auswahl mit der Taste .
- Jetzt wählen Sie mit den Pfeiltasten / die gewünschte Selbstauslöserstufe
(„Einzeln“ = sofortige Auslösung) an und bestätigen die Auswahl mit der Taste
.
- Ist eine Selbstauslöserstufe gewählt, so erscheint bei Einzelbildaufnahme das
Timersymbol oben im Bild. Jetzt startet die Bildaufnahme erst nach Ablauf des
Timers. Das Herunterzählen wird in Sekunden angezeigt.
) an.
an. Jetzt erscheint
an. Jetzt erscheint
die
die
) aus.
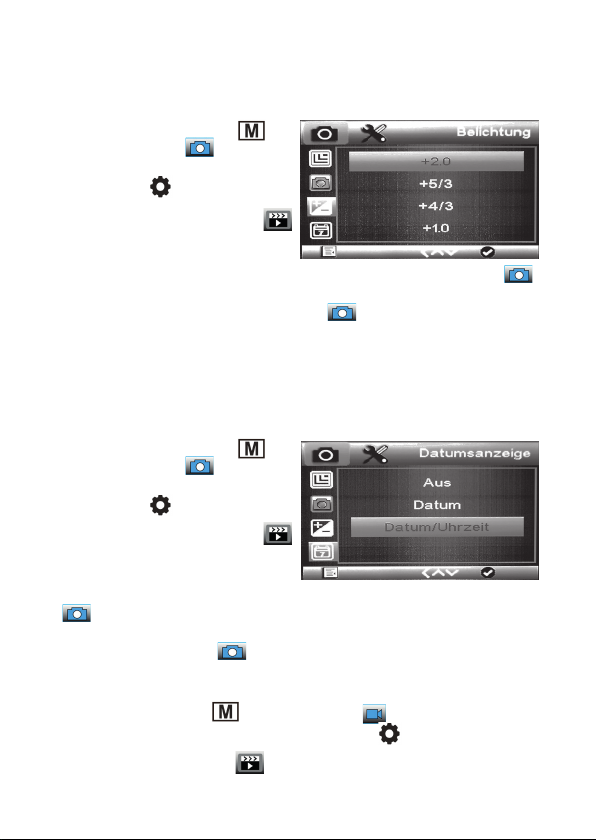
Belichtungskorrekturwert einstellen
Mit dieser Einstellung können Sie eine Belichtungskorrektur je nach Aufnahmesituation vornehmen.
- Wählen Sie mit der Taste
Einzelbildaufnahme (
- Wählen Sie dann das Menü des Geräts
mit der Taste
die erste Menüseite, das Symbol
ist blau hinterlegt.
- Hier wählen Sie mit den Pfeiltasten
/ die Zeile „Belichtung“ an und bestätigen die Auswahl mit der Taste .
- Jetzt wählen Sie mit den Pfeiltasten / die gewünschte Belichtungskorrektur
an und bestätigen die Auswahl mit der Taste .
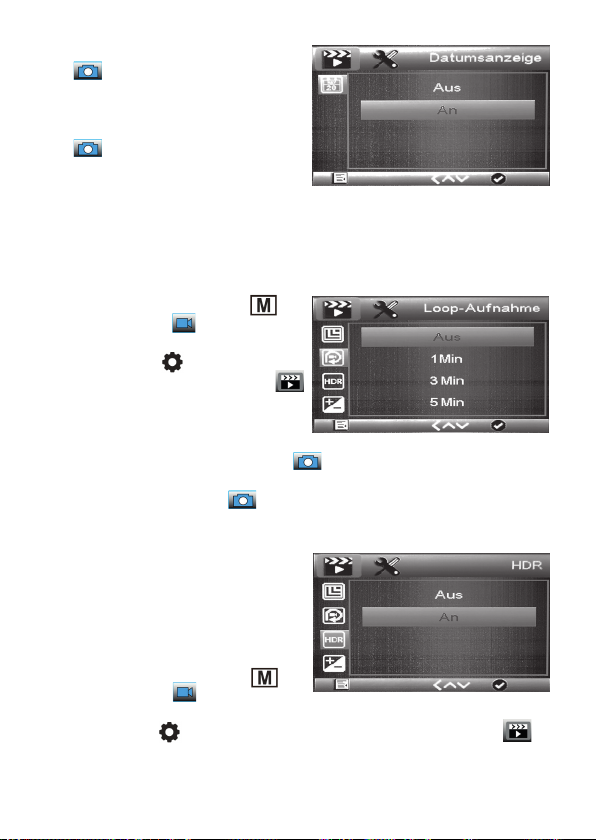
Datumsstempel einstellen, Datumsstempel bei Videoaufnahme
Mit dieser Einstellung können Sie festlegen, ob eine Uhrzeit-, eine Datums-/Uhrzeiteinblendung oder keine Einblendung in die Aufnahmen stattfinden soll.
- Wählen Sie mit der Taste
Einzelbildaufnahme (
- Wählen Sie dann das Menü des Geräts
mit der Taste
die erste Menüseite, das Symbol
ist blau hinterlegt.
- Hier wählen Sie mit den Pfeiltasten
/ die Zeile „Datumsanzeige“ an und bestätigen die Auswahl mit der Taste
.
- Jetzt wählen Sie mit den Pfeiltasten / die gewünschte Option an und bestätigen
die Auswahl mit der Taste .
an. Jetzt erscheint
an. Jetzt erscheint
die
) aus.
die
) aus.
Sie können für die Aufnahme von Videos die Datumsstempeleinblendung getrennt
ein- und ausschalten:
- Wählen Sie mit der Taste
- Wählen Sie dann das Menü des Geräts mit der Taste
erste Menüseite, das Symbol
- Hier wählen Sie mit den Pfeiltasten
12 13
die Videoaufnahme ( ) an.
ist blau hinterlegt.
/
die Zeile „Datumsanzeige“ an und
an. Jetzt erscheint die
bestätigen die Auswahl mit der Taste
.
- Jetzt wählen Sie mit den Pfeiltasten
/
die gewünschte Option an und
bestätigen die Auswahl mit der Taste
.
Loop-Aufnahme
Mit dieser Einstellung können Sie festlegen, wie lang einzelne Videofiles sein
dürfen. Nach Ablauf der eingestellten Zeit beendet das Gerät dann selbstständig
die Videoaufnahme.
- Wählen Sie mit der Taste
Videoaufnahme (
) an.
die
- Wählen Sie dann das Menü des Geräts
mit der Taste
die erste Menüseite, das Symbol
an. Jetzt erscheint
ist blau hinterlegt.
- Hier wählen Sie mit den Pfeiltasten
/
die Zeile „Loop-Aufname“ an und
bestätigen die Auswahl mit der Taste
- Jetzt wählen Sie mit den Pfeiltasten
die Auswahl mit der Taste
.
.
/
die gewünschte Option an und bestätigen
HDR ein-/ausschalten
Mit dieser Einstellung können Sie
einen erweiterten Dynamikumfang für
Videoaufnahmen, z. B. bei Gegenlicht,
anwählen.
- Wählen Sie mit der Taste die
Videoaufnahme (
- Wählen Sie dann das Menü des Geräts
mit der Taste
blau hinterlegt.
- Hier wählen Sie mit den Pfeiltasten / die Zeile „HDR“ an und bestätigen die
) an.
an. Jetzt erscheint die erste Menüseite, das Symbol ist
Auswahl mit der Taste .
- Jetzt wählen Sie mit den Pfeiltasten / die gewünschte Option an und bestätigen
die Auswahl mit der Taste .
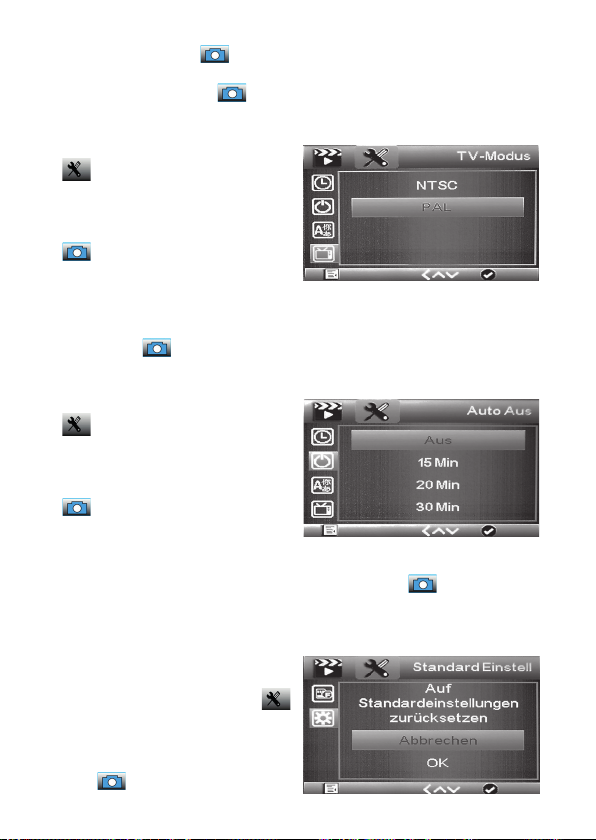
TV-Norm einstellen
- Wählen Sie die zweite Menüseite an:
.
- Hier wählen Sie mit den Pfeiltasten
/ die Zeile „TV-Modus“ an und
bestätigen die Auswahl mit der Taste
.
- Im Einstellmenü wählen Sie nun mit den
Pfeiltasten / die gewünschte Norm
je nach angeschlossenem TV-Gerät/
Monitor an und bestätigen die Auswahl
mit der Taste .
Automatische Abschaltung einstellen
- Wählen Sie die zweite Menüseite an:
.
- Hier wählen Sie mit den Pfeiltasten
/ die Zeile „Auto Aus“ an und
bestätigen die Auswahl mit der Taste
.
- Im Einstellmenü wählen Sie nun mit
den Pfeiltasten / die gewünschte
Abschaltzeit (Aus = keine automatische
Abschaltung) an und bestätigen die Auswahl mit der Taste .
- Ist eine Abschaltzeit gewählt, schaltet sich das Gerät automatisch aus, wenn in der
gewählten Zeit keine Bedienhandlung bzw. Aufnahme mehr stattgefunden hat.
Werkseinstellung wiederherstellen
- Wählen Sie die zweite Menüseite an:
- Hier wählen Sie mit den Pfeiltasten
/ die Zeile „Standardeinstellung“
an und bestätigen die Auswahl mit der
Taste .
14 15
.

- Im Einstellmenü wählen Sie nun mit den Pfeiltasten / die gewünschte Option
(Abbrechen = Abbruch, individuelle Einstellungen bleiben erhalten) an und bestätigen die Auswahl mit der Taste .

5.3 Bedienung/Aufnahme/Abspielen
Bild scharfstellen (Fokussieren)
- Wenn das Gerät auf einem Stativ montiert
ist und Sie das Beobachtungsobjekt
anvisiert haben, stellen Sie das Bild mit
dem Fokus-Einstellrad (7) scharf.
Zoomfunktion
- Wenn das Gerät auf einem Stativ montiert
ist und Sie das Beobachtungsobjekt anvisiert haben, können Sie das Bild digital
zoomen und so Details noch detaillierter
darstellen.
- Betätigen Sie dazu die Zoomtaste am
Gerät oder der Fernbedienung, nachdem
Sie diese an den Anschluss für die Fernbedienung (14) angeschlossen haben, in
Richtung + oder –.
FokusEinstellrad
Zoom
16 17

Einzelbilder/Videos aufzeichnen
- Wenn Sie das Bild scharfgestellt haben,
können Sie mit der Taste
Videoaufnahme ( ), Einzelbildaufnahme
(
) oder Abspiel wählen.
- Mit der Aufnahmetaste (6,
(und bei Videoaufnahme stoppen) Sie die
Aufnahme.
- Alternativ können Sie den Modus und den
Aufnahmestart/die Fotoaufnahme auch
mit den entsprechenden Tasten (15/17)
der Kabelfernbedienung ausführen, nachdem Sie diese an den Anschluss für die
Kabelfernbedienung (14) angeschlossen
haben. So können Sie Verwacklungseffekte vermeiden.
Einzelbilder/Videos abspielen
zwischen
) starten
Auslöser
- Wählen Sie mit der Taste
() an.
- Wählen Sie dann mit den Pfeiltasten /
die gewünschte Aufnahme an und starten
Sie bei Videofiles das Abspiel mit der Taste
.
- Mit den Pfeiltasten / können Sie
während des Abspiels die Abspielgeschwindigkeit einstellen, diese erscheint
jeweils mit +/- im Display.
- Das Abspiel von Videos kann mit der Taste
gestoppt werden.
das Abspiel
Abspielen

Aufnahmen löschen
- Wählen Sie mit der Taste
- Wählen Sie dann mit den Pfeiltasten / die gewünschte Aufnahme an (Video
nicht starten!) und drücken Sie die Taste
Schutz“. Hier wählen Sie mit den Pfeiltasten / die gewünschte Option an und
drücken anschließend die Taste .
- Jetzt erscheint die Abfrage, ob die gewählte Aufnahme („Löschungen z.Z.“) oder
alle Aufnahmen auf der Speicherkarte („Alle“) gelöscht werden sollen. Wählen
Sie wieder mit den Pfeiltasten / die gewünschte Option an und drücken Sie
anschließend die Taste .
- Jetzt erscheint die Abfrage, ob gelöscht werden soll. Hier haben Sie mit den
Pfeiltasten / die Auswahl, ob wirklich gelöscht oder der Vorgang abgebrochen
werden soll.
- Bestätigen Sie die entsprechende Auswahl mit der Taste .
- Jetzt können Sie den Löschdialog mit der Taste
Aufnahmen schützen
- Wählen Sie mit der Taste
- Wählen Sie dann mit den Pfeiltasten / die gewünschte Aufnahme an (Video
nicht starten!) und drücken Sie die Taste
Schutz“. Hier wählen Sie mit den Pfeiltasten / die gewünschte Option an und
drücken anschließend die Taste .
- Jetzt erscheint die Abfrage, ob die gewählte Aufnahme geschützt werden soll („Eins
Schützen“), ein vorhandener Löschschutz für diese Aufnahme entfernt werden soll
(„Eins Öffnen“) oder entsprechend alle Aufnahmen geschützt oder entsperrt werden
sollen.
- Wählen Sie mit den Pfeiltasten / die gewünschte Option an und drücken Sie
anschließend die Taste .
- Jetzt erscheint im Abspielmodus bei einer nun geschützten Datei ein Schlüsselsymbol, bei einer entsperrten Datei ist das vorher aktive Schlüsselsymbol
verschwunden.
das Abspiel () an.
. Es erscheint der Dialog „Löschen/
verlassen.
das Abspiel () an.
. Es erscheint der Dialog „Löschen/
18 19

5.4 Aufnahmen auf einen PC kopieren
- Schließen Sie das Gerät über das mitgelieferte USB-Kabel an Ihren PC an und
schalten Sie das Gerät ein.
- Jetzt erscheint die microSD-Karte des Geräts als zusätzlicher Massenspeicher des
Rechners (auf dem Bildschirm des Geräts erscheint „Massenspeicher“ als Hinweis,
jetzt können keine Aufnahmen getätigt werden), und Sie können die Aufnahmen
ansehen, löschen oder auf den Rechner kopieren.
5.5 Monitor/Fernsehgerät anschließen
- Schließen Sie das Gerät über das mitgelieferte FBAS-Kabel (Cinch) oder ein
HDMI-Kabel an Ihren Monitor/TV-Gerät an und schalten Sie das Gerät ein.
- Jetzt agiert der angeschlossene Monitor als Gerätemonitor, das interne Gerätedisplay wird abgeschaltet.

6. Fehlerhinweise
Kein Bild auf dem Display.
- Akku ist leer → laden.
- Gerät hat sich automatisch ausgeschaltet.
- Bei Wiedergabe und Anschluss eines Bildschirms an den FBAS-/HDMI-Ausgang
bleibt das Display abgeschaltet.
Gerät erkennt Speichermedium nicht.
- Speichermedium defekt oder nicht exakt eingelegt.
Kein Bild, unscharfes Bild, keine Details.
- Das Beobachtungsobjekt ist nicht weit genug entfernt, eine scharfe Abbildung ist
aufgrund der großen Brennweite erst in einigen Metern Entfernung möglich.
Bild wird nicht stabil angezeigt, verwackelt.
- Aufgrund der hohen Brennweite muss das Gerät immer ruhig stehen, z. B. auf einem
Stativ montiert sein. Bei Freihandbetrieb sind keine stabilen Aufnahmen möglich.
- Lösen Sie Aufnahmen mit der Fernbedienung oder Einzelbilder mit dem Selbstauslöser aus.
Bilder sind fleckig.
- Hier kann Schmutz auf der Linse die Ursache sein. Reinigen Sie die Linse mit
einem Linsenreinigungspinsel und transportieren Sie das Gerät nur mit aufgesetzter
Schutzkappe und in seiner Tragetasche.
Kein Bild auf angeschlossenem Fernsehgerät/Monitor.
- Kontrollieren Sie, ob am Fernsehgerät/Monitor der mit dem jeweiligen Videokabel
belegte Eingang gewählt ist und bei FBAS-Ausgabe die Videonorm des Monitors
am Teleskop eingestellt ist.
Akku wird nicht geladen.
- Ladegerät/Netzspannungszufuhr kontrollieren.
20 21

7. Pflege und Wartung
- Reinigen Sie das Gerät nur mit einem weichen, trockenen Leinentuch. Bei starken
Verschmutzungen kann dieses leicht angefeuchtet sein. Reinigen Sie das Gerät nicht
mit lösungsmittelhaltigen Reinigungsmitteln! Das Gerät ist danach sorgfältig mit
einem Tuch zu trocknen. Darauf achten, dass keine Feuchtigkeit in das Geräteinnere
gelangt.
- Berühren Sie die Linsen nicht. Wenn Sie das Gerät nicht benutzen, setzen Sie immer
die Schutzkappe auf das Objektiv.
- Zur Reinigung der Objektivlinse spezielle Linsenreinigungswerkzeuge wie z. B.
Reinigungspinsel und Spezial-Reinigungstücher verwenden.
8. Technische Daten
Vergrößerungsfaktor: .................................................................................50fach
Display: .................................................................... 12,7 cm, IPS, 960 x 450 Pixel
Aufnahmemedium: ............................................................microSD-Speicherkarte
Aufnahmeformat:............. ........... ...............................Video: MP4; Einzelbild: JPEG
Aufnahmeauflösungen Video:. ...................Full-HD: 1920 x 1080, HD: 1280 x 720
Aufnahmeauflösungen Einzelbild:. ................ ............14 Megapixel: 4976 x 2800
12 Megapixel: 4608 x 2592
10 Megapixel: 4208 x 2368
8 Megapixel: 3760 x 2112
5 Megapixel: 2976 x 1680
Belichtungskorrektur:.............................................................................. bis ±2,0
Selbstauslöser Einzelbilder:. ...............................................................2/5/10/20 s
Cliplängen Video:. ..................................................... ............endlos, 1/3/5/10 min
Ausgänge: .................................FBAS (3,5-mm-Klinkenbuchse), HDMI, Mini-USB (PC)
Spannungsversorgung: .................... interner Akku, Li-Ion, 3,7 V, nicht wechselbar
Ladegerät: .................................................................. Netzteil 5 VDC, 1 A, USB-A-Port
Abmessungen (B x H x T): .......................................................... 132 x 94 x 189 mm
Gewicht: ............................................................................................................. 435 g

9. Konformitätserklärung
Hiermit erklärt die dnt Innovation GmbH, Maiburger Straße 29, 26789 Leer, Deutschland, dass sich das Gerät
„Digitales Teleskop DigiTele PRO“
in Übereinstimmung mit den grundlegenden Anforderungen und den übrigen einschlägigen Bestimmungen der Richtlinie 2014/30/EU befindet.
Die Konformitätserklärung kann unter folgender Adresse gefunden werden:
www.dnt.de
10. Entsorgung
Gerät nicht im Hausmüll entsorgen!
Elektronische Geräte sind entsprechend der Richtlinie über Elektro- und
Elektronik-Altgeräte über die örtlichen Sammelstellen für Elektronik-Altgeräte zu entsorgen!
11. Kontakt
Sie haben Fragen zum Produkt oder zur Bedienung?
Unser Technischer Kundendienst erteilt Ihnen gerne umfassende
und qualifizierte Auskünfte:
E-Mail: support@dnt.de
1. Ausgabe Deutsch 04/2021
Dokumentation © 2019 dnt Innovation GmbH
Alle Rechte vorbehalten. Ohne schriftliche Zustimmung des Herausgebers darf diese Bedienungsanleitung auch nicht auszugsweise in irgendeiner Form reproduziert oder vervielfältigt werden.
Es ist möglich, dass die vorliegende Bedienungsanleitung noch druck tech nische Mängel oder
Druckfehler aufweist. Die Angaben in dieser Bedienungsanleitung werden jedoch regelmäßig
überprüft und Korrekturen in der nächsten Ausgabe vorgenommen. Für Fehler technischer oder
drucktechnischer Art und ihre Folgen übernehmen wir keine Haftung. Alle Warenzeichen und
Schutzrechte werden anerkannt. Änderungen im Sinne des technischen Fortschritts können ohne
Vorankündigung vorgenommen werden.
DNT000009-04/2021, Version 2.01
22 23

Digital telescope DigiTele PRO
Article number: DNT000009 User manuel
Please r ead these instr uctions befor e installing and c ommissioning com plete and retain t he instructi ons
for later use. If you leave the device to other persons for use, pass these instruc tions.

Content
1 Function ......................................................................................................25
2 Intended use, scope of delivery....................................................................26
3 Operating, maintenance and safety instructions ...........................................26
4 Overview, description ..................................................................................28
5 Operation ....................................................................................................29
5.1 Installation ...................................................................................................29
Charge battery, insert SD card .....................................................................29
Display symbols ..........................................................................................30
Switch on and off, fold out the screen ..........................................................30
5.2 Basic settings/menu functions ..................................................................... 31
Choose a language ......................................................................................31
Format the SD card .....................................................................................31
Set the date .................................................................................................32
Set single image resolution .........................................................................32
Set video resolution .....................................................................................33
Set the self-timer for single images .............................................................33
Set exposure compensation value ...............................................................34
Set date stamp, date stamp for video recording ...........................................34
Loop recording ............................................................................................35
Switch HDR on/off .......................................................................................35
Set TV standard ...........................................................................................36
Set automatic shutdown ..............................................................................36
Restore factory settings ...............................................................................37
5.3 Operation/recording/playback
Focus the image (focus)...............................................................................38
Zoom function .............................................................................................38
Record single images/videos .......................................................................39
Play images/videos ......................................................................................39
Delete recordings ........................................................................................40
Protect recordings .......................................................................................40
5.4 Copy recordings to a PC ..............................................................................41
5.5 Connect monitor/TV ..................................................................................... 41
6. Error notices ................................................................................................42
7. Care and Maintenance .................................................................................42
8. Technical specifications ...............................................................................43
9. Declaration of conformity .............................................................................43
10. Disposal ......................................................................................................44
11. Contact........................................................................................................44
24 25

1. Function
The digital telescope is used for observation tasks from a far distance up to several
hundred meters, e.g. for wildlife viewing or sporting events. A very high image resolution is achieved through the up to 50x magnification. The observation image can be
displayed on the large, fold-out 12.7 cm color screen or saved on a microSD memory
card. It is possible to record single images or video sequences in a selectable resolution.
Recordings can be played back either on the internal screen or via USB on a computer
or via HDMI or CVBS cable (cinch cable) on a monitor or television.
It is operated via an internal, non-replaceable Li-Ion battery that is charged via a
USB port.
- High-resolution digital telescope with up to 50x magnification
- Integrated, fold-out 12.7 cm color display, 960 x 540 pixels
- Recording of single images with up to 15-megapixel resolution, JPEG-format
- Recording of video sequences in HD/Full HD resolution, MP4-format
- Exact focusing through manual fine focusing
- Digital zoom for detailed viewing on the color display
- Exposure adjustment possible within wide limits
- Cable remote control for blur-free shots
- Adjustable self-timer function 2/5/10/20 s
- Single image storage with time stamp possible
- Recording length for video sequences selectable
- HDR video function (extended dynamic range) e. g. for backlighting and
landscape shots with disturbing sunlight
- Storage of the recordings on a microSD card
- Photo/video output via USB, CVBS (Cinch) or HDMI connection
- Power supply with rechargeable Li-Ion battery via USB port
Note
Please always use a tripod to keep the digital telescope stationary.
Due to the high focal length, you will only get blur-free images!
Use the cable remote control for operation during a recording.

2. Intended use, scope of delivery
The digital telescope is intended for observation tasks and digital video/single image
recording at a far distance. The power supply may only be provided via the built-in
Li-Ion battery, charging may only be carried out with the supplied USB charger. The
Li-Ion battery is permanently installed and cannot be replaced.
Any other use is not in accordance with the intended purpose and leads to
exclusion of warranty and liability. This also applies to conversions and changes.
Note:
When recording, observe the personal rights and copyrights and comply
with the applicable legal provisions.
Scope of Delivery:
- Digital telescope DigiTele PRO
- Cable remote control
- 5 V USB power supply
- USB cable for power supply and PC connection
- Video cable, jack plug 3.5 mm to 1x Cinch/RCA
- Tripod
- Protective bag
- User manuel
3. Operating, maintenance and safety instructions
Warning
Used to mark safety instructions or to draw attention to special
dangers and risks.
Note
Used to indicate additional information or important information.
26 27

- Do not leave packaging material lying around carelessly! Plastic films/bags, polystyrene parts etc. can become a dangerous toy for children.
- The devices are no toys. They must not be kept or operated in the access area of
children.
- Avoid heavy mechanical stress such as shock, pressure or vibration.
- The device may only be used in a dry environment at ambient temperatures between
-5 and +50 ° C, it is not protected against the ingress of water. It must also not be
used and stored in rooms with high air humidity.
- After a quick change in the ambient temperature, e.g. when used in a cold environment and changing to a warm interior, condensation may form in the device.
Therefore, always transport it in the protective bag and only switch it on after such
a temperature change when it has reached the ambient temperature.
- Do not point the lens at the sun or other strong light sources for a long time. Lenses
and recording electronics could be damaged.
- Do not touch the lenses. When you are not using the device, al ways put the protective
cap on the lens.
- Only clean the device with a dry linen cloth, which may be slightly dampened if it is
very dirty. Do not use cleaning agents containing solvents for cleaning. Make sure
that no moisture gets inside the device.
- To clean the objective lens, use special lens cleaning tools such as cleaning brushes
and special cleaning cloths.
- The device may only be operated with the power supply specified in the technical
data.
We accept no liability for damage to property or personal injury caused by
improper handling or failure to observe the safety instructions and operating
instructions. In such cases, all warranty claims expire! For further damages
we do not accept liability.
Do not open the device, do not attempt to repair it, make any modifications
or changes – this will invalidate the warranty. For further damages we do not
accept liability.

4. Overview, description
1 On/off button
2 Set-up button
3 Exposure button
4 Exposure button
5 Play button
6 Record button
7 Focus setting
8 Video output (CVBS, PAL / NTSC)
9 MicroSD card slot
10 HDMI output
11 Zoom button
12 USB port for battery charging (5 V/USB) and PC connection
13 Charge indicator
14 Connection for cable remote control
15 Photo/video/playback remote control selection button
16 Remote control zoom button
17 Remote control record button
18 Remote control playback button
28 29

5. Operation
5.1 Commissioning
Charge the battery
- Before using for the first time, charge the internal battery with the supplied power
adapter.
- To do this, connect the USB port (12) of the device to the 5 V-USB-charging-output
of the power adapter using the supplied USB cable and plug it into a mains socket.
- Leave the device switched off while charging.
- The active charging process is indicated by the red charging display (13): Glowing
red: charging is in progress
Off: battery fully charged
- Disconnect the charging cable from the device after charging.
- The charging time for a full charge is approx. 3 hours. Up to 3 hours of operation
are possible with a fully charged battery.
Insert the SD card
- Switch off the device and insert a microSD card in the exact position according to
the graphic into the card slot until it clicks into place. Do not force it in, a wrong
position can damage the card and slot mechanism!
- The memory card has to be
formatted before use. How
you do this, you find in the
„Menu“ chapter.
„Format SD card“.

Display Symbols
Single image mode (photo mode)
Video-Mode
Exposure setting
01:27:06 Remaining recording time or number of frames depending
on the resolution
1080HD Selected resolution
microSD card recognized
Battery charge status (3x blue = full, empty symbol = discharged)
The symbols in the display are switched off 10 s after the last key was pressed.
Switch on and off, fold out the screen
- Press the on/off button (1) for
approx. 3 s until the start message
appears on the display.
- Briefly press the button to switch
off the device.
- If necessary, you can fold out the
screen to have an optimal view of
the picture.
30 31

5.2 Basic settings/menu functions
- Select the device menu with the button . Now the first menu page appears,
the symbol
- You reach the second menu page by pressing the button again . Now the menu
changes to the second page:
Choose a language
- Go to the second menu page by pressing
the
- Use the / arrow buttons to select
the „Language“ line and confirm the
selection with the
- Now use the / arrow buttons to
select the „German“ line and confirm
your selection with the button.
- Now the menu language changes to
German.
Format the SD card
- Press the
second menu page:
- Use the / arrow buttons to select
the „Format“ line and confirm your
selection with the button.
- Now use the / arrow buttons to
select the „Internal memory“ or „SD
card“ line and confirm your selection
with the button
- Now use the / arrow buttons to
is highlighted in blue.
.
Note:
From all submenus you can use the
mode if changes are to be saved. If changes are to be discarded, press
the button
button twice:
to go back.
button.
button twice to go to the
to return to normal operating

select the „Internal memory“ or „SD card“ line and confirm your selection with
the button
- Now select the line „OK“ with the arrow buttons and confirm the selection with
the button.
- Now any existing data on the memory card or internal memory will be deleted
and the card/memory will be formatted for use.
- If you do not want to delete and format the card now, select instead „OK“ the
option „Cancel“ and confirm the
selection with the button .
Set the date
- Select the second menu page: .
- Use the arrow buttons / to select
the line „Date / Time“ and confirm the
selection with the button.
- In the settings menu, use the button
to change the display position and set the
position with the / arrow buttons.
Set the date format in the lower line.
- Use the
menu after completing all settings.
Set single image resolution
- Use the
image recording (
- Then select the menu of the device with
the
appears, the symbol is highlighted
in blue.
- Use the arrow buttons / to select
the line „Resolution“ and confirm the
selection with the button.
- Now select the desired image resolution
with the arrow buttons / and confirm the selection with the button.
button to return from the
button to select single
).
button. Now the first menu page
32 33

Set video resolution
- Use the
recording ( ).
- Then select the menu of the device
with the
menu page appears, the symbol
is highlighted in blue.
- Use the arrow buttons / to select
the line „Resolution“ and confirm the selection with the
- Now select the desired video resolution with the arrow buttons / and confirm
the selection with the
Set self-timer for single images
With this setting you can set a self-timer, after which the device automatically takes a
single picture. This way you can avoid blurring when triggered using the record button.
- Use the
image recording (
- Then select the menu of the device
with the button. Now the first
menu page appears, the symbol
is highlighted in blue.
- Use the arrow buttons / to select
the line „Capture mode“ and confirm the
selection with the button.
- Now use the arrow buttons / to select the desired self-timer level („Single“
= immediate release) and confirm the selection with the button.
- If a self-timer level is selected, the timer symbol appears at the top of the picture
when taking a single picture. Now the image acquisition starts only after the timer
has expired. The countdown is displayed in seconds.
button to select the video
button. Now the first
button.
button.
button to select single
).

Set exposure compensation value
With this setting you can make an exposure correction depending on the shooting
situation.
- Use the
image recording (
- Then select the menu of the device with
the
appears, the
in blue.
- Use the / arrow buttons to select
the „Exposure“ line and confirm the
selection with the
- Now select the desired exposure compensation with the arrow buttons / and
confirm the selection with the
Set date stamp, date stamp for video recording
With this setting you can determine whether the time, date/time should be superimposed on the recordings or not.
- Use the
image recording (
- Then select the menu of the device with
the
appears, the
in blue.
- Use the arrow buttons
the line „Date display“ and confirm the
selection with the button.
- Now select the desired option with the arrow buttons
with the button.
You can switch the date stamp display on and off separately for recording videos:
- Use the
- Then select the menu of the device with the
appears, the
- Use the arrow buttons
selection with the button.
34 35
button to select single
).
button. Now the first menu page
symbol is highlighted
button.
button.
button to select single
).
button. Now the first menu page
symbol is highlighted
/
to select
button to select the video recording ( ).
symbol is highlighted in blue.
/
to select the line „Date display“ and confirm the
/
and confirm the selection
button. Now the first menu page

- Now select the desired option
with the arrow buttons
confirm the selection with the
button.
/
and
Loop recording
With this setting you can determine how long individual video files may be. After the
set time has elapsed, the device automatically ends the video recording.
- Use the
video recording (
button to select the
).
- Then select the menu of the device
with the
button. Now the
first menu page appears, the
symbol is highlighted in blue.
/
- Use the
arrow keys to select the „Loop recording“ line and
confirm the selection with the
button.
- Now use the
/
arrow buttons to
select the selection using the
Switch HDR on/off
With this setting you can select the
extended dynamic range for video
recordings, e. g. with backlight.
- Use the
video recording (
- Then select the menu of the device
button to select the
).
button.

with the button. Now the first menu page appears, the symbol is
highlighted in blue.
- Use the / arrow buttons to select the „HDR“ line and confirm your selection
with the
- Now select the desired option with the arrow buttons / and confirm the
selection with the button.
Set TV standard
- Select the second menu page:
- Use the arrow button / to select
the line „TV mode“ and confirm the
selection with the button.
- In the settings menu, use the
/ arrow buttons to select the
desired standard depending on the
connected TV/monitor and confirm
the selection with the button.
Set automatic shutdown
- Select the second menu page:
- Use the / arrow buttons to
select the „Auto Off“ and confirm
the selection with the button.
- In the settings menu, use the /
arrow buttons to select the desired
switch-off time (Off = no automatic
switch-off) and confirm the selection with the button.
- If a switch-off time is selected, the
device switches off automatically if
no operator action or recording has
taken place in the selected time.
button.
36 37

Restore factory settings
- Select the second menu page:
- Use the arrow buttons / to
select the line „Standard setting“
and confirm the selection with the
button.
- In the settings menu, use the /
arrow buttons to select the desired
option (cancel = cancel, individual
settings are retained) and confirm
the selection with the button.

5.3 Operation / recording / playback
Focus the image
- If the device is mounted on a tripod and
you have sighted the observation object,
focus the image with the focus setting
wheel (7).
Zoom function
- If the device is mounted on a tripod and
you have sighted the observation object,
you can digitally zoom the image and thus
show details in even more detail.
- To do this, press the zoom button on the
device or the remote control after connecting it to the remote-control connection
(14) in the + or - direction.
38 39

Record single images/videos
- When you have focused the image, you
can use the
ween video recording ( ), single image
recording ( ) or playback.
- Use the record button (6, ) to start
(and stop with video recording) the recording.
- Alternative, you can also carry out the
mode and the start of recording/photo
recording with the corresponding buttons
(15/17) on the cable remote control after
you have connected it to the connection
for the cable remote control (14). In this
way you can avoid blurring effects.
Play single images/videos
- Use the
- Then select the desired recording with
the arrow buttons / and start the
playback for video files with the
button.
- With the arrow buttons / you can set
the playback speed during the playback,
this appears with +/- on the display.
- The playback of videos can be stopped
with the button.
button to choose bet-
button to select the play ().

Delete recordings
- Use the
- Then use the / arrow buttons to select the desired recording (do not start
the video!) And press the button. The „Delete / Protection“ dialog appears.
Here, use the arrow buttons / to select the desired option and then press the
button.
- Now the question appears whether the selected recording („Deletions at the
moment“) or all recordings on the memory card („All“) should be deleted. Select
the desired option again with the arrow buttons / and then press the
button.
- Now the query appears whether to delete. Here you can use the arrow buttons
/ to choose whether you really want to delete or cancel the process.
- Confirm the corresponding selection with the button.
- Now you can exit the deletion dialog with the button.
Protect recordings
- Use the
- Then use the / arrow buttons to select the desired recording (do not start
the video!) And press the
Here, use the arrow buttons / to select the desired option and then press
the button.
- Now the question appears whether the selected recording should be protected
(„Protect one“), an existing deletion protection for this recording should be removed
(„Open one“) or whether all recordings should be protected or unlocked accordingly.
- Use the / arrow buttons to select the desired option and then press the
- A key symbol now appears in the play mode for a file that is now protected; in the
case of an unlocked file, the previously active key symbol has disappeared.
button to select the play ().
button to select the play ().
button. The „Delete / Protection“ dialog appears.
button.
40 41

5.4 Copy recordings to a PC
- Connect the device to your PC using the USB cable provided and switch on the
device.
- The device‘s microSD card now appears as an additional mass storage device on
the computer („Mass storage“ appears on the device screen as an indication that
no recordings can now be made), and you can view, delete or copy the recordings
to the computer.
5.5 Connect monitor/TV
- Connect the device to your monitor/TV device using the supplied CVBS cable (cinch)
or an HDMI cable and switch on the device.
- Now the connected monitor acts as a device monitor, the internal device display
is switched off.

6. Error notices
No picture on the display.
- Battery is empty charge.
- The device switched off automatically.
- The display remains switched off when a screen is played back and connected to
the CVBS / HDMI output.
Device does not recognize storage medium.
- Storage medium defect or not insert correctly.
No picture, blurred picture, no details.
- The observation object is not far enough away, because of the large focal length,
a sharp image is only possible a few meters away.
Image is not displayed stably, blurred.
- Due to the high focal length, the device must always be stationary, e. g. be mounted
on a tripod. No stable recordings are possible with handsfree operation.
- Take pictures with the remote control or single pictures with the self-timer.
Images are blotchy.
- Dirt on the lens can be the cause here. Clean the lens with a lens cleaning brush
and only transport the device with the protective cap on and in its carrying case.
No picture on connected TV/monitor.
- Check whether the input assigned to the respective video cable is selected on
the television set/monitor and whether the video standard of the monitor on the
telescope is set for CVBS output.
Battery is not charging.
- Check the charger/main voltage supply.
7. Care and Maintenance
- Only clean the device with a soft, dry linen cloth. In the case of heavy soiling, it can
be slightly damp. Do not clean the device with cleaning agents containing solvents!
The device must then be carefully dried with a cloth. Make sure that no moisture
gets inside the device.
- Do not touch the lenses. When you are not using the device, al ways put the protective
cap on the lens.
- To clean the objective lens use special lens cleaning tools such as cleaning brushes
and special cleaning cloths.
42 43

8. Technical specifications
Magnification factor: ................................................................................ 50times
Display: ...................................................................12,7 cm, IPS, 960 x 455 pixels
Recording medium: ........................................................... microSD memory card
Recording format: .................................................Video: MP4; Single image: JPEG
Recording resolutions video: .....................Full-HD: 1920 x 1080, HD: 1280 x 720
Recording resolutions single image: ........................14 megapixels: 4976 x 2800
...............................................................................12 megapixels: 4608 x 2592
...............................................................................10 megapixels: 4208 x 2368
.................................................................................8 megapixels: 3760 x 2112
.................................................................................5 megapixels: 2976 x 1680
Exposure compensation: ...................................................................... up to ±2,0
Self-timer single images: ....................................................................2/5/10/20 s
Clip length video: .................................................................endless, 1/3/5/10 min
Outputs: ................................................ CVBS (3,5-mm-jack), HDMI, mini-USB (PC)
Power supply: ....................................internal battery, Li-Ion, 3,7 V, not chargeable
Charger: .........................................................Power supply 5 VDC, 1 A, USB-A-Port
Dimensions (W x H x T): ......................................................... 132 x 94 x 189 mm
Weight: ..........................................................................................................435 g
9. Declaration of conformity
Dnt Innovation GmbH, Maiburger Strasse 29, 26789 Leer, Germany, hereby declares
that the device
„DigiTele PRO digital telescope“
is in accordance with the basic requirements and the other relevant provisions of
Directive 2014/30 / EU.
The declaration of conformity can be found at the following address: www.dnt.de

10. Disposal
Do not dispose of this device through domestic waste.
Electronic devices are to be disposed of in accordance with the directive
on waste electrical and electronic equipment via the local collection
points for old electronic devices!
11. Contact
Do you have any questions about the product or how to use it?
Our technical customer service will be happy to provide you with comprehensive
and qualified information:
Email: support@dnt.de
1st English edition 04/2021
Documentation © 2021 dnt Innovation GmbH
All rights reserved. No part of this user manual may be reproduced or reproduced in any form
without the written consent of the publisher. It is possible that these operating instructions still
have typographical defects or typographical errors. However, the information in these operating
instructions will be checked regularly and corrections made in the next edition. We accept no
liability for technical or printing errors and their consequences. All trademarks and copyrights
are acknowledged. Changes in the sense of technical progress can be made without notice.
DNT000009-04/2021, version 1.0
Importer/Importeur: dnt Innovation GmbH
Maiburger Straße 29 · 26789 Leer · Germany
www.dnt.de
44 44
 Loading...