

Page 1

WIRELESS PRINT SERVER
WPS Pro
User Guide
©2017 DNP Imagingcomm America Corporation. ALL RIGHTS RESERVED REV: 04.10.2017
PN: DOC-U-WPS-PRO-R01
Page 2

Page 3

CONTENTS
1. Before You Begin
Documentation Conventions . . . . . . . . . . . . . . . . . . . . . . . . . . . . . . . . . . . . . . . . . . . . . . . . . . . . . . . . . . 11
Text Elements . . . . . . . . . . . . . . . . . . . . . . . . . . . . . . . . . . . . . . . . . . . . . . . . . . . . . . . . . . . . . . . . . . . . . . . . . . . . . . . . . . . .11
Text Treatments. . . . . . . . . . . . . . . . . . . . . . . . . . . . . . . . . . . . . . . . . . . . . . . . . . . . . . . . . . . . . . . . . . . . . . . . . . . . . . . . . . . 11
Important Safety Instructions . . . . . . . . . . . . . . . . . . . . . . . . . . . . . . . . . . . . . . . . . . . . . . . . . . . . . . . . . 11
2. Introduction
What is WPS Pro? . . . . . . . . . . . . . . . . . . . . . . . . . . . . . . . . . . . . . . . . . . . . . . . . . . . . . . . . . . . . . . . . . . 13
Getting to Know Your WPS Pro Device . . . . . . . . . . . . . . . . . . . . . . . . . . . . . . . . . . . . . . . . . . . . . . . . . 14
What devices can send prints to my WPS Pro? . . . . . . . . . . . . . . . . . . . . . . . . . . . . . . . . . . . . . . . . . . . 15
WPS Pro Software Applications . . . . . . . . . . . . . . . . . . . . . . . . . . . . . . . . . . . . . . . . . . . . . . . . . . . . . . . 15
System Requirements . . . . . . . . . . . . . . . . . . . . . . . . . . . . . . . . . . . . . . . . . . . . . . . . . . . . . . . . . . . . . . . 16
3. Installation
Setting Up the WPS Pro System . . . . . . . . . . . . . . . . . . . . . . . . . . . . . . . . . . . . . . . . . . . . . . . . . . . . . . . 18
Connecting to the WPS Pro Wireless Network . . . . . . . . . . . . . . . . . . . . . . . . . . . . . . . . . . . . . . . . . . . . 21
Connecting the WPS Pro to an Existing Network . . . . . . . . . . . . . . . . . . . . . . . . . . . . . . . . . . . . . . . . . . . . . . . . . . . . . . . .21
Turning Off the WPS Pro . . . . . . . . . . . . . . . . . . . . . . . . . . . . . . . . . . . . . . . . . . . . . . . . . . . . . . . . . . . . 22
4. Using Android Devices with WPS Pro
Using Android Devices for Web Transfers (Mobile Apps) . . . . . . . . . . . . . . . . . . . . . . . . . . . . . . . . . . . . 26
Configuring Android Devices for Web Transfers (Mobile Apps) . . . . . . . . . . . . . . . . . . . . . . . . . . . . . . . . . . . . . . . . . . . . . .26
Printing from Android Devices using the Share Option . . . . . . . . . . . . . . . . . . . . . . . . . . . . . . . . . . . . . . . . . . . . . . . . . . . . 26
Printing from Android Devices using the WPS Print 2 App . . . . . . . . . . . . . . . . . . . . . . . . . . . . . . . . . . . . . . . . . . . . . . . . 27
Using the WPS Status App to Monitor Your Network. . . . . . . . . . . . . . . . . . . . . . . . . . . . . . . . . . . . . . . . . . . . . . . . . . . . . 29
Using Android Devices for FTP Transfers . . . . . . . . . . . . . . . . . . . . . . . . . . . . . . . . . . . . . . . . . . . . . . . . 32
Configuring Android for FTP Transfers . . . . . . . . . . . . . . . . . . . . . . . . . . . . . . . . . . . . . . . . . . . . . . . . . . . . . . . . . . . . . . . .32
Printing from Android Devices Using FTP Transfer . . . . . . . . . . . . . . . . . . . . . . . . . . . . . . . . . . . . . . . . . . . . . . . . . . . . . .33
Printing Errors . . . . . . . . . . . . . . . . . . . . . . . . . . . . . . . . . . . . . . . . . . . . . . . . . . . . . . . . . . . . . . . . . . . . . 34
Print Size Chart . . . . . . . . . . . . . . . . . . . . . . . . . . . . . . . . . . . . . . . . . . . . . . . . . . . . . . . . . . . . . . . . . . . . 35
5. Using Apple Mobile iOS Devices with WPS Pro
Using Apple Devices for Web Transfers (Mobile Apps) . . . . . . . . . . . . . . . . . . . . . . . . . . . . . . . . . . . . . . 38
Configuring Apple Devices for Web Transfers (Mobile Apps). . . . . . . . . . . . . . . . . . . . . . . . . . . . . . . . . . . . . . . . . . . . . . . . 38
Printing from Apple Devices using the Share Sheet Option . . . . . . . . . . . . . . . . . . . . . . . . . . . . . . . . . . . . . . . . . . . . . . . . . 38
Printing from Apple Devices using the WPS Print 2 App . . . . . . . . . . . . . . . . . . . . . . . . . . . . . . . . . . . . . . . . . . . . . . . . . .38
Using the WPS Status App to Monitor Your Network. . . . . . . . . . . . . . . . . . . . . . . . . . . . . . . . . . . . . . . . . . . . . . . . . . . . . 41
Using Apple Mobile iOS Devices for FTP Transfers . . . . . . . . . . . . . . . . . . . . . . . . . . . . . . . . . . . . . . . . 43
Configuring Apple Devices for FTP Transfers. . . . . . . . . . . . . . . . . . . . . . . . . . . . . . . . . . . . . . . . . . . . . . . . . . . . . . . . . . . . 43
DNP Imagingcomm America Corporation 3
Page 4

WPS Pro User Guide
Printing from Apple Devices using FTP Transfers . . . . . . . . . . . . . . . . . . . . . . . . . . . . . . . . . . . . . . . . . . . . . . . . . . . . . . . .44
Printing Errors . . . . . . . . . . . . . . . . . . . . . . . . . . . . . . . . . . . . . . . . . . . . . . . . . . . . . . . . . . . . . . . . . . . . . 45
Print Size Chart . . . . . . . . . . . . . . . . . . . . . . . . . . . . . . . . . . . . . . . . . . . . . . . . . . . . . . . . . . . . . . . . . . . . 45
6. Using a Windows PC with the WPS Pro
Using Windows PC with the Hot Folder Print Options (HFP) . . . . . . . . . . . . . . . . . . . . . . . . . . . . . . . 50
Configuring a Windows PC for HFP . . . . . . . . . . . . . . . . . . . . . . . . . . . . . . . . . . . . . . . . . . . . . . . . . . . . . . . . . . . . . . . . . . . 50
Printing from a Windows PC using HFP . . . . . . . . . . . . . . . . . . . . . . . . . . . . . . . . . . . . . . . . . . . . . . . . . . . . . . . . . . . . . . .51
Printing Errors . . . . . . . . . . . . . . . . . . . . . . . . . . . . . . . . . . . . . . . . . . . . . . . . . . . . . . . . . . . . . . . . . . . . . 51
Print Size Chart . . . . . . . . . . . . . . . . . . . . . . . . . . . . . . . . . . . . . . . . . . . . . . . . . . . . . . . . . . . . . . . . . . . . 52
7. Using a Mac with the WPS Pro
Using a Mac for Hot Folder Printing (HFP) . . . . . . . . . . . . . . . . . . . . . . . . . . . . . . . . . . . . . . . . . . . . . . 55
Configuring a Mac for HFP Printing . . . . . . . . . . . . . . . . . . . . . . . . . . . . . . . . . . . . . . . . . . . . . . . . . . . . . . . . . . . . . . . . . . . 56
Printing from a Mac (HFP Transfer). . . . . . . . . . . . . . . . . . . . . . . . . . . . . . . . . . . . . . . . . . . . . . . . . . . . . . . . . . . . . . . . . . . 57
Adding ICM Files . . . . . . . . . . . . . . . . . . . . . . . . . . . . . . . . . . . . . . . . . . . . . . . . . . . . . . . . . . . . . . . . . . . . . . . . . . . . . . . . . .57
Printing Errors . . . . . . . . . . . . . . . . . . . . . . . . . . . . . . . . . . . . . . . . . . . . . . . . . . . . . . . . . . . . . . . . . . . . . 59
Print Size Chart . . . . . . . . . . . . . . . . . . . . . . . . . . . . . . . . . . . . . . . . . . . . . . . . . . . . . . . . . . . . . . . . . . . . 60
8. Using a Digital Camera with the WPS Pro
Using Digital Cameras for Wi-Fi Transfers . . . . . . . . . . . . . . . . . . . . . . . . . . . . . . . . . . . . . . . . . . . . . . . 65
Printing from Digital Cameras Using a Mobile Device . . . . . . . . . . . . . . . . . . . . . . . . . . . . . . . . . . . . . . . . . . . . . . . . . . . . .66
Using Digital Cameras for FTP Transfers . . . . . . . . . . . . . . . . . . . . . . . . . . . . . . . . . . . . . . . . . . . . . . . . 66
Configuring Digital Cameras for FTP Transfers . . . . . . . . . . . . . . . . . . . . . . . . . . . . . . . . . . . . . . . . . . . . . . . . . . . . . . . . . . 66
Printing from Digital Cameras Using FTP . . . . . . . . . . . . . . . . . . . . . . . . . . . . . . . . . . . . . . . . . . . . . . . . . . . . . . . . . . . . . . 67
Print Size Chart . . . . . . . . . . . . . . . . . . . . . . . . . . . . . . . . . . . . . . . . . . . . . . . . . . . . . . . . . . . . . . . . . . . . 67
9. Custom Borders
Custom Border Requirements . . . . . . . . . . . . . . . . . . . . . . . . . . . . . . . . . . . . . . . . . . . . . . . . . . . . . . . . . 71
Creating Custom Borders . . . . . . . . . . . . . . . . . . . . . . . . . . . . . . . . . . . . . . . . . . . . . . . . . . . . . . . . . . . . . 71
Adding the Custom Borders to the WPS Pro . . . . . . . . . . . . . . . . . . . . . . . . . . . . . . . . . . . . . . . . . . . . . 72
Enabling Borders . . . . . . . . . . . . . . . . . . . . . . . . . . . . . . . . . . . . . . . . . . . . . . . . . . . . . . . . . . . . . . . . . . . 73
Troubleshooting Borders . . . . . . . . . . . . . . . . . . . . . . . . . . . . . . . . . . . . . . . . . . . . . . . . . . . . . . . . . . . . . 75
Borders are only enabled for one print size.. . . . . . . . . . . . . . . . . . . . . . . . . . . . . . . . . . . . . . . . . . . . . . . . . . . . . . . . . . . . . . 75
I can’t enable different borders for different print sizes. . . . . . . . . . . . . . . . . . . . . . . . . . . . . . . . . . . . . . . . . . . . . . . . . . . . .75
My border isn’t printing. . . . . . . . . . . . . . . . . . . . . . . . . . . . . . . . . . . . . . . . . . . . . . . . . . . . . . . . . . . . . . . . . . . . . . . . . . . . . 76
10. Advanced Actions
About This Chapter . . . . . . . . . . . . . . . . . . . . . . . . . . . . . . . . . . . . . . . . . . . . . . . . . . . . . . . . . . . . . . . . . 77
Using the WPS Pro Configuration Screen . . . . . . . . . . . . . . . . . . . . . . . . . . . . . . . . . . . . . . . . . . . . . . . . 77
Changing the General Configuration Settings . . . . . . . . . . . . . . . . . . . . . . . . . . . . . . . . . . . . . . . . . . . . . 78
Configuring Image Archiving. . . . . . . . . . . . . . . . . . . . . . . . . . . . . . . . . . . . . . . . . . . . . . . . . . . . . . . . . . . . . . . . . . . . . . . . . 78
Changing the Test Print Setting . . . . . . . . . . . . . . . . . . . . . . . . . . . . . . . . . . . . . . . . . . . . . . . . . . . . . . . . . . . . . . . . . . . . . . 80
Changing the Default Language . . . . . . . . . . . . . . . . . . . . . . . . . . . . . . . . . . . . . . . . . . . . . . . . . . . . . . . . . . . . . . . . . . . . . . 81
About the WPS Pro Region Setting . . . . . . . . . . . . . . . . . . . . . . . . . . . . . . . . . . . . . . . . . . . . . . . . . . . . . . . . . . . . . . . . . . . 81
Changing the Printing Settings . . . . . . . . . . . . . . . . . . . . . . . . . . . . . . . . . . . . . . . . . . . . . . . . . . . . . . . . 82
4 DNP Imagingcomm America Corporation
Page 5

WPS Pro User Guide
Changing the Printing Size Options. . . . . . . . . . . . . . . . . . . . . . . . . . . . . . . . . . . . . . . . . . . . . . . . . . . . . . . . . . . . . . . . . . . . 82
Changing the Print Finish . . . . . . . . . . . . . . . . . . . . . . . . . . . . . . . . . . . . . . . . . . . . . . . . . . . . . . . . . . . . . . . . . . . . . . . . . . . 86
Changing the Print Pooling Settings . . . . . . . . . . . . . . . . . . . . . . . . . . . . . . . . . . . . . . . . . . . . . . . . . . . . . . . . . . . . . . . . . . .87
Configuring FTP Settings . . . . . . . . . . . . . . . . . . . . . . . . . . . . . . . . . . . . . . . . . . . . . . . . . . . . . . . . . . . . 88
Configuring FTP . . . . . . . . . . . . . . . . . . . . . . . . . . . . . . . . . . . . . . . . . . . . . . . . . . . . . . . . . . . . . . . . . . . . . . . . . . . . . . . . . .88
Configuring Borders . . . . . . . . . . . . . . . . . . . . . . . . . . . . . . . . . . . . . . . . . . . . . . . . . . . . . . . . . . . . . . . . . . . . . . . . . . . . . . . .89
Changing the Number of Copies Printed . . . . . . . . . . . . . . . . . . . . . . . . . . . . . . . . . . . . . . . . . . . . . . . . . . . . . . . . . . . . . . . .90
Selecting the Printer Queue . . . . . . . . . . . . . . . . . . . . . . . . . . . . . . . . . . . . . . . . . . . . . . . . . . . . . . . . . . . . . . . . . . . . . . . . . .91
Selecting Borders . . . . . . . . . . . . . . . . . . . . . . . . . . . . . . . . . . . . . . . . . . . . . . . . . . . . . . . . . . . . . . . . . . . . . . . . . . . . . . . . . . 92
Configuring HFP Settings . . . . . . . . . . . . . . . . . . . . . . . . . . . . . . . . . . . . . . . . . . . . . . . . . . . . . . . . . . . . 93
Configuring HFP . . . . . . . . . . . . . . . . . . . . . . . . . . . . . . . . . . . . . . . . . . . . . . . . . . . . . . . . . . . . . . . . . . . . . . . . . . . . . . . . . . 93
Configuring Borders . . . . . . . . . . . . . . . . . . . . . . . . . . . . . . . . . . . . . . . . . . . . . . . . . . . . . . . . . . . . . . . . . . . . . . . . . . . . . . . .94
Changing the Number of Copies Printed . . . . . . . . . . . . . . . . . . . . . . . . . . . . . . . . . . . . . . . . . . . . . . . . . . . . . . . . . . . . . . . .95
Selecting Borders . . . . . . . . . . . . . . . . . . . . . . . . . . . . . . . . . . . . . . . . . . . . . . . . . . . . . . . . . . . . . . . . . . . . . . . . . . . . . . . . . . 96
Configuring the Windows File Protocol. . . . . . . . . . . . . . . . . . . . . . . . . . . . . . . . . . . . . . . . . . . . . . . . . . . . . . . . . . . . . . . . . 96
Configuring the Networking Options . . . . . . . . . . . . . . . . . . . . . . . . . . . . . . . . . . . . . . . . . . . . . . . . . . . . 97
Configuring SLP. . . . . . . . . . . . . . . . . . . . . . . . . . . . . . . . . . . . . . . . . . . . . . . . . . . . . . . . . . . . . . . . . . . . . . . . . . . . . . . . . . . 97
Configuring LPR . . . . . . . . . . . . . . . . . . . . . . . . . . . . . . . . . . . . . . . . . . . . . . . . . . . . . . . . . . . . . . . . . . . . . . . . . . . . . . . . . . 98
Configuring OTA . . . . . . . . . . . . . . . . . . . . . . . . . . . . . . . . . . . . . . . . . . . . . . . . . . . . . . . . . . . . . . . . . . . . . . . . . . . . . . . . . . 99
DNP Imagingcomm America Corporation 5
Page 6

WPS Pro User Guide
6 DNP Imagingcomm America Corporation
Page 7

WPS Pro User Guide
License Agreements
SOFTWARE END USER LICENSE AGREEMENT (EULA). PLEASE READ THE FOLLOWING TERMS AND CONDITIONS CAREFULLY BEFORE
USING THIS SOFTWARE. USING THIS SOFTWARE INDICATES YOUR ACCEPTANCE OF THESE TERMS AND CONDITIONS. IF YOU DO NOT
AGREE WITH THESE TERMS AND CONDITIONS, DO NOT DOWNLOAD OR USE THIS SOFTWARE. This Software License Agreement (the “Software
License Agreement”) is an agreement entered into by and between you (hereinafter referred to as “You” or Your”) and DNP Imagingcomm America Corp.
(DNP IAM) (the “Licensor”) for any and all software and documentation provided by the Licensor (the “Software”). The Software includes items available
either by Internet download, contained in a CD/DVD or contained within a 3
Software License Agreement. The Licensor grants You a non-exclusive, non-transferable license to use one copy of the Software in object code only.
OWNERSHIP RETAINED BY LICENSOR. The Licensor owns all title and copyrights in and to the Software and the Licensor has the full right and
authority to grant the license granted herein. Your license does not give You any title or ownership in the Software, nor is it a sale of any rights in the
Software. The only right granted to You is the right to use the Software in accordance with the terms of this Software License Agreement. All rights not
specifically granted to You under this Software License Agreement are reserved by the Licensor. You may make only a single copy of the Software as a
backup copy, provided that it includes all notices and markings, including copyright, trademark and other proprietary notices as on the original. Such
backup copy of the Software may not be in use at any time unless the original Software is damaged beyond use, and both the original and the copy must
remain in Your possession and control. You may not copy the software onto any public network. You may not, and You may not allow others to modify,
disassemble, decompile, translate, reverse engineer, reproduce, make derivative works of or enhance the Software. You may not, and You may not allow
others to rent, lease, sell, sub license, export or otherwise transfer the Software to any other person. In addition to any other rights it may have, the
Licensor may terminate this Software License Agreement if You fail to comply with the terms and conditions hereof. In such event, You must cease all use
of the Software and destroy all copies of the Software and all of its component parts. At the Licensor’s sole discretion, the Licensor may from time to time
provide You with updates to the Software. Any such updates shall become part of the Software licensed to You hereunder and subject to all of the terms
and conditions of this Software License Agreement.
DISCLAIMER OF WARRANTIES. The Licensor expressly disclaims any and all warranties relative to the Software. THE SOFTWARE IS PROVIDED “AS
IS,” WITHOUT WARRANTY OF ANY KIND, EXPRESS OR IMPLIED, INCLUDING, WITHOUT LIMITATION, THE IMPLIED WARRANTIES OF
MERCHANTABILITY AND FITNESS FOR A PARTICULAR PURPOSE, NON-INFRINGEMENT, COURSE OF DEALING AND USAGE OF TRADE. YOU
HEREBY ASSUME THE ENTIRE RISK AS TO THE QUALITY AND PERFORMANCE OF THE SOFTWARE.
LIMITATION OF LIABILITY. In no event shall the Licensor be liable for any direct, special, incidental, indirect or consequential damages whatsoever to
You (including, without limitation, damages for loss of profits, sales or data or for business interruption) arising out of the use of or inability to use the
Software, even if the Licensor has been advised of the possibility of such damages. In any event, the Licensor’s entire liability under any provision shall be
limited to the amount actually paid by You for the Software. Because some states and jurisdictions do not allow the exclusion or limitation of liability, the
above limitation may not apply to You. If any provision of the Software License Agreement is declared by a court of competent jurisdiction to be invalid for
any reason, such invalidity shall not affect the remaining provisions hereof.
GOVERNING LAW. This Software License Agreement shall be governed by the laws of the State of North Carolina without regard to conflict of laws
principles. You and the Licensor hereby consent to the exclusive venue and jurisdiction of the state and federal courts located in Mecklenburg County,
North Carolina.
TAXE S. You are responsible for all taxes or charges imposed by any government or regulatory authority with respect to the delivery and use of the
Software, but exclusive of any taxes based upon the Licensor’s net income.
TERM. This License Agreement is effective until terminated. You may terminate this License Agreement by ceasing to use the Software and, if applicable,
returning the Software to the Licensor. Licensor may terminate this License Agreement if You breach any of the terms and conditions. Upon termination of
this License Agreement for any reason, You shall cease using the Software and, if applicable, return the Software to the Licensor. All provisions of this
Agreement relating to disclaimers of warranties, limitation of liability, remedies, or damages, and Licensor’s proprietary rights shall survive termination.
rd
party software installer. By using the Software, You agree to the terms of this
DNP Imagingcomm America Corp. 7
Page 8

WPS Pro User Guide
ACKNOWLEDGMENTS. The ICC profiles provided by DNP Imagingcomm America Corp. are prepared using the technology of X-Rite, Incorporated.
YOU ACKNOWLEDGE YOU HAVE READ AND UNDERSTAND THIS AGREEMENT AND AGREE TO BE BOUND BY ITS TERMS. YOU FURTHER
AGREE THAT THIS AGREEMENT IS THE COMPLETE AND EXCLUSIVE STATEMENT OF THE AGREEMENT BETWEEN YOU AND LICENSOR, AND
SUPERSEDES ANY PROPOSAL OR PRIOR AGREEMENT, ORAL OR WRITTEN, AND ANY OTHER COMMUNICATIONS RELATING TO THE
SOFTWARE ADDRESSED IN THIS AGREEMENT.
The information contained in this document represents the current view of DNP Imagingcomm America Corp. on the issues discussed as of the date of
publication. Because DNP Imagingcomm America Corp. must respond to changing market conditions, it should not be interpreted to be a commitment on
the part of DNP Imagingcomm America Corp., and DNP Imagingcomm America Corp. cannot guarantee the accuracy of any information presented after
the date of publication. This document is for informational purposes only. DNP Imagingcomm America Corp. MAKES NO WARRANTIES, EXPRESSED
OR IMPLIED, AS TO THE INFORMATION IN THIS DOCUMENT.
Complying with all applicable copyright laws is the responsibility of the user. Without limiting the rights under copyright, no part of this document may be
reproduced, stored in or introduced into a retrieval system, or transmitted in any form or by any means (electronic, mechanical, photocopying, recording,
or otherwise), or for any purpose, without the express written permission of DNP Imagingcomm America Corp.
DNP Imagingcomm America Corp. may have patents, patent applications, trademarks, copyrights, or other intellectual property rights covering subject
matter in this document. Except as expressly provided in any written license agreement from DNP Imagingcomm America Corp., the furnishing of this
document does not give you any license to these patents, trademarks, copyrights, or other intellectual property.
WPS-1™, WPS Pro™, Tomo™, Hot Folder Print™, PrintCenter™, DS-Series Printers™, and PrintTurbine™ are trademarks and Nexlab® is a registered
trademark of DNP Imagingcomm America Corp. PrintRush® and Party Print® are registered trademarks of Dai Nippon Printing Company LTD. Apple, the
Apple logo, iPad, and iPhone are trademarks of Apple Inc., registered in the U.S. and other countries. App Store is a service mark of Apple Inc. Amazon
is a trademark of Amazon.com Inc. or its affiliates. Android and Google Play are trademarks of Google, Inc. SD, SDHC and SDXC are trademarks or
registered trademarks of SD-3C, LLC in the United States, other countries or both. Sony® and Cyber-shot® are the registered trademarks of the Sony
Corporation. PiPO™ is the trademark of PiPO Corporation. The names of actual companies and products mentioned herein may be the trademarks of
their respective owners.
DNP Imagingcomm America Corp. * 4524 Enterprise Dr NW * Concord, NC 28027 * USA
© 2000-2017 DNP Imagingcomm America Corp. All rights reserved.
Compliance Notices
WARNING: Changes or modifications not expressly approved by the party responsible for compliance could void the user's authority to
operate the equipment under FCC rules.
This equipment has been tested and found to comply with the limits for a Class B digital device, pursuant to Part 15 of the FCC Rules.
These limits are designed to provide reasonable protection against harmful interference in a residential installation. This equipment
generates, uses and can radiate radio frequency energy and, if not installed and used in accordance with the instructions, may cause
harmful interference to radio communications. However, there is no guarantee that interference will not occur in a particular installation. If
this equipment does cause harmful interference to radio or television reception, which can be determined by turning the equipment off and
on, the user is encouraged to try to correct the interference by one or more of the following measures:
• Reorient or relocate the receiving antenna.
• Increase the separation between the equipment and receiver.
• Connect the equipment into an outlet on a circuit different from that to which the receiver is connected.
• Consult the dealer or an experienced radio/TV technician for help.
This equipment complies with FCC radiation exposure limits set forth for an uncontrolled environment. This equipment is in direct contact
with the body of the user under normal operating conditions. This transmitter must not be co-located or operating in conjunction with any
other antenna or transmitter.
8 DNP Imagingcomm America Corp.
Page 9

WPS Pro User Guide
Under Industry Canada regulations, this radio transmitter may only operate using an antenna of a type and maximum (or lesser) gain
approved for the transmitter by Industry Canada. To reduce potential radio interference to other users, the antenna type and its gain should
be so chosen that the equivalent isotropically radiated power (e.i.r.p.) is not more than that necessary for successful communication. This
is a controlled document. To be sure you have the latest version of this Procedure, compare this document revision to the revision listed in
the Document Control database. If you find this document is not current, discard and get the latest version from the Document Control
database.
Conformément à la réglementation d'Industrie Canada, le présent émetteur radio peut fonctionner avec une antenne d'un type et d'un gain
maximal (ou inférieur) approuvé pour l'émetteur par Industrie Canada. Dans le but de réduire les risques de brouillage radioélectrique à
l'intention des autres utilisateurs, il faut choisir le type d'antenne et son gain de sorte que la puissance isotrope rayonnée équivalente
(p.i.r.e.) ne dépasse pas l'intensité nécessaire à l'établissement d'une communication satisfaisante.
NOM 121 – La operación de este equipo está sujeta a las siguientes dos condiciones: (1) es posible que este equipo o dispositivo no
cause interferencia perjudicial y (2) este equipo o dispositivo debe aceptar cualquier interferencia, incluyendo la que pueda causar su
operación no deseada.
Importer:
DNP PHOTO IMAGING EUROPE SAS
Le Raphael Paris Nord 2 22 Avenue de Nations BP 51077
Villepinte, 95948 ROISSY CH DE GAULLE CEDEX, FRANCE
Manufacturer:
PIPO Technology Co., Ltd.
c/o DNP Imagingcomm America Corporation
4524 Enterprise Drive NW
Concord, NC 28027 United States
If you want to dispose of this product, do not mix with general household waste. There is a separate collection system for used electronics
products in accordance with legislation under the WEEE Directive. For details, please consult with your dealer.
PIPO Technology Co., Ltd. hereby declares that this Wireless Print Server is in compliance with the essential requirements and other
relevant provisions of Directive 1999/5/EC. For details, please access the URL: http://www.dnpphoto.eu/en/
Par la présente PIPO Technology Co., Ltd. déclare que l’appareil est conforme aux exigences essentielles et aux autres dispositions
pertinentes de la directive 1999/5/CE. Pour toute information complémentaire, veuillez consulter l’URL suivante:
http://www.dnpphoto.eu/fr/
Hiermit erklärt PIPO Technology Co., Ltd., dass sich das Gerät Wireless Print Server in Übereinstimmung mit den grundlegenden
Anforderungen und den übrigen einschlägigen Bestimmungen der Richtlinie 1999/5/EGbefindet. Weitere Informationen erhältlich unter:
http://www.dnpphoto.eu/de/
Por medio de la presente PIPO Technology Co., Ltd. declara que el Wireless Print Server cumple con los requisitos esenciales y
cualesquiera otras disposiciones aplicables o exigibles de la Directiva 1999/5/CE. Para mayor información, por favor consulte el siguiente
URL: http://www.dnpphoto.eu/es/
Con la presente PIPO Technology Co., Ltd. dichiara che questo Wireless Print Server è conforme ai requisiti essenziali ed alle altre
disposizioni pertinenti stabilite dalla direttiva 1999/5/CE. Per ulteriori dettagli, si prega di consultare il seguente
URL: http://www.dnpphoto.eu/it/
PIPO Technology Co., Ltd. tímto prohlašuje, že tento Wireless Print Server je ve shodě se základními požadavky a dalšími příslušnými
ustanoveními směrnice 1999/5/ES. Podrobnosti lze získat na následující URL: http://www.dnpphoto.eu/en/
PIPO Technology Co., Ltd. vakuuttaa täten että Wireless Print Server tyyppinen laite on direktiivin 1999/5/EY oleellisten vaatimusten ja sitä
koskevien direktiivin muiden ehtojen mukainen. Halutessasi lisätietoja, käy osoitteessa: http://www.dnpphoto.eu/en/
DNP Imagingcomm America Corp. 9
Page 10

WPS Pro User Guide
Με την παρούσα η PIPO Technology Co., Ltd. δηλώνει ότι Wireless Print Server συμμορφώνεται προς της ουσιώδεις απαιτήσεις και τις
λοιπές σχετικές διατάξεις της οδηγίας 1999/5/ΕΚ. Για λεπτομέρειες παρακαλούμε όπως ελένξετε την ακόλουθη σελίδα του διαδικτύου:
http://www.dnpphoto.eu/en/
Niniejszym PIPO Technology Co., Ltd. oświadcza, że Wireless Print Server jest zgodne z zasadniczymi wymaganiami oraz innymi
stosownymi postanowieniami Dyrektywy 1999/5/WE. Szczegółowe informacje znaleźć można pod następującym adresem
URL: http://www.dnpphoto.eu/en/
PIPO Technology Co., Ltd. declara que este Wireless Print Server está conforme com os requisitos essenciais e outras disposições da
Directiva 1999/5/CE. Para mais informações, por favor consulte o seguinte URL: http://www.dnpphoto.eu/en/
10 DNP Imagingcomm America Corp.
Page 11
1
Attention
Note
Before You Begin
Use the information in this chapter to better understand this document and any standard procedures or warnings that may
come with your product.
Documentation Conventions
When using this document, several text elements and treatments are repeated throughout. The following is an explanation
of these symbols and headings:
Text Elements
This denotes important information concerning safety when working with the equipment. Failure to comply with
an Attention statement can cause you injury or harm or cause damage to the system.
This signifies convenient or useful instructions.
Text Treatments
Bold Text – Indicates items you can select, such as buttons and menu entries.
Italic Text – Indicates variable text or placeholders for information, such as user names and directory paths. When entering
directory paths and so forth, the word in italics should not be typed, but should be replaced by the appropriate text. Italic
text also introduces new words and is occasionally used for emphasis in text.
Monospace – Distinguishes information that is displayed on the screen, as well as the text that you should enter.
Important Safety Instructions
Safety is paramount when installing and operating the system. These safety instructions are to protect you and the
customer and the overall public. The following bullet points apply to the safety instructions in this manual:
Read all of these instructions before setting up, installing, and operating your system.
Follow all warnings, safety precautions, and notices for all procedures in this manual.
When in doubt, stop what you are doing and reassess the safety of the situation or procedure. Never continue with a
step or procedure when there is the slightest doubt regarding safety.
Save these instructions for future reference.
DNP Imagingcomm America Corporation 11
Page 12

Important Safety Instructions WPS Pro User Guide
12 DNP Imagingcomm America Corporation
Page 13

2
Introduction
What is WPS Pro?
Print photos wirelessly. The DNP Wireless Print Server (WPS Pro) allows you to print
glossy and matte photos to any supported DNP printer. You can also send your prints
to up to two (2) DNP printers simultaneously. Print photos from up to 30 feet away.
Your WPS Pro wireless print server works with the following DNP printers:
DS40
DS80
RX1
RX1-HS
DS620 (only available in designated sales regions)
DS620A (only available in designated sales regions)
DS820 (only available in designated sales regions)
DS820A (only available in designated sales regions)
Manage your system wirelessly. Use the WPS Pro mobile apps to manage your network and printers while you’re on-themove. With the WPS Print 2 Application, you can print from compatible iOS or Android mobile devices. In many cases you
can even print from within other photo apps by using the share functionality! Use the WPS Status app to monitor your
printer media usage, check to make sure your prints were transmitted, and troubleshoot network issues. With the WPS Pro’s
new touchscreen display you can change your system configuration - such as matte vs. glossy prints, default print
quantities, and border settings.
DNP Imagingcomm America Corporation 13
Page 14
Getting to Know Your WPS Pro Device WPS Pro User Guide
Getting to Know Your WPS Pro Device
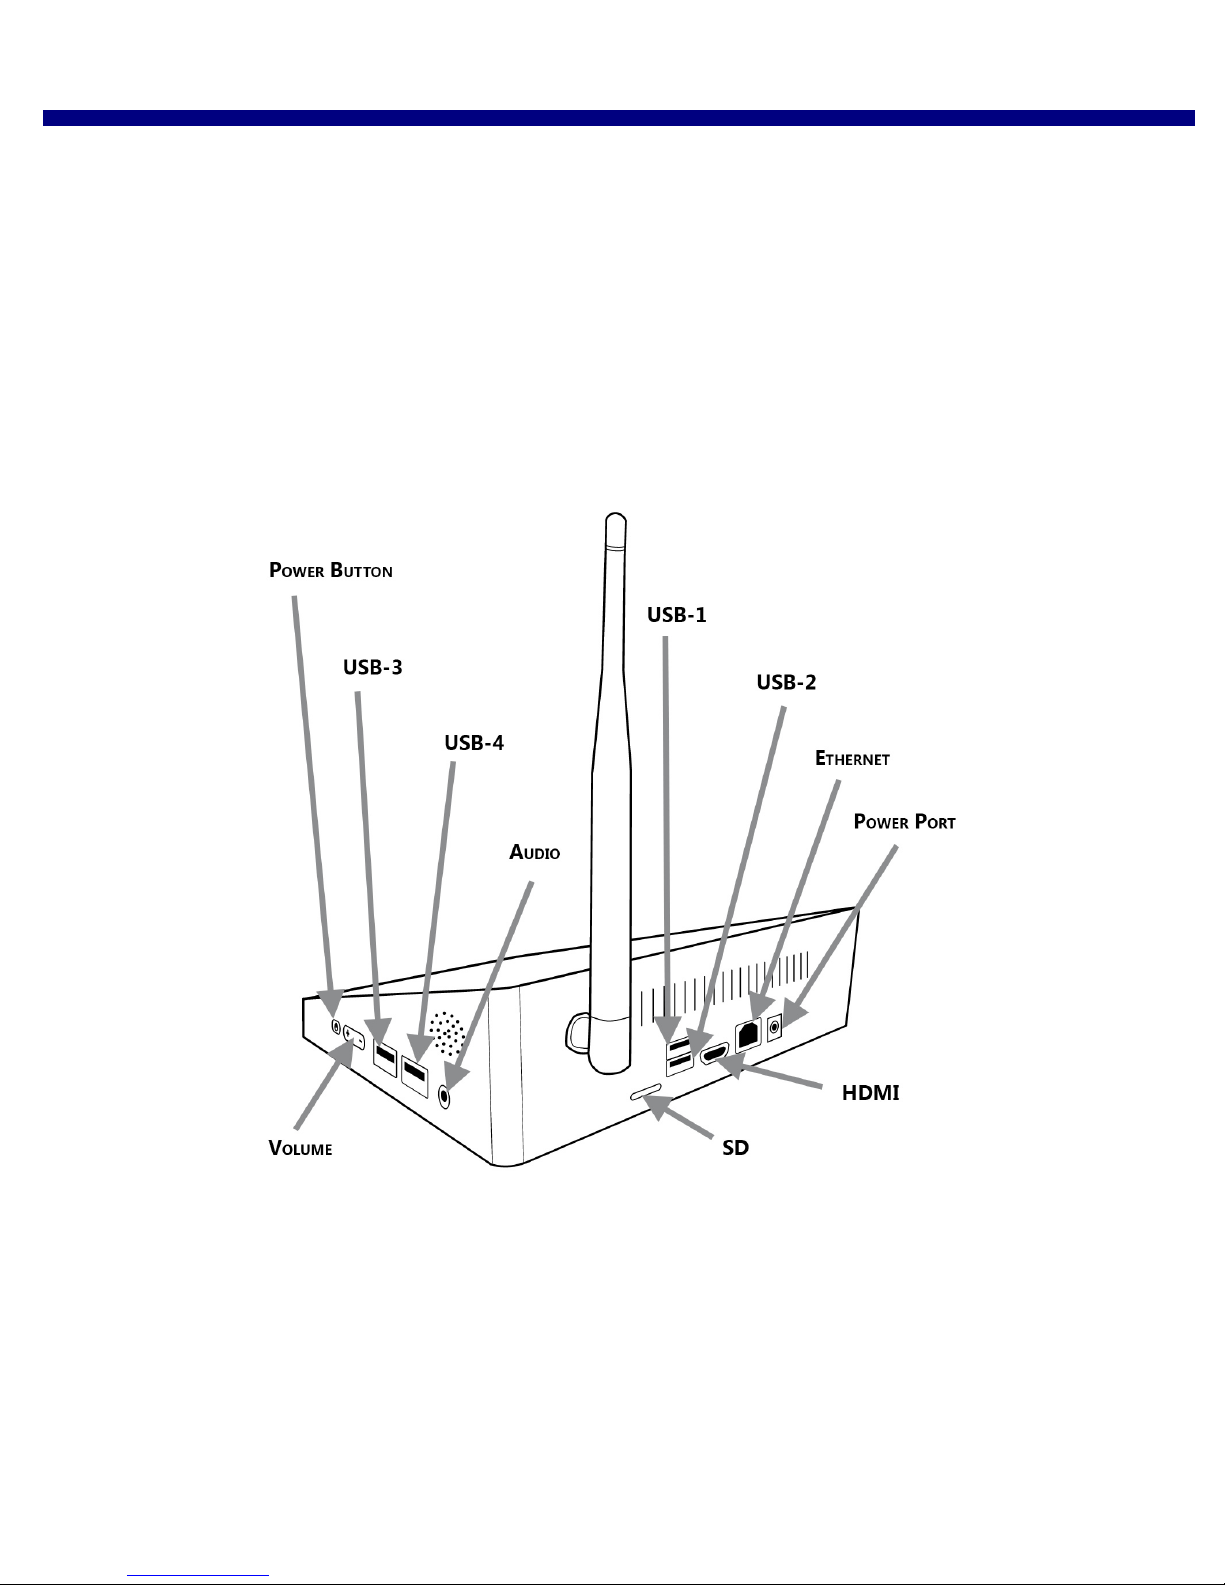
Your new WPS Pro device is now equipped with an 8” touchscreen display and the following ports (as labeled in the below
diagram):
One (1) Power
Four (4) USB
One (1) micro SD card
One (1) HDMI
Ethernet
Volume Control
Power Button
Audio
When hooking up your WPS Pro device, you are only going to use the power port and up to two (2) USB ports; if you are
connecting only one printer, you are going to use only one USB port. For more information, please “Setting Up the WPS Pro
System” on page 18.
One new feature of your new WPS Pro device is an 8” touchscreen display. From this display, you can see the DNP printer(s)
attached to the device, how much media is left in each attached printer, any pending print jobs, and up to 5 of the last
completed print jobs. You can also use the touchscreen display to access the Configuration module to change your system’s
configuration. To learn how to change your system’s configuration settings, see “Advanced Actions” on page 77.
14 DNP Imagingcomm America Corporation
Page 15

What devices can send prints to my WPS Pro? WPS Pro User Guide
Note
What devices can send prints to my WPS Pro?
The WPS Pro device is compatible with the following input devices. You can connect up to five input devices at the same
time, using any combination of devices as long as each device is connected wirelessly to the WPS Pro network.
Windows PCs (hot folder transfer, FTP)
Mac OS X computers (hot folder transfer, FTP or printer driver functionality)
iOS 8 or later mobile devices (i.e. iPad/iPhone) (WPS Print mobile app or FTP)
Android 4.4 (Kit Kat) or later devices (WPS Print mobile app or FTP)
Other digital cameras with FTP camera-to-printer capability (FTP transfer or by use of supported third party
devices like CamRanger™)
WPS Pro Software Applications
While some software applications, or apps, will be used daily, other apps should only be used under the direction of DNP
Imagingcomm America Corporation Technical Support. The WPS Pro system is comprised of the following software
applications, which are loaded on the WPS Pro console.
Need to re-open an app? Press the Apps button on your console and select the app from the
listed open applications. If the application is not listed, press the Home button, touch the top right
corner of the screen, and select the app from the application menu.
Applications for normal, daily use:
WPS Status: Monitor your WPS Pro system as a whole. You can view your last printed image, see what
files were recently transferred for printing, view information about your printer, and keep your system
running smoothly. This application must be active and displayed when you are sending prints to the
system.
Applications for troubleshooting or system maintenance:
WPS Maintenance: Used in conjunction with DNP Imagingcomm America Corporation Technical Support
to troubleshoot issues with the system. Also used to reboot or power OFF your WPS Pro system.
Update Image: Used when the system needs to be updated to the latest software version. Only use this
app when instructed to do so by DNP Imagingcomm America Corporation Technical Support.
DNP Imagingcomm America Corporation 15
Page 16
System Requirements WPS Pro User Guide
Note
System Requirements
WPS Pro supports the following:
PC
Windows 7, 8.1 or Windows 10
Mac
OS X 10.6 and later
iPhone™/iPad™
Android™
Supported Printers
Printer Media Sizes
iOS 8 or later
Version 4.4 (KitKat) or later
DS40
DS80
RX1
RX1-HS
DS620/DS620A
DS820/DS820A
DS40 (any media size supported by the printer)
DS80 (any media size supported by the printer)
RX1 (any media size supported by the printer)
RX1-HS (any media size supported by the printer)
DS620/DS620A (any media size supported by the printer)
DS820/DS820A (any media size supported by the printer)
Depending on your sales region, not all media sizes may be available for your printer. See “Print
Size Chart” on page 35 for more information on print sizes.
16 DNP Imagingcomm America Corporation
Page 17
3
Installation
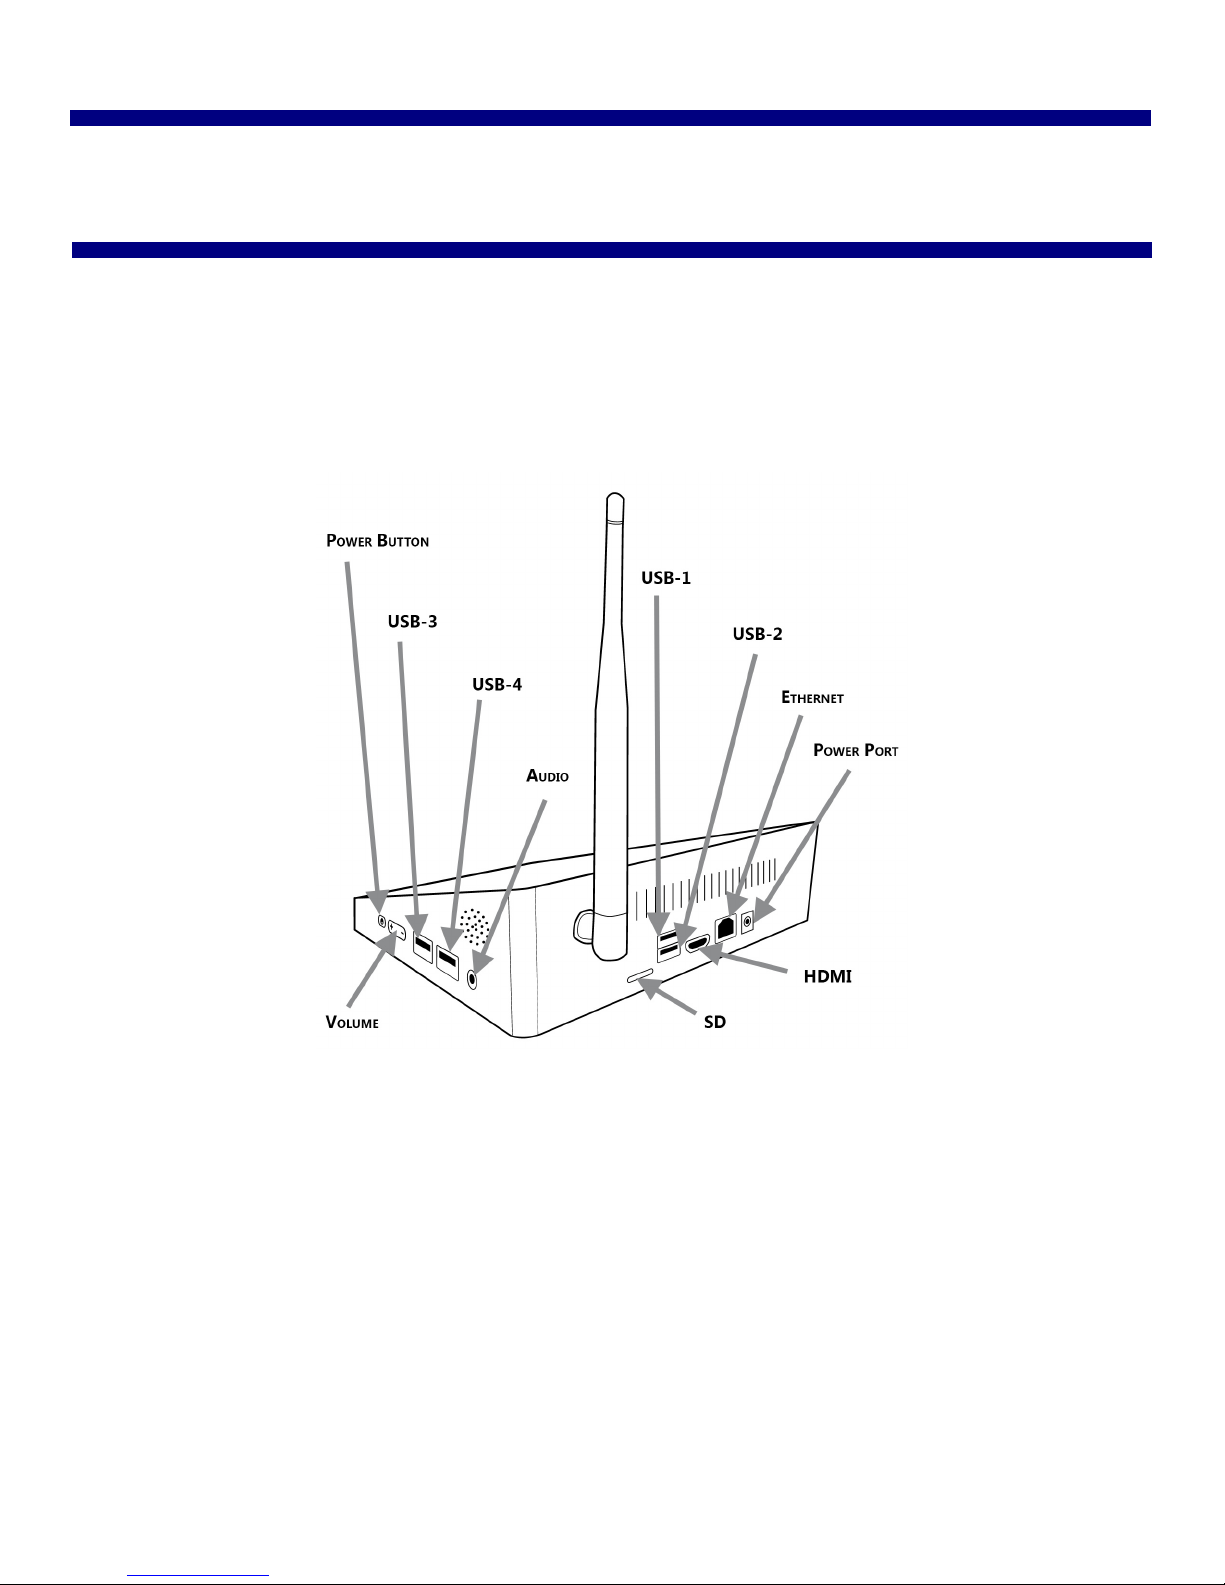
Your WPS Pro box contains your WPS Pro unit and a power cable. Use the diagram below to find the ports you will need
when using your system.
DNP Imagingcomm America Corporation 17
Figure 1. WPS Pro Back View of Ports
Page 18
Setting Up the WPS Pro System WPS Pro User Guide
Note
Attention
Setting Up the WPS Pro System
Be sure you plug in and turn ON the printer before you connect to the WPS Pro device. When WPS
Pro starts, it automatically configures the network for the connected printers. If you change printer
connections, shut down your device and then restart it. See “Turning Off the WPS Pro” on page 22
to properly reboot your device.
1. Turn ON your printer(s).
If your printer(s) are NOT powered ON, they will not be detected when connected to the WPS Pro device.
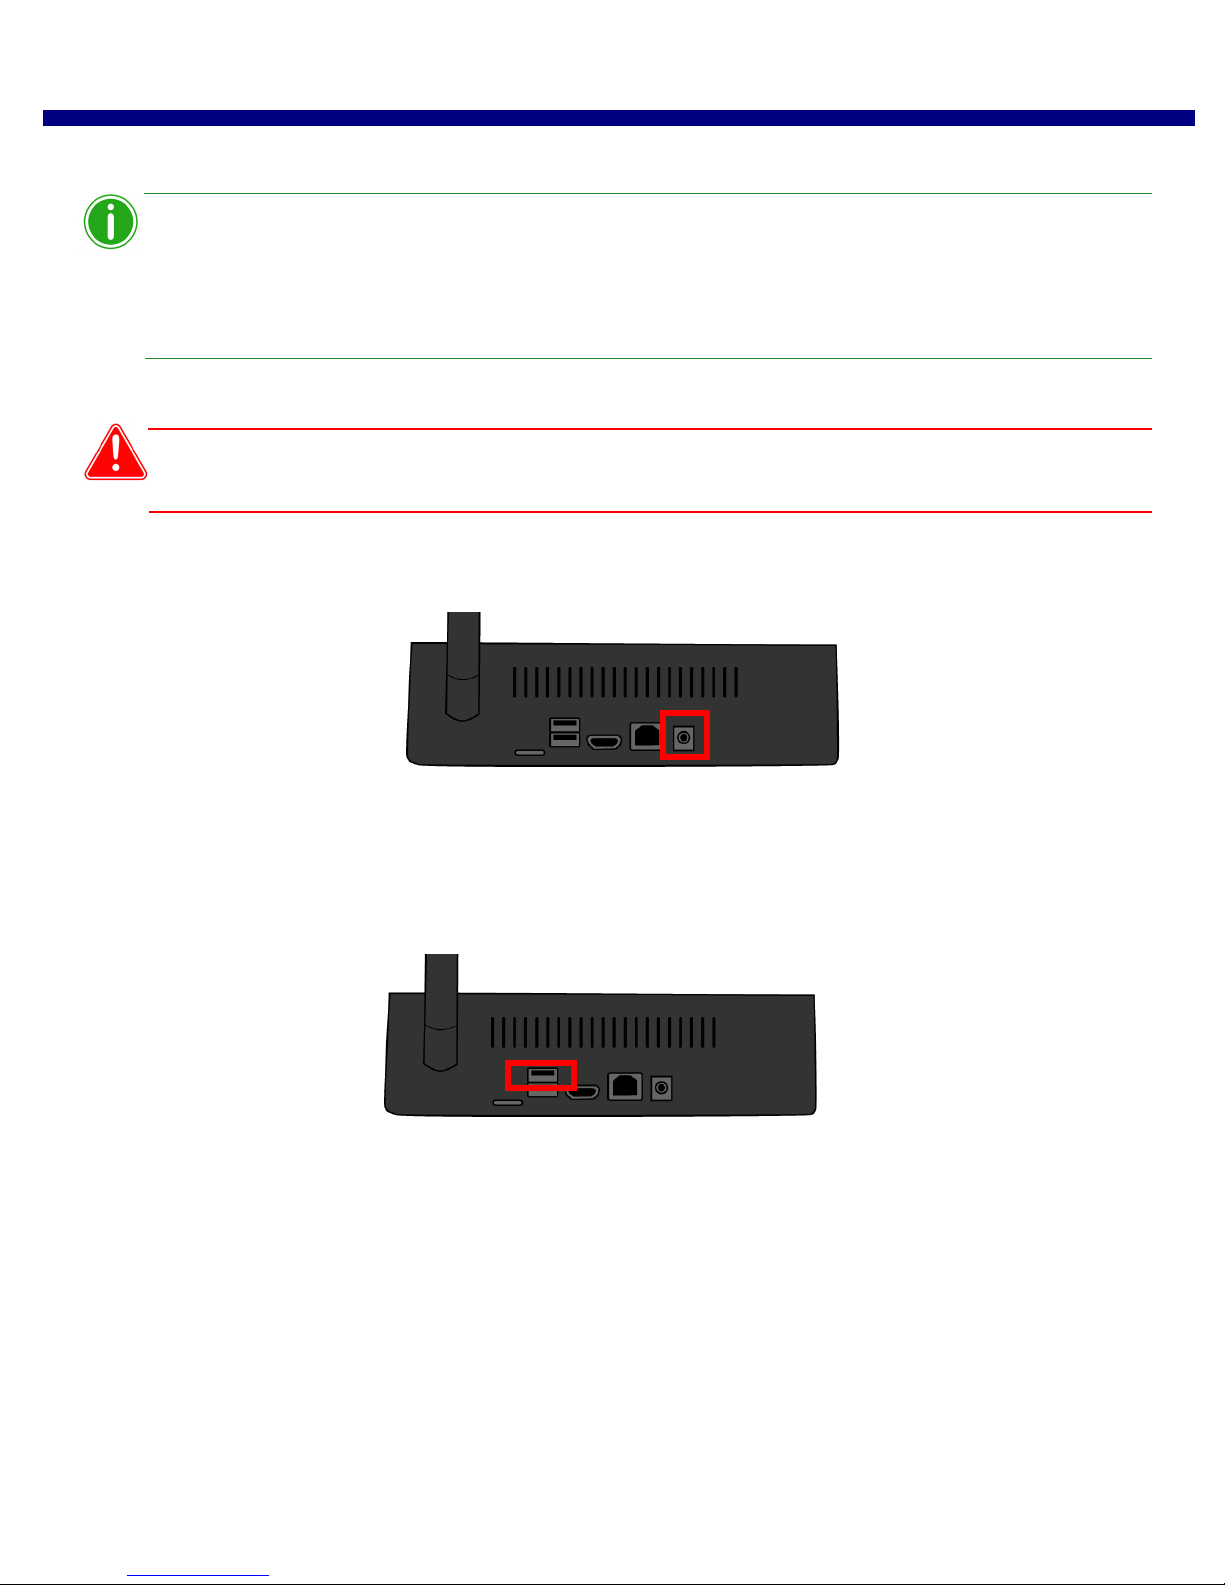
2. Plug the power cable into a properly grounded power outlet and into the WPS Pro power port on the back of the
device.
Figure 2. WPS Pro Power Port
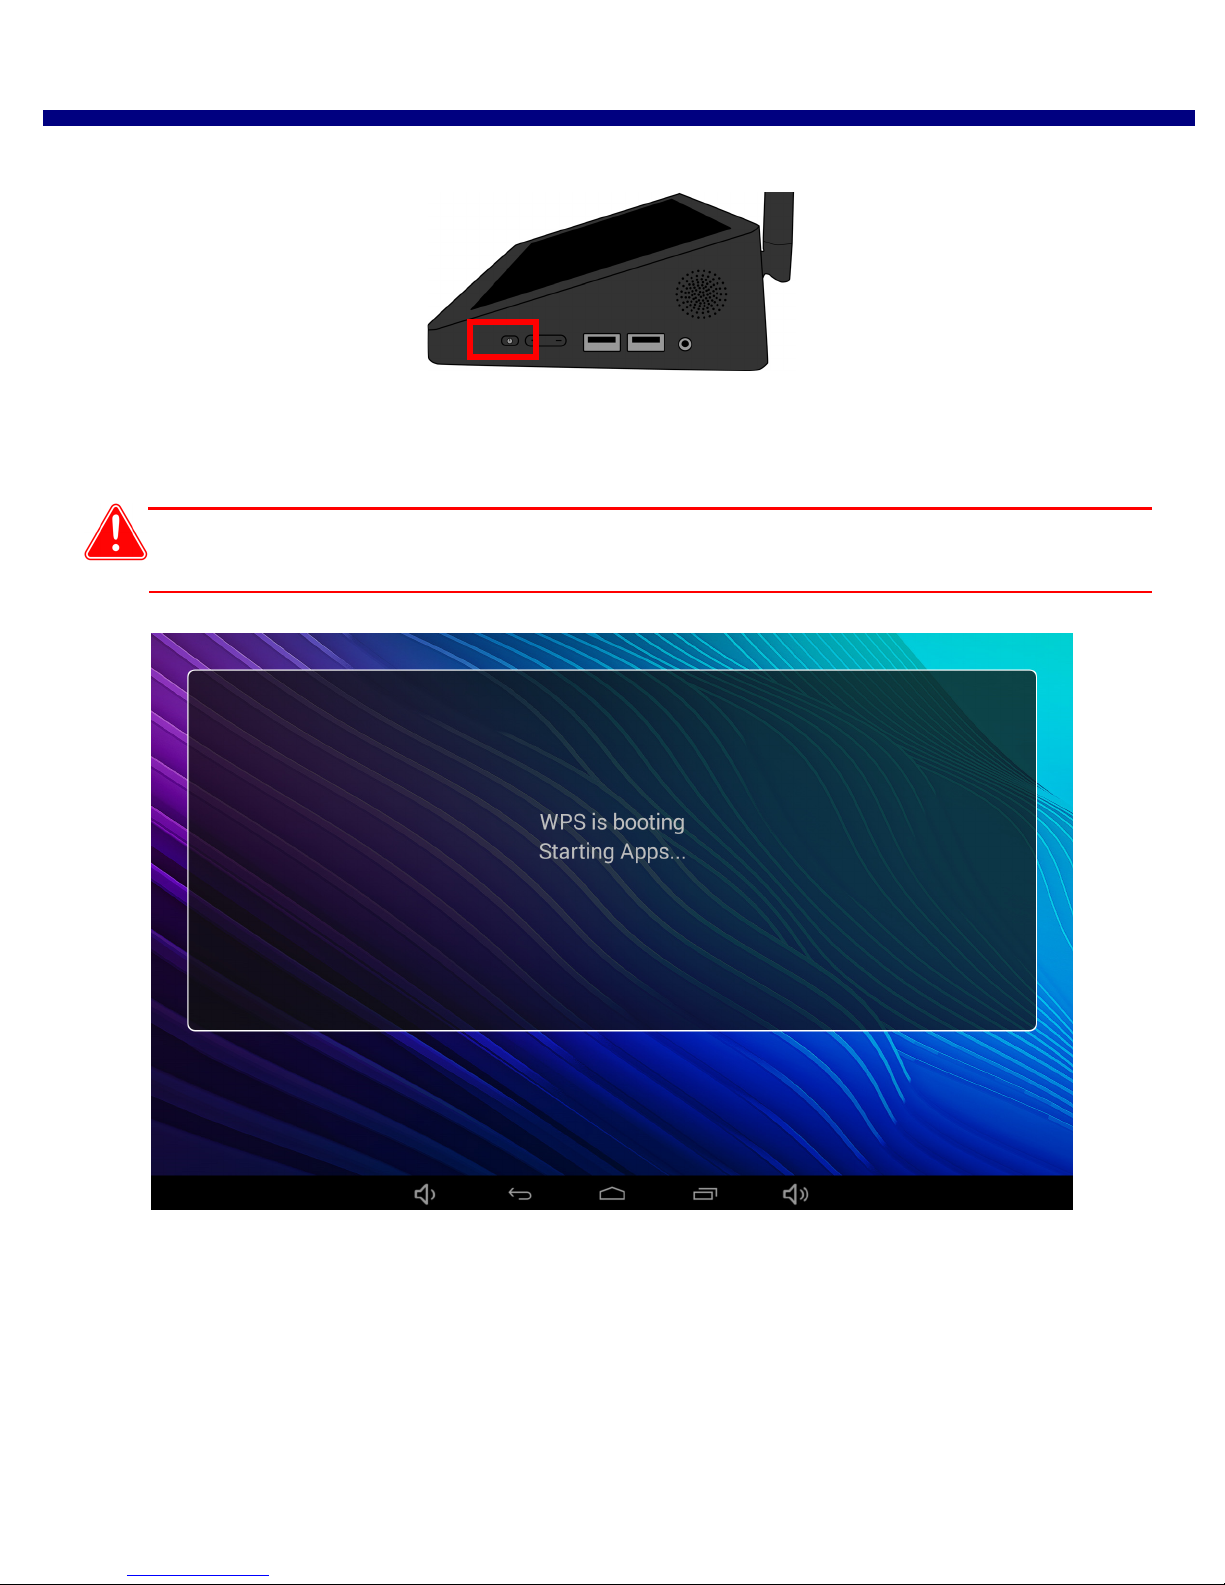
3. Connect the printer(s) to the USB ports on the back and side of the WPS Pro device. If you are connecting only one (1)
printer to the device, connect the printer USB cable to the top/upper USB port on the back of the device.
Figure 3. WPS Pro top/upper USB
WPS Pro can connect to two (2) DNP printers simultaneously. You must connect to the top/upper USB port on the back
of the device first. The WPS Pro device can be connected to the following DNP printers: DS40, DS80, DS620A/DS620,
DS820A/DS820, RX1, and RX1-HS.
18 DNP Imagingcomm America Corporation
Page 19
Setting Up the WPS Pro System WPS Pro User Guide
Attention
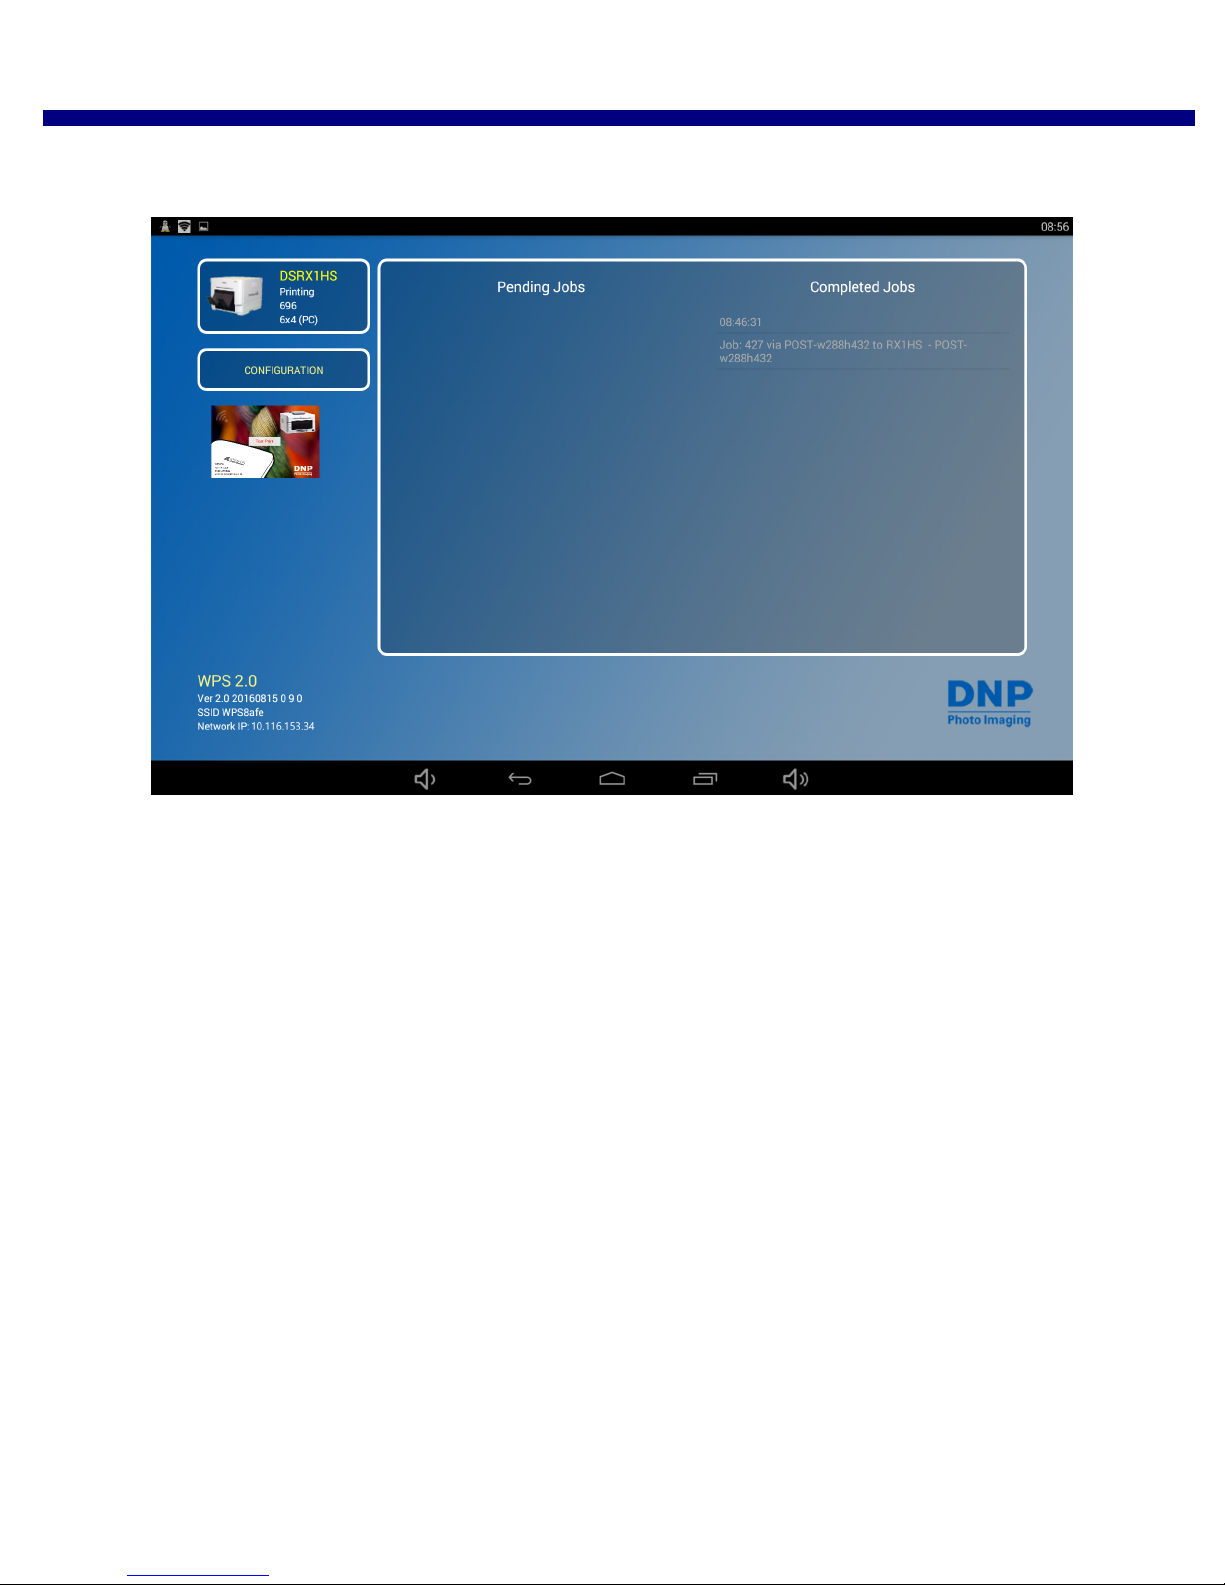
4. Turn on the device using the Power button. Press, and hold, the Power for two (2) seconds, until the logo is displayed.
5. When the WPS Pro device powers ON, it automatically detects the connected printer(s) and what media is loaded in
those printers. Wait three minutes before you try to connect any input devices to the WPS Pro network. When the
WPS Pro powers on, the device’s touchscreen display shows the booting process and the time remaining until the
WPS Pro is ready for use.
When you start or restart the WPS Pro device, it takes about three (3) minutes before the device is ready for use.
6. Once the WPS Pro has started, the WPS Status app is displayed and a test print is automatically printed.
To turn off test prints, see “Changing the Test Print Setting” on page 80.
DNP Imagingcomm America Corporation 19
Page 20
Setting Up the WPS Pro System WPS Pro User Guide
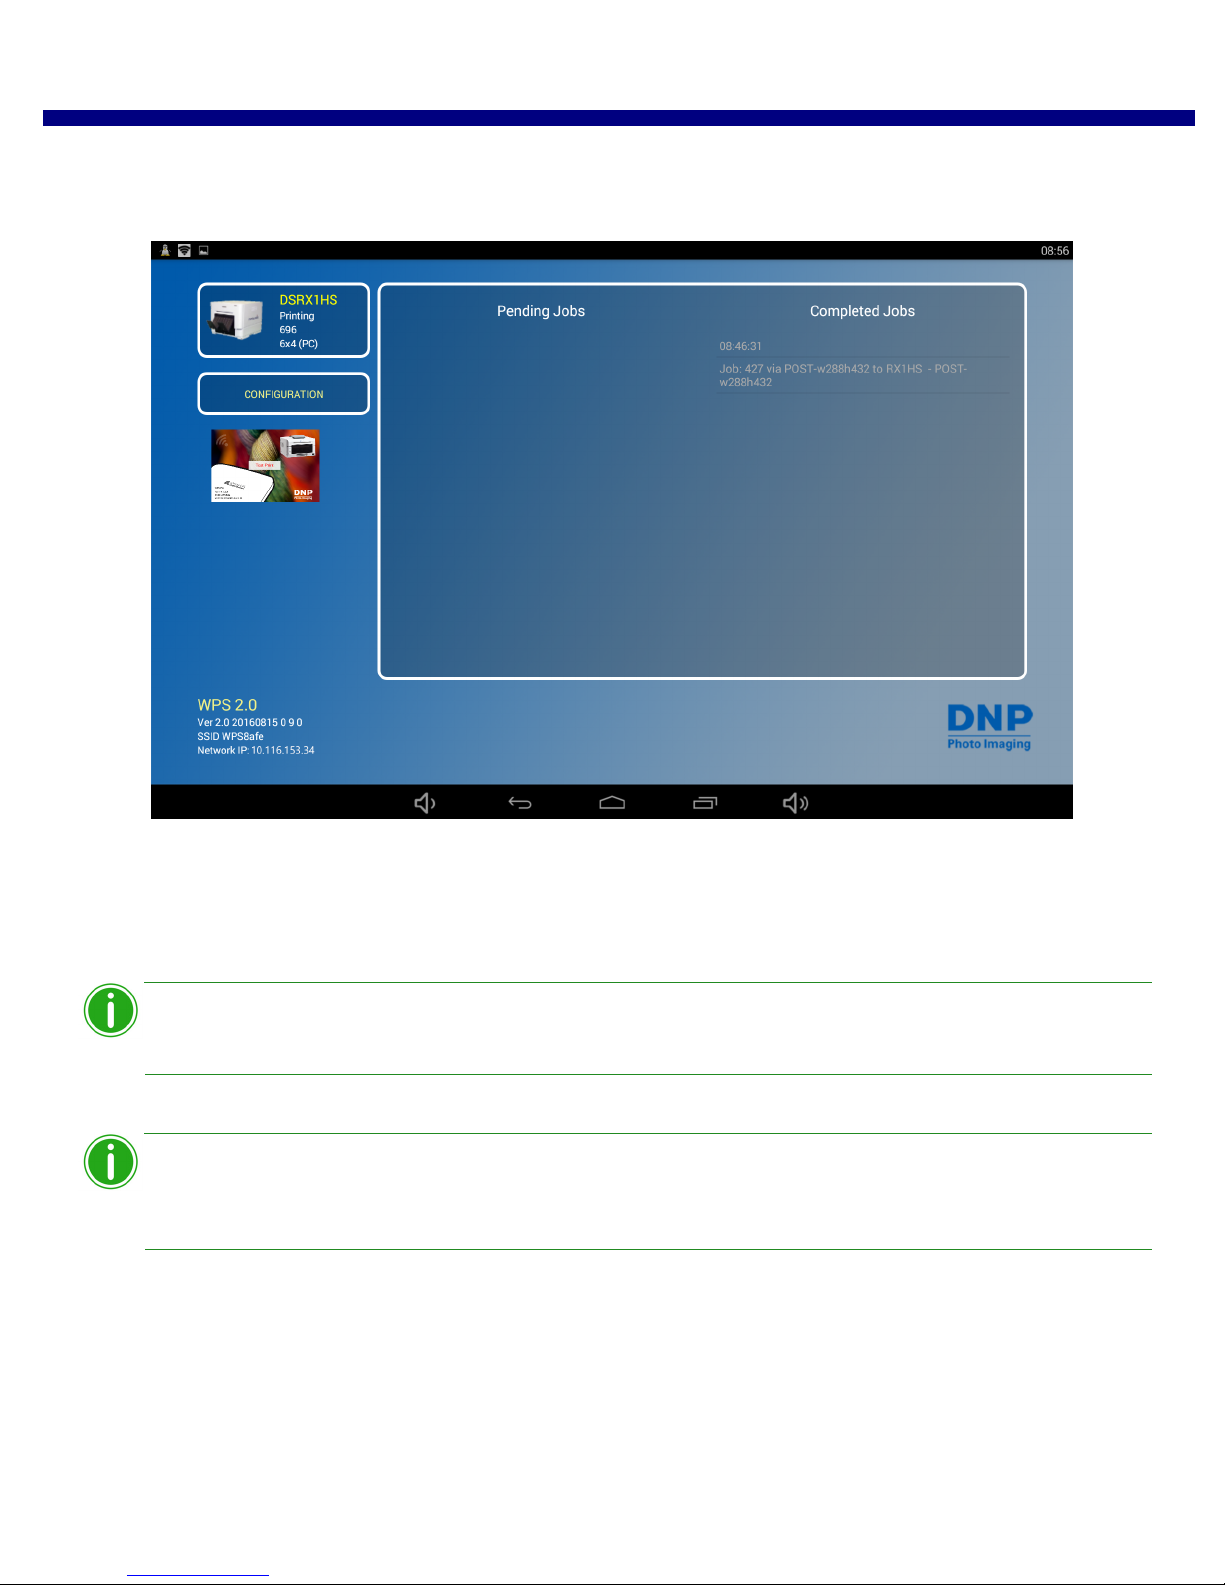
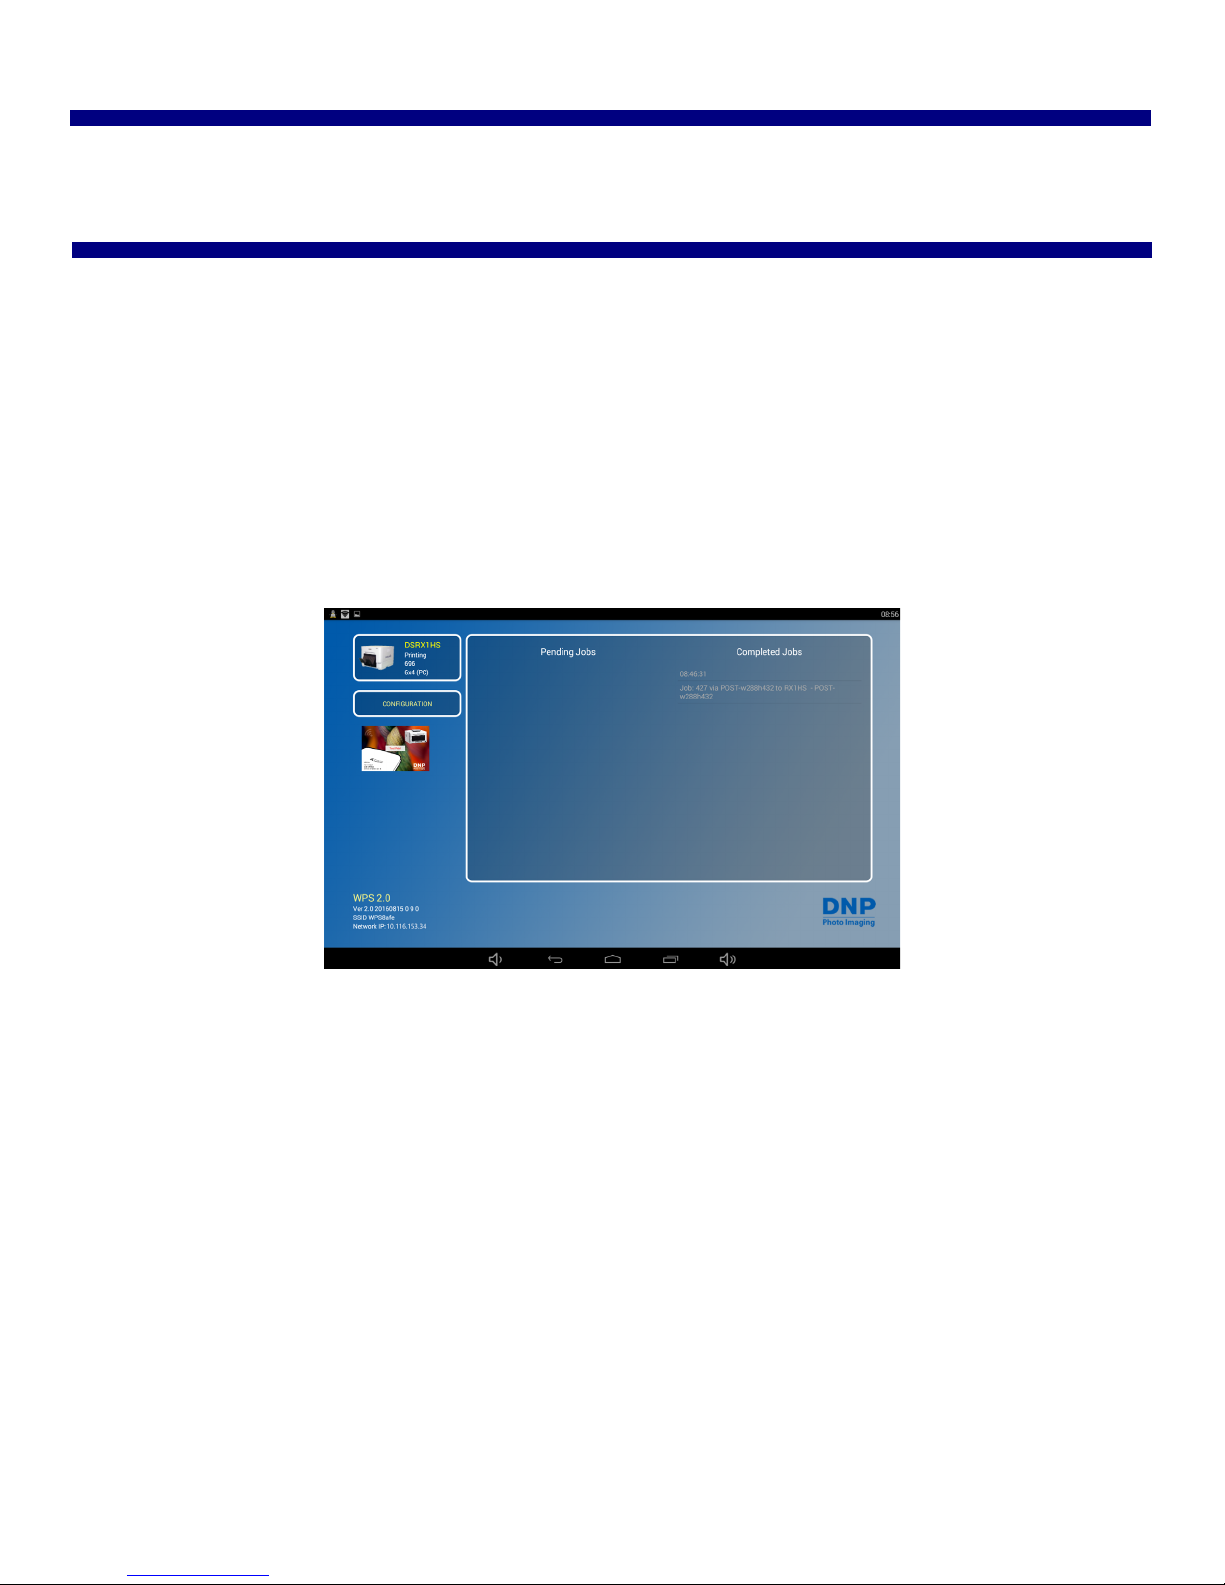
While using your WPS Pro system, make sure that the WPS Status app is displayed on the console when you are ready
to print.
Figure 4. WPS Status App
20 DNP Imagingcomm America Corporation
Page 21
Connecting to the WPS Pro Wireless Network WPS Pro User Guide
Note
Note
7. The touchscreen display shows you the type of printer(s) you have connected to the WPS Pro and the amount of
media remaining in the connected printer(s). The touchscreen display also shows the last five (5) completed print jobs
and any pending print jobs.
Connecting to the WPS Pro Wireless Network
The WPS Pro acts as its own wireless network for your input devices and printers.
1. From your computer or mobile device, connect to the WPS Pro Wi-Fi network.
The Wi-Fi network is named WPSxxxx, where xxxx is a unique number for your device.
2. When prompted, type the following password: DNP20153 (ALL CAPS)
If you are connecting to the wireless network from a Mac or PC, use the above steps to connect
using the provided network name and password.
Connecting the WPS Pro to an Existing Network
You can connect the WPS Pro to an existing home or office network using an Ethernet cable. Connect the cable to the back
of your WPS Pro unit and to a working network port on your router or network hub. At this time, you cannot bridge the
WPS Pro device wirelessly to an existing network.
DNP Imagingcomm America Corporation 21
Page 22
Turning Off the WPS Pro WPS Pro User Guide
Note
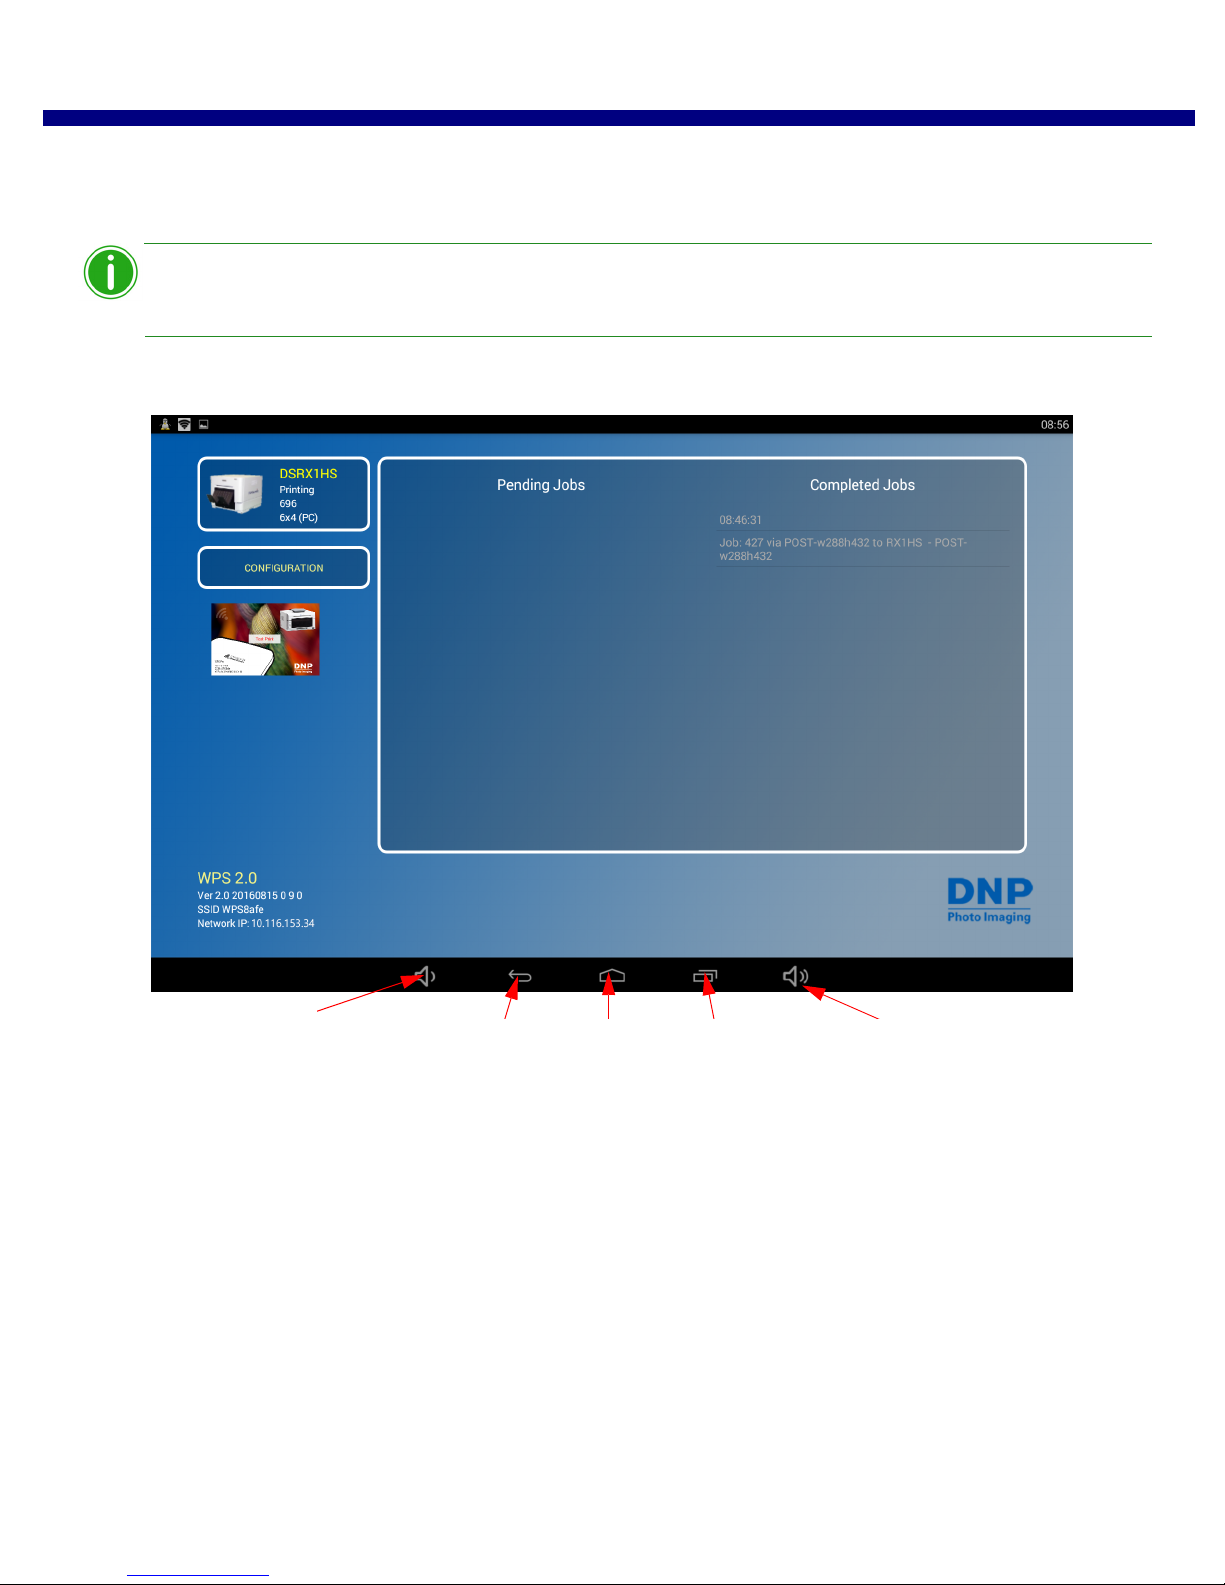
Volume Down Return Home Apps Volume Up
Turning Off the WPS Pro
There are times when you need to turn off your WPS Pro. For example, after you’ve made updates to the Configuration
screen, you need to turn off the WPS Pro for the updates to take effect. Follow these steps to turn off your WPS Pro:
Before you shut down your WPS Pro device, make sure there aren’t any print jobs running.
1. From the navigation menu at the bottom of the WPS Pro screen, touch the Apps icon.
22 DNP Imagingcomm America Corporation
Page 23
Turning Off the WPS Pro WPS Pro User Guide
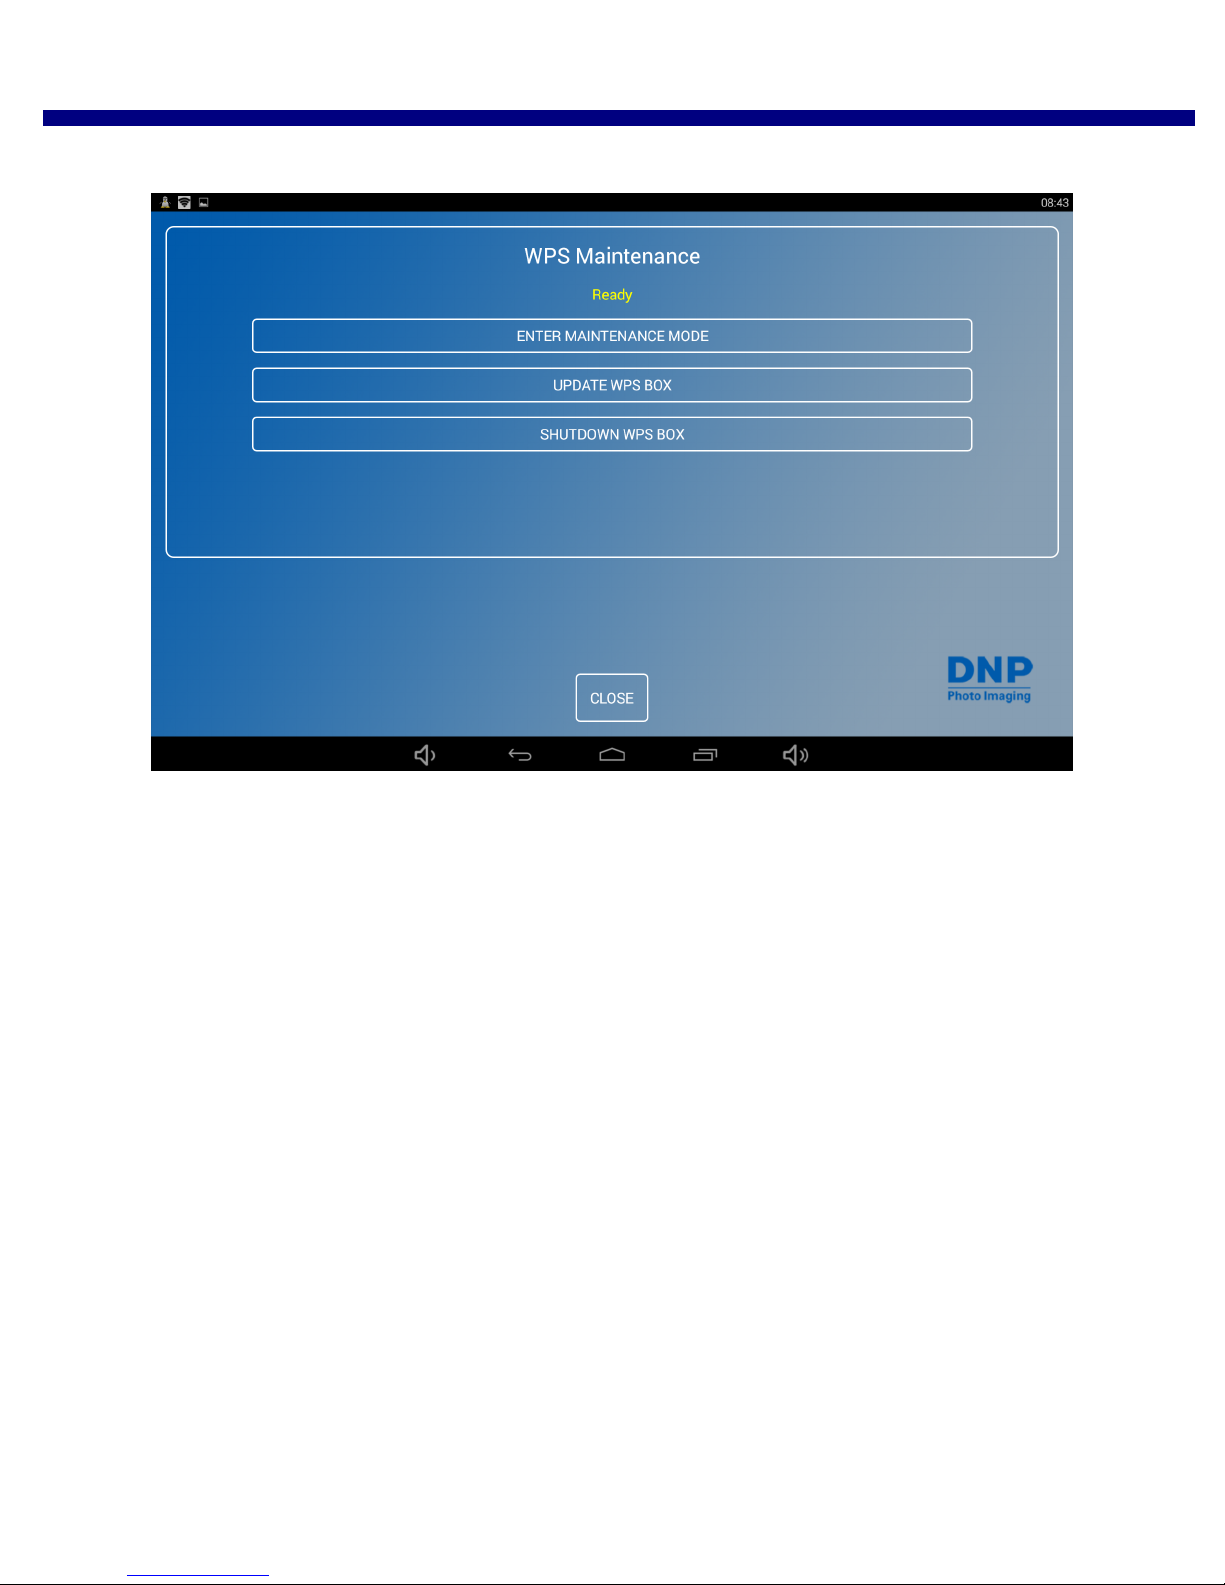
2. Select the WPS Maintenance application from the Apps screens. The maintenance screen appears.
3. Touch the Shutdown WPS Box option.
4. Your WPS Pro console will now powered OFF.
DNP Imagingcomm America Corporation 23
Page 24

Turning Off the WPS Pro WPS Pro User Guide
24 DNP Imagingcomm America Corporation
Page 25
4
Using Android Devices with WPS Pro
This chapter discusses how to use your Android mobile devices to print using the WPS Pro network.
Be sure to follow the installation steps at “Setting Up the WPS Pro System” on page 18 before continuing.
There are two transfer methods you can use to print from your Android Device to the WPS Pro network - web services or
FTP.
1. Using Android Devices for Web Transfers (Mobile Apps). Currently, web services requires the use of a WPS
companion app. Use the WPS Print 2 App app to print photos. Use the WPS Status app to monitor your media usage
and system status.
2. Using Android Devices for FTP Transfers. FTP transfers allow you to print through the WPS Pro network using your
favorite camera and photo editing applications on your mobile device. WPS Pro supports printing from Wi-Fi enabled
Android and mobile devices (i.e., smartphones and tablets) using a FTP client application.
WPS Pro also allows you to connect five (5) input/transfer devices simultaneously. Your input/transfer device(s) can be a
maximum of 30 feet (10 meters) away from WPS Pro and still send the print job successfully, although ranges can vary
based on network traffic.
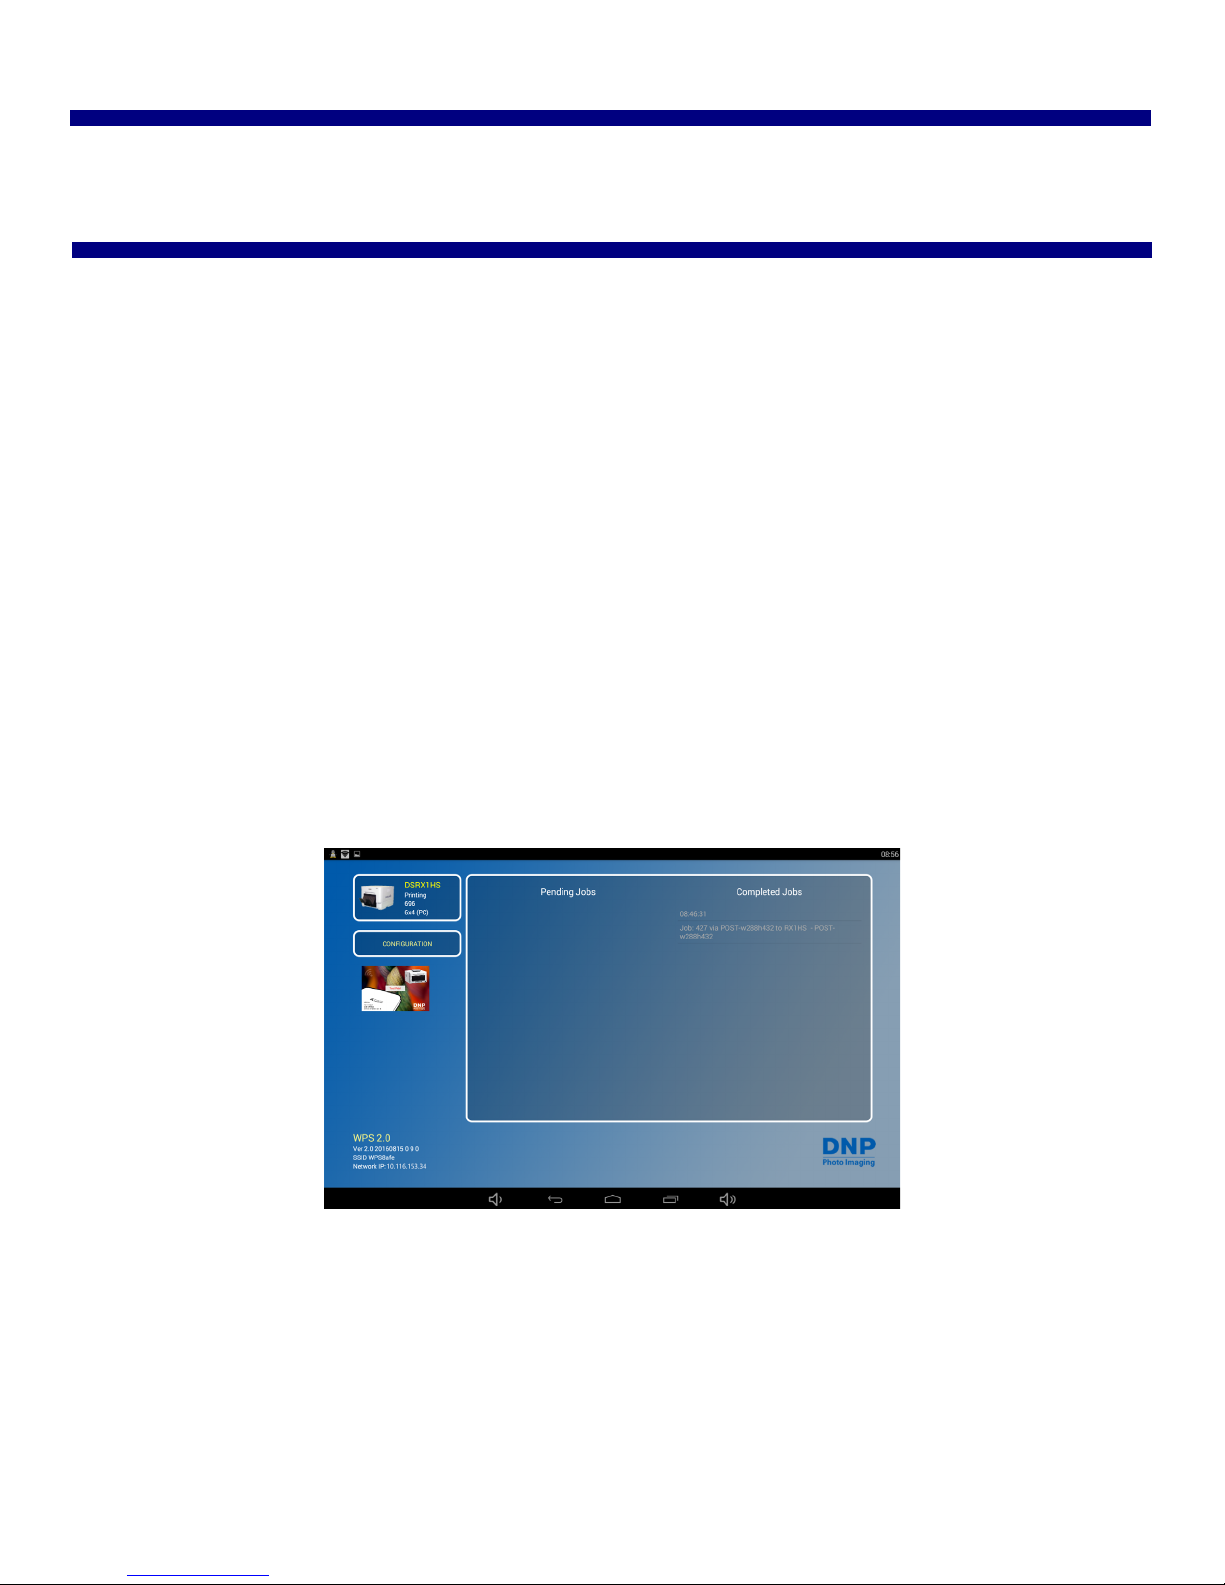
Before you begin printing, check your WPS Pro console and make sure the WPS Status app is running. In order to
process the images it receives, the WPS Pro console must have the WPS Status app open and active.
DNP Imagingcomm America Corporation 25
Figure 5. WPS Status App
Page 26
Using Android Devices for Web Transfers (Mobile Apps) WPS Pro User Guide
Note
Attention
Using Android Devices for Web Transfers (Mobile Apps)
Web transfer is a transfer method used by your WPS Pro system. HTTP transfers use web technology to act as an interface
between the WPS Pro network and the user. Currently, the companion app, WPS Print 2, use an HTTP interface to transfer
images to the WPS Pro device for printing. While you can also use web services transfer on a PC or Mac computer, that
method requires third party software development. If you want more information about third party software development,
contact your DNP IAM sales representative.
Configuring Android Devices for Web Transfers (Mobile Apps)
The configuration for mobile apps is easy. Simply download the following apps from the Google Play or Amazon App store.
WPS Status app
WPS Print 2 app
Printing from Android Devices using the Share Option
Use the following procedure to print from your device. By downloading the WPS Print 2 mobile application, you can print
from within any photo app that uses standard share sheet functionality.
1. If you haven’t already, download the WPS Print 2 app to your mobile device.
2. Connect to the Wi-Fi signal created by WPS Pro.
The signal is labeled WPSxxxx, where xxxx is a unique number for your device.
3. When prompted, type the following password: DNP20153 (ALL CAPS)
4. Launch the photo application. This application can be your standard camera roll (or photo gallery), a photo editing
application, or a third party photo viewing application.
To use the WPS Print share feature, your photo application must use standard share sheet functionalities.
5. Select your image or images.
6. Click the Share option.
7. Select the WPS Print 2 app from the listed share applications.
8. The WPS Print 2 app is launched. You can now print images using the WPS Print 2 app.
26 DNP Imagingcomm America Corporation
Page 27
Printing from Android Devices using the WPS Print 2 App WPS Pro User Guide
Note
Note
Printing from Android Devices using the WPS Print 2 App
The WPS Print 2 app allows you to print existing images from your device’s photo gallery or photo album to the WPS Pro
device.
When using this app, the images you take are saved in an album in your photo gallery or camera
roll. If you have the image archiving functionality turned ON, and an micro SD card plugged into
the WPS Pro device, your images are also saved to a micro SD card.
1. Connect your mobile device to the Wi-Fi signal created by WPS Pro.
The signal will be labeled WPSxxxx, where xxxx is a unique number for your device.
2. When prompted, enter the password: DNP20153. (ALL CAPS)
3. Wait until your device shows as connected to the WPS Pro Wi-Fi network. This can take up to two minutes.
4. On your mobile device, open the WPS Print 2 app.
5. The WPS Print 2 application is now ready to use.
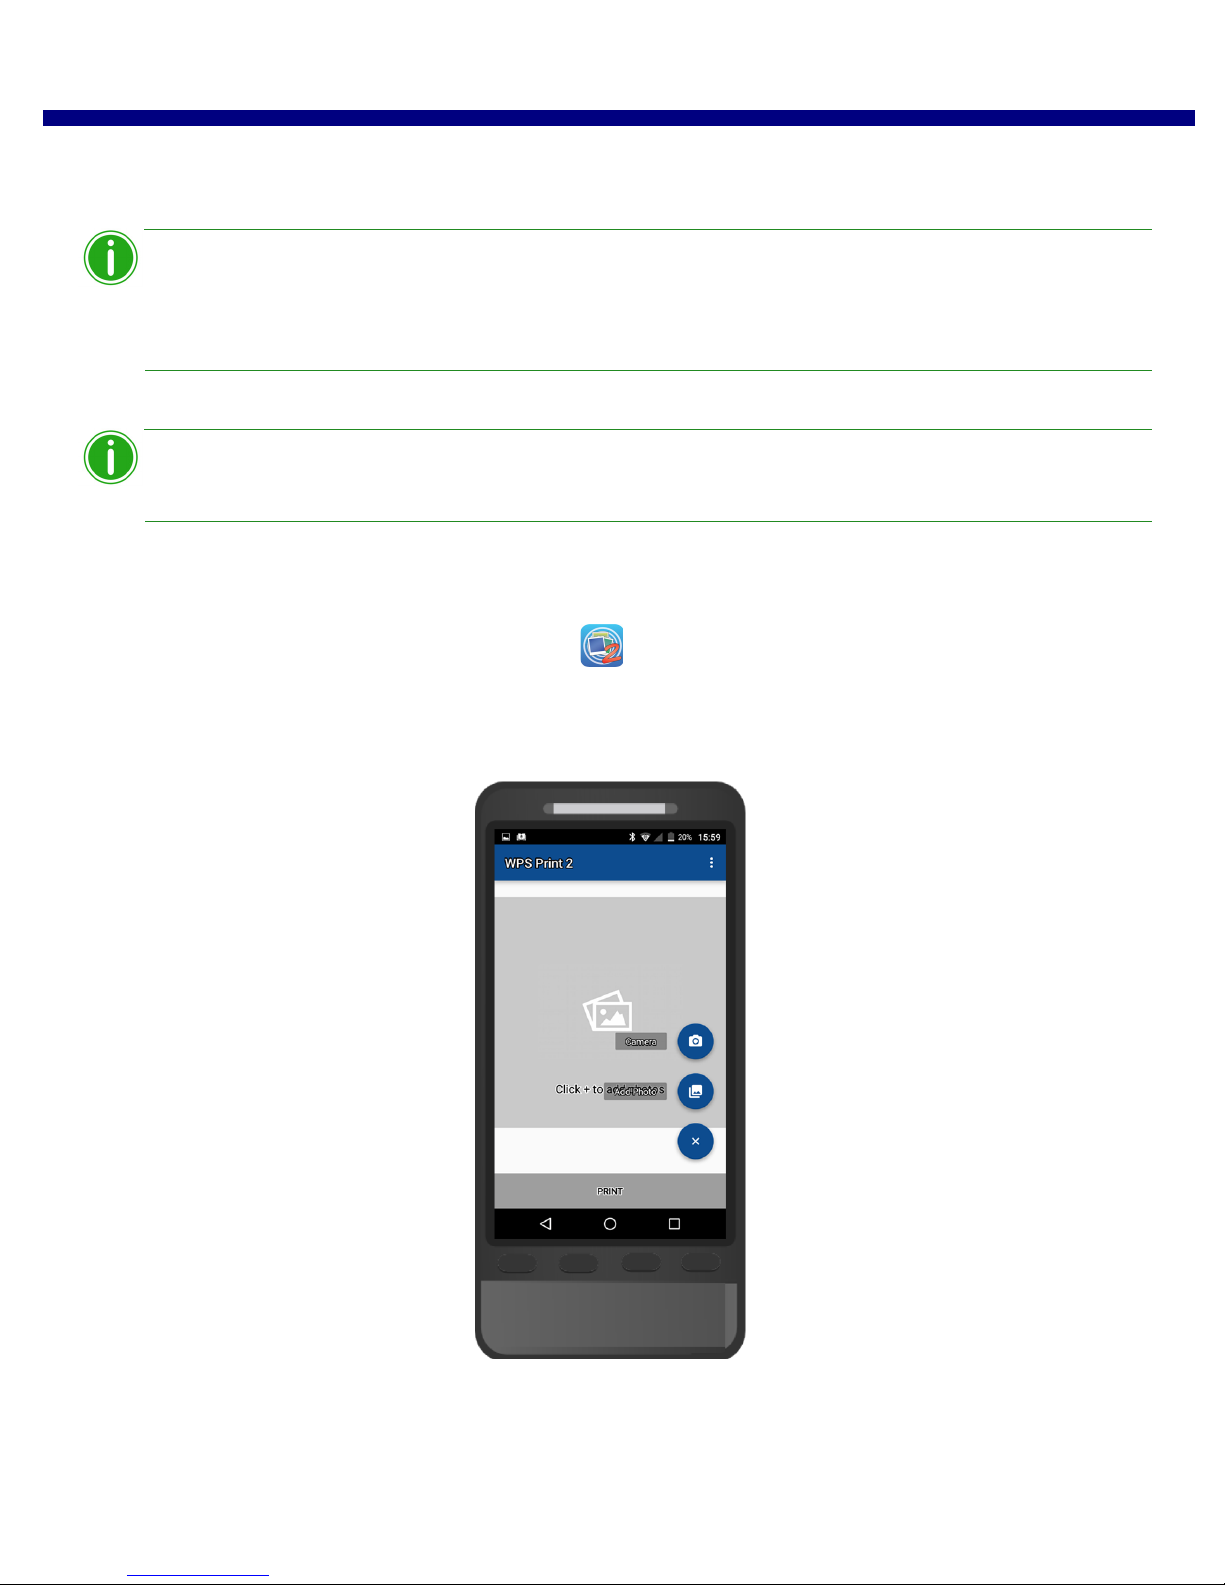
6. At the WPS Print home screen, press the blue + button to open your image options.
7. Select either the Camera or Gallery option from the menu.
DNP Imagingcomm America Corporation 27
Page 28
Printing from Android Devices using the WPS Print 2 App WPS Pro User Guide
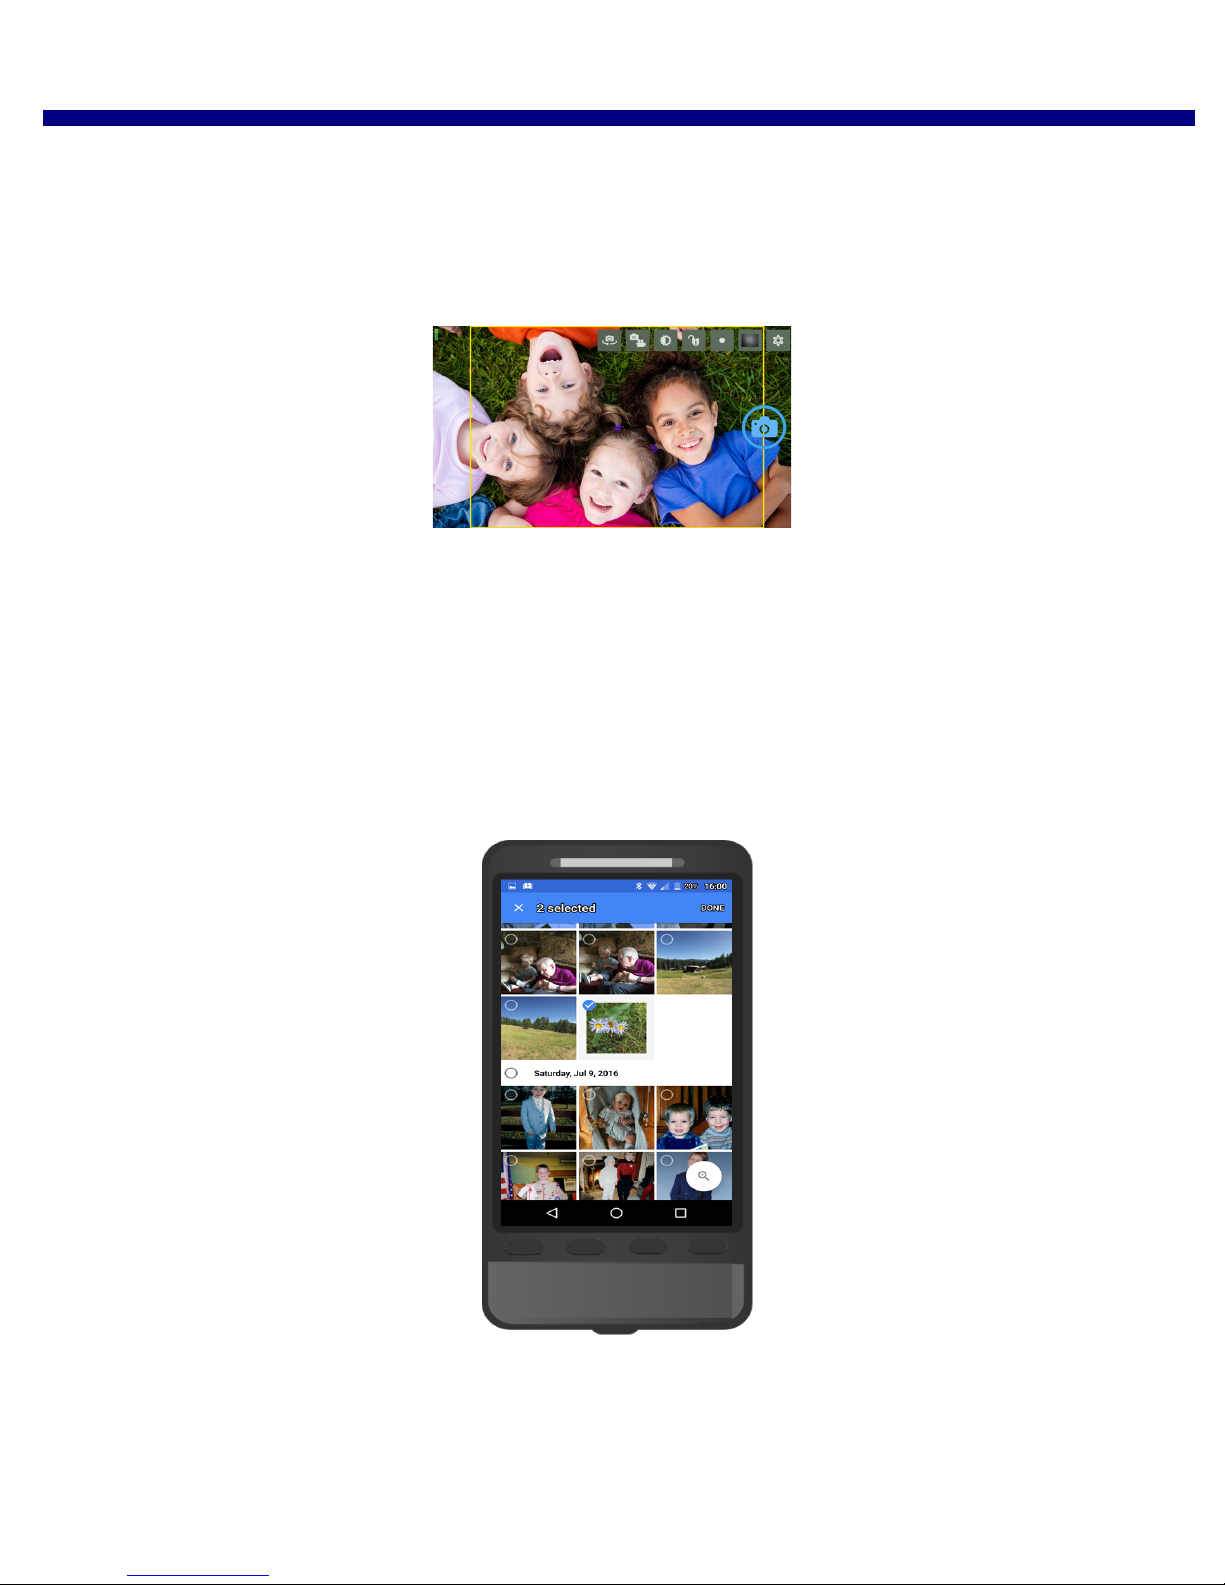
8. To print images using your camera:
If necessary, accept any app permissions. Once your device’s default camera application opens, take your picture.
When you are returned to the WPS Print 2 application, view your image. If you are ready to print, press the Print
button. Otherwise, you can remove the images, add images from the gallery, or take more photos before
printing.
To continue, see step 10.
9. To print images using your photo gallery:
Select the photo gallery application you want to use. If necessary, accept any app permissions. If you have
multiple photo applications on your phone, you may have to choose a gallery each time you load images.
Select your image. Depending on your gallery application, you may be able to select more than one image at a
time. To do this, click and hold an image until check marks appear on the images. Then select the images you
want to print and press Done to return to the WPS Print 2 application. Not all gallery applications allow for
multiple image selection.
When you are returned to the WPS Print 2 application, view your image. If you are ready to print, press the Print
button. Otherwise, you can remove the images, add images from the gallery, or take more photos before
printing.
10. At any time, you can scroll through the images you have loaded.
28 DNP Imagingcomm America Corporation
T
Page 29
Using the WPS Status App to Monitor Your Network WPS Pro User Guide
Note
11. When you are ready, press the Print button to print your loaded images.
12. Select your finish type.
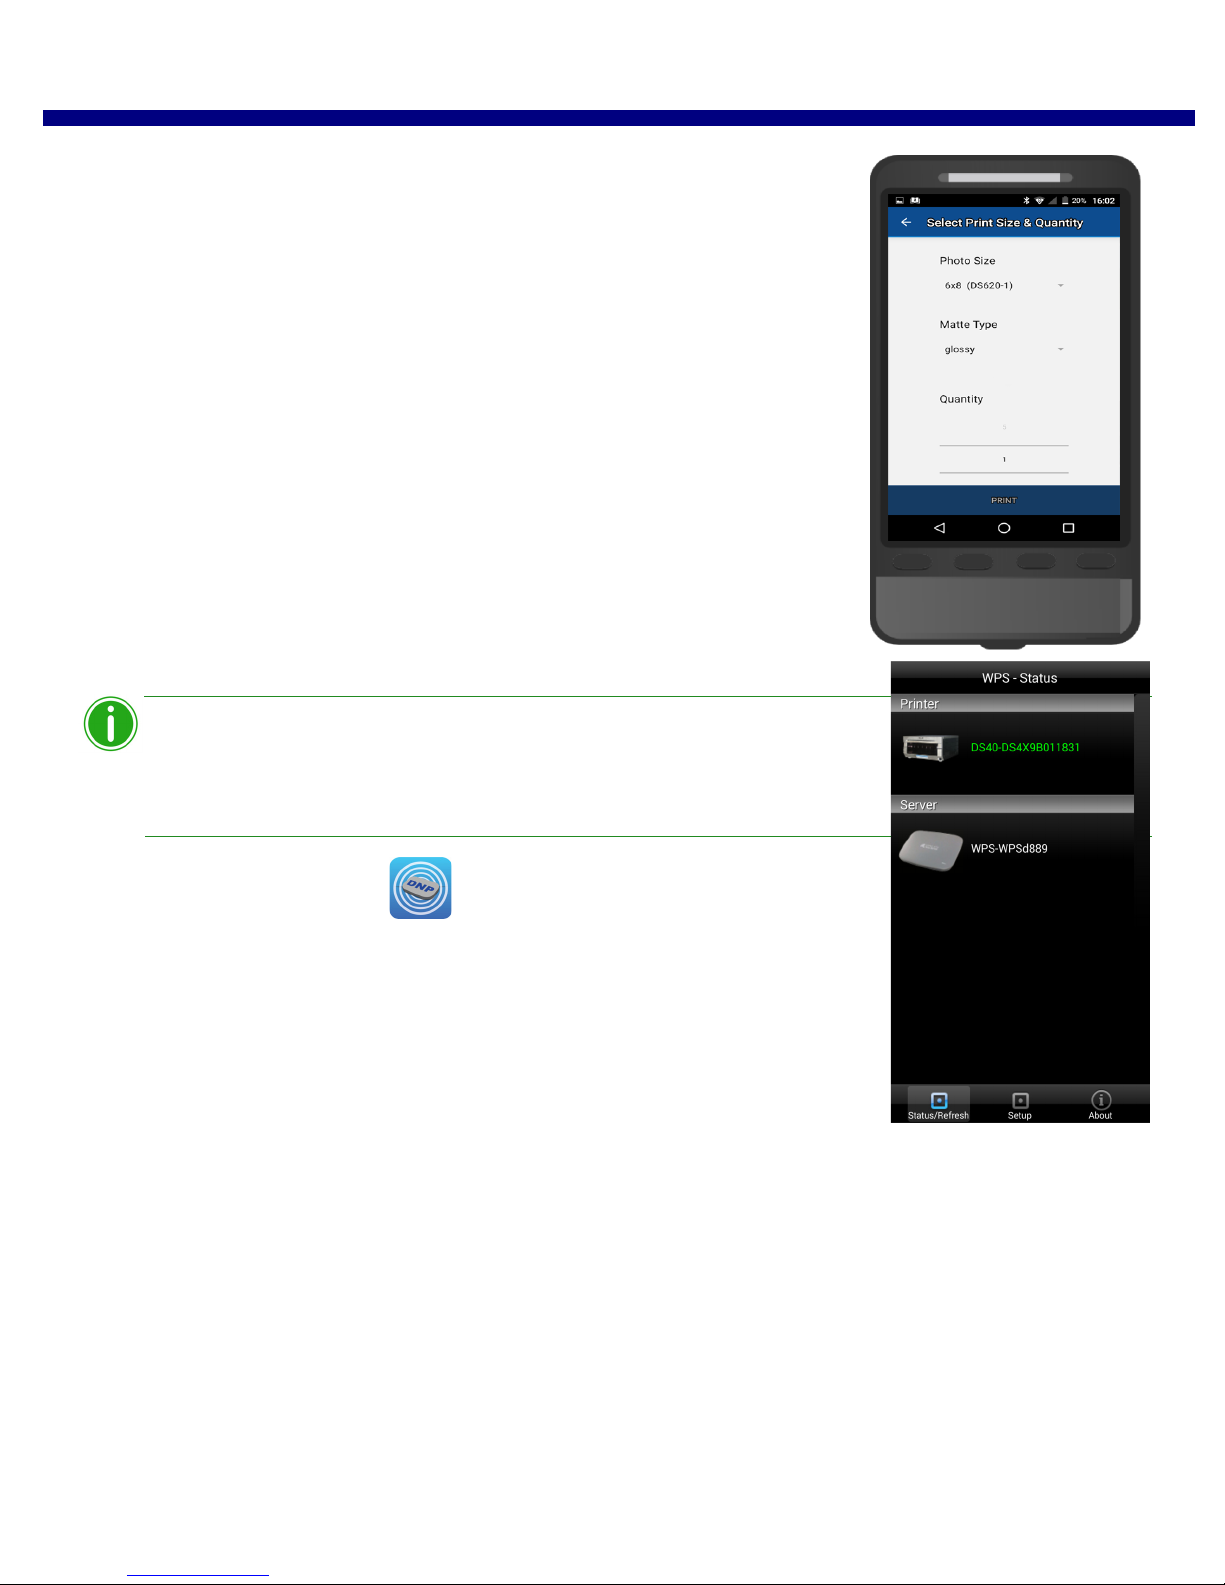
13. On the print size and quantity selection screen, select the Photo Size from the
drop-down list. You can select any size that is allowed by your attached printer.
14. Use the Quantity scroll wheel to select your print quantities.
15. Press the Print button to print your images. Your images are transmitted wirelessly
from your Android device to the WPS Pro. Print times can vary depending on your
image size, distance from the Wi-Fi device, and signal strengths.
16. Press the arrow () at the top of the screen to return to the WPS Print 2 app home
screen.
Using the WPS Status App to Monitor Your Network
When connecting to the WPS Status app for the first time, you may notice an
incorrect date. The WPS Status app will reset the time from the value on your
phone or tablet. This may take up to a minute to take effect.
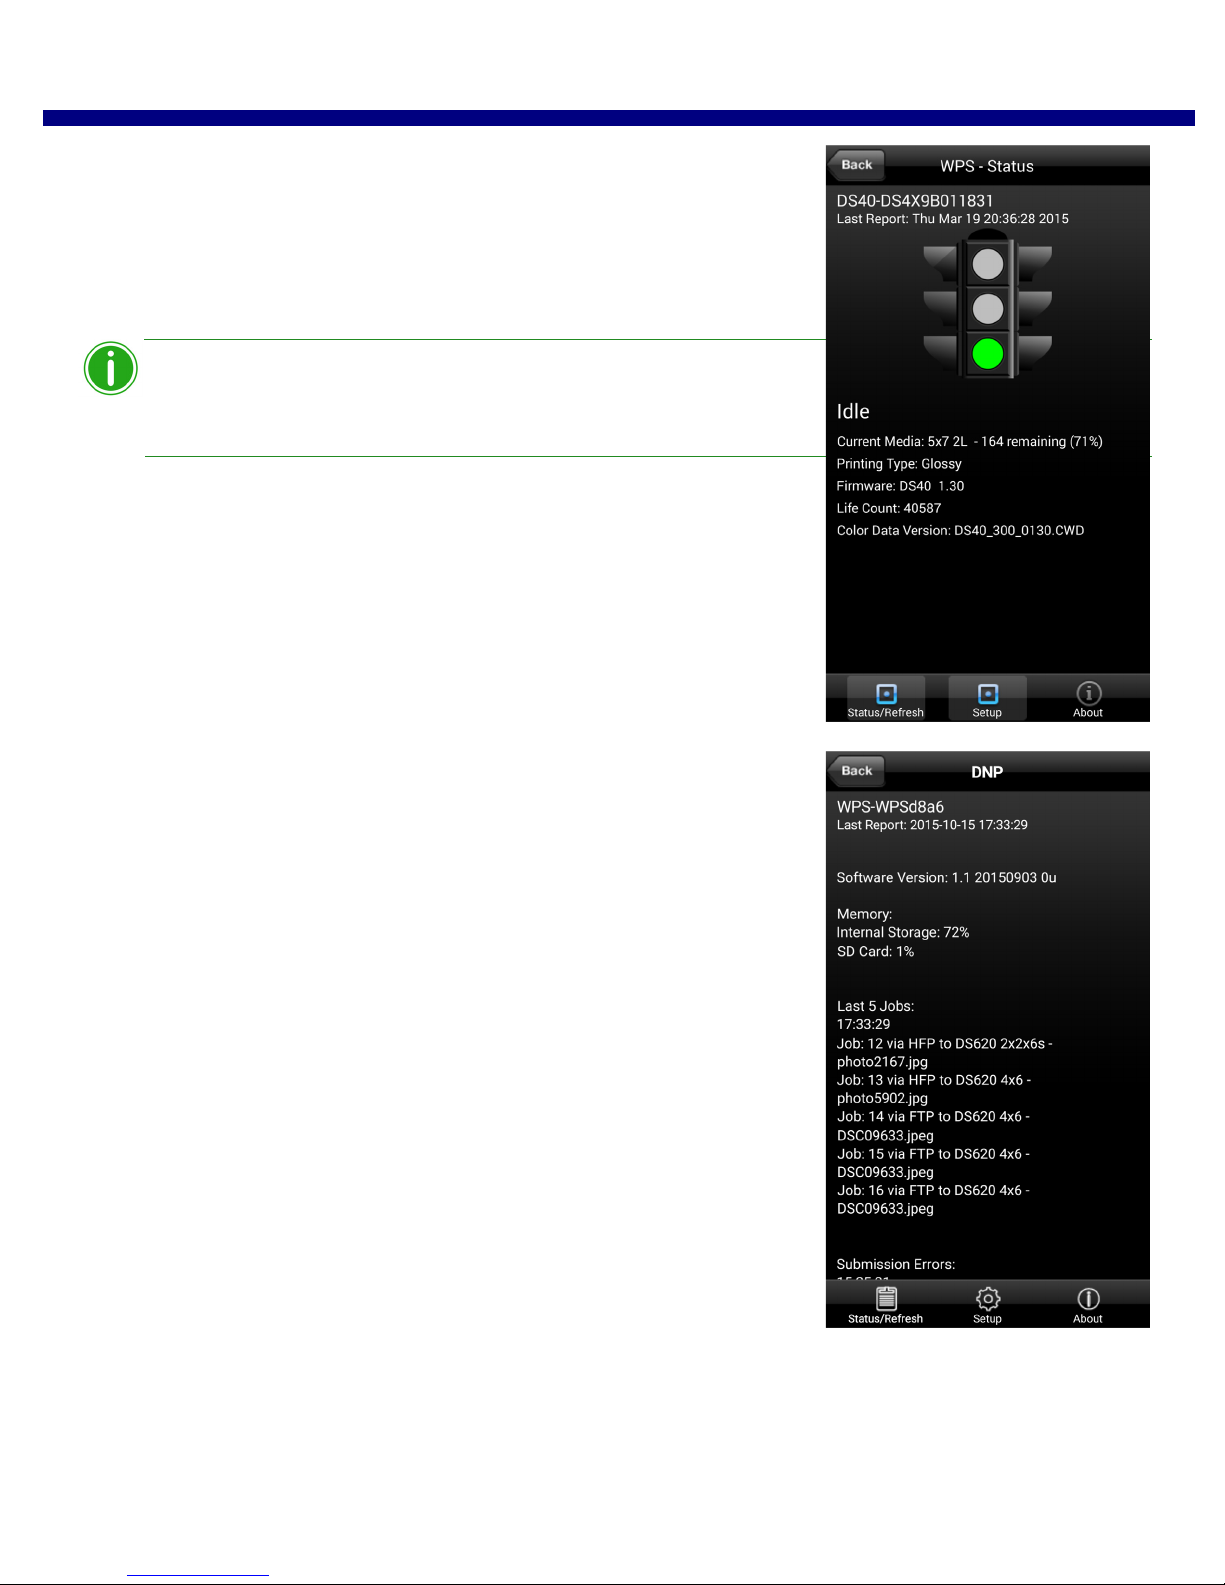
Upon opening the WPS Status app, two icons are displayed: Printer and Server.
DNP Imagingcomm America Corporation 29
Page 30
Using the WPS Status App to Monitor Your Network WPS Pro User Guide
Note
Printer Icon
Clicking the Printer icon allows you to view the following information regarding
your attached printer(s):
Status: Shows the status of the connected printer(s):
Green: Printer is in a workable state.
Yellow: Printer is low on media.
Red: Printer is extremely low on media, has an error, or a jam.
The Yellow and Red warnings can be configured using the Setup screen
of this application. See “Setup Button” on page 30.
Current Media: Displays the printer/media prints remaining, media type
loaded in the connected printer(s), and remaining media amount for
connected printer(s).
Printing Type: Displays whether images are being printed in Matte or Glossy
format.
Firmware: Displays the version of printer software installed on the connected
printer(s).
Life Count: Displays the total prints that have been produced by the
connected printer(s) in the printer(s)’ lifetime.
Color Data Version: Displays the ICM file version your device is using.
Server Icon
Clicking on the Server icon allows you to view the following information:
Software/Firmware Version: Displays the installed WPS Pro firmware version.
You can use this version number when you need to troubleshoot information
about your system.
Last 5 Jobs: Lists the name of the last 5 images printed, as well as the manner
in which they were sent to the printer, i.e., FTP.
Submission Errors: Displays any errors in printing your images.
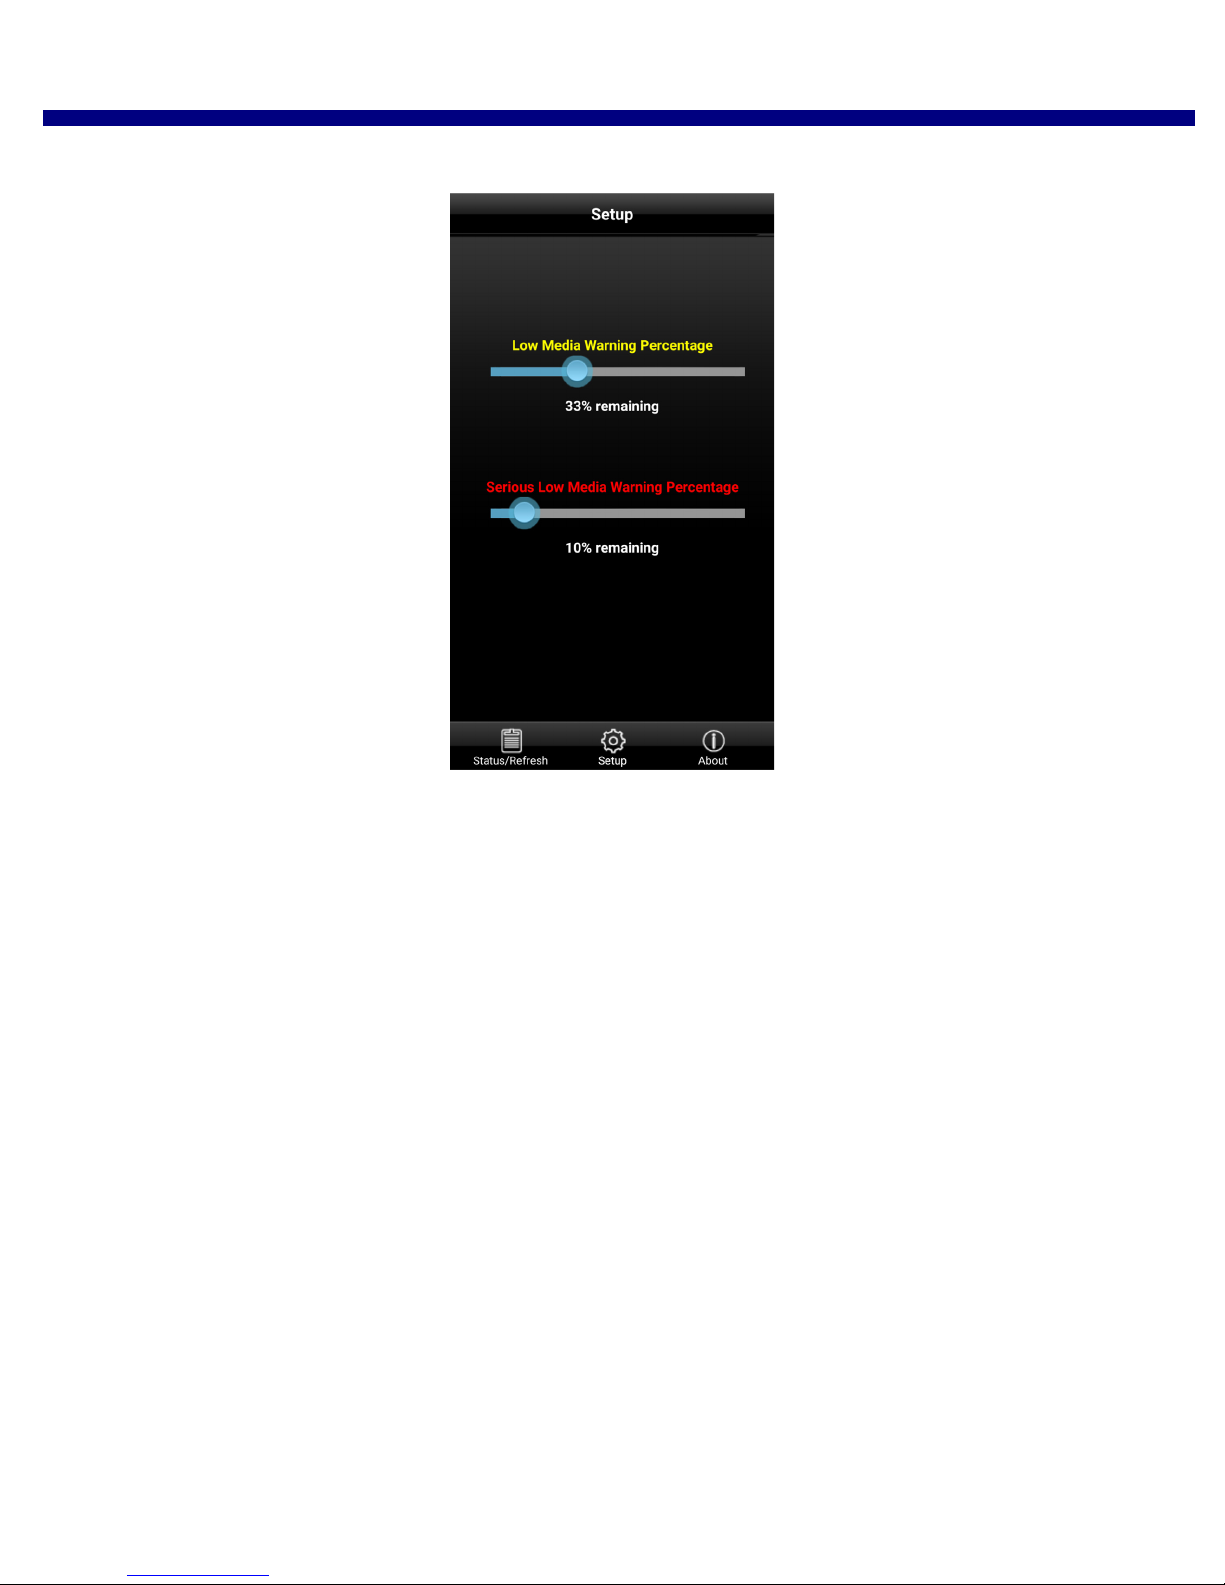
Setup Button
As mentioned earlier, the Status screen displays whether your attached printer(s)
have a high level (green light), low level (yellow light), or extremely low level (red
light) of remaining media. Using the Setup button, you can set the threshold for
when the low media warnings are displayed.
30 DNP Imagingcomm America Corporation
Page 31
Using the WPS Status App to Monitor Your Network WPS Pro User Guide
1. Click the Setup button.
2. Using the Low Media Warning Percentage slider, set the percentage at which a low media warning is triggered. If
you set this at 40%, when the media left in your printer reaches 40%, the icon on the Printer screen will be Yellow.
3. Using the Serious Low Media Warning Percentage slider, set the percentage at which an extremely low media
warning is triggered. If you set this at 25%, when the media left in your printer reaches 25%, the icon on the Printer
screen will be Red.
DNP Imagingcomm America Corporation 31
Page 32
Using Android Devices for FTP Transfers WPS Pro User Guide
Note
Using Android Devices for FTP Transfers
One of the transfer methods offered by WPS Pro is FTP, or File Transfer Protocol. File Transfer Protocol (FTP) is a standard
network protocol used to transfer files from one device to another device over a TCP-based network, such as the Internet.
FTP is built on a client-server architecture and uses separate control and data connections between the client and the server.
FTP transfer is best used when transferring images from a mobile device to the WPS Pro for printing. To do this, you must
have a FTP client application installed on your mobile device. Be sure your FTP client application allows for binary data
transfer as that is the data type WPS Pro supports.
Configuring Android for FTP Transfers
You can configure mobile FTP client applications to allow you to use this transfer method from most mobile camera and
photo editing applications. You can send images to print via the FTP client using the share option.
1. Download and install a FTP client application from Google Play™.
Some examples of FTP client applications are: AndFTP, Auto Uploader, and Turbo Client.
2. Once installed, launch the FTP client application.
32 DNP Imagingcomm America Corporation
Page 33
Printing from Android Devices Using FTP Transfer WPS Pro User Guide
Attention
Note
Note
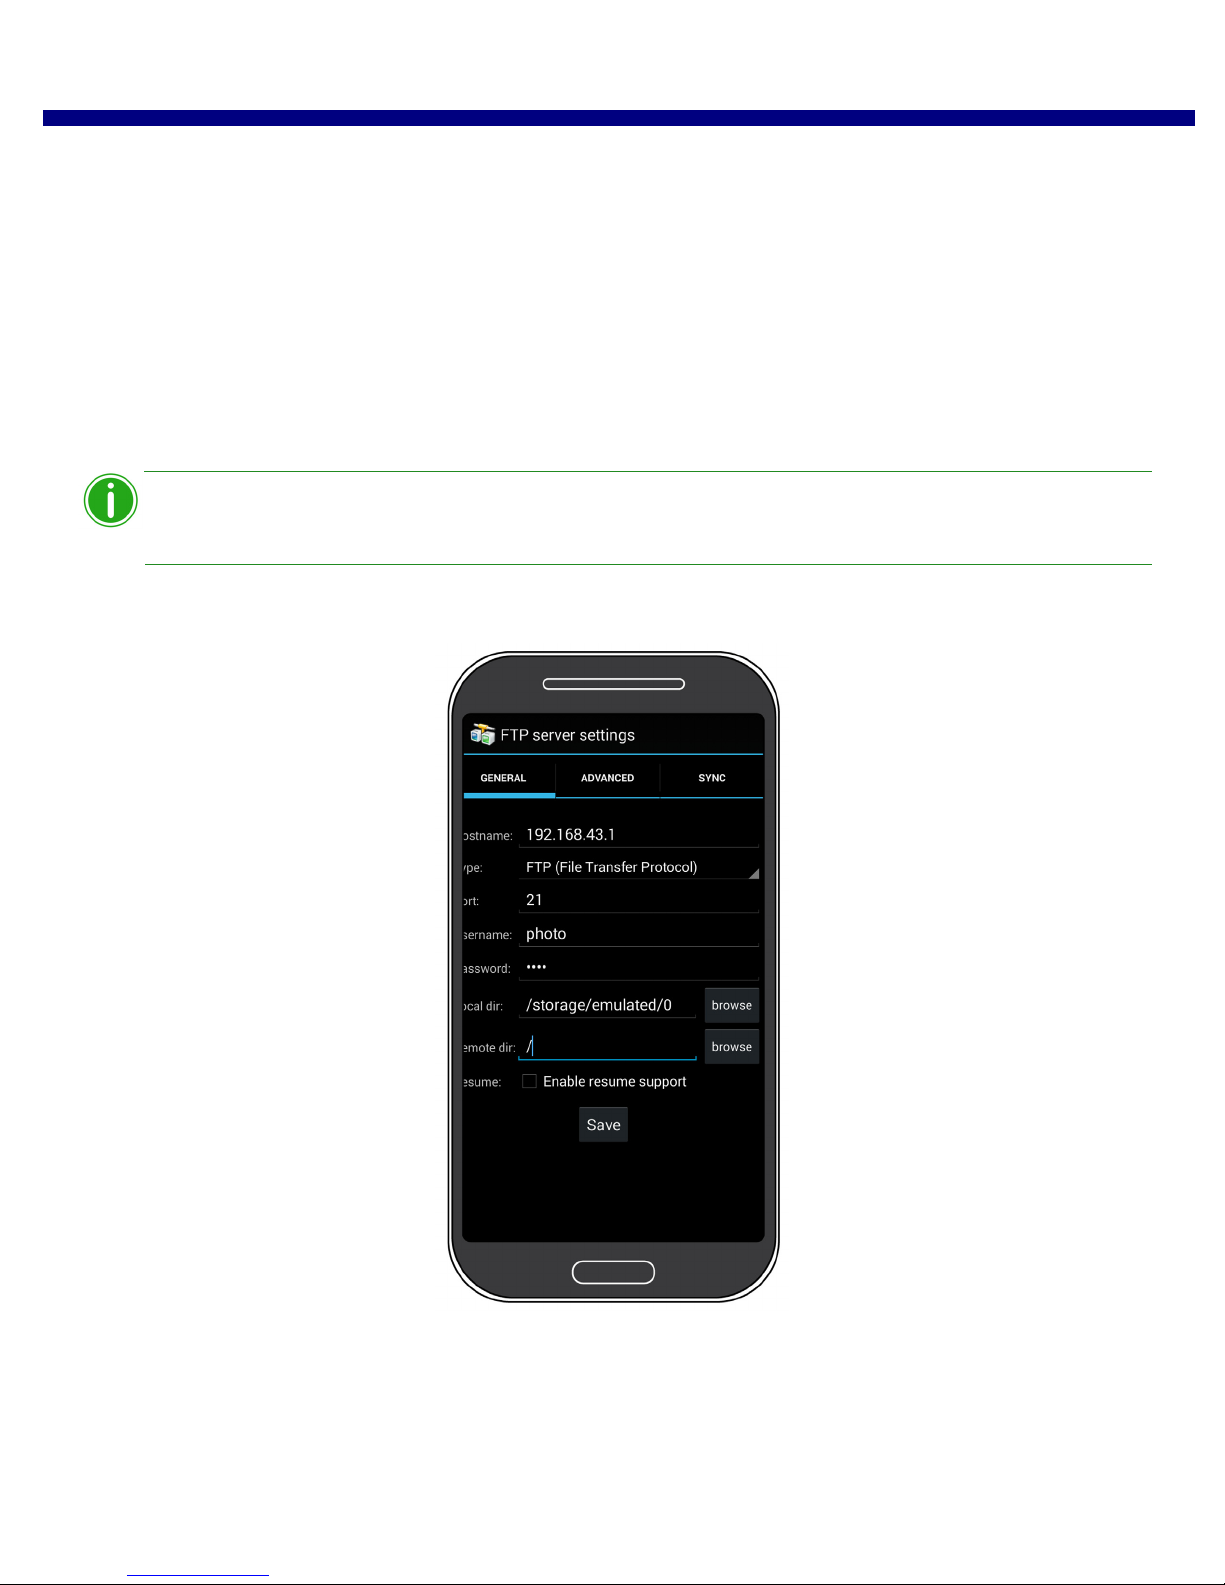
3. Enter the required information into the following fields:
Host: 192.168.43.1
Type: FTP
Port: 21
Username: photo
Password: none (type the word “none”)
Remote Dir: / (forward slash)
Mode: Active (usually in advanced settings)
If you are prompted to enter a transfer option, select Binary.
If you select ASCII, your images will not print correctly.
4. Click Save to save your settings.
5. If you have not already, connect to the WPS Pro Wi-Fi network.
6. Return to the FTP client application, and click the Login button to connect to WPS Pro.
If the login was successful, a dialog box is displayed, confirming the connection.
7. Once you connect to WPS Pro, you can now print your images wirelessly. Please note that WPS Pro only prints JPEG
and PNG file formats.
Printing from Android Devices Using FTP Transfer
Use the following steps to print images from your Android phone/tablet.
1. Select your WPS Pro device from the Settings icon. This is located in the Wi-Fi portion of the Settings screen.
The signal is labeled WPSxxxx, where xxxx is a unique number for your device.
2. Launch the FTP client application.
3. Launch the photo gallery application for your device. Sometimes the photo gallery is also called the “camera roll” or
“photo album.”
4. Select the photo you wish to print, and click the Share button.
5. Select your FTP client app from the list of share options.
6. Depending on your FTP client app, you may have to confirm the FTP address and other relevant information before
you can send your image.
7. Your photos are sent from your Android device to WPS Pro and are printed.
DNP Imagingcomm America Corporation 33
Page 34
Printing Errors WPS Pro User Guide
Note
Printing Errors
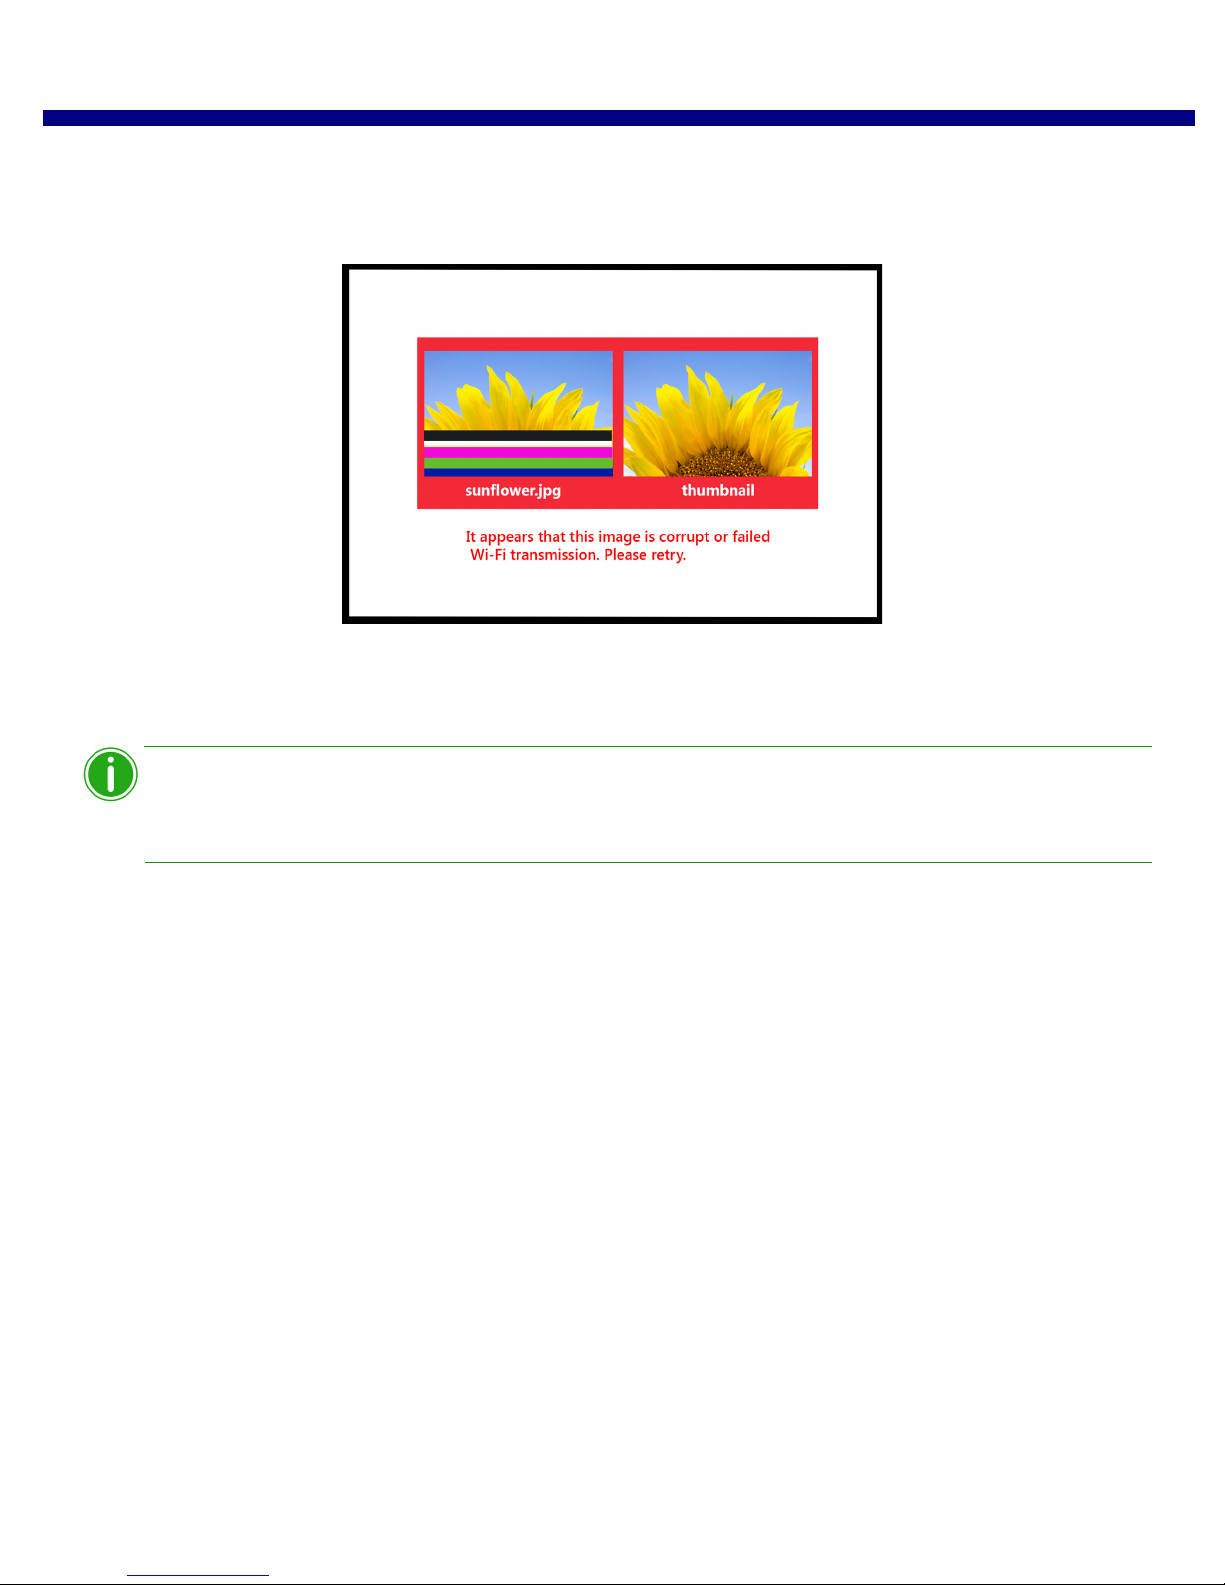
If you have issues when printing images, an error sheet will print. This sheet gives you information on which image did not
print so you can try to reprint the image.
Figure 6. Example error sheet
1. If you receive this error, try to reprint the image. If the image doesn’t print the second time, verify your network
connections, then try again.
WPS Pro has been built for JPEG and PNG files with an RGB color space. Make sure your images
are in one of these formats before sending them to the WPS Pro for printing.
34 DNP Imagingcomm America Corporation
Page 35
Print Size Chart WPS Pro User Guide
Note
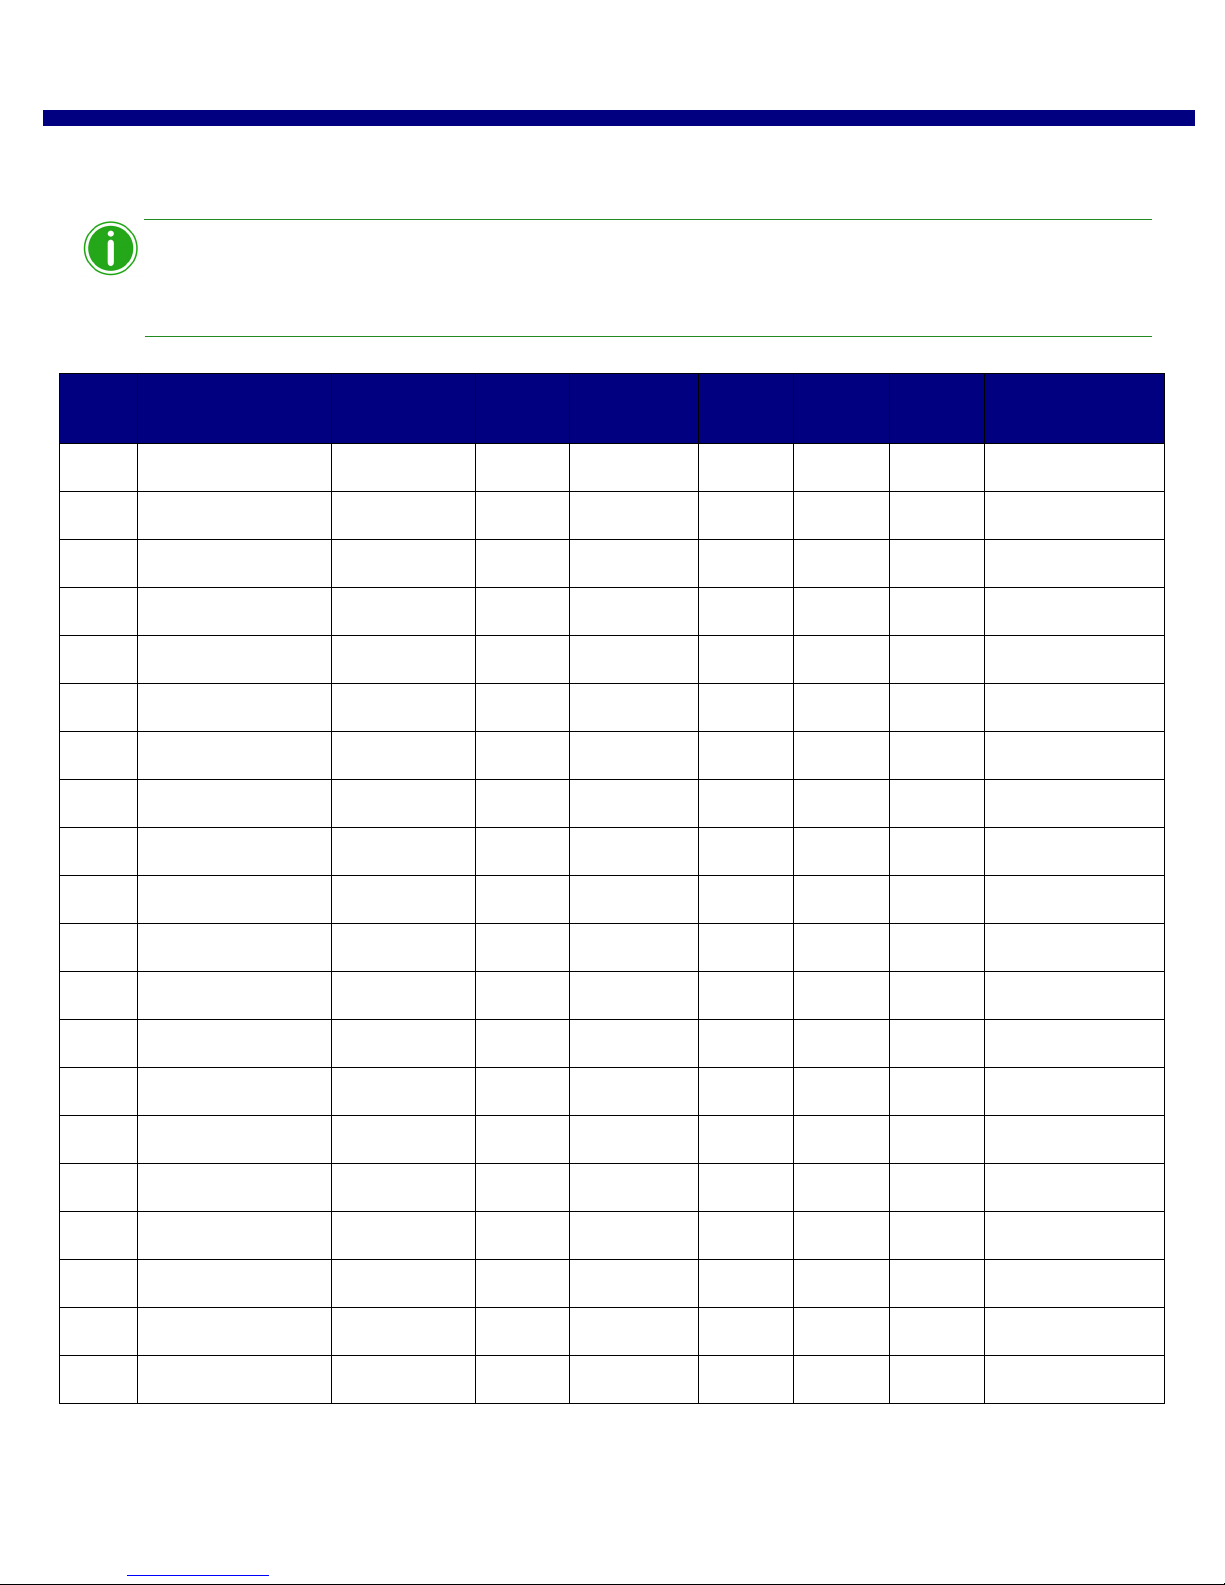
Print Size Chart
Use the table below to determine the size of media you need for your printer.
If you use the half panel printing option, only half of your available ribbon will be used. Costs will
be higher as the other half panel is not used.
Media
Size
3.5x5 3.5x5 * 3.5x5
4x6 two 2x6 cut strip 2 strip 2x2x6s
5x7 3.5x5 ½ panel * 3.5x5
6x8 two 2x6 cut strip 2 strip 2x6x2s
Description Configuration
Notes
4x6 4x6
two 3.5x5 cut 2 strip ** 3.5x5s
5x5 square square 5x5sq
5x7 * 5x7
4x6 ½ panel 4x6
two 4x6 cut strip 2 strip 2x4x6s
four 2x6 cut strip 4 strip 2x6x4s
DS40 DS620/
DS620A
RX1 DS80/
DS80DX
DS820/
DS820A
WPS Pro Printer
Queue Name
6x6 square square 6x6sq
6x8 6x8
6x9 two 2x6 cut strip 2 strip * * 2x6x2s
4x6 ½ panel * * 4x6
two 4x6 cut strip 2 strip * * 2x4x6s
four 2x6 cut strip 4 strip * * 2x6x4s
6x6 square square * 6x6sq
4.5x6 ½ panel * 4.5x6
two 4.5x6 cut strip 2 strip * 4.5x6s
DNP Imagingcomm America Corporation 35
Page 36
Print Size Chart WPS Pro User Guide
Note
Media
Size
Description Configuration
Notes
DS40 DS620/
DS620A
RX1 DS80/
DS80DX
DS820/
DS820A
WPS Pro Printer
6x9 6x8 cut at 8" * 6x8
6x9 * 6x9
8x10 4x8 ½ panel 4x8
two 4x8 cut strip 2 strip 4x8x2s
5x8 ½ panel 5x8
2 5x8 cut strip 2 strip 5x8x2s
6x8 ½ panel 6x8
8x8 square square 8x8sq
8x10 8x10
8x12 4x8 ½ panel 4x8
two 4x8 cut strip 2 strip 4x8x2s
Queue Name
three 4x8 cut strips 3 strip 4x8x3s
5x8 ½ panel 5x8
two 5x8 cut strip 2 strip 5x8x2s
6x8 ½ panel 6x8
two 6x8 cut strip 2 strip 6x8x2s
8x8 square square 8x8sq
8x10 cut at 810" 8x10
8x12 8x12
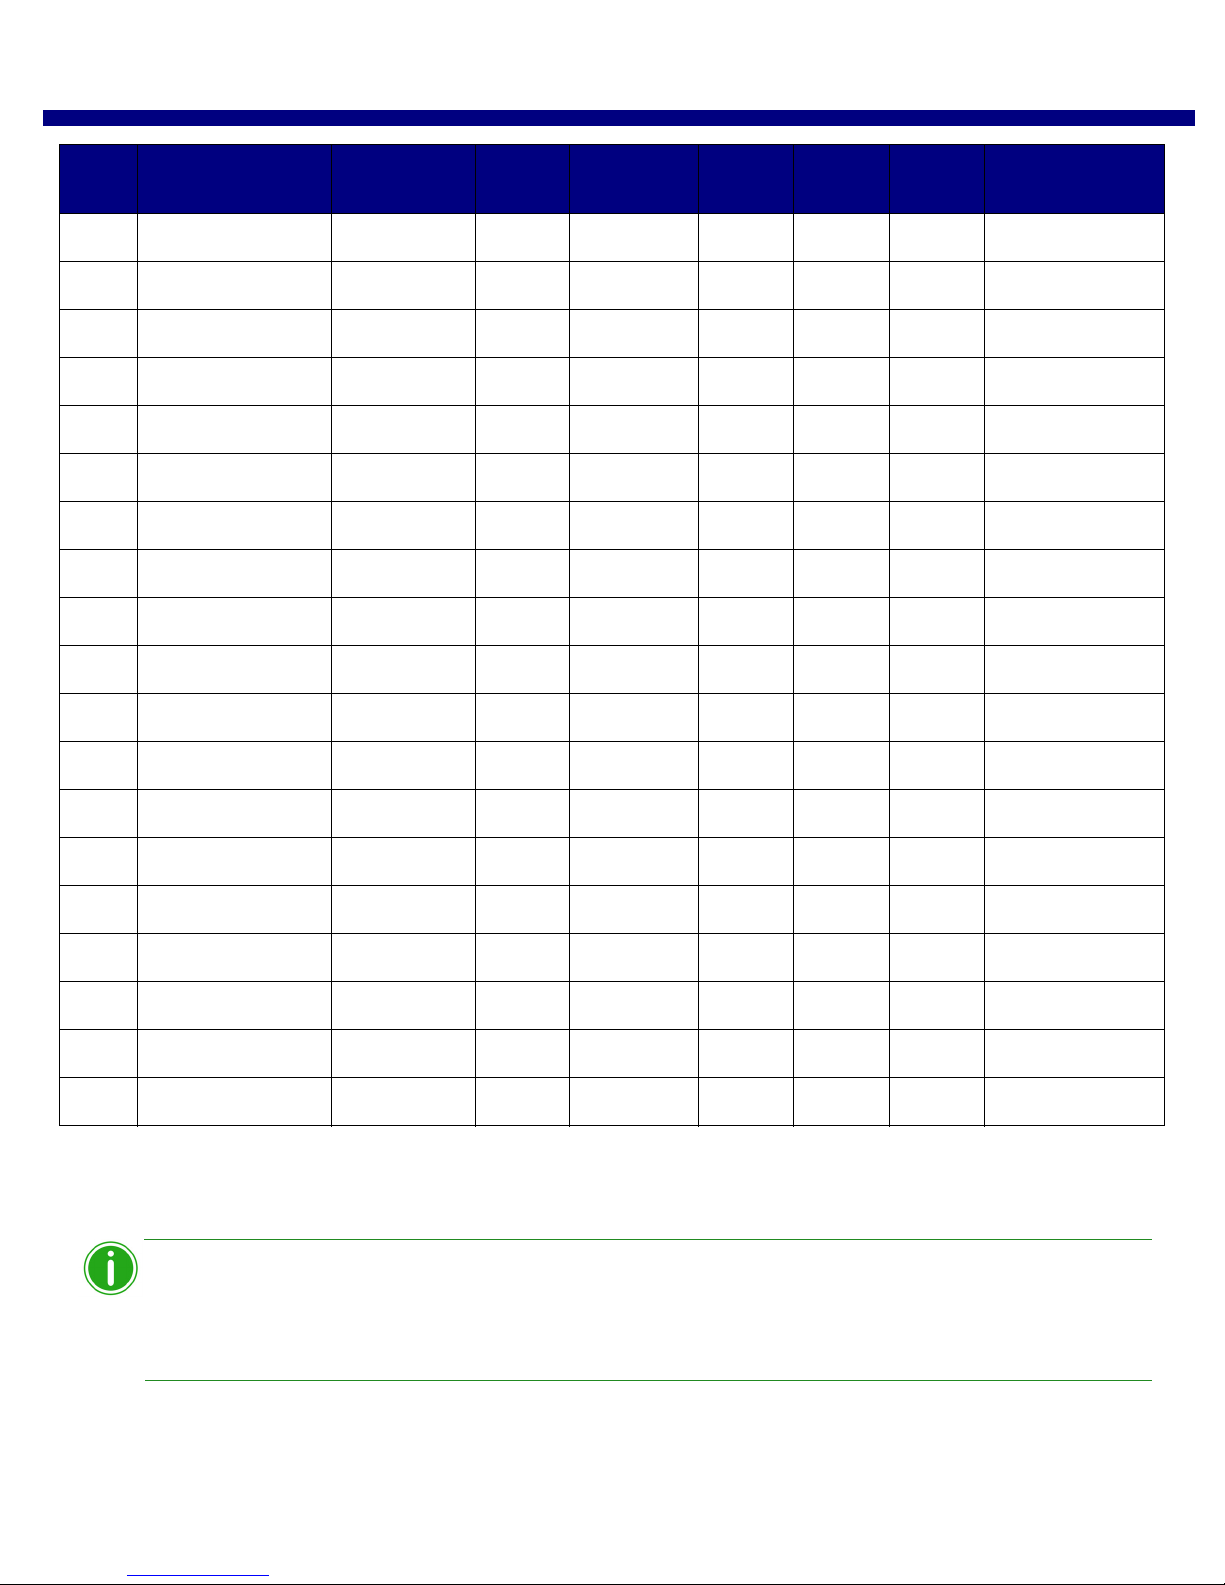
Print size is available for that printer
Default setting.
* Print size may not be available in all sales regions. Contact your sales representative for more information.
** Firmware v1.5 or greater
You can have two (2) printers connected to WPS Pro simultaneously. The media loaded must be
the same, i.e., two printers that both have 4”6” media loaded. See “Changing the Print Pooling
Settings” on page 87 for more information.
36 DNP Imagingcomm America Corporation
Page 37
5
Using Apple Mobile iOS Devices with WPS Pro
This chapter discusses how to use your Apple mobile devices to print using the WPS Pro network.
Be sure to follow the installation steps at “Setting Up the WPS Pro System” on page 18 before continuing.
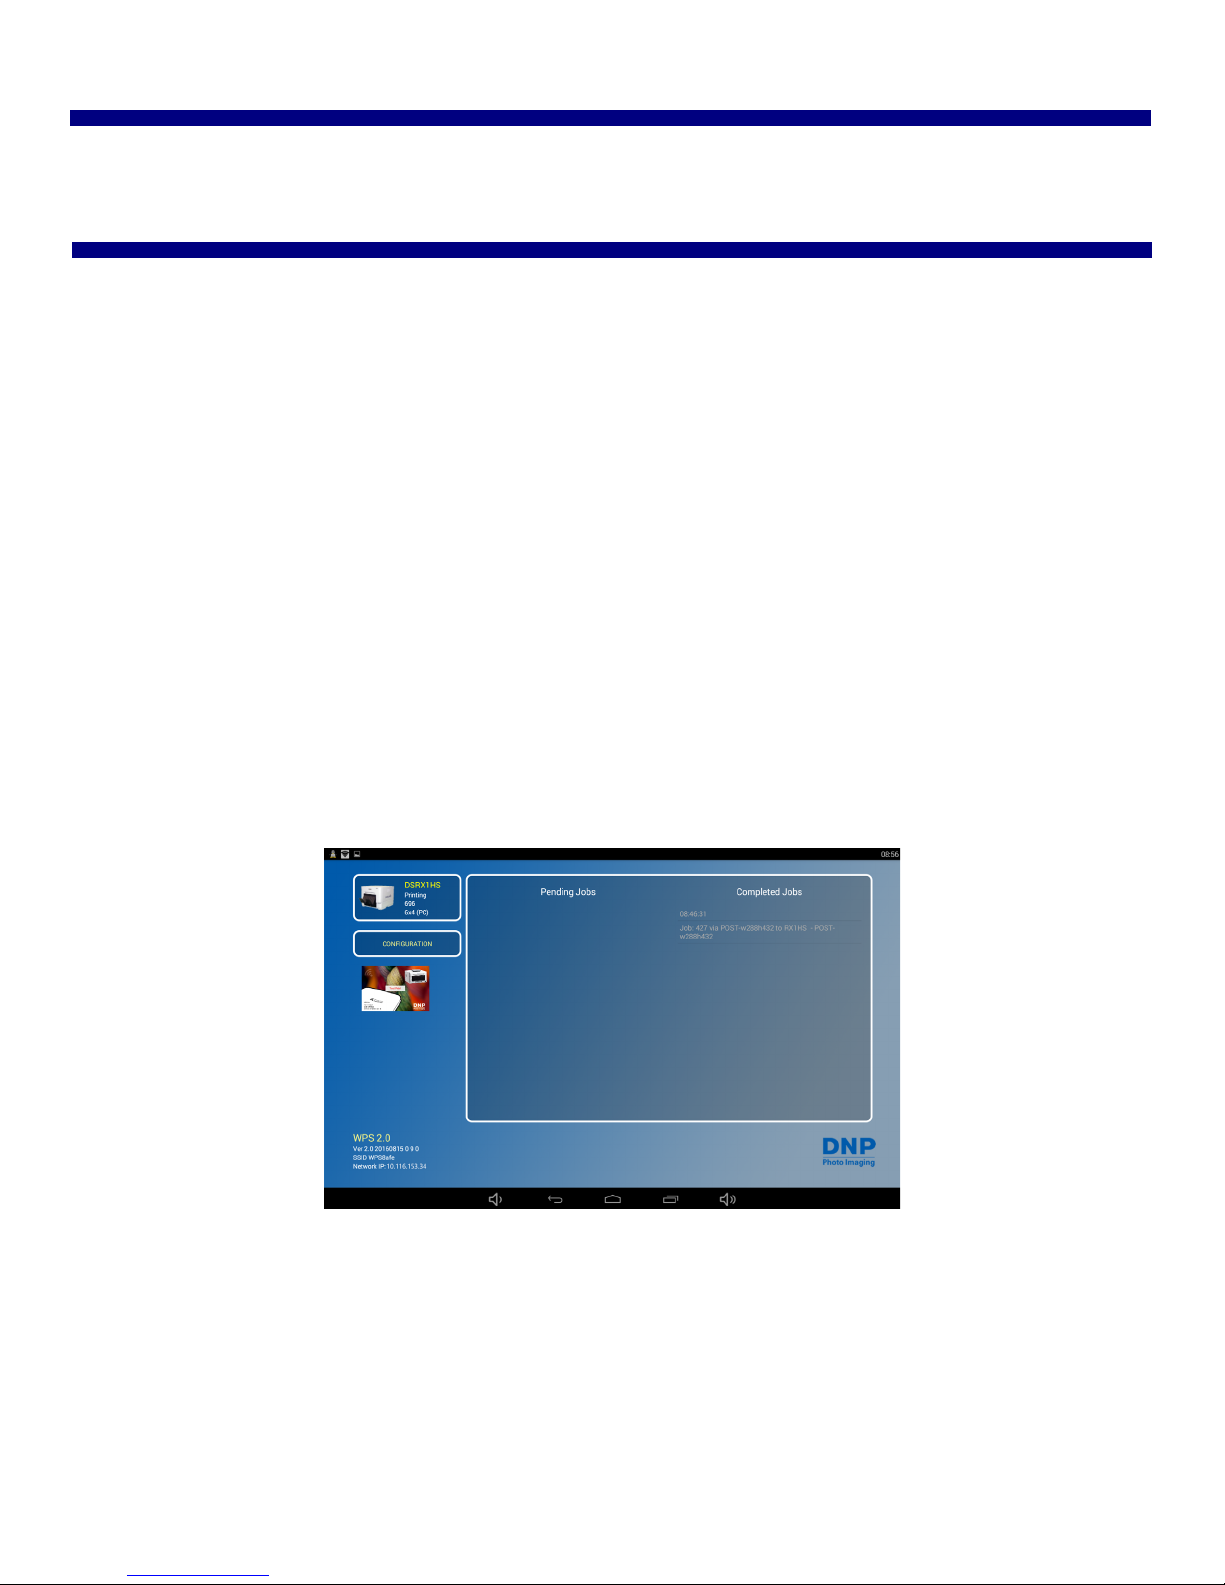
There are two transfer methods you can use to print from your Apple device to the WPS Pro network - web transfer or FTP
transfer.
1. Using Apple Devices for Web Transfers (Mobile Apps). Currently, web services requires the use of a WPS
companion app. Use the WPS Print 2 app to print photos. Use the WPS Status app to monitor your media usage and
system status.
2. Using Apple Mobile iOS Devices for FTP Transfers. FTP transfers allow you to print through the WPS Pro network
using your favorite camera and photo editing applications on your mobile device. WPS Pro supports printing from
Wi-Fi enabled iOS mobile devices (i.e., smartphones and tablets) using a FTP client application.
WPS Pro also allows you to connect five (5) input/transfer devices simultaneously. Your input/transfer device(s) can be a
maximum of 30 feet away from WPS Pro and still send the print job successfully, although ranges vary depending on
network traffic.
Before you begin printing, check your WPS Pro console and make sure the WPS Status app is running. In order to
process the images it receives, the WPS Pro console must have the WPS Status app open and active.
DNP Imagingcomm America Corporation 37
Page 38
Using Apple Devices for Web Transfers (Mobile Apps) WPS Pro User Guide
Note
Attention
Note
Using Apple Devices for Web Transfers (Mobile Apps)
Web transfer is a transfer method used by your WPS Pro system. HTTP transfers use web technology to act as an interface
between the WPS Pro network and the user. Currently, the companion app, WPS Print 2, use an HTTP interface to transfer
images to the WPS Pro device for printing. While you can also use web services transfer on a PC or Mac computer, that
method requires third party software development. If you want more information about third party software development,
contact your DNP IAM sales representative.
Configuring Apple Devices for Web Transfers (Mobile Apps)
The configuration for mobile apps is easy. Simply download the following apps from the iTunes store.
WPS Status app
WPS Print 2 app
Printing from Apple Devices using the Share Sheet Option
Use the following steps to print images from your iPad/iPhone.
1. If you haven’t already, download the WPS Print 2 app to your mobile device.
2. Connect to the Wi-Fi signal created by WPS Pro.
The signal is labeled WPSxxxx, where xxxx is a unique number for your device.
3. When prompted, type the following password: DNP20153
4. Launch the photo application. This application can be your standard camera roll (or photo gallery), a photo editing
application, or a third party photo viewing application.
To use the WPS Print share feature, your photo application must use standard share sheet functionalities.
5. Select your image or images.
6. Click the Share Sheet.
7. Select the WPS Print 2 app from the listed share applications.
8. The WPS Print 2 app is launched. You can now print images using the WPS Print 2 app.
Printing from Apple Devices using the WPS Print 2 App
When using this app, the images you take are saved in an album in your photo gallery or camera
roll. If you have the image archiving functionality turned ON, and a micro SD card plugged into the
WPS Pro device, your images are also saved to the micro SD card.
1. Connect to the Wi-Fi signal created by WPS Pro.
38 DNP Imagingcomm America Corporation
Page 39
Printing from Apple Devices using the WPS Print 2 App WPS Pro User Guide
Note
The signal will be labeled WPSxxxx, where xxxx is a unique number for your device.
2. When prompted, type the following password: DNP20153
3. Wait two minutes for your device to connect to the wireless network before opening the app.
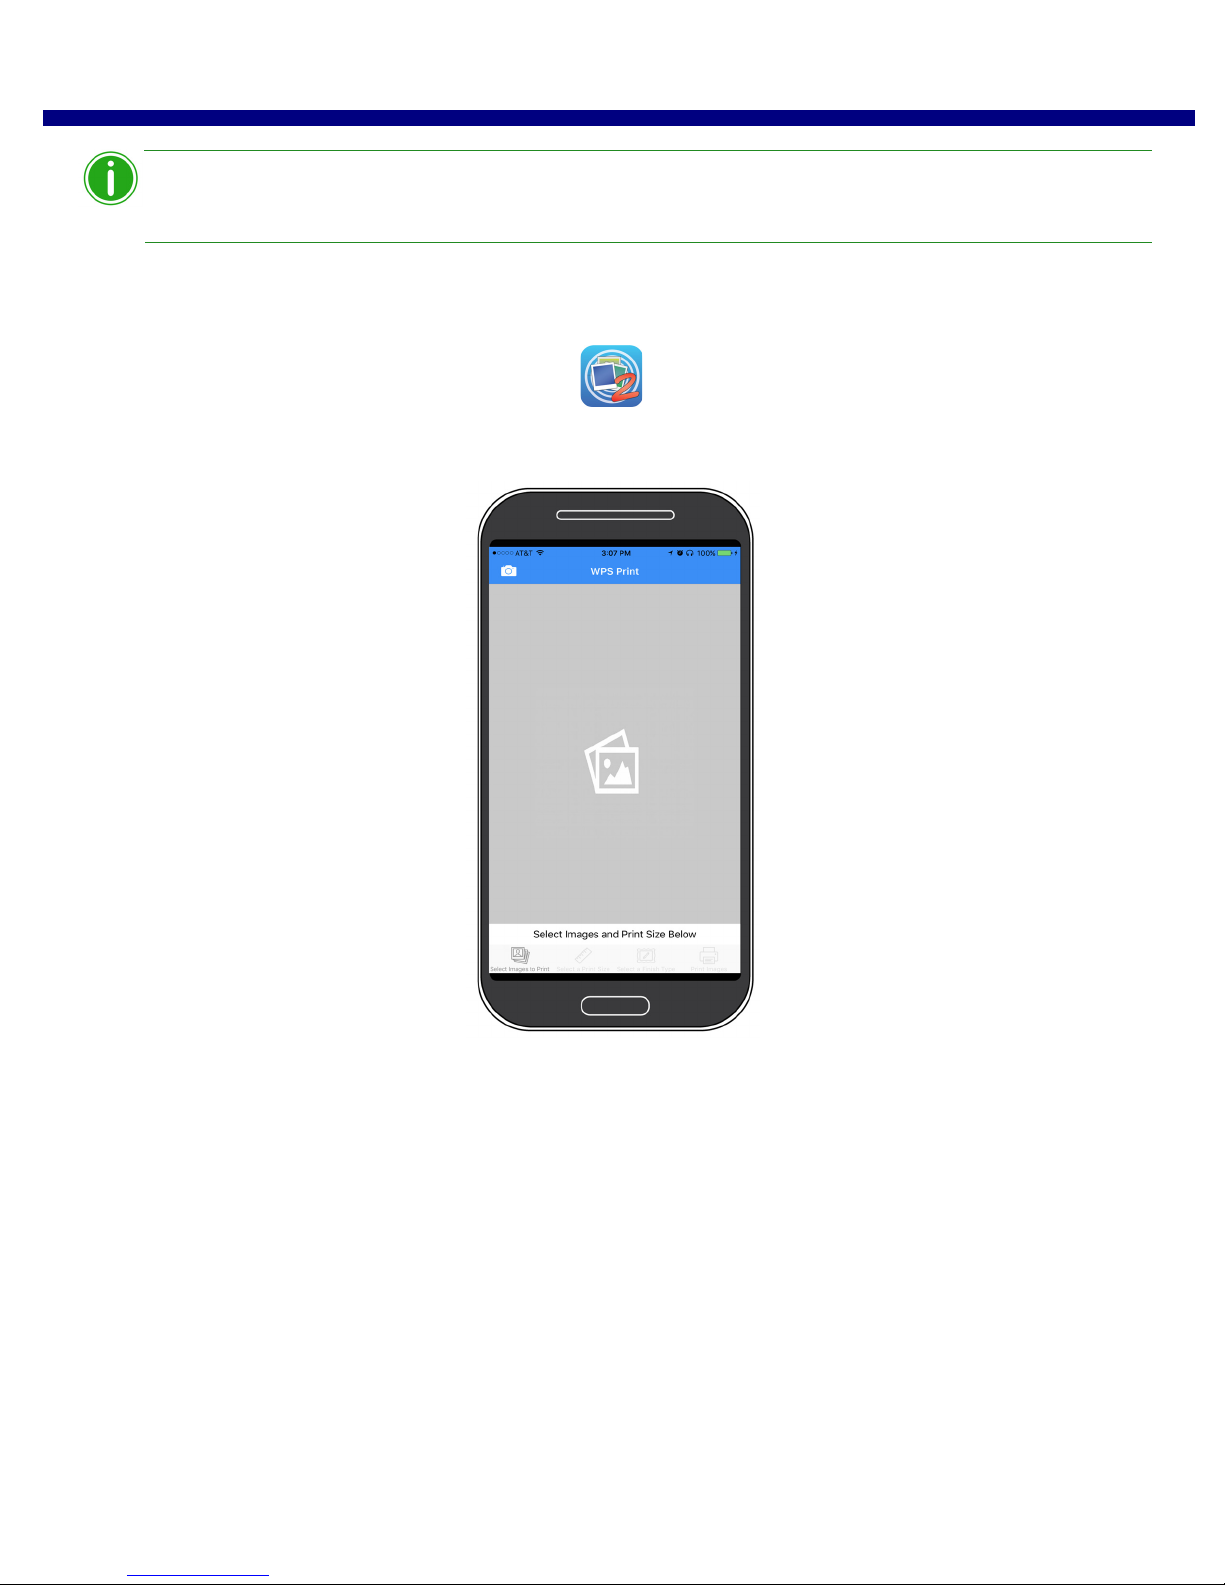
4. On your mobile device, open the WPS Print 2 app.
5. The WPS Print 2 app opens to the home screen and is now ready for use.
6. From your WPS Print 2 app home screen, you can either take a picture using your device’s camera, or choose images
from your camera roll.
DNP Imagingcomm America Corporation 39
Page 40
Printing from Apple Devices using the WPS Print 2 App WPS Pro User Guide
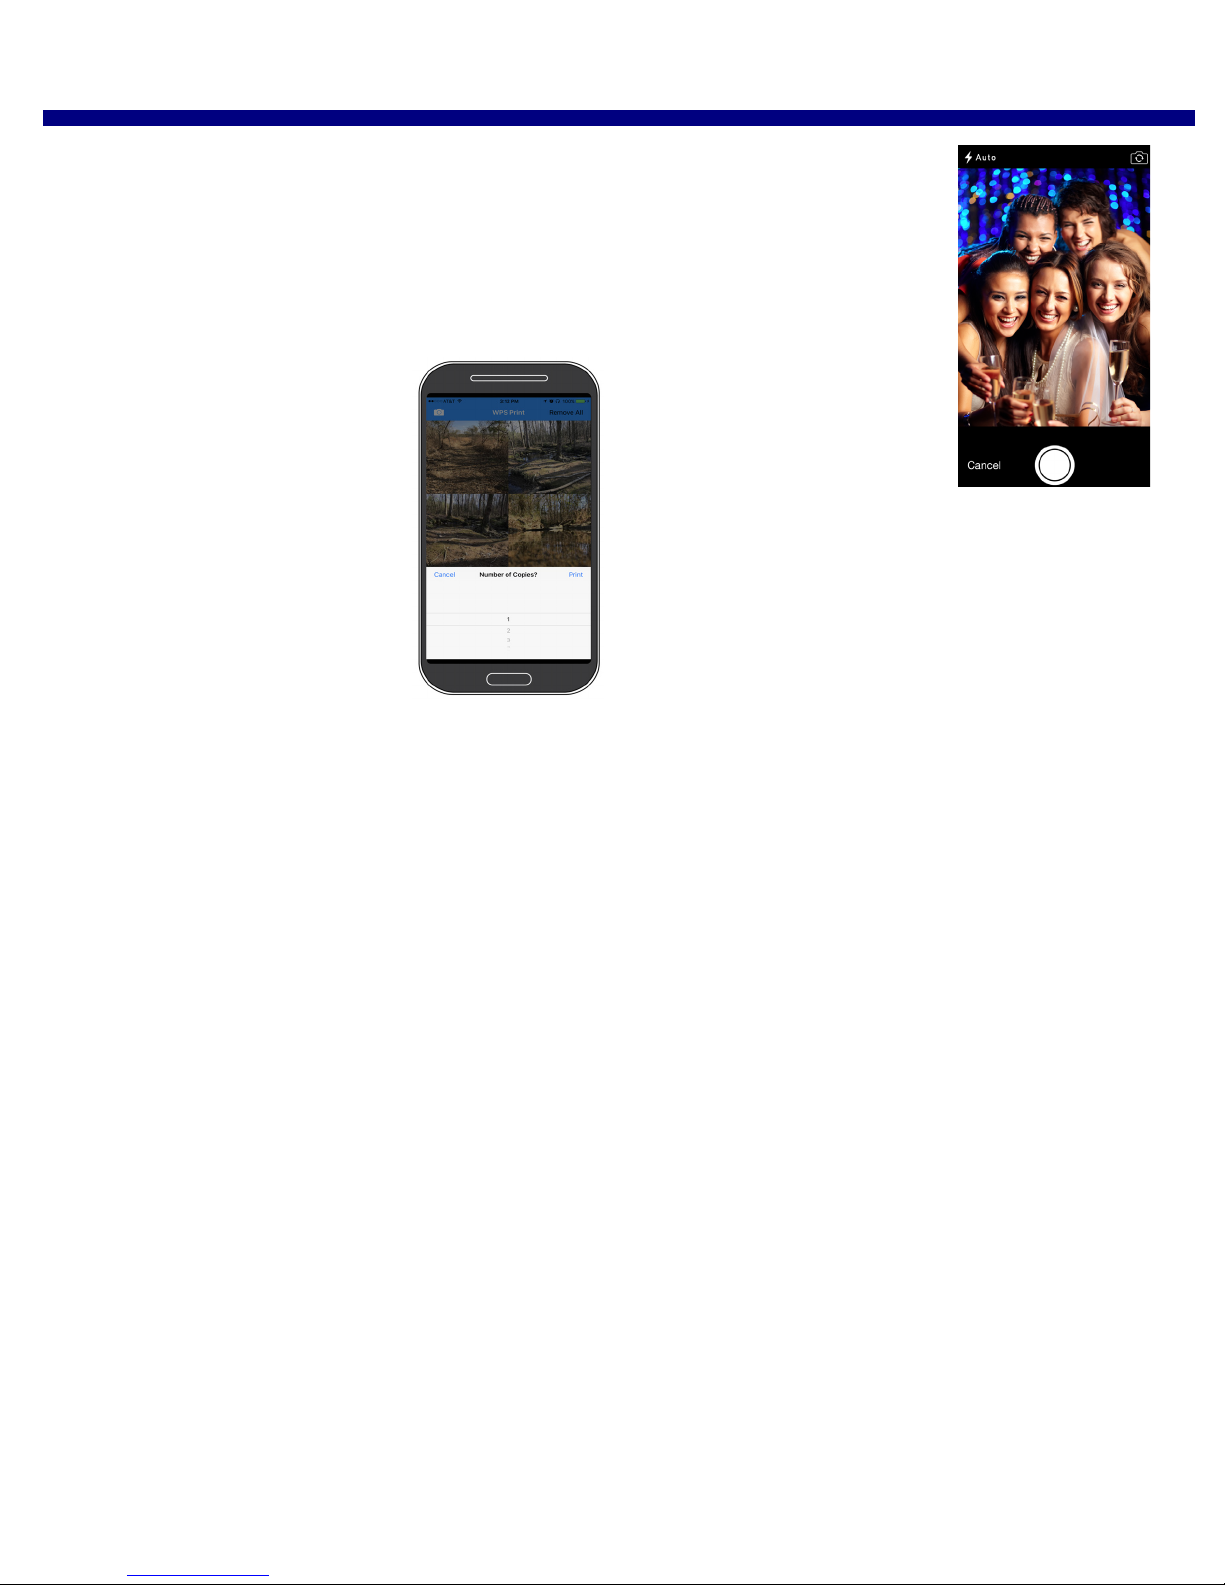
7. To print images using your camera:
Touch the camera in the upper left corner of the app.
Your device’s default camera application opens. Take your picture as you normally would.
Press the Use Photo button to use that image.
When you are returned to the WPS Print 2 application, view your image.
From the bottom menu, select the printer/print size, finish type, and image quantity.
Press the Print button to print your image(s).
8. To print images using your photo gallery:
Press the Select Images to Print option at the bottom of the screen.
Select your image. Depending on your gallery application, you may be able to select more than one image at a
time. To do this, click and hold an image until check marks appear on the images. Then select the images you
want to print and press Done to return to the WPS Print 2 application. Not all gallery applications allow for
multiple image selection.
When you are returned to the WPS Print 2 application, view your image.
From the bottom menu, select the printer/print size, finish type, and image quantity.
Press the Print button to print your image(s).
40 DNP Imagingcomm America Corporation
Page 41
Using the WPS Status App to Monitor Your Network WPS Pro User Guide
Note
Note
Using the WPS Status App to Monitor Your Network
When connecting to the WPS Status app for the first time, you may notice an
incorrect date. The WPS Status app will reset the time from the value on your
phone or tablet. This may take up to a minute to take effect.
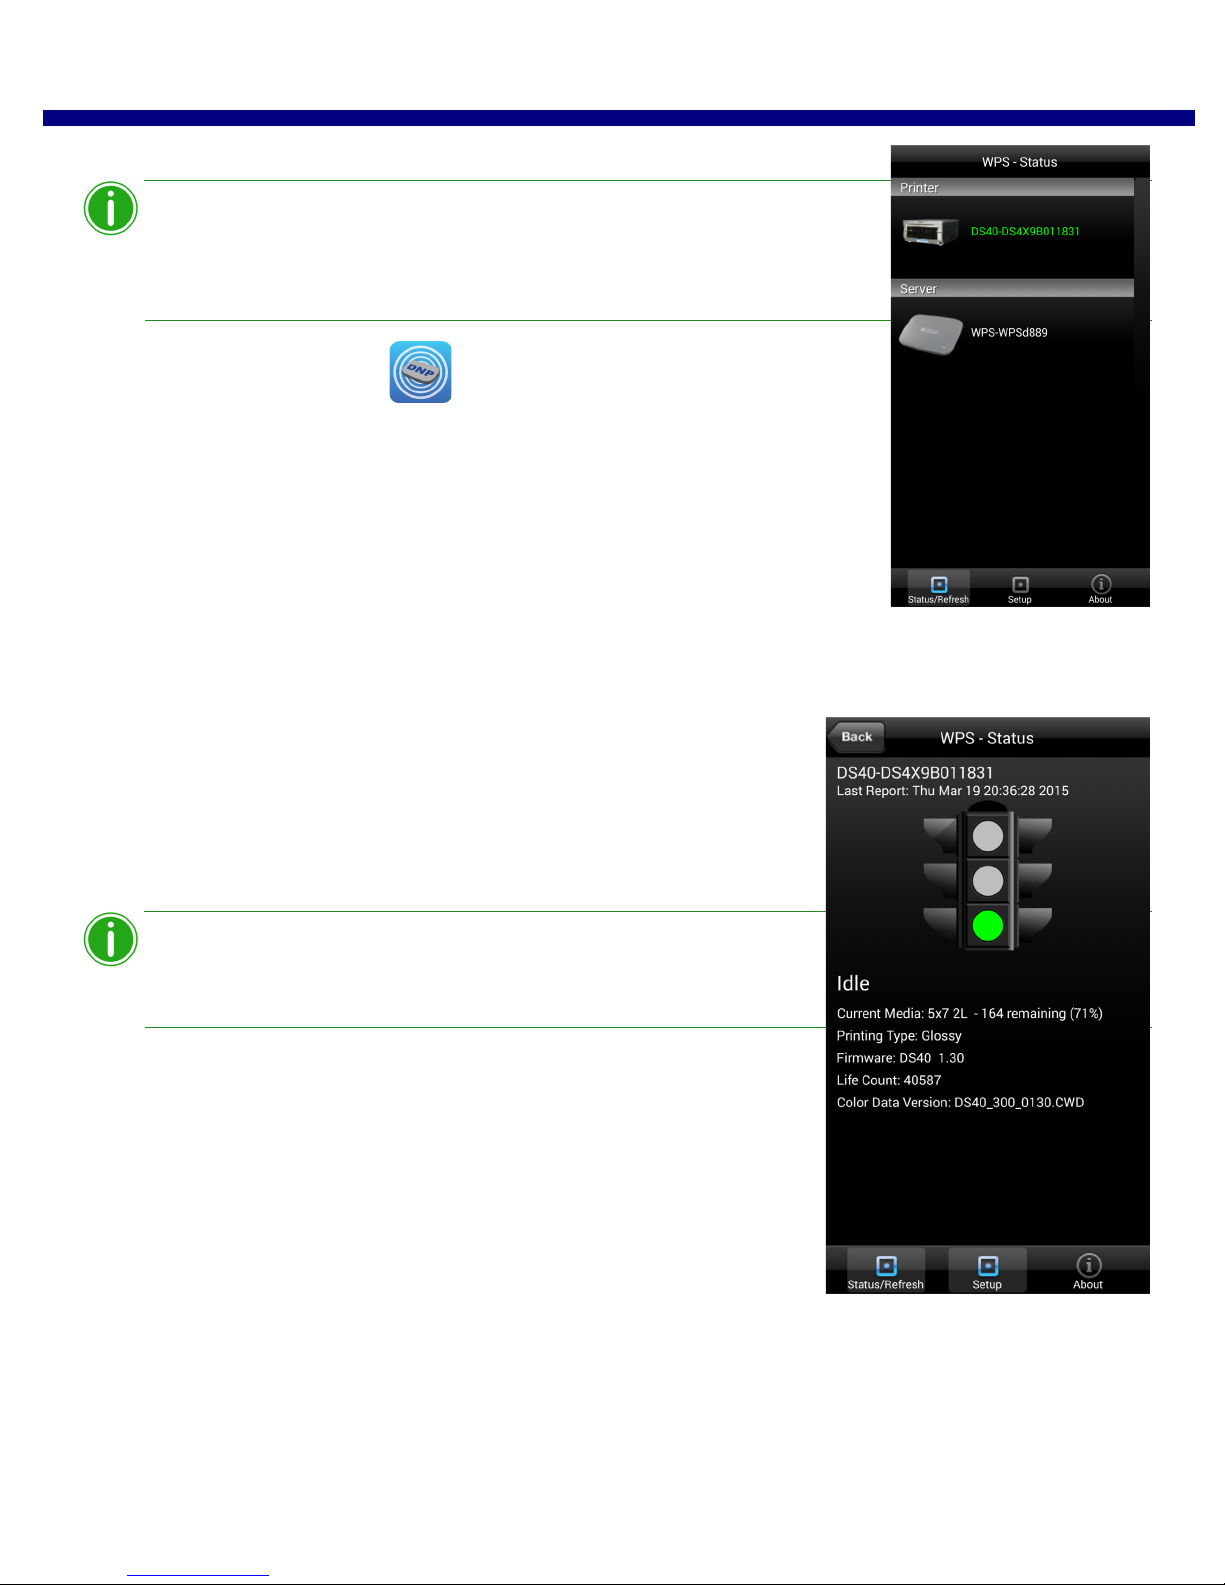
Upon opening the WPS Status app, two icons are displayed: Printer and Server.
Printer Icon
Clicking the Printer icon allows you to view the following information regarding
your attached printer(s):
Status: Shows the status of the connected printer(s):
Green: Printer is in a workable state.
Yellow: Printer is low on media.
Red: Printer is extremely low on media, has an error, or a jam.
The Yellow and Red warnings can be configured using the Setup screen
of this application. See “Setup Button” on page 42.
Current Media: Displays the printer/media prints remaining, media type
loaded in the connected printer(s), and remaining media amount for
connected printer(s).
Printing Type: Displays whether images are being printed in Matte or Glossy
format.
Firmware: Displays the version of printer software installed on the connected
printer(s).
Life Count: Displays the total prints that have been produced by the
connected printer(s) in the printer(s)’ lifetime.
Color Data Version: Displays the ICM file version your device is using.
DNP Imagingcomm America Corporation 41
Page 42
Using the WPS Status App to Monitor Your Network WPS Pro User Guide
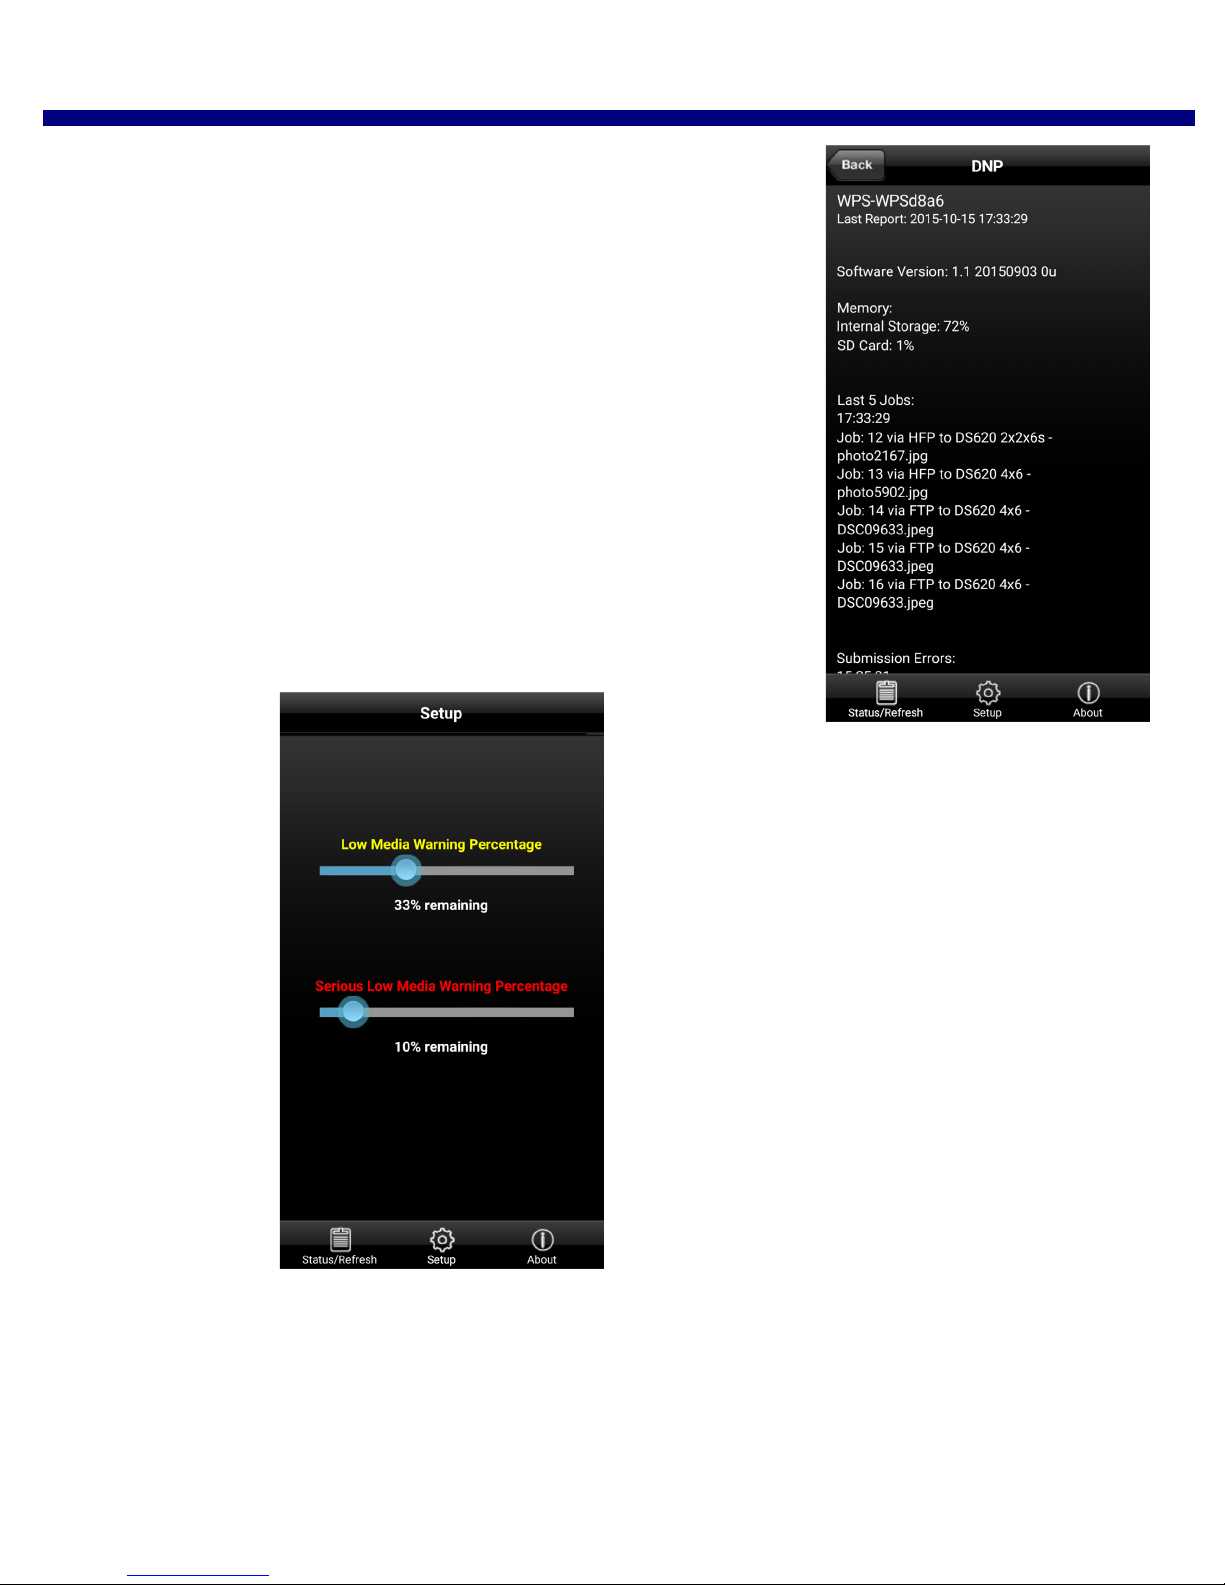
Server Icon
Clicking on the Server icon allows you to view the following information:
Software/Firmware Version: Displays the installed WPS Pro firmware version.
You can use this version number when you need to troubleshoot information
about your system.
Last 5 Jobs: Lists the name of the last 5 images printed, as well as the manner
in which they were sent to the printer, i.e., FTP.
Submission Errors: Displays any errors in printing your images.
Setup Button
As mentioned earlier, the Status screen displays whether your attached printer(s)
have a high level (green light), low level (yellow light), or extremely low level (red
light) of remaining media. Using the Setup button, you can set the threshold for
when the low media warnings are displayed.
1. Click the Setup button.
2. Using the Low Media Warning Percentage slider, set the percentage at which a low media warning is triggered. If
you set this at 40%, when the media left in your printer reaches 40%, the icon on the Printer screen will be Yellow.
3. Using the Serious Low Media Warning Percentage slider, set the percentage at which an extremely low media
warning is triggered. If you set this at 25%, when the media left in your printer reaches 25%, the icon on the Printer
screen will be Red.
42 DNP Imagingcomm America Corporation
Page 43
Using Apple Mobile iOS Devices for FTP Transfers WPS Pro User Guide
Note
Note
Using Apple Mobile iOS Devices for FTP Transfers
One of the transfer methods offered by WPS Pro is FTP, or File Transfer Protocol. File Transfer Protocol (FTP) is a standard
network protocol used to transfer files from one device to another device over a TCP-based network, such as the Internet.
FTP is built on a client-server architecture and uses separate control and data connections between the client and the server.
FTP transfer is best used when transferring images from a mobile device to the WPS Pro for printing. To do this, you must
have a FTP client application installed on your mobile device. Be sure your FTP client application allows for binary data
transfer as that is the data type WPS Pro supports.
Configuring Apple Devices for FTP Transfers
Only use this procedure when setting up your WPS Pro device for the first time. After you have
configured your FTP client application to use the share sheet, you do not have to make any other
changes.
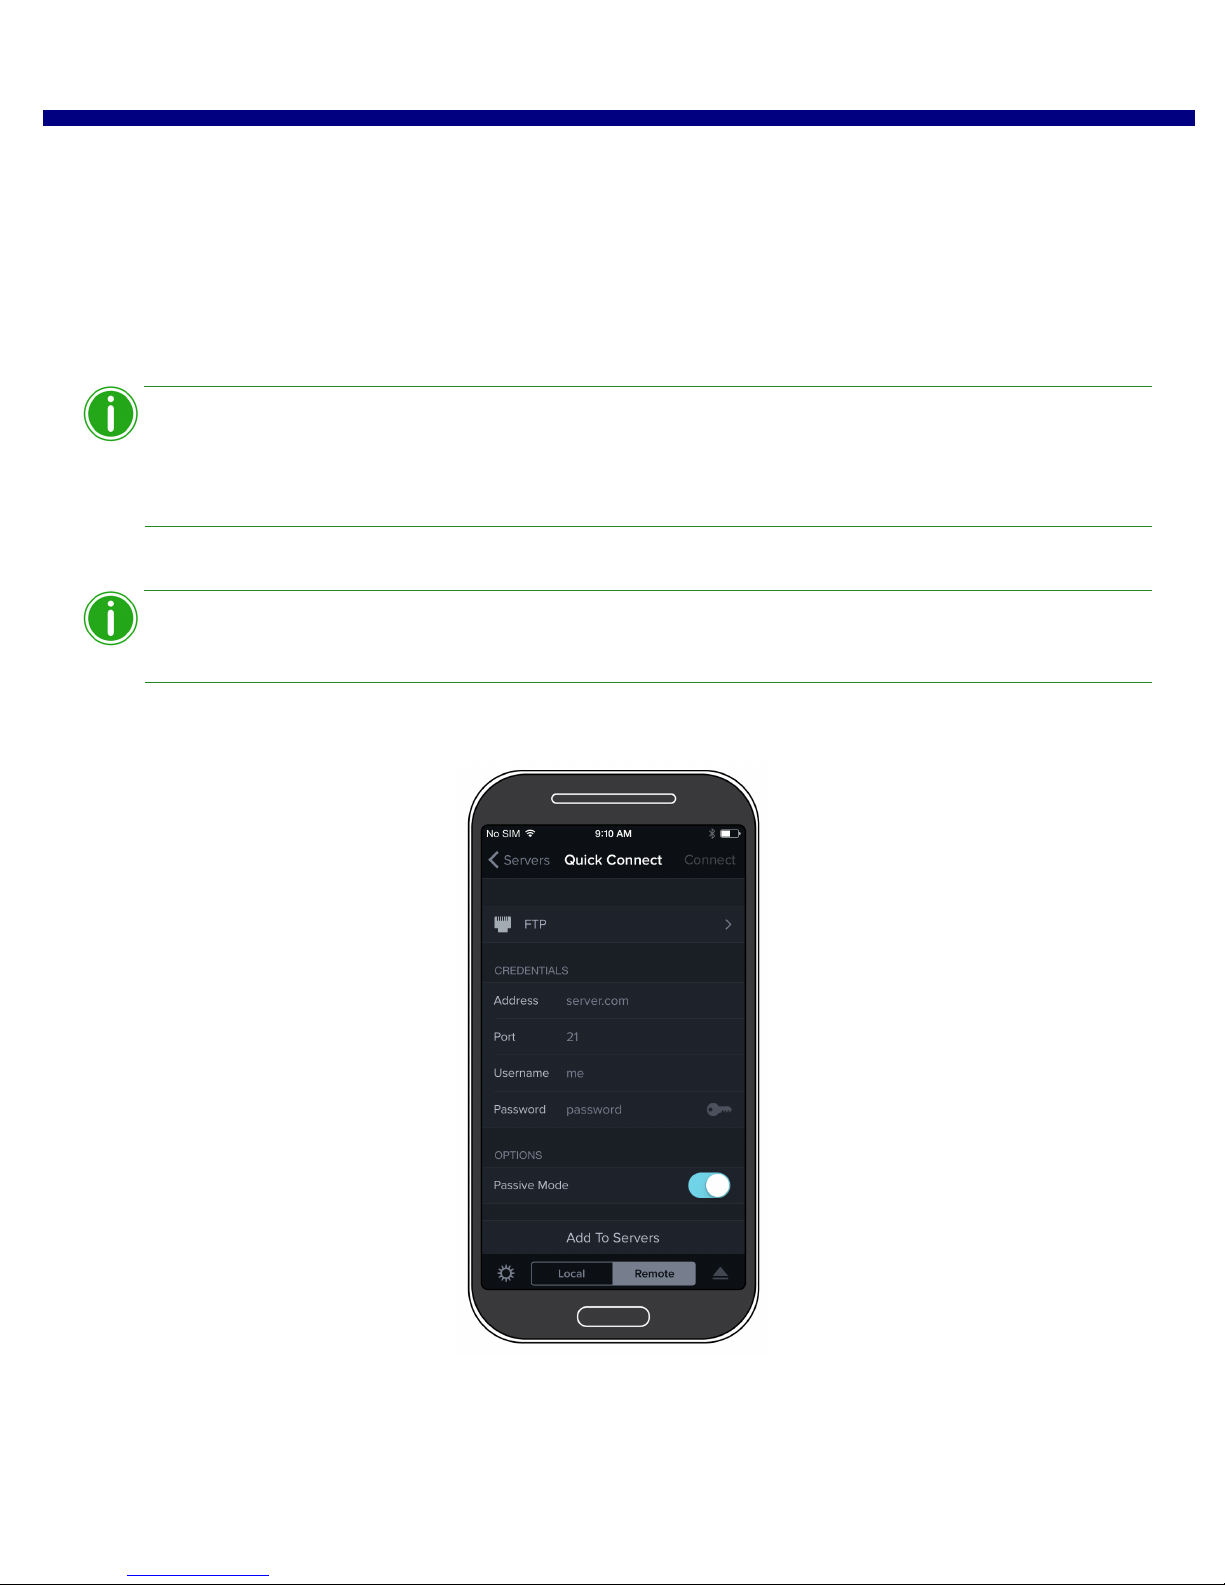
1. Download a FTP client application from the Apple
Some examples of FTP client applications are: Transmit™, FTP Client Pro, and Easy FTP Pro.
2. Once downloaded, launch the FTP client application.
®
App StoreSM.
DNP Imagingcomm America Corporation 43
Figure 7. Example of client FTP app
Page 44
Printing from Apple Devices using FTP Transfers WPS Pro User Guide
Attention
Note
Note
3. Enter the required information into the following fields:
Host: 192.168.43.1
Type: FTP
Port: 21
Username: photo
Password: none (type the word “none”)
Remote Dir: / (forward slash)
Mode: Active (usually in advanced settings)
If you are prompted to enter a transfer option, select Binary.
If you select ASCII, your images will not print correctly.
4. Click Save to save your settings.
5. If you have not already, connect to the WPS Pro Wi-Fi network.
6. Return to the FTP client application, and click the Login button to connect to WPS Pro.
If the login was successful, a dialog box is displayed, confirming the connection.
7. Once you connect to the WPS Pro network, you can now print your images wirelessly. Please note that WPS Pro only
prints JPEG and PNG file formats.
To print your images using your iPad or iPhone, see “Printing from Apple Devices using the Share Sheet Option” on
page 38.
Printing from Apple Devices using FTP Transfers
Use the following steps to print images from your iPad/iPhone. If you have not already configured your device to connect
to WPS Pro through a FTP client app.
1. Connect to the Wi-Fi signal created by WPS Pro.
The signal is labeled WPSxxxx, where xxxx is a unique number for your device.
2. When prompted, type the following password: DNP20153
3. Launch the photo application. This application can be your standard camera roll (or photo gallery), a photo editing
application, or a third party photo viewing application.
4. Select your image or images.
5. Click the Share Sheet.
6. Select the FTP client app from the listed share applications.
7. The image is printed.
44 DNP Imagingcomm America Corporation
Page 45
Printing Errors WPS Pro User Guide
Note
Note
Printing Errors
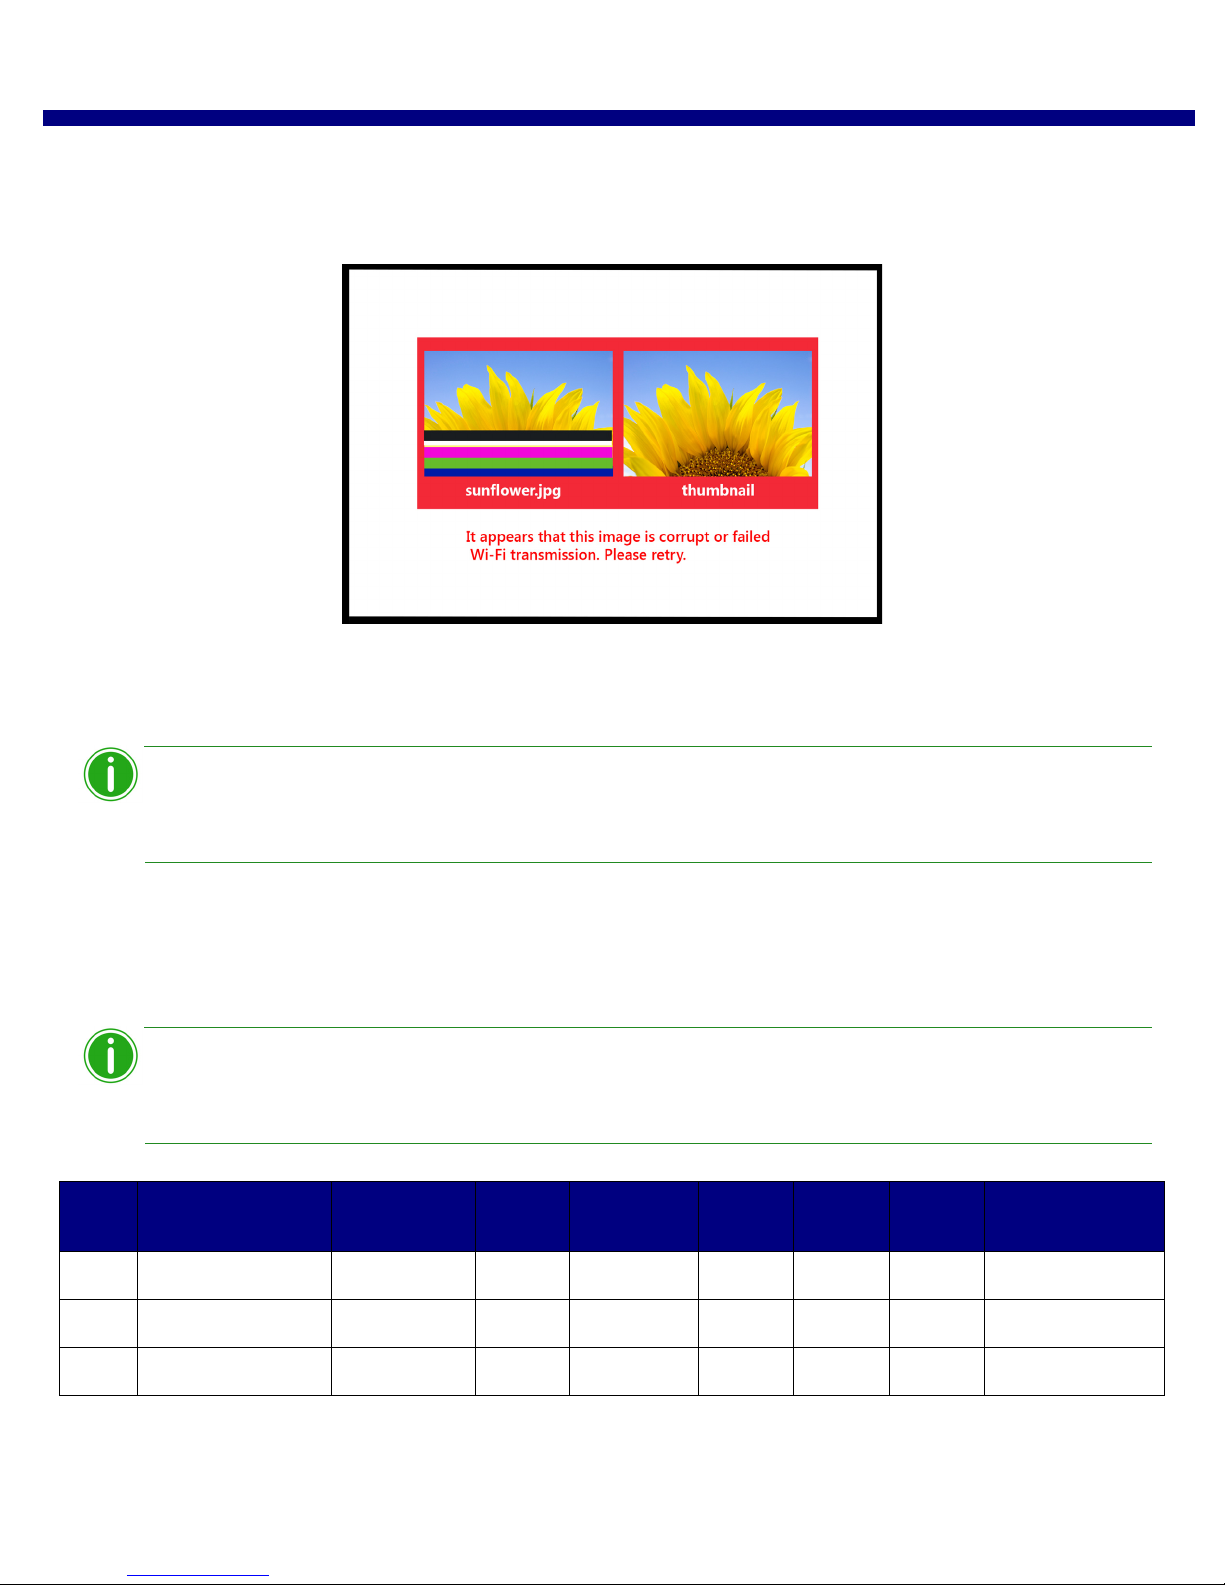
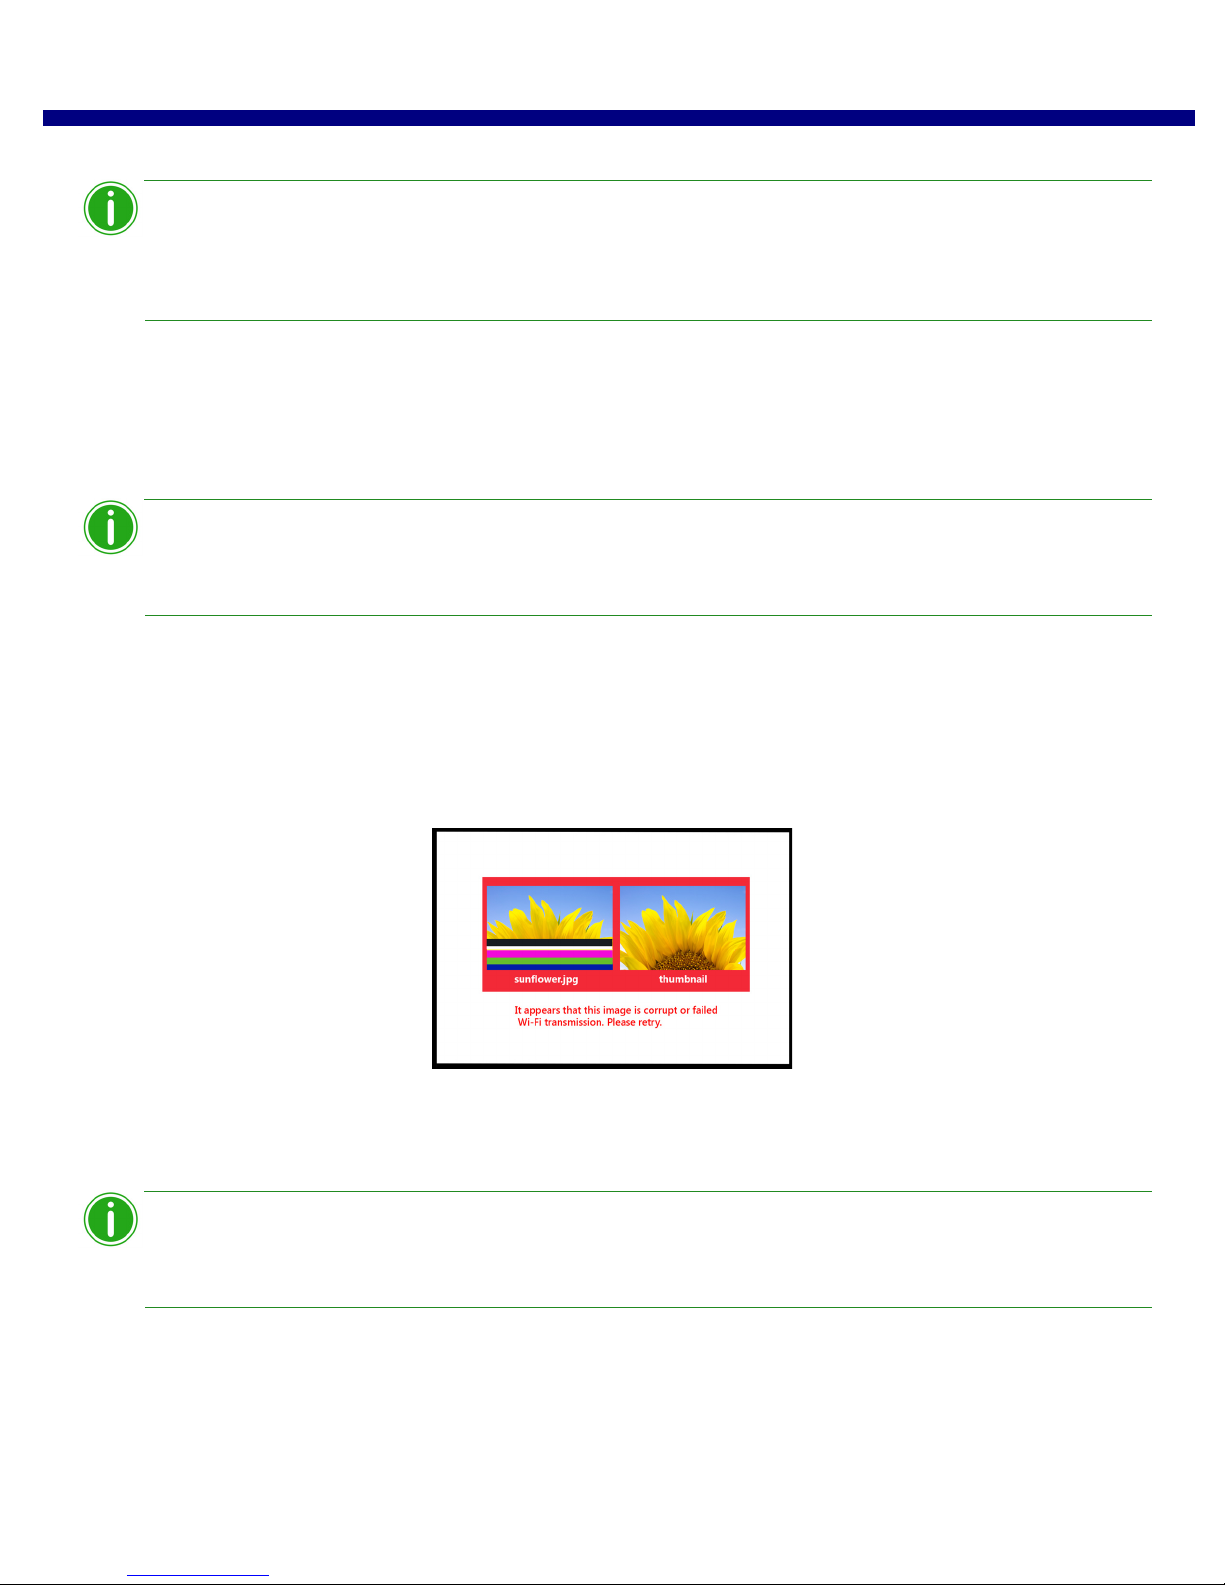
If you have issues when printing images, an error sheet will print. This sheet gives you information on which image did not
print so you can try to reprint the image.
Figure 8. Example error sheet
1. If you receive this error, try to reprint the image. If the image doesn’t print the second time, verify your network
connections, then try again.
WPS Pro has been built for JPEG and PNG files with an RGB color space. Make sure your images
are in one of these formats before sending them to the WPS Pro for printing.
Print Size Chart
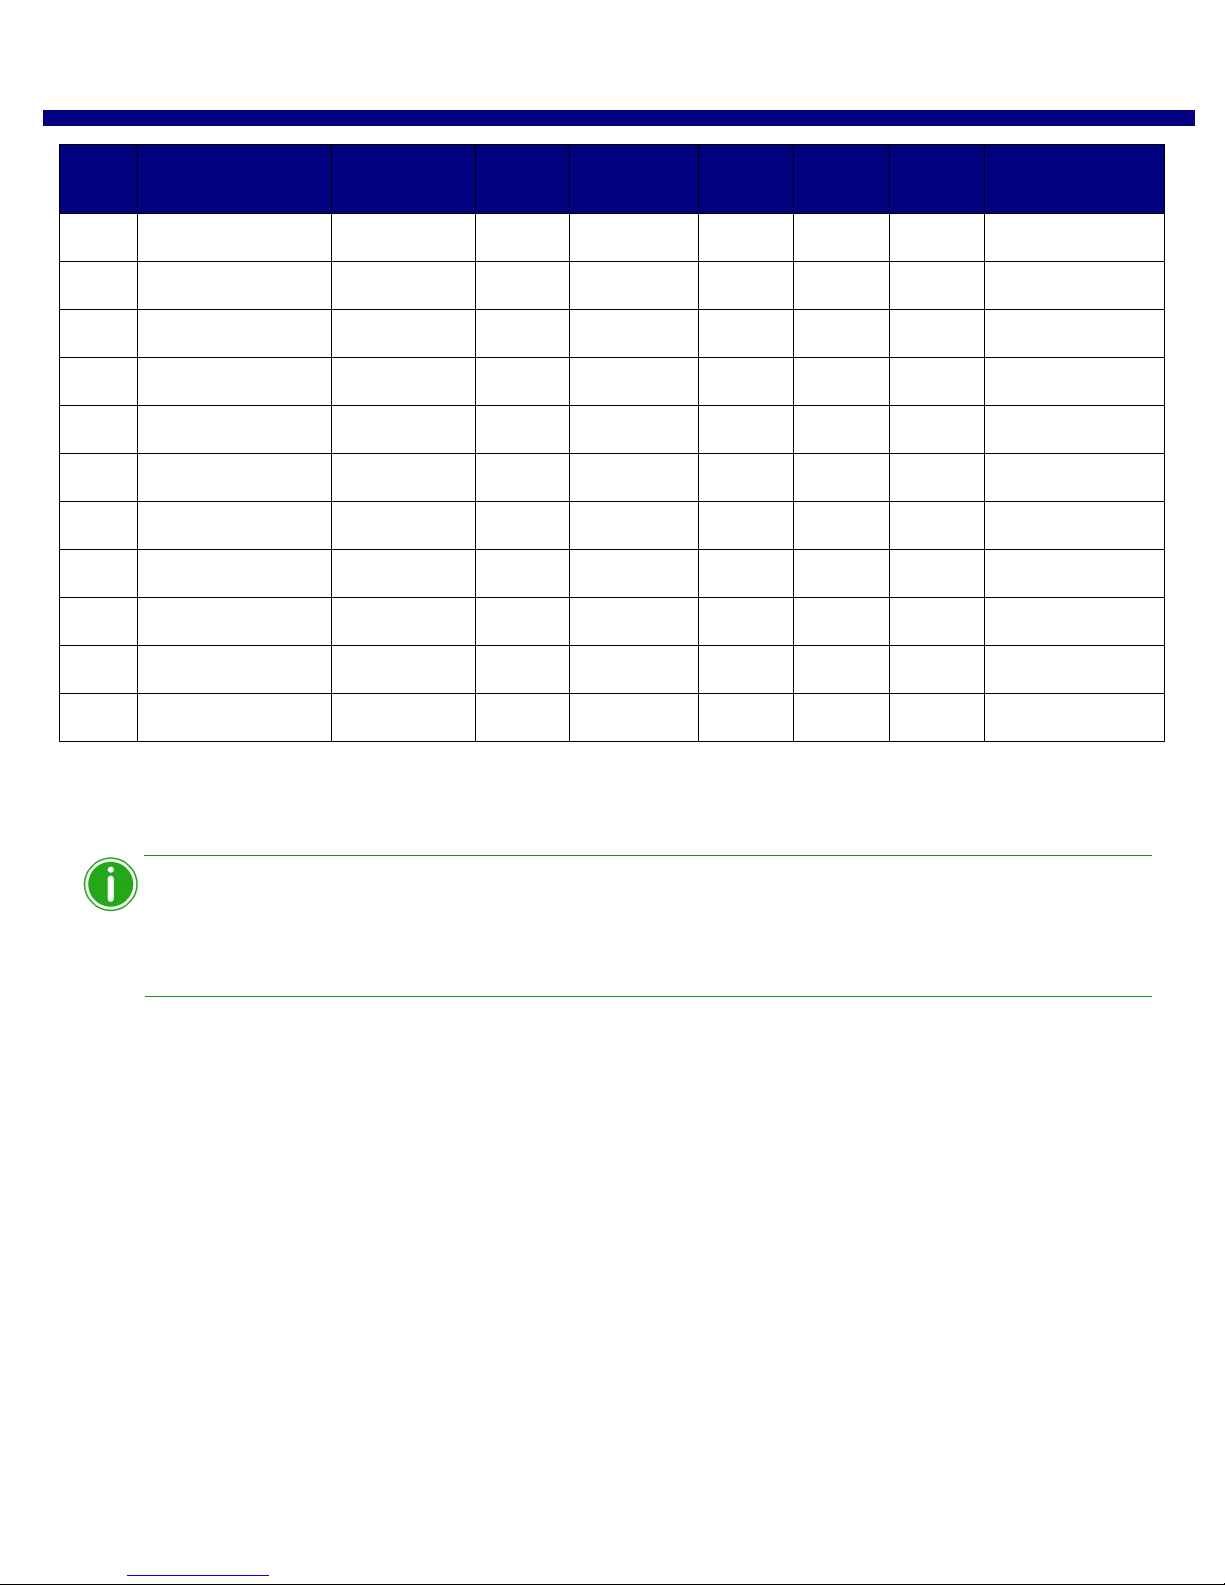
Use the table on the next pages to determine the size of media you need for your printer.
If you use the half panel printing option, only half of your available ribbon will be used. Costs will
be higher as the other half panel is not used.
Media
Size
3.5x5 3.5x5 * 3.5x5
Description Configuration
Notes
DS40 DS620/
DS620A
RX1 DS80/
DS80DX
DS820/
DS820A
WPS Pro Printer
Queue Name
4x6 two 2x6 cut strip 2 strip 2x2x6s
4x6 4x6
DNP Imagingcomm America Corporation 45
Page 46

Print Size Chart WPS Pro User Guide
Media
Size
Description Configuration
Notes
DS40 DS620/
DS620A
RX1 DS80/
DS80DX
DS820/
DS820A
WPS Pro Printer
Queue Name
5x7 3.5x5 ½ panel * 3.5x5
two 3.5x5 cut 2 strip ** 3.5x5s
5x5 square square 5x5sq
5x7 * 5x7
6x8 two 2x6 cut strip 2 strip 2x6x2s
4x6 ½ panel 4x6
two 4x6 cut strip 2 strip 2x4x6s
four 2x6 cut strip 4 strip 2x6x4s
6x6 square square 6x6sq
6x8 6x8
6x9 two 2x6 cut strip 2 strip * * 2x6x2s
4x6 ½ panel * * 4x6
two 4x6 cut strip 2 strip * * 2x4x6s
four 2x6 cut strip 4 strip * * 2x6x4s
6x6 square square * 6x6sq
4.5x6 ½ panel * 4.5x6
two 4.5x6 cut strip 2 strip * 4.5x6s
6x8 cut at 8” * 6x8
6x9 * 6x9
8x10 4x8 ½ panel 4x8
two 4x8 cut strip 2 strip 4x8x2s
5x8 ½ panel 5x8
2 5x8 cut strip 2 strip 5x8x2s
6x8 ½ panel 6x8
8x8 square square 8x8sq
46 DNP Imagingcomm America Corporation
Page 47
Print Size Chart WPS Pro User Guide
Note
Media
Size
Description Configuration
Notes
DS40 DS620/
DS620A
RX1 DS80/
DS80DX
DS820/
DS820A
WPS Pro Printer
8x10 8x10 8x10
8x12 4x8 ½ panel 4x8
two 4x8 cut strip 2 strip 4x8x2s
three 4x8 cut strips 3 strip 4x8x3s
5x8 ½ panel 5x8
two 5x8 cut strip 2 strip 5x8x2s
6x8 ½ panel 6x8
two 6x8 cut strip 2 strip 6x8x2s
8x8 square square 8x8sq
8x10 cut at 10” 8x10
8x12 8x12
Queue Name
Print size is available for that printer
Default setting.
* Print size may not be available in all sales regions. Contact your sales representative for more information.
** Firmware v1.5 or greater
You can have two (2) printers connected to WPS Pro simultaneously. The media loaded must be
the same, i.e., two printers that both have 4”6” media loaded. See “Changing the Print Pooling
Settings” on page 87 for more information.
DNP Imagingcomm America Corporation 47
Page 48

Print Size Chart WPS Pro User Guide
48 DNP Imagingcomm America Corporation
Page 49
6
Using a Windows PC with the WPS Pro
The easiest way to transfer images from your computer to your WPS Pro network is using the HFP transfer option. You can
also set up the native print drivers for the WPS Pro device to print from your photo editing applications. Use the following
sections to configure your PC computer to use WPS Pro.
Using Windows PC with the Hot Folder Print Options (HFP). Using Hot Folder Printer folders, you can transfer
images in bulk (or individually) by copying and pasting the images into the hot folder printers on the WPS Pro device.
Before you begin printing, check your WPS Pro console and make sure the WPS Status app is running. In order to
process the images it receives, the WPS Pro console must have the WPS Status app open and active.
DNP Imagingcomm America Corporation 49
Page 50
Using Windows PC with the Hot Folder Print Options (HFP) WPS Pro User Guide
Note
Using Windows PC with the Hot Folder Print Options (HFP)
HFP, or Hot Folder Printing, is a transfer method where a hot folder (or “watched folder”) is continuously monitored by the
WPS Pro system. Images copied into this folder are automatically printed and then removed. Hot folders are used both for
manual image imports (copying and pasting files into the hot folder) and for integration with third party software (often via
FTP to the hot folder).
HFP transfers work best on PC computers, however some tablets do have HFP transfer capability. Hot folder printing allows
you to load larger quantities of prints at a time to the print folder.
Configuring a Windows PC for HFP
Use the following steps to print images from your PC.
1. From your computer, select your WPS Pro device.
The signal is labeled WPSxxxx, where xxxx is a unique number for your device.
2. When prompted, type the following password: DNP20153
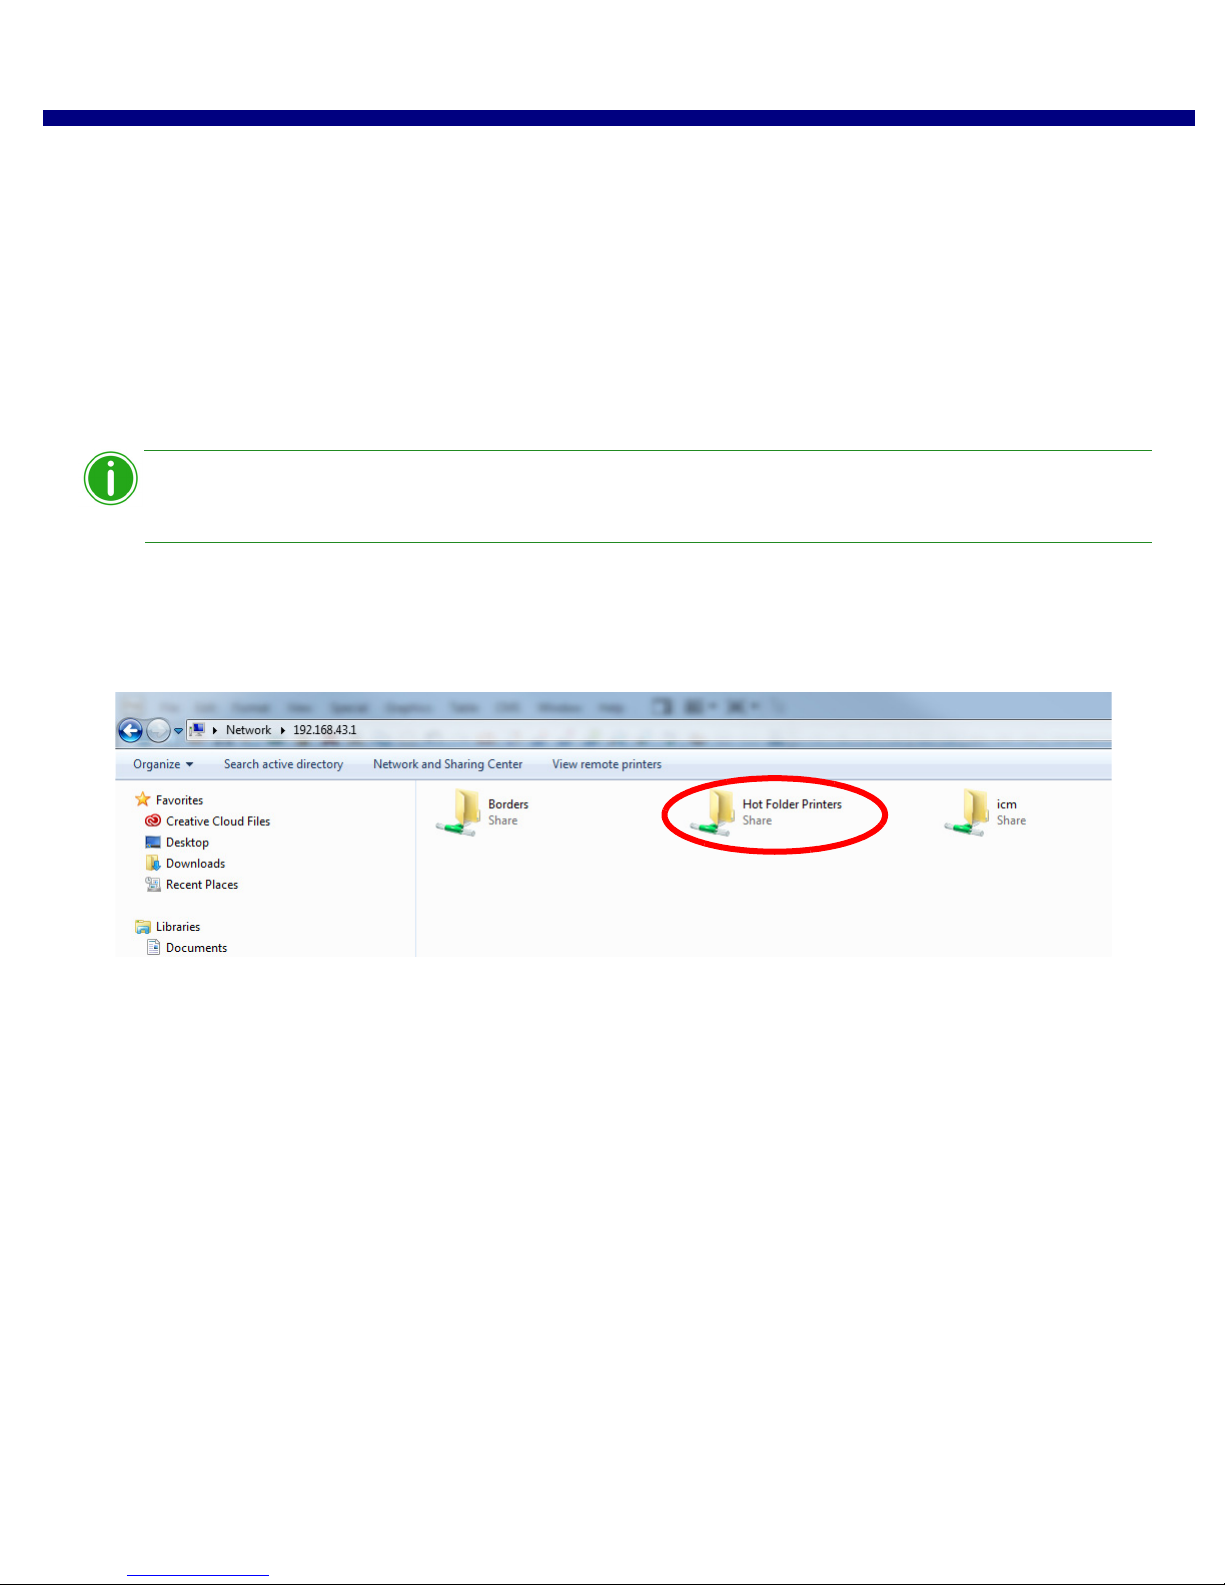
3. Open a file explorer window. (Be sure you are not opening an internet browser.)
4. Type \\192.168.43.1 in the address bar. This accesses the WPS Pro directories.
5. Select Hot Folder Printers folder.
6. Select the folder for your printer model. This is labeled with the model of your DNP printer (for example, DS40.)
7. Select the print folder. This folder will be labeled with the print size loaded in your attached printer (i.e., 4”x6”, 5”x7”,
6”x8”.)
8. You are now ready to print your images using hot folder print transfer.
50 DNP Imagingcomm America Corporation
Page 51
Printing from a Windows PC using HFP WPS Pro User Guide
Note
Note
Note
Printing from a Windows PC using HFP
When naming your image files, use alphanumeric characters. Do NOT use any special characters.
Special characters include: @ $ % ^ & * ( ) + = { } Also, a space or a dash should not be the first
character in the file name.
1. If you have not already, open a file explorer window and browse to your Hot Folder Printers directory.
Use this address to access your device: \\192.168.43.1
For more information, see “Configuring a Windows PC for HFP” on page 50
2. Open a second file explorer window and browse to the images you want to print.
3. Copy the images and paste them into the print size folder in the Hot Folder Printers folder.
If possible, only copy and paste your image. If you cut and paste your image when you have
automatic archiving turned OFF, your images will not be saved on the WPS Pro device.
4. Your photos are sent from your PC to the WPS Pro and are printed.
Printing Errors
If you have issues when printing images, an error sheet will print. This sheet gives you information on which image did not
print so you can try to reprint the image.
Figure 9. Example error sheet
1. If you receive this error, try to reprint the image. If the image doesn’t print the second time, verify your network
connections, then try again.
WPS Pro has been built for JPEG and PNG files with an RGB color space. Make sure your images
are in one of these formats before sending them to the WPS Pro for printing.
DNP Imagingcomm America Corporation 51
Page 52
Print Size Chart WPS Pro User Guide
Note
Print Size Chart
Use the table on the next pages to determine the size of media you need for your printer.
If you use the half panel printing option, only half of your available ribbon will be used. Costs will
be higher as the other half panel is not used.
Media
Size
3.5x5 3.5x5 {default} * 3.5x5
4x6 two 2x6 cut strip 2 strip 2x2x6s
5x7 3.5x5 ½ panel * 3.5x5
6x8 two 2x6 cut strip 2 strip 2x6x2s
Description Configuration
Notes
4x6 4x6
two 3.5x5 cut 2 strip ** 3.5x5s
5x5 square square 5x5sq
5x7 * 5x7
4x6 ½ panel 4x6
two 4x6 cut strip 2 strip 2x4x6s
four 2x6 cut strip 4 strip 2x6x4s
DS40 DS620/
DS620A
RX1 DS80/
DS80DX
DS820/
DS820A
WPS Pro Printer
Queue Name
6x6 square square 6x6sq
6x8 6x8
6x9 two 2x6 cut strip 2 strip * * 2x6x2s
4x6 ½ panel * * 4x6
two 4x6 cut strip 2 strip * * 2x4x6s
four 2x6 cut strip 4 strip * * 2x6x4s
6x9 6x6 square square * 6x6sq
4.5x6 ½ panel * 4.5x6
two 4.5x6 cut strip 2 strip * 4.5x6s
52 DNP Imagingcomm America Corporation
Page 53
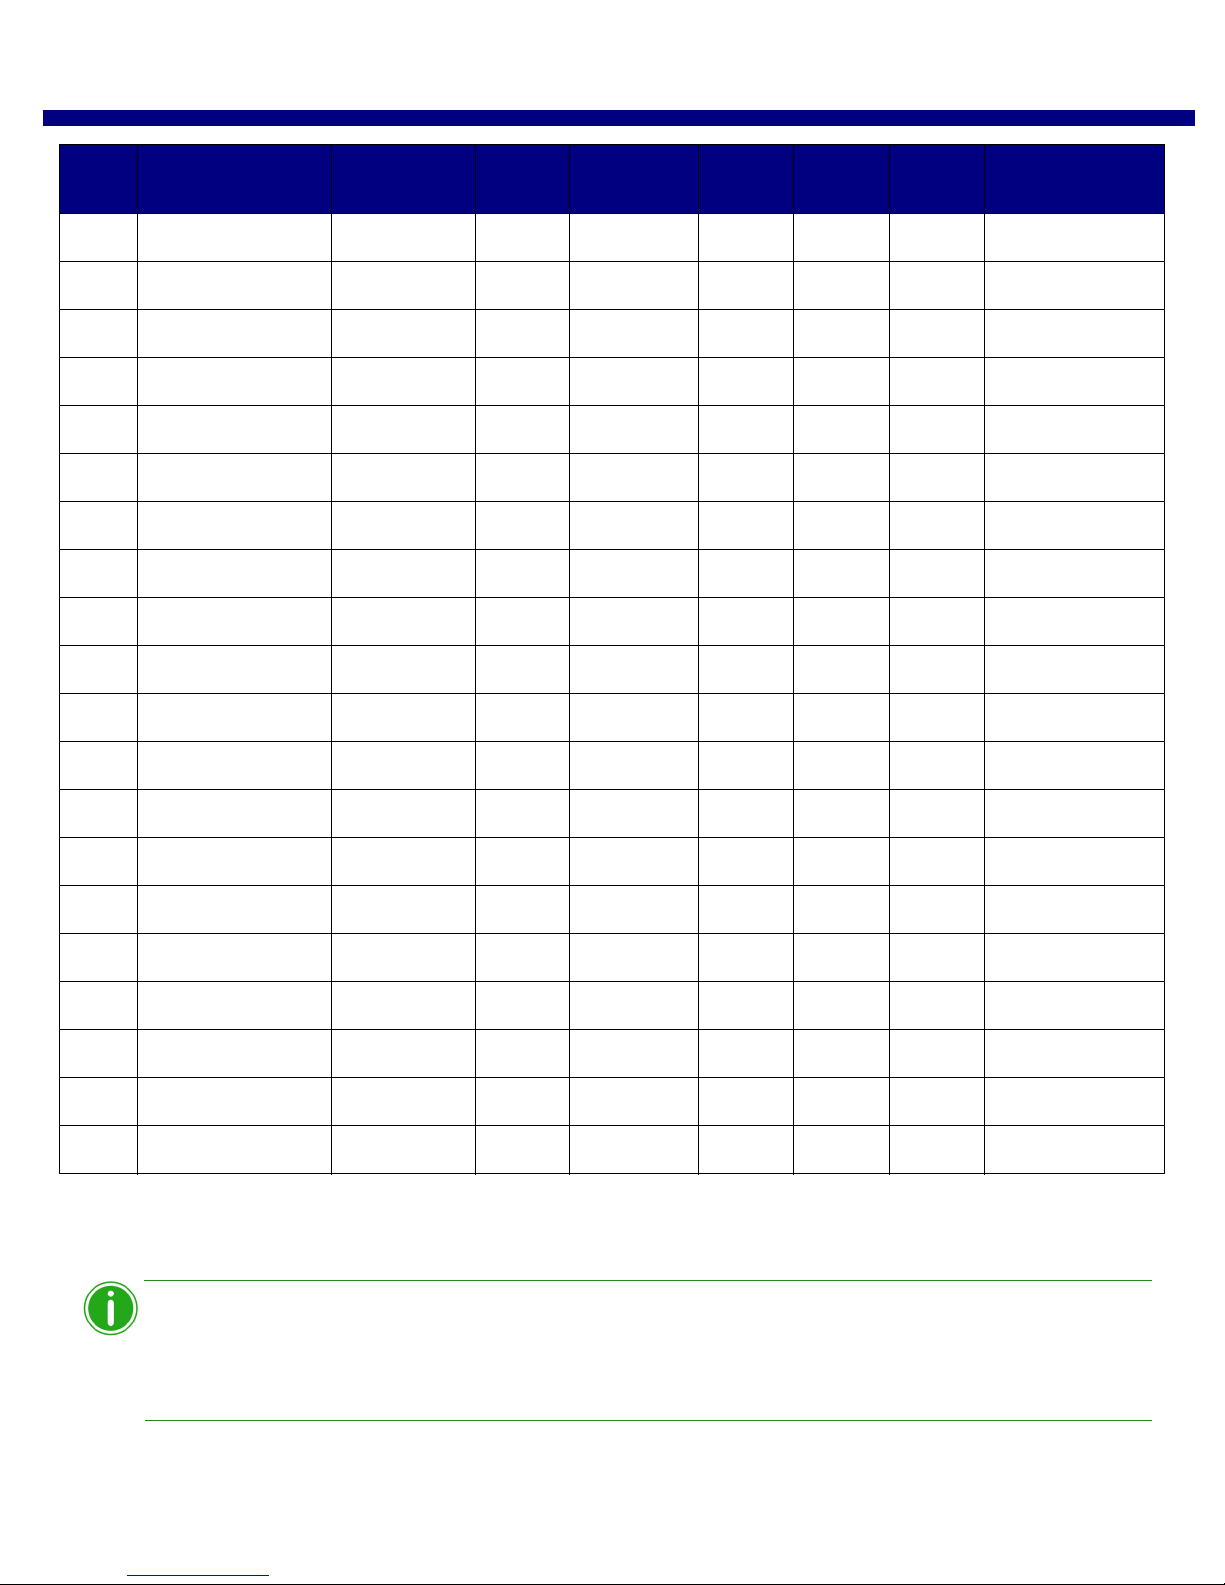
Print Size Chart WPS Pro User Guide
Note
Media
Size
Description Configuration
Notes
DS40 DS620/
DS620A
RX1 DS80/
DS80DX
DS820/
DS820A
WPS Pro Printer
6x8 * 6x8
6x9 * 6x9
8x10 4x8 ½ panel 4x8
two 4x8 cut strip 2 strip 4x8x2s
5x8 ½ panel 5x8
2 5x8 cut strip 2 strip 5x8x2s
6x8 ½ panel 6x8
8x8 square square 8x8sq
8x10 8x10
8x12 4x8 ½ panel 4x8
two 4x8 cut strip 2 strip 4x8x2s
Queue Name
three 4x8 cut strips 3 strip 4x8x3s
5x8 ½ panel 5x8
two 5x8 cut strip 2 strip 5x8x2s
6x8 ½ panel 6x8
two 6x8 cut strip 2 strip 6x8x2s
8x8 square square 8x8sq
8x10 8x10
A4 A4
8x12 8x12
Print size is available for that printer
Default setting.
* Print size may not be available in all sales regions. Contact your sales representative for more information.
** Firmware v1.5 or greater
You can have two (2) printers connected to WPS Pro simultaneously. The media loaded must be
the same, i.e., two printers that both have 4”6” media loaded. See “Changing the Print Pooling
Settings” on page 87 for more information.
DNP Imagingcomm America Corporation 53
Page 54

Print Size Chart WPS Pro User Guide
54 DNP Imagingcomm America Corporation
Page 55
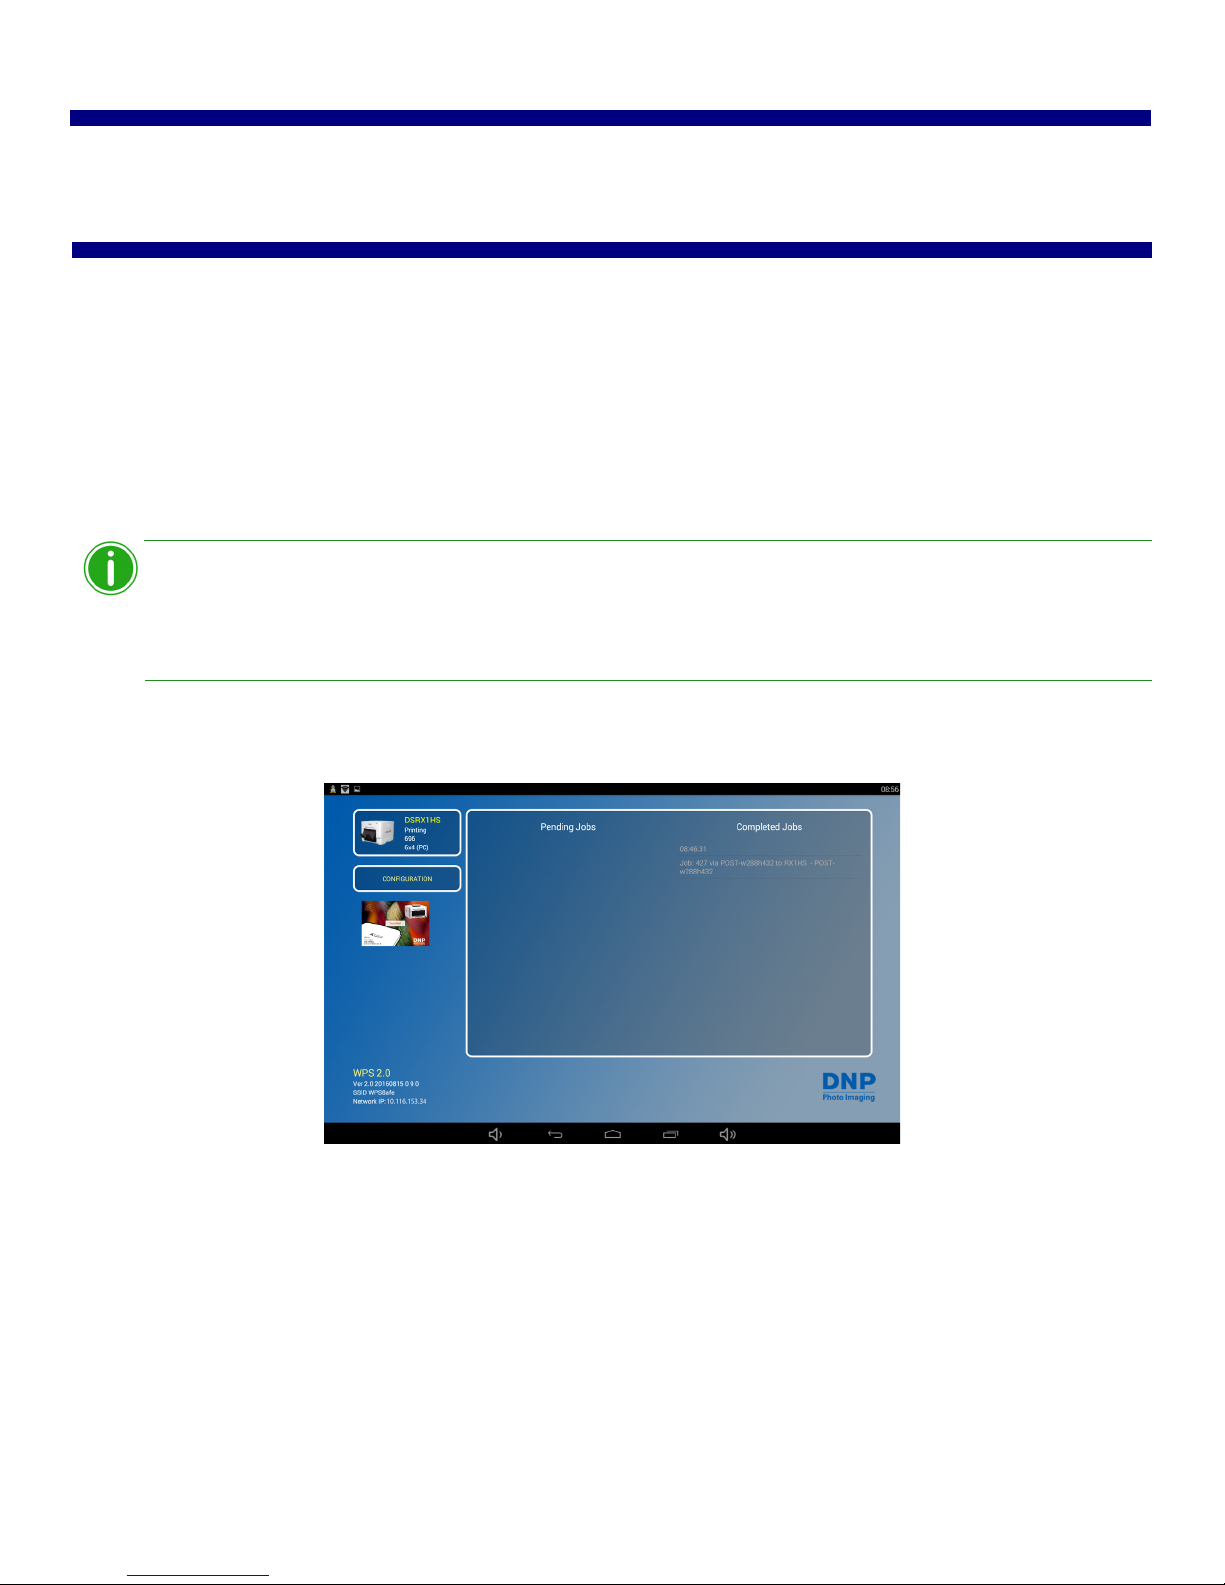
7
Note
Using a Mac with the WPS Pro
This chapter discusses how to use your Mac computer to print using the WPS Pro network.
Be sure to follow the installation steps at “Setting Up the WPS Pro System” on page 18 before continuing.
There are two transfer options for using WPS Pro with your Mac:
1. Using a Mac for Hot Folder Printing (HFP). Using Hot Folder Printer folders, you can transfer images in bulk (or
individually) by copying and pasting the images into the hot folder printers on the WPS Pro device.
WPS Pro also allows you to connect five (5) input/transfer devices simultaneously. Your input/
transfer device(s) can be a maximum of 30 feet away from WPS Pro and still send the print job
successfully.
Before you begin printing, check your WPS Pro console and make sure the WPS Status app is running. In order to
process the images it receives, the WPS Pro console must have the WPS Status app open and active.
Using a Mac for Hot Folder Printing (HFP)
HFP, or Hot Folder Printing, is a transfer method where a hot folder (or “watched folder”) is continuously monitored by the
WPS Pro system. Images copied into this folder are automatically printed and then removed. Hot folders are used both for
manual image imports (copying and pasting files into the hot folder) and for integration with third party software (often via
FTP to the hot folder).
HFP transfers work best on Mac computers, however some tablets do have HFP transfer capability. Hot folder printing
allows you to load larger quantities of prints at a time to the print folder.
DNP Imagingcomm America Corporation 55
Page 56
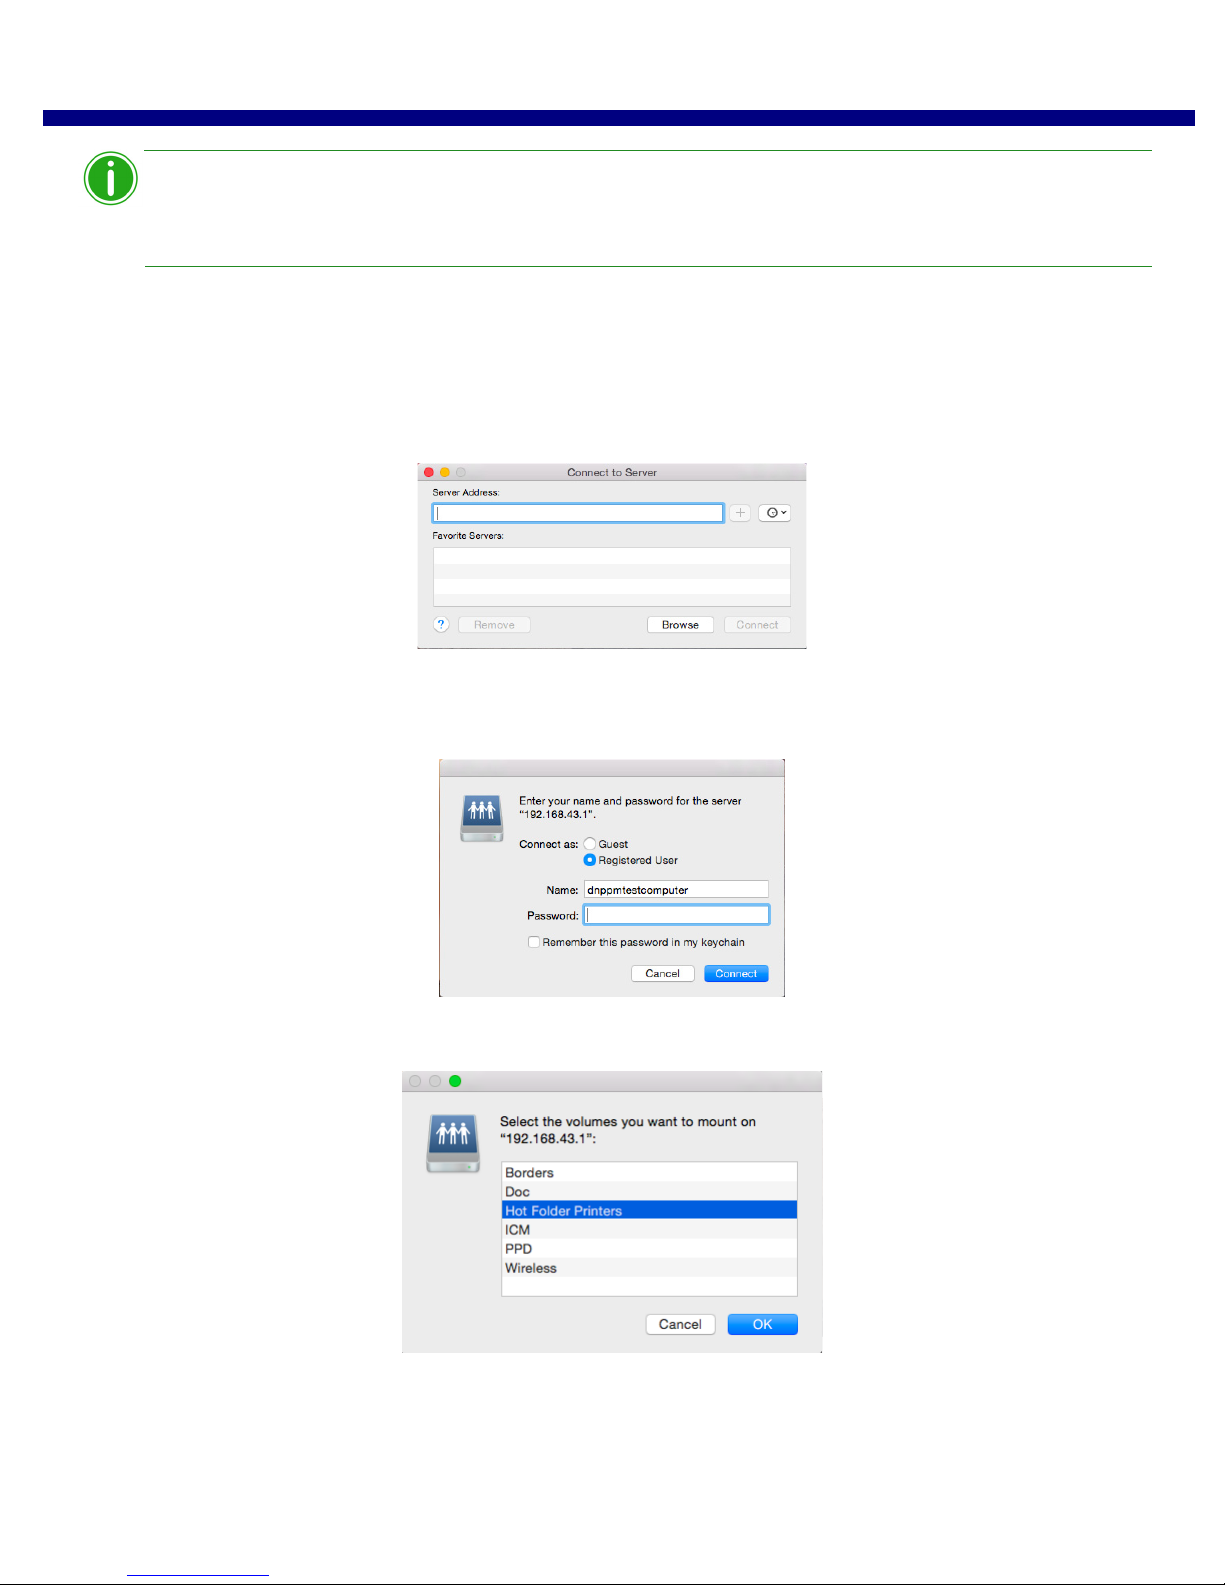
Configuring a Mac for HFP Printing WPS Pro User Guide
Note
Transferring more than nine (9) images using the HFP method can result in a transfer error (Error
43.) Contact Tech Support for more information.
Configuring a Mac for HFP Printing
1. From the Desktop, select Go.
2. Select Connect to Server.
3. In the Server Address field, type the address: smb://192.168.43.1
4. Click Connect.
5. Select the Connect as: Guest radio button and click Connect.
6. From the Volumes To Mount list, select the Hot Folder Printers option and click OK.
56 DNP Imagingcomm America Corporation
Page 57
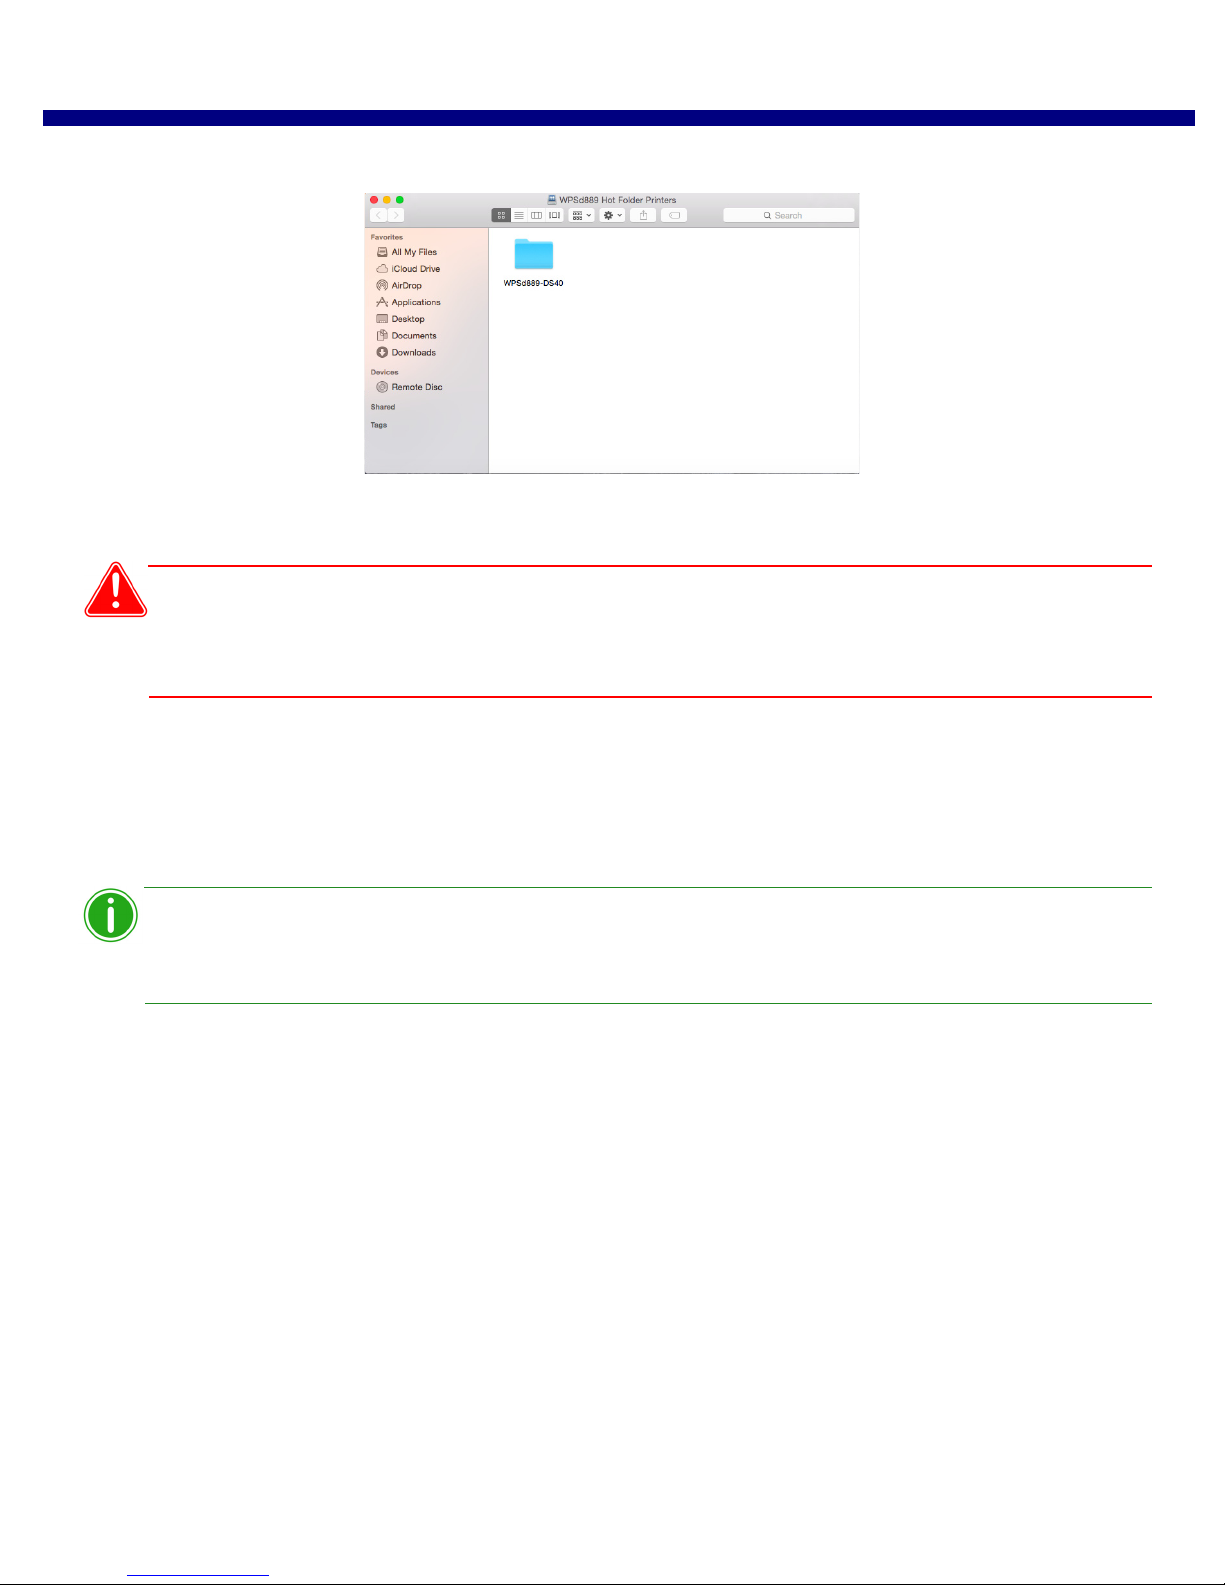
Printing from a Mac (HFP Transfer) WPS Pro User Guide
Attention
Note
7. When the Finder window is displayed, make note of the WPS Pro device name.
Printing from a Mac (HFP Transfer)
Any custom cropping must be done before printing as WPS Pro only “center crops” to maximize print size and
eliminate white spaces. Custom cropping can be accomplished via the capture and edit functions found in
standard applications like Photoshop, Lightroom, iPhoto, etc.
1. If you have not already, configure your Mac to use WPS hot folder printing. See “Configuring a Mac for HFP Printing”
on page 56.
2. Open the Hot Folder Printers folder you created.
3. Open a second finder window and browse to the images you want to print.
4. Copy the images and paste them into the print size folder in the Hot Folder Printers folder.
If possible, only copy and paste your image. If you cut and paste your image when you have
automatic archiving turned OFF, your images will not be saved on the WPS Pro device.
5. Your photos are sent from your Mac to WPS Pro and are printed.
Adding ICM Files
On Macs running OS 10.7 and up, the folder where the ICM files are located may be locked by default. To add ICM files, you
must first unlock this folder before you can install printer profiles. To unlock this folder and then install the ICM files:
1. Select Go.
2. Select Computer.
3. Select your Mac and then select the Library folder.
4. Select the ColorSync folder.
5. Select the Profiles folder.
DNP Imagingcomm America Corporation 57
Page 58
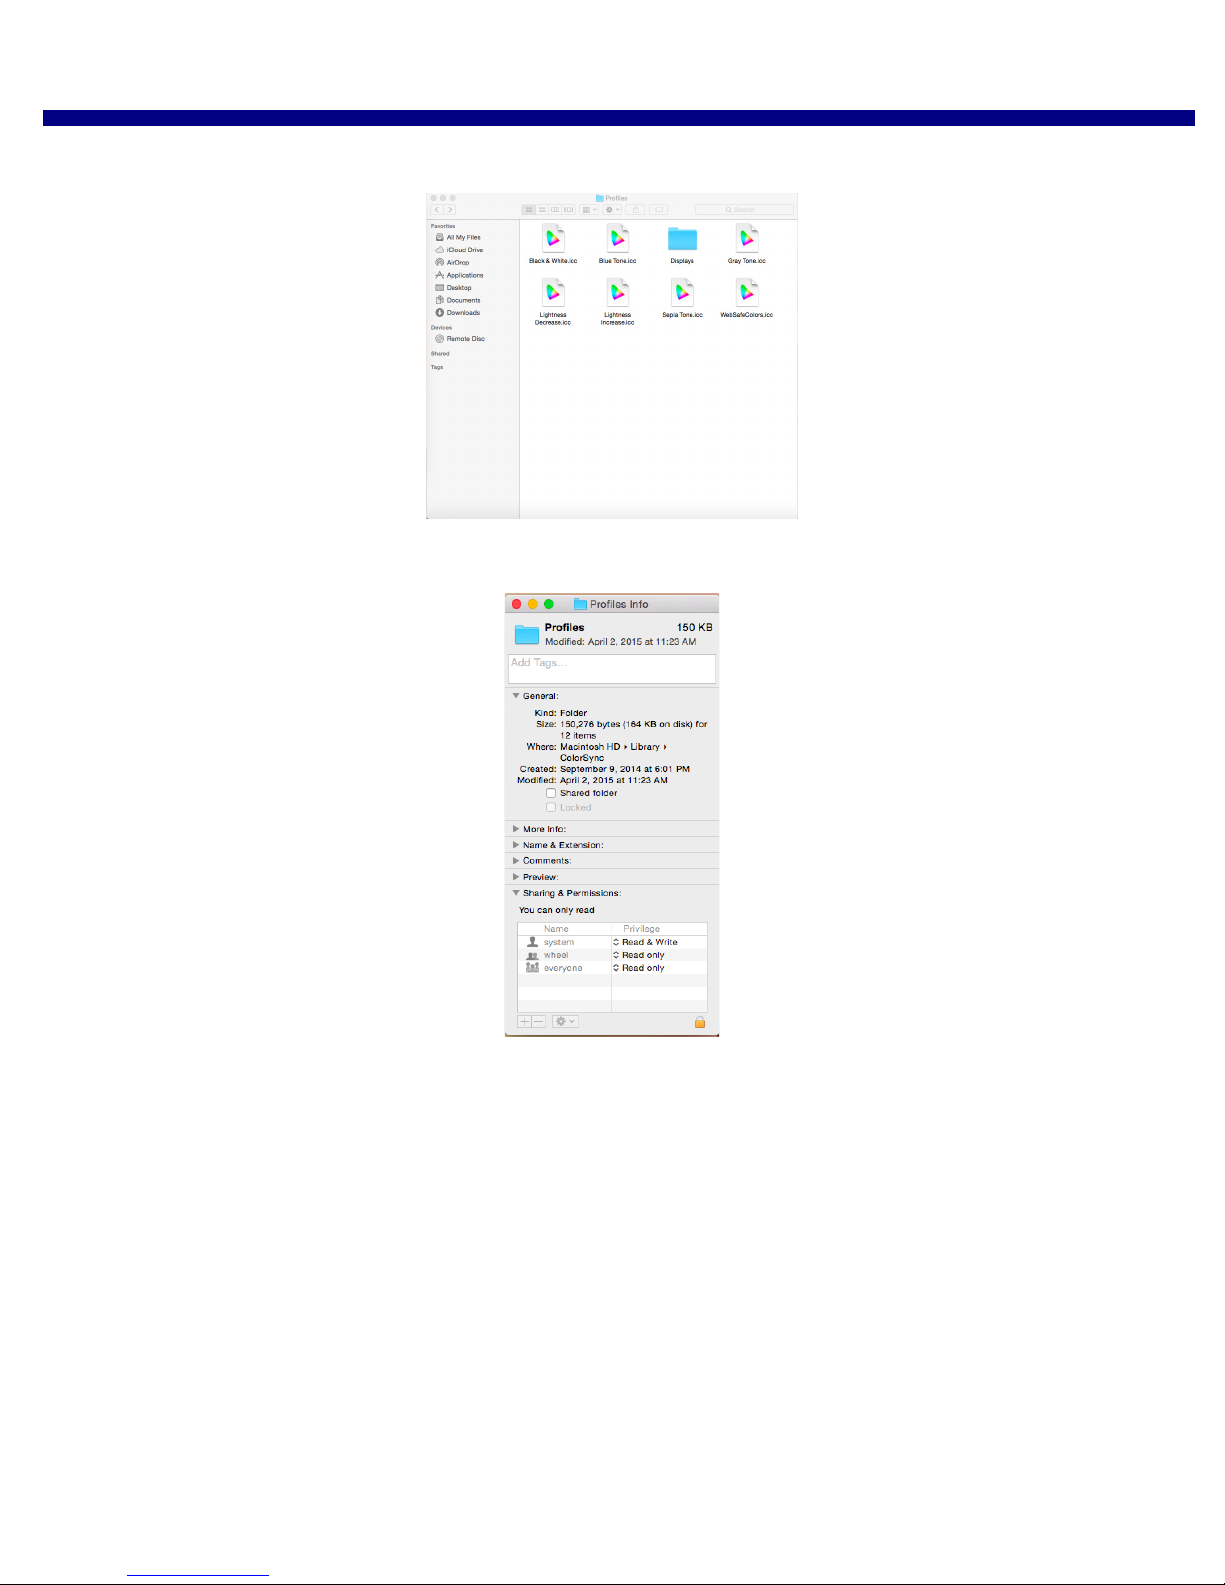
Adding ICM Files WPS Pro User Guide
6. From the menu bar, select File and then Get Info.
7. Click the Lock icon at the bottom right corner of the window and enter the Admin password.
8. Change the folder’s access state to Read and Write.
9. You are now ready to install the printer profiles.
10. Select Go.
11. Select Connect to Server.
12. In the Server Address field, type smb://192.168.43.1.
13. Click Connect.
14. Select the Connect as: Guest radio button and click Connect.
58 DNP Imagingcomm America Corporation
Page 59
Printing Errors WPS Pro User Guide
Note
15. From the Volumes To Mount list, select the ICM option and click OK.
16. Select each icm file for your connected printer(s) (i.e., DS40.icm, DS80.icm, etc.) and drag the file(s) over to the
Profiles folder.
17. You are now ready to print to your WPS Pro network from any of your usual photo editing programs.
Printing Errors
If you have issues when printing images, an error sheet will print. This sheet gives you information on which image did not
print so you can try to reprint the image.
1. If you receive this error, try to reprint the image. If the image doesn’t print the second time, verify your network
connections, then try again.
WPS Pro has been built for JPEG and PNG files with an RGB color space. Make sure your images
are in one of these formats before sending them to the WPS Pro for printing.
DNP Imagingcomm America Corporation 59
Figure 10. Example error sheet
Page 60
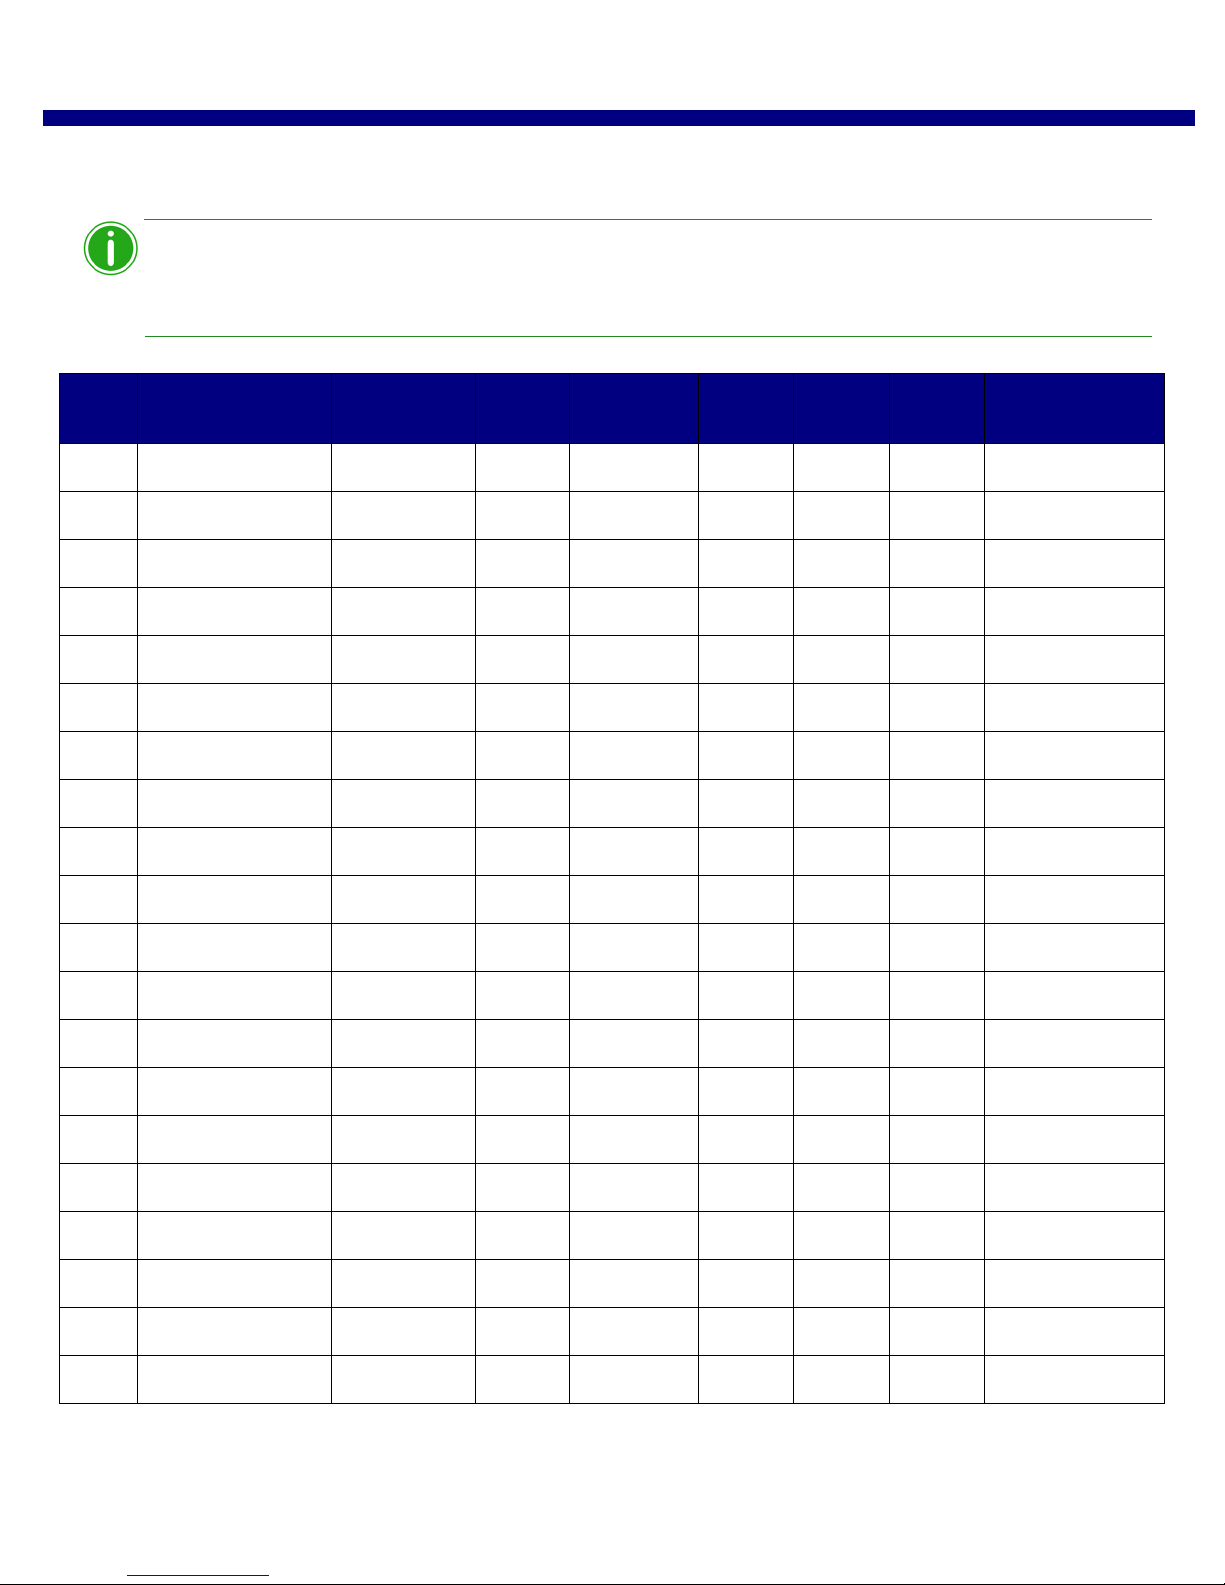
Print Size Chart WPS Pro User Guide
Note
Print Size Chart
Use the table on the next pages to determine the size of media you need for your printer.
If you use the half panel printing option, only half of your available ribbon will be used. Costs will
be higher as the other half panel is not used.
Media
Size
3.5x5 3.5x5 * 3.5x5
4x6 two 2x6 cut strip 2 strip 2x2x6s
5x7 3.5x5 ½ panel * 3.5x5
6x8 two 2x6 cut strip 2 strip 2x6x2s
Description Configuration
Notes
4x6 4x6
two 3.5x5 cut 2 strip ** 3.5x5s
5x5 square square 5x5sq
5x7 * 5x7
4x6 ½ panel 4x6
two 4x6 cut strip 2 strip 2x4x6s
four 2x6 cut strip 4 strip 2x6x4s
DS40 DS620/
DS620A
RX1 DS80/
DS80DX
DS820/
DS820A
WPS Pro Printer
Queue Name
6x6 square square 6x6sq
6x8 6x8
6x9 two 2x6 cut strip 2 strip * * 2x6x2s
4x6 ½ panel * * 4x6
two 4x6 cut strip 2 strip * * 2x4x6s
four 2x6 cut strip 4 strip * * 2x6x4s
6x6 square square * 6x6sq
4.5x6 ½ panel * 4.5x6
two 4.5x6 cut strip 2 strip * 4.5x6s
60 DNP Imagingcomm America Corporation
Page 61
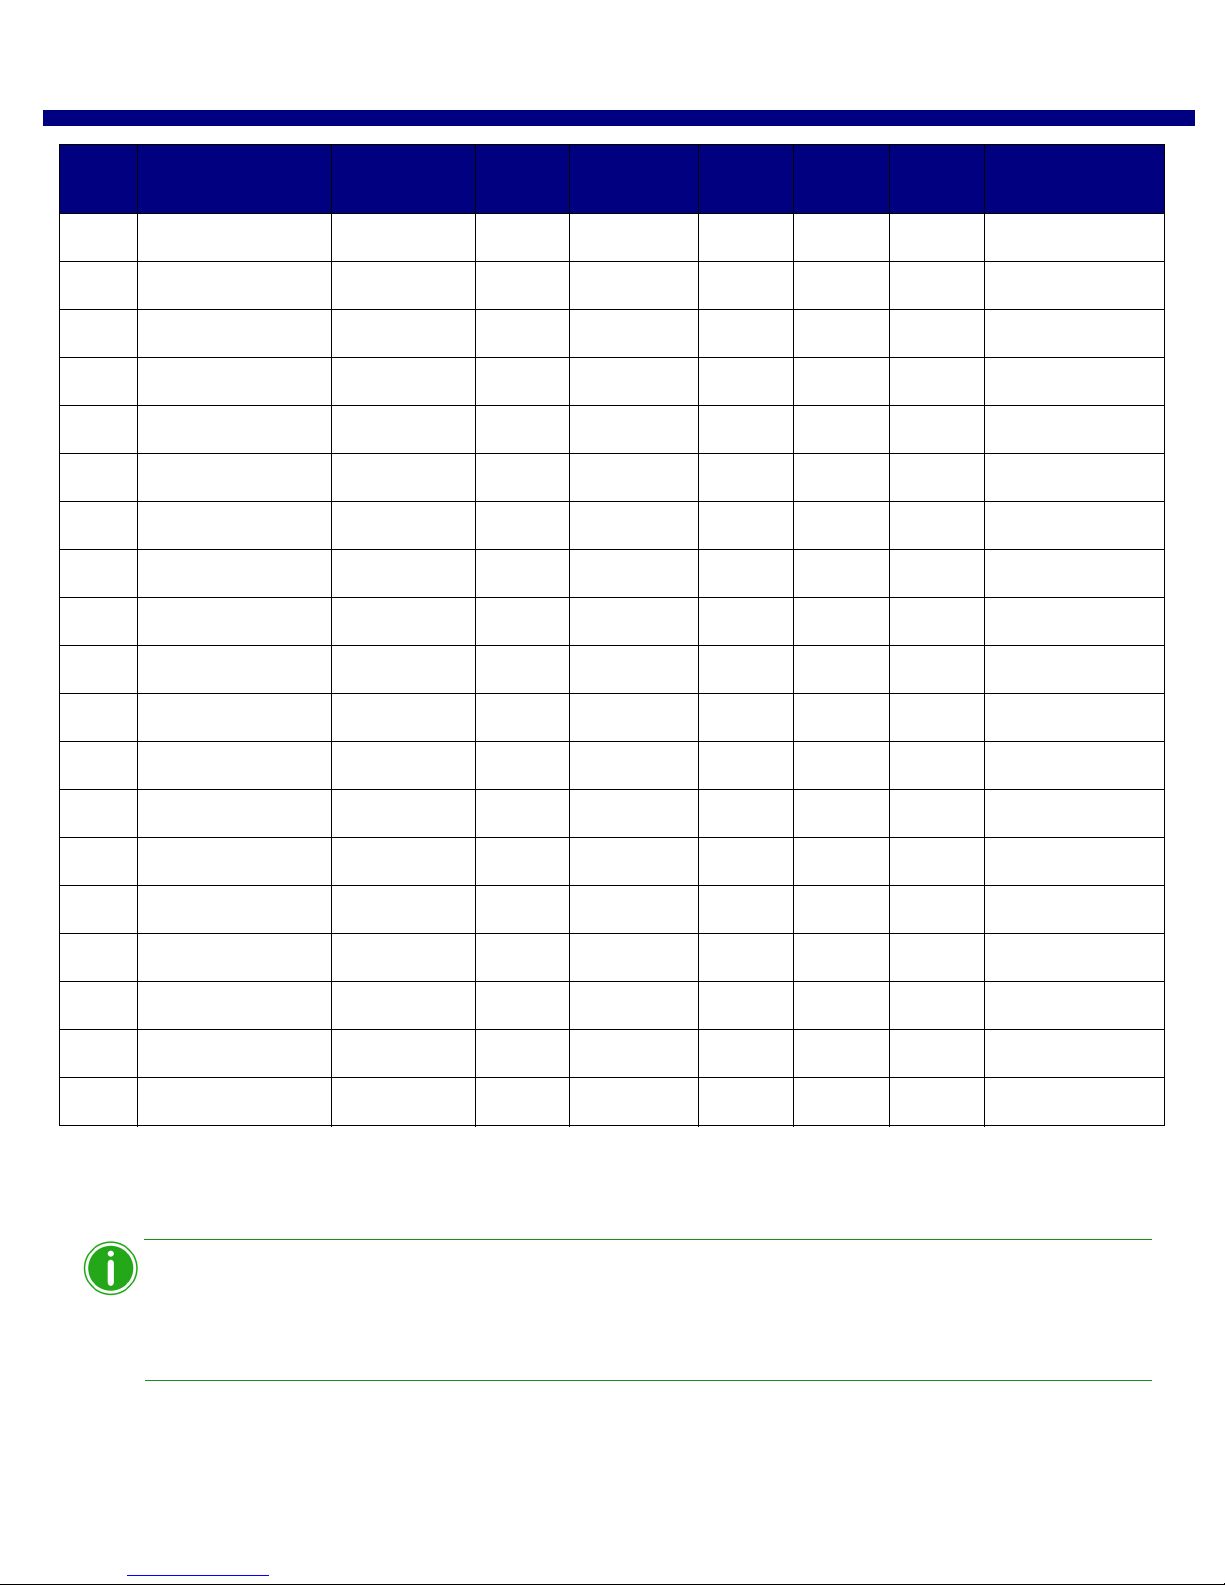
Print Size Chart WPS Pro User Guide
Note
Media
Size
Description Configuration
Notes
DS40 DS620/
DS620A
RX1 DS80/
DS80DX
DS820/
DS820A
WPS Pro Printer
6x9 6x8 cut at 8” * 6x8
6x9 * 6x9
8x10 4x8 ½ panel 4x8
two 4x8 cut strip 2 strip 4x8x2s
5x8 ½ panel 5x8
2 5x8 cut strip 2 strip 5x8x2s
6x8 ½ panel 6x8
8x8 square square 8x8sq
8x10 8x10
8x12 4x8 ½ panel 4x8
two 4x8 cut strip 2 strip 4x8x2s
Queue Name
three 4x8 cut strips 3 strip 4x8x3s
5x8 ½ panel 5x8
two 5x8 cut strip 2 strip 5x8x2s
6x8 ½ panel 6x8
two 6x8 cut strip 2 strip 6x8x2s
8x8 square square 8x8sq
8x10 cut at 8” 8x10
8x12 8x12
Print size is available for that printer
Default setting.
* Print size may not be available in all sales regions. Contact your sales representative for more information.
** Firmware v1.5 or greater
You can have two (2) printers connected to WPS Pro simultaneously. The media loaded must be
the same, i.e., two printers that both have 4”6” media loaded. See “Changing the Print Pooling
Settings” on page 87 for more information.
DNP Imagingcomm America Corporation 61
Page 62

Print Size Chart WPS Pro User Guide
62 DNP Imagingcomm America Corporation
Page 63

Print Size Chart WPS Pro User Guide
DNP Imagingcomm America Corporation 63
Page 64

Print Size Chart WPS Pro User Guide
64 DNP Imagingcomm America Corporation
Page 65
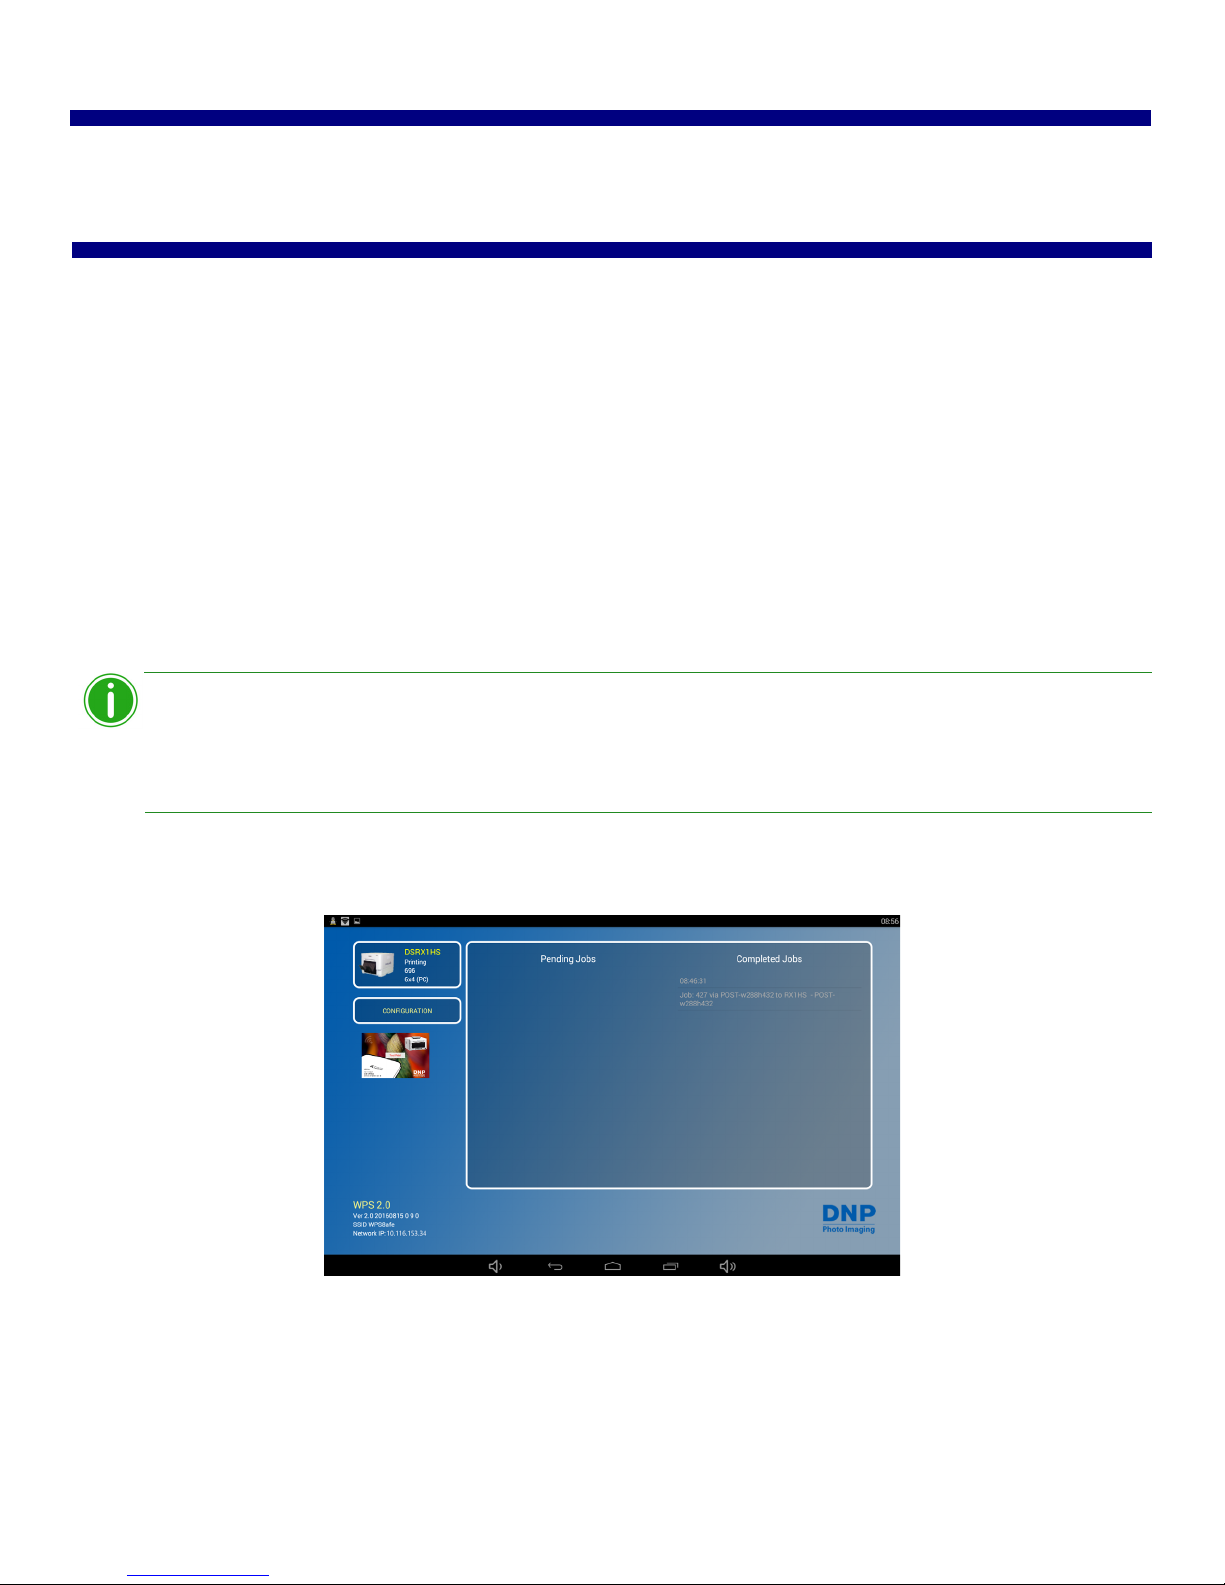
8
Note
Using a Digital Camera with the WPS Pro
This chapter discusses how to use your digital camera to print using the WPS Pro network.
Be sure to follow the installation steps at “Setting Up the WPS Pro System” on page 18 before continuing.
WPS Pro enhances your digital camera capture-to-print work flows. There are a few ways to print to your DNP printers using
your digital cameras and your WPS Pro device:
1. “Using Digital Cameras for Wi-Fi Transfers” on page 65. If your digital camera is Wi-Fi enabled, or you have a Wi-
Fi adapter for you camera, you can send images to your mobile device, and then print from the mobile device to the
WPS network. (Recommended solution.)
2. “Using Digital Cameras for FTP Transfers” on page 66. If you have a digital camera that has an option for FTP
transfer, you can also use this option with the WPS Pro network. While some cameras do allow direct FTP transfers,
you can also use a third party product.
WPS Pro also allows you to connect up to five (5) input/transfer devices simultaneously. Your
input/transfer device(s) can be a maximum of 30 feet away from WPS Pro and still send the print
job successfully.
Before you begin printing, check your WPS Pro console and make sure the WPS Status app is running. In order to
process the images it receives, the WPS Pro console must have the WPS Status app open and active.
Using Digital Cameras for Wi-Fi Transfers
If your digital camera is Wi-Fi enabled, you can set your camera to transfer your images to your preferred mobile device or
computer. Once you’ve set up your digital camera to transfer images via Wi-Fi, it’s easy to transfer images and then print
DNP Imagingcomm America Corporation 65
Page 66

Printing from Digital Cameras Using a Mobile Device WPS Pro User Guide
Note
them from your mobile device or computer. How you transfer your images to your mobile device depends on your digital
camera. Some cameras come with built-in Wi-Fi connectivity, while others require a Wi-Fi adapter or accessory. Consult
your camera documentation to see if your camera is Wi-Fi compatible.
Printing from Digital Cameras Using a Mobile Device
Once you’ve set up your digital camera to transfer images to your mobile device, it’s easy to send images to your device for
printing. Once you’ve transferred the images, use the same steps as “Printing from Android Devices using the WPS Print 2
App” on page 27 or “Printing from Apple Devices using the WPS Print 2 App” on page 38 to print your images. How you
transfer your images to your mobile device depends on your digital camera. Some cameras come with built-in Wi-Fi
connectivity, while others require a Wi-Fi adapter or accessory. Consult your camera documentation to see if your camera is
Wi-Fi compatible.
You can now begin printing your images. When WPS Pro powers ON, it will auto-detect the connected printer(s) and the
media loaded. A test image is automatically printed. It will also set up the appropriate folder (hot folder) from which images
will be printed. As noted earlier, WPS Pro can be connected to two (2) printers simultaneously. Normal transfer time for
prints is 25 seconds but varies based on signal strength, and connection speeds.
When naming your image files, use alphanumeric characters. Do NOT use any special characters.
Special characters include: @ $ % ^ & * ( ) + = { } Also, a space or a dash should not be the first
character in the file name.
Using Digital Cameras for FTP Transfers
To transfer images from your digital camera using FTP, you must have a camera that supports configurable file transfers via
FTP or uses a dedicated Android operating system.
Configuring Digital Cameras for FTP Transfers
1. Download a FTP client application from Google Play.
2. Once downloaded, launch the FTP client application.
66 DNP Imagingcomm America Corporation
Page 67
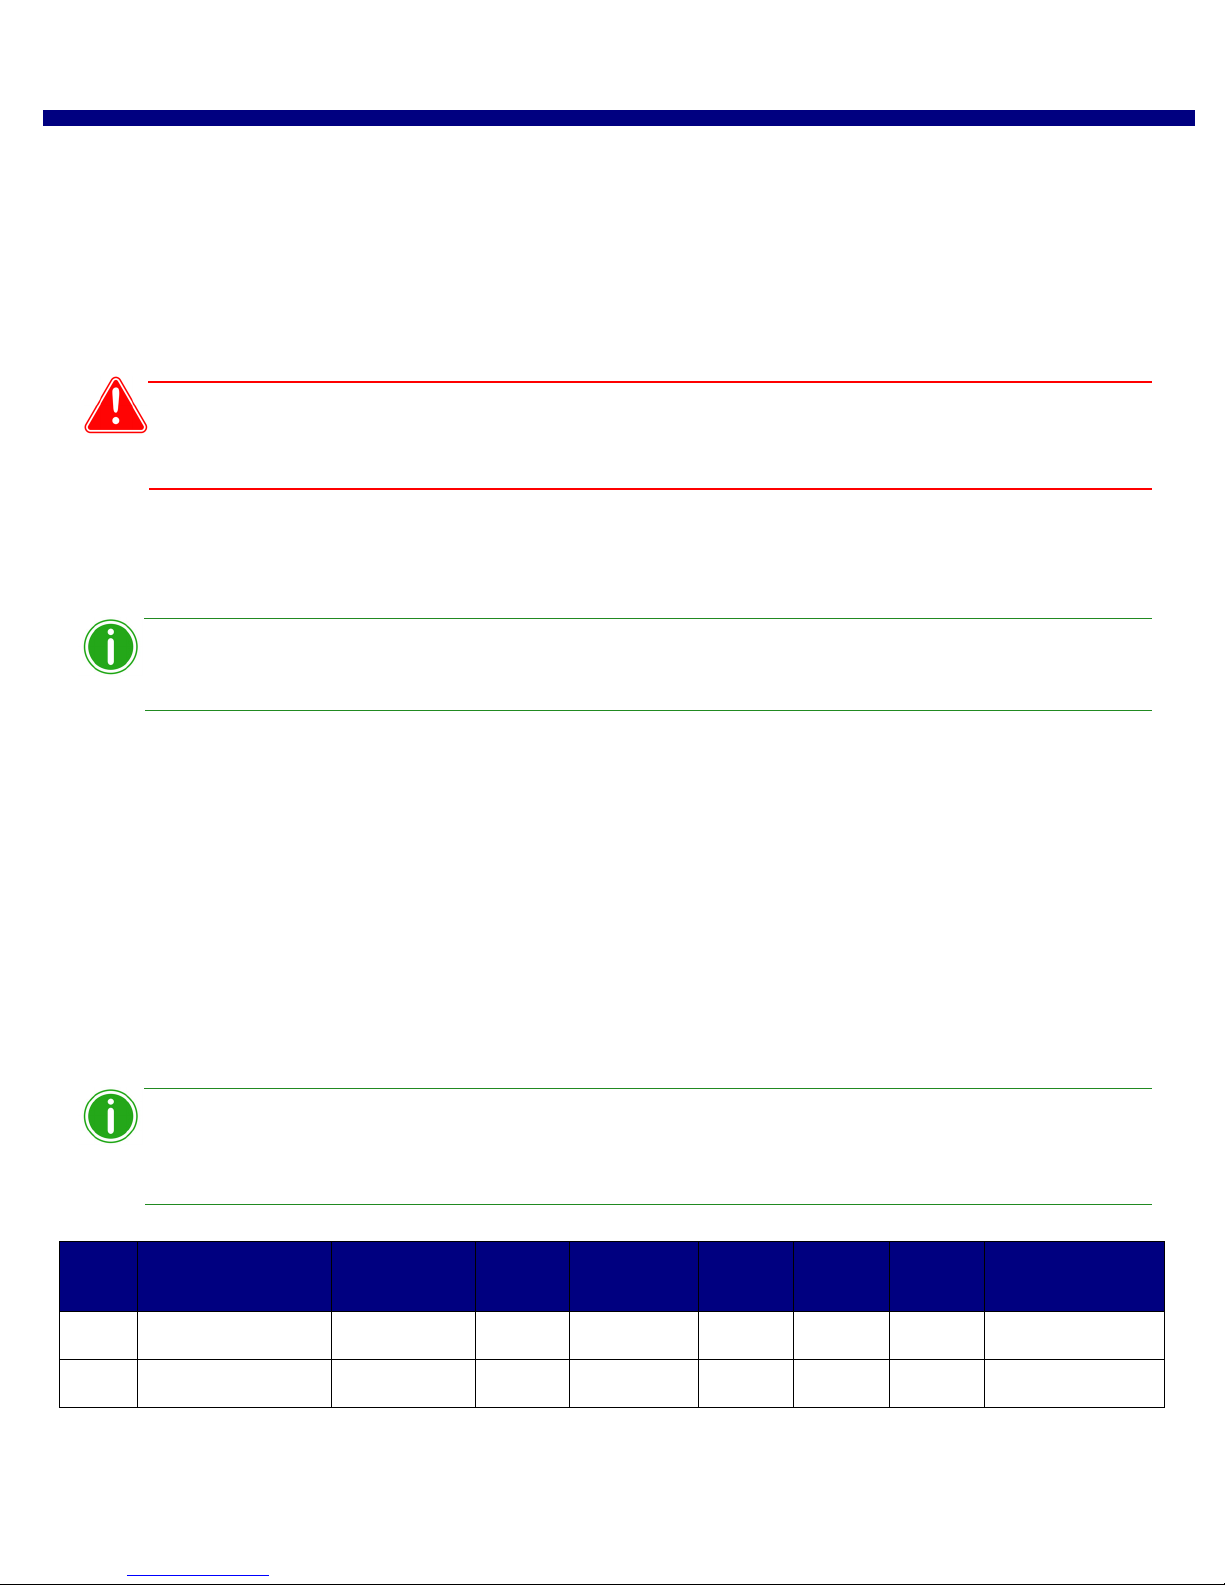
Printing from Digital Cameras Using FTP WPS Pro User Guide
Attention
Note
Note
3. Enter the required information into the following fields:
Host: 192.168.43.1
Type: FTP
Port: 21
Username: photo
Password: none (type the word “none”)
Remote Dir: / (forward slash)
Mode: Active (usually in advanced settings)
If you are prompted to enter a transfer option, select Binary.
If you select ASCII, your images will not print correctly.
4. Click Save to save your settings.
5. If you have not already, connect to the WPS Pro Wi-Fi network.
6. Return to the FTP client application, and click the Login button to connect to WPS Pro.
If the login was successful, a dialog box is displayed, confirming the connection.
7. Once connected to WPS Pro, you can now begin to print your images wirelessly. Please note that WPS Pro will only
print JPEG and PNG file formats.
Printing from Digital Cameras Using FTP
While only a handful of cameras currently offer a FTP transfer option, those work flows are usually compatible with the WPS
Pro network. Consult your camera documentation to find out more about your camera’s specific FTP options. If your
camera does support FTP transfer, follow the instructions in “Using Android Devices for FTP Transfers” on page 32 or “Using
Apple Mobile iOS Devices for FTP Transfers” on page 43 to connect your camera to the WPS Pro network and print directly
from your digital camera.
Print Size Chart
Use the table on the next pages to determine the size of media you need for your printer.
If you use the half panel printing option, only half of your available ribbon will be used. Costs will
be higher as the other half panel is not used.
Media
Size
Description Configuration
Notes
DS40 DS620/
DS620A
RX1 DS80/
DS80DX
DS820/
DS820A
WPS Pro Printer
Queue Name
3.5x5 3.5x5 * 3.5x5
4x6 two 2x6 cut strip 2 strip 2x2x6s
DNP Imagingcomm America Corporation 67
Page 68

Print Size Chart WPS Pro User Guide
Media
Size
Description Configuration
Notes
DS40 DS620/
DS620A
RX1 DS80/
DS80DX
DS820/
DS820A
WPS Pro Printer
Queue Name
4x6 4x6
5x7 3.5x5 ½ panel * 3.5x5
two 3.5x5 cut 2 strip ** 3.5x5s
5x5 square square 5x5sq
5x7 * 5x7
6x8 two 2x6 cut strip 2 strip 2x6x2s
4x6 ½ panel 4x6
two 4x6 cut strip 2 strip 2x4x6s
four 2x6 cut strip 4 strip 2x6x4s
6x6 square square 6x6sq
6x8 6x8
6x9 two 2x6 cut strip 2 strip * * 2x6x2s
4x6 ½ panel * * 4x6
two 4x6 cut strip 2 strip * * 2x4x6s
four 2x6 cut strip 4 strip * * 2x6x4s
6x6 square square * 6x6sq
4.5x6 ½ panel * 4.5x6
two 4.5x6 cut strip 2 strip * 4.5x6s
6x9 6x8 cut at 8” * 6x8
6x9 * 6x9
8x10 4x8 ½ panel 4x8
two 4x8 cut strip 2 strip 4x8x2s
5x8 ½ panel 5x8
2 5x8 cut strip 2 strip
5x8x2s
6x8 ½ panel 6x8
68 DNP Imagingcomm America Corporation
Page 69
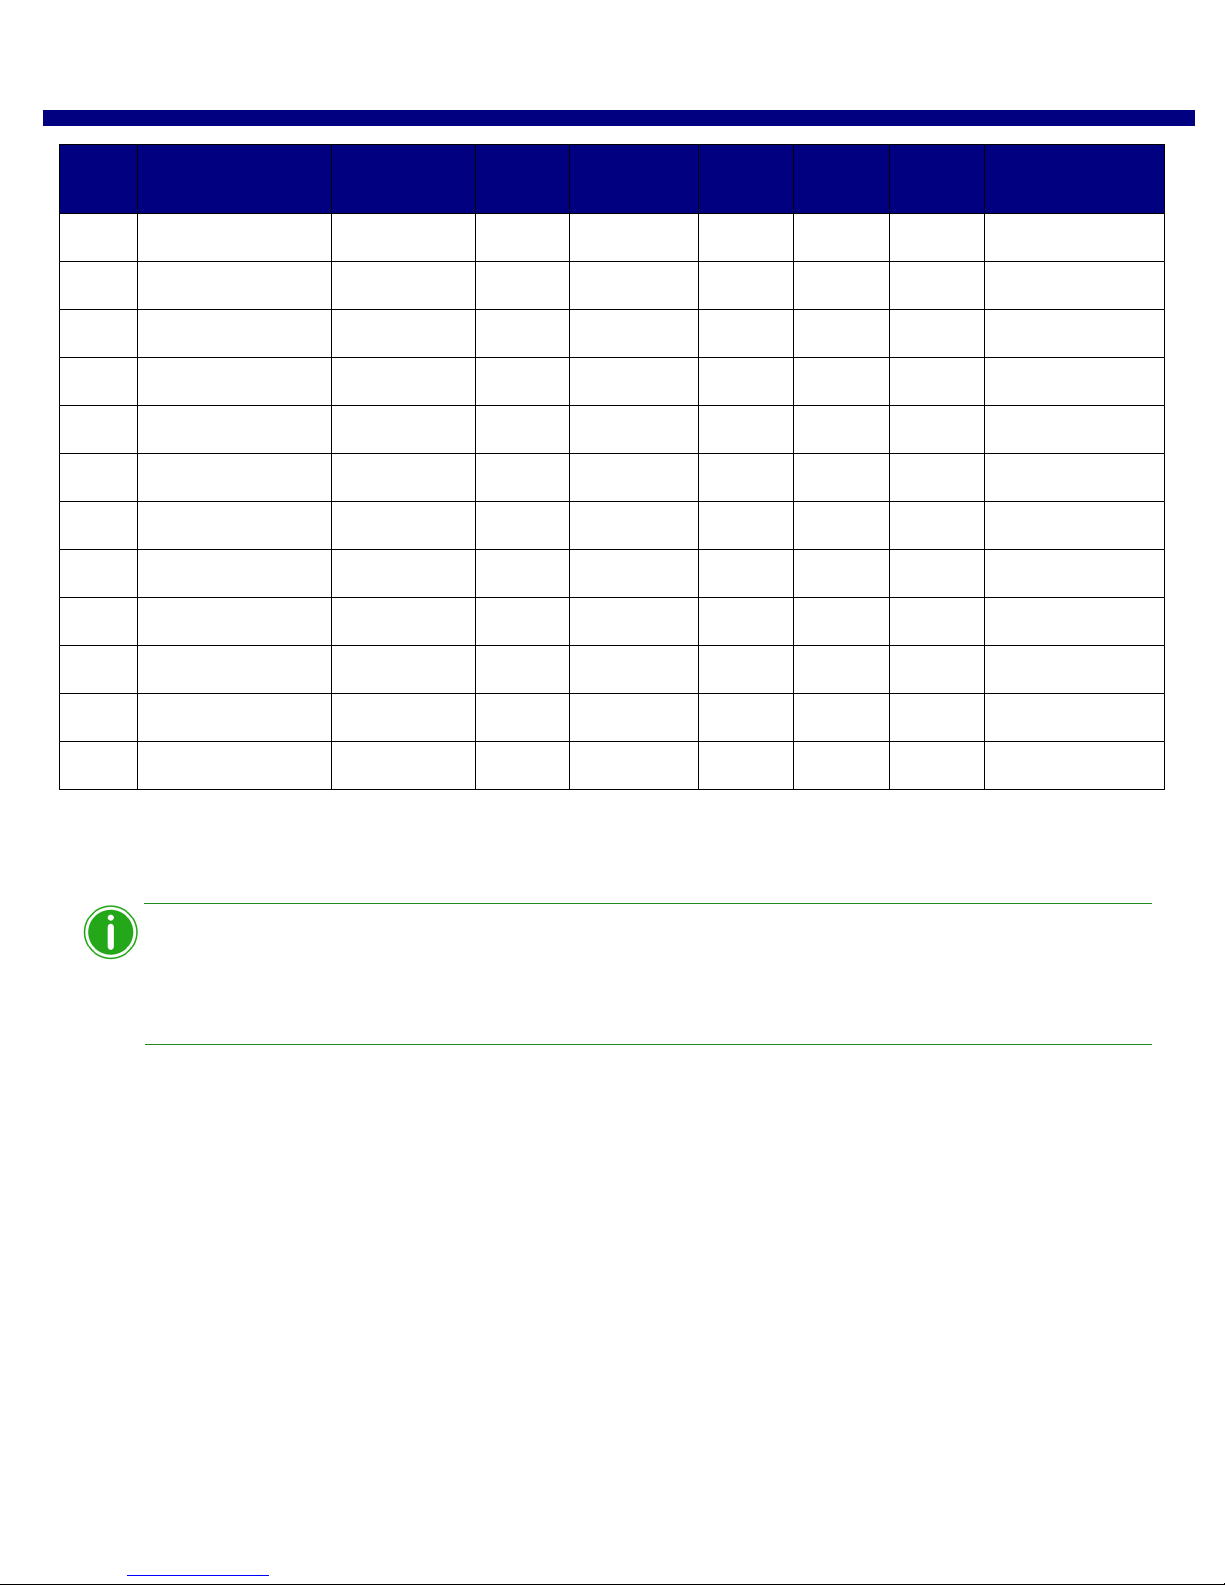
Print Size Chart WPS Pro User Guide
Note
Media
Size
Description Configuration
Notes
DS40 DS620/
DS620A
RX1 DS80/
DS80DX
DS820/
DS820A
WPS Pro Printer
8x8 square square 8x8sq
8x10 8x10
8x12 4x8 ½ panel 4x8
two 4x8 cut strip 2 strip 4x8x2s
three 4x8 cut strips 3 strip 4x8x3s
5x8 ½ panel 5x8
two 5x8 cut strip 2 strip 5x8x2s
6x8 ½ panel 6x8
two 6x8 cut strip 2 strip 6x8x2s
8x8 square square 8x8sq
8x10 cut at 10” 8x10
Queue Name
8x12 8x12
Print size is available for that printer
Default setting.
* Print size may not be available in all sales regions. Contact your sales representative for more information.
** Firmware v1.5 or greater
You can have two (2) printers connected to WPS Pro simultaneously. The media loaded must be
the same, i.e., two printers that both have 4”6” media loaded. See “Changing the Print Pooling
Settings” on page 87 for more information.
DNP Imagingcomm America Corporation 69
Page 70

Print Size Chart WPS Pro User Guide
70 DNP Imagingcomm America Corporation
Page 71

9
Custom Borders
Custom borders provide the ability to create branded prints with custom logos and event information. The borders are
automatically applied to any print of the specified print size when the images are printed via the WPS Pro system and you
have enabled borders. You can design a border using any photo application software package that allows for the creation of
layers within the file. A few examples are Photoshop, GIMP, and Corel Paintshop Pro. You must create a border for each
orientation - both horizontal and vertical.
Custom Border Requirements
Each border file must contain a space with a transparent background where the image will appear. Newly created borders
must meet the following criteria:
File Format: PNG only.
Orientation: Both horizontal and vertical borders must be loaded for each new border. If you only load one
orientation, then only that border will appear on prints.
File Naming: border-o.png where border is a fixed term, and o is the border orientation, i.e.,
border-v.png for a border that has a vertical orientation.
Size: Must be the full size in inches for each print size. For example, a 4x6 border would be 4”x6” (vertical) and 6”x4”
(horizontal). You can also use the following pixel sizes:
4x6: 1200x1800 pixels
5x7: 1500x2100 pixels
6x8: 1800x2400 pixels
Resolution: 300 dpi
Color Mode: RGB only
Background/Image Space: Must have a transparent background, or image space. The area where the image will
appear cannot be colored in.
Image Compression: No compression allowed. (No LZW, etc.)
In general, the opening in the border should be the same aspect ratio as the overall image, although the opening does not
have to be strictly rectangular, and it may have varied edge treatments. Having elements of the border overlap the image
space is acceptable, however keep in mind this may block important portions of your images.
Creating Custom Borders
1. On your computer, create a folder for your border files. Name the border folder with a dynamic name that you will
recognize later.
2. Use your preferred photo editing software to create your new border.
3. Use the above requirements to create two borders that have the correct file size, file format, color mode, background
transparency, and resolution. One for horizontal prints and one for vertical prints.
4. Save your borders with the proper file name (either border-v.png or border-h.png) in the border folder you
just created. Remember, each print size must have a horizontal and vertical border.
DNP Imagingcomm America Corporation 71
Page 72
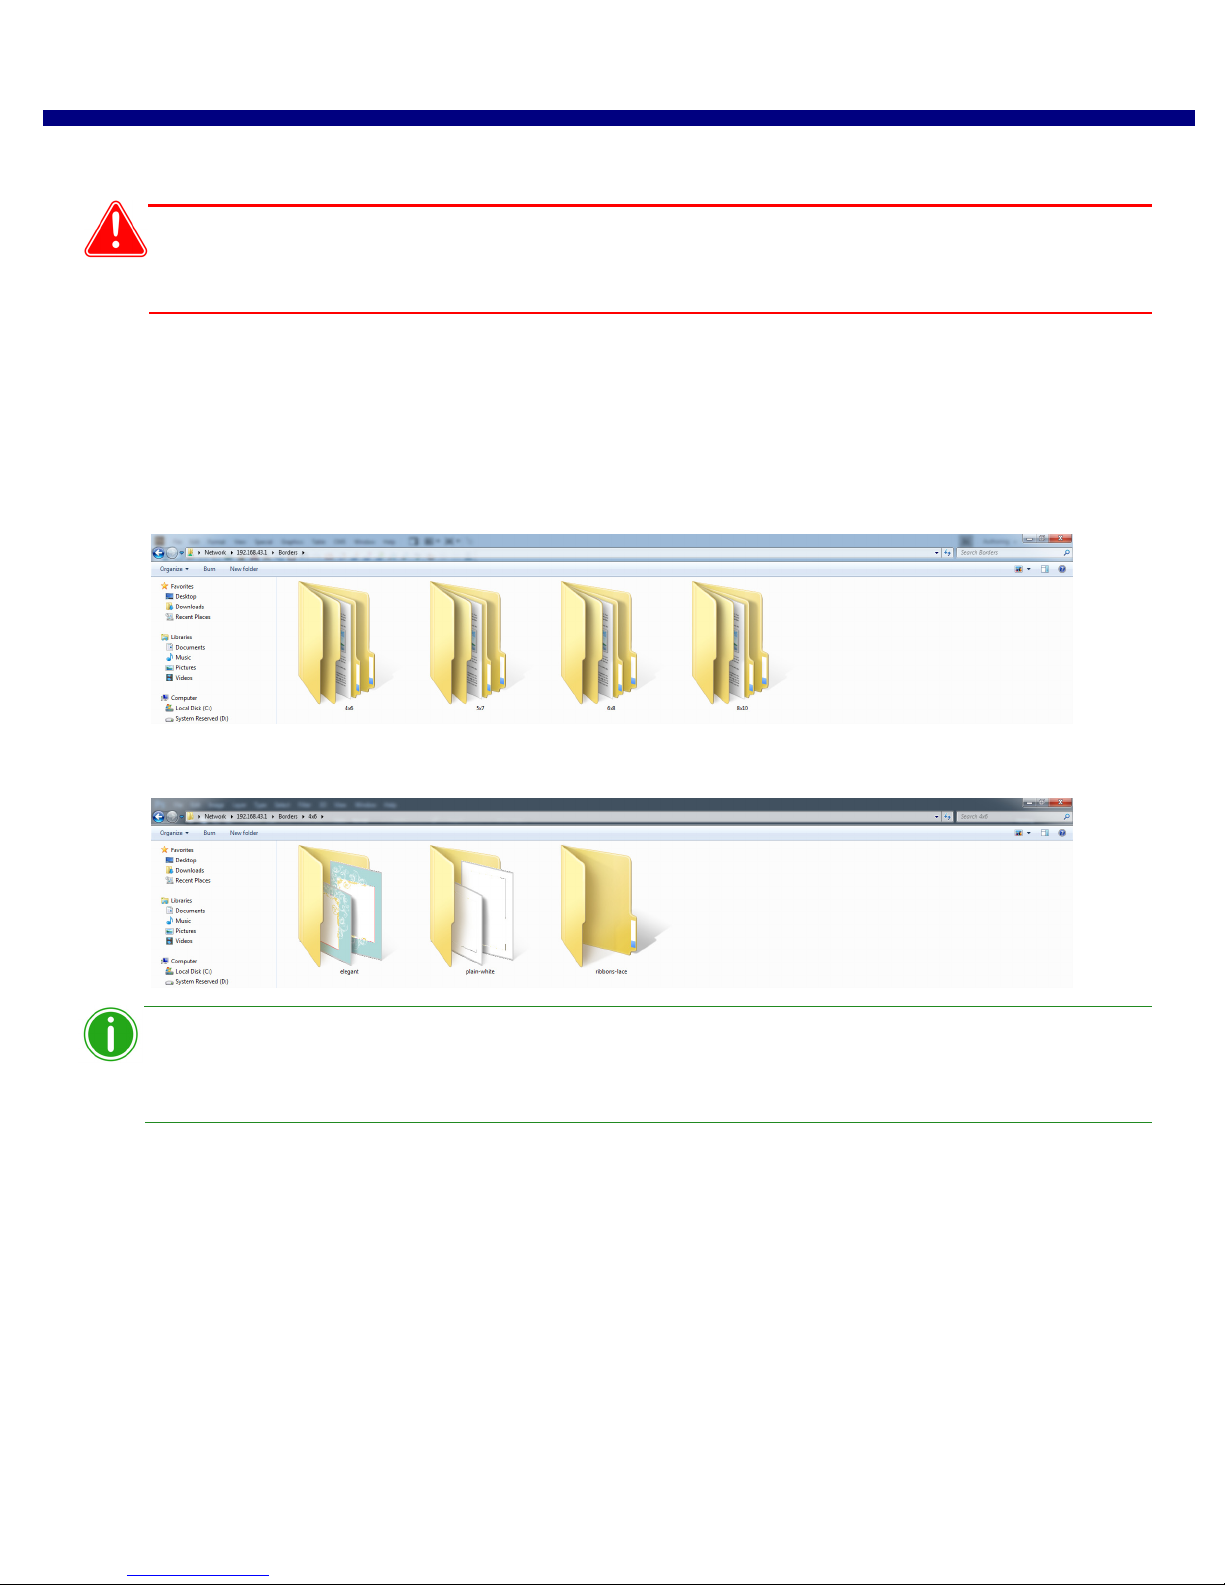
Adding the Custom Borders to the WPS Pro WPS Pro User Guide
Attention
Note
Adding the Custom Borders to the WPS Pro
You must complete this procedure from a PC or Mac computer that is wirelessly connected to your WPS Pro
device.
1. Connect to the WPS Pro Wi-Fi network.
2. Open a file explorer window. (Be sure you are not opening an internet browser.)
3. Type \\192.168.43.1 in the address bar. This accesses the WPS Pro directories.
4. Open the Borders directory.
5. Browse to the print size for the borders you created.
6. Copy the border folder you created earlier (with both border files in it), and paste that folder in the print size folder.
Within each border folder, a configuration file (XML file) is automatically created by the WPS Pro
system. There is no need to create a new XML file for new border folders.
72 DNP Imagingcomm America Corporation
Page 73
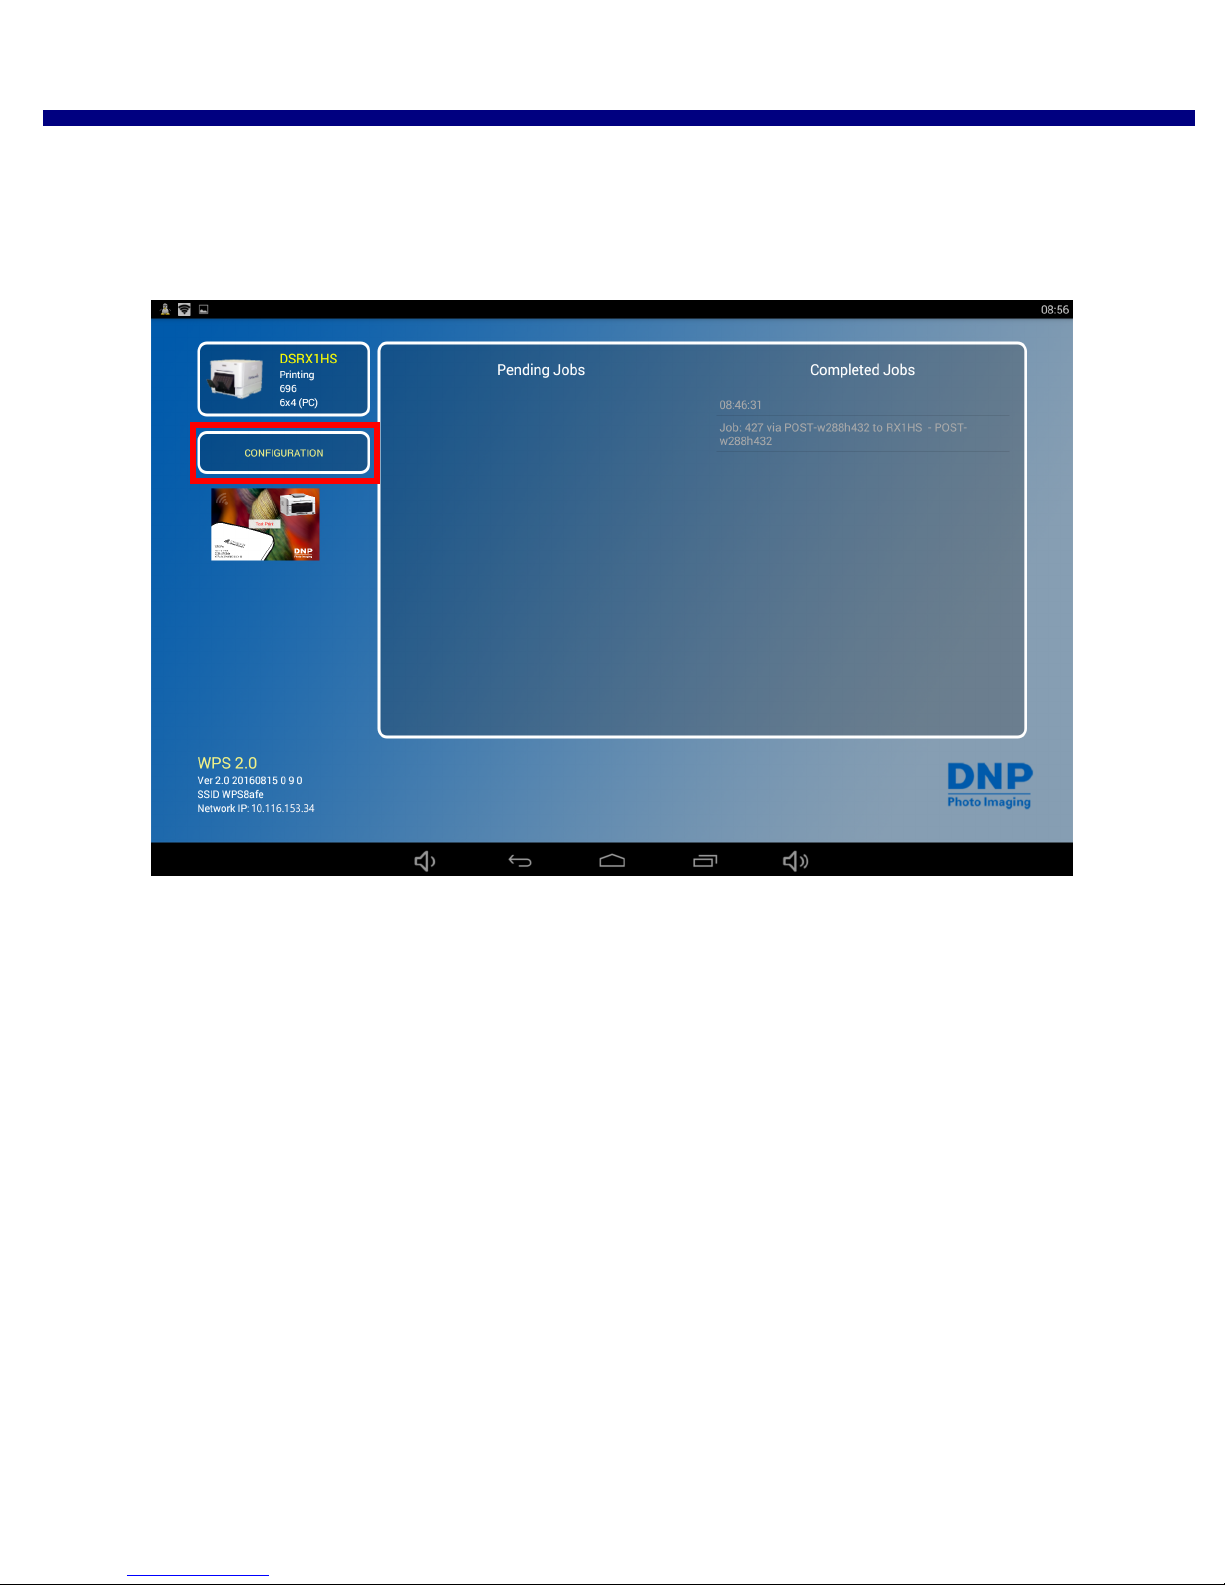
Enabling Borders WPS Pro User Guide
Enabling Borders
Once you have created your borders and added them to the appropriate folders, you can easily enable these borders from
your WPS Pro’s touchscreen display. Just follow these steps!
1. From your WPS Pro’ touchscreen, touch the Configuration button.
DNP Imagingcomm America Corporation 73
Page 74
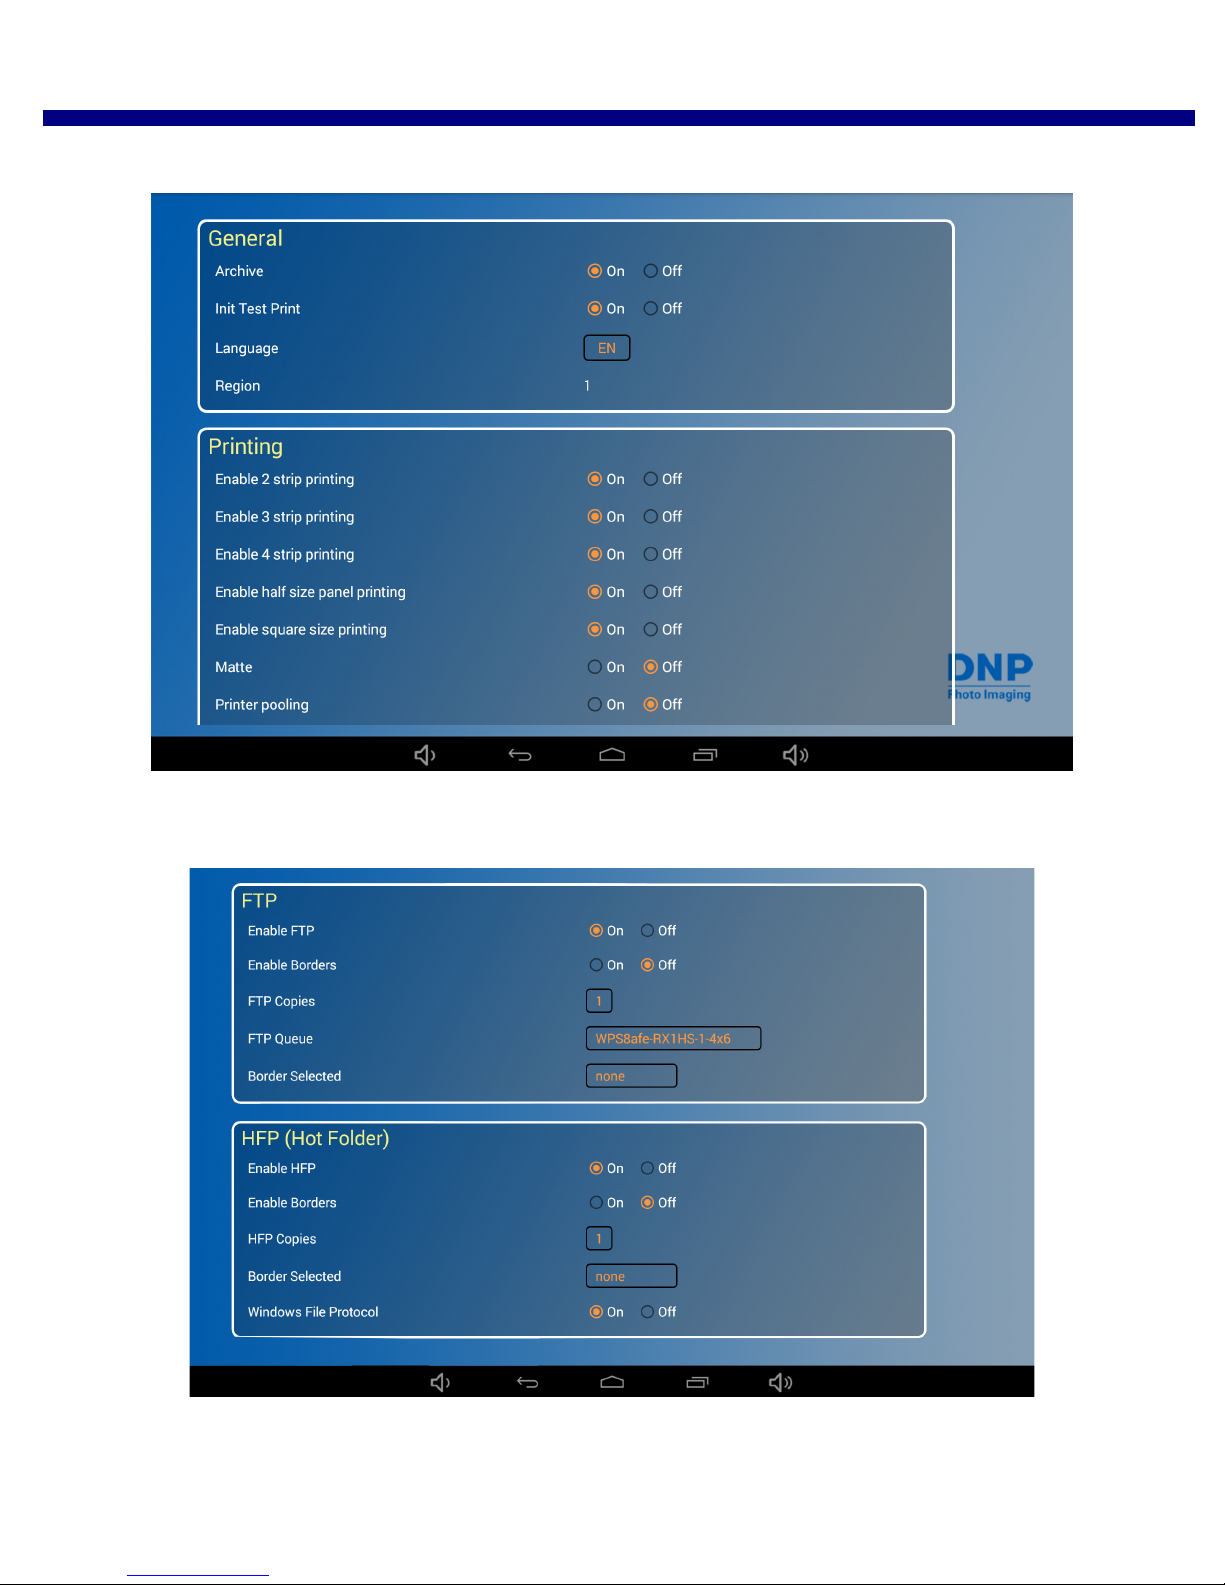
Enabling Borders WPS Pro User Guide
The WPS Pro Configuration screen is displayed.
2. Under the correct file transfer section (either FTP, HFP, depending on your file transfer preferences), locate the
Enable Borders option.
74 DNP Imagingcomm America Corporation
Page 75
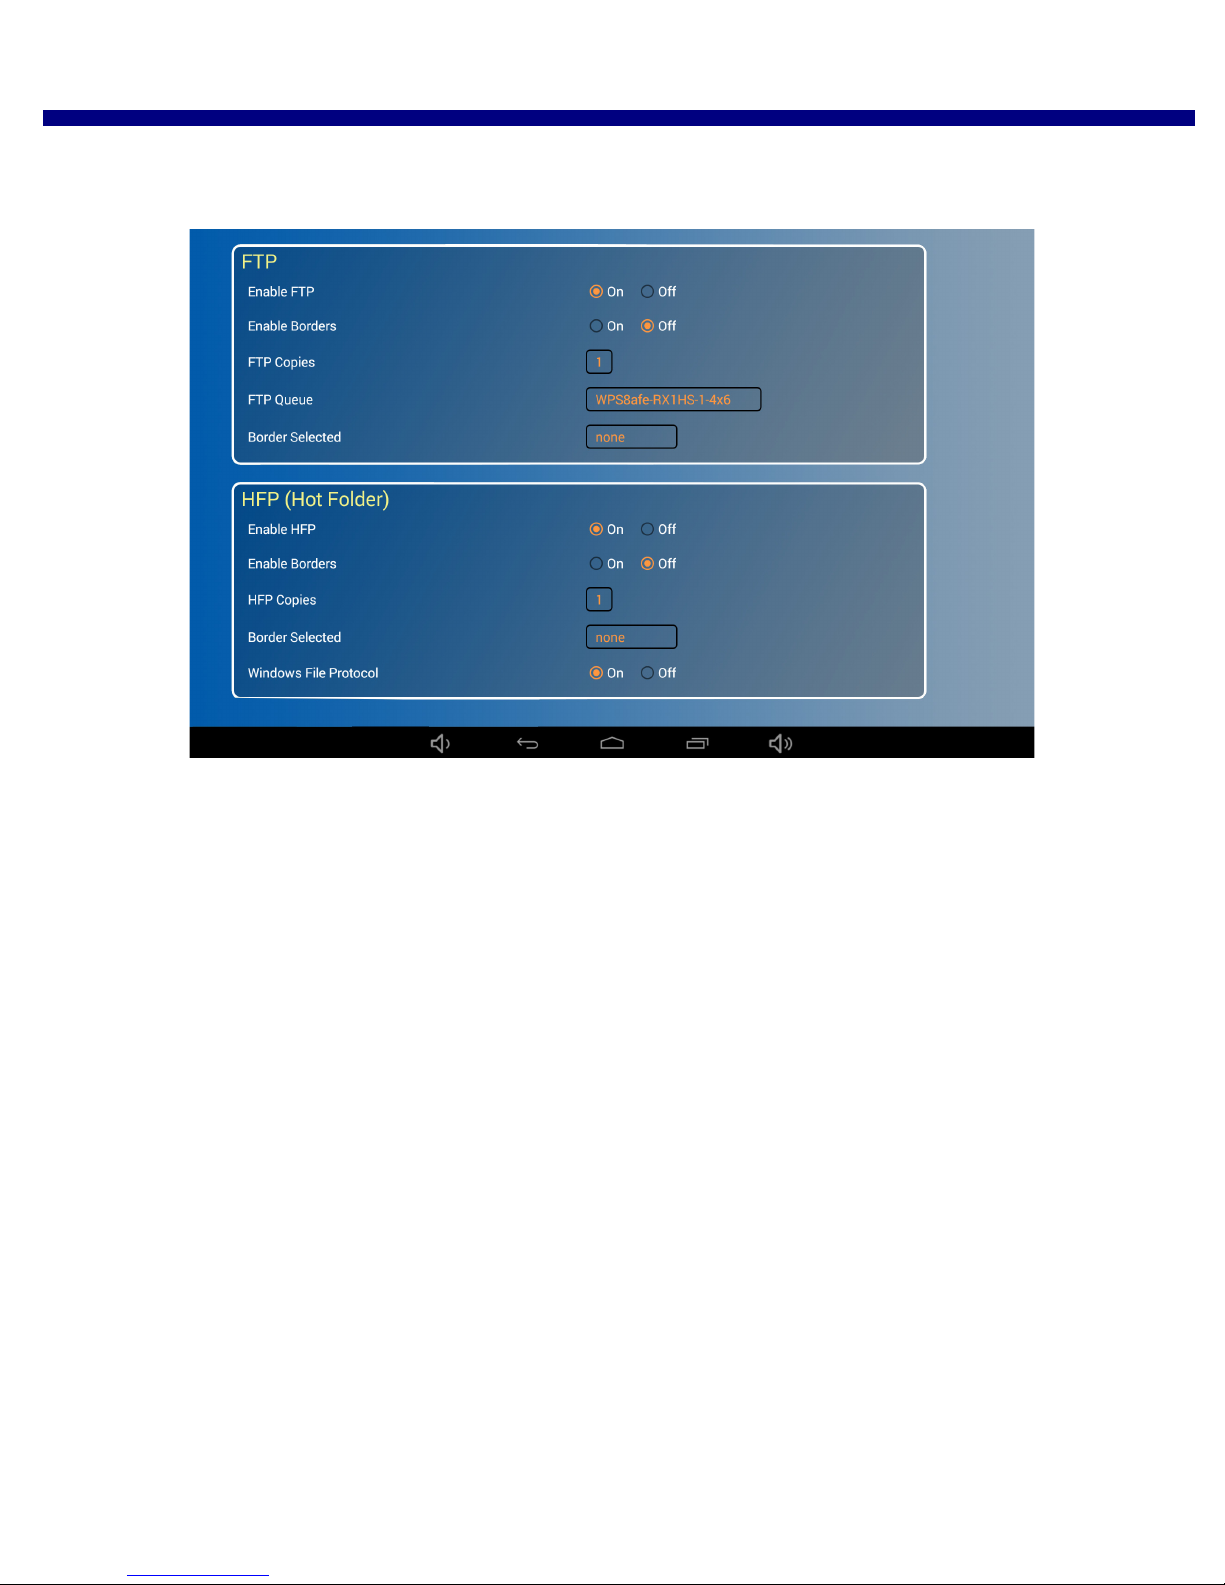
Troubleshooting Borders WPS Pro User Guide
3. Select the ON radio button.
4. Locate the Border Selected option.
5. Tap the Border Selected box and select the border you wish to add to your image.
6. Scroll to the bottom of the page and touch the Save Configuration button. After touching the Save Configuration
button, WPS Pro re-boots itself. (If you have initial test prints turned ON, reconnect once your test image prints.)
7. The border you have selected is printed on your images.
Troubleshooting Borders
If you are having issues after installing and enabling borders, use this section to troubleshoot those issues.
Borders are only enabled for one print size.
If you want borders enabled for all print sizes, you must have border files installed on your WPS Pro device for all print sizes.
Example: You are using your WPS Pro system with a DS620A printer and you have 6x8 ribbon and paper installed. You have
included border files in your 4x6 print size folder, and you have enabled borders using the WPS Pro Configuration screen
on your device’s touchscreen display. If you make 6x8 prints, no borders will appear. You must create and install border files
in your 6x8 print size folder as well.
I can’t enable different borders for different print sizes.
At this time, you can only enable borders with the same folder name for all print sizes. You can create any border you want
and as long as you use the same folder name, and then you can enable that border across any print size.
Example: You want a “thank you” border for 4x6 prints, and a “congratulations” border for 6x8 prints. Create the sets of
borders, and use the same folder name - “wedding 2015” - for both sets of borders. After you have enabled borders using
the WPS Pro Configuration screen, any 4x6 you print will have the thank you border and any 6x8 you print will have the
congratulations border.
DNP Imagingcomm America Corporation 75
Page 76

My border isn’t printing. WPS Pro User Guide
My border isn’t printing.
Check for the following common issues if your border isn’t printing:
Have you enabled borders using the WPS Pro Configuration screen? If so, did you reboot your WPS Pro device
to make sure the changes were saved?
Is your border file named correctly?
Did you use the correct border file parameters when creating the file?
Are your borders saved inside a border folder for the print size you need?
If borders are only printing for one orientation, make sure you have installed both borders on your device and
that both files were created properly.
If you are still having issues, contact technical support for assistance.
76 DNP Imagingcomm America Corporation
Page 77
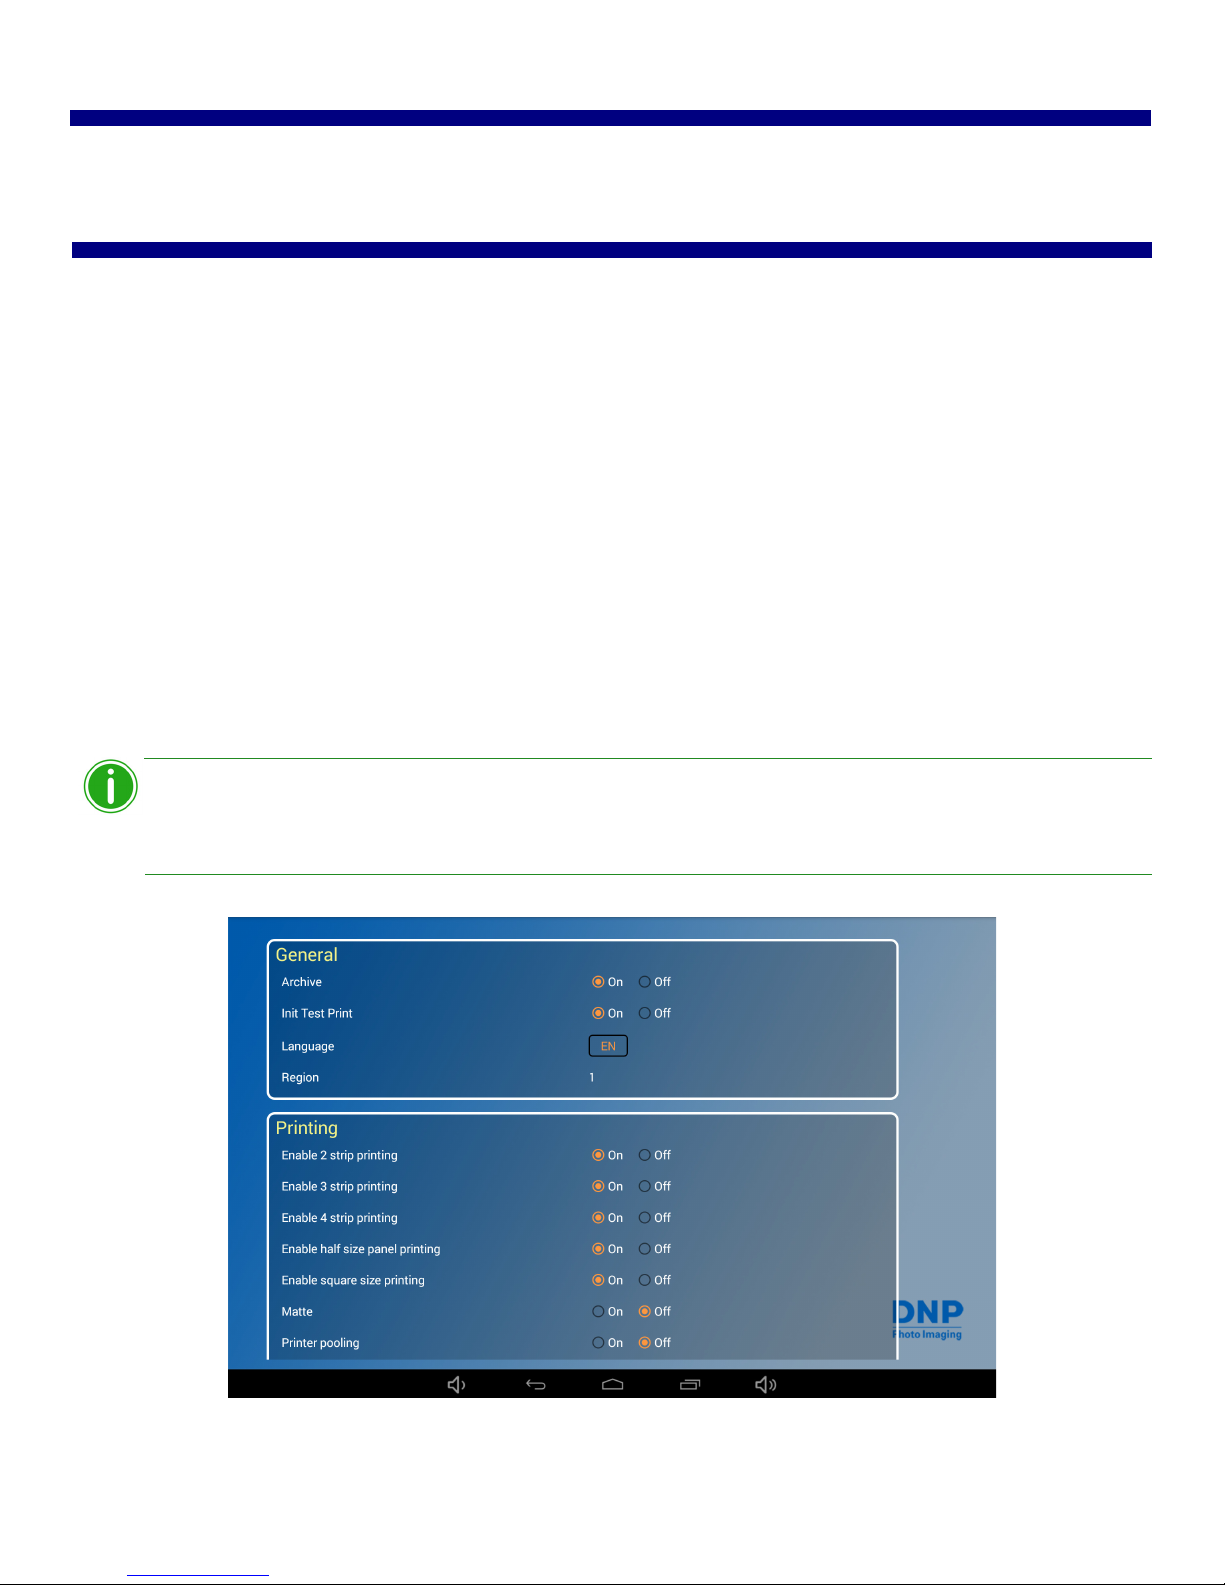
10
Note
Advanced Actions
About This Chapter
This chapter covers advanced topics and procedures relating to your WPS Pro device. Please read through all instructions
carefully and thoroughly before proceeding. Changing the settings covered in this chapter can cause your WPS Pro device
to not function in the manner in which you intended. Your WPS Pro device ships with recommended settings from the
factory. Only make the changes covered in this chapter if you are trying to customize a setting for your specific needs.
All changes must be made exactly as stated in the following procedures. Changes that are not made in accordance with
these procedures can void your warranty and cause damage to your WPS Pro device. If you have questions about
procedures in this chapter, please contact Technical Support or your sales representative.
Using the WPS Pro Configuration Screen
Configure your WPS settings using the WPS Pro Configuration screen, which is accessible from your device’s touchscreen.
When changing configuration settings, follow the procedures carefully, including the timing and
reboot instructions.
DNP Imagingcomm America Corporation 77
Page 78
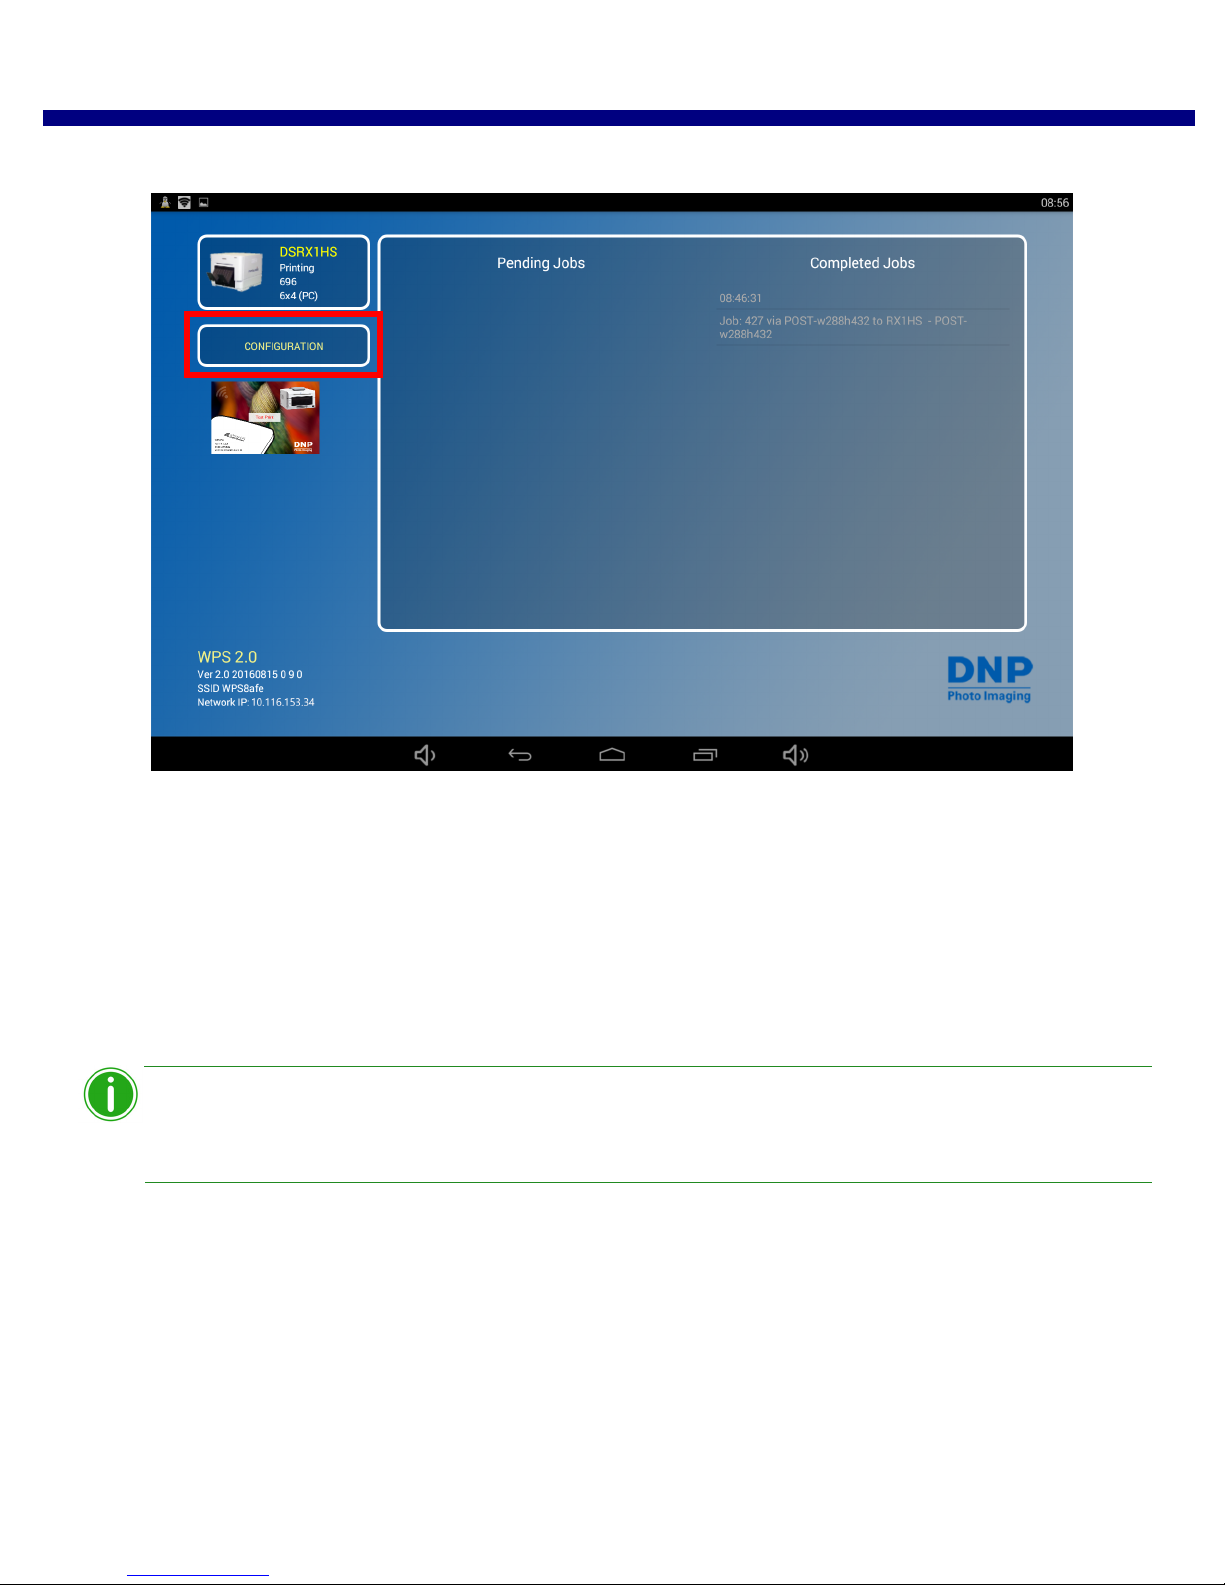
Changing the General Configuration Settings WPS Pro User Guide
Note
1. From your WPS Pro’s Status screen, touch the Configuration button.
2. The WPS Pro configuration screen opens.
3. Use the following procedures to change any settings for your WPS Pro system.
Changing the General Configuration Settings
Use the general configuration settings to change your archive settings, default language, and initial test print settings.
Configuring Image Archiving
You can archive your images to a micro SD card once you have printed them. WPS Pro is set to archive your images by
default.
If you turn OFF the archiving functionality, your images are deleted from the WPS Pro device once
they have been printed.
1. If you have not already, navigate to the WPS Pro Configuration screen from your console’s touchscreen display.
78 DNP Imagingcomm America Corporation
Page 79
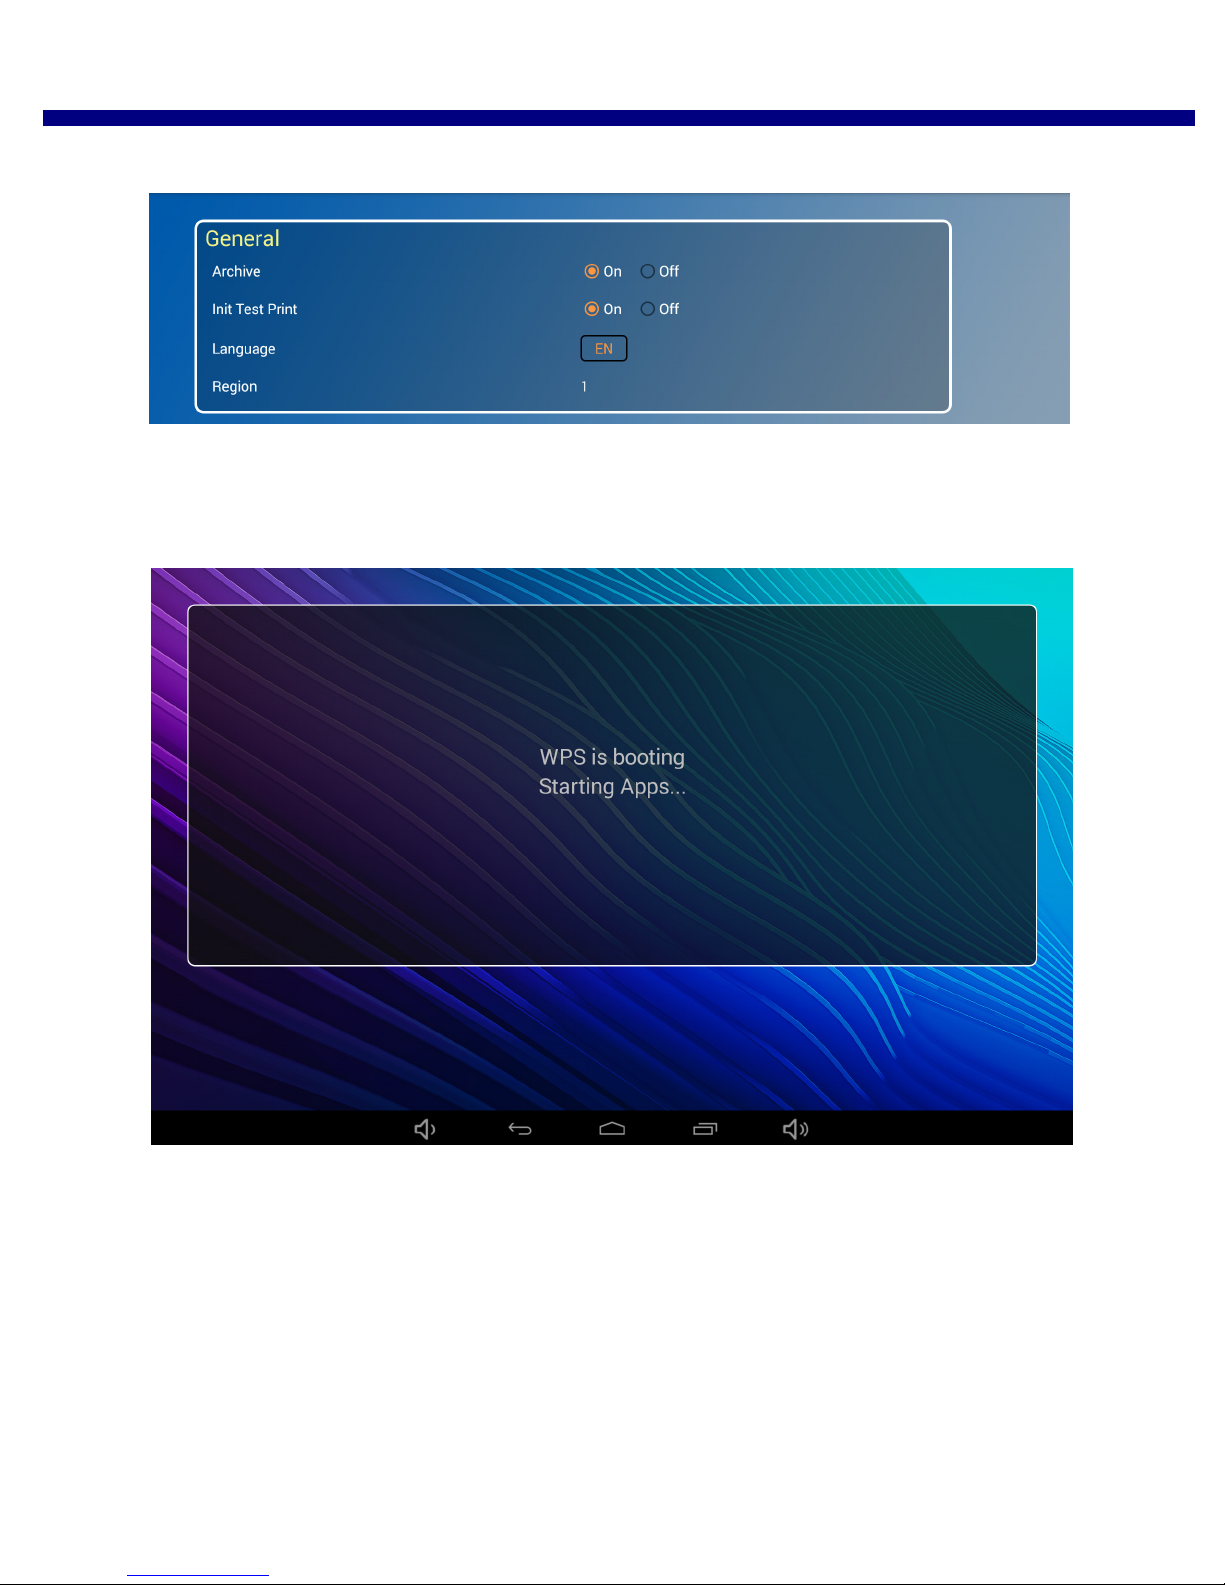
Configuring Image Archiving WPS Pro User Guide
2. Under the General section of the WPS Pro Configuration screen, locate the Archive option.
3. Using the radio buttons, set archiving images to either OFF or ON.
4. Scroll to the bottom of the page and touch the Save Configuration button.
5. Upon touching the Save Configuration button, the software restarts.
6. After three minutes, reconnect to the WPS Pro Wi-Fi network. (If you have initial test prints turned ON, reconnect
once your test image prints.)
DNP Imagingcomm America Corporation 79
Page 80
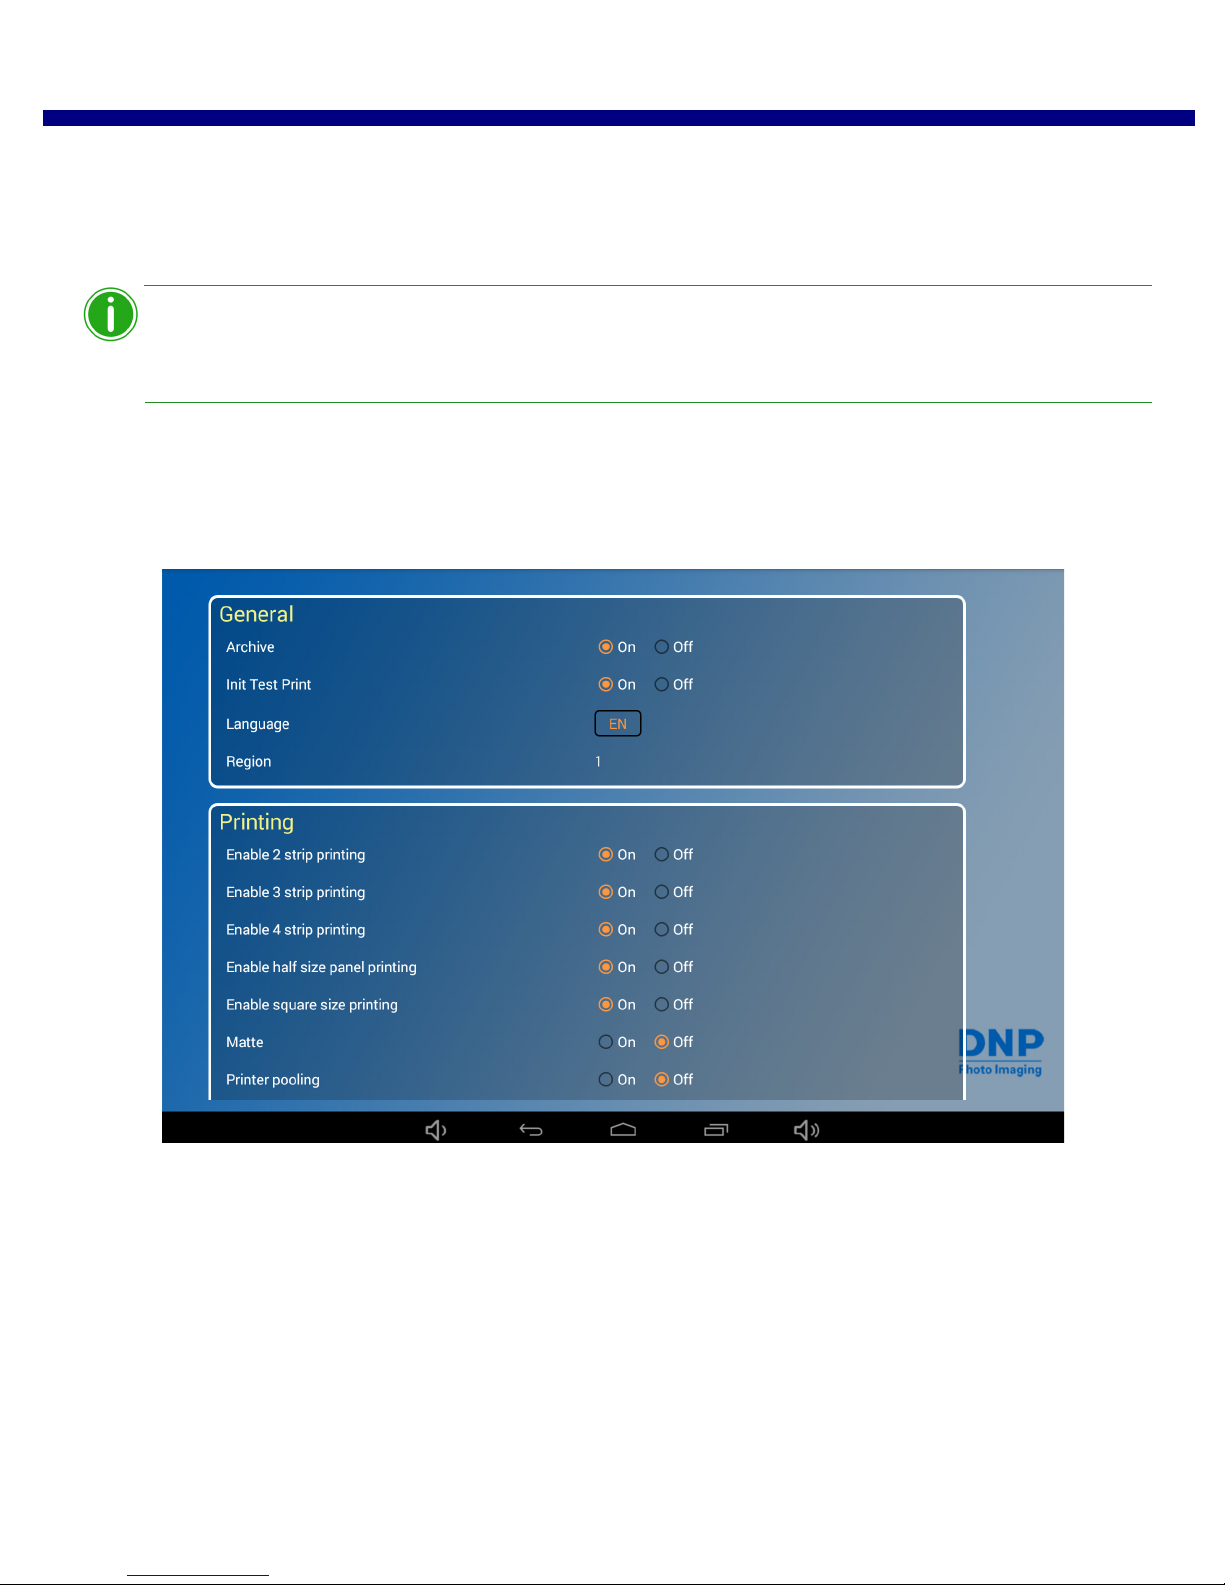
Changing the Test Print Setting WPS Pro User Guide
Note
Archiving Images
1. Make sure your Archive setting is set to ON. “Configuring Image Archiving” on page 78 for more information.
2. Insert a micro SD card in the slot on the back of the WPS Pro device.
3. Once you print your image, your image is saved to the directory on your micro SD card.
Your card must have a directory called DNParchive for your images to be saved.
If you do not have a micro SD card inserted into the slot, your images will not be saved.
Changing the Test Print Setting
When the WPS Pro starts, a test image is automatically printed. Use this procedure to enable or disable that setting.
1. Under the General section of the WPS Pro Configuration screen, locate the Init Test Print option.
2. Using the radio buttons, set test images to either OFF or ON.
3. Scroll to the bottom of the page and touch the Save Configuration button.
4. Upon touching the Save Configuration button, your device restarts.
5. After three minutes, reconnect to the WPS Pro Wi-Fi network. (If you have initial test prints turned ON, reconnect
once your test image prints.)
6. Return to the WPS Pro Configuration screen to confirm the change has been made.
80 DNP Imagingcomm America Corporation
Page 81
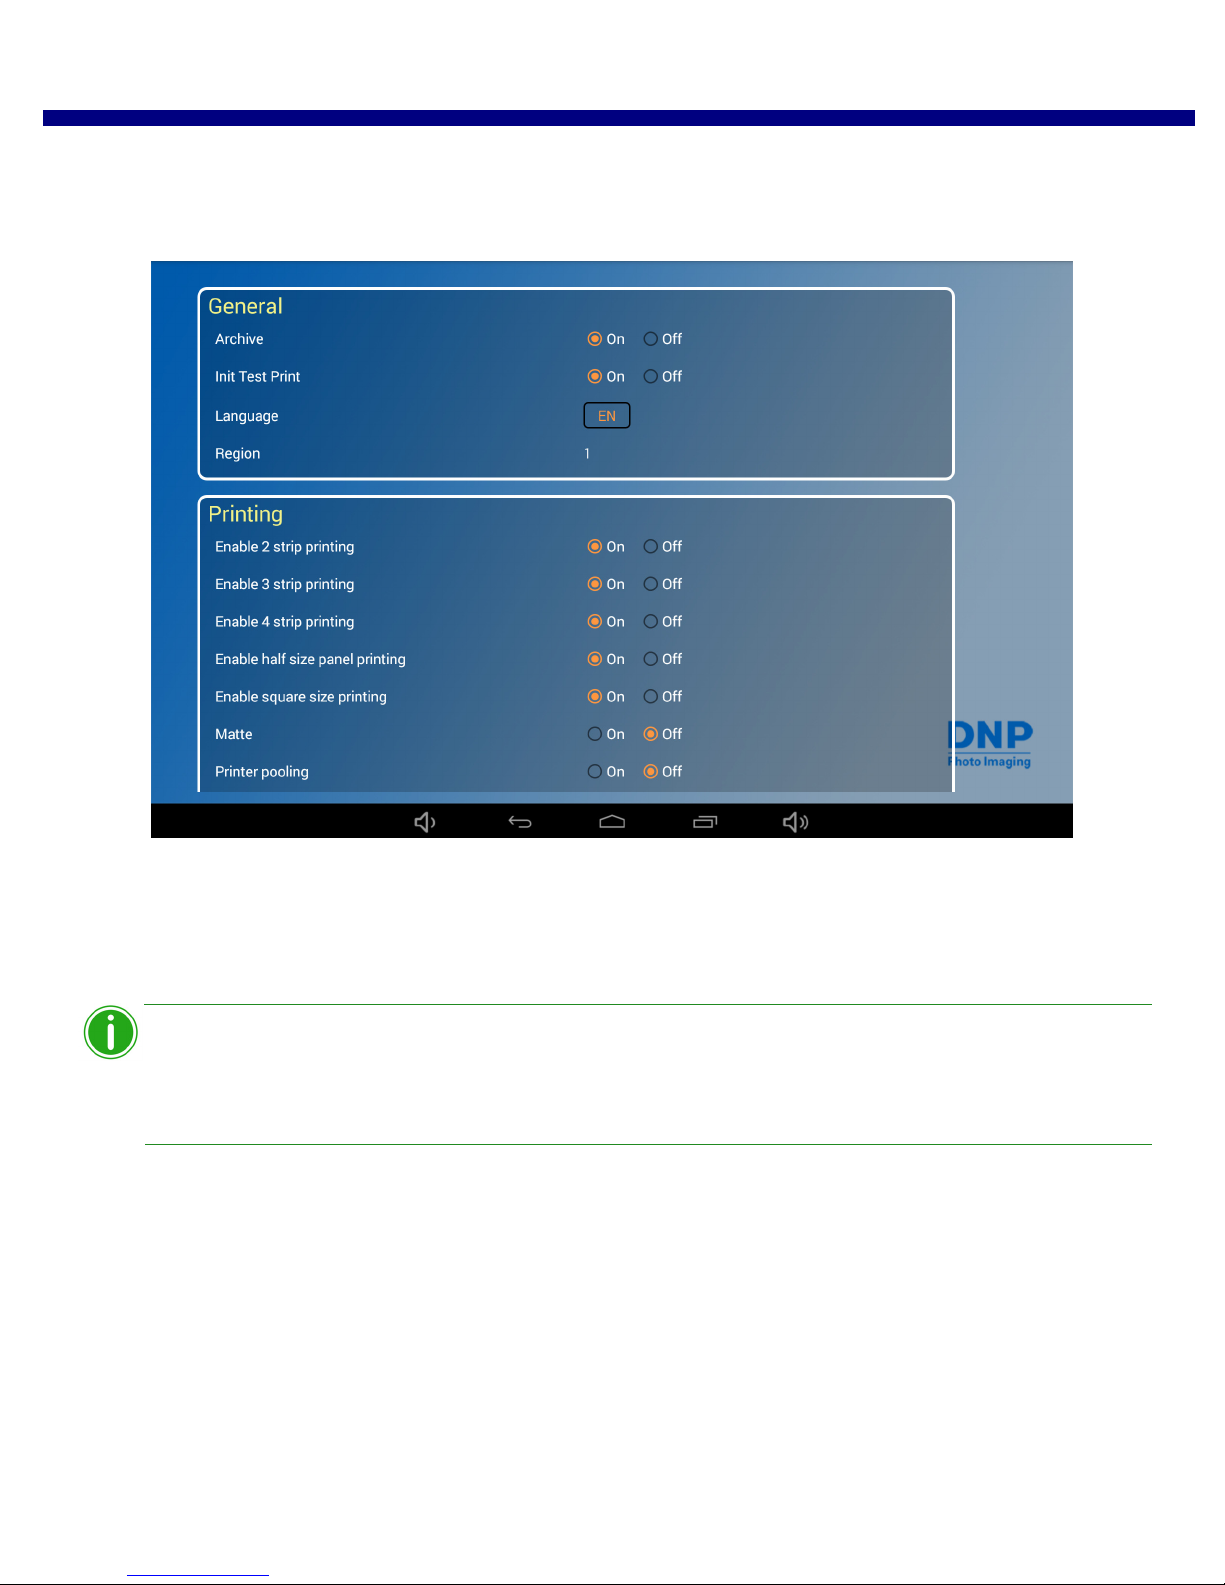
Changing the Default Language WPS Pro User Guide
Note
Changing the Default Language
Use this procedure to change the default language for your WPS Pro device.
1. Under the General section of the WPS Pro Configuration screen, locate the Language option.
2. Tap the Language box and select a language from the list.
EN – English
FR – French
ES – Spanish
PT – Portuguese
Not all languages are available in every sales region where the WPS Pro devices are sold. Only the
languages that are available in your sales region are displayed on the WPS Pro Configuration
screen. For more information, please contact your sales representative.
3. Scroll to the bottom of the page and touch the Save Configuration button.
4. Upon touching the Save Configuration button, your device restarts.
5. After three minutes, reconnect to the WPS Pro Wi-Fi network. (If you have initial test prints turned ON, reconnect
once your test image prints.)
6. Return to the WPS Pro Configuration screen to confirm the change has been made.
About the WPS Pro Region Setting
The region setting displays the region where your WPS Pro device is intended to be used. The sales region cannot be
changed.
DNP Imagingcomm America Corporation 81
Page 82
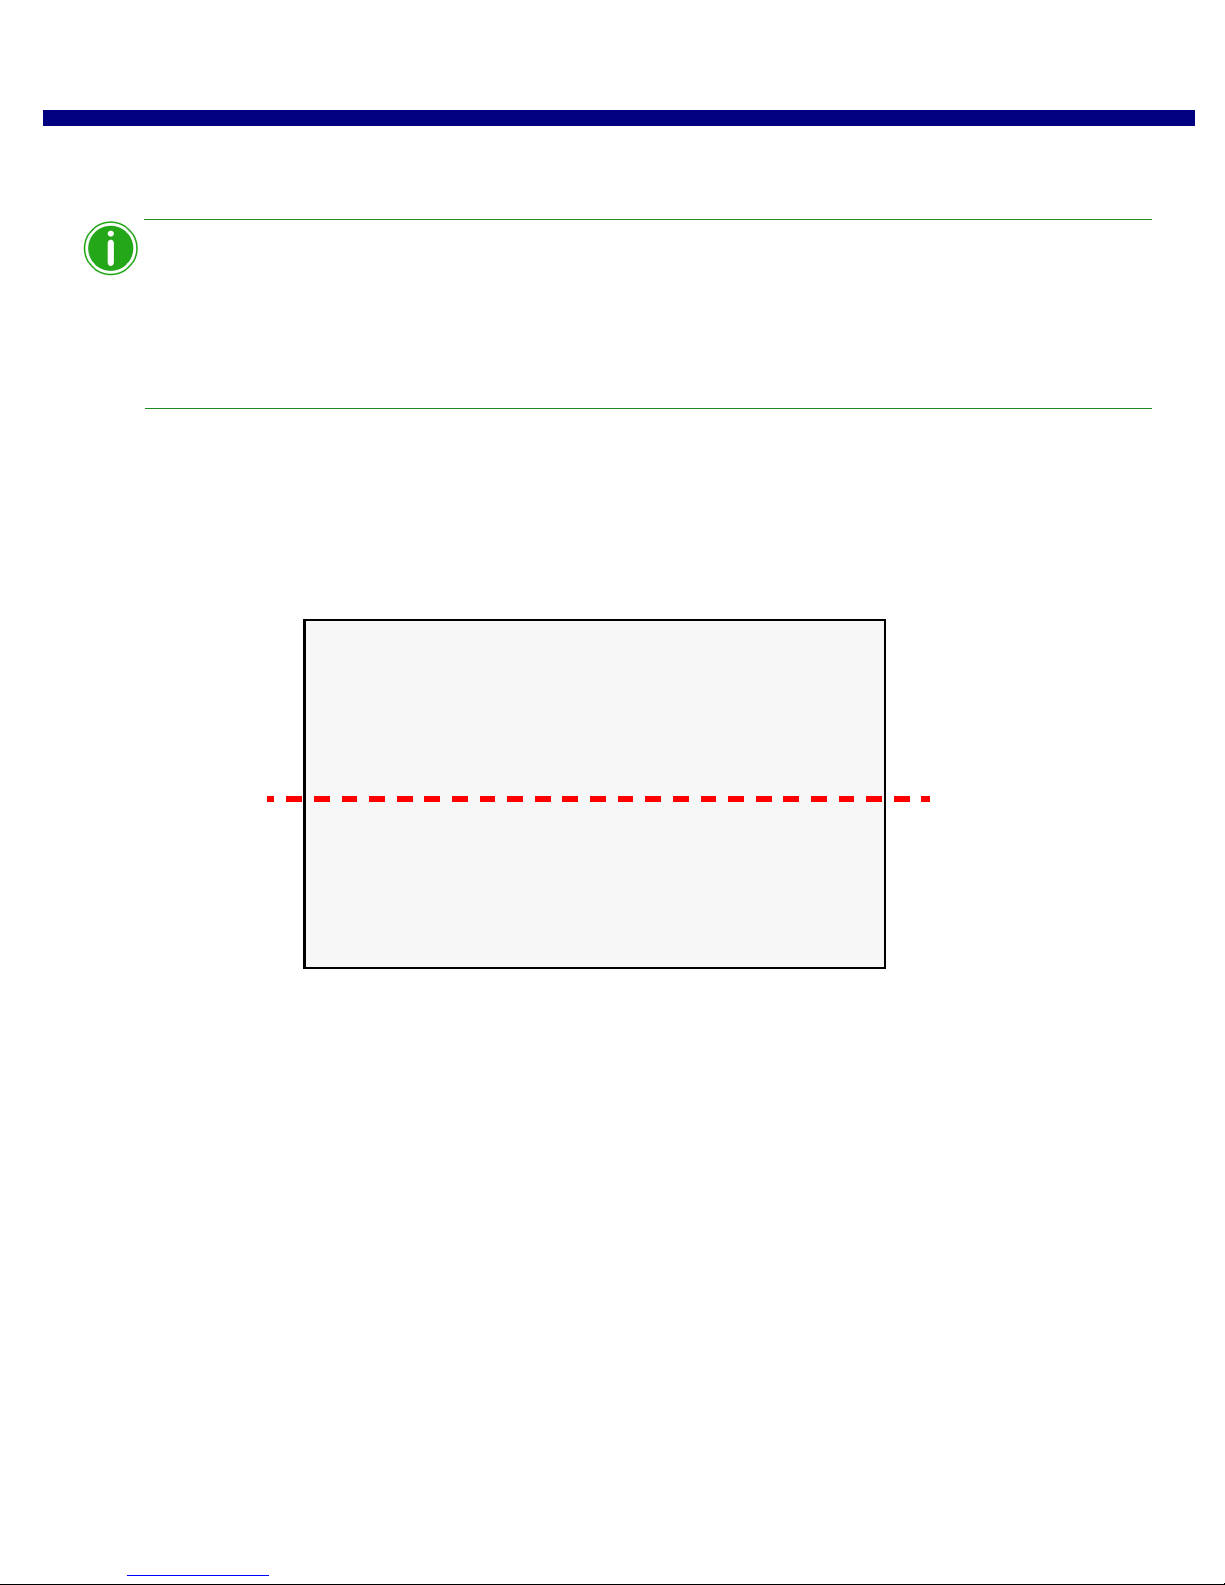
Changing the Printing Settings WPS Pro User Guide
Note
6"
4"
Changing the Printing Settings
Use the printing settings to change your print finish type, printer pooling settings, and other printing size options.
When sending images via WPS Pro, keep the image size in mind in relation to your selected print
sizes. You must send images that are formatted to the correct aspect ratio for your print media.
This is especially important when dealing with strip cuts or square cuts. For example, if you send
an image that is sized for a 4x6 aspect ratio print to a printer that has 2x6 strips as the default print
size, the print will be cut down the middle - not resized to print on part of the paper.
Changing the Printing Size Options
There are a few printing options that can be enabled or disabled that deal with the final print size or how the print is printed
on the ribbon panel. Those options are:
2 Strip Printing – Allows 4x6 prints to be cut into two 2x6 strips.
82 DNP Imagingcomm America Corporation
Page 83
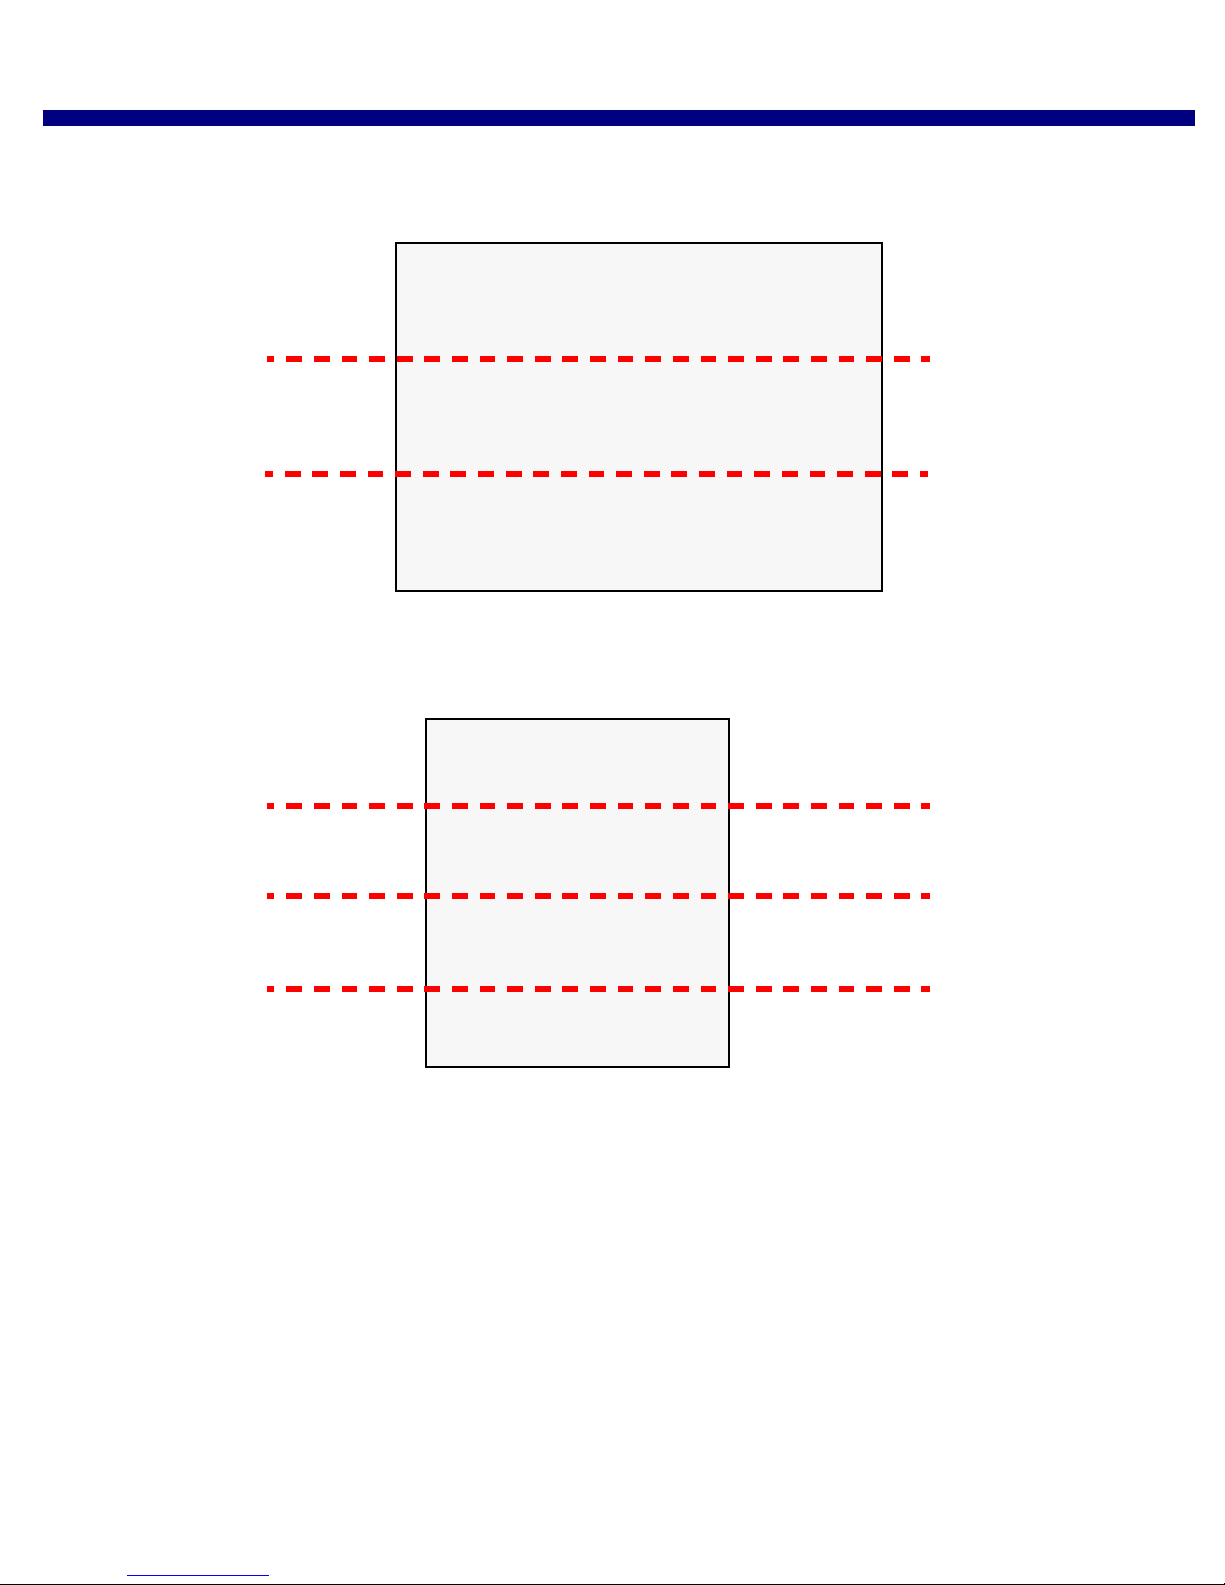
Changing the Printing Size Options WPS Pro User Guide
5"
7"
6"
8"
3 Strip Printing - Allows 5x7 prints to be cut into three 2x5 strips.
4 Strip Printing– Allows 6x8 prints to be cut into four 2x6 strips.
DNP Imagingcomm America Corporation 83
Page 84
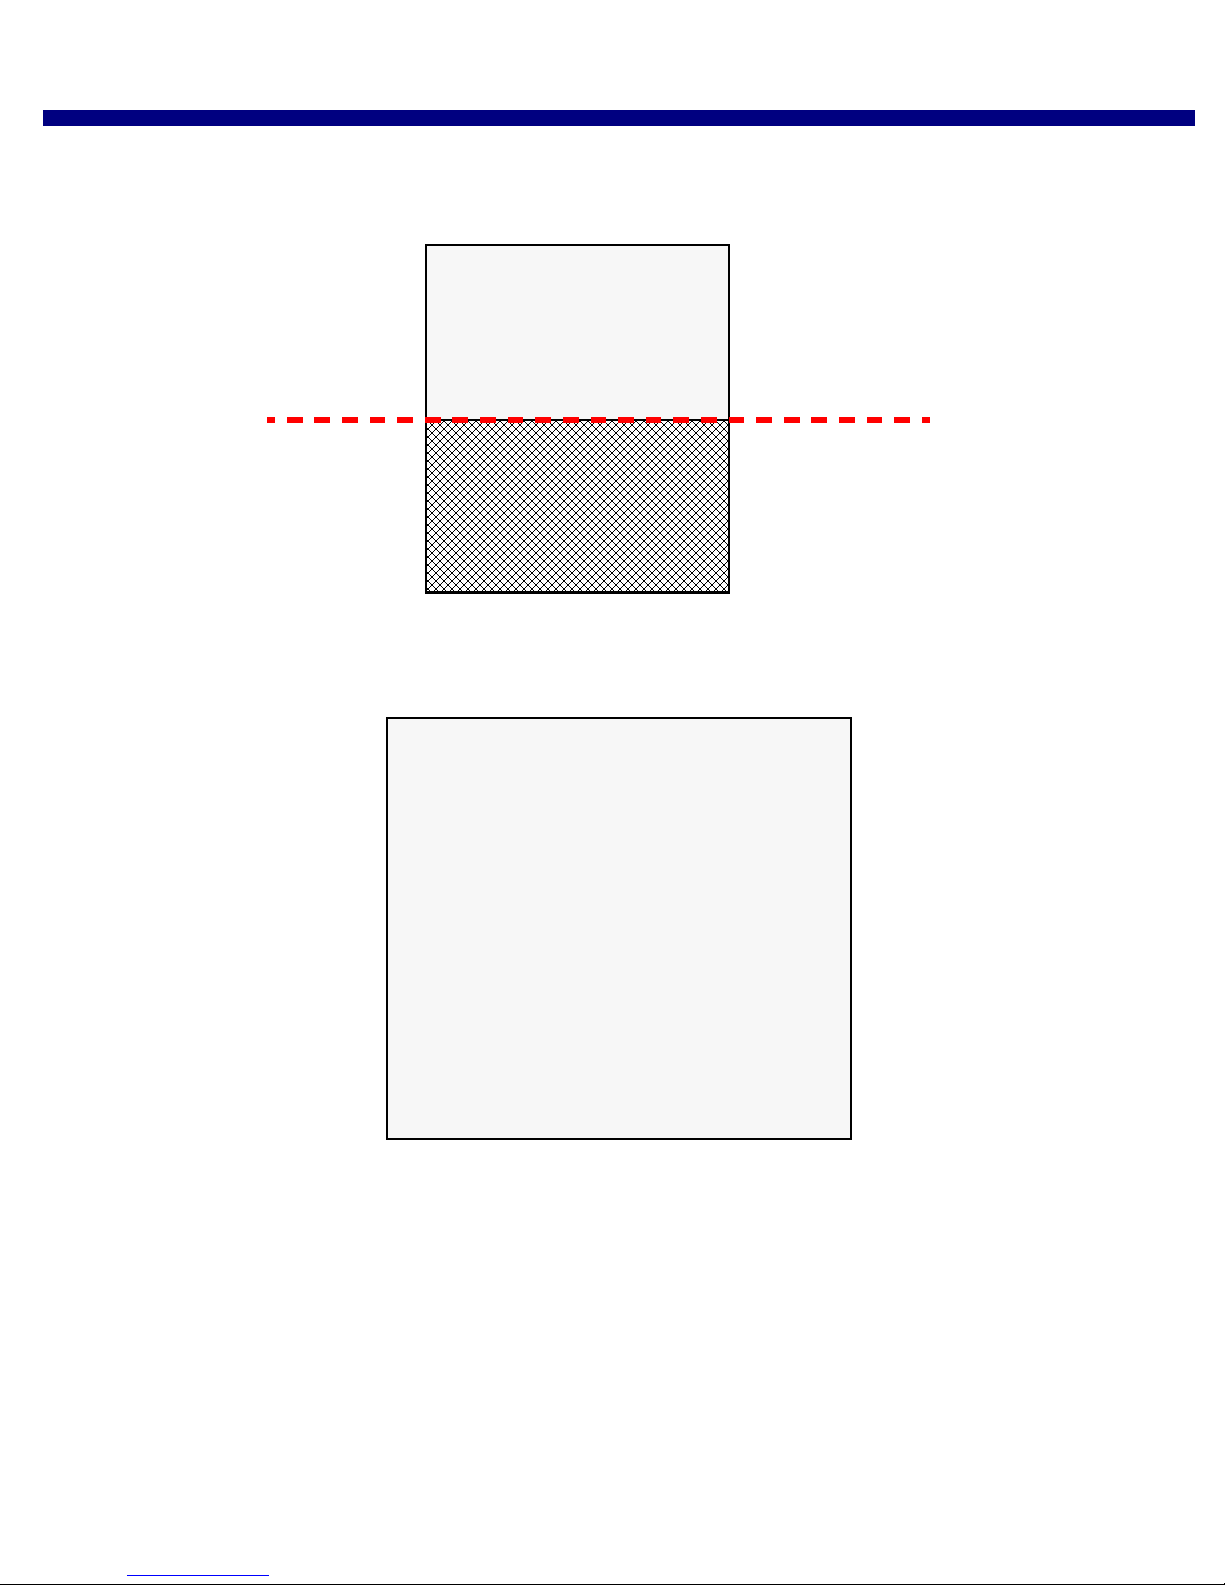
Changing the Printing Size Options WPS Pro User Guide
6"
8"
6"
6"
Half Size Panel Printing – Only prints on half of a ribbon panel. The next order will start on a new ribbon panel.
Square Size Printing – Allows printing of square images such as 5x5, 6x6 and 8x8.
Refer to the printer chart on page 35 for more information on whether the above printing size options are available with
your media type. To change the settings, use the procedure below. Make only one printing size change at a time. If you
need to make more than one printing size change, repeat the procedure.
84 DNP Imagingcomm America Corporation
Page 85
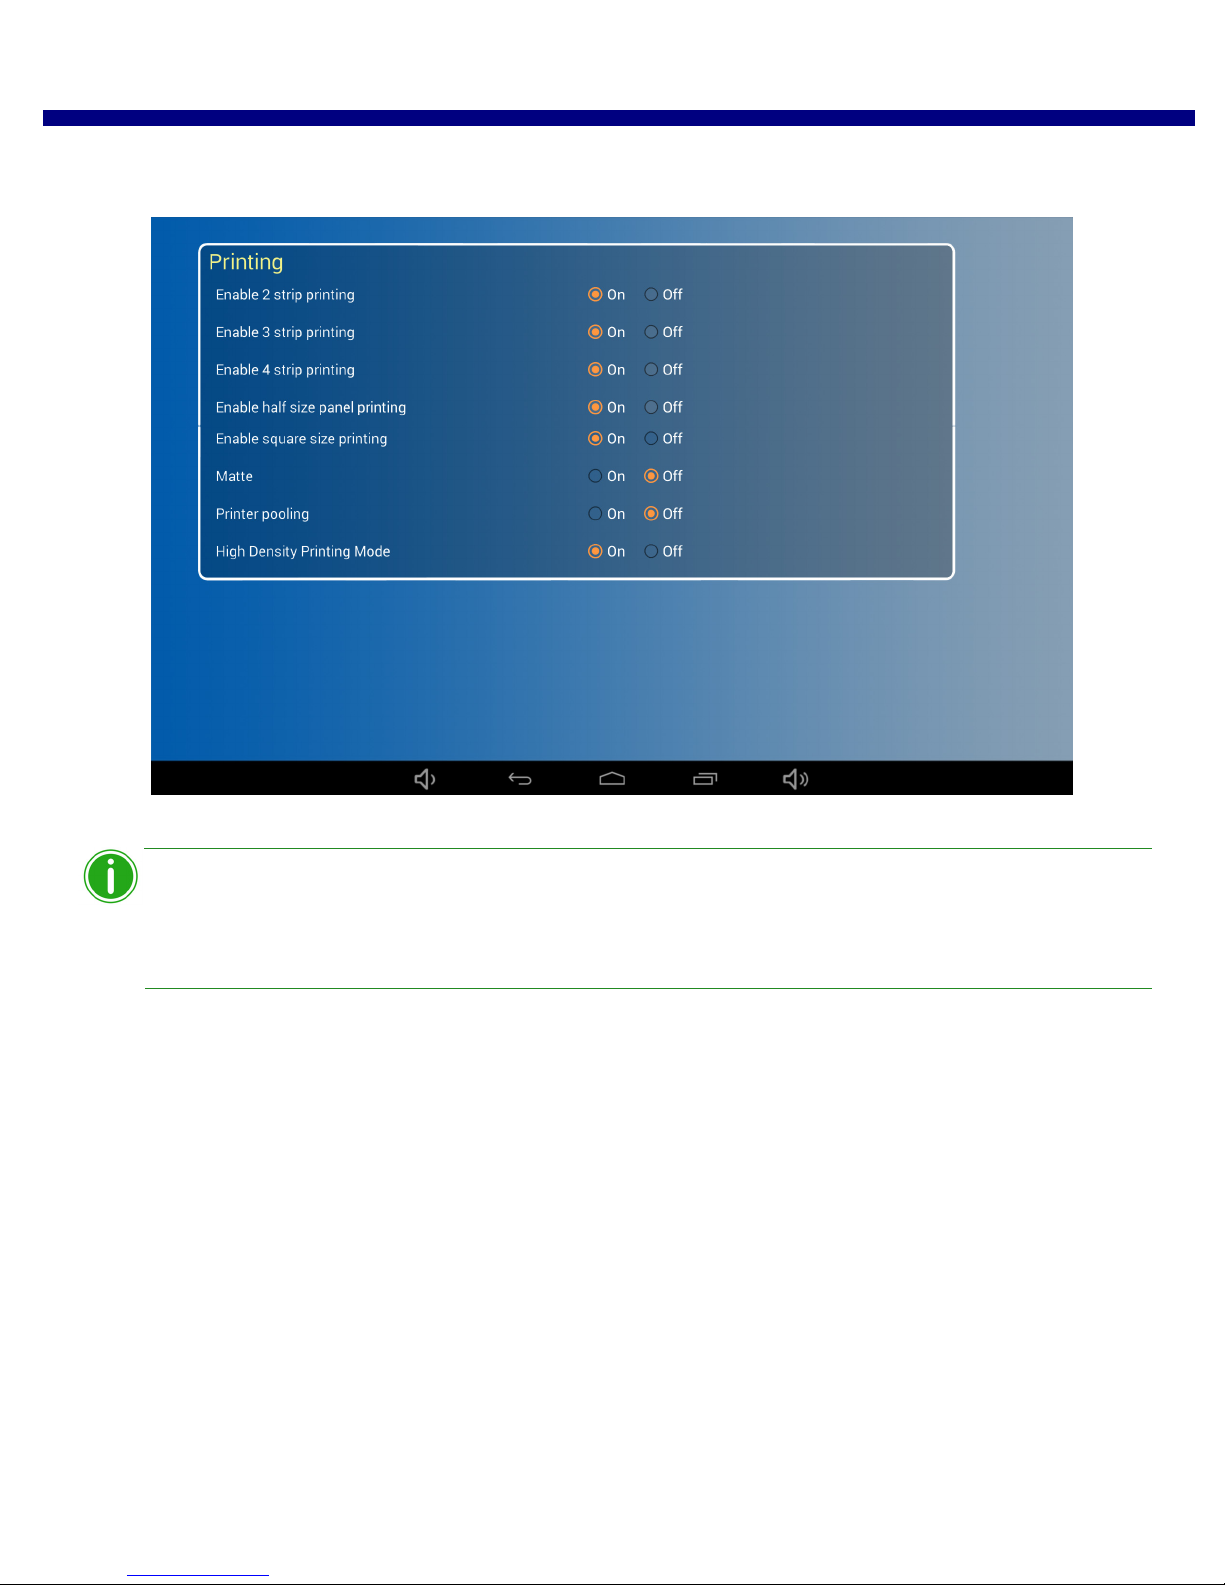
Changing the Printing Size Options WPS Pro User Guide
Note
1. Under the Printing section of the WPS Pro Configuration screen, locate the printing size option you want to
update.
2. Change the radio button to ON or OFF.
If you want to have 2x6 photo booth-type strips as your default print size, be sure to change the
print queue setting under your transfer type. See either “Configuring FTP Settings” on page 88 or
“Configuring HFP Settings” on page 93 for details on changing your print queue.
3. Scroll to the bottom of the page and touch the Save Configuration button.
4. Upon touching the Save Configuration button, the software restarts.
5. After three minutes, reconnect to the WPS Pro Wi-Fi network. (If you have initial test prints turned ON, reconnect
once your test image prints.)
DNP Imagingcomm America Corporation 85
Page 86
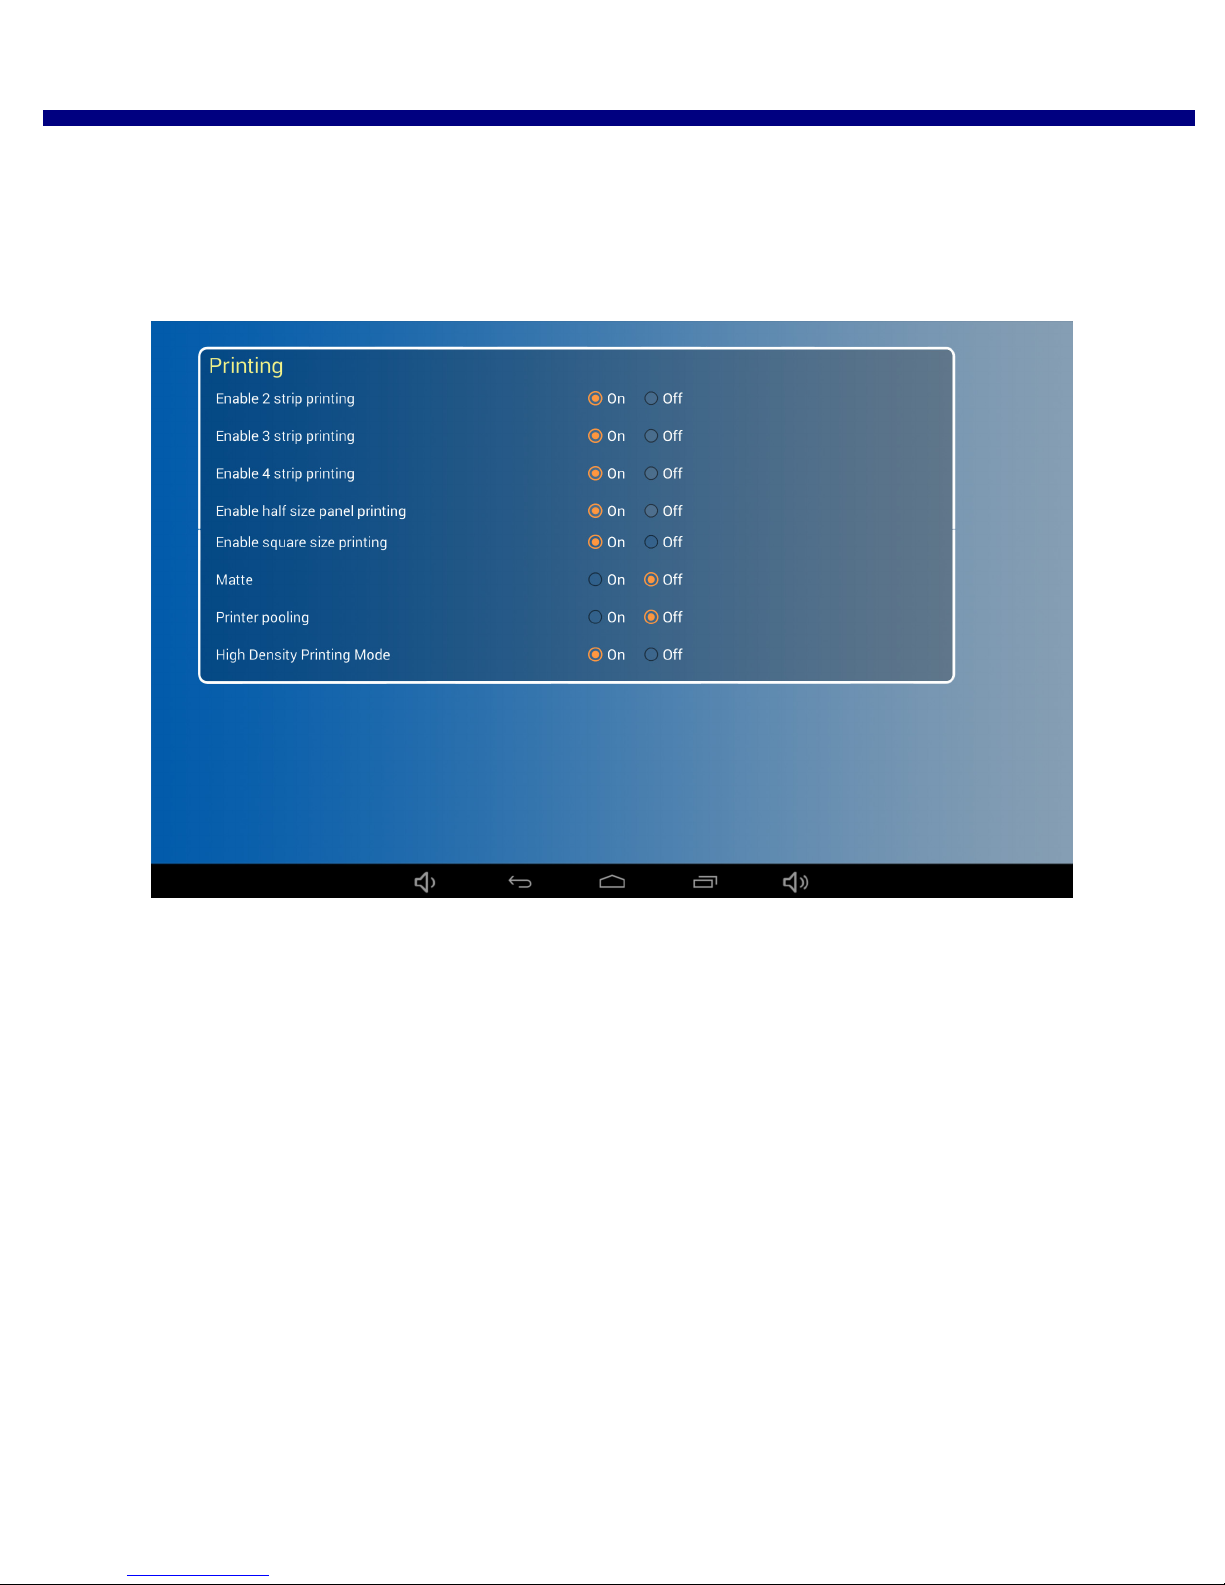
Changing the Print Finish WPS Pro User Guide
Changing the Print Finish
You can print your images with either a matte or glossy print finish. WPS Pro is set to Glossy by default. If you wish to print
your images with a matte finish:
1. Under the Printing section of the WPS Pro Configuration screen, locate the Printing section.
2. Find the Matte option and change the radio button to ON or OFF.
3. Scroll to the bottom of the page and touch the Save Configuration button.
4. Upon touching the Save Configuration button, your device restarts.
5. After three minutes, reconnect to the WPS Pro Wi-Fi network. (If you have initial test prints turned ON, reconnect
once your test image prints.)
86 DNP Imagingcomm America Corporation
Page 87
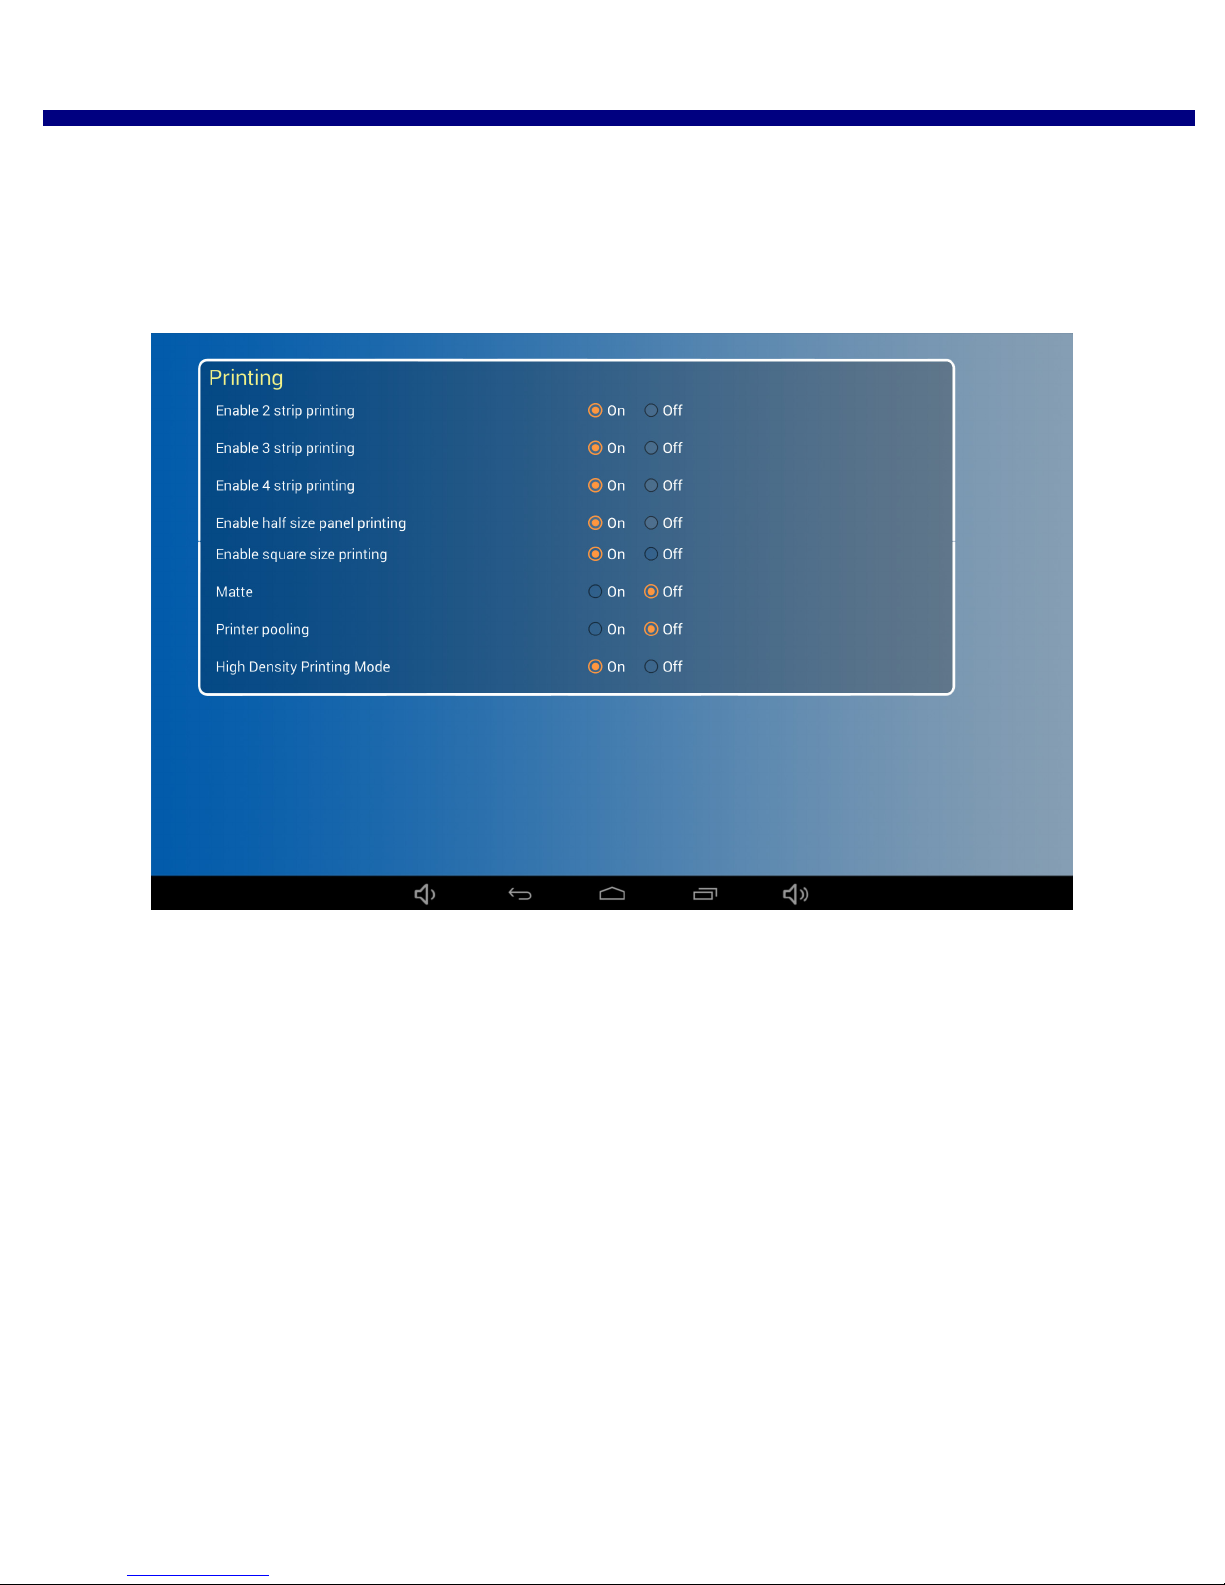
Changing the Print Pooling Settings WPS Pro User Guide
Changing the Print Pooling Settings
If you are using two of the same model printers and the printers are set to the same output size, you can print to both
printers simultaneously. This produces a balanced print load between the two printers and allows for even media
consumption. You must have the same model of printers, and they must have the same output size (e.g. 4”x6” media in one,
and 6”x8” media set to 4”x6” output in the other).
1. Under the Printing section of the WPS Pro Configuration screen, locate the Printing section.
2. Scroll to the bottom of the page and touch the Save Configuration button.
3. Upon touching the Save Configuration button, your device restarts.
4. After three minutes, reconnect to the WPS Pro Wi-Fi network. (If you have initial test prints turned ON, reconnect
once your test image prints.)
DNP Imagingcomm America Corporation 87
Page 88
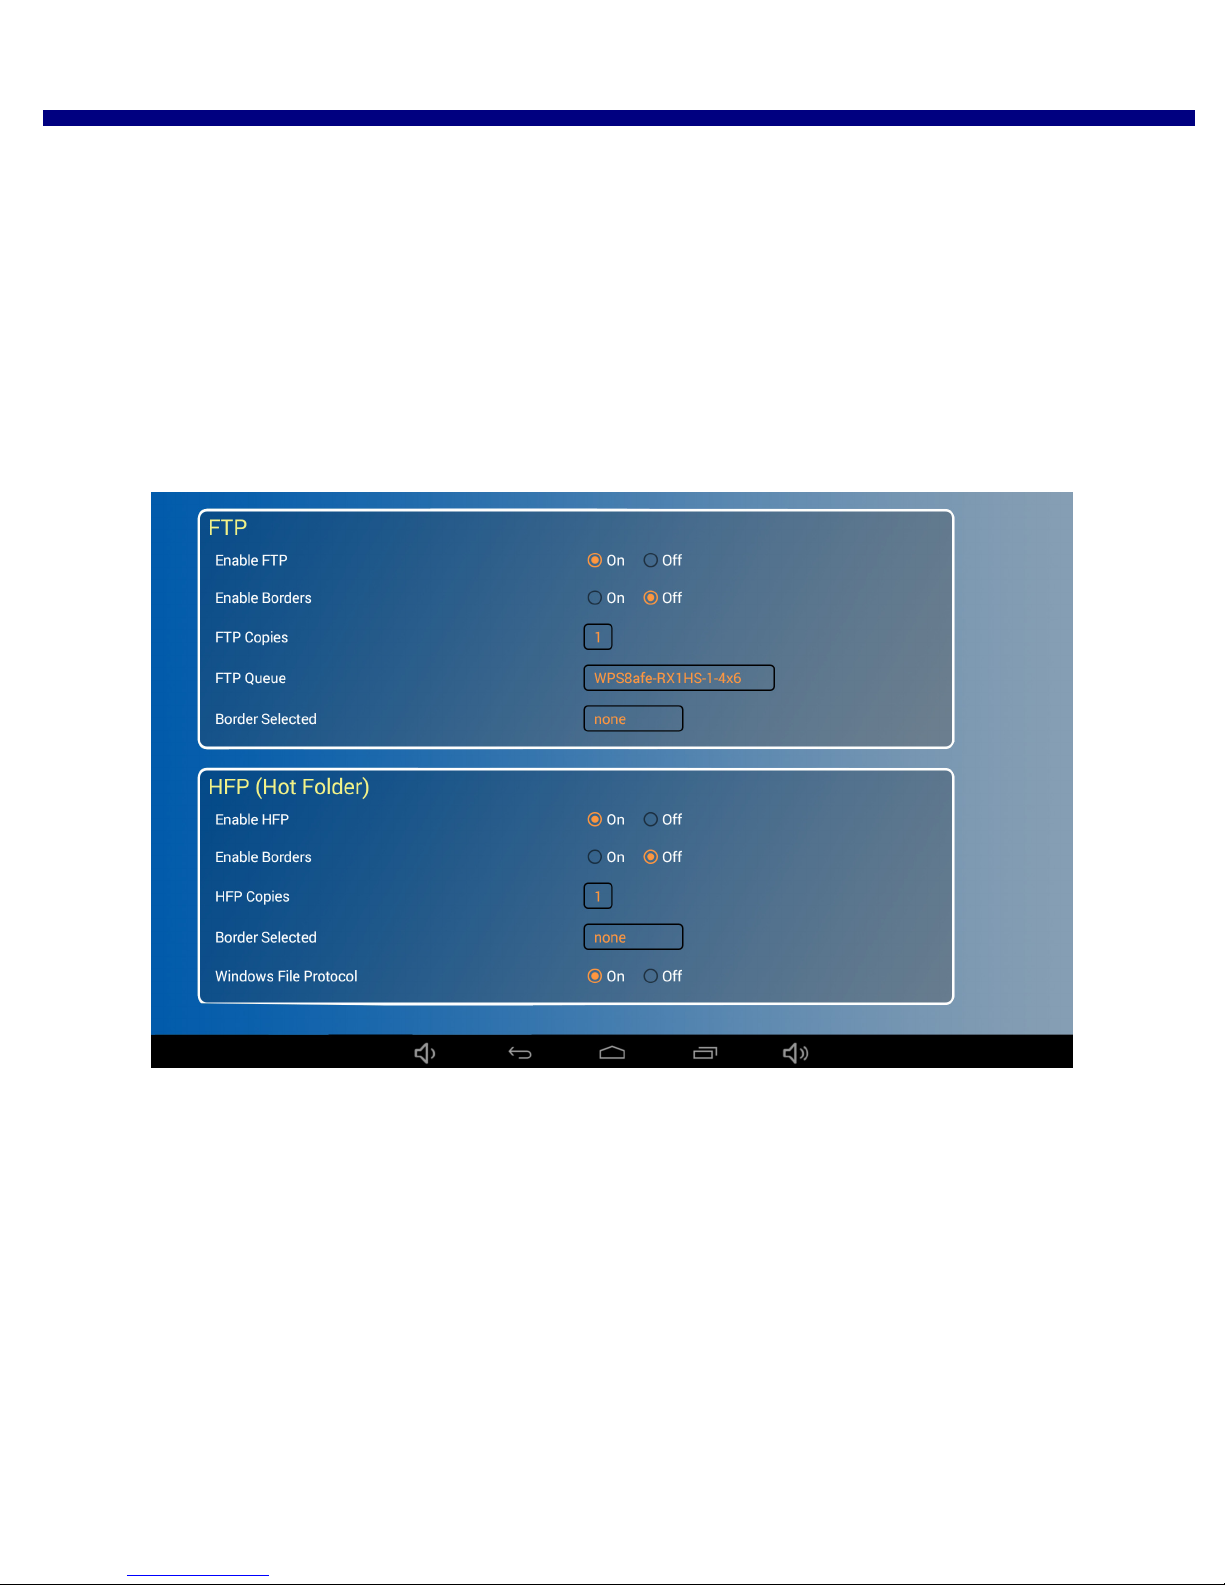
Configuring FTP Settings WPS Pro User Guide
Configuring FTP Settings
One of the transfer methods offered by WPS Pro is FTP, or File Transfer Protocol. File Transfer Protocol (FTP) is a standard
network protocol used to transfer files from one device to another device over a TCP-based network, such as the Internet.
FTP is built on a client-server architecture and uses separate control and data connections between the client and the server.
FTP transfer is best used when transferring images from a mobile device to the WPS Pro for printing. To do this, you must
have a FTP client application installed on your mobile device. Be sure your FTP client application allows for binary data
transfer as that is the data type WPS Pro supports. Use this section to set up your FTP setting for your WPS Pro network.
Configuring FTP
Enables or disables the FTP transfer option. Only enable FTP if you are planning on using that transfer option. If you disable
the FTP transfer option, be sure to enable the HFP transfer option.
1. Under the FTP section of the WPS Pro Configuration screen, locate the Enable FTP option.
2. Change the radio button to ON or OFF.
3. Scroll to the bottom of the page and touch the Save Configuration button.
4. Upon touching the Save Configuration button, your device restarts.
5. After three minutes, reconnect to the WPS Pro Wi-Fi network. (If you have initial test prints turned ON, reconnect
once your test image prints.)
6. You can now print from your devices using FTP. For more information, see “Using Android Devices for FTP Transfers”
on page 32 or “Using Apple Mobile iOS Devices for FTP Transfers” on page 43
88 DNP Imagingcomm America Corporation
Page 89
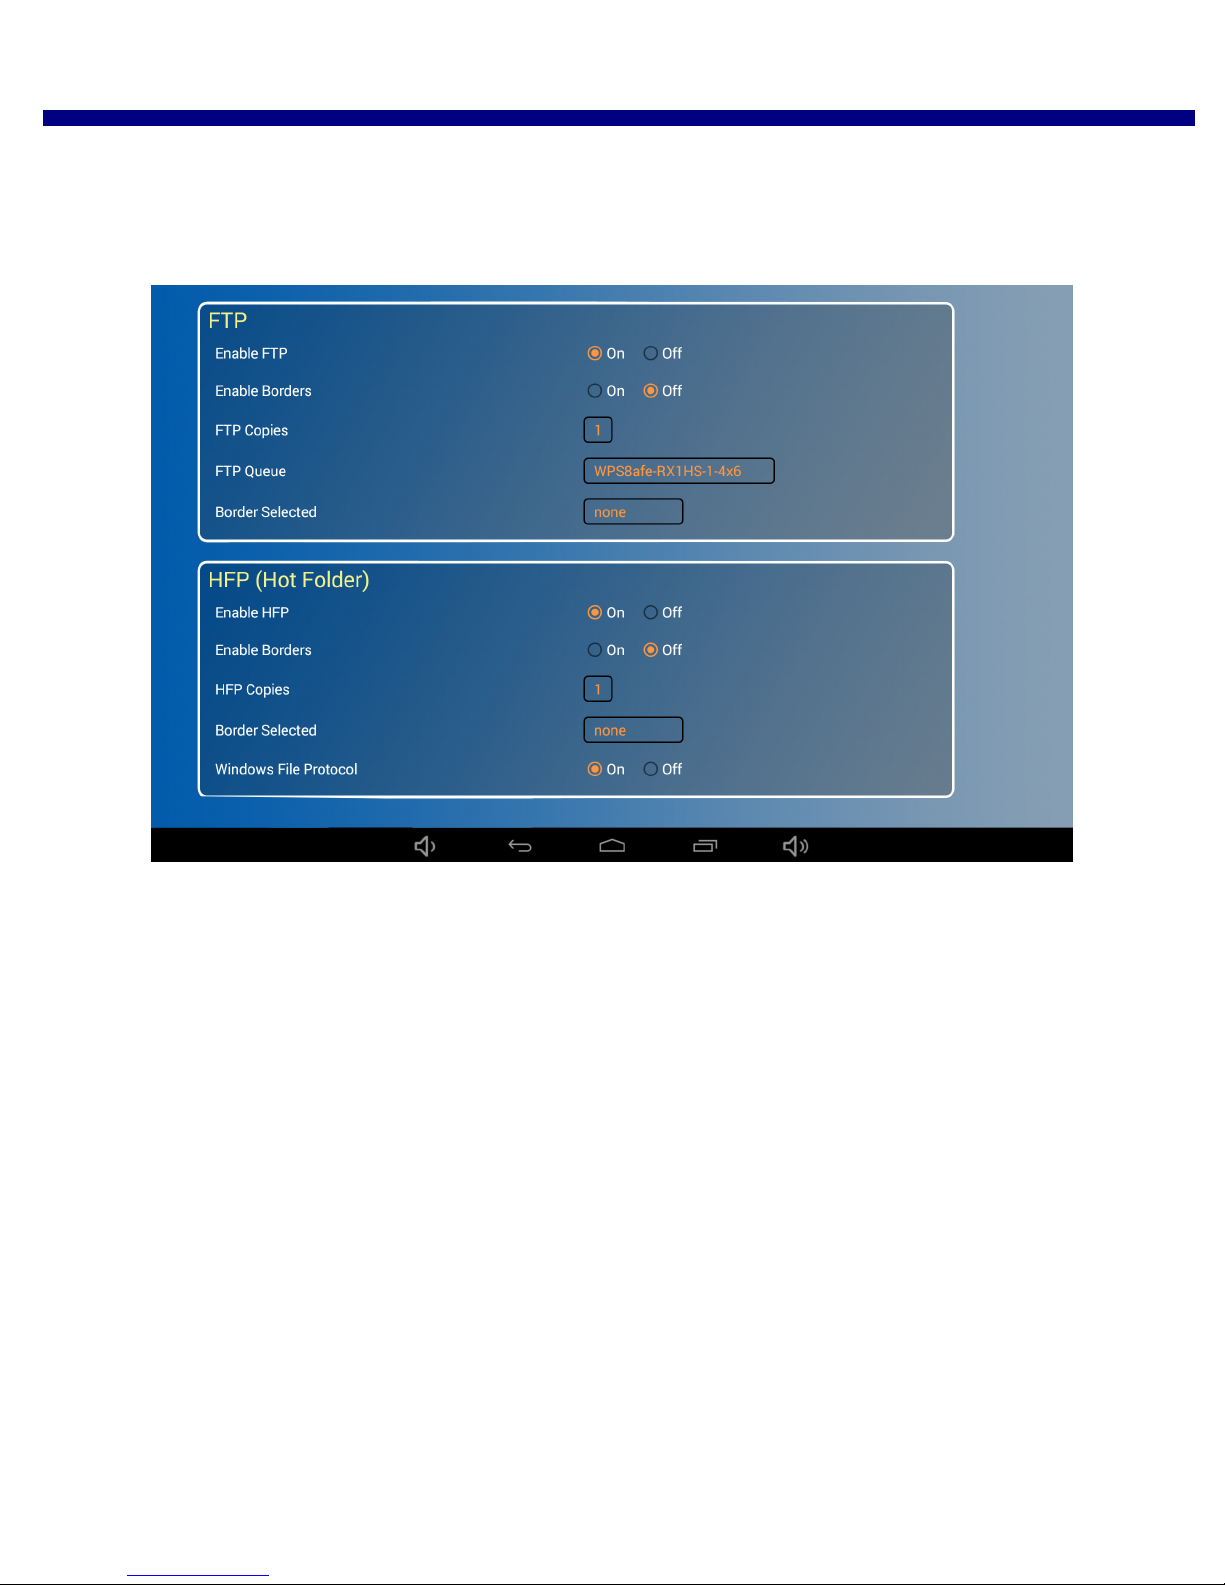
Configuring Borders WPS Pro User Guide
Configuring Borders
This procedure explains how to enable or disable borders for images you transfer using FTP. For more information on
setting up and enabling custom borders, see “Custom Borders” on page 71.
1. Under the FTP section of the WPS Pro Configuration screen, locate the Enable Borders option.
2. Change the radio button to ON or OFF.
3. Scroll to the bottom of the page and touch the Save Configuration button.
4. Upon touching the Save Configuration button, your device restarts.
5. After three minutes, reconnect to the WPS Pro Wi-Fi network. (If you have initial test prints turned ON, reconnect
once your test image prints.)
6. Now images printed using FTP transfer will have the selected border applied.
DNP Imagingcomm America Corporation 89
Page 90
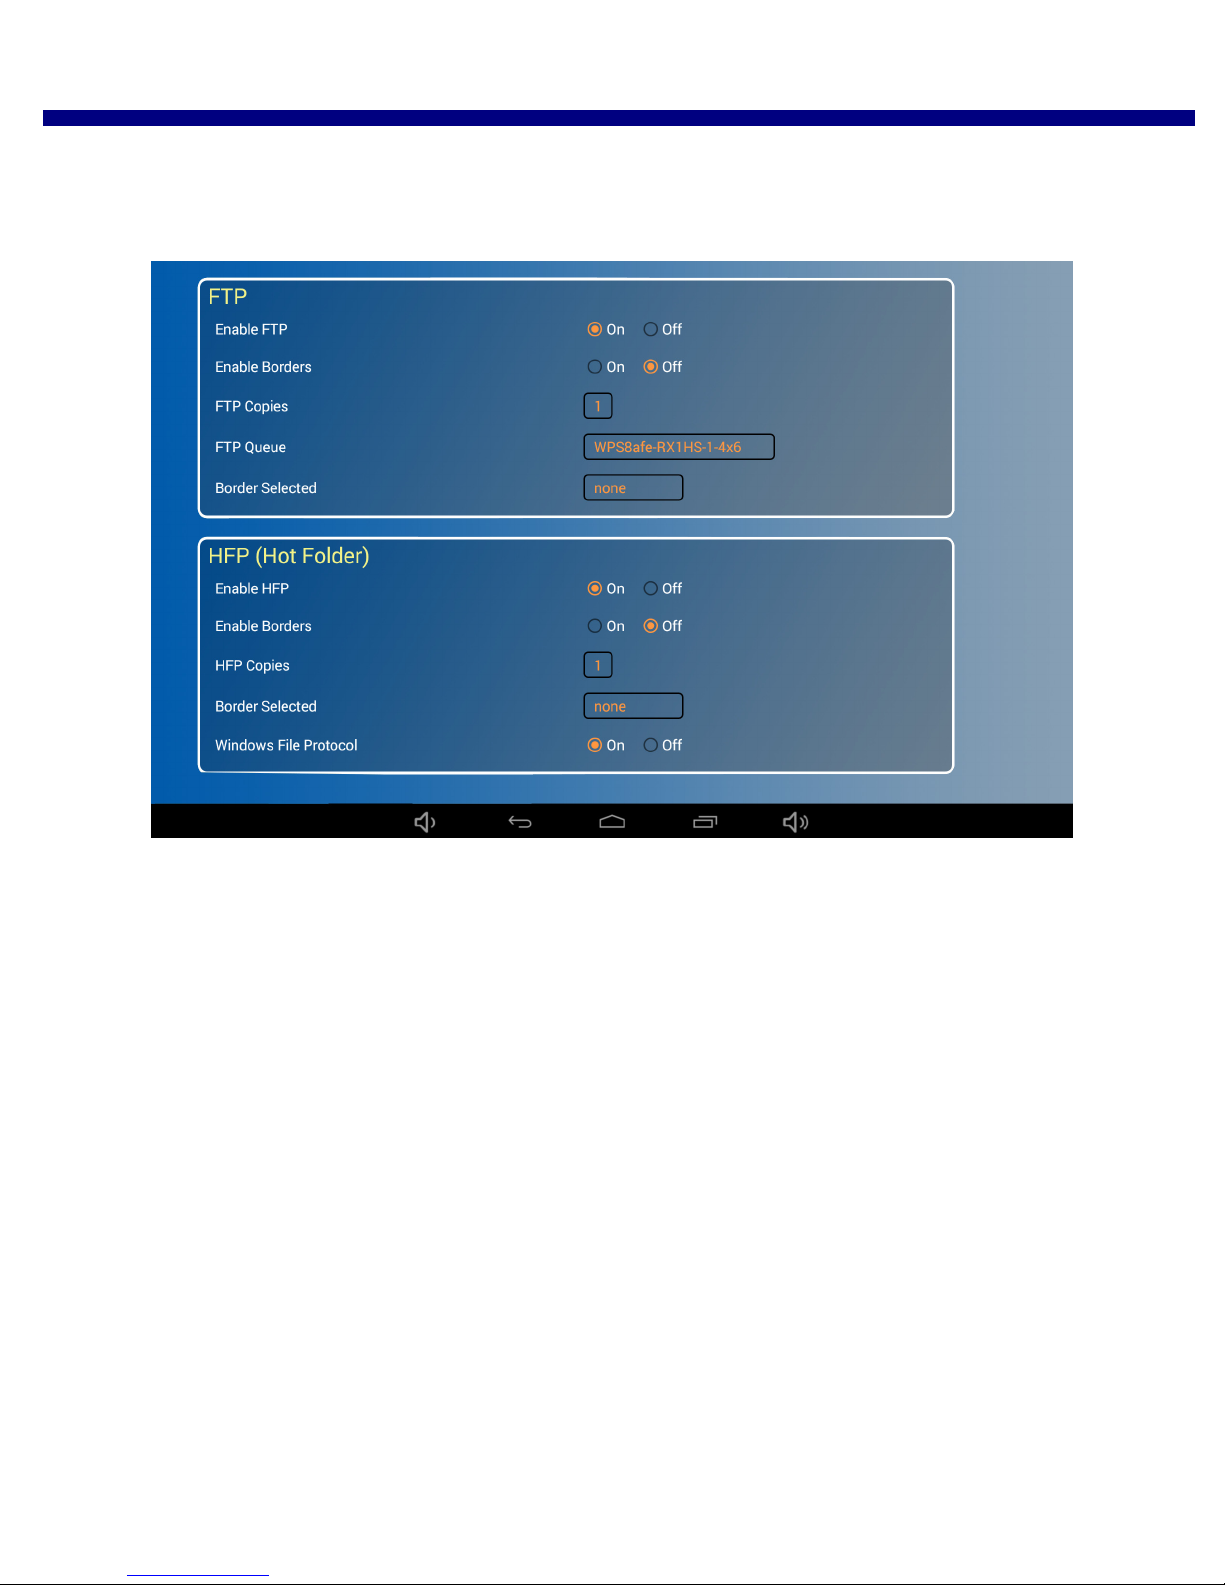
Changing the Number of Copies Printed WPS Pro User Guide
Changing the Number of Copies Printed
Sets the number of copies for each image that is transferred using the FTP transfer method.
1. Under the FTP section of the WPS Pro Configuration screen, locate the FTP Copies option.
2. Tap the FTP Copies box and select the number of copies from the list. You can choose any number between 0 and 49.
3. Scroll to the bottom of the page and touch the Save Configuration button.
4. Upon touching the Save Configuration button, your device restarts.
5. After three minutes, reconnect to the WPS Pro Wi-Fi network. (If you have initial test prints turned ON, reconnect
once your test image prints.)
6. Now images printed using FTP transfer will print the number of copies you selected.
90 DNP Imagingcomm America Corporation
Page 91
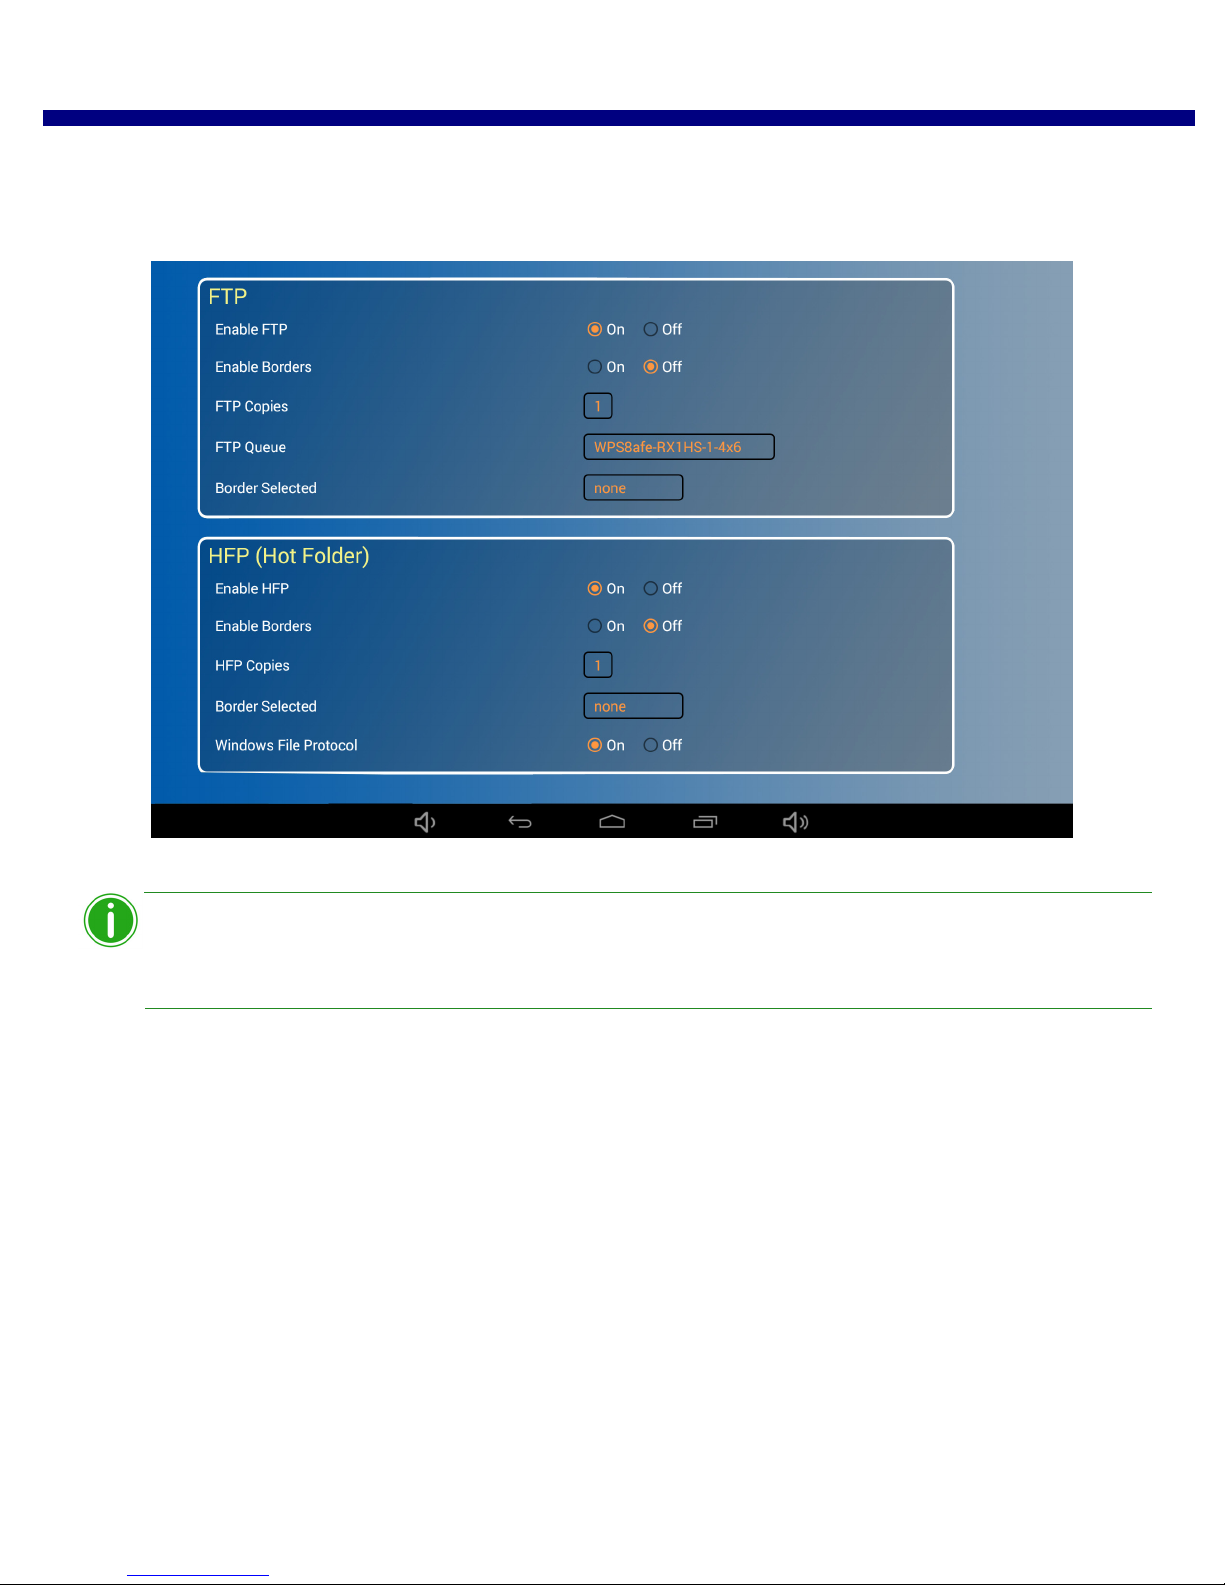
Selecting the Printer Queue WPS Pro User Guide
Note
Selecting the Printer Queue
Selects the default printer and print size.
1. Under the FTP section of the WPS Pro Configuration screen, locate the FTP Queue option.
2. Tap the FTP Queue box and select the printer and default print size you want.
If you are setting the print queue to a 2” cut option, be sure you have enabled 2” photo strips for
your media size. See “Changing the Printing Size Options” on page 82 for more information.
3. Scroll to the bottom of the page and touch the Save Configuration button.
4. Upon touching the Save Configuration button, your device restarts.
5. After three minutes, reconnect to the WPS Pro Wi-Fi network. (If you have initial test prints turned ON, reconnect
once your test image prints.)
DNP Imagingcomm America Corporation 91
Page 92
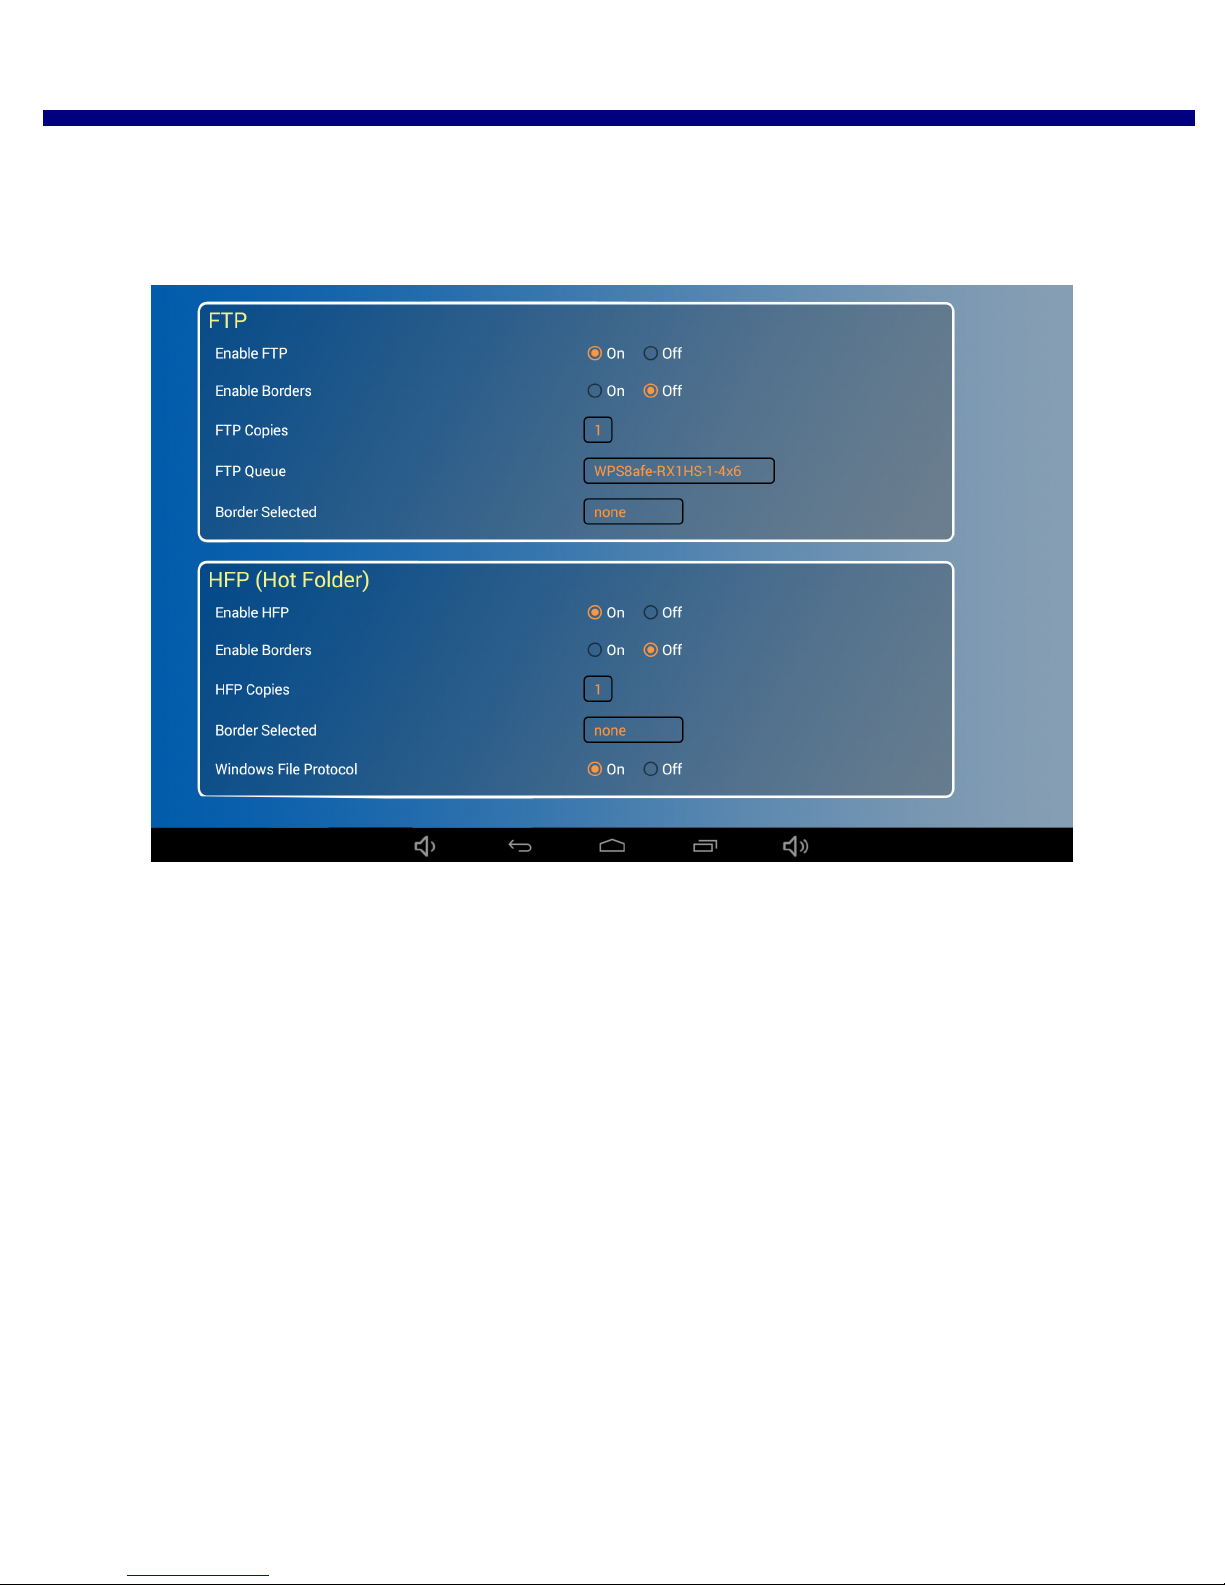
Selecting Borders WPS Pro User Guide
Selecting Borders
Use this option to select a border to print on all of your images. For more information on setting up and enabling custom
borders, see “Custom Borders” on page 71.
1. Under the FTP section of the WPS Pro Configuration screen, locate the Border Selected option.
2. Tap the Border Selected box and select the border you wish to add to your image.
3. Scroll to the bottom of the page and touch the Save Configuration button.
4. Upon touching the Save Configuration button, your device restarts.
5. After three minutes, reconnect to the WPS Pro Wi-Fi network. (If you have initial test prints turned ON, reconnect
once your test image prints.)
92 DNP Imagingcomm America Corporation
Page 93
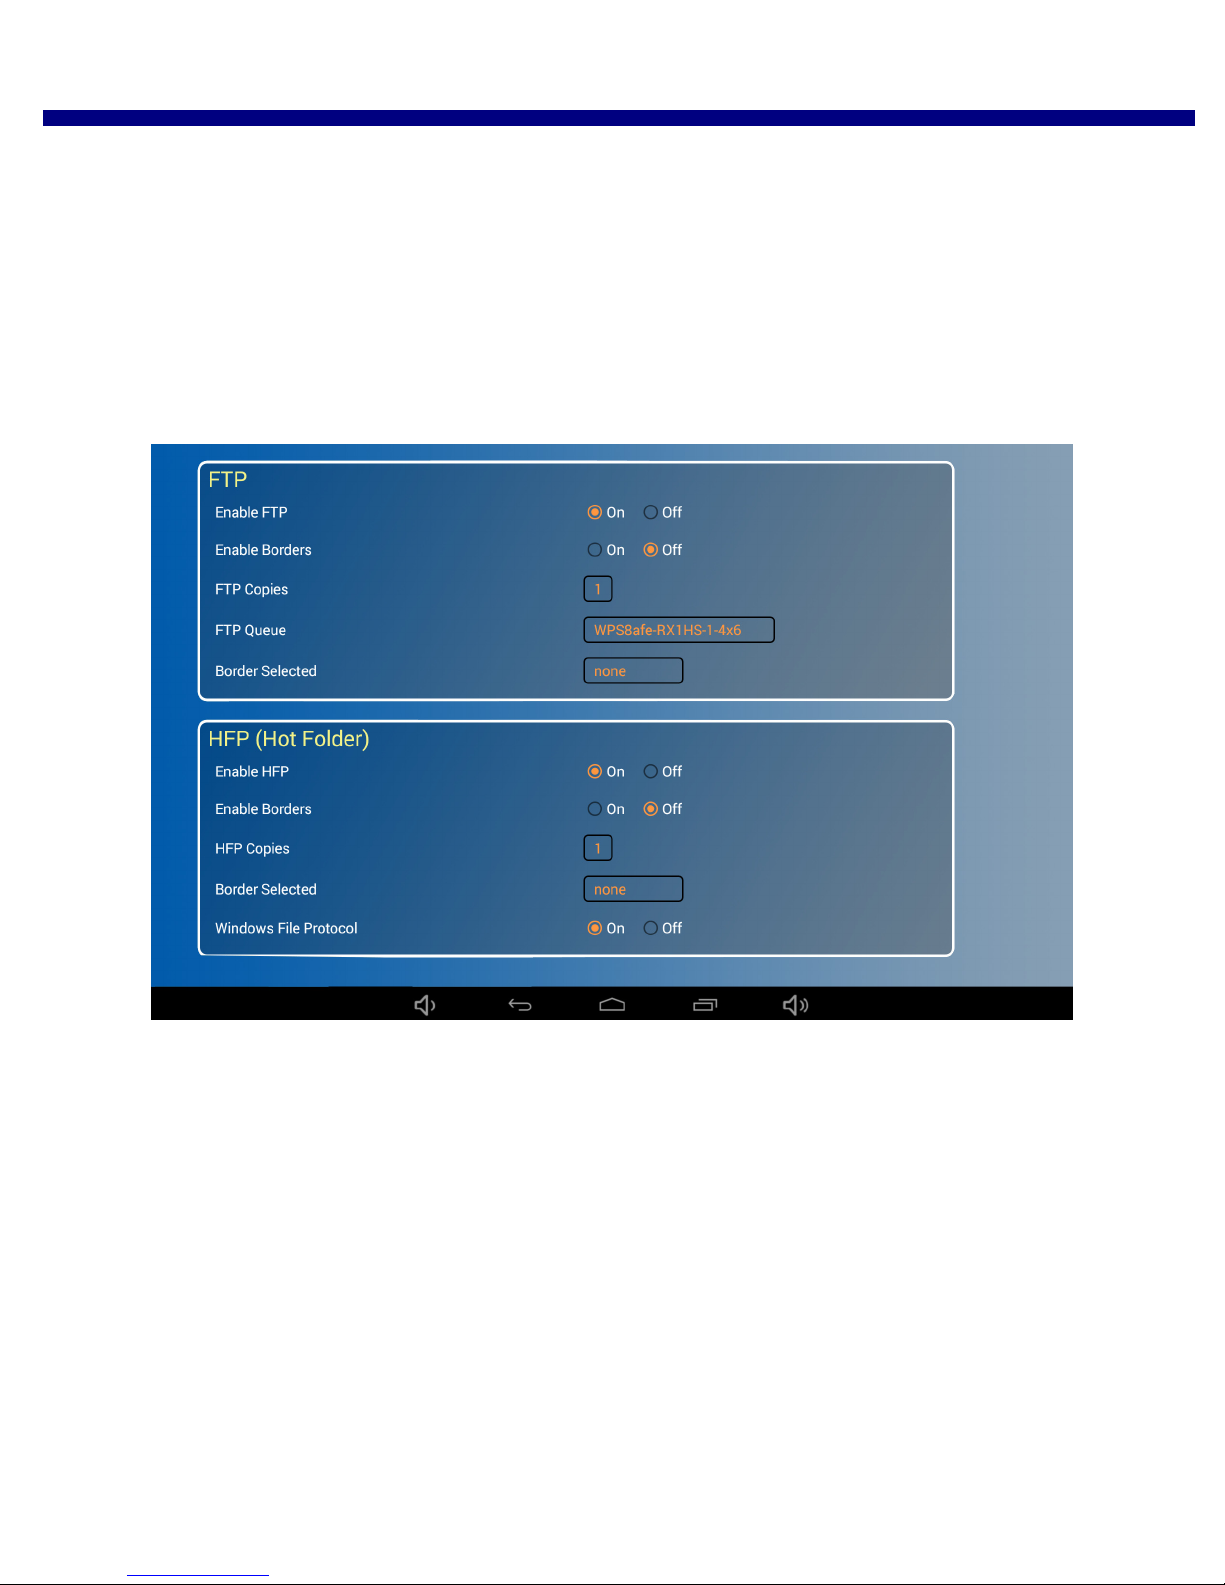
Configuring HFP Settings WPS Pro User Guide
Configuring HFP Settings
HFP, or Hot Folder Printing, is a transfer method where a hot folder (or “watched folder”) is continuously monitored by the
WPS Pro system. Images copied into this folder are automatically printed and then removed. Hot folders are used both for
manual image imports (copying and pasting files into the hot folder) and for integration with third party software (often via
FTP to the hot folder). Hot folder printing allows you to load larger quantities of prints at a time to the print folder.
Configuring HFP
Enables or disables the HFP transfer option. Only enable HFP if you are planning on using that transfer option. If you disable
the HFP transfer option, be sure to enable the FTP transfer option.
1. Under the HFP section of the WPS Pro Configuration screen, locate the Enable HFP option.
2. Change the radio button to ON or OFF.
3. Scroll to the bottom of the page and touch the Save Configuration button.
4. Upon touching the Save Configuration button, your device restarts.
5. After three minutes, reconnect to the WPS Pro Wi-Fi network. (If you have initial test prints turned ON, reconnect
once your test image prints.)
6. You can now transfer your images to WPS Pro using HFP. See “Using Windows PC with the Hot Folder Print Options
(HFP)” on page 50 or “Using a Mac for Hot Folder Printing (HFP)” on page 55 for more information.
DNP Imagingcomm America Corporation 93
Page 94
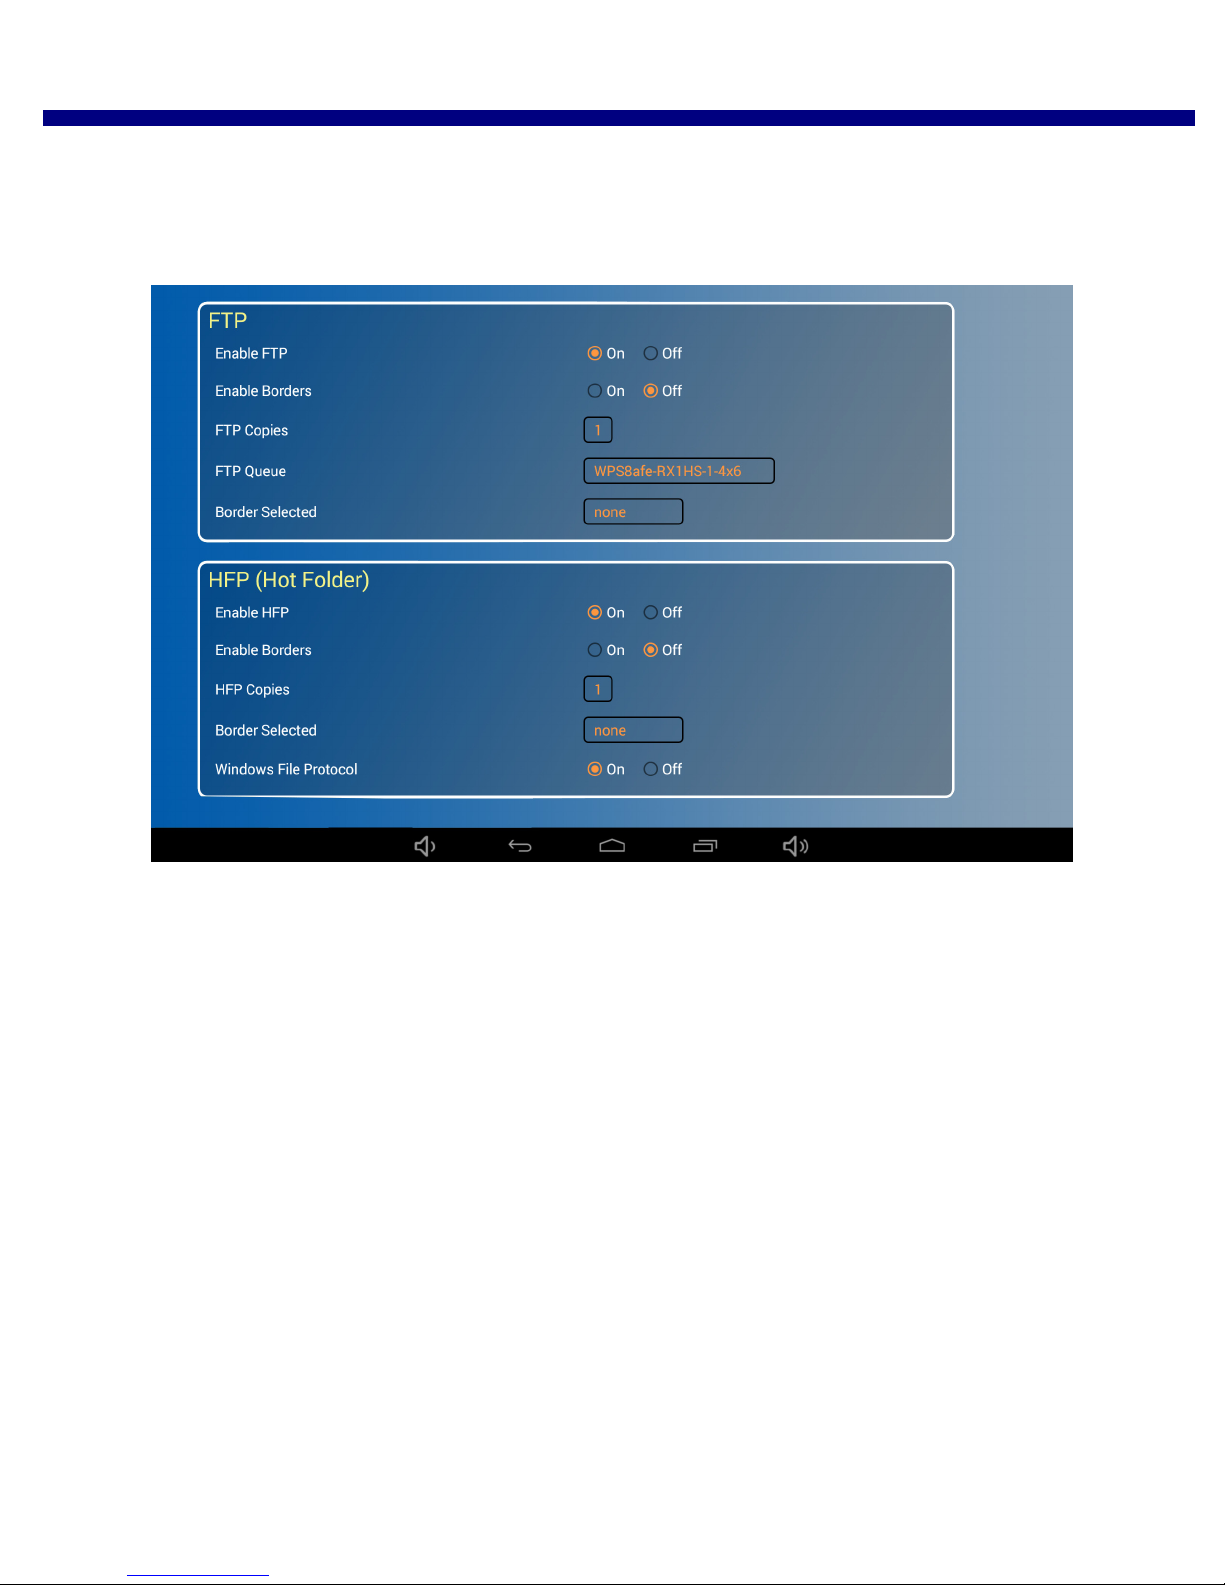
Configuring Borders WPS Pro User Guide
Configuring Borders
Enables or disables borders for images you transfer using HFP. For more information on setting up and enabling custom
borders, see “Custom Borders” on page 71.
1. Under the HFP section of the WPS Pro Configuration screen, locate the Enable Borders option.
2. Change the radio button option to ON or OFF.
3. Scroll to the bottom of the page and touch the Save Configuration button.
4. Upon touching the Save Configuration button, your device restarts.
5. After three minutes, reconnect to the WPS Pro Wi-Fi network. (If you have initial test prints turned ON, reconnect
once your test image prints.)
6. You can now add borders to your images.
94 DNP Imagingcomm America Corporation
Page 95
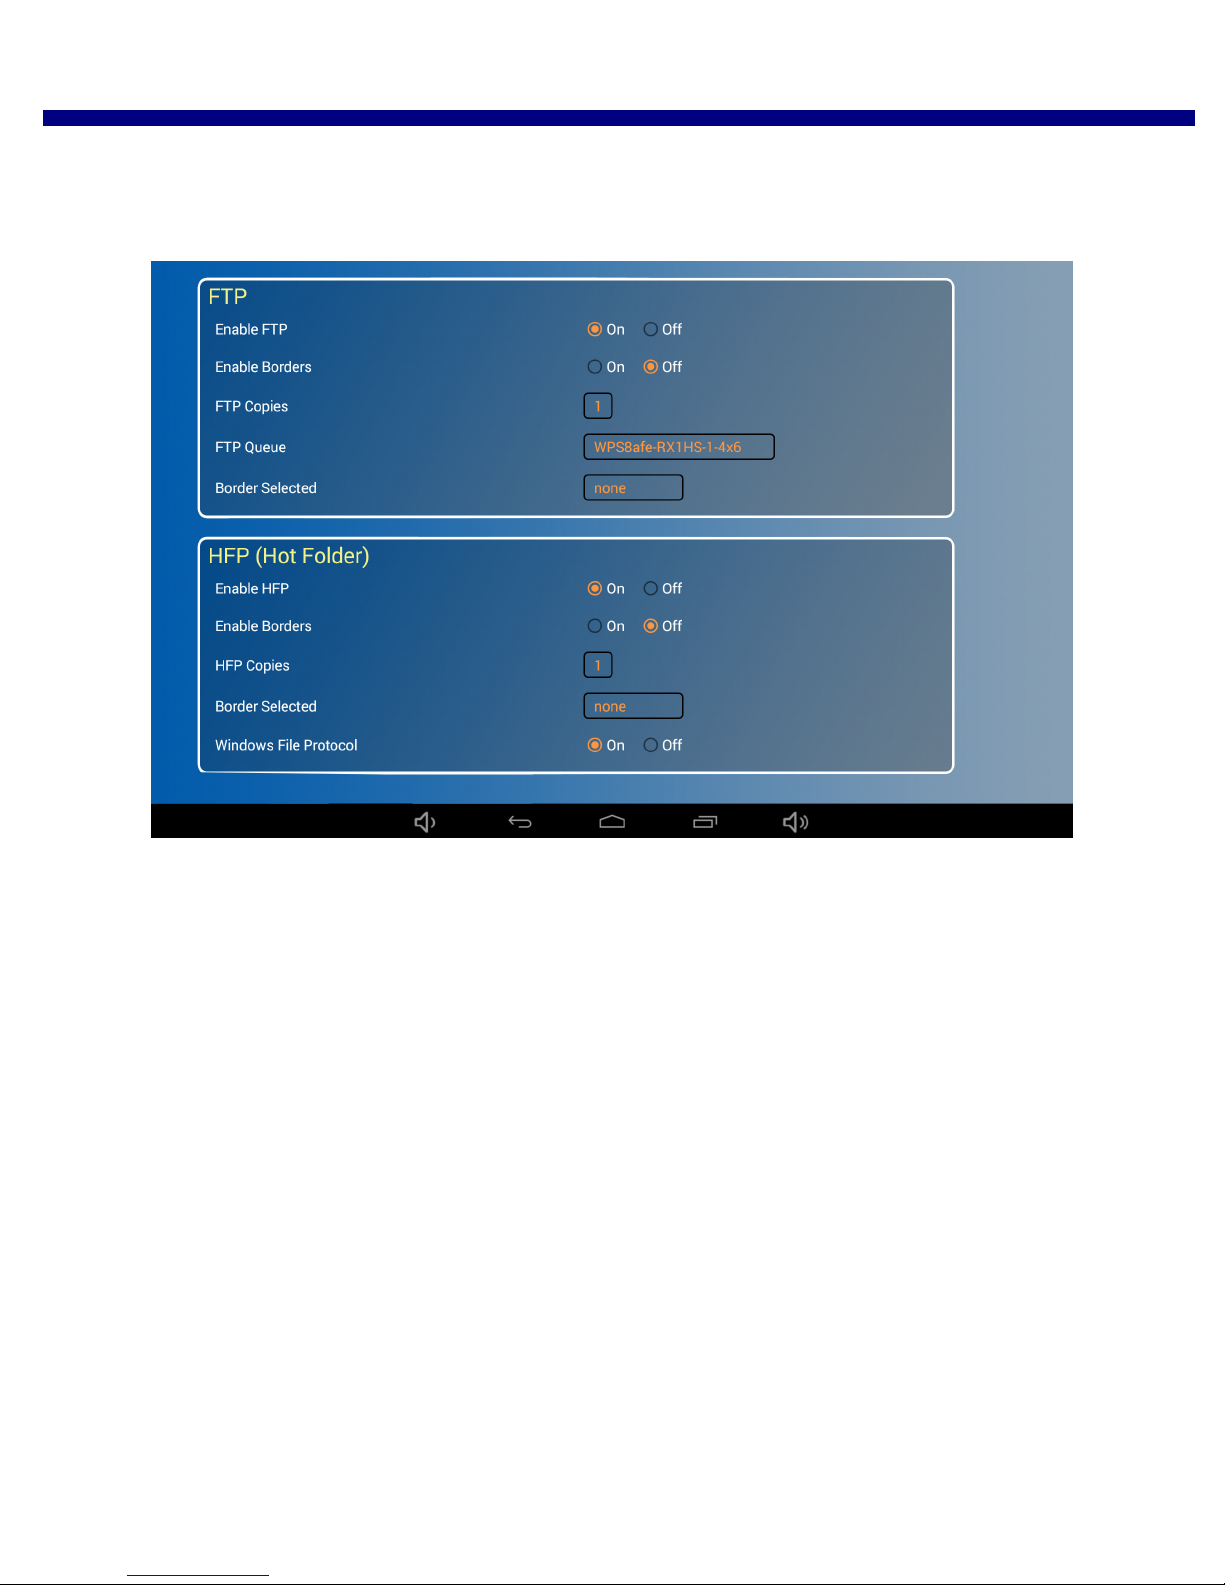
Changing the Number of Copies Printed WPS Pro User Guide
Changing the Number of Copies Printed
Changes the number of copies of each print you order.
1. Under the HFP section of the WPS Pro Configuration screen, locate the HFP Copies option.
2. Tap the HFP Copies box and select the number of copies from the list. You can choose any number between 0 and
49.
3. Scroll to the bottom of the page and touch the Save Configuration button.
4. Upon touching the Save Configuration button, your device restarts.
5. After three minutes, reconnect to the WPS Pro Wi-Fi network. (If you have initial test prints turned ON, reconnect
once your test image prints.)
6. Now images printed using HFP transfer will print the number of copies you selected.
DNP Imagingcomm America Corporation 95
Page 96
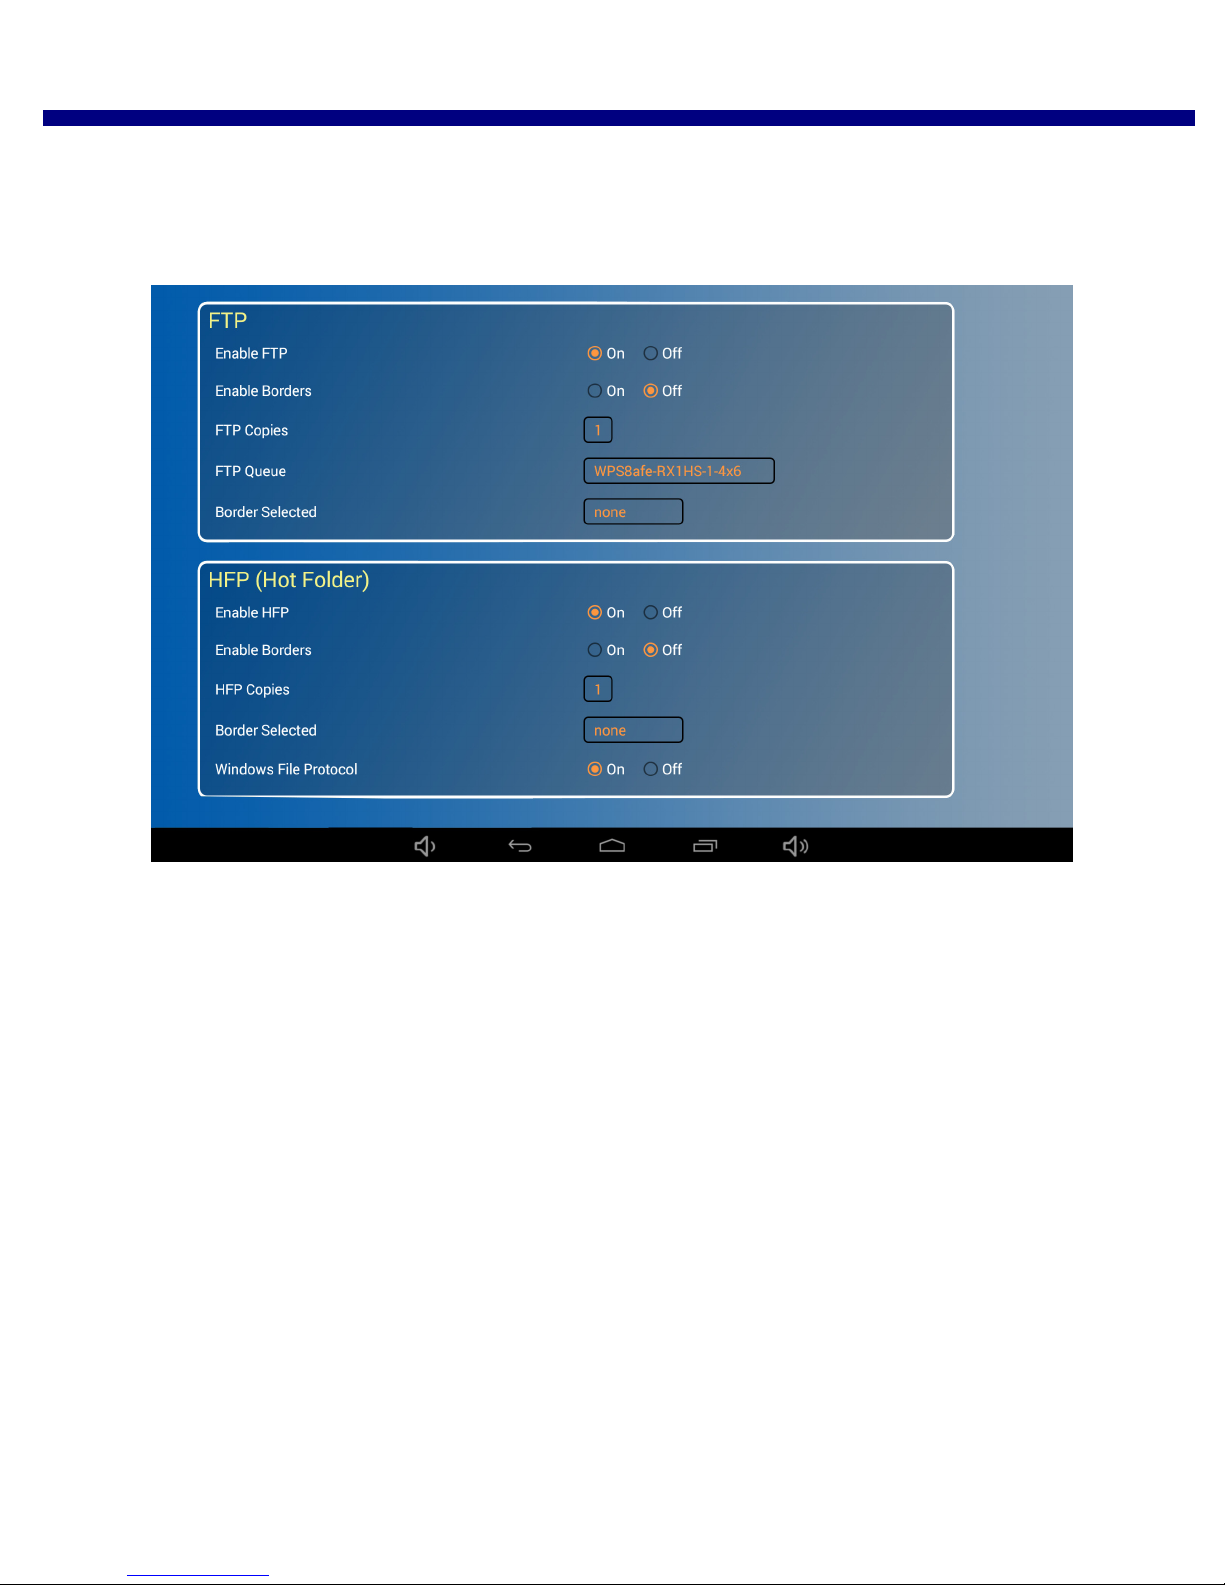
Selecting Borders WPS Pro User Guide
Selecting Borders
Use this option to select a border to print on all of your images. For more information on setting up and enabling custom
borders, see “Custom Borders” on page 71.
1. Under the HFP section of the WPS Pro Configuration screen, locate the Border Selected option.
2. Tap the Border Selected box and select the border you wish to add to your image.
3. Scroll to the bottom of the page and touch the Save Configuration button.
4. Upon touching the Save Configuration button, your device restarts.
5. After three minutes, reconnect to the WPS Pro Wi-Fi network. (If you have initial test prints turned ON, reconnect
once your test image prints.)
6. The border you have selected is printed on your images.
Configuring the Windows File Protocol
The Windows File Protocol is enabled by default. This setting allows the WPS Pro to transfer files via standard Windows
processes and procedures. Disabling this option can cause failed image transfers. Only change this setting under the
supervision of Technical Support.
96 DNP Imagingcomm America Corporation
Page 97
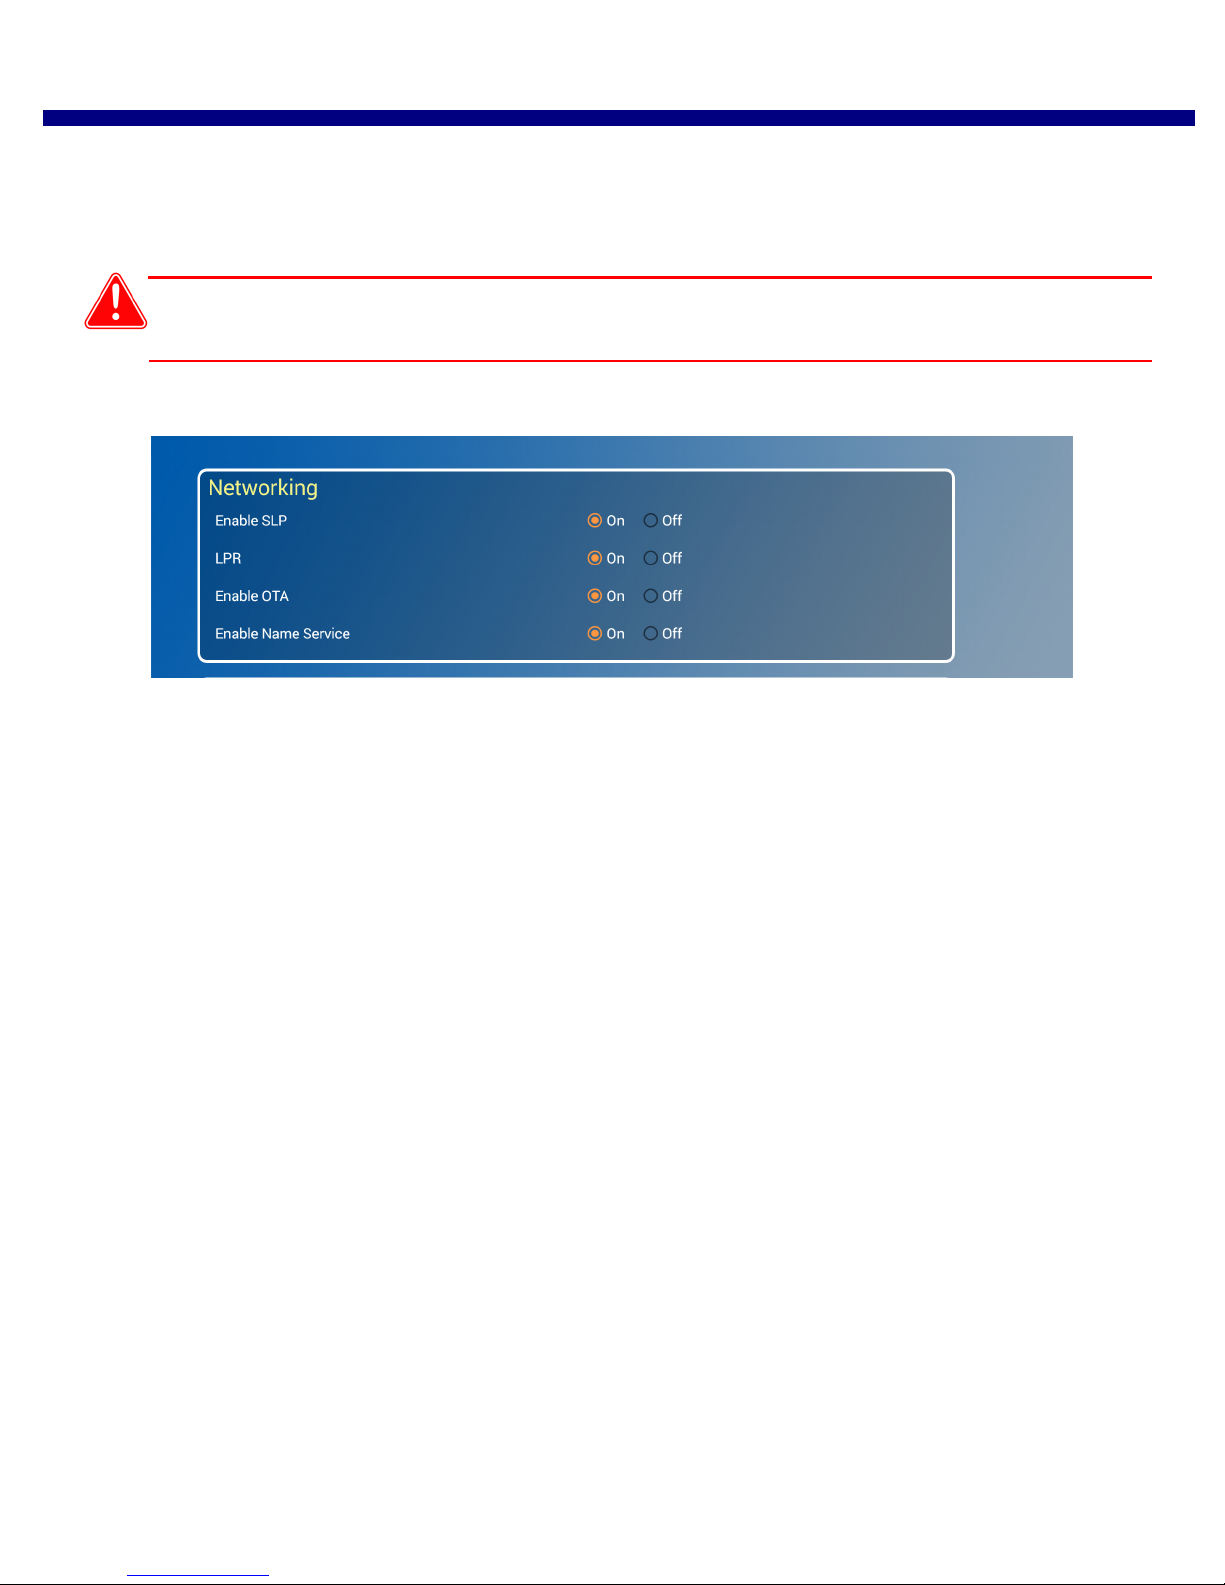
Configuring the Networking Options WPS Pro User Guide
Attention
Configuring the Networking Options
Configuring SLP
Allows or disables SLP broadcasting.
If you disable SLP broadcasting, you cannot print your images using native print drivers.
1. Under the Networking section of the WPS Pro Configuration screen, locate the Enable SLP option.
2. Change the radio button option.
3. Scroll to the bottom of the page and touch the Save Configuration button.
4. Upon touching the Save Configuration button, your device restarts.
5. After three minutes, reconnect to the WPS Pro Wi-Fi network. (If you have initial test prints turned ON, reconnect
once your test image prints.)
DNP Imagingcomm America Corporation 97
Page 98
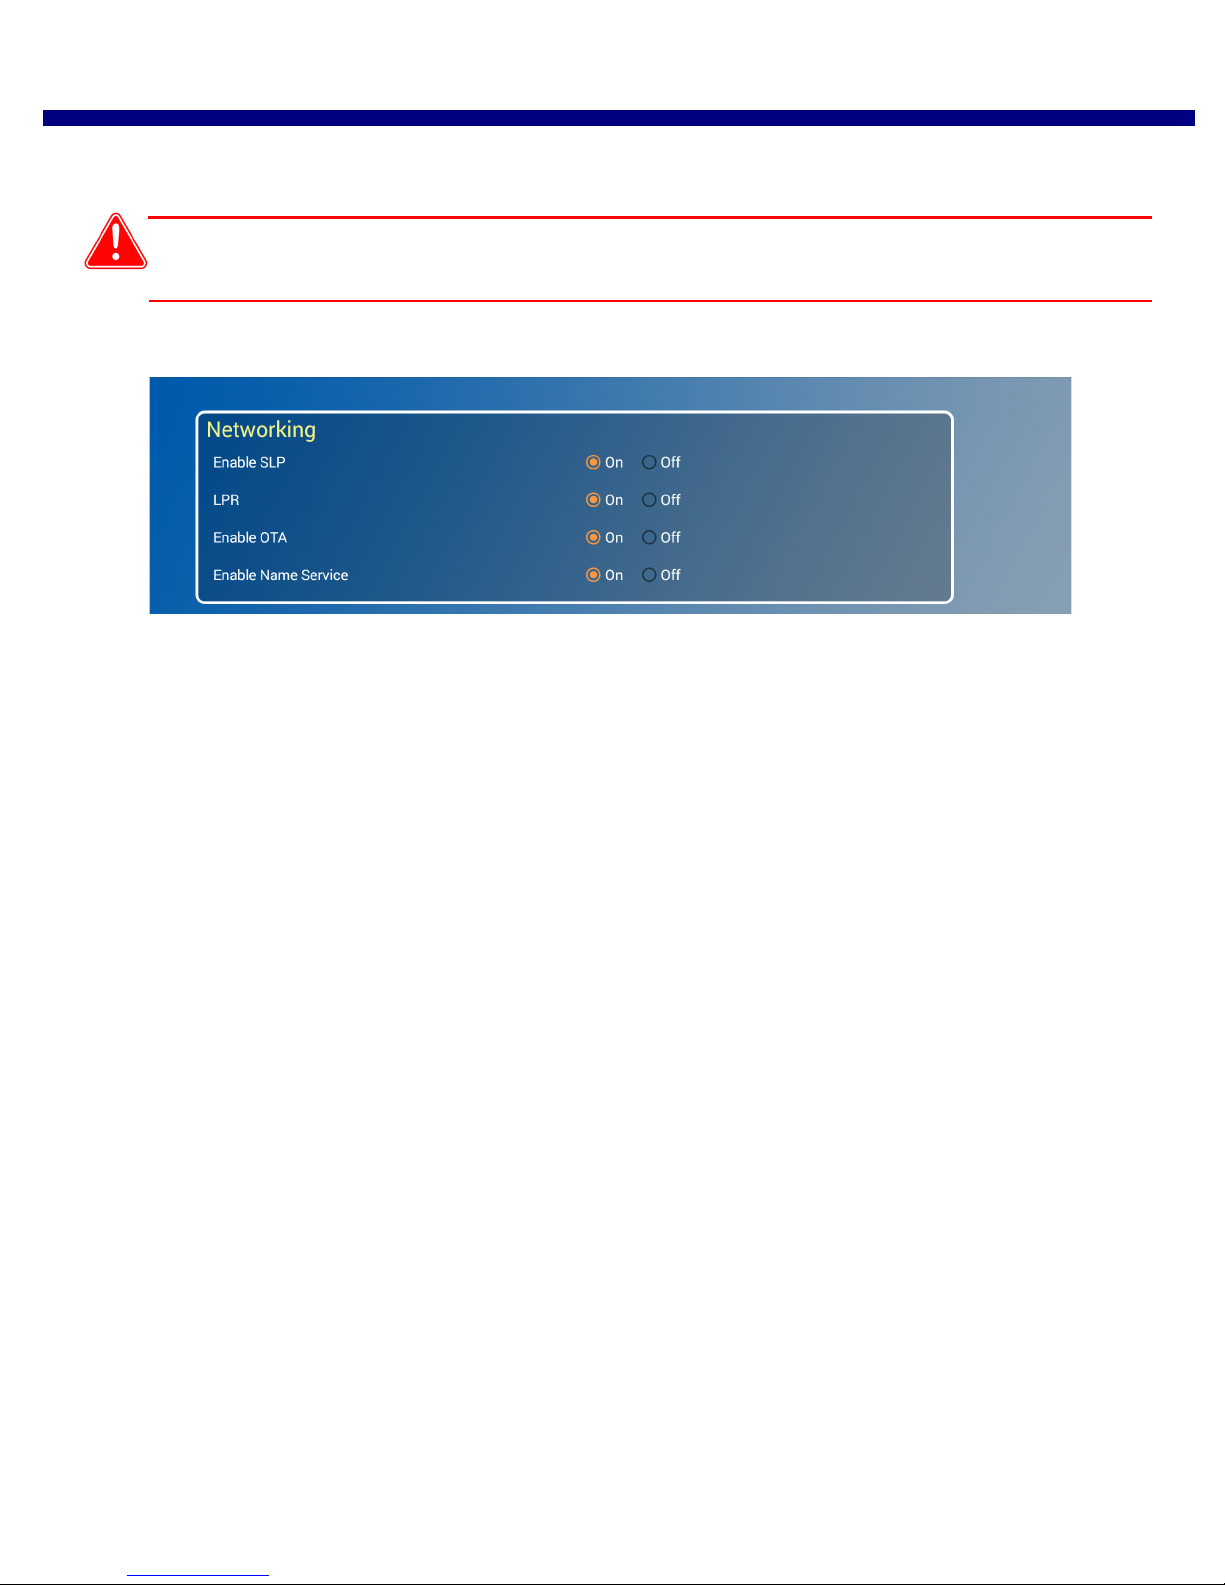
Configuring LPR WPS Pro User Guide
Attention
Configuring LPR
Allows you to enable/disable LPR printing protocols.
If you disable LPR, you cannot print your images using native print drivers.
1. Under the Networking section of the WPS Pro Configuration screen, locate the LPR option.
2. Change the radio button option.
3. Scroll to the bottom of the page and touch the Save Configuration button.
4. Upon touching the Save Configuration button, your device restarts.
5. After three minutes, reconnect to the WPS Pro Wi-Fi network. (If you have initial test prints turned ON, reconnect
once your test image prints.)
98 DNP Imagingcomm America Corporation
Page 99

Configuring OTA WPS Pro User Guide
Configuring OTA
Enables or disables over-the-air transfer protocols.
1. Under the Networking section of the WPS Pro Configuration screen, locate the Enable OTA option.
2. Change the radio button option.
3. Scroll to the bottom of the page and touch the Save Configuration button.
4. Upon touching the Save Configuration button, your device restarts.
5. After three minutes, reconnect to the WPS Pro Wi-Fi network. (If you have initial test prints turned ON, reconnect
once your test image prints.)
DNP Imagingcomm America Corporation 99
Page 100

Configuring OTA WPS Pro User Guide
100 DNP Imagingcomm America Corporation
 Loading...