

Page 1
October 31, 2014 Ver.1.20
Page 2

Dai Nippon Printing Co.,Ltd.
●Safety precautions
Please read the User’s Manual for the printer carefully before use, and follow the instructions. Note that the contents of
directions for use and safety precautions correspond to the safety standards as of the time the User’s Manual has been
created.
●Remodeling
For product safety, do not remodel the DS-RX1 printers or the contents of the DS-RX1 printer drivers and the CD.
●Copyright
Copyrights, trademarks or any other intellectual property rights whatsoever that pertain to documents, programs or other
items provided with this product, are ascribed to Dai Nippon Printing Co., Ltd., or the respective other holders of rights.
Except in cases permitted by applicable laws, these may not be duplicated or used without consent from Dai Nippon Printing
Co., Ltd.
Microsoft and Windows are registered trademarks of Microsoft Corporation valid in the USA and other countries.
LEADTOOLS Copyright (C) 2008 LEAD Technologies, Inc.
The ICC profile is prepared by the technology of X-Rite.
Page 3

Dai Nippon Printing Co.,Ltd.
Contents
Chapter 1 Install ______________________________________ 1
1.1 Printer and Host computer Connection __________________________________________ 1
1.2 Found New Hardware Wizard __________________________________________________ 1
1.3 Install from Add Printer Wizard ________________________________________________ 6
Chapter 2 Properties __________________________________ 12
2.1 Opening Printer Properties _________________________________________________ 12
2.2 Explanation of Print Setting Functions ________________________________________ 14
2.2.1 Layout _____________________________________________________________________________________ 14
2.2.2 Advanced Options ___________________________________________________________________________ 15
2.2.3 Paper/Quality _______________________________________________________________________________ 19
2.2.4 Option______________________________________________________________________________________ 19
2.2.5 Color Adjustment ____________________________________________________________________________ 20
2.3 Default Values for Various Settings ___________________________________________ 21
2.4 Color Management _______________________________________________________ 21
2.5 Print Area _______________________________________________________________ 22
2.6 Print Drection ___________________________________________________________ 22
Chapter 3 Updating the Driver __________________________ 23
Chapter 4 Driver Removal _____________________________ 29
・Added "(5x3.5) x 2" and "PR(3.5x5) x 2" to the paper sizes
For details, see "Multiple layout" in 2.2.2 Advanced Options.
Additional functions
Page 4
1
Dai Nippon Printing Co.,Ltd.
[DS-RX1 Printer Driver] Instruction Manual for Windows Vista
CChhaapptteerr 11
IInnssttaallll
11..11 PPrriinntteerr aanndd HHoosstt ccoommppuutteerr CCoonnnneeccttiioon
n
Power ON the DS-RX1 and connect the DS-RX1 printer and the host by USB cable.
* Please refer to the manual for the DS-RX1 printer for connection if needed.
Note) Do not insert the accompanying CD at this time.
In order to install the driver, log in with administrator right. The following explanations are given on the assumption of use with
administrator rights.
After that, if [Found New Hardware Wizard] is initiated, please install using the procedure in [1.2 Found New Hardware Wizard]. If
[Found New Hardware Wizard] is not initiated, please install in accordance with [1.3 Install from Add Printer Wizard].
11..22 FFoouunndd NNeeww HHaarrddwwaarree WWiizzaarrd
d
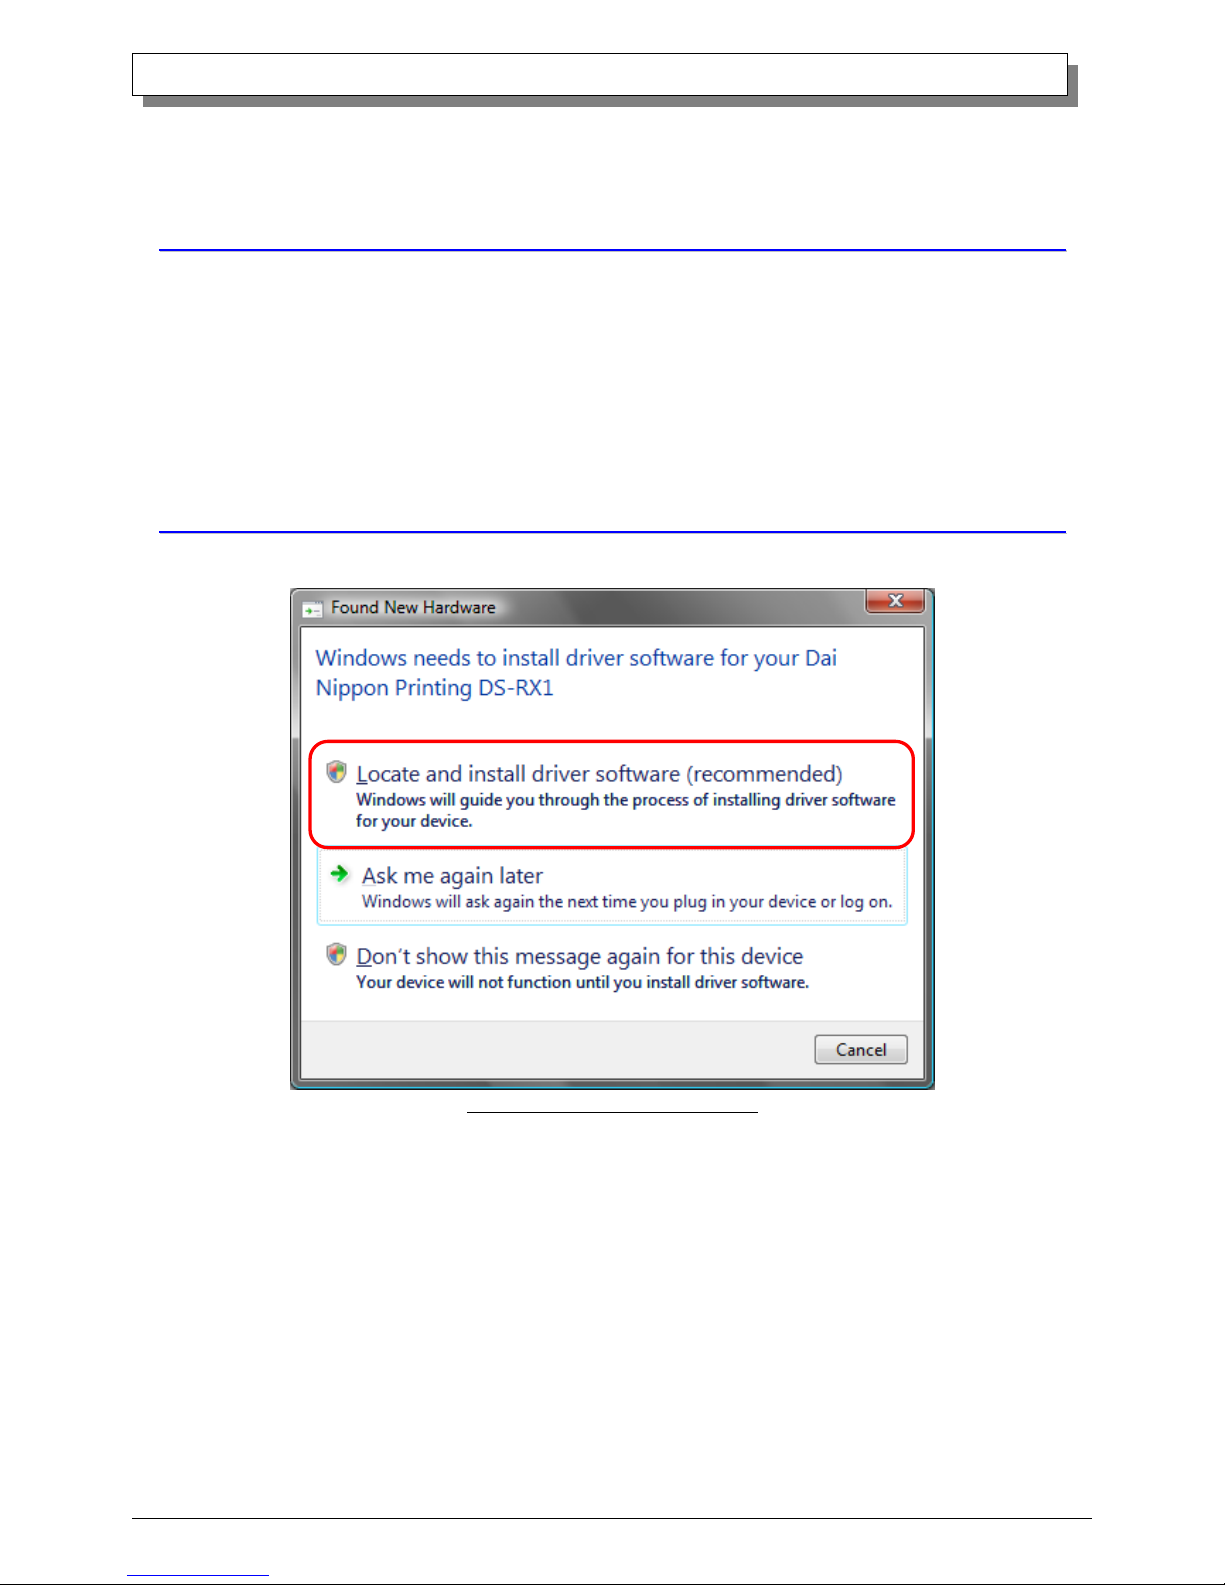
When “Found New Hardware Wizard” starts running, click on “Locate and install driver software (recommended)”.
Fig 1.1 Found New Hardware Wizard
Note) For user account control, confirmation of “Windows needs your permission to continue” will be requested. Click on the
“Continue” button.
Page 5

2
Dai Nippon Printing Co.,Ltd.
[DS-RX1 Printer Driver] Instruction Manual for Windows Vista
If the message “Insert the disc that came with yuor Dai Nippon Printing DS-RX1” appears, click on “I don’t have the disc. Show me
other options”.
Fig 1.2 Insert the disc
If the message “Windows couldn’t find driver software for your device” appears, click on “Browse my computer for driver software
(advanced)”.
Fig 1.3 Windows couldn’t find driver software for your device
Page 6
3
Dai Nippon Printing Co.,Ltd.
[DS-RX1 Printer Driver] Instruction Manual for Windows Vista
Insert the accompanying CD here.
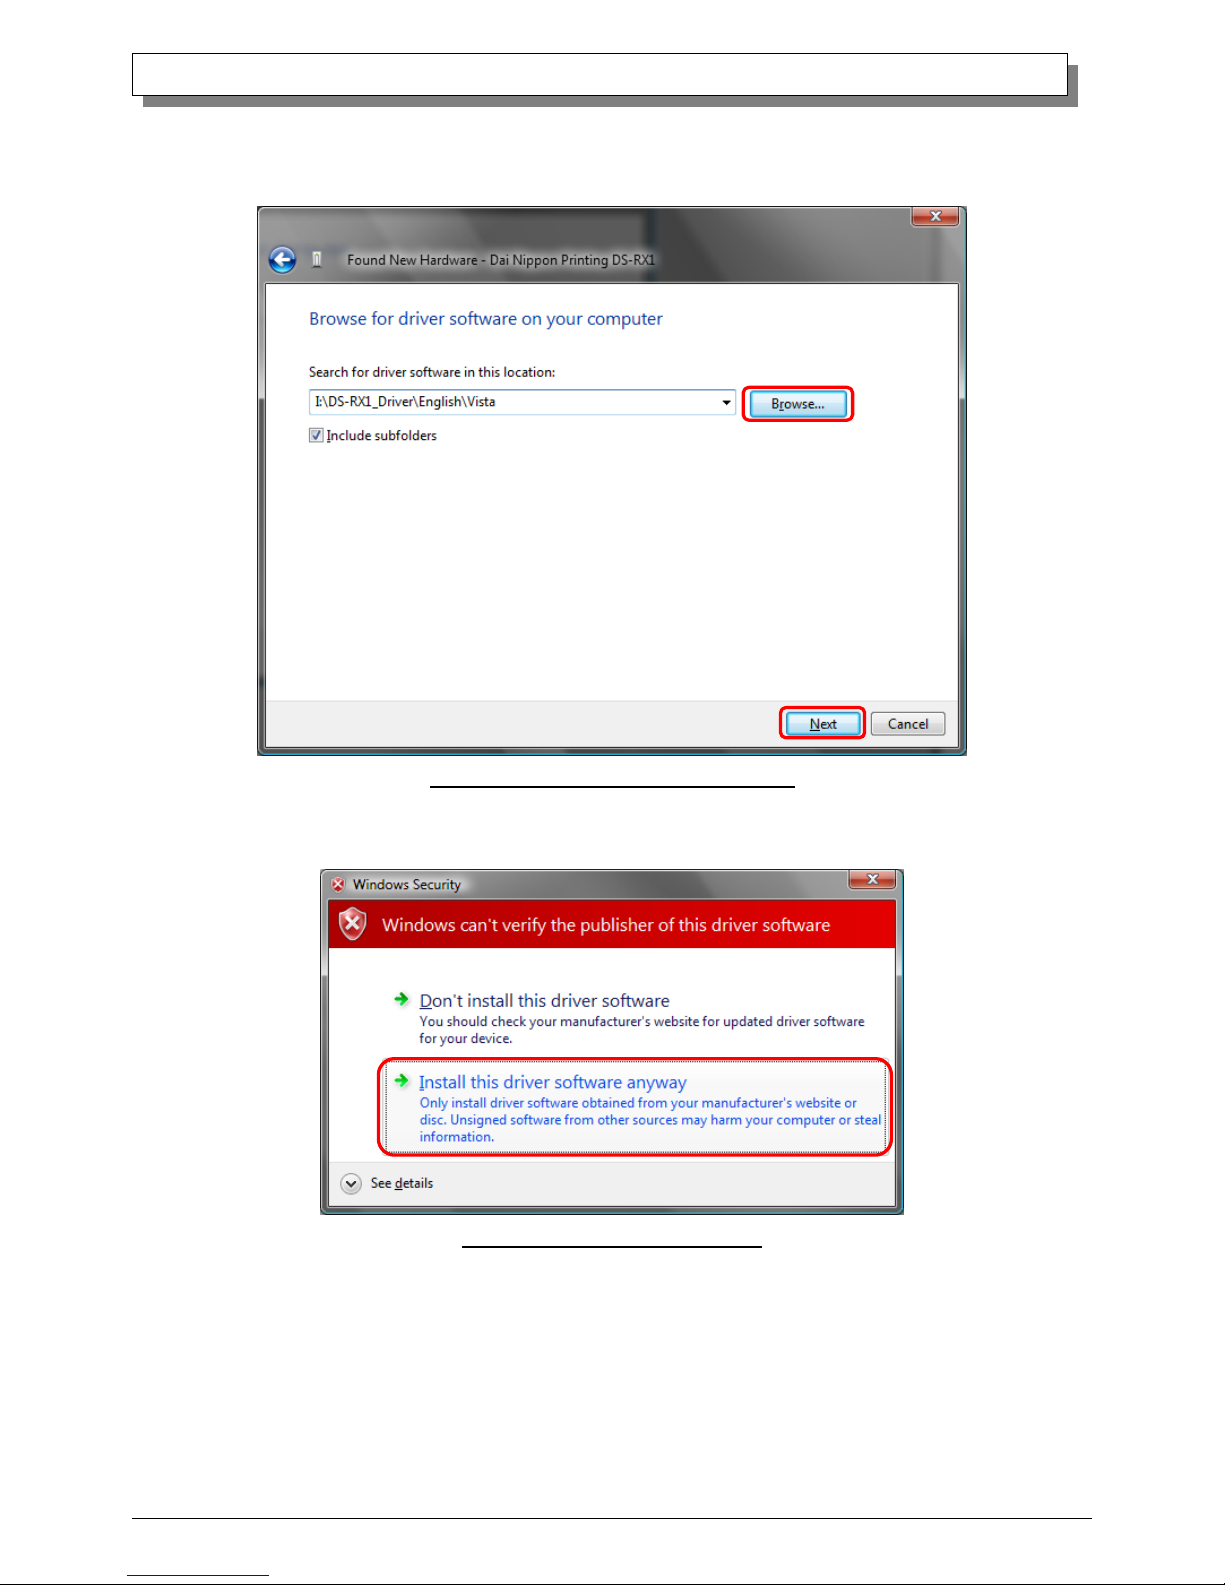
If the message “Browse for driver software on your computer” appears, click on the “Browse” button, designate the location of the
Installation Disk, and click on the “Next” button.
Fig 1.4 Designating the driver software location
If the Windows Security confirmation window appears, click on “Install this driver software anyway”.
Fig 1.5 Windows Security confirmation
Page 7
4
Dai Nippon Printing Co.,Ltd.
[DS-RX1 Printer Driver] Instruction Manual for Windows Vista
The driver software will be installed.
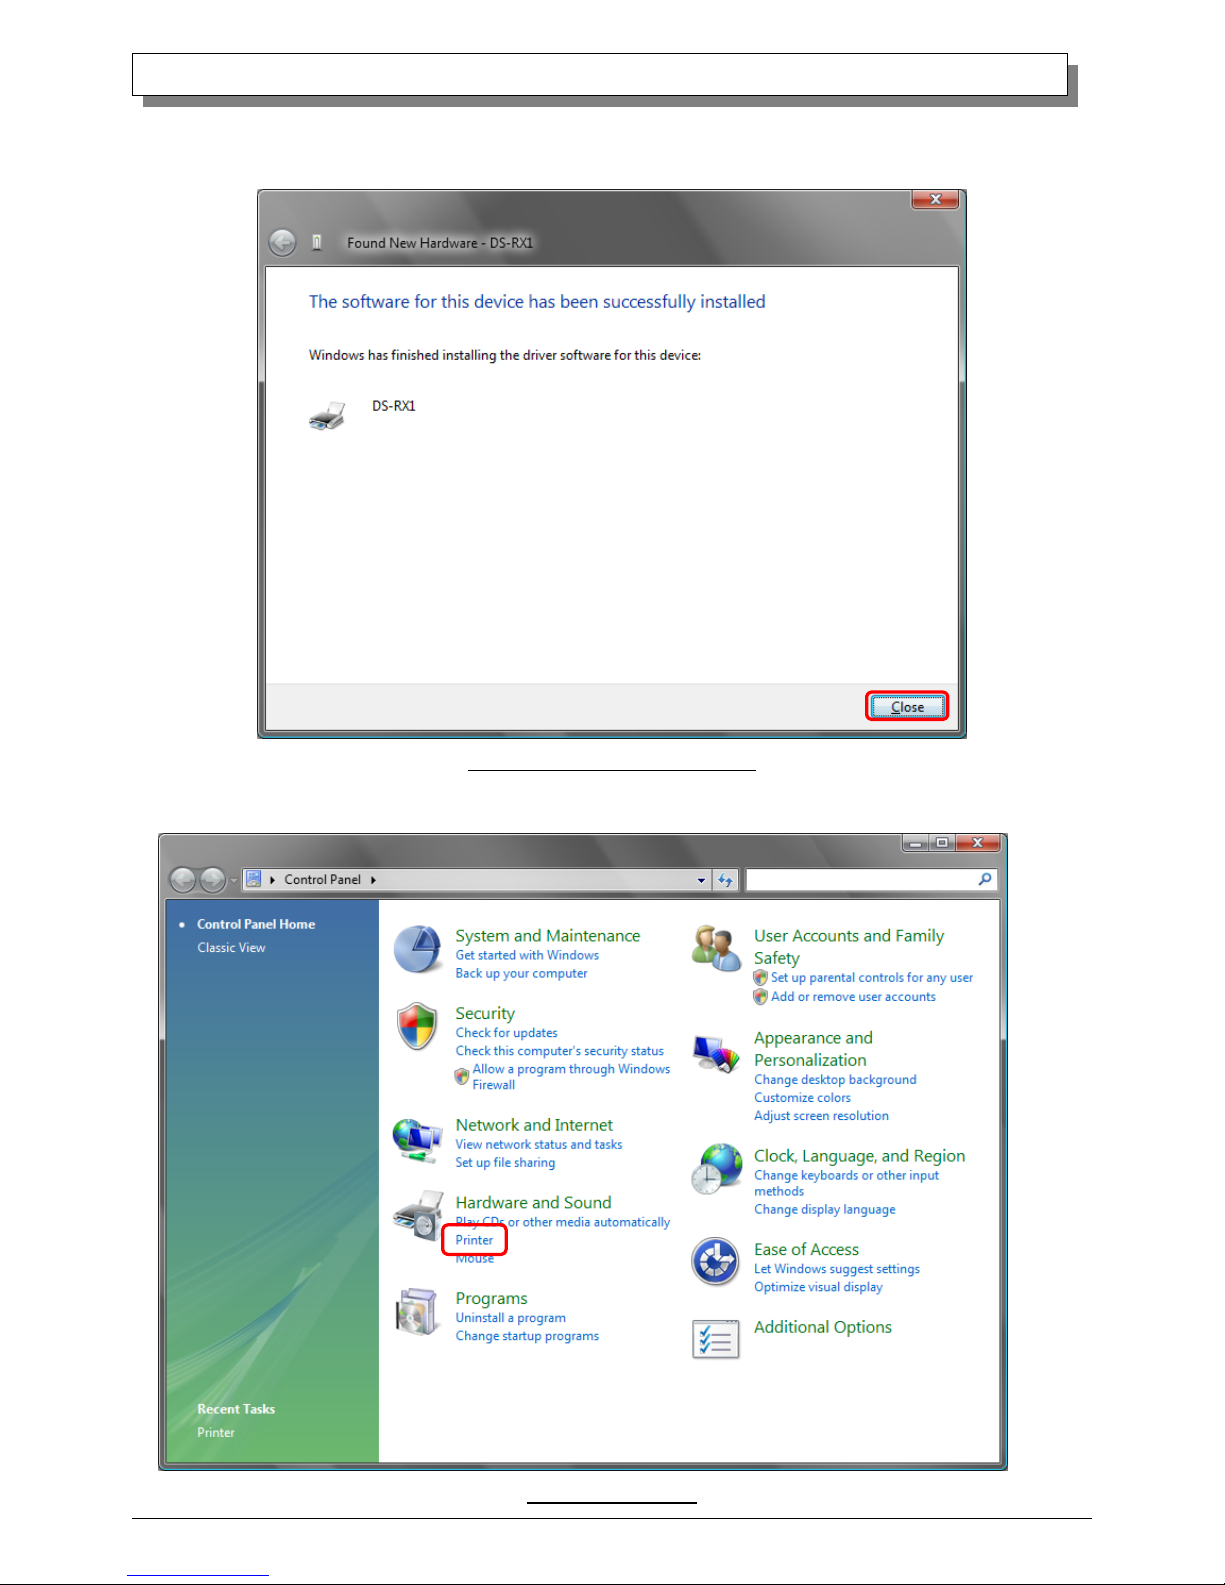
When “The software for this device has been successfully installed” appears, click on the “Close” button, and end the wizard.
Fig 1.6 Installation Complete window
Select “Start”, then “Control Panel”, and open the control panel. Click on “Printer” in the control panel.
Fig 1.7 Control panel
Page 8
5
Dai Nippon Printing Co.,Ltd.
[DS-RX1 Printer Driver] Instruction Manual for Windows Vista
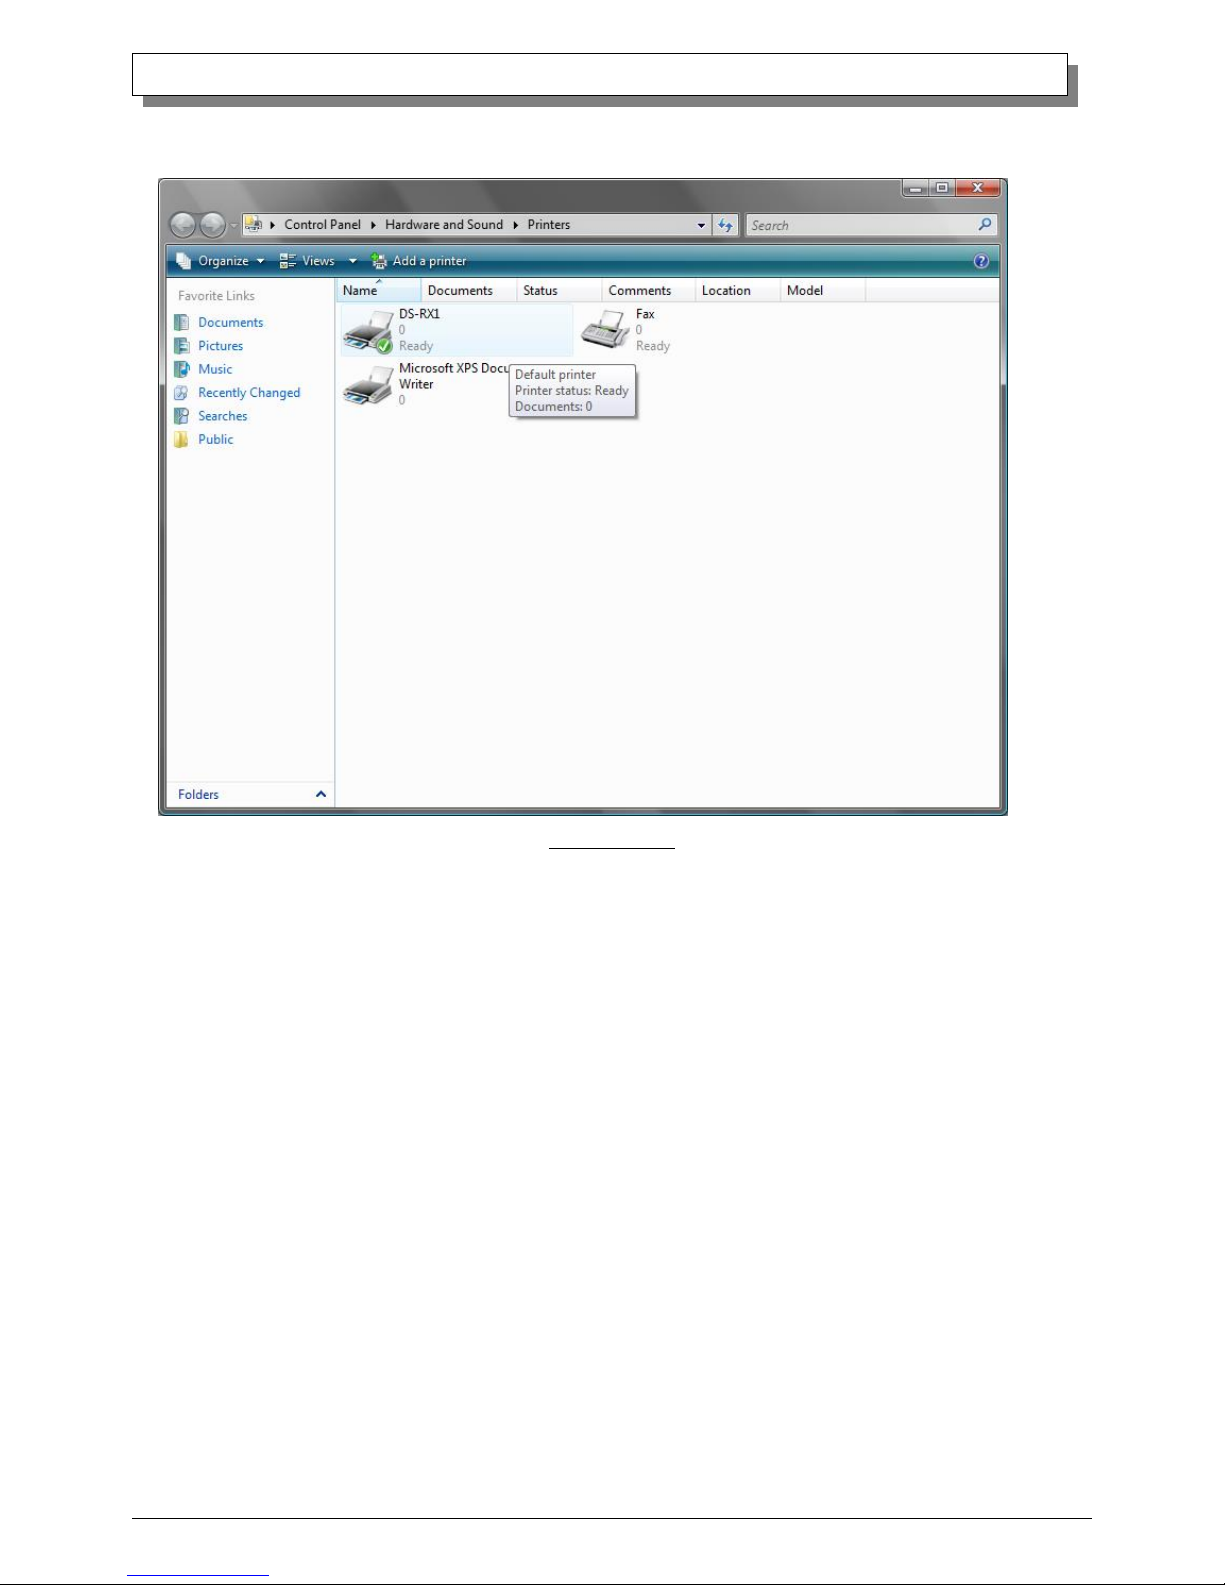
Open [Printer] and confirm that [DS-RX1] is shown.
Now installation is complete.
Fig 1.8 Printers
After installation of the printer-driver is complete, be sure to reboot the computer.
Page 9
6
Dai Nippon Printing Co.,Ltd.
[DS-RX1 Printer Driver] Instruction Manual for Windows Vista
11..33 IInnssttaallll ffrroomm AAdddd PPrriinntteerr WWiizzaarrd
d
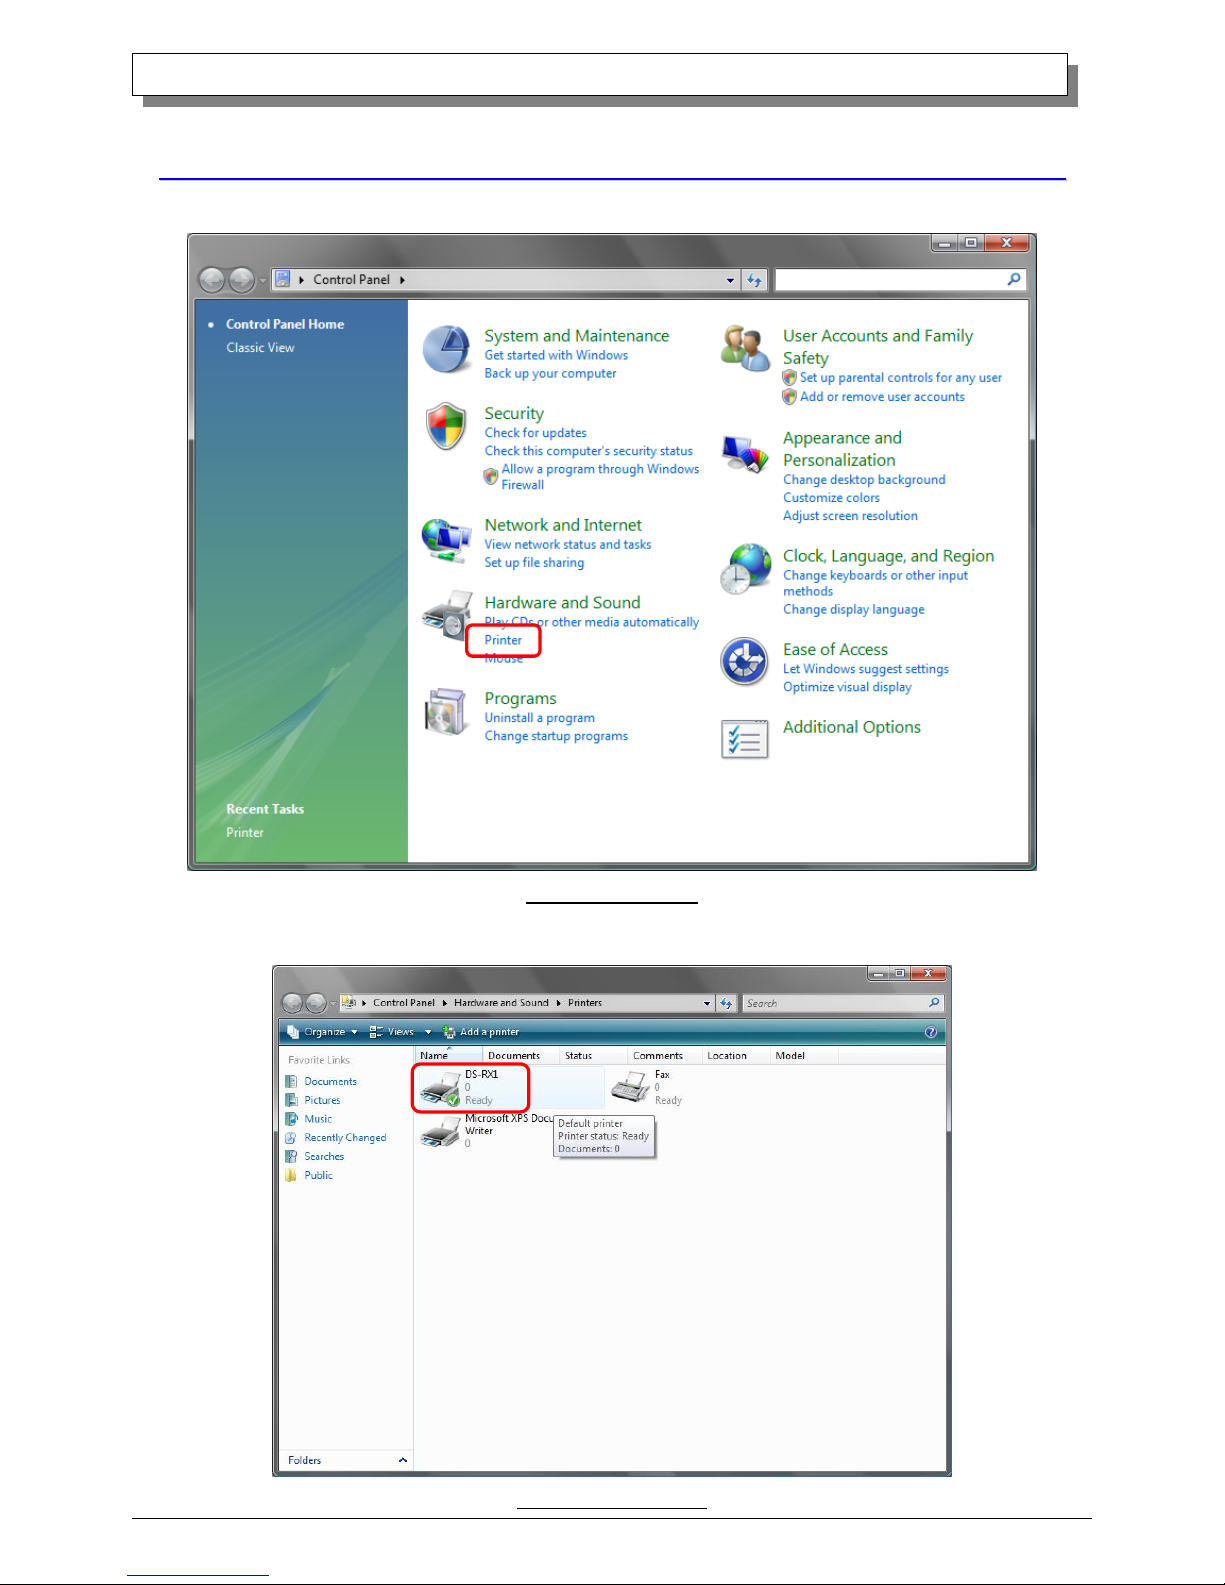
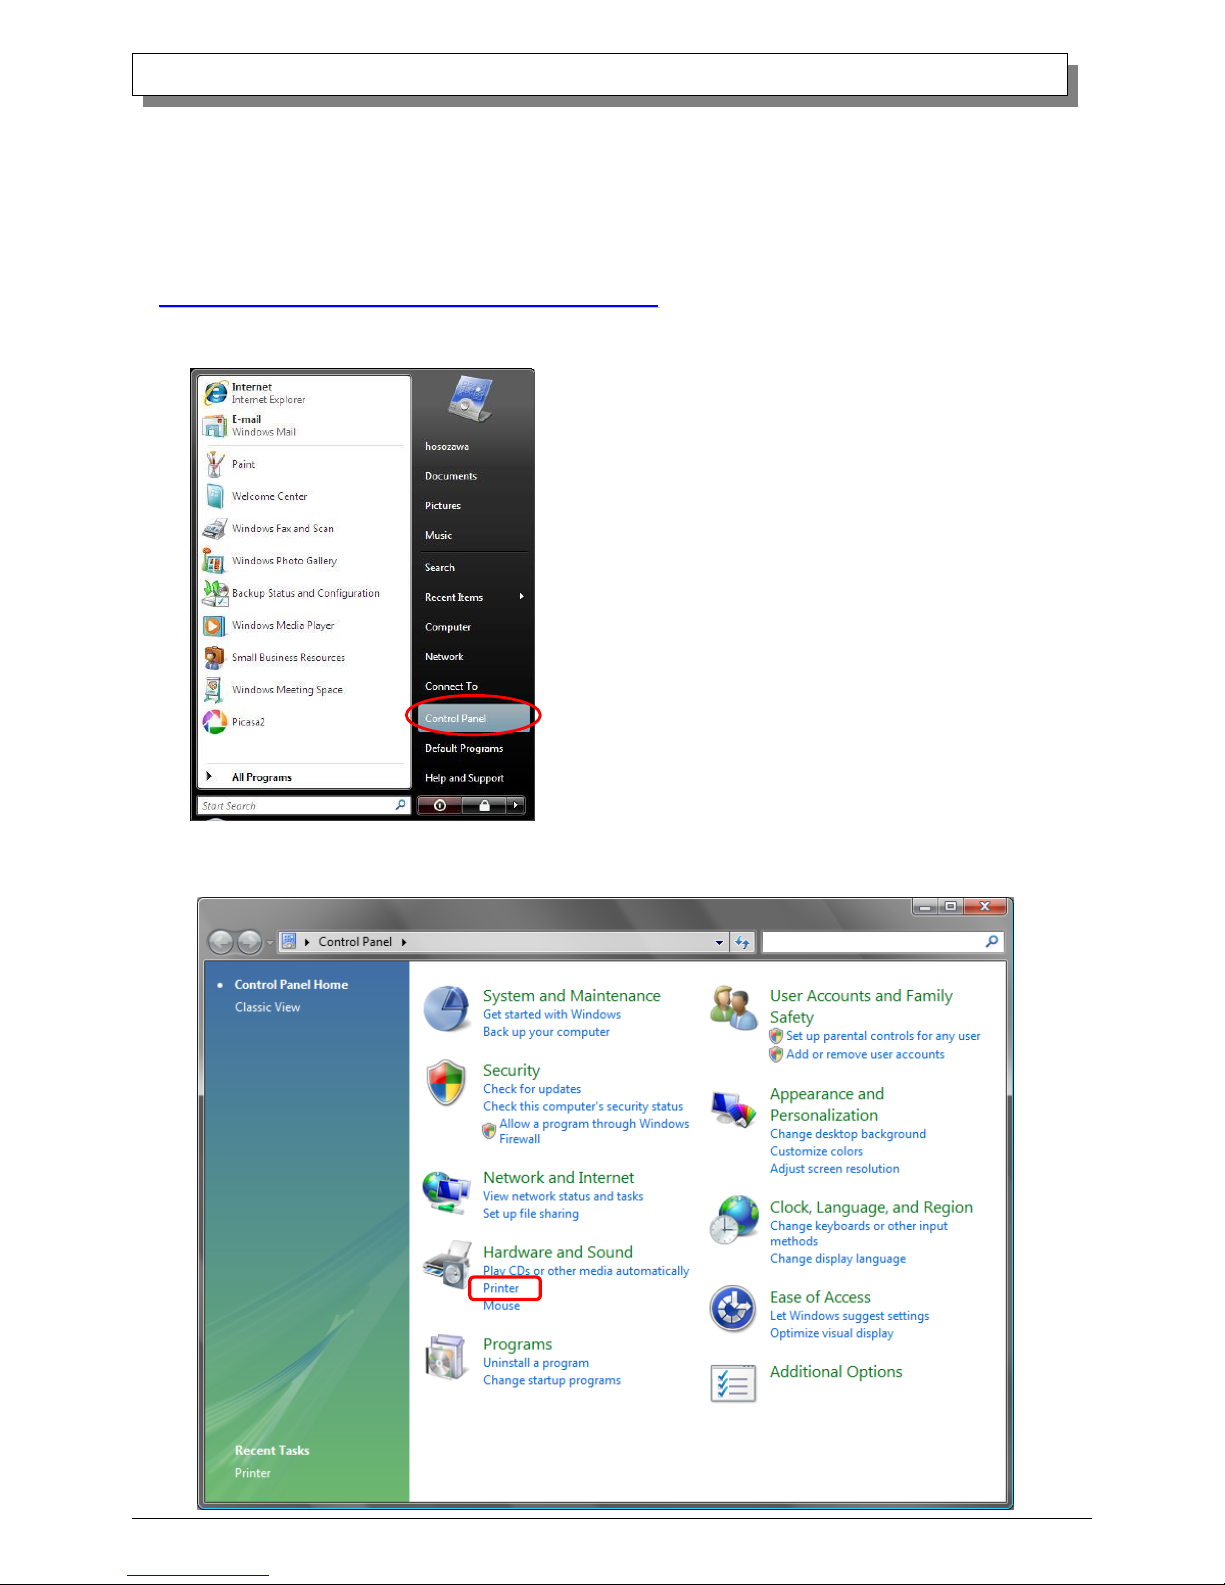
Select “Start”, then “Control Panel”, and open the control panel. Click on “Printer” in the control panel.
Fig 1.9 Control Panel
Click on “Add a Printer” in the menu bar at the top of the “Printer” window.
Fig 1.10 Printer window
Page 10
7
Dai Nippon Printing Co.,Ltd.
[DS-RX1 Printer Driver] Instruction Manual for Windows Vista
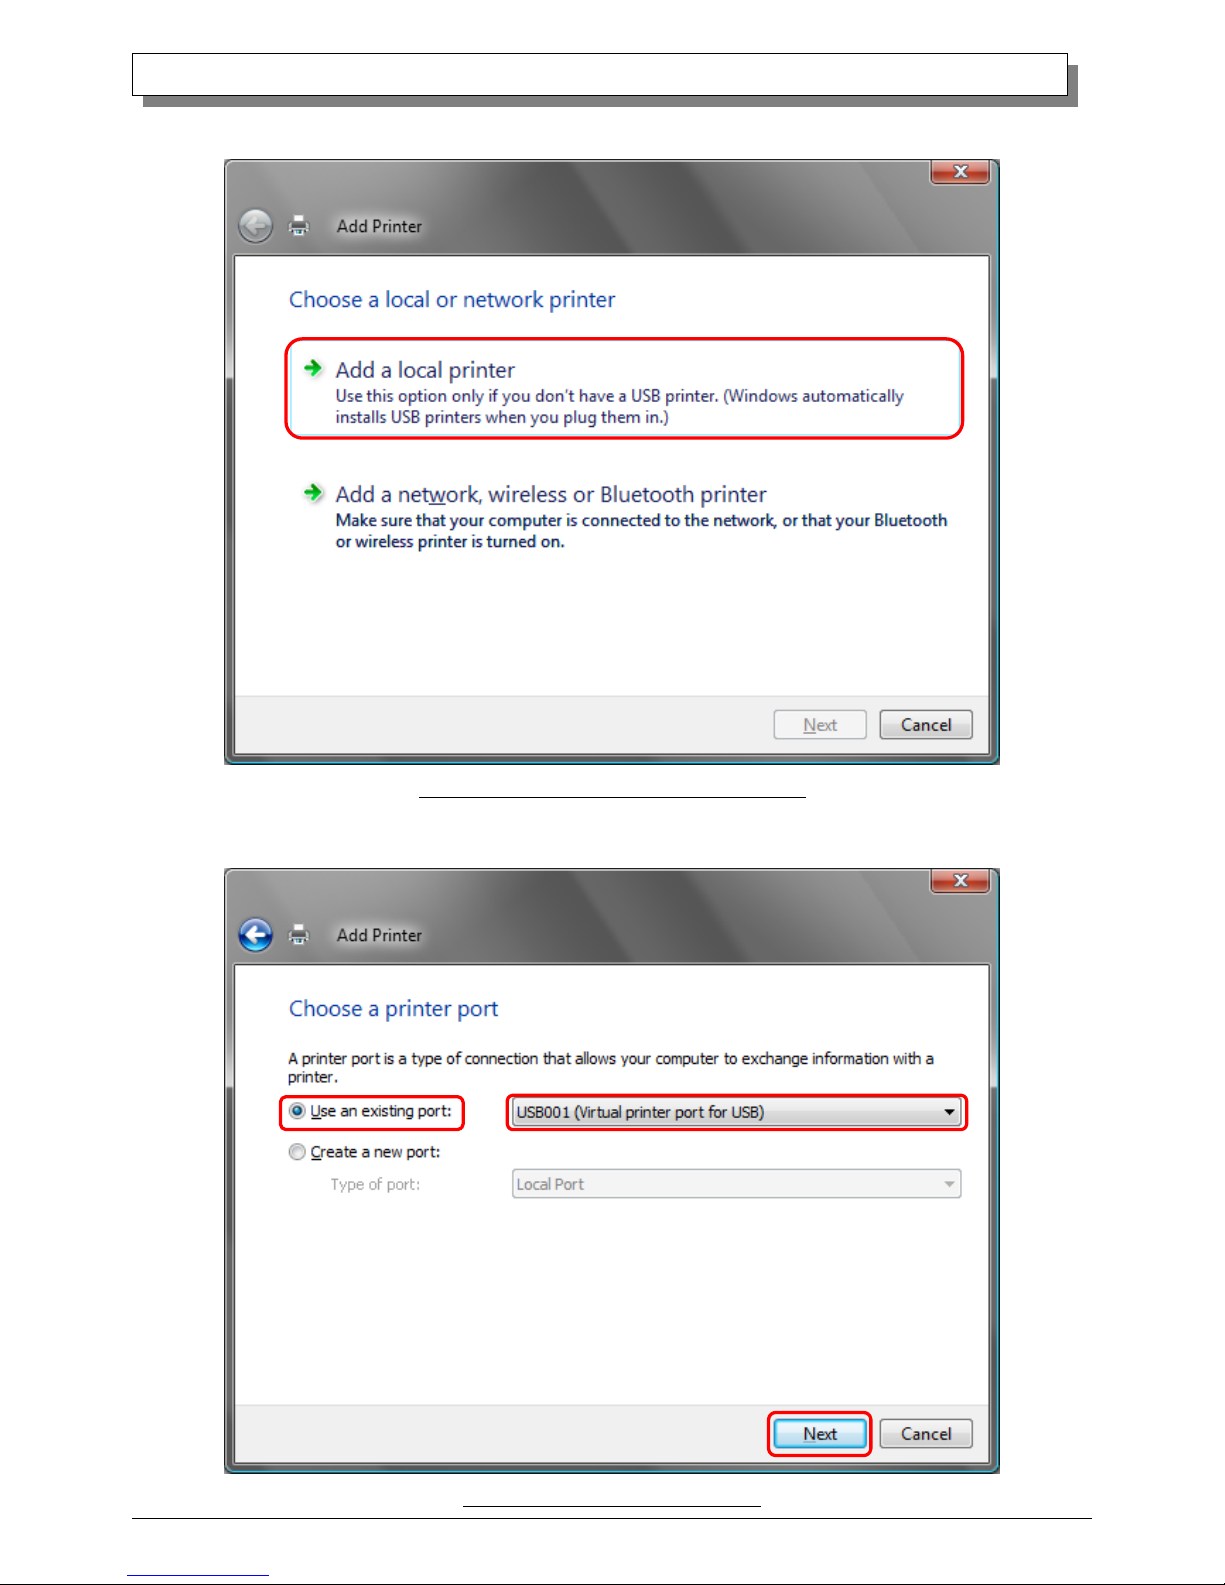
When the “Choose a local or network printer” window appears, click on “Add a local printer”.
Fig 1.11 Choose a local or network printer window
When the “Choose a printer port” window appears, select “Use an existing port:”, and select the USB port the printer is connected to
(for example, “USB001”) from the drop-down list, and click the “Next” button.
Fig 1.12 Choose a printer port window
Page 11
8
Dai Nippon Printing Co.,Ltd.
[DS-RX1 Printer Driver] Instruction Manual for Windows Vista
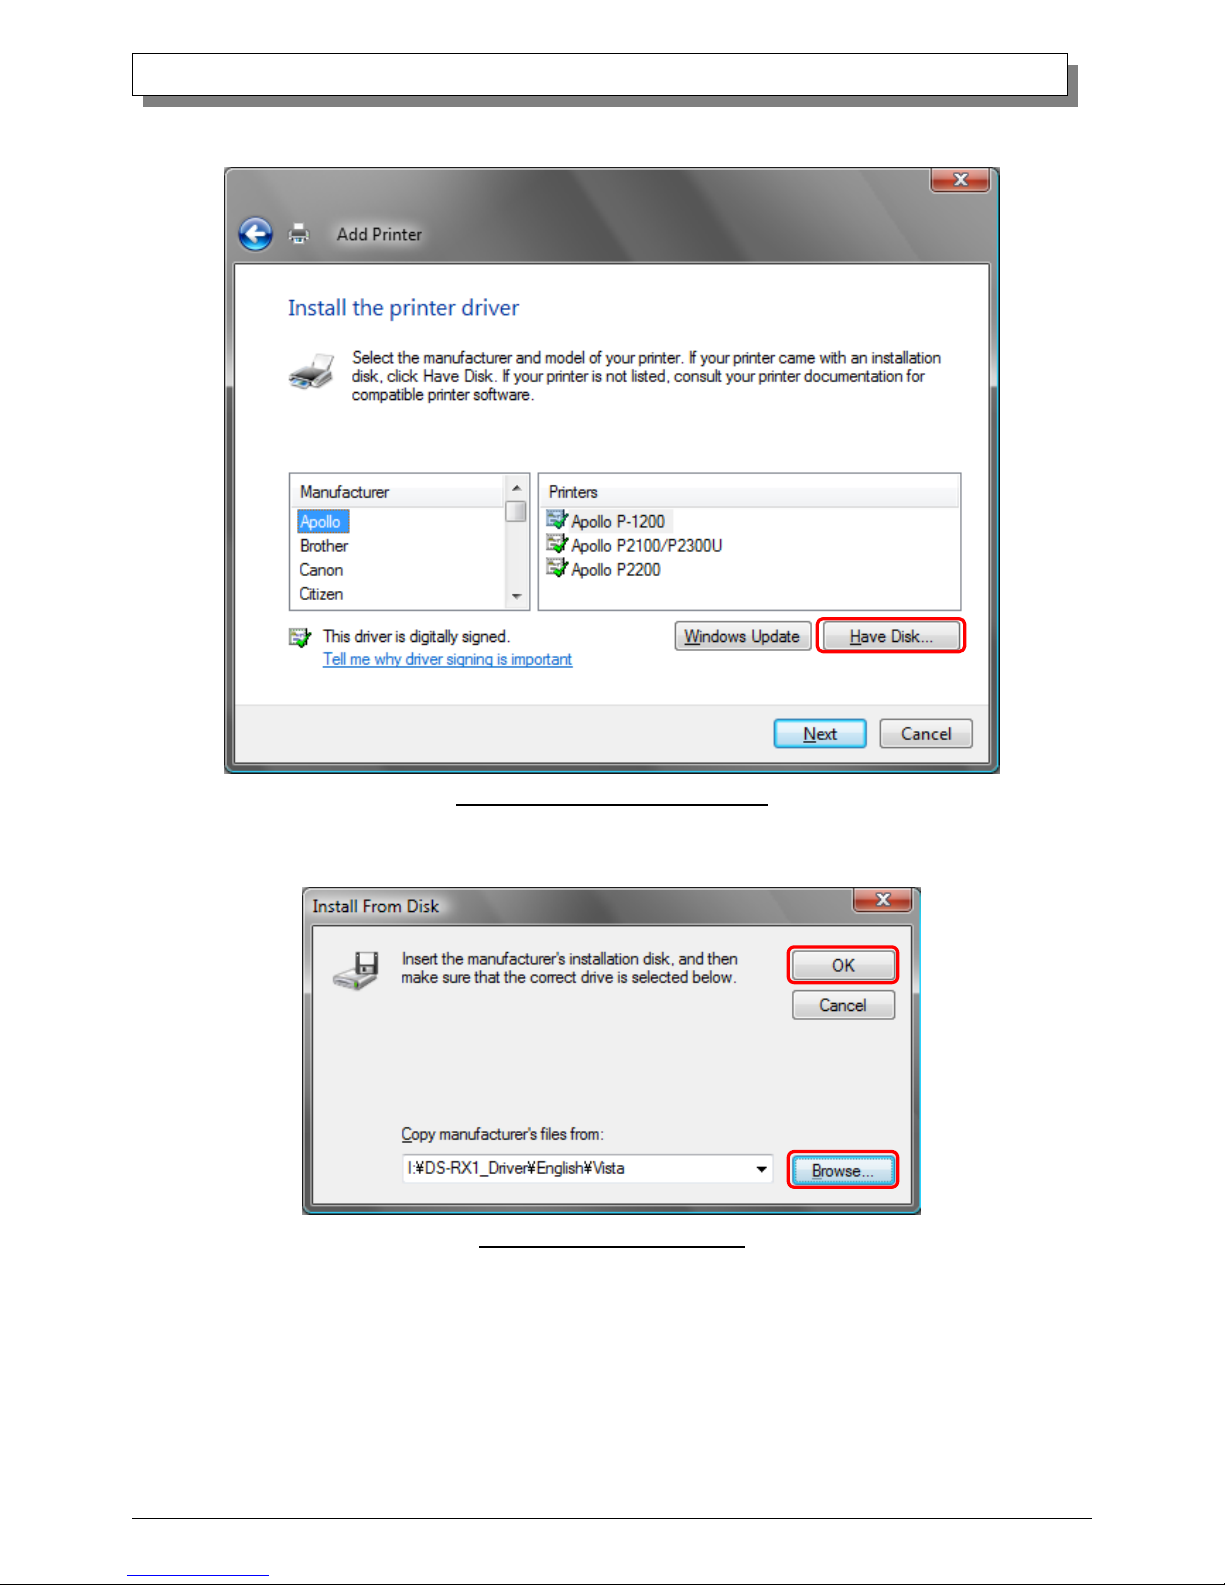
When the “Install the printer driver” window appears, click on the “Have Disk...” button.
Fig 1.13 Install the printer driver window
When the “Install From Disk” window appears, use “Browse...” to designate the installation disk location, and click the “OK” button.
Fig 1.14 Install From Disk window
Page 12
9
Dai Nippon Printing Co.,Ltd.
[DS-RX1 Printer Driver] Instruction Manual for Windows Vista
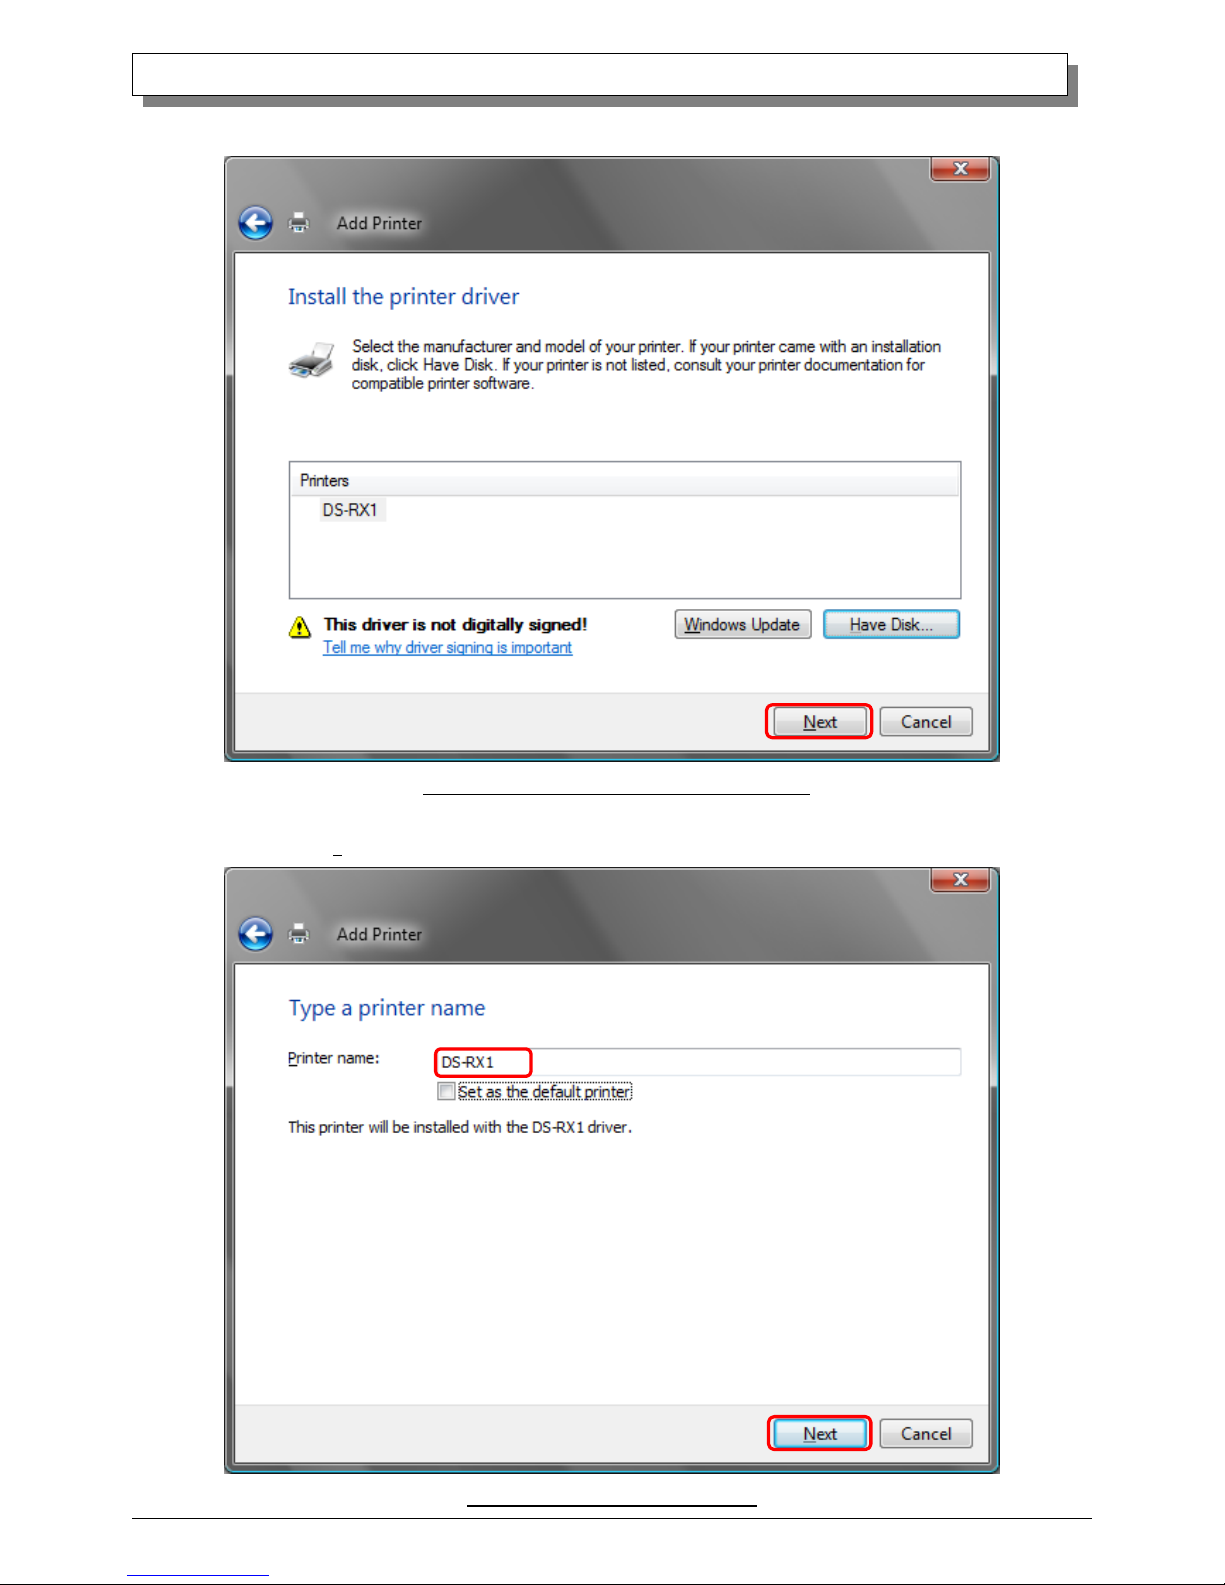
In the “Install the printer driver” window, check that “DS-RX1” is displayed, and click the “Next” button.
Fig 1.15 DS-RX1 Install the printer driver window
When the “Type a printer name” window appears, you can set the printer name. Also, to set it as the printer usually used, select the
check box for “Set as the default printer”, and click the “Next” button.
Fig 1.16 Type a printer name window
Page 13
10
Dai Nippon Printing Co.,Ltd.
[DS-RX1 Printer Driver] Instruction Manual for Windows Vista
Note)Insallation will begin, but the User Account Control will request confirmation with the message “Install this driver software
anyway”. Click on “Continue”.
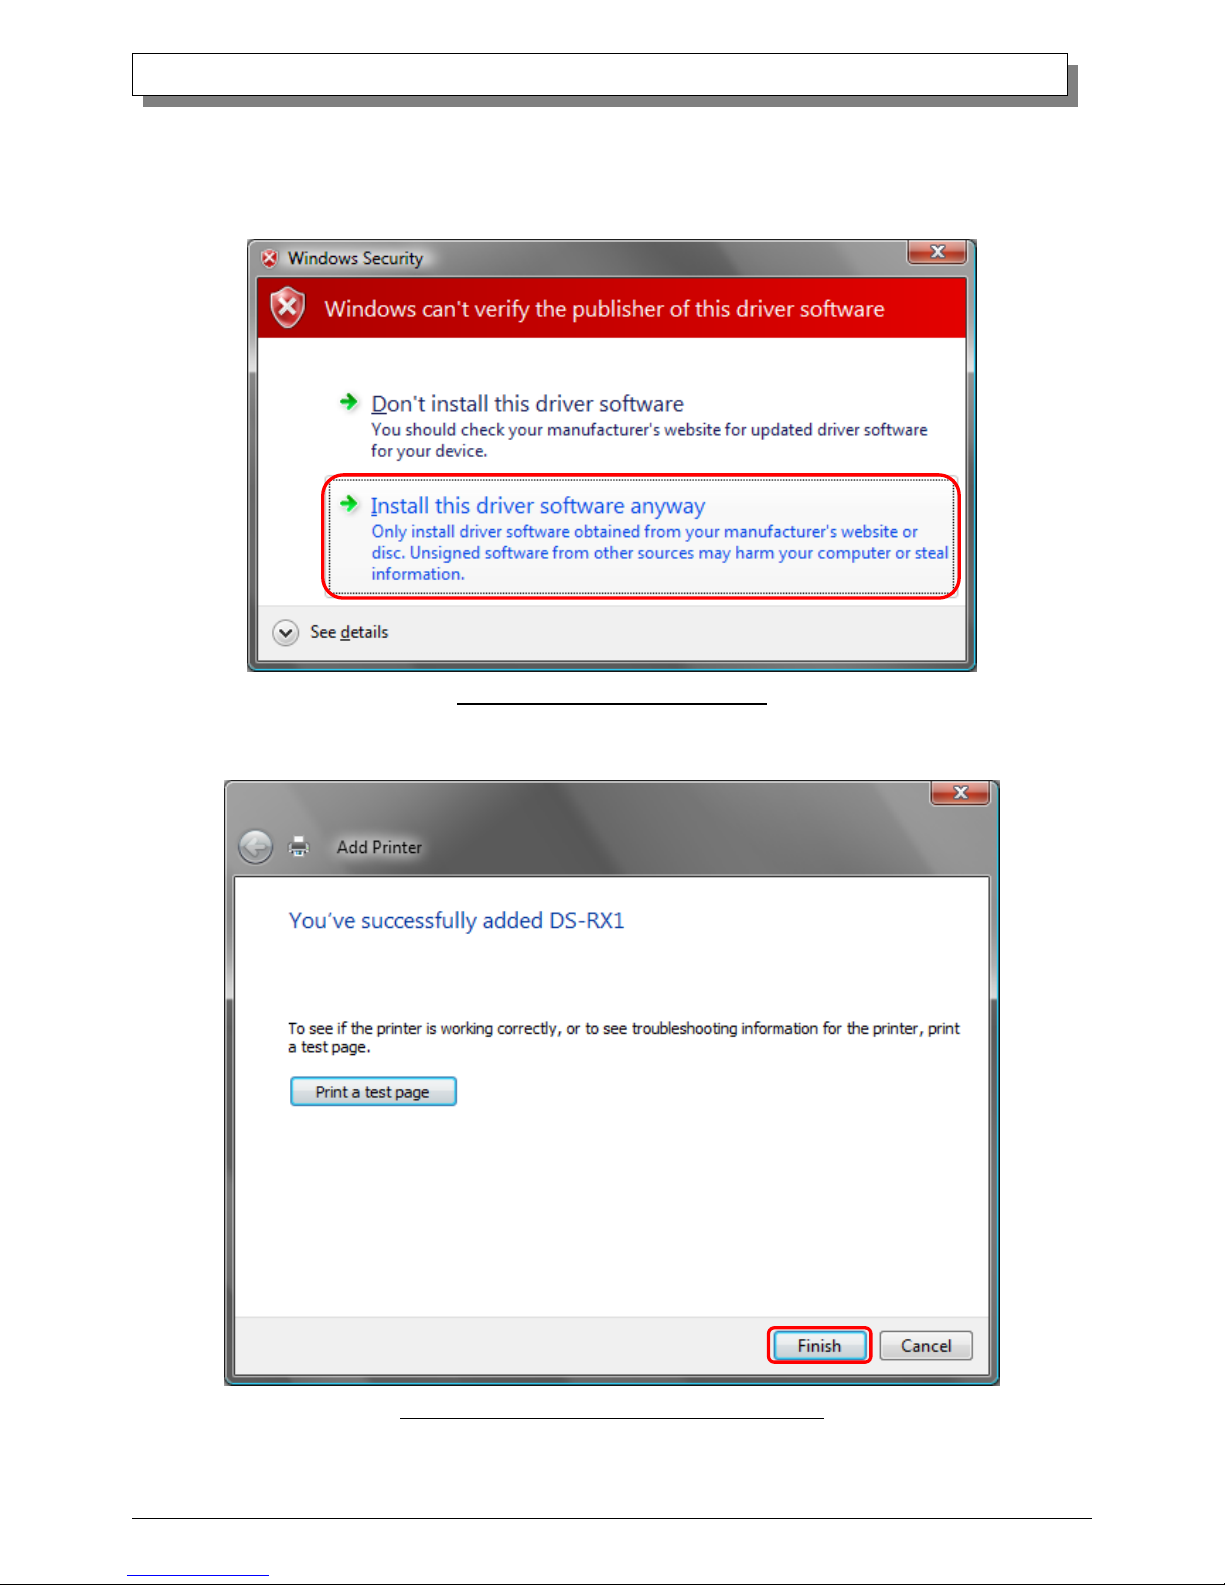
When the Windows Security window appears, click on “Install this driver software anyway”.
Fig 1.17 Windows Security confirmation
When the message “The software for this device has been successfully installed”, click on “Finish”.
Fig 1.18 DS-RX1 driver has been successfully installed
Page 14
11
Dai Nippon Printing Co.,Ltd.
[DS-RX1 Printer Driver] Instruction Manual for Windows Vista
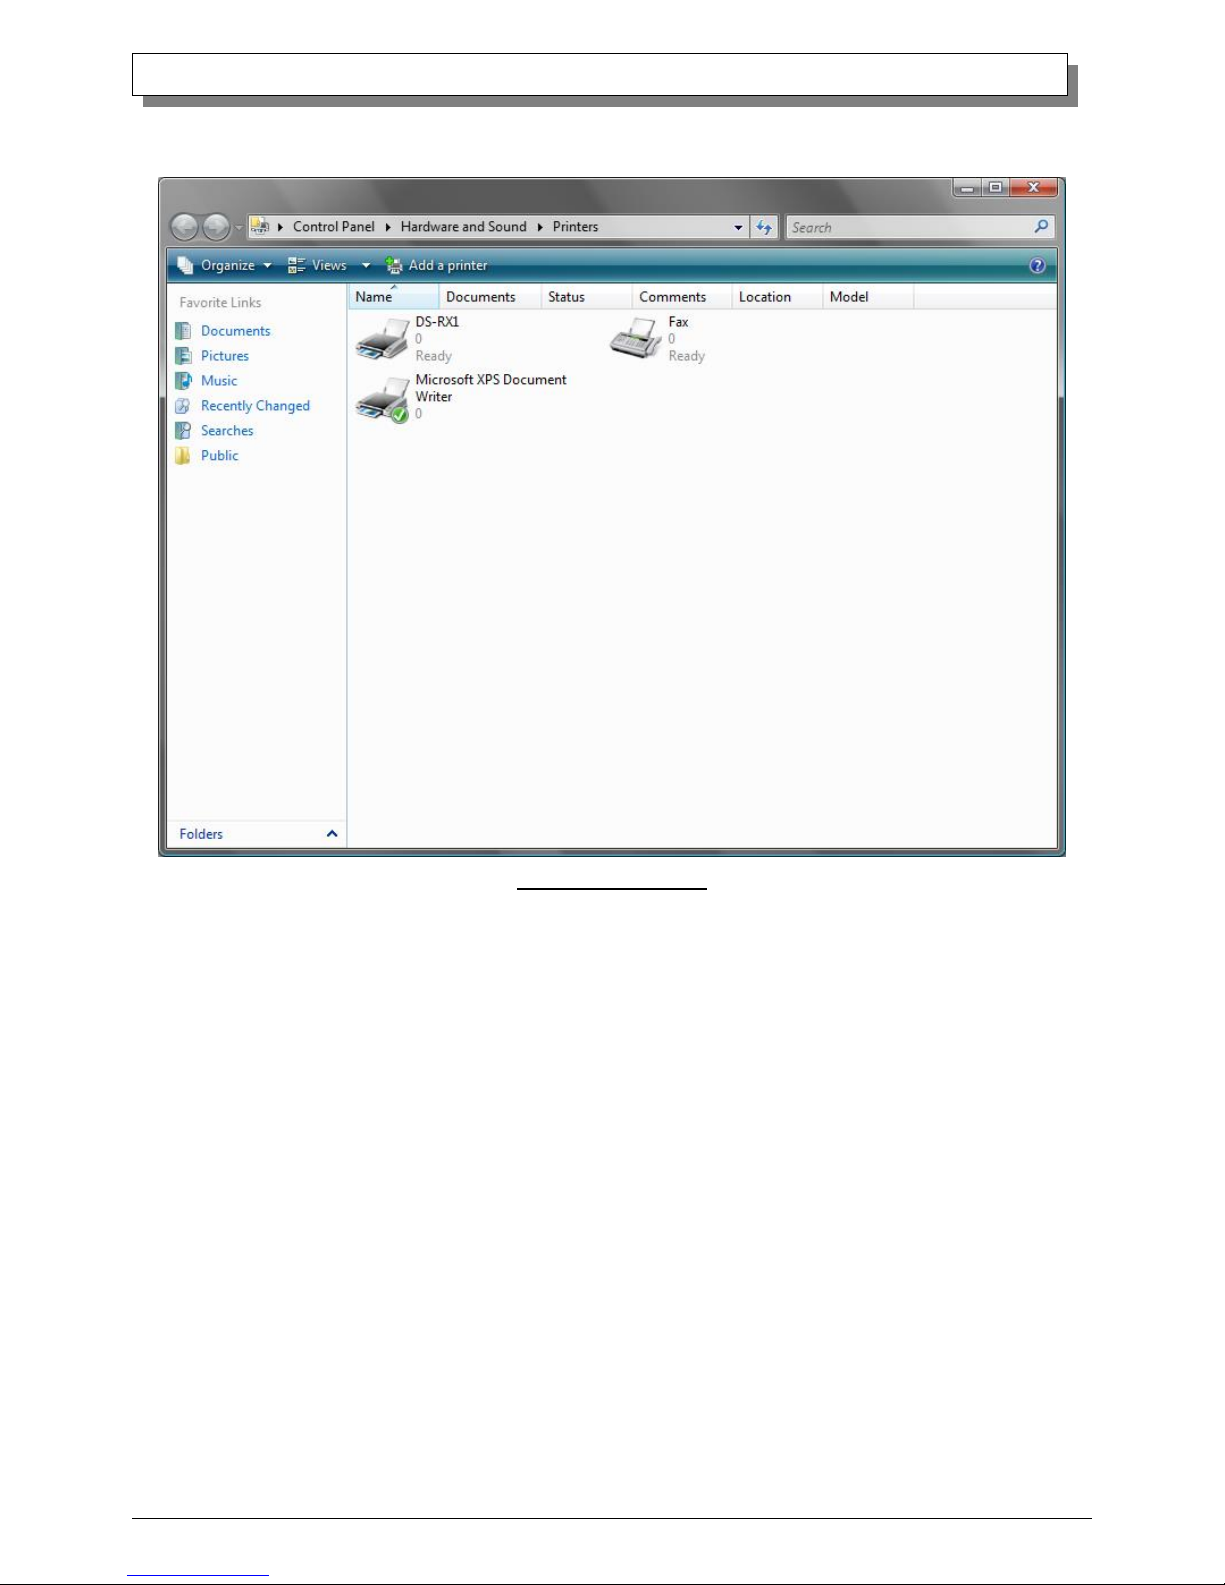
Check that the DS-RX1 is shown in the Printer window.
Now, installation of the DS-RX1 printer driver is complete.
Fig 1.19 Printer window
After installation of the printer-driver is complete, be sure to reboot the computer.
Page 15
12
Dai Nippon Printing Co.,Ltd.
[DS-RX1 Printer Driver] Instruction Manual for Windows Vista
CChhaapptteerr 22
PPrrooppeerrttiieess
Various printer settings can be made using the DS-RX1 Driver properties. Before operation, be sure to have a good understanding
of the contents. Login by administrator authority is required for operation. Depending on application of the use, operation from
print setting of the application is necessary.
22..11 OOppeenniinngg PPrriinntteerr PPrrooppeerrttiieess
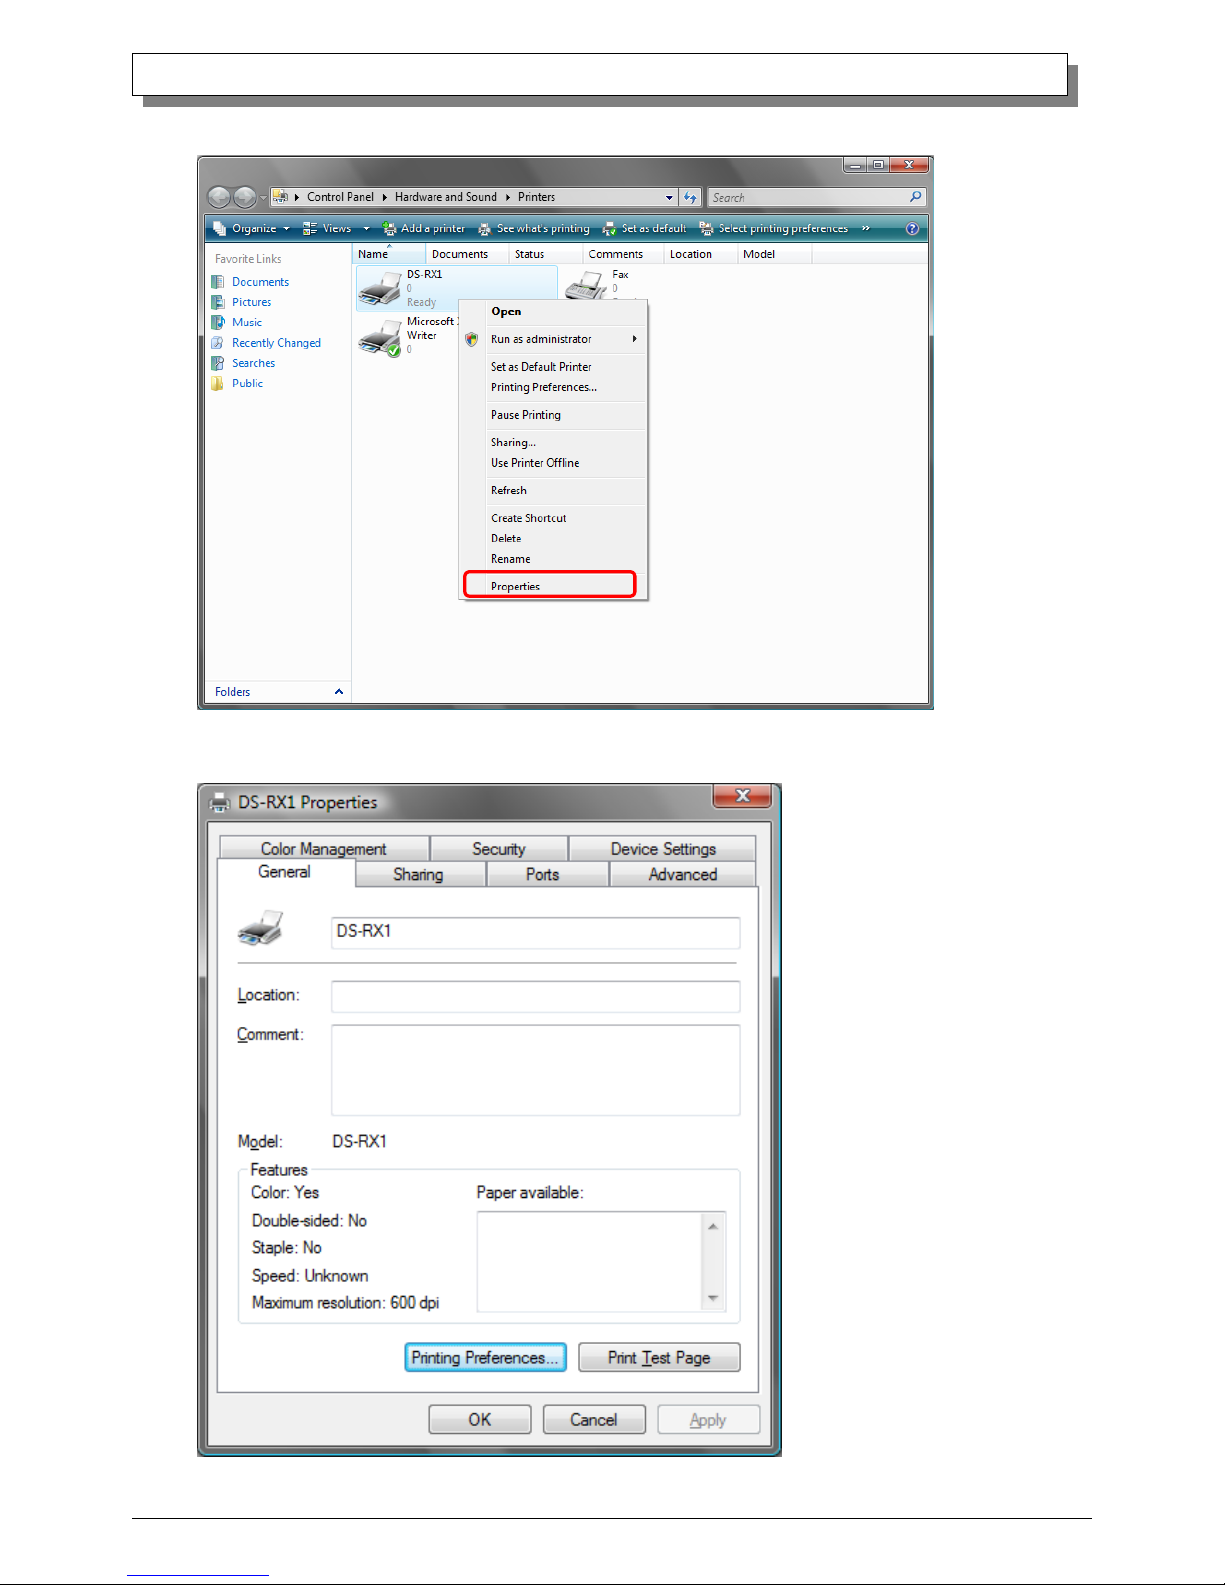
1. Click Start ⇒ Control Panel ⇒ open the control panel
2. In the control panel, select Printer⇒open the Printer window
Page 16
13
Dai Nippon Printing Co.,Ltd.
[DS-RX1 Printer Driver] Instruction Manual for Windows Vista
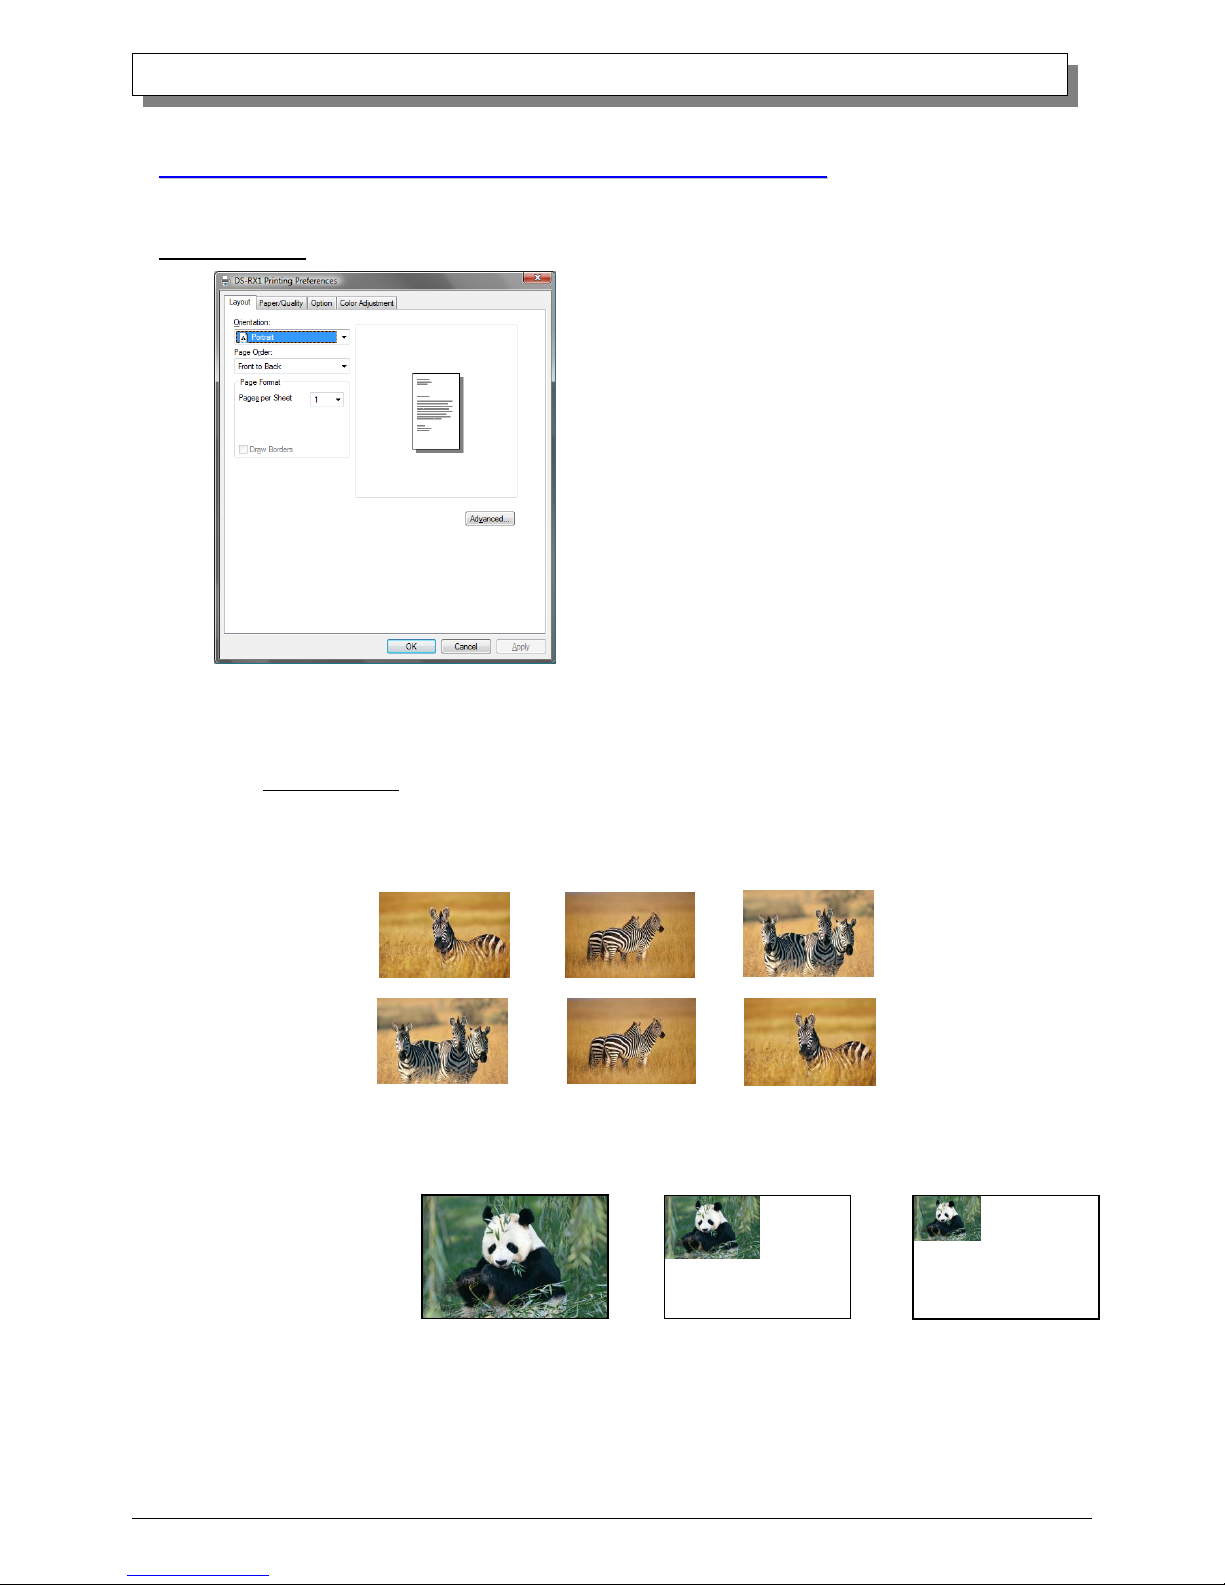
3. Right-click on the DS-RX1 icon, and from the pull-down menu select Properties ⇒ open the Properties window
4. The DS-RX1 Properties window will appear.
Page 17
14
Dai Nippon Printing Co.,Ltd.
[DS-RX1 Printer Driver] Instruction Manual for Windows Vista
22..22 EExxppllaannaattiioonn ooff PPrriinntt SSeettttiinngg FFuunnccttiioonnss
From the Properties window, by selecting Printing Preferences you can make various print settings.
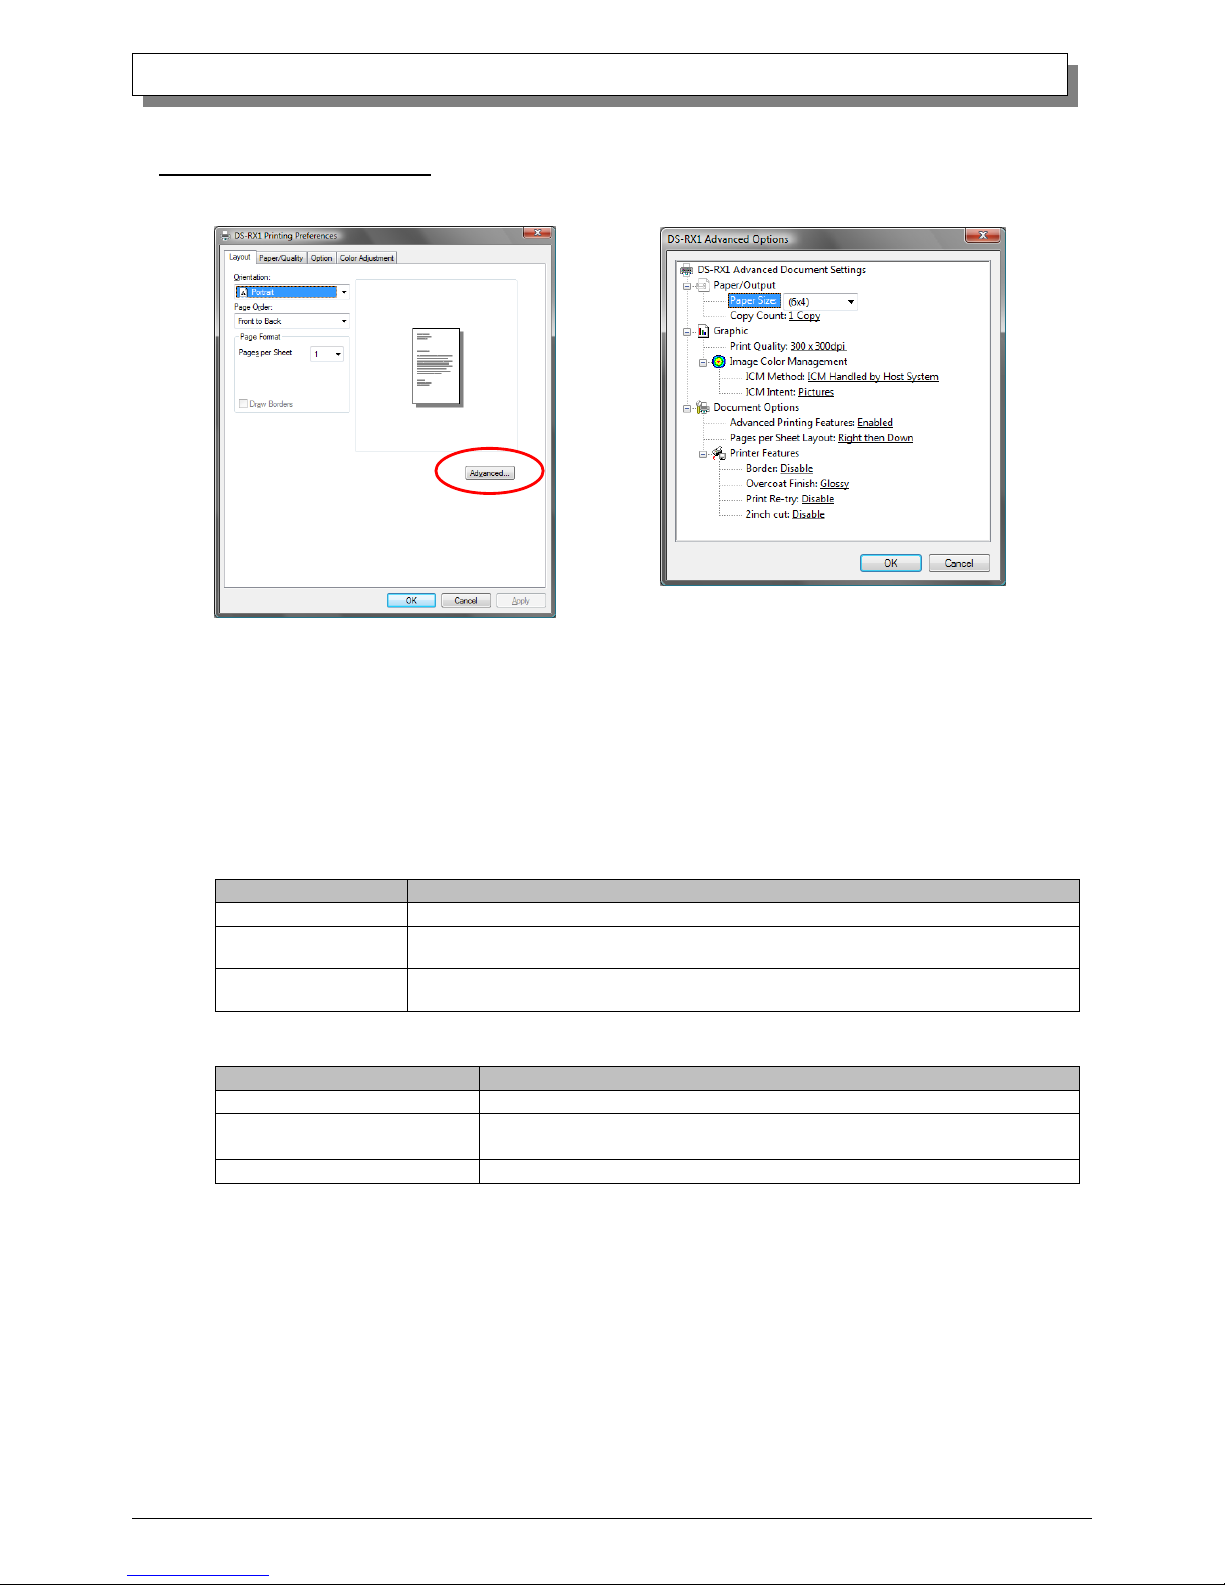
2.2.1 Layout
Orientation
Assign print orientation as Landscape or Portrait.
Refer to 2.6 Print direction.
Page Order
When printing multiple images in the application, you can set the order.
Ex.) Print order
Pages per Sheet
Prints the designated fractional size.
Ex.) Fractional size
In order
Reverse
order
Fig 2.2.1 Layout tab
No.1
No.2
No.3
1 (Whole)
4 (Quarter-size)
9 (One-ninth size)
Page 18
15
Dai Nippon Printing Co.,Ltd.
[DS-RX1 Printer Driver] Instruction Manual for Windows Vista
2.2.2 Advanced Options
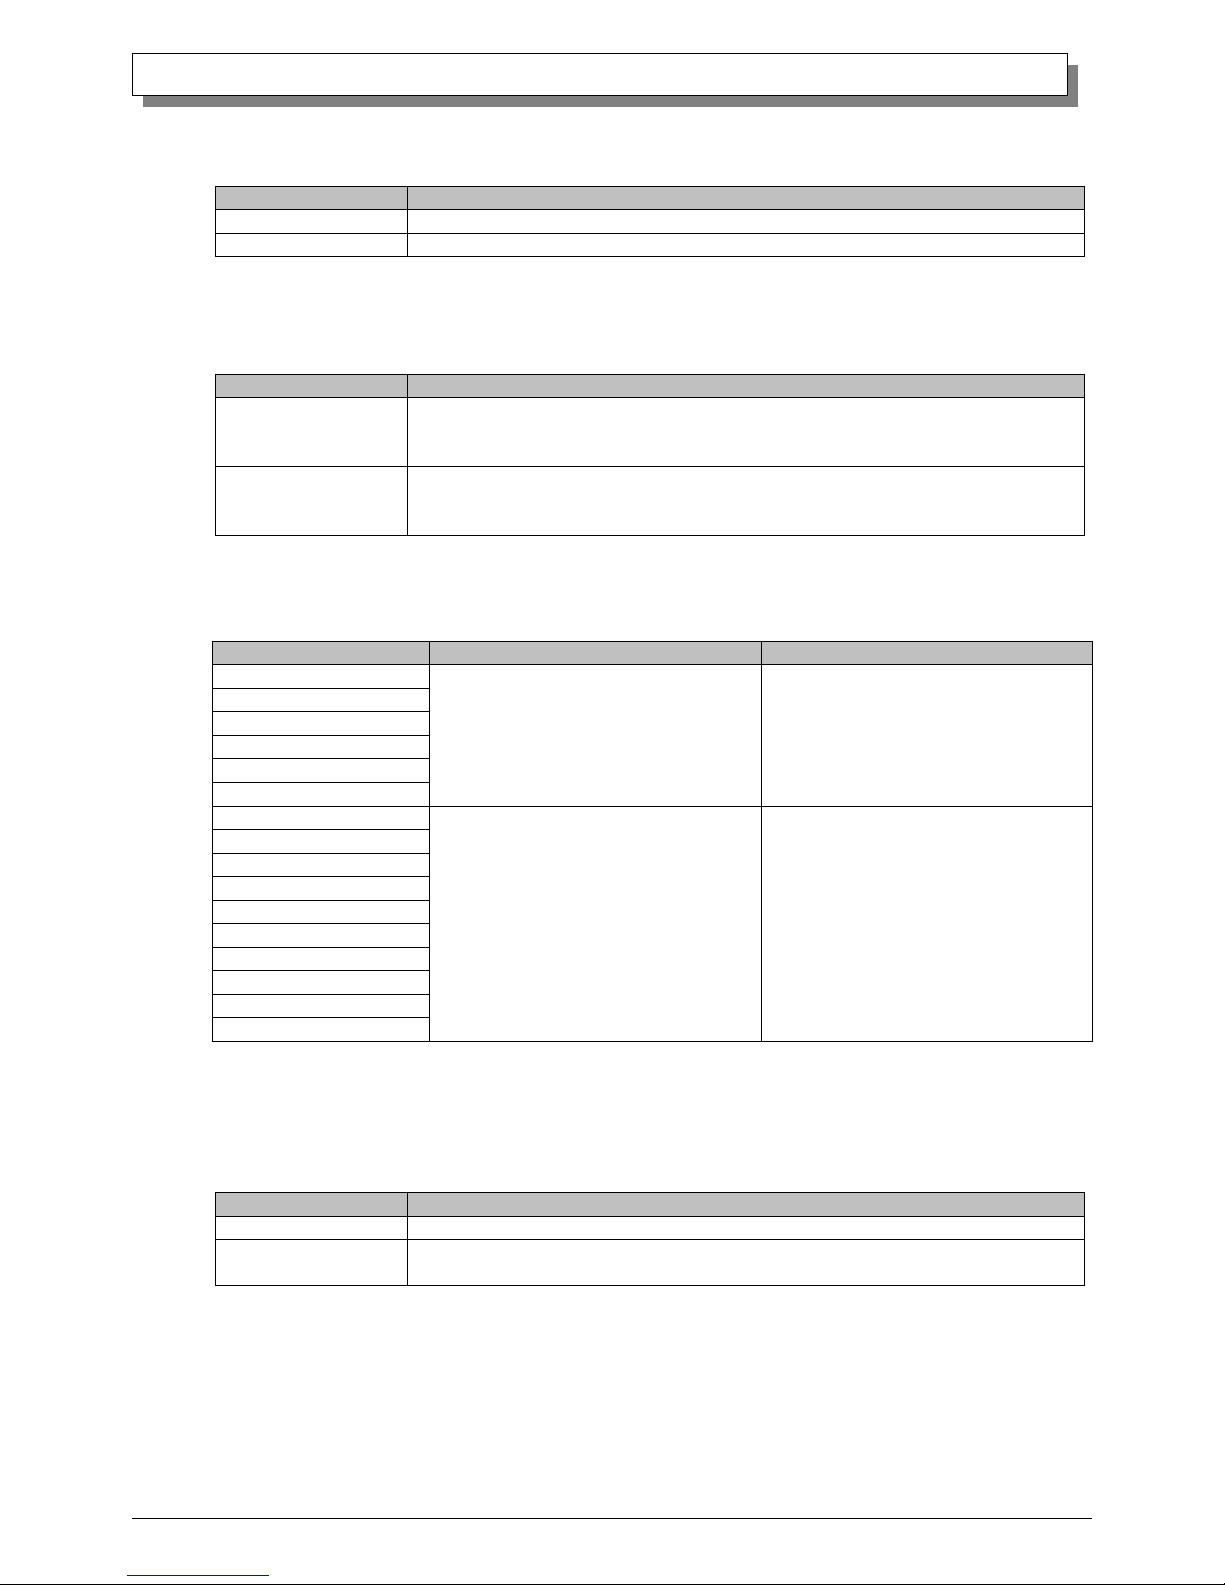
By selecting [Advanced] in the Layout window, various settings can be made using Advanced Options.
Paper Size
You can designate the paper size. Please match the paper size to the media size with which the printer is
equipped
Copy Count
You can designate the number of times an image will be printed.
Print Quality
You can designate the print quality.
Print Quality
Function
300 x 300dpi
Printing in the high-speed mode
300 x 600dpi
Printing in the high-quality mode
(If the application can not set an asymmetric aspect resolution, please set the 600x600dpi.)
600 x 600dpi
Printing in the high-quality mode
(Printer driver converts to 300x600dpi data, and sends it to the printer.)
ICM Method
ICM Method
Function
ICM Disabled
2.2.4 Synchronous with “Color Management: None” in paper option.
ICM Handled by Host System
2.2.4 Synchronous with “Color Management: ICM” in paper option.
Performs color management with the driver.
ICM Handled by Printer
This is the same as setting “ICM Handled by Host System”.
ICM Intent
This designates the rendering method when using ICM. Always have the ICC profile for the DS-RX1 set
to “Picture”. Please do not use it at other settings.
Advanced Printing Features
Always have it set to “Enabled”. Please do not use it at other settings.
Pages per Sheet Layout
The layout direction of a picture is specified, when Pages per Sheet setting is multiple pages per sheet.
Border
Synchronous with the border option in the paper option.
Fig 2.2.2.2 Advanced Options tab
Fig 2.2.2.1 Advanced Settings
Page 19
16
Dai Nippon Printing Co.,Ltd.
[DS-RX1 Printer Driver] Instruction Manual for Windows Vista
Overcoat Finish
The overcoat finish for the printed surface can be selected from the following two types.
Overcoat Finish
Function
Glossy
This finishes the print with a glossy surface.
Matte
This finishes the print with a matte (non-glossy) surface.
Print Re-try
This sets up whether print data in a printer buffer when the error of a printer occurs is printed after error recovery,
or it does not print.
Print Re-try
Function
Disable
Printing data in a printer buffer is cleared in the case of a printer error.
After an error recovery, the cleared image data must be re-sent.
When using an application that has an error recovery function, select this option.
Enable
Printing data in a printer buffer is held in the case of a printer error.
After an error recovery, the print process resumes with the saved data.
However, if the power is turned OFF, the data will not be saved.
According to the contents of a printer error, the power supply of a printer needs to be re-switched on for error
recovery. In this case, it is not dependent on a setup of Print Re-try, and printing data in a printer buffer is cleared.
Operation by Print Re-try setup in each error is shown below.
Contents of an error
Print Re-try setup is “Disable”
Print Re-try setup is “Enable”
Paper End
Please resend picture data not printed
after error recovery.
Printing processing is resumed from data
currently held in a printer buffer after
error recovery.
When paper initialization operation is
performed, it is printed after paper
initialization operation.
Ribbon End
Cover Open
Paper Jam (*1)
Ribbon Error (*1)
Paper Definition Error
Data Error
For error recovery, the power supply of a
printer once needs to be turned OFF.
Therefore, print data in a printer buffer is
cleared by power-supply OFF of a
printer regardless of a setup of the Print
Re-try function.
Please resend picture data not printed
after printer re-starting.
For error recovery, the power supply of a
printer once needs to be turned OFF.
Therefore, print data in a printer buffer is
cleared by printer power-supply OFF
even if the Print Re-try function is set to
"Enable".
Please resend picture data not printed
after printer re-starting.
Head Position Error
Power Supply Fan Stop
Cutter Error
Head Voltage Error
Abnormal Head Temp.
Abnormal Media Temp.
Ribbon Tension Error
RFID Module Error
System Error
*1: After an error stop, a paper or a ribbon should perform removal work of an error factor according to a printer
user's manual.
2inch cut (Depending on the version of printer firmware being used, “Disable” may be the only option.)
In the case of the specific paper size, it sets up whether it cuts into two or more sheets by the length of 2 inches.
2inch cut
Function
Disable
It cuts in usual size.
Enable
By the length of 2 inches, in the case of (6x4) and PR(4x6) size, it cuts to two sheets,
and, in the case of (6x8) size, it cuts to four sheets.
Page 20
17
Dai Nippon Printing Co.,Ltd.
[DS-RX1 Printer Driver] Instruction Manual for Windows Vista
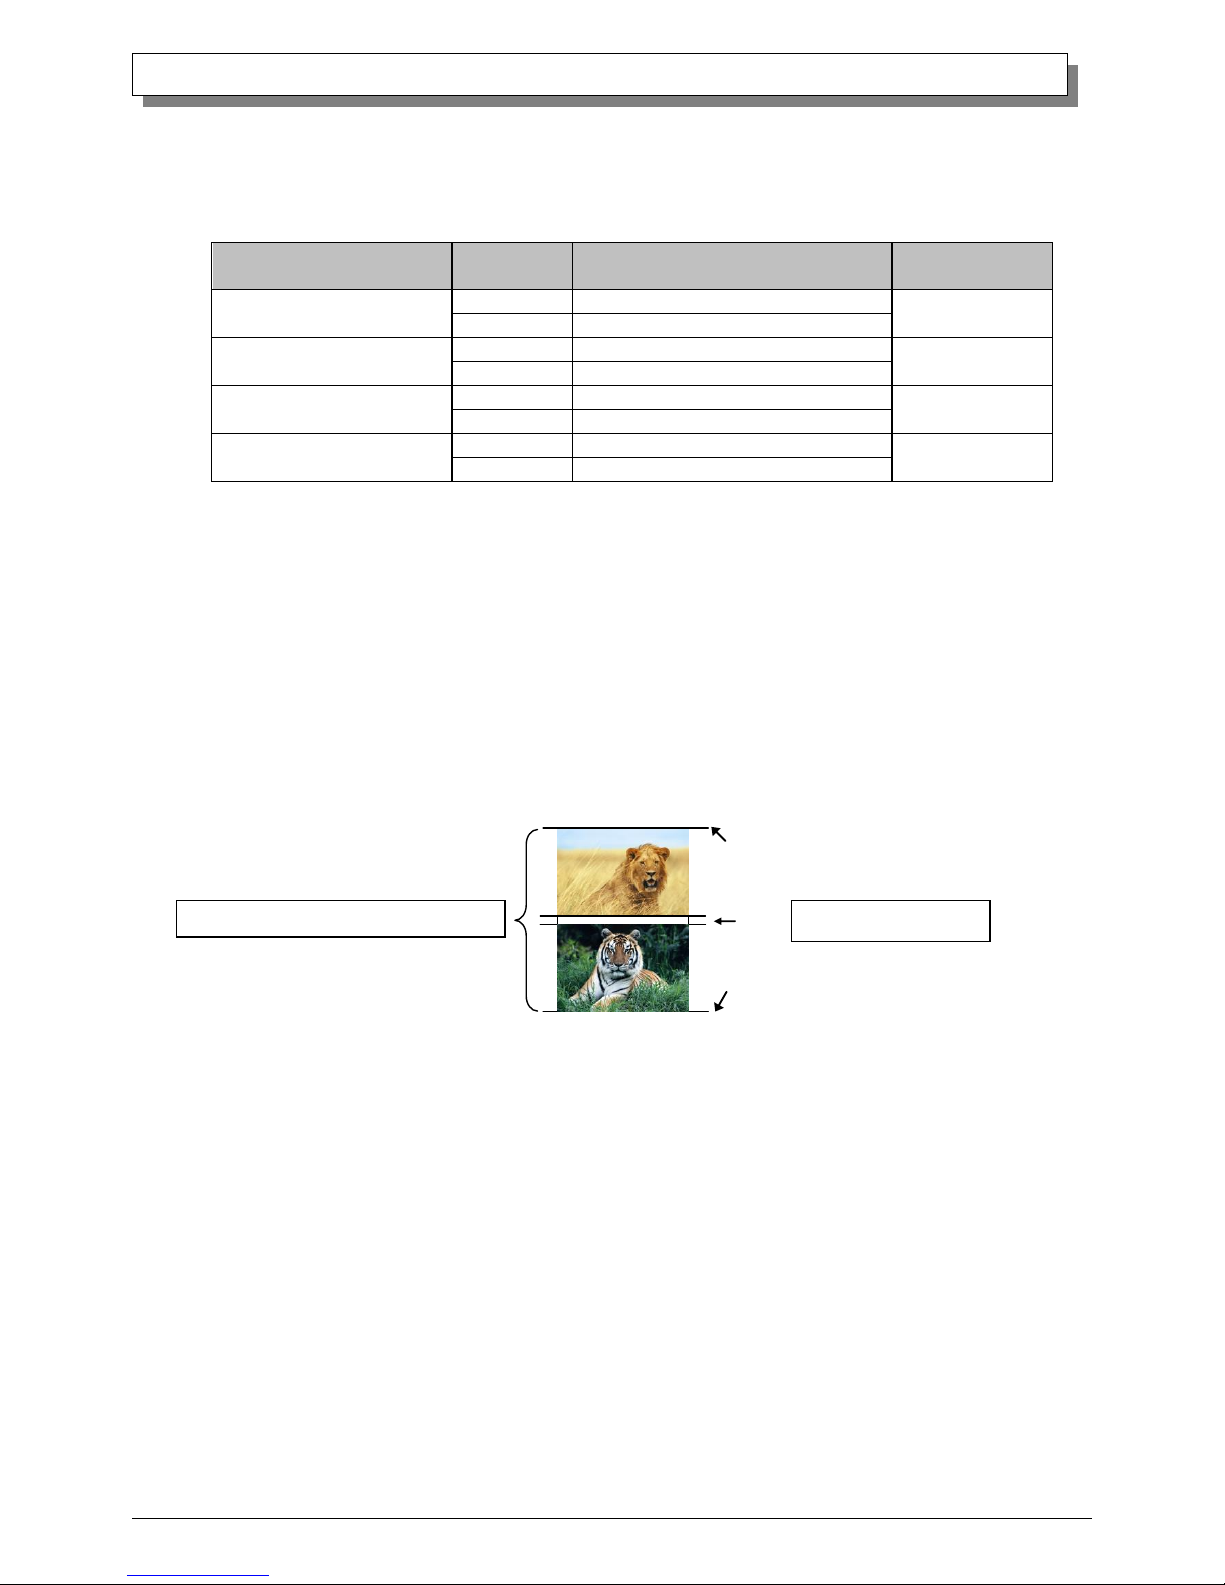
<Multiple layout>
When the DS-RX1 is using 5x7 size and 6x8 size media, 2 image layout is possible. With the printer driver paper setting,
multi-image layout is made possible, and the image sizes are as follows.
Layout designation
Driver paper setting
(layout)
Paper
Orientation
Image size width x height
(㎜)
Using media
(5x3.5) x 2
Portrait
(131.1x 92.1) x 2
5x7
Landscape
(92.1x131.1) x 2
PR (3.5x5) x 2
Portrait
(92.1x131.1) x 2
5x7
Landscape
(131.1x 92.1) x 2
(6x4) x 2
Portrait
(156.1x105.0) x 2
6x8
Landscape
(105.0x156.1) x 2
PR (4x6) x 2
Portrait
(105.0x156.1) x 2
6x8
Landscape
(156.1x105.0) x 2
Multiple layout is possible under the following conditions.
1.The printer is using 5x7 size and 6x8 size media.
2.The printer driver paper size is set to one of the above sizes.
3.Multiple images are sent from the application.
Note)Because the multi-image layout occurs on a per job basis, this works when there are multiple images for 1 job.
If you want to print the same image, be sure to send the image data for each copy to be printed. The printer
prints 2 images in one operation, and the paper is cut as it is fed out.
<Multi-image layout patterns>
The following is possible for the multi-image layout pattern.
Cut as sheet is fed out
Layout for 1 sheet with 2 same-size images
Page 21
18
Dai Nippon Printing Co.,Ltd.
[DS-RX1 Printer Driver] Instruction Manual for Windows Vista
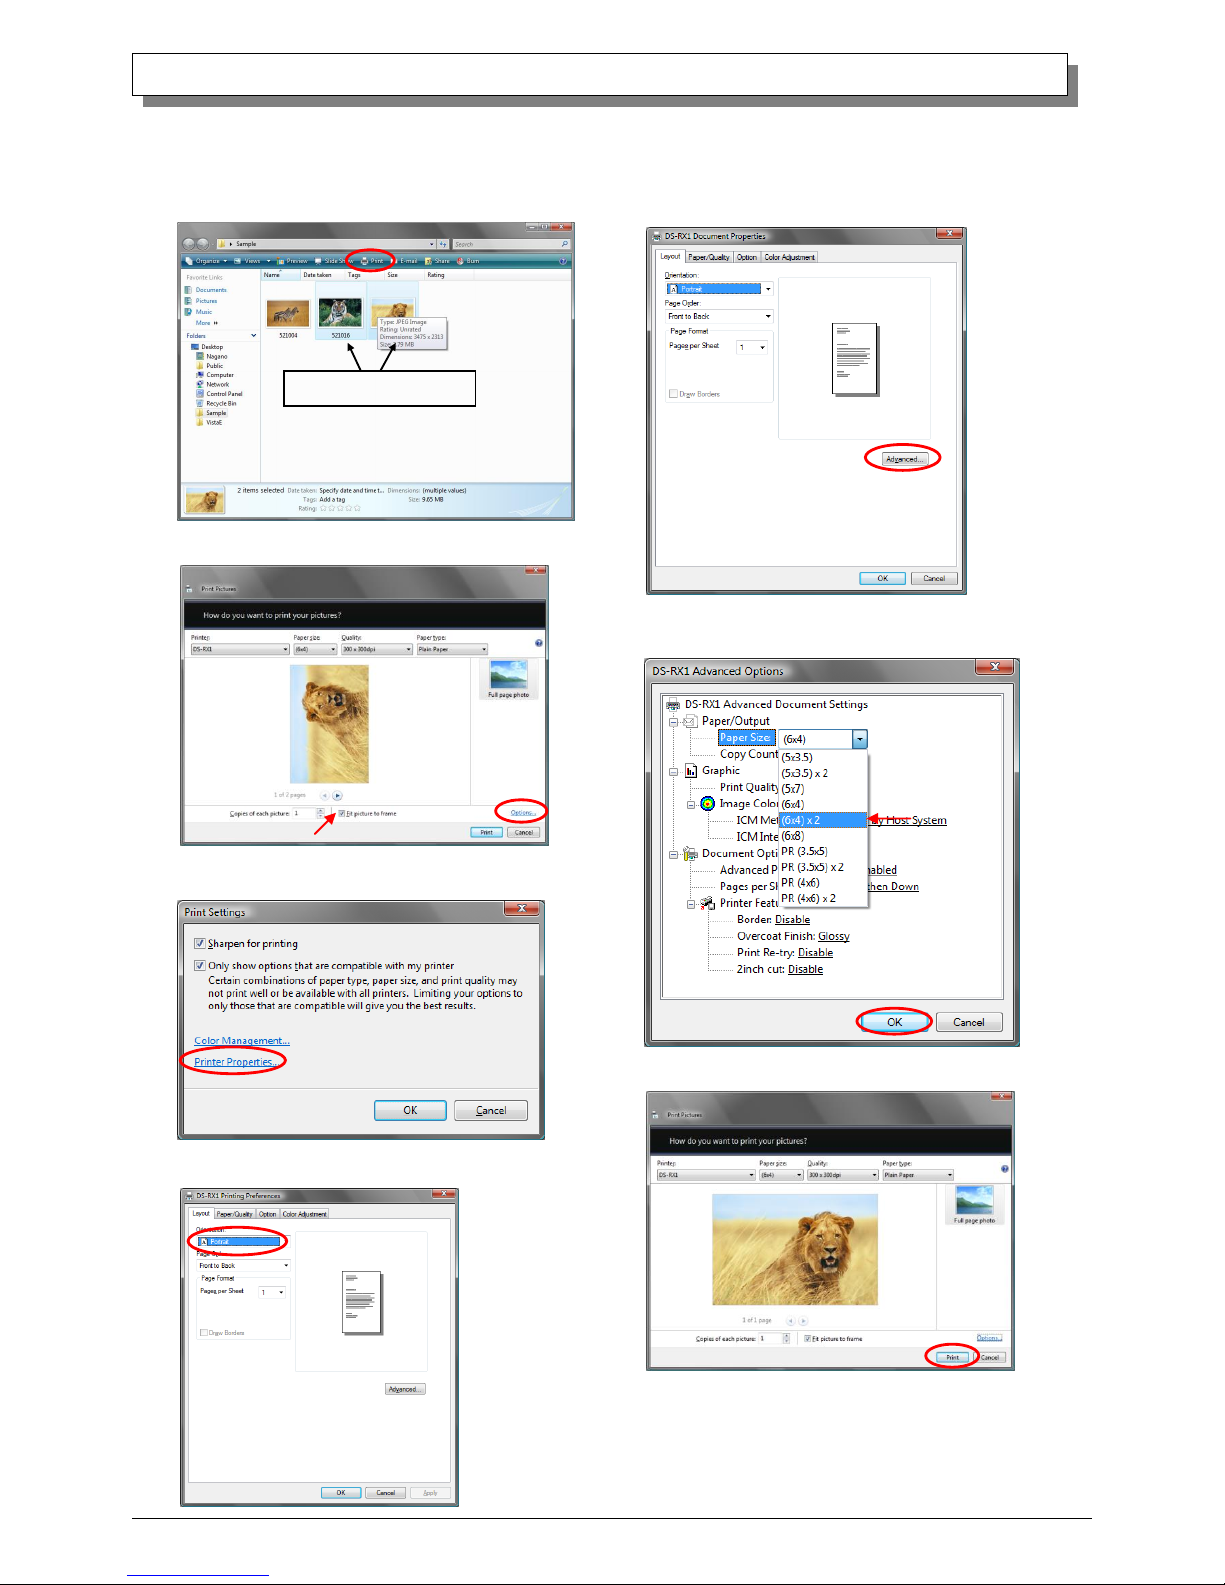
<Example of Application Use>
This is an example using Windows Explorer
Step 1. Select 2 or more images⇒Click “Print”.
Step 3. Click on “Printer Properties”.
Step 4. From the “Orientation” pull-down menu, select “Portrait”.
Step 5. Click on “Advanced”.
Step 7. Click on “Print”.
Step 6. Set the Paper Size to “(6x4)x2”. Then click “OK” on the windows
from steps 6⇒5, returning to the window displayed in Step 2.
Step 2. Check “Fit picture to frame” and click “Options”.
Select 2 or more images
Page 22
19
Dai Nippon Printing Co.,Ltd.
[DS-RX1 Printer Driver] Instruction Manual for Windows Vista
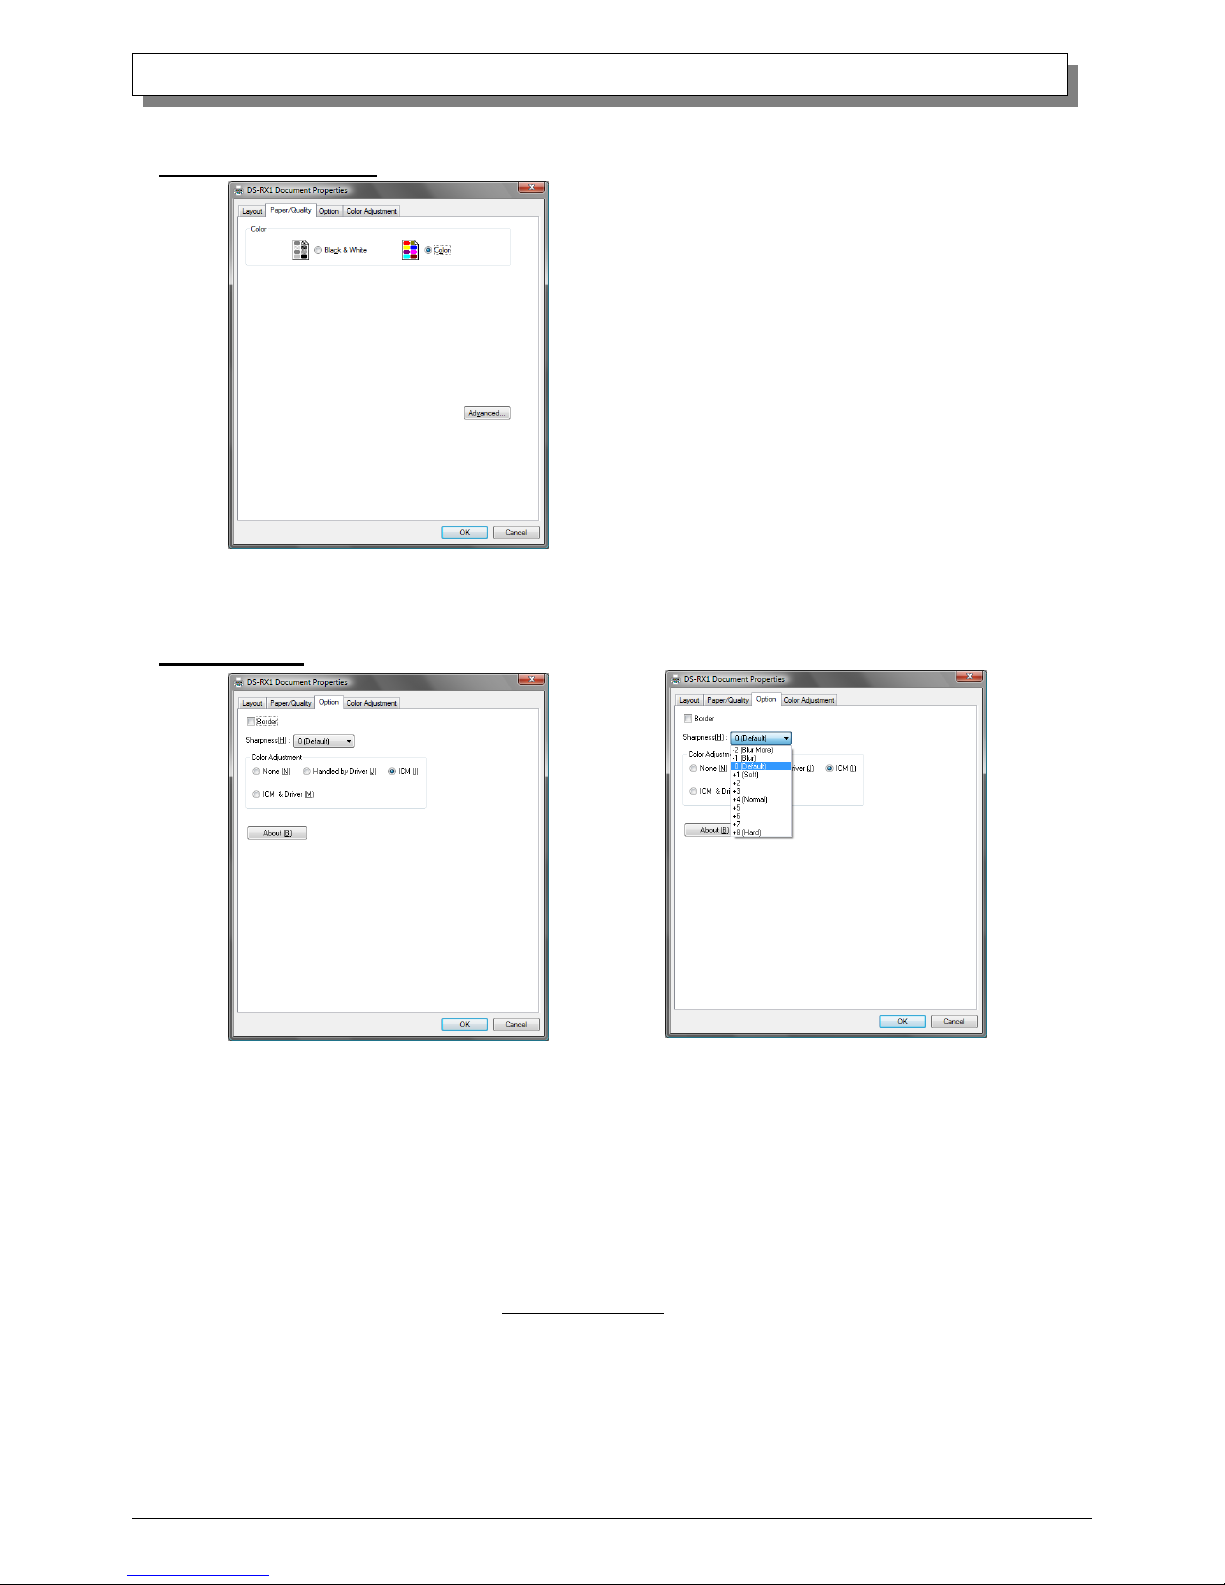
2.2.3 Paper/Quality
Color Please set to color print. Do not use for black and white printing.
2.2.4 Option
Border
Designates yes or no for border (check means with border). Synchronous with border in the Advanced Settings.
Sharpness
Processes for 11 sharpness levels (Fig 2.2.4.2). 0(Initial setting) means there is no sharpness processing. Minus(-) blurs the
image, and plus(+) increases the sharpness.
Color Adjustment
None
Synchronous with the ICM Method in the Advanced Settings. Checking this item disables ICM and the Color Adjustment
tab, and color management does not occur from the driver.
Handled by Driver
Checking this item disables ICM and 2.2.5 Color Adjustment is enabled. The adjustment values for gamma, brightness,
contrast, and chroma are shown.
ICM
Synchronous with the ICM Method in the Advanced Settings (ICM Handled by Host System). Checking this item enables
color management from the driver.
ICM & Driver
If you check this, ICM (color management) and color adjustment will be enabled.
About
Displays the driver version.
Fig 2.2.4.1 Paper option tab
Fig 2.2.4.2 Sharpness setting
Fig 2.2.3 Paper/Quality tab
Page 23
20
Dai Nippon Printing Co.,Ltd.
[DS-RX1 Printer Driver] Instruction Manual for Windows Vista
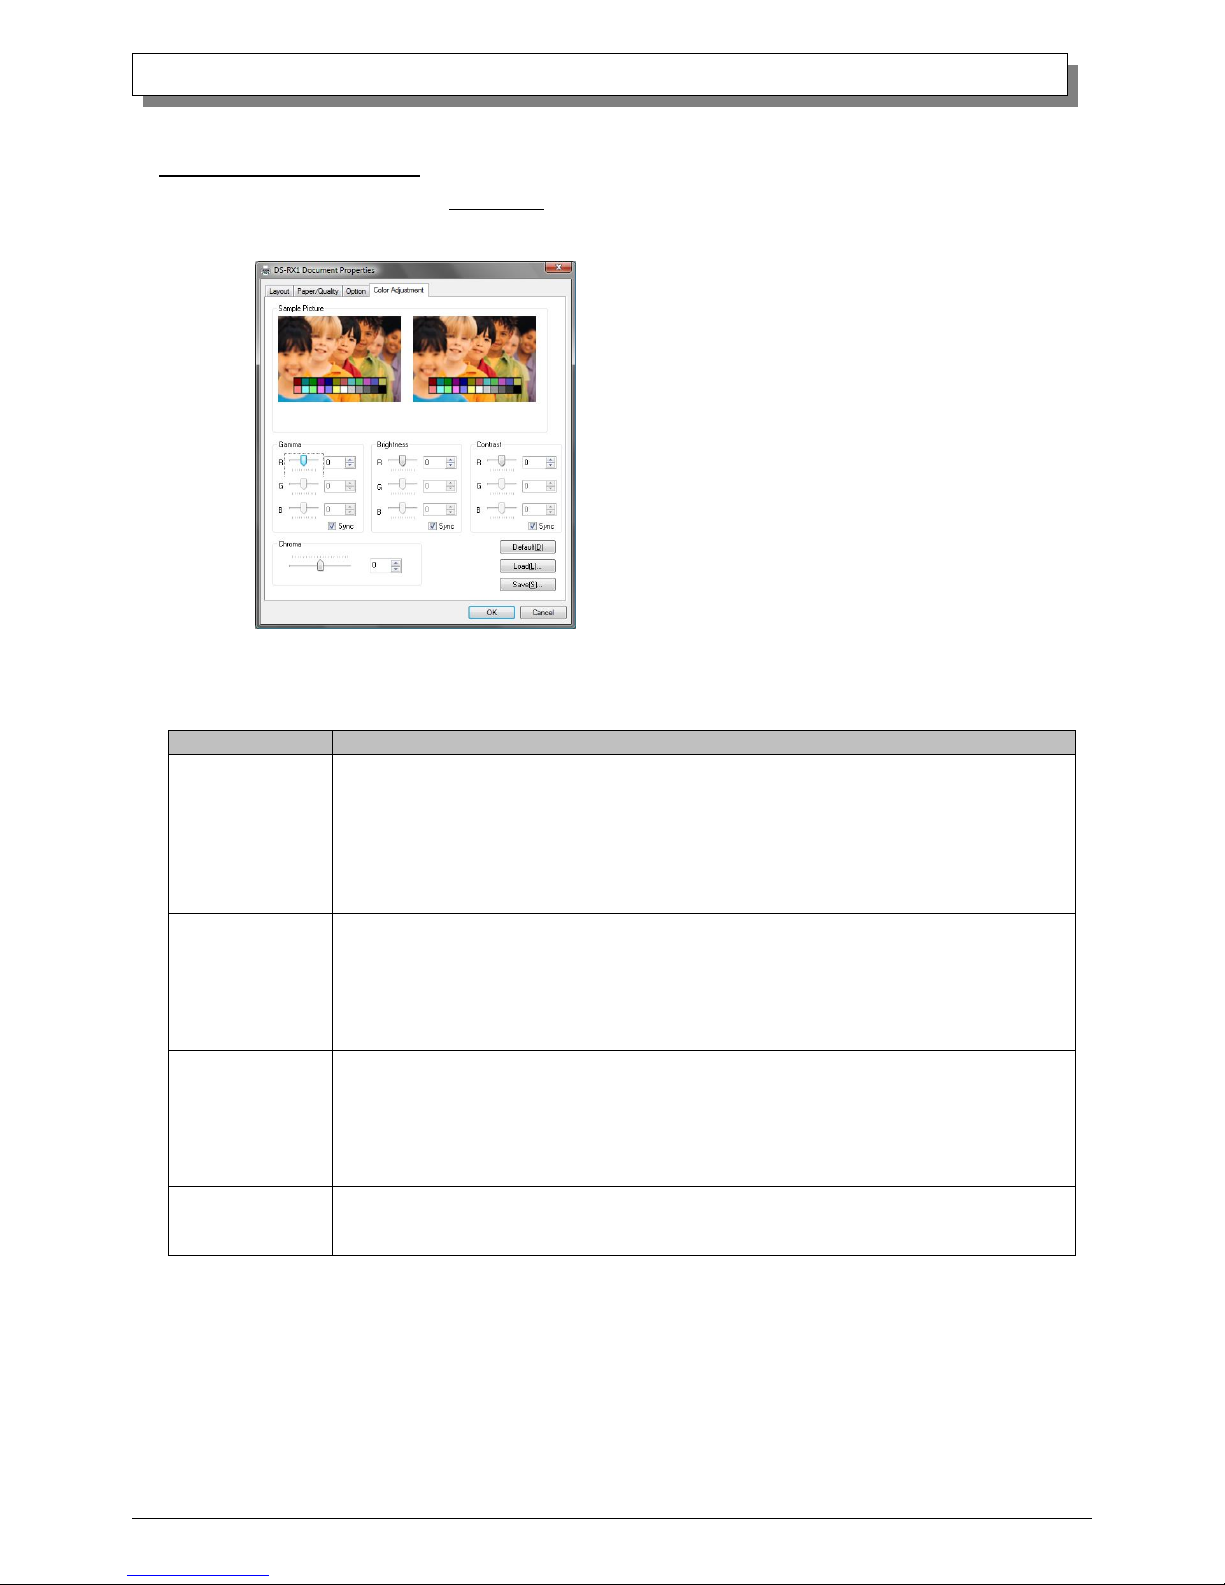
2.2.5 Color Adjustment
If you check Handled by Driver in 2.2.4 Option, the respective color adjustment values in the Color Adjustment tab
are reflected in the image.
Setting ranges in the Color Adjustment tab are as follows:
Adjustment Item
Adjustment Value
Gamma
-100(dark) ~ 100(light) (0 means no adjustment, Gamma 2.0 ~ 0.5)
Adjusts the density of the highlights in the image. The greater the gamma value, the brighter the
highlights.
Synchronous check box
ON : Sets RGB at the same value
OFF:Sets RGB at a different value
Brightness
-100(dark) ~ 100(light) (0 means no adjustment)
Adjusts the brightness of the image. The larger the value, the greater the overall brightness of the image.
Synchronous check box
ON :Sets RGB at the same value
OFF:Sets RGB at a different value
Contrast
-100(weak) ~ 100(strong) (0 means no adjustment)
Adjusts the contrast of the image. The larger the value, the greater the contrast.
Synchronous check box
ON : Sets RGB at the same value
OFF: Sets RGB at a different value
Chroma
-100(weak) ~ 100(strong) (0 means no adjustment)
Adjusts the color saturation of the image.
Fig 2.2.5 Color Adjustment tab
Page 24
21
Dai Nippon Printing Co.,Ltd.
[DS-RX1 Printer Driver] Instruction Manual for Windows Vista
22..33 DDeeffaauulltt VVaalluueess ffoorr VVaarriioouuss SSeettttiinnggss
Default values for each option (at the time of installation) are shown below. If the printer driver does not work correctly after
changing the options, please return the options to the default settings.
Note) According to the Service Pack and use environment of OS, the default value at the time of installation may differ from the following chart.
Tab
Options
Default
Layout
Orientation
Portrait
Page Order
Front to Back
Pages Per Sheet
1
Paper/Quality
Color
Color
Option
Border
Disable
Sharpness
0 (Default)
Color Adjustment
ICM
Color
Adjustment
Gamma
0
Brightness
0
Contrast
0
Chroma
0
Advanced
(Click [Advanced]
button of Layout tab)
Paper/Output
Paper Size
(6x4)
Copy Count
1
Graphic
Print Quality
300 x 300dpi
Image Color
Management
ICM Method
ICM Handled by Host
System
ICM Intent
Pictures
Document
Option
Advanced Printing Features
Enable
Pages per Sheet Layout
Right then Down
Printer Features
Border
Disable
Overcoat Finsh
Glossy
Print Re-try
Disable
2inch cut
Disable
Chart 2.3 Print Setting Default Values
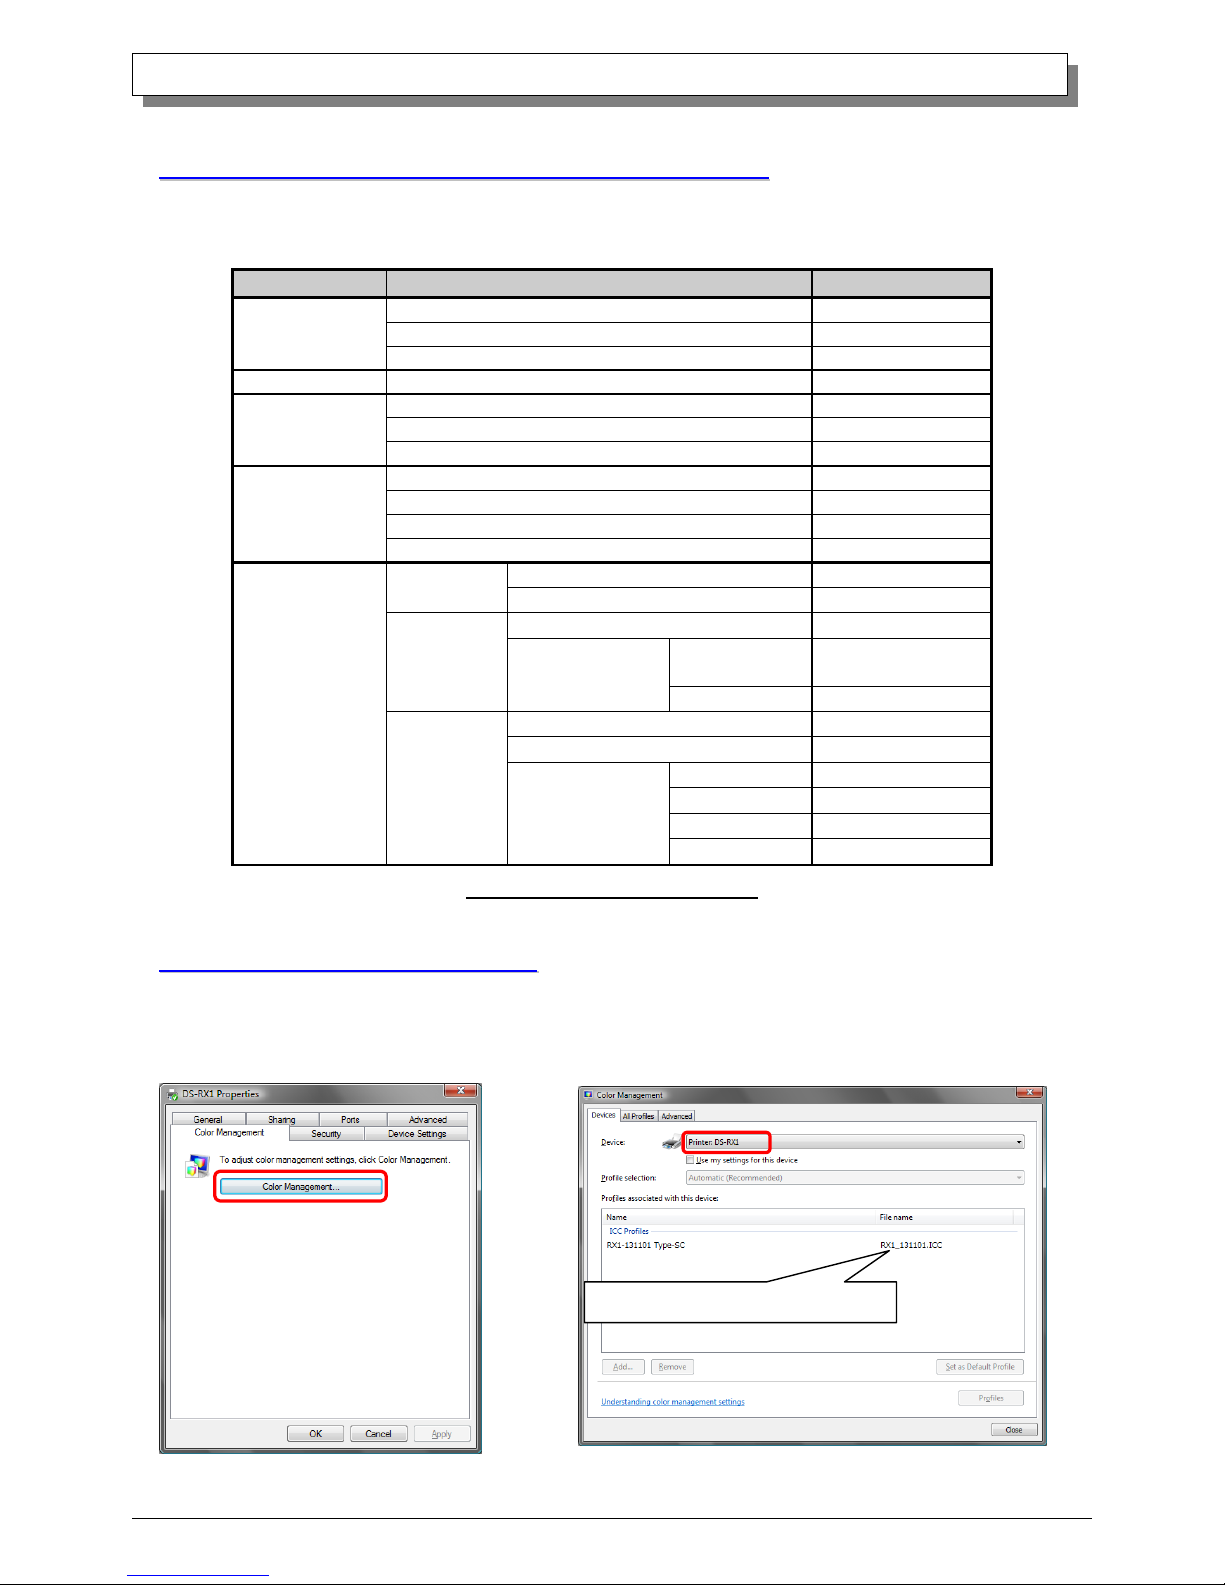
22..44 CCoolloorr MMaannaaggeemmeenntt
In [Color Management], this designates the color profile. Default at installation associates [RX1_xxxx.icc].
xxxx indicates the version.
Fig 2.4 Color Management
Step 1. Select “Color Management” tab in “Printer
Properties”, and click on “Color Management” button.
Step 2. Choose printer: DS-RX1 from a device.
The installer associated this file
Page 25
22
Dai Nippon Printing Co.,Ltd.
[DS-RX1 Printer Driver] Instruction Manual for Windows Vista
22..55 PPrriinntt AArreeaa
Depending on the paper size designated at the driver, the image size and dot count will be as follows.
Paper
Paper
Orientation
Image size(width x height)
Image pixel amount (width x height)
(inch)
(㎜)
300x300 DPI
300x600 DPI
600x600 DPI
(5x3.5)
(5x3.5) x 2
Portrait
5”x 3.5”
131.1 x 92.1
1548 x 1088
1548 x 2176
3096 x 2176
Landscape
3.5”x 5”
92.1 x 131.1
1088 x 1548
2176 x 1548
2176 x 3096
(6x4)
(6x4) x 2
Portrait
6”x 4”
156.1 x 105.0
1844 x 1240
1844 x 2480
3688 x 2480
Landscape
4”x 6”
105.0 x 156.1
1240 x 1844
2480 x 1844
2480 x 3688
(5x7)
Portrait
5”x 7”
131.1 x 181.0
1548 x 2138
1548 x 4276
3096 x 4276
Landscape
7”x 5”
181.0 x 131.1
2138 x 1548
4276 x 1548
4276 x 3096
(6x8)
Portrait
6”x 8”
156.1 x 206.2
1844 x 2436
1844 x 4872
3688 x 4872
Landscape
8”x 6”
206.2 x 156.1
2436 x 1844
4872 x 1844
4872 x 3688
PR (3.5x5)
PR (3.5x5) x 2
Portrait
3.5”x 5”
92.1 x 131.1
1088 x 1548
2176 x 1548
2176 x 3096
Landscape
5”x 3.5”
131.1 x 92.1
1548 x 1088
1548 x 2176
3096 x 2176
PR (4x6)
PR (4x6) x 2
Portrait
4”x 6”
105.0 x 156.1
1240 x 1844
2480 x 1844
2480 x 3688
Landscape
6”x 4”
156.1 x 105.0
1844 x 1240
1844 x 2480
3688 x 2480
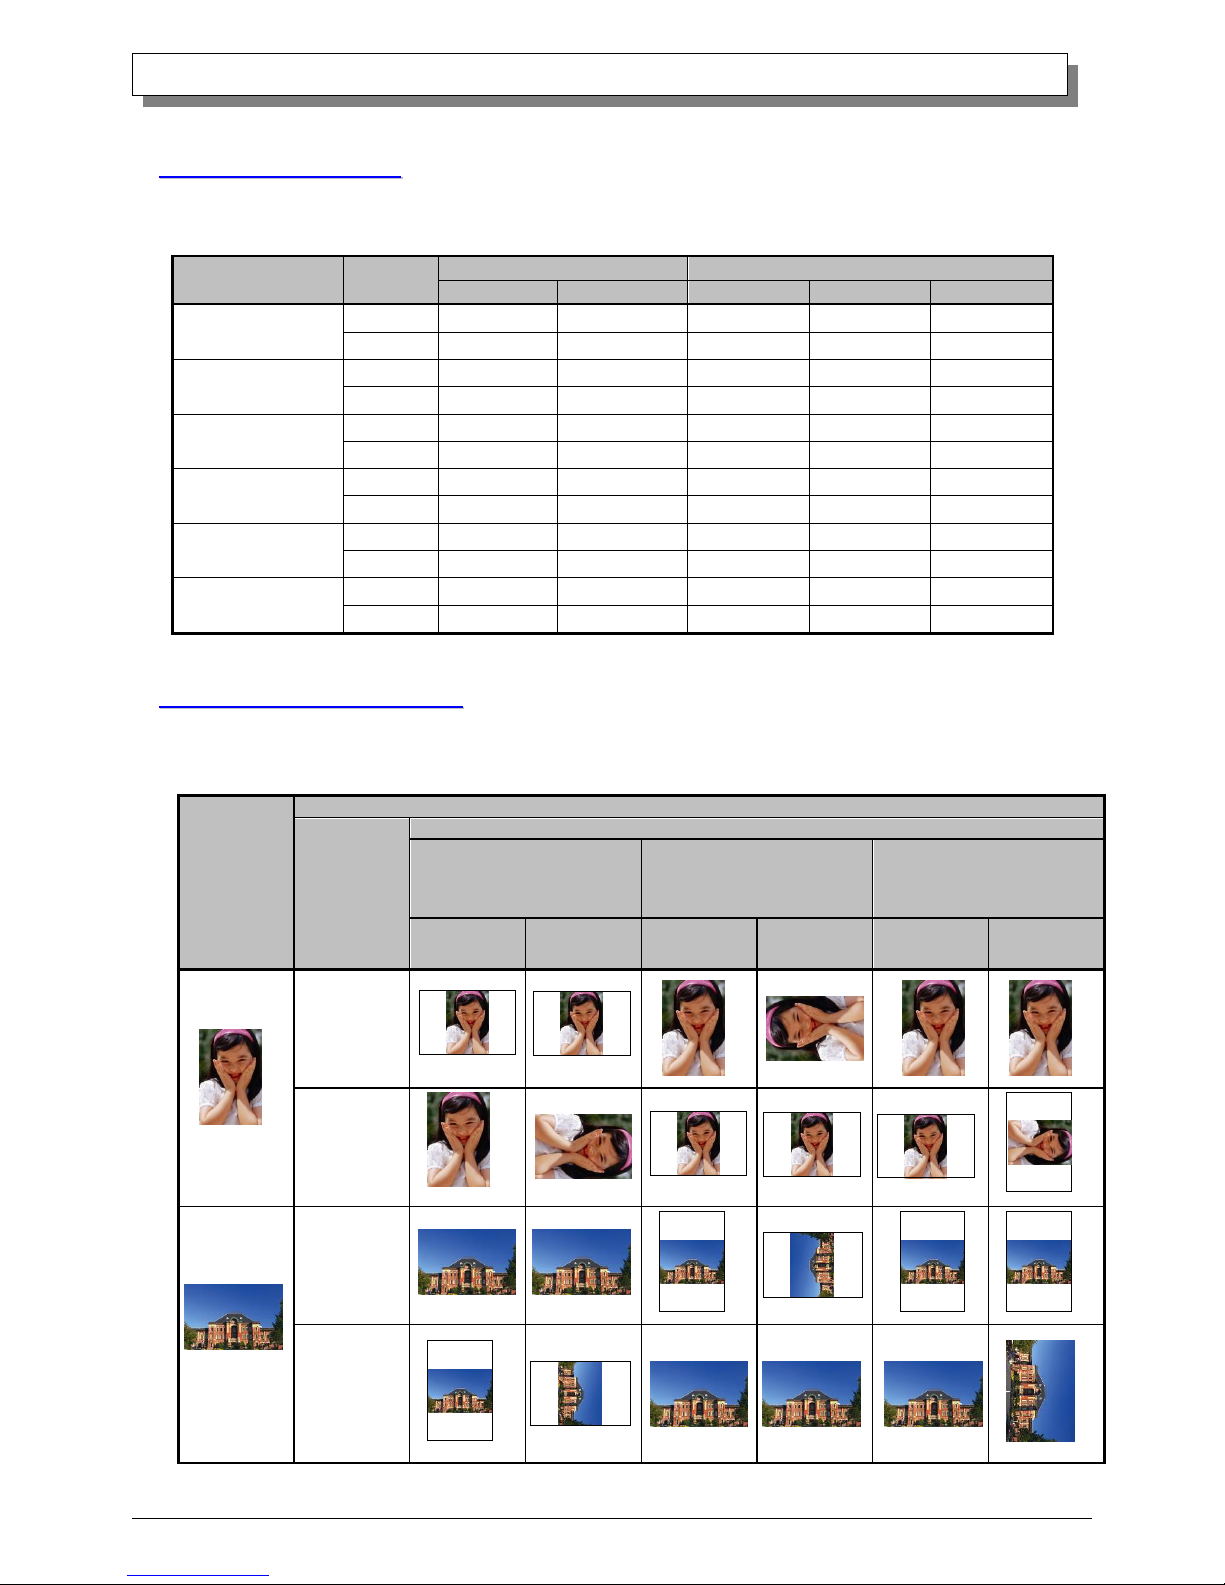
22..66 PPrriinntt DDrreeccttiioonn
Regarding the print direction setting, the relationship between the application-generated image and the print (feed direction) is as
shown in the following chart. The generated image is the image generated through enlargement/reduction to fit the size shown in
2.5 Print Area, without having the application rotate the original image.
Original
Image
Driver setting
Orientation
setting
Paper setting
(5x3.5)
(5x3.5) x 2
(6x4)
(6x4) x 2
PR (3.5x5)
PR (3.5x5) x 2
PR (4x6)
PR (4x6) x 2
(5x7)
(6x8)
Generation
image
Output image
(direction↓)
Generation
image
Output image
(direction↓)
Generation
image
Output image
(direction↓)
Portrait
Landscape
Portrait
Landscape
Page 26
23
Dai Nippon Printing Co.,Ltd.
[DS-RX1 Printer Driver] Instruction Manual for Windows Vista
CChhaapptteerr 33
UUppddaattiinngg tthhee DDrriivveerr
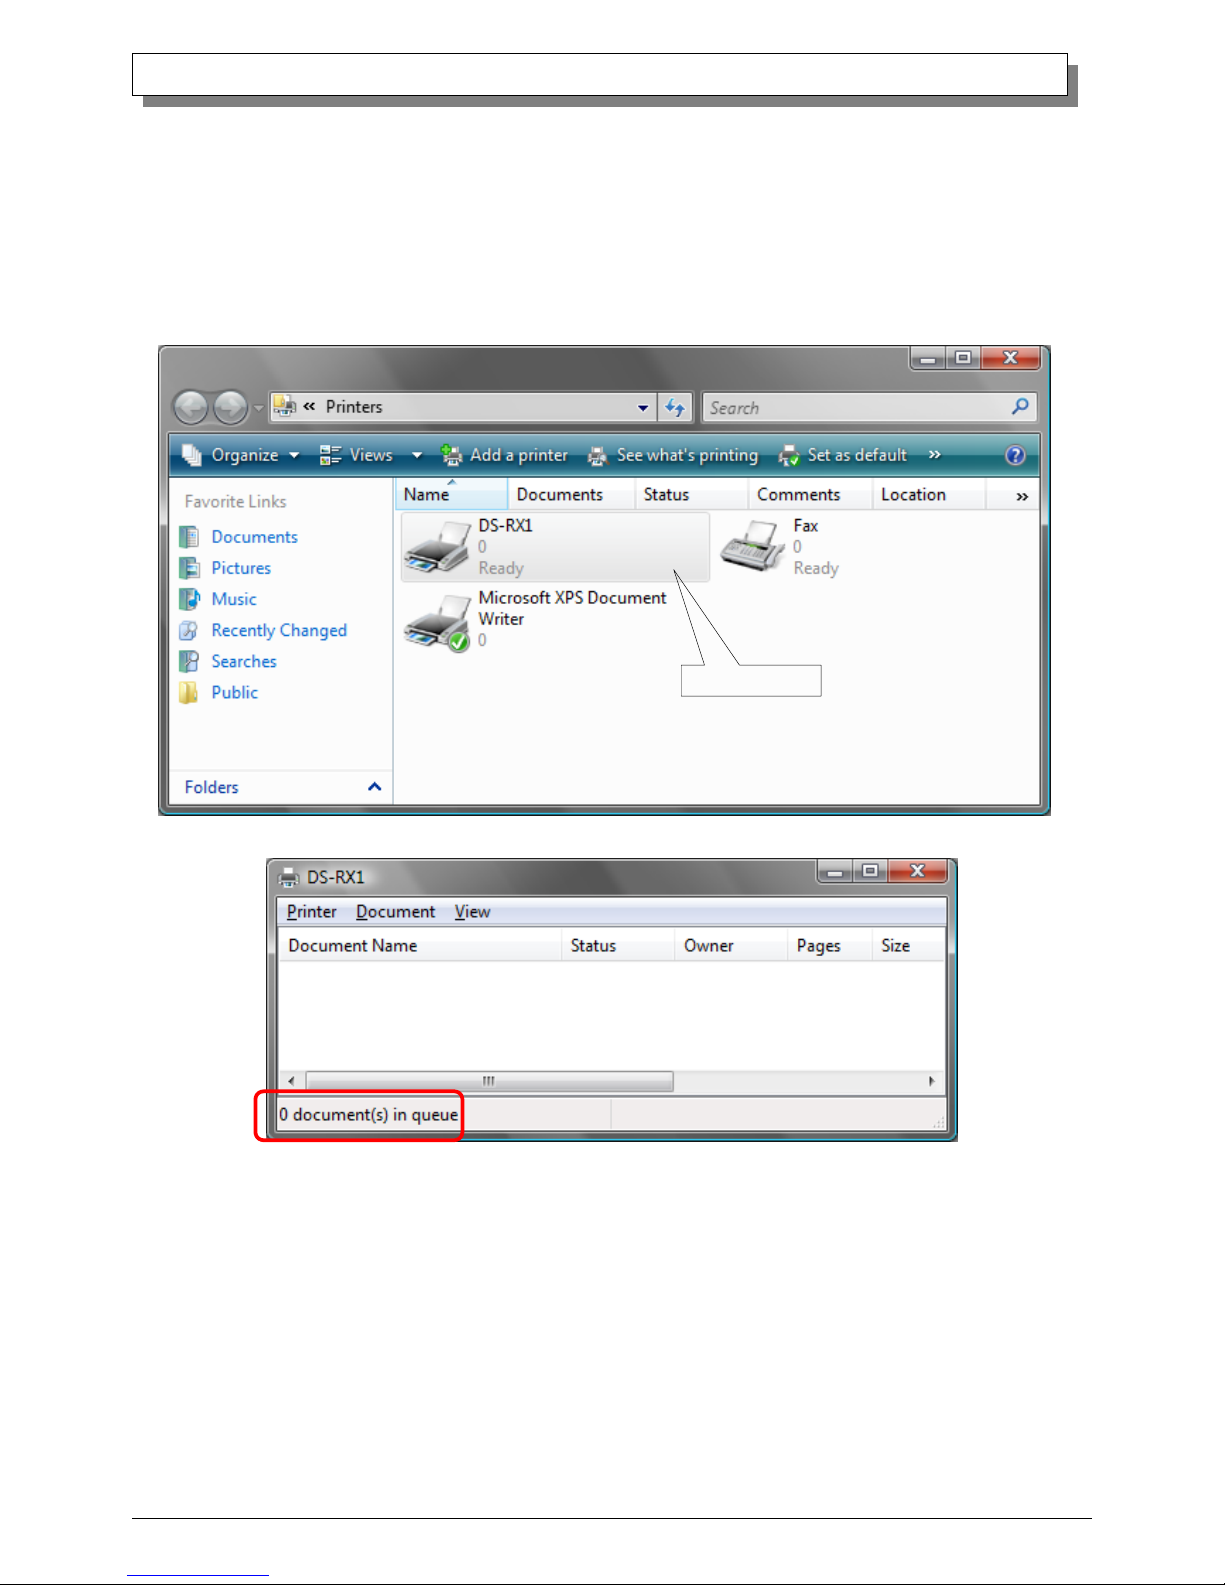
In order to update the printer-driver, follow the steps shown below.
1. Driver Removal
(1) Before removing the printer-driver, shut down all other applications. Also, double click the icon for the printer to
be removed, and make sure there are no documents in the queue before you begin removal of the driver.
Double click
Page 27
24
Dai Nippon Printing Co.,Ltd.
[DS-RX1 Printer Driver] Instruction Manual for Windows Vista
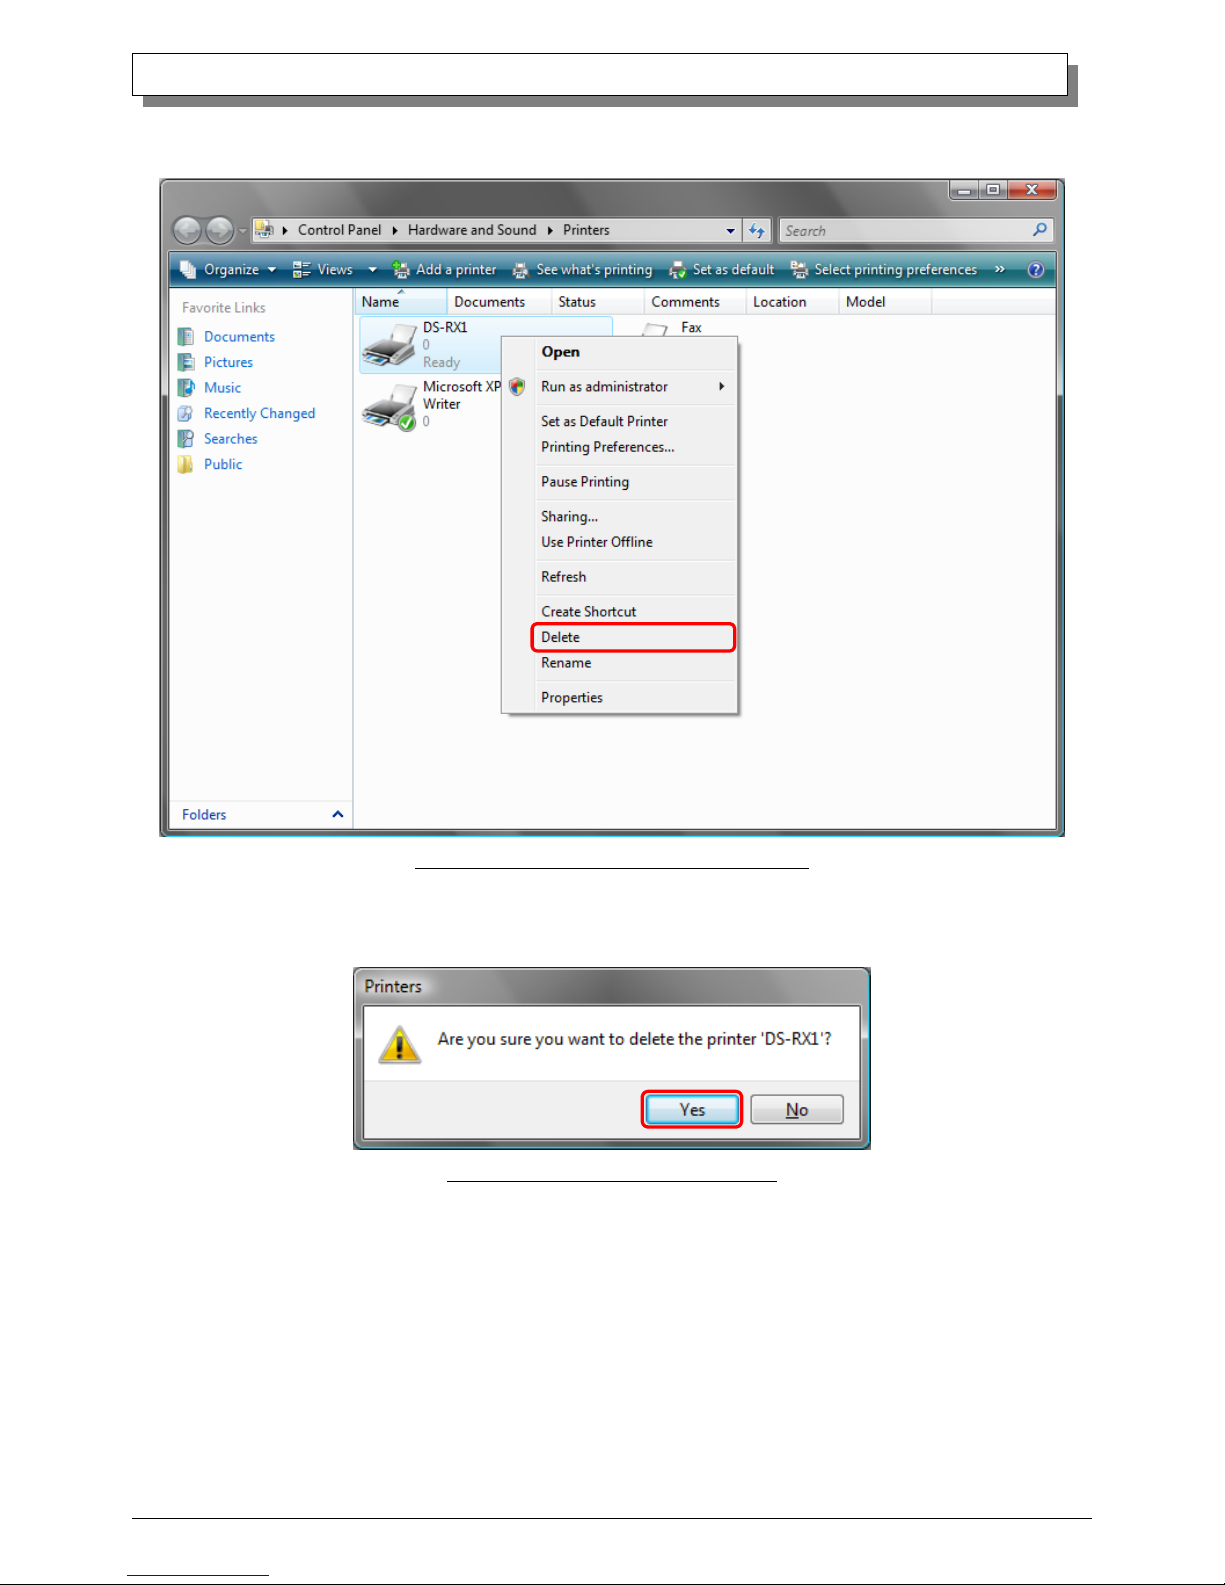
(2) Select “Start”–“Control Panel”, and click on “Printer” in the control panel. From the “Printer” window, select the DS-RX1
printer, display the pull-down menu with the right click, and click on “Delete”.
Fig 3.1 Printer window; DS-RX1 right-clicked menu
(3) When “Are you sure you want to delete the printer `DS-RX1`?” appears, click on “Yes”.
Fig 3.2 Delete Printer confirmation window
Page 28
25
Dai Nippon Printing Co.,Ltd.
[DS-RX1 Printer Driver] Instruction Manual for Windows Vista
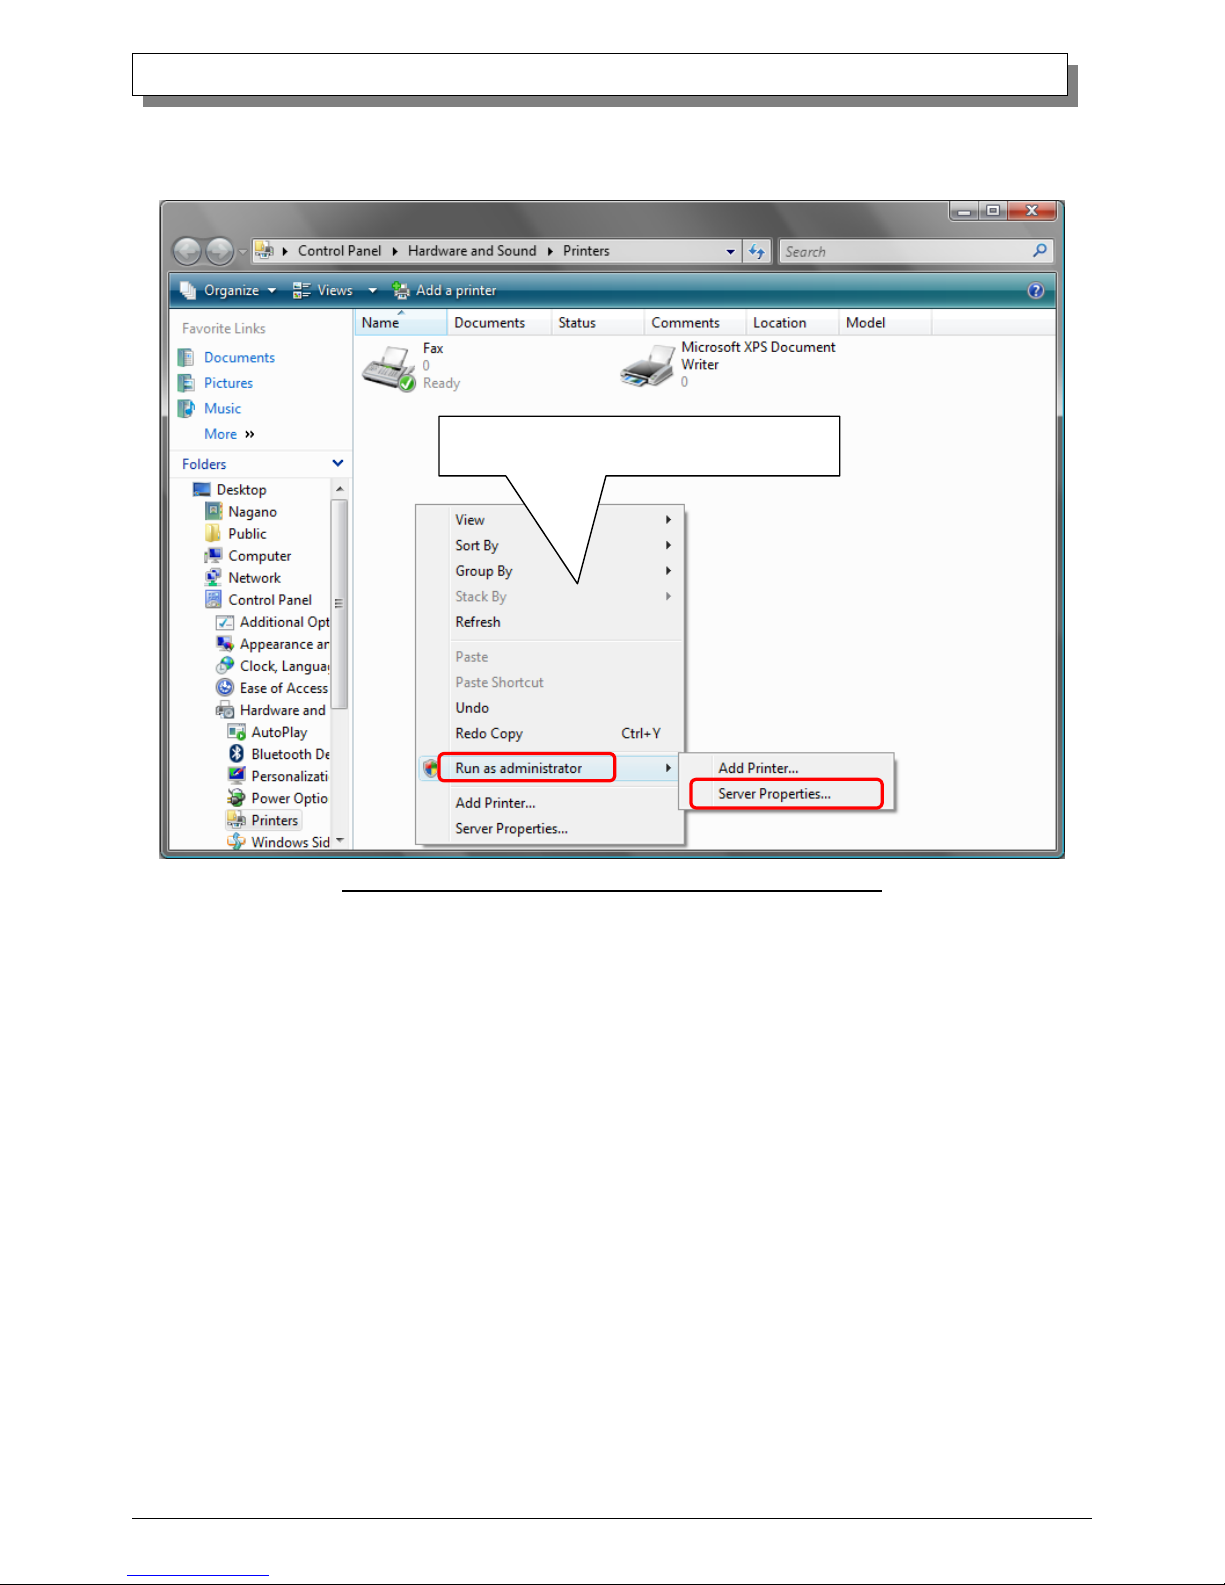
(4) After the DS-RX1 has been deleted, right-click where there is no icon, and get the pull-down menu. In the pull-down menu,
click on “Run as administrator”- “Server Properties”.
Fig 3.3 Pull-down menu opened by right-clicking on the Printer window
(5) After this, user account control will request confirmation with “Windows needs your permission to continue.”
Click on the “Continue” button.
Right-click where there is no printer icon, and get the
pull-down menu.
Page 29
26
Dai Nippon Printing Co.,Ltd.
[DS-RX1 Printer Driver] Instruction Manual for Windows Vista
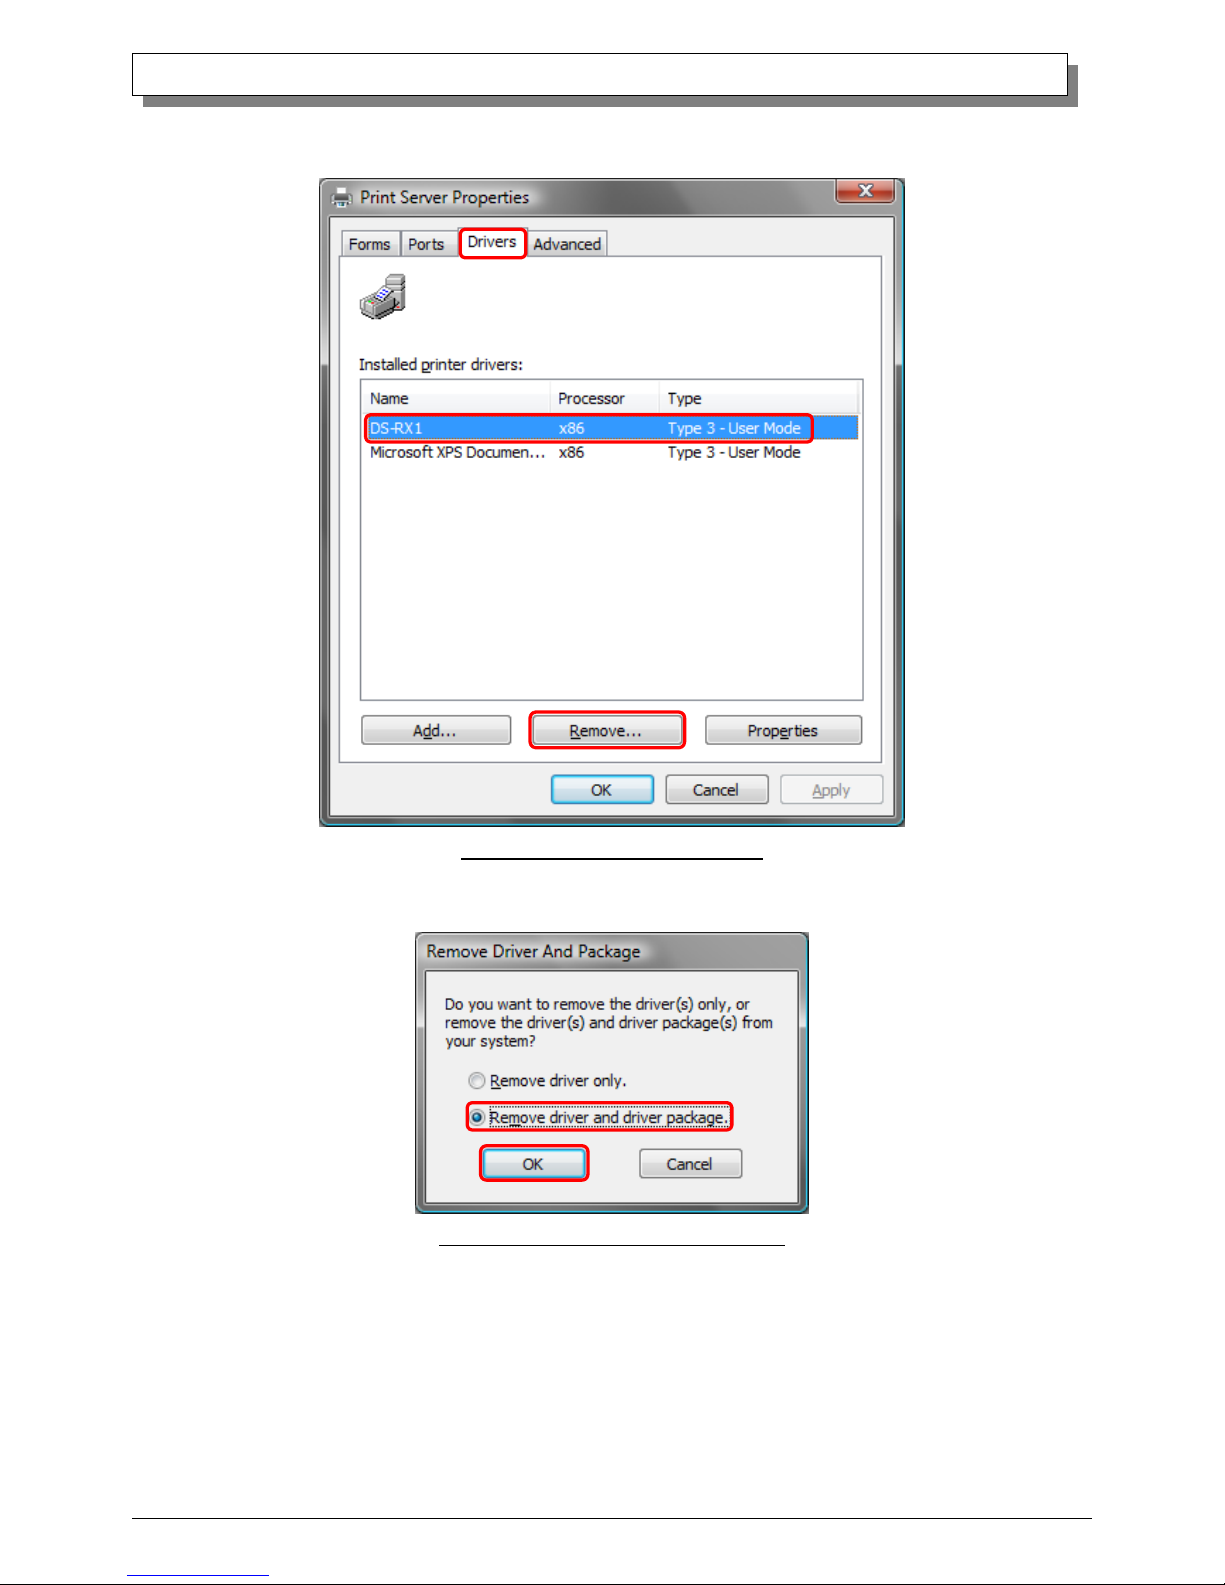
(6) When the Print Server Properties window appears, click on the Drivers tab. From the list of installed printer drivers, select
“DS-RX1”, and click the “Remove” button.
Fig 3.4 Print Server Properties window
(7) When the Remove Driver and Package window appears, select “Remove driver and driver package”, and click on the”OK”
button.
Fig 3.5 Remove Driver and Package window
Page 30
27
Dai Nippon Printing Co.,Ltd.
[DS-RX1 Printer Driver] Instruction Manual for Windows Vista
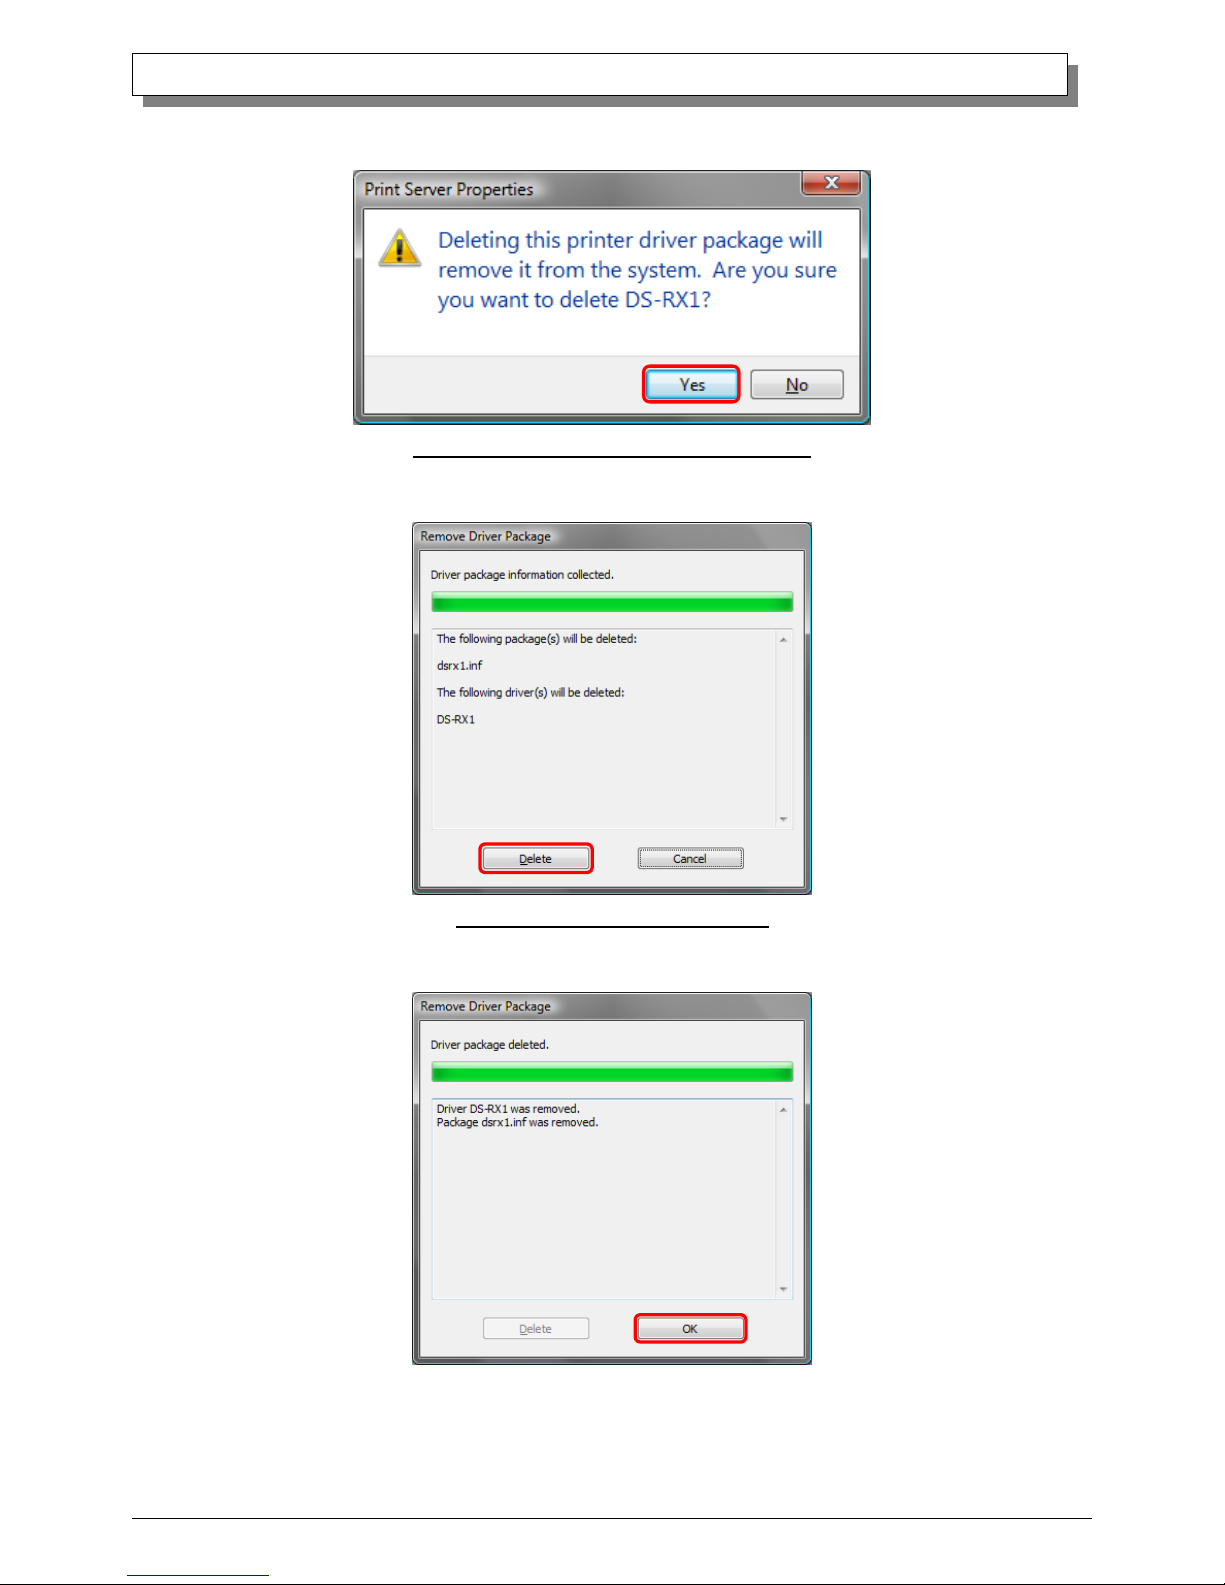
(8) When the Print Server Properties confirmation window appears, click on the “Yes” button.
Fig 3.6 Print Server Properties confirmation window
(9) When the Remove Driver Package window appears, click on the “Delete” button.
Fig 3.7 Remove Driver Package window
(10) When the Driver Package Deleted window appears, click on the “OK” button.
Page 31
28
Dai Nippon Printing Co.,Ltd.
[DS-RX1 Printer Driver] Instruction Manual for Windows Vista
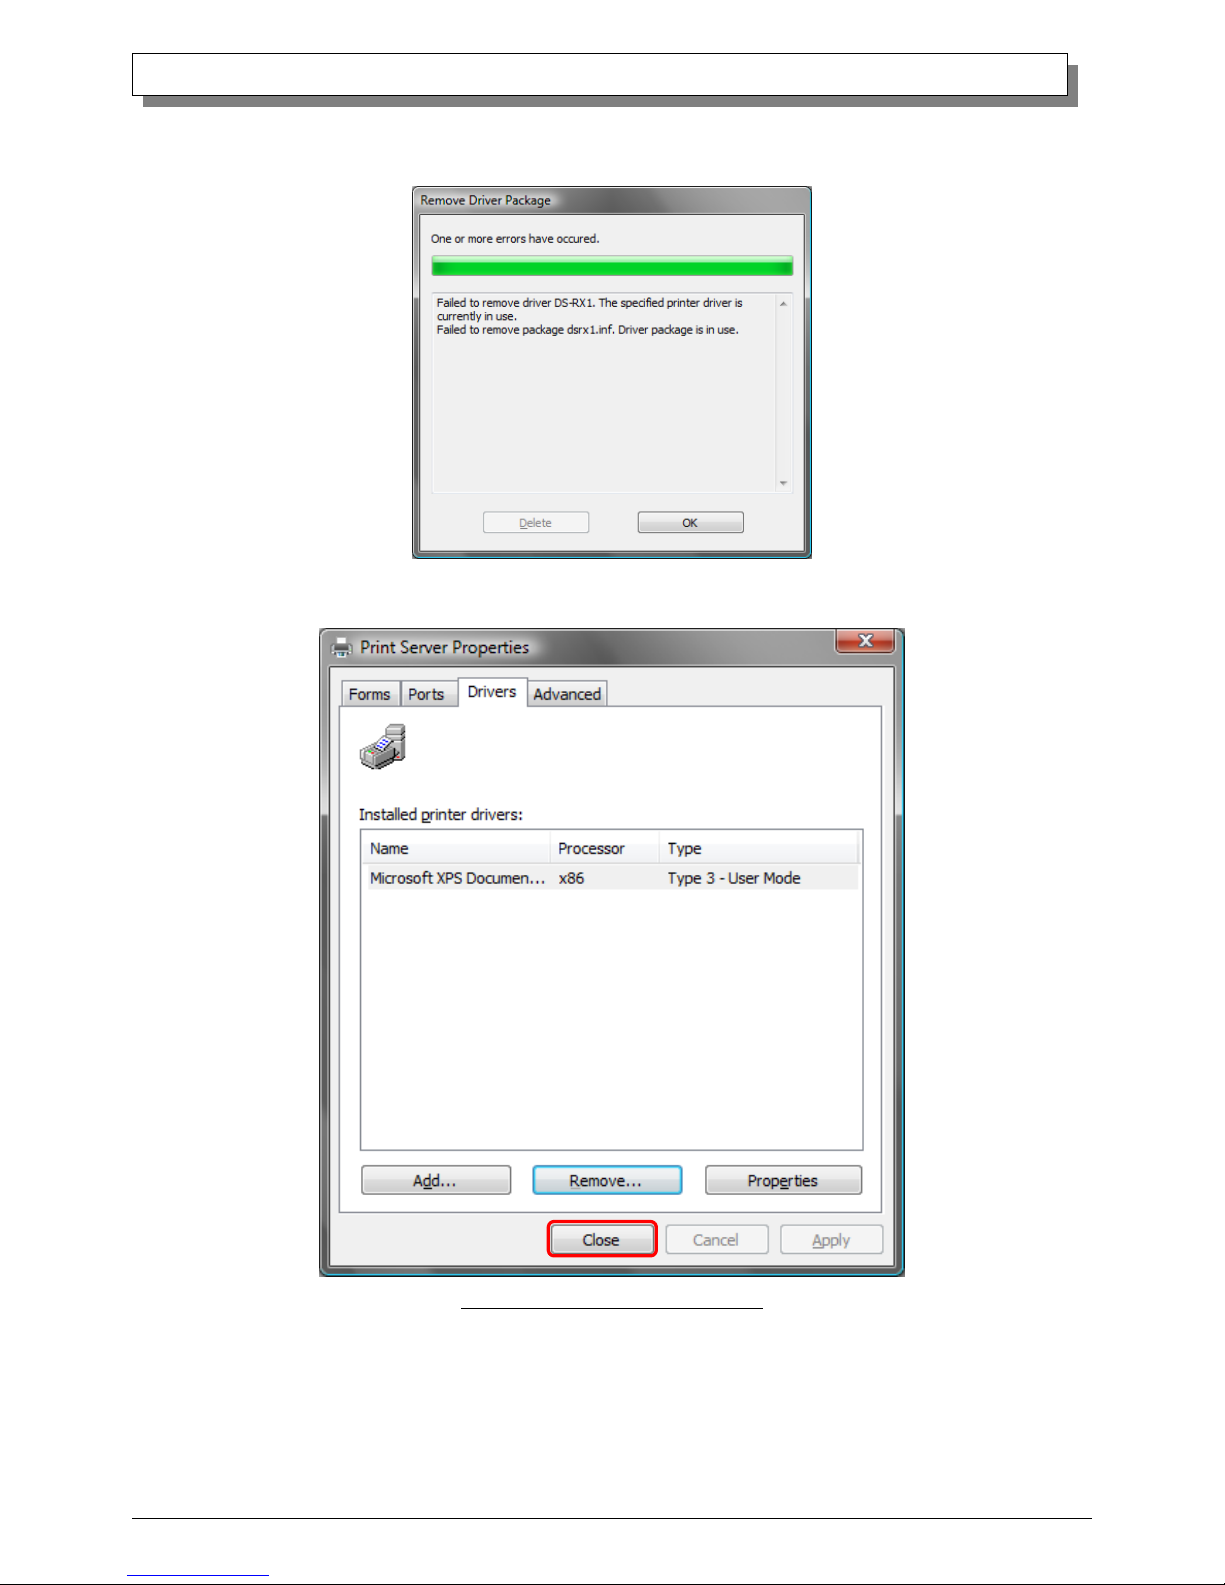
Note) Before removing the printer-driver, if the following error message appears, please reboot the computer. After the
computer has been rebooted, repeat the steps to remove the printer-driver.
(11) Using the Print Server Properties window, confirm that “DS-RX1” has been removed, and click on the “Close”
button.Now the removal of the printer driver is complete. After removal, reboot the computer.
Fig 3.9 Print Server Properties window
2. Installing the printer-driver upgrade
After removing the printer and printer-driver, install the new printer-driver. For installation steps, please refer to
Chapter 1 “Install”.
3. Rebooting the computer
After installation of the printer-driver is complete, be sure to reboot the computer.
( Do not print immediately after installation. First reboot the computer. )
Page 32

29
Dai Nippon Printing Co.,Ltd.
[DS-RX1 Printer Driver] Instruction Manual for Windows Vista
CChhaapptteerr 44
DDrriivveerr RReemmoovvaall
For steps to remove the printer-driver, refer to Chapter3-1 “Driver Removal”
Page 33

30
Dai Nippon Printing Co.,Ltd.
[DS-RX1 Printer Driver] Instruction Manual for Windows Vista
 Loading...