

Page 1

DIGITAL PHOTO PRINTER
DP-DS620
DP-DS620
User’s Manual
(
A
)
©2014 Dai Nippon Printing Co., Ltd.
Version 1.00
Page 2
WA R NING
To reduce the risk of fire or electric shock, do not expose this apparatus to rain or moisture. To
avoid electrical shock, do not open the cabinet. Refer servicing to qualified personnel only.
This apparatus must be earthed.
For pluggable equipment, the socket-outlet be installed near the equipment and shall be easily
accessible.
To disconnect the main power, unplug the AC IN connector.
When installing the unit, incorporate a readily accessible disconnect device in the fixed wiring, or
connect the power plug to an easily accessible socket-outlet near the unit. If a fault should occur
during operation of the unit, operate the disconnect device to switch the power supply off, or
disconnect the power plug.
Warning on power connection
Use a proper power cord for your local power supply.
1. Use the approved Power Cord (3-core mains lead) /Appliance Connector / Plug with earthingcontacts that conforms to the safety regulations of each country if applicable.
2. Use the Power Cord (3-core mains lead) / Appliance Connector /Plug conforming to the proper
ratings (Voltage, Ampere).
If you have questions on the use of the above Power Cord/Appliance Connector/Plug, please consult
a qualified service personnel or the distributor.
For the Customers in Europe
This product shall not be used in the residential area.
This is a Class A product. In a domestic environment, this product may cause radio interference in
which case the user may be required to take adequate measures.
Dai Nippon Printing Co.,Ltd. hereby declares that this DP-DS620 is in compliance with the essential
requirements and other relevant provisions of Directive 1999/5/EC.
If you want to dispose this product, do not mix with general household waste.
There is a separate collection system for used electronics products in accordance
with legislation under the WEEE Directive and is effective only within
European Union. For details, consult your dealer.
For kundene i Norge
Dette utstyret kan kobles til et IT-strømfordelingssystem.
- 2 -
Page 3

dansk
Undertegnede Dai Nippon Printing Co.,Ltd. erklærer herved, at følgende udstyr DP-DS620
overholder de væsentlige krav og øvrige relevante krav i direktiv 1999/5/EF.
Nederlands
Hierbij verklaart Dai Nippon Printing Co.,Ltd. dat het toestel DP-DS620 in overeenstemming is met
de essentiële eisen en de andere relevante bepalingen van richtlijn 1999/5/EG.
suomi
Dai Nippon Printing Co.,Ltd. vakuuttaa täten että DP-DS620 tyyppinen laite on direktiivin 1999/5/
EY oleellisten vaatimusten ja sitä koskevien direktiivin muiden ehtojen mukainen.
ελληνικά
Με την παρούσα η Dai Nippon Printing Co.,Ltd δηλώνει ότι DP-DS620 συμμορφώνεται προς της
ουσιώδεις απαιτήσεις και τις λοιπές σχετικές διατάξεις της οδηγίας 1999/5/ΕΚ.
magyar
Alulírott, Dai Nippon Printing Co.,Ltd. nyilatkozom, hogy a(z) DP-DS620 megfelel a vonatkozó
alapvetQ követelményeknek és az 1999/5/EC irányelv egyéb elQírásainak.
italiano
Con la presente Dai Nippon Printing Co.,Ltd. dichiara che questo DP-DS620 è conforme ai requisiti
essenziali ed alle altre disposizioni pertinenti stabilite dalla direttiva 1999/5/CE.
norsk
Dai Nippon Printing Co.,Ltd. erklærer herved at utstyret DP-DS620 er i samsvar med de
grunnleggende krav og øvrige relevante krav i direktiv 1999/5/EF.
português
Dai Nippon Printing Co.,Ltd. declara que este DP-DS620 está conforme com os requisitos essenciais
e outras disposições da Directiva 1999/5/CE.
svenska
Härmed intygar Dai Nippon Printing Co.,Ltd. att denna DP-DS620 står I överensstämmelse med de
väsentliga egenskapskrav och övriga relevanta bestämmelser som framgår av direktiv 1999/5/EG.
- 3 -
Page 4

Table of Contents
Introduction � � � � � � � � � � � � � � � � � � � � � � � � � � � � � � � � � � � � � � � � � � � � � � � � � � � � 5
For Safe Operation � � � � � � � � � � � � � � � � � � � � � � � � � � � � � � � � � � � � � � � � � � � � � � 5
Caution for installation � � � � � � � � � � � � � � � � � � � � � � � � � � � � � � � � � � � � � � � � � � � 8
Regulatory compliance statements � � � � � � � � � � � � � � � � � � � � � � � � � � � � � � � � � 9
Printer Installation � � � � � � � � � � � � � � � � � � � � � � � � � � � � � � � � � � � � � � � � � � � � � � 10
Checking the contents � � � � � � � � � � � � � � � � � � � � � � � � � � � � � � � � � � � � � � � � 10
Name of components � � � � � � � � � � � � � � � � � � � � � � � � � � � � � � � � � � � � � � � � � �11
Connecting the power cord and a computer � � � � � � � � � � � � � � � � � � � � � � � � 12
Paper and ribbon � � � � � � � � � � � � � � � � � � � � � � � � � � � � � � � � � � � � � � � � � � � � 13
Setting the media (paper, ribbon) � � � � � � � � � � � � � � � � � � � � � � � � � � � � � � � � 14
Paper tray installation � � � � � � � � � � � � � � � � � � � � � � � � � � � � � � � � � � � � � � � � � 18
Disposing of paper scrap � � � � � � � � � � � � � � � � � � � � � � � � � � � � � � � � � � � � � � 19
Troubleshooting � � � � � � � � � � � � � � � � � � � � � � � � � � � � � � � � � � � � � � � � � � � � � � � 20
Error display � � � � � � � � � � � � � � � � � � � � � � � � � � � � � � � � � � � � � � � � � � � � � � � � 20
Solving errors � � � � � � � � � � � � � � � � � � � � � � � � � � � � � � � � � � � � � � � � � � � � � � � 21
The printer is jammed with paper � � � � � � � � � � � � � � � � � � � � � � � � � � � � � 21
The ribbon is caught in the printer � � � � � � � � � � � � � � � � � � � � � � � � � � � � 22
The printer stopped with the paper partially cut � � � � � � � � � � � � � � � � � � 23
The power has been cut during printing � � � � � � � � � � � � � � � � � � � � � � � � 23
Cleaning � � � � � � � � � � � � � � � � � � � � � � � � � � � � � � � � � � � � � � � � � � � � � � � � � � � � � � 24
Platen roller � � � � � � � � � � � � � � � � � � � � � � � � � � � � � � � � � � � � � � � � � � � � � � � � � 24
Thermal print head � � � � � � � � � � � � � � � � � � � � � � � � � � � � � � � � � � � � � � � � � � � 24
Specications � � � � � � � � � � � � � � � � � � � � � � � � � � � � � � � � � � � � � � � � � � � � � � � � � 25
Safety precautions
Note that the contents of directions for use and safety precautions correspond to the safety
standards as of the time this manual has been created�
Remodeling
For safety, do not remodel this product after purchase�
Copyright
Copyrights, trademarks or any other intellectual property rights whatsoever that pertain to
documents, programs or other items provided with this product, are ascribed to Dai Nippon Printing
Co�, Ltd�, or the respective other holders of rights� Except in cases permitted by applicable laws,
these may not be duplicated or used without consent from Dai Nippon Printing Co�, Ltd�
About the product destination
You cannot resale/use the DP-DS620 without destination number (A) in the U�S�
- 4 -
Page 5
Introduction
Thank you for purchasing this product�
This document explains how to handle and operate this product�
Please read this document carefully before use�
Be sure to read “For Safe Operation” (P�5-7), and operate the product correctly�
For Safe Operation
Be sure to read this document before using the product� After reading, keep it in a safe place where
it can be easily accessed as needed�
The warnings listed here are to ensure proper use of the prod uct, to prevent physical injury to the
customer or other persons, and to prevent property damage� Please follow these warnings�
Warnings and Cautions
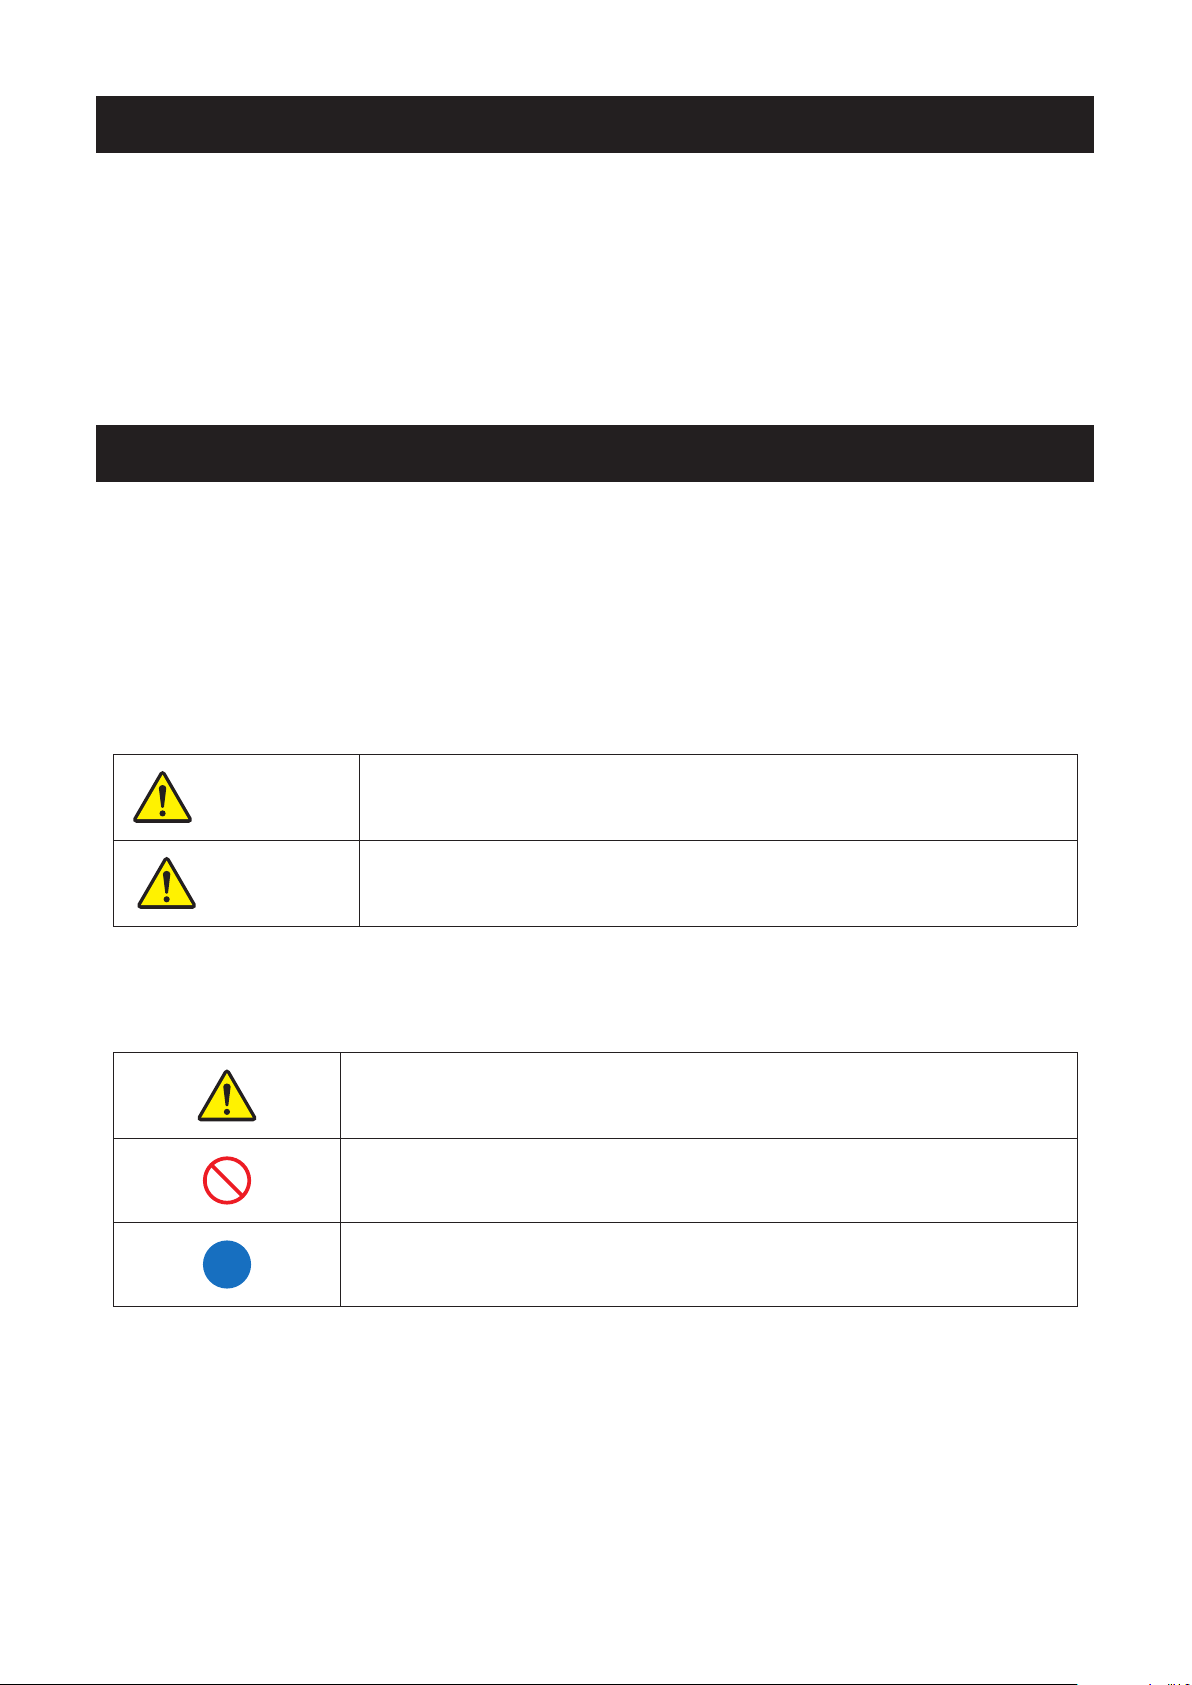
The possible levels of injury or damage due to misuse are categorized below as Warnings and
Cautions, according to the degree of danger involved�
Warning
Caution
Accidents caused by failure to heed the warnings accompanying this
symbol may lead to serious or fatal injury�
Accidents caused by failure to heed the cautions accompanying this
symbol may lead to physical injury or property damage�
Symbols
The symbols shown have the following meanings:
This symbol indicates warning and caution messages�
The warning content is indicated in or near the symbol�
This symbol indicates prohibited actions�
The prohibited action is indicated in or near the symbol�
This symbol indicates necessary actions or instructions�
The action is indicated in the symbol�
- 5 -
Page 6
For Safe Operation
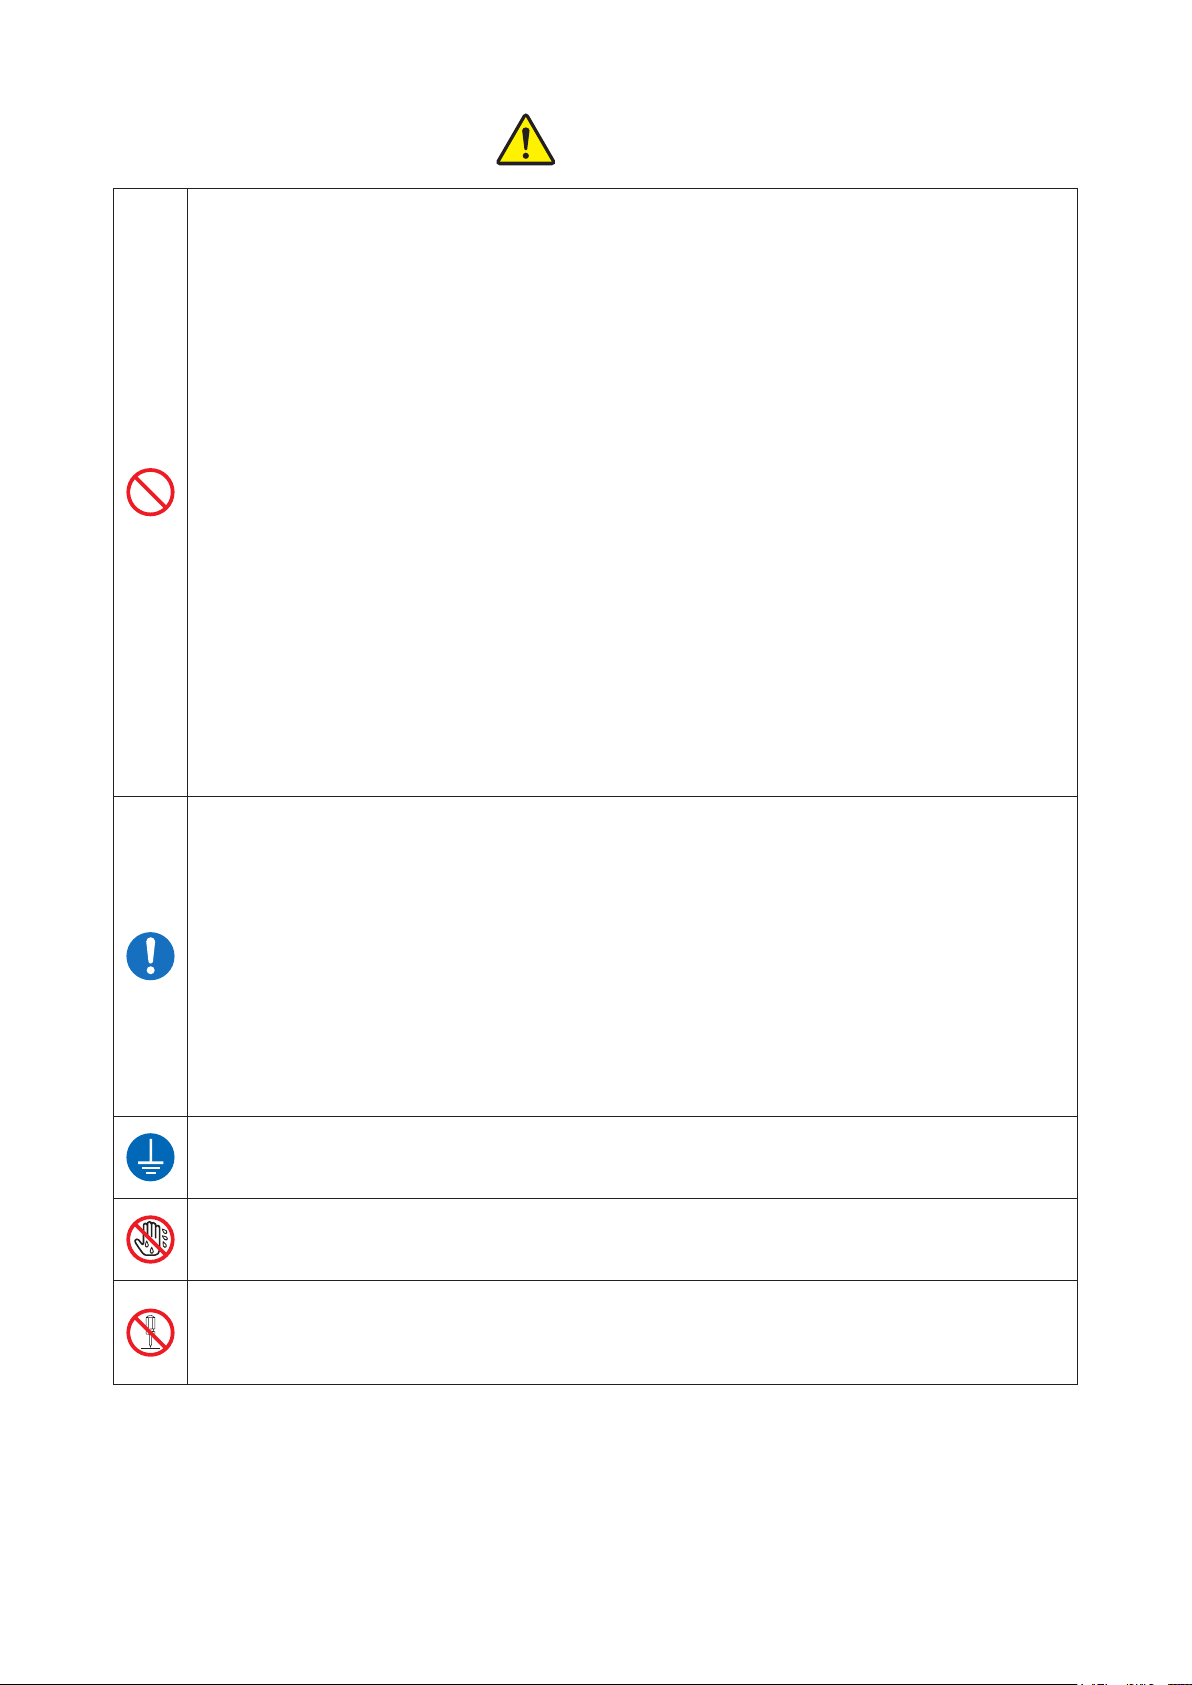
• This unit has no power switch� When installing the unit, incorporate a readily
• Use the product only with the designated voltage and frequency� Improper
• Avoid connecting too many devices to the outlet used for this product and using
• Do not damage, cut, bundle, or alter the power cord� Also, the cord may be damaged
• Do not install the product in places with salinity or corrosive gases in the air� This
• Do not block the vents of the product� Heat may build up in the product and cause a
• Do not stand on or place heavy objects on the product� Also, do not apply excessive
• Store the bag of the product out of the reach of children� It may cause suffocation if
• Be careful not to injure yourself or damage other things on the edges of the product�
• Do not use this product for applications involving human life (such as medical, space,
Warning
accessible disconnect device in the fixed wiring, or connect the power plug to an
easily accessible socket-outlet near the unit� If a fault should occur during operation
of the unit, operate the disconnect device to switch the power supply off, or
disconnect the power plug�
connection may cause electric shock or re.
extension cords. The outlet may overheat and cause a re.
if heavy objects are placed on it, or if pulled or bent with excessive force, and it may
cause a re.
may cause a re.
malfunction or re.
force on the buttons, switches, terminals, etc� This may damage the product and
cause injury to the user or other people�
placed over the head�
aeronautic, or other applications that require extreme reliability)�
• The product weighs approximately 12 kg (26�46 lbs�)� When moving it, lift it in a way
that avoids excessive physical stress� Lifting recklessly or dropping the product may
cause physical injury�
• Place the product as close to an outlet as possible to be able to easily unplug the
power cord in case of problem�
• If there is dust on the plug, clean it off thoroughly� It may cause an electric shock or a
short circuit�
• If metal objects or liquids have fallen into the product, or if there is smoke, a strange
odor, or any other abnormality, immediately unplug the power cord, and then contact
a service representative� Do not continue using the product if it is damaged or not
operating properly� This may cause an electrical shock, a short circuit, a fire, or
damage the product�
• Be sure to ground the product� Otherwise, a short circuit may occur, causing an
electric shock or re.
• Do not plug or unplug the cord with wet hands� This may cause an electric shock�
• Do not open the product, disassemble internal parts, or modify the product� It may
cause an electric shock, re, or injury, or a product malfunction. For internal check-
ups, adjustments, or repair, please contact a service representative�
- 6 -
Page 7
For Safe Operation
Caution
• Do not install the product in dusty or humid places. This may cause re or an electric
shock, or damage the product�
• Do not install the product on an unstable surface� It may fall and cause injury to the
user or other people�
• Do not allow foreign objects to enter into the product� They may cause an electric
shock, a short circuit, a fire, or damage the product� If something falls into the
product, immediately unplug the power cord, and then call a service representative�
• Do not open the cover while printing� This may damage the product�
• Do not spill or spray liquids or chemicals onto the product�
• When cleaning the cover, do not use thinner, trichloroethane, benzene, ketone-based
cleaners, or chemically treated cloths� They could discolor or deteriorate the cover�
• At least once a year, unplug the power cord, and clean the prongs and the plug� If
dust accumulates, it may cause a re.
• When printing continuously for long periods in a small room, be sure to ventilate the
room properly�
• If you intend to use the product on a transportation vehicle (train, truck, ship, etc�),
please talk to a representative in advance�
• When disposing of the product, accessories, packaging materials, or media (paper,
ribbon), please abide by local waste removal ordinances� For details, contact your
local government ofces.
• When unplugging the cord, always grip the plug� Do not pull on the cord as it may
damage the cord and cause an electric shock or re.
• When moving the product, be sure to unplug the power cord� Otherwise, the cord
may be damaged, which may cause re or an electric shock.
• For safety, when not using the product for an extended period of time, be sure
to unplug the power cord� Otherwise, it may cause an electric shock, fire, or a
malfunction�
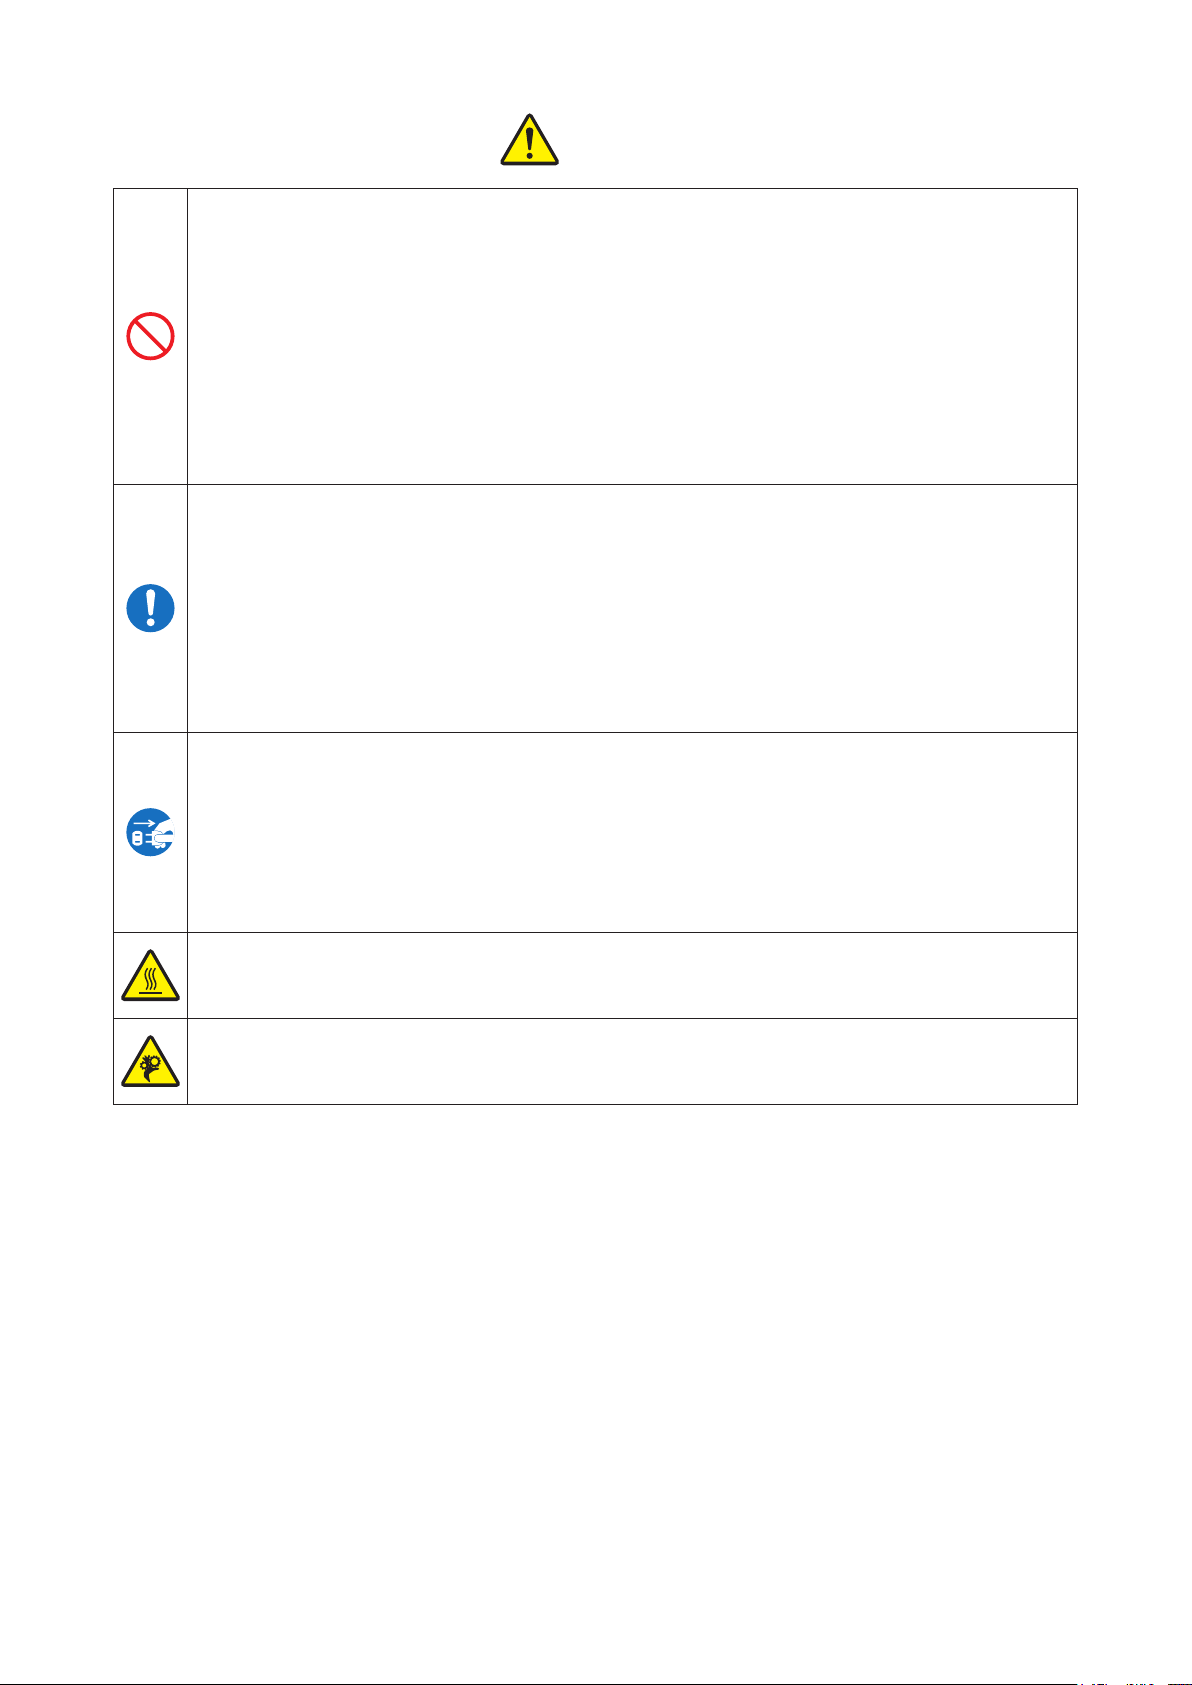
• Parts with this warning get extremely hot� Do not touch these parts after printing�
There is a danger of burns�
• Do not touch the gear mechanisms. There is a danger of injury if ngers get caught
in spinning gears�
- 7 -
Page 8

Caution for installation
• Before using the product, read “For Safe Operation” carefully and observe the instructions
therein�
• Use care when moving the product� Never try to carry the product alone� Dropping it may cause
injury or property damage�
• Do not use or store the product near a fire, humid places, in direct sunlight, near an air
conditioner or heater, or any other location with unusually high or low temperature, strong
humidity, or excessive dust�
• Do not place the product where chemical reactions occur, such as in a laboratory�
• Do not install the product where there is salinity or corrosive gas in the air�
• The product must be installed on a rm, level surface where there is ample ventilation.
• Do not put anything on top of the product�
• Do not use the product near a radio or television, and do not use the same wall outlet for the
product and a radio or television� Otherwise radio or television reception may be adversely
affected�
• Do not use a power voltage or a frequency other than those specied.
• Do not put anything on the power cord or step on it�
• Do not drag or carry the product by the power cord or the USB cable�
• Avoid plugging the power cord into an outlet with many other cables connected�
• Do not bundle the power cord�
• Always grip the plug housing, not the cord, to plug or unplug the power cord�
• Always unplug the power cord before connecting or disconnecting the USB cable�
• Avoid using a long USB cable or connecting it to any noise-producing device� If it is unavoidable,
use a shielded cable or twisted pair for each signal�
• Use a shielded USB cable compatible with the USB 2.0 specications.
• Place the product near the outlet where the power cord can be unplugged easily to shut the
power off�
• Use an AC outlet that accepts a three-pronged plug� Otherwise, there may be a danger of
electric shock�
• Do not use the cord set supplied with the printer for other devices�
• Use the cord set supplied for the product�
• This product is not intended for use in the immediate/direct visual eld of the display work place.
To avoid disturbing reections on the display work place, this product shall not be placed in the
immediate/direct eld of vision.
• Use as a network printer is not anticipated� Any use in conjunction with a network will be the
customer’s sole responsibility�
- 8 -
Page 9

Regulatory compliance statements
For the Customer in USA
FCC CAUTION
Changes or modifications not expressly approved by the party responsible for compliance could
void the user’s authority to operate the equipment.
Note: This equipment has been tested and found to comply with the limits for a Class A digital
device, pursuant to part 15 of the FCC Rules. These limits are designed to provide reasonable
protection against harmful interference when the equipment is operated in a commercial
environment. This equipment generates, uses, and can radiate radio frequency energy and, if not
installed and used in accordance with the instruction manual, may cause harmful interference to
radio communications. Operation of this equipment in a residential area is likely to cause harmful
interference in which case the user will be required to correct the interference at his own expense.
Caution: Use shielded cables to connect this computers. Any changes or modifications not expressly
approved by the grantee of this device could void the user’s authority to operate the equipment.
For the customers in Canada
This device complies with Industry Canada licence-exempt RSS standard(s). Operation is subject
to the following two conditions: (1) this device may not cause interference, and (2) this device must
accept any interference, including interference that may cause undesired operation of the device.
Türkçe
EEE Y
önetmeliğine Uygundur
- 9 -
Page 10

Printer Installation
Checking the contents
Check that the printer and all the following accessories are included in the package�
Printer unit
(for L and PC sizes)
Printer Driver User'sManual
Ribbon cassette
*Set in the printer�
Remove the wrapping before using them�
Power cordPaper tray
DIGITAL PHOTO PRINTER
DP-DS620
DP-DS620 (A
©2014 Dai Nippon Printing Co., Ltd.
For Safe Operation
Sicherheitshinweise
Leitfaden zur Inbetriebnahme
Pour un fonctionnement sans risque
Guide de dém arrage
Para un funcionamiento seguro
Безопасная эксплуатация
Руководство по вводу в эксплуатацию
安全にお使いいただくために
スタートアップガイド
)
Start-up Guide
Guía de in icio de
关于安全操作
入门指南
關於安全操作
入門指南
안전한 사용을 위해
시작 가이드
L size spacers installation
English
Deutsch
français
español
Русский
中文-简体
中文-繁體
한국어
日本語
Explanation bookletCD-ROM
For Safe Operation
Start up guide
Paper holder
*Set in the printer�
L size spacer
L size spacers installation
Install the L size spacers to the paper holders when using L or 2L paper rolls�
1 2 3 4
Caution
• Pay particular attention when removing the product from its package, carrying it, or moving
it� Dropping the printer may result in personal injury or property damage�
• Do not lift the printer by grasping the wrapping materials� The materials may break and
cause the printer to fall�
• Do not put your ngers between the paper holders and the L size spacers. Otherwise, you
may get injured�
- 10 -
Page 11

Name of components
Front of the unit
LEDs
Printer Installation
Paper output
Standby
Back of the unit
Side of the unit
Scrap box
Opening lever
Vent
ON/Standby
ON
switch
USB port
Power inlet
Vent
Caution
• Be careful not to hurt yourself or damage anything on the edges of the printer�
- 11 -
Page 12
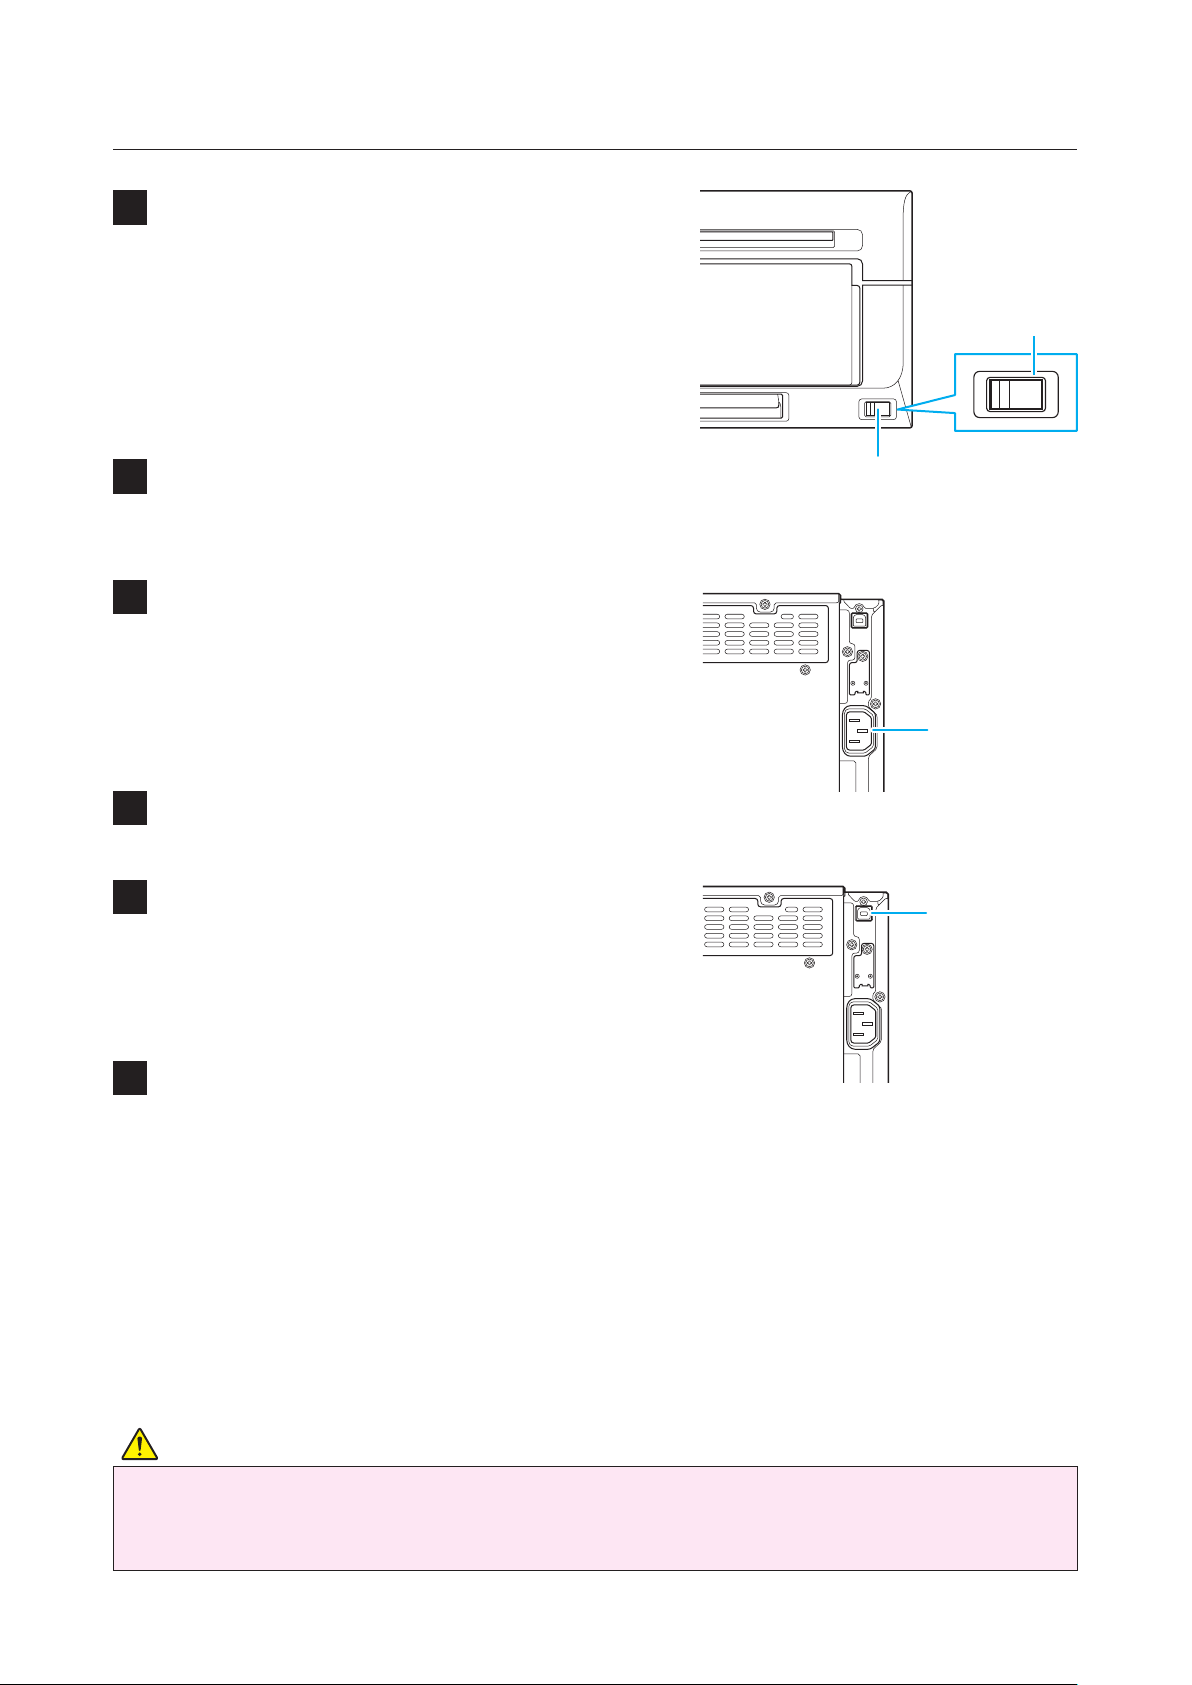
Printer Installation
Connecting the power cord and a computer
Make sure that the ON/Standby switch of the
1
printer unit is set to Standby�
Standby
Make sure that the power switch of the
2
computer is set to OFF�
Plug the connector of the power cord
3
(supplied) into the printer power inlet�
Plug the power cord into an outlet�
4
Connect the printer and the computer with a
5
USB cable�
ON/Standby
switch
Power inlet
USB port
Set the ON/Standby switch of the printer unit
6
and the power switch of the computer to ON�
Caution
• Use the power cable supplied with the printer, and be sure to connect the ground wire�
• Use a shielded USB cable compatible with the USB 2�0 specifications� Otherwise
unexpected troubles may arise�
- 12 -
Page 13
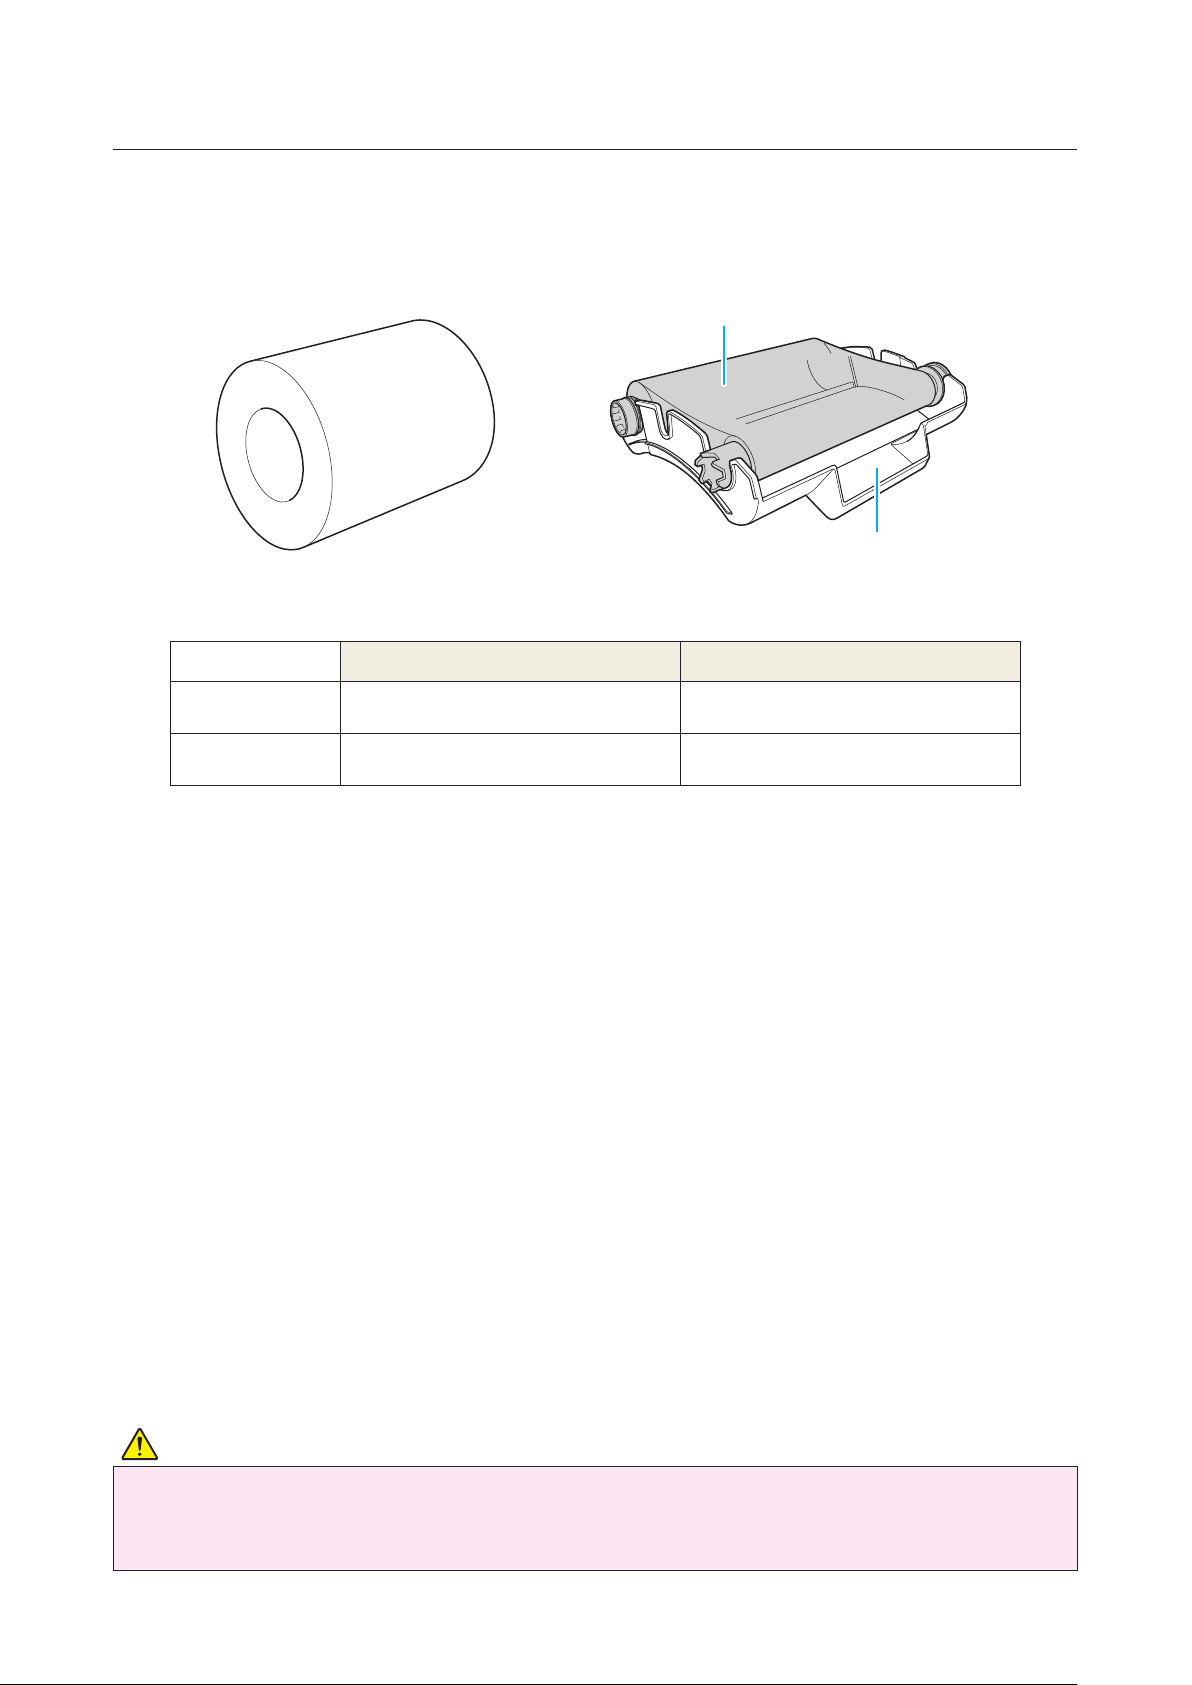
Paper and ribbon
Prepare the media (paper, ribbon) with the following widths�
Printer Installation
Ribbon
Paper
Size Paper Ribbon (Ribbon cassette)
L , 2L 127 mm in width 134 mm in width
PC , A5 152 mm in width 159 mm in width
Ribbon cassette
Caution
• Set the paper and ribbon without putting them directly on the work surface� If dust or dirt
adheres to the media when setting it inside the printer unit, it may adversely affect the print
quality�
- 13 -
Page 14

Printer Installation
Setting the media (paper, ribbon)
Use the opening lever to open the lock, and
1
then pull out the mechanism unit�
Lift the paper lever and raise the front cover�
2
Opening lever
Paper Lever
Front cover
Hold the center of the scrap box and lift it
3
up straight�
Scrap box
Caution
• Do not apply too much strength when pulling the mechanism unit out� If detached, the
mechanism unit may fall and cause an injury or damage to surrounding objects�
• Never remove the scrap box diagonally� The scrap box may be damaged and the product
may not operate normally�
• When the scrap box has been removed, do not touch the cutter on the upper part or you
may be cut�
• In order to facilitate color adjustment, media type recognition, and print quantity
management, an IC chip is included in the ink ribbon� Note that a ribbon with an IC chip that
has not been evaluated and approved may not function properly� (If correct data cannot be
read from the IC chip, an alarm will sound� In such a case, ink concentration levels will be
lowered in order to protect the product�)
- 14 -
Page 15
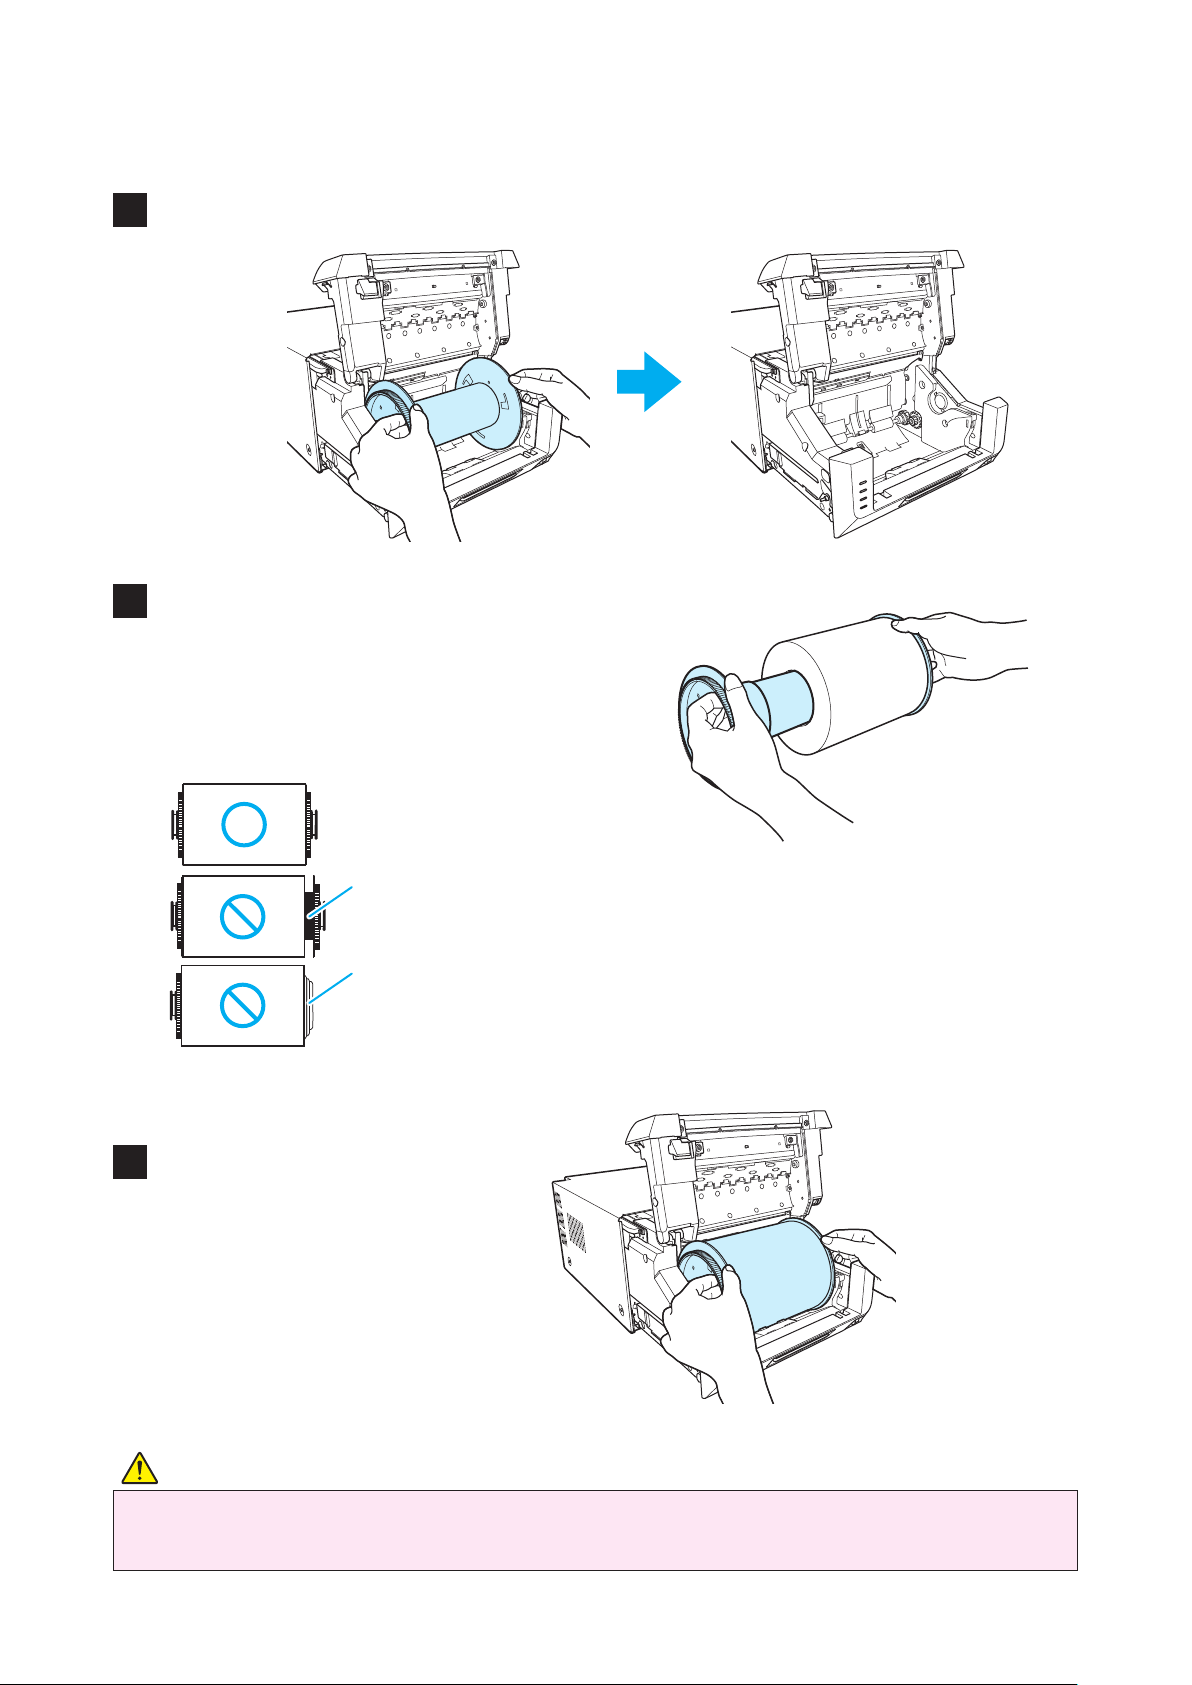
Remove the paper holder from the printer�
4
Remove the old paper roll from the paper
5
holder, and then set the new paper roll
ensuring there are no gaps�
If the paper protrudes, remove the roll from
the paper holder and set the edge face of
paper at.
Printer Installation
Set the roll so that there are
no gaps�
Set the paper so that it does
not protrude from the roll�
Set the paper holder into the printer�
6
Caution
• The paper holders with a new paper roll set on it weigh approximately 2�0 kg� Do not let
them fall as they may cause physical injury or damage to the paper holders�
- 15 -
Page 16

Printer Installation
While pressing the paper holder, rotate
7
the paper in the direction of the arrow and
advance the leading edge until the buzzer
beeps�
The ashing LED (orange) turns off.
Set the scrap box and close the front cover�
8
Remove the ribbon cassette from the printer
9
unit�
Remove the old ribbon from the ribbon
10
cassette and set the new ribbon�
Take-up side
Supply side
Rotate in the direction
of the arrow to take
up the slack�
- 16 -
Page 17
Install the ribbon cassette to the printer unit�
11
Install the cassette here�
Printer Installation
Set the cassette
so that the supply
side is at the
front�
Close the mechanism unit�
12
When the mechanism unit is closed, the printer
starts paper initialization� (Five blank sheets
are output�) Paper initialization cuts off the
outer layer of the paper that may be dirty� Note
that paper initialization is not carried out if the
printer ON/Standby switch is set to ON after the
paper is set�
Caution
• Make sure that the scrap box is installed when printing. If not installed, your ngers may get
caught in the moving parts and be injured�
- 17 -
Page 18
Printer Installation
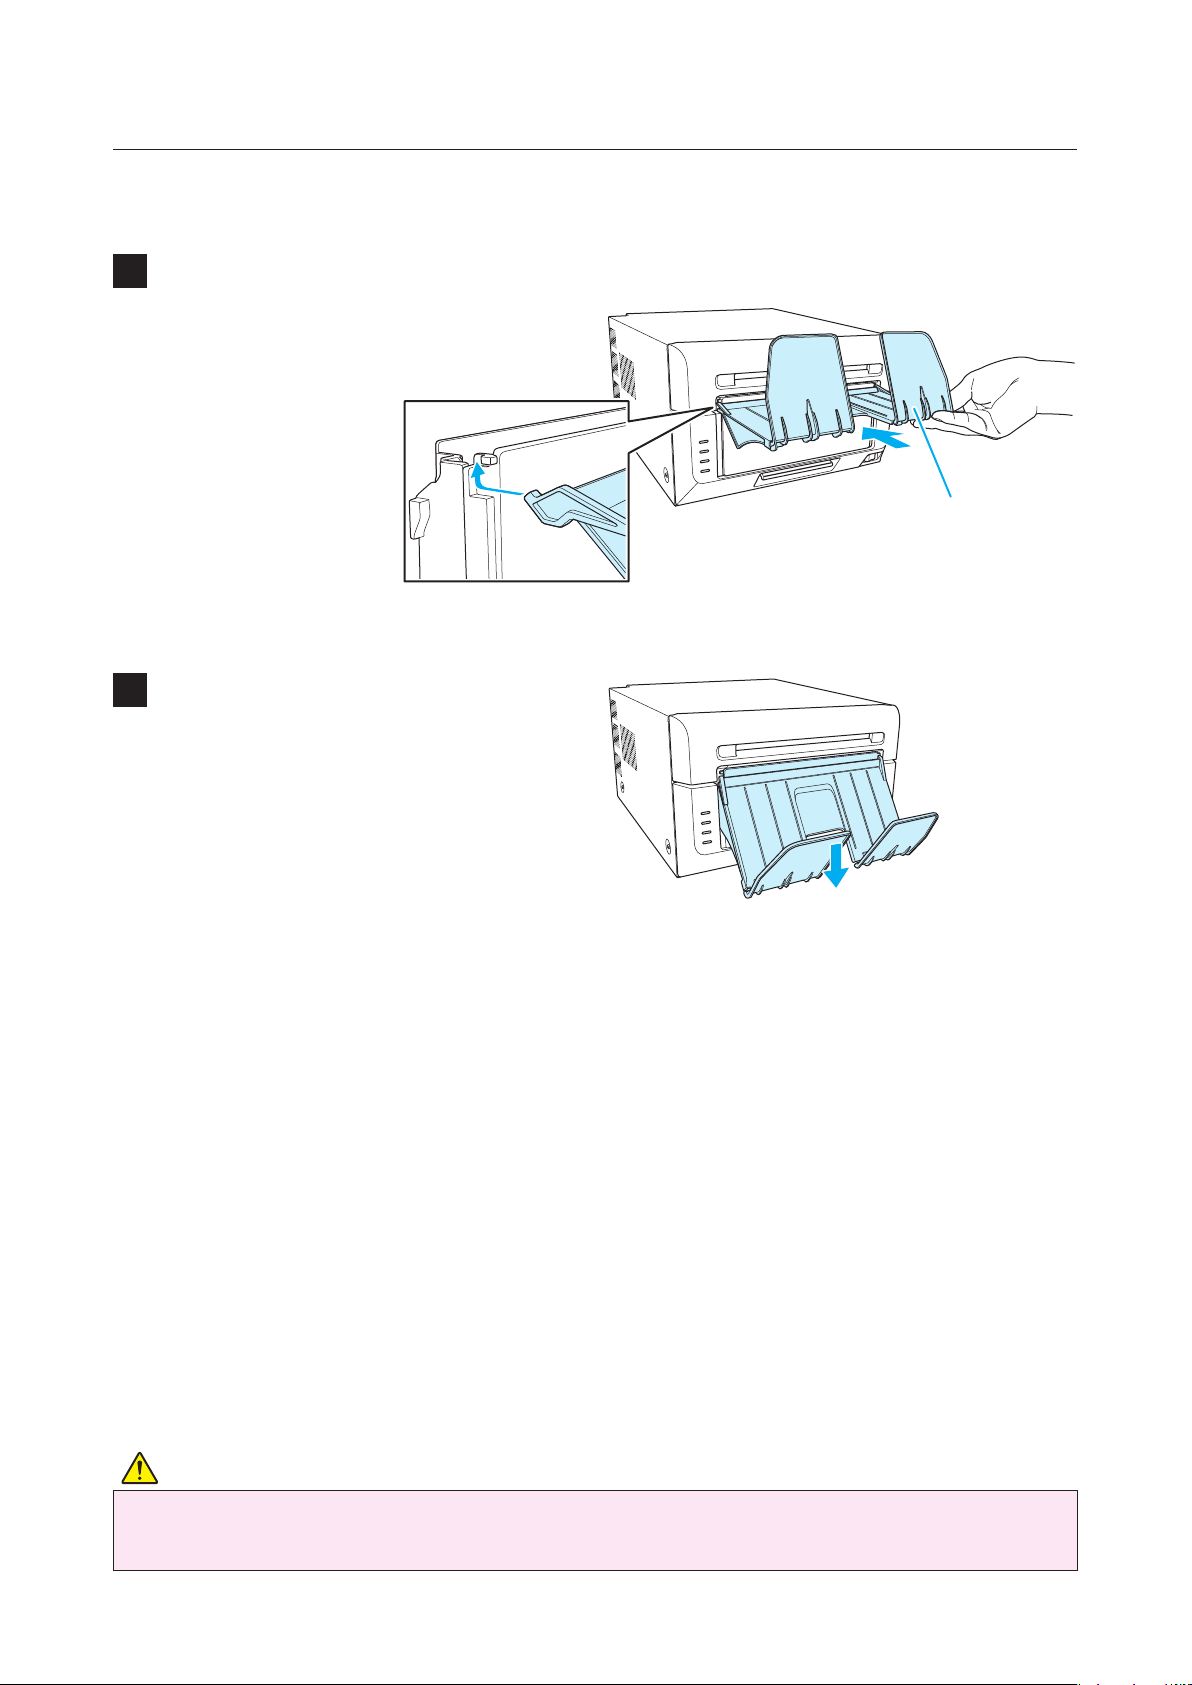
Paper tray installation
You may install the paper tray when using L or PC size paper rolls�
Up to 50 sheets can be stored, however it is recommended to remove the sheets regularly�
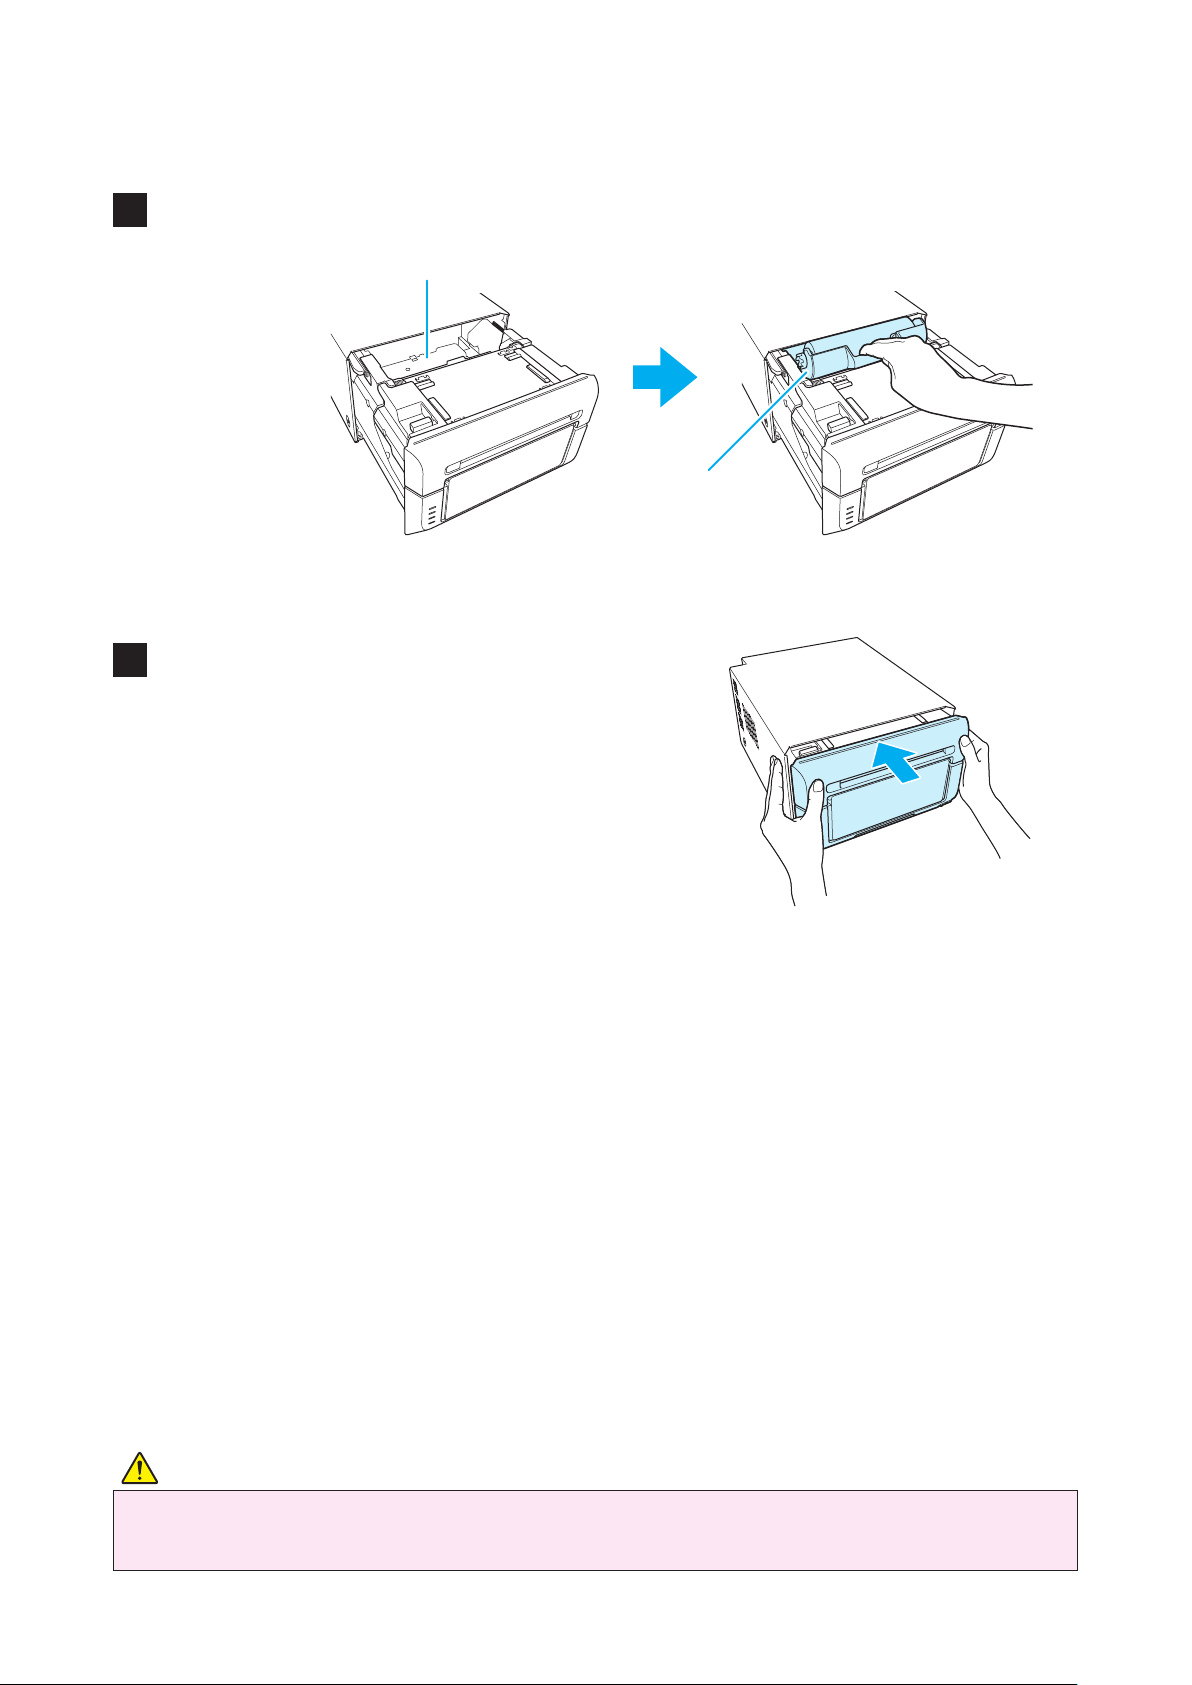
Attach the paper tray to the scrap box�
1
Insert the tray horizontally.
Lower the paper tray to set it�
2
Caution
• Storing too many sheets may cause a malfunction�
• Do not apply too much strength on the paper tray� Otherwise, it may be damaged�
- 18 -
Page 19
Printer Installation
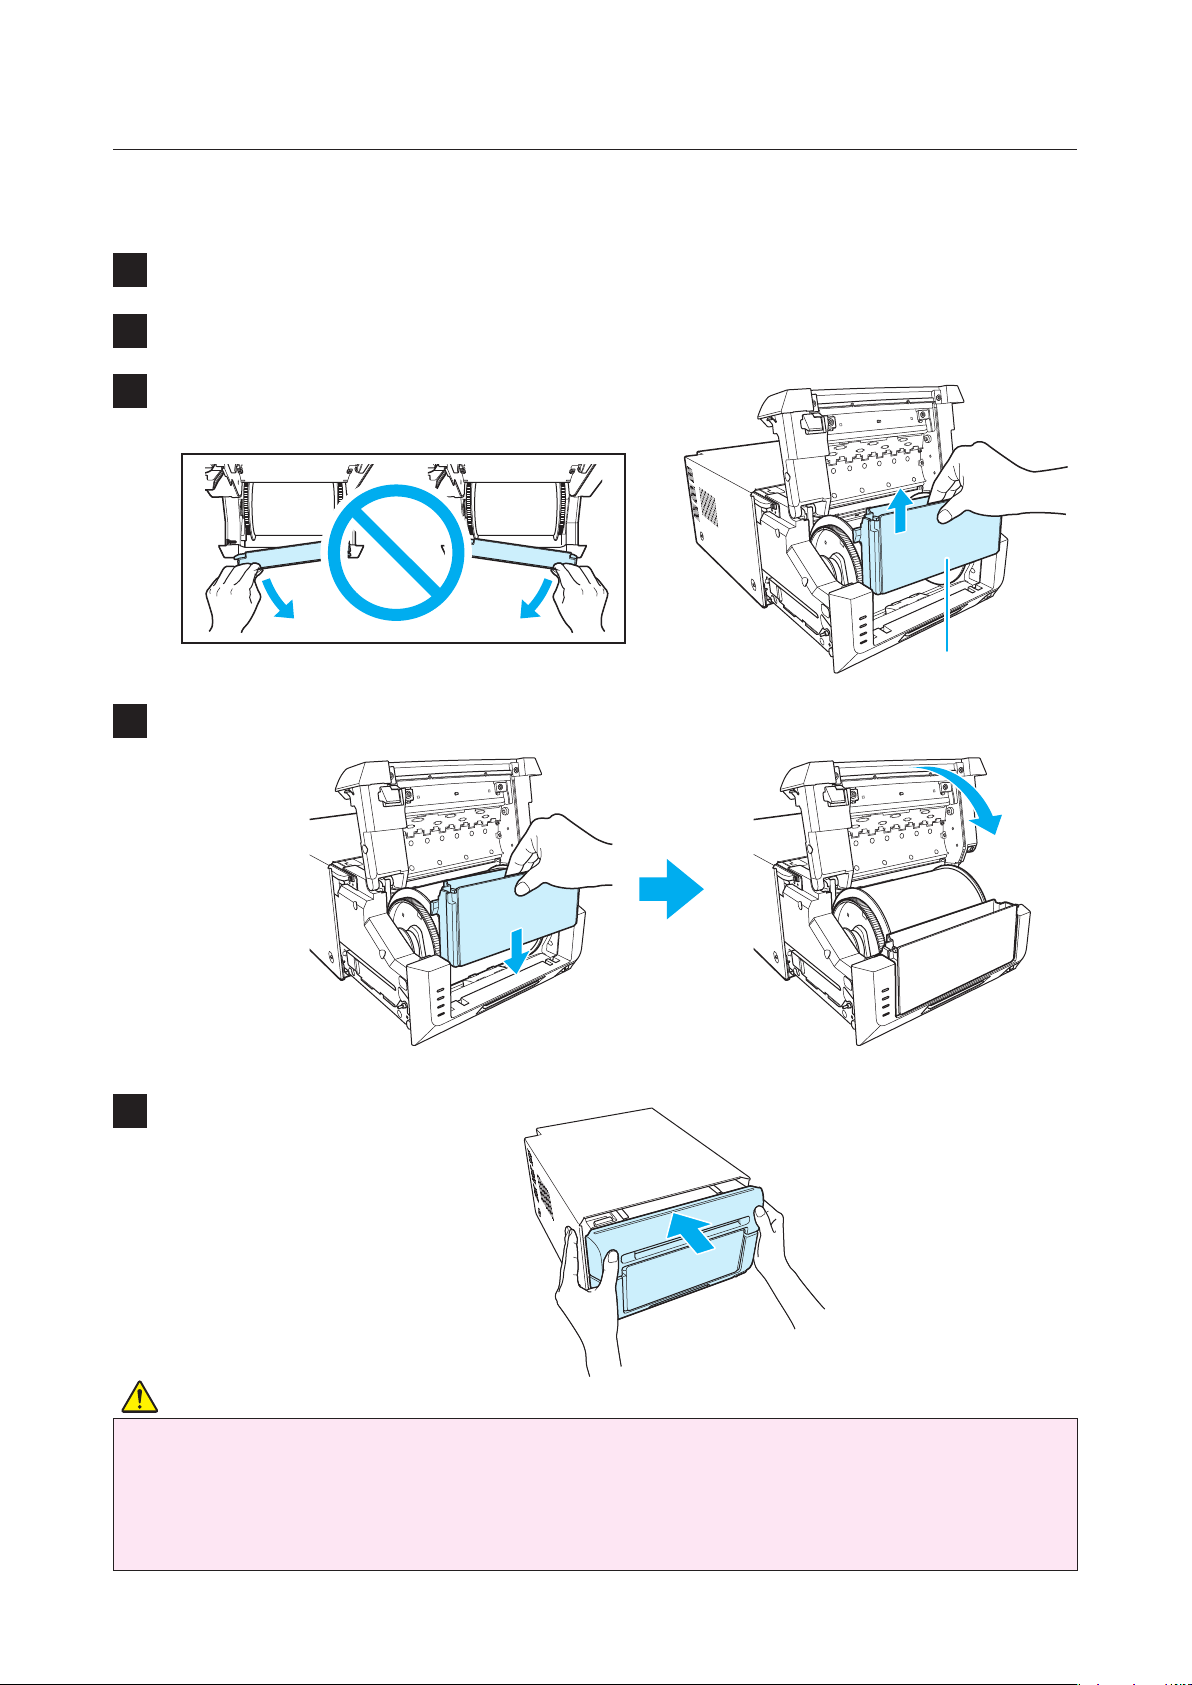
Disposing of paper scrap
Paper scraps generated when the paper is cut are collected in the scrap box� Be sure to empty the
scrap box when replacing the paper�
Release the opening lever, and pull out the mechanism unit�
1
Lift the paper lever and raise the front cover�
2
Hold the center of the scrap box and lift it up straight�
3
Set the scrap box and close the front cover�
4
Close the mechanism unit�
5
Scrap box
Caution
• Never remove the scrap box diagonally� The scrap box may be damaged and the product
may not operate normally�
• When the scrap box has been removed, do not touch the cutter on the upper part or you
may be cut�
• Troubles may occur if the printer is used when the scrap box is full�
- 19 -
Page 20

Troubleshooting
Error display
The LEDs condition (lit, ashing, off) indicates the product status.
lit, ashing, off�
LED display Status Condition Refer to
POWER
RIBBON
PAPER
ERROR
POWER
RIBBON
PAPER
ERROR
Paper end Set a new roll of paper� P�14
Ribbon end Set a new ribbon� P�14
POWER
RIBBON
PAPER
ERROR
POWER
RIBBON
PAPER
ERROR
POWER
RIBBON
PAPER
ERROR
POWER
RIBBON
PAPER
ERROR
POWER
RIBBON
PAPER
ERROR
POWER
RIBBON
PAPER
ERROR
Door is open
(no paper)
Properly set the paper and then close
the mechanism unit�
P�14
Door is open Close the mechanism unit� P�17
Paper error Set the paper properly� P�14
Ribbon error Set the ribbon properly� P�17
Reset the ON/Standby switch�
System error
If the system does not recover, contact
-
your dealer�
Head cool
down
The print heads are being cooled�
This error is cleared automatically�
-
- 20 -
Page 21
Solving errors
Release the opening lever, and pull out the mechanism unit�
1
Remove the ribbon cassette front the printer unit�
2
Perform the action corresponding to the error�
3
“The printer is jammed with paper” (see this page),
“The ribbon is caught in the printer” (see P�22),
“The printer stopped with the paper partially cut” (see P�23),
“The power has been cut during printing” (see P�23)
Troubleshooting
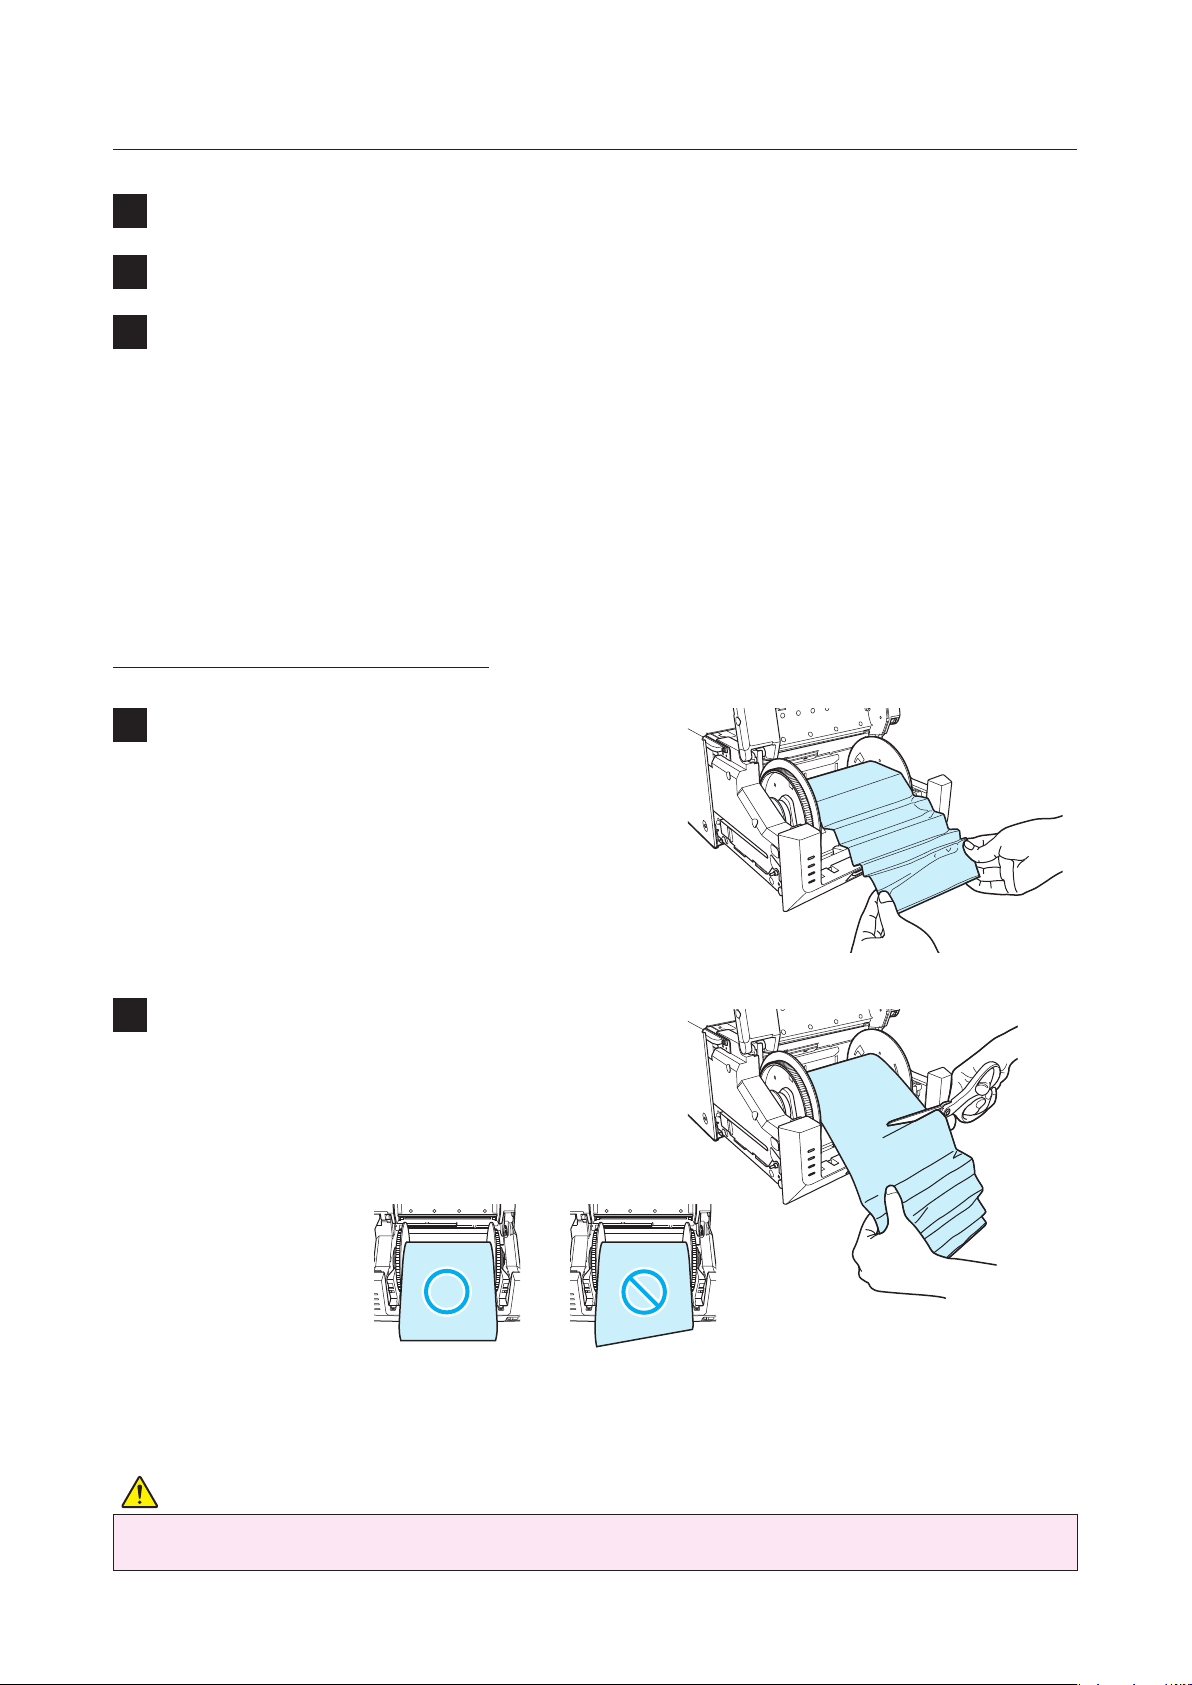
The printer is jammed with paper
Pull out the jammed paper�
1
Printing over an already printed area will make
the ribbon stick and the printer will jam again�
When pulling the paper out, pull it slowly�
Applying too much strength may damage the
product�
Cut off the problem section, such as a
2
wrinkled or partially printed area, with a pair
of scissors�
If wrinkled or partially printed areas remain,
they may jam the printer again� Furthermore, if
the paper is not cut evenly, the printer does not
operate correctly�
Next, refer to “Setting the media (paper, ribbon)” (P�14)�
Caution
• Be careful not to hurt yourself or damage anything on the edges of the printer�
- 21 -
Page 22

Troubleshooting
The ribbon is caught in the printer
Pull out the ribbon�
1
Cut the ribbon�
2
Remove the ribbon that remains in the
3
printer unit carefully�
Any pieces of ribbon left inside
the printer may affect the print
quality� In such cases, clean the
platen roller�
(see “Platen roller” P�24)�
Reattach the ribbon with tape or similar
4
material�
Fix with tape�
Rotate the take-up roller until the part
5
attached with tape cannot be seen anymore�
Take-up side
Do not let a slack form
when taking up the
ribbon�
Supply side
Next, refer to “Setting the media (paper, ribbon)” (P�14)�
- 22 -
Page 23

The printer stopped with the paper partially cut
Set the ON/Standby switch to Standby and then ON again�
1
The paper jam is released and the cutter blade returns to its standby position�
• If you cannot release the paper, contact a service representative�
Remove the partially printed part of paper from the printer�
2
Next, refer to “The printer is jammed with paper” (see P�21)�
Troubleshooting
The power has been cut during printing
If the power is cut during printing, you will not be able to pull out the mechanism unit�
1
Set the ON/Standby switch to Standby and then ON again�
The partially printed paper is cut into scrap-size pieces and removed� After this, you
can pull out the mechanism unit�
2
Check that no partially printed paper remains in the printer�
If partially printed paper remains, refer to “The printer is jammed with paper” (see P�21)�
Caution
• Do not set the ON/Standby switch to Standby during printing� This may cause a malfunction�
- 23 -
Page 24

Cleaning
Platen roller
If indents appear at the same places on the printout at a regular interval (approximately every 50
mm), or if the back of the printout (white side) is dirty, clean the platen roller�
There may be dust, dirt, adhesive, etc� from the ribbon or paper on the platen roller�
Prepare a piece of gauze or other soft cloth
1
moistened with ethyl alcohol�
Platen roller
Perform the steps to of “Setting the
2
media (paper, ribbon)”�
Wipe off all the dirt while turning the platen
3
roller�
1 4
Thermal print head
If stains adhere to the thermal print head, unevenness or gaps may appear during printing�
Prepare a piece of gauze or other soft cloth
1
moistened with ethyl alcohol�
Gently wipe the thermal head without
2
touching it directly with your hands�
If the problem persists, wipe with a
3
polishing sheet�
Recommended polishing sheet :
Mipox polishing sheet GC10000-75 FEY-A
Thermal print head
Caution
• Do not use benzene or thinners, which may damage plastic materials�
• To avoid injuring or burning yourself, always unplug the power cord before cleaning�
• The thermal head is hot just after printing� To avoid burning yourself, wait some time before
cleaning�
- 24 -
Page 25

Specications
Print method Thermal dye sublimation transfer
Resolution
Standard 11�8 × 11�8 dot/mm (300 × 300 dpi)
High quality
11�8 × 23�6 dot/mm (300 × 600 dpi)
23�6 × 23�6 dot/mm (600 × 600 dpi)
Print size
Paper/ ink ribbon set
Interface USB2�0 (max 480 Mbps) TYPE B connector
Dimensions 275 mm (W) × 366 mm (D) × 170 mm (H)
Weight Approx� 12�0 kg (printer unit only)
Rated Voltage AC 100 V - 240 V 50 Hz / 60 Hz
Rated Current 100 V 3�9 A 240 V 1�6 A
Operating environment
L (3�5×5
PC (6×4
2L (7×5
A5 (6×8
PC (6×4
2L (7×5
A5 (6×8
)
)
)
)
)
)
)
Temperature 5 °C to 35 °C in natural convection conditions
Humidity 35 % to 80 % with no condensation
89 mm × 127 mm
101 mm × 152 mm
127 mm × 178 mm
152 mm × 203 mm
400 sheets
230 sheets
200 sheets
* If you cannot set different resolution values horizontally and vertically in your software
application, set the resolution to 600 x 600 dpi� (The printer driver will change the resolution to
300 x 600 dpi before sending the data to the printer�)
* The specications and appearance of the printer may be changed without prior notice.
Customer service
For information about the product operation or repair, contact your dealer or a service center�
- 25 -
Page 26

 Loading...