

Page 1
November 20, 2014 Ver. 1.0.0.0
Printer Driver User's Manual
Page 2

Dai Nippon Printing Co., Ltd.
● Safety precautions
Before you use the printer, carefully read the User’s manual to ensure that you use the printer correctly. Be
aware that the content complies with the standards at the time the User’s manual section related to safety,
including usage and safety precautions, was created.
● Modifications
For product safety, it is prohibited to modify the DP-DS620/DP-DS620 (A) printer, DP-DS620/DP-DS620 (A)
printer driver, and CD contents.
● Copyright
The copyrights, trademark rights, and other intellectual property rights related to documents and programs
included with this product are the property of Dai Nippon Printing Co., Ltd. and other rights holders. You cannot
copy and use these items without the permission of Dai Nippon printing Co., Ltd. except where permitted by
applicable laws.
Microsoft and Windows are trademarks or registered trademarks of Microsoft Corporation in the United States
and in other countries.
LEADTOOLS Copyright (C) 2008 LEAD Technologies, Inc.
● About the country of delivery
Not for resale/use in the U.S. Inside the U.S., use : DP-DS620 (A)
Page 3

Dai Nippon Printing Co., Ltd.
Table of contents
Chapter 1 Installation __________________________________ 1
1.1 Prepare the printer and computer ______________________________________________________________ 2
1.2 Install the driver package _____________________________________________________________________ 2
1.3 Install the printer driver ______________________________________________________________________ 5
1.4 Install drivers for unspecified devices ________________________________ ___________________________ 9
Chapter 2 Properties _________________________________ 12
2.1 Open the printer properties __________________________________________________________________ 12
2.2 Print settings functions ______________________________________________________________________ 14
2.2.1 Layout _______________________________________________________________________________ 14
2.2.2 Advanced options ______________________________________________________________________ 15
2.2.3 Paper/Quality _________________________________________________________________________ 20
2.2.4 Option _______________________________________________________________________________ 20
2.2.5 Color Adjustment _______________________________________________________________________ 22
2.2.6 Printer information ______________________________________________________________________ 23
2.3 Default values for settings ___________________________________________________________________ 25
2.4 Color management ________________________________________________________________ ________ 26
2.5 Print Area ________________________________________________________________________________ 27
2.6 Orientation _______________________________________________________________________________ 28
Chapter 3 Update the driver ____________________________ 29
Chapter 4 Delete the driver ____________________________ 36
・Added "(6x4) x N" and "(5x3.5) x N" to the paper sizes (limited to applicable countries)
Added "(6x4) x n" and "(5x3.5) x n" to reduce ribbon consumption by printing at (6x4) and (5x3.5) sizes using
the winding print function.
For details, see "Paper size (6x4) x n setting" in 2.2.2 Advanced options.
・Added printer information
Added a printer information function to display, for example, printer information and the status/number of
printable copies on the driver screen.
For details, see 2.2.6 Printer information.
・Added language settings
Added a function to change the display language for the following print settings: Advanced options-Printer
functions, Option, Color Adjustment, and Printer Info.
For details, see 2.2.4 Option.
Main additional functions from previous models
Page 4

1
Dai Nippon Printing Co., Ltd.
[DP-DS620/DP-DS620 (A) Printer Driver] User’s Manual (For Windows 7, 8)
CChhaapptteerr 11 IInnssttaallllaattiioonn
Installation procedure
The installation procedure is made up of three steps.
The details of each step are explained below.
On
USB cable
Insert the included CD into the disk drive, and then
install the driver package.
Prepare the printer and computer → "1.1 Prepare the printer and computer"
Connect the USB cable, switch on the printer, and then
install the printer driver.
After installation is complete, restart the computer.
At this point, the USB cable is not yet
connected.
Install the driver package → "1.2 Install the driver package"
Install the printer driver → "1.3 Install the printer driver"
Page 5
2
Dai Nippon Printing Co., Ltd.
[DP-DS620/DP-DS620 (A) Printer Driver] User’s Manual (For Windows 7, 8)
11..11 PPrreeppaarree tthhee pprriinntteerr aanndd ccoommppuutteerr
Make sure that the DP-DS620 printer power is off.
Prepare a USB cable. However, do not use the USB cable to connect the printer and computer at this time.
Log in to Windows as an administrator. The following explanation presumes that the operations are carried out with
administrator privileges.
11..22 IInnssttaallll tthhee ddrriivveerr ppaacckkaaggee
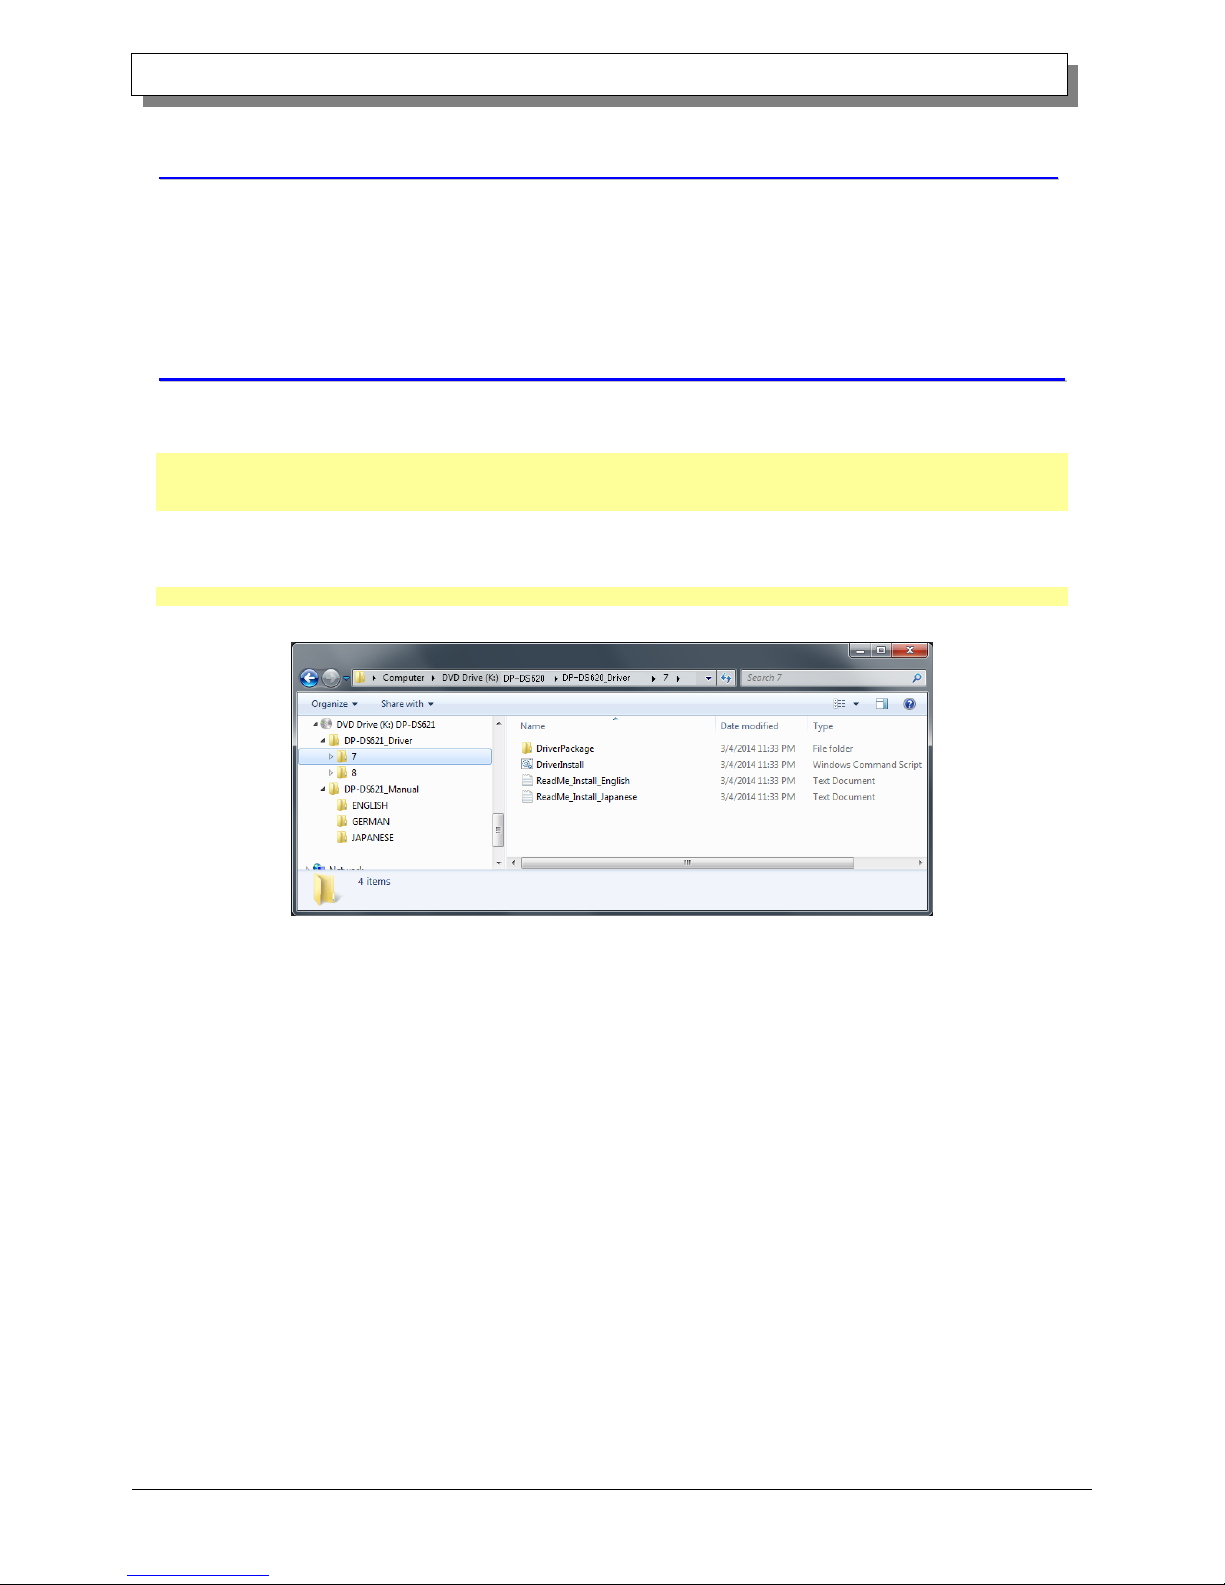
Insert the included CD into the disc drive.
Open Windows Explorer, and then click the corresponding drive.
(If AutoPlay is enabled, select Open folder to view files using Windows Explorer.)
If AutoPlay is enabled in Windows 8, a message appears stating “Tap to choose what happens with this disk”. Click the
message and select “Open folder to view files Windows Explorer”)
Select one of the following folders on the included CD. *Select the folder for your usage environment.
Windows 7 … CD drive:¥¥DP-DS620_Driver¥7
Windows 8 … CD drive:¥¥DP-DS620_Driver¥8
Figure 1.1 Driver Package folder
Page 6
3
Dai Nippon Printing Co., Ltd.
[DP-DS620/DP-DS620 (A) Printer Driver] User’s Manual (For Windows 7, 8)
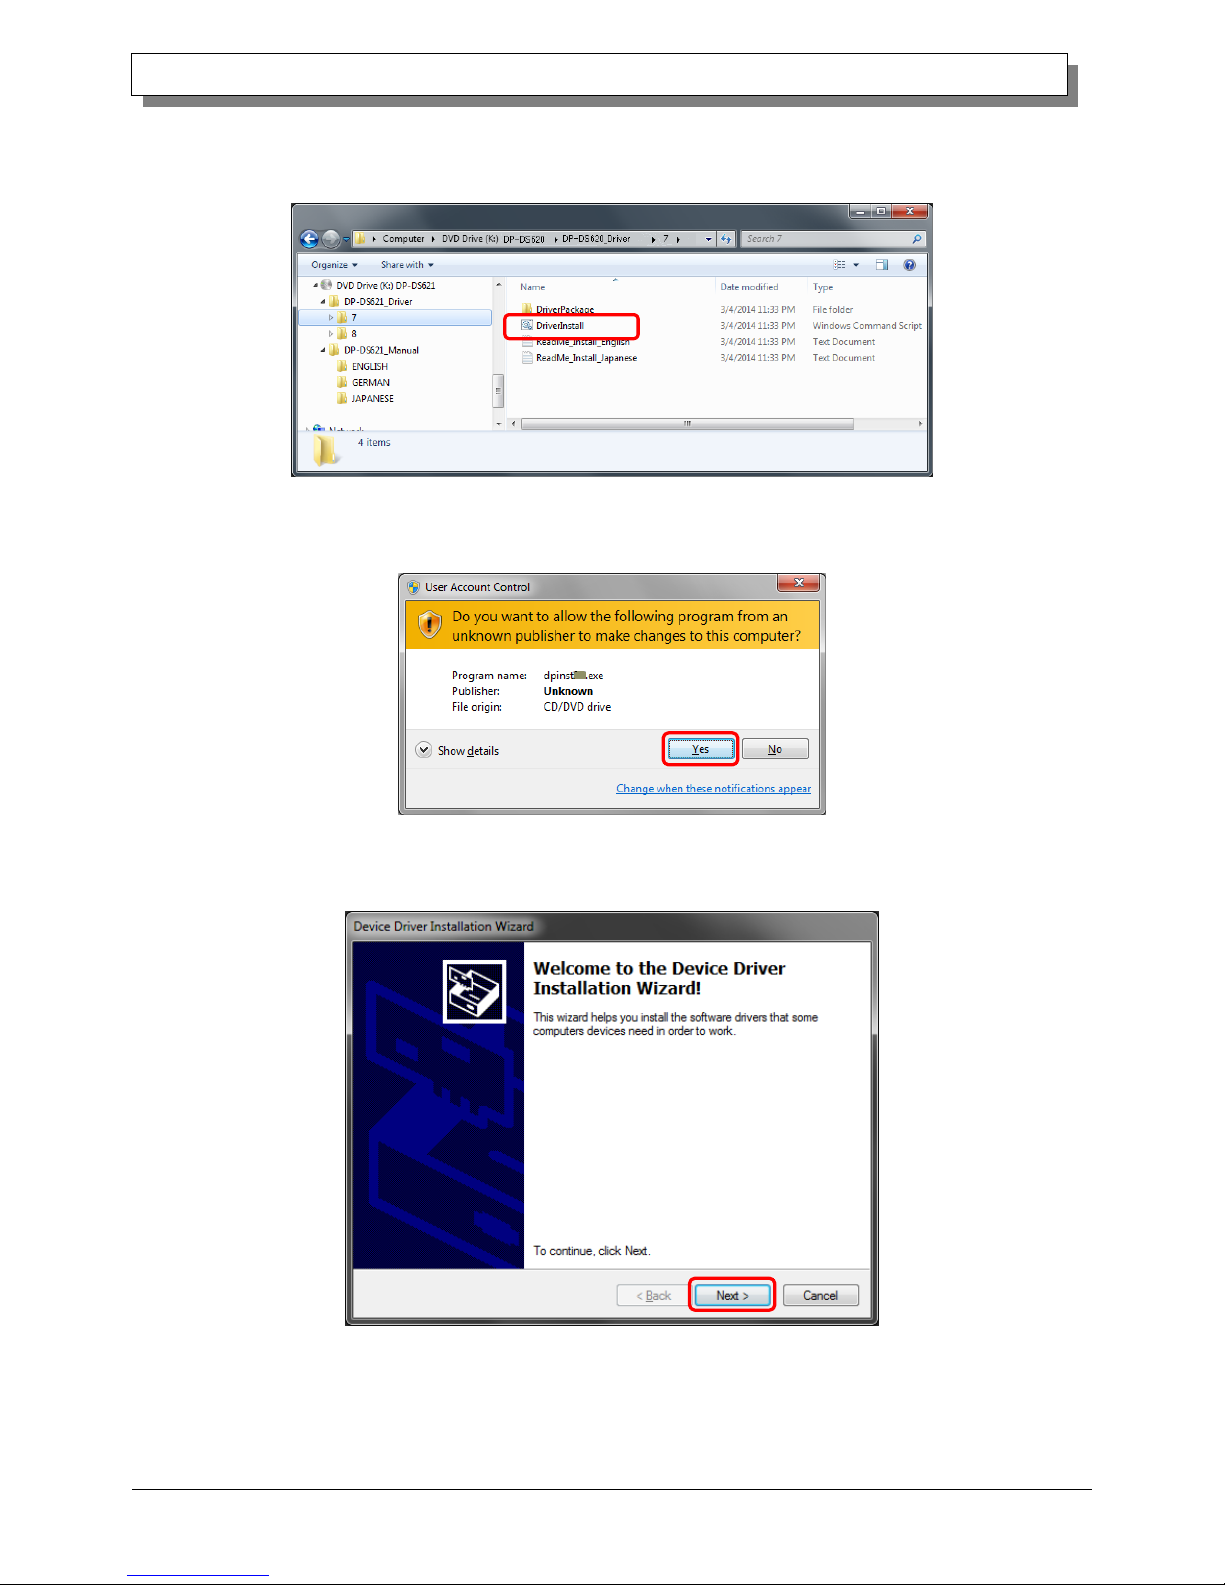
In the selected folder, double click the following file: DriverInstall.CMD. (Depending on your usage environment,
the .CMD extension may not be displayed.)
The driver package installer appropriate for your operating system (32-bit or 64-bit) is selected automatically.
Figure 1.2 Installation file
When a User Account Control dialog box appears, click Yes.
Figure 1.3 User Account Control
The Welcome to the Device Driver Installation Wizard! screen appears. Click "Next".
Figure 1.4 Start of Installation Wizard
Page 7

4
Dai Nippon Printing Co., Ltd.
[DP-DS620/DP-DS620 (A) Printer Driver] User’s Manual (For Windows 7, 8)
Click "Install (I)" when the Windows Security confirmation display appears.
Figure 1.5.i Windows Security confirmation
Installation of the driver package starts. Wait until installation finishes.
The Completing the Device Driver Installation Wizard screen appears. Click Finish.
Figure 1.4 Finish of Installation Wizard
Page 8
5
Dai Nippon Printing Co., Ltd.
[DP-DS620/DP-DS620 (A) Printer Driver] User’s Manual (For Windows 7, 8)
11..33 IInnssttaallll tthhee pprriinntteerr ddrriivveerr
Use the USB cable to connect the printer and computer, and then switch on the power of the DP-DS620 printer.
After the printer is recognized, installation of the driver starts.
*For the connection, see the User’s manual of the DP-DS620.
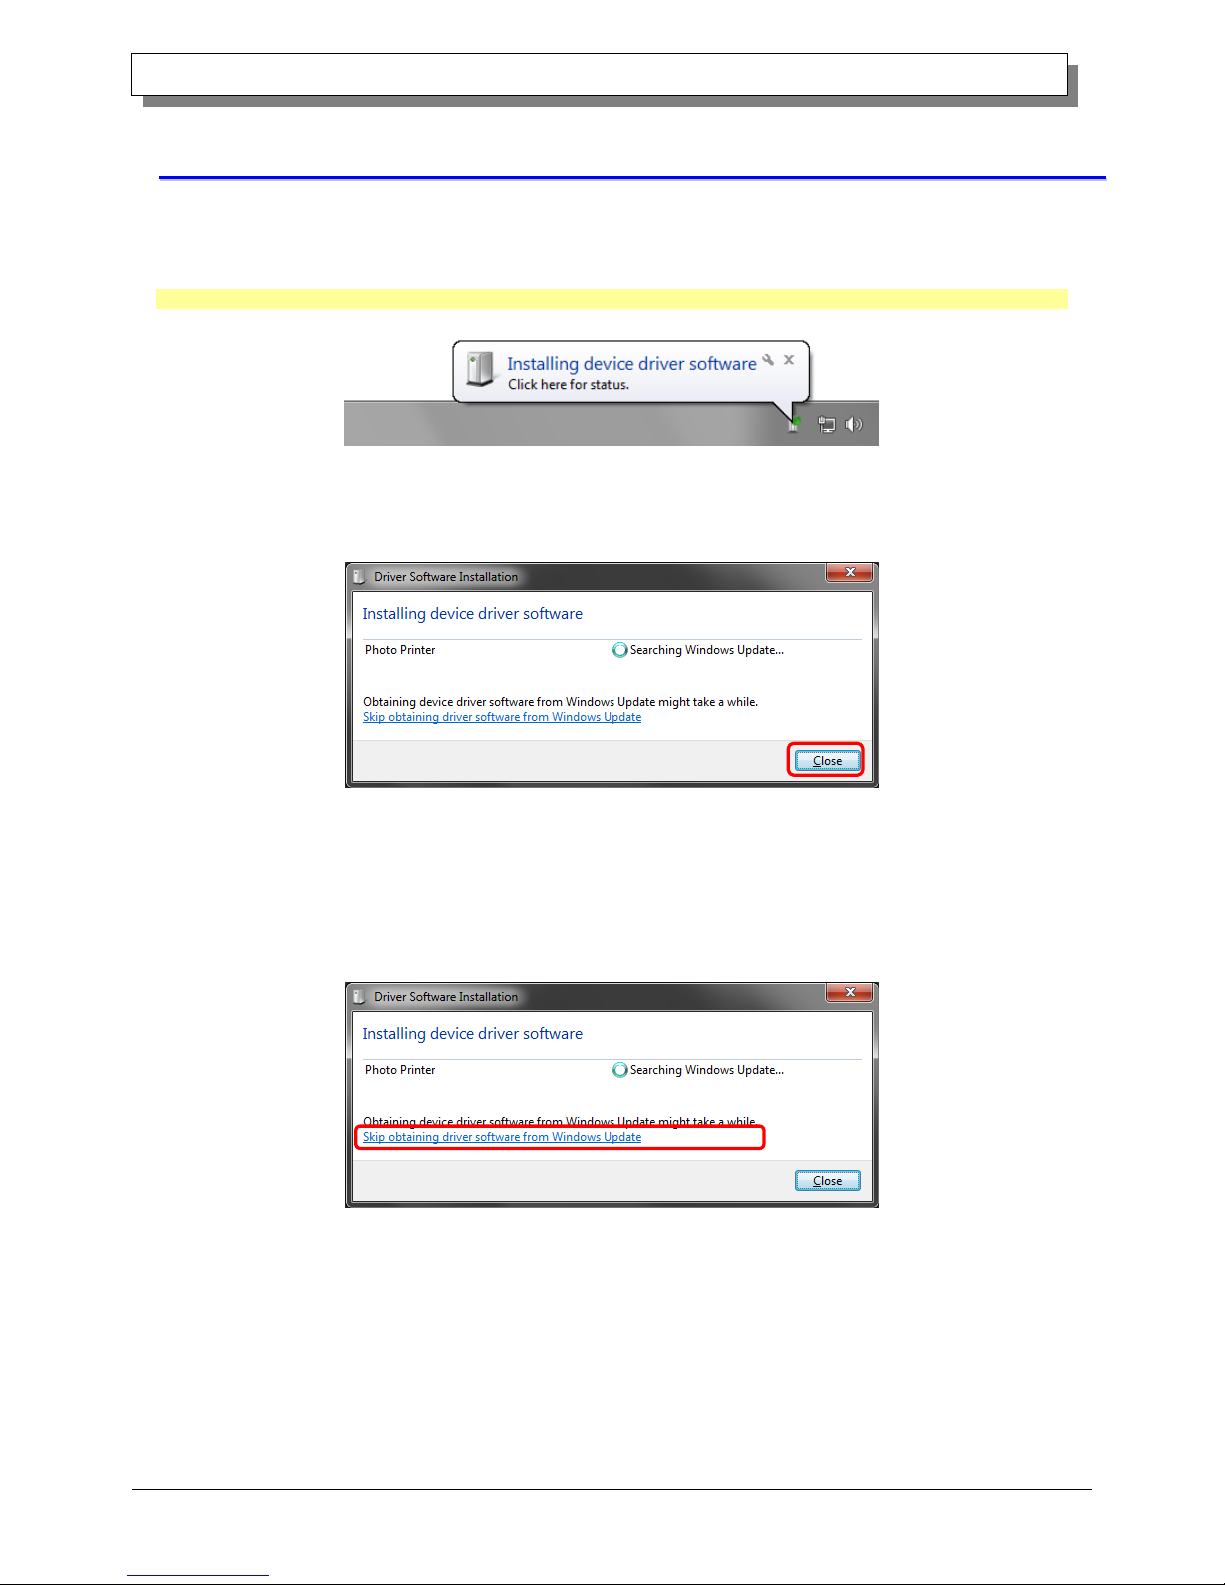
If driver installation starts, the following message appears in the taskbar: “Installing device driver software”.
In Windows 8, this message does not appear. Proceed to page 7.
Figure 1.7 Driver installation message
If you click on this message, the Install driver software screen appears and displays the installation status of the driver. If
Close is clicked, this screen closes.
Figure 1.8 Installing the driver software
*About the “Skip obtaining driver software from Windows Update” option
If your operating system is configured to obtain driver software from Windows Update, it may take time for installation to
complete because the process searches for drivers from Windows Update first. You can reduce the time until the
completion of installation by choosing to skip obtaining driver software from Windows Update. (Depending on your
operating system, it may take some time until installation is complete.)
From the Driver Software Installation dialog box, click "Skip obtaining driver software from Windows Update".
Figure 1.9 Option to skip obtaining driver software from Windows Update
Page 9
6
Dai Nippon Printing Co., Ltd.
[DP-DS620/DP-DS620 (A) Printer Driver] User’s Manual (For Windows 7, 8)
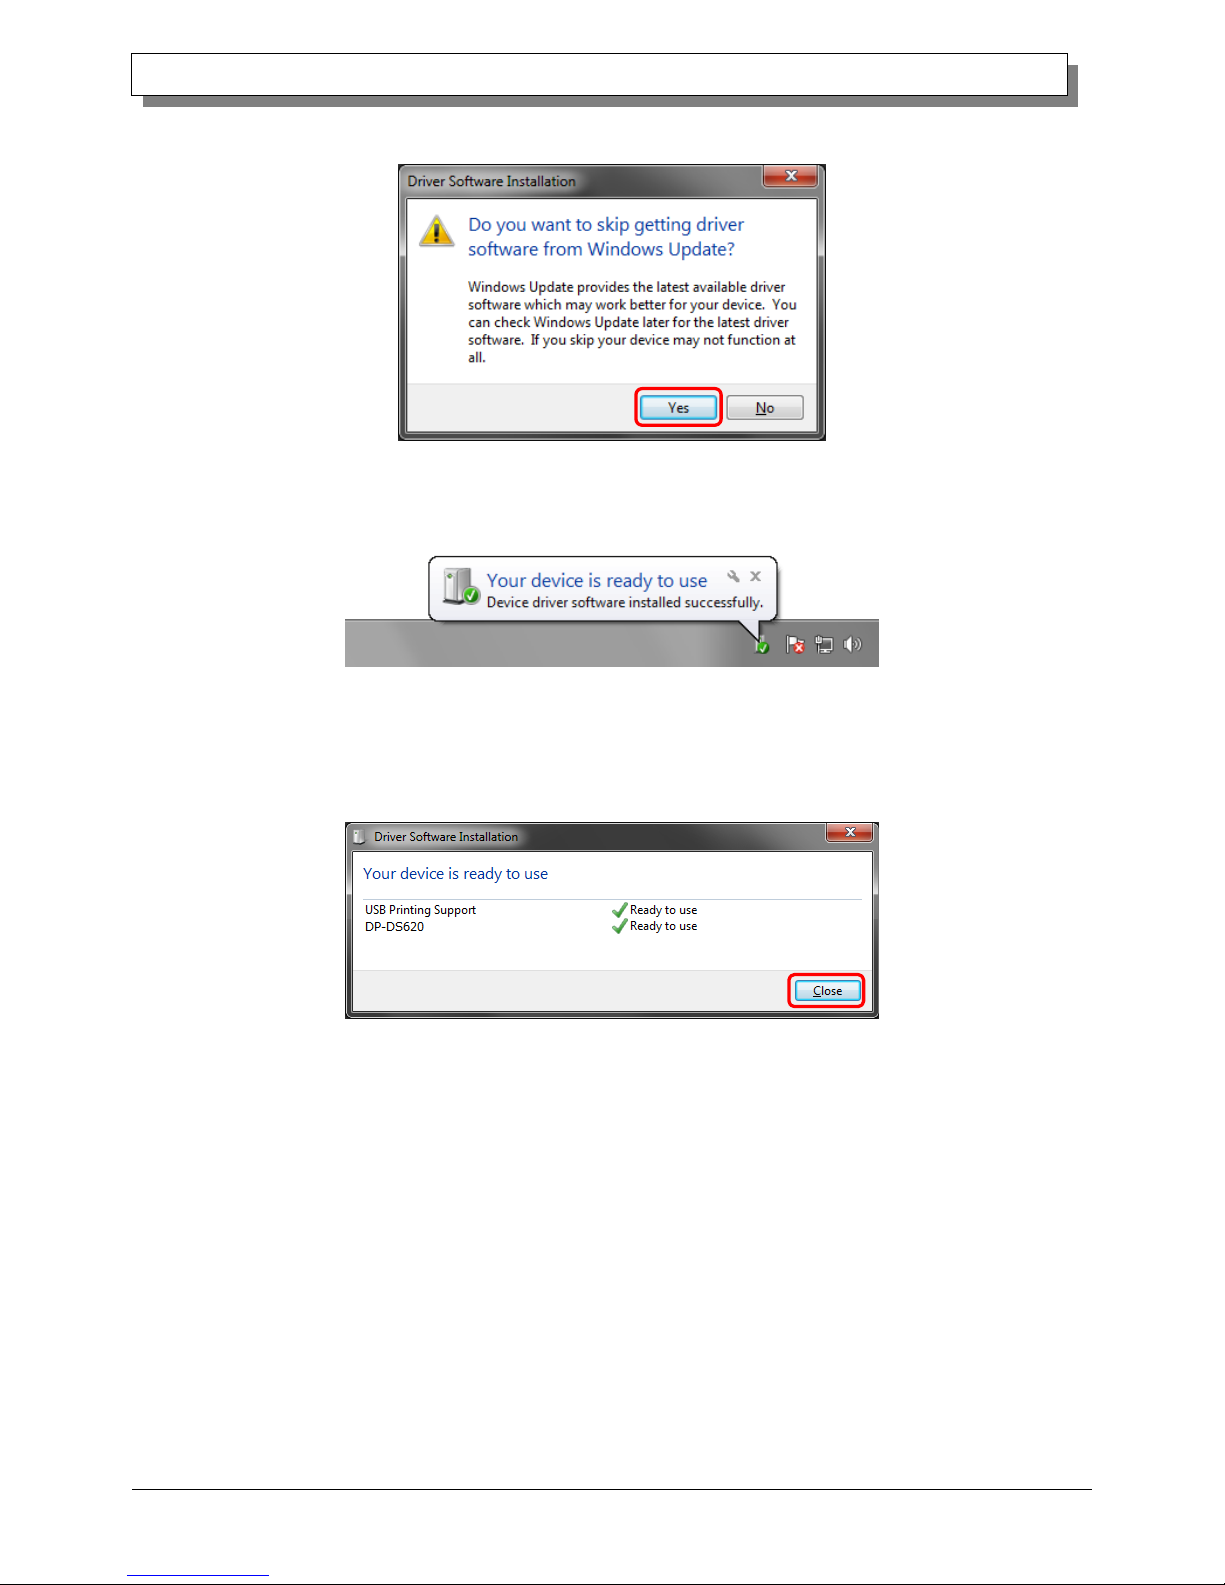
A confirmation dialog box appears. Click Yes.
Figure 1.10 Confirmation to skip getting driver software from Windows Update
Soon after installation starts, a message appears in the taskbar stating “Your device is ready to use”, and then printer
driver installation finishes.
Figure 1.11 Installation complete message
If you click on the message, the Driver Software Installation dialog appears, and the “Your device is ready to use”
message appears. Click Close.
(If the Driver Software Installation screen is open when installation starts, the abovementioned taskbar message is not
displayed.)
Figure 1.12 Completion of driver software installation
Page 10
7
Dai Nippon Printing Co., Ltd.
[DP-DS620/DP-DS620 (A) Printer Driver] User’s Manual (For Windows 7, 8)
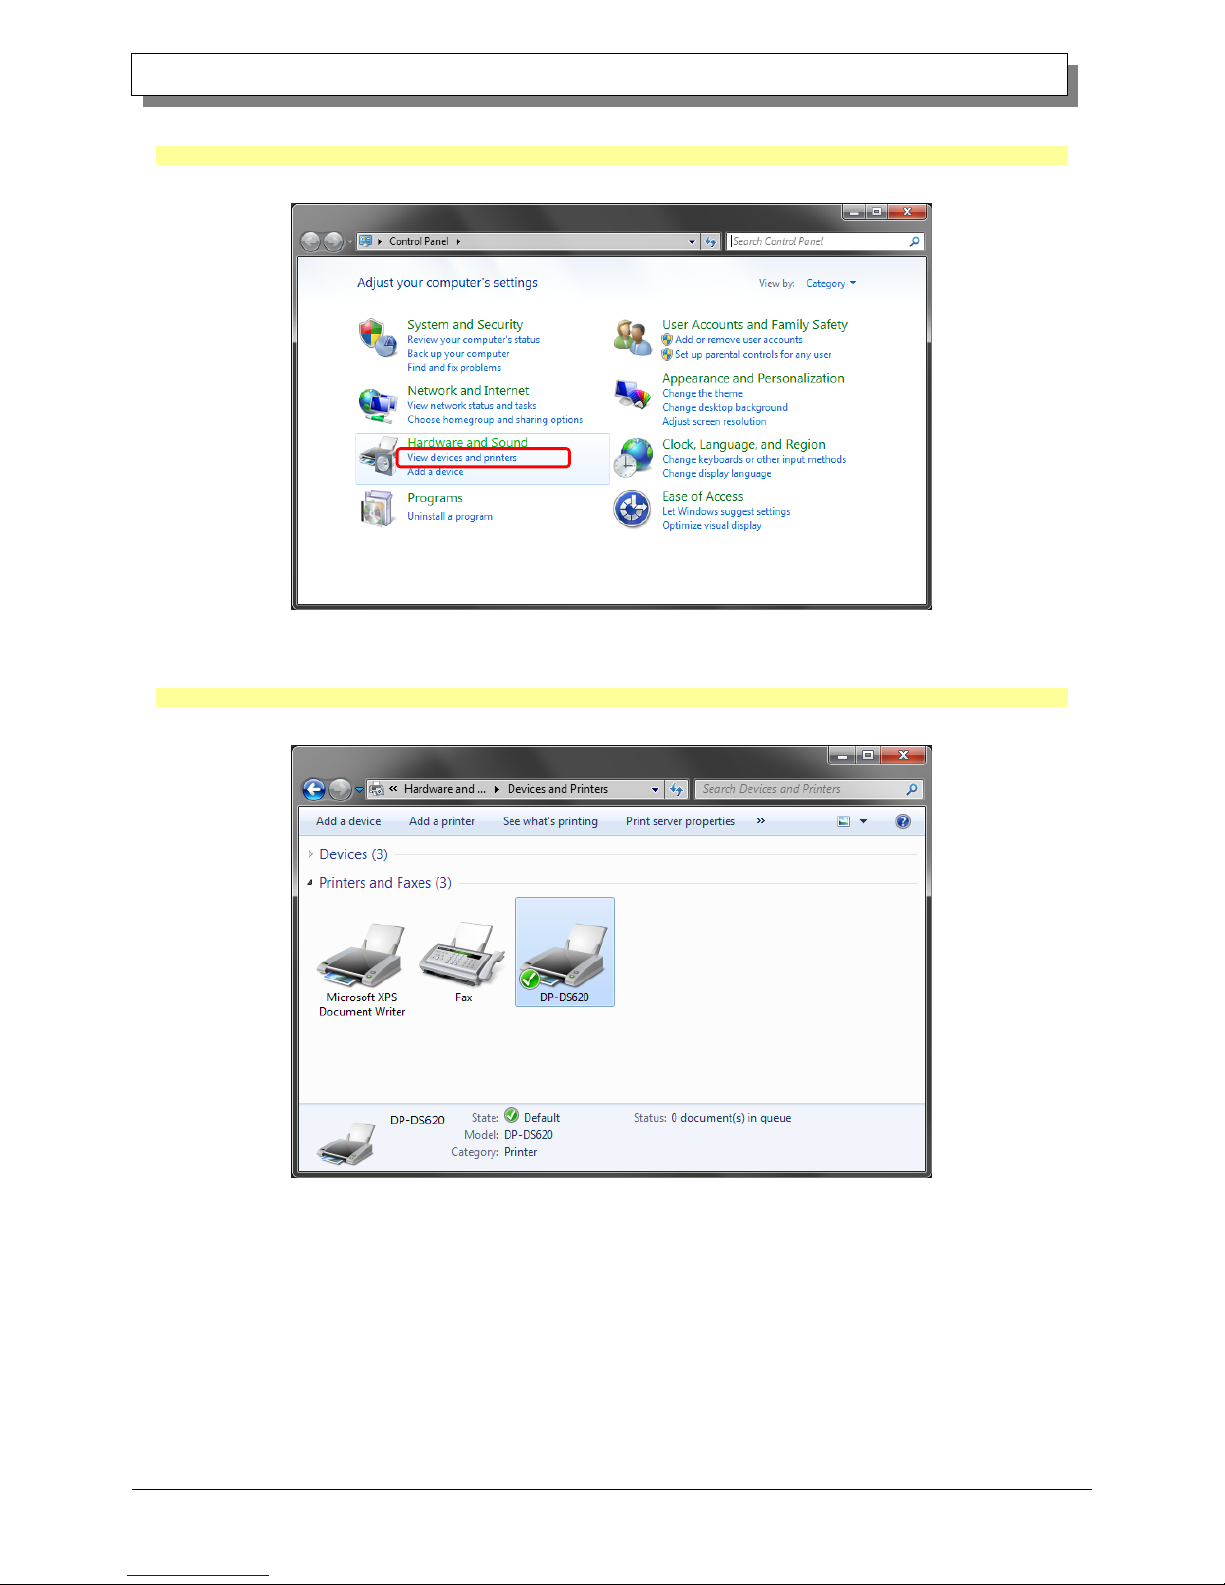
Click "Start", and then click "Control Panel" to open the Control Panel.
In Windows 8, right click the Start screen. In the bottom right area, select All Apps, and then select Control Panel.
In Control Panel, click "View devices and printers".
Figure 1.13 Control Panel
In Devices and Printers, make sure that “DP-DS620” is present.
Note: In Windows 8, when the printer is offline (the printer is not on and connected), the DP-DS620 icon is not displayed.
This completes installation of the DP-DS620 printer driver.
Figure 1.14 Devices and Printers screen
After the installation of the printer driver is complete, always restart the computer.
Page 11
8
Dai Nippon Printing Co., Ltd.
[DP-DS620/DP-DS620 (A) Printer Driver] User’s Manual (For Windows 7, 8)
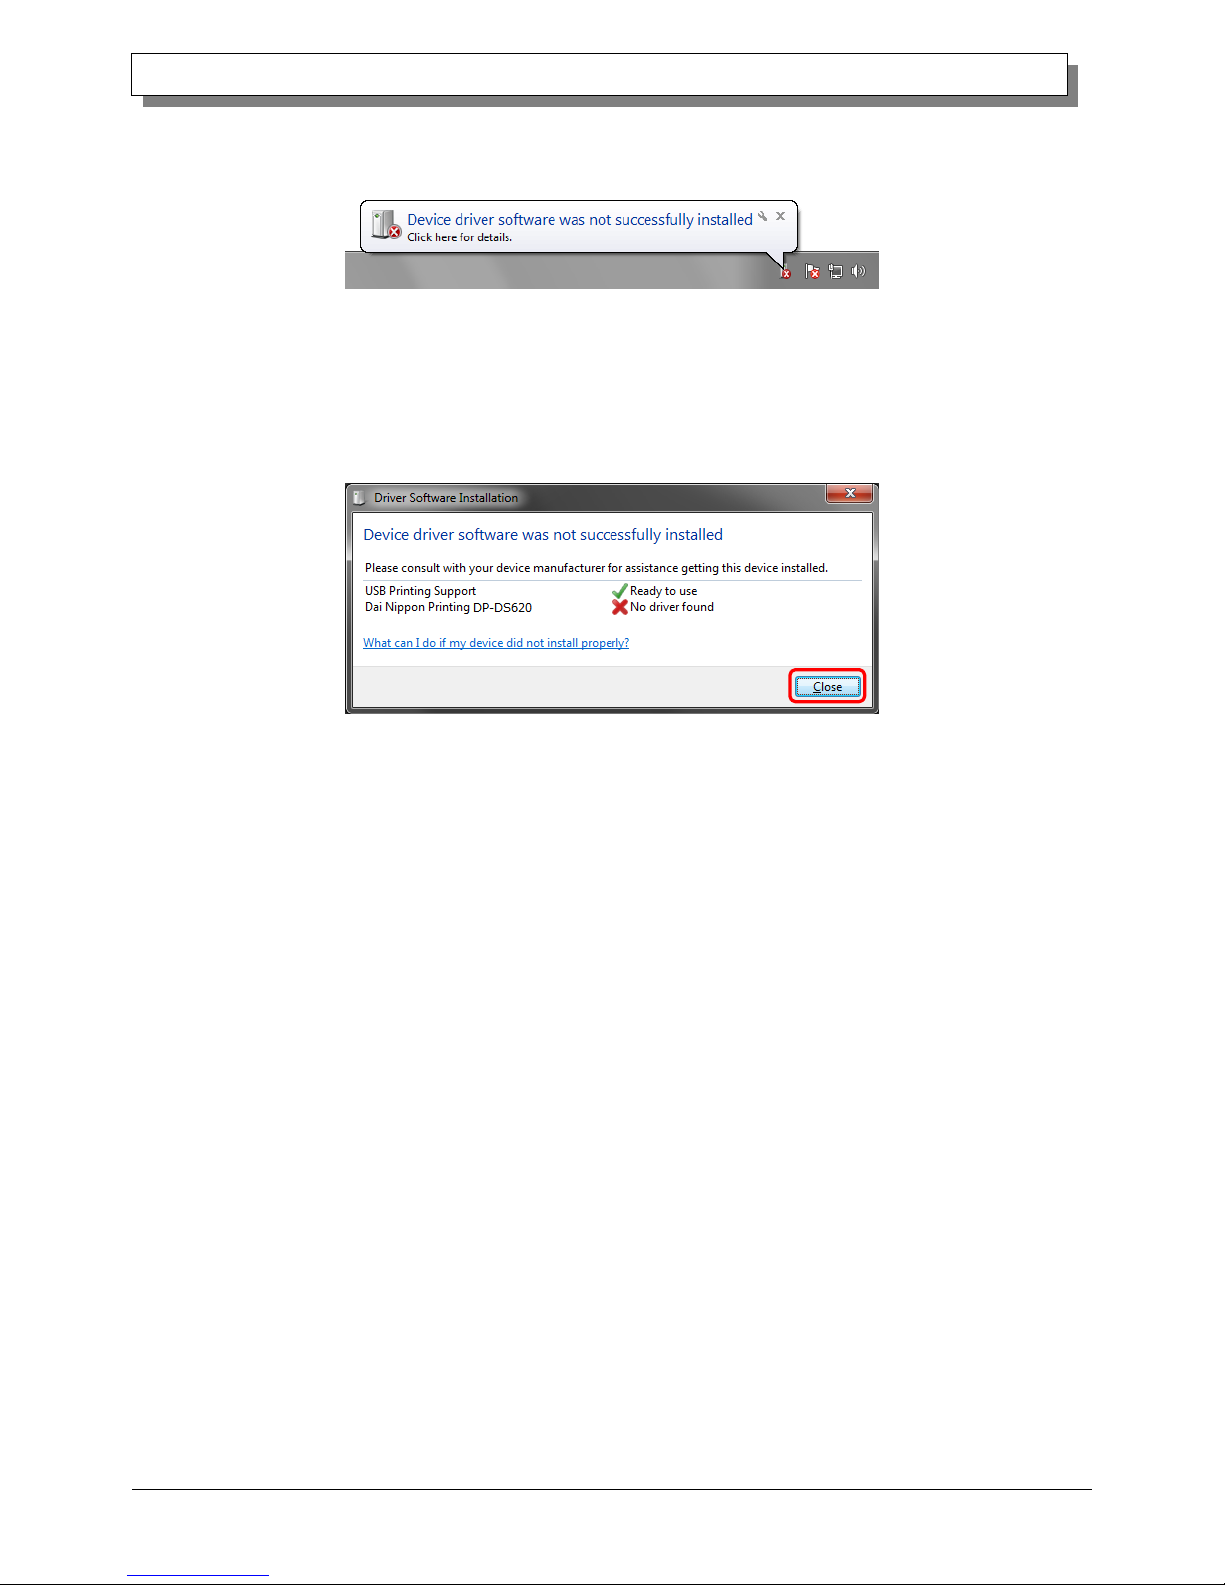
When it was not possible to install the DP-DS620 printer driver correctly, the following message appears in the taskbar:
Device driver software was not successfully installed.
Figure 1.15 Message indicating that the driver was not installed
If you click on this message, the Install driver software screen appears and displays the message "Device driver software
was not successfully installed". Click Close.
(If the Driver Software Installation screen is open when installation starts, the abovementioned taskbar message is not
displayed.)
When the driver could not be installed correctly, see the next section, 1.4, “Install drivers for unspecified devices”, and
then install the printer driver.
Figure 1.16 When the driver was not installed correctly
Page 12
9
Dai Nippon Printing Co., Ltd.
[DP-DS620/DP-DS620 (A) Printer Driver] User’s Manual (For Windows 7, 8)
11..44 IInnssttaallll ddrriivveerrss ffoorr uunnssppeecciiffiieedd ddeevviicceess
If you connect a printer that is on to the computer before installing the driver package, a device is created under
“Unspecified” in Devices and Printers. In such a case, use the following method to install the printer driver.
Furthermore, use the following method to install the printer driver if you use the standard installation procedure (install
the driver package, connect the printer, and then install the printer driver), but the driver is not installed correctly, and a
device is created under “Unspecified”.
1. Install the driver package
When the driver package has not yet been installed, install it by following the procedure in 1.2, “Install the driver
package”.
If you install the driver package, installation of the printer driver for the unspecified device completes it automatically.
2. Installing a driver for an unspecified device
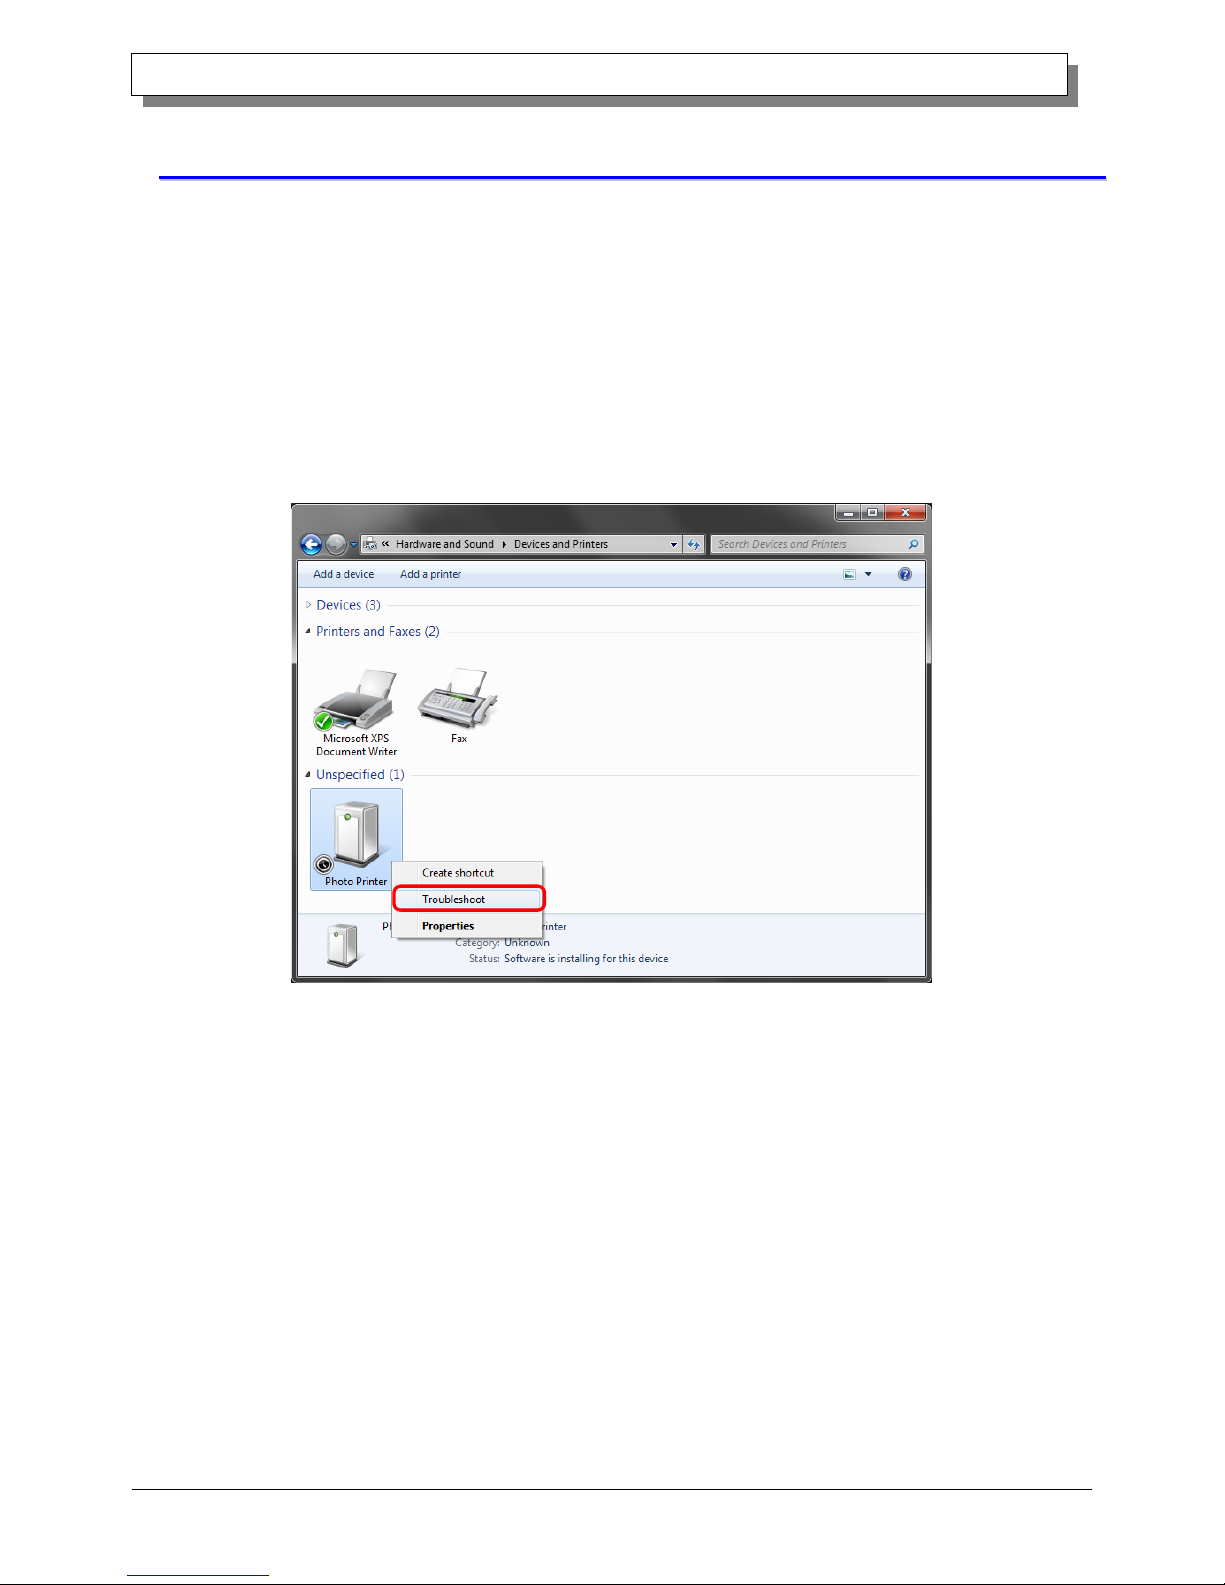
In Devices and Printers, under Unspecified, right click on “Photo Printer”. From the menu, click "Troubleshoot".
Figure 1.17 Photo Printer under Unspecified
Page 13
10
Dai Nippon Printing Co., Ltd.
[DP-DS620/DP-DS620 (A) Printer Driver] User’s Manual (For Windows 7, 8)
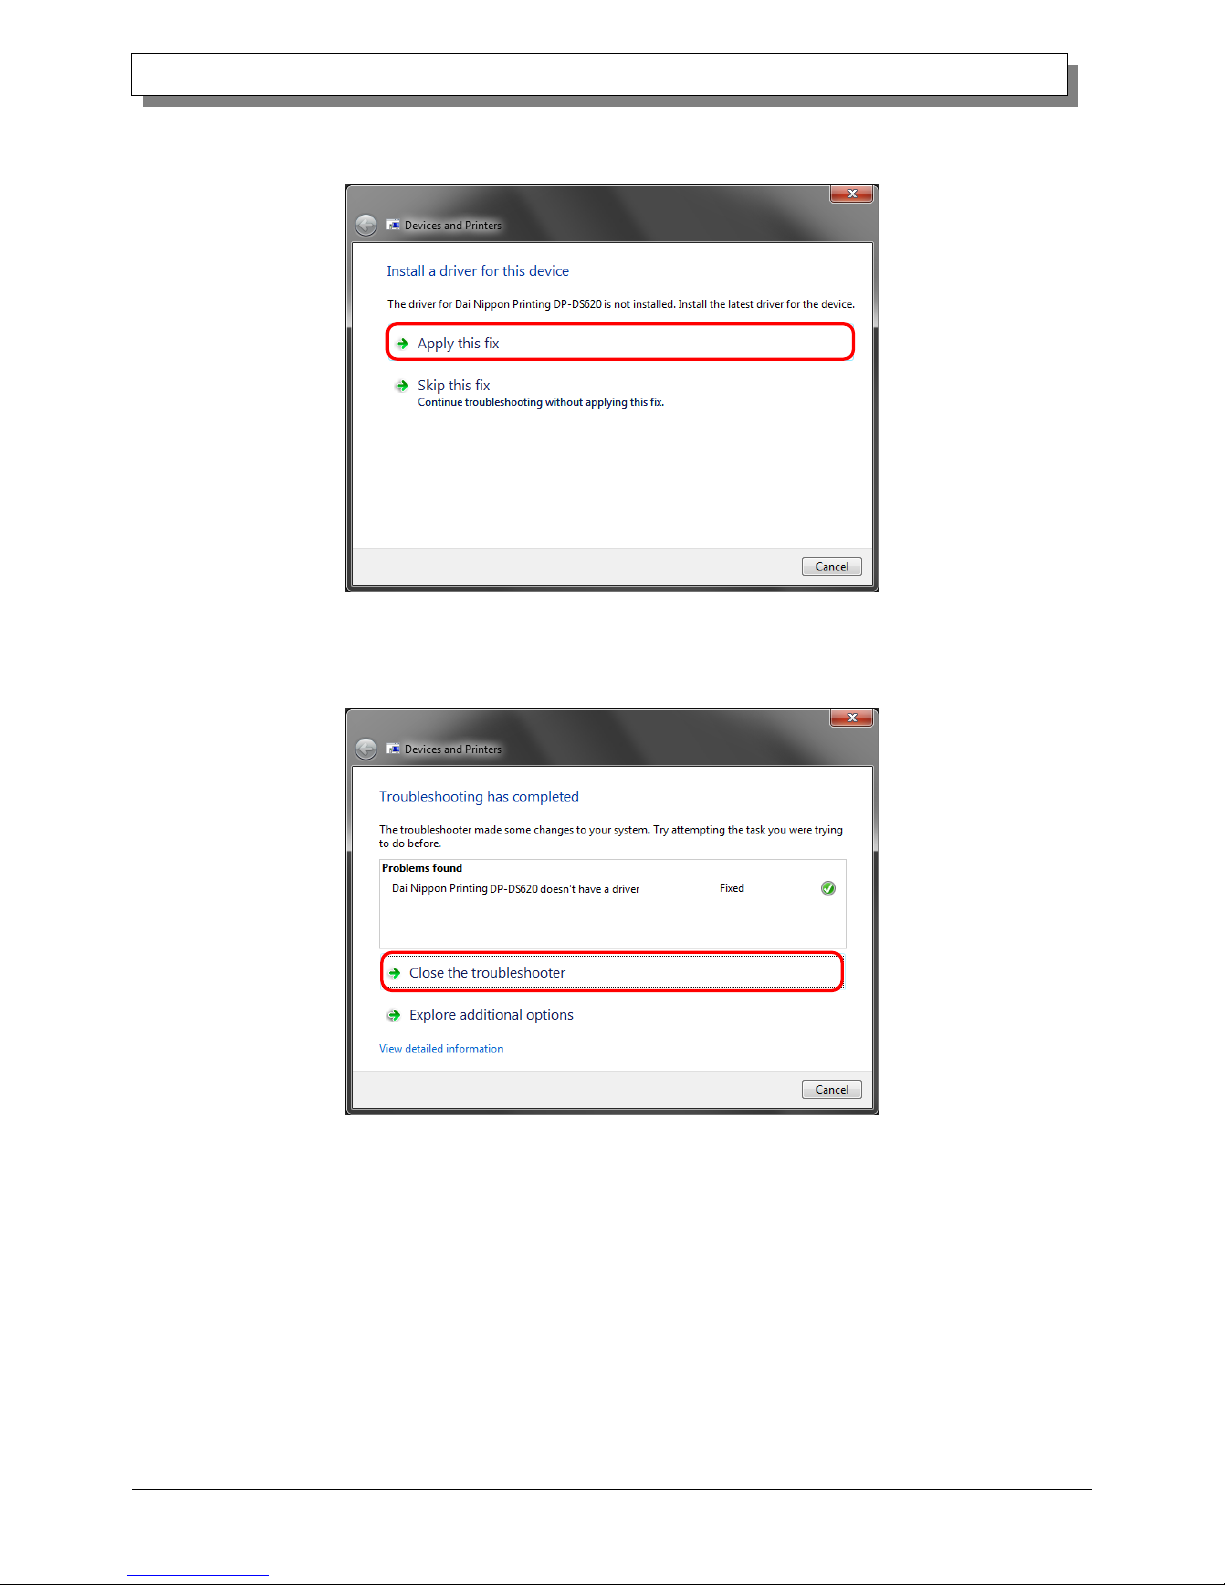
The Install a driver for this device screen appears. Click "Apply this fix".
The computer searches for a driver automatically, and then installs it.
Figure 1.18 Applying a fix
If the driver is installed, the message "Troubleshooting has completed" appears. Click "Close the troubleshooter" to close
the troubleshooting window.
Figure 1.19 Completing troubleshooting
Page 14
11
Dai Nippon Printing Co., Ltd.
[DP-DS620/DP-DS620 (A) Printer Driver] User’s Manual (For Windows 7, 8)
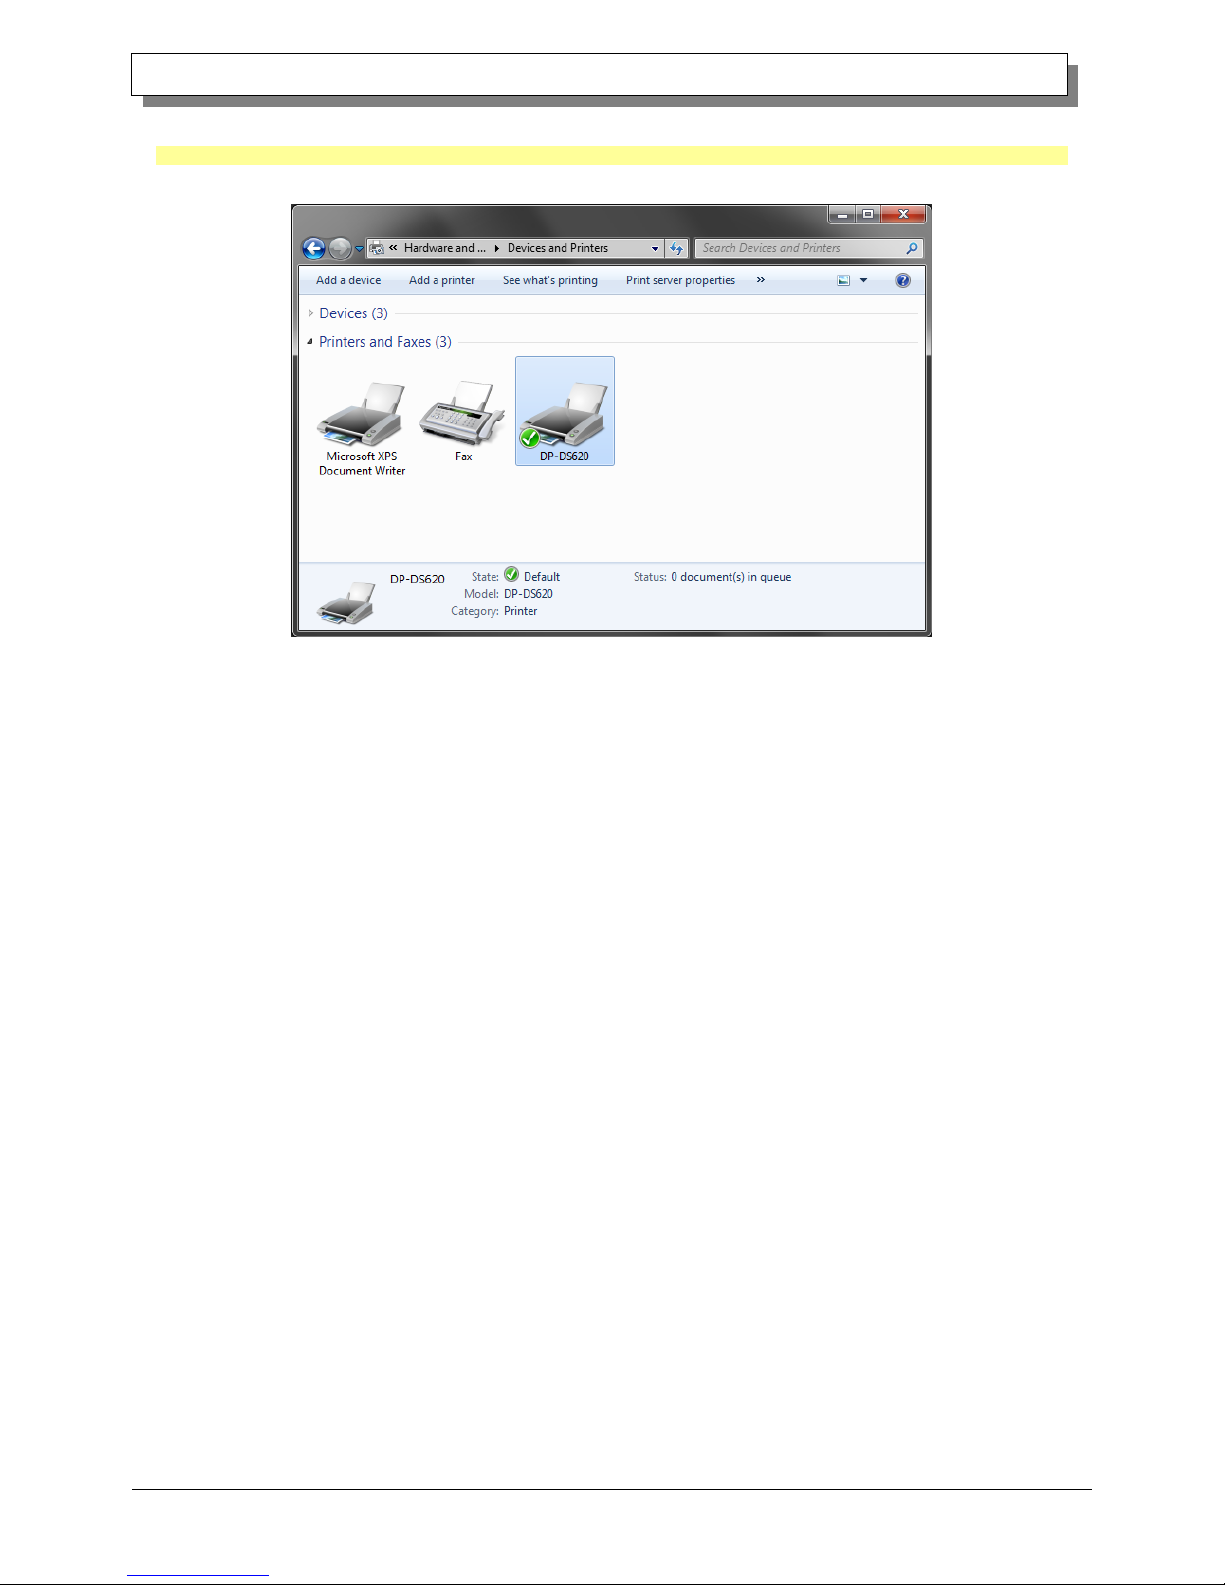
In Devices and Printers, make sure that “DP-DS620” is present.
Note: In Windows 8, when the printer is offline (the printer is not on and connected), the DP-DS620 icon is not displayed.
This completes installation of the DP-DS620 printer driver.
Figure 1.20 Devices and Printers screen
After the installation of the printer driver is complete, always restart the computer.
Page 15
12
Dai Nippon Printing Co., Ltd.
[DP-DS620/DP-DS620 (A) Printer Driver] User’s Manual (For Windows 7, 8)
CChhaapptteerr 22 PPrrooppeerrttiieess
You can configure various printer settings from the Properties of the DP-DS620 driver. Make sure you understand the
contents well before changing settings. To use the properties, log in as an administrator. Depending on the application
you are using, you must perform this operation from the print settings of the application.
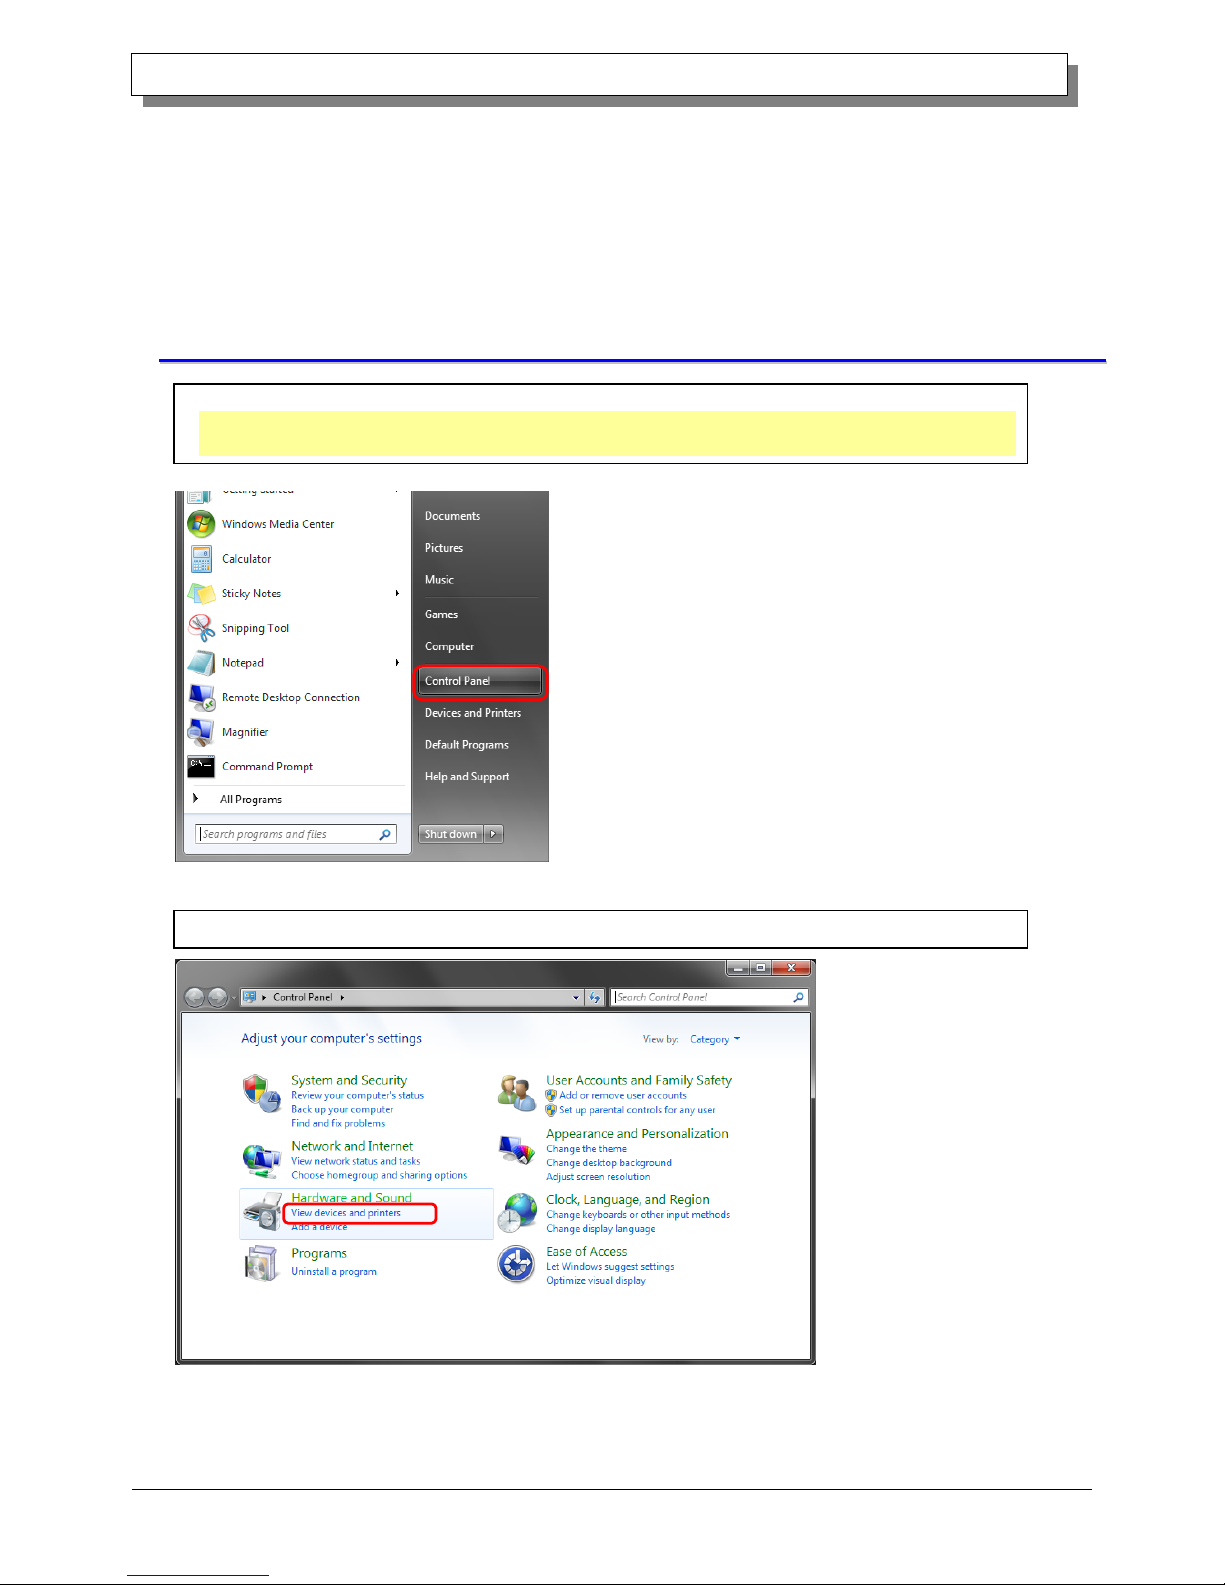
22..11 OOppeenn tthhee pprriinntteerr pprrooppeerrttiieess
2. From the Control Panel, click "View devices and printers" to open the Devices and Printers screen.
1. Click "Start", and then click "Control Panel" to open the Control Panel.
In Windows 8, right click the Start screen, click "All Apps", and then click "Control Panel" to open the Control
Panel.
Page 16
13
Dai Nippon Printing Co., Ltd.
[DP-DS620/DP-DS620 (A) Printer Driver] User’s Manual (For Windows 7, 8)
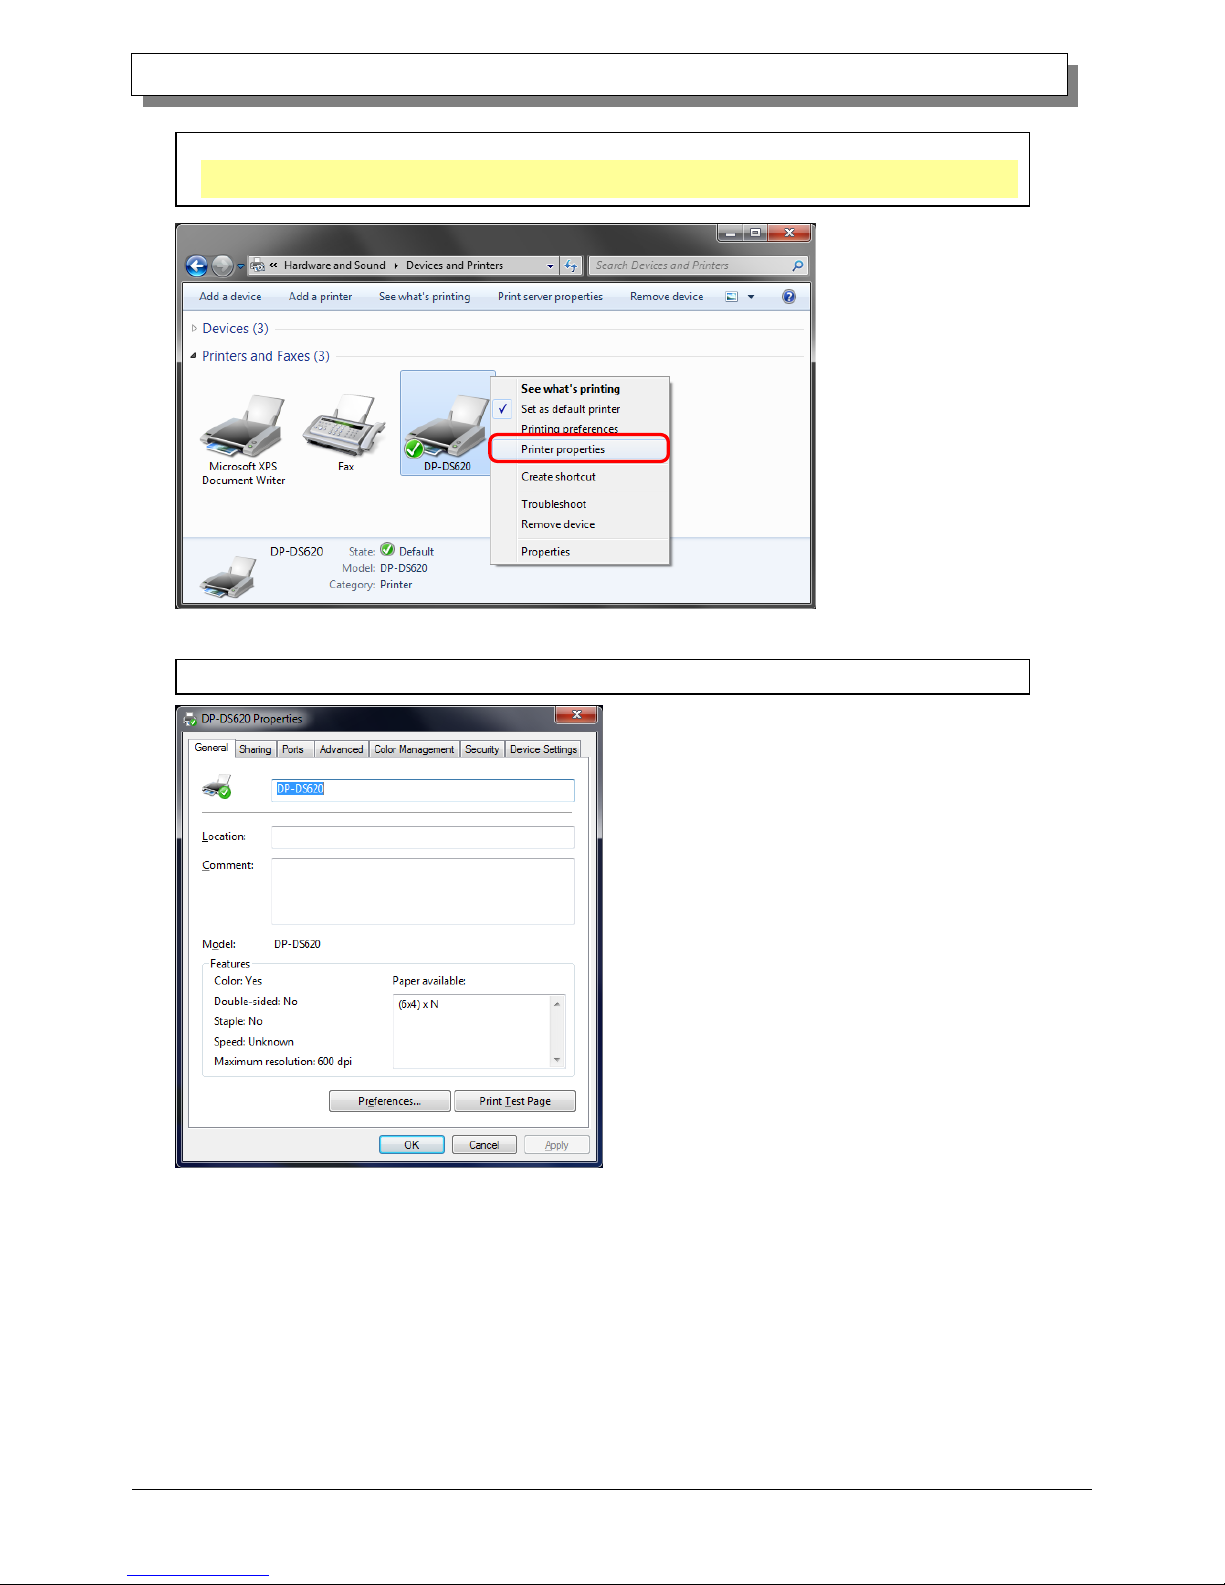
4. The DP-DS620 Properties screen appears.
3. Right click the DP-DS620 icon. From the menu, click "Printer Properties" to open the Properties dialog box.
Note: In Windows 8, when the printer is offline (the printer is not on and connected), the DP-DS620 icon is
not displayed.
Page 17
14
Dai Nippon Printing Co., Ltd.
[DP-DS620/DP-DS620 (A) Printer Driver] User’s Manual (For Windows 7, 8)
22..22 PPrriinntt sseettttiinnggss ffuunnccttiioonnss
If you select the basic settings from the Properties screen, you can change various print settings.
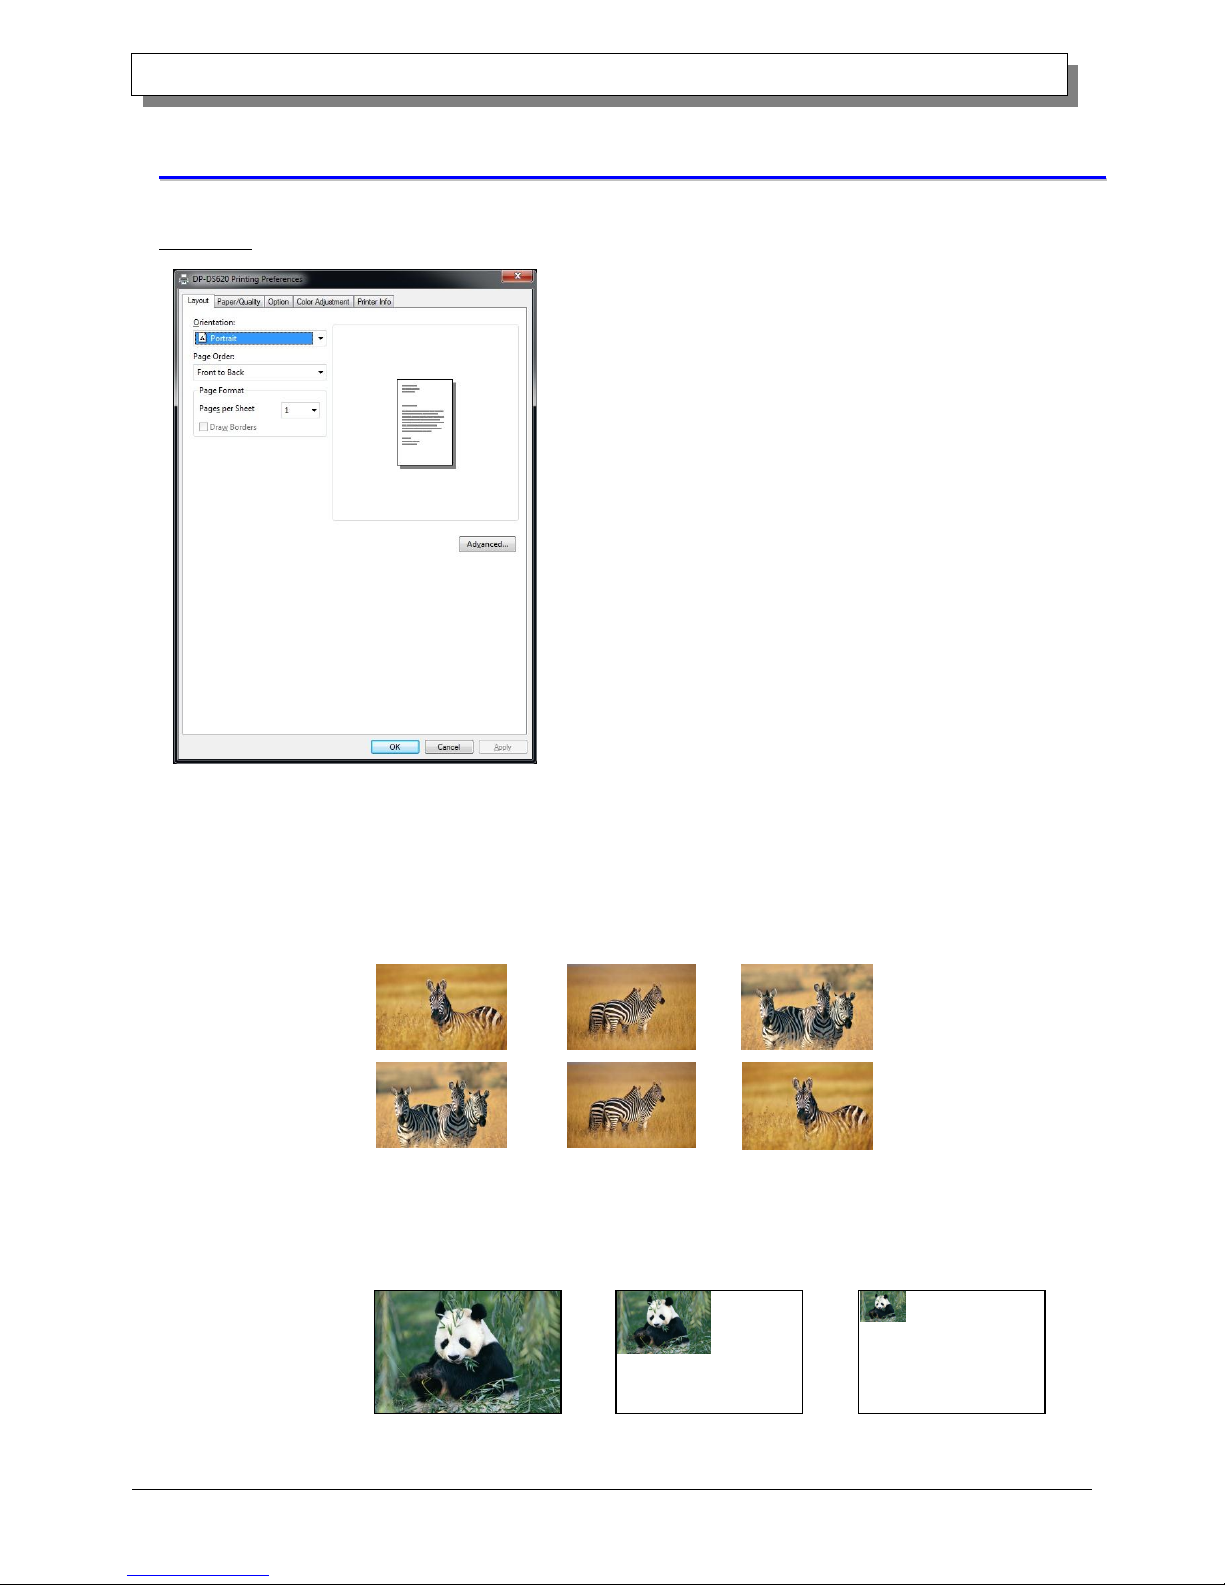
2.2.1 Layout
Orientation
Set the print orientation to "Portrait" or "Landscape".
For details, refer to “2.6 Orientation”.
Page Order
In the application, specify the order when multiple copies of an image are printed.
Example) Print order
Pages per Sheet
Set printing of the specified division size. In most situations, set “1”.
Example) Division size
No.1
No.2
No.3
Front to Back
Back to Front
1 division
4 divisions
9 division
Figure 2.2.1 Layout tab
Page 18
15
Dai Nippon Printing Co., Ltd.
[DP-DS620/DP-DS620 (A) Printer Driver] User’s Manual (For Windows 7, 8)
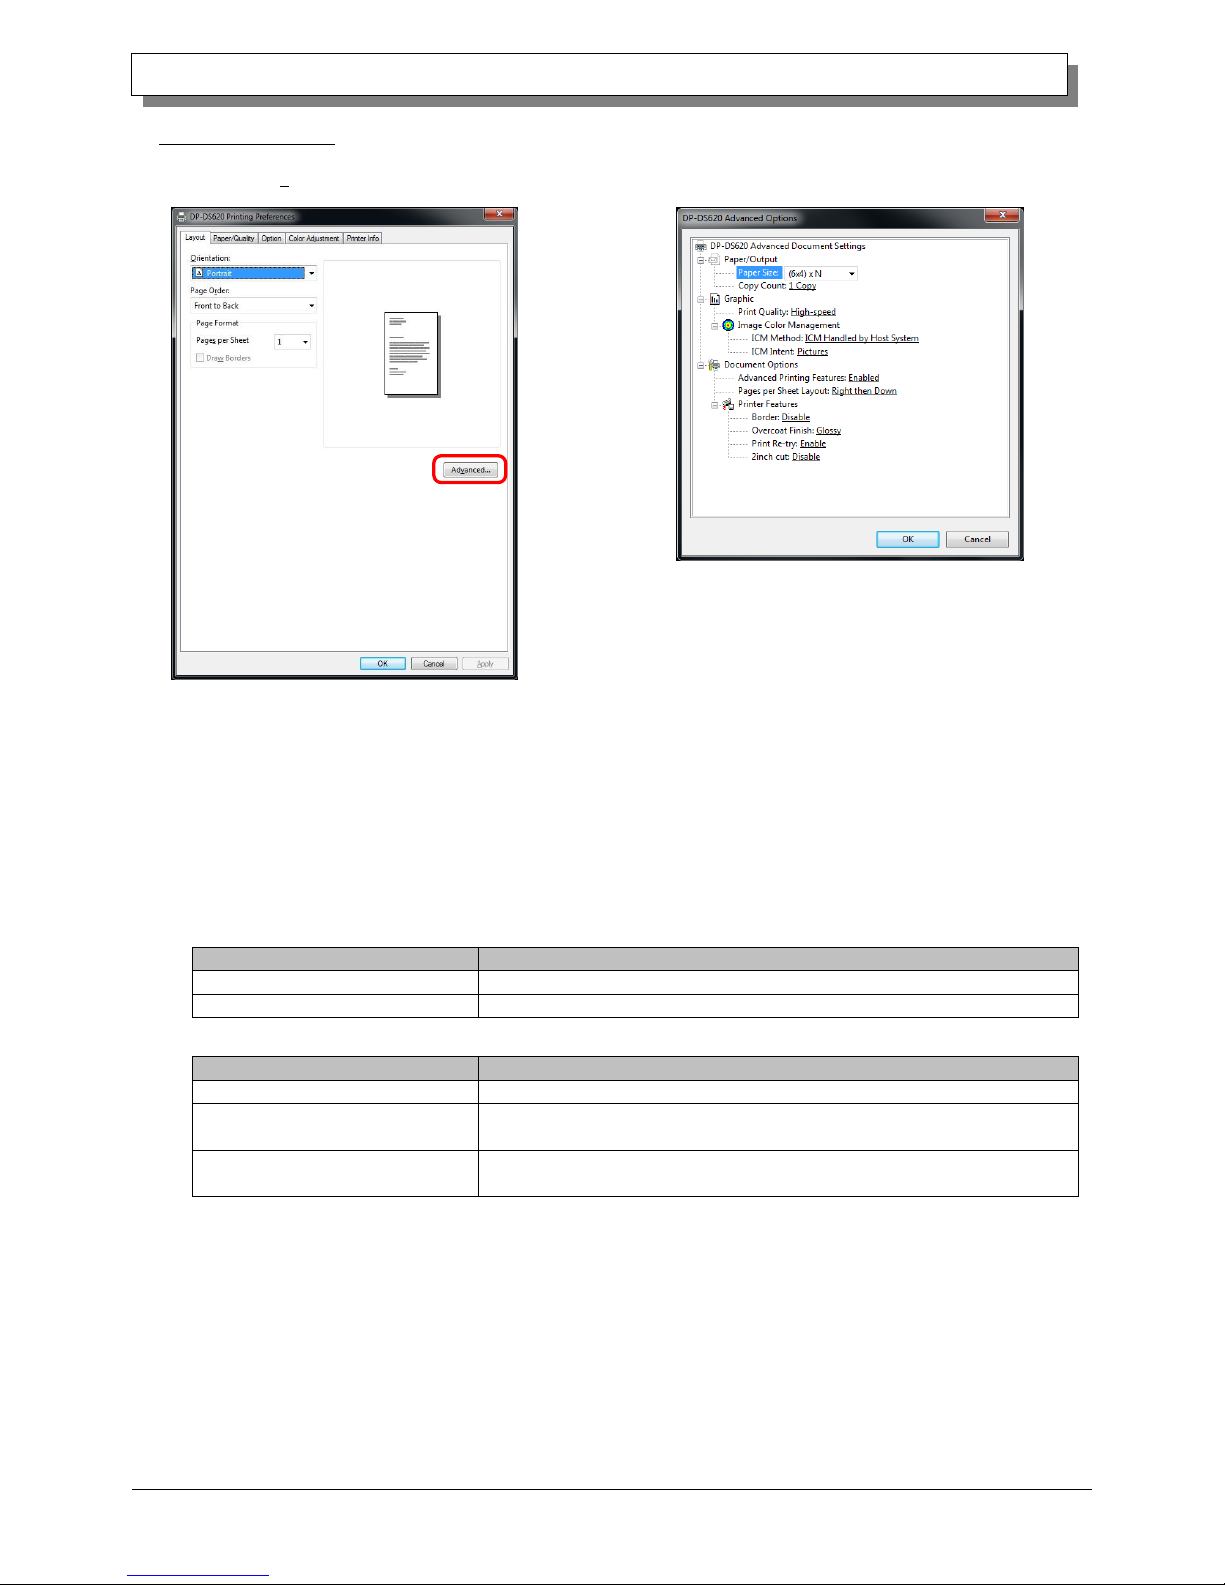
2.2.2 Advanced options
If you select "Advanced..." on the Layout tab, you can configure various advanced options.
Paper Size
Specify the paper size. Match the paper size with the size of the media set in the printer.
You can enable multiple layout settings by setting the paper size. See later sections for details.
Copy Count
You can specify the number of copies to be published for images.
Print Quality
Specify the resolution.
Print quality
Function
High-speed
Print using high speed mode
High-quality
Print using high quality mode
ICM Method
ICM Method
Function
ICM Disabled
Synchronized with "Color Adjustment Disabled" in the 2.2.4 Option.
ICM Handled by Host System
Synchronized with "Color Adjustment ICM" in the 2.2.4 Option.
Manage colors using the driver.
ICM Handled by Printer
When this item has been selected, operation is the same as "ICM Handled by Host
System".
ICM Intent
Set the rendering method when using ICM. For the ICC profile, always set to “Pictures”.
Do not use other settings.
Figure 2.2.2.2 Advanced options tab
Figure 2.2.2.1 Advanced settings
Page 19
16
Dai Nippon Printing Co., Ltd.
[DP-DS620/DP-DS620 (A) Printer Driver] User’s Manual (For Windows 7, 8)
Advanced Printing Features
Always set Enable. Do not use other settings.
Pages per Sheet Layout
Set the layout direction of an image when the Pages per Sheet setting is set for multiple divisions.
Border
Synchronized with Border in the Option.
Overcoat Finish
Set the overcoat finish method for the surface of printed items from the following two types.
Overcoat Finish
Function
Glossy
Create an item with a glossy finish.
Matte
Create an item with a matte finish.
Print Re-try
Specify whether to print data in the printer buffer after a printer error has been cleared.
Print Re-try
Function
Disable
Clear the print data in the printer buffer when a printer error occurs.
You must send the cleared print data again after the error is cleared.
When you use an application with an error recovery function, select this option.
Enable
Save print data in the printer buffer when an error occurs.
The printing process is restarted from the saved data after the error is cleared.
Note that if the power is switched off, the data is not saved.
Depending on the content of the printer error, it may be necessary to restart the printer to clear the error. In such
cases, the print data in the printer buffer is cleared regardless of the Print Re-try setting.
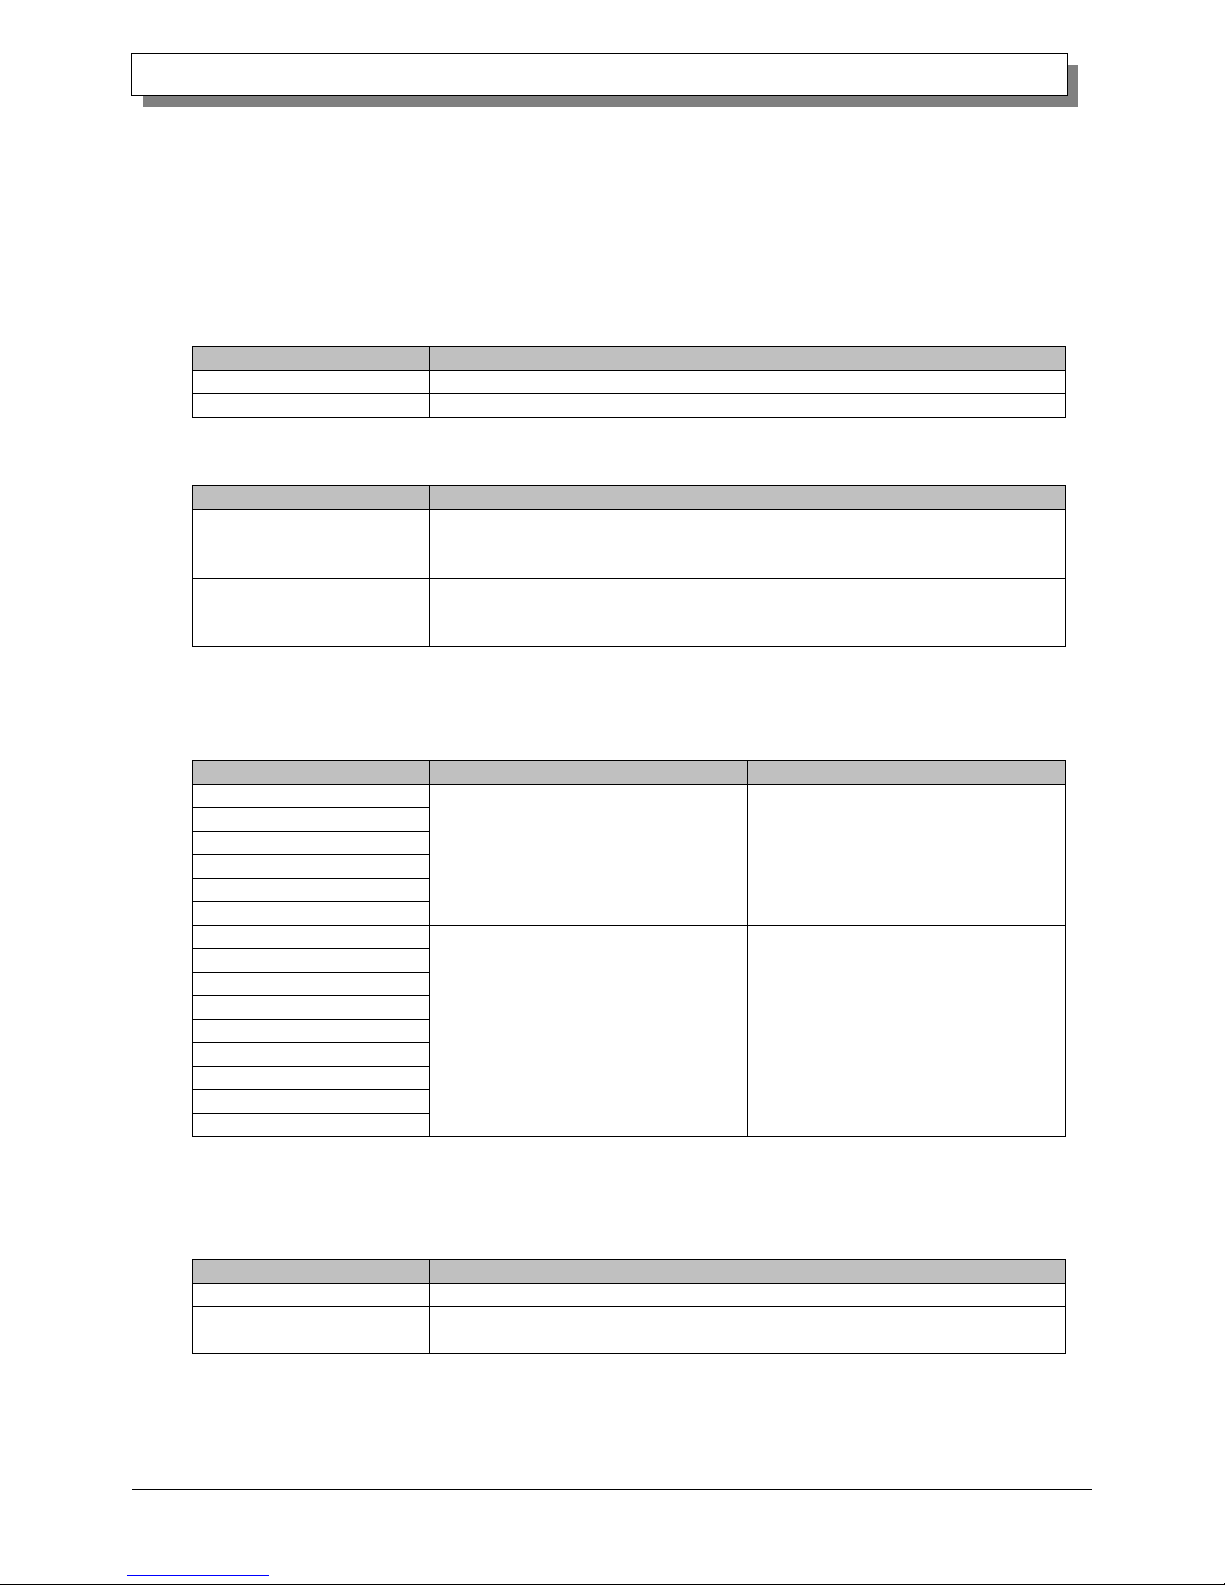
The following section shows the operation for each Print Re-try setting by error.
Error content
When Print Re-try is disabled
When Print Re-try is enabled
Paper end
You must send the unprinted image data
again after the error is cleared.
The printing process is restarted from the
data saved in the printer buffer after the error
is cleared.
When the paper initialization operation is to
be carried out, printing occurs afterwards.
Ribbon end
Cover open
Paper jam (*1)
Ribbon error (*1)
Paper setting error
Data error
Because the printer must be switched on
and off to clear the error, the print data in the
printer buffer is cleared regardless of the
Print Re-try setting.
After the printer has restarted, you must
send the unprinted image data again.
Because the printer must be switched on
and off to clear the error, the print data in the
printer buffer is cleared by switching the
printer off, even when the Print Re-try setting
is Enabled.
After the printer has restarted, you must
send the unprinted image data again.
Head voltage error
Head position error
Power supply fan stopped
Cutter error
Head temperature error
Media temperature error
RFID module error
System error
*1: After the printer stops due to an error, follow the user’s manual of the printer to eliminate the cause of the paper
or ribbon error.
2inch cut
Specify whether to cut paper into multiple sheets with a 2-inch length when you use a specified paper size.
2inch cut
Function
Disable
Cut at the normal size.
Enable
Cut at 2-inch lengths so that the 6 x 4 size becomes two sheets and the 6 x 8 size
becomes four sheets.
Page 20
17
Dai Nippon Printing Co., Ltd.
[DP-DS620/DP-DS620 (A) Printer Driver] User’s Manual (For Windows 7, 8)
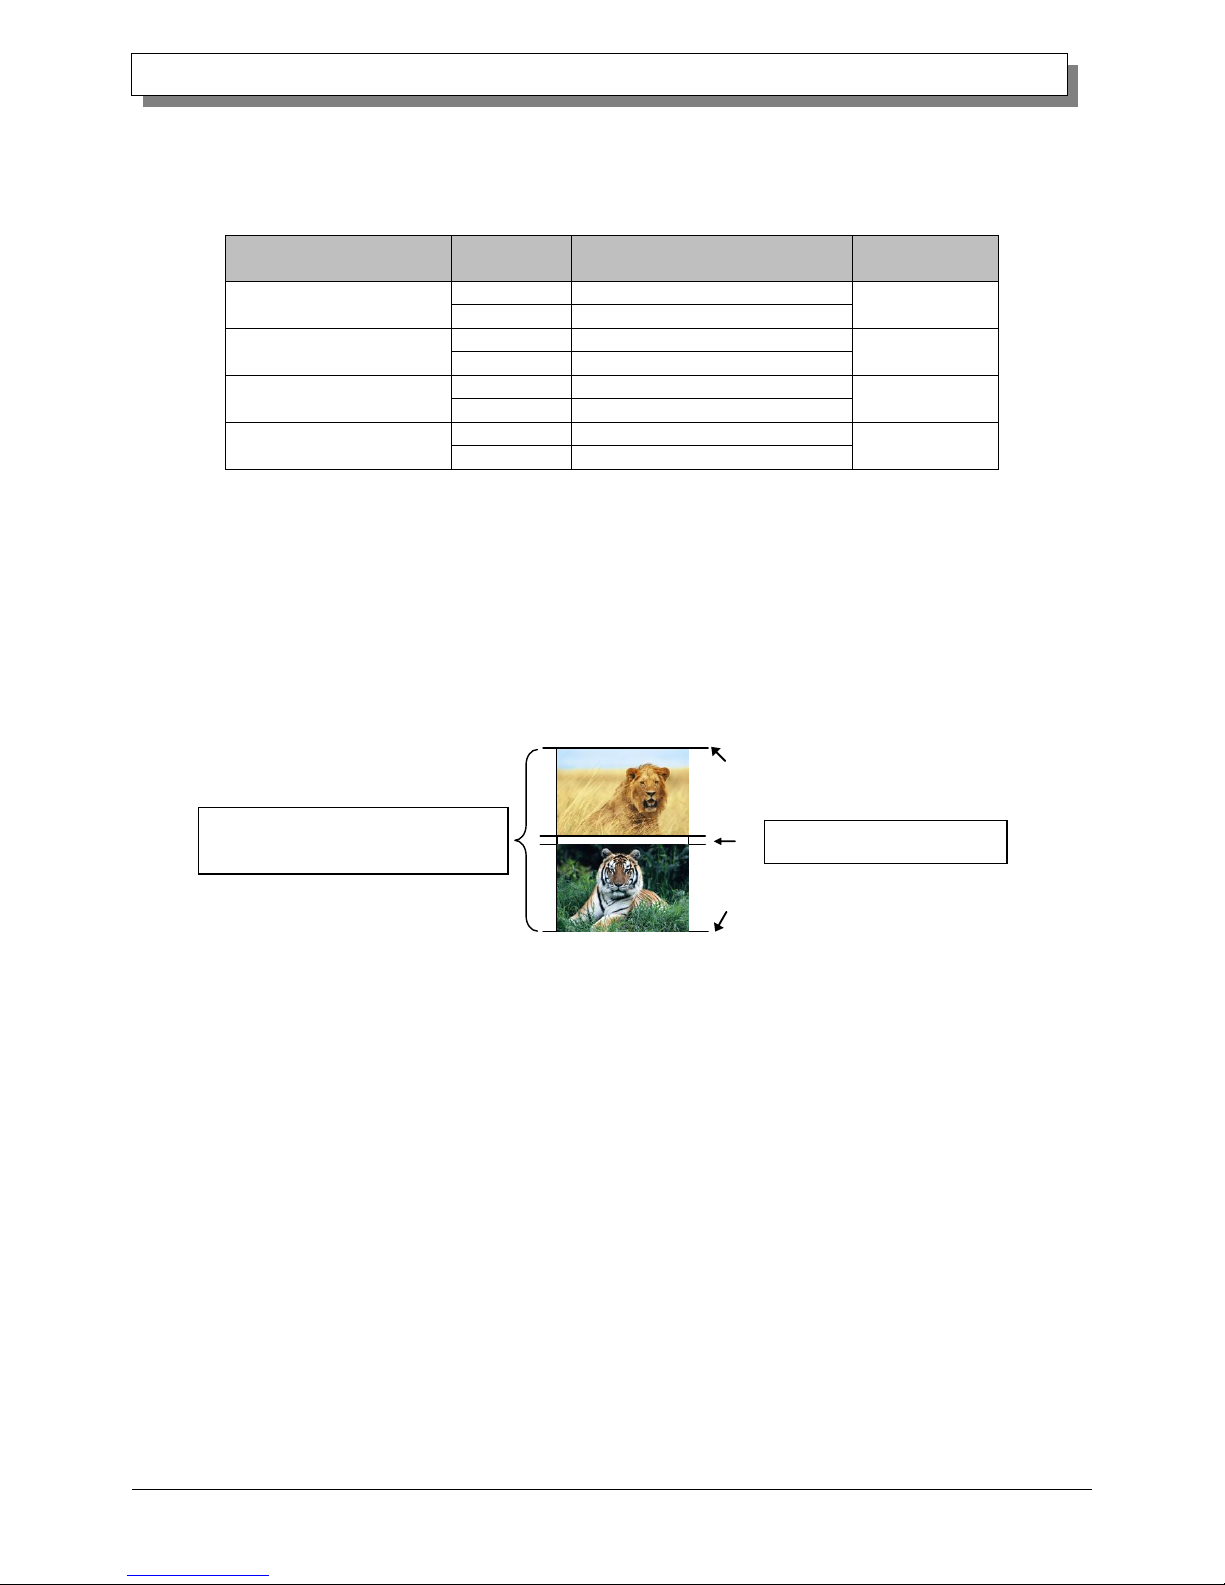
<Multiple layout>
When 5 x 7 or 6 x 8 media is used, you can use a two-picture layout. You can enable multiple layout settings by setting
the paper size of the printer driver. The following section shows the image sizes.
Layout settings
Driver paper size setting
Paper
direction
Paper size length x height (mm)
Media used
(5x3.5) x 2
(5x3.5) x N
Vertical
(131.1x 92.1) x 2
5x7
Horizontal
(92.1x131.1) x 2
PR (3.5x5) x 2
PR (3.5x5) x N
Vertical
(92.1x131.1) x 2
5x7
Horizontal
(131.1x 92.1) x 2
(6x4) x 2
(6x4) x N
Vertical
(156.1x105.0) x 2
6x8
Horizontal
(105.0x156.1) x 2
PR (4x6) x 2
PR (4x6) x N
Vertical
(105.0x156.1) x 2
6x8
Horizontal
(156.1x105.0) x 2
Multiple layout is carried out under the following conditions.
1. Set 5 x 7 or 6 x 8 size media in the printer.
2. Set the paper size of the printer driver to one of the abovementioned paper sizes.
3. From the application, send multiple images.
Note) Because they are carried out by the print job, multiple layout are carried out when there are multiple images
in a single job.
If you want to layout the same image, send the same number of images as the number-of-sheets setting.
The printer handles two pictures at one time and cuts the paper after it is ejected.
Same-size images on one sheet
Layout of 2 pictures: set x 2
Cut when paper is ejected
Page 21
18
Dai Nippon Printing Co., Ltd.
[DP-DS620/DP-DS620 (A) Printer Driver] User’s Manual (For Windows 7, 8)
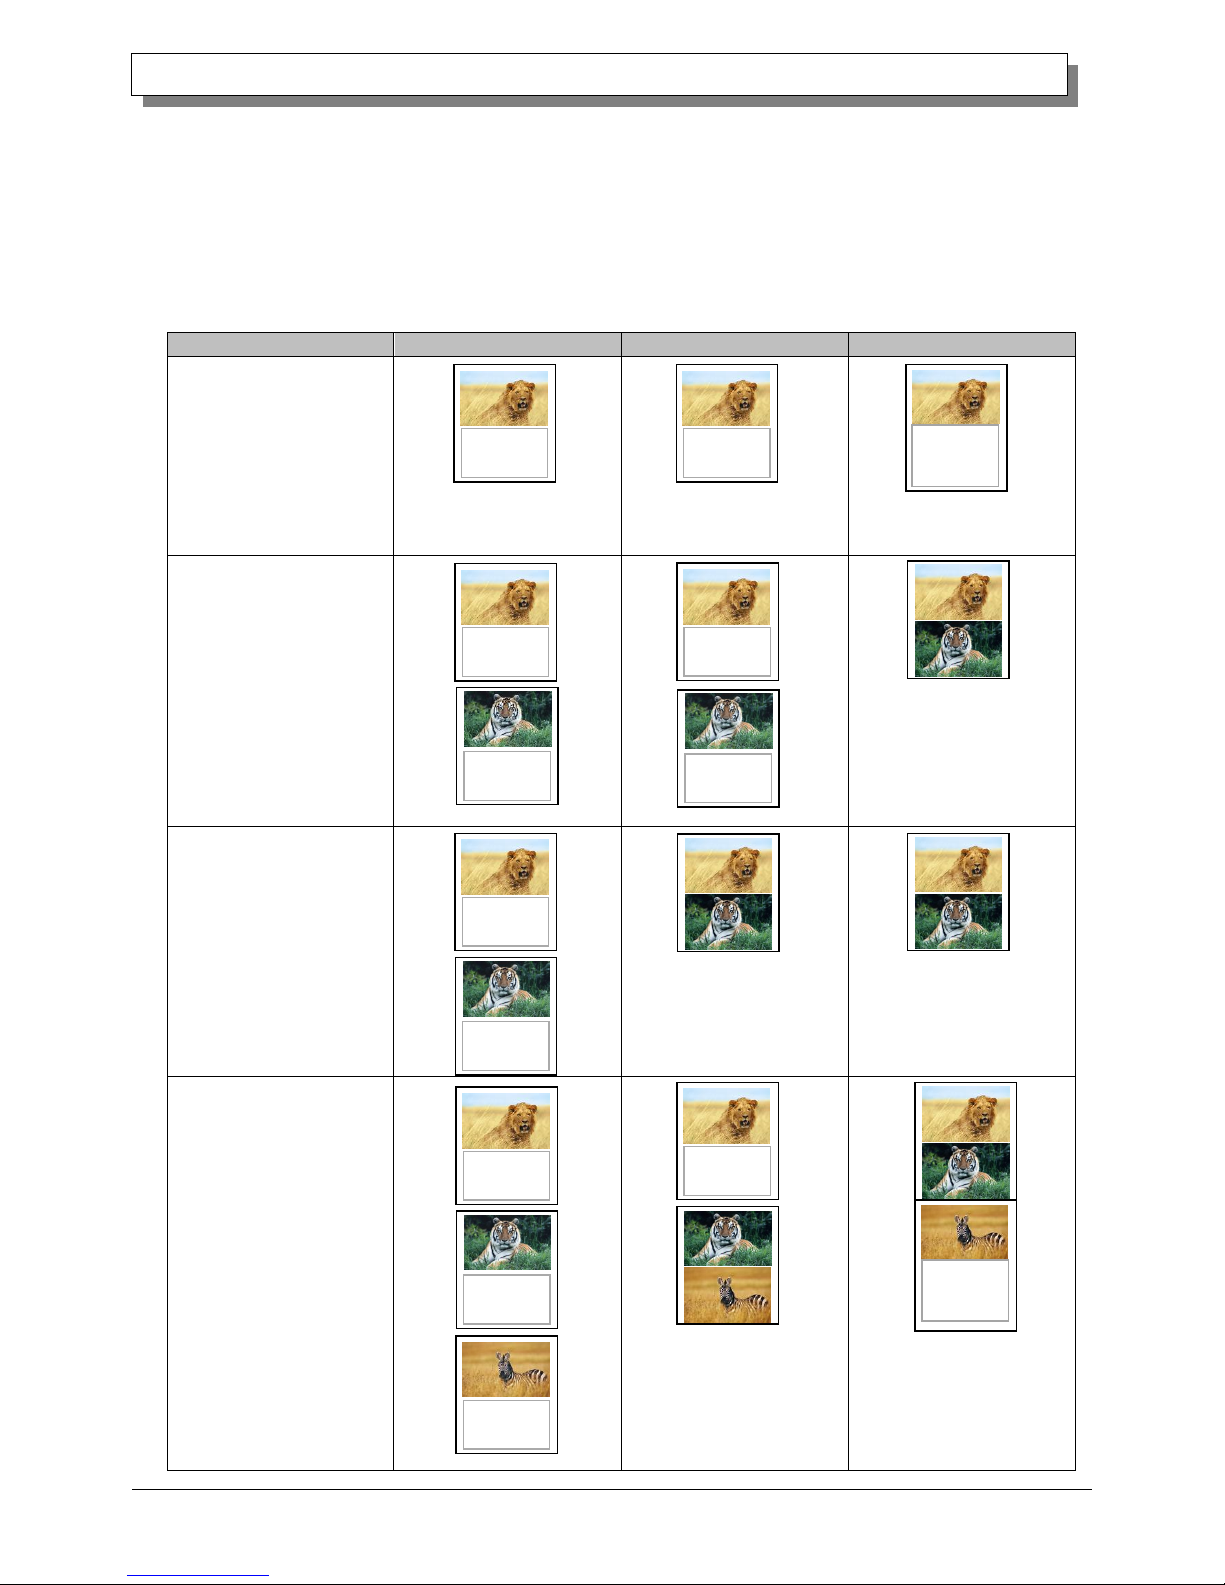
< Paper size (6x4) x N setting >
If you set the paper size setting to (6 x 4) x N when printing 6 x 4 size to 6 x 8 size media, printing is optimized to
reduce consumption of the ribbon. Furthermore, if you set the paper size setting to (5x3.5) x N when printing 5 x 3.5
size to 5 x 7 size media, printing is similarly optimized to reduce consumption of the ribbon.
The above operation applies only to the DP-DS620. When (6x4)xN is selected with the DP-DS620 (A), printing is
performed the same as for (6x4)x2 without rewinding the ribbon. The same applies for (5x3.5)x2 even if (5x3.5)xN is
selected.
The following section shows the differences in ribbon consumption when (6x4), (6x4) x 2, or (6x4) x N is specified for
the paper size setting.
(6x4)
(6x4) x 2
(6x4) x N
When printing one sheet at
6 x 4 size once
*After printing, the ribbon is
rewound and adjusted to the next
print position.
When printing one sheet at
6 x 4 size twice
*After the first sheet is printed, the
ribbon is rewound, and the second
sheet is printed.
When printing two sheets
at 6 x 4 size once
*Two sheets are printed at the
same time in a multiple layout.
*Two sheets are printed at the
same time in a multiple layout.
When printing one 6 x 4
size sheet once, and then
printing two 6 x 4 size
sheets once
*For the second and third sheets,
two sheets are printed at the same
time in a multiple layout.
*After the first sheet is printed, the
ribbon is rewound, and the second
and following sheets are printed.
Furthermore, after the third sheet is
printed, the ribbon is rewound and
adjusted to the next print position.
Not used
Not used
Not used
Not used
Not used
Not used
Not used
Not used
Used for
the next
printing
Used for
the next
printing
Page 22
19
Dai Nippon Printing Co., Ltd.
[DP-DS620/DP-DS620 (A) Printer Driver] User’s Manual (For Windows 7, 8)
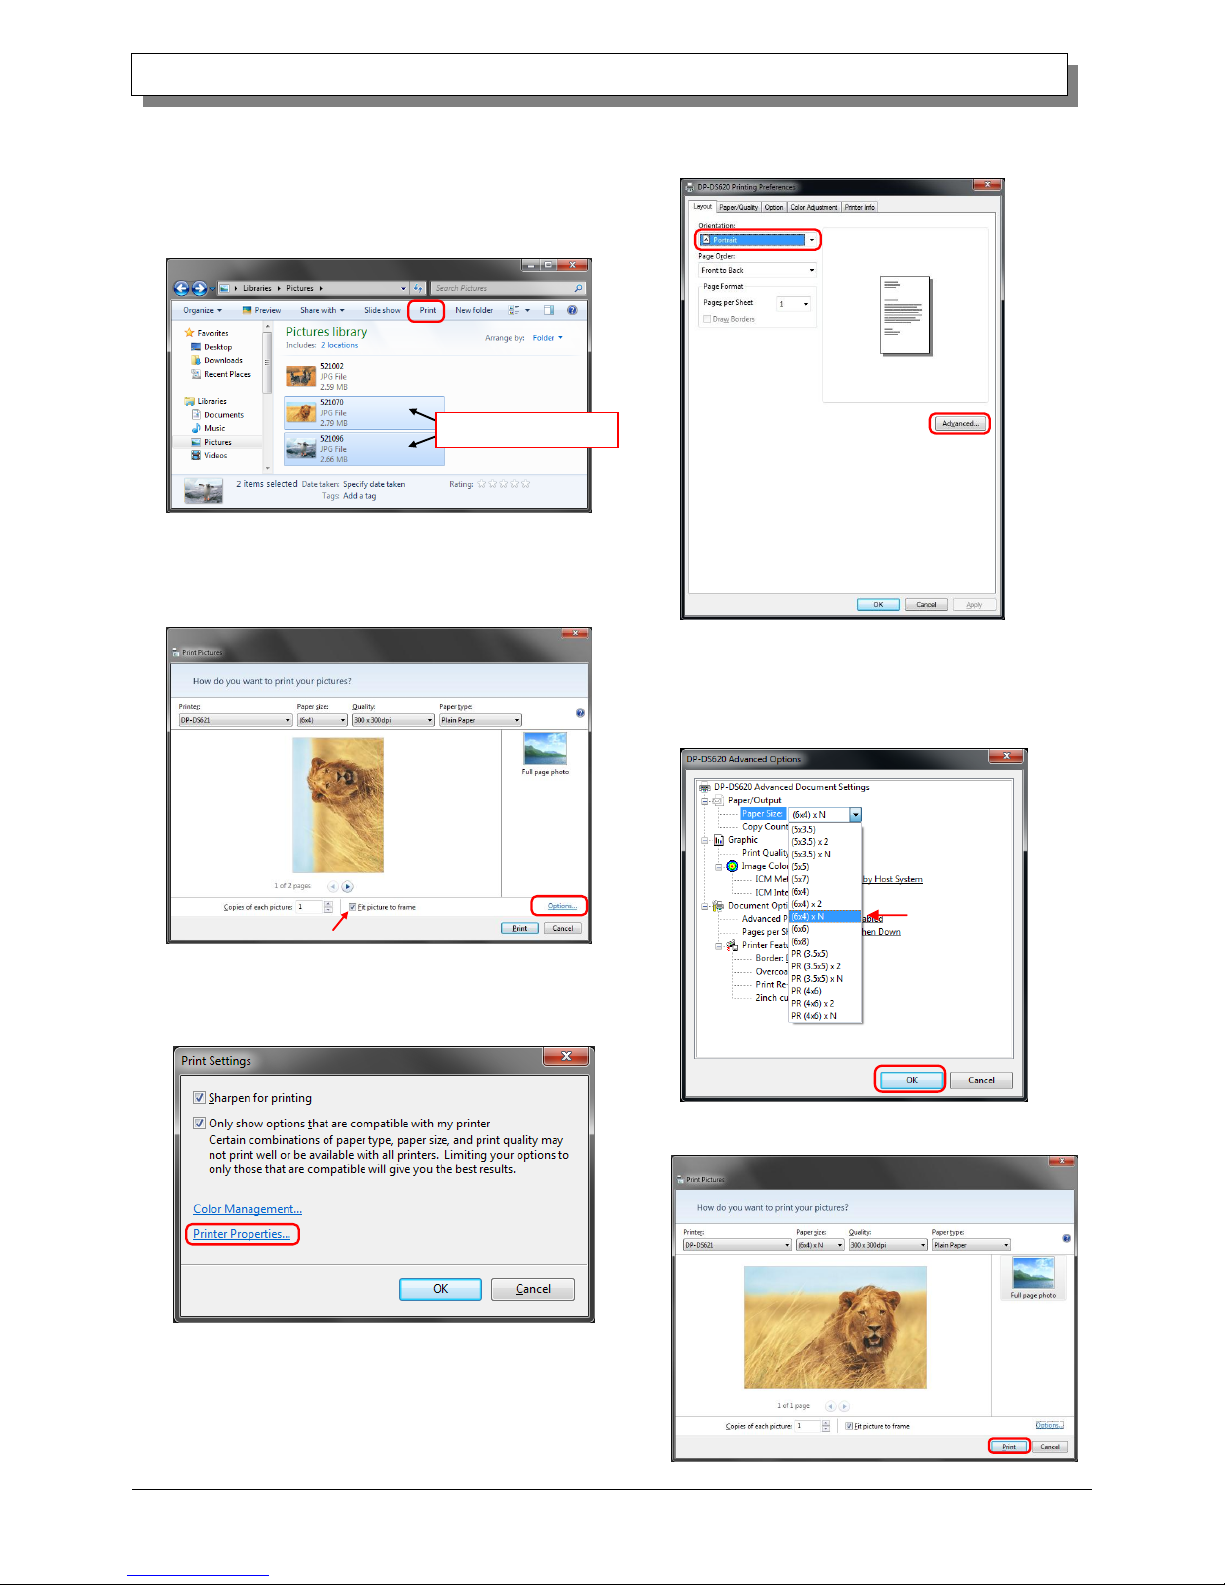
< Application usage example >
This usage example uses Windows Explorer.
Step 2. Select "Fit picture to frame" check box, and then
click "Options...".
Step 1. In Windows Explorer, select two or more pictures.
Next, click "Print".
Select 2 or more images
Step 3. Click "Printer Properties...".
Step 6. Click the Print button.
Step 4. Set the Orientation to Portrait,
and click "Advanced...".
Step 5. Set the paper size to the setting of the multiple
layout.
Click OK twice to close the dialog boxes in Step 5
and 4.
Page 23
20
Dai Nippon Printing Co., Ltd.
[DP-DS620/DP-DS620 (A) Printer Driver] User’s Manual (For Windows 7, 8)
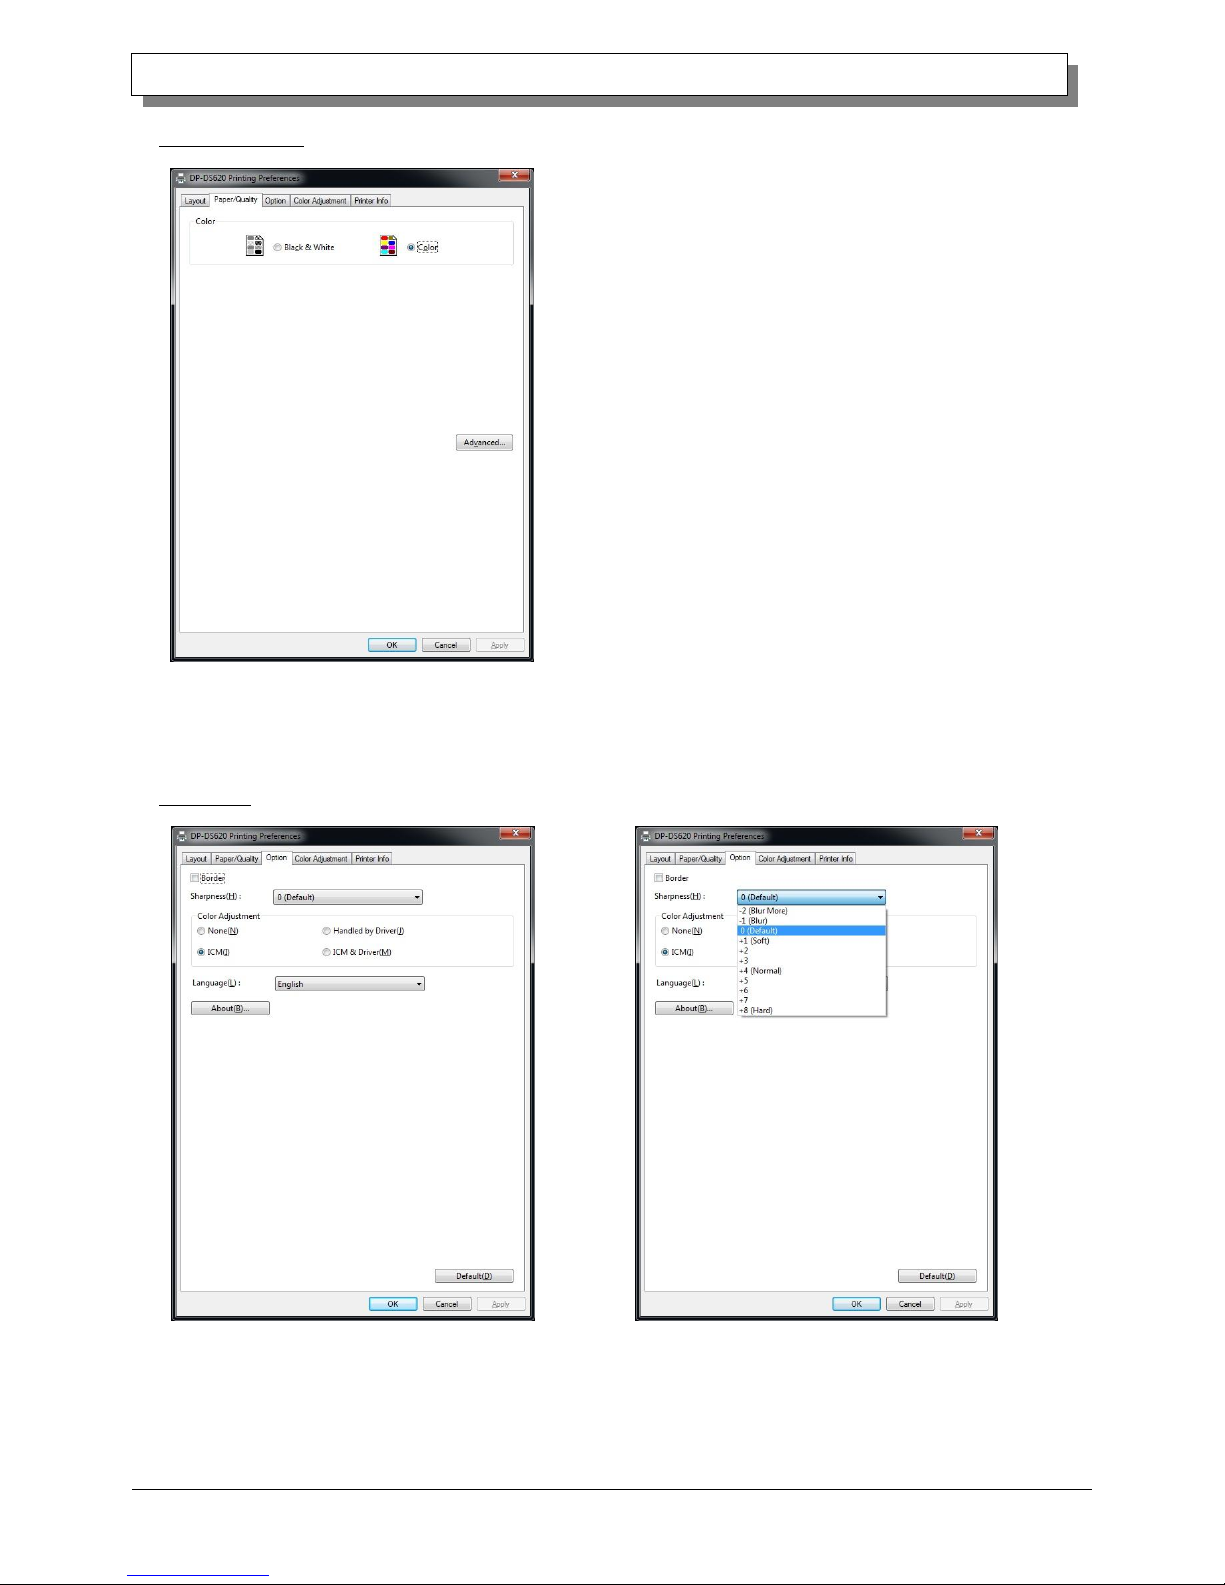
2.2.3 Paper/Quality
Color Set Color. Do not use black and white.
2.2.4 Option
Border
Specify a border for printing. (Select the check box for a border.) Synchronized with Border Enable/Disable in the
Advanced settings.
Figure 2.2.3 Paper/Quality tab
Fig 2.2.4.1 Option tab
Fig 2.2.4.2 Sharpness setting
Page 24
21
Dai Nippon Printing Co., Ltd.
[DP-DS620/DP-DS620 (A) Printer Driver] User’s Manual (For Windows 7, 8)
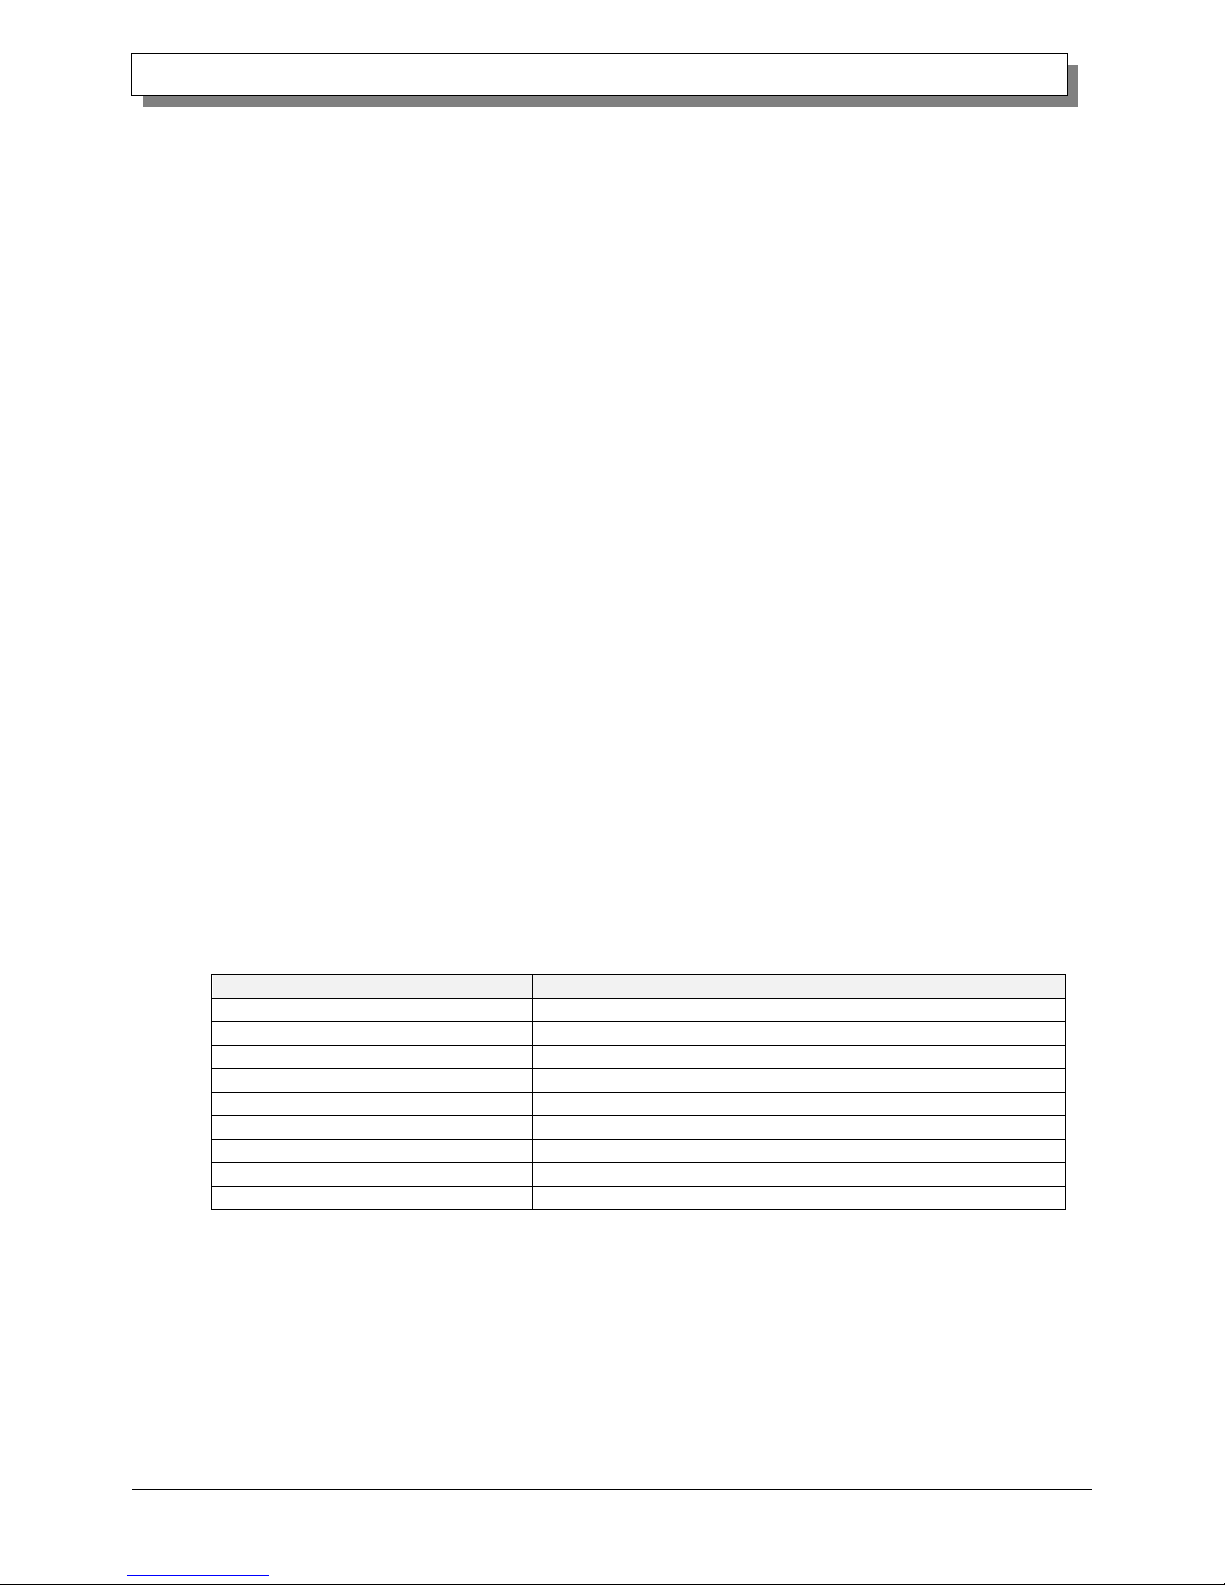
Sharpness
Process sharpness using one of the 11 stages (Figure 2.2.4.2). If the setting is “0 (Default)”, sharpness is not
processed.
Moving to the minus (-) side blurs the image and moving to the plus (+) side sharpens the image.
Color Adjustment
None
Synchronized with the ICM Method in the Advanced settings. If this check box is selected, ICM is disabled,
the Color adjustment tab is also disabled, and the printer driver does not carry out color adjustment.
Handled by Driver
If this check box is selected, ICM is disabled, and the 2.2.5 Color Adjustment is enabled. The result is applied
to the adjustment values of the following items: Gamma, Brightness, Contrast, and Chroma.
ICM
Synchronized with the ICM Method of the Advanced settings (ICM Handled by Host System). If this check box is
selected, the driver manages colors.
ICM & Driver
If this check box is selected, ICM (color management) and the 2.2.5 Color Adjustment are enabled.
Language
Change the display language for the following items: Advanced options-Printer functions, Option, Color Adjustment,
and Printer Info.
The selected language is enabled the next time the print settings are displayed.
[Available languages]
・Japanese
・English (US)
・French (France)
・German (Germany)
・Russian (Russia)
・Spanish (Spain)
・Korean
・Chinese (People's Republic of China)
・Chinese (Taiwan)
・When your operating system environment corresponds with one of the above settings, the default display language
is the language of the corresponding country.
Furthermore, when your operating system environment does not correspond with one of the above settings,
the default display language is English.
・To use a language different from that of your operating system, you must install the following font for
the corresponding language.
Language
Font
Japanese
Meiryo (メイリオ)
English (US)
Segoe UI
French (France)
Segoe UI
German (Germany)
Segoe UI
Russian (Russia)
Segoe UI
Spanish (Spain)
Segoe UI
Korean
Malgun Gothic(맑은 고딕)
Chinese (People's Republic of China)
Microsoft YaHei(微软雅黑)
Chinese (Taiwan)
Microsoft JhengHei(微軟正黑體)
About
Show the driver version.
Page 25
22
Dai Nippon Printing Co., Ltd.
[DP-DS620/DP-DS620 (A) Printer Driver] User’s Manual (For Windows 7, 8)
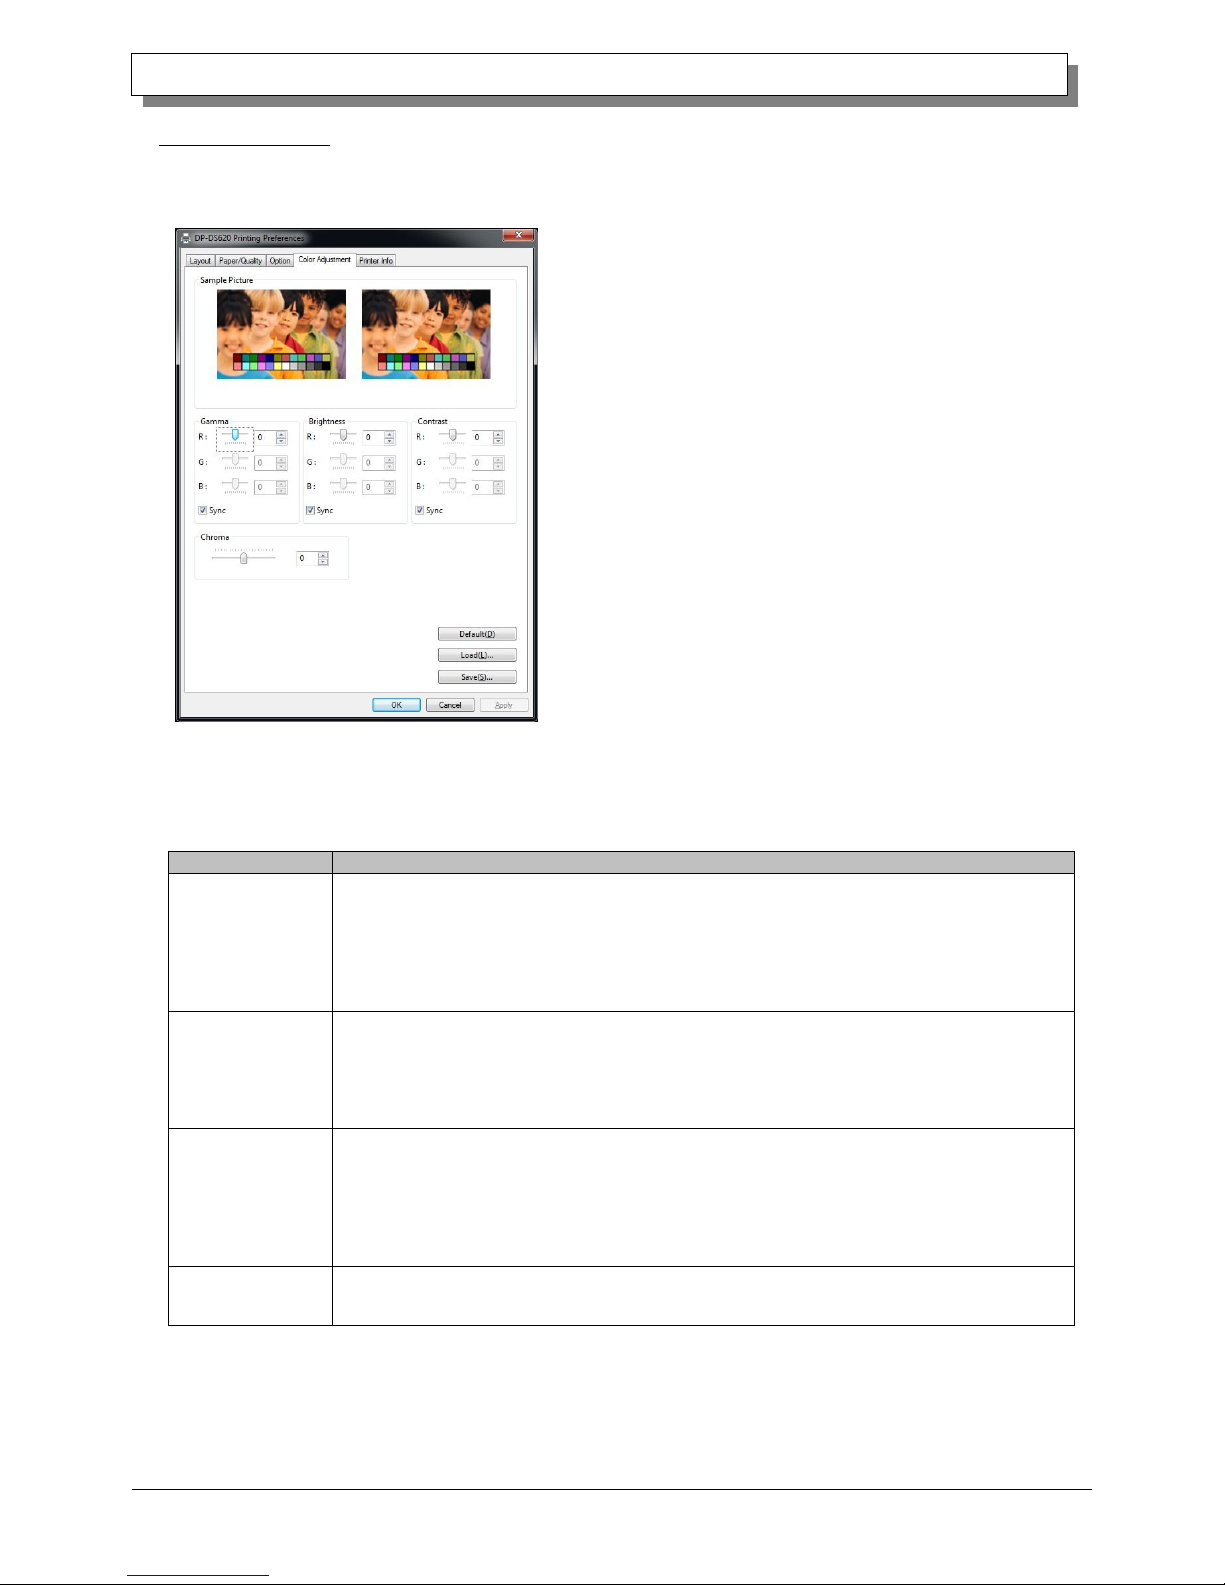
2.2.5 Color Adjustment
If the Handled by Driver check box is selected in the 2.2.4 Option, the adjustment values of the Color Adjustment tab
are applied to the image.
The following section shows the setting ranges on the Color Adjustment tab.
Adjustment item
Adjustment value
Gamma
-100 (dark) to 100 (bright) (“0” results in no adjustment, γ2.0 to 0.5)
Adjust the density of the half-tone section of the image. Increasing the gamma value brightens
the half-tone section.
Sync check box
ON: Set RGB to same value.
OFF: Set RGB to different value.
Brightness
-100 (dark) to 100 (bright) (“0” results in no adjustment)
Adjust the brightness of the image. Increasing the brightness value brightens the entire image.
Sync check box
ON: Set RGB to same value.
OFF: Set RGB to different value.
Contrast
-100 (weak) to 100 (strong) (“0” results in no adjustment)
Adjust the contrast of the image. Increasing the contrast value increases the difference of
brightness and darkness.
Sync check box
ON: Set RGB to same value.
OFF: Set RGB to different value.
Chroma
-100 (weak) to 100 (strong) (“0” results in no adjustment)
Adjust the chroma of the image.
Fig 2.2.5 Color Adjustment tab
Page 26
23
Dai Nippon Printing Co., Ltd.
[DP-DS620/DP-DS620 (A) Printer Driver] User’s Manual (For Windows 7, 8)
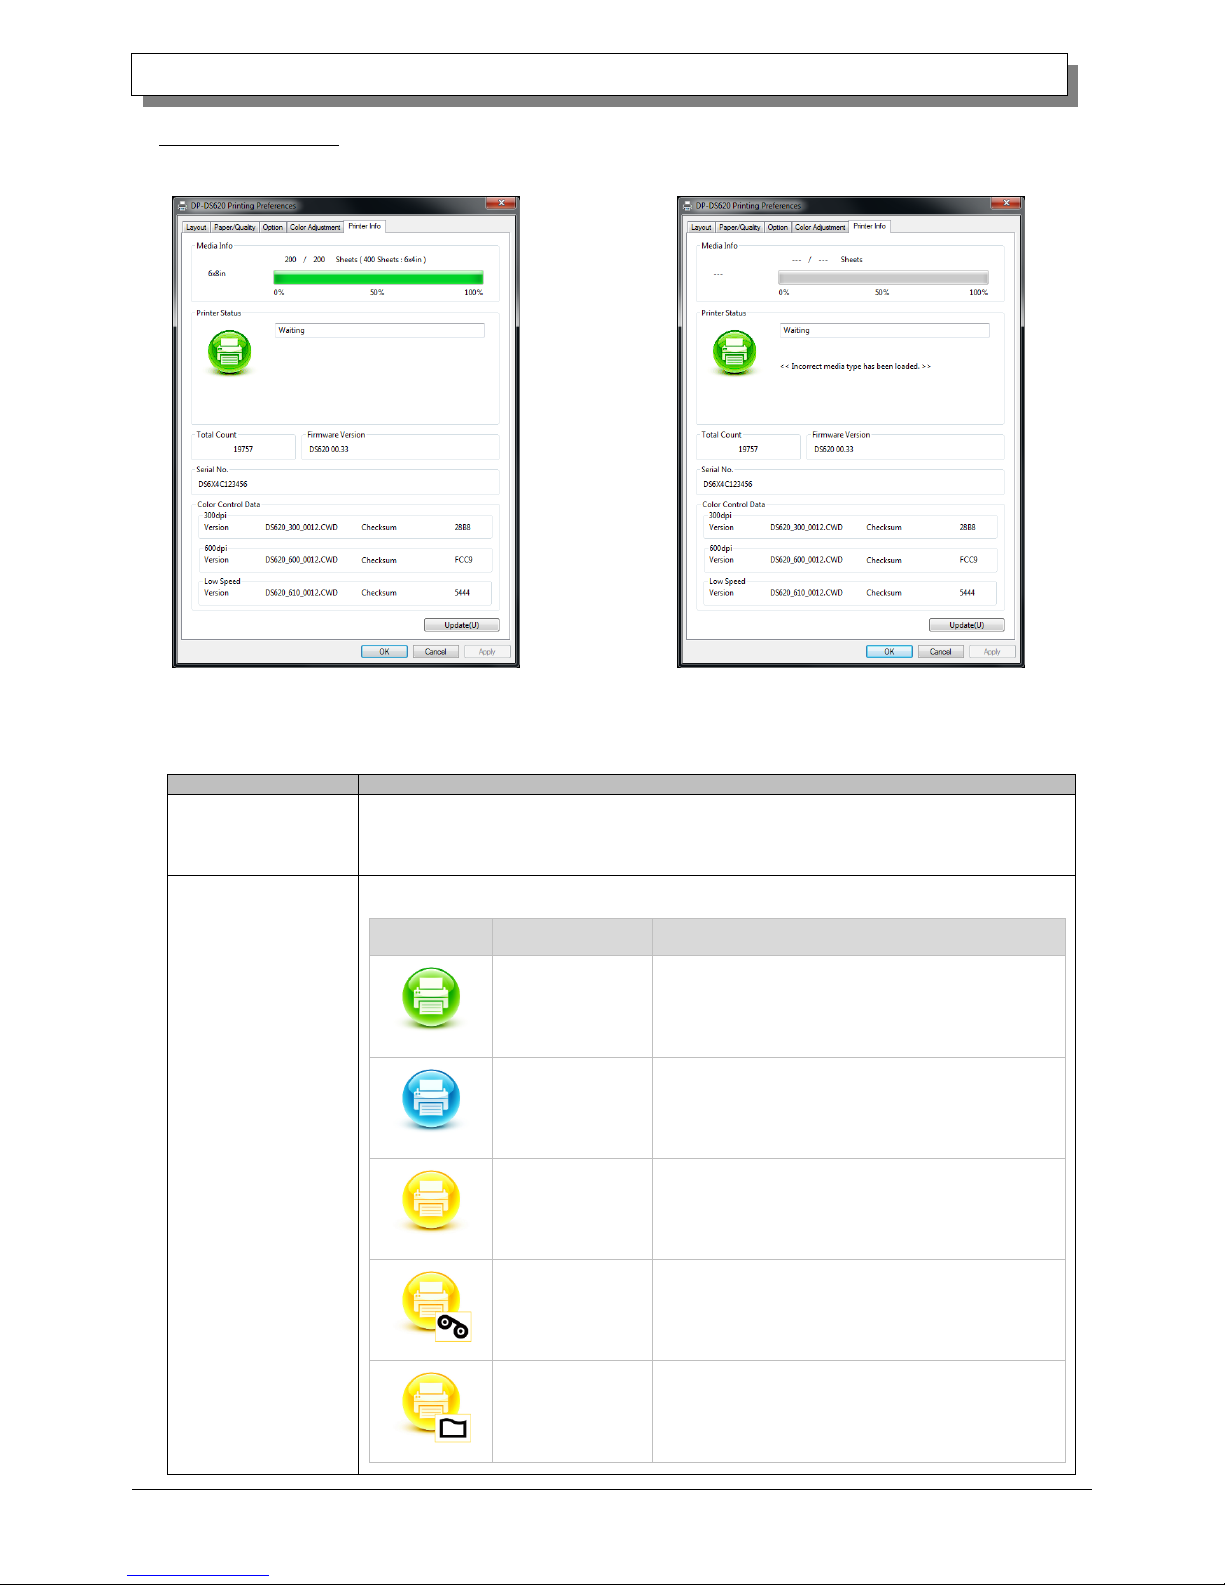
2.2.6 Printer information
View the printer information.
The following section shows the information displayed in the Printer Info tab.
Display item
Display details
Media Info
This area shows, for example, the size and remaining number of printable sheets for the
ribbon media in the printer.
* Media information is not displayed when a media type not supported by the printer has
been loaded. (Figure 2.2.6.2)
Printer Status
Displays the status of the printer using icons and characters.
Display icon
(Color)
Display characters
Status/Response
(Green)
Waiting
Printing is possible.
(Blue)
Printing
The printer is printing.
(Yellow)
Door open
Front door is open.
Close the front door.
(Yellow)
Ribbon end
No ribbon remains.
Load new media.
(Replace the paper and ribbon as a set.)
(Yellow)
Paper end
No paper remains.
Load new media.
(Replace the paper and ribbon as a set.)
Fig 2.2.6.1 Printer Information tab
Figure 2.2.6.2 Display when incorrect media is loaded
Page 27
24
Dai Nippon Printing Co., Ltd.
[DP-DS620/DP-DS620 (A) Printer Driver] User’s Manual (For Windows 7, 8)
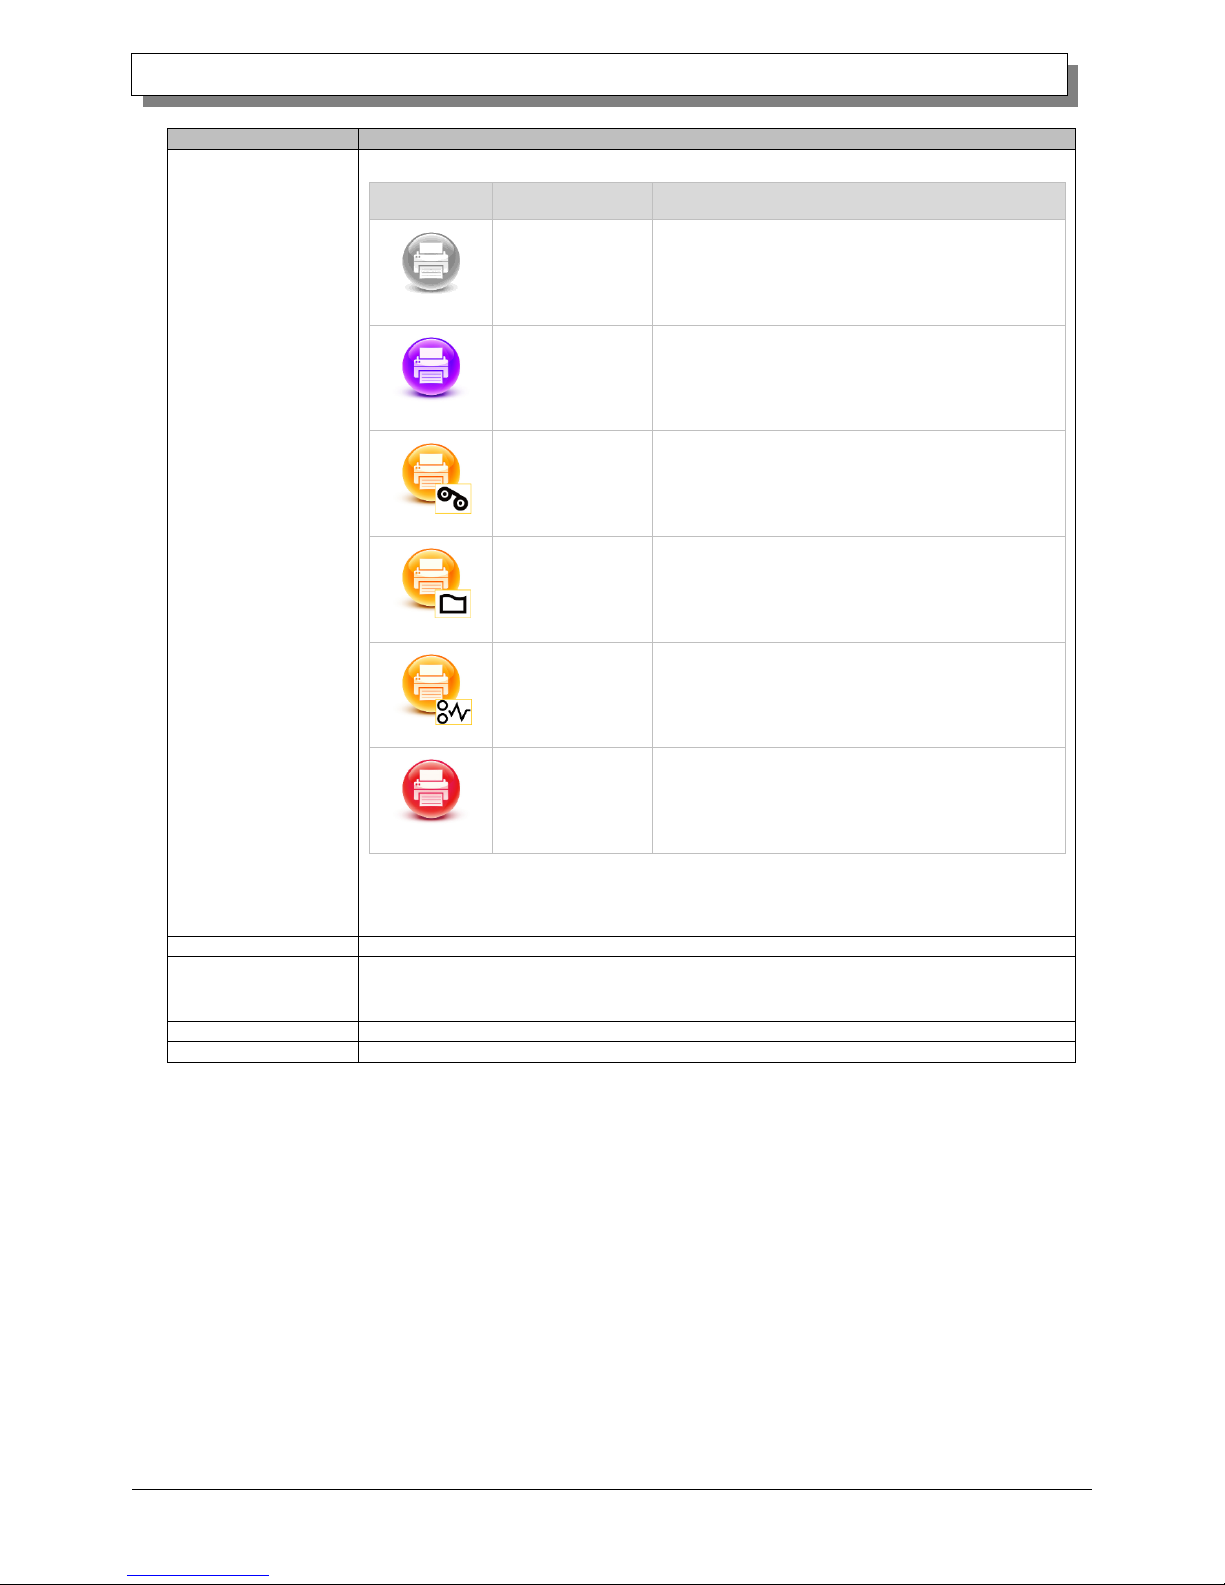
Display item
Display details
* A warning message is displayed when a media type not supported by the printer has been
loaded.(Figure 2.2.6.2)
Display icon
(Color)
Display characters
Status/Response
(Gray)
Offline
The printer cannot be recognized.
Connect the printer and computer, and then turn on
the power.
(Purple)
Cooling head
The head is being cooled.
Please wait a while. Printing will resume
automatically.
(Orange)
Ribbon error
The ribbon is not set correctly.
Reload the ribbon properly.
(Orange)
Paper size
setting error
The printer settings and size of the installed ribbon
do not match.
Check the paper size setting and ribbon size.
(Orange)
Paper jam
A paper jam was detected.
Remove the paper and reload it properly.
(Red)
System error
System error.
Restart the printer and computer. If the printer does
not recover after the restart, contact the service
center.
Total Count
Total count of printed sheets (printing other than 6x4 or 5x3.5 size will count as two sheets).
Firmware Version
Version of the control program of the printer. xx.xx indicates the version.
・DS620A xx.xx (For the United States)
・DS620 xx.xx (For other countries)
Serial No.
Serial number of the printer.
Color Control Data
Printer color control data.
Page 28
25
Dai Nippon Printing Co., Ltd.
[DP-DS620/DP-DS620 (A) Printer Driver] User’s Manual (For Windows 7, 8)
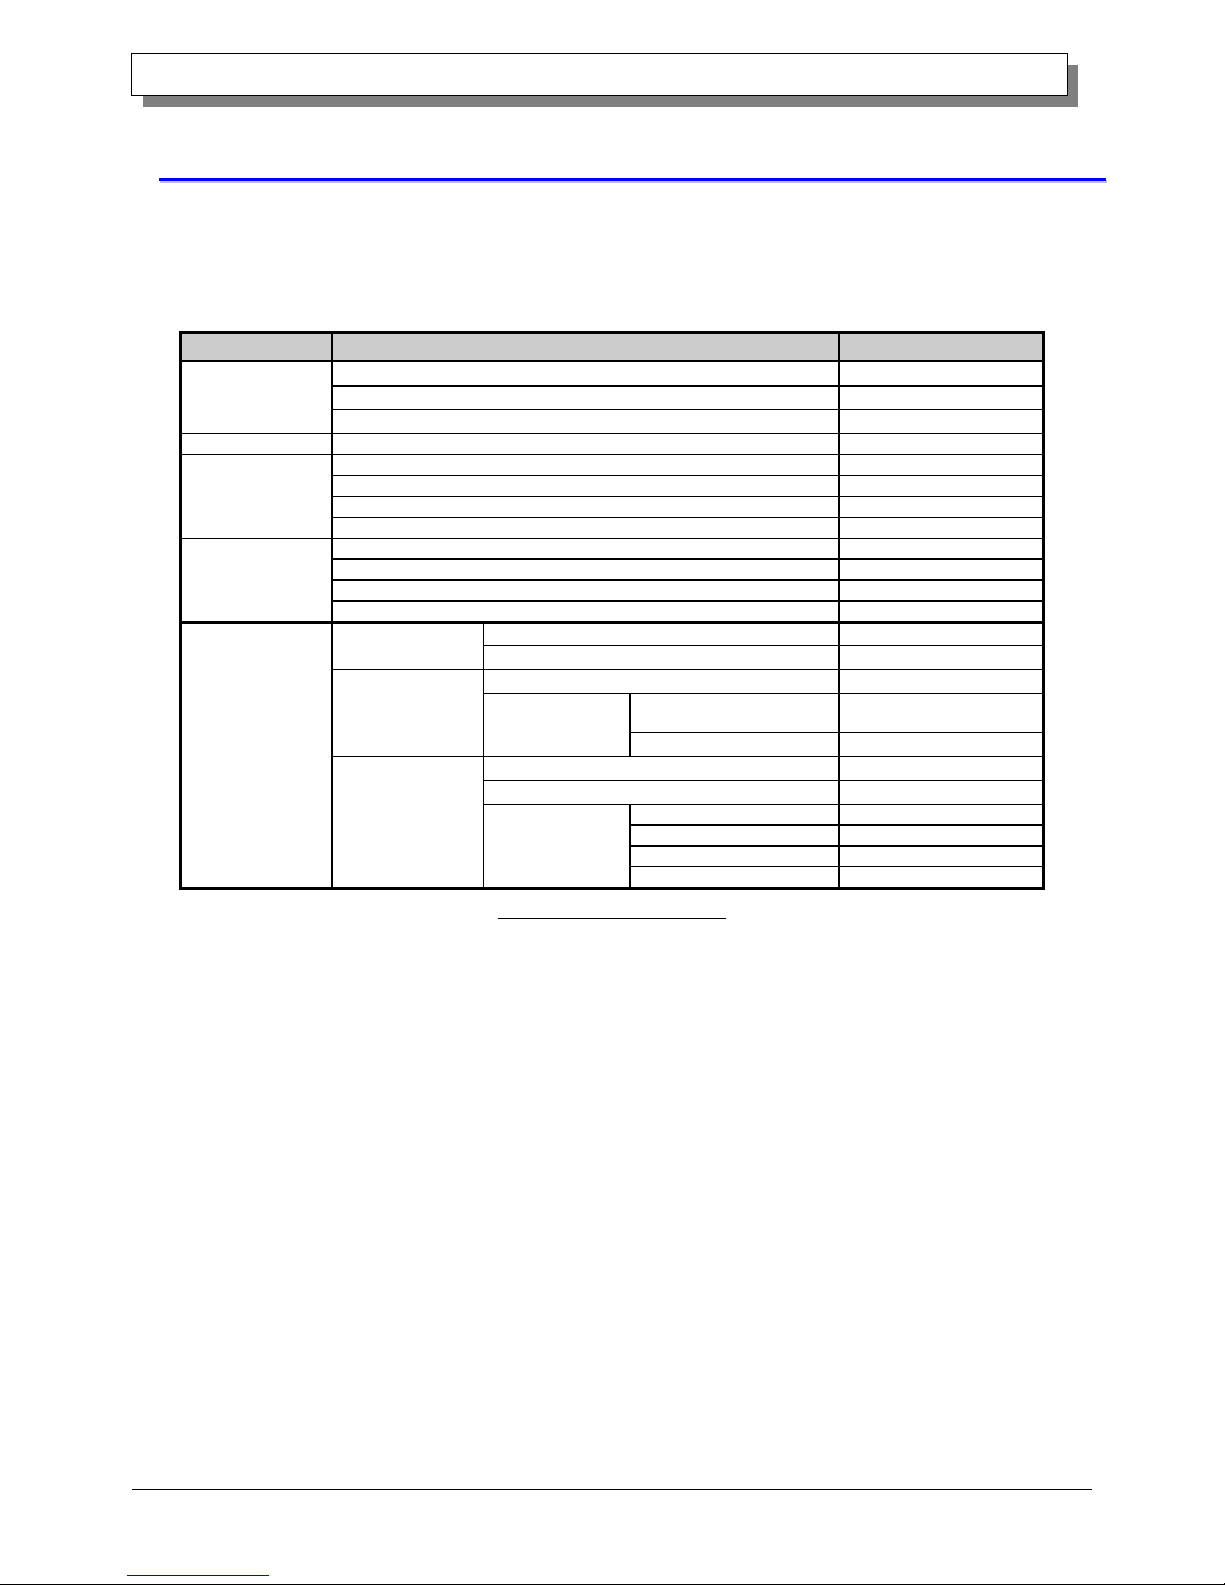
22..33 DDeeffaauulltt vvaalluueess ffoorr sseettttiinnggss
The following section shows the default values of the settings (at installation). If the settings have been changed,
and the printer driver no longer operates normally, return to the default values shown below.
Note) Depending on the service pack of your operating system or your usage environment, the default values
at installation may differ from those in the chart below.
Tab
Setting
Value
Layout
Orientation
Portrait
Page Order
Front to Back
Pages Per Sheet
1
Paper/Quality
Color
Color
Option
Border
Disable
Sharpness
0 (Default)
Color Adjustment
ICM
Language setting
English
Color Adjustment
Gamma
0
Brightness
0
Contrast
0
Chroma
0
Advanced
settings
(In the Layout tab,
click "Advanced...")
Paper/Output
Paper Size
(6x4)x N
Copy Count
1
Graphic
Print Quality
High-speed
Image
color
management
ICM Method
ICM Handled by Host
System
ICM Intent
Pictures
Document
options
Advanced Printing Features
Enable
Pages per Sheet Layout
Right then Down
Printer function
Border
Disable
Overcoat Finish
Glossy
Print Re-try
Enable
2inch cut
Disable
Chart 2.3 Default print settings
Page 29
26
Dai Nippon Printing Co., Ltd.
[DP-DS620/DP-DS620 (A) Printer Driver] User’s Manual (For Windows 7, 8)
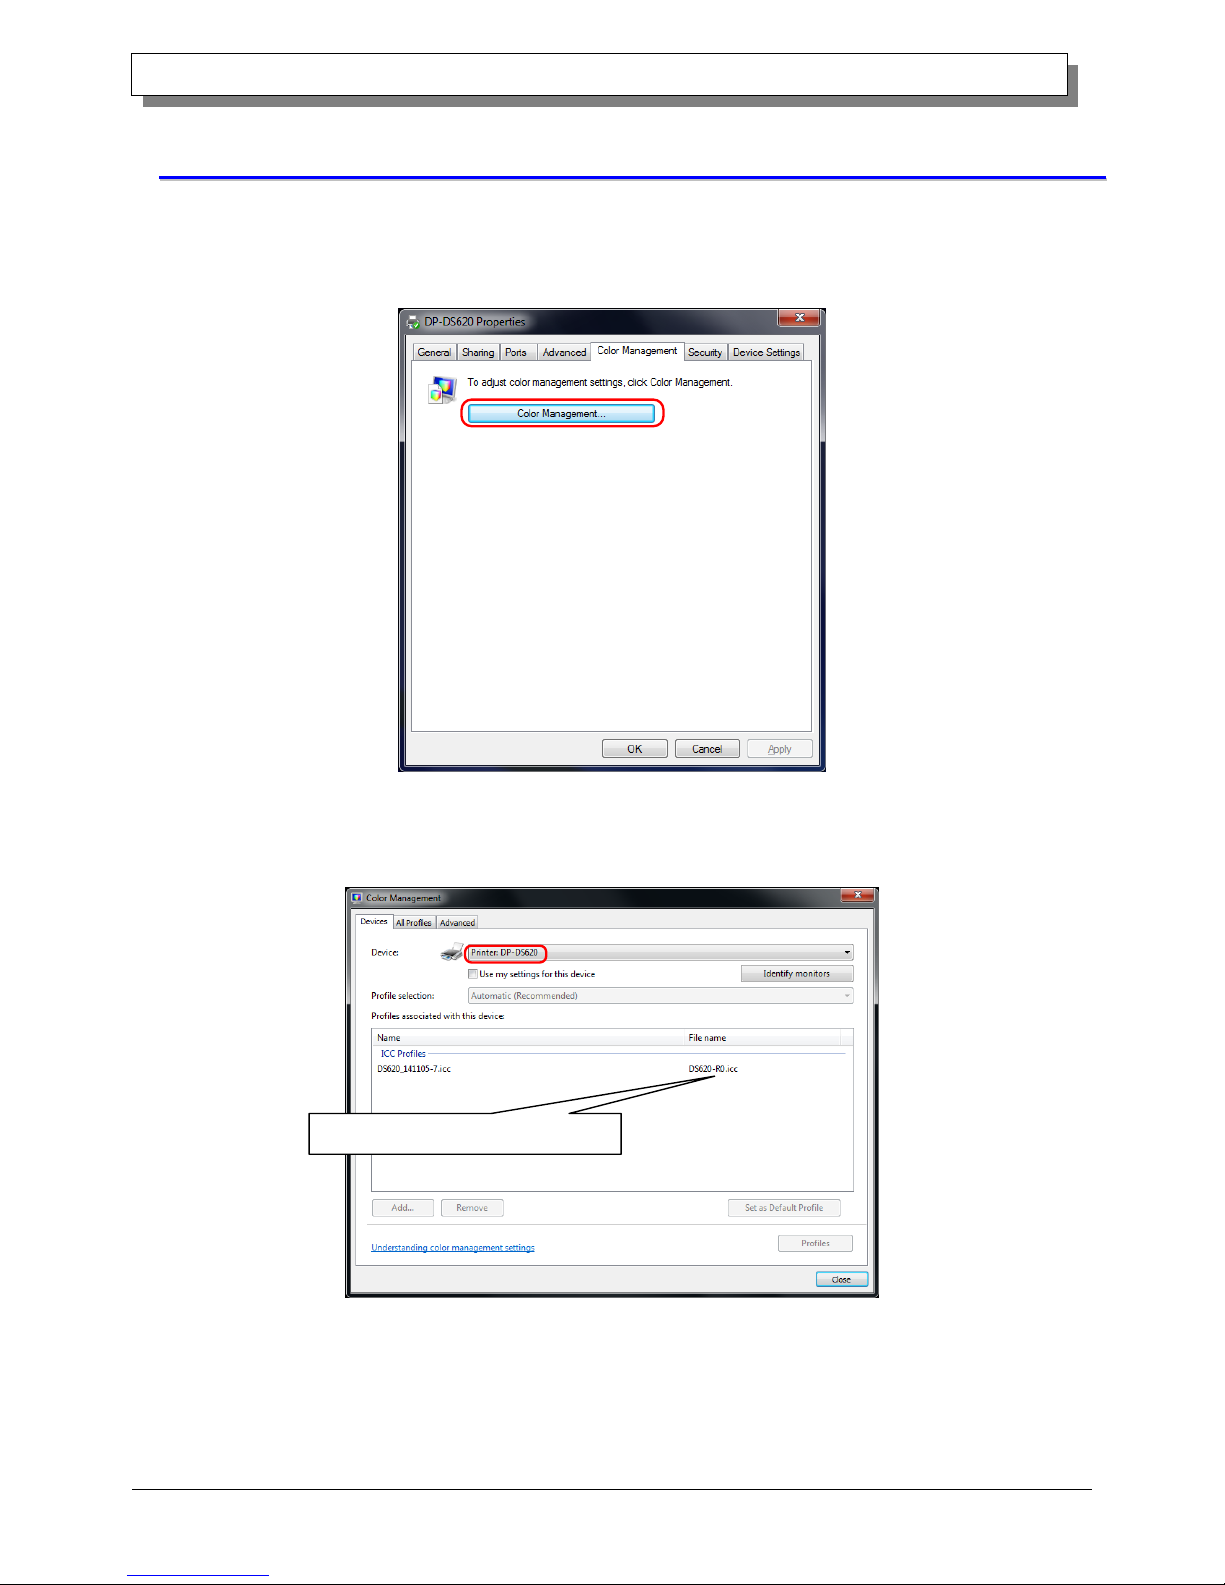
22..44 CCoolloorr mmaannaaggeemmeenntt
Use Color management to specify the color profile. The installer associates " DS620.icc" by default.
Fig 2.4 Color Management
Step 1. From the Printer Properties, select the Color Management
tab, and then click "Color Management...".
Step 2. From Device, select DP-DS620.
The installer associated this file
Page 30
27
Dai Nippon Printing Co., Ltd.
[DP-DS620/DP-DS620 (A) Printer Driver] User’s Manual (For Windows 7, 8)
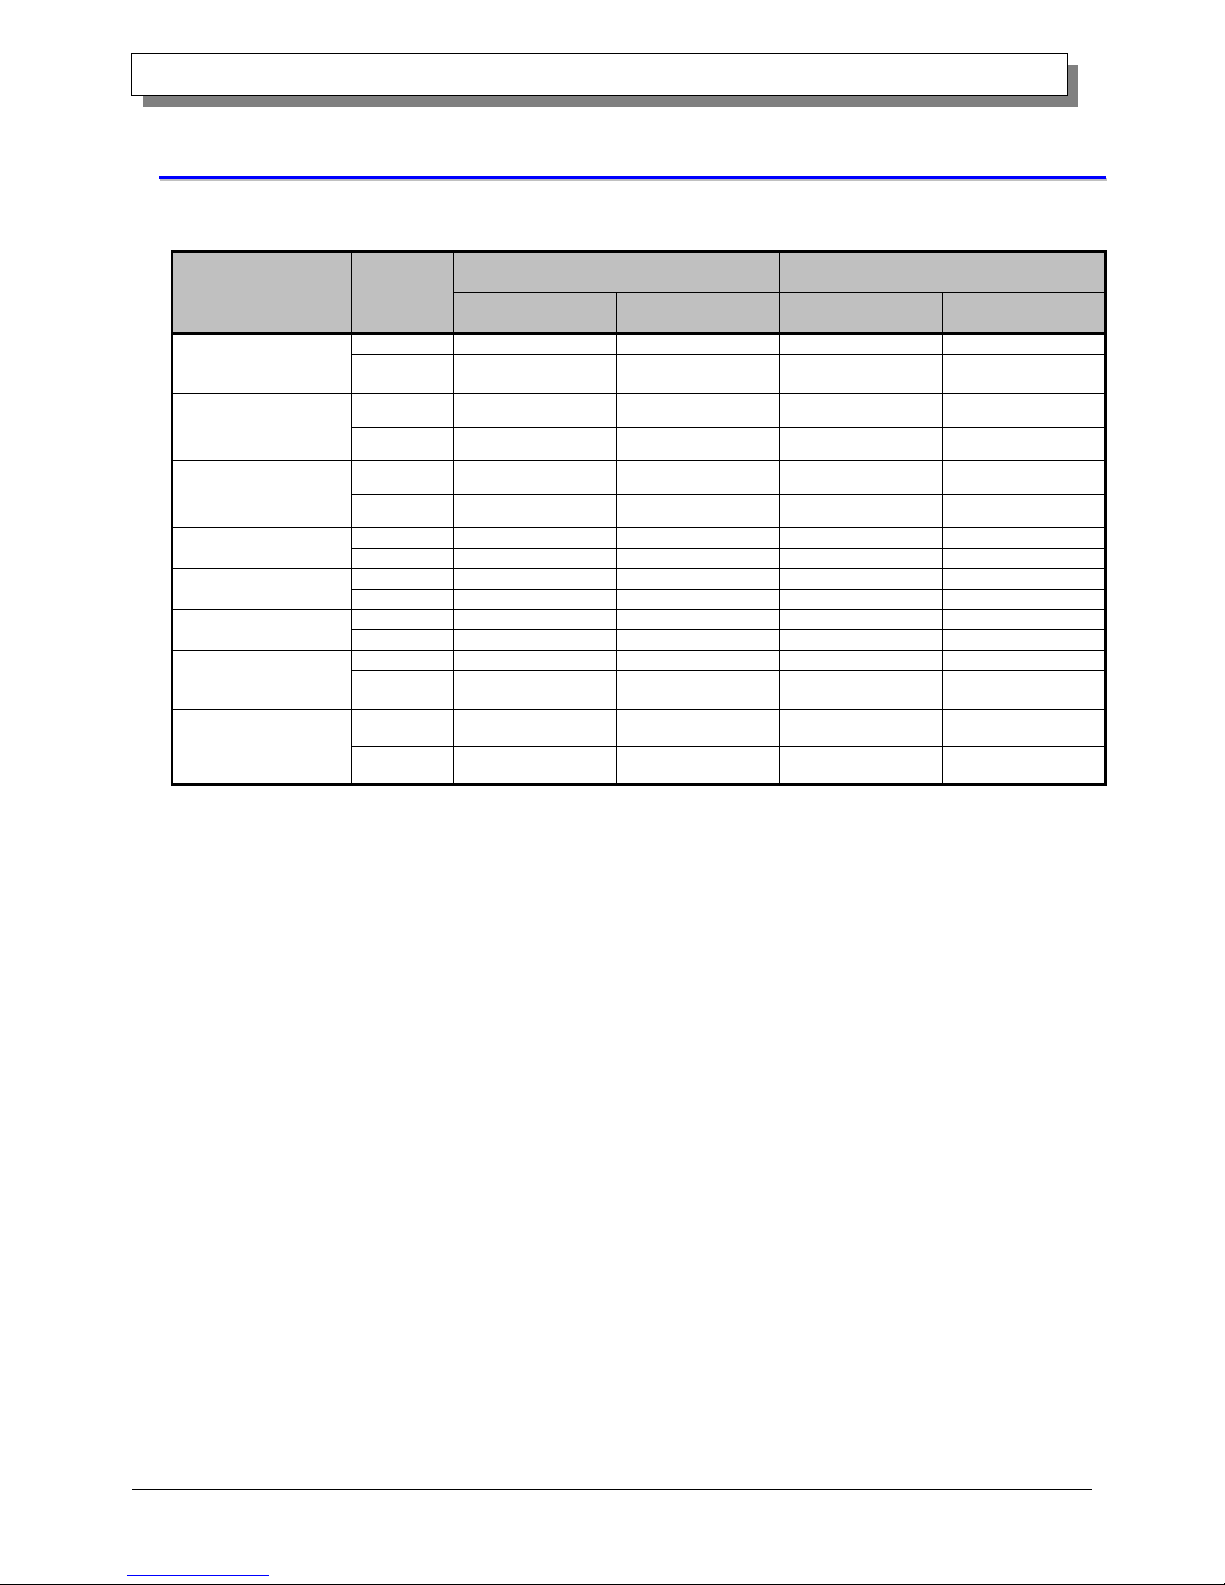
22..55 PPrriinntt AArreeaa
The following section shows the image sizes and numbers of dots generated by the paper size setting of the driver.
Paper size
Orientation
Image size
(width x height)
Number of image dots
(width x height)
(inch)
(mm)
High-speed
(300x300 dpi)
High-quality
(600x600 dpi)*1
(5x3.5)
(5x3.5) x 2
(5x3.5) x N
Portrait
5” x 3.5”
131.1 x 92.1
1548 x 1088
3096 x 2176
Landscape
3.5” x 5”
92.1 x 131.1
1088 x 1548
2176 x 3096
(5x5)
Portrait
5” x 5”
131,1 x 130,4
1548 x 1540
3096 x 3080
Landscape
5” x 5”
130,4 x 131,1
1540 x 1548
3080 x 3096
(6x4)
(6x4) x 2
(6x4) x N
Portrait
6” x 4”
156.1 x 105.0
1844 x 1240
3688 x 2480
Landscape
4” x 6”
105.0 x 156.1
1240 x 1844
2480 x 3688
(6x6)
Portrait
6” x 6”
156.1 x 155.4
1844 x 1836
3688 x 3672
Landscape
6” x 6”
155.4 x 156.1
1836 x 1844
3672 x 3688
(5x7)
Portrait
5” x 7”
131.1 x 181.0
1548 x 2138
3096 x 4276
Landscape
7” x 5”
181.0 x 131.1
2138 x 1548
4276 x 3096
(6x8)
Portrait
6” x 8”
156.1 x 206.2
1844 x 2436
3688 x 4872
Landscape
8” x 6”
206.2 x 156.1
2436 x 1844
4872 x 3688
PR (3.5 x 5)
PR (3.5x5) x 2
PR (3.5x5) x N
Portrait
3.5” x 5”
92.1 x 131.1
1088 x 1548
2176 x 3096
Landscape
5” x 3.5”
131.1 x 92.1
1548 x 1088
3096 x 2176
PR (4x6)
PR (4x6) x 2
PR (4x6) x N
Portrait
4” x 6”
105.0 x 156.1
1240 x 1844
2480 x 3688
Landscape
6” x 4”
156.1 x 105.0
1844 x 1240
3688 x 2480
*1: Convert to 300 x 600 dpi size within the driver, and then send to the printer.
Page 31
28
Dai Nippon Printing Co., Ltd.
[DP-DS620/DP-DS620 (A) Printer Driver] User’s Manual (For Windows 7, 8)
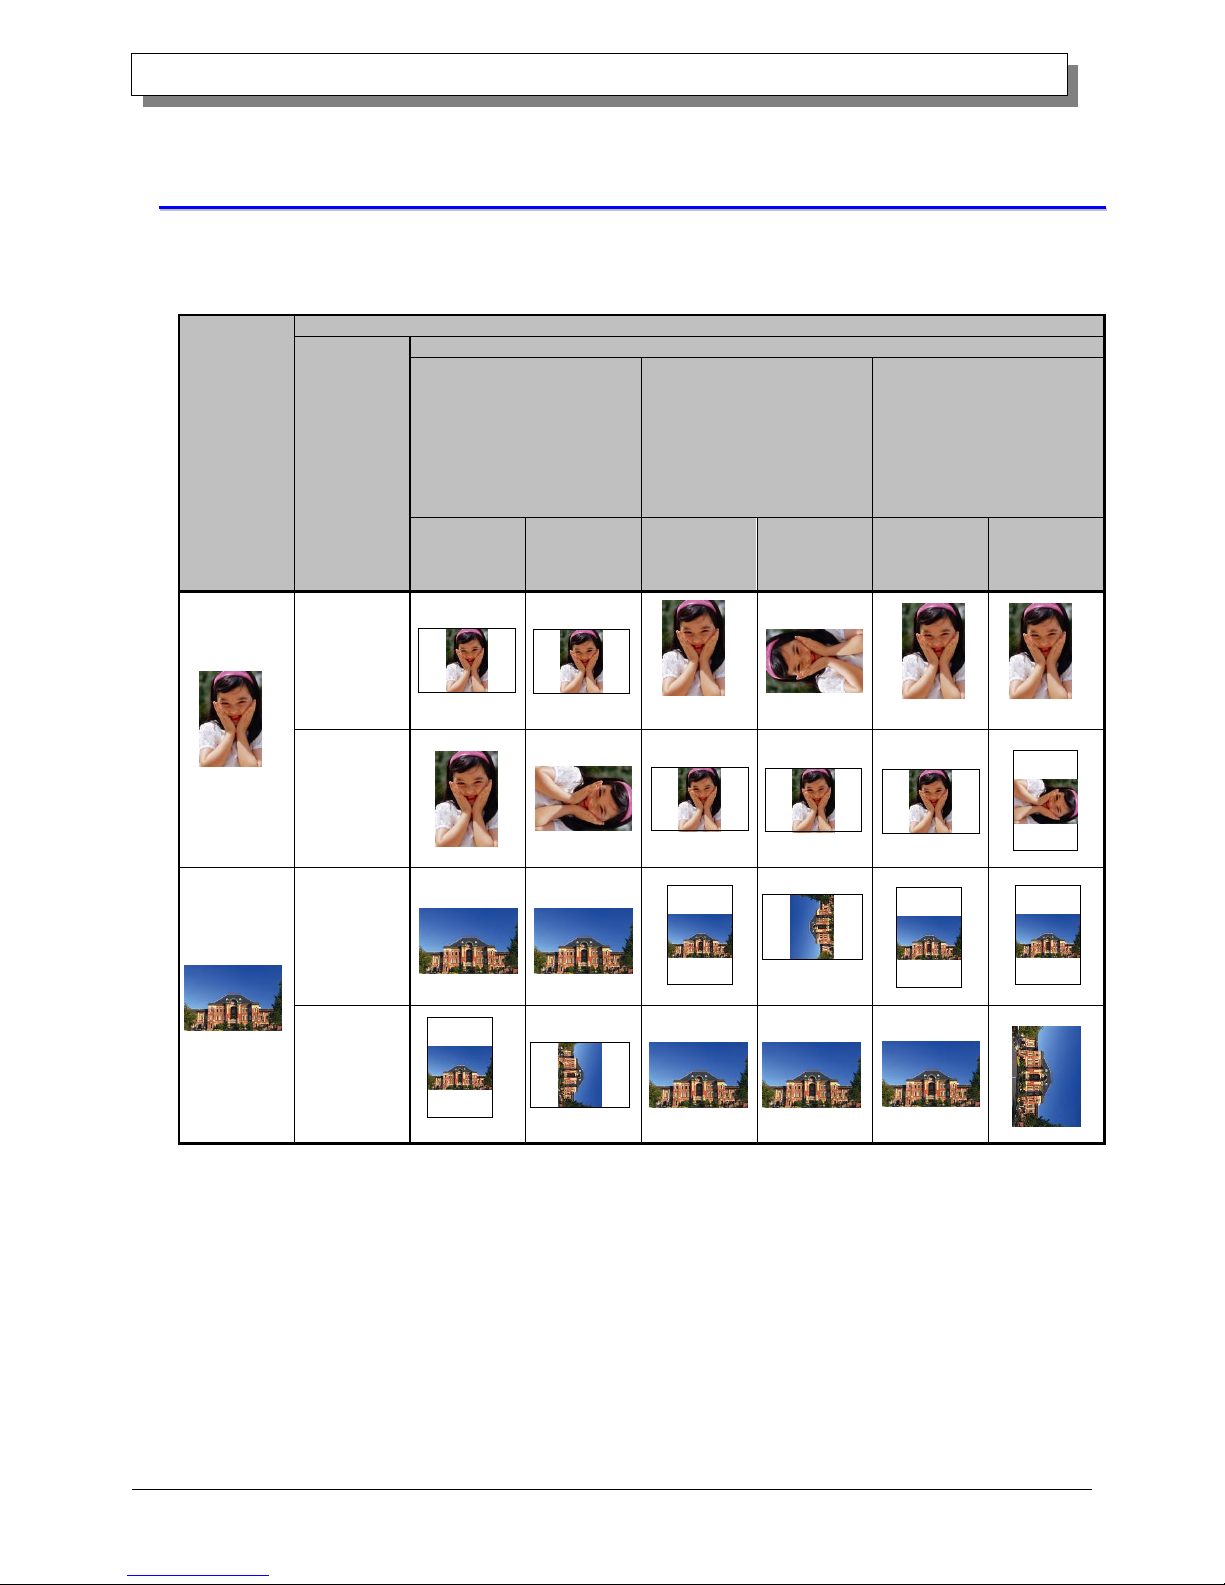
22..66 OOrriieennttaattiioonn
The following chart shows the relationship of images generated by an application and printed items (output direction)
according to the orientation setting. Generated images are not the original image rotated by the application but are
zoomed to fit within the sizes is shown in "2.5 Print Area".
Original
image
Driver setting
Orientation
Paper setting
(5x3.5)
(5x3.5) x 2
(5x3.5) x N
(5x5)
(6x4)
(6x4) x 2
(6x4) x N
(6x6)
PR (3.5x5)
PR (3.5x5) x 2
PR (3.5x5) x N
PR (4x6)
PR (4x6) x 2
PR (4x6) x N
(5x7)
(6x8)
Generated
image
Printed item
(Output
orientation ↓)
Generated
image
Printed item
(Output
orientation ↓)
Generated
image
Printed item
(Output
orientation ↓)
Portrait
Landscape
Portrait
Landscape
Page 32
29
Dai Nippon Printing Co., Ltd.
[DP-DS620/DP-DS620 (A) Printer Driver] User’s Manual (For Windows 7, 8)
CChhaapptteerr 33 UUppddaattee tthhee ddrriivveerr
As when performing the installation, log in as an administrator before carrying out this operation.
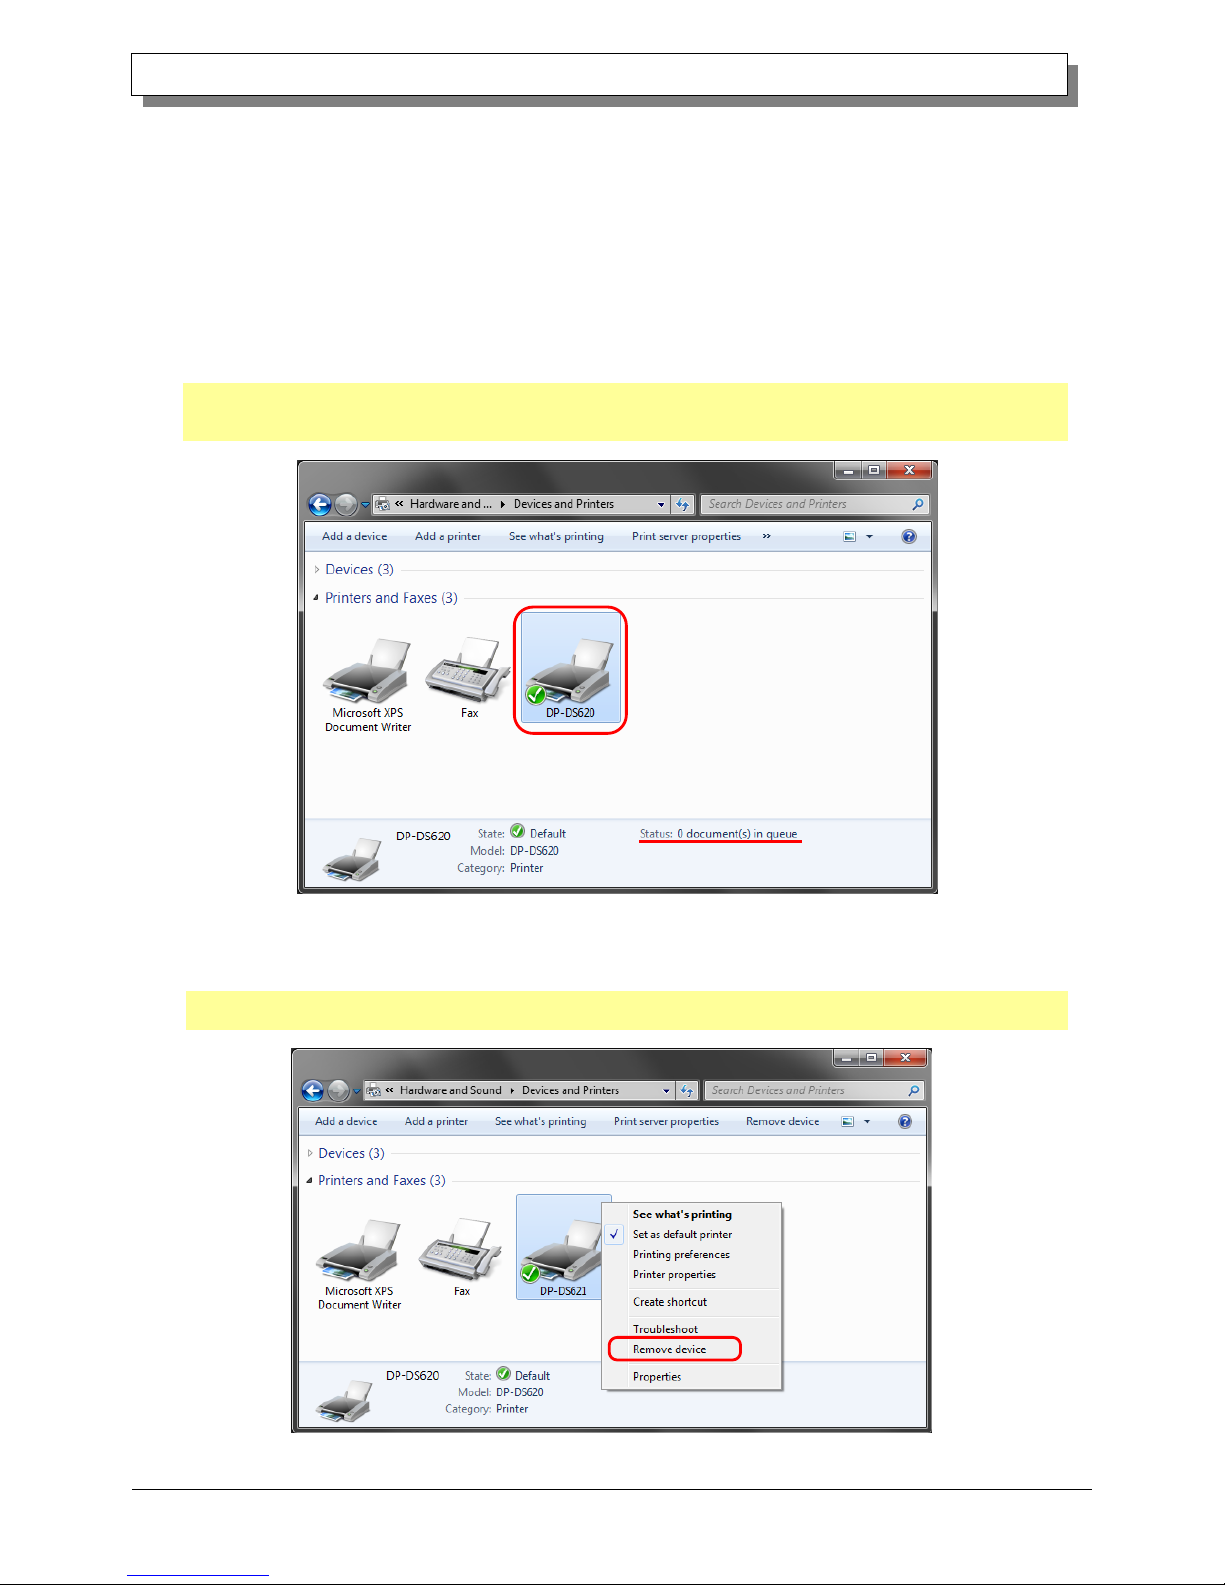
1. Delete the driver
1) Before deleting the printer driver, close all applications. Furthermore, click on the icon of the printer to be deleted in
the Devices and Printers screen. At the bottom area of the screen, confirm that there are no documents in the queue,
and then start deletion of the driver.
Note: In Windows 8, when the printer is offline (the printer is not on and connected), the DP-DS620 icon is not
displayed. If you cannot connect a printer that is on, use the procedure on the following page to delete the
device.
Figure 3.1 Clicking the DP-DS620 icon at the Devices and Printers screen
2) Click "Start", and then click "Control Panel". In Control Panel, click "Devices and Printers". From the Devices and
Printers screen, right click the DP-DS620 printer. From the menu, click "Remove device".
In Windows 8, right click the Start screen. In the bottom right area, select "All Apps", and then select "Control Panel".
In the Control Panel, click "Devices and Printers".
Figure 3.2 Right clicking DP-DS620 in the Devices and Printers screen
Page 33
30
Dai Nippon Printing Co., Ltd.
[DP-DS620/DP-DS620 (A) Printer Driver] User’s Manual (For Windows 7, 8)
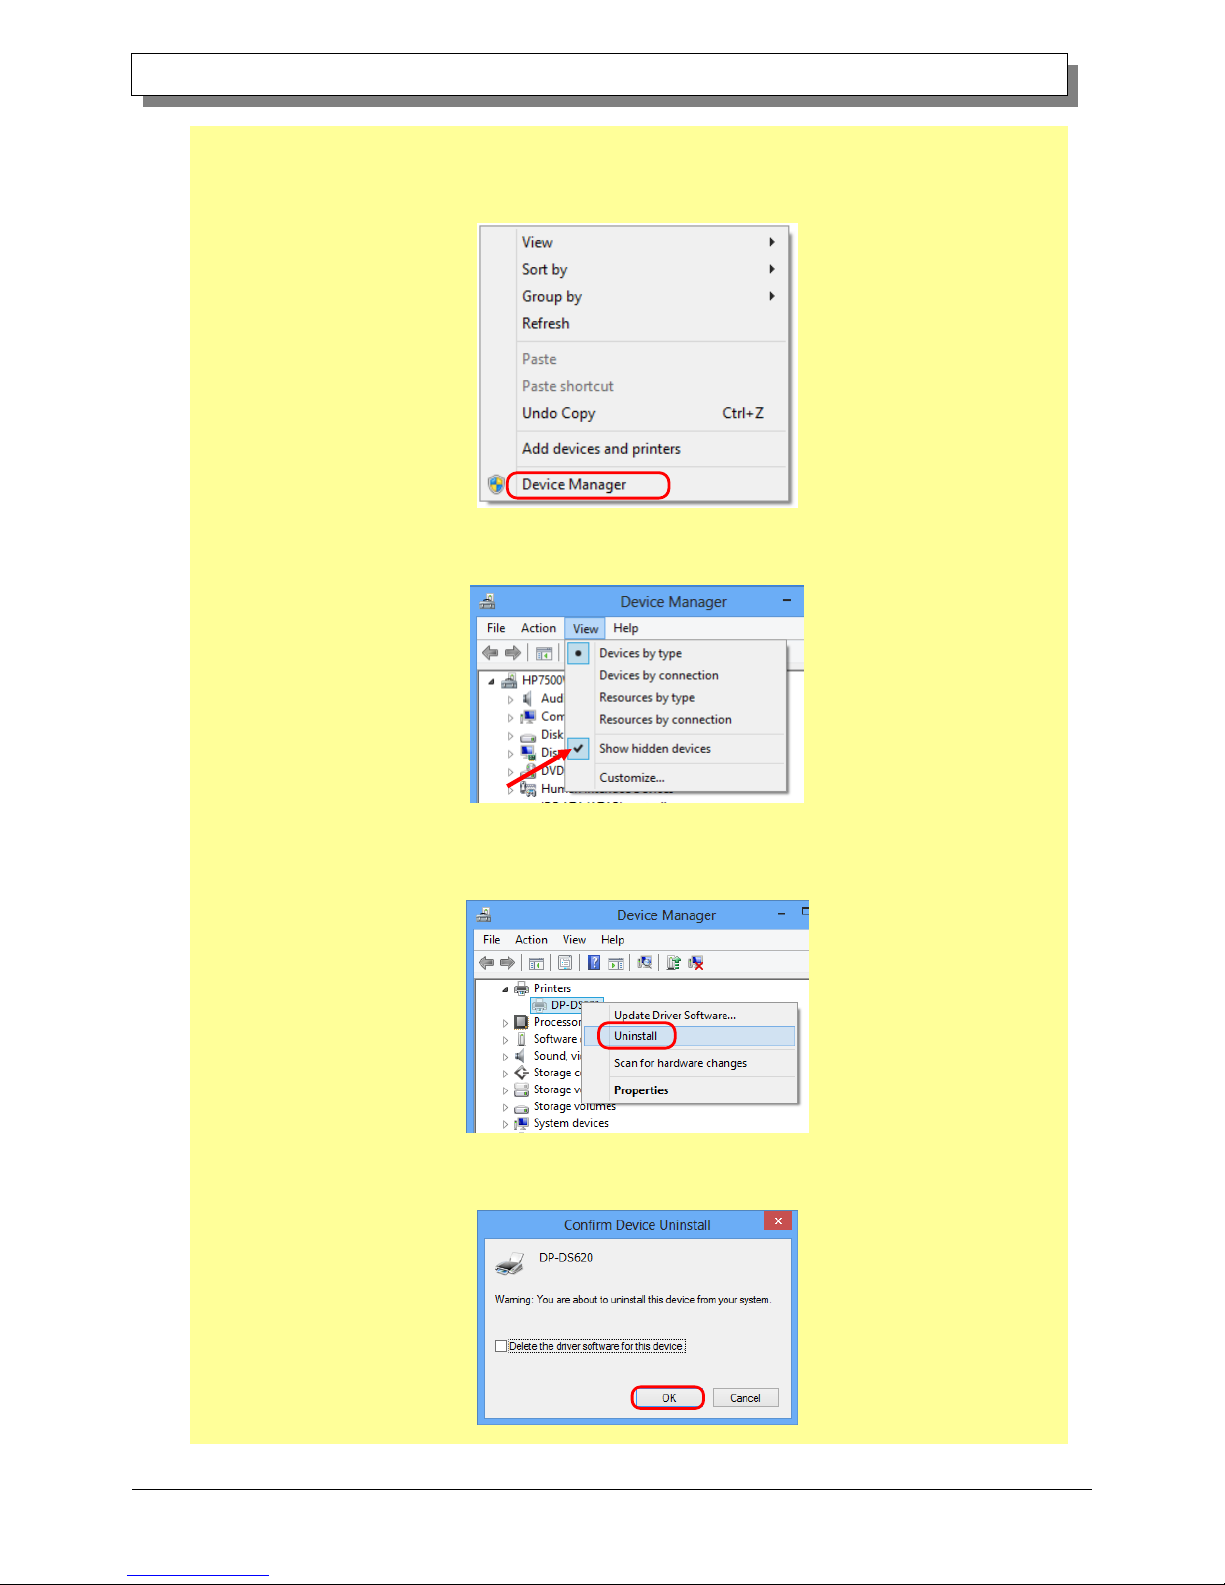
In Windows 8, when the printer is offline (the printer is not on and connected), the DP-DS620 icon is not displayed.
In such cases, use the following procedure to delete the device.
(i) On an empty area in the Devices and Printers screen, right click, and then select "Device Manager".
Figure 3.2.i Right clicking on an empty area in the Devices and Printers screen
(ii) Click View, and then select "Show hidden devices".
Figure 3.2.ii Displaying the View menu for hidden devices
(iii) Under Printers, right click DP-DS620, and then select "Uninstall".
Figure 3.2.iii Displaying the menu to delete DP-DS620
(iv) At the Confirm Device Uninstall screen, click OK.
Figure 3.2.iv Confirm Device Uninstall screen
Page 34
31
Dai Nippon Printing Co., Ltd.
[DP-DS620/DP-DS620 (A) Printer Driver] User’s Manual (For Windows 7, 8)
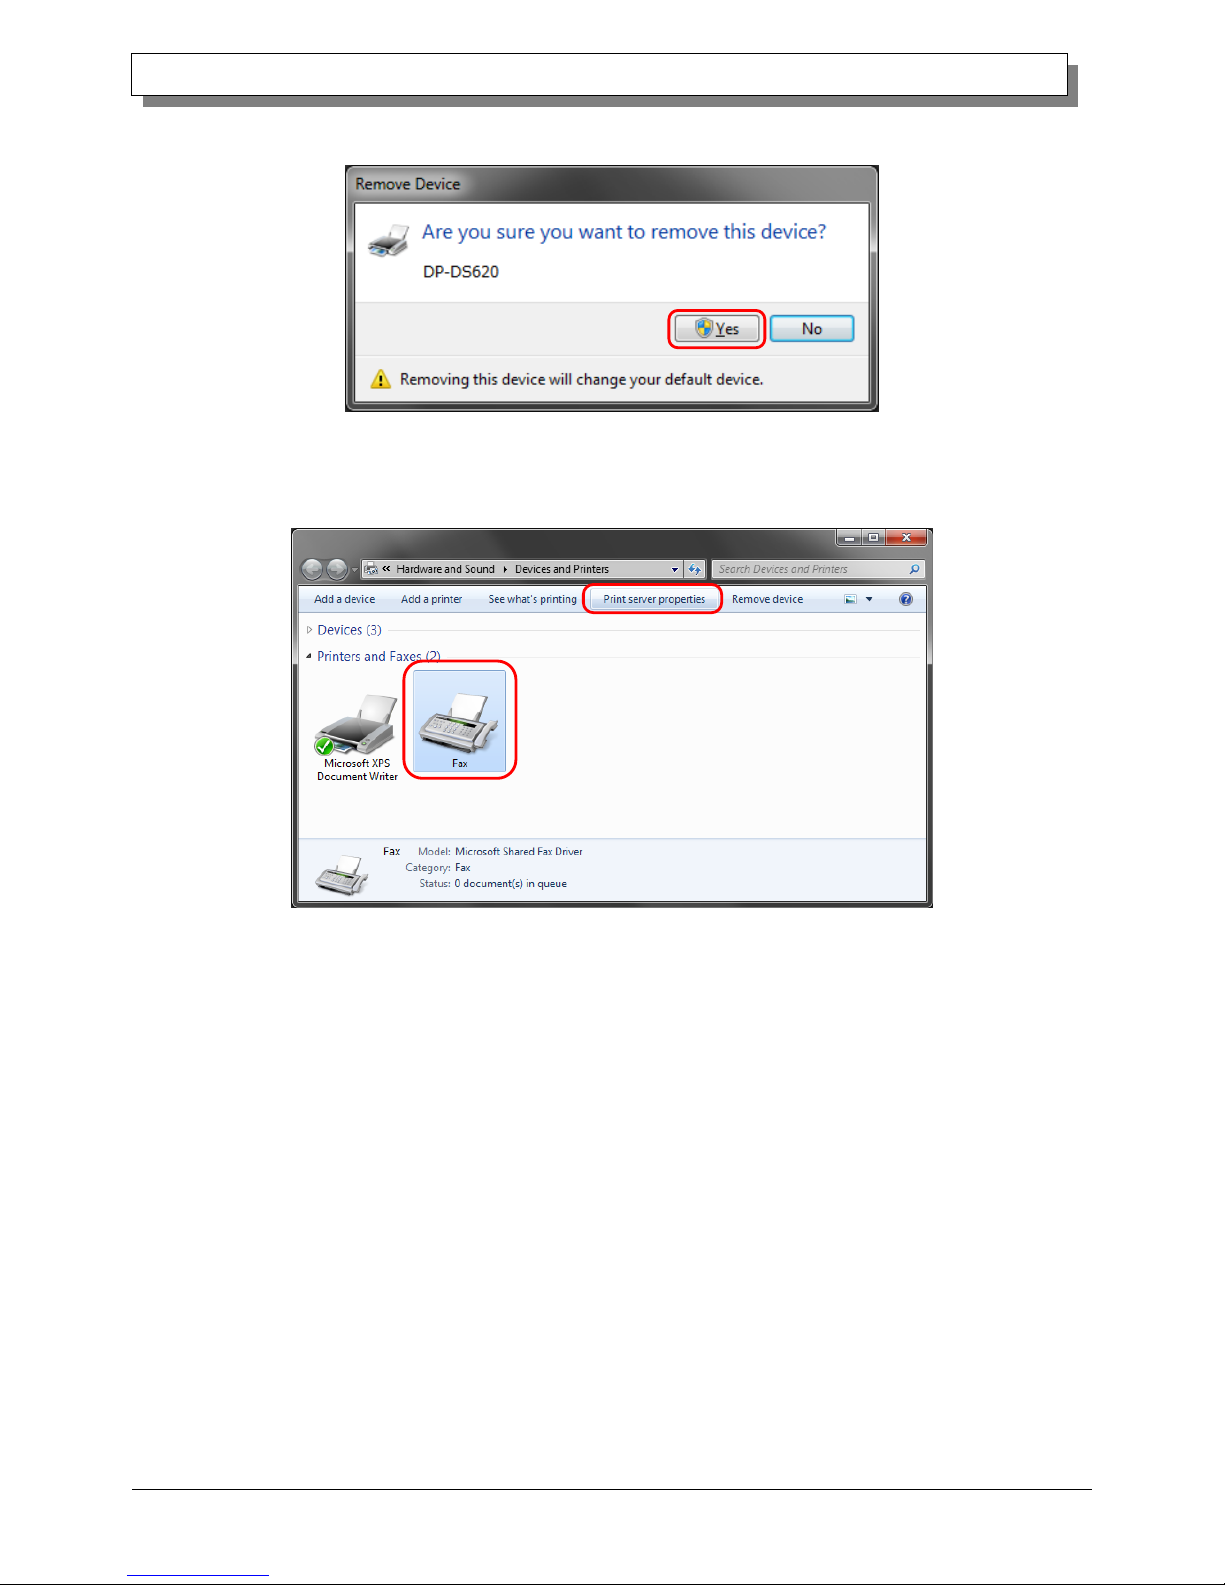
3) The printer deletion confirmation dialog box appears. Click Yes.
Figure 3.3 Printer deletion confirmation dialog box
4) After deleting the DP-DS620 printer, select another printer (for example, Fax), and then click "Print Server
Properties" in the menu bar.
Figure 3.4 Displaying the Print Server Properties menu in the Devices and Printers screen
Page 35
32
Dai Nippon Printing Co., Ltd.
[DP-DS620/DP-DS620 (A) Printer Driver] User’s Manual (For Windows 7, 8)
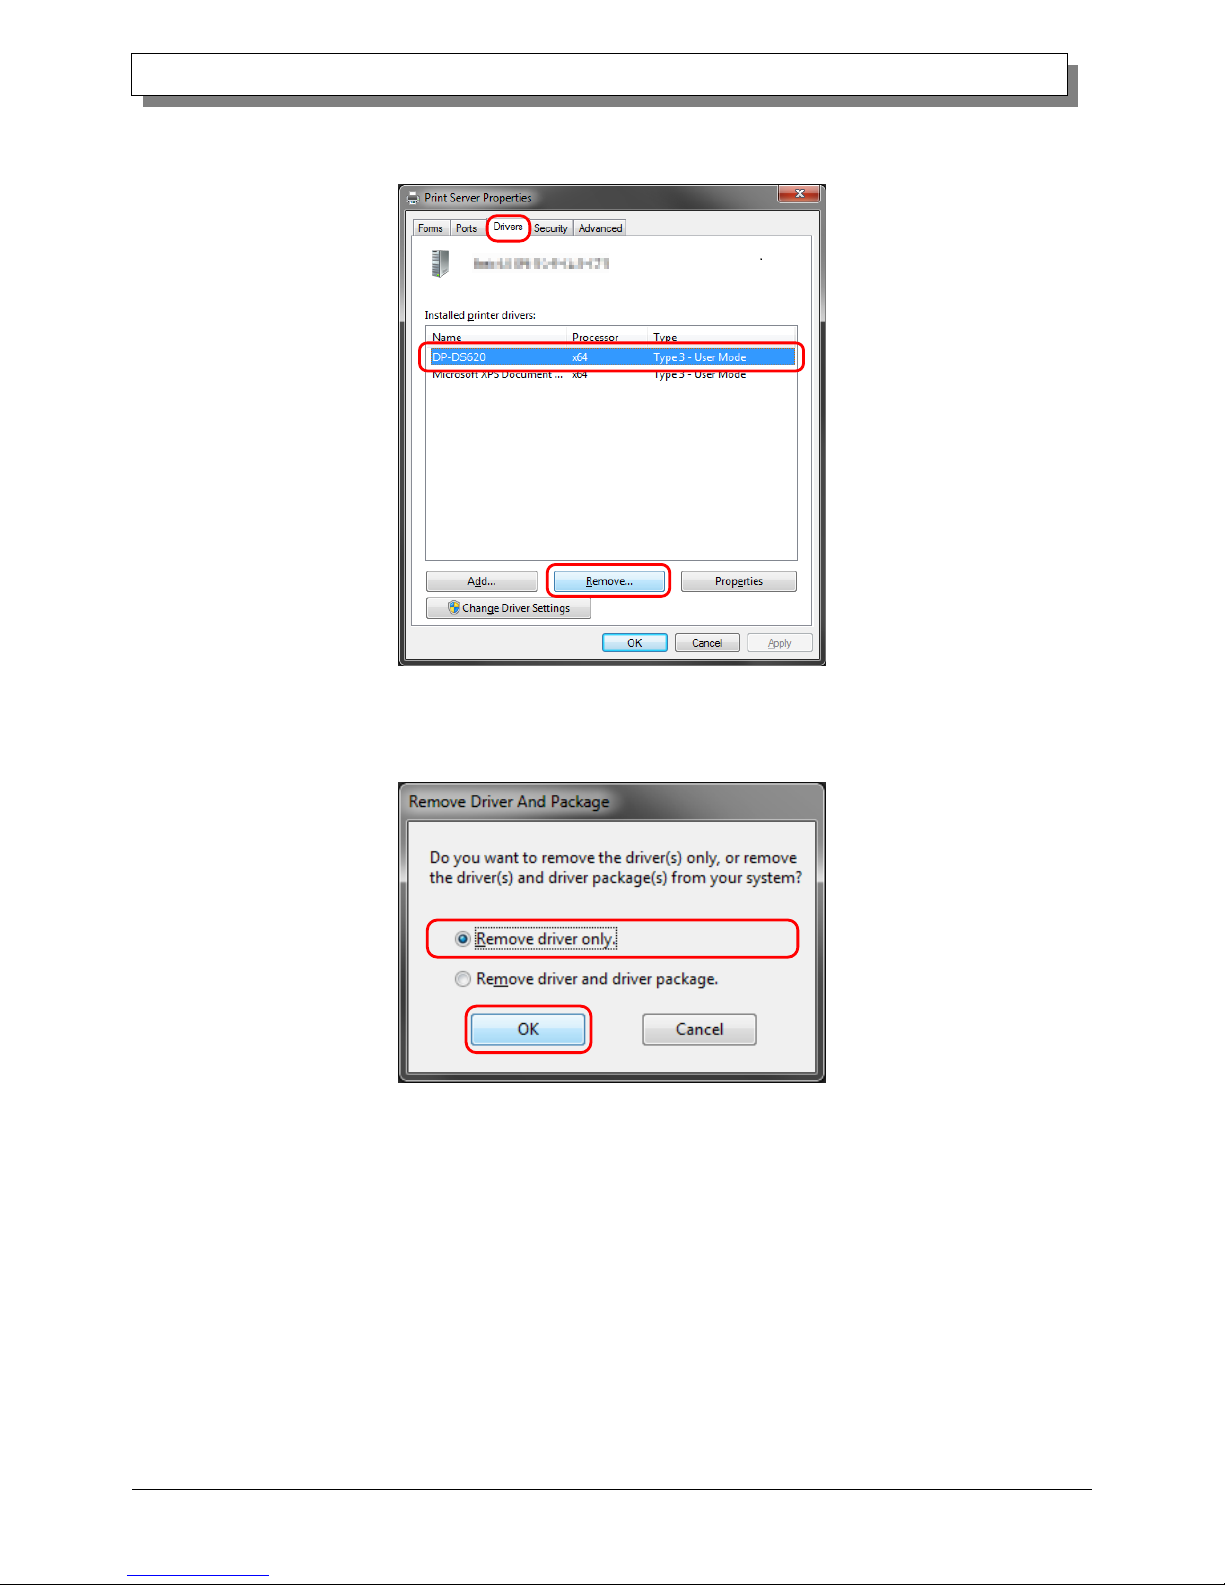
5) The Print Server Properties dialog box appears. Click the Drivers tab. From the installed printer driver list, select
DP-DS620, and then click "Remove...".
Figure 3.5 Printer Server Properties dialog box
6) The Remove Driver and Package dialog box appears. Select "Remove driver only", and then click OK. To delete the
driver package, carry out the procedure in the next section, “2. Uninstall the driver package”.
Figure 3.6 Remove Driver And Package dialog box
Page 36
33
Dai Nippon Printing Co., Ltd.
[DP-DS620/DP-DS620 (A) Printer Driver] User’s Manual (For Windows 7, 8)
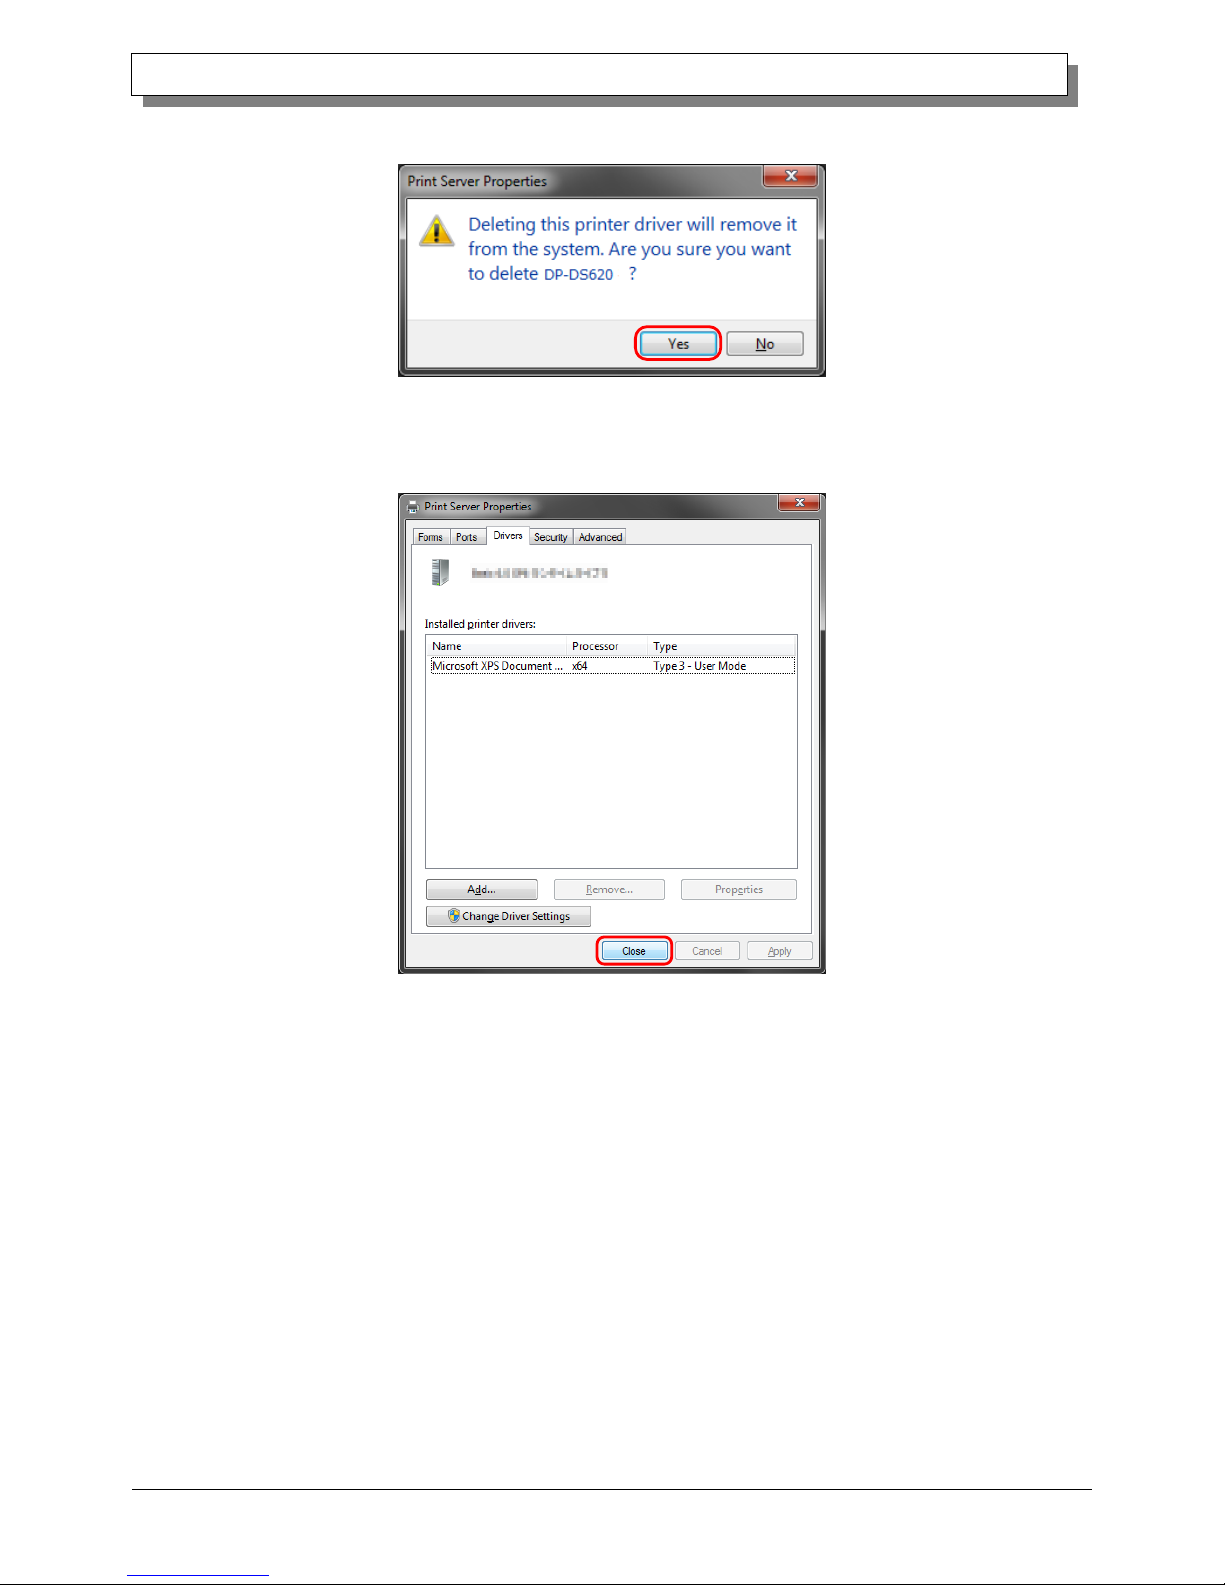
7) The Print Server Properties confirmation dialog box appears. Click Yes.
Figure 3.7 Driver deletion confirmation dialog box
8) In the Print Server Properties dialog box, confirm that DP-DS620 was deleted, and then click Close. After deleting
the printer driver, uninstall the driver package.
Figure 3.8 Print Server Properties
Page 37
34
Dai Nippon Printing Co., Ltd.
[DP-DS620/DP-DS620 (A) Printer Driver] User’s Manual (For Windows 7, 8)
2. Uninstall the driver package
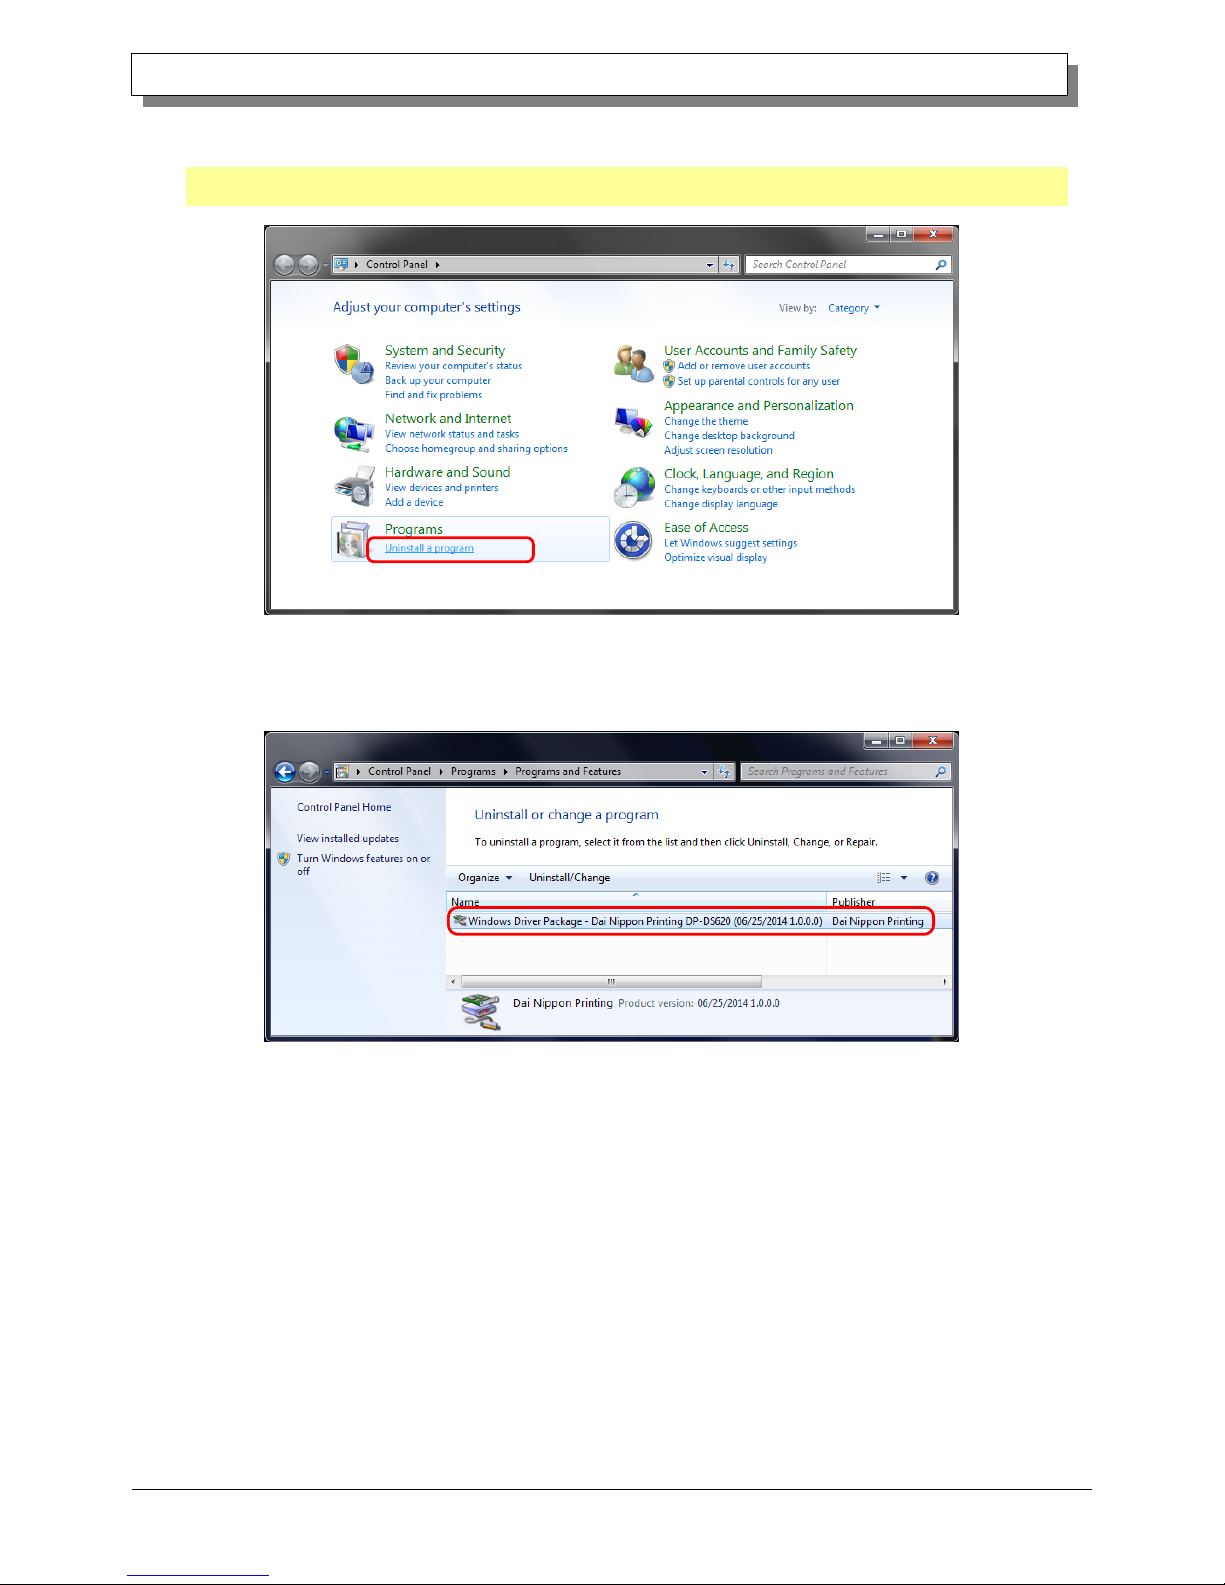
1) Click "Start", and then click "Control Panel". In the Control Panel, click "Uninstall a program".
In Windows 8, right click the Start screen. In the bottom right area, select "All Apps", and then select "Control Panel".
In the Control Panel, click "Uninstall a program".
Figure 3.9 Control Panel
2) The Uninstall or change a program screen appears. In the list, double click “Windows driver package – Dai Nippon
Printing DP-DS620 (mm/dd/yyyy x.x.x.x)”. (mm/dd/yyyy is the date, x.x.x.x is the version.)
Figure 3.10 Uninstall a program
Page 38
35
Dai Nippon Printing Co., Ltd.
[DP-DS620/DP-DS620 (A) Printer Driver] User’s Manual (For Windows 7, 8)
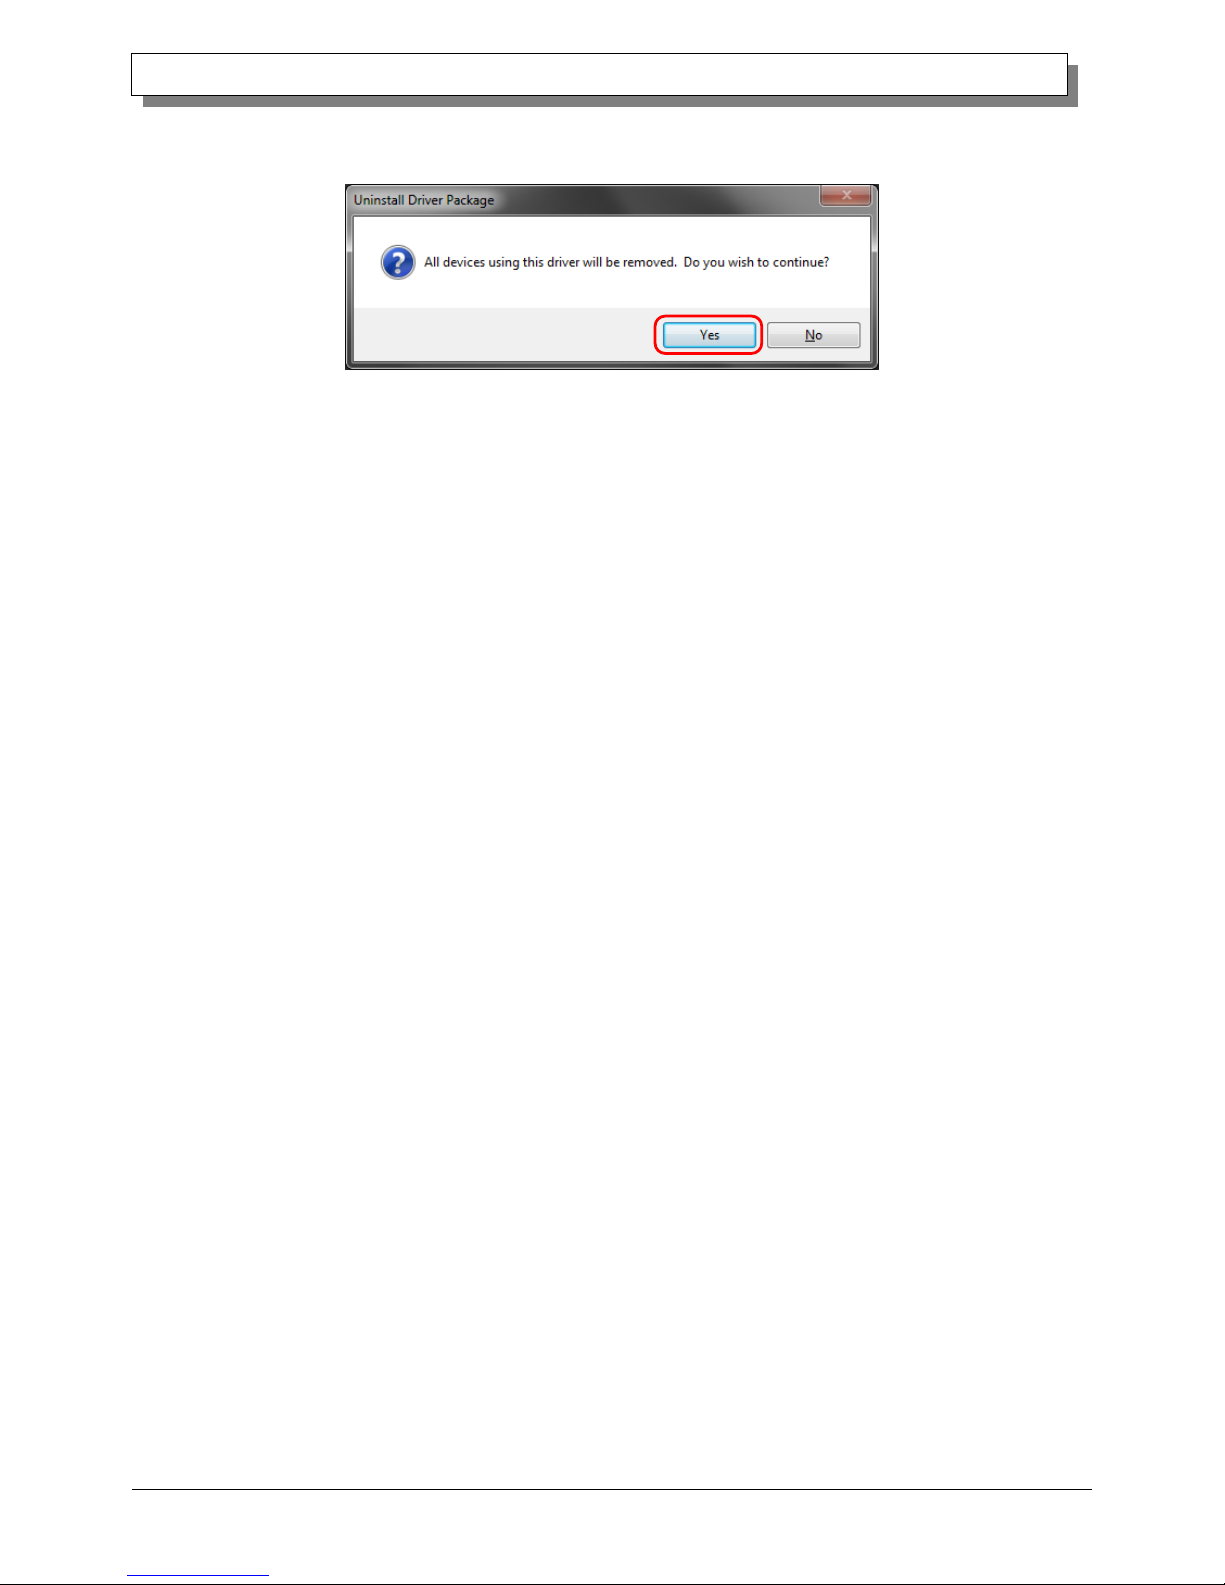
3) The Uninstall Driver Package screen appears. Click Yes. The program has been uninstalled.
After uninstalling the printer package, restart the computer.
Figure 3.11 Uninstallation confirmation
3. Install an upgrade for the printer driver
After deleting the printer and the printer driver, install the new printer driver. For the installation procedure, see
“Chapter 1 Installation”.
4. Restart the computer
After the installation of the printer driver is complete, always restart the computer.
(Do not print just after installation. Always restart the computer once.)
Page 39

36
Dai Nippon Printing Co., Ltd.
[DP-DS620/DP-DS620 (A) Printer Driver] User’s Manual (For Windows 7, 8)
CChhaapptteerr 44 DDeelleettee tthhee ddrriivveerr
For the procedure to delete the printer driver, see Chapter 3, “1. Delete the driver” and “2. Uninstall the driver package”.
Page 40

37
Dai Nippon Printing Co., Ltd.
[DP-DS620/DP-DS620 (A) Printer Driver] User’s Manual (For Windows 7, 8)
 Loading...