

Page 1

12843 Foothill Blvd. Suite C
Sylmar, California 91342
V: 818.898.3380
F: 818.898.3360
sales@dnfcontrols.com
Model No. DMAT-EZ
(O, A, 22, 44)
INSTANT REPLAY SYSTEM
ODETICS, GV AMP, Protocol
2 channel, 4 channel
User Manual
Revision 1.27
DMAT-EZ, Instant Replay Controller Page 1 of 26
Page 2

Page 2 of 26 DMAT-EZ, Instant Replay Controller
Page 3

TABLE OF CONTENTS
REVISION HISTORY ..................................................................................... 4
I. DEFINITIONS....................................................................................... 5
II. SYSTEM DESCRIPTION......................................................................... 6
III. INSTALLATION.................................................................................. 6
IV. DMAT-EZ SCREEN LAYOUT ................................................................. 10
V. OPERATION ....................................................................................... 11
VI. REFERENCE........................................................................................ 19
VII. FUNCTION TABLE............................................................................ 22
VIII. SPECIFICATIONS ............................................................................ 24
IX. KEY LAYOUT....................................................................................... 25
X. DNF CONTROLS LIMITED WARRANTY ................................................ 26
DMAT-EZ, Instant Replay Controller Page 3 of 26
Page 4

REVISION HISTORY
050406 1.0 Original Document
060706 1.1 Added gang function
071106 1.11 Corrected key layout
072806 1.20 Conform to models 22 and 44 and include AMP protocol.
082906 1.21 Add auto save function to the out key.
091806 1.22 Change Connection Diagram to conforms to silk screen.
102006 1.23 Added Sub Clip feature to AMP protocol.
021607 1.24 Expanded CLIPLIST description.
021607 1.25 Add connection diagrams for new connector numbering
scheme.
020609 1.26 Adjusted description of Reverse Slo-Mo function
072009 1.27 Added DMAT-EZ Screen Layout
Page 4 of 26 DMAT-EZ, Instant Replay Controller
Page 5

I. DEFINITIONS
A. Throughout this document, DDR, VDR & Video Server will be referred to
collectively as “Video Server.”
B. The DMAT-EZ-(x) will be referred to as ST400. Model variations will be
defined in the sections where applicable.
C. Words surrounded by brackets, for example, [ENTER], are keys on the
ST400. [XXX] + [XXX] means hold the two keys down simultaneously.
D. Words surrounded by curly brackets, for example, {GANG}, are referred
to as “Softkeys”. The 6 keys directly below the display are the softkeys.
Their function changes as indicated on the last line of the display.
DMAT-EZ, Instant Replay Controller Page 5 of 26
Page 6

II. SYSTEM DESCRIPTION
The DMAT-EZ was created to allow simultaneous record and playback of
segments and list playout. All functions are performed from a single screen
except for some basic configuration items which have their own screen. The
session is started by a simple two-key press. The IN and OUT point of each
CUE can be marked and saved to CUEs and then be recalled for playback.
The IN and OUT points are editable to refine the CUE for optimal effect. CUEs
can be added to a list to form a playlist which can be used as a highlight reel
for later playout. There are more functions that will be described in the rest
of the manual. The DMAT-EZ is available as a 2 channel record and 2 channel
playback model (DMAT-x-22) and a 4 channel record and 4 channel playback
model (DMAT-x-44). Each model can be ordered with either ODETICS or
Grass Valley AMP control protocol.
III. INSTALLATION
The installation consists of connecting the control ports of the video server
channels to the RS422 connectors on the back of the DMAT-EZ and
connecting the power to all involved devices. The low er row of connectors is
for the PLAY channels, and the connector above each lower row connector is
for the corresponding RECORD channels.
A. Grouping
Grouping assigns channels that share media.
Model 44: There are three selections available:
1. Channels 1, 2, 3, 4, are on the same server.
2. Channels 1, 2, and 3, 4 are on two different servers.
The channels of one server must be connected to the RS422
connectors 1 and 2. The channels of the other server must be
connected to the RS422 connectors 3 and 4.
3. Channels 1, 2, 3, 4 are on different servers.
Model 22: There are two selections available:
4. Channels 1 and 2 are on the same server.
5. Channels 1 and 2 are on different servers.
The record and play channel pairs of each server can be connected to the
RS422 connectors in any convenient order.
See connection diagram on page 8.
Page 6 of 26 DMAT-EZ, Instant Replay Controller
Page 7

B. Connections
1. Using standard 9-conductor (pin to pin), RS422 serial cable,
follow the connection diagram to connect the controller to the
server. Identify your chassis by comparing the "C" number on
the serial number tag to the illustration number.
Note: On the 22 model:
Only connectors 1, 2, 4, and 5 are available on C1xx3xx chassis.
Only connectors 1, 2, 3, and 4 are available on C1xx4xx chassis.
2. Attach a video reference cable (from House Reference) to "Ref.
Video In" on the rear of the ST400 to utilize the gang function.
Video Reference must be connected for frame accurate playout of
ganged channels.
3. Connect the supplied POWER SUPPLY, APX #4108, into the
POWER connector on the rear of the ST400. Plug the Power
Supply into a 90 - 240 VAC outlet.
4. Check SETUP MENU prior to using the ST400 to confirm proper
Record Mode and other User Settable Modes.
Installation is complete.
C. Video Server Setup
1. Select control protocol according to DMAT-EZ model:
a) For the O model, Select ODETICS protocol on each VIDEO
SERVER channel to be controlled.
b) For the A Model, Select AMP protocol on each VIDEO SERVER
channel to be controlled.
2. Assign the serial ports on the VIDEO SERVER that will be
controlled by the ST400.
DMAT-EZ, Instant Replay Controller Page 7 of 26
Page 8
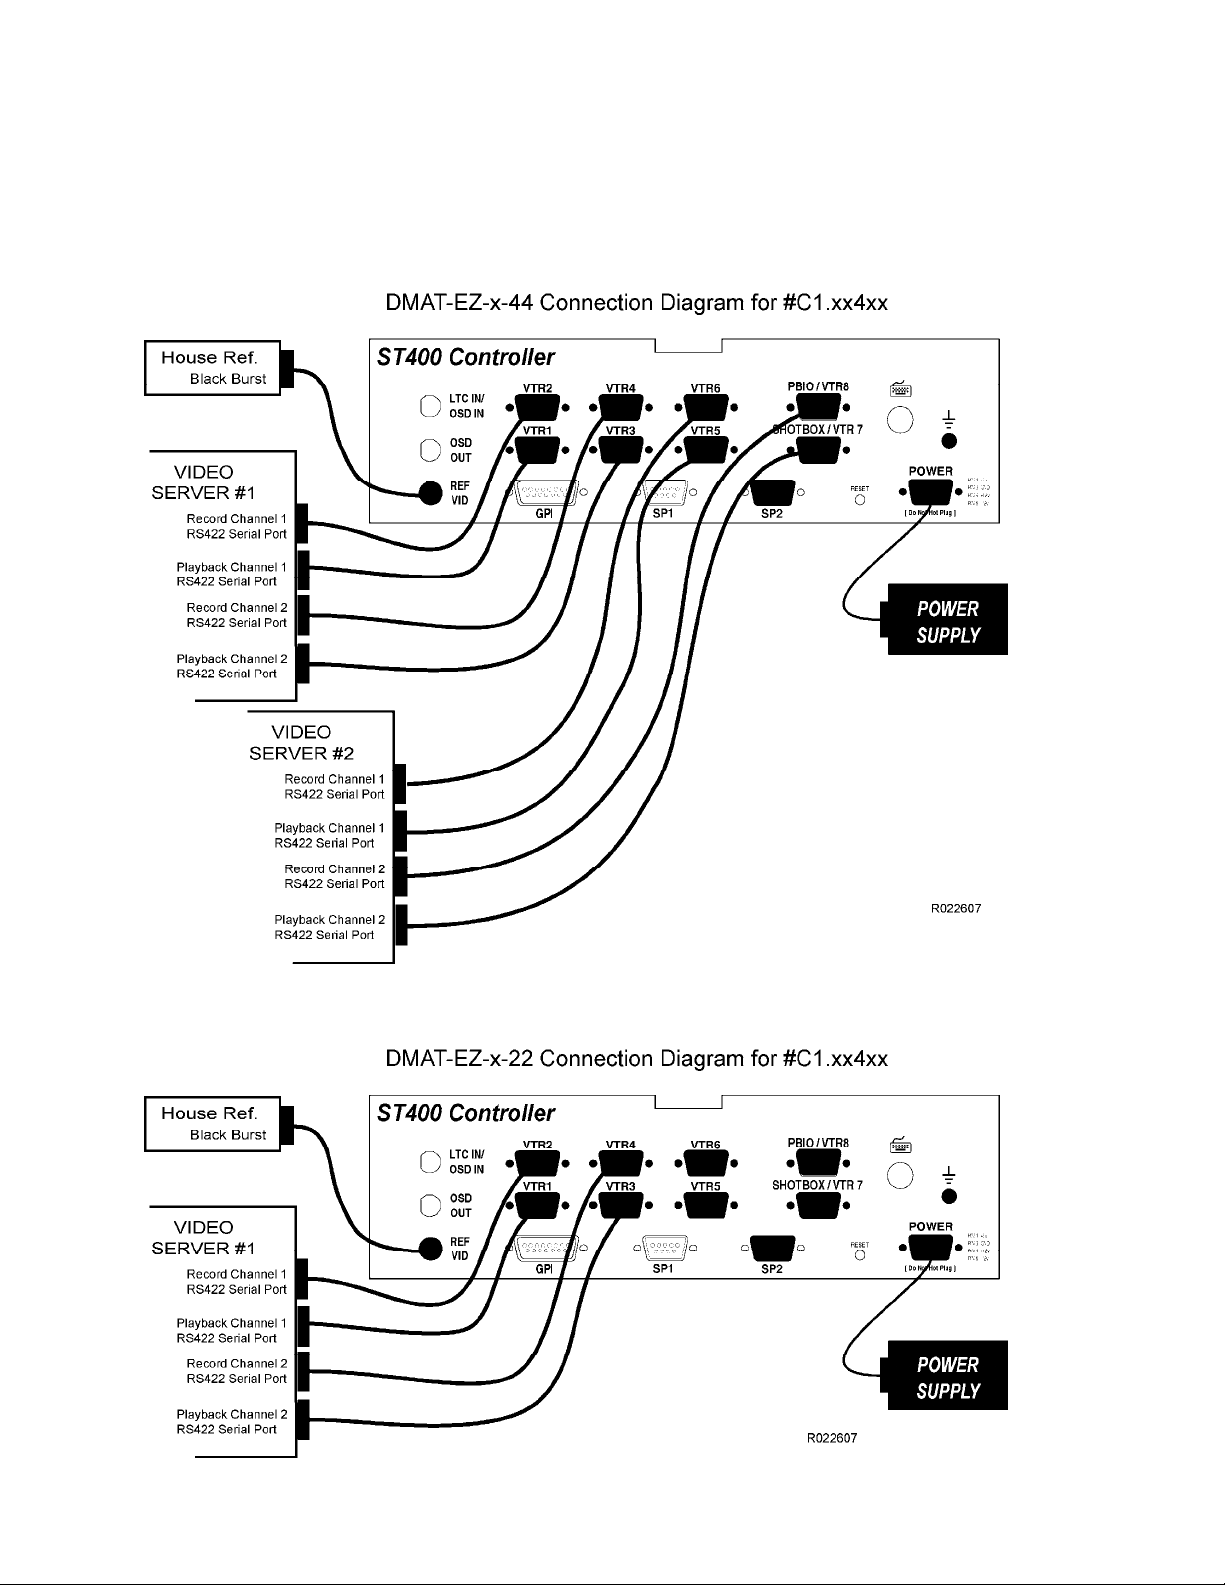
D. Connection Diagram
NOTE: Check the serial number tag on the back of the unit to identify the connector
numbering scheme
Page 8 of 26 DMAT-EZ, Instant Replay Controller
Page 9

NOTE: Check the serial number tag on the back of the unit to identify the connector
numbering scheme
DMAT-EZ, Instant Replay Controller Page 9 of 26
Page 10

Current
Timecode
IV. DMAT-EZ SCREEN LAYOUT
“P1”- error with playback or record chan.
“P2”- error with playback or record chan.
Displayed instead of Timecode
when communication error
with playback channel
Displayed when
communication error
on record channel
Mode: EE, PB, or PL
Current channel:
P1, P2, P3, or P4
Currently loaded
Cue Point #,
In, Out, & Dur
Loaded Highlight List
20 elements per list
Bottom row of screen-
legends for SOFTKEYS
Name of Currently
Loaded Clip
Current Channel’s
Cue points
Page 10 of 26 DMAT-EZ, Instant Replay Controller
Page 11

V. OPERATION
AMP PROTOCOL ONLY:
Using the "WORK FOLDER" menu item: select the work folder into which
the clips will be created and saved.
Also select the "CLIP SAVE" item and choose whether to save the subclips
on the video server or not.
A. Start Record
To start the recording is a simple two-key press operation. Pressing the
[SHIFT] + [RECORD] Keys will create (name) the Master Clip on the
record channel and then put the channel into the record mode. Each
Master Clip is named according to its channel number and a clip id suffix.
The default name DNFRECxy is created, where x is a record channel
number and y is the suffix which is automatically incremented starting
with 0 (zero) and incremented to 9 with each record start. When 9 is
reached a message will display “No free clips on channel x. Please delete
clips DNFRECx0 – DNFRECx9 from the server”.
The default name can be changed to any six characters using the setup
menu item “Rec Clipname”. The suffix is still added t o differentiate
between the channels.
B. Gang Function
If more than one channel is going to be used during the session, a GANG
must be established between all the record channels.
Model 44:
Press the [GANG] key and then the corresponding VTR key [1], [2],
[3], [4].
Pressing the VTR key a second time will remove it from the gang.
Press the [GANG] key again to complete the gang function.
Model 22:
Press the [GANG] key to gang the two channels. Press the [GANG]
key again to un-gang the channels.
The gang function must be established before starting record.
C. Stop Record
Press the [SHIFT] + [STOP] keys to STOP the record process. A
message will display “Are you sure you want to stop Recording?” Press
the [ENTER] key to confirm or press the [ESC] key to continue
recording.
DMAT-EZ, Instant Replay Controller Page 11 of 26
Page 12

D. CUEs
The working (loaded) CUE is displayed in the upper portion of the screen.
The saved CUEs are displayed in the lower portion of the screen.
There are 500 CUEs for each channel. The numbering starts with 1000 for
channel 1, 2000 for channel 2, 3000 for channel 3, and 4000 for channel
4. If channels are grouped together, all CUE numbers are available in that
group. There is no protection from marking a “wrong” CUE, i.e. if the user
on channel 1 selects CUE 2000 and presses the [IN] key, the CUE will be
saved and no warning will be displayed.
1. Mark CUEs
NOTE: Press [REC] key to put channel into EE before marking liv e
shots. If gang is set, all ganged VTRs will have their points marked.
On the 44 model:
Press a VTR channel [1], [2], [3], or [4].
On the 22 model:
Press a VTR channel [1] or [2].
Press the [NEXT] or [LAST] key, or enter the CUE number on the
numeric key pad to select the CUE into which you want to mark the
IN or OUT points.
Pressing the [IN] or [OUT] key will record the time indicated on
the display into the IN or OUT points accordingly. The LED above
each key will light to indicate that the point has been entered.
If an IN point is entered, and the time is after the OUT point the
OUT point is cleared.
Press the [DEL] + [IN] or [DEL] + [OUT] to clear the IN or OUT
points.
Press the [SHIFT] + [IN] or [SHIFT] + [OUT] keys.
To cue to the selected point press the {GOTO} softkey.
OR
To modify the IN or OUT points, use the numeric keypad
followed by pressing [ENTER].
The Cue point can be given a text label to help in identifyin g the
cue. Press the [LABEL] key then enter up to eight characters using
the key pad or a PC type key board attached to the keyboard
connector on the rear of the DMAT. Press [ENTER] on either the
keypad or PC keyboard to complete the label function.
Page 12 of 26 DMAT-EZ, Instant Replay Controller
Page 13

2. Save CUEs
Settings in the SETUP MENU will affect how the CUEs are saved.
The AUTO SAVE feature will add duration to the marked IN or OUT
point. The duration is settable in the SETUP MENU (the default
value is 10 seconds).
The CUE ADVANCE feature will increment th e CUE number each time
the [IN] or [OUT] key is pressed. The [OUT] key will not advance
the CUE number when the AUTO SAVE is turned OFF.
Settings Available in the Setup Menu:
a) AUTO SAVE = OFF and CUE = CURRENT:
Select the CUE before marking the IN or OUT point by pressing
the [NEXT] or [LAST] key.
Press the [IN] or [OUT] key to mark the point. The marked
IN and OUT points are entered into the current CUE. With
subsequent presses of the [IN] or [OUT] keys the point will be
modified, and the original point will be lost. The CUE number
remains the same.
b) AUTO SAVE = ON and CUE = CURRENT:
Select the CUE before marking the IN or OUT point by pressing
the [NEXT] or [LAST] key.
Press the [IN] or [OUT] key to mark the point. The marked
IN point is entered into the current CUE with duration equal to
the time preset in the SETUP MENU. With subsequent presses
of the [IN] key the points will be modified and the original
points will be lost. The CUE number remains the same. If an
OUT point is entered the in point will be calculated to create a
duration equal to the time preset in the SETUP MENU. With
subsequent presses of the [OUT] key the points will be
modified and the original points will be lost. The CUE number
remains the same.
c) AUTO SAVE = OFF and CUE = ADVANCE:
Press the [IN] key to mark the point. The marked IN point is
entered into the next CUE. With every press of the [IN] key
the IN point is entered into the next CUE. Entering an OUT
point is optional but must be done after pressing the [IN] key.
d) AUTO SAVE = ON and CUE = ADVANCE:
Press the [IN] or [OUT] key to mark the point. The marked
IN point is entered into the next CUE with a duration equal to
the time preset in the SETUP MENU. With every press of the
[IN] key, the IN point with duration is entered into the next
CUE. IF the [OUT] key is pressed the out point is entered into
the next CUE with duration equal to the time preset in the
SETUP MENU. With every press of the [OUT] key, the OUT
point with duration is entered into the next CUE.
The IN or OUT points can be modified later.
DMAT-EZ, Instant Replay Controller Page 13 of 26
Page 14

3. Recall CUEs
CUEs are displayed in the lower portion of the screen.
Press the [NEXT] or [LAST] key or enter the CUE number on the
numeric keypad to select the CUE that you want to recall.
Then press the [GOTO] key. The CUE will be loaded on the server
and cued to the IN point.
4. Edit CUEs
Press a VTR channel:
On the 44 model:
Press a VTR channel [1], [2], [3], or [4].
On the 22 model:
Press a VTR channel [1] or [2].
Press the [NEXT] or [LAST] key, or enter the CUE number on the
numeric key pad to select the CUE that you want to edit.
Press the [IN] or [OUT] key to mark the time indicated on the
display into the IN or OUT points accordingly.
If an IN point is entered, and the time is after the OUT point the
OUT point is cleared.
Press the [DEL] + [IN] or [DEL] + [OUT] to clear the IN or OUT
points.
To modify the IN or OUT points, press the [SHIFT] + [IN] or
[SHIFT] + [OUT] keys. Then use the numeric keypad followed by
pressing [ENTER].
The Cue point can be given a text label to help in identifyin g the
cue. Press the [LABEL] key then enter up to eight characters using
the key pad or a PC type key board attached to the keyboard
connector on the rear of the DMAT. Press [ENTER] on either the
keypad or PC keyboard to complete the label function.
Page 14 of 26 DMAT-EZ, Instant Replay Controller
Page 15

E. Playback
The playback may be in three modes: EE mode, PB mode and PL
mode. Playback of pre-recorded clips is available in the PB Mode.
1. EE Mode
NOTE: Press the [GANG] key to apply the following functions to
several VTRs (see SECTION B for details):
To put the channel into EE mode, press [REC] key. The Master Clip
will be loaded (DNF_REC1x on playback channel 1, DNF_REC2x on
playback channel 2 etc.), will search to the recorder’s timecode minus
Input Video Delay, and continue to play. The timecode that is
displayed on the first line of the display shows the recorder’s LTC. The
playback channel is also put into EE mode.
In EE mode, the user can mark IN and OUT points. The timecode for
the IN and OUT points is read from the Recorder. The user can also
perform non-transport functions (such as edit the playlist). Any
transport function will terminate the EE mode.
2. PB Mode
NOTE: Press the [GANG] key to apply the following functions to
several VTRs (see SECTION B for details):
Press any transport key to go from EE mode to PB mode. The CUEs
that were made in EE Mode can be GOTOed in PB mode.
NOTE: Pre-recorded clips can be loaded using the [CLIPLIST] button
to access and load the clip from the server. In and out points can be
set on these clips and entered as CUES. They will perform as any of
the other clips marked from the record clips.
If the [GOTO] key is pressed, the currently displayed IN point is cued
to.
Press the [PLAY
stop. If the channel is parked at or after the OUT point, the playout
continues to play after the OUT point.
If IN and OUT points are marked, press the [LOOP] key to start play
of same clip after the OUT point.
The [GOTO LIVE] key will search the playback channel to the
recorder’s timecode minus Input Video Delay and continue to play.
The mode will be switched to PB. The user can mark IN and OUT
points in PB mode. In that case the IN and OUT times are read from
the Playback channel. The user can edit the playlist in PB mode. All
transport functions are available in PB mode.
When the channel plays out from IN to OUT point, it will display the
real-time countdown of the clip. (RT, the Real-Time Countdown is
displayed only when both IN and OUT points exist and the CUE plays).
] key to play from the IN point to the OUT point and
Press the [RECUE] key to cue the loaded clip back to the IN point.
DMAT-EZ, Instant Replay Controller Page 15 of 26
Page 16

3. PL Mode
The 6 keys directly below the display are the softkeys ({SOFTKEYS}).
They are used to manipulate the playlist.
Press the {LIST} key to enable Playlist mode and cue the list to the
top.
Press the [SHIFT] + {NEXT} to toggle the Playlist number (x0-x9,
x=channel number). Use the VTR keys to select the channel number.
Press the [PLAY] key to play the list. Press the [SLOMO] key or
move the Tbar to play the list in slow motion at the set speed.
Press the [STOP] key to stop the list.
See section F.4 to create and edit the playlist.
Page 16 of 26 DMAT-EZ, Instant Replay Controller
Page 17

F. Playlist
The 6 keys directly below the display are the softkeys
({SOFTKEYS}).These are used to manipulate the playlist.
Press the {LIST} softkey to enable Playlist mode and cue the list to the
top.
Key
{LIST} Cue to the top of the list ( the
{ADD} Append an element to the end of
{INS} Insert element before the
{PREV} Move the highlight to the
{NEXT} Move the highlight to the next
{DEL} Delete the highlighted element Clear the selected list (Are you
Standalone function
highlight also moves to the first
element)
list
highlighted element
previous element.
element.
[Shift] + {key function}
None
None
None
Change current playlist number
to the previous number. Do not
cue the playlist
Change current playlist number
to the next number. Do not cue
the playlist.
sure? prompt is displayed first)
Each playlist can contain 20 elements. Each channel may have up to 10
playlists. The numbering of the playlists is similar to the numbering of the
CUEs. Channel 1 has playlists numbered from 10 to 19, channel 2: 20 –
29, channel 3: 30- 39, and channel 4: 40 – 49.
If channels 1 and 2 are grouped, any playlist from 10 to 29 may be loaded
on that channel. If channels 1 and 2 are grouped, any CUE between 1000
and 2999 may be added to any playlist.
The playlist is displayed as two columns of 10 elements each as in the
following example:
1. >1013<> 11. 1156
2. 1032 12. 1257
… …
10. 1009 20. 1003
The arrows next to the clip number indicate that the element is cued.
When the {NEXT} key is pressed, the highlight moves down the column.
When {PREV} key is pressed, the highlight moves up the column.
DMAT-EZ, Instant Replay Controller Page 17 of 26
Page 18

1. Create Playlist
(Press {LIST} soft key to enter PLAY LIST MODE if not in PL MODE.)
To add a clip to the playlist, select a CUE using [NEXT CUE] and
[LAST CUE] keys (or enter a CUE number using a numeric keypad),
and press {ADD}.
To insert an element into the list, select a CUE to insert using [NEXT
CUE] and [LAST CUE] keys (or enter a CUE number using a numeric
keypad), then using the {PREV} or {NEXT} key, find the place in
the playlist above which to insert an element and press the {INS}
key.
To be part of the playlist, the CUE has to have both IN and OUT point.
If the user adds the CUE to the playlist and then deletes the IN or OUT
point, this element becomes invalid and gets skipped when the list is
played out. If the user deletes the whole CUE that is in the playlist,
the corresponding element becomes invalid and gets skipped when the
list is played out.
NOTE: Pre-recorded clips can be loaded using the [CLIPLIST] button
to access and load the clip from the server. In and out points can be
set on these clips and entered as CUES. They will perform as any of
the other clips marked from the record clips.
2. Play Playlist
(Press {LIST} soft key to enter PLAY LIST MODE if not in PL MODE.)
Press the [PLAY] key to play the list. Press the [STOP] key to stop
the list play. Press SLOMO or move the Tbar to play the list in slow
motion.
Press the [RECUE] key to cue the currently highlighted element to the
beginning.
When the list is playing, press the {NEXT} key to skip the next
element (the current element will play to the end but the element + 2
will play next, element +1 is skipped).
When the list is playing, press the [FFWD] key to CUT to the next
element (the current element immediately transitions to the element +
1).
When Playlist is playing, the RT (real-time countdown) is displayed.
3. Loop Playlist
(Press {LIST} soft key to enter PLAY LIST MODE if not in PL MODE.)
When the [LOOP] key is pressed, the playlist plays out in loop mode
(after the last element plays, the list immediately starts to play from
the first element until the [STOP] key is pressed).
4. Edit Playlist
(Press {LIST} soft key to enter PLAY LIST MODE if not in PL MODE.)
To delete an element in the list, use the {PREV} or {NEXT} key to
select the element to delete and then press the {DEL} key.
There is no Editing of the IN or OUT points of the elements in the
playlist. Use the EDIT CUE function.
There is no Editing of the playlist as it plays out.
Page 18 of 26 DMAT-EZ, Instant Replay Controller
Page 19

The Speed is not saved as part of the element.
There is no Ganged playout of playlists.
VI. REFERENCE
A. Setup Menu
Press [MENU]. The MENU indicator will turn on.
The display will show the following parameters with their current settings.
Turn the wheel to select a menu option.
Press the {CHANGE} softkey to modify the current setting.
Press the {EXIT} softkey to exit the Setup Menu. The current setting will
be in affect.
PARAMETER DESCRIPTION
WORK FOLDER
(Available in
AMP protocol
only)
REC CLIPNAME “DNFREC” is the default name. To change the default name use the
STANDARD Press Softkey to select the Timecode standard for time calculations:
WIND MODE Press Softkey to select:
“default” is the default name. Use the Wheel to select a different
folder/bin and press the [GOTO] key.
OR
Press [ENTER] to use the Keypad or an attached PC type keyboard to
enter up to a 32 character name (this will not create a folder, this is only
a shortcut for selecting the folder name). Press the [ENTER] key to
complete the function.
Keypad or an attached PC type keyboard to enter up to 6 characters (the
suffix of channel number and id will still be added to the name). Press
the [ENTER] key to complete the function.
{NTSC}, {DF}, {PAL}
{HOLD} (Fast wind is maintained only while key is depressed.)
OR
{LATCH} (Fast wind is maintained after key is released.)
Set the fast wind speed (x3.9 to x23.7) by pressing the {SPEED}
softkey.
DMAT-EZ, Instant Replay Controller Page 19 of 26
Page 20

PARAMETER DESCRIPTION
SLOMO Press the {TBAR} (or {WHEEL}) softkey to select the T-bar or wheel for
slomo.
For T-bar:
The T-BAR has a speed range of 0 Æ 2x with a detent at 1x play
speed
OR a range of 0 Æ 1x (detent at 1x Play speed).
Press {SPD-RNG} softkey to toggle between SLOMO speed
ranges:
0 Æ 1x OR 0 Æ 2x.
Press {BACK} softkey to return to SLOMO MENU.
Press [ESC] to exit OR turn the Wheel to select another item.
For Wheel:
Press the {PRSET} sofkey to toggle between UPDATE and STATIC.
UPDATE: When exiting SLOMO mode, the last used speed is
saved in the Preset Speed register.
STATIC: The Preset Speed register is NOT updated when
exiting SLOMO mode. It is only changed by [SHIFT]
+ [SLOMO] (PRESET SLOMO).
Press {SPD-RNG} softkey to toggle between SLOMO speed
ranges: 0 Æ 1x OR 0 Æ 2x.
GANG
MODE
CLIP SAVE
(Available in
AMP protocol
only)
REF. VIDEO Select the appropriate softkey to enable or disable the reference video
{PERM} Permanent Gang:
The GANG can be created and undone only with the [GANG] key.
{TEMP} Temporary Gang:
Quickly create a GANG by pressing and holding a VTR key, then pressing
other VTR keys.
Quickly undo the GANG by pressing any VTR key.
Video Reference must be connected for frame accurate playout of ganged
Channels.
Select the appropriate softkey to enable or disable SUB CLIP SAVE to
server.
{DMAT} Save sub clips to DMAT only.
{DMAT and SERVER} Save sub clips to DMAT and SERVER.
{ON} If reference video is attached.
{OFF} If reference video is not attached. (this will affect the accuracy of
ganged events)
Page 20 of 26 DMAT-EZ, Instant Replay Controller
Page 21

PARAMETER DESCRIPTION
CUE POINT Select the appropriate softkey to enable or disable the ADVANCE function.
{ADVANCE} The CUE number will increment each time the [IN] or
[OUT] key is pressed. If the AUTO SAVE function is not on, the [OUT]
key will not advance the CUE number (this will allow IN and OUT points to
be marked).
{CURRENT} The CUE number will remain the same after the [IN] or
[OUT] key is pressed.
AUTO-SAVE Select the appropriate softkey to enable or disable the AUTO-SAVE
function
{ON} Pressing the [IN] key will enter the IN point and the OUT point
will automatically be marked with the In Time + DEFAULT DURATION.
Pressing the [OUT] key will enter the OUT point and the IN point will
automatically be marked with the out time – (minus) the DEFAULT
DURATION.
{OFF} No duration will be set.
DEFAULT DUR Use Key Pad to enter the Auto-save duration.
VIDEO DELAY Use Key Pad to enter the Play Delay inherent to the video server.
GROUP Select the appropriate softkey
Model 44:
{NONE} No channel grouping.
{TWO} Group channels 1-2 and 3-4.
{ALL} Group all channels 1-2-3-4.
Model 22:
{NONE} No channel grouping.
{ALL} Group channels 1-2.
{SERVICE}
SOFTKEY
Select the appropriate softkey
{DEFAULTS} Set DMAT to factory defaults
{CLEANUP} Deletes all CUEs on all channels.
Press [ENTER] to continue or press [ESC] to exit without changing
settings.
DMAT-EZ, Instant Replay Controller Page 21 of 26
Page 22

VII. FUNCTION TABLE
Function Key Press Description
CLIPLIST [CLIPLIST] Press the [CLIPLIST] key to select a clip to
be loaded into the selected play channel. This
clip can be the record clip or any other clip on
the server.
EE [REC] Press [REC] to cue the play channel to the
record time minus the record delay and place
the play channel in E-E mode.
FAST FORWARD [FFWD] Press and HOLD to shuttle forward. Release
key to stop. Set WIND Speed in MENU.
GANG SETUP {GANG} Model 44:
Individually press the VTR keys to be
included in the gang. The LED above the
key will turn on. Press the VTR key again to
remove from gang. The LED above the key
will turn off. Press [GANG] to exit. Upon
exiting, all members of the gang will have
their VTR LEDs turned on. The flashing LED
shows which VTR is currently selected.
Model 22:
Press the [GANG] key to gang both
channels.
All members of the gang will have their VTR
LEDs turned on. The flashing LED shows
which VTR is currently selected.
Press the [GANG] key again to cancel the
gang mode.
GOTO [GOTO] Press the [GOTO] button to load the selected
CUE on the selected VTR channel. The clip will
be cued to the in point.
GOTO ENTERED
TIME
GOTO LIVE [GOTO LIVE] Press [GOTO LIVE] to cue the play channel to
JOG [JOG] Select JOG mode and enable Wheel.
LABEL CUE [LABEL] Press the [LABEL] key to label the CUE using
[SHIFT] + [RECUE] Search the VTR to the manually entered time.
Use the ST400 numeric keypad. Press
[ENTER] or [RECUE].
the record time minus the record delay.
the attached PC Keyboard. 8 characters max.
LAST CUE [LAST CUE] Step to the previous CUE Location.
Page 22 of 26 DMAT-EZ, Instant Replay Controller
Page 23

Function Key Press Description
LOOP [LOOP ENABLE] Plays the currently loaded clip or Playlist in a
continuous loop.
NEXT CUE [NEXT CUE] Step to the next CUE Location.
PLAY [PLAY] If an OUT point is marked, play to the OUT
point and stop. If no OUT point is marked,
play normally. If the CLIP ID ends with an ‘*’
or ‘#’, do loop play.
PLAYLIST
NEXT NUMBER
PLAYLIST
PREVIOUS
NUMBER
RECORD [SHIFT] + [RECORD]. Creates Master Clip and places VTR into the
RECUE [RECUE] If the IN point is marked, cue to the IN point.
REVERSE SLO-MO [REV] While in SLO-MO mode press and hold the
REWIND [RWD] Press and HOLD to shuttle backward. Release
SHUTTLE [SHUTTLE] Select SHUTTLE mode and enable Wheel.
SLOMO [SLOMO] Press [SLOMO] to slomo the VTR. Turn the
[SHIFT] + {NEXT} Select next playlist number
[SHIFT] + {PRV} Select previous playlist number
Record mode
[REV] key to play in reverse direction.
key to stop. Set WIND Speed in MENU.
Wheel. (Or move the T-Bar, if available) to
change the play speed. Press [SLOMO] to
STILL frame. OR press any transport key to
exit SLOMO.
SLO-MO SPEED
PRESET
STOP [STOP] Press once to STILL frame VTR. Press again to
DMAT-EZ, Instant Replay Controller Page 23 of 26
[SHIFT] + [SLOMO] For WHEEL ONLY: Press [SHIFT] + [SLOMO]
to preset the slomo speed. Turn the Wheel to
select desired speed. Press [ESC] or any
transport key to exit.
put VTR into STOP mode.
Page 24

VIII. SPECIFICATIONS
Power: 90 VAC to 265 VAC adapter supplied with IEC connector
APX Model #AP4108
+5v @ 4A, +12v @ 1.0A, -12V @ 0.6A
Size: (H” x W” x D”) 1 3/4” (front), 3 5/8” (rear) x 12 3/4” x 8”
(8 5/8” height to the top of display)
Weight: 10 lbs.
Rear Panel Connectors: VTR1 - 8 (All D9F)
GPI (D26HDF)
Power (D9M)
Keyboard (6-pin mini DIN)
Ref. Video In (BNC)
Ground Threaded stud.
Display: Easy to read, back-lit LCD display
Jog/Shuttle Wheel: With mechanical detents
T-Bar: With mechanical detents
RS422 SERIAL CONNECTOR
9-Pin D-Type, Female (D9F)
Pin # 1 Frame Ground 6 Receive Common
2 Receive A Í 7 Receive B Í
3 Transmit B Î 8 Transmit A Î
4 Transmit Common 9 Frame Ground
5 Spare
POWER CONNECTOR
9-Pin D-Type, Female (D9M)
Pin # 1 +5v DC 6 +5 VDC
2 +5v DC 7 Ground
3 Ground 8 Ground
4 +12 VDC 9 Ground
5 –12 VDC
GPI IN/OUT CONNECTOR
26-Pin D-Type, Female (D26HDF)
Connector Has No Function
Page 24 of 26 DMAT-EZ, Instant Replay Controller
Page 25

IX. KEY LAYOUT
DMAT-EZ, Instant Replay Controller Page 25 of 26
Page 26

X. DNF CONTROLS LIMITED WARRANTY
DNF Controls warrants its product to be free from defects in material and
workmanship for a period of one (1) year from the date of sale to the original
purchaser from DNF Controls.
In order to enforce the rights under this warranty, the customer must first contact
DNF’s Customer Support Department to afford the opportunity of identifying and
fixing the problem without sending the unit in for repair. If DNF’s Customer Support
Department cannot fix the problem, the customer will be issued a Returned
Merchandise Authorization number (RMA). The customer will then sh ip the defective
product prepaid to DNF Controls with the RMA number clearly indicated on the
customer’s shipping document. The merchandise is to be shipped to:
DNF Controls
12843 Foothill Blvd., Suite C
Sylmar, CA 91342
USA
Failure to obtain a proper RMA number prior to retu rning the product may result in
the return not being accepted, or in a charge for the required repair.
DNF Controls, at its option, will repair or replace the defectiv e unit. DNF Controls will
return the unit prepaid to the customer. The method of shipment is at the discretion
of DNF Controls, principally UPS Ground for shipments within the United States of
America. Shipments to international customers will be sent via air. Should a
customer require the product to be returned in a more expeditious manner, the
return shipment will be billed to their freight account.
This warranty will be considered null and void if accident, misuse, abuse, improper
line voltage, fire, water, lightning, or other acts of God damaged the product. All
repair parts are to be supplied by DNF Controls, either directly or through its
authorized dealer network. Similarly, any repair work not performed by either DNF
Controls or its authorized dealer may void the warranty.
After the warranty period has expired, DNF Controls offers repair services at prices
listed in the DNF Controls Price List. DNF Controls reserves t he right to refuse repair
of any unit outside the warranty period that is deemed non-repairable .
DNF Controls shall not be liable for direct, indirect, in cidental, consequential or oth er
types of damage resulting from the use of the product.
# # #
Page 26 of 26 DMAT-EZ, Instant Replay Controller
 Loading...