

Page 1

DNA SPX12/15 DSP
Instrukcja obsługi / User Manual
DNA SPX12/15 DSP
Instrukcja obsługi / User Manual
Page 2

DNA SPX12/15 DSP
Instrukcja obsługi / User Manual
1
POLSKI
Spis treści
Bezpieczeństwo użytkowania ........................................................................................................ 2
Konserwacja ................................................................................................................................... 2
Środki ostrożności .......................................................................................................................... 3
Konstrukcja tylnego panelu i funkcje ............................................................................................. 3
Informacja o zużytym sprzęcie elektrycznym i elektronicznym .................................................... 5
Page 3
DNA SPX12/15 DSP
Instrukcja obsługi / User Manual
2
Bezpieczeństwo użytkowania
Przed użyciem prosimy o szczegółowe zapoznanie się z instrukcją obsługi. Prosimy również o
zachowanie jej na przyszłość. Instrukcja zawiera zasady bezpiecznego korzystania z urządzenia.
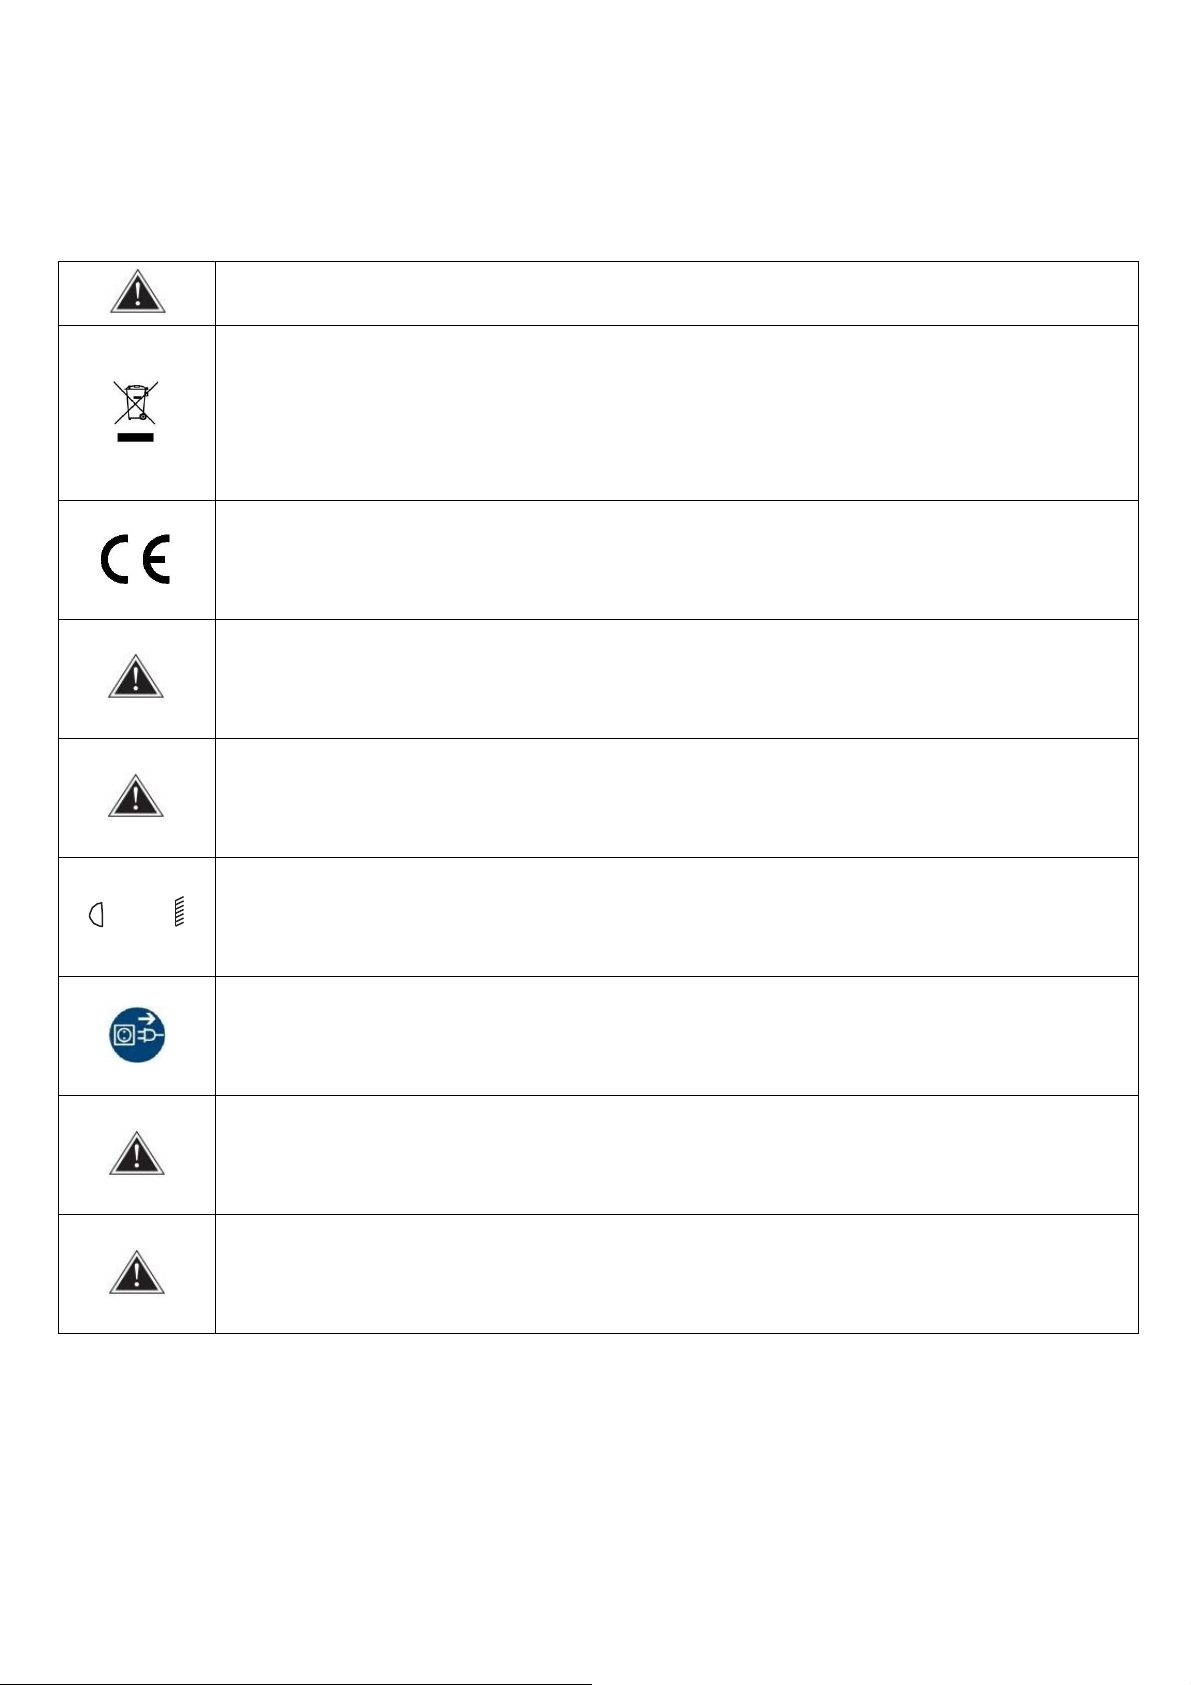
UWAGA! URZĄDZENIA NIE WOLNO WYRZUCAĆ DO ODPADÓW DOMOWYCH.
To oznaczenie oznacza, że produkt nie może być wyrzucany razem z odpadami domowymi w całej
UE. W celu zapobiegnięcia potencjalnym szkodom dla środowiska lub zdrowia, zużyty produkt należy
poddać recyklingowi. Zgodnie z obowiązującym prawem, nie nadający się do użycia sprzęt
elektryczny i elektroniczny należy zbierać osobno, w specjalnie do tego celu wyznaczonych punktach
zbierania zużytego sprzętu, celem ich przetworzenia i ponownego wykorzystania na podstawie
obowiązujących norm ochrony środowiska.
Produkt opisany w tej instrukcji jest zgodny z dyrektywami europejskimi, dlatego jest oznaczony
znakiem CE.
Urządzenie należy trzymać z dala od dzieci i niewykwalifikowanych osób. Producent nie ponosi
odpowiedzialności za szkody spowodowane nieprawidłowym użytkowaniem.
Przed użyciem upewnij się, że obudowa nie jest uszkodzona.
‐‐1 m
Zapewnij minimum 1 m dystansu pomiędzy urządzeniem a materiałami łatwopalnymi.
Urządzenie pracuje na zasilaniu oznaczonym na obudowie – nie należy podłączać do prądu o innych
parametrach. Zadbaj, aby urządzenie i źródło zasilania było uziemione. Odłącz urządzenie z zasilania
przed zdjęciem obudowy lub konserwacją. Jeżeli podczas pracy urządzenia pojawią się zakłócenia,
natychmiast odłącz przewód zasilający od źródła zasilania!
Urządzenie do użytku zewnętrznego i wewnętrznego, nie narażać na długotrwałe działanie wilgoci.
Nie należy narażać produktu na bezpośrednie działanie słońca lub innych urządzeń oświetleniowych.
Nie należy instalować urządzenia na podłożu narażonym na wibracje. Optymalna temperatura
otoczenia pracy urządzenia to -15°C – 40°C. Nie użytkuj urządzenia przez czas dłuższy niż 10
godzin!
Konserwacja
1. Urządzenie może użytkować tylko wykwalifikowany personel, szkody spowodowane użytkowaniem
niezgodnym z przeznaczeniem lub próbą samodzielnej naprawy nie podlegają gwarancji. W ewnątrz
opakowania nie ma żadnych części serwisowych, naprawy mogą być wykonywane wyłącznie przez
autoryzowany punkt serwisowy.
2. Regularne czyszczenie umożliwia długotrwałe użytkowanie.
Page 4

DNA SPX12/15 DSP
Instrukcja obsługi / User Manual
3
Środki ostrożności
1. Mocowanie i instalacja głośnika musi być przeprowadzona przez wykwalifikowany personel, zgodnie
z zatwierdzonymi normami bezpieczeństwa.
2. Nie próbuj czyścić plastikowej obudowy rozpuszczalnikami lub środkami czyszczącymi na bazie
produktów petrochemicznych.
3. Nie umieszczaj na obudowie głośnika przedmiotów będących źródłem ciepła, takich jak sprzęt
oświetleniowy czy wytwornice dymu.
4. Nie wystawiaj obudowy głośnika na bezpośrednie działanie deszczu lub kontakt z wodą. Dostanie
się wilgoci do urządzenia spowoduje zwarcie.
5. Nie ustawiaj obudowy głośnika w sposób, który mógłby spowodować obrażenia w przypadku
przemieszczenia się obudowy.
6. Przed instalacją upewnij się, że napięcie i częstotliwość gniazdka elektrycznego odpowiadają
wymaganiom zasilania głośnika.
7. Przed zmianą połączeń kablowych w głośniku odłącz go od głównego zasilania.
8. Upewnij się, że przewód zasilający nie jest zgięty ani uszkodzony ostrymi krawędziami. Nigdy nie
dopuszczaj do kontaktu przewodu zasilającego z innymi kablami. Przewód zasilający należy trzymać
wyłącznie za wtyczkę.
9. W przypadku wymiany bezpiecznika należy go wymienić na bezpiecznik o takich samych
parametrach i wymiarach.
Konstrukcja tylnego panelu i funkcje
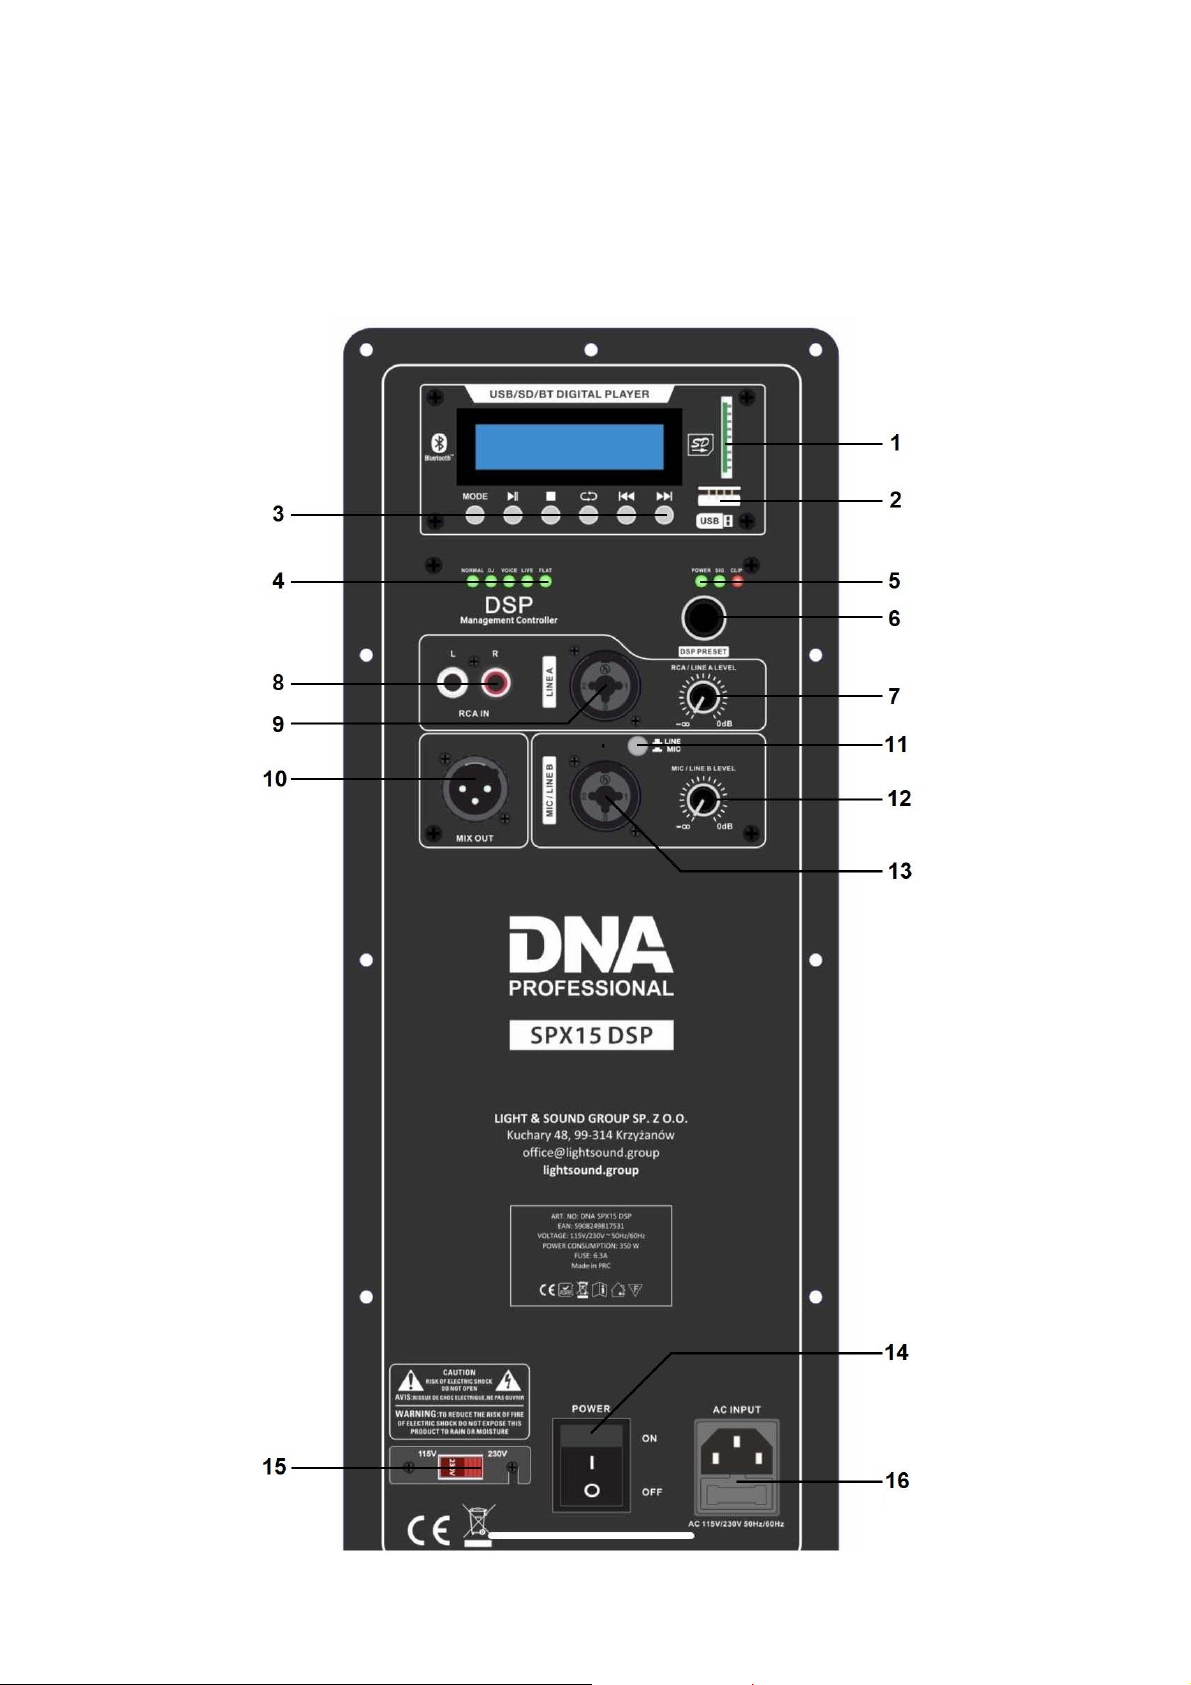
1. Gniazdo karty SD.
2. Gniazdo USB.
3. Tryb pracy (MODE): USB/SD/Bluetooth:
: Odtwórz/Pauza;
: Zatrzymanie;
: Pętla (jeden utwór, losowo, wszystkie utwory);
: Poprzednia ścieżka;
: Następna ścieżka.
4. Wybór programu DSP: NORMAL, DJ, VOICE, LIVE, FLAT.
5. Wskaźnik świetlny:
Wskaźnik zasilania (POWER): zasilanie jest włączone;
Wskaźnik sygnału (SIG): sygnał otrzymywany z wejścia audio;
Wskaźnik clip (CLIP): poziom sygnału wyjściowego jest zbyt duży i powinien zostać
zmniejszony.
6. Przycisk do wyboru programu DSP.
7. Kontrola głośności wejścia RCA / Line A.
8. Wejście RCA.
9. Wejście Line A: wejście na zbalansowany jack 6.3 mm (1/4”) lub XLR.
10. Zbalansowane równoległe wyjście XLR: połączone równolegle z wejściem audio, możliwe
podłączenie innego wzmacniacza.
11. Przycisk do wyboru wejścia Mic / Line.
12. Kontrola głośności wejścia Mic / Line B.
13. Wejście Line B: wejścia na zbalansowany jack 6.3 mm (1/4”) lub XLR.
Page 5
DNA SPX12/15 DSP
Instrukcja obsługi / User Manual
4
14. Przełącznik zasilania: wł./wył. urządzenie.
15. Przełącznik napięcia: 115V i 230V.
16. Wejście zasilania: podłącz kabel zasilania IEC, aby zasilić urządzenie.
Page 6

DNA SPX12/15 DSP
Instrukcja obsługi / User Manual
5
Informacja o zużytym sprzęcie elektrycznym i elektronicznym
Głównym celem regulacji europejskich oraz krajowych jest ograniczenie ilości odpadów powstałych
ze zużytego sprzętu elektrycznego i elektronicznego, zapewnienie odpowiedniego poziomu jego
zbierania, odzysku i recyklingu oraz zwiększenie świadomości społecznej o jego szkodliwości dla
środowiska naturalnego, na każdym etapie użytkowania sprzętu elektrycznego i elektronicznego. W
związku
z powyższym należy wskazać, iż gospodarstwa domowe spełniają kluczową rolę w przyczynianiu się
do ponownego użycia i odzysku, w tym recyklingu zużytego sprzętu. Użytkownik sprzętu
przeznaczonego dla gospodarstw domowych jest zobowiązany po jego zużyciu do oddania
zbierającemu zużyty sprzęt elektryczny i elektroniczny. Należy jednak pamiętać, aby produkty
należące do grupy sprzętu elektrycznego lub elektronicznego utylizowane były w uprawnionych do
tego punktach zbiórki.
Page 7

DNA SPX12/15 DSP
Instrukcja obsługi / User Manual
6
ENGLISH
Table of contents
Safety rules .................................................................................................................................... 7
Maintenance ................................................................................................................................... 7
Precautions .................................................................................................................................... 8
Back panel construction and features ........................................................................................... 8
Information about used electrical and electronic equipment ...................................................... 10
Page 8
DNA SPX12/15 DSP
Instrukcja obsługi / User Manual
7
Safety rules
Please read the user manual in detail before use. Please also keep it for future reference. The man-
ual contains rules for the safe use of the device.
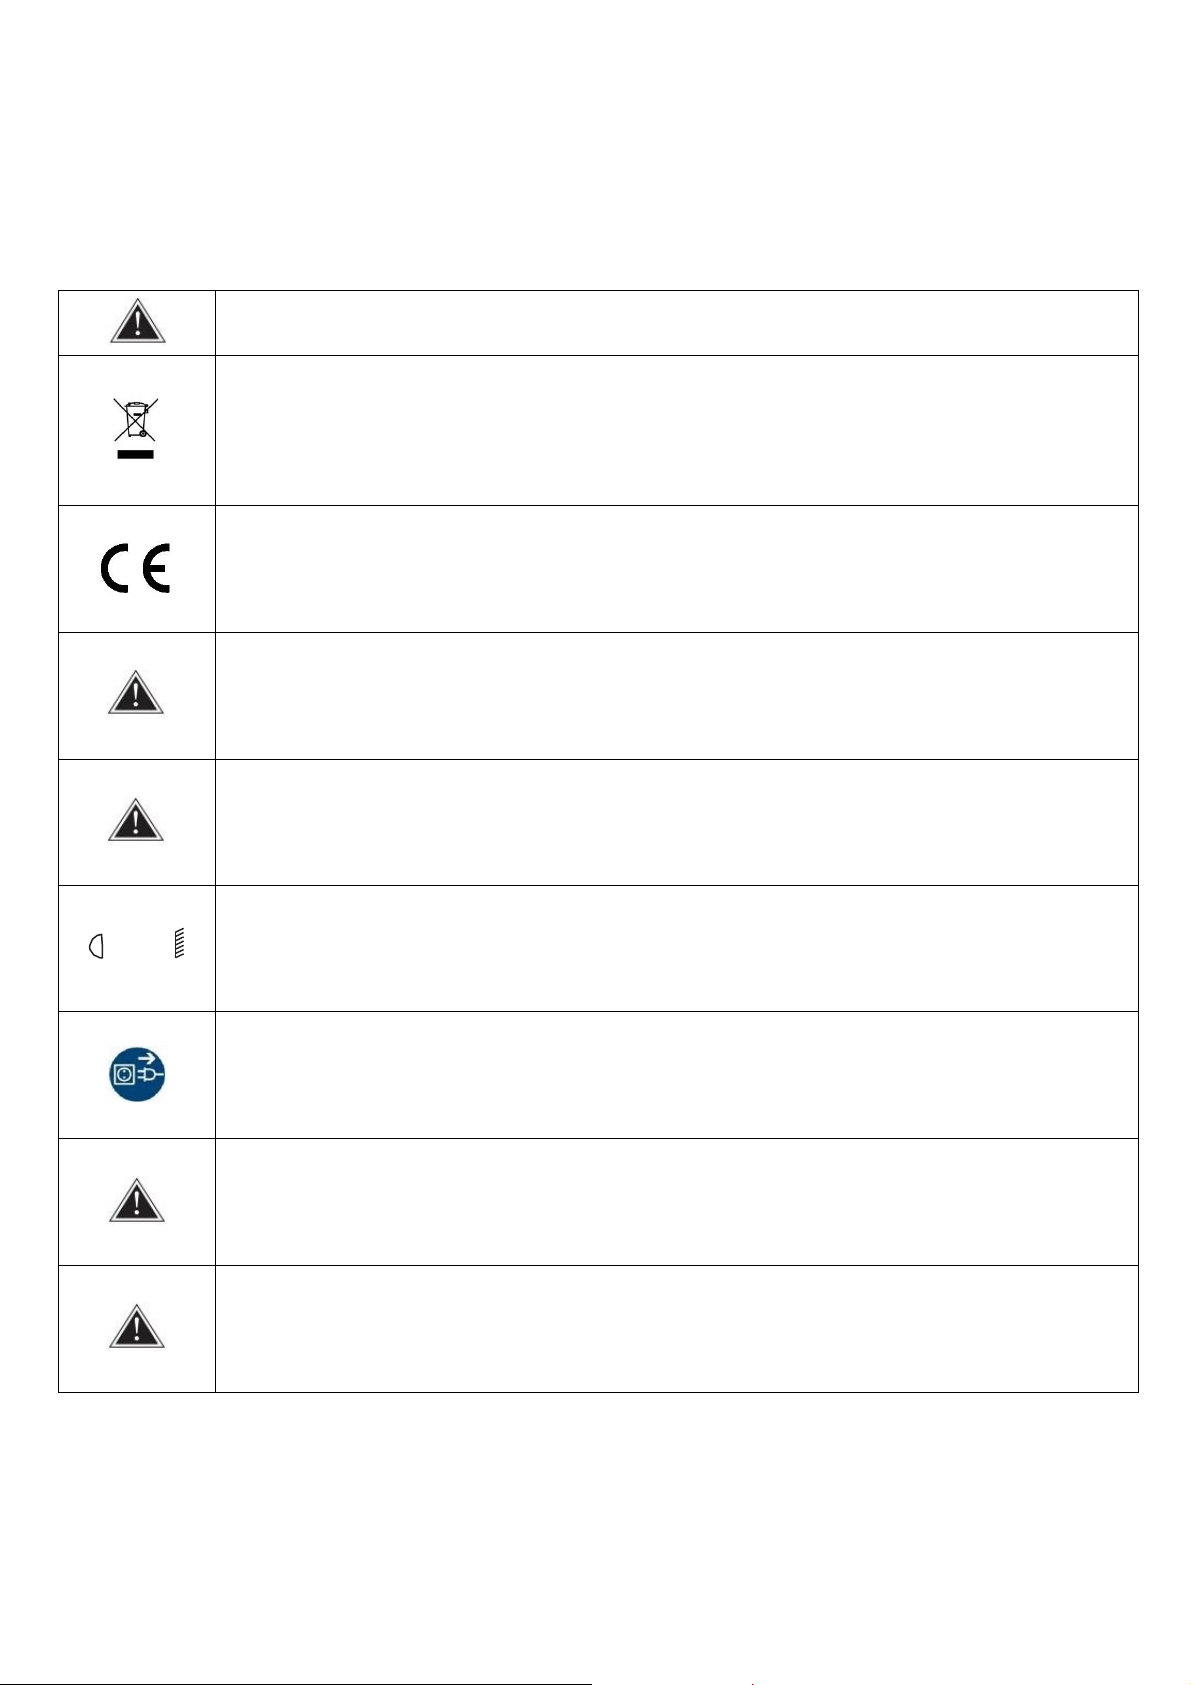
WARNING! THE DEVICE MUST NOT BE DISPOSED OF WITH HOUSEHOLD WASTE. This symbol
indicates that this product must not be disposed of with household waste, according to the EU and
your national law. In order to prevent potential damage to the environment or health, the used product
must be recycled. In accordance with current legislation, unusable electrical and electronic devices
must be collected separately at the designated facilities for recycling, acting on the basis of applicable
environmental standards.
The product described in this manual comply with European directives and it is therefore CE marked.
Keep the device away from children and unqualified persons. The manufacturer is not liable for dam-
age caused by improper use.
Before use, make sure the housing is not damaged.
‐‐1 m
Ensure a minimum distance of 1 m between the device and flammable materials.
The device operates on the power supply marked on the housing – do not connect to a power supply
with different parameters. Ensure that the device and the power source are grounded. Disconnect
the device from the power supply before removing the housing or performing maintenance. If interfer-
ence occurs during operation, immediately disconnect the power cable from the power source!
The device for outdoor and indoor use, do not expose to prolonged moisture. Do not expose the prod-
uct to direct sunlight or other lighting devices.
Do not install the device on a surface subjected to vibration. The optimal ambient operating tempera-
ture of the device is -15°C - 40°C. Do not use the device for more than 10 hours!
Maintenance
1. The device may only be used by qualified personnel. Damage caused by improper use or attempted
repair is not covered by the warranty. There are no service parts inside the packaging. Repairs may
only be carried out by authorized service center.
Page 9

DNA SPX12/15 DSP
Instrukcja obsługi / User Manual
8
2. Regular cleaning allows of long term use.
Precautions
1. Fixing and installation of this speaker cabinet must be carried out by qualified personnel following
the approved safety standards.
2. Do not attempt to clean the plastic enclosure with solvents or petrochemical based cleaners.
3. Do not place objects which are sources of heat on the speaker cabinet such as lighting equipment
or smoke machines.
4. Do not expose the speaker cabinet to direct rain or standing in water. Liquid getting into the box will
cause a short circuit and it will be hazardous.
5. Do not stack the speaker cabinet in a manner that could cause injury.
6. Before installation, ensure that the voltage and frequency of power outlet match the power requirements of the loudspeaker.
7. Disconnect from main power before to make connections in the loudspeaker.
8. Make sure that the power cord is never crimped or damaged by sharp edges. Never let the power
cord come into contact with other cables. Only handle the power cord by the plug.
9. In case to replace the fuse, it must be changed by the same rate and dimensions.
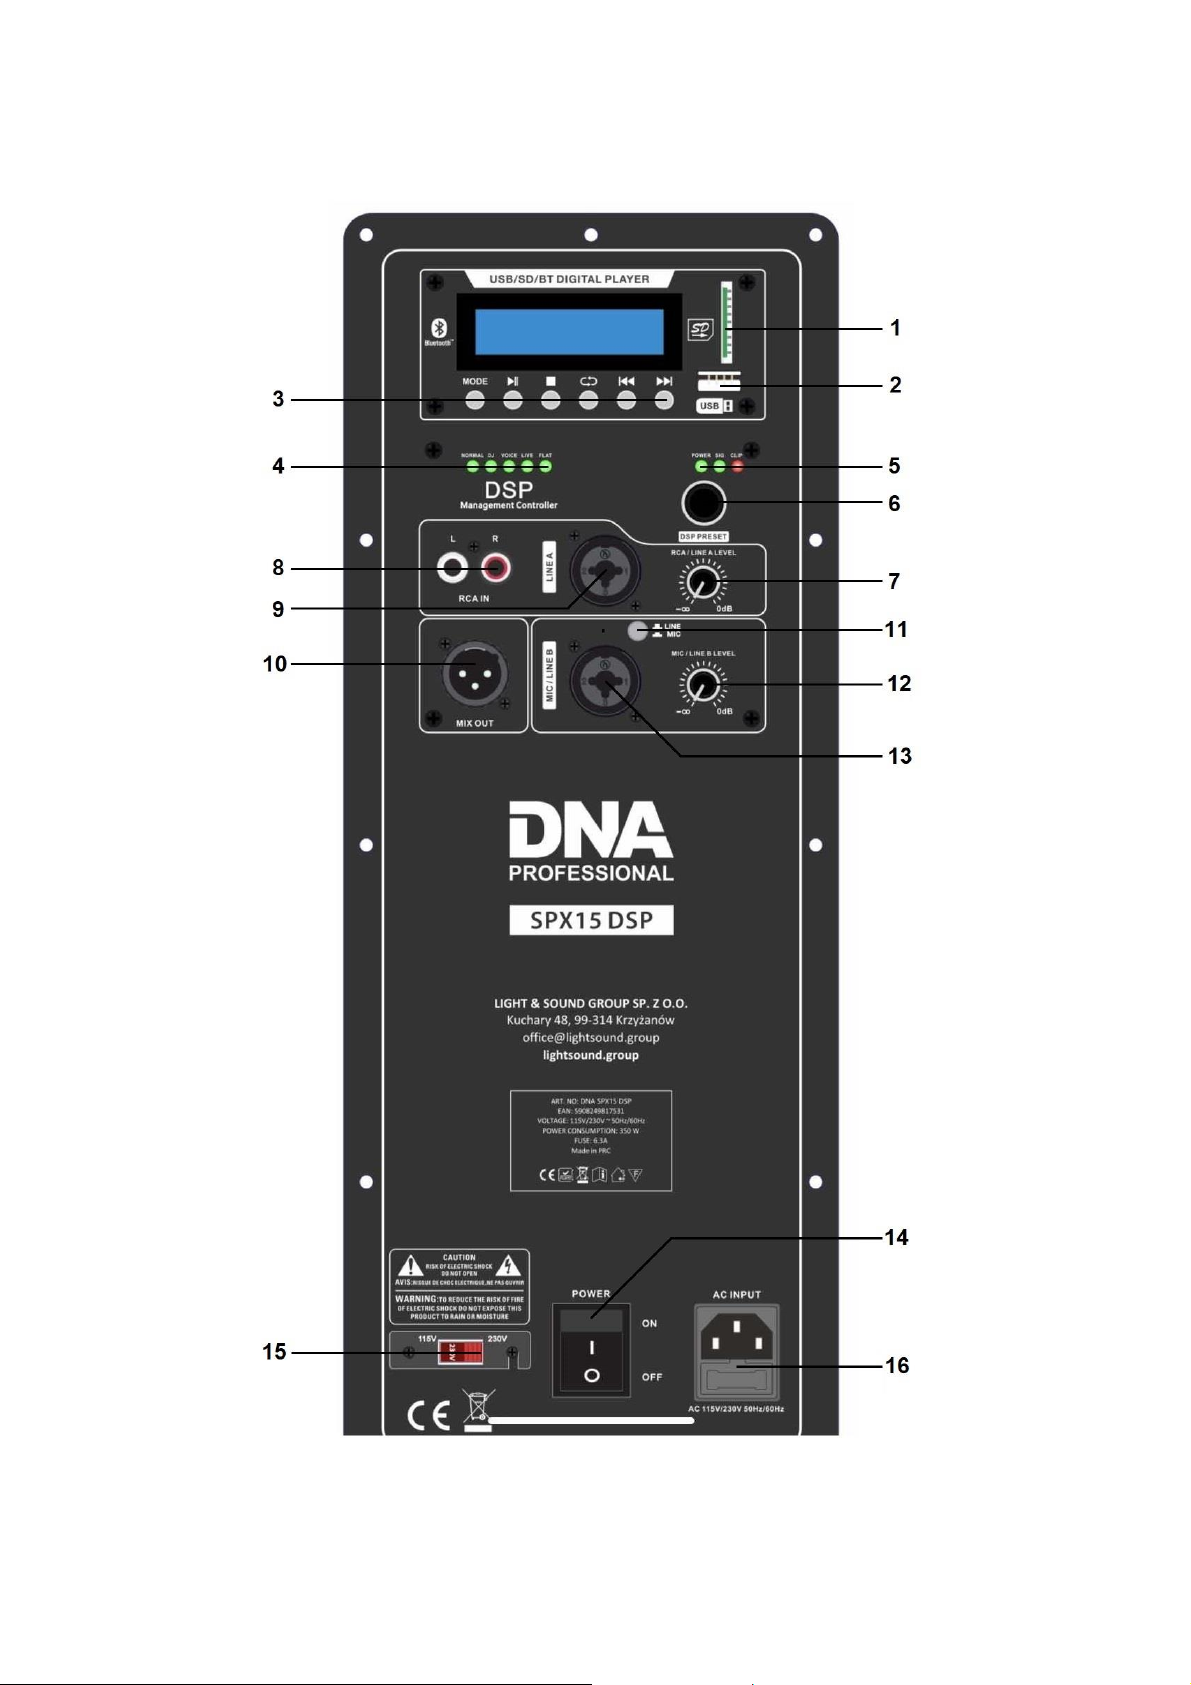
Back panel construction and features
1. SD card socket.
2. USB disk socket.
3. Mode: exchange between USB/SD/Bluetooth:
: Play/Pause;
: Pause;
: Repeat (single, random, all);
: Previous song;
: Next song.
4. DSP program choice: NORMAL, DJ, VOICE, LIVE, FLAT.
5. Light indicator:
Power light (POWER): When lit, the power is on;
Signal light (SIG): When lit, the signal is present at the audio input;
Clip light (CLIP): When lit, the output signal level is excessive and should be reduced.
6. Button to choose DSP program.
7. RCA / Line A input volume control.
8. RCA line input.
9. Line A input: balanced jack 6.3 mm (1/4”) or XLR input.
10. Balanced parallel XLR output: linked in parallel with the audio input and is useful to connect another
amplifier.
11. Button to choose Line input or Microphone input.
12. Mic / Line B input volume control.
13. Line B input: balanced jack 6.3 mm (1/4”) or XLR input.
14. Power switch: it allows to switch on/off the device.
15. Voltage switch: 115V and 230V.
16. Main power inlet: connect IEC power cable here to supply power to the unit
Page 10
DNA SPX12/15 DSP
Instrukcja obsługi / User Manual
9
Page 11

DNA SPX12/15 DSP
Instrukcja obsługi / User Manual
10
Information about used electrical and electronic equipment
The main goal of European and national law regulations is to reduce the amount of waste produced
from used electrical and electronic equipment, to ensure an appropriate level of collection, recovery
and recycling of used equipment, and to increase public awareness of its harmfulness to the environment, at each stage of use of electrical and electronic equipment. Therefore, it should be pointed out
that households play a key role in contributing to reuse and recovery, including recycling of used equipment. The user of electrical and electronic equipment – intended for households – is obliged to return
it to authorized collector after its use. However, it should be remembered that products classified
as electrical or electronic equipment should be disposed of at authorized collection points.
 Loading...