

Page 1
Before using this product, please read the security instructions first
and bear them in mind when using the product.
English
User’s manual
Internet Radio
Page 2
English
1
Safety Instructions
Please read the safety instructions below before using your Internet Radio.
• Only use the AC adaptor that provided with your Internet Radio. Using an unauthorized power supply
will invalidate your guarantee and may damage the radio.
• Do not overload the electrical outlet with too many devices at any time.
(This may cause overheating and/or fire.)
• Do not bend the power cord excessively or place any heavy objects on it. (This may cause fire.)
• Do not handle the power plug with wet hands. (This may cause electric shock.)
• Your product may interfere with other electrical equipment, e.g. telephones, TV and radio sets,
clock/alarms and computers if placed too close. It is recommended that you place your product at least
one meter away from such appliances to minimize any risk of interference.
• Never disassemble or modify this Internet Radio in any way.
• Do not let chemicals, such as benzene, thinners etc., come in contact with this Internet Radio.
• Avoid using this Internet Radio in locations with high temperatures (40°… or higher) or low
temperatures (5°… or lower), or with excessive moisture.
• Do not drop this Internet Radio or give it a shock.
• Keep this Internet Radio away from locations where it may be exposed to severe vibrations or
magnetic materials.
• Avoid exposing this Internet Radio to direct sunlight or heat-generating devices.
• Avoid exposing this Internet Radio to dirt or soot.
• Never allow liquids, spray or other materials to come into contact with the inside of this Internet Radio.
• Unplug this Internet Radio from the wall outlet before cleaning it. Use only a soft cloth to clean the
exterior of this Internet Radio.
Warning
Caution
Disposal of Old Electrical & Electronic Equipment (Applicable in the European
Union and other European countries with separate collection systems)
This symbol on the product or on its packaging indicates that this product shall not be
treated as household waste. Instead it shall be handed over to the applicable collection point
for the recycling of electrical and electronic equipment. By ensuring this product is disposed
of correctly, you will help prevent potential negative consequences for the environment and
human health, which could otherwise be caused by inappropriate waste handling of this
product. The recycling of materials will help to conserve natural resources. For more detailed
information about recycling of this product, please contact your local city office, your
household waste disposal service or the shop where you purchased the product.
Page 3

English
2
FCC Information
The Federal Communications Commission Radio Frequency Interference Statement includes the
following warning:
NOTE: This equipment has been tested and found to comply with the limits for a Class B digital device,
pursuant to Part 15 of the FCC Rules. These limits are designed to provide reasonable protection against
harmful interference in a residential installation.
This equipment generates, uses, and can radiate radio frequency energy and, if not installed and used in
accordance with the instructions, may cause harmful interference to radio communications.
However, there is no guarantee that interference will not occur in a particular installation.
If this equipment does cause harmful interference to radio or television reception, which can be determined
by turning the equipment off and on, the user is encouraged to try to correct the interference by one or
more of the following measures:
• Reorient or relocate the receiving antenna.
• Increase the separation between the equipment and receiver.
• Connect the equipment into an outlet on a circuit different from that to which the receiver is connected.
• Consult the dealer or an experienced radio/TV technician for help.
This device complies with part 15 of the FCC Rules.
Operation is subject to the following two conditions: (1) This device may not cause harmful interference,
and (2) this device must accept any interference received, including interference that may cause undesired
operation.
Caution : Any changes or modifications in construction of this device which are not expressly approved
by the party responsible for compliance could void the user’s authority to operate the equipment.
IMPORTANT NOTE:
FCC Radiation Exposure Statement
This equipment complies with FCC radiation exposure limits set forth an uncontrolled environment.
This equipment should be installed and operated with minimum distance 20cm between the radiator
and your body. This transmitter must not be co-located or operating in conjunction with any other
antenna or transmitter.
Canadian Department of Communications Radio Interference Regulations
This digital apparatus (Wireless Internet Radio) does not exceed the Class B limits for radio-noise emissions
from digital apparatus as set out in the Radio Interference Regulations of the Canadian Department of
Communications.
Page 4

English
3
Table of contents
Safety instructions ..............................................1
FCC Information ...................................................2
Features..................................................................4
Part Descriptions
Internet Radio.......................................................5
Display window icons ...........................................7
Getting started
What you need before you can use
your Internet radio ...............................................8
Steps for connecting your radio to
your wireless network ..........................................8
Using the wired LAN function (optional)............9
Using the Internet Radio
Choosing a radio station to listen to ...................10
Storing a radio station in a preset........................10
Stations which enable you to choose
what you listen to .................................................11
Using Podcasts
Choosing podcasts to listen to .............................12
Using the Media Player
Windows shares ....................................................13
UPnP servers..........................................................14
Local Media (External USB Host)..........................17
Auxiliary Function ...............................................18
Alarm clock
Setting the Alarms ................................................19
Setting the sleep timer .........................................19
Configure menu ...................................................20
Configure ‘My Stuff’
Registering an account on Reciva’s website .......23
Configuring ‘My Stations’ ....................................23
Configuring ‘My Streams’ ....................................23
Configuring ‘My Podcasts’ ...................................23
Product Specifications ........................................24
Troubleshooting...................................................25
Software license information...........................26
Page 5
English
4
Features
This internet radio is a device with which you can play music files that are stored on your computer, or
listen to web radio or podcasts, via a wireless LAN. You can also listen to music files stored on USB thumb
drive via USB HOST. You can enjoy music with high quality speakers.
What this product can do
•Listen to thousands of radio stations from around the world,
• Stations checked and updated daily.
• Listen to live streaming radio and on-demand content.
• Listen to music files you have stored on your computer. (PC Streaming Function)
• Listen to an audio device (Auxiliary Function)
• Listen to music files you have stored on USB thumb drive.
• Listen to podcasts.
• Alarm clock feature.
• Sleep Timer
• Integrated high quality stereo speakers.
• Wireless and easy to use.
• Line Out Function
• Support the Wired LAN.(optional)
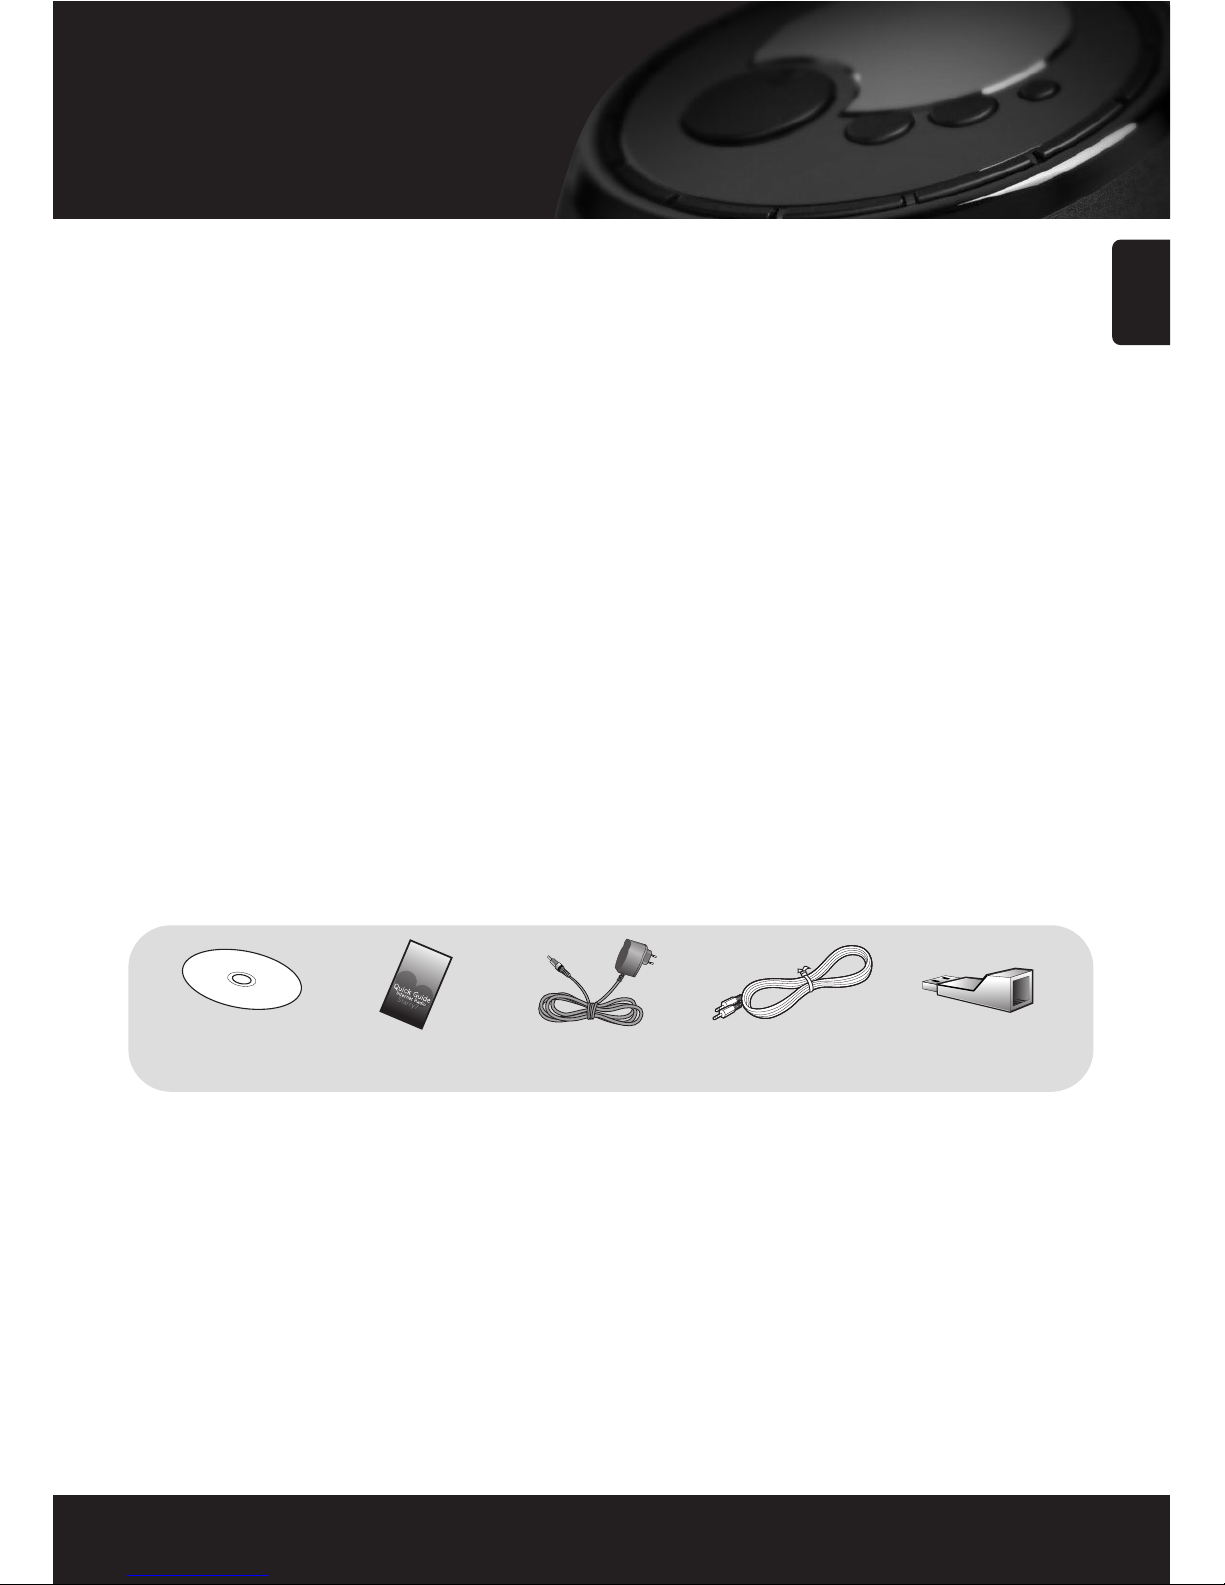
Accessories
•The components may differ slightly in appearance with the provided images.
AC AdaptorUser’s manual CD Quick Guide
AUX IN Audio Cable
(optional)
USB to Ethernet
(optional)
Page 6
English
5
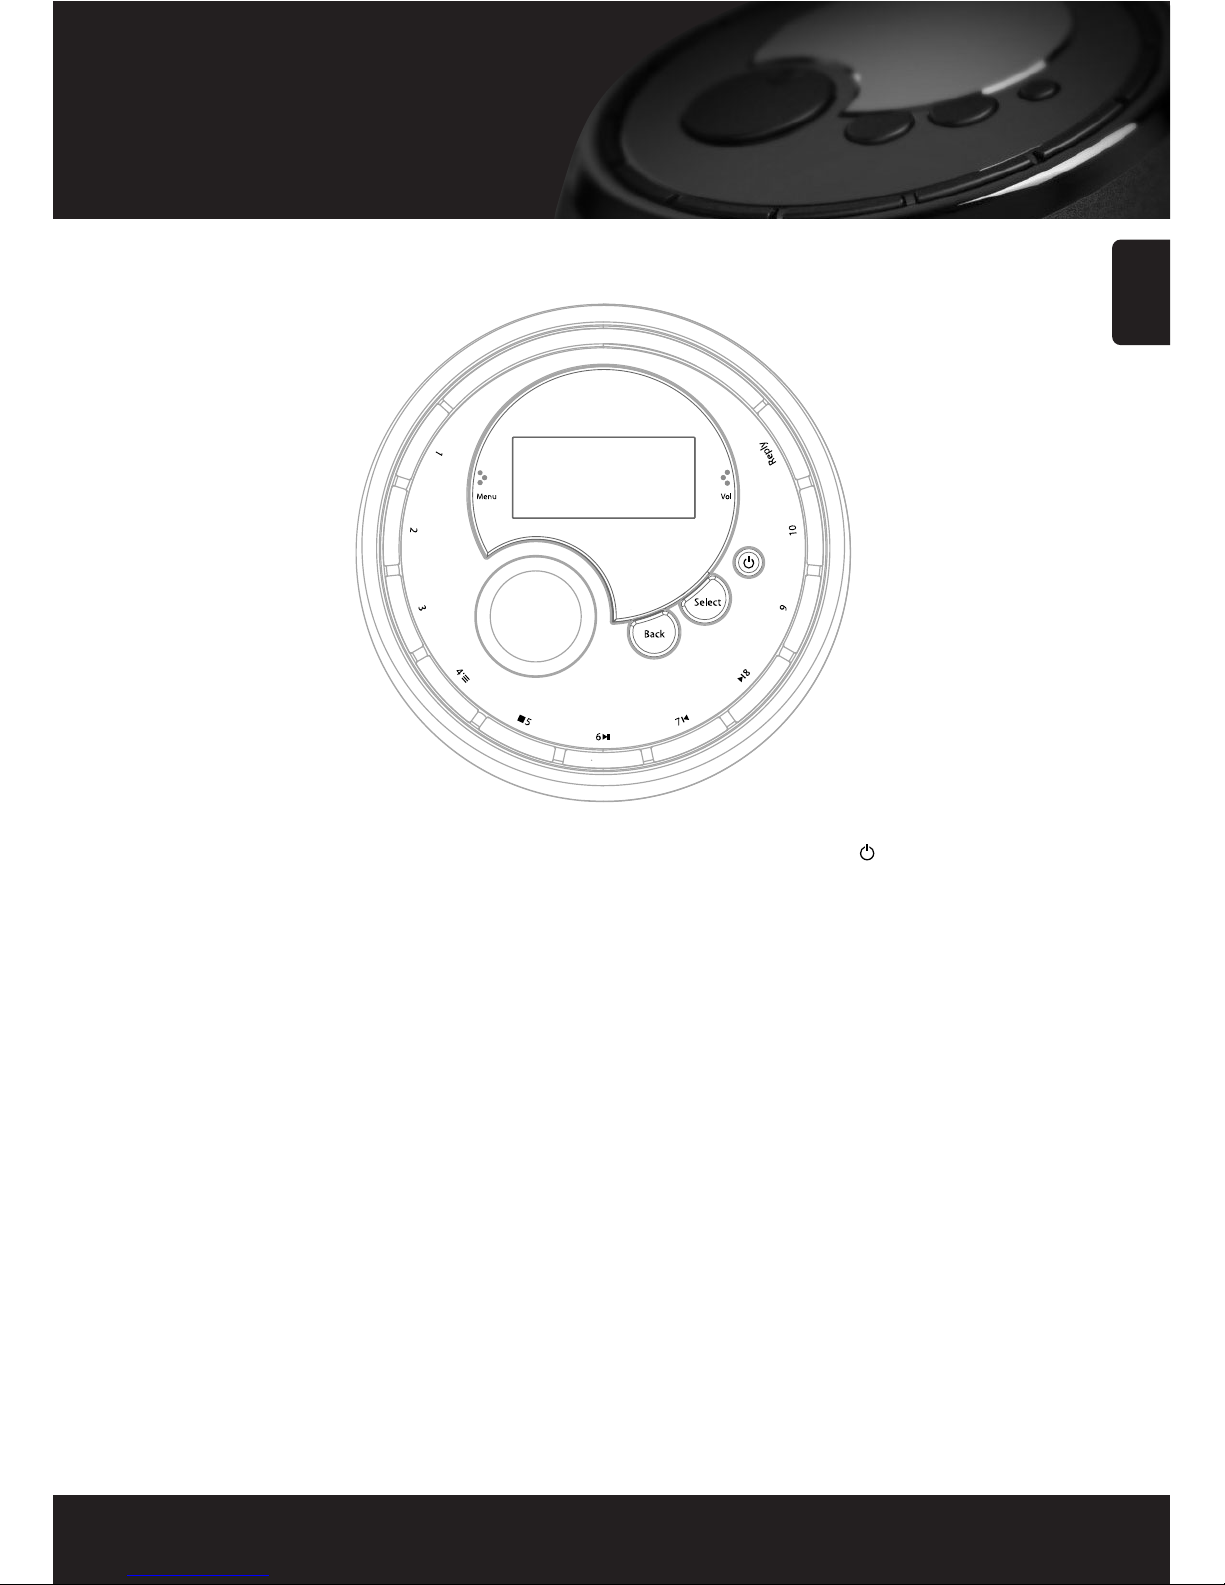
Part Description
1- 3
In radio mode, press and hold down
to store preset #, pressing again will
play preset# (# : 1-3)
4 (Browse)
In radio mode, press and hold down
to store preset 4, pressing again will
play preset4.
In media player mode, press to
browse through the list of tracks in
the playback queue.
5 (Stop)
In radio mode, press and hold down
to store preset 5, pressing again will
play preset 5.
In media player Mode, press to stop
playback. Also to delete a track
from the media queue when in
‘browse’ mode.
6 (Play/Pause)
In radio mode, press and hold down
to store preset 6, pressing again will
play preset 6.
In media player mode, press to
pause the track currently playing.
Press to restart a paused or stopped
track.
7 (Previous Track)
In radio mode, press and hold down
to store preset 7, pressing again will
play preset 7.
In media player mode, press to skip
back to the previous track.
8 (Next Track)
In radio mode, press and hold down
to store preset 8, pressing again will
play preset 8.
In media player mode, press to skip
forward to the next track.
9- 10
In radio mode, press and hold down
to store preset #, pressing again will
play preset# (# : 9-10)
Reply
Use to access to interactive services
(when they become available).
Back
Cancels or stops the action and
returns to the previous menu.
Select
Use to select / confirm a menu option.
POWER(
)
Turns the power on/off.
LCD screen
A station name or music tile,
settings and messages appear on
this display window.
Knob
Use to adjust the volume when
playing music files or listening this
radio.
Use to navigate menu options or
radio stations.
Use for setting the time and alarm.
• Internet Radio
Page 7
English
6
Part Description
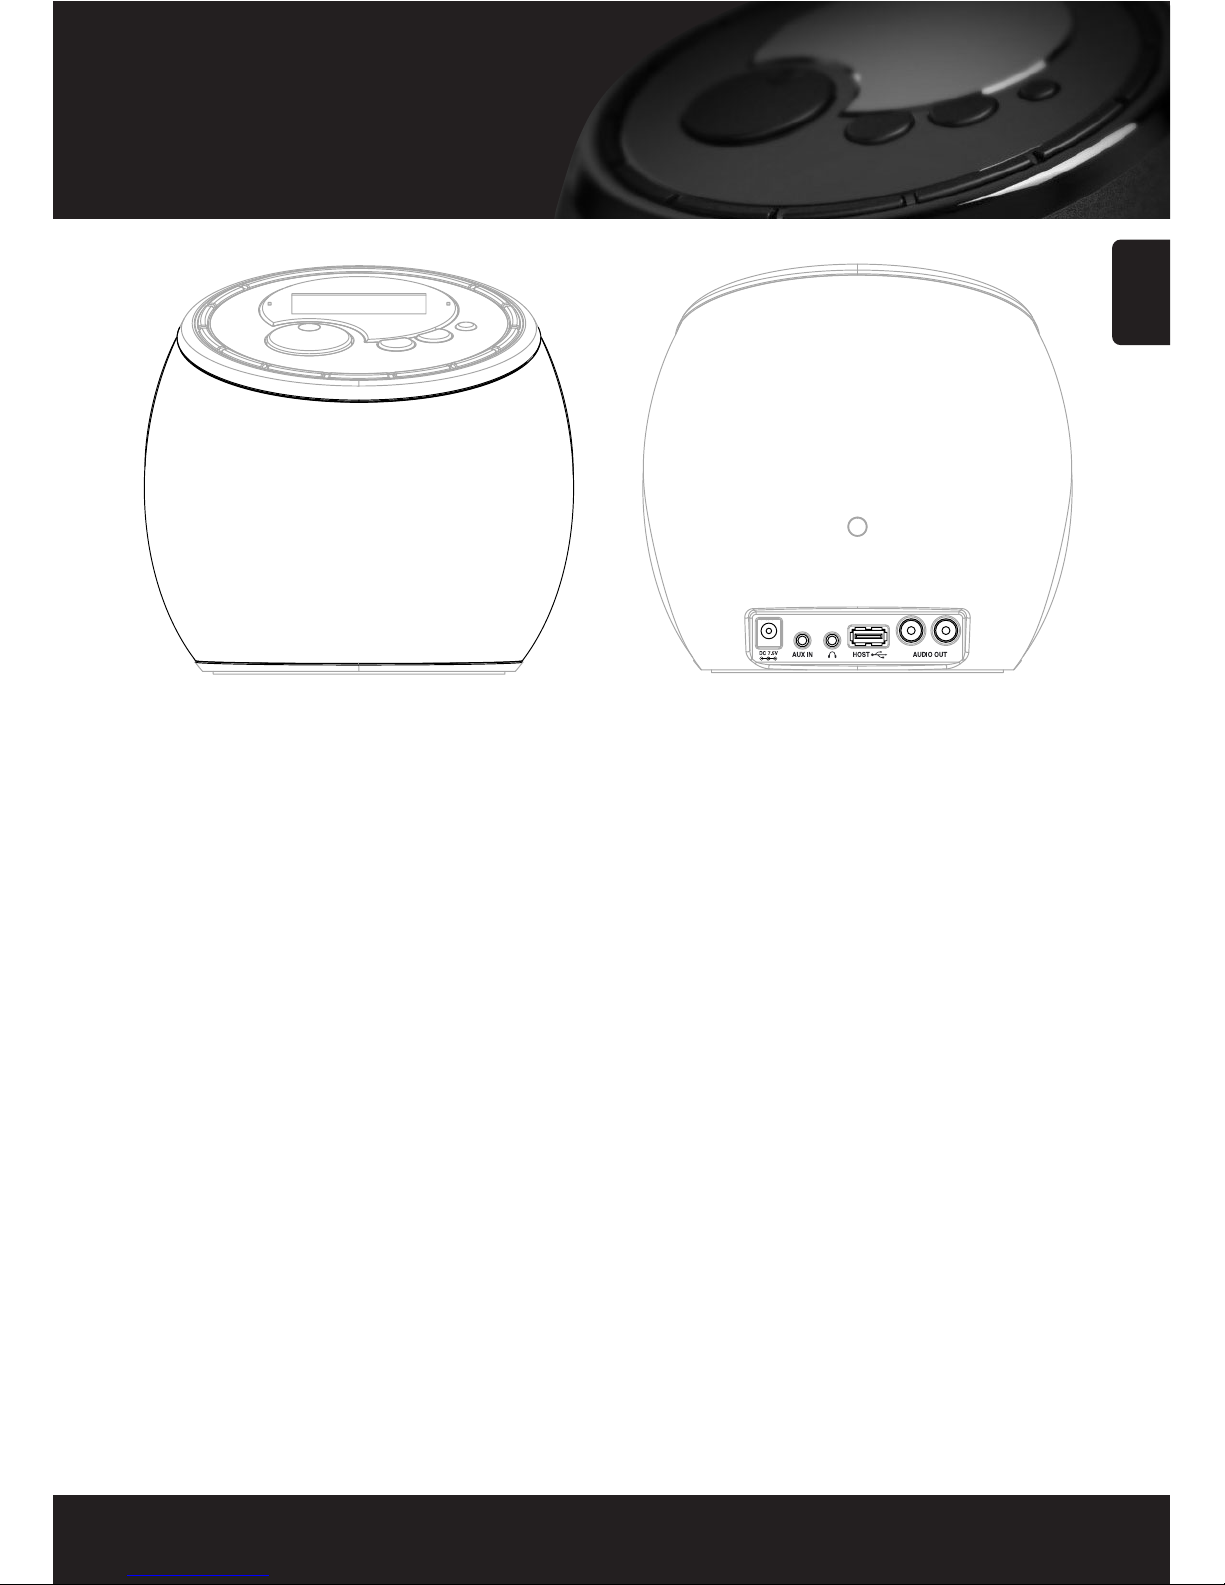
DC Power Jack
Connect the AC Adaptor (DC 7.5V, 1.6A) to the DC Jack.
AUX IN jack
Use to connect a external audio device to AUX IN jack
using ‘Audio Cable’.
Headphone Socket
Use to connect a headphone.
USB HOST jack
Use to connect the external USB compatible devices with
UMS support(USB memory, MP3 player, etc.)
Use to connect the external USB to Ethernet dongle
provided for wired LAN (optional).
LINE OUT jack
Use to connect this radio to external high-grade audio
component using ‘RCA Cable’.
Built-in stereo speaker
Page 8
English
7
Part Description
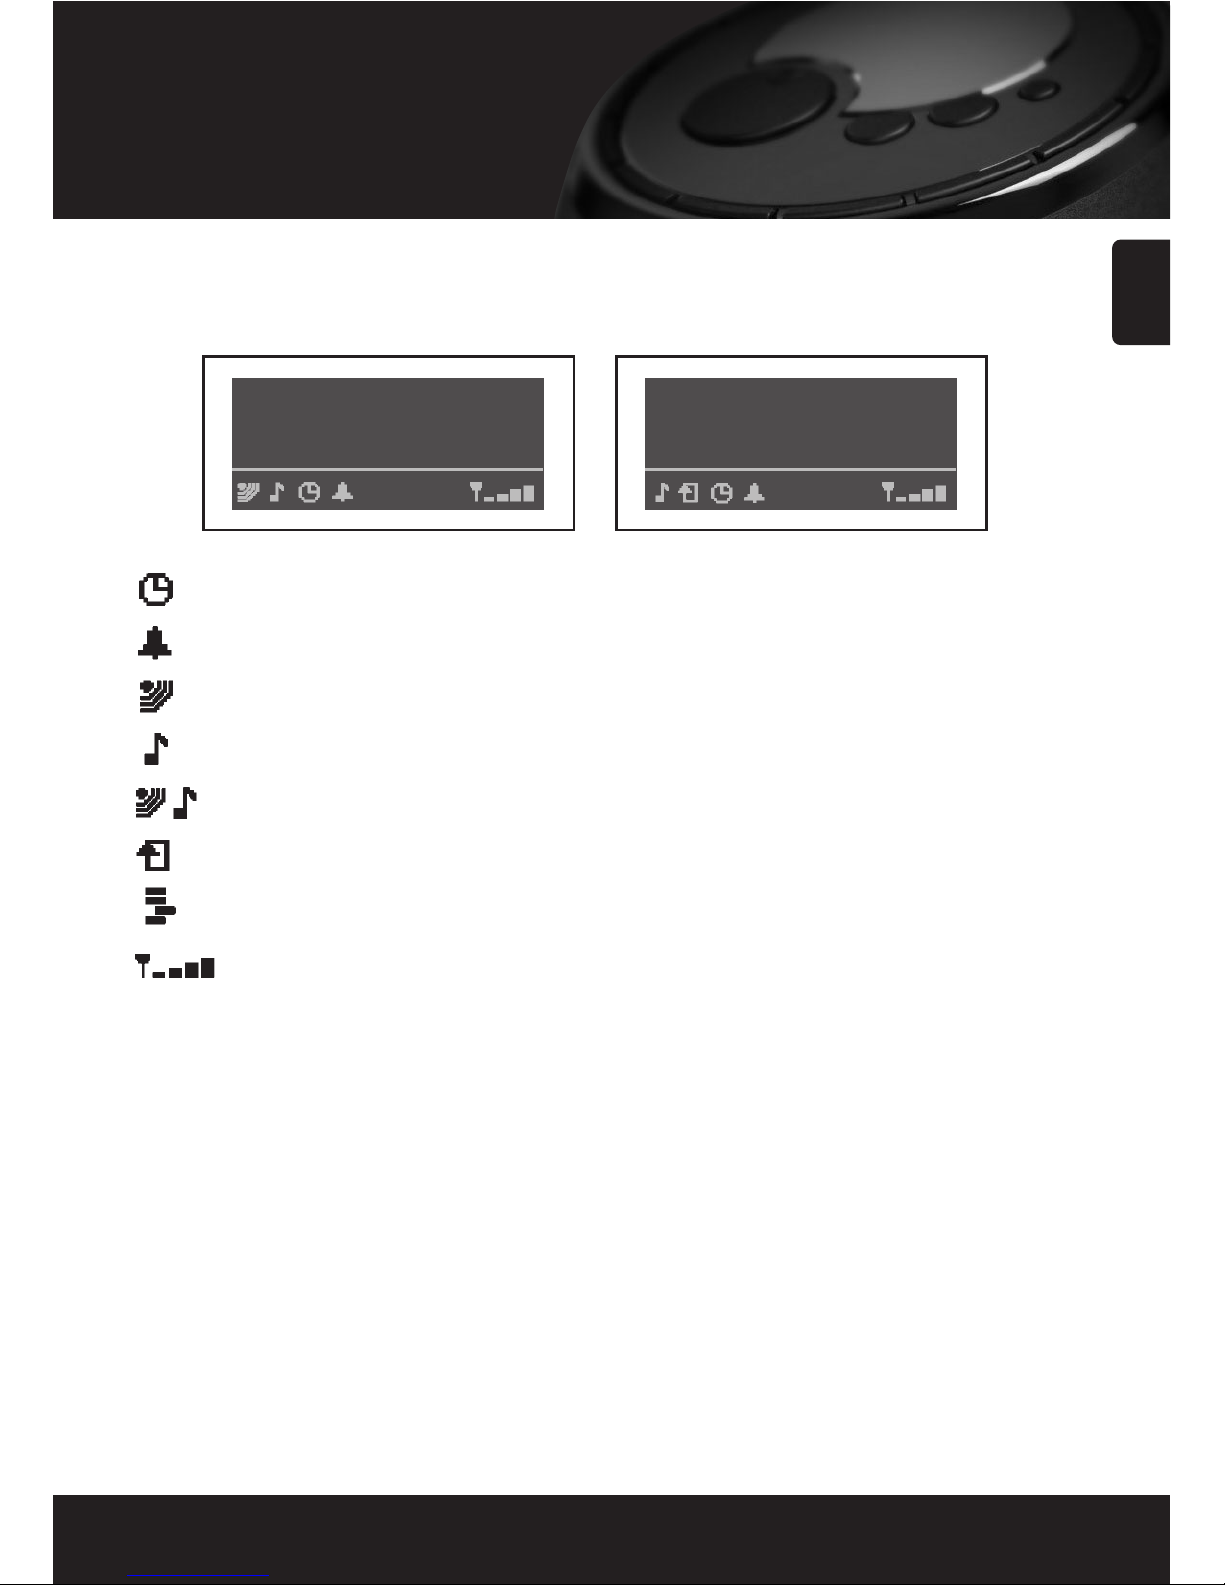
Sleep timer.
Alarm set indicator.
The radio is in ‘Internet Radio’ mode and is playing a live stream.
The radio is in ‘Media Player’ mode. Media controls (PLAY/PAUSE etc.) are active.
The radio is in ‘Internet Radio’ mode and is playing on demand content.
Repeat mode enabled.
Shuffle mode enabled.
Wireless LAN signal strength indicator.
Internet Radio Mode Media Player Mode
• Display Window Icons
Icons are displayed on the bottom row of the display. The meaning of these icons is explained below.
Page 9
English
8
Getting started
• What you need before you can use
your Internet radio
Before you can use your Internet radio, you need the
following:
• A broadband Internet connection.
• A wireless access point (Wi-Fi)connected to your
broadband Internet, preferably via a wireless router.
• If your wireless network is configured to use Wired
Equivalent Privacy (WEP) or Wi-Fi Protected Access(WPA)
data encryptions then you need to know the WEP or
WPA code so you can get the Internet radio to
communicate with the network.
The Internet radio should work anywhere within 100
meters of the wireless access point. But this condition may
differ depending on the access point or wireless network
environments.
Before you continue, make sure that your wireless access
point is powered up and connected to your broadband
Internet. To get this part of the system working, you must
read the instructions supplied with the wireless access point.
• Steps for connecting your radio to
your wireless network
Step 1 Power up the radio
Plug the cable from the mains adapter into the socket
labeled 7.5V DC on the back of the radio.
CAUTION: Use only the mains adapter supplied
with the radio. Connecting a power supply with a
different rating will cause permanent damage to
the radio and may be hazardous.
Note: if you would like to give your radio a static IP
address then please see the ‘Network config’ section
under the ‘Configure’ section at the end of the guide.
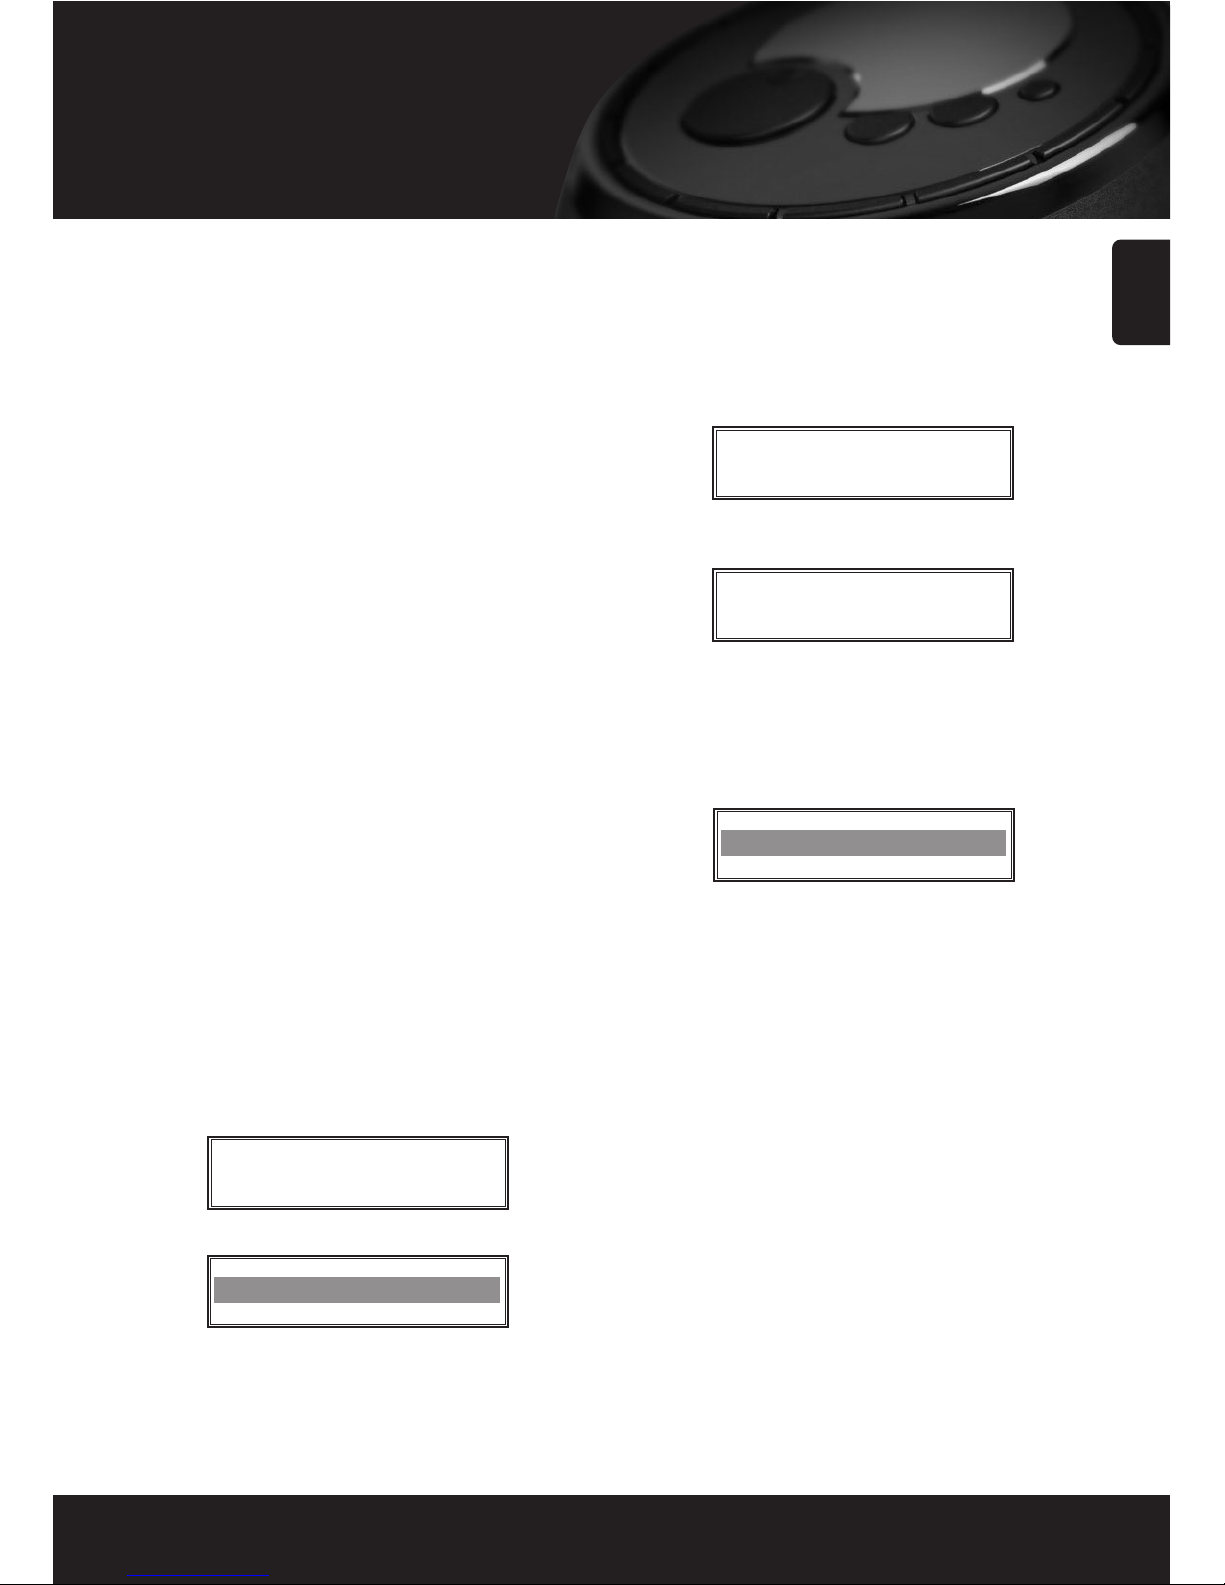
The display on the front of the radio will light up and say:
After a few seconds, this will change to show:
Step 2 Scan for a wireless network connection
When the display says <Scan for networks>, press the
SELECT button.
Note: if you make a mistake at any point, press the
BACK button to go back to the previous screen.
The radio will now scan for all available wireless
networks and will display:
If the radio can’t find any wireless networks, the display
will show:
If this happens then you will have to get your wireless
access point working - see the instructions supplied with it.
When the radio finds your wireless network, it displays
the ESSID for the access point on the screen – this is a
name that is allocated to the access point by the person
who set up the network - for example:
It is possible, and in some locations highly likely, that
your radio will find more than one wireless access point,
in which case you can choose which one you want to
connect to. Turn the knob on the radio to see the ESSID
for each access point the radio has found.
Reciva Radio
ARM Powered
Scanning
No Networks
Found
Scan For networks
My Home Networks
Page 10
English
9
Getting started
Step 3 Connect to the wireless network
When the ESSID for the access point you want to connect
to is displayed on the screen, press the SELECT button.
If your network is not configured to need an encryption
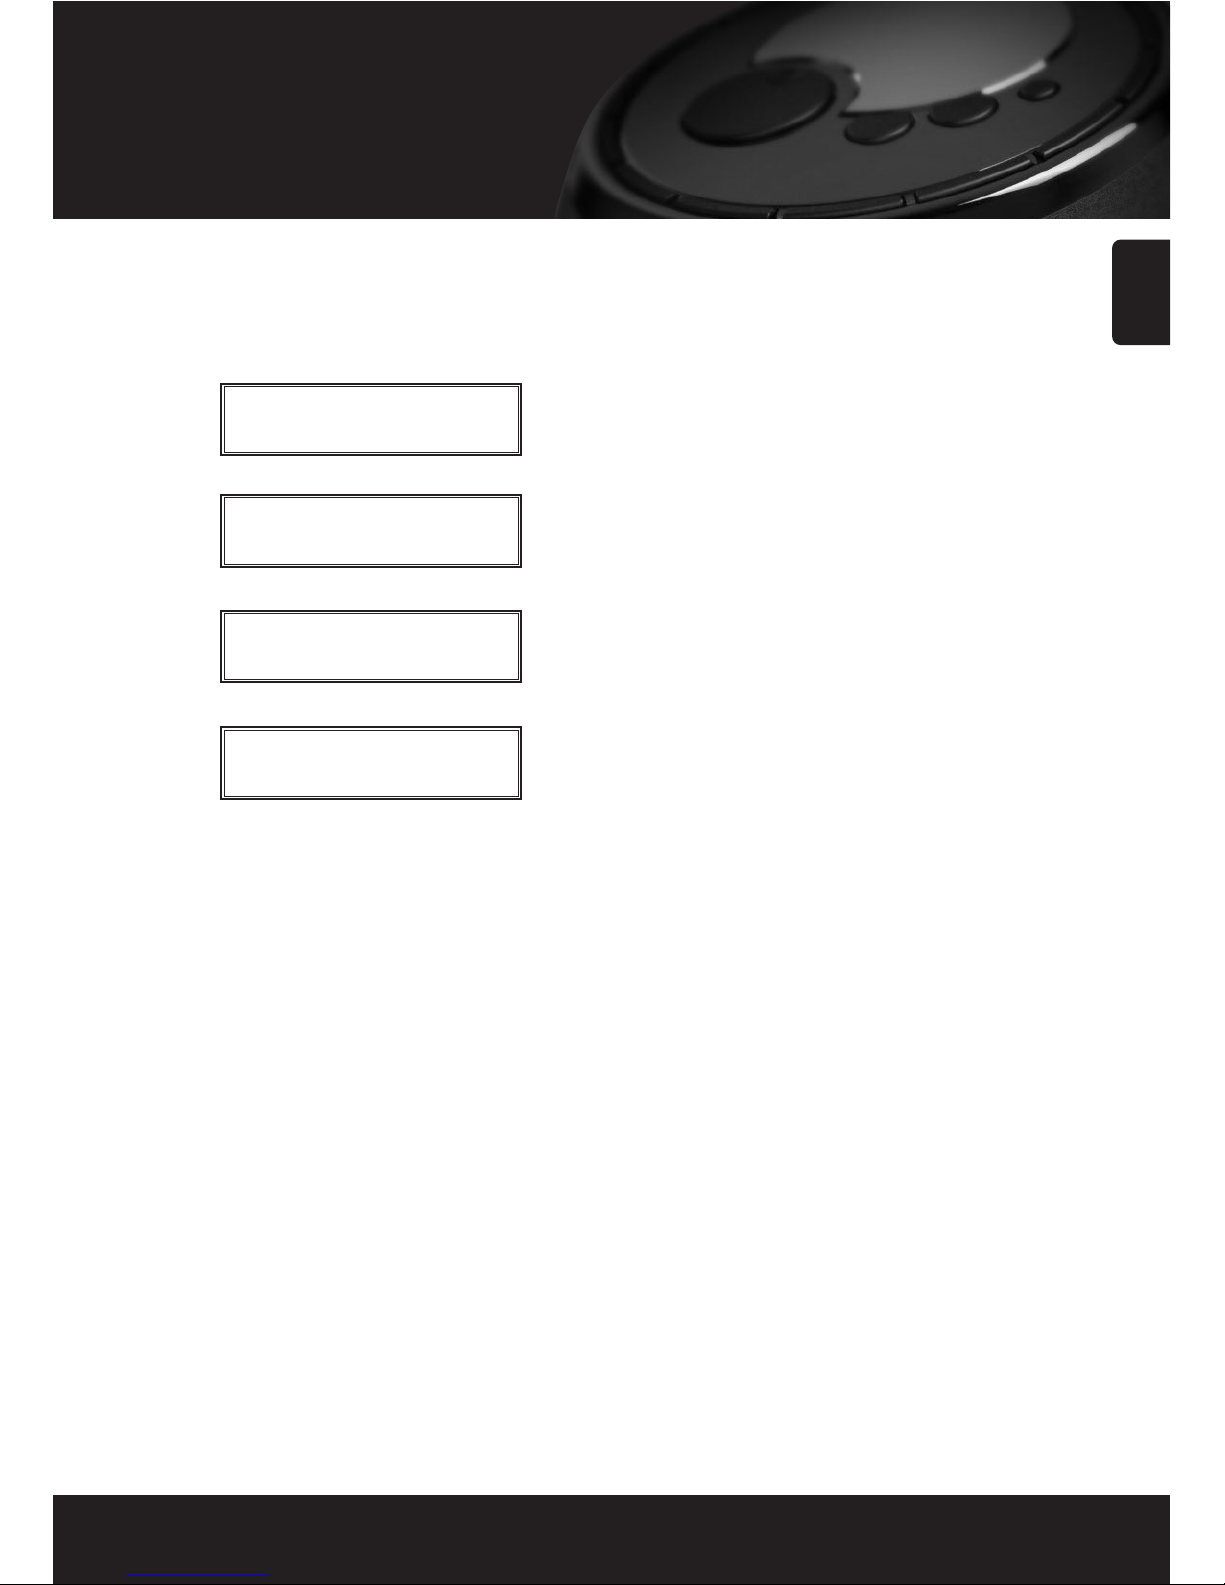
code, the screen should say:
Then:
If the screen displays either:
Or
Then the network is using one of the encryption systems:
Wired Equivalent Privacy (WEP) or Wi-Fi Protected
Access (WPA). You therefore need to enter the correct
WEP or WPA code into the radio to get it to
communicate with your network.
Only the person who set up the network in the first place
knows this code; if that person is not you then you need
to find out what it is.
After 3 seconds, the display goes into the code entry
mode. To enter the code, use the knob to select each
character of the code in turn, pressing the SELECT
button after each character.
Note that WEP and WPA codes are sensitive to upper and
lower case characters so you must enter them exactly.
Make sure the character you want is shown in the center
of the display before you press SELECT.
After the final character, use the knob to select the [END]
character and press the SELECT button.
The radio should now be able to connect to the network.
Note. Before using the Internet Radio, You need to
setup the language in advance.
You can select the language in the following
menu. (Configure > Language)
• Using the Wired LAN function
(optional)
This product supports the Wired LAN function using the
external “USB to Ethernet dongle” optionally. The user
should use the external “USB to Ethernet dongle” that
provided with your the Internet Radio.
The user has to plug “USB to Ethernet dongle” in USB
HOST jack before powering the unit.
If you use the the external “USB to Ethernet dongle”, You
can select the network in the following menu. (Configure
> Network Config> Wired/Wireless) depending on your
network conditions.
There are three selections in the network options as ‘Auto’,
‘Wired Only’, ‘Wireless Only’.
Connecting to
network
Network OK
Enter WEP Key
Enter WPA Key
Page 11
English
10
Using the Internet Radio
Putting the radio into standby mode
If you are not using the radio for an long period, you can
conserve the radio power by putting it into standby mode.
When in standby mode the clock will be shown on the
display.
1. When the radio is on, press POWER(
)
and the clock
will be displayed.
Or
When the radio is off, press POWER(
)
. The radio will
take 30 seconds to start playing again, as it finds the radio
station you were last connected to. But if AC adaptor is
unplugged at the DC input, the radio will take up to 60
seconds to start playing when plugged into DC jack again.
• Choosing a radio station to listen to
1. Press the SELECT button to return to the top-level menu.
(Note: if you make a mistake at any point, press the
BACK button to go back to the previous screen.)
2. If the screen does not say < Stations > as shown above,
turn the knob until it does.
3. Press the SELECT button.
4. Turn the knob to choose from <Location> or <Genre>.
<Location> enables you to choose from the radio stations
provided by any country which you choose from a list.
<Genre> enables you to choose radio stations according to
their content, for example Classic, Rock, Sport, News, etc.
5. Press the SELECT button to choose the option you want.
<Location>
1. Turn the knob until the display shows the region you
want, then press the SELECT button.
2. Turn the knob until the display shows the country you
want, then press the SELECT button.
3. Turn the knob until the display shows the station you
want, then press the SELECT button and wait until the
radio connects to that station.
<Genre>
1. Turn the knob until the display shows the type of
content you want, then press the SELECT button.
2. Turn the knob until the display shows the station you want.
3. Press the SELECT button and wait until the radio
connects to that station.
Note that some radio stations do not broadcast 24
hours per day, and some stations are not always
on-line. If this station has on-demand content (that
is, it gives the option of listening to programs
which have already been broadcast), see “Stations
which enable you to choose what you listen to”.
Changing the volume
Whilst a radio station is playing and is displayed on the
radio’s screen, you can change the volume simply by
turning the knob.
If a radio station is being played and the Internet Radio is
in its menu-browsing state, then you can change the
volume if you keep pressing the BACK button until the
radio leaves its menu and displays the current station and
then turn the knob.
Returning to the menu while a station is playing
When the Internet radio is playing a radio station it will
display the station’s name and bit rate. You can return to
the radio’s menu section at any time by either pressing the
SELECT button – which will take you to the ‘Stations’
menu - or the BACK button to return to the previous
menu item.
• Storing a radio station in a preset
Whilst a radio station is playing, hold down one of the
preset buttons (numbered 1 to 10) until the screen says
Where # is the number of the button you held down.
Playing a preset radio station
When a radio station is playing, briefly press one of the
preset buttons, 1 to 10, for the station you want.
(Note, do not hold the button down - if you do then the
station currently playing will overwrite the one stored in
the preset; be careful).
Requesting a station that is currently unavailable
If you want to listen to a particular radio station which is
currently not available online, you can visit the Reciva
website at
http://www.reciva.com/ and put in a request
to add the station to the list.
Assigned to
Preset #
Stations
Page 12
English
11
Using the Internet Radio
• Stations which enable you to choose what you listen to
Some radio stations can provide a number of options associated with their station; for example, some stations enable you
to listen to programs that have already been broadcast. When you select a radio station that has this facility, the station
does not start playing immediately, but instead the display shows:
1. Turn the knob to choose <Live> or <On Demand>, then press the SELECT button.
If you choose <Live> then the radio plays the current output from this station as normal.
If you choose <On Demand> then more screens are displayed where you choose what you want to listen to.
What is displayed will depend on the station you have chosen - the following steps are only a guide.
2. When you choose <On Demand>, the display shows the names of the programs. Turn the knob to choose the program
you want, then press the SELECT button.
3. When you have chosen the program you want to listen to, either it will just start playing, or the display may show a list
of days for you to choose from - use the knob to set the day the program was broadcast, then press the SELECT button.
4. After you have chosen the day, you may be able to choose the Start Time. Set the Start Time using the
knob and press the SELECT button.
5. Programs which enable you to choose the time also enable you to fast-forward and rewind to the part you want while
the radio is playing. You can now turn the knob to change this time. You can also use the 7/ SKIP TO PREVIOUS TRACK
or 8/ SKIP TO NEXT TRACK buttons to adjust the time. When you press the SELECT button again, the program will play
from that point.
6. Once the Internet radio is playing a program that allows you to choose its start time, the radio’s preset buttons become
playback-control buttons for the stream; e.g. you can press PAUSE at any time to pause the stream, and then press
PLAY to resume playing.
Live
Page 13
English
12
Using Podcasts
• Choosing Podcasts to listen to
1. Press the SELECT button to return to the top-level menu.
(Note: if you make a mistake at any point, press the BACK button to go back to the previous screen.)
2. If the screen does not say < Podcasts > as shown above, turn the knob until it does.
3. Press the SELECT button.
4. Display a few of podcasts portal site. (for example, BBC Podcasts, Podcast.com)
5. Press the SELECT button to choose the option you want.
6. Displays dozens of podcasts folder. (for example, Recommended, International, Books, Business…)
7. Press the SELECT button to choose the option you want.
8. Turn the knob until the display shows the podcast you want, then press the SELECT button and wait until the radio
connects to the selected podcasts feed. After a few seconds, you can listen to podcasts
The remaining operation is similar to the internet radio operation.
Podcasts
Page 14

English
13
Using the Media Player
The Media Player allows you to play audio files (AAC, AIFF,
AU, MP3, RM, WAV and WMA) and playlists (M3U) stored
on a networked PC. It has been verified to work on
Windows 2000, Windows XP and Windows vista.
To be able to play music files that you have stored on your
PC via the media player, please ensure that:
1. The music files are one of the allowed type of audio
(AAC, AIFF, AU, MP3, RM, WAV and WMA).
2. Music files are not ‘protected’.
3. Music files are stored in the correct location on your PC
and ‘File Sharing’ is switched on.
4. Music files can be shared on the network.
Note. This product don’t support the music files that
built in DRM properties (Digital Rights Management).
• Windows shares
Set up your Windows PC to allow the radio to access
your audio files via Windows Shares
1. Please ensure that your PC is available on the network
for your Internet radio, then, using Windows Explorer,
locate the folder where your audio files are stored.
2. Right click on the folder.
3. Select ‘Properties’.
4. Click on ‘Sharing’.
5. Select ‘Share this folder on the network’ and ‘Allow
network users to change my files’.
Please note, do not try to make your ‘My Documents’ or
any of its sub-folders (e.g. ‘My Music’) shareable.
Locate the shared audio files using the radio
1. Power up the radio.
2. Wait for ‘Stations’ to be displayed on the radio, or press
the BACK button repeatedly until ‘Stations’ is displayed.
3. Turn the knob until the radio display shows 'Media
Player' and press SELECT.
4. Tturn the knob until ‘Windows Shares’ is displayed and
press SELECT.
5. Turn the knob until ‘Scan for PCs’ is displayed and press
SELECT again.
6. The radio will now display ‘Finding PCs’. Once the radio
has finished, turn the knob to highlight the correct PC
and press the SELECT. The radio will search for shared
folders.
7. Turn the knob to highlight the correct shared folder and
press SELECT.
8. The radio will display 'File Scan…' as it scans through the
media files in the shared folder.
If you have a large number of audio files this could take
several minutes to complete.
9. Once the radio has finished scanning, it will display 'By
Album'. You can now browse through the scanned
media files, which will now be organized ‘By Album’, ‘By
Artist’ and ‘Playlists’ – if available.
Note that the first time the file scan is done a file called
‘.reciva_media_cache’ is written to the folder where the
audio files are stored. This is in order to speed up
subsequent file scans.
Listening to a single shared track
1. Turn the knob until ‘By Artist’ is displayed and press the
SELECT button.
2. Turn the knob until the required artist is displayed and
press the SELECT button.
3. Turn the knob until the required album name is
displayed and press the SELECT button.
4. ‘[Add to Queue]’ will be displayed. Turn the knob until
the required track is displayed and press the SELECT
button. The track will begin playing.
Listening to a complete shared album
1. Turn the knob until ‘By Artist’ is displayed and press the
SELECT button.
2. Turn the knob until the required artist is displayed and
press the SELECT button.
3. Turn the knob until the required album name is
displayed and press the SELECT button.
4. ‘[Add to Queue]’ will be displayed, press the SELECT
button. The album will begin playing
Queuing up tracks for playback later
1. Highlight the required track.
2. Press the SELECT button. ‘Track Added To Queue’ will
be displayed.
Queuing up albums for playback later
1. Highlight the required album and press the SELECT button.
2. Turn the knob until ‘[Add To Queue]’ is displayed and
press the SELECT button. ‘Tracks Added to Queue’ will
be displayed.
Page 15

English
14
Using the Media Player
Controlling playback
1. Use the 5/STOP button to stop playback.
2. Use the 6/PLAY/PAUSE button to either pause a
currently playing track or to restart a currently paused
track or to restart a stopped track.
3. Use the 7/SKIP TO PREVIOUS TRACK button to start
playback of the previous track in the queue.
4. Use the 8/SKIP TO NEXT TRACK button to start
playback of the next track in the queue.
Browsing the list of tracks currently queued up for
playback
1. Press the 4/BROWSE button. The currently playing track
name will be displayed.
2. Turn the knob to see which tracks are queued up for
playback.
3. If you want to jump to a particular place in the queue
then press the SELECT button when the required track is
displayed.
Removing tracks from the queue
1. Press the 4/BROWSE button. The currently playing track
name will be displayed.
2. Turn the knob to select the track you want to remove
from the queue.
3. Press and hold the 5/STOP button for 2 seconds and the
radio will display: ‘Delete Track?’
4. Turn the knob to highlight ‘Yes’ or ‘No’.
5. Press SELECT to confirm whether you actually want to
delete the track from the queue.
6. If ‘Yes’ was selected then ‘Removed From Queue’ will be
displayed.
7. To remove all tracks from the queue, keep pressing
BACK until the ‘Media Player’ menu item is s selected,
press SELECT and then turn the knob to select ‘Clear
Queue’ and press SELECT again.
Playing tracks in random order(shuffle)
1. Select the individual tracks as described previously.
2. Navigate to top-level menu item 'Media Player' using
the SELECT and BACK buttons and press the SELECT
button.
3. Turn the knob until 'Playback Mode' is displayed and
press the SELECT button.
4. Turn the knob until 'Shuffle' is displayed and press the
SELECT button.
5. Turn the knob to select YES/NO to confirm that shuffle
mode should be enabled.
Playing tracks in the queue repeatedly(repeat)
1. Select the individual tracks as described previously.
2. Navigate to top-level menu item 'Media Player' using
the SELECT and BACK buttons and press the SELECT
button.
3. Turn the knob until 'Playback Mode' is displayed and
press the SELECT button.
4. Turn the knob until 'Repeat' is displayed and press the
SELECT button.
5. Turn the knob to select YES/NO to confirm that repeat
mode should be enabled.
• UPnP servers
Set up a Windows PC to allow the radio to access
your audio files via a UPnP server
If your music is stored as large, uncompressed files, for
example .WAV, we recommend you follow this method of
file sharing.
If your music is stored as smaller ,compressed files, for
example .MP3 or .WMA we recommend you follow the
‘Windows Shares’ method of file sharing outlined in the
section ‘Set up your Windows PC to allow the radio to
access your audio files via Windows Shares’.
1. If your PC is running Microsoft Windows XP or Windows
Vista, then you can use Windows Media Player 11
(WMP11) to act as your UPnP (Universal Plug and Play)
media server 1.0. Windows Media Player 11 may be
downloaded from Microsoft’s website and installed by
following the instructions detailed in its installation
wizard.
2. Once installed, Windows Media Player 11 will create a
library from all the media files available to it on
your PC. To add new media files to the library, select ‘File
➞ Add to Library… ➞ Advanced Options’, click ‘Add’
and choose the files you wish to add and click ‘OK’.
3. You will now need to connect your Internet radio to
Windows Media Player 11 and configure it to allow the
radio to access your media library. In order to this, you
will need to do the following:
a. Keep pressing BACK to get to the radio’s top-level
menu and then turn the rotary knob to select ‘Media
Player’.
b. Press SELECT and then turn the knob to highlight
‘UPNP Servers’.
Page 16
English
15
Using the Media Player
c. Press SELECT and the radio will scan for all available UPnP servers. Note, this may take a few seconds for the radio to
complete its scan and before the scan has completed, the radio will display ‘[Empty]’. The radio will continue to
display ‘[Empty]’ if no UPnP servers are found.
d. After a successful scan, select your UPnP server, by rotating the knob if there is more than one UPnP server, and then
press SELECT (note, your radio will display ‘Access Denied’ at this stage).
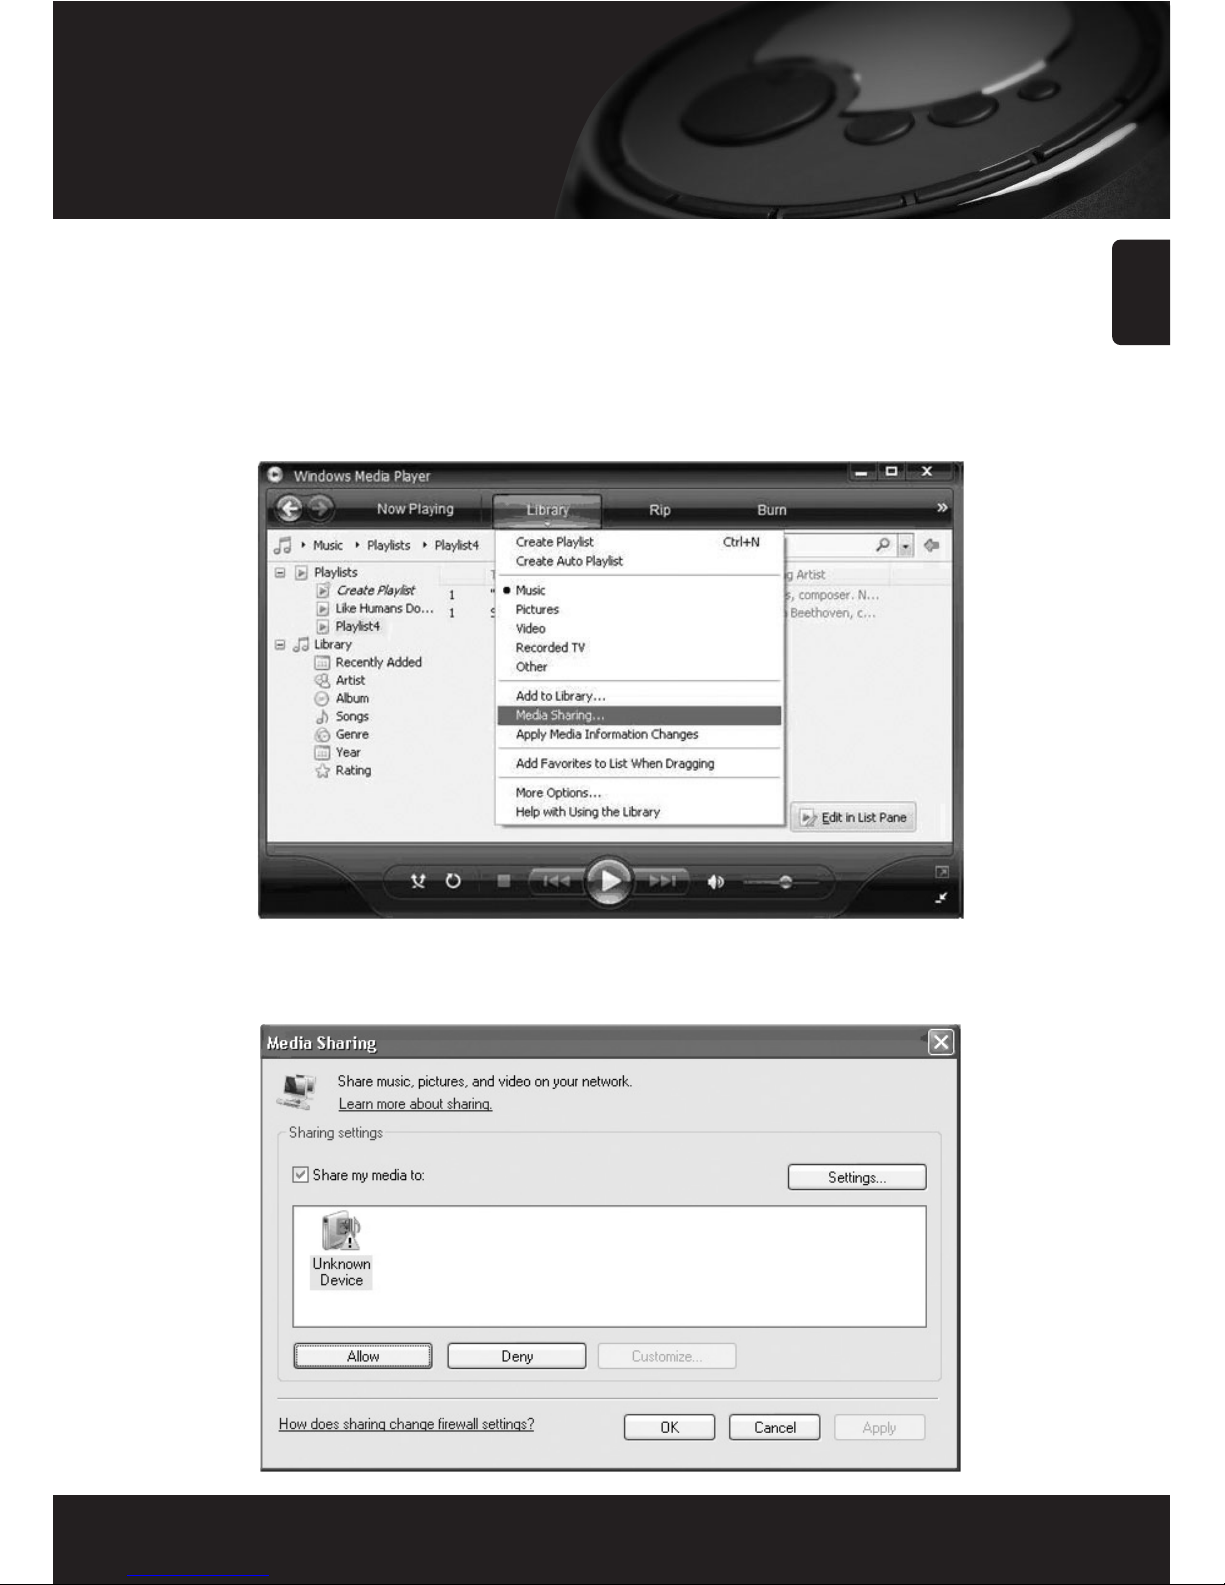
4. Your PC will now prompt you that a device has attempted to connect to your UPnP server. In order to allow the radio
to have access to the media files, you will need to click the ‘Library’ tab from Windows Media Player 11 and select the
‘Media Sharing…’ item to open the ‘Media Sharing’ window.
Selecting ‘Media Sharing…’ for Windows Media Player 11:
5. From the ‘Media Sharing’ window, the radio will be listed as an unknown device.
Click on the unknown device listed, then click the ‘Allow’ button and then click ‘OK’.
Allowing the Radio to Connect:
Page 17

English
16
Using the Media Player
Locating and playing media files using the radio and
UPnP
1. Once the UPnP server is configured to share media files
with the Internet radio, you can play the files by doing
the following on the radio.
2. Keep pressing BACK to get to the radio’s top-level menu
and then turn the knob to select ‘Media Player’.
3. Press SELECT and then turn the knob to highlight ‘UPNP
Servers’.
4. Press SELECT and the radio will scan for all available
UPnP servers. Note, this may take a few seconds for the
radio to complete its scan and before the scan has
completed, the radio will display ‘[Empty]’. The radio will
continue to display ‘[Empty]’ if no UPnP servers are found.
5. After a successful scan, select your UPnP server, by
rotating the knob if there is more than one UPnP
server, and then press SELECT.
6. The radio will now list the media categories available
from the UPnP server, e.g. ‘Music’, ‘Playlists’ etc.
Turn the knob to select which category you wish to
browse, press SELECT and turn the knob to highlight a
sub category and press SELECT again. For example, you
could select ‘Music’ and then ‘Album’.
7. Turn the knob to highlight the media files that you wish
to play and press SELECT.
8. The radio will display ‘[Add to Queue]’, press SELECT
and the radio will add the tracks to its queue and begin
playing them automatically.
Browsing the list of tracks currently queued up for
playback
1. Press the 4/BROWSE button. The currently playing track
name will be displayed.
2. Turn the knob to see which tracks are queued up for
playback.
3. If you want to jump to a particular place in the queue
then press the SELECT button when the required
track is displayed.
4. It is important to note here that media files scanned
from the radio’s ‘Windows Shares’ function can also be
added to the radio’s queue.
Queuing up UPnP tracks for playback later
1. Highlight the required track.
2. Press the SELECT button. ‘Track Added To Queue’ will
be displayed.
Queuing up albums for playback later
1. Highlight the required album and press the SELECT button.
2. Turn the knob until ‘[Add To Queue]’ is displayed and
press SELECT button. ‘Tracks Added to Queue’ will be
displayed.
Controlling playback
1. Use the 5/STOP button to stop playback.
2. Use the 6/PLAY/PAUSE button to either pause a
currently playing track or to restart a currently paused
track or to restart a stopped track.
3. Use the 7/SKIP TO PREVIOUS TRACK button to start
playback of the previous track in the queue.
4. Use the 8/SKIP TO NEXT TRACK button to start
playback of the next track in the queue.
Removing tracks from the queue
1. Press the 4/BROWSE button. The currently playing track
name will be displayed.
2. Turn the knob to select the track you want to remove
from the queue.
3. Press and hold the 5/STOP button for 2 seconds.
4. Turn the knob to highlight ‘Yes’ or ‘No’.
5. Press SELECT to confirm whether you actually want to
delete the track from the queue.
6. If ‘Yes’ was selected then ‘Removed From Queue’ will be
displayed.
7. To remove all tracks from the queue, keep pressing
BACK until the ‘Media Player’ menu item is selected,
press SELECT and then turn the knob to select ‘Clear
Queue’ and press SELECT again.
Page 18
Playing tracks in random order(shuffle)
1. Select the individual tracks as described previously.
2. Navigate to top-level menu item 'Media Player' using
the SELECT and BACK buttons and press the SELECT
button.
3. Turn the knob until 'Playback Mode' is displayed and
press the SELECT button.
4. Turn the knob until 'Shuffle' is displayed.
And press the SELECT button.
5. Turn the knob to select YES/NO to confirm that shuffle
mode should be enabled.
Playing tracks in the queue repeatedly(repeat)
1. Select the individual tracks as described previously.
2. Navigate to top-level menu item 'Media Player' using
the SELECT and BACK buttons and press the SELECT
button.
3. Turn the knob until 'Playback Mode' is displayed and
press the SELECT button.
4. Turn the knob until 'Repeat' is displayed and press the
SELECT button.
5. Turn the knob to select YES/NO to confirm that repeat
mode should be enabled.
• Local Media (External USB Host)
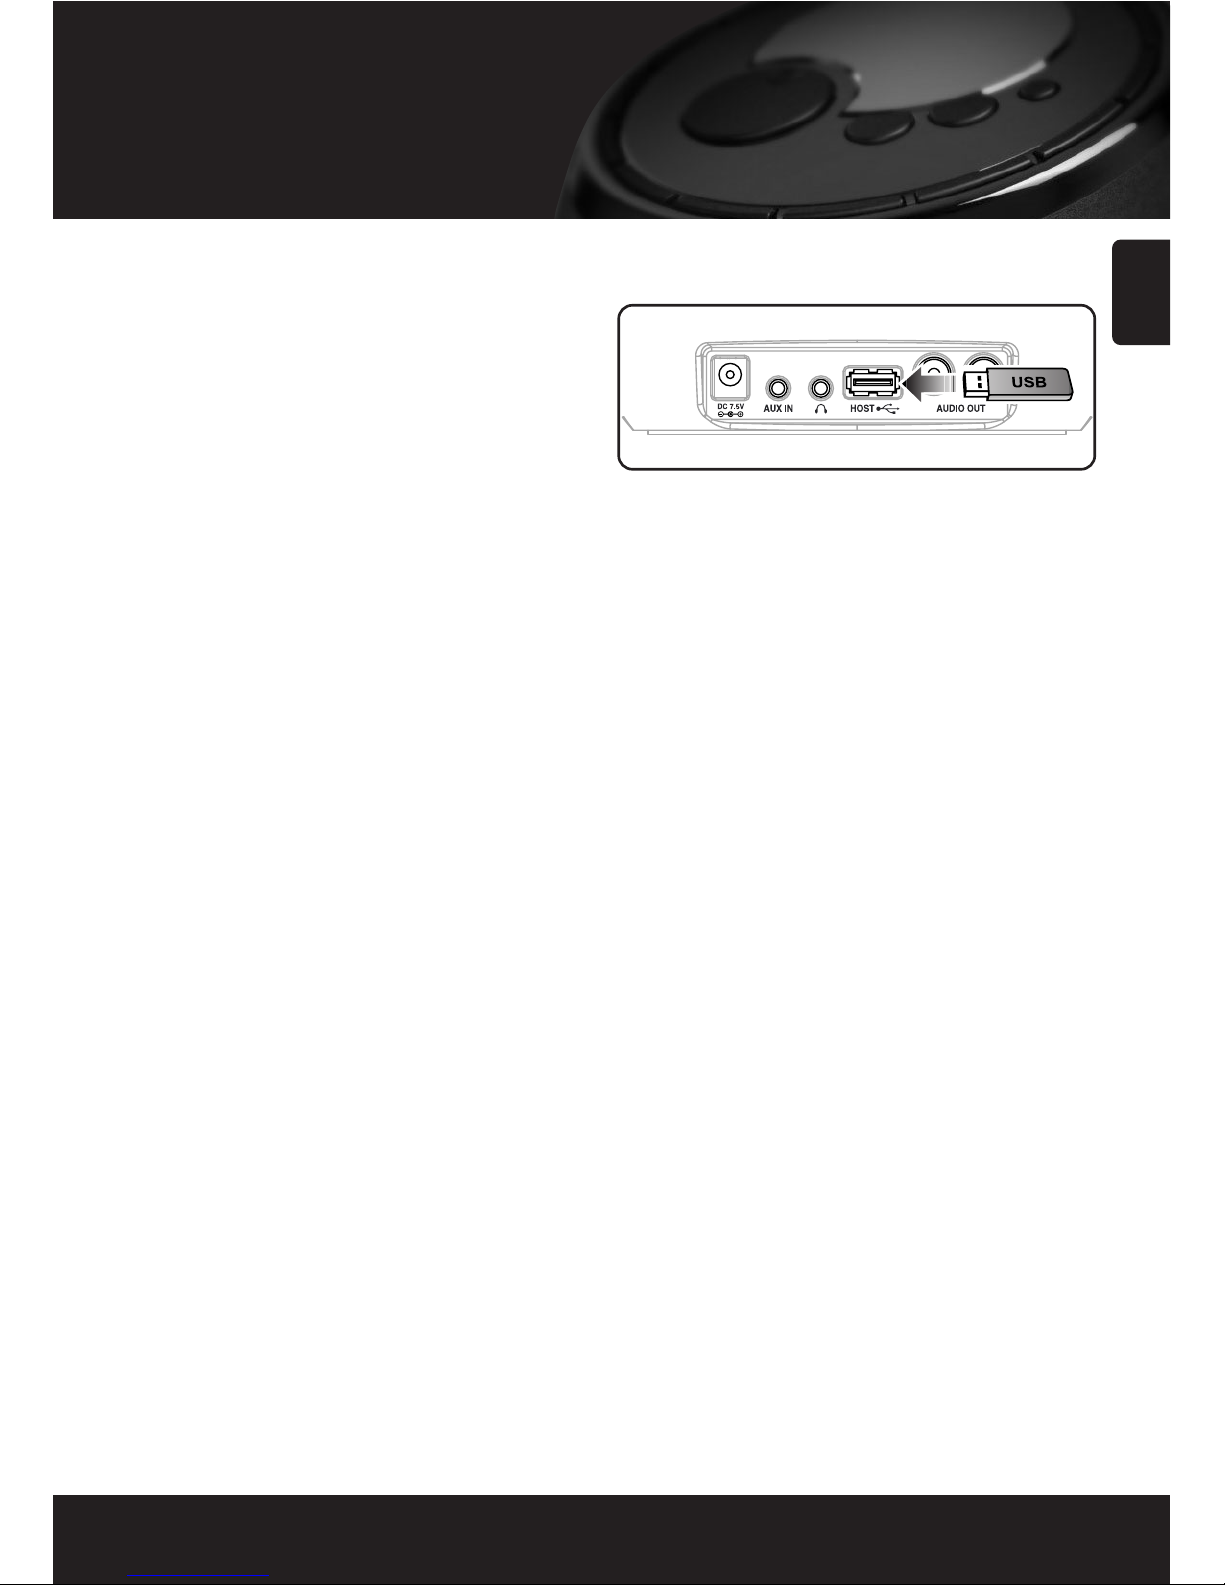
Playing media files from the USB thumb drive
You can play music files that are stored on USB compatible
devices (USB thumb drive, MP3 player, etc.).
1. Connect the USB thumb drive to the USB HOST socket on
the back side of this radio.
2. Navigate to the top level menu item ‘Media Player’ using
the SELECT and BACK button.
3. Turn the knob until ‘Local Media’ is displayed and press
the SELECT button.
4. The radio will display 'File Scan…' as it scans through the
media files in the USB thumb drive.
If you have a large number of audio files, this could take
several minutes to complete.
5. Once the radio has finished scanning the thumb drive
for media files, you will then be able to browse the files by
selecting 'By Album' and ‘By Artist’ .
6. Finally, press the SELECT button for the files you wish to
add to the radio’s media queue.
Note.
• It is not recommended using an external-type HDD.
• This product don’t support the music files that built
in DRM properties (Digital Rights Management).
English
17
Using the Media Player
Page 19
English
18
Auxiliary Function
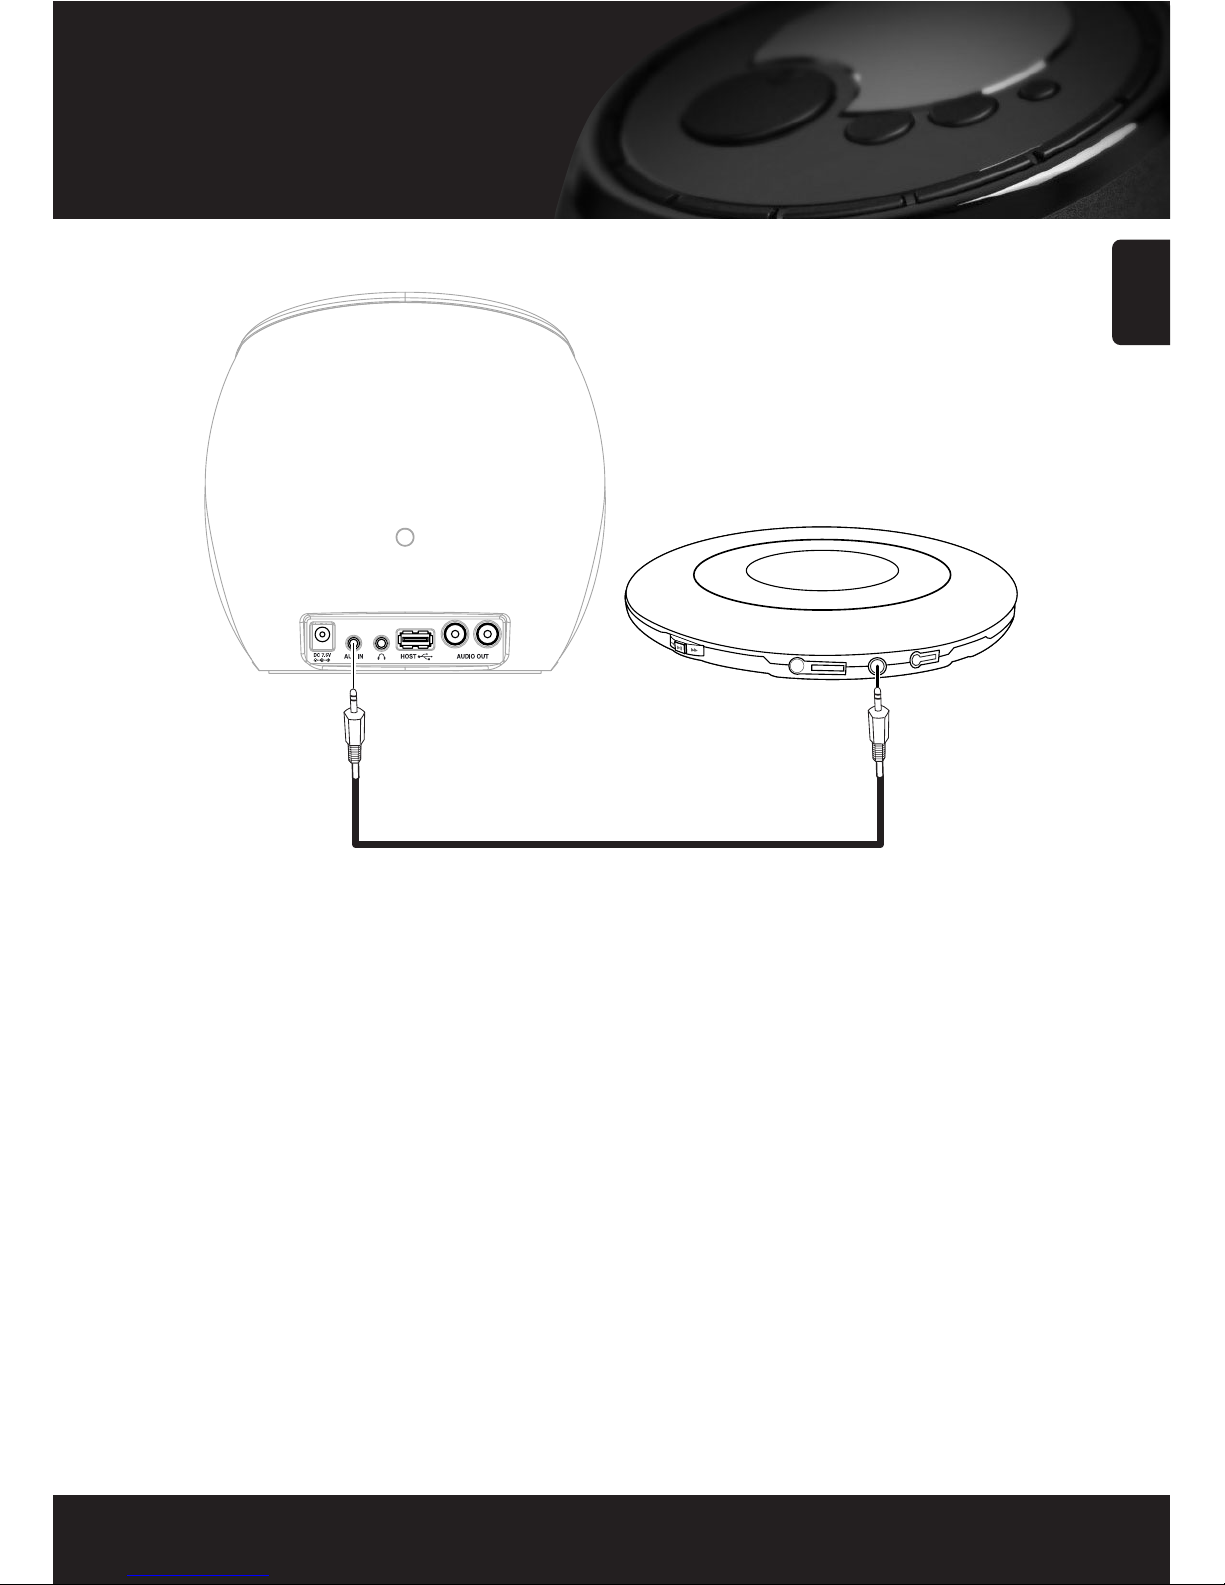
You can listen to music from the audio device via the speakers of this device.
1. Connect an audio device, such as a MP3 player or CD player, to the AUX IN jack on the back side of this radio by using
“Audio Cable”.
2. Navigate to the top level menu item ‘Auxiliary Input’ using the SELECT and BACK buttons.
3. Press the SELECT button. Then this device switches to the Auxiliary Input.
4. Turn the knob to adjust the volume.
Page 20
English
19
Alarm clock
Use this option to set the alarms , to view the current alarm
setting or to set the sleep timer.
• Setting the alarms
1. Press the SELECT button. (Note: if you make a mistake
at any point, press the BACK button to go back to the
previous screen.)
2. Turn the knob until the display says <Alarm Clock>.
3. Press the SELECT button.
4. Turn the knob until the display says <Set Alarms>.
5. Press the SELECT button.
6. Turn the knob to swap between the various alarms and
‘Disable All’. Pressing the SELECT button on ‘Disable All’
will cause all the alarms to be turned off. The display will
then say ‘All alarms disabled’ for 3 seconds, then returns
to the radio station display.
7. If you select one of the numbered alarms, then the radio
will allow you to select the time for the alarm.
8. Turn the knob until the hour setting is correct, then
press the SELECT button.
9. Turn the knob until the minute setting is correct, then
press the SELECT button.
10. Turn the knob to choose between ‘Once’, ‘Every day’,
‘Weekly’, ‘Weekdays’ and ‘Weekends’. If you choose
‘Once’ or ‘Weekly’, then you will need to choose which
day you would the alarm to be activated on and then
press the SELECT button.
11. Finally, you will need to select which type of alarm you
would like to use: the radio’s buzzer, the radio station
currently being listened to or a station that is assigned to
a preset and then press the SELECT button.
• Setting the sleep timer
Selecting this option will enable the Internet radio to switch
itself off after a set period.
1. After selecting the ‘Sleep Timer’ menu item, the radio
will display: ‘Sleep Timeout’ and the sleep timer value in
the form ‘00:00:’ (hours: minutes).
2. Rotate the knob to change to sleep timer value and then
press SELECT to begin the sleep timer.
3. The radio will continue to play as normal, but it will go
into standby mode after the sleep timer has expired.
4. To turn the radio back on again, simply press the
POWER(
)
button.
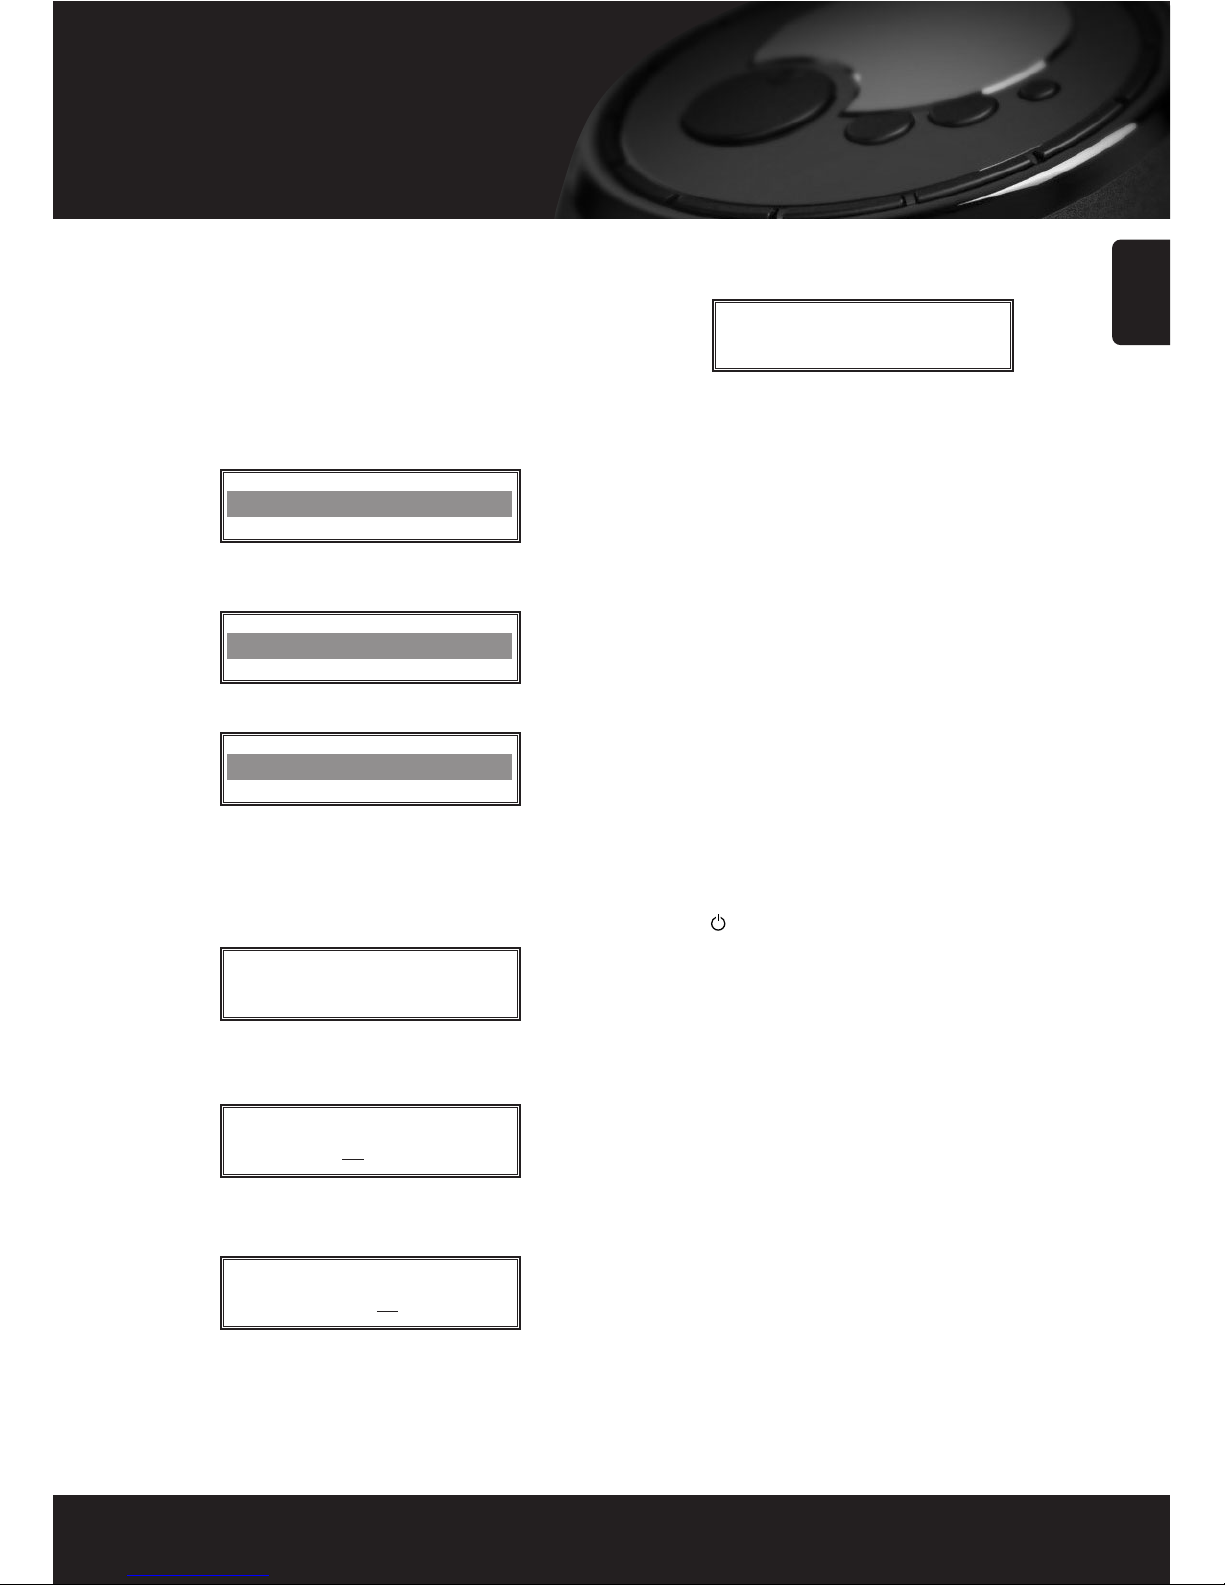
Alarm Clock
Set Alarms
1 OFF 00:00 Sunday
All alarms disabled
Set Alarm
15
: 06
Alarm Set :
07 : 45
Set Alarm
15 : 06
Page 21

English
20
Configure menu
Choosing the option you want from the Configure
menu
1. Press the SELECT button.
(Note: if you make a mistake at any point, press the
BACK button to go back to the previous screen.)
2. Turn the knob until ‘Configure’ is displayed press the
SELECT button.
3. Turn the knob until the display shows the option you
want.
4. Press the SELECT button to choose the option shown on
the display. The options are explained below.
Network Config
This is useful if you take your Internet radio to another
building where you want to use it.
Configuring the radio to use a static IP address
In order for your radio to use a static IP address on your
network, you will need to do the following:
1. From your radio, select the ‘Configure - Network config Edit Config’ menu and then press SELECT.
2. The radio will now display ‘Auto (DHCP)? YES / NO’. Turn
the radio’s rotary encoder to select ‘NO’ and then press
SELECT.
3. You will now be able to enter the IP address you wish to
give your radio by using the rotary encoder to select the
desired numbers followed by pressing SELECT to end
inputting the address.
4. The radio will now prompt you to enter the required
network mask for the network. You will be able to enter
this in the same way as before for entering the IP address.
5. You will now need to enter the default gateway’s IP
address used by the radio on the network.
6. Finally, you will need to enter the DNS IP address for the
radio. On some networks, you may need to enter your
ISP’s DNS IP address, which should be available on your
ISP’s support page on their website.
7. After entering the above information, the radio will
now connect successfully to your network. In order to
make the radio use DHCP again (to automatically get its
network information when it attempts to connect to a
network), you will need to select ‘Configure - Network
config > Edit Config’ and then set ‘Auto (DHCP)? YES /
NO’ to ‘YES’.
If your radio supports wired networking using “USB to
Ethernet dongle” then you will be able to configure your
radio to connect to your network via an available Ethernet
connection (RJ45) or via a Wi-Fi router:
Configuring the radio to only use a wired Ethernet
connection
From the radio’s ‘Network config’ menu, select
‘Wired/Wireless’. This menu will present you with three
options: ‘Wireless Only’, ‘Wired’ and ‘Auto’. Selecting
‘Wired Only’ will allow cause the radio to reboot and then
only use its Ethernet connection to communicate with the
network. The radio will also disable its wireless network
capabilities.
Configuring the radio to only use a Wi-Fi connection
Selecting the ‘Wireless Only’ option from the ‘Wired/Wireless’
menu will allow cause the radio to reboot and then only
use its Wi-Fi connection to communicate with the network.
The radio will also disable its Ethernet connection.
Configuring the radio to use either an Ethernet or a
wireless connection
Selecting the ‘Auto’ option from the ‘Wired/Wireless’
menu will allow cause the radio to reboot and then
attempt to establish an Ethernet connection, if it is
available, to communicate with the network. Otherwise,
the radio will attempt to establish a Wi-Fi connection to
the network.
Once the radio has established a certain type of connection
to the network, then this type of connection will remain in
use while the radio is on.
The ‘Network Config’ menu also allows you to choose
whether or not the Internet radio displays a warning
message when its network signal strength is low. You can
enable this feature by selecting ‘Signal Warning’ and then
selecting ‘Yes’.
Page 22
Version
Displays the versions numbers of the various parts of
software and hardware on your Internet radio.
Upgrade Firmware
Use this option to download new firmware for the radio
from the Reciva portal on the Internet. If there is
new firmware available, then the radio will prompt you if
you want to download it or not. Note, at this
stage, you can press the radio’s BACK button to cancel the
radio beginning a firmware upgrade.
A Firmware upgrade may take several minutes, so
do not switch off the power to the radio until the
operation is complete otherwise the radio may
become permanently damaged.
Language
Allows you to change the display language.
Factory Reset
Puts all the settings back to their defaults as they were
when they left the factory. If you perform a factory
reset on your radio you will lose all your presets and your
wireless network connection.
Register
This will display a key that can be used to register the radio
on the Reciva Customer portal:
http://www.reciva.com/
Clock Setup
Use this option to set the time & the date.
Setting the clock
1. Press the SELECT button. (Note: if you make a mistake
at any point, press the BACK button to go back to the
previous screen.)
2. Turn the knob until the display says <Configure>.
3. Press the SELECT button.
4. Turn the knob until the display says <Clock Setup>.
5. Press the SELECT button.The display says <Set
Time/Date>.
6. Press the SELECT button.
7. Turn the knob until the hour setting is correct, then
press the SELECT button.
8. Turn the knob until the minute setting is correct, then
press the SELECT button.
9.Set the Date as below
The display says ‘Time and Date Set’ message for 3 seconds,
then returns to ‘ Set Time/Date’ menu.
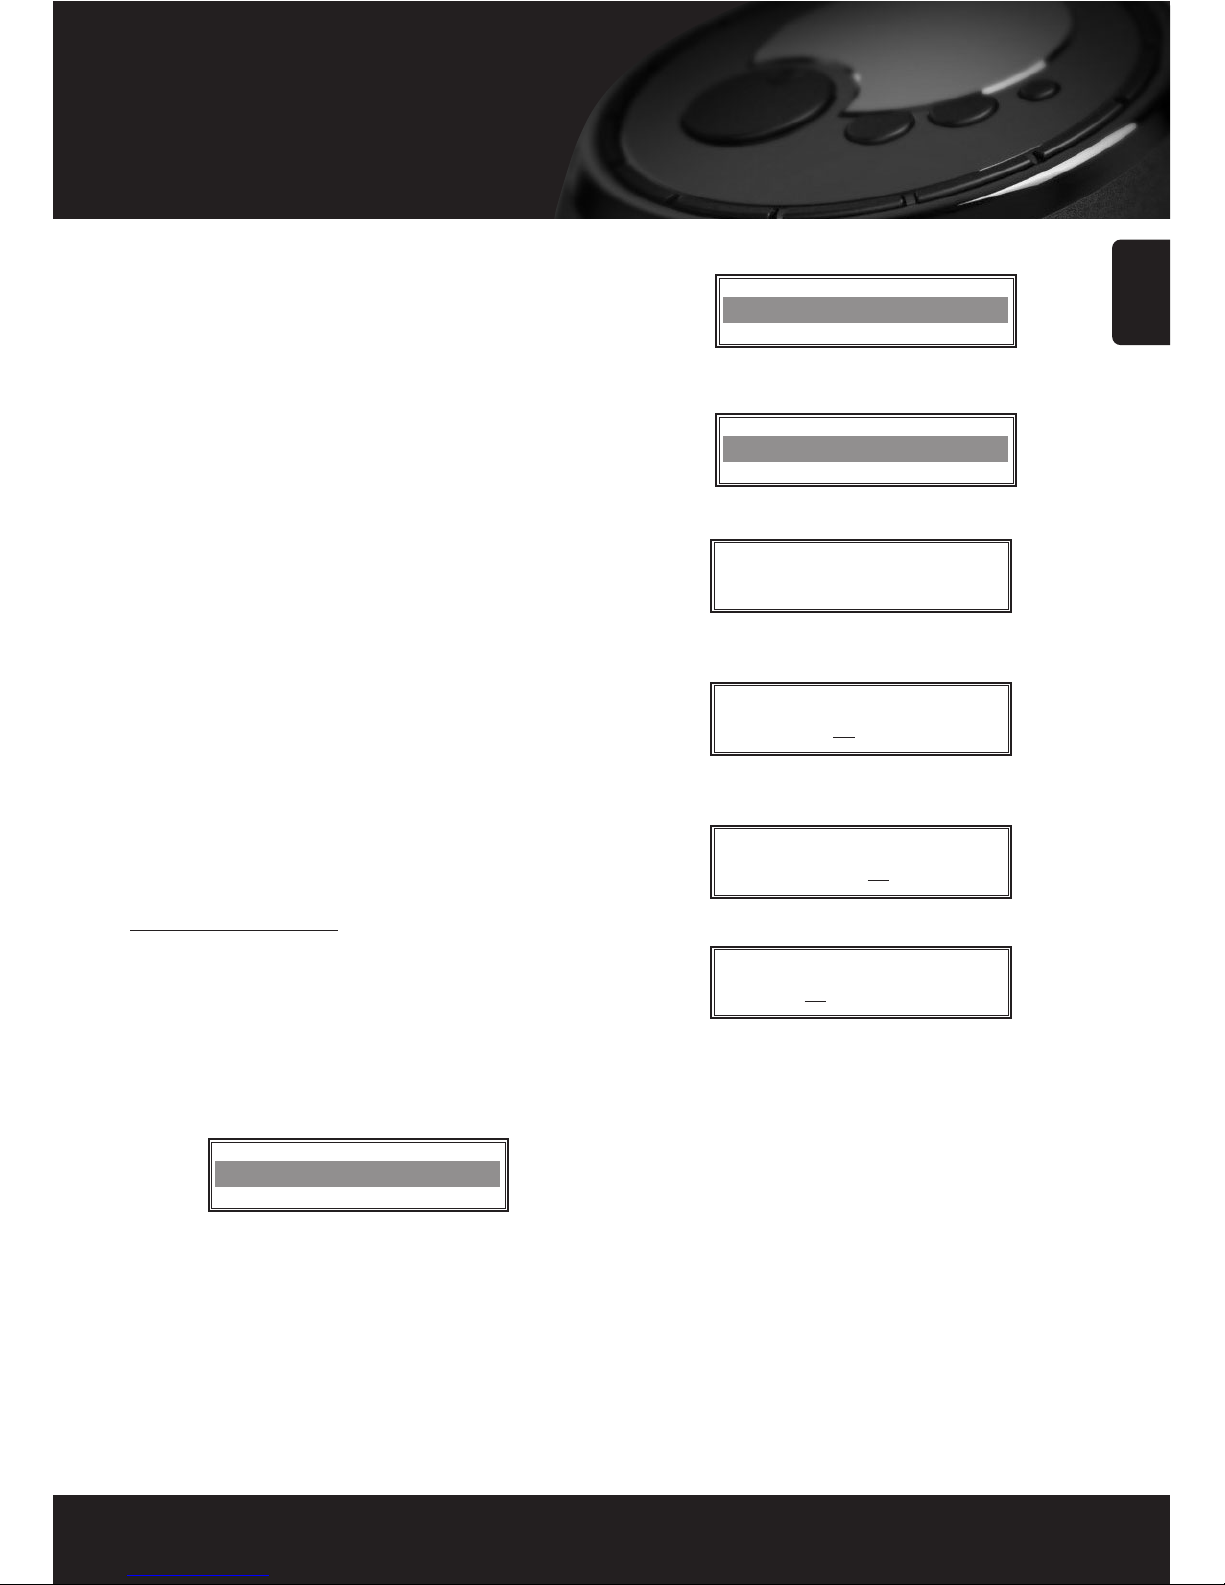
Set Time
14 : 03
English
21
Configure menu
Set Time
15
: 03
Set Time
15 : 06
Set Date
20
Sep 2007
Configure
Clock Setup
Set Time / Date
Page 23

Backlight
Selecting this option will alter the Internet radio’s backlight values.
1. After selecting the ‘Backlight’ menu item, the radio will display its list of three menu modes: ‘Active’,
‘Inactive’ and ‘Standby’. These three states are explained below:
The radio gets into its ‘inactive’ state when there is no user activity for 30 seconds.
The ‘active’ state is when there is user activity.
‘Standby’ is the state when the radio has been turned off.
2. Rotate the knob to highlight the desired menu mode and press SELECT.
3. The radio will now display the current backlight value for this menu mode. You can alter this value by
rotating the knob to increase or decrease it.
WiFi Strength
Selecting this option will display the wireless signal strength.
1. The radio will now display the current wireless signal strength value for this menu mode.
English
22
Configure menu
Page 24

English
23
Configuring ‘My Stuff’
• Registering an account on Reciva’s
website
1. Open the website, http://www.reciva.com from your
Internet browser.
2. Click on the ‘Register’ link and follow the on-screen
instructions to register an account. Please note, during
the registration process, a validation code will be sent to
you via email. Please enter this code when prompted to
do so.
3. After logging into your account, you will be able to edit
your information for ‘My Profile’, ‘My Stations’, ‘My
Streams’, ‘My Radios’ and ‘My Podcasts’ from the lefthand side of the website.
4. You can now add your Internet Radio to your account
on the website by accessing the ‘My Radios’ link. From
the ‘My Radios’ section, you will need to enter in your
radio’s eight digit serial number, which can be found
from the ‘Configure - Version’ menu on the radio, and
you will also need to enter in your radio’s seven digit
registration code, which can be found from the
‘Configure - Register’ menu on the radio.
Configuring ‘My Profile’
Once logged into you Reciva account, you can edit your
account’s details from your ‘My Profile’ section.
Click on the ‘My Profile’ link to view your account’s current
information. This information will include various details
such as your address, user name, password etc. Edit your
details and then click on the ‘Update’ button to save them.
• Configuring ‘My Stations’
1. It is possible to search for radio stations that are
available in Reciva’s stations’ database from Reciva’s
website. Whenever stations are searched for on the
website, they will be displayed in a list of search results
together with a link to ‘Add to My Stations’.
2. Clicking on the ‘Add to My Stations’ link, will add the
station to your account’s ‘My Stations’ list. Clicking on
‘My Stations’ and then selecting the station will allow
you to edit this list.
3. Once you have Internet stations available in your ‘My
Stations’ list, you may play these stations from your
Internet Radio. These stations will be available on your
radio from the menu item: ‘Stations - My Stuff - My Stations’.
Please note, the stations will only be available to your
radio once your radio has downloaded a new stations’
list. To cause the radio to download a new stations’ list
immediately, please remove and reconnect the power to
your radio.
• Configuring ‘My Streams’
1. Once logged into your Reciva website account, you can
add your own Internet radio streams to your ‘My
Streams’.
2. Clicking on ‘My Streams’ will prompt you to enter the
station’s name and its media stream URL. The media
stream URL should be a link to a website’s actual audio
stream. If you have any doubt about locating the media
stream URL from a webpage, then please refer to the
FAQs section on Reciva’s website,
http://www.reciva.com.
3. Once you have Internet radio streams available in your
‘My Streams’ list, you may play these stations from your
Internet Radio. These stations will be available on your
radio from the menu item: ‘Stations - My Stuff - My
Streams’. Please note, the streams will only be available
to your radio once your radio has downloaded a new
stations’ list. To cause the radio to download a new
stations’ list immediately, please remove and reconnect
the power to your radio.
• Configuring ‘My Podcasts’
1. It is possible to add audio podcasts (RSS feeds) to your
Reciva account that can be accessed on your Internet
radio. To add a podcast, simply login to your account and
then click on the ‘My Podcasts’ link.
2. From your ‘My Podcasts’ section, you can add your
chosen podcast by entering in the podcast’s name and its
URL as prompted by the website. Please note, the
podcast URL will have to be a direct RSS feed which will
end with the ‘.xml’ extension e.g.
http://someurl.com/podcast.xml
3. Once you have podcasts available in your ‘My Podcasts’
list, you may access these feeds from your Internet Radio.
These podcasts will be available on your radio from the
menu item: ‘Stations > My Stuff > My Podcasts’. Please
note, the podcasts will only be available to your radio
once your radio has downloaded a new stations’ list.
To cause the radio to download a new stations’ list
immediately, please remove and reconnect the power to
your radio.
Page 25
English
24
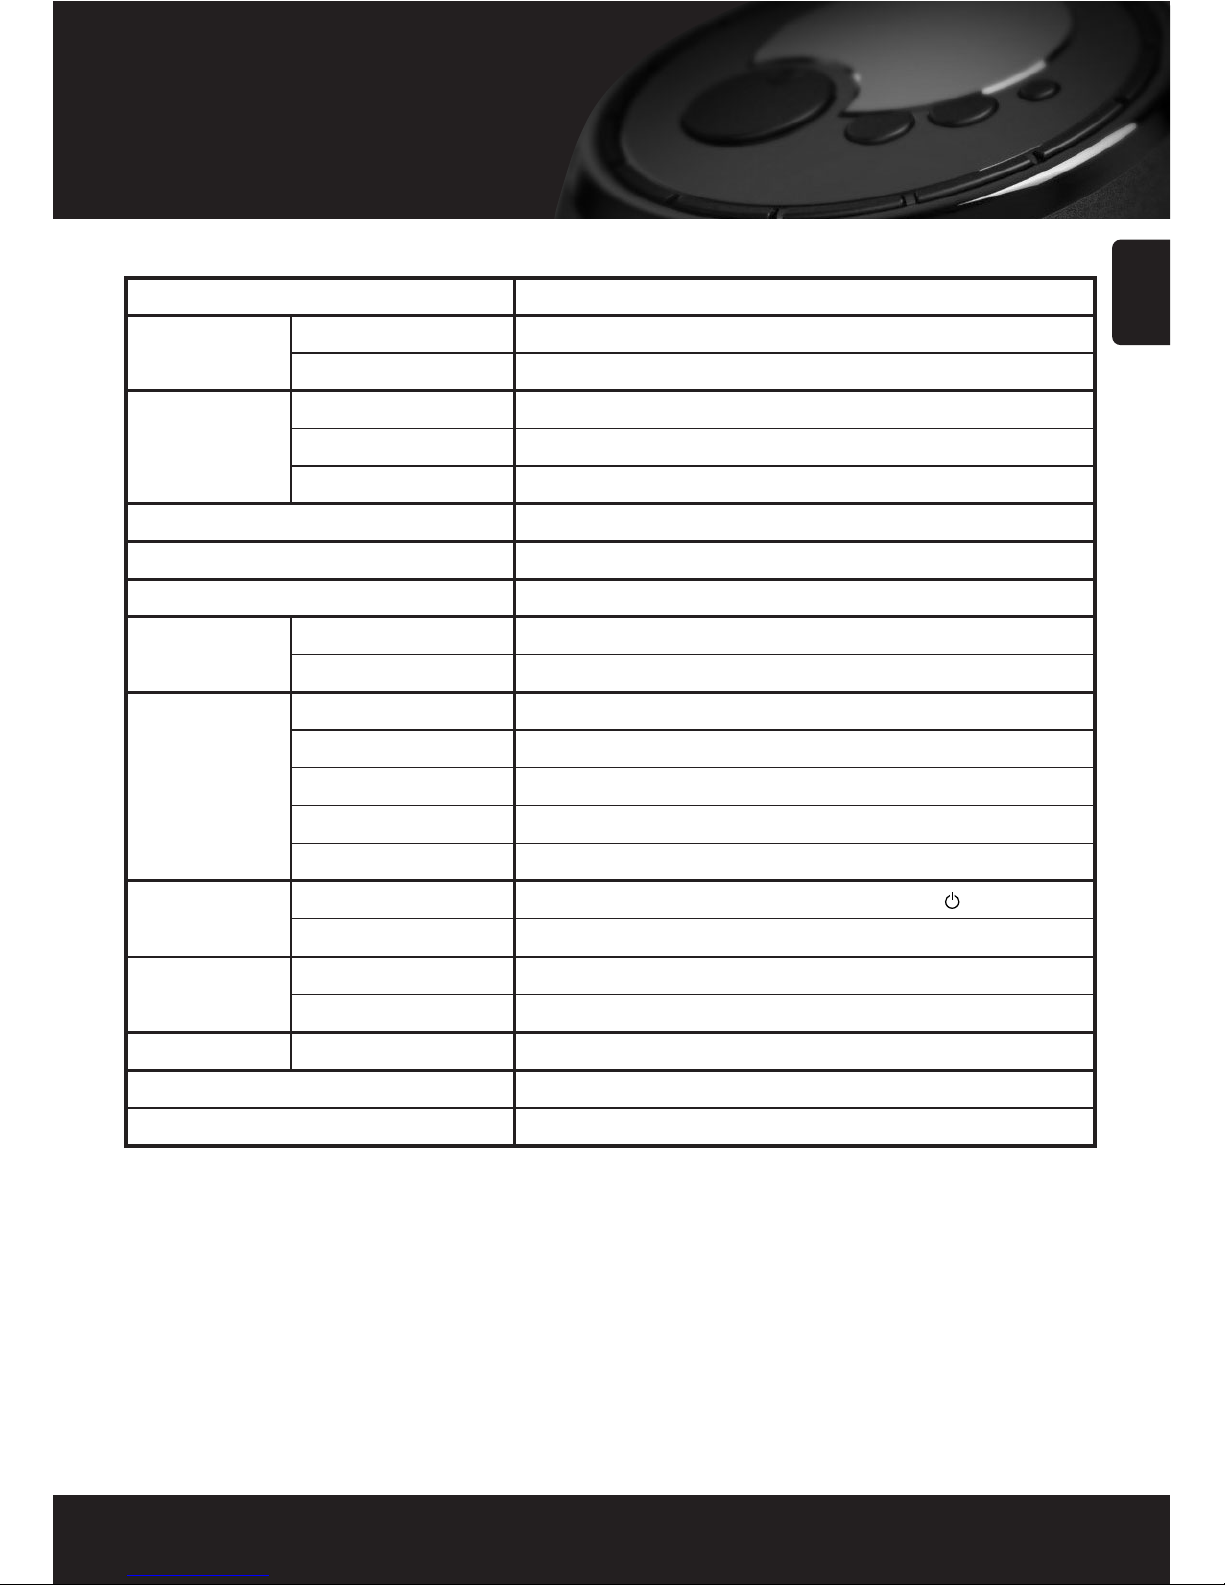
Product Specfications
Product specifications can be changed without prior notice for improving the product performance.
Display Graphic 132 x64 ESTN LCD Monochrome (Negative)
Network
WiFi
IEEE 802.11b,g
Wired (option)
10/100Mbps IEEE 802.3x
Network
Functionality
WEP Key
HEX and ASCII, 64/128 bit, Auto sense
WPA
WPA1(TKIP) with PSK only
IP v4 protocol
Static or DHCP address assignment
Audio Decoders
Playlist formats
Real Audio, WMA, AAC, MP3, AIFF, AU, WAV
ASX,RAM,M3U,RPM,PLS
Clock Alarm Time, Alarm
Rated Power
Speaker
3W + 3W Stereo, 8 ohm
Headphone
20mW + 20mW Stereo, 16 ohm
Terminals
Headphone
X1, 3.5mm Stereo mini-jack
AUX IN
X1, 3.5mm Stereo mini-jack
LINE-OUT
X1, RCA pin jacks(Stereo)
USB Host
x1, USB A jack
DC Input
X1, DC 7.5V 1.6A
Key
Tact
PSET1~PSET10, REPLY,SELECT,BACK,
Rotary Encoder
Volume Up/Down, Menu Navigation
Power
AC Adaptor
DC 7.5V, 1.6A
Power Consumption
Max 15W, Normal 8W
Dimension(mm)
Set (W x H x D)
173 x 170 x 163
Weight(Kg)
1.2 Kg
Recommended System (OS)
Windows2000/ Windows XP SP2/Windows Vista
Page 26

English
25
Troubleshooting
If you experience any trouble with your wireless Internet radio, first refer to the troubleshooting below. And then you may
find it useful to visit the help section of the following: http://www.reciva.com
if your questions remain unanswered.
If you have trouble connecting the radio to your wireless network, these steps may help to resolve the problem:
1. Confirm that your connected PC can access the Internet (i.e. can browse the web) using the same network.
2. Check that a DHCP server is available, or that you have configured a static IP address on the radio. You can
configure a static IP address on the radio using the menu item ‘Configure
➞ Network Config ➞ Edit Config’, and
then select ‘No’ for ‘Auto (DHCP)’.
3. Check that your network’s firewall is not blocking any outgoing ports. As a minimum, the radio needs access to
UDP and TCP ports 80, 554, 1755, 5000, 6000 and 7070.
4. Check your access point does not restrict connections to particular MAC addresses. You can view the radio’s
MAC address using the menu item ‘Configure
➞ Network Config ➞ View Config ➞ MAC address’.
5. If you have an encrypted network, check that you have entered the correct key or pass phrase into the radio.
Remember that text-format keys are case sensitive. If, when attempting to connect to an encrypted network, your
radio displays: ‘Wireless error’ followed by a 5-digit number, then please ensure that you enter the correct
passphrase for the network. If the problem persists, then you may need to consult your network configuration.
If your radio can connect to the network successfully, but is unable to play particular stations, it may be due to one
of the following causes:
1. The station is not broadcasting at this time of the day (remember it may be located in a different time zone).
2. The station has reached the maximum allowed number of simultaneous listeners.
3. The station is not broadcasting anymore.
4. The link on the radio is out of date.
5. The Internet connection between the server (often located in a different country) and you is slow.
Try using a PC to play back the stream via the broadcaster’s web site.
If you can play back the station with a PC, use the form at http://www.reciva.com/
to notify us so that we can change
the station data that is used by the radio.
If you are having trouble connecting to your Windows XP shared music folder, and you are using a username with no
password, try adding a new user name with a password to Windows (Control Panel – User Accounts) specifically for the
radio, and try to connect using that.
Page 27

English
26
Software licence information
• This product contains software licensed under version2 of the GNU Public License and version 2.1 of the
GNU Lesser Public License, The source code for this software is available from: http://www.reciva.com/gpl/
• This product includes technology owned by Microsoft Corporation and under a licence from Microsoft
Licensing GP. Use or distribution of such technology outside of this product is prohibited without a license
from Microsoft Corporation and/or Microsoft Licensing, GP as applicable.
 Loading...