

Page 1
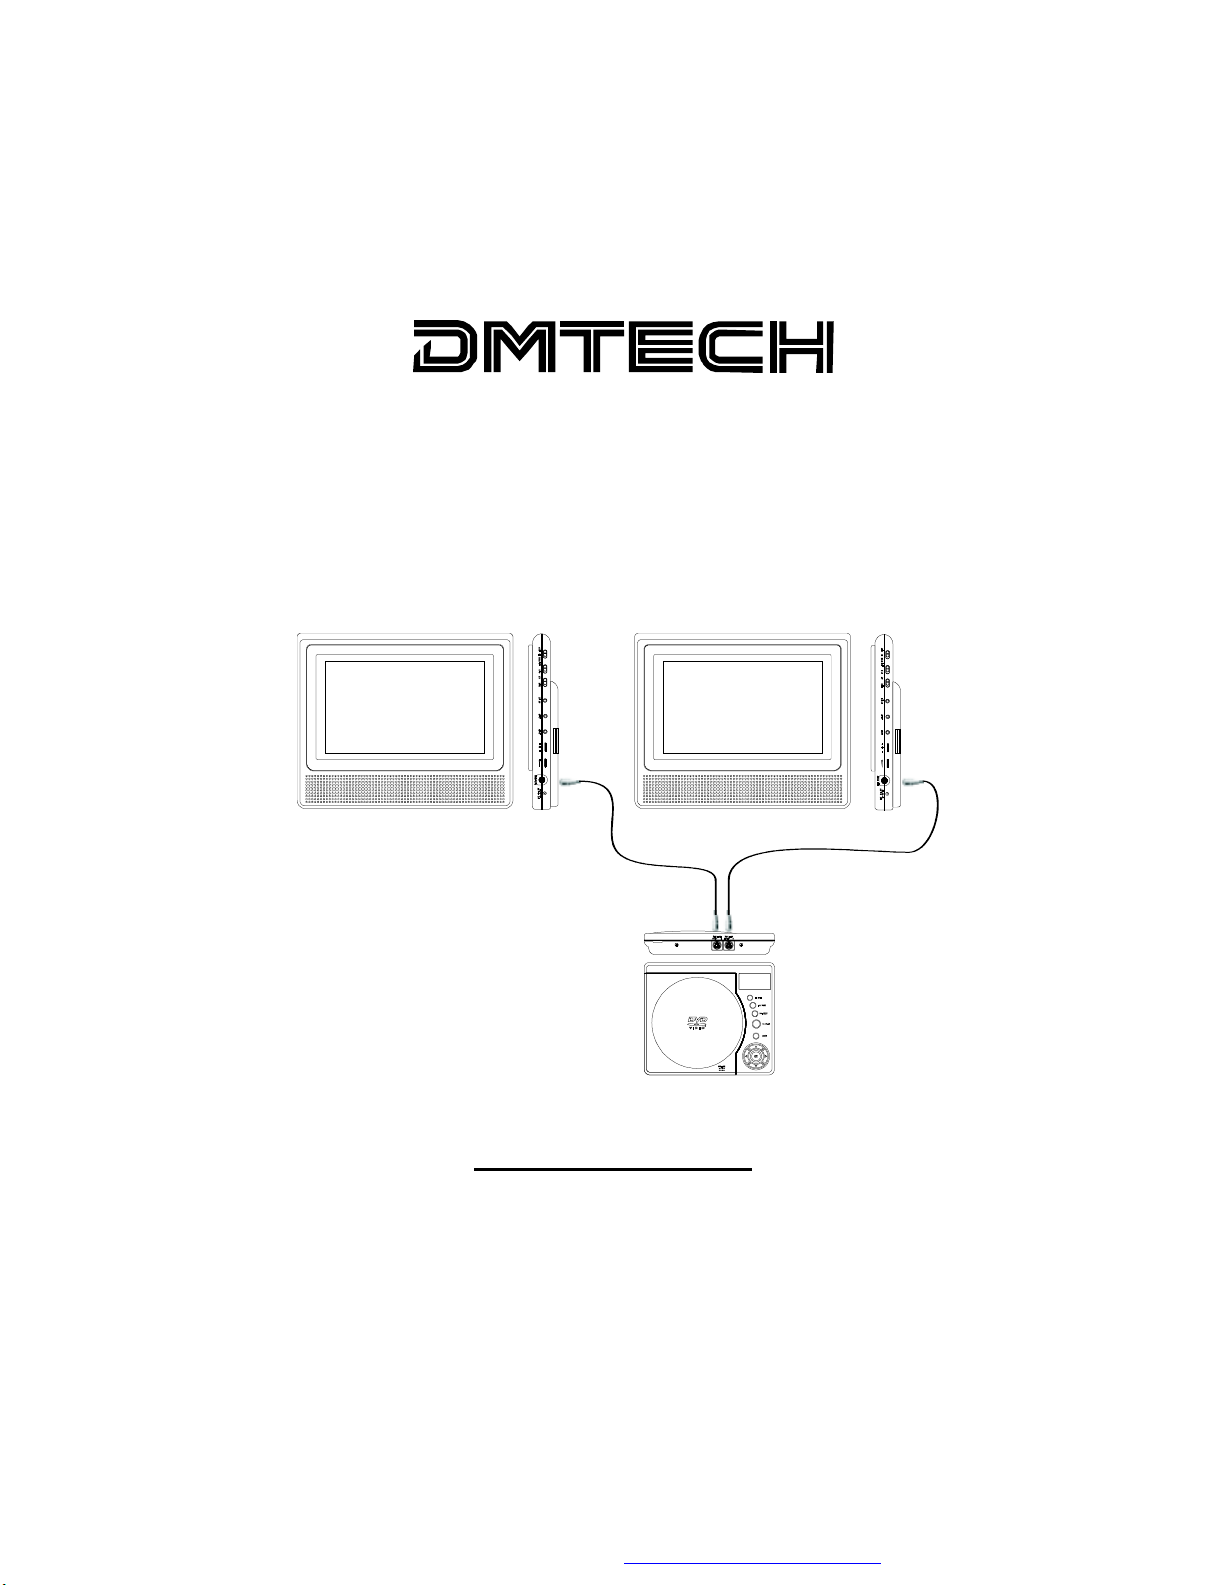
PDV971-2
DVD PLAYER WITH TWIN MONITORS
Owner’s Manual
PDF created with FinePrint pdfFactory Pro trial version http://www.fineprint.com
Page 2

Notice:
This Product incorporates copyright protection technology that is protected by method claims of certain U.S. Patents and other intellectual
property rights owned by Macrovision Corporation and other rights owners. Use of this copyright protection technology must be authorized by
Macrovision Corporation, and is intended for home and other limited viewing uses only unless otherwise authorized by Macrovision Corporation.
Reverse engineering or disassembly is prohibited.
PDF created with FinePrint pdfFactory Pro trial version http://www.fineprint.com
Page 3

Content
A.Introduction ....................................................................... 1
B.Cautions and Warnings ................................................... 1
C.Contents ........................................................................... 3
D.Powering and installation ................................................. 3
E.Controls, Indicators, and Connectors .............................. 6
F.Loading and Playing a Disc ............................................. 8
G.Basic Operation ................................................................ 9
H.Menu ................................................................................. 10
I.Display................................................................................ 10
J.Variable Playing Mode ............................................ 13
K.Setup.................................................................................. 18
L. Connecting to Other Equipment.........................................22
M.Specifications ................................................................... 23
N.Troubleshooting ............................................................... 24
PDF created with FinePrint pdfFactory Pro trial version http://www.fineprint.com
Page 4

A. Introduction
Thank you for choosing the portable DVD player with twin 9” LCD
monitors. The main features include two 9" Wide Screen (16:9 Aspect
Ratio) Liquid Crystal Display (LCD) monitors and a single DVD player.
Please read the entire instruction manual supplied with this product
prior to using. The documentation will assist you in installing the system
properly to obtain the best equipment performance. Please save this
manual for later use.
B. Cautions and Warnings
1. Placement
To prevent fire or electric shock, do not expose this appliance to
rain or moisture. Do not place the set on an unstable cart, stand,
tripod, bracket or table to prevent it from falling. Keep the unit away
from strong magnets, heat sources, direct sunlight, excessive
dust. If the unit is brought directly from a cold to a warm location,
moisture may condense inside the unit. When you move it from a
cold to a warm location, wait for about one hour before operating
the unit, or remove the disc and leave the unit turned on until the
moisture evaporates.
2. Installation
Ensure the DVD player and the 9” monitors are installed in
accordance with the instructions and illustrations provided in this
manual.
3. Caution
Do not push objects of any kind into the unit through openings; do
not spill or spray liquid of any kind on or in the system (this may
result in a fire or electric shock). Do not place anything heavy on
the unit. To ensure proper ventilation and proper operation, never
cover or block the slots and openings with a cloth or other material.
Keep the unit away from an open flame such as fire, candle etc.
Do not use the unit in temperatures higher than 95 degrees
Fahrenheit or 35 degrees Celsius.
1
PDF created with FinePrint pdfFactory Pro trial version http://www.fineprint.com
Page 5

4.Disassemble
Do not attempt to disassemble the cabinet. There is a risk of electric shock and/or exposure to Laser Radiation. Contact qualified
service personnel if your system needs repair.
5. Cleaning Unit
When cleaning, make sure the system is unplugged from the power
source. Do not use liquid cleaners or aerosol cleaners. Use a cloth
lightly dampened with water for cleaning the exterior of the system
only.
6. Disc
Do not use irregularly shaped discs such as heart or star-shaped
discs as they may cause the unit to malfunction. Do not stick paper,
tape or glue on the disc. Do not expose the disc to direct sunlight
or heat sources. Do not touch the surface of disc. Handle the disc
by its edge. Clean the disc by wiping the disc from the center out
with a cleaning cloth. Remove the disc from the unit and store it in
its case after playing. Some playback operations of discs may be
intentionally fixed by software producers. Since this unit plays discs
according to the disc contents the software producers designed,
some playback features may not be available. Also refer to the instructions supplied with the discs.
7. Regional Coding
Both the DVD player and disc are coded by region. These regional
codes must match in order for the disc to play. If the codes don’t
match, the disc won’t play. This unit’s code is region 2. DVD’s with
other regional codes cannot be played in this unit.
2
PDF created with FinePrint pdfFactory Pro trial version http://www.fineprint.com
Page 6
C. Contents
1. 1 x DVD Player
2. 2 x 9” Monitors
3. 1 x Remote Control with battery (CR2025)
4. 2 x DIN Cables
5. 1 x Cigarette Lighter Adapter
6. 1 x Instruction Manual
7. 1 x Carry Bag
8. 1 x DVD Pouch
9. 2 x Straps for 9” single monitor
10. 1 x AC to DC Adapter
D. Powering and installation
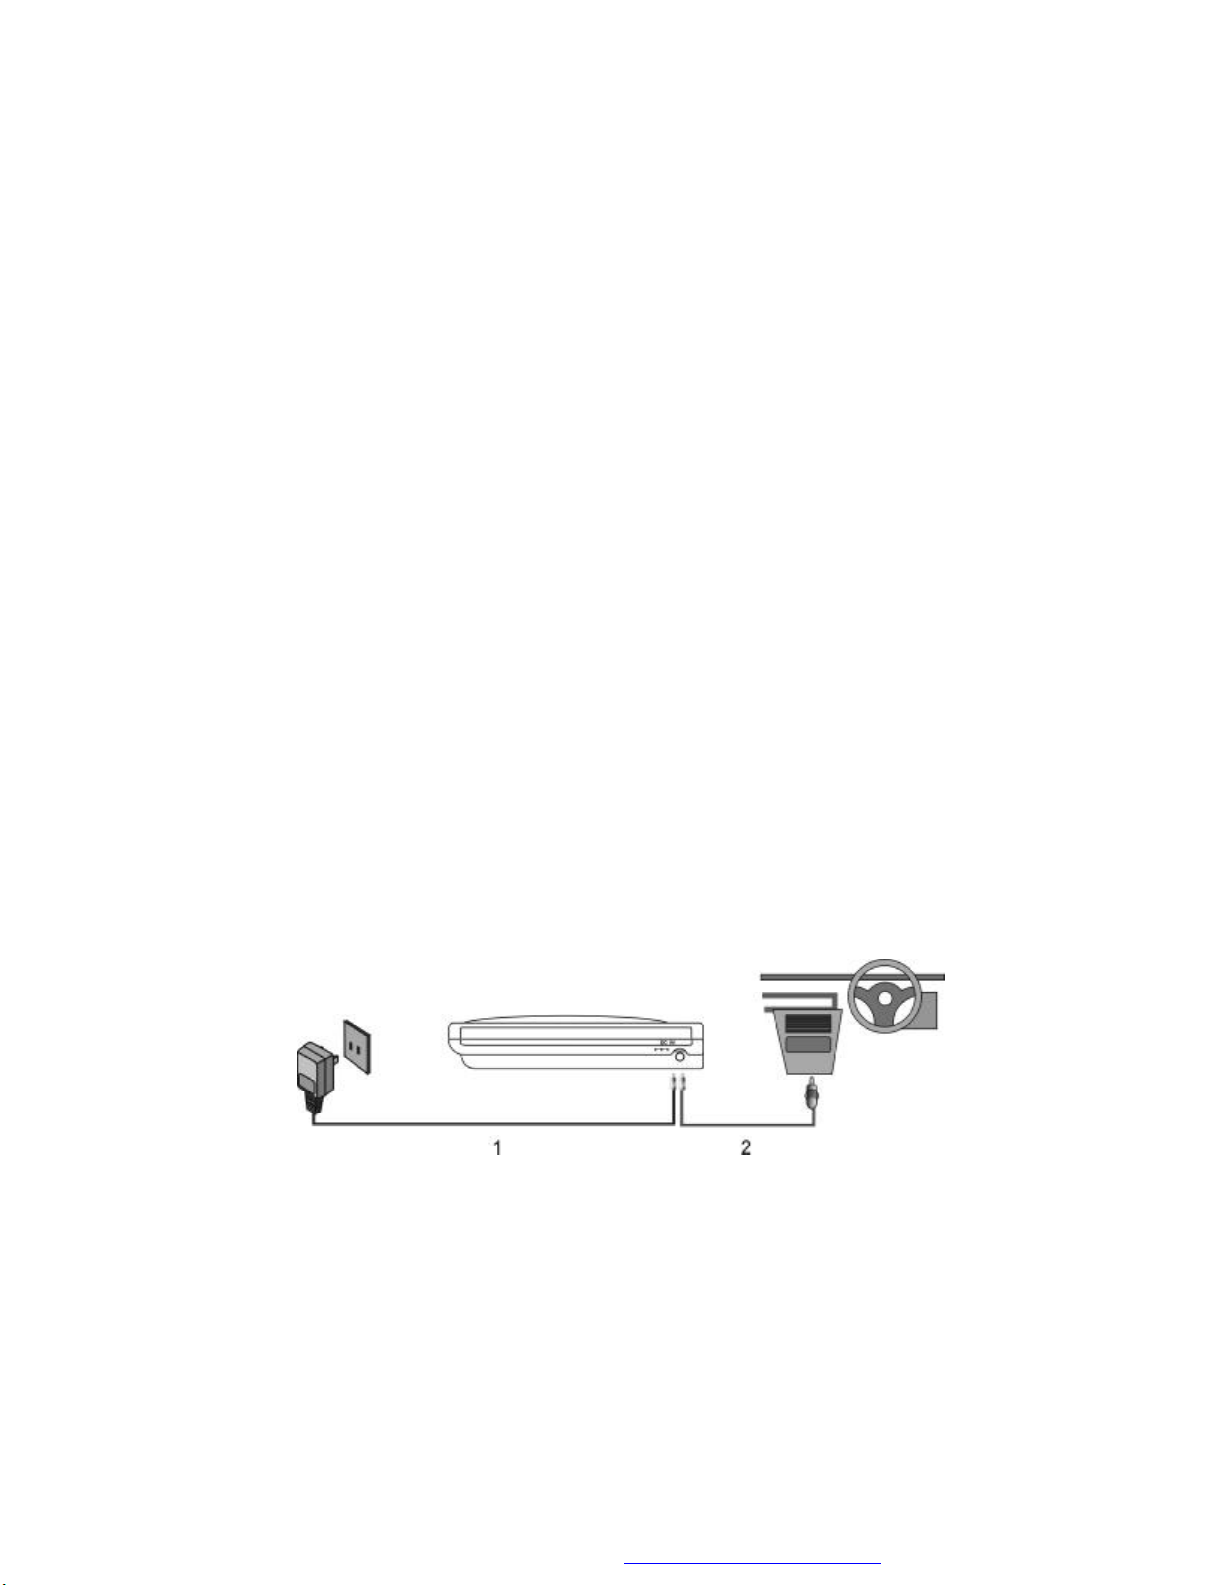
1. Powering the system indoors (Refer to Figure 1)
Plug one end of the AC to DC adapter into the DC Input jack on the
right side of the DVD player, then plug the other end into the
100~240V AC power receptacle.
2. Powering the system in a car (Refer to Figure 1)
Plug one end of the cigarette lighter adapter into the DC Input jack
on the DVD player, then plug the other end into the cigarette lighter
socket.
Figure 1
NOTE:The adapter which be used must be certified
and must be coverd the range of 9V&2A output parameter
3
PDF created with FinePrint pdfFactory Pro trial version http://www.fineprint.com
Page 7
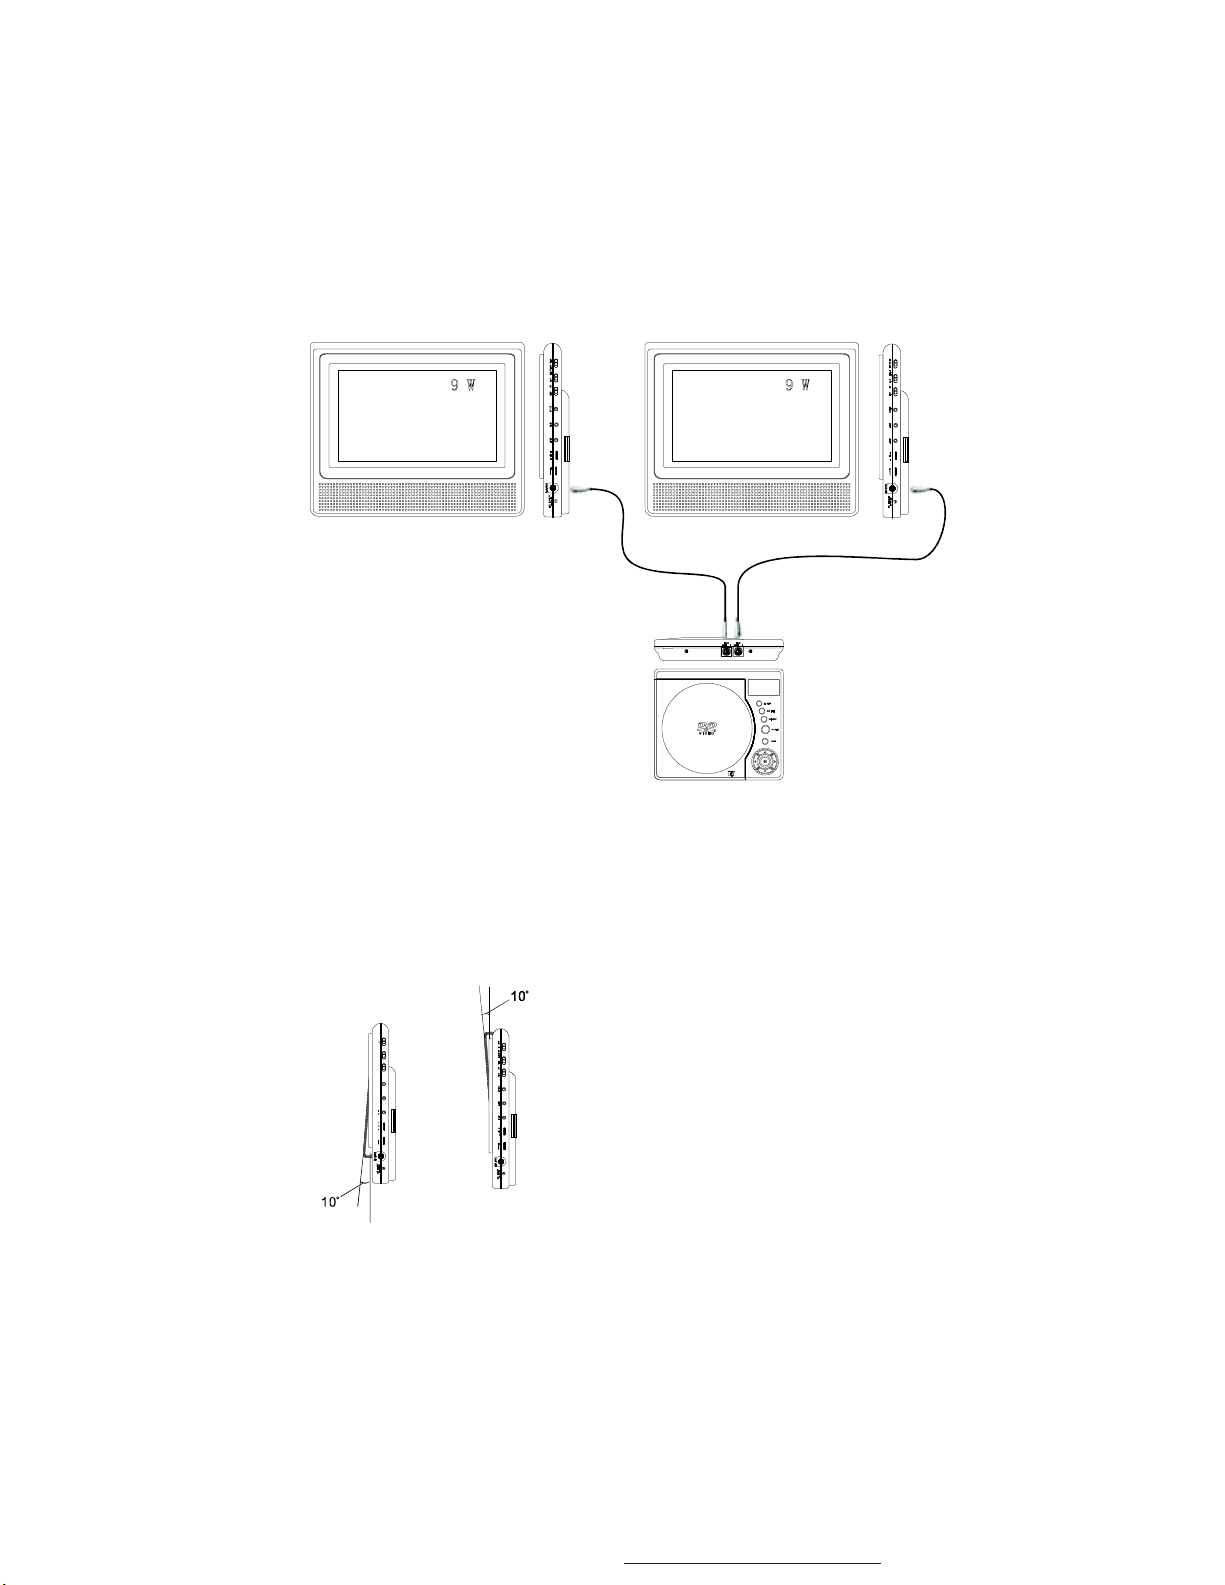
3. Connection with DVD player and monitors (Refer to Figure 2)
OFF
Figure 2
Note: Unplug the apparatus when not using for a long time or intent to
disconnect from the Mains power.
4. Installation Prior to use
1 AV IN 4:3 16:9DIN AV ON
VOL 2
Figure 3
The monitor can rotate 10
Degrees up and down. (Refer
the Figure 3)
4
PDF created with FinePrint pdfFactory Pro trial version http://www.fineprint.com
Page 8

Positioning the Monitor On Headrest
Figure 4
Install the monitor according to the pictures above.
5
PDF created with FinePrint pdfFactory Pro trial version http://www.fineprint.com
Page 9
E. Controls, Indicators, and Connectors
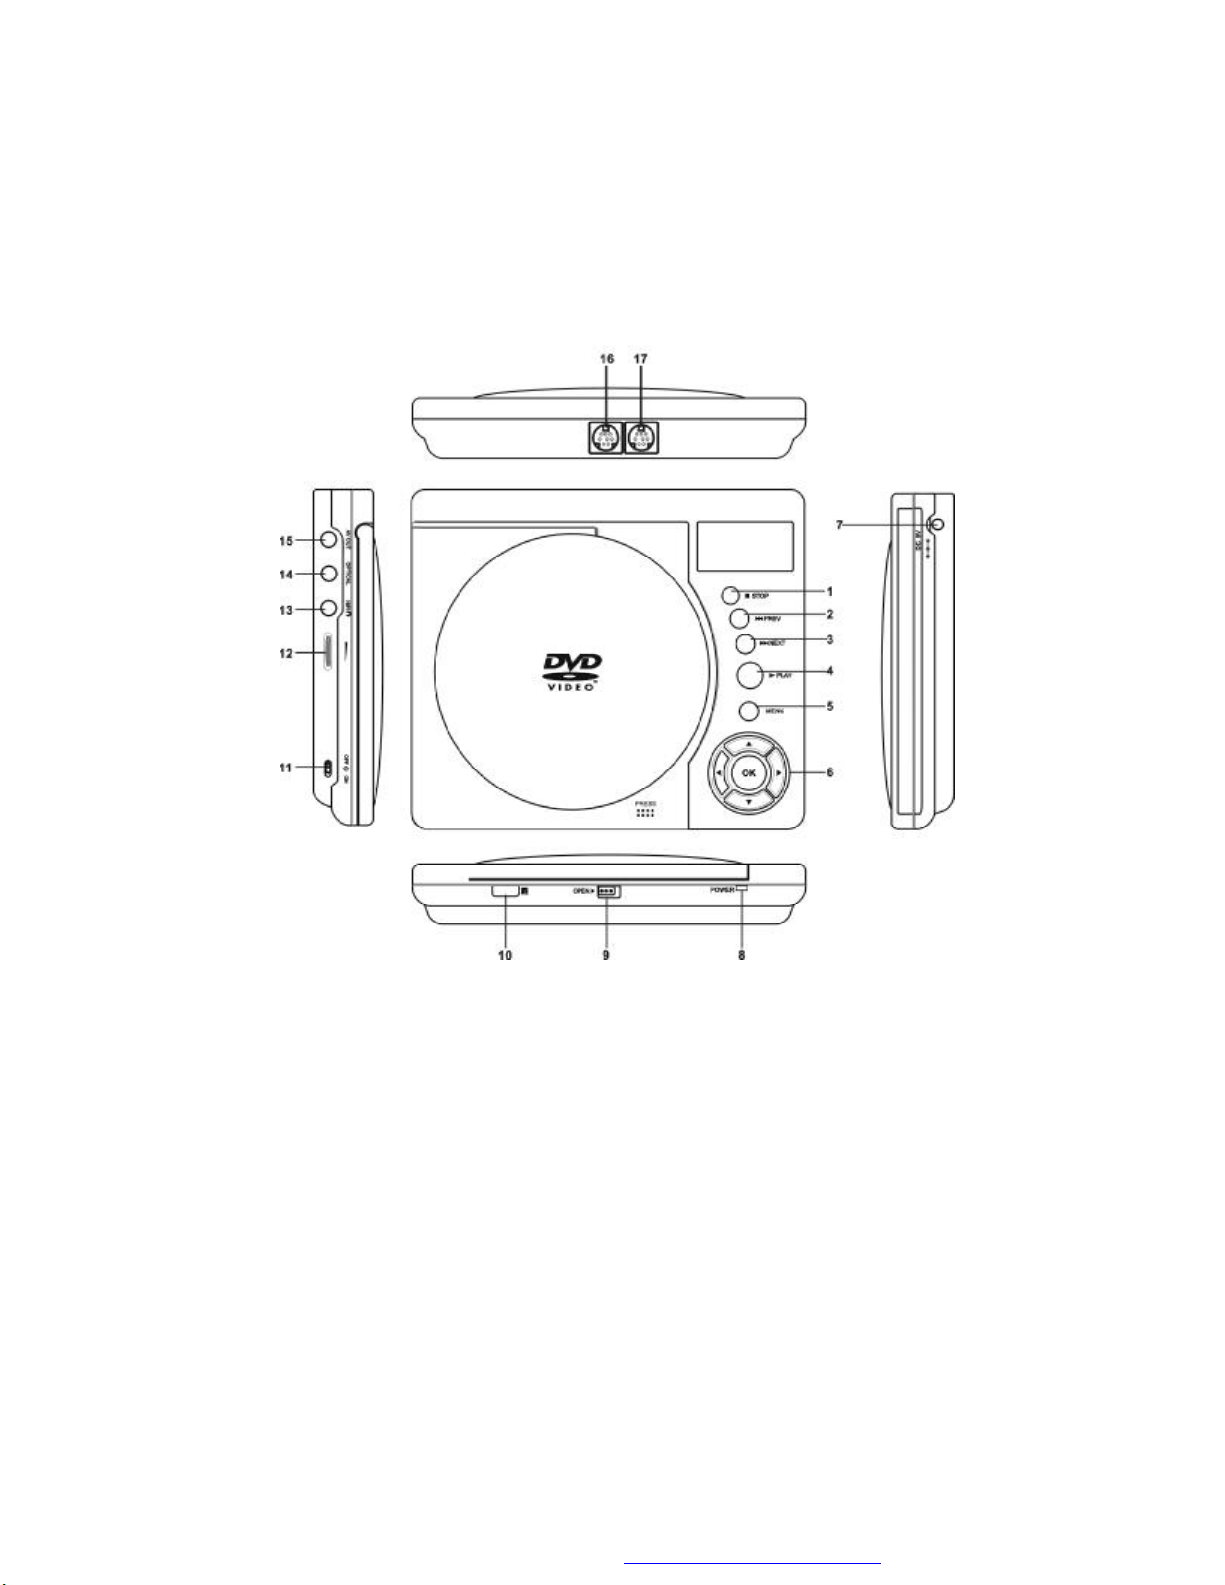
1. Unit View (Refer to Figure 5)
Figure 5
1) Stop Button
2) Previous Button
3) Next Button
4) Play Button
5) Menu Button
6) Up/Down/Left/Right/OK
button
7) DC 9-12V Input Jack
8) Power LED
9) Open Switch
10) Remote Control Sensor
11) Power On/ Off Switch
12) Volume Control
13) Headphone Jack
14) Optical Jack
15) AV Out Jack
16) DVD Port 2
17) DVD Port 1
6
PDF created with FinePrint pdfFactory Pro trial version http://www.fineprint.com
Page 10
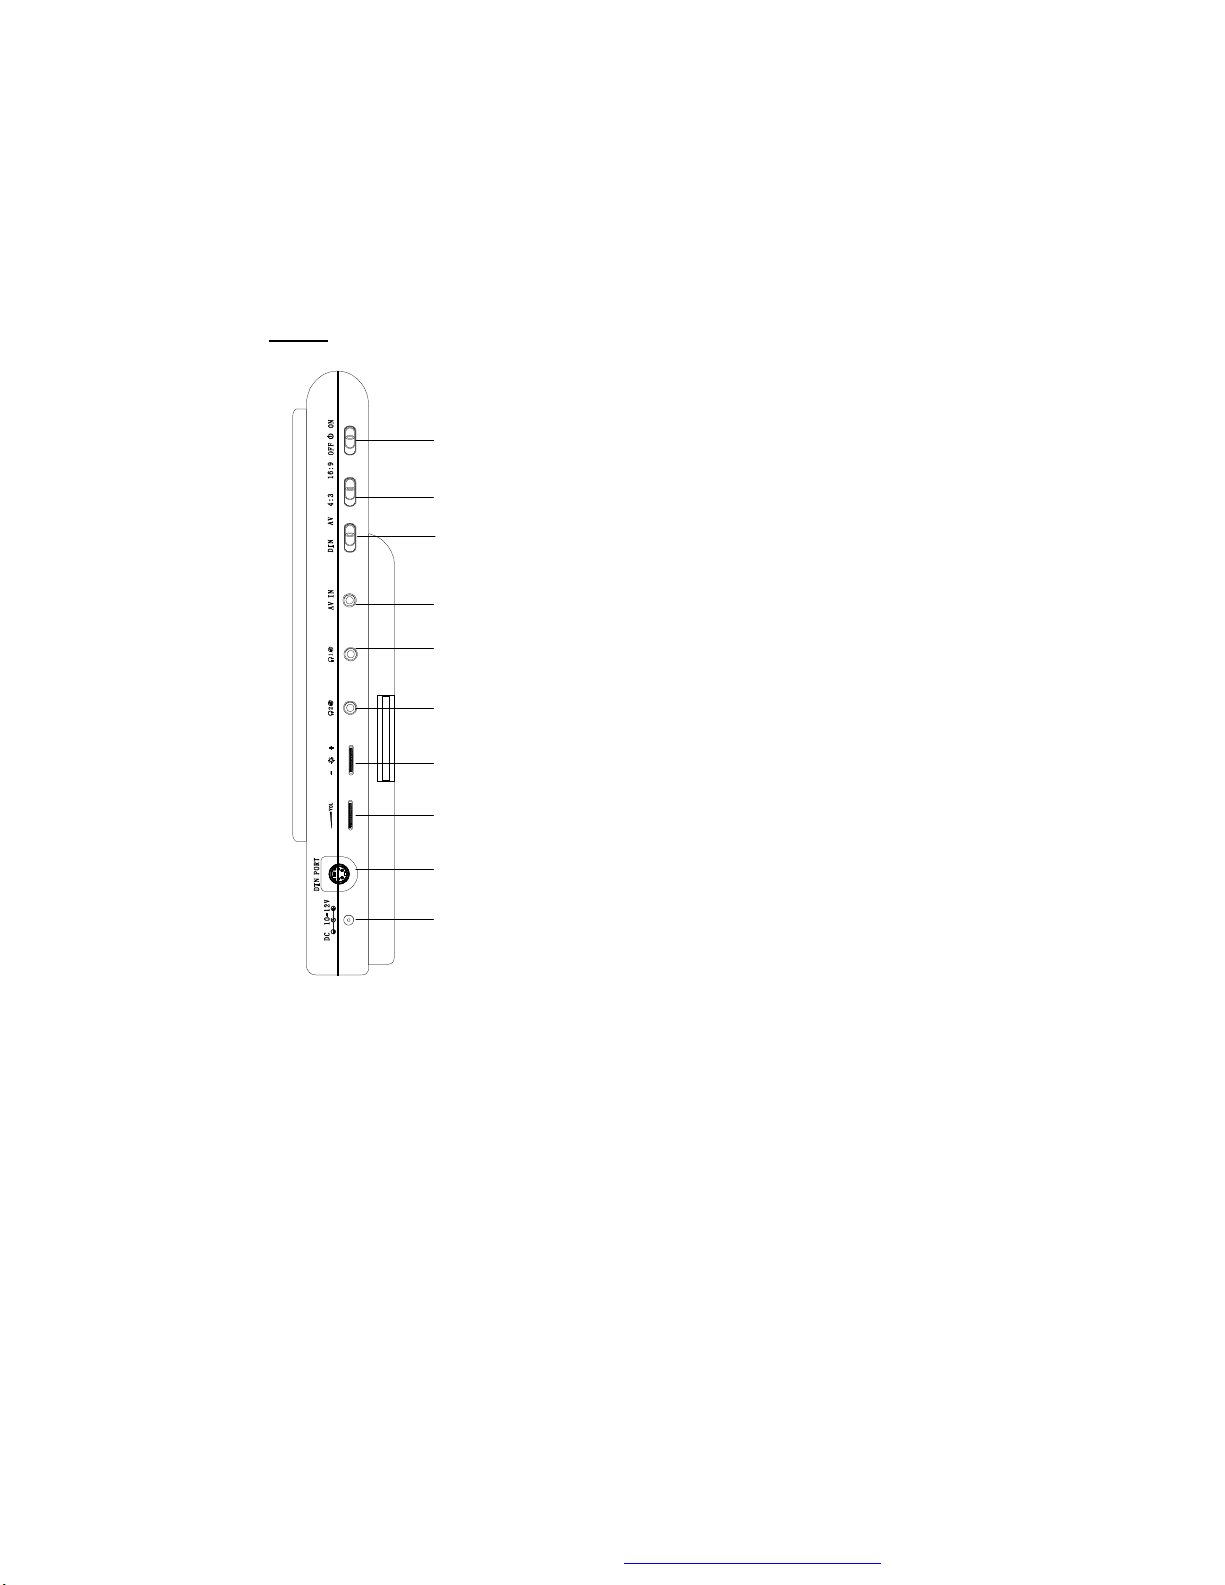
2. Monitor View (Refer to Figure 6)
123456789
10
RIGHT
1). Power On/Off Switch
Turns the player on or off.
2). Wide Button
Switches the LCD screen between the 16:9
and 4:3 screen display.
3). AV/DIN Jack
Slide to AV when the player connecting to a
external source./Slide to DIN position when
the player connecting to DVD player.
4). AV Jack
Connects to an external audio/video source.
5). Headphone Jack 1
Disable internal speakers.
6). Headphone Jack 2
Disable internal speakers.
7). Brightness Control
Adjust the brightness.
Figure 6
8). Volume Control
Adjust the Volume.
9). Din Port
Connets to the DVD port with the Din cable.
10). DC Input Jack
Connects to the AC adapter.
7
PDF created with FinePrint pdfFactory Pro trial version http://www.fineprint.com
Page 11
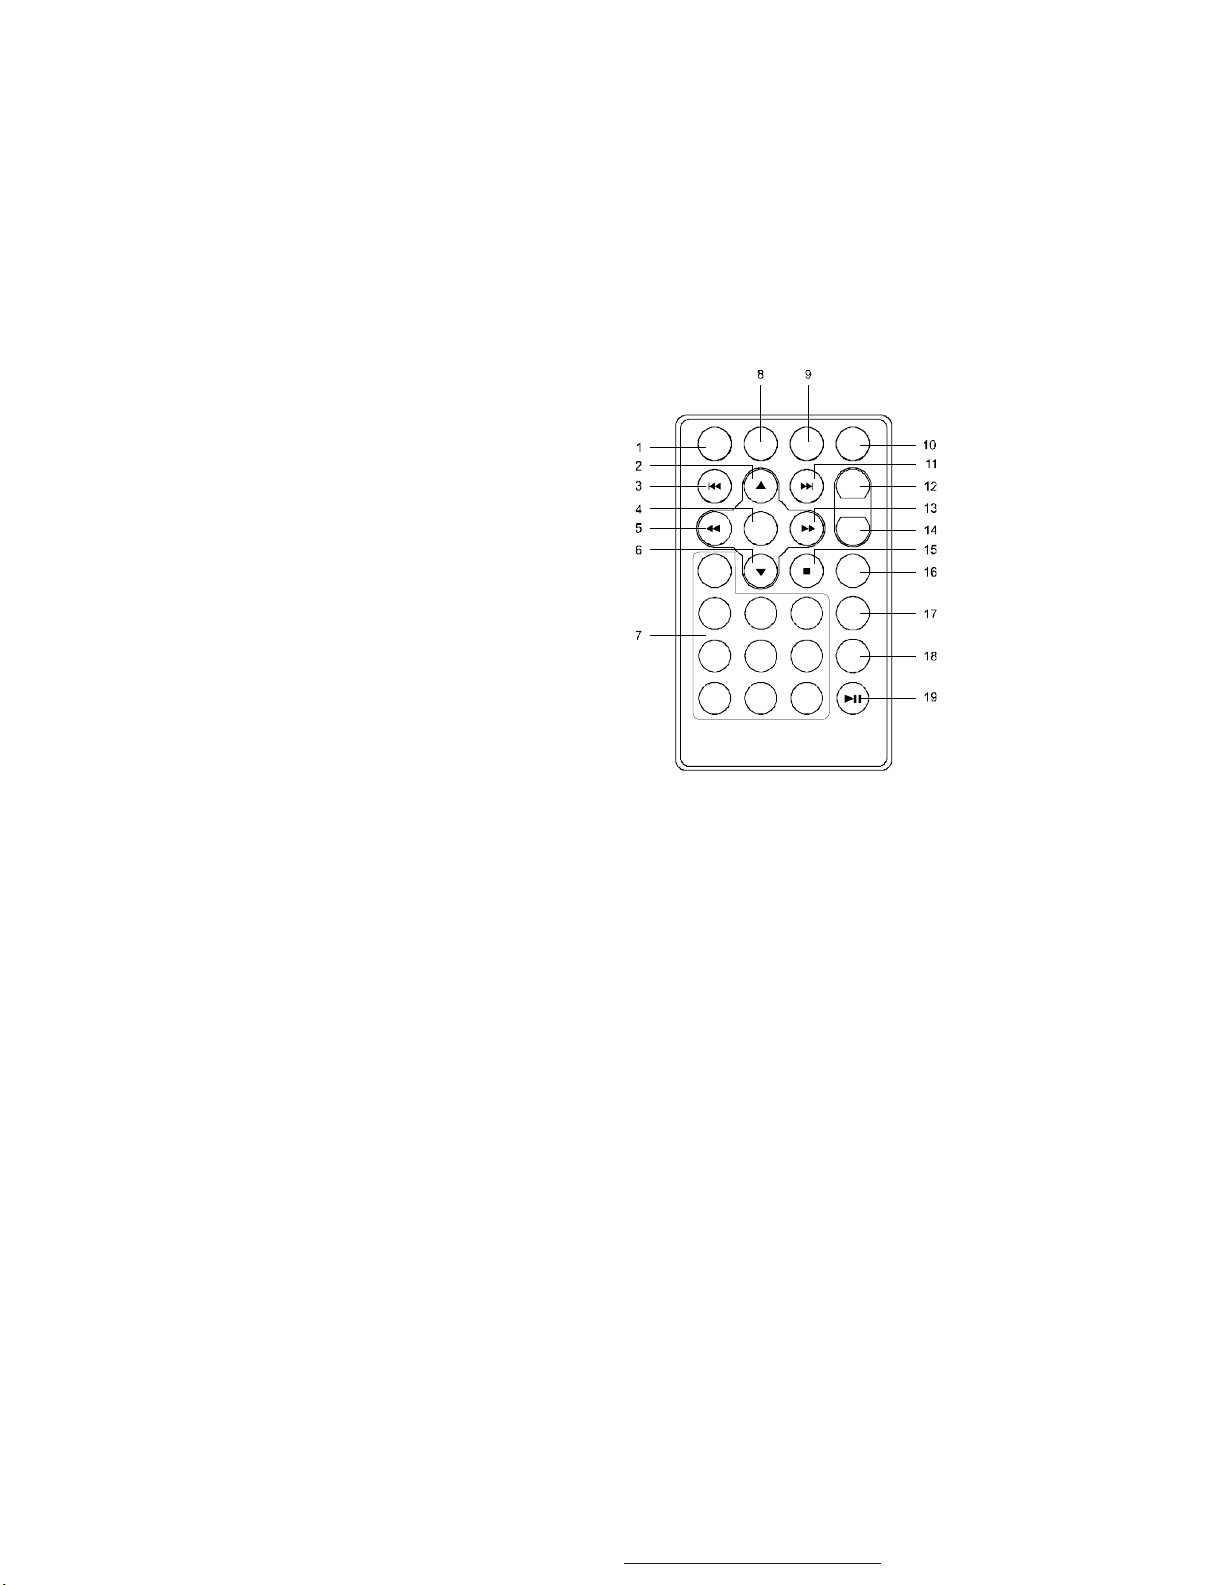
3. Remote Control View (Refer to Figure 7)
1) Setup Button
2) Up Button
3) Previous Button
4) Enter Button
5) Left/Reverse Button
6) Down Button
7) Numberic Button
8) Display Button
9) Zoom Button
10) Subtitle Button
11) Next Button
12) A-B Repeat Button
13) Right/Forward Button
14) 1/ALL Repeat Button
15) Stop Button
16) Menu Button
17) Audio Button
18) Angle Button
19) Play/Pause Button
Figure 7
F. Loading and Playing a Disc
a. After connecting power to the unit, power on “DVD player” with the
power switch. The power indicator will light.
b. Open the disc tray by pressing OPEN, and place a disc into the
tray with the label side facing up.
c. Close the tray by pressing the “PRESS” button.The unit will load
the disc and start playing.
d. Rotate BRIGHTNESS and VOLUME to adjust the LCD’s bright-
ness and the DVD player’s volume.
e. To stop playing a disc, press STOP.
8
PDF created with FinePrint pdfFactory Pro trial version http://www.fineprint.com
Page 12

G. Basic Operation
OPEN
PLAY/PAUSE
STOP
NEXT
PREVIOUS
RIGHT/FORWARD
LEFT/REVERSE
UP/DOWN
ENTER
NUMBERS
MENU
1/ALLREPEAT
A-B REPEAT
DISPLAY
ANGLE
SUBTITLE
AUDIO
ZOOM
SETUP
Remove/load the disc
Start Play/Execute item or setting
(1 time) Stop at the present playing point /
(2 times) Stop playing
Go to the next chapter, track or scene during play back
Go back to the previous chapter, track or
scene during play back
Scan forward at 2, 4, 8,16 or 32 times speed
Scan backward at 2, 4, 8, 16 or 32 times
speed
Used for Menu Navigation
Execute item or confirm setting
Select item or setting
Display the main menu of the disc
Repeat playing title, chapter, or track
Repeat a specific portion from point A to point
B of the disc
Display information (title, chapter, track,
time, etc.).
Change the viewing angles on the scene
Select the subtitle language and turn it on/
off
Select the audio language
Enlarge an image to 2, 3, or 4 times the
original size.
Display the setup menu to select and set
items, and exit the setup menu.
9
PDF created with FinePrint pdfFactory Pro trial version http://www.fineprint.com
Page 13
H. Menu
A DVD is divided into sections called titles and chapters. When you
play a DVD, you can choose different titles or chapters to enjoy. But
please notice that not every disc have choice titles.
When playing a disc, press MENU to enter root menu. Generally you
will see some choices in root menu. Press or button to select
the menu and press ENTERto confirm.
I. Display
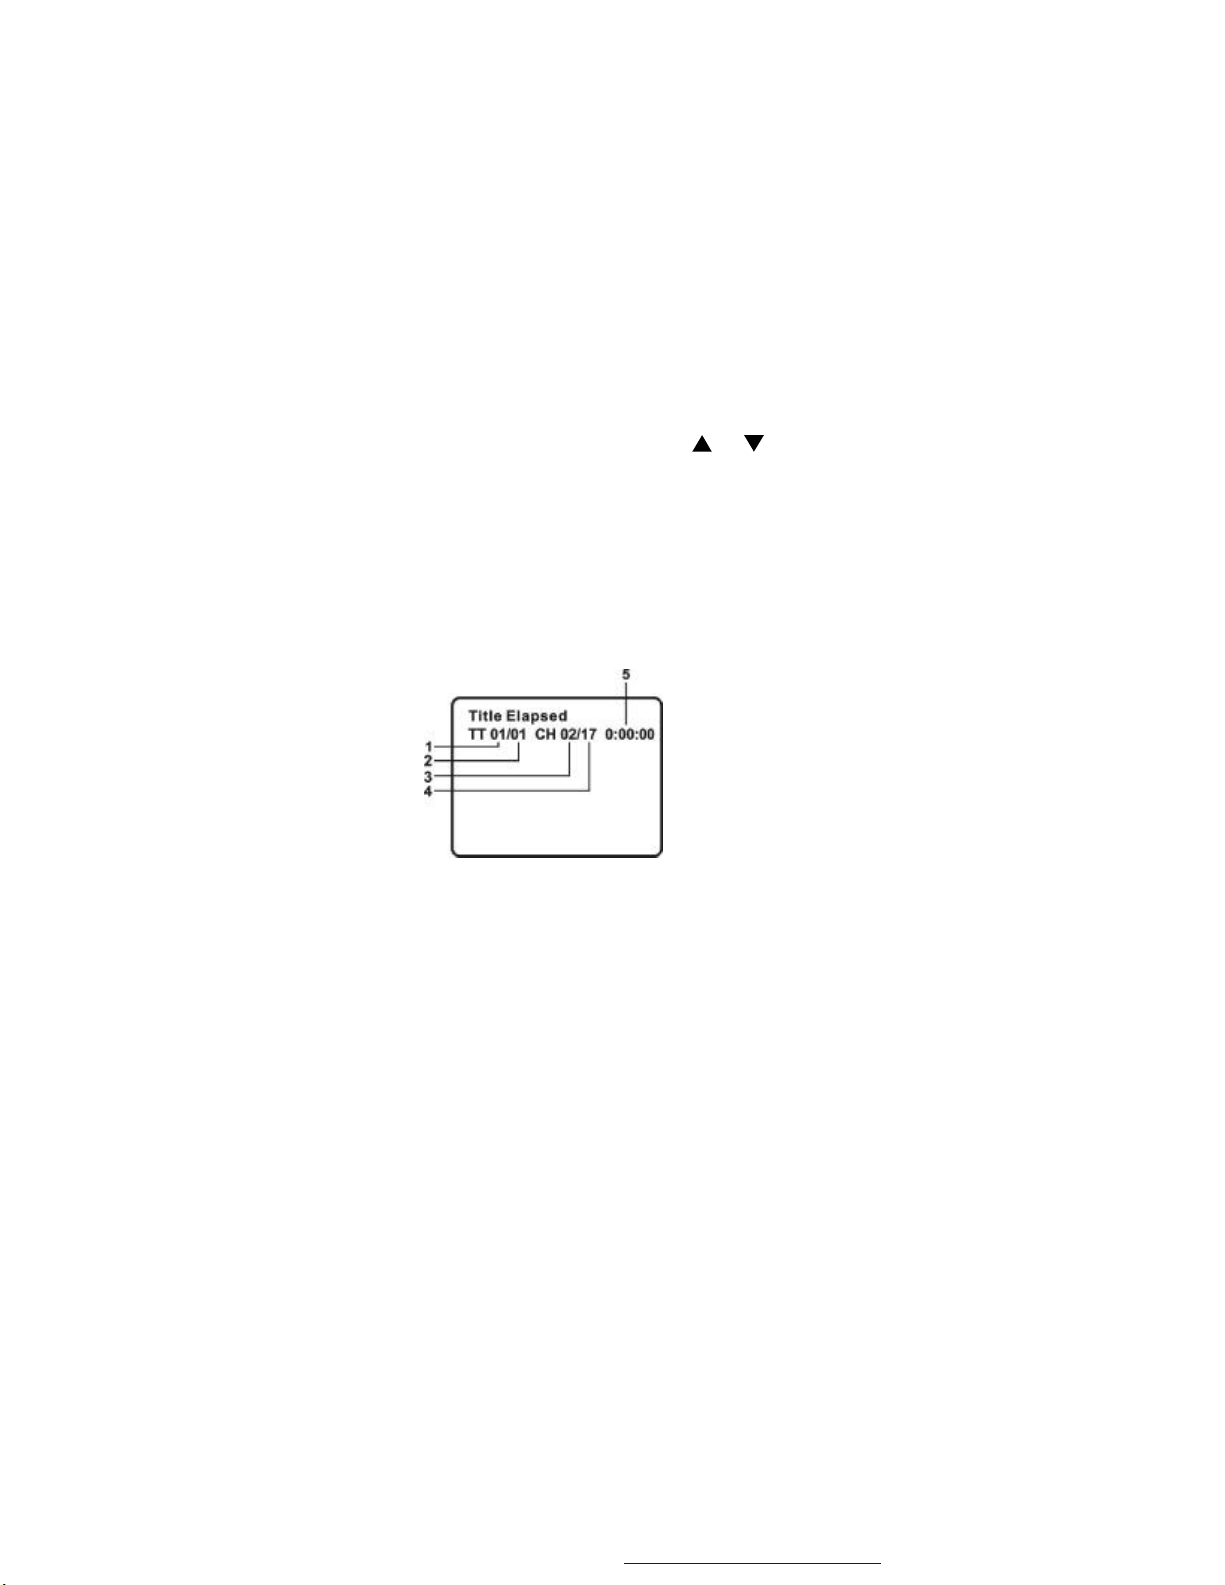
1. PLAYING TIME AND REMAINING TIME
a. During playback press the ‘DISPLAY’ button to display the cur-
rent Title Number (1), the total Number of Titles (2), the current
Chapter Number (3), the total Number of Chapters (4), and the
Playing elapsed Time for the title (5). The heading will disappear
automatically after 3 seconds if DISPLAY button is not pressed.
Title, Chapter Number, and Time Screen Display
b. Press ‘DISPLAY’ constantly to choose the options below circularly.
Title Elapsed: The elapsed time of the title
Title Remain: The remaining time of the title
Chapter Elapsed: The elapsed time of the chapter
Chapter Remain: The remaining time of the chapter
Display Off: The DVD’s time Information will not be displayed.
10
PDF created with FinePrint pdfFactory Pro trial version http://www.fineprint.com
Page 14
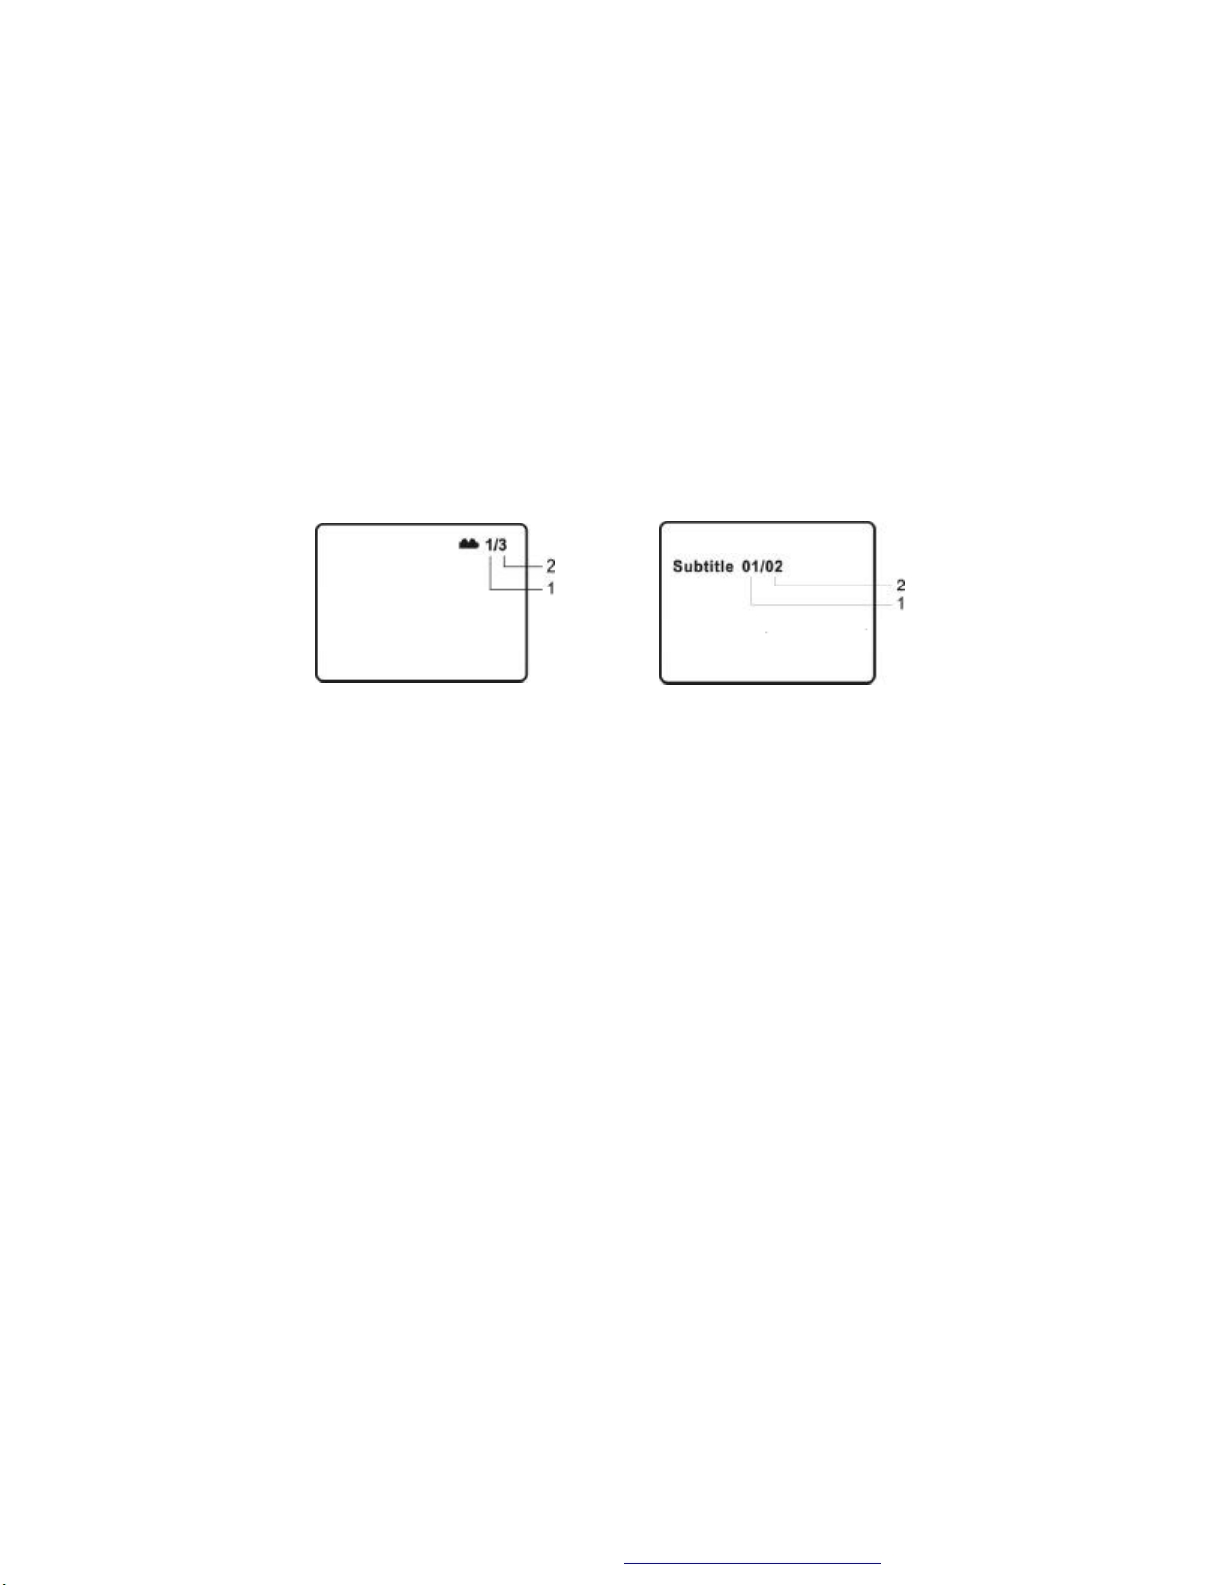
2. ANGLE
During playback of a disc, press ‘ANGLE’ to display the available angles
for discs containing multi-angles*, with the current angle number (1)
and the total number of angles (2) displaying. Press ‘ANGLE’ to select
another angle, then press again to exit and return to the normal viewing angle. The angle display will disappear automatically if the ‘ANGLE’
button is not pressed again within 3 seconds.
*NOTE: Not all discs contain this feature.
Angle Screen Display
Subtitle Screen Display
3. SUBTITLE
During disc playback press ‘SUBTITLE’ to select the subtitle language
you desire*, with the current Subtitle Language Number (1) and the
total Number of Subtitle Languages (2) displayed. If there are multiple languages press ‘SUBTITLE’ again to select another subtitle language. To turn subtitles OFF, press the ‘SUBTITLE’ button until ‘Subtitle Off’ is displayed. The Subtitle display will disappear automatically
if the ‘SUBTITLE’ button is not pressed again within 3 seconds.
* Some DVDs only allow access to this function through the DVD menu
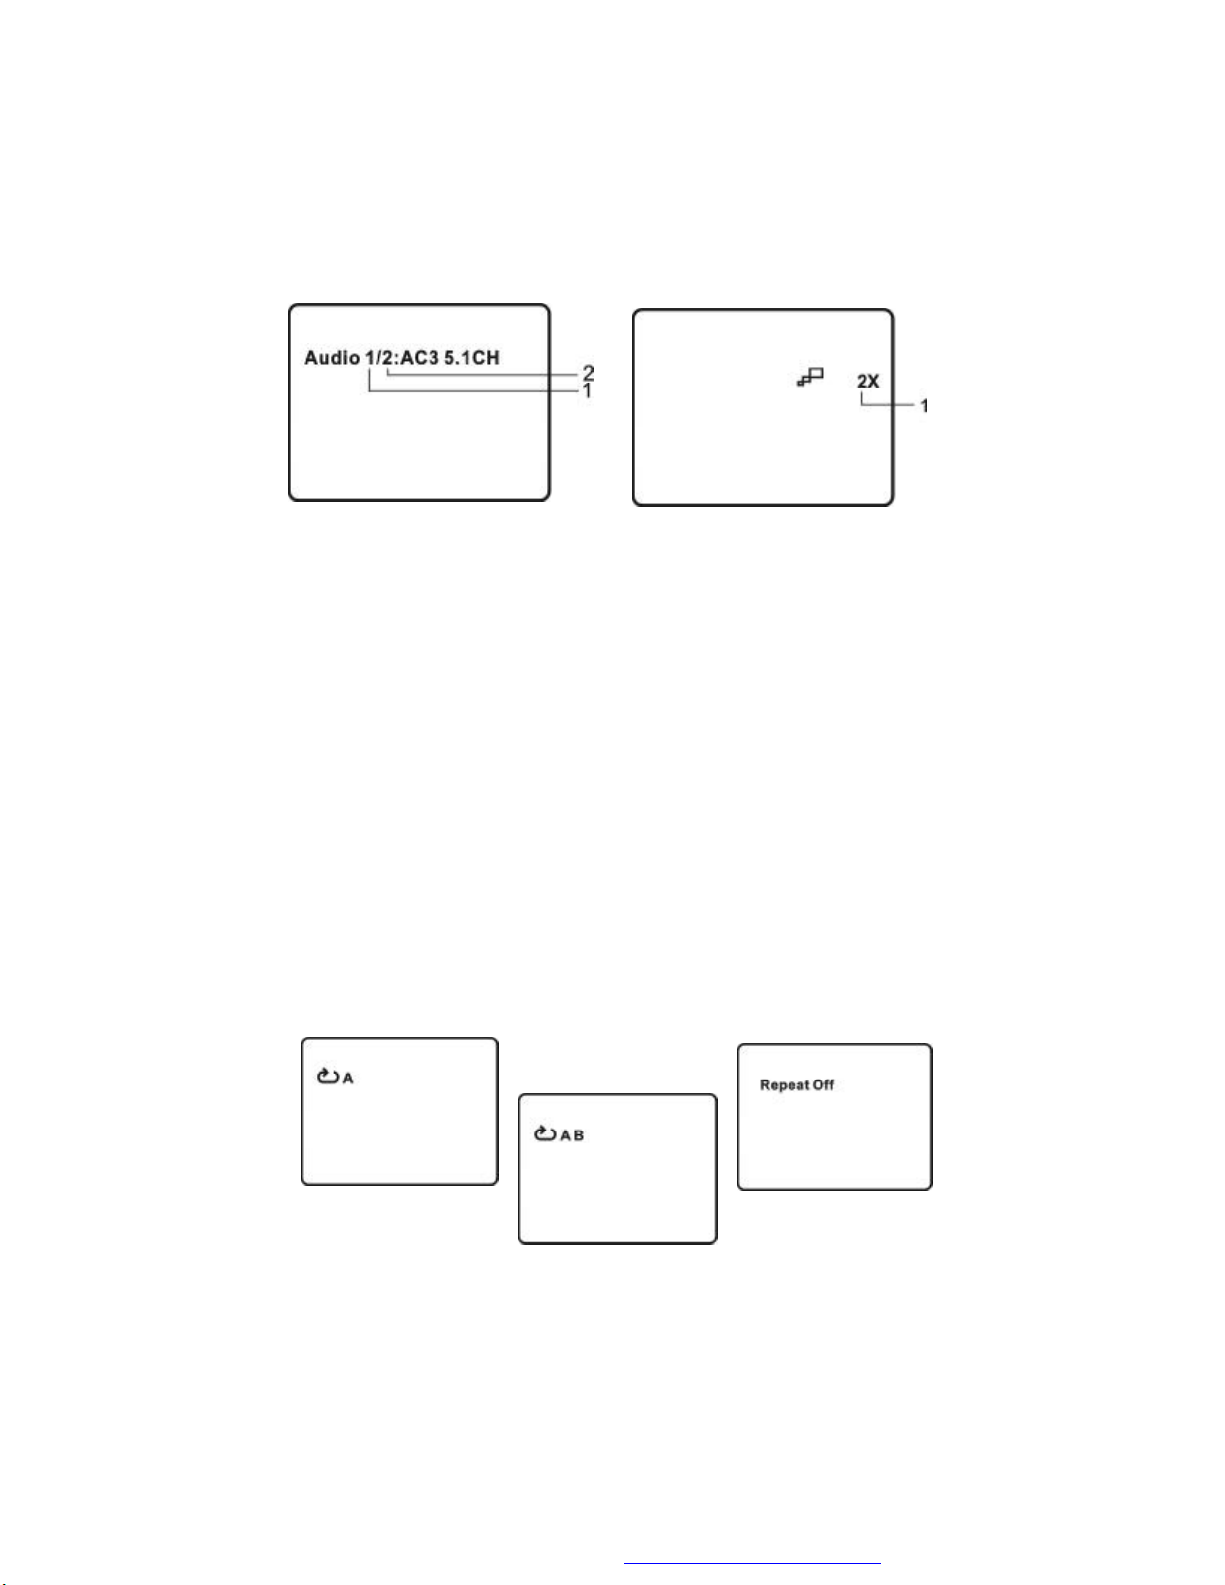
4. AUDIO
During playback press ‘AUDIO’ to select the audio language you
desire*, with the current Audio Channel Number (1) and the total number of Audio Channels (2) displayed. Press AUDIO again to select
another audio language. The audio display will disappear automati-
cally if the ‘AUDIO’ button is not pressed within for 3 seconds.
* Some DVDs only allow access to this function through the DVD
menu.
11
PDF created with FinePrint pdfFactory Pro trial version http://www.fineprint.com
Page 15
Audio Language
Zoom
5. ZOOM
During playback press ‘ZOOM’ to enlarge the picture by 2X, 3X or 4X
with the current zoom multiple.
(1)Press “zoom”one time ,the picture will be enlarged 2X.
(2)Press “zoom” a second time ,the picture will be enlarged 3X.
(3)Press “zoom” a 3rd time ,the picture will be enlarged 4X.
(4)Press “zoom” a 4th time ,the picture will return to normal size.
6. A-B REPEAT
a. During playback press a first time ‘A-B’ to set the Starting Point
A.
b. Press ‘A-B’ a second time to set the Ending Point B and the
player will repeatedly play the part between Point A and Point B.
c. Press A-B a third time to cancel A-B repeat and resume
normal playback.
A-B Repeat Starting Point
A-B Repeat Ending Point
12
A-B Repeat Cancelled
PDF created with FinePrint pdfFactory Pro trial version http://www.fineprint.com
Page 16
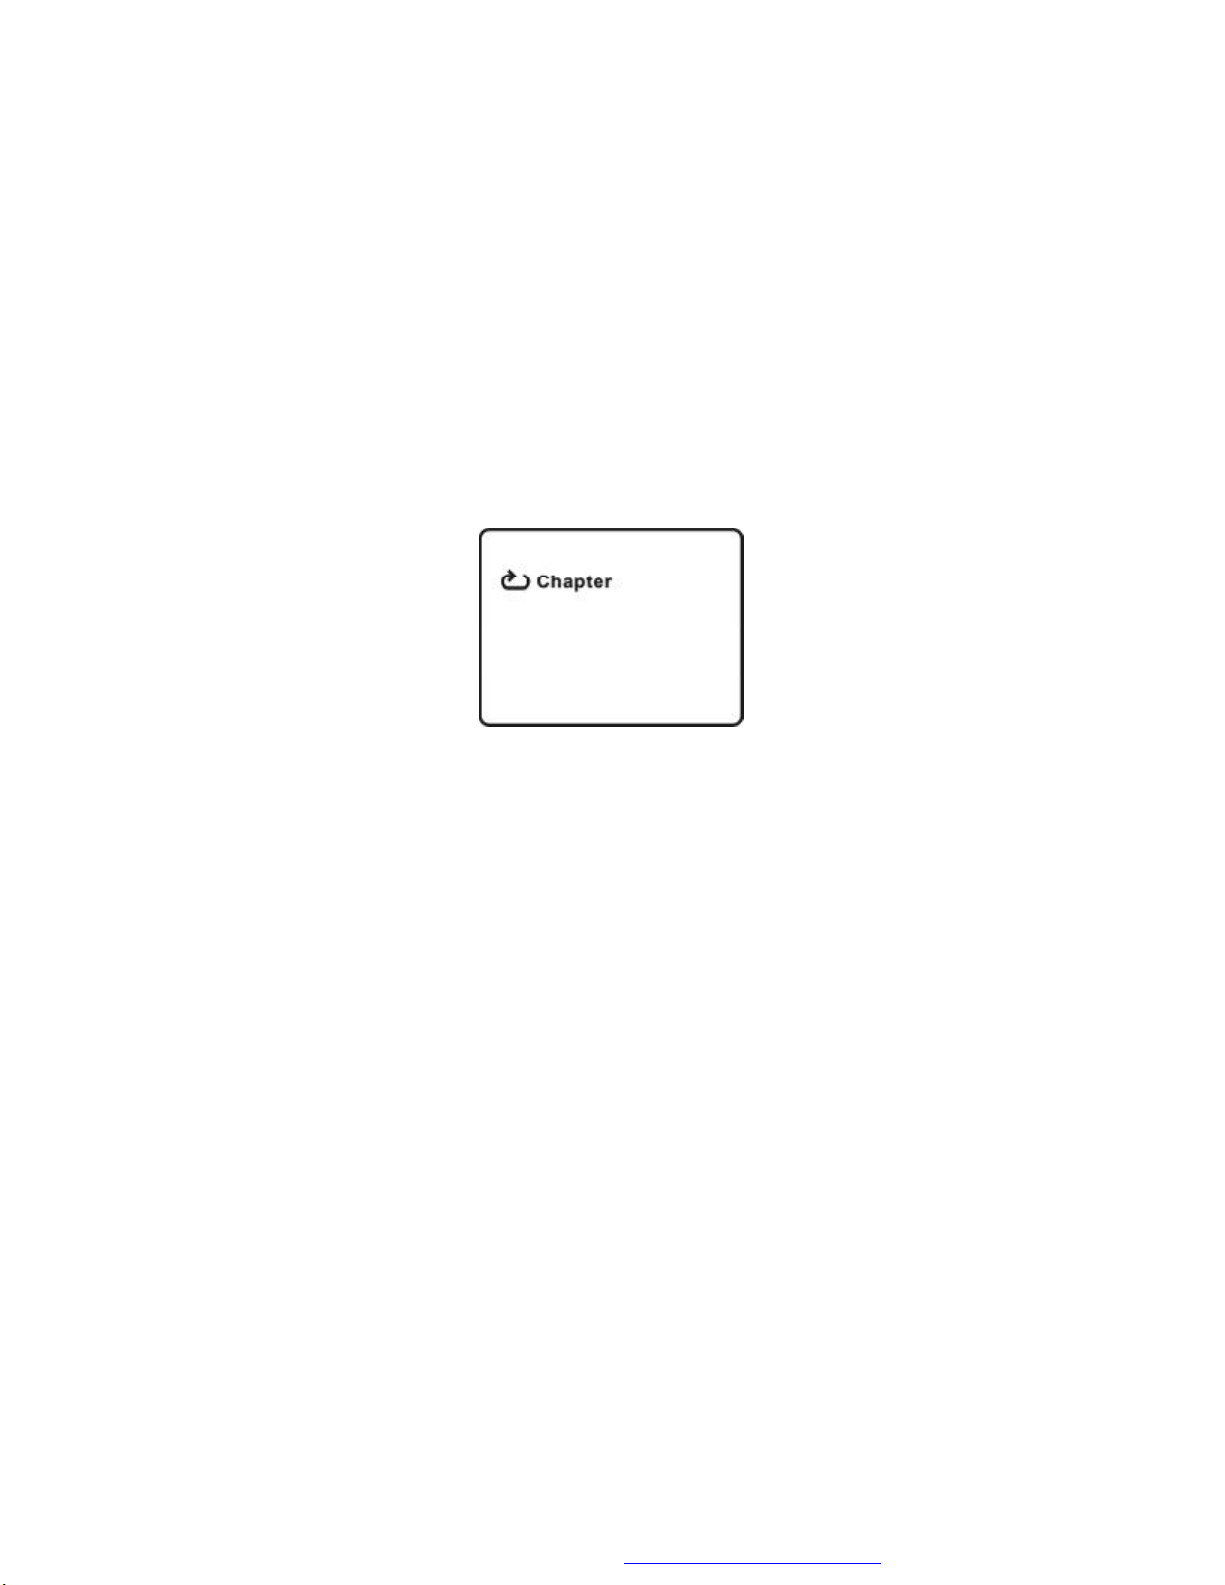
7. REPEAT
a. During playback press ‘REPEAT’ constantly to see the repeat mode.
Chapter: Repeat the current chapter
Title: Repeat the current title
All: Repeat all chapters and titles
Off: Resume normal playback
The ‘Chapter’ repeat display shows below for example:
Chapter Repeat Screen Display
J. Variable Playing Mode
1. Playing Audio CDS
When playing an audio CD press the DISPLAY button constantly on
the remote to view time information. The options below appear on
screen display circularly to show you what information is available
using this function.
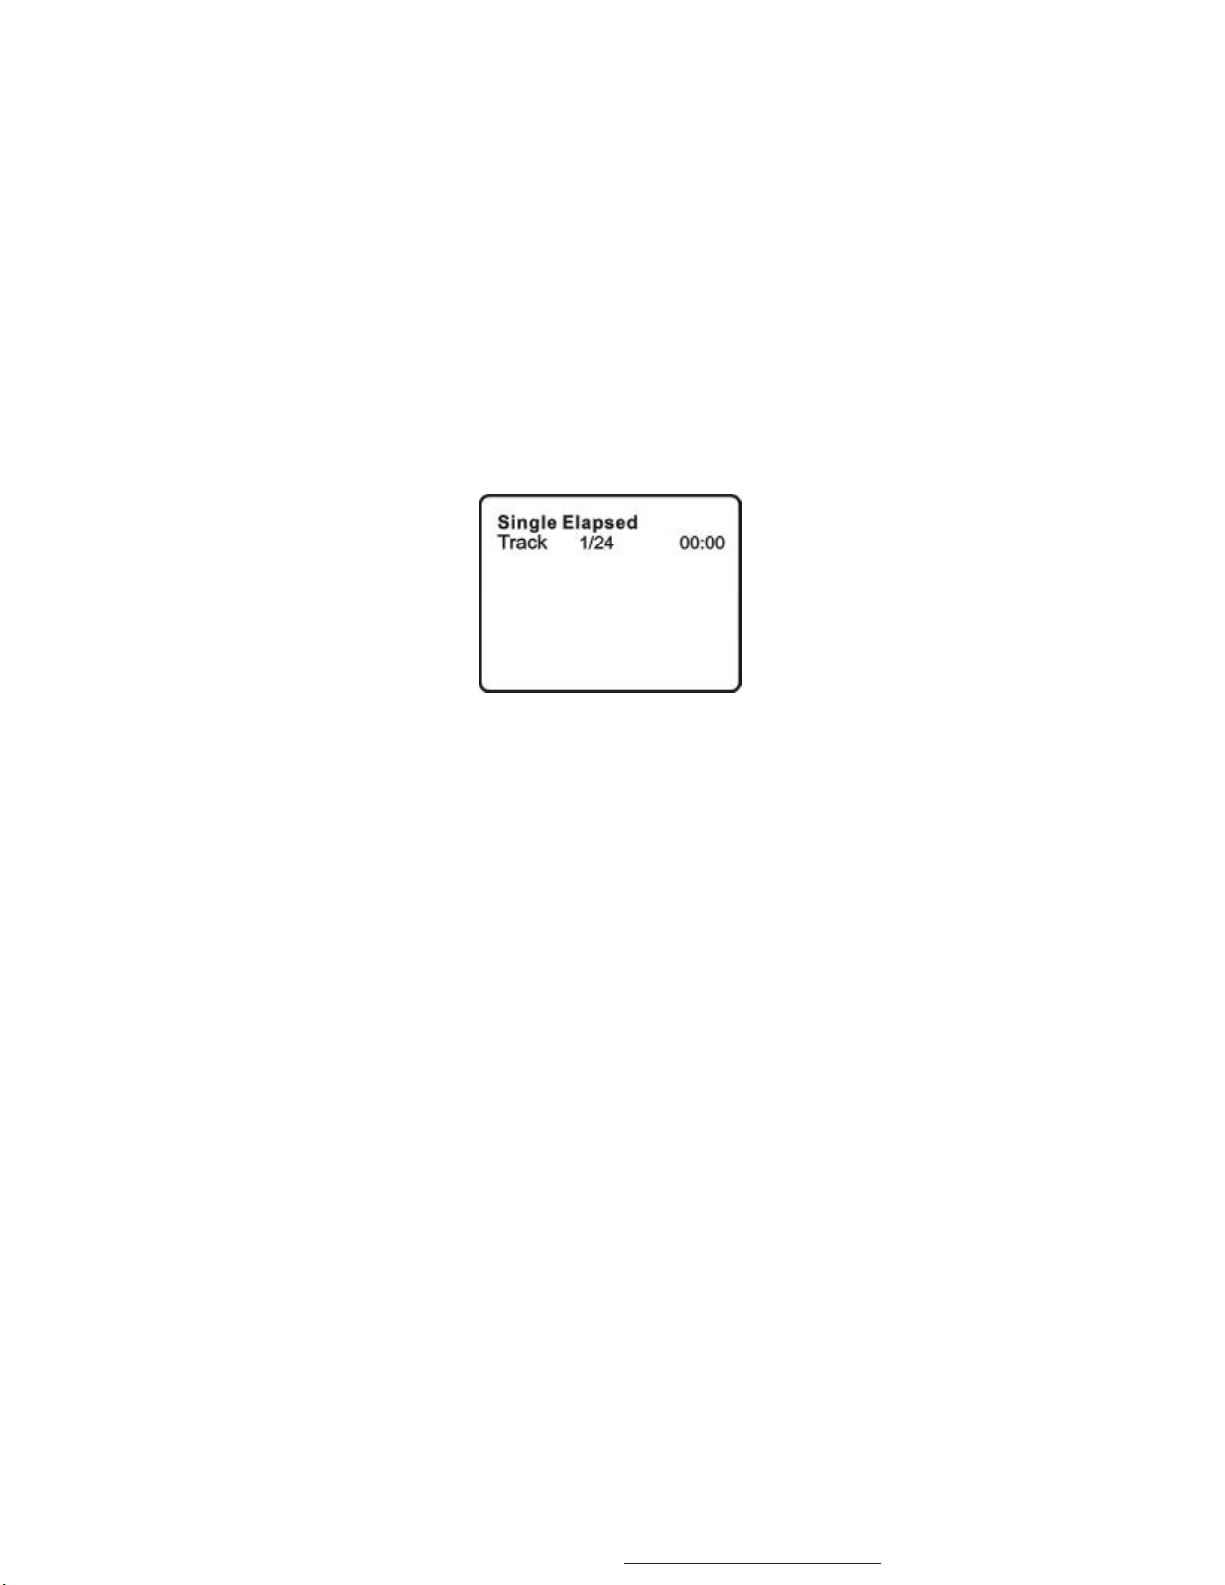
Single Elapsed: The current track playing and playing time of that
track will display on the screen.
Single Remain: The current track playing and the amount of time
left.
13
PDF created with FinePrint pdfFactory Pro trial version http://www.fineprint.com
Page 17
Total Elapsed: The current track playing and the total time that the
CD has been playing.
Total Remain: The current track playing and the amount of time
remaining on the CD.
Display Off: The CD time Information will not be displayed.
Take ‘Single Elapsed’ display as a example:
Single Elapsed Screen Display
USING THE REPEAT FEATURE
The default mode for the Repeat feature is OFF. Pressing REPEAT
consecutively changes the repeat options:
• Track- repeats the track that is playing.
• All- repeats the disc that is playing.
• Off
As you toggle through the options, the repeat option changes. The
selected repeat option loops repeatedly until you turn it off.
2. Playing MP3 Discs
MP3 is a format for storing digital audio. An audio CD-quality song is
compressed into the MP3 format with very little loss of audio quality
while taking up much less disc space. CD-R /RW discs that have
been encoded in MP3 format are compatible with this system.
When a MP3 disc is inserted into the unit, the menu screen appears
automatically. You can use the menu screen to select your desired
folders and songs or the system plays the songs in the order they were
burned onto the disc.
14
PDF created with FinePrint pdfFactory Pro trial version http://www.fineprint.com
Page 18
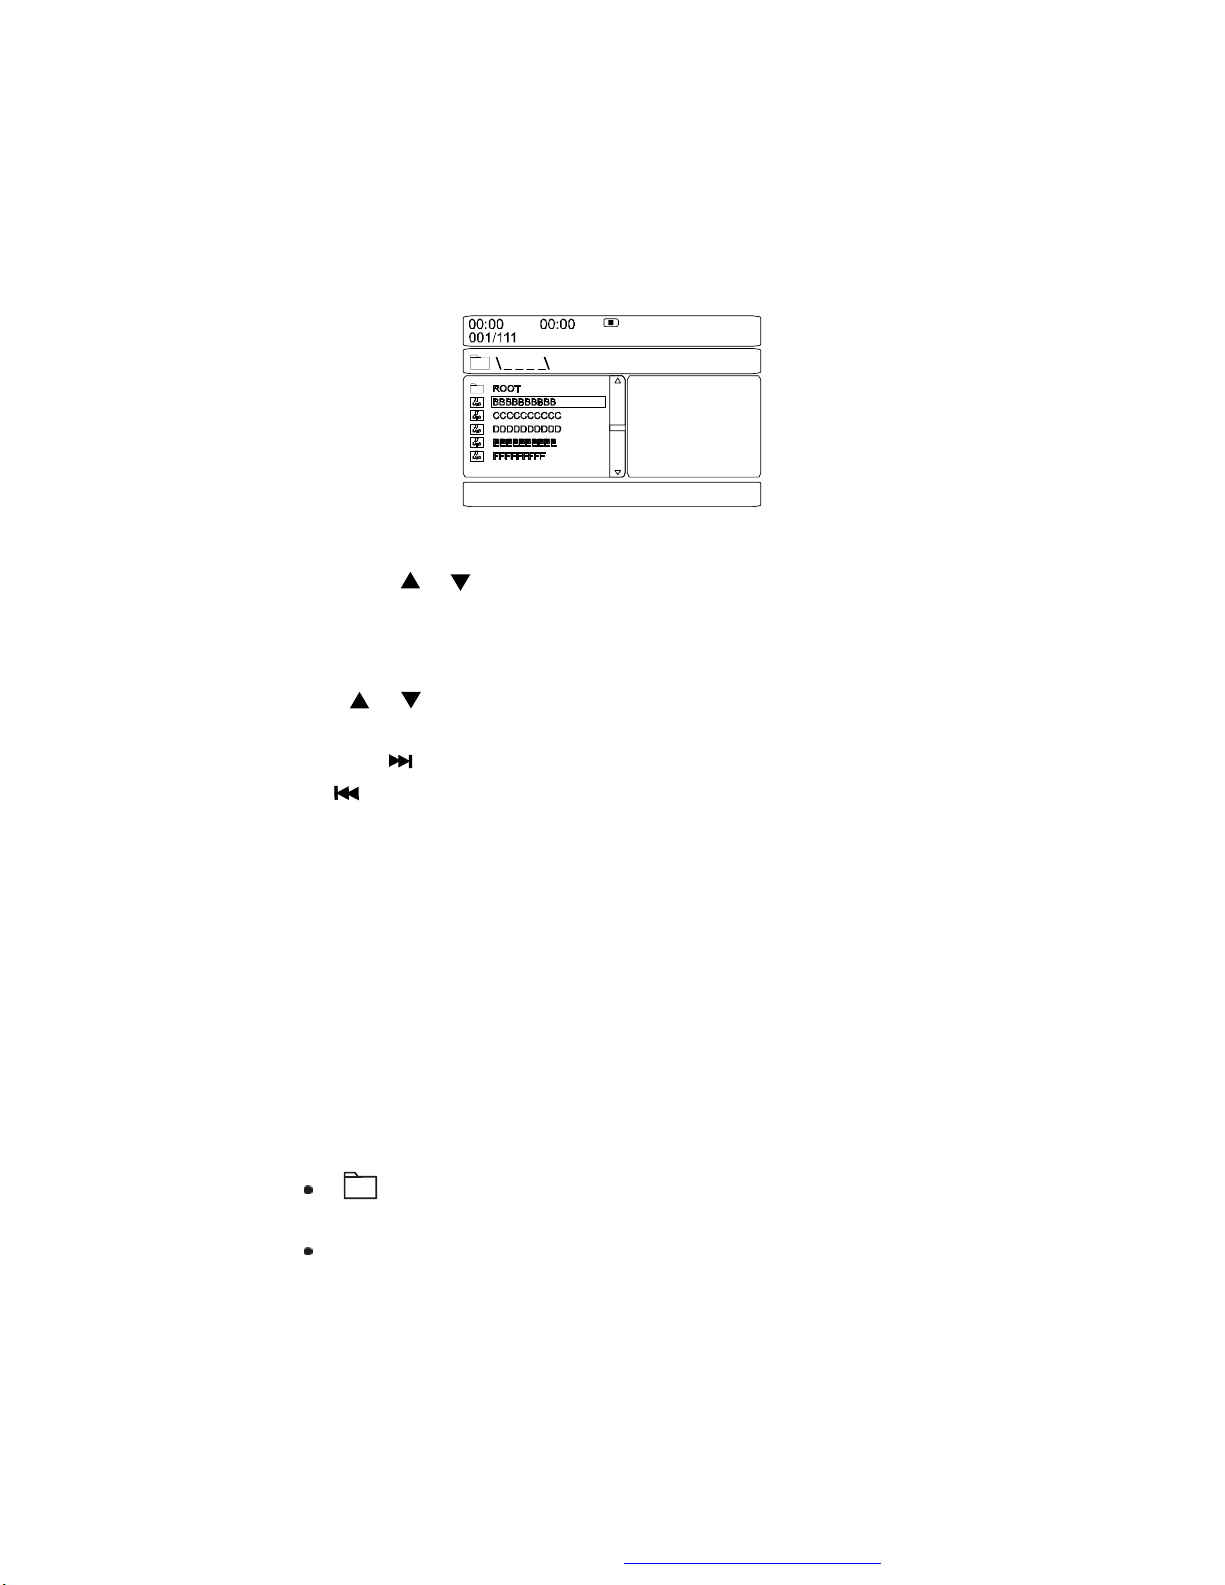
MP3 MENU Screen Display
1. Press the or button to choose a folder from the folder list on the
left side of the screen.
2. Press ENTER to select the highlighted folder. The songs available
under the folder will be listed.
3. Use or button to choose a song from the list. Press ENTER to
select and begin playback of the highlighted song.
4. Use the ( NEXT ) button to move to the next song. Press the
(PREVIOUS) button to move to the beginning of the previous
song.
USING THE REPEAT FEATURE
The default mode for the Repeat feature is OFF. Pressing REPEAT
consecutively changes the repeat options:
• Repeat One (repeat playback of a song)
• Repeat Folder (repeat playback of a specific folder)
• Repeat Off
As you toggle through the options, the repeat mode changes. The
selected repeat mode loops repeatedly until you turn it off.
NOTICE
“ ” icon in front of a file name indicates that this is a folder, not an
MP3 file.
“MP3” icon in front of a file name indicates that this is a MP3 file.
15
PDF created with FinePrint pdfFactory Pro trial version http://www.fineprint.com
Page 19

3. Playing JPG file
1) Load the JPG Disc into tray.
2) Select JPG file by pressing “UP/DOWN” or ENTER button through
menus or submenus. To go back previous menu page, use LEFT
button.
3) You can preview the JPG file which you selected by pressing “PLAY”
or “ENTER”.
4) Pressing the “LEFT“ Key will rotate the picture 90 degrees
counterclockwise. Pressing the “RIGHT“ Key will rotate the
picture clockwise.
5) When browsing the photos, you can reverse the photo vertically by
pressing “UP” key,or you can reverse the photos horizontally by
pressing “DOWN” key.
6) When you browse the JPG file, press “DISPLAY” , there will be
different refresh mode below:
WIPE TOP, WIPE BOTTOM, WIPE LEFT, WIPE RIGHT, DIAGONAL
WIPE LEFT TOP, DIAGONAL WIPE RIGHT TOP, DIAGONAL WIPE
LEFT BOTTOM, DIAGONAL WIPE RIGHT BOTTOM,EXTEND FROM
CENTER H, EXTEND FROM CENTER V, COMPRESS TO CENTER
H, COMPRESS TO CENTER V, WINDOW H, WINDOW V, WIPE
FROM EDGE TO CENTER, NONE
7) When previewing the file, pressing “ANGLE”, “SUBTITLE ”, “AUDIO”,
“AB” and other operations a hand icon will appear on the display
meaning that these options are not available.
8) Press “STOP” to browse the JPG file, “SLIDE SHOW” “MENU” will
display on the screen.
9) When browsing the picture, press “STOP” and thumbnail size
picture will be displayed. You can select the picture you desire by
using the UP/DOWN/LEFT/RIGHT/ENTER key.
Note:
Due to the company’s policy of constant improvement and technical
refinement, the company reserves the right to change or alter software.
16
PDF created with FinePrint pdfFactory Pro trial version http://www.fineprint.com
Page 20

4. Playing MPEG4 Discs
MPEG4 is a compressed video file format without reduced visual quality.
DVD, CD-R /RW discs that have been encoded in MPEG4 format are
compatible with this system.
Note: Only the files whose suffix is ‘avi’ can be displayed.
The operation of a MPEG4 Disc is the same as the MP3 discs. Using
UP, DOWN, LEFT, RIGHT to move the cursor and press ENTER to
confirm.
* Press MENU to return to the available menu.
17
PDF created with FinePrint pdfFactory Pro trial version http://www.fineprint.com
Page 21

K. Setup
1. General Setup Page
1) Press ‘SETUP’ to display the Main screen of the Setup Menu on the
screen and “General Setup Page” appears. At the same time, “ ” is
highlighted. Press ‘SETUP’ again to exit the Setup Menu and the unit will
resume it’s last playback mode.
2)Press the ENTER button, “SPDIF Output” is highlighted.
3) Press the or button to select the other menus in general setup
page.
4) Press
to enter the sub menu.
5) Press the or button to select the sub menu and press the
ENTER to confirm your selection.
6) Repeat steps 3-5 for other menus.
Note: Press
to return the previous menu.
a) SPDIF Output
* SPDIF Off: The digital signal audio output will be off.
* SPDIF/RAW: The audio output will be not modulated.
* SPDIF/PCM: The audio output will be modulated in Pulse Code
Modulation mode.
b) TV Display
* Normal/PS: When the player outputs signal to a normal TV, a nor-
mal picture is shown on the full screen.
* Normal/LB: When the player outputs signal to a normal TV, a nor-
mal picture is shown on the screen with a black strip at both the top
and bottom of the screen.
* Wide: When the player outputs signal to a wide screen TV, a
wide picture is shown on the full screen.
c).Angle Mark
* On: The screen will show the angle mark icon. (*If an angle option is
available).
* Off: The screen will not display the Angle Mark
NOTE: Not all discs contain above features. The above features are
disc dependent.
18
PDF created with FinePrint pdfFactory Pro trial version http://www.fineprint.com
Page 22

d). OSD Language
Choose the different language as you disire.
e). Screen Saver
*On: Enables screen saver
*NOTE: The DVD player will enter the Screen Saver mode after approximately five minutes if the same image remains on the screen.
*Off: Disables screen saver (off)
f). Last Memory
*On: The unit will return to the last position on the disc.
*Off: The unit will not return to the last position on the disc.
2.Video Quality Setup
1)In Setup menu, Press the or button to select “Video Quality Setup”
and is highlighted. Press ENTER to enter the video quality setup
page.
2)Press the ENTER button, “Brightness” is highlighted.
3)Press the or button to select the other menus in the video
quality setup page.
4) Press
to enter the sub menu.
5) Press the or button to adjust the quantity and press the ENTER
to confirm your selection.
6) Repeat steps 3-5 for other menus.
Note: Press ENTER to return the previous menu.
a) Brightness b) Contrast
c) Hue d) Saturation
3. Password
With no disk inside the player, press SETUP to enter the Setup menu.
Press the or button to select “Password Setup Page” and
highlighted. Press ENTER to enter the password page.
Press ENTER twice to enter the Password Change Page. Input the
19
PDF created with FinePrint pdfFactory Pro trial version http://www.fineprint.com
is
Page 23

Old Password or the Default Password, the New Password, and the
Confirmed New Password. Press ENTER to confirm the change.
Note: In case you forget newly-input password, you can use 3308
as a password.
4. Preference Page
1) With no disk inside press “SETUP” to enter Setup menu, use the or
button to select “Preference Page”and
ENTER to enter the preference page.
2)Press the ENTER button, “Audio” is highlighted.
3)Press the or button to select the other menus in the preference
page.
4) Press
to enter the sub menu.
5) Press the or button to select the sub menu and press the
ENTER to confirm your selection.
6) Repeat steps 3-5 for other menus.
Note: Press
to return the previous menu.
a) Audio
b) Subtitle
c) Disc Menu
Note: Language and subtitle selection is only available for discs that
are recorded in the above listed languages. If the selected language
is not available, the player will play and display on the screen the
original recorded language contained in the disc.
is highlighted. Press
d) Parental
Select ‘Parental’ by pressing the or button in the preference page.
And Press
to enter the sub menu.
Select the parental level you desire using or button for discs with
lock-out function or multiple rating levels. These are listed from the lowest level (1 Kid Safe) to the highest level (8 Adult). Press ENTER and
input 4 digit password, then press ENTER again to confirm the parental
level setting.
20
PDF created with FinePrint pdfFactory Pro trial version http://www.fineprint.com
Page 24

1 KID SAFE (Kid safe)
2 G (General audiences)
3 PG (Parental guidance suggested)
4 PG 13 (Parents strongly cautioned)
5 PGR (Parents very strongly cautioned)
6 R (Restricted)
7 NC-17 (No one 17 and under admitted)
8 ADULT (Adult)
NOTE: The level of 8 Adult is the factory default.
e) Default
Select ‘Default’ by pressing the or button in preference page. And
Press
to enter the sub menu. Press ENTER to make the setting
return to the factory-set mode.
NOTE: The parental setting is not affected by the default reset
function. The master password is 3308. This password is always
effective even after you have selected your own password and
changed it. To avoid the possibility of others using the default password to set the parental level and change the password, you can
record this master password in another area and delete it from this
manual. Some discs can be limited depending on the age of users
while some discs cannot.
21
PDF created with FinePrint pdfFactory Pro trial version http://www.fineprint.com
Page 25
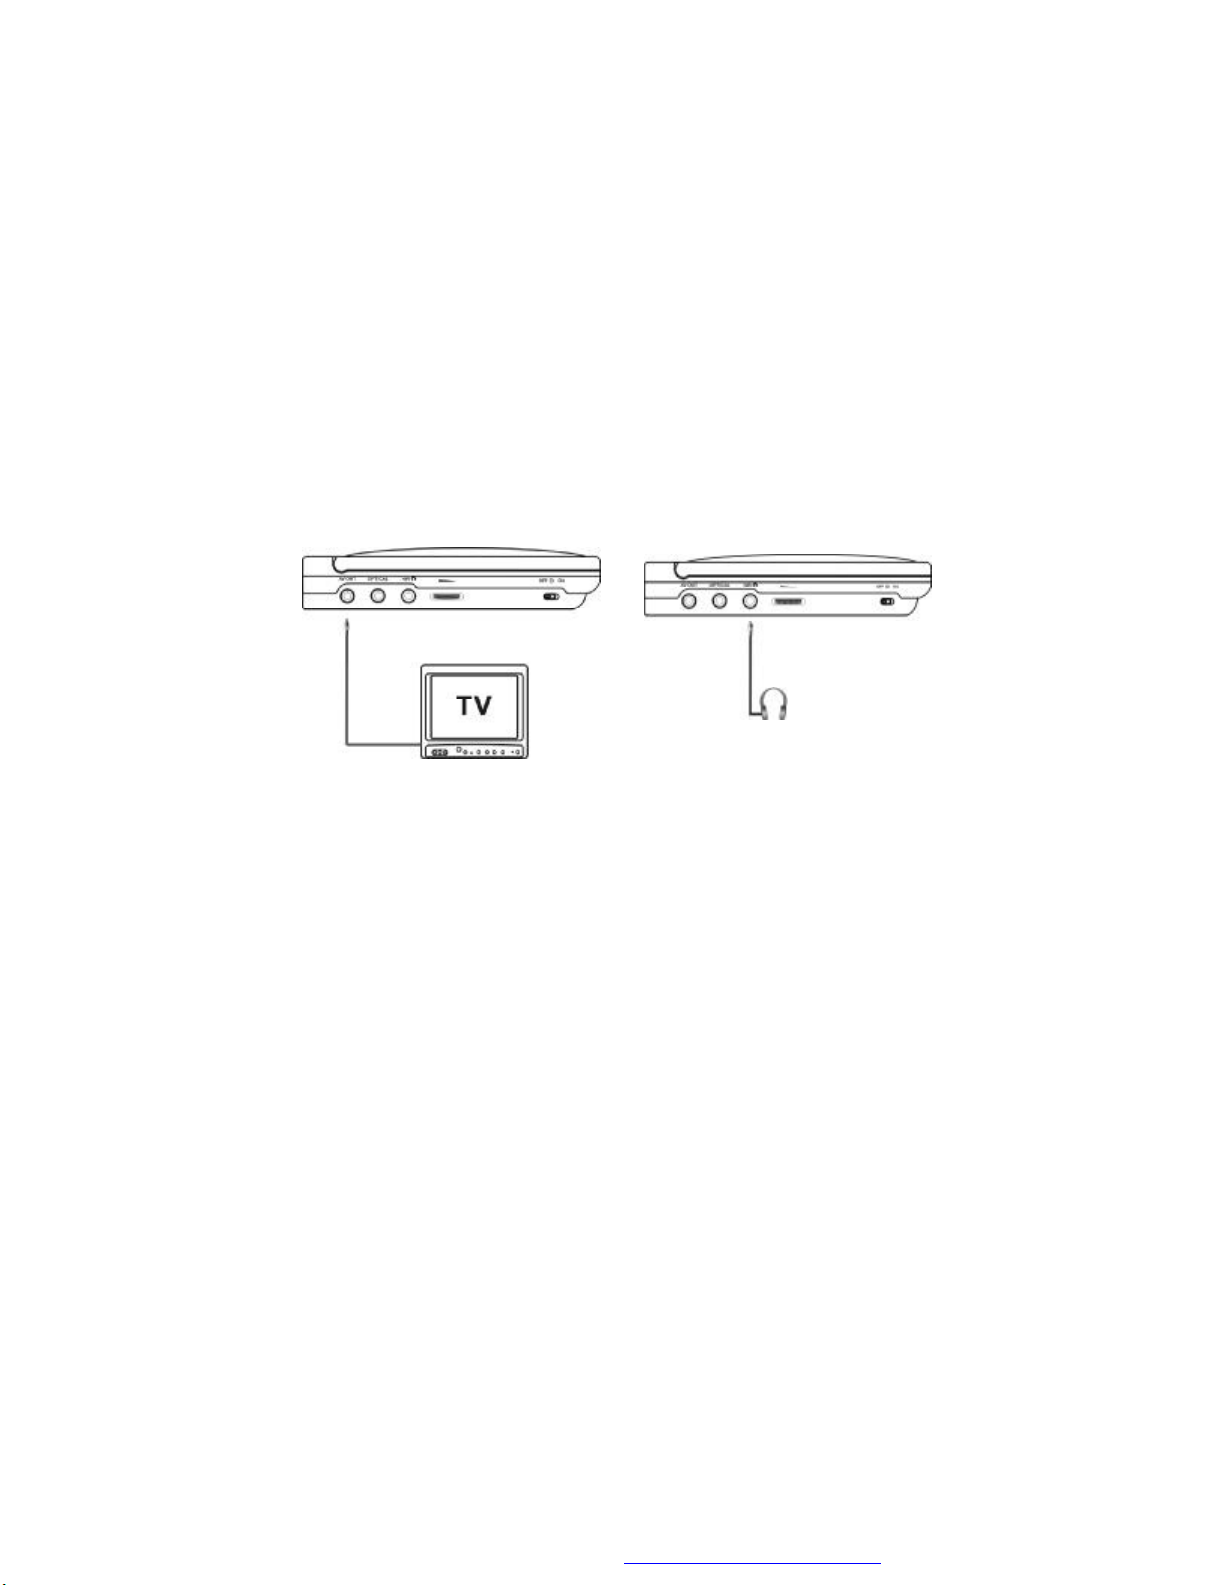
L. Connecting to Other Equipment
Connecting to a TV or another monitor ( Refer to Figure 8)
You can also connect the DVD player to a TV to enjoy high quality
stereo sound and picture on another monitor.
Connect one end of the audio/video cable (optional) into the unit’s DVD
A/V OUT jack, and connect the other end to the AUDIO/VIDEO INPUT
jacks on your TV or Monitor.
Figure 8
* Optional wired headphones may be used with the unit. Simply plug in
the headset to headphone jack.
22
PDF created with FinePrint pdfFactory Pro trial version http://www.fineprint.com
Page 26

M. Specifications
DVD Player
Compatible DISC: DVD/CD/MP3/MPEG 4
Signal system: PAL
Frequency response: 20 Hz to 20 kHz
Video output: 1 Vp-p/75 Ohm, unbalanced
Audio output: 1.4Vrms/10kOhm
Audio S/N: Better than 60 dB
Dynamic range : Better than 85 dB
Laser: Semiconductor Laser, Wave Length: 650 nm/795 nm
Power source: DC 9-12 V
Power consumption: < 12W
Operating temperature: 5~35°C
Weight : 0.43 kg
Dimensions (W x D x H): 6.54 X 5.59 X 1.04 inches
166 x 142 x 26.5 mm
Single Monitor
Colour System:
Screen Size:
Power Supply:
Power Consumption:
Operating Temperature:
Operating Humidity:
Dimensions (W x D x H):
Weight:
PAL
9 Inches
DC 10-12V
< 12W
41~95ºF(5~35ºC)
10-75%
275x 226.5 x 37.5 mm
0.69Kg
23
PDF created with FinePrint pdfFactory Pro trial version http://www.fineprint.com
Page 27
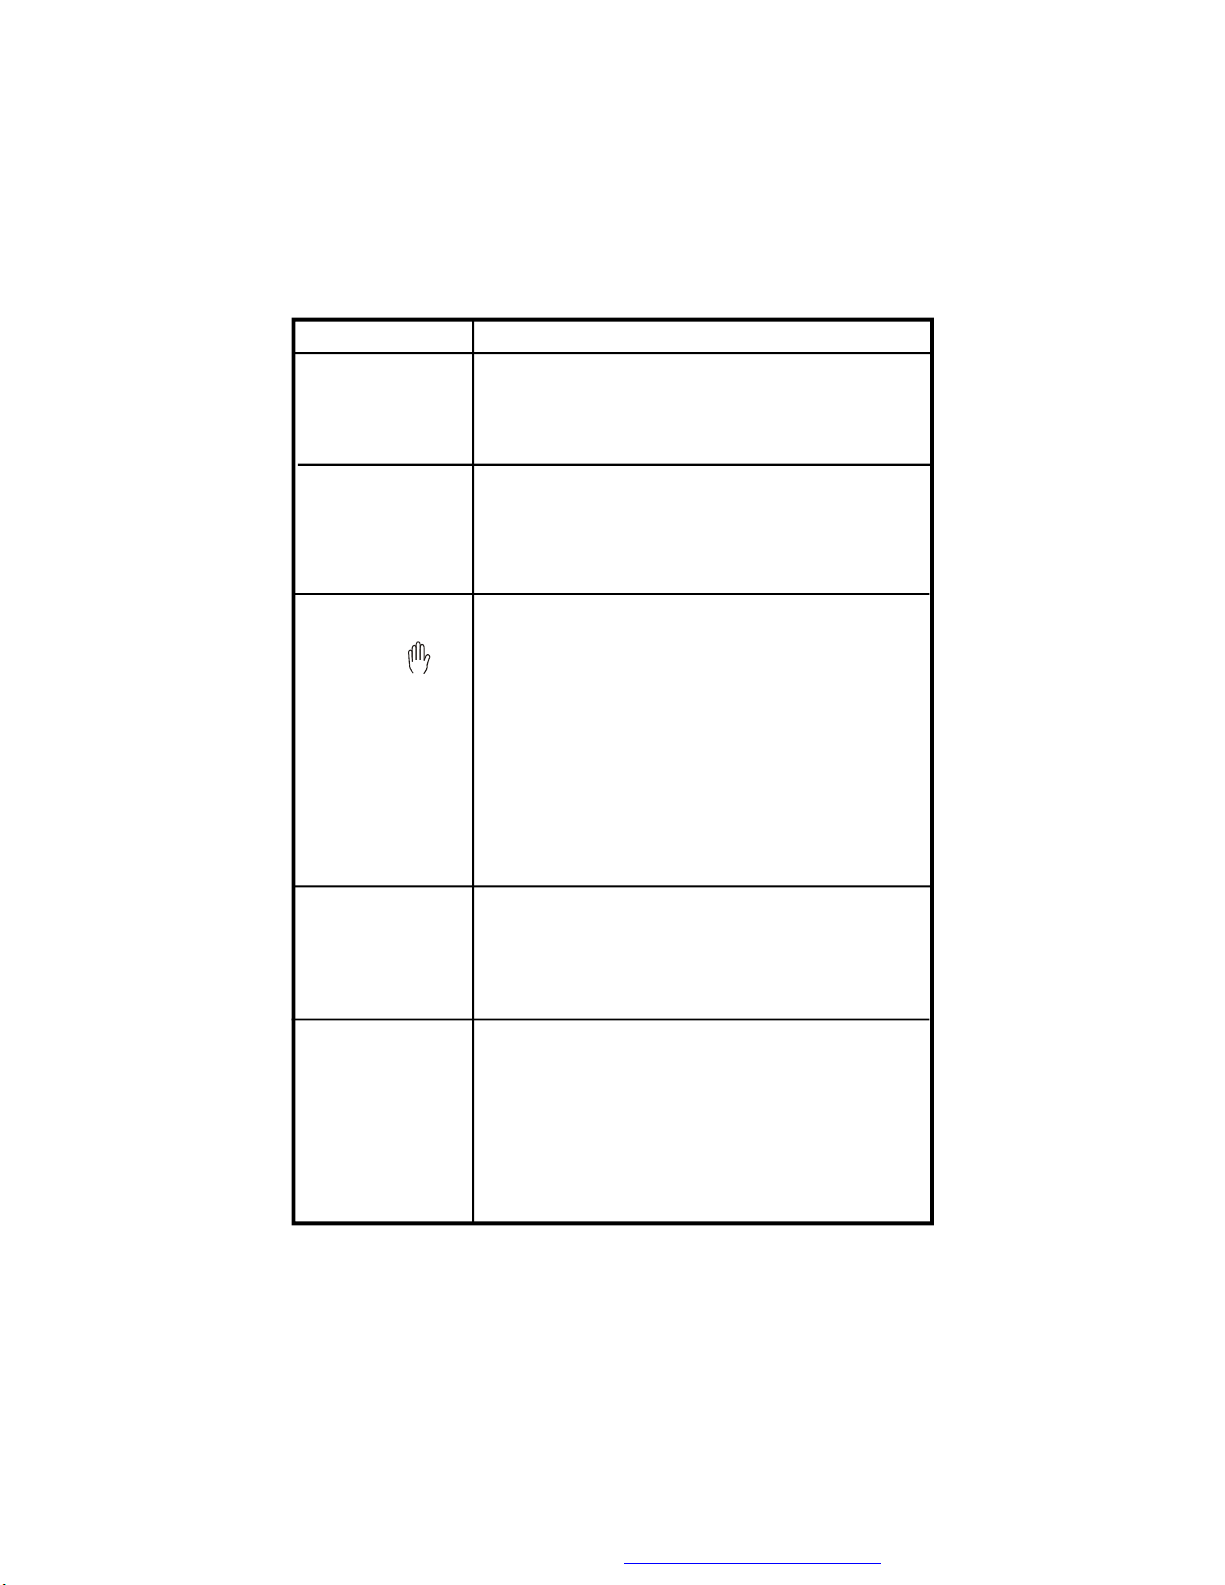
N. Troubleshooting
PROBLEM
No sound or
distorted sound
Can’t advance
through a movie
The icon ( )
appears on
screen
Picture is
distorted
SOLUTION
• Make sure your DVD is connected properly.
Make sure all cables are securely inserted
into the appropriate jacks.
• You can’t advance through the opening
credits and warning information that appears
at the beginning of movies because the disc
is programmed to prohibit that action.
The feature or action cannot be
completed at this time because:
1. The disc’s software restricts it.
2. The disc’s software doesn’t support the
feature (e.g., angles)
3. The feature is not available at the
moment.
4. You’ve requested a title or chapter
number that is out of range.
• The disc might be damaged. Try another
disc.
• It is normal for some distortion to appear
during forward or reverse scan.
No forward or
reverse scan
• Some discs have sections that prohibit rapid
scanning or title and chapter skip.
• If you try to skip through the warning information and credits at the beginning of a
movie, you won’t be able to. This part of the
movie is often programmed to prohibit
skipping through it.
24
PDF created with FinePrint pdfFactory Pro trial version http://www.fineprint.com
Page 28
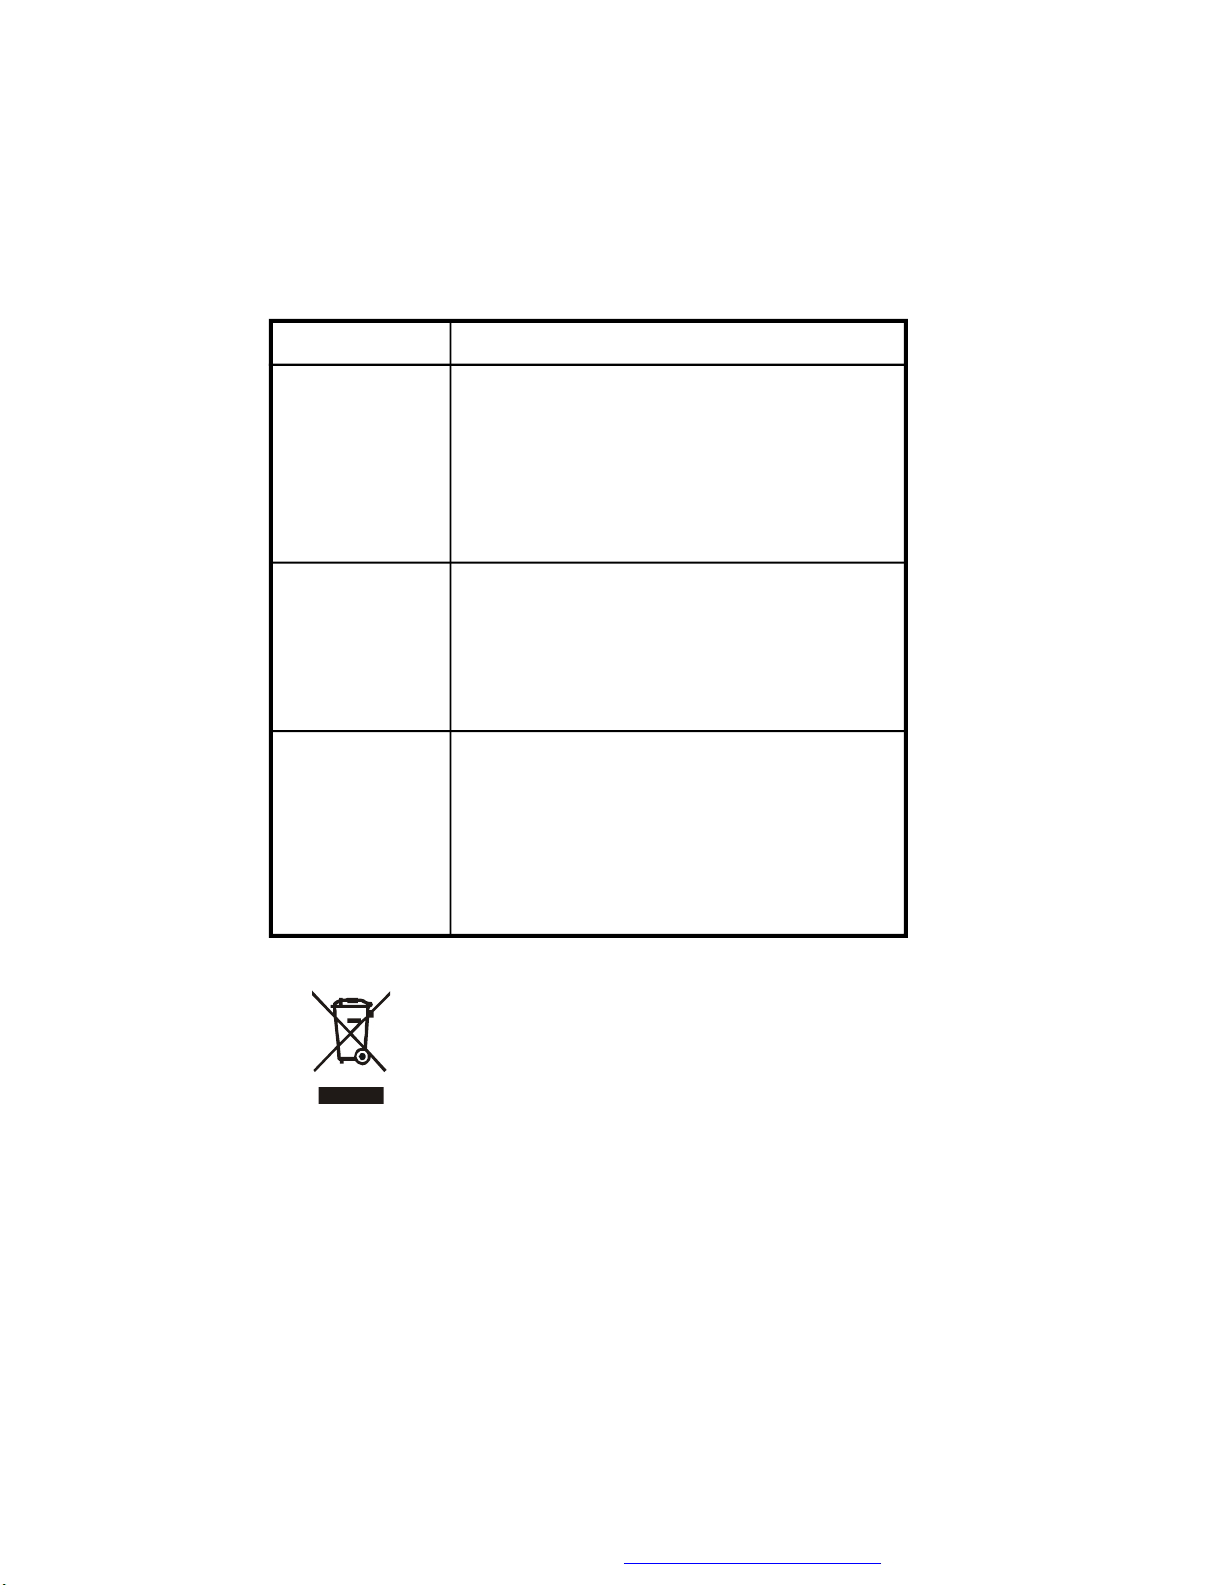
Troubleshooting (Cont)
PROBLEM
IR sensor
inoperative
Disc won’t play
Play starts, but
then stops
immediately
SOLUTION
• Verify that the batteries in the remote are
fresh.
• Verify that the remote sensor eye is not
obstructed.
• Verify that the infrared transmitter is
affixed over the sensor eye of the component to be controlled.
• Insert a disc with the label side facing
up.
• Check the type of disc you put into disc
tray. This DVD only plays digital video
discs, audio CDs and MP3s.
• Both the unit and the disc are coded by
region. If the regional codes don’t
match, the disc can’t be played. This
DVD is Region Number 2.
• The disc is dirty. Clean it.
• Condensation has formed. Allow
player to dry out.
This symbol on the product or in the instructions means that your electrical and electronic equipment should be disposed at the end of its life
separately from your household waste.There are separate collection
systems for recycling in the EU.
For more information, please contact the local authority or your retailer
where you purchased the product.
25
PDF created with FinePrint pdfFactory Pro trial version http://www.fineprint.com
 Loading...