

Page 1
19” LED TV with Digital MPEG4
DVB-T Tuner
LED19HT-B
LED19HT-W
Page 2

Page 3

Contents
Contents
Caution
Safety Information
Accessories
Product Introduction
Front View
Rear View
Connections
Remote Control
Basic Operation
OSD Menu
1. Video menu
2. Audio menu
3. TV menu
4. Setup menu
5. Time menu
6. Others menu
7. PC menu
1
2
3
4
4
4
5
6-7
8
9-17
9
10
11-13
14
15
16
17
USB Operation
Maintenance and Service
SimpleTroubleshooting
Specifications
18
91PVR Operation
20-21
20
21
Page 4

Caution
Caution
The lightening flash with arrowhead symbol, within an equilateral triangle
is intended to alert the user to the presence of un-insulated “dangerous
voltage” within the products enclosure that may be of sufficient magnitude
to constitute a risk of electric shock to the persons.
The exclamation point within an equilateral triangle is intend to alert the
user to the presence of important operating and maintenance (servicing)
instructions in the literature accompanying the appliance.
Correct disposal of this Product
(Waste Electrical & Electronic Equipment (WEEE)
Your product is designed and manufactured with high quality materials and
components which can be recycled and reused.
This symbol means that electrical and electronic equipment, at their endof-life should be disposed of separately from your household waste.
Please dispose of this equipment at your local community waste collection/
recycling centre.
In the USA there are separate collection systems for used electrical and
electronic products. Please help us to conserve the environment we live in!
directives.
1
Page 5

Safety Information
Safety Information
To ensure reliable and safe operation of this equipment, please read carefully all the
instructions in this user guide, especially the safety information below
Electrical safety
• The TV set should only be connected to a mains supply which matches that stated on
the label on the mains adaptor.
• To prevent overload, don't share the same mains supply socket with too many other
items of equipment.
- Do not place any connecting wires where they may be stepped on or tripped over.
- Do not place heavy items on the leads, which may damage them.
- Hold the Mains plug, not the wires, when removing from a socket.
- During a thunderstorm or while leaving the TV for long periods, disconnect the aerial
(if outdoor) and mains adaptor from the supply.
- Do not allow water or moisture to enter the TV or mains adaptor. Do NOT use in wet
or moist areas such as Bathrooms, steamy kitchens or near swimming pools.
• Pull the plug out immediately, and seek professional help if:
- the mains plug or cable is damaged.
- liquid is spilt onto the set, or if it is accidentally exposed to water or moisture.
- anything accidentally penetrates the ventilation slots.
- the set does not work normally.
- Do NOT remove the safety covers. There are no user serviceable parts inside.
You may invalidate the warranty. Qualified personnel only are permitted to service
this apparatus.
- To avoid battery leakage, remove exhausted batteries from the remote control
handset, or when not using for along period.
- Do NOT break open or throw exhausted batteries on a fire.
.
Physical safety
• Do NOT block ventilation slots in the back cover. You may place the TV in a cabinet,
but ensure at least 5cm (2") clearance all around the unit.
• Do NOT tap or shake the TV screen, you may damage the internal circuitry. Take good
care of the remote control, do not drop it or allow it to come into contact with liquids.
• To clean the TV use a soft dry cloth. Do NOT use solvents or petrol based fluids. For
stubborn stains, you may use a damp soft cloth with diluted detergent.
2
Page 6
Accessories
Accessories
POWER MUTE
REC
PICTURE SOUND FREEZE AUTO
SLEEP NICAM SUBPAGE SIZE
EPG LANGUAGE SUBTITLE TV/RADIO
TV/AV
OK
MENU
1234
5678
90
VOL CH
FAV FAV+ FAV- ASPECT
TV/TXT INDEX R.VEAL HOLD
INFO
EXIT
- / - -
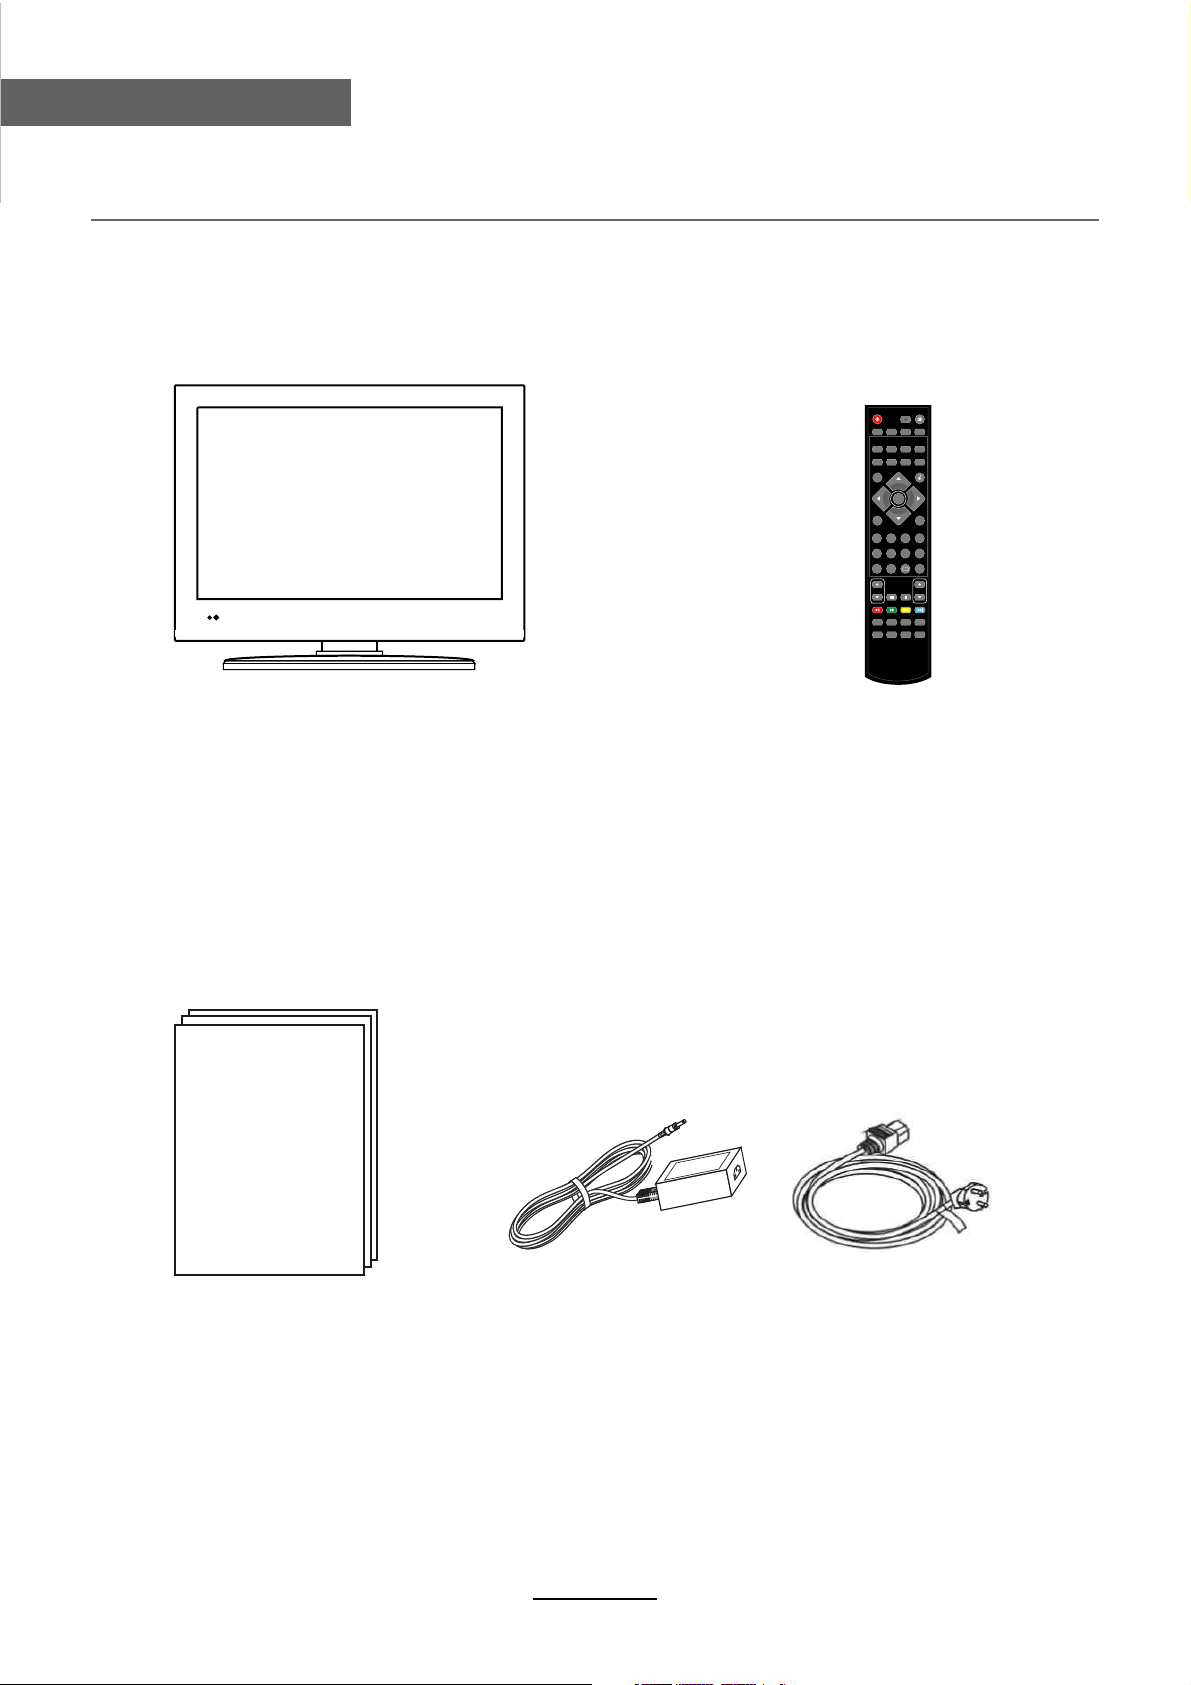
TV Set
Remote control
B-15X-02
User’s Manual
Mains adaptor Mains cable
* Note: The configuration of the components may look different from the following illustration
3
Page 7
Product Introduction
Front View
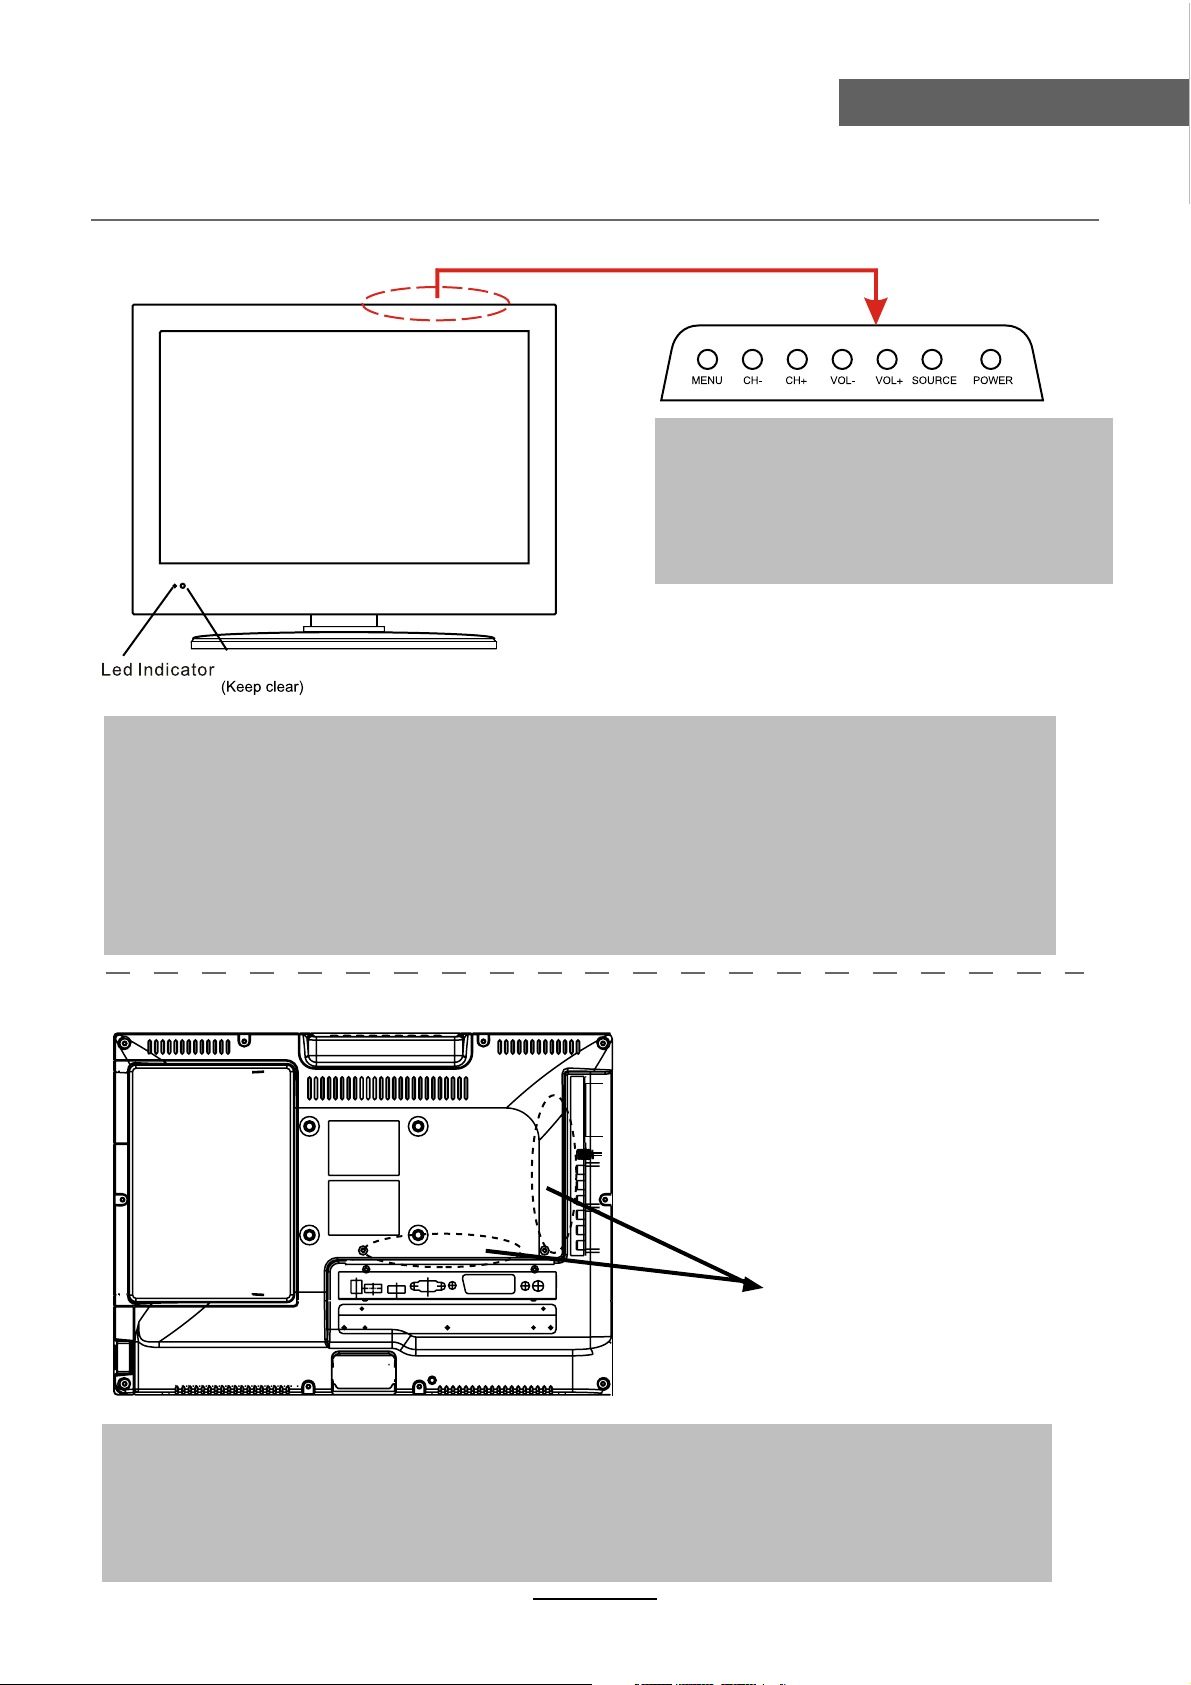
Remote Control window
Product Introduction
MENU: Display/exit the OSD menu.
CH+/-: Scan through channels.
VOL+/-: Adjust the volume.
SOURCE: Display the input source menu.
POWER: Turn on/standby the TV set.
(IR) Infrared Receiver: Receives IR signals from the remote control.
(Power on/Standby) LED indicator: Press POWER to turn on and off.
Indicator on(Red) Standby mode
Indicator on(Green) Power on mode
The effective receiving range for the signal is 5-8 metres from the front of the remote
0
control window, and 30
to the left or right side and 200 above or below the control
window.
Rear View
Connections
See next page
Wall Mounting
The TV is provided with mounting holes for a VESA approved wallmounting bracket (NOT SUPPLIED).
Remove the Posi screws holding the base to the base bracket and lift the base away (do not remove the
basemounting bracket).Mount the VESA bracket using 4xM4x10mm ISO metric threaded screws (not
supplied). Do not use screws longer than 10mm, it will occur damage to the internal parts. Fit the wall
bracket securely following themanufacturers instructions.
4
Page 8
Connections
Connections
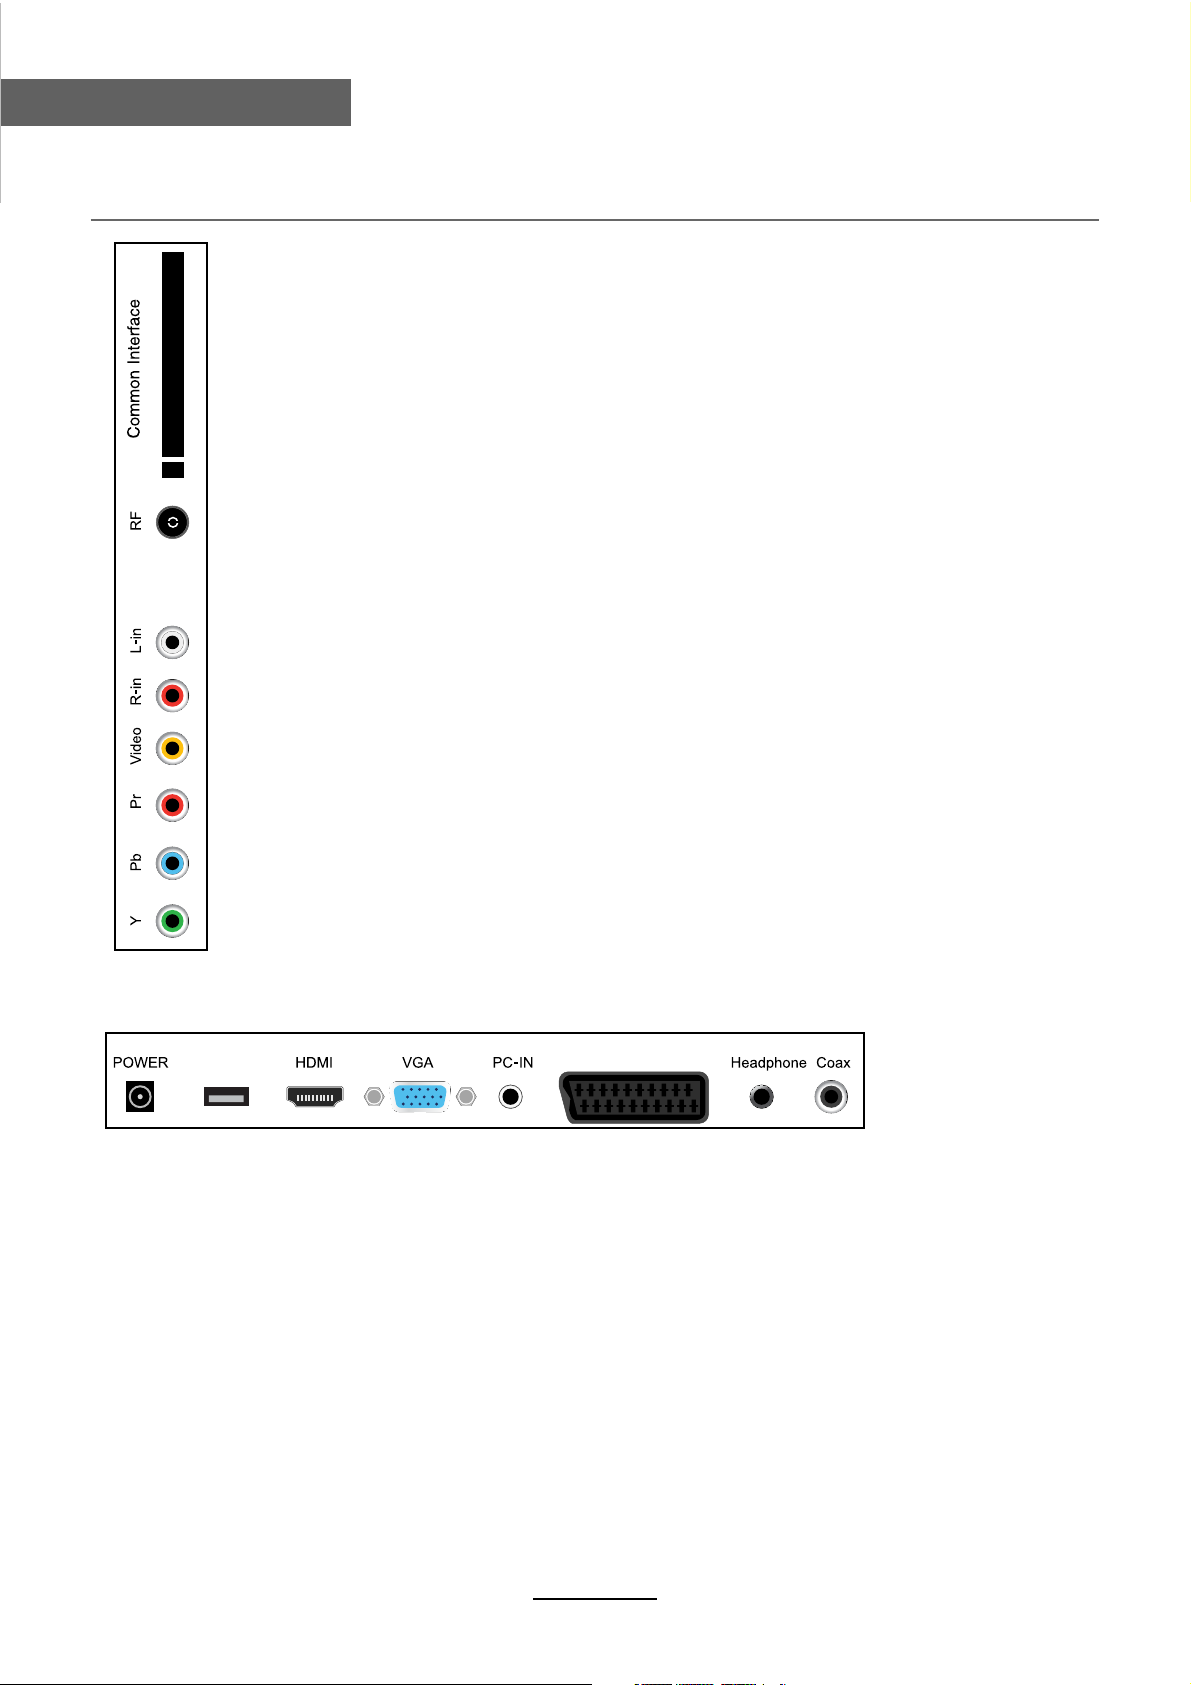
Common Interface: CI slot.
RF: Connect antenna or cable 75 Ohm coaxial to receive TV signal.
R/L in: Connect them to the audio output terminal of DVD.(shared with YPbPr)
VIDEO: Connect it to video output terminal of DVD.
YPbPr: Connect them to the YPbPr video output terminal of DVD.(used in
component source)
USB SCART
POWER: Connect to the mains adaptor.
USB: UDB for upgrade, media and PVR.
HDMI: Connect it to the HDMI of DVD or other equipment.
VGA: For PC display.Connect it to the D-Sub 15 pins analog output connector of the PC.
PC-IN: Connect it to the audio output terminal of PC.
SCART: Connect them to the SCART video output terminal of DVD.
Headphone: Connect it to your headphone or other audio equipment.
Coax: Digital coaxial output.
5
Page 9
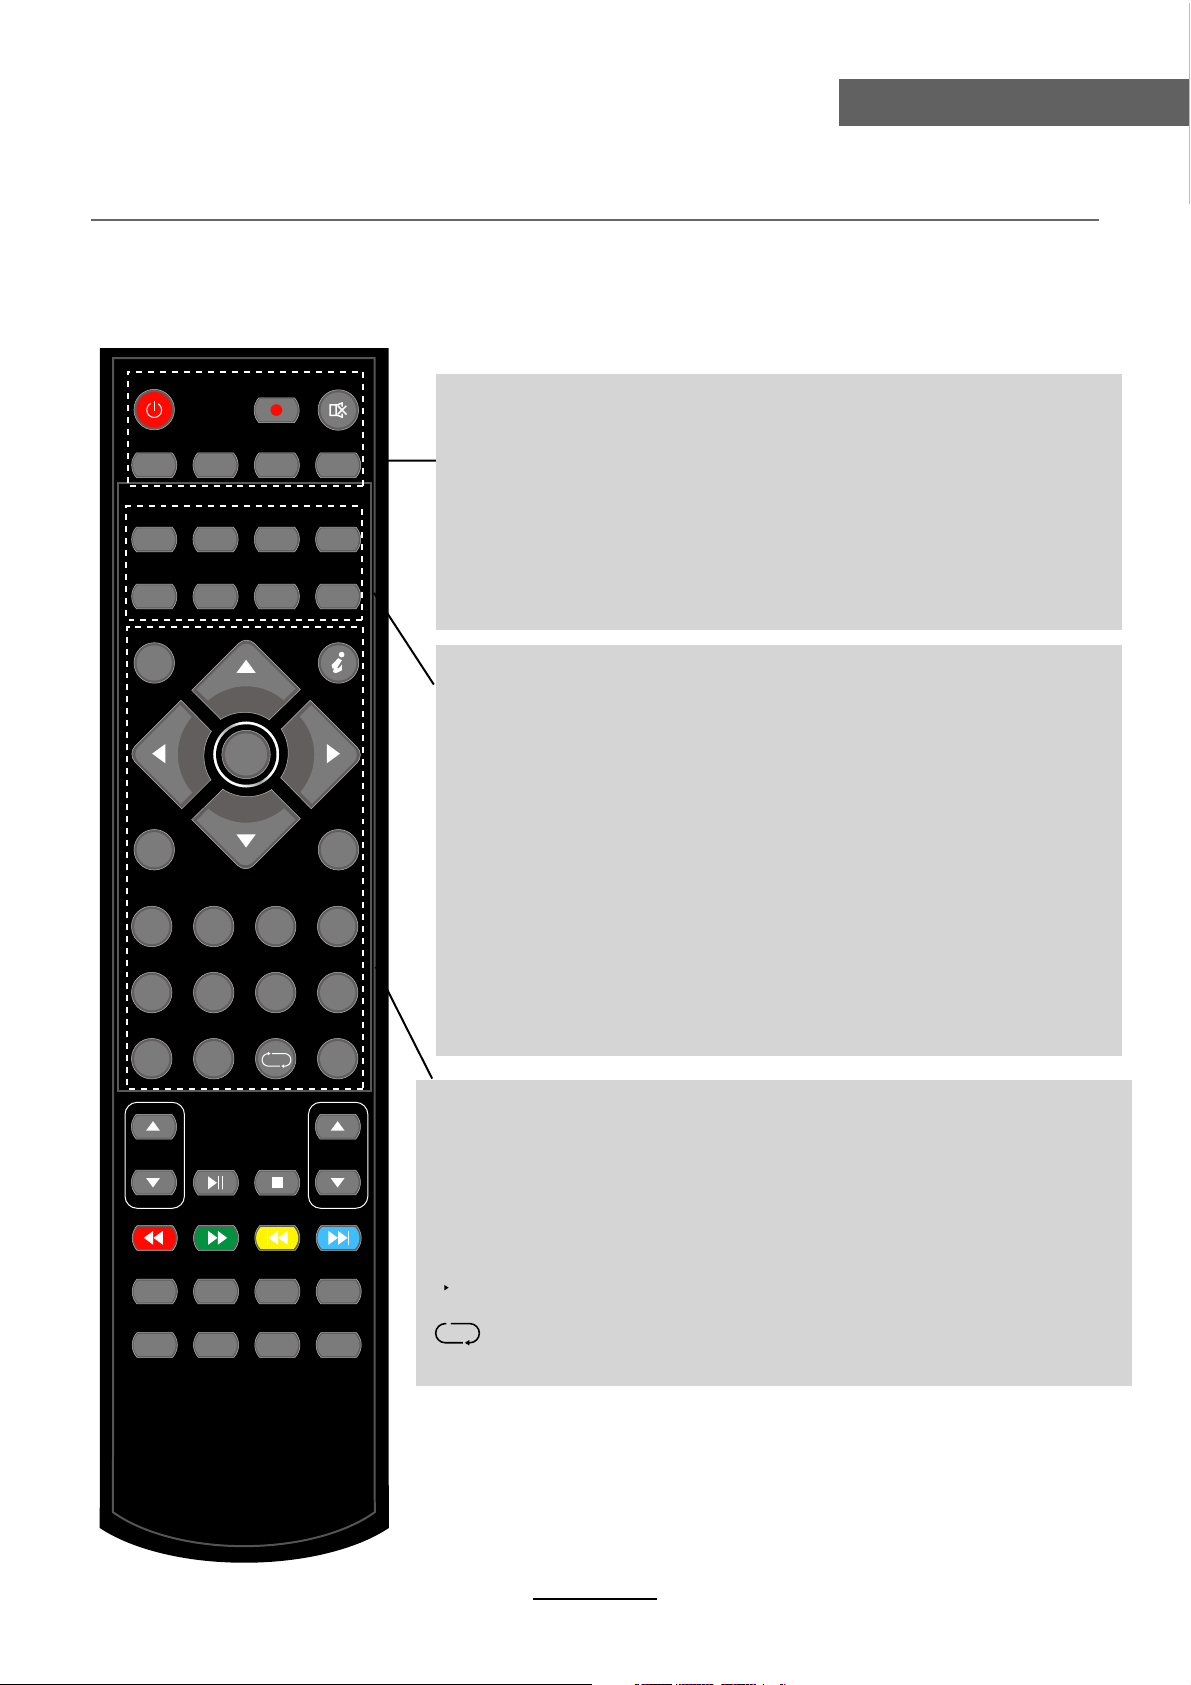
Remote Control
Remote Control
The remote control is using Infra-Red(IR). Point it towards the front of the LCD TV. The remote
control may not work correctly if it is operated out of range or out of angle.
POWER
PICTURE SOUND FREEZE AUTO
SLEEP NICAM SUBPAGE SIZE
EPG LANGUAGE SUBTITLE TV/RADIO
SOURCE
OK
MENU
1234
5678
90
REC
MUTE
INFO
EXIT
- / - -
POWER: Turn the TV on/standby.
MUTE: Press to mute the sound, press again or press VOL+ to
unmute.
REC:Press to start record the program in DVB mode.
PICTURE: Select the picture mode.
SOUND: Select the sound mode.
FREEZE: Catch the picture of the current program.
AUTO: Auto adjust in the PC mode.
SLEEP: Standby timer.
NICAM: NICAM/A2.
SUBPAGE: For example to go directly to subpage 4:
press SUBPAGE, then 0,0,0,4; press SUBPAGE again
to cancel subpage mode.
SIZE: Press to see top half of page double size, Press again to
see the bottom half og page double size, Press again
for normal size.
EPG: To show the Electronic Program Guide during no-menu
state only in DTV mode.
LANGUAGE: Select the language for the TV in DTV mode.
SUBTITLE: Turn on/off the subtitle display in DTV mode.
TV/RADIO: Change the state between DTV and RADIO in
DTV mode.
VOL CH
FAV FAV+ FAV- ASPECT
TV/TXT INDEX R.VEAL HOLD
SOURCE:Press to display the input source menu.
INFO: Display brief information concerning the current channel
you are view.
Cursor left/right/up/down: Cursor buttons used in mens.
OK: CONFIRM BUTTON for menu.
MENU: System setup menu.
EXIT: Exit the OSD menu.
0-9,-/--: Choose channel directly.
: Return to the previous channel viewed.
6
Page 10
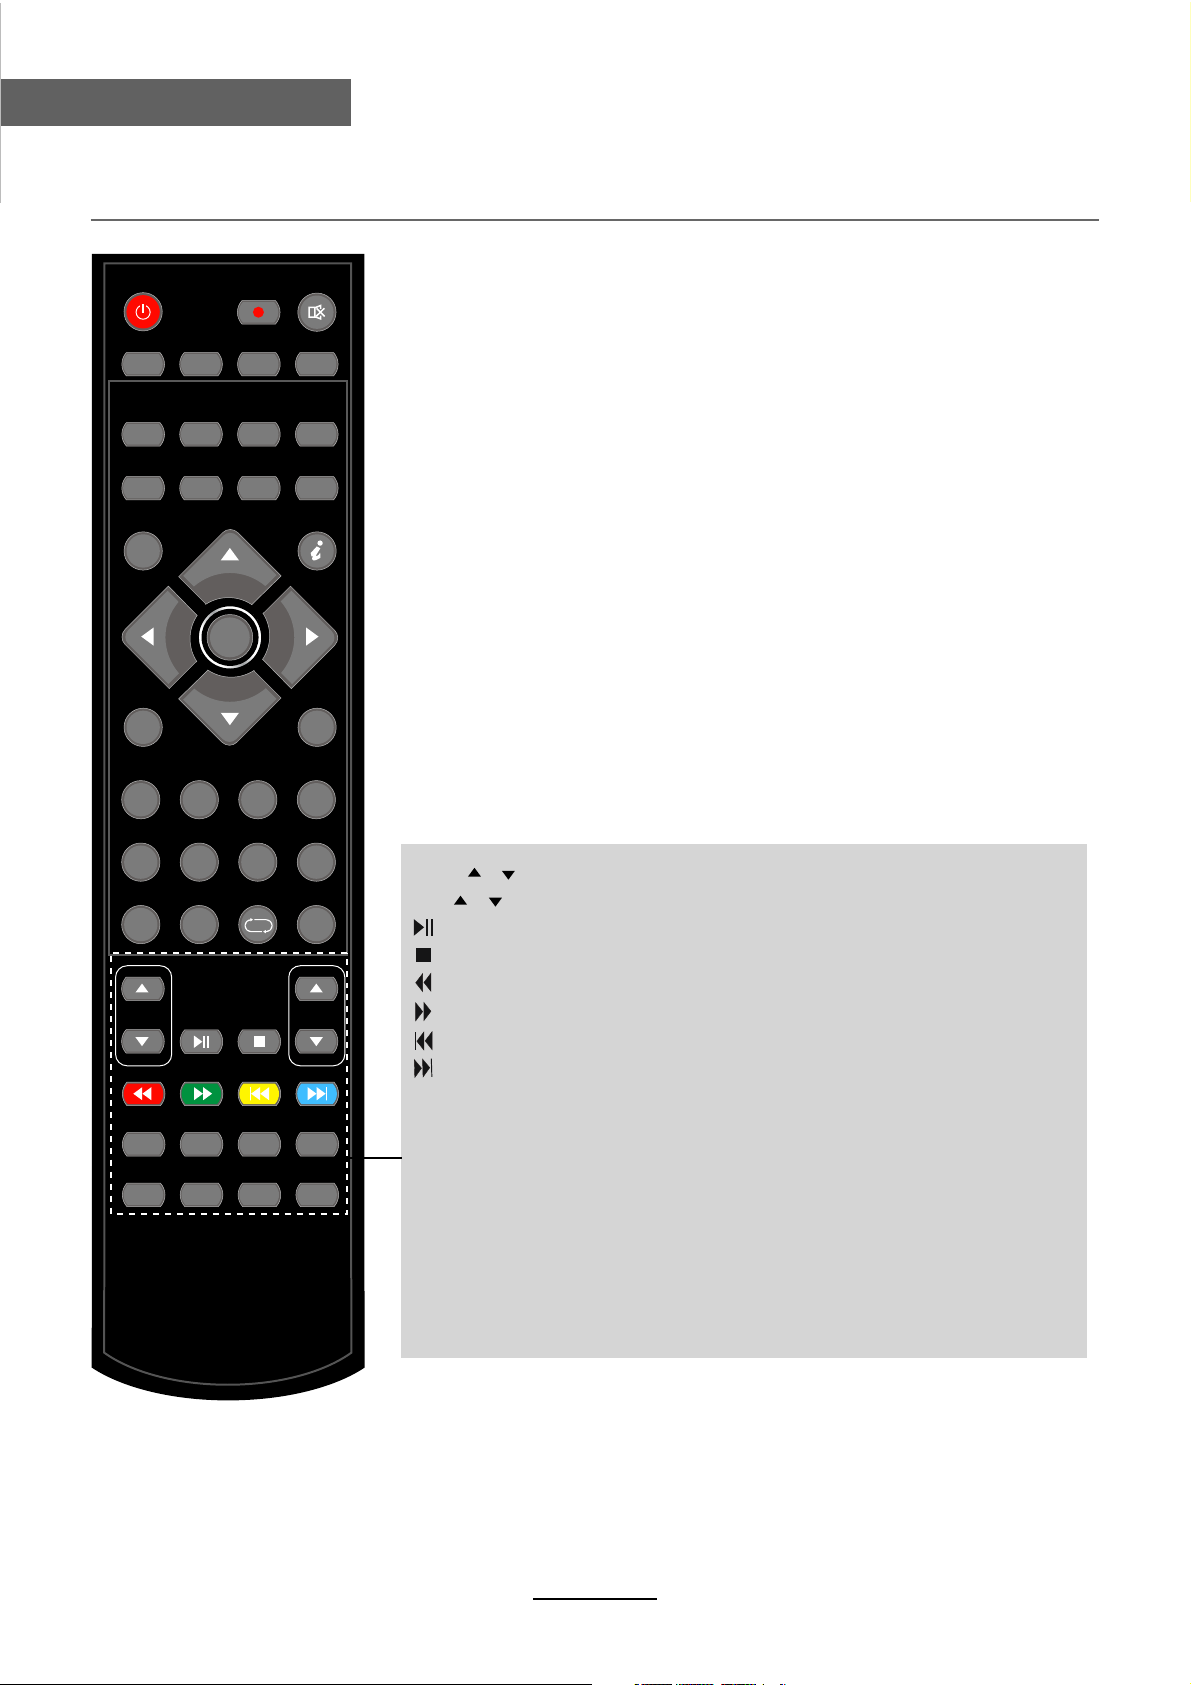
Remote Control
Remote Control
POWER
PICTURE SOUND FREEZE AUTO
SLEEP NICAM SUBPAGE SIZE
EPG LANGUAGE SUBTITLE TV/RADIO
SOURCE
OK
MENU
1234
REC
MUTE
INFO
EXIT
5678
90
VOL CH
FAV FAV+ FAV- ASPECT
TV/TXT INDEX R.VEAL HOLD
- / - -
VOL / : Adjust the volume.
CH / : Scan through channels.
: Play/pause program.
: Stop program.
: Fast reverse.
: Fast forward.
: Previous chapter.
: Next chapter.
Colour buttons: short cuts-follow the coloured links in the text.
FAV: Display the favourite program list.
FAV+/-:
Favovite channel +/-.
ASPECT: Press to change the display mode of the screen.
TV/TXT: Turn off/on the Teletext display.
INDEX: Go to index.
R.VEAL: Reveal any hidden text, for example-quiz answer.
HOLD: Hold or carry on the current subpage.
7
Page 11
Basic Operation
Power on/off
1. Connect to the power supply with a power code and an adaptor.
2. -To turn on the TV
Press POWER button on the TV or remote control.
-To turn off the TV
Press POWER button on the TV or remote control.
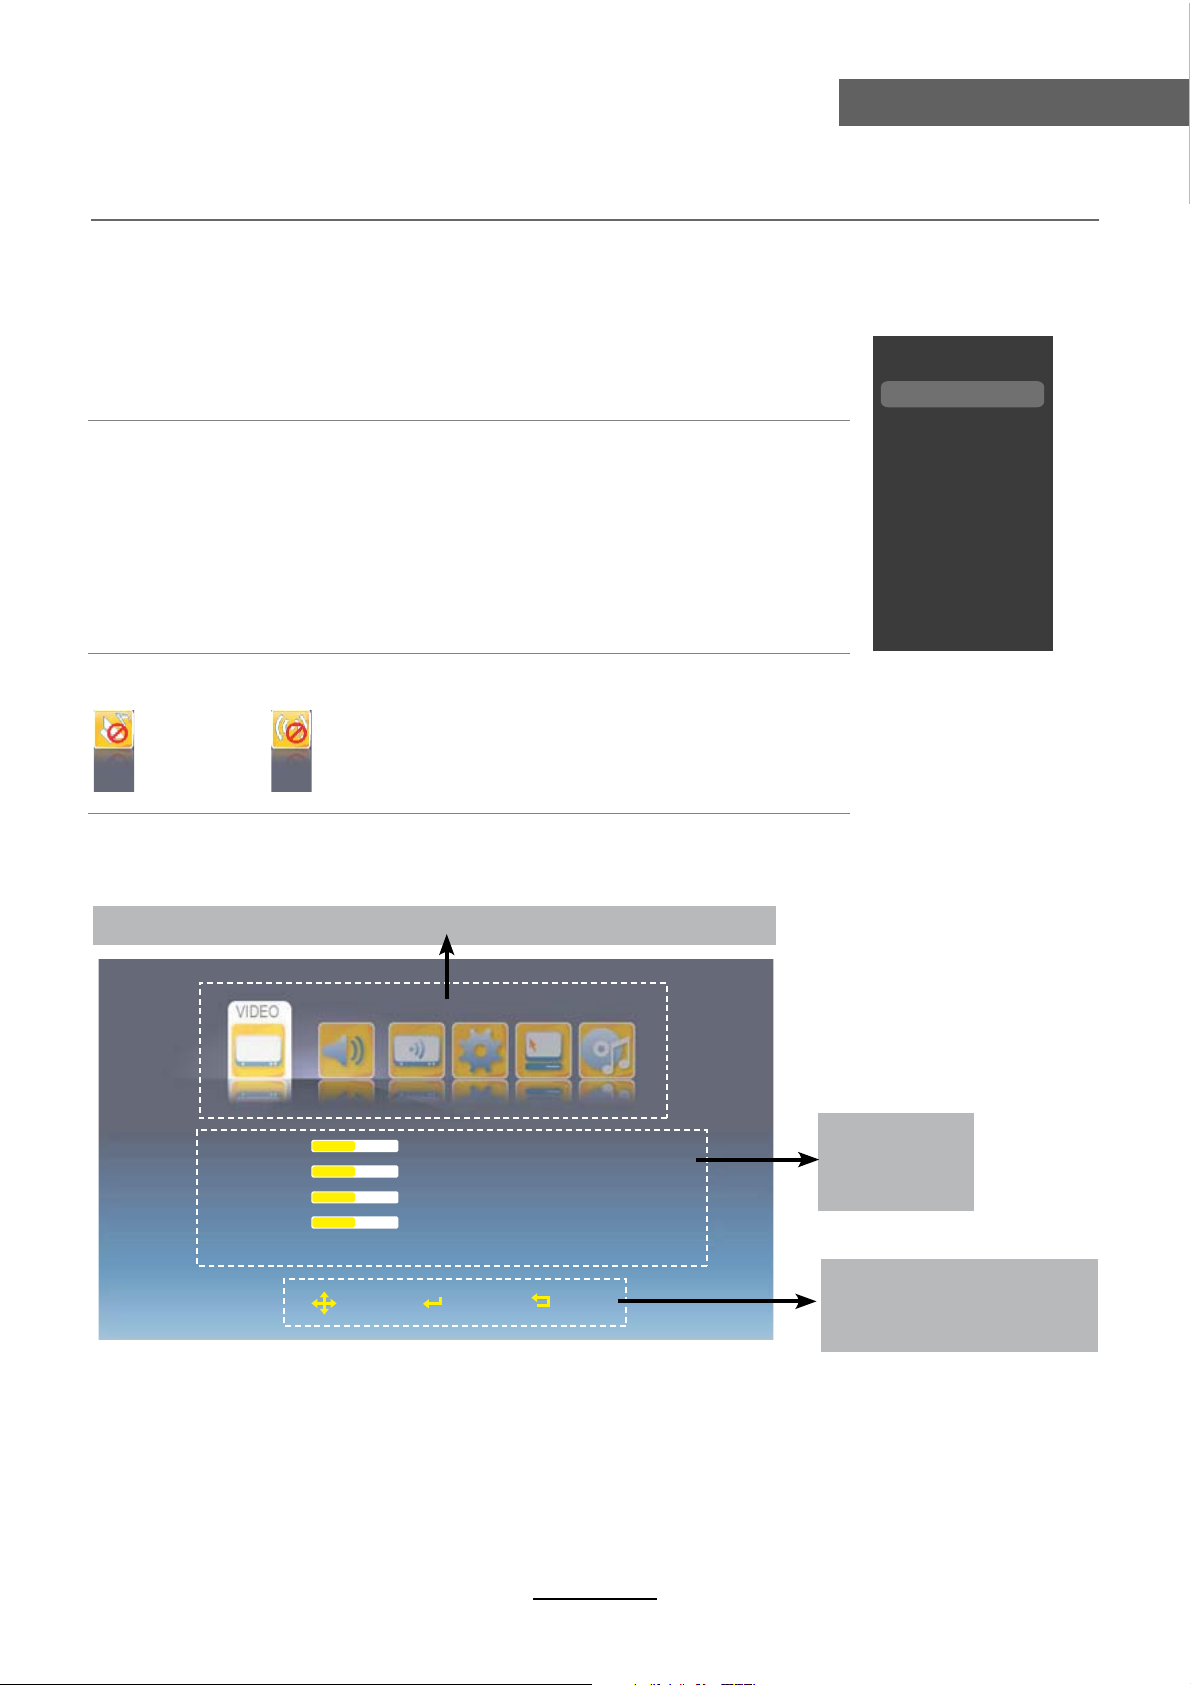
Input Source select
Press SOURCE button on the TV set or remote control to display the
input source menu, and use CH+/- button on the TV set or Ĥ0ĥ!button
on remote control to select the input source, press OK button on the
remote control to enter.
Note: Before you select the input source, make sure the
connections are prepared.
Basic Operation
SOURCE
DTV
ATV
AV
SCART
YPBPR
PC
HDMI
USB
Signs on the screen
Mute No signal
Basic OSD Menu operation
Press MENU button to display the OSD menu as below:
Main menu: VIDEO AUDIO TV SETUP TIME OTHERS
Brightness
Contrast
Saturation
Sharpness
Move
50
50
50
50
Picture Mode
Color Temp
NR
MPEG NR
Cinema Mode
Select
Custom
Normal
Medium
Low
Low
Exit
Submenu
(Video menu
for example)
Hint---you should operate
the OSD menu according
to the hint.
Use
In the submenu, use Ĥ///
button to select the main menu, and press button to enter the submenu.
Ĥ/ĥ
ĥ
button to select the function item, press OK button to enter
Ĥ
ĥ
ĥ
the adjust/setup menu.
* (Press MENU button to return to the upper menu.)
* (Press EXIT button to exit the menu display.)
Note1: Only when you input the suitable signal, the relevant items can be activated
Note2: Please operating the OSD menu according to hint on the bottom of the banner.
8
Page 12
OSD Menu
OSD Menu
1. Video menu
Brightness
Contrast
Saturation
Sharpness
Move
50
50
50
50
Select
Picture Mode
Color Temp
NR
MP
EG NR
Cinema Mode Low
Exit
Standard
Normal
Low
Low
Description
Adjust menu (Brightness menu for example)
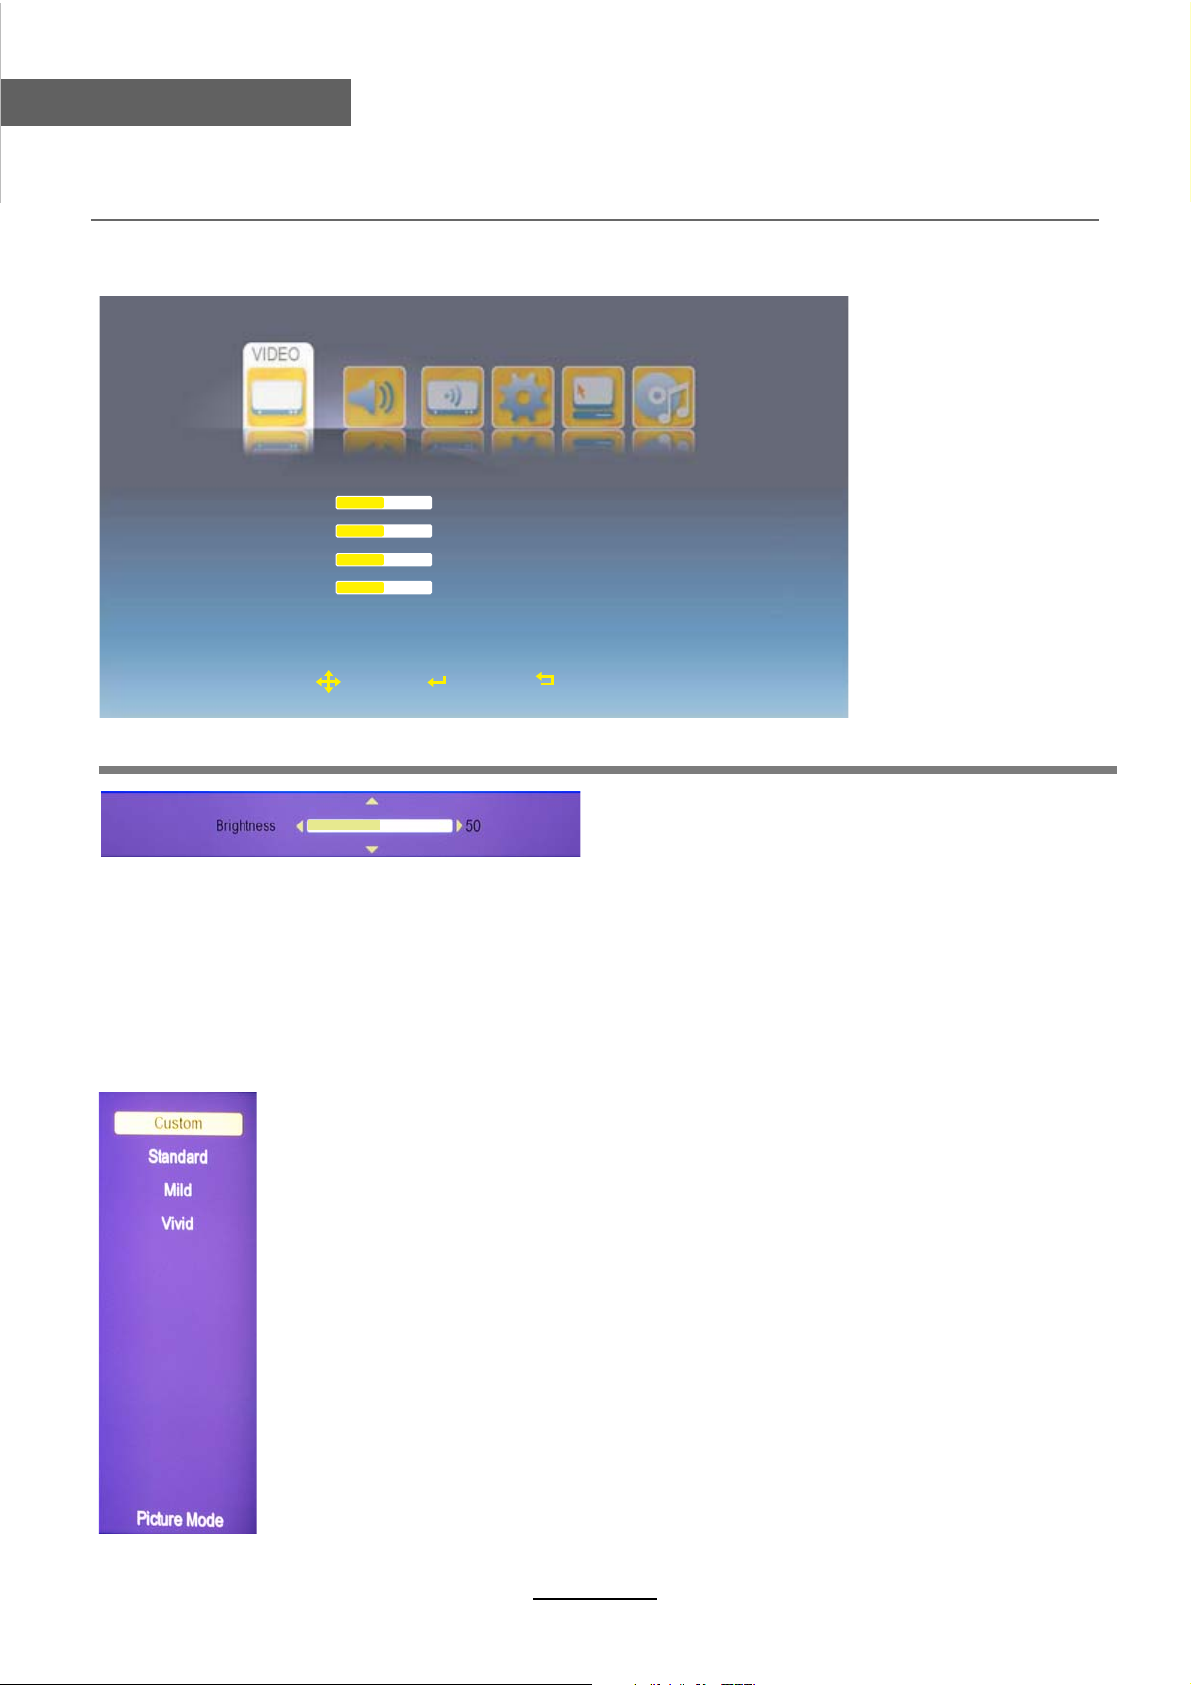
Adjust menu: Press / button to adjust, and press / button to switchover between
Ĥ
ĥ
Ĥĥ
Brightness, Contrast, Saturation, Sharpness.
Brightness: Adjust image black level.
Contrast: Adjust image contrast.
Saturation: Adjust image saturation.
Sharpness: Adjust the sharpness(Gray and invalid in VGA/PC mode).
Select menu (Picture mode menu for example)
Select menu: Press / button to select, and press OK button to confirm.
Ĥĥ
Picture Mode: Select your desired picture mode from Custom, Standard,
Mild, Vivid.
You may select the picture mode directly by pressing the PICTURE button
on the remote control.
Color Temp: Select an optimum color temperature mode to suit your eyes
for viewing from Cold, Normal, Warm)
NR: If the broadcast signal received is weak, you can select the NR option
to reduce the video noise level between Off, Low, Medium and High.
MPEG NR: Select MPEG NR mode from Off, Low, Medium and High.
9
Page 13
OSD Menu
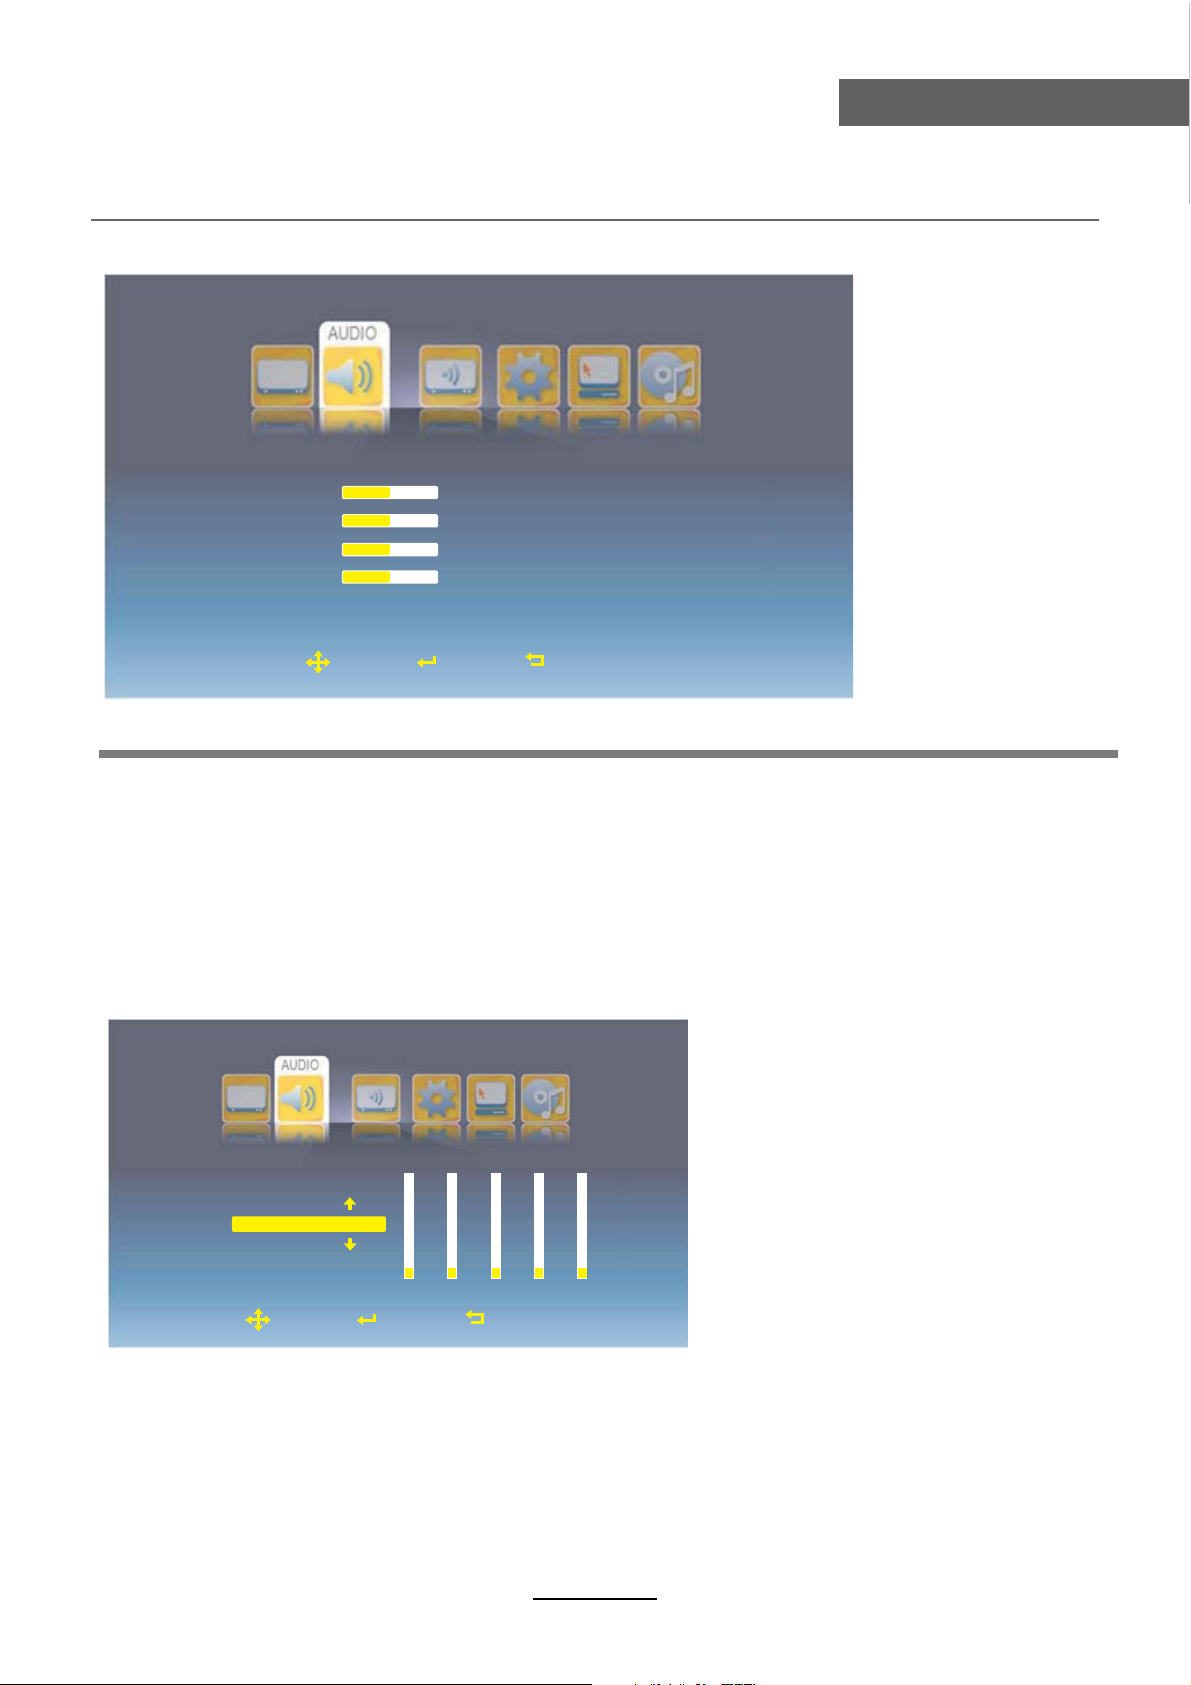
2. Audio menu
OSD Menu
Volume
Balance
Treble
Bass
Move
50
0
50
50
Select
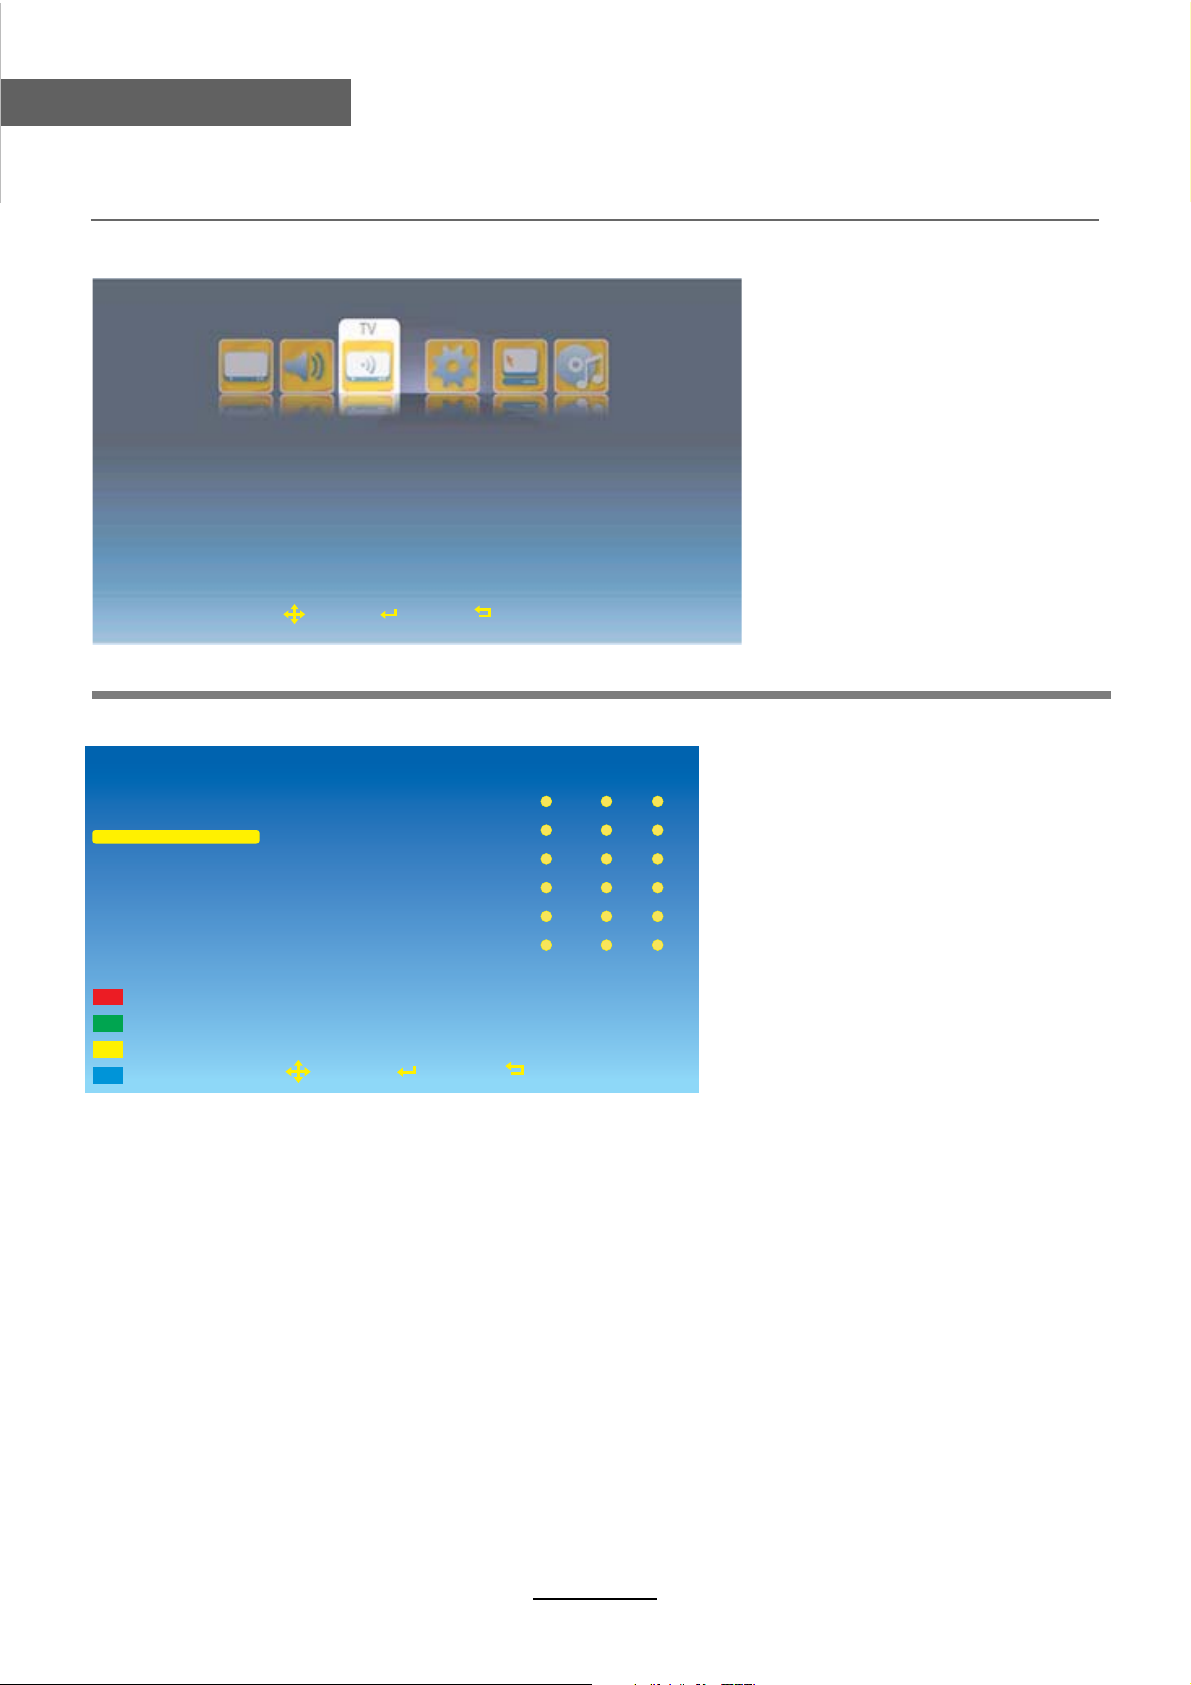
Sound Effect
SPDIF Output
Equalizer
Exit
Normal
OFF
Description
Volume: Adjust vollume.
Balance: Adjust the audio output between left and right speakers.
Treble: Adjust the level of the higherpitched sounds.
Bass: Adjust the level of the lower-pitched sounds.
Sound Effect: Select the sound effect from BBE, SRS, Normal.
SPDIF Output: Select the Spide Ouput mode from Off, PCM, RAW.
Equalizer: Enter the Equalizer menu to adjust.
0
53
Equalizer
Move
Customer
100 Hz
Select
1K Hz
00
5K Hz
Exit
3K Hz
0
12K Hz
Select the Equalizer mode from Rock, Country, Jazz, Classical, Blue, Default and Customer.
Note: You could adjust by yourself when you select “Customer” mode.
10
Page 14
OSD Menu
OSD Menu
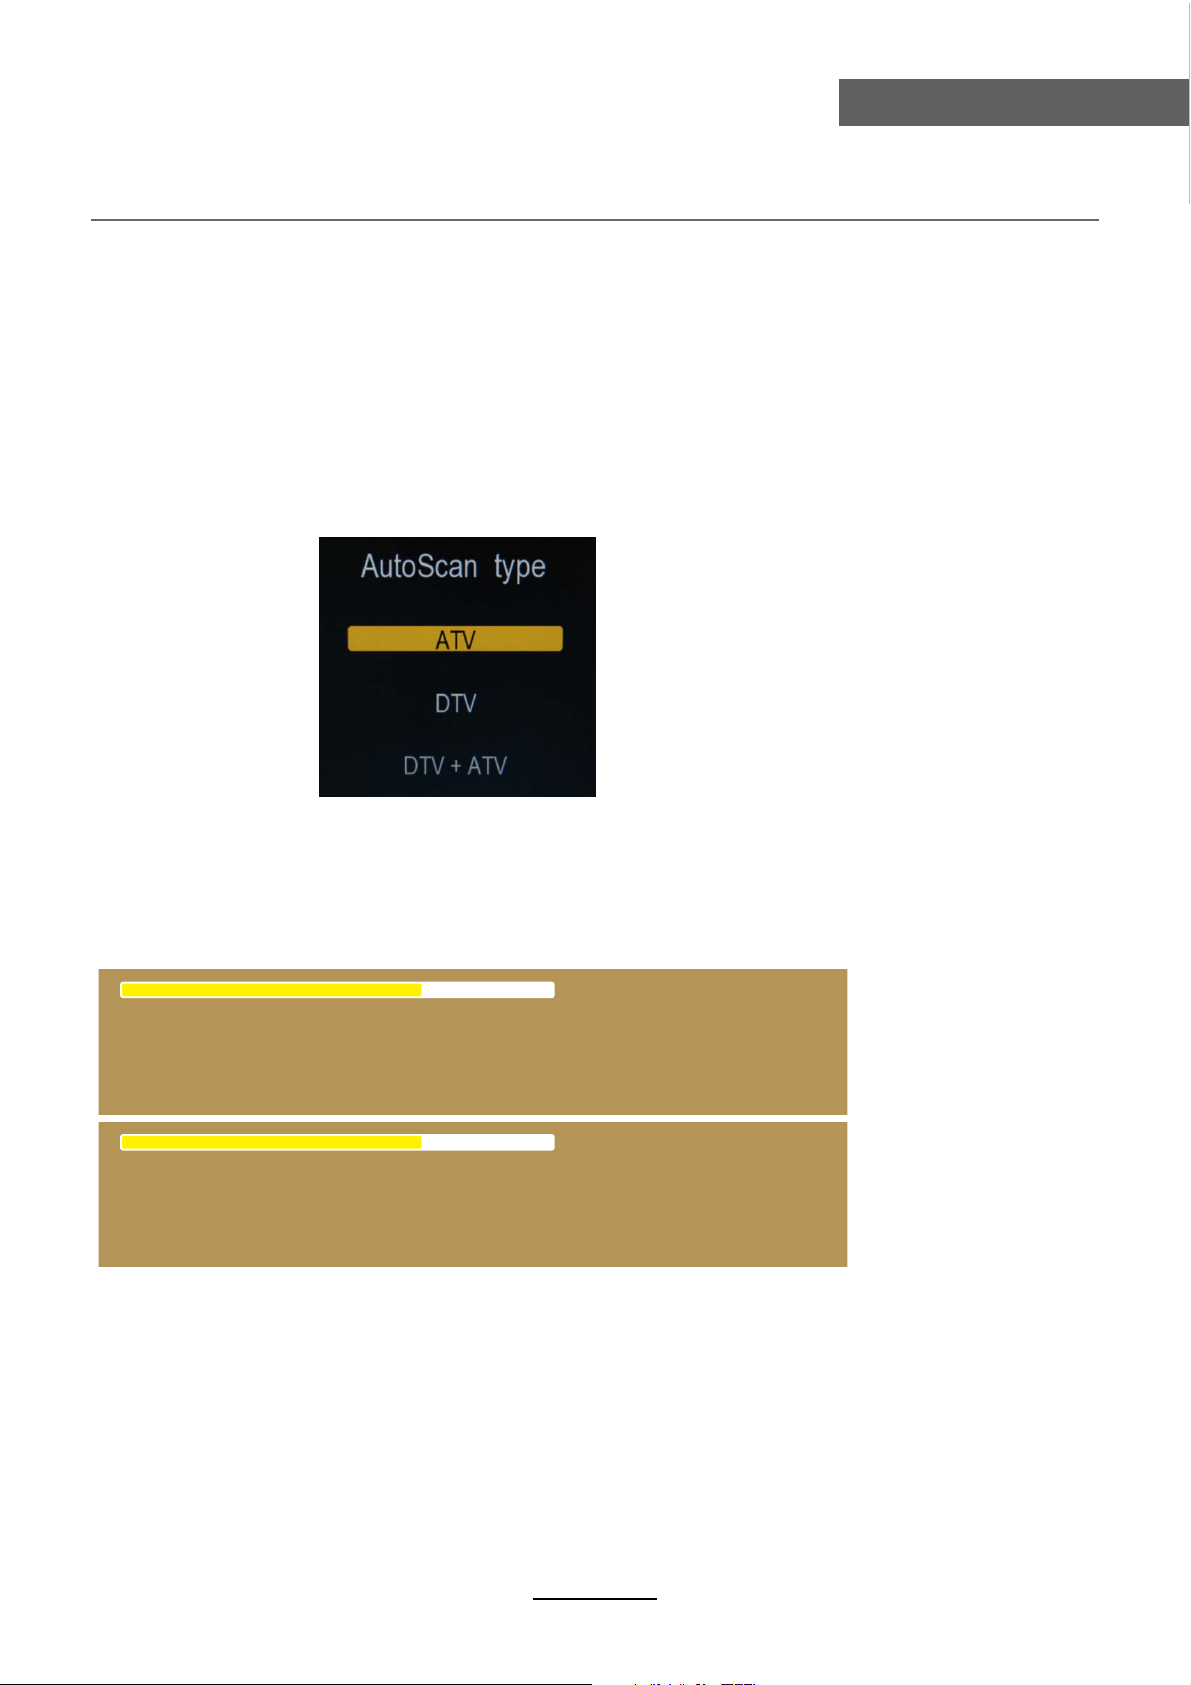
3. TV menu(In ATV/DTV mode)
Program Edit
EPG
Move
Select
Auto Search
Manual Search
Exit
Description
Program Edit: Enter the Program Edit menu as below:
Service Type
ATV
Network
ALL
Press color key to edit
Rename
Delete
Swap
Move
Move
Fav. Lock
1
6
2
3
4
5
CATV1
CATV6
CATV2
CATV3
CATV4
CATV5
Select
Exit
Skip
Note: Press / / / button to select the item you want to operate from Service Type,
Ĥ
Ĥĥ
ĥ
Network, Channel list, Fav., Lock, and Skip.
Service Type: Press OK button to select the Service Type you want.
Network: Press OK button to select the Network mode you want.
Operation on the Program Edit menu:
After you select the Service Type and Network modes, you will see the program’s
information displays on the right side of the screen.
Rename: Select the program you want to rename by / button, and press RED button
Ĥĥ
on the remote control to start renaming the program, you should select the position by /
button and select the character you like on the position by / button. Press OK
ĥ
Ĥĥ
button to confirm.
Delete: Delete the program you select by GREEN button.
Swap: Select the program you want to swap, and press YELLOW button, then select
the other program you want it to be swaped and press OK button to swap.
Move: Select the program you want to move, and press BLUE button, then select the position
you want the program to be moved to and press OK button to move.
11
Ĥ
Page 15
OSD Menu
OSD Menu
Note: Press button to select the Fav., Lock and Skip item on the channel table.
ĥ
Fav.: Press OK button to add the program to the favorite channel list, and press OK button
to cancel.
Lock: Press OK button to lock the channel, and you have to enter the code to view the
program. (Note: you should set the code in Parent control menu of OTHERS menu).
Press OK button to cancel.
Skip: Press OK button to skip the channel, and the channel will be skipped when you
scan the channels by CH+/- buttons, and press OK button to cancel.
EPG(Gray and invalid in ATV mode): To display the Electronic Program Guide in DTV mode.
Auto Search: Press OK button to enter the Auto Search select menu.
Select the Auto Scan type, and press OK button to start autoscan.
Note: 1. When auto searching, it will store the channel it found.
2. You could press MENU/EXIT button to cancel the auto searching, or it will
stop when all the frequency has been searched.
ATV
430.23MHz
75%
Found Channels
6
ATV
autoscan menu
Press Key MENU or EXIT to stop searching
DVB-T
430.23MHz
75%
Found Channels
6
DTV
autoscan menu
Press Key MENU or EXIT to stop searching
Press Key MENU or EXIT to stop searching
12
Page 16

OSD Menu
OSD Menu
Manual Search(in ATV mode): Press OK button to enter the Manual menu.
Channel No.
AFT
Signal Strength
0
On
Color System
Frequency
Auto
49.78MHz
2%
Sound System
Store
B/G
Note: Press /
button to select.
ĥ
Channel No.: Select the channel you want to manual search.
Color System: Select the Color System for the channel.
Sound System: Select the Sound System for the channel.
AFT: Due to weak signals or a wrong antenna configuration, some of the channels may
not be turned to the best reception condition. AFT function allows you to fine tune
channel selected.
Frequency: Press / button to search the signal.
Ĥ
ĥ
Store: Press OK button to store the settings.
Ĥ
13
Page 17
OSD Menu
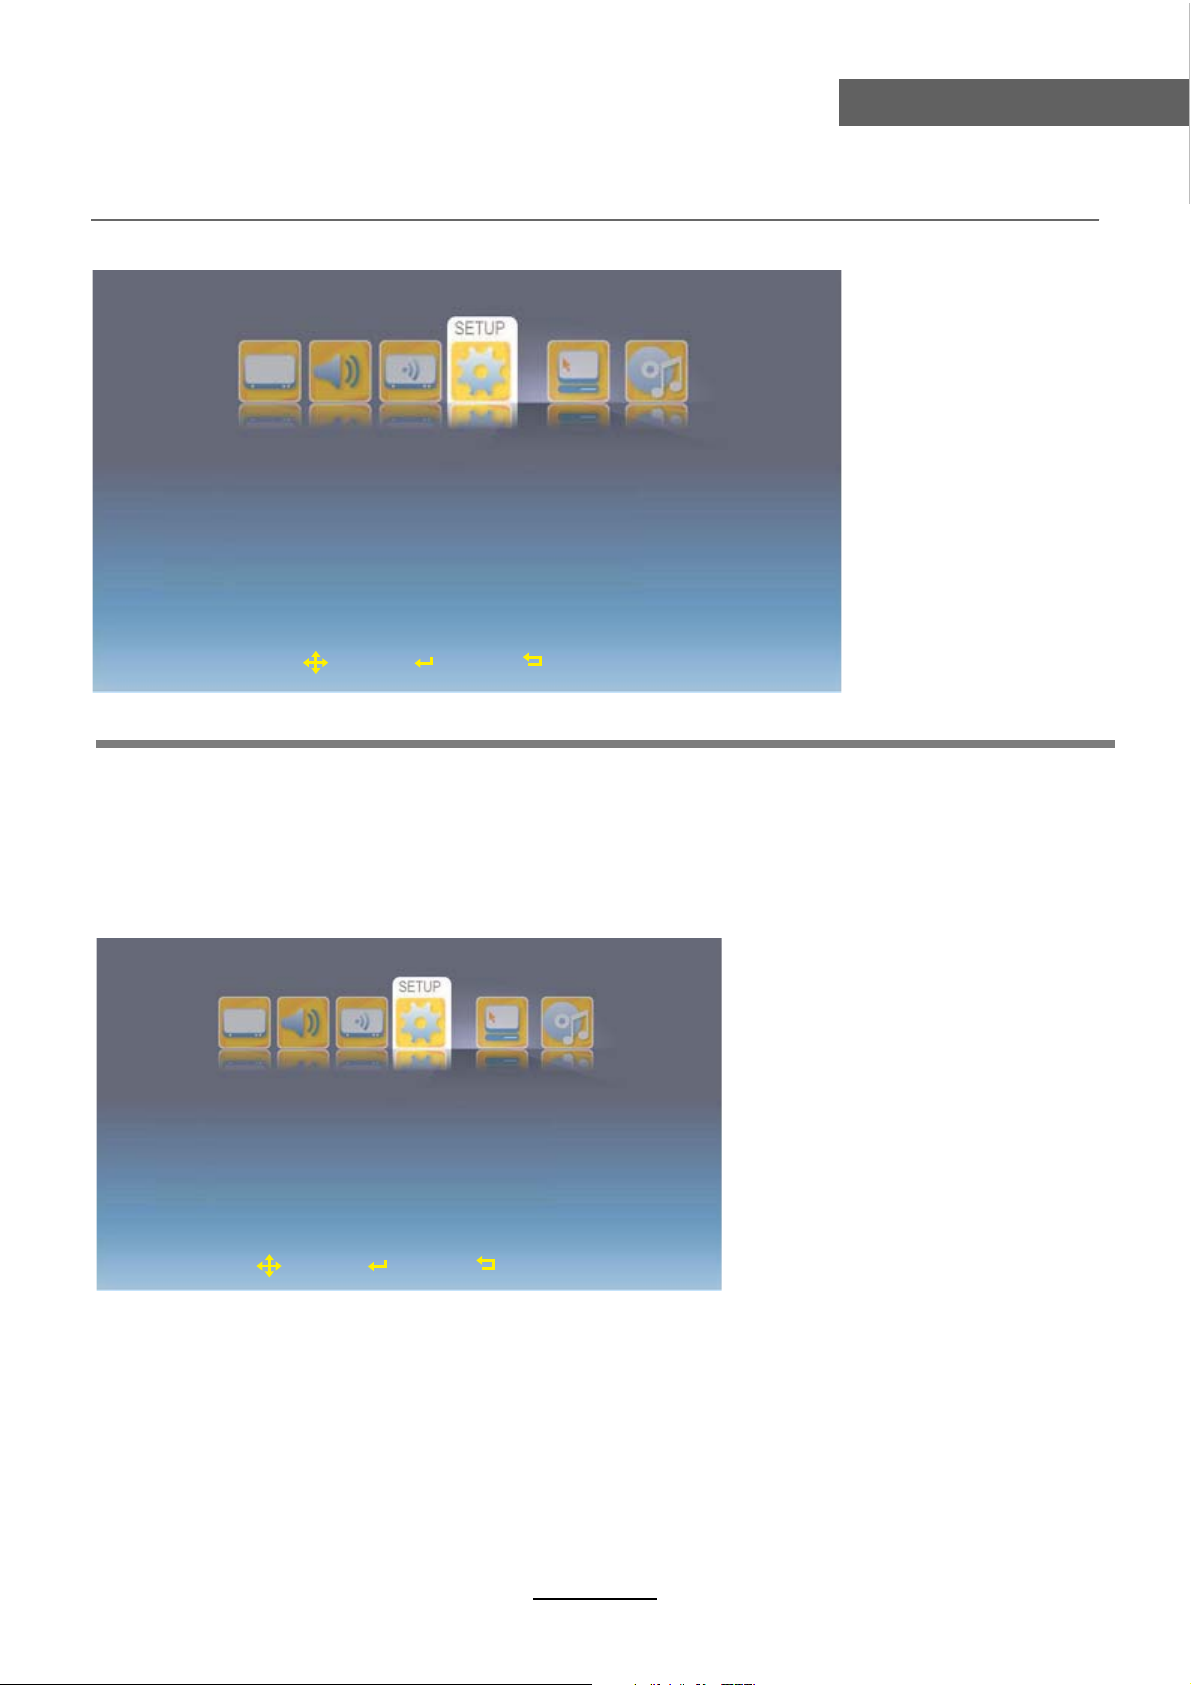
4. SETUP menu
OSD Menu
Country
OSD Language
Audio Language
Teletext Language
Subtitle
Move
Denmark
English
English
Select
Setup Wizard
R
eset
Exit
Description
Country: Select the Country in ATV/DTV mode.
OSD Language: Select the OSD language.
Audio Language: Enter the submenu and select the audio languages for the programs in DTV
mode.
Teletext Language: Select th Teletext language in ATV/DTV mode.
Subtitle: Enter the submenu and set the subtitle settings for the programs in DTV mode.
Subtitle
Subtitle Mode
Subtitle Language
Alt.Language1
Alt.Language2
Alt.Language3
Move
On
Normal
English
Welsh
Gaelic
Select
Exit
Subtitle: Turn on/off the subtitle display.
Subtitle Mode: Select the the subtitle display mode from Normal or Hard of Hearing.
Subtitle Language: Select the subtitle languages for the programs.
Setup Wizard: Turn on/off the setup wizard.
Customer Reset: Reset all the settings above.
14
Page 18
OSD Menu
OSD Menu
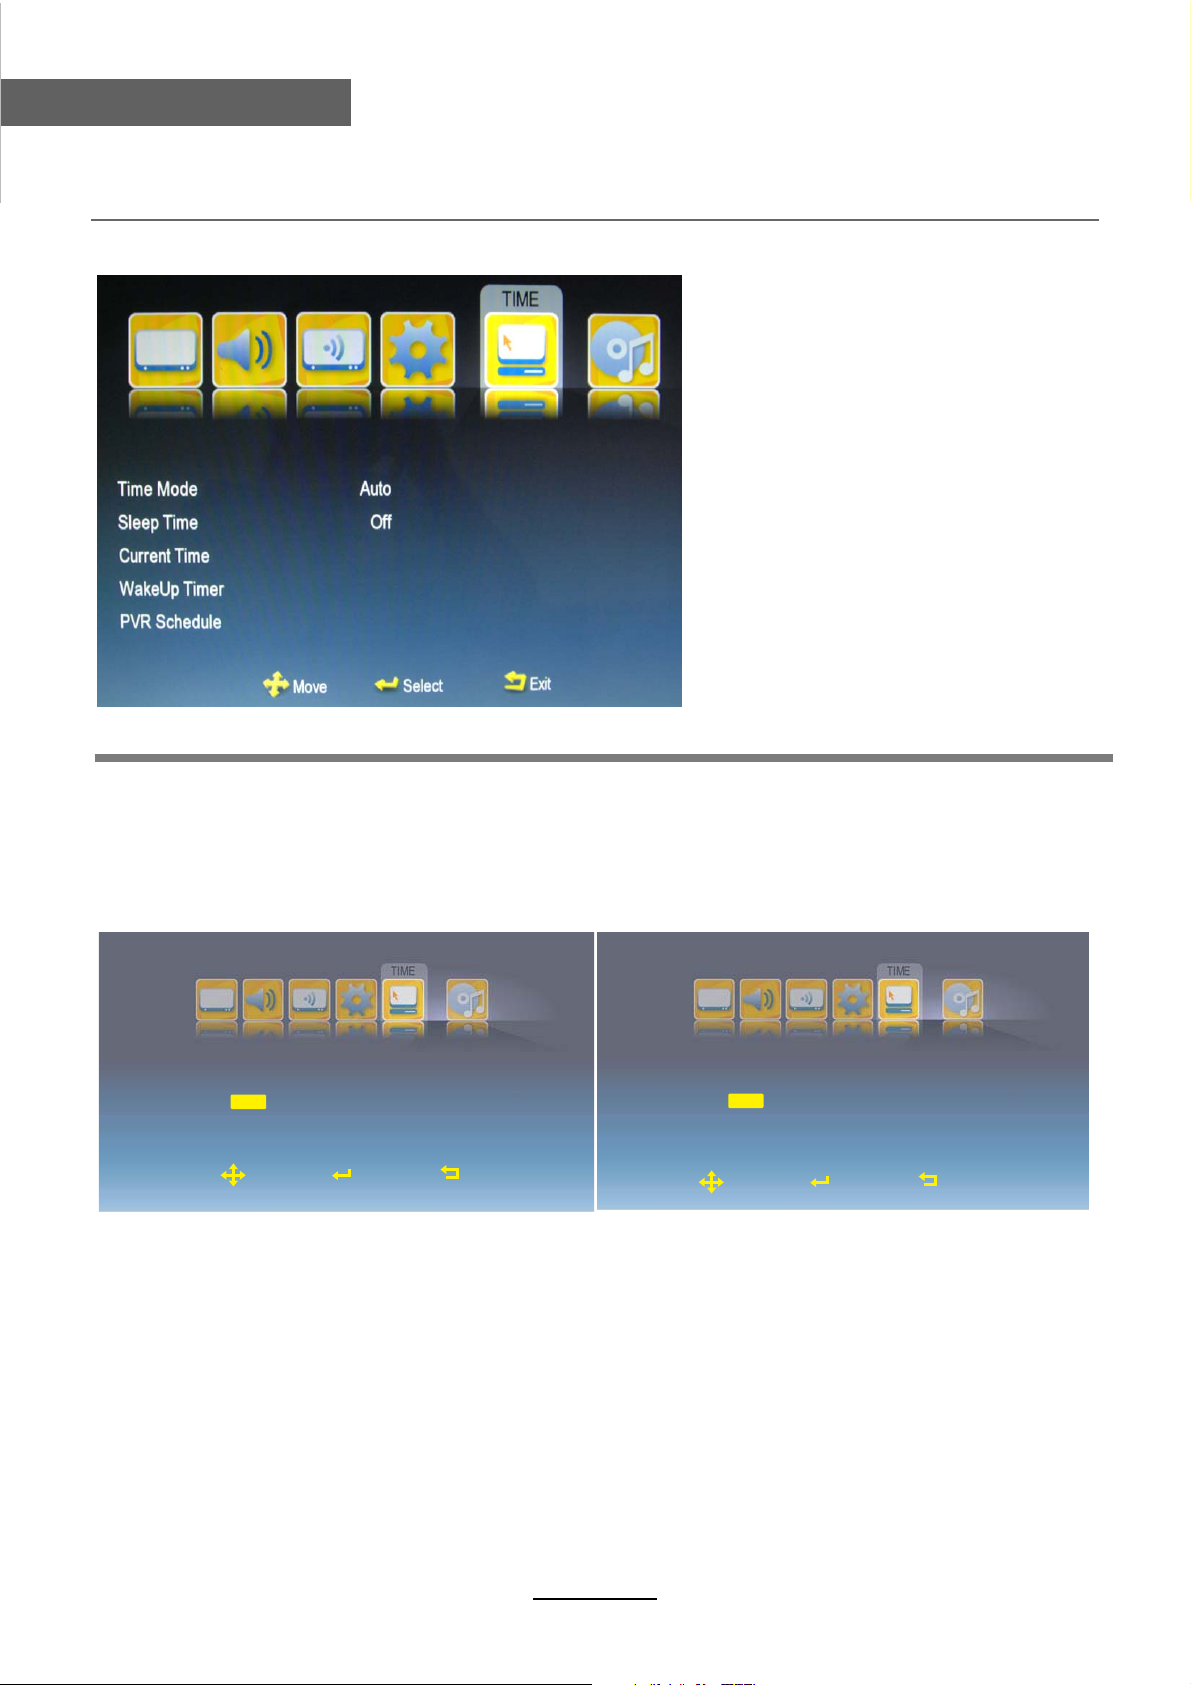
5. Time menu
Description
Time Mode: Select Time mode from Auto or Maunal.
Note: You should select Manual mode when you want to setting the Current Time below.
Sleep Time: Set the sleep time for the TV.
Current Time: Press OK button to enter the submenu and set the current time yourself.
Wake Up Timer: Press OK button to enter the submenu and set the wakeup timer for the TV.
Current Time 2009-01-01 Thu 01:00AM
2009
2009
Date
. 1 . 1
Move
Operation for Time: Press / to select the position you want to edit, and press /
Time
Select
1 : 0 AM
Exit
Ĥ
ĥ
Date
. 1 . 1
Move
Select
Time
1 : 0 AM
Exit
Ĥĥ
button to select.
15
Page 19
OSD Menu
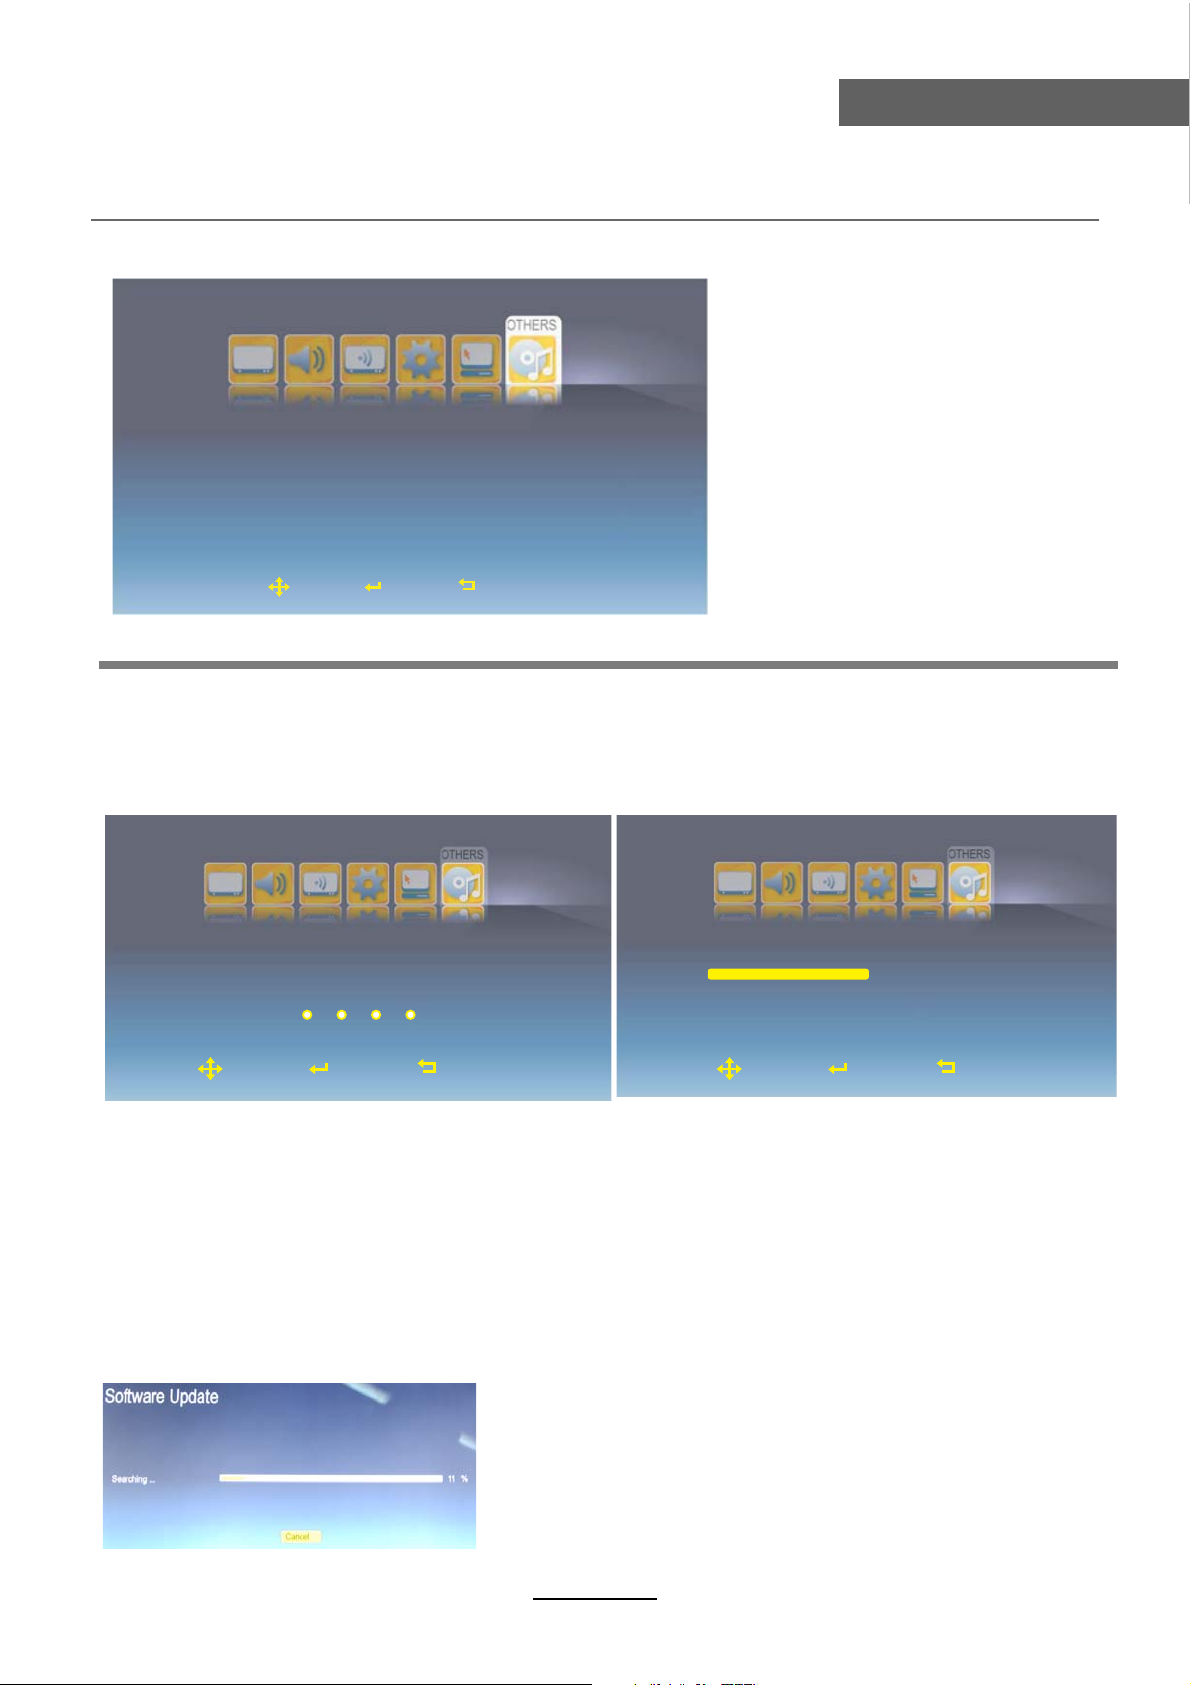
6. OTHERS menu
OSD Menu
Select
PIP
PIP Position
Hotel Mode
Software Update
Exit
Off
TopLeft
TopLeft
Off
USB
Screen Mode
Parent Control
Blue Screen
Auto
Off
Move
Description
Screen Mode: Select the screen mode for the TV from 16:9Wide, 16:9 Zoom,16:9 Subtitle,
4:3.
Parent Control: Press OK button and enter the code by the number buttons to enter Parent
Control menu(the original password is 8888).
Please Input Password
Parental Lock
Parental Rating
Change PIN
Off
4
Move
Select
Exit
Parental Lock: Turn on/off the Parental Lock function.
Parental Rating: Select the Parental from 3 to 18.
Change PIN: Press OK button to enter the submenu and change the PIN code.
Note; You should enter the old code, then enter the new code twice to change the code.
Blue Screen: Turn on/off the blue screen function.
The background will be blue screen when there’s no signal.
PIP Function
PIP: Select the input source for the PIP window.
PIP Position: Select the PIP Position on the screen.
Software Update: TV Software Update.
16
Move
Select
Exit
Page 20
OSD Menu
OSD Menu
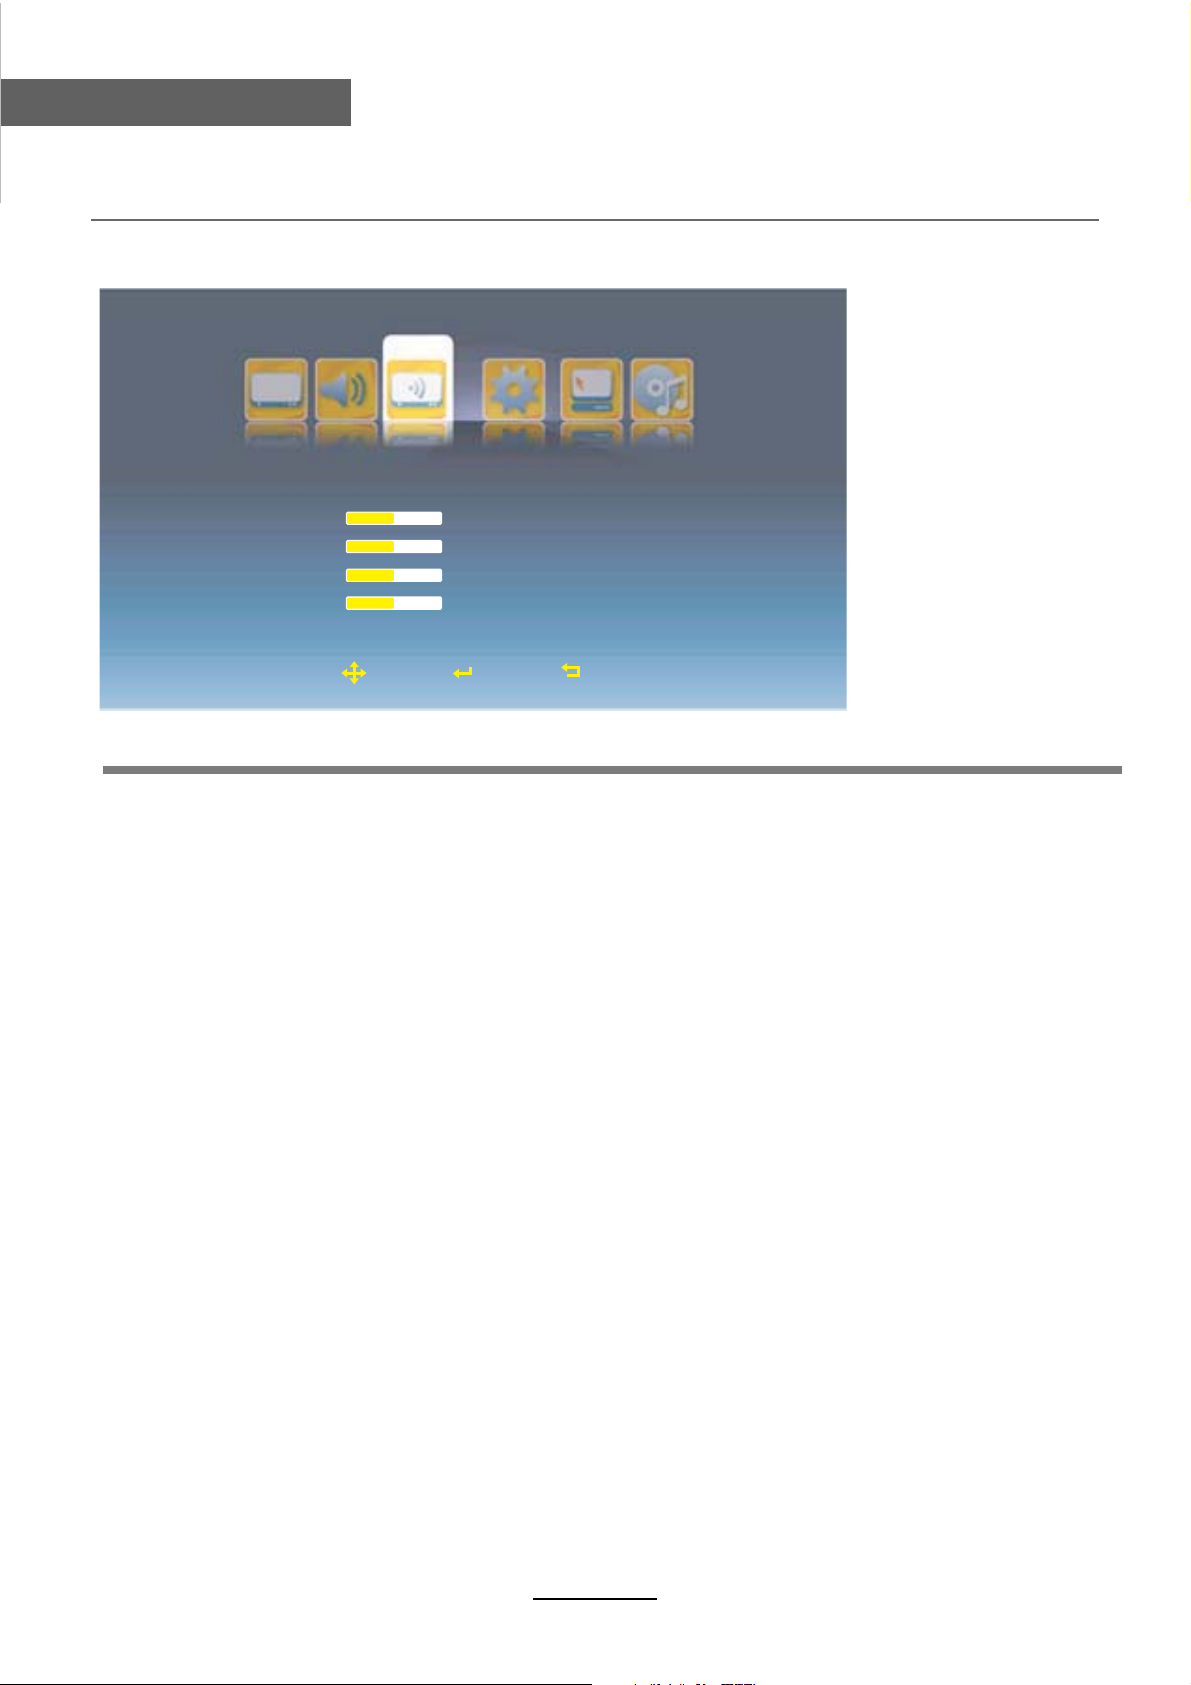
7. PC menu(In PC mode)
PC
V.Position
H.Position
Phase
Clock
50
50
50
50
Move
Select
Auto Adjust
Auto Phase
Reset
Exit
Description
V.Position: Adjust the vertical position of the picture.
H.Position: Adjust the horizontal position of the picture.
Phase: Adjust the phase of the picture.
Clock: Adjust the clock of the picture.
Auto Adjust: Auto adjust the PC/VGA settings.
Auto Phase: Auto adjust the phase of the picture.
Reset: Reset the PC/VGA settings to factory default.
17
Page 21
USB Operation
USB Operation
Enter the USB mode
SOURCE
DTV
ATV
AV
SCART
YPBPR
PC
HDMI
USB
Press SOURCE
button to select USB, press OK button to enter the USB mode.
You could use the Media button on the remote control to enter the USB
mode straightway.
USB Operation
button to display the input source menu, and press /
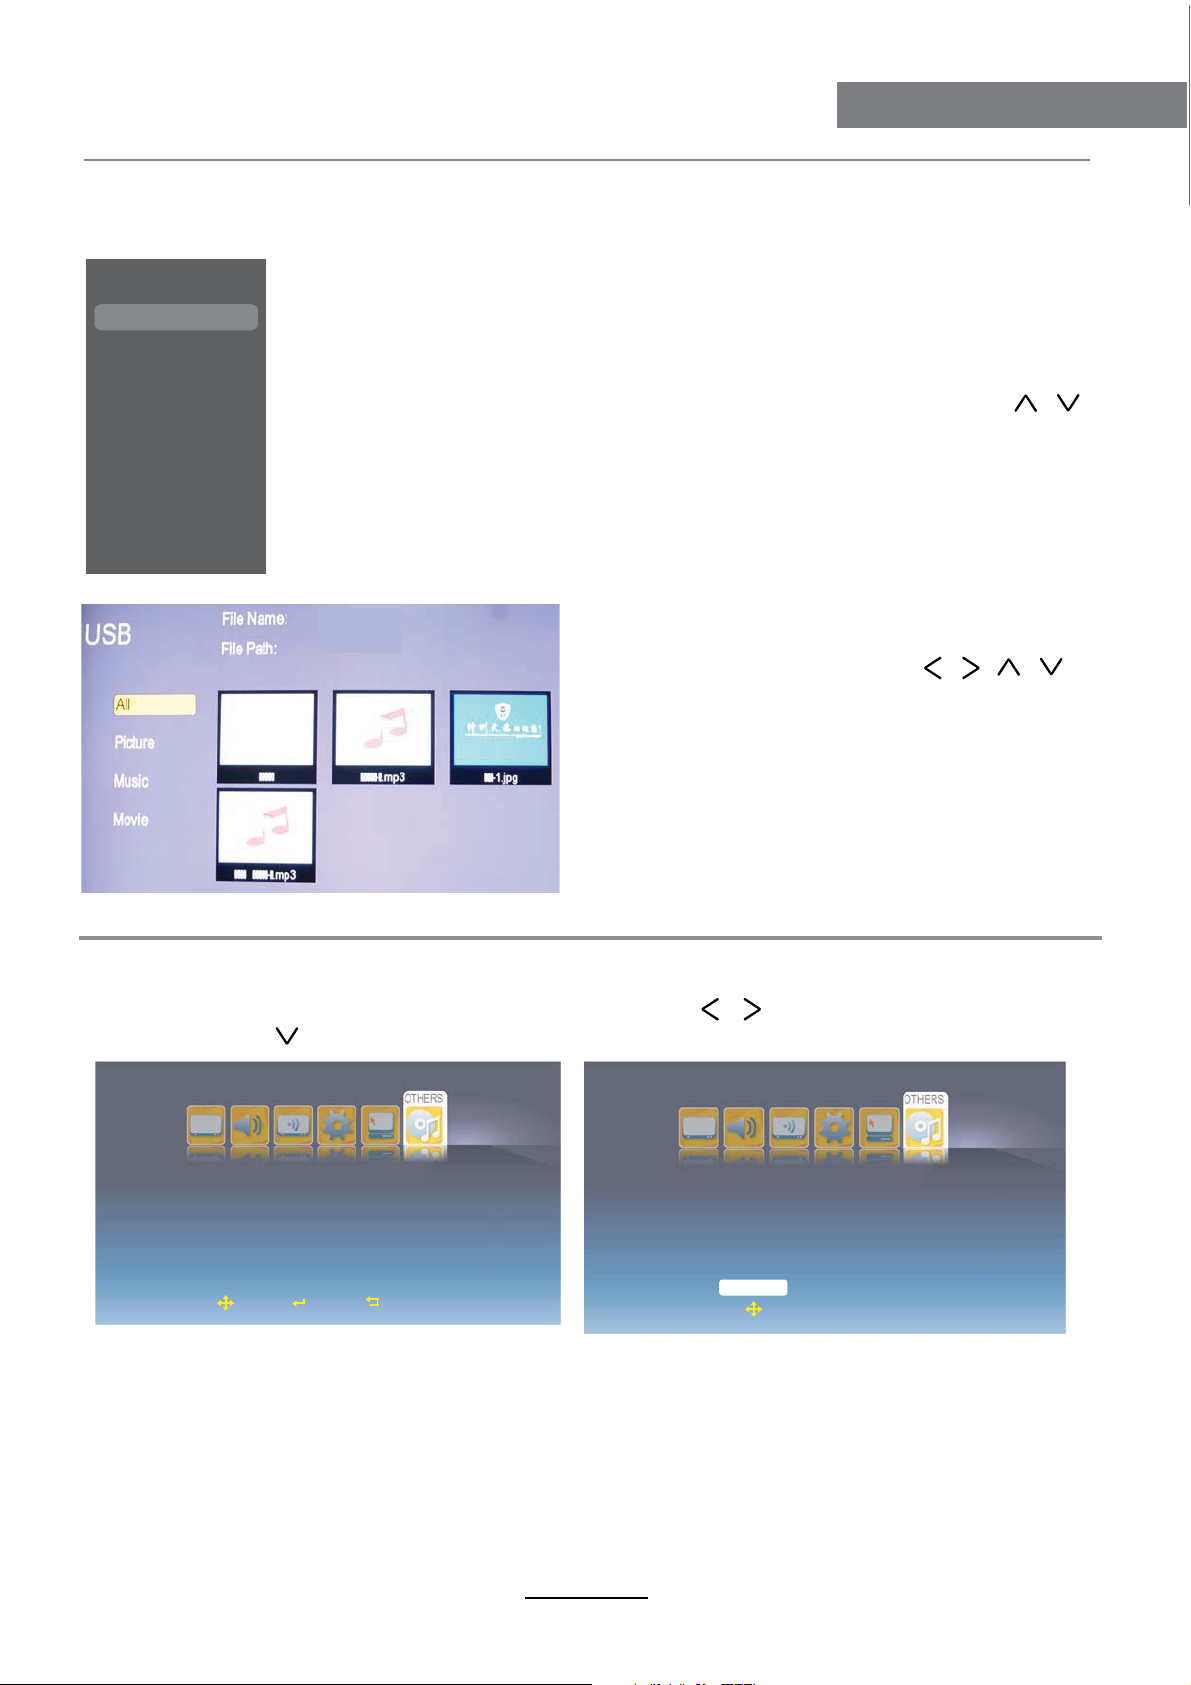
- When you enter the USB menu, the TV will
display the menu as the picture left.
- Select the content you want by / / /
button.
- You could select the sort from All, Picture,
Music and Movie to display the corresponding
content in the USB device on the screen.
- When you select a file, press OK button to
program the file or open the file.
- You could press EXIT button to return to the
menu when the program is playing.
Setup Menu for USB
Press MENU button to display the OSD menu, and press / button to select OTHERS
menu, and press button to select USB item, and press OK button to enter the USB menu.
USB
Screen Mode
Parent Control
Blue Screen
Move
Auto
Off
Select
PIP
PIP Position
Software Update
Exit
TopLeft
TopLeft
Off
Off
Device:
SLOT
Partition
Select
Move
Total Space(MB):
USB
Used Space(MB):
0
Free Space(MB):
0
File System:
ENTER Select
Format
Exit Exit
0
0
0
Unknow
On the menu you will found the Total Space, Used Space, Free Space and File System
informations of the USB device.
SLOT: Select the device you want to program when you slot several devices with a USB jack.
Partition: Select the partition you want to program when the USB device has several partitions.
After you select the the SLOT and Partition, you should select “Select” on the menu, and press
OK button to confirm.
Note: You could select “Format”, and press OK button to enter the format menu, then you could
format the device by your desire.
18
Page 22
PVR Operation
PVR Operation
PVR
Instant Recorder
note: Make sure you have insert the USB device to the TV board before you start to do the recording. Press RECORD button on your
control to start record whenever you want to start.There will be a recording iron on the left top of the display screen during recording.
Recording...
Press RECORD button again to set the During time of recording,press ŻŹbutton to select the hour and minute,
press źŸbutton to set the Duration Time .Press Żbutton to confirm you record time setting and back to the previous opertion.
Set Duration Time
12 :59
It will stop recording when have recorded for the Duration Time.
Press STOP button on your remote control to stop recording, there will be a dialog as follows:
It is recording now.Do you want to save and exit?
OK
pressŻŹbutton to select OK(to exit)or Cancel(continue recording),press OK button on your remote control to comfirm your choose.
Note:During recording,you can’t callout Input Source,Menu,Text,EPG,MHEG,FAV List and so on unless you stop RECORD first.During
recording,you can’t change the channel unless you stop recording first.
Press POWER button to enter the standby mode,the recording is continue backstage,The PVR function doesn’t support recording Subtitle,
RadioChannel and Lock channel.
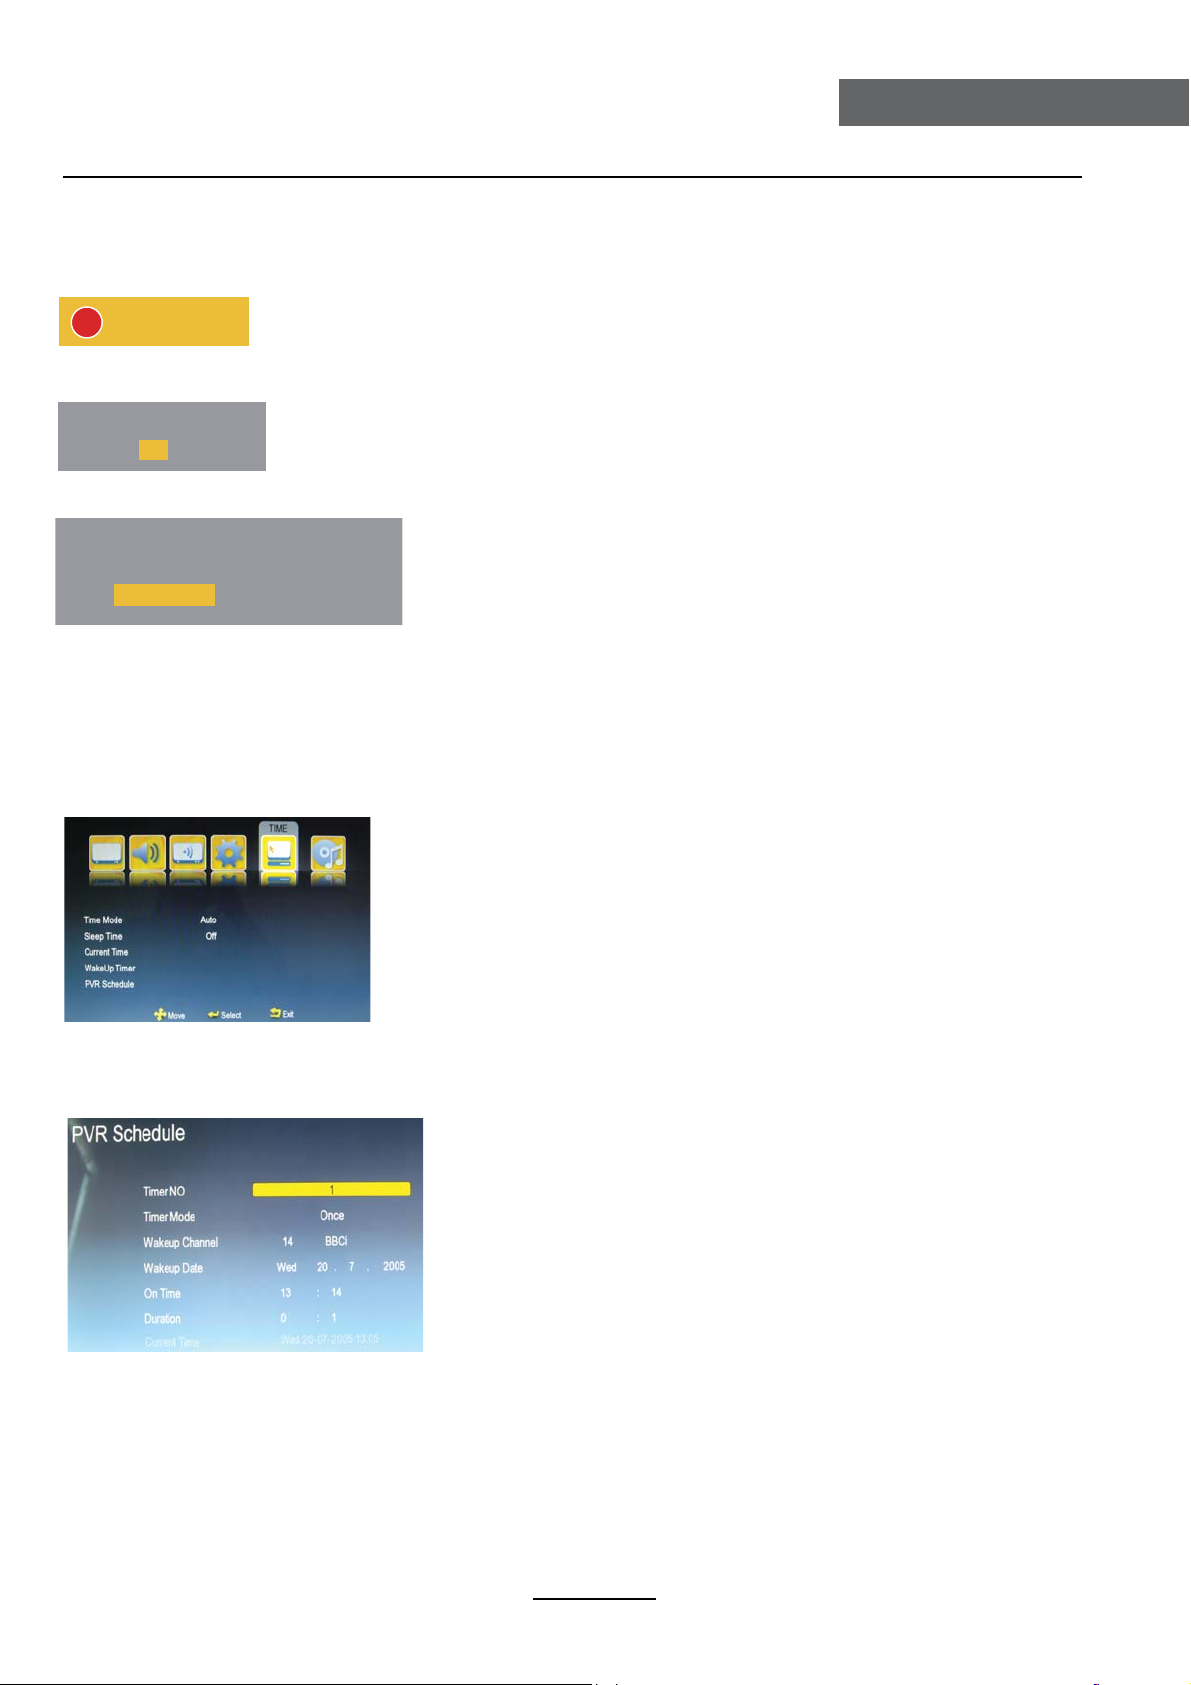
PVR Wake Up Timer
Press MENU button on the front of panel pr MENU on the remote control to display the main menu.
Press ŻŹ button to select Time in the main menu,then press OK button or źto enter.
1.Press źŸ button to select PVR Wake Up Timer.
2.Press OK button to enter and press źŸbutton to edit.
3.After finishing your adjustment,Press Menu or EXIT button to save and back to the previous menu.
Wake Up Date
Press źŸ button to select WakeUp Date,then press źŸ button to select the year,month and day,press źŸ button to set the number.
Press Ż button to confirm you date setting and back to the previous operation.
On Time
Press źŸ button to select On Time,then press źŸ button to select the minute and second, press źŸ button to set the number.
Press Żbutton to confirm you start record time setting and back to the previous operation.
Duration
Press źŸ button to select Duration,press źŸ button to select the hour and minute,press źŸ button to set the number.
press Żbutton to confirm you record time setting and back to the precious operation.
Cancel
Time NO
Press źŸ button to select Time NO,then press OK button to enter and press
źŸbutton select Timer NO,you can set 8 different PVR WakeUp Timers in all.
Timer Mode
Press źŸ button to select Timer Mode,then press OK button to enter and press
źŸbutton to select Off ,Once,Daily or Weekly.
Note:You can’t set the following options if you set the Timer Mode “Off”.
Wake up Channel
Press źŸ button to seclect Wakeup Channel,then press OK button to enter the
Channel List and press źŸ buttonto select the program which you want to record.
19
Page 23

Maintenance and Service
Simple Troubleshooting
If the display fails or performance dramatically deteriorates check the Display in accordance
with the following instructions.Remember to check the peripherals topinpiont the source of the
failure.
If the display still fails to perform as expected,connect your helpline for assistance.
No power
- Check all connections to the TV.
- Press either the power button or the Standby button on the Remote control.
No picture or sound
- Ensure that the TV is plugged in and the power is on.
- Ensure that the aerial is connected.
- Try a different programme.
Poor picture quality
- Check the aerial connections.
- Check that the channel is tuned in properly.
- Adjust the picture settings:brightness,colour,sharpness,contrast,hue.
- Make sure that the TV is not located close to electrical appliances that may emit radio
frequency interference.
No colour
- Adjust the colour setting.
- Check that the programme is broadcast in colour.
- Check that the cannel is tuned properly.
TV does not respond to remote control
- Check that there are no obstructions between the remote control and the unit.
- Check that the remote control is within range of the unit.
- Check that the batteries in the remote control and not weak or exhausted.
This LCD TV is for household use and registered as harmless on electromagnetic waves.
Therefor,you can use it in every location as well as residential areas.
20
Page 24
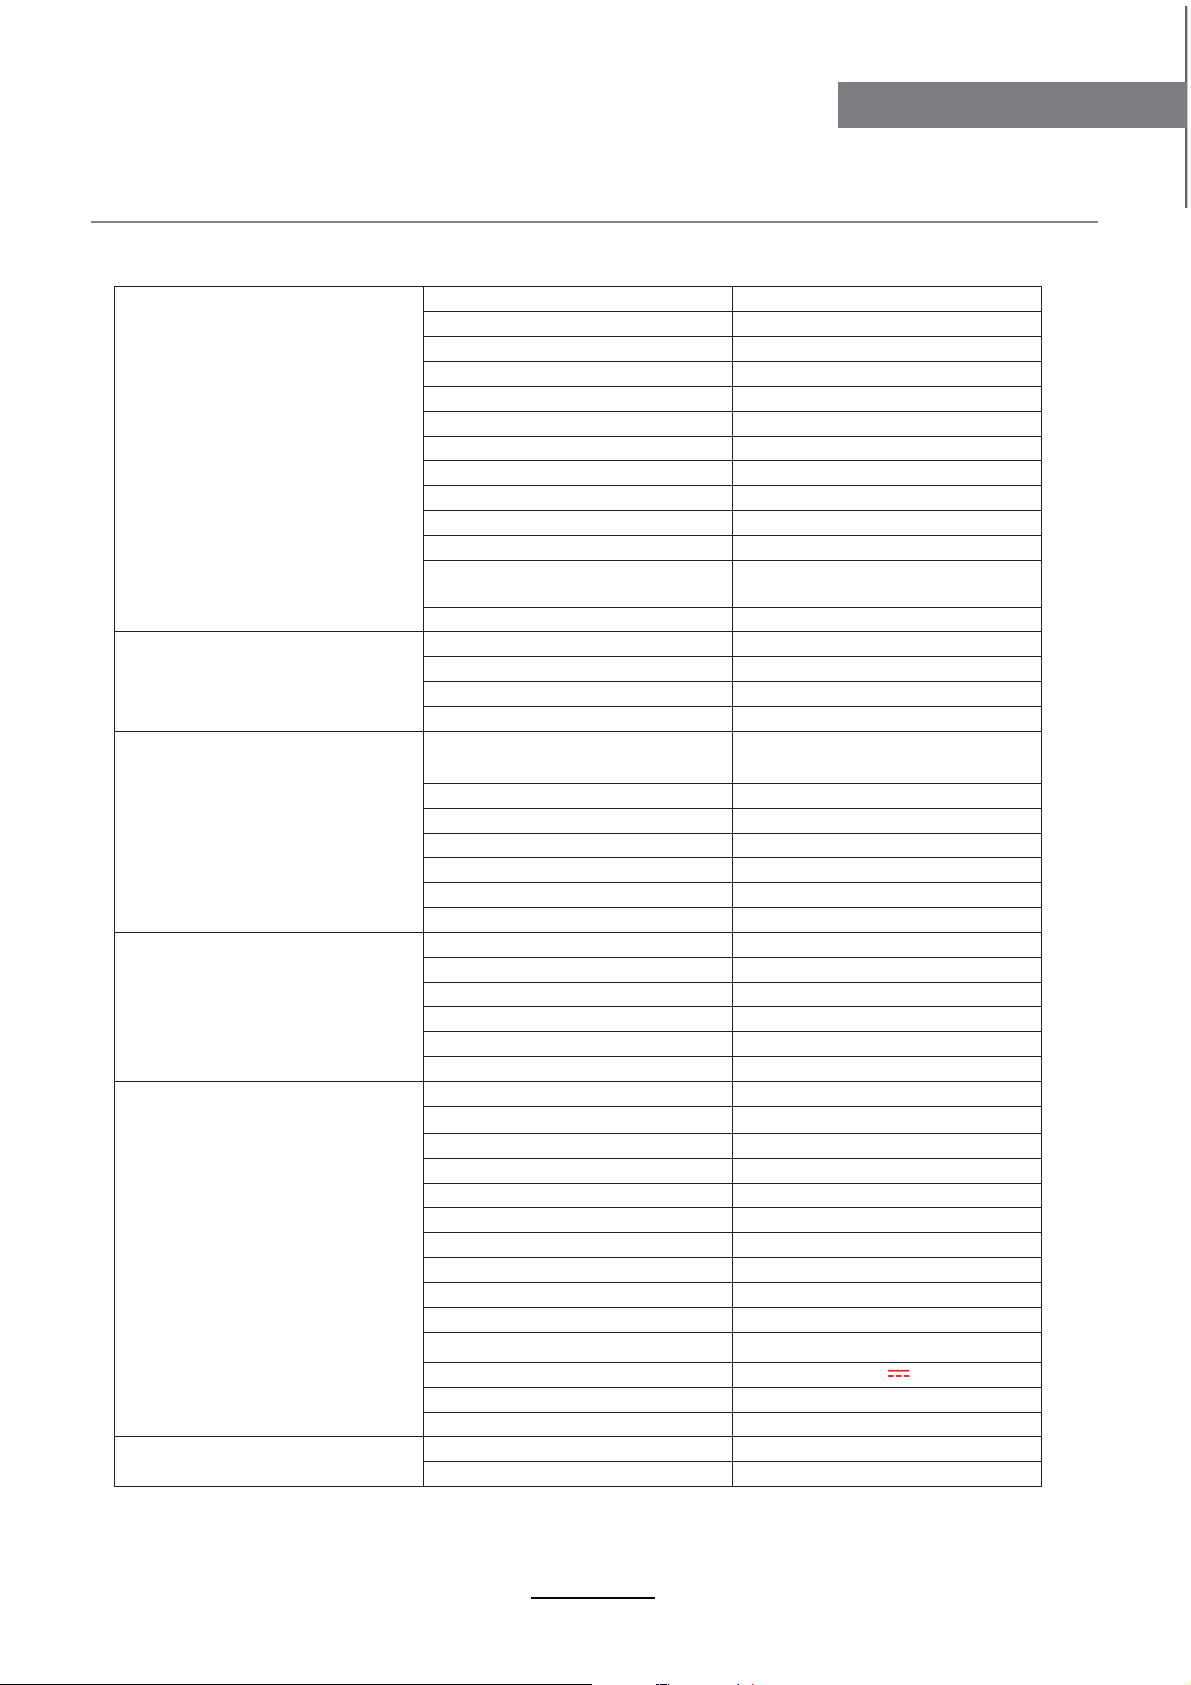
Specifications
y
g
r
y
Technical ^ƉĞĐŝĮĐĂƟŽŶƐ – DŽĚĞů>ϭ9HT-B>ϭϵHT-W
Maintenance and Service
Panel
ATV
dV
s
ŽŶŶĞĐƚŽƌƐ
ŝŵĞŶƟŽŶƐ
Panel
Screen Size
ŝƐplayArea
ŝƐplayRĞƐŽůƵƟŽn
ViewingAngle
AƐpect ZĂƟŽ
Pixelpitch (H/V)
BrightnĞƐƐ
ŽŶƚƌĂƐƚ
ReƐpŽŶƐe ƟŵĞ
ŽůŽrCapacit
Panel Type
>ŝĨĞƟŵĞ ŽĨ Backli
TV ƐyƐƚĞŵƐ
BanĚ
^ŽƵŶĚ
Teletext
sB ƐƚĂŶĚĂƌĚ
sŝĚĞŽ ĚeĐŽĚer
ĞŵŽĚƵůĂƟŽŶ
K&M
ĂŶĚǁŝĚƚŚ
Teletext
CI
Playback formats
Supported Media
System
Semi-conductor Lase
S/N
Audio d
RF-IN
SCART ( Euro 21pin ) -IN
Component Video-IN
VGA-IN
PC ƵĚŝŽ-IN
,MI-IN
sŝĚĞŽ-IN
>Z ƵĚŝŽ-IN
HeaĚpŚŽŶĞ ŽƵƚ
ŽĂdž ŽƵƚ
USB
PŽwer
PŽwer ĐŽŶƐƵŵpƟŽn
^ƚĂŶĚ-bypŽǁer ĐŽŶƐƵŵpƟŽn
With ^ƚĂŶĚ ( >/W/H )
WitŚŽƵt ƐƚĂŶĚ ( >/W/H )
namic range
ht
>
ϭϵ
409.8 (H) x 230.4 (V)
ϭϯϲϲ;,Ϳ x ϳϲϴ(V)
ϭϳϬ;,Ϳϭϲ0(V) (CRı20)
ϭϲϵ
0.3(H) x 0.3 (V)
300 nitƐ
ϭϬϬϬϭ
5 ŵƐ(TR +TF)
ϭϲϳD
TFT >ŝƋƵŝĚ ƌLJƐƚĂů ŝƐƉůĂLJ ŵŽĚƵůĞ with
> Backlight Ƶnit
50,000hƌƐ
W> ^D -BG K/I,
UHF /VHF
ŶĂůŽŐ ƐƚĞƌĞŽ NICAM/A2
ϭϬϬϬ PageƐ Teletext
&ƵůůycŽŵply with sB-T aŶĚ MPG-4
MPG-4
YW^<ϭϲYDϲϰYD
2K/8K
7/8MHz
d^/EϯϬϬϰϳϮ
x ϭ
NO
NO
NO
NO
NO
NO
75 ŽŚŵ ( /ϳϱ )
s^Z'>нZ ĂŶĂůŽŐ ƐŽƵŶĚ
YPbPr;ĂƌƉŚŽŶĞ ŽŶŶĞĐƚŽƌͿ x ϭ
-SUB ϭϱ Pin * x ϭ
x ϭ
x ϭ
CVBS x ϭ
RCA R/> x ϭ;ĨŽr CVBS &YPBPR)
x ϭ
x ϭ
x ϭ
12V 5A
25W
<ϭW
461x155x377mm
461x49x340mm
PC dŝŵŝŶŐ ^ƵƉƉŽƌƚĞĚ ϲϰϬΎϰϴϬ ϲϬHZ ϭ3ϲϬΎϳϲϴ ϲϬHZ
ϴϬϬΎϲϬϬ ϲϬHZ
ϭϬϮϰΎϳϲϴ ϲϬHZ
21
Page 25

Manufactured under license from Dolby Laboratories.
"Dolby" and the double-D symbol are trademarks of Dolby Laboratories.
 Loading...