

Page 1
Quick Start Guide
1
Feature Summary
● Wi-Fi connectivity ● 7.0” Touch Screen ● 3
rd
Party Apps Support
● Built-in Webcam ● Built-in G-sensor ● Media Player ● 3G (optional)
Accessories
z Main Unit ● USB cable ● AC Adaptor
z Earphone ● Quick Start Guide ● OTG USB cable
Product Overview
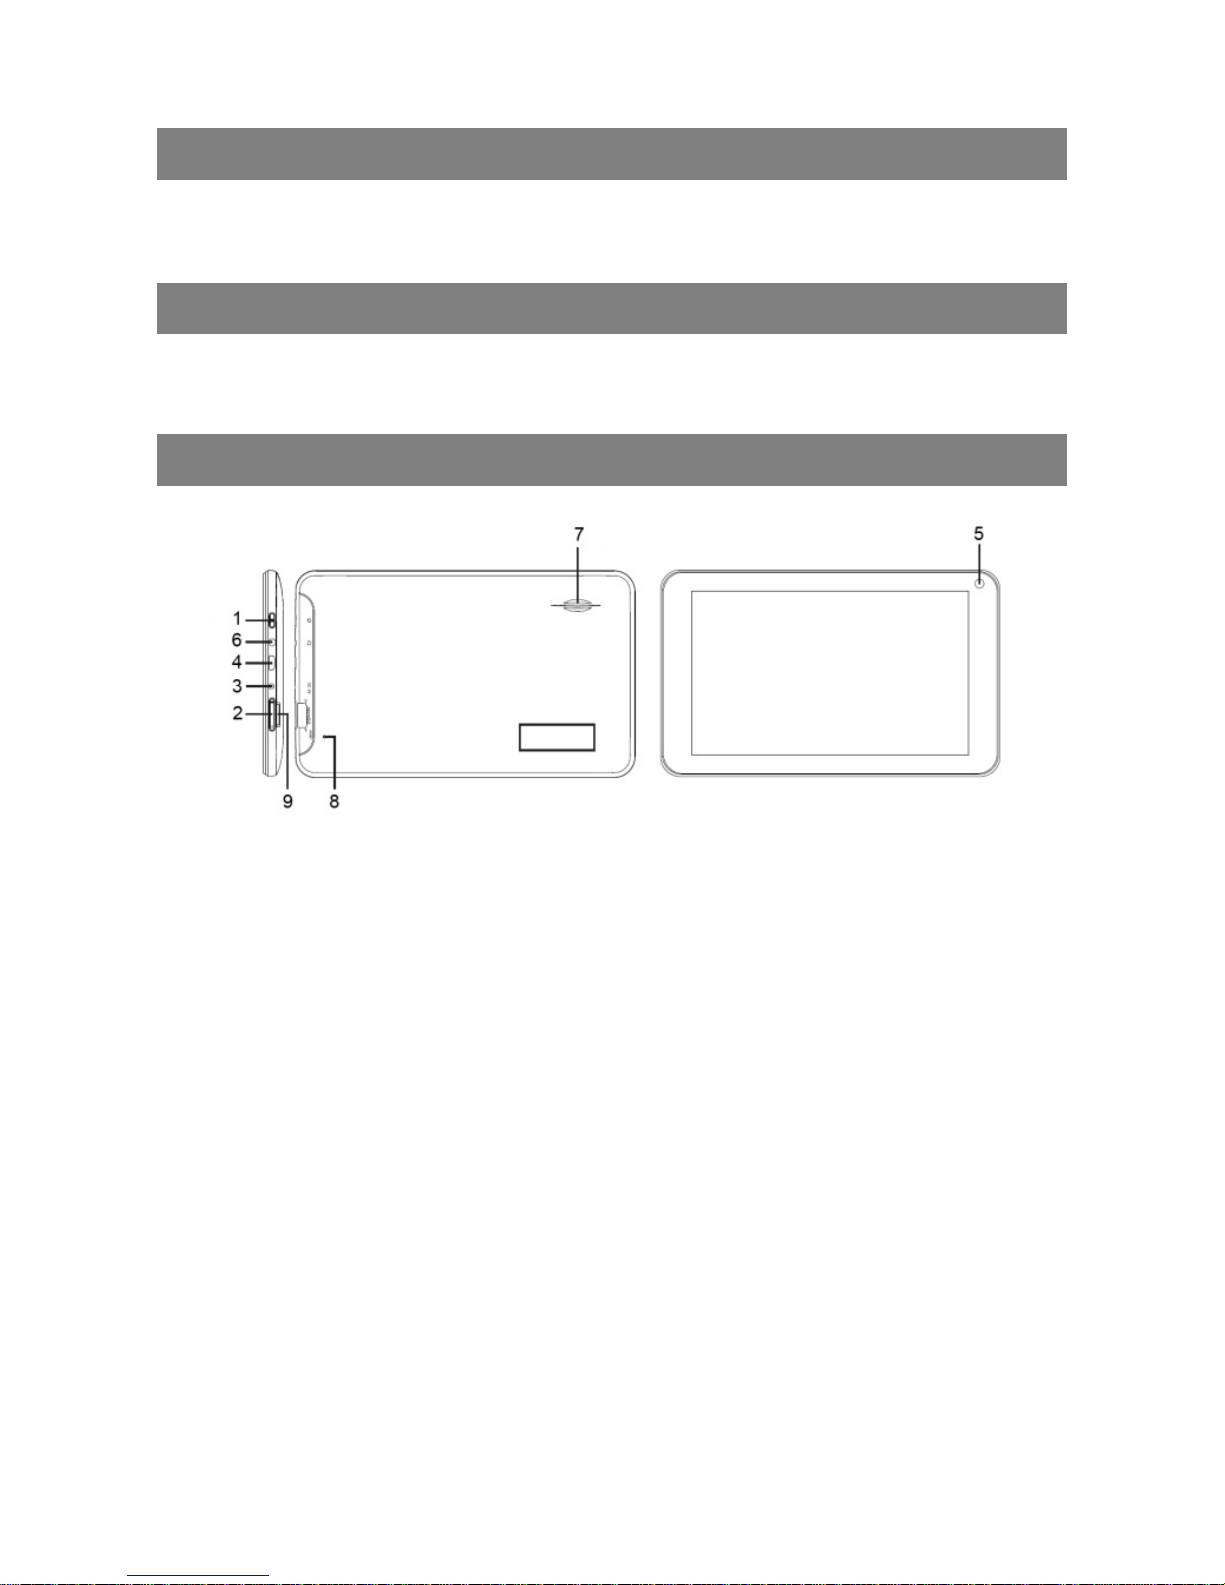
1. Power – Press and hold to turn on or off the unit; briefly press to lock or unlock the screen
2. VOL+ : Increase the volume / VOL- : Decrease the volume
3. DC-IN Port – Connects to the provided AC adaptor
4. Micro USB port – Connects to PC via USB cable / Connects to USB memory device,
keyboard/mouse or 3G dongle via USB host cable
Microphone – The microphone is located near the USB port inside the cabinet
5. Camera – Built-in Webcam
6. Earphone Socket – Connects to stereo earphones
7. Speaker
8. Reset Pin Hole – Reset your device if the device freezes
9. MicroSD Card Slot
Page 2
Quick Start Guide
Before o
p
Power On/ Off t
h
To turn on the
d
when you see t
h
system, please
b
To turn off the d
e
option, then tap
o
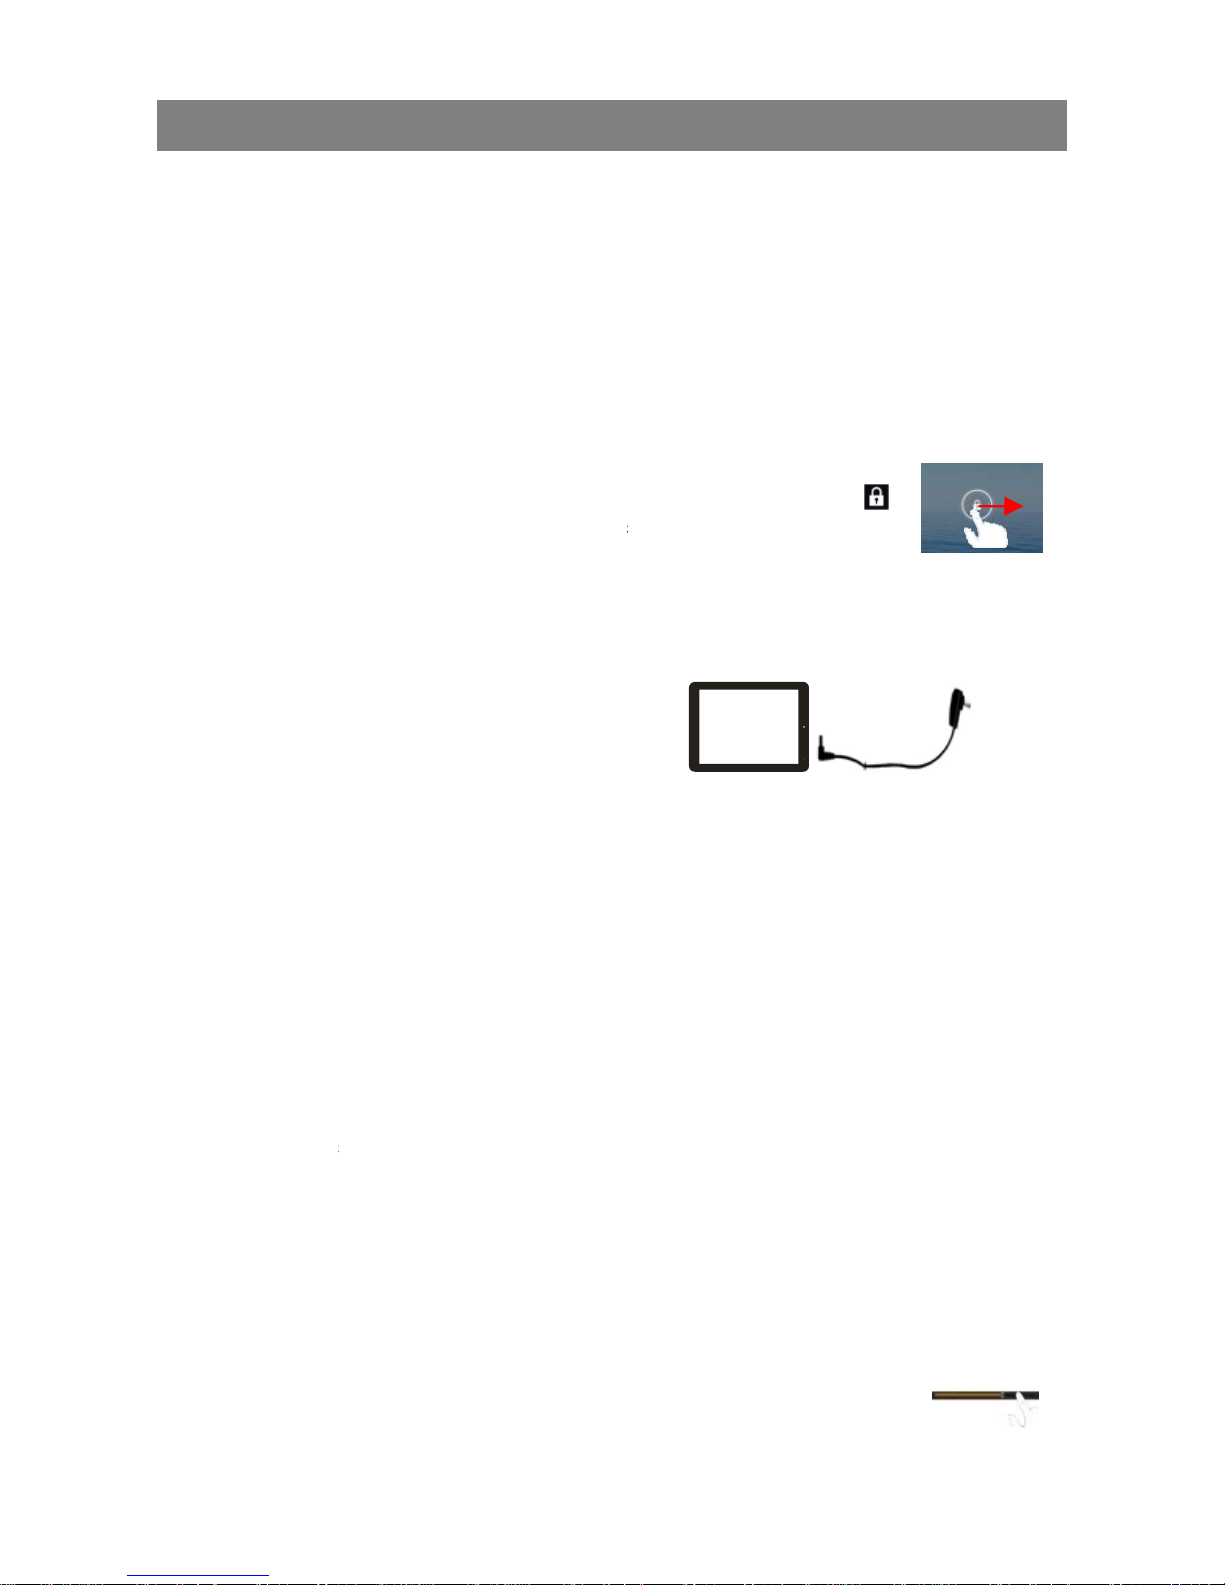
Unlock the Scr
e
The screen displ
seconds. You ne
e
rightwards before
Charge the Bat
t
Charge the devi
c
device to any st
a
about 5 hours to
Install Memory
C
To install a mem
o
card into the slot
Transfer Files f
r
You may need t
o
(1) Connect the
d
(2) Once the co
n
appear on yo
(3) Copy files fro
Reset the Devi
c
(1) If the device
button for s
e
(2) If the above
reset” butto
n
General Touch
A
y During play
b
playback p
r
y In different
b
finger on th
e
2
e Device
evice, press and hold the
e boot-up screen. It may
e patient before you proce
e
vice, press and hold the
P
n “Power Off” and “OK”.
en Display
ay will be locked when the
d to unlock the screen by
d
you continue to use the devi
c
ery
e when it indicates low batt
ndard wall outlet via the D
C
fully charge the battery.
eration
Power button on the unit
a
take one or two minutes t
o
d.
ard
ry card, find the card slot
o
in the correct orientation.
om PC
transfer media files from a
evice to a computer with t
h
nection is done, an icon of
m
ur computer.
m the PC to the internal me
e
freezes, you can force the
d
conds.
operation does not work, u
s
.
ctions
ack of music or video, you
c
ogress.
rowsers (e.g. File, Music et
screen up and down to sc
ower button to bring up th
device is idle for a few
ragging the lock icon
e.
ery. To charge the battery,
c
-IN port using the power a
d
n the device and then inse
r
computer to the device.
e supplied USB cable.
obile phone (internal me
m
mory or the memory card.
evice to shut down by hold
i
e a pin to penetrate into th
e
an tap on the progress bar
c.), you can slide your
roll the file list.
nd release it
start up the
e “Power Off”
onnect the
aptor. It takes
t the memory
ory) will
ng the Power
“pinhole
to change the
Page 3
Quick Start Guide
y In some bro
w
your finger
o
sers (File, Music, Video,
W
y Tap on
tap on
button to dis
the recently
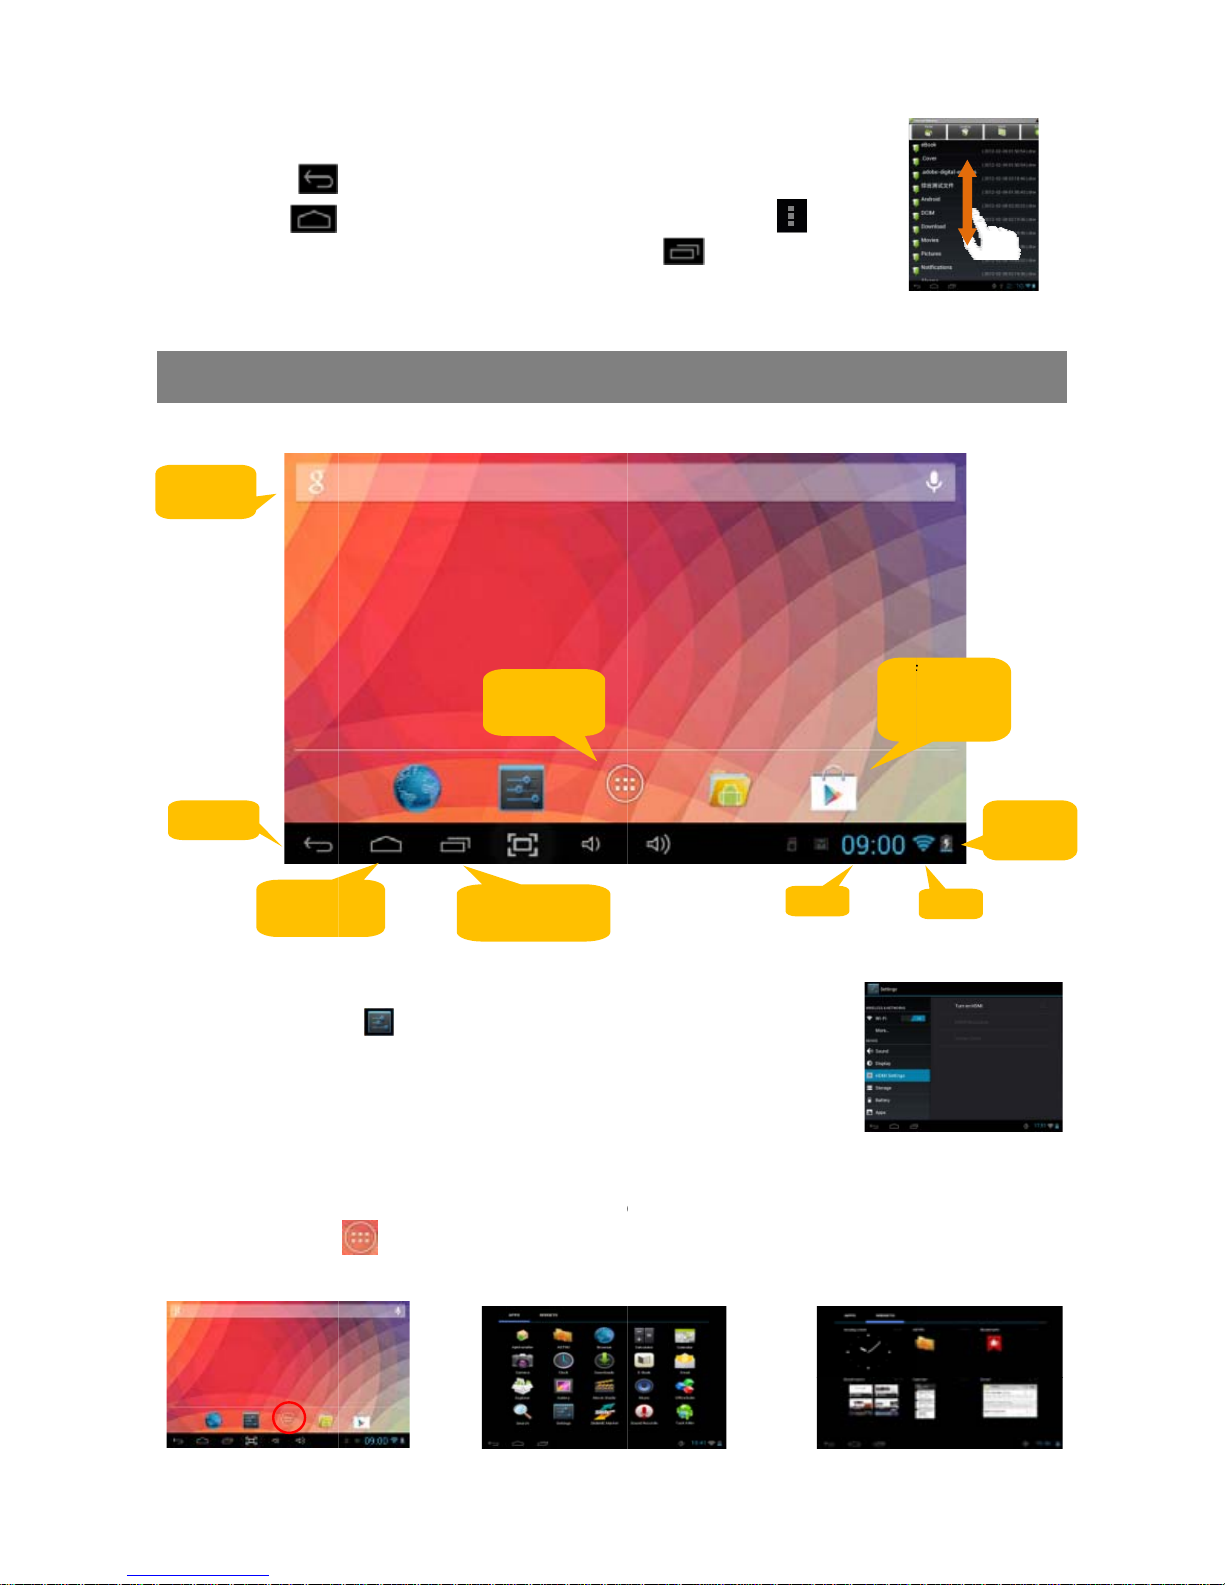
Home Screen
System Setting
s
Tap the Setting ic
o
setting menu. Her
device, e.g. Lang
u
Display all Appl
The device has
m
Application Tab
Google
Search
Go to H
screen
Return
3
n an item to display option
s
eb etc.), you may hold
button to get back to previ
o
button to go to the Home
S
play the menu options; tap
o
opened apps.
Basic O
p
n on the Home Screen t
o
e you can setup the working
e
age, Display, WiFi, Sound, A
ications and Widgets
any useful pre-installed a
p
to display them.
Go to apps
page
ome
Recently
opened apps
.
us operation interface;
creen; tap on
n button to check
eration
open the system
nvironment for the
pps etc..
plications/widgets. You can
De
fShoapp
Time
tap the
Battery
Level
WiFi
ault
rtcuts to
lications
Page 4
Quick Start Guide
Customizing H
o
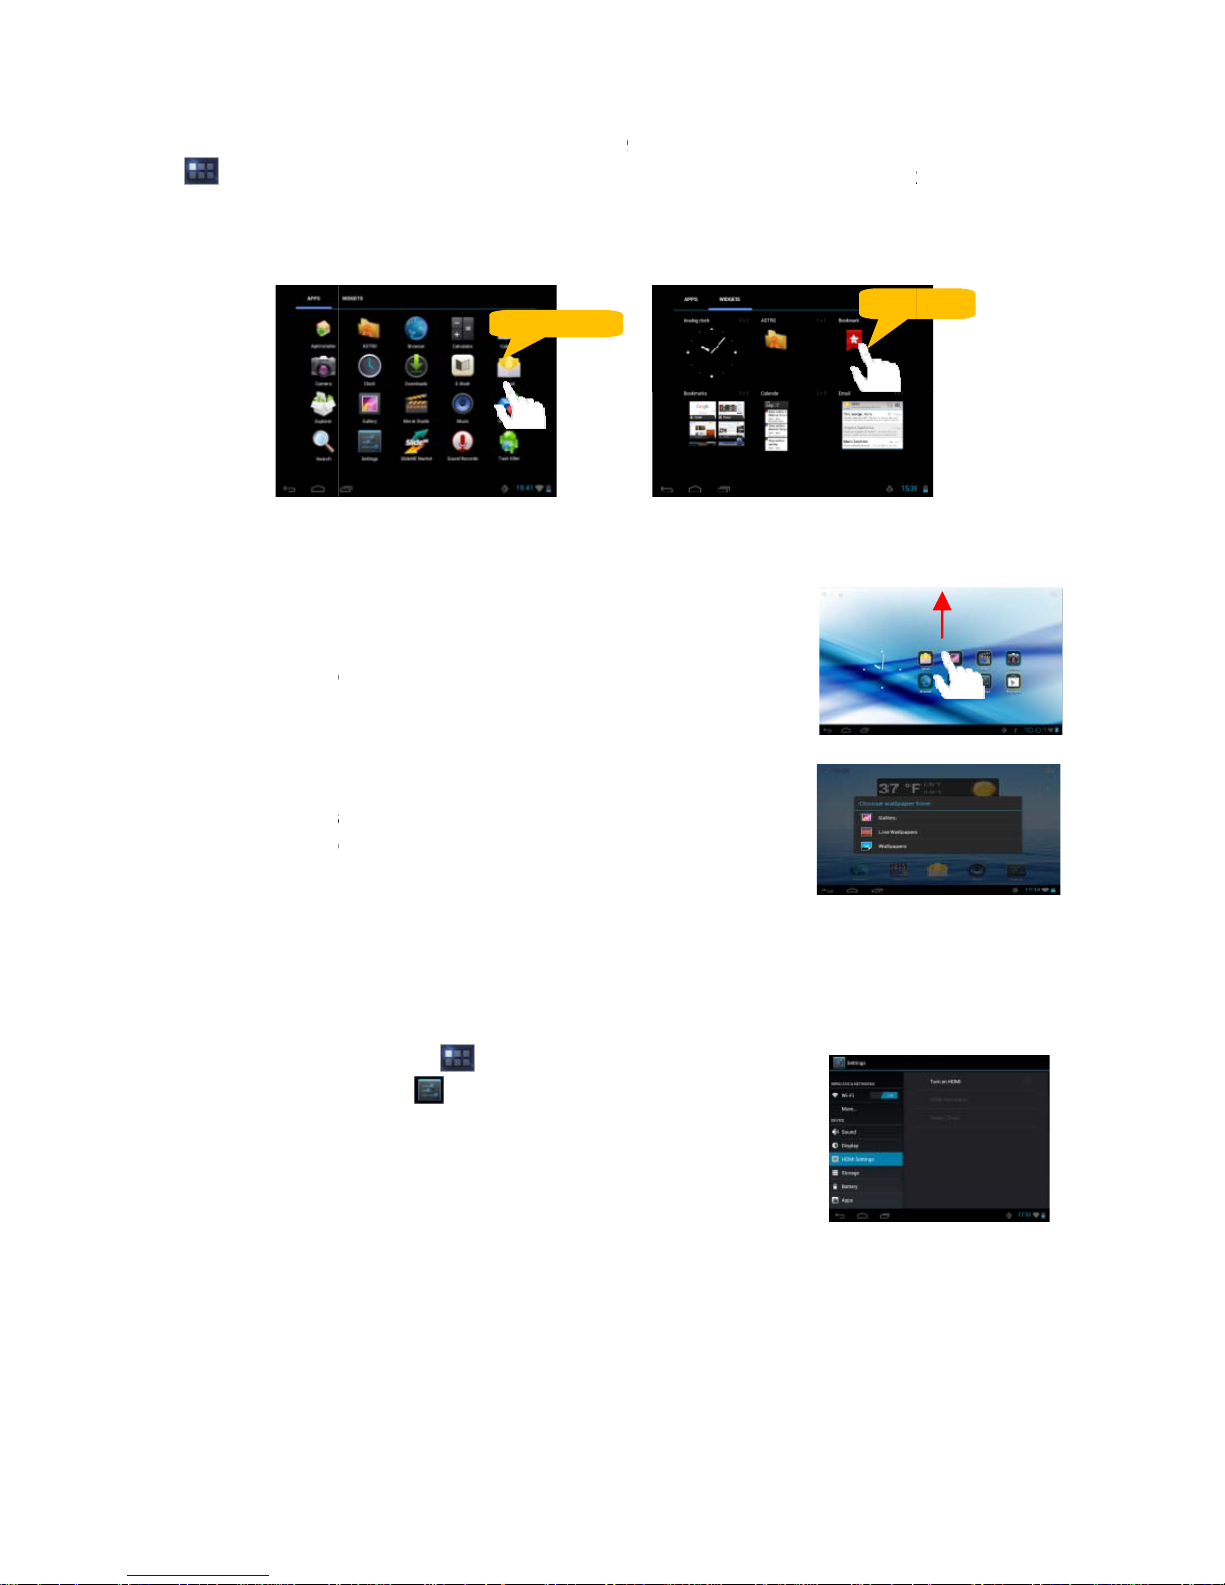
y To add a Hom
e
to display
on the home p
a
me Screen Items
Note: If current p
a
be prompted that
Screen item (shortcut, wid
g
all applications and widgets
ge.
g
et etc.), you can tap the a
p
, then hold your tap on an i
t
plication icon
em to place it
ge of the Home Screen has no
there is no more room.
enough room for a shortcut or widget, you will
y To move a Hom
highlight it, then
y To remove a H
o
highlight it, drag
release your fin
g
y To change the
w
till a menu appe
a
desktop wallpa
p
Make Wi-Fi Con
Before launchin
g
Wi-Fi network.
(1)
Tap
tap the A
(2) Tap
the Setti
n
(3) Slide the WI
F
(4) The device
w
networks and
(5) Choose a ne
t
connect.
4
e Screen item, hold your fing
e
drag it to the desired location
me Screen item, hold your fin
it to the recycle bin “X Remo
v
er.
allpaper, hold your tap on th
e
a
rs, then tap on “Wallpaper” t
o
er.
nection
the web browser, you first
n
pps Tab to display all
a
g icon
on the apps scr
e
I toggle switch to “ON” to t
u
ill scan automatically for
display them.
work from the list and then
t
Hold
d
Hold down
r onto it to
, and release it.
ger onto it to
e” and then
Home screen
set the
eed to activate the Wi-Fi a
n
d
own
d configure a
pps.
en.
rn on WIFI.
available WiFi
ap “Connect” to
Page 5
Quick Start Guide
Using 3G Dong
l
Besides Wi-Fi c
o
dongle (not provi
network is enabl
e
You can surf on
t
e
nnection, you can access i
n
ded) to the device through
t
d with 3G network icon ap
p
he Internet freely now.
ternet by 3G dongle. Conn
e
he USB host cable and the
n
earing at the bottom right
o
ct a 3G
the 3G
f the screen.
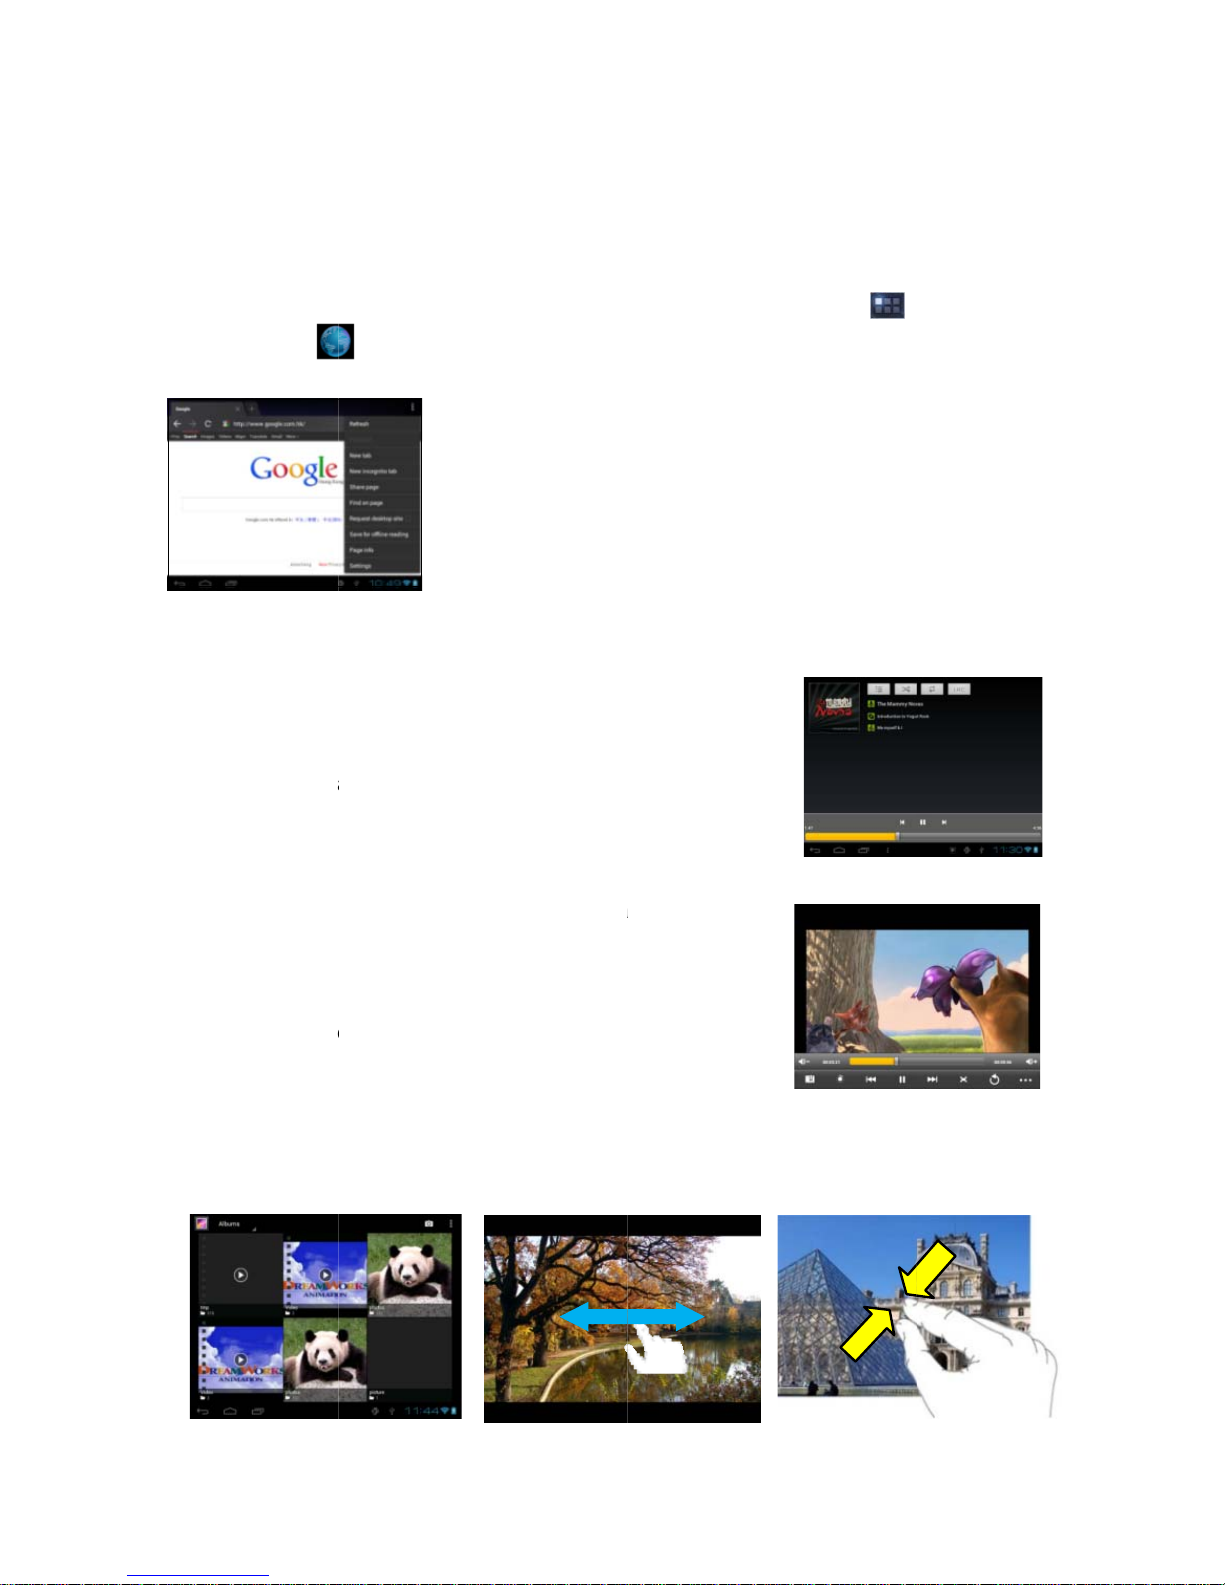
Launching the
W
To launch the
W
Browser icon
eb browser
Playing Music
(1) Tap the Mu
s
the music pl
a
(2) Navigate thr
o
(3) Select a file
a
Playing Videos
(1) Tap the Vid
e
(2) Navigate thr
o
(3) Tap on a vid
V
iewing photos
(1) Tap the Gall
e
launch the
P
(2) Browse pho
t
(3) Tap a photo
(4) To display t
h
(5) To zoom in
o
eb browser, you can ta
p
in the Home screen.
5
ic icon in the application pa
g
yer.
ugh the music library.
nd tap it to enjoy the musi
c
o icon in the Home Screen
ugh the video files if avail
a
eo file to start playing it.
ry icon in the application p
a
hoto Gallery.
os listed in thumbnail.
thumbnail to view the phot
o
e previous/next picture, sli
d
r out the picture, pinch you
r
the Application Tab and then the
e to launch
.
to launch the video player.
ble.
ge to
in full screen.
e your finger on the screen
finger on the picture.
horizontally.
Page 6
Quick Start Guide
6
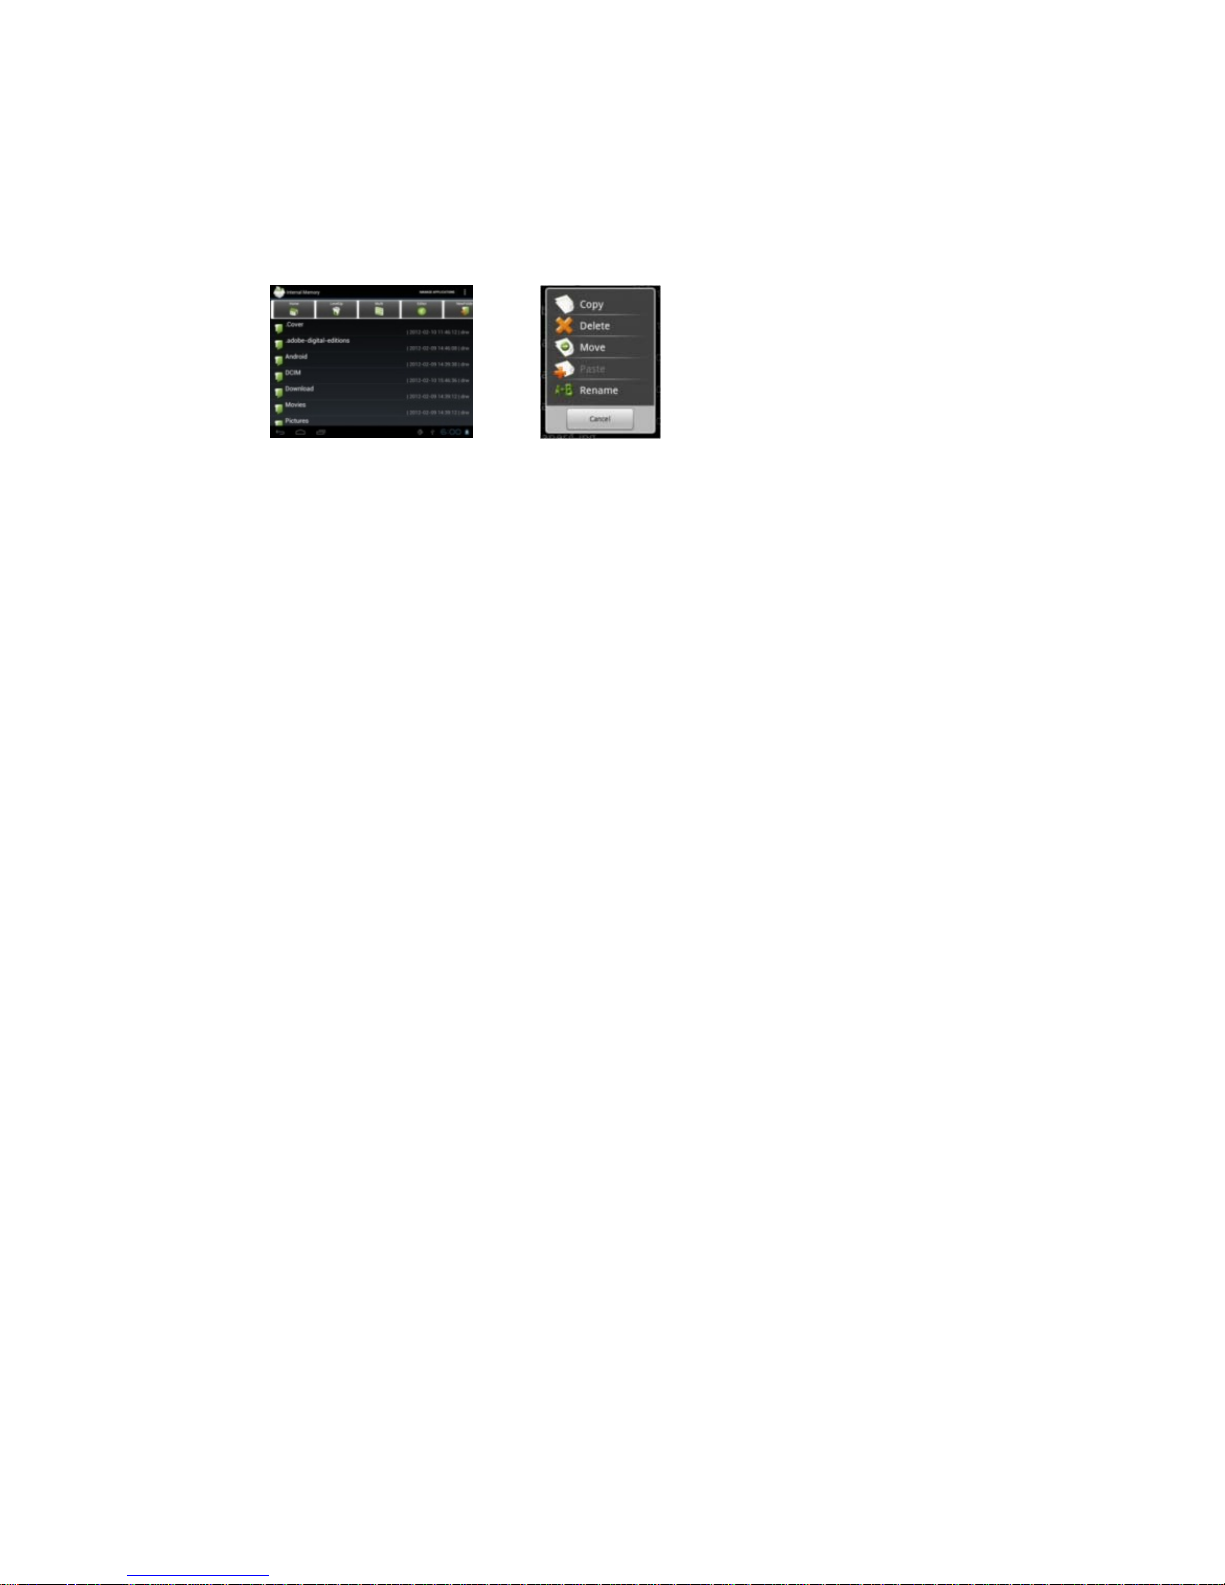
Managing the Files
You can check or manage your files with Explorer application.
(1) Tap the Explorer icon in the apps page to open this mode.
(2) In this mode, you can look through all your file resources.
(3) You can also manage your file resources by bringing up the menu.
Receiving and Sending Emails
You can receive and send emails with this device if internet access is available.
Setup your Email Account
(1) Start up the email application by tapping the Email application icon.
(2) Input your email address and login password.
(3) Tap “Manual Setup” to set the email server information.
(4) Click “Next” to continue. Your tablet will check the server settings. When it
prompts you that “Your account is set up, and email is on its way”, your account is
set up successfully.
(5) Input your name and then tap on “Done” to finish.
Managing apps and tasks
There are number of useful apps pre-installed in the device as it is produced at the
factory, and you can copy, download or purchase some 3rd apps from other
resources (e.g. the Internet).
● Download or purchase apps
With your device, you can visit an apps store or E-market website (e.g. SlideMe) that
offers you plenty of free or paid apps to download.
● Install apps
(1) Open the Explorer application, then find the app you want to install.
(2) Tap the app to start installation. However, for the sake of security, the installation
may be blocked if the device is not sure of the source of the app. In this case, you
shall have to check the “Unknown sources” in the pop-up setting menu before you go
on with the installation.
(3) Once the installation finishes, you can find the icon of the app in the apps screen.
It is available for you now.
● Uninstall 3rd party apps
(1) Tap the Settings icon to display setting menus.
(2) Select “Apps”.
(3) Tab on the application that you want to uninstall.
(4) Tab on “Uninstall” to uninstall the application.
Page 7
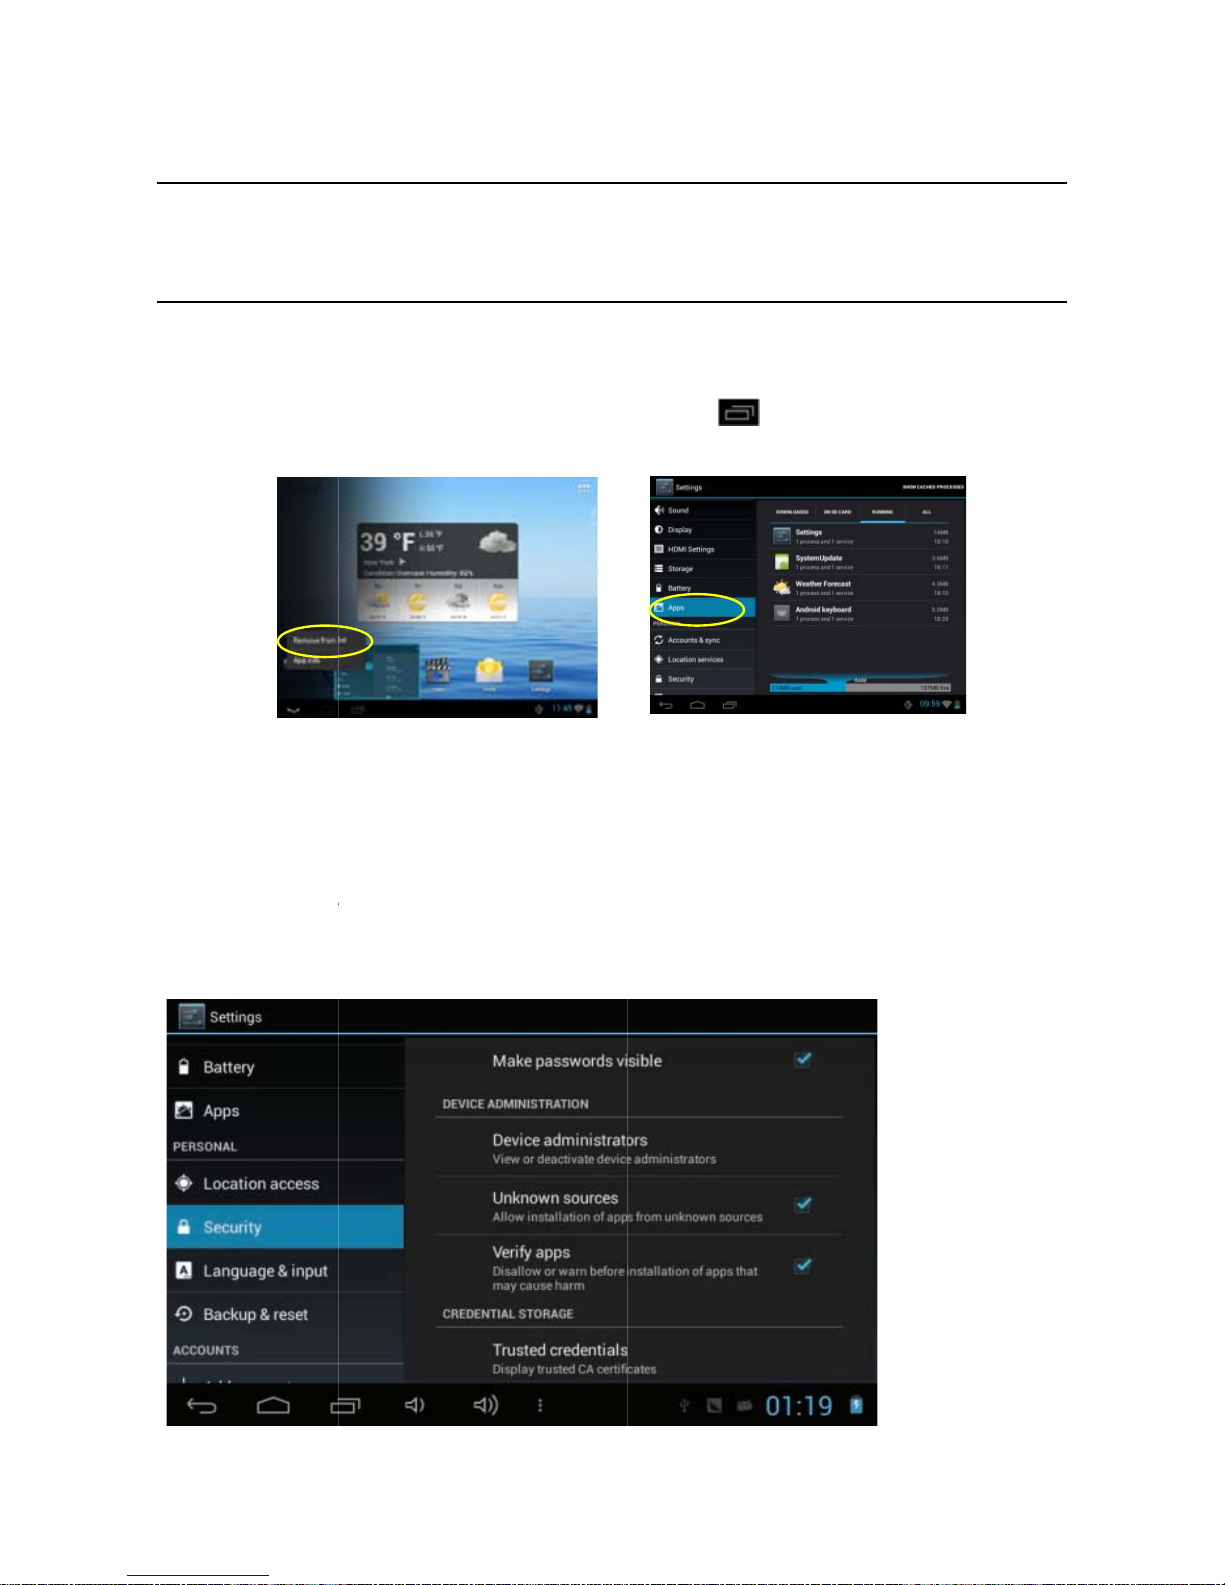
(5) You can sim
p
then drag it to t
h
Note:
y You cannot unin
s
p
arty apps you i
n
y
Make sure all a
p
● Managing task
You can handle
m
can view photos
(1) To remove t
h
hold your tap on
(2) You can als
o
tasks.
(3) You can op
e
Security
Unknown sourc
e
If you do not sel
e
Store.
Quick Start Guide
ly tap and hold on an app i
c
7
e dustbin icon to uninstall i
t
on to jump to the Home Screen,
.
tall the pre-installed applications,
stalled can be uninstalled.
but you can deactivate or stop them; Only the 3rd
p
ps you have copied or downloaded to your device are in the .apk format.
s
ultiple tasks at the same ti
while listening to music.
me with this device. For example, you
e apps used recently, you
c
the app that you want to st
o
an tap button to disp
l
p, and finally select “Remo
v
ay them, then
e from list”.
run the application Advan
c
n the Settings menu and s
e
s: Set the device to install
a
ct this option, you can insta
ed Task Killer (if avaialble)
lect Apps to stop the tasks.
pplications downloaded fro
m
ll only applications downloa
to kill your
any source.
ded from Play
Page 8
Quick Start Guide
8
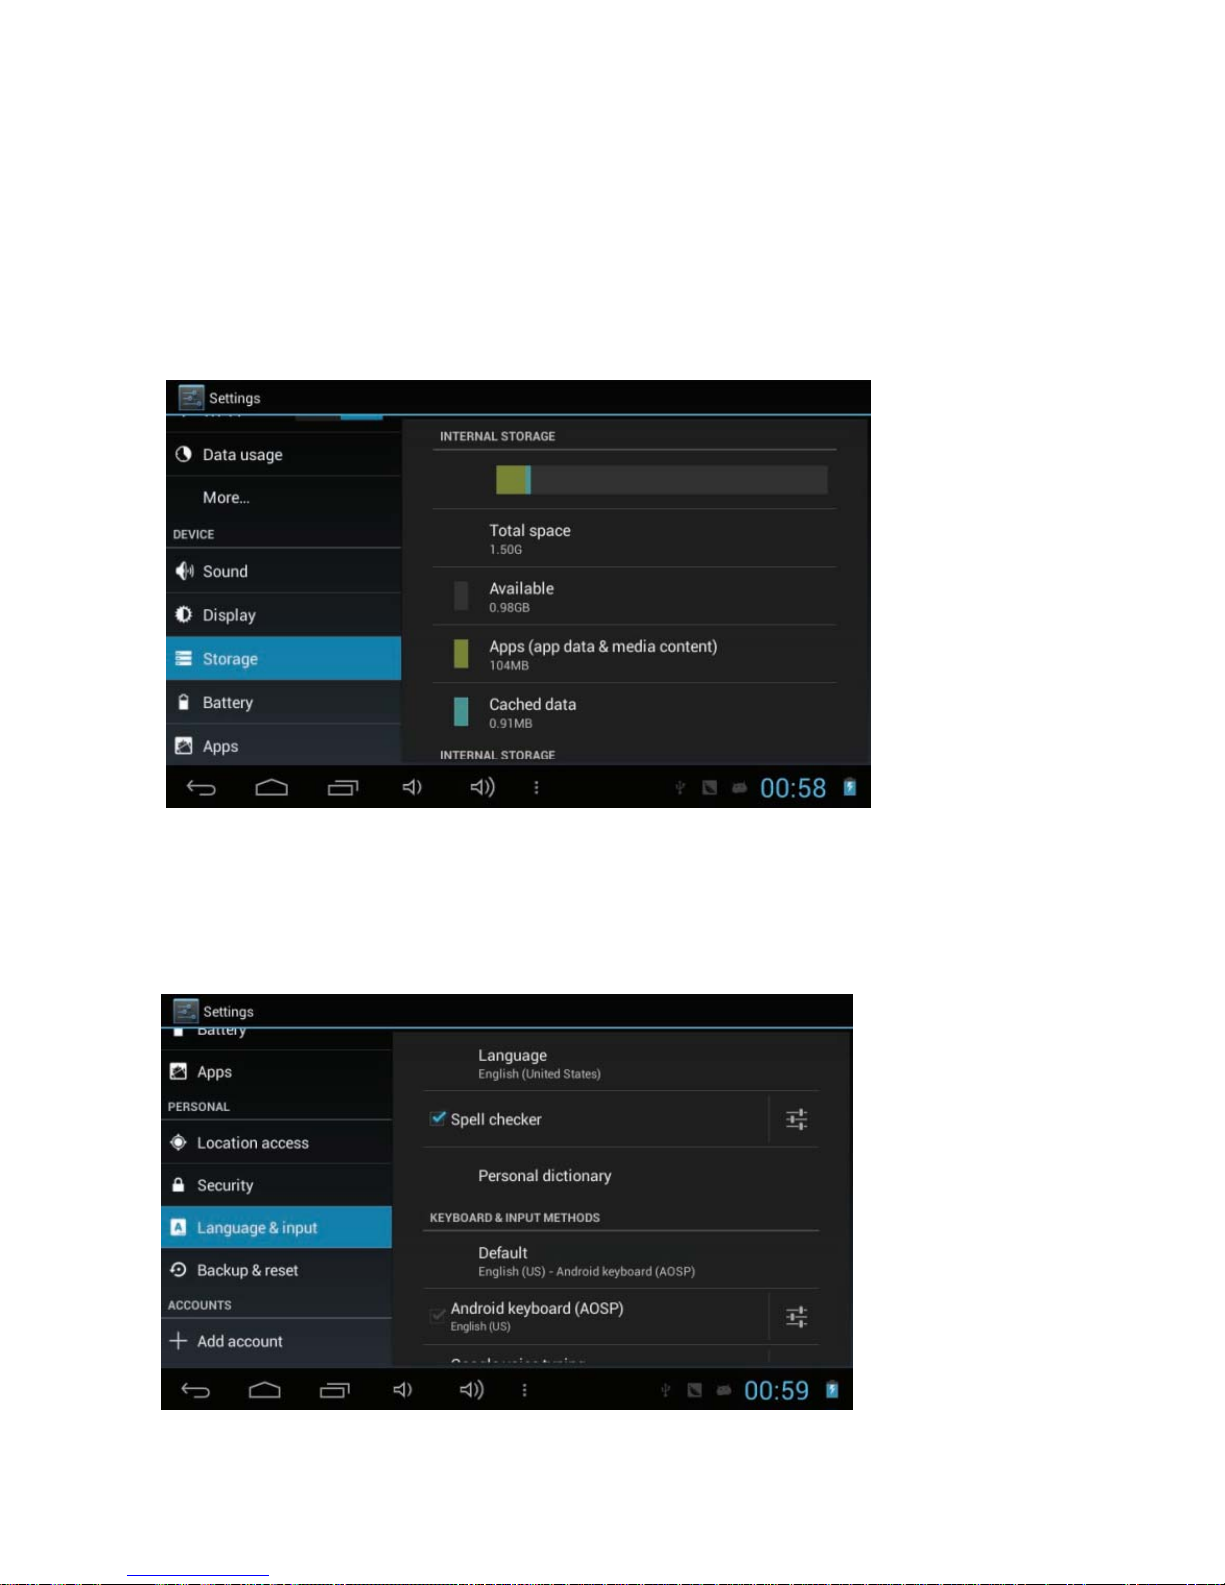
Storage
View memory information for your device and memory card. You can also format the
memory card.
• Formatting a memory card will permanently delete all data from the
memory location.
• The actual available capacity of the internal memory is less than the
specified capacity because the operating system and default applications
occupy part of the memory.
Language and input
Change the settings for languages and text input.
Language: Select a display language.
Keyboard & input methods: Select a text input method.
Page 9
Quick Start Guide
9
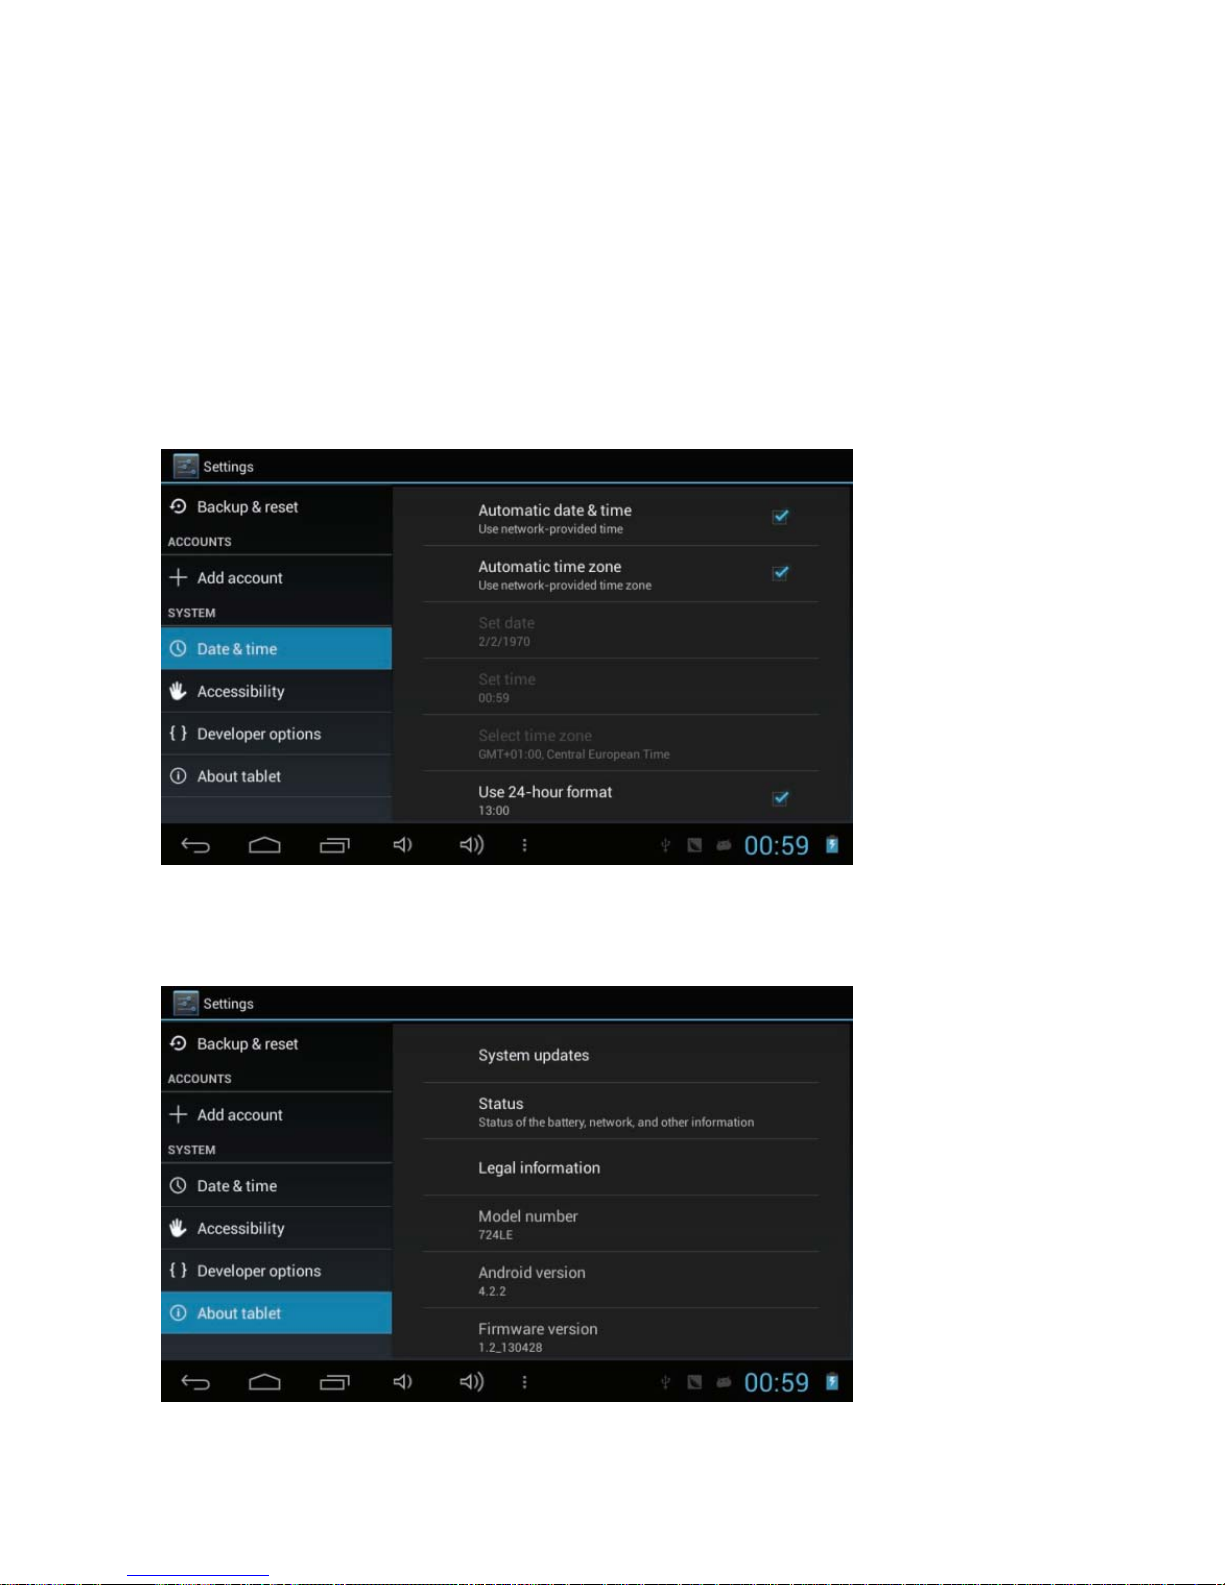
Date and time
Change the settings to control how time and date appears on your device
• Automatic date and time: Set to receive time information from
the network and update the time and date automatically.
• Set date: Set the current date manually.
• Set time: Set the current time manually.
• Automatic time zone: Set to receive time zone information from
the network when you move across time zones.
• Select time zone: Select a time zone.
• Use 24-hour format: Set to show the time in 24-hour format
or 12-hour format.
• Select date format: Select a date format.
About tablet
View information about your device, such as model number and version.
Page 10
Quick Start Guide
10
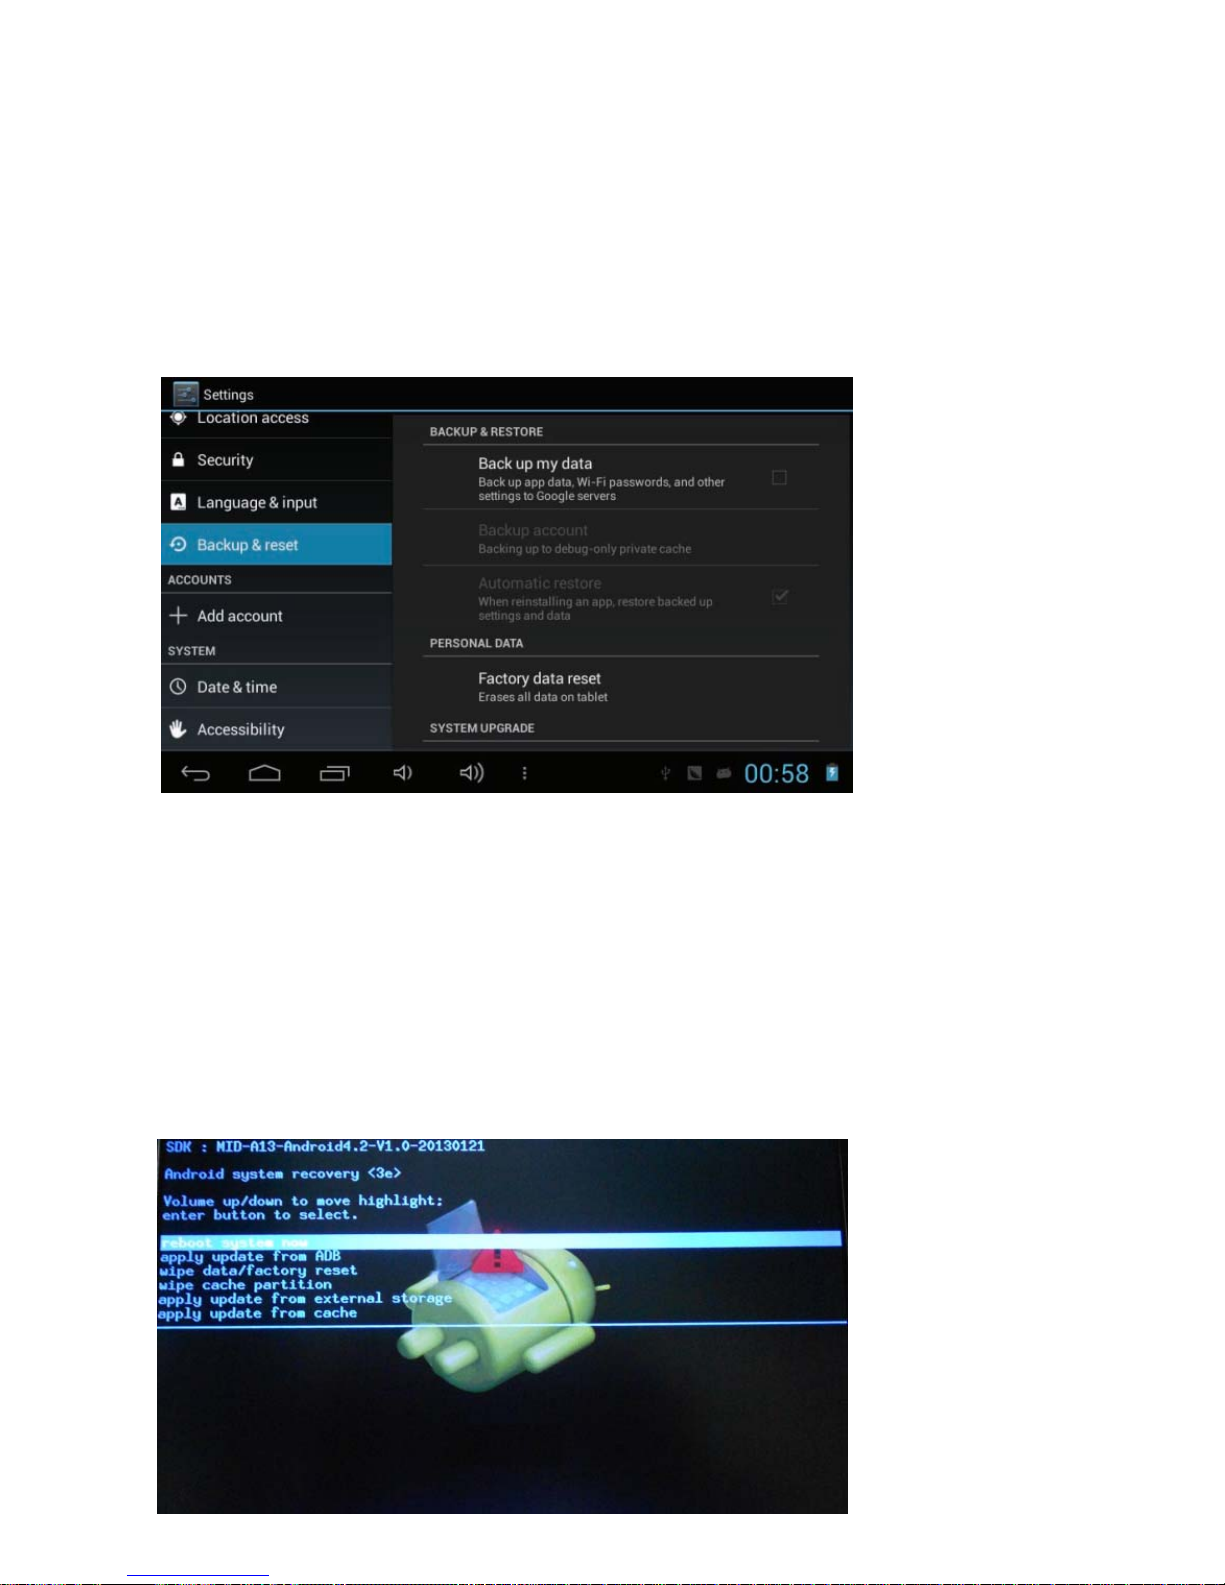
Back up and reset
Change the settings for managing settings and data.
• Back up my data: Set to back up your settings and application data to the
Google server.
• Backup account: Set up or edit your Google backup account.
• Automatic restore: Set to restore your settings and application data when
you must reinstall an application.
• Factory data reset: Reset your settings to the factory defaults and delete
all your data.
Doing factory reset by Recovery Mode
• While the tablet is powered off, press and hold "power" and "Vol+" buttons
at the same time for 10 seconds.
• Use Vol+ / Vol- to move the highlight to "wipe data/factory reset".
• Press "power" button to select.
• Use Vol+ / Vol- to move the highlight to "Yes -- delete all user data".
• Press "power" button to select
WARNING: Your tablet will be reset to factory default and all data will be
deleted.
Page 11

Quick Start Guide
11
Recovery of firmware or software
This is made to improve your tablet - therefore you should regularly look for upgrades
for your model. We recommend you to upgrade the firmware or software before you
turn in your tablet for service, since it can solve problems and technical issues if your
tablet doesn't work to your gratification.
Go to www.netlogic.se and find your model. Follow the instructions on how to upgrade
your tablet.
By doing the upgrade by yourself you minimize the risk of being charged for firmware
or software upgrades before you send it to a service center. Upgrading firmware or
software is not included in the service that the warranty covers.
Page 12
Quick Start Guide
Item
CPU
DDR
Built-in operating s
y
Hardware
Internal Memory
Memory Card type
Operation System
Interface
Connection Agreem
E-Book Format
Photo Format
Audio Format
Video Format
Battery Charge Tim
e
Battery Life
Display
Front webcam
SNR
Power Supply
Storage Temp.
Ambient Temp.
Operation Relative
H
Storage Relative H
u
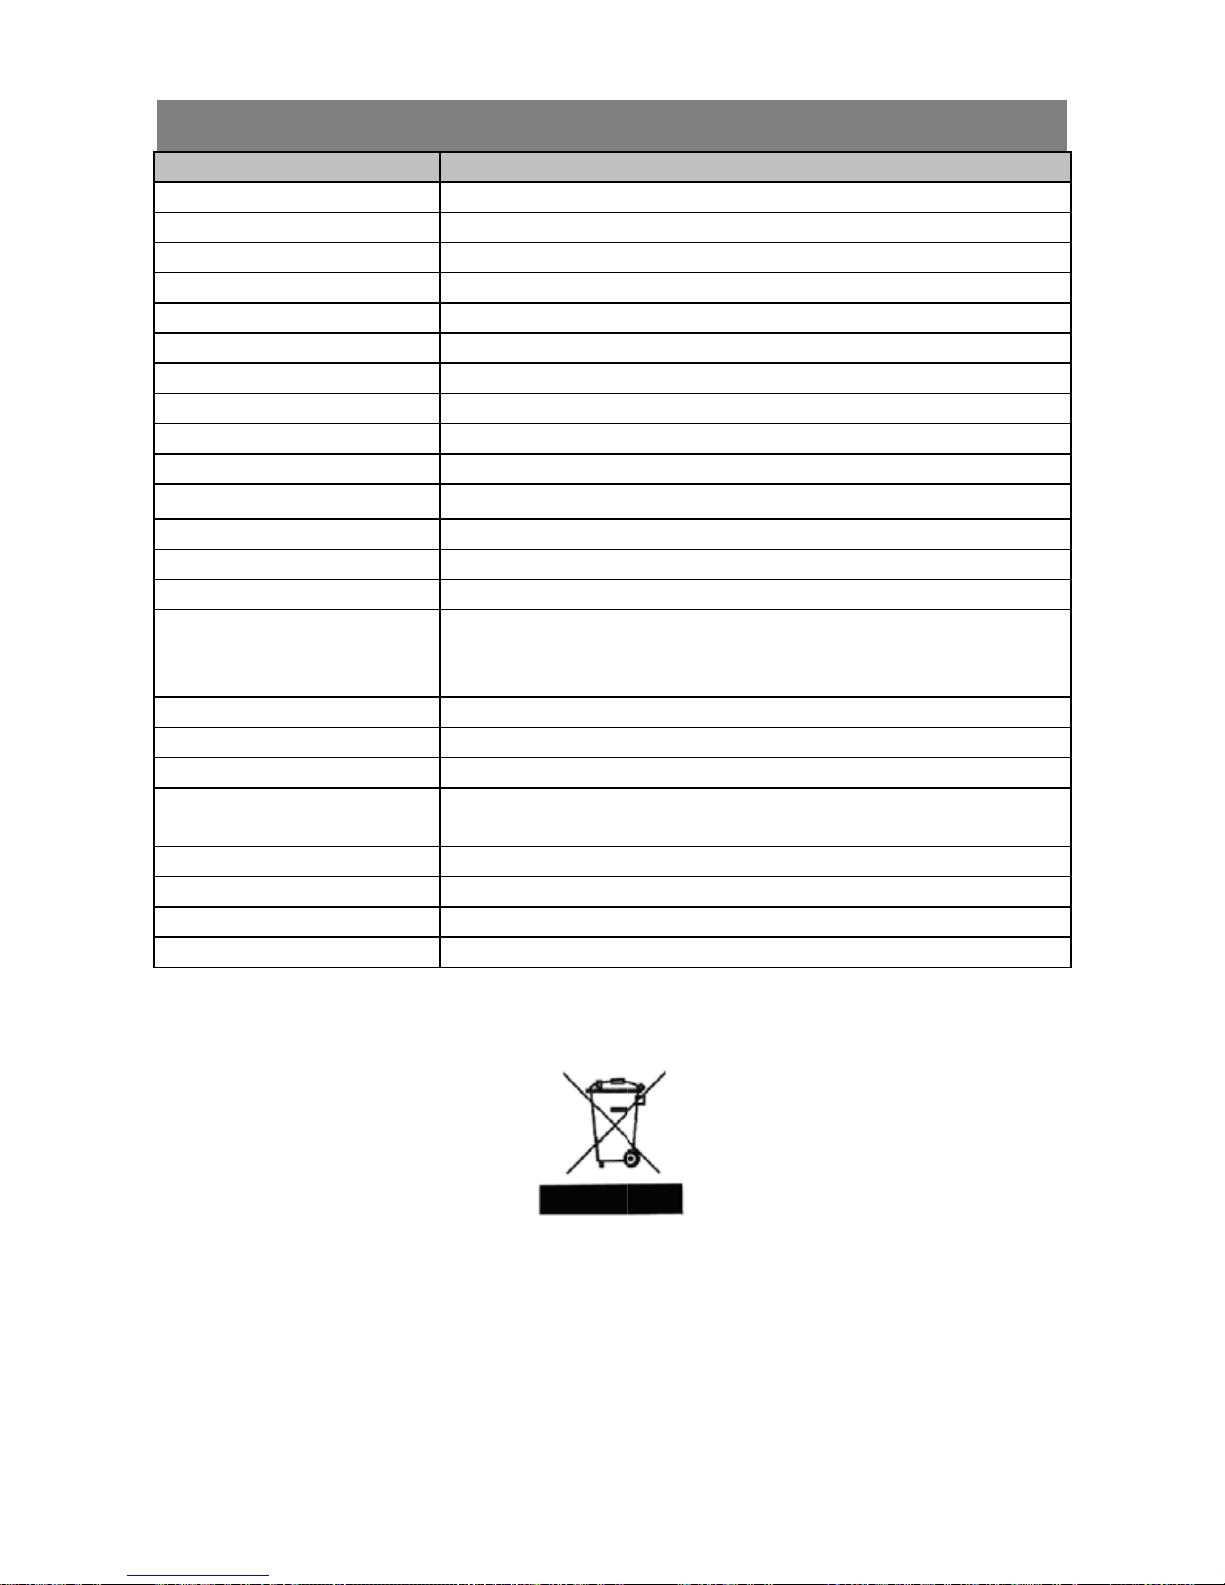
Specifications
Cortex-A8 CPU 1.2
G
512MB
stem Android OS 4.2 or a
b
IBM PC or compatib
4GB (2.5 GB for int
e
SD card: 2GB, 4GB
Windows2000/XP/V
i
USB2.0 High speed
ent WiFi (802.11 b/g/n)
PDF/EPUB/TXT/FB
2
JPEG(Baseline)/ B
M
MP3/WAV/OGG/FL
A
AVI, 3GP, MP4, RM,
About 5 Hours
About 6 hours of m
u
About 5 hours of vid
About 4 hours of we
7.0-inch TFT LCD,
T
0.3 Mega Pixels
>=80dB
Rechargeable lithiu
m
AC Adapter: AC Inp
u
-20℃~ +65℃
0℃ ~ +50℃
umidity
20% ~ 90% (40℃)
midity
20% ~ 93% (40℃)
Description
Hz
ove
le PC, Note-book or Macintosh wit
rnal system)
(SDHC), 8GB, 16GB, 32GB(SDH
C
sta/windows 7/Linux2.4/ MAC OS
/ MicroSD / 3.5mm Earphone
/PDB/RTF
P / GIF (Static))1000x 1000 (Ma
x
C/APE/AAC
RMVB, FLV, MOV
sic playback;
eo playback;
b browsing
ouchpad (capacitive touch pad), 8
0
-ion polymer battery;
t 100-240V~50/60Hz, DC Outpu
t
Specifications a
n
This symbol on
electronic equip
m
household wast
e
For more inform
purchased the p
r
12
d contents of this manual a
the product or in the inst
ent should be disposed a
. There are separate collec
t
ation, please contact the l
o
oduct.
re subject to change withou
h USB port
)
10.6.7 above
.) / PNG
0X480 pixels
5V/2A
t notice
ructions means that your
t the end of its life separa
t
ion systems for recycling in
electrical and
ely from your
the EU.
cal authority or your retailer where you
Rev. 130530
 Loading...