

Page 1
Face3 International Pte Ltd 2015
Document:
DMT v3.2 User Manual
Revision:
A-1
Revision status:
Released
Revision date:
2015-10-13
Prepared by:
Anders Berglund
Approved by:
Anders Berglund
Classification
Open Distribution
Serstech 100 Indicator
Data Management Tool
DMT v3.2
USER MANUAL
Page 2
DMT v3.2 User Manual A-1 DMT v3.2 Page 2 (55)
2015-10-13 Open Distribution
TABLE OF CONTENTS
1! INTRODUCTION*........................................................................................................................................*4!
1.1! WHAT*IS*DMT?*.....................................................................................................................................*4!
1.2! SYSTEM*REQUIREMENTS*...........................................................................................................................*5!
1.2.1! Serstech+100+Indicator+firmware+.........................................................................................................+5!
1.2.2! Supported+Operating+Systems+.............................................................................................................+5!
1.3! LOCAL*LANGUAGE*SUPPORT*......................................................................................................................*6!
2! GETTING*STARTED*....................................................................................................................................*7!
2.1! INSTALLATION*........................................................................................................................................*7!
2.2! CONNECTING*THE*INSTRUMENT*..................................................................................................................*7!
2.3! DMT*REGISTRATION*...............................................................................................................................*7!
2.4! USER*ACCESS*CONTROL*............................................................................................................................*8!
3! MAIN*MENU*.............................................................................................................................................*9!
4! MEASUREMENT*ANALYSIS*......................................................................................................................*10!
4.1! SCREEN*MEASUREMENT*DASHBOARD*........................................................................................................*11!
4.2! IDENTIFY*MEASUREMENT*DASHBOARD*......................................................................................................*13!
4.3! VERIFY*MEASUREMENT*DASHBOARD*.........................................................................................................*15!
4.4! ADD*SUBSTANCE*MEASUREMENT*DASHBOARD*............................................................................................*17!
4.5! CALIBRATE*MEASUREMENT*DASHBOARD*....................................................................................................*19!
4.6! EXTERNAL*MEASUREMENT*FILES*DASHBOARD*.............................................................................................*21!
4.7! RAW*DATA*SPECTRUM*ANALYSIS*.............................................................................................................*23!
4.8! PROCESSED*DATA*SPECTRUM*ANALYSIS*.....................................................................................................*24!
5! LOCAL*DATABASE*MANAGEMENT*...........................................................................................................*25!
5.1! DELETE*LIBRARY*...................................................................................................................................*26!
5.2! EXPORT*LIBRARY*..................................................................................................................................*27!
5.3! EMAIL*LIBRARY*....................................................................................................................................*28!
5.4! CREATE*NEW*LIBRARY*...........................................................................................................................*29!
5.5! IMPORT*LIBRARY*..................................................................................................................................*29!
5.6! ADD*SUBSTANCE*LIST*............................................................................................................................*30!
5.7! VIEW*LIBRARY*SCREEN*...........................................................................................................................*31!
5.7.1! Delete+Substance+...............................................................................................................................+32!
5.7.2! Export+Substance+...............................................................................................................................+33!
5.7.3! Email+Substance+................................................................................................................................+33!
5.7.4! Import+Substance+..............................................................................................................................+34!
5.7.5! View+Substance+Screen+......................................................................................................................+35!
5.7.6! View+and+Export+Raman+Spectra+.......................................................................................................+36!
5.7.7! Edit+Substance+Data+Screen+...............................................................................................................+37!
6! FACTORY*DATABASES*.............................................................................................................................*40!
6.1! REVIEW*LIBRARY*CONTENT*......................................................................................................................*41!
6.2! SUBSTANCE*OVERVIEW*..........................................................................................................................*42!
7! USER*MANAGEMENT*..............................................................................................................................*43!
7.1! DELETE*USER*.......................................................................................................................................*44!
7.2! EDIT*USER*..........................................................................................................................................*44!
7.3! NEW*USER*..........................................................................................................................................*45!
Page 3
DMT v3.2 User Manual A-1 DMT v3.2 Page 3 (55)
2015-10-13 Open Distribution
7.4! USER*PROFILES*&*PRIVILEGES*..................................................................................................................*46!
8! LOG*ANALYSIS*........................................................................................................................................*48!
8.1! DMT*LOG*..........................................................................................................................................*48!
8.2! INSTRUMENT*LOG*................................................................................................................................. *49!
9! ABOUT*&*UPGRADE*................................................................................................................................*50!
9.1! INSTRUMENT*TAB*.................................................................................................................................*50!
9.2! UPGRADE*TAB*......................................................................................................................................*51!
9.3! COPYRIGHT*&*DISCLAIMER*TAB*................................................................................................................*52!
9.4! ABOUT*TAB*.........................................................................................................................................*53!
10! BATCH*SPECTRA*EXPORT*......................................................................................................................*54!
11! EXIT*......................................................................................................................................................*55!
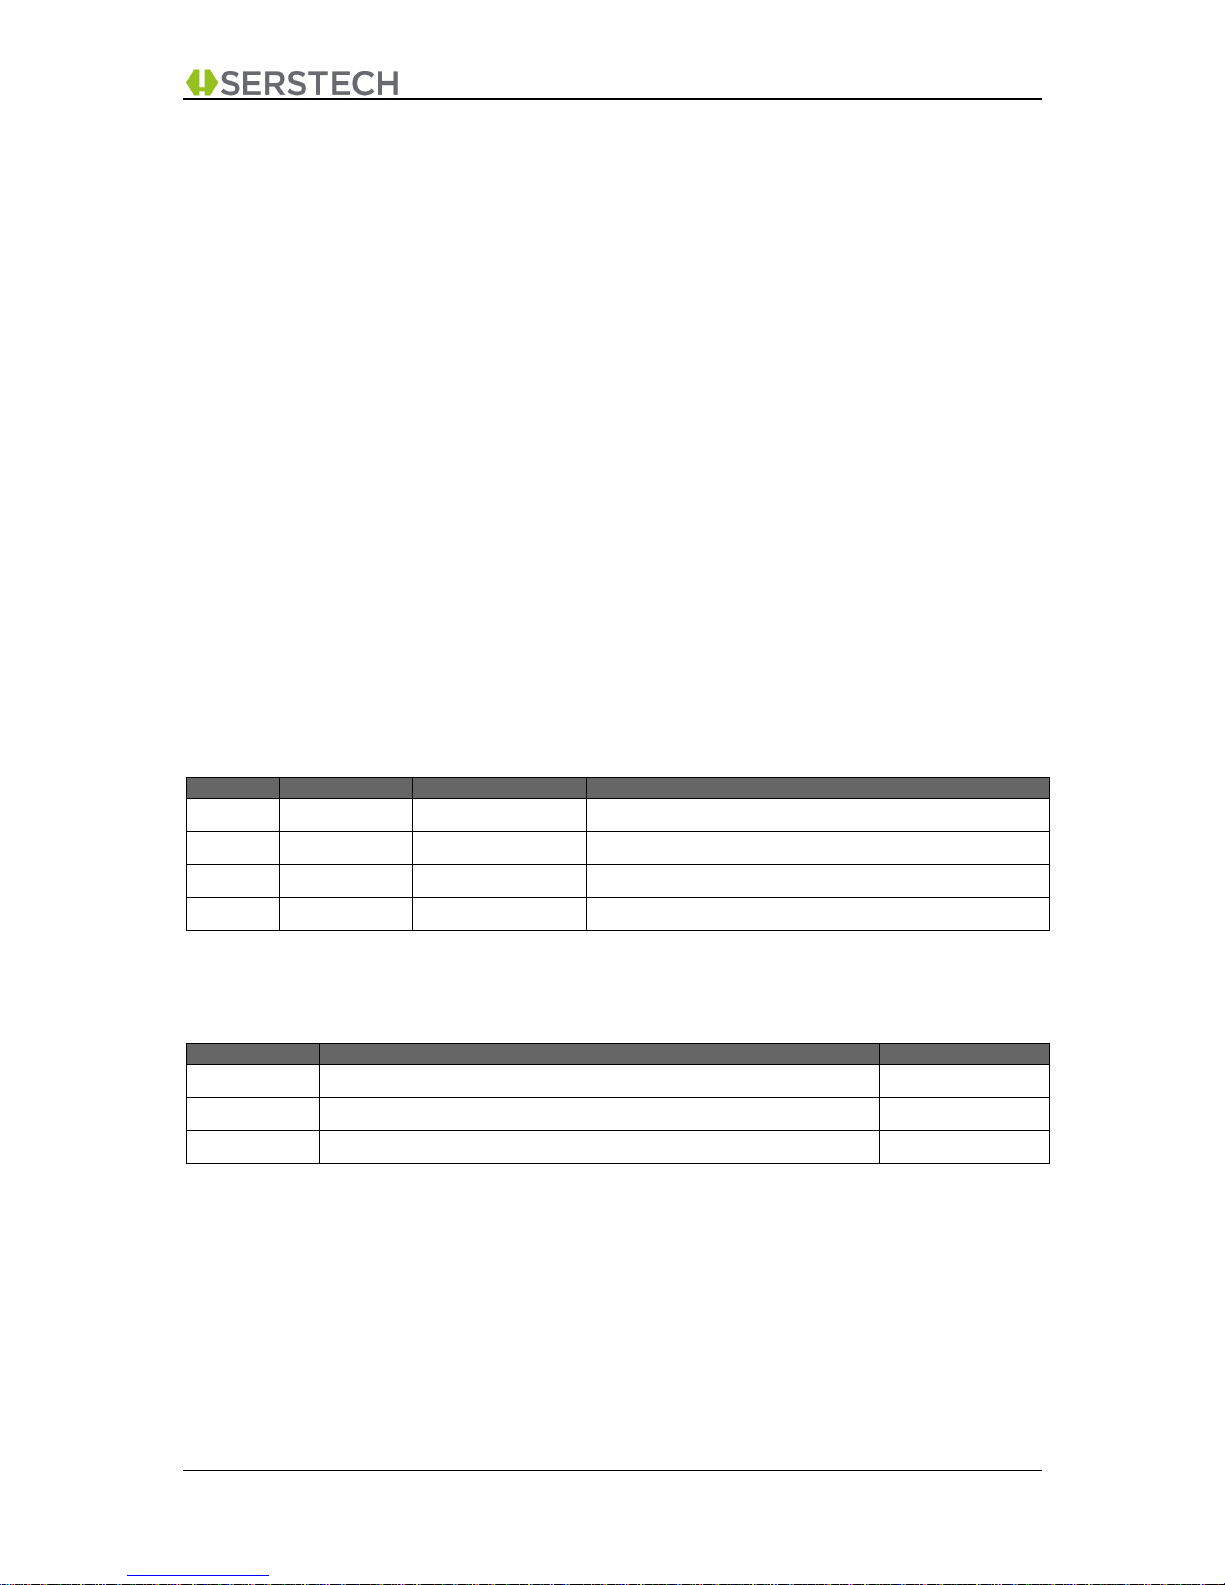
Revision History
Revision
Date
Author
Description
A1
2015-10-13
Anders Berglund
Initial Draft
Referenced documents
Reference
Title
Date
Serstech 100 Indicator User Manual v3.2
Page 4
DMT v3.2 User Manual A-1 DMT v3.2 Page 4 (55)
2015-10-13 Open Distribution
1 INTRODUCTION
1.1 What is DMT?
The Serstech Data Management Tool (DMT) is an integrated part of the Serstech 100 Indicator
product family. DMT is a desktop/laptop application running on MS Windows, MAC OS X or Linux
operating system that manage the following tasks for the Serstech 100 Indicator;
• Measurement Analysis
o Analysing and housekeeping of all measurements done with your Serstech 100
instrument.
o Effortless sharing of measurement results with other Serstech users and/or exporting
measurement data and graphs to 3rd party software.
• Substance Library Management
o Creating customized spectra libraries (“Local Databases”) by editing results from “Add
Substance” scans. This includes not only editing name, CAS information and Material
Safety Data for such substances, but also to group substances in various sub libraries
and easily export and import substances (or complete sub libraries) to/from other
Serstech users and instruments.
o Reviewing all commercial reference libraries (“Factory Databases”) installed in the
instrument.
• Instrument Configuration & Management
o Add, Edit and Delete various users for the instrument and to give these users
customized user privileges - thus manage the integrity of “who is allowed to do what”.
o Review log files (audit trails) of “who has done what and when”.
o Review system related information and provide a convenient and safe way to install
firmware upgrades and/or other patches and files into the instrument.
Please Note:
DMT acts as a “big screen” for easy management of the Serstech instrument.
DMT is especially useful in order to export and/or share measurement files and/or reference
substances (or complete libraries) from “Local Databases”. This implies that DMT will also allow the
user to view and analyse measurements files stored externally, e.g. on the hard drive of your
computer.
Having said this, DMT however does not store any application data on your computer.
This means that you are not required to use the same computer each time you work with a specific
Serstech instrument, but for your next DMT session you can continue your work with any other
Windows, OS X or Linux computer on which DMT has been installed.
Page 5
DMT v3.2 User Manual A-1 DMT v3.2 Page 5 (55)
2015-10-13 Open Distribution
1.2 System Requirements
1.2.1 Serstech 100 Indicator firmware
DMT v3.2 is designed to work with Serstech
Instrument running firmware 3.2.4 or later. If you
are using an earlier firmware release, please use
an earlier compatible DMT version or upgrade to
firmware 3.2.4 or later.
1.2.2 Supported Operating Systems
DMT 3.2 is designed to run on the following platforms;
MS Windows:
• Windows Vista
• Windows 7
• Windows 8.x
• Windows 10
MAC OS X:
• OS X Lion 10.7.x
• OS X Mountain Lion 10.8.x
• OS X Mavericks 10.9.x
• OS X Yosemite 10.10.x
Linux (presently in beta):
• Linux Mint 16 or later
• Ubuntu 10.04 or later
• Debian 6.0 or later
• OpenSUSE 11.3 or later
• Fedora 13 Desktop or later
• CentOS 6.0 or later
Version 3.2.x Version 3.2
100 Indicator
Page 6

DMT v3.2 User Manual A-1 DMT v3.2 Page 6 (55)
2015-10-13 Open Distribution
1.3 Local Language Support
DMT v3.2 is designed for easy localization, meaning that the “on screen” language will follow the
default language settings of your Computer:
• To change your Windows PC’s screen language, please go to:
Control Panel/Region and Languages/Formats/Format
• To change your MAC computer’s screen language, please go to:
System Preferences/Language & Text/Language
Changes take place when you restart the DMT. If the DMT does not have a particular translation, it will
default to English.
If you want to help to localize DMT for additional language support, please drop us an email at
Page 7
DMT v3.2 User Manual A-1 DMT v3.2 Page 7 (55)
2015-10-13 Open Distribution
2 GETTING STARTED
2.1 Installation
Please make sure you have the correct DMT v3.2 installation file depending on your computer’s
operating system (Windows, OS X or Linux) and follow the simple instructions in the “Released Notes”
file (which is packaged together with the software installation file).
2.2 Connecting the Instrument
DMT v3.2 communicates with the Serstech 100 Indicator via USB. To work with DMT you thus need
to:
• Connect the USB cable (provided with the instrument).
• Activate the USB port in the instrument (through the instrument’s Settings/Administration
menu).
2.3 DMT Registration
The first time you start the DMT v3.2 application, you may be asked to fill in a simple registration
screen.
Please note that there are no separate licensing fees for the DMT software, but the information
collected is only to be used to register your license and thereby grant access to the DMT support
service.
The information collected will be kept strictly confidential in line with Serstech’s and its partner’s Data
Privacy and Security policy.
Please Note:
The Serstech 100 (running firmware 3.2.x or later) has three different USB “partitions”
(i100_CONF, i100_DATA and i100_DMT) that provide access to various parts of the instrument’s
stored information. Certain DMT functions require a specific “partition” to be active. Depending on
each user’s “Access Rights” (refer section 2.4 below) the user may not have the permission to
activate the USB port at all, or the user may only be able to activate one or two of the above
“partitions”.
Please note:
• To complete the registration you will need to have Internet access from your computer.
• In case your instrument has already been registered for use with DMT, a “Welcome screen” is
presented showing the current registration. You can accept this and proceed directly to DMT
or, you may select to update the registration details, in which case the normal registration
screen will be presented.
Page 8
DMT v3.2 User Manual A-1 DMT v3.2 Page 8 (55)
2015-10-13 Open Distribution
2.4 User Access Control
The Serstech 100 Indicator running firmware 3.2.x or later has a built-in User Access Control system
through which each user is given their own unique user privileges specifying what functions that user
is allowed to perform.
DMT v3.2 will automatically work with the access control system implemented in the instrument. This
implies that all functions described in this User Manual will not be available to you unless your
administrator has given you the required access rights.
The administration of users and their access rights are described in chapter 7 (“User Management”).
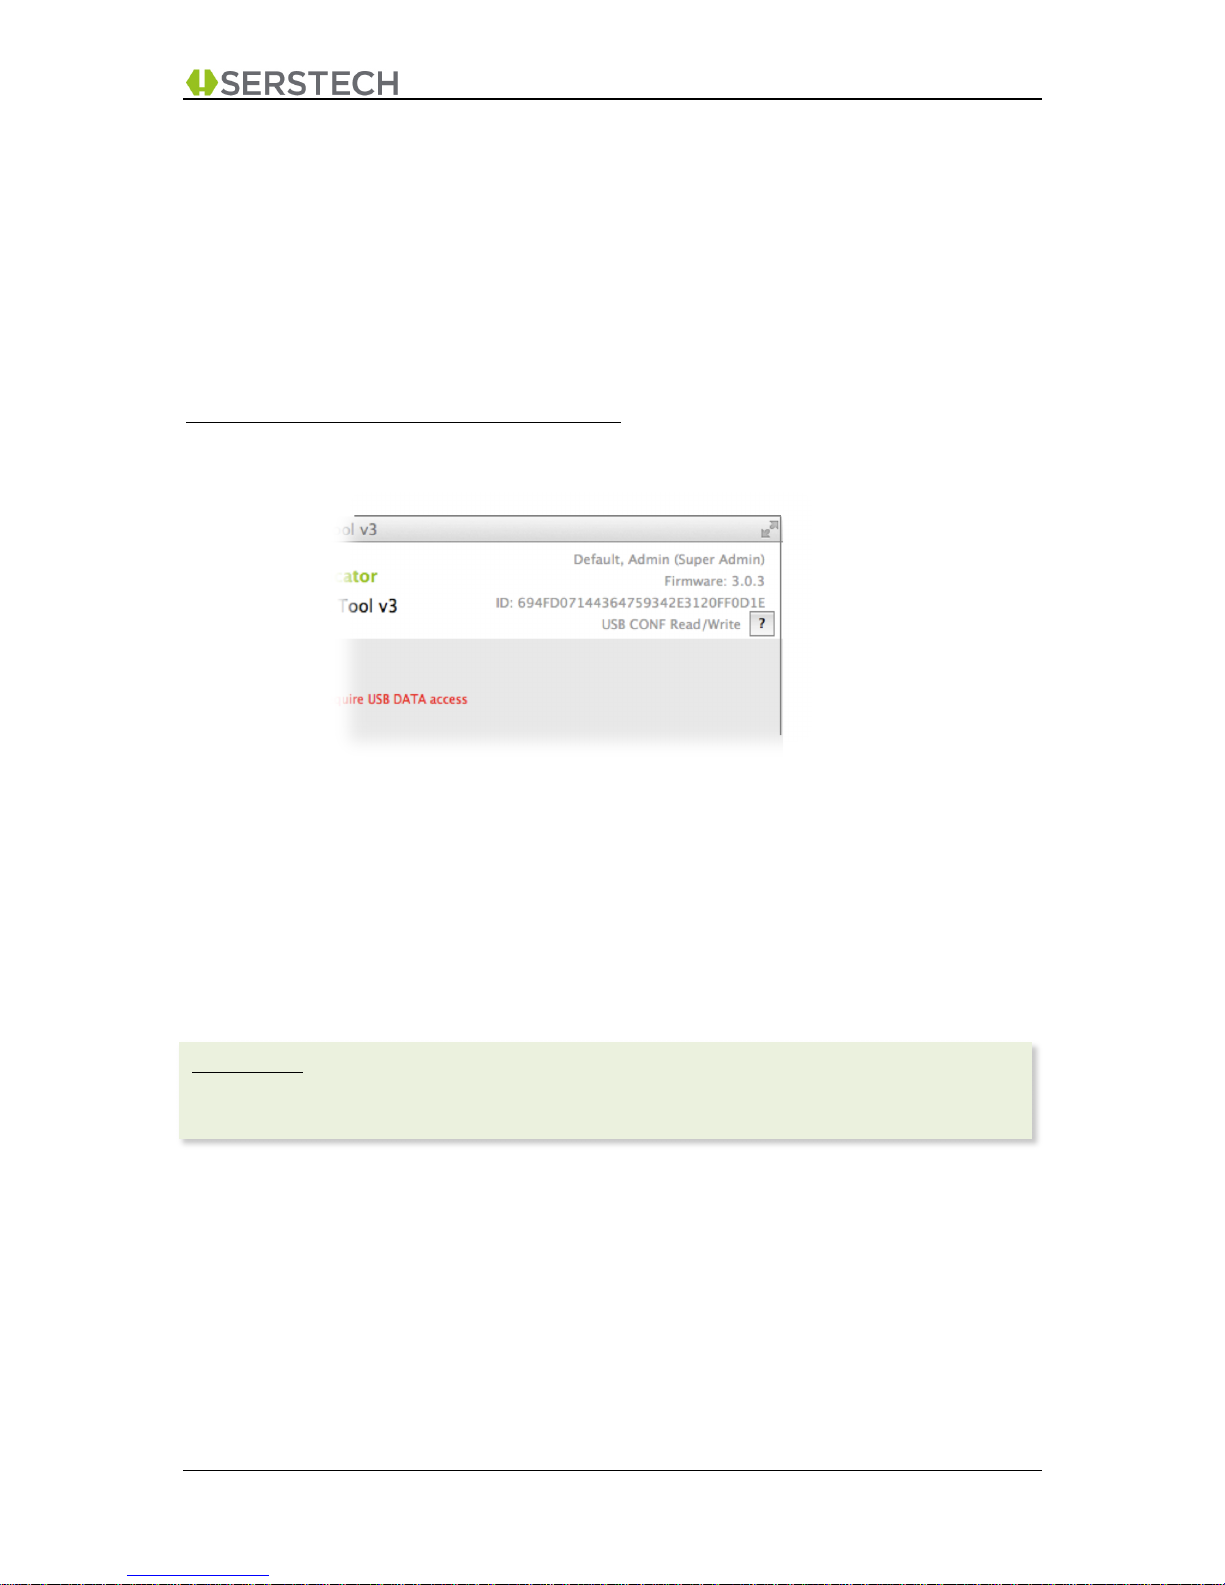
Knowing your connection and Access Privileges
On the top right corner of the Main Menu (and other main screens) you will find information about your
current connection and what your privileges allow you to do within DMT.
1st Line: Your User Name and, within brackets, your User Profile
2nd Line: The firmware version of the connected Serstech 100 Indicator
3rd Line: The Device ID of the connected Serstech 100 Indicator
4th Line: The currently active USB mode for the instrument
Help button: Clicking the help button will provide clarification to what your User Profile means and
what functions you will have access to in DMT.
Please note:
If there is no instrument connected to your computer, the first three lines are empty and there is a
“NO DEVICE CONNECTED” message shown.
Page 9
DMT v3.2 User Manual A-1 DMT v3.2 Page 9 (55)
2015-10-13 Open Distribution
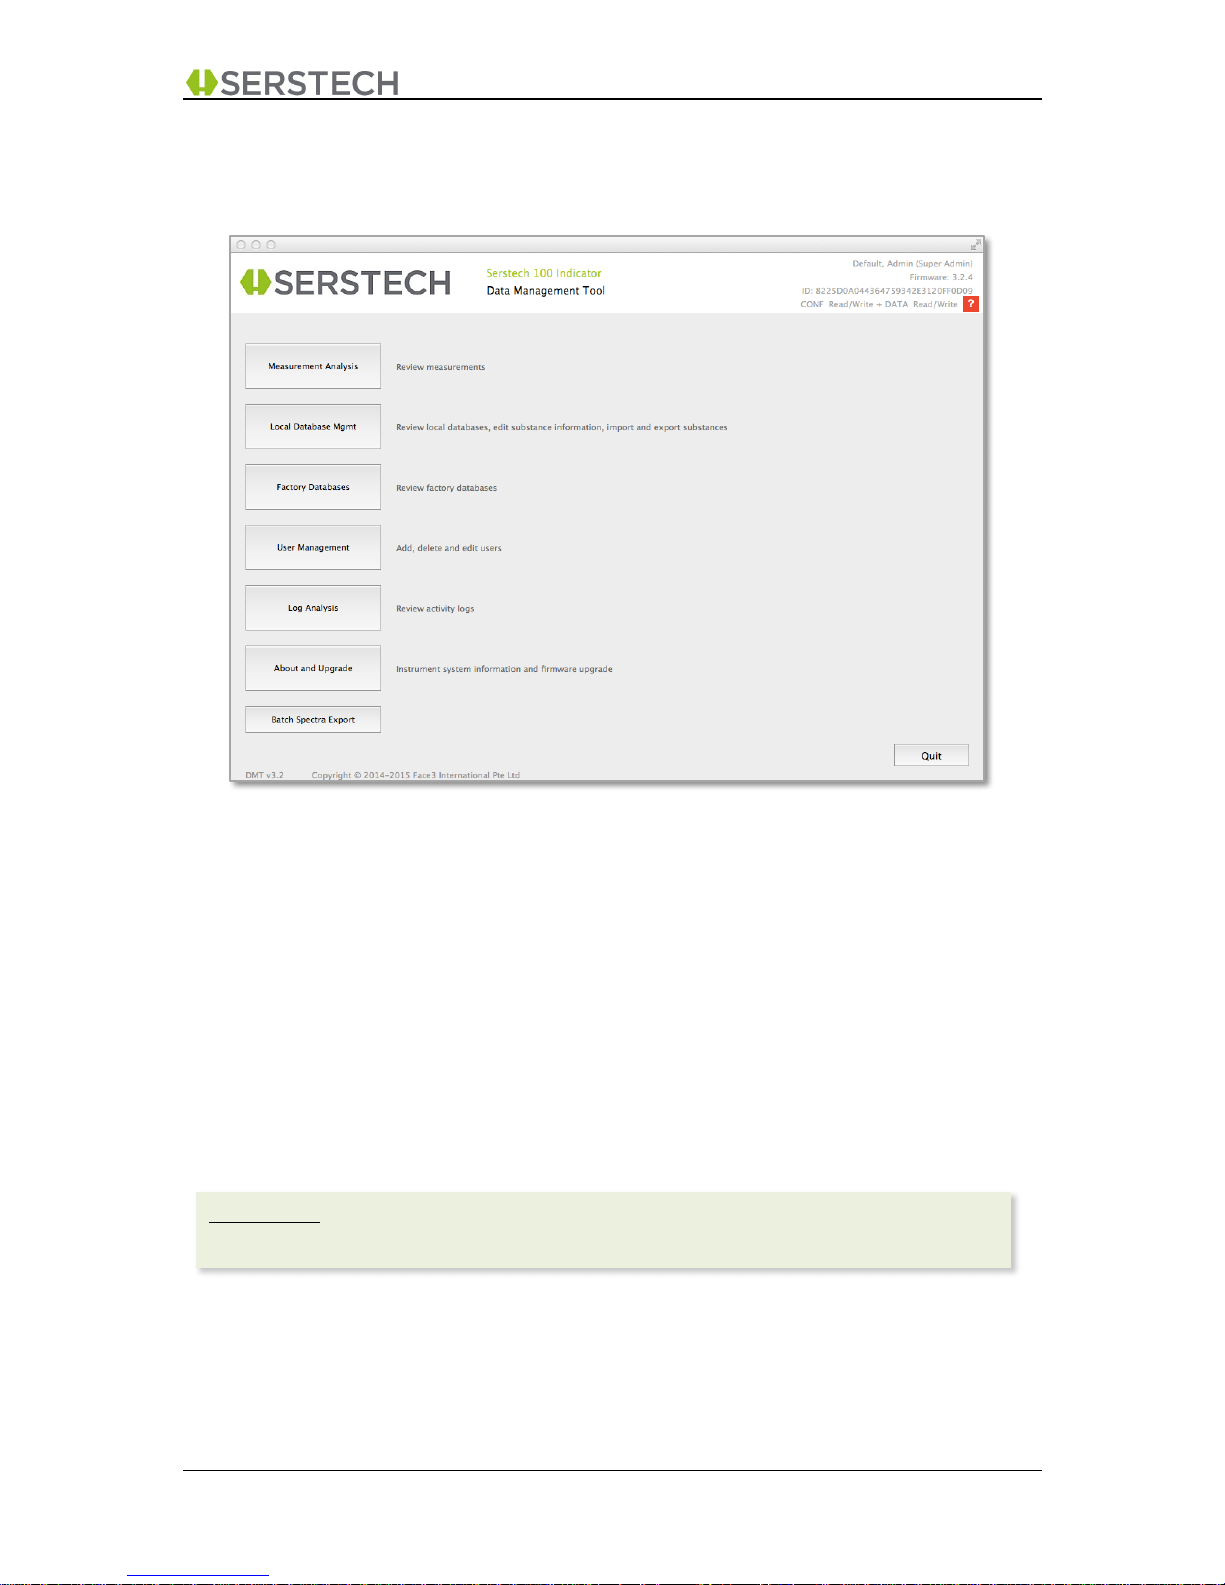
3 MAIN MENU
Launching the application will open the main menu, from which the following options are available:
• Measurement Analysis See chapter 4
• Local Database Management See chapter 5
• Factory Databases See chapter 6
• User Management See chapter 7
• Log Analysis See chapter 8
• About & Upgrade See chapter 9
• Batch Spectra Export See chapter 10
• Exit/Quit (the DMT application) See chapter 11
The desired function is selected by clicking on the respective “buttons” on the screen.
Please note:
Certain “buttons” may be “dimmed” as you may not have the permission to access this function
Page 10
DMT v3.2 User Manual A-1 DMT v3.2 Page 10 (55)
2015-10-13 Open Distribution
4 MEASUREMENT ANALYSIS
Measurement Analysis is the most commonly used function in DMT. Among other things, this allows
you to;
• review and analyse all your recorded measurements on a “big screen”
• copy results from your measurements (such as the Raman spectra) into your own reports and
presentations
• export results from your measurements to 3rd party software
• easily share your results with co-workers and others
• do “housekeeping” activities, such as deleting unsuccessful measurements and export or
archive measurement results to external storage location
• analyse measurements sent from co-workers or others
The Serstech 100 Indicator can perform 5 different types of measurements, thus the screen layout
varies slightly depending on the type of measurement analysed.
In addition, there is a possibility to review archived measurements stored on external media (such as
your computer’s hard drive).
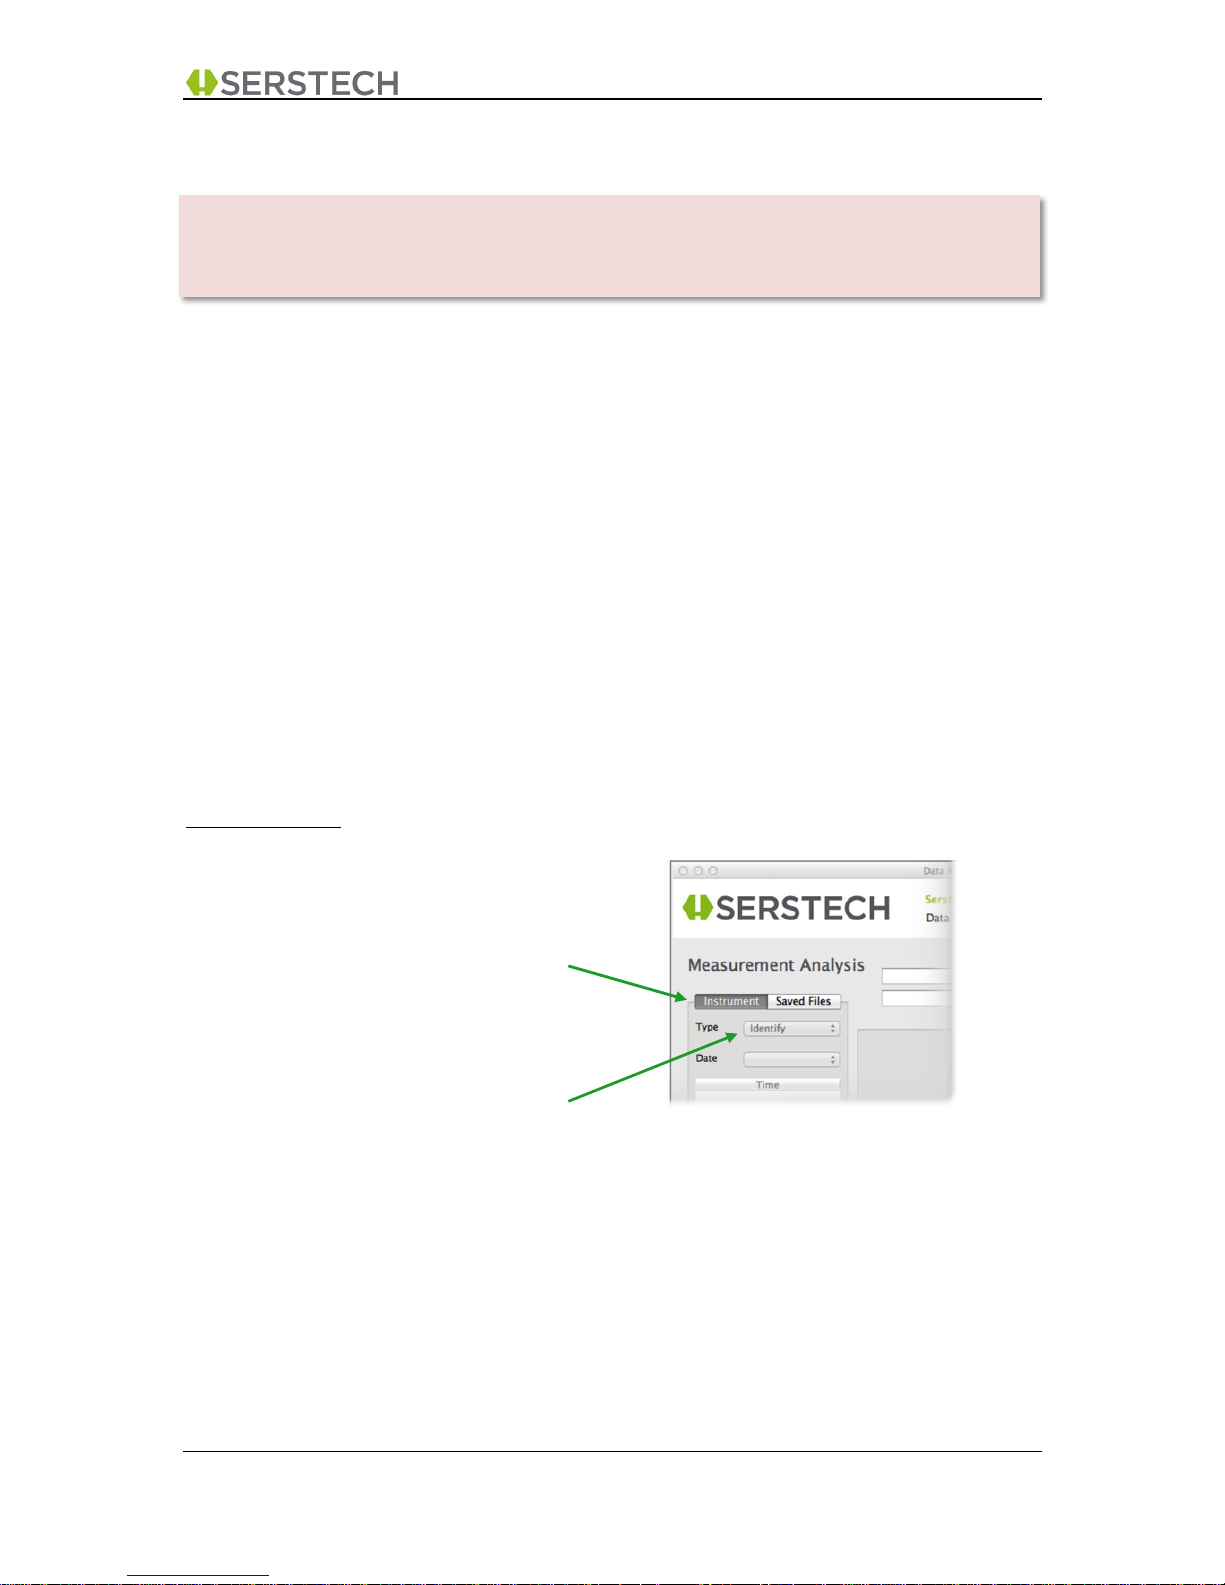
Initial Selections:
1. Click on the respective “tab” on the
top left portion of the screen to
select if you want to analyse
measurement results stored in the
instrument or saved files stored
externally.
2. When working with measurement
results stored in the instrument,
select the “Type” of measurement
(“Identify”, “Verify”, “Add Substance”
or “Calibrate”) from this Drop-down
list.
The MEASUREMENT ANALYSIS function is always accessible allowing you to analyse files stored
on your computer even without an instrument attached.
To analyse measurement files on the instrument, USB mode i100_data must be activated.
Page 11
DMT v3.2 User Manual A-1 DMT v3.2 Page 11 (55)
2015-10-13 Open Distribution
4.1 Screen Measurement Dashboard
Selecting which Screen measurement to view
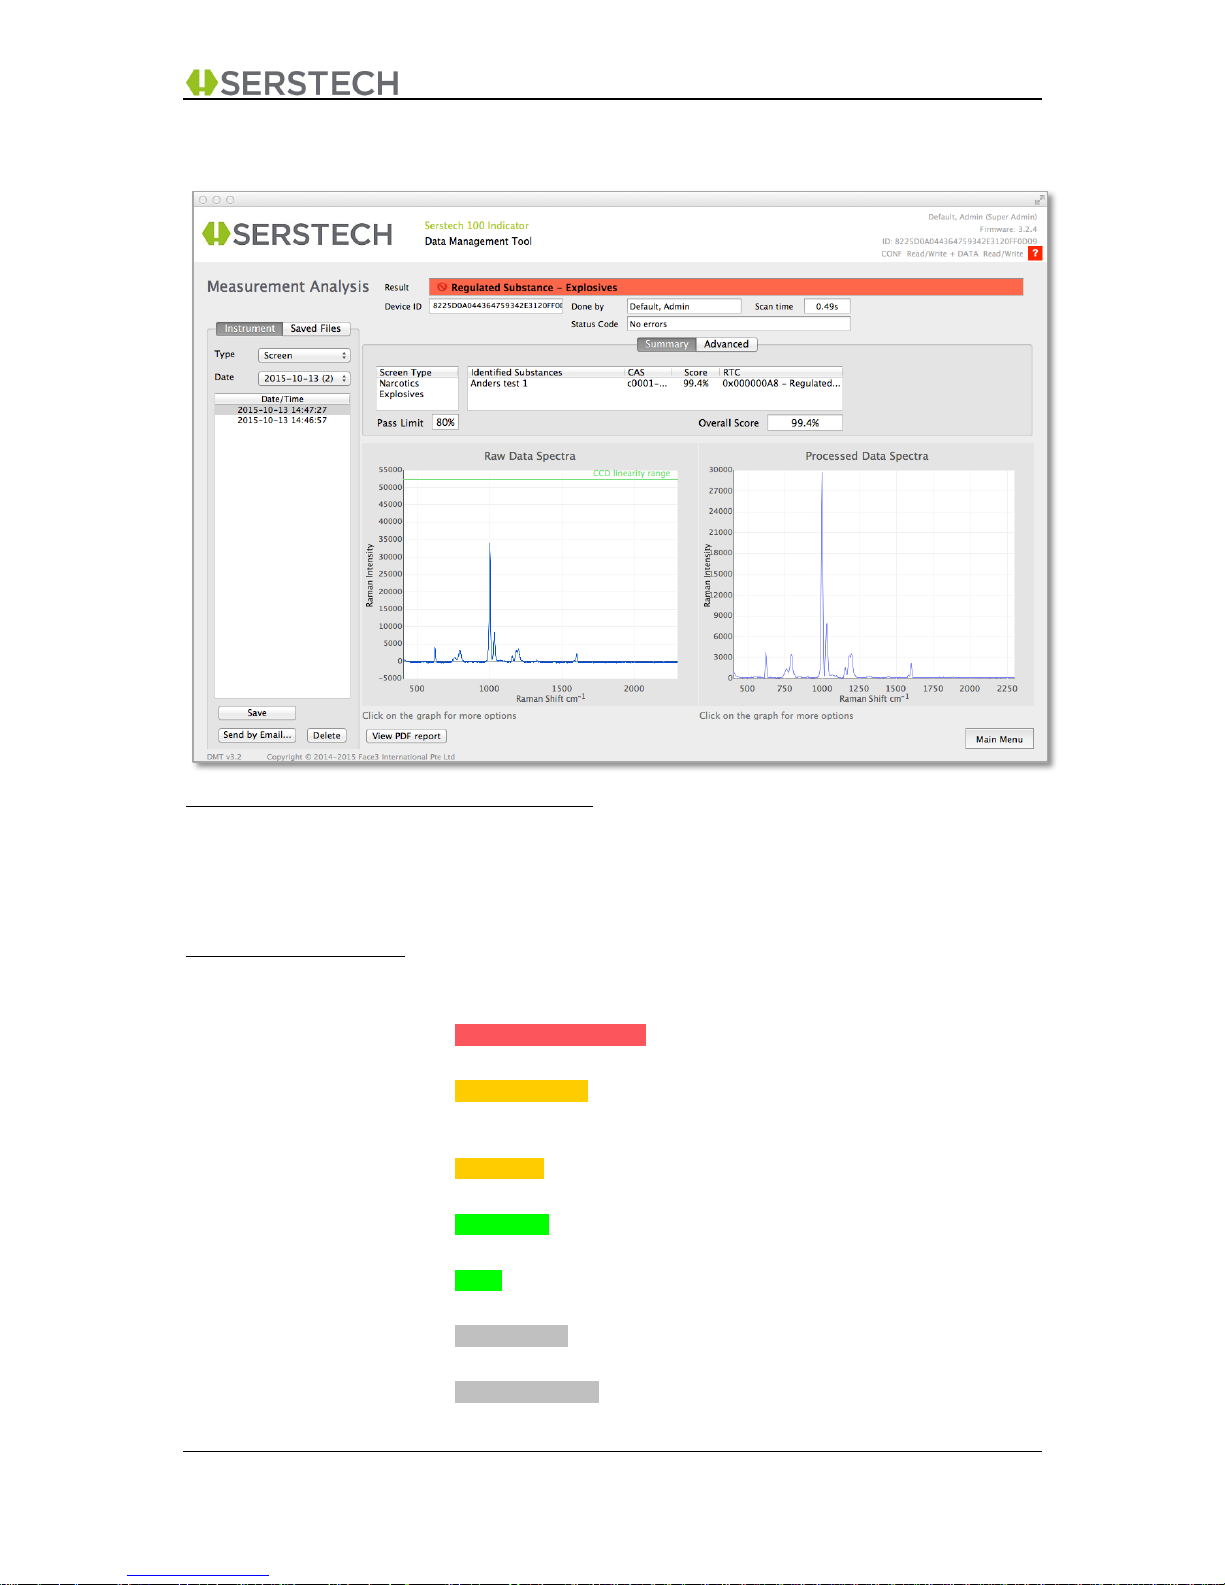
• Select “Screen” in the “Type” option (top left corner)
• Select the “Date” when the measurement was done
• Scroll down to the time of the measurement in the “Date/Time” window.
The Dashboard Content:
Result: Shows the overall result of the measurement (provided by the
instrument’s internal algorithms). There are several options here;
• Regulated Substance indicates that the substance found is regulated
for the “Scan Type(s)” selected.
• Masking Agent indicates that the substance found may be used to
mask/hide the presence of a regulated substance for the “Scan
Type(s)” selected.
• Precursor indicates that the substance found is classified as a
precursor for the “Scan Type(s)” selected.
• Adulterant indicates that the substance found is classified as a
“cutting agent” (or adulterant) for the “Scan Type(s)” selected.
• Clear indicates that the substance found is not regulated for the “Scan
Type(s)” selected.
• Inconclusive indicates that there is no spectra in the selected
libraries that match the sample.
• Not Categorized indicates that the substance found has not yet been
classified for the “Scan Type(s)” selected.
Page 12
DMT v3.2 User Manual A-1 DMT v3.2 Page 12 (55)
2015-10-13 Open Distribution
Device ID: The unique ID code of the instrument that was used for this measurement
Done by: Shows the name of the user who performed this measurement
Scan Time: Shows the exposure time used for the measurement
Status Code: Shows the status code reported by the instrument
Screen Type: Shows what type of “Screen Measurement” that was done. Presently
(firmware 3.2.5) the instrument can support “Screen” measurements for
substances classified under “Explosives”, “Narcotics” or both of these
together.
Pass Limit: Shows the mathematical spectrum correlation limit selected on the
instrument for when a match is to be reported as a “match”.
Identified Substance: Shows the name, CAS number, Score (=mathematical correlation factor)
and the Regulatory Type settings of the “Identified Substance” in the
sample (if any).
Overall Score: The instrument may find more than one substance during the
measurement. The substance that is shown in the instrument (and on
DMT) is the substance having the highest “Regulatory Type
Classification”, i.e. the substance regarded as most “critical”. Please note
that this may not necessarily be the substance with the highest
mathematical correlation factor. “Overall Score” thus shows the “score” of
the substance with the best “mathematical match”.
Raw Data spectra: Shows a thumbnail “Raw Data” image for this measurement. The user
may click this image to bring up a larger graph with additional options
(Chapter 4.7)
Processed Data spectra: Shows a thumbnail “Processed Data” image for this measurement. The
user may click this image to bring up a larger graph with additional options
(Chapter 4.8)
Delete: Selecting a measurement and clicking “Delete” allows you to permanently
erase the information from the instrument.
Save to disk: Selecting a measurement and clicking “Save to Disk” will bring up a File
browser window and allow you to copy this measurement to external
storage (for example your computer’s hard drive)
Send by Email: Selecting a measurement and clicking “Email” will bring up an email
template (with the files attached) and thus provide a convenient way to
share results with other users. (The email template looks and works the
same way as seen in e.g. chapter 5.3)
View PDF report: Extracts the pdf-report generated by the instrument for this measurement.
Please note:
• The “Delete” button may be “dimmed” as you may not have the permission to access this
function
• The “Email” functions requires that you have access to the Internet from your computer
• The “Advanced” tab allows you to study every detail of the “2-result.js” file, which is the
internal file format for the Serstech 100 Indicator. (Only to be used for “advanced users”)
Page 13
DMT v3.2 User Manual A-1 DMT v3.2 Page 13 (55)
2015-10-13 Open Distribution
4.2 Identify Measurement Dashboard
Selecting which Identify measurement to view
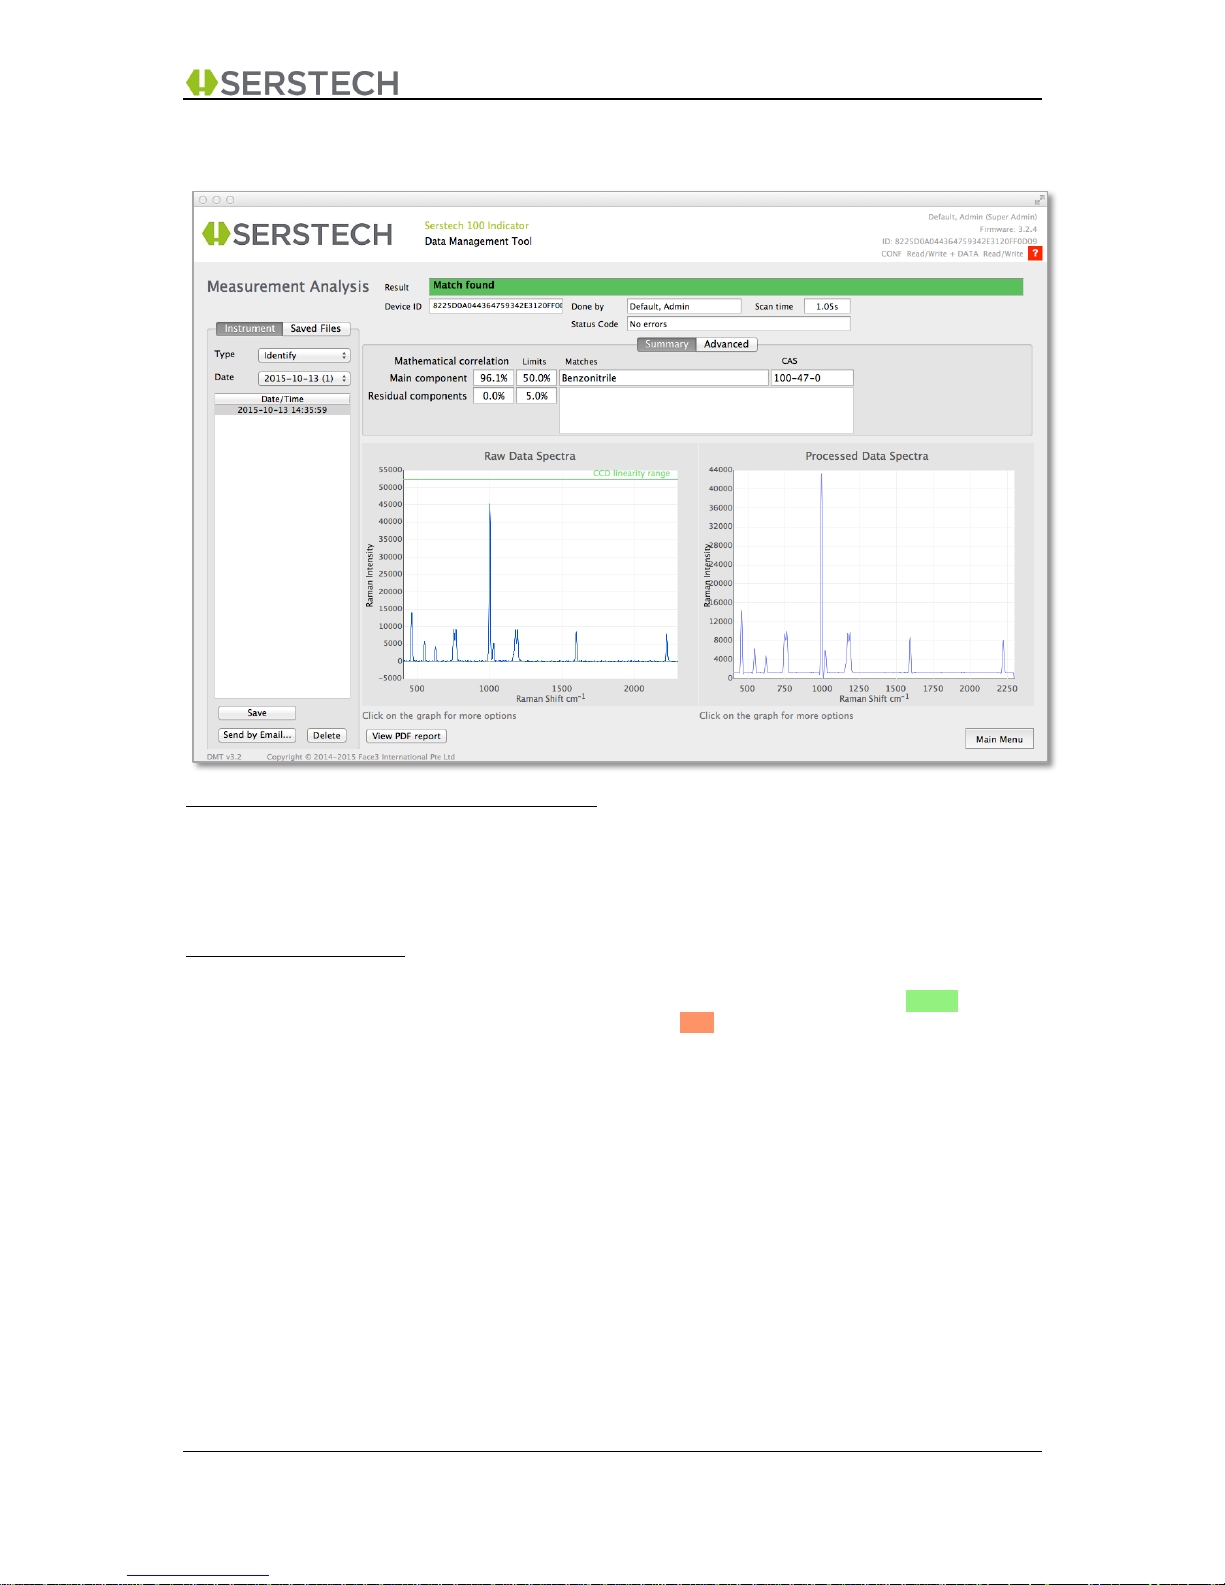
• Select “Identify” in the “Type” option (top left corner)
• Select the “Date” when the measurement was done
• Scroll down to the time of the measurement in the “Date/Time” window.
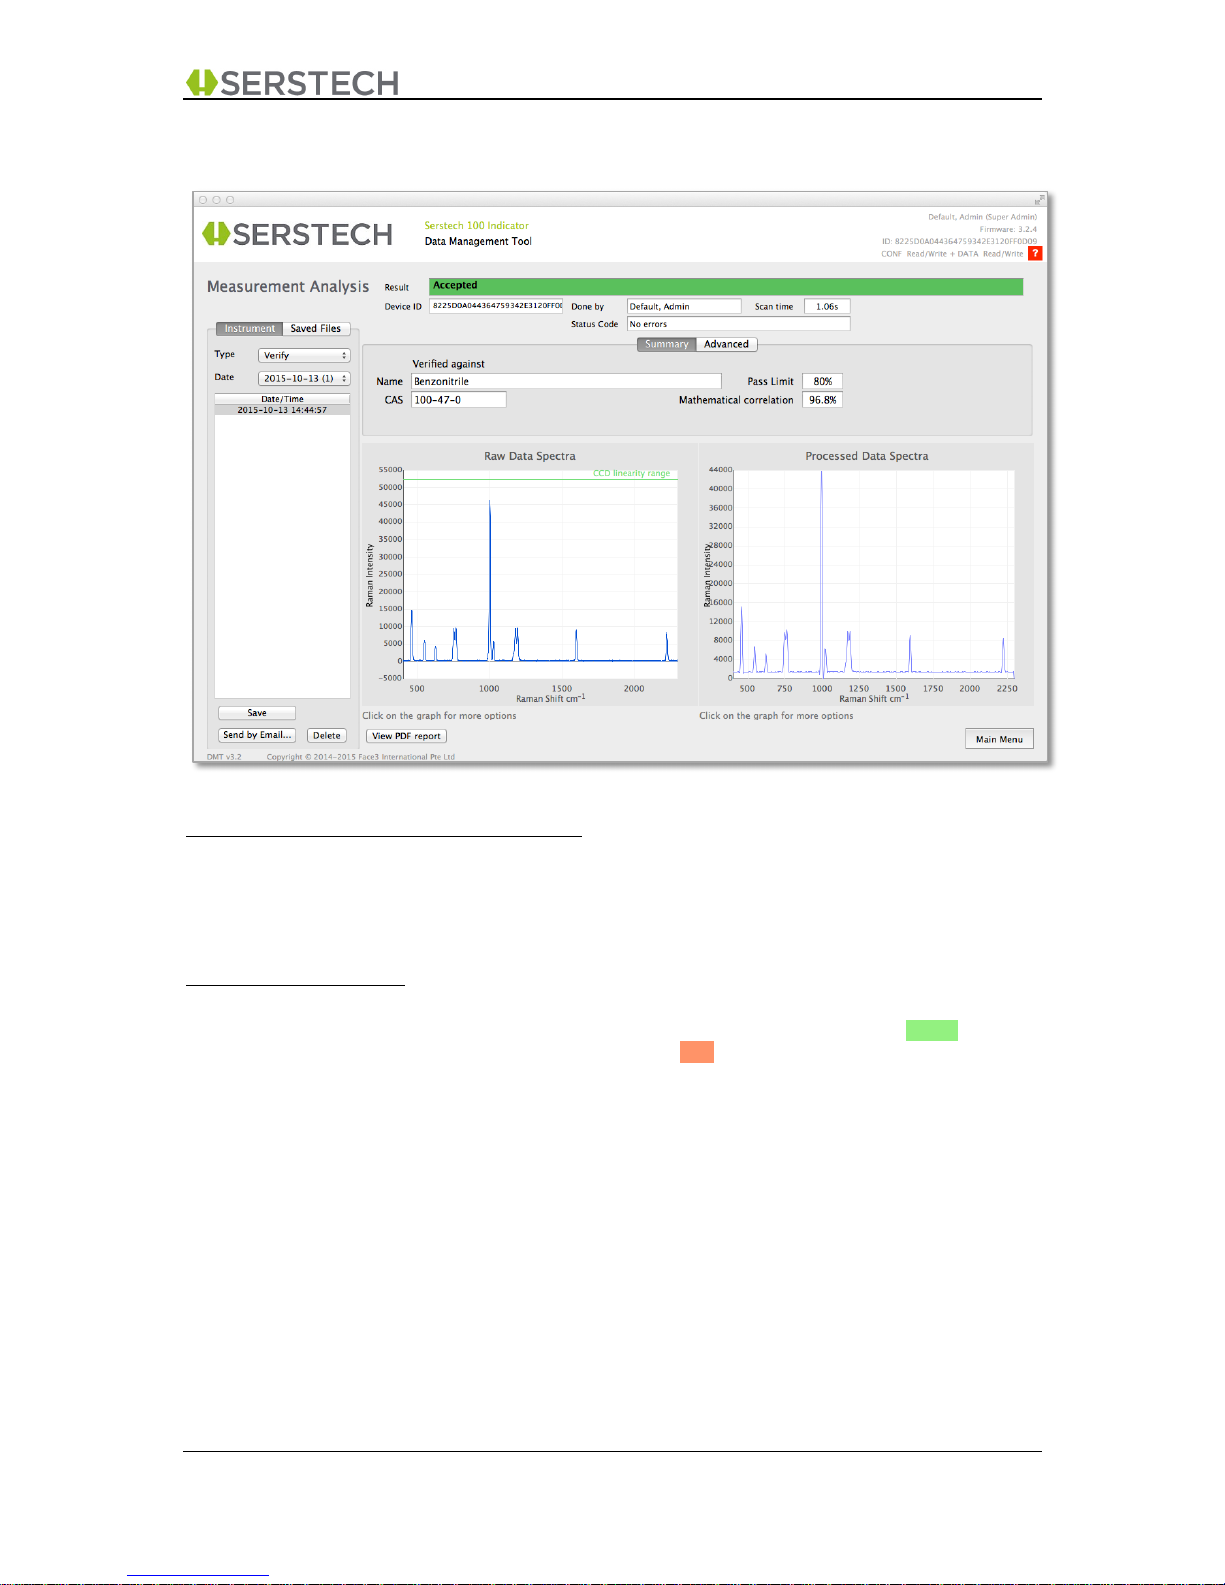
The Dashboard Content:
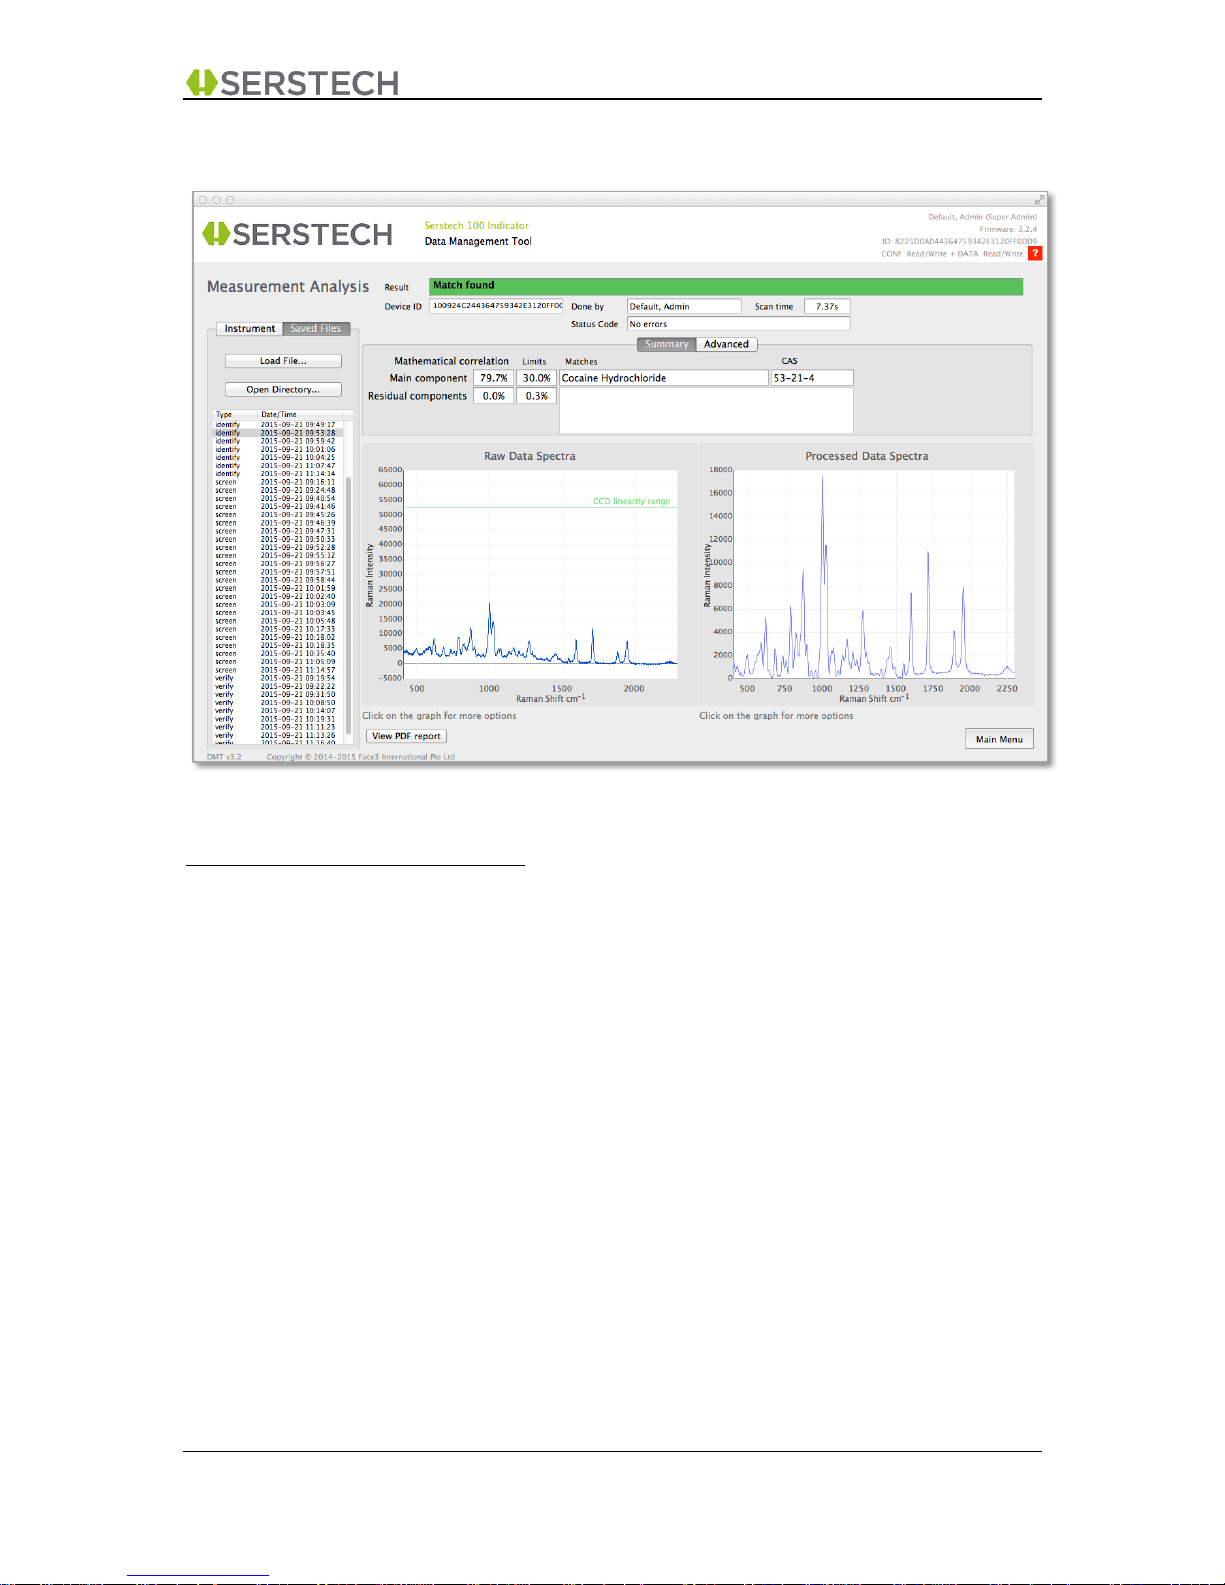
Result: Shows the overall result of the measurement (provided by the
instrument’s internal algorithms). The colour of this field is Green for
successful measurements and Red if there was no match or if any other
failure occurred.
Device ID: The unique ID code of the instrument that was used for this measurement
Done by: Shows the name of the user who performed this measurement
Scan Time: Shows the exposure time used for the measurement
Status Code: Shows the status code reported by the instrument
Main Component: Shows the mathematical spectrum correlation factor (and the limit
selected on the instrument for a match to be regarded as “Main
Component”), the name and CAS number of the “Main Component”
identified in the sample (if any).
Residual Components: Shows the combined (if several) mathematical spectrum correlation factor
(and the limit selected on the instrument for a match to be regarded as
“Residual Component”), the name(s) and CAS number(s) of the “Residual
Component(s)” identified in the sample (if any).
Page 14
DMT v3.2 User Manual A-1 DMT v3.2 Page 14 (55)
2015-10-13 Open Distribution
Raw Data spectra: Shows a thumbnail “Raw Data” image for this measurement. The user
may click this image to bring up a larger graph with additional options
(Chapter 4.7)
Processed Data spectra: Shows a thumbnail “Processed Data” image for this measurement. The
user may click this image to bring up a larger graph with additional options
(Chapter 4.8)
Delete: Selecting a measurement and clicking “Delete” allows you to permanently
erase the information from the instrument.
Save to disk: Selecting a measurement and clicking “Save to Disk” will bring up a File
browser window and allow you to copy this measurement to external
storage (for example your computer’s hard drive)
Send by Email: Selecting a measurement and clicking “Email” will bring up an email
template (with the files attached) and thus provide a convenient way to
share results with other users. (The email template looks and works the
same way as seen in e.g. chapter 5.3)
View PDF report: Extracts the pdf-report generated by the instrument for this measurement.
Please note:
• The “Delete” button may be “dimmed” as you may not have the permission to access this
function
• The “Email” functions requires that you have access to the Internet from your computer
• The “Advanced” tab allows you to study every detail of the “2-result.js” file, which is the
internal file format for the Serstech 100 Indicator. (Only to be used for “advanced users”)
Page 15
DMT v3.2 User Manual A-1 DMT v3.2 Page 15 (55)
2015-10-13 Open Distribution
4.3 Verify Measurement Dashboard
Selecting which Verify measurement to view
• Select “Verify” in the “Type” option (top left corner)
• Select the “Date” when the measurement was done
• Scroll down to the time of the measurement in the “Date/Time” window.
The Dashboard Content:
Result: Shows the overall result of the measurement (provided by the
instrument’s internal algorithms). The colour of this field is Green for
successful measurements and Red if there was no match or if any other
failure occurred.
Device ID: The unique ID code of the instrument that was used for this measurement.
Done by: Shows the name of the user who performed this measurement
Scan Time: Shows the exposure time used for the measurement
Status Code: Shows the status code reported by the instrument
Verified Against: Shows the name and CAS number of the reference substance that was
selected for this scan.
Mathematical correlation: Shows the mathematical correlation factor between the measured
spectrum and the spectrum of the selected reference substance. Please
note that the “Pass Limit”, which is set on the instrument, defines the
threshold for what mathematical correlation factor that is to be defined as
a “Match”.
Page 16
DMT v3.2 User Manual A-1 DMT v3.2 Page 16 (55)
2015-10-13 Open Distribution
Raw Data spectra: Shows a thumbnail “Raw Data” image for this measurement. The user
may click this image to bring up a larger graph with additional options
(Chapter 4.7)
Processed Data spectra: Shows a thumbnail “Processed Data” image for this measurement. The
user may click this image to bring up a larger graph with additional options
(Chapter 4.8)
Delete: Selecting a measurement and clicking “Delete” allows you to permanently
erase the information from the instrument.
Save to disk: Selecting a measurement and clicking “Save to Disk” will bring up a File
browser window and allow you to copy this measurement to external
storage (for example your computer’s hard drive)
Send by Email: Selecting a measurement and clicking “Email” will bring up an email
template (with the files attached) and thus provide a convenient way to
share results with other users. (The email template looks and works the
same way as seen in e.g. chapter 5.3)
View PDF report: Extracts the pdf-report generated by the instrument for this measurement.
Please note:
• The “Delete” button may be “dimmed” as you may not have the permission to access this
function
• The “Email” functions requires that you have access to the Internet from your computer
• The “Advanced” tab allows you to study every detail of the “2-result.js” file, which is the
internal file format for the Serstech 100 Indicator. (Only to be used for “advanced users”)
Page 17
DMT v3.2 User Manual A-1 DMT v3.2 Page 17 (55)
2015-10-13 Open Distribution
4.4 Add Substance Measurement Dashboard
Selecting which Add Substance measurement to view
• Select “Add Substance” in the “Type” option (top left corner)
• Select the “Date” when the measurement was done
• Scroll down to the time of the measurement in the “Date/Time” window.
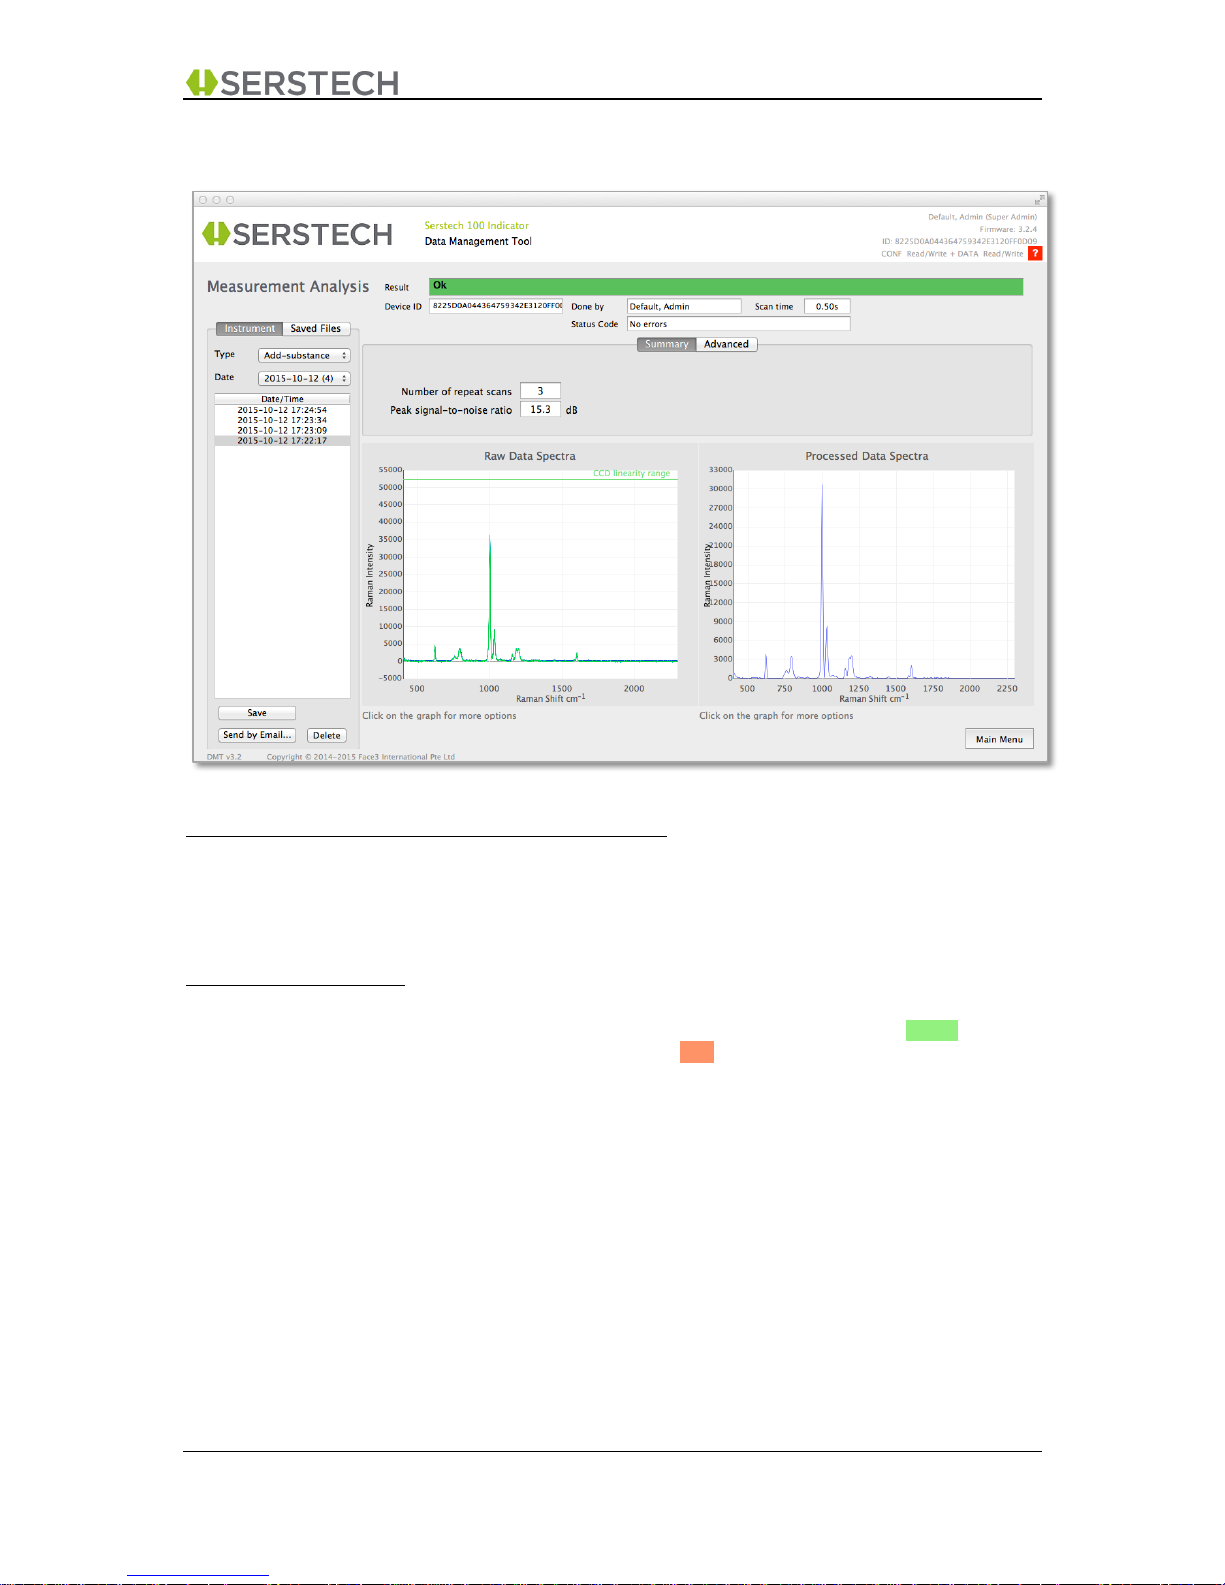
The Dashboard Content:
Result: Shows the overall result of the measurement (provided by the
instrument’s internal algorithms). The colour of this field is Green for
successful measurements and Red if any failure occurred.
Device ID: The unique ID code of the instrument that was used for this measurement.
Done by: Shows the name of the user who performed this measurement
Scan Time: Shows the exposure time used for the measurement
Status Code: Shows the status code reported by the instrument
Number of repeat scans: Shows the number of repeat scans used for this measurement. During
“Add Substance” the user will set the instrument to perform a number of
repeat scans (from 3-99) from which the instrument will calculate an
average spectrum. This is to get as accurate reference spectrum as
possible for your local reference library.
Peak signal-to-noise ration: The Peak signal-to-noise ratio provides a “quality measurement” of
the spectra. This may be of interest as “Add Substance” spectra typically
are saved as reference spectra in the Local Database spectra library.
Page 18
DMT v3.2 User Manual A-1 DMT v3.2 Page 18 (55)
2015-10-13 Open Distribution
Raw Data spectra: Shows a thumbnail “Raw Data” image for this measurement. The user
may click this image to bring up a larger graph with additional options
(Chapter 4.7)
Processed Data spectra: Shows a thumbnail “Processed Data” image for this measurement. The
user may click this image to bring up a larger graph with additional options
(Chapter 4.8)
Delete: Selecting a measurement and clicking “Delete” allows you to permanently
erase the information from the instrument.
Save to disk: Selecting a measurement and clicking “Save to Disk” will bring up a File
browser window and allow you to copy this measurement to external
storage (for example your computer’s hard drive)
Send by Email: Selecting a measurement and clicking “Email” will bring up an email
template (with the files attached) and thus provide a convenient way to
share results with other users. (The email template looks and works the
same way as seen in e.g. chapter 5.3)
Please note:
• The “Delete” button may be “dimmed” as you may not have the permission to access this
function
• The “Email” functions requires that you have access to the Internet from your computer
• The “Advanced” tab allows you to study every detail of the “2-result.js” file, which is the
internal file format for the Serstech 100 Indicator. (Only to be used for “advanced users”)
Page 19
DMT v3.2 User Manual A-1 DMT v3.2 Page 19 (55)
2015-10-13 Open Distribution
4.5 Calibrate Measurement Dashboard
Selecting which Calibrate measurement to view
• Select “Calibrate” in the “Type” option (top left corner)
• Select the “Date” when the measurement was done
• Scroll down to the time of the measurement in the “Date/Time” window.
The Dashboard Content:
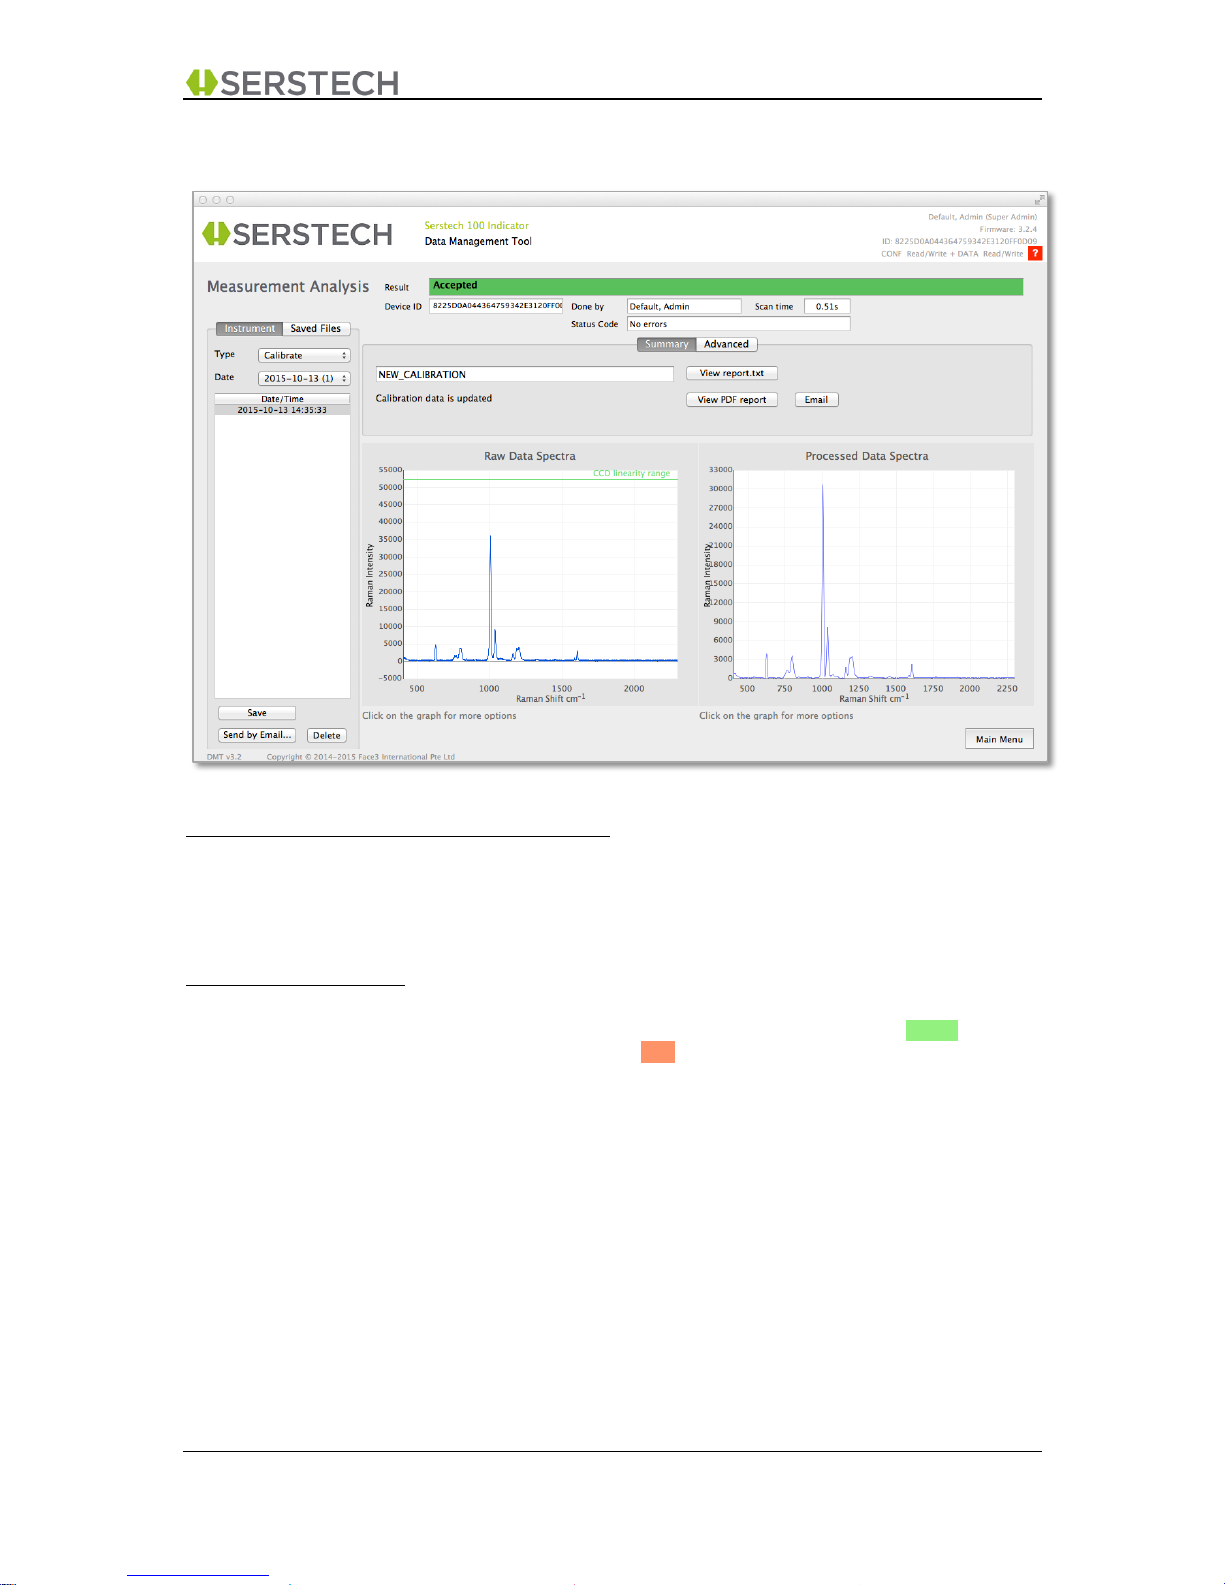
Result: Shows the overall result of the measurement (provided by the
instrument’s internal algorithms). The colour of this field is Green for
successful calibration and Red if the calibration failed.
Device ID: The unique ID code of the instrument that was used for this measurement.
Done by: Shows the name of the user who performed this measurement
Scan Time: Shows the exposure time used for the measurement
Status Code: Shows the status code reported by the instrument
Summary: Shows whether the instrument’s calibration files were updated or not as a
result of this calibration.
View Report: The “View report.txt” or “View report.pdf” buttons will retrieve a detailed
report (in plain text or pdf format respectively) with the results of this
calibration. You will be able to save this to your computer.
Email Report: The “Email” button will bring up an email template to which the pdf version
of the detailed report is attached. This is a convenient way to submit your
information, for example to Serstech support. (The email template looks
and works the same way as seen in e.g. chapter 5.3)
Page 20
DMT v3.2 User Manual A-1 DMT v3.2 Page 20 (55)
2015-10-13 Open Distribution
Raw Data spectra: Shows a thumbnail “Raw Data” image for this measurement. The user
may click this image to bring up a larger graph with additional options
(Chapter 4.7)
Processed Data spectra: Shows a thumbnail “Processed Data” image for this measurement. The
user may click this image to bring up a larger graph with additional options
(Chapter 4.8)
Delete: Selecting a measurement and clicking “Delete” allows you to permanently
erase the information from the instrument.
Save to disk: Selecting a measurement and clicking “Save to Disk” will bring up a File
browser window and allow you to copy this measurement to external
storage (for example your computer’s hard drive)
Send by Email: Selecting a measurement and clicking “Email” will bring up an email
template (with the files attached) and thus provide a convenient way to
share results with other users. (The email template looks and works the
same way as seen in e.g. chapter 5.3)
Please note:
• The “Delete” button may be “dimmed” as you may not have the permission to access this
function
• The “Email” functions requires that you have access to the Internet from your computer
• The “Advanced” tab allows you to study every detail of the “2-result.js” file, which is the
internal file format for the Serstech 100 Indicator. (Only to be used for “advanced users”)
Page 21
DMT v3.2 User Manual A-1 DMT v3.2 Page 21 (55)
2015-10-13 Open Distribution
4.6 External Measurement files Dashboard
Selecting which measurement to view
With “Saved Files” selected in the top left corner, you may click;
Load File… This button will open up a File Browser window from where you can browse to
any location on your computer and select any previously saved
measurement, or a measurement file sent to you by any other Serstech user.
Please note that DMT can read external files in the following formats only:
• Uncompressed “2-result.js” files, which is the Serstech internal file
format for measurements.
• Compressed zip-files, as per the format used when exporting
measurement files by using the “Save to Disk” or “Send as Email”
functions described in the previous chapters above.
• DMT will also accept large zip-files, which may contain multiple
measurements. DMT will scan through such archives and list all
measurements found therein.
Open Directory… This button will open up a File Browser window from where you can browse
to any location of your computer and select a specific folder. Click “Open”
and DMT will scan through this folder, including all its subfolders, and list all
measurements found therein.
Page 22
DMT v3.2 User Manual A-1 DMT v3.2 Page 22 (55)
2015-10-13 Open Distribution
The list-box on the left of your screen will show the type and time of all measurements found. You
may scroll through this list and you may also sort the list by clicking on the “labels” on top of each
column.
The Dashboard Content:
After selecting a specific measurement from the list-box, the Dashboard to the right will be populated.
Depending on the type of measurement, the dashboard content will be identical to what is described in
the previous chapters for “Screen”, “Identify”, “Verify”, “Add Substance” and “Calibrate”
respectively.
Please note:
DMT supports analysing measurements done with earlier firmware releases when such files are
found on external storage (such as your computer’s hard drive). These files may however not
contain all the parameters supported from firmware 3.2.x onwards. In such cases, these fields are
left blank or the buttons may be dimmed.
Page 23
DMT v3.2 User Manual A-1 DMT v3.2 Page 23 (55)
2015-10-13 Open Distribution
4.7 Raw Data Spectrum Analysis
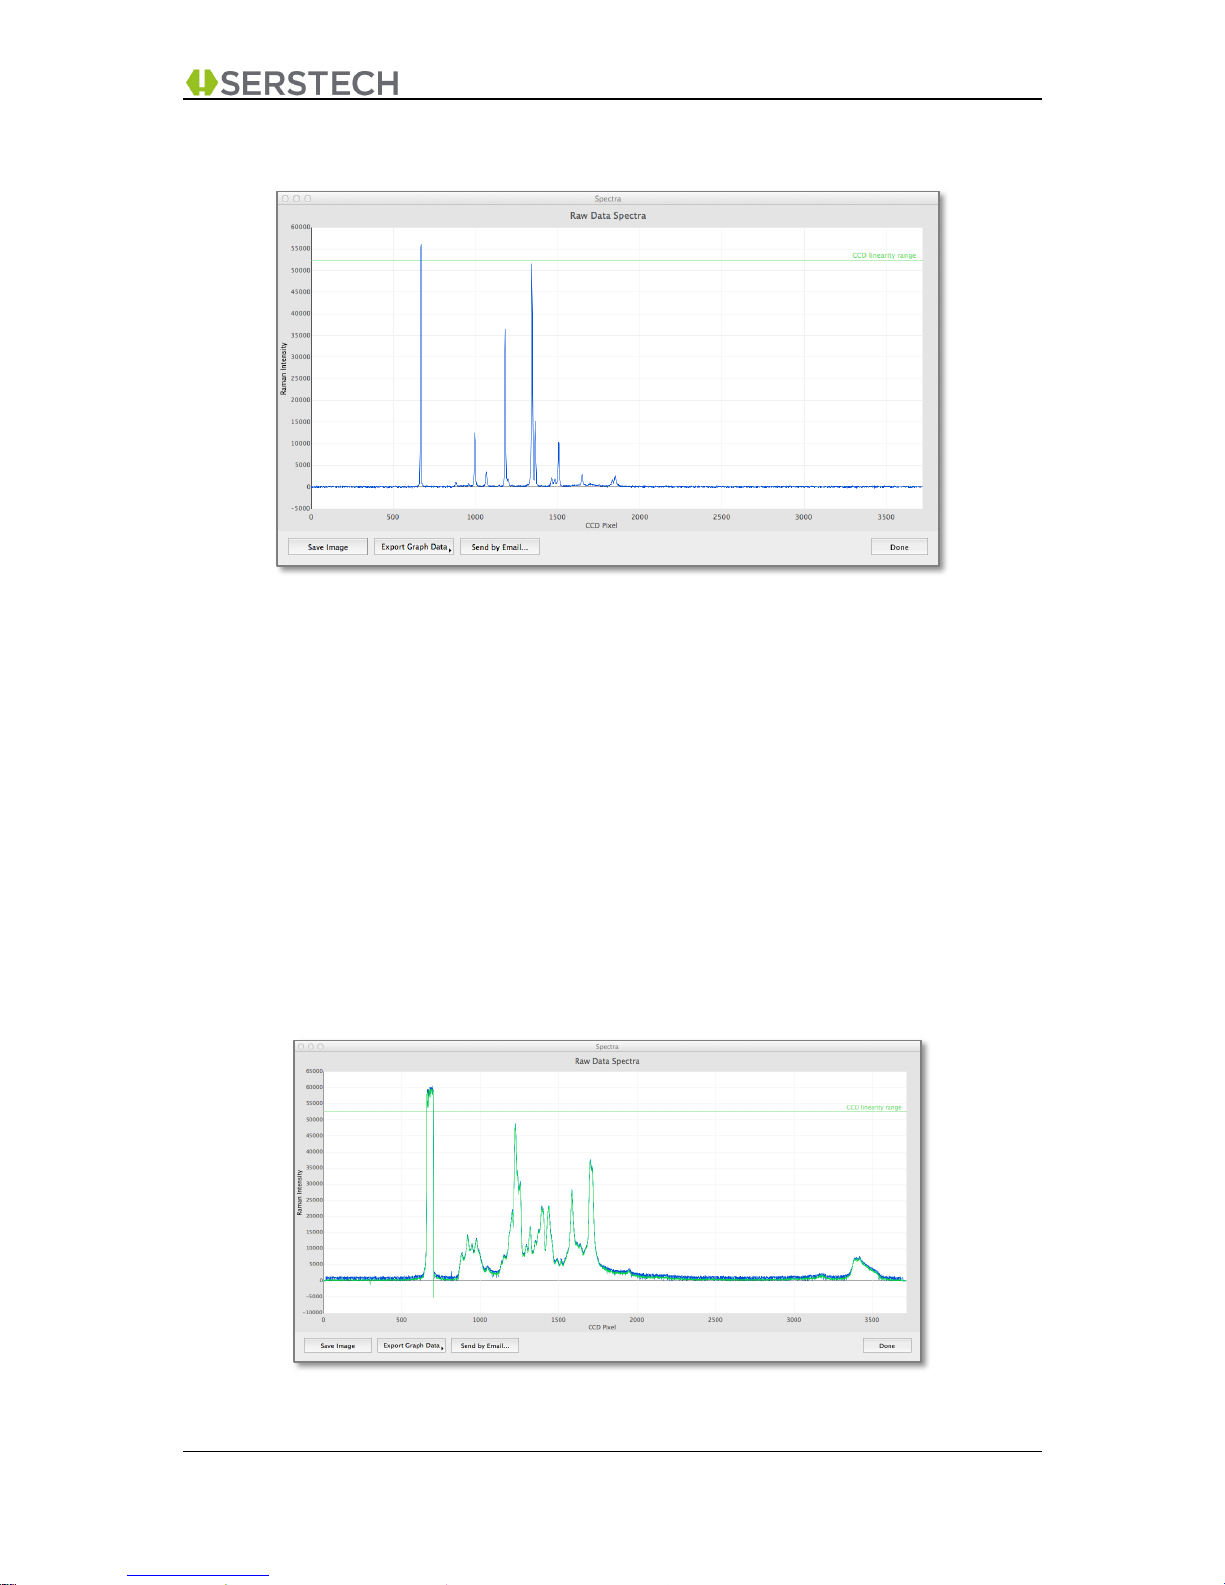
This enlarged graph of the Raw Data Spectrum allows you to:
• Resize the window to you preference
• Verify that you have used as much as possible of the linearity range of the CCD. This is
important in order to get a good resolution in your result.
• Save the image (in .png format) to any location on your computer
• Email the image (as attachment) directly from DMT. (The email template looks and works the
same way as seen in e.g. chapter 5.3)
• Export the graph data, for example to allow it to be analysed in 3rd party software. The
following formats are presently supported:
o CSV format
o JCAMP format
o Panorama format, with “.” as decimal character
o Panorama format with “,” as decimal character
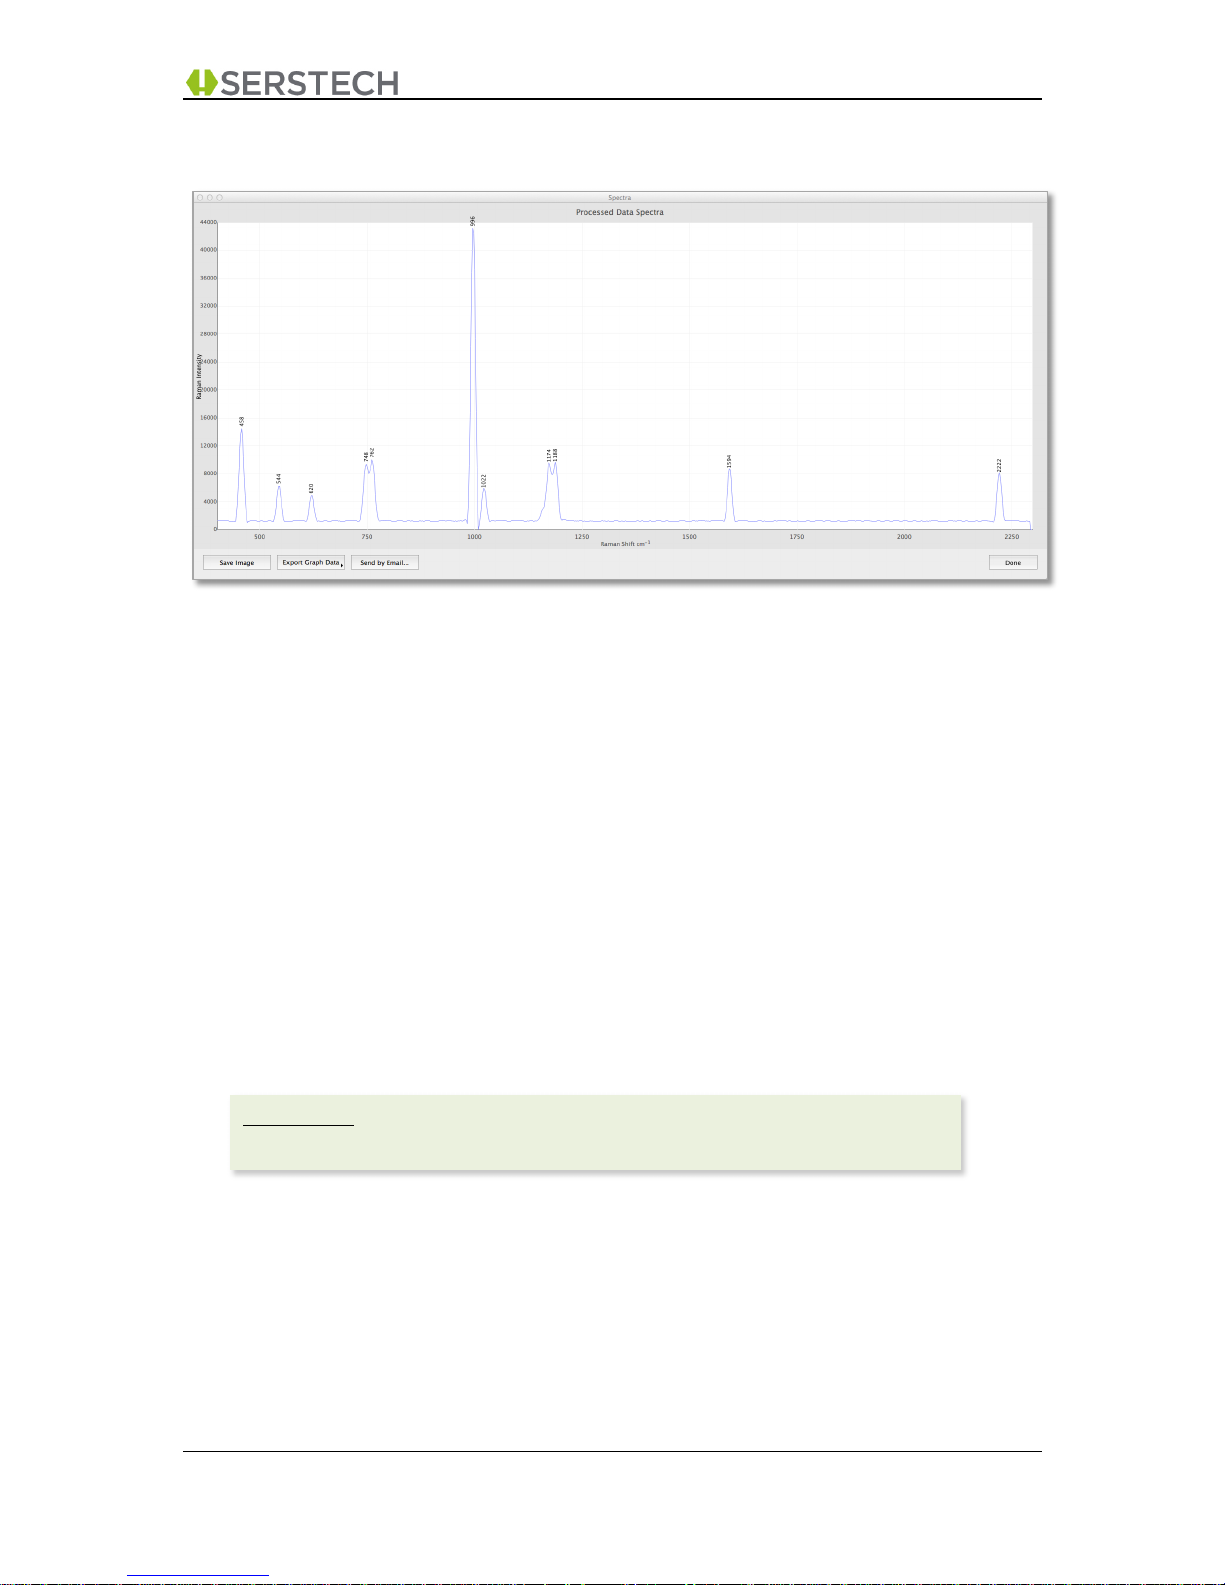
Please note that Raw Data Spectrum for “Add Substance” will have several overlaid graphs, one for
each repeat scan, as can be seen in the below example:
Page 24
DMT v3.2 User Manual A-1 DMT v3.2 Page 24 (55)
2015-10-13 Open Distribution
4.8 Processed Data Spectrum Analysis
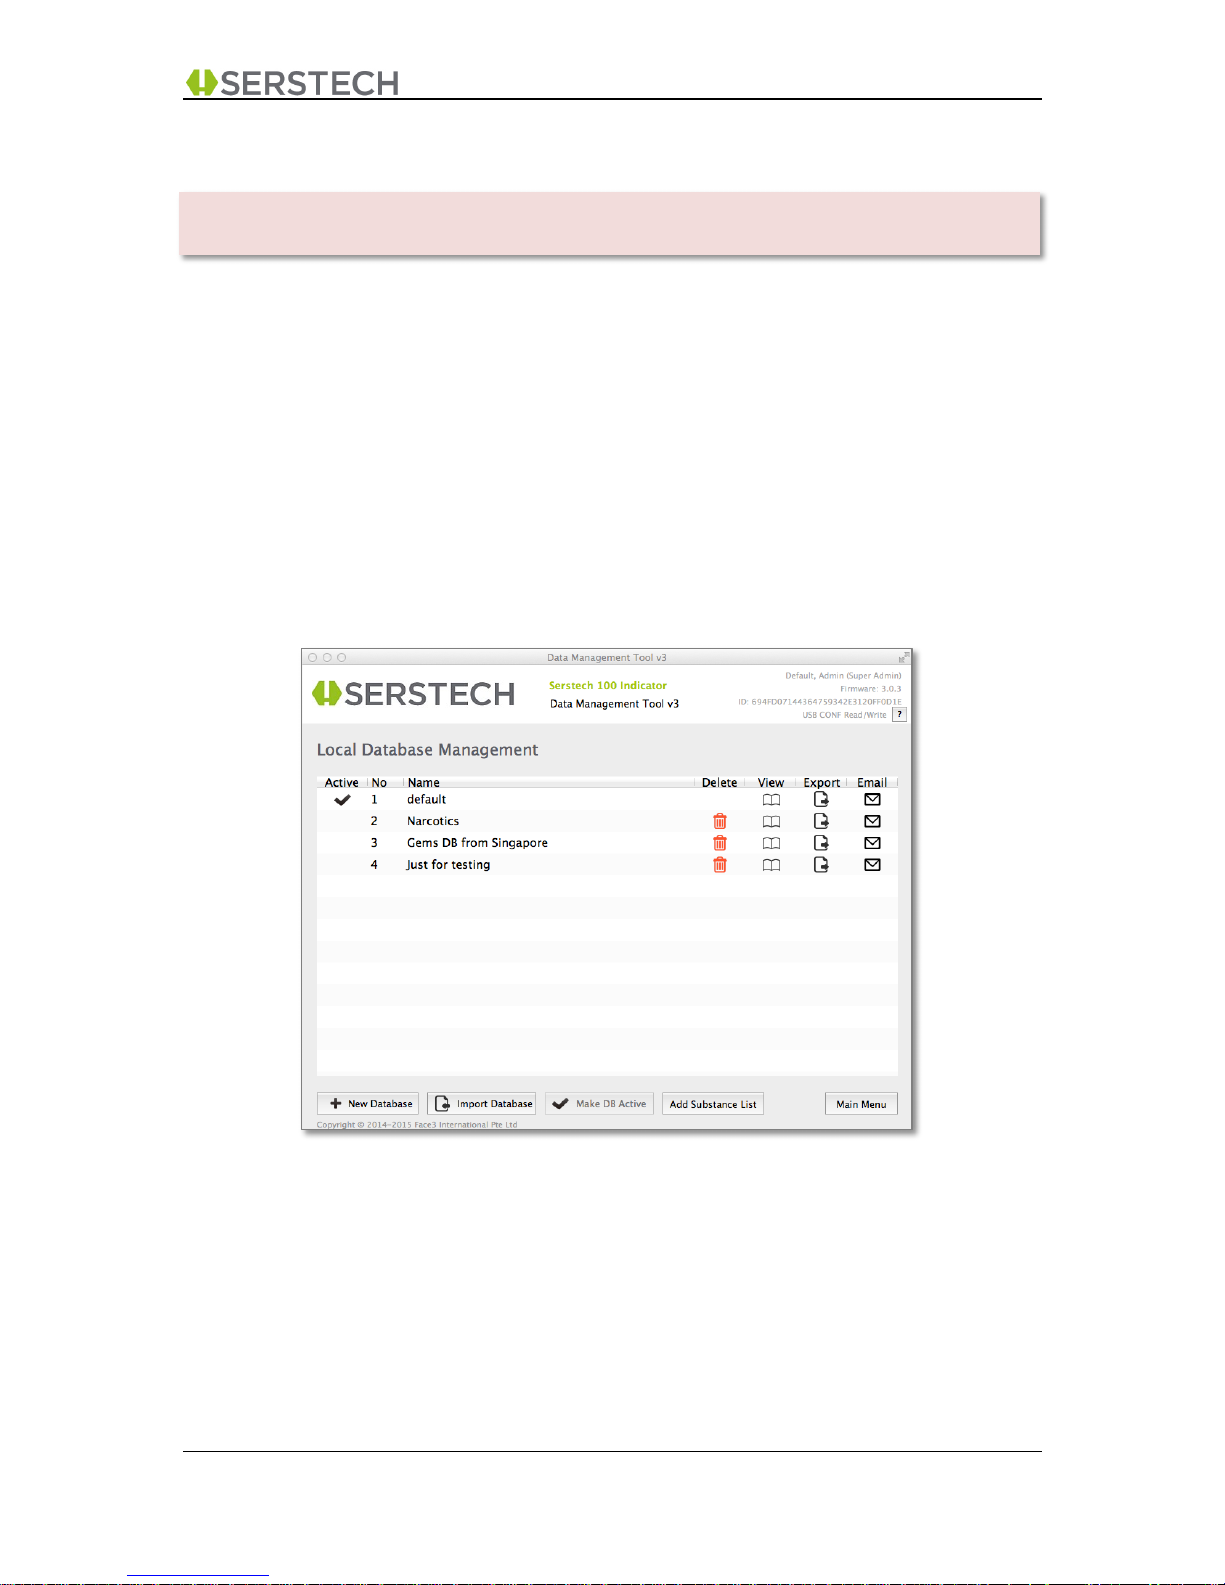
This enlarged graph of the Processed Data Spectrum allows you to:
• Resize the window to you preference
• Move the cursor close to a specific “peak” and it will reveal a label with the precise “Raman
Shift” for that peak (in cm-1).
o With the mouse click you can “save” that label and continue to mark additional peaks
in your spectrum.
o A repeat mouse click next to an existing label will remove that label from the graph.
• Save the image (in .png format) to any location on your computer
• Email the image (as attachment) directly from DMT. (The email template looks and works the
same way as seen in e.g. chapter 5.3)
• Export the graph data, for example to allow it to be analysed in 3rd party software. The
following formats are presently supported:
o CSV format
o JCAMP format
o Panorama format, with “.” as decimal character
o Panorama format with “,” as decimal character
Please note:
The email function requires that you have access to the Internet from your computer.
Page 25
DMT v3.2 User Manual A-1 DMT v3.2 Page 25 (55)
2015-10-13 Open Distribution
5 LOCAL DATABASE MANAGEMENT
The Serstech 100 Indicator’s unique ability to build your own reference libraries, by using the “Add
Substance” scan feature, is one of the absolute strengths of the instrument.
The Local Database Management function in DMT is a very powerful tool when working with your own
reference spectra that have previously been recorded with such “Add Substance” scans.
In this section you will find many useful functions, including tools to;
• edit name, CAS number, Material Safety Data Sheets and Regulatory classification for such
substances
• arrange and group your references in various sub libraries
• share your references (both individual substances or whole libraries) with other users and
instruments
• import and export individual substances or complete reference libraries
Local Database Management Main Screen
Options activated with the symbols in the main window:
“Delete”: Brings up the “Delete Library Pop-up Window” which will permanently erase this whole
library from the instrument (chapter 5.1)
“View”: Launches the “View Library Screen” in order to view the content of this library (chapter
5.7)
“Export”: Brings up the “Export Library Pop-Up Window” which will allow you to copy this whole
reference library (as a compressed zip-file) to an external location (e.g. your local hard
drive) (chapter 5.2)
The LOCAL DATABASE MANAGEMENT function is only accessible when USB mode i100_conf is
activated.
Page 26
DMT v3.2 User Manual A-1 DMT v3.2 Page 26 (55)
2015-10-13 Open Distribution
“Email”: Which brings up an email template allowing you to easily share this library with other
users. The library will automatically be attached as a compressed zip-file. (chapter 5.3)
Options available from the buttons at the bottom of the screen:
“New Database”: Brings up the “Create New Local Library Pop-Up Window” which allows you
to create a new empty library. (chapter 5.4)
“Import Database”: Brings up a file browser allowing you to browse to any location on your
computer, select an archived reference library and import this to your
instrument. Please note that the reference library to be imported must be in
compressed “zip-format” (as per the exported result of either the “export” or
“email” function explained above). (chapter 5.5)
“Make DB Active”: Highlighting a specific library in the list box and then clicking this button will
select the highlighted library as the “Active Local Database”. (Please Note:
The Serstech 100 Indicator will only be able to see one of the “Local
Database” libraries at any one time. With the DMT you will thus be able to
select which of your customized libraries you want to use as the active
library in the instrument for any specific measurement session. The Active
Library will always be called “local” on the Serstech Instrument screen,
regardless of the name given in DMT)
“Add Substance List”: This allows you to pre-define a list with names of substances that you later
may want to add to your local libraries with the “Add Substance” function in
the instrument. This list will be available on the instrument screen after each
“Add Substance” scan, so that you can “name” your substances directly from
the instrument. (chapter 5.6)
“Main Menu”: This will bring you back to the Main Menu.
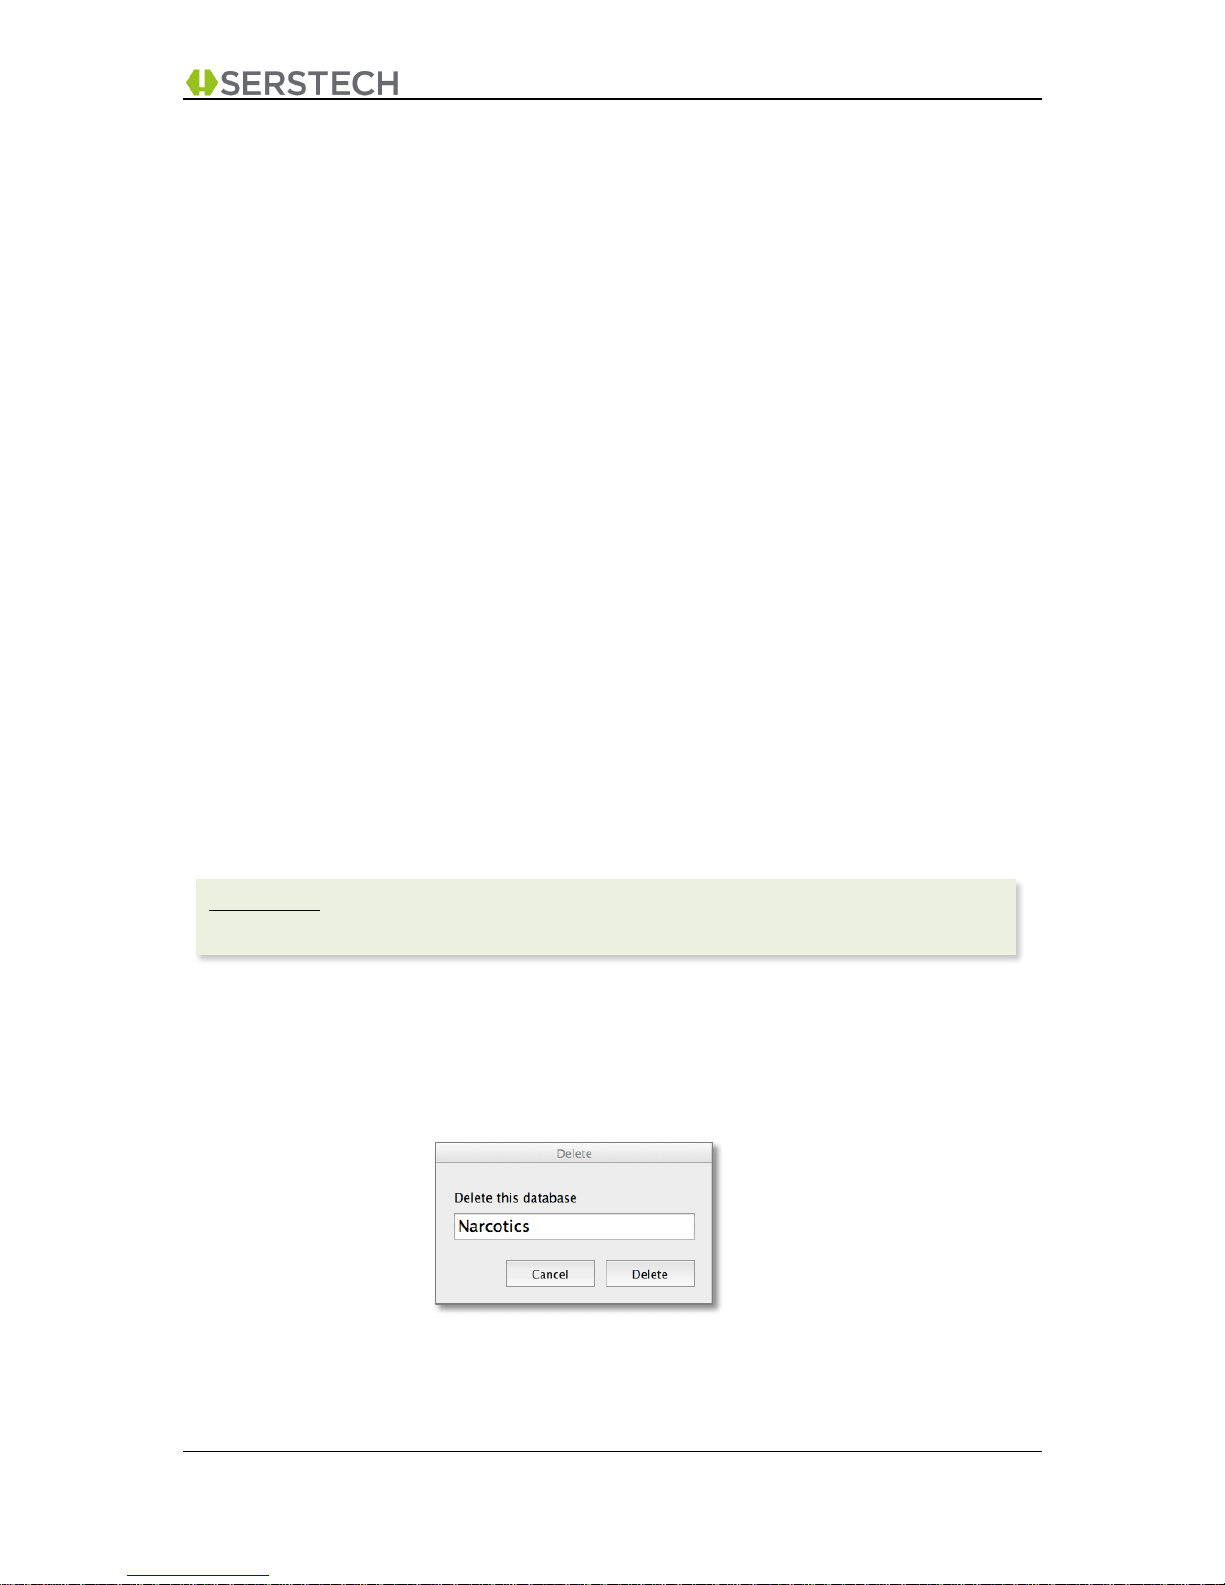
5.1 Delete Library
You have the option to:
• Click “Cancel”, which returns you to “Local Database Management Main Screen”
• Click “OK”, which permanently erases the complete reference library from the instrument
!
Please note:
Certain “options” may be “dimmed” as you may not have the permission to access this function.
Page 27
DMT v3.2 User Manual A-1 DMT v3.2 Page 27 (55)
2015-10-13 Open Distribution
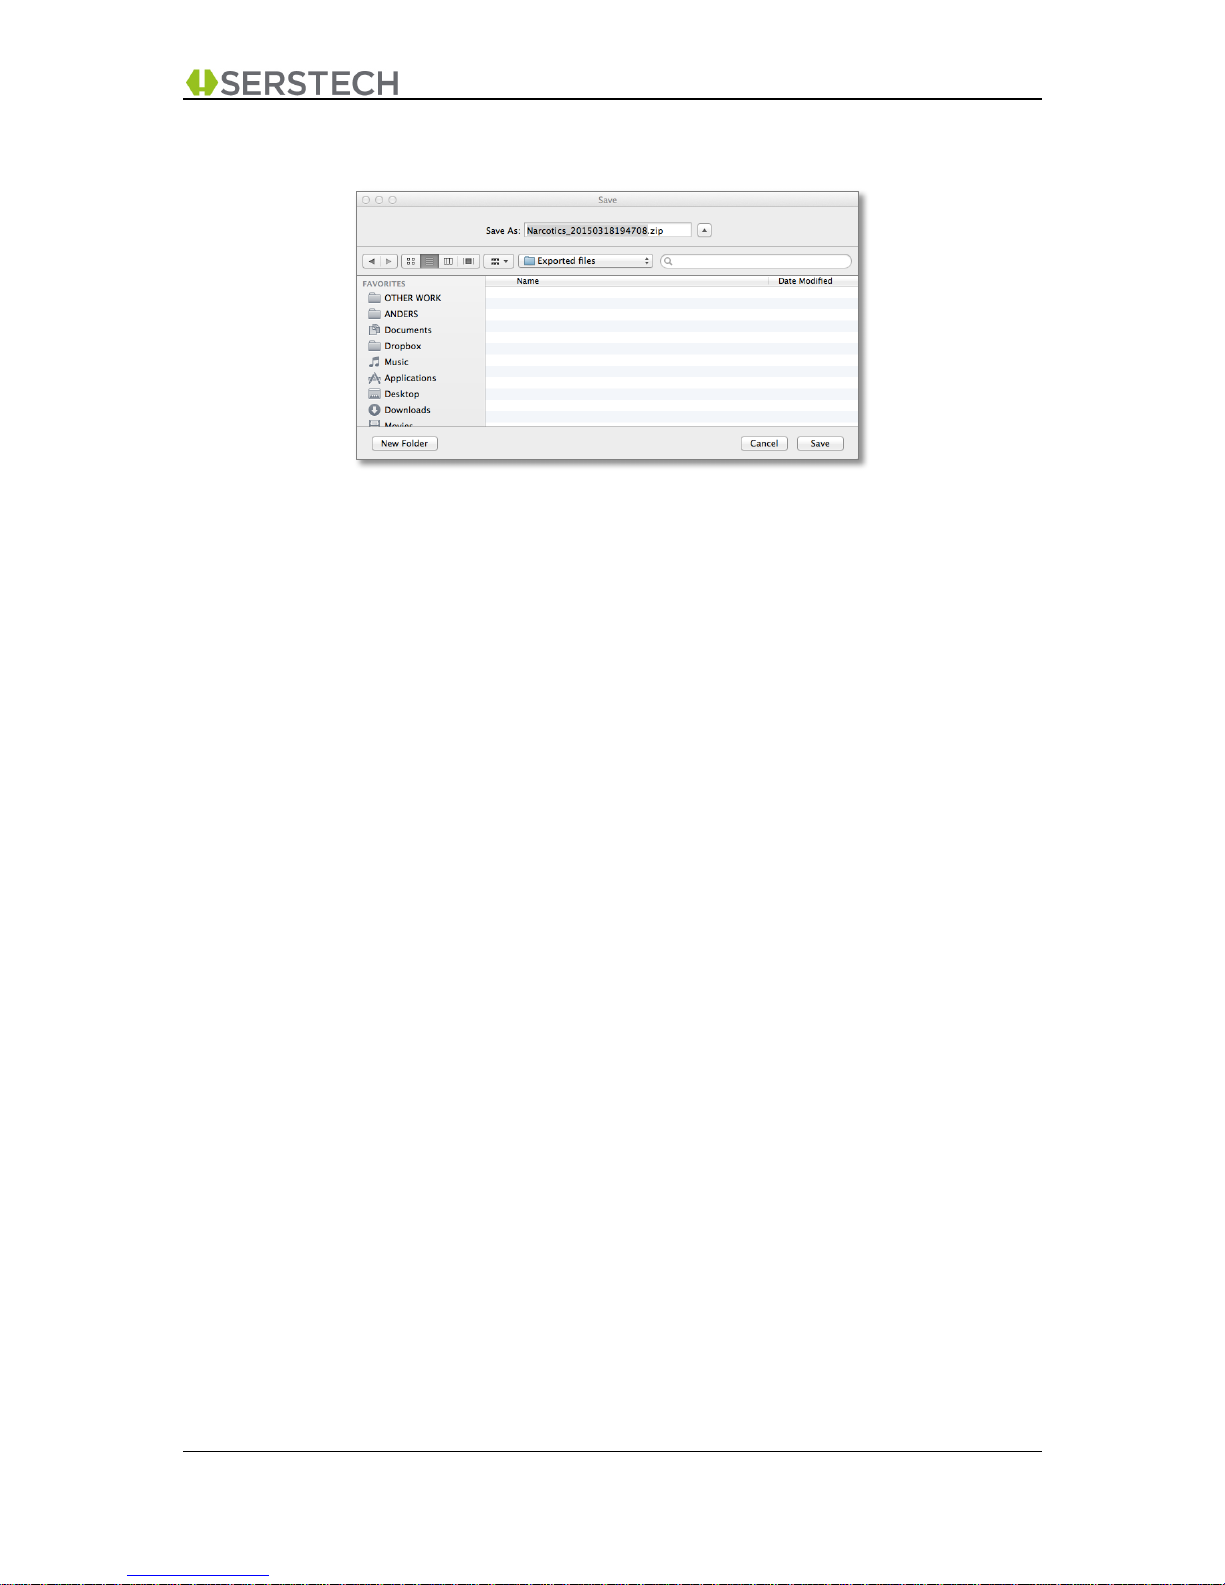
5.2 Export Library
This brings up a file browser window that may vary slightly in appearance depending on your
operating system (above example from MAC OS X).
You have the option to:
• Clicking “Cancel”, which returns you to “Local Database Management Main Screen”
• Browse to a certain location on your computer where you want to save the file.
• Clicking “Save”, which will save the complete reference library as a compressed zip file to the
active location.
Page 28
DMT v3.2 User Manual A-1 DMT v3.2 Page 28 (55)
2015-10-13 Open Distribution
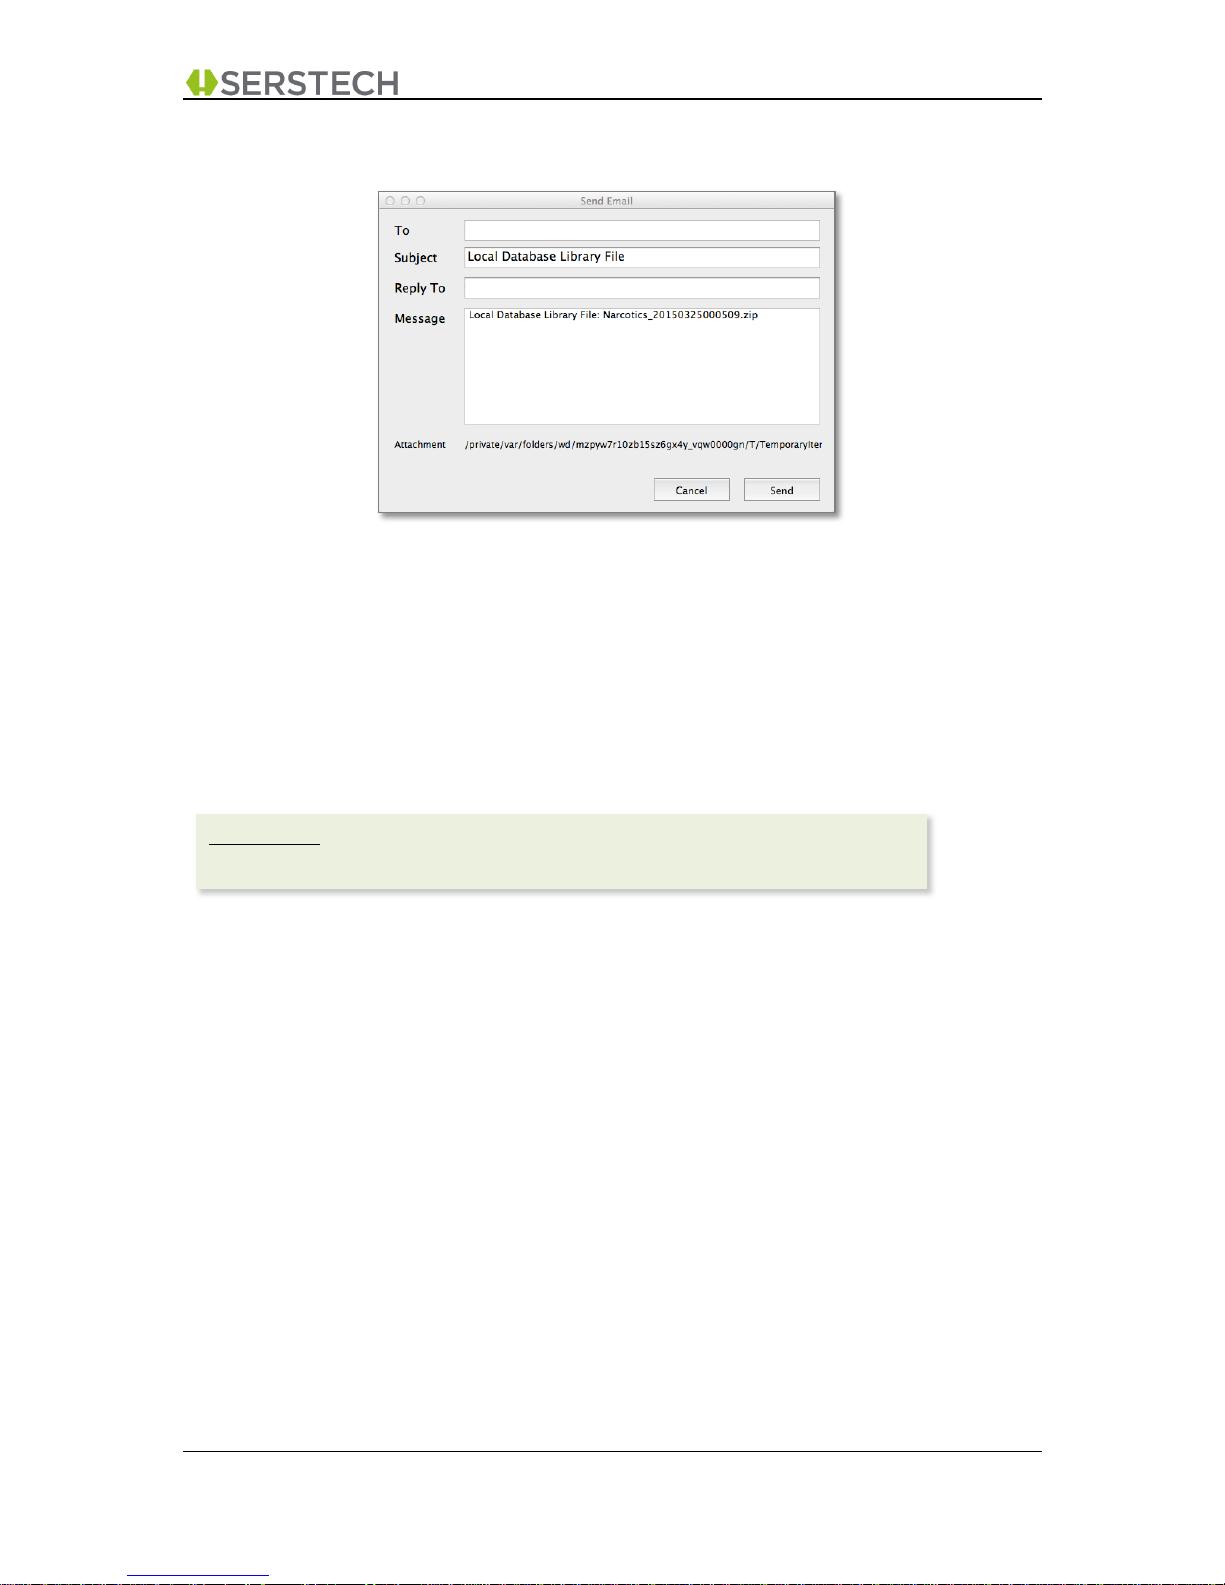
5.3 Email Library
This function displays an email template to which your selected library has already been attached (as
a compressed zip file).
The options available are:
• Insert the email address to the person you want to send this email to
• Insert your own email address in the “Reply To” field so the recipient knows who sent this
email and knows how to reply to you.
• You can add whatever text you want in the main body of the email.
• “Cancel”, which returns you to “Local Database Management Main Screen”
• “Send”, which will send this email.
Please note:
The email function requires that you have access to the Internet from your computer.
Page 29
DMT v3.2 User Manual A-1 DMT v3.2 Page 29 (55)
2015-10-13 Open Distribution
5.4 Create New Library
• Type in the name of your new reference library
• Clicking “Cancel”, which returns you to “Local Database Management Main Screen”.
• Clicking “Save”, which creates a new, currently empty, reference library on your instrument.
You may later populate this new library with reference spectra in any of the following ways;
• By making this library the “Active Database” and then performing “Add Substance” scans from
the instrument
• By importing substances from external storage
• By moving substances from other local references libraries, thus being able to sort your
substances in various sub libraries
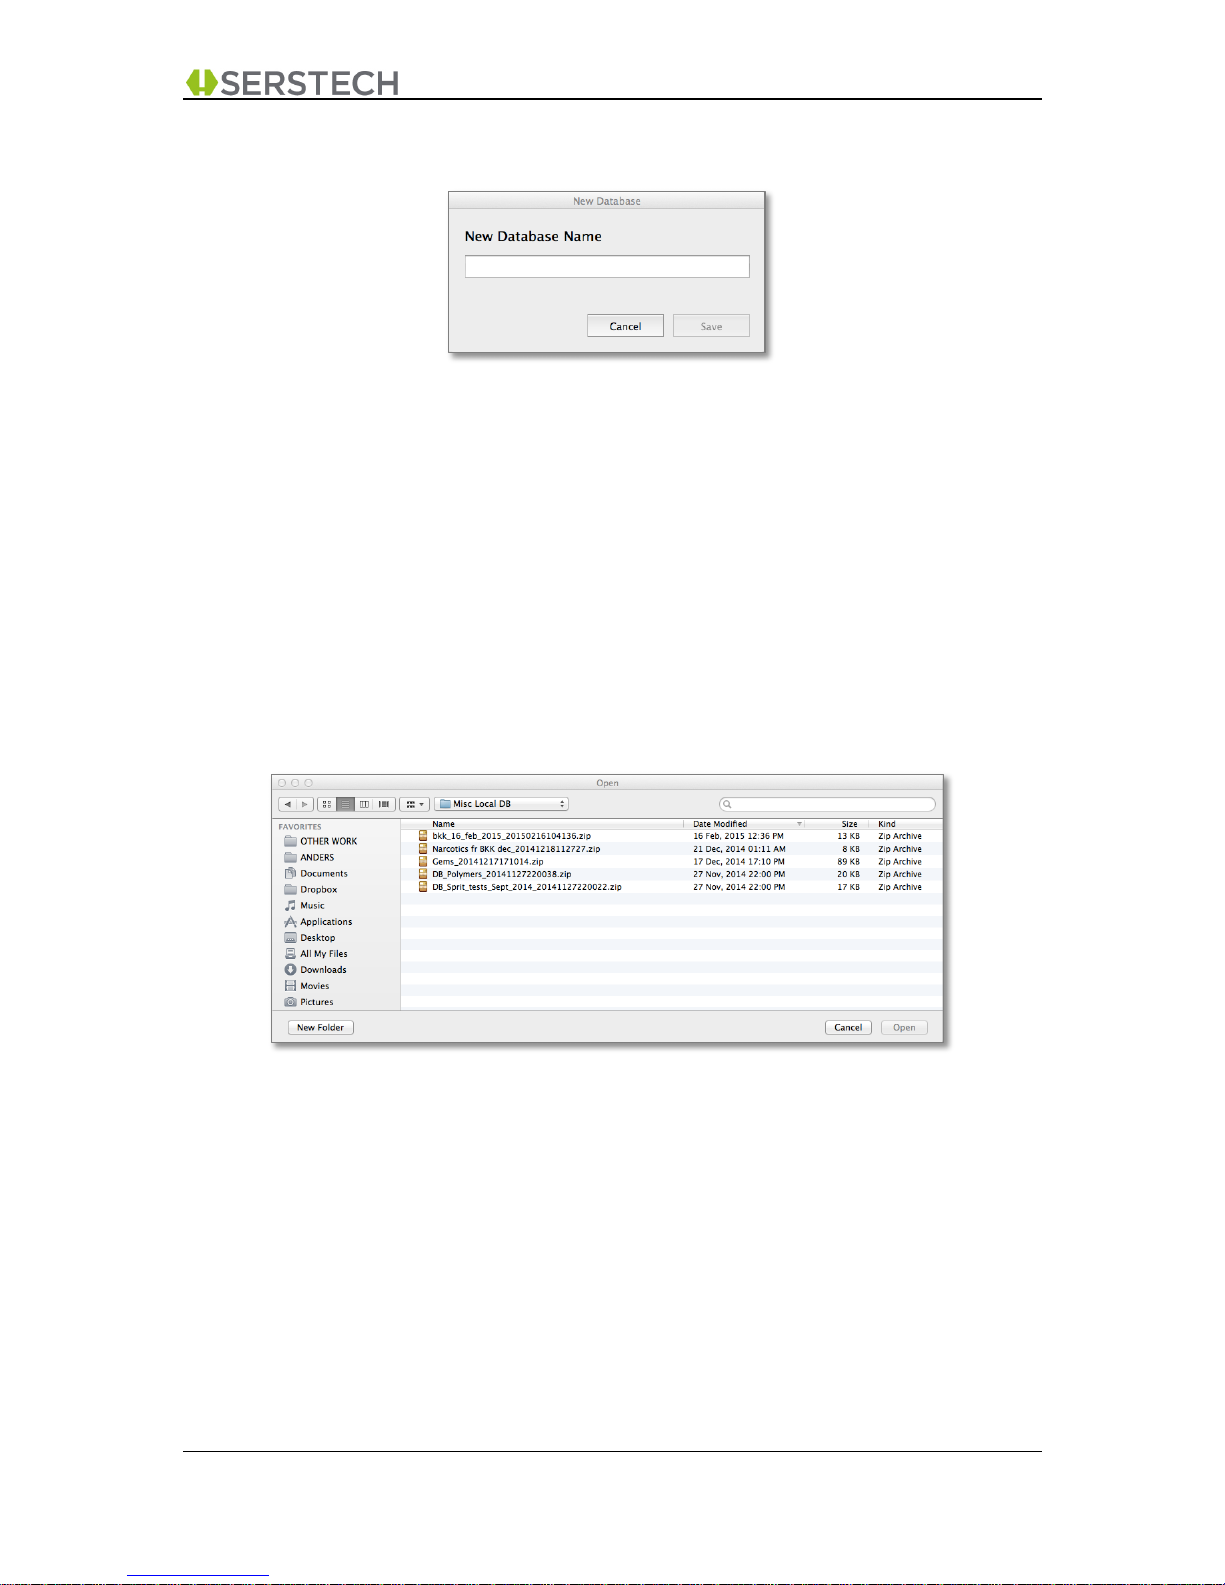
5.5 Import Library
This brings up a file browser window that may vary slightly in appearance depending on your
operating system (above example from MAC OS X).
You have the option to:
• Click “Cancel”, which returns you to “Local Database Management Main Screen”
• Browse to a certain location on your computer where you have stored earlier exported
reference libraries (possibly from another Serstech instrument) or reference libraries shared
with you by other user(s), for example using DMT’s built-in “email” function. Please note that
reference libraries to be imported must be in compressed zip format, typically created by
DMT’s “export” or “email” functions.
• Select the file containing the library you want to import and click “Open”. This will “unpack” the
zip file and install the selected library on your Serstech instrument.
Page 30
DMT v3.2 User Manual A-1 DMT v3.2 Page 30 (55)
2015-10-13 Open Distribution
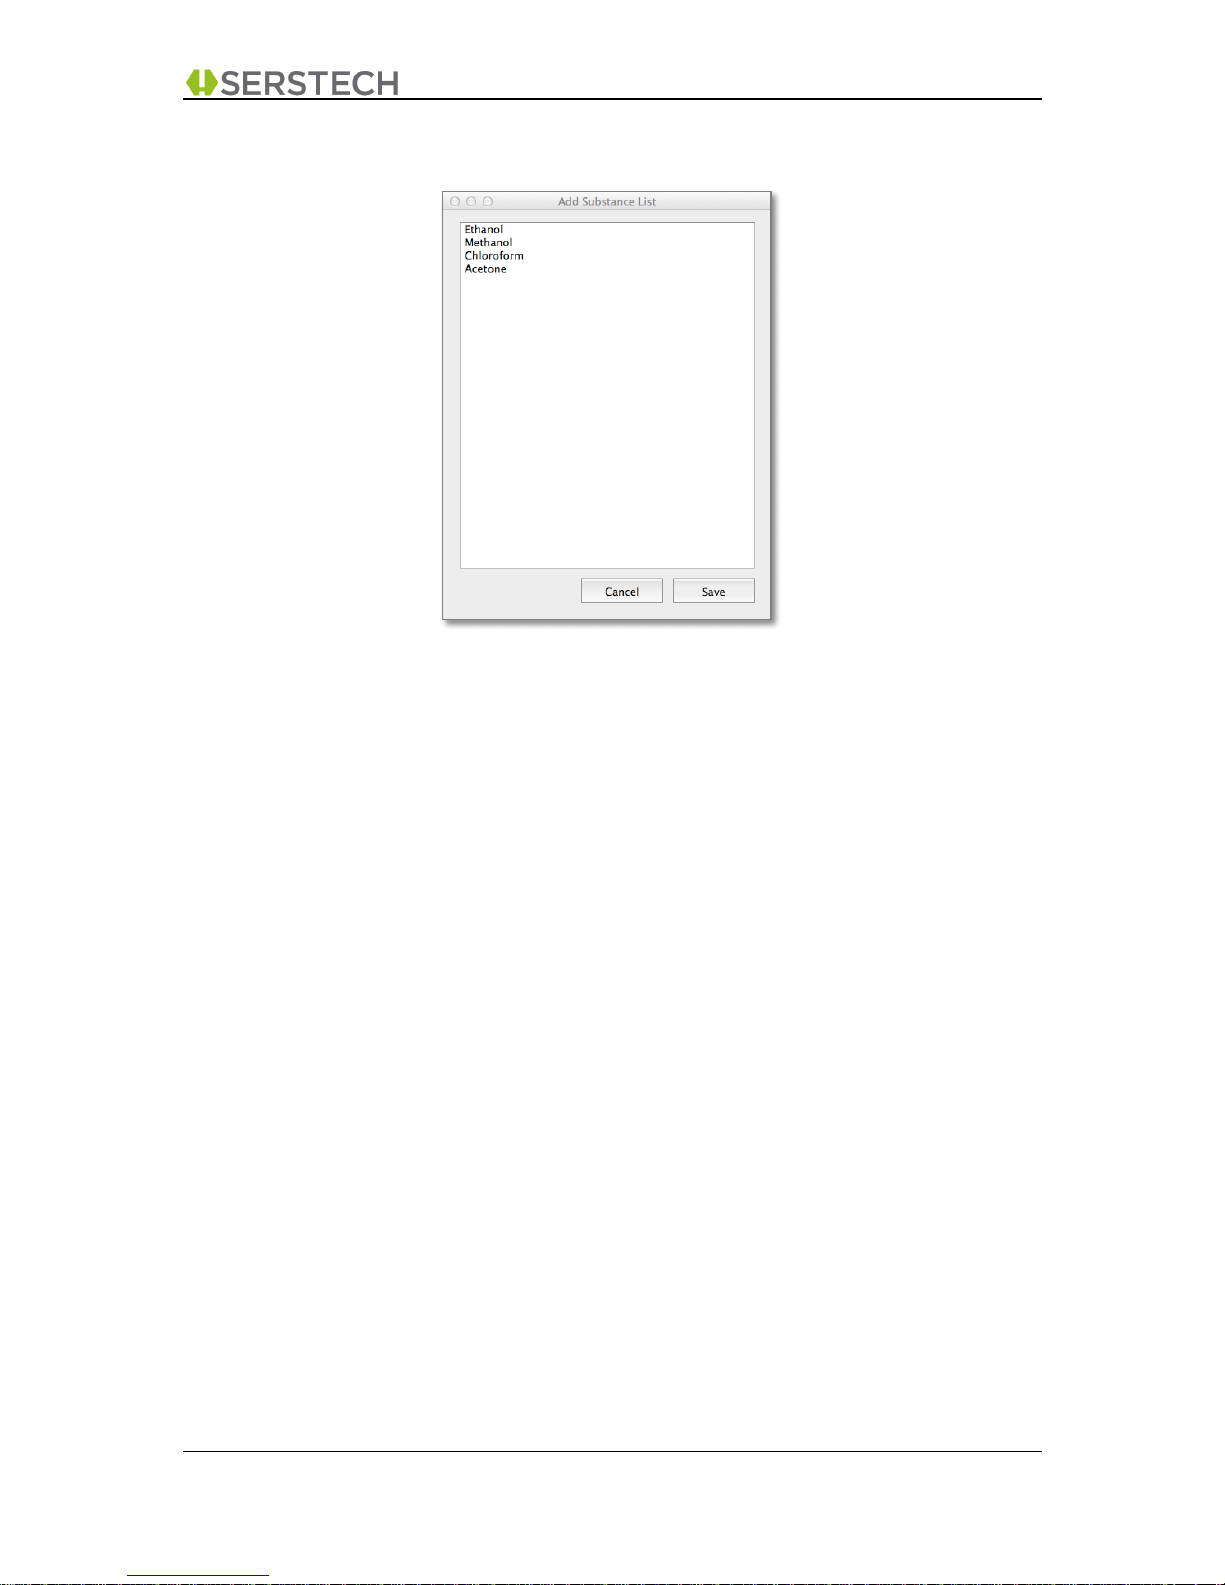
5.6 Add Substance List
This function brings up a simple “text editor” where you insert the names of the Substances you plan
to add to your local reference library by using the Serstech instrument’s “Add Substance” feature. This
list will be stored on the instrument and allow you to “name” your new references directly from the
instrument.
You have the option to:
• Click “Cancel”, which returns you to “Local Database Management Main Screen”
• Click “Save”, which will store your list on the instrument.
Page 31
DMT v3.2 User Manual A-1 DMT v3.2 Page 31 (55)
2015-10-13 Open Distribution
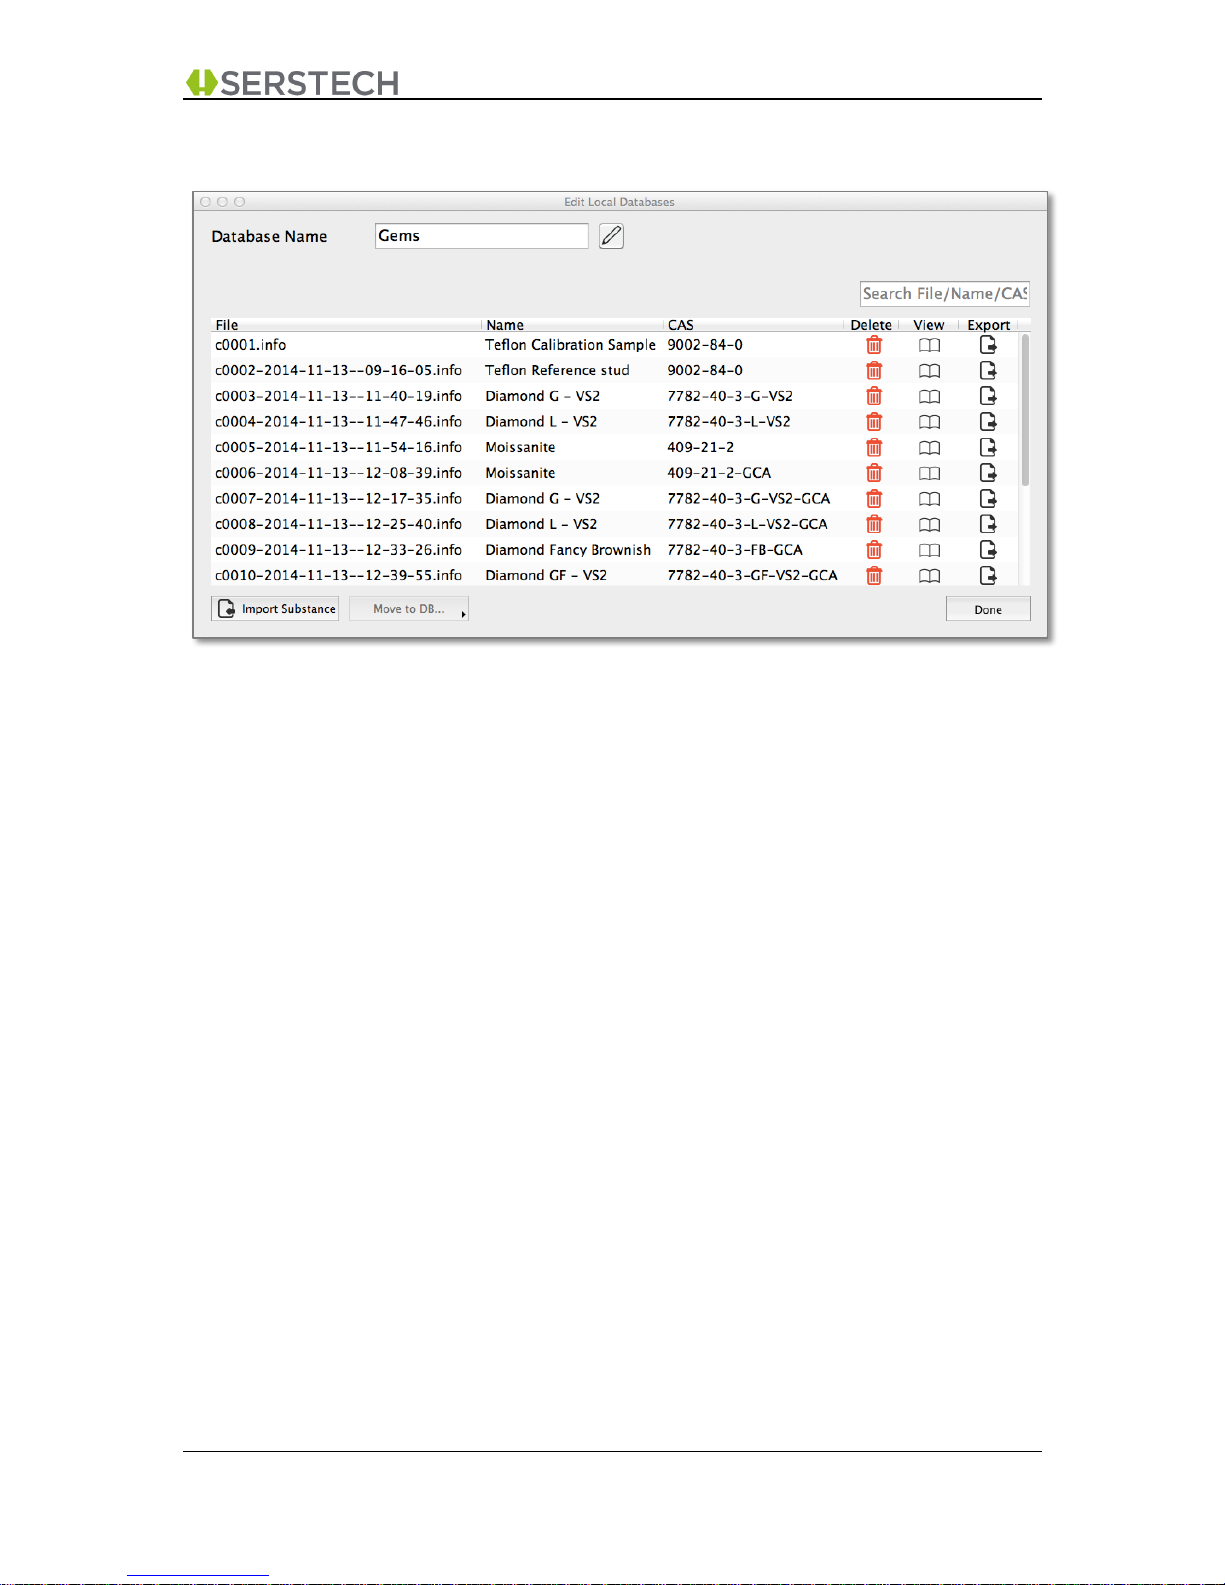
5.7 View Library Screen
!
This screen shows the content of the selected reference library. You may scroll the list up or down and
you may also sort the list by clicking on any of the “labels” on top of each column.
Each substance in this library is represented by:
• The file name containing this substance’s data and spectrum
• The name of the Substance. (Please note that, unless the user have opted to use the “Add
Substance List” feature, the instrument will give each new substance a sequential “default
name” starting with c0001-[date]-[time].)
• The CAS number of the Substance. (Please note that the instrument will give each new
substance a sequential “default CAS number” starting with c0001-[date]-[time].)
On the top part of the screen, you find:
“Database Name”: Clicking the “edit” symbol next to the name allows you to edit the name of
this sub library.
“Search Field”: If the library contains many substances, this gives you a convenient way to
search for the substance you are interested in. It is a free text search of the
file name, substance name and CAS number fields.
Options activated with the symbols in the main window:
“Delete”: Brings up “Delete Substance Pop-up Window” which will permanently erase this
substance from the library (chapter 5.7.1)
“View”: Brings up “View Substance Screen” in order to view and/or edit the information for this
substance (chapter 5.7.5)
“Export”: Brings up the “Export Substance Pop-Up Window” which will allow you to copy this
substance (as a compressed zip-file) to an external location (e.g. your local hard drive)
(chapter 5.7.2)
Page 32
DMT v3.2 User Manual A-1 DMT v3.2 Page 32 (55)
2015-10-13 Open Distribution
“Email”: Which brings up an email template allowing you to easily share this substance with other
users. The substance will automatically be attached as a compressed zip-file. (chapter
5.7.3)
Options available from the buttons at the bottom of the screen:
“Import Substance”: Brings up a file browser allowing you to browse to any location on your
computer, select an archived substance file and import this to your
instrument. Please note that the substance file to be imported must be in
compressed “zip-format” (as per the exported result of either the “export” or
“share” function explained above). (chapter 5.7.4)
“Move to DB”: Highlighting a specific substance in the list box and then clicking this button
will allow you to move the highlighted substance to another “Local Database”
sub library.
“Done”: Returns you to the Local Database Management Main Screen.
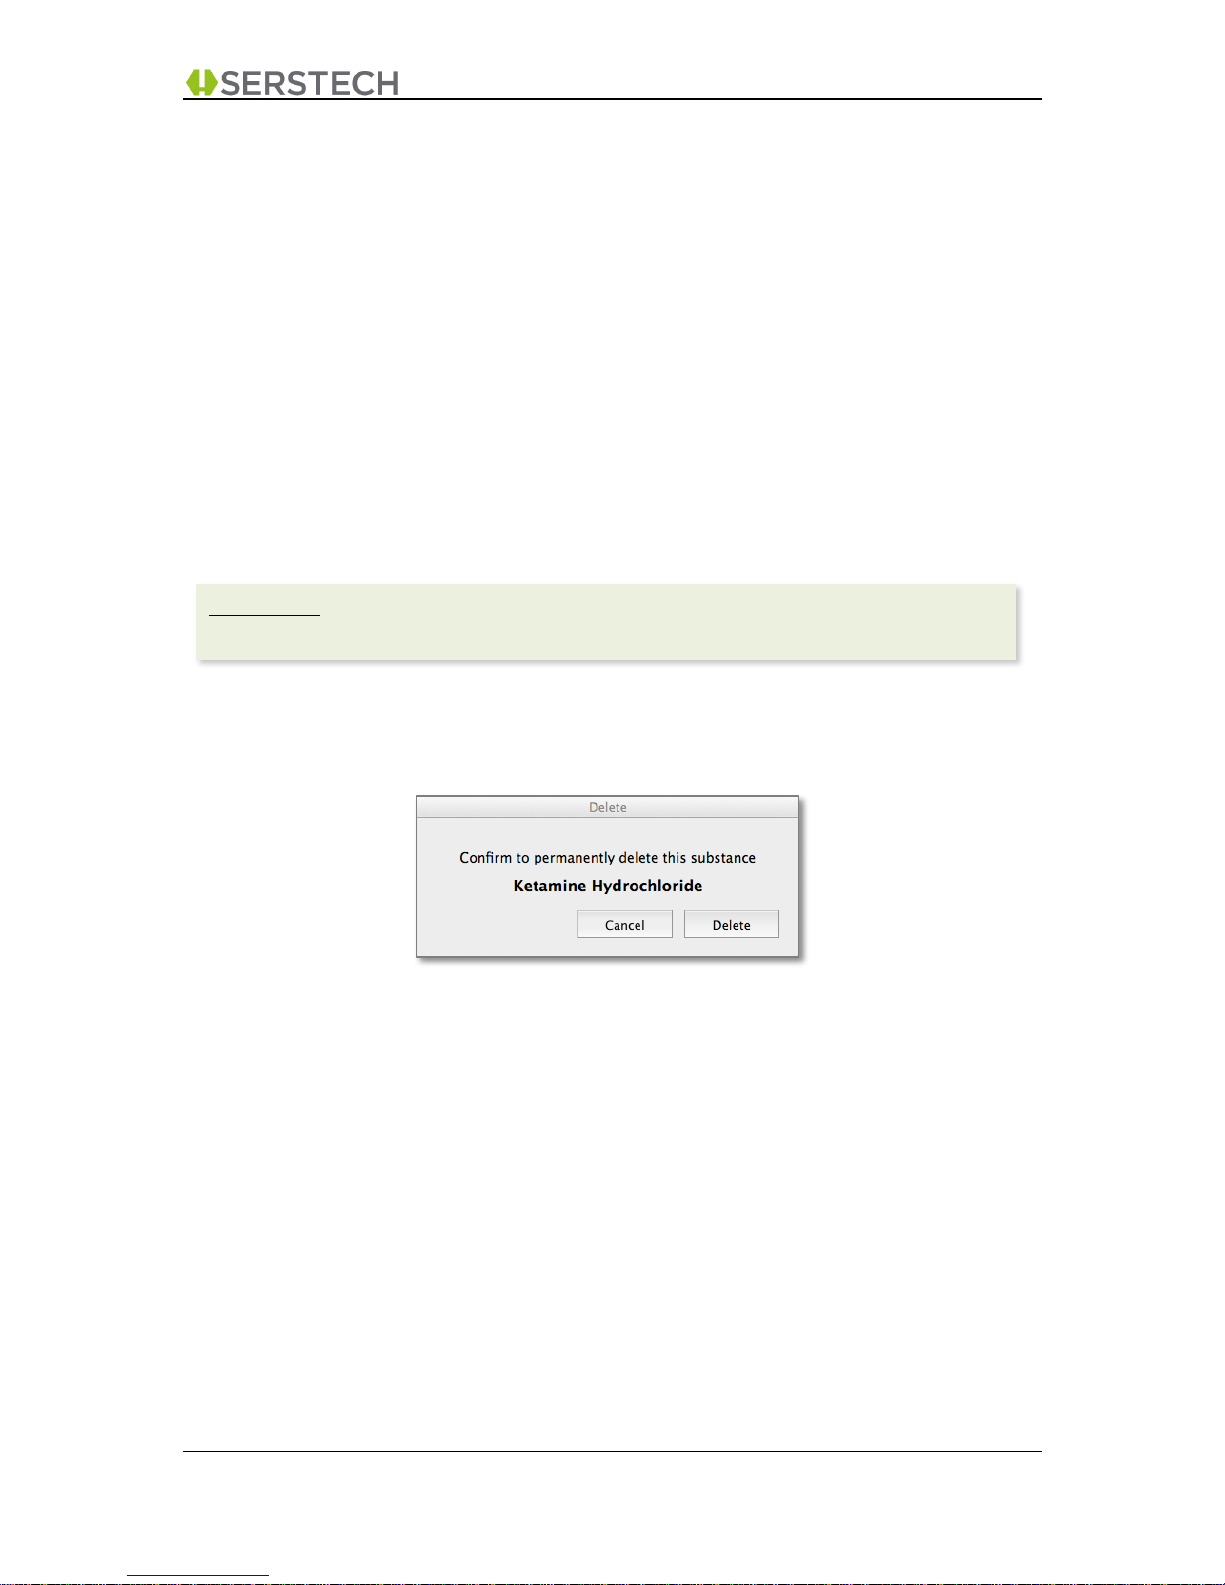
5.7.1 Delete Substance
!
You have the option of:
• Click “Cancel”, which returns you to “View Library Screen”
• Click “OK”, which permanently erases the substance from the library
Please note:
Certain “options” may be “dimmed” as you may not have the permission to access this function.
Page 33
DMT v3.2 User Manual A-1 DMT v3.2 Page 33 (55)
2015-10-13 Open Distribution
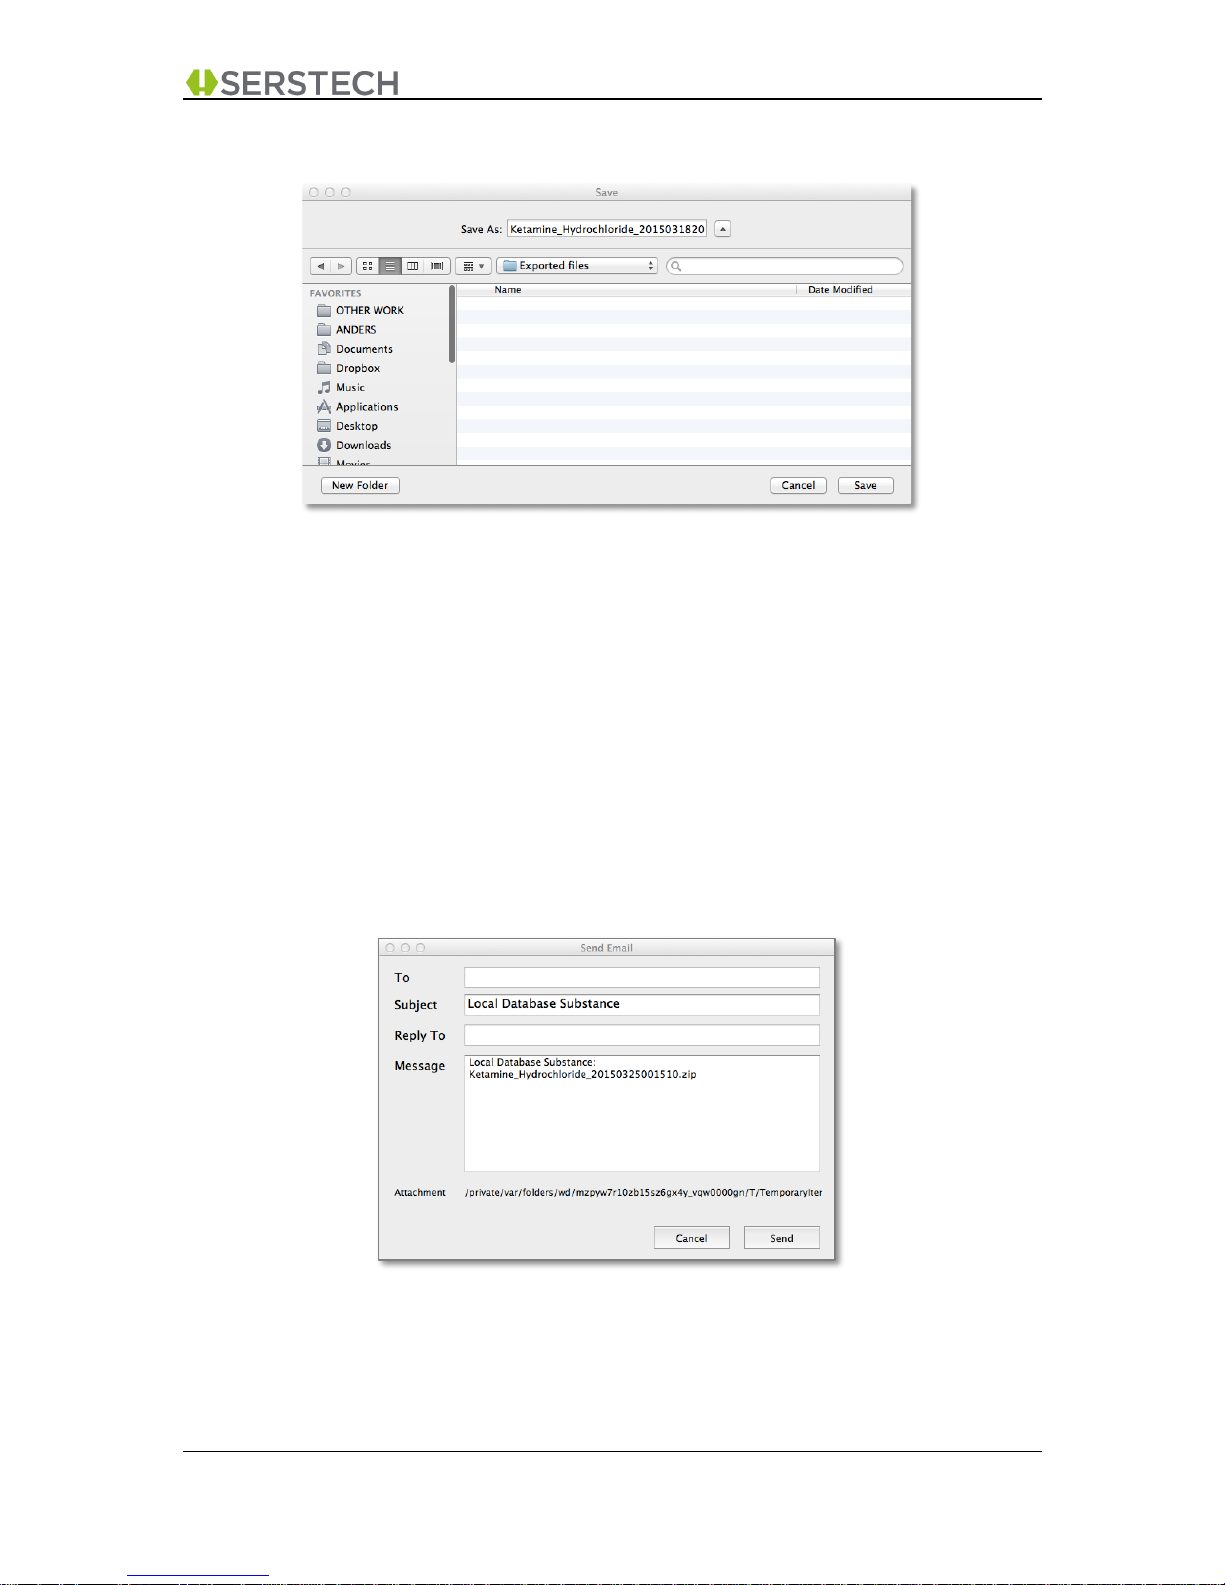
5.7.2 Export Substance
This brings up a file browser window that may vary slightly in appearance depending on your
operating system (above example from MAC OS X).
You have the option to:
• Click “Cancel”, which returns you to “View Library Screen”
• Browse to a certain location on your computer where you want to save the file.
• Click “Save”, which will save the selected substance as a compressed zip file to the active
location.
5.7.3 Email Substance
This function displays an email template to which your selected substance has already been attached
(as a compressed zip file).
The options available are:
• Insert the email address to the person you want to send this email to
• Insert your own email address in the “Reply To” field so the recipient knows who sent this
email and how to reply to you.
Page 34
DMT v3.2 User Manual A-1 DMT v3.2 Page 34 (55)
2015-10-13 Open Distribution
• You can add any text you want in the main body of the email.
• “Cancel”, which returns you to “Local Database Management Main Screen”
• “Send”, which will send this email.
5.7.4 Import Substance
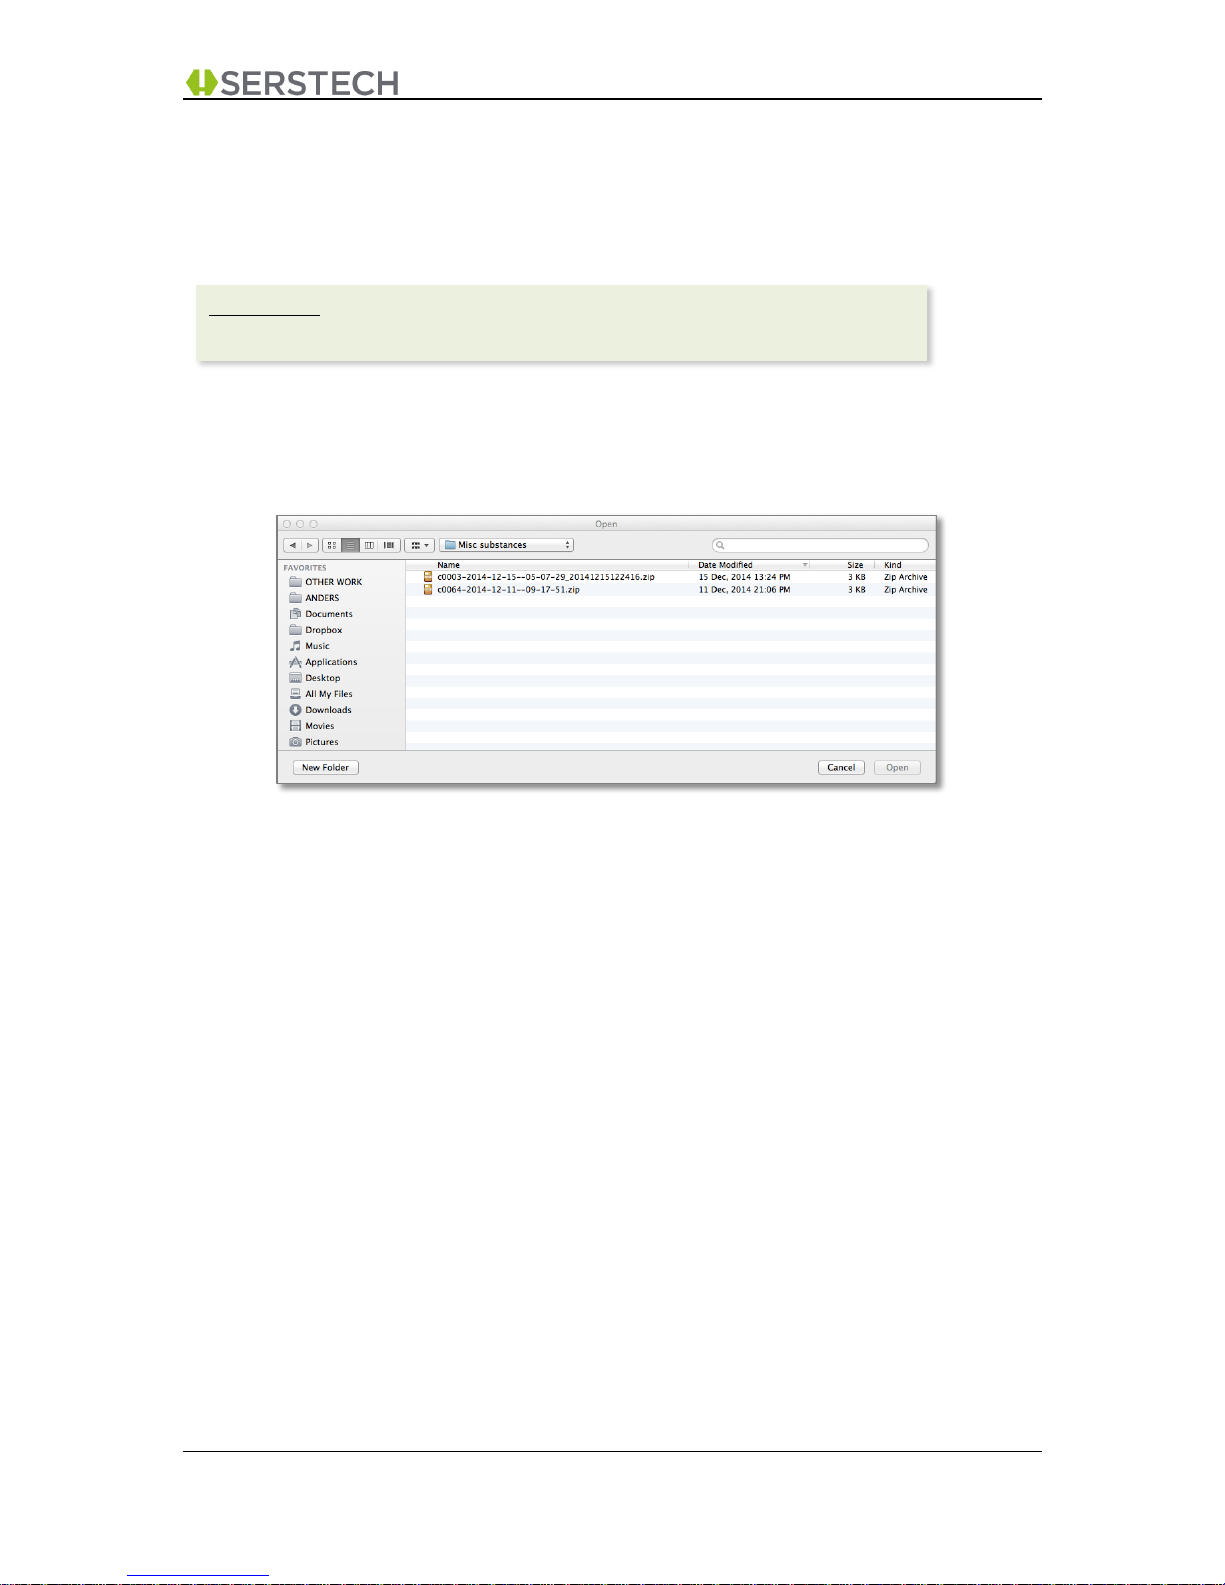
This brings up a file browser window that may vary slightly in appearance depending on your
operating system (above example from MAC OS X).
You have the option to:
• Click “Cancel”, which returns you to “View Library Screen”
• Browse to a certain location on your computer where you have stored earlier exported
substances (possibly from another Serstech instrument) or substances shared with you by
other user(s), for example using DMT’s built-in “email” function. Please note that substances
to be imported must be in compressed zip format, typically created by DMT’s “export” or
“email” functions.
• Select the file containing the substance you want to import and click “Open”. This will “unpack”
the zip file and install the selected substance to your reference library.
Please note:
The email function requires that you have access to the Internet from your computer.
Page 35
DMT v3.2 User Manual A-1 DMT v3.2 Page 35 (55)
2015-10-13 Open Distribution
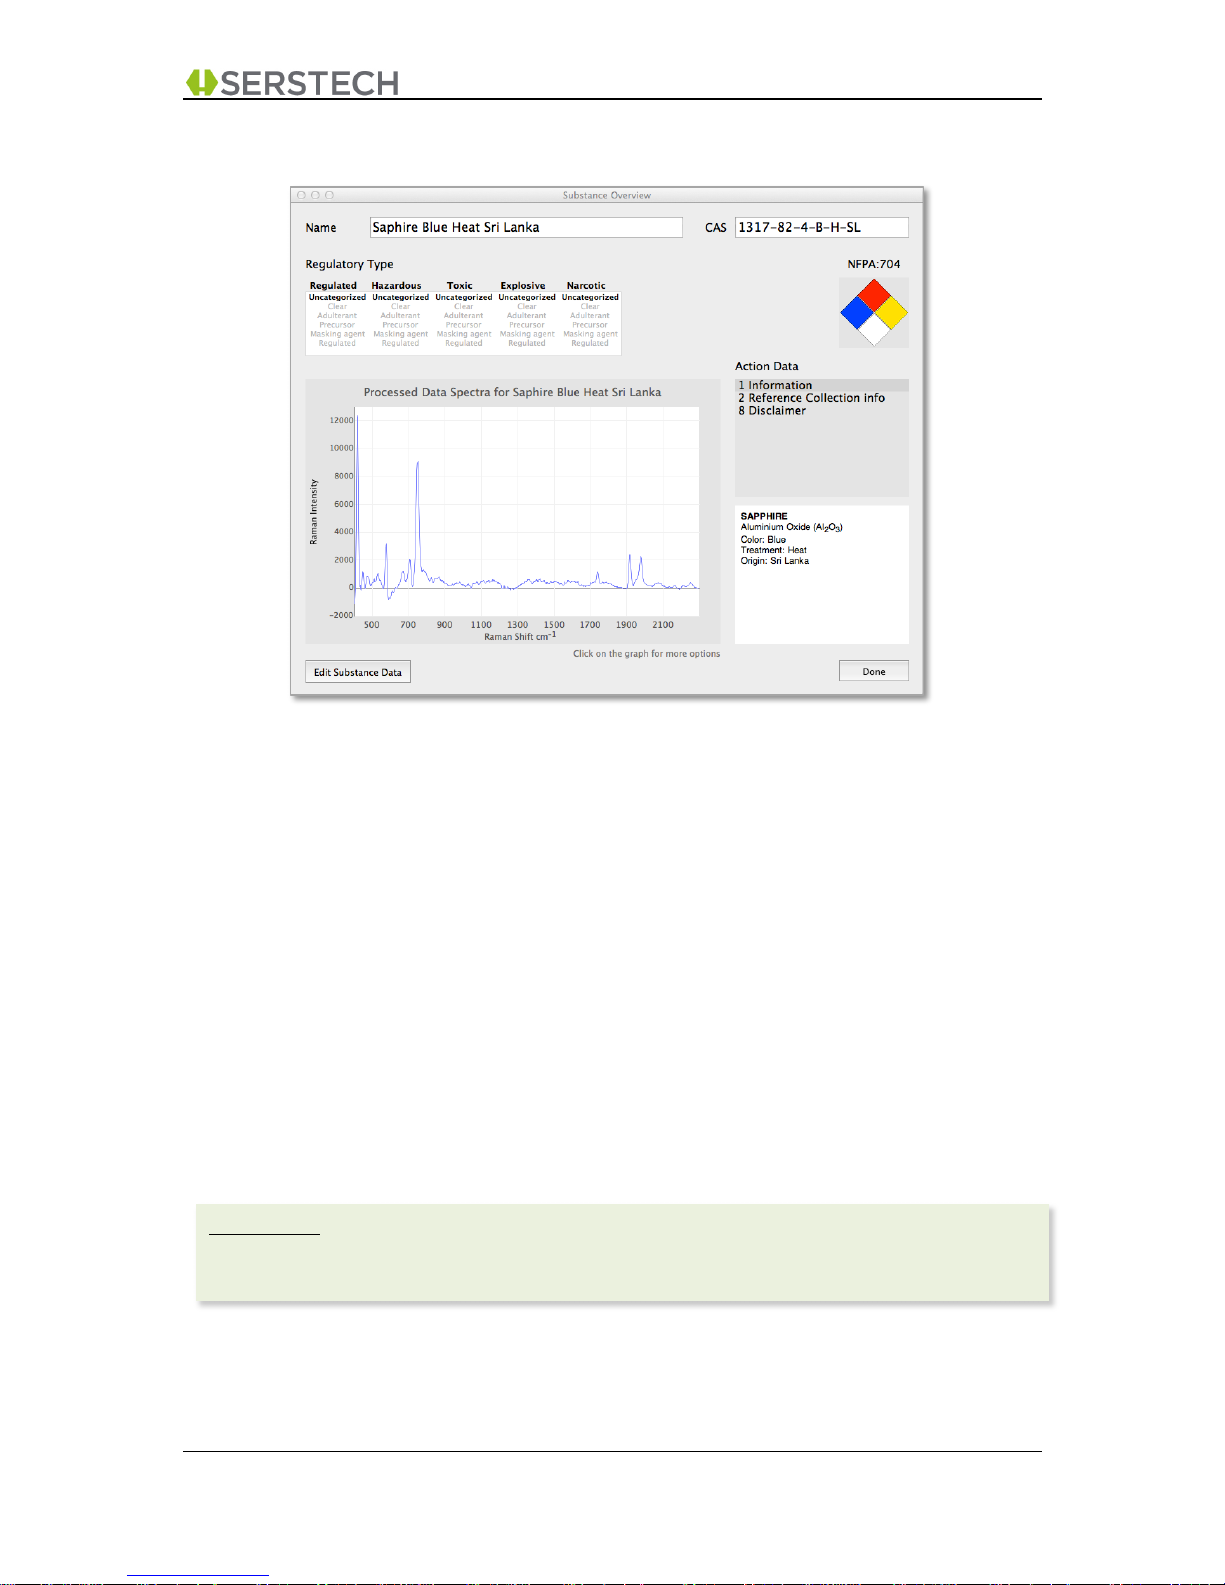
5.7.5 View Substance Screen
!
The above screen is displayed and populated with:
• the “Name” and the “CAS No” of the substance
• the “Regulatory Type” settings of the substance
• the Raman spectrum for this substance
• the NFPA:704 diamond containing hazardous classification for this substance (if any)
• Serstech’s so called “Action Data” (typically in the form of Material Safety Data) for this
substance (if any)
You have the option to:
• Click on the graph, which brings up a larger image with additional options for saving or
exporting the graph data (chapter 5.7.6)
• Click on various “Action Data” labels in order to view the content of this Action Data instance
• Click on the NFPA 704 diamond in order to get a generic guide for the various NFPA
classifications
• Click on “Edit Substance Data” to edit the information for this substance (chapter 5.7.7)
• Click “Done” to return to the “View Library” screen.
Please note:
“Edit Substance Data” may be “dimmed” as you may not have the permission to access this
function.
Page 36
DMT v3.2 User Manual A-1 DMT v3.2 Page 36 (55)
2015-10-13 Open Distribution
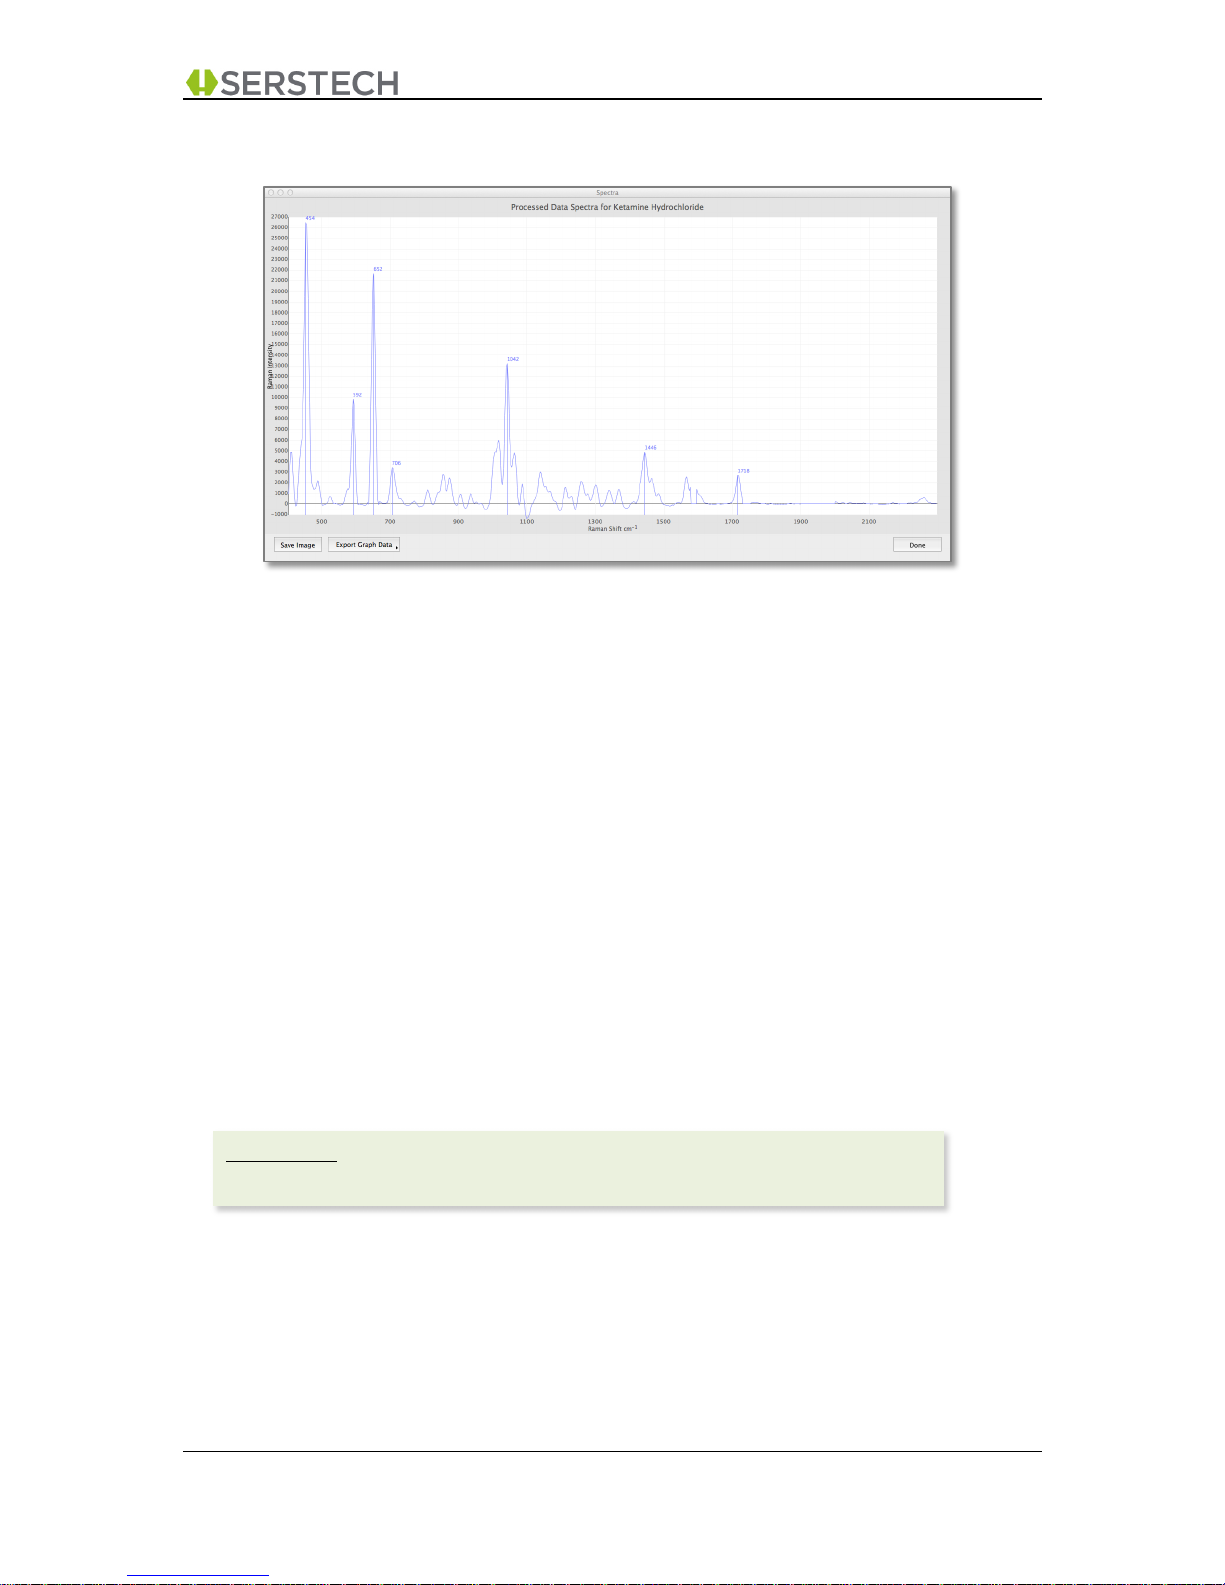
5.7.6 View and Export Raman Spectra
This enlarged graph of the substance’s Raman Spectra allows you to:
• Resize the window to you preference
• Move the cursor close to a specific “peak” and it will reveal a label with the precise “Raman
Shift” for that peak (in cm-1).
o With a mouse click you can “save” that label and continue to mark additional peaks in
your spectrum.
o A repeat mouse click next to an existing label will remove that label from the graph.
• Save the image (in .png format) to any location on your computer
• Email the image (as attachment) directly from DMT. (The email templates looks and works the
same way as seen in e.g. chapter 5.3)
• Export the graph data, for example to be analysed in 3rd party software. The following formats
are presently supported:
o CSV format
o JCAMP format
o Panorama format, with “.” as decimal character
o Panorama format with “,” as decimal character
Please note:
The email function requires that you have access to the Internet from your computer.
Page 37
DMT v3.2 User Manual A-1 DMT v3.2 Page 37 (55)
2015-10-13 Open Distribution
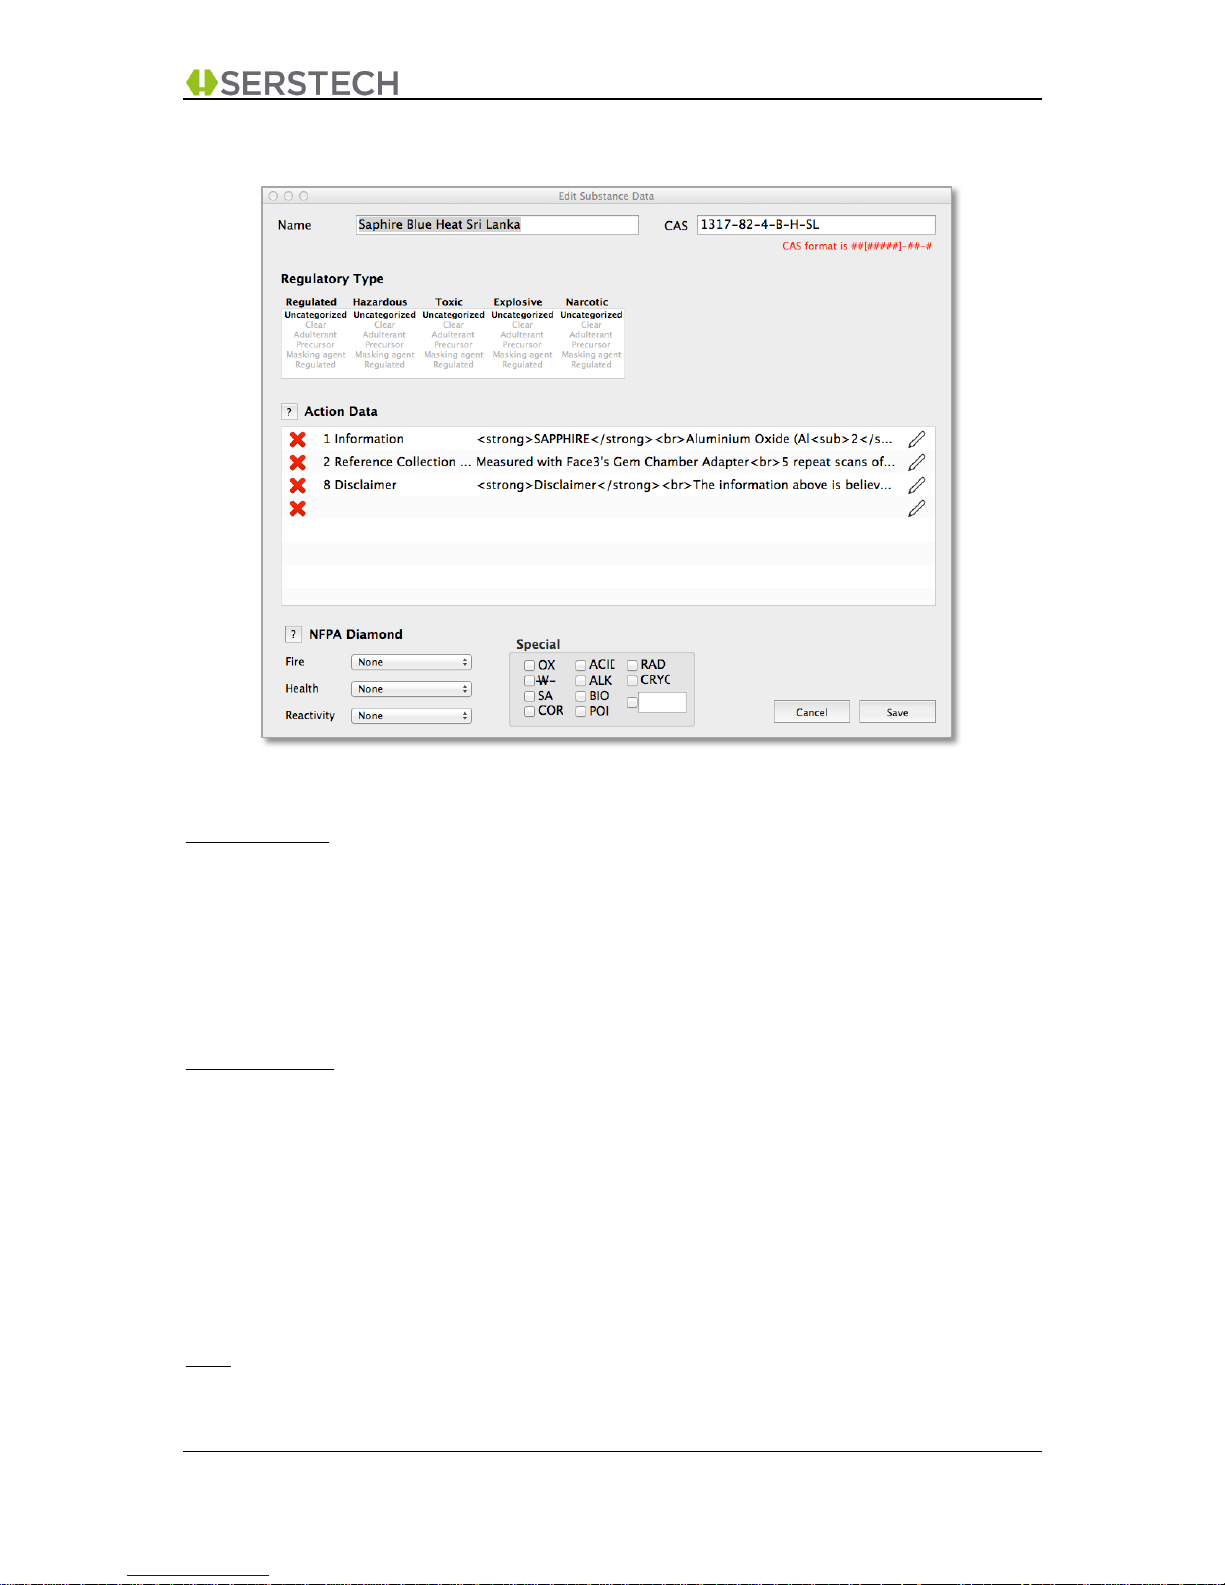
5.7.7 Edit Substance Data Screen
This is the main screen for editing the information for the substances in your local libraries.
Name & CAS no
• You can edit the Name of the substance.
• The CAS number is a unique numerical identifier assigned by Chemical Abstracts Service
(CAS) to every chemical substance described in open scientific literature. If you know the CAS
number of your substance, please enter it here. Otherwise, you may leave the default “unique
identifier” provided by the system. (Please note that DMT will verify that the CAS number
entered follows the CAS format convention. You are still able to use a “non-standard” CAS
number, the warning you may notice is included as a guidance only.)
Regulatory Type
You may here classify your substance as per various “Regulatory Types”, which are used when
performing “Screen Measurements”. For each of these “categories” you may define the substance as:
• Clear, meaning the substance is not a critical substance under this category.
• Adulterant (or Cutting Agent), meaning that the substance may be used as a Cutting Agent
under this category (e.g. Caffeine in the case of the Narcotics category)
• Precursor, meaning that the substance may be used to manufacture regulated substances in
this category.
• Masking Agent, meaning that the substance may be used in a mixture to hide the presence
of a regulated substance in this category.
• Regulated, meaning that the substance is a regulated substance in this category.
Note:
The present firmware (3.2.4) only supports “Narcotics” and “Explosives” categories for “Screen”
measurements.
Page 38

DMT v3.2 User Manual A-1 DMT v3.2 Page 38 (55)
2015-10-13 Open Distribution
Action Data
• You may click the “Edit” symbol at the end of an existing row to edit any of the Action Data
instances. This will bring up the “Action Data text editor” (please chapter 5.7.8).
• You may click the “Edit” symbol at the last empty row to add a new Action Data instance. You
may define up to 24 Action Data instances for each substance.
• You may click the red “X” in front of an “Action Data” row in order to delete the selected Action
Data instance.
• You may click the “Help” symbol, which provides a pop-up window with some general
guidance in regards to what “Action Data” is and how it may be used.
NFPA Diamond
• You may click the “Drop-down List” for any of the NFPA Diamond’s “Fire”, “Health” and
“Reactivity” quadrants in order to set the correct NFPA hazard class for your substance.
• The “Special” quadrant has some standard abbreviations, which may be selected. You can
also enter a “free text” abbreviation should you not find the applicable choice among the predefined options.
• You may click the “Help” symbol which provides a pop-up window with some general guidance
in regards to the NFPA Diamond
Cancel
• Cancel returns you to “View Substance Screen” without saving any of the data.
Save
• Save returns you to “View Substance Screen” after first storing your edited data to the library
on the instrument.
Page 39
DMT v3.2 User Manual A-1 DMT v3.2 Page 39 (55)
2015-10-13 Open Distribution
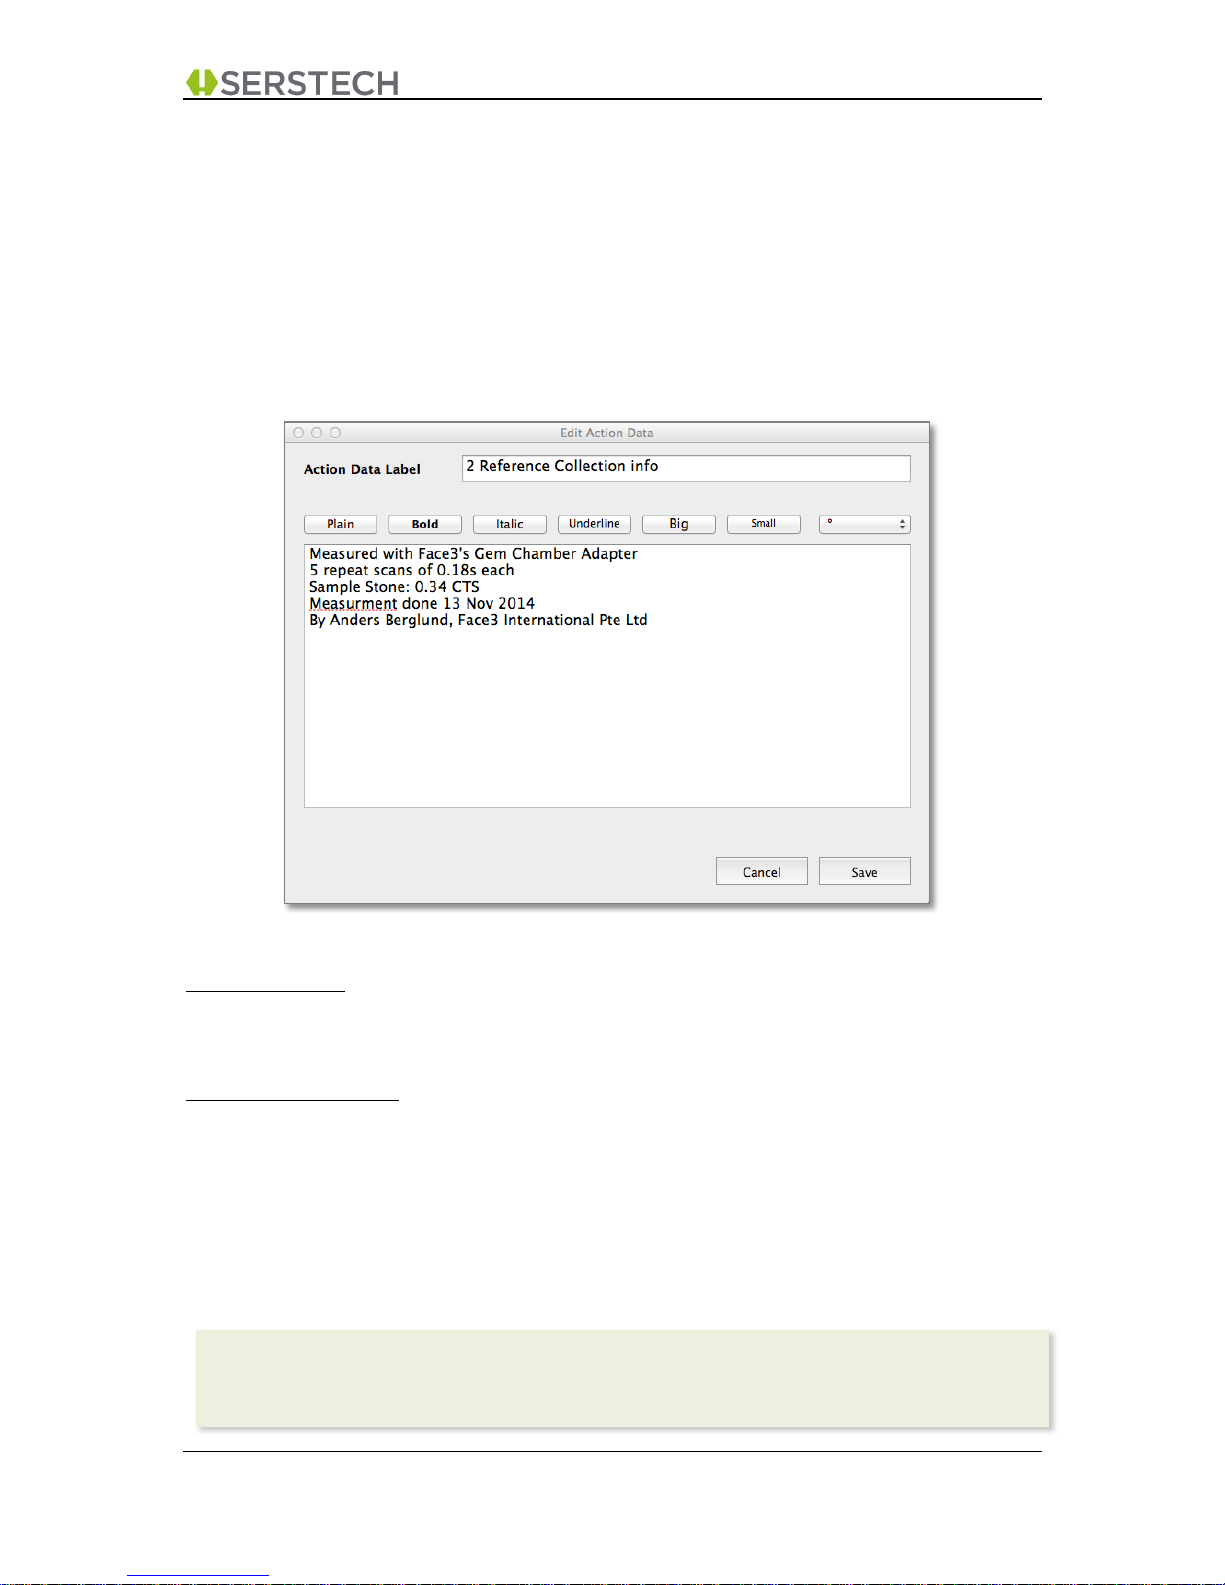
5.7.8 The ACTION DATA Text Editor
This is the “text editor” in order to add/edit what Serstech names as “Action Data” for your substances.
Typically Action Data may be in the form of Material Safety Data sheets, but you may also use the
Action Data instances for any other type of information you want the users to be made aware of
should they identify this substance during any field measurements.
The Serstech instrument stores the Action Data as Unicode in a “json” file and uses HTML tags for
formatting. This combination implies that special caution must be applied to control the format of the
text. This text editor provides a convenient way to create or edit Action Data instances knowing that
the formatting control is provided for by the system.
Action Data Label
• This is a free text “label” for this specific instance of Action Data. It is recommended to have a
leading numerical digit in front of the label, as that will control within which sequence the
Action Data instances are shown on the instrument.
Action Data Information
• Enter text: You can enter text directly into the text box in the following ways;
o Directly from your keyboard.
o By pasting text using your computer’s usual short cuts for “paste”
• Format text: You can format your text by using the predefined “format buttons” (Bold, Italic
and so on) on top of the text window
• Special characters: The Drop-down list to the right of the format buttons provides an easy
way to include special characters, such as: ©, ®, ™, °, ½, ¼, ¾, ±
•
Please note:
A double quotation mark character, “, will not be allowed in Action Data Information field as this will
cause the instrument to hang. DMT will thus replace these with single quotation mark: ‘
Page 40
DMT v3.2 User Manual A-1 DMT v3.2 Page 40 (55)
2015-10-13 Open Distribution
6 FACTORY DATABAS ES
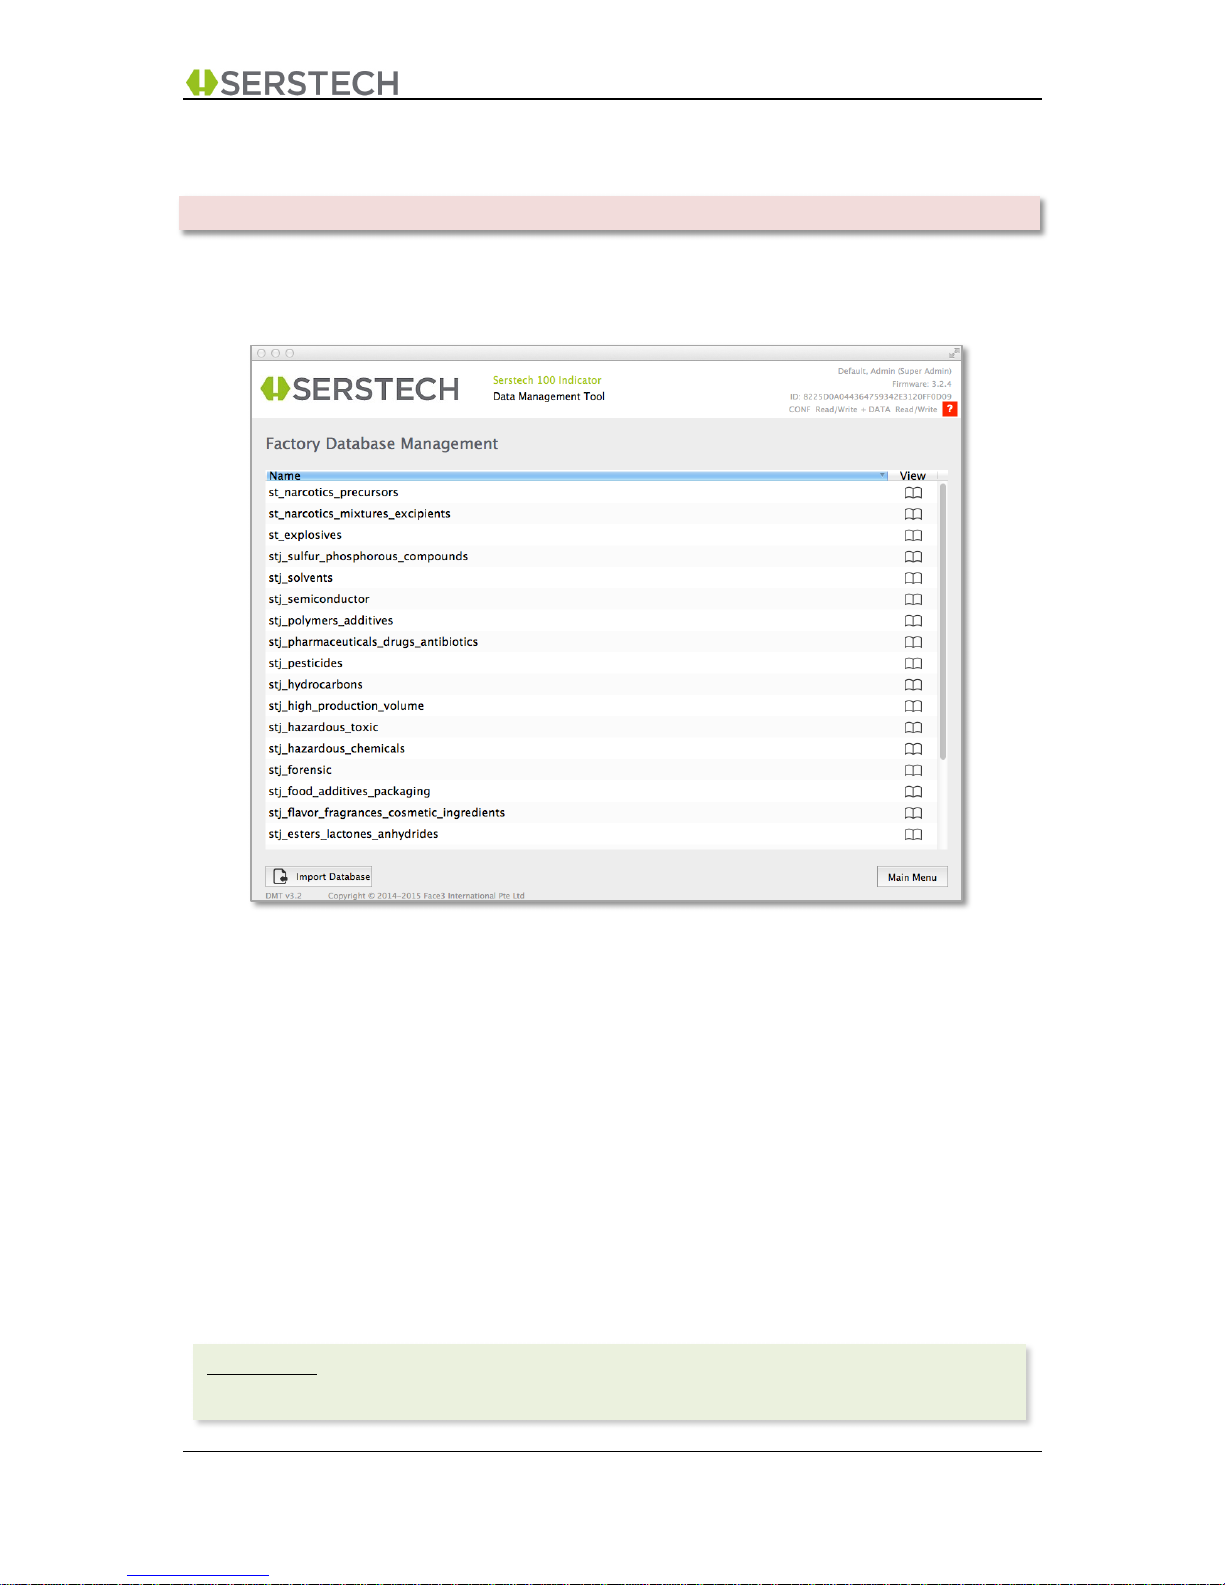
The “Factory Databases” function allows you to review all commercial spectra libraries installed on
your Serstech 100 Indicator. These are the commercial databases acquired from Serstech.
Factory Databases Main Screen
Options activated with the symbols in the main window:
“View”: Brings up “Review Library Content” screen in order to view the content of
this library. (chapter 6.1)
Options available from the buttons at the bottom of the screen:
“Import Database”: Brings up a file browser allowing you to browse to any location on your
computer, select a newly acquired reference library and import this to your
instrument. Please note that the reference library to be imported must
contain a license for your specific instrument and must be in compressed
“.tar.gz format”.
“Main Menu”: This will bring you back to the main menu.
Please note:
“Import Database” may be “dimmed” as you may not have the permission to access this function.
The FACTORY DATABASES function is only accessible when USB mode i100_conf is actived.
Page 41
DMT v3.2 User Manual A-1 DMT v3.2 Page 41 (55)
2015-10-13 Open Distribution
6.1 Review library content
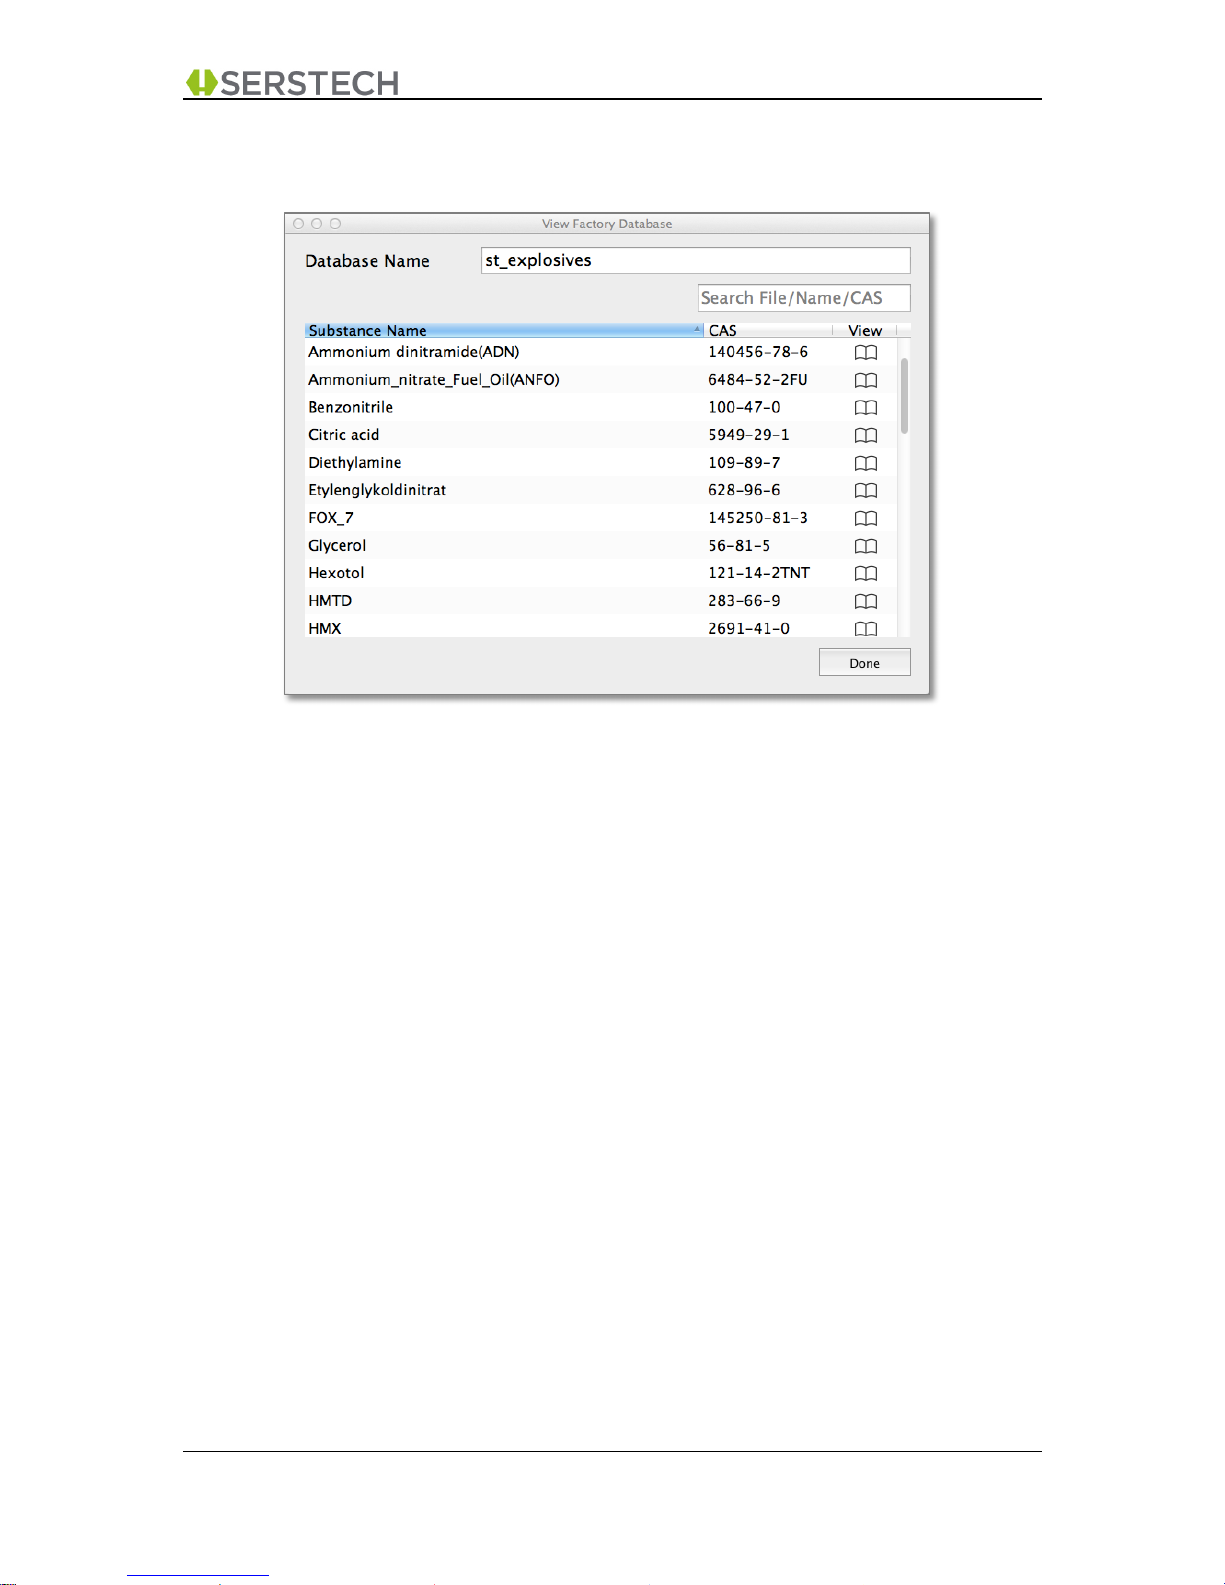
This screen shows the content of the selected reference library. You may scroll through the list and
you may also sort the list by clicking on any of the “labels” on top of each column. Each substance in
this library is represented by:
• The name of the Substance.
• The CAS number of the Substance.
On the top part of the screen, you find:
“Search Field”: If the library contains many substances, this gives you a convenient way to search
for the substance you are interested in. It is a free text search of substance name
and CAS number fields.
Options activated with the symbols in the main window:
“View”: Brings up “Substance Overview” screen in order to view the information about this
substance. (chapter 6.2)
Options available from the buttons at the bottom of the screen:
“Done”: Brings you back to the previous screen
Page 42
DMT v3.2 User Manual A-1 DMT v3.2 Page 42 (55)
2015-10-13 Open Distribution
6.2 Substance Overview
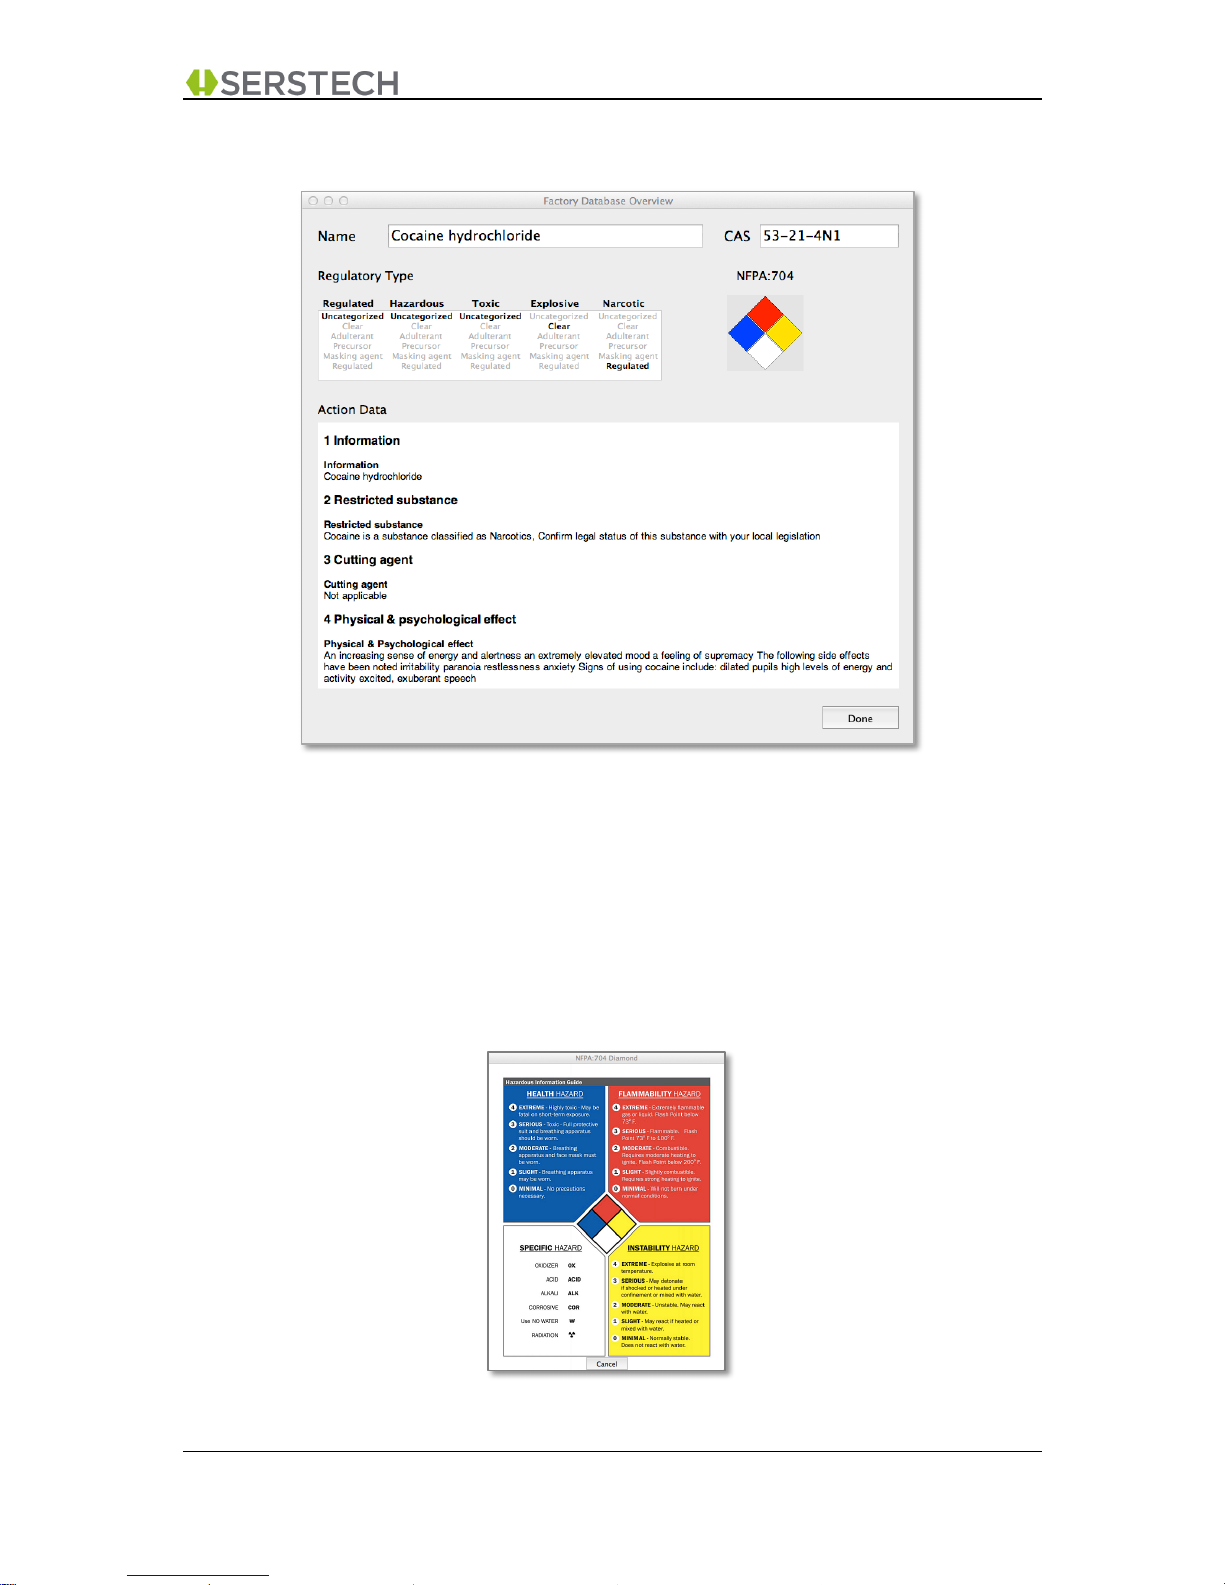
Here you will be able to see Serstech’s classification of each substance in the “Factory Databases” as
to its “Regulatory Type” (please refer chapter 5.7.7 for more details of “Regulatory Type”)
Also you will see what Serstech names as “Action Data” for the selected substance. This is typically in
the format of a standard Material Safety Data sheet. The text window can be scrolled up and down.
This is the same information that will be displayed on the instrument’s screen in case this substance is
identified during a scan.
You will also have a visual representation of the NFPA 704 diamond with the NFPA hazardous
classification for this substance. Clicking on the “diamond symbol” will bring up a generic guide for the
various NFPA classifications:
Page 43
DMT v3.2 User Manual A-1 DMT v3.2 Page 43 (55)
2015-10-13 Open Distribution
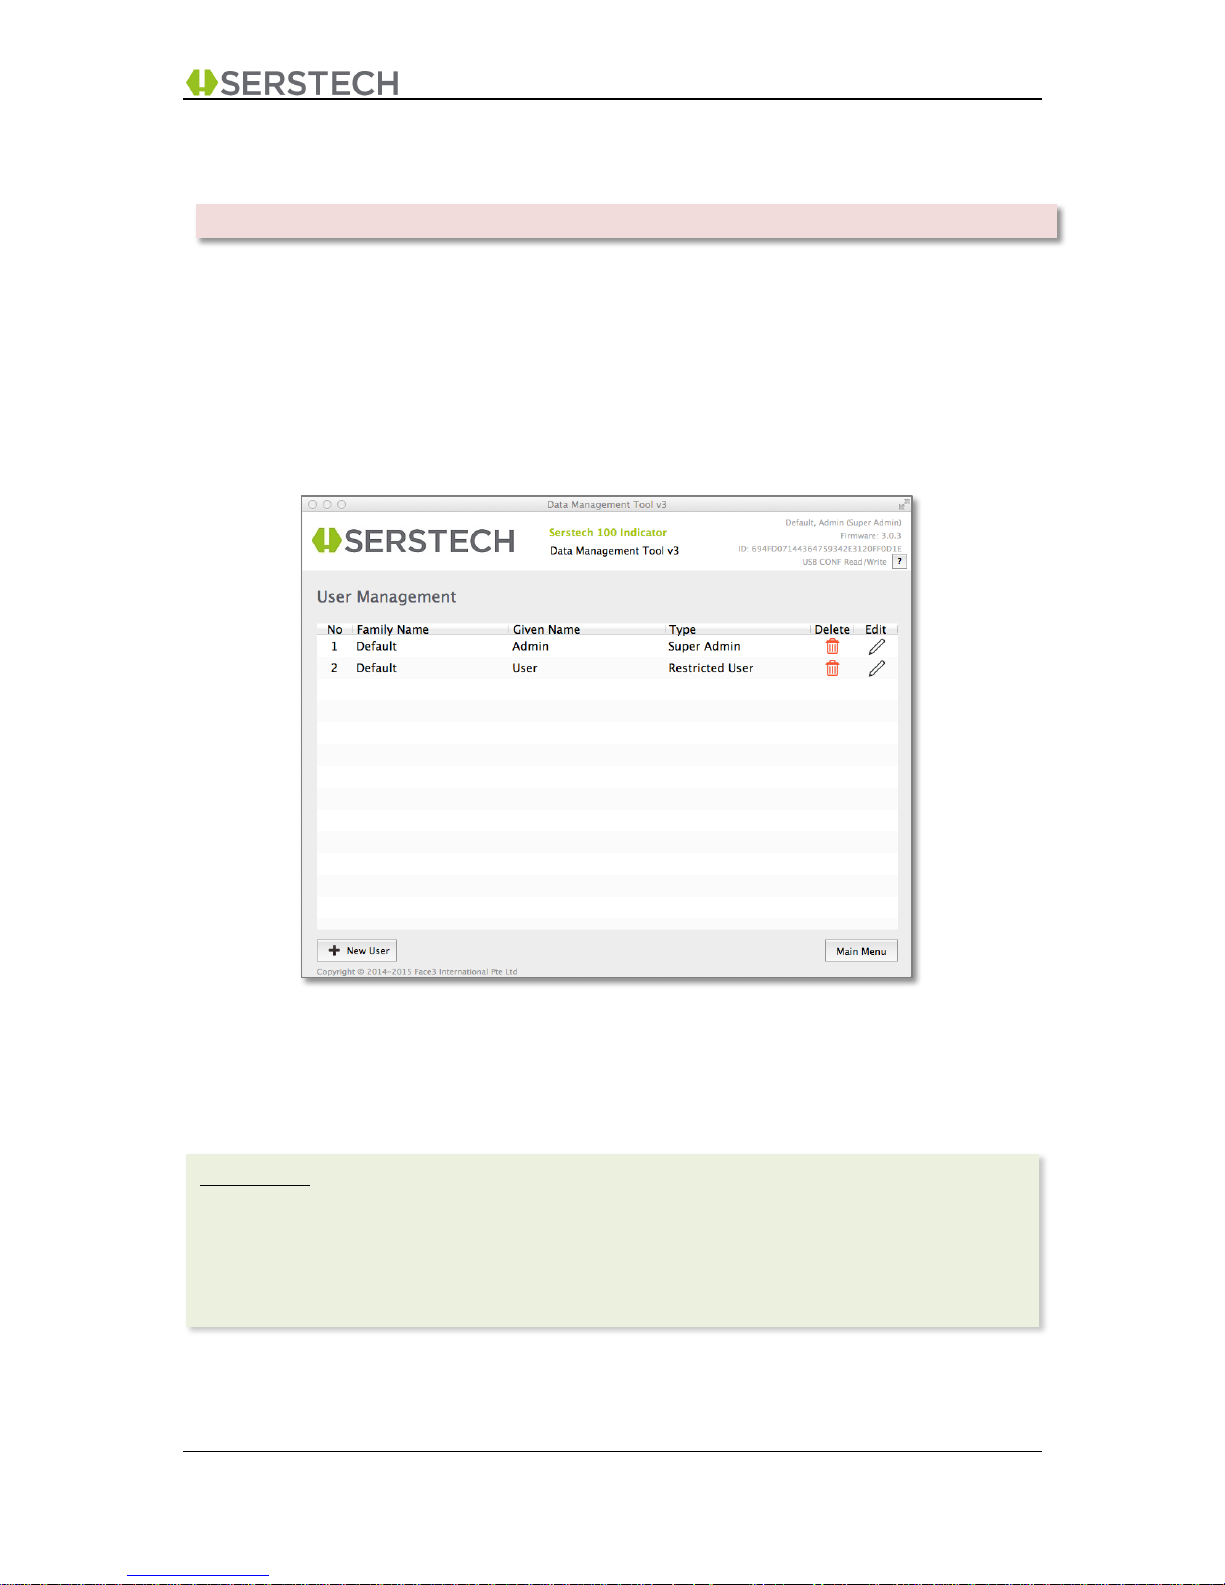
7 USER MANAGEMENT
The “User Management” function allows you to:
• Review which users that are defined on your Serstech 100 Indicator
• Edit the information for such users, including giving them specific “User Privileges” that
defines which functions they are allowed to perform
• Add new users
• Delete users
From this main “User Management Screen, the following options are available:
• Clicking “Delete” symbol for an existing user brings up “Delete User Pop-up” (chapter 7.1)
• Clicking “Edit” symbol for an existing user brings up “Edit User Pop-Up” (chapter 7.2)
• Clicking the “New User” button brings up the “New User Pop-Up” (chapter 7.3)
Please note:
• Certain options may be “dimmed” as you may not have the permission to access this
function.
• If any updates are done (new users added, old users deleted or existing users being
edited) the Serstech 100 instrument must be restarted for these changes to take effect. A
reminder message is thus shown on the screen whenever such changes have been made.
The USER MANAGEMENT function is only accessible when USB mode i100_conf is actived.
Page 44
DMT v3.2 User Manual A-1 DMT v3.2 Page 44 (55)
2015-10-13 Open Distribution
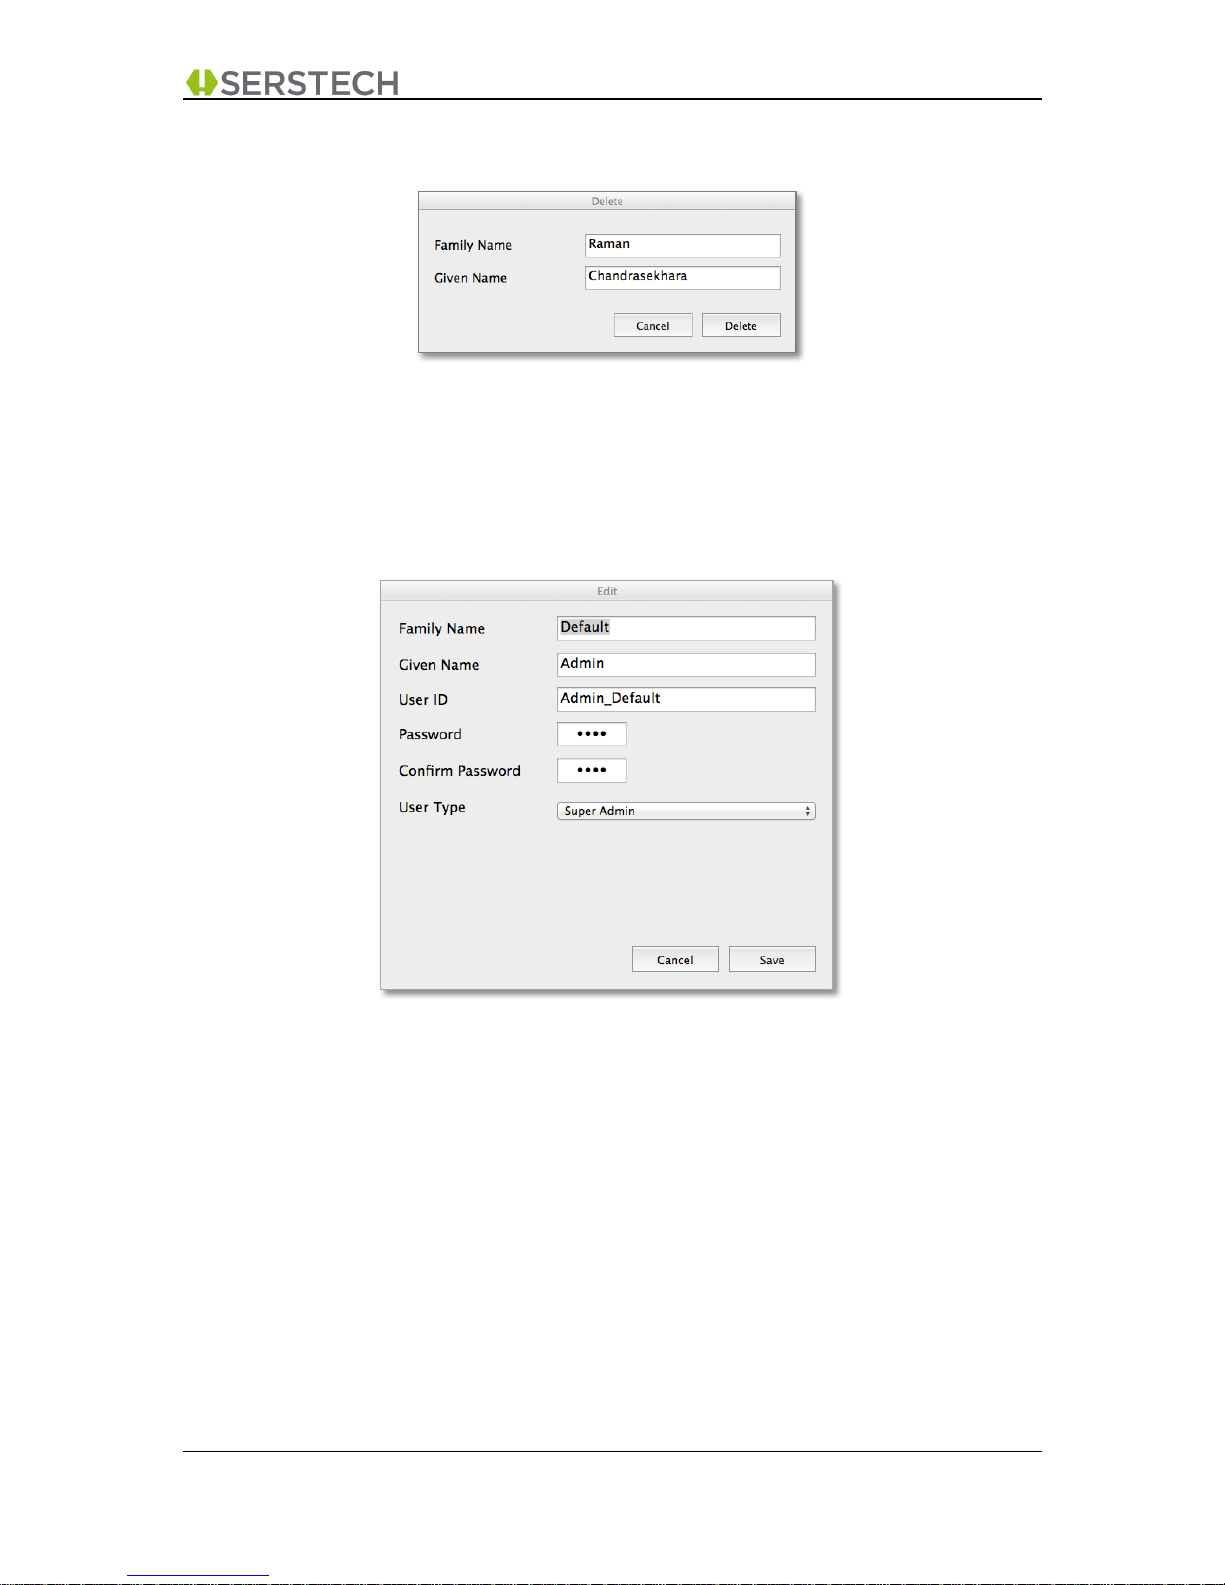
7.1 Delete User
You have the option to:
• Click “Cancel”, which returns you to “User Management Main Screen”
• Click “Delete”, which permanently deletes the user from the instrument
7.2 Edit User
You have the option to:
• Click “Cancel”, which returns you to “User Management Main Screen”
• Edit the First Name, Last Name, User ID and/or Password. DMT will check for correct entry as
follows:
o First name & Last Name: Alphanumerical max 34 characters in total
o User ID: Alphanumerical max 34 characters
o Password: Numerical, must be 4 digits (i.e. 0000-9999)
• Change “User Type” in order to modify the “user privileges” for this user (for details, please
refer to chapter 7.4 “User Profile & Privileges” below)
• Click “Save”, which stores the updated data records in the instrument
Page 45
DMT v3.2 User Manual A-1 DMT v3.2 Page 45 (55)
2015-10-13 Open Distribution
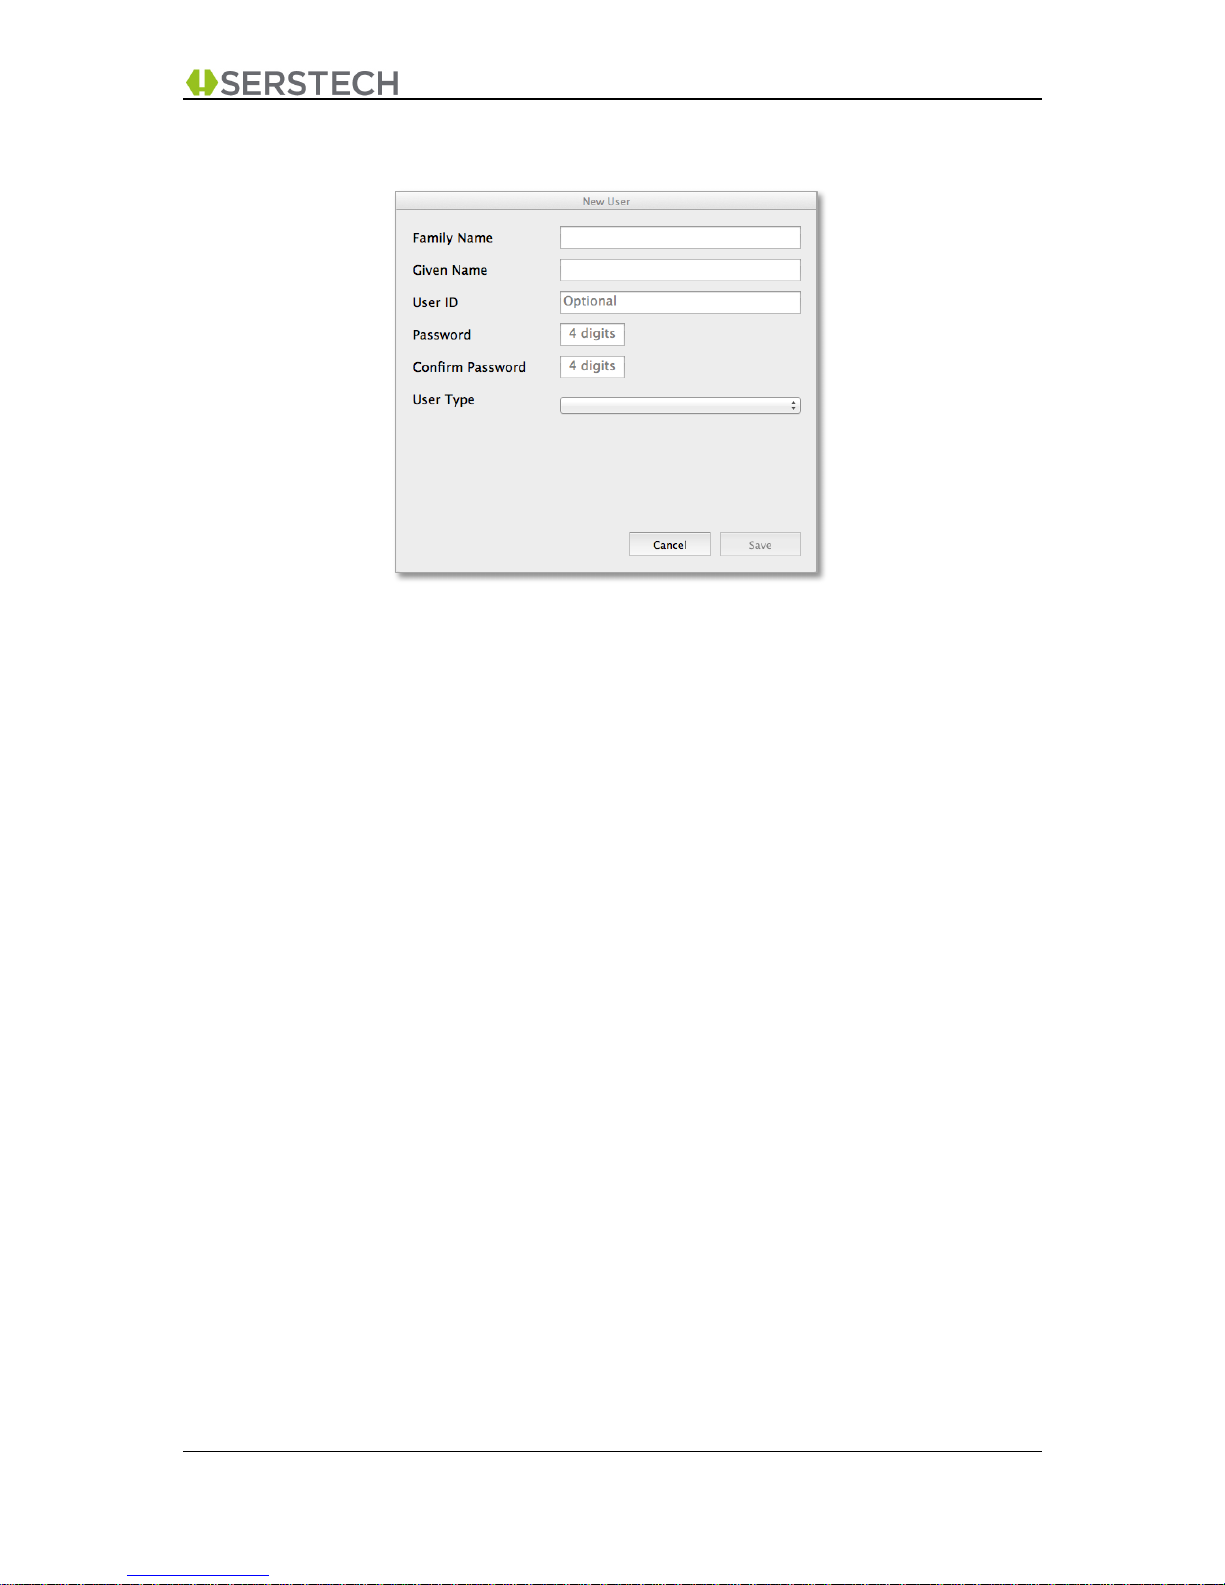
7.3 New User
Your have the option to:
• Click “Cancel”, which returns you to “User Management Main Screen”
• Enter the Name, User ID and Password of a new user. The application will check for correct
entry as follows:
o First name & Last Name: Alphanumerical max 34 characters in total
o User ID: Alphanumerical max 34 characters. If no User ID is entered, DMT will
automatically set “GivenName_Family Name” as user ID.
o Password: Numerical, must be 4 digits (i.e. 0000-9999). If no password is entered, the
application assumes “0000”.
• Select “User Type” in order to set the “user privileges” for this user (for details, please refer to
chapter 7.4 “User Profiles & Privileges” below)
• Click “Save”, which stores the updated data records in the instrument
Page 46
DMT v3.2 User Manual A-1 DMT v3.2 Page 46 (55)
2015-10-13 Open Distribution
7.4 User Profiles & Privileges
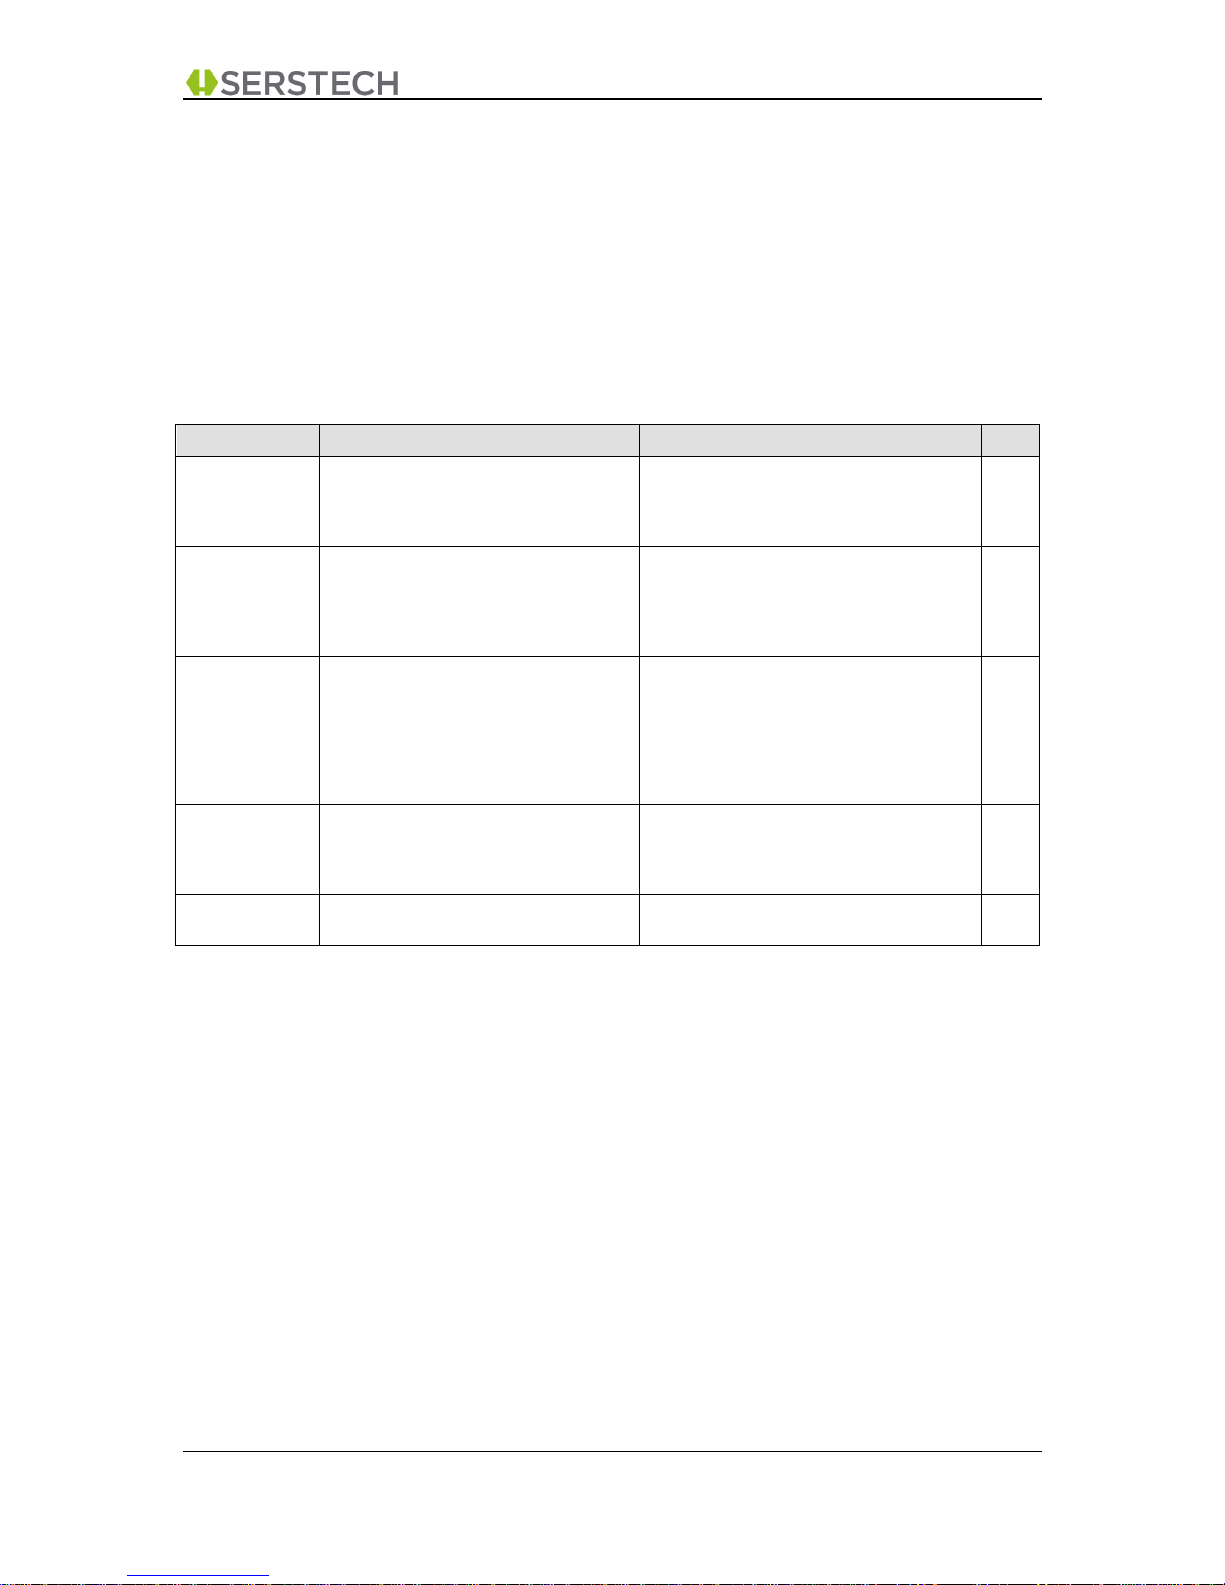
The Serstech 100 indicator supports a flexible method to define various user profiles (in DMT called
“User Types”). This allows you to give each user specific user privileges that define what functions
they are authorized to do, both on the instrument and by using the DMT software.
DMT has 5 pre-defined User Profiles covering typical user scenarios. You are also able to define
customized user profiles should the standard types not match your requirements.
The pre-defined User Profiles are listed below:
User Type
Instrument Access
DMT Access
Note
Restricted
User
This user has very restricted privileges.
She can perform “Screen”, “Identify”
and “Verify” scans, but cannot change
the settings on the Instrument.
This user cannot activate the USB port,
thus can only use DMT to analyse
measurement files that are stored
externally.
1
Normal User
This user can perform “Screen”,
“Identify” and “Verify” scans and also
change the language on the instrument.
This user can activate USB DATA (read
access only), thus use DMT to analyse,
save and email measurements done, both
on the instrument and measurements
stored externally.
Plus User
In addition to the above, this “power
user” can also perform “Add
Substance” scans and adjust scan
settings on the instrument.
This user has read access to both USB
DATA and USB CONF, which allow
him/her to also use DMT to review e.g.
reference libraries in both Local and
Factory Databases (but still not to add,
delete or edit any information on the
Instrument).
Normal Admin
This admin user can perform all types
of measurements and adjust all settings
on the instrument.
This user can access all of the DMT
functionality, including e.g. to add, delete
or edit Users on the instrument and to edit
and manage the Local Database libraries.
Super Admin
Same as “Normal Admin”, but also
includes “Factory Reset”
Same as “Normal Admin”
1
Note 1: The factory setting of a new instrument includes one Restricted User (named “User Default”) and one
Super Admin (named “Admin Default”).
Page 47
DMT v3.2 User Manual A-1 DMT v3.2 Page 47 (55)
2015-10-13 Open Distribution
“Custom” user profile
This section is rather technical and recommended for advanced readers only.
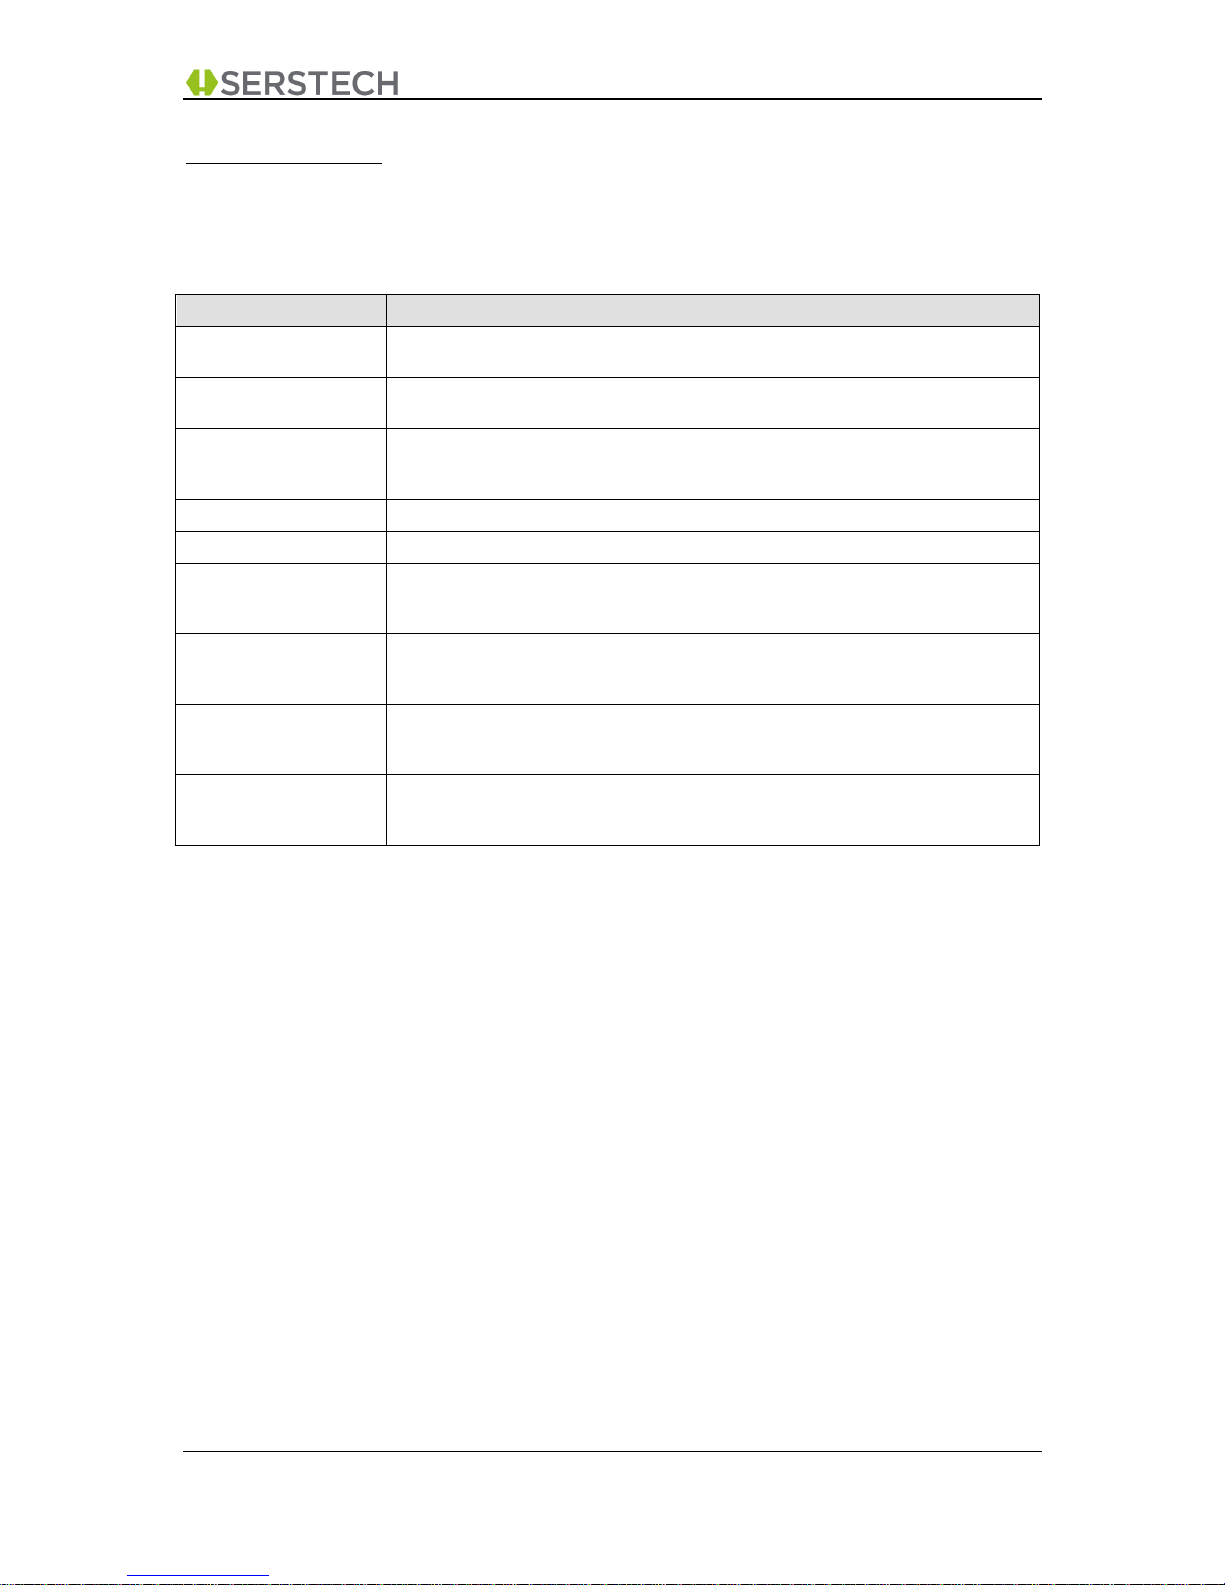
To allow for full flexibility, there are 9 different “user privilege” parameters that can be set in any
combination of your choice in order to create your own unique User Type.
Privilege
Description
Factory Reset
If set, this allow the user to perform a “Factory Reset” from the menu of the
instrument.
Scan Settings
If set, this allow the user to change the “Scan Settings” from the menu of the
instrument.
Add Substance
If set, this allow the user to perform “Add Substance” scans, which stores the result
in the Local Database reference library so that it may be used as a reference for
future “identify” and “Verify” scans.
Time & Date
If set, this allow the user to adjust the Date and Time settings on the Instrument.
Change Language
If set, this allow the user to change the Language for the Instrument’s menus.
USB CONF Read
If set, this allow the user to activate USB CONF (read access only). This means that
DMT will be able to view (but not edit or delete) Local Databases, Factory
Databases, User overview, Instrument Log file and System Information.
USB CONF Read/Write
If set, this allow the user to activate USB CONF (both read & write access). This
means that DMT will also be able to edit Local Databases, create/edit Users and
load firmware upgrade files to the Instrument.
USB DATA Read
If set, this allow the user to activate USB DATA (read access only). This means that
DMT will be able to view (but not edit or delete) Measurement Files, Instrument
Log file and System Information.
USB DATA Read/Write
If set, this allow the user to activate USB DATA (both read & write access). This
means that DMT will also be able to delete unsuccessful Measurement Files for
housekeeping purpose.
Page 48
DMT v3.2 User Manual A-1 DMT v3.2 Page 48 (55)
2015-10-13 Open Distribution
8 LOG ANALYSIS
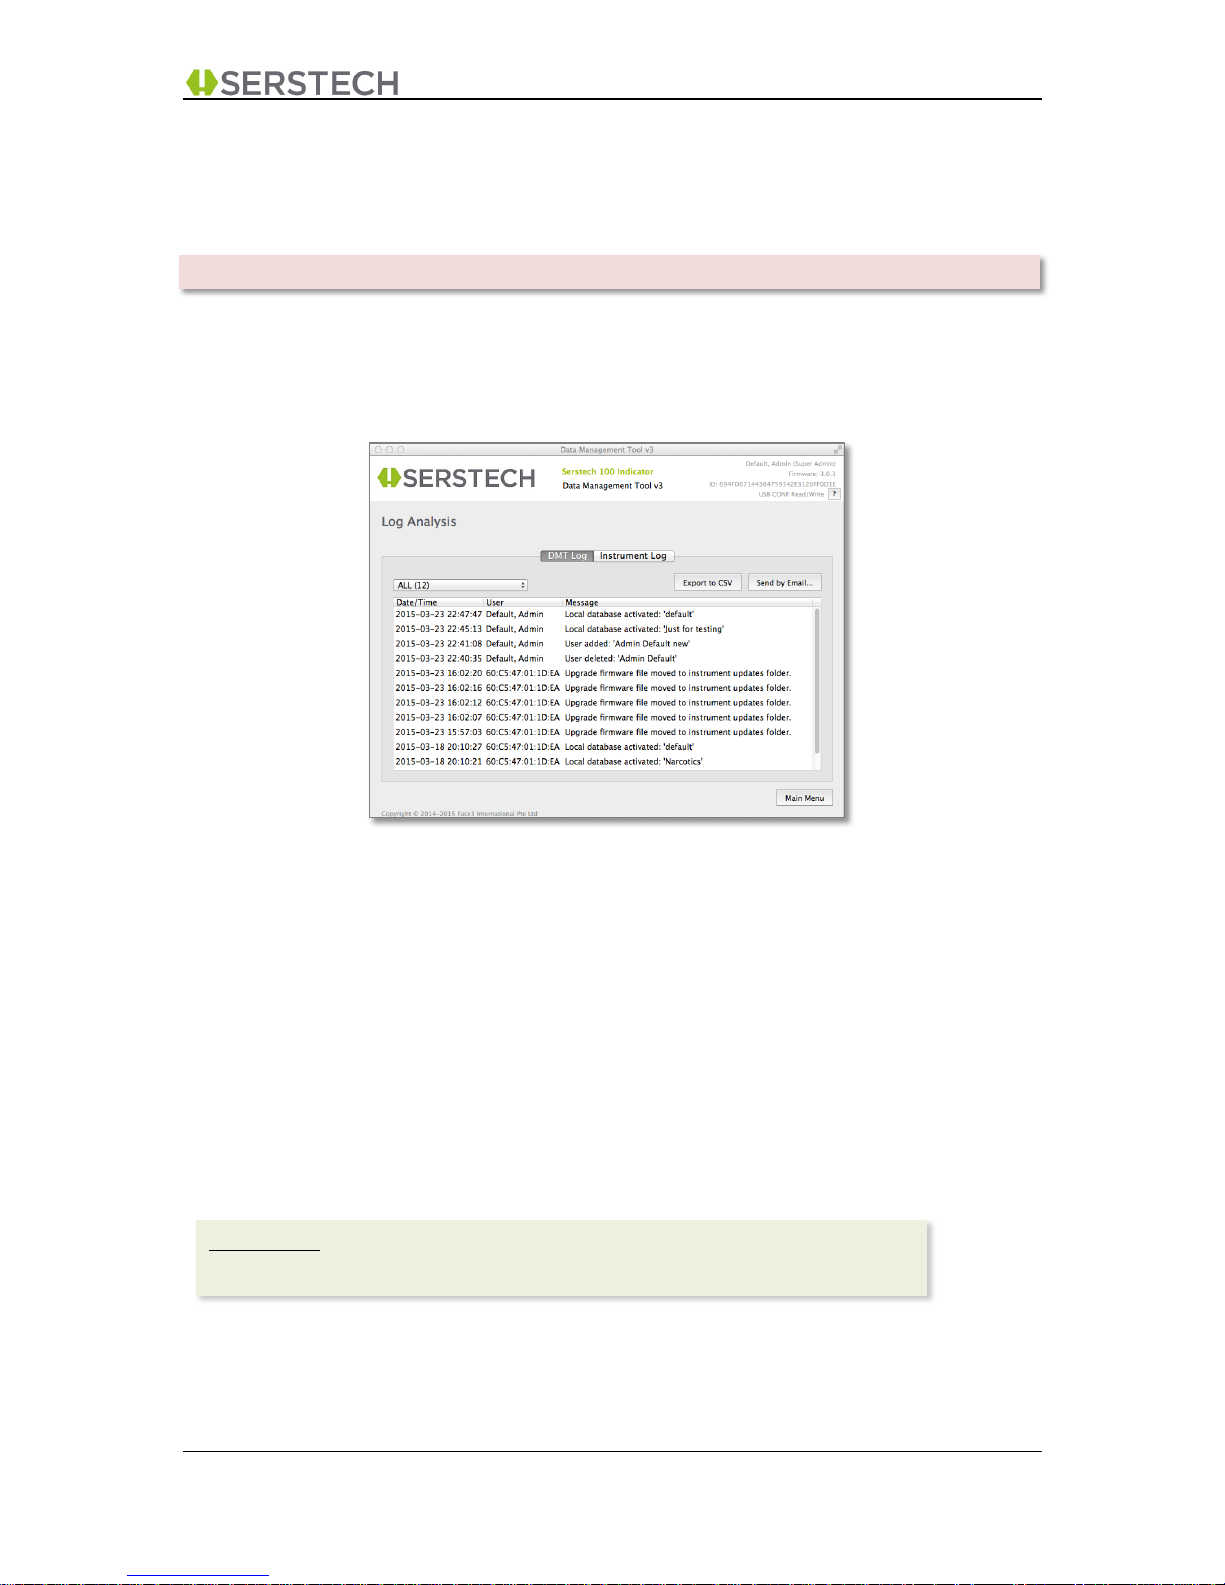
The Log Analysis function has two “tabs” to choose from.
8.1 DMT Log
The “DMT Log” tab shown above will display the DMT log file, which keeps records of all activities
done with the DMT that results in any alterations to any data on the instrument. Please note that
using DMT simply to view information will not result in any log entries.
The following options are available:
• “All (nnn)”, drop-down list allows you to view “All” log entries or to filter and only view log
entries from a specific date. (nnn) will tell you the number of entries for each date (or in total).
• “Export to CSV”, this will open up a file browser window from which you can select a location
where you want to store/archive the log file (in CSV format).
• “Send by Email”, will copy the log file as an attachment to an email template. This could be
useful in case you need help from Serstech Support. (The email template looks and works the
same way as seen in e.g. chapter 5.3)
The LOG ANALYSIS function is accessible if either USB DATA or USB CONF is activated.
Please note:
The email function requires that you have access to the Internet from your computer.
Page 49
DMT v3.2 User Manual A-1 DMT v3.2 Page 49 (55)
2015-10-13 Open Distribution
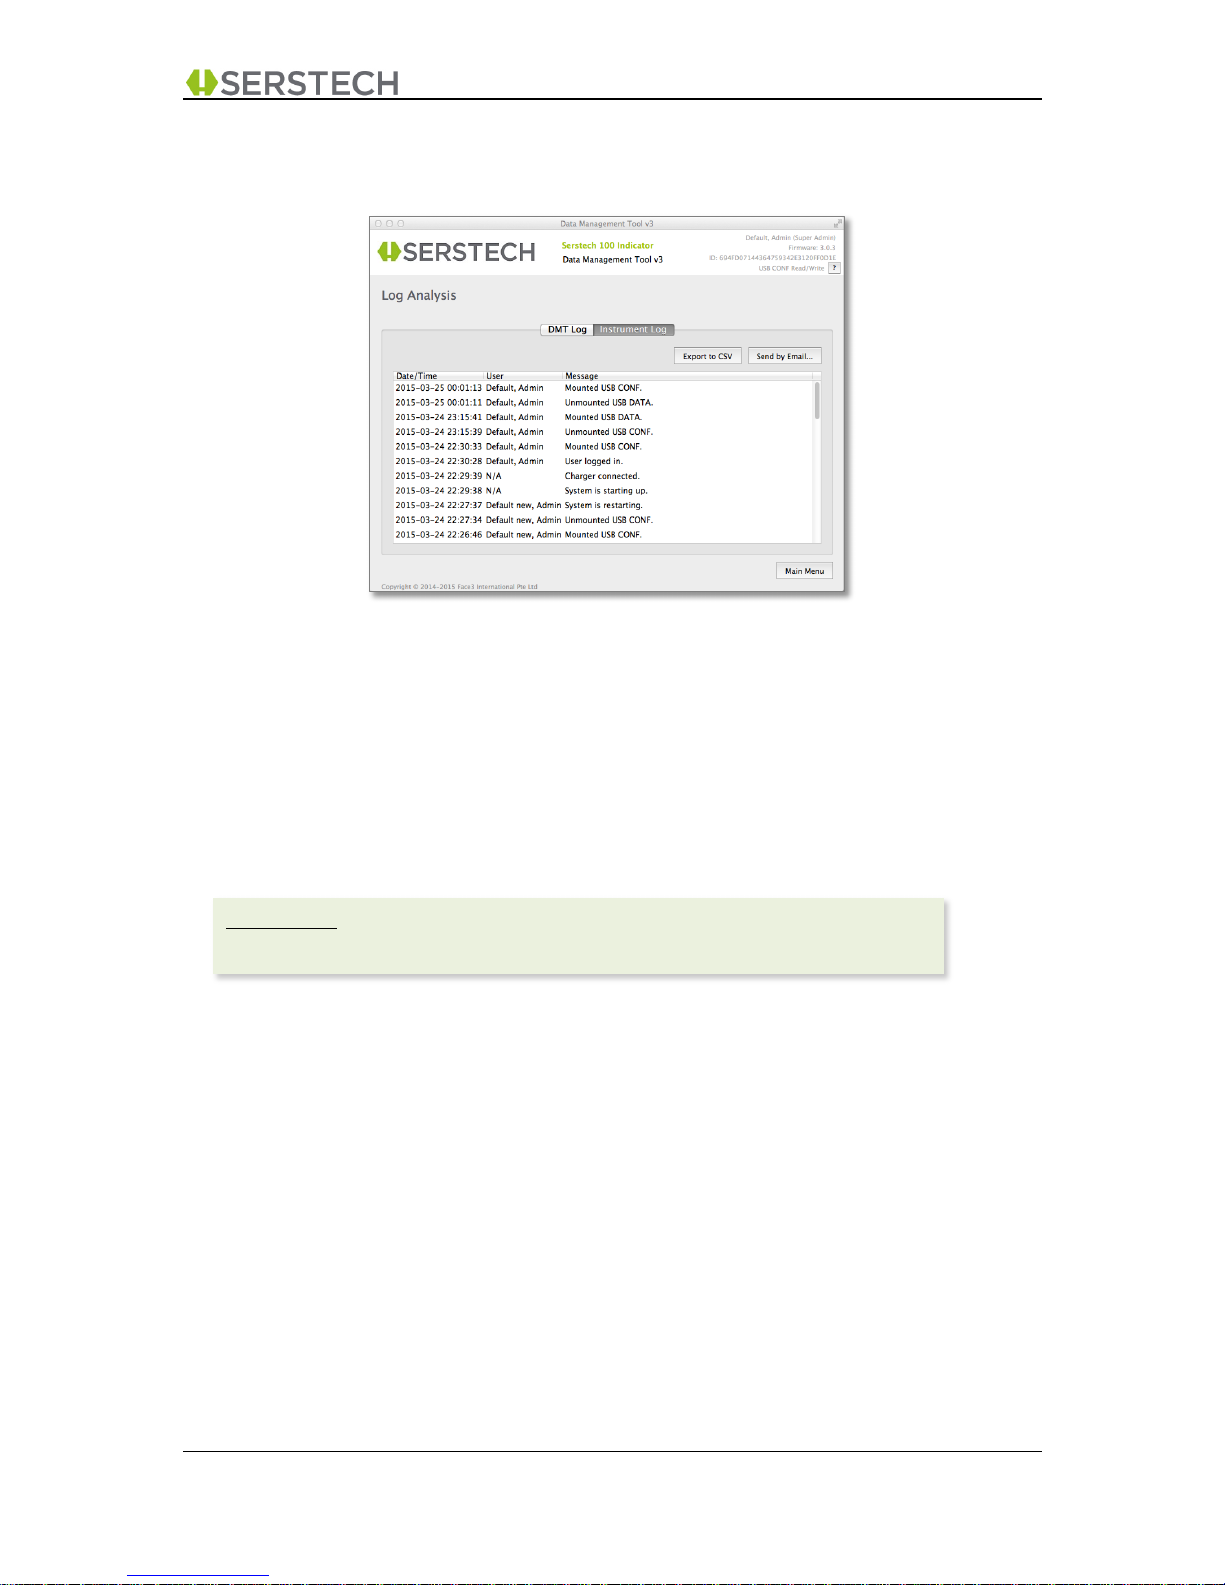
8.2 Instrument Log
The “Instrument Log” tab (above) will display the internal log file from the attached Serstech 100
Indicator. This log keeps records of all activities done on the instrument itself.
The following options are available:
• “Export to CSV”, this will open up a file browser window from which you can select a location
where you want to store/archive the log file (in CSV format).
• “Send by Email”, which will copy the log file as an attachment to an email template. This
could be useful in case you need help from Serstech Support. (The email template looks and
works the same way as seen in e.g. chapter 5.3)
Please note:
The email function requires that you have access to the Internet from your computer.
Page 50
DMT v3.2 User Manual A-1 DMT v3.2 Page 50 (55)
2015-10-13 Open Distribution
9 ABOUT & UPGRADE
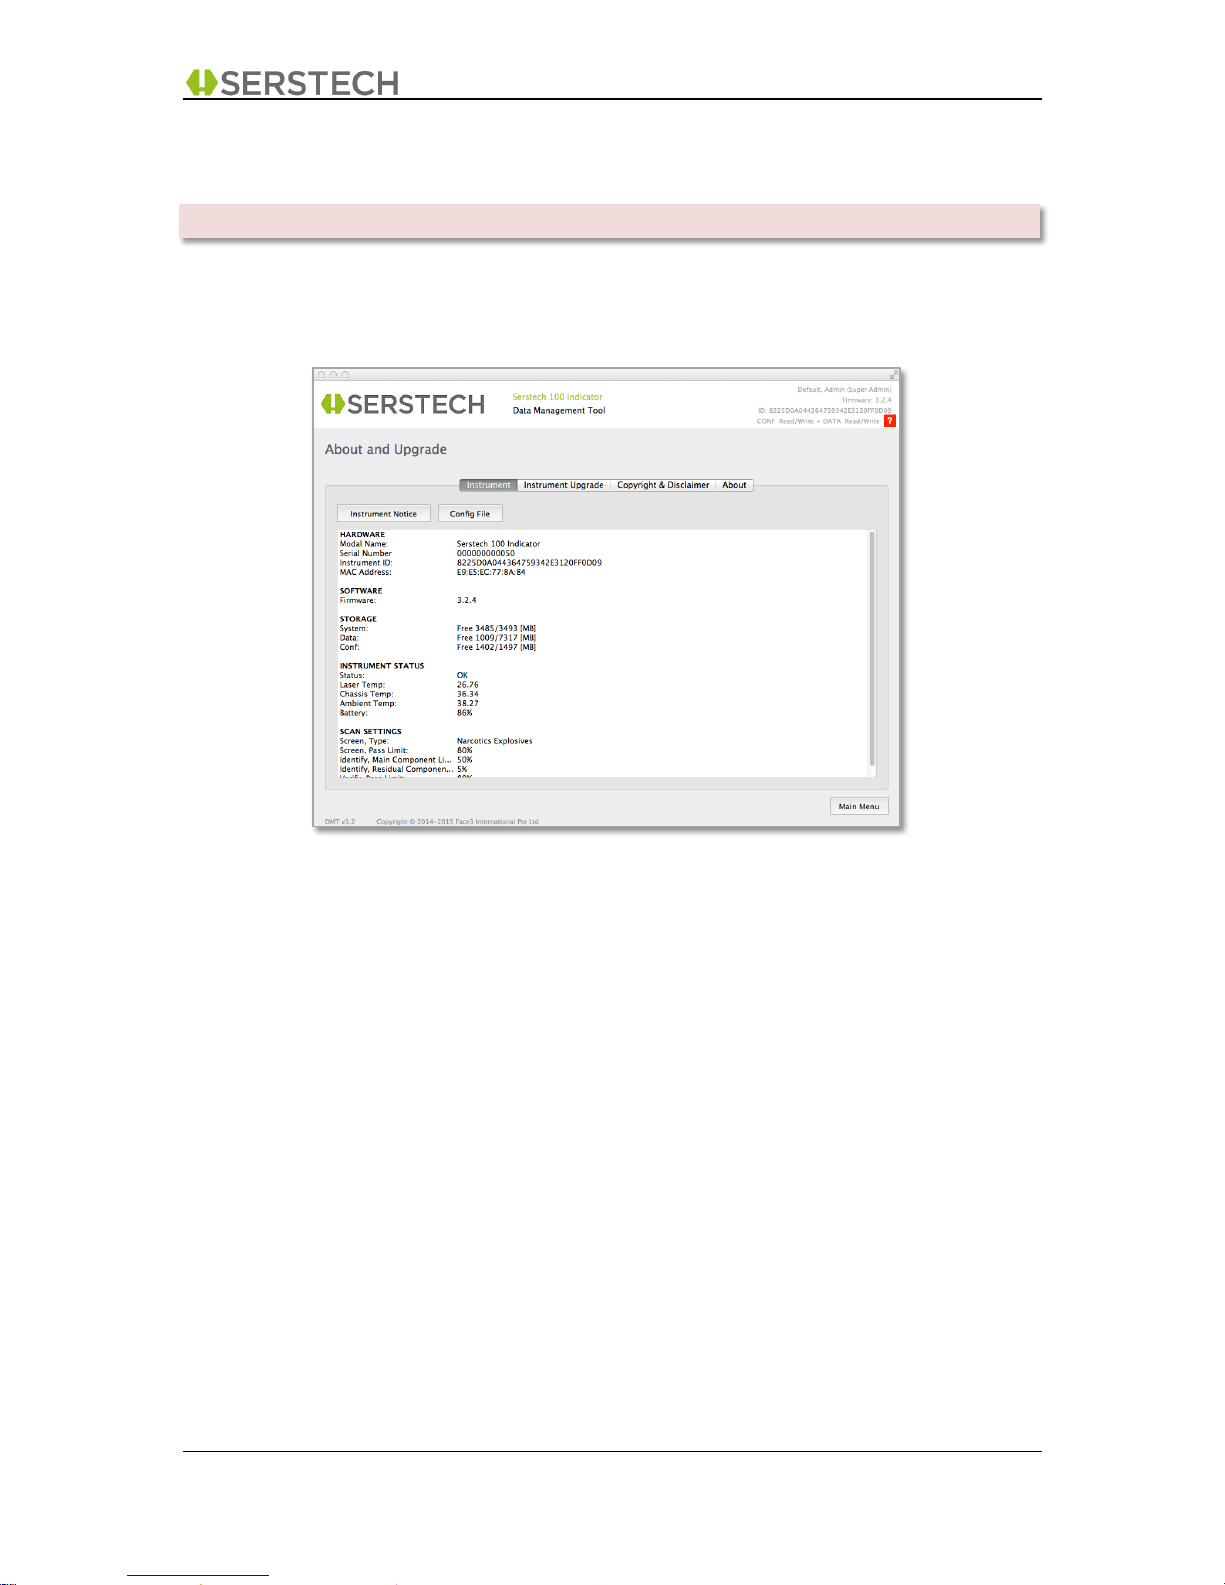
The About & Upgrade function has four available “tabs” to choose from.
9.1 Instrument tab
The “Instrument” tab (above) will display certain system related information about the connected
instrument.
You can retrieve the “Notice” information from the instrument, which contain
• The copyright information for the embedded firmware
• Safety Notice for the instrument; and
• Contact details for Serstech AB, the manufacturer of the Serstech 100 Indicator
You can also retrieve the complete “config.txt” file from the instrument, which contains all the
instrument’s parameters. You will have the option to;
• Save this file to your computer’s desktop
• Send this file directly by email, for example to Serstech Support in case you have a problem
with your instrument.
The ABOUT & UPGRADE function is accessible if either USB DATA or USB CONF is activated.
Page 51
DMT v3.2 User Manual A-1 DMT v3.2 Page 51 (55)
2015-10-13 Open Distribution
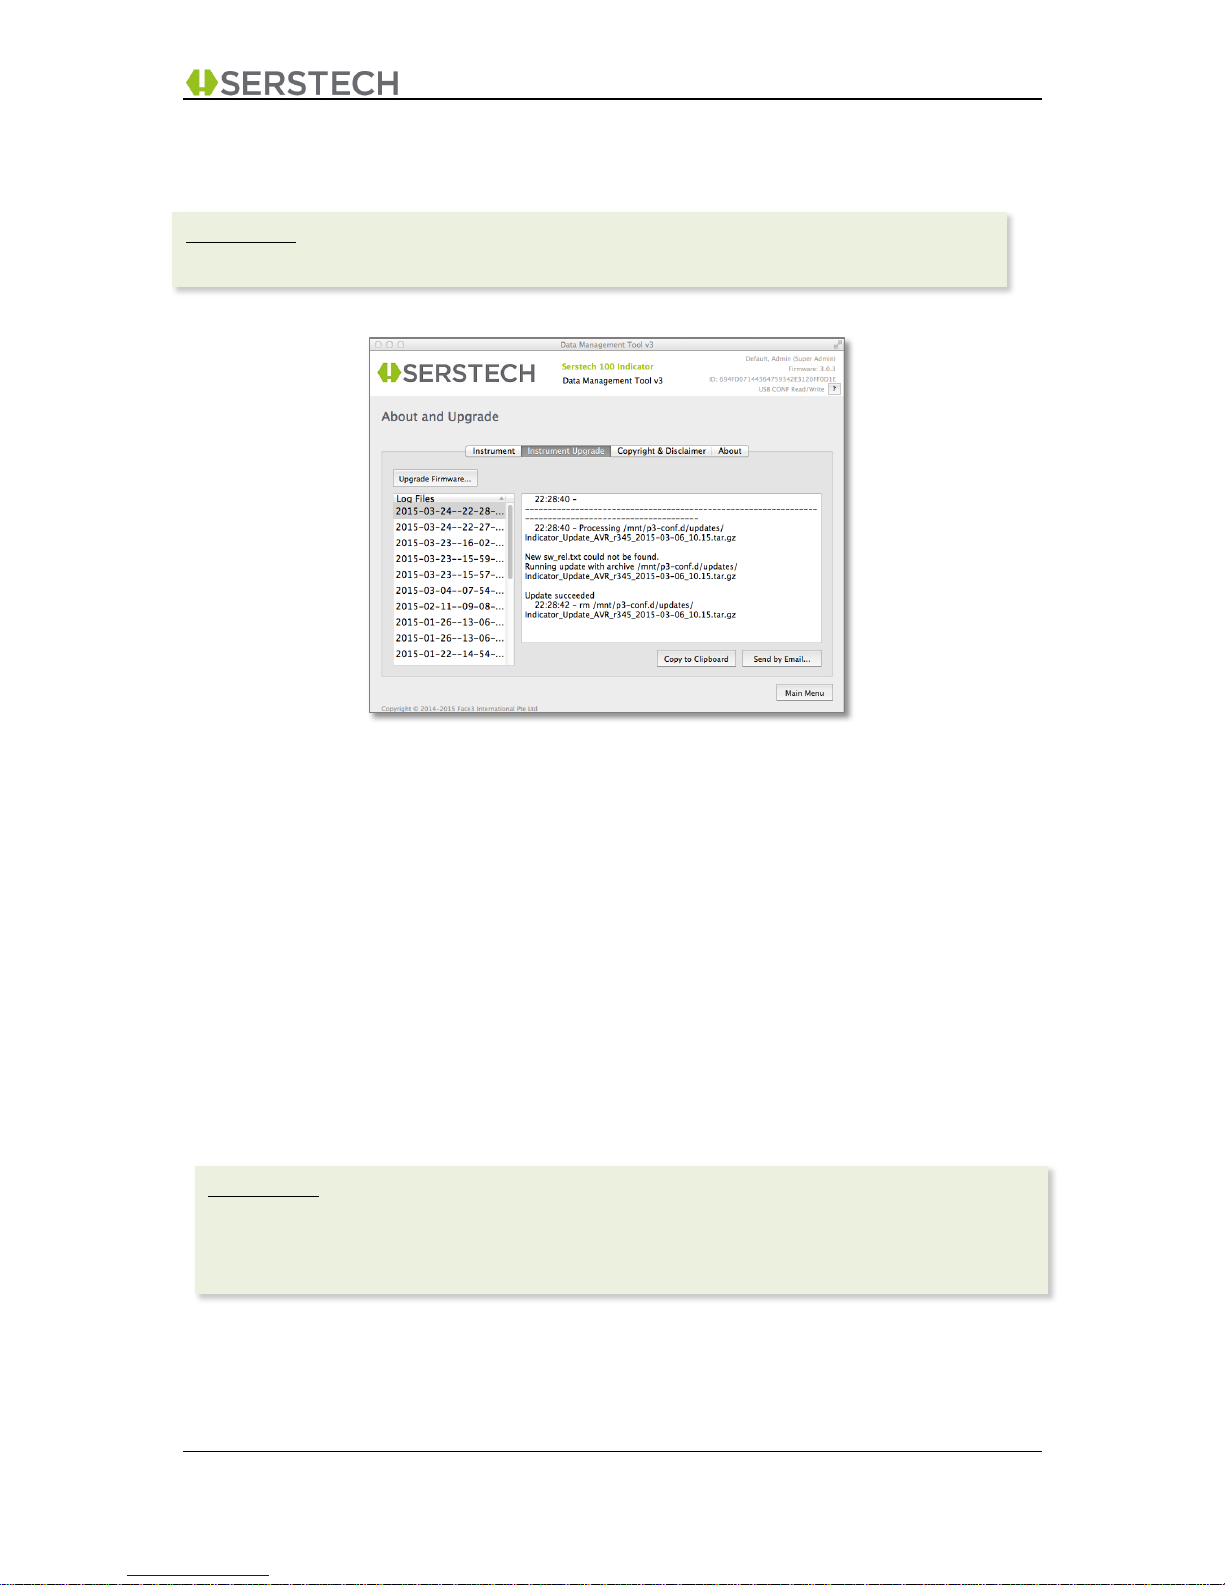
9.2 Upgrade tab
The “Upgrade” tab (above) will display a list box containing log files of all upgrades that have been
done on the attached instrument.
Selecting a specific log file will allow you to view the content of this file on the screen. You will also be
able to:
• “Copy to Clipbord”, which will copy this content to the clipboard in case you want to include
the information into a report or document.
• “Send by Email”, which will copy the selected log file as an attachment to an email template.
This could be useful in case you need help from Serstech Support. (The email template looks
and works the same way as seen in e.g. chapter 5.3)
Finally, the “Upgrade Firmware” button will bring up a File Browser window from which you can
browse to a directory where a firmware upgrade file (in .tar.gz format) is located. This is a very
convenient and safe way to upgrade the firmware on the instrument. You will also be reminded to
“Restart” the instrument for the new upgrade to be installed.
Please note:
The “Upgrade” tab may be “dimmed” as you may not have the permission to access this function.
Please note:
• The “Upgrade Firmware” button may be “dimmed” as you may not have the permission to
access this function
• The email function requires that you have access to the Internet from your computer
Page 52
DMT v3.2 User Manual A-1 DMT v3.2 Page 52 (55)
2015-10-13 Open Distribution
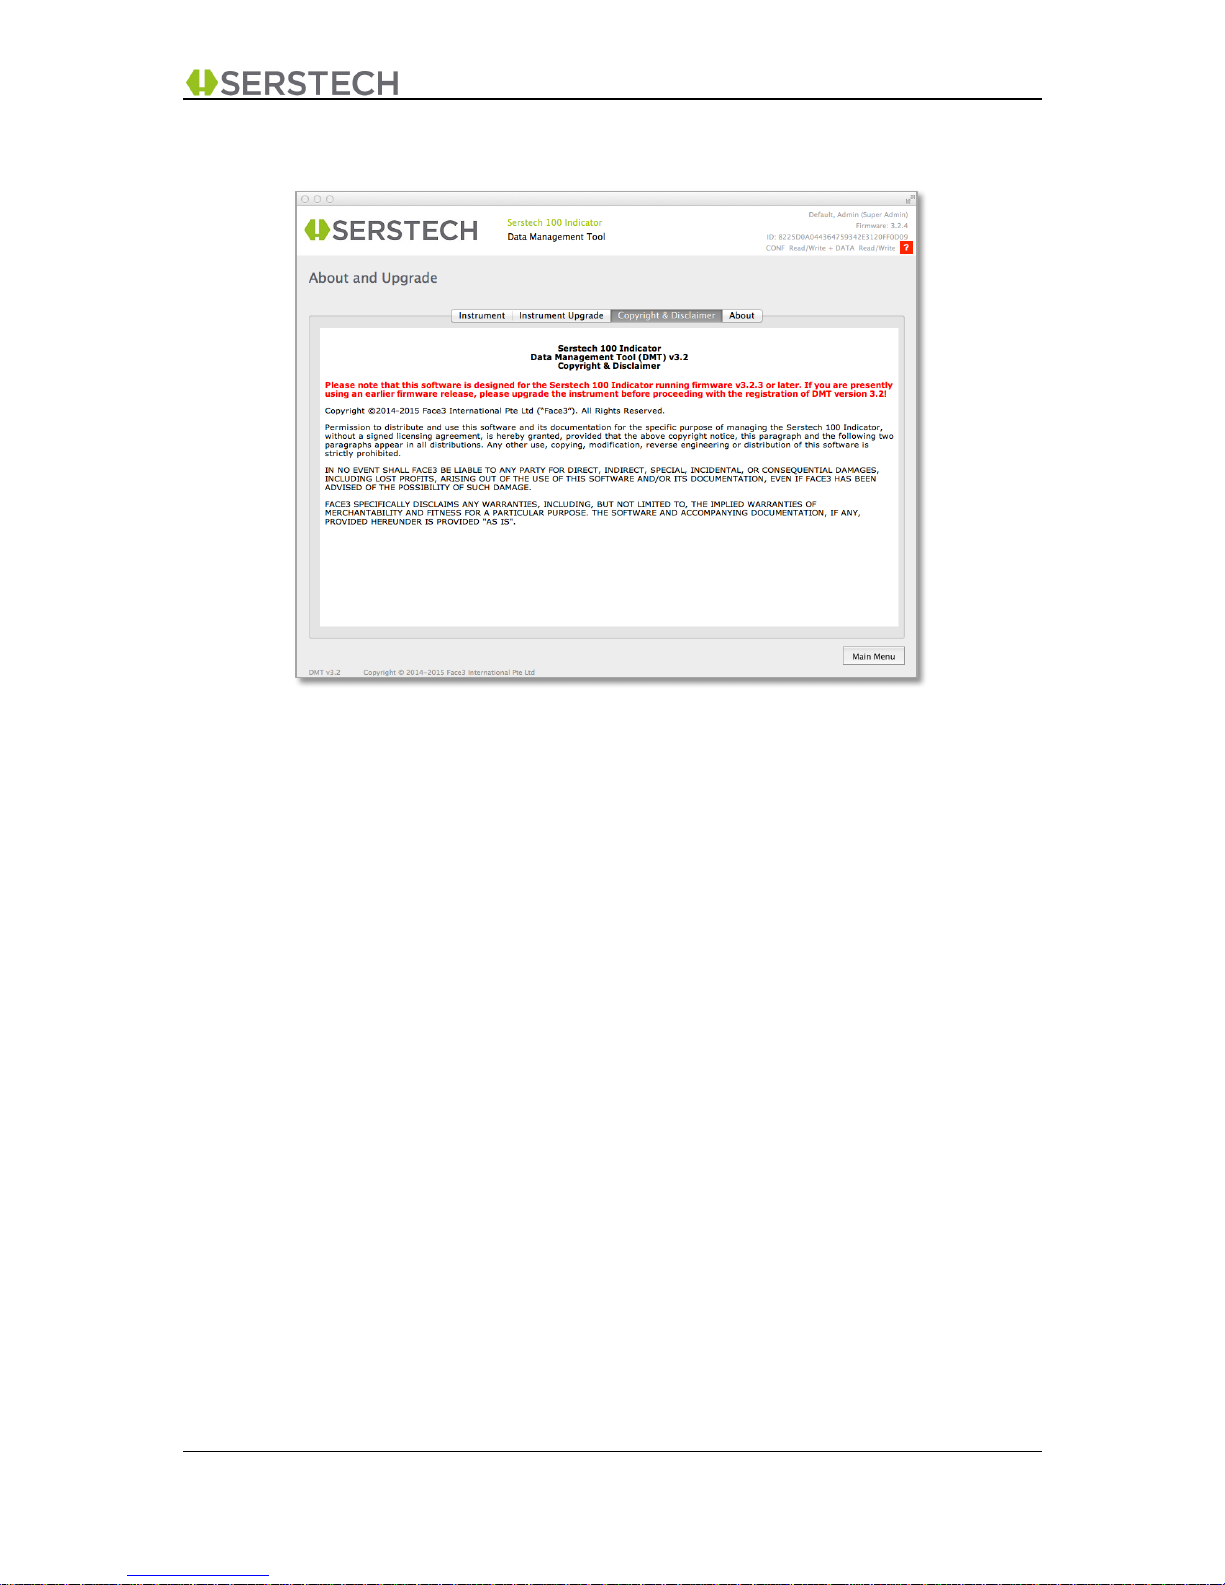
9.3 Copyright & Disclaimer tab
The “Copyright & Disclaimer” tab (above) will display the copyright and disclaimer policy of Face3
International Pte Ltd, the owner of the DMT intellectual property.
Page 53
DMT v3.2 User Manual A-1 DMT v3.2 Page 53 (55)
2015-10-13 Open Distribution
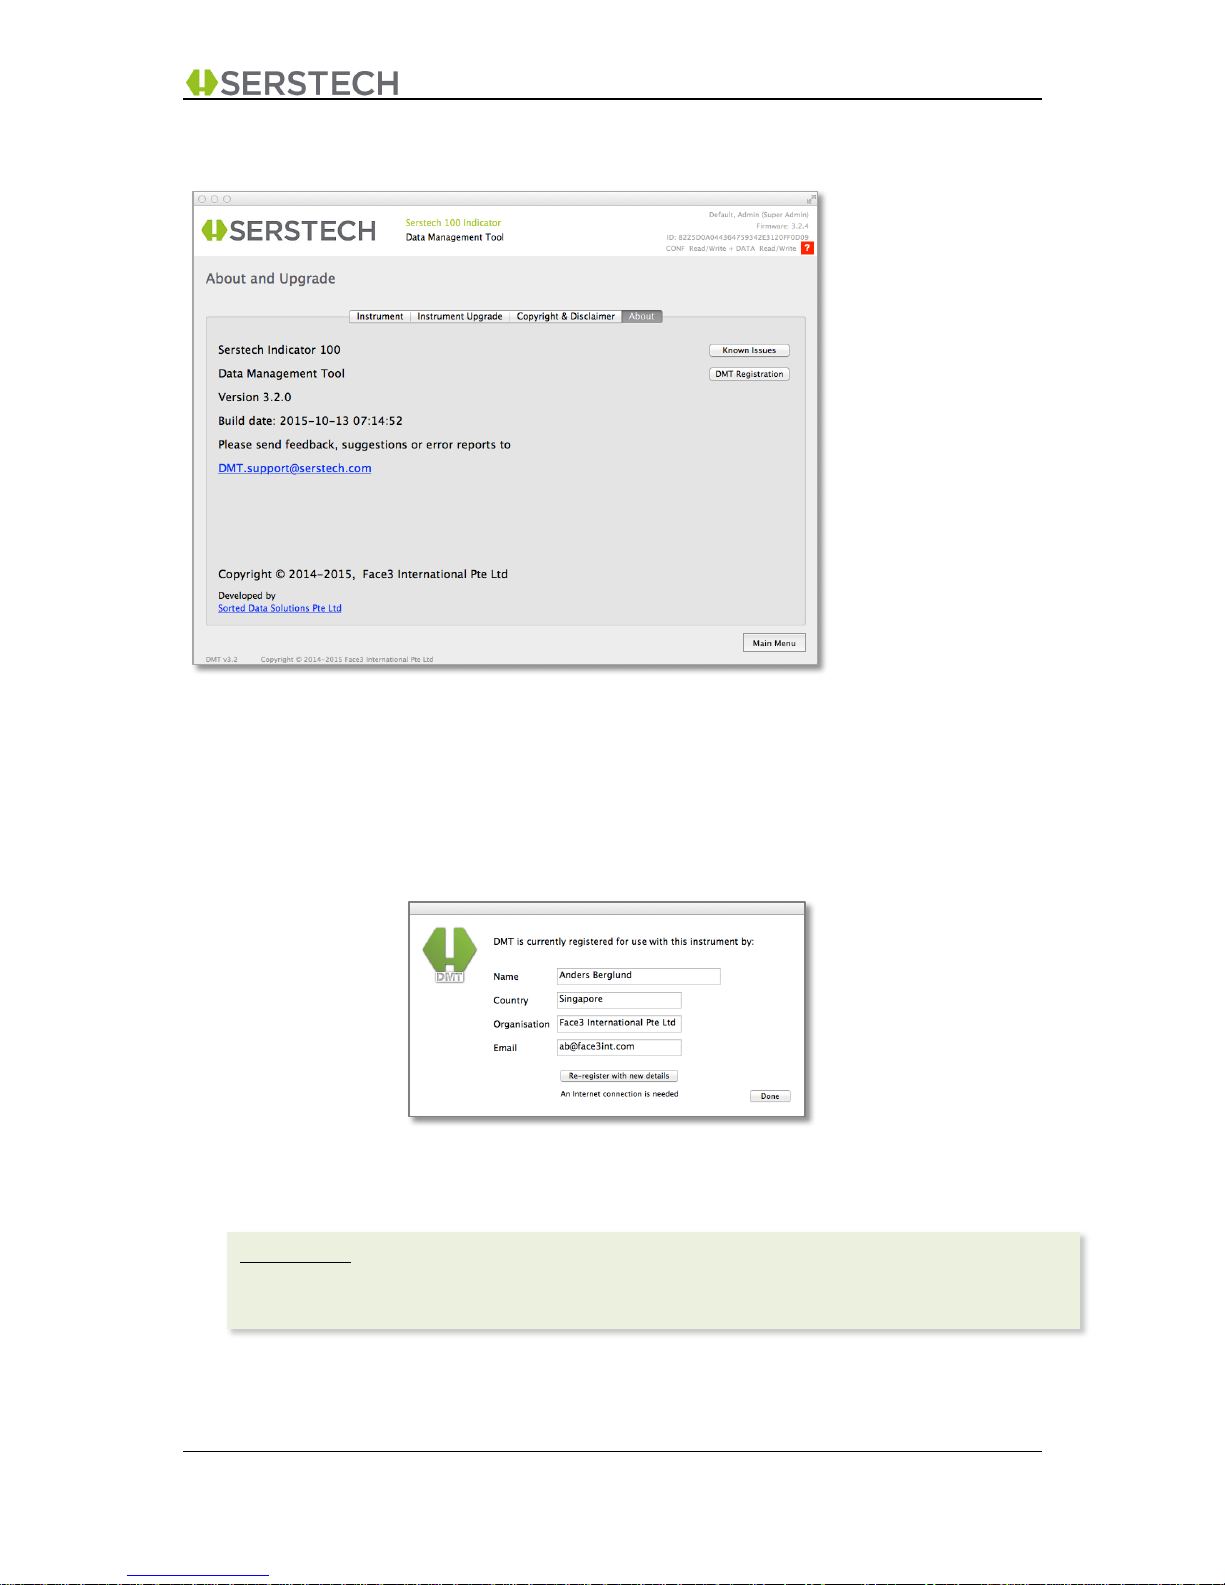
9.4 About tab
Under the “About” tab (above) you find;
• DMT version and build date
• Contact details for sending feedback, suggestions and error reports by email
• “Known issues” with the software
• “DMT Registration”, where you will see the current registration for this instrument.
In case you wish to update the DMT registration details, you may select “Re-register with
new details”. Otherwise, just click “Done” to return to the “About” screen.
Please note:
Sending emails to DMT.support and the “Re-registration” function require that you have access to
the Internet from your computer.
Page 54
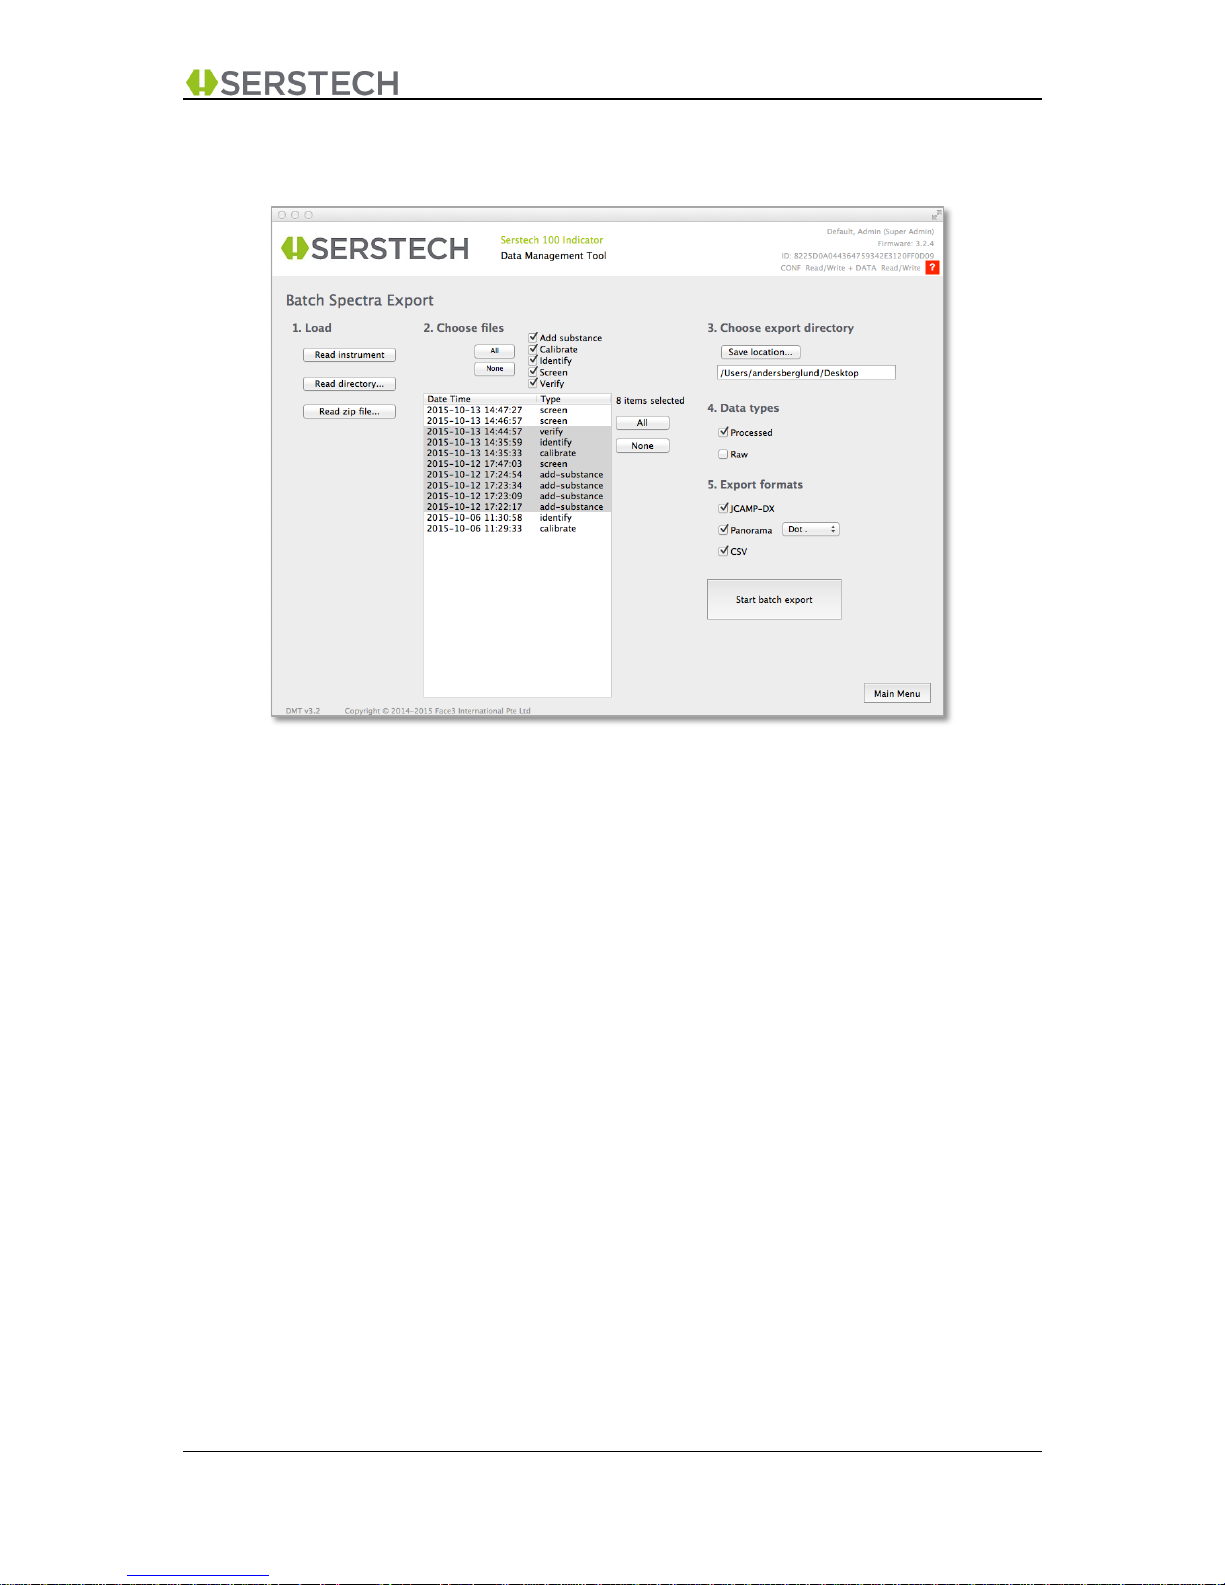
DMT v3.2 User Manual A-1 DMT v3.2 Page 54 (55)
2015-10-13 Open Distribution
10 BATCH SPECTRA EXPORT
This function provides a convenient way to convert a selection of spectra from various measurement
files to one or several 3rd party formats in one single batch process.
This is a 6 steps process:
1. You select the location of your source files, either from
• an attached instrument
• a directory on your computer (or any attached media device)
• a compressed zip file on your computer (or any attached media device)
2. The listbox will be populated with all measurement files found. You can select the “type(s)”
with the tic boxes, and also select specific dates/times by highlighting the files of your choice
in the list box.
3. You click “Save location…” to decide where to store the converted spectra files.
4. You select if you want to convert the Raw Data spectra, the Processed Data spectra or both.
5. You select the format(s) you want to export to
6. You click “Start batch export”
Page 55
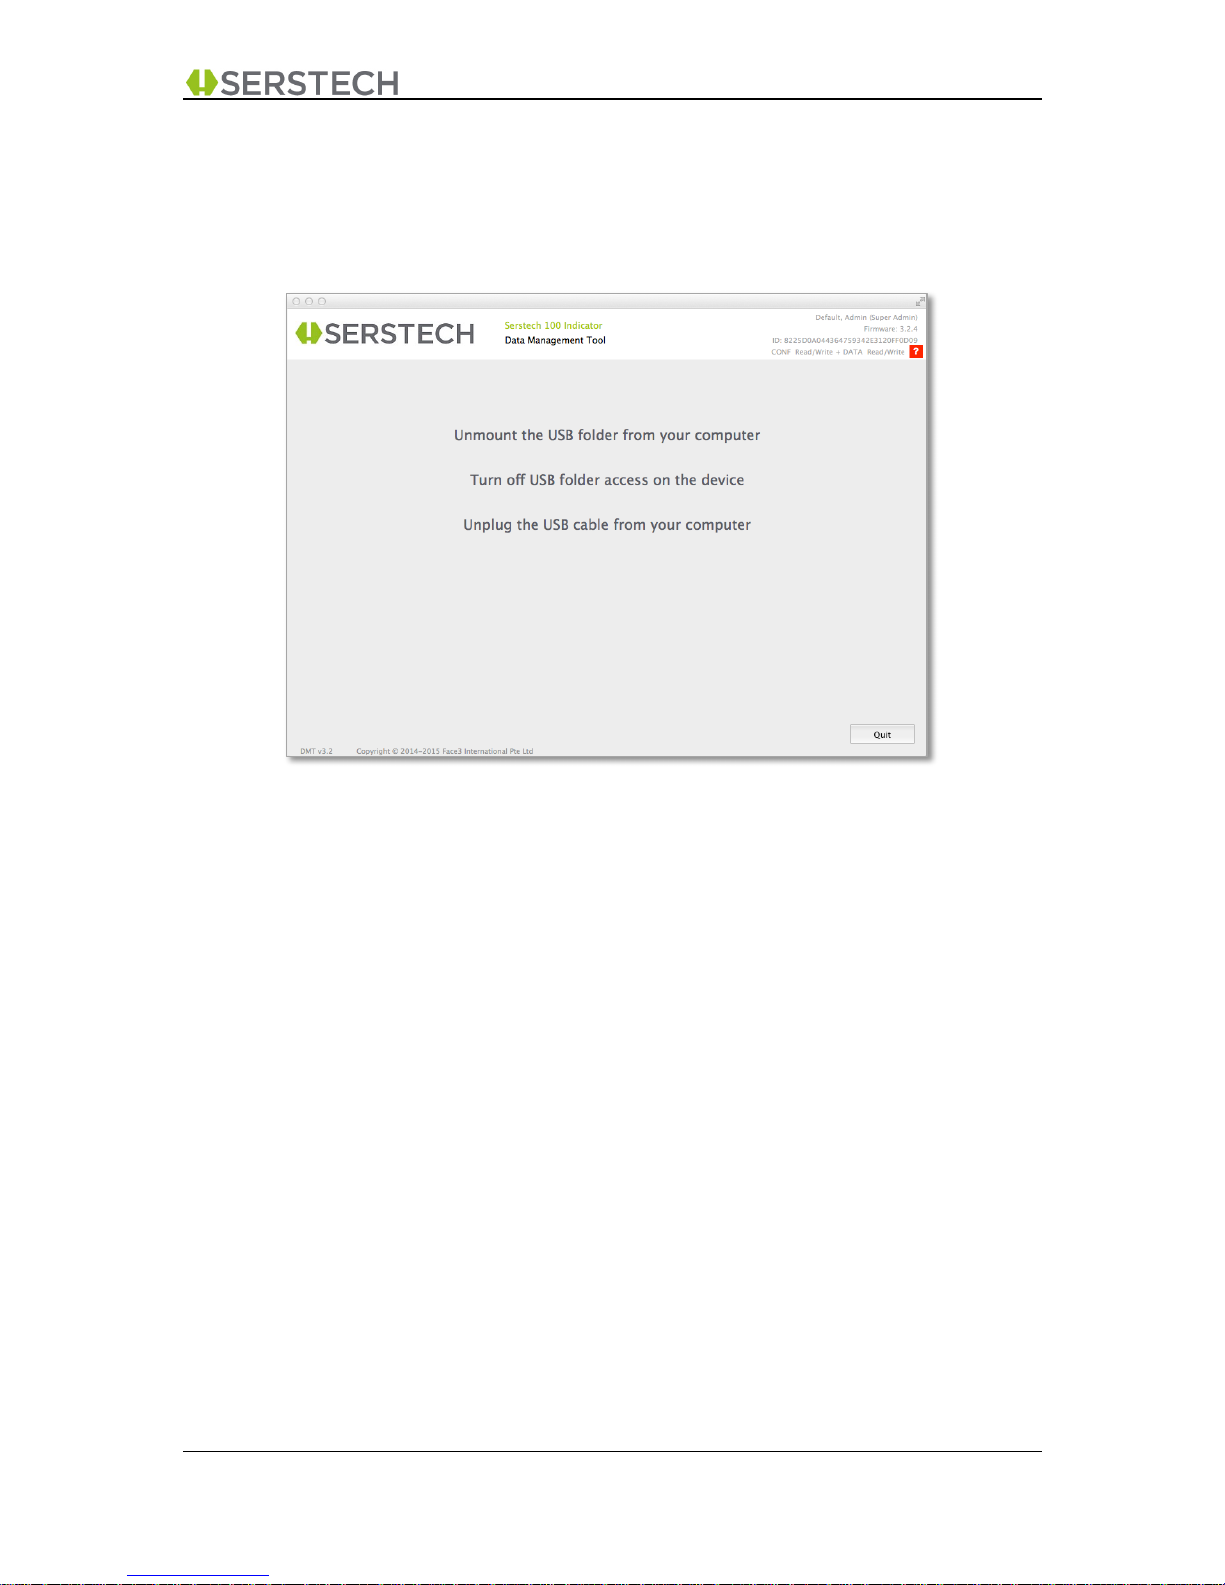
DMT v3.2 User Manual A-1 DMT v3.2 Page 55 (55)
2015-10-13 Open Distribution
11 EXIT
When you select Exit/Quit from the main menu, the below “Exit Screen” will be presented reminding
you to safely “unmount” the “i100_conf”, i100_data” and/or “i100_dmt” drives from your computer and
turn off USB folder access on the instrument’s key pad.
Clicking “Exit/Quit” will close the application
 Loading...