

Page 1
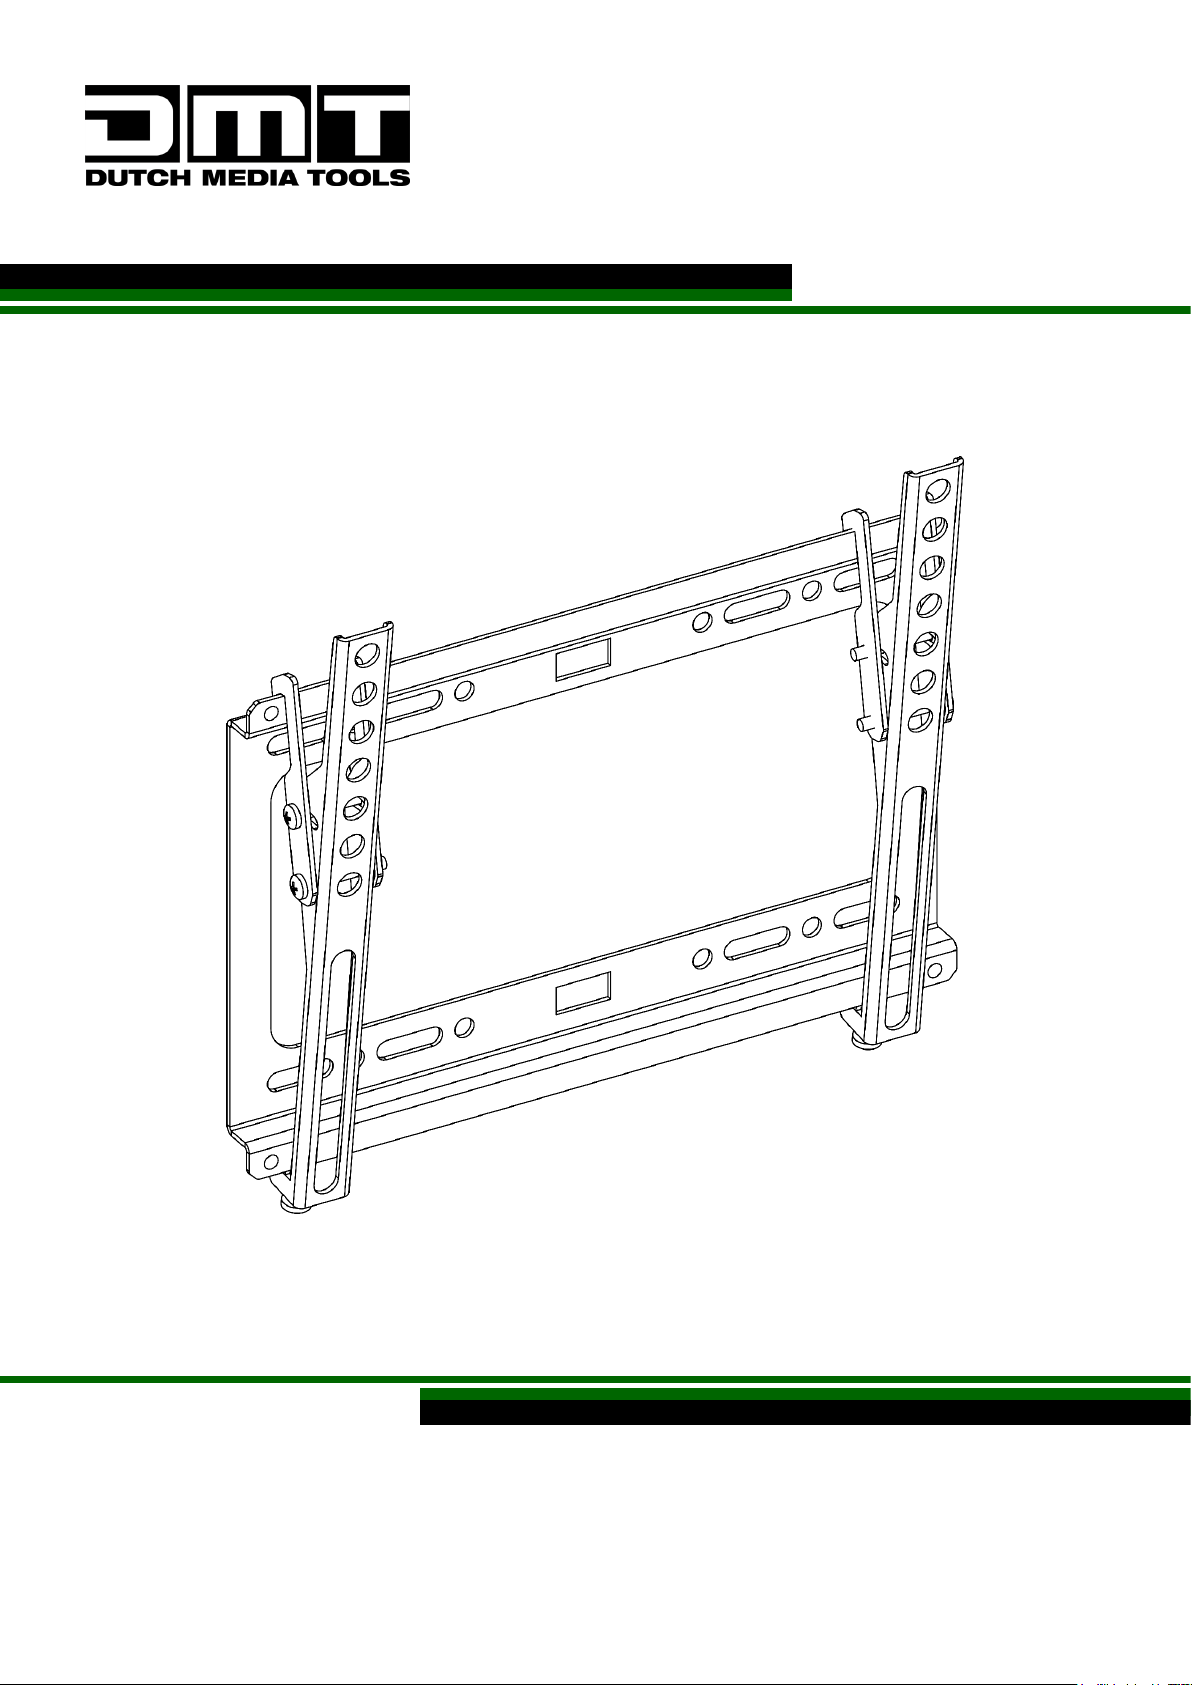
PLB-2246 13-42 LCD Bracket V1
Highlite International B.V. – Vestastraat 2 – 6468 EX – Kerkrade – the Netherlands
Ordercode: 100260
MANUAL
ENGLISH
Page 2

1
Ordercode: 100260
PLB-2246 13-42 LCD Bracket
Table of contents
Warning ............................................................................................................................................................................... 2
Tools required for installing the PLB-2246 13-42 LCD Bracket ................................................................................ 3
Safety Instructions ......................................................................................................................................................... 3
Operating Determinations .......................................................................................................................................... 4
Return Procedure .......................................................................................................................................................... 4
Claims .............................................................................................................................................................................. 4
Description of the device ................................................................................................................................................. 5
Overview ........................................................................................................................................................................ 5
Installation ........................................................................................................................................................................... 5
Set Up and Operation ....................................................................................................................................................... 5
Wood Stud Wall Mounting .......................................................................................................................................... 6
Solid Brick and Concrete Block Mounting ............................................................................................................... 6
Maintenance ...................................................................................................................................................................... 9
Product Specifications ...................................................................................................................................................... 9
Page 3
2
Ordercode: 100260
PLB-2246 13-42 LCD Bracket
Warning
Unpacking Instructions
Immediately upon receiving this product, carefully unpack the carton and check the contents to ensure
that all parts are present, and have been received in good condition. Notify the dealer immediately and
retain packing material for inspection if any parts appear damaged from shipping or the carton itself
shows signs of mishandling. Save the carton and all packing materials. In the event that a fixture must be
returned to the factory, it is important that the fixture be returned in the original factory box and packing.
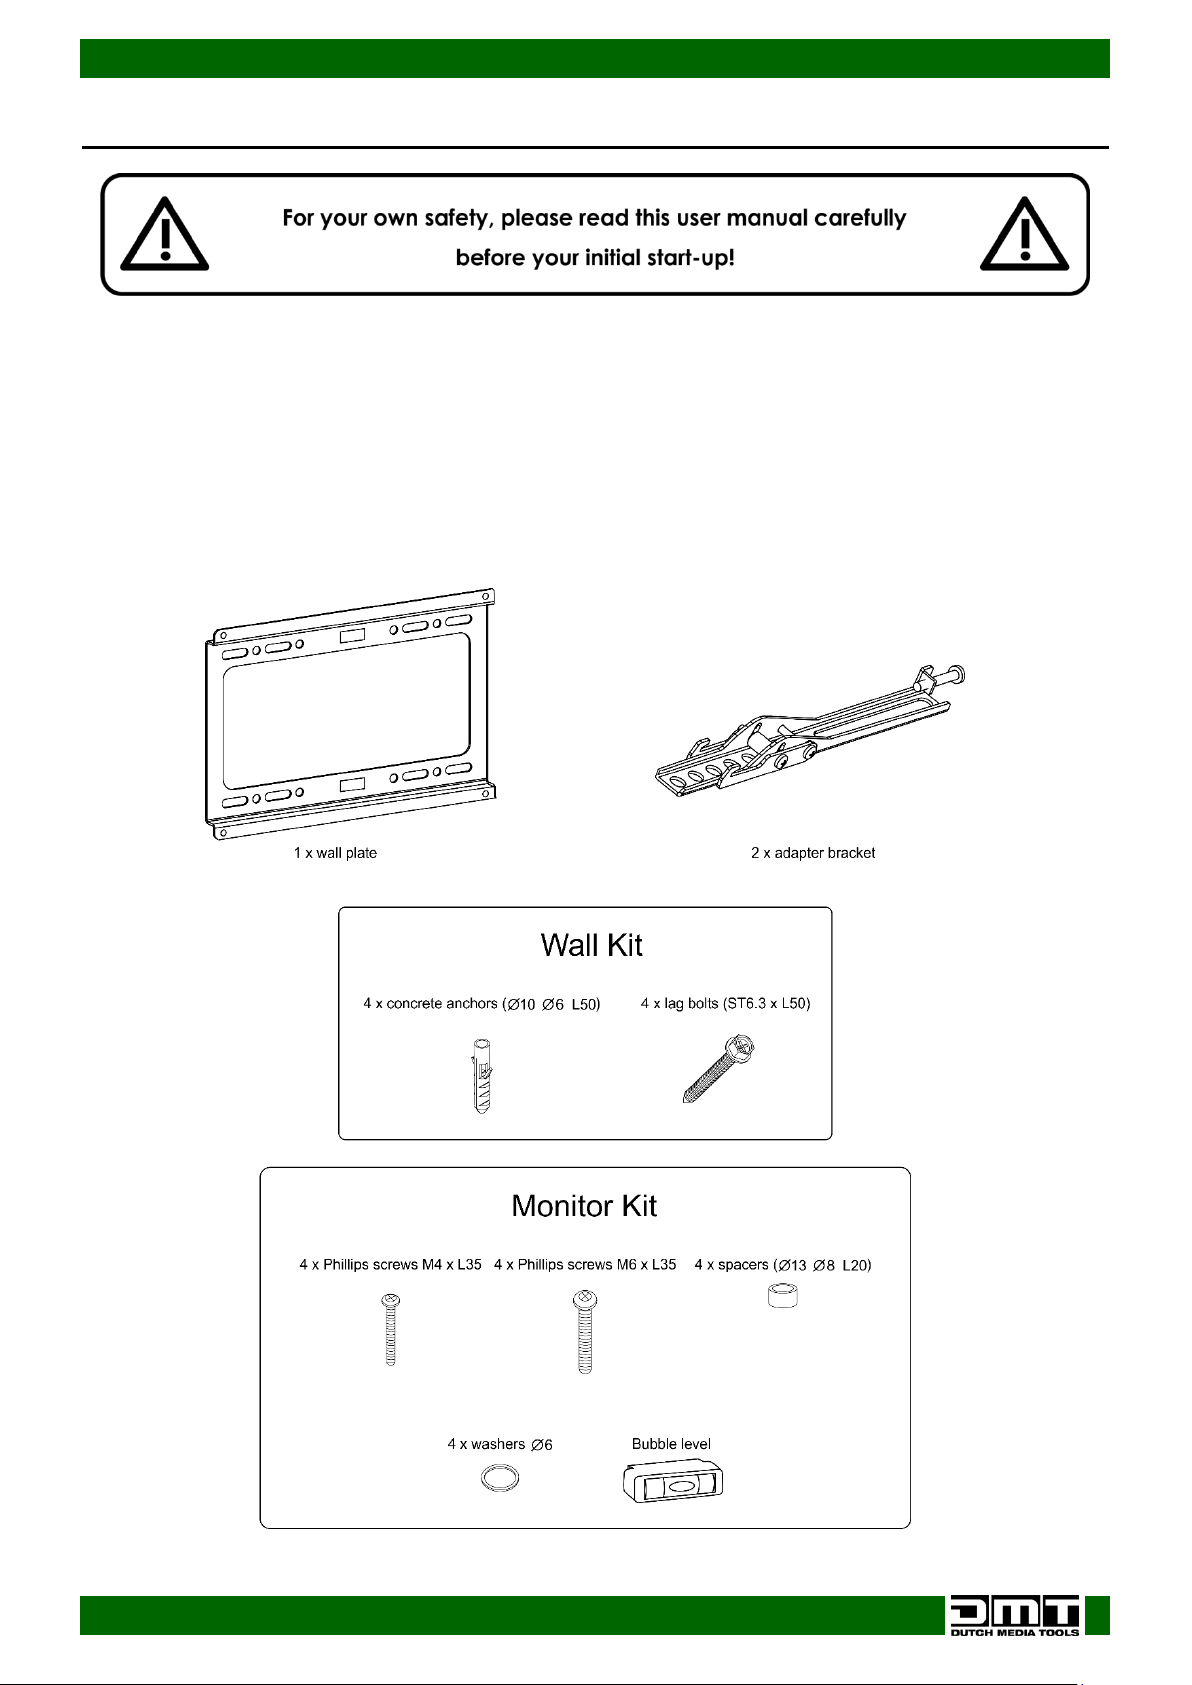
Your shipment includes:
● DMT PLB-2246 13-42 LCD Bracket
● User manual
Page 4
3
Ordercode: 100260
PLB-2246 13-42 LCD Bracket
Tools required for installing the PLB-2246 13-42 LCD Bracket
● Phillips head screwdriver (200 mm length excluding the handle)
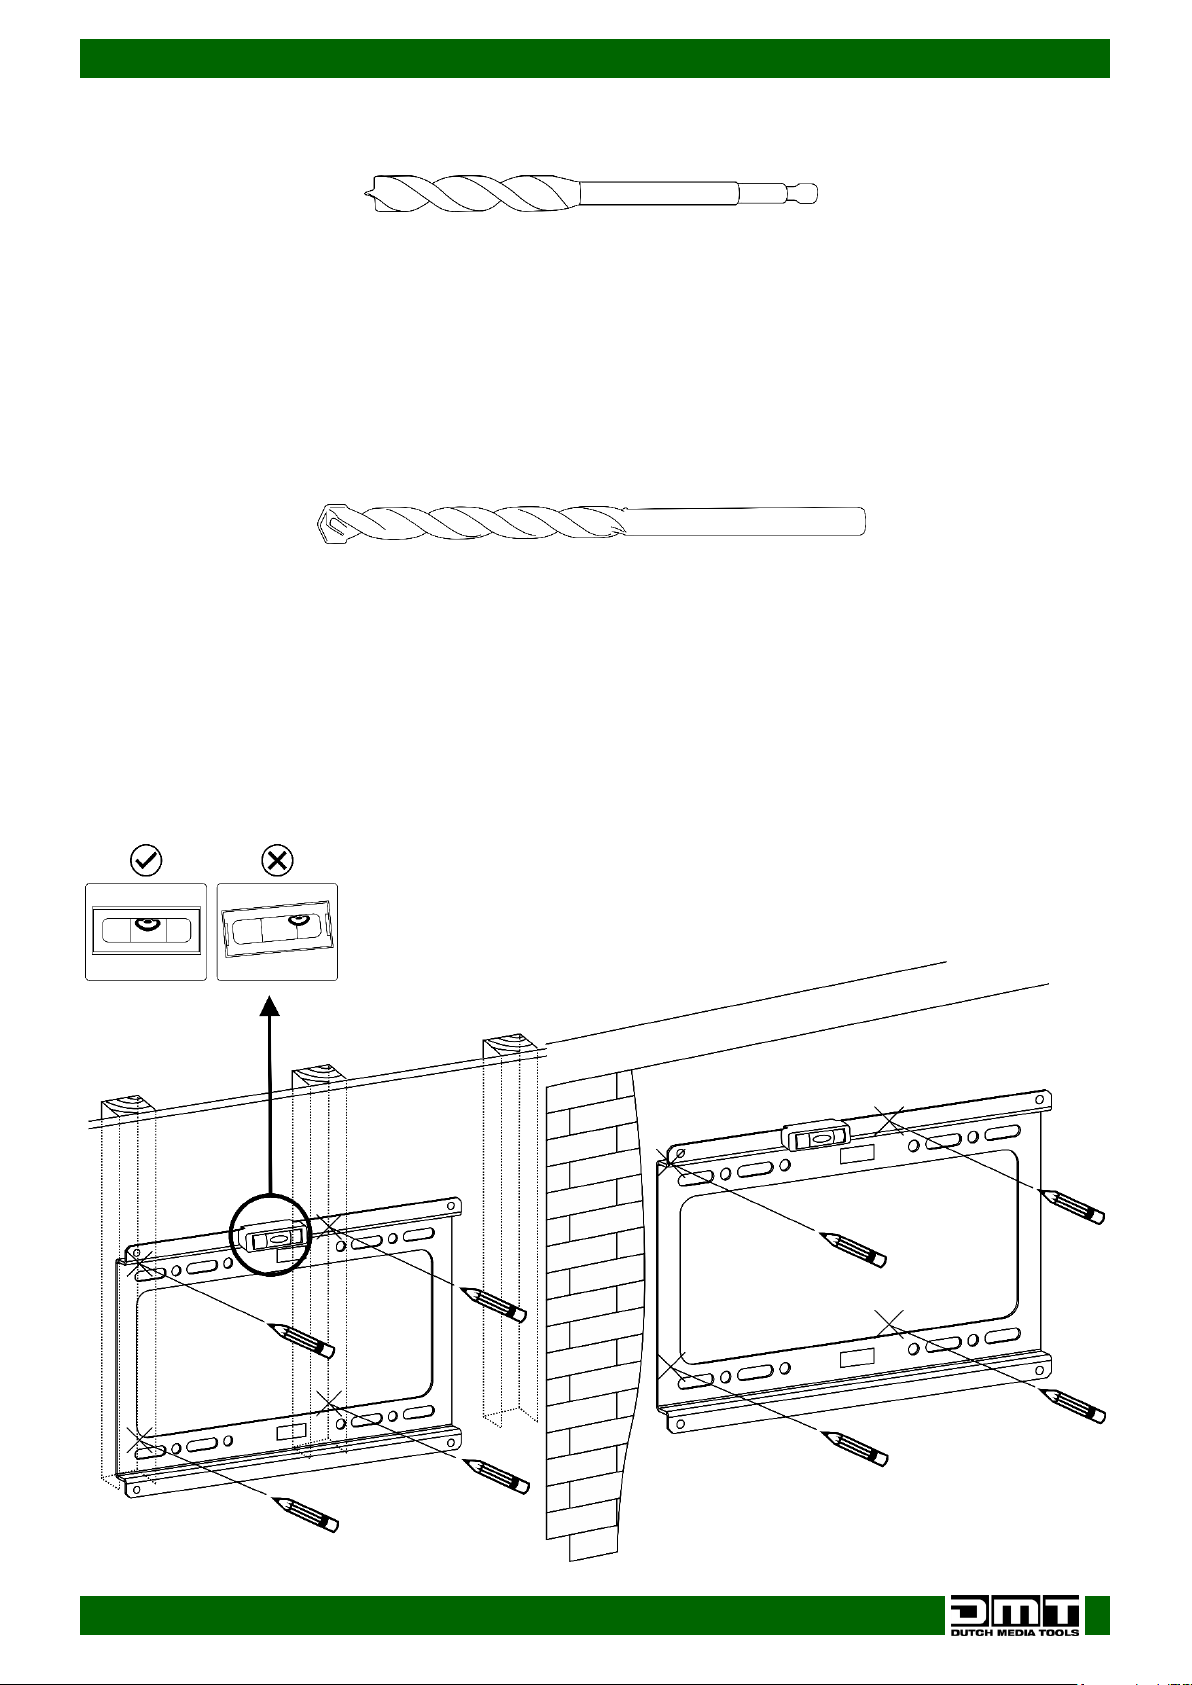
● Power drill + 10 mm masonry (concrete) and 3,2 mm (wood) drill bits for wall installation
● Allen wrench
● Marking pen
● Measuring tape
● Level
Safety Instructions
Every person involved with the installation, operation and maintenance of this device has to:
● be qualified
● follow the instructions of this manual
Before your initial start-up, please make sure that there is no damage caused by transportation. Should
there be any, consult your dealer and do not use the device.
To maintain perfect condition and to ensure a safe operation, it is absolutely necessary for the user to
follow the safety instructions and warning notes written in this manual.
Please consider that damages caused by manual modifications to the device are not subject to
warranty.
This device contains no user-serviceable parts. Refer servicing to qualified technicians only.
IMPORTANT:
The manufacturer will not accept liability for any resulting damages caused by the non-observance of
this manual or any unauthorized modification to the device.
● Never exceed the maximum load capacity.
● Never remove warning or informative labels from the unit.
● Never lift the bracket, including the flat screen TV, by grabbing the bracket, as the bracket may
become damaged. Always remove the flat screen TV first and then remove the bracket.
● Never leave any cables lying around.
● Do not begin the installation of this product before you have read the entire manual.
● Firmly tighten the screws, but do not overtighten. Overtightening can damage the bracket, thereby
greatly reducing its holding power.
● When mounting the bracket to wood wall studs, make sure that the mounting screws are anchored
into the center of the studs. Use of an "edge to edge" stud finder is highly recommended.
● Please read this manual carefully and keep it for future reference, especially for the required
distance from bracket to the wall.
● Always use an assistant or mechanical lifting equipment to safely lift and position your equipment
● Do not shake the device. Avoid brute force when installing the bracket.
● Only use device indoors, avoid contact with water or other liquids.
● Avoid flames and do not put close to flammable liquids or gases.
● Make sure that the supporting surface will safely support the combined load of the equipment and
all attached hardware and components.
● Make sure that the device is not exposed to extreme heat, moisture or dust.
● If the bracket is dropped or struck, have a qualified engineer inspect for safety before installing.
● For adult use only. Bracket must be installed by a qualified technician.
● Repairs, servicing and electric connection must be carried out by a qualified technician.
● WARRANTY: Till one year after date of purchase.
Page 5
4
Ordercode: 100260
PLB-2246 13-42 LCD Bracket
Operating Determinations
● The relative humidity must not exceed 50% with an ambient temperature of 40°C.
● If this product is operated in any other way, than the one described in this manual, the product may
suffer damages and the warranty becomes void.
● Any other operation may lead to dangers like short-circuit, burns, electric shock, crash etc.
You endanger your own safety and the safety of others!
Improper installation can cause serious damage to people and property !
Return Procedure
Returned merchandise must be sent prepaid and in the original packing, call tags will not be issued.
Package must be clearly labeled with a Return Authorization Number (RMA number). Products returned
without an RMA number will be refused. Highlite will not accept the returned goods or any responsibility.
Call Highlite 0031-455667723 or mail [email protected] and request an RMA prior to shipping the fixture.
Be prepared to provide the model number, serial number and a brief description of the cause for the
return. Be sure to properly pack fixture, any shipping damage resulting from inadequate packaging is the
customer’s responsibility. Highlite reserves the right to use its own discretion to repair or replace
product(s). As a suggestion, proper UPS packing or double-boxing is always a safe method to use.
Note: If you are given an RMA number, please include the following information on a piece of paper
inside the box:
01) Your name
02) Your address
03) Your phone number
04) A brief description of the symptoms
Claims
The client has the obligation to check the delivered goods immediately upon delivery for any shortcomings and/or visible defects, or perform this check after our announcement that the goods are at their
disposal. Damage incurred in shipping is the responsibility of the shipper; therefore the damage must be
reported to the carrier upon receipt of merchandise.
It is the customer's responsibility to notify and submit claims with the shipper in the event that a fixture is
damaged due to shipping. Transportation damage has to be reported to us within one day after receipt
of the delivery.
Any return shipment has to be made post-paid at all times. Return shipments must be accompanied with
a letter defining the reason for return shipment. Non-prepaid return shipments will be refused, unless
otherwise agreed in writing.
Complaints against us must be made known in writing or by fax within 10 working days after receipt of the
invoice. After this period complaints will not be handled anymore.
Complaints will only then be considered if the client has so far complied with all parts of the agreement,
regardless of the agreement of which the obligation is resulting.
Page 6
5
Ordercode: 100260
PLB-2246 13-42 LCD Bracket
Description of the device
Features
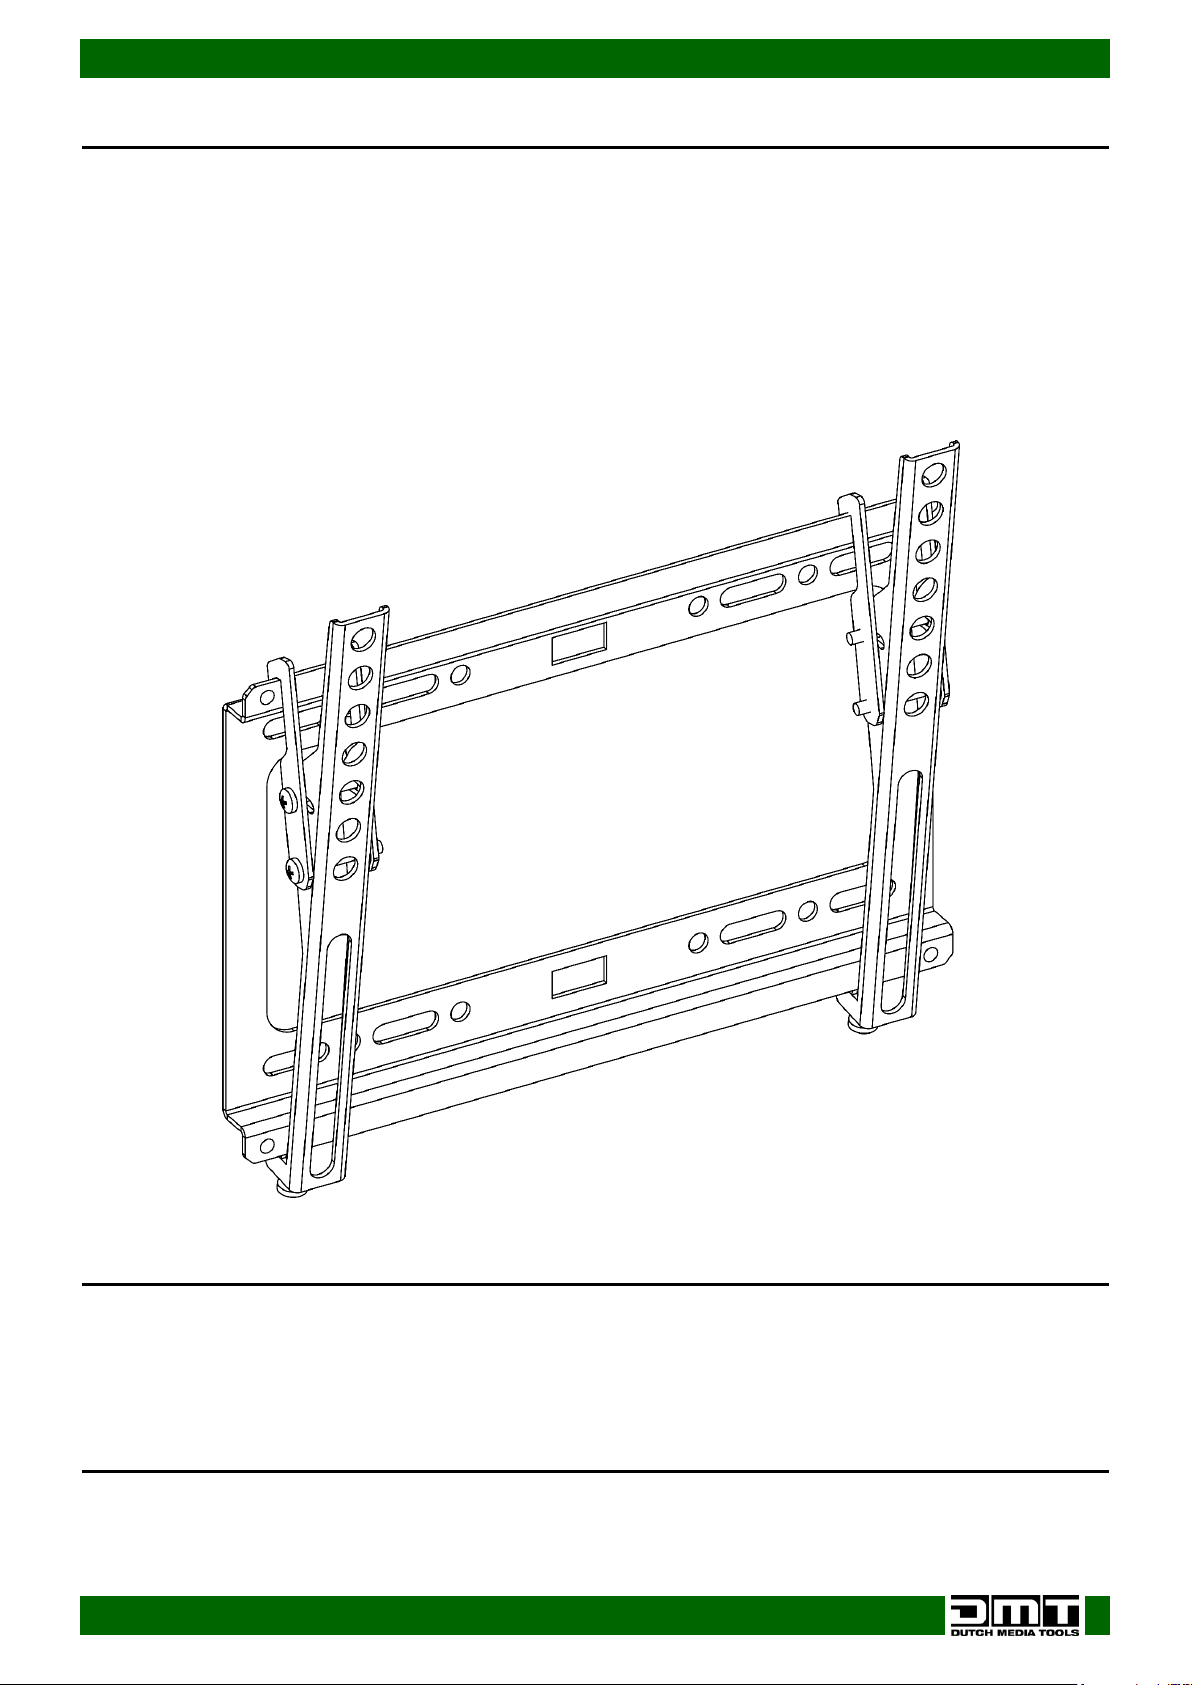
The PLB-2246 13-42 LCD Bracket is a bracket for flat screen TVs.
● Fixed wall mount
● Maximum load: 25 kg
● Screen size: 13" - 42"
● Max. VESA: 75 x 75 to 200 x 200 mm
● Tilt adjustment: 0-6°
● Weight: 2,5 kg
Overview
Fig. 01
Installation
Remove all packing materials from the PLB-2246 13-42 LCD Bracket. Check that all foam and plastic
padding is removed. Connect all cables.
Do not supply power before the whole system is set up and connected properly.
Always disconnect from electric mains power supply before cleaning or servicing.
Damages caused by non-observance are not subject to warranty.
Set Up and Operation
Follow the directions below, as they pertain to your preferred operation mode.
Page 7
6
Ordercode: 100260
PLB-2246 13-42 LCD Bracket
Wood Stud Wall Mounting
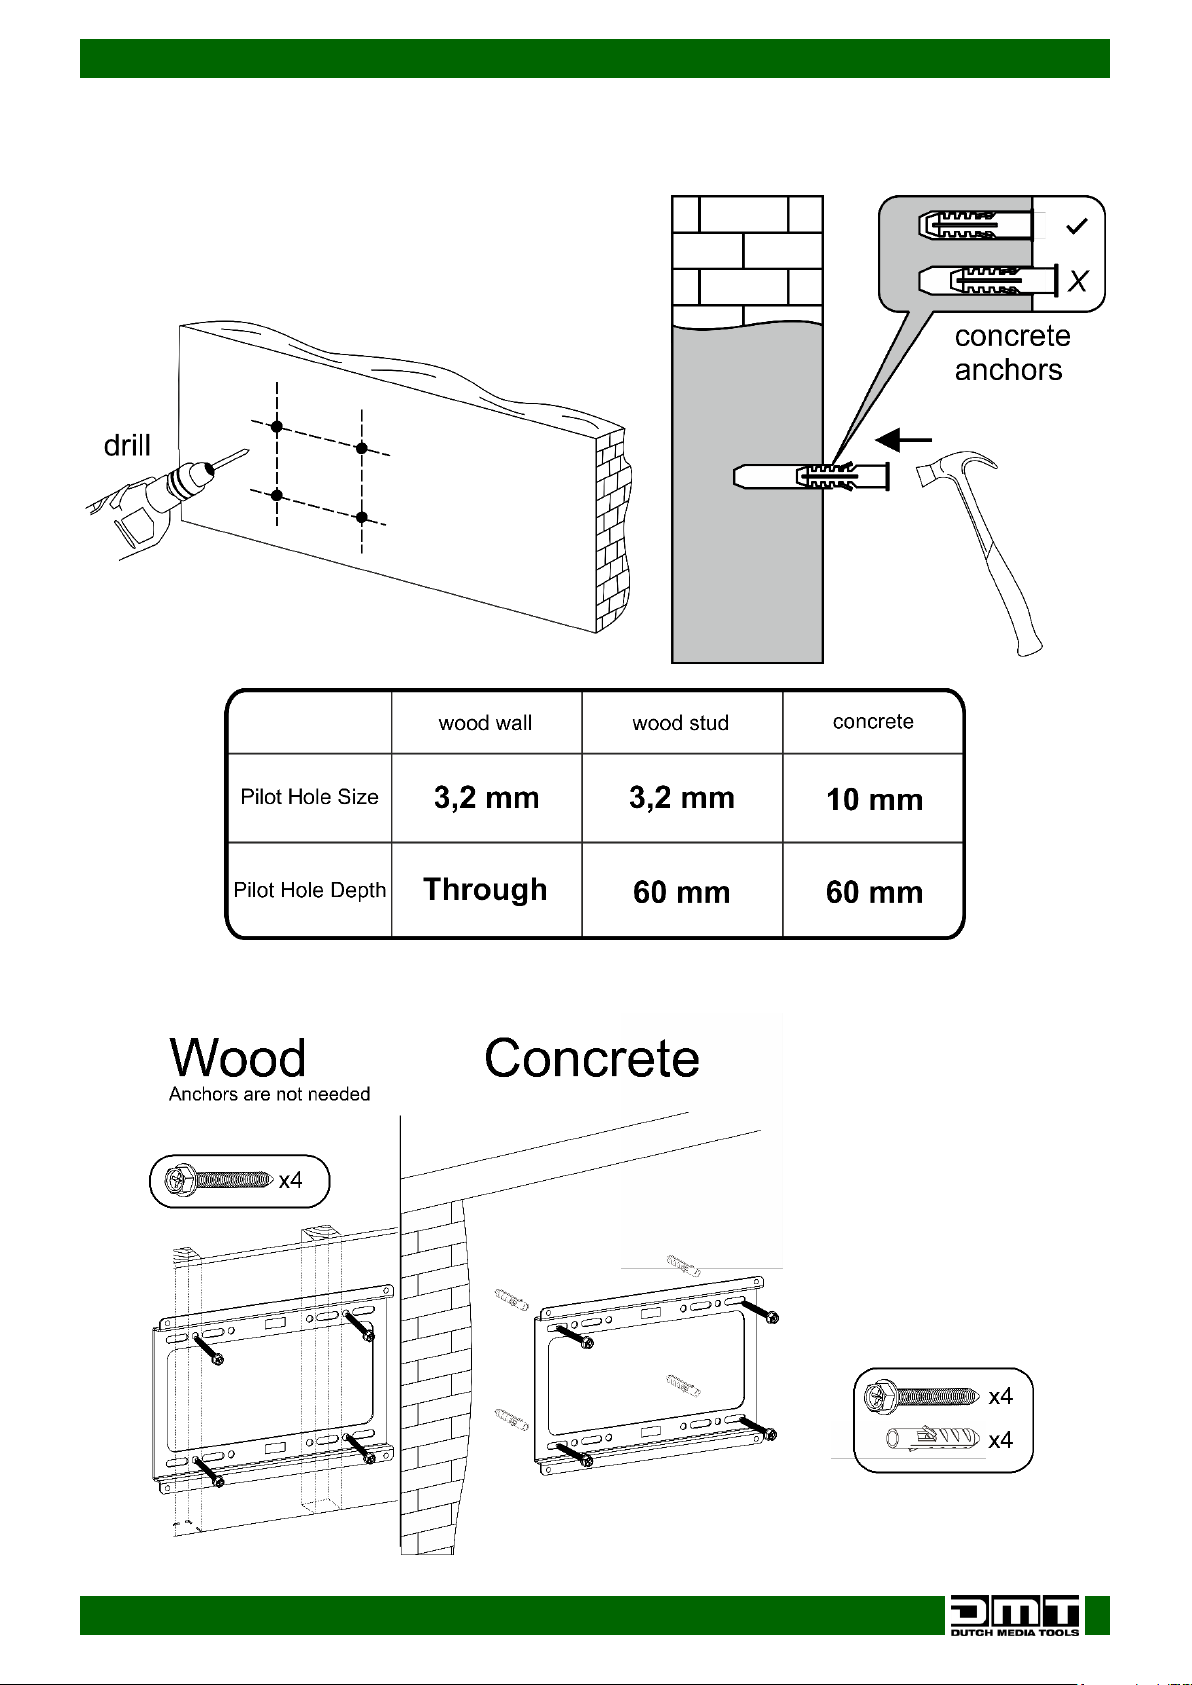
● Use a 3,2 mm drill bit (wood) to drill the holes (hole size: 3,2 mm, hole depth: 60 mm).
● Make sure that the supporting surface will safely support the combined load of the equipment and all
attached hardware and components.
● Firmly tighten the woodscrews, but do not overtighten. Overtightening can damage the bracket, thereby
greatly reducing its holding power.
● When mounting the bracket to wood wall studs, make sure that the mounting screws are anchored into
the center of the studs. Use of an “edge to edge” stud finder is highly recommended.
● The provided hardware is for mounting through or attachment to a standard thickness drywall or plaster
into studs. Installers are responsible for providing the hardware for other types of mounting situations.
Solid Brick and Concrete Block Mounting
● Use a 10 mm drill bit (concrete) to drill the holes (hole size: 10 mm, hole depth: 60 mm).
● When installing the wall mounts on a cinderblock, verify that you have a minimum of 1-3/8” of actual
concrete thickness in the hole to be used for the concrete anchors.
● Do not drill into mortar joints!
● Be sure to mount on a solid part of the block, with a 1” minimum from the side of the block. You should use
an electric drill at low speed to drill the hole, instead of a hammer drill to avoid breaking out the back of
the hole when entering a void or cavity.
● The installer must verify if the supporting surface will safely support the combined load of the equipment
and all attached hardware and components.
● Use the wall bracket as a template to mark the holes on the wall.
01) Use a level to mark the drilling location of the wall plate (for wood studs, please detect the center
with a stud finder). Make sure that the alignment is correct.
Page 8
7
Ordercode: 100260
PLB-2246 13-42 LCD Bracket
02) Drill pilot holes at marked locations. Gently hammer the anchors in. (The anchors should be used only
in case of solid brick or concrete block mounting. In case of wood stud mounting, the anchors are
not needed.)
03) Insert the lag bolts, through the wall plate, into the drilled holes. Tighten the screws with an Allen
wrench.
Page 9
8
Ordercode: 100260
PLB-2246 13-42 LCD Bracket
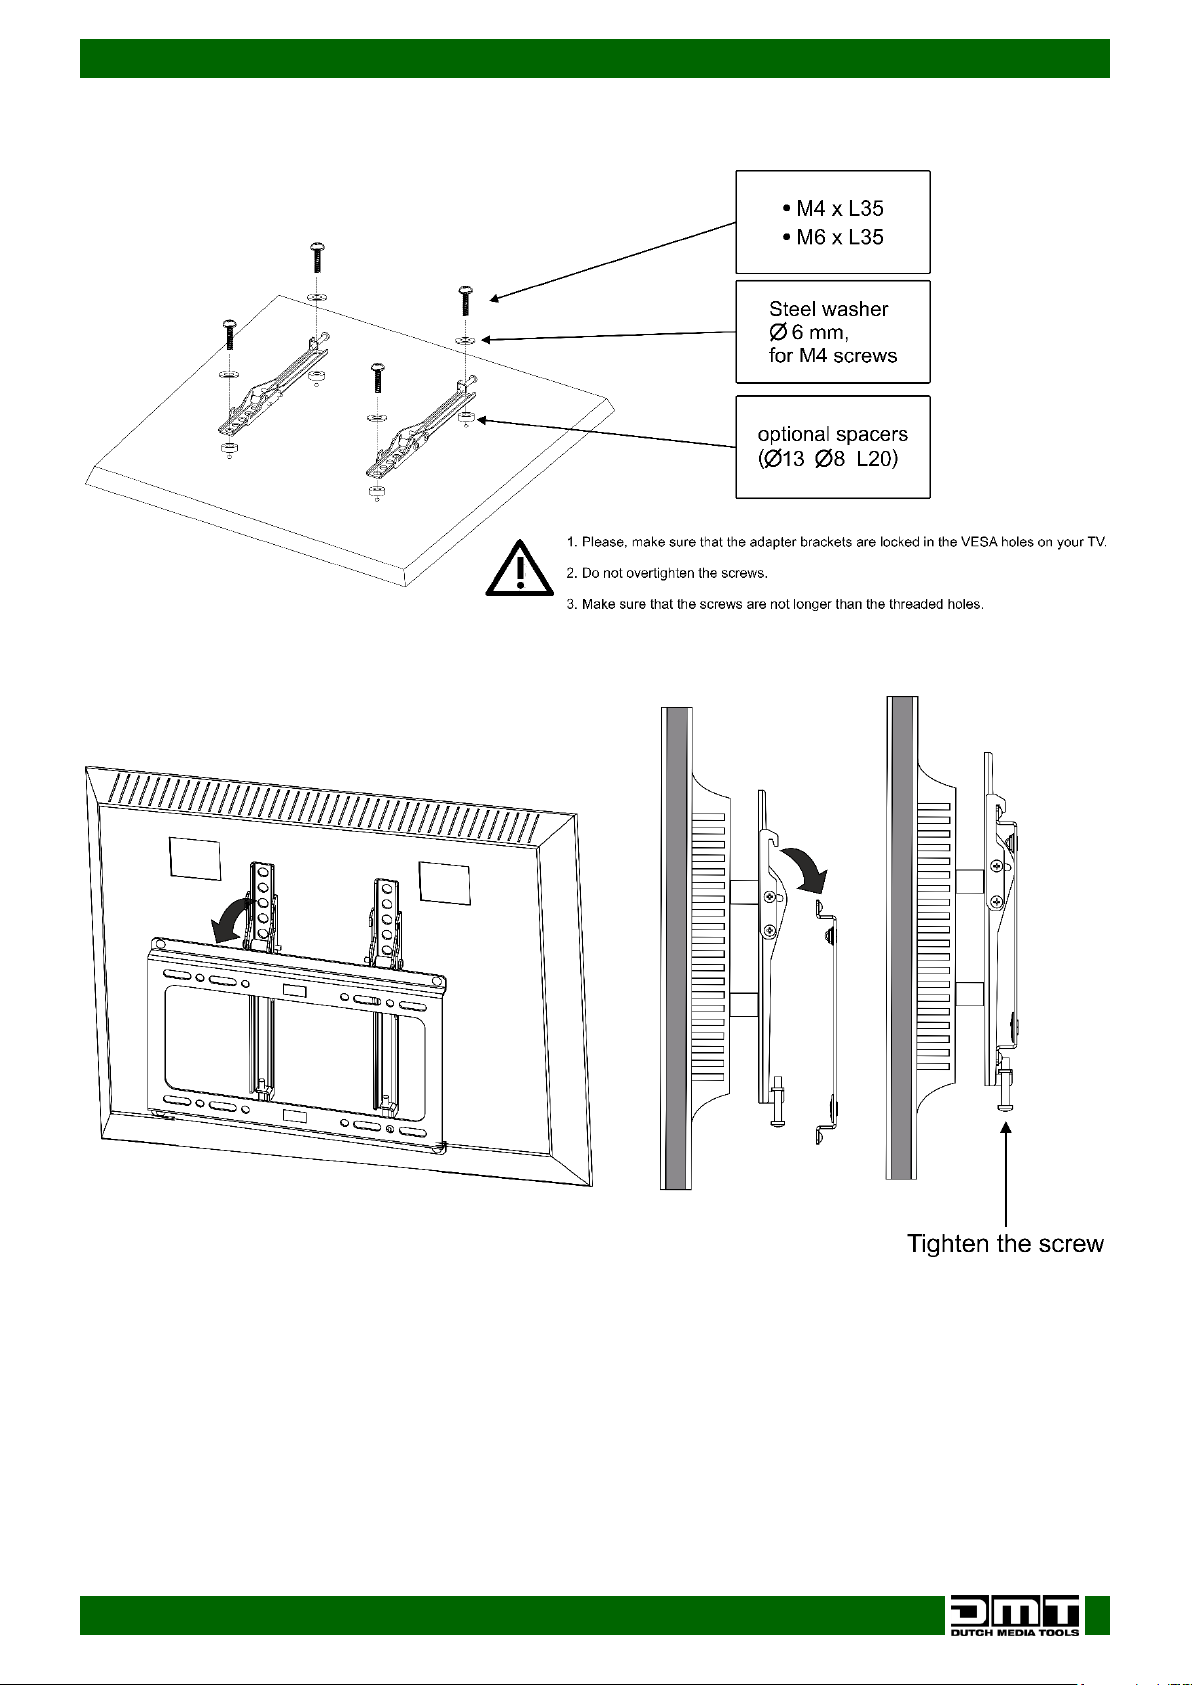
04) Attach the adapter brackets to the VESA holes. Select the screws appropriate for your TV. If needed,
use the included spacers and washers. Tighten the screws with a screwdriver.
05) Once the wall plate has been secured to the wall, carefully lift your TV (with 2 people) and hook the
top hooks over the top of the wall plate rail, as shown below.
Page 10
9
Ordercode: 100260
PLB-2246 13-42 LCD Bracket
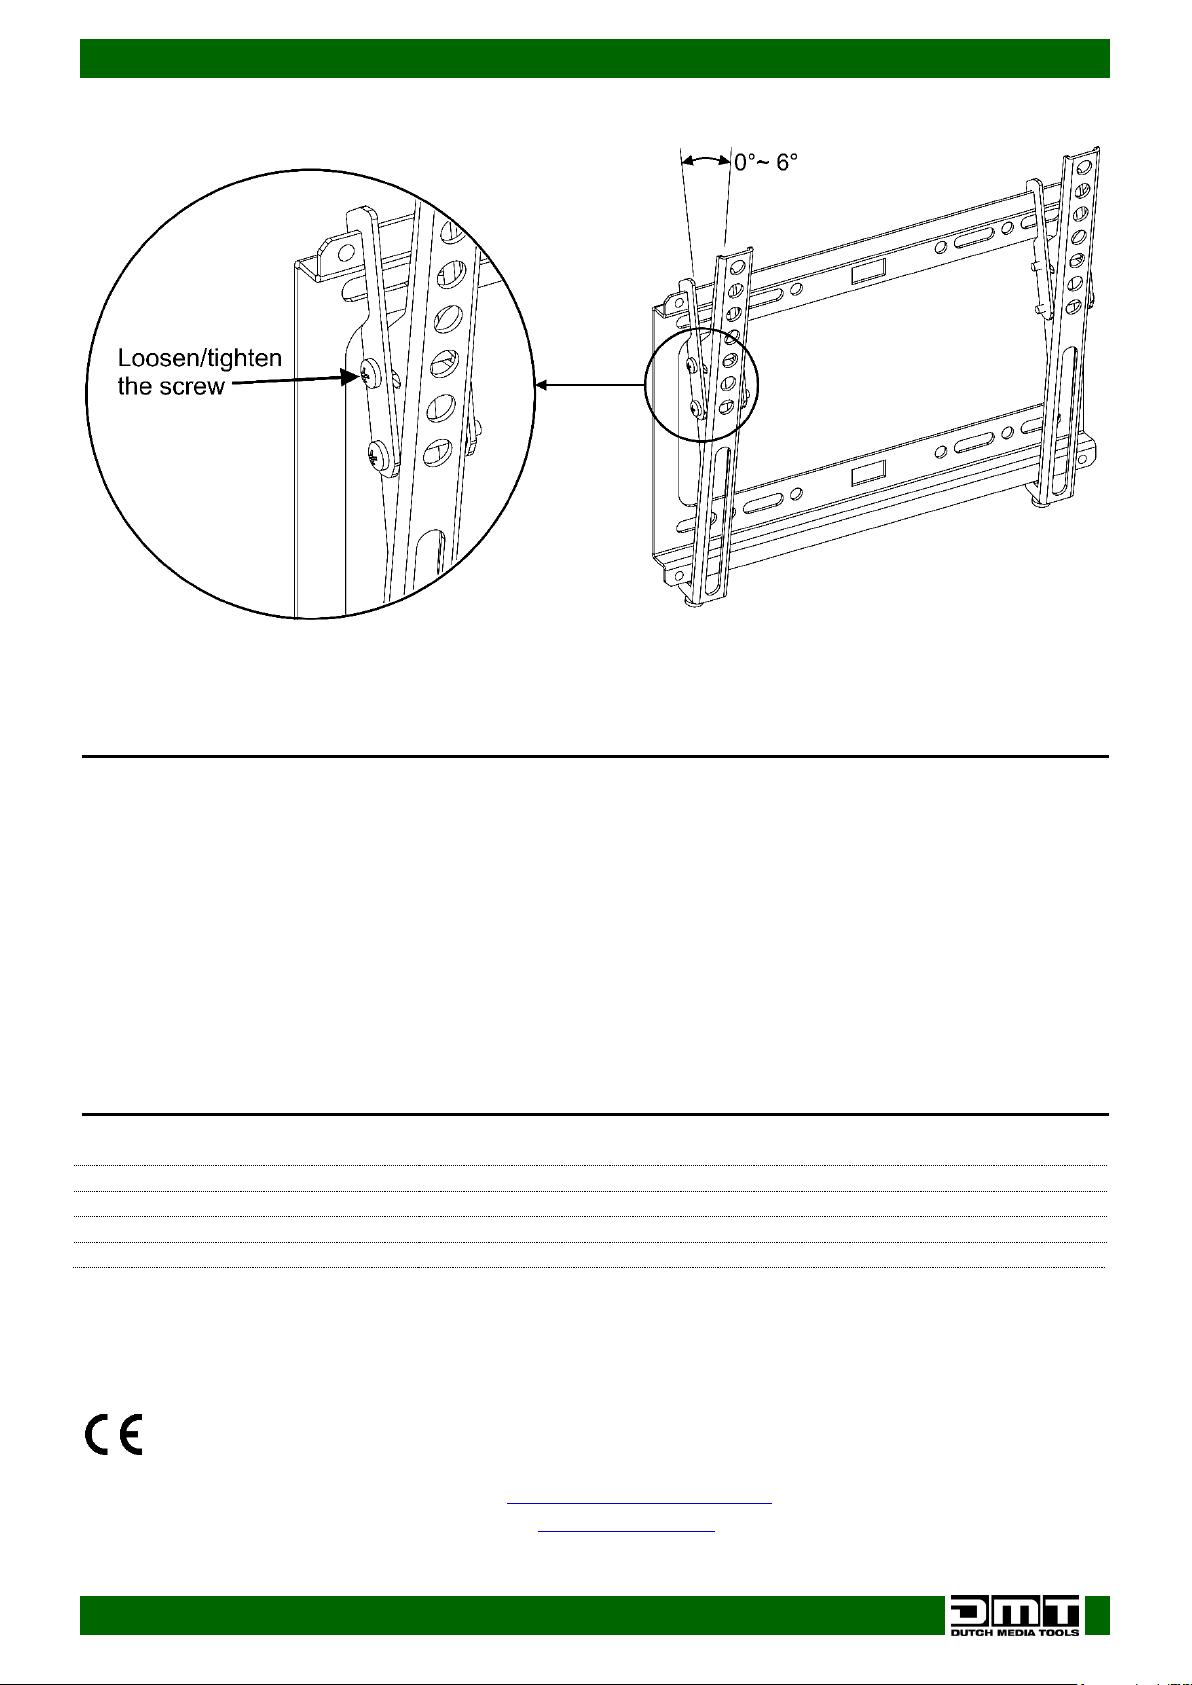
06) Loosen the screws on the bracket and tilt the TV to the desired angle.
07) Tighten the screws.
Maintenance
The operator has to make sure that safety-related and machine-technical installations are to be
inspected by an expert after every year in the course of an acceptance test.
The operator has to make sure that safety-related and machine-technical installations are to be
inspected by a skilled person once a year.
The following points have to be considered during the inspection:
01) All screws used for installing the device or parts of the device have to be tightly connected and must
not be corroded.
02) There may not be any deformations on housings, fixations and installation spots.
03) Mechanically moving parts like axles, eyes and others may not show any traces of wearing.
04) The electric power supply cables must not show any damages or material fatigue.
Product Specifications
Model:
DMT PLB-2246 13-42 LCD Bracket
Maximum load:
25 kg
Screen size:
13" - 42"
Max. VESA:
75 x 75 to 200 x 200 mm
Weight:
2,5 kg
Design and product specifications are subject to change without prior notice.
Website: www.DutchMediaTools.info
Email: [email protected]
Page 11

10
Ordercode: 100260
PLB-2246 13-42 LCD Bracket
Page 12

©2017 DMT
 Loading...