

Page 1
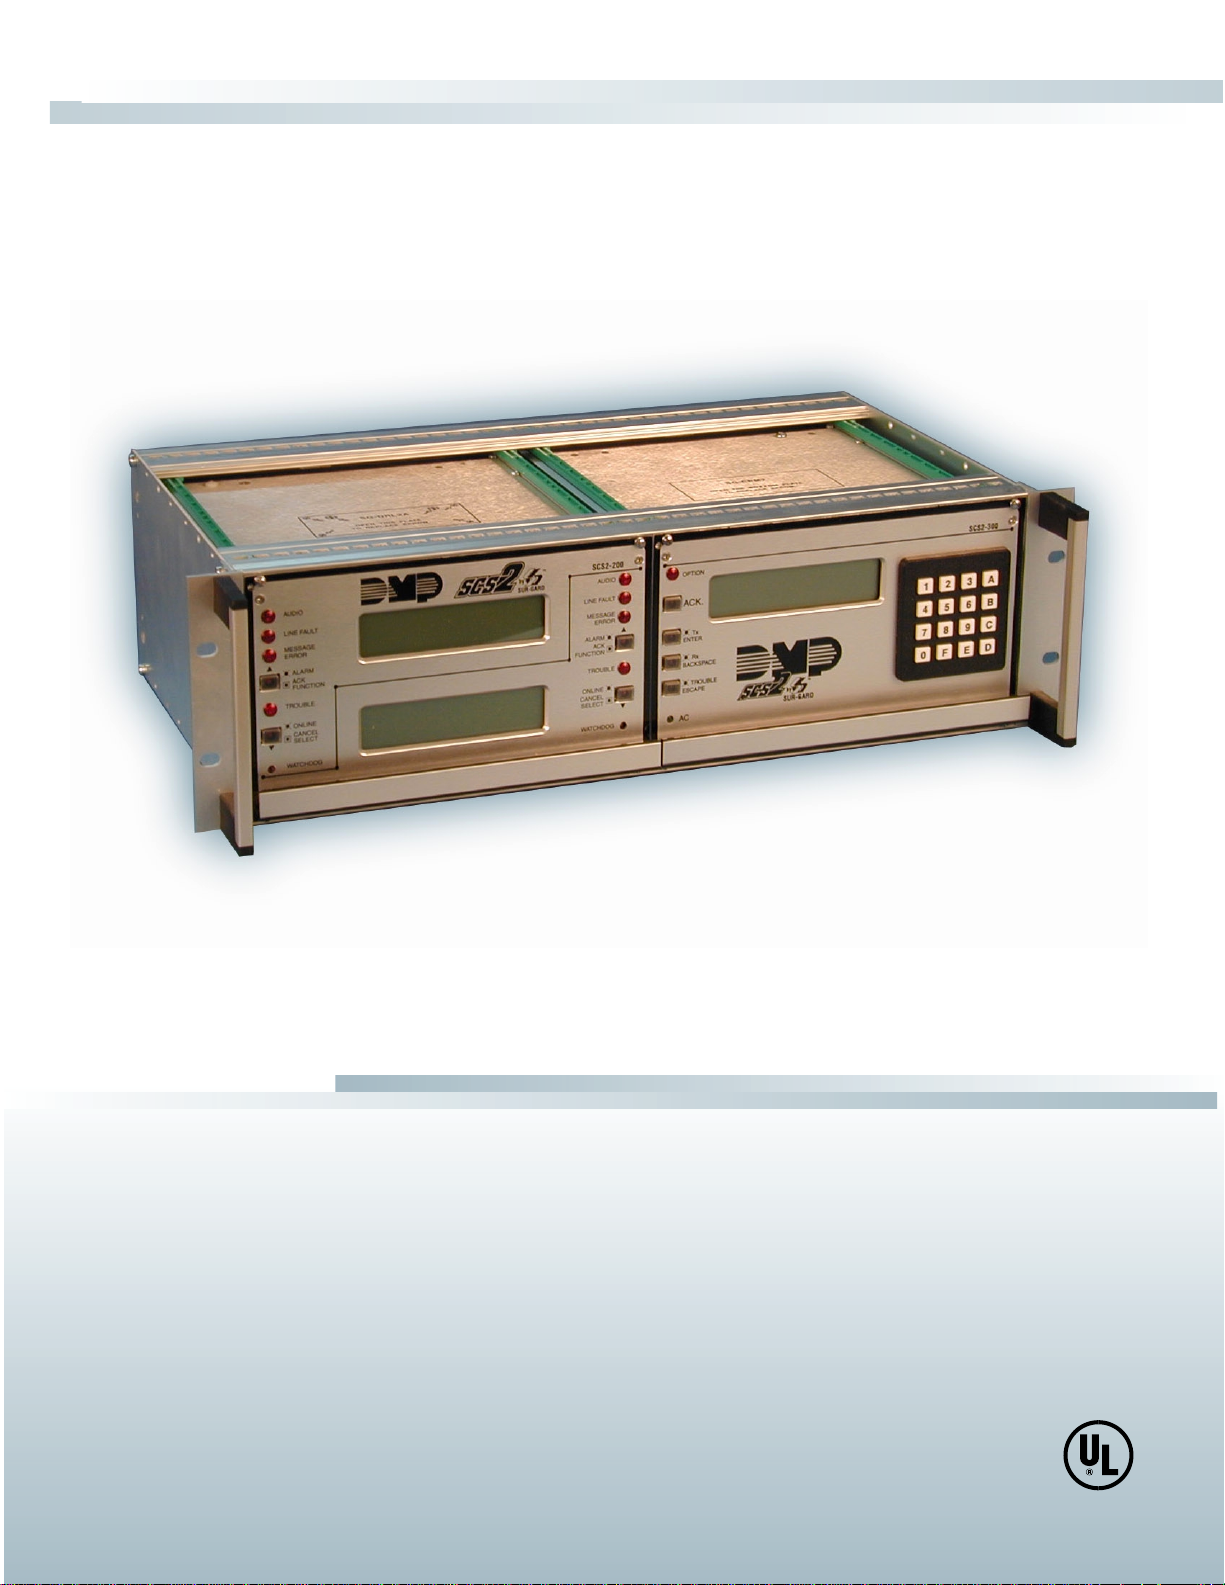
INSTALLATION GUIDE
SCS2 Multi-Line
Digital Receiver
version 1.3
version 1.3
Page 2

TABLE OF CONTENTS
INTRODUCTION 1
SCS2-300 ..............................................................................................1
SCS2-200 ..............................................................................................1
Supervision ..........................................................................................1
Compatibility ...................................................................................... 1
SCS2-300 Outputs/Inputs .................................................................... 1
System Overview.................................................................................1
Virtual Receiver Architecture ............................................................ 2
Number of Line Cards Supported ....................................................... 2
Approvals .............................................................................................2
SCS2 Backplane Connection Diagram .................................................3
Connections for SCS2-200 Line Card Expansion .................................3
SCS2 UPS Connection Diagram............................................................4
Quick Start 5
Receiver Setup and Operation Without Programming....................... 5
Installation 6
Mounting the Receiver........................................................................ 6
Printer Connections ............................................................................ 6
Computer Connections ....................................................................... 6
Telephone Line Connections ..............................................................6
Grounding ............................................................................................ 6
Power Supply.......................................................................................6
Battery Charging Current ................................................................... 6
SCS2-200 Communication Formats 18
Common Formats ..............................................................................18
DMP DTMF Formats ........................................................................... 18
Ademco Contact ID ........................................................................... 18
Ademco Express ................................................................................ 18
Ademco Super Fast (High Speed Format) ....................................... 1 9
DMP FSK .............................................................................................19
FBI Super Fast Format....................................................................... 19
ITI Format .......................................................................................... 20
Modem II, Modem IIE, Modem IIIa² and BFSK Formats .................... 21
SIA FSK ............................................................................................... 21
Silent Knight FSK1, FSK2................................................................... 21
Silent Knight FSK2 Protocol .............................................................. 21
Sescoa Super Speed ..........................................................................22
SCS2-200 Predefined Library Decoding and
Event Codes Table ............................................................................ 23
SCS2-300 – Central Processing Module 24
General Information ......................................................................... 24
Features ............................................................................................ 24
SCS2-300 Controls ............................................................................. 24
SCS2-300 Operating Mode ................................................................. 25
Message Priorities .............................................................................30
SCS2-300 Utility Modes ..................................................................... 3 1
SCS2-300 EPROM Programming .........................................................33
SCS2-200 Digital Receiver Line Card 7
General Information ........................................................................... 7
SCS2-200 Features............................................................................... 7
Installation .......................................................................................... 7
SCS2-200 Controls ............................................................................... 7
SCS2-200 Operating Mode 8
SCS2-200 Standby Mode ......................................................................8
SCS2-200 Cold Startup ......................................................................10
Communications in Progress.............................................................10
Profiles 11
Static Options.................................................................................... 11
Default Dynamic Options ..................................................................12
Automation Protocols 33
Data Byte Protocol: ........................................................................... 33
Acknowledgment of the Signal.........................................................33
Appendix A: SCS2-200 Communication Formats 34
Appendix B: ASCII Character Chart 35
Appendix C: Decimal - Hex - Binary Conversion Chart 36
Appendix D: Printer Words - Options [60] - [6F] 37
Appendix E: Default Static Options 38
Appendix F: Default Dynamic Options 39
Appendix G: Event Code Classifications 40
Page 3

INTRODUCTION
The SCS2 is a multi-line, multi-format digital receiver for
commercial fire and burglary. The basic unit consists of up
to 15 individual line card modules (SCS2-200) and 30 telco
lines connected to a SCS2-300. The SCS2 can decode a variety
of popular and widely used communication formats. Refer
to Appendix A, SCS2-200 Communication Formats for a list
of the available communication protocols.
The SCS2’s real-time clock and calendar stamps all information
received with the time and date, and all information can be
printed and/or forwarded to a computer. To ensure security,
adjustment of the clock, calendar and other programming is
password-protected.
SCS2-300
The SCS2-300 Central Processing Module oversees operation
of the line cards. Along with its built-in keypad and LCD
message screen, the SCS2-300 features one parallel printer
port, and two COM Ports.
SCS2-200
Each SCS2-200 module can monitor two telephone lines. The
line card module is equipped with a 256-event non-volatile
memory buffer to record events and corresponding telephone
numbers. Caller Source capability is built-in and telephone
numbers can be printed out, sent to automation and stored
in memory. Events and information stored in memory can be
printed at any time. Each line card also features flash EPROM
uploads through the Debug port for software upgrades or
options programming.
SUPERVISION
The standby battery voltage and connections are supervised.
The line cards are also continuously supervised to ensure
uninterrupted communication with the SCS2-300. Any trouble
conditions are reported on the LCD screens and sent to the
printer and the computer.
The SCS2-200 line card module also verifies communications
with the SCS2-300. In the event of a malfunction, the operator
will be advised with a visual indication and the line cards will
continue to function. Each line card will continue to receive
information.
The printer is supervised for loss of power, off-line, paper
out and other trouble conditions. The communication link to
the computer through the RS-232 port is monitored by the
supervisory “heartbeat” test transmissions.
COMPATIBILITY
Central station automation software packages such as
M.A.S., DICE, SIMSII, S.I.S., GENESIS and MICROKEY
support the SCS2 DMP interface. Compatibility with the automation
software in a system used at a central station is intended to
be handled under a separate UL 1981 software package and/
or site certification evaluation.
SCS2-300 OUTPUTS/INPUTS
The SCS2-300 features three switched-negative outputs. One
output labeled “OPTION” has a corresponding LED on the
SCS2-300 front panel; the factory default programming slowly
flashes the OPTION LED when the “OPTION” output is activated.
Switched negative outputs are also provided for the
Acknowledge and Trouble LEDs.
SYSTEM OVERVIEW
• Patented Caller Identification (Call Display) capability
• Patent pending DNIS identification
• Battery backed up RAM on each SCS2-200 line card
module for programming and event buffers.
• Fast communication between line cards and SCS2-300
• Flash upload for software upgrades
• Up to 64 different options set (profiles per line)
• Patent pending Virtual configurations
• 3/1, 4/2 formats with or without parity, 4/1 without parity
at 10, 14, 20, or 40 Baud
• 4/1, 4/2, 4/3, and 4/3 with checksum DTMF formats
• Optional* formats: 3-2, 4/1,4/2 extended
• Contact ID (DTMF) format
• Super Fast or High Speed DTMF format, with or
without parity
• DTMF 4/1 Express format optional*, 4/2 Express format
• Westec
• FBI Super Fast format with or without parity
• RADIONICS Modem II, Modem IIE, Modem IIIa
BFSK formats
• SIA format: 110 and 300 Baud, tone and data
acknowledgment
• SK FSK1, FSK2
• Any handshake frequencies by increment of 100 Hz
from 300 Hz to 3400 HZ, Dual Tone, SIA FSK, Modem
IIx, Double Dual Tone and ITI selected by configuration
commands.
• Up to 8 different handshakes per profile with individual
duration control.
• Large, easy to read 2-line, 16-characters-per-line, Liquid
Crystal Display screen
• All modules function individually to help ensure
uninterrupted operation during hardware or software
upgrades
• Inputs on SCS2-300 for UPS supervisory
• 30 lines maximum per receiver
• 256-event memory buffer on each individual line card
• Real-time clock
• SCS2-300 features 16-bit microcontroller
• 1 parallel printer port and 2 serial RS-232 ports
• Programmable serial port configurations
• Programmable system functions: computer and printer
• Fast transmission of multiple alarms to the computer
and printer to ensure operator’s quick response
• Continuous verification of the computer-receiver links
with the “heartbeat” function
• Switched-negative outputs on SCS2-300 (special
applications)
• AC-lost detection and standby battery supervision
• Low battery detection and automatic low battery disconnect
to prevent deep-discharge damage to battery
• Operator Acknowledge option
• Telephone line supervision and reporting
*All formats noted as optional are selected using configuration
commands.
2
and
1
Page 4

VIRTUAL RECEIVER ARCHITECTURE
The most novel feature of the SCS2-200 is its ability to use
the telephone company information delivered as DNIS (Dialed
Number Information Service) or Caller ID. This allows the
DMP Format Expert System to handle on the fly each received
call. With this feature, dedicated line pool hardware is
eliminated. Instead, the DNIS or Caller ID information allows
dynamic options that set up virtual line pools to identify
security formats and extend account numbers.
Standard DNIS is supported up to 10 digits. Each dialed
number should be assigned to a virtual receiver. Multiple
Caller ID numbers can be assigned to a single virtual receiver.
Each dialed number would formerly have been a line pool
on conventional line cards.
NUMBER OF LINE CARDS SUPPORTED
The system will support a maximum of 15 line card modules
concurrently connected.
APPROVALS
Agency Listings
• UL 864 Control Units for Fire-Protective Signaling
Systems
• UL 1610 Central Station Burglar Alarm Units
This equipment should be installed in accordance with the
requirements of NFPA72, NFPA70, UL827 and the local
authority having jurisdiction.
UL MANUAL MODE
For UL manual mode, each event will activate the internal
buzzer to be acknowledged manually. Each event will also
be sent automatically to the connected printer.
For Central Station applications, the signaling performance of
each DACT (Digital Alarm Communication Transmitter) shall
be manually tracked. Failure to receive a signal from a DACT
over a 24 hour period shall be handled as a trouble signal.
2
Page 5
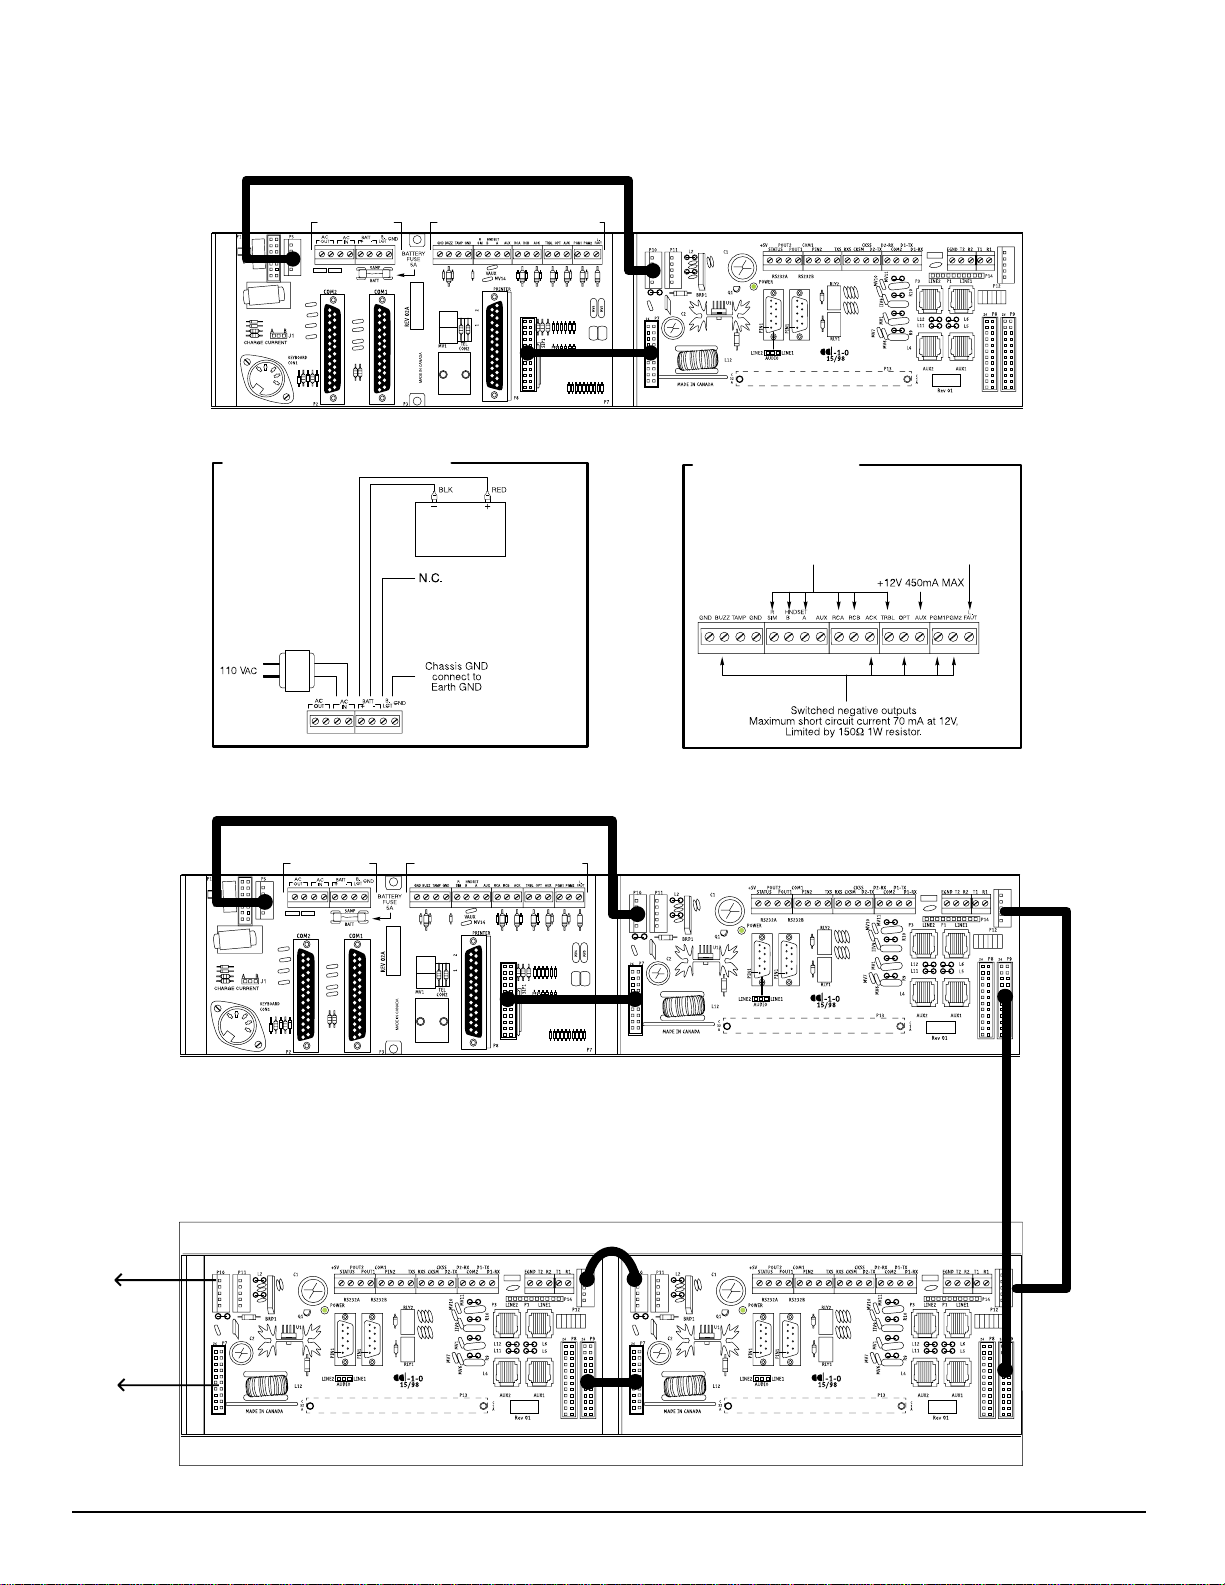
SCS2 BACKPLANE CONNECTION DIAGRAM
REFER TO SCS2-430 POWER
CONNECTIONS
REFER TO SCS2-430 CONNECTIONS
SCS2-430
SUR-GARD LTD.
P
6
P
5
MV3 MV2
P4 P2
SUR-GARD SECURITY SYSTEMS LTD.
SCS2
R4R6R7
R13
R11
R12
SCS2-430 POWER CONNECTIONS
Transformer
AC
, 175 VA
16 V
Battery
12V Rechargeable
lead-acid
35Ah
SCS2-430 CONNECTIONS
CONNECTIONS FOR SCS2-420 LINE CARD EXPANSION
REFER TO SCS2-430 POWER
CONNECTIONS
REFER TO SCS2-430 CONNECTIONS
SCS2-430
SUR-GARD LTD.
MV3 MV2
SUR-GARD SECURITY SYSTEMS LTD.
P
6
Not used on
SCS2-300
P
5
Not used on
P4 P2
SCS2
SCS2-300
R4R6R7
R13
R11
R12
NEXT
MODULE
NEXT
MODULE
SUR-GARD SECURITY SYSTEMS LTD.
P6P
P6P
5
P4 P2
SCS2
R4R6R7
R13
R11
R12
SUR-GARD SECURITY SYSTEMS LTD.
5
P4 P2
R4R6R7
R13
R11
R12
SCS2
3
Page 6
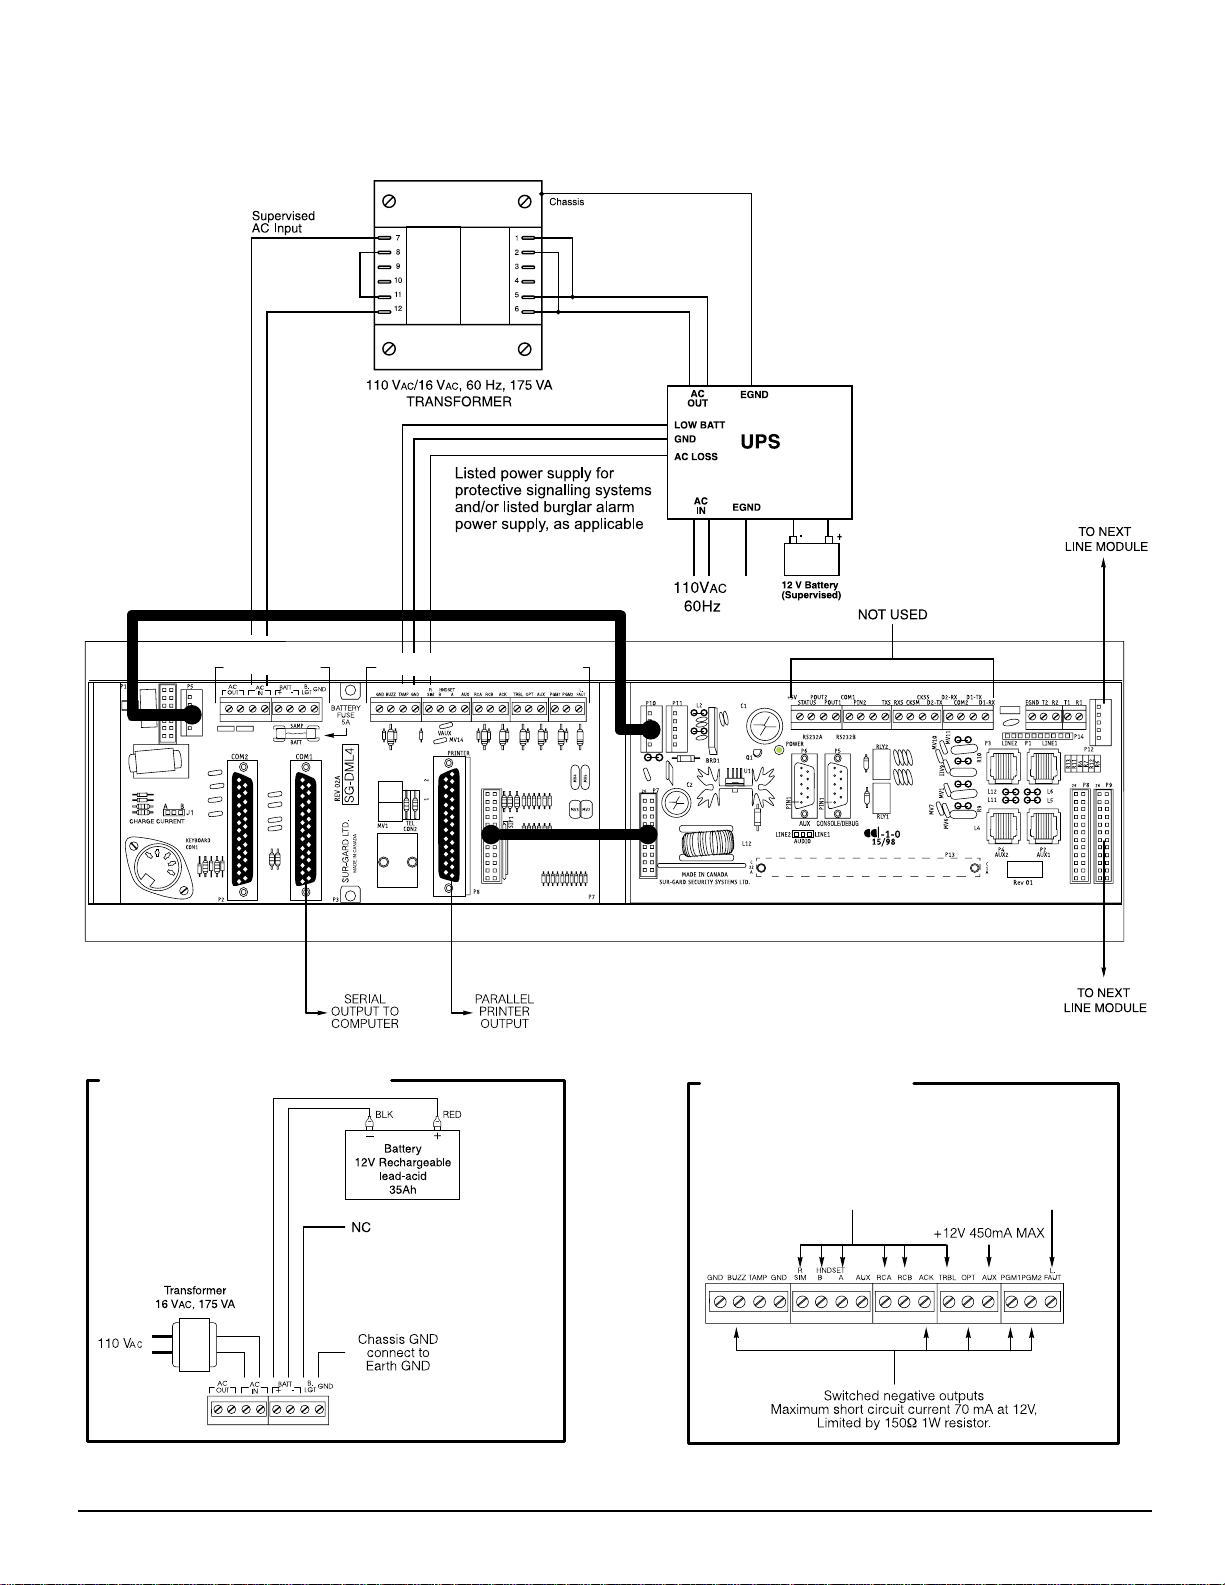
SCS2 UPS CONNECTION DIAGRAM
REFER TO SCS2-430 POWER
CONNECTIONS
REFER TO SCS2-430 CONNECTIONS
SCS2-430 POWER CONNECTIONS
SCS2-430 CONNECTIONS
Not used on
SCS2-300
SCS2
Not used on
SCS2-300
4
Page 7
QUICK START
Receiver Setup and Operation Without
Programming
UNPACKING
Carefully unpack the receiver and inspect for shipping damage.
If there is any apparent damage, notify the carrier immediately.
BENCH TESTING
It is suggested that the receiver be tested before actual
installation; becoming familiar with the connections and setup
of the unit on the workbench will make final installation more
straightforward.
The following items are required:
• 16V
AC, 175VA transformer
• 2 telephone lines
• One or more dialers or digital dialer control panels
Dialers and control panels using an optocoupler phone line
interface will require a connection method providing a DC
current for direct connection testing.
POWER UP
When power is applied, the receiver will beep and will
indicate any trouble conditions on the LCD message screen.
If the line cards do not have telephone lines connected, the
SCS2-200 modules will beep and their “Line Fault” LEDs will
FLASH.
Press the flashing [ACK] button to silence the buzzer. If
there is no computer or printer connected, a trouble message
will be displayed on the SCS2-300 LCD and the “ACK” light
will FLASH. Press the [ACK] button to silence the SCS2-300
buzzer.
OPERATION WITH DEFAULT PROGRAMMING
Without any changes to the factory default programming,
the receiver operates as follows:
• Answers incoming calls on the first ring
• Sends SIA FSK as the first handshake
• Sends 1400 Hz as the second handshake
• Sends double dual tone as the third handshake
• Sends 2300 HZ tone as the fourth handshake
• Sends Modem II tone as the fifth handshake
• Sends ITI, Modem IIE, Modem IIIa2 tone as sixth handshake
• The following formats can be manually selected: 3/2, 4/1
express, 4/2 extended, 4/2 checksum and 3/1 checksum.
Signals can be displayed on the debug output as they are received.
The signals are then sent to the parallel printer and computer
connected to serial port COM1. The default event codes described
in the “SCS2-200 Library Decoding and Event Codes Table” will
be used with the DMP Automation Communication Protocol to
send signals to the computer, if connected.
If a computer is not connected, press the [ACK] button on
the SCS2-300 module to silence the buzzer.
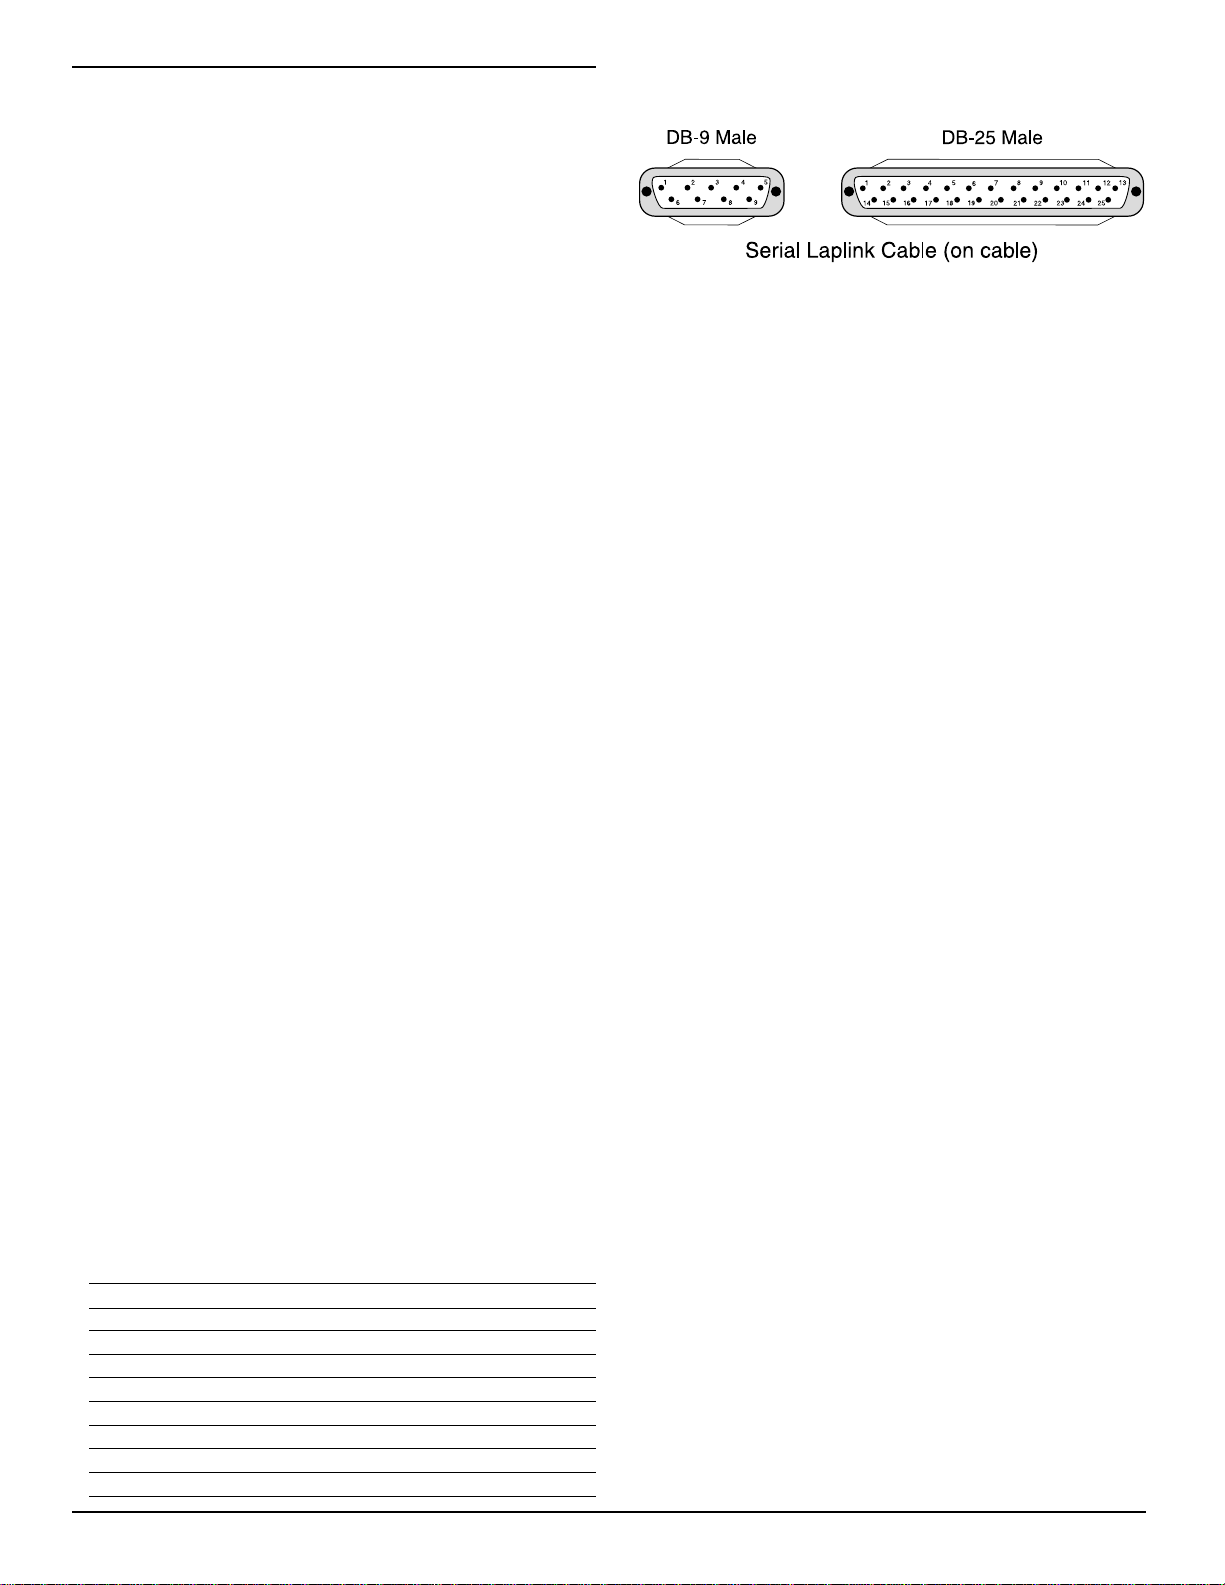
SERIAL LAPLINK CABLE FOR DEBUG/CONSOLE
For Debug/Console data transfer between a PC and the SCS2200, a serial data transfer cable is used to connect either
the DB9 male or DB25 male serial ports on a computer to
the DB9 male serial (Debug/Console) port on the SCS2-200.
Serial Laplink Cable
from DB9 from DB25 to DB9 to DB25 Signal
2 3 2 3 Receive - Transmit
3 2 3 2 Transmit - Receive
4 20 6 6 DTR - DSR
5 7 7 5 Ground - Ground
6 6 20 4 DSR - DTR
7 4 5 8 RTS - CTS
8 5 4 7 CTS - RTS
DEBUG OUPUT
The debug output is another means of accessing the line
card’s programmed options and diagnostics features. A null
modem cable is required to connect by serial communication.
DEBUG CABLE CONNECTIVITY
Connect the female DB-9 connector to the serial port of a
computer.
DEBUG SOFTWARE SETUP
Using WIN9x, point and click on the “START” button. Access
“Programs” -> “Accessories” -> “HyperTerminal.” Once in
the HyperTerminal window, point and click on “Hypertrm.exe”
icon.
A connection description window should appear. A prompt
should appear on the “Name” category. Type a name. Point
and click on “OK."
A phone number window should appear. Choose the “direct
to” COM port required for connection and point and click
on “OK”.
COM port properties windows should appear. The configuration
should be :
• Bits per second: 19200
• Data bits: 8
• Parity: None
• Stop bits: 1
• Flow control: None
Point and click on the “OK” button after setting the
configuration.
The HyperTerminal window should appear. Press any button.
The debug menu will be displayed.
BUTTON COMMANDS
C Cold boot
D This button will initiate the download of a file to the line
card.
O This button will enable the user to dump the current
programmed options of the line card or set an option to
a particular value.
V To view software version information
DOWNLOADING STEPS
Press the “D” button to initiate downloading of the binary
file. The HyperTerminal will display:
Ready to download.
CCCC
Point and click at “Transfer” on the HyperTerminal menu
and access the “Send File” category (you also have rightclick access with the mouse). The “Send File” window should
appear. Change the protocol to “X-modem” and place the
correct path and file name of the binary file to be uploaded.
Point and click on the “Send” button and the downloading
status window should appear.
The line card will restart automatically after a successful
upload.
5
Page 8
INSTALLATION
MOUNTING THE RECEIVER
Install the SCS2 in a closed 19"/48cm rack or cabinet with
a locking rear access door. Cover all unused spaces with
blank metal plates. The LCD screens on the receiver are
designed to be viewed below eye level. If the unit must be
mounted where the screens are above eye level, angle the
unit downwards to improve visibility. The following items
can be supplied for a complete installation:
Stand-up Unit (61.25"/1.55cm tall up to 30 telephone lines)
Part # MLR2-CL
• Rack
• Door with lock and ventilation
• Blank plates 21"/53cm (2)
• Blank plate 5.25"/13.3cm (3)
• Screws
• Washers
• Clipnuts
• FROST 16V/175VA transformer
P/N FT3304
• AC utility box
• AC cable clamps (2)
• 8'/2.4m battery cables
• 3-Gauge conductor AC cable
• Secondary non-replaceable fuse, 15A, 125 V
NOTE: If 30 telephone lines are not used, cover each unused location with a blank plate.
Desk-mount Unit (28"/71cm tall up to 14 telephone lines)
Part # MLR2-CM
• Rack
• Louvered door back plate
• Blank Plate 1.75"]
• Back Plate 7"/17.8cm
• Blank Plates 5.25 (4)
• Screws
• Washers
• Clipnuts
• FROST 16V/175VA
• AC utility box
• AC cable clamp for 3/8"/1cm cable
• 8'/2.4m battery cable
• 18 gauge 3-conductor AC cable
• Secondary non-replaceable fuse, 15A, 125 V
NOTE: If 18 telephone lines are not used, cover each unused
location with a blank plate.
AC
AC
PRINTER CONNECTIONS
Connect the parallel printer to the SCS2 printer output port
using a standard parallel printer cable.
For UL Listed applications, the following UL Listed printers can be used with the SCS2:
• DMP CPU-1150
• DMP CPU DMP-206
• DMP SCS-PTR
IMPORTANT: Do not use a printer cable that has only 1
common ground wire.
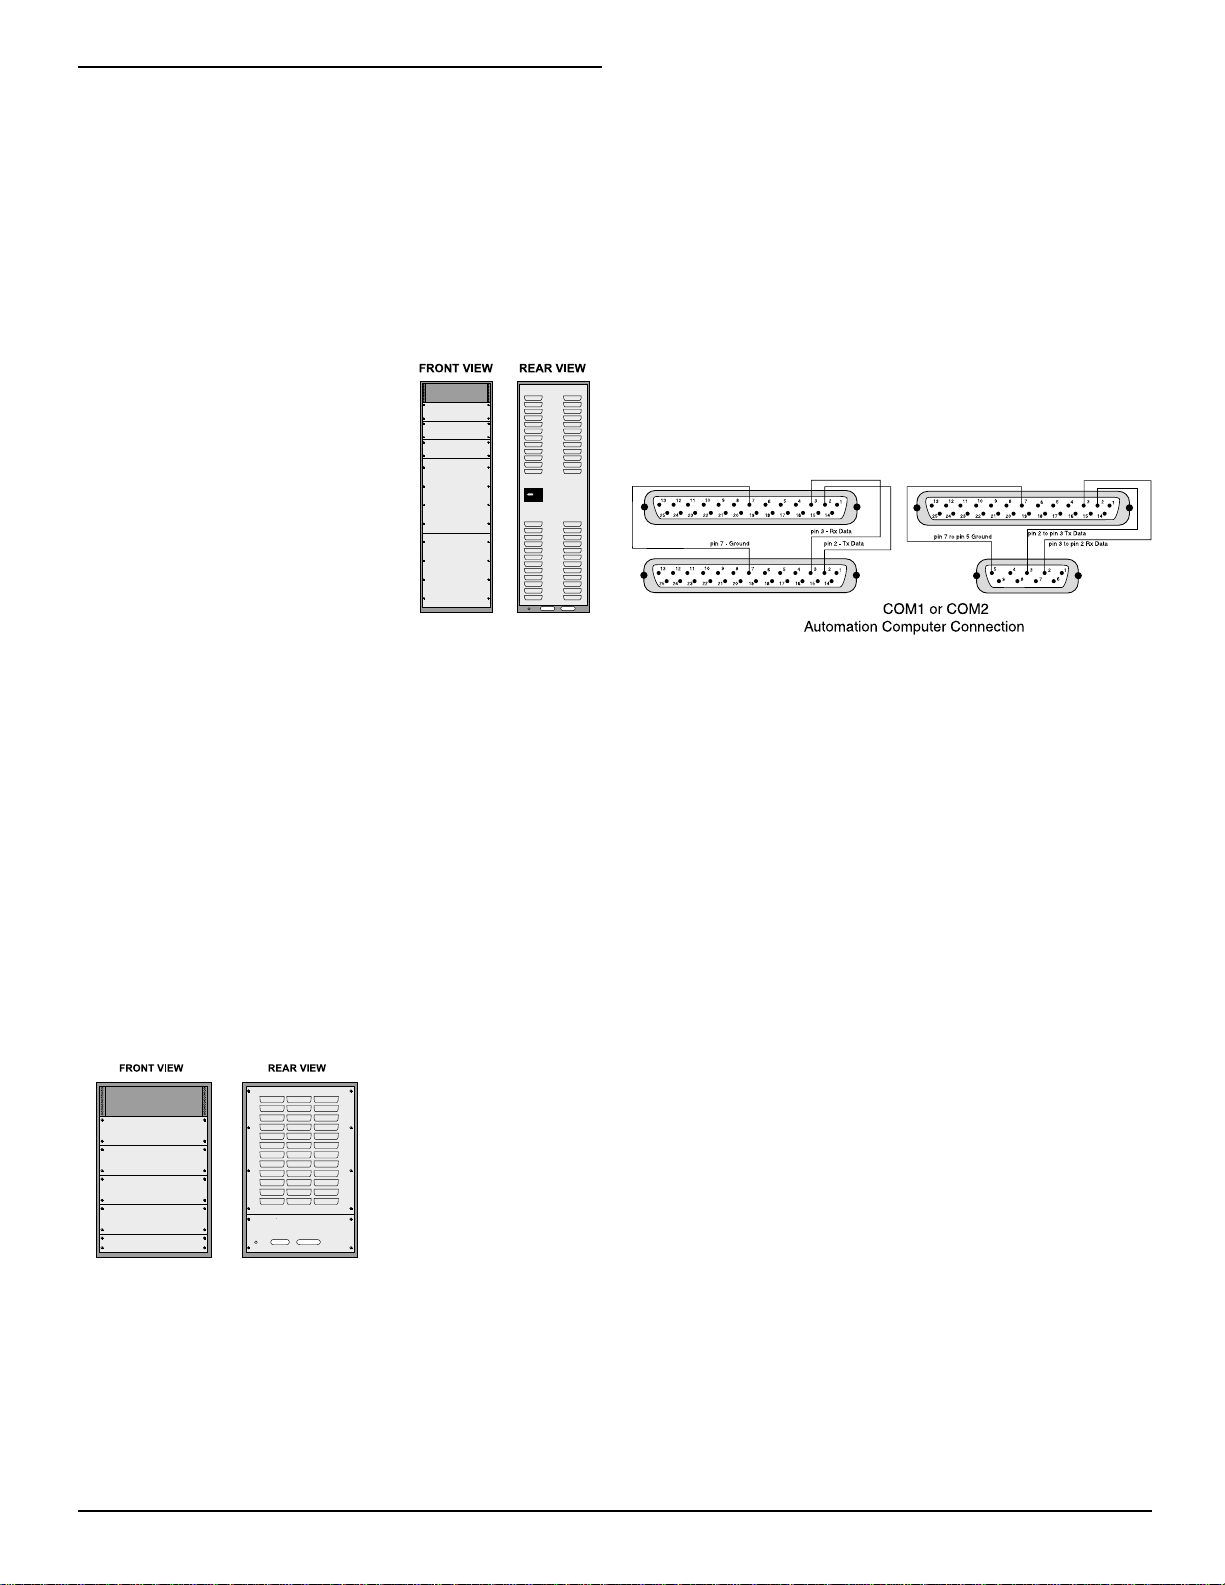
COMPUTER CONNECTIONS
Connect the computer to the SCS2 RS-232 port using a serial
cable to COM1.
DB-25 to DB-25
Receiver RS-232 Computer RS-232 Computer RS-232
25-pin connector 25-pin connector 9-pin connector
11
223
332
775
IMPORTANT: Do not use a null modem cable.
DB-25 to DB-9
SCS2
TELEPHONE LINE CONNECTIONS
With 6-pin modular cables, connect each line module jack
(line 1 or 2) to its corresponding telephone line.
GROUNDING
For maximum resistance to static and electrical noise, the
19"/48cm rack frame should be connected to earth ground
through the AC utility box.
POWER SUPPLY
Ensure that all electrical connections are made correctly. After
verifying all connections, connect the RED and BLACK leads to
a 12V
DC sealed rechargeable battery. Be sure to observe polarity
when connecting the battery. When the battery is connected,
test the system under battery power only. CAUTION: Connecting
a positive (+) terminal to a negative (-) terminal may cause a
fire and possibly serious personal harm.
For 4-hour standby a 12-volt 35 Ah rechargeable battery
should be used in conjunction with an engine-driven power
generator.
BATTERY CHARGING CURRENT
The maximum battery charging current is factory set at 1A.
6
Page 9
SCS2-200 DIGITAL RECEIVER
LINE CARD
The SCS2-200 acts as an interface between the digital alarm
transmitter and the SCS2-300. Different communication formats
can be used to transmit the information.
The main functions of the line cards are to continuously
monitor the telephone line, receive calls from digital dialers
or control panels, and to report alarms to the SCS2-300. In
addition, if a line card is unable to communicate with the
SCS2-300, each line card is capable of functioning
independently. Each line card can record 256 different alarm
messages and 255 Caller-ID telephone numbers.
GENERAL INFORMATION
The receiver is capable of processing signals from digital
communicators in a variety of formats. The type of signal
(alarm, trouble, restore, cancel and so on) can be printed.
SCS2-200 FEATURES
• Operator selection of communication formats and
handshake priority
• 64 profiles per line card, up to 30 line pools.
• Flash Download for software upgrades.
• Records up to 256 messages.
• Records up to 256 Caller ID phone numbers. This
feature helps to locate and identify the source of the
device in communication and assists in troubleshooting.
• Multiple alarms are forwarded to the computer and
printer through the SCS2-300 with minimum delay
• The SCS2-200 monitors the telephone line connection,
and line faults will result in reports to the computer
and the printer
• SCS2-200 automatically goes into standalone mode in
case of SCS2-300 failure
• “Watchdog” timer continually monitors receiver operation
• “Cold boot” option allows receiver’s configuration to be
reset to factory default programming
• DSP processing to reduce data receiving errors, and to
help for weak and noisy signals
• Gain boost available to amplify weak signals
• Serial link for troubleshooting and easy software
upgrade
SCS2-200 CONTROLS
Each SCS2-200 Module features 2 line cards. The LEDs and
push buttons on the left side and the upper LCD are for Line
Card 1. The LEDs and push buttons on the right side and the
lower LCD are for Line Card 2.
Momentarily depressing and releasing a button will register
as a single input or keystroke. Pressing and holding a button
for approximately 1 second will register as a repeating input
or keystroke. For example, to quickly scroll through a list of
items, you press and hold the appropriate button, rather
than pressing the button repeatedly.
LCD (Liquid Crystal Display)
Displays incoming data, programming and other information.
The display is backlit for visibility in low light environments.
AUDIO
The “Audio” light comes ON when the receiver is in Audio
mode. When ON, “listen-in” or “2-Way Audio” is in use. The
“Audio” light will automatically turn OFF at the end of the
timed period or when the [CANCEL] button is pressed.
LINE FAULT
The “Line Fault” light will come ON if the telephone line is
disconnected. The “Line Fault” light will turn OFF automatically
when the telephone line is restored.
MESSAGE ERROR
The “Message Error” light will come ON when faulty data is
received (for example, if the round pair does not match, or if
the checksum is incorrect). Press the [ACK] button to acknowledge
the error; the “Message Error” light will be shut OFF.
[ACK/FUNCTION] BUTTON
Press this button to acknowledge an alarm in emergency
manual mode. In the normal mode, press this button to
access the line card menu.
ALARM
The “Alarm” light is located inside the [ACK/FUNCTION] button.
The “Alarm” light will flash if an alarm is received. The
“Alarm” light will be shut OFF when the alarm is successfully
communicated to the SCS2-300, or when the operator
acknowledges the alarm by pressing the [ACK/FUNCTION] button.
CANCEL SELECT
While on-line, press this button to drop the line. In normal
mode, press this button to select the current item.
WATCHDOG
The "Watchdog" light will FLASH once every 4 seconds to
indicate that line card operation is being monitored.
7
Page 10

SCS2-200 Operating Mode
SCS2-200 STANDBY MODE
With the line card installed, apply power to the unit. This
message will be displayed briefly on the top LCD:
INITIALIZING
CONTRAST LOADING
Next, the following message will be displayed on each line
card in turn, starting with line card 1:
PRESS ACK+SELECT
TO COLDBOOT
The cold booting procedure is covered in detail below.
The LCDs will then display:
INITIALIZING
CONTRAST LOADING
During this time, the line cards will load default options and
code, and perform a low-level diagnostic to determine the
status of the system.
Once the line cards are ready, they will display a message
similar to the following:
SCS2-200-Line #D
<<-Line Fault->>
After these startup messages, the line card monitors the
telephone line and the SCS2-300.
LINE FAULT
The SCS2-200 verifies the telephone line voltage every 10
seconds. The “Line Fault” light will come ON after two
successive line verifications indicate irregular telephone line
voltage. This message will be displayed:
SCS2-200-Line #D
<<-Line Fault->>
If the Line Check option is enabled, the following information
will be transmitted to the printer and computer:
Printer: L01- 0000-PHONE-LINE-TROUBLETIME:DATE
(printer option set to 03)
Computer: 0RRL[#0000 | NLTRRLL]
NOTE: The first RRL is subject to the line card length
option. The second RRL is the receiver and line card number,
both in HEX.
If the Line Check option is disabled, the SCS2-200 will not
send the report to the printer or computer. Refer to “SCS2-
200 Programmable Features” for information on enabling
the Line Check option.
When the line condition returns to normal, the “Line Fault”
LED will be shut OFF.
If the Line Check option is enabled and the telephone line
returns to normal, the following information will be transmitted
to the printer and computer:
Printer: L01- 0000-PHONE-LINE-RESTORALTIME:DATE
Computer: 0RRL[#0000 | NLRRRLL]
NOTE: The first RRL is subject to the line card length option.
The second RRLL is the receiver and line card number,
both in HEX.
SCS2-300 ERROR; DISPLAY ALARM MESSAGES
If the SCS2-200 cannot detect SCS2-300 polling and there
are no alarm events in the event buffer, this message will
be displayed:
SCS2-200-Line #D
<<-SCS2-300 ERROR->>
If alarm messages cannot be sent to the SCS2-300 because
of the error, the SCS2-200 will display the oldest message
which has not been manually acknowledged. The “Alarm”
light will FLASH and the sounder will beep if the “Mute Buzzer”
option is programmed as [00], [02] or [03].
When a SCS2-300 error is present, each alarm must be manually
acknowledged. Press the [ACK/FUNCTION] button to acknowledge
the alarm and silence the line card sounder. If several alarms
have been received but cannot be sent to the SCS2-300, they
will have to be individually acknowledged; when all alarms are
acknowledged, the line card sounder will be silenced.
Up to 128 alarm messages for the printer and computer will
be retained in the SCS2-300 event buffer. When the event
buffer is full, the oldest messages will be deleted as new
events are recorded.
When the SCS2-300 error condition is corrected, the alarm
messages in the event buffer will be transmitted to the SCS2-300.
KEEP LAST ALARM MESSAGE
The SCS2-200 may be programmed to leave the last alarm
message on the display screen until a new message is received.
A typical alarm message is shown below:
0000-PHONE LINE
TROUBLE 28
“0000” is the “internal” account code.
“28” is the event’s location in the event buffer.
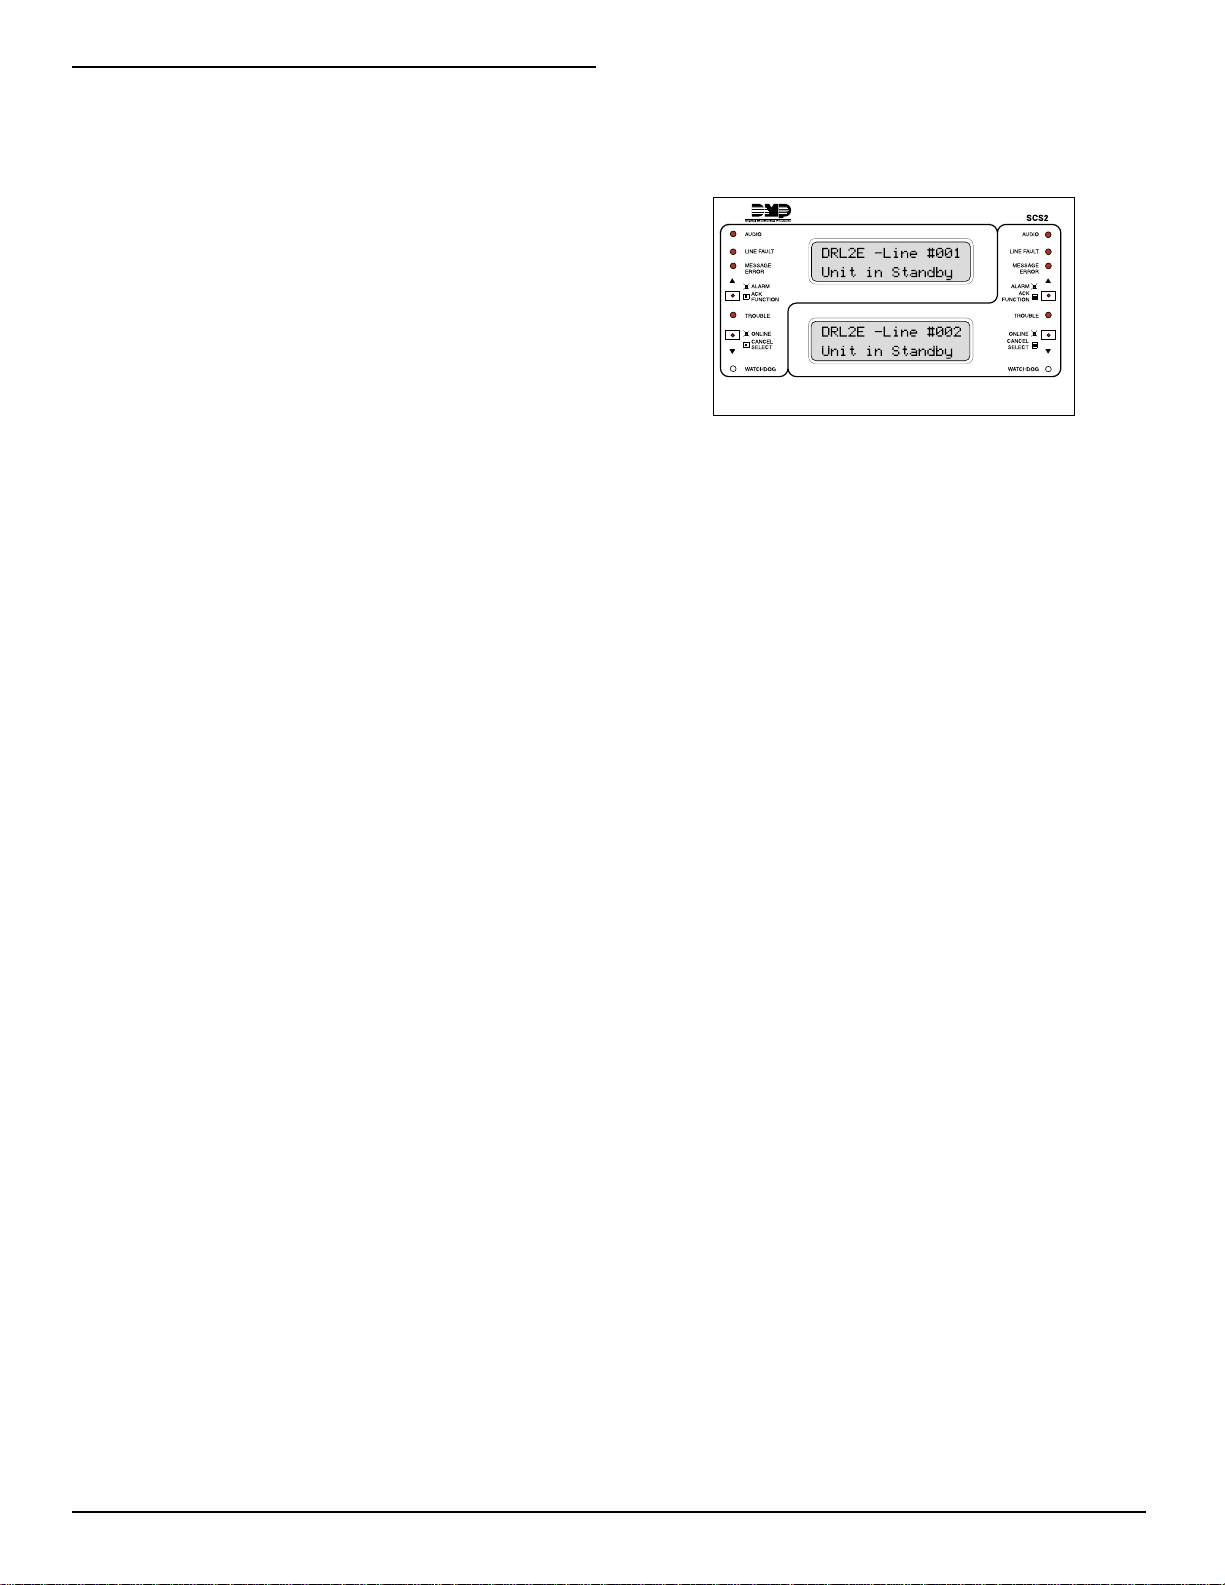
STANDBY MODE
When the line card is operating normally, this message will
be displayed:
SCS2-200-Line #D
Unit in Standby
LINE CARD MENU MODE
When the unit is not on line, pressing the [ACK/FUNCTION]
button will display the first function menu:
PRINTER BUFFER
ACK:menu SEL:sel
8
Page 11

Press the [ACK] button to scroll through the menu items. Press
the [SELECT] button to select the function displayed on the LCD
screen. When a function is selected, press [ACK] and [SELECT]
together to exit from the Menu mode. The SCS2-200 will
automatically exit from the Menu mode if no keys are pressed
for 30 seconds.
The following functions are available in the line card
Menu mode:
• Display Printer Alarm Buffer
• Display Line Card Configuration
• Display Program Version
• Adjust LCD Contrast
• Adjust Backlight
DISPLAY PRINTER AND CALLER ID ALARM BUFFER
PRINTER BUFFER
ACK:menu SEL:sel
With this message displayed, press the [SELECT] button; the
most recent alarm message will be displayed. If Option [12]
CALLER SOURCE is selected, the corresponding Caller
Identification will also be displayed.
Press the [SELECT] button to scroll backwards through alarm
messages; press the [ACK] button to scroll forward through
alarm messages.
Press the [ACK] button to display the alarm message:
3576-312
Alarm 001
“3576” is the Account Code.
In this example, a 4/3 communication format is used.
“3” indicates an alarm, while “12” is the zone number.
“Alarm” indicates an alarm.
“001” is the event’s location in the event buffer.
The event buffer can record up to 256 alarm messages and
Caller Identifications. To print these messages, a print
command can be sent from the SCS2-300; refer to “SCS2300 Utility Mode” for information.
If no Caller Identification data was received from the telephone
company, the following message will be displayed when the
[ACK] button is pressed to display the Caller Identification
screen:
1234 UnknownCall
If the Caller Identification is sent but with no telephone
number, one of these messages could be displayed:
1234 PRIVATE NO
1234 UNAVAILABLE
If Option [12] is disabled, the Caller Identification feature will
be bypassed; only the alarm messages will be displayed.
Press [ACK] and [SELECT] together to return to the Standby
mode. If no keys are pressed, the SCS2-200 will automatically
return to the Standby mode after 30 seconds.
DISPLAY OPTIONS
DISPLAY OPTIONS
ACK:menu SEL:sel
With this message displayed, press the [SELECT] button; the
current Option Configuration will be displayed. Shown
below is the first screen you will see, representing profile
0. Use the ACK button to scroll through all 64 profiles (0-
63).
Select Profile 0
Ack: up SEL: sel
Press [ACK] and [SELECT] together to return to the
Standby mode.
options display
and description
DISPLAY PROGRAM VERSION
PROGRAM VERSION
ACK:menu SEL:sel
With this message displayed, press the [SELECT] button; the
date and the software version number will be displayed as
shown below:
SG-SCS2-200 V1.30
Jan 19,2001
Press [ACK] and [SELECT] together to return to the Standby
mode.
ADJUST LCD CONTRAST
Adjust CONTRAST
ACK:menu SEL:sel
With this message displayed, press the [SELECT] button to
adjust the LCD screen’s contrast. When the [SELECT] button
is pressed, this message will be displayed:
Adjust CONTRAST
....
Press the [ACK] button to increase the contrast; press the
[SELECT] button to reduce the contrast. The display will
indicate the contrast level on the second line.
Press [ACK] and [SELECT] together to return to the Standby
mode.
ADJUST BACKLIGHT
ADJUST BACKLIGHT
ACK: up SEL: down
The [ACK] button is used to brighten the backlighting and
the [SELECT] button is used to darken it.
9
Page 12

SCS2-200 COLD STARTUP
From HyperTerminal, press “C” to perform a cold boot and
select which channel to cold boot, either 1 or 2. The
following will appear on the display:
COLD BOOTING
Channel X
X = 1 or 2
[ACK] and [SELECT] must be presssed on power up to
initiate cold boot.
COLD BOOT?
ACK: yes SEL: no
CHANGE LC NUMBER?
ACK: yes SEL: no
LINECARDNUMBER:OE
ACK: up SEL:down
COMMUNICATIONS IN PROGRESS
Data Reception
During data reception, a message similar to this will be displayed:
In Communication
1234 56
If valid Caller Identification information is received, a message
similar to this will be displayed:
TEL:15145551212
1234 56
The SCS2-200 decodes all information received and stores
the information in its event buffer. When a valid signal is
received, the SCS2-200 sends a kissoff signal and transmits
the decoded alarm signal to the computer and then to the
printer through the SCS2-300.
Options [1D] and [1E] can be adjusted to allow the SCS2-200
to compensate for weak signals or noisy telephone lines;
refer to “SCS2-200 Programmable Features” for information
on programming these options.
The SCS2-200 will send each message it receives to the
printer for review by the system operator. Two messages
may be sent to the printer to indicate reception problems:
“Invalid Report” and “Communication Fail”.
This output for account code “0000” indicates that data has
been received, but is not valid (for example, there are
unmatched rounds or the wrong parity). The following is an
example of faulty data received by the SCS2-200, and the
printer output generated:
Round Data Received Printer Output
1st 123456 [No printout]
2nd 123446 ?1234?56 Invalid Report
?1234?46 Invalid Report
3rd 123356 ?1233?56 Invalid Report
4th 123456 ?1234?56 Invalid Report
5th 123346 ?1233?46 Invalid Report
?????10 Invalid Report
NOTE: There is only 1 invalid report at the end of a call.
COMMUNICATION FAIL
When this problem is encountered, the following information
is transmitted to the printer and the computer:
Printer: L01- 0000-COMMUNICATION FAIL TIME:DATE
Computer: 0RRL[#0000 | NYCRRLL]
NOTE: The first RRL is subject to the line card length
option. The second RRLL is the receiver and line card
number, both in HEX.
This output indicates that a call was received, but no data was
detected. The call may have been a wrong number, or the
calling control panel was unable to connect with the receiver’s
handshake.
CALLER ID
If an Invalid Report or Communication Fail occurs, and
Caller ID is enabled, the printer messages will be similar to
the following:
Fault Data: “??????10 5551212”
Fault Call: “??????40 5551212”
Note that “?” represents the missing data; “5551212” represents
the originating telephone number.
Stopping Data Reception Manually
To cancel communications between the SCS2-200 line card
and the calling control panel, press the [CANCEL] button.
Pressing the [CANCEL] button will hang up the line. This
feature can be used to hang up on a control panel that is
repeatedly sending alarms.
INVALID REPORT MESSAGE
When this problem is encountered, the following information
is transmitted to the printer and the computer:
Printer: L01- 0000-INVALID REPORT TIME:DATE
Computer: 0RRL[#0000 | NYNRRLL]
NOTE: The first RRL is subject to the line card length
option.The second RRLL is the receiver and line card
number, both in HEX.
10
Page 13

PROFILES
The SCS2-200 will load unique “profiles” in order to effectively
communicate with control panels. A profile is a set of pre-programmed line card options unique for a particular “Calling ID
Number” or DNIS number. The “Calling id” or “DNIS” will point to a
particular profile, which will then be loaded into the line card at the
beginning of each call.
Each SCS2-200 can have a maximum of 64 profiles. To change the
options for a particular profile, utility software is provided. This
software will allow the user /operator to edit the profiles.
Option [05]: Pre-Handshake Delay
When the line card seizes the line, it will wait the time
programmed at option [05], then send the first handshake.
The time programmed (hex) at this location will be multiplied
by 100 ms – e.g., 100 ms, 200 ms etc.
The default setting is 0A, for 1 second.
NOTE: If DNIS is used, this time will not start until DNIS
is received.
[Default is 00]
STATIC OPTIONS
Option [01]: Line Card Number
The Line Card Number provides a virtual identification code
for each SCS2-200 module. Hexadecimal numbers “01” to
“1E” can be programmed in Option [01] to identify line
cards.
[Defaults are 0D and 0E]
Option [02]: Line Card Number Length
This option is used to determine how many digits from the
line card number will be sent to the output. You also have
the option of displaying the number in hex or decimal.
Program option 02 with one of the following:
01 Send only one hex digit to the printer or computer
output (If you have a 2 digit line card number, only
the last digit will be sent to the output).
02 Send 2 hex digit line card number to the output.
03 Send 3 hex digit line card number to the output (leading
zeros will be inserted prior to the line card number).
0A Send 2 digits receiver number in decimal. 3 digits line
number in decimal.
0D Send 2 digits receiver number as programmed. Send
3 digits line card number in decimal.
0E Send 2 digits receiver number in Hex. Send 1 digit
line card number as follows:
Line Card # Send
1..F 1..F
10..1E G..U
NOTE: When using the SCS2-200, the Line Card Number
Length option should always correspond to the number
of DNIS digits being received.
For example, if 5 digits are being received then the Line
Card Number Length Option should be programmed to 3
so that 1RRLLL would be overwritten by the 5 digits of
DNIS to become 1ddddd. [Default is 0E]
Option [04]: 2-Way Audio Activation Time
Option [04] determines how long, in 10-second increments,
the 2-Way Audio function will be active once it is initiated.
At the end of this time, the line card will hang up the line.
Program a value from “01” to “FF” for 10 to 2550 seconds.
Three minutes (set option 04 to 12) is the recommended
length of time for the 2-Way Audio activation time.
To disable the 2-Way Audio feature, program Option [04]
as “00”.
NOTE: For UL Listed installations program time maximum
20 seconds.
[Default is 00]
Option [0F]: Mute Buzzer Option
Operation of the line card’s buzzer may be programmed as
follows:
00 Buzzer sounds for line fault, SCS2-300 error, or if an
alarm occurs during a SCS2-300 error
01 Buzzer does not sound for any event
02 Buzzer sounds for audio, line fault, SCS2-300 error,
or if an alarm occurs during a SCS2-300 error
03 Buzzer sounds for all status change conditions
[Default is 00]
Option [10]: Keep Last Message On
To have the last alarm message retained on the SCS2-200
display, enable this option with a setting of 01.
Option [11]: Hook-flash Enable/Disable
Enables or disables ability to hook-flash the phone lines and
determines its duration in increments of 10 ms.
If programmed as 00, the option is disabled. If set to anything
else, you multiply the decimal equivalent of the hex value
by 10ms and that is the duration.
For example, if a hook-flash time of 500 ms is wanted, program
option [11] to 32 hex. 500 ms/10=50, 50 Dec=32 hex.
[Default is 00]
Option [12]: Caller Source Selection
Option [12] allows the line card to receive Caller ID data or
DNIS that is transmitted after the first ring on the telephone
line.
The appropriate service must be available and requested
from the telephone company for this feature to be operational.
00 Disabled
01 North American CID
• Private Call: An anonymous indication is received
instead of the originating telephone number
• No call no.: An out-of-area or unavailable indication is
received instead of the originating telephone number
• Unknown Call: The originating telephone number has
not been received or was not transmitted
02 British Caller ID (BABT hardware required)
04 – 0A Receive 04 –10 DTMF DNIS digits [Default is 00]
Option [13]: Caller Source to SG Computer
Option [13] allows the transmission of the Caller Identification
or DNIS, to the computer output.
Program Option [13] as one of the following:
00 Do not send to the computer
01 4RRL protocol: send to the computer using North
American Caller ID protocol
05 4RRL protocol: send to the computer using North
American Caller ID protocol sending calling name to
the computer if available.
NOTE: Option [12] must be enabled.
[Default is 00]
11
Page 14

Option [14]: Caller Source to printer
Option [14] allows the transmission of the Caller Identification
or DNIS, to the printer output.
Program Option [14] as one of the following:
00 Do not send Caller Source to the printer
01 Send Caller ID to the printer
05 Send Caller Name and Caller ID to the printer if available.
Each alarm will print an extra line, printing the Caller Source.
NOTE: Option [12] must be enabled.
[Default is 00]
Option [19]: Fault Data Counter
This option allows the line card to control the rate at which
fault call messages are generated.
00 Generate a fault call message for every 10 fault calls
received
01 Generate a fault call message for every fault call
received
[Default is 00]
Option [1A]: DNIS Sensitivity
NOTE: Do not change this option unless specified by a
DMP technician.
Option [1C]: Busy Out
This option allows the line card to immediately seize the phone
line in case of loss of communication with the SCS2 checksum
error after download.
Program Option [1C] with one of the following:
00 The line is seized if any of the conditions mentioned
above occurs
01 The line is not seized if any of the conditions
mentioned above occurs
[Default is 01]
Option [1D]: Input Sensitivity
NOTE: Do not change this option unless specified by a
DMP technician.
[Default is 3F]
Option [1E]: Output Levels
Default is C0 for –9.7db transmit level.
NOTE: Do not change this option unless specified by a
DMP technician.
[Default is C0]
Option [1F]: Debug Output
00 Disabled
01 Enabled
This output when enabled will allow you to see the data
received by the SCS2-200 on the HyperTerminal.
NOTE: Do not change this option unless specified by a
DMP technician.
[Default is 00]
Option [27]: Caller ID DNIS
This option determines how many digits of Caller ID or DNIS
the receiver will process.
0x x is number of digits of DNIS or Caller ID to be
processed (range from 1 to A hex).
[Default is 00]
Option [2A]: Hook Flash Delay
This option will control the duration ×100ms (maximum of
9500 ms) after dialing and before the receiver goes back on
hook.
[Default is 00]
Options [2F]: Max On-Line time
On-line duration delay is built in to control runaway dialers.
A duration delay from 01 to 99 minutes can be programmed.
The receiver starts timing when it picks up the line and,
when the delay expires, the receiver will hang up the call
even if the dialer continues to send data. If the duration
delay is programmed as 00, this feature will be disabled.
[Default is 00]
DEFAULT DYNAMIC OPTIONS
The SCS2-200 uses a unique DMP communication format to
transmit data through the SCS2-300 to the central station
computer. Event codes corresponding to alarm codes in 10
to 40 Baud formats and DTMF 4/1 to 4/3 formats are used
in this unique format to enable the computer software to
determine alarm types.
Options [30] - [3F]: 3/1, 4/1 Format Event Codes
The SCS2-200 will use the last digit of data received in 3/
1 and 4/1 formats to determine the computer event code.
The event code will then be transmitted to the central
station computer. Refer to the SCS2-200 Decoding Library
for the complete set of event codes used by the SCS2-200.
In Sections [30] through [3F], program ASCII codes according to
the Decoding Library. Values other than 20-7F (ASCII) will not be
accepted. Note that the old value programmed in each Option
will not be changed until a command with valid data is received.
Default settings are as below:
• 30-38: 41 • 3A: 41 • 3C: 43 • 3E: 52
• 39: 52 • 3B: 4F • 3D: 5C • 3F: 54
Options [40] - [4F]: 4/2 Format Event Codes Selection
The SCS2-200 will use the first digit following the account
code in 4/2, 3/1 extended, 4/1 extended, or 3/2 formats to
determine the computer event code. The event code will
then be transmitted to the central station computer. Refer
to the “SCS2-200 Decoding Library” for the complete set of
event codes used by the SCS2-200.
In Sections [40] through [4F], program ASCII codes according to
the Decoding Library. Values other than 20-7F (ASCII) will not be
accepted. Note that the old value programmed in each Option
will not be changed until a command with valid data is received.
Default settings are as below:
• 40-48: 41 • 4A: 41 • 4C: 43 • 4E: 52
• 49: 52 • 4B: 4F • 4D: 5C • 4F: 54
12
Page 15

Options [50] - [5F]: 4/3 Format Event Codes Selection
The SCS2-200 will use the fifth digit of data received in 4/3
and 4/2 extended formats to determine the message and event
code. The event code will then be transmitted to the central
station computer. Refer to the “SCS2-200 Decoding Library”
for the complete set of messages and event codes used by the
SCS2-200.
In Sections [50] through [5F], program ASCII codes according to
the Decoding Library. Values other than 20-7F (ASCII) will not be
accepted. Note that the old value programmed in each Option
will not be changed until a command with valid data is received.
Default settings are as below:
• 50: 54 • 54: 43 • 58: 41 • 5C: 4F
• 51: 41 • 55: 4F • 59: 52 • 5D: 42
• 52: 41 • 56: 54 • 5A: 54 • 5E: 48
• 53: 41 • 57: 41 • 5B: 43 • 5F: 5C
Option [60]-[6F]:
See APPENDIX D
Option [74]: Equivalent Line
Equivalent line option is used when an incoming signal can
be received on another receiver telephone line if the original
line is busy. Information printed and/or sent to the computer
will indicate that the information was received on the same
telephone line. The receiver number does not change. Program
00 at option [74] to disable, or a number from 01 to 1E.
[Default is 00]
Option [75]: Receiver Number
The Receiver Number is used to identify the receiver to the
central station software.
Refer to the manuals for any central station automation
software being used to determine if there are any special
requirements for this number. Also, check the numbers used
for any other receivers in the station to ensure that numbers
are not duplicated.
[Default is 01]
Option [70]: Automation Common Event Code
Some central station software packages are unable to process
the alarm using the event codes listed in the SCS2-200 Decoding
Library. Where a central station monitors thousands of accounts
belonging to different companies, the same reporting codes
may have different meanings depending on the company.
Because of this, the individual event codes in Options [30]
through [5F] cannot accurately represent the alarm condition.
To overcome this, Option [70] may be programmed as follows:
Program Operation
00 Use Individual Event Codes to computer
20, 30-39, 41-5A Use Common Event Codes (space, 0-9, A-Z)
When using Common Event Codes, it is recommended that
either hexadecimal code “5A” (ASCII “Z”) or hexadecimal
code “41” (ASCII “A”) be used.
The “Space” character (Hex 20) can be used as the common
event code with certain automation software packages to
avoid account code database changes when switching over
from other brand receivers to the DMP receiver.
Note that Option [70] is ignored when using Modem formats,
Contact-ID, ACRON, FBI Super Fast, BFSK, ADEMCO Super
Fast and SK FSK1, 2 formats.
[Default is 00]
Option [71]: Library Select
Determine how to use Printer Words Options.
00 No printer words
01 Printer word options used for 1-digit reporting code
formats only; other will use predefined (hard coded)
library.
02 Printer word options used for 2-digit reporting code
formats only; other will use predefined library.
03 Printer word options used for 3-digit reporting code
formats only; other will use predefined library.
04 Printer word options used for 1-digit and 2-digit reporting
code formats only; other will use predefined library.
05 Printer words options 60-6F used for 1-digit, 2-digit
and 3-digit reporting code formats.
[Default is 04]
Option [76]: 3 Digit Account (3/x to 4/x)
Program Option [76] with one of the values listed below:
Value Function
00 All 3 digit account codes will have a leading space.
01 All 3 digit account codes will have a leading zero.
02 All 3 digit account codes will have a leading zero
and all one digit event codes will have a leading
zero.
[Default is 00]
Option [78]: Max Inter-digit Time
Certain old dialers may have difficulties communicating with
the receiver. The SCS2-200 provides a possible solution by
programming this option. This option should be left as a
default and should be changed only on the recommendation
of a DMP technician. When programmed as 00, the interdigit time is determined by the Baud rate of the format
being used; all other values are in 100 ms intervals.
00 determined by Baud rate (default)
01 100 ms
02 200 ms
... etc.
[Default is 00]
Option [79]: Max Inter-burst
Certain old dialers may have difficulties in communicating with
the receiver. The SCS2-200 provides a possible solution by
programming this option. This option should be left as default
and should be changed only on the recommendation of a DMP
technician. When programmed as 00, the inter-burst has a
time of 100 ms, all other values are in 10ms increments.
00 100 ms (default)
01 10 ms
02 20 ms
... etc.
[Default is 00]
13
Page 16

Option [7A]: Account Codes to Activate 2-Way Audio
Option [7A] determines which 4 digit account codes will be
able to activate the 2-Way Audio feature. Program the first
digits of the desired account codes in Option [7A]. For example,
to allow all account codes between 1000 and 2FFF to activate
the 2-Way Audio function, program Option [7A] as “12.” To
allow all account codes between 3000 and 6FFF to activate
the 2-Way Audio function, program Option [7A] as “36.”
Option [7A] may be used with any formats supported by the
SCS2. To disable the 4 digit account range 2-Way Audio
function, program Option [7A] as “00.”
NOTES: Option [04] must have a value other than 00.
In order to receive 2-way audio from an ITI panel, the
account number needs to fall within the account range.
For UL Listed installations Option [04] shall not have a
value greater than 20.
[Default is 00]
Option [7B]: 3 Digits Account Codes to Activate
2-Way Audio
Option [7B] determines which 3 digit account codes will be
able to activate the 2-Way Audio feature. Program the first
digits of the desired account codes in Option [7B]. For example,
to allow all 3 digit account codes between 200 and 3FF to
activate the 2-Way Audio function, program Option [7B] as
“23.” To allow all 3 digit account codes between 300 and 6FF
to activate the 2-Way Audio function, program Option [7B] as
“36. ”
Option [7B] may be used with any 3 digit account code formats
supported by the SCS2. To disable the 3 digit account range
2-Way Audio function, program Option [7B] as “00.”
NOTES: Option [04] must have a value other than 00.
For UL Listed installations Option [04] shall not have a
value greater than 20.
[Default is 00]
Option [7C]: Alarm Codes to Activate 2-Way Audio
Option [7C] determines the range of alarm codes which will
activate the 2-Way Audio function. Program the first digits
of the desired alarm codes in Option [7C]. For example, if
all alarm codes beginning with 6, 7 and 8 are to activate 2Way Audio, program Option [7C] as “68.”
Option [7C] may be used with 10 to 40 Baud formats, DTMF
4/1, 4/2 and 4/3. Program Option [7C] as “00” to disable
this function.
The SCS2-200 will initiate audio by the account range, option
[7A] and [7B] or by option [7C] ALARM CODE or a combination
of all that are programmed.
Example: 4/2 format with account code 1234, alarm code 2
on zone 3 (1234-23).
NOTES: Option [04] must have a value other than 00.
For UL Listed installations Option [04] shall not have a
value greater than 20.
[Default is 00]
Option Option Switch to Reason
[7A]/[7B] [7C] Audio?
00 1-2 Yes Alarm code 2 falls within the code
1-1 00 Yes Account code 1234 falls within the
2-3 00 No Account code 1234 is outside the
00 3-4 No Alarm code 2 is outside the range
1-2 3-4 No If both are programmed, both must
3-5 1-3 No Both must be good and account
1-4 1-5 Yes Alarm code 2 falls within the code
range 1-2.
range 1-1.
range 2-3.
3-4.
be good and alarm code 2 is
outside the range 3-4.
code 1234 is outside the range 3-5.
range 1-5, account code 1234 falls
within the range 1-4.
Option [7D]: Audio Zone Code
Audio zone code is the range of zone (last digit) codes that
will activate audio. The most significant nibble tells us the
lowest code and the least significant nibble tells us the
highest zone that will activate audio.
NOTES: Option [04] must have a value other than 00.
For UL Listed installations Option [04] shall not have a
value greater than 20.
[Default is 00]
Option [7E]: Audio Event Code
Option [7E] is used to send a message to the computer and
the printer to indicate that the line card has enabled the 2Way Audio function.
00 Audio event to computer Disabled
01 Send
02 Send 0
NOTES: Option [04] must have a value other than 00.
For UL Listed installations Option [04] shall not have a
value greater than 20.
SRRL[#AAAA
where S = protocol identifier
RR
= receiver number
L
= line card number
AAAA
= account number
RRL[#AAAA
where 0 = protocol identifier
RR
= receiver number
L
= line card number
AAAA
= account number
|NLF
|NLF
RRL
RRL
][DC4]
][DC4]
[Default is 00]
14
Page 17

Option [7F]: Enable Audio Format
This option will give the user the ability to enable and
disable audio for selected formats. A ‘1’ in the formats bit
position will enable the format for audio. A ‘0’ in the formats
bit position will disable audio for the format.
Bit 0 3 Digit pulse formats.
Bit 1 4 Digit pulse formats.
Bit 2 DTMF formats.
Bit 3 Contact ID
Bit 4 SIA Level 1,2 and 3
Bit 5 Modem II
Bit 6 ITI
Example: If the user wants Audio to work only for 3 digit
pulse and SIA formats, option 7F would have to be programmed
as 11 hex which enables bit 0 and bit 4.
NOTE: Option [04] must have a value other than 00.
For UL Listed installations Option [04] shall not have a
value greater than 20.
[Default is 00]
Option [80]: Kissoff to Hang-up Time
This option determines the delay between kissoff and the
release of the line.
The hex value programmed at this location will be converted
to decimal and then multiplied by 100 milliseconds to generate
the delay.
For example:
Option 80 = 0A hex = 10 decimal * 100 ms = 1000 ms = 1
second delay.
Option 80 = 28 hex = 40 decimal * 100 ms = 4000 ms = 4
second delay.
[Default is 1E]
Options [81] through [88]: Handshake Selection
The SCS2-200 is a multi-format receiver capable of sending
several handshakes to a dialer. Often it is important which
handshake is sent first. Program Options [81] through [88]
according to your applications.
Handshake Options
00 No handshake
0B Modem II handshake
0C SIA FSK handshake
0D Westec
0E Modem IIE, Modem IIIa
0F DMP handshake
1D Single Dual tone handshake
2D Double Dual tone handshake
FC Full duplex SIA FSK
All other frequencies can be used by programming the first
two digits. For example:
23 = 2300 Hz, 18 = 1800 Hz, 14 = 1400 Hz, 10 = 1000 Hz
Default settings are as below:
• 81: 14 • 83: 2D • 85: 0E • 87: 00
• 82: 23 • 84: 0C • 86: 0B • 88: 00
Note: For Westec formats the handshake and kissoff
duration time must be set to 600ms.
2
and ITI handshake
Option [89] to [90]: Handshake and Kissoff Duration
Some control panels may require different handshake duration.
Each unit has increments of 100 ms, from 100 ms to a
maximum of 6.3 sec. Program options 89 to 90 to the desired
duration respective to the corresponding handshake options
81-88.
00 1 sec (default)
01 100 ms
02 200 ms
03 300 ms
04 400 ms
05 500 ms
06 600 ms
07 700 ms
08 800 ms
09 900 ms
0A 1 sec
0B 1.1 sec
0C 1.2 sec
…
3F 6.3 ms
NOTE: These options will only affect steady tone handshakes.
[Default is 00]
Option [91]: Inter Handshake Duration
The SCS2-200 line card will usually wait for signals from the
control panels for 4 seconds before sending the next handshake,
if there are no signals received. In certain applications,
control panels can not wait long enough to get their own
handshake, especially if the handshake is programmed as
the fifth or later handshake.
Program Option [91] with one of the following:
00 4 second interval (default)
01 1 second interval
02 2 second interval
03 3 second interval
[Default is 00]
Option [95]: 5 digits pulse
The SCS2-200 cannot distinguish between 4/1, 3/2 and 3/1
with checksum because all of them contain a total of 5
digits. Therefore, this option must be programmed to inform
the SCS2-200 which of the 3 formats may be used.
00 select 4/1 format (default)
01 select 3/2 format
02 select 3/1 with checksum format
NOTE: The printer messages for the 3-2 format are the
same as those used for the 4/2 format.
[Default is 00]
15
Page 18

Option [96]: 4/1 Extended Format
Program Option [96] as “01” to combine 2 round pairs of 4/
1 extended format into 4/2 output for reporting to the
computer and the printer.
For example, with Option [96] enabled, the security control
panel may transmit the following information:
1234 3
1234 3
3333 1
3333 1
The SCS2-200 will interpret this information as: 1234 31
This format is not recommended as it occupies the telephone
line for long periods of time. The default setting for Option
[96] is “01”; when programmed as “00,” the option is disabled.
[Default is 00]
Option [99]: 8 Digit DTMF
The Ademco 4/1 Express format may cause conflicts with
the DMP DTMF 4/3 with checksum format or FBI Superfast
without checksum. Therefore, this option must be programmed
to inform the SCS2-200 which of the 3 formats may be used.
00 DMP DTMF 4/3 with checksum
01 Ademco 4/1 Express
02 FBI without checksum
[Default is 01]
Option [9A]: Error Counter
0X This option is used for pulse formats. If set to X
value, the line card will hang up after X bad
rounds.
00 Disabled [Default is 01]
Option [97]: 4/2 Extended Format
Program Option [97] as “01” to combine 2 round pairs of
4/2 extended format into 4/3 output for reporting to the
computer and the printer. Program one of the following:
00 4/2 Extended format data is not combined
01 The panel sends: 1234 05
1234 05
0505 16
0505 16
The SCS2-200 will interpret this information as 1234 516,
or the panel sends: 1234 03
1234 03
3333 01
3333 01
The SCS2-200 will interpret this information as 1234 301.
NOTE: The default setting for Option [97] is “00”; when programmed as “00”, the option is disabled.
[Default is 00]
Option [98]: 3/1 extended format
Program Option [98] as “01” to combine 2 round pairs of 3/
1 extended format into 3/2 output for reporting to the
computer and the printer. (For M.A.S. software users, the
option should be programmed as “02”.)
For example, with Option [98] enabled, the security control
panel may transmit the following information:
123 3
123 3
333 1
333 1
The SCS2-200 will interpret this information as: 123 31
The default setting for Option [98] is “01”; when programmed
as “00”, the option is disabled.
[Default is 00]
Option [9B]: Echo Suppression
00 Disabled
01 Enabled: The echo suppression option will enable
the transmission of a 2 second, 2025 Hz tone from
the line card to disable echo suppression
equipment. This option will only work with panels
which require a 2225 Hz handshake.
Option [9C]: Acron RS-232
When this option is programmed as “00”, the SCS2-200 will
convert the Acron Super Fast format signal into 3/2 or 4/2
format (Ex: AAAAsXssYY[DC4]). If it is programmed as “01”
the Acron Super Fast will be sent to the computer as follows:
9RRLssssAAAACCCCCCCCC[DC4]
Where:
9 = Protocol number
RR = Receiver number
L = Line number
ssss = Spaces
AAAA = Account code
CCCC = Channel 1-4
CCCC = Channel 5-8
[DC4] = Terminator
Example:
• Raw data:
1578BDDDDDDD
1578BDDDDDDD
• Printer output will be as follows:
(01-001-1578-BDDDDDDD-)
• Computer output:
(901001 1578BDDDDDDD)
[Default is 01]
16
Page 19

Option [9D]: MODEM II RS-232
The SCS2-200 is able to decode the Modem II formats. The
handshake 0B needs to be programmed as one of the
handshakes of the SCS2-200 for the Modem II, Modem IIa, or
Modem IIb, and handshake 0E for Modem IIE or Modem IIIa
Option [9D] determines the protocol sent to the computer.
2
.
NOTE: This option will also affect the BFSK format only
if programmed as 00 or 01.
Option 9D: Modem II RS-232
00: 1RRLssssssAAAAXXYYYY[DC4] (6500 protocol)
01: 6RRLssssssAAAAXXYYYY[DC4] (SG protocol)
02: Modem II to SIA protocol
03: Modem II to SIA protocol, and text is decoded
and sent to printer and computer.
NOTE: please make sure the automation software supports settings 02 and 03 if the SIA protocol is desired.
[Default is 00]
Option [9F]: Ademco High Speed RS-232
When this option is programmed as “00”, the SCS2-200 will
convert the High-Speed format signal into 4/2 format (Ex:
1RRLssssssAAAAsXssYY[DC4]). If it is programmed as “01” the
Ademco High Speed will be send to the computer as follows:
8RRLAAAAsCCCCsCCCCsC[DC4]
Where:
8 Protocol number
RR Receiver number
L Line number
AAAA Account code
s Space
CCCC Channel 1-4
s Space
CCCC Channel 5-8
s Space
C Channel 9
[DC4] Terminator
[Default is 01]
Option [A1]: FBI RS-232
To enable the computer FBI Superfast protocol, program
option [A1] as “01.” When enabled, the computer output
will be as follows:
JRRLssssssAAAATZZEss[DC4]
Where:
J = FBI protocol identifier
RR = Receiver number
L = Line number
s = Spaces
AAAA = Account code.
T = Zone type
ZZ = Zone number, in hex.
E = Event code
NOTE: if E=0 and T=0 : listen in.
[Default is 01]
Option [A3]: D6500 computer output
The SCS2-200 will emulate the Radionics D6500 RS-232 protocol
on pulse formats only (00 = disable, 01 = enable).
Examples:
1. 3/1 format: Account code “123” with alarm code “1”
(alarm), the computer output will be:
00 1RRLsssssss123sAss1[DC4]
01 1RRLsssssss123sAss1[DC4]
2. 3/1 format: Account code “123” with alarm code “B”
(opening), the computer output will be:
00 1RRLsssssss123sOssB[DC4]
01 1RRLsssssss123sOsss[DC4]
3. 4/2 extended (or 3/2 or 3/1 extended): Account code
“1234” with alarm code “2” on zone “1” (alarm), the
computer output will be:
00 1RRLssssss1234sAs21[DC4]
01 1RRLssssss1234sAs21[DC4]
4. 3/1 extended (or 4/2 or 3/2): Account code “234” with
alarm code “C” on zone “2” (closing), the computer
output will be:
00 1RRLsssssss234sCsC2[DC4]
01 1RRLsssssss234sCss2[DC4]
Where RR = Receiver Number
L = Line Number
s = Space
[DC4] = Terminator
Please note that option [70] must be left as individual event
code when enabling this option.
[Default is 01]
Option [A4]: BFSK RS-232
When programming option [A4] as “01”, the BFSK format
will convert its Radionics D6500 computer output to a standard
protocol output.
[Default is 01]
NOTE: This option also affects the modem option [9D].
Option [A5]: 7 Digit Pulse
This option allows the SCS2-200 to select Sescoa Super
Speed or 4/2 checksum pulse. Ordinarily, the SCS2-200
cannot distinguish between these two formats, since they
are both 7 digit pulse. Program option [A5] as 00 to have
all incoming 7 digit pulse calls decoded as 4/2 checksum,
or 01 to decode as Sescoa Super Speed.
[Default is 00]
Option [A7]: SK FSK2 RS-232
The SCS2-200 provides two possible outputs to the computer.
Select 00 for protocol #1 or 01 for protocol #2. Please refer
to SCS2-200 Communication Formats section (SK FSK
communication format) for more details.
[Default is 00]
17
Page 20

SCS2-200 COMMUNICATION
FORMATS
COMMON FORMATS
The following formats are commonly used:
• 3/1, 4/1, 4/2 formats; 10, 14, 20 Baud
• 3/1 extended format; 10, 14, 20, 40 Baud.
• 3/1, 4/2 formats with or without checksum; 40 Baud
• 3-2 format; 10, 14, 20 Baud
• 4/1 Extended format; 10, 14, 20 Baud
• 4/2 Extended format; 10, 14, 20, 40 Baud
Example:
• 3/1 FORMAT
Computer: 1011ssssss123sAsss1[14]
Printer: L01-123-1-FIRE ALARM HH:MM:SS-DD/MM
• 3/1 EXTENDED FORMAT
Computer: 1011ssssss123sAss32[14]
Printer: L01-123-32-FIRE ALARM HH:MM:SS-DD/MM
• 4/2 FORMAT
Computer: 1011ssssss1234sAss22[14]
Printer: L01-1234-22-FIRE ALARM HH:MM:SS-DD/MM
DMP DTMF FORMATS
DMP DTMF 4/3 and 4/3 with checksum formats provide fast,
reliable and easy-to-understand and decode data transmission.
On-line time will be greatly reduced when using 4/3 and 4/
3 with checksum formats. The 4/1 and 4/2 DTMF formats
can also be decoded by the SCS2-200.
The 4/3 with checksum format is recommended for use with
DMP and DSC security control panels.
Example:
• DMP 4/3 format
Each round pair represents a single event: AAAAEZZ
AAAA = 4-digit account code.
E = Event code.
ZZ = Zone number or user number.
Computer: 1011ssssss2255sAs266[14][6]
Printer: L01—2255-266-PANIC ALARM HH:MM:SS-DD/MM
ADEMCO CONTACT ID
This DTMF format requires a dual tone handshake and 1400
Hz kissoff, or 1400 Hz handshake and 1400 Hz kissoff.
Example:
Printer: L1-1221-E110-00 FIRE ALARM
HH:MM:SS-DD/MM
Computer: 5011 181221E11000101[14]
**PLEASE SEE APPENDIX G FOR EVENT CODES CLASSIFICATIONS TABLE**
ADEMCO EXPRESS
This format consists of 4-digit account codes, two digit format
identifiers and 1- or 2-digit alarm codes. The SCS2-200 will
decode the signal as regular 4/1 or 4/2 format. Option [99]
must be programmed as “01” to decode the 4/1 Express
format instead of the DMP 4/3 with checksum format or FBI
Superfast no checksum.
Example:
• Option 99 set to 00
Raw data: 23451726
Computer Output: 1011 2345 A 172
Printer Output: L01-2345-172-FIRE ALARM
HH:MM:SS-DD/MM
• Option 99 set to 01
Raw data: 23451726
Computer Output: 1011 2345 A 2
Printer Output: L01-2345-2-PANIC ALARM
HH:MM:SS-DD/MM
18
Page 21

ADEMCO SUPER FAST
(High Speed Format)
The High Speed format consists of 4 account numbers, 8
channel status digits, and 1 auxiliary channel.
NOTE: When option [9F] is programmed as “00,” the SCS2200 will convert the signal into 4/2 format. When option
[9F] is programmed as “01,” the SCS2-200 will send the
information as it received to the printer and to the computer using High Speed RS-232 communication protocol.
8RRLAAAAsCCCCsC[DC4]
AAAAZZZZ ZZZZ S
AAAA= Three digit or four digit account number.
ZZZZ ZZZZ = Zone status.
S = Status Channel indicates the meaning of the message.
AAAAZZZZZZZZS or AAAZZZZZZZZS
Example
• With option 9F disabled
Computer: 1011ssssss1234sAss02[14][6]
Printer: L01-1234-02-ALARM ZONE02
HH:MM:SS-DD/MM
• With option 9F enabled
Computer: 8011 1234s5155s5555s7[14][6]
Printer: L01-1234 – 515555557 HH:MM:SS-DD/MM
DMP FSK
PRRLssAAAAAsXT1...Tns[DC4]
Data:
P = DMP protocol identifier
RR = Receiver number
L = Line number
s = Spaces
AAAA = Account code
X = If X position is inhabited by any character other
T
1-T2
NOTE: If account code changes, it will be right justified by
the panel. Panel will send leading spaces as place fillers.
Expected Output
PRRLssAAAAAsXT1...Tns[DC4]
Data:
P = DMP Protocol identifier
ddddd = RRL replaced by the 5-digit DNIS, therefore
s = Spaces
AAAA = Account code
X = DMP serial format identifier
T
1-Tn
than an upper case "Z", the incoming signal is
in serial 1 format. If X position holds an upper
case "Z" than the incoming signal will be in
serial 3 format.
The actual character position of X will vary
depending on number of account digits and/or
line number length.
= Alarm information
increasing the length by two.
= Alarm information
Examples:
P011ss12345sA00081EASTsSMOKE[DC4]
P011ss12345sA00085555116NORTH OFFICE PRI15S.
WEST BUILDING[DC4]
The above two automation signals are both DMP serial 1
format. The 15th character in the above examples will
determine if the received format is serial 1 or serial 3. If
the 15th digit is anything but an uppercase "Z", the DMP
format is serial 1. If you look at the signal below, you will
see that the 15th digit is an uppercase "Z"; therefore, the
signal is serial 3 format.
P011ss12345sZa\61\t"BU\z 0232"FRONT DOOR\a
03OFFICE\u0568"JOHN SMITH\[DC4]
NOTE: The position of the DMP serial format identifier
can change, depending on the line card number length.
FBI SUPER FAST FORMAT
This DTMF format consists of 4-digit account codes, 2-digit
zone codes, 1-digit zone type codes, and 1-digit event codes.
The zone codes will be converted into 3-digit decimal codes
by the SCS2-200.
The following are the zone type codes used by this format:
FBI Code Converted Event
Event Code
Fire 1 A
Panic 2 A
Burglary 3 A
Medical 4 A
Auxiliary 5 A
Bypass 6 B
Inactive 7 A
Eight 8 A
Nine 9 A
Zero 0 A
Opening B O
Closing C C
Abort D T
Restore E R
Trouble F T
NOTE: Option [A1] enabled will output the FBI RS-232
protocol.
Example
Alarm string - 1234B001
FBI RS-232 Option on
Automation: J011 1234B001[14]
FBI RS-232 Option Off
Automation: 1011 1234B001[14]
19
Page 22

ITI FORMAT
The ITI format covers ITI panel models RF Commander,
Caretaker Plus, SX-V, SX-IVB, UltraGard 5000 (Pro 5000),
Commander III and Commander 2000 Simon. In order to
receive the ITI format, the handshake 0E must be programmed.
Upon a cold boot, the fifth handshake (option [86]) is
programmed as 0E hex.
RF Commander/Commander III:
Sensor# Printed out as
00-16 ALARM
80 ALARM
81 ALARM
82 ALARM
83 PHONE TEST
84 OPEN USER X
85 CLOSE USER X
86 SILENT DURESS
87 FORCE ARMED
90 AC FAILURE
91 LOW CPU BAT
92 ALM TAMPR LOOP
93 AUTO PHONE TEST
94 TROUBLE
95 CPU BACK IN
Caretaker Plus
77 ALARM TAMPER
78 TROUBLE
79 NO ACTIVI ALM
80 ALARM
81 ALARM
82 ALARM
83 PHONE TEST
84 OPEN USER X
85 CLOSE USER X
86 ALARM SILENT DURESS
87 FORCE ARMED
88 TROUBLE
92 ALARM TAMPER LOOP
93 AUTO PHONE TEST
SX-V
01 BAD SENSOR #
02-76 ALARM
77 TAMPER KEYPAD
80 ALARM
81 ALARM
82 ALARM
83 PHONE TEST
84 OPEN USER
85 CLOSE USER
86 SILENT DURESS
87 FORCE ARM
90 AC FAILURE
91 LOW CPU BAT
92 ALM TAMPR LOOP
93 AUTO PHONE TEST
94 RECEIVER TROUBLE
95 CPU BACK IN
Commander 2000
Sensor #
01-18 ALARM
80 ALARM
81 ALARM
82 ALARM
83 ALARM
84 OPEN USER#
85 CLOSE USER#
86 SILENT DURESS
87 FORCE ARMED
89 RF TOUCHPAD
90 AC FAILURE
91 LOW CPU BAT
92 ALM TAMPR LOOP
93 AUTO PHONE TEST
94 CPU RX FAIL
95 CPU BACK IN
96 FAIL TO COMMUNICATE
98 EVENT DUMP REPORT
Pro 5000 (UltraGard 5000)
Sensor #
01-76 ZONE ALARM
01-76 Zone Alarm Cancel
77 Touchpad Tamper
77 Touchpad Tamper Cancel w/User ID
78 Freeze Sensor Trouble
79 No Activity Time-out
79 No Activity Time-out Cancel
80 Touchpad Fire Alarm
81 Touchpad Police Alarm
82 Touchpad Auxiliary Alarm
83 Manual Phone Test w/User ID
84 Open User #
85 Close User #
86 Silent Duress w/User ID
87 Force Arm
88 Energy Saver Trouble
89 Wireless Touchpad (Supervisory or Low Battery)
90 AC Failure
90 AC Restore
91 Low Panel Battery
91 Panel Battery Restore
92 Panel Tamper
93 Automatic Phone Test
94 Wireless Receiver Failure
95 Panel Reset
96 Phone Failure
Example:
• ITI Printer:
L01-12345-81-TOUCHPAD FIRE ALARMHH:MM:SSDD/MM
• ITI Computer Example:
1011ssss1B2345A081A31[DC4]
20
Page 23

MODEM II, MODEM IIE, MODEM IIIa2 and
BFSK FORMATS
BFSK, Modem II, Modem IIIa2 or Modem IIE formats can be
decoded by the SCS2-200.
Modem II
Example
• Modem II RS-232 Option ON
Computer Output: 6011 7112 T 9[14]
Printer Output: L01-7112—BATTERY MISSING
HH:MM:SS-DD/MM
• Modem II RS 232 option OFF
Computer Output: 1011 7112 R F01[14]
Printer Output: L01-7112—PROG ACCESS OK
HH:MM:SS-DD/MM
BFSK
Example:
• Modem II RS232 option ON
Computer Output: 6011 112F 1[14]
Printer Output: L01 112—FIRE ALARM HH:MM:SS-DD/MM
• Modem II RS232 option OFF
Computer Output: 1011 112F 1[14]
Printer Output: L01-112—FIRE ALARM HH:MM:SS-DD/MM
SIA FSK
The SIA digital format is a modem format communicating at
110 or 300 Baud and using the SIA protocol to transfer
information to the computer.
The standard SCS2-200 can receive Bell 103 modem frequencies.
NOTE: The SCS2-200 can accept SIA formats with and without separators. The SCS2-200 version 1.3 software implements
Levels 1, 2 and 3 of the SIA 1993IIb Digital Communication
Standard, but it does not support “Receiver Call out and
Access Passcode Block,” “Reverse Channel Block,” and “V-
Channel Communications".
The SCS2-200 supports an account code with a maximum of
16 digits, (including any displayable ASCII characters except
the pipe symbol: “|”). It also supports an alarm code with
a maximum of 4 digits. Usually, the central station automation
refers to the SIA Event Block Data Code Definitions for
information on interpreting the alarm codes.
Acknowledgments for the SIA format are tonal by default.
The transmitter may, however, request data acknowledgment
by transmission of the optional configuration block. When
the SCS2-200 receives the configuration block from a
transmitter requiring data acknowledgment, it will send the
tonal acknowledgment to this block. It will then send the
data acknowledgment to the following data blocks if the
data received is valid.
SILENT KNIGHT FSK1, FSK2
Silent Knight FSK1 Protocol
ERRLssssAAAAAAXXssss[DC4]
Where:
E FSK protocol identifier
RR Receiver number
L Line number
s Spaces
AAAAAA Account number (if the account is 4 or 5 digits,
XX Alarm code
Possible alarm codes are as follows:
00 Alarm Panic
01-08 Alarm 01-08
09 Holdup
10-19 Alarm 10-19
30 Test code
31 Trouble line 1
32 Trouble line 2
33 Expand trouble
34 Forced access
35 Restore line 1
36 Restore line 2
37 Expand restore
38 Cancel code
39 Data lost
40 Closing
41-49 Closing 1-9
50-59 Bypass 10-19
60 Trouble AC
61-68 Trouble 1-8
69 Trouble bat
70 Restore AC
71-78 Restore 1-8
79 Restore bat
80 Access
81-89 Access 1-9
90 Opening
91-99 Opening 1-9
[DC4] Represents the terminator
the leading “A”s will be replaced by spaces)
Example
Printer: L1-1234-03-LIBRARY WORD
HH:MM:SS-DD/MM
Computer: E01001 123403 [14]
Example
Printer: L01-1234 – NM008 HH:MM:SS-DD/MM
Computer: S011[#1234:NBA08]
21
Page 24

SILENT KNIGHT FSK2 PROTOCOL
The SCS2-200 will provide two possible outputs to the computer,
according to the value set under option A7. When the option
is programmed as “00” (factory default), the computer output
will be as follows:
FRRLssssAAAAAAYYZZss[DC4]
Where:
F FSK2 protocol 1 identifier
RR Receiver number
L Line number
s Spaces
AAAAAA Account number (if the account is 4 or 5 digits,
the leading “A”s will be replaced by spaces)
YY Event code
ZZ Zone/user number
[DC4] Represents the terminator
Possible events are as follows:
YT00 Battery Trouble
YR00 Battery Restore
AT00 System Trouble AC
DOZZ Access left open ID ZZ
DFZZ Access forced ID ZZ
DSZZ Access Station ID ZZ
AJ00 System Restore AC
LT0Z Trouble phone line #0Z
Restore phone line 0Z
Expand trouble device ID z
Expand restore device ID z
ETZZ Expand trouble station ID ZZ (ZZ=17-31)
ERZZ Expand restore station ID ZZ (ZZ=17-31)
RP00 Automatic test
RXZZ Manual test zone ZZ
CA Automatic closing
OA Automatic opening
CLZZ Normal closing ID ZZ
OPZZ Normal opening ID ZZ
CFZZ Forced closing ID ZZ
ORZZ Forced opening ID ZZ
Supervised closing ID ZZ
OTZZ Supervised opening ZZ
CG0a Closing area 0a
OG0a Opening area 0a
DRZZ Access granted ID ZZ
Possible events are as follows:
B600 Battery Trouble
BE00 Battery Restore
C600 System Trouble AC
CE00 System Restore AC
D60z Trouble phone line #0z
DE0z Restore phone line 0z
E60z Expand trouble device ID z
EE0z Expand restore device ID z
E6zz Expand trouble station ID zz (zz=17-31)
EEzz Expand restore station ID zz (zz=17-31)
E100 Automatic test
E2zz Manual test zone ZZ
F000 Automatic closing
F400 Automatic opening
F1zz : Normal closing ID ZZ
F5zz : Normal opening ID ZZ
F2zz : Forced closing ID ZZ
F6zz : Forced opening ID ZZ
F3zz : Supervised closing ID ZZ
F7zz : Supervised opening ZZ
FD0a: Closing area 0a
FF0a : Opening area 0a
F8zz : Access
F9zz : Access left open ID zz
FAzz : Access forced ID ZZ
FBzz : Access station ID ZZ
FC00: Duress
FE00 : Data lost
SESCOA SUPER SPEED
Sescoa Super Speed is a 40 Baud communication format.
Account codes are programmed as 4-digit decimal codes
ranging from 0001 to 3374. The account code is followed by
a 1-digit event code, a 2-digit alarm code, and 1-digit
checksum.
Option [A5] must be programmed as “01” in order to use
Sescoa Super Speed decoding instead of 4/2 with checksum
decoding.
Example:
Printer: L01-1234—LOW BATT HH:MM:SS-DD/MM
Computer: 7017ssssss1234sF
When the option is programmed as “01”, the computer
output will be as follows:
CRRLssssAAAAAAXYZZss[DC4]
Where:
C FSK2 protocol 2 identifier
RR Receiver number
L Line number
s Spaces
AAAAAA Account number (if the account is 4 or 5 digits,
the leading “A”s will be replaced by spaces)
X Event code
Y Condition code
ZZ Zone/user number
[DC4] Represents the terminator
WESTEC FORMATS
The WESTEC formats are a DTMF format. The SCS2-200 will
receive and decode signals from the following WESTEC panels:
W900, W2K, W800, W1000/W2000/W3000, and W5000.
NOTE: For full WESTEC printer messages, the SCS2-300
must be set to 80 columns printer output.
Example:
Printer:
Oct 08 1998-12:00:00-04/06-SG –12-206-0900—S
YSTEM TYPE:900
CALL#:01
STATUS: 0000 0000 0001 0110 0000 (000000 000000)
DATA1 POWER UP
DATA2 CLEAR POWER UP
DATA3 CLEAR
ENDCALL*
Computer: W0100101Csss40ssssSSss011567871404166650[14]
22
Page 25

SCS2-200 PREDEFINED LIBRARY
DECODING AND EVENT CODES TABLE
3/1 - 4/1 Alarm Library
For Alarm Corresponding Event
Message Code Code (Options 30-3F)
0 (A) A PER TEST REPORT
1 A FIRE ALARM
2 A PANIC ALARM
3 A BURGLARY
4 A GENERAL ALARM
5 A GENERAL ALARM
6 A GENERAL ALARM
7 A MEDICAL
8 A SYSTEM TROUBLE
Restore 9 R RESTORE
Open B O OPENING
Close C C CLOSING
Cancel D / CANCEL
Restore E R RESTORE
Trouble F T SYSTEM TROUBLE
3/1-4/1 Extended, 3/2 & 4/2 Alarm Library
Alarm 0x(Ax) A PER TEST PEPORT
Alarm 1x A FIRE ALARM
Alarm 2x A PANIC ALARM
Alarm 3x A BURGLARY
Alarm 4x A GENERAL ALARM
Alarm 5x A GENERAL ALARM
Alarm 6x A GENERAL ALARM
Alarm 7x A MEDICAL
Alarm 8x A SYSTEM TROUBLE
Restr 9x R RESTORE
Open Bx O OPENING
Close Cx C CLOSING
Cancl Dx / CANCEL
Restr Ex R RESTORE
Trble Fx T SYSTEM TROUBLE
4/2 Extended & 4/3 Alarm Library
Alarm 0xx(Axx) T 0 PER TEST REPORT
Alarm 1xx A 1 FIRE ALARM
Alarm 2xx A 2 PANIC ALARM
Alarm 3xx A 3 BURGLARY
Close 4xx C 4 CLOSING
Open 5xx O 5 OPENING
Alarm 6xx T 6 SERVICE
Alarm 7xx A 7 MEDICAL
Alarm 8xx A 8 MESSAGE
Restr 9xx R 9 RESTORE
CloseGrp Bxx C C GROUP CLOSING
OpenGrp Cxx O O GROUP OPENING
Bypas Dxx B B CANCEL
UnByp ExxH H ZONE BYPASS
Cancl Fxx / / UN BYPASS
Ensure that the central station automation software is able to
accept these codes if they are to be used.
Event Codes Summary
Code Event
0 Automatic Test
1 Fire Alarm
2 Panic Alarm
3 Burglary Alarm
4 Closing by User Number
5 Opening by User Number
6 Service
7 Medical Emergency
8 Message
9 Restore
A Alarm
B Bypass
C Closing
D or / Cancel
H Unbypass
O Opening
R Restore
T Trouble
Z Common Event Code
20 Hex Common Event code “Space”
23
Page 26

SCS2-300 – Central Processing
Module
GENERAL INFORMATION
The SCS2-300 16-bit microcontroller and real-time assembly
language program running at 16 MHz allow the system to
quickly and efficiently execute several tasks at the same
time. The use of a unique menu display system enhances
the system’s ease of use for the operator and makes the
system configuration and programming simple and efficient.
Several diagnostic modes are available to assist the operator
in troubleshooting and maintenance.
FEATURES
• Multi-tasking allows the receiver to perform functions
that might otherwise be delayed by a slow computer
acknowledgment response
• Fast internal communication results in practically no
delay in transfer of information between the line card
and the SCS2-300.
SCS2-300 CONTROLS
• 128-event computer alarm message buffer
• 128-event printer alarm message buffer
• LCD contrast easily adjusted
• Ability to individually examine each line card message
• “Cold boot” option allows easy installation of default
configuration
• Built-in diagnostic “debug” mode allows each line card
to be monitored individually
• Serial port COM1 features LED indicators for Transmit
(Tx) and Receive (Rx) functions
• Available COM1 Baud rates: 110, 150, 300, 600, 1200,
2400, 4800, 9600, 19200 or 38400
• COM1 Data bits: 7, 8 or 9
• COM1 Parity: Even, odd or none
• COM 1 Stop bits: fixed at 1
• Built-in Serial Communication Diagnostic Mode for
COM1. The technician can test the communication with
the central station computer and monitor what is being
transmitted to and received from the computer
• Two programmable outputs, one with front panel LED
indicator
• Buzzer mute option for system testing
• System menu for easy programming and diagnostics
• Software version 2.1 (or higher) supports SCADA
(SCADA stands for Supervisory Control and Data
Acquisition) line cards for networks of receivers
• Software version 2.1 (or higher) supports line card and
SCS2-300 programming through computer software
interface
• Software version 2.4 (or higher) allows up to 30 line
cards to be connected to a single SCS2-300.
LIQUID CRYSTAL DISPLAY
2-line, 16 character per line liquid crystal display; backlit for
easy reading in low level light
“OPTION” LIGHT
Indicates the state of the “Option” programmable output.
Flashing 2 seconds ON, 2 seconds OFF, with the standard
program.
[ACK] BUTTON
Used to manually acknowledge an alarm event when a computer
is not connected to the receiver or when the UL Receiver
option is enabled. Press the [ACK] button to turn the “ACK”
light OFF and silence the buzzer. The [ACK] button is also
used in the Configuration mode to select menu items.
“ACK” LIGHT
Flashes when a message is received from the line card and
COM1 is disabled or disconnected.
[ENTER] BUTTON
Executes a command or scrolls the display to the next message.
“TX” LIGHT
Monitors the COM1 transmission signal.
[BACKSPACE] BUTTON
Used to erase errors or move the cursor back one character;
also used to scroll the display back to the previous message.
“RX” LIGHT
Monitors the signal received from the computer connected
to COM1.
[ESCAPE] BUTTON
Used to save changes and exit a mode; also used for other
functions when indicated on the display screen.
“AC” LIGHT
Indicates that AC power is present.
24
Page 27

SCS2-300 OPERATING MODE
SCS2-300 COLD STARTUP
The “cold boot” should be performed to install the default
system software. Follow the procedure described here to
perform a “cold boot” of the SCS2-300.
Remove the SCS2-300 from the card cage.
Turn the “PROG EN” (Program Enable) switch ON. The Program
Enable switch is located on the left side of the SCS2-300
unit; use a small screwdriver to turn the switch ON by
turning it clockwise.
Reinstall the SCS2-300 in the card cage, but do not fasten
the mounting screws. The SCS2-300 should power up and
this message will be displayed:
SYST COLD BOOT?
Ent=Yes Bsp=No
Press the [Enter] button to perform the “cold boot.” This
message will be displayed:
SYST COLD BOOT
Executing!
After approximately 1 second, this message will be displayed:
Please Turn Off
Program Switch!
The SCS2-300 will remain in an inoperative mode until the
Program Enable switch is turned OFF.
• Pull the SCS2-300 part way out of the card cage
• Use a small screwdriver to turn the Program Enable
switch OFF by turning it counterclockwise.
• Reinstall the SCS2-300 in the card cage and secure the
faceplate screws
The SCS2-300 is now ready for operation. Set the clock and
calendar and configure the SCS2-300.
SCS2-300 IN STANDBY MODE
When the SCS2-300 is in Standby mode, a message similar
to this will be displayed:
*FEB-23 07:30:45
Scanning 1E (30)
This indicates that the system is ready to receive data from the
line cards and input from the numeric keypad and push buttons.
SCS2-300 CONFIGURATION MODE
The Configuration mode allows programming of the various
features and options available on the SCS2-300. To enter
the Configuration mode, press the [Escape] button; this
message will be displayed:
Enter MASTER-ID
....
Enter the Master Access Code using the keypad; the default
Master Access Code is “CAFE.” When the access code is entered,
the screen will display the first option in the Options menu:
01:Sys Date/Time
Ent:+ Bs:- Ack:S
Press the [Enter] button to display the next menu item, or
press the [Backspace] button to display the previous menu
item; press the [ACK] button to select the menu item presently
displayed on the screen.
CONFIGURATION OPTIONS
The SCS2-300 features 28 configuration options:
01 System Date and Time
02 System Passwords
03 Number of Line Cards
04 Printer Select
05 COM1 Configuration
06 COM1 Format
07 Acknowledge Wait Delay
08 Heartbeat Select
09 COM2 Configuration
10 COM2 Format
11 Contrast Adjust
12 UL Receiver Option
13 Erase Memory
14 Mute Buzzer
15 Keep Last Message
16 Debug ComPort
17 Test 9v/12v Batt
18 Debug Line Card
19 Program Version
20 Monitor Battery
21 Year / Second
22 Force Reset
23 Change Receiver Number
24 Scada COM1 and COM2 Control
25 Printer Control
26 Printer Test
27 Printer Width
28 Tamper Input
Option 01: Setting the Clock
Option [01] allows the SCS2-300 date and time to be set.
Press the [ACK] button when the “01: Sys Date/Time” message
is displayed; this message will be displayed:
(D/M/Y) 23/02/93
(H:M:S) 07:30:45
Enter the date and time using the numbers 0 through 9 only.
Press the [Enter] button to move the cursor one character to
the right; press the [Backspace] button to move the cursor one
space to the left. When the date and time are entered, press
the [Escape] button; when the [Escape] button is pressed, the
next Configuration option will be displayed on the screen.
Note that if “0” or a number greater than “12” is programmed
for the month, the screen will display the word “Nul” in place
of the month while in the Standby mode. “Nul” will also be
displayed for the time if the time has not been programmed
properly.
25
Page 28

Option 02: Changing System Passwords
Option [02] allows the SCS2-300 passwords to be changed
or erased. Press the [ACK] button when the “02: Sys Passwords”
message is displayed; this message will be displayed:
PassID#0: xxxx
Operator: S.G.
Sixteen 4-digit passwords are available for use on the SCS2-
300. Password 0 is the Master password, and passwords 1
through F may be assigned to individual operators. Two
letters, representing the initials of the operator, may be
assigned to each password to help in identifying the operator.
When this option is entered, a cursor will appear beneath
the first character in the 4-digit password. Enter a new
password using the 0 through 9 and the A through F keys.
To enter the operator’s initials, use the [0] and [1] keys to
scroll forward or backward through the alphabet. When
the desired letter is displayed, press the [Enter] button;
the cursor will move to the next character. To move the
cursor to the previous character, press the [Backspace]
button. When the password and initials have been entered,
press the [Escape] button; the next password will be
displayed. When all passwords have been programmed, the
display will advance to the next Configuration option.
Option 03: Change the Number of Line Cards
Option [03] is used to set the number of line cards polled
by the SCS2-300. Press the [ACK] button when the “03:
Numb of Lcard” message is displayed; this message will be
displayed:
#LnCard Attached
0E Change to:xx
Enter a number from 01 to 1E to indicate how many line
cards, from 1 to 30, are to be polled by the SCS2-300. When
the new number is entered, press the [Enter] button; the
screen will then display the next Configuration option.
Option 04: Select Printer Function
Option [04] determines how the printer connected to the
SCS2-300 will operate. Press the [ACK] button when the
“04:PrinterSelect” message is displayed; this message will
be displayed:
Prter Config As:
Bkup:0 Enable:1
Enter a digit from 0 through 1 for both “Bkup” and “Enable”
according to the chart below:
Bkup Enable Printer Operation
0 0 Bypass printer
0 1 Enable printer (default setting)
1 x Enable printer only if COM1 is in failure
where x = don’t care
(same as above)
If “Bkup” is programmed as “1,” messages will only be sent
to the printer if an acknowledge signal is not received from
COM1. When using the Star 8340 printer, the SCS2-300 is
able to print in both red and black. If an IBM-compatible
printer is selected, the SCS2-300 will print in black only.
When programming is complete, press the [Escape] button;
when the [Escape] button is pressed, the next Configuration
option will be displayed on the screen.
Option 05: COM1 Configuration
Option [05] determines the Baud rate, data bits and parity to
be used on COM1. Press the [ACK] button when the “05:
Com#1 Config.” message is displayed; this message will be
displayed:
Com#1 Config As:
Br:12 Da:7 Pa:2
• Br: Baud Rate
Enter... for Baud Rate
11 110
15 150
03 300
12 1200
24 2400
48 4800
96 9600
19 19200
38 38400
• Da: Data Bits
Enter a number from 7 through 9 to indicate 7, 8, or 9
data bits.
• Pa: Parity
Enter… for Parity
0 no parity
1 odd parity
2 even parity
NOTE: The stop bit is fixed at 1.
When programming is complete, press the [Escape] button;
when the [Escape] button is pressed, the next Configuration
option will be displayed on the screen.
Option 06: COM1 Communication Format
Option [06] determines the communication format to be
used on COM1. Press the [ACK] button when the 06: Com#1
Format” message is displayed; this message will be displayed:
Com#1 Format is:
1 Change to: x
Enter a number from 0 to 4 to select one of the following:
0 COM1 disabled
1 DMP format (default setting)
2 DMP format with common event code “A”
3 DMP format with header 01 Hex.
4 DMP Clock Signal format
When programming is complete, press the [Enter], [Backspace],
or [Escape] button; when a button is pressed, the next
Configuration option will be displayed on the screen.
Option 07: Wait Time for Acknowledge on COM1
Option [07] determines the acknowledge wait time, in seconds,
to be used for COM1. Press the [ACK] button when the
“07:ACK Wait Time” message is displayed; this message will
be displayed:
<ACK> Wait Delay
4.0S Chg to:x.xS
26
Page 29

Enter a decimal number from 4.0 to 9.9. Use the [Enter] and
[Backspace] buttons to move the cursor forward or backward
when editing the acknowledge time. When programming is
complete, press the [Escape] button; when the [Escape]
button is pressed, the next Configuration option will be
displayed on the screen.
NOTE: It is strongly recommended that you not change
the default setting (4.0 sec.) unless so instructed by a
DMP technician.
Option 08: Heartbeat Time for COM1
Option [08] determines at what time interval, in seconds,
the supervisory “heartbeat” transmission will be sent to
COM1. The “heartbeat” transmission is used to ensure that
communications through COM1 are functioning normally. Press
the [ACK] button when the “08: Heartbeat Sel” message is
displayed; this message will be displayed:
Heartbeat Select
30S Chg to:XXSec
Enter a decimal number from 01 through 99 to determine the
time interval between heartbeat transmissions. Program this
option as “00” to disable the heartbeat transmission. Use the
[Enter] and [Backspace] buttons to move the cursor forward
or backward when editing the heartbeat time. When
programming is complete, press the [Escape] button; when
the [Escape] button is pressed, the next Configuration option
will be displayed on the screen.
Option 09: COM2 Configuration
Option [09] determines the Baud rate, data bits and parity
to be used on COM2. Press the [ACK] button when the “05:
Com#1 Config.” message is displayed; this message will be
displayed:
Com#2 Config As:
Bd:03 Da:8 Pa:2
• Bd: Baud Rate
Enter… for Baud Rate
11 110
15 150
03 300
12 1200
• Da: Data Bits
Enter a number from 7 through 9 to indicate 7, 8, or 9
data bits.
• Pa: Parity
Enter… for Parity
0 no parity
1 odd parity
2 even parity
NOTE: the stop bit is fixed at 1.
When programming is complete, press the [Escape] button;
when the [Escape] button is pressed, the next Configuration
option will be displayed on the screen.
Option 10: COM2 Communication Format
Option [10] determines the application to be used on COM2.
Press the [ACK] button when the “10: Com#2 Format” message
is displayed; this message will be displayed:
Com#2 Format is:
0 Change to x
Enter a number from 0 to 2 to select one of the following:
0 PC Computer Programming Software capability (default
setting)
1 SCADA connection through Com#2 enable
2 SCADA connection through Com#2 with Redundancy
Backup enable
Option 11: Adjust LCD Contrast
Option [11] allows the contrast of the message display screen
to be adjusted. Press the [ACK] button when the “11: Contrast
Adj” message is displayed; this message will be displayed:
Contrast Level
.....
Press the [Enter] button to increase the contrast; press the
[Backspace] button to reduce the contrast.
When the display contrast is adjusted to the desired level,
press the [Escape] button; when the [Escape] button is pressed,
the next Configuration option will be displayed on the screen.
Option 12: UL Receiver Option
To have the SCS2 operate in compliance with UL Listed
Central Station requirements, press the [ACK] button when
the “12: UL Receiver” message is displayed. This message
will be displayed:
UL Requirement:
0 Change to:x
When Option [12] is programmed as “1,” the SCS2-300 will
operate according to the following UL864 requirements:
• All signals are sent to the computer and/or the printer if
connected.
• The SCS2-300 retains alarm messages received from
the line cards and the SCS2-300 supervisory signal on
the LCD display, and activates the buzzer to alert the
operator. The display will also indicate if additional
signals are waiting to be displayed and acknowledged.
• The operator must press the [ACK] button to
acknowledge the signal manually. The SCS2-300 will
scroll to the next message if there are more messages
to display.
• The SCS2-300 returns to the Standby mode when all
signals have been manually acknowledged.
When Option [12] is programmed as “00,” functions described
above will be bypassed. The default setting for Option 12 is
“00.”
NOTE: By activating this option, the SCS2-300 will overwrite some option settings if they are not set to comply
with UL requirements.
Option 13: Erase Alarm Message Buffer
NOTE: Under normal operating conditions, the b uffer should
not be erased.
Option [13] is used to erase the SCS2-300 alarm message
buffer. Press the [ACK] button when the “13: Erase Memory”
27
Page 30

message is displayed; this message will be displayed:
Erase all MEMORY
ent=Y bs=N esc=X
Press the [Backspace] or [Escape] buttons to cancel this
option without erasing the SCS2-300 buffer. To erase the
buffer, press the [Enter] button. When the [Enter] button is
pressed, this message will be displayed:
Are You Sure?
ent=Y bs=N esc=X
Again, press the [Backspace] or [Escape] buttons to cancel
this option without erasing the SCS2-300 buffer. To erase
the buffer, press the [Enter] button. When the [Enter] button
is pressed, all printer and computer messages will be erased.
Ensure that a printed record of the alarm messages is made
before erasing the buffer.
Option 14: Mute Buzzer
A buzzer will sound when the SCS2-300 receives an alarm
and is unable to forward the alarm message to COM1. The
buzzer can be silenced by programming Option [14] as “1.”
Press the [ACK] button when the “14: Mute Buzzer” message
is displayed; this message will be displayed:
Mute Buzzer: 1/0
0 Change to:X
When programmed as “1,” the buzzer will not sound when
an alarm is received and cannot be forwarded to COM1.
When programmed as “0,” the buzzer will sound when an
alarm is received and cannot be forwarded to COM1. The
default setting is “0.”
NOTE: Option 14 will have no effect on the buzzer if the
UL Receiver Option is enabled.
Option 15: Display Last Message
When an alarm is received, the alarm message is displayed
on the screen until the message is forwarded to the computer
and printer. When the message is sent to the computer and
printer, the Standby mode message will be displayed. The
most recent alarm message may be retained on the screen
until the next alarm message is received. To retain the most
recent alarm message, program Option [15] as “1”. Press
the [ACK] button when the “15: Keep Lst Msg” message is
displayed; this message will be displayed:
Keep Lst Msg:1/0
0 Change to:X
To have the Standby mode message displayed after an
alarm is received and sent to the computer or printer,
program Option [15] as “0”. The default setting is “0”.
When “0” or “1” has been entered, press the [Enter] key.
Option 16: ComPort Diagnostics
The SCS2-300 features a Diagnostics mode that allows the
operator to view all data being communicated through COM1
(or COM2) on the display screen. To use this feature, press
the [ACK] button when the “16: Debug ComPort” message is
displayed; this message will be displayed:
Debug ComPort1,2
0 Change to:x
Enter “1” and press the [Enter] button to enable the Diagnostics
feature on Com1 (or “2” for Com2). All data being sent
through COM1 will now be displayed on the screen. A typical
transmission is shown here:
1RRL AAAAsX
YY N 06
N represents the number of times the SCS2-300 tries to resend the message to COM1; this value should be “1” during
normal communication.
[06] represents the Acknowledge received from COM1 To
disable the diagnostics feature, program Option 16 as “0”.
The Diagnostics mode should only be enabled to test and
review the information being sent to COM1; the Diagnostics
feature should be disabled during normal receiver operation.
Option 17: Test 9V/12V Battery
Some earlier SCS2-300 units provide 9V battery for memory
storage while present SCS2-300 units use different technology
for this purpose. If the unit uses 9V battery , the battery
voltage should be supervised by enabling this option. Press
[ACK] button when the “17:Test 9V/12v .” message is displayed;
the following message will be displayed:
9V/12V Batt: 0-3
2 Change to:x
0 Do not supervise the 12V and 9V batteries
1 Supervise 9V only
2 Supervise 12V only
3 Supervise both batteries
Option 18: Line Card Diagnostics
The SCS2-300 features a Diagnostics mode that allows the
operator to view all data being communicated between the
SCS2-300 and the line cards. To enable this feature, press
the [ACK] button when the “18: Debug LnCard#” message is
displayed.
Enter a hexadecimal number from “1” through “E” to monitor
line card 01 through 14, or enter “FF” to monitor all line
cards connected to the SCS2-300. Standby communications
between the line card and the SCS2-300 will be displayed
with messages similar to this:
01
FE
• 01 represents the line card number
• FE represents the response from line number 1 to the
normal SCS2-300 alarm messages transmitted by the
line cards will be displayed with messages similar to
this:
L01-1234-C01
OpenGrp
NOTE: When Diagnostics mode are enabled, messages
will be displayed according to the following priority:
• UL message - Acknowledge required
• COM1 Diagnostic messages
• Line Card Diagnostic messages
• “Retain last message” displays
• Internal Troubles messages
• Standby mode message
Refer to “Message Priorities” for more information.
28
Page 31

Option 19: Display Software Version
To display the software version presently installed in the
SCS2-300, press the [ACK] button when the “19:Program
Vers#” message is displayed; a message similar to this will
be displayed:
SG-SCS2-300 RECEIVER
*June-22-00 V2.4
Option 20: Battery Monitor
To view the present voltage of the 12V general backup
batteries, press the [ACK] button when the “20: Monitor
Batt.” message is displayed. A message similar to this will
be displayed:
Battery Monitor:
12V:13.9 Volt
If the 12V battery is disconnected, approximately 11.2V will
be indicated for that battery.
NOTE: If option 17 is at 03, a message similar to this will
be displayed:
Battery Monitor:
9V:08.8 12V:13.9
Option 21: Alarm Messages Print Year or Seconds
Alarm messages may be programmed to include either the
year in their dates, or the seconds in their times. To program
Option [21], press the [ACK] button when the “21: Year/
Second” message is displayed; this message will be displayed:
Year/Second:1/0
0 Change to:X
Program Option [21] as “1” to include the year in the alarm
message date; alarm messages will be printed as follows:
L01-1234-05 Alarm 21:24-24/11/94
Note that the time (21:24) is represented with just hours
and minutes, and that the year is added to the date (24/
11/94). Program Option [21] as “0” to include the seconds
in the alarm message time; alarm messages will be printed
as follows:
L01-1234-05 Alarm 21:24:30-24/11
Note that the time (21:24:30) now includes hours, minutes
and seconds; the date (24/11) only indicates the day and
the month.
NOTE: This option will affect COM1 when COM1 is programmed with communication format 4.
Option 23: Change Receiver Number
The receiver number is used to identify the receiver when
communicating to COM1 and printer to report internal troubles.
To change the receiver number, press the [ACK] button
when the “23: Chg Receiver#” message is displayed. This
message will be displayed:
Receiver Number:
01 Chg to:xx
Enter a new receiver number using the hexadecimal numbers
“01” to “FF”. When a new number is entered, press the
[Enter] button.
Options 24 to 27: Not used
Option 28: Tamper Input
To view the Tamper Input / UPS Low Battery supervisory,
press the [ACK] button until “28: Tamper Input” is displayed.
Press [ACK], the following message will then be displayed:
UPS/<ACK> : 0/1
0 Change to: 0
When this option is set to “0,” the TAMP terminal when
shorted to ground will send a UPS Low Battery supervisory
to the computer and activate the buzzer and ACK LED. The
buzzer will shut off when the [ACK] button is pressed, or
the UPS Low Battery is restored. When the option is set to
“1,” the TAMP terminal can be used as a remote [ACK]
button when shorted to ground. The default setting is “0.”
Connect a push-button switch between the TAMP terminal
and the GND terminal. When shorting the TAMP terminal
with the ground, the receiver will react as if the front [ACK]
button had been pressed. This could be used to install a
remote Acknowledge button when using the receiver in manual
mode.
Option 22: System Reset
To reset the SCS2-300 program, press the [ACK] button when
the “22: Force Reset” message is displayed; this message
will be displayed:
Force Sys Reset
Ent=Yes Bsp=No
Press the [Backspace] button to cancel the option without
resetting the SCS2-300. To reset the SCS2-300, press the
[Enter] button. The reset will take approximately 8 seconds
to complete. Press the [Backspace] or [Escape] buttons to
move to the next Configuration option.
29
Page 32

MESSAGE PRIORITIES
When in Standby mode, the SCS2-300 will display warning
and other operational messages according to the following
priority:
1 UL Requirement Message
2 COM1/COM2 Diagnostics
3 Line Card Diagnostics
4 “Retain last message” Displays
5 Printer Error
6 COM1 Absent
7 12V Battery Low
8 9V Battery Low
9 AC Failure
10 Standby Mode Message
UL REQUIREMENT MESSAGE
When Option [12] is programmed as “01,” the [ACK] button
must be pressed to acknowledge each incoming alarm
manually and to silence the internal buzzer.
COM1 DIAGNOSTICS
If both Option [16] and Option [06] are enabled, the screen
will display the data being communicated through COM1.
Refer to Option [16] for information.
LINE CARD DIAGNOSTICS
If Option [18] is enabled, the screen will display the data
exchanged between the SCS2-300 and the selected (or all)
line card(s). Refer to Option [18] for more information.
“RETAIN LAST MESSAGE” DISPLAYS
If Option [15] is enabled, the latest printer message will be
retained on the display screen. Refer to Option [15] for more
information.
PRINTER ERROR
If Option [04] is enabled and there is a printer trouble (for
example, printer off-line, paper out, and so on), a message
similar to this will be displayed:
*Feb-23 07:30:45
<Printer ERROR!>
COM1 ABSENT
If Option 06 is enabled and COM1 is absent (for example,
disconnects, off-line, or fails to send acknowledge signal), a
message similar to this will be displayed:
*Feb-23 07:30:45
<<Com#1 ABSENT>>
12V BATTERY LOW
If the 12V backup battery is disconnected or its voltage is low,
a message similar to this will be displayed:
*Feb-23 07:30:45
12V Battery LOW!
AC FAILURE
If AC power is removed from the SCS2-300, this message will
be displayed:
*Feb-23 07:30:45
<AC Power LOST!>
Standby Mode Message
During normal standby operation, this message will be displayed:
*Feb-23 07:30:45
Scanning 1E (30)
SCS2-300 UTILITY MODES
SCS2-300 v2.4 provides for a 2 digit line card number. Since
v2.4 is being shipped with all SCS2-200 modules, the sample
screens need to be changed.
[A] Send Computer Messages to Printer
[B] Operator Log-On
[C] System Command Mode
[D] Send Printer Messages to the Printer
[E] Examine Printer Messages on Display Screen
[F]Examine Computer Messages on Display Screen
[A] SEND COMPUTER MESSAGES TO PRINTER
This mode is used to send the computer messages from the
buffer to the printer. When the [A] key is pressed, this message
will be displayed:
Dump COM Msg->PRT
Lcard#:FF Ent:EXE
Enter a hexadecimal number to print the following:
Enter... to print
00 SCS2-300 internal supervisory signals (if any)
FF Computer messages for all line cards and
SCS2-300 internal supervisory signals
01-E Computer messages for specified line card
Example: If “0” is entered, the following will be printed:
Dump Computer Alarm Buffer
1011 ...... 0000 . R .. 06 12:37:31 - 12/10 106
1011 ...... 0000 . A .. 01 12:38:22 - 12/10 106
NOTE:“106” indicates the message was sent to the computer
once and the computer has responded correctly with an [06]
acknowledge.
[B] OPERATOR LOG-ON
Different operators may “log on” to the system by entering this
mode. When an operator logs on, a message similar to this
one will be printed: “Operator on duty S.G. 11:03-21/12/92”;
the operator’s initials (if programmed) and the time and date
will be printed. If the Star 8340 printer is being used, this
message will be printed in red.
To log on, press the [B] key, and then enter a 4-digit password.
If a valid password is entered, a log-on message will be
printed. If an invalid password is entered, the SCS2-300 will
sound a tone to indicate that the code was entered incorrectly.
Refer to SCS2-300 Option [02] for information on programming
operator passwords and initials.
30
Page 33

[C] SYSTEM COMMAND MODE
The System Command mode is used to send commands to
the line cards through the SCS2-300. To enter this mode, press
[C] and then enter an Operator password. When the password
is entered, this message will be displayed:
LCard:__ Comd:__
Op:__ Cd:__ Sc:__
• LCard: Enter a 2-digit hexadecimal number from 01 to
0E to indicate which line card is to be affected.
• Comd: Enter one of the line card Commands described
in the SCS2-200 line card Menu mode section of this
manual
• Op: and Cd: “Op” and “Cd” are used to indicate
parameters that may be required within certain
commands. For example, when using the F7 line card
programming command “Op” and “Cd” are used to
indicate the Option number and the new code
programmed for that option.
• Sc: “Sc” is used with SCADA applications. Enter digits
using the keypad; when a digit is entered, the cursor
will move one character to the right. Press the
[Backspace] button to delete the character presently
indicated by the cursor and move the cursor 1 character
to the left. When a command has been entered, press
the [Escape] button to send the command to the line
card. If more than one command is to be sent, press
the [ACK] button to send the command presently
displayed on the screen. Another command may now
be entered.
[D] SEND PRINTER MESSAGE TO THE PRINTER
With the SCS2-300 in the Standby mode, press the [D] key to
send printer messages in the buffer to the printer. When the
[D] key is pressed, this message will be displayed:
Dump PRT Msg->PRT
LCard#:FF ent:EXE
Enter a hexadecimal number to print the following:
Enter... to print
00 SCS2-300 internal trouble messages (if
any)
01to1E Messages for specified line card
FF Messages for all line cards
If an error is made in entering the number, simply re-enter the
desired number on the keypad.
Press the [Backspace] or [Escape] button to cancel this function
and return to the Standby mode, o r, press the [Enter] button to
print the indicated messages. When the [Enter] button is pressed,
the SCS2-300 will print the printer messages, starting with the oldest
message. The messages will be printed in red if the Star DP8340
printer is being used. If the SCS2-300 receives new alarms from the
line card while the buffer is being printed, the new alarms will be
sent to the printer when the buffer printout is completed.
[E] EXAMINE PRINTER MESSAGES ON DISPLAY
SCREEN
With the SCS2-300 in the Standby mode, press the [E] key to
review printer messages on the display screen. When the [E]
key is pressed, this message will be displayed:
Exam PRINTER msg
LCard#:FF ent:EXE
Enter a hexadecimal number to view the following:
Enter... to view
00 SCS2-300 internal trouble messages (if
any)
01to1E Messages for specified line card
FF Messages for all line cards
If an error is made in entering the number, simply re-enter the
desired number on the keypad.
Press the [Backspace] or [Escape] button to cancel this function
and return to the Standby mode, or, press the [Enter] button
to view the indicated messages. When the [Enter] button
is pressed, the SCS2-300 will display the printer messages,
starting with the most recent message. When [Enter] is pressed,
a message similar to this will be displayed:
L01-1234-05
Alarm xx
"xx" indicates the number (in hexadecimal) of printer messages
in the line card buffer.
Press the [Enter] button to scroll through the messages; the
messages will be displayed in order from the most recent to
the oldest. Press the [Backspace] button to scroll from the
oldest message to the most recent.
When finished viewing the messages, press the [Escape] button.
[F] EXAMINE COMPUTER MESSAGES ON DISPLAY
SCREEN
With the SCS2-300 in the Standby mode, press the [F] key
to review computer messages on the display screen. When
the [F] key is pressed, this message will be displayed:
Examine COM1 msg
LCard#:FF ent:EXE
Enter a hexadecimal number to view the following:
Enter... to view
00 SCS2-300 internal trouble messages (if any)
01to 1E Computer messages for specified line card
FF Computer messages for all line cards
If an error is made in entering the number, simply re-enter
the desired number on the keypad.
Press the [Backspace] or [Escape] button to cancel this function
and return to the Standby mode, or, press the [Enter] button
to view the indicated messages. When the [Enter] button is
pressed, the SCS2-300 will display the computer messages,
starting with the most recent message. When [Enter] is pressed,
a message similar to this will be displayed:
1011......0000.A
..03 1.06 xx
"xx" indicates the number (in hexadecimal) of computer
messages in the line card buffer.
Press the [Enter] button to scroll through the messages; the
messages will be displayed in order from the most recent to
the oldest. Press the [Backspace] button to scroll from the
oldest message to the most recent. When finished viewing the
messages, press the [Escape] button.
SCS2-300 Computer Interface
The SCS2-300 is able to send alarm messages to a computer
connected to the COM1 serial port. This section describes the
communication procedures, and the communication formats
available for use.
31
Page 34

OVERVIEW OF COMMUNICATION
When the SCS2-300 receives data from a line card, it forwards
the data to COM1 and awaits an acknowledgment signal
from the computer. If a NAK signal is received from the
computer, the SCS2-300 will make 4 attempts to send the
data. If all four attempts fail, SCS2-300 buzzer will sound
and the SCS2-300 will retain the alarms in its internal buffer
until communications are restored. This routing provides
reliable and supervised communication between the SCS2300 and the line cards. The SCS2-300 also monitors the
connection to the computer by sending a supervisory
“heartbeat” signal through COM1 every 30 seconds. If the
“heartbeat” transmission determines that the computer is
off-line or disconnected, a message similar to this will be
sent to the printer:
Com#1 Absent!! 09:45-21/09/92
Note that the message indicates the time and date that
communications through COM1 were determined to be
interrupted. When COM1 communications are re-established,
a message similar to this one will be printed:
Com#1 Restored 09:50-21/09/92
Note that the message indicates the time and date that
communications through COM1 were determined to be reestablished. The “heartbeat” feature may be disabled if
this feature is not compatible with the central station
automation software being used on the computer.
SCS2-300 COM1 STATUS REPORT MESSAGES
The SCS2-300 will send the following messages to COM1 to
report internal status conditions. SCS2-300 will use an account
code of “0000” to indicate that it is reporting an internal
condition. The line number is fixed to be “0.”
Sent to COM1 Event
0000 A 00 Reserved to indicate Operator activity
for C or ESC mode (not implemented in
this program version).
0000 A 01: Printer Error
0000 R 02: Printer Restored
0000 A 03: 12V Battery Low
0000 R 04: 12V Battery Restored
0000 A 05: COM1 Absent
0000 R 06: COM1 Restored
0000 A 07: UPS AC Fail
0000 R 08: UPS AC Restored
0000 A 11: 9V Batt. Low
0000 R 12: 9V Batt. Restr
0000 A 13: COM2 Absent
0000 R 14: COM2 Restored
0000 A 15: AC Failure
0000 R 16: AC Restored
0000 A 17: UPS Low Battery
0000 R 18: UPS Low Batt Restr
0000 T 19: SCS2-300 Master Fail
0000 A C1 to CU: Internal Communication Error
NOTE: Trouble can be caused by bad backplane connections or RAM failure. Cold boot may be necessary.
0000 A D0: SCS2-300 Reset
When a SCS2-300 event is sent to the computer that has the
line card number in it, the SCS2-300 changes the value of
the line card number to a letter. Line cards 01 to 1E will be
displayed as 1 to 9 for line cards 01 to 09 and A to U for
line cards 0A to 1E.
0000 A F1 to FU: Line Card 01 to 1E Absent
0000 R E1 to EU: Line Card 01 to 1E Restored
The following messages will be sent to COM1 to report status
changes on the line cards. Again, the account code of “0000”
indicates that an internal event is being reported. The line
number varies depending on which line card is reporting.
Sent to COM1 Event
#0000|NYNRRL Faulty Data Received on Line Card
#0000|NLTRRL Telephone Line Fault on Line Card
#0000|NLRRRL Telephone Line Restored on Line Card
#0000|NYCRRL Faulty Call; No Data Received on Line
Card
Depends on Option [7E] Audio on line X
When a SCS2-300 event is sent to the printer that has the
line card number in it, the SCS2-300 changes the value of
the line card number to a letter. Line cards 01 to 1E will be
printed as 1 to 9 for line cards 01 to 09 and A to U for line
cards 0A to 1E.
The message will be printed as follows:
L1T-Linecard restored 17:49:56-11/08
L1U-Linecard Inc. Resp. 17:51:36-11/08
L1S-Comm Error 17:35:37-11/08
32
Page 35

SCS2-300 EPROM PROGRAMMING
6500 05H Printer strobe pulse width
default = 5 microseconds
6501-6502 3E80 Delay time x 0.25 ms to re-send
message to COM1 if heartbeat is
not selected
6505-6506 0100H Test Line Card 01 at 01:00
6505-6508 0115H Test Line Card 02 at 01:15
6507-650A 0130H Test Line Card 03 at 01:30
6509-650C 0145H Test Line Card 04 at 01:45
650B-650E 0200H Test Line Card 05 at 02:00
650D-6510 0215H Test Line Card 06 at 02:15
6511-6512 0230H Test Line Card 07 at 02:30
6513-6514 0245H Test Line Card 08 at 02:45
6515-6516 0300H Test Line Card 09 at 03:00
6517-6518 0315H Test Line Card 0A at 03:15
AUTOMATION PROTOCOLS
The DMP SG-SCS2 receiver sends the various protocols to
report signals to the central station computer via an RS-232
port. The complete description of protocols is available upon
request.
DATA BYTE PROTOCOL
The DMP SCS2 receiver uses a default configuration of 19200
Baud, one start bit, seven data bits, one even parity bit, and
one stop bit structure to transmit and receive signals on the
RS-232 port. This protocol can be programmed on the receiver
to enable different configurations.
ACKNOWLEDGEMENT OF THE SIGNAL
The DMP receiver requires an acknowledgment signal [ACK]
(Hex 06) from the computer software within 4 seconds for
each message sent. Failure to receive the [ACK] will result in
the retransmission of the same signal three times before giving
up. The same thing happens if the receiver receives a [NAK]
(hex 15). In case of communication failure with the computer,
the DMP receiver can store up to 127 times the number of
lines installed in its internal memory. The communication is
resumed when the first ACK is received on the heartbeat.
6519-651A 0330H Test Line Card 0B at 03:30
651B-651C 0345H Test Line Card 0C at 03:45
651D-651E 0400H Test Line Card 0D at 04:00
6501F6520 0415H Test Line Card 0E at 04:15
The 24 Hour Timetest will occur only for the first 14 line
cards. Changes are rarely required, but these features may
be changed to suit particular needs. To make changes to
the EPROM programming, first insert a standard SCS2-300
EPROM into an EPROM programming unit. Follow the
instructions provided with the EPROM programmer to select
addresses and modify data. Ensure that the correct addresses
are being programmed, and verify the existing data in the
address before making changes.
33
Page 36

APPENDIX A: SCS2-200 COMMUNICATION FORMATS
UL has verified compatibility with the following formats:
NAME HANDSHAKE DATA BAUD FORMAT EXTENDED KISS OFF
Ademco Slow 1400Hz 1900Hz 10bps 3/1,4/1(or 3/2),4/2 NO 1400Hz
Ademco Slow 1400Hz 1900Hz 10bps 4/2,4/1,3/1 YES 1400Hz
Silent Knight Fast 1400Hz 1900Hz 14bps 3/1,4/1(or 3/2), 4/2 NO 1400Hz
Silent Knight Fast 1400Hz 1900Hz 14bps 4/2,4/1,3/1 YES 1400Hz
Franklin 2300Hz 1800Hz 20bps 3/1,4/1(or 3/2), 4/2 NO 2300Hz
Franklin 2300Hz 1800Hz 20bps 4/2,4/1,3/1 YES 2300Hz
Radionics 2300Hz 1800Hz 40bps 3/1,4/2 NO 2300Hz
Radionics 2300Hz 1800Hz 40bps 4/2,3/1 YES 2300Hz
Radionics 2300Hz 1800Hz 40bps 3/1+parity NO 2300Hz
4/2+parity
Radionics 2300Hz 1800Hz 40bps 3/1+parity YES 2300Hz
4/2+parity
Sescoa S. Speed 2300Hz 1800Hz 40bps 4/3+Checksum NO 2300Hz
Sescoa S. Speed 2300Hz 1800Hz 40bps 4/3+Checksum ID O/C 2300Hz
SIA FSK FSK mark FSK mark 110bps tonal data ACK
Level 1, 2, and 3. Space 300bps
Contact ID Dual Tone DTMF DTMF 4/2/1/3/2/3 NO 1400Hz
D MP 2300Hz DTMF DTMF 4/1,4/2,4/3 NO 2300Hz
DMP Dual Tone DTMF DTMF 4/1,4/2,4/3 NO 1400Hz
D MP 2300Hz DTMF DTMF 4/3+Checksum NO 2300Hz
DMP Dual Tone DTMF DTMF 4/3+Checksum NO 1400Hz
S.F. Ademco Dual Tone DTMF DTMF 4/8/1 NO 1400Hz
S.F. Ademco Dual Tone DTMF DTMF 4/8/1 + Checksum NO 1400Hz
Ademco Express Dual Tone DTMF DTMF 4/1(option), 4/2 NO 1400Hz
FBI Super Fast 2300Hz DTMF DTMF 4/3/1 NO 2300Hz
Modem II FSK FSK 110 Baud FSK NO FSK
RadionicsBFSK 1400Hz FSK 42 Baud 3/2 NO 1400Hz
RadionicsBFSK 2300Hz FSK 42 Baud 3/2 NO 2300Hz
Silent Knight FSK1 2300Hz FSK 110 Baud 4/2, 5/2, 6/2 NO 2300Hz
Silent Knight FSK2 2300Hz FSK 110 Baud SIA equiv. NO 2300Hz
ITI FSK FSK 110/300 Baud NO FSK
Modem IIE FSK FSK 300 Baud NO FSK
Modem IIIa
DMP Data hsk FSK 300 Baud NO Data K-O
*Varitech 2300Hz FSK 40 Baud 4/2 NO 2300Hz
*Westec Double Dual Tone DTMF DTMF NO
*
UL has not verified compatibility with these formats.
2
FSK FSK 300 Baud NO FSK
34
Page 37

APPENDIX B: ASCII CHARACTER CHART
ASCII with library Corresponding ASCII
on printer Hex Character
(Option 30)
20 Space
B0 30 0
B1 31 1
B2 32 2
B3 33 3
B4 34 4
B5 35 5
B6 36 6
B7 37 7
B8 38 8
B9 39 9
C1 41 A
C2 42 B
C3 43 C
C4 44 D
C5 45 E
C6 46 F
C7 47 G
C8 48 H
C9 49 I
CA 4A J
CB 4B K
CC 4C L
CD 4D M
CE 4E N
CF 4F O
D0 50 P
D1 51 Q
D2 52 R
D3 53 S
D4 54 T
D5 55 U
D6 56 V
D7 57 W
D8 58 X
D9 59 Y
DA 5A Z
DC 5C \
35
Page 38

APPENDIX C DECIMAL - HEX - BINARY CONVERSION CHART
DEC HEX BINARY
000 00 0000 0000
001 01 0000 0001
002 02 0000 0010
003 03 0000 0011
004 04 0000 0100
005 05 0000 0101
006 06 0000 0110
007 07 0000 0111
008 08 0000 1000
009 09 0000 1001
010 0A 0000 1010
011 0B 0000 1011
012 0C 0000 1100
013 0D 0000 1101
014 0E 0000 1110
015 0F 0000 1111
016 10 0001 0000
017 11 0001 0001
018 12 0001 0010
019 13 0001 0011
020 14 0001 0100
021 15 0001 0101
022 16 0001 0110
023 17 0001 0111
024 18 0001 1000
025 19 0001 1001
026 1A 0001 1010
027 1B 0001 1011
028 1C 0001 1100
029 1D 0001 1101
030 1E 0001 1110
031 1F 0001 1111
032 20 0010 0000
033 21 0010 0001
034 22 0010 0010
035 23 0010 0011
036 24 0010 0100
037 25 0010 0101
038 26 0010 0110
039 27 0010 0111
040 28 0010 1000
041 29 0010 1001
042 2A 0010 1010
043 2B 0010 1011
044 2C 0010 1100
045 2D 0010 1101
046 2E 0010 1110
047 2F 0010 1111
048 30 0011 0000
049 31 0011 0001
050 32 0011 0010
051 33 0011 0011
052 34 0011 0100
053 35 0011 0101
054 36 0011 0110
055 37 0011 0111
056 38 0011 1000
057 39 0011 1001
058 3A 0011 1010
059 3B 0011 1011
060 3C 0011 1100
061 3D 0011 1101
062 3E 0011 1110
063 3F 0011 1111
DEC HEX BINARY
064 40 0100 0000
065 41 0100 0001
066 42 0100 0010
067 43 0100 0011
068 44 0100 0100
069 45 0100 0101
070 46 0100 0110
071 47 0100 0111
072 48 0100 1000
073 49 0100 1001
074 4A 0100 1010
075 4B 0100 1011
076 4 C 0100 1100
077 4D 0100 1101
078 4E 0100 1110
079 4F 0100 1111
080 50 0101 0000
081 51 0101 0001
082 52 0101 0010
083 53 0101 0011
084 54 0101 0100
085 55 0101 0101
086 56 0101 0110
087 57 0101 0111
088 58 0101 1000
089 59 0101 1001
090 5A 0101 1010
091 5B 0101 1011
092 5 C 0101 1100
093 5D 0101 1101
094 5E 0101 1110
095 5F 0101 1111
096 60 0110 0000
097 61 0110 0001
098 62 0110 0010
099 63 0110 0011
100 64 0110 0100
101 65 0110 0101
102 66 0110 0110
103 67 0110 0111
104 68 0110 1000
105 69 0110 1001
106 6A 0110 1010
107 6B 0110 1011
108 6 C 0110 1100
109 6D 0110 1101
110 6E 0110 1110
111 6F 0110 1111
112 70 0111 0000
113 71 0111 0001
114 72 0111 0010
115 73 0111 0011
116 74 0111 0100
117 75 0111 0101
118 76 0111 0110
119 77 0111 0111
120 78 0111 1000
121 79 0111 1001
122 7A 0111 1010
123 7B 0111 1011
124 7 C 0111 1100
125 7D 0111 1101
126 7E 0111 1110
127 7F 0111 1111
DEC HEX BINARY
128 80 1000 0000
129 81 1000 0001
130 82 1000 0010
131 83 1000 0011
132 84 1000 0100
133 85 1000 0101
134 86 1000 0110
135 87 1000 0111
136 88 1000 1000
137 89 1000 1001
138 8A 1000 1010
139 8B 1000 1011
140 8C 1000 1100
141 8D 1000 1101
142 8E 1000 1110
143 8F 1000 1111
144 90 1001 0000
145 91 1001 0001
146 92 1001 0010
147 93 1001 0011
148 94 1001 0100
149 95 1001 0101
150 96 1001 0110
151 97 1001 0111
152 98 1001 1000
153 99 1001 1001
154 9A 1001 1010
155 9B 1001 1011
156 9C 1001 1100
157 9D 1001 1101
158 9E 1001 1110
159 9F 1001 1111
160 A0 1010 0000
161 A1 1010 0001
162 A2 1010 0010
163 A3 1010 0011
164 A4 1010 0100
165 A5 1010 0101
166 A6 1010 0110
167 A7 1010 0111
168 A8 1010 1000
169 A9 1010 1001
170 A A 1010 1010
171 A B 1010 1011
172 A C 1010 1100
173 A D 1010 1101
174 AE 1010 1110
175 AF 1010 1111
176 B0 1011 0000
177 B1 1011 0001
178 B2 1011 0010
179 B3 1011 0011
180 B4 1011 0100
181 B5 1011 0101
182 B6 1011 0110
183 B7 1011 0111
184 B8 1011 1000
185 B9 1011 1001
186 B A 1011 1010
187 B B 1011 1011
188 B C 1011 1100
189 B D 1011 1101
190 B E 1011 1110
191 BF 1011 1111
DEC HEX BINARY
192 C 0 1100 0000
193 C 1 1100 0001
194 C 2 1100 0010
195 C 3 1100 0011
196 C 4 1100 0100
197 C 5 1100 0101
198 C 6 1100 0110
199 C 7 1100 0111
200 C 8 1100 1000
201 C 9 1100 1001
202 C A 1100 1010
203 C B 1100 1011
204 C C 1100 1100
205 C D 1100 1101
206 C E 1100 1110
207 C F 1100 1111
208 D0 1101 0000
209 D1 1101 0001
210 D2 1101 0010
211 D3 1101 0011
212 D4 1101 0100
213 D5 1101 0101
214 D6 1101 0110
215 D7 1101 0111
216 D8 1101 1000
217 D9 1101 1001
218 D A 1101 1010
219 D B 1101 1011
220 D C 1101 1100
221 D D 1101 1101
222 D E 1101 1110
223 DF 1101 1111
224 E0 1110 0000
225 E1 1110 0001
226 E2 1110 0010
227 E3 1110 0011
228 E4 1110 0100
229 E5 1110 0101
230 E6 1110 0110
231 E7 1110 0111
232 E8 1110 1000
233 E9 1110 1001
234 EA 1110 1010
235 E B 1110 1011
236 E C 1110 1100
237 E D 1110 1101
238 E E 1110 1110
239 EF 1110 1111
240 F0 1111 0000
241 F1 1111 0001
242 F2 1111 0010
243 F3 1111 0011
244 F4 1111 0100
245 F5 1111 0101
246 F6 1111 0110
247 F7 1111 0111
248 F8 1111 1000
249 F9 1111 1001
250 FA 1111 1010
251 FB 1111 1011
252 F C 1111 1100
253 FD 1111 1101
254 FE 1111 1110
255 FF 1111 1111
36
Page 39

APPENDIX D: PRINTER WORDS - OPTIONS [60] - [6F]
The English Printer Library is provided and can be selected by programming the event codes to the corresponding word.
Words available:
00 MEDICAL
01 PENDANT TRANSMITTER
02 FAIL TO REPORT IN
03 RESERVED
04 RESERVED
05 RESERVED
06 RESERVED
07 RESERVED
08 RESERVED
09 RESERVED
0A FIRE ALARM
0B SMOKE
0C COMBUSTION
0D WATER FLOW
0E HEAT
0F PULL STATION
10 DUCT
11 FLAME
12 NEAR FIRE ALARM
13 RESERVED
14 PANIC ALARM
15 DURESS ALARM
16 SILENT ALARM
17 AUDIBLE ALARM
18 DURESS
19 DURESS
1A RESERVED
1B RESERVED
1C RESERVED
1D RESERVED
1E BURGLARY
1F PERIMETER
20 INTERIOR
21 24 HOUR
22 ENTRY/EXIT
23 DAY/NIGHT
24 OUTDOOR
25 TAMPER
26 NEAR BURGLARY ALARM
27 INTRUSION VERIFIER
28 GENERAL ALARM
29 POLLING LOOP OPEN
2A POLLING LOOP SHORT
2B EXPANSION MODULE FAILURE
2C SENSOR TAMPER
2D EXPANSION MODULE TAMPER
2E SILENT BURG
2F SENSOR SUPERVISON FAILURE
30 RESERVED
31 RESERVED
32 24 HOUR NON-BURGLARY
33 GAS DETECTED
34 REFRIGERATION
35 LOSS OF HEAT
36 WATER LEAKAGE
37 FOIL BREAK
38 DAY TROUBLE
39 LOW BOTTLED GAS LEVEL
3A HIGH TEMPERATURE
3B LOW TEMPERATURE
3C RESERVED
3D LOSS OF AIR FLOW
3E CARBON MONOXIDE
3F TANK LEVEL
40 RESERVED
41 RESERVED
42 RESERVED
43 RESERVED
44 RESERVED
45 RESERVED
46 FIRE SUPERVISORY
47 LOW WATER PRESSURE
48 LOW CO2
49 GATE VALVE SENSOR
4A LOW WATER LEVEL
4B PUMP ACTIVATED
4C PUMP FAILURE
4D RESERVED
4E RESERVED
4F RESERVED
50 SYSTEM TROUBLE
51 AC LOSS
52 LOW SYSTEM BATTERY
53 RAM CHECKSUM BAD
54 ROM CHECKSUM BAD
55 SYSTEM RESET
56 PANEL PROGRAM CHANGED
57 SELF-TEST FAILURE
58 SYSTEM SHUTDOWN
59 BATTERY TEST FAILURE
5A GROUND FAULT
5B BATTERY MISSING/DEAD
5C POWER SUPPLY OVERCURRENT
5D ENGINEER RESET
5E RESERVED
5F RESERVED
60 RESERVED
61 RESTORE ALARM
62 OPENING ALARM
63 CLOSING ALARM
64 SOUNDER/RELAY
65 BELL 1
66 BELL 2
67 ALARM RELAY
68 TROUBLE RELAY
69 REVERSING
6A NOTIFICATION APPLIANCE 3 CHECK
6B NOTIFICATION APPLIANCE 4 CHECK
6C RESERVED
6D RESERVED
6E SYSTEM PERIPHERAL
6F POLLING LOOP OPEN
70 POLLING LOOP SHORT
71 EXPANSION MODULE FAILURE
72 REPEATER FAILURE
73 LOCAL PRINTER PAPER OUT
74 LOCAL PRINTER FAILURE
75 EXPANSION MODULE DC LOSS
76 EXPANSION MODULE LOW BATTERY
77 EXPANSION MODULE RESET
78 RESERVED
79 EXP. MODULE TAMPER
7A EXP. MODULE AC LOSS
7B EXP. MODULE SELF-TEST FAIL
7C LOSS SUPERVISORY RF
7D RESERVED
7E RESERVED
7F RESERVED
80 RESERVED
81 RESERVED
82 COMMUNICATION
83 TELCO 1 FAULT
84 TELCO 2 FAULT
85 LONG RANGE RADIO
86 FAIL TO COMMUNICATE
87 LOSS OF RADIO SUPERVISION
88 LOSS OF CENTRAL POLLING
89 VSWR
8A RESERVED
8B RESERVED
8C PROTECTION LOOP
8D PROTECTION LOOP OPEN
8E PROTECTION LOOP SHORT
8F FIRE TROUBLE
90 EXIT ALARM
91 PANIC ZONE TROUBLE
92 HOLDUP ZN TROUBLE
93 SWINGER TROUBLE
94 CROSS ZONE TROUBLE
95 RESERVED
96 SENSOR TROUBLE
97 LOSS OF SUPERVISORY - RF
98 LOSS OF SUPERVISORY - RPM
99 SENSOR TAMPER
9A RF TRANSMITTER. LOW BATTERY
9B SMOKE HI-SENSOR
9C SMOKE LOW-SENSOR
9D INTRUSION HI-SENSOR
9E INTRUSION LOW-SENSOR
9F SELF TEST FAIL
A0 OPEN/CLOSE
A1 O/C BY USER
A2 GROUP O/C
A3 AUTOMATIC O/C
A4 LATE O/C
A5 DEFERRED O/C
A6 CANCEL
A7 REMOTE ARM/DISARM
A8 QUICK ARM
A9 KEYSWITCH O/C
AA RESERVED
AB CALLBACK REQUEST MADE
AC SUCCESSFUL DOWNLOAD ACCESS
AD UNSUCCESSFUL ACCESS
AE SYSTEM SHUTDOWN
AF DIALER SHUTDOWN
B0 SUCCESS FULL UPLOAD
B1 RESERVED
B2 RESERVED
B3 RESERVED
B4 RESERVED
B5 ACCESS DENIED
B6 ACCESS REPORT BY USER
B7 FORCED ACCESS
B8 EGRESS DENIED
B9 EGRESS GRANTED
BA ACCESS
BB ACCESS
BC ACCESS
BD ACCESS
BE RESERVED
BF ARMED STAY
C0 KEYSWITCH ARMED STAY
C1 RESERVED
C2 RESERVED
C3 RESERVED
C4 RESERVED
C5 RESERVED
C6 GROUP CLOSING
C7 GROUP OPENING
C8 EXCEPTION O/C
C9 EARLY O/C
CA LATE O/C
CB FAIL TO O/C
CC FAIL TO O/C
CD AUTO ARM FAIL
CE O/C PARTIAL ARMED
CF EXIT ERROR
D0 USER PRESENT
D1 RECENT CLOSE
D2 SOUNDER/RELAY DISABLED
D3 BELL 1 DISABLE
D4 BELL 2 DISABLE
D5 ALARM RELAY DISABLE
D6 TROUBLE RELAY DISABLE
D7 REVERSING RELAY DISABLE
D8 NOTIFICATION APPLIANCE 3
DISABLED
D9 NOTIFICATION APPLIANCE 4
DISABLED
DA RESERVED
DB RESERVED
DC RESERVED
DD DIALER DISABLED
DE RADIO TRANSMITTER DISABLED
DF REMOTE UPLOAD DOWNLOAD
DISABLED
E0 RESERVED
E1 RESERVED
E2 RESERVED
E3 RESERVED
E4 MESSAGE
E5 SERVICE
E6 ZONE BYPASS
E7 FIRE BYPASS
E8 24 HOUR ZONE BYPASS
E9 BURGLARY BYPASS
EA GROUP BYPASS
EB SWINGER BYPASS
EC ACCESS ZN SHUNT
ED ACCESS POINT BYPASS
EE RESERVED
EF UNBYPASS
F0 RESERVED
F1 MANUAL TRIGGER TEST
F2 PERIODIC TEST REPORT
F3 PERIODIC RF TRANSMISSION
F4 FIRE TEST
F5 STATUS REPORT TO FOLLOW
F6 LISTEN-IN TO FOLLOW
F7 WALK TEST MODE
F8 OFF NORMAL CONDITION
F9 VIDEO TRANSMITER ACTIVE
FA RESERVED
FB FIRE POINT TEST
FC FIRE POINT NOT TESTED
FD INTRUSION ZONE WALK TESTED
FE FIRE ZONE WALK TESTED
FF PANIC ZONE WALK TESTED
37
Page 40

APPENDIX E: DEFAULT STATIC OPTIONS
OptionOption
Option
OptionOption
DescriptionDescription
Description
DescriptionDescription
01 LINE # 0D, 0E
02 LINE # LENGTH 0E
03 DSC AUDIO 01
04 AUDIO TIME 00
05 PRE H.S. TIME 0A
0E LINE DETECTION 01
0F MUTE BUZZER 00
10 LAST MESSAGE 1D
11 HOOK-FLASH 00
12 CALLER SOURCE 00
13 CALLER SOURCE -COMP00
DefaultDefault
Default
DefaultDefault
OptionOption
Option
OptionOption
14 CALLER SOURCE 00
15 LINE SEIZE EVENT 00
16 LINE RELEASE EVENT 0 0
1 C BUSY OUT 01
1D INPUT SENSITIVITY 3F
1E OUTPUT LEVELS C 0
1F DEBUG 00
2A HOOK FLASH DURATION 00
27 CALLER SOURCE PROCESS 00
28 SK FSK ENABLE 00
2B ECHO SUPPRESSION 00
2F MAX ONLINE TIME 00
DescriptionDescription
Description
DescriptionDescription
DefaultDefault
Default
DefaultDefault
38
Page 41

APPENDIX F: DEFAULT DYNAMIC OPTIONS [30] - [AF]
Line Card Configuration Command:
LCard Comd O p C d Sc
Line Ca r d Command(F7) Option Code Second Code
OptionOption
Option
OptionOption
DescriptionDescription
Description
DescriptionDescription
30 4/1 DIGIT#0 -A- 41
31 4/1 DIGIT#1 -A- 41
32 4/1 DIGIT#2 -A- 41
33 4/1 DIGIT#3 -A- 41
34 4/1 DIGIT#4 -A- 41
35 4/1 DIGIT#5 -A- 41
36 4/1 DIGIT#6 -A- 41
37 4/1 DIGIT#7 -A- 41
38 4/1 DIGIT#8 -A- 41
39 4/1 DIGIT#9 -R- 52
3A 4/1 DIGIT#A=0 -A- 41
3B 4/1 DIGIT#B -O- 4F
3C 4/1 DIGIT#C -C- 43
3D 4/1 DIGIT#D -\- 5C
3E 4/1 DIGIT#E -R- 52
3F 4/1 DIGIT#F -T- 54
40 4/2 DIGIT#0=A -A- 41
41 4/2 DIGIT#1 -A- 41
42 4/2 DIGIT#2 -A- 41
43 4/2 DIGIT#3 -A- 41
44 4/2 DIGIT#4 -A- 41
45 4/2 DIGIT#5 -A- 41
46 4/2 DIGIT#6 -A- 41
47 4/2 DIGIT#7 -A- 41
48 4/2 DIGIT#8 -A- 41
49 4/2 DIGIT#9 -R- 52
4A 4/2 DIGIT#A=0 -A- 41
4B 4/2 DIGIT#B -O- 4F
4C 4/2 DIGIT#C -C- 43
4D 4/2 DIGIT#D -\- 5C
4E 4/2 DIGIT#E -R- 52
4F 4/2 DIGIT#F -T- 54
50 4/3 DIGIT#0=A -T- 54
51 4/3 DIGIT#1 -A- 41
52 4/3 DIGIT#2 -A- 41
53 4/3 DIGIT#3 -A- 41
54 4/3 DIGIT#4 -C- 43
55 4/3 DIGIT#5 -O- 4F
56 4/3 DIGIT#6 -T- 54
57 4/3 DIGIT#7 -A- 41
58 4/3 DIGIT#8 -A- 41
59 4/3 DIGIT#9 -R- 52
5A 4/3 DIGIT#A=0 -T- 54
5B 4/3 DIGIT#B -C- 43
5C 4/3 DIGIT#C -O- 4F
5D 4/3 DIGIT#D -B- 42
5E 4/3 DIGIT#E -H- 48
5F 4/3 DIGIT#F -A- 5C
60 PRINTER WORDS: F2
61 PRINTER WORDS: 0A
62 PRINTER WORDS: 14
63 PRINTER WORDS: 1E
64 PRINTER WORDS: 28
65 PRINTER WORDS: 28
66 PRINTER WORDS: 50
67 TEPRINTER WORDS:
68 PRINTER WORDS: 50
69 PRINTER WORDS: 61
6A PGM OUTPUT: 000 F2
6B PGM INPUT: 000 62
6C FILTER OPT: 000 63
DefaultDefault
Default
DefaultDefault
ChangeChange
Change
ChangeChange
ASCII (HEX)ASCII (HEX)
ASCII (HEX)
ASCII (HEX)ASCII (HEX)
OptionOption
Option
OptionOption
DescriptionDescription
Description
DescriptionDescription
6 D PRINTER WORDS: A6
6E PRINTER WORDS: 61
6F PRINTER WORDS: 50
70 AUTOMATION CODE: 00
71 LIBRARY SELECT: 04
72 COM SELECT: 01
73 PRINTER SELECT: 01
74 EQUIVALENT LINE: 00
75 RECEIVER NUMBER: 01
76 3 DIGIT ACCOUNT 00
78 INTEGER DIGIT: 00
79 INTEGER BURST: 00
7 A AUDIO 4 DIGIT 00
7B AUDIO 3 DIGIT: 00
7 C AUDIO CODE: 00
7 D AUDIO ZONE: 00
7E AUDIO EVENT: 00
7F AUDIO FORMAT: 00
80 KO/HANGUP TIME: 1F
81 HANDSHAKE#1: 14
82 HANDSHAKE#2: 23
83 HANDSHAKE#3: 2D
84 HANDSHAKE#4: 0C
85 HANDSHAKE#5: 0B
86 HANDSHAKE#6: 0E
87 HANDSHAKE#7: 00
88 HANDSHAKE#8: 00
89 HS/KO TIME#1: 00
8A HS/KO TIME#2: 00
8B HS/KO TIME#3: 00
8C HS/KO TIME#4: 00
8D HS/KO TIME#5: 00
8E HS/KO TIME#6: 00
8F HS/KO TIME#7: 00
90 HS/KO TIME#8: 00
91 INTER H.S: 00
95 5 DIGIT PULSE 00
96 4/1 EXTEND 01
97 4/2 EXTEND 00
98 3/1 EXTEND 00
99 8 DIGIT DTMF 01
9A GROUP O/C 00
9B 4/3 USR/ZN 00
9 C ACRON RS-232 01
9 D MODEM II RS-232 01
9F ADEMCO HS RS-232 01
A0 RESERVED 00
A1 FBI RS-232 01
A3 D6500 COM 00
A4 BFSK RS-232 01
A 5 7 DIGIT PULSE 01
A7 SKFSK RS-232 00
A8 DIAL-OUT 2-WAY 00
A9 DIAL-OUT 2-WAY 00
AA DIAL-OUT 2-WAY 00
AB DIAL-OUT 2-WAY 00
AC DIAL-OUT 2-WAY 00
AD DIAL-OUT 2-WAY 00
AE DIAL-OUT 2-WAY 00
AF DIAL-OUT 2-WAY 00
DefaultDefault
Default
DefaultDefault
ChangeChange
Change
ChangeChange
ASCII (HEX)ASCII (HEX)
ASCII (HEX)
ASCII (HEX)ASCII (HEX)
39
Page 42

APPENDIX G: EVENT CODE CLASSIFICATIONS
The Event codes have been grouped according to the type of event, as described below.
Medical Alarms - 100
100 Medical
101 Pendant transmitter
102 Fail to report in
Fire Alarms - 110
110 Fire alarm
111 Smoke
112 Combustion
113 Water Flow
114 Heat
115 Pull Station
116 Duct
117 Flame
118 Near alarm
Panic Alarms - 120
120 Panic alarm
121 Duress
122 Silent
123 Audible
Burglar Alarms - 130
130 Burglary
131 Perimeter
132 Interior
133 24 Hour
134 Entry/Exit
135 Day/Night
136 Outdoor
137 Tamper
138 Near alarm
139 Silent Burg
General alarms
140 General alarm
141 Polling loop open
142 Polling loop short
143 Expansion module failure
144 Sensor tamper
145 Expansion module tamper
146 Silent Alarm
24 Hour Non-Burglary - 150 and 160
150 24 Hour non-burg
151 Gas detected
152 Refrigeration
153 Loss of heat
154 Water leakage
155 Foil break
156 Day trouble
157 Low bottled gas level
158 High temp
159 Low temp
161 Loss of air flow
Fire supervisory - 200 and 210
200 Fire supervisory
201 Low water pressure
202 Low CO2
203 Gate valve sensor
204 Low water level
205 Pump activated
206 Pump failure
System Troubles - 300 and 310
300 System trouble
301 AC loss
302 Low system battery
303 RAM checksum bad
304 ROM checksum bad
305 System reset
306 Panel program changed
307 Self-test failure
308 System shutdown
309 Battery test failure
310 Ground fault
Sounder/Relay Troubles - 320
320 Sounder/relay
321 Bell 1
322 Bell 2
323 Alarm relay
324 Trouble relay
325 Reversing
System Peripheral Troubles - 330
and 340
330 System Peripheral
331 Polling loop open
332 Polling loop short
333 Exp. module failure
334 Repeater failure
335 Local printer paper out
336 Local printer failure
337 Exp Mod DC Loss
338 Exp Mod Low Batt
339 Exp Mod Reset
341 Exp Mod Tamper
Communication Troubles 350 and 360
350 Communication
351 Telco 1 fault
352 Telco 2 fault
353 Long range radio
354 Fail to communicate
355 Loss of radio supervision
356 Loss of central polling
357 Radio Xmtr VSWR
Protection Loop Troubles - 370
370 Protection loop
371 Protection loop open
372 Protection loop short
373 Fire trouble
374 Exit Alarm
Sensor Troubles- 380
380 Sensor trouble
381 Loss of super. - RF
382 Loss of super. - RPM
383 Sensor tamper
384 RF xmtr. low battery
385 Smoke Hi-Sens.
386 Smoke Low Sens.
387 Intrusion Hi-Sens.
388 Instrusion Low Sens.
389 Detector Self Test Fail
Open/close - 400
400 Open/Close
401 O/C by user
402 Group O/C
403 Automatic O/C
404 Late to O/C
405 Deferred O/C
406 Cancel
407 Remote arm/disarm
408 Quick Arm
409 Keyswitch O/C
Remote Access - 410
411 Callback request made
412 Succes - download access
413 Unsuccessful access
414 System shutdown
415 Dialer shutdown
Access Control - 420
421 Access denied
422 Access report by user
System O/C - 440 and 450
441 Armed stay
450 O/C by Exception
451 Early O/C
452 Late O/C
453 Fail to Open
454 Fail to Close
455 Auto Arm Fail
456 O/C Partial Arm
457 Exit Error
458 User on Premises
459 Recent Close
System Disables - 500 and 510
Sounder/Relay disables - 520
520 Sounder/Relay disable
521 Bell 1 disable
522 Bell 2 disable
523 Alarm relay disable
524 Trouble relay disable
525 Reversing relay disable
System peripheral Disables - 530 and 540
Communication Disables - 550 and 560
551 Dialer disabled
552 Radio xmitter disabled
Bypasses - 570
570 Zone bypass
571 Fire bypass
572 24 Hour zone bypass
573 Burg. bypass
574 Group bypass
575 Swinger Bypass
Test/Misc. - 600
601 Manual trigger test
602 Periodic test report
603 Periodic RF Xmission
604 Fire test
605 Status report to follow
606 Listen-in to follow
607 Walk Test Mode
621 Event log reset
622 Event log 50% full
623 Event log 90% full
624 Event log overflow
625 Time/Date Reset
626 Time/Date inaccurate
627 Program mode Entry
628 Program mode Exit
631 Exception Schedule change
632 Access Sched Change
Page 43

Industry Canada NOTICE
Notice: The Industry Canada label identifies certified equipment. This certification
means that the equipment meets certain telecommunications network protective,
operational and safety requirements. Industry Canada does not guarantee the
equipment will operate to the user's satisfaction.
Before installing this equipment, users should ensure that it is permissible to be
connected to the facilities of the local telecommunications company. The equipment
must also be installed using an acceptable method of connection. The customer
should be aware that compliance with the above conditions may not prevent
degradation of service in some situations.
Repairs to certified equipment should be made by an authorised Canadian
maintenance facility designated by the supplier. Any repairs or alterations made
by the user to this equipment, or equipment malfunctions, may give the
telecommunications company cause to request the user to disconnect the equipment.
User should ensure for their own protection that the electrical ground connections
of the power utility, telephone lines and internal metallic water pipe system, if
present, are connected together. This precaution may be particularly important
in rural areas.
Caution: Users should not attempt to make such connections themselves, but
should contact the appropriate electric inspection authority, or electrician, as
appropriate.
NOTICE: The Load Number assigned to each terminal device denotes the
percentage of the total load to be connected to a telephone loop which is used
by the device, to prevent overloading. The termination on an interface may
consist of any combination of devices subject only to the requirement that the
total of the Load Numbers of all the devices does not exceed 100.
Ringer Equivalence Number: 01
AVIS: L'étiquette de l'Industrie Canada identifie le matériel homologué. Cette
étiquette certifie que le matériel est conforme à certaines normes de protection,
d'exploitation et de sécurité des réseaux de télécommunications. Industrie Canada
n'assure toutefois pas que le matériel fonctionnera à la satisfaction de l'utilisateur.
Avant d'installer ce matériel, l'utilisateur doit s'assurer qu'il est permis de le
raccorder aux installations de l'entreprise locale de télécommunication. Le matériel
doit également être installé en suivant une méthode acceptée de raccordement.
L'abonné ne doit pas oublier qu'il est possible que la conformité aux conditions
énoncées ci-dessus n'empêchent pas la dégradation du service dans certaines
situations.
Les réparations de matériel homologué doivent être effectuées par un centre
d'entretien canadien autorisé désigné par le fournisseur. La compagnie de
télécommunications peut demander à l'utilisateur de débrancher un appareil à la
suite de réparations ou de modifications effectuées par l'utilisateur ou à cause
de mauvais fonctionnement.
Pour sa propre protection, l'utilisateur doit s'assurer que tous les fils de mise à
la terre de la source d'énergie électrique, les lignes téléphoniques et les canalisations
d'eau métalliques, s'il y en a, sont raccordés ensemble. Cette précaution est
particulièrement importante dans les régions rurales.
AVERTISSEMENT: L'utilisateur ne doit pas tenter de faire ces raccordements
lui-même; il doit avoir recours à un service d'inspection des installations électriques,
ou à un électricien, selon le cas.
L'indice de charge (IC) assigné à chaque dispositif terminal indique, pour
éviter toute surcharge, le pourcentage de la charge totale qui peut être reccordée
à un circuit té;éphonique bouclé utilisé par ce dispositif. La terminaison deu
circuit bouclé peut être constituée de n'importe quelle combinaison de dispositifs,
pourvu que la somme des indices de charge de l'ensemble des dispositifs ne
dépasse pas 100.
Indices d'equivalence de la sonnerie: 01
FCC Compliance Statement
This equipment has been tested and found to comply with the limits for a Class
A digital device, pursuant to Part 15 of the FCC Rules. These limits are designed
to provide reasonable protection against harmful interference in a commercial
environment. This equipment generates, uses, and can radiate radio frequency
energy and, if not installed and used in accordance with the instruction manual,
may cause harmful interference to radio communication. Operation of this
equipment in a residential area is likely to cause harmful interference in which
case the user will be required to correct the interference at his own expense.
CAUTION: Changes or modification not expressly approved by DMP Security
Systems Ltd. could void the user's authority to operate the equipment.
Important Information
This equipment complies with Part 68 of the FCC Rules. On the back of this
equipment is a label that contains among other information, the FCC registration
number of this equipment.
Notification to Telephone Company
Upon request, the customer shall notify the telephone company of the particular
line to which the connection will be made, and provide the FCC registration number
and the ringer equivalence of the protective circuit.
FCC Registration Number: 1VDCAN-35164-AL-N
Ringer Equivalence Number: 01A
Telephone Connection Requirements
Except for the telephone company provided ringers, all connections to the telephone
network shall be made through standard plugs and telephone company provided
jacks, or equivalent, in such a manner as to allow for easy, immediate disconnection
of the terminal equipment. Standard jacks shall be so arranged that, if the plug
connected thereto is withdrawn, no interference to the operation of the equipment
at the customer's premises which remains connected to the telephone network
shall occur by reason of such withdrawal.
Incidence of Harm
Should terminal equipment or protective circuitry cause harm to the telephone
network, the telephone company shall, where practicable, notify the customer
that temporary disconnection of service may be required; however, where prior
notice is not practicable, the telephone company may temporarily discontinue
service if such action is deemed reasonable in the circumstances. In the case of
such temporary discontinuance, the telephone company shall promptly notify
the customer and will be given the opportunity to correct the situation.
Changes in Telephone Company Equipment or Facilities
The telephone company may make changes in its communications facilities,
equipment, operations or procedures, where such actions are reasonably required
and proper in its business. Should any such changes render the customer's terminal
equipment incompatible with the telephone company facilities, the customer
shall be given adequate notice to effect the modifications to maintain uninterrupted
service.
General
This equipment should not be used on coin telephone lines. Connection to party
line service is subject to state tariffs.
Ringer Equivalence Number (REN)
The REN is useful to determine the quantity of devices that you may connect
to your telephone line and still have all of those devices ring when your telephone
number is called. In most, but not all areas, the sum of the REN's of all devices
connected to one line should not exceed five (5). To be certain of the number
of devices that you may connect to your line, you may want to contact your
local telephone company.
Equipment Maintenance Facility
If you experience trouble with this telephone equipment, please contact the
facility indicated below for information on obtaining service or repairs. The
telephone company may ask you disconnect this equipment from the network
until the problem has been corrected or until you are sure that the equipment is
not malfunctioning.
U.S. Point of Contact
Digital Security Controls Ltd.
160 Washburn St.
Lockport, NY 14094
Page 44

Limited Warranty
Digital Monitoring Products warrants that for a period of 36 months from the date of purchase, the product shall be free of defects
in materials and workmanship under normal use and that in fulfillment of any breach of such warranty, Digital Monitoring Products
shall, at its option, repair or replace the defective equipment upon return of the equipment to its repair depot. This warranty applies
only to defects in parts and workmanship and not to damage incurred in shipping or handling, or damage due to causes beyond
the control of Digital Monitoring Products, such as lightning, excessive voltage, mechanical shock, water damage, or damage
arising out of abuse, alteration or improper application of the equipment.
The foregoing warranty shall apply only to the original buyer, and is and shall be in lieu of any and all other warranties, whether
expressed or implied and of all other obligations or liabilities on the part of Digital Monitoring Products This warranty contains
the entire warranty. Digital Monitoring Products neither assumes responsibility for, nor authorizes any other person purporting
to act on its behalf to modify or to change this warranty, nor to assume for it any other warranty or liability concerning this product.
In no event shall Digital Monitoring Products be liable for any direct, indirect or consequential damages, loss of anticipated profits,
loss of time or any other losses incurred by the buyer in connection with the purchase, installation or operation or failure of this
product.
Warning
Digital Monitoring Products recommends that the entire system be completely tested on a regular basis. However,
despite frequent testing, and due to, but not limited to, criminal tampering or electrical disruption, it is possible for
this product to fail to perform as expected.
How to contact us:
• Sales
For information about additional products, please call our customer service number: 1-800-641-4282, fax
us at 1-800-743-5724 or e-mail us at customerservice@dmpnet.com.
• Technical Support
If you have questions or problems when using this product, you can call Technical Support. If you are
within the United States, you can get support by dialing 1-888-436-7832, or e-mail us at
techsupport@dmpnet.com.
• Internet
Visit our web site at www.dmpnet.com for further product information.
29004491 R001
© 2001 Digital Monitoring Products Printed in Canada
 Loading...