

Page 1

En glish
Installation Instruction
Suit for:
VESA 100x1 00
VESA 200x1 00
VESA 200x2 00
UNPACKING INSTRUCTIONS
! Careful ly o pen the carton, remo ve contents and lay out on car dboar d or other
protective s urface to avoid damage.
! Che ck package co ntents a gainst the Supplied P arts Lis t in the next pa ge to as sure
that all c omponents were recei ved u ndama ged. Do not use dama ged or defective
parts.
! Carefully re ad all in structions befo re attempting installa tion.
IMPORTANT SAFETY INFORMATION
Install and operate this device with care. Please read this instructi on before
beginning the installatio n, an d car efull y fol low a ll in structions contained herein. Use
proper safet y equip ment during insta llation.
Please call a qu alifi ed installation c ontractor for help if you:
! If you don't und erstand these directi ons or have a ny doubt s about the s afety of the
installati on.
! If you are uncert ain about the nature of your wall, consu lt a qu alified installatio n
contractor.
Do not use this produc t for any p urpos e or in any configuration not expli citly specified
in this in struction. We hereby discla ims any and all liabi lity for inju ry or da mage
arising from i ncorr ect assembly, incorre ct moun ting, or incorrec t use of this product.
1
Page 2
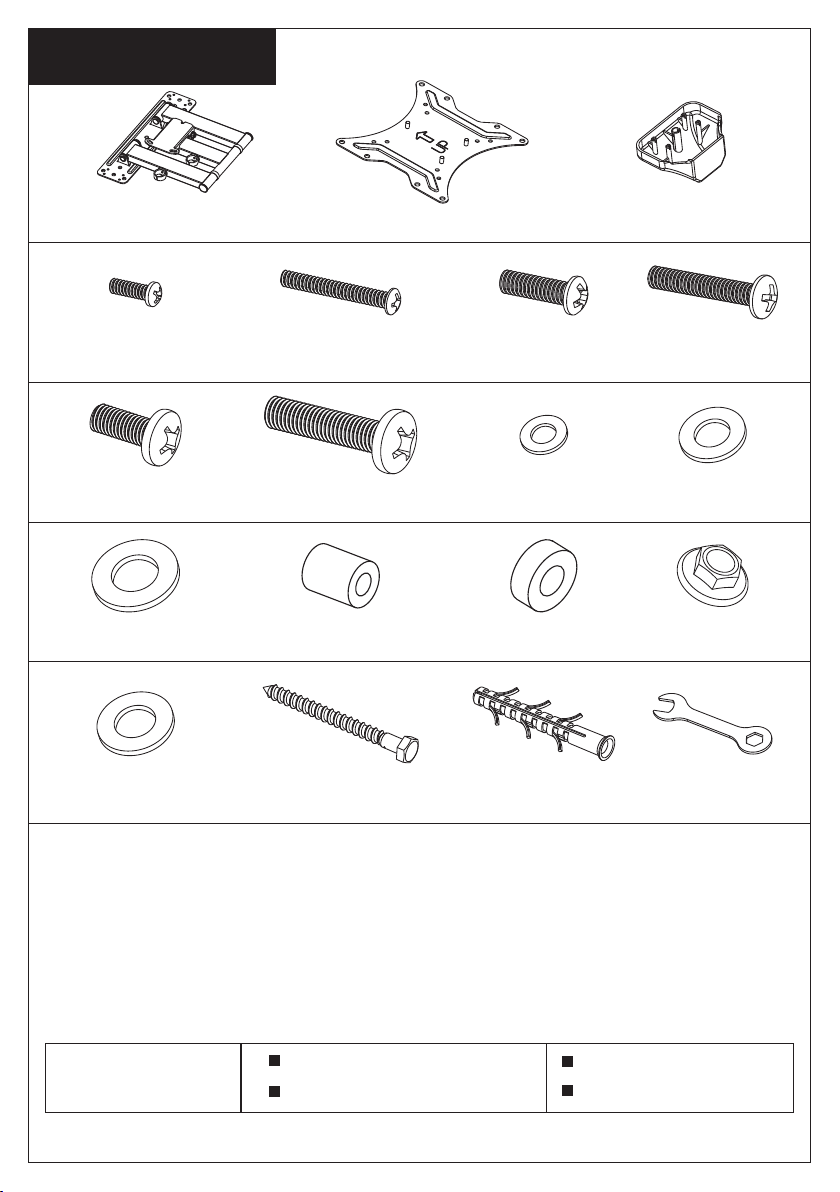
Su pp li ed Par ts List
(2)Wall Pl ate Cover-c(1)Wall Pl ate with Arm-a (1)VESA 200 Pla te-b
(4)M4x12 Bol t-d (4)M4x30 Bol t-e
(4)M8x20 Bol t-h (4)M8x35 Bol t-i
(7)M8 Wash er-l
(4)M4 Spacer -m
(3)M8x90 Lag B olt-q
(4)M6x20 Bol t-f (4)M6x35 Bol t-g
(4)M4 Wash er-j (4 )M6 Wash er-k
(8)M6/M8 Spa cer-n
(3)M10x80 Co ncret e
Anchor-r
(3)Cushi one d Nut -o
(1)M6 Wrench-s(3)Plastic Washer-p
Tools Required
4mm Drill Bit
Phillips Screwdriver
2
10mm Masonry Bit
Carpenter's Level
Page 3

St ep 1
Mounting the Wall Plate to the Wall
Brick or Concrete Wall
90mm
80mm
10mm
l
q
a
r
Wood Studs Wall
90mm
4mm
This TV mount must be securely attached to the
!
WARNING
vertical wall. If the mount is not properly
installed it may fall, resulting in possible injury
and/or damage.
q
a
CAUTION!
l
3
Page 4

St ep 2
Install VESA Plate to the back of TV
VESA 100x1 00
VESA 200x1 00
VESA 200x2 00
d to i
j,k,l
m,n(if nec ess ary )
First of all, make sure the diameter and leng th of the Bolt(d,e,f,g,h,i) your
TV requires. Once you have de termined the correct diameter and l ength,
you will thread the Bolt into the TV using the correct Washer (j,k,l) . Use the
Spacer(m,n) only if the bolts are too longer.
St ep 3
3. 1 3. 2
Mounting the TV to the Wall Plate
o
p
1
3. 3 3. 4
p
o
4
2
s
Page 5

St ep 4
Final Installation
4.1 4.2
c
Install the Wall Plate Covers Adjust the Tilt Angle
4.3 4.4
s
Manage the Wires Level Adjustment
Thanks for choosing our products, enjoy the using.
5
s
 Loading...