

Page 1
EBOX-335xDX3 Series
User’s Guide
Page 2

i
Copyright
The information in this manual is subject to change without notice for continuous
improvement in the product. All rights are reserved. The manufacturer assumes no
responsibility for any inaccuracies that may contain in this document, and makes no
commitment to update or to keep current information contain in this manual.
No part of this manual may be reproduced, copied, translated or transmitted, in whole
or in part, in any form or by any means without the prior written permission of the DMP
Electronics Inc.
Copyright 2016 DMP Electronics Inc.
Special Notice to Users
DMP Electronics Inc. provides no warranty with regard to this manual, the software,
or other information contained herein and hereby expressly disclaims any implied
warranties of merchantability or fitness for any particular purpose with regard to this
manual, the software, or such other information. In no event shall DMP Electronics
be liable for any incidental, consequential, or special damages, whether based on tort,
contract, or otherwise, arising out of or in connection with this manual, the software,
or other information contained herein or the use thereof.
DMP Electronics reserves the right to make any modification to this manual or the
information contained herein at any time without notice. The software described herein
is governed by the terms of a separated user license agreement or label sticker.
This product contains software owned by DM&P and licensed by third parties. Use of
such software is subject to the terms and conditions of license agreements enclosed
with this product. Software specifications are subject to change without notice and may
not necessarily be identical to current retail versions.
Updates and additions to software may require an additional charge. Subscription
to online service providers may require a fee and credit card information. Financial
services may require prior arrangements with participating financial institution.
Page 3

ii
Trademarks Acknowledgment
The EBOX-335xDX3 Series is the registered trademarks of DMP Electronics Inc.
Microsoft, Windows, and AMI are registered trademarks of Microsoft Corporation
and American Megatrends Inc. in the United States and/ or other countries respectively.
Other brand names, product names or trade names appearing in this document are the
properties and registered trademarks of their respective owners. All names mentioned
herewith are served for identification purpose only.
Page 4

iii
Safety Information
WARNING
Do not expose EBOX to rain or moisture, in order to prevent shock and fire hazard.
Never install EBOX in wet locations.
Do not open the cabinet to avoid electrical shock. Refer to your nearest dealer for qualified
personnel servicing.
Never touch un-insulated terminals or wire unless your power adaptor and display monitor
are disconnected.
Locate EBOX as close as possible to the socket outline for easy access and to avoid force
caused by entangling of your arms with surrounding cables from the EBOX.
When using EBOX, avoid using or installing the modem to the serial port during a storm or a
lightning.
Do not use the modem or a telephone to report a gas leak in the vicinity of the leak.
USB connectors are supplied with Limited Power Sources.
DO NOT ATTEMPT TO OPEN OR TO DISASSEMBLE THE
CHASSIS (ENCASING) OF THIS PRODUCT. PLEASE
CONTACT YOUR NEAREST DEALER FOR SERVICING
FROM QUALIFIED TECHNICIAN.
Page 5

iv
Regulatory
FCC Class A Note
This equipment has been tested and found to comply with the limits for a Class A digital device,
pursuant to Part 15 of the FCC Rules. These limits are designed to provide reasonable protection
against harmful interference when the equipment is operated in a commercial environment. This
equipment generates, uses and can radiate radio frequency energy and, if not installed and used in
accordance with the instruction manual, may cause harmful interference in which case the user will be
required to correct the interference at his own expense. Testing was done with shielded cables.
Therefore, in order to comply with the FCC regulations, you must use shielded cables with your
installation.
WARNING
This product complies with EN55022 class A. In a domestic environment this product may cause radio
interference in which case the user may be required to take adequate measures.
Changes or modifications to this unit not expressly approved by the party responsible for compliance
could void the user’s authority to operate the equipment.
This device complies with Part 15 of the FCC rules. Operation is subject to the following two conditions:
(1) this device may not cause harmful interference, and (2) this device must accept any interference
received, including interference that may cause undesired operation.
This digital apparatus does not exceed the Class A limits for radio noise emissions from digital
apparatus as set out in the interference - causing equipment standard entitled “Digital Apparatus”,
ICES-003 of the Department of Communications.
Manufacturer’s Declaration of Conformity
This equipment has been tested and found to comply with the requirements of European Community
Council Directives 89/336/EEC and 73/23/EEC relating to electromagnetic compatibility and product
safety respectively.
Attention
This product has been designed and certified to comply with certain regulatory requirements pertaining
to Information Technology Equipment. This product has not been designed for use as a medical
device. Without limitation of the foregoing, this product is not intended and has not been certified for
use in a hospital or clinical environment to diagnose, treat, or monitor patients under medical
supervision, and is not intended and has not been certified to make physical or electrical contact with
patients, nor to transfer energy to or from patients and/or to detect such energy transfer to or from
patients.
Page 6

v
Purchase Agreement
Purpose:
In accordance to the general commercial conduct of Trust and Fair Trade, herewith below is the
agreement for the protection for both parties, DMP and Users in pursuant of trading.
Product Description:
With this product, herewith also known as EBOX-335xDX3 Series, which is a simplified & an
economical design of an embedded device for Special Purpose Personal Computing. The basic
specification of this product is comprised of the x86 technology, design, and with onboard 1GB/ 2GB
DDR3 System memory, VGA display, USB, Serial ports and LAN Interfaces.
Distribution Convention:
1. This Product includes a PC, VESA rack (Optional). Upon receiving this product, kindly please
refer to the User’ Manual to check for the contents and appearance of this product; contact
immediately your nearest dealer or DMP office for any defective or missing parts. The supplier
will not be responsible for any reported discrepancy there after the expiration period of 3-days
from the received date.
2. In consideration of transportation and the cost of storage, the supplier provides to the
distributors a warranty of 12 months. This warranty covers the failure caused by hardware
breakdown (excluding hard drives), but does not cover the act of misuse and mishandling.
3. The supplier will not accept unknown post, therefore if you wish to repair or to return your
goods – kindly please contact your nearest dealer to make your declaration, and at the same
time, apply for an RMA number (RMA stands for Return Merchandise Authorization – please
ask for RMA form and fill-up for authorization).
4. The freight for return goods for repair will follow the International customary practice and
convention: Both parties is to pay for freight of one shipment each. The shipper is required to
prepay the freight from the place of origin (This means that the returnee (user) covers the
freight for return goods, while the Supplier covers the freight for goods after the repair).
5. Obsolete warranty is referred to as: (1) Expiration of warranty or (2) Damage due to misuse
within warranty. The Supplier will be taken into consideration of the circumstances, to provide
repair service with charges expense for obsolete warranty. This expense includes the cost of
material and the cost of labor.
Note: If there is other particular issue, not listed in the above conditions, both parties agreed to follow
the General Law of Commerce with fair and reasonable discussion in handling and resolving the
argument.
Page 7

vi
Contents
Chapter 1
02 Unpacking Your EBOX Mini PC
Chapter 2
05 EBOX-335xDX3 Series Overview
06 System Specification
07 Peripherals
Chapter 3
10 BIOS Reconfiguring
11 Drivers Installation Guide
14 Additional Information
14 Screen rotation
15 Turn off the display function setting
16 PXE Diskless boot setting
17 Linux installation
Chapter 4
23 Onboard Connectors Summary
25 Pin Assignments
Chapter 5
28 Taking Care of your EBOX
30 Troubleshooting
Chapter 6
33 Terms and Condition
33 Warranty
33 Service and Support
33 Return Merchandise Authorization (RMA) Policy
33 Shipping Policy
Page 8

1
Chapter1
Page 9
2
Unpacking Your EBOX Mini PC
Congratulation! You have just acquired EBOX-335xDX3 Series, please check
the following items:
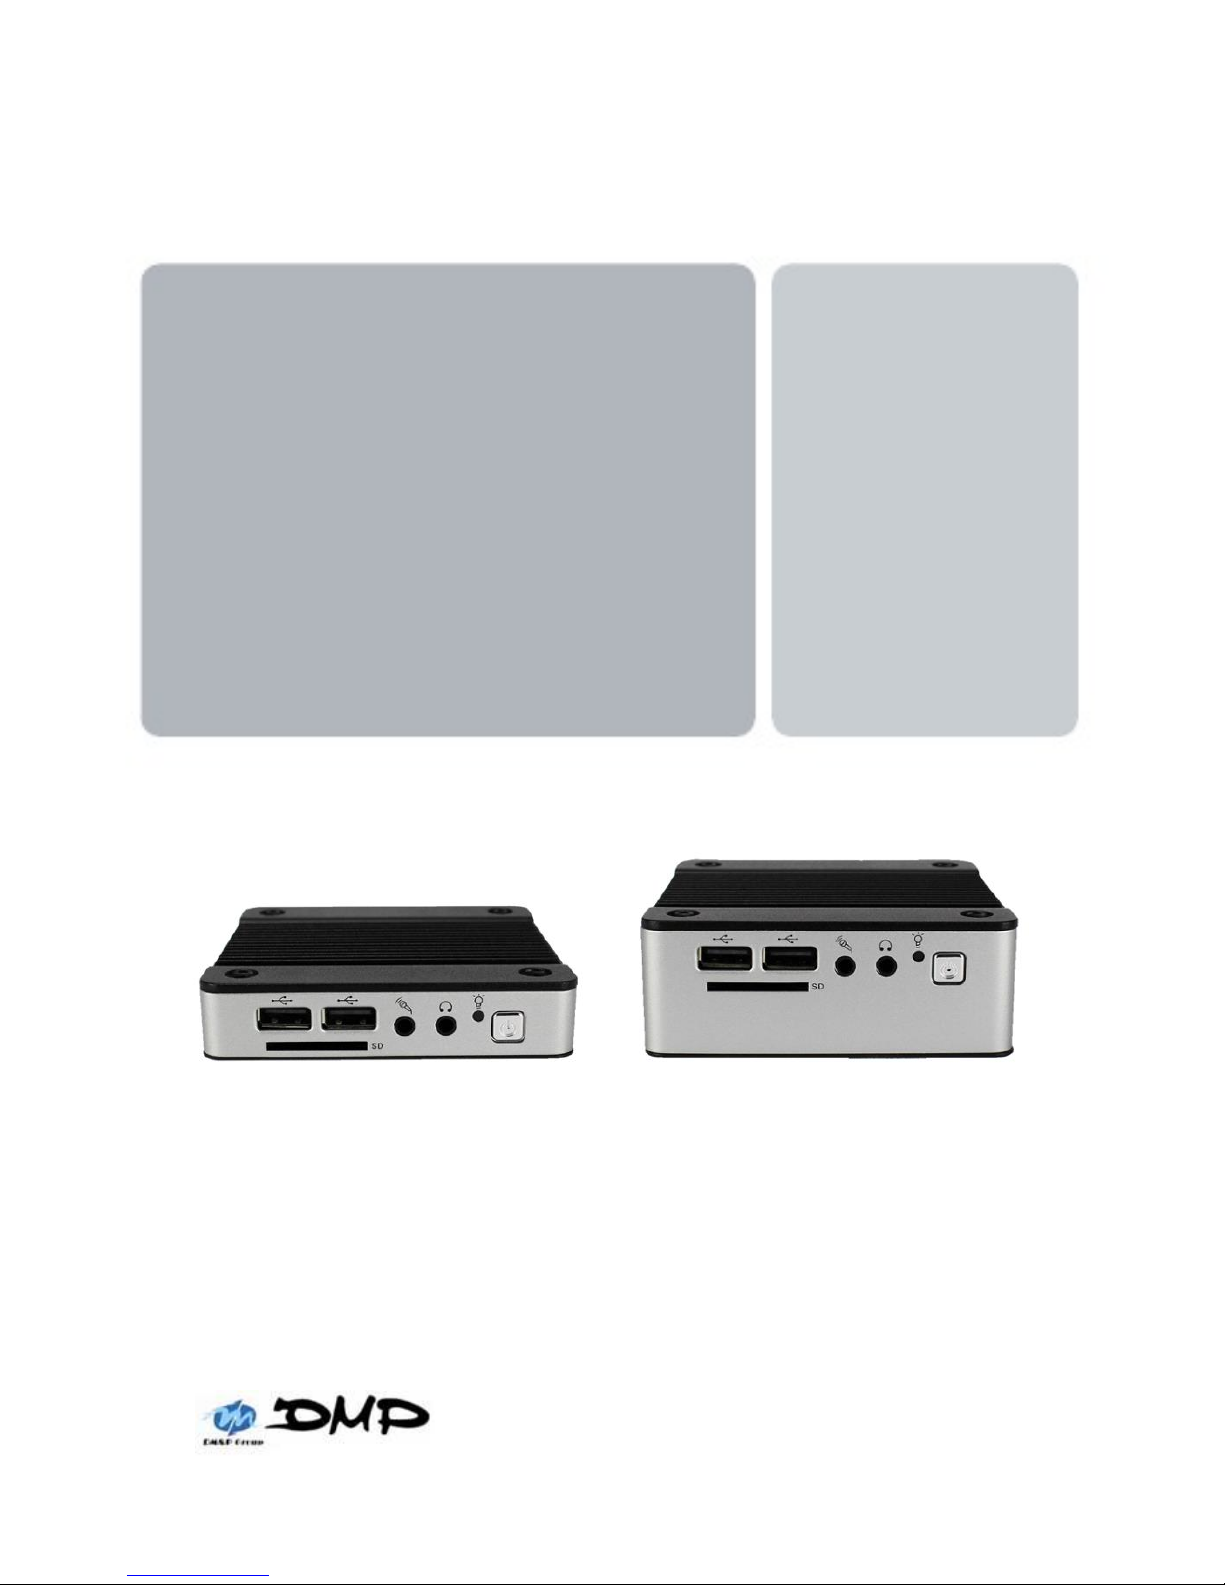
Packing List:
Item No.
Description
Q’ty
1
EBOX-335xDX3 Series VESA PC
x1
2
75 x 75 mm to 100 x 100 mm VESA mounting rack (Optional)
x1
Note: The accessories are subject to change without immediate notice.
Check Before Use
1. EBOX-335xDX3 Series Unit
2. VESA rack (Optional)
Page 10

3
Preface
EBOX-335xDX3 Series: VESA PC
The EBOX-335xDX 3 Series is a revolutionary device which is especially designed for limited physical
space and temperature concerns. No matter you are in a jammed office, a crowded place, or public
transportation, EBOX-335xDX3 Series can be easily integrated with a VESA LCD to bring it
to access at any time.
It can be attached to any VESA mounting fixture; allowing it to be securely mounted onto desks, walls,
or buildings, and thereby optimizes your work area. It can also attach directly to any size LCD for a
mobile system for the use at trade shows, presentations, promotions, etc. Unlike traditional portable
laptop design, the EBOX-335xDX3 Series can be used with a large size LCD. Furthermore, with
FANLESS design, EBOX-335xDX3 Series is ideal to be used in the environment where temperature
demand is critical.
So, if you are looking for a device that is able to provide with more mobility & space, and at the
same time uses less power consumption, EBOX-335xDX3 Series will be surely meet your need.
The VESA® FDMI™ Standard defines mounting interfaces, hole patterns and associated cable/
power supply locations for LCD monitors, plasma displays and other flat panel devices. EBOX335xDX3 Series is designed to fit this standard to make monitor attachment quickly and easily.
Page 11

4
Chapter2
Page 12
5
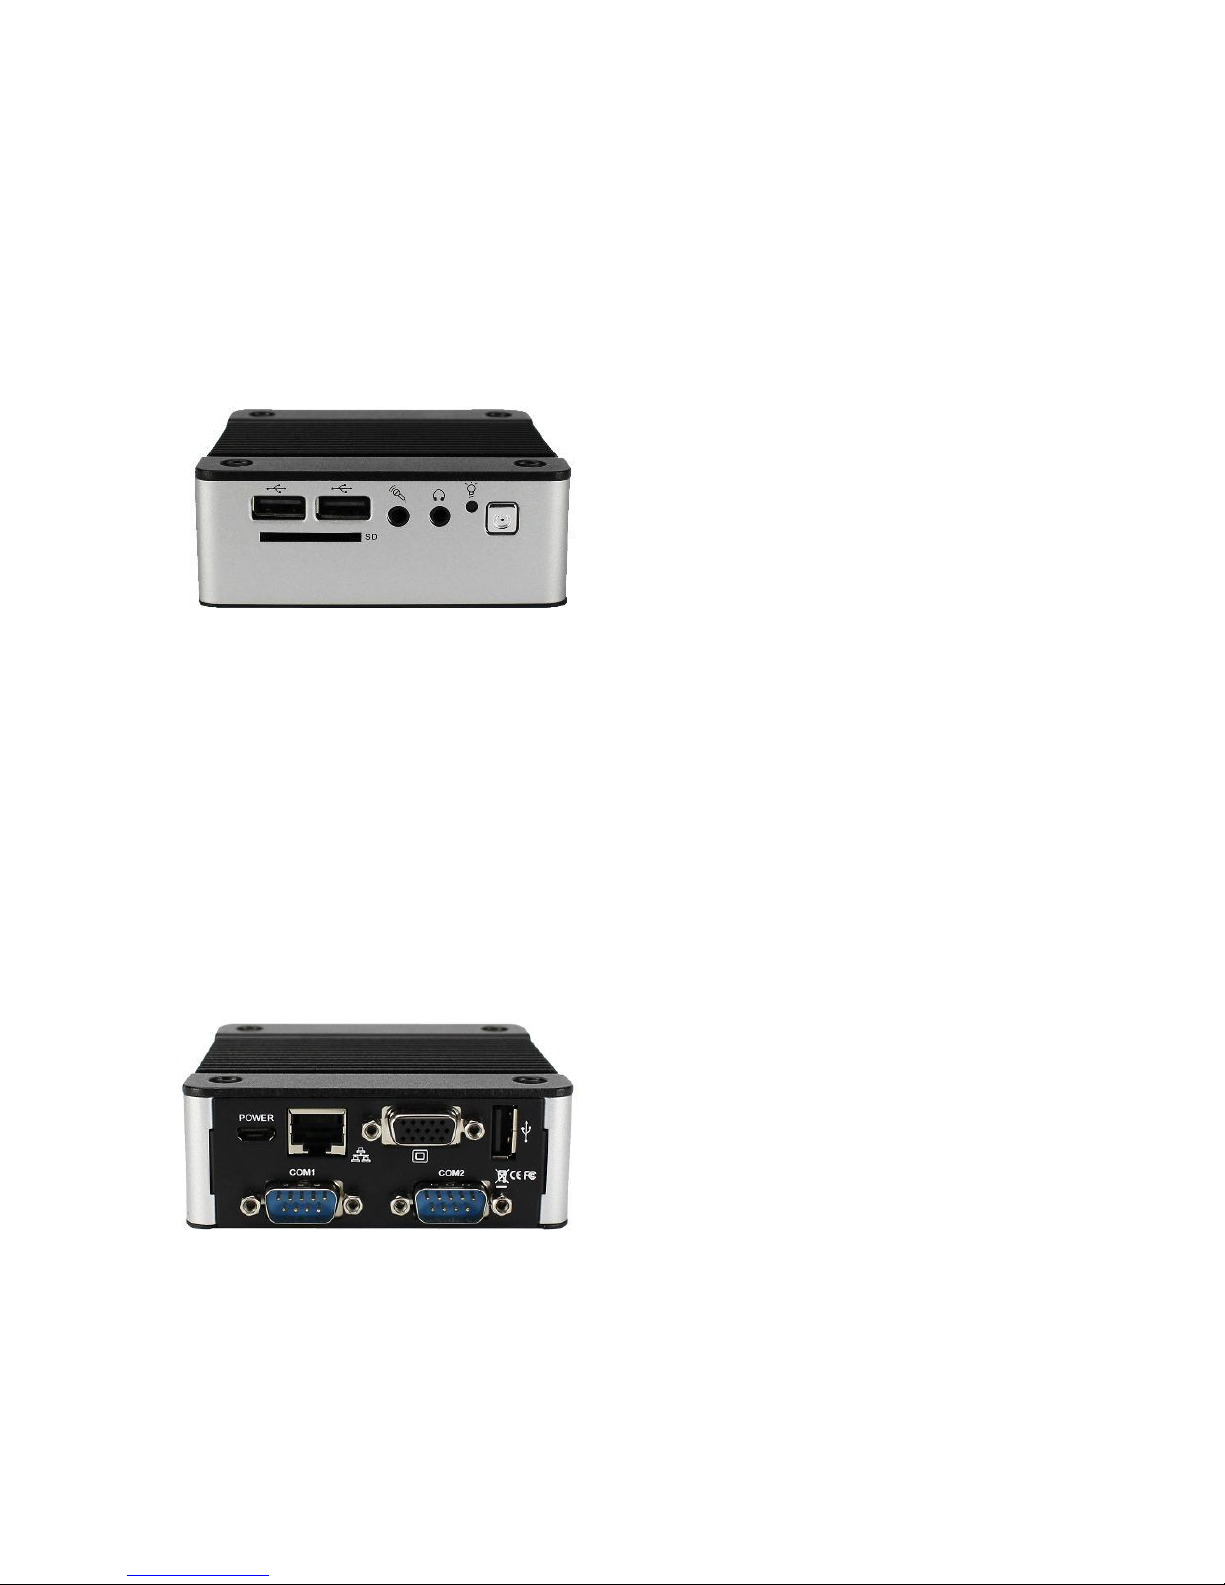
J: Power Jack
+5V@2A power adapter is highly recommend
K: RS-232 port
Available in 335xDX3-C2/ 335xDX3-C2AP
EBOX-335xDX3 Series Overview
Front Panel
A: Reset Button
For system reset or turn on.
Available in 335xDX3/ 335xDX3-C2
B: Power LED
The power LED lights up when the system
is turned on.
C: Audio Line Out
Audio output to speaker.
D: Audio Mic In
For Microphone input.
E: USB v2.0 ports
For connection to devices with USB
Interface such as CD/ DVD-ROM, USB
HDD, etc.
F: SD Slot
For the storage SD Card, the system is
bootable from SD Card.
Back Panel
G: USB V2.0 port
H: VGA port D-Sub 15-pin
I: RJ-45 LAN Jack
G
H
I
J
K
K
B
D E F
Page 13

6
System Specifications
CPU
Vortex86DX3 (1GHz)
Main Memory
1GB DDR3 (32-bit DRAM bus, EBOX-3350DX3 Series)
2GB DDR3 (32-bit DRAM bus, EBOX-3352DX3 Series)
For Windows 7 users, EBOX-335x Series support
32bit version only, 64bit version does not support.
BIOS
AMI BIOS
VGA
Resolution up to 1920 x 1080 pixels
Peripheral
1. USB V2.0 x 3 (2 at front, 1 at rear)
2. SD Card slot x 1
3. Audio (Mic In, Line Out)
4. RS-232 port x 2
Available in EBOX-335xDX3-C2/ 335xDX3-C2AP
Dimension & Weight
EBOX-335xDX 3/ 335xDX3-AP
95 x 95 x 20 mm/ 280g
EBOX-335xDX3-C2/ 335xDX3-C2AP
95 x 95 x 35 mm/ 360g
Power consumption
+5VDC@1150mA
Supported Windows O/S
Windows 7 Home/ Pro
Windows 7 Embedded
Windows XP Home/ Pro
Windows XP Embedded
Linux OS
(click Linux Support List for details)
Page 14

7
Peripherals
Connecting the Power Adaptor
A: DC Power Jack
To use EBOX-335xDX3 Series immediately,
please attach the USB cable or supplied AC
adapter for the power source.
Note: With the Auto Power On support function
(Optional), the system then will be turned on
automatically.
Connecting the Monitor
B: VGA Connection
Make your LCD display connection with the
VGA cable to the 15-pin D-Sub VGA port.
A
B
Page 15

8
Peripherals
Connecting the USB
EBOX-335xDX3 series provides 3 external USB ports (2 at front, 1 at rear).
C: SD Slot
For booting device by SD Card.
D: Microphone/ Earphone
The EBOX-335xDX3 Series supports
Microphone Input and Speaker Output
E: Reset Button
For system reset or turn on
Note: Models with Auto Power On feature has
Reset Button Eliminated.
F: USB Ports
The USB ports are available for connection to
USB devices such as CD-ROM/ USB Drive.
Connecting the LAN
Connecting Serial port
C
D
E
F
F
H
H
G
H: Serial Ports
(Available in EBOX-3350DX3-C2/ 3350DX3-C2AP)
The serial port is usually connected to a serial device
like modem or terminal devices.
G: RJ-45 LAN
There is an available RJ-45 LAN jack for
Ethernet connection.
(see left diagram for RJ-45 Jack).
Page 16

9
Chapter3
Page 17

10
BIOS Reconfiguring
1. AMI BIOS is used in the EBOX-335xDX3 Series. To reconfigure the EBOX-
335xDX3 Series, press or hit the <Del> key to enter the BIOS setup main
menu as below:
2. Press <Esc> to go back to main menu.
3. Press <F9> to load factory default setting.
4. Adjust your BIOS settings, and be sure that your settings will affect.
For Windows platform user, please use default setting directly.
5. Press <Tab> move to Boot menu to find default setting as below:
6. Set up the boot device order, press <F10> and select “Save Settings and Exit”,
press “Y” to save the changes. EBOX-335xDX3 Series will restart accordingly
to the new setup.
Page 18

11
Drivers Installation guide
Under the Windows series OS, the following drivers need to be installed manually.
1. VGA driver
2. Ethernet driver
3. Wireless USB wifi Dongle driver (Optional)
4. Audio driver (for windows XP only)
Note:
1. Please download EBOX-335xDX3 Series from EBOX Support Page .
2. For Windows 7 or Windows 7 Embedded OS, install the XMPlay for audio player
download here.
VGA driver:
Unzip the downloaded file and double click the setting .exe file then “Next” as below to install:
After VGA driver installation completed, you will have to restart the computer. Then you will be able to
select the resolution up to 1920 x 1080 pixels.
Page 19

12
Ethernet driver:
1. Find the yellow question mark of Ethernet in the Device Manager under the control panel/ system.
2. Select “Update Driver Software” and choose the right path, then click “ Install this driver software
anyway ” when Windows Security popped out.
3. After installation completed, the Device Manager will update and show the correct device.
Page 20

13
Audio driver:
Unzip the downloaded file and double click the setting .exe file, then “Next” as below to install. After the
installation completed, the Device Manager will update and show the correct device.
Page 21

14
Additional information
Screen rotation:
1. After VGA driver installation completed, type “Customize icons” in search bar.
2. Adjust Utility Application to “Show icon and notifications”.
3. A blue icon = Graphic Utility appears on screen, double click it.
4. In Graphic Utility, go to Rotation section. Select the direction of rotation then press
Apply to test and OK to save the changes.
Page 22

15
Turn off the display function setting:
For Windows 7 or Windows 7 Embedded OS users, click Start Menu > Control Panel
> Power Options or simply search for "Power Options" (without quotes). You will see a list of
different power plans.
The plan currently in use has a blue dot in front of it. Click "Change Plan Settings" next to the
power plan currently use. Click on the drop-down menu list, that is exactly next to "Turn off the display".
From the options, you can set the amount of idle time.
EBOX-335xDX3 Series does not support sleep function, it cannot wake up after sleep.
To avoid the unwakeable situation, please disable the function by setting “Put the computer to sleep”
to “Never”.
Page 23

16
PXE Diskless boot setting:
1. Boot up EBOX unit and press <Del> to get into BIOS menu.
2. Select “Boot” then move to “Boot Settings Configuration” and press ENTER.
3. Move to “Boot From LAN” and choose “Used INT 19h” then press “F10” to save setting and exit.
Page 24

17
Linux installation For Debian7.0/ Ubuntu10.04
Regarding the system installation of Debian7.0/ Ubuntu10.04, please follow the steps and
suggestions to complete the system installation on the EBOX-335xDX3 Series platform.
The following is a brief instruction, users may configure it according to their specific needs.
1. Basic system installation
For Debian7.0, after booting from the installation CD, moving straight to install
system would get a text mode system only, please choose Graphic Install for
Graphical User Interface OS installation.
Set basic configuration such as language, keyboard map and time zone, etc.
steps by steps.
Then the system will detect the network hardware, requires users to load the firmware
files for network device rtl8168, just answer no for this inquiry and move forward.
Next the system will detect multiple network interfaces on the EBOX-335xDX3
Series, and users have to decide the primary network interface, both of them could
be chosen.
Note: the Ethernet cable must be plugged in during this period.
Page 25

18
During the installation process, the system would ask users to create partitions
for the operating system. Following example is using entire disk for the beginner.
Choose “Guided - use entire disk”.
Select “Yes” to create the partition.
Then the system would keep asking you few questions for configuration,
suggestions were attached as follow.
Then the system would keep popping out questions for configuration, suggestions
as below:
For Software selection:
Please remark both the Debian desktop environment and standard system utilities,
then click to continue. It would start the package installation, and around hundred
packages would be installed, after installation completed, the next indicatation
message would pop up.
Page 26

19
For Install the GRUB boot loader on a hard disk:
Answer YES to complete the installation as last procedure.
When it's completed, the disc tray will eject and inform you, then press continue to
restart and be ready to enjoy the new system!
The Debian7.0
The Ubuntu10.04
Page 27

20
2. Install the VGA driver (Console mode)
Switch to console mode by pressing key <Ctrl> + <Alt> + <F1>, then copy the
VGA driver rdc_drv.so to the driver folder /usr/lib/xor/modules/drivers/, please
refer to Linux support page for most updated drivers.
Follow instruction below to execute.
※Please click xorg.conf to download for your system, if the display is out of range.
Reboot and make sure all the display is normal then set the resolution as requested.
The supported resolutions:
1920x1080 (16:9)
1600x1200 (4:3)
1680x1050 (16:10)
1400x1050 (4:3)
1440x960 (3:2)
1400x960
1280x1024 (5:4)
1440x900 (16:10)
1280x960 (4:3)
1366x768 (16:9)
1360x768 (16:9)
1280x768 (16:10)
1280x720 (16:9)
1024x768 (4:3)
800x600 (4:3)
640x480 (4:3)
#/etc/init.d/gdm stop
#X –configure
#cp /root/xorg.conf.new /etc/X11/xorg.conf
#/etc/init.d/gdm restart
Page 28

21
3. The system configuration
Enable the Auto login
System / Administration / Login Screen
Execute the utility “Login Screen” and enter the password to process it.
Set the Log in as “user account” automatically.
Disable the power saving mode when system idle,
System / Preference / Screensaver
Unmarked the option “Active the screensaver when computer is idle”.
Click close to complete the system configuration.
Page 29

22
Chapter4
Page 30

23
Onboard Connectors Summary
Summary Table for CPU Board
Nbr.
Description
Type of Connections
Pin nbrs.
J3
VGA
D-Sub Connector
15-pin
J4
DC +5V Input
Micro USB B Type
5-pin
J5
Line out
Audio Jack
2-pin
J6
Mic in
Audio Jack
2-pin
J7
USB (Front)
USB Connector
4-pin
J8
USB (Front)
USB Connector
4-pin
J9
USB (Back)
USB Connector
4-pin
J12
Ethernet LAN
RJ-45
8-pin
J13 (Note)
COM1 Port
Box Header 5 x 2 2.0mm
9-pin
J14 (Note)
COM2 Port
Box Header 5 x 2 2.0mm
9-pin
Note: J13 & J14 only available in EBOX-335xDX3-C2/ C2AP
Front Connectors Outline
Models with Auto Power On
do NOT have front Reset Button.
EBOX-335xDX3
FRONT LOOK
A
B C D
E
F
A: Reset Button
B: Power LED
C: Line out
D: Mic in
E: USB V2.0
F: SD Slot
EBOX-335xDX3-AP
FRONT LOOK
EBOX-335xDX3-C2/ 335xDX3-C2AP
FRONT LOOK
Page 31

24
Rear Connectors Outline
EBOX-335xDX3/ 335xDX3-AP
REAR LOOK
EBOX-335xDX3-C2/ 335xDX3-C2AP
REAR LOOK
Only Available in EBOX-335xDX3-C2/ 335xDX3-C2AP
G: USB V2.0
H: VGA
I : RJ-45 LAN
J : DC Power Jack
G
H
I
J
K
K
K: RS-232 Port
Page 32

25
Pin Assignments
J3: VGA – 15-pin D-Sub Connector
Pin #
Signal Name
Pin #
Signal Name
Pin #
Signal Name
1
MR
6
GND
11
NC 2 MG
7
GND
12
VCC
3
MB
8
GND
13
HYSYNC
4
NC 9 NC
14
VSYNC
5
GND
10
GND
15
VCC
J4: Micro-B USB DC Power Input
J7, J8: USB (180o) : For connection to external USB device – 4-pin USB Type 1 Connector (H)
Pin #
Signal Name
1
VCC
2
Data --
3
Data +
4
ID
5
GND
Pin #
Signal Name
1
VCC
2
Data --
3
Data +
4
GND
Page 33

26
Pin Assignments
J9: USB (90o) – For connection to external USB device – 4-pin USB Type 1 Connector (V)
J12: LAN: RJ-45 Connector
Pin #
Signal Name
Pin #
Signal Name
1
FTXD+
2
FTXD-
3
FRXIN+
4
NC 5 NC
6
FRXIN-
7
NC 8 NC
J13, J14: RS-232 9-pin D-Sub Connector
Pin #
Signal Name
Pin #
Signal Name
1
DCD
2
RXD
3
TXD
4
DTR
5
GND
6
DSR
7
RTS
8
CTS
9
RI
- -
- -
LEDS: POWER ON/ OFF
LED Color
State
Blue
Power On
Pin #
Signal Name
1
VCC
2
Data --
3
Data +
4
GND
Page 34

27
Chapter5
Page 35

28
Taking Care of your EBOX
This section gives you some guidelines on using EBOX-335xDX3 Series – Safe using, Storing and
Handling.
Storing
Do not place EBOX-335xDX3 Series in a location that is subject to:
Heating sources, such as stove, oven, heater, radiator or air duct
Direct contact from sunlight
Rain or moisture area
Excessive dust accumulation area
High humidity place
Constant or occasional mechanical movement, vibration or shock
Strong magnets or magnetic fields or magnetically unshielded speakers
Out of the operating temperature range from 5oC to 50oC
Do not place other electronic device or electrical equipment near EBOX-335xDX3 Series.
The electromagnetic field of the EBOX-335xDX3 Series may cause interference subjecting
to malfunction.
Provide adequate air ventilation (circulation) to prevent internal buildup of heat. Do not place
EBOX-335xDX3 Series near the wall, behind the curtains or draperies, in between two books that
block its ventilation slots. Leave a space of at least 8 inches (20cm) behind the sides and back
panel of the EBOX-335xDX3 Series.
Change of environmental temperature: Problems may occur when there is a sudden change of
environmental temperature, or if the EBOX-335xDX3 Series is brought directly from a cold
location to a warm one, moisture may condense inside EBOX-335xDX3 Series. Turn off the
device, and contact your nearest dealer.
Check the surrounding appliance(s) before using EBOX-335xDX3 Series. Since the EBOX-
335xDX3 Series uses high-frequency radio signal and may interface with radio or TV reception
causing interference or poor signal display. When this happens, relocate the EBOX-335xDX 3
Series by a suitable distance away from it.
Do not drop the EBOX-335xDX3 Series from working table nor place heavy objects on top of it.
Page 36

29
Using Cables for Connection
To avoid the problem, use only the specified interface cables in your accessory bag. The supplier
will not be responsible for the connection arising from the other unspecified peripheral equipment.
Do not use cut or damaged cables for connection.
Cleaning Your VESA PC
Clean the VESA PC with a soft, dry cloth or a soft cloth lightly moistened with a mild detergent
solution.
Do not use any type of abrasive pad, scouring powder, or solvent such as alcohol or benzene,
as these may damage the finish of EBOX.
When a solid object falls or a liquid spills onto the EBOX, turn off the EBOX immediately and
unplug the LAN and power cables. Contact a qualified person or your dealer to check the EBOX
before you use it again.
Always disconnect the power cord from the power source before cleaning the EBOX.
Page 37

30
Troubleshooting
This section describes the techniques of resolving some basic problems that you encounter when
using EBOX-335xDX3 Series. For more troubleshooting guidelines, please contact your nearest
dealer for technical support.
Troubleshooting Your VESA PC
A. VESA PC does not start –
Make sure the EBOX-335xDX3 Series is properly secured and plugged into a power source
before it is turned on. Make sure the power indicator shows the power is on. See chapter 2 for
more information about “EBOX-335xDX3 Series Overview”.
When the EBOX-335xDX3 Series is plugged into a power strip or the UPS (Uninterruptible
Power Supply), make sure the power strip or UPS is turned on and working normally.
Check if your VGA or LCD monitor is properly plugged into a power source and turned on. Make
sure the brightness and contrast controls are adjusted correctly. See the manual that came with
your display (monitor) for details.
Check if your power control button does not function, by removing the AC adaptor. Wait for one
minute, and then reattach all power connection before pressing the power button.
Condensation may cause the EBOX-335xDX3 Series to malfunction for a while. If this happens,
do not use the EBOX-335xDX3 Series for at least one hour.
When you have checked all the above guidelines and the EBOX-335xDX3 Series does not work.
Remove the power adaptor from the EBOX-335xDX3 Series, unplug the power supply, and plug
it in again. Then turn on the power.
When booting EBOX-335xDX3 series, if LED power indicator is on but not detecting the crt
monitor, please reboot and keep pressing <C> key to force CRT display (VGA mode).
B. BIOS Error Message –
BIOS error message appears when my VESA PC starts
If the BIOS error message appears, press any key to resume or, hit <DEL> to enter BIOS setup main
menu, follow these steps:
1. Press <DEL>, and the BIOS Setup main menu appears, check if HDD is detected. If it is not
detected, use Direction keys <↑↓> to choose “AUTO” and then go back to the main menu by
pressing <ESC>. Move your cursor down with Direction keys <↓>, and choose “Save
Settings and Exit”, a message dialog appears as seen below, hit <Enter>.
“Save current settings and exit (Y/N)? Y”
2. Go to “Exit” menu using the Direction keys <↑↓> and choose the option “Load Optimal
Defaults”, then press <Enter>. A message dialog appears as seen below, hit “Y” key and
presses <Enter> to save and recover to the factory setting.
“Load Optimal Defaults (Y/N)? Y”
Page 38

31
(BIOS Setup menu “Exit”)
C. “Operating System Not Found” –
A message indicating that “Operating system not found” appear when
my VESA PC starts (Windows won’t start)
Enter your BIOS setup main menu by pressing <DEL> key, be sure that the C: drive is enable.
If Windows still does not start, follow these steps to initialize the BIOS:
1. Turn off the EBOX-335xDX3 Series.
2. Remove any peripheral devices connected to the EBOX-335xDX3 Series.
3. Restart the EBOX-335xDX3 Series.
4. Press <DEL> to enter BIOS Setup main menu window.
5. Follow the steps as written in item B. BIOS error message.
If you have just connected EBOX-335xDX3 Series to a CD/ DVD or USB Drivers, remove these
peripherals. And restart to confirm that the Windows operating system starts properly. If EBOX335xDX3 Series continues to display the message ”Operating system not found,” and Windows
does not start, please contact your nearest dealer for servicing.
Page 39

32
Chapter6
Page 40

33
Terms and Conditions
Warranty
The warranty terms for EBOX-335xDX3 Series are twelve (12) months from the shipped month.
During the warranty period, DMP Electronics Will repair replace the product covered under this limited
warranty.
Service and Support
DMP Electronics Inc. provides the technical support for hardware problems with your system
throughout the warranty period. The technical support service is limited to configuration and operation
of EBOX-335xDX3 Series sold by DMP Electronics Inc. The technical support service does not offer
software tutoring or training.
Return Merchandise Authorization(RMA)policy
If the DMP staff or dealer determines that a part is defective. Purchaser must call our technical support
service to obtain an RMA number before attempting to return any part. Please refer to your nearest
dealer for :
To obtain an RMA number, Purchaser must follow procedures as below:
1. Complete the DMP Electronics Inc. standard RMA Form and fax back to the RMA Department.
2. The RMA Number must be used within 7 DAYS.
3. The RMA Number must be shown clearly on your shipping label.
4. DMP Electronics Inc. must receive all Returns before a replacement will be sent.
5. The repair cost depends on the parts, the damage reasons, and whether under warranty
period…etc. The Seller will charge the Purchaser in a reasonable price.
6. A copy of the invoice for the RMA product(s) will also be shipped to Purchaser.
7. The freight of return to DMP Electronics Inc. is charged to the Purchaser's account and
accompanied by an RMA number. Any Returns with freight collect will be refused and returned
to you. After Repairing, the cost of freight will be paid by Seller.
8. DMP Electronics Inc. must receive all returned goods within the warranty period.
Shipping Policy
The Purchaser must pre-pay shipping for any defective system or parts returned under the warranty.
DMP Electronics Inc. shall not be liable for risk of loss or damage during shipment of your returned
system or parts if you fail to insure the shipment.
All products must be shipped back to DMP Electronics Inc. in original or equivalent packaging. DMP
Electronics Inc. will ship the repaired or replacement product(s) to the Purchaser by freight prepaid.
Purchaser assumes the risk of loss. DMP Electronics Inc. shall not be responsible for failure of the
delivery service to make on-time delivery.
 Loading...