

Page 1
DME HYDRAULIC LOCKING CORE PULL CYLINDERS Specification No. ME-E32-0001(C)
Part No. HLCP-PS01 Page 1 of 12
IMPORTANT SAFETY INFORMATION
1. To avoid injury, exercise caution by reading these instructions before servicing or operating the system.
2. These instructions must be passed on to the end user where they should be read before using this product. Failure to do so can result in injury.
Failure to comply can result in injury:
STORED ENERGY HAZARD
1. This product maintains hydraulic pressure during normal operation in both full back (retracted) and full forward (extended) position of the cylinder
assembly’s piston. Use caution when operating and servicing the system. Proper protective equipment, including eye protection, must be worn.
2. Hydraulic service to the cylinder assembly must not exceed 3625 PSI hydraulic pressure.
Failure to comply can result in improper equipment operation or damage:
1. The DME Hydraulic Locking Core Pull Cylinder (HLCP) assembly includes two inductive proximity sensors at low power. The proximity sensors require
power to deliver a signal. It is the responsibility of the customer to provide proper electrical service for sensor operation.
2. The proximity sensors require proper adjustment while installing into the cylinder assembly, as each sensor must be installed to a different depth. Please
follow the provided sensor installation instructions properly, or else the cylinder may not operate properly, or, the sensors will fail to detect the proper
position of the piston.
3. The proximity sensors are available in two types: NPN (standard) or PNP (optional). If PNP type is required, this must specified at system order.
Electrical wire-up schematics are provided for both types in this document. Please follow the proper wire-up for the proximity sensor.
4. If the proximity sensors are not used, it is always important to monitor the position of the sliding core. External limit switches may be used if the machine
cannot deliver power to the sensors, or where the service temperature of the proximity sensors is expected to be exceeded, or in cases were an elevated
level of magnetism or electrical current is expected to be in close proximity to the sensors. For proper system function, it is important that full forward
(extended) position as well as the full reverse (retracted) position of the piston (or sliding core) be monitored.
5. If using the proximity sensors provided with this device, do not exceed the maximum service temperature of 176°F (80° C).
6. When using external limit switches in the mold instead of the proximity sensors supplied with this product, the maximum service temperature of this
device is 356°F (180° C).
7. A minimum of 870 PSI holding pressure (hydraulic service) is required at all times. If the 870 PSI holding pressure is not maintained while the piston is in
full forward (extended position), the piston may not remain locked in forward position within the cylinder assembly.
8. The Mold Designer and/or Mold Maker is required to select the proper size of cylinder assembly in order to counter load that will act on the sliding core
due to plastic injection pressure within the mold cavity. Improperly selected cylinder assembly size can result in molded part flash or damage to the mold
during operation.
9. When selecting the appropriate size of cylinder assembly, take care to account for the necessary preload when the sliding core needs to shut off on an
opposing core face inside the mold. Load capacity of the cylinder assembly is reduced when preload of the sliding core is required. The recommended
preloads for each cylinder assembly size are provided in this document, as well as load capacities for both with and without preload.
10. The piston rod is not to be used as the sliding core itself. Do not modify the piston rod in any way. The piston rod is intended to be attached to the sliding
core in the mold, and it is the responsibility of the mold designer and/or mold maker to select appropriate sliding core design for the intended application.
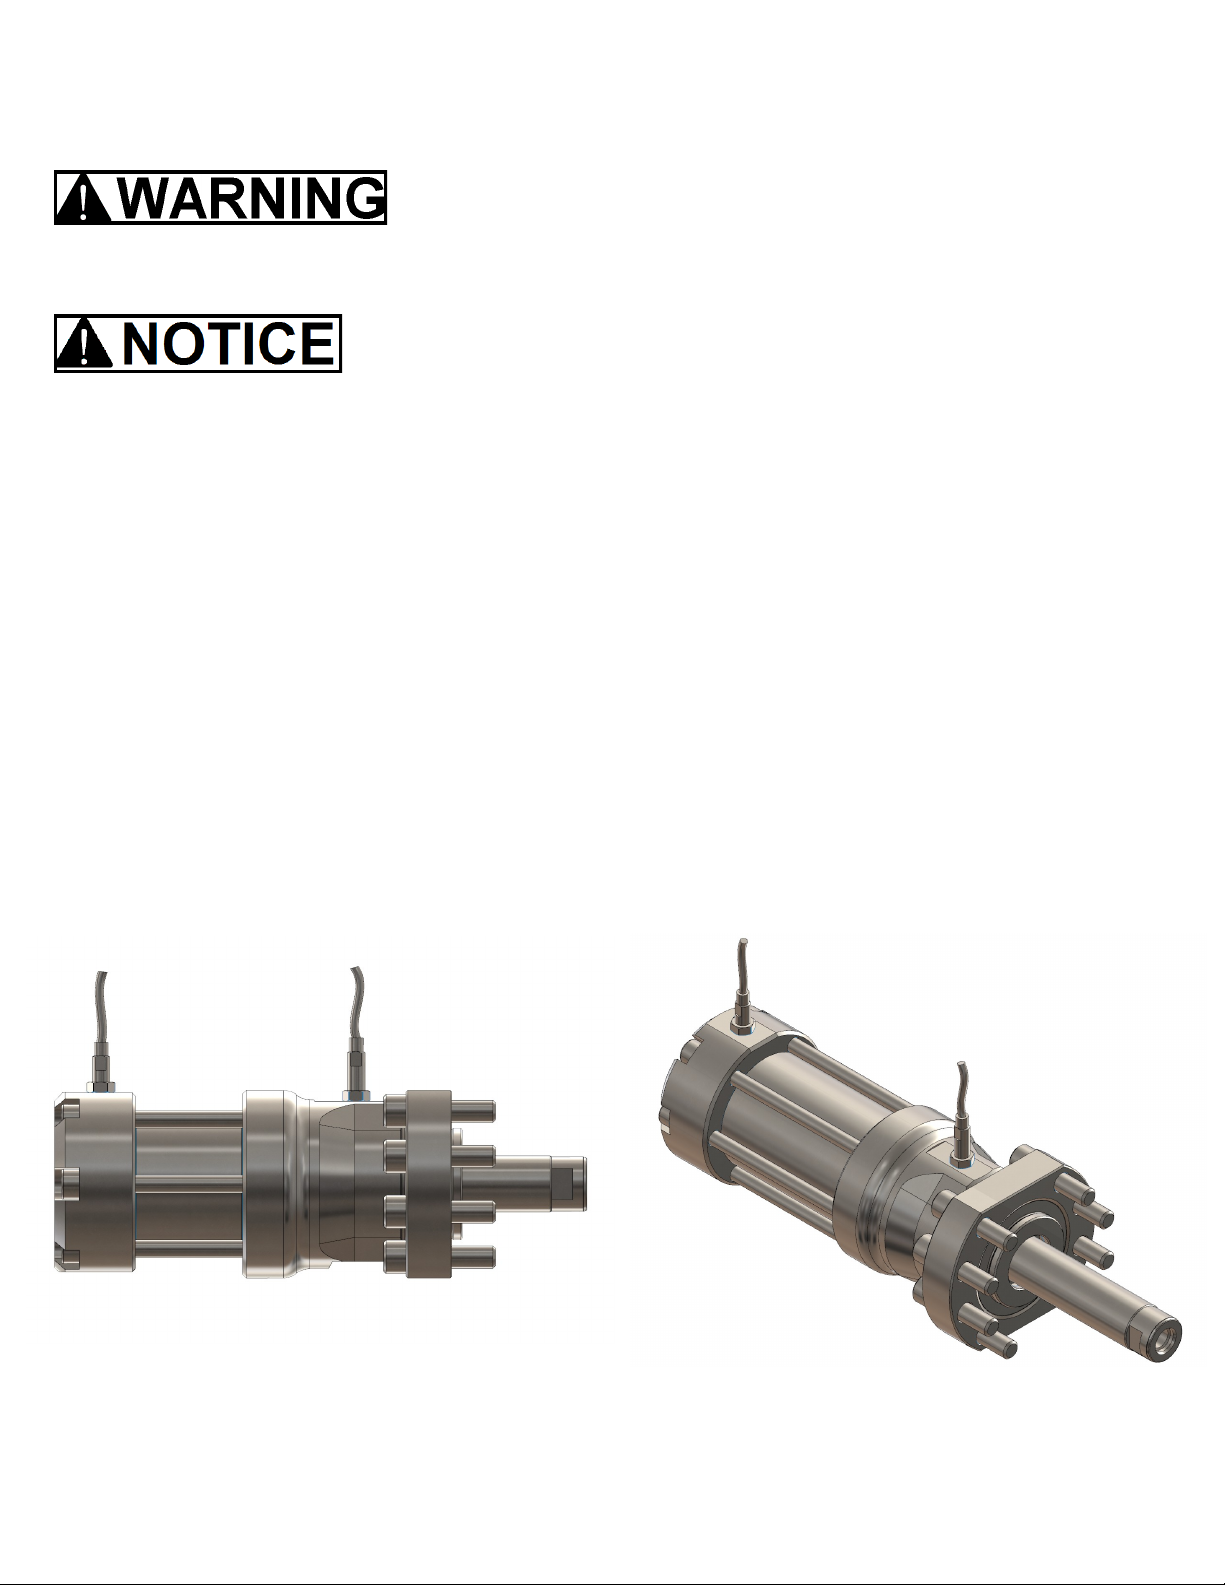
DETAIL 1.0: HYDRAULIC LOCKING CORE PULL CYLINDER ASSEMBLY
Note: Spacer disk not shown
MOLD DESIGN CONSIDERATIONS:
This product is available in several sizes, and each size has a two available “standard” stroke lengths. If you require a stroke that is different than the
available standard strokes, then a non-standard stroke design is required. When ordering this product, please specify the required stroke if the standard
strokes available are not suitable for the intended application.
This product maintains a sliding core in full back (retracted) or full forward (extended) positions. In order for the cylinder assembly to “lock”, the piston
must be full extended forward.
This product includes a spacer disk. The spacer disk is placed between the front of the body flange and pocket installation. The mold maker must grind
the spacer disk to ensure proper fit at the desired mold operation temperature. The adjustment of the spacer disk is important for when the sliding core
Page 2
DME HYDRAULIC LOCKING CORE PULL CYLINDERS Specification No. ME-E32-0001(C)
Part No. HLCP-PS01 Page 2 of 12
MOLD DESIGN CONSIDERATIONS (continued):
must “shut off” against an opposing core wall or face, so that plastic flashing is avoided. For proper “shut-off” as described above, recommended preload
amounts are provided in this document. Adjust the spacers prior to final mold assembly. Ensure sufficient pocket clearance around the piston rod and
spacer disk is present for smooth operation.
Positional alignment of the cylinder assembly is achieved by aligning the forward collet of the cylinder body (protrudes forward of the mounting flange)
into the mold plate via the outer diameter of the collet. The collet will protrude past the spacer disk. Rotational alignment of the overall assembly is
achieved via the mounting screws, as rotational alignment is only used to position the proximity sensors and hydraulic fitting connections and/or hoses
within the overall installation. The piston may freely rotate, therefore if rotational alignment of the sliding core is required, rotational alignment of the
sliding core must be achieved via other means.
The positional alignment of the mold’s sliding core is not to be maintained by the cylinder assembly’s piston. The sliding core must have it’s own
provision for positional alignment within the mold plate.
The suggested installation pocket details are based on the cylinder assembly being recessed into the side of the mold plate. It is possible to have the
cylinders assembly mounted fully “proud” of the side of the mold plate, however, positional alignment of the cylinder assembly to the mold plate requires
the forward collet (protruding forward of the mounting flange of the cylinder body) to be recessed partially into the side of the mold. Please adjust the
overall installation as required to fit your application, while maintaining minimum clearances for the hydraulic fitting connections and/or hoses, as well as
maintaining clearances for the proximity sensors. It is the responsibility of the mold designer and/or mold maker to select appropriate hydraulic fittings, as
well as provide necessary pocket clearances (where required) for the hydraulic fittings. Clearance for hydraulic service may need to accommodate hoses
or other features, in addition to the hydraulic fittings themselves. Standard hydraulic thread is NPTF type, but other types are available upon request.
Please see Detail 3.4 for additional notes regarding necessary clearance needed to accommodate the proximity sensors.
Mounting screws provided should not be modified (shortened). Ensure the tapped mounting holes are deep enough to ensure the screw heads can fully
seat on the mounting flange after the screws are installed fully and torque is applied.
SEE NEXT PAGES FOR SUGGESTED POCKET MACHINING DETAILS
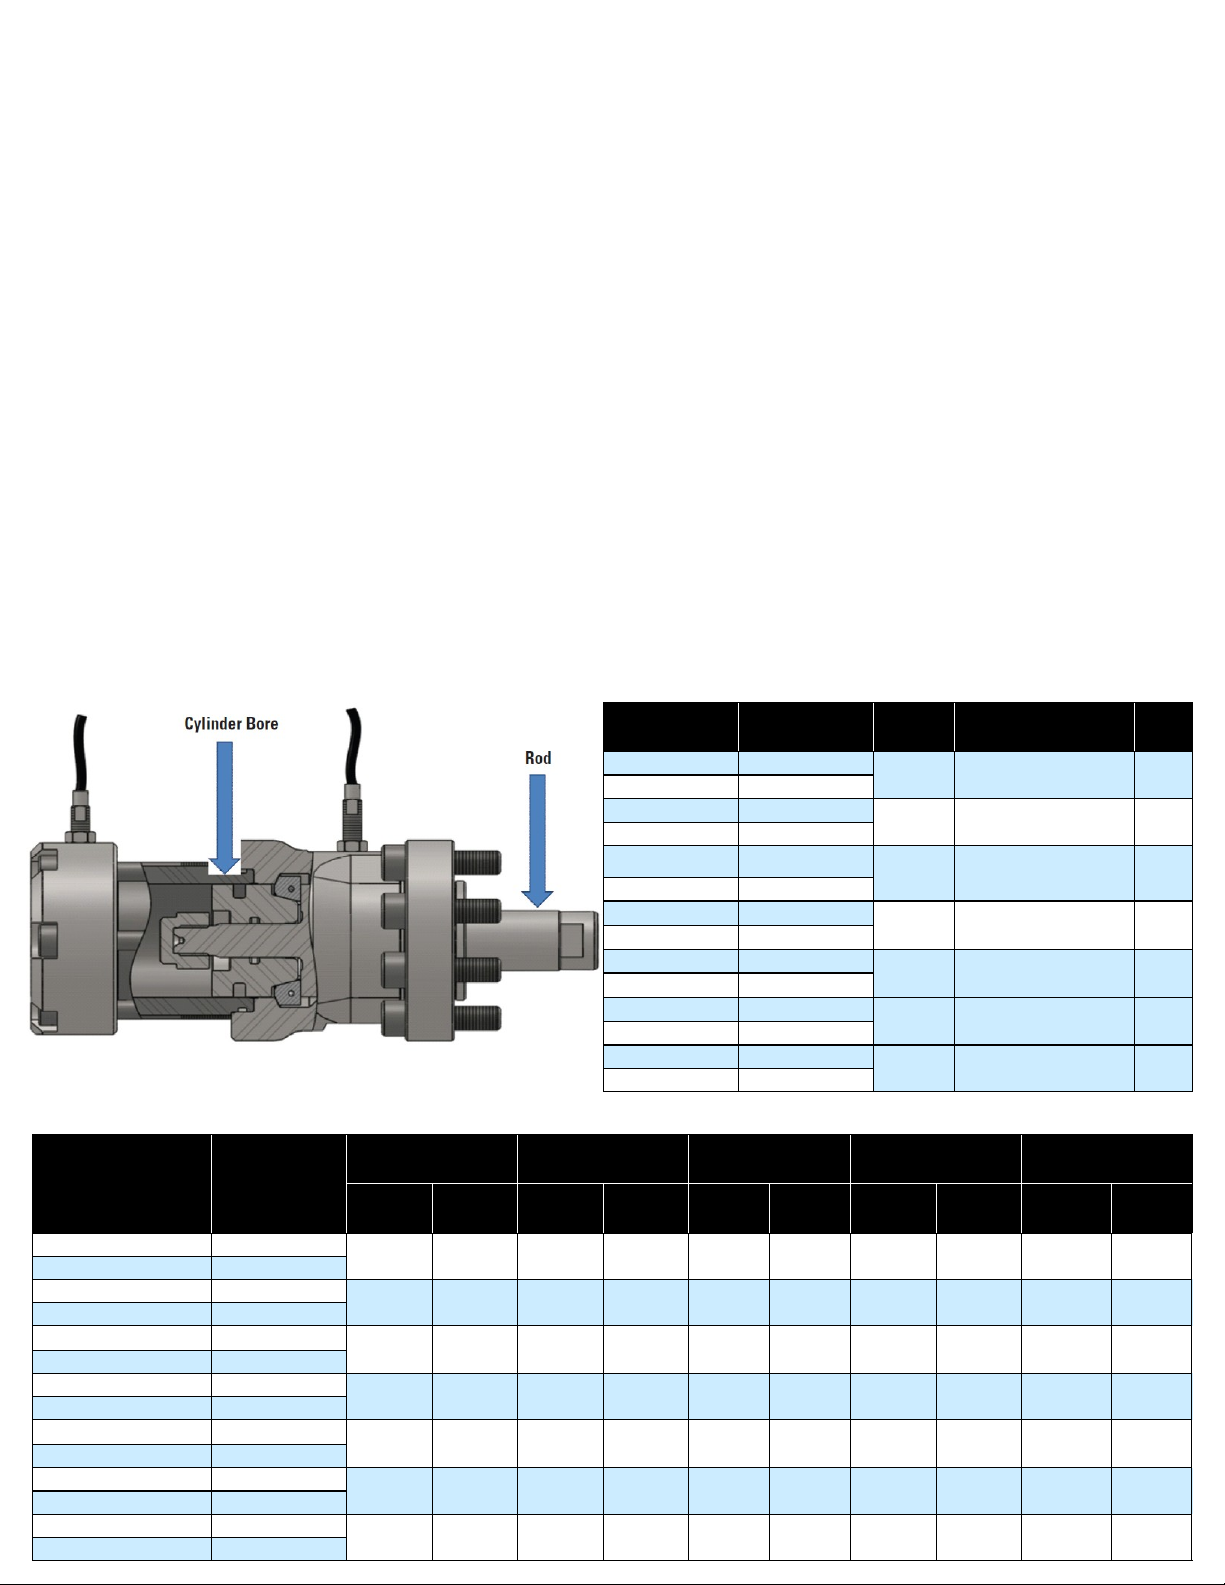
DETAIL 1.1 - HYDRAULIC LOCKIN CORE PULL ASSEMBLY
TABLE 1.0 — HLCP ASSEMBLY SIZES
ASSEMBLY No. STROKE ROD DIA. CYLINDER BORE DIA.
HLCP060-1000 25.4 mm (1.00 in)
HLCP060-2000 50.8 mm (2.00 in)
HLCP100-1250 31.8 mm (1.25 in)
HLCP100-2500 63.5 mm (2.50 in)
HLCP150-1375 34.9 mm (1.375 in)
HLCP150-2750 69.9 mm (2.75 in)
HLCP200-1750 44.5 mm (1.75 in)
HLCP200-3500 88.9 mm (3.50 in)
HLCP300-2000 50.8 mm (2.00 in)
HLCP300-4000 101.6 mm (4.00 in)
HLCP500-2500 63.5 mm (2.50 in)
HLCP500-5000 127.0 mm (5.00 in)
HLCP750-3000 76.2 mm (3.00 in)
HLCP750-6000 152.4 mm (6.00 in)
16 mm
(0.63 in)
20 mm
(0.79 in)
25 mm
(0.98 in)
32 mm
(1.26 in)
42 mm
(1.65 in)
50 mm
(1.97 in)
60 mm
(2.36 in)
30 mm (1.18 in) 1/8
36 mm (1.42 in) 1/8
45 mm (1.77 in) 1/4
56 mm (2.20 in) 1/4
71 mm (2.80 in) 3/8
84 mm (3.31 in) 3/8
105 mm (4.13 in) 1/2
NPTF
TAP
TABLE 1.1 — LOAD CAPACITIES FOR THE DME HYDRAULIC LOCKING CORE PULL CYLINDER ASSEMBLY
AT 160 BAR
ASSEMBLY NUMBER
(2321 PSI)
PRELOAD
HLCP060-1000 0.15 mm (0.006 in)
HLCP060-2000 0.20 mm (0.008 in)
HLCP100-1250 0.15 mm (0.006 in)
HLCP100-2500 0.20 mm (0.008 in)
HLCP150-1375 0.10 mm (0.004 in)
HLCP150-2750 0.15 mm (0.006 in)
HLCP200-1750 0.15 mm (0.006 in)
HLCP200-3500 0.20 mm (0.008 in)
HLCP300-2000 0.15 mm (0.006 in)
HLCP300-4000 0.20 mm (0.008 in)
HLCP500-2500 0.20 mm (0.008 in)
HLCP500-5000 0.30 mm (0.012 in)
HLCP750-3000 0.20 mm (0.008 in)
HLCP750-6000 0.30 mm (0.012 in)
Holding Force in kilo
Newton [kN]
Without
Preload
60 35 13,488 7,868 6.12 3.57 5.46 3.19 6.74 3.93
100 50 22,480 11,240 10.20 5.10 9.11 4.55 11.24 5.62
150 65 33,720 14,612 15.30 6.63 13.65 5.91 16.86 7.31
200 110 44,960 24,728 20.39 11.21 18.20 10.01 22.48 12.36
300 160 67,440 35,968 30.59 16.31 27.31 14.57 33.72 17.98
500 300 112,400 67,440 50.98 30.59 45.51 27.31 56.20 33.72
750 400 168,600 89,920 76.48 40.79 68.27 36.41 84.30 44.96
With
Preload
Holding Force in
Pound Force [lbf]
Without
Preload
With
Preload
Holding Force in
Metric ton [ton]
Without
Preload
With
Preload
Holding Force in UK
(troy) ton [ton]
Without
Preload
With
Preload
Holding Force in US
(avdp) ton [ton]
Without
Preload
With
Preload
Page 3

DME HYDRAULIC LOCKING CORE PULL CYLINDERS Specification No. ME-E32-0001(C)
Part No. HLCP-PS01 Page 3 of 12
MOLD DESIGN CONSIDERATIONS (continued):
TABLE 1.3 — MASSES AND THREAD SIZES
Assembly Number
Mass
kg lb
HLCP060-1000 1.8 3.97
HLCP060-2000 2.0 4.41
HLCP100-1250 2.9 6.39
HLCP100-2500 3.2 7.05
HLCP150-1375 5.0 11.02
HLCP150-2750 5.4 11.90
HLCP200-1750 9.3 20.50
HLCP200-3500 10.5 23.15
HLCP300-2000 20.1 44.31
HLCP300-4000 22.4 49.38
HLCP500-2500 31.0 68.34
HLCP500-5000 33.0 72.75
Thread Size
in Piston Rod
Thread Tap Hole Depth
to Drill Point
5/16 - 24 UNF 20mm
5/16 - 24 UNF 20mm
3/8 - 24 UNF 28mm
1/2 - 20 UNF 35mm
5/8 - 18 UNF 40mm
5/8 - 18 UNF 42mm
HLCP750-3000 55.5 122.36
HLCP750-6000 62.1 136.91
3/4 - 16 UNF 50mm
Page 4
DME HYDRAULIC LOCKING CORE PULL CYLINDERS Specification No. ME-E32-0001(C)
Part No. HLCP-PS01 Page 4 of 12
PROXIMITY SWITCH ELECTRICAL DATA:
Switching Output: BHS006Y = NPN (Standard), BHS006U = PNP (Special)
Connection 2 m Cable (PUR)
Utilization category DC 13
Ripple max. of Ue 10 %
Rated operational voltage (Ue) 24 DC V mm Operating frequency (f) 3000 Hz
Load current capacity (Ie) 100 mA Voltage drop max. static 2.5 V
Hysteresis max (H) 15 % No-load supply current damped 10 mA
Switching element function NO No-load supply current undamped 7 mA
Time delay before availability 25 ms Off-state current max (Ir) 100 μA
Electrical type DC Supply voltage max. (Ub) 30 V
Load capacitance max 0.4 μF Supply voltage min. (Ub) 10 V
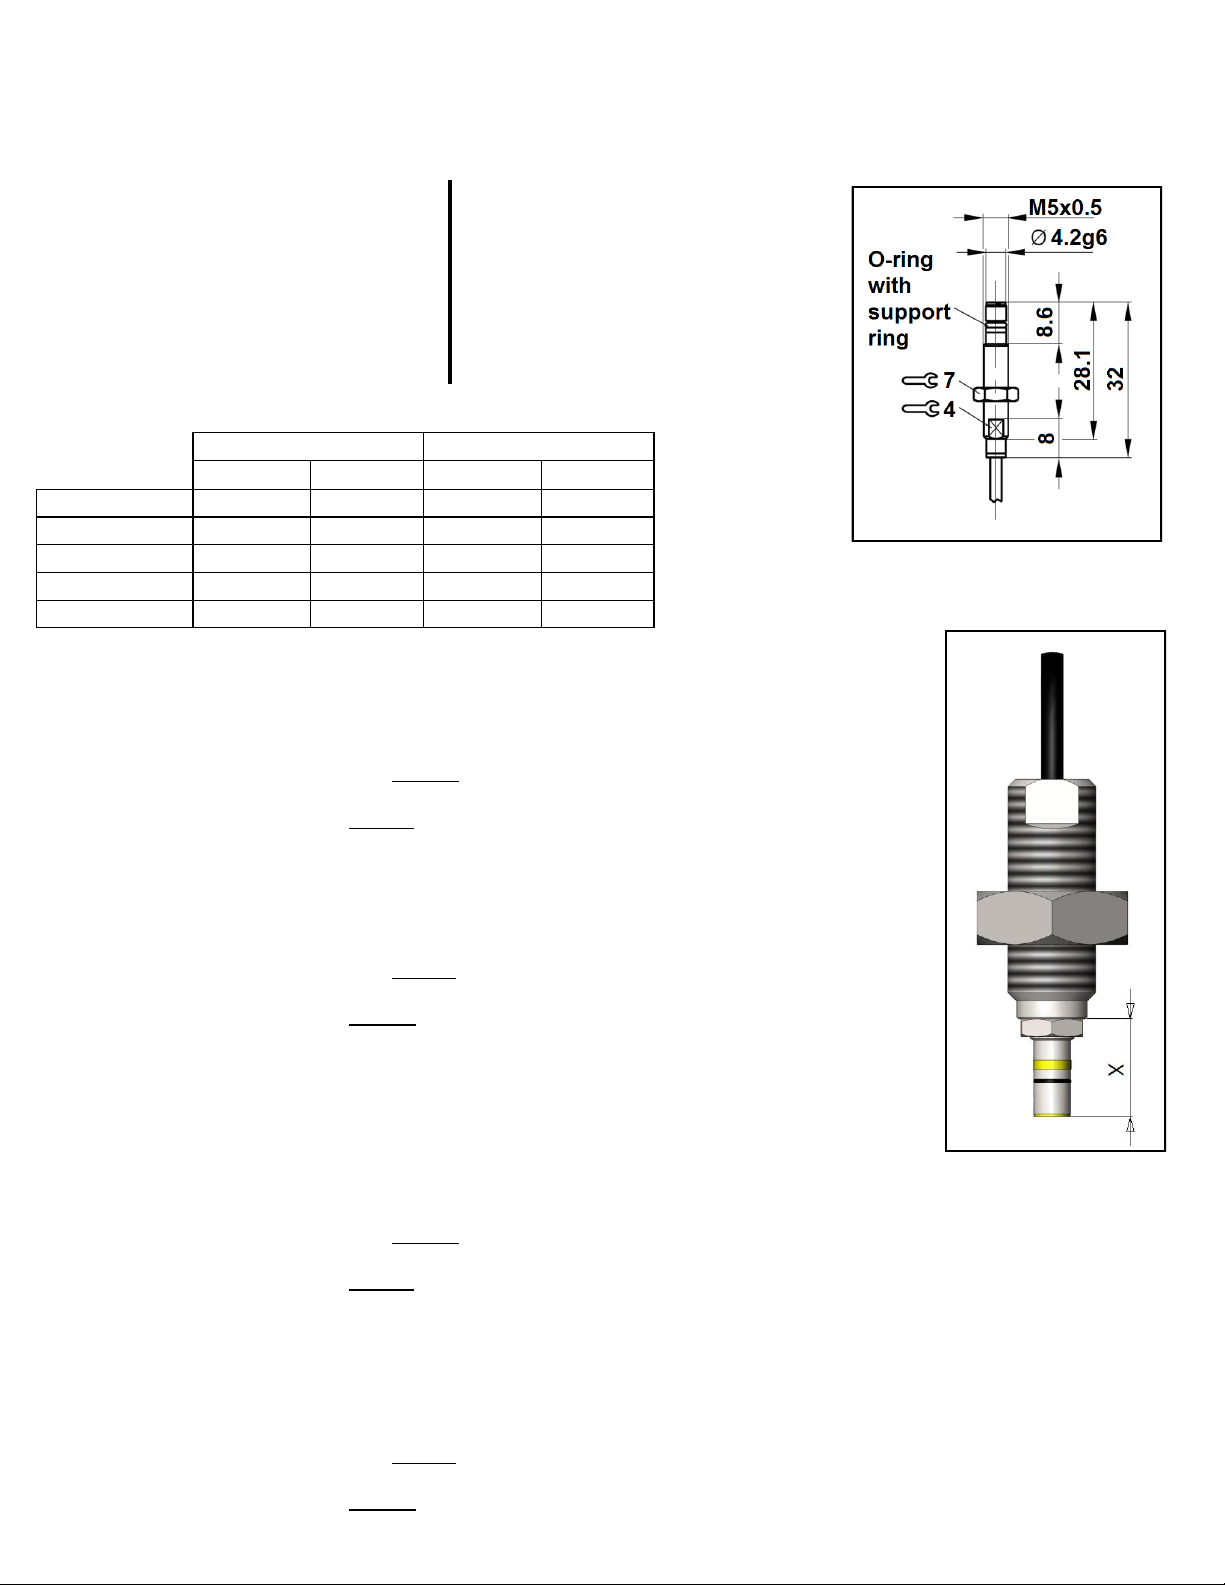
PROXIMITY SENSOR INSTALLATION INSTRUCTIONS:
TABLE 2.0:
DIMENSION “X”
HLCP150
HLCP200
HLCP300
HLCP500
HLCP750
REAR (CAP END) FRONT (FLANGE END)
[mm] [inches] [mm] [inches]
11.1 0.44 11.1 0.44
18.8 0.74 11.1 0.44
11.1 0.44 14.4 0.57
14.5 0.57 18.5 0.73
13.5 0.53 15.0 0.59
NOTE: These sensors require power to produce a signal. This includes during installation/setup and during normal
operation. Refer to power requirements (above). Customer is responsible to provide power service to operate sensors.
If only dry contacts are present on the injection molding machine, see next page for suggested wire-up.
A) HLCP060 & HLCP100
Rear sensor in the CAP:
1. Make sure the CYLINDER ROD is in the fully extended position.
2. Install the SENSOR into the CAP and slowly advance until the signal is lost. Be careful not to overshoot the lost position.
3. Return the CYLINDER ROD to the fully retracted position.
4. If the signal is still lost, continue to advance the SENSOR until it produces the signal again.
Advance the SENSOR one additional quarter turn.
5. Tighten the 7mm nut on the SENSOR to a torque setting of 1.0 Nm (8.9 in. lbs) to secure the SENSOR to the CAP
B) HLCP060 & HLCP100
Front sensor in the BODY:
1. Make sure the CYLINDER ROD is in the fully retracted position.
2. Install the SENSOR into the BODY and advance until the signal is lost. Be careful not to overshoot the lost position.
3. Return the CYLINDER ROD to the fully extended position.
4. If the signal is still lost, continue to advance the SENSOR until it produces the signal again.
Advance the SENSOR one additional quarter turn.
5. Tighten the 7mm nut on the SENSOR to a torque setting of 1.0 Nm (8.9 in. lbs) to secure the SENSOR to the BODY.
C) HLCP150 - HLCP750
Rear sensor in the CAP:
1. Assemble the SENSOR into the CAP SENSOR BUSHING as shown in DETAIL 2.1. The X dimension is found in
TABLE 2.0. Once the X dimension is set, use a torque setting of 1.0 Nm (8.9 in. lbs.) to secure the position of
the SENSOR inside the CAP SENSOR BUSHING.
2. Make sure the CYLINDER ROD is in the fully extended position.
3. Install the SENSOR and CAP SENSOR BUSHING into the CAP and tighten until the signal is lost. Be careful not to overshoot the lost position.
4. Return the CYLINDER ROD to the fully retracted position.
5. Continue to tighten the CAP SENSOR BUSHING until it produces the signal again. Tighten the SENSOR BUSHING one additional quarter turn.
6. Tighten the nut on the CAP SENSOR BUSHING to a torque setting of 17.0 Nm (12.6 ft. lbs) to secure the CAP SENSOR BUSHING to the CAP.
D) HLCP150 - HLCP750
Front sensor in the BODY:
1. Assemble the SENSOR into the BODY SENSOR BUSHING as shown in DETAIL 2.1. The X Dimension is found in TABLE 2.0. Once the X dimension is
set, use a torque setting of 1.0 Nm (8.9 in. lbs.) to secure the position of the SENSOR inside the CAP SENSOR BUSHING.
2. Make sure the CYLINDER ROD is in the fully retracted position.
3. Install the SENSOR and BODY SENSOR BUSHING into the BODY and advance it until the signal is lost. Be careful not to overshoot the lost position.
4. Return the CYLINDER ROD to the fully extended position.
5. Continue to advance the BODY SENSOR BUSHING until it produces the signal again. Advance the SENSOR BUSHING one additional quarter turn.
6. Tighten the nut on the BODY SENSOR BUSHING to a torque setting of 17.0 Nm (12.6 ft. lbs) to secure the BODY SENSOR BUSHING to the BODY.
DETAIL 2.0: PROXIMITY
SENSOR DIMENSIONS
(Shown in
Millimeters)
DETAIL 2.1: PROXIMITY
SENSOR BUSHING & X DIMENSION
Page 5

DME HYDRAULIC LOCKING CORE PULL CYLINDERS Specification No. ME-E32-0001(C)
Part No. HLCP-PS01 Page 5 of 12
DETAIL 2.2: PROXIMITY SENSOR WIRE UP INSTRUCTIONS:
DETAIL 2.3: OPTIONAL WIRE-UP—WHEN INJECTION MOLDING MACHINE CANNOT SUPPLY POWER
Not all injection molding machines are equipped to supply power to the proximity sensors. The proximity sensors are highly accurate, high-pressure,
inductive sensors which have no moving parts. Inductive sensors require power to deliver a signal. If dry contacts are required, an external power supply
and relay circuit will be required with the BHS006Y (NPN, NO) or BHS006U (PNP, NO) proximity sensors. A suggested electrical schematic is shown
below. This suggested circuit can be used with either NPN or PNP proximity sensors. Voltages shown are suggested only. Please refer to the voltage
range specified for the sensors on the previous page. The molder is required to provided the electrical service required to operate the sensors.
SUGGESTED ONLY:
When servicing the HLCP cylinder assembly, ensure that proper signals are received from both the front and rear mounted proximity sensors. Check the
condition of the proximity sensor wires. If wires are found to be damaged, the sensors will need to be replaced. Follow the sensor installation information
provided on the previous page.
If you intend to use external limit switches in your mold, and do not intend to use the proximity sensors, threaded plugs (to replace the sensors and plug
the threaded holes in the cylinder body and cylinder cap) are available upon request.
NPN, NO (normally open) proximity sensors are supplied standard
with product. These sensors are inductive sensors and will require
power to operate.
PNP, NO (normally open) proximity sensors are optional and must be
requested at the time of the HLCP cylinder assembly order. As with
the NPN sensors, the PNP sensors are inductive sensors and will
require power to operate.
Page 6

DME HYDRAULIC LOCKING CORE PULL CYLINDERS Specification No. ME-E32-0001(C)
Part No. HLCP-PS01 Page 6 of 12
SUGGESTED POCKET DETAILS (PLAN VIEW)
DETAIL 3.0: POCKET DETAIL — PLAN VIEW (HLCP060 AND HLCP100 SIZES ONLY)
DETAIL 3.1: POCKET DETAIL — PLAN VIEW (HLCP150 THROUGH HLCP500 SIZES)
Where shown, dimensions
are in inches [millimeters]
Where shown, dimensions
are in inches [millimeters]
Where shown, dimensions
are in inches [millimeters]
GENERAL OPERATING INSTRUCTIONS:
Do not exceed hydraulic service pressure of 3625 PSI.
Always have a minimum 870 PSI hold pressure avail-
able for normal operation of this device.
Always monitor the position of the cylinder piston (i.e.
fully retracted or fully extended).
SERVICING INSTRUCTIONS:
Take care to implement a preventative maintenance
schedule for your mold and Hydraulic Locking Core Pull
cylinder assembly. In most conditions, a regular review
of the cylinder every 3 months is recommended. In
some extreme cases a more frequent preventative
maintenance schedule may be required. In the first 3
months of use, it is recommended that the cylinder
assembly should be checked monthly to ensure proper
alignment and function of the product.
At every preventative maintenance schedule, ensure the
cylinder assembly properly actuates as well as properly
locks when in the full-forward (extended) position.
Mounting screws are provided with each Hydraulic
Locking Core Pull Cylinder assembly. Check mounting
and assembly screws for damage prior to installation or
assembly. If a mounting or assembly screw is required
to be replaced, Grade 8 UNC Socket Head Cap Screws
of appropriate length must be used. Please see the Bill
of Materials (BOM) lists included in this document, for
the quantity and size of mounting screws required.
Standard O-rings are used with this device, and are
listed in the Bill of Materials (BOM) lists provided. When
changing or replacing O-rings, take care to inspect the O
-ring for nicks, scraps or cuts. If an O-ring is found to be
damaged prior to or after installation, remove and
replace the damaged O-ring.
It is recommended that the hydraulic service to the
cylinder assembly have proper filtration employed, to
ensure proper functioning as well as product life for the
cylinder assembly. Any debris in the hydraulic service
can prevent the locking mechanism from properly
locking when the piston is in full forward (extended)
position. During servicing, ensure that no debris is left
inside the cylinder body, as well as in the hydraulic
service lines and/or fittings.
During servicing, check the condition of the proximity
sensor wires, and check for signal. If the sensor wires
are damaged or if signal has been lost for either sensor,
the affected sensor or sensors will need to be replaced.
The cylinder is internally self-lubricated via the hydraulic
service oil. Lubrication of the sliding core may be
necessary.
DETAIL 3.2: POCKET DETAIL — PLAN VIEW (HLCP750 SIZE ONLY)
Page 7

DME HYDRAULIC LOCKING CORE PULL CYLINDERS Specification No. ME-E32-0001(C)
Part No. HLCP-PS01 Page 7 of 12
INSTALLATION INSTRUCTIONS:
If preload is required on the piston rod and sliding core (when shutting off on an opposing core face or wall), ensure the spacer disk provided has been
properly adjusted to ensure the recommended preload is achieved.
Insert the modified (adjusted) spacer disk into the cylinder assembly installation pocket in the mold plate.
Insert the cylinder assembly into the installation pocket, and fasten the cylinder assembly to the mold plate using the mounting screws provided. Take
care to use recommended torque settings.
If the sliding core must be attached to the piston rod after the cylinder assembly has been attached to the mold plate, please connect the sliding core to
the piston rod at this time.
Attach all hydraulic service hoses and fittings to the cylinder assembly. Attached service hoses to the hydraulic service system or equipment. Ensure
870 PSI minimum hold pressure is available at all times.
If proximity sensors are included and used with this device, ensure the sensors are connected to the desired monitoring equipment and/or to the injection
molding machine. If different limit switches are used in place of the product’s proximity sensors, make sure that those limit switches are installed and
connected to the desired monitoring equipment and/or to the injection molding machine. For either method, it is important to ensure that the proximity
sensors or limit switches are functioning and monitored properly. Note: Power (electrical service) is required to operate the proximity sensors.
For cylinder sizes larger than the HLCP060 and HLCP100 sizes, a cap sensor bushing (with nut) and body sensor bushing (with nut) are used to retain
the proximity sensors to the cylinder assembly. Ensure sufficient pocket clearance is present.
Details 3.0 through 3.2 show the suggested plan view pocket installation. The suggested installation varies by cylinder assembly size, as different sizes
use different quantities of mounting screws. See chart on following pages for all suggested dimensions and mounting screw thread size.
Recommended torque values for assembly and mounting screws are shown in the BOM (Bill of Materials) for each HLCP cylinder size and stroke.
Important:
The suggested installation pocket
details show two “slots” (please refer
to Section B-B and the appropriate
Plan View). The slot described for the
proximity switch (signaling full forward
position of the piston rod) is a minimum
requirement but can be made larger if
required. The slot shown for hydraulic
service is only a representation, and
the mold maker and/or mold designer
is responsible to provide appropriate
clearance for the actual hydraulic
service (fittings, hoses, etc) that will
be used with the intended mold and/or
application.
NOTE:
IN DETAILS 3.3 — 3.4,
WHERE SHOWN,
DIMENSIONS ARE IN
INCHES [MILLIMETERS]
DETAIL 3.3: SUGGESTED POCKET DETAIL — SECTION VIEW A-A (ALL SIZES)
DETAIL 3.4: SUGGESTED POCKET DETAIL — SECTION VIEW B-B (ALL SIZES)
SLOT FOR
PROXIMITY
SENSORS
NOTICE:
DME shall not be liable for misuse or failure
to follow the enclosed instructions and
specifications. DME hereby disclaims all
implied warranties, including merchantability
and fitness for a particular purpose. In no
event shall DME be responsible for loss of
use, revenue or profit, or for incidental or
consequential damages.
Page 8

DME HYDRAULIC LOCKING CORE PULL CYLINDERS Specification No. ME-E32-0001(C)
Part No. HLCP-PS01 Page 8of 12
TABLE 3.0: INSTALLATION DIMENSION CHART — SUGGESTED POCKET DETAILS. FOR PISTON ROD THREAD SIZES, SEE PAGE 3.
HLCP060
size
HLCP100
size
HLCP150
size
HLCP200
size
HLCP300
size
HLCP500
size
HLCP750
size
ØA ØC E H1 H2 H3 H4 G1 G2 G3 K M
[mm]
MIN SEE BELOW
66.00 31.240 +0.025/-0 20.00 10.00 7.87 20.70 86.00 17.40 25.78 18.0 13.0
[mm]
[in]
2.598 1.2299 +0.0010/-0 0.787 0.394 0.310 0.815 3.386 0.685 1.015 0.71 0.51
82.00 37.590 +0.025/-0 24.00 10.00 9.78 25.53 94.00 21.46 31.88 21.0 18.0
[mm]
[in]
3.228 1.4799 +0.0010/-0 0.945 0.394 0.385 1.005 3.701 0.845 1.255 0.83 0.71
96.00 44.450 +0.025/-0 29.00 10.00 17.02 30.86 101.00 25.91 36.45 40.26 26.0 18.0
[mm]
[in]
3.780 1.7500 +0.0010/-0 1.142 0.394 0.670 1.215 3.976 1.020 1.435 1.585 1.02 0.71
120.50 63.500 +0.030/-0 37.00 10.00 21.46 38.86 113.25 32.64 46.10 50.80 26.0 25.0
[mm]
[in]
4.744 2.5000 +0.0012/-0 1.457 0.394 0.845 1.530 4.459 1.285 1.815 2.000 1.02 0.98
150.00 76.200 +0.030/-0 47.00 10.00 28.96 52.32 128.00 36.58 56.90 63.75 33.0 41.0
[mm]
[in]
5.906 3.0000 +0.0012/-0 1.850 0.394 1.140 2.060 5.039 1.440 2.240 2.510 1.30 1.61
177.50 88.900 +0.035/-0 55.00 10.00 31.75 57.66 141.75 48.39 68.20 75.18 34.0 55.0
[mm]
[in]
6.988 3.5000 +0.0014/-0 2.165 0.394 1.250 2.270 5.581 1.905 2.685 2.960 1.34 2.17
213.00 114.300 +0.035/-0 66.00 10.00 16.64 47.88 72.90 159.50 56.90 79.12 90.93 42.0 60.0
[mm]
[in]
8.386 4.5000 +0.0014/-0 2.598 0.394 0.655 1.885 2.870 6.280 2.240 3.115 3.580 1.65 2.36
ØB
+/- 0.03
+/- 0.001 +/- 0.001 +/- 0.001
MIN
+/- 0.03
MIN
+/- 0.03
MIN MAX
Flange Mounting Screw
Thread Size
(and recommended torque ) [in]
1/4-20 UNC
Torque: 13 ft.lbs [17.5 Nm]
5/16-18 UNC
Torque: 27 ft.lbs [36.4 Nm]
5/16-18 UNC
Torque: 27 ft.lbs [36.4 Nm]
3/8-16 UNC
Torque: 52 ft.lbs [70.2 Nm]
1/2-13 UNC
Torque: 130 ft.lbs [175 Nm]
5/8-11 UNC
Torque: 255 ft.lbs [344 Nm]
5/8-11 UNC
Torque: 255 ft.lbs [344 Nm]
"T"
HYDRAULIC LOCKING CORE PULL CYLINDER ASSEMBLY — SECTION ASSEMBLY VIEWS
DETAIL 4.0: SECTION ASSEMBLY VIEW
Detail 4.0 applies to the HLCP060 and HLCP100 sizes only. Detail 4.1 applies to all other sizes.
DETAIL 4.1: SECTION ASSEMBLY VIEW
(Note: number of components may vary — see tables below for details)
Page 9

DME HYDRAULIC LOCKING CORE PULL CYLINDERS Specification No. ME-E32-0001(C)
Part No. HLCP-PS01 Page 9 of 12
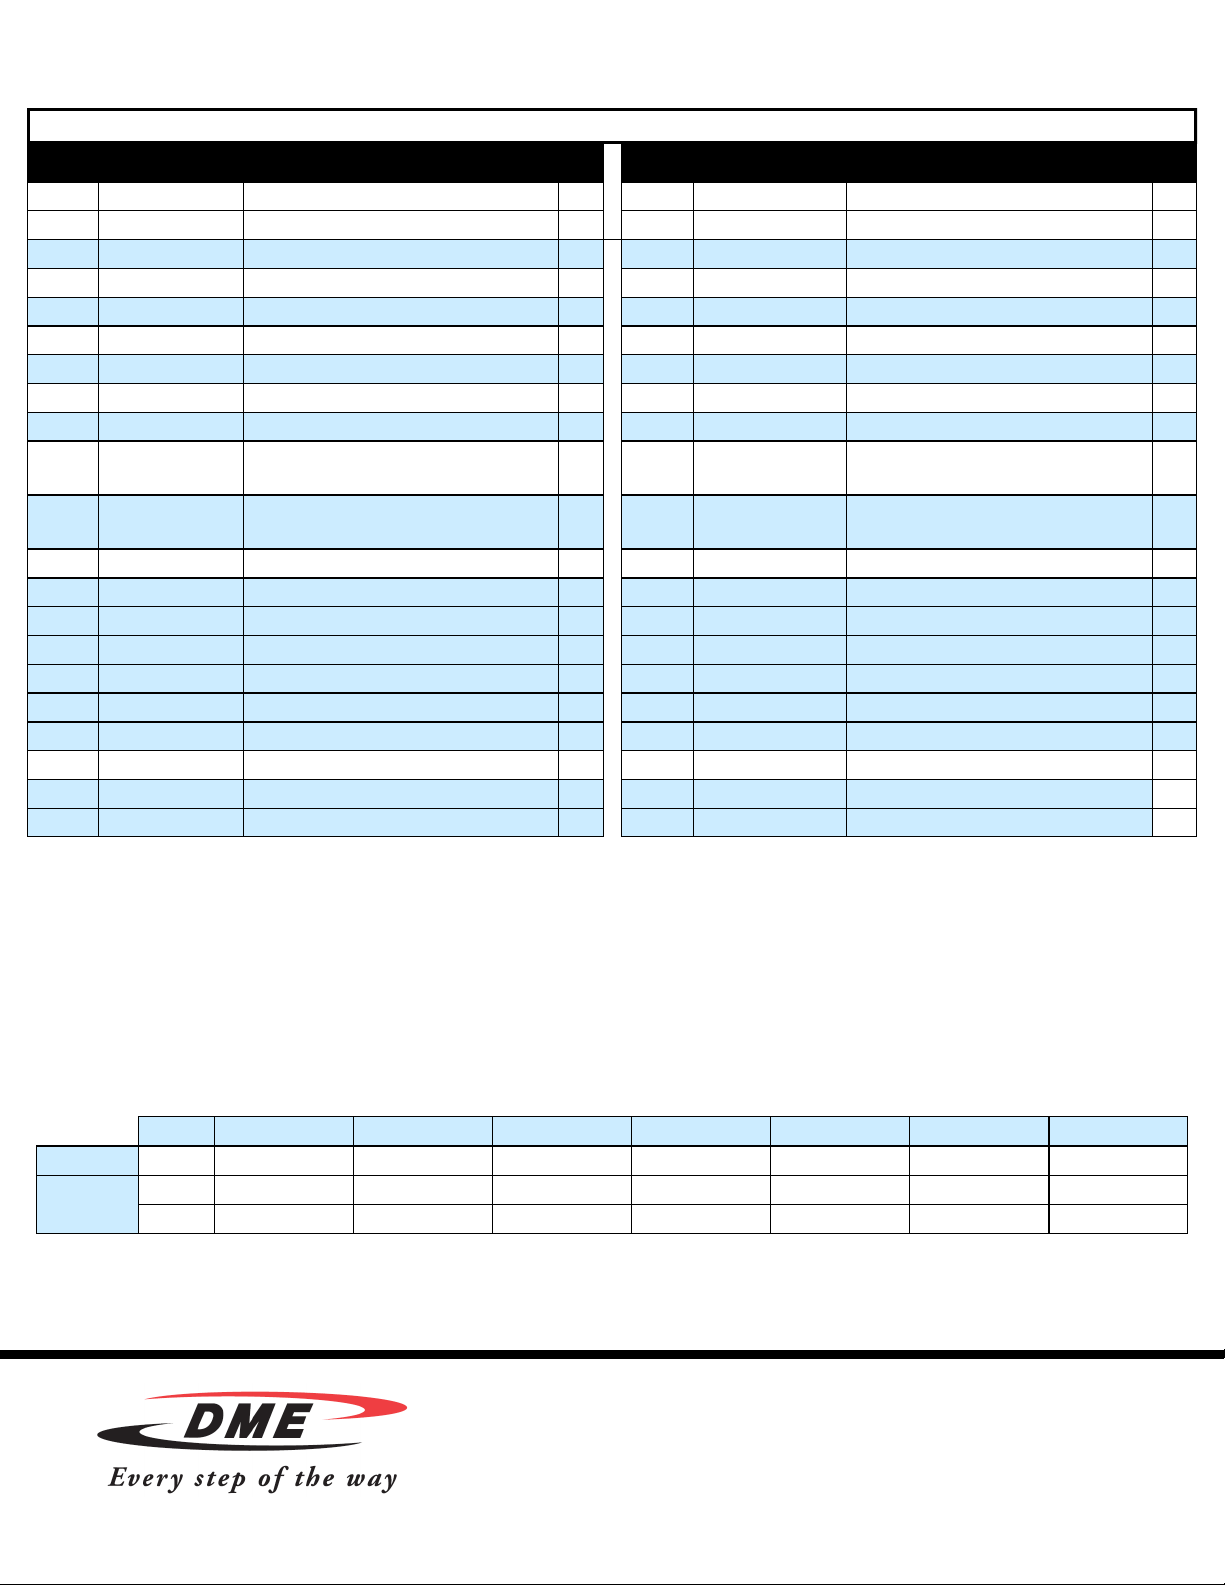
HYDRAULIC LOCKING CORE PULL CYLINDER ASSEMBLY — BILL OF MATERIALS
6
8
1 HLCP060BODY HLCP CYLINDER, BODY 1
2 HLCP0602000SL HLCP CYLINDER, SLEEVE 1
3 HLCP060CAP HLCP CYLINDER, CAP 1
4 HLCP0602000RD HLCP CYLINDER, ROD 1
5 HLCP060PSTN HLCP CYLINDER, PISTON 1
6 HLCP060PSTNBU HLCP CYLINDER, PISTON BUSHING 1
7 HLCP060SEGM HLCP CYLINDER, SEGMENT KIT 1
9 HLCP060ASCREW2
10 HLCP060MSCREW
11 HLCP060OILCAP HLCP CYLINDER, OIL CAPS 2
12 HLCP060-SEALS HLCP CYLINDER, SEAL KIT 1
12a WD2200160-Z201 EXCLUDER 1
12b RSK000160-T46V STEPSEAL 1
12d S35P9X12.3X2.6 INNER PISTON O-RING 1
12e OR1603510-VC009 SLEEVE O-RING 2
13 HLCP060SPACER HLCP CYLINDER, SPACER PLATE 1
14a
14b
TABLE 4.1: HLCP060-2000
HLCP CYLINDER, ASSEMBLY SCREWS.
HLCP CYLINDER, MOUNTING SCREWS.
1/4-20 UNC x 1.00 inches (Torque: 13 ft.lbs)
NOT NEEDED IN THIS SIZE
6
8
TABLE 4.0: HLCP060-1000
ITEM NO. PART NO. DESCRIPTION QTY. ITEM NO. PART NO. DESCRIPTION QTY.
1 HLCP060BODY HLCP CYLINDER, BODY 1
2 HLCP0601000SL HLCP CYLINDER, SLEEVE 1
3 HLCP060CAP HLCP CYLINDER, CAP 1
4 HLCP0601000RD HLCP CYLINDER, ROD 1
5 HLCP060PSTN HLCP CYLINDER, PISTON 1
6 HLCP060PSTNBU HLCP CYLINDER, PISTON BUSHING 1
7 HLCP060SEGM HLCP CYLINDER, SEGMENT KIT 1
8 BHS006Y BALLUF INDUCTIVE SENSOR M5X0,5 NPN 2 8 BHS006Y BALLUF INDUCTIVE SENSOR M5X0,5 NPN 2
9 HLCP060ASCREW1
10 HLCP060MSCREW
11 HLCP060OILCAP HLCP CYLINDER, OIL CAPS 2
12 HLCP060-SEALS HLCP CYLINDER, SEAL KIT 1
12a WD2200160-Z201 EXCLUDER 1
12b RSK000160-T46V STEPSEAL 1
12c PT0100300-T46V GLYD RING 1 12c PT0100300-T46V GLYD RING 1
12d S35P9X12.3X2.6 INNER PISTON O-RING 1
12e OR1603510-VC009 SLEEVE O-RING 2
13 HLCP060SPACER HLCP CYLINDER, SPACER PLATE 1
14a
14b
HLCP CYLINDER, ASSEMBLY SCREWS.
HLCP CYLINDER, MOUNTING SCREWS.
1/4-20 UNC x 1.00 inches (Torque: 13 ft.lbs)
NOT NEEDED IN THIS SIZE
TABLE 4.2: HLCP100-1250
ITEM NO. PART NO. DESCRIPTION QTY. ITEM NO. PART NO. DESCRIPTION QTY.
1 HLCP100BODY HLCP CYLINDER, BODY 1
2 HLCP1001250SL HLCP CYLINDER, SLEEVE 1
3 HLCP100CAP HLCP CYLINDER, CAP 1
4 HLCP1001250RD HLCP CYLINDER, ROD 1
5 HLCP100PSTN HLCP CYLINDER, PISTON 1
6 HLCP100PSTNBU HLCP CYLINDER, PISTON BUSHING 1
7 HLCP100SEGM HLCP CYLINDER, SEGMENT KIT 1
8 BHS006Y BALLUF INDUCTIVE SENSOR M5X0,5 NPN 2
9 HLCP100ASCREW1
10 HLCP100MSCREW
11 HLCP100OILCAP HLCP CYLINDER, OIL CAPS 2
12 HLCP100-SEALS HLCP CYLINDER, SEAL KIT 1
12a WD2200200-Z201 EXCLUDER 1
12b RSK100200-T46V STEPSEAL 1
12c PT0100360-T46V GLYD RING 1
12d S35P10X14.06X3.2 INNER PISTON O-RING 1
12e OR2504200-VC009 SLEEVE O-RING 2
13 HLCP100SPACER HLCP CYLINDER, SPACER PLATE 1
14a
14b
HLCP CYLINDER, ASSEMBLY SCREWS.
M6x60 mm (Torque: 12.6 ft.lbs)
HLCP CYLINDER, MOUNTING SCREWS.
5/16-18 UNC x 1.25 inches (Torque: 27 ft.lbs)
NOT NEEDED IN THIS SIZE
1 HLCP100BODY HLCP CYLINDER, BODY 1
2 HLCP1002500SL HLCP CYLINDER, SLEEVE 1
3 HLCP100CAP HLCP CYLINDER, CAP 1
4 HLCP1002500RD HLCP CYLINDER, ROD 1
5 HLCP100PSTN HLCP CYLINDER, PISTON 1
6 HLCP100PSTNBU HLCP CYLINDER, PISTON BUSHING 1
7 HLCP100SEGM HLCP CYLINDER, SEGMENT KIT 1
8 BHS006Y BALLUF INDUCTIVE SENSOR M5X0,5 NPN 2
6
8
9 HLCP100ASCREW2
10 HLCP100MSCREW
11 HLCP100OILCAP HLCP CYLINDER, OIL CAPS 2
12 HLCP100-SEALS HLCP CYLINDER, SEAL KIT 1
12a WD2200200-Z201 EXCLUDER 1
12b RSK100200-T46V STEPSEAL 1
12c PT0100300-T46V PT0100360-T46V 1
12d S35P10X14.06X3.2 INNER PISTON O-RING 1
12e OR2504200-VC009 SLEEVE O-RING 2
13 HLCP100SPACER HLCP CYLINDER, SPACER PLATE 1
14a
14b
TABLE 4.3: HLCP100-2500
HLCP CYLINDER, ASSEMBLY SCREWS.
M6x90 mm (Torque: 12.6 ft.lbs)
HLCP CYLINDER, MOUNTING SCREWS.
5/16-18 UNC x 1.25 inches (Torque: 27 ft.lbs)
NOT NEEDED IN THIS SIZE
6
8
Page 10

DME HYDRAULIC LOCKING CORE PULL CYLINDERS Specification No. ME-E32-0001(C)
Part No. HLCP-PS01 Page 10 of 12
HYDRAULIC LOCKING CORE PULL CYLINDER ASSEMBLY — BILL OF MATERIALS
TABLE 4.4: HLCP150-1375
ITEM NO. PART NO. DESCRIPTION QTY. ITEM NO. PART NO. DESCRIPTION QTY.
1 HLCP150BODY HLCP CYLINDER, BODY 1 1 HLCP150BODY HLCP CYLINDER, BODY 1
2 HLCP1501375SL HLCP CYLINDER, SLEEVE 1 2 HLCP1502750SL HLCP CYLINDER, SLEEVE 1
3 HLCP150CAP HLCP CYLINDER, CAP 1 3 HLCP150CAP HLCP CYLINDER, CAP 1
4 HLCP1501375RD HLCP CYLINDER, ROD 1 4 HLCP1502750RD HLCP CYLINDER, ROD 1
5 HLCP150PSTN HLCP CYLINDER, PISTON 1 5 HLCP150PSTN HLCP CYLINDER, PISTON 1
6 HLCP150PSTNBU HLCP CYLINDER, PISTON BUSHING 1 6 HLCP150PSTNBU HLCP CYLINDER, PISTON BUSHING 1
7 HLCP150SEGM HLCP CYLINDER, SEGMENT KIT 1 7 HLCP150SEGM HLCP CYLINDER, SEGMENT KIT 1
8 BHS006Y BALLUF INDUCTIVE SENSOR M5X0,5 NPN 2 8 BHS006Y BALLUF INDUCTIVE SENSOR M5X0,5 NPN 2
9 HLCP150ASCREW1
10 HLCP150MSCREW
11 HLCP150OILCAP HLCP CYLINDER, OIL CAPS 2
12 HLCP150-SEALS HLCP CYLINDER, SEAL KIT 1
12a WE3100250-T46V EXCLUDER 1 12a WE3100250-T46V EXCLUDER 1
12b RSK100250-T46V STEPSEAL 1 12b RSK100250-T46V STEPSEAL 1
12c PT0200450-T46V GLYD RING 1 12c PT0200450-T46V PT0100360-T46V 1
12d S35P13X17.5X3.6 INNER PISTON O-RING 1 12d S35P13X17.5X3.6 INNER PISTON O-RING 1
12e OR2505500-VC009 SLEEVE O-RING 2 12e OR2505500-VC009 SLEEVE O-RING 2
13 HLCP150SPACER HLCP CYLINDER, SPACER PLATE 1 13 HLCP150SPACER HLCP CYLINDER, SPACER PLATE 1
14a HLCP150BSEBU BODY SENSOR BUSHING 27MM, WITH NUT 1 14a HLCP150BSEBU BODY SENSOR BUSHING 27MM, WITH NUT 1
14b HLCP150CSEBU CAP SENSOR BUSHING 27MM, WITH NUT 1
HLCP CYLINDER, ASSEMBLY SCREWS.
M6x80 mm (Torque: 12.6 ft.lbs)
HLCP CYLINDER, MOUNTING SCREWS.
5/16-18 UNC x 1.50 inches (Torque: 27 ft.lbs)
8 9 HLCP150ASCREW2
10
10 HLCP150MSCREW
11 HLCP150OILCAP HLCP CYLINDER, OIL CAPS 2
12 HLCP150-SEALS HLCP CYLINDER, SEAL KIT 1
14b HLCP150CSEBU CAP SENSOR BUSHING 27MM, WITH NUT 1
TABLE 4.5: HLCP150-2750
HLCP CYLINDER, ASSEMBLY SCREWS.
M6x110 mm (Torque: 12.6 ft.lbs)
HLCP CYLINDER, MOUNTING SCREWS.
5/16-18 UNC x 1.50 inches (Torque: 27 ft.lbs)
8
10
10
1 HLCP200BODY HLCP CYLINDER, BODY 1
2 HLCP2003500SL HLCP CYLINDER, SLEEVE 1
3 HLCP200CAP HLCP CYLINDER, CAP 1
4 HLCP2003500RD HLCP CYLINDER, ROD 1
5 HLCP200PSTN HLCP CYLINDER, PISTON 1
6 HLCP200PSTNBU HLCP CYLINDER, PISTON BUSHING 1
7 HLCP200SEGM HLCP CYLINDER, SEGMENT KIT 1
8 BHS006Y BALLUF INDUCTIVE SENSOR M5X0,5 NPN 2
8
9 HLCP200ASCREW2
10 HLCP200MSCREW
11 HLCP200OILCAP HLCP CYLINDER, OIL CAPS 2
12 HLCP200-SEALS HLCP CYLINDER, SEAL KIT 1
12a WE3100320-T46V EXCLUDER 1
12b RSK100320-T46V STEPSEAL 1
12c PT0200560-T46V PT0100360-T46V 1
12d S35P16X22.1X4.7 INNER PISTON O-RING 1
12e OR3007000-VC009 SLEEVE O-RING 2
13 HLCP200SPACER HLCP CYLINDER, SPACER PLATE 1
14a HLCP200BSEBU BODY SENSOR BUSHING 27MM, WITH NUT 1
14b HLCP200CSEBU CAP SENSOR BUSHING 27MM, WITH NUT 1
TABLE 4.7: HLCP200-3500
HLCP CYLINDER, ASSEMBLY SCREWS.
M8x140 mm (Torque: 29.5 ft.lbs)
HLCP CYLINDER, MOUNTING SCREWS.
3/8-16 UNC x 1.75 inches (Torque: 52 ft.lbs)
8
10
TABLE 4.6: HLCP200-1750
ITEM NO. PART NO. DESCRIPTION QTY. ITEM NO. PART NO. DESCRIPTION QTY.
1 HLCP200BODY HLCP CYLINDER, BODY 1
2 HLCP2001750SL HLCP CYLINDER, SLEEVE 1
3 HLCP200CAP HLCP CYLINDER, CAP 1
4 HLCP2001750RD HLCP CYLINDER, ROD 1
5 HLCP200PSTN HLCP CYLINDER, PISTON 1
6 HLCP200PSTNBU HLCP CYLINDER, PISTON BUSHING 1
7 HLCP200SEGM HLCP CYLINDER, SEGMENT KIT 1
8 BHS006Y BALLUF INDUCTIVE SENSOR M5X0,5 NPN 2
9 HLCP200ASCREW1
10 HLCP200MSCREW
11 HLCP200OILCAP HLCP CYLINDER, OIL CAPS 2
12 HLCP200-SEALS HLCP CYLINDER, SEAL KIT 1
12a WE3100320-T46V EXCLUDER 1
12b RSK100320-T46V STEPSEAL 1
12c PT0200560-T46V GLYD RING 1
12d S35P16X22.1X4.7 INNER PISTON O-RING 1
12e OR3007000-VC009 SLEEVE O-RING 2
13 HLCP200SPACER HLCP CYLINDER, SPACER PLATE 1
14a HLCP200BSEBU BODY SENSOR BUSHING 27MM, WITH NUT 1
14b HLCP200CSEBU CAP SENSOR BUSHING 27MM, WITH NUT 1
HLCP CYLINDER, ASSEMBLY SCREWS.
M8x100 mm (Torque: 29.5 ft.lbs)
HLCP CYLINDER, MOUNTING SCREWS.
3/8-16 UNC x 1.75 inches (Torque: 52 ft.lbs)
Page 11

DME HYDRAULIC LOCKING CORE PULL CYLINDERS Specification No. ME-E32-0001(C)
Part No. HLCP-PS01 Page 11 of 12
HYDRAULIC LOCKING CORE PULL CYLINDER ASSEMBLY — BILL OF MATERIALS
TABLE 4.8: HLCP300-2000
ITEM NO. PART NO. DESCRIPTION QTY. ITEM NO. PART NO. DESCRIPTION QTY.
1 HLCP300BODY HLCP CYLINDER, BODY 1 1 HLCP300BODY HLCP CYLINDER, BODY 1
2 HLCP3002000SL HLCP CYLINDER, SLEEVE 1 2 HLCP3004000SL HLCP CYLINDER, SLEEVE 1
3 HLCP300CAP HLCP CYLINDER, CAP 1 3 HLCP300CAP HLCP CYLINDER, CAP 1
4 HLCP3002000RD HLCP CYLINDER, ROD 1 4 HLCP3004000RD HLCP CYLINDER, ROD 1
5 HLCP300PSTN HLCP CYLINDER, PISTON 1 5 HLCP300PSTN HLCP CYLINDER, PISTON 1
6 HLCP300PSTNBU HLCP CYLINDER, PISTON BUSHING 1 6 HLCP300PSTNBU HLCP CYLINDER, PISTON BUSHING 1
7 HLCP300SEGM HLCP CYLINDER, SEGMENT KIT 1 7 HLCP300SEGM HLCP CYLINDER, SEGMENT KIT 1
8 BHS006Y BALLUF INDUCTIVE SENSOR M5X0,5 NPN 2 8 BHS006Y BALLUF INDUCTIVE SENSOR M5X0,5 NPN 2
9 HLCP300ASCREW1
10 HLCP300MSCREW
11 HLCP300OILCAP HLCP CYLINDER, OIL CAPS 2
12 HLCP300-SEALS HLCP CYLINDER, SEAL KIT 1
12a WE3100420-T46V EXCLUDER 1 12a WE3100420-T46V EXCLUDER 1
12b RSK200420-T46V STEPSEAL 1 12b RSK200420-T46V STEPSEAL 1
12c PT0200710-T46V GLYD RING 1 12c PT0200710-T46V PT0100360-T46V 1
12d S35P20X26.85X5.4 INNER PISTON O-RING 1 12d S35P20X26.85X5.4 INNER PISTON O-RING 1
12e OR4009000-VC009 SLEEVE O-RING 2 12e OR4009000-VC009 SLEEVE O-RING 2
13 HLCP300SPACER HLCP CYLINDER, SPACER PLATE 1 13 HLCP300SPACER HLCP CYLINDER, SPACER PLATE 1
14a HLCP300BSEBU BODY SENSOR BUSHING 27MM, WITH NUT 1 14a HLCP300BSEBU BODY SENSOR BUSHING 27MM, WITH NUT 1
14b HLCP300CSEBU CAP SENSOR BUSHING 45MM, WITH NUT 1
HLCP CYLINDER, ASSEMBLY SCREWS.
M10x110 mm (Torque: 58.3 ft.lbs)
HLCP CYLINDER, MOUNTING SCREWS.
1/2-13 UNC x 2.25 inches (Torque: 130 ft.lbs)
8 9 HLCP300ASCREW2
10
10 HLCP300MSCREW
11 HLCP300OILCAP HLCP CYLINDER, OIL CAPS 2
12 HLCP300-SEALS HLCP CYLINDER, SEAL KIT 1
14b HLCP300CSEBU CAP SENSOR BUSHING 45MM, WITH NUT 1
TABLE 4.9: HLCP300-4000
HLCP CYLINDER, ASSEMBLY SCREWS.
M10x160 mm (Torque: 58.3 ft.lbs)
HLCP CYLINDER, MOUNTING SCREWS.
1/2-13 UNC x 2.25 inches (Torque: 130 ft.lbs)
8
10
10
10
1 HLCP500BODY HLCP CYLINDER, BODY 1
2 HLCP5005000SL HLCP CYLINDER, SLEEVE 1
3 HLCP500CAP HLCP CYLINDER, CAP 1
4 HLCP5005000RD HLCP CYLINDER, ROD 1
5 HLCP500PSTN HLCP CYLINDER, PISTON 1
6 HLCP500PSTNBU HLCP CYLINDER, PISTON BUSHING 1
7 HLCP500SEGM HLCP CYLINDER, SEGMENT KIT 1
8 BHS006Y BALLUF INDUCTIVE SENSOR M5X0,5 NPN 2
9 HLCP500ASCREW2
10 HLCP500MSCREW
11 HLCP500OILCAP HLCP CYLINDER, OIL CAPS 2
12 HLCP500-SEALS HLCP CYLINDER, SEAL KIT 1
12a WE3100500-T46V EXCLUDER 1
12b RSK200500-T46V STEPSEAL 1
12c PT0300840-T46V PT0100360-T46V 1
12d S35P24X30.8X5.4 INNER PISTON O-RING 1
12e OR4510600-VC009 SLEEVE O-RING 2
13 HLCP500SPACER HLCP CYLINDER, SPACER PLATE 1
14a HLCP500BSEBU BODY SENSOR BUSHING 27MM, WITH NUT 1
14b HLCP500CSEBU CAP SENSOR BUSHING 45MM, WITH NUT 1
TABLE 4.11: HLCP500-5000
HLCP CYLINDER, ASSEMBLY SCREWS.
M10x200 mm (Torque: 58.3 ft.lbs)
HLCP CYLINDER, MOUNTING SCREWS.
5/8-11 UNC x 2.50 inches (Torque: 255 ft.lbs)
10
10
TABLE 4.10: HLCP500-2500
ITEM NO. PART NO. DESCRIPTION QTY. ITEM NO. PART NO. DESCRIPTION QTY.
1 HLCP500BODY HLCP CYLINDER, BODY 1
2 HLCP5002500SL HLCP CYLINDER, SLEEVE 1
3 HLCP500CAP HLCP CYLINDER, CAP 1
4 HLCP5002500RD HLCP CYLINDER, ROD 1
5 HLCP500PSTN HLCP CYLINDER, PISTON 1
6 HLCP500PSTNBU HLCP CYLINDER, PISTON BUSHING 1
7 HLCP500SEGM HLCP CYLINDER, SEGMENT KIT 1
8 BHS006Y BALLUF INDUCTIVE SENSOR M5X0,5 NPN 2
9 HLCP500ASCREW1
10 HLCP500MSCREW
11 HLCP500OILCAP HLCP CYLINDER, OIL CAPS 2
12 HLCP500-SEALS HLCP CYLINDER, SEAL KIT 1
12a WE3100500-T46V EXCLUDER 1
12b RSK200500-T46V STEPSEAL 1
12c PT0300840-T46V GLYD RING 1
12d S35P24X30.8X5.4 INNER PISTON O-RING 1
12e OR4510600-VC009 SLEEVE O-RING 2
13 HLCP500SPACER HLCP CYLINDER, SPACER PLATE 1
14a HLCP500BSEBU BODY SENSOR BUSHING 27MM, WITH NUT 1
14b HLCP500CSEBU CAP SENSOR BUSHING 45MM, WITH NUT 1
HLCP CYLINDER, ASSEMBLY SCREWS.
M10x140 mm (Torque: 58.3 ft.lbs)
HLCP CYLINDER, MOUNTING SCREWS.
5/8-11 UNC x 2.50 inches (Torque: 255 ft.lbs)
Page 12
DME HYDRAULIC LOCKING CORE PULL CYLINDERS Specification No. ME-E32-0001(C)
Part No. HLCP-PS01 Page 12 of 12
HYDRAULIC LOCKING CORE PULL CYLINDER ASSEMBLY — BILL OF MATERIALS
10
12
1 HLCP750BODY HLCP CYLINDER, BODY 1
2 HLCP7506000SL HLCP CYLINDER, SLEEVE 1
3 HLCP750CAP HLCP CYLINDER, CAP 1
4 HLCP7506000RD HLCP CYLINDER, ROD 1
5 HLCP750PSTN HLCP CYLINDER, PISTON 1
6 HLCP750PSTNBU HLCP CYLINDER, PISTON BUSHING 1
7 HLCP750SEGM HLCP CYLINDER, SEGMENT KIT 1
8 BHS006Y BALLUF INDUCTIVE SENSOR M5X0,5 NPN 2
9 HLCP750ASCREW2
10 HLCP750MSCREW
11 HLCP750OILCAP HLCP CYLINDER, OIL CAPS 2
12 HLCP750-SEALS HLCP CYLINDER, SEAL KIT 1
12a WE3100600-T46V EXCLUDER 1
12b RSK200600-T46V STEPSEAL 1
12c PT0301050-T46V PT0100360-T46V 1
12d RT0100300-T46V INNER PISTON O-RING 1
12e OR5013000-VC009 SLEEVE O-RING 2
13 HLCP750SPACER HLCP CYLINDER, SPACER PLATE 1
14a HLCP750BSEBU BODY SENSOR BUSHING 45MM, WITH NUT 1
14b HLCP750CSEBU CAP SENSOR BUSHING 65MM, WITH NUT 1
TABLE 4.13: HLCP750-6000
HLCP CYLINDER, ASSEMBLY SCREWS.
M12x240 mm (Torque: 100.3 ft.lbs)
HLCP CYLINDER, MOUNTING SCREWS.
5/8-11 UNC x 3.00 inches (Torque: 255 ft.lbs)
TABLE 4.12: HLCP750-3000
ITEM NO. PART NO. DESCRIPTION QTY. ITEM NO. PART NO. DESCRIPTION QTY.
1 HLCP750BODY HLCP CYLINDER, BODY 1
2 HLCP7503000SL HLCP CYLINDER, SLEEVE 1
3 HLCP750CAP HLCP CYLINDER, CAP 1
4 HLCP7503000RD HLCP CYLINDER, ROD 1
5 HLCP750PSTN HLCP CYLINDER, PISTON 1
6 HLCP750PSTNBU HLCP CYLINDER, PISTON BUSHING 1
7 HLCP750SEGM HLCP CYLINDER, SEGMENT KIT 1
8 BHS006Y BALLUF INDUCTIVE SENSOR M5X0,5 NPN 2
9 HLCP750ASCREW1
10 HLCP750MSCREW
11 HLCP750OILCAP HLCP CYLINDER, OIL CAPS 2
12 HLCP750-SEALS HLCP CYLINDER, SEAL KIT 1
12a WE3100600-T46V EXCLUDER 1
12b RSK200600-T46V STEPSEAL 1
12c PT0301050-T46V GLYD RING 1
12d RT0100300-T46V INNER PISTON O-RING 1
12e OR5013000-VC009 SLEEVE O-RING 2
13 HLCP750SPACER HLCP CYLINDER, SPACER PLATE 1
14a HLCP750BSEBU BODY SENSOR BUSHING 45MM, WITH NUT 1
14b HLCP750CSEBU CAP SENSOR BUSHING 65MM, WITH NUT 1
HLCP CYLINDER, ASSEMBLY SCREWS.
M12x160 mm (Torque: 100.3 ft.lbs)
HLCP CYLINDER, MOUNTING SCREWS.
5/8-11 UNC x 3.00 inches (Torque: 255 ft.lbs)
ORDERING INFORMATION:
Before placing an order, make sure you have defined the necessary HLCP assembly size and stroke length.
Contact DME Customer Service and specify the HLCP cylinder assembly number. If a special stroke length is required, please specify the required
stroke to the DME Customer Service representative.
Specify NPN or PNP type. Remember: the HLCP cylinder assembly is delivered standard with NPN sensors are installed. PNP is optional and if PNP
is required, it must be specified at time of order. PNP type, Normally Open proximity sensor — part number = BHS009U
If you intend to use external limit switches in your mold, and do not intend to use the proximity sensors, threaded plugs (to replace the sensors) are
available upon request. The plugs replace the sensors. When using a sensor bushing, the plug is installed into the sensor bushing in the same manner
as installing a sensor into a sensor bushing (see page 3 for detail). Install plug assemblies into cylinder until each assembly bottoms out in the threaded
sensor holes in the cylinder assembly. Then apply suggested torque. Part numbers and suggested torque setting is given below for the threaded plugs:
PART No. HLCP060PLUG HLCP100PLUG HLCP150PLUG HLCP200PLUG HLCP300PLUG HLCP500PLUG HLCP750PLUG
TORQUE
SIZE 060 100 150 200 300 500 750
[Nm] 1.0 Nm 1.0 Nm 17.0 Nm 17.0 Nm 17.0 Nm 17.0 Nm 17.0 Nm
[ft.lbs] 8.9 in.lbs 8.9 in.lbs 12.6 ft.lbs 12.6 ft.lbs 12.6 ft.lbs 12.6 ft.lbs 12.6 ft.lbs
Remember that hydraulic fittings are not supplied by DME, and are to be supplied by the mold maker and/or mold maker. Threaded connections (for
hydraulic fittings) on the HLCP cylinder assembly are NPTF, however other hydraulic fitting thread types can be supplied upon special request.
It is recommended that spare parts be ordered along with the system assembly order. Suggested spare parts include the Seal Kit, Spacer Plate,
Proximity Sensors (NPN or PNP types) and Sensor bushings (Body and Cap types).
World Headquarters DME Company DME Europe C.V.B.A.
DME Company 6210 Northwest Drive Industriepark Noord
29111 Stephenson Highway Mississauga, Ontario B-2800 Mechelen Belgium
Madison Heights, MI 48071 Canada L4V 1J6 32-15-215011 tel
800-626-6653 toll-free tel 800-387-6000 toll-free tel 32-15-218235 fax
248-398-6000 tel 905-677-6370 tel sales@dmeeu.com e-mail
888-808-4363 toll-free fax 800-461-9965 toll-free fax
www.dme.net web dme_canada@dme.net e-mail
© 2010 Printed in U.S.A.
Info@dme.net e-mail
10
12
MES 11/11
 Loading...