


2
IR Vandal Dome Camera
사용 설명서
용 서
DIC-7030DV
680TVL
MANUAL
3
The lightning flash with an arrowhead symbol, within an equilateral
triangle is intended to alert the user to the presence of uninsulated
dangerous voltage within the product's enclosure that may be of
sufficient magnitude to constitute a risk of electric shock to persons.
The exclamation point within an equilateral triangle is intended to alert

4
the user to the presence of important operating and maintenance
(servicing) instructions in the literature accompanying the appliance.
INFORMATION - This equipment has been tested and found to comply with limits for a
Class A digital device, pursuant to part 15 of the FCC Rules.
These limits are designed to provide reasonable protection against harmful interference
when the equipment is operated in a commercial environment.
This equipment generates, uses, and can radiate radio frequency energy and, if not
installed and used in accordance with the instruction manual, may cause
harmful interference to radio communications.
Operation of this equipment in a residential area is likely to cause harmful interference in
which case the user will be required to correct the interference at his own expense.
WARNING - Changes or modifications not expressly approved by the
manufacturer could void the user’s authority to operate the equipment.
CAUTION : To prevent electric shock and risk of fire hazards:
Do NOT use power sources other than that specified.
Do NOT expose this appliance to rain or moisture.
This installation should be made by a qualified service person and should conform
to all local codes
The camera needs periodic inspection.
Contact an authorized technician for inspection.
Stop using your camera when you find a malfunction.
If you use your camera around smoke or unusual heat for a long time,
fire may be caused.
Do not Install the camera on a surface that can not support it.
Unless the surface is suitable, it could cause falling or other hazards.
Do not hold plug with wet hands.
■ Warning

5
It could cause an electric shock.
Do not disassemble the camera.
It may result in fire, electric shock or other hazards.
Do not use the camera close to a gas or oil leak.
It may result in fire or other hazards.
1.Features
--------------------------------- 6
2. Cable Connection & OSD Control
--------------------------------- 7
3. Setup Menu Operation
--------------------------------- 8
4. Troubleshooting
--------------------------------- 19
5. Dimensions
--------------------------------- 20
6. Specifications
--------------------------------- 21
■ Contents

6

■SONY 1/3" 480K/570K-Effective Pixel Ex-view HAD CCD II
Minimum Resolution 0.1 Lux (F1.2, 50 IRE)
■High Resolution: More than 680 TV Lines
This camera has realized high resolution of 680 TV lines using the top-notch full digital
image processing, 12 Bit A/D serial signal processing and special algorithm technologies.
■NR (Digital Noise Reduction)
The DNR technology eliminates noise thus generating a distinct and clear image.
■High Color Reproduction
White balance processing with wide-range color temperature support and high-saturation
processing.
■DAY&NIGHT
This camera has the Day/Night function which shows clear image in dark condition
■ATR (Adaptive Tone Reproduction)
Automatically this function compensates the darker areas surrounding the object to
provide naturally sharp picture and then improves contrast in bright/dark areas
■High sensitivity and high saturation signal
This camera increases the number of horizontal pixels and achieves a high saturation
signal level and high sensitivity that extends into the near infrared.
■ Preset OSD(On Screen Display) menu (8 languages)
This camera supports the OSD function which is used with multi language. And so,
the camera can be controlled via selecting text displayed on the monitor screen.
■ Privacy Zone
It has 8 privacy zone function to prefect private area. It is possible to maximum 8 areas
and free to adjust masking size & area
1. Features

8
1) Cable Connection
( DC12V Type )
(Dual Type DC12/AC24V)
2) OSD Control
① 3AXIS BRACKET
- Please loosen screws and fix tilted and panned position.
③ LENS : Vari-Focal Auto Iris Lens ( 2.8mm ~ 12.0mm / F1.2 ) with ICR OSD PCB
- SETUP button : Used for the menu display. This button can be used to confirm settings
after changing the value of the selected function or current conditions.
- UP & DOWN buttons : Used for selecting items by moving the cursor up or down on the
menu screen.
- LEFT & RIGHT buttons : Used when changing item values, by moving the cursor to the
left or right on the menu screen
2. Cable Connection & OSD Control

9
•Please press the SETUP button to set OSD menu. The SETUP menu is displayed like
under the picture on the monitor.
• if it has been selected. You may move up/down to use another function by up/down
buttons and change the status by pressing left/right buttons.
• After finishing all desired setting, Please select 'EXIT.
Note) If ‘ ’ appears at the mode you wish to operate, it means that there is a sub-menu
which can be selected by pressing the SETUP button.
LENS
This menu is used to select kind of the lens.
• DC
- DC: Please select, when you use DC auto iris lens
- VIDEO: please select, when you use video iris lens
• MANUAL: please select, when you use manual lens
• MODE
- AUTO: The mechanical iris is controller automatically
-CLOSE: The mechanical iris is fixed to close
-OPEN: The mechanical iris is fixed to open
•SPEED: Set the convergence speed of the mechanical
iris
SHUTTER/AGC
You can select either auto or manual shutter.
This function is used to set AE or ME.
3. Setup Menu Operation
SETUP MENU
LENS AUTO
SHUTTER/AGC AUTO
WHITE BAL ATW
BACKLIGHT OFF
PICT ADJUST
ATR OFF
MOTION DET OFF
NEXT
SETUP MENU
LENS AUTO
SHUTTER/AGC AUTO
WHITE BAL ATW
BACKLIGHT OFF
PICT ADJUST
ATR OFF
MOTION DET OFF
NEXT
10
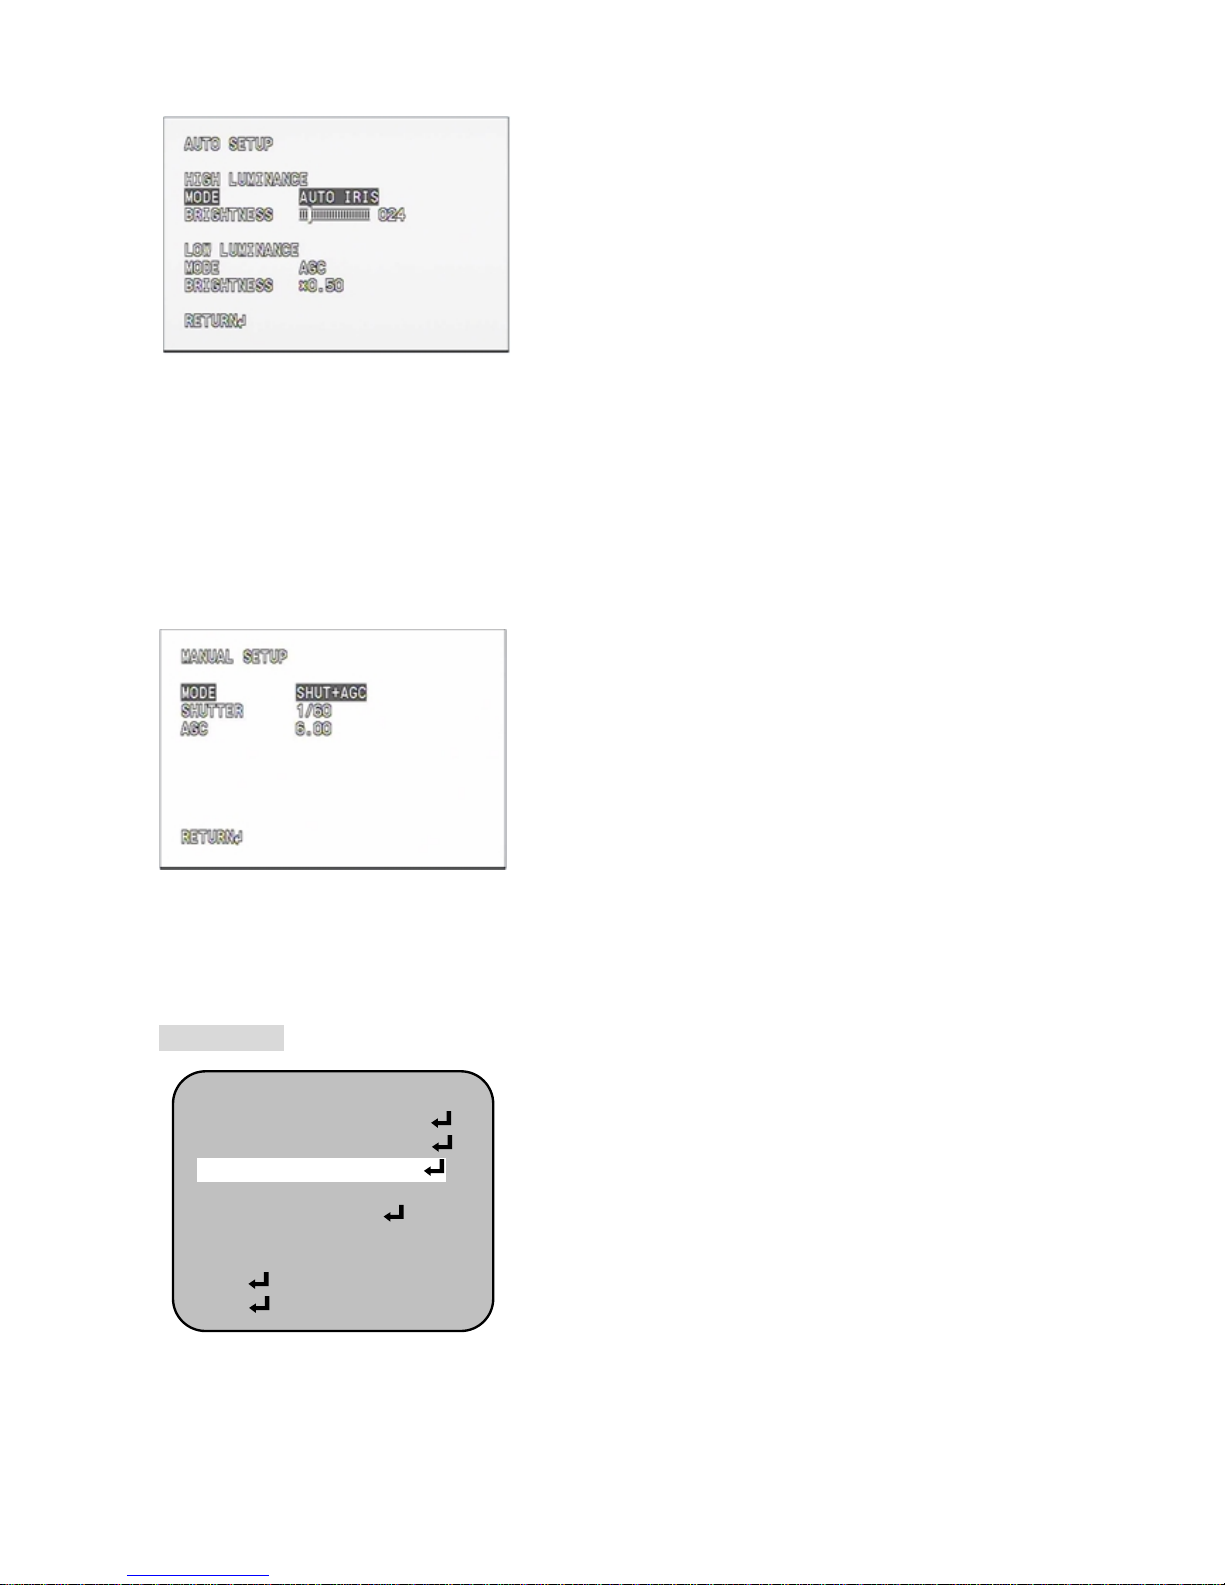
•AUTO
(HIGH LUMINANCE)
- AUTO IRIS
Select this to control the shutter speed automatically.
-SHUT+AUTO IRIS
Select AE control on the medium and high brightness
side
-Brightness
Select the high and medium brightness side reference
(LOW LUMINANCE)
-AGC
Select AE control on the low-brightness side
-Brightness
Select the low brightness side reference
•MANUAL
- MODE (SHUT+AGC)
“SHUT + AGC" is the only option available for the ME
operation mode.
There are no other options.
-SHUTTER
Sets the ME shutter speed.
(1/60(1/50),1/100(1/120),1/250,1/500,1/1K,1/2K,1/4K,
1/10K)
-AGC
Sets the AGC value [dB] for ME
(6.00/12.00/18.00/24.00/30.00/36.00/42.00/44.80)
WHITE BAL
This function is used to set the white balance operation
made.
•PUSH: All pull-in
•PUSH LOCK: Hold
•ANTI CR: Color rolling suppression
SETUP MENU
LENS AUTO
SHUTTER/AGC AUTO
WHITE BAL ATW
BACKLIGHT OFF
PICT ADJUST
ATR OFF
MOTION DET OFF
NEXT

11
•ATW
- SPEED
Adjusts the pull-in speed ATW
- DELAY CNT
Sets the time-based hysteresis of ATW
- ATW FRAME
Sets the pull-in frame magnification
- ENVIROMENT
Sets the pull-in frame(indoor/outdoor)of ATW
•USER1
- B-GAIN
Used for operating the B gain in the WB fixed gain
mode
-R-GAIN
Used for operating the R gain in the WB fixed gain
mode
•USER2
-B-GAIN
Used for operating the B gain in the WB fixed gain
mode
-R-GAIN
Used for operating the B gain in the WB fixed gain
mode
•MANUAL
-LEVEL
Sets the B and R gain values for manual WB
(0-255)
12
BACKLIGHT
•OFF
Backlight compensation OFF
•BLC
Backlight compensation ON
•HLC
High light compensation ON
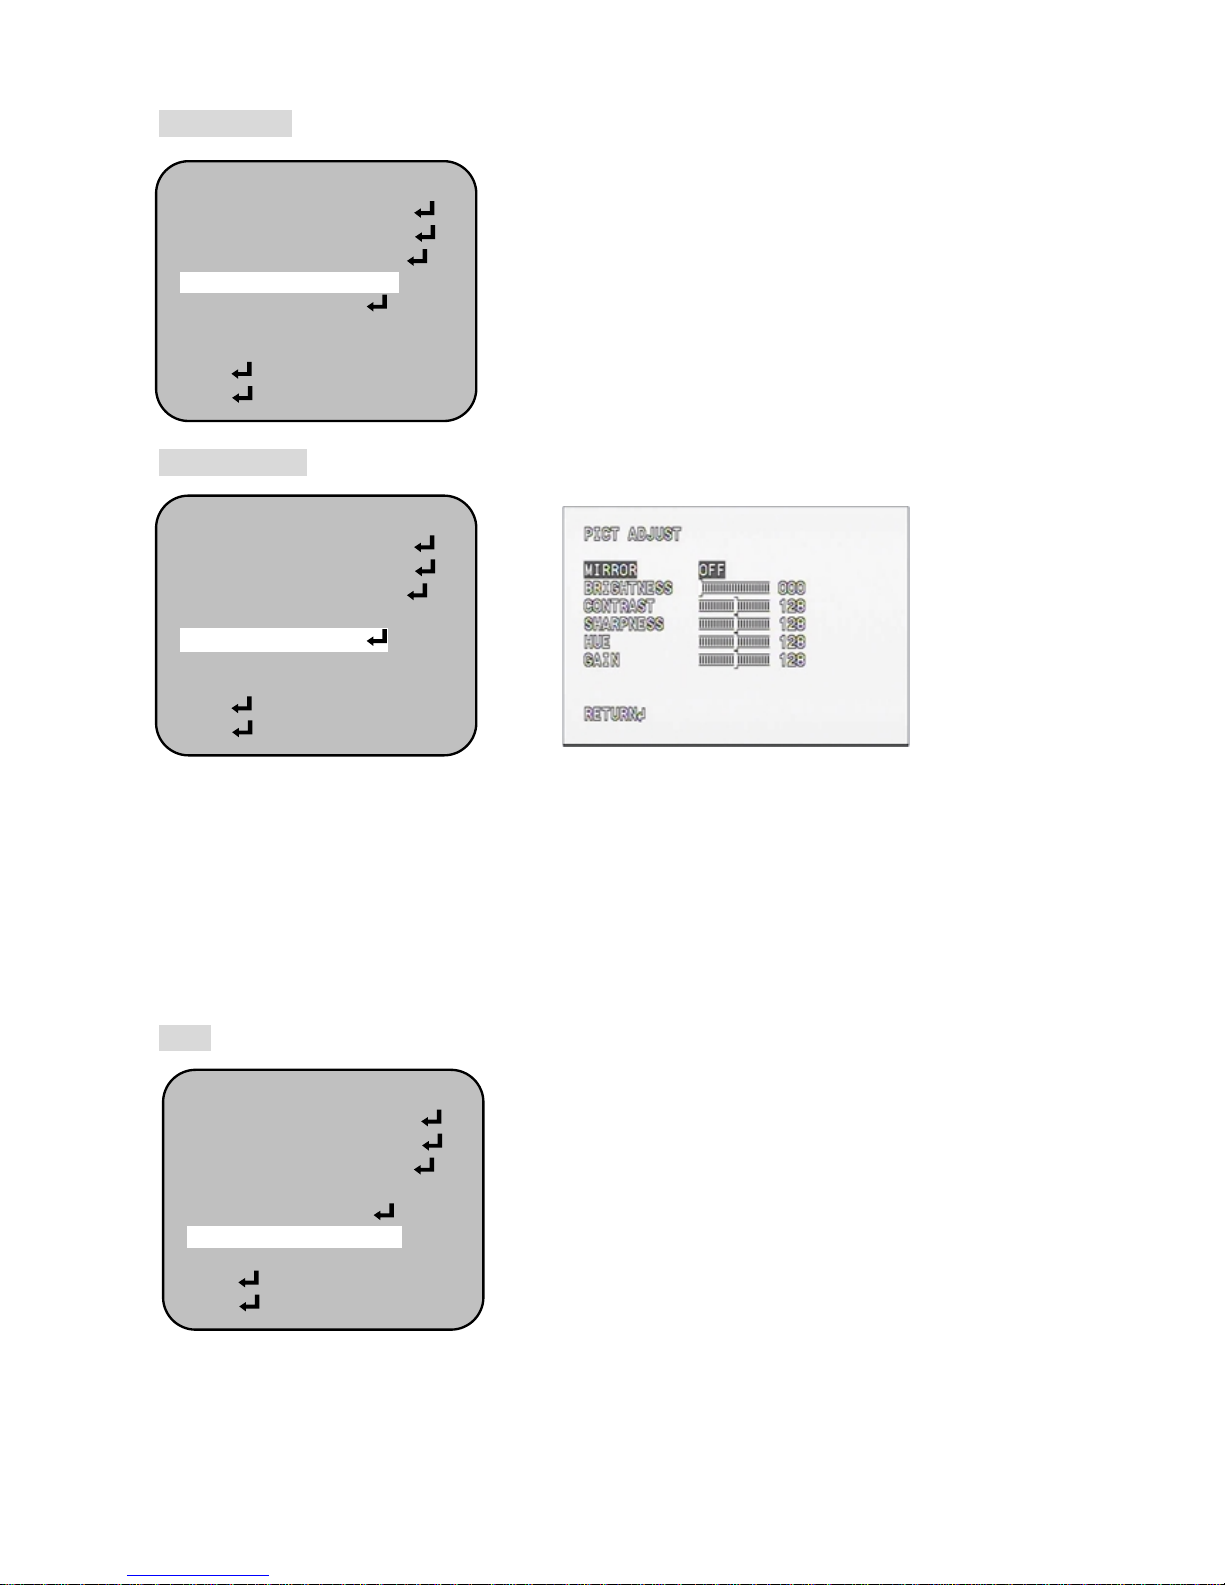
PICT ADJUST
•MIRROR: Sets the horizontal flip for display output
•BRIGHTNESS: Sets the screen brightness
•CONTRAST: Sets the screen contrast
•SHARPNESS: Sets the screen sharpness
•HUE: Adjusts the hue
•GAIN: Adjusts the gain
ATR ( Adaptive Tone Reproduction)
Automatically this function compensates the darker
areas surrounding the object to provide naturally sharp
picture and then improves contrast in bright/dark areas
SETUP MENU
LENS AUTO
SHUTTER/AGC AUTO
WHITE BAL ATW
BACKLIGHT OFF
PICT ADJUST
ATR OFF
MOTION DET OFF
NEXT
SETUP MENU
LENS AUTO
SHUTTER/AGC AUTO
WHITE BAL ATW
BACKLIGHT OFF
PICT ADJUST
ATR OFF
MOTION DET OFF
NEXT
SETUP MENU
LENS AUTO
SHUTTER/AGC AUTO
WHITE BAL ATW
BACKLIGHT OFF
PICT ADJUST
ATR OFF
MOTION DET OFF
NEXT
13
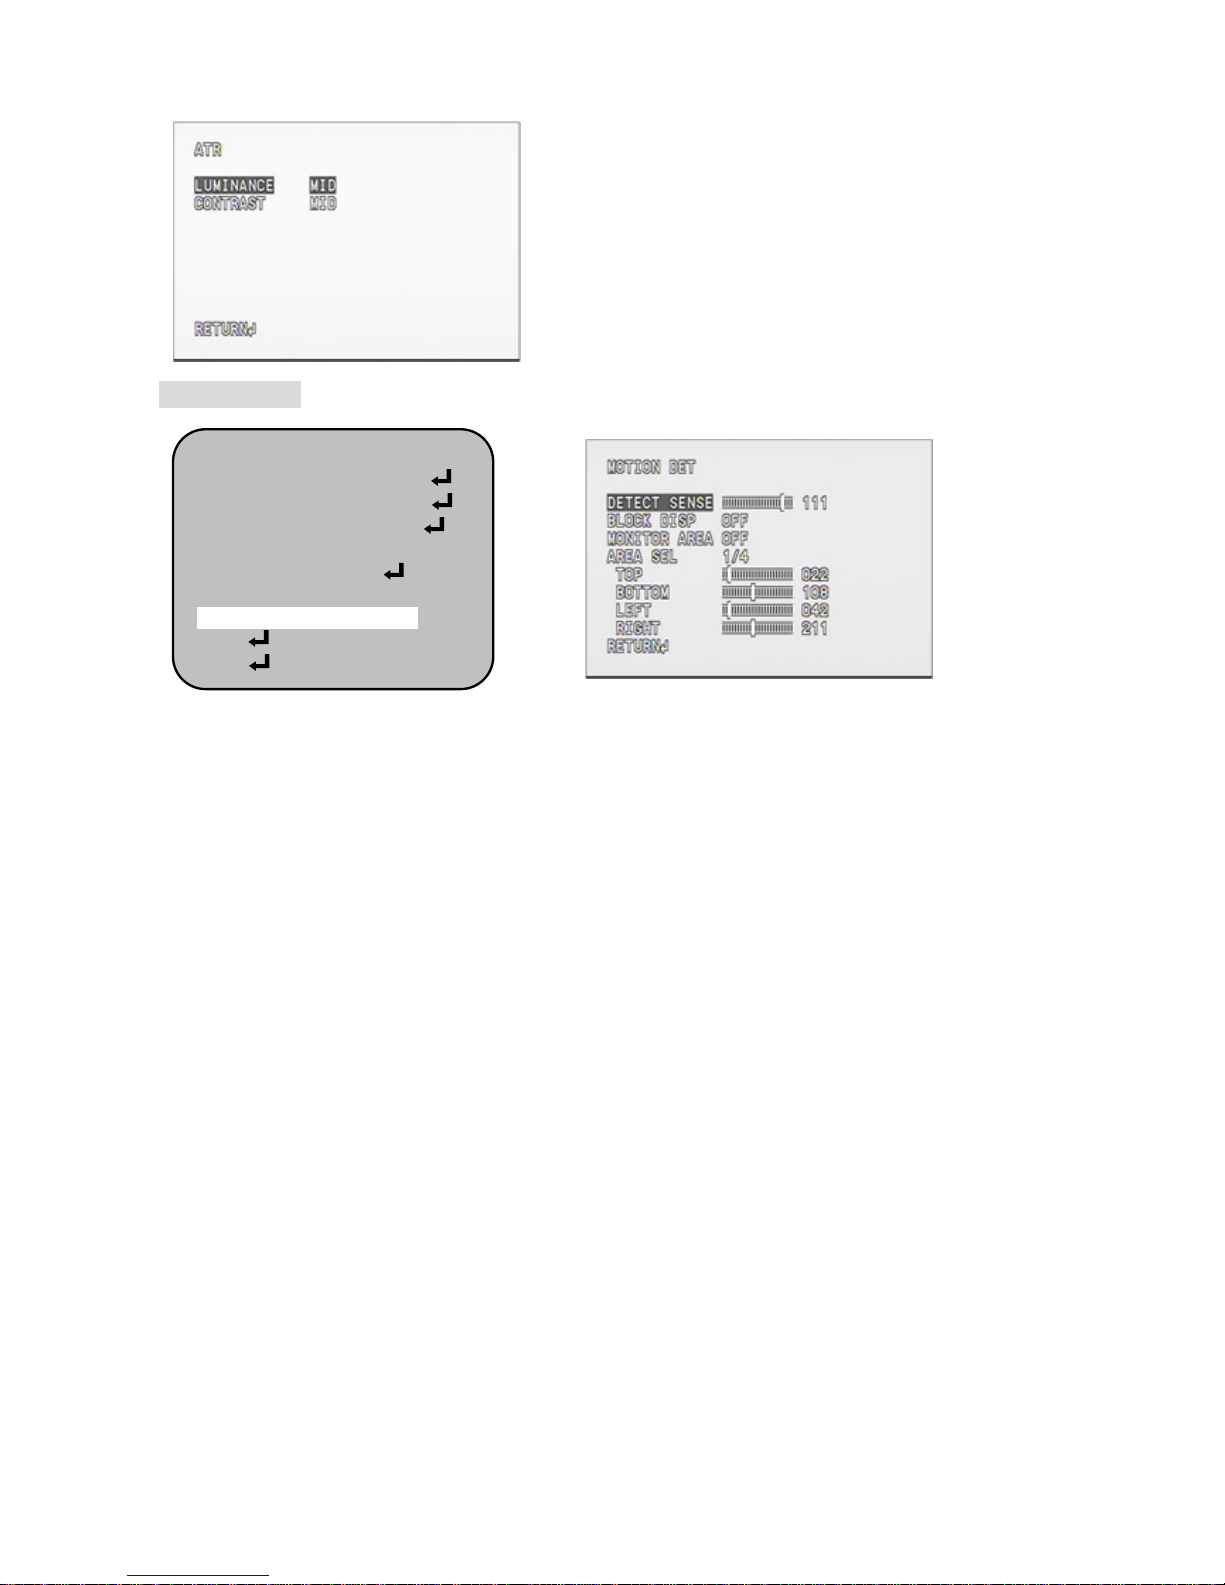
•LUMINANCE
Sets the extent of the luminance compression
(LOW/MID/HIGH)
•CONTRAST
Sets the extent of the contrast enhancement
(LOW/MIDDLE/MID/MIDHIGH/HIGH)
MOTION DET
•DETECT SENSE: Sets the motion detection sensitivity
•BLOCK DISP OFF: Controls the ON/OFF status of the motion detection block display
•BLACK DISP ENABLE:
The display switches to the "dead band setting" screen when the Enter operation input is
performed from the ENABLE selected status.
To come back previous menu, Press SET button during 3 seconds
•MONITOR AREA OFF:
Sets whether to use the monitoring frames
OFF: The monitoring frames are not used
ON: The monitoring frames are used
•AREA SEL
Monitoring frame 0 / Monitoring frame 1 / Monitoring frame 2 / Monitoring frame 3
•TOP
Set the top side of the monitoring frame selected by the AREA SEL parameter.
•BOTTOM
Set the bottom side of the monitoring frame selected by the AREA SEL parameter
•LEFT
Set the left side of the monitoring frame selected by the AREA SEL parameter.
•RIGHT
Sets the right side of the monitoring frame selected by the AREA SEL parameter
SETUP MENU
LENS AUTO
SHUTTER/AGC AUTO
WHITE BAL ATW
BACKLIGHT OFF
PICT ADJUST
ATR OFF
MOTION DET OFF
NEXT

14
PRIVACY
•AREA SEL: Selects the mask frame to be adjusted
•TOP: Sets the top side of the mask frame selected by the AREA SEL parameter
•BOTTOM: Sets the bottom side of the mask frame selected by the AREA SEL parameter.
•LEFT: Sets the left side of the mask frame selected by the AREA SEL parameter.
•RIGHT: Sets the right side of the mask frame selected by the AREA SEL parameter
•COLOR: Sets the colors of the mask frames
•TRANSP: Sets the transparency ratio of the mask frames.
•MOSAIC: Sets the mask frame mosaic to ON or OFF
DAY/NIGHT
You can display pictures in color or black and white.
When the SETUP menu screen is displayed, select
‘DAY/NIGHT’ by using the UP and DOWN buttons so
that the arrow indicates “DAY NIGHT”.
Please select the mode you wish to operate by pressing
the LEFT or RIGHT button.
•AUTO
The mode is switched to ‘Color’ in a normal environment, but switches to ‘B/W’ mode when
ambient illumination is low.
-BURST
Burst signal OFF enable, Burst signal ON
-DELAY CNT
Sets the Night/Day identification transfer time
-DAY→NIGHT
Set the threshold for identifying the Night status from
the Day status.
-NIGHT→DAY
SETUP MENU
PRIVACY ON
DAY/NIGHT AUTO
NR
CAMERA ID OFF
SYNC INT
LANGUAGE ENGLISH
CAMERA RESET
BACK
EXIT
SAVE ALL
SETUP MENU
PRIVACY ON
DAY/NIGHT AUTO
NR
CAMERA ID OFF
SYNC INT
LANGUAGE ENGLISH
CAMERA RESET
BACK
EXIT
SAVE ALL

15
Set the threshold for identifying the Day status from the Night status.
•B/W
-BURST
Burst signal OFF enable, Burst signal ON
•COLOR
The picture is always displayed in color.
NR
The function is used to set the noise reduction
-NR MODE
OFF
Y:Y filter ON
C: filter ON
Y/C:Y and C filters ON
-Y LEVEL
Set the Y filter strength.
-C LEVEL
Set the Y filter strength.
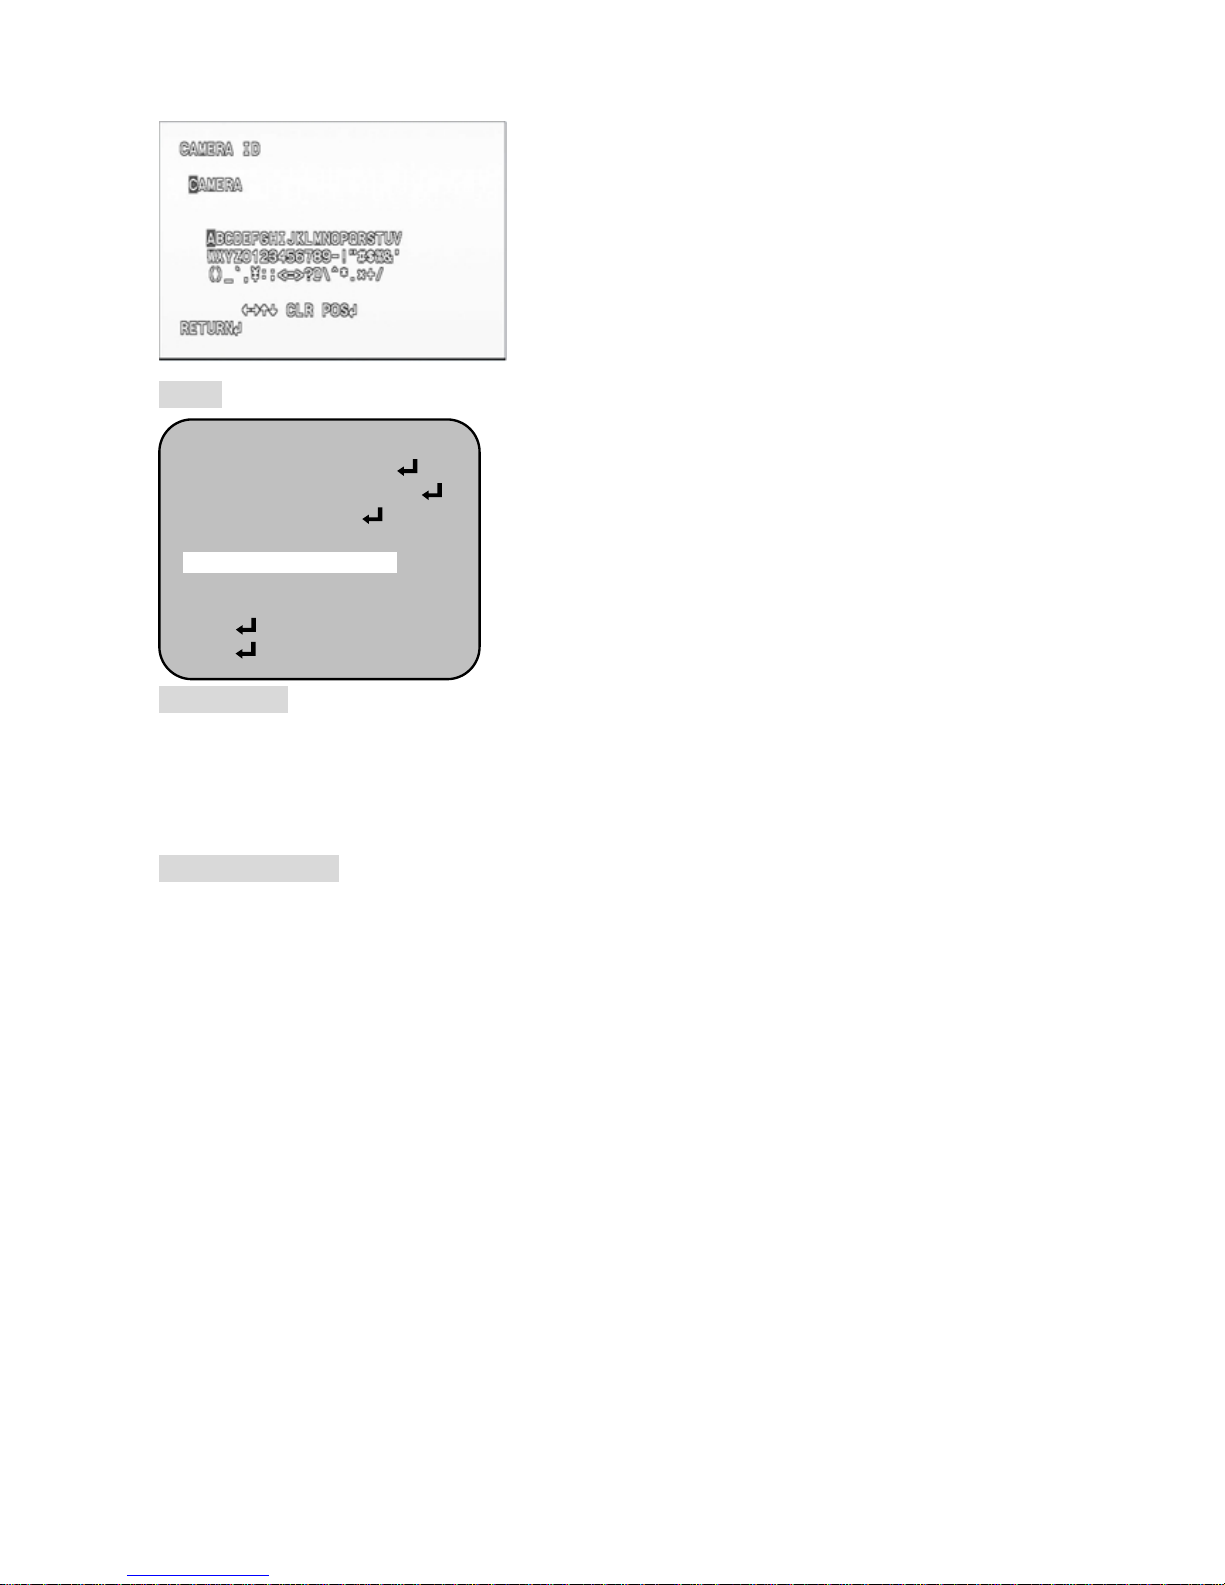
CAMERA ID
The function is used to set the camera ID
•ON
Camera ID display OFF
•OFF
Camera ID display ON
SETUP MENU
PRIVACY ON
DAY/NIGHT AUTO
NR
CAMERA ID OFF
SYNC INT
LANGUAGE ENGLISH
CAMERA RESET
BACK
EXIT
SAVE ALL
SETUP MENU
PRIVACY ON
DAY/NIGHT AUTO
NR
CAMERA ID OFF
SYNC INT
LANGUAGE ENGLISH
CAMERA RESET
BACK
EXIT
SAVE ALL
16
•↑↓→ ←
The camera ID cursor moves
•CLR
The character selected by the camera ID cursor is
cleared
•POS
The display switches to the camera ID display
position setting screen
SYNC
•INT
Internal mode
•LL
Line lock mode
LANGUAGE
Select the language in which to display the internal OSD menu.
ENGLISH, JAPANESE, GERMAN, FRENCH, RUSSIAN, PORTUGUESE, SPAINS,
CHINES
CAMERA RESET
All the internal OSD menu settings are initialized.
SETUP MENU
PRIVACY ON
DAY/NIGHT AUTO
NR
CAMERA ID OFF
SYNC INT
LANGUAGE ENGLISH
CAMERA RESET
BACK
EXIT
SAVE ALL

17
If you have trouble operating your camera, refer to the following table.
If the guidelines do not enable you to solve the problem, contact an authorized technician.
• Nothing appears on the screen.
- Check that the power cord and line connection between the camera and monitor are
fixed properly.
- Check that you have properly connected VIDEO cable to the camera VIDEO output jack.
• The image on the screen is dim.
-Is lens stained with dirt? Clean your lens with soft, clean cloth.
-Set the monitor to proper condition.
-If the camera is exposed to too strong light, change the camera position.
• The image on the screen is dark.
-Adjust the contrast feature of the monitor.
- If you have an intermediate device, set the 75Ω / Hi-z properly.
• The camera is not working properly, and the surface of the camera is hot.
-Check that you have properly connected the camera to an appropriate power source. •
• The Motion Detection function does not work.
-Check that MOTION DET of SETUP menu is ‘OFF’.
• Color is not correct.
-Check the setting of WHITE BAL SETUP menu.
• The screen flickers continually.
-Check that direction of camera turns toward the Sun.
• When coaxial communication is not available:
- Make sure that the camera and monitor are installed within the recommended distance.
- Use the video amplifier equivalent to coaxitron if the recommended installation distance
is exceeded.
• IR-LED isn't lighted.
-Isn't DAYNIGHT function setting up the color mode.
-Please change the AUTO or B/W mode.
4. Troubleshooting

18
5. Dimensions

19
▪ GENERAL
Signal system NTSC PAL
Image Sensor
Sony 1/3" 480K/570K-Effective Ex-view HAD CCD Ⅱ
Total Pixels
1020(H) × 596(V) 1020(H) × 596(V)
Effective Pixels
976(H) × 494(V) 976(H) × 582(V)
Resolution
680 TV lines
Syns. Inter. H/V 15.734/ 59.94Hz 15.625K/50Hz
MIN. ILLUMINATION(F1.2)
IR On : 0 Lux
IR Off : 0.1Lux (50IRE)/0.02Lux(15IRE)
B/W:0.08Lux(50IRE)/0.002Lux(15IRE)
Lens
2.8-12mm Auto Iris Lens ( True Day & Night with ICR ), F1.2
Day & Night Color / Auto / B/W, True Day & Night with ICR
IR LED Range
Max. 30M (LED :30 PCS)
Mirror On / Off
ATR
On / Off
WHITE BALANCE ATW / PUSH / USER1 / USER2 / ANTI CR / MANUAL /PUSH LOCK
BLC / HLC
On / Off
Sharpness
Level setting
AGC Level setting
DNR(NR) OFF / ON(2D)
Privacy Zone & Motion Detection OFF / ON (Motion:4 Zones, Privacy:8 Zones)
Sharpness 0 ~ 31
Camera ID On / Off
S/N Ratio More than 52dB
Video Output Composite video output 75 ohm terminated
Sync. System
Internal
Operating Humidity
30 % ~ 90 % RH
Operating Temp.
- 10°C to 50°
Install Type
Outdoor (IP66)
Dimension
φ100(Bubble) x 107.5(H)mm
Material
PC Bubble, Aluminum Body
Weight
1.1Kg
Power Consumption
Max 5W (LED On)
Power Supply
DC 12 V 1A
Dual Voltage (Option) : AC24V / DC12V
6. Specifications
 Loading...