

Page 1
MECHANICAL ADJUSTMENT
u
DETENT/VISION CLEANING – The Luxe® X Vision® anti-chop sensors and ball detents are housed under easily removed
covers on either side of your marker. Simply slide the cover’s latch forward, and rock the cover forward to remove it. A cotton swab
can be used to clean the electronic sensors, ball detents and the pass-through holes they use to access the breech.
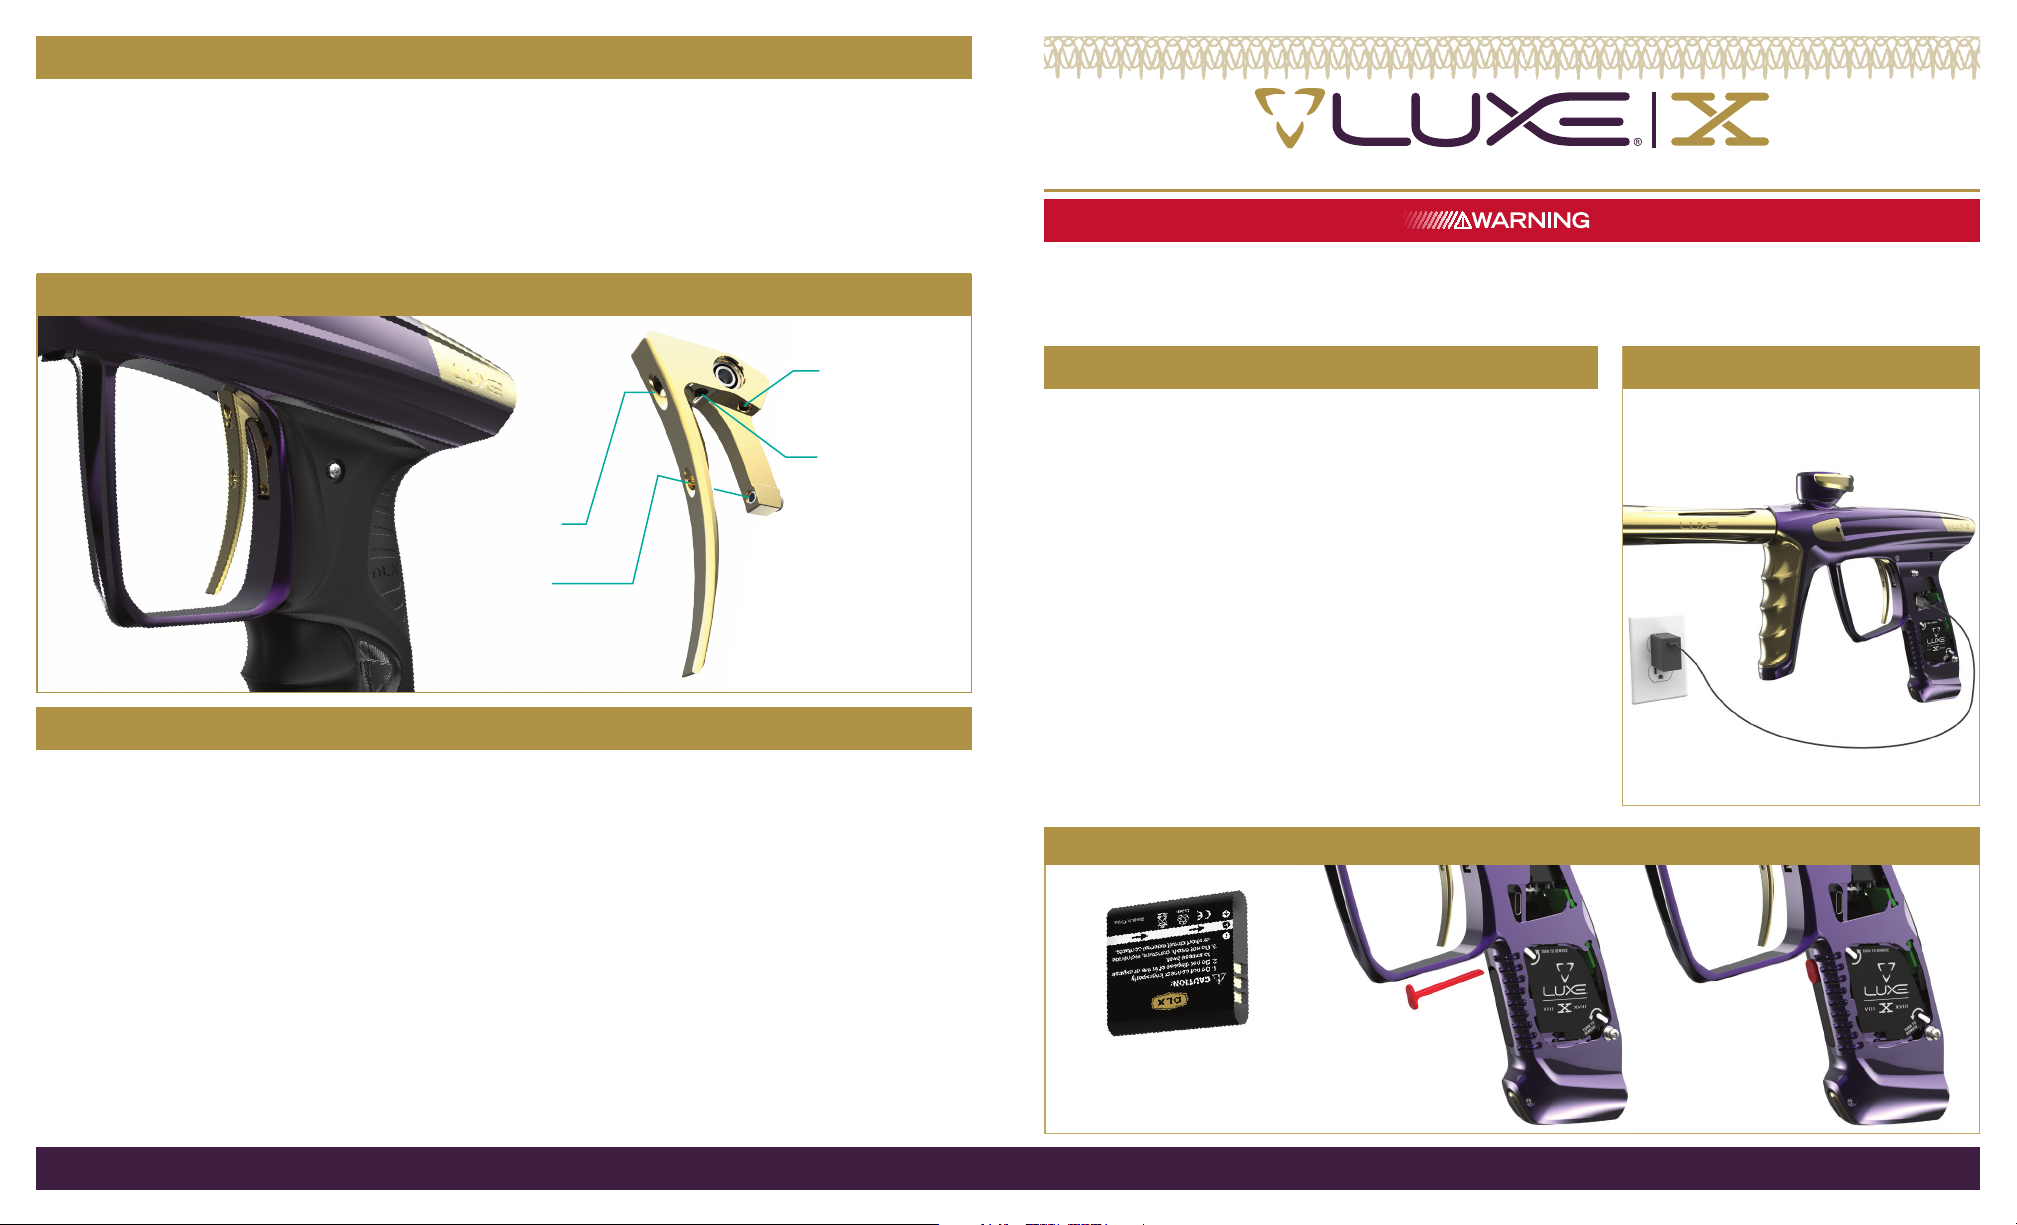
TRIGGER ADJUSTMENT – Your Luxe® X features four-point trigger adjustment. Each of the four settings may be adjusted
with a 1/16 inch hex key. Pre-Travel limits how far forward the trigger can swing. Post-Travel limits how far back the trigger can
swing. Activation point adjusts how far into the pull the trigger switch is activated to re your Luxe® X, and trigger resistance
adjusts the strength of the magnetic eld that resets the trigger. CAUTION – If the trigger is not adjusted to stop rmly on the Post-
Travel adjuster screw, permanent damage to the Luxe® X circuit board can occur from aggressive trigger pulls. {FIG. 07}
TRIGGER ADJUSTMENT
07
Trigger
Resistance
Switch
Activation
u
Post-Travel
Pre-Travel
u
WARRANTY
u
WARRANTY – Warranty Support and Service for DLX Technologies (DLX) products is provided by factory trained service techni-
cians and DLX Authorized Service Locations. The DLX warranty is valid for one (1) year to initial retail purchaser. The warranty is
limited to defects and workmanship in materials covering the paintball marker and regulator components. The electronic components and solenoid are warranted for six (6) months. Disposable parts (Batteries, O-Rings, Seals, etc.) are not warrantied. This
warranty is eective only if the customer registers their marker online in our RMA system within 30 days of purchase. The warranty
is non-transferable.This warranty is limited to repair or replacement of defective parts with the customer responsible for transporting the product to and from the Luxe® Paintball Authorized Service Location.
QUICK START GUIDE | V.03
WARNING! – THIS IS NOT A TOY. MISUSE OF THE LUXE® X MAY RESULT IN SERIOUS INJURY OR DEATH.
EYE PROTECTION DESIGNED FOR PAINTBALL USE MUST BE WORN BY THE USER AND ANY PERSON WITHIN RANGE OF THE LUXE® X. DLX RECOMMENDS THAT THE LUXE® X ONLY BE SOLD TO PERSONS 18 AND
OLDER. THOROUGHLY READ THE LUXE® X QUICK START GUIDE BEFORE OPERATING.
LUXE X SETUP
u
u
BATTERY – The lithium polymer battery in your Luxe® X must be fully
charged before use. Lift the left side of the rubber grip away from the Luxe®
X, un-tucking the tab from its slot at the top. Connect the USB Type C
charging connector to the Luxe® X circuit board. Make certain the battery
is fully seated in the grip frame. Once connected to the Luxe® X, plug the
charger into a power outlet. The Luxe® X is compatible with standard USB
and USB-C chargers, allowing it to be charged directly from a portable phone
power pack, car USB power source, laptop computer or other USB compli-
ant power supply. The battery may also be removed and charged separately
with the optional Luxe® battery charger. Even if stored, the battery should be
charged at least once every 6 months. {FIG. 01}
The following three steps must be followed to ensure the Luxe® X battery is
properly installed for reliable use: 1} Install the battery into its slot with the
electrical terminals facing downward. 2} press downward on the battery when
it is fully slid into the battery slot, locking it into position. 3} Insert the Battery
Lock Pin all the way into the gap at the top of the battery slot until its tab
rests against the front of the grip frame, locking the battery in place. {FIG. 02}
WARNING! – Omitting the Battery Lock Pin may cause momentary power
loss, turning o the Luxe X® after a jarring impact, such as when diving into
a bunker. Always be sure to secure the battery with the Battery Lock Pin for
uninterrupted operation on the eld. {FIG. 02}
02
BATTERY
01
FIG. 2
CHARGING
This warranty does not cover surface damages (scratches and nicks), misuse, or improper disassembly and reassembly. Attempts
made to drill holes or remove metal from external surfaces could degrade the performance and/or safety of the marker and may
only be preformed with written approval. The only authorized lubricant for the marker is GR33SE™ Lubricant. Use of any other
lubricant could result in reduced performance and invalidation of the DLX warranty.
Trigger alteration of any kind may result in serious injury, do NOT attempt to alter the trigger assembly in any way. Use of aftermarket components within the bolt system, trigger or other operational components voids any warranty on the modied assembly and
its interacting systems. Removal of factory anodizing or other nish voids the warranty of any aected component as tolerances
will be eected by such action. DLX strongly discourages use of aftermarket internal components as they may jeopardize the per-
formance and/or safety of your paintball marker.
Luxe® is a registered trademark owned by KEE Action Sports and used under license by DLX Technologies.
Freak® is a registered trademark owned by KEE Action Sports and used under license by Philadelphia Americans, LLC.
WWW.LUXEPAINTBALL.COM
Battery Orientation
1}
for Installation
Battery
2}
Lock Pin
Uninstalled
WWW.LUXEPAINTBALL.COM
Battery
3}
Lock Pin
Installed
Page 2
SETUP & OPERATION SETUP & OPERATION
u
u
u
u
DEGASSING - After use, remove the hopper and paintballs,then turn o your Luxe® X, secure the barrel blocker in place and
turn o the ASA by swinging the ASA charging handle to its extended position. This will relieve air pressure between the ASA
and vertical regulator, but, the Luxe® Power Core will still be charged with air. Relieve the internal pressure by pressing the bottom back of the quick-strip latch at the back of your marker. This will degas your Luxe® X and sound similar to opening a can of
soda. Do not attempt to degas your Luxe® X while the ASA charging handle is in the charged position, as the continuous rush of
gas will unseat an o-ring in the Luxe® X quick-strip system causing a leak.
WARNING! – If the Luxe® Power Core is pulled out of the body before it is fully de-gassed it may be under enough pressure to
re a single low-power shot as it is being removed. Always turn o and or remove the gas supply (see the Luxe® X manual or quick-
start) and hold the quick-strip latch open until no escaping gas can be heard, before pulling back to extract the power core. {FIG. 06}
DEGASSING IMPORTANT!
06
LIFT UP
3}
PUSH IN with thumb
-
Degas ASA
1}
by rotating lever
CLEANING - The Luxe® power core can be removed for cleaning or inspection by gripping the top of the quick-strip latch and
pulling the entire assembly out the back of the marker. The bolt serves as the marker’s exhaust valve and is the main moving
part. Unscrew the re chamber from the quick-strip mechanism and the bolt may be removed from between the two components. Clean the parts of the power core and replace any o-rings showing signs of damage or severe wear. Lightly lubricate the
contact surfaces of all o-rings with Luxe® GR33SETM. Non-approved lubricants may cause damage and void your warranty. Do
not use oil. This simple cleaning, and the Detent/Vision® cleaning mentioned below is the only routine maintenance required to
properly care for your Luxe® X.
2}
Degas by lifting Tail Cover
until fully degassed.
u
ELECTRONIC ADJUSTMENTS
u
PROGRAMMING – The The Luxe
ware menus. Unlock the marker and turn it on while holding back the trigger to open the Main Menu. Pull the trigger to scroll through the
available settings. To make a change, nd the desired setting and tap the power button. The Luxe® will display the currently selected value
for that sub-menu on its OLED display with “SET” appearing on screen. Changes may be made by pulling the trigger to cycle through the
available values. Tapping the power button will select a value and return to the main menu. Press the power button for approximately 2
seconds to turn o the Luxe® and exit programming mode.
®
X OLED display and exclusive Luxe® voice feedback make it easy to navigate your marker’s soft-
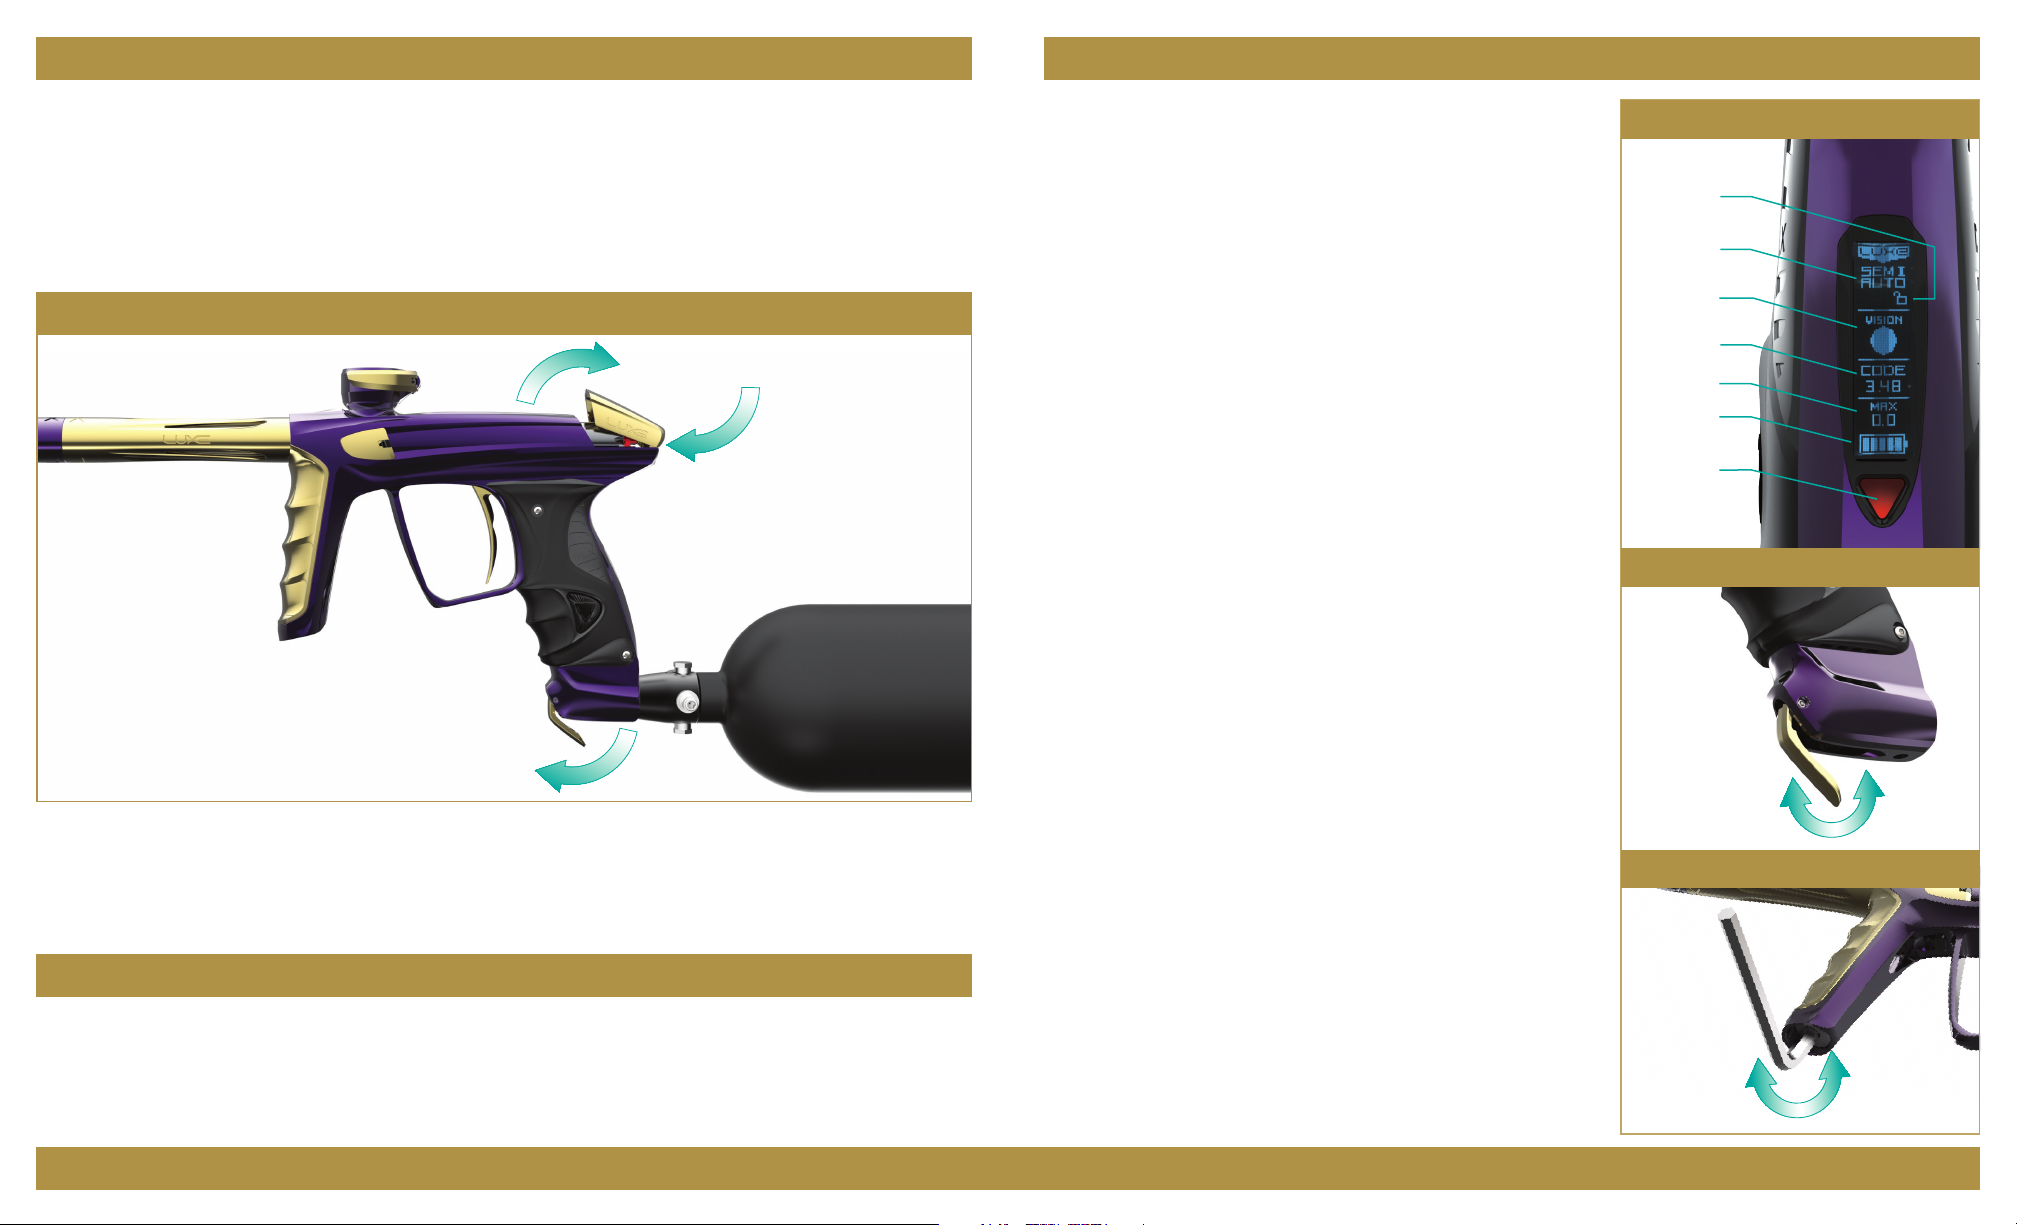
POWER – Turn on your Luxe® X by double-clicking the power button or
pressing and holding it for two seconds. When the Luxe® is on, the Luxe® X
display will be illuminated to show its status. {FIG. 03} WARNING! – Tur n -
ing o your Luxe® X is the equivalent of setting the safety on a mechanical
paintball marker, but should not be relied on in place of a barrel blocking
device and paintball goggles. Your Luxe® X will turn o automatically if it sits
idle for one hour.
VISION – The Vision® anti-chop system is on by default. It may be turned
o or back on with a quick double-tap of the button. Vision® status will be
indicated in the Luxe® X display with a solid circle when a paintball is detected in the breech, or an empty circle when the Vision® beam is unbroken.
Vision® Fault indicates that the beam has not cleared after ring, usually due
to debris blocking an eye.
TOURNAMENT LOCK – The Luxe® X tournament lock switch makes t
he programming menu unavailable when it is turned on. To change the lock
setting, open the left side of the rubber grip and slide the tournament lock
switch (located next to the USB-C charging port) towards the barrel to unlock, or towards the back of the marker to lock. The lock status is displayed
on the OLED screen with an open or locked padlock. Some events may
require the rubber grip to be secured with screws in place of snap posts, so
that the lock may not be accessed without using a tool.
BARREL/REGULATOR GRIP PANEL - Assemble the Included Freak®
XL Barrel and install it on your Luxe® X. The interchangeable grip panel on the
vertical regulator can be changed by removing the regulator nut on the
bottom of the vertical regulator with a 5/16-inch hex-key.
BARREL BLOCKER - The barrel blocker is an important safety device
and should be used any time the Luxe® X is connected to an air supply or
turned on unless all persons within range are protected by paintball goggles
and or netting. Slide the barrel blocker over the end of the barrel cinch
down the cords over the rear of the marker to secure it in place.
AIR SETUP - Your Luxe® X is a high-performance paintball marker. Pres-
sure spikes from liquid CO2 can cause internal damage and will void the
Luxe® warranty. Use only regulated compressed air as a power source. HPA
systems set for 450-550 psi output are ideal. Low-output 250psi systems
may be used with your Luxe® X but may cause velocity drop-o at high
rates of re. With the barrel blocker in place, screw a lled paintball
compressed air system into the Luxe® ASA. Charge your Luxe® X with
air by rotating the ASA charging handle to the rear position. {FIG.04}
WARNING! – Once your Luxe® X has been charged with air, it can hold
enough air to re 2 or more shots, even after the HPA system has been
removed.
VELOCITY ADJUSTMENT - Velocity must be tested and adjusted at
the start of each paintball session. Attach a hopper and lled HPA system to
your Luxe® X. Fill the hopper with fresh 68-caliber paintballs. While wearing
paintball goggles, while everyone in range is similarly protected, remove the
barrel blocking device, rotate the ASA charging handle to charge your Luxe®
X with air, turn on the power and take a few test shots over a chronograph.
Adjust the velocity of your Luxe® X with a 5/32-inch hex key inserted in
the bottom of the marker’s vertical regulator. Turn clockwise (like tightening a screw) to increase velocity and counter-clockwise (like loosening) to
decrease. After each adjustment take a few shots, then re-adjust as needed
until the desired velocity is reached. Never adjust your Luxe® X to re at
velocities greater than 300 feet per second (91.4 m/s). {FIG. 05}
FIG. 2
Programming
Lock
Mode &
BPS cap
Vision™
Status
Software
Version
Max ROF
Battery
Level
Power
FIG. 2
POWER
03
AIR SETUP
04
AIR OFF
VELOCITY ADJUSTMENT
05
+
AIR ON
–
 Loading...