

DLS IRIDIUM 12I, IRIDIUM 15, ULTIMATE Iridium 10i, ULTIMATE Iridium 12i, ULTIMATE Iridium 15 User Manual
Page 1

ULTIMATE Iridium
SERIES SUBWOOFERS
Iridium 10i
Iridium 12i
Iridium 15
WELCOME
Thank you for buying a DLS ULTIMATE Iridium subwoofer.
The subwoofer must be installed correctly in order to work well.
This manual will show you how to install it like a pro. Please
read the entire manual before beginning the installation.
Install the subwoofer yourself if you feel confident with our
instructions and if you have the proper tools. However if you
feel unsure, turn over the installation job to someone better
suited to it.
The speakers are designed for enclosure mounting. In "open
air" installations the power handling capacity is reduced by 30%
from the nominal value. We dont recommend ”open air”
installations for Ultimate Iridium subwooers.
CONNECTION OF SUBWOOFER
How to connect depends on what type of amplifier you use.
The best is to follow the instructions given in the manual for the
amplifier. Most amplifiers today have built-in lowpass crossover
and possibilities to connect your subwoofer in bridge mode.
Two 4 ohm subwoofers are often connected in stereo mode
since most amplifiers can´t handle bridge mode loads below 4
ohms.
The Iridium subwoofers have dual, four ohm, voice coils. Each
voice coil has an impedance of 4 ohms. If they are connected in
series the resulting impedance is 8 ohms. If they are connected
in parallel the resulting impedance is 2 ohms. Make sure to
connect in a way that don´t ruin the amplifier. If you have a DLS
Ultimate amplifier it´s possible to connect the voice coils in
parallel, these ampliers are 1 ohm stable.
We also recommend the use of a subsonic highpass filter. This
gives a better bass reproduction with less "rumble". In most
DLS amplifiers this feature is already built-in.
For wiring use high class speaker wires, min AWG13 (2.5 mm
2
).
For example DLS SC 2x4.
ENCLOSURE DAMPING
Most enclosures should be damped inside with syntetic
(acoustic) wool or damping mat (line). Attach the damping material on the wall opposite from the speaker and port. A sealed
enclosure should be filled up to 70-100% with acoustic wool.
SUBWOOFER ENCLOSURES, GENERAL
Build your enclosure in a stable and airtight material. The best
is MDF-board, 19 mm, or particle board, 22 mm. Larger
enclosures must have bracing inside to avoid vibrations. The
enclosure must be completely airtight. Use sealing compound
in all joints, also around the cable terminals. The size of the
enclosure is decided by the speaker data.
SEALED ENCLOSURES
Sealed enclosures are easy to build. The size is not critical, but
it can´t be too small. The speaker data such as Fs, Qts, Vas
and X-max decides the size of the enclosure.
Large speakers need larger boxes. Two speakers need a box
of the double size etc. The enclosure must be completely airtight.
A sealed enclosure should be filled with acoustic wool up to 75
- 100%.
A sealed enclosure has a lower efficiency than a vented
enclosure, but they can handle high power and are easy to build.
A subwoofer in a sealed enclosure creates a tight bass suitable
for the audiophiles listening to classical music, jazz and soft
rock.
VENTED ENCLOSURES
A speaker in a vented enclosure has a higher efficiency (+3 dB)
and higher power handling capacity than in a sealed enclosure.
In a vented enclosure the sound from the speaker and the port
work together creating a higher sound level. The sound from
the port must come out in the same phase as from the speaker
otherwise the result is bad.
The size of the vented enclosure is decided by the speaker
data just as for the sealed one.
The size of the vehicle often decides the practical size of the
enclosure. A smaller enclosure has a higher resonant frequency
than the larger one. The size of the enclosure should not be so
big that the speaker plays below it´s own free air resonance
(Fs), then it loose in power handling capacity.
The port does not have to be fully inside the enclosure as long
as the area and length are correct. Sometimes you need two or
more ports in an enclosure. You can convert from one to two or
more ports as long as the total port area is the same.
IMPORTANT!
Think of the speaker weight when you install it. If you don´t
mount it properly it can come loose.
DLS Svenska AB
P.O. Box 13029
SE-40251 Göteborg, Sweden
Tel: +46 31 840060
Fax: +46 31 844021
E-mail: info@dls.se
www.dls.se
WARRANTY SERVICE
This speaker is covered by warranty, depending on the
conditions in the country where it is sold. If the speaker is returned for service, please include the original dated receipt with
the product.
Technical Assistance
For technical assistance ask the shop where the product was
sold or the distributor in your very country.You can always phone
the DLS Helpdesk in Sweden + 46 31 840060 or send an email to info@dls.e
Information can also be found on our WEB-site www.dls.se
We follow a policy of continuous advancement in development.
For this reason all or part of specifications & designs may be
changed without prior notice.
RUNNING-IN PERIOD
Allow the speaker to play for at least 15-20 hours. After this
time the performance is correct.
Page 2

Technical specifications for DLS ULTIMATE Iridium 10i
Iridium 10i
Size 25 cm (10")
Impedance 2 x4 ohm
Nom. power (RMS) 500 W (max 800)
Freq. range 25 Hz - 2,5 kHz
Voice coil, diameter 75 mm (3”)
Voice coil, length 40 mm (1,57”)
X-max +-14 mm (0,55”)
Cms 58
SD 380 cm
2
Cone material Non-press paper
Magnet weight 180 oz (5,1 kg)
Magnet, diameter 180mm (7,08”)
Installation depth 150 mm (5,91”)
Mounting hole 236 mm (9,29”)
Outer diameter 266 mm ( 10,47”)
Weigth 9,8 kg (21,6 lbs)
Data that can vary depending on how the voice coils are connected:
Single VC VC connected in parallel to 2 ohm
Re, DC-resistance 3,2 ohm 1,8 ohm
BL product 15,1 14,6
Sensitivity (SPL 1W/1m) 82,3 84 dB
Resonant freq. (Fs) 43,5 42,3 Hz
Vas (litre) 12 12
Vas (ft3) 0,42 0,42
Qms 2,84 3,44
Qes 0,87 0,54
Qts 0,67 0,47
Technical specifications for DLS ULTIMATE Iridium 12i
Technical specifications for DLS ULTIMATE Iridium 15
Iridium 12i
Size 30 cm (12")
Impedance 2 x4 ohm
Nom. power (RMS) 600 W (max 1000)
Freq. range 20 Hz - 2,5 kHz
Voice coil, diameter 75 mm (3”)
Voice coil, length 40 mm (1,57”)
X-max +-14 mm (0,55”)
Cms 147
SD 531 cm
2
Cone material Non-press paper
Magnet weight 180 oz (5,1 kg)
Magnet, diameter 220mm (8,7”)
Installation depth 153 mm (6”)
Mounting hole 282 mm (11,1”)
Outer diameter 313 mm ( 12,32”)
Weigth 12,7 kg (28 lbs)
Data with voice coils in parallel to 2 ohm
Re, DC-resistance 1,8 ohm
BL product 11,85
Sensitivity (SPL 1W/1m) 87,3 dB
Resonant freq. (Fs) 30,2 Hz
Vas (litre) 58,8
Vas (ft3) 2,08
Qms 4,17
Qes 0,46
Qts 0,41
Iridium 15
Size 37,5 cm (15")
Impedance 2 x4 ohm
Nom. power (RMS) 600 W (max 1000)
Freq. range 15 Hz - 2,5 kHz
Voice coil, diameter 75 mm (3”)
Voice coil, length 40 mm (1,57”)
X-max +-14 mm (0,55”)
Cms 73,75
SD 779 cm
2
Cone material Non-press paper
Magnet weigth 200 oz (5,67 kg)
Magnet, diameter 220mm (8,7”)
Installation depth 176 mm (6,93”)
Mounting hole 360 mm (14,17”)
Outer diameter 390 mm ( 15,35”)
Weigth 13,4 kg (29,54 lb)
Data that can vary depending on the voice coil impedance:
Single voice coil, 4 ohm Voice coils in series to 8 ohm Voice coils in parallel to 2 ohm
Re, DC-resistance 3,7 ohm 7,3 ohm 1,7 ohm
Z, impedance 4 ohm 8 ohm 2 ohm
BL product 17 33,3 16,9
Sensitivity 86,2 dB 89,1 dB 89,5 dB
Resonant freq. (Fs) 33 Hz 33 Hz 33 Hz
Vas (litre) 63,54 63,54 63,54
Vas (ft3) 2,24 2,24 2,24
Qms 3,4 3,44 3,6
Qes 0,84 0,43 0,39
Qts 0,67 0,38 0,35
Page 3
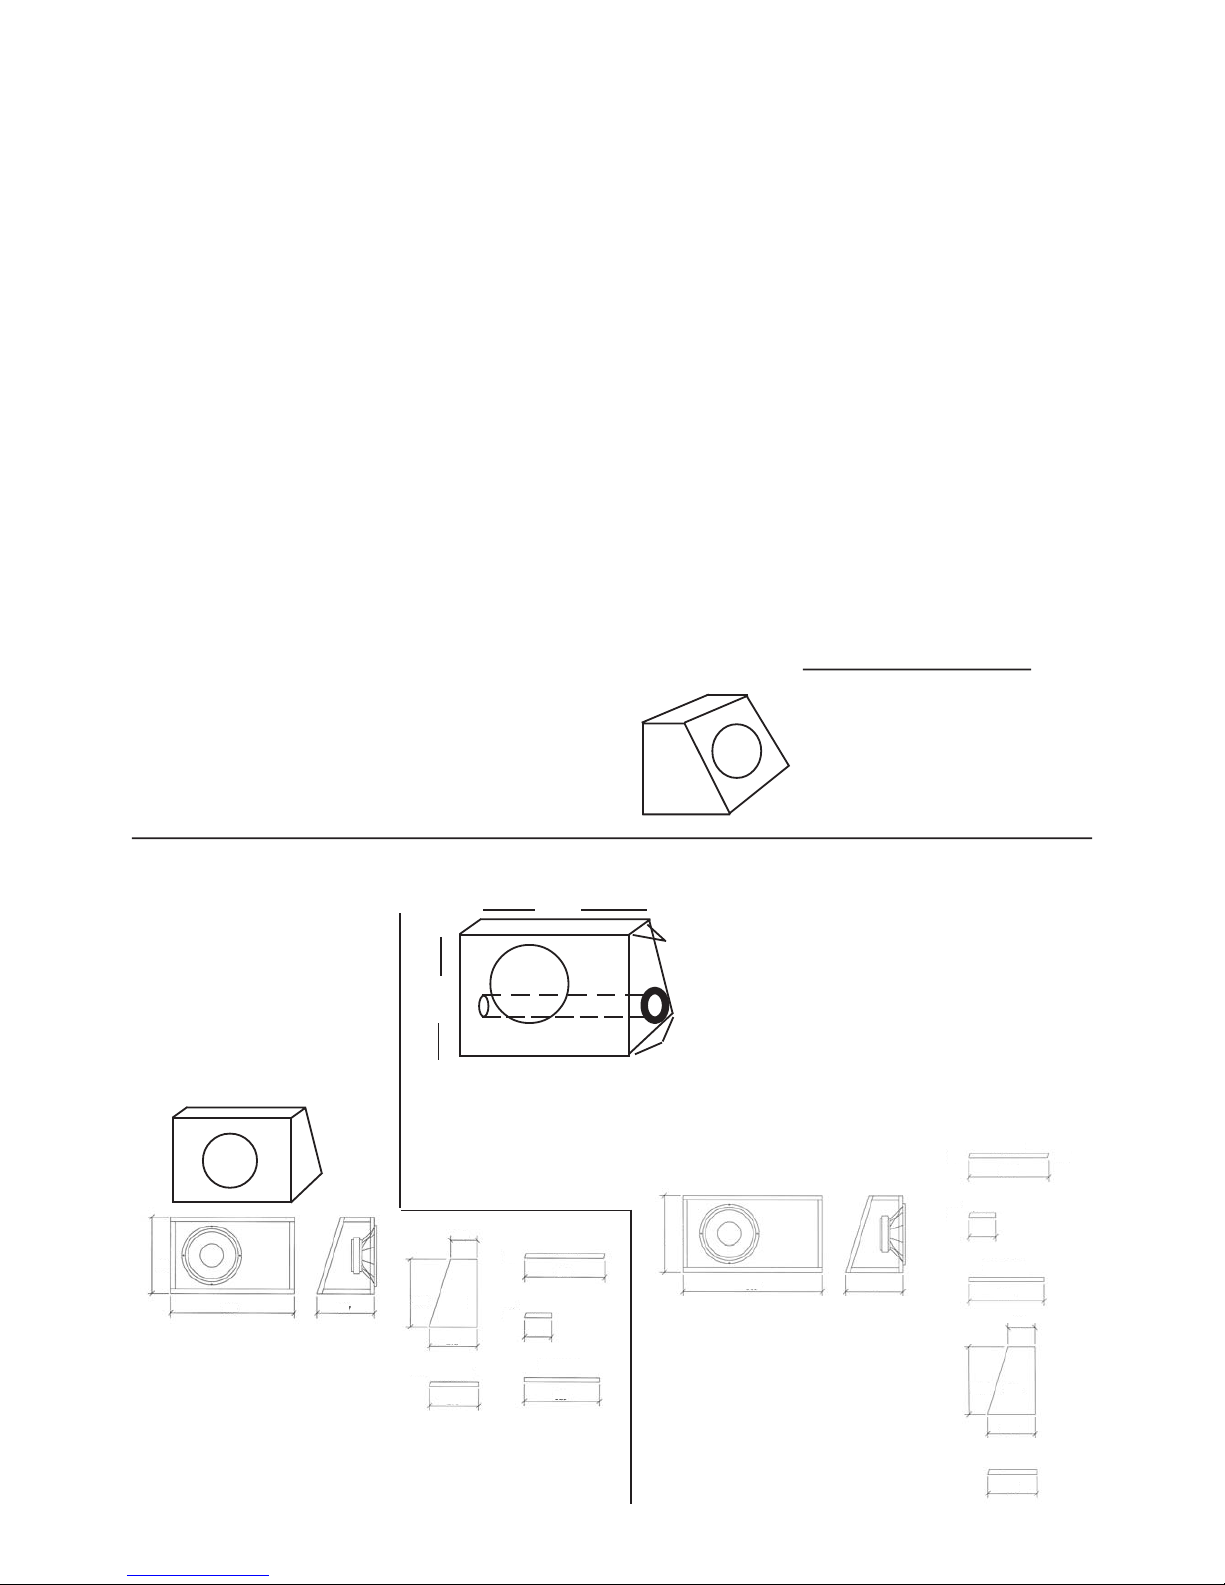
ENCLOSURE PLACING IN DIFFERENT TYPES OF
VEHICLES
In small vehicles like VW Golf, Peugeot 306 and similar the
bass box should be installed with both speaker and port directed
backwards. Alternatively booth speaker and port can be directed
upwards. This way of mounting is valid for all types of vehicles
where the trunk is incorporated with the inner compartment.
In sedan vehicles with the passenger compartment separated
from the trunk, the enclosure should be installed with booth
speaker and port directed towards the rear seat. Some cars
have an opening in the middle of the rear seat for loading skis
etc. You can install the enclosure behind this opening and direct
speaker or port through this opening. There must be some free
space in front of the port, (between the rear seat and the port
opening).
In large vehicles like station wagons the best sound is achieved
with the enclosure installed behind the rear seat with booth speaker and port directed backwards. Alternatively you can install
the enclosure on one side of the luggage compartment.
CALCULATE YOUR OWN ENCLOSURE
Box volumes:
When calculating the inner volume of an enclosure you just
multiply the width (W) x height (H) x depth (D).
Use measures in dm and you will get the answer in liters.
A trapezoid box is calulated as this:
Vol=width (W) x height (H) x upper depth (UD) + lower depth (LD)
2
Be sure to measure the
inside dimensions.
W
H
UD
LD
ABOUT THE RECOMMENDED ENCLOSURES
The performance of these recommended enclosures will
vary from vehicle to vehicle. It is more difficult to get a
tight and well defined bass in a SEDAN vehicle because
of the tightness between trunk and interior. In most cases
the recommended enclusures below is the best choise.
The vented box is to be preferred.
- The given enclosure volume is the inner volume.
- Volumes occupied by speaker and ports have already
been added to the given enclosure volumes so don’t add
any volume.
- Use conical bass ports for best result. (DLS BP75 for
Iridium 10i & 12i, BP110 for Iridium 15). Cut the tube to
the correct length.
There are two flanges coming with this kit. The larger
one is for the outside, and the smaller one should be
attached to the tube inside the enclosure.
Make a round hole in the box where you want to mount
the bass port.
The larger flange should beattached to the outside of
the box. Fasten it to the box with screws or with some
glue. There are prepared drill holes on the back of the
flange.
The smaller flange is for the inner end of the tube. Use
a PVC-glue to attach it on the tube.
Then glue the tube to the port mounted in the box.
Use sealing compound round the flange to make the
box as airtight as possible.
SEALED
Sealed enclosure:
Wiring : Use single V/C
Volume : 22 / 0,78 (litre / ft3)
Damping : Acoustic wool
F3 : 40 Hz
Outside box dimensions:
Width : 529 mm (20,83”)
Height : 320 mm (12,60”)
Lower depth : 247 mm (9,72”)
Upper depth : 147 mm (5,79”)
Material : MDF 19 mm (3/4”)
Vented enclosure:
Wiring : Use parallel V/C
Volume : 25 / 0,88 (litre / ft3)
Port* : 3”(6,8 cm) x 38 cm / 15”
Damping : Line inside
F3 : 31,7 Hz
* Use the BP 75 port kit . Mount the flanges
on the tube ends. The port should be on the
side of the enclosure.
Cut the tube to it’s correct length.
Outside box dimensions:
Width : 599 mm (23,58”)
Height : 320 mm (12,60”)
Lower depth : 247 mm (9,72”)
Upper depth : 147 mm (5,79”)
Material : MDF 19 mm (3/4”)
RECOMMENDED ENCLOSURES Iridium 10i
VENTED
Width
Height
Lower
depth
Upper
depth
Technical drawing for a
25 litre enclosure.
The Iridium 10i can work well in
a 25 litre vented enclosure.
Here is the drawing for the box
and the separate boards needed
to build a suitable enclosure.
For best result, use any of these
recommended enclosures.
If you want to modify the dimensions,
use the calculation methods
described above.
Technical drawing for a
22 litre enclosure.
The Iridium 10i can work well in
a 22 litre sealed enclosure.
Here is the drawing for the box
and the separate boards needed
to build a suitable enclosure.
282
Depth 529
Depth 529
Depth 529
Depth 529
73
0
73
0
73
0
73
0
2 pcs
529
320
247
114
202
341
114
320
208
282
Depth 599
Depth 599
Depth 599
Depth 599
73
0
73
0
73
0
73
0
320
599 247
320
114
114
341
2 pcs
202
208
Page 4
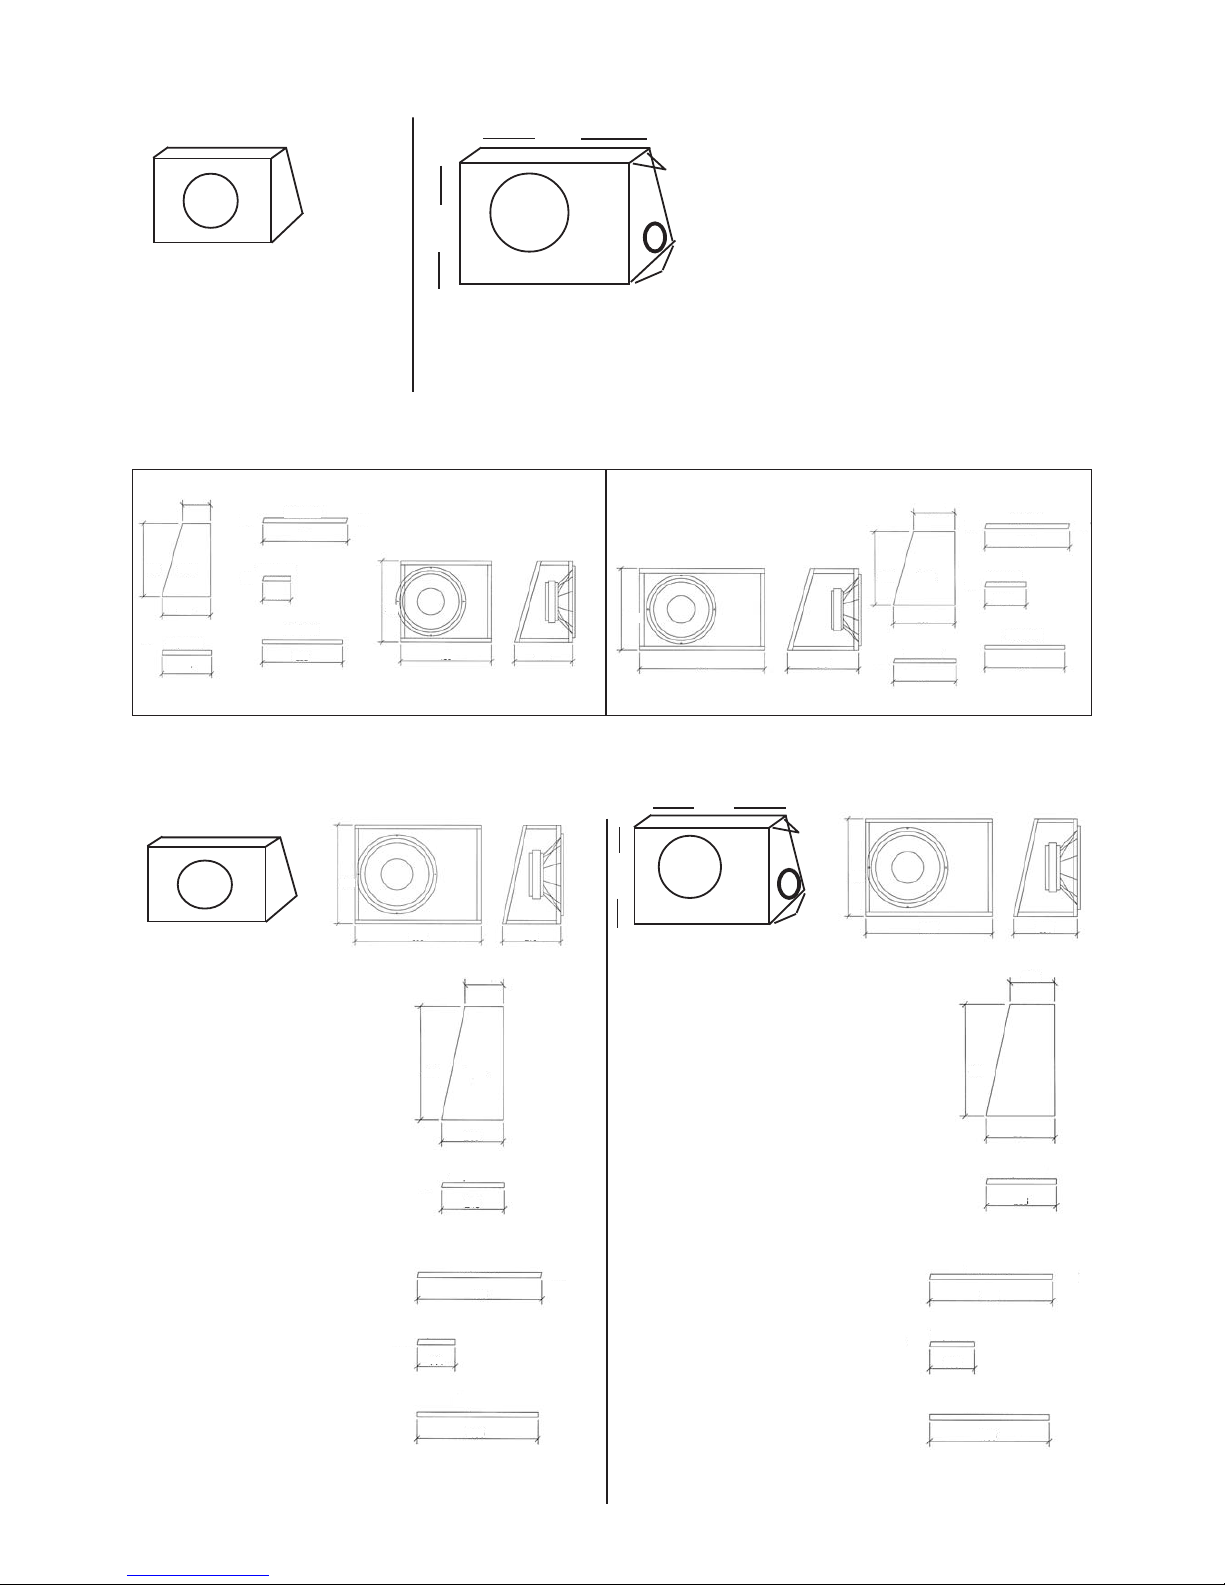
SEALED
Sealed enclosure:
Wiring : Single VC
Volume : 45,5 / 1,6 (litre / ft3)
Damping : Acoustic wool
F3 : 44,6 Hz
Outside box dimensions:
Width : 600 mm (23,62”)
Height : 460 mm (18,11”)
Lower depth : 278 mm (10,94”)
Upper depth : 178 mm (7,01”)
Material : MDF 19 mm (3/4”)
RECOMMENDED ENCLOSURES for Iridium 12i
SEALED
For best result, use any of these
recommended enclosures.
If you want to modify the dimensions,
use the calculation methods
described on previous page.
Technical drawing for a
19,3 litre enclosure.
RECOMMENDED ENCLOSURES for Iridium 15
VENTED
Width
Height
Lower
depth
Upper
depth
Technical drawing for a
45 litre enclosure.
The Iridium 15 works well in a
45 litre sealed enclosure.
This is a drawing for the 45
litre box and the separate
boards needed to build a
suitable enclosure.
Sealed enclosure:
Wiring : Parallel VC
Volume : 19,3 / 0,67 (litre / ft3)
Damping : Acoustic wool
F3 : 56 Hz
Outside box dimensions:
Width : 400 mm (15,75”)
Height : 350 mm (13,78”)
Lower depth : 256 mm (10,08”)
Upper depth : 156 mm (6,14”)
Material : MDF 19 mm (0,75”)
Vented enclosure:
Wiring : Parallel VC
Volume : 36,5 / 1,29 (litre / ft3)
Port* : 3”(6,8 cm) x 27 cm / 10,63”
Damping : Line inside
F3 : 32 Hz
* Use the port included in the subwoofer
packing.Mount the flanges on the tube ends.
Dont cut the tube, it has the correct length.
Outside box dimensions:
Width : 550 mm (17,72”)
Height : 350 mm (13,78”)
Lower depth : 313 mm (12,32”)
Upper depth : 213 mm (8,39”)
Material : MDF 19 mm (0,75”)
Technical drawing for a
36,5 litre enclosure.
Vented enclosure:
Wiring : Parallel VC
Volume : 50 / 1,765 (litre / ft3)
Port* : 4”(10,3 cm) x 31 cm / 12,2”
Damping : Line inside
F3 : 38,3 Hz
* Use the BP 110 port kit . Mount the flanges
on the tube ends. The port should be on the
side of the enclosure.
Cut the tube to it’s correct length.
Outside box dimensions:
Width : 600 mm (23,62”)
Height : 450 mm (17,71”)
Lower depth : 304 mm (11,96”)
Upper depth : 204 mm (8,03”)
Material : MDF 19 mm (0,75”)
Technical drawing for a
50 litre enclosure.
The Iridium 15 works well in
a 50 litre vented enclosure.
This is a drawing for the 50
litre box and the separate
boards needed to build a
suitable enclosure.
VENTED
Width
Height
Lower
depth
Upper
depth
For best result, use any of these
recommended enclosures.
If you want to modify the dimensions,
use the calculation methods
described on previous page.
Depth 400
Depth 400
Depth 400
Depth 400
74
0
74
0
74
0
74
0
312
217
212
350
123
400
350
256
370
123
2 pcs
312
Depth 550
Depth 550
Depth 550
Depth 550
74
0
74
0
74
0
74
0
2 pcs
180
370
350
274
269
180
350
550
313
2 pcs
412
422
Depth 600
Depth 600
Depth 600
Depth 600
77
0
77
0
77
0
77
0
170
304
450
600
261
266
465
170
450
Depth 600
Depth 600
Depth 600
Depth 600
78
0
78
0
78
0
78
0
460
600
278
144
2 pcs
235
240
475
144
460
 Loading...