

Page 1

Version 1.00 | 04/12/2019
User Manual
U.S. Cellular Home Phone
DWR-920V
Page 2
Preface
D-Link reserves the right to revise this publication and to make changes in the content hereof without obligation to notify
any person or organization of such revisions or changes.
Manual Revisions
Revision Date Description
1.0 April 12, 2019 • Initial release for U.S.
Trademarks
D-Link and the D-Link logo are trademarks or registered trademarks of D-Link Corporation or its subsidiaries in the United
States or other countries. All other company or product names mentioned herein are trademarks or registered trademarks
of their respective companies.
Copyright © 2018 by D-Link Corporation, Inc.
All rights reserved. This publication may not be reproduced, in whole or in part, without prior expressed written permission
from D-Link Corporation, Inc.
iD-Link DWR-920V User Manual
Page 3

Table of Contents
Table of Contents
Product Overview .............................................................. 1
Package Contents .........................................................................1
System Requirements ................................................................. 2
Introduction ................................................................................... 3
Hardware Overview ..................................................................... 4
Overview .................................................................................. 4
LED Indicators ........................................................................ 5
Power Bank .............................................................................6
Installation ......................................................................... 7
Advanced Setup .................................................................9
Navigation .....................................................................................10
Quick Access .................................................................................11
Call Info ..........................................................................................12
Call Timer ...............................................................................12
Black List & White List ........................................................13
How to Use Your Device ................................................... 26
Troubleshooting .............................................................. 28
Technical Specications ..................................................29
Regulatory Information ..................................................30
SMS ..................................................................................................15
Short Messages ...................................................................15
System ............................................................................................18
System Information ...........................................................18
Admin Settings ....................................................................19
Settings Prole .....................................................................22
Firmware Upgrade ..............................................................24
Help .................................................................................................25
iiD-Link DWR-920V User Manual
Page 4
Section 1 - Product Overview
Product Overview
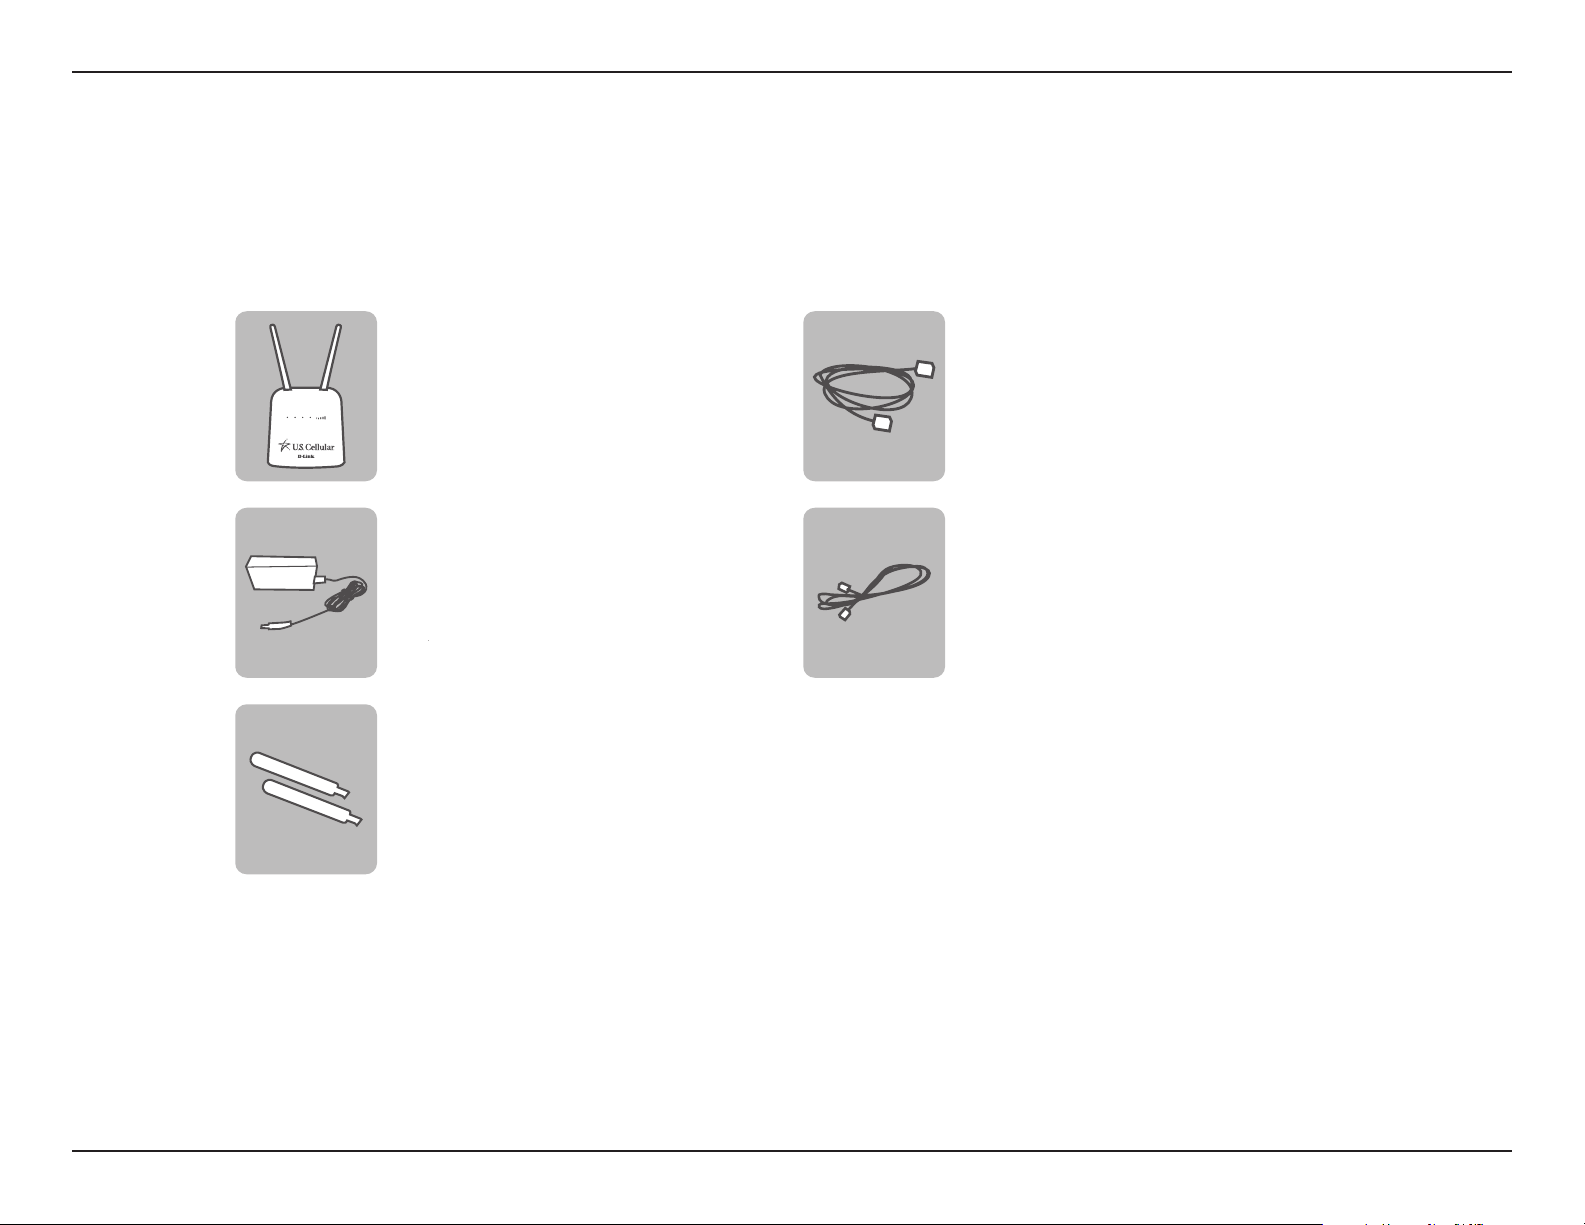
Package Contents
DWR-920V
U.S. Cellular Home Phone +
Preinstalled SIM/UICC Card
Ethernet Cable
12V 1A Power adapter
+ Power Bank
2 x 4G Blade Antennas
If any of these items are missing or damaged, please contact your reseller.
Telephone Cable
1D-Link DWR-920V User Manual
Page 5
Section 1 - Product Overview
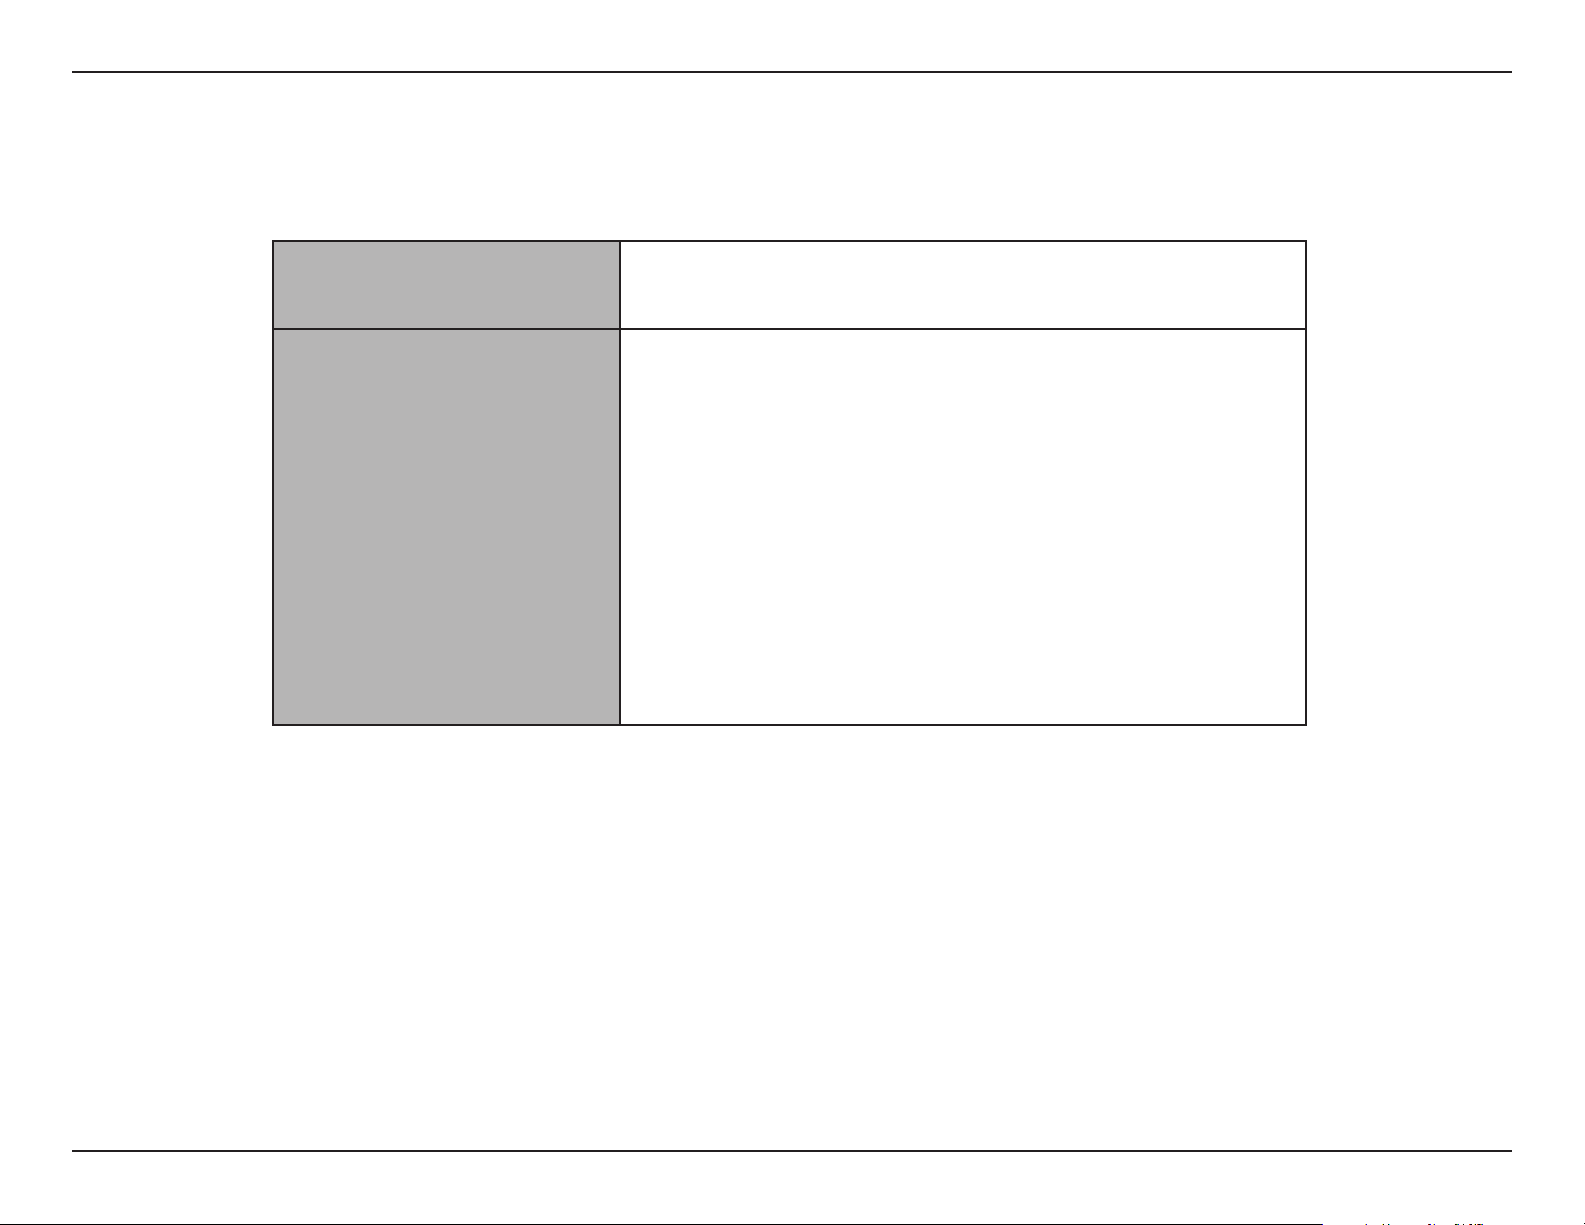
System Requirements
Network Requirements
service
1
Computer with the following:
• Windows
Browser Requirements:
• Internet Explorer 9 or higher
• A compatible mini-SIM/UICC card with mobile data
Web-based Conguration
Utility Requirements
• Firefox 12 or higher
• Safari 4 or higher
• Chrome 20 or higher
®
Windows
Users: Make sure you have the latest version of
Java installed. Visit www.java.com to download the latest
version.
1
Subject to services and service terms available from your carrier.
®
, Macintosh, or Linux-based operating system
2D-Link DWR-920V User Manual
Page 6

Section 1 - Product Overview
Introduction
SIMPLE AFFORDABLE HOME PHONE SERVICE
The U.S. Cellular Home Phone is a simple-to-use and aordable alternative for home phone service and connects to any corded
or cordless touch-tone telephones. Simply plug any touch-tone telephone into the U.S. Cellular Home Phone to start making
and receiving calls from your home phone using the U.S. Cellular wireless network.
ALWAYS STAY CONNECTED WITH A BACKUP POWER BANK
With a backup power bank, you can stay connected if the power goes out or if you take your U.S. Cellular Home Phone to a
location that does not have a power outlet.
SIMPLE TO INSTALL AND USE
The U.S. Cellular Home Phone can be installed quickly and easily almost anywhere. Its user friendly LED indicators make it easy
to know when you have a waiting voicemail or when you’ve received a SMS message.
Note: This device only works with the US Cellular Home VoLTE Network.
3D-Link DWR-920V User Manual
Page 7
Section 1 - Product Overview
1
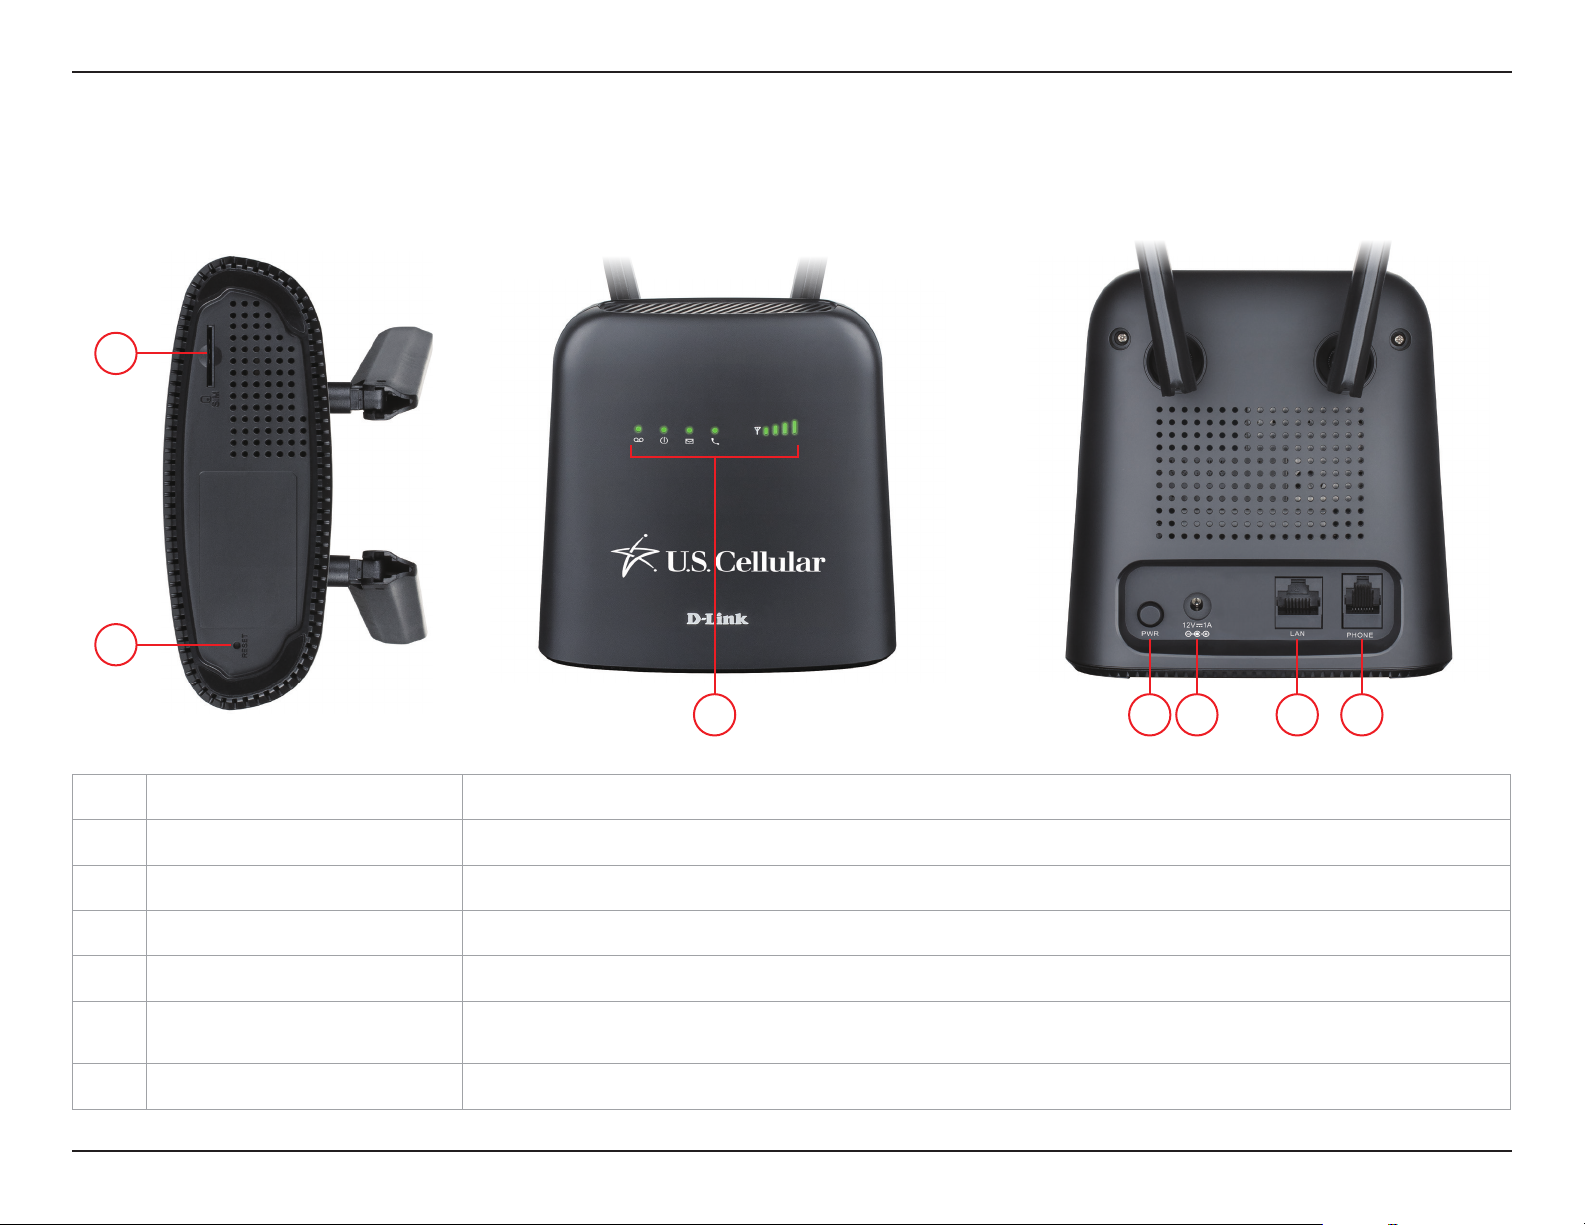
Hardware Overview
Overview
2
43
5 6 7
1 SIM/UICC Card Slot Insert a SIM/UICC card for phone service.
2 Reset Button Using a paper clip, press and hold this recessed button for 10 seconds to reset the device to default.
3 LED Indicators Status display. Please refer to LED Indicators on page 5.
4 Power Button Press this button to power on/o the device.
5 Power Input Receptacle for the included power bank.
6 LAN Use an Ethernet cable to congure your advanced settings by accessing the web user interface.
7 Phone Connect a phone here that uses a regular phone line.
4D-Link DWR-920V User Manual
Page 8
Section 1 - Product Overview
Hardware Overview
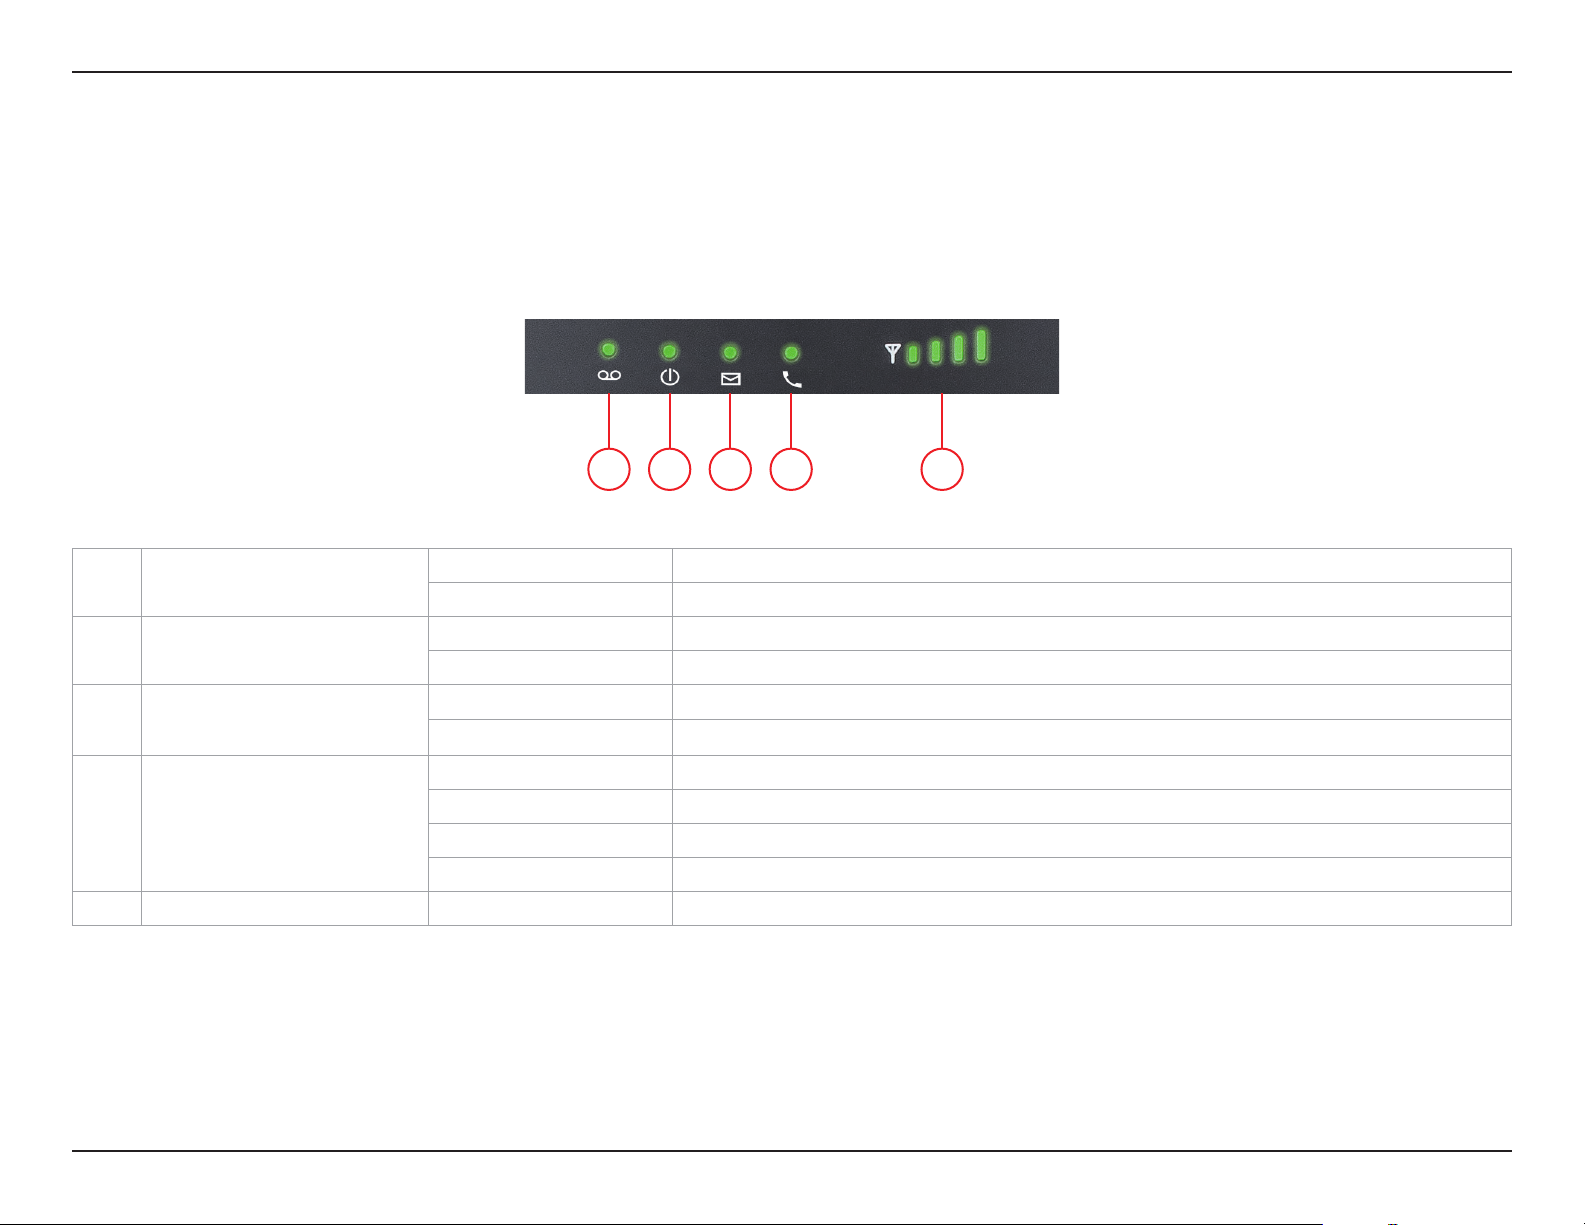
LED Indicators
1 2 3 4 5
1 Voicemail
2 Power
3 SMS
4 Telephone
5 Signal Strength Blinking Red Indicates signal strength
Solid Green New unread voicemail/s
O No new voicemail/s
Solid Green Device is powered on
O Device is powered o
Solid Green New unread short message/s
O No new short message/s
Solid Green Registered to IMS network and ready for voice calls
Solid Blue Voice call in progress
Solid Red Failed IMS registration
Blinking Red No SIM/UICC card detected or invalid SIM/UICC card
5D-Link DWR-920V User Manual
Page 9
Section 1 - Product Overview
Hardware Overview
Power Bank
INPUT OUTPUT
1
2
1 Power LED Indicators Sequential LED’s to indicate the percentage of battery left in the power bank.
2 Power LED Indicator Button Press this button to light up the Power LED Indicators.
3 Input
4 Output
Receptacle for the power adapter.
Receptacle for the DC connector.
3 4
6D-Link DWR-920V User Manual
Page 10
Section 2 - Installation
Installation
This section will guide you through the installation process. Placement of the device is very important. Do not place the
DWR-920V U.S. Cellular Home Phone in an enclosed area such as a closet, cabinet, or in an attic or garage. Ensure that your
DWR-920V U.S. Cellular Home Phone is powered o before performing the steps below.
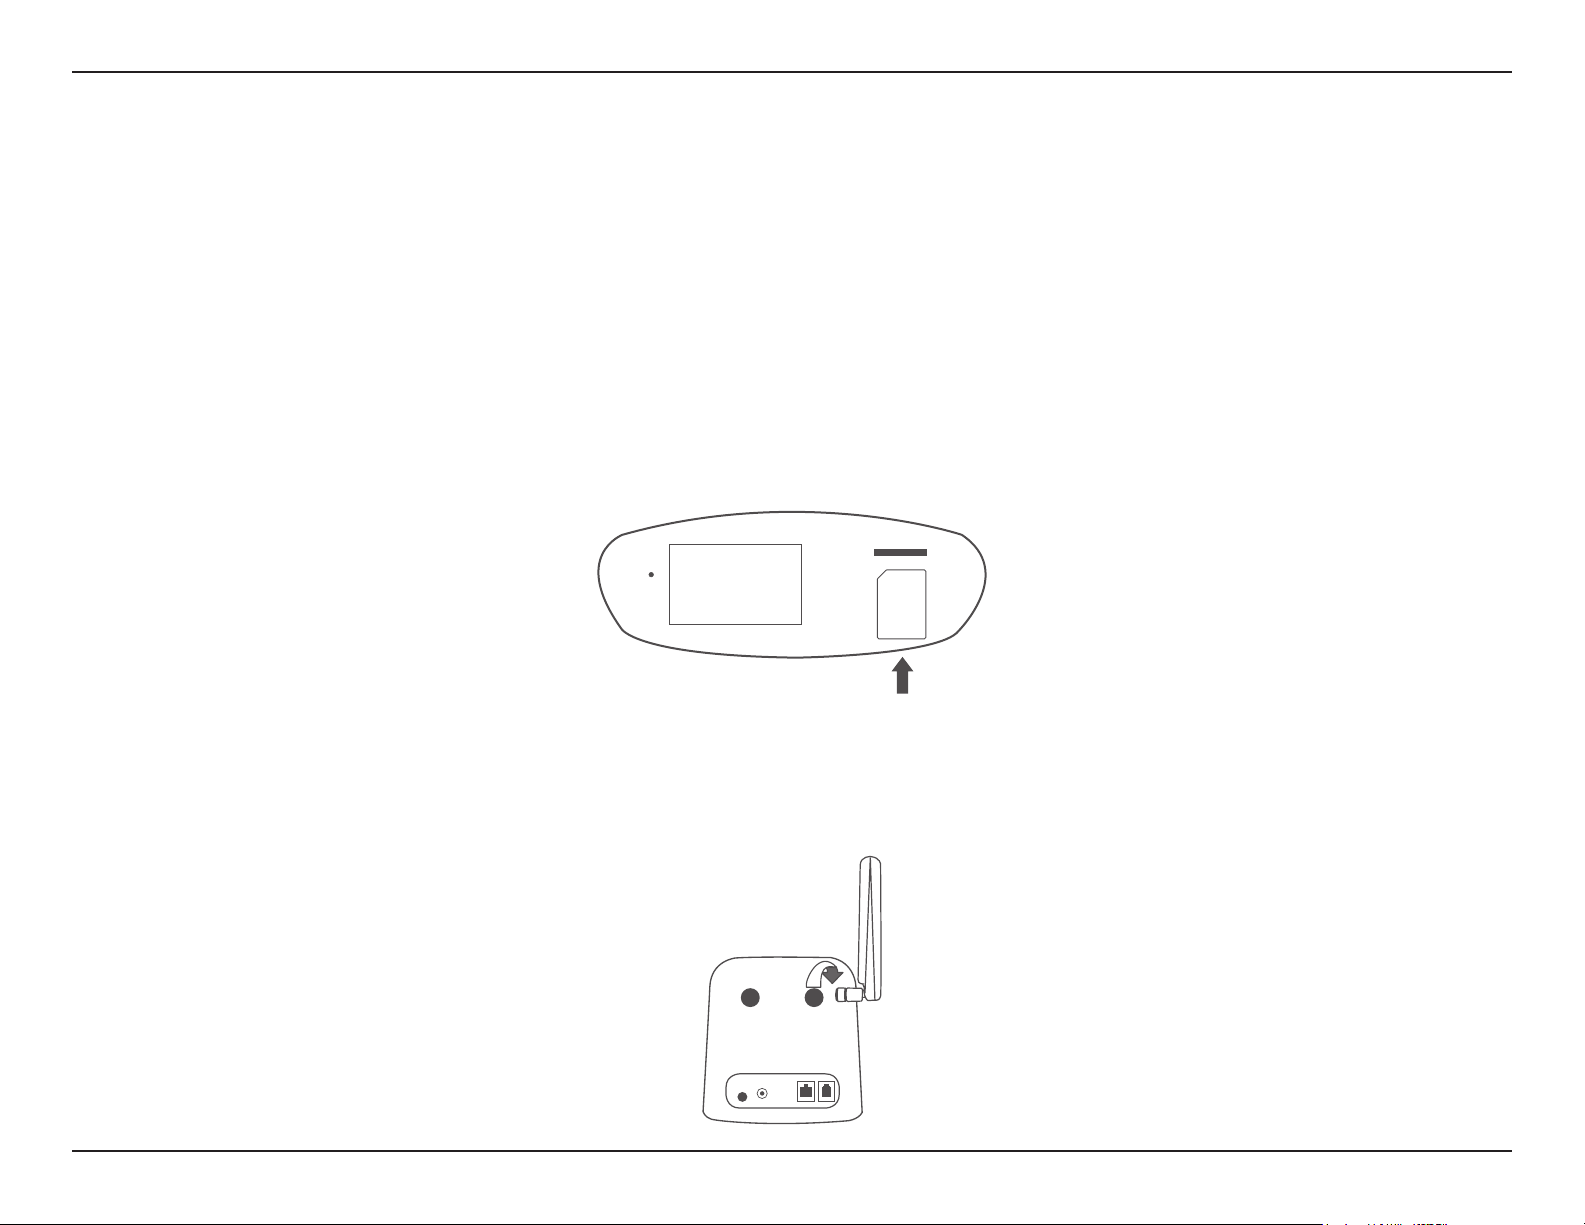
Step 1
Verify that your SIM/UICC card is installed and has been activated by your carrier. If it has not been installed, follow the diagram
next to the slot at the bottom of the DWR-920V. Push gently until it locks into place.
SIM
RESET
SIM
Card
Step 2
Attach the included antennas to the back of the device, screwing them in clockwise. Arrange the antennas so that they point
upwards.
7D-Link DWR-920V User Manual
Page 11

Section 2 - Installation
Step 3
Using the DC connector cable, connect one end to the OUTPUT socket of the power bank and the other end to the power
input socket of the DWR-920V. Connect the power adapter to INPUT socket of the power bank and the other end into a wall
outlet or power strip.
INPUT OUTPUT
Step 4
To connect the device to a phone, please plug your telephone into the “Phone” port on your U.S. Cellular Home Phone, using
your existing phone cable or the included phone cable.
Step 5
Press the power button to turn on the device. The power LED will light up green to indicate that power is being supplied. After
a few moments, the LED indicators will show the current status of the DWR-920V’s various functions.
8D-Link DWR-920V User Manual
Page 12

Section 3 - Advanced Setup
Advanced Setup
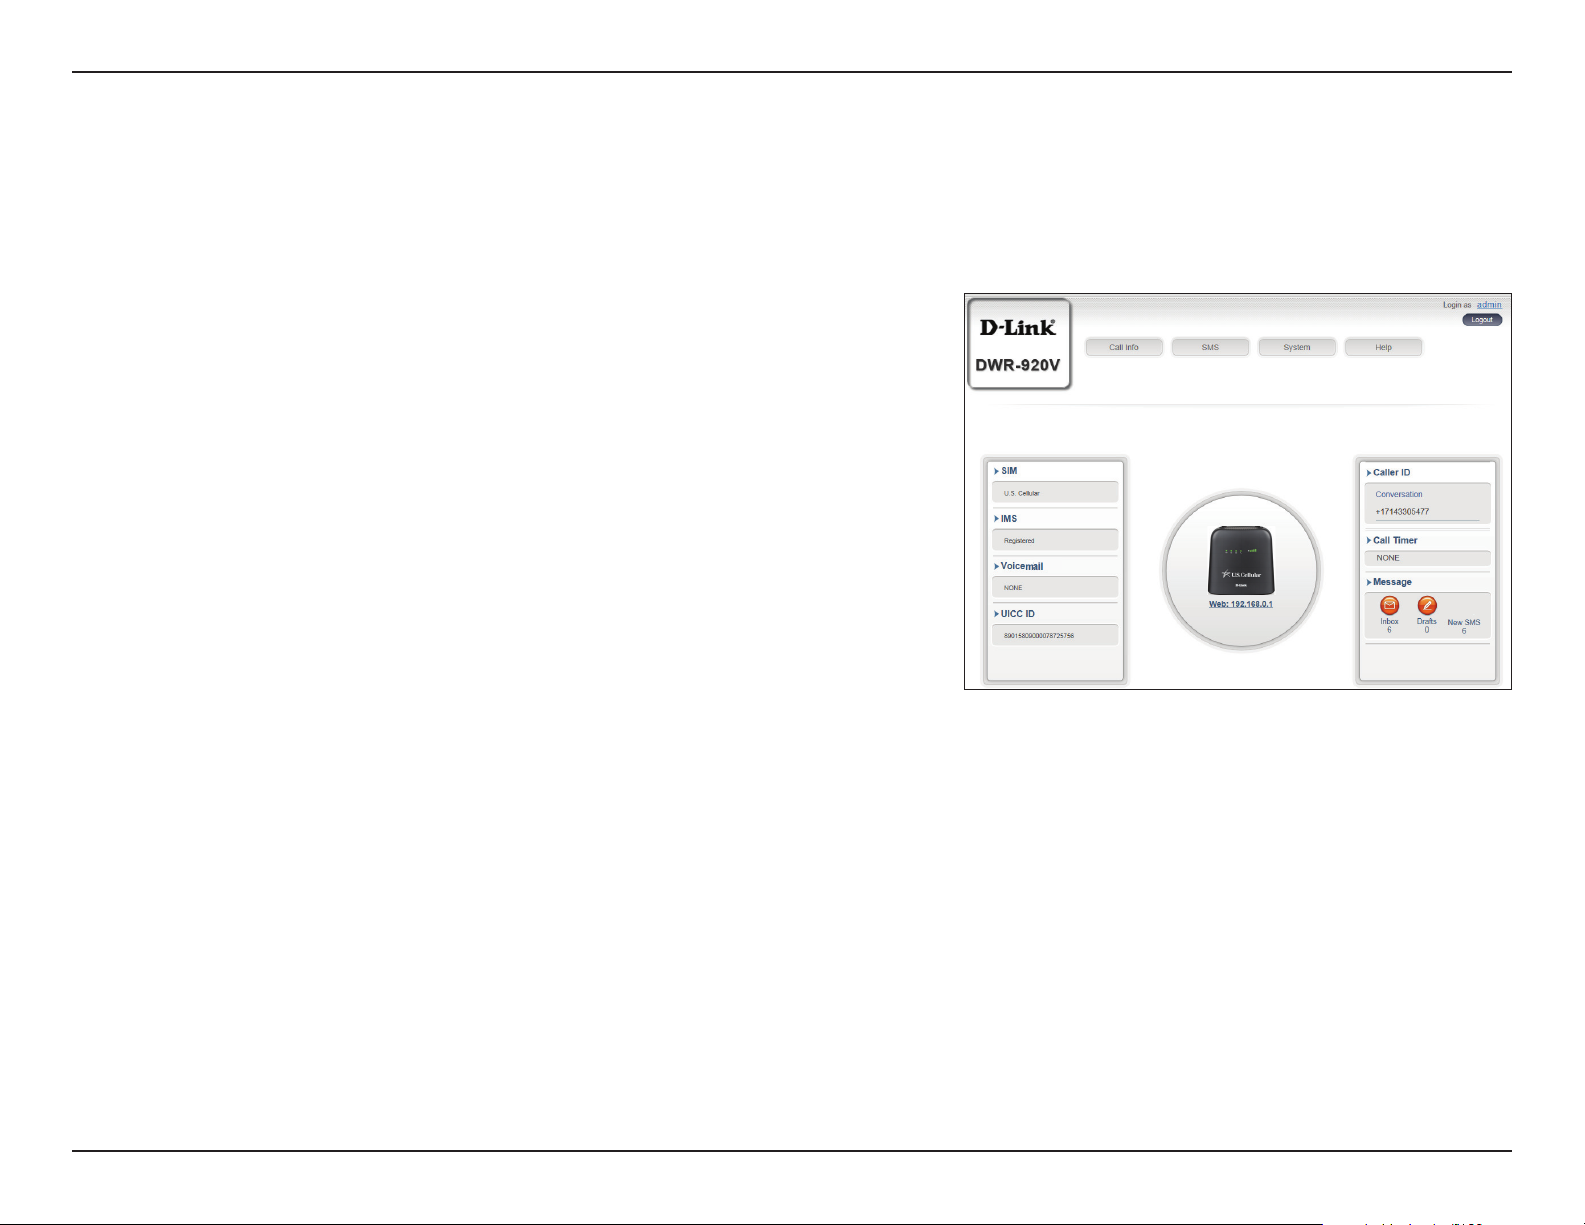
Once connected to your U.S. Cellular Home Phone, open a web browser
and enter the IP address http://192.168.0.1 into a browsers address eld.
Log in using the username “admin” and leave the password eld blank.
Click Sign in to continue.
After logging in, you can access the WebGUI for features such as SMS
messaging and voicemail.
9D-Link DWR-920V User Manual
Page 13

Section 3 - Advanced Setup
Navigation
On the home page of the advanced settings interface, you will nd a menu bar at the top of the page which includes tabs for
easy navigation.
Call Info The Call Info tab gives you the telephone records and an inventory to black or white list phone
numbers.
SMS From the SMS tab, you can send and receive SMS text messages.
System The System tab allows you to view system information, change your login information, congure
your settings proles and upgrade the rmware.
Help The Help tab provides you with information for troubleshooting your device.
10D-Link DWR-920V User Manual
Page 14
Section 3 - Advanced Setup
Quick Access
A quick access page will be displayed on the initial home page for the DWR-920V.
SIM The phone number tied to your SIM card.
IMS The IP Multimedia Subsystem ID.
Voicemail This area displays the number of voicemail
messages received by the device.
UICC ID The ID tied to your SIM/UICC card.
Caller ID The caller ID of the person you are connected
to during a phone call.
Call Timer Counter for an ongoing call.
Message This area displays the number of SMS
messages in your inbox and your draft
messages.
11D-Link DWR-920V User Manual
Page 15

Section 3 - Advanced Setup
Call Info
Call Timer
This page gives you a telephone record history for the DWR-920V.
ID A chronological number given to each call
you receive.
Delete Check this box to select and delete a call log
in your telephone record.
Call number The caller’s number.
Caller Time The time that the call was received.
Call/Ring Time The time that the call took (in seconds).
12D-Link DWR-920V User Manual
Page 16

Section 3 - Advanced Setup
Black List & White List
This page gives you an inventory to black or white list phone numbers. The White List is a list of numbers that will be approved
to connect to your number - all other numbers will be denied access, except those included in the White List. The Black List
is the reverse of White List.
WHITE LIST
White List Click the toggle to Enable or Disable the
White List feature.
Apply Click Apply to save the settings for enabling
or disabling the White List feature.
Add New Click Add New to add a number to the White
List.
ID A chronological number given to each White
Listed number.
Delete Check this box to select and delete White
Number.
White Number The White Listed number.
ADD NEW
White Address Enter the number you would like to White
List here.
13D-Link DWR-920V User Manual
Page 17

Section 3 - Advanced Setup
Black List Click the toggle to Enable or Disable the
Apply Click Apply to save the settings for enabling
Add New Click Add New to add a number to the Black
ID A chronological number given to each Black
Delete Check this box to select and delete Black
BLACK LIST
Black List feature.
or disabling the Black List feature.
List.
Listed number.
Number.
Black Number The Black Listed number.
ADD NEW
Black Address Enter the number you would like to Black List
here.
14D-Link DWR-920V User Manual
Page 18

Section 3 - Advanced Setup
SMS
Short Messages
On the Short Messages page you can organize, send and receive Short Message Service (SMS) messages by selecting between
the Setup, Inbox and Drafts tab. These messages can either be saved to the DWR-920V’s internal memory or on the SIM/UICC
card itself. Click Apply to save changes.
SETUP
Store To Choose between the location to store contact
numbers, either on your SIM/UICC card or the
DWR-920V device.
Current Short
Messages
SMS Center Number Your SIM/UICC card’s contact number.
The current number of messages received.
15D-Link DWR-920V User Manual
Page 19

Section 3 - Advanced Setup
ID A chronological number given to each
Delete Check this box to select and delete a
From The SMS sender’s number.
Time The time the message was received.
Content The SMS message’s content.
Add New Click Add New to send a new message.
INBOX
message you receive.
message in your inbox.
+ ADD NEW
Sent to Enter the phone number of the intended
recipient here.
Content Type your message content here.
Click Send to send your message. Click Save as
Draft to save the message as a draft and send it
later.
16D-Link DWR-920V User Manual
Page 20

Section 3 - Advanced Setup
ID A chronological number given to each
Delete Check this box to select and delete a
To The SMS recipient’s number.
Time The time the message was last edited.
Content The SMS message’s content.
DRAFTS
message you save to drafts.
message in your drafts folder.
17D-Link DWR-920V User Manual
Page 21

Section 3 - Advanced Setup
System Information
ABOUT DWR920V
FW Version The current rmware version of the
DWR-920V.
Hardware Version The current hardware version of the
DWR-920V.
IMEI An International Mobile Equipment Identity
is a unique number assigned to every mobile
device.
System
MEID A Mobile Equipment Identier is a unique
number assigned to every mobile device.
SIM IMSI The SIM card has a unique number
called an International Mobile Subscriber
Identity (IMSI). This is used to identify and
authenticate users on cellular devices.
Local Number The phone number tied to your SIM card.
Model Name The model number of your D-Link device.
System Uptime The length of time since the last restart.
18D-Link DWR-920V User Manual
Page 22

Section 3 - Advanced Setup
Admin Settings
This section allows you to customize your administrator settings, change the device interface’s language and adjust the date
and time settings for the DWR-920V. Click Apply to save changes.
ACCOUNT
Username Adjust your login username.
Password Enter your new password.
Conrm Password Conrm the new password.
Auto logout after Click the drop-down arrow to select the
length of time (in minutes) before being
automatically logged out of the interface.
LANGUAGE
Language Select your desired language for the device
interface here.
19D-Link DWR-920V User Manual
Page 23

Section 3 - Advanced Setup
DATE & TIME SNTP ENABLED
SNTP Click the toggle to Enable or Disable
automatic time synchronization with a
Simple Network Time Protocol (SNTP) server.
Primary, Secondary
and Tertiary SNTP
Server
Enter a SNTP server address which will be
used to synchronize the device’s time and
date.
Time Zone Select your current Coordinated Universal
Time Zone (UTC).
Synchronization
Cycle
You can specify in hours how frequently the
DWR-920V will update the time from the
SNTP server.
Selected Date and
Time
Reects the current date and time of the
device per the settings.
Daylight Savings Select Enable if your region observes
daylight savings.
Start Date Enter the details of your region’s daylight
savings start date.
End Date Enter the details of your region’s daylight
savings end date.
20D-Link DWR-920V User Manual
Page 24

Section 3 - Advanced Setup
DATE & TIME SNTP DISABLED
SNTP Click the toggle to Enable or Disable
Time Zone Select your current Coordinated Universal
Date & Time Displays your new adjusted time.
automatic time synchronization with a
Simple Network Time Protocol (SNTP) server.
Time Zone (UTC).
Selected Date and
Time
Reects the current date and time of the
device per the settings.
Daylight Savings Select Enable if your region observes
daylight savings.
Start Date Enter the details of your region’s daylight
savings start date.
End Date Enter the details of your region’s daylight
savings end date.
21D-Link DWR-920V User Manual
Page 25

Section 3 - Advanced Setup
Settings Prole
This section allows you to import or export conguration proles and reset your device. Click Apply to save changes.
IMPORT
Select Browse your computer for previously
exported settings. Click Apply Import to
upload the settings to your device.
To Get Current
Prole
EXPORT PROFILE
Click the Click Me button to download the
current settings of your DWR-920V.
22D-Link DWR-920V User Manual
Page 26

Section 3 - Advanced Setup
Reset to default Select the Reset to Default button to reset
Reboot Select the Reboot button to reboot the
RESET & REBOOT
the DWR-920V to factory default settings.
DWR-920V.
23D-Link DWR-920V User Manual
Page 27

Section 3 - Advanced Setup
Firmware Upgrade
This page allows you to upgrade your DWR-920V’s rmware manually or through the remote server.
UPGRADE MY HOME PHONE MANUAL
Upgrade My Home
Phone
Select Manual from the drop down menu
to manually upgrade your DWR-920V’s
rmware.
Open File If you have selected manual upgrade, click
Choose File and select the appropriate le
for the upgrade.
Current Version The current version of your rmware.
Click the Start Update button.
UPGRADE MY HOME PHONE REMOTE SERVER
Upgrade My Home
Phone
Current Version The current version of your rmware.
Select Remote Server from the drop down
menu to check and install any available
rmware upgrades from the remote server.
Upgrade My Home Phone
Upgrade My Home Phone
Upgrade My Home Phone
Upgrade My Home Phone
Click the Check Remote Server button.
24D-Link DWR-920V User Manual
Page 28

Section 3 - Advanced Setup
Help
This section provides answers for frequently asked questions regarding the DWR-920V U.S. Cellular Home Phone.
U.S. Cellular Home Phone: HELP content
U.S. Cellular Home Phone FAQs
Will my U.S. Cellular Home Phone work in areas with no or low
wireless signal strength?
25D-Link DWR-920V User Manual
Page 29

Section 4 - How to Use Your Device
How to Use Your Device
Three-Way Calling
While on a current call, dial the second telephone number then press the Flash (recall) key.
• If the second party answers, press the Flash key again to activate the three-way calling.
• If the second party does not pick up the phone, press the Flash key twice to end the call and return to the original call.
Note: If your phone does not have a Flash key, use your phone’s o-hook mechanism to perform this action.
Voicemail
Note: If the answering system on your telephone is enabled, then the second party will be directed to the answering system
instead of the voicemail service. Please disable the telephone’s answering system to enable the voicemail service.
When you receive a new voicemail, the voicemail LED on your DWR-920V U.S. Cellular Home Phone will blink green.
1. Lift the handset of your telephone.
2. Dial 1 or *86 and wait for a few seconds to connect to the voicemail service
3. Follow the instructions to listen to and manage your voicemails.
Call Waiting
If someone calls you while you are on a current call, you will hear a beep tone. To answer the new call, press the Flash key on
your telephone to put your current call on hold. You can press the Flash key at any time to switch between calls.
26D-Link DWR-920V User Manual
Page 30

Section 4 - How to Use Your Device
Call Forwarding
Use this feature to forward calls to another phone number.
To Activate the Feature To Deactivate the Feature
Immediate Call Forwarding
Forwards calls to another
phone number regardless
of the situation
No Answer Call Forwarding
Only forwards calls to
another phone number if the
telephone is not answered
1. Pick up the telephone and dial
*72 phone number to forward to#
2. The conrmation tone veries
that the feature is activated.
3. Hang up the telephone.
1. Pick up the telephone and dial
*92 phone number to forward to#
2. The conrmation tone veries
that the feature is activated.
3. Hang up the telephone.
1. Pick up the telephone and dial *720#
2. The conrmation tone veries
that the feature is deactivated.
3. Hang up the telephone.
1. Pick up the telephone and dial *920#
2. The conrmation tone veries
that the feature is deactivated.
3. Hang up the telephone.
27D-Link DWR-920V User Manual
Page 31

Section 5 - Troubleshooting
Troubleshooting
This chapter provides solutions to problems that can occur during the setup and configuration of the DWR-920V
U.S. Cellular Home Phone. Read the following descriptions if you are having problems.
What kind of phone do I need to use with the DWR-920V U.S. Cellular Home Phone?
Most standard touch-tone phones may be used. Rotary phones are not supported. Cordless phone systems provide the most
exibility and allow you to easily place additional handsets throughout your home. Cordless phone systems still need to be
plugged into a power outlet. During a power outage, a standard corded phone which does not require electrical power is
recommended.
How do I reset my DWR-920V U.S. Cellular Home Phone to factory default settings?
If you cannot remember your administrator password, unfold a paperclip and use it to press and hold the recessed reset
button on the bottom of the device for about 10 seconds. Resetting the device to factory default settings will erase the current
conguration.
Will my DWR-920V U.S. Cellular Home Phone work in areas with no or low wireless signal strength?
A strong wireless signal (full signal bars) is recommended for optimal performance. A moderate signal (two signal bars) may
be sucient. It is recommended that you nd a location with a strong wireless signal (full signal bars) for your device.
Does 911 work on this device?
Yes, the U.S. Cellular Home Phone is Enhanced 911 (E911) compatible. As the device is intended for indoor use, please be
prepared to provide your location inside the premises to public service personnel when you dial 911.
28D-Link DWR-920V User Manual
Page 32

Appendix A - Technical Specications
Technical Specications
LTE Mode
• Supports LTE Band 2/4/5/12/66
Antenna
• 2x2 MIMO
• External 3G/4G antenna
Ports
• 1 x FxS (RJ-11)
• 1 x 10/100/1000 Mbps LAN (RJ-45) for GUI Management
interface
USIM Slot
• Standard 6-pin SIM card interface
LED Status Indicators
• Power
• Voicemail
• SMS
• Telephone
• Signal Strength
Dimensions
• 121.0 x 117.3 x 43.5 mm (L x W x H)
Weight
• 205 g
Operating Temperature
• 0 to 40 ˚C (32 to 147 ˚F)
Operating Humidity
• 10% to 90% (Non-condensing)
Certication
• RoHS
• FCC
Power Input
• DC 12V 1A power adapter and power bank
29D-Link DWR-920V User Manual
Page 33

Appendix A - Technical Specications
Regulatory Information
Federal Communication Commission Interference Statement
This equipment has been tested and found to comply with the limits for a Class B digital device, pursuant to Part 15 of the FCC Rules. These limits
are designed to provide reasonable protection against harmful interference in a residential installation. This equipment generates, uses and
can radiate radio frequency energy and, if not installed and used in accordance with the instructions, may cause harmful interference to radio
communications. However, there is no guarantee that interference will not occur in a particular installation. If this equipment does cause harmful
interference to radio or television reception, which can be determined by turning the equipment o and on, the user is encouraged to try to
correct the interference by one of the following measures:
- Reorient or relocate the receiving antenna.
- Increase the separation between the equipment and receiver.
- Connect the equipment into an outlet on a circuit dierent from that to which the receiver is connected.
- Consult the dealer or an experienced radio/TV technician for help.
Non-modications Statement:
Any changes or modications not expressly approved by the party responsible for compliance could void the user’s authority to operate this
equipment.
Caution:
This device complies with Part 15 of the FCC Rules. Operation is subject to the following two conditions:
(1) This device may not cause harmful interference, and (2) this device must accept any interference received, including interference that
may cause undesired operation.
FCC Radiation Exposure Statement
This device complies with FCC radiation exposure limits set forth for an uncontrolled environment and it also complies with Part 15 of the FCC RF
Rules. This equipment must be installed and operated in accordance with provided instructions and the antenna(s) used for this transmitter must
be installed to provide a separation distance of at least 20 cm from all persons and must not be co-located or operating in conjunction with any
other antenna or transmitter. End-users and installers must be provide with antenna installation instructions and consider removing the nocollocation statement.
30D-Link DWR-920V User Manual
 Loading...