

Page 1
Page 2

Preface
D-Link reserves the right to revise this publication and to make changes in the content hereof without obligation to
notify any person or organization of such revisions or changes.
Trademarks
D-Link and the D-Link logo are trademarks or registered trademarks of D-Link Corporation or its subsidiaries in
the United States or other countries. All other company or product names mentioned herein are trademarks or
registered trademarks of their respective companies.
Copyright © 2011 by D-Link Systems, Inc.
All rights reserved. This publication may not be reproduced, in whole or in part, without prior expressed written
permission from D-Link Systems, Inc.
iD-Link DWR-730 User Manual
Page 3

Table of Contents
Table of Contents
Preface...........................................................................i
Trademarks .............................................................. i
Product Overview ........................................................1
Package Contents ...................................................1
System Requirements .............................................1
Introduction ..............................................................2
Hardware Overview ................................................. 3
Front ..................................................................3
Back ...................................................................4
Wireless Installation Considerations ........................ 5
Product Setup ..........................................................6
WiFi/WPS Conguration .......................................... 7
Web-Based Conguration Utility ............................... 8
Internet Connection Setup Wizard ........................... 9
Internet Setup ........................................................ 12
Factory Reset ........................................................25
Firmware Upgrade ................................................. 26
Device Information .................................................27
Statistics ................................................................28
Wireless Information .............................................. 29
Support .................................................................. 30
Wireless Security.......................................................31
What is WEP? .......................................................31
Congure WEP ......................................................32
What is WPA? .......................................................33
Congure WPA-PSK/WPA2-PSK .......................... 34
Connect to a Wireless Network ................................ 35
Using Windows Vista™ .........................................35
Congure Wireless Security ............................36
®
Using Windows
XP ...............................................38
Wireless Settings ................................................... 13
Manual Wireless Setup .......................................... 16
Network Setup ....................................................... 17
SIM Settings ..........................................................18
MAC Filter ..............................................................19
Advanced Internet Settings ...................................20
Advanced Wireless Settings ..................................21
Administrator Settings ...........................................22
MicroSD Card Reader ...........................................23
SMS Messages .....................................................24
Congure WEP ................................................39
Congure WPA-PSK ........................................41
Troubleshooting ........................................................ 43
Wireless Basics ......................................................... 45
What is Wireless? .................................................. 46
Tips ........................................................................48
Wireless Modes ..................................................... 49
Networking Basics .................................................... 50
iiD-Link DWR-730 User Manual
Page 4

Table of Contents
Check your IP address ..........................................50
Statically Assign an IP address .............................51
Technical Specications........................................... 54
Warnings and Declarations ...................................... 55
iiiD-Link DWR-730 User Manual
Page 5

Section 1 - Product Overview
• D-Link DWR-730 HSPA+ Mobile Router
• Battery
• USB cable
• Power adapter
Note: Using a power supply with a different voltage rating than the one included with the DWR-730 will cause damage and
void the warranty for this product.
Product Overview
Package Contents
System Requirements
• A compatible (U)SIM card with service*
• Computers with Windows
• Internet Explorer 6 or higher, Firefox 2.0 or higher, or another Java-enabled browser (for conguration)
*Subject to services and service terms available from your carrier.
®
, Macintosh® , or Linux-based operating systems
1D-Link DWR-730 User Manual
Page 6

Section 1 - Product Overview
Introduction
The D-Link DWR-730 HSPA+ Mobile Router is a palm sized 3G router, slim and small enough to carry in a pocket. It
allows users to access and share their 3G mobile Internet connection anywhere and anytime.
The DWR-730 functions as a Wi-Fi router allowing Wi-Fi capable devices like smart phones, portable gaming
devices, notebooks, or digital cameras access to 3G networks via a wireless connection. The DWR-730 can share
its 3G connection with up to 6 Wi-Fi clients. The built-in battery allows you to simply turn it on to provide your
devices with an instant connection to the Internet.
2D-Link DWR-730 User Manual
Page 7

Section 1 - Product Overview
Hardware Overview
Front
Status LEDs
Power Button
Reset Button
WiFi/WPS Button
Indicator Color Solid Blinking(fast) Blinking
(Slow)
SMS LED Green New incoming message Inbox full
Signal LED Purple HSPA+ Network Transmitting
Blue WCDMA/HSDPA/HSUPA network Transmitting
Green GSM/GPRS network Transmitting
Red Sim error or no service
Amber Roaming operator found, but service
not active
Battery LED Blue Battery fully charged 100% to 50% capacity
Green Charging, 99% to 50% capacity 50% to 10% capacity
Red Charging, 50% to 0% capacity Less than 3% capacity Less than 10% capacity
WiFi LED Green WiFi active Transmitting WPS active
Transmitting
3D-Link DWR-730 User Manual
Page 8

Section 1 - Product Overview
Hardware Overview
Back
Micro USB Port MicroSD Slot
Port/LED Function
Micro USB Port Connects to a PC or power adapter through the included USB cable.
MicroSD Slot Accepts a MicroSD card.
4D-Link DWR-730 User Manual
Page 9

Section 2 - Installation
Wireless Installation Considerations
The DWR-730 can be accessed using a wireless connection from virtually anywhere within the operating range of your wireless network.
Keep in mind, however, that the quantity, thickness and location of walls, ceilings, or other objects that the wireless signals must pass
through, may limit the range. Ranges vary depending on the types of materials and background RF (radio frequency) noise in your home
or ofce. The key to maximizing the wireless range is to follow these basic guidelines:
1. Minimize the number of walls and ceilings between the D-Link router and other network devices. Each wall or ceiling can
reduce your adapter’s range from 3 to 90 feet (1 to 30 meters).
2. Be aware of the direct line between network devices. A wall that is 1.5 feet thick (0.5 meters), at a 45-degree angle
appears to be almost 3 feet (1 meter) thick. At a 2-degree angle it looks over 42 feet (14 meters) thick. Position devices
so that the signal will travel straight through a wall or ceiling (instead of at an angle) for better reception.
3. Try to position access points, wireless routers, and computers so that the signal passes through open doorways and
drywall. Materials such as glass, metal, brick, insulation, concrete and water can affect wireless performance. Large
objects such as sh tanks, mirrors, le cabinets, metal doors and aluminum studs may also have a negative effect on
range.
4. If you are using 2.4 GHz cordless phones, make sure that the 2.4 GHz phone base is as far away from your wireless
device as possible. The base transmits a signal even if the phone in not in use. In some cases, cordless phones, X-10
wireless devices, and electronic equipment such as ceiling fans, uorescent lights, and home security systems may
dramatically degrade wireless connectivity.
5D-Link DWR-730 User Manual
Page 10

Section 2 - Installation
Product Setup
1. Remove the back cover of the DWR-730, and remove the
battery.
2. Insert the SIM card with the gold contacts facing down. Make
sure that you insert the SIM card in the right direction.
3. Replace the battery and the back cover.
6D-Link DWR-730 User Manual
Page 11

Section 2 - Installation
WiFi/WPS Configuration
Short press (1 second) to enable WPS. The WiFi/WPS LED will ash for 2
minutes, allowing devices to connect. WPS will be disabled after 2 mintues.
Long press (5 seconds) to enable/disable WiFi. The WiFi/WPS LED will be
displayed accordingly
WiFi/WPS button
7D-Link DWR-730 User Manual
Page 12
Section 3 - Configuration
Web-Based Configuration Utility
You can use the web-based conguration utility to manage your wireless network. It allows you to set wireless encryption, control access
to the wireless network.
Note: The web-based conguration utility and its associated features are for both Modem and Router modes.
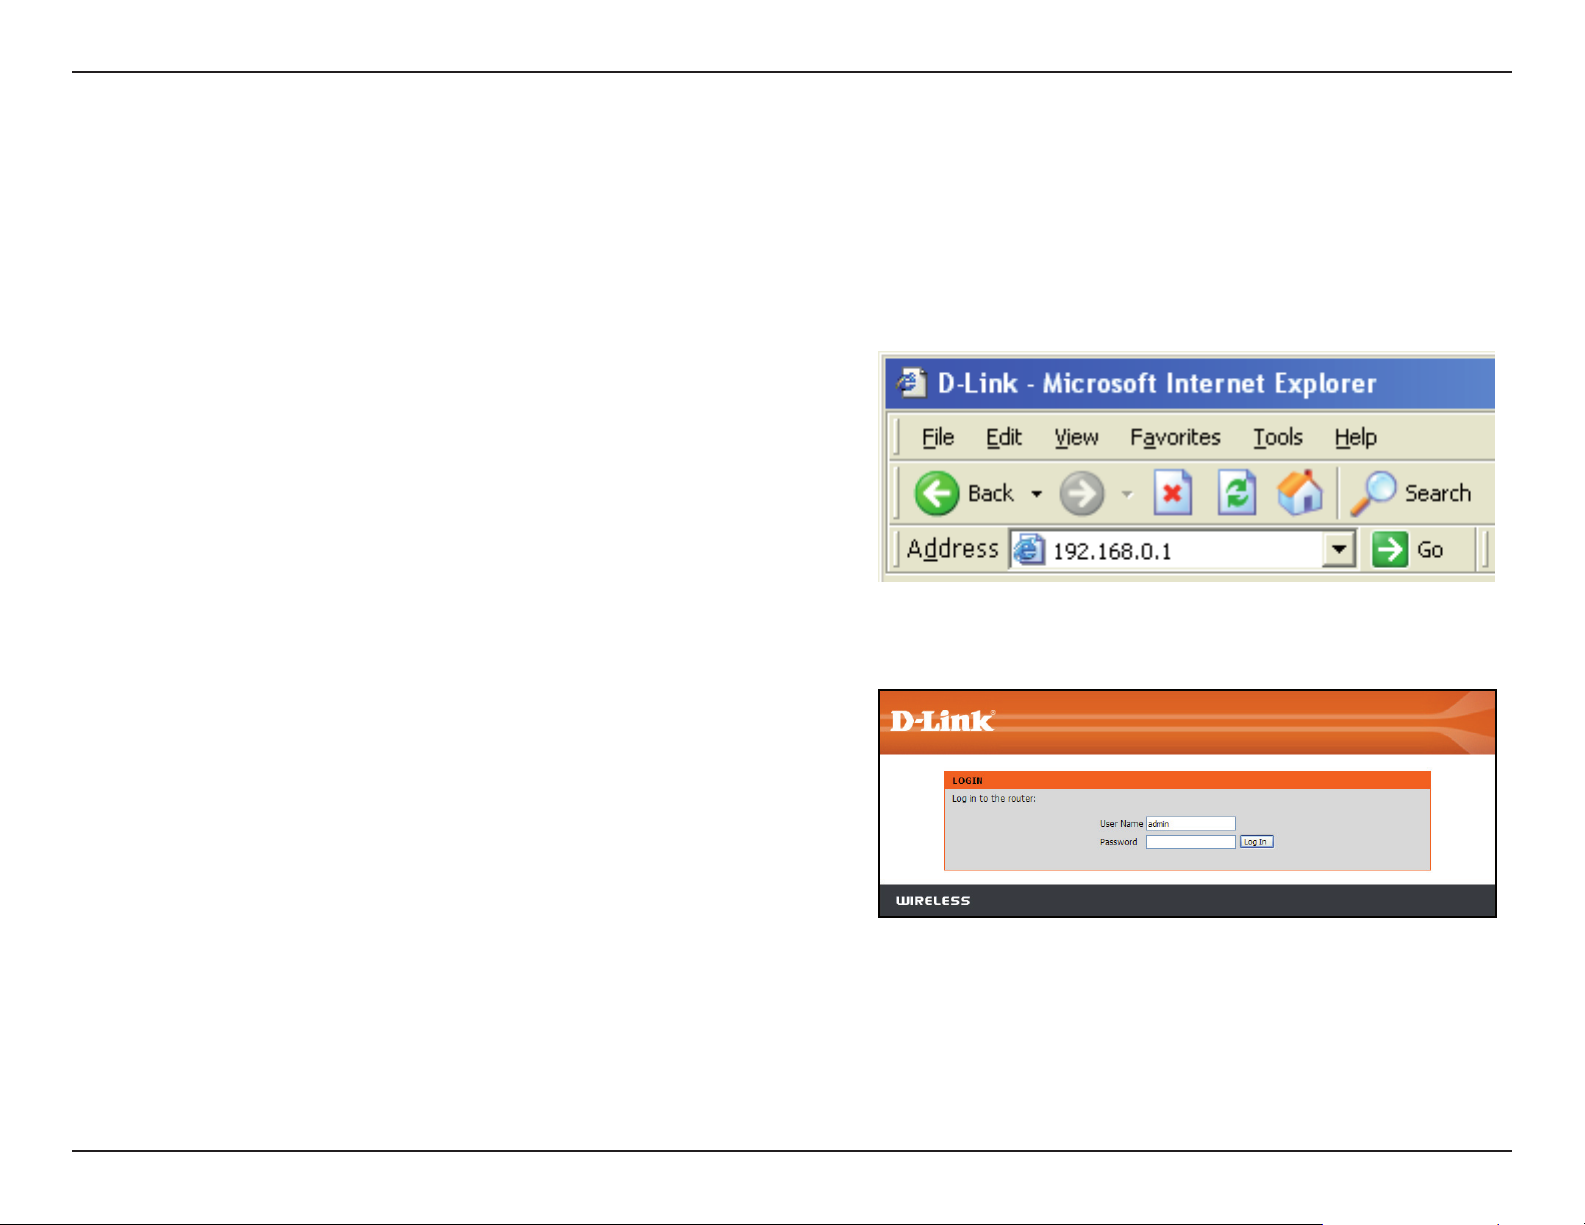
To access the conguration utility, open a web-browser
such as Internet Explorer and enter the IP address of
the router (192.168.0.1 by default).
Type admin in the User Name eld and then enter your
password. Leave the password blank by default.
Click the Login button to log in to the router.
If you get a Page Cannot be Displayed error, please
refer to the Troubleshooting section for assistance.
8D-Link DWR-730 User Manual
Page 13
Section 3 - Configuration
Internet Connection Setup Wizard
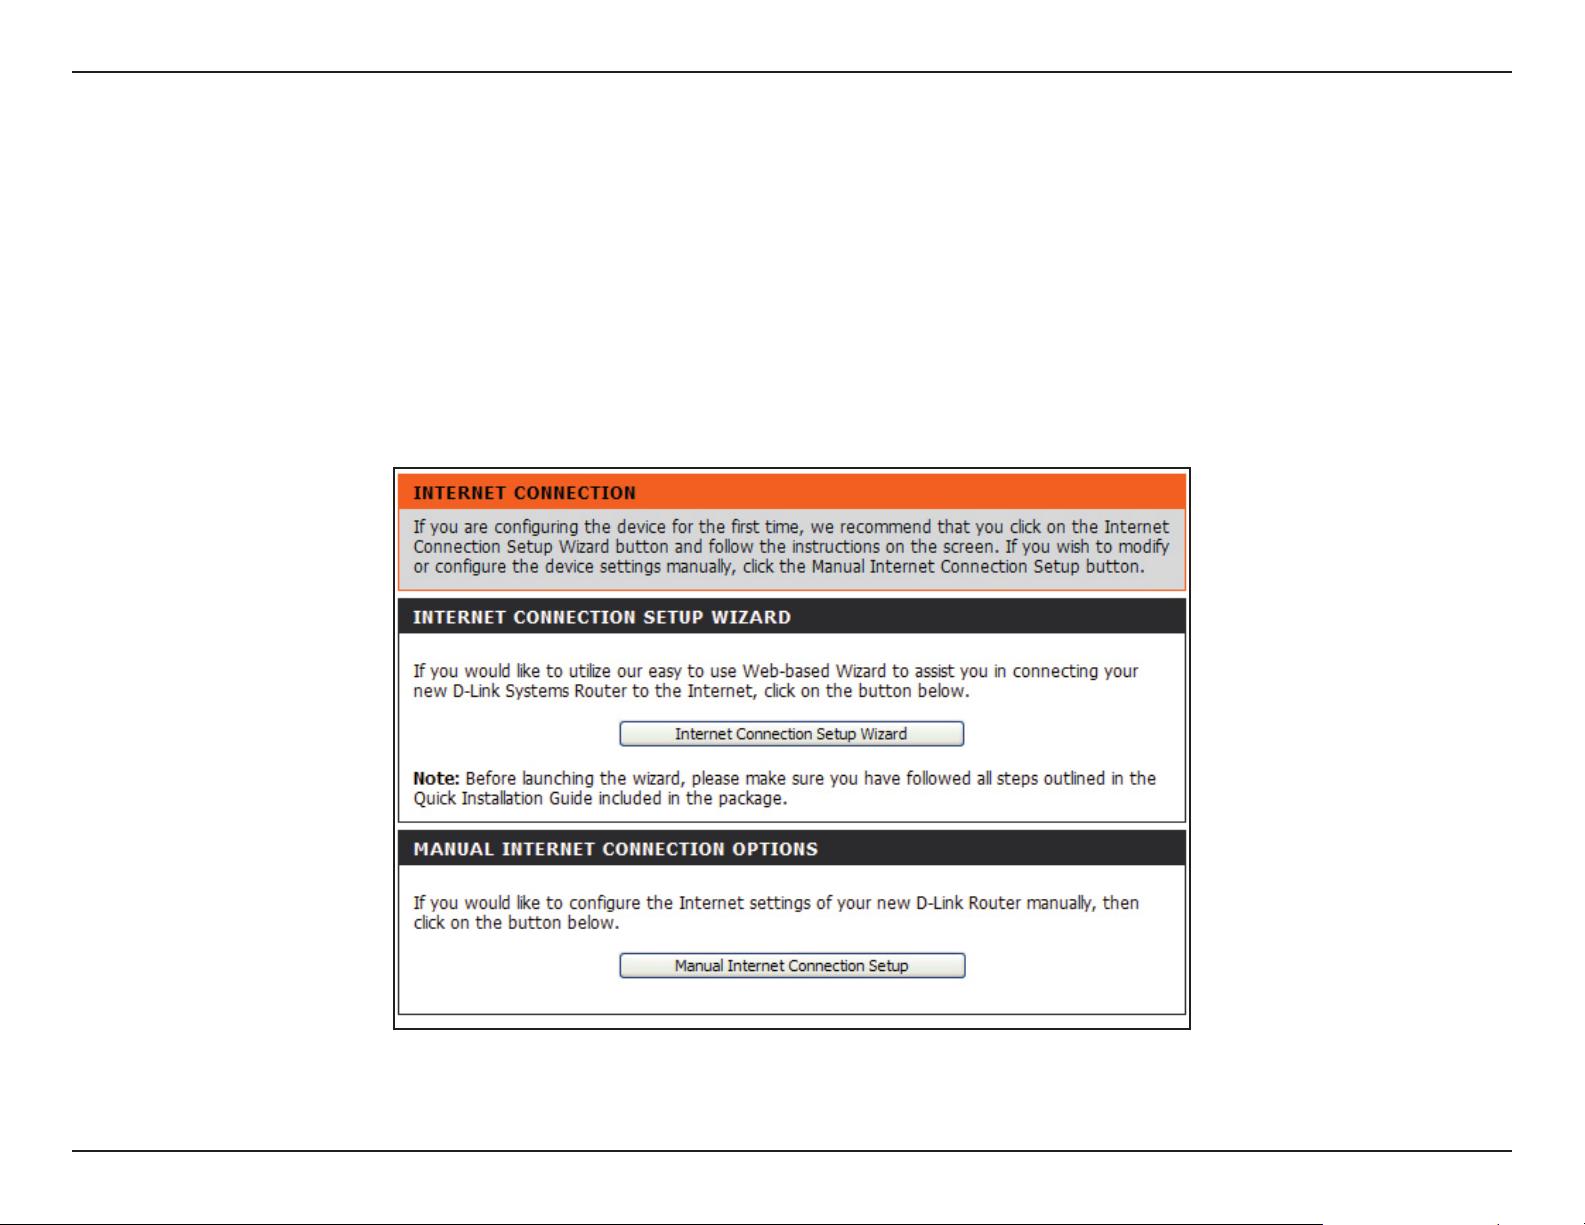
Once logged into the web interface of the router, the Setup > Internet page will appear. Click the Internet Connection
Setup Wizard button to quickly congure your router using the setup wizard.
If you want to enter your settings without running the wizard, click Manual Internet Connection Setup and skip to
“Manual Internet Conguration”.
9D-Link DWR-730 User Manual
Page 14

Section 3 - Configuration
Click Next to continue.
Create a new password and then click Next to
continue.
Congure your 3G Internet Connection settings and
then click Next to continue.
10D-Link DWR-730 User Manual
Page 15
Section 3 - Configuration
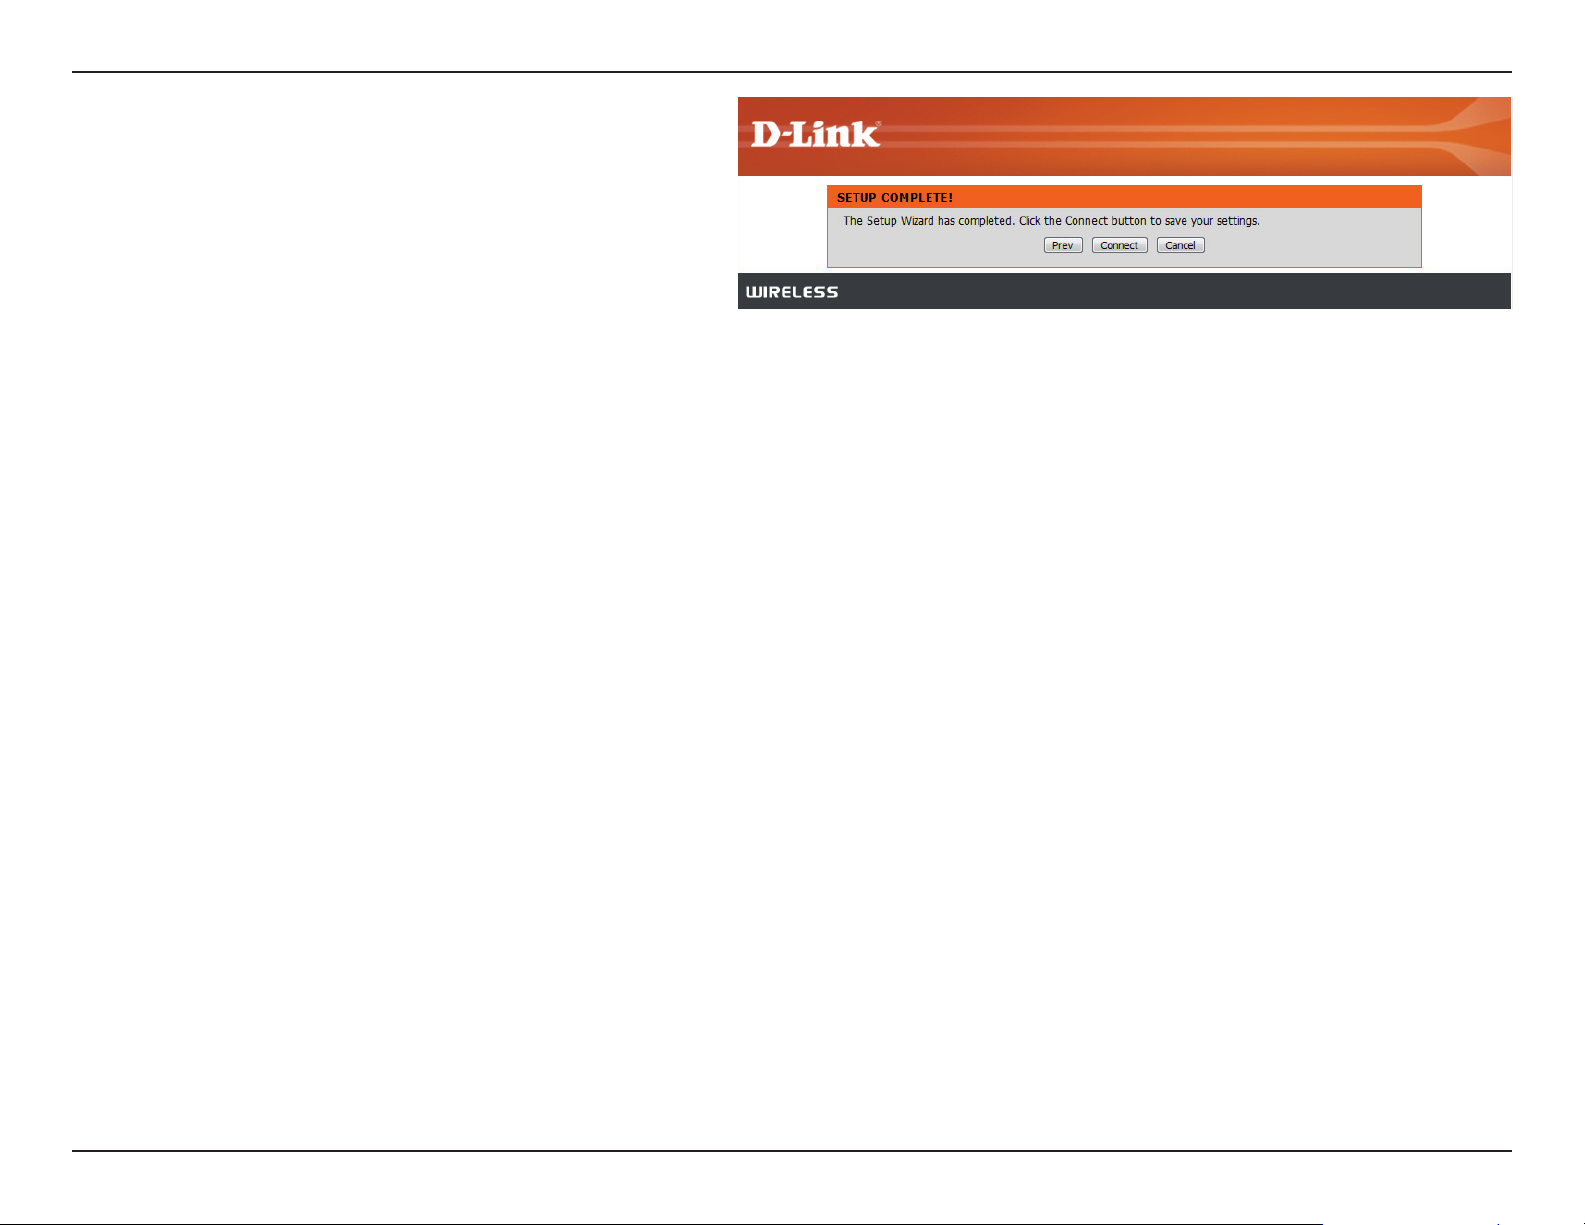
Click Connect to save your settings. Once the router
has nished rebooting, click Continue. Please allow
1-2 minutes to connect.
11D-Link DWR-730 User Manual
Page 16

Section 3 - Configuration
Internet Setup
This section lets you manually enter the Internet connection information provided by your Internet Service Provider (ISP).
Auto APN:
ISP:
Username:
Password:
APN:
Reconnect Mode:
Maximum Idle Time:
If you want to enable Auto APN, tick the check
box.
Enter the name of your ISP.
Enter a username.
Enter a password.
Enter the APN description.
Set to Always On, On Demand, or Manual.
Enter a maximum idl e time in minutes.
Choose 0 for innite.
12D-Link DWR-730 User Manual
Page 17
Section 3 - Configuration
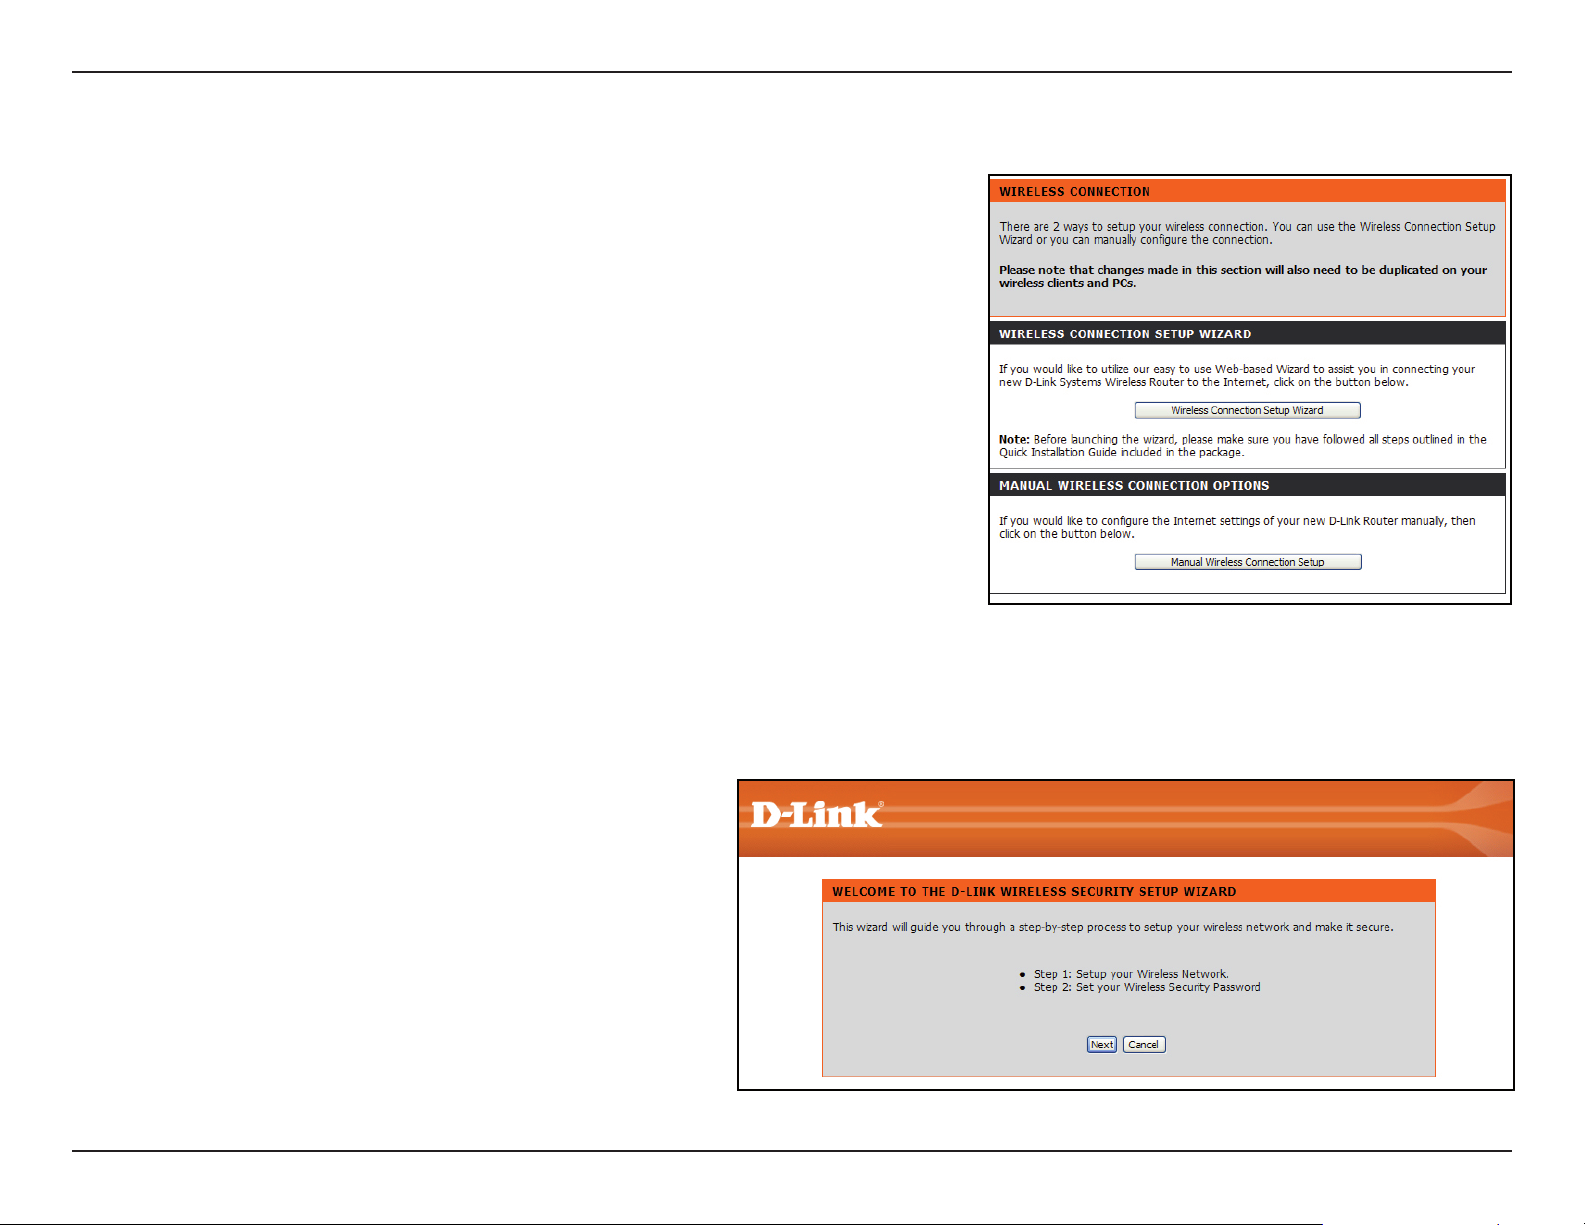
Wireless Settings
If you want to congure the wireless settings on your
router using the wizard, click Wireless Connection
Setup Wizard.
If you want to manually congure the wireless settings
on your router click Manual Wireless Connection
Setup and refer to “Manual Wireless Connection
Setup”.
Click the Wireless Connection Setup Wizard
button to view the Wireless Security Setup Wizard
menu. The Welcome menu lists the steps used for
setup. Click on the Next button to continue.
13D-Link DWR-730 User Manual
Page 18

Section 3 - Configuration
Enter the SSID (Service Set Identier). The SSID
is the name of your wireless network. Create a
name using up to 20 characters. The SSID is casesensitive.
It is recommended that you tick the checkbox to use
WPA wireless encryption to secure your wireless
network.
Click Next to continue.
Type a password that you would like to use for your
wireless network in the Network Key: entry eld.
Click Next to continue.
14D-Link DWR-730 User Manual
Page 19
Section 3 - Configuration
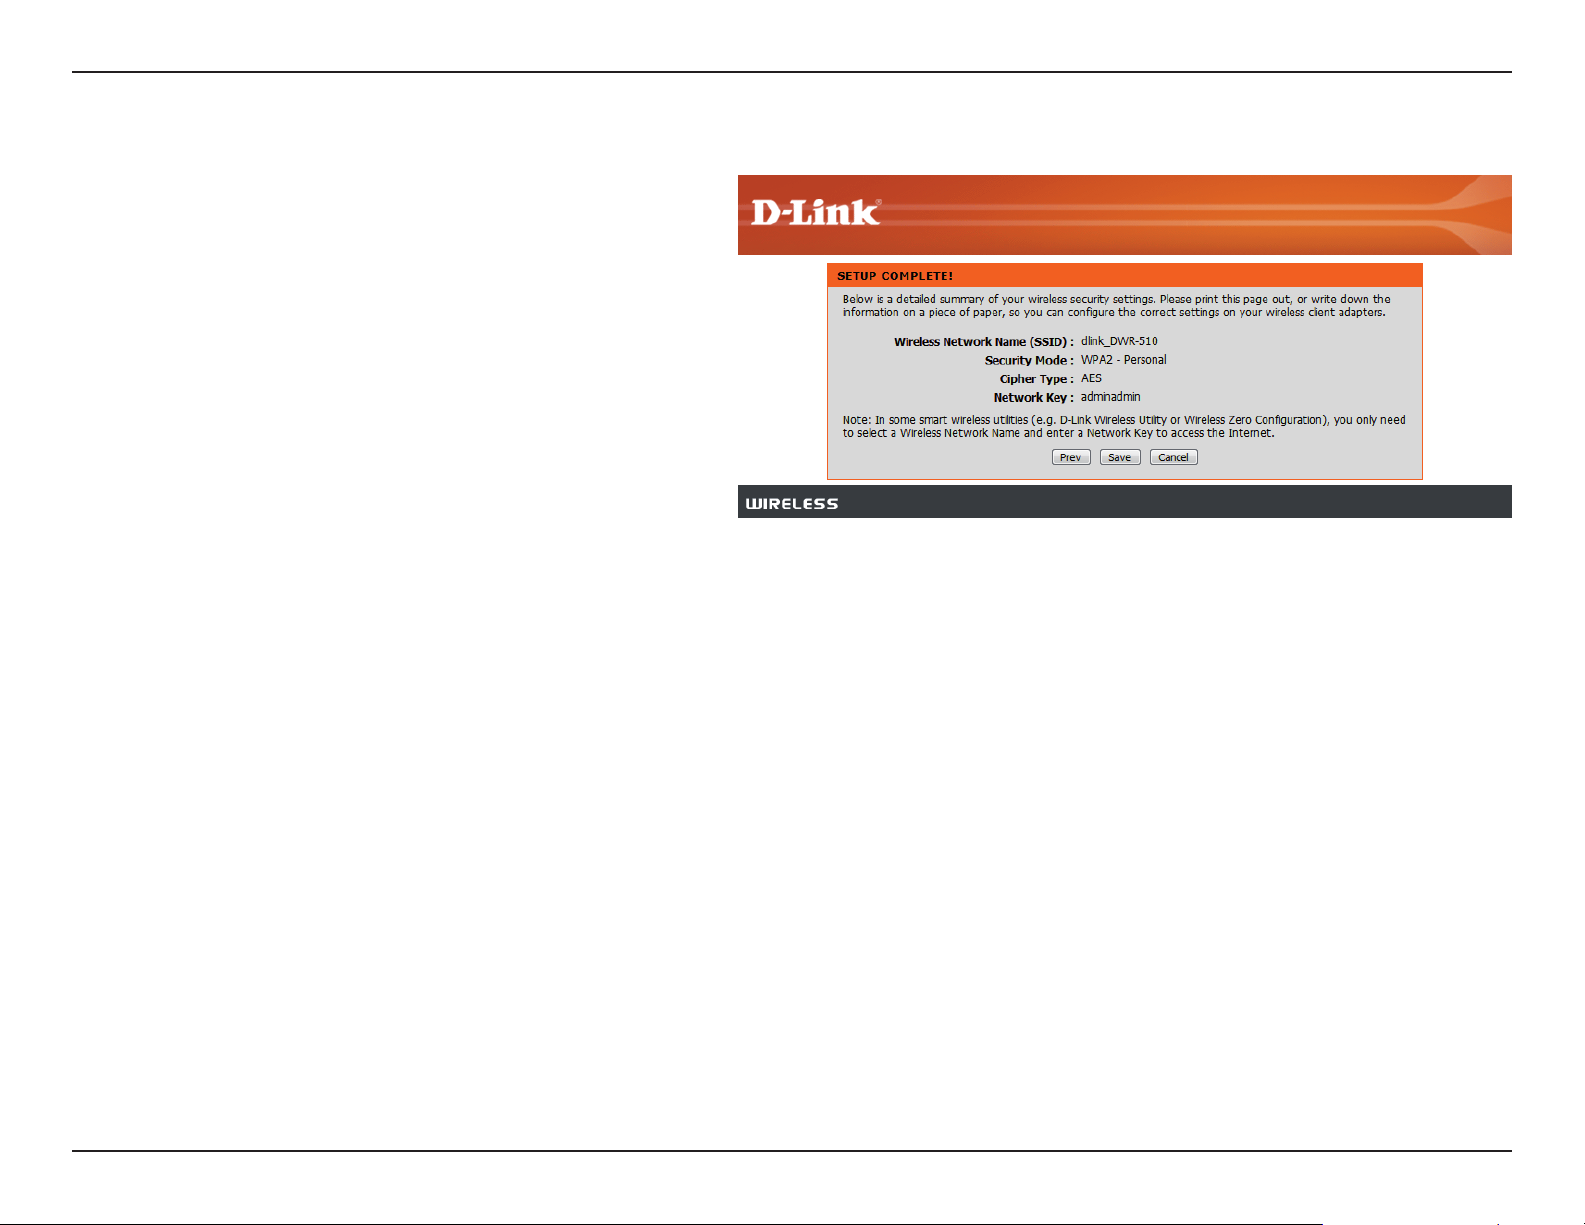
The nal menu appears to indicate that setup is
complete.
You should write down the Wireless Network Name
(SSID) and Network Key for future reference when
connecting other wireless devices to your wireless
network.
Click Save to nish the Security Wizard.
15D-Link DWR-730 User Manual
Page 20
Section 3 - Configuration
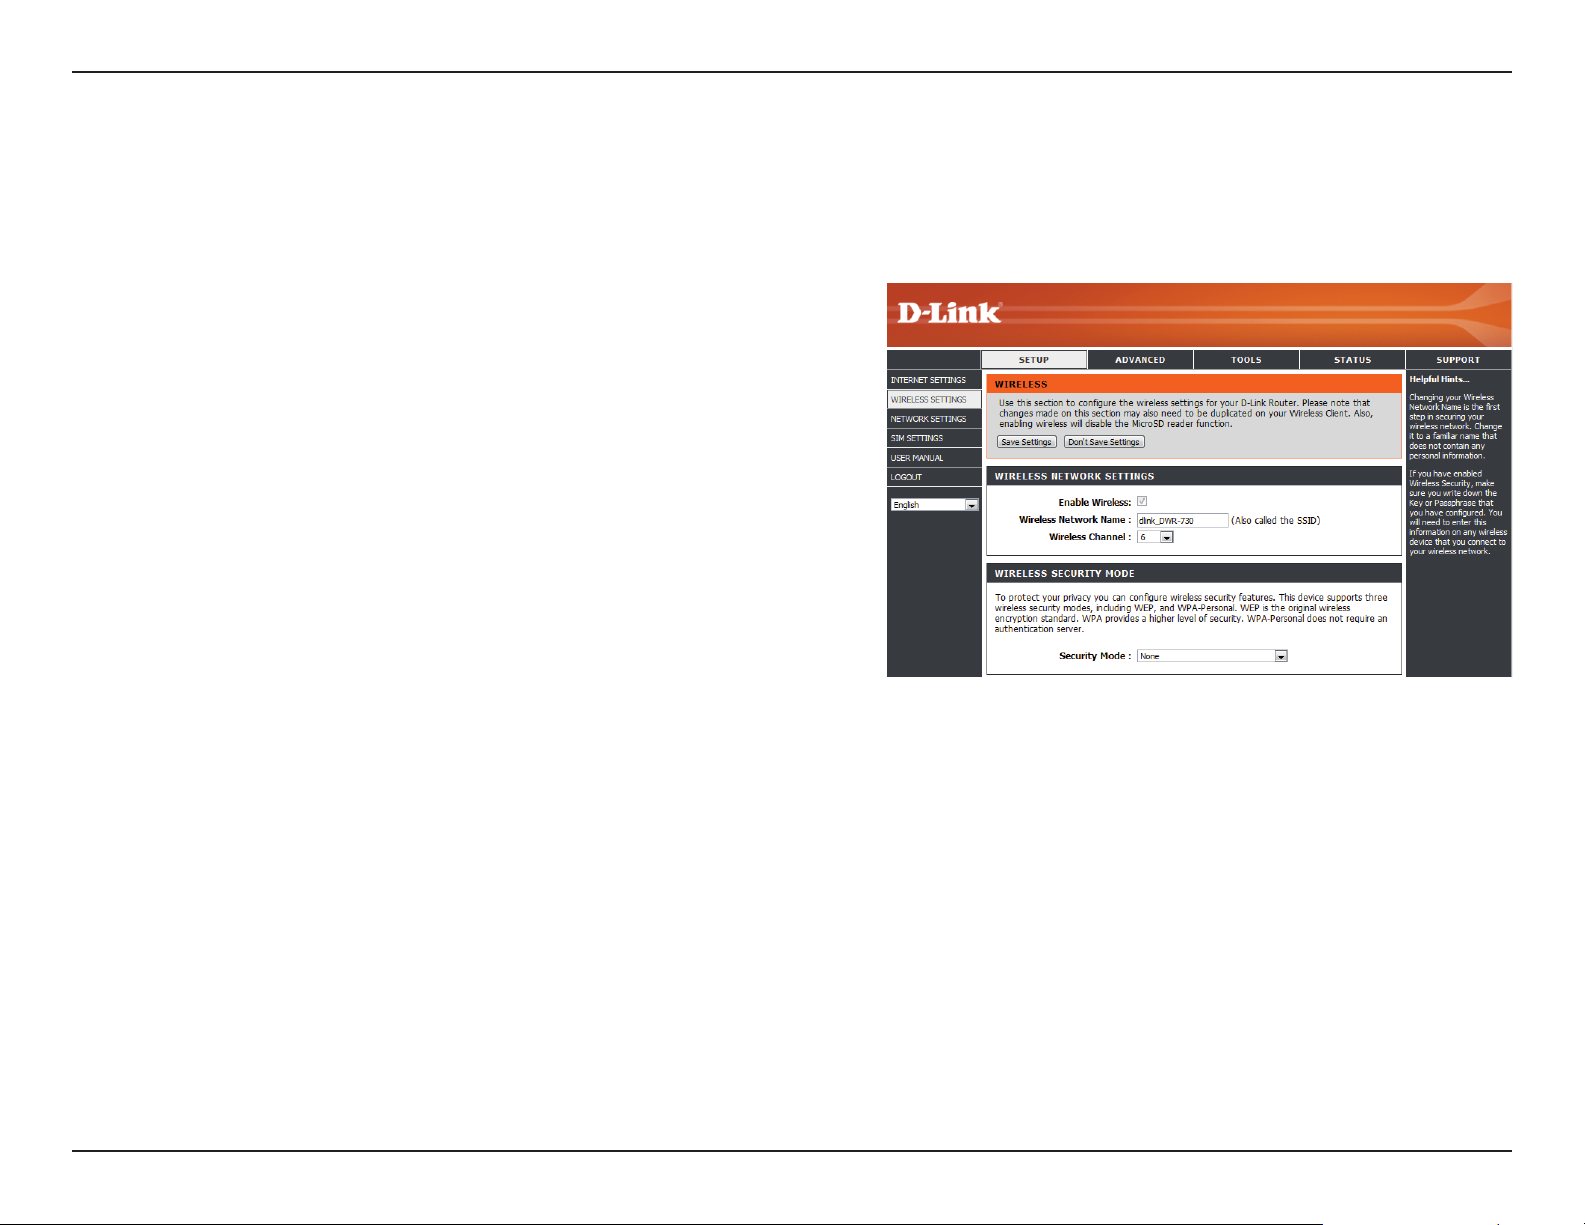
Manual Wireless Setup
Use this section to congure the wireless settings for your D-Link router.
Enable Wireless :
Wireless Network Name:
Wireless Channel:
Security Mode:
Check box to enable (Router mode); Uncheck
to disable (Modem mode, only when Micro USB
cable is connected)
Enter a wireless network name.
Choose the wireless channel.
Choose the wireless security mode.
16D-Link DWR-730 User Manual
Page 21
Section 3 - Configuration
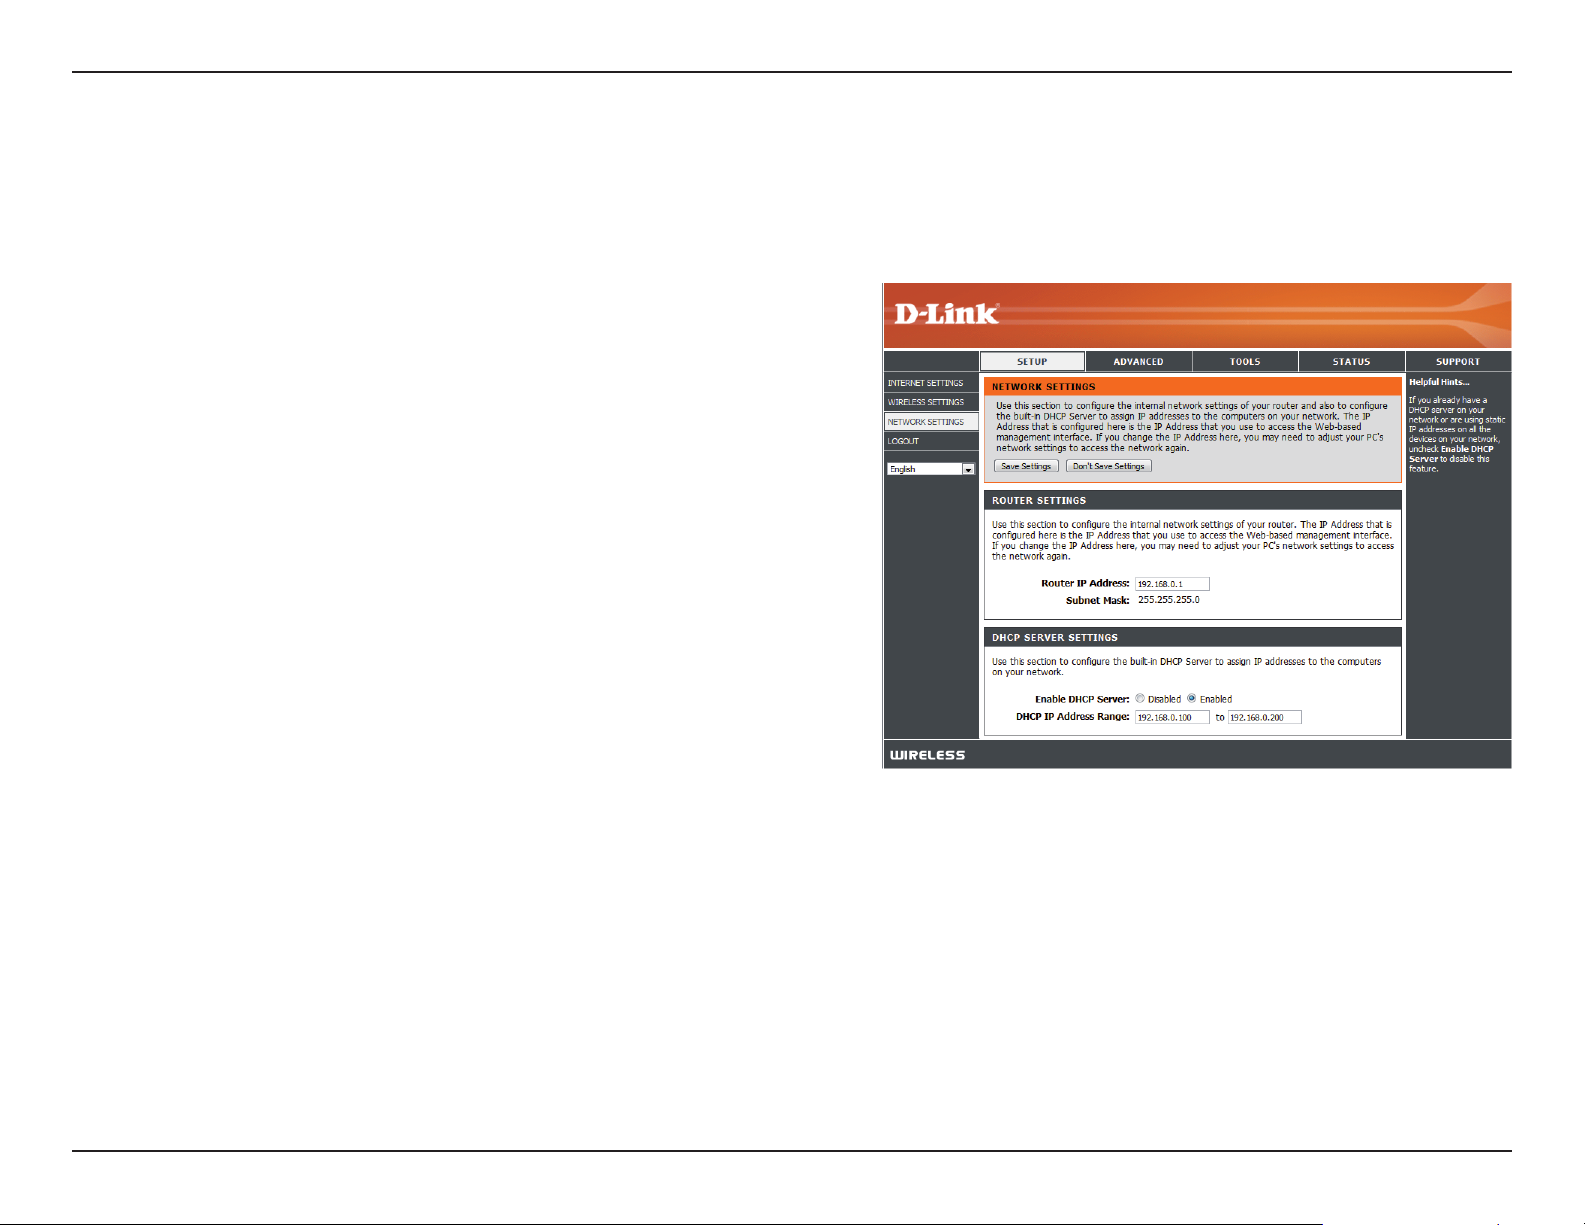
Network Setup
Use this section to congure the internal network settings of your router.
Router IP Address:
Subnet Mask:
Enable DHCP Server:
DHCP IP Address Range:
Enter the router IP address.
Enter the subnet mask.
If you want to enable DHCP Server, check
Enabled. Otherwise, check Disabled.
Enter values for the DHCP IP address range.
17D-Link DWR-730 User Manual
Page 22
Section 3 - Configuration
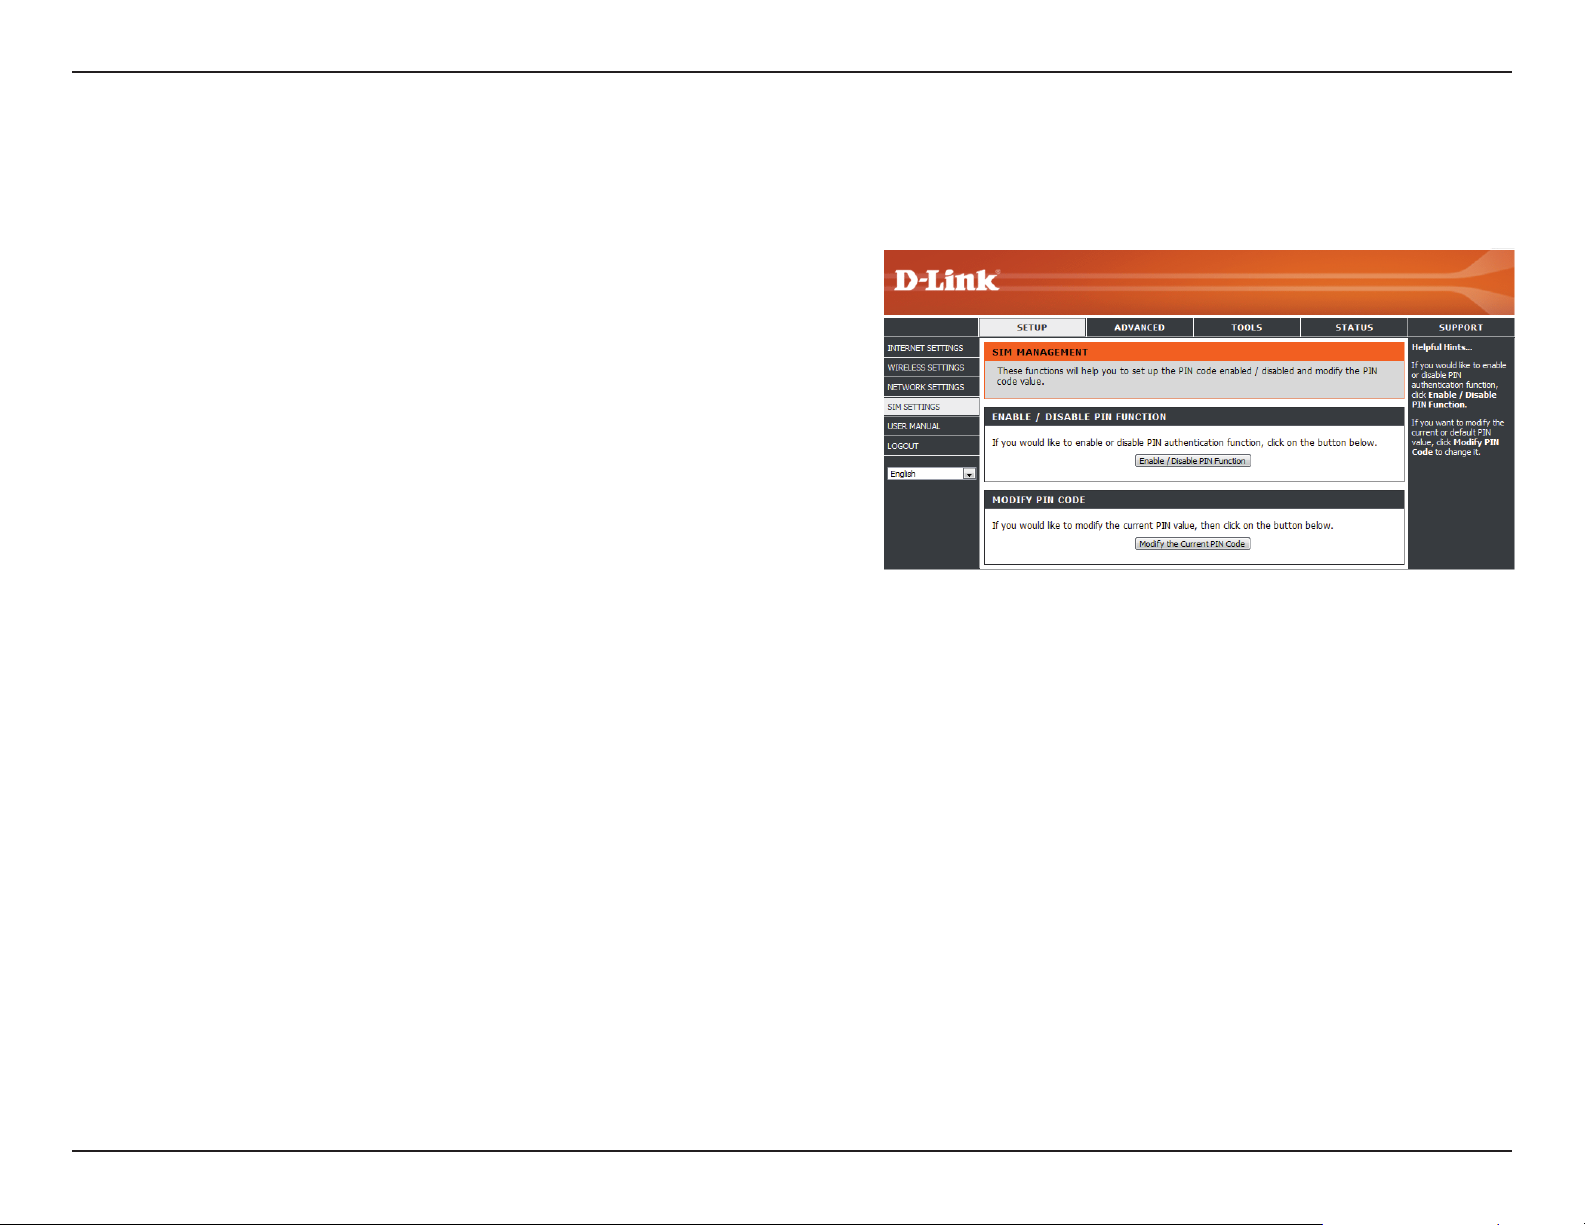
SIM Settings
Enable/ Disable PIN
Function:
Modify PIN Code:
If you would like to enable or disable PIN
authentication fuction, click Enable/Disable
PIN Function.
If you want to modify the current or default PIN
value, click Modify PIN Code to change it.
18D-Link DWR-730 User Manual
Page 23
Section 3 - Configuration
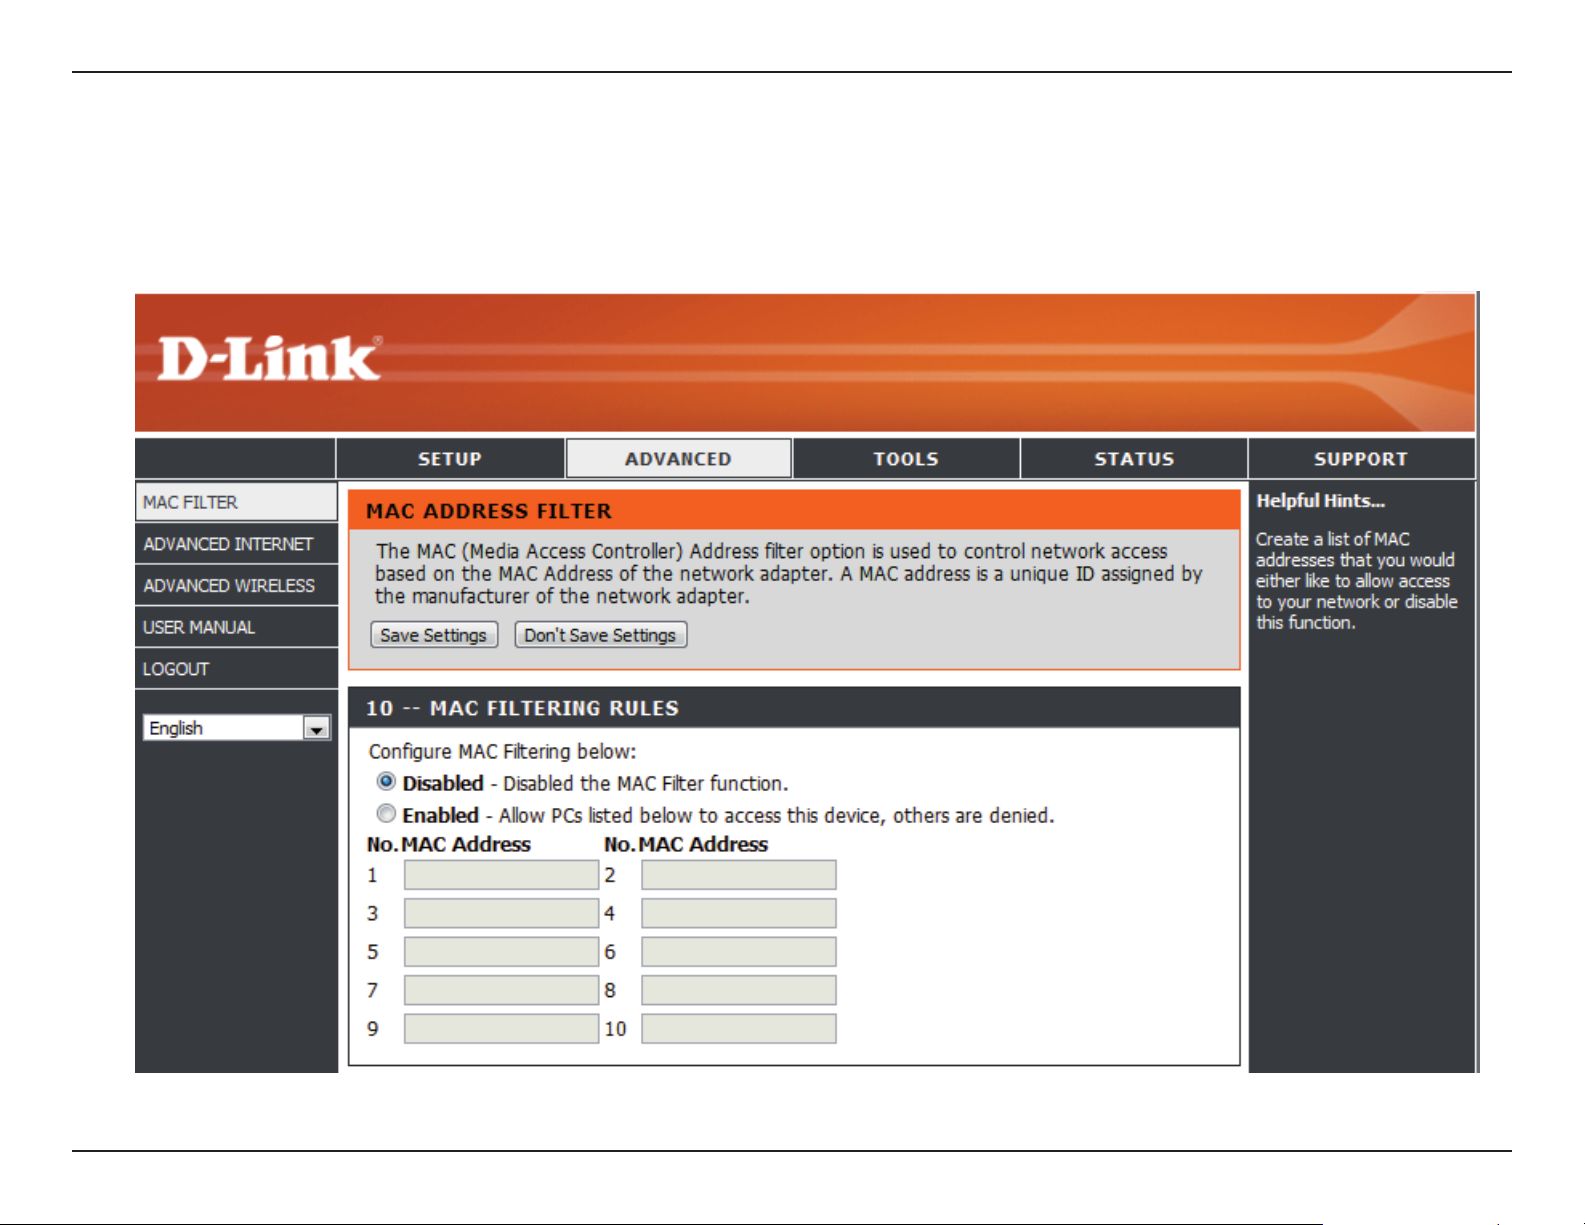
MAC Filter
Use MAC (Media Access Control) Filters to allow only specic computers or devices to access your wireless network. Select Enabled
to enable MAC ltering, and enter the MAC addresses of the computers and devices you want to have access; all other computers and
devices will be denied access to your wireless network.
19D-Link DWR-730 User Manual
Page 24
Section 3 - Configuration
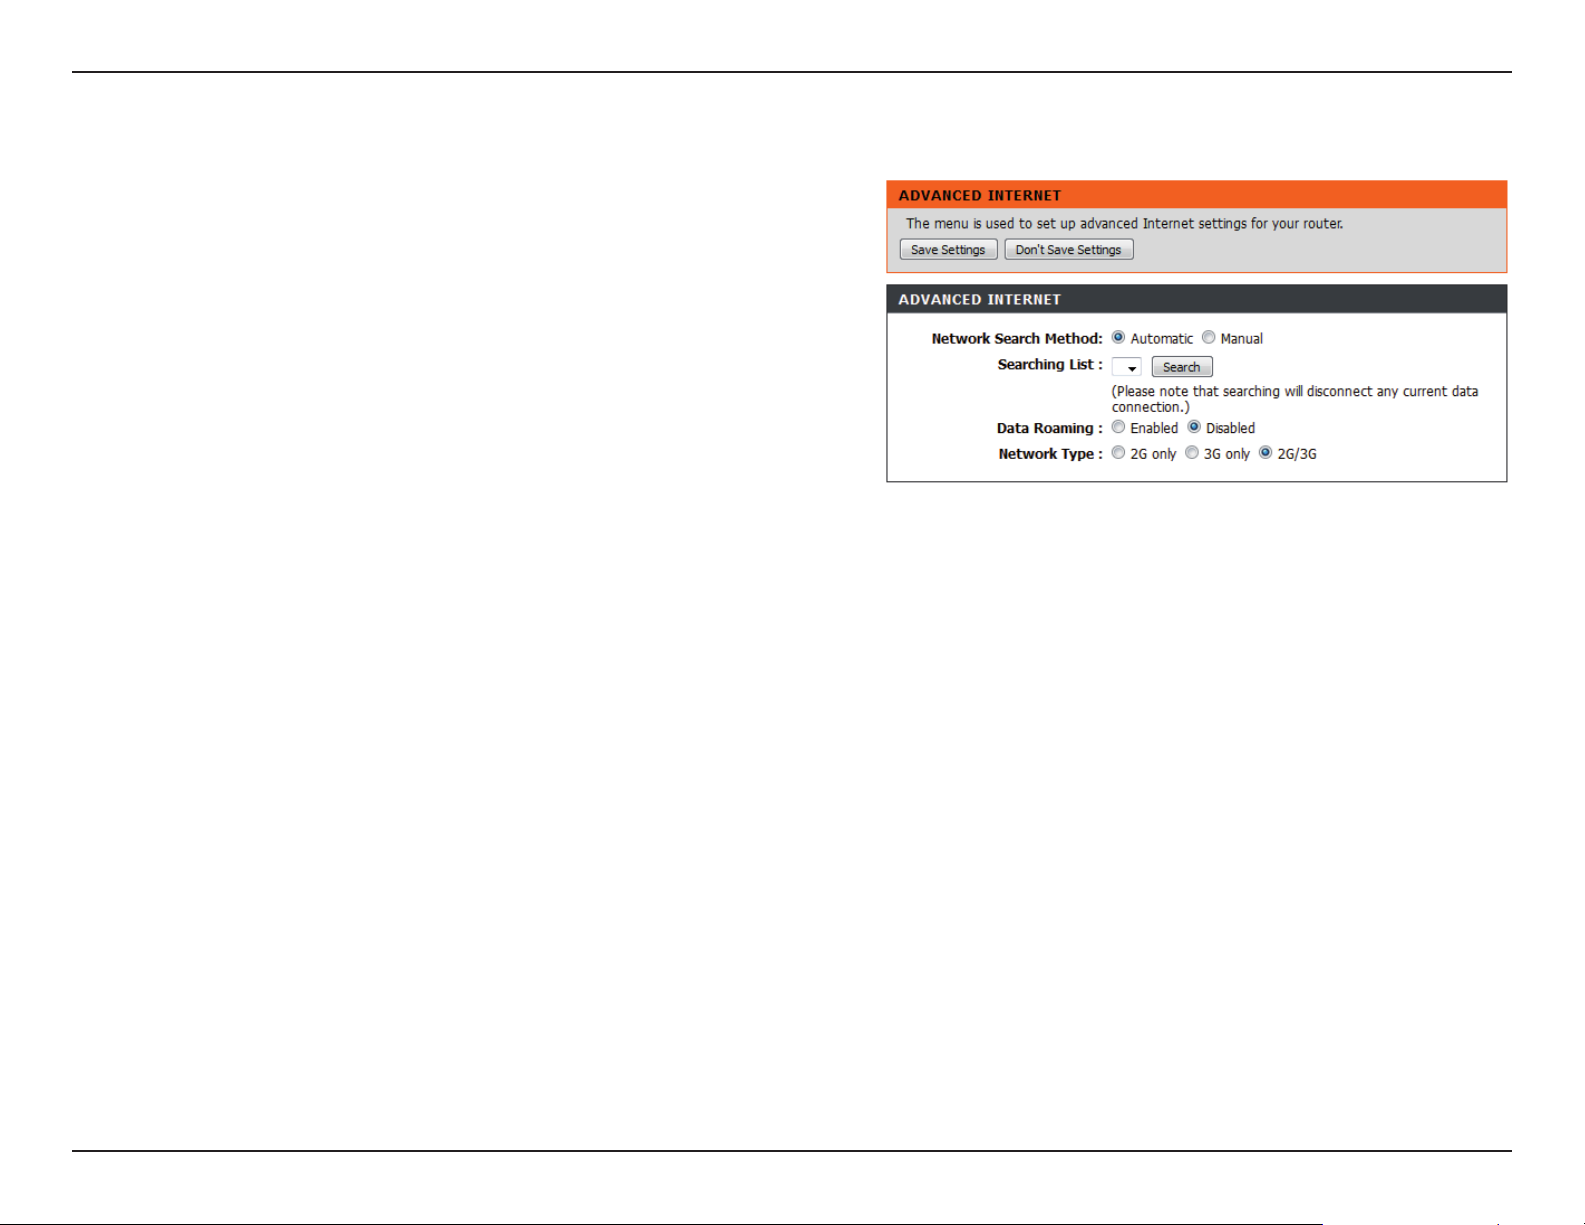
Advanced Internet Settings
Network Search Method:
Data Roaming:
Network Type:
Determine whether the router will search for available
carriers automatically, or to only connect to the carrier
you specify.
Enabling Data Roaming will allow the router to use your
data connection when on an outside carrier’s network.
Disabling it will prevent the router from doing this, but
will still allow you to send and recieve SMS messages.
Allows you to determine whether the router will connect
via 2G only, 3G only, or 2G and 3G(whichever is available)
20D-Link DWR-730 User Manual
Page 25
Section 3 - Configuration
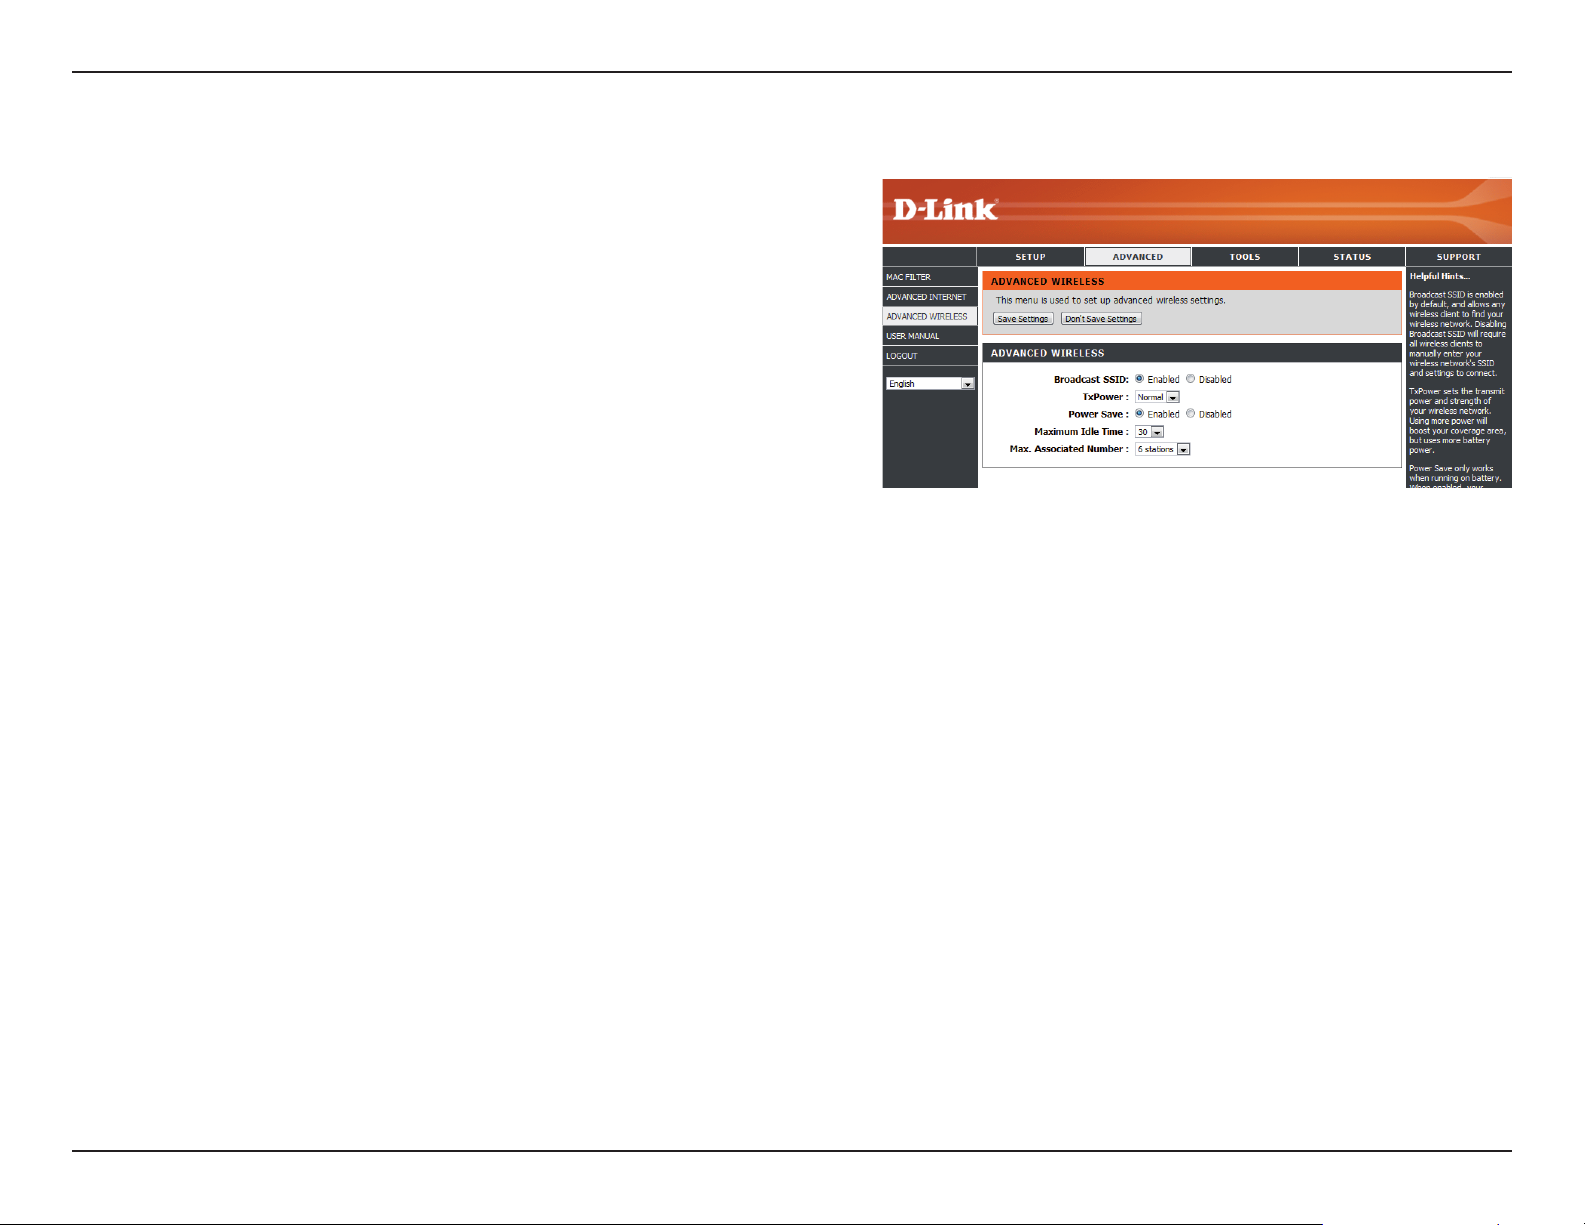
Advanced Wireless
Broadcast SSID:
TxPower:
Power Save:
Maximum Idle Time:
Max. Associated Number:
Enable to allow any wireless client to nd your wireless
network. Disable to require all wireless clients to manually
enter your wireless network’s SSID and settings to
connect.
Set the transmit power and strength of your wireless
network. Higher setting will boost coverage area, but uses
more battery power.
Only works when running on battery. When enabled,
wireless network will be turned off when no wireless
clients are connected to the router for more than alotted
Maximum Idle Time. Turn wireless back on by pressing
the power button for 1 second.
Set alotted Maximum Idle Time for wireless network
Determines the maximum number of wireless PCs,
devices, and other clients that can connect to your
wireless network
21D-Link DWR-730 User Manual
Page 26
Section 3 - Configuration
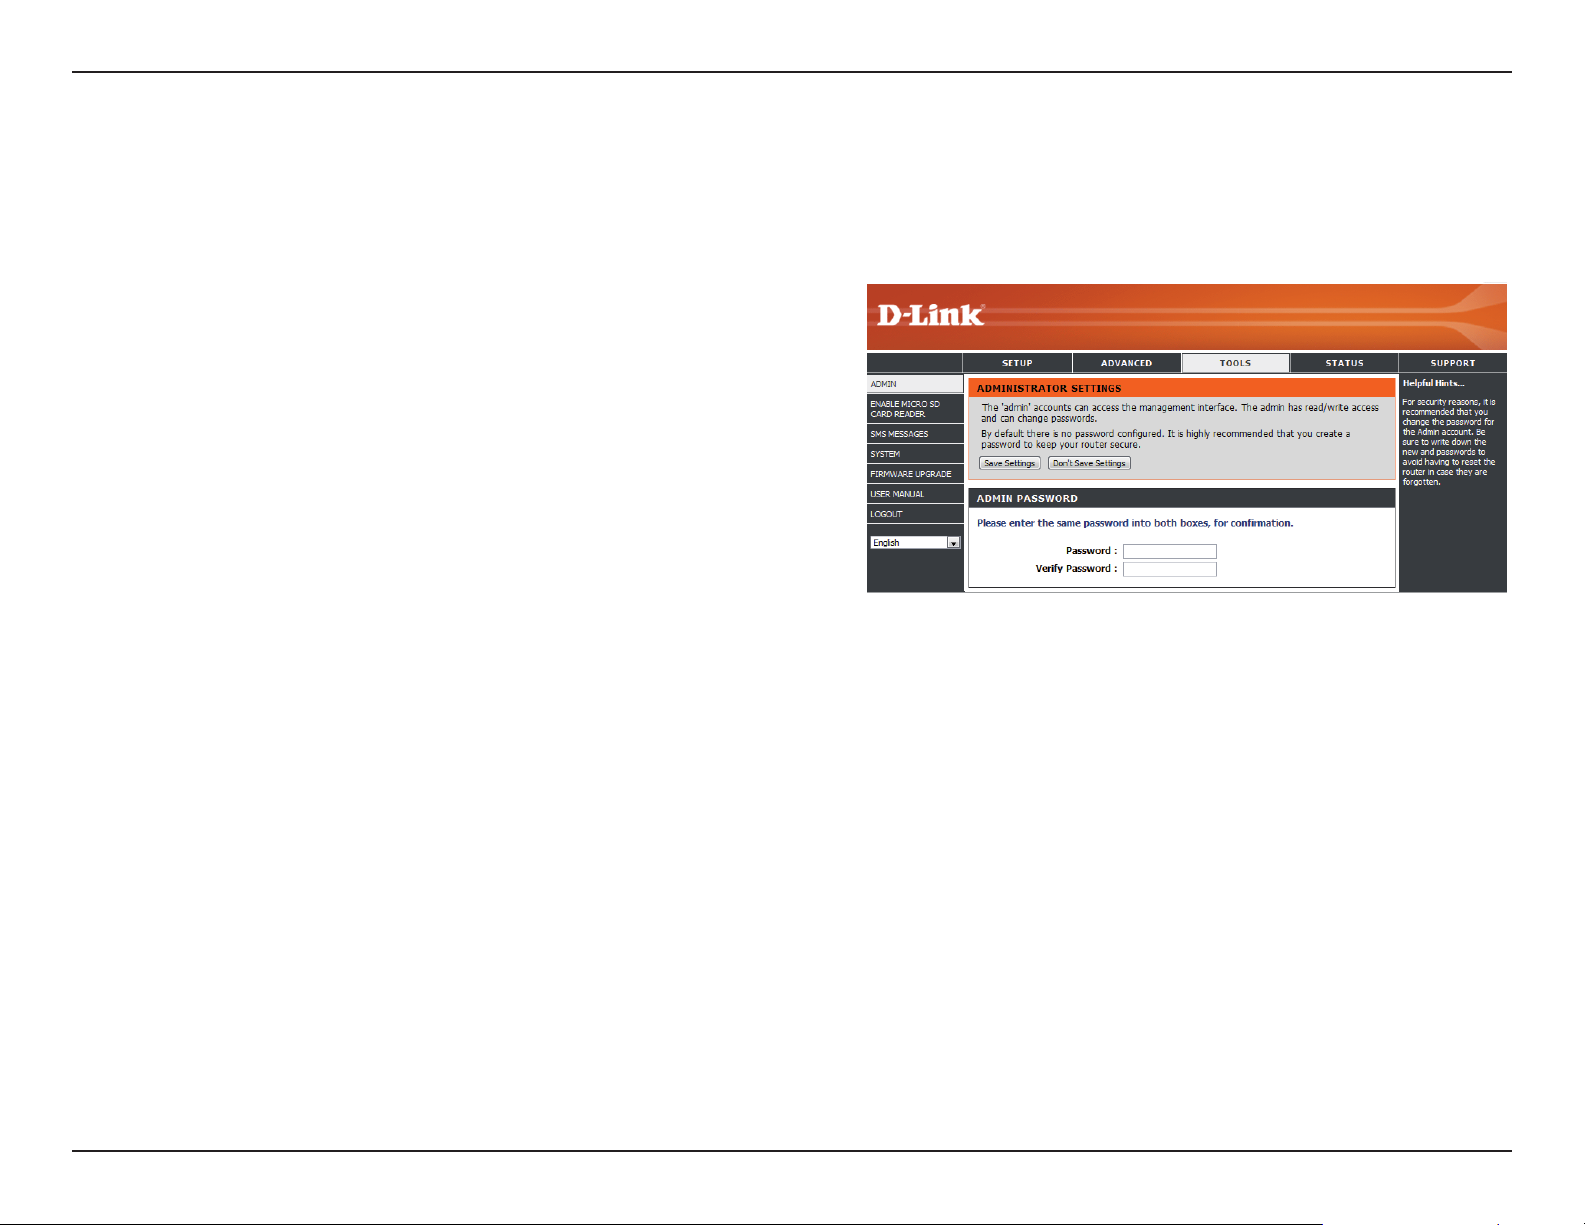
Administrator Settings
Use this section to change the password for the Administrator account.
Password:
Verify Password:
Enter a password.
Verify the password.
22D-Link DWR-730 User Manual
Page 27
Section 3 - Configuration
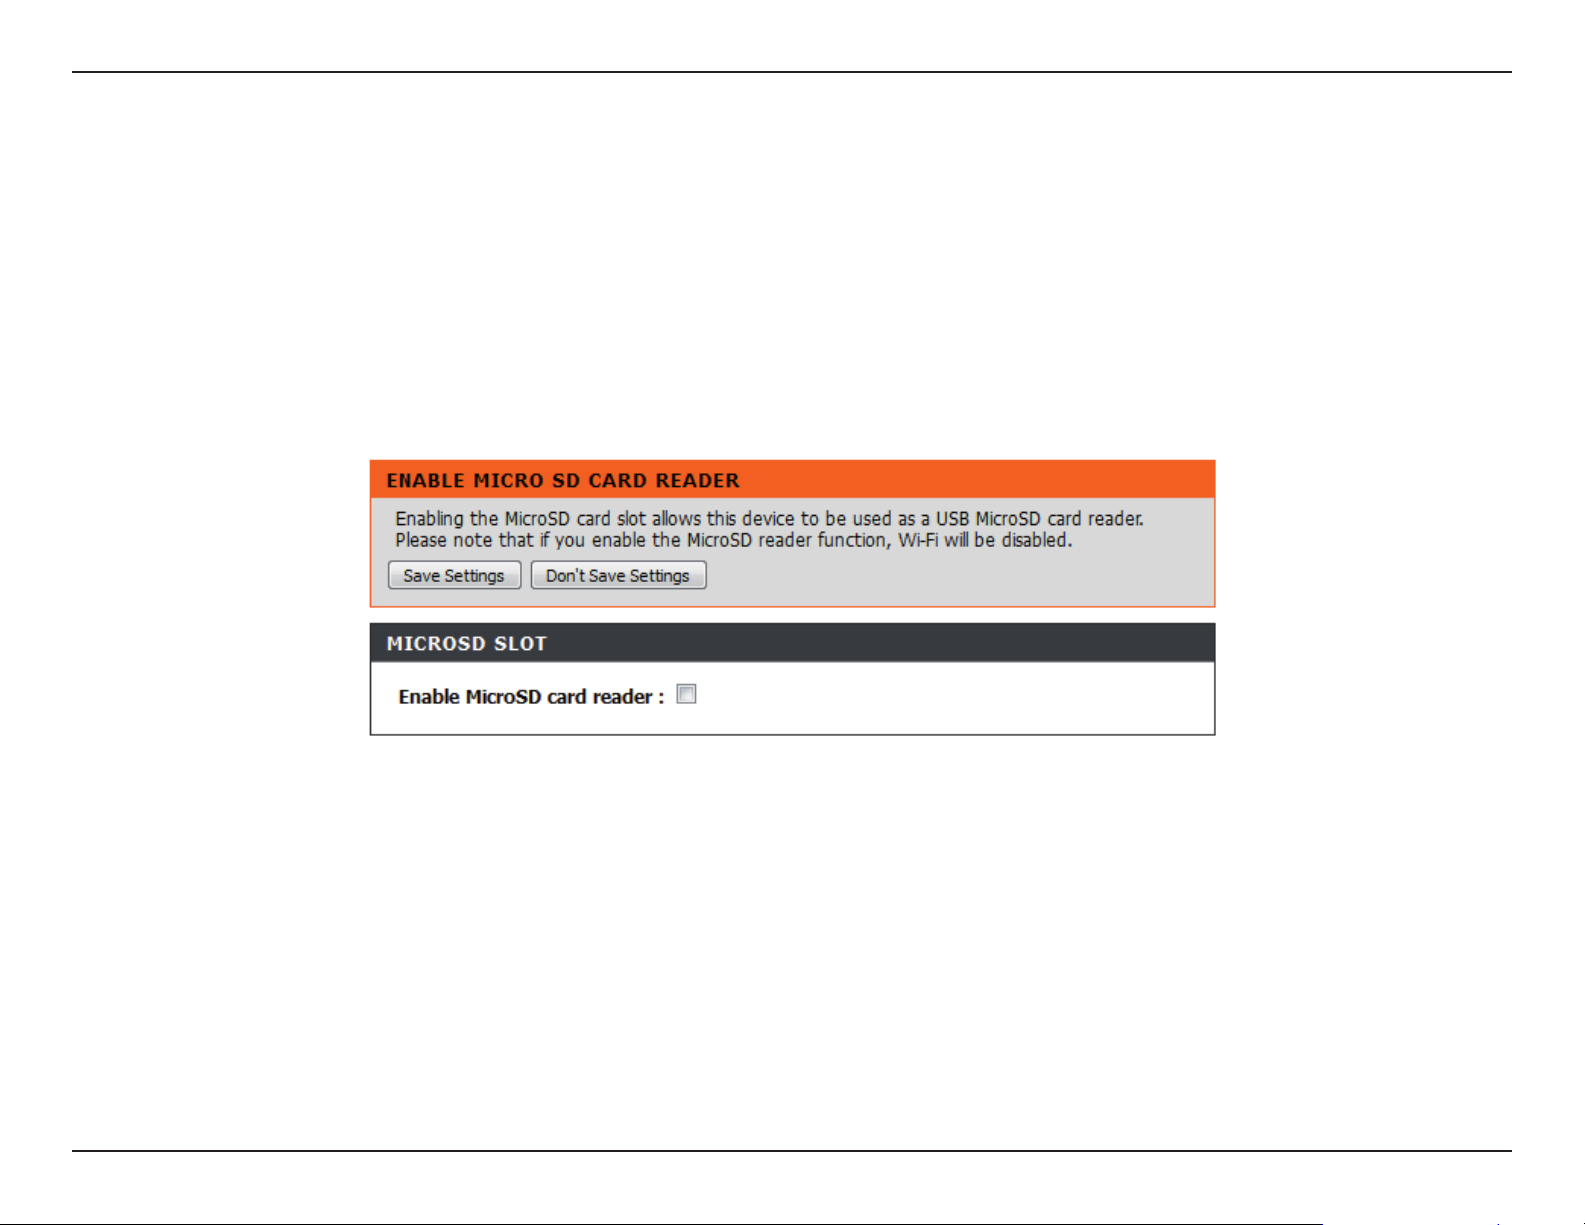
MicroSD Card Reader
The DWR-730 allows you to share les stored on an inserted MicroSD card. Once you enable the MicroSD card reader, you will see a
new USB device appear as a storage/memory device on your computer allowing you to modify les directly.
Note 1: You must insert a MicroSD card to use this feature.
Note 2: Once MicroSD card Reader is enabled, Wi-Fi will be disabled. To re-enable Wi-Fi, please navigate to Setup -> Wireless Settings
23D-Link DWR-730 User Manual
Page 28
Section 3 - Configuration
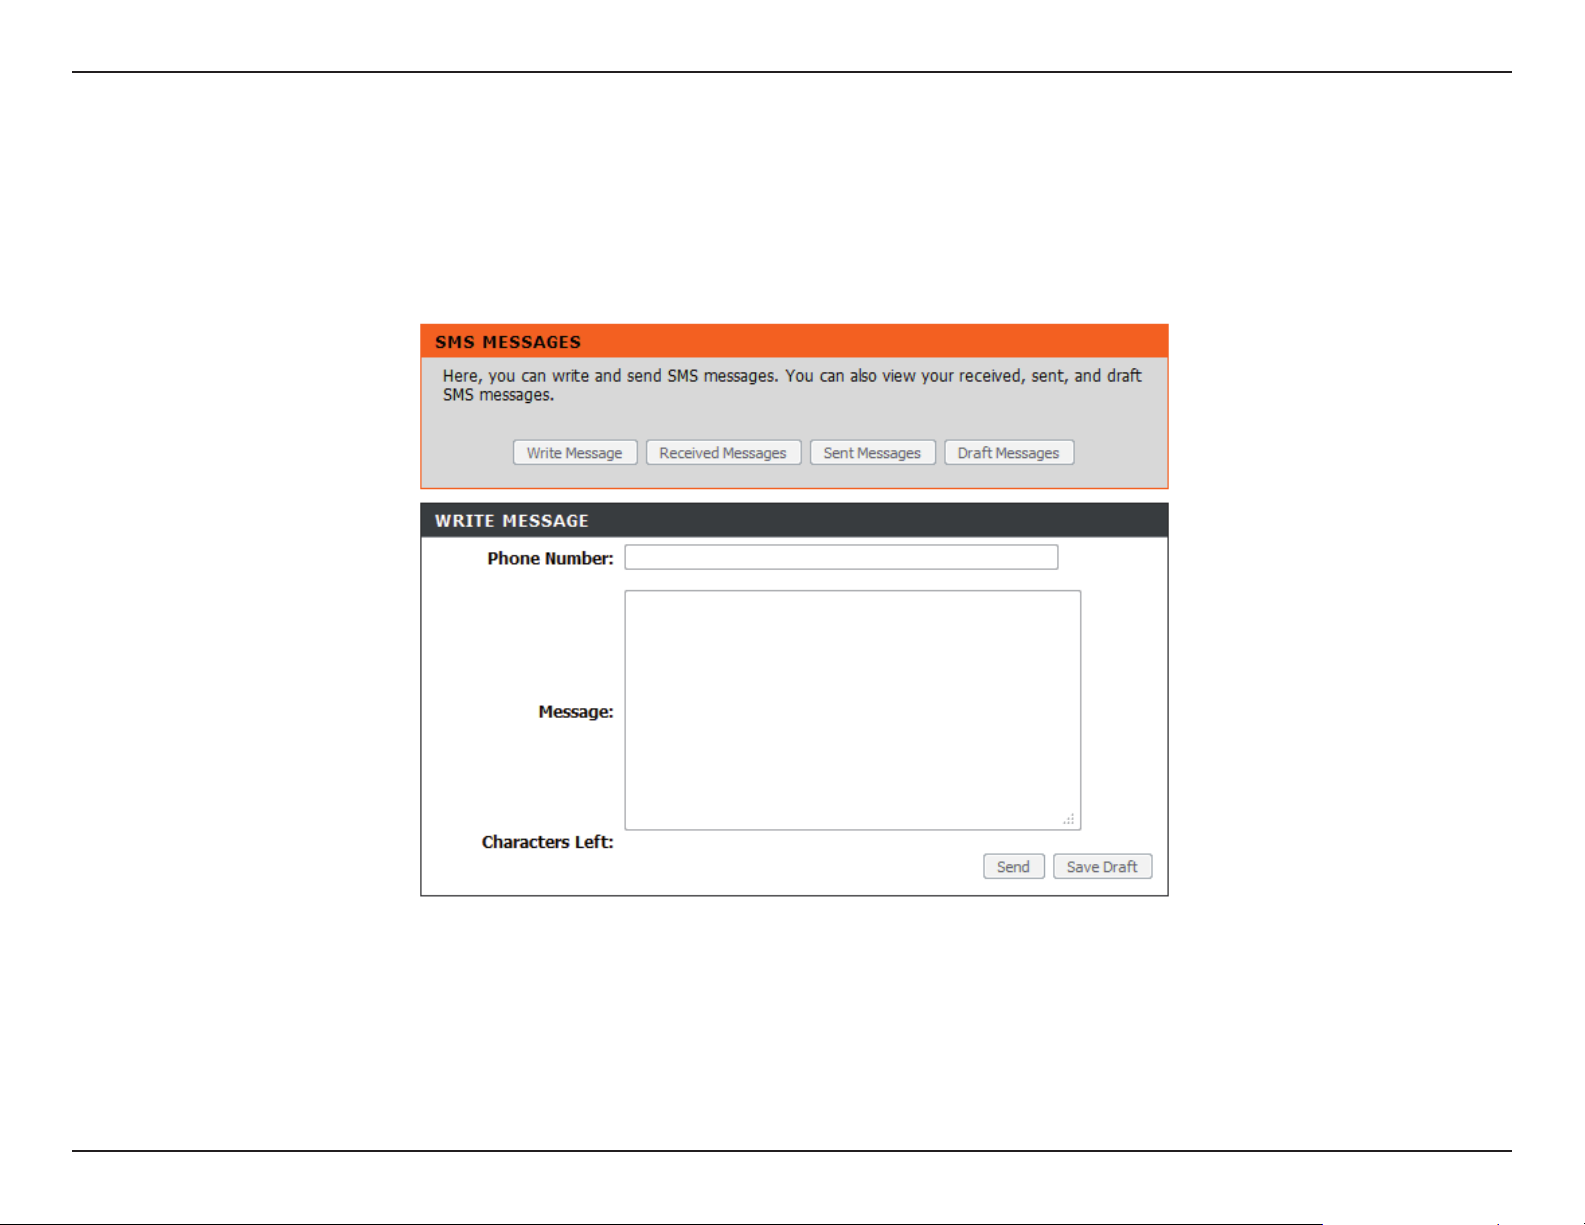
SMS Messages
The DWR-730 allows you to read, write, and send SMS messages directly from the user interface.
Note 1: You must insert a SIM card to use this feature.
24D-Link DWR-730 User Manual
Page 29
Section 3 - Configuration
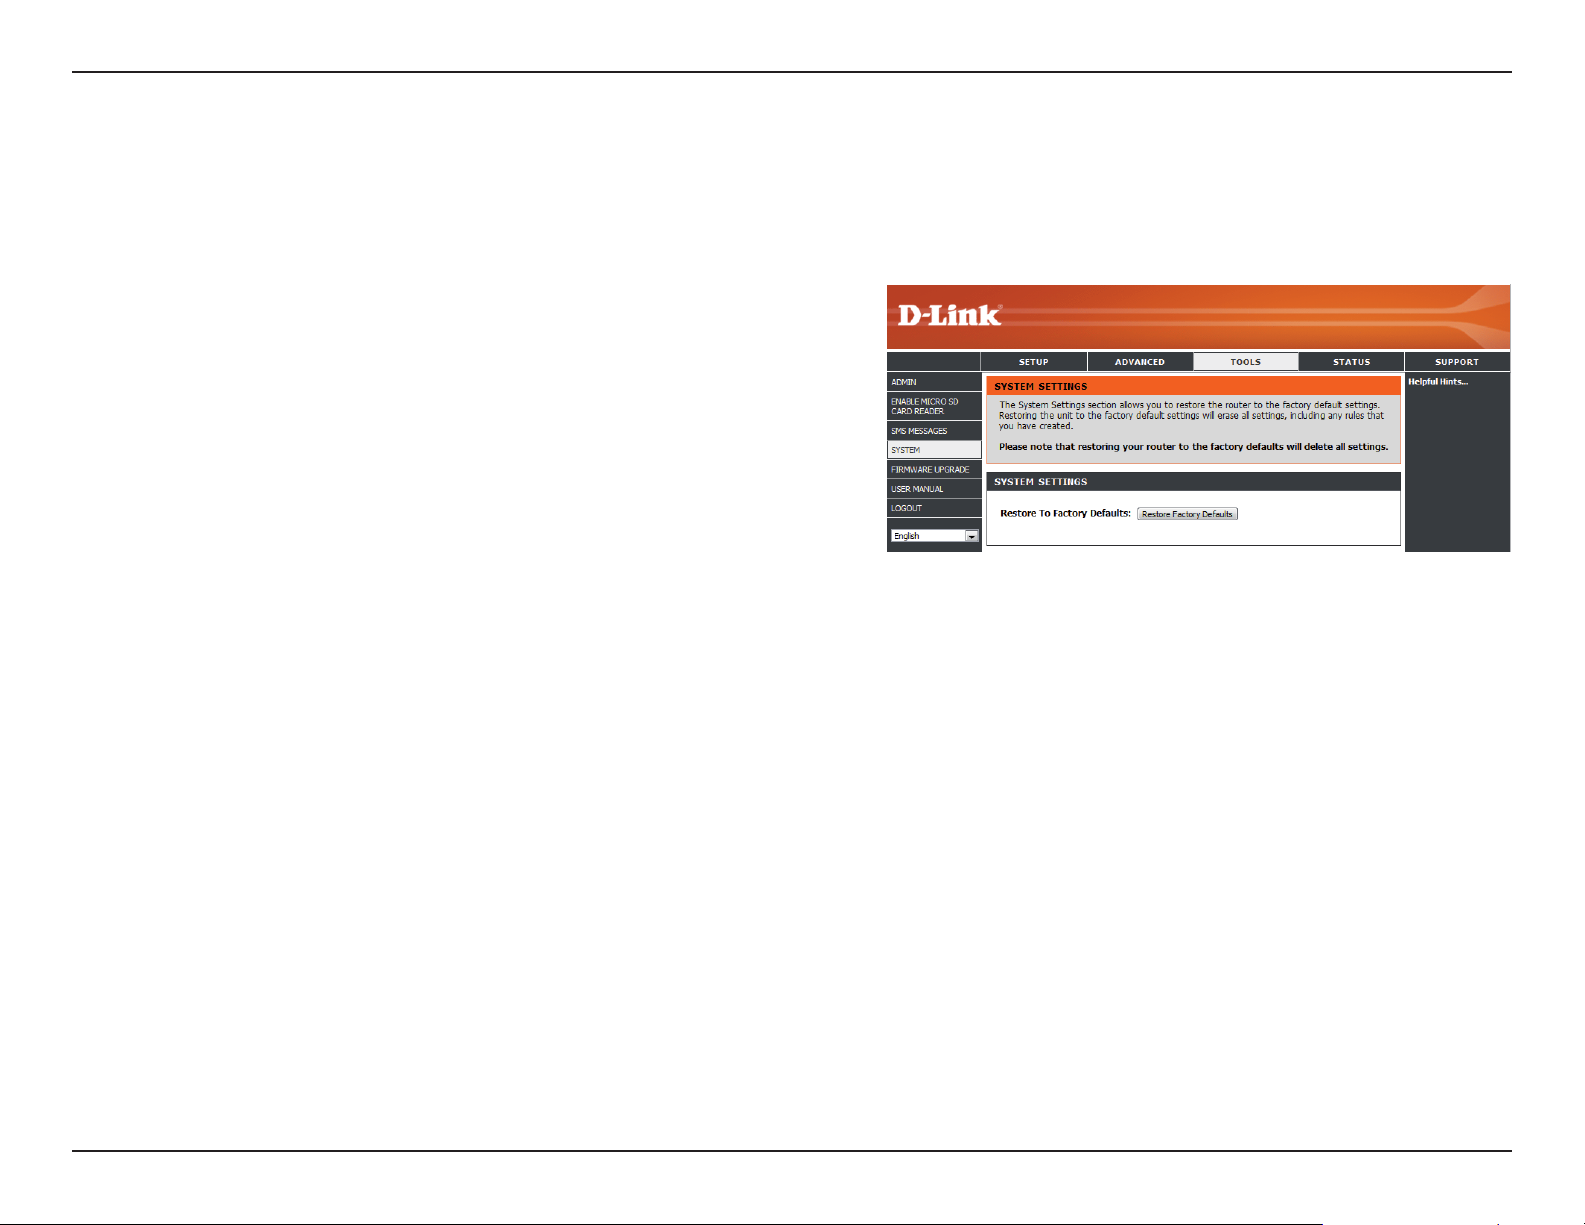
Factory Reset
Use this section to restore the router to the factory default settings.
Restore To Factory Default:
Click this button to restore all settings to the
factory defaults.
25D-Link DWR-730 User Manual
Page 30
Section 3 - Configuration
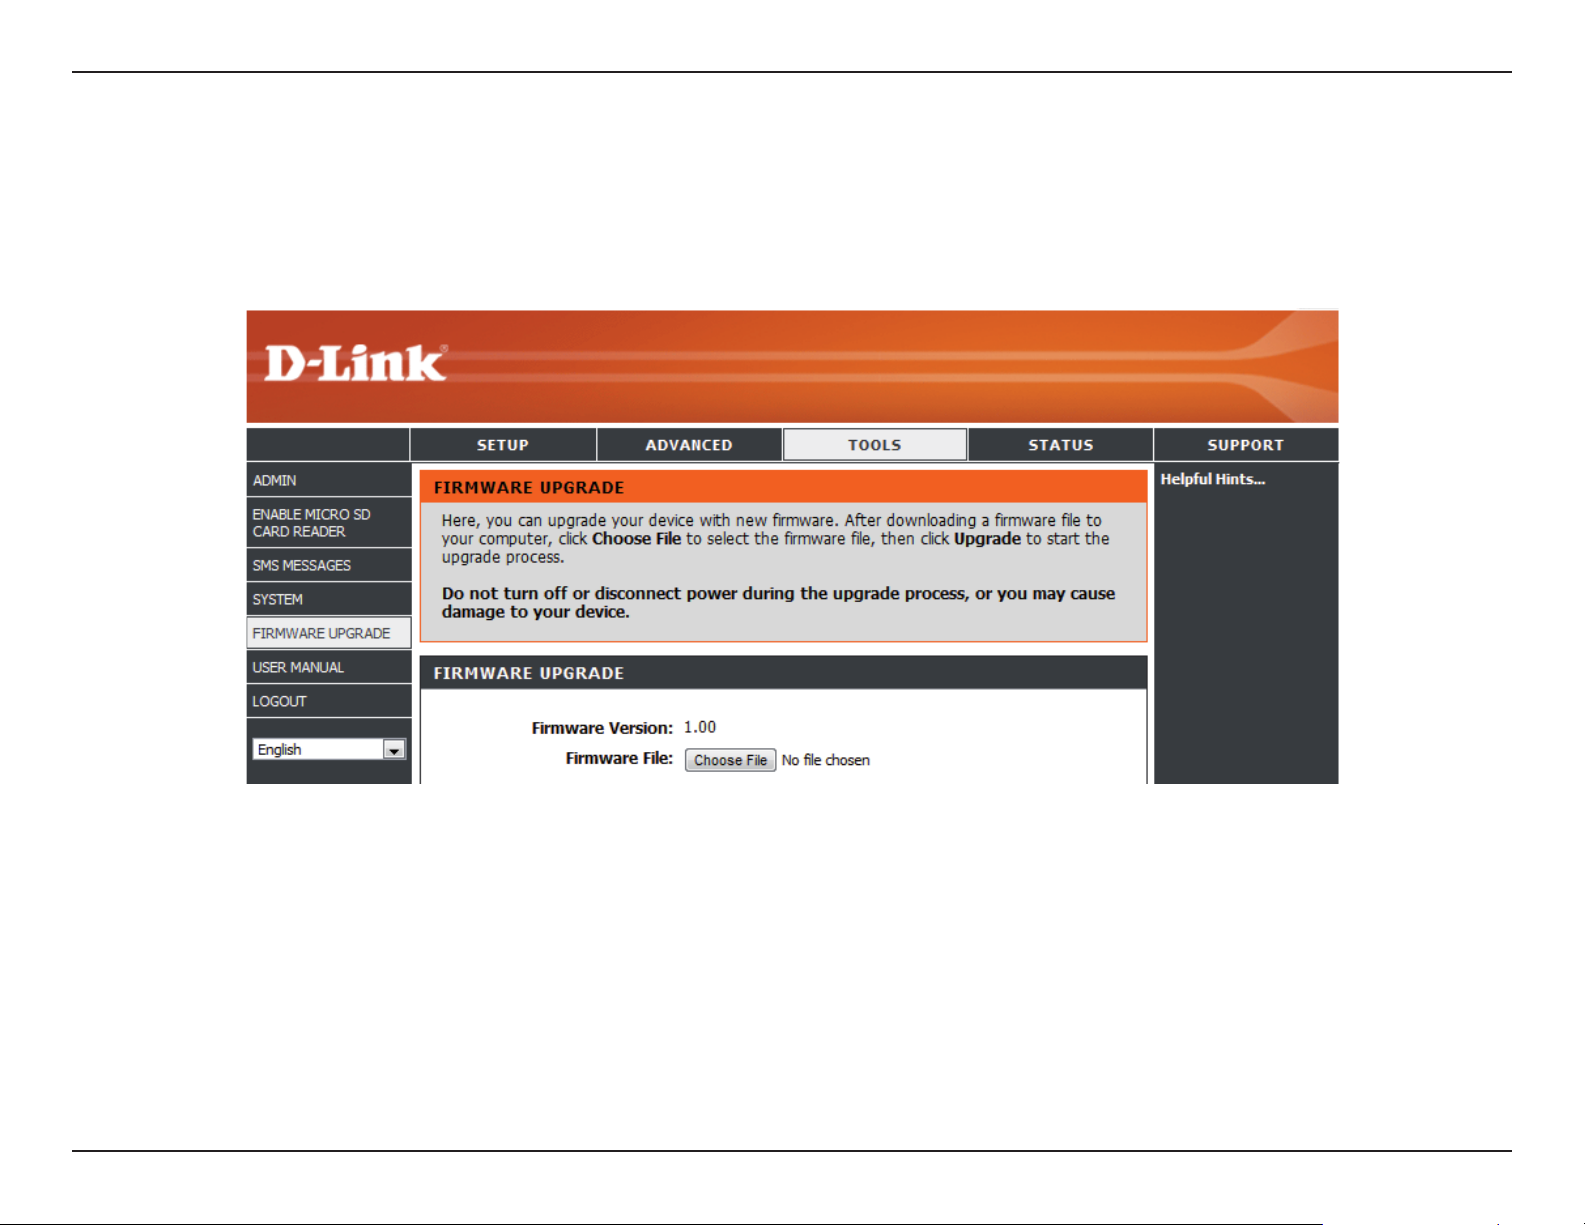
Firmware Upgrade
After downloading a rmware le to your computer, click Choose File to select the rmware le, then click Upgrade to start the
upgrade process.
Note: Do not turn off or disconnect the power during the upgrade process, or you may cause damage to your device.
26D-Link DWR-730 User Manual
Page 31
Section 3 - Configuration
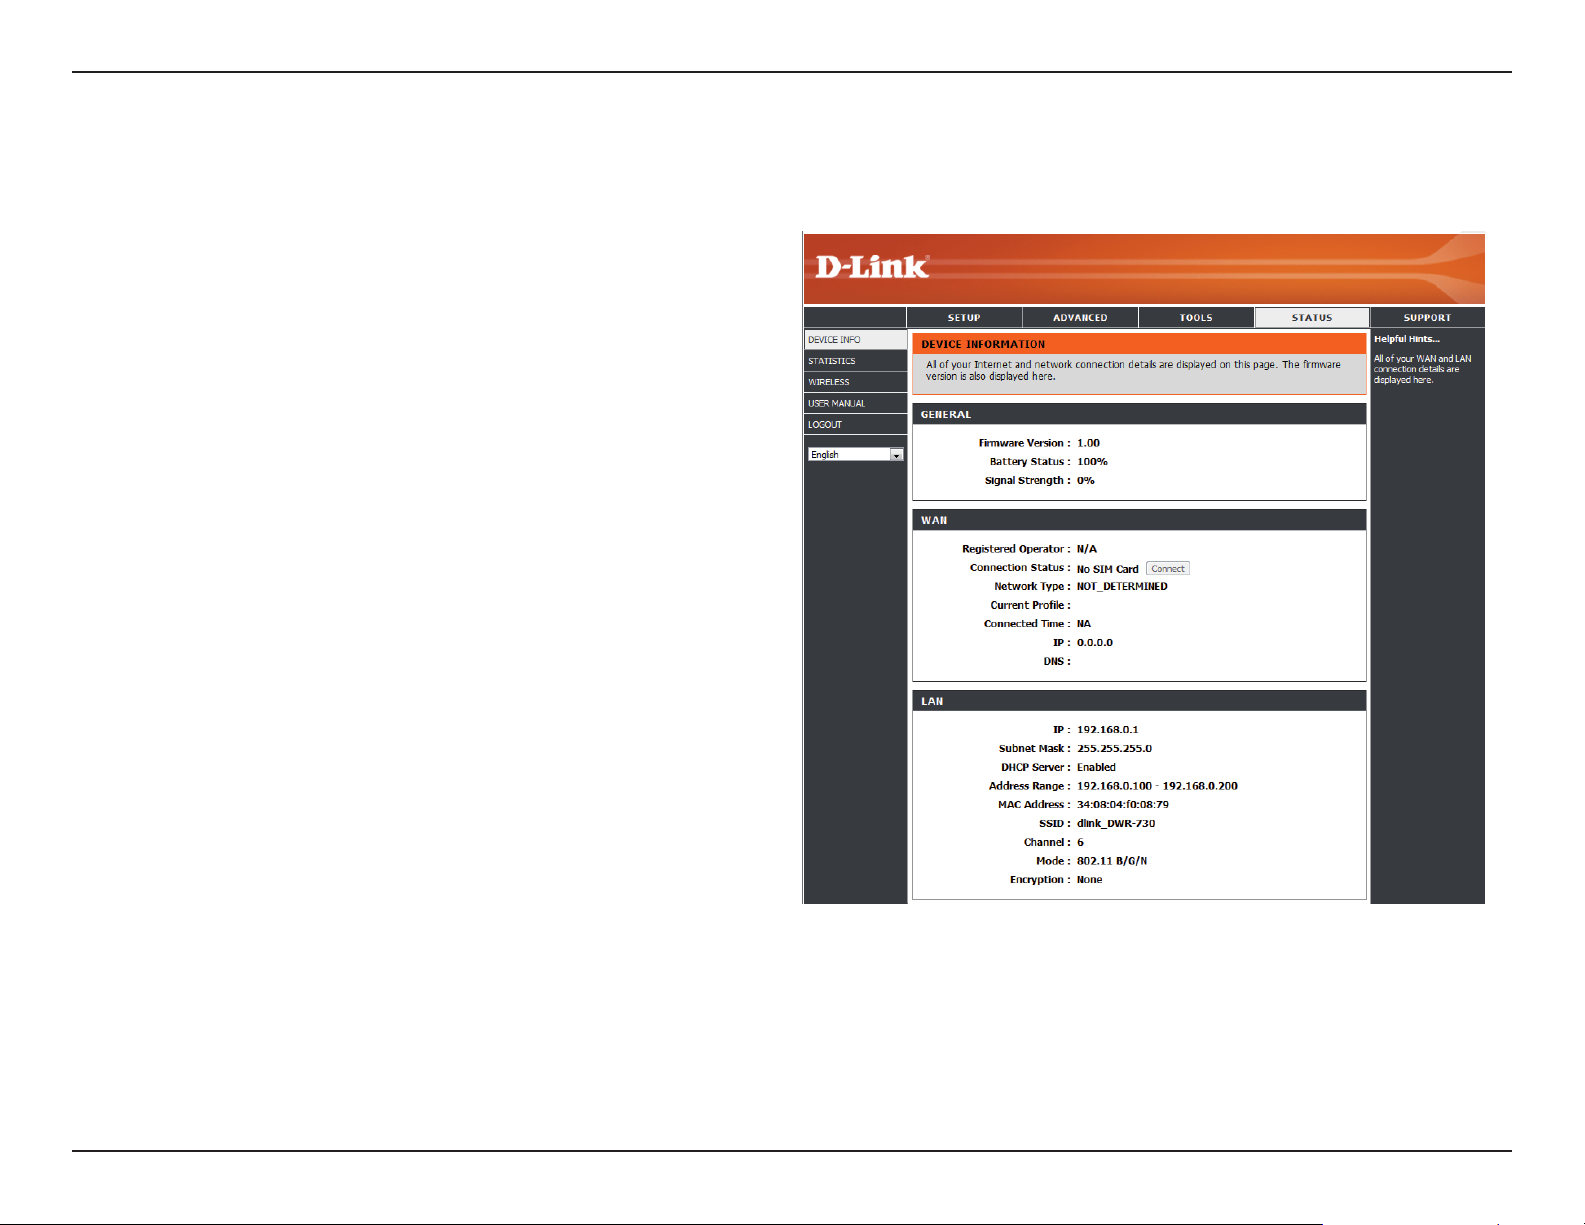
Device Information
All of your Internet and network connection details are displayed on this page. The rmware version is also displayed here.
General:
WAN:
LAN:
Displays the rmware version.
Displays information about the WAN.
Displays information about the LAN.
27D-Link DWR-730 User Manual
Page 32
Section 3 - Configuration
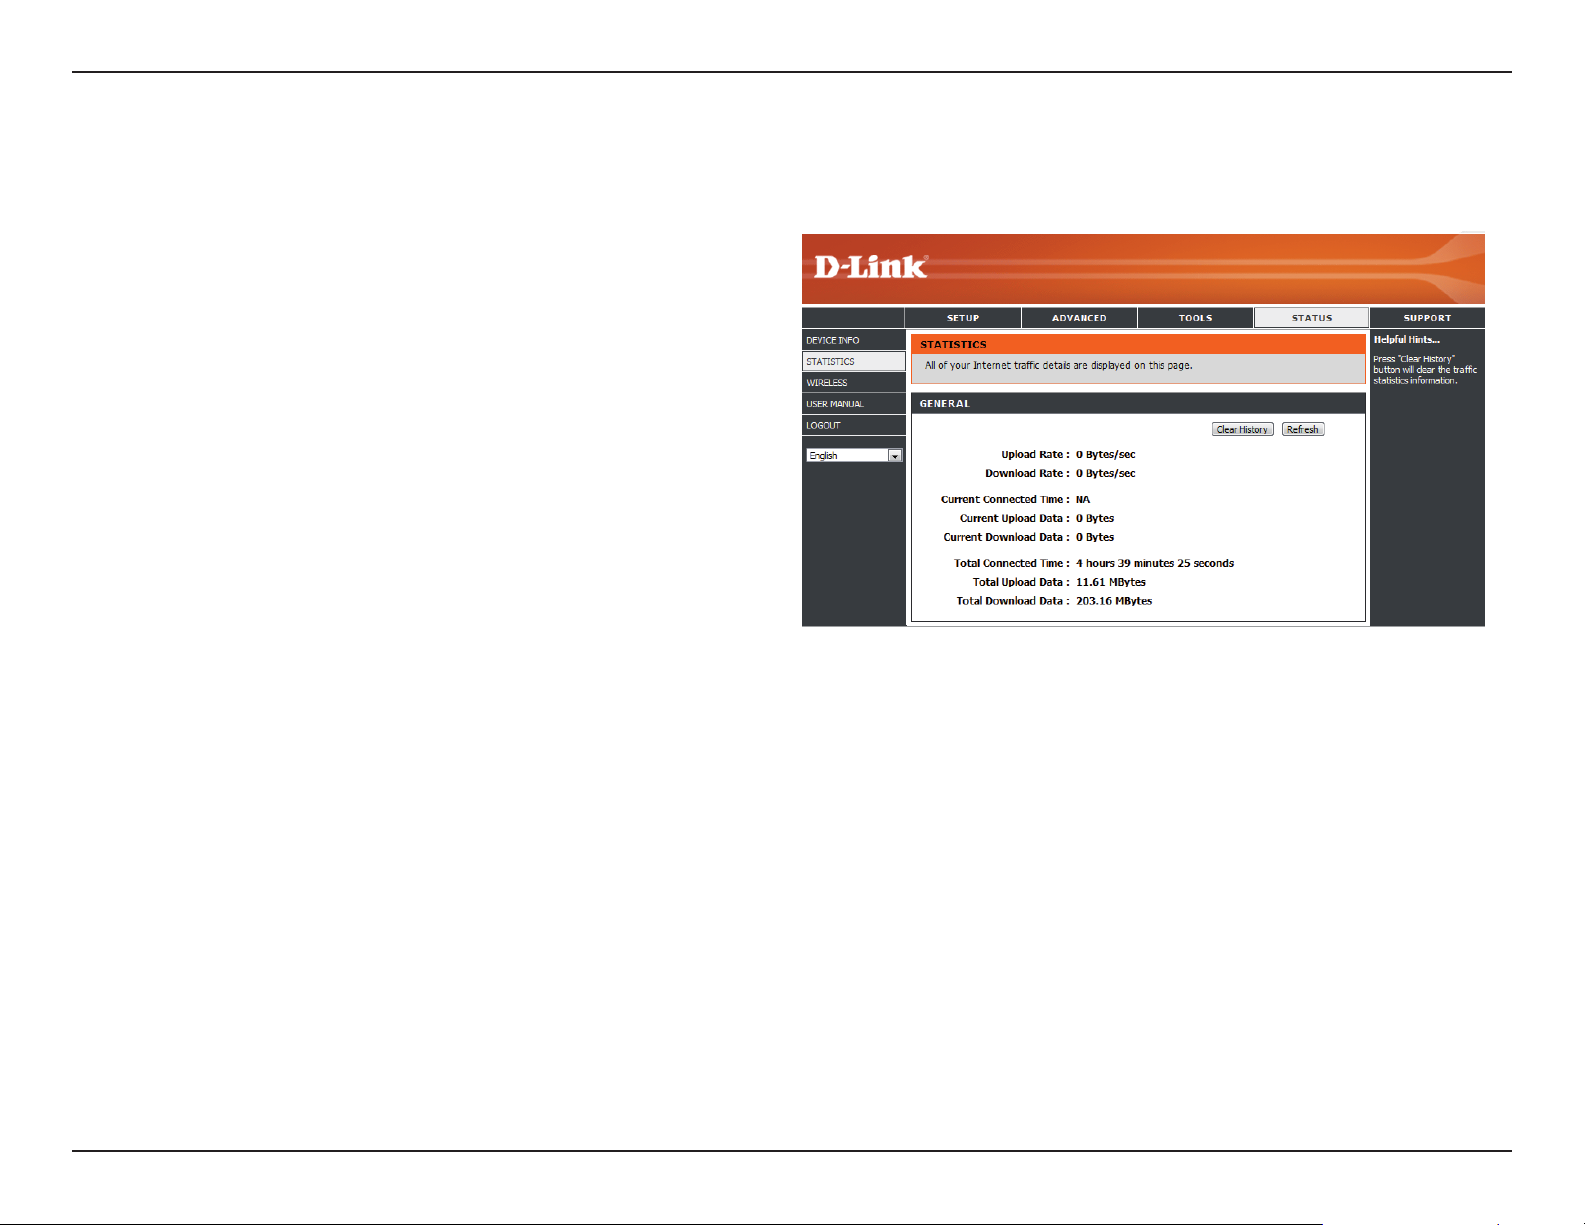
Statistics
All of your Internet trafc details are displayed on this page.
Clear History:
Clears the trafc statistics information
28D-Link DWR-730 User Manual
Page 33
Section 3 - Configuration
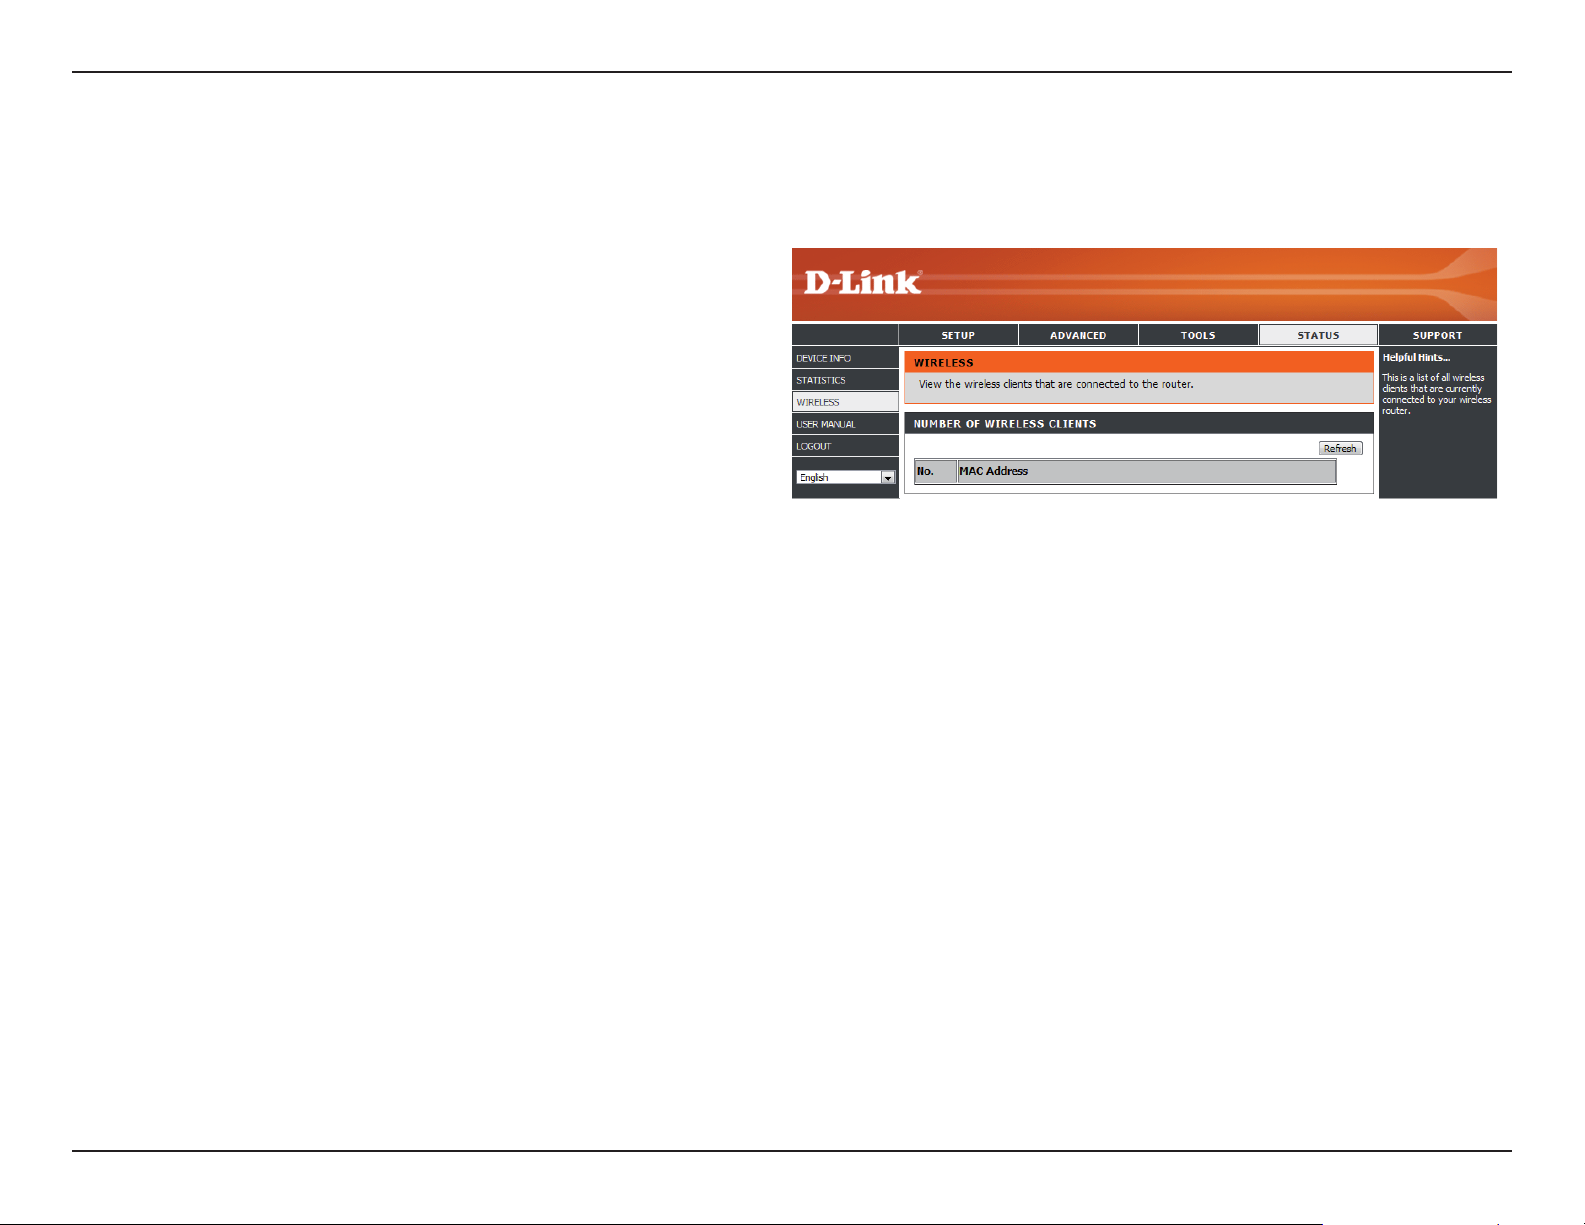
Wireless Information
All of your wireless connection details are displayed on this page.
Number of wireless clients:
Displays the wireless clients and
their MAC addresses.
29D-Link DWR-730 User Manual
Page 34
Section 3 - Configuration
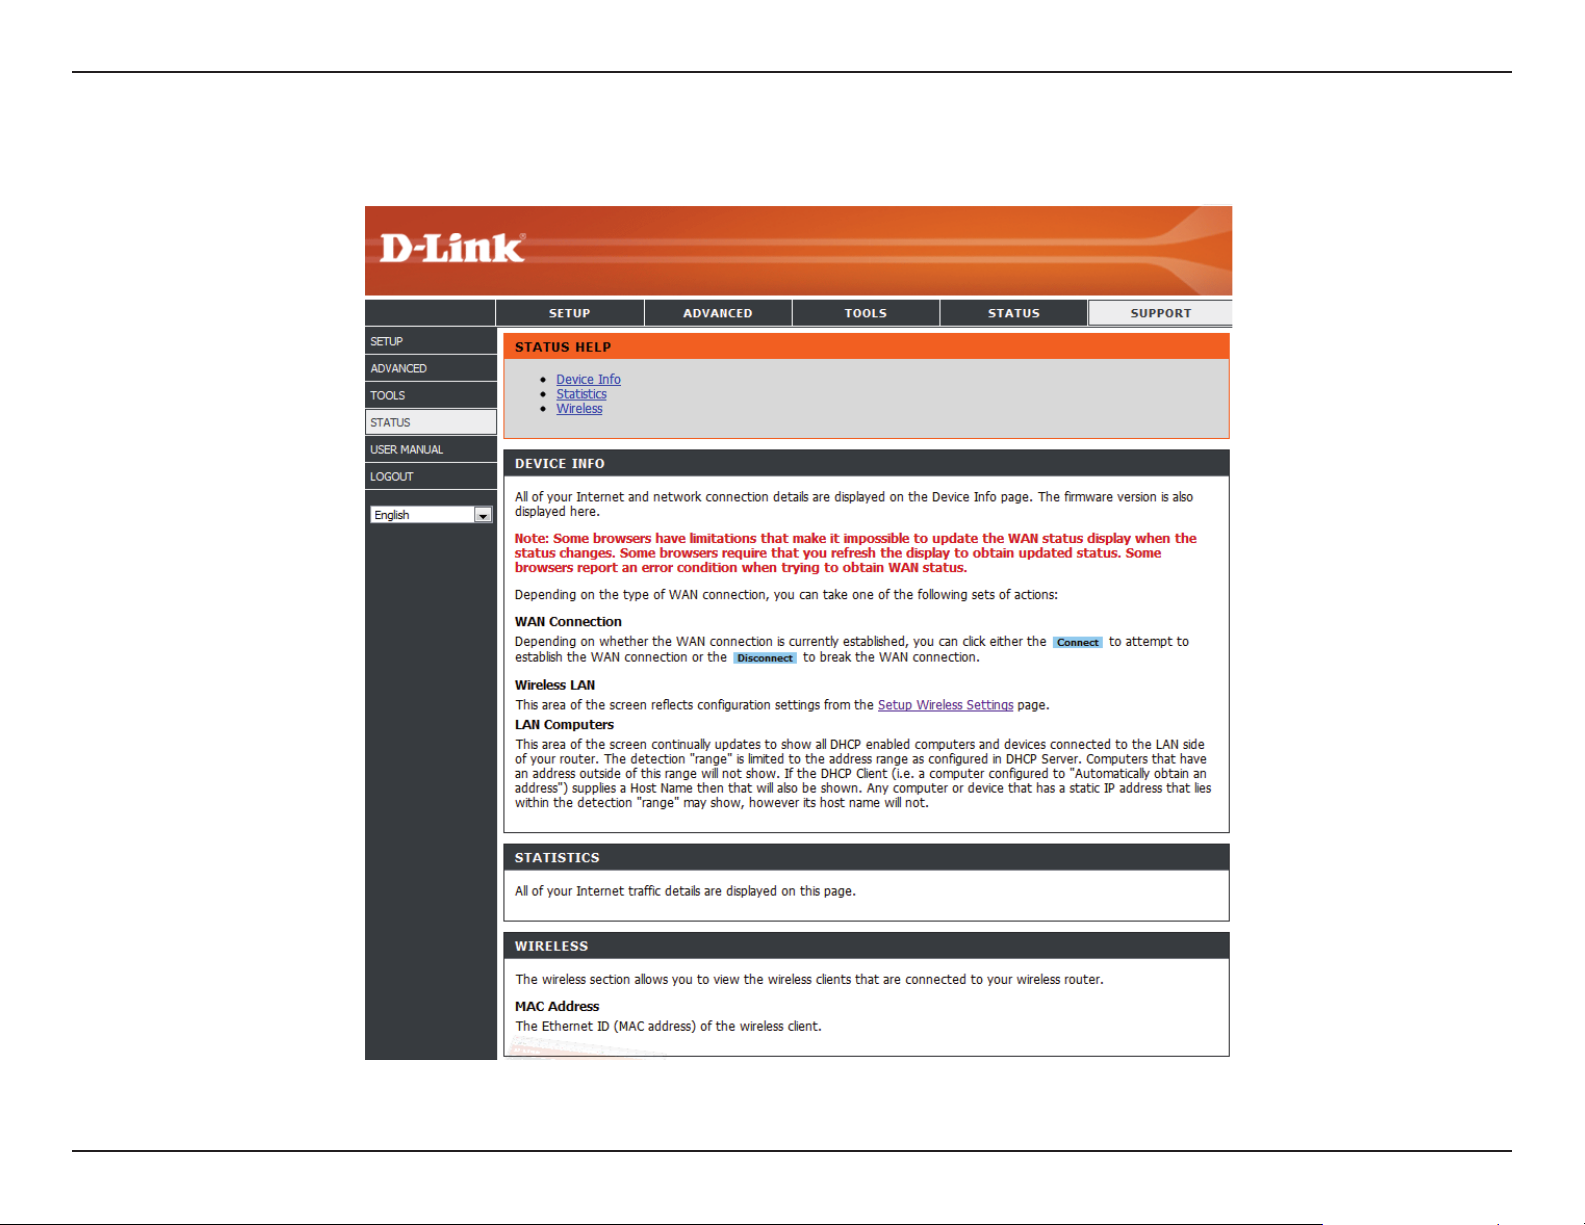
Support
30D-Link DWR-730 User Manual
Page 35

Section 4 - Security
Wireless Security
This section will show you the different levels of security you can use to protect your data from intruders. The
DWR-730 offers the following types of security:
• WPA2 (Wi-Fi Protected Access 2) • WPA2-PSK (Pre-Shared Key)
• WPA (Wi-Fi Protected Access) • WPA-PSK (Pre-Shared Key)
• WEP (Wired Equivalent Privacy)
What is WEP?
WEP stands for Wired Equivalent Privacy. It is based on the IEEE 802.11 standard and uses the RC4 encryption algorithm. WEP provides
security by encrypting data over your wireless network so that it is protected as it is transmitted from one wireless device to another.
To gain access to a WEP network, you must know the key. The key is a string of characters that you create. When using WEP, you must
determine the level of encryption. The type of encryption determines the key length. 128-bit encryption requires a longer key than 64-bit
encryption. Keys are dened by entering in a string in HEX (hexadecimal - using characters 0-9, A-F) or ASCII (American Standard Code for
Information Interchange – alphanumeric characters) format. ASCII format is provided so you can enter a string that is easier to remember.
The ASCII string is converted to HEX for use over the network. Four keys can be dened so that you can change keys easily.
31D-Link DWR-730 User Manual
Page 36
Section 4 - Security
Configure WEP
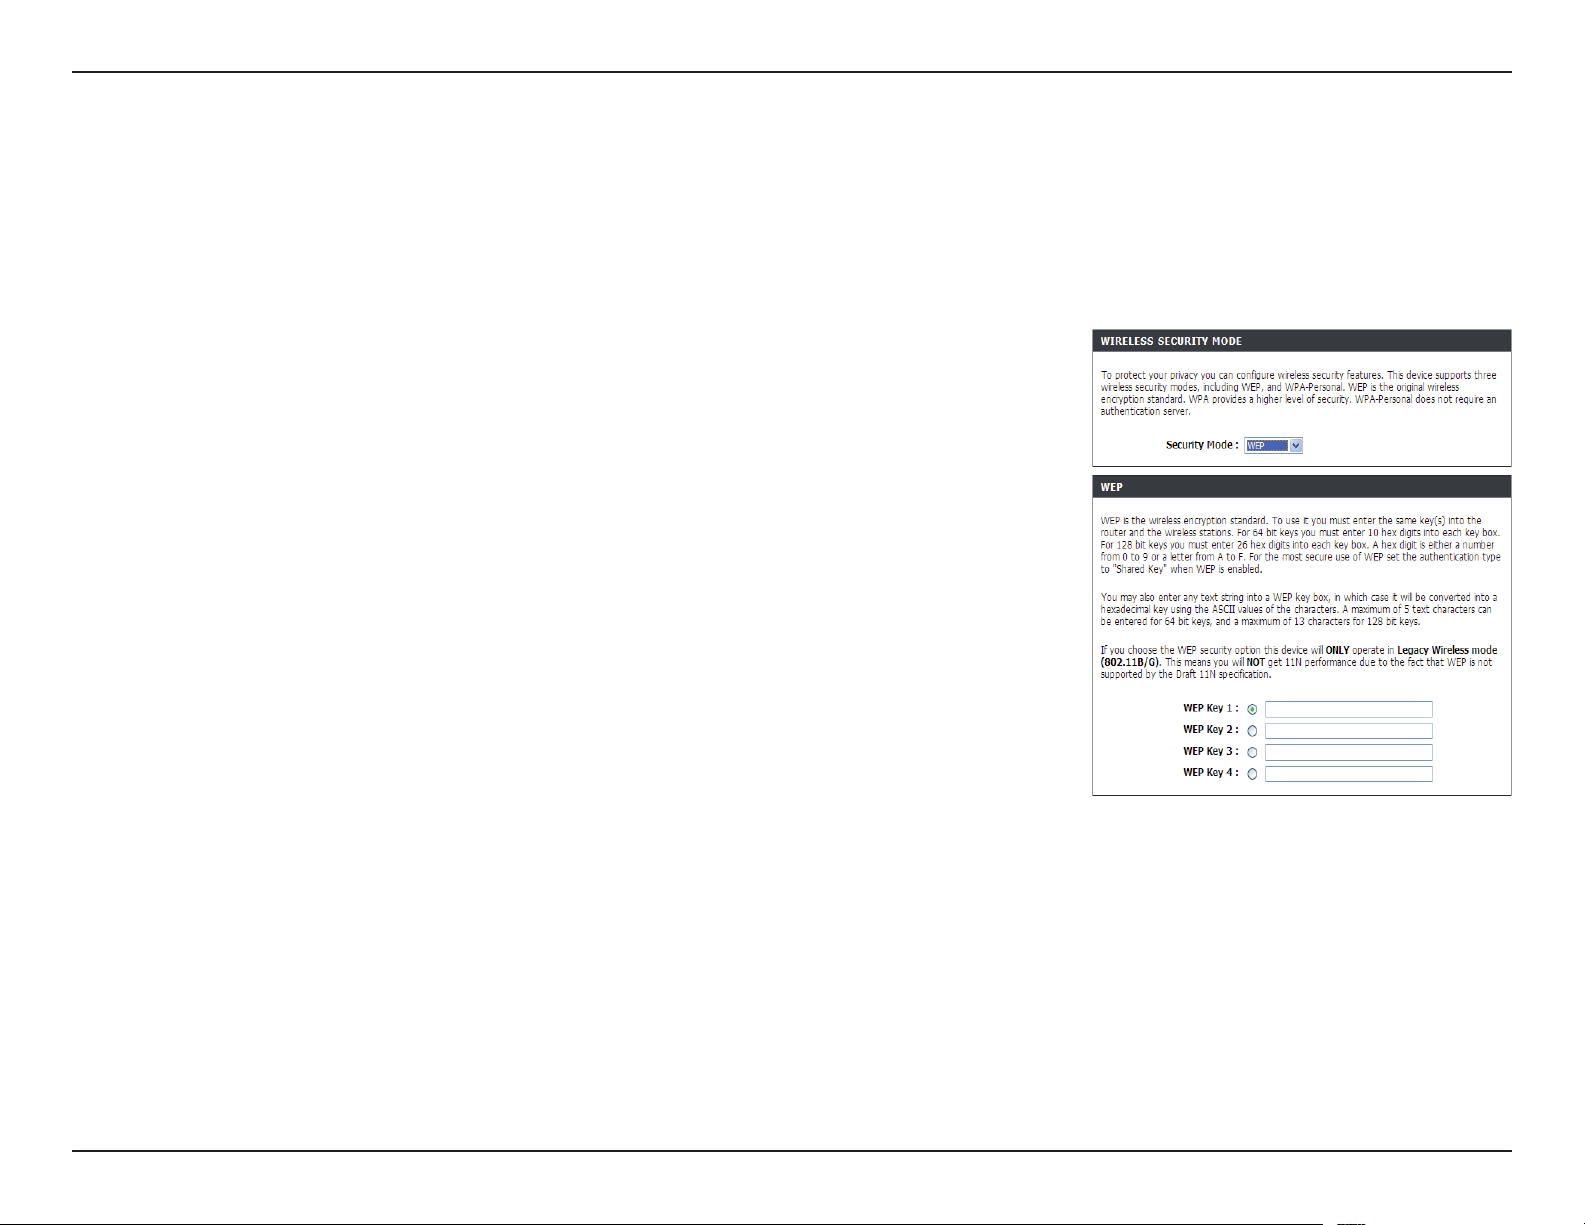
It is recommended to enable encryption on your wireless router before your wireless network adapters. Please establish wireless connectivity
before enabling encryption. Your wireless signal may degrade when enabling encryption due to the added overhead.
1. Log into the web-based conguration by opening a web browser and entering the IP address
of the router (192.168.0.1). Click on Wireless Settings on the left side.
2. Next to Security Mode, select WEP.
3. Next to WEP Key 1, enter a WEP key that you create. Make sure you enter this key exactly
on all your wireless devices. You may enter up to 4 different keys.
7. Click Save Settings to save your settings. If you are conguring the router with a wireless
adapter, you will lose connectivity until you enable WEP on your adapter and enter the same
WEP key as you did on the router.
32D-Link DWR-730 User Manual
Page 37

Section 4 - Security
What is WPA?
WPA, or Wi-Fi Protected Access, is a Wi-Fi standard that was designed to improve the security features of WEP (Wired Equivalent Privacy).
The 2 major improvements over WEP:
• Improved data encryption through the Temporal Key Integrity Protocol (TKIP). TKIP scrambles the keys using a hashing
algorithm and, by adding an integrity-checking feature, ensures that the keys haven’t been tampered with. WPA2 is based
on 802.11i and uses Advanced Encryption Standard (AES) instead of TKIP.
• User authentication, which is generally missing in WEP, through the extensible authentication protocol (EAP). WEP
regulates access to a wireless network based on a computer’s hardware-specic MAC address, which is relatively simple
to be sniffed out and stolen. EAP is built on a more secure public-key encryption system to ensure that only authorized
network users can access the network.
WPA-PSK/WPA2-PSK uses a passphrase or key to authenticate your wireless connection. The key is an alpha-numeric password between
8 and 63 characters long. The password can include symbols (!?*&_) and spaces. This key must be the exact same key entered on your
wireless router or access point.
WPA/WPA2 incorporates user authentication through the Extensible Authentication Protocol (EAP). EAP is built on a more secure public
key encryption system to ensure that only authorized network users can access the network.
33D-Link DWR-730 User Manual
Page 38
Section 4 - Security
Configure WPA-PSK/WPA2-PSK
It is recommended to enable encryption on your wireless router before your wireless network adapters. Please establish wireless connectivity
before enabling encryption. Your wireless signal may degrade when enabling encryption due to the added overhead.
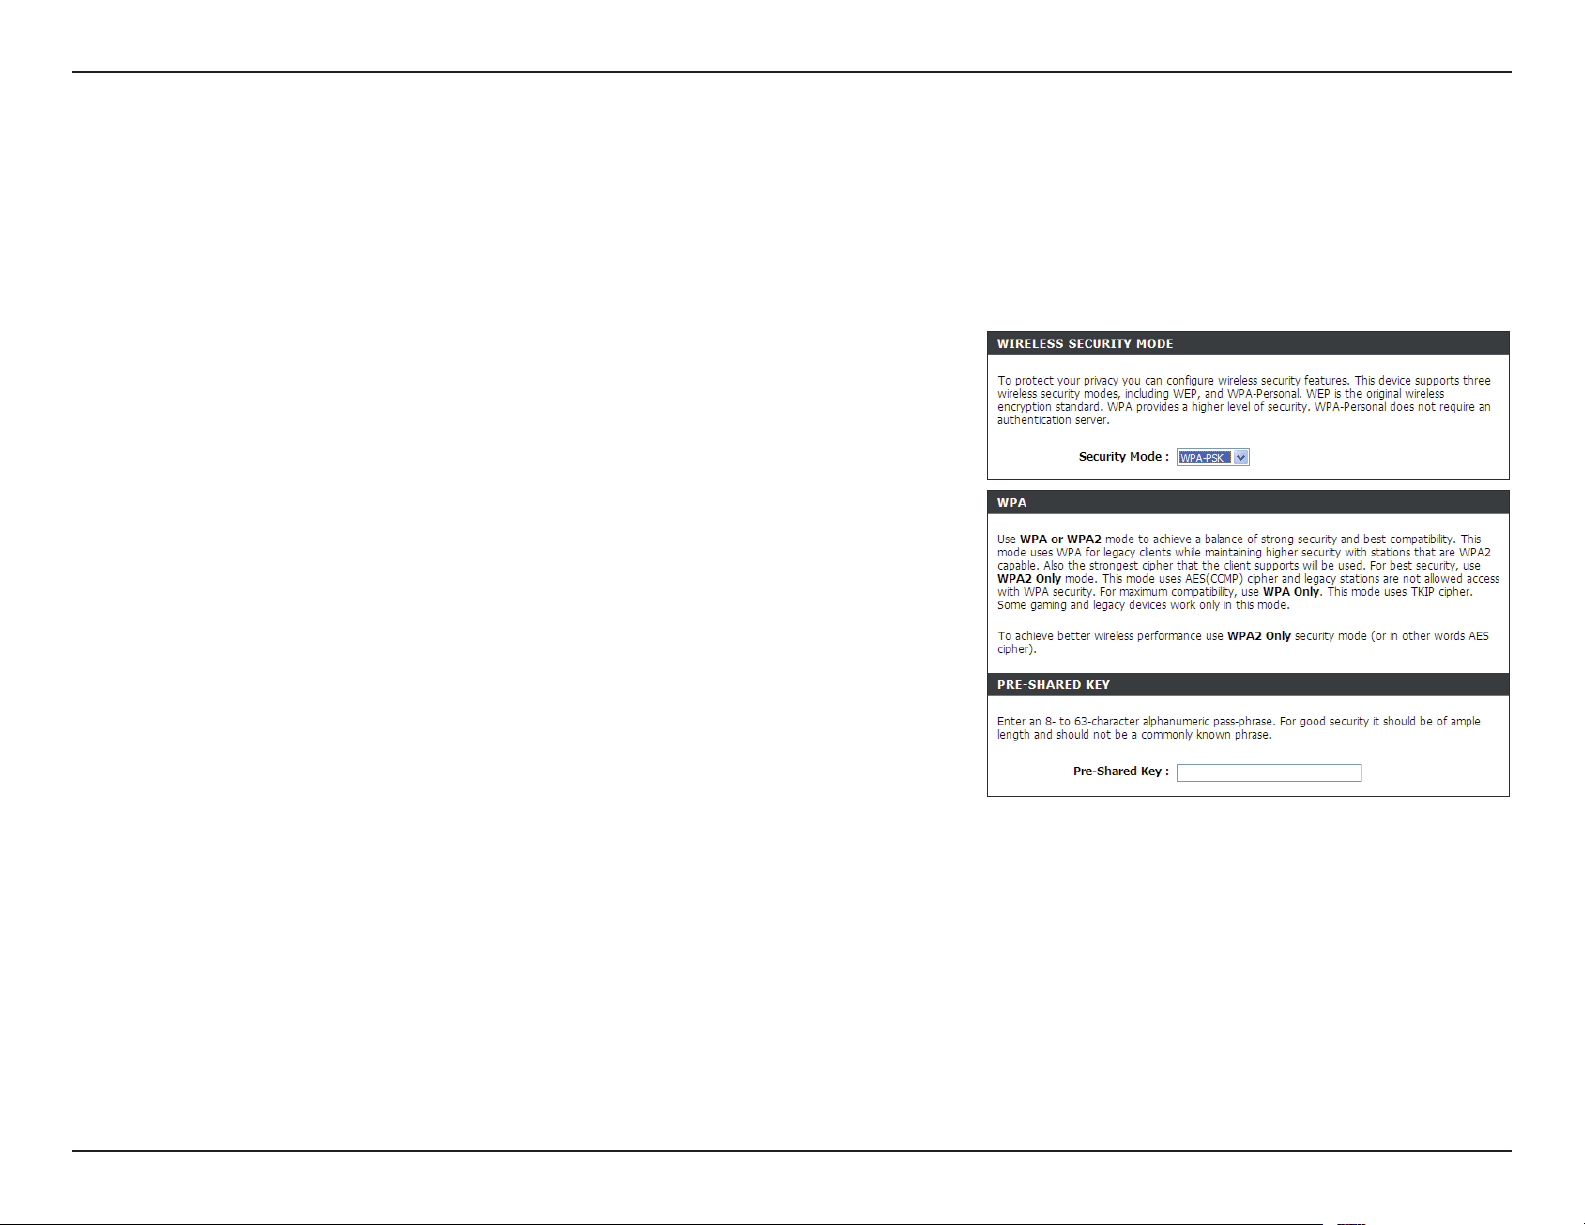
1. Log into the web-based conguration by opening a web browser and entering the
IP address of the router (192.168.0.1). Click on Wireless Settings on the left side.
2. Next to Security Mode, select WPA-PSK or WPA2-PSK.
3. Next to Pre-Shared Key, enter a key (passphrase). The key is an alpha-numeric
password between 8 and 63 characters long. The password can include symbols
(!?*&_) and spaces. Make sure you enter this key exactly the same on all other
wireless clients.
4. Click Save Settings to save your settings. If you are conguring the router with a
wireless adapter, you will lose connectivity until you enable WPA-PSK (or WPA2PSK) on your adapter and enter the same passphrase as you did on the router.
34D-Link DWR-730 User Manual
Page 39
Section 5 - Connecting to a Wireless Network
Connect to a Wireless Network
Using Windows Vista™
Windows® Vista™ users may use the built-in wireless utility. If you are using another company’s utility or Windows® 2000, please refer to
the user manual of your wireless adapter for help with connecting to a wireless network. Most utilities will have a “site survey” option similar
®
to the Windows
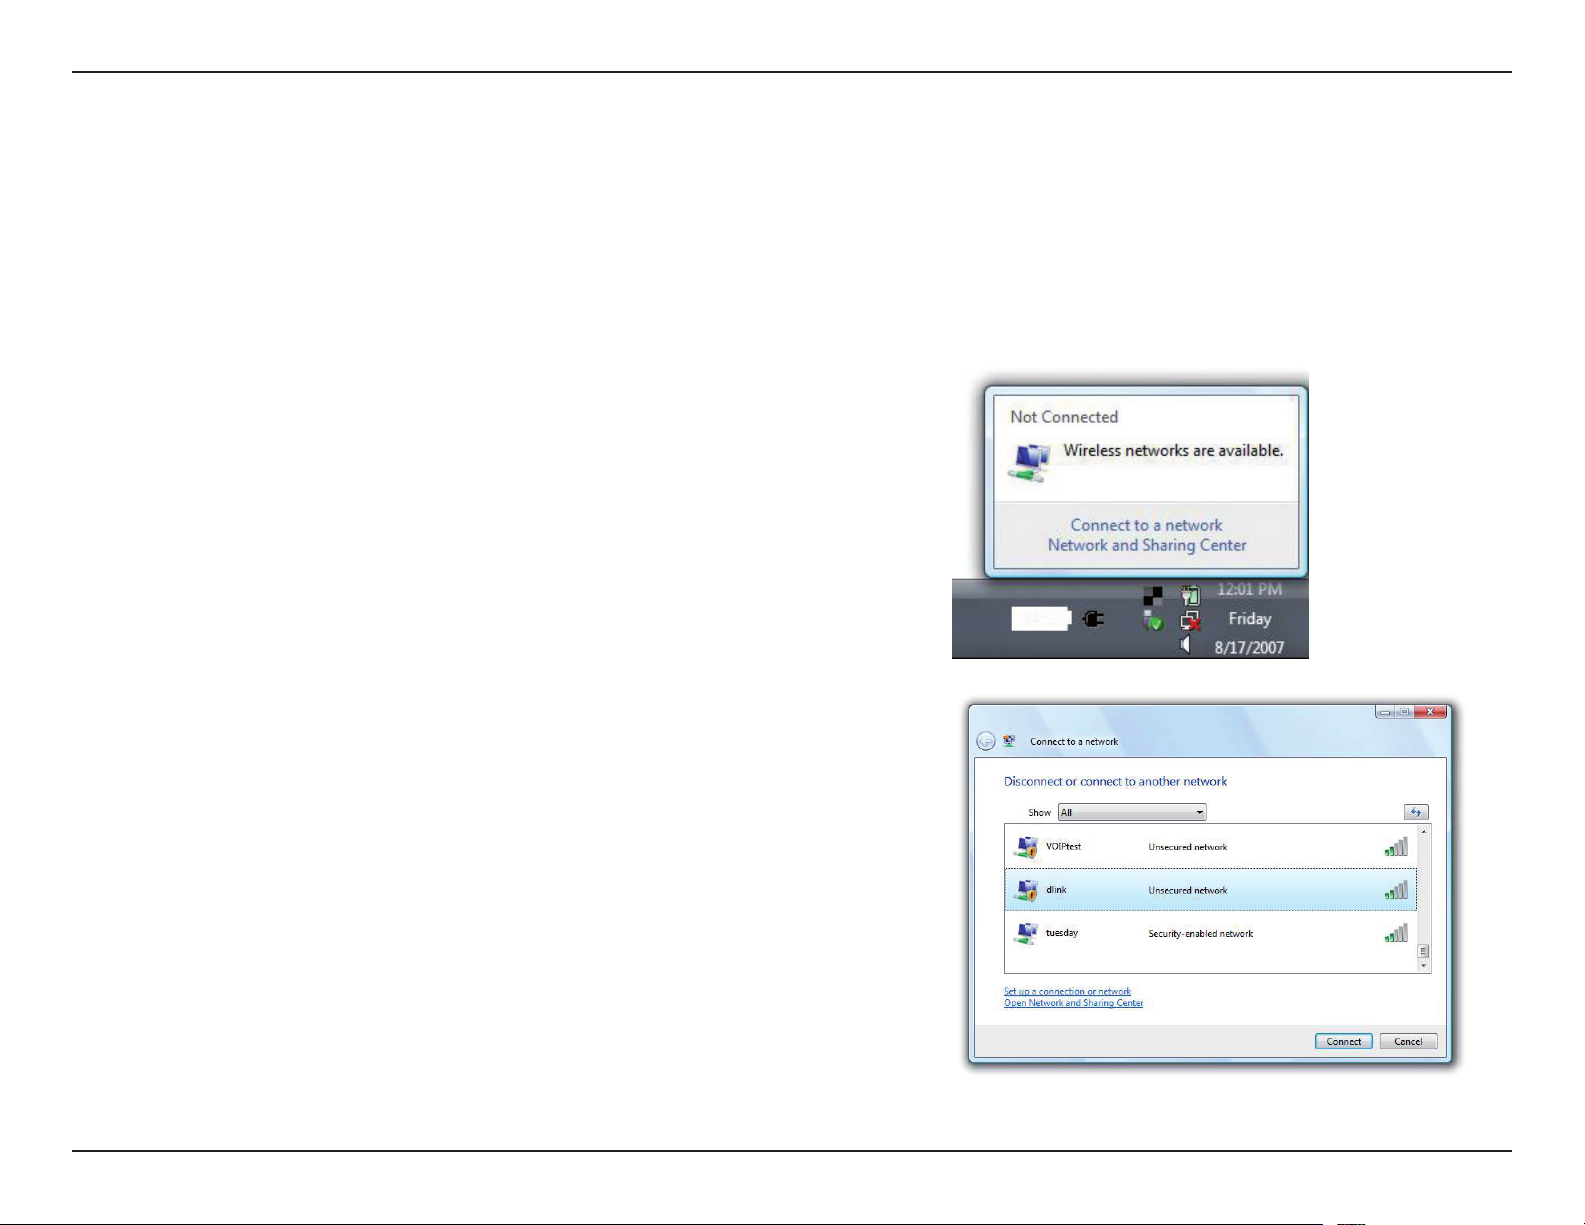
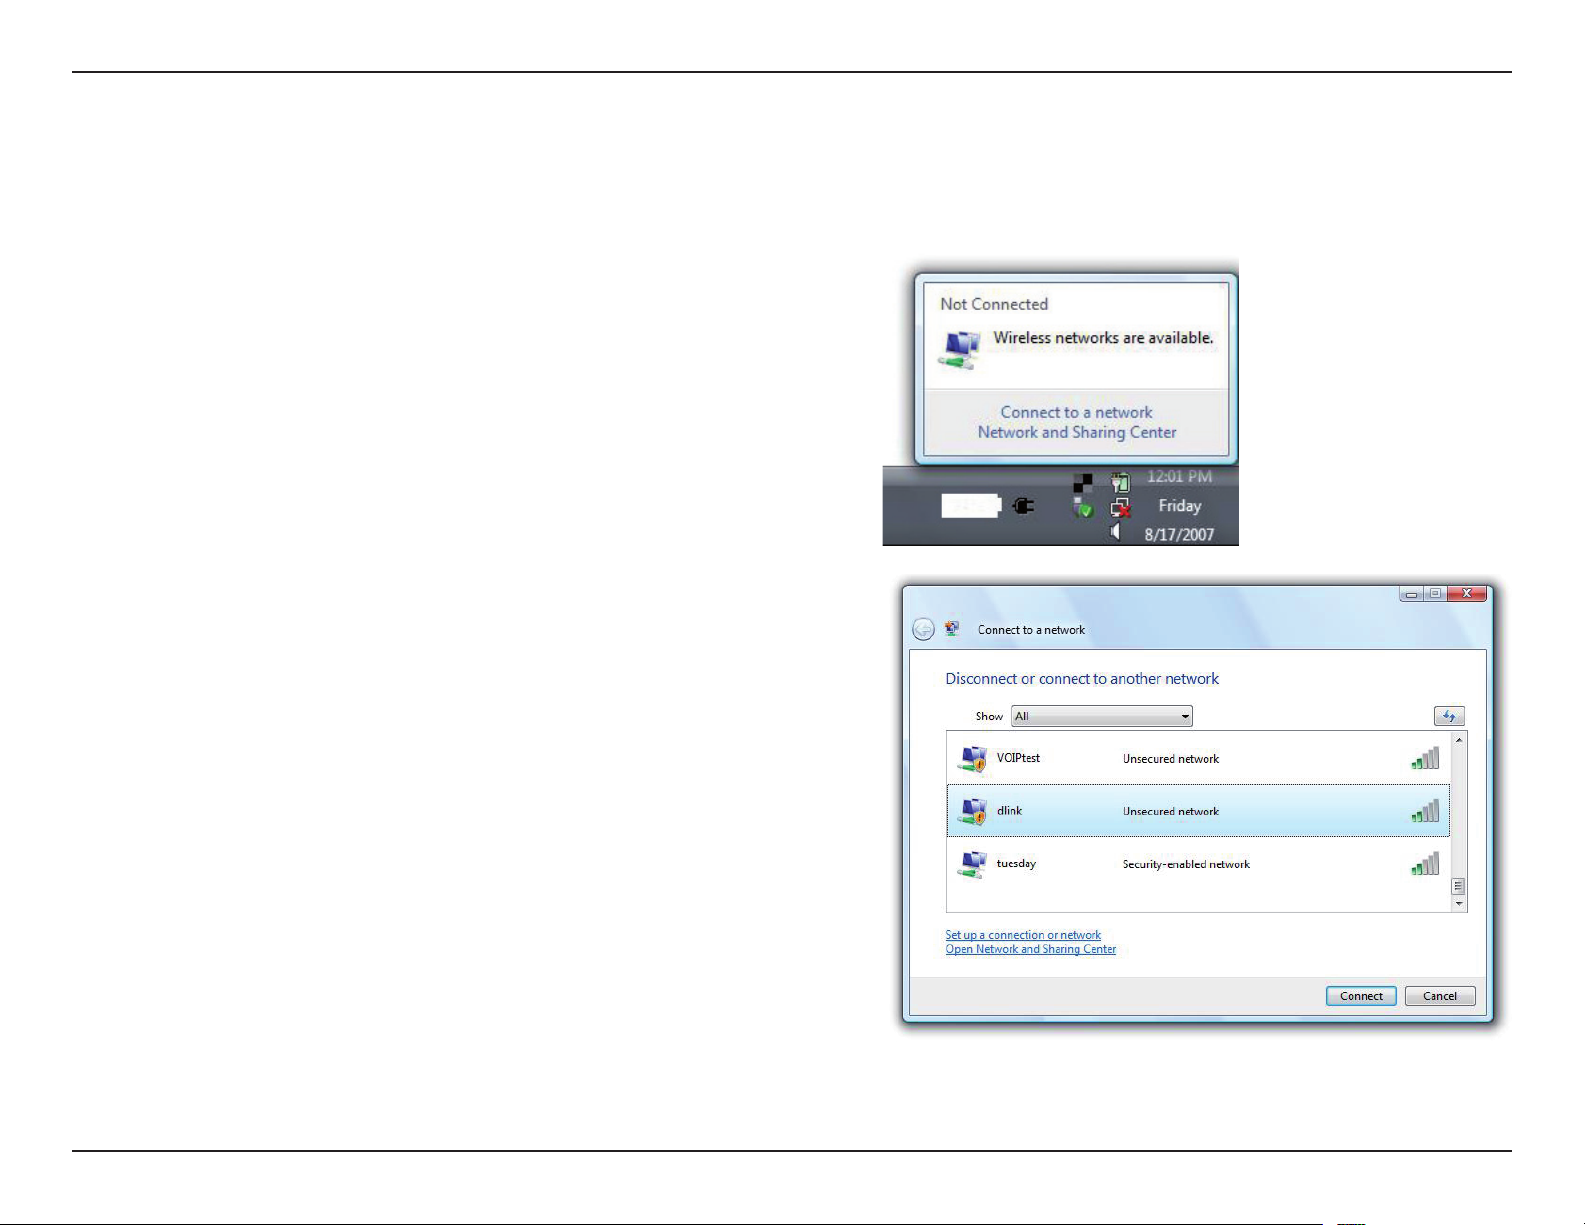
If you receive the Wireless Networks Detected bubble, click on the center
of the bubble to access the utility.
or
Right-click on the wireless computer icon in your system tray (lower-right
corner next to the time). Select Connect to a network.
Vista™ utility as seen below.
The utility will display any available wireless networks in your area. Click on
a network (displayed using the SSID) and click the Connect button.
If you get a good signal but cannot access the Internet, check the TCP/IP
settings for your wireless adapter. Refer to the Networking Basics section
in this manual for more information.
35D-Link DWR-730 User Manual
Page 40
Section 5 - Connecting to a Wireless Network
Configure Wireless Security
It is recommended to enable wireless security (WEP/WPA/WPA2) on your wireless router or access point before conguring your wireless
adapter. If you are joining an existing network, you will need to know the security key or passphrase being used.
1. Open the Windows® Vista™ Wireless Utility by right-clicking on the
wireless computer icon in your system tray (lower right corner of screen).
Select Connect to a network.
2. Highlight the wireless network (SSID) you would like to connect to and
click Connect.
36D-Link DWR-730 User Manual
Page 41
Section 5 - Connecting to a Wireless Network
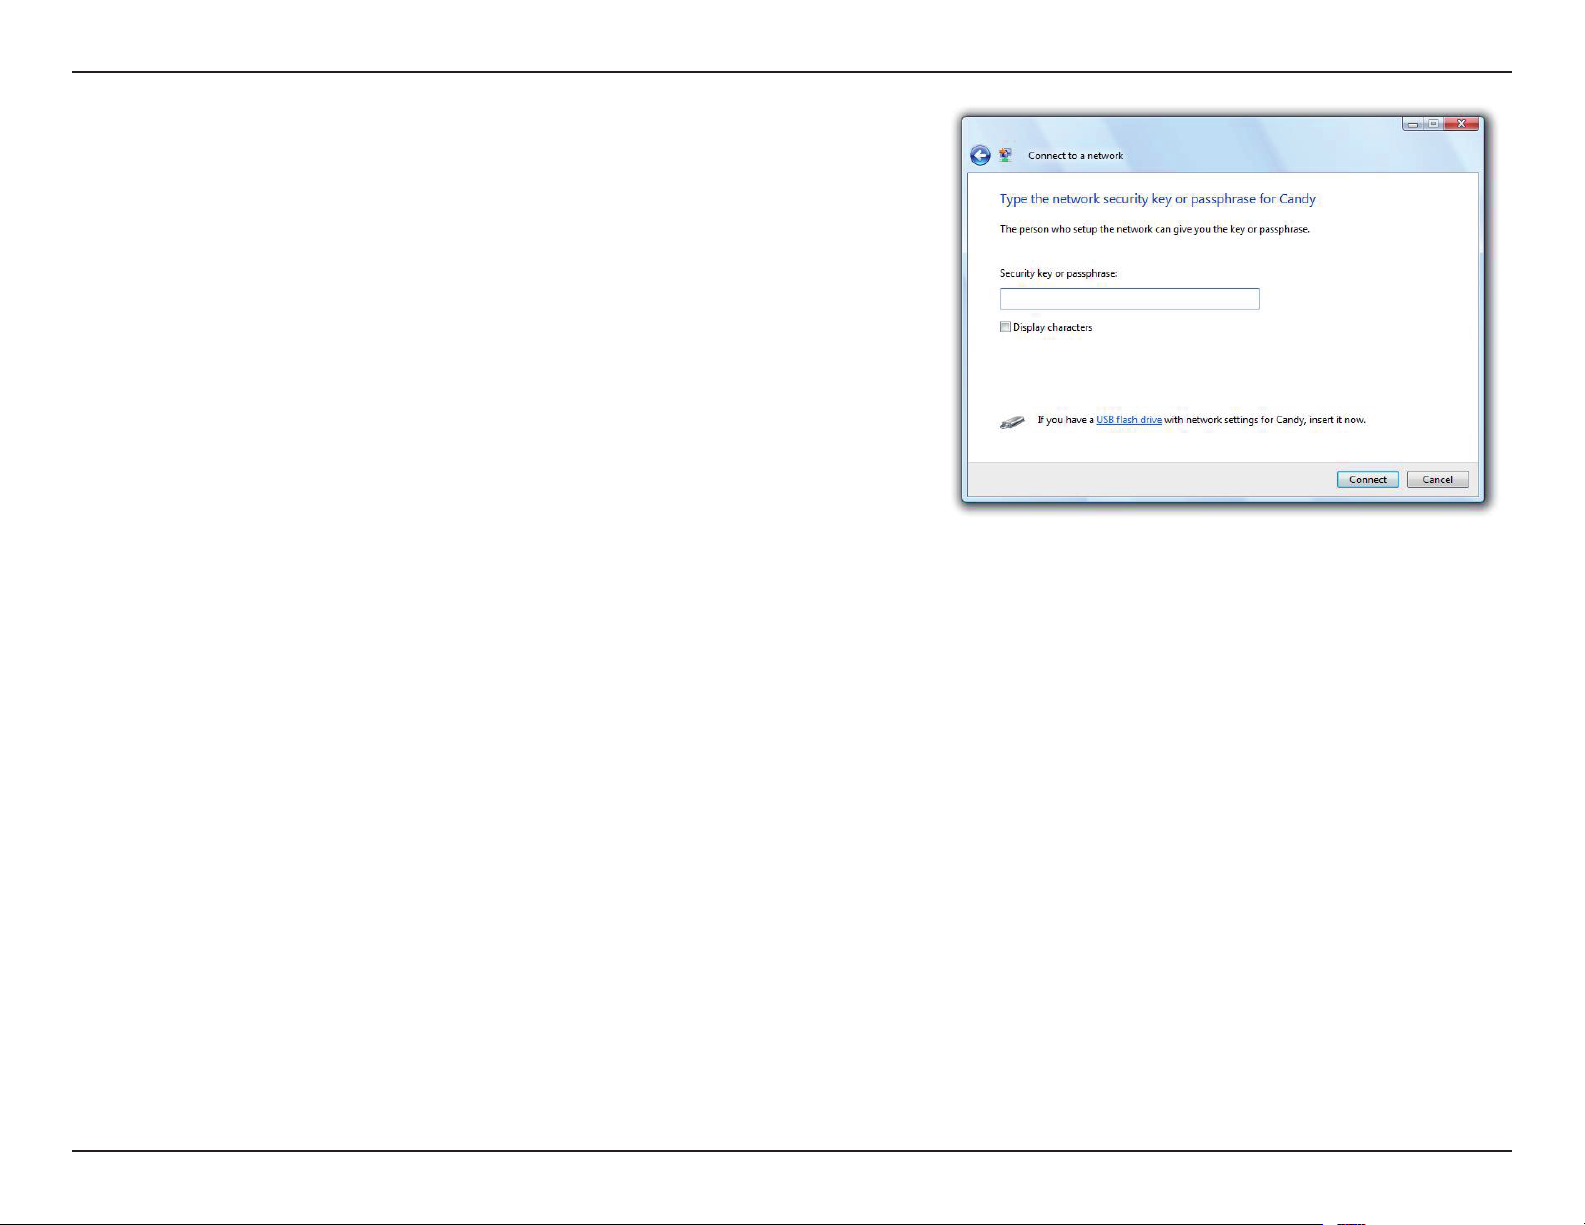
3. Enter the same security key or passphrase that is on your router and click
Connect.
It may take 20-30 seconds to connect to the wireless network. If the connection
fails, please verify that the security settings are correct. The key or passphrase
must be exactly the same as on the wireless router.
37D-Link DWR-730 User Manual
Page 42
Section 5 - Connecting to a Wireless Network
Connect to a Wireless Network
Using Windows® XP
Windows® XP users may use the built-in wireless utility (Zero Conguration Utility). The following instructions are for Service Pack 2
users. If you are using another company’s utility or Windows® 2000, please refer to the user manual of your wireless adapter for help with
connecting to a wireless network. Most utilities will have a “site survey” option similar to the Windows® XP utility as seen below.
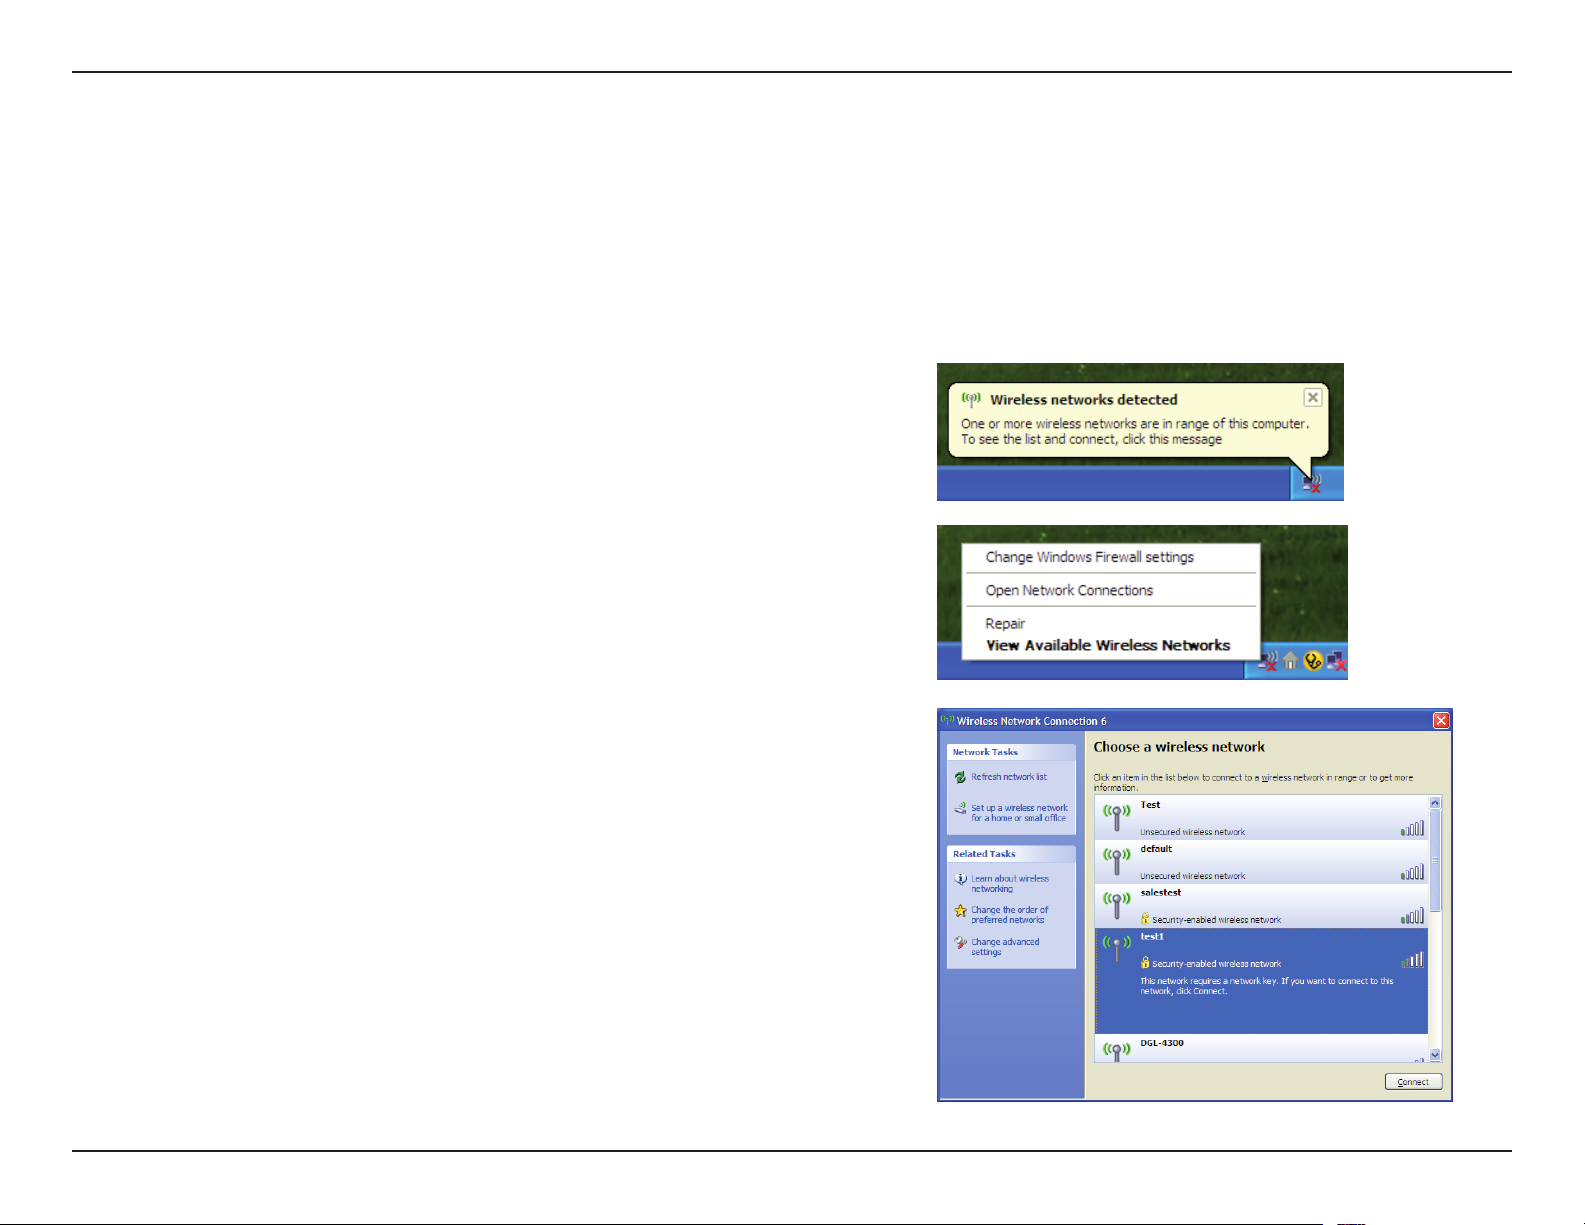
If you receive the Wireless Networks Detected bubble, click on the center
of the bubble to access the utility.
or
Right-click on the wireless computer icon in your system tray (lower-right
corner next to the time). Select View Available Wireless Networks.
The utility will display any available wireless networks in your area. Click on
a network (displayed using the SSID) and click the Connect button.
If you get a good signal but cannot access the Internet, check the TCP/IP
settings for your wireless adapter. Refer to the Networking Basics section
in this manual for more information.
38D-Link DWR-730 User Manual
Page 43
Section 5 - Connecting to a Wireless Network
Configure WEP
It is recommended to enable WEP on your wireless router or access point before conguring your wireless adapter. If you are joining an
existing network, you will need to know the WEP key being used.
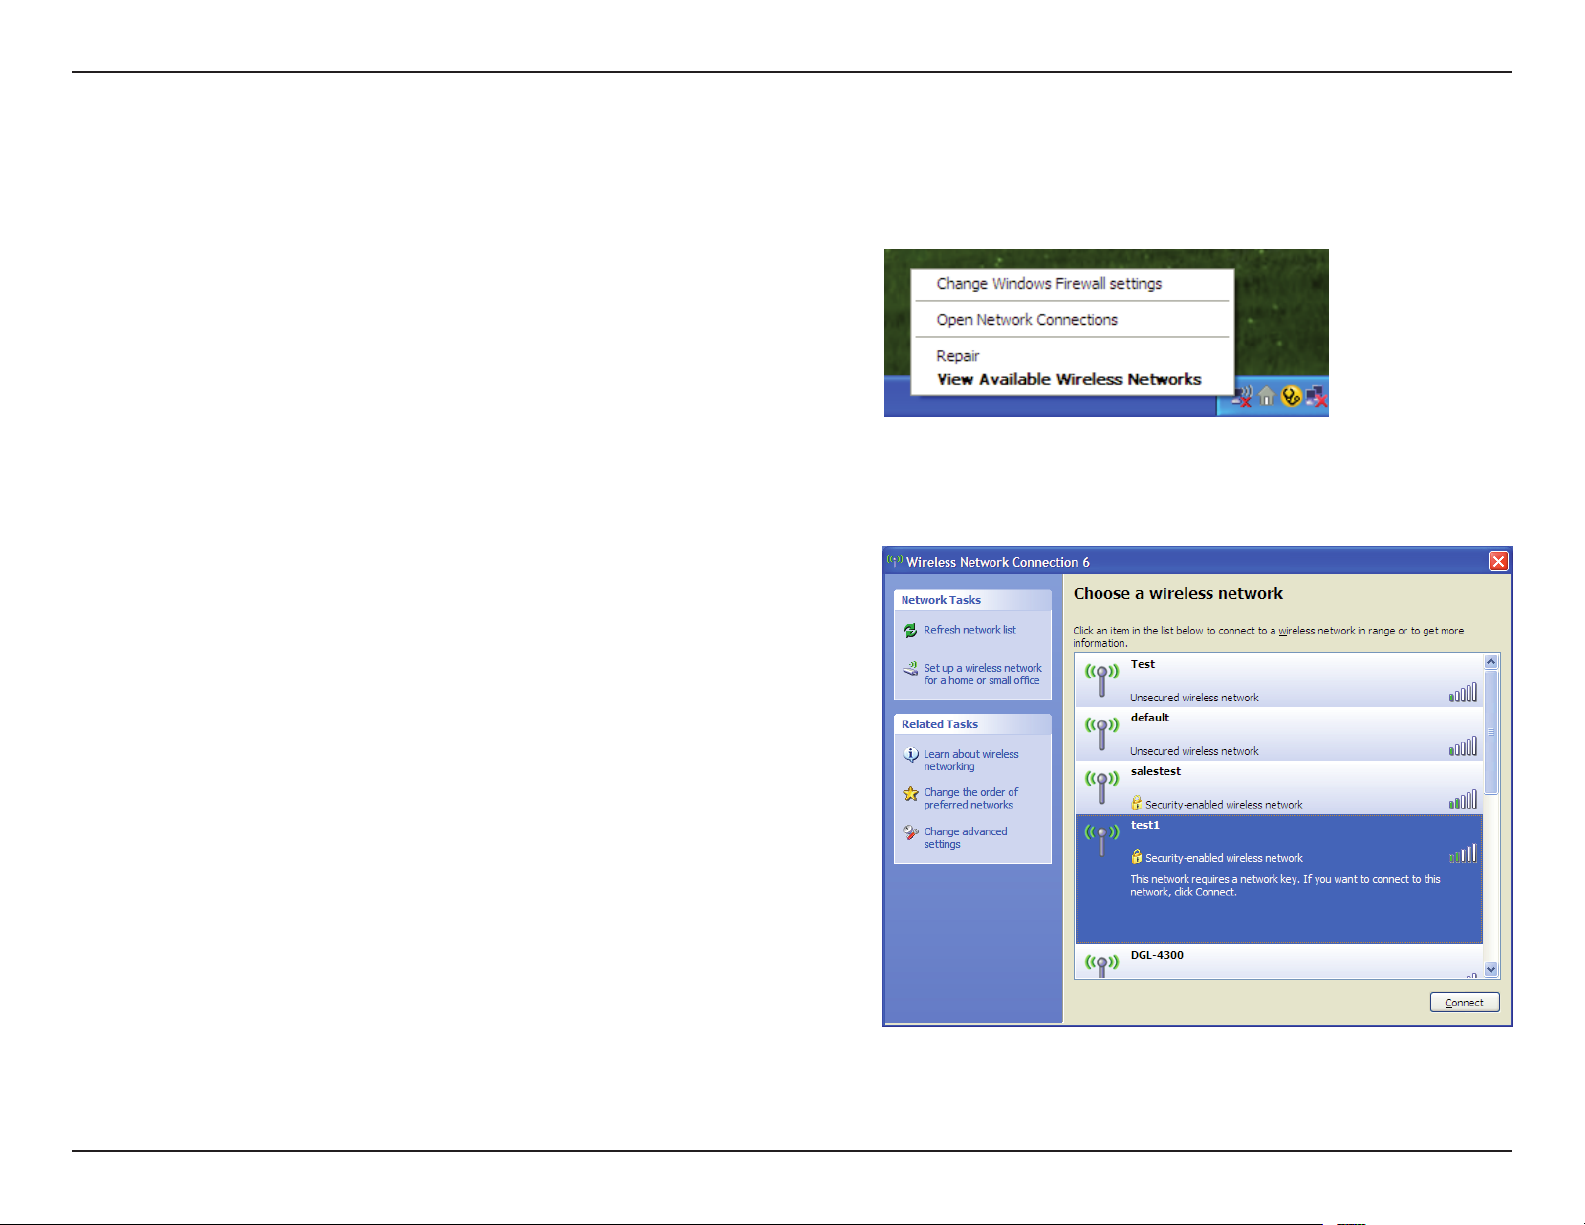
1. O p e n t h e W i n d o w s® X P W i r e l e s s U t i l i t y b y r i g h t -
clicking on the wireless computer icon in your system tray
(lower-right corner of screen). Select View Available Wireless
Networks.
2. Highlight the wireless network (SSID) you would like to connect
to and click Connect.
39D-Link DWR-730 User Manual
Page 44
Section 5 - Connecting to a Wireless Network
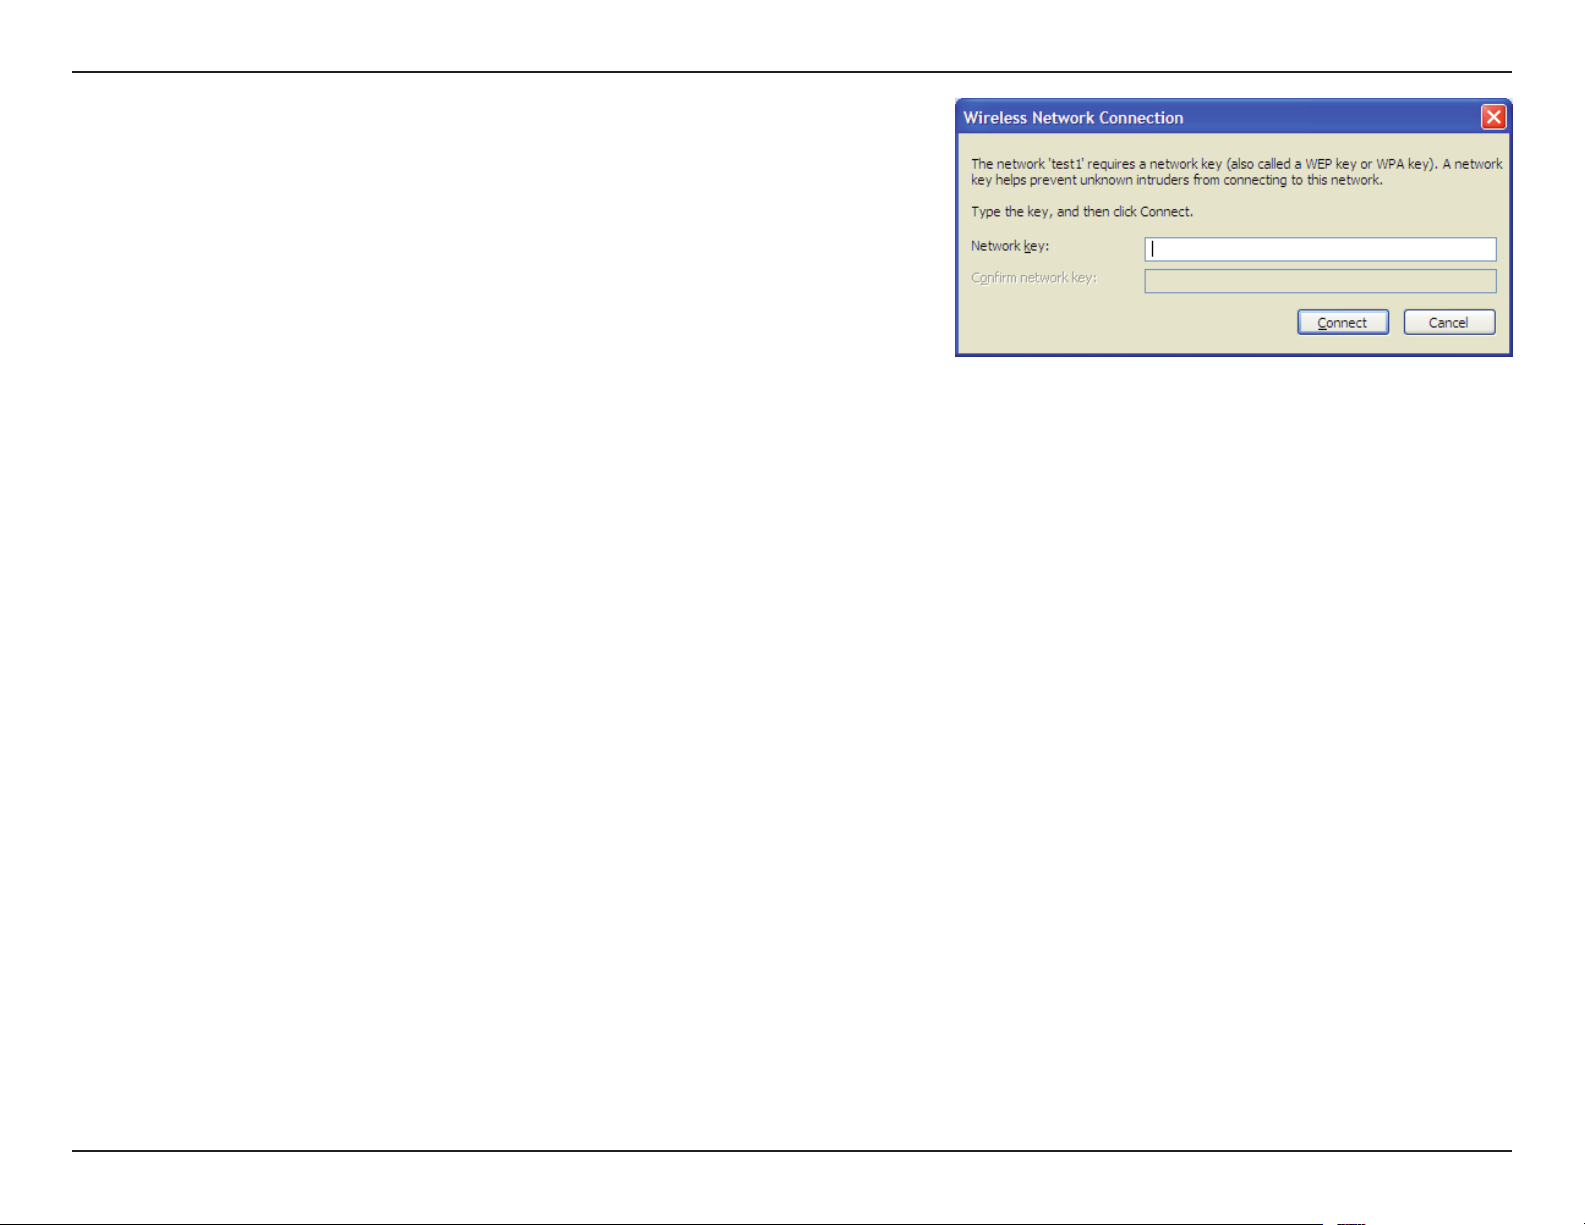
3. The Wireless Network Connection box will appear. Enter the same WEP
key that is on your router and click Connect.
It may take 20-30 seconds to connect to the wireless network. If the connection
fails, please verify that the WEP settings are correct. The WEP key must be
exactly the same as on the wireless router.
40D-Link DWR-730 User Manual
Page 45
Section 5 - Connecting to a Wireless Network
Configure WPA-PSK
It is recommended that you enable WPA on your wireless router or access point before conguring your wireless adapter. If you are joining
an existing network, you will need to know the WPA key being used.
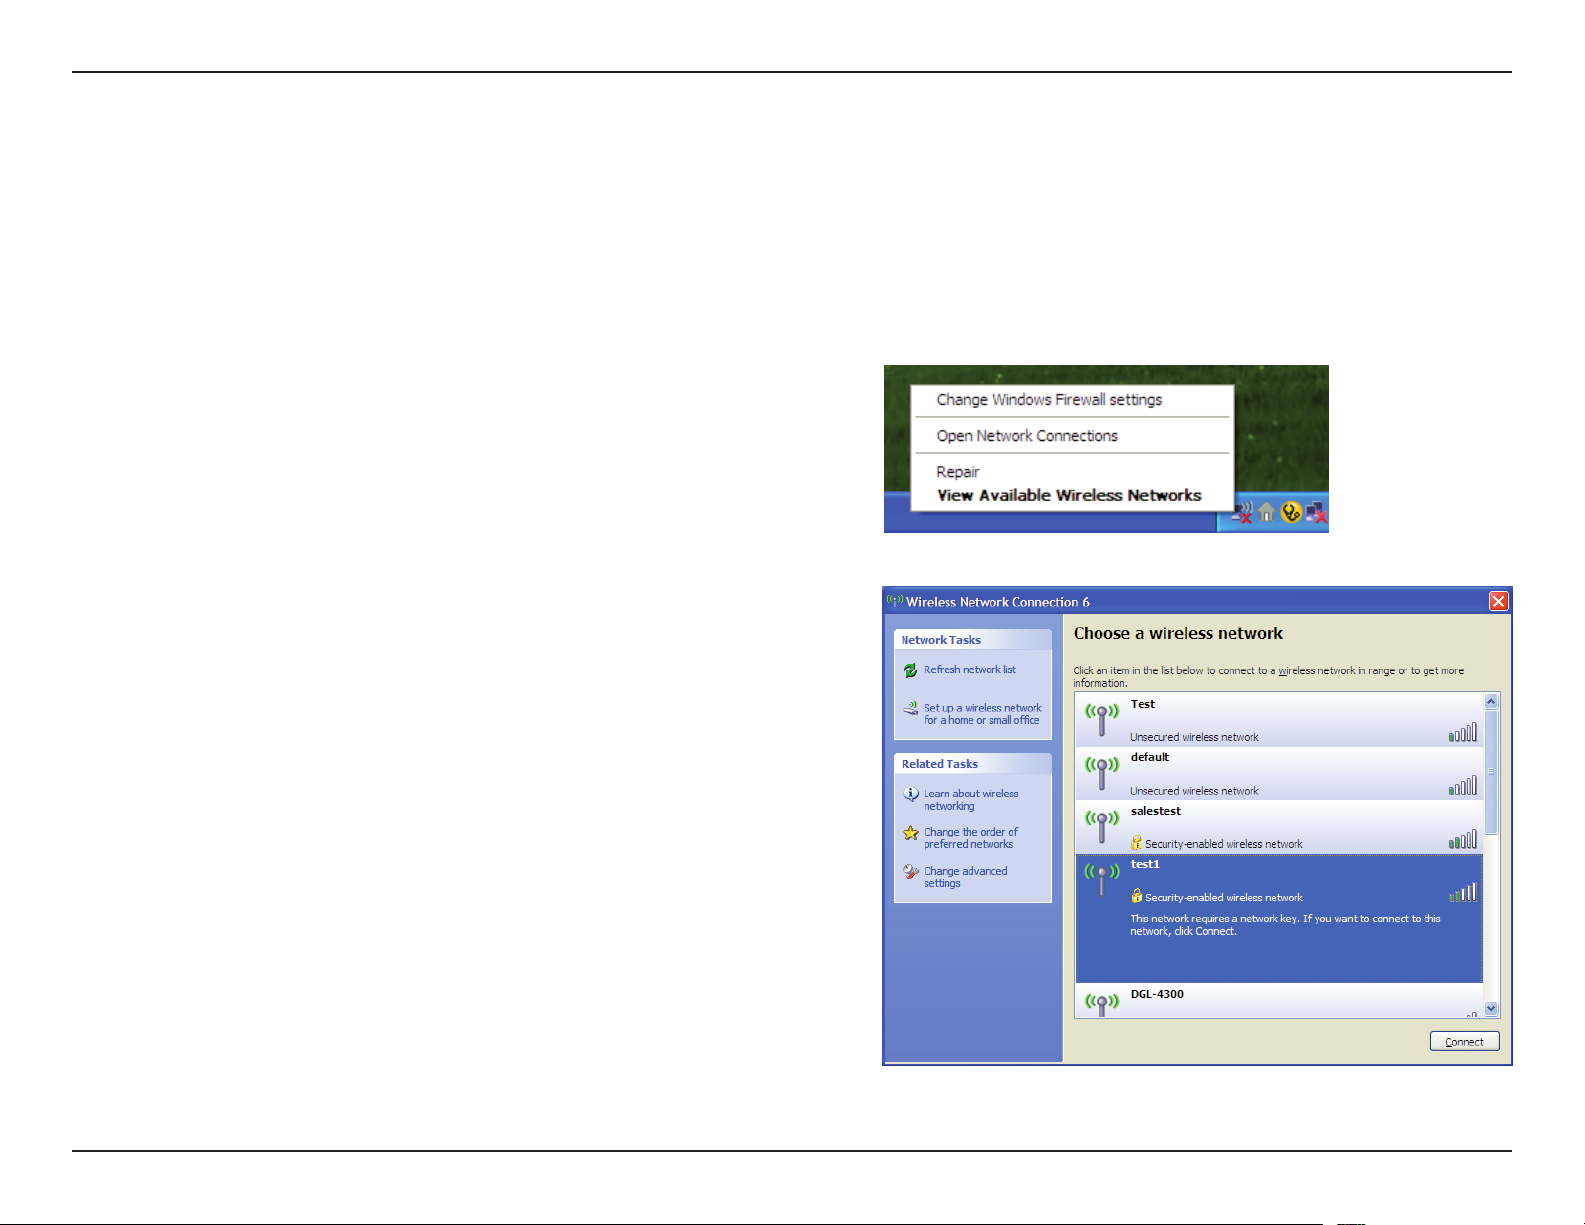
1. Open the Windows® XP Wireless Utility by right-clicking
on th e w i re l e s s c om p ut er ic o n i n y ou r s ys t em tr a y
(lower-right corner of screen). Select View Available Wireless
Networks.
2. Highlight the wireless network (SSID) you would like to connect to
and click Connect.
41D-Link DWR-730 User Manual
Page 46
Section 5 - Connecting to a Wireless Network
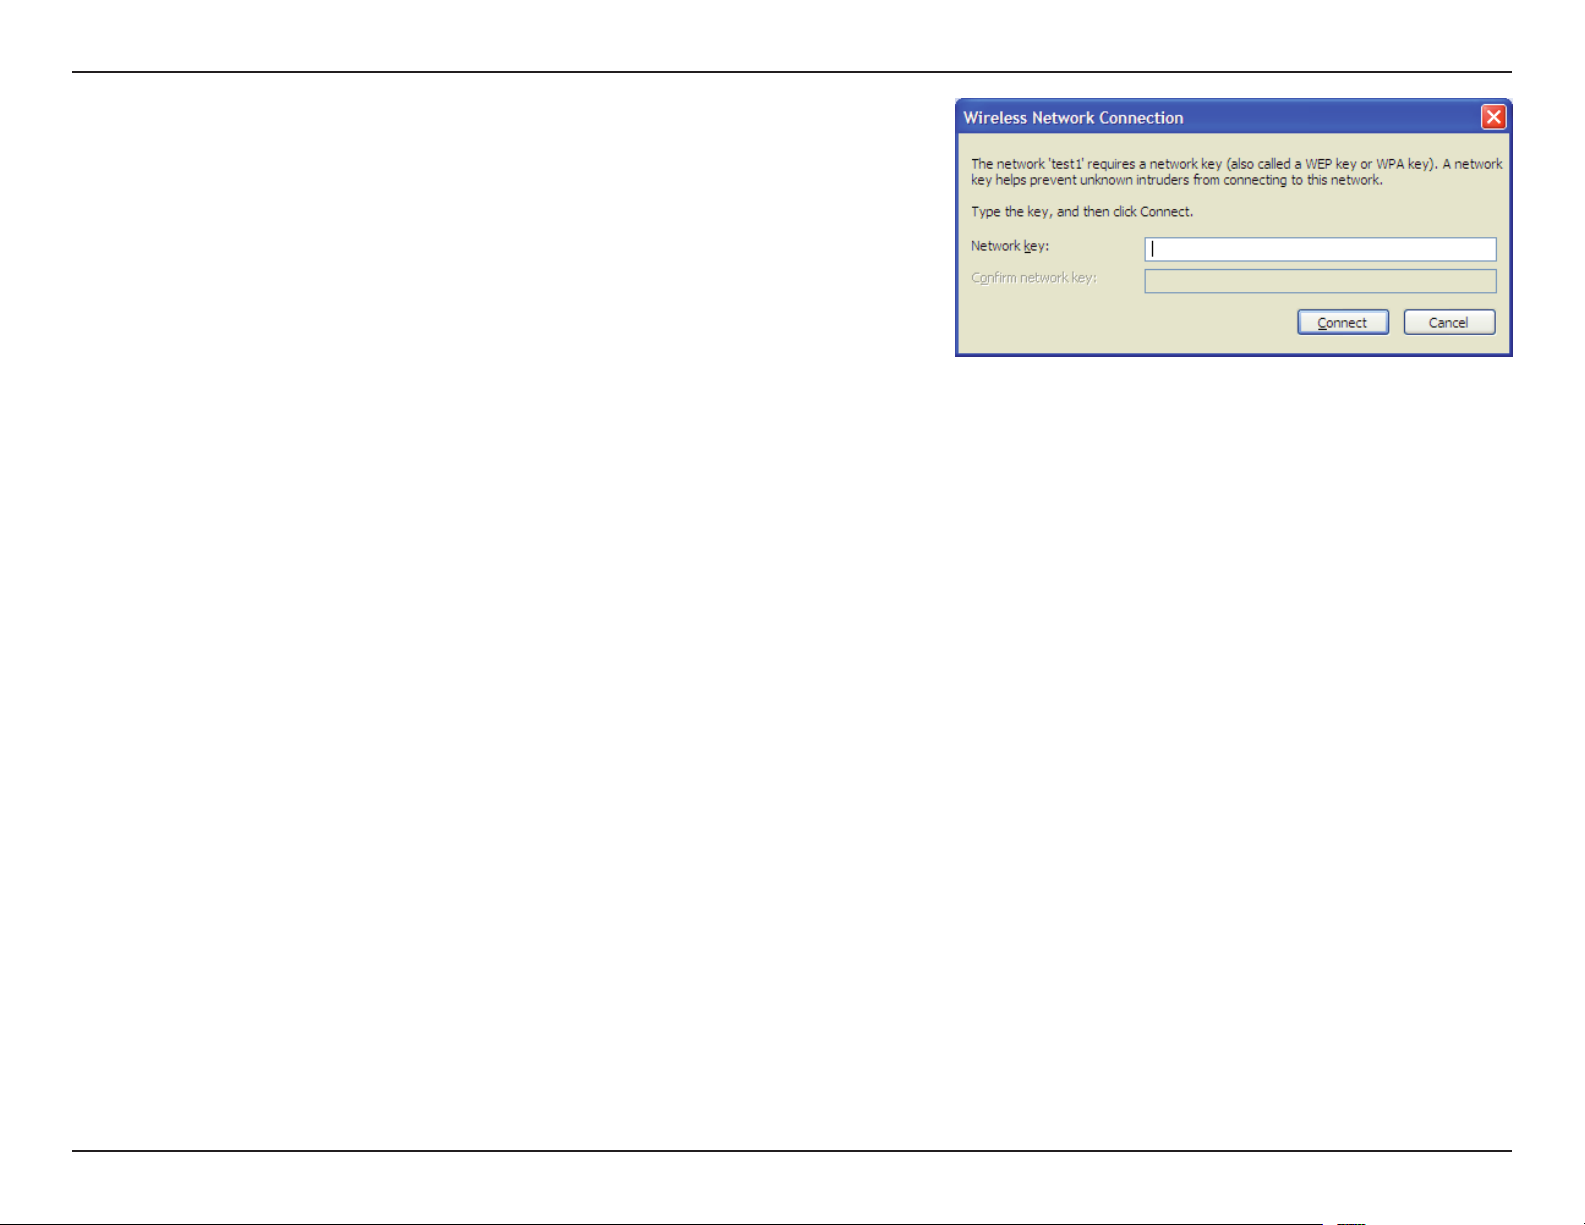
3. The Wireless Network Connection box will appear. Enter the WPA-PSK
passphrase and click Connect.
It may take 20-30 seconds to connect to the wireless network. If the connection
fails, please verify that the WPA-PSK settings are correct. The WPA-PSK
passphrase must be exactly the same as on the wireless router.
42D-Link DWR-730 User Manual
Page 47

Section 6 - Troubleshooting
Troubleshooting
This chapter provides solutions to problems that can occur during the installation and operation of the DWR-730. Read the following
descriptions if you are having problems. (The examples below are illustrated in Windows® XP. If you have a different operating system,
the screenshots on your computer will look similar to the following examples.)
1. Why can’t I access the web-based conguration utility?
When entering the IP address of the D-Link router (192.168.0.1 for example), you are not connecting to a website on the Internet or have
to be connected to the Internet. The device has the utility built-in to a ROM chip in the device itself. Your computer must be on the same
IP subnet to connect to the web-based utility.
• Make sure you have an updated Java-enabled web browser. We recommend the following:
• Internet Explorer 6.0 or higher
• Netscape 8 or higher
• Mozilla 1.7.12 (5.0) or higher
• Opera 8.5 or higher
• Safari 1.2 or higher (with Java 1.3.1 or higher)
• Camino 0.8.4 or higher
• Firefox 1.5 or higher
• Verify physical connectivity by checking for solid link lights on the device. If you do not get a solid link light, try using a different cable or
connect to a different port on the device if possible. If the computer is turned off, the link light may not be on.
• Disable any internet security software running on the computer. Software rewalls such as Zone Alarm, Black Ice, Sygate, Norton Personal
®
Firewall, and Windows
for more information on disabling or conguring it.
XP rewall may block access to the conguration pages. Check the help les included with your rewall software
43D-Link DWR-730 User Manual
Page 48

Section 6 - Troubleshooting
• Congure your Internet settings:
• Go to Start > Settings > Control Panel. Double-click the Internet Options Icon. From the Security tab, click the button
to restore the settings to their defaults.
• Click the Connection tab and set the dial-up option to Never Dial a Connection. Click the LAN Settings button. Make sure
nothing is checked. Click OK.
• Go to the Advanced tab and click the button to restore these settings to their defaults. Click OK three times.
• Close your web browser (if open) and open it.
• Access the web management. Open your web browser and enter the IP address of your D-Link router in the address bar. This should
open the login page for your the web management.
• If you still cannot access the conguration, unplug the power to the router for 10 seconds and plug back in. Wait about 30 seconds and
try accessing the conguration. If you have multiple computers, try connecting using a different computer.
2. How can I upgrade the rmware on the device?
To update the rmware on the DWR-730, insert the device into an available USB port on your PC. Next, launch the rmware utility
(FirmwareUpgrade.exe). Click the Start button to update the rmware. Please don’t remove the DWR-730 while the upgrade is in progress.
To nish the rmware update procedure, click the OK button.
Note: For update information, please follow the revision notice on the ofcial web site.
3. I’m having problems installing the D-Link Connection Manager.
Your antivirus program may be preventing installation of the software. Try disabling your antivirus software temporarily while you install
the D-Link Connection Manager.
44D-Link DWR-730 User Manual
Page 49

Appendix A - Wireless Basics
Wireless Basics
D-Link wireless products are based on industry standards to provide easy-to-use and compatible high-speed wireless connectivity within
your home, business or public access wireless networks. Strictly adhering to the IEEE standard, the D-Link wireless family of products
will allow you to securely access the data you want, when and where you want it. You will be able to enjoy the freedom that wireless
networking delivers.
A wireless local area network (WLAN) is a cellular computer network that transmits and receives data with radio signals instead of wires.
Wireless LANs are used increasingly in both home and ofce environments, and public areas such as airports, coffee shops and universities.
Innovative ways to utilize WLAN technology are helping people to work and communicate more efciently. Increased mobility and the
absence of cabling and other xed infrastructure have proven to be benecial for many users.
Wireless users can use the same applications they use on a wired network. Wireless adapter cards used on laptop and desktop systems
support the same protocols as Ethernet adapter cards.
Under many circumstances, it may be desirable for mobile network devices to link to a conventional Ethernet LAN in order to use servers,
printers or an Internet connection supplied through the wired LAN. A Wireless Router is a device used to provide this link.
45D-Link DWR-730 User Manual
Page 50

Appendix A - Wireless Basics
What is Wireless?
Wireless or Wi-Fi technology is another way of connecting your computer to the network without using wires. Wi-Fi uses radio frequency
to connect wirelessly, so you have the freedom to connect computers anywhere in your home or ofce network.
Why D-Link Wireless?
D-Link is the worldwide leader and award win n ing designer, developer, and ma nufacturer of ne t working products.
D-Link delivers the performance you need at a price you can afford. D-Link has all the products you need to build your network.
How does wireless work?
Wireless works similar to how cordless phone work, through radio signals to transmit data from one point A to point B. But wireless
technology has restrictions as to how you can access the network. You must be within the wireless network range area to be able to
connect your computer. There are two different types of wireless networks Wireless Local Area Network (WLAN), and Wireless Personal
Area Network (WPAN).
Wireless Local Area Network (WLAN)
In a wireless local area network, a device called an Access Point (AP) connects computers to the network. The access point has a small
antenna attached to it, which allows it to transmit data back and forth over radio signals. With an indoor access point as seen in the picture,
the signal can travel up to 300 feet. With an outdoor access point the signal can reach out up to 30 miles to serve places like manufacturing
plants, industrial locations, college and high school campuses, airports, golf courses, and many other outdoor venues.
Wireless Personal Area Network (WPAN)
Bluetooth is the industry standard wireless technology used for WPAN. Bluetooth devices in WPAN operate in a range up to 30 feet
away.
46D-Link DWR-730 User Manual
Page 51

Appendix A - Wireless Basics
Compared to WLAN the speed and wireless operation range are both less than WLAN, but in return it doesn’t use nearly as much power
which makes it ideal for personal devices, such as mobile phones, PDAs, headphones, laptops, speakers, and other devices that operate
on batteries.
Who uses wireless?
Wireless technology as become so popular in recent years that almost everyone is using it, whether it’s for home, ofce, business, D-Link
has a wireless solution for it.
Home
• Gives everyone at home broadband access
• Surf the web, check e-mail, instant message, and etc
• Gets rid of the cables around the house
• Simple and easy to use
Small Ofce and Home Ofce
• Stay on top of everything at home as you would at ofce
• Remotely access your ofce network from home
• Share Internet connection and printer with multiple computers
• No need to dedicate ofce space
47D-Link DWR-730 User Manual
Page 52

Appendix A - Wireless Basics
Where is wireless used?
Wireless technology is expanding everywhere not just at home or ofce. People like the freedom of mobility and it’s becoming so popular
that more and more public facilities now provide wireless access to attract people. The wireless connection in public places is usually
called “hotspots”.
Using a D-Link Cardbus Adapter with your laptop, you can access the hotspot to connect to Internet from remote locations like Airports,
Hotels, Coffee Shops, Libraries, Restaurants, and Convention Centers.
Wireless network is easy to setup, but if you’re installing it for the rst time it could be quite a task not knowing where to start. That’s why
we’ve put together a few setup steps and tips to help you through the process of setting up a wireless network.
Tips
Here are a few things to keep in mind, when you install a wireless network.
Centralize your Router or Access Point
Make sure you place the router/access point in a centralized location within your network for the best performance. Try to place the router/
access point as high as possible in the room, so the signal gets dispersed throughout your home. If you have a two-story home, you may
need a repeater to boost the signal to extend the range.
Eliminate Interference
Place home appliances such as cordless telephones, microwaves, and televisions as far away as possible from the router/access point.
This would signicantly reduce any interference that the appliances might cause since they operate on same frequency.
Security
Don’t let you next-door neighbors or intruders connect to your wireless network. Secure your wireless network by turning on the WPA or
WEP security feature on the router. Refer to product manual for detail information on how to set it up.
48D-Link DWR-730 User Manual
Page 53

Appendix A - Wireless Basics
Wireless Modes
There are basically two modes of networking:
• Infrastructure – All wireless clients will connect to an access point or wireless router.
• Ad-Hoc – Directly connecting to another computer, for peer-to-peer communication, using wireless network adapters on
each computer, such as two or more WNA-2330 wireless network Cardbus adapters.
An Infrastructure network contains an Access Point or wireless router. All the wireless devices, or clients, will connect to the wireless
router or access point.
An Ad-Hoc network contains only clients, such as laptops with wireless cardbus adapters. All the adapters must be in Ad-Hoc mode to
communicate.
49D-Link DWR-730 User Manual
Page 54
Appendix B - Networking Basics
Networking Basics
Check your IP address
After you install your new D-Link adapter, by default, the TCP/IP settings should be set to obtain an IP address from a DHCP server (i.e.
wireless router) automatically. To verify your IP address, please follow the steps below.
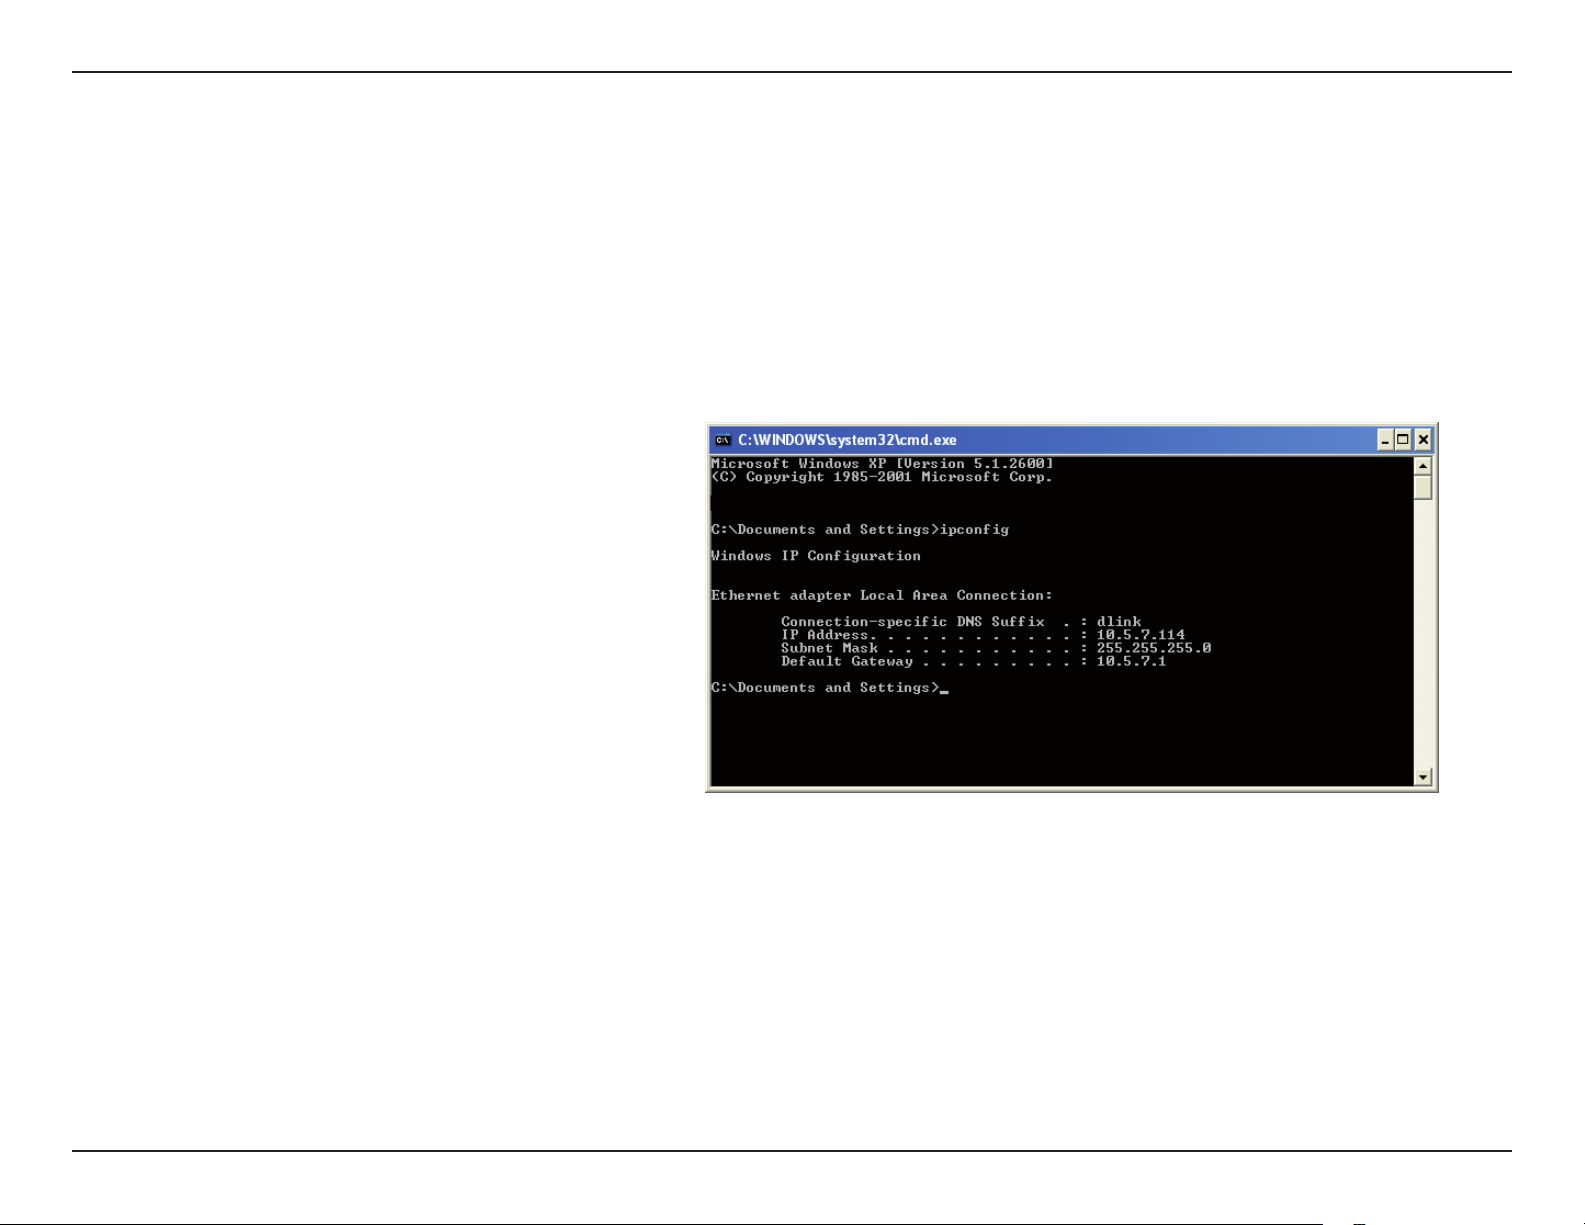
Click on Start > Run. In the run box type cmd and click
OK. (Windows
box.)
At the prompt, type ipconfig and press Enter.
®
Vista™ users type cmd in the Start Search
This will display the IP address, subnet mask, and the
default gateway of your adapter.
If the address is 0.0.0.0, check your adapter installation, security settings, and the settings on your router. Some rewall software programs
may block a DHCP request on newly installed adapters.
50D-Link DWR-730 User Manual
Page 55
Appendix B - Networking Basics
Statically Assign an IP address
If you are not using a DHCP capable gateway/router, or you need to assign a static IP address, please follow the steps below:
Step 1
Windows
®
Vista™ - Click on Start > Control Panel > Network and Internet > Network and Sharing Center > Manage Network
Connections.
Windows
Windows
®
XP - Click on Start > Control Panel > Network Connections.
®
2000 - From the desktop, right-click My Network Places > Properties.
Step 2
Right-click on the Local Area Connection which represents your network adapter and select Properties.
Step 3
Highlight Internet Protocol (TCP/IP) and click Properties.
Step 4
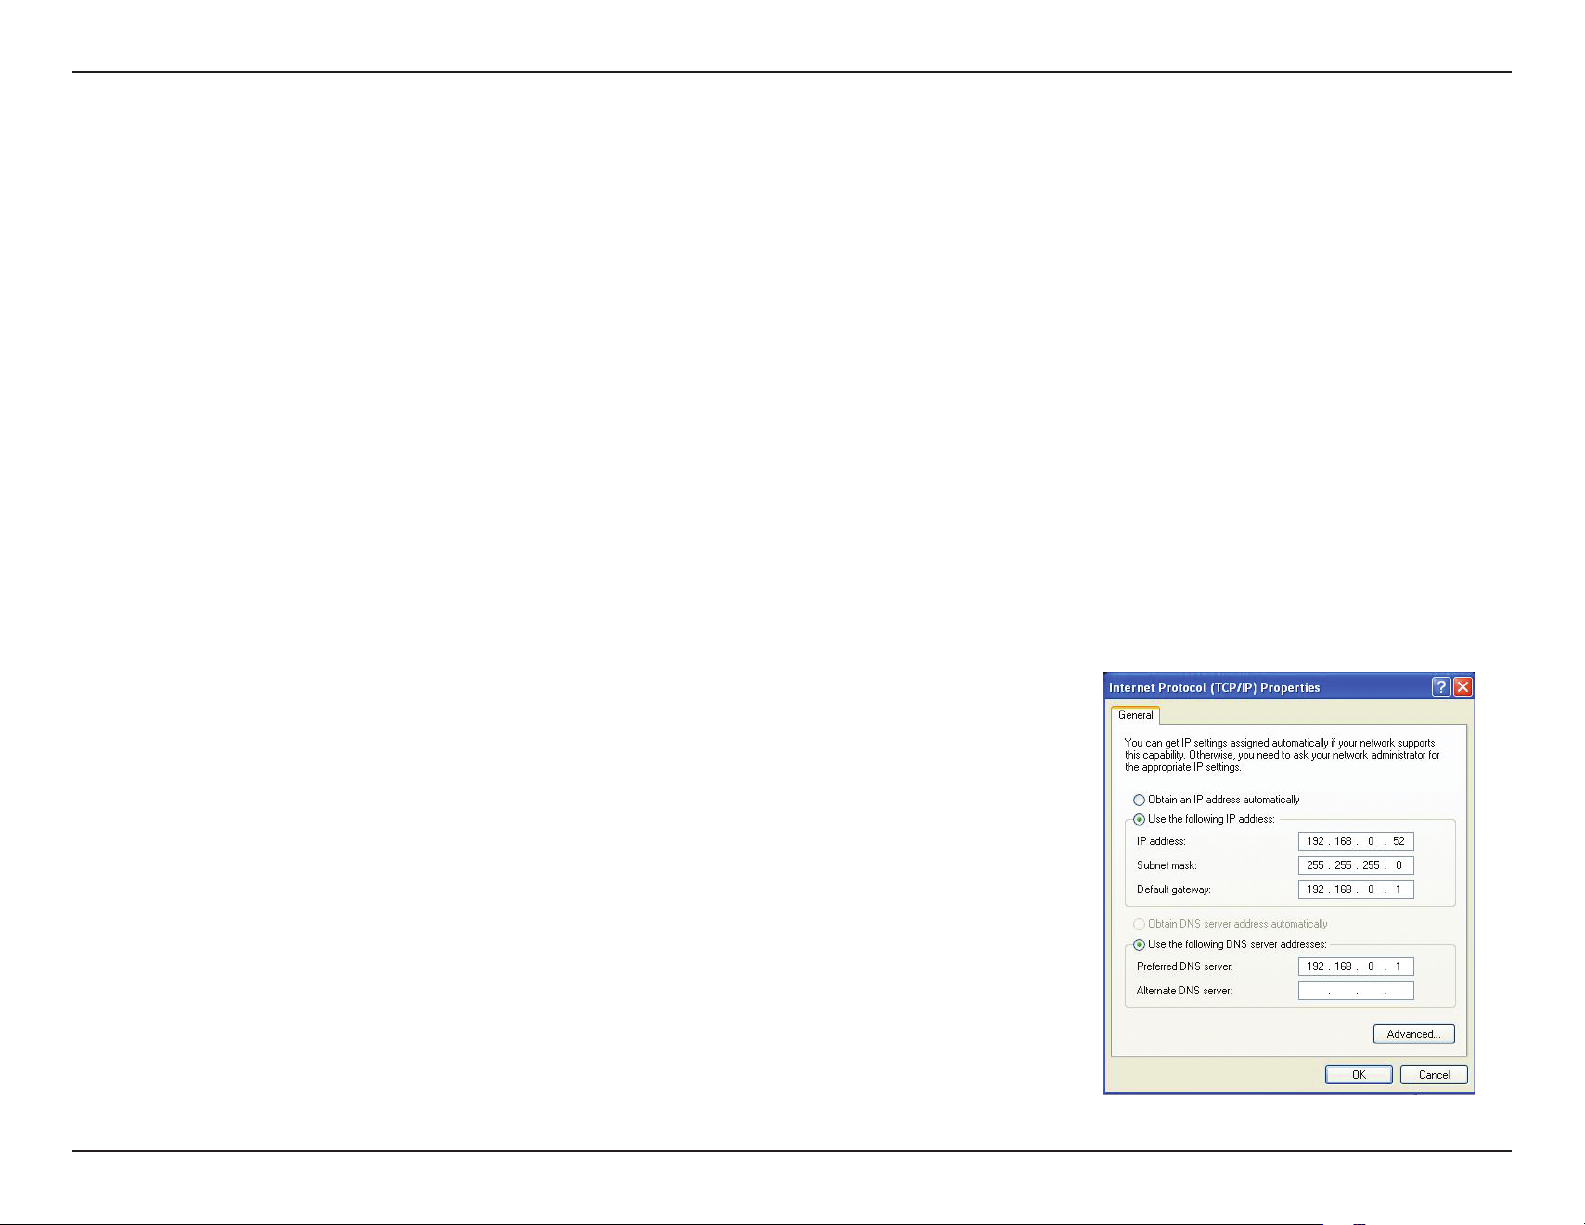
Click Use the following IP address and enter an IP address that is on the same subnet as your
network or the LAN IP address on your router.
Example: If the router´s LAN IP address is 192.168.0.1, make your IP address 192.168.0.X where
X is a number between 2 and 99. Make sure that the number you choose is not in use on the
network. Set Default Gateway the same as the LAN IP address of your router (192.168.0.1).
Set Primary DNS the same as the LAN IP address of your router (192.168.0.1). The Secondary
DNS is not needed or you may enter a DNS server from your ISP.
Step 5
Click OK twice to save your settings.
51D-Link DWR-730 User Manual
Page 56

Appendix C - Warnings and Declarations
Products with 2.4–GHz Wireless LAN Devices France
L’utilisation de cet equipement (2.4GHz wireless LAN) est soumise à certaines restrictions: cet equipement peut être
utilisé à l’interieur d’un batiment en utilisant toutes les frequences de 2400 a 2483.5MHz (Chaine 1–13). Pour une
utilisation en environement exterieur, les frequences comprises entre 2400-2454 MHz (Chaîne 1-9) peuvent être
utilisé. Pour les dernières restrictions, voir http://www.art-telecom.fr.
For 2.4–GHz wireless LAN operation of this product, certain restrictions apply. This equipment may use the
entire–2400–MHz to 2483.5–MHz frequency band (channels 1 through 13) for indoor applications. For outdoor use,
only 2400-2454 MHz frequency band (channels 1-9) may be used. For the latest requirements, see http://www.
art-telecom.fr.
Wireless LAN Module’s Maximum EIRP
Frequency Ranges (MHz) Indoors Outdoors
2400 MHz ~ 2446.5 MHz 10mW Not Permitted
2446.5 MHz ~ 2483.5 MHz 100mW 100mW on private property with Ministry of Defense approval.
52D-Link DWR-730 User Manual
Page 57
D-Link Corporation
Date: January 18, 2012
Declaration of Conformity
We, D-Link Corporation,
Address: No.289, Sinhu 3rd Rd, Neihu District Taipei City 114 Taiwan
Declare under our own responsibility that the product:
Model: DWR-730
Intended use: HSPA+ Mobile Router
complies with the essential requirements of Article 3 of the R&TTE 1999/5/EC Directive, if used
for its intended use and that the following standards has been applied:
1. Health (Article 3.1(a) of the R&TTE Directive)
Applied Standard(s):
EN62311: 2008/ EN 62209-2:2010
2. Safety (Article 3.1(a) of the R&TTE Directive)
Applied Standard(s):
EN 60950-1:2006+A11:2009
3. Electromagnetic compatibility (Article 3.1 (b) of the R&TTE Directive)
Applied Standard(s):
EN 301 489-1 V1.8.1/-7 V1.3.1/-17 V2.1.1/-24 V1.5.1
4. Radio frequency spectrum usage (Article 3.2 of the R&TTE Directive)
Applied Standard(s):
EN 301 511 V9.0.2
EN 301 908-1 V4.2.1
EN 301 908-2 V5.2.1
EN 300 328 V1.7.1
5. EMC Directive (2004/108 /EC)
Applied Standard(s):
EN 55022:2006/A1:2007 Class B ; EN55024:1998/A1:2001/A2:2003
All the reports of the applied standards have the Positive Opinion of Notified Body:
PHONEIX TESTLAB, Königswinkel 10 D-32825 Blomberg, Germany
Identification mark: 0700 (Notified Body) CE(!)
This equipment may be operated in:
AT BE BG CH CY CZ DE DK
EE ES FI FR GB GR HU IE
IT IS LI LT LU LV MT NL
NO PL PT RO SE SI SK TR
Page 58

Appendix D - Technical Specifications
Technical Specifications
Interfaces
802.11g/b wireless, compatible with 802.11n devices
Micro USB port
MicroSD slot
GSM Band (GSM/GPRS/EDGE)
850/900/1800/1900 MHz
Power Class 4 (850/900 MHz)
Power Class 1 (1800/1900 MHz)
UMTS/HSDPA Band
1
850/1900/2100 MHz
900/1900/2100 MHz
Power Class 3 (+24 dBm)
HSUPA Data Rates
2
Downlink: Up to 21.6 Mbps
Uplink: Up to 5.76 Mbps
Wireless Data Rates
2
Up to 150 Mbps in 802.11n mode
6/9/11/12/18/24/36/48/54 Mbps in 802.11g mode
1/2/5.5/11 Mbps in 802.11b mode
Firewall
Built-in NAT
Built-in rewall
Antenna
Internal 3G and Wi-Fi antenna
Battery
1500 mAh rechargeable
LED Status Indicators
SMS
Signal
Battery
Wi-Fi
Dimensions (L x W x H)
90 x 50 x 12 mm
Operating Temperature
-10 to 55 ˚C (14 to 131 ˚F)
Operating Humidity
10% to 90% (Non-condensing)
Wireless Security
64/128-bit WEP (Wired Equivalent Privacy)
WPA & WPA2 (Wi-Fi Protected Access)
1
Supported frequency band is dependent upon regional hardware version.
2
Maximum wireless signal rate derived from IEEE Standard 802.11g specications. Actual data throughput will vary. Network conditions and
environmental factors, including volume of network trafc, building materials and construction, and network overhead, lower actual data throughput
rate. Environmental factors will adversely affect wireless signal range.
Certications
CE
FCC
54D-Link DWR-730 User Manual
Page 59

Appendix E - Warranty
Warnings and Declarations
FCC Regulations:
This device complies with part 15 of the FCC Rules. Operation is subject to the following two conditions: (1) This device
may not cause harmful interference, and (2) this device must accept any interference received, including interference
that may cause undesired operation.
This device has been tested and found to comply with the limits for a Class B digital device, pursuant to Part 15 of the
FCC Rules. These limits are designed to provide reasonable protection against harmful interference in a residential
installation. This equipment generates, uses and can radiated radio frequency energy and, if not installed and used
in accordance with the instructions, may cause harmful interference to radio communications. However, there is no
guarantee that interference will not occur in a particular installation If this equipment does cause harmful interference to
radio or television reception, which can be determined by turning the equipment off and on, the user is encouraged to try
to correct the interference by one or more of the following measures:
-Reorient or relocate the receiving antenna.
-Increase the separation between the equipment and receiver.
-Connect the equipment into an outlet on a circuit different from that to which the receiver is connected.
-Consult the dealer or an experienced radio/TV technician for help.
Changes or modications not expressly approved by the party responsible for compliance could void the user‘s authority
to operate the equipment.
The antenna(s) used for this transmitter must not be co-located or operating in conjunction with any other antenna or
transmitter.
55D-Link DWR-730 User Manual
Page 60

Appendix E - Warranty
RF Exposure Information (SAR)
This device meets the government’s requirements for exposure to radio waves.
This device is designed and manufactured not to exceed the emission limits for exposure to radio frequency (RF) energy
set by the Federal Communications Commission of the U.S. Government.
The exposure standard for wireless devices employs a unit of measurement known as the Specic Absorption Rate,
or SAR. The SAR limit set by the FCC is 1.6W/kg. *Tests for SAR are conducted using standard operating positions
accepted by the FCC with the device transmitting at its highest certied power level in all tested frequency bands.
Although the SAR is determined at the highest certied power level, the actual SAR level of the device while operating
can be well below the maximum value. This is because the device is designed to operate at multiple power levels so as
to use only the poser required to reach the network. In general, the closer you are to a wireless base station antenna,
the lower the power output.
The highest SAR value for the device as reported to the FCC, as described in this user guide, is 1.3 W/kg.
While there may be differences between the SAR levels of various devices and at various positions, they all meet the
government requirement.
The FCC has granted an Equipment Authorization for this device with all reported SAR levels evaluated as in
compliance with the FCC RF exposure guidelines. SAR information on this device is on le with the FCC and can be
found under the Display Grant section of www.fcc.gov/oet/ea/fccid after searching on FCC ID: KA2WR730A1
This device has been tested and meets the FCC RF exposure guidelines.
56D-Link DWR-730 User Manual
 Loading...