

Page 1
GVC-3000 User Guide
1
GVC-3000
D-Link Video Phone
User Guide
(Updated for Firmware revision GVC-3000-0.9.8)
Page 2

GVC-3000 User Guide
Table of Contents
1. Product Overview ............................................................................................................................... 4
1.1. Software Features ....................................................................................................................... 5
1.2. Hardware Overview ................................................................................................................... 7
1.2.1. Keypad Overview ................................................................................................................. 8
1.2.2. LED Overview ................................................................................................................... 10
2. Make your Connections .................................................................................................................. 11
2.1. Internal ..................................................................................................................................... 11
2.2. External .................................................................................................................................... 12
3. Before you Begin ............................................................................................................................. 13
3.1. On-Screen-Display ................................................................................................................... 13
4. Using Video Phone ........................................................................................................................... 14
4.1. Privacy Status Icons ................................................................................................................. 14
4.2. Missed Call Icon ....................................................................................................................... 15
4.3. Settings Button ......................................................................................................................... 15
4.4. View Button ............................................................................................................................. 16
4.4.1. Making Calls through Phone Book .................................................................................... 16
4.4.2. Making Calls through Speed Dial ...................................................................................... 17
4.4.3. Making Calls through Call History .................................................................................... 17
4.4.4. Voice Mail Message Summary .......................................................................................... 18
5. Managing Contacts ........................................................................................................................... 20
5.1. Phone Book .............................................................................................................................. 20
5.1.1. Adding a Phone Book entry ............................................................................................... 20
5.1.2. Modifying Phone Book entries .......................................................................................... 23
5.2. Speed Dial ................................................................................................................................ 24
5.2.1. Adding a Speed Dial entry ................................................................................................. 24
5.2.2. Modifying Speed Dial entries ............................................................................................ 25
6. Get the best out of your Video Phone .............................................................................................. 26
6.1. Lighting .................................................................................................................................... 26
6.2. LCD viewing angle ................................................................................................................... 26
6.3. Movement ................................................................................................................................. 26
6.4. Sound ........................................................................................................................................ 26
6.5. Connecting to a TV ................................................................................................................. 27
6.6. Before making a Call ................................................................................................................ 27
7. Making and Answering Phone Calls ................................................................................................ 28
7.1. Handset and Speaker modes ..................................................................................................... 28
7.2. Making Calls ............................................................................................................................ 28
7.3. Receiving Calls ........................................................................................................................ 31
7.4. Ending a Call ............................................................................................................................ 31
7.5. Call Features during a Call ....................................................................................................... 32
7.5.1. Call Waiting ....................................................................................................................... 32
7.5.2. Switch between Calls ........................................................................................................ 32
7.5.3. Call Hold ............................................................................................................................ 32
7.5.4. Call Transfer ....................................................................................................................... 32
7.5.5. Mute audio and Freeze video ............................................................................................. 33
7.5.6. Increase and Decrease Volume .......................................................................................... 33
7.5.7. Full Screen / Normal View mode ....................................................................................... 34
2
Page 3

GVC-3000 User Guide
7.5.8. Self / Remote toggle ........................................................................................................... 34
7.5.9. LCD / TV toggle ................................................................................................................ 34
7.5.10. Switching between Handset and Hands free modes ......................................................... 34
8. Configuration Guide ......................................................................................................................... 35
8.1. Before starting Network Setup ................................................................................................. 35
8.1.1. How you are connected to the Internet ............................................................................... 35
8.1.2. Pre-requisites to connect to your network .......................................................................... 35
8.2. Network Configuration ............................................................................................................ 36
8.2.1. Network Address Configuration ........................................................................................ 36
8.2.2. DNS Configuration ............................................................................................................ 39
8.2.3. Network Type ..................................................................................................................... 40
8.2.4. NAT Traversal .................................................................................................................... 41
8.2.5. QoS Configuration ............................................................................................................. 42
8.2.6. Network Check ................................................................................................................... 43
8.3. SIP Configuration ..................................................................................................................... 44
8.3.1. SIP Advanced Configuration ............................................................................................. 45
8.3.2. SIP Other Configuration ..................................................................................................... 46
8.3.3. MWI Configuration ............................................................................................................ 47
8.4. Managing Call Features ........................................................................................................... 49
8.5. Voice Configuration ................................................................................................................. 51
8.6. Video Configuration ................................................................................................................. 53
8.6.1. Video Codec Configuration ............................................................................................... 53
8.6.2. Display Properties .............................................................................................................. 54
8.7. Time Configuration .................................................................................................................. 55
8.7.1. Manual mode ...................................................................................................................... 55
8.7.2. SNTP .................................................................................................................................. 55
8.8. Access Information .................................................................................................................. 56
8.9. System Information .................................................................................................................. 57
8.10. Factory Reset .......................................................................................................................... 58
8.11. Save Configuration ................................................................................................................. 59
8.12. Logout ..................................................................................................................................... 60
8.13. Software Upgrade .................................................................................................................... 61
8.13.1. Automatic mode ............................................................................................................... 61
8.13.2. Manual mode .................................................................................................................... 62
8.13.3. Server Configuration ........................................................................................................ 63
9. Troubleshooting ............................................................................................................................... 66
3
Page 4

GVC-3000 User Guide
1. Product Overview
D-Link Video Phone GVC-3000 is a fully featured, easy-to-use, SIP based Video
and Voice over IP phone, typically used in making Video and Voice calls over the IP
network; with an excellent quality resulting in a low cost, long distance Visual and
Voice communication.
It has an inbuilt Camera and 5” color LCD screen for capturing & displaying
Video with the flexible options to user. D-Link Video Phone supports all the latest
Industry Standard Video Codec such as H.264, H.263, H.263+ and MPEG-4 along
with the Audio Codec G.711 μ-Law and A Law, G.723.1 and G.729 a/b. Since DVP
is a standalone device, you do not need a computer or television to video
conference over the Internet.
With its advanced Jitter Buffer Management and perfect Lip Synchronization,
D-Link Video Phone brings together toll quality voice and high quality video to the
users delight. It can send and receive Video at CIF or QCIF resolution, up to 30
frames per second. Through its On-Screen-Display [OSD), configuring the device,
making and receiving calls can be done in an extremely user friendly manner.
D-Link Video Phone features a very intuitive user interface and keypad,
making it simple to answer incoming videophone calls or initiate new ones. Browse
through all names and numbers in the built-in phone book directory.
A Setup Wizard guides you step-by-step through the setup process and makes
it easy to personalize and change your options.
Be there real time, anytime. You won’t miss a moment with your friends,
family, and colleagues with the D-Link Video Phone.
4
Page 5

GVC-3000 User Guide
1.1. Software Features
1) Video Features
a) Encoding and Decoding
i) H.264
ii) H.263 and H.263+
iii) MPEG-4
b) Audio and Video Lip Synchronization
c) IP Level TOS
d) Supports CIF and QCIF resolutions
e) Up to 30 frames per second
f) Picture-in-Picture or Full Screen View
g) LCD / TV (NTSC / PAL) out
2) Audio Features
a) Encoding and Decoding
i) G.711 μ-Law and A Law
ii) G.723.1 5.3 K bps
iii) G.729 AB
b) VAD and CNG
c) IP Level TOS
d) Adaptive Jitter Buffer
e) Automatic Gain/Attenuation control
f) G.167 Echo Cancellation for Hands free Telephony
5
Page 6

GVC-3000 User Guide
3) Call Features
a) Two Line Call Support
b) Call Hold & Consultation Call Hold
c) Unattended & Attended Call Transfer
d) Call Forward (Unconditional, On Busy & No Answer)
e) Call Waiting
f) Call History (Dialed, Received and Missed)
g) Mute Voice / Video
h) Phone Book (up to 300 entries)
i) Speed Dial
j) E.164 Dialing
k) Country Specific Tones
l) Static IP / DHCP / PPPoE support
4) Management
a) On Screen Display support for configuration
b) Software Upgrade using HTTP and FTP
5) Protocols:
a) SIP (RFC3261) and SDP (RFC2327)
b) SIP REFER Method (RFC3515 )
c) RTP and RTCP (RFC1889 and 3550)
d) RTP Payload Format for H.263 (RFC2190)
e) RTP Payload Format for H.263 -1998 (RFC2429)
f) RTP Payload Format for MPEG-4 (RFC3640)
g) RTP Payload Format for H.264 (RFC3984)
h) DTMF TX/RX support using Out of Band (RFC2833)
i) STUN (RFC3489) and IP Sharing Support for NAT
j) SNTP (RFC2030) for device time synchronization
k) DNS / SRV (RFC3263)
l) DHCP (RFC2131), PPPoE (RFC2516), FTP (RFC959), HTTP 1.1 clients
6
Page 7
GVC-3000 User Guide
1.2. Hardware Overview
Package Contents:
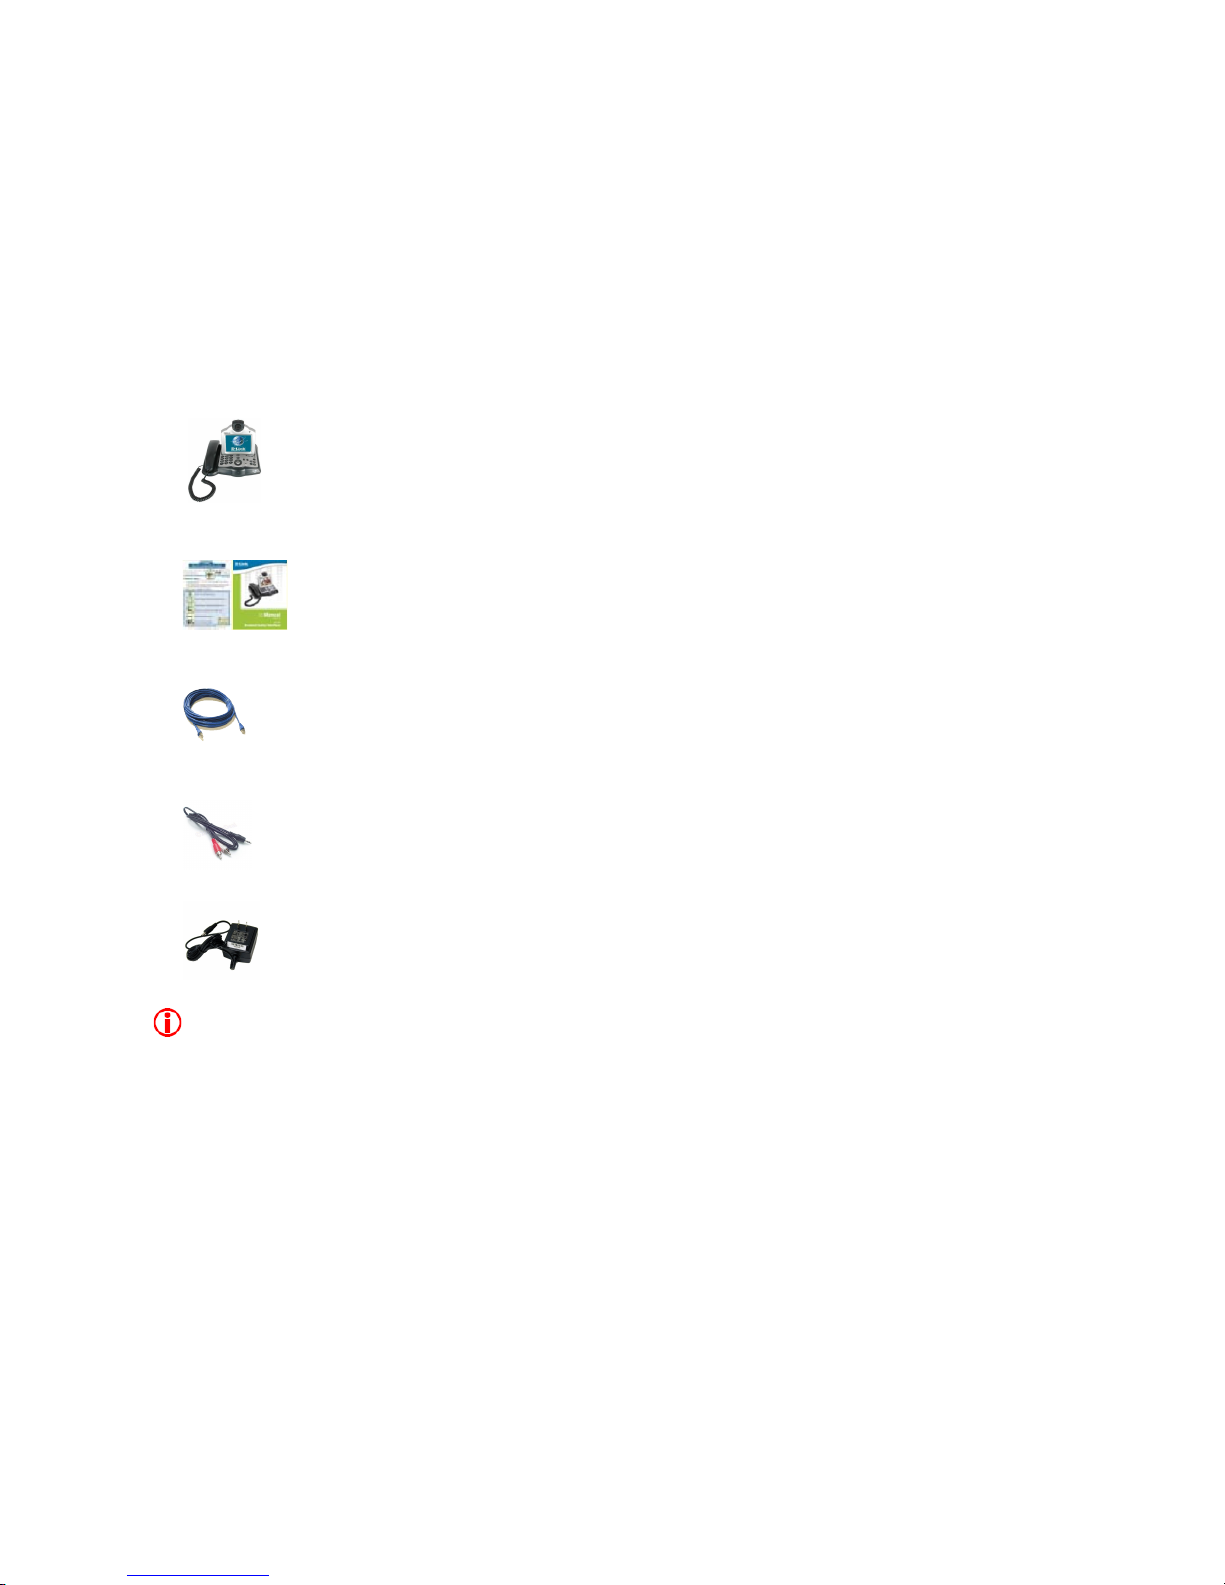
The following accessories are included with your phone. Carefully unpack your
system and check the supplied accessories with this list. In case of any
discrepancy, please contact your reseller.
1. D-Link Video Phone (GVC – 3000)
2. Quick Installation Guide & User Manual
3. Ethernet (CAT5 UTP / Straight through) Cable
4. Standard Composite RCA Audio/Video Cable
5. 5V DC, 4A Power Adapter
Note: Using a power supply with a different voltage rating damages the product and voids the
warranty.
7
Page 8
GVC-3000 User Guide
1.2.1.Keypad Overview
8
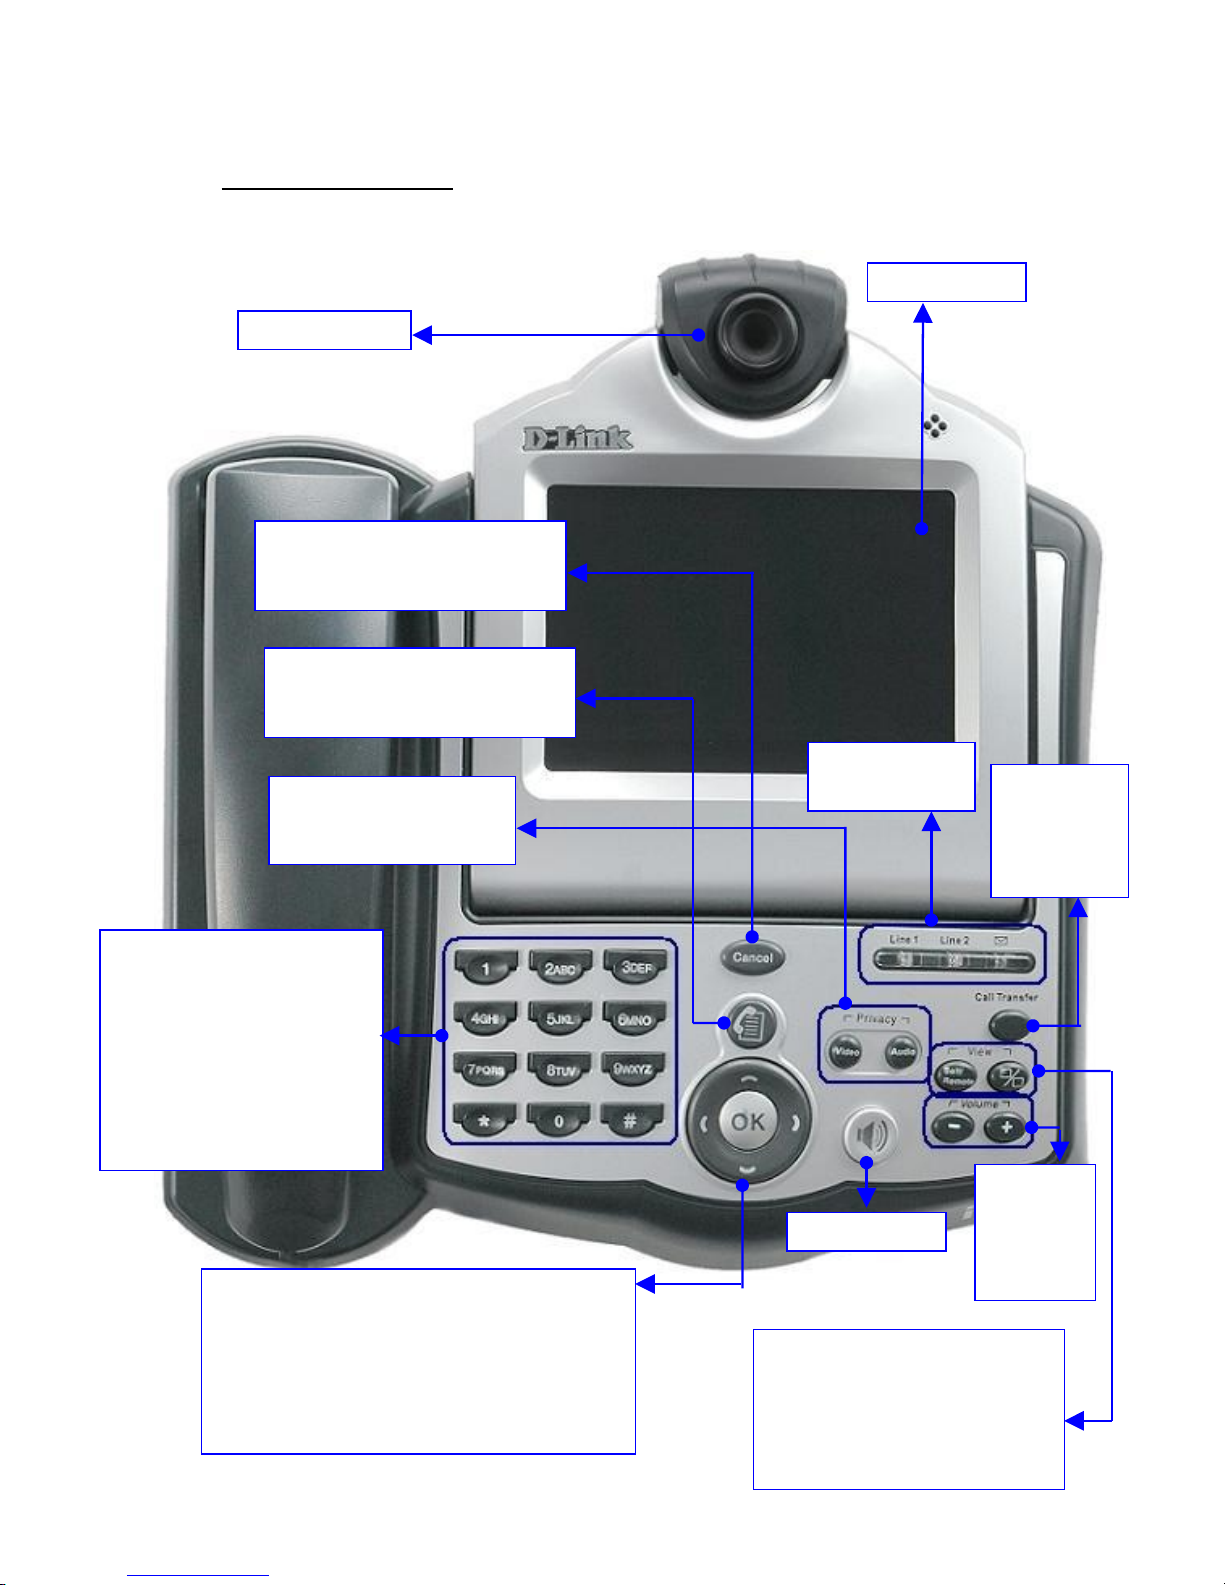
Video Camera
LCD Display
Speaker Key
Arrows: Used to move the Position of
the on-screen cursor. Arrow keys are
used to traverse from one field to other
in the user interface screens and move
between characters while entering text.
OK: Used to make a selection in the
user interface screens
Keys to
increase
and
decrease
Volume
Cancel: Deletes the
characters to the left of the
cursor while entering text
View:
Opens a screen with
Phonebook, Speed dial and
Call History dialing options
Line1, Line 2
Message LED
Alpha-numeric Keypad:
Used while making a call
or when entering text to
configure the device.
Pressing ‘1’ multiple
times can be used to
enter special characters.
Space can be entered by
pressing ‘0’ twice.
Privacy: Used to
stop audio or video
transmission
Self / Remote: Toggles
between your local view
and remote party’s view.
Full-screen / Standard:
Toggles between full-screen
and standard view
Transfer:
Used to
transfer
existing
Page 9

GVC-3000 User Guide
Alphanumeric keypad is used for entering alphabets, numeric information
and special characters based on the context. On the fields accepting special
characters, key ‘1’ can be pressed multiple times to enter special characters.
Key ‘0’ can be used to enter ‘space’ by pressing twice in the relevant fields.
Transfer button is used for transferring a call to a third party.
Cancel is used to reject an incoming call. It can also be used as a backspace
while entering information in a text box or to move the cursor to “Cancel” soft
key in the respective screen when text box is empty. It can also be used to
move back to the previous screen canceling the modifications done in the
screen.
Contact button brings up the “View” screen (A menu screen which would lead
to the phone book/speed dial/call history dialing/Voice Mail summary screen).
If you happened to be viewing one of the “Phone Book” or, ”Speed Dial” or, “Call
History” screens, the respective screen would be shown.
The directional arrows are used to navigate through the interface. While
entering alphanumeric information the left and right arrows is used for
traversing within the text entered.
OK button is used to make a selection or to act as “Apply / Ok / Call” soft
button in the user interface screens.
Speaker button is used to turn the speaker phone on and off. It can also be
used to receive an incoming call or to disconnect an active call.
Self/Remote Toggle button toggles the remote camera view and local camera
view.
9
Page 10

GVC-3000 User Guide
Full Screen/Standard View button toggles between the full screen and
standard display modes.
Privacy buttons enable and disable audio and video transmission, only during
the call.
Volume buttons are used to increase and decrease ringer and speaker volumes
1.2.2.LED Overview
Line-1 LED and Line-2 LED would depict the activity on the lines respectively.
Line LED in a blinking state indicates that the Video Phone is trying to
connect your call or Call is in an in-active state.
Line LED in a glowing state indicates that the call is in connected state on
that line.
Message Waiting LED would glow depicting that there are new voice mails
at your voice mail server.
10
Page 11
GVC-3000 User Guide
2. Make your Connections
2.1. Internal
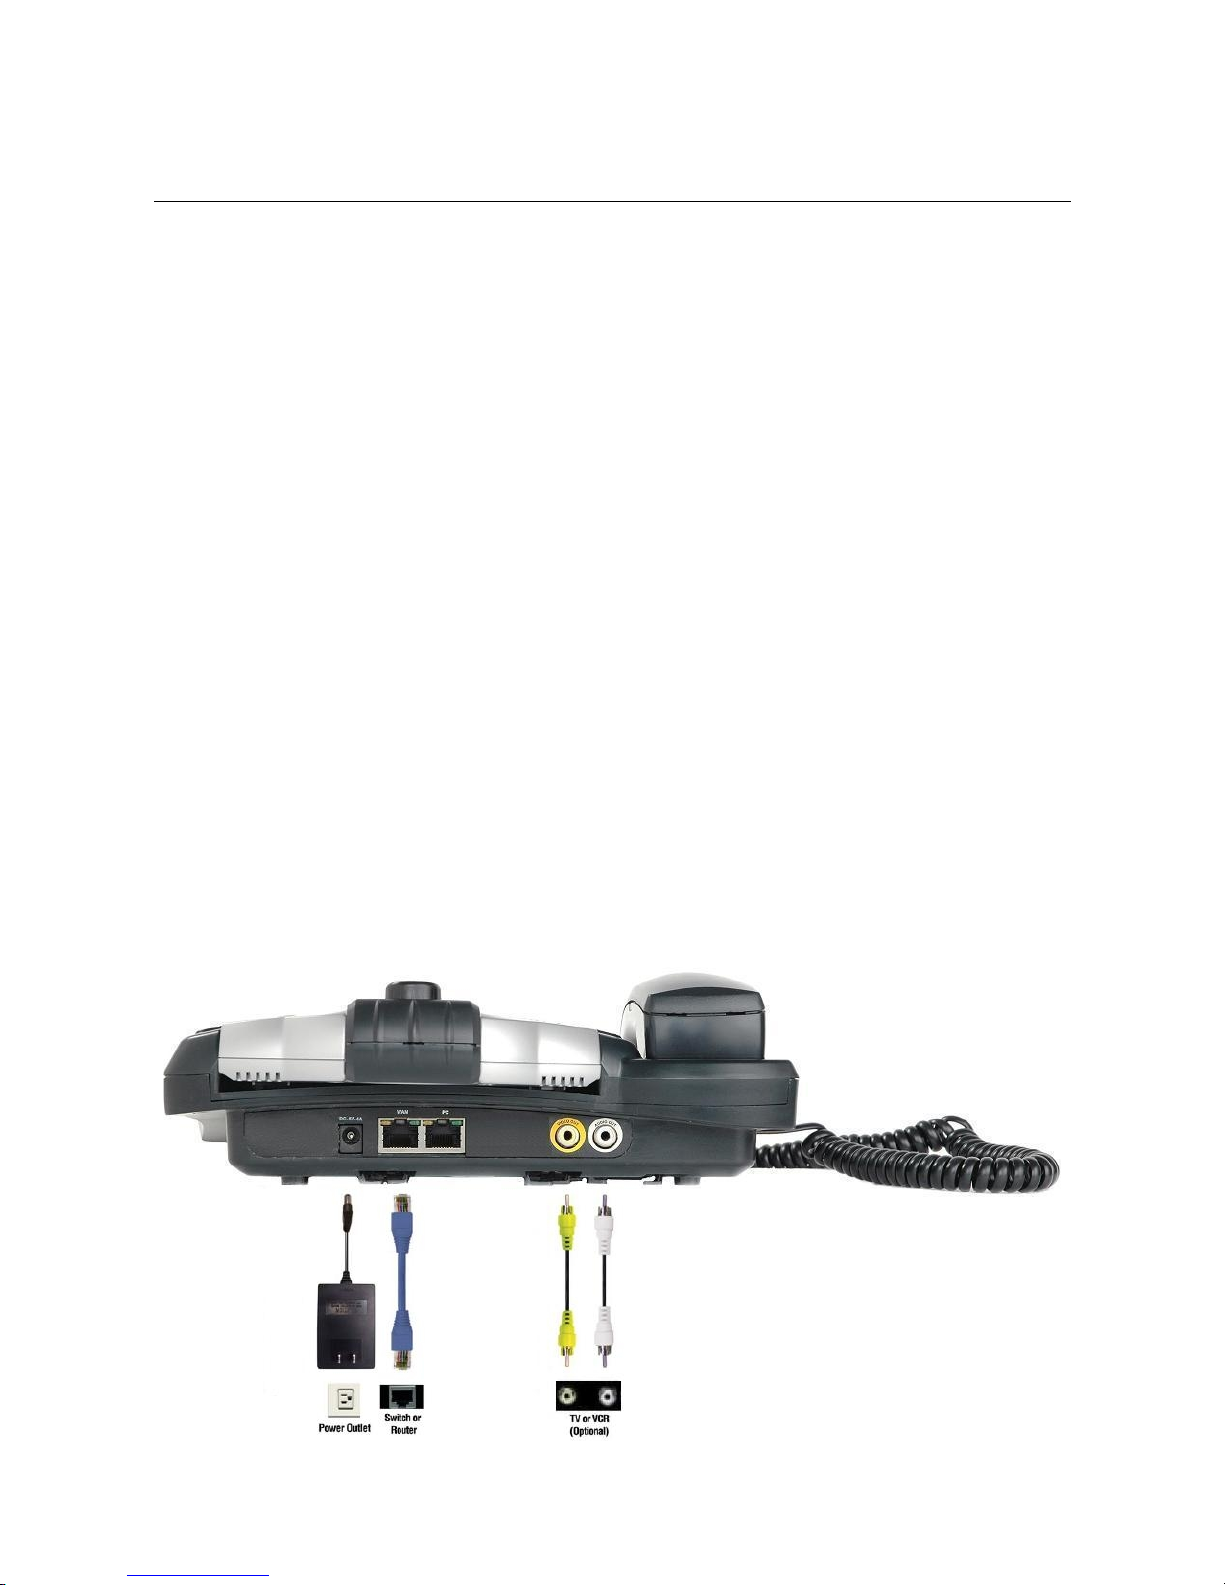
Place GVC-3000 in a location where you can easily connect to a power outlet, and
to your router or gateway.
Plug the supplied AC power cable into an AC outlet and then connect the other
end to the GVC-3000.
Attach the supplied Ethernet cable to the port labeled LAN on the GVC-3000
and connect the other end to your Ethernet network device. GVC-3000 has an
additional Ethernet port for connecting any device (i.e.; PC) to the network,
working transparently as a switch.
Optional: If you want to use a television instead of the built in TFT video
display screen, connect the supplied yellow and white RCA cables to the yellow
and white RCA connectors on the GVC-3000 and to the matching audio/video
jacks on the television or VCR.
Note: You must toggle the TV/LCD switch on the side on the unit if you want to use
the television output.
11
Page 12
GVC-3000 User Guide
2.2. External
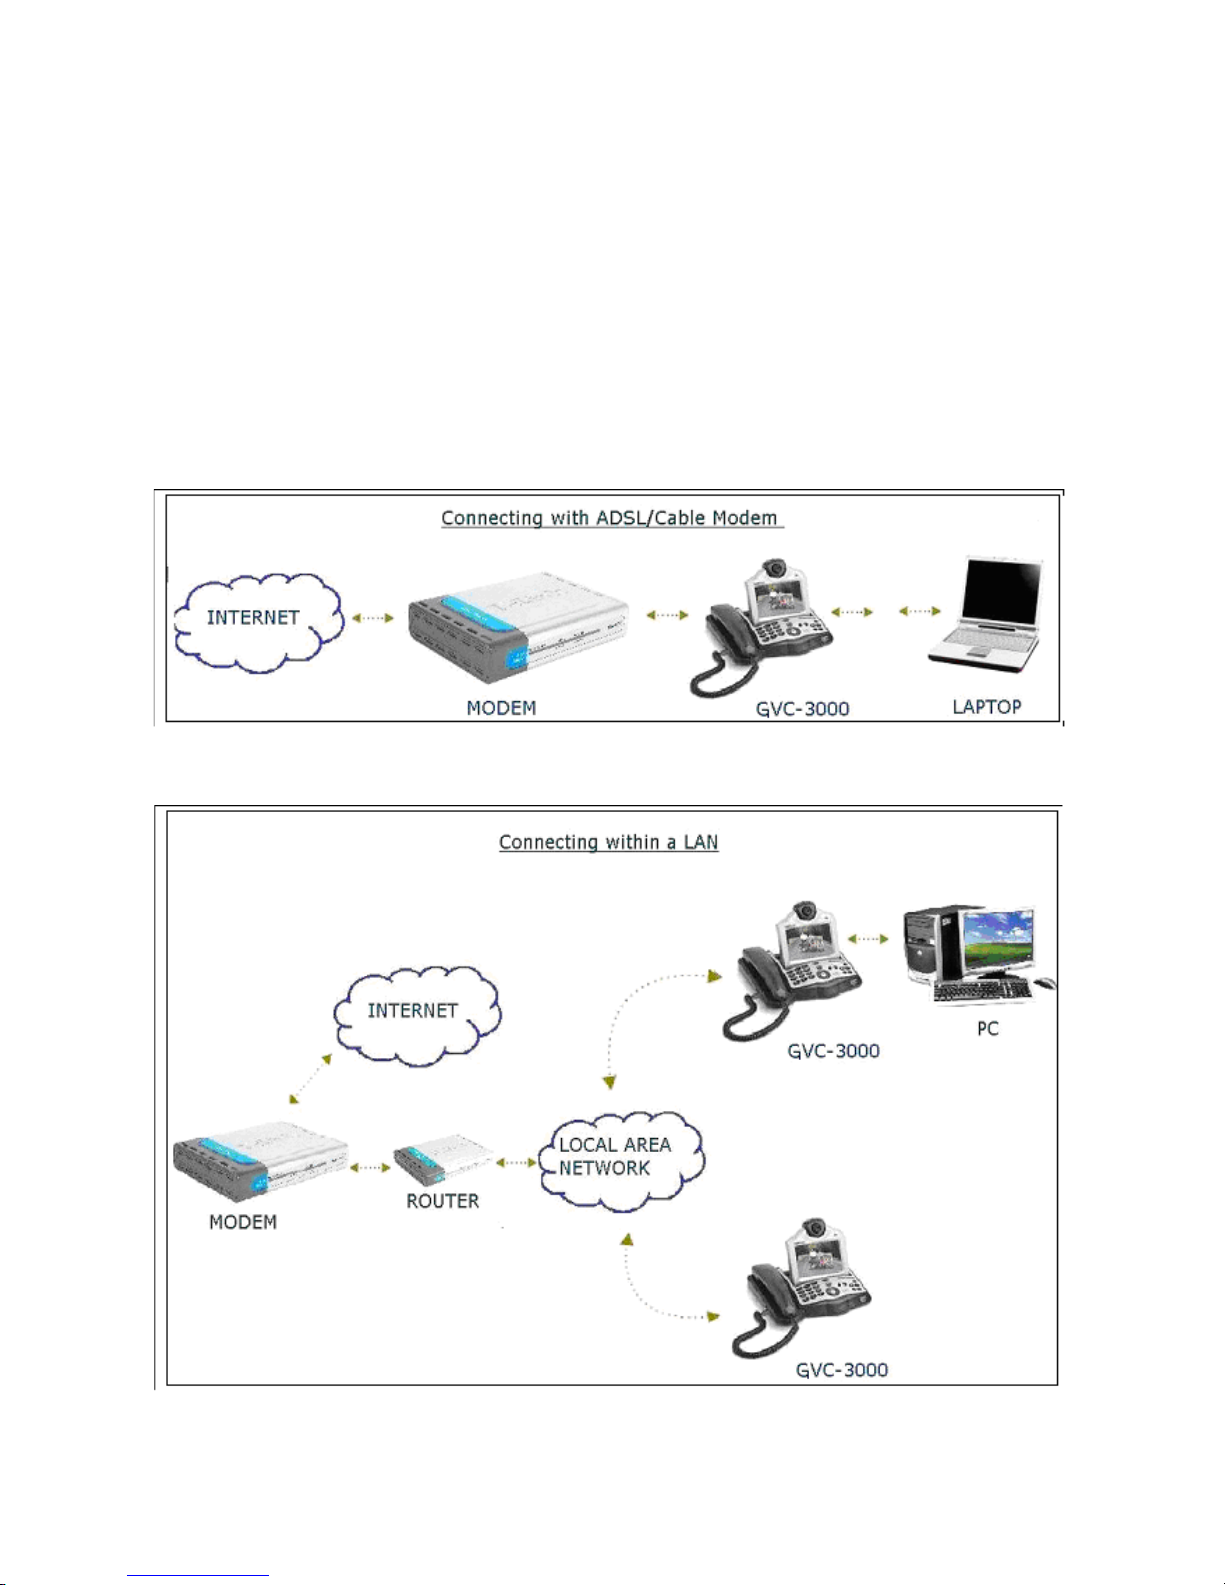
If you are sharing your broadband connection with a PC, use additional
Ethernet (CAT5 UTP) cable to connect your Video Phone’s port labeled PC to your
PC. Connect your Video Phone to a router or residential gateway depending on
your network. When you have completed the connections, your connected Video
Phone should look similar to this:
12
Page 13

GVC-3000 User Guide
3. Before you Begin
1) Network Connectivity
a) Using the GVC - 3000 requires a Broadband Internet connection.
b) If you are sharing the Internet connection with another device (such as a
PC), you will also need a broadband router or residential gateway.
2) Register with a SIP server
a) Obtain a SIP account to register with a SIP server, if you do not have one.
b) If you do not have a SIP account you can still use GVC - 3000 to make
calls, provided the contact you are trying to reach has an E.164 number or
you know the contacts’ complete URI ( SIPID @ Domain : Port).
3.1. On-Screen-Display
D-Link Video Phone is enriched with On-Screen-Display [OSD) on built in 5” Color
LCD through which, configuring the device, making and receiving calls can be
done in an extremely user friendly manner.
13
Page 14
GVC-3000 User Guide
4. Using Video Phone
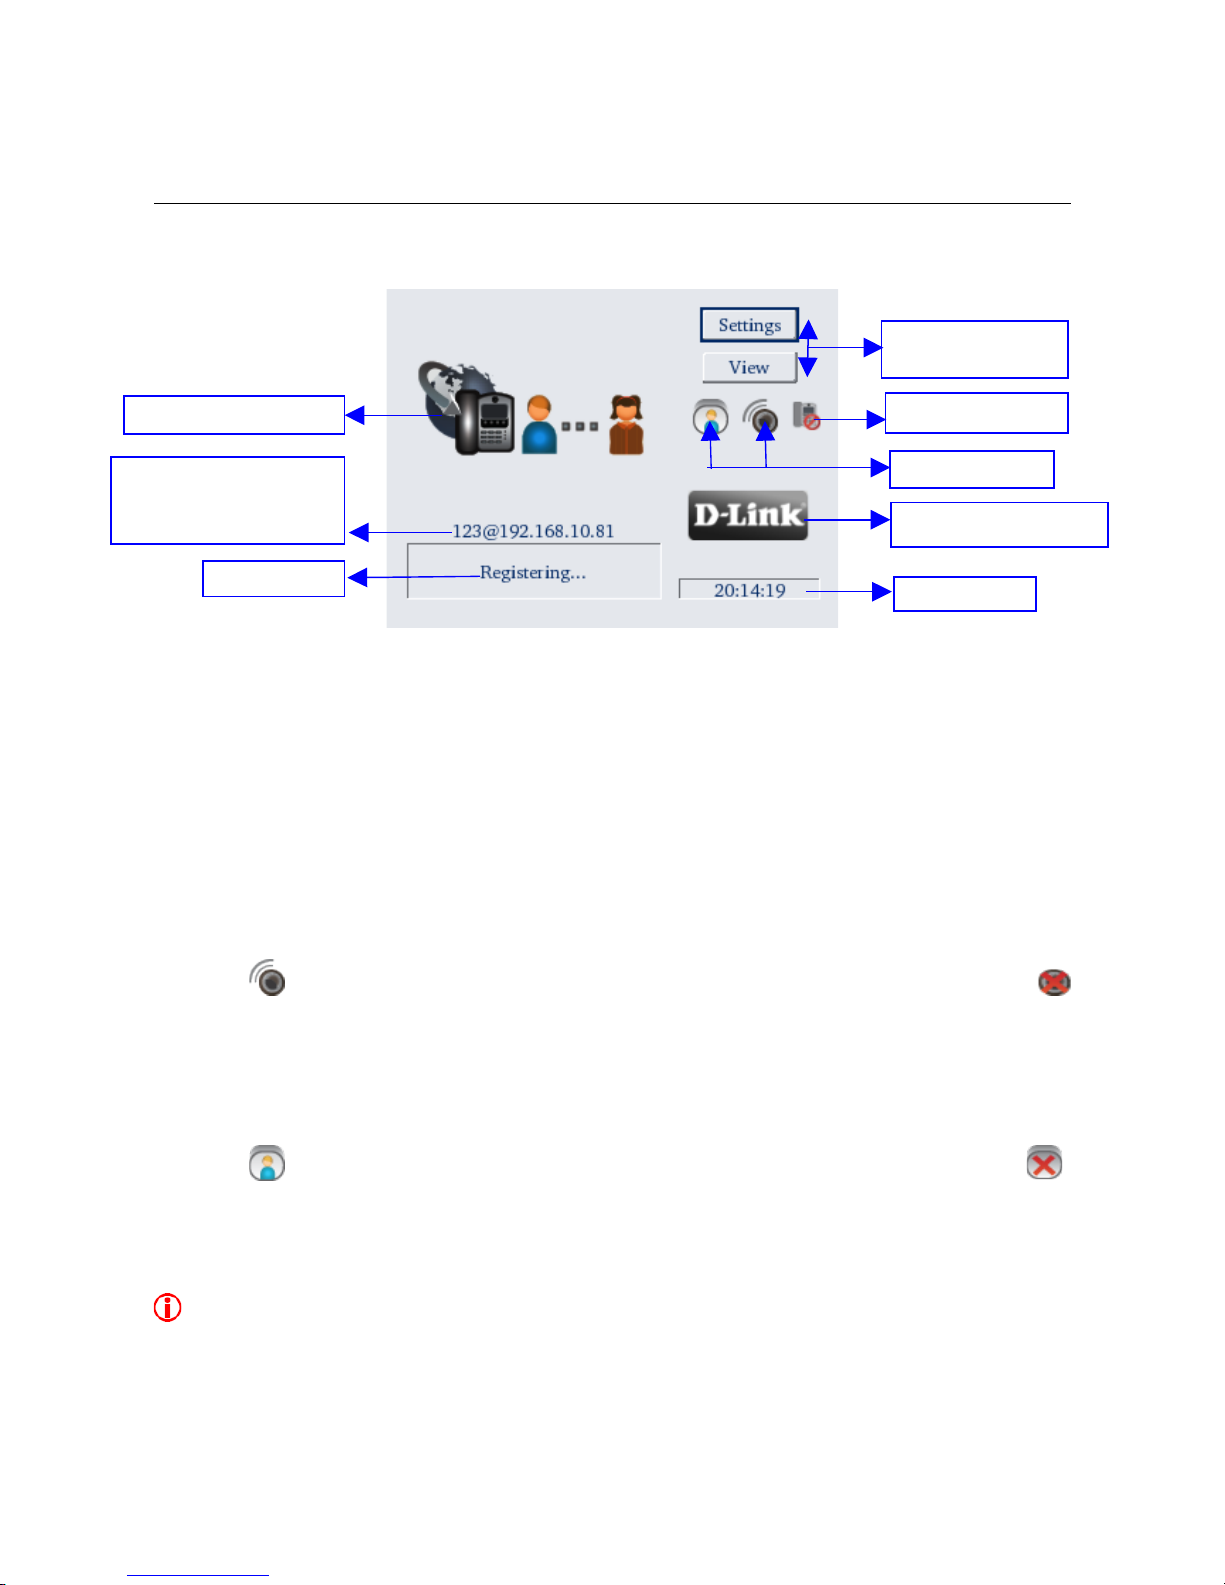
When powered on and after completing the Setup Wizard, the screen above will
appear. The larger main Window displays the party you are calling when the call
is connected. The smaller Self-View Window displays the self-view. To toggle the
images that is in the main Window and Self-View Window press the
Self/Remote key on the keypad.
4.1. Privacy Status Icons
Audio If you select Audio Privacy by pressing the Audio Privacy key,
the other party will not hear you and the audio icon will
appear with a cross through it
If Audio Privacy is disabled by pressing the same key again,
the cross would not be present.
Video If you select Video Privacy by pressing the Video Privacy
button, the other party will not see you and the video icon will
appear with a cross through it.
If Video Privacy is disabled, the cross would not be present.
Privacy icons will appear only during a call. Video and Audio privacy keys on the keypad
do not have any effect when the device is not in the call.
14
LARGER WINDOW
SMALLER WINDOW
Settings and
Status bar
Device details:
Your ‘SIP’ User ID' @
device IP
Privacy Icons
Missed Call Icon
Page 15
GVC-3000 User Guide
Note: If video privacy is enabled in the “Video Properties” screen, your phone would
initiate a normal speech call. The video icon will appear with a cross through it. You can
change video privacy status by pressing the “Video Privacy” key.
4.2. Missed Call Icon
If you have a missed call, a missed call icon would appear on your main
screen to indicate about the missed call. Once you view the call history screen (See
Call History Call Section), the missed call icon would disappear.
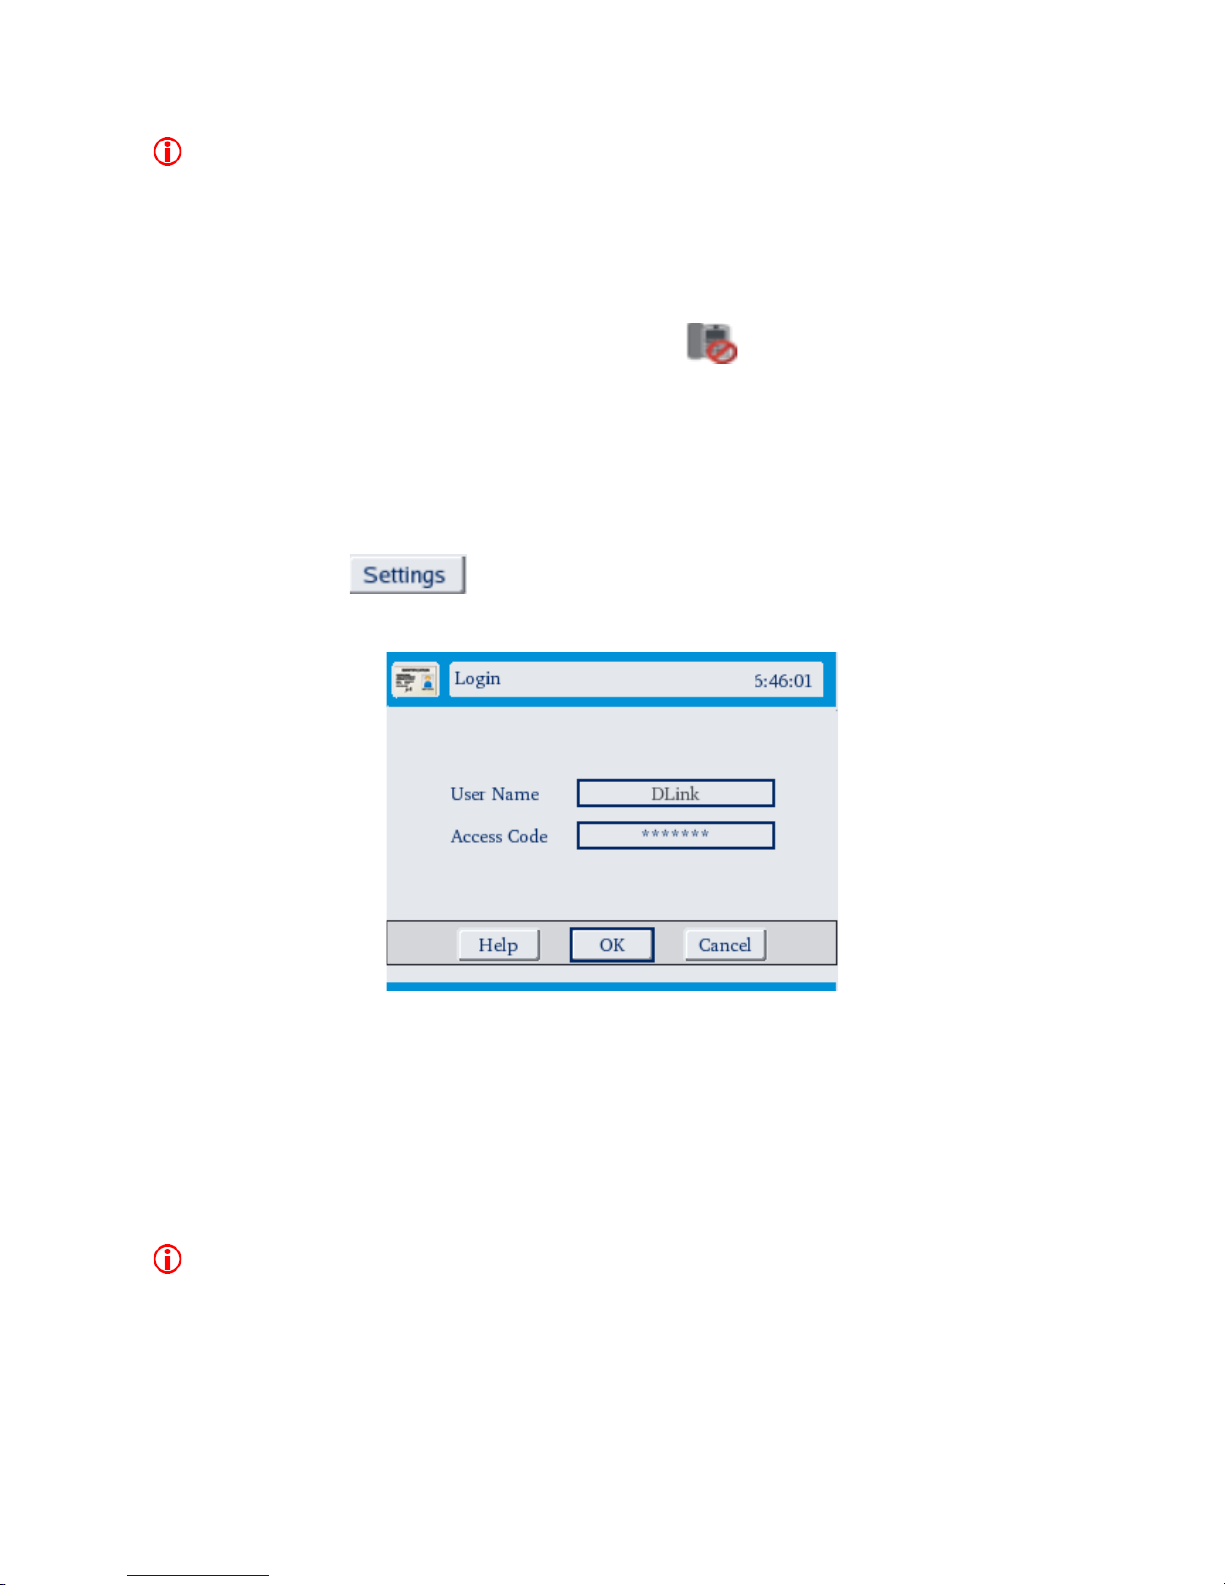
4.3. Settings Button
On pressing the button on the Main Page, the “Login” screen would
come up.
The access code would have to be provided if you want to login for changing the
configuration of the device. Once you provide the correct access code, you would
get the configuration screen. You are now ready for configuring the device!!! While
configuring, if you get a call, your phone is capable of preserving your changes
until you have finished your call.
Caution!!! While pressing the “Settings” button if you are in a call, you would lose all the
previous changes that were not saved.
15
Page 16
GVC-3000 User Guide
4.4. View Button
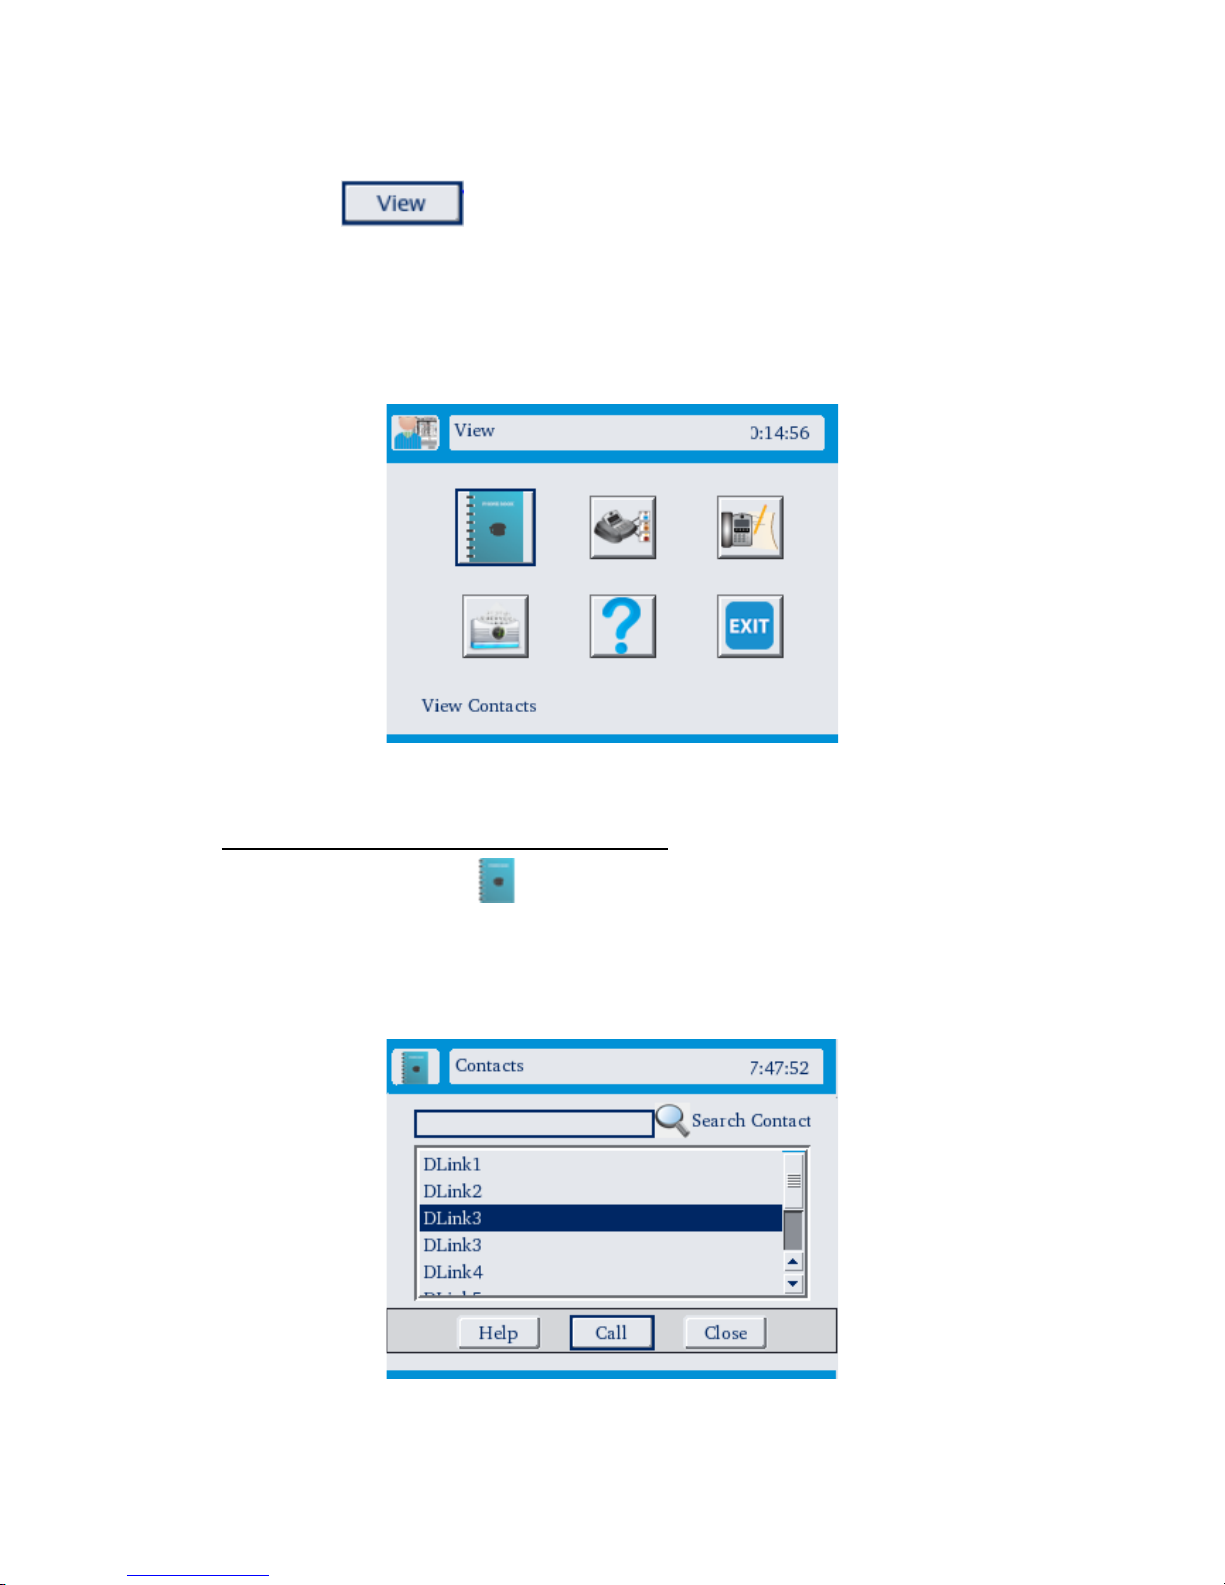
On pressing the button, the view screen would come up, which would
give you a variety of options to make calls the easier way. You can make a call
through phone book or through speed dial list (a mechanism where you can store
most frequently used numbers so that you can dial more easily) or through call
history.
View screen can also be obtained by pressing the “View” key on the keypad.
4.4.1.Making Calls through Phone Book
Press the phone book icon. The phone book page would appear. Select the
contact that you wish to call. Press the “Call” button. Please refer section 5.1.1 for
adding a phone book entry.
16
Page 17
GVC-3000 User Guide
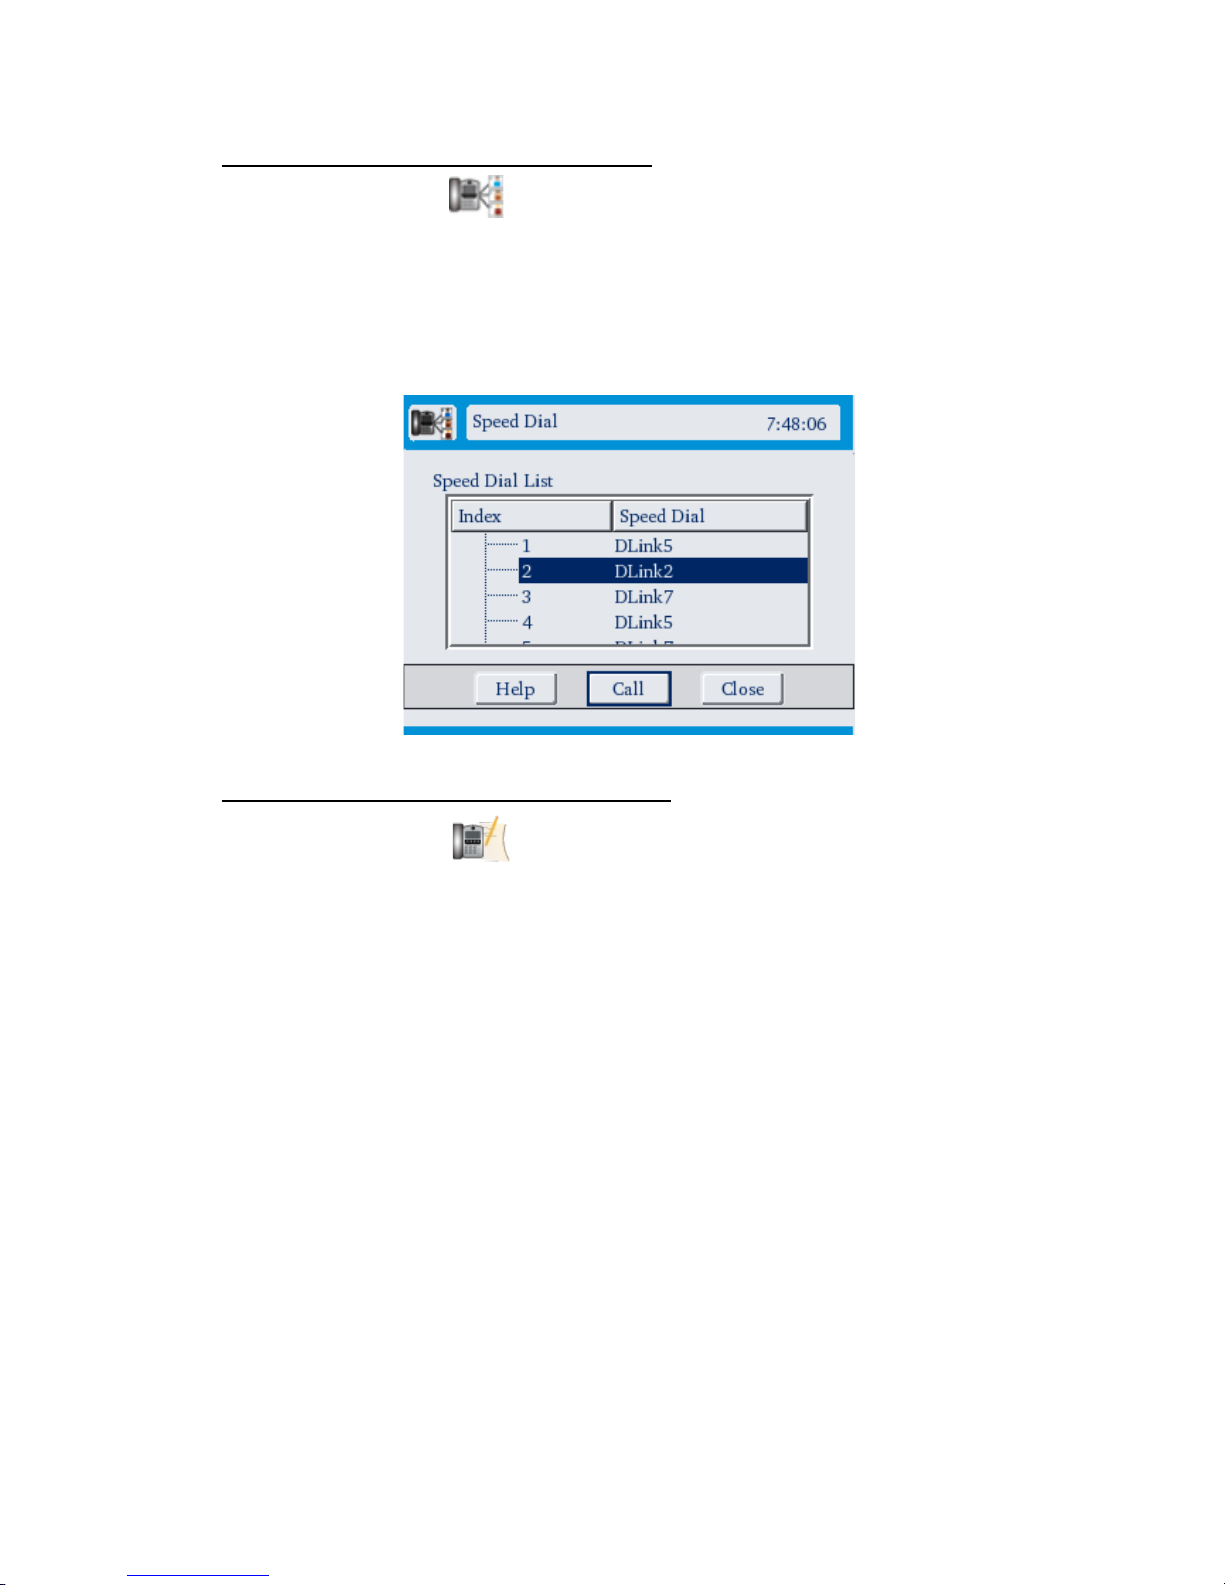
4.4.2.Making Calls through Speed Dial
Press the speed dial icon. The speed dial page would appear. You can scroll
to a specific contact that you wish to call and press the “Call” button or you can
press the index digit on the keypad to initiate a call for the corresponding “Speed
Dial”.
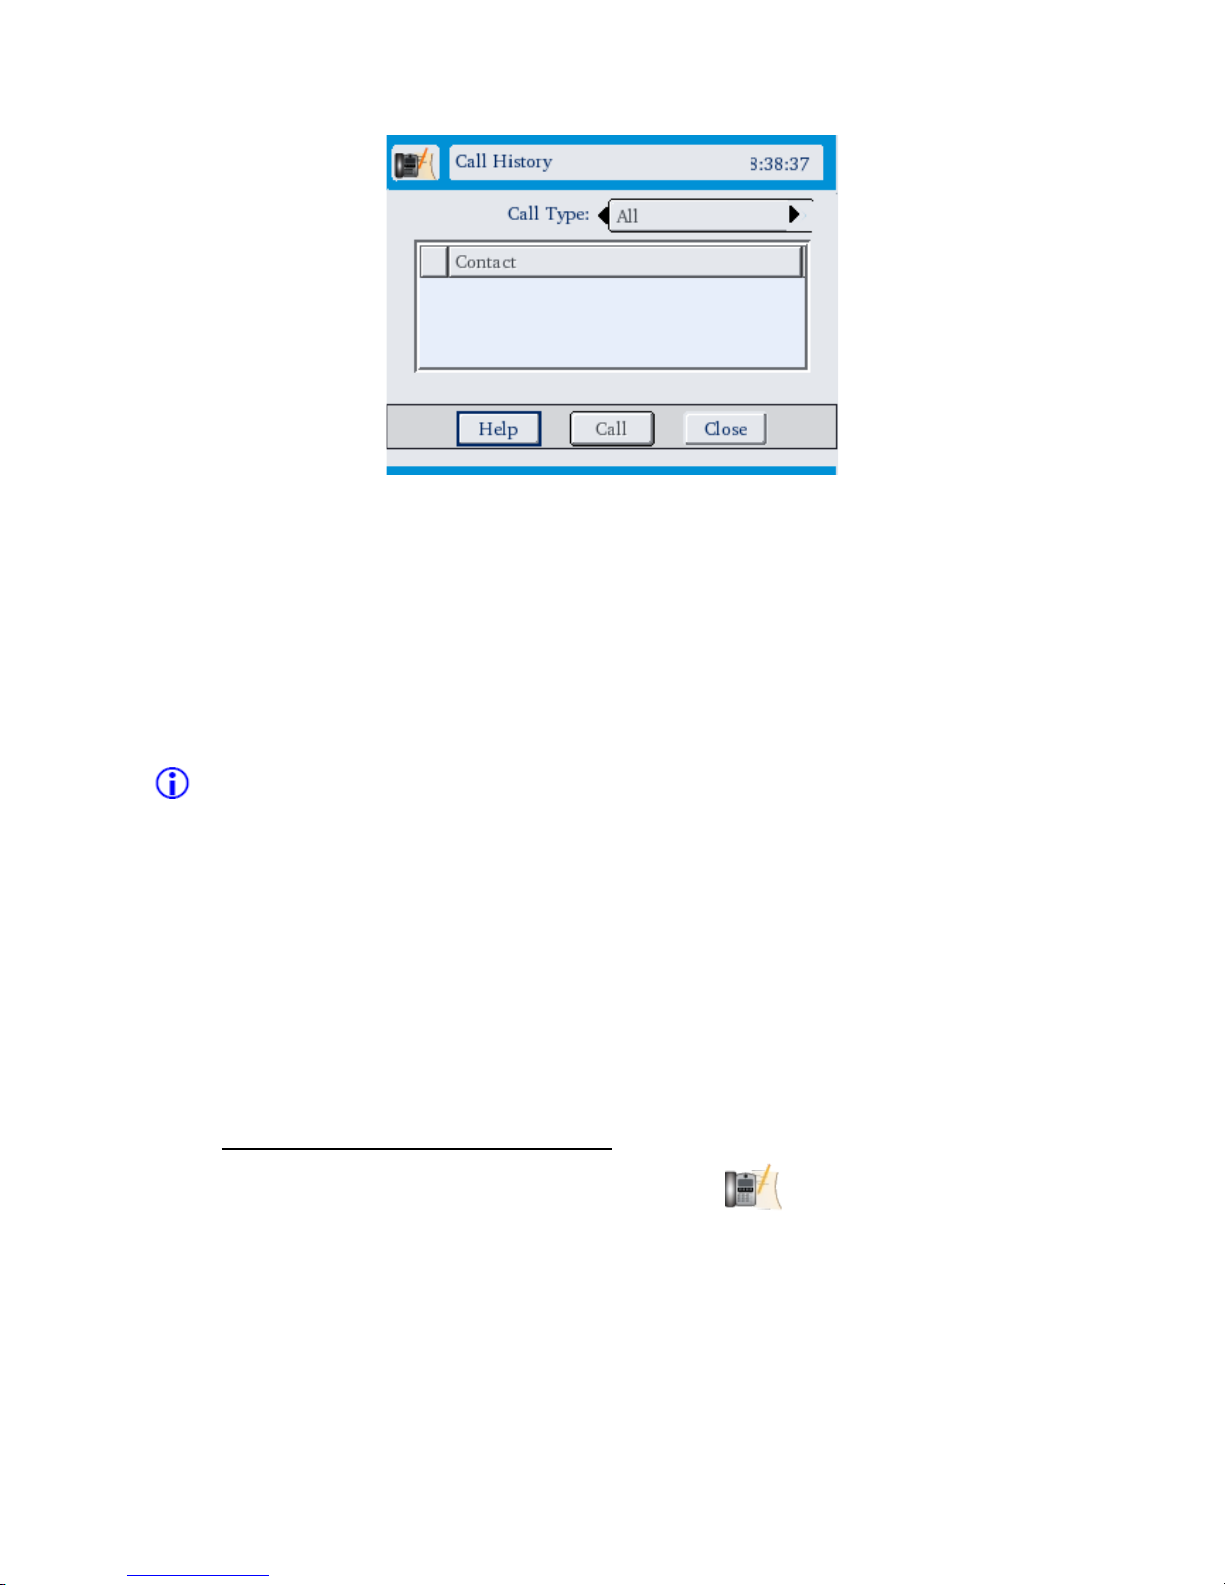
4.4.3.Making Calls through Call History
Press the call history icon. The call history page would appear.
Your videophone will store the last 20 dialed, received and missed numbers
respectively, with the date and time the call was made/received/missed. The total
number of consecutive missed calls related to a particular contact would also be
displayed in the parenthesis. Consecutive received or dialed entries from/to a
particular contact are shown as a single entry. A total of 60 entries can be seen
arranges in the order of time in the “All” list.
17
Page 18
GVC-3000 User Guide
The latest number dialed or received or missed is at the top of the list. You can
select the number that you wish to dial from the list and make a phone call easily
and quickly without having to re-enter the number. You can also view your entire
call history entries by looking into the “All” list in the call history. You can select a
contact from any one of the lists, i.e. “All” or, “Dialed” or, “Missed”, or, “Received”
and press “Call” button to place the call.
NOTE:
If you find the “Call” button disabled at any point of time in any of the screens, it
could be because:
a) You are already in two calls
b) The error tone is being played. (You have to put your phone in the on-hook
state)
c) There are no entries in the list.
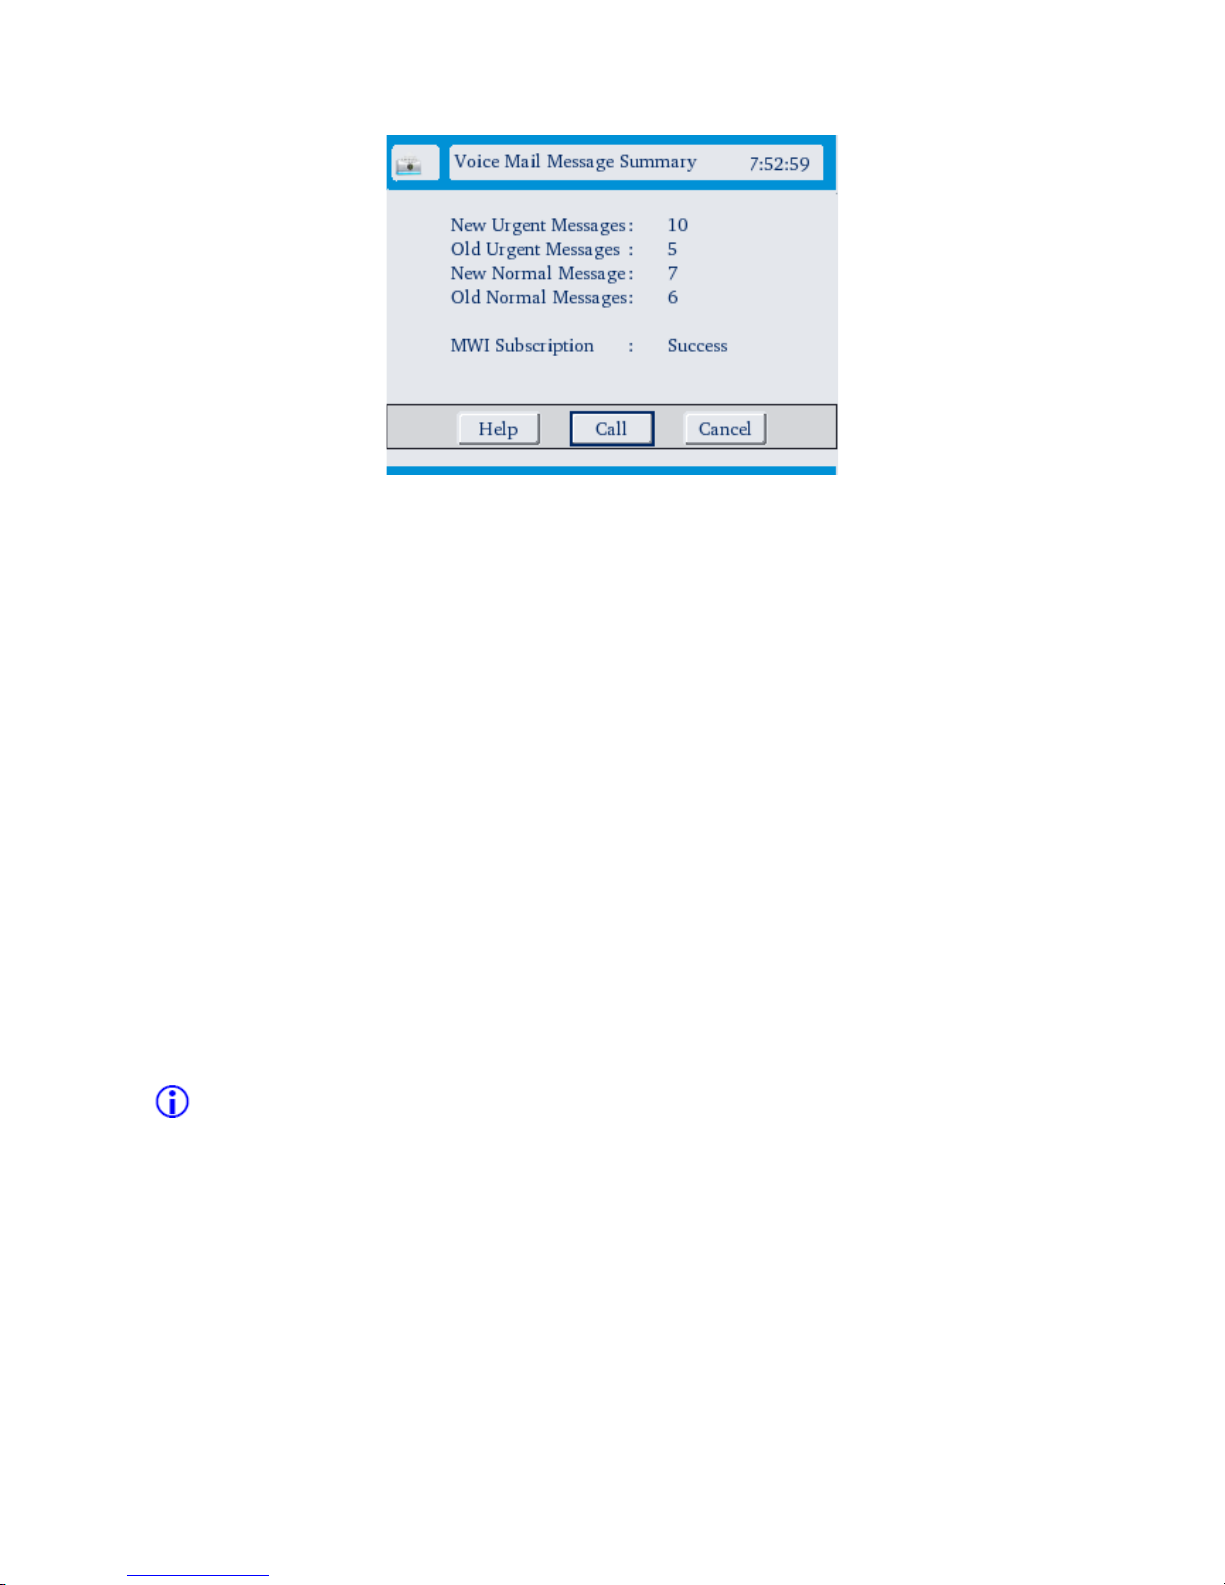
4.4.4.Voice Mail Message Summary
Press the voice mail message summary icon. The voice mail message
summary page would appear.
18
Page 19
GVC-3000 User Guide
New Urgent Messages: The voice mails at the server which are unread and are of
high priority.
Old Urgent Messages: The voice mails at the server which are read and are of high
priority.
New Normal Messages: The voice mails at the server which are unread and are of
normal priority.
Old Normal Messages: The voice mails at the server which are read and are of
normal priority.
To retrieve voicemail messages, press the “Call” button, this will initiate an
outgoing call to the MWI server (to “Voice Mail Number”) configured in the SIP
Configuration. You can follow the voice commands once you are connected to
retrieve messages.
NOTE:
If you find the “Call” button disabled at any point of time in any of the screens, it
could be because:
d) You are already in two calls
e) The error tone is being played. (You have to put your phone in the on-hook
state)
f) You have not configured a “Voice Mail Number” in SIP Other Configuration
screen. Please refer section 8.3.3.
19
Page 20
GVC-3000 User Guide
5. Managing Contacts
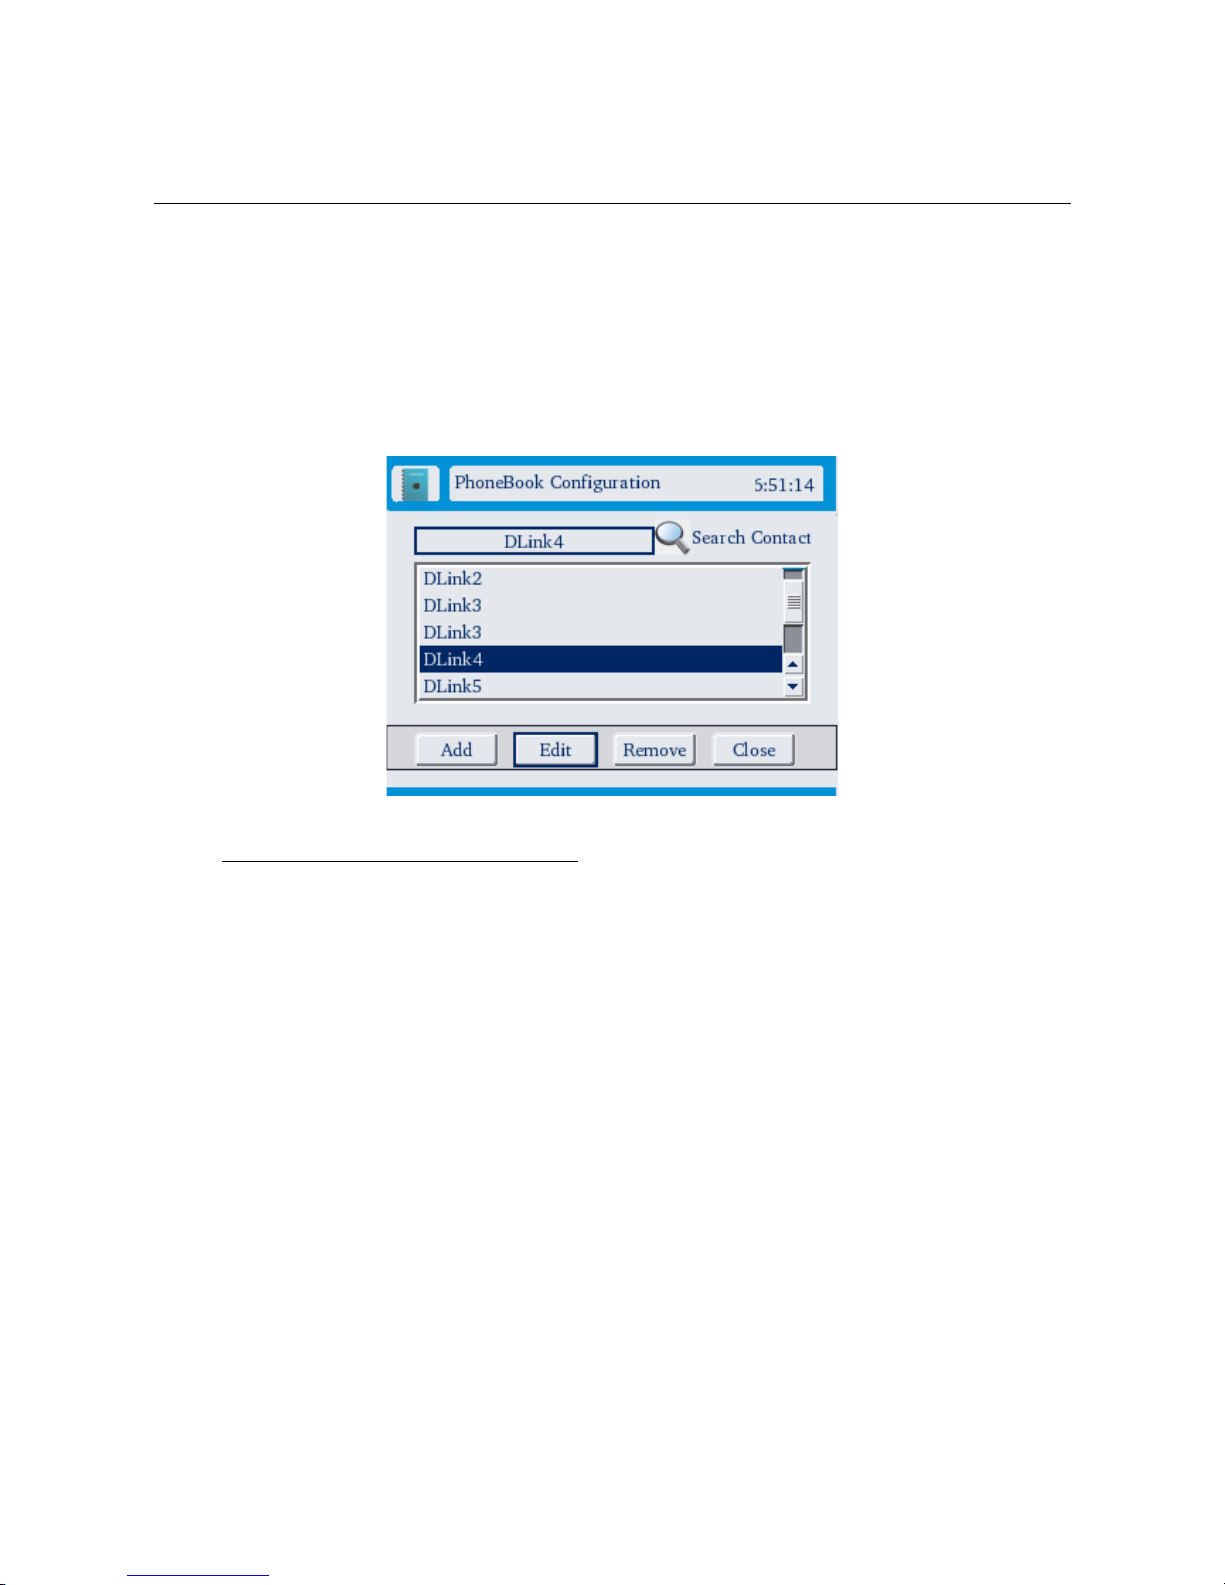
5.1. Phone Book
Your videophone provides up to 300 entries for you to store most frequently used
numbers so you can dial them easily. The “Phone Book” screen can be found at
(Settings → Dial Configuration → Phone Book). This screen would list out the
contacts that you have in the phone book in alphabetical order.
5.1.1.Adding a Phone Book entry
1) To add a new contact, press the “Add” button. A new screen would come up
where the details of your new contact can be added.
2) Name: Enter the name of your contact in this field.
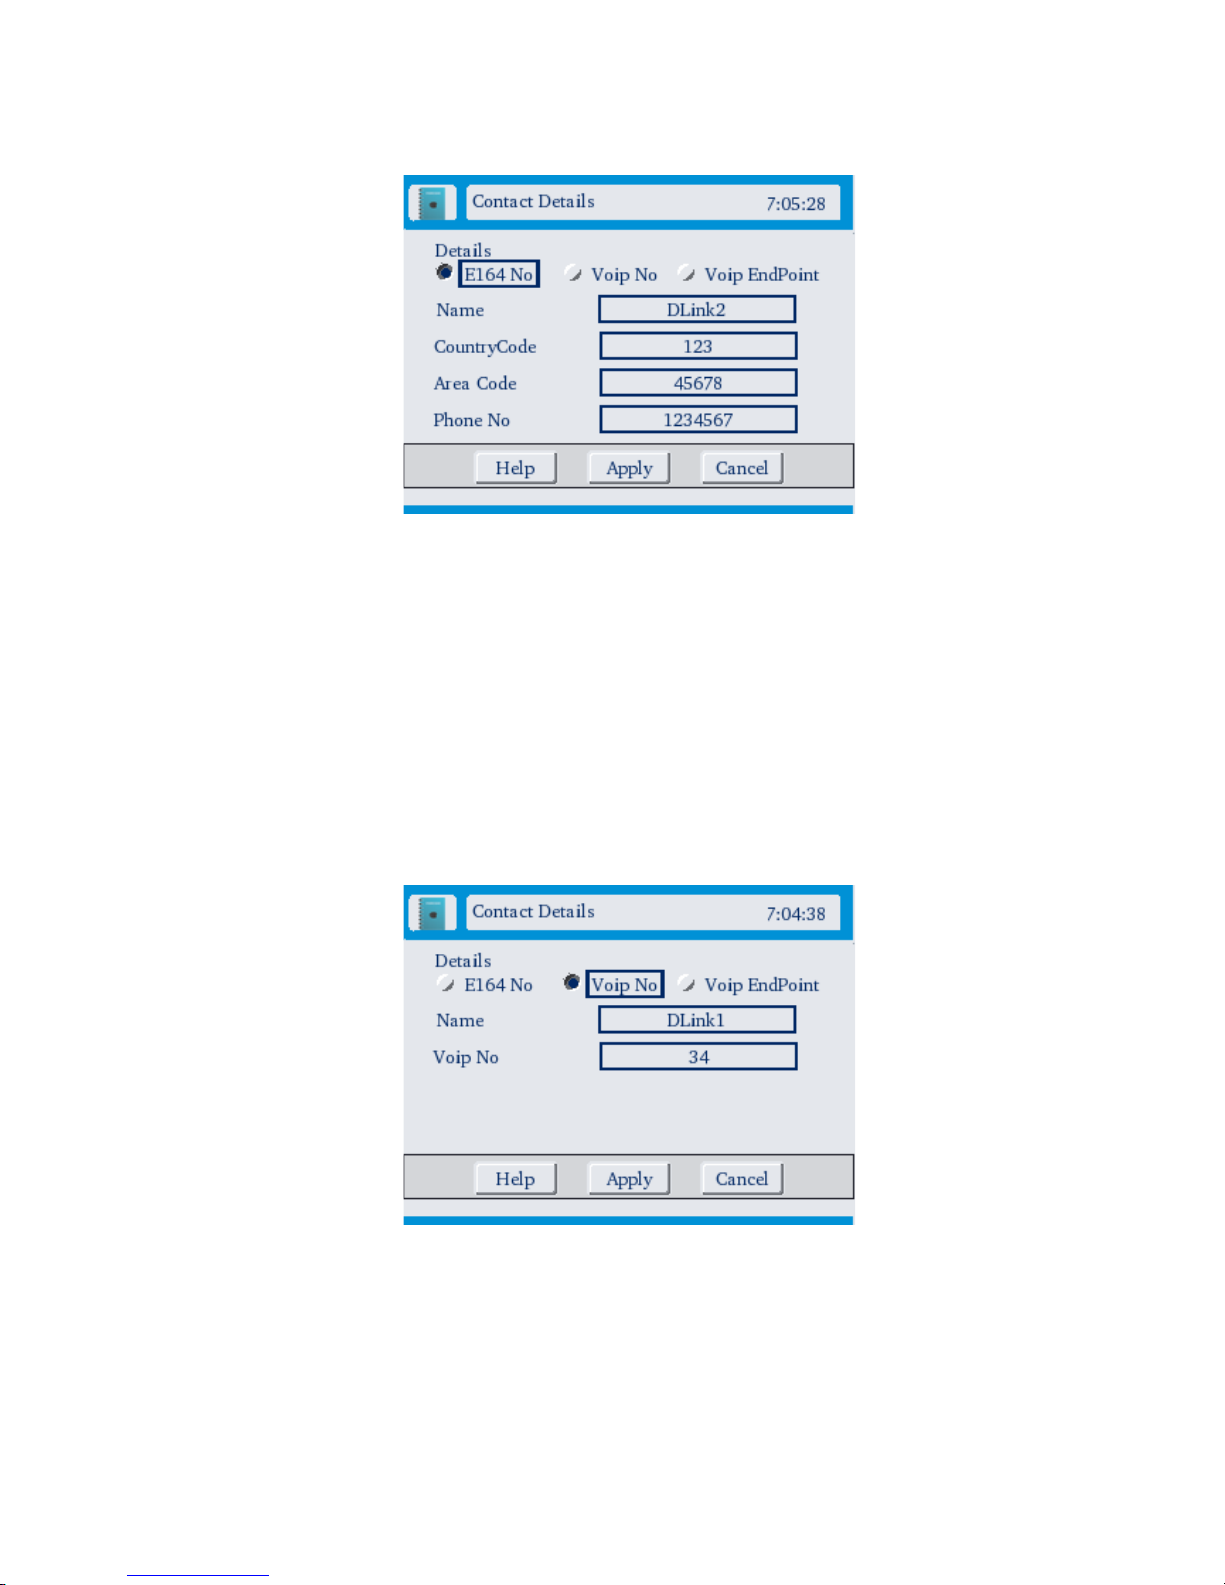
3) Details: The contact details can be of three different types, namely, an E.164
number or a VoIP number or, a VoIP endpoint number.
20
Page 21
GVC-3000 User Guide
a) E.164 Number: This is the telephone number of your contact.
i) Country Code: Enter the country code of your contact without “+”
preceding it.
ii) Area code: Enter the area code of your contact in this field.
iii) Phone No: This field should contain the phone number part of the E.164
number.
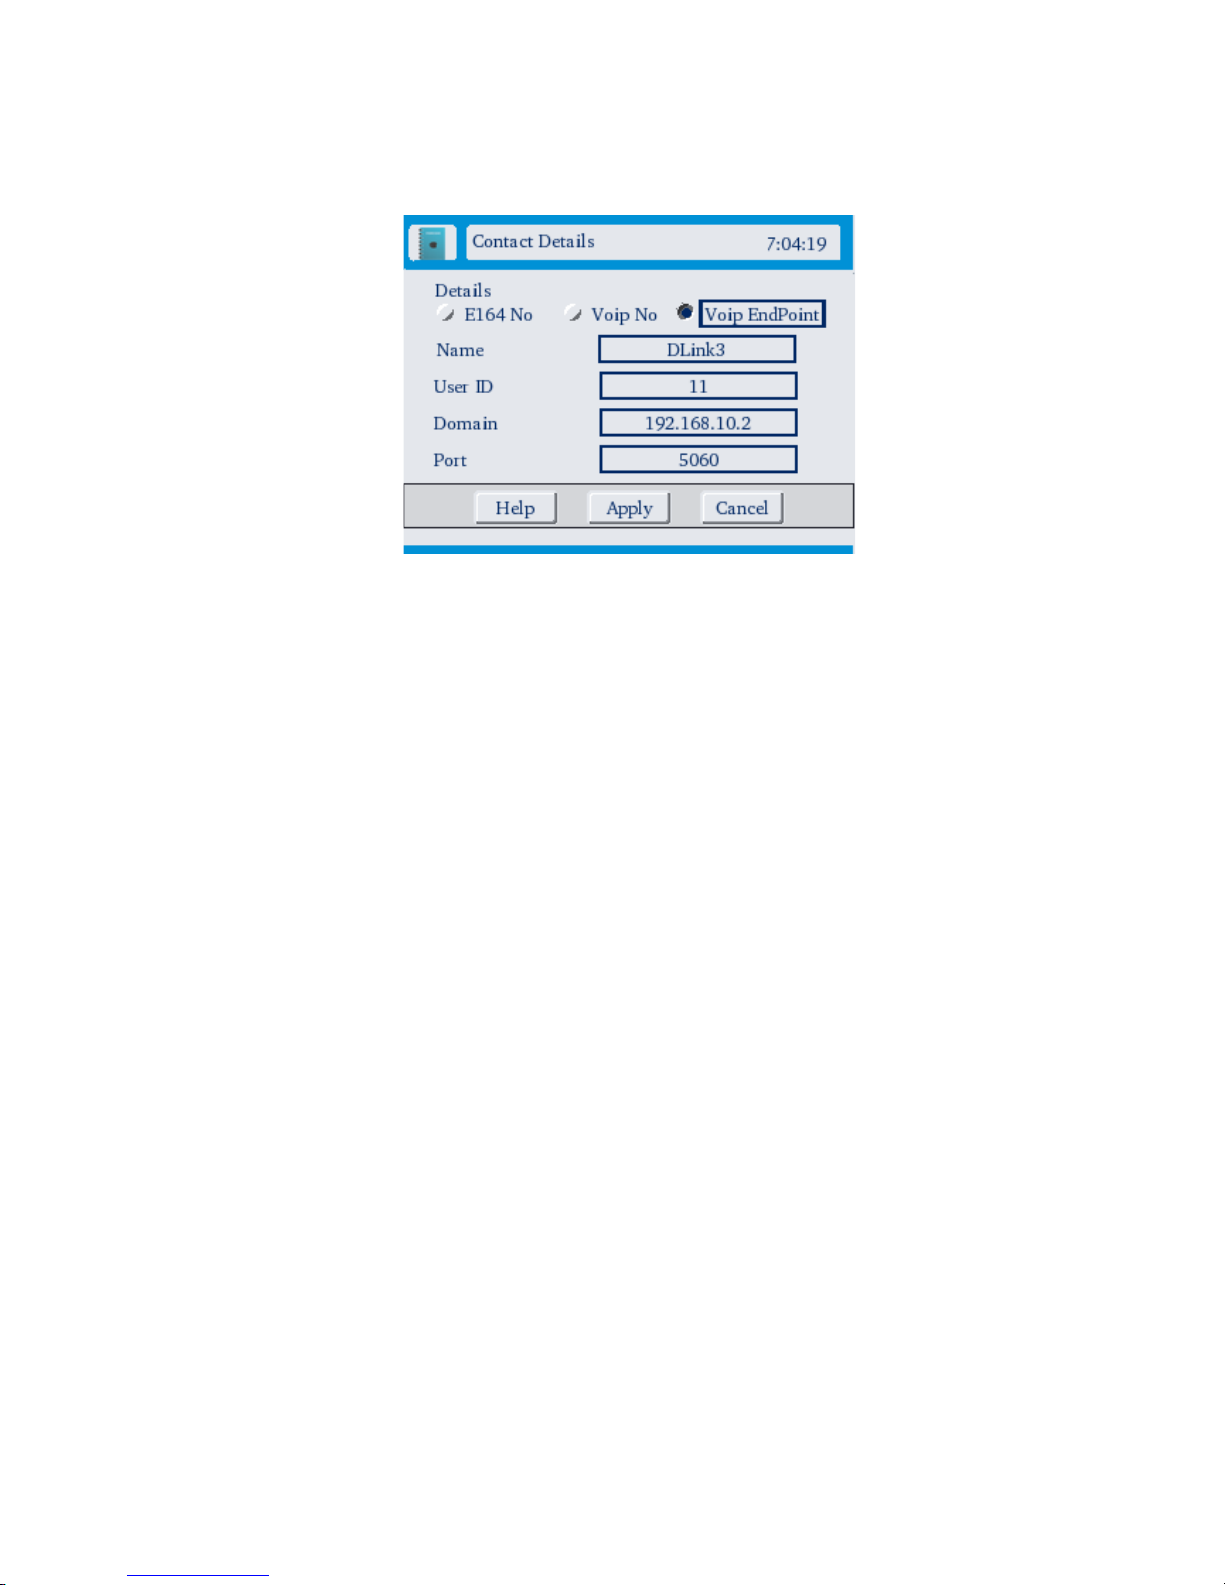
b) VOIP Number: If your contact is registered with the same SIP server as you
are registered with, then you can add your contact by providing only the SIP
ID of your contact.
For example, if you are registered with “xyz.com” and your contact’s user ID is
contact.
21
Page 22
GVC-3000 User Guide
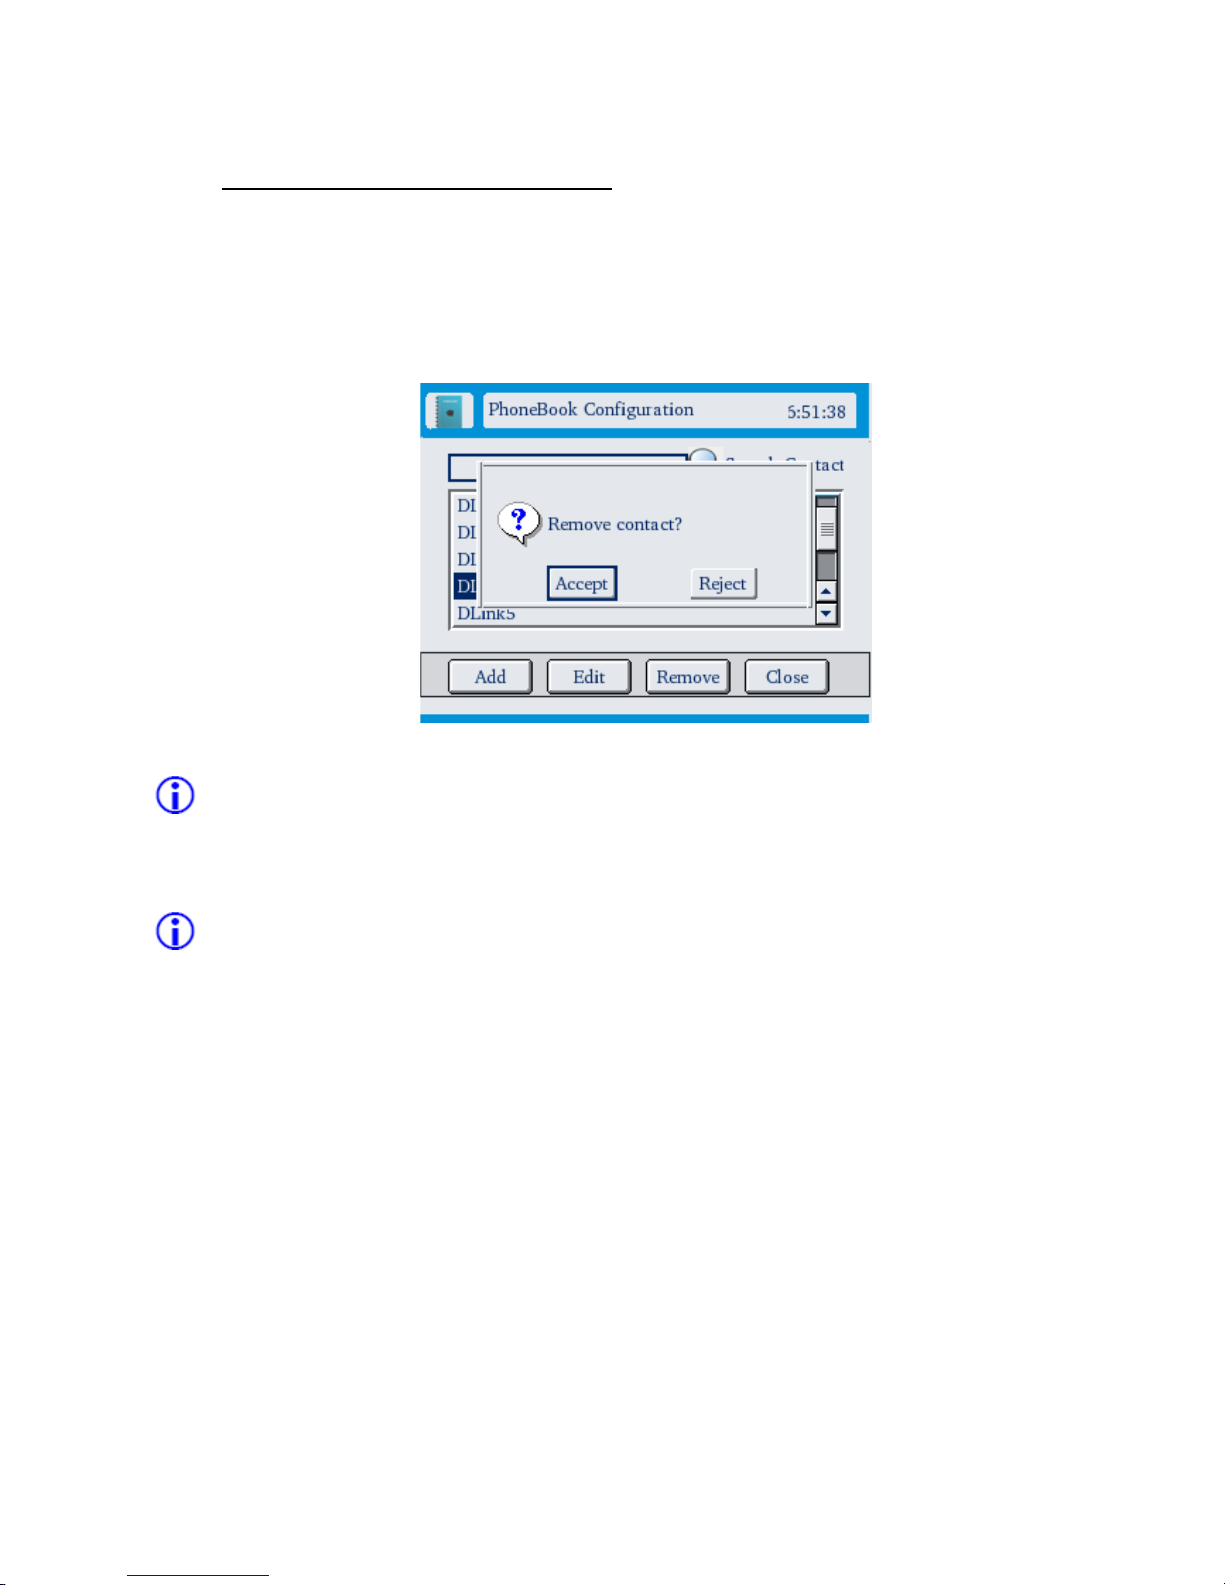
c) VOIP Endpoint: This allows you to add a contact by providing his/her
complete URI (User ID, Domain and Port).
i) User ID: The account number of your contact’s SIP account. For example,
in “[email protected]:5062” the User ID is “user”, provided by your VoIP
service provider.
ii) Domain: For example, in “[email protected]:5062”, the domain is
“domain.com”, provided by your VoIP service provider
iii) Port: For example, in “[email protected]:5062”, the port is 5062,
provided by your VoIP service provider. The default is 5060.
4) Press the “Ok” button to save the changes or, “Cancel” button to discard the
changes.
22
Page 23
GVC-3000 User Guide
5.1.2.Modifying Phone Book entries
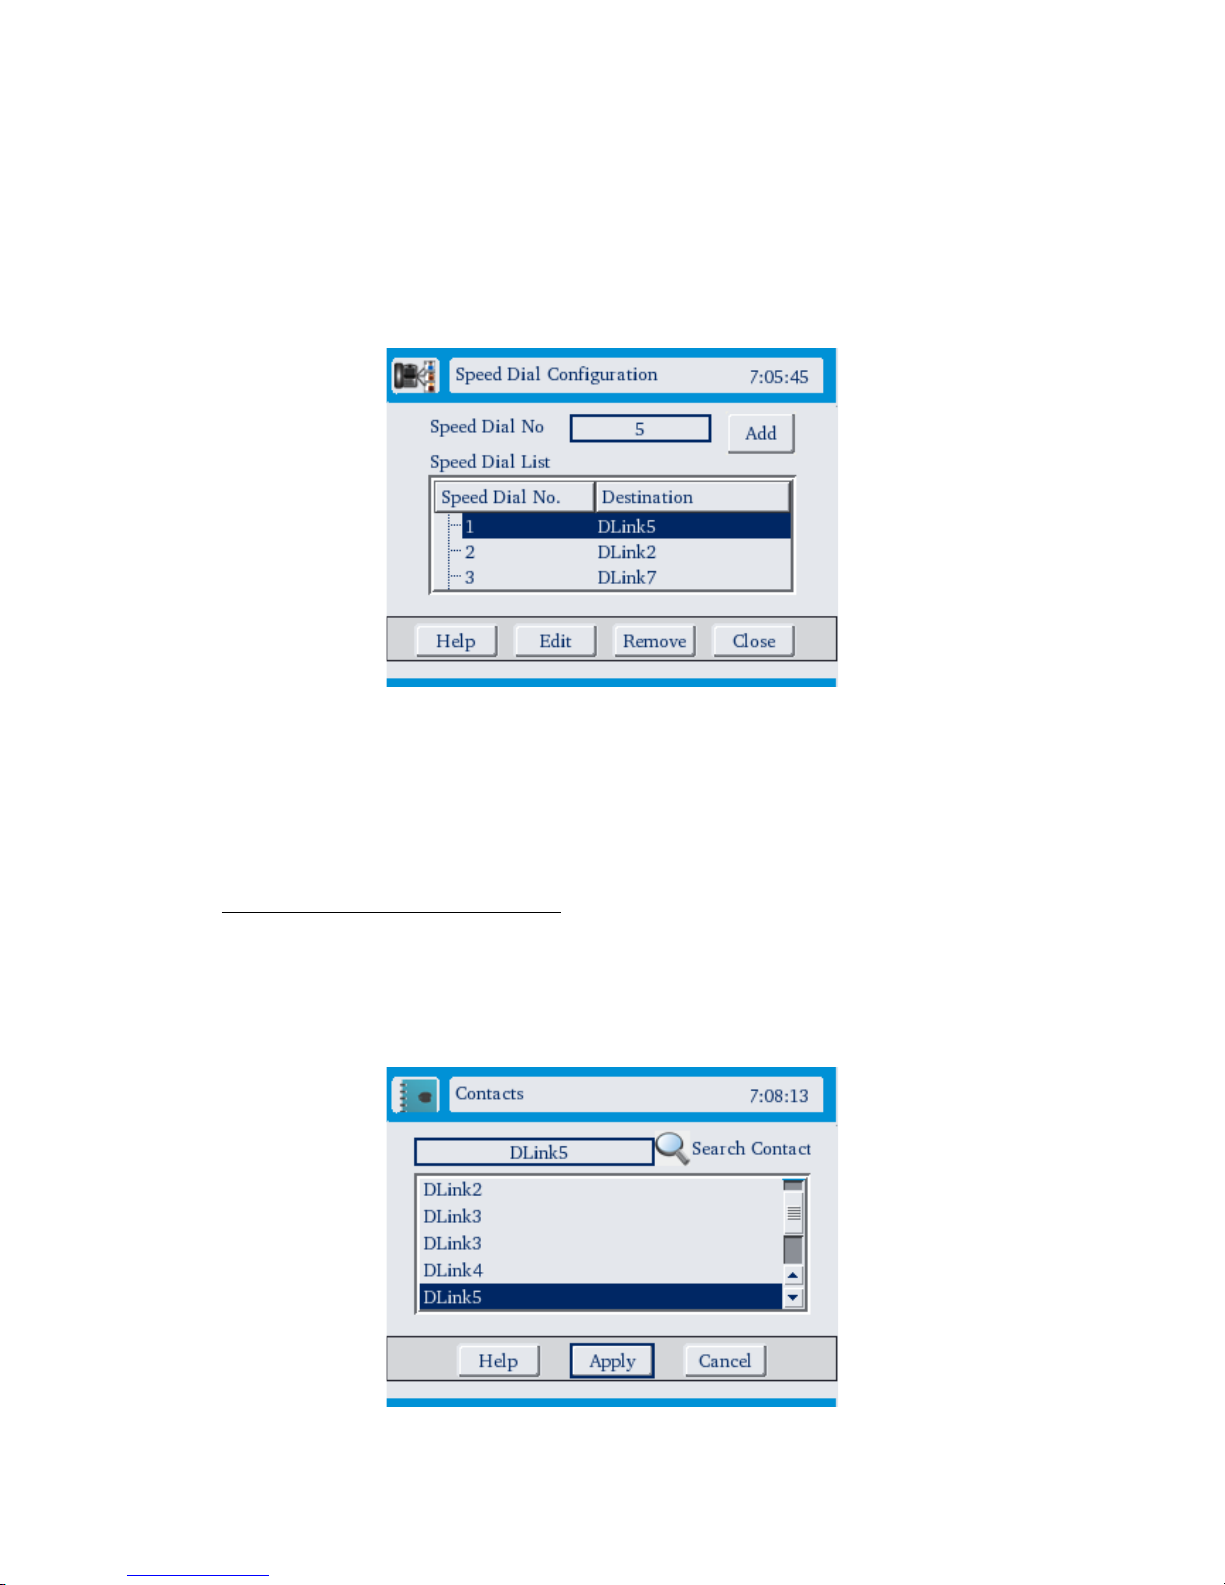
1) Highlight the entry you wish to modify.
2) Press the “Edit” button to modify the entry.
3) Press “Remove” button to delete.
Please note that if the contact you wish to delete is configured for speed dial or
for a call feature, that feature would be disabled if you agree to delete the contact.
Note: Adding / modifying a Contact shall ensure the change to come into effect
ONLY till the device restarts. Please “Save Current Configuration” to retain the
modification permanently.
23
Page 24
GVC-3000 User Guide
5.2. Speed Dial
Your videophone provides a Speed Dial feature for you to allocate frequently used
numbers so that you can dial them easily. A maximum of 10 speed dials with
indices 0 to 9 can be configured.
By traversing through Settings → Dial Configuration→ Speed Dial, you can
register new speed dials for your contacts, modify the previously configured ones
or, remove the unwanted speed dials.
5.2.1.Adding a Speed Dial entry
1. To add a speed dial entry, specify a speed dial Index and press on “Add”
button
2. The Phone Book screen opens showing your existing contacts.
24
Page 25

GVC-3000 User Guide
3. You may traverse through the contact list or use the search textbox on the
top of the list to select a contact as the destination for the speed dial index
you have mentioned.
4. Press ‘Ok’ to save and add the contact to your speed dial list. “Cancel”
button would discard the changes that you have made.
5.2.2.Modifying Speed Dial entries
1) Highlight the entry you wish to modify.
2) Press the “Edit” button to modify, or, “Remove” button to delete the entry.
Note: Adding / modifying a speed dial entry shall ensure the change to come
into effect ONLY till the device restarts. Please “Save Current Configuration” to
retain the modification permanently.
25
Page 26

GVC-3000 User Guide
6. Get the best out of your Video Phone
There are a few steps you can take when setting up your room and using the
videophone to ensure that you get the best results:
6.1. Lighting
As with conventional photography, correct lighting is vital for achieving the best
results from your videophone. Make sure your face is well lit, preferably from the
front, and avoid having lights behind you that might shine into the camera lens.
6.2.LCD viewing angle
Correct LCD angle is essential to obtain the proper colors on the self view and
configuration screens. Move GVC-3000’s LCD so that it is perpendicular i.e. at 90
degrees to the phone’s keypad to get the best out of the phone.
6.3. Movement
Too much movement tends to result in a jerky picture. Avoid having a lot of
movement in the background. This doesn’t mean you have to sit completely still:
just move naturally, but be aware that if you wave your arms around, the person
you are calling may see a jerky picture. Remember too that a small movement near
the camera is just as bad as a big movement at a normal distance.
If you have something very detailed to show, you can send a clear still image using
the “Video Privacy” key. When the call is active, hold the clear still image before
your camera and press “Video Privacy” key so that the image is transmitted to the
person you are talking to. You can press “Video Privacy” key again to send your
video.
6.4. Sound
Where possible, it is better to choose a quiet environment than a noisy one. In very
noisy situations you will find the handset more effective than hands free.
26
Page 27

GVC-3000 User Guide
6.5. Connecting to a TV
Although the built-in LCD screen is ideal for individual use, you may find it useful
in some situations to display the pictures on a TV screen. For example, it is more
convenient to use a TV if several people need to see the screen, or if you are using
an MCU (Multi point Control Unit) to conference with more than one caller, with
video from several sources on the screen.
6.6. Before making a Call
Use the local view image to check that the camera is pointing where you want it to
and that it is in focus. If necessary, adjust the camera brightness, sharpness and
contrast to give a good picture. See the section on “Video Properties” for details on
how to adjust the sharpness, brightness or contrast of the local video image.
27
Page 28

GVC-3000 User Guide
7. Making and Answering Phone Calls
7.1. Handset and Speaker modes
During a call, audio-in can be through two modes, namely, the traditional handset
mode or hands free (speaker) mode while audio-out can be through handset,
hands free or through TV.
If handset mode or hands free mode is the only active mode, then both
audio-in and audio-out would be through the same mode.
Whenever both handset and hands free modes are active, then audio-in
would be through handset only.
Audio-out at any time would be through all the modes active.
Note:
• The active hands free mode (speaker) gets automatically turned off, when
handset is picked up or when the call gets terminated.
7.2. Making Calls
You can make a call in two ways:
1) Manual Dial :
Go off-hook by lifting the handset from the cradle or, by switching on the
speaker to get the manual dial screen. Here, you can enter your contact’s complete
URI (User ID, Domain and Port) or the speed dial number associated with any of
your known contacts followed by speed dial key sequence to make the call.
Numeric and Alpha-Numeric modes:
You can toggle between Numeric and Alpha Numeric modes while entering
your contact’s details depending on the context. In numeric mode only digits (0-9)
can be entered, while in Alpha-Numeric mode, any character acceptable in the
field can be entered. This is to facilitate easy and fast entering of numeric phone
numbers.
Please note that ‘*’ and ‘.’ can not be entered when you are in numeric mode and the
modes are dynamically changeable.
28
Page 29

GVC-3000 User Guide
Already in Call:
If you are already in a call then to make a second call you will have to tap
the hook-flash ( press and release the hook in quick succession ) to get the
manual dial screen. This shall place the first call on hold and open the manual
dial screen to initiate second call.
The “dial” tone would be played at this moment and the corresponding line
LED would be light up. The moment you press one of the keys in the
alphanumeric keypad, you will no longer be able to hear the “dial” tone and
instead, you would be able to hear the “DTMF” tone of the digit you pressed.
You can place a call by entering the SIP URI or E.164 number of your
contact or the speed dial number that you have assigned to your contact.
a) Dialing a SIP URI :
i) Phone No: Destination SIP account number. For example, in
“[email protected]:5062” the phone number would be “user”.
ii) Domain: Destination SIP server. For example, in
“[email protected]:5062”, the domain would be “sipserver.com”. Note
that if this field is left empty, it is assumed that the destination that you
are trying to reach is registered with the same SIP server that you are
registered with. The sip server address and port would be used.
iii) Port: For example, in “[email protected]:5062”, the port is 5062. Note
that if this field is left empty, it is assumed that the port is 5060.
b) Dialing an E.164 number : The “Phone no” field should contain the E.164
number (normal telephone number) that you wish to dial. For example, you
can dial the E.164 number in one of the following formats, i.e., +123-45-
1234567, or, +123451234567.
c) Dialing a speed dial number : Dial Speed Dial Key sequence (*4) and the
speed dial number of your contact to place a speed dial call.
29
Page 30

GVC-3000 User Guide
d) Redialing: Press OK key on the keypad without entering anything. The last
dialed number if exists shall be called out.
In Manual Dial screen, if the “Call” button is not pressed after one of the
alphanumeric keys is pressed, the phone (by default) will wait for five seconds
before sending all digits out and initiating the call. If no digits are entered for one
minute then your phone would timeout and the “Error” tone would be played out,
and the screen you were viewing previously would be shown.
2) You can make calls the easier way by selecting your contact from the phone
book entries or speed dial entries or from one of the call history lists. You can
reach one of these screens in three ways:
a) Go off-hook by lifting the handset from the cradle or, by switching on the
speaker. If you are already in a call then to make a second call you would
have to flip the hook-flash to get the manual dial screen. Press the phone
book icon or call history icon to get to the respective screen to
make the call.
b) Press the “Contact” key on the keypad.
c) Go to the main screen and, press the “View” button.
Once the call has been initiated, the main screen would be shown with
appropriate status messages; the “Progress” tone would be played out along with
the corresponding line LED blinking. When your phone attempts to establish a
connection, the “Ring back” tone would be played along with the corresponding
line LED blinking and the main screen displaying “Ringing” message.
When your contact answers your call, you can hear the other party in hands
free/handset mode as explained in “Handset and Speaker phone mode”.
If your contact is busy, the “Busy” tone would be played or, if call could not be
established due to some other reasons, the “Error” tone would be played along
with the reason for call termination on the OSD.
30
Page 31

GVC-3000 User Guide
7.3. Receiving Calls
On receiving a call, you would be prompted by a “Ring” tone and a pop-up box
along with the caller details asking whether you want to accept the call or not; the
corresponding line LED will be blinking.
You can accept the call in three ways:
1) Go off-hook by taking the handset from the cradle or, by turning the speaker
on.
2) Press the “Accept” button on the pop-up box. In this case, the speaker would be
turned on automatically.
3) If you are already in a call, enter the HOLD sequence (*1) on the alert box or
flip the hook-flash. GVC - 3000 would accept the call and then put the called
party on hold.
Once you accept the call, you can hear the calling party in hands free/handset
mode as explained in “Handset and Speaker phone mode”.
If you do not wish to answer the call, you can press the “Reject” button on the
pop-up box.
7.4. Ending a Call
You can end an active call by keeping your phone in on-hook state, i.e. the
handset should be on the cradle and the speaker should be switched off. The
corresponding line LED would stop glowing.
31
Page 32

GVC-3000 User Guide
7.5. Call Features during a Call
7.5.1.Call Waiting
You can enable your phone to allow a second incoming call if you are already in a
call. When receiving a second incoming call, your phone would play the “Call
Waiting” beep along with the corresponding line LED glowing; and, a pop-up box
would appear asking you whether you want to accept or reject the call. You can
enable or disable the call waiting feature as explained in the Call Features section.
7.5.2. Switch between Calls
If you are in two simultaneous calls, you can switch between them by tapping the
hook-flash or by entering the HOLD key sequence (*1).
7.5.3.Call Hold
While in conversation, tapping the hook-flash will put the other party on hold. You
can enter the HOLD sequence (*1) for the same purpose. You can resume the
conversation by tapping the hook-flash again or entering HOLD sequence (*1) in
the phone number field of Manual Dial screen. The appropriate status messages
would be displayed on the main screen.
Note: When you are in two calls and you go into on-hook state, i.e. the handset
is on the cradle and, speaker is in off state, then the “Ring” tone will be played
along with the pop-up box on the OSD to remind you that you have put the call in
hold state. If you do not answer the call, then the call would be terminated.
7.5.4.Call Transfer
GVC - 3000 supports both BLIND (UNATTENDED) and ATTENDED (SUPERVISED)
Transfer.
32
Page 33

GVC-3000 User Guide
• Blind (or Un-attended) Transfer: When you are in a call, if you press the
“Transfer” button or enter the TRANSFER sequence (*2), the manual dial
screen would appear and you can make the required call. GVC - 3000 will
transfer the other party in the corresponding line to the dialed number.
• Attended (or Supervised) Transfer: When in conversation with an active
call and if the second call is kept on hold, if you press the “Transfer” key or
enter the TRANSFER sequence (*2), GVC-3000 will transfer the party in the
inactive line to the party in the active line.
NOTE:
• Transferring calls across SIP domains needs to be supported by SIP
service providers.
• Transfer key would work only if you are in at least 1 active call.
7.5.5.Mute audio and Freeze video
When you press the “Audio Privacy” button, other party in call can no longer
hear you. The audio privacy icon would appear with a cross on the main screen to
remind you that you have enabled audio privacy. To cancel audio mute, press the
“Audio Privacy” button again. The audio privacy icon would appear without a
cross to confirm that you are no longer muted.
When you press the “Video Privacy” button, your phone would stop sending video
to other party. The video privacy icon would appear with a cross on the main
screen to remind you that you have enabled video privacy. To cancel video mute,
press the “Video Privacy” button again. The video privacy icon would appear
without a cross to confirm that you are no longer muted.
7.5.6.Increase and Decrease Volume
You can increase or decrease the speaker volume based on your need by pressing
the volume up or down keys.
33
Page 34

GVC-3000 User Guide
7.5.7.Full Screen / Normal View mode
You can toggle between “full screen view” and “normal view of the image in the
LARGER WINDOW of the main screen” by pressing the “Full screen/Normal
toggle” button.
If the SMALLER WINDOW displays the Self View, you can press ‘Self/Remote
Toggle’ key followed by ‘Full Screen/Standard View’ key on the keypad to view
your self view on the Full Screen.
Note: In full screen mode, you would be reverted back to the normal mode
automatically if one of the following happens:
• The “Contact” key on the Keypad is pressed.
• You put the current call on hold and try making another call.
• You get an incoming call.
7.5.8.Self / Remote toggle
By default, the local video would be displayed in the smaller window of the main
screen while the remote video would be displayed in the larger window of the main
screen. You can toggle the local and remote video, by pressing the “Self/Remote
Toggle” button.
7.5.9.LCD / TV toggle
You can toggle between LCD and TV display by pressing the LCD/TV toggle”
button, i.e. if you have connected your video phone to the TV. Only one of the
displays can be active at any time.
7.5.10.Switching between Handset and Hands free modes
You can switch between the handset and hands free mode by pressing the
“Speaker” button. Refer “Handset and Speaker phone mode” for more details
on audio-in and audio-out in various scenarios.
34
Page 35

GVC-3000 User Guide
8. Configuration Guide
8.1. Before starting Network Setup
Please read this section carefully. There are a couple of things that YOU MUST
KNOW in order to setup your phone properly.
8.1.1.How you are connected to the Internet
(Identifying your Network Environment)
• PPPoE (ADSL) - ADSL stands for Asymmetric Digital Subscriber Line. It's a
type of DSL, where you connect to the Internet through an ADSL modem
(NOT your common dial up modem) connected to your common phone line.
You MUST be using an EXTERNAL PPPoE ADSL modem.
• DHCP - DHCP stands for Dynamic Host Configuration Protocol. If you are
connected through cable TV, this is what you're using. You are connected to
the Internet through a cable modem (NOT your common dial up modem)
connected to your TV cable.
• Fixed IP - This is commonly called LAN (Local Area Network). If all you have
is a jack in the wall or a long cable slinking up to your desk and no modem
(ADSL, cable, or dial up) in sight, this is probably what you have.
8.1.2.Pre-requisites to connect to your network
(Network settings)
• PPPoE (ADSL) - You must know your ID and password.
If your ADSL provider has provided you with a fixed IP address you must
configure your videophone to ‘Fixed IP (you must know your IP address, subnet
mask address, and your gateway address).
• DHCP - You don't need to know anything else.
• Fixed IP - Your IP address, subnet mask address, gateway address, and a
DNS server address.
35
Page 36
GVC-3000 User Guide
8.2. Network Configuration
You must know what type of network you are using first. Refer to “Before Starting
Network Setup” to see what network you are using.
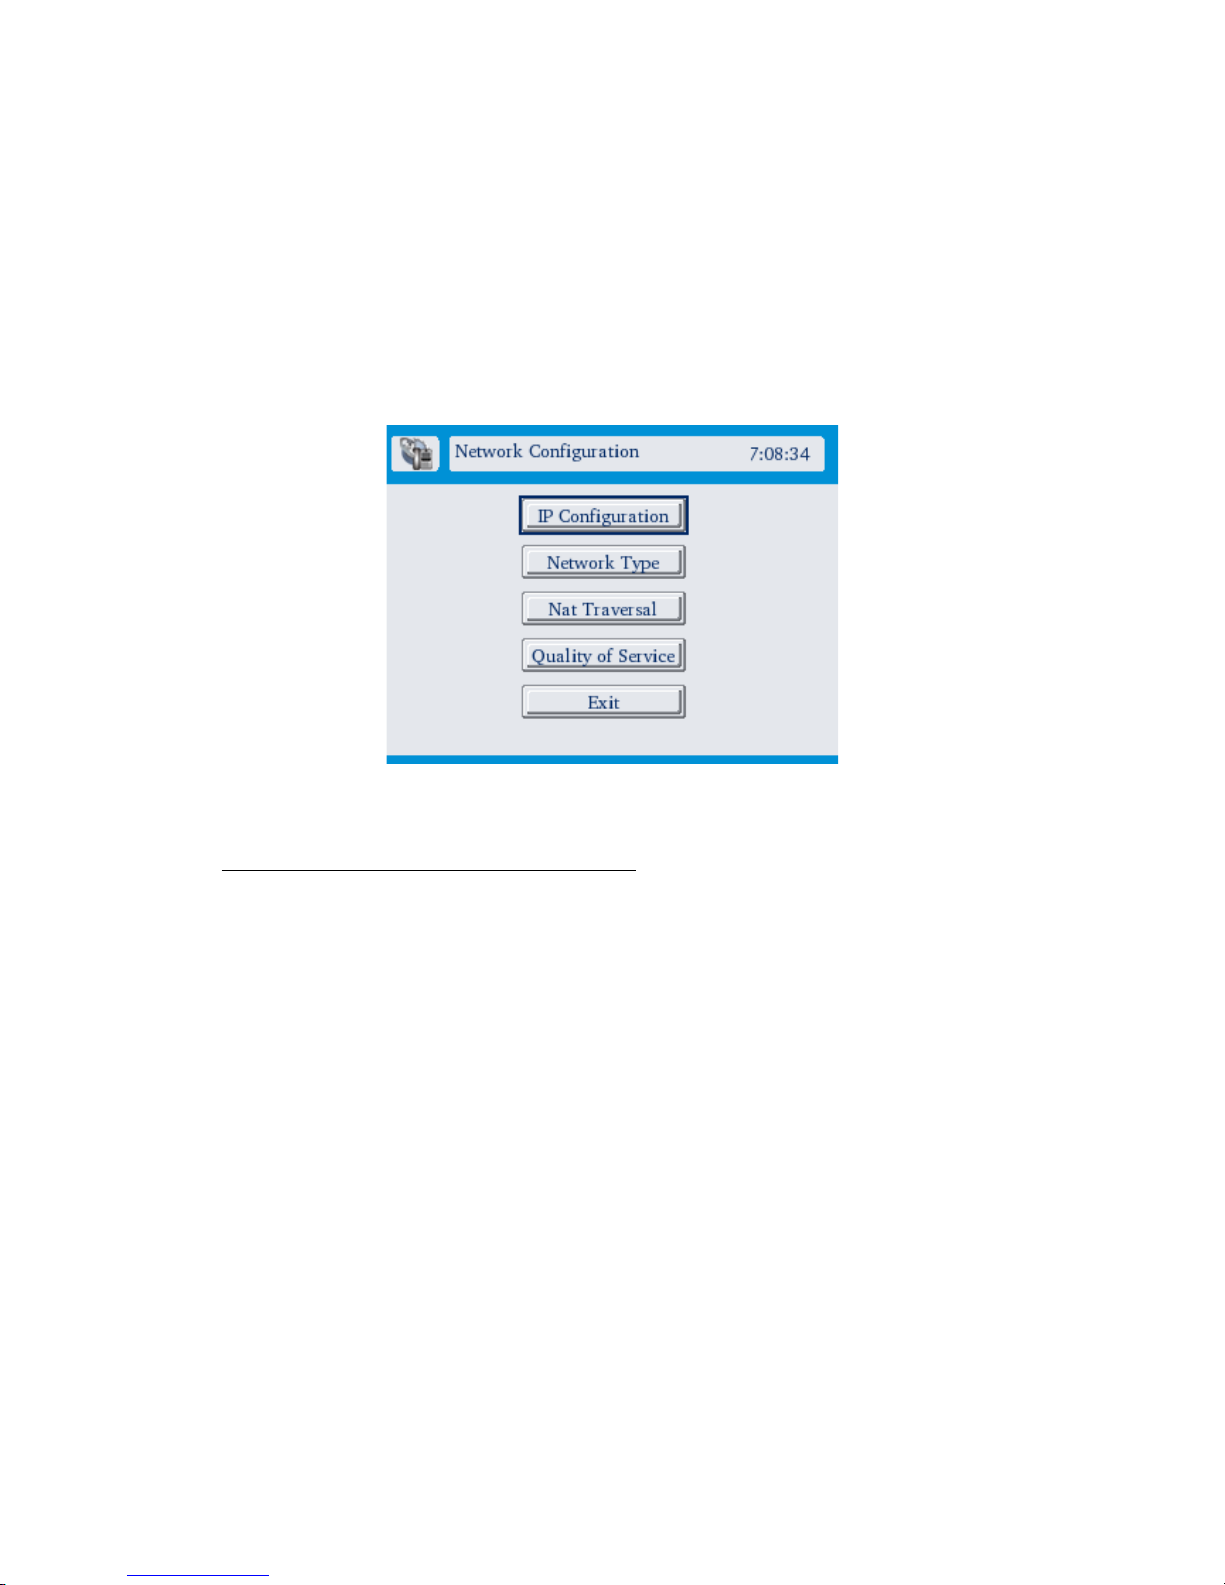
The network configuration (Settings → Network Configuration) provides different
parameters to connect to your network.
8.2.1.Network Address Configuration
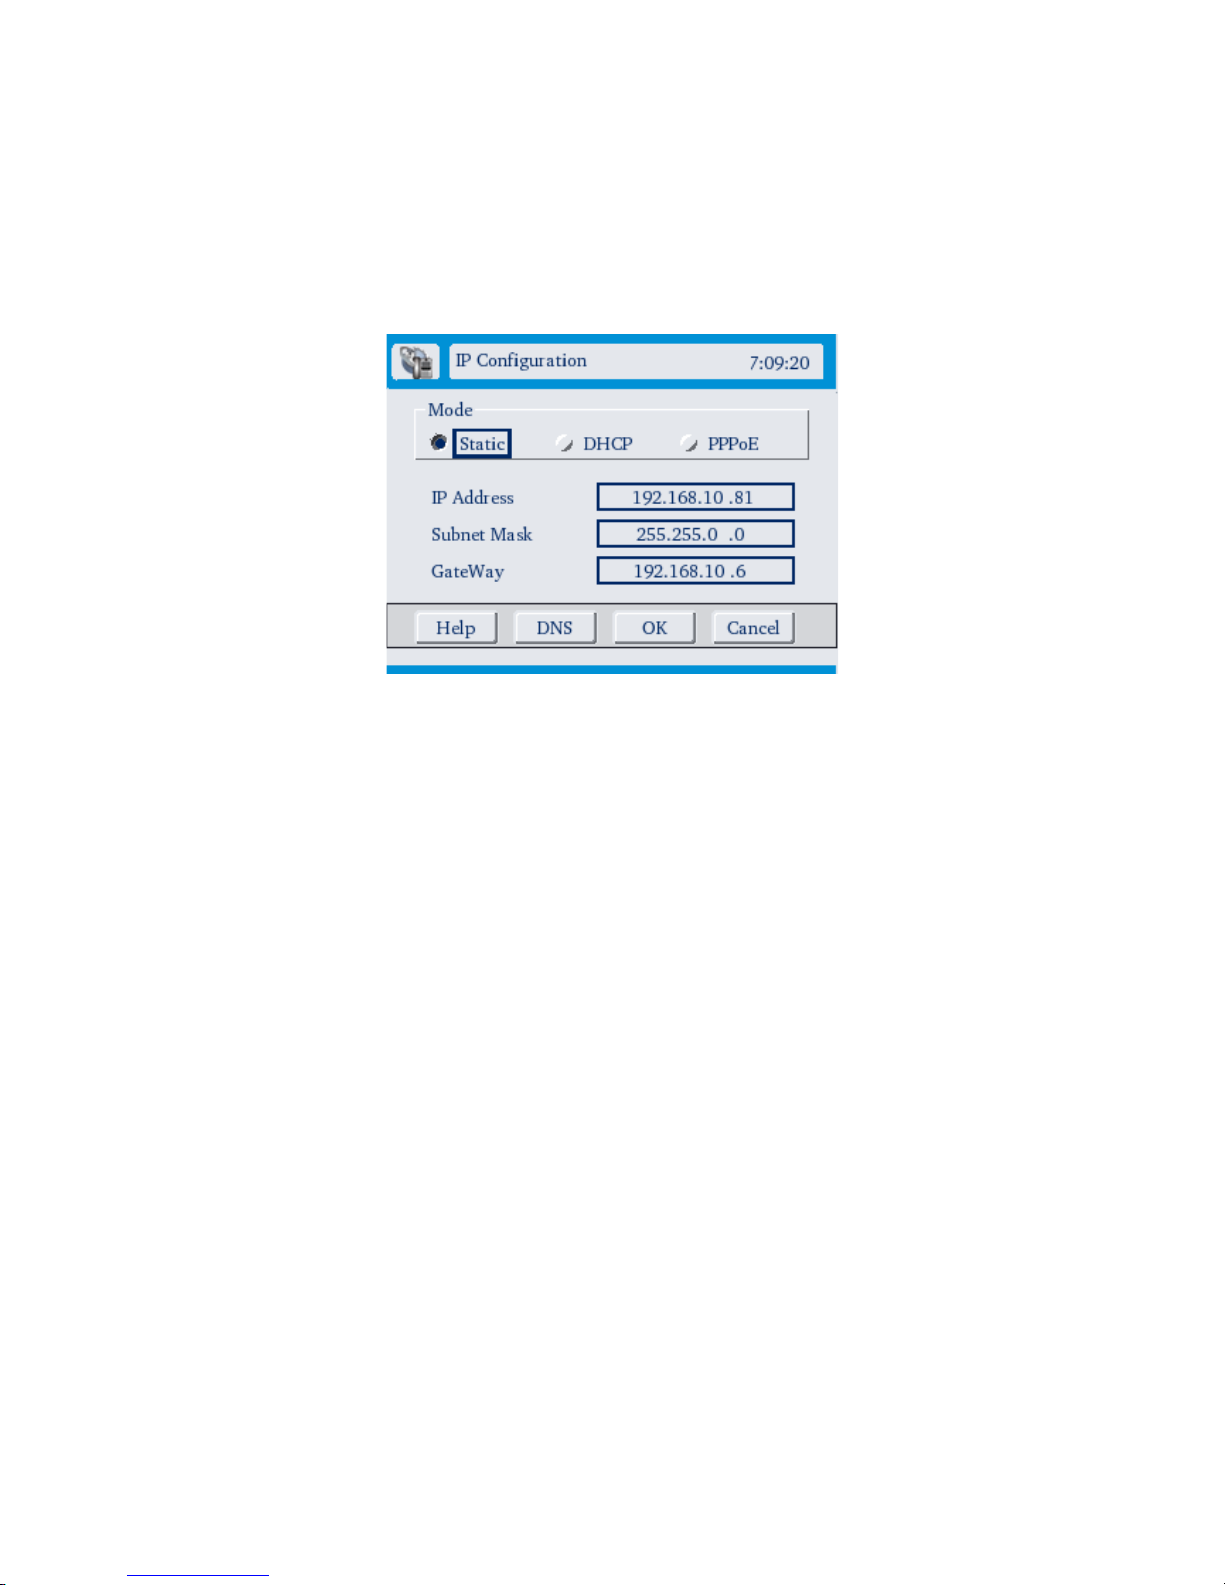
The Network Address screen (Settings → Network Configuration → IP
Configuration) asks for the information that is necessary to connect a GVC - 3000
call over the Internet. There are three types of network connections to choose
from: Static, DHCP, and PPPoE. If you do not know which to choose or you do not
have enough information to complete this section, please contact the ISP (Internet
Service Provider) or Network Administrator for assistance.
36
Page 37
GVC-3000 User Guide
STATIC
Choose Static when connecting to a broadband connection that offers static IP
addressing or when behind a router that does not have a DHCP server enabled.
This choice requires the input of specific IP address information.
IP Address: Input the IP Address provided from your router configuration settings,
ISP, or network administrator.
Subnet Mask: Input the Subnet mask provided from your router configuration
settings, ISP, or network administrator.
Gateway: Input the Gateway address provided from your router configuration
settings, ISP, or network administrator.
37
Page 38
GVC-3000 User Guide
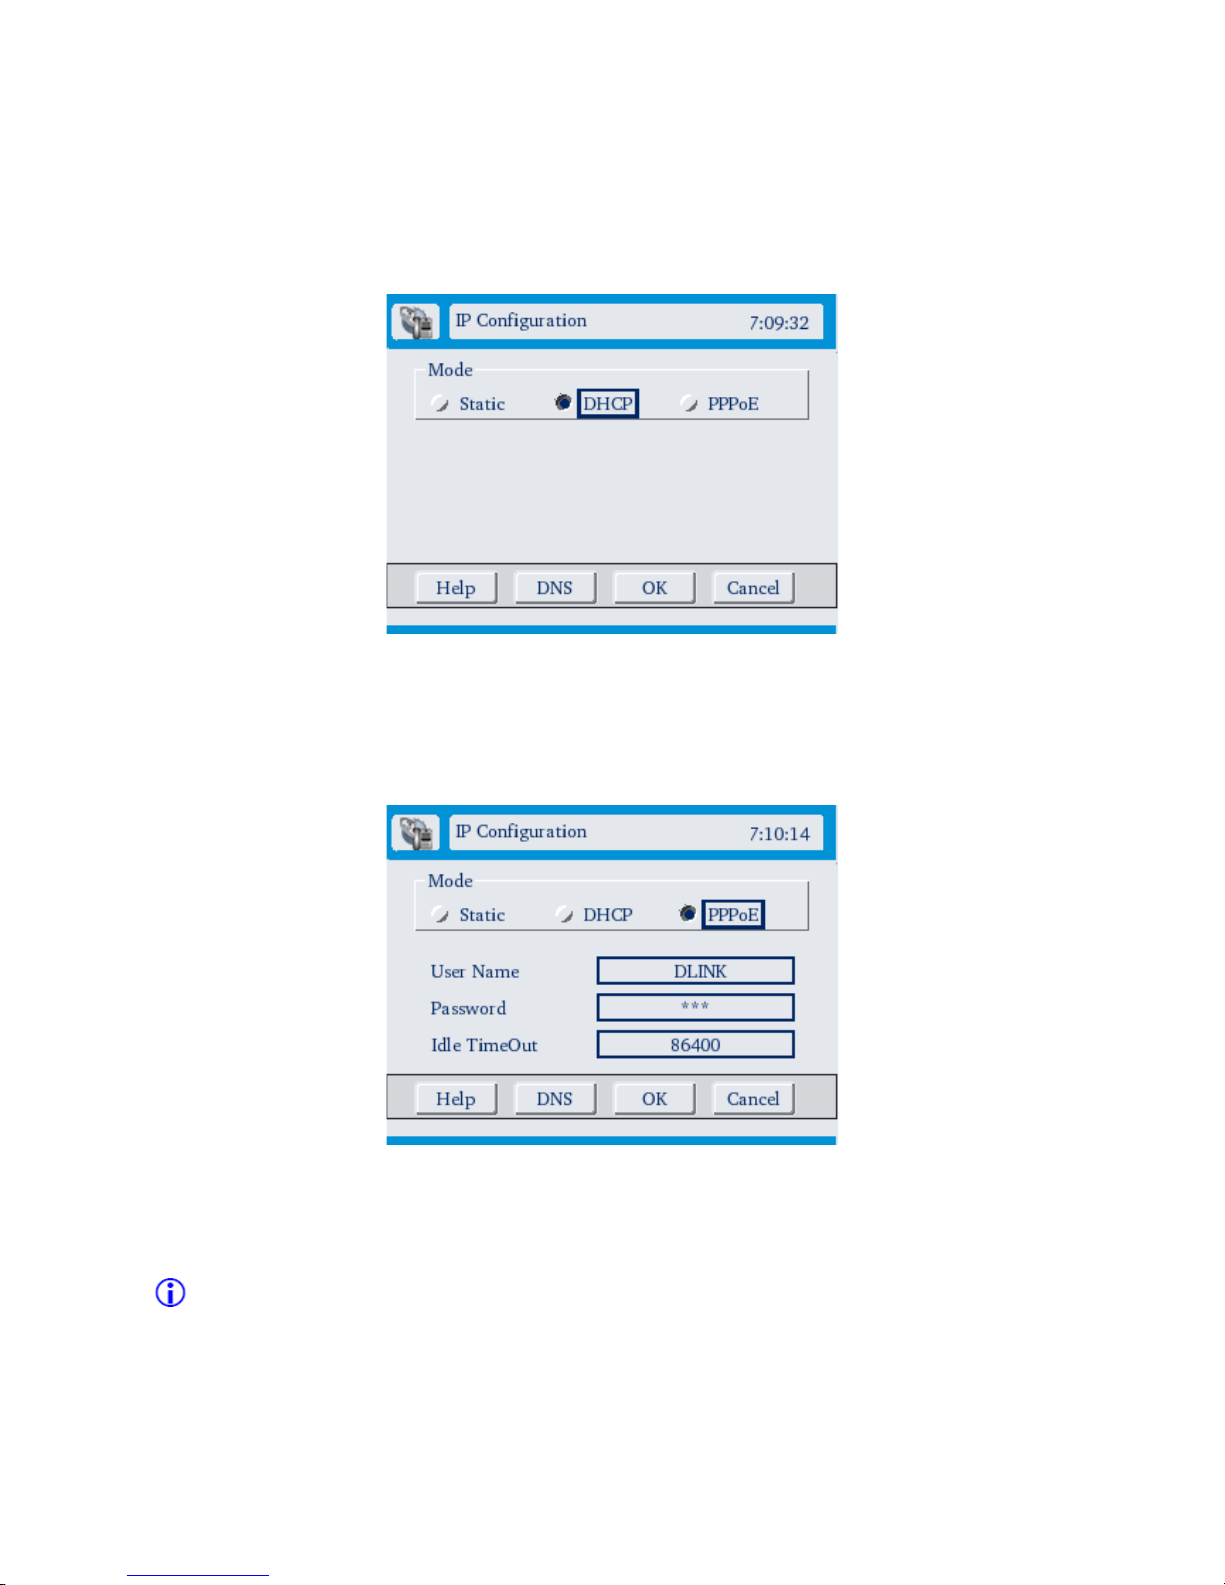
DHCP
Choose DHCP when connecting directly to a broadband modem that offers
dynamic IP addressing or when behind a router/DHCP server configured for
DHCP.
PPPoE
Choose this option when connecting directly to a DSL modem that offers a PPPoE
connection.
User Name: PPPoE user name provided by the ISP.
Password: Enter the PPPoE password.
Please note that the Password can be alpha-numeric. To enable easy entering of alpha-
numeric text on a password field, the entered character is shown at the right end of the box
for a split second.
38
Page 39
GVC-3000 User Guide
Idle Timeout: Disconnects the PPPoE connection after “timeout” minutes.
Maximum value that can be configured is 86400 seconds. Configuring a value of
zero does not disconnect even when there is no activity.
8.2.2.DNS Configuration
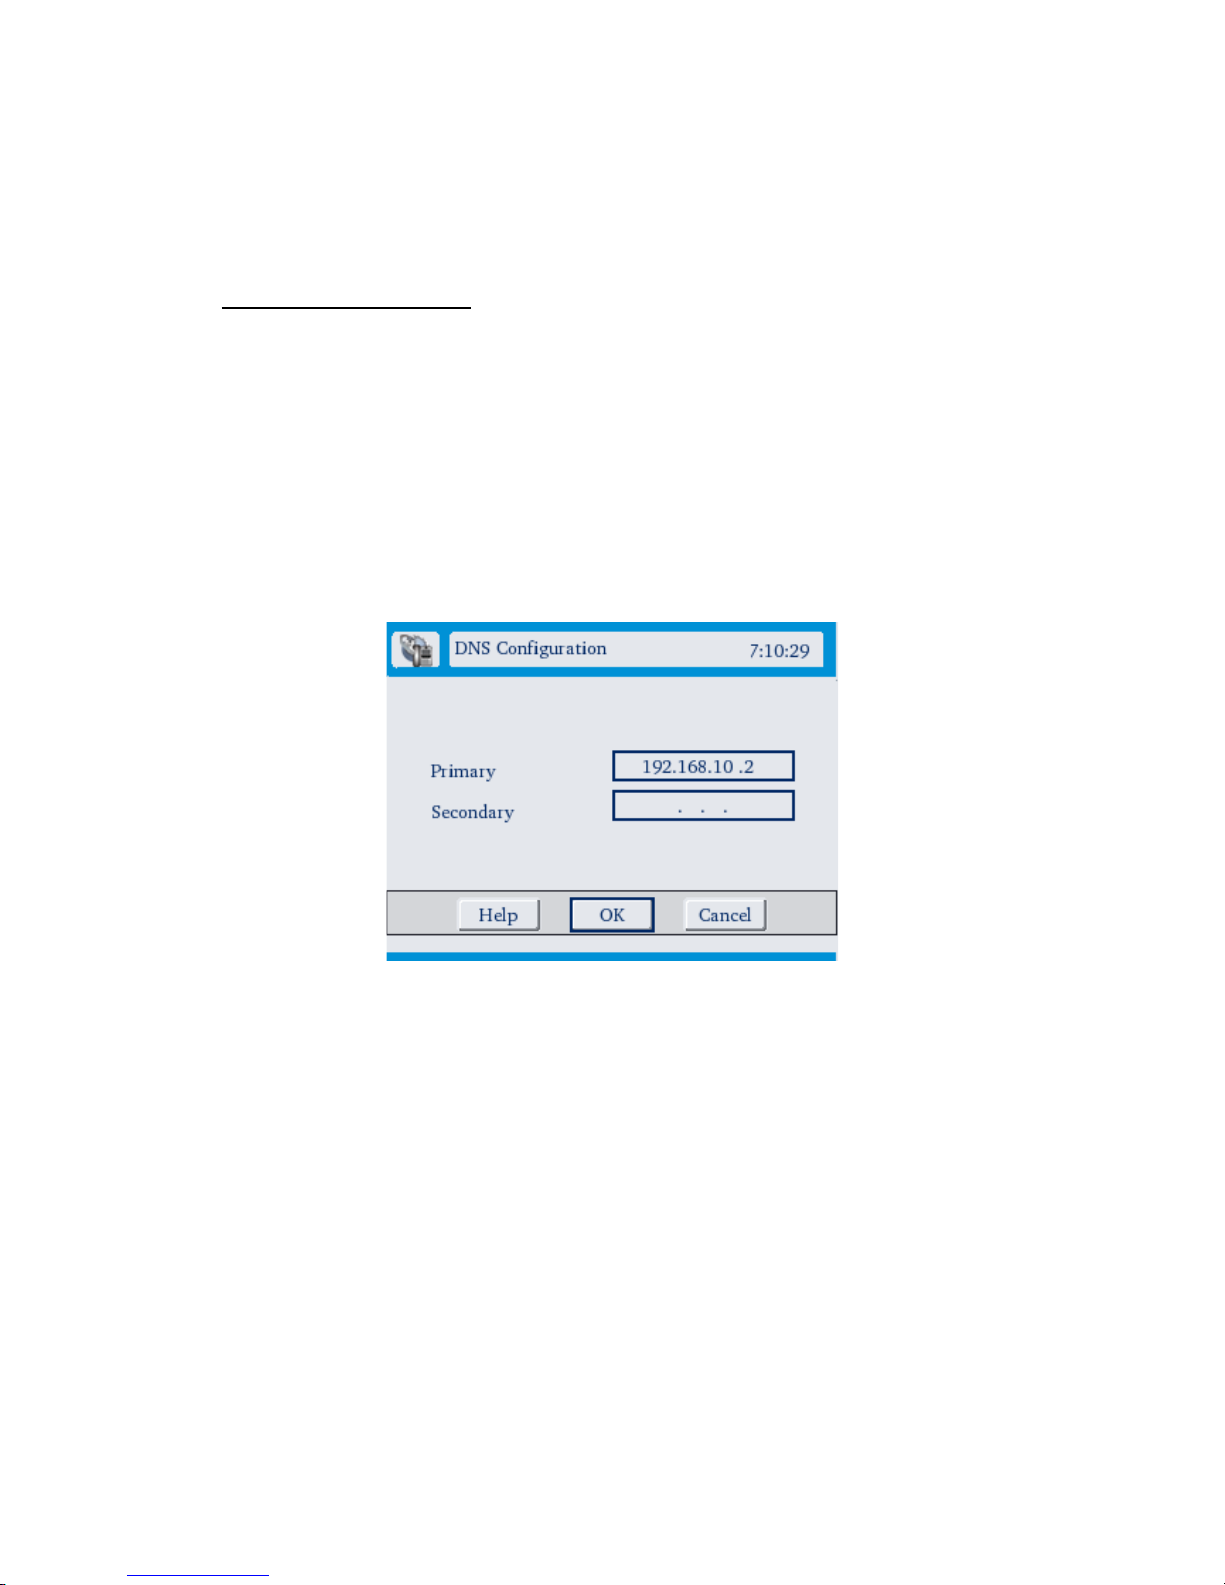
The DNS* screen (Settings → Network Configuration → DNS Settings) asks for
information regarding the Domain Name System (DNS) server. If you chose static
IP on the Network Address screen (described on the previous pages), it would be
useful to provide the DNS Primary Server settings. If you chose DHCP or PPPoE
modes on the Network Address screen, these values can be left blank as they are
obtained from the server.
You should be able to get both of these settings from your router configuration
settings, ISP, or your network administrator. Only the primary DNS server address
is required, though it is best to have both the primary and secondary addresses.
39
Page 40
GVC-3000 User Guide
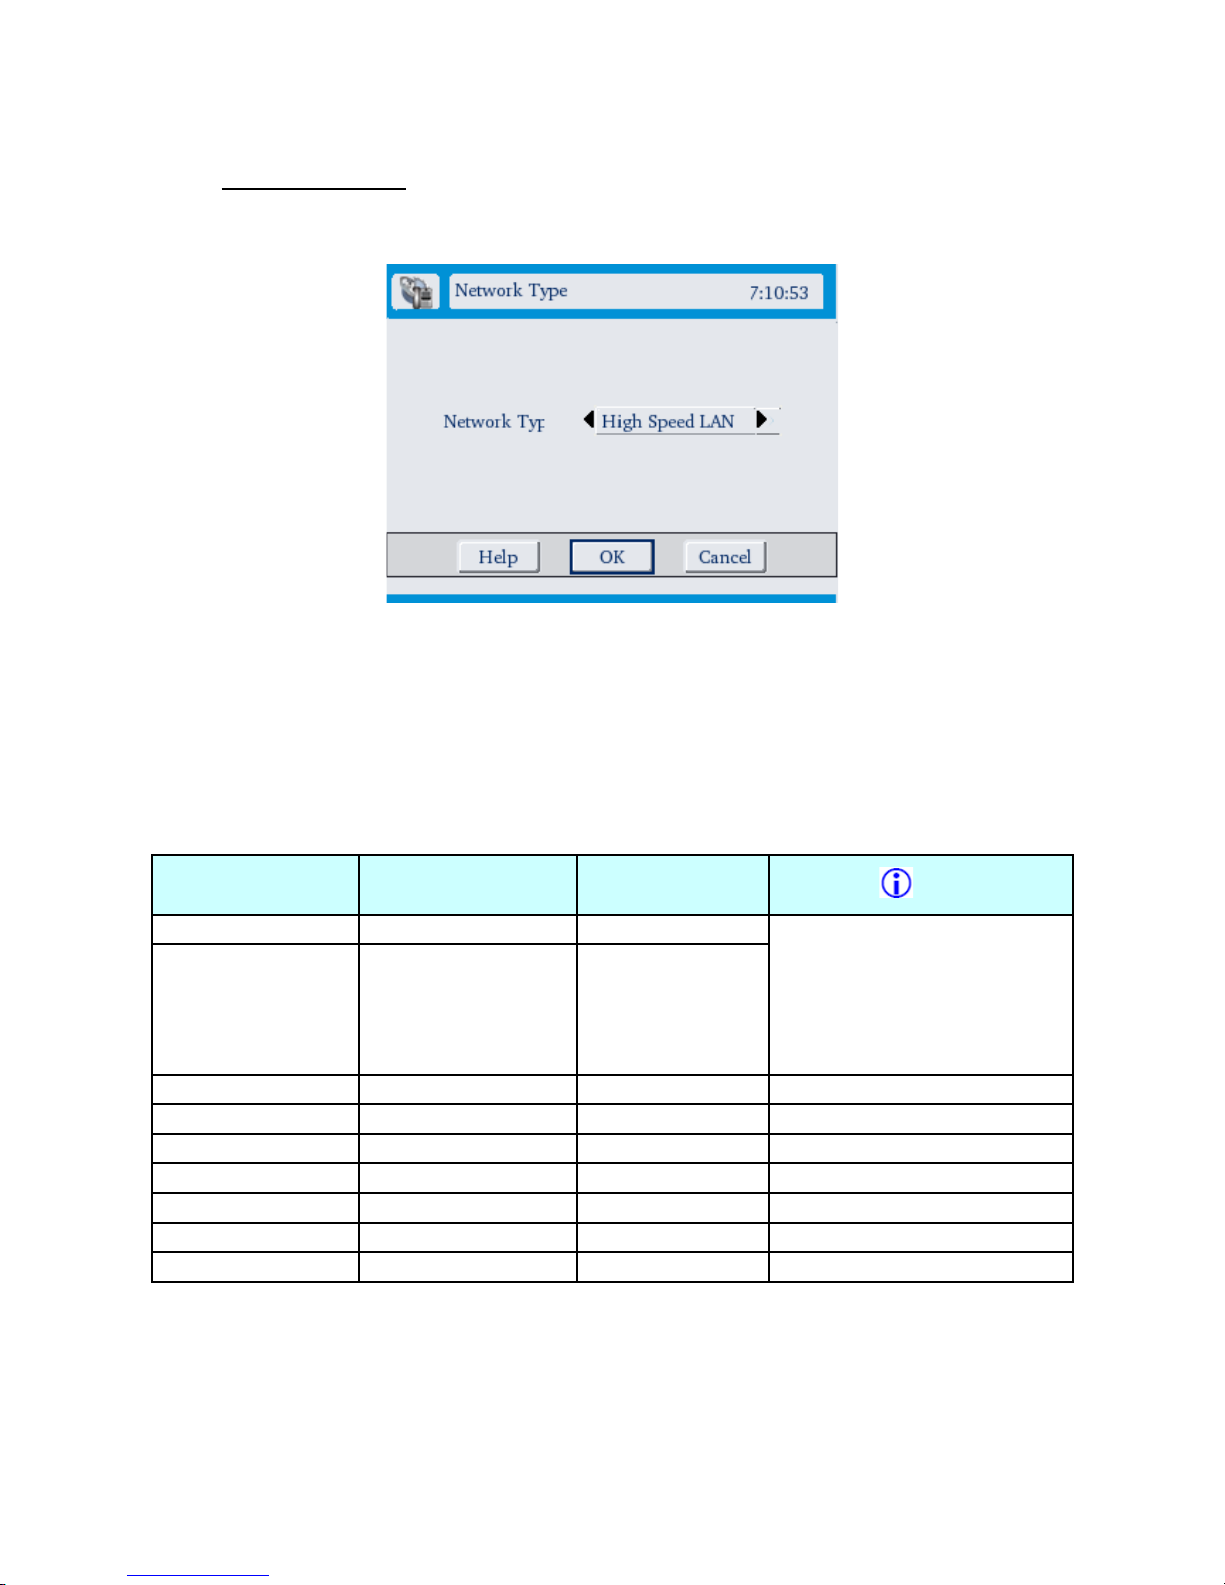
8.2.3.Network Type
(Settings → Network Configuration → Network Type)
This screen lets you configure the type of Network you are connected to. You
should be able to get the type of your network from your network administrator.
Depending on the Network Type configured, Video Phone selects the best Video,
Audio Codec and resolutions for making and receiving the calls.
Network Type
Chosen
Audio Codec
Supported
Video Codec
Supported
Note
Dial up G723, G729 H264
xDSL 64 G723, G729 H264
The unsupported Codec
shall be disabled and can
not be configured in the
Audio Configuration and
Video Codec Configura-
tion screens
Cable Modem All Codec All Codec
xDSL 128 All Codec All Codec
ISDN 128 All Codec All Codec
xDSL 256 All Codec All Codec
xDSL 512 All Codec All Codec
T1 Connection All Codec All Codec
High Speed LAN All Codec All Codec
40
Page 41
GVC-3000 User Guide
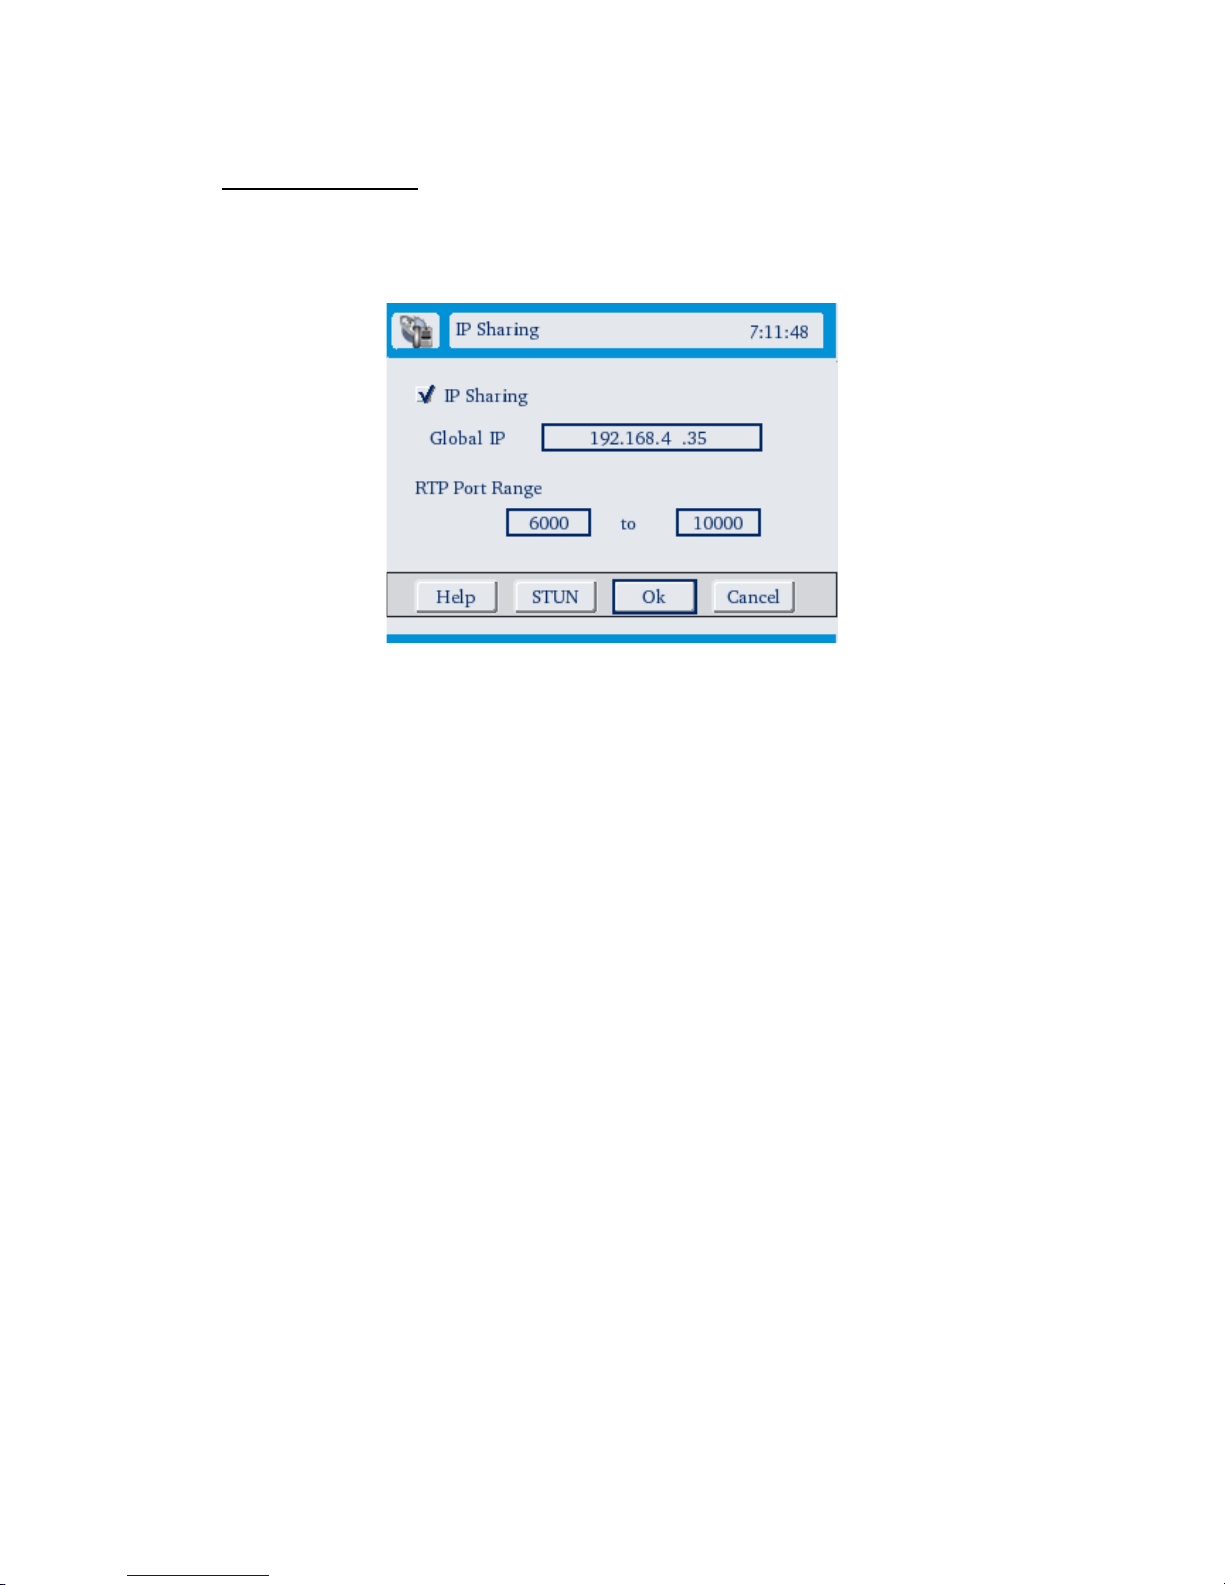
8.2.4.NAT Traversal
(Settings → Network Configuration → NAT Traversal)
IP Sharing: If IP Sharing is enabled, GVC - 3000 would attempt to use the IP that
is provided, in all of its outgoing messages. This IP can be obtained from your
network administrator.
RTP Port Range: These parameters define the local RTP-RTCP port pair GVC -
3000 will listen and transmit. A minimum of eight ports SHOULD be defined. This
is for supporting two calls at a time, each making use of two RTP-RTCP port pairs.
If IP sharing has been enabled, the RTP port range could be specified by your
administrator.
Press the “Stun” button to get the STUN Configuration screen.
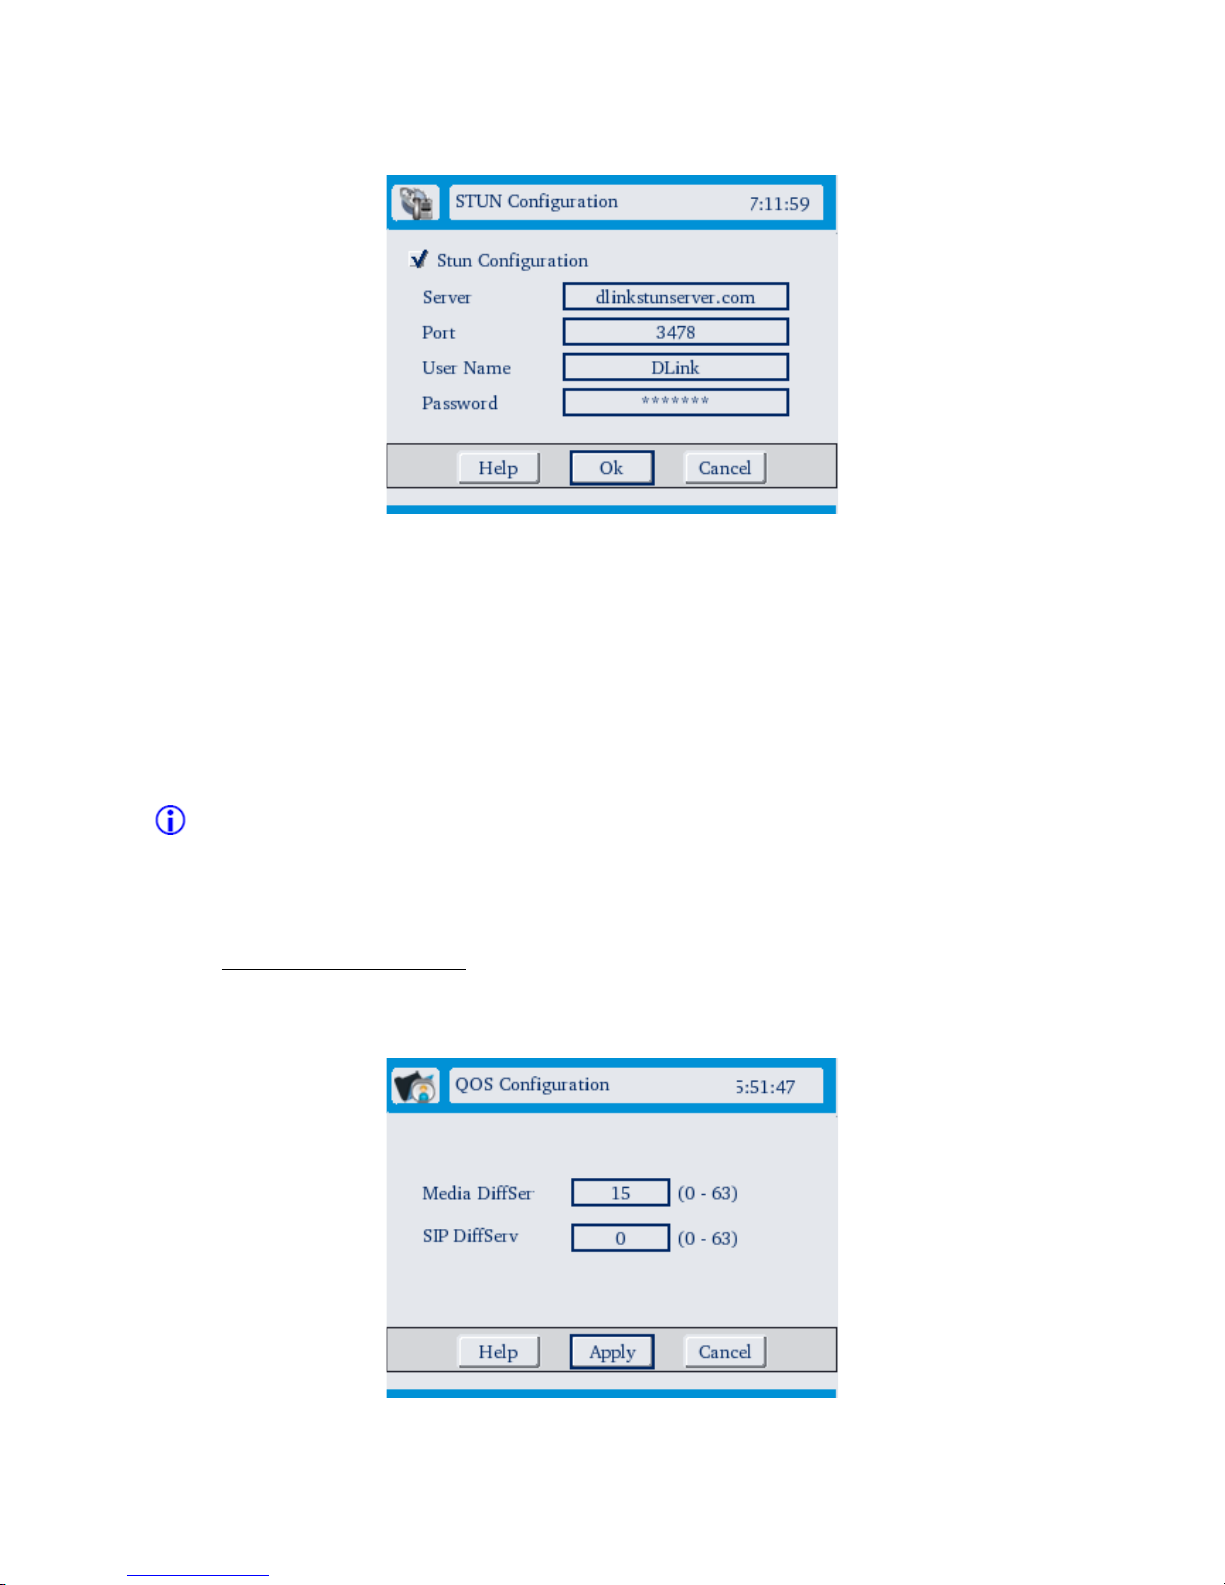
STUN Configuration:
If the Stun Server setting is enabled, then the GVC - 3000 NAT traversal
mechanism would behave according to the STUN client specification. Under this
mode, the embedded STUN client inside the GVC - 3000 will attempt to detect if
and what type of firewall/NAT it is sitting behind through communication with the
specified STUN server. Once GVC - 3000 detects the type of NAT, it will attempt to
use its mapped public IP address and port in all of its outgoing messages. The
STUN server details would be provided by your VoIP service provider.
41
Page 42
GVC-3000 User Guide
Server Address: IP Address of the STUN server.
Server Port: Port at which STUN server can be contacted. Default is 3478.
User Name: STUN user name
Password: STUN password
Most of the STUN servers do not ask for authentication. User name and Password
can be left blank in those cases.
Please note that the Password can be alpha-numeric. To enable easy entering of alpha-numeric
text on a password field, the entered character is shown at the right end of the box for a split second.
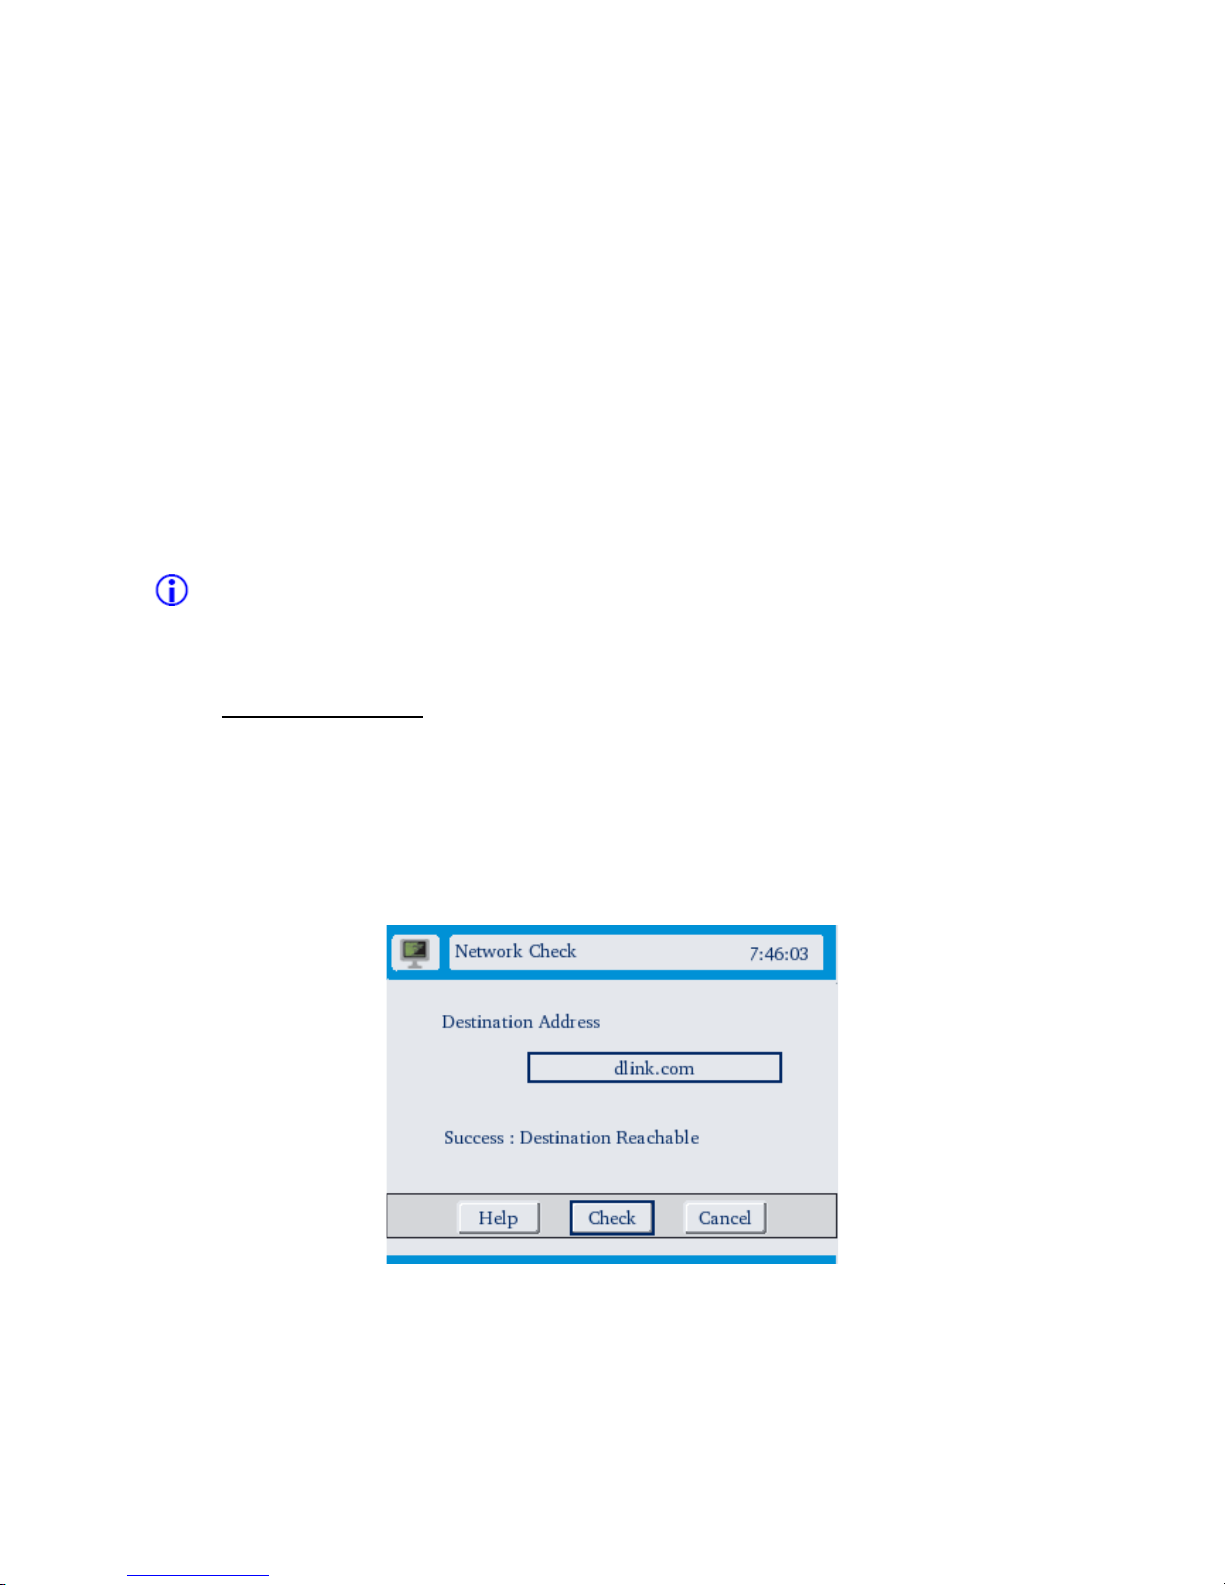
8.2.5.QoS Configuration
(Settings → Network Configuration → Quality of Service)
42
Page 43
GVC-3000 User Guide
The QoS/TOS denotes how a network should make tradeoffs between throughput,
delay, reliability and cost. D-Link Video Phone implements QoS as per RFC 2474
(Differentiated Services TOS). The Differentiated services byte in IP header carries
the QoS Value. Six bits of the Differentiated Services field are used to select per-
hop-behavior, a packet experiences at each node.
You can enter value in between 0 to 63 where in 0 means QoS not being applied
and packets would be transmitted as normal packets.
The above implementation is in conformance to Differentiated Services compliant
routers in the network and other v2ip phones
Please contact your network administrator for further assistance.
The entire Network related Configuration require “Save” for the changes to
come into effect.
8.2.6.Network Check
You can determine whether you can access an IP address from GVC - 3000 by
using the network check utility (Settings → General → Network Check). Enter a
valid IP or a Domain name and press “Check” to find out whether you have
network connectivity.
43
Page 44
GVC-3000 User Guide
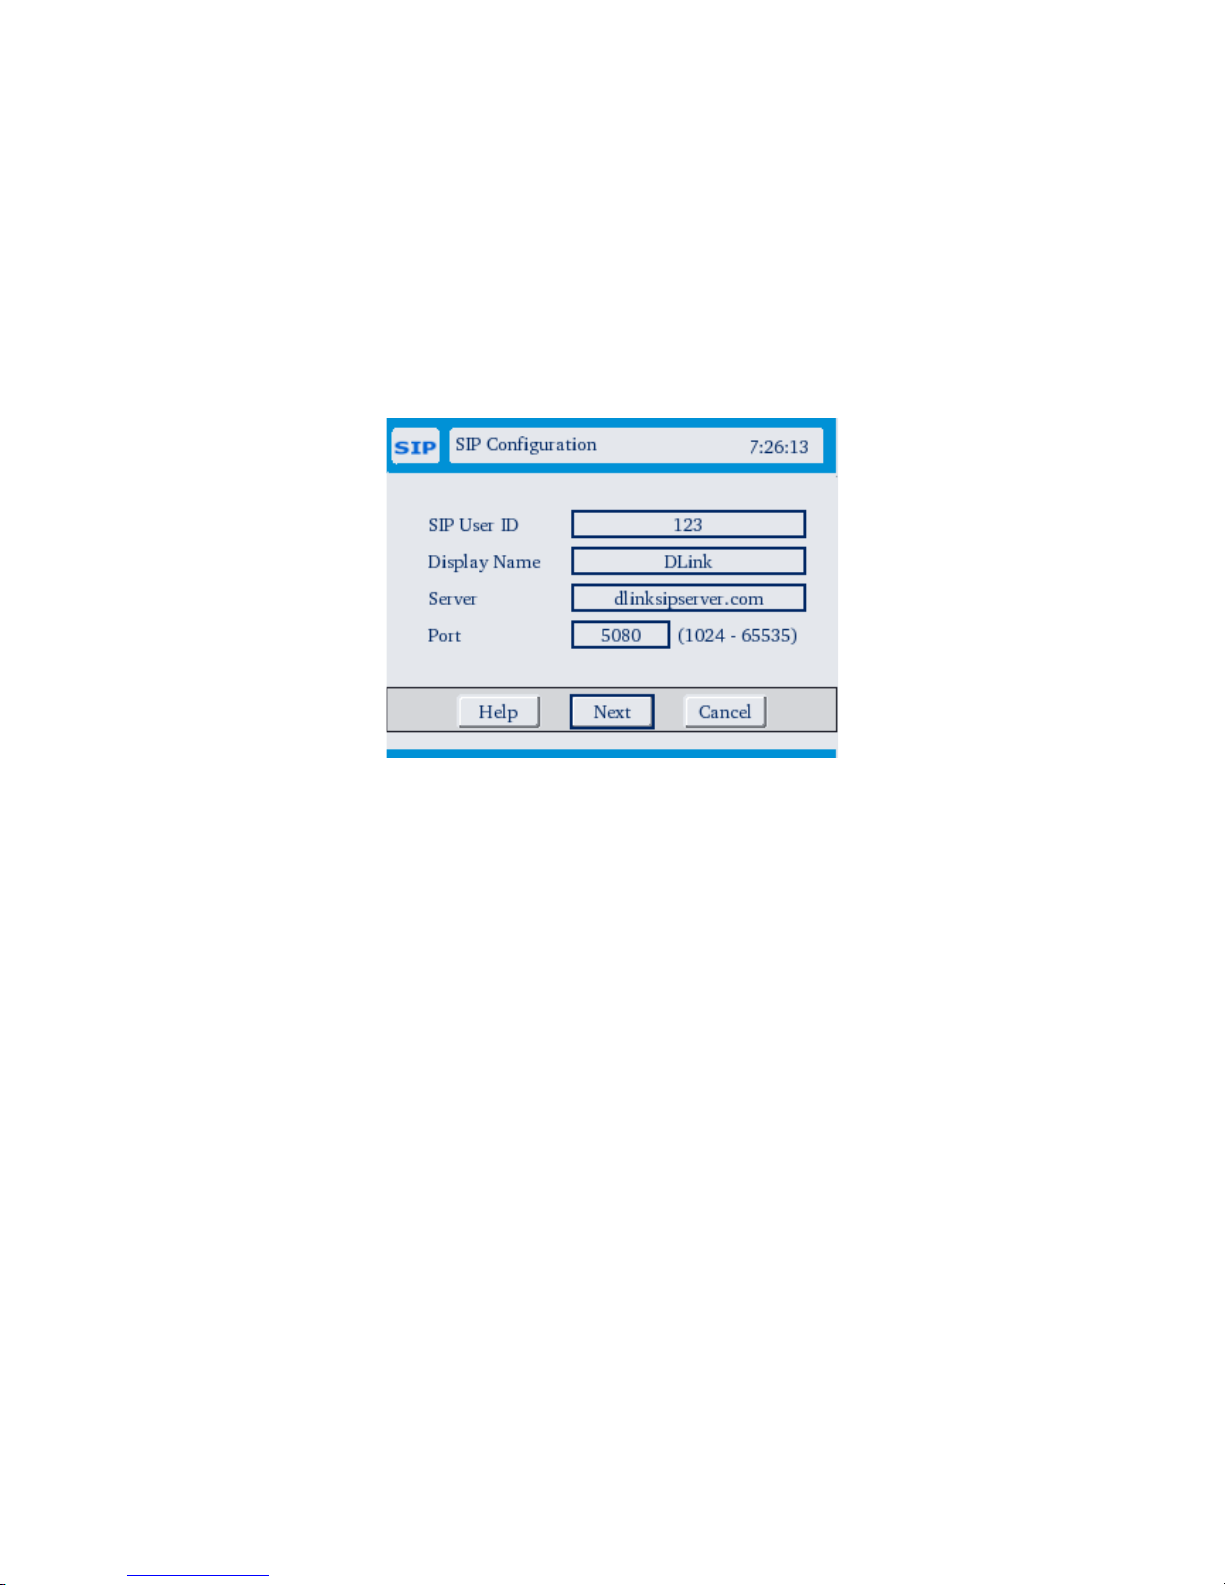
8.3. SIP Configuration
(Settings → Sip Configuration)
SIP (Session Initiation Protocol) is the Voice over Internet protocol that allows GVC
- 3000 to communicate with the calling/called destination and to receive incoming
calls.
SIP ID: Typically the account number for the SIP account. For example, in
“[email protected]:5062” the SIP ID is “user”, provided by your VoIP service
provider. In most of the accounts, SIP ID shall be your phone number for others to
call you.
Display Name: This name is displayed to other parties when they are connected to
you.
SIP Server: For example, in “[email protected]:5062”, the domain is
“domain.com”, provided by your VoIP service provider
SIP Port: For example, in “[email protected]:5062”, the port is 5062, provided by
your VoIP service provider. The default is 5060.
Press “Next” button to configure Advanced SIP details. You can at anytime press
“Back” on the SIP Advanced Configuration screen to come back and re-configure.
44
Page 45
GVC-3000 User Guide
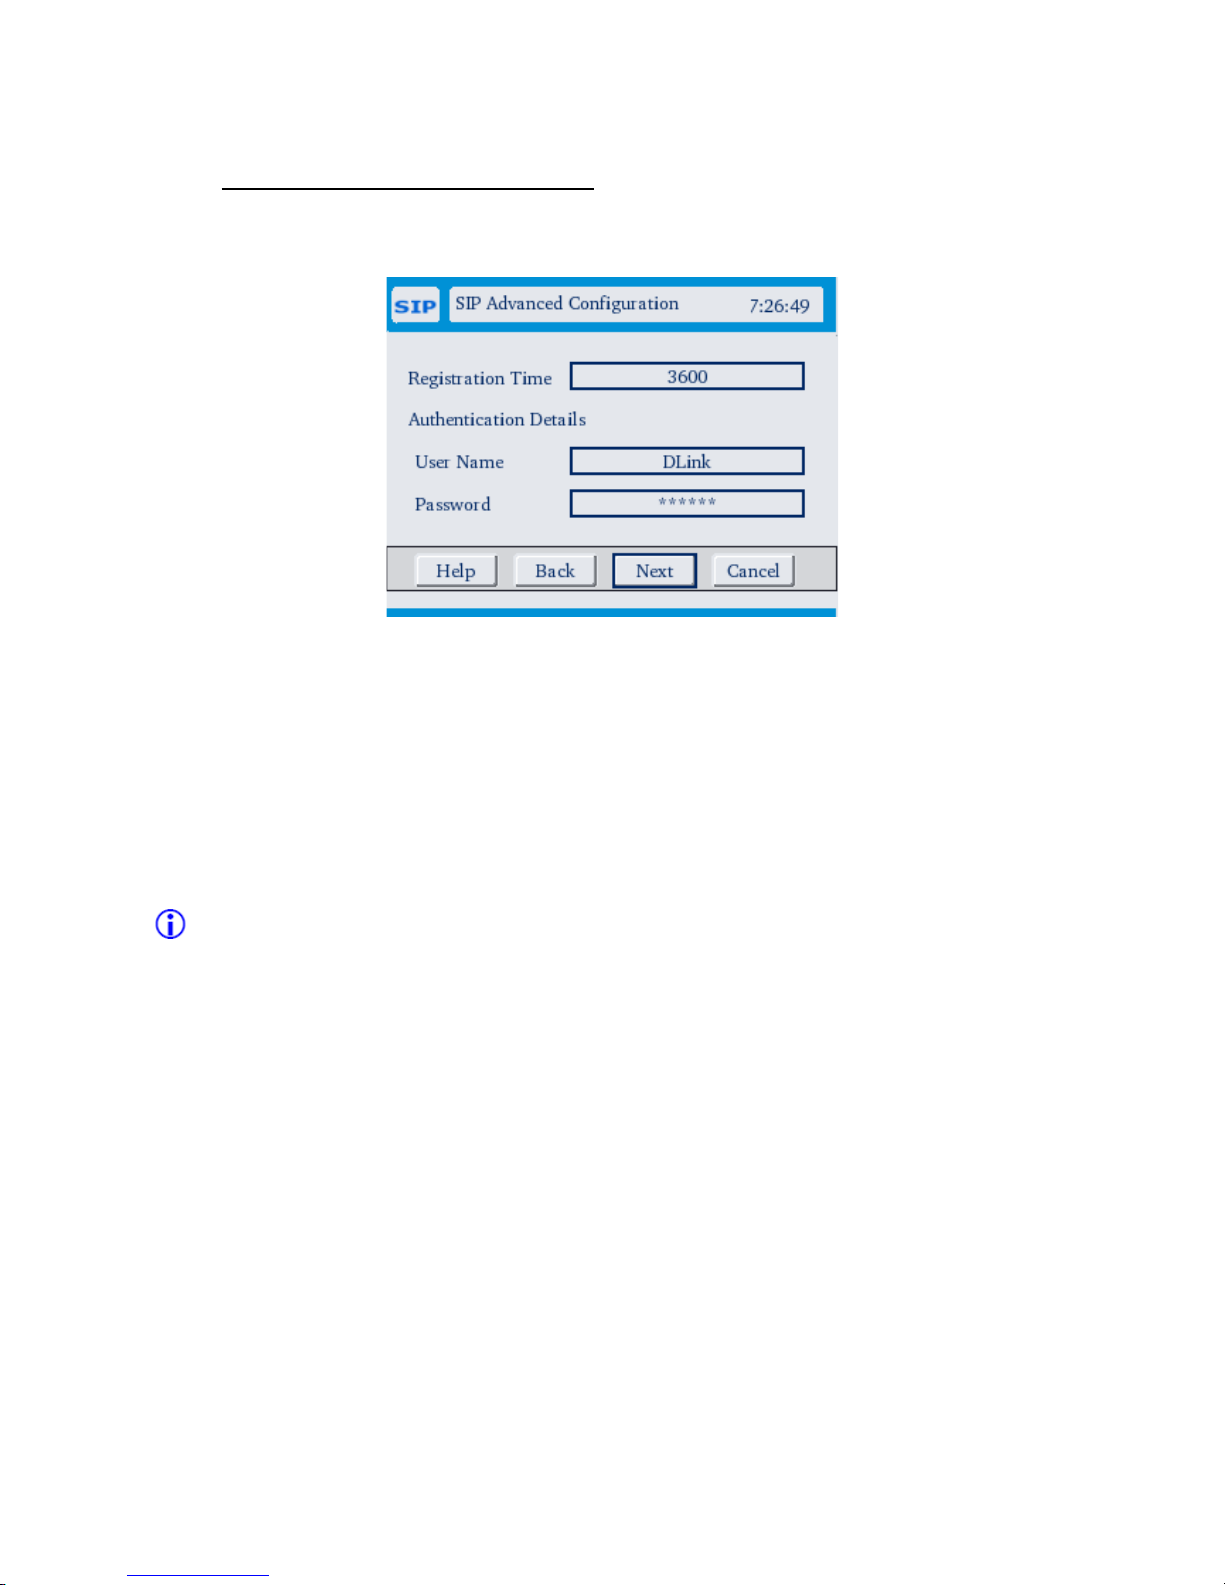
8.3.1.SIP Advanced Configuration
SIP Registration Time: The time interval between GVC - 3000’s attempts to re-
register, in order to refresh the account registration with the VoIP service provider
for this account. The default is 3600.
User Name: Typically the SIP ID but, certain servers provide the flexibility of
having different user name.
Password: Provided by the service provider.
Please note that the Password is alpha-numeric. To enable easy entering of alpha-
numeric text on a password field, the entered character is shown at the right end of the box
for a split second
Press “Next” button to configure Other SIP details. You can at anytime press
“Back” on the SIP Other Configuration screen to come back and re-configure.
45
Page 46
GVC-3000 User Guide
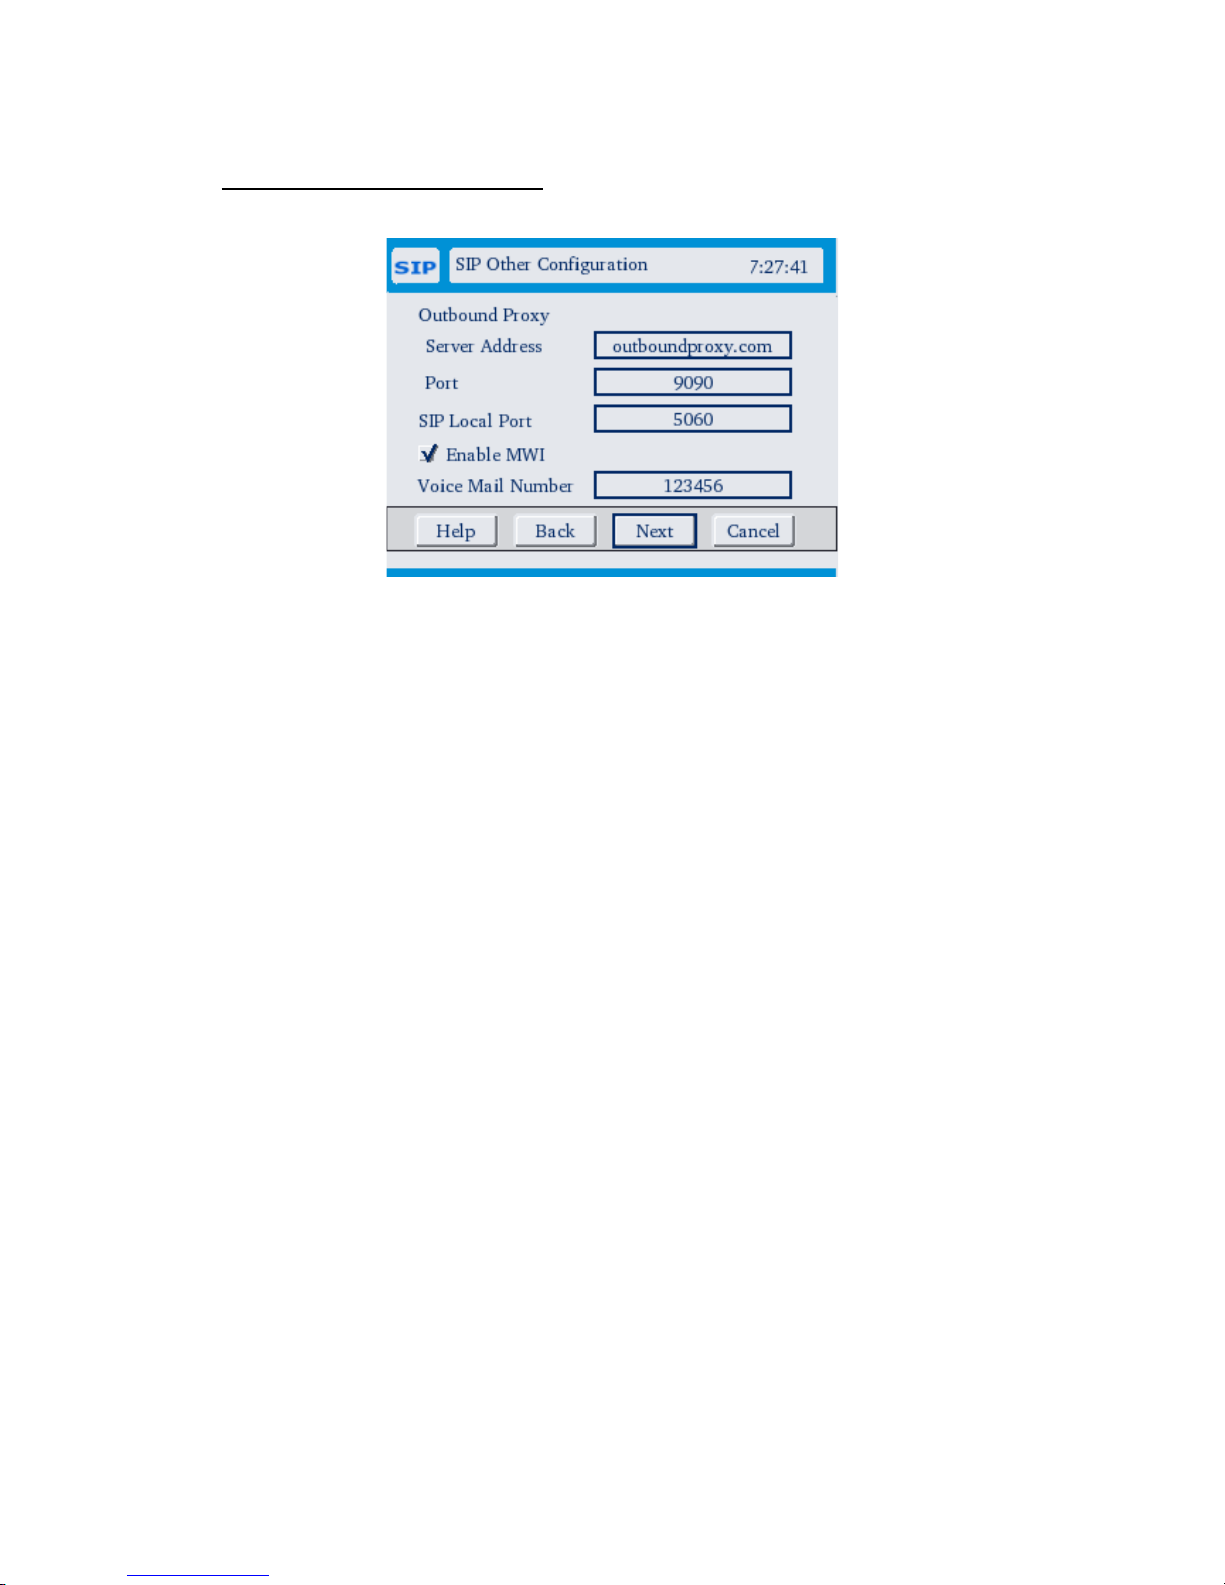
8.3.2.SIP Other Configuration
Outbound Proxy: If your VoIP service provider specifies that an outbound proxy*
is to be used then fill up the server address and port fields.
Server Address: The outbound proxy address provided by the VoIP service
provider. For the address enter a domain name (for example, domain.com) or an IP
address (for example, 123.123.123.123)
Port: The outbound proxy port provided by the VoIP service provider. The default is
5060.
Local Port: This is the port used by GVC - 3000 to send and receive SIP
messages. The default is 5060. Change in Local port. It does not come into effect
immediately. Please “Save Current Configuration” for the change to come into
effect.
Message Waiting Indication:
Voice mail Message Waiting Indication (MWI) feature provides an indication upon
arrival of new Voice mail messages. The Message Waiting LED will glow to provide
a visual indication for new Voice messages.
Enable MWI: Enable this field to subscribe MWI support. If you enable this field,
you can press “Next” button to configure MWI details. You can at anytime press
“Back” on the MWI Configuration screen to come back and re-configure. If you do
not wish to use this feature, un-check this field and press “Apply / Ok”.
46
Page 47
GVC-3000 User Guide
Voice Mail Number: This specifies the Phone number of the MWI server to be used
to retrieve the voice mail messages. This field is optional and can be left blank.
* An Outbound Proxy is a SIP Proxy used when the User Agent (UA) sits behind a NAT (Network
Address Translation) Server. It is the proxy’s job to get responses from the UA and route replies
back to the UA via the NAT Server.
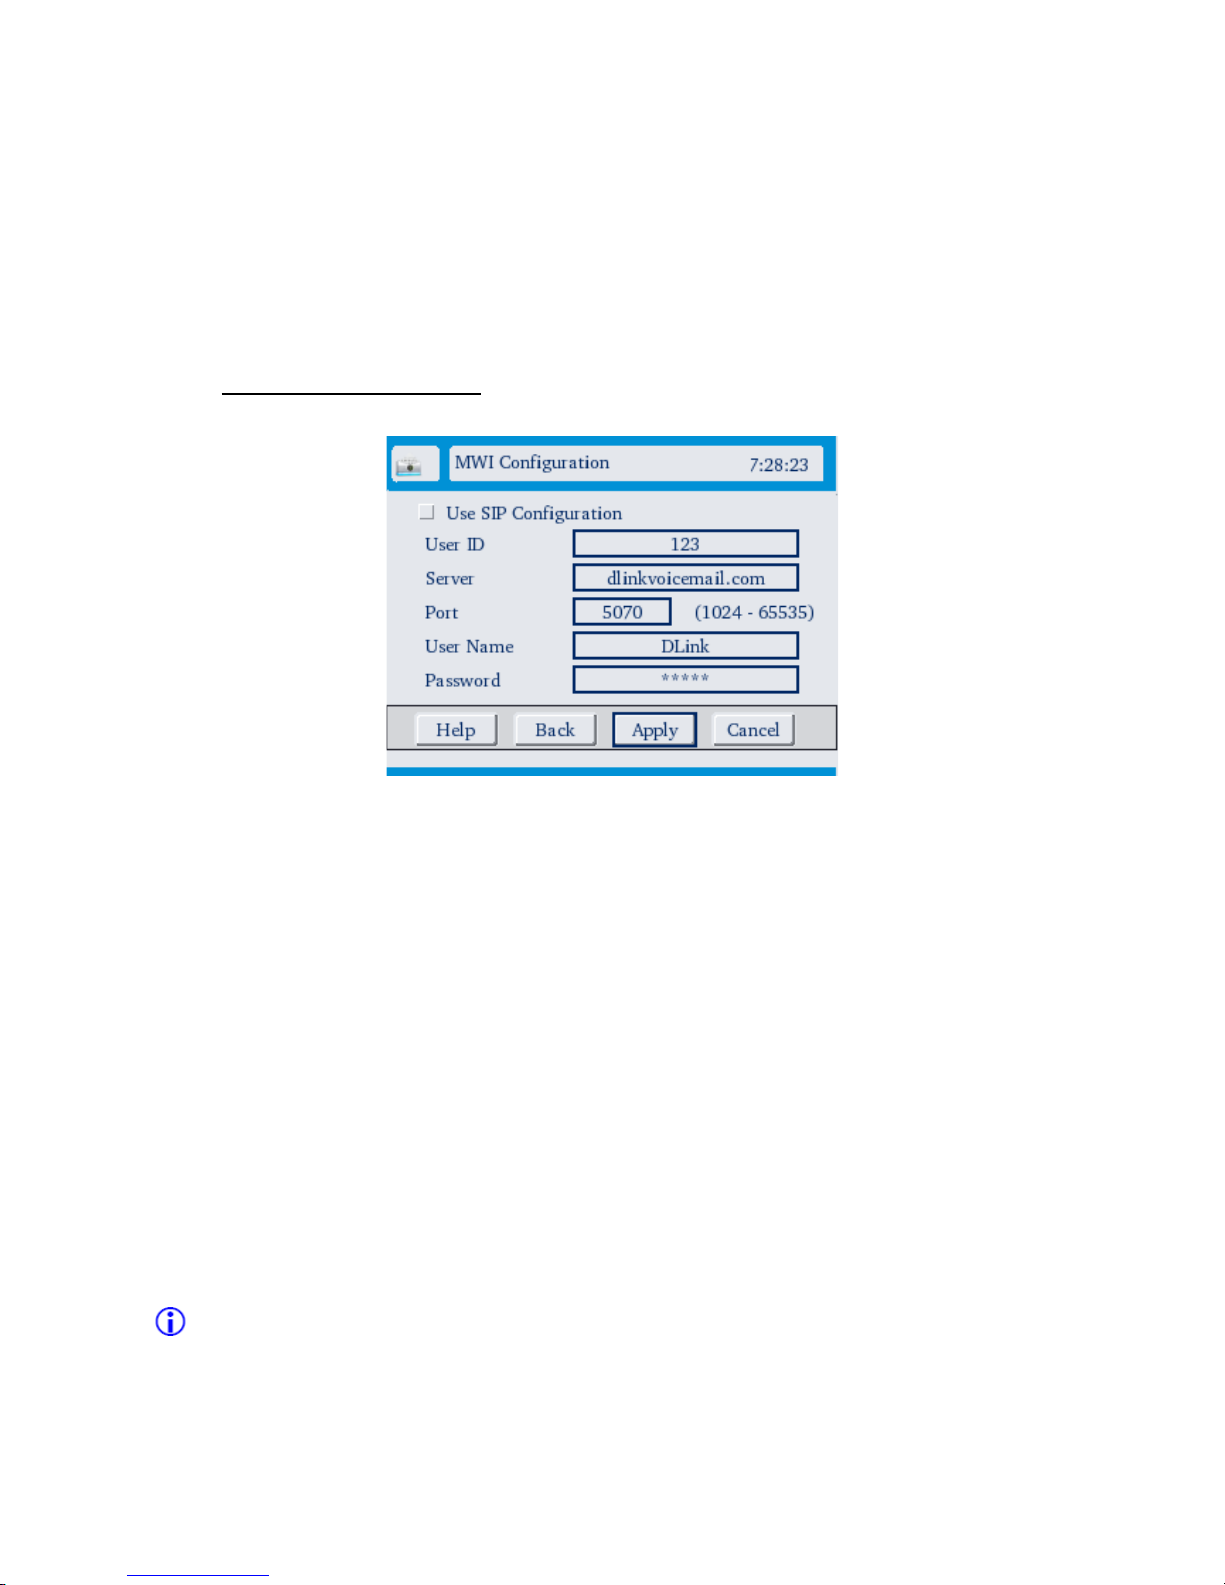
8.3.3.MWI Configuration
Use SIP Configuration: Select this check box if your MWI Configuration is same as
your SIP Configuration provided in your previous screens. If you select this, all
configuration fields are grayed out indicating that you need not have to enter the
details again. Do not select this if you like to configure the MWI details.
User ID: This specifies the phone number of the Phone with which it subscribes
with MWI server. Normally this would be same as the SIP Phone number.
Server: This field specifies the IP or domain name of the server for MWI service.
Port: This specifies the Port number of the MWI server.
User Name: This field along with the Password used to authenticate the IP Phone
with the Voice Message Server.
Password: This field along with the User Name used to authenticate the IP Phone
with the Voice Message Server.
Please note that the Password is alpha-numeric. To enable easy entering of
alpha-numeric text on a password field, the entered character is shown at the right
end of the box for a split second
47
Page 48

GVC-3000 User Guide
To retrieve your voice messages, please refer section 4.4.4.
Note: Pressing Apply on this screen shall ensure the changes to come into effect
ONLY till the device restarts. Please “Save Current Configuration” to retain
configuration permanently.
48
Page 49
GVC-3000 User Guide
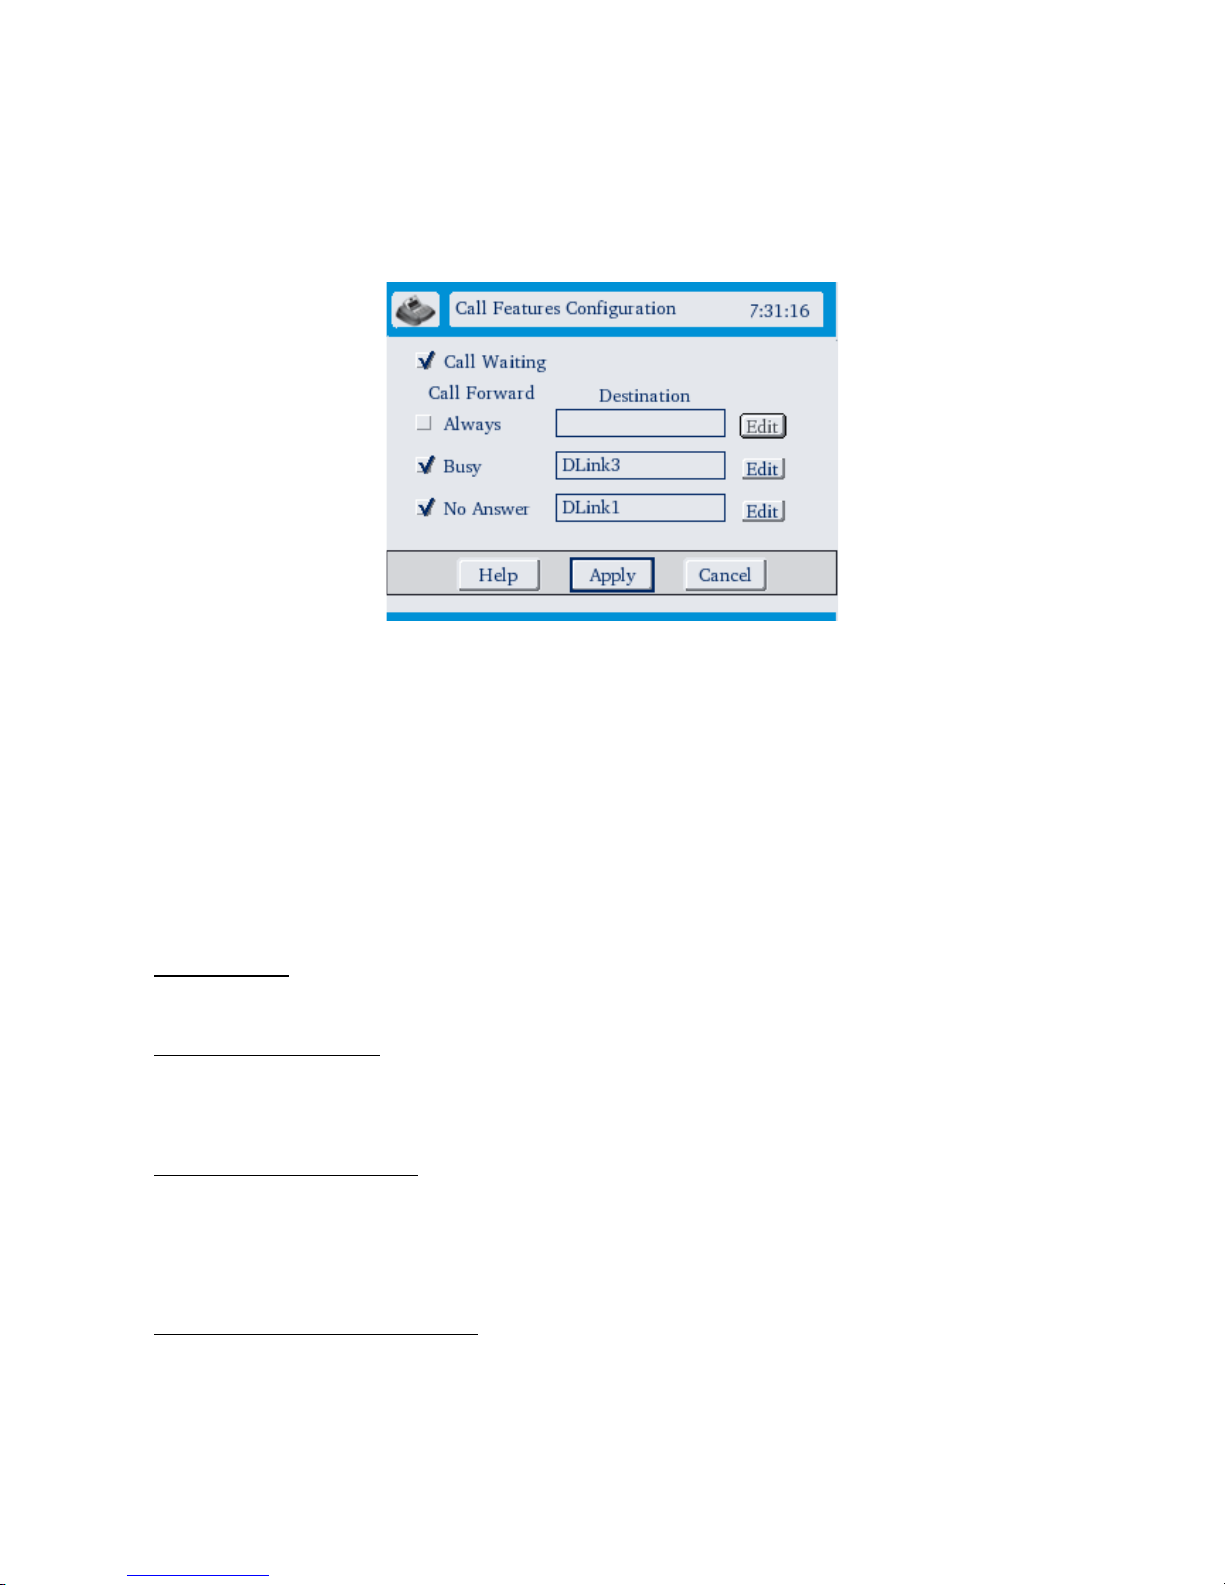
8.4. Managing Call Features
(Settings → General → Call Features)
This screen helps you to configure your phone to manage your incoming calls.
GVC - 3000 has a call forwarding feature that forwards your calls to an alternate
number when you are unable to receive your call. GVC - 3000 also supports call
waiting feature which plays a special beep if another caller tries to reach you when
you are already in a call. You can place the existing call on hold, answer the
second call, and easily switch back and forth between the two calls.
Call Waiting: Enable this if you want your phone to support call waiting feature.
Please refer section 7.5.1 for better understanding of this feature.
Call forward always: Unconditionally forward your call. Press the “Edit” button to
view the contacts in your phone book. Select a contact from the phone book and
press “Ok” to confirm the destination.
Call forward when busy: Forwards your call when you are engaged in conversation
or when your receiver is not in the cradle. Press the “Edit” button to view the
contacts in your phone book. Select a contact from the phone book and press “Ok”
to confirm the destination.
Call forward when no answer: Forwards your call if you don’t answer the phone for
a specific time. Press the “Edit” button to view the contacts in your phone book.
Select a contact from the phone book and press “Ok” to confirm the destination.
49
Page 50
GVC-3000 User Guide
Note:
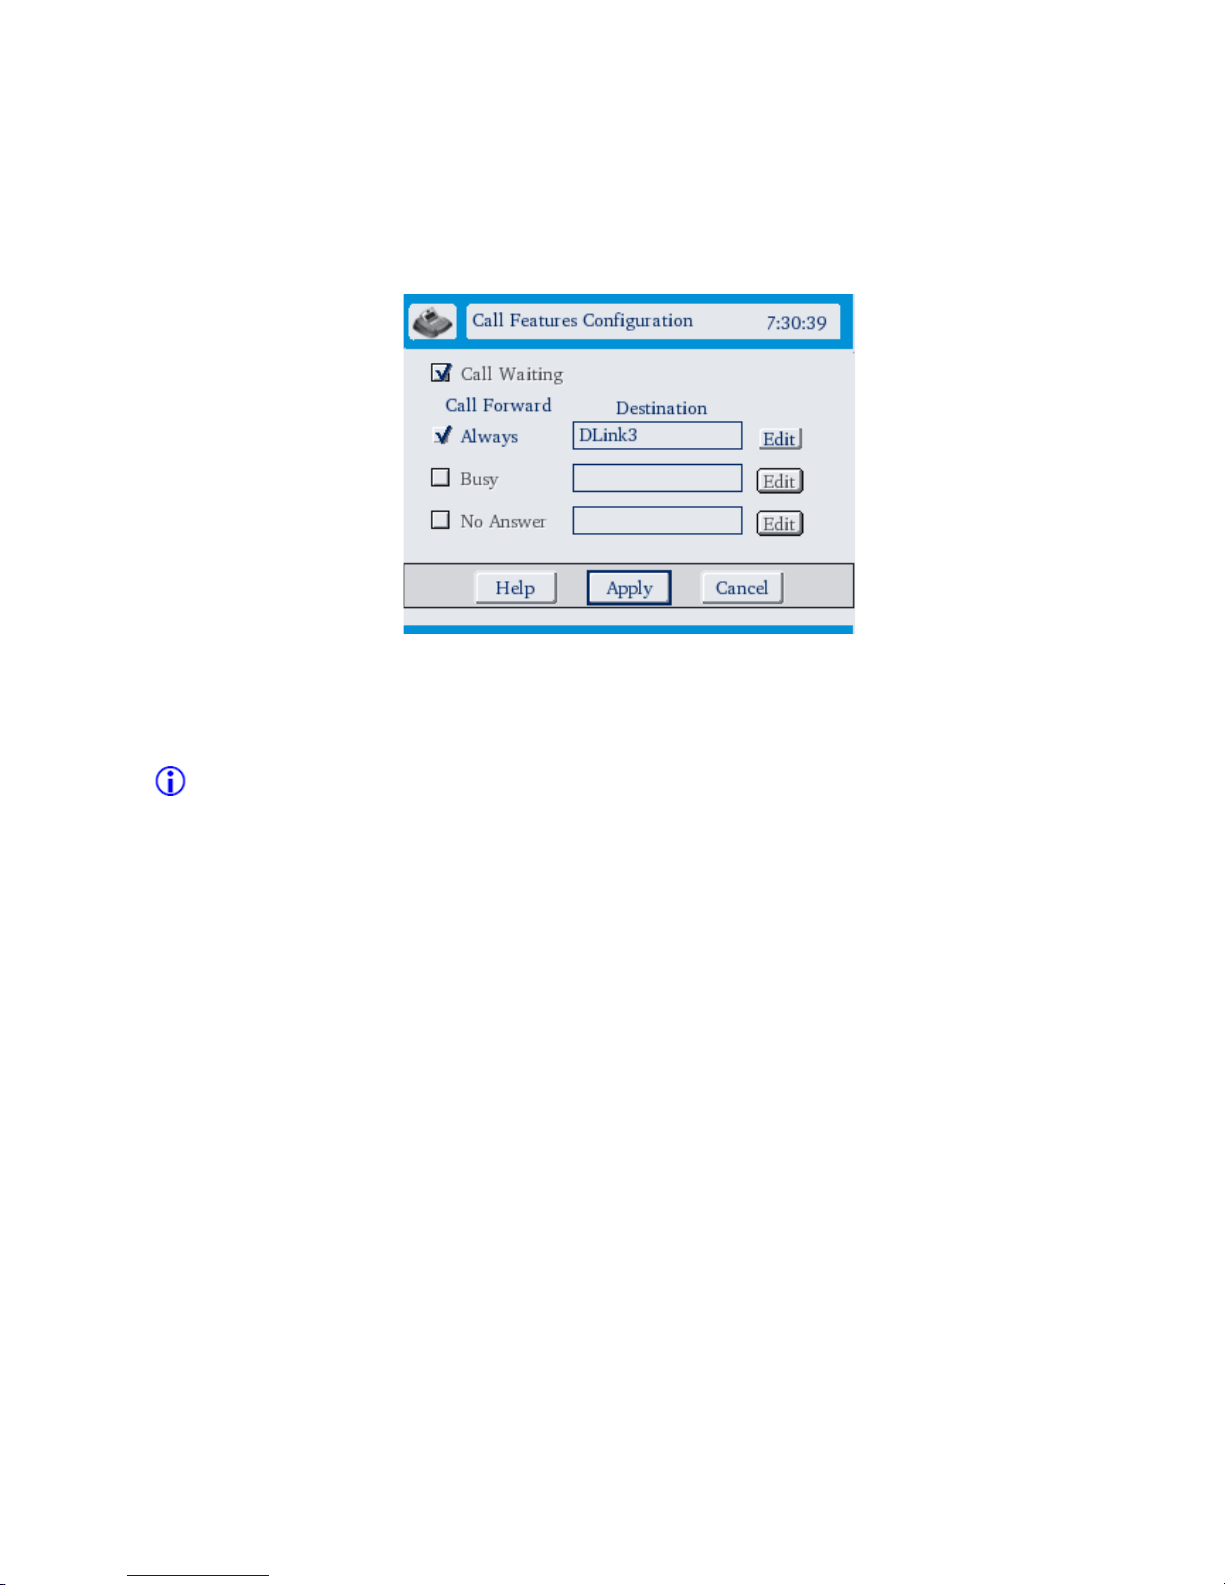
1) If call forward always is enabled, all other call related features cannot be
configured and the options are grayed out. This is because all other features
do not make sense if this feature is enabled.
2) To enable any of the call forwarding features, we have to first add the
destination in the phone book and then try enabling the required feature.
Note: Pressing Apply on this Configuration screen shall ensure the changes to
come into effect ONLY till the device restarts. Please “Save Current Configuration” to
retain configuration permanently.
50
Page 51
GVC-3000 User Guide
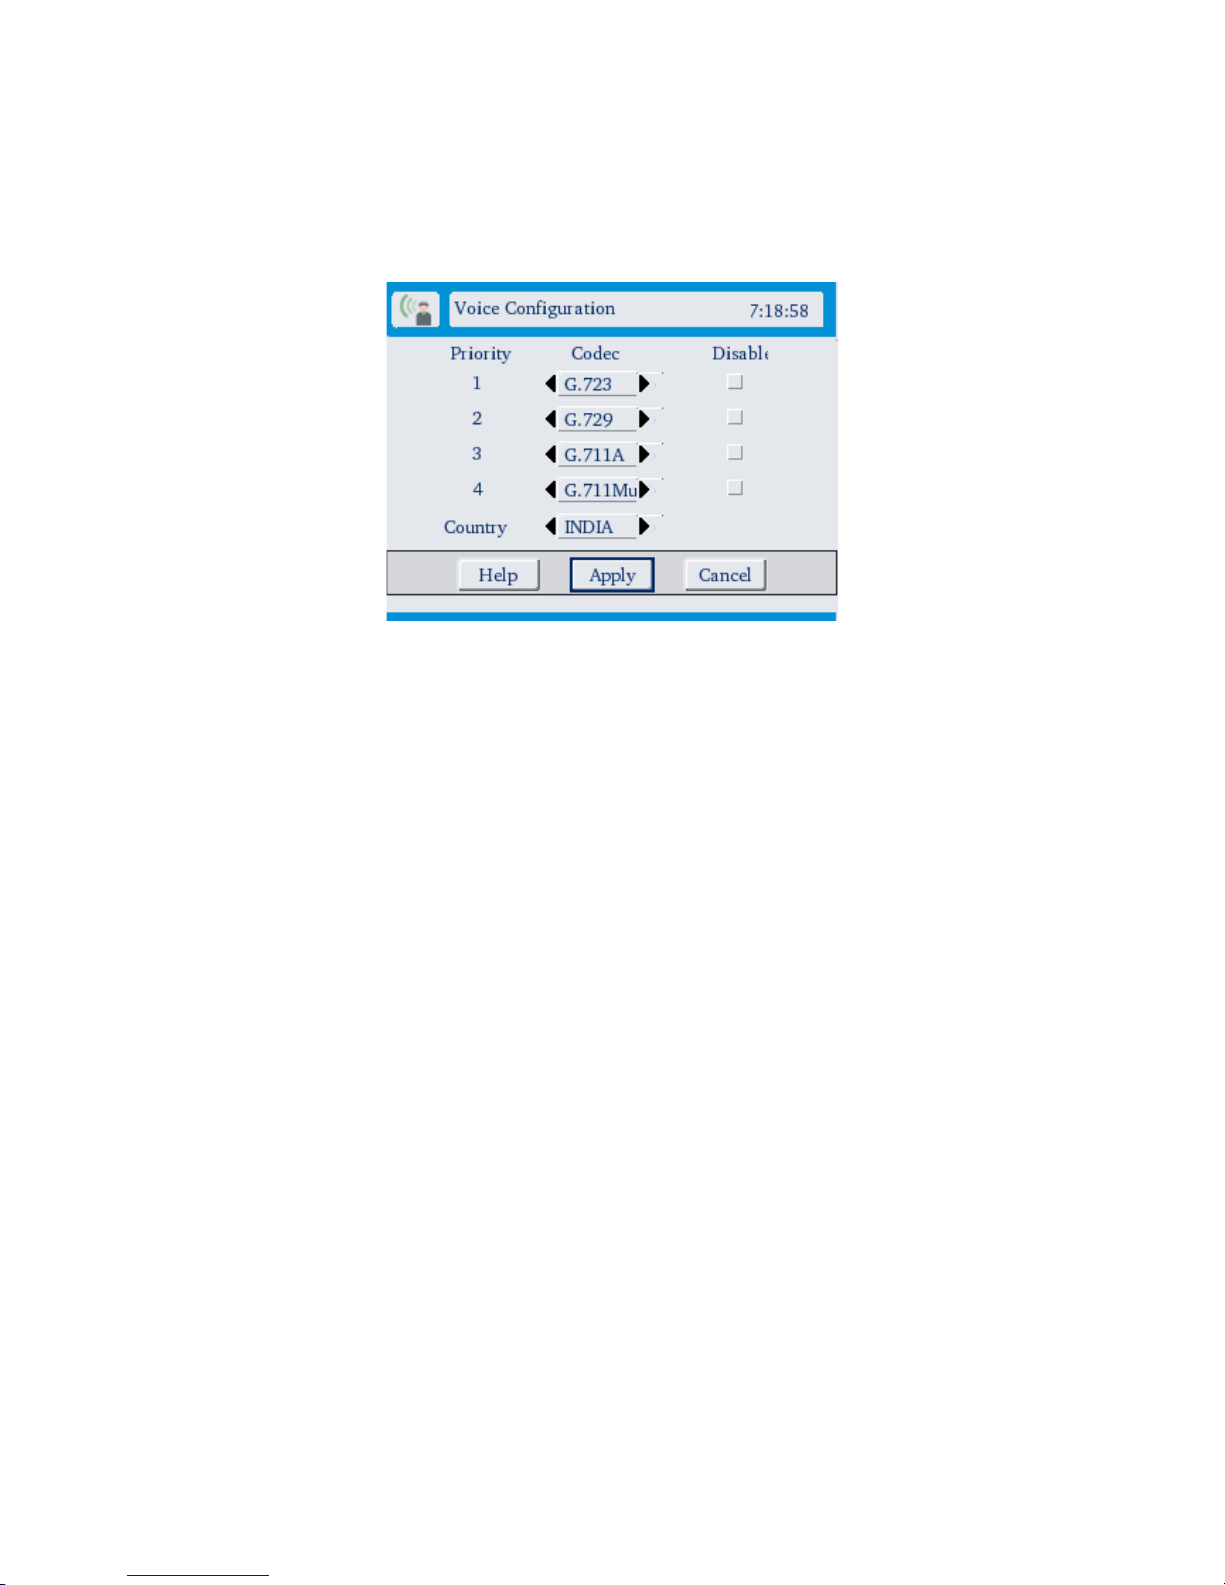
8.5. Voice Configuration
(Settings → Voice Configuration)
Codec stands for compressor/de-compressor; a Codec is a technology standard for
compressing and decompressing data. Video/audio quality depends on what kind
of Codec you use.
GVC - 3000 supports three types of audio Codec (G.729, G.723, and G.711-A/μ).
You can set the priorities of these three Codec in the order you would want to use.
Country specific tone settings can also be adjusted in this screen.
Note that your phone would automatically choose the most appropriate Codec based
on what Codec other party supports, to enable call.
You can choose the Codec that you would like to use and assign it a priority.
Disabling a Codec makes it unusable during negotiation.
51
Page 52
GVC-3000 User Guide
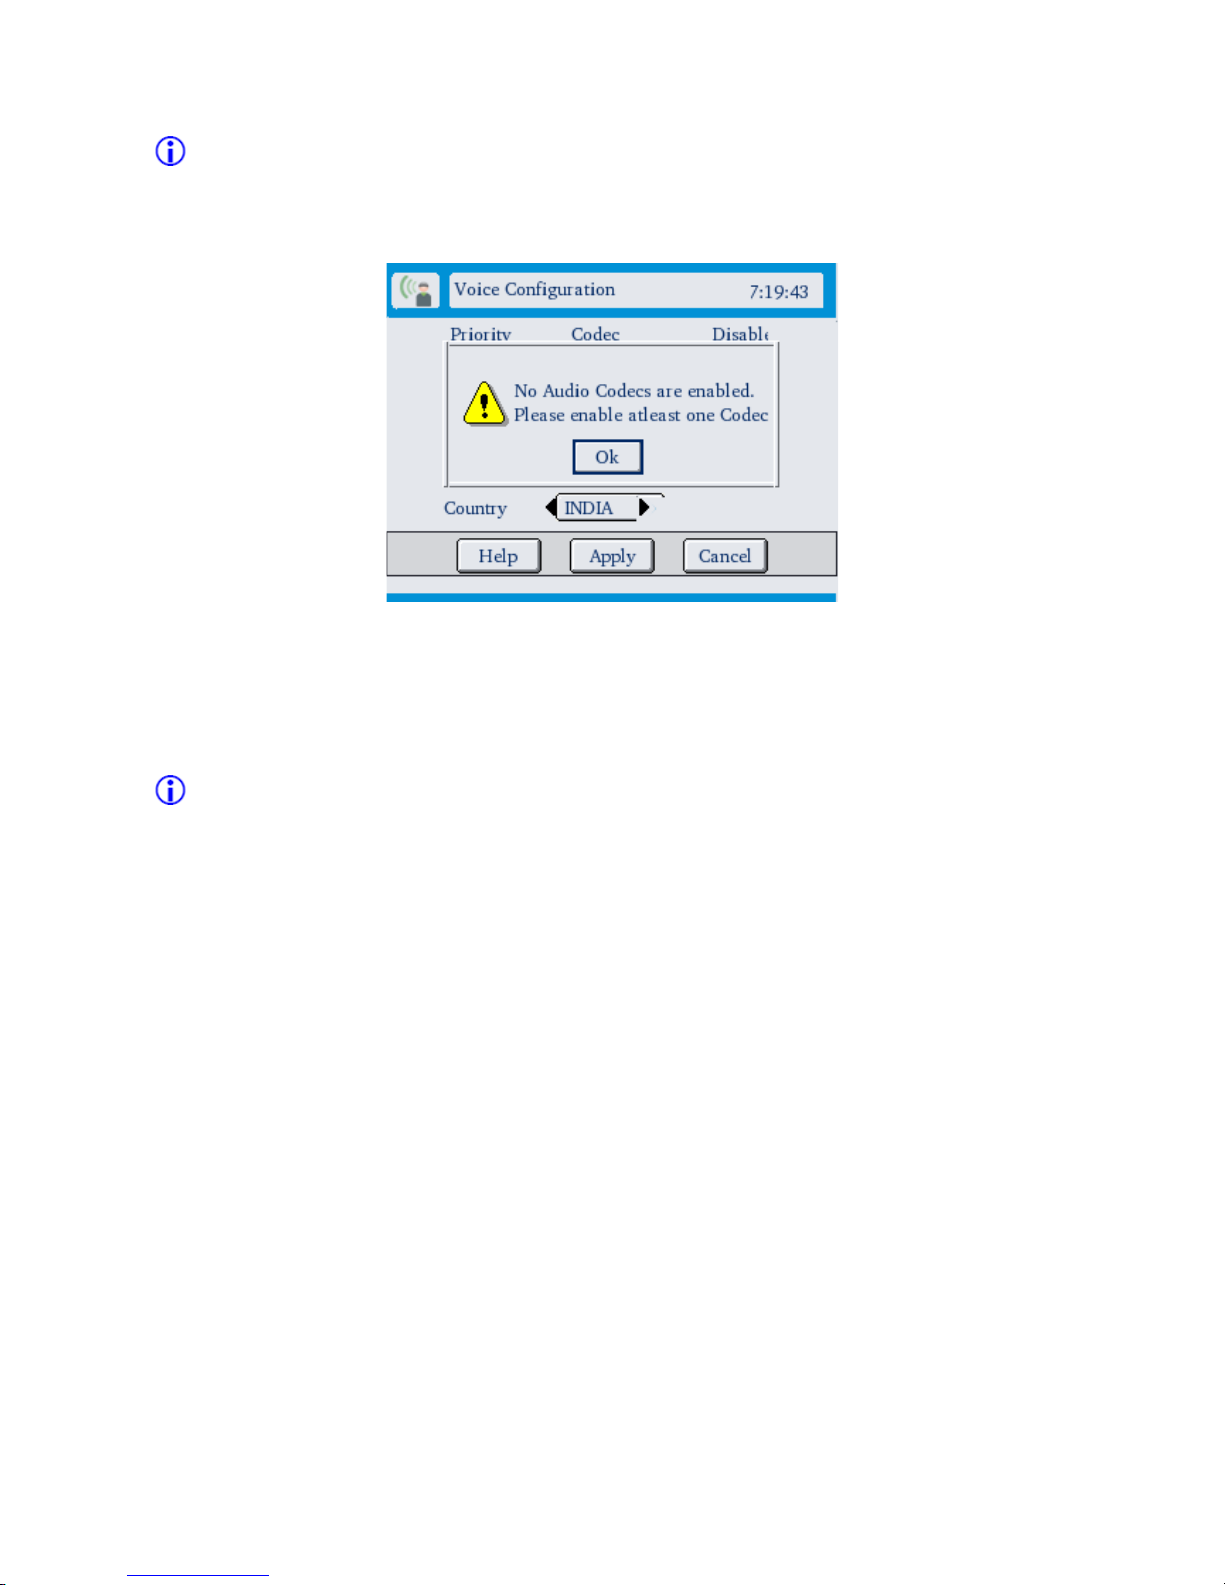
Note: Same Codec can not be selected at different priorities. All Codec can not be
disabled since device can not make or receive calls. At least one Codec has to be
enabled.
Country: GVC - 3000 generates tones to indicate busy, ringing, dial tone, and
similar. The setting of country determines which tone set is to be used.
Note: Pressing Apply on this Configuration screen shall ensure the changes to
come into effect ONLY till the device restarts. Please “Save Current Configuration” to
retain configuration permanently
52
Page 53
GVC-3000 User Guide
8.6. Video Configuration
(Settings → Video Configuration)
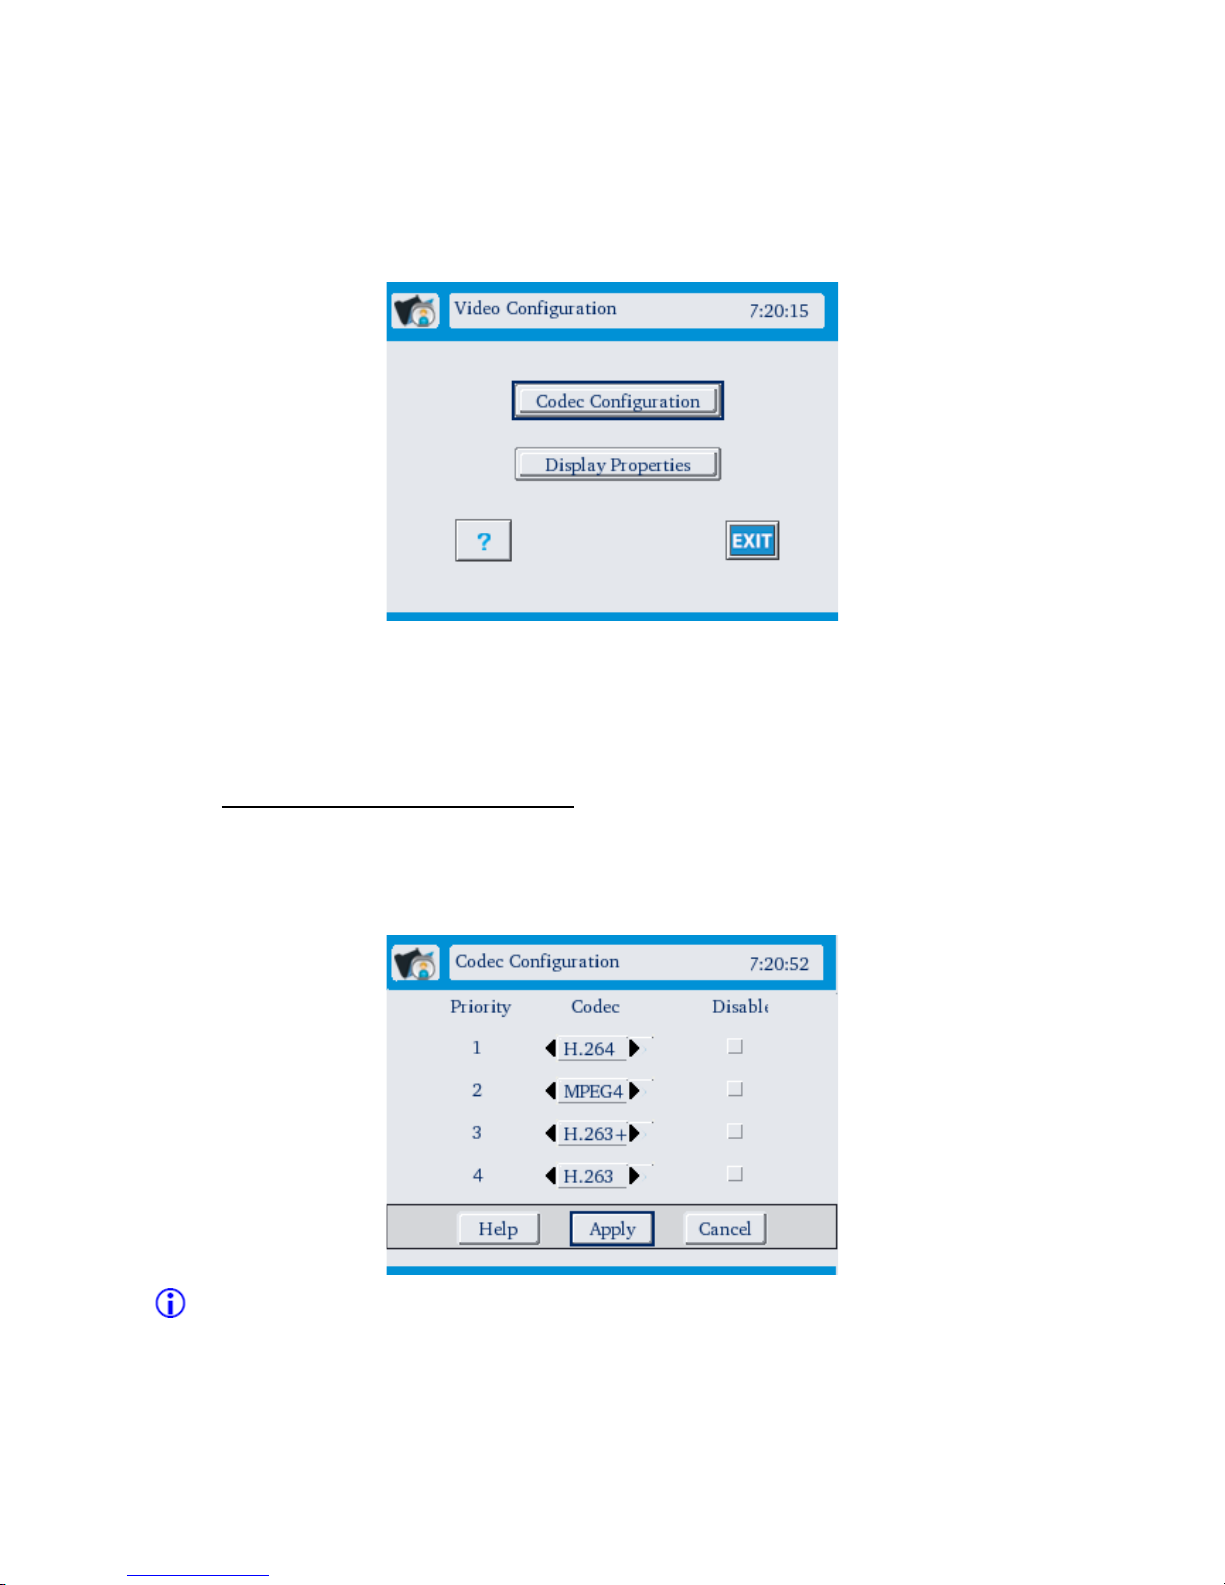
All video related configurations can be done here. Codec configuration and video
quality settings can be done.
8.6.1.Video Codec Configuration
(Settings → Video Configuration → Video Codec Configuration)
You can choose the Codec that you would like to use and assign it a priority.
Disabling a Codec makes it unusable during negotiation.
Note: Same Codec can not be selected at different priorities. If all Codec are
disabled, device can make and receive only audio calls. No video call is possible.
53
Page 54
GVC-3000 User Guide
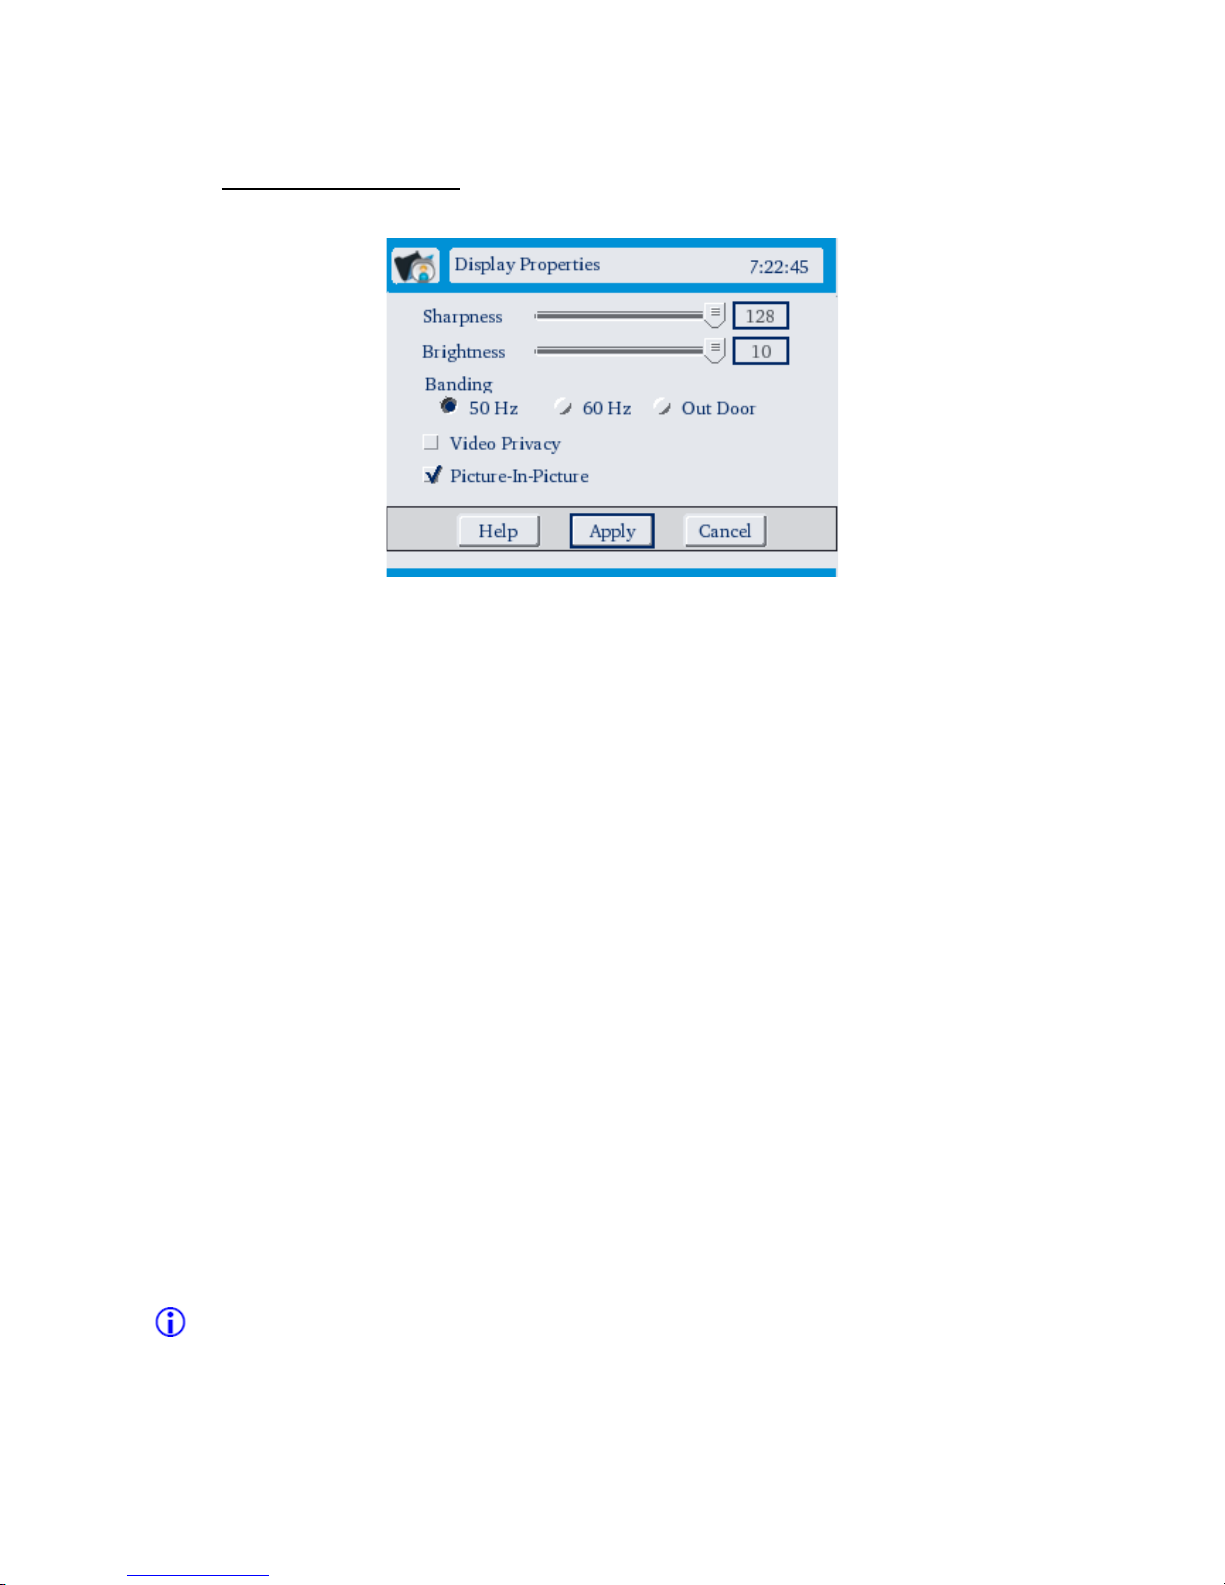
8.6.2.Display Properties
(Settings → Video Configuration → Display Properties)
Sharpness: Sharpness controls how GVC - 3000 displays edges of objects in the
local video image on-screen. If the image shows multiple vertical lines at the edges
of an object, decrease sharpness; if the vertical edges of on-screen objects are
fuzzy, increase sharpness.
Brightness: The brightness setting controls the overall amount of light in the local
video image. If the picture is too bright, reduce brightness; if the picture is too
dark, increase brightness.
Banding: Configure Banding as one of 50 Hz, 60 Hz or Out Door.
Video Privacy: Video Privacy keeps your video from being sent to the remote party.
The person on the other end of the video conference call will not be able to see you
if this setting is checked. This shall be applicable to all the calls. To send video
when you are in a call, press the “video privacy” key on the keypad.
Picture-In-Picture: Picture in Picture (PIP) is a feature provided by your Video
Phone. By enabling PIP, Remote video is displayed on the full screen, at the same
time as your local video is displayed in an inset window to the bottom right of the
screen. The two images can be toggled using the “Self/Remote Toggle” key on the
keypad.
Note: Pressing Apply on this Configuration screen shall ensure the changes to
come into effect ONLY till the device restarts. Please “Save Current Configuration” to
retain configuration permanently
54
Page 55
GVC-3000 User Guide
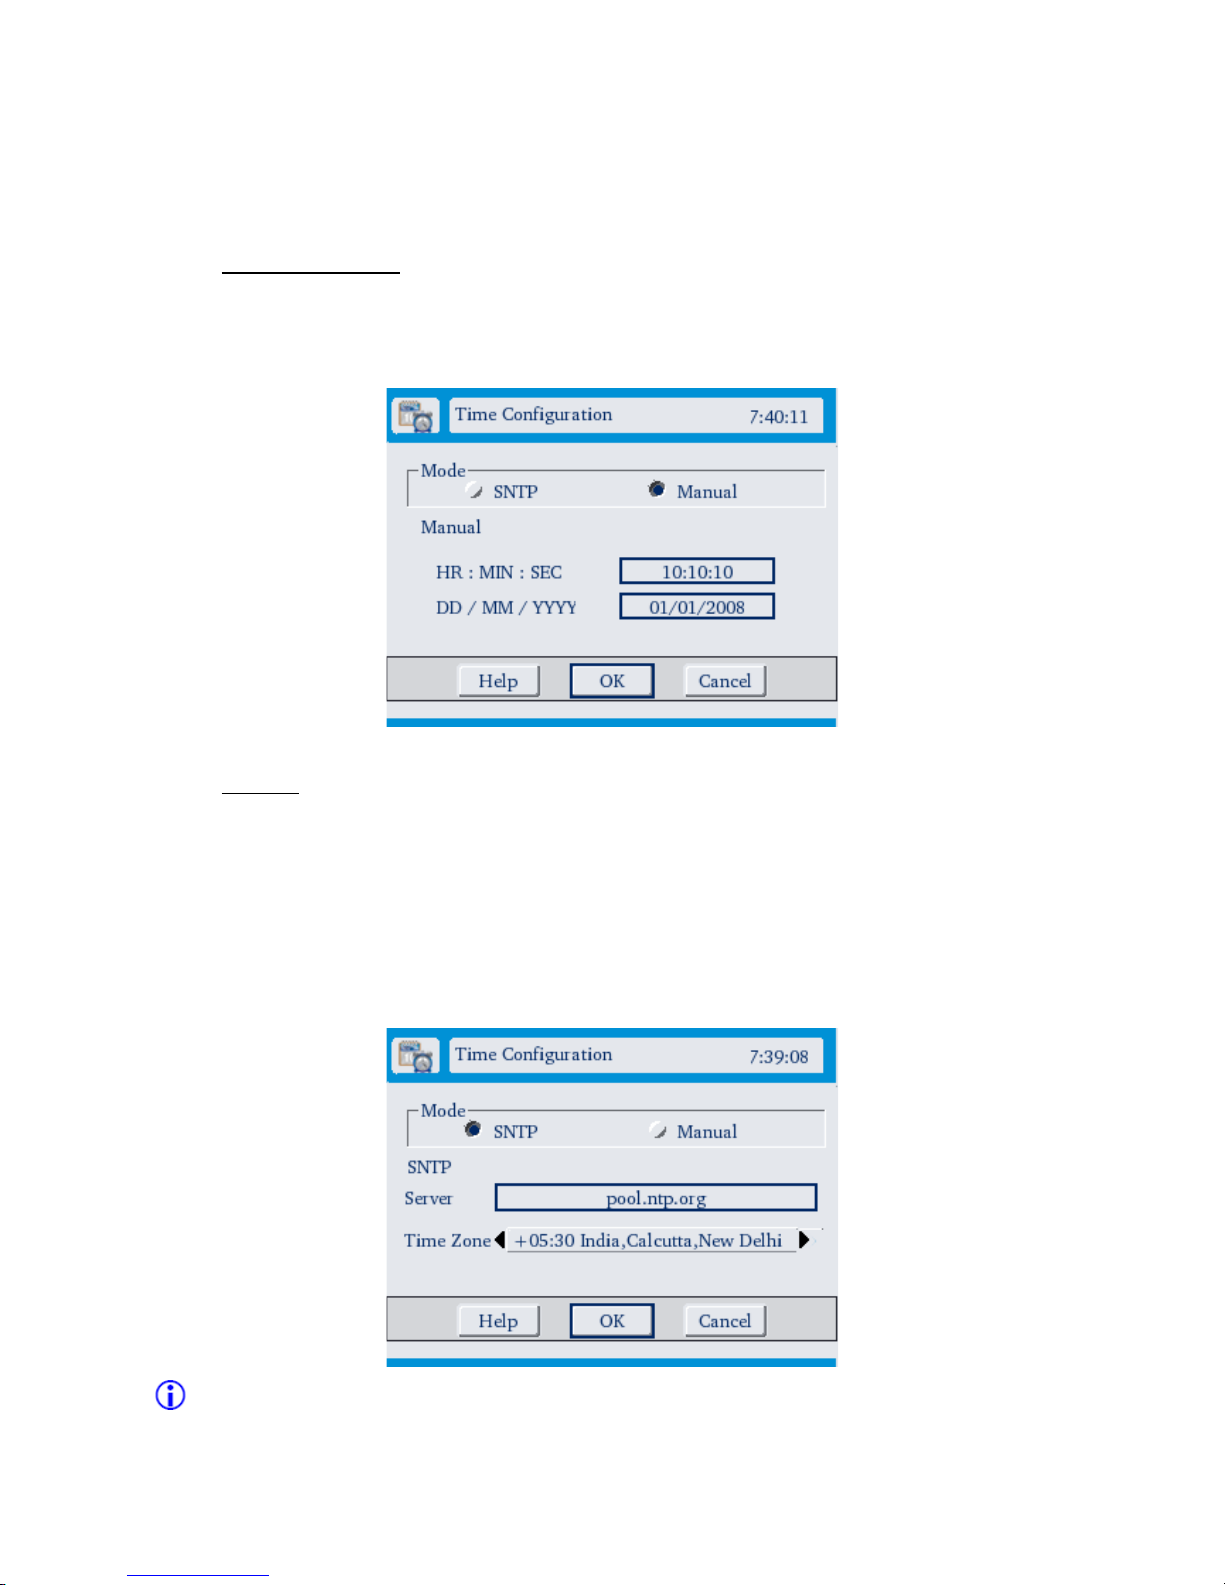
8.7. Time Configuration
(Settings → General → Time Configuration)
8.7.1.Manual mode
Video Phone’s date and time can be set manually in the hour: minute: seconds,
date/month/year format.
8.7.2.SNTP
The date and time can be synchronized with an SNTP server for your time zone.
Server: NTP server address provided by your administrator or, any public
timeserver. For example, pool.ntp.org is a big virtual cluster of time servers.
Time Zone: Time zone is the region of earth that has adopted the same standard
time. Select the most appropriate time zone or contact your administrator.
Note: The configuration screen requires “Save” for the changes to come into effect.
55
Page 56
GVC-3000 User Guide
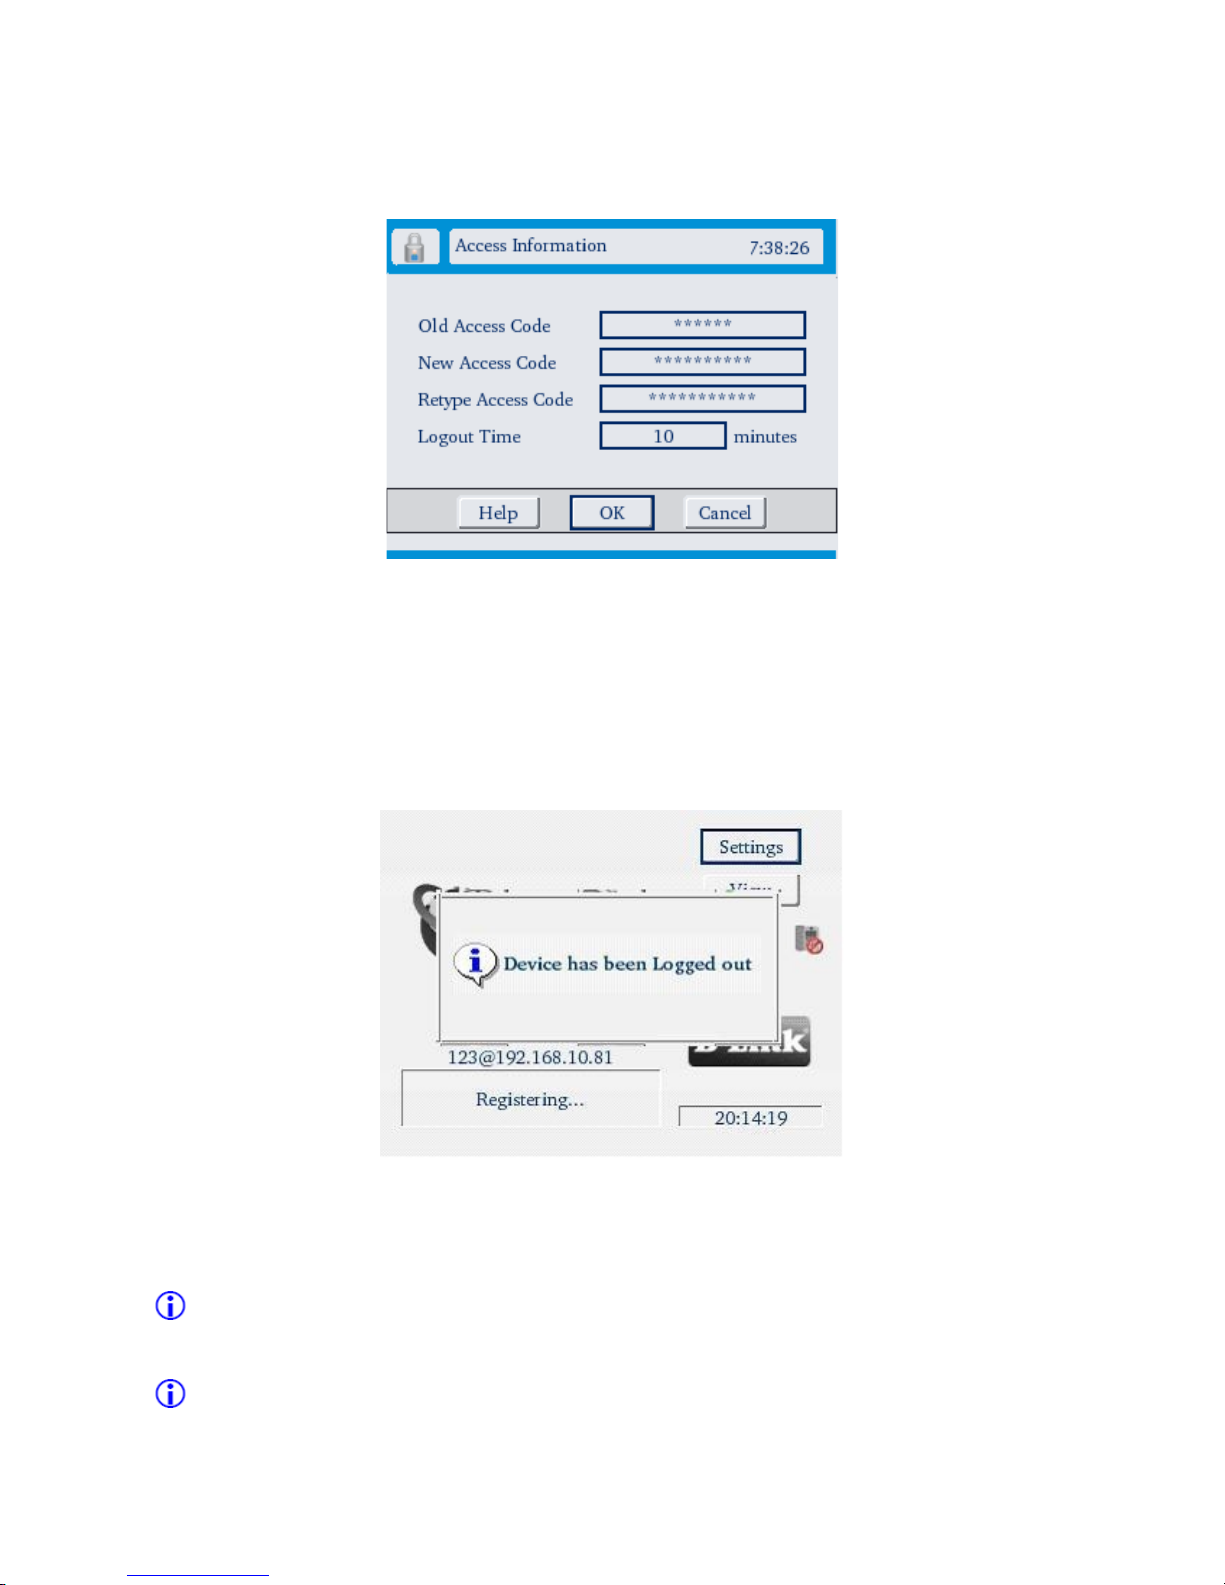
8.8. Access Information
(Settings → General → Access Information)
Once you login for configuring GVC - 3000, if there is no activity for more than
“Logout Time”, GVC - 3000 automatically logs you out from the configuration
mode. An alert as shown in the picture below would appear when idle logout time
occurs. Logout Time is configured in minutes.
The access code can also be changed in this screen. Modifying the Access Code is
advised as it makes GVC - 3000 less vulnerable to misuse.
New Access Code: The code you enter is the secret code that should be provided to
Login GVC-3000 configuration.
Re-Type Access Code: Re-type the secret code for confirmation.
Forgotten password can be reset by factory reset through key sequence. Please
refer 8.10 for a clear understanding.
Note: The configuration screen requires “Save” for the changes to come into effect.
56
Page 57
GVC-3000 User Guide
8.9. System Information
(Settings → General → System Information)
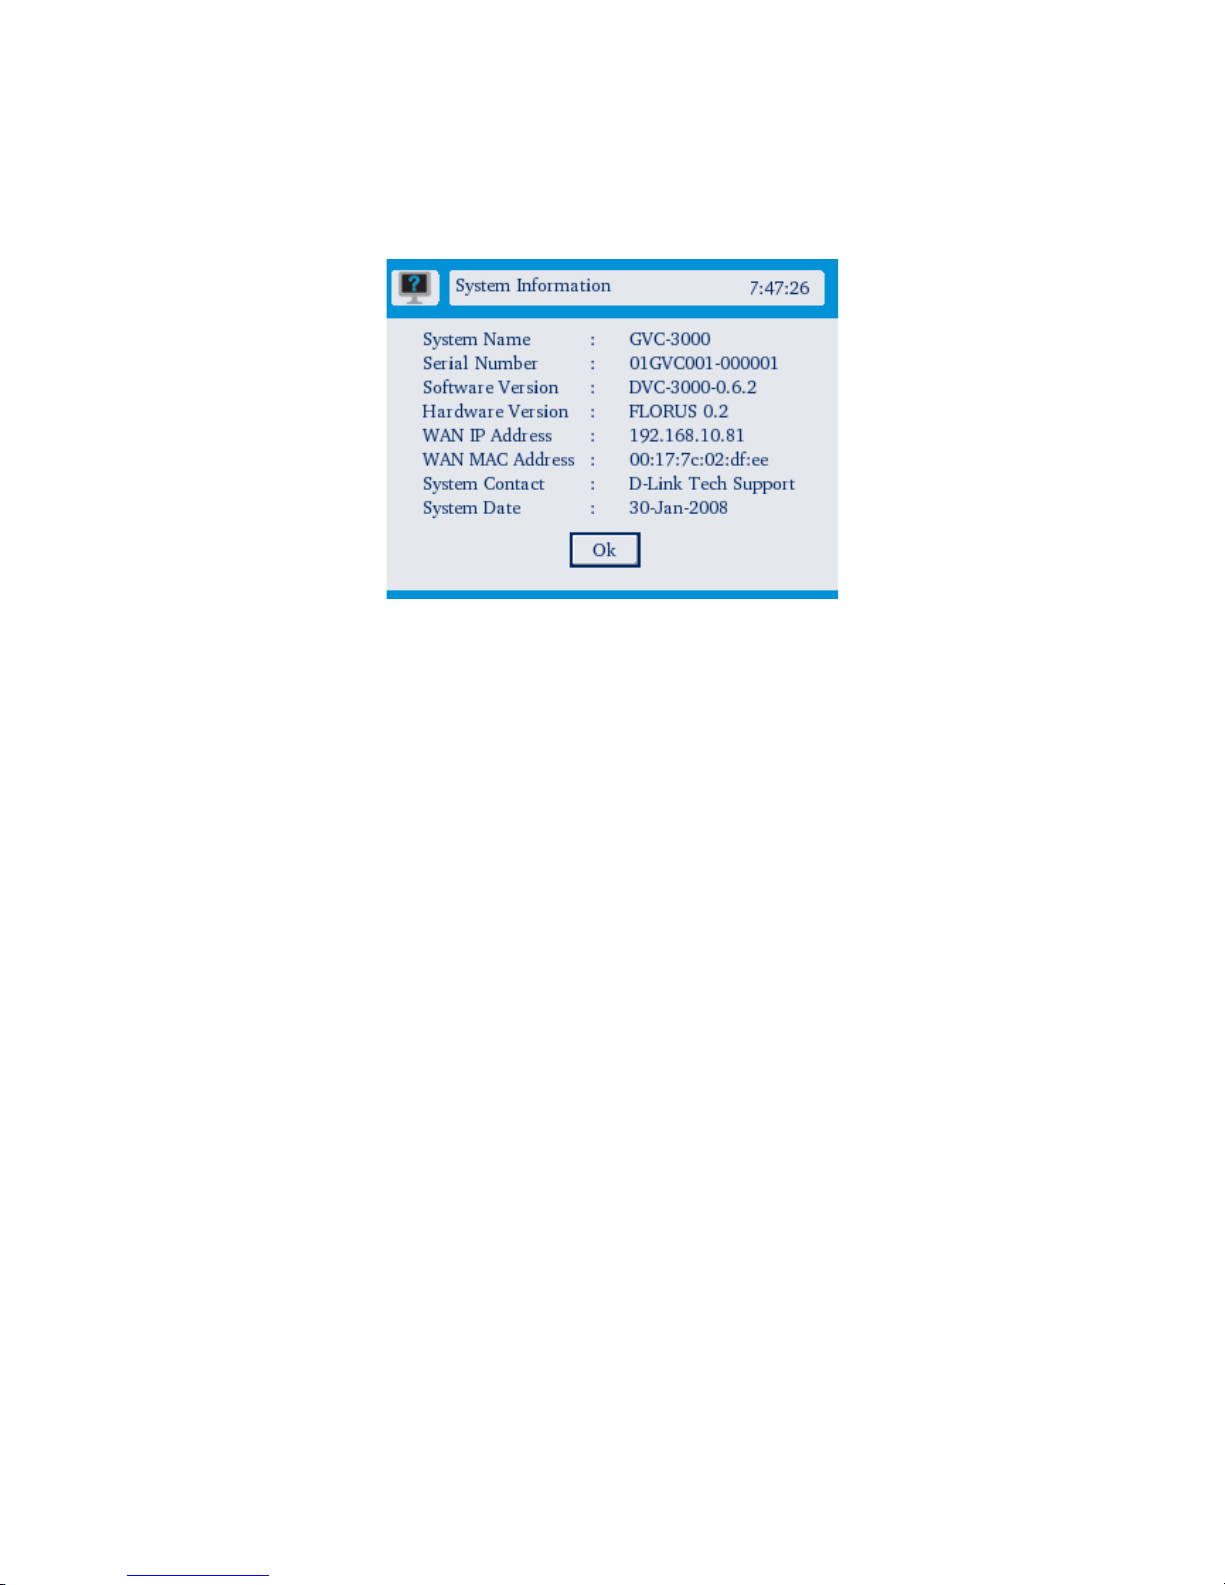
All the required Information regarding GVC - 3000 like the system name, serial
number, software and hardware versions, network address, system contact and
System date are available in this screen.
57
Page 58
GVC-3000 User Guide
8.10. Factory Reset
(Settings → General → Factory Reset)
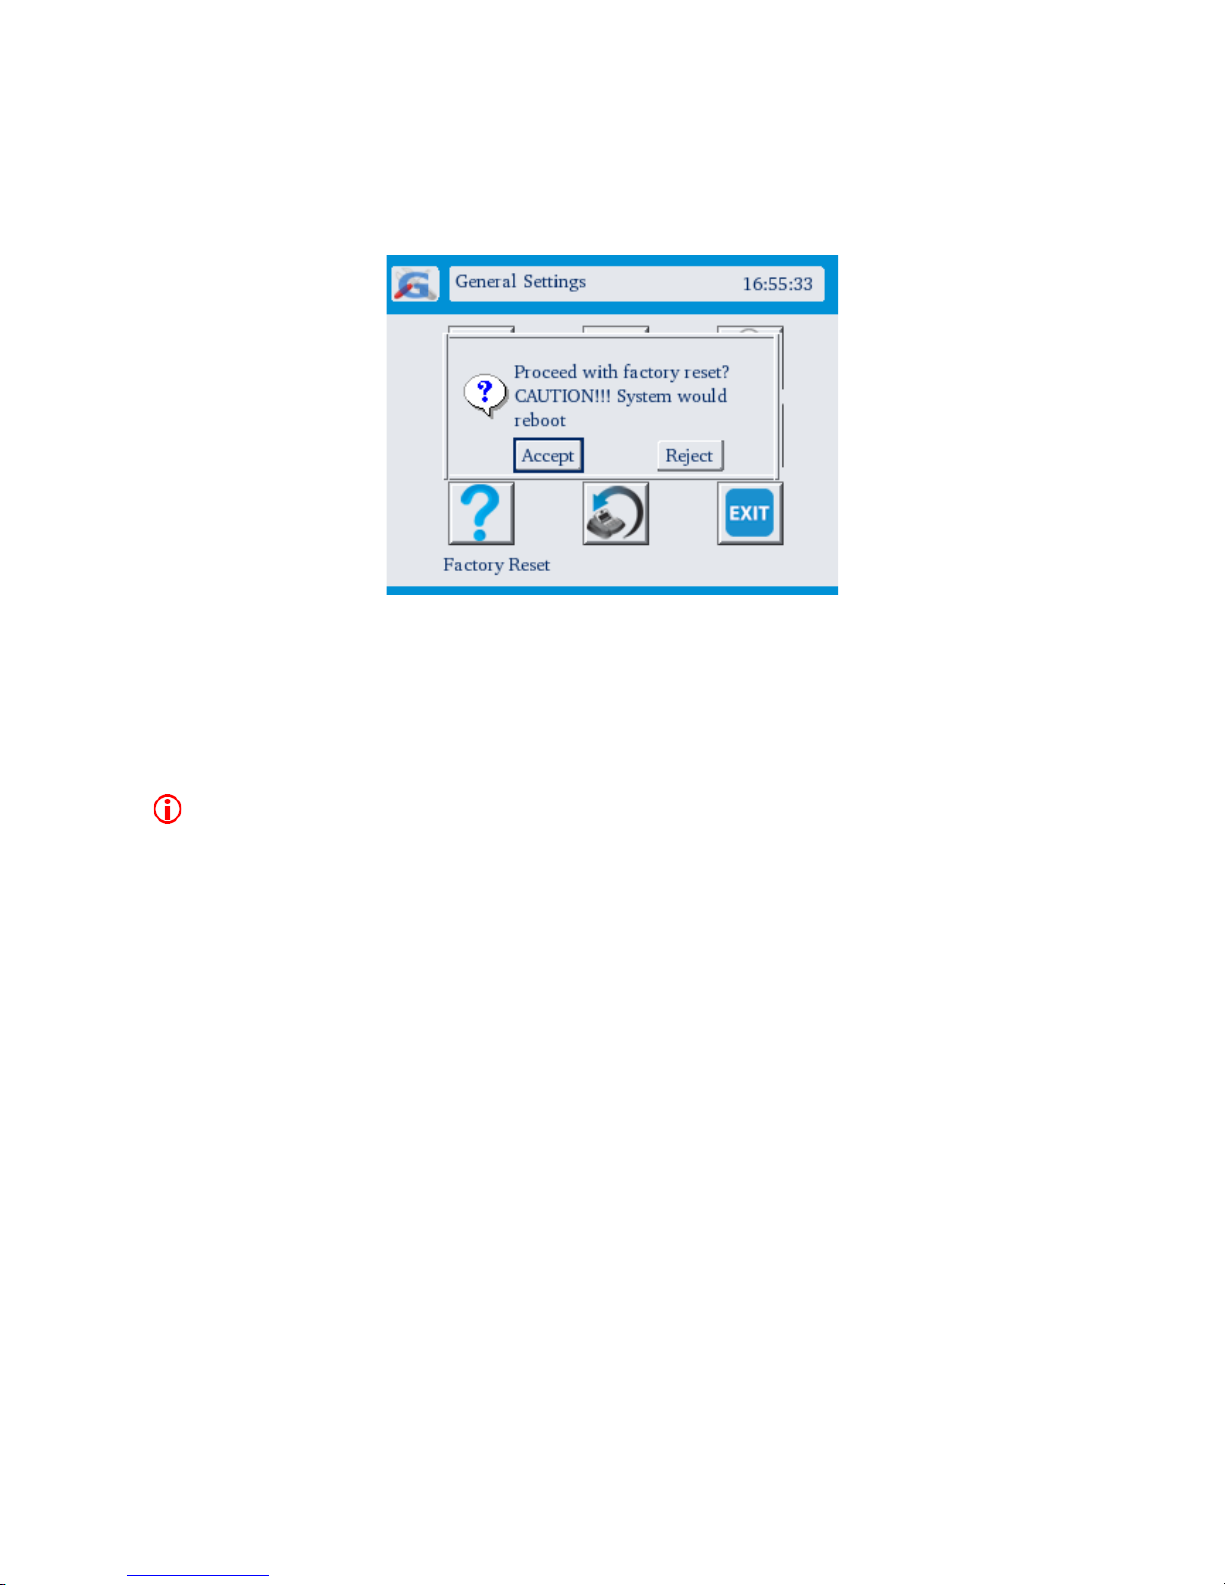
Click on “Factory Reset” button to restore the system default values which were
programmed at factory. You will be asked to confirm the choice.
WARNING!!! You will lose all configuration modifications you have made if you
continue with this option. All parameters like call features, phone book, speed dial
entries, network settings, audio configuration, etc will be set to system defaults.
58
Page 59
GVC-3000 User Guide
8.11. Save Configuration
(Settings → save Current Configuration)
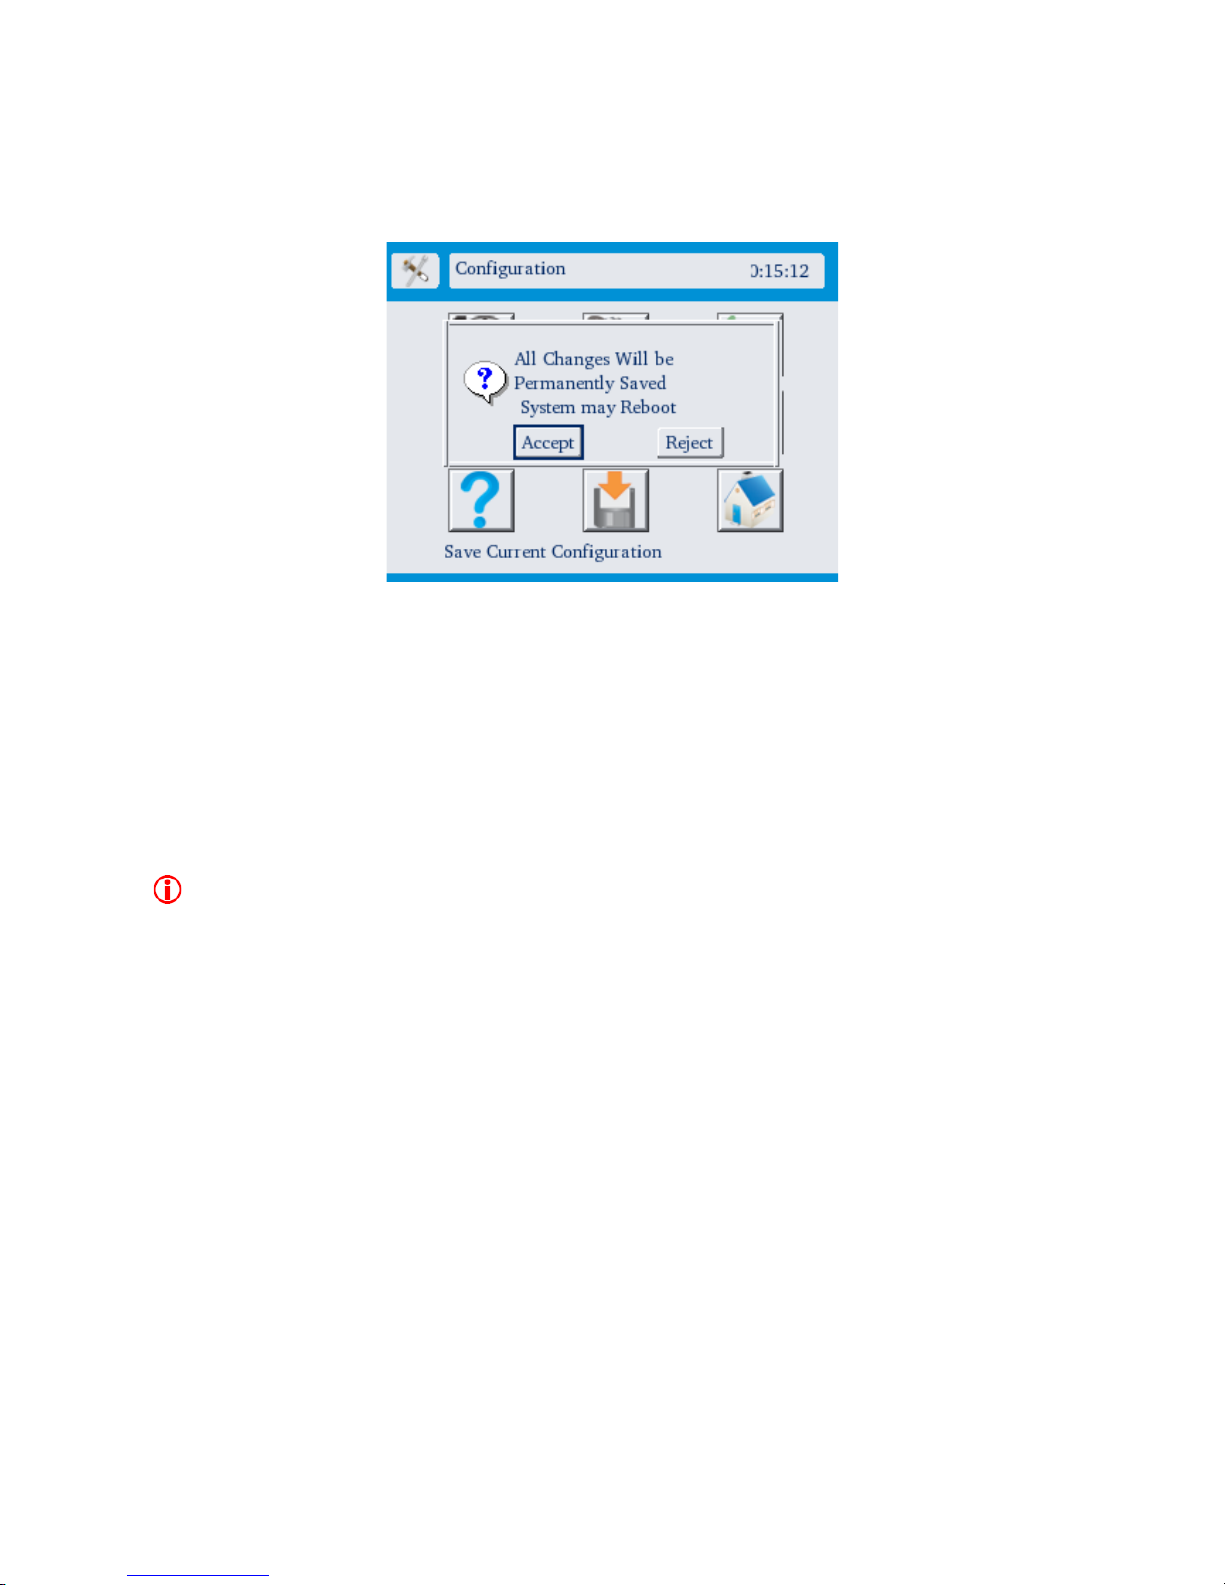
Each screen in OSD would have an “Apply / Ok” button to save the modifications
made in the screen. In the screens having Apply, the modifications made come
into effect “immediately” but are LOST once the system restarts. In the screens
having Ok button, the modifications DO NOT come into effect until they are
permanently saved.
In both the cases, to permanently retain the configuration, press the “Save
Current Configuration” button.
WARNING!!! Changes in some fields may require your phone to restart and in this case all the
current calls, if there are any will be disconnected.
59
Page 60
GVC-3000 User Guide
8.12.Logout
(Settings → Logout)
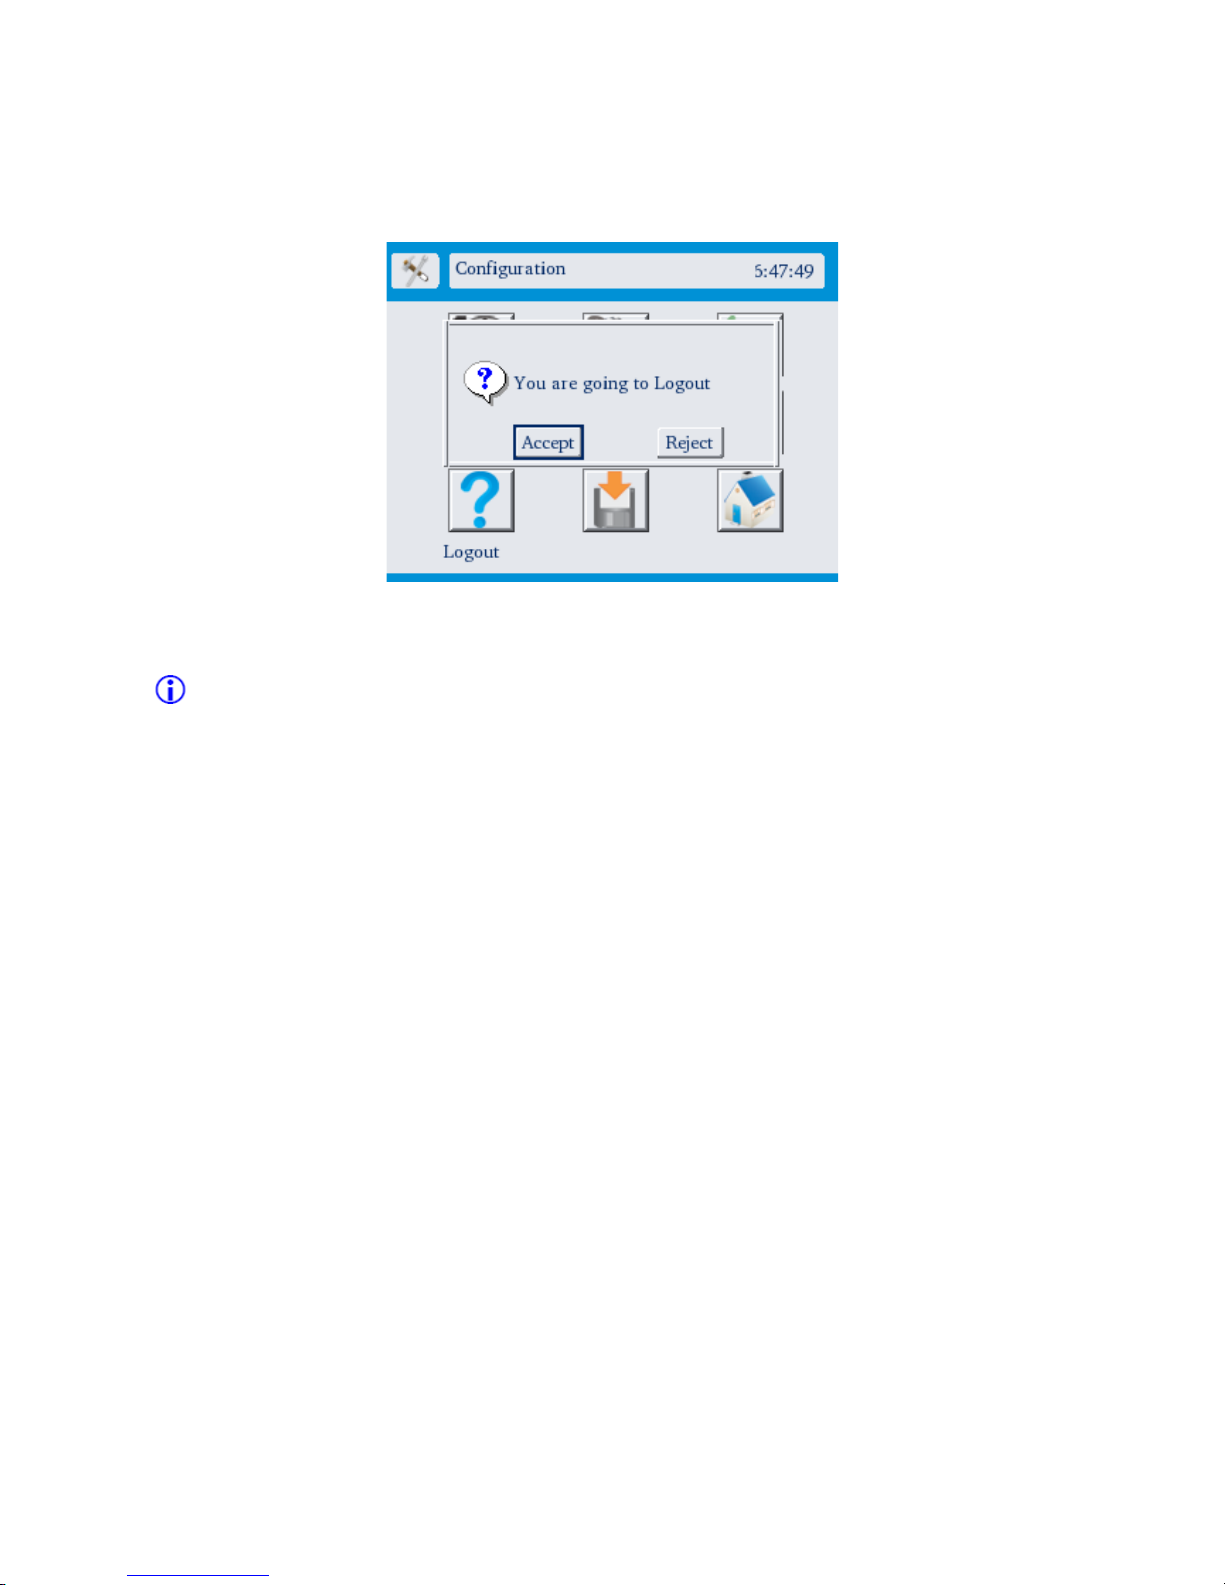
Press the “Logout” button to logout from the configuration mode. You would be
asked for confirmation. If you wish to logout, press “Accept”.
The unsaved changes done to your configuration shall be retained even after
logout ONLY till the device restarts. Please “Save Current Configuration” to retain
configuration permanently. The same is applicable if the device logs out
automatically after the period of inactivity.
60
Page 61
GVC-3000 User Guide
8.13.Software Upgrade
(Settings → General → Device management → Upgrade)
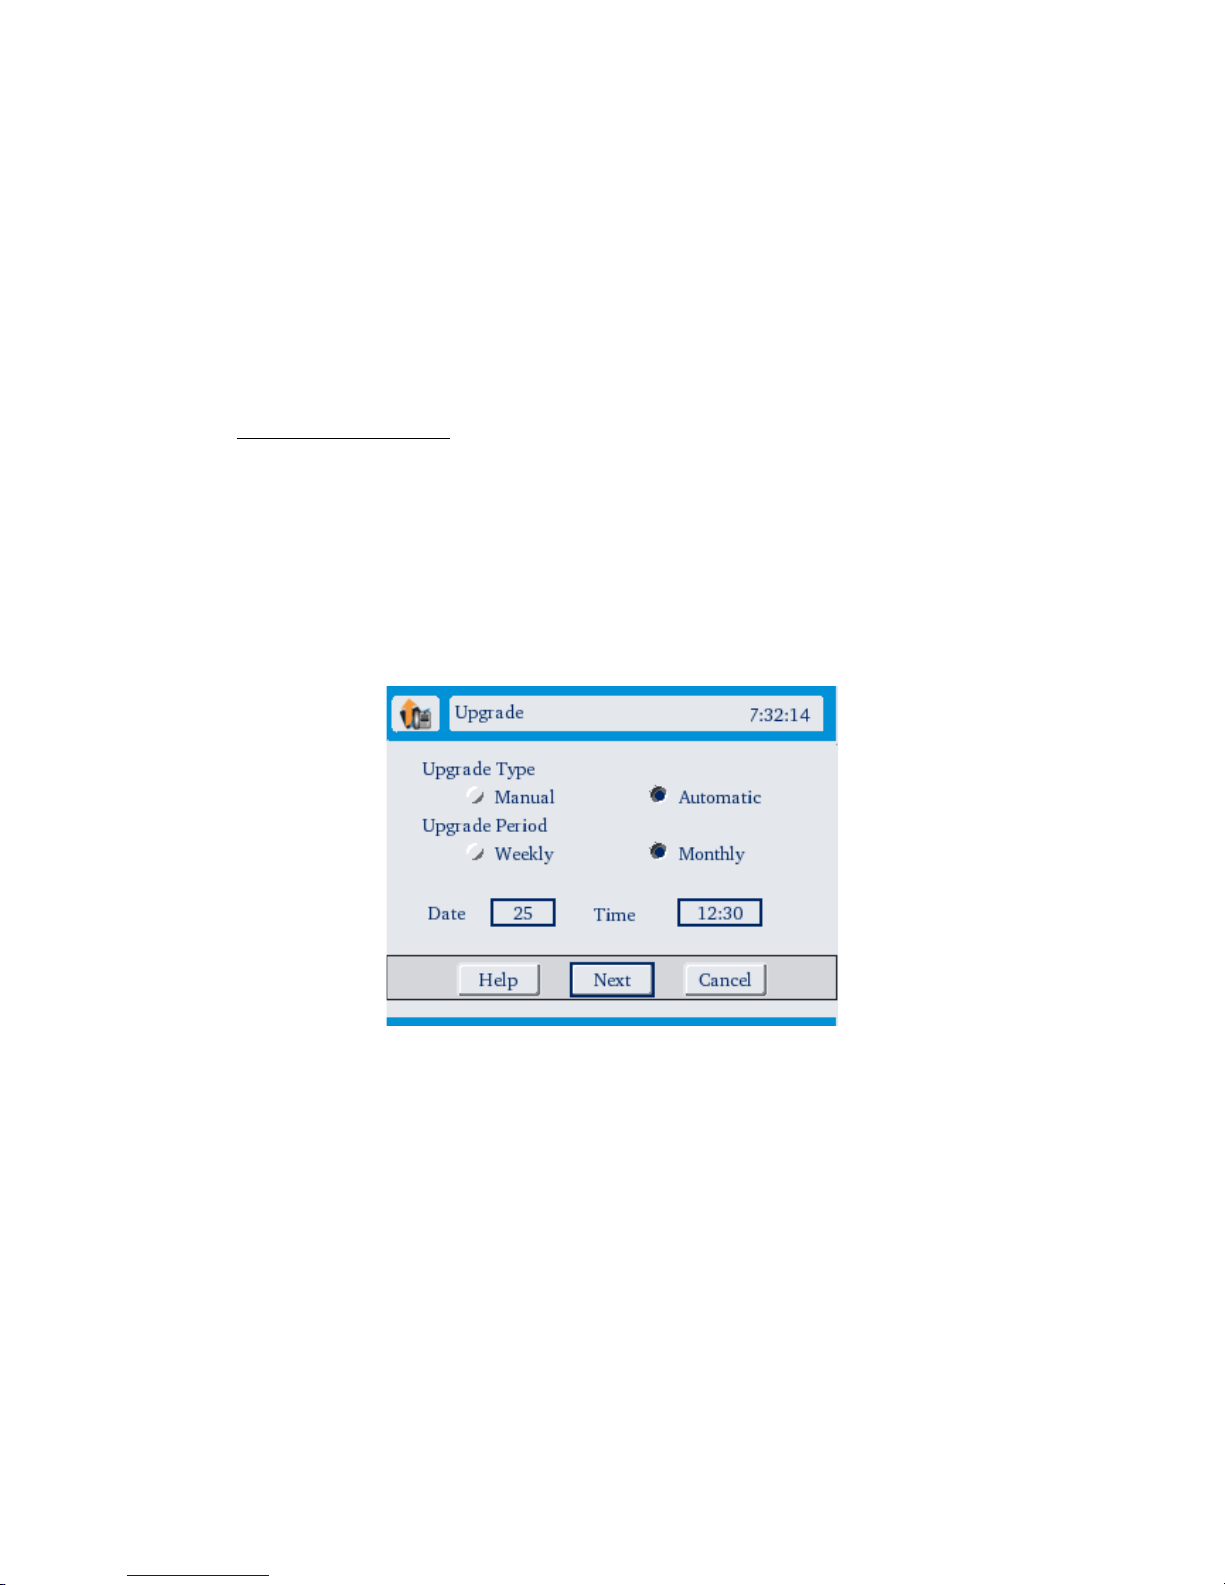
GVC – 3000 allows you to choose the upgrade from the following modes:
• Automatic
• Manual
8.13.1.Automatic mode
If you want to perform the upgrade at regular intervals, you can configure
“automatic mode” and set the frequency parameters of the device, there by
allowing the device to upgrade with the latest firmware automatically. The
frequency of upgrade can be a weekly check at the server or a monthly update.
For a monthly once upgrade, specify the date of the month and the time at which
GVC – 3000 has to interact with the configured server to start the upgrade.
61
Page 62
GVC-3000 User Guide
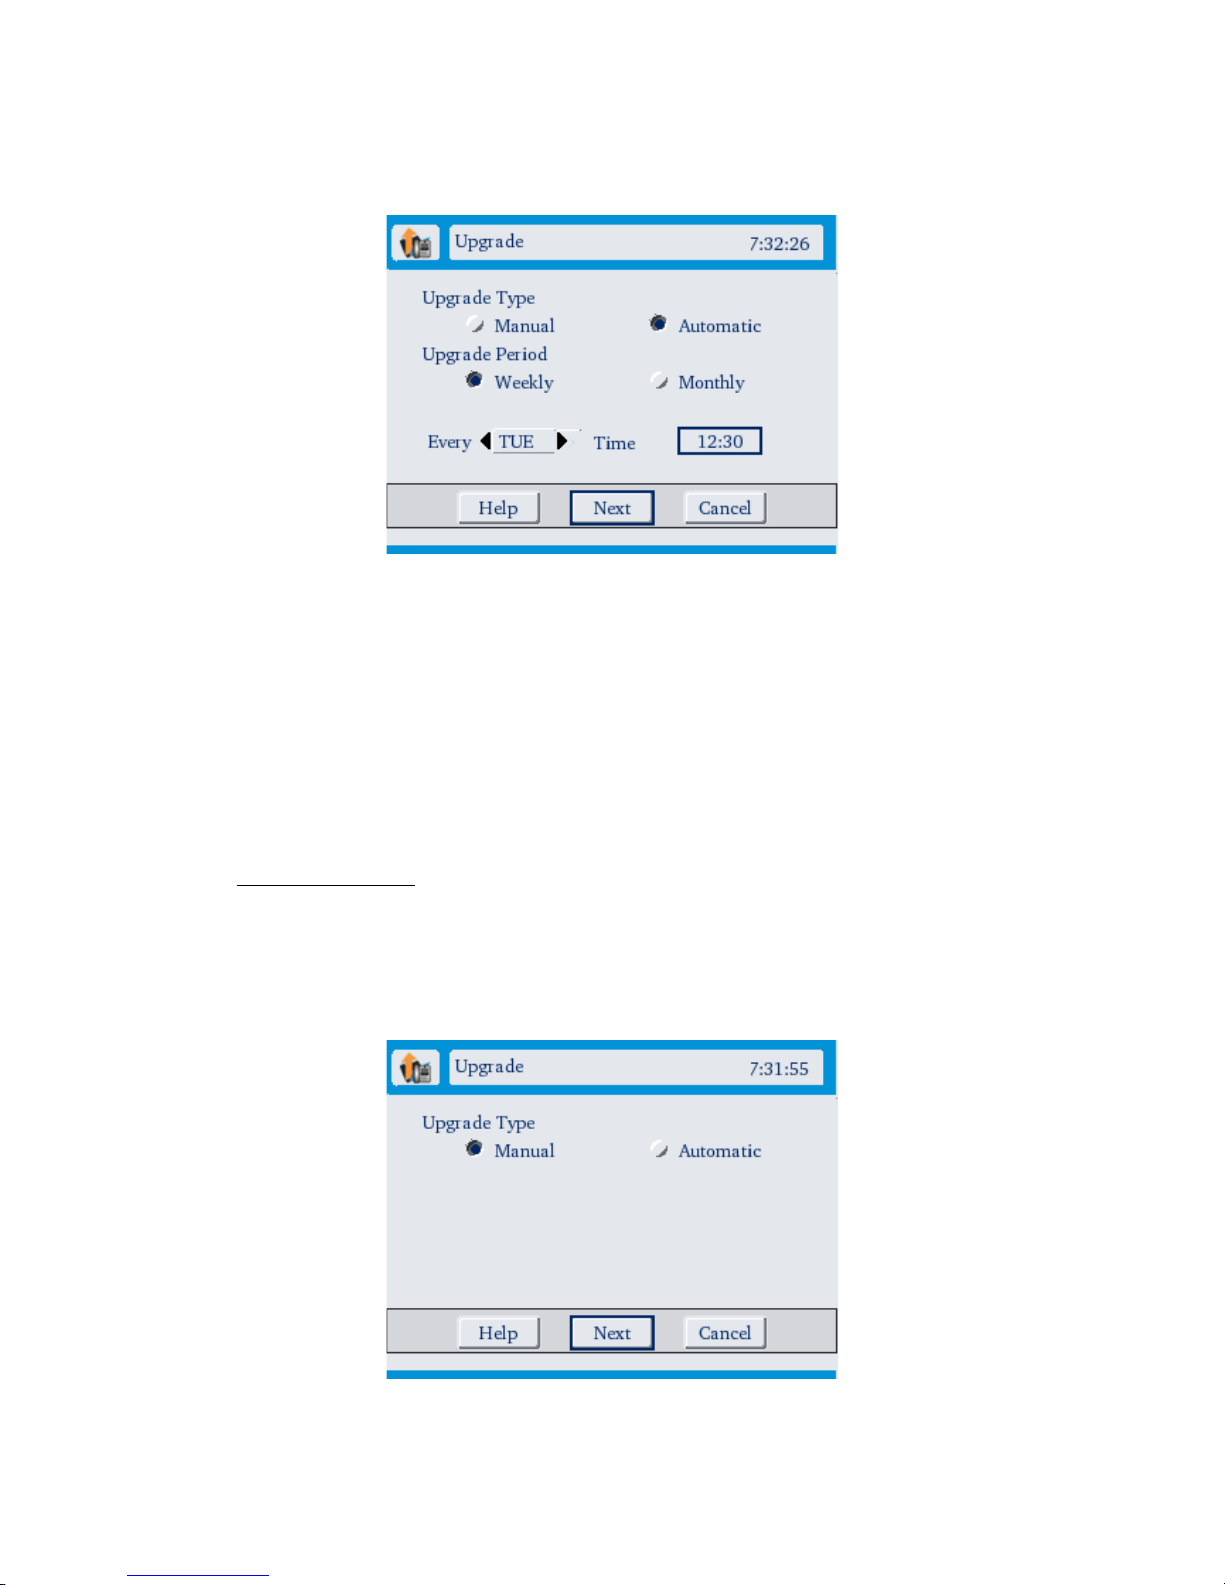
For a weekly once upgrade, specify the day of the week and the time at which GVC
– 3000 has to interact with the configured server to start the upgrade.
At the configured interval, GVC - 3000 checks for higher firmware versions at the
configured server and starts the upgrade with the highest firmware available.
During the upgrade, phone functionalities will be blocked and user will see a
message with regard to ‘Upgrade Notification’ being displayed. Along with
notification, screen displays the upgrade progress information also.
In the Automatic mode before starting with the upgrade procedure, you can cancel
the upgrade by pressing on the cancel button on the confirmation dialog.
8.13.2.Manual mode
Upgrade can also be made manually. Select the Manual mode of upgrade in the
screen and press “next” to go to the upgrade configuration screen.
62
Page 63
GVC-3000 User Guide
8.13.3.Server Configuration
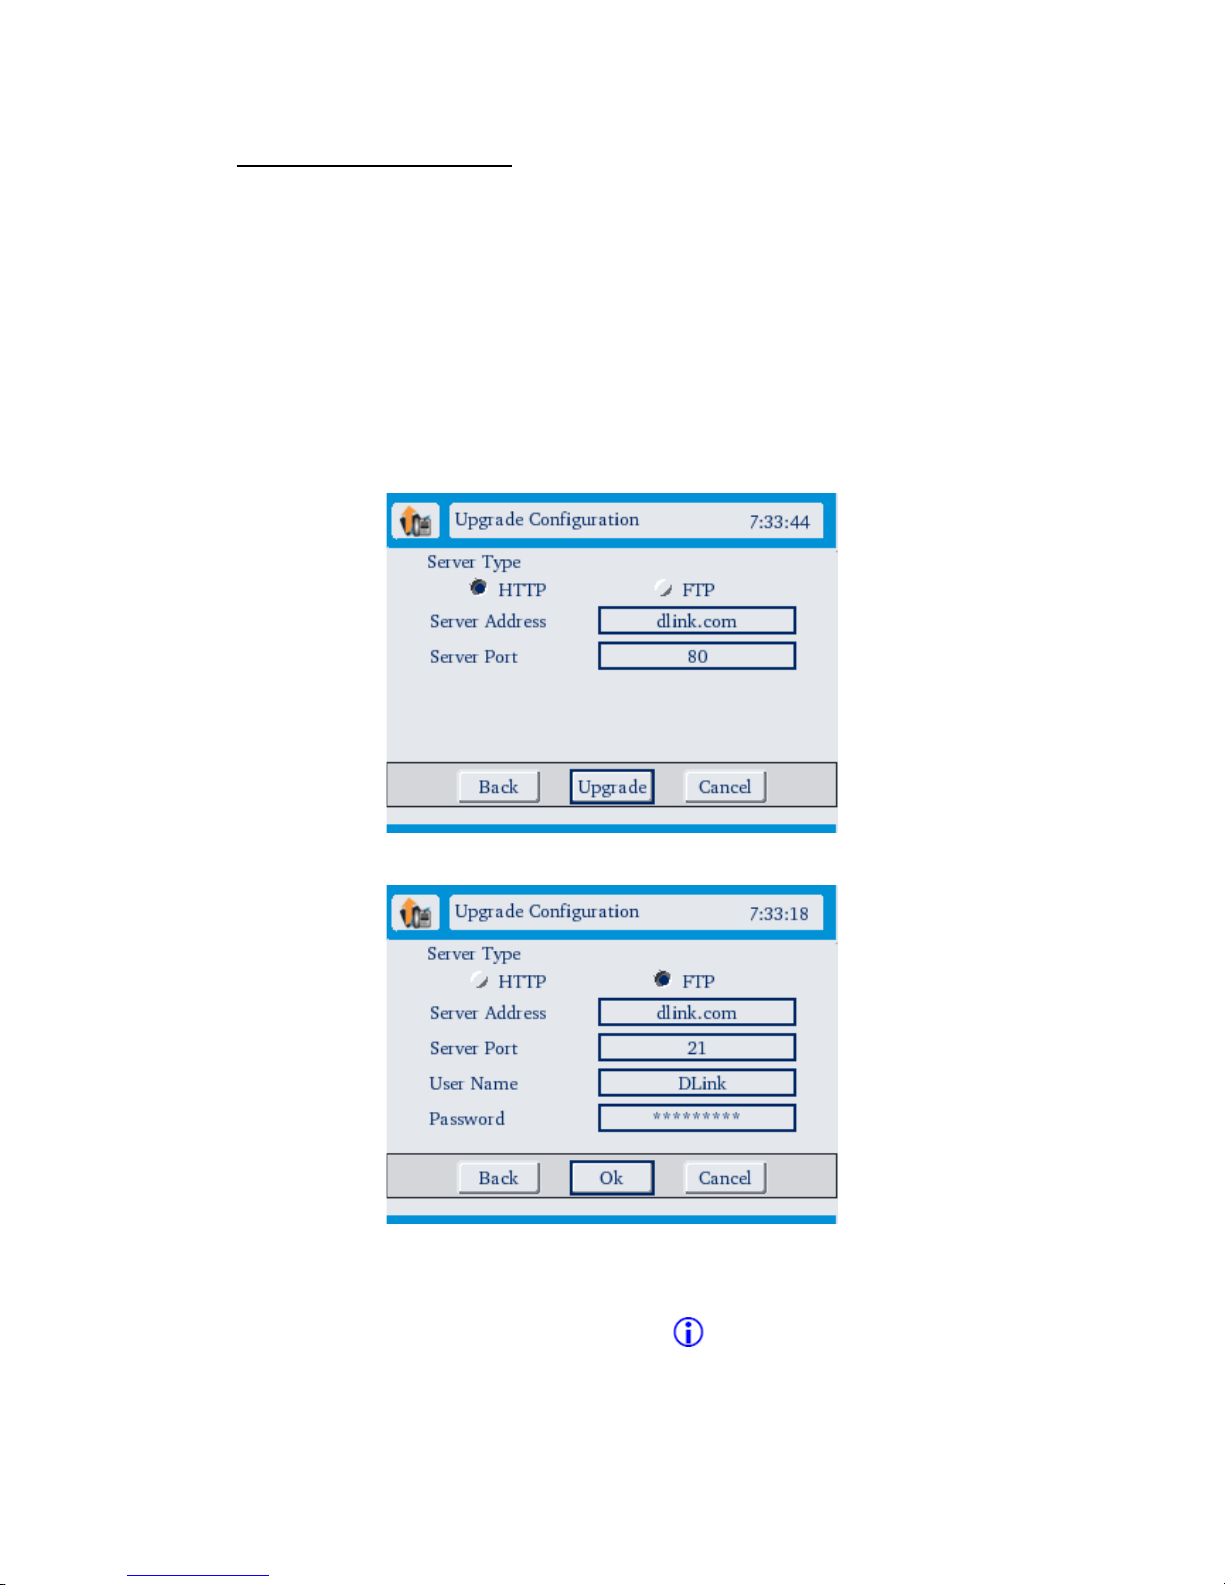
Firmware (Software) upgrade can be done via either FTP or HTTP. To upgrade via
FTP or HTTP, you have to select FTP or HTTP upgrade method. If the server is in a
public network, the preferred method is HTTP. GVC - 3000 technical support team
would furnish you with the required details
Server: The server address needs to be set to a valid URL of a HTTP/FTP server.
Server name can be either a domain name or an IP address.
Port: Server port address. By default, HTTP server port is 80 and FTP port is 21.
FTP server requires authentication to download and initiate upgrade.
User Name: User name provided to access the FTP Server.
Password: Password to access the FTP Server. Please note that the Password is
alpha-numeric. To enable easy entering of alpha-numeric text on a password field,
the entered character is shown at the right end of the box for a split second.
63
Page 64
GVC-3000 User Guide
Press “Upgrade” to fetch the firmware files. If the configured upgrade server is
found and new code images are available, the GVC - 3000 phone will attempt to
retrieve the new image files by downloading them into the phone’s memory.
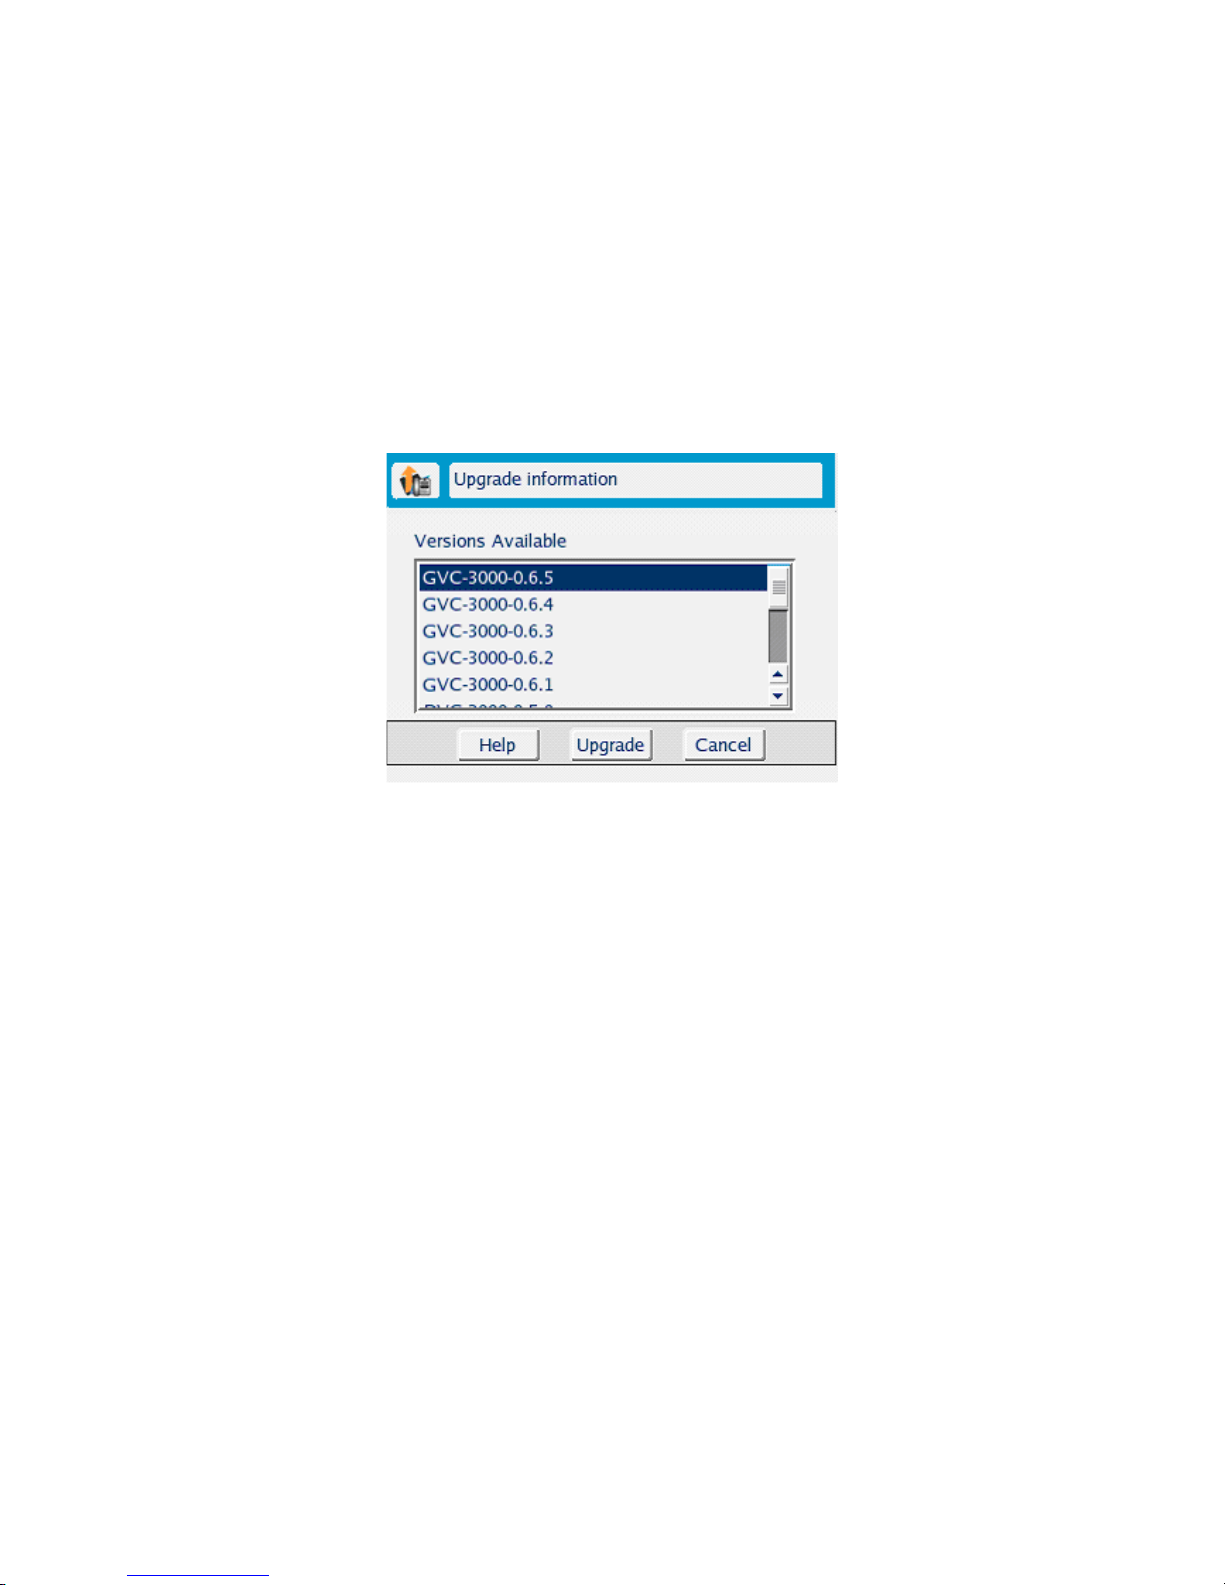
After the initial version file is downloaded, OSD shows a list of firmware versions
available on the server for you to select. Upgrade to a higher version and
downgrade to a lower version are both supported by the device.
Once the Versions are available for upgrading, you can scroll down and select any
of the versions and press Upgrade to initiate the upgrade.
GVC – 3000 would then initiate the upgrade with the selected version. The version
file shall be downloaded into the phone’s memory.
Upon verification of checksum, the new code image will be saved into the Flash. If
firmware upgrade fails for any reason (e.g., FTP/HTTP server is not responding,
there are no code image files available for upgrade, or checksum test fails, etc), the
GVC - 3000 phone will stop the upgrading process and simply boot using the
existing code image in the flash.
Firmware upgrading may take as long as 45 minutes over Internet, or just 5
minutes on a controlled LAN. It is strongly recommended to conduct firmware
upgrade in a controlled LAN environment whenever possible.
64
Page 65

GVC-3000 User Guide
Warning!!! Power failure during the Firmware upgrade can corrupt the flash and
there by causing the board to fail during the boot-up time. Then, fail-safe mechanism
adopted by GVC – 3000 shall ensure to bring up the device using a backed up
image of the old firmware. You need to perform an upgrade again to achieve the
latest version.
WARNING!!! All active calls would be disconnected on initiating firmware upgrade
and no configuration / calls can be made until Software upgrade is over.
65
Page 66

GVC-3000 User Guide
9. Troubleshooting
1) GVC - 3000 is unable to make a call using a phone number
a) Check that you dialed a valid number.
b) Check that your network cable is properly connected.
c) The Videophone is not connected to the Internet. Verify all network settings,
including DNS.
d) The Videophone is not registered with any SIP server.
2) GVC - 3000 is showing an off-hook message on the LCD.
a) The handset is off the hook. Make sure that the handset is in the cradle
properly.
3) GVC – 3000 shows a busy message on the alert after the call is tried.
a) Person you are trying to call is not ready for a SIP based Internet call. Wait
until the person you are trying to reach is ready.
b) Person you are trying to call is in a call or has rejected your call. Try your
call at a later time.
4) GVC - 3000 doesn’t ring with an incoming call
a) GVC - 3000 call forwarding feature is enabled. Un-check “call forward
always” and save your changes.
5) GVC - 3000 freezes-up while answering a call
a) GVC - 3000 is not functioning properly behind a firewall. See
troubleshooting question #7 on the following page.
6) Poor video in a call
a) Camera out of focus. The other party should focus their camera by twisting
the knob on GVC - 3000 until the image is in focus.
66
Page 67

GVC-3000 User Guide
b) It could be because of excessive motion in the picture you are receiving. A
background with less motion at the other end provides a better, smoother
video picture.
7) No video in a call
a) GVC - 3000 is not functioning properly behind a firewall. Place the IP
address of GVC - 3000 in the DMZ of the firewall. Consult your router’s
documentation or your network administrator for help on doing this.
b) The Videophone is not functioning properly behind NAT (Network Address
Translation). Go to Settings → Network Configuration → NAT Traversal and
enter the Videophone’s public IP address, which is given to you by either
your ISP or network administrator.
c) It could be because the Codec negotiation could have failed with the other
party.
8) Video freezes during a call
a) Far side muted their video. If the far side mutes their video you will not be
able to see him or her.
b) Network is congested. Give the Videophone a couple of minutes to try to
recover, or disconnect the call and try again at a later time.
67
 Loading...