

Page 1
DAP-1720
AC1750 Wi-Fi
Range Extender
Quick Install Guide
Page 2

Page 3

DAP-1720 Install Guide
Package Contents
DAP-1720 AC1750 Wi-Fi Range Extender
Wi-Fi Conguration Card
Quick Install Guide
If any of the above items are missing, please contact your reseller.
Before You Begin
• Make sure the area that you want to plug the extender into has
a solid connection to your router. Use a wireless laptop, tablet, or
mobile phone in that area to test the connection to verify.
• If your wireless router or access point does not support WPS,
follow the steps under Congure the DAP-1720 Using a Web
Browser to connect to the DAP-1720 and run the Setup Wizard.
If you are not sure how to enable WPS on your wireless router,
please refer to your router’s user manual.
1
Page 4
DAP-1720 Install Guide
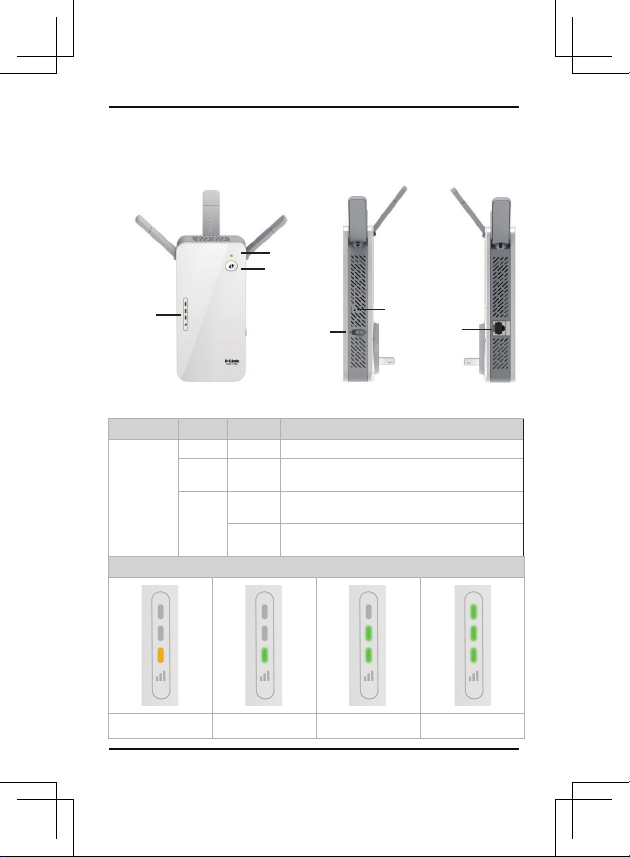
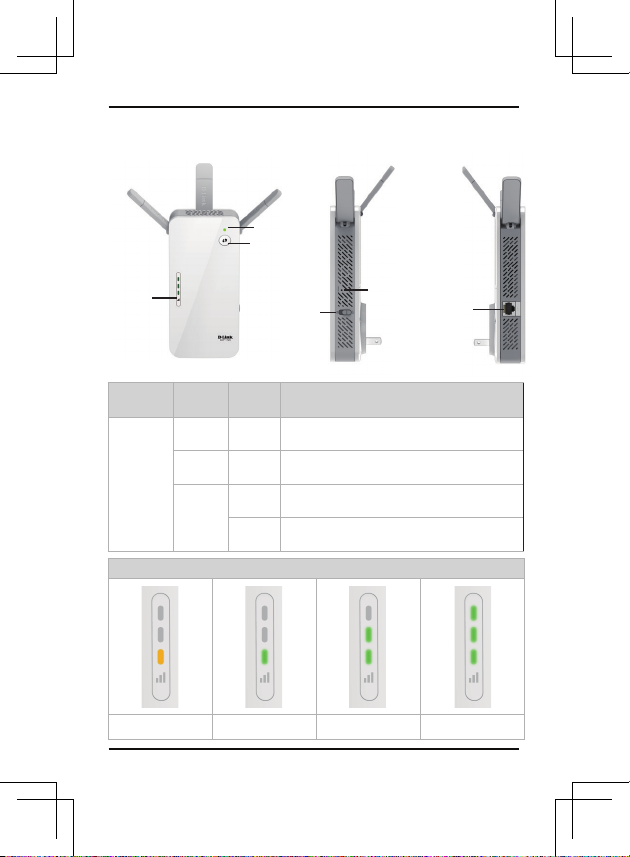
Product Overview
Status LED
WPS Button
Signal
Strength
Indicators
On/O
Switch
Reset
Button
Ethernet
Port
LED Color Status Description
Red Solid The device is powering on/booting up.
Amber Blinking
Status LED
Green
The device is ready but not connected to an uplink
router.
Indicates that the DAP-1720 is securely connected
Solid
to your wireless router or access point.
The WPS button has been pushed and the device is
Blinking
processing a connection.
Signal Strength Indicators
Very Weak (Amber) Weak (Green) Good Best
2
Page 5
DAP-1720 Install Guide
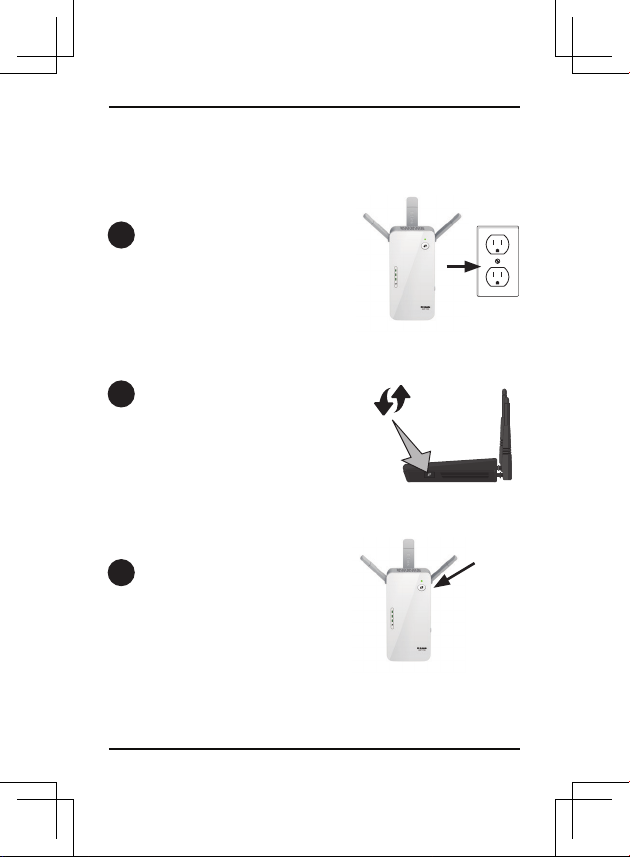
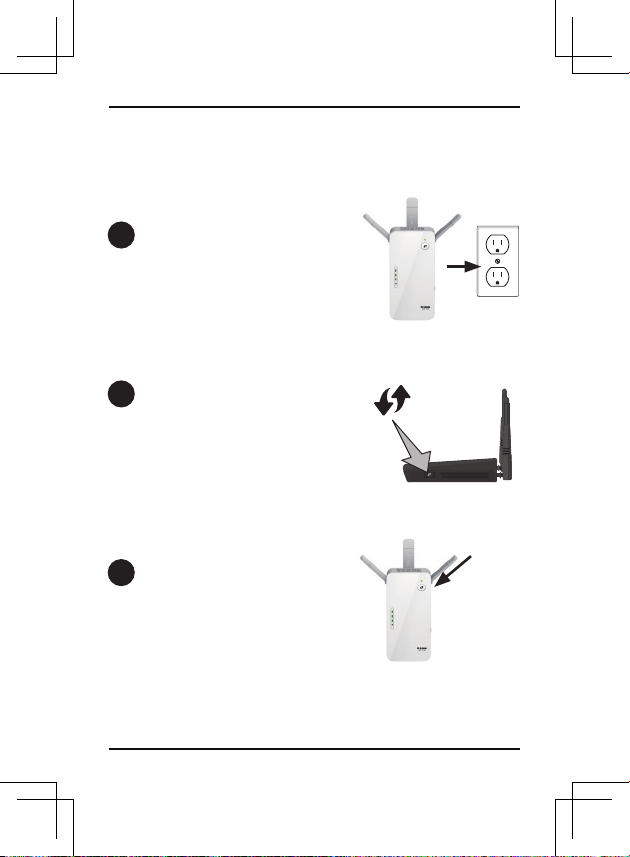
Connect to Your Router
Using WPS
Find an available outlet near your wireless
1
router. Plug in the DAP-1720 and wait until
the Status LED is blinking amber.
Press the WPS (Wi-Fi Protected Setup)
2
button on your wireless router.
Within one minute, press the WPS button
3
on the DAP-1720. The Status LED will start
to blink.
3
Page 6
DAP-1720 Install Guide
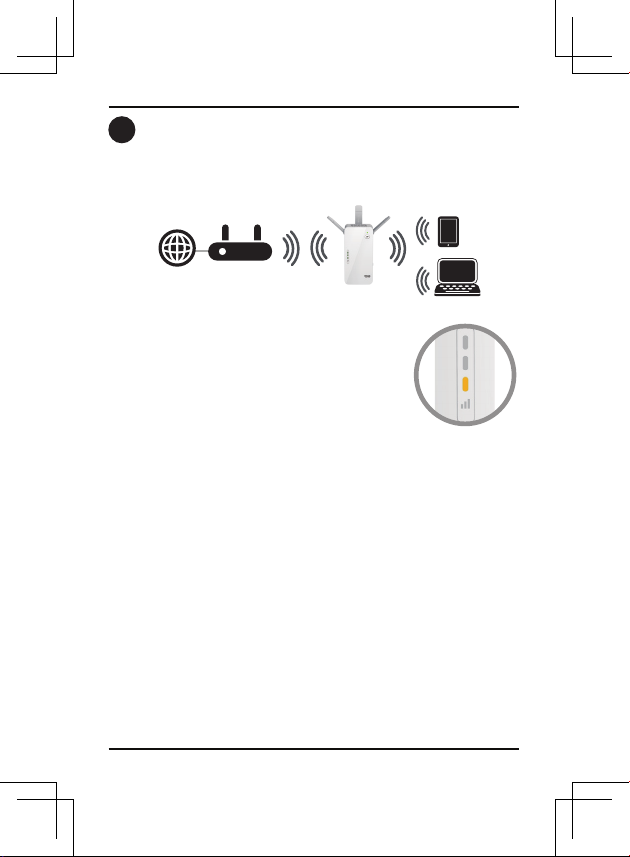
When the Status LED turns solid green, this indicates that the DAP-1720 is
4
securely connected to your wireless router or access point. You can now
unplug and move the DAP-1720 to a location between your wireless router
and the area that you need wireless coverage.
If the signal strength indicators are showing one single
amber bar or if the DAP-1720 is not connecting, move
the DAP-1720 to a wall outlet closer to your wireless
router or access point.
4
Page 7
DAP-1720 Install Guide
Connect Your Wireless Devices
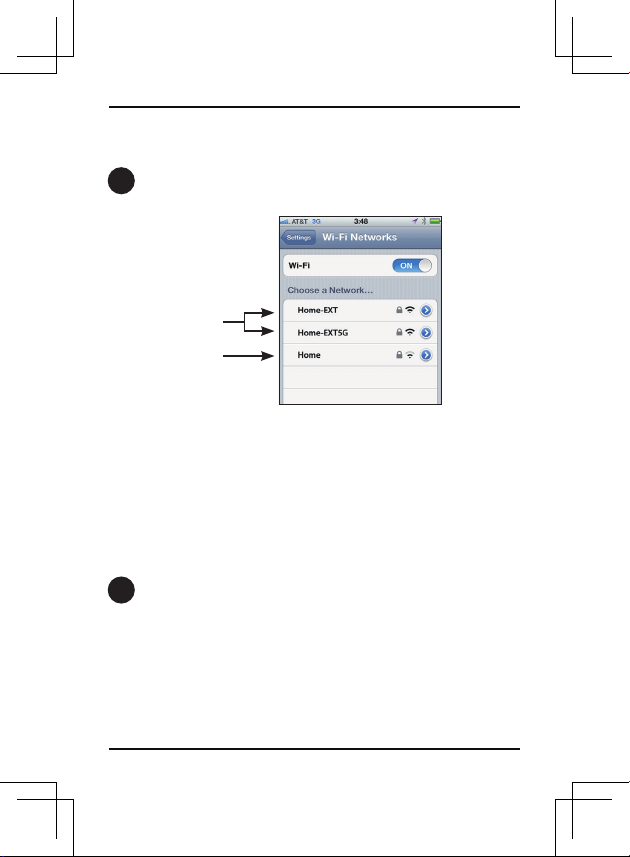
From your wireless device go to the Wireless Utility to display the available
5
wireless networks.
Extended
network
Original
network
The SSID on the DAP-1720 will automatically be assigned the following:
• 2.4GHz (Your Router’s SSID)-EXT
• 5GHz (Your Router’s SSID)-EXT5G
The Wi-Fi password for the DAP-1720 will be the same as your router.
Repeat step 5 to connect additional Wi-Fi devices to the DAP-1720.
Your device is now connected to the DAP-1720 and can connect to your
6
wireless router. If you want to change your network settings, password, etc.,
follow the steps on the next page to congure the DAP-1720. To connect
additional devices, repeat step 5.
Your setup is complete!
5
Page 8
DAP-1720 Install Guide
Congure the DAP-1720
Using a Web Browser (Optional)
You may log into the web-based conguration utility on the DAP-1720 to perform
the following tasks:
• Upgrade rmware
• Change wireless and network settings
• Change the login password
Plug the DAP-1720 in an available outlet near your router. You may move it
1
to a more suitable location after conguration.
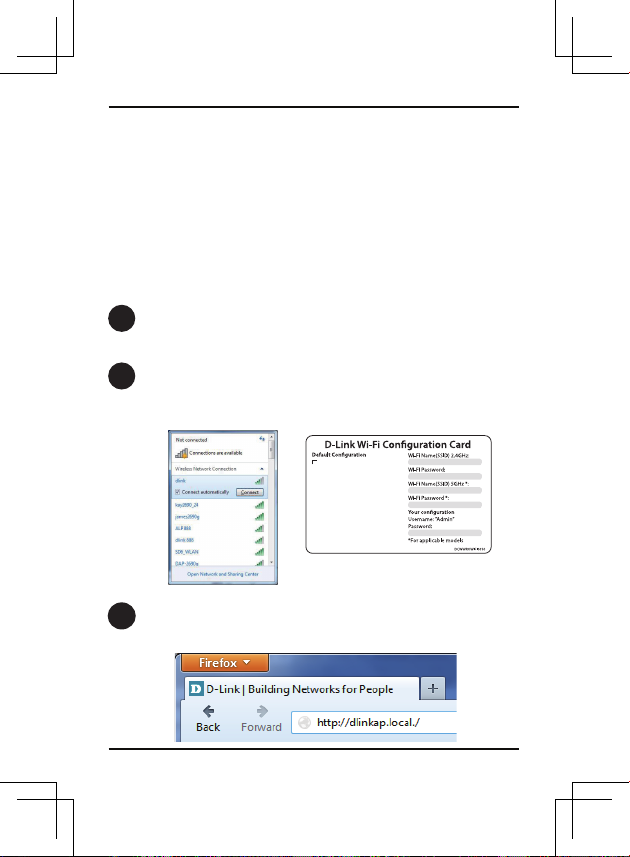
Open the wireless utility on your wireless device or computer. Select the
2
Wi-Fi Network name (from the Wi-Fi Conguration Card) and enter the
password. You may also connect the DAP-1720 to your router or computer
using an Ethernet cable.
Wi-Fi Name(SSID) 2.4Ghz:
dlink-xxxx
Wi-Fi Name(SSID) 5GHz:
dlink-xxxx-5GHz
Password: xxxxxxxx
To congure your extender, go to:
http://dlinkap.local.
Or http://192.168.0.50
Username: “Admin”
Password:” “ (leave the eld blank)
Open a web browser (e.g., Internet Explorer, Firefox, Safari, or Chrome)
3
and enter http://dlinkap.local./. You may also enter the IP address of the
DAP-1720.
6
Page 9
DAP-1720 Install Guide
Note: The default IP address is 192.168.0.50. Once the DAP-1720 connects to
your router, it will get assigned a new IP address based on your router/network’s
DHCP settings. You will need to log in to your router and view the DHCP table to
see what IP address was assigned to the DAP-1720. The MAC address is printed
on the label on the device.
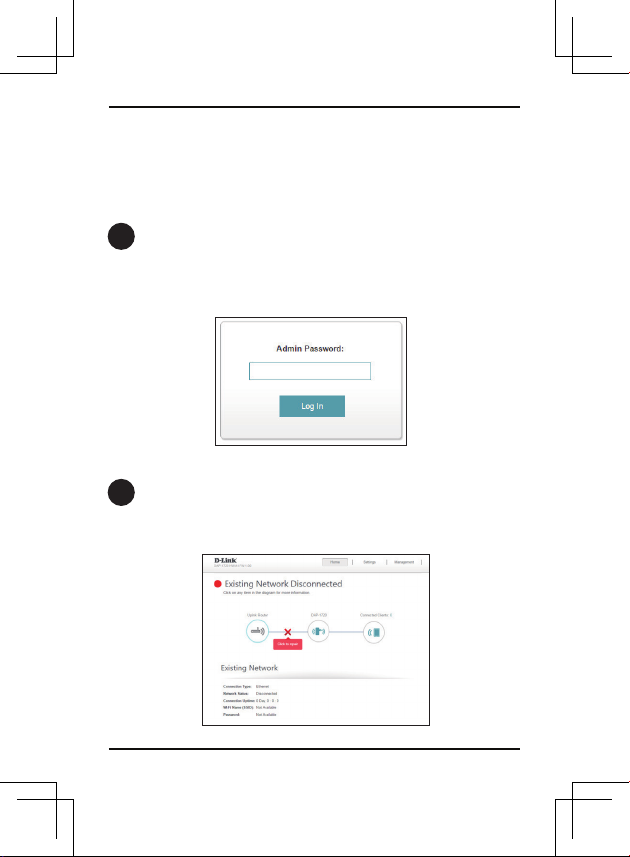
Once you connect, the login page will appear. Enter your password and click
4
Log in. By default the password is blank.
Note: If this is the rst time logging in to the DAP-1720, you will be directed to
the Wizard automatically. Skip to step 6.
The home page will display your current status. A green check mark
5
represents a successful connection to your wireless router or Access Point
(AP). A red X means there is not a connection to your router or access point.
Click the Uplink Router icon.
7
Page 10
DAP-1720 Install Guide
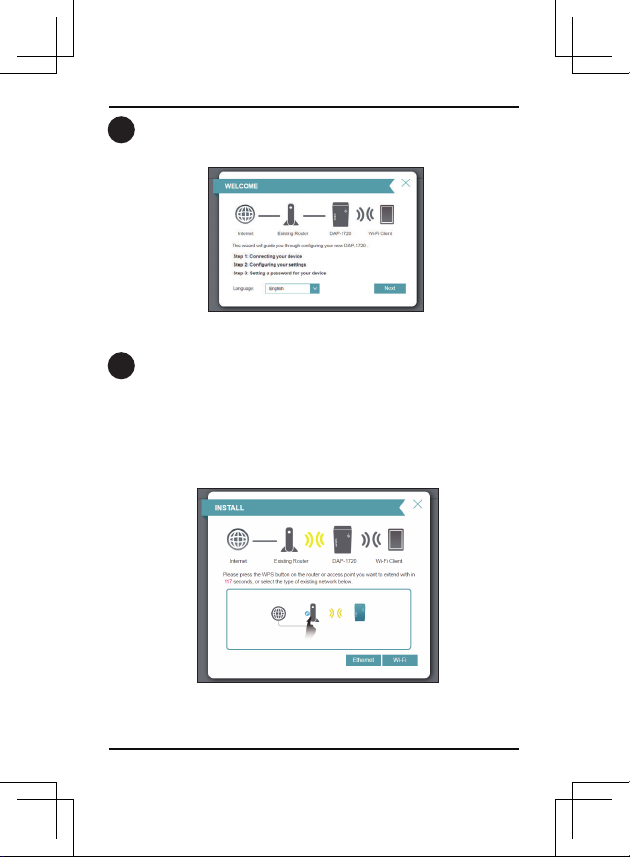
Select your language from the drop-down menu and then click Next.
6
The WPS process will be started on the DAP-1720 automatically. Press the
7
WPS button on your wireless router or access point.
If you want to manually select the wireless network you want to extend, click
Extend an existing wireless network and go to the next page. If you want
to connect the DAP-1720 to a wired network using an Ethernet cable, click
Add wireless to your wired network and skip to page 11.
8
Page 11
DAP-1720 Install Guide
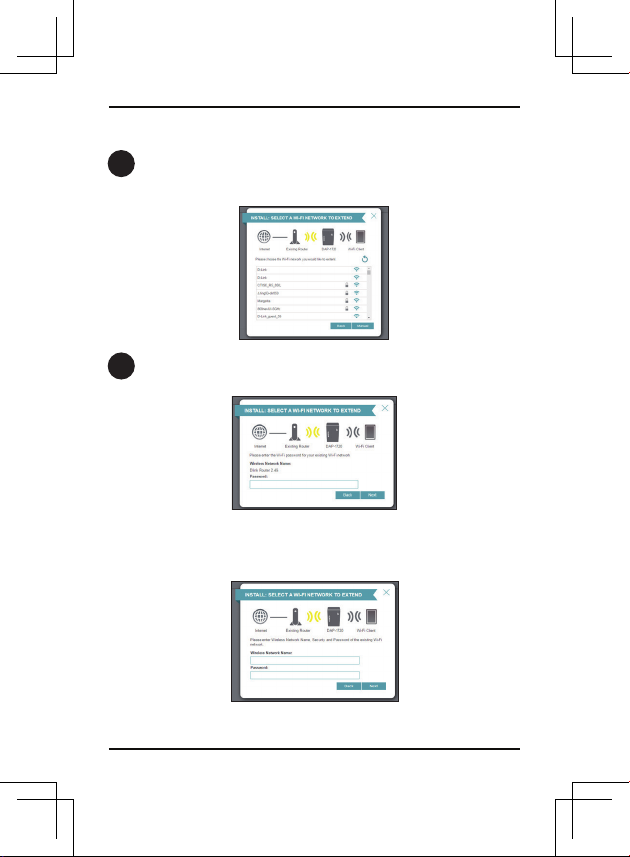
If you clicked “Extend an existing wireless network”
A list of detected wireless networks within range of the DAP-1720 will
8
appear. Click on the network you want to extend. If you want to manually
type in the Wi-Fi network name (SSID), click Manual at the bottom.
If your wireless network is secure/encrypted, enter the Wi-Fi password and
9
click Next to continue.
If you clicked Manual, enter the SSID and security information (Wi-Fi
password) of the wireless network you want to extend and click Next to
continue.
Skip to page 12 to continue
9
Page 12
DAP-1720 Install Guide
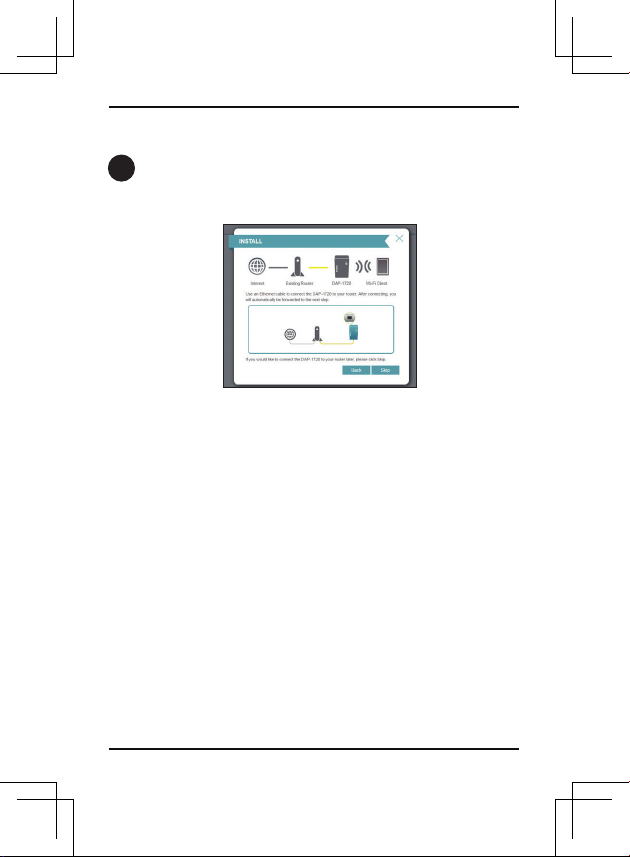
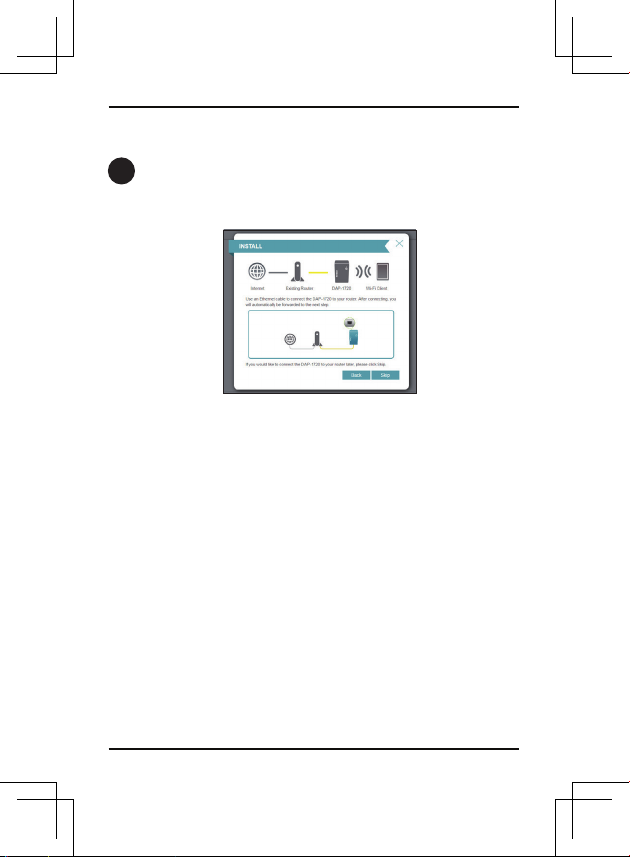
If you clicked “Add wireless to your wired network”
Connect the DAP-1720 to your network using an Ethernet cable. The wizard
8
will automatically go to step 10 on the next page. If you wish to connect the
DAP-1720 later, click Skip.
10
Page 13
DAP-1720 Install Guide
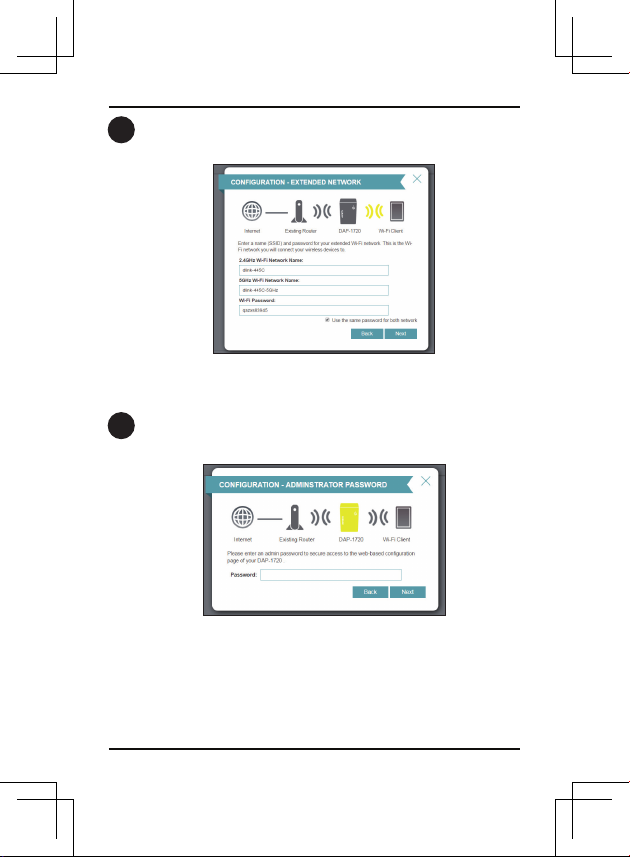
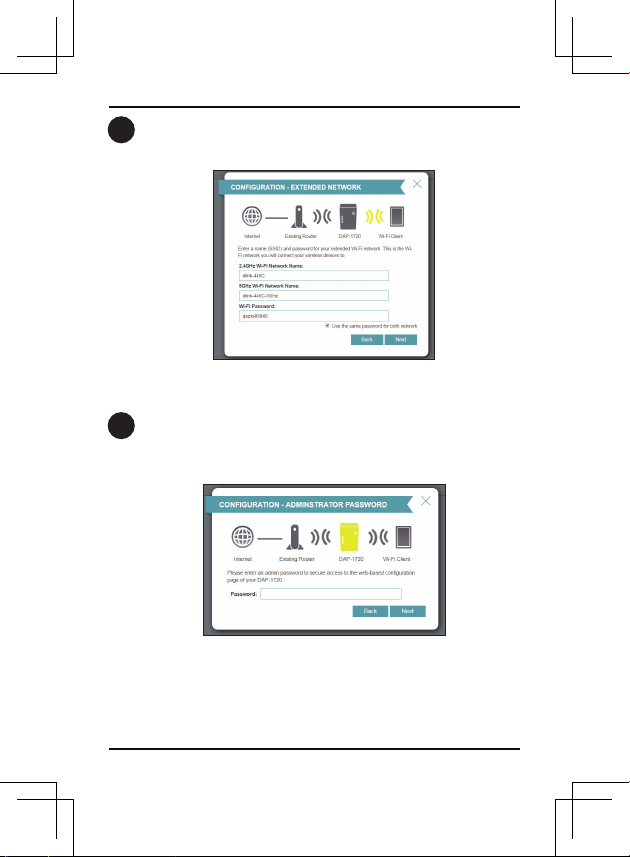
Enter a new Wi-Fi network name for the DAP-1720 and enter a new Wi-Fi
10
password. Click Next to continue.
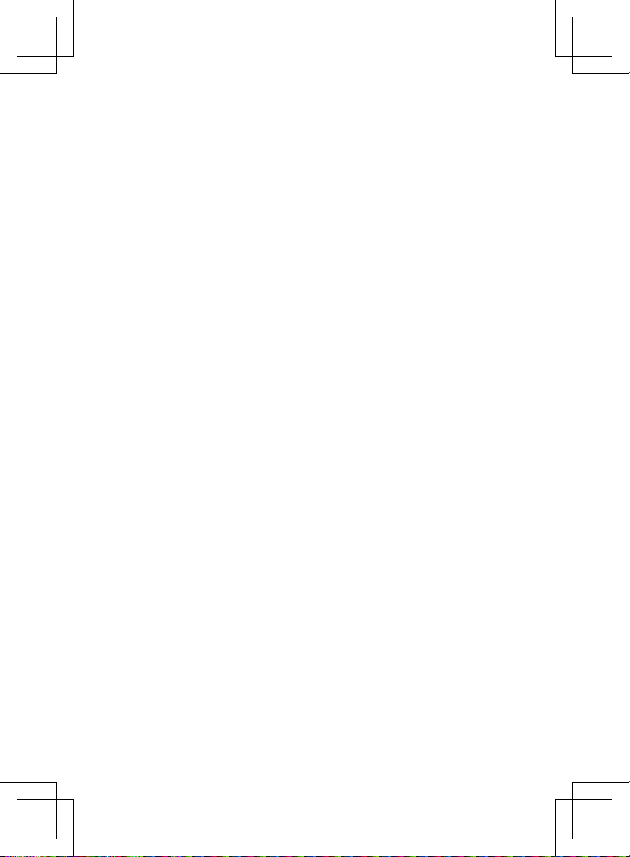
Enter an administrator password for the DAP-1720. This is the password
11
you will use to enter the web-based conguration. Click Next to continue.
11
Page 14

DAP-1720 Install Guide
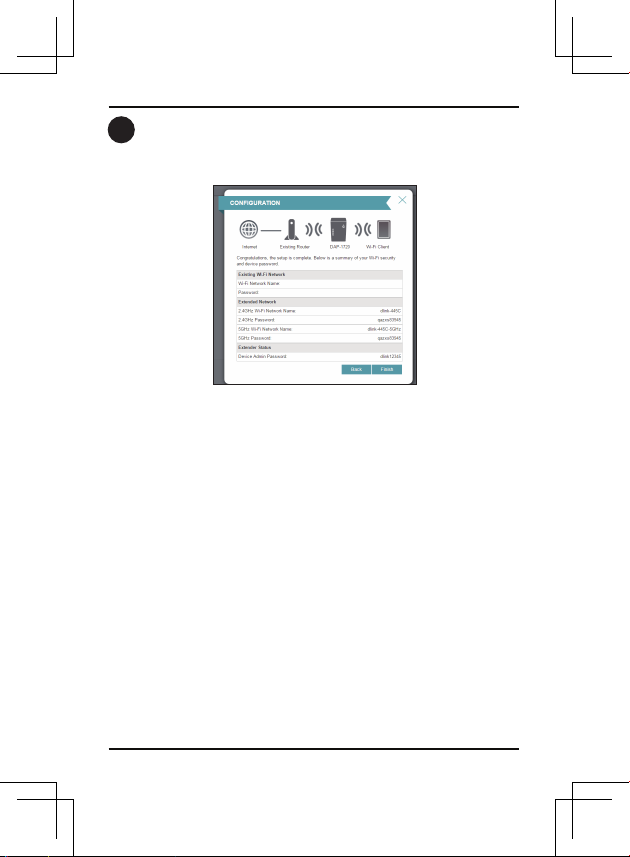
A summary page will display your settings. Click Finish and the DAP-1720
12
will reboot. If you want to make any changes, click Back.
Setup is now complete. Allow about two minutes for the DAP-1720 reboot. Verify
that the Status light is green and the signal strength indicators are lit. You can now
unplug the DAP-1720 and connect to a dierent location if needed.
12
Page 15

DAP-1720 Install Guide
Troubleshooting
Why can’t I connect to my wireless router or my wireless connection drops?
1. Verify that the DAP-1720 is within range of your wireless router. Try plugging it
into a location closer to the router and verify the Status LED is solid green.
2. Note that when repeating a wireless signal from a router or access point, devices
connected to the repeater will not get the same speed/throughput as when
connected directly to the router.
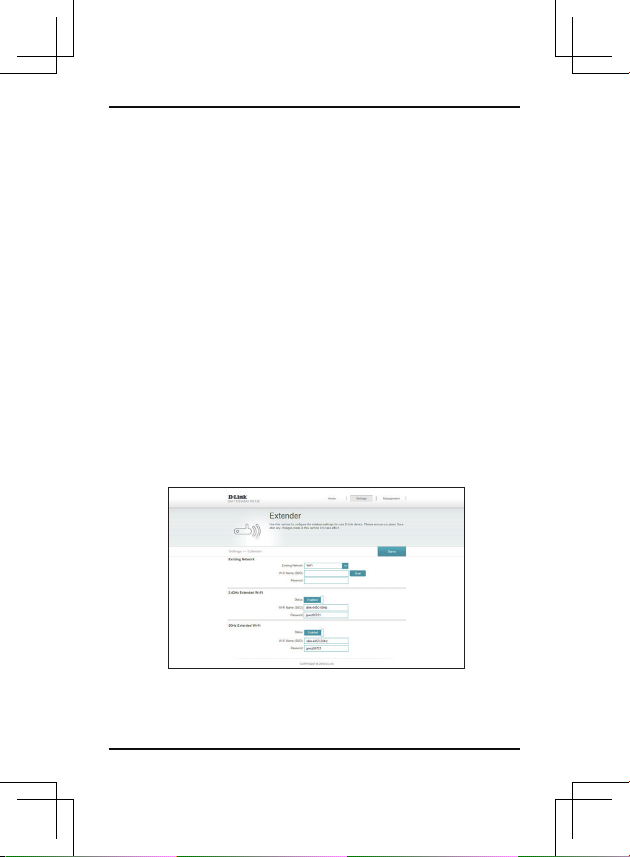
How do I change the wireless settings on the DAP-1720?
1. Open a web browser (e.g., Internet Explorer, Firefox, Chrome or Safari) and go to
http://dlinkap.local./ or enter the IP address (http://192.168.0.50 by default).
2. At the login screen, enter your password and click Log in.
3. Go to Setup > Wireless.
4. Enter a new Wi-Fi Network Name (SSID) for the 2.4GHz and 5GHz bands, and
modify the security (Wi-Fi password) settings as needed.
5. Click Save.
Note: If you have changed the Wi-Fi Network name, the device you are currently using to connect
to the DAP-1720 will drop. You will need to open your wireless utility and connect to the DAP-1720
using the new network name and password.
13
Page 16

DAP-1720 Install Guide
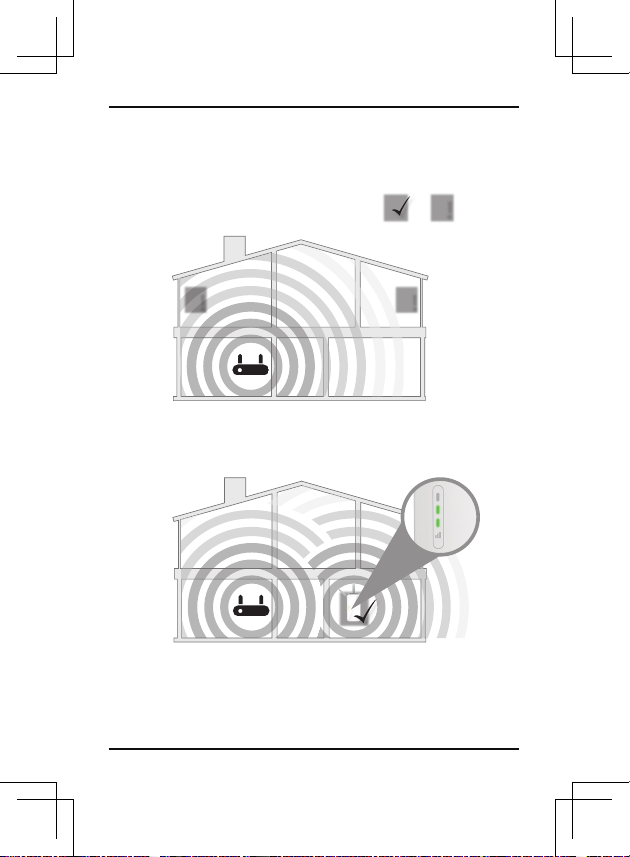
Where should I place my DAP-1720 when using it as a range extender?
A Range Extender only works as well as the signal it is extending. Therefore,
proper placement of your DAP-1720 is important in achieving desired results.
!
Poor
Ideal
location
location
!!
A Range Extender only works as well as the signal it is extending.
Therefore, proper placement of your DAP-1720 is important in achieving
desired results.
For best performance, place your DAP-1720 in between your router and
your dead zone, making sure it’s placed in a location where the Wi-Fi
signal is still strong. Use the Smart Signal Indicator to help nd a location
with a strong signal. The more bars lit on the signal indicator, the stronger
the Wi-Fi signal is.
14
Page 17

DAP-1720 Install Guide
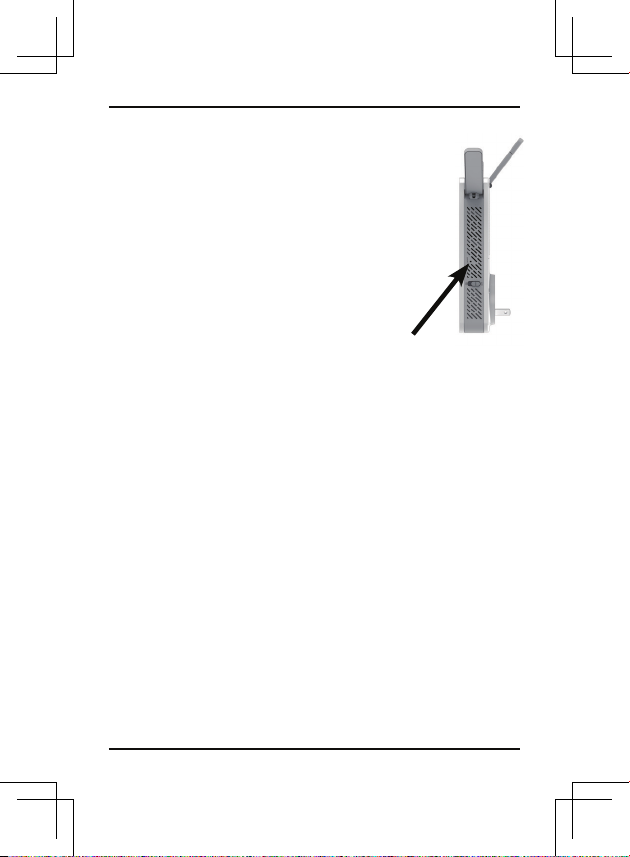
What if I forgot my DAP-1720 password?
1. If you forgot your password or want to reset the DAP1720 back to the factory default settings, press and
hold the reset button on the bottom of the extender
using a paper clip and release after a minimum of 10
seconds. The Status light will turn red.
Note: This process will erase all your settings.
2. You may repeat the WPS process on page 5. Follow
the steps under Connect to Your Router Using WPS.
Reset Button
15
Page 18

DAP-1720 Install Guide
GPL Code Statement
This D-Link product includes software code developed by third parties, including
software code subject to the GNU General Public License (“GPL”) or GNU Lesser
General Public License (“LGPL”). As applicable, the terms of the GPL and LGPL,
and information on obtaining access to the GPL code and LGPL code used in this
product, are available to you at:
http://tsd.dlink.com.tw/GPL.asp
The GPL code and LGPL code used in this product is distributed WITHOUT ANY
WARRANTY and is subject to the copyrights of one or more authors. For details,
see the GPL code and the LGPL code for this product and the terms of the GPL
and LGPL.
Written Oer for GPL and LGPL Source Code
Where such specific license terms entitle you to the source code of such
software, D-Link will provide upon written request via email and/or traditional
paper mail the applicable GPL and LGPLsource code files via CD-ROM for a
nominal cost to cover shipping and media charges as allowed under the GPL
and LGPL.
Please direct all inquiries to:
Email:
GPLCODE@dlink.com
Snail Mail:
Attn: GPLSOURCE REQUEST
D-Link Systems, Inc.
17595 Mt. Herrmann Street
Fountain Valley, CA 92708
GNU GENERAL PUBLIC LICENSE
Version 3, 29 June 2007
Copyright (C) 2007 Free Software Foundation, Inc. <http://fsf.org/>
View the full GPL Code Statement at http://www.gnu.org/licenses/gpl.html
16
Page 19
Page 20
This guide is for rst time conguration. Please refer to the user manual to learn more.
Technical Support
U.S. and Canadian customers can contact D-Link Technical Support through our website.
USA
http://support.dlink.com/DAP-1720
Canada
http://support.dlink.ca/DAP-1720
Version 1.01(CA)_85X125
September 19, 2016
6AP1720Q.D02G
©2016 D-Link. All rights reserved. D-Link and the D-Link logo are trademarks or registered
trademarks of D-Link Corporation or its subsidiaries. All other third-party marks mentioned
herein may be trademarks of their respective owners. This publication may not be reproduced,
in whole or in part, without prior express written permission from D-Link Systems, Inc.
Page 21

DAP-1720
Prolongateur de portée
Wi-Fi AC1750
Guide d’installation rapide
Page 22

Page 23

Guide d’installation du DAP-1720
Contenu de la boîte
Prolongateur de portée Wi-Fi AC1750
DAP-1720
Carte de conguration du Wi-Fi
Guide d’installation rapide
Contactez votre revendeur s'il manque l'un des éléments ci-dessus.
Avant de commencer
• Assurez-vous que la zone où vous voulez brancher le
prolongateur possède une connexion stable à votre routeur.
Utilisez un ordinateur portable sans l, une tablette ou un
téléphone mobile dans cette zone pour tester la connexion.
• Si votre routeur ou point d'accès sans l ne prend pas en
charge le WPS, suivez les étapes de la section Congurer le DAP-
1720 à l'aide d'un navigateur Web pour vous connecter au DAP1720 et exécuter l'Assistant de conguration. Si vous ne savez
pas comment activer le WPS sur votre routeur sans l, veuillez
consulter son manuel d'utilisation.
1
Page 24
Guide d’installation du DAP-1720
Présentation du produit
Voyant d’état
Bouton WPS
Voyants
indiquant
la force du
signal
Voyant
lumineux
Voyant
d’état
Interrupteur
marche/arrêt
Couleur État Description
Reste
Rouge
Orange Clignote
Vert
Le périphérique est en cours d'allumage/de
allumé
démarrage.
Le périphérique est prêt, mais il n'est pas
connecté à un routeur de liaison montante.
Reste
Indique que le DAP-1720 est bien connecté à
votre routeur ou point d'accès sans l.
allumé
Le bouton WPS a été enfoncé et le périphérique
Clignote
est en train de traiter une connexion.
Bouton de
réinitialisation
Voyants indiquant la force du signal
Très faible (Orange) Faible (Vert) Bon Optimal
2
Port
Ethernet
Page 25
Guide d’installation du DAP-1720
Connexion à votre réseau
Utilisation du WPS
Trouvez une prise disponible à
1
proximité de votre routeur sans l.
Branchez le DAP-1720 et attendez que
le voyant d'état clignote en orange.
Appuyez sur le bouton WPS (Wi-Fi
2
Protected Setup) de votre routeur sans
l.
Dans la minute qui suit, appuyez sur le
3
bouton WPS du DAP-1720. Le voyant
d'état commence à clignoter.
3
Page 26

Guide d’installation du DAP-1720
Lorsque le voyant reste allumé en vert, cela indique que le DAP-1720
4
est bien connecté à votre routeur ou point d'accès sans l. Vous
pouvez maintenant débrancher le DAP-1720 et le déplacer vers un
emplacement entre votre routeur sans l et la zone où vous avez
besoin d'une couverture sans l.
Si les voyants indiquant la force du signal
présentent une seule barre ou si le DAP-1720 ne
se connecte pas, déplacez le vers une prise murale
plus proche du routeur sans l ou point d'accès.
4
Page 27

Guide d’installation du DAP-1720
Connecter vos périphériques sans l
À partir de votre périphérique sans l, accédez à l'utilitaire sans l pour
5
acher les réseaux sans l disponibles.
Réseau
étendu
Réseau
original
Le SSID du DAP-1720 sera automatiquement attribué comme suit:
• 2,4GHz (Le SSID de votre routeur)-EXT
• 5GHz (Le SSID de votre routeur)-EXT5G
Le mot de passe Wi-Fi du DAP-1720 sera le même que celui de votre
routeur.
Répétez l'étape 5 pour connecter d'autres périphériques Wi-Fi au DAP-
1720.
Votre périphérique est maintenant connecté au DAP-1720 et peut
6
se connecter à votre routeur sans l. Si vous souhaitez modier les
paramètres de votre réseau, le mot de passe, etc., suivez les étapes
sur la page suivante pour congurer le DAP-1720. Pour connecter des
périphériques supplémentaires, répétez l'étape 5.
Conguration terminée!
5
Page 28

Guide d’installation du DAP-1720
Congurer le DAP-1720
À l'aide d'un navigateur Web (Facultatif)
Vous pouvez vous connecter à l'utilitaire de conguration Web du DAP-1720
pour eectuer les tâches suivantes:
• Mettre à jour le microprogramme
• Modier les paramètres sans l et réseau
• Changer le mot de passe de connexion
Branchez le DAP-1720 dans un prise disponible à proximité de
1
votre routeur. Vous pouvez le déplacer vers un emplacement plus
convenable après la conguration.
Ouvrez l'utilitaire sans l sur votre périphérique ou ordinateur sans
2
l. Sélectionnez le nom du réseau Wi-Fi (indiqué sur la carte de
conguration du Wi-Fi) et saisissez le mot de passe. Vous pouvez aussi
connecter le DAP-1720 à votre routeur ou à votre ordinateur à l'aide
d'un câble Ethernet.
Wi-Fi Name(SSID) 2.4Ghz:
dlink-xxxx
Wi-Fi Name(SSID) 5GHz:
dlink-xxxx-5GHz
Password: xxxxxxxx
To congure your extender, go to:
http://dlinkap.local.
Or http://192.168.0.50
Username: “Admin”
Password:” “ (leave the eld blank)
Ouvrez un navigateur web (par ex., Internet Explorer, Firefox, Safari ou
3
Chrome) et saisissez http://dlinkap.local./. Vous pouvez également
saisir l'adresse IP du DAP-1720.
6
Page 29

Guide d’installation du DAP-1720
Remarque : L'adresse IP par défaut est 192.168.0.50. Une fois que le
DAP-1720 se connecte à votre routeur, il obtiendra une nouvelle adresse
IP basée sur les paramètres DHCP votre routeur/réseau. Vous devez vous
connecter à votre routeur et acher la table DHCP pour voir quelle adresse
IP a été attribuée au DAP-1720. L'adresse MAC est imprimée sur l'étiquette
du DAP-1330.
Une fois que vous vous connectez, la page de connexion s'ache.
4
Saisissez votre mot de passe, puis cliquez sur Login (Connexion). Le
mot de passe par défaut est vide.
Remarque: Si vous vous connectez au DAP-1720 pour la première fois,
vous serez dirigé automatiquement vers l'assistant. Passez à l'étape 6.
La page d'accueil ache l'état actuel de votre connexion. Une coche
5
verte indique une connexion réussie à votre routeur ou point d'accès
(PA) sans l. Un X rouge signie qu'il n'y a pas de connexion à votre
routeur ou point d'accès. Cliquez sur l'icône du routeur de liaison
montante.
7
Page 30

Guide d’installation du DAP-1720
Sélectionnez votre langue dans le menu déroulant, puis cliquez sur
6
Next (Suivant).
Le processus WPS démarre automatiquement sur le DAP-1720.
7
Appuyez sur le bouton WPS de votre routeur ou point d’accès sans l.
Si vous souhaitez sélectionner manuellement le réseau sans l que
vous souhaitez prolonger, cliquez sur Extend an existing wireless
network (Étendre un réseau sans l existant), puis passez à la page
suivante. Si vous souhaitez connecter le DAP-1720 à un réseau câblé
à l'aide d'un câble Ethernet, cliquez sur Add wireless to your wired
network (Ajouter une capacité sans l à votre réseau câblé), puis
passez à la page11.
8
Page 31

Guide d’installation du DAP-1720
Si vous avez cliqué sur «Extend an existing wireless
network» (Étendre un réseau sans l existant)
Une liste de réseaux sans l détectés dans la portée du DAP-1720
8
s'ache. Cliquez sur le réseau que vous souhaitez prolonger. Si vous
voulez saisir manuellement le nom du réseau Wi-Fi (SSID), cliquez sur
Manual (Manuel) en bas.
Si votre réseau sans l est sécurisé/crypté, saisissez le mot de passe Wi-
9
Fi et cliquez sur Next (Suivant) pour continuer.
Si vous avez cliqué sur Manual (Manuel), saisissez le SSID et les
informations de sécurité (mot de passe Wi-Fi) du réseau sans l
que vous souhaitez prolonger, puis cliquez sur Next (Suivant) pour
continuer.
Passez à la page12 pour continuer
9
Page 32
Guide d’installation du DAP-1720
Si vous avez cliqué sur «Add wireless to your wired
network
»
(Ajouter une capacité sans l à votre réseau câblé)
Connectez le DAP-1720 à votre réseau à l'aide d'un câble Ethernet.
8
L'Assistant passe automatiquement à l'étape 10 à la page suivante.
Si vous souhaitez connecter le DAP-1720 plus tard, cliquez sur Skip
(Ignorer).
10
Page 33
Guide d’installation du DAP-1720
Saisissez un nouveau nom de réseau Wi-Fi et un nouveau mot de passe
10
Wi-Fi pour le DAP-1720. Cliquez sur Next (Suivant) pour continuer.
Saisissez un mot de passe administrateur pour le DAP-1720. Il s'agit
11
du mot de passe que vous utiliserez pour accéder à l'utilitaire de
conguration Web. Cliquez sur Next (Suivant) pour continuer.
11
Page 34
Guide d’installation du DAP-1720
Une page de résumé ache vos paramètres. Cliquez sur Finish
12
(Terminer) et le DAP-1720 va redémarrer. Si vous souhaitez apporter
des changements, cliquez sur Back (Précédent).
La conguration est maintenant terminée. Attendez environ deux minutes
que le DAP-1720 redémarre. Vériez que le voyant d'état est vert et que les
voyants indiquant la force du signal sont allumés. Vous pouvez maintenant
débrancher le DAP-1720 et le connecter dans un autre emplacement si
nécessaire.
12
Page 35
Guide d’installation du DAP-1720
Résolution des problèmes
Pourquoi ne puis-je pas me connecter à mon routeur sans l ou ma
connexion sans l se coupe?
1. Vériez que le DAP-1720 se trouve à portée de votre routeur sans l.
Essayez de le brancher dans un endroit plus près du routeur et vériez que
le voyant d'état reste allumé en vert.
2. Notez que lorsqu'un signal sans l d'un routeur ou d'un point d'accès est
répété, les périphériques connectés au répétiteur n'auront pas la même
vitesse/le même débit que s'ils étaient connectés directement au routeur.
Comment modier les paramètres sans l du DAP-1720?
1. Ouvrez un navigateur web (par ex., Internet Explorer, Firefox, Chrome
ou Safari) et allez sur http://dlinkap.local./ ou saisissez l’adresse IP
(http://192.168.0.50 par défaut).
2. Quand l’écran de connexion apparaît, saisissez votre mot de passe et
cliquez sur Log in (Connexion).
3. Accédez à Setup > Wireless (Conguration> Sans l).
4. Saisissez un nouveau nom de réseau Wi-Fi (SSID) pour les bandes de 2,4 GHz
et 5 GHz et modiez les paramètres de sécurité (mot de passe Wi-Fi) au besoin.
5. Cliquez sur Save (Enregistrer).
Remarque: Si vous avez modié le nom du réseau Wi-Fi, le périphérique que vous utilisez actuellement
pour vous connecter au DAP-1720 ne sera plus connecté. Vous devrez ouvrir votre utilitaire sans l
et vous connecter au DAP-1720 en utilisant le nouveau nom de réseau et le nouveau mot de passe.
13
Page 36
Guide d’installation du DAP-1720
Où dois-je placer mon DAP-1720 lorsque je l'utilise comme prolongateur de portée?
Un prolongateur de portée ne fonctionne qu'aussi bien que le signal qu'il
prolonge. Par conséquent, le bon positionnement de votre DAP-1720 est
important pour obtenir les résultats souhaités.
!
Poor
Ideal
location
location
!!
Un prolongateur de portée ne fonctionne qu'aussi bien que le
signal qu'il prolonge. Par conséquent, le bon positionnement de
votre DAP-1720 est important pour obtenir les résultats souhaités.
Pour de meilleures performances, positionnez votre DAP-1720 entre
votre routeur et votre zone morte, en veillant à ce qu'il soit placé dans
un endroit où le signal est encore puissant. Utilisez le voyant de signal
intelligent pour vous aider à trouver un endroit avec un signal fort. Plus
il y a de barres allumées sur le voyant indicateur du signal, plus fort est
le signal Wi-Fi.
14
Page 37
Guide d’installation du DAP-1720
Que faire si j'ai oublié le mot de passe de mon DAP1720?
1. Si vous avez oublié votre mot de passe ou si
vous souhaitez réinitialiser le DAP-1720 sur les
paramètres d'usine par défaut, appuyez sur le
bouton de réinitialisation au bas du prolongateur
à l'aide d'un trombone et relâchez-le après 10
secondes. Le voyant d'état devient rouge.
Remarque: Ce processus efacera tous vos
paramètres.
2. Vous pouvez répéter le processus WPS à la page 5.
Suivez les étapes de la section Connexion à votre
routeur à l'aide du WPS.
Bouton de réinitialisation
15
Page 38
Guide d’installation du DAP-1720
Déclaration relative au code GPL
Ce produit D-Link comprend des codes de logiciel développés par des tiers,
y compris des codes de logiciel soumis à la Licence Publique Générale GNU
( «GPL ») ou à la Licence Publique Générale GNU Limitée («LGPL»). Le
cas échéant, les conditions de la GPL et de la LGPL, et les informations sur
l'obtention de l'accès au codes GPL et LGPL utilisés dans ce produit, sont
disponibles sur:
http://tsd.dlink.com.tw/GPL.asp
Les codes GPL et LGPL utilisés dans le produit sont distribués SANS AUCUNE
GARANTIE et sont soumis aux droits d'auteur d'un ou de plusieurs auteurs.
Pour plus de détails, reportez-vous aux codes GPL et LGPL de ce produit et
aux conditions de la GPL et de la LGPL.
Ore écrite pour le code source GPL et LGPL
Si des conditions spéciques de la licence vous donnent droit au code source
du logiciel, D-Link fournira, sur demande écrite par courrier électronique
et/ou courrier papier traditionnel, les chiers de code source GPL et LGPL
applicables via CD-ROM à un coût nominal pour couvrir les frais d'expédition
et de support comme autorisé par la licence GPL et LGPL.
Veuillez adresser toutes les demandes à:
Courrier électronique:
GPLCODE@dlink.com
Courrier ordinaire:
Attention: GPLSOURCE REQUEST
D-Link Systems, Inc.
17595 Mt. Herrmann Street
Fountain Valley, CA 92708
LICENCE PUBLIQUE GÉNÉRALE GNU
Version 3, 29 juin 2007
Copyright (C) 2007 Free Software Foundation, Inc. <http://fsf.org/>
Consultez la déclaration complète relative au code GPL
sur http://www.gnu.org/licenses/gpl.html
16
Page 39

Page 40
Ce guide concerne la première conguration. Veuillez vous reporter au manuel
Assistance technique
d'utilisation pour en savoir plus.
Les clients des États-Unis et du Canada peuvent contacter le support technique de
D-Link via notre site Web.
États-Unis
http://support.dlink.com/DAP-1720
Canada
http://support.dlink.ca/DAP-1720
Version 1.01(CA)_85X125
19 septembre 2016
6AP1720Q.D02G
©2016 D-Link. Tous droits réservés. D-Link et le logo D-Link sont des marques ou des
marques déposées de D-Link Corporation ou de ses liales. Toutes les autres marques de tiers
mentionnés dans ce document peuvent être des marques de leurs propriétaires respectifs.
Toute reproduction partielle ou totale de cette publication est interdite sans l'autorisation
préalable, expresse et écrite de D-Link Systems, Inc.
Page 41

Federal Communication Commission Interference Statement
This equipment has been tested and found to comply with the limits for a Class B digital device,
pursuant to Part 15 of the FCC Rules. These limits are designed to provide reasonable protection
against harmful interference in a residential installation. This equipment generates, uses and can
radiate radio frequency energy and, if not installed and used in accordance with the instructions, may
cause harmful interference to radio communications. However, there is no guarantee that interference
will not occur in a particular installation. If this equipment does cause harmful interference to radio or
television reception, which can be determined by turning the equipment off and on, the user is
encouraged to try to correct the interference by one of the following measures:
● Reorient or relocate the receiving antenna.
● Increase the separation between the equipment and receiver.
● Connect the equipment into an outlet on a circuit different from that to which the receiver is
connected.
● Consult the dealer or an experienced radio/TV technician for help.
FCC Caution: Any changes or modifications not expressly approved by the party responsible for
compliance could void the user’s authority to operate this equipment.
This device complies with Part 15 of the FCC Rules. Operation is subject to the following two
conditions: (1) This device may not cause harmful interference, and (2) this device must accept any
interference received, including interference that may cause undesired operation.
This device is restricted for indoor use.
IMPORTANT NOTE:
FCC Radiation Exposure Statement:
This equipment complies with FCC radiation exposure limits set forth for an uncontrolled environment.
This equipment should be installed and operated with minimum distance 20cm between the radiator &
your body.
Page 1 of 3
Page 42

IC statement
This device complies with Industry Canada license-exempt RSS standard(s). Operation is subject to
the following two conditions: (1) this device may not cause interference, and (2) this device must
accept any interference, including interference that may cause undesired operation of the device.
Le présent appareil est conforme aux CNR d'Industrie Canada applicables aux appareils radio exempts de licence.
L'exploitation est autorisée aux deux conditions suivantes : (1) l'appareil ne doit pas produire de brouillage, et (2)
l'utilisateur de l'appareil doit accepter tout brouillage radioélectrique subi, même si le brouillage est susceptible d'en
compromettre le fonctionnement.
This radio transmitter (4216A-AP1720A1) has been approved by Industry Canada to operate with the
antenna types listed below with the maximum permissible gain indicated. Antenna types not included
in this list, having a gain greater than the maximum gain indicated for that type, are strictly prohibited
for use with this device.
Le présent émetteur radio (4216A-AP1720A1) a été approuvé par Industrie Canada pour fonctionner avec les types
d'antenne énumérés ci-dessous et ayant un gain admissible maximal d'antenne. Les types d'antenne non inclus dans cette
liste, ou dont le gain est supérieur au gain maximal indiqué, sont strictement interdits pour l'exploitation de l'émetteur.
Ant. Brand Holder P/N
HONGXIN INTERNATIONAL
1
HONGXIN INTERNATIONAL
2
HONGXIN INTERNATIONAL
3
Note: The EUT has three antennas.
LIMITED
LIMITED
LIMITED
290-20290
290-20291
290-20292
Antenna
Type
Dipole
Dipole
Dipole
Connector
I-PEX
I-PEX
I-PEX
Gain (dBi)
2.4GHz 5GHz
2.67 3.94
2.42 4.06
2.94 3.66
The device for operation in the band 5150–5250 MHz is only for indoor use to reduce the potential for
harmful interference to co-channel mobile satellite systems.
les dispositifs fonctionnant dans la bande 5150-5250 MHz sont réservés uniquement pour une
utilisation à l’intérieur afin de réduire les risques de brouillage préjudiciable aux systèmes de satellites mobiles utilisant
les mêmes canaux.
Page 2 of 3
Page 43

The maximum antenna gain permitted for devices in the band 5725-5850 MHz shall be such that the
equipment still complies with the e.i.r.p. limits specified for point-to-point and non-point-to-point
operation as appropriate.
le gain maximal d’antenne permis (pour les dispositifs utilisant la bande 5725-5850 MHz)
doit se conformer à la limite de p.i.r.e. spécifiée pour l’exploitation point à point et non point à point, selon le cas.
For indoor use only.
Pour une utilisation en intérieur uniquement.
IMPORTANT NOTE:
IC Radiation Exposure Statement:
This equipment complies with IC RSS-102 radiation exposure limits set forth for an uncontrolled
environment. This equipment should be installed and operated with minimum distance 20cm between
the radiator & your body.
Cet équipement est conforme aux limites d'exposition aux rayonnements IC établies pour un environnement non contrôlé.
Cet équipement doit être installé et utilisé avec un minimum de 20 cm de distance entre la source de rayonnement et votre
corps.
Page 3 of 3
 Loading...