

Page 1

Version 1.0 | 10/30/2013
User Manual
Wireless AC750 Dual Band Range Extender
DAP-1520
Page 2
Preface
D-Link reserves the right to revise this publication and to make changes in the content hereof without obligation to notify any
person or organization of such revisions or changes.
Manual Revisions
Revision Date Description
1.0 October 2, 2013 • Initial release
Trademarks
D-Link and the D-Link logo are trademarks or registered trademarks of D-Link Corporation or its subsidiaries in the United
States or other countries. All other company or product names mentioned herein are trademarks or registered trademarks of
their respective companies.
Copyright © 2013 by D-Link Corporation.
All rights reserved. This publication may not be reproduced, in whole or in part, without prior expressed written permission
from D-Link Systems, Inc.
This purpose of this product is to create a constant network connection for your devices. As such, it does not have a standby
mode or use a power management mode. If you wish to power down this product, please simply unplug it from the power
outlet.
iD-Link DAP-1520 User Manual
Page 3

Table of Contents
Table of Contents
Preface ................................................................................. i
Manual Revisions ........................................................................... i
Trademarks ...................................................................................... i
Introduction ....................................................................... 1
Package Contents .........................................................................1
System Requirements ................................................................. 2
Introduction ................................................................................... 3
Features .................................................................................... 3
What is a Wireless Extender? ............................................ 4
Hardware Overview ..................................................................... 5
Front/Top ................................................................................. 5
Side and Bottom ................................................................... 6
Wireless Installation Factors .....................................................7
Setting Up Your DAP-1520 ................................................ 8
QRS Mobile App Setup ............................................................... 9
Admin .....................................................................................27
System ....................................................................................28
Upgrade .................................................................................29
Statistics .................................................................................30
Connecting a Wireless Client ..........................................31
WPS Button ...................................................................................31
Connect to a Wireless Network .............................................32
Windows® 8 ...........................................................................32
WPA/WPA2 .......................................................................32
Windows® 7 ...........................................................................34
WPA/WPA2 .......................................................................34
Windows Vista® ....................................................................37
WPA/WPA2 .......................................................................38
Windows® XP ........................................................................40
WPA/WPA2 .......................................................................41
Web-based Conguration .......................................................13
Setup Wizard .................................................................... 14
Using the WPS Method ....................................................16
Using the Manual Method ..............................................17
Home Screen ........................................................................20
Wi-Fi Settings .......................................................................22
Extended Wi-Fi Settings ...................................................23
Network Settings ................................................................24
Advanced Settings ........................................................24
Maintenance ................................................................................27
Troubleshooting .............................................................. 43
Wireless Basics .................................................................45
Tips ...................................................................................................46
Technical Specications .................................................. 47
GPL Code Statement........................................................48
Safety Statements ...........................................................63
iiD-Link DAP-1520 User Manual
Page 4

Section 1 - Product Overview
Introduction
Package Contents
DAP-1520
Wireless AC750 Dual Band Range Extender
Wi-Fi Conguration Card
If any of the above items are missing from your package, please contact your reseller.
1D-Link DAP-1520 User Manual
Page 5

Section 1 - Product Overview
Network Requirements
Web-based Conguration
Utility Requirements
System Requirements
• A wireless router with an active Internet connection.
• IEEE 802.11ac draft, 802.11n, 802.11g, 802.11b or 802.11a
wireless clients/devices
Computer or Mobile Device with the following:
• A Windows®, Macintosh, Android, or Linux-based operating
system
• Wireless adapter or Wi-Fi functionality
Browser Requirements:
• Internet Explorer 7 or later
• Firefox 12.0 or later
• Safari 4 or later
• Google Chrome 20.0 or later
2D-Link DAP-1520 User Manual
Page 6

Section 1 - Product Overview
Introduction
Features
Easily Extend Your Existing Network
The DAP-1520 Wireless AC750 Dual Band Range Extender lets you extend a secure wireless network throughout your home. Connect
the DAP-1520 to a router and share your high-speed Internet access in more places throughout your home or small oce.
High-speed Wireless Performance With Wireless 802.11ac Technology
Thanks to the latest Wireless N technology, the DAP-1520 provides a wireless connection at up to 750 Mbps* with other 802.11ac
wireless devices wireless devices. This capability allows users to participate in real-time activities online, such as video streaming, online
gaming, and real-time audio with smooth performance.
Simple Setup
Through its easy-to-use web-based user interface, you can quickly and easily connect the DAP-1520 to an uplink router, congure the
extender wireless network, and manage the administrative settings. The setup wizard will even guide you through the setup process,
getting your extended wireless network up and running in no time.
Compatibility
The DAP-1520 is still fully compatible with the IEEE802.11n/g/b standards, so it can still connect with your older IEEE802.11n/g/b devices.
Latest Wireless Network Security and Encryption
The DAP-1520 supports wireless security features to prevent unauthorized access, be it from over the wireless network or from the
Internet. Support for WPA/WPA2 standards ensure that you’ll be able to use the best possible encryption methods with your compatible
wireless devices.
* Maximum wireless signal rate derived from IEEE Standard 802.11n and 802.11g specications. Actual data throughput will vary. Network conditions and environmental factors,
including volume of network trac, building materials and construction, and network overhead, lower actual data throughput rate. Environmental conditions will adversely
aect wireless signal range.
3D-Link DAP-1520 User Manual
Page 7
Section 1 - Product Overview
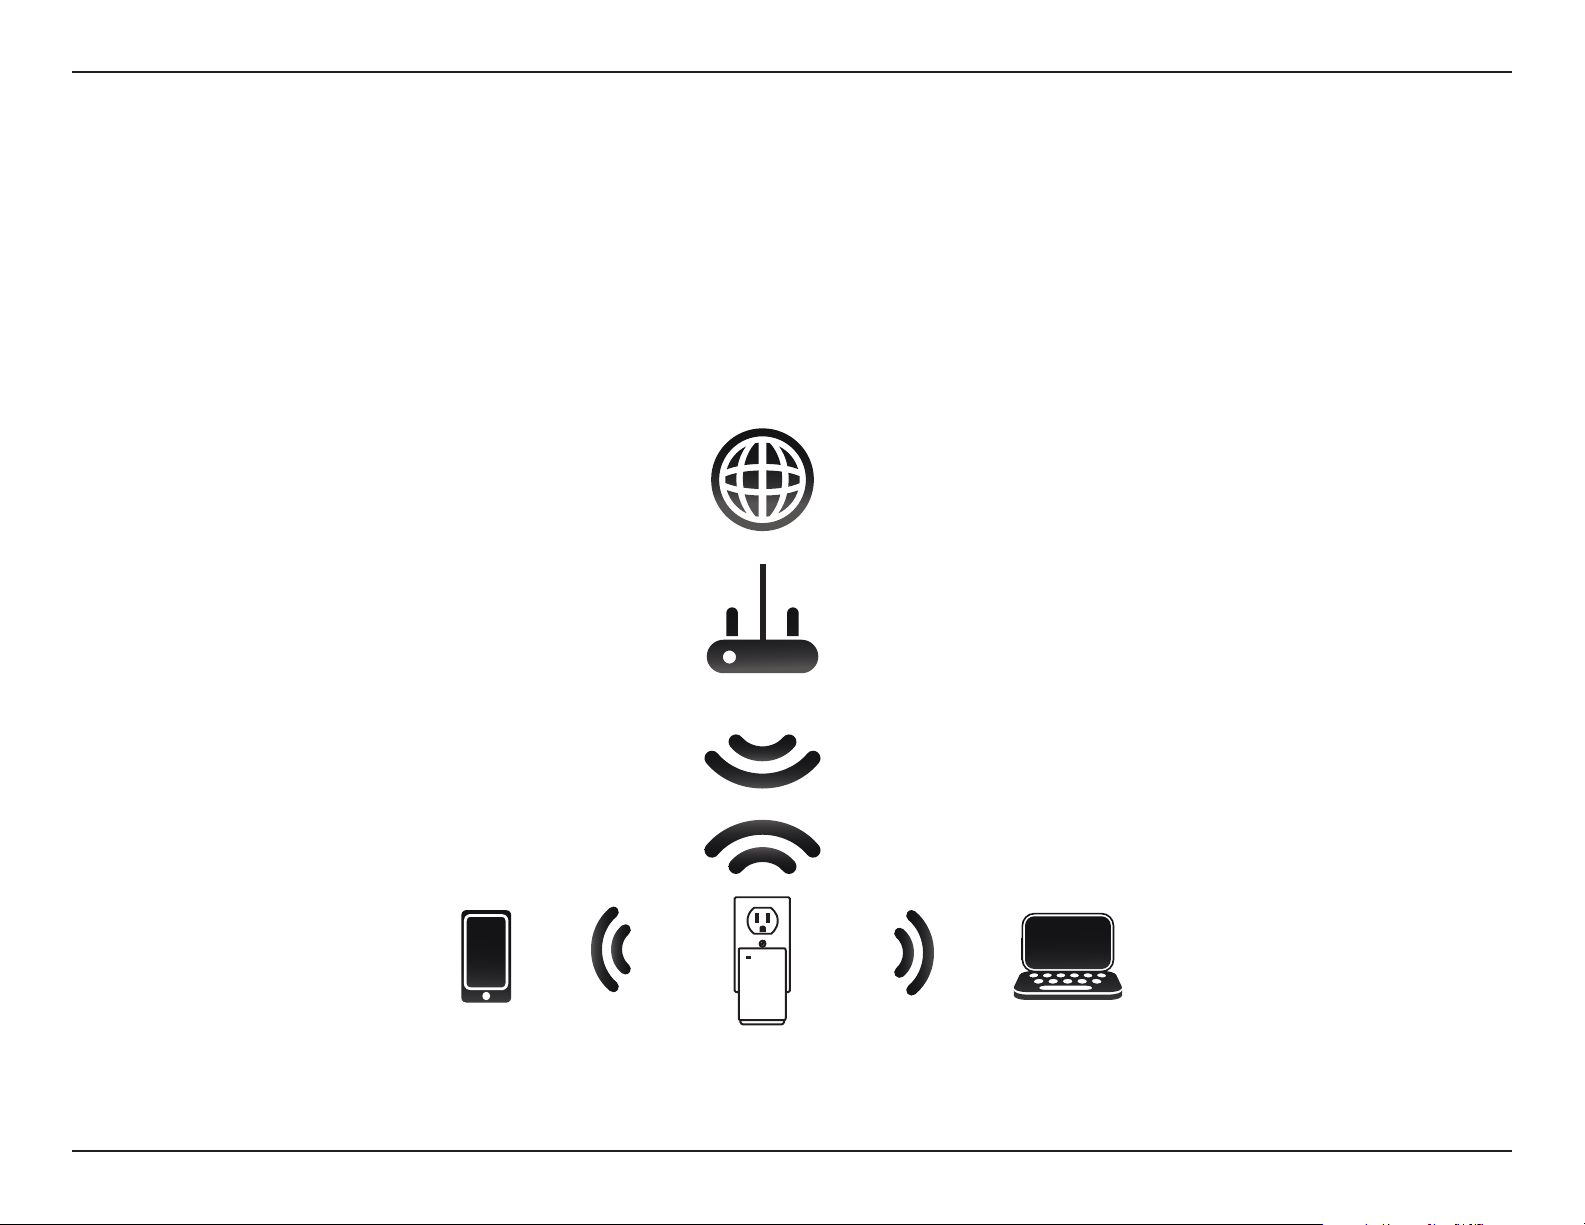
What is a Wireless Extender?
The DAP-1520 acts as a repeater to extend the range of an existing wireless network to provide better signal for parts of your
home or oce that may have poor or no reception. Your existing wireless signal will be re-broadcast by the DAP-1520, allowing
you to reach the farthest corners of your home or oce . The extended network can simply use the same network credentials
as the existing network, or you can specify a dierent network name and password, giving you the exibility to control network
access.
Internet
Mobile Device
Wireless Router
Computer
DAP-1520
4D-Link DAP-1520 User Manual
Page 8
Section 1 - Product Overview
Hardware Overview
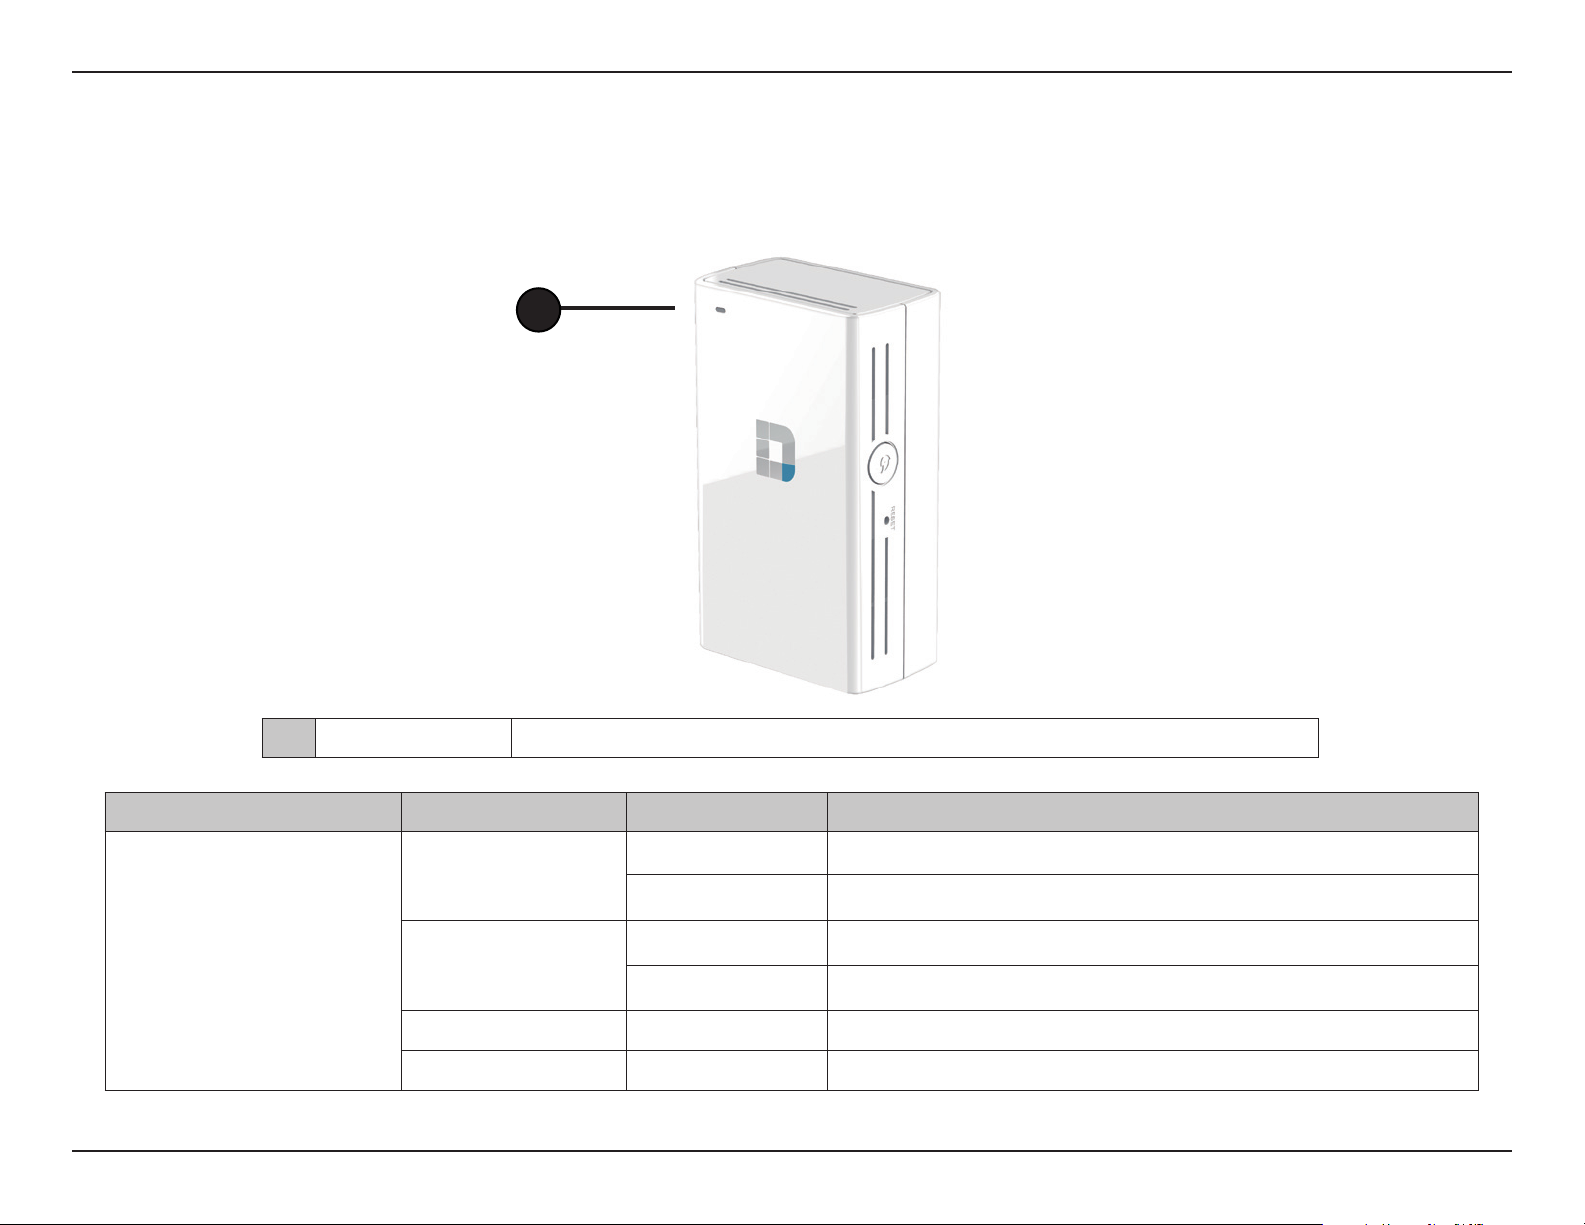
Front/Top
1
1 LED Indicator This indicates the current status of the DAP-1520, as detailed in the table below.
LED Indicator Color Status Description
Solid Green The device is powered ON and operating normally
Green
Blinking Green The device is processing WPS
Power/Status
Red
Orange Blinking Orange Cannot connect or provision an IP address from the uplink router
None O Device is not receiving power. Check the power outlet.
Solid Red Device is powering ON or system is defective
Blinking Red The device is in recovery mode or the device has malfunctioned
5D-Link DAP-1520 User Manual
Page 9
Section 1 - Product Overview
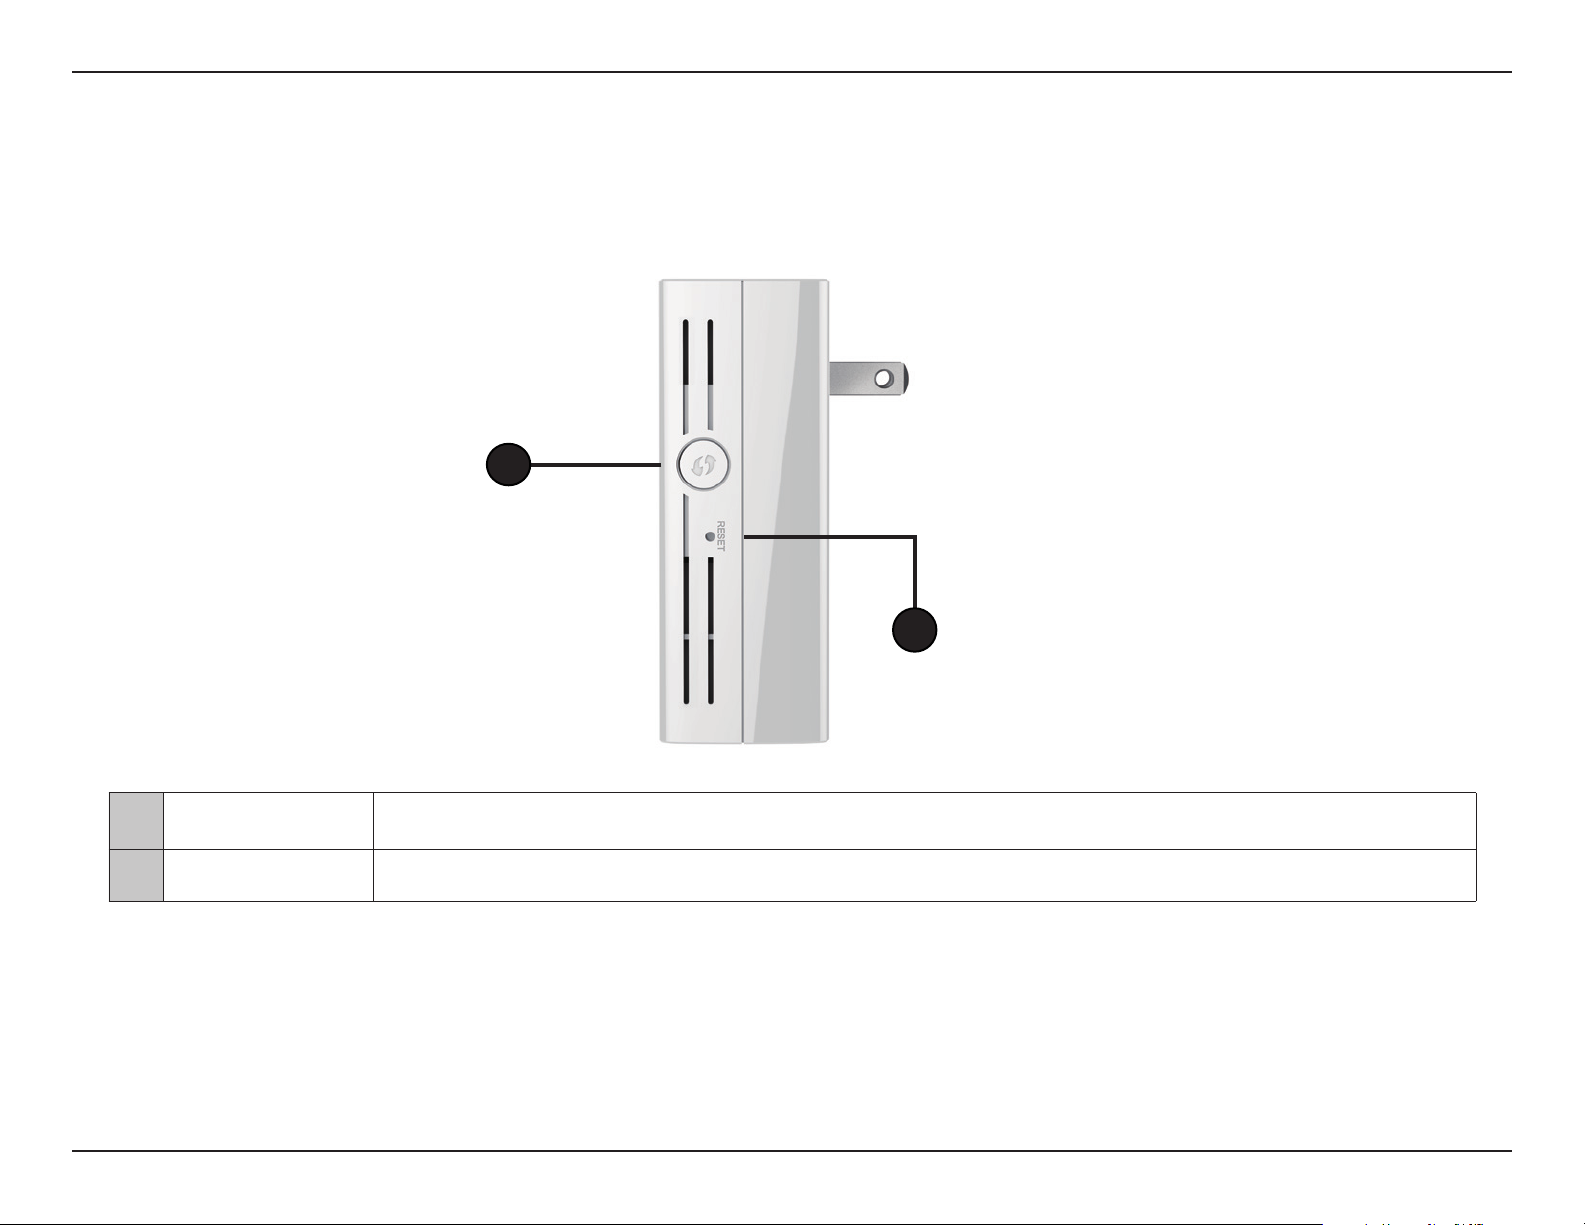
Hardware Overview
Side and Bottom
1
2
1 WPS Button Pressing the WPS button for 1 second allows you to connect with Wi-Fi clients using Wi-Fi Protected Setup.
2 Reset Button Pressing the reset button will reset the DAP-1520 to the factory default settings.
6D-Link DAP-1520 User Manual
Page 10

Section 2 - Conguration
Wireless Installation Factors
The Wireless AC750 Dual Band Range Extender lets you extend the reach of your existing wireless network, allowing you to
work wirelessly from more places in your home or oce. Keep in mind, however, that the number, thickness, and location of
walls, ceilings, or other objects that the wireless signals must pass through, may limit the range. Typical ranges vary depending
on the types of materials and background RF (radio frequency) noise in your home or business. The key to maximizing wireless
range is to follow these basic guidelines:
1. Keep the number of walls and ceilings between the extender and other network devices to a minimum - each wall or ceiling can
reduce your adapter’s range by up to 98 feet (30 meters). Position your devices so that the number of walls or ceilings is minimized.
2. Be aware of the direct line between network devices. At a 45-degree angle, a wall that is 0.5 meters thick (1.5 feet) appears to be
almost 1 meter (3 feet) thick. At a 2-degree angle it can appear over 14 meters (45 feet) thick! Position devices so that the signal
will travel straight through a wall or ceiling (instead of at an angle) for better reception.
3. Building materials make a dierence. A solid metal door or aluminum studs may have a negative eect on range. Try to position
access points, wireless routers, and computers so that the signal passes through drywall or open doorways. Materials and objects
such as glass, steel, metal, walls with insulation, water (sh tanks), mirrors, le cabinets, brick, and concrete can degrade your
wireless signal.
4. Keep your product away (at least 3-6 feet or 1-2 meters) from electrical devices or appliances that generate RF noise.
5. If you are using 2.4 GHz cordless phones or X-10 (wireless products such as ceiling fans, lights, and home security systems), your
wireless connection may degrade dramatically or drop completely. Make sure your 2.4 GHz phone base is as far away from your
wireless devices as possible. The base transmits a signal even if the phone in not in use.
7D-Link DAP-1520 User Manual
Page 11
Section 2 - Conguration
Ethernet
Setting Up Your DAP-1520
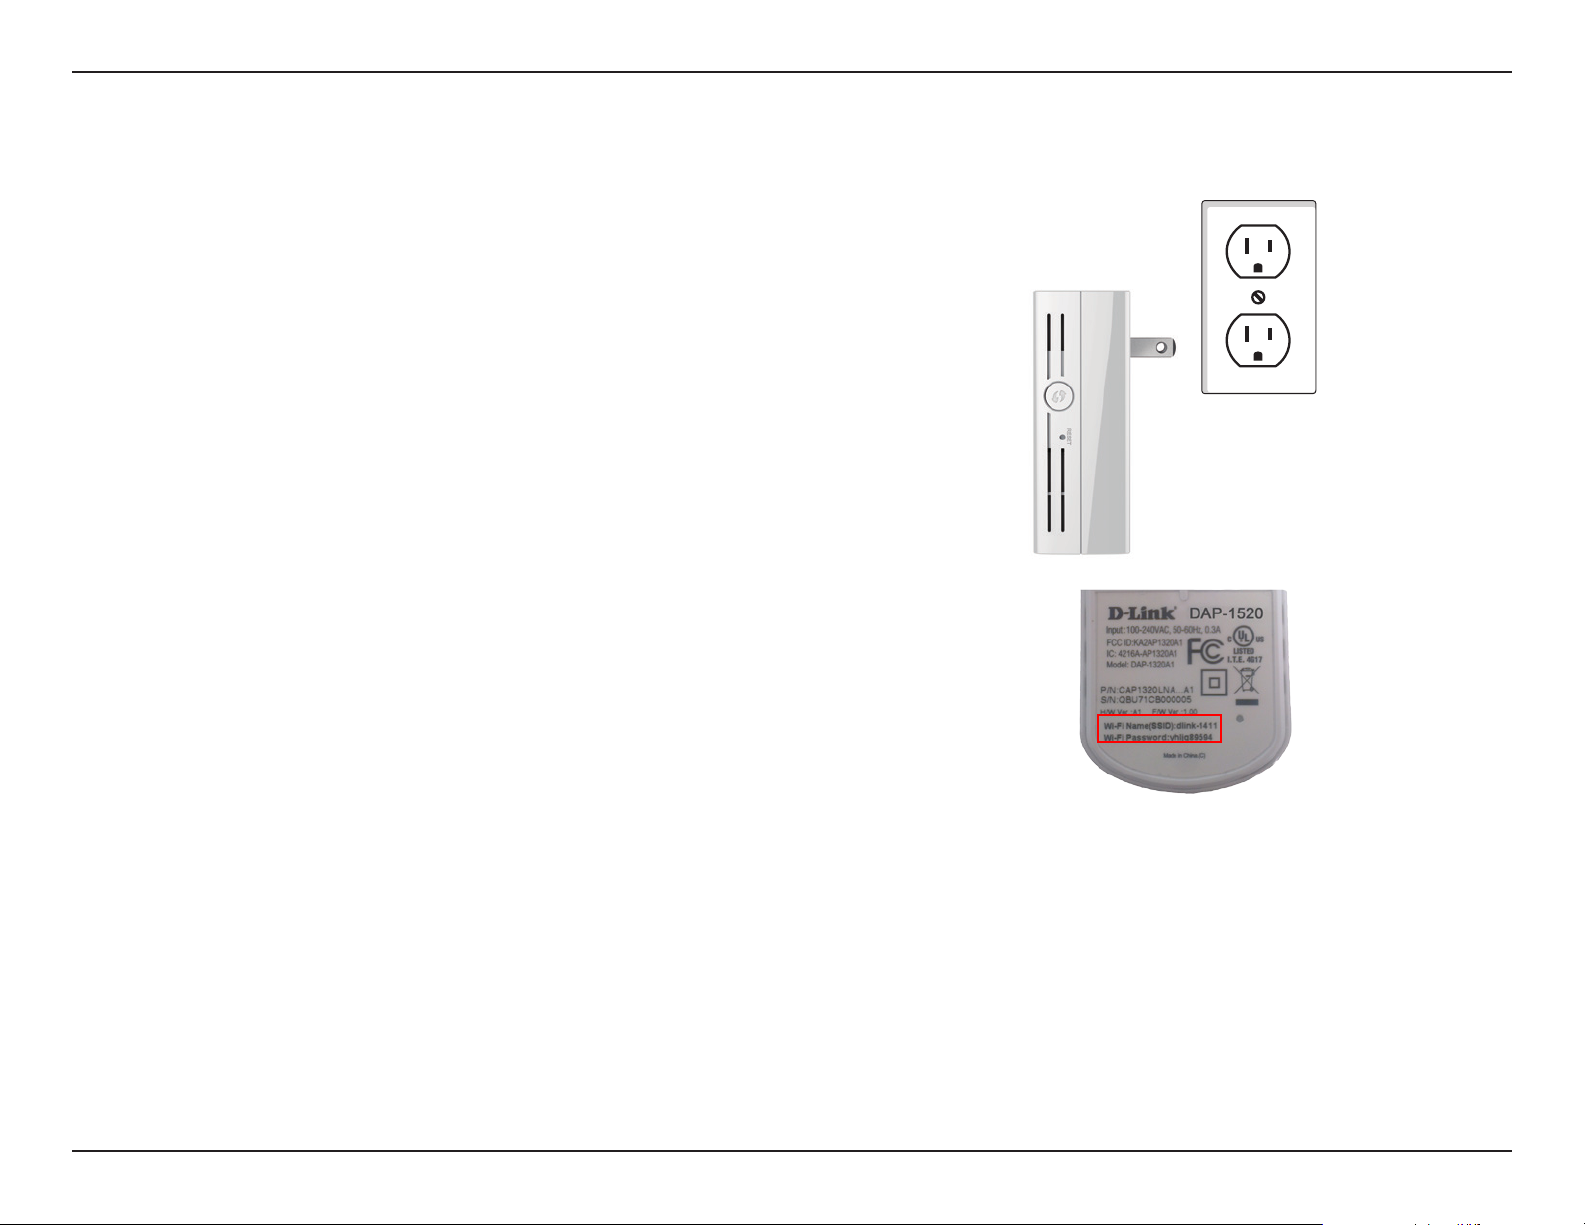
Plug in the DAP-1520 to a power outlet. Verify that the power LED
is blinking orange before continuing.
Locate the Wi-Fi name (SSID) and password for your DAP-1520
device. These details are printed on the specication sticker on the
underside of the device. Using your computer or mobile device’s
Wi-Fi connection utility, connect to the SSID of your DAP-1520
and enter the password. If you are unsure of how to connect to a
wireless network, please refer to “Connect to a Wireless Network”
on page 32, or consult your device’s user manual. Once connected,
you are ready to begin the setup process.
Outlet
There are two ways to congure your DAP-1520; using the QRS
Mobile app on your smartphone or tablet device, or using the
web GUI on your computer.
For detailed information on either of the methods for conguring
your DAP-1520, refer to the following sections of the manual:
• “QRS Mobile App Setup” on page 9
• “Web-based Conguration” on page 13
8D-Link DAP-1520 User Manual
Page 12
Section 2 - Conguration
QRS Mobile App Setup
The DAP-1520 can be set up from your iOS or Android smartphone or tablet device using the QRS Mobile app.
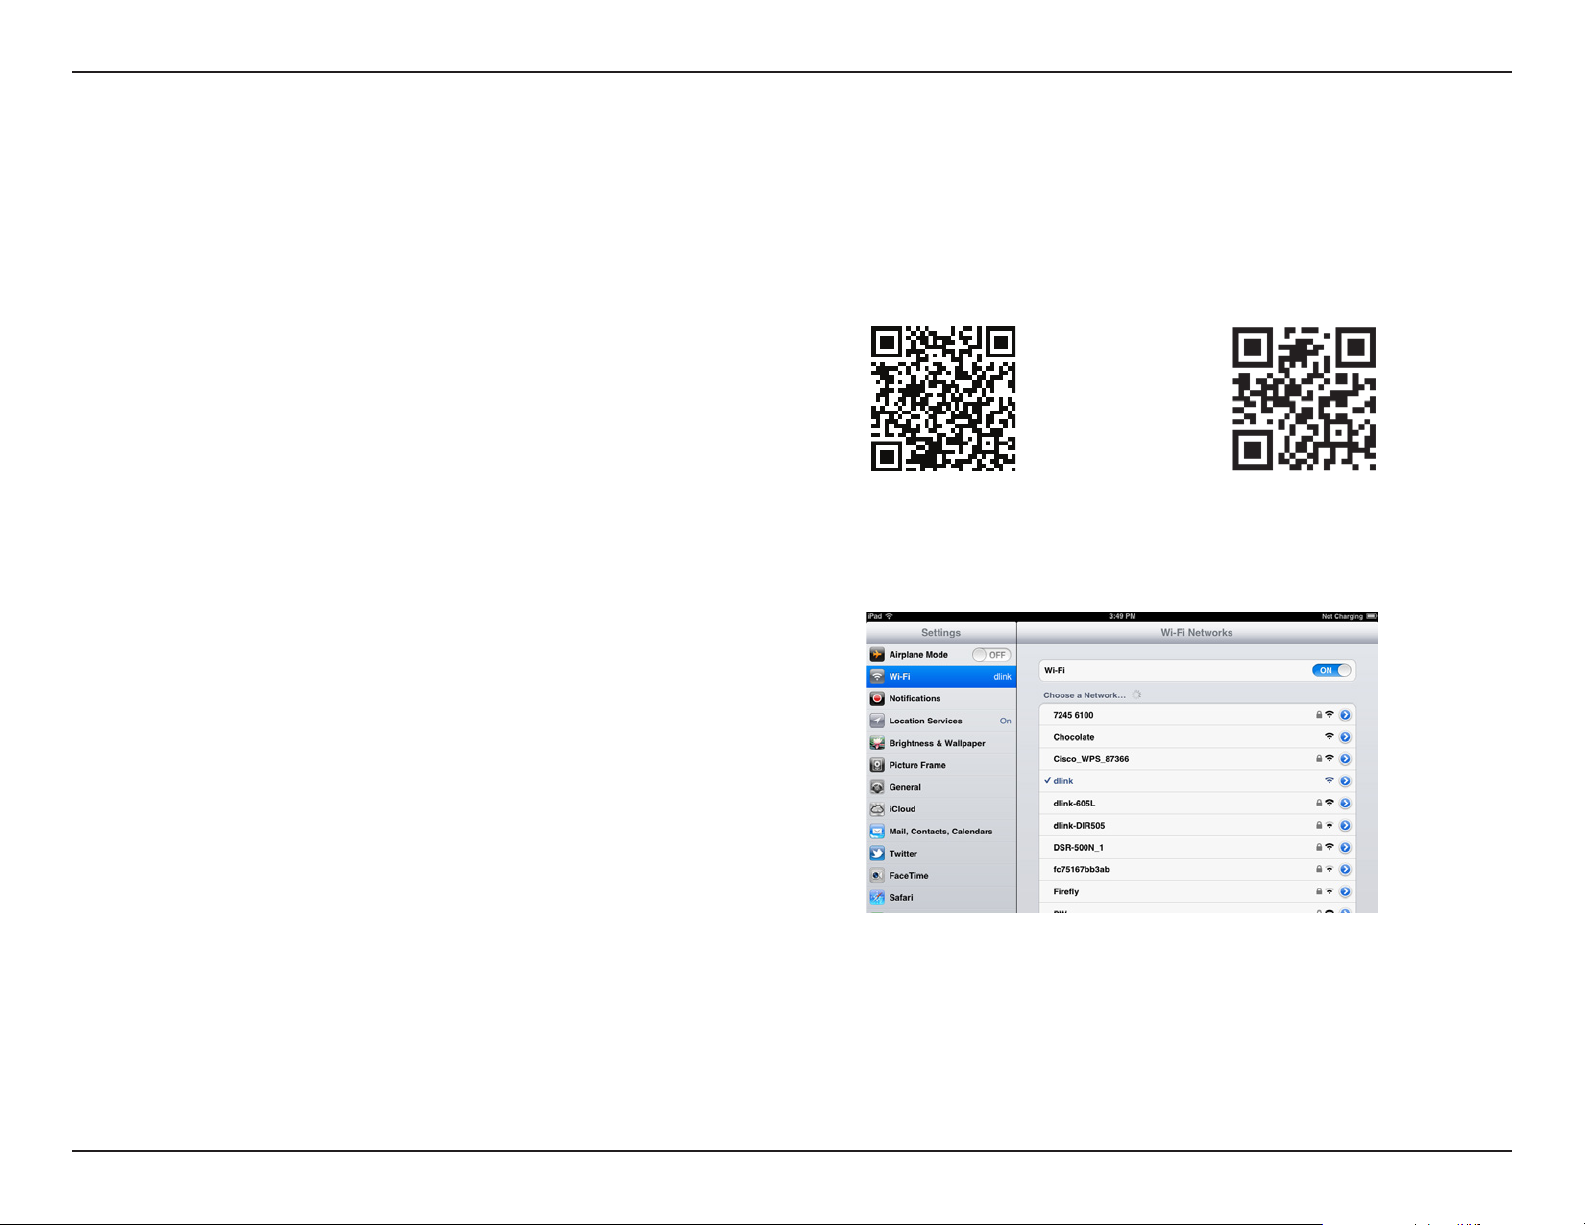
Search for “QRS Mobile” in the App Store or Google Play, or use
your mobile device to scan the QR codes on the right to download
the QRS Mobile app from the App Store (left) for your iOS device,
or from Google Play (right) for your Android device.
For iOS For Android
Connect to the Wi-Fi network that is displayed on the Wi-Fi
Conguration Card included in your package (ex: dlink-a8fa).
Then, enter the Wi-Fi password also printed on the Wi-Fi
Conguration Card (akbdj1936).
9D-Link DAP-1520 User Manual
Page 13
Section 2 - Conguration
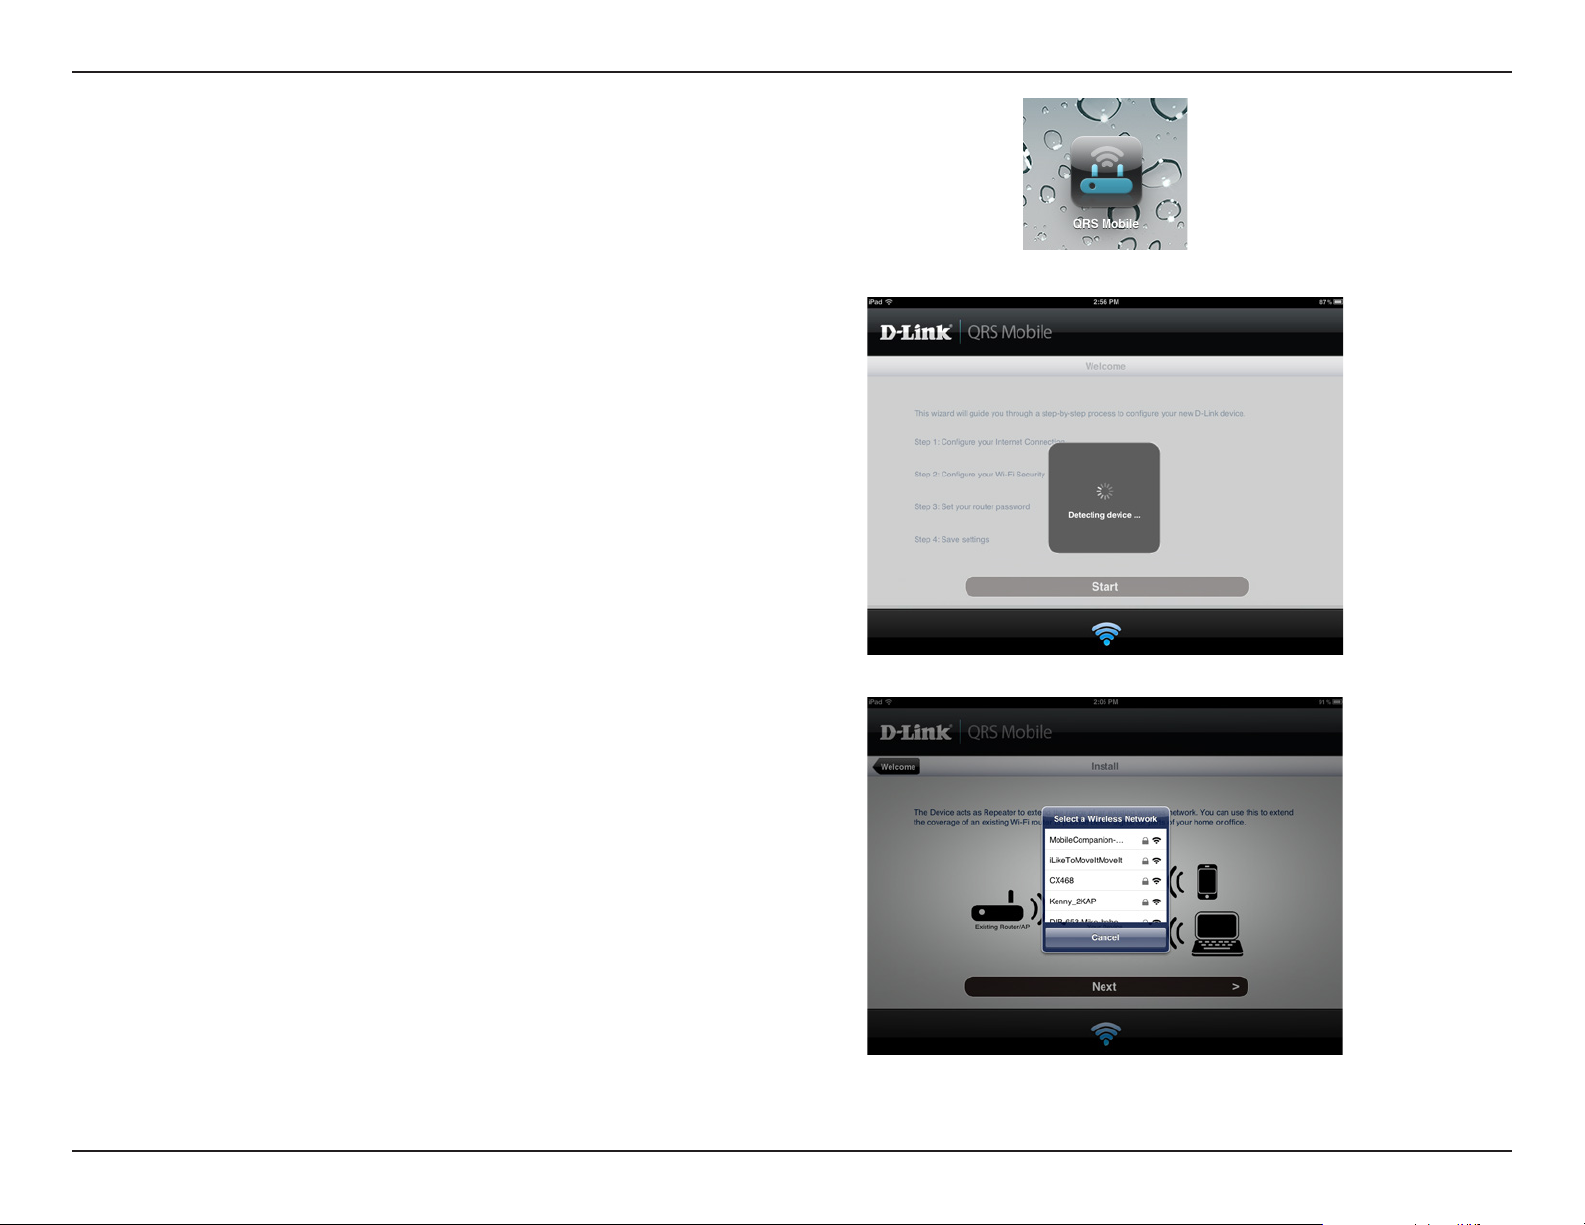
Once your mobile device is connected, tap on the QRS Mobile
icon.
Click Start to continue.
QRS Mobile will rst detect your DAP-1520, then scan for available
Wi-Fi networks. Select the network you wish to extend and enter
the password if required.
10D-Link DAP-1520 User Manual
Page 14
Section 2 - Conguration
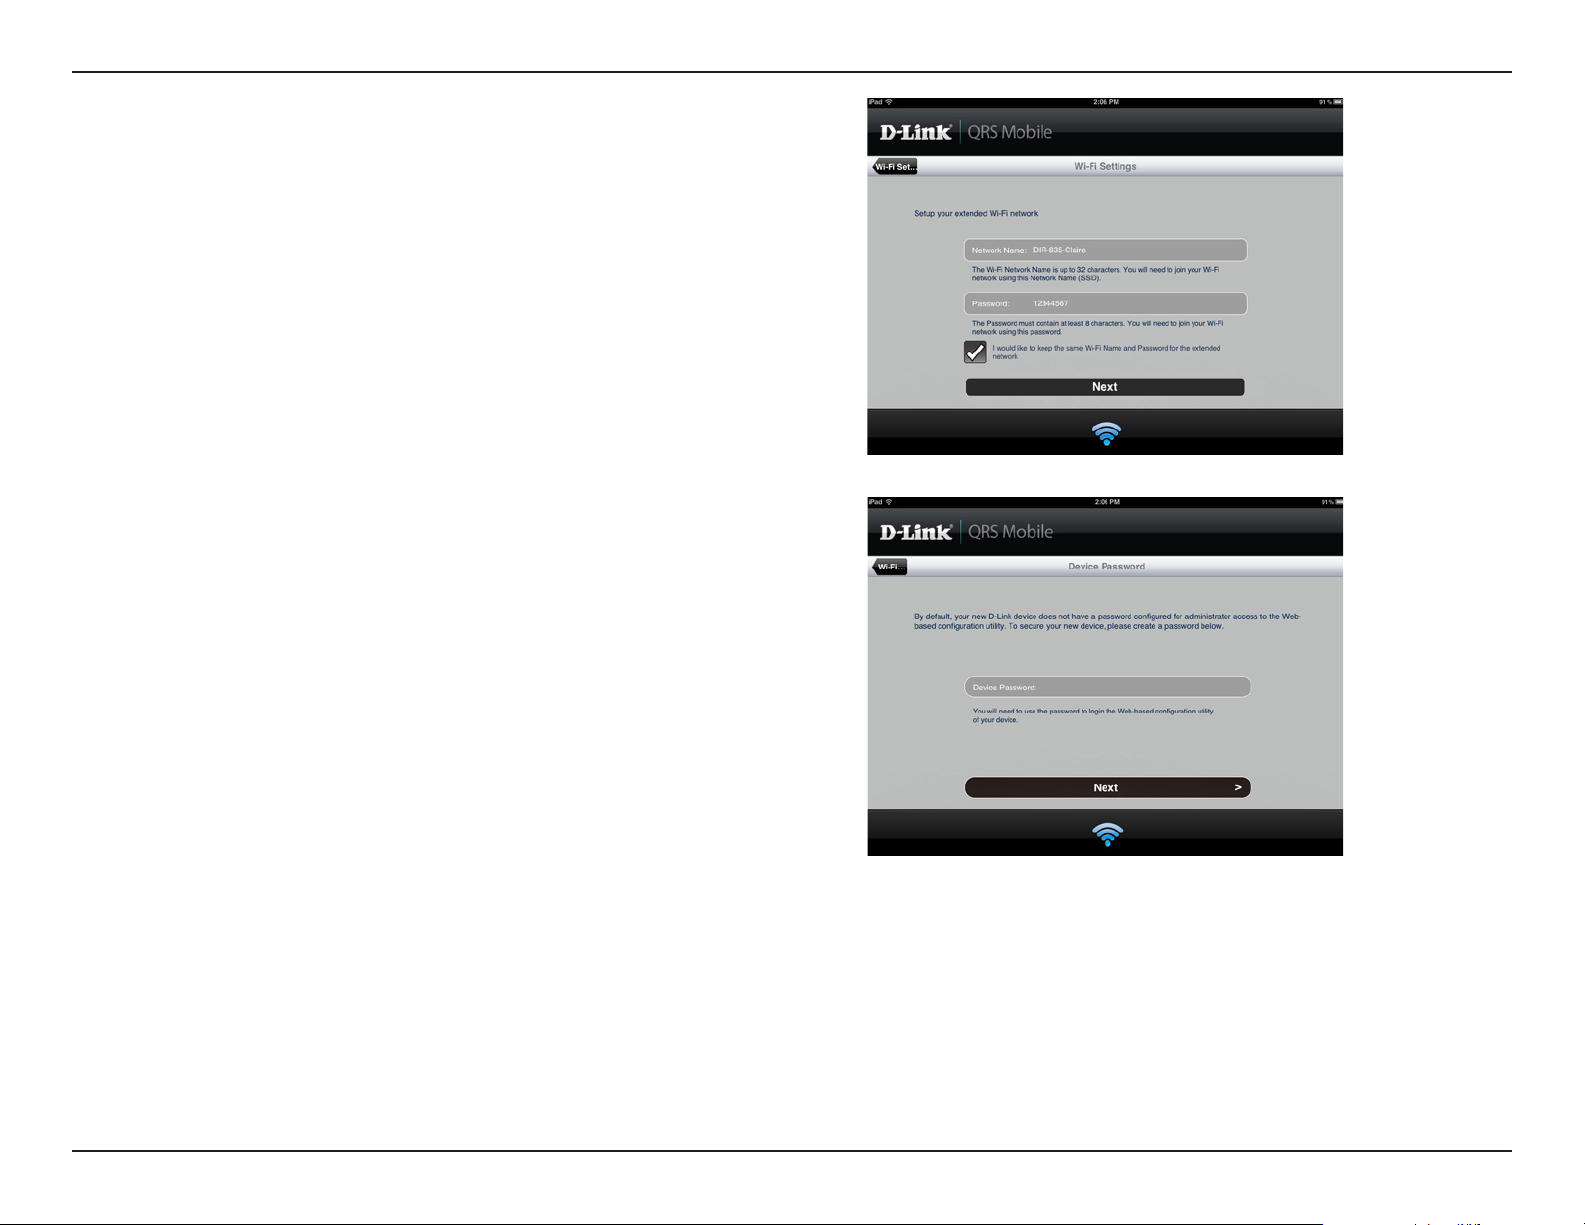
Enter a network name (SSID) and password for the extended WiFi network. You may keep the existing SSID and password if you
wish. Click Next to continue.
Create an admin password for the DAP-1520’s Web-based
conguration utility. Click Next to continue.
11D-Link DAP-1520 User Manual
Page 15
Section 2 - Conguration
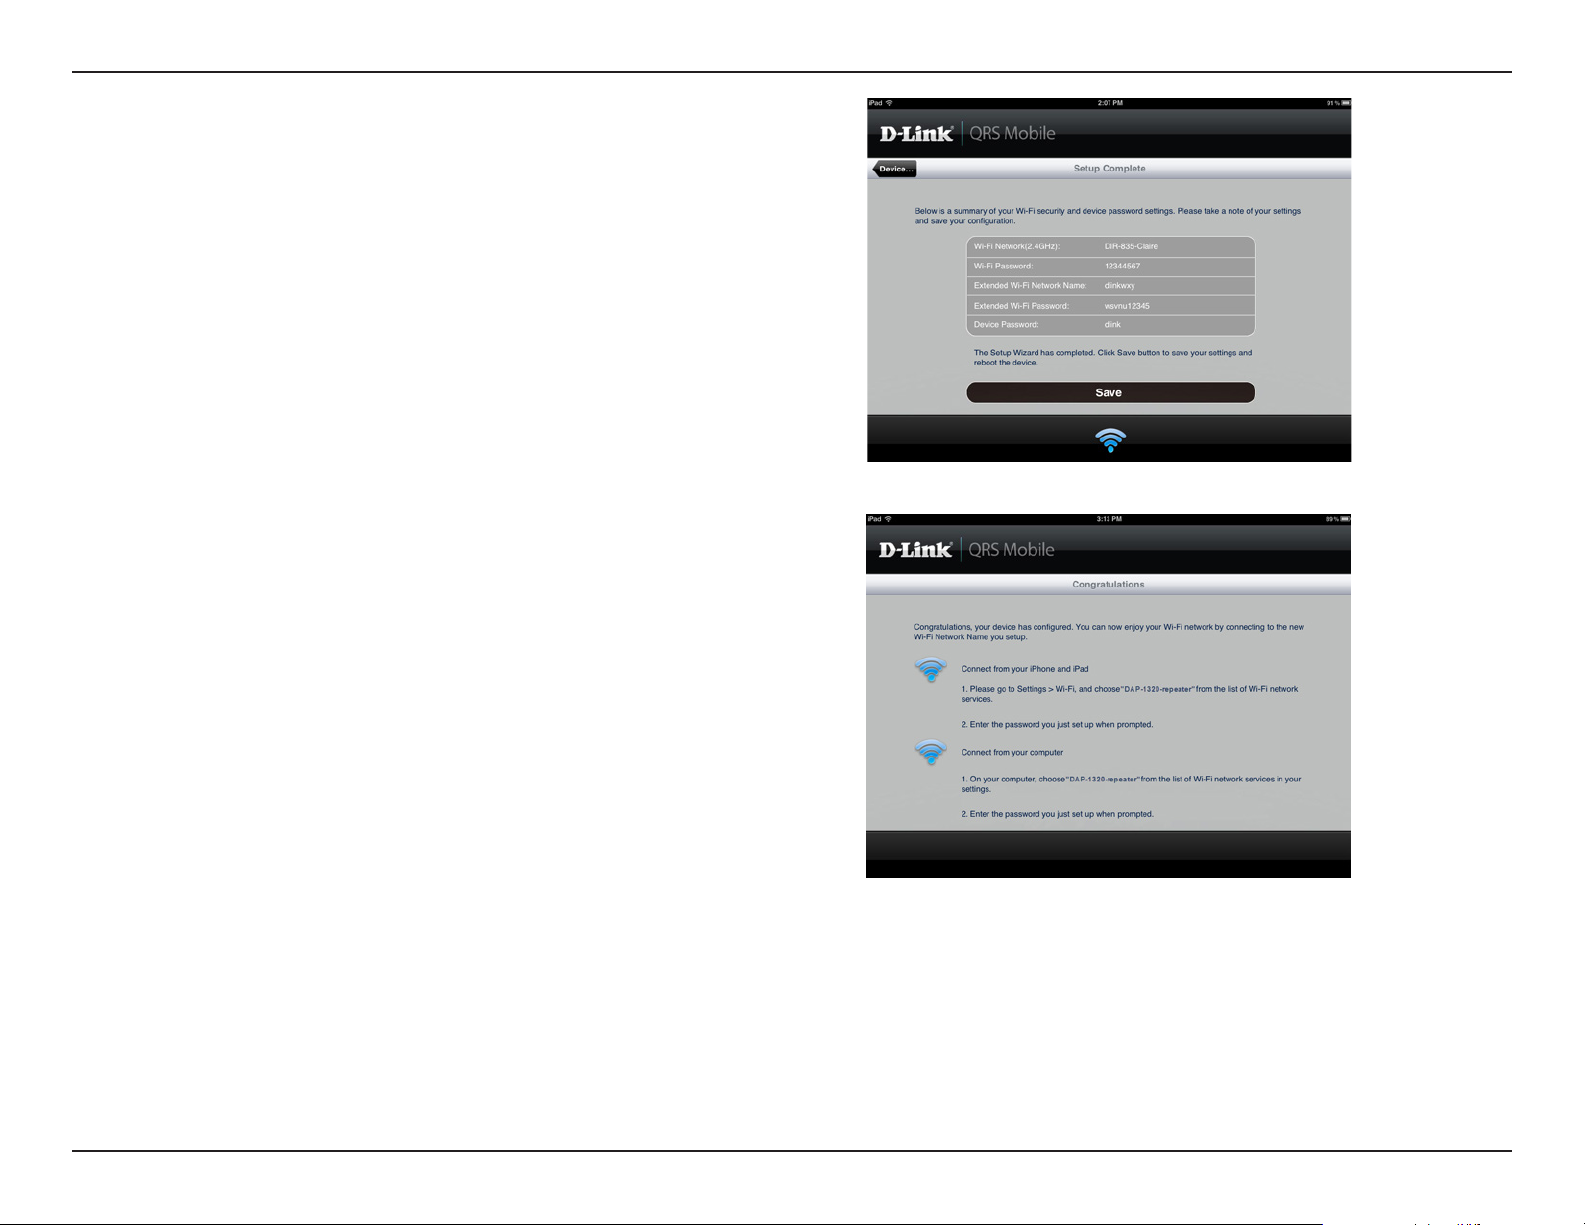
A summary of your settings will be displayed. Click Save to reboot
the device and to complete the setup.
After the setup wizard is complete, the following screen will
appear. You can now change your mobile device and laptop WiFi settings to the wireless network name and password you just
created.
12D-Link DAP-1520 User Manual
Page 16
Section 2 - Conguration
Web-based Conguration
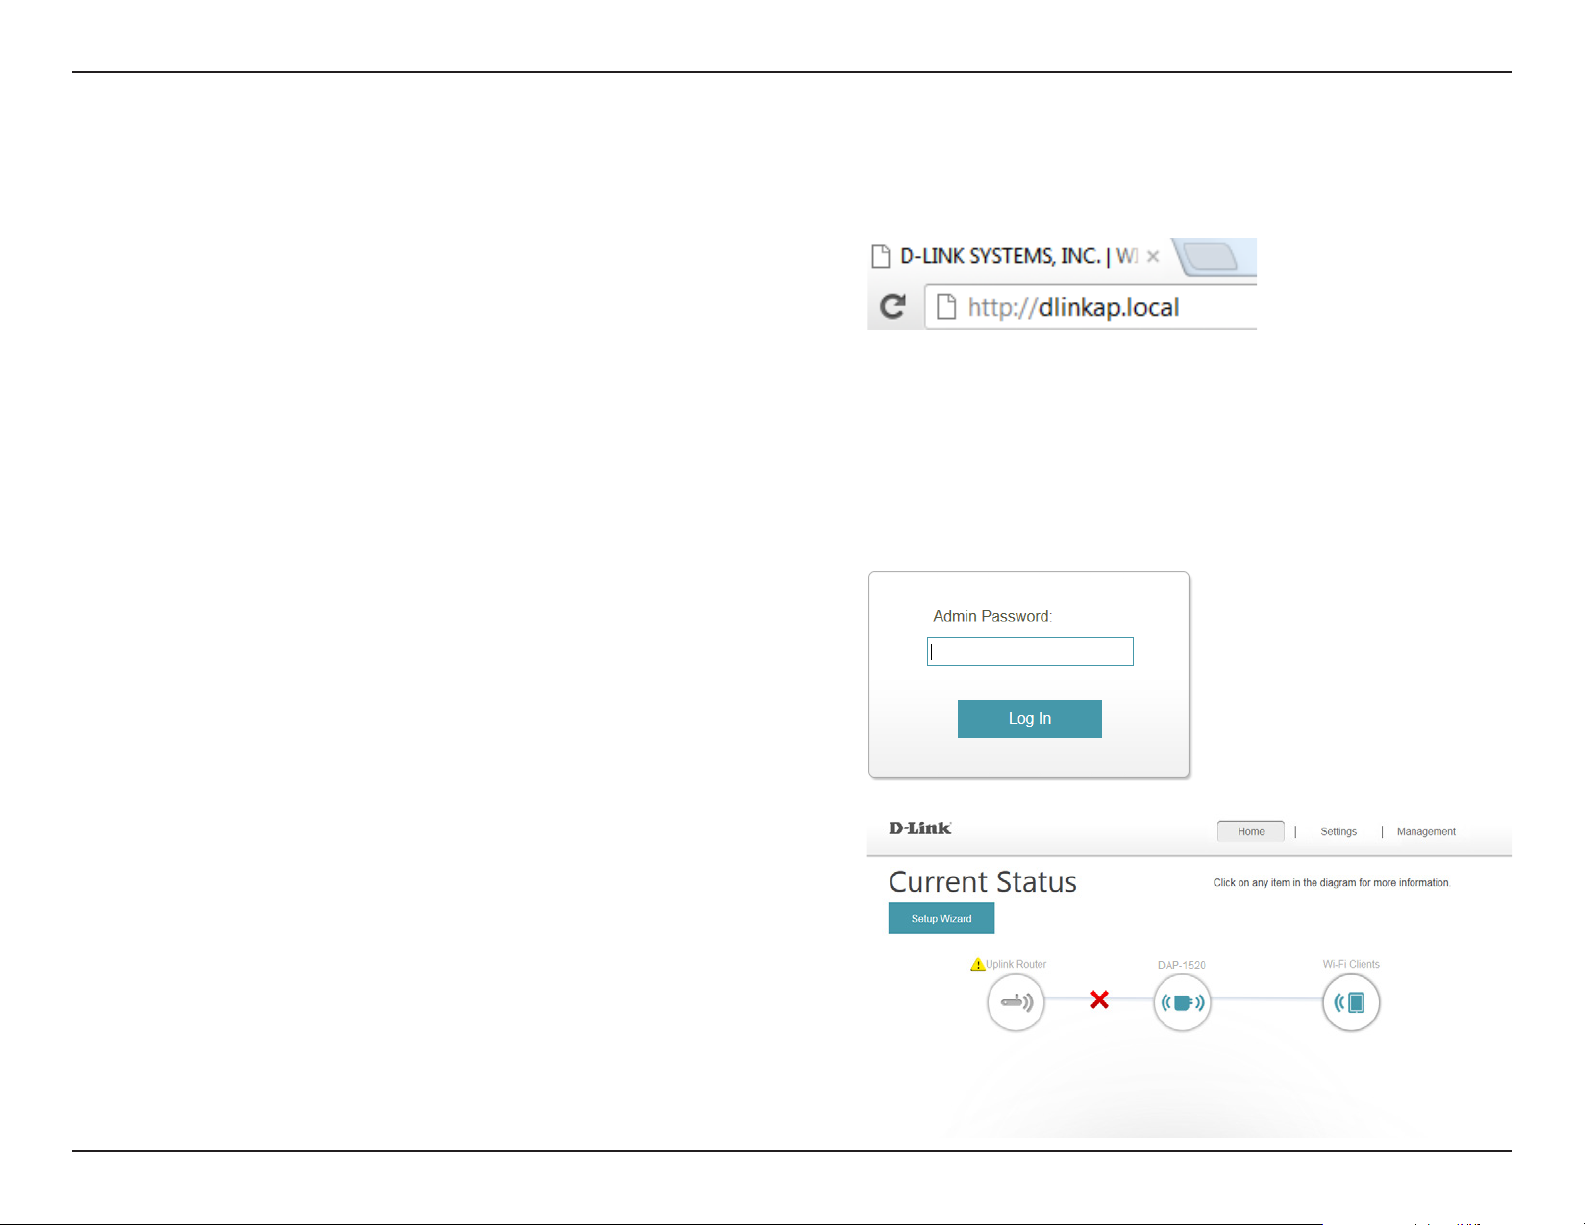
To access the conguration utility for the DAP-1520 on your PC,
rst connect to the DAP-1520 wirelessly using the Wi-Fi name
(SSID) and password located on your Wi-Fi Conguration Card.
Then open a web browser and enter http://dlinkap.local. in the
address bar. You can also use the IP address http://192.168.0.50.
Note: If you have multiple DAP-1520 devices on the network,
you can access web-based conguration via http://dlinkapxxxx.
local. as shown in the included Wi-Fi Conguration Card, with
“xxxx” being the last four digits of the DAP-1520’s MAC address.
Enter your password. By default, Admin is selected as the username
and cannot be changed, and by default, the password is blank.
The conguration interface will open, and you can congure the
various settings for the DAP-1520. If you have not yet congured
and uplink network, the home screen will show that there is no
connection between the DAP-1520 and the uplink router.
For detailed information on manually setting up your DAP-1520
to extend an existing wireless network, refer to “Using the Manual
Method” on page 17.
13D-Link DAP-1520 User Manual
Page 17
Section 3 - Web-based Conguration
Setup Wizard
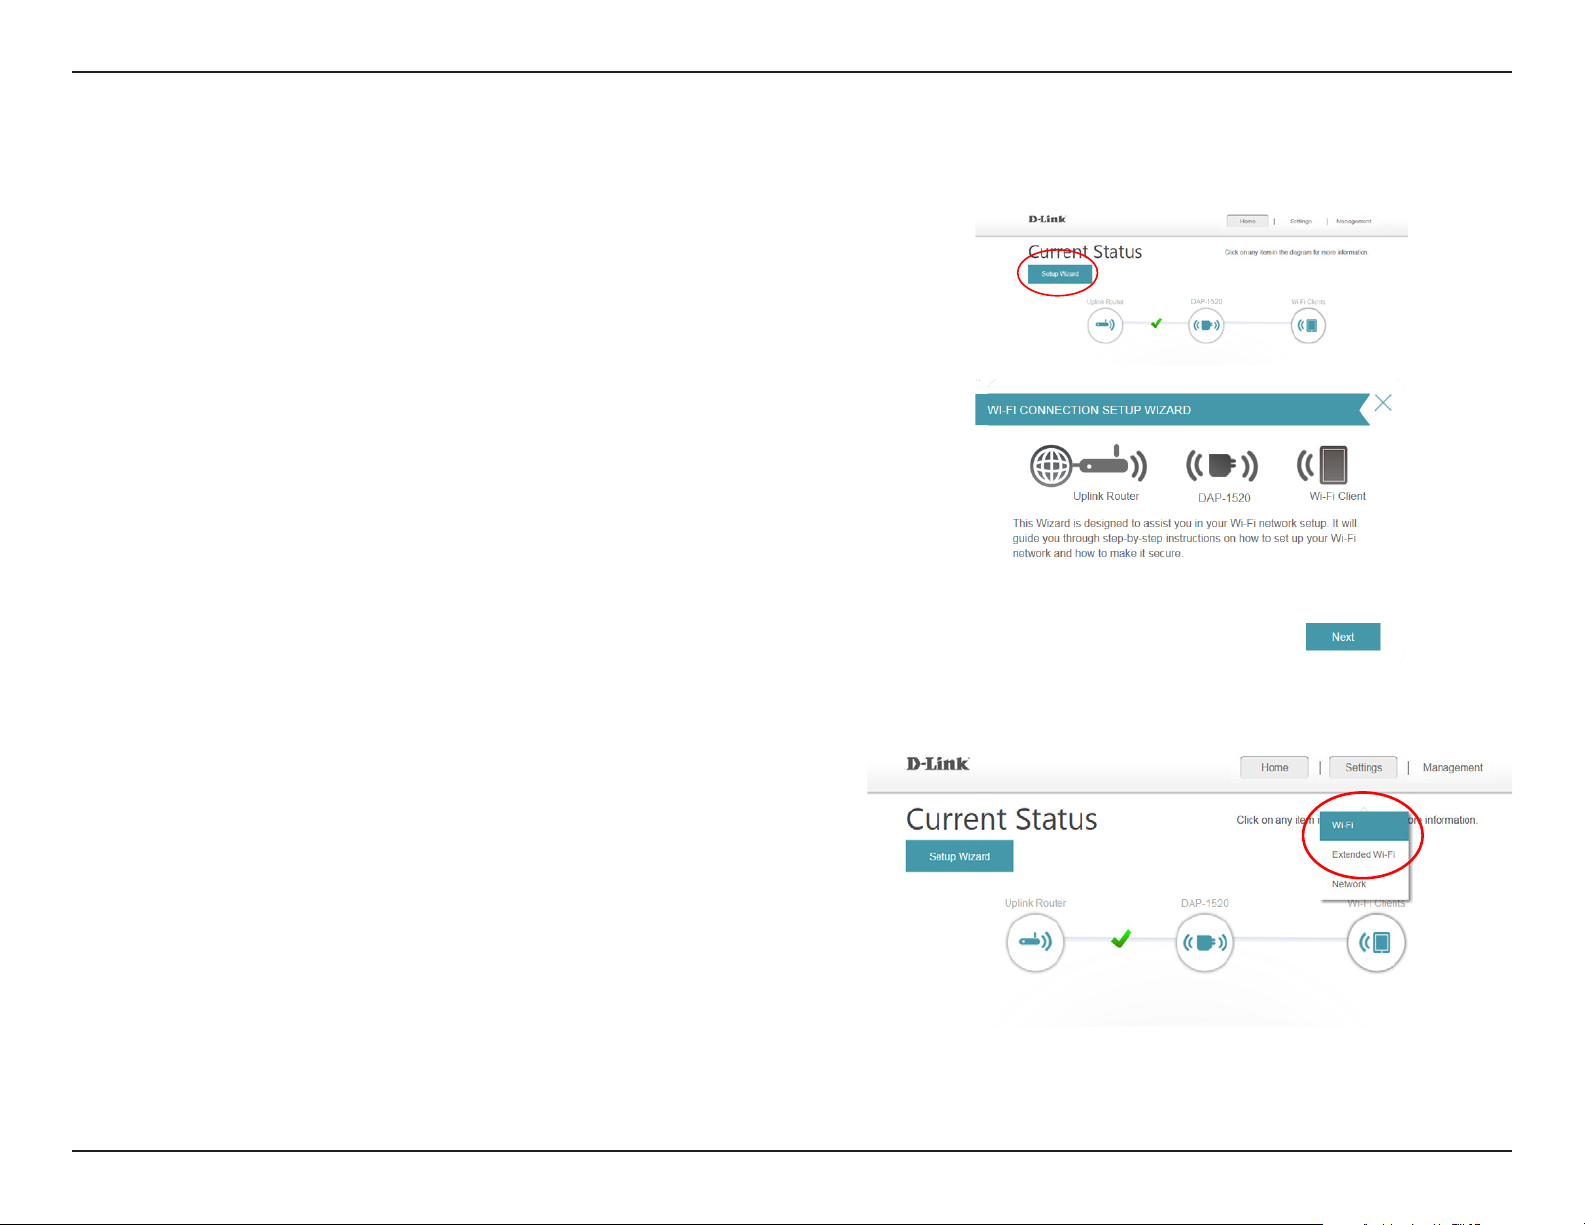
If you wish to congure your extender to connect to the Internet
using the setup wizard, click the Setup Wizard button.
This wizard is designed to guide you through a step-by-step process
to congure your new Wireless AC750 Dual Band Range Extender
to extend your wireless network and connect to the Internet.
Click Next to continue.
If you already have a Wi-Fi network set up and you want to
congure your Wi-Fi network settings manually, go to Settings
at the top of your browser window and select Wi-Fi from the
drop-down menu (refer to “Wi-Fi Settings” on page 22) to set up the
connection between your DAP-1520 and the uplink router. To set
up the extended Wi-Fi network, select Extended Wi-Fi (refer to
”Extended Wi-Fi Settings” on page 23).
14D-Link DAP-1520 User Manual
Page 18
Section 3 - Web-based Conguration
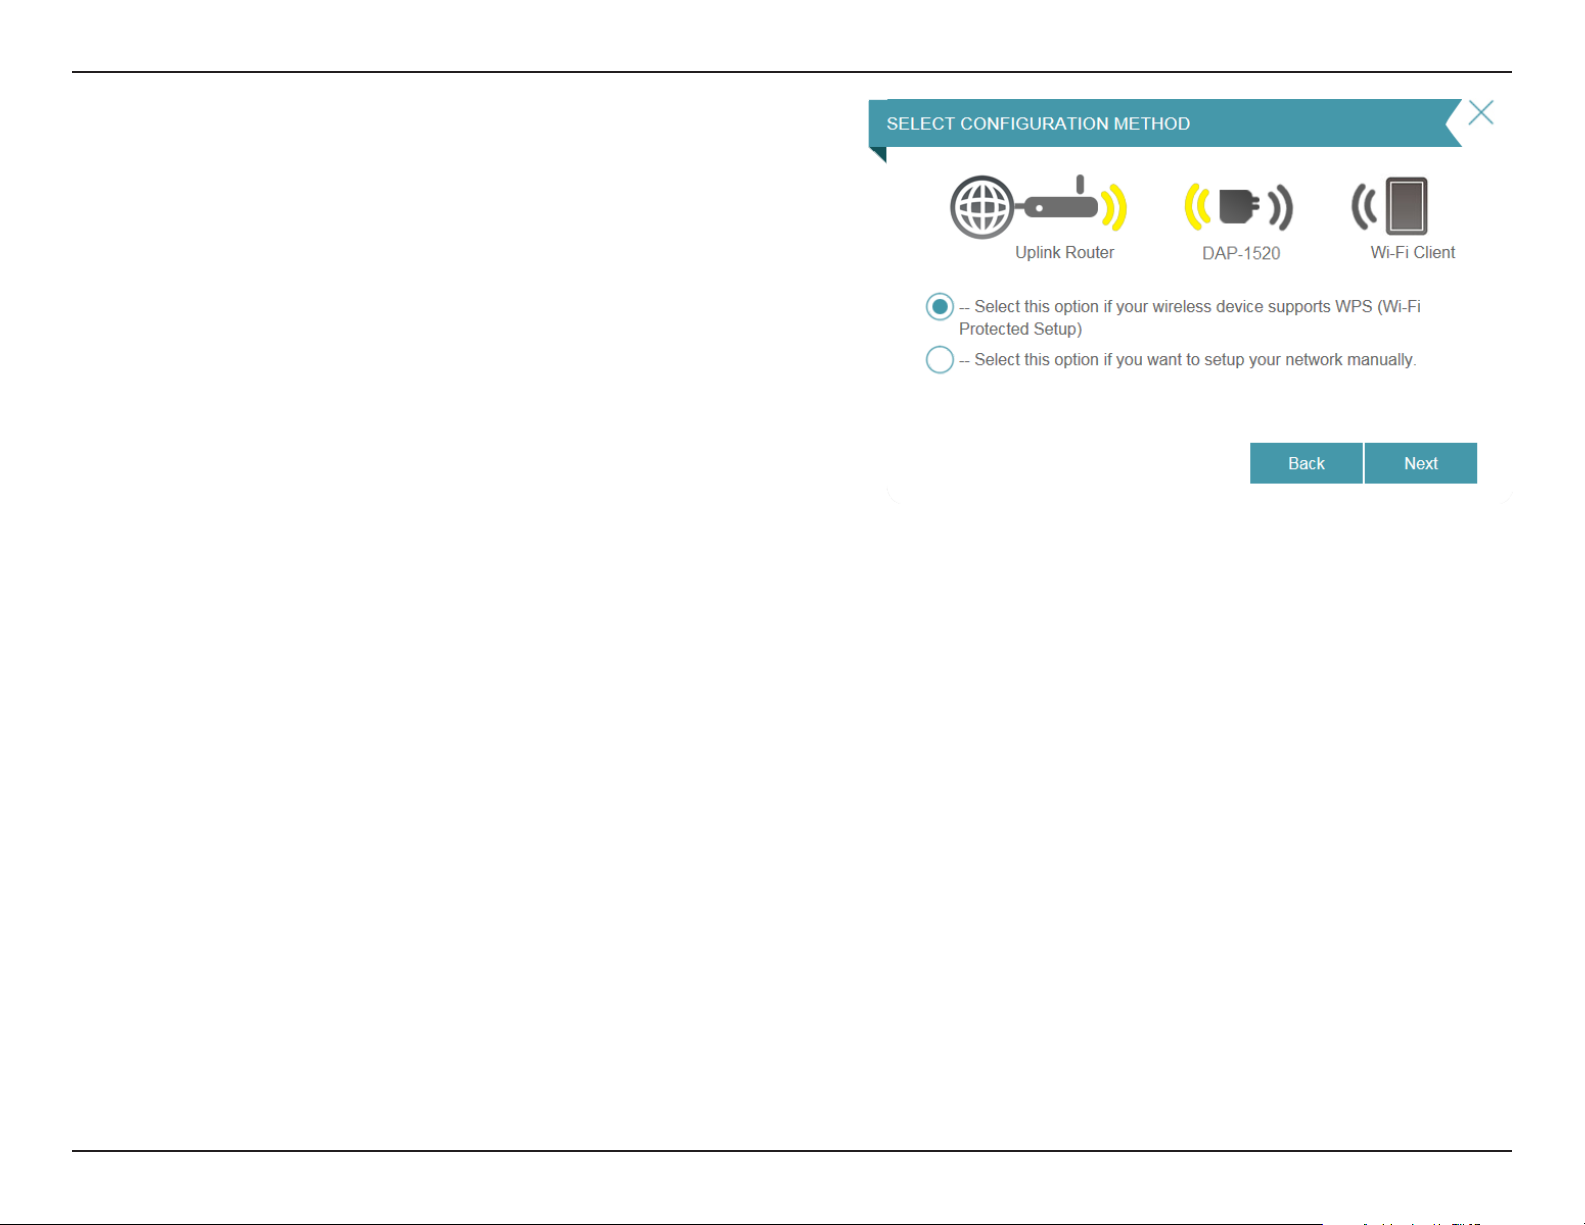
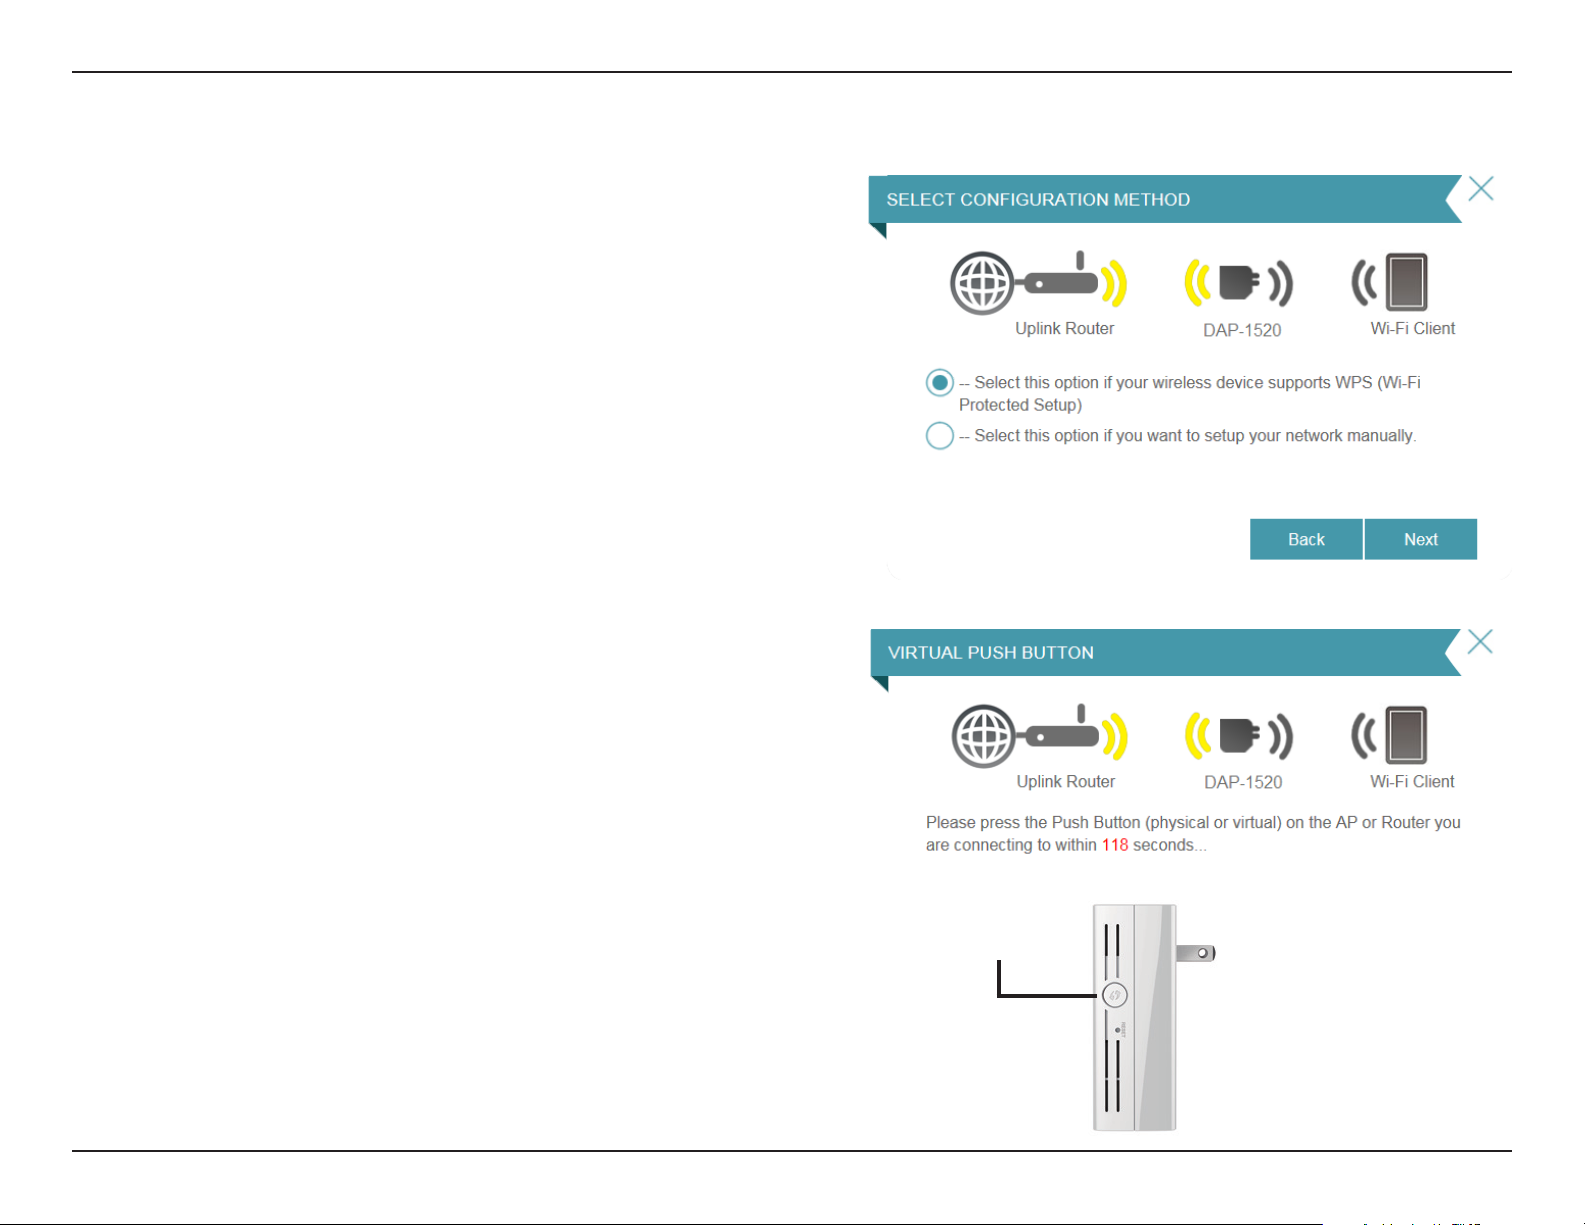
Select whether you want to use the WPS (Wireless Protected
Setup) method or the manual method to set up an extended
wireless network using your DAP-1520 and click Next.
If you wish to use the WPS method, please refer to “Using the WPS
Method” on page 16.
If you wish to use the manual setup method, please refer to “Using
the Manual Method” on page 17.
15D-Link DAP-1520 User Manual
Page 19
Section 3 - Web-based Conguration
Using the WPS Method
To set up using the WPS method, select the rst option from the
setup wizard menu. Click Next to continue.
The DAP-1520 uses the push-button method for WPS. After
selecting WPS, the DAP-1520 will ask you to press the WPS push
button on the access point or router you want to connect the
DAP-1520 to. You have 120 seconds to press the button on your
access point or router. Click Next to continue.
If a connection has been successfully made, you will see a notice
on the screen and the LED on the device will turn solid green.
You can also use the WPS button on the side of the DAP-1520 to
initiate a WPS connection with the uplink router. After pressing
the WPS button on the DAP-1520, you will have 120 seconds to
press the WPS button on your access point or router. The LED on
the DAP-1520 will turn solid green when a connection has been
successfully established with the uplink router.
WPS Button
16D-Link DAP-1520 User Manual
Page 20
Section 3 - Web-based Conguration
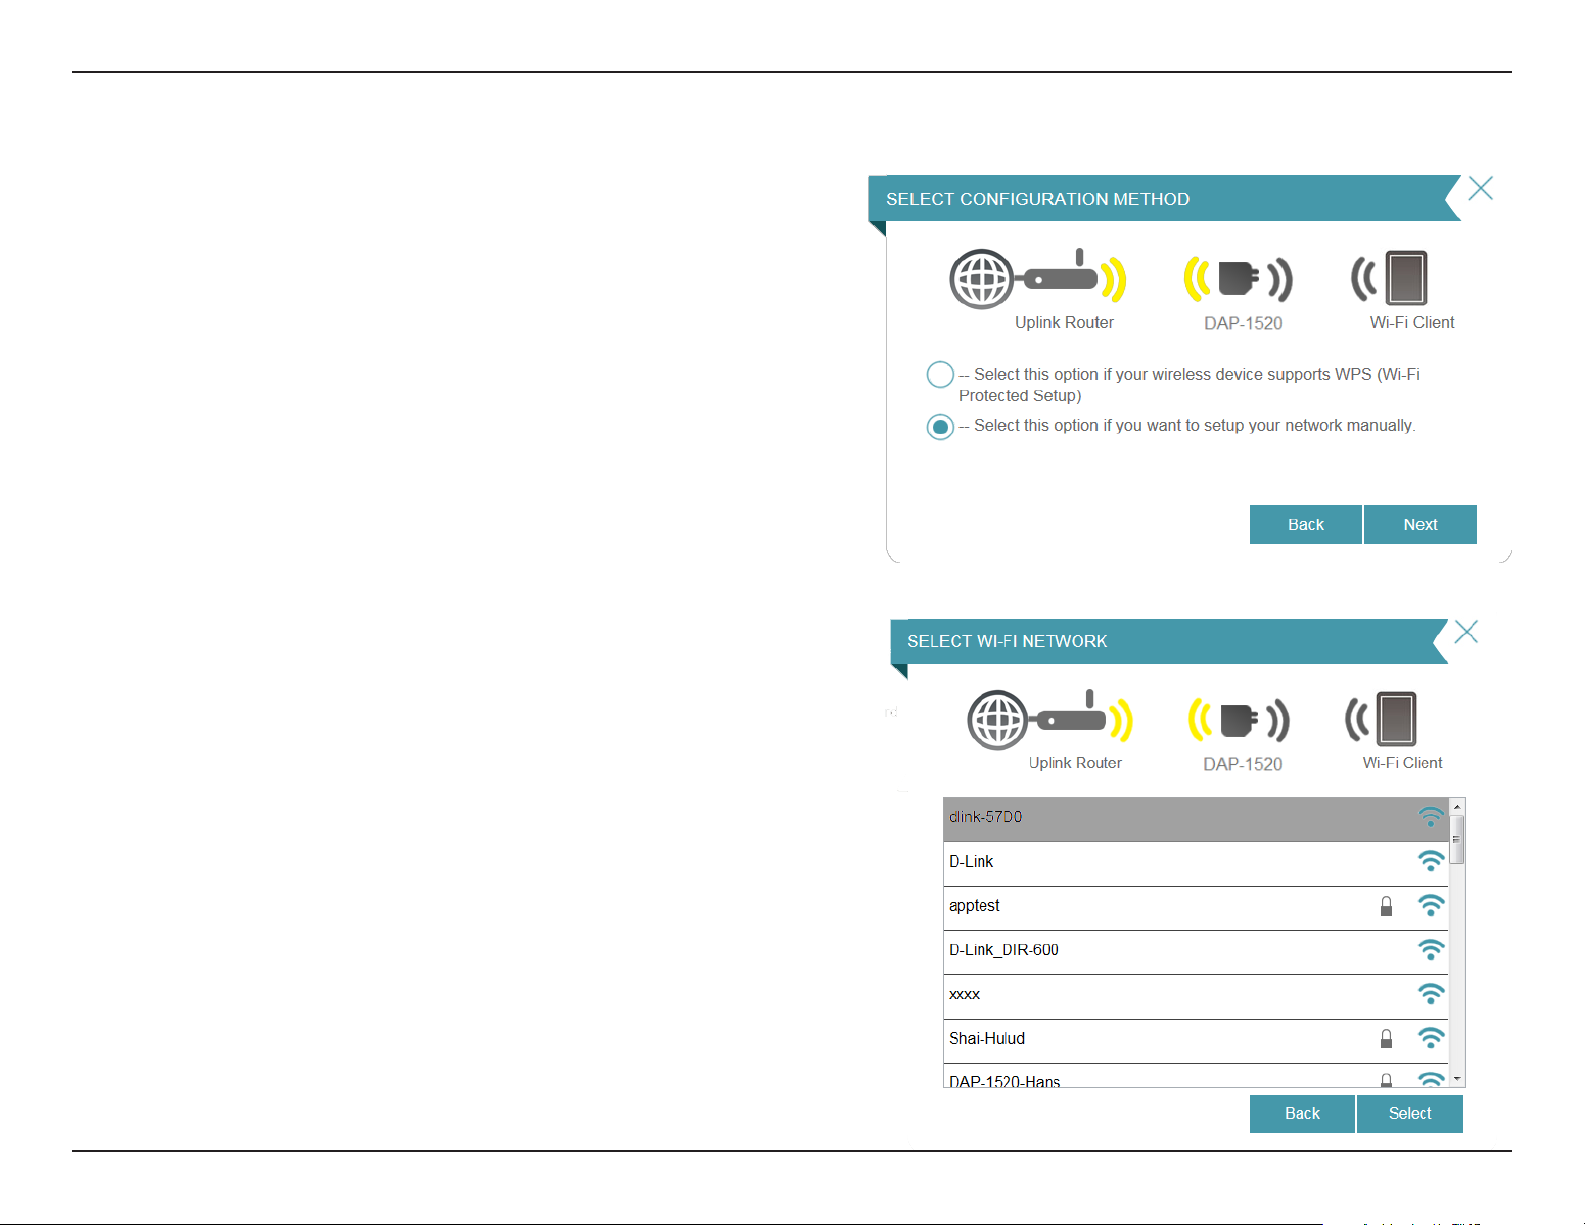
Using the Manual Method
To set up your network manually, select the second option from
the setup wizard menu. Click Next to continue.
The DAP-1520 will rst scan for available Wi-Fi networks and list
the networks it has found. If the network you would like to connect
to isn’t listed, click Back and select the manual option again to
perform another scan.
Once you have selected the uplink network you wish to use, click
Select.
17D-Link DAP-1520 User Manual
Page 21
Section 3 - Web-based Conguration
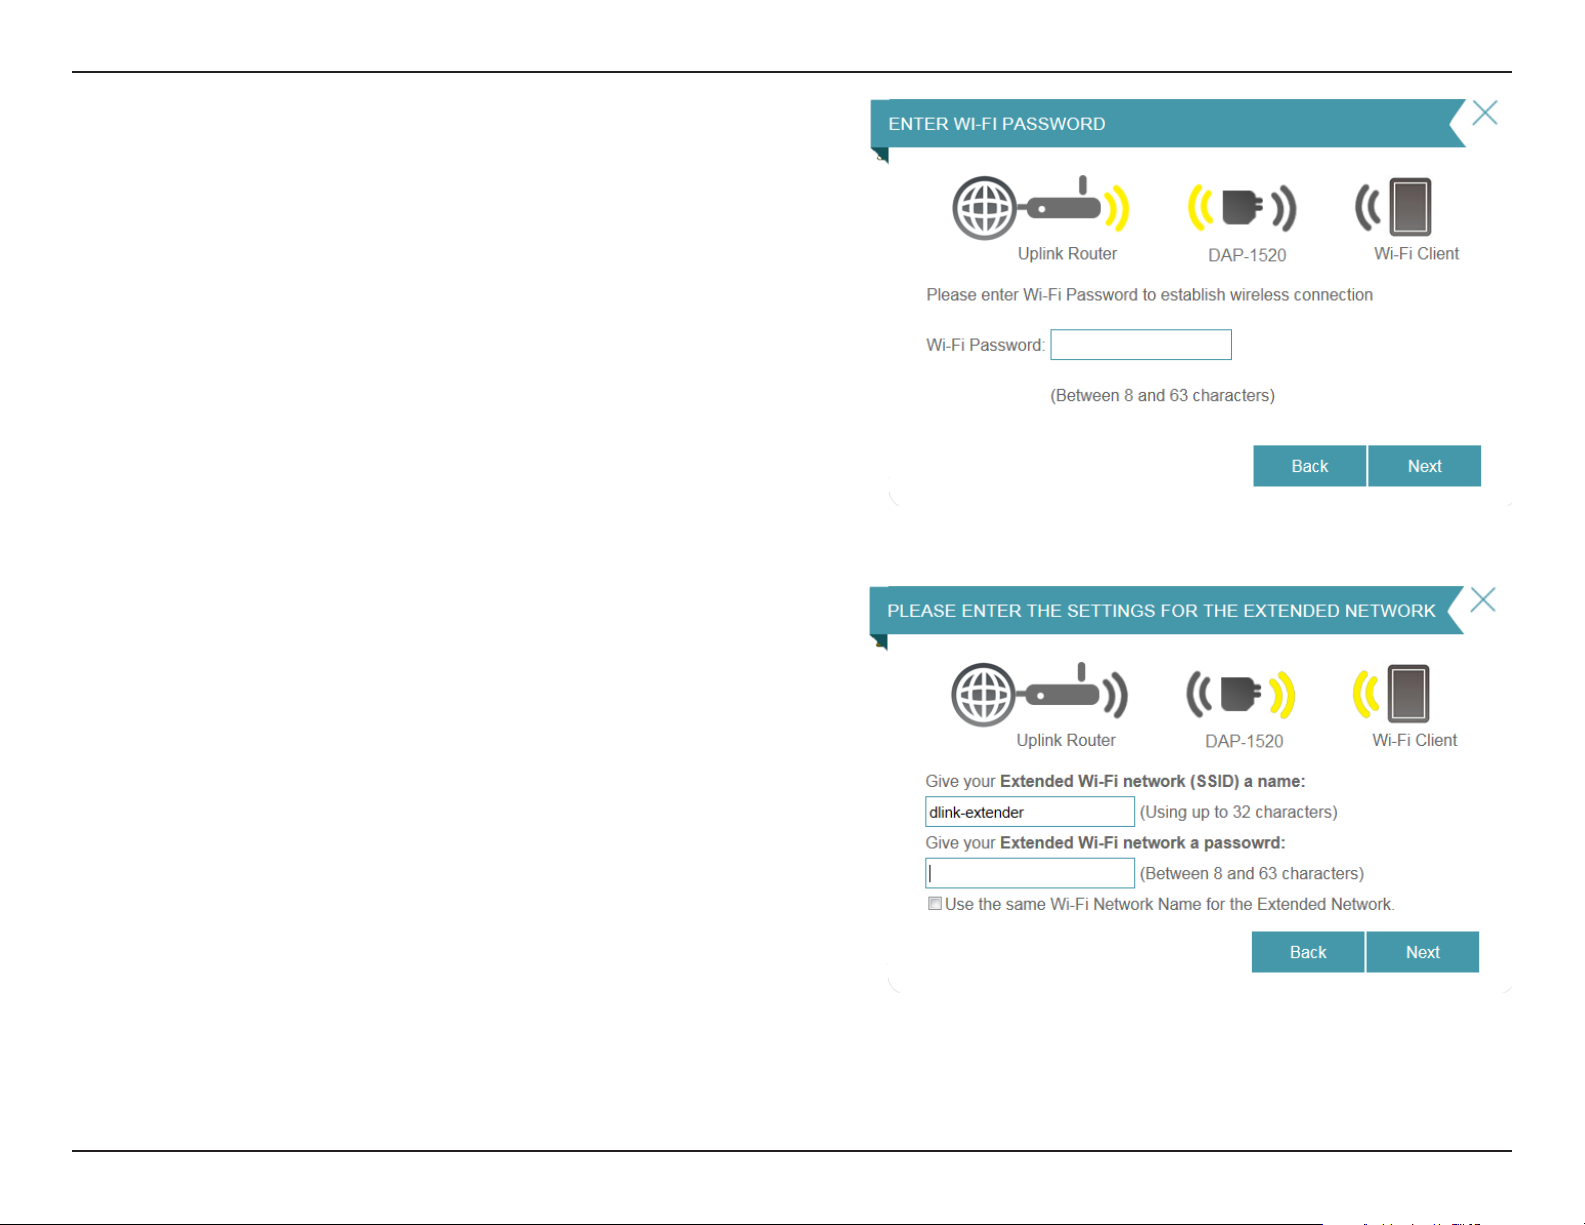
Enter the password for your uplink network.
Click Next to continue, or click Back to return to the previous step.
The DAP-1520 will re-broadcast the Wi-Fi connection from the
uplink router as an extended Wi-Fi network. Enter the SSID and
password that you wish to apply to the extended Wi-Fi network. If
you would like the uplink router Wi-Fi network and the extended
Wi-Fi network to have the same SSID and password, check the
box at the bottom of the screen.
Click Next to continue, or click Back to return to the previous step.
18D-Link DAP-1520 User Manual
Page 22

Section 3 - Web-based Conguration
The setup process is now complete. A summary page will appear
showing the settings for both the connection to the uplink router,
and the extended Wi-Fi network. It is recommended that you
make a record of this information for future reference.
Click Save to exit the wizard and return to the home screen.
Or, click Back to return to the previous step.
19D-Link DAP-1520 User Manual
Page 23

Section 3 - Web-based Conguration
Home Screen
The home screen gives a summary of the current status of devices
connected to the DAP-1520. A green check between devices
indicates that there is an active connection. A red cross indicates
that there is no connection present, or there is a connection error.
At any time, you can click on the device images on the home
screen to view the current status of each device.
20D-Link DAP-1520 User Manual
Page 24

Section 3 - Web-based Conguration
If there is no connection between the DAP-1520 and the uplink
router, you can click on the uplink router icon to search for an
available uplink router.
You can view the details of both the uplink router network and
the extended Wi-Fi network by clicking on the DAP-1520 icon.
21D-Link DAP-1520 User Manual
Page 25

Section 3 - Web-based Conguration
Wi-Fi Settings
This page lets you congure the Wi-Fi settings to connect your DAP-1520 to another wireless network. This is the uplink network
which the DAP-1520 will then be able to extend. To access this page, click on the Settings drop-down menu at the top of the
page, and select Wi-Fi.
Wireless
Mode:
Wi-Fi Network
Name (SSID):
Security:
Password:
This is set to Repeater mode and cannot be changed.
Click Scan to scan for available wireless networks and select
the one you want to use the DAP-1520 to extend.
You can also type in the name (SSID) of the wireless network.
Select the security method that is being used by the wireless
network that you have selected: WEP, WPA/WPA2, or None.
If you selected WEP or WPA/WPA2, you will be required to
enter the password or security key for the network you are
attempting to join.
You can also use WPS to connect your wireless devices to
the DAP-1520’s extended network. For further information
on how to do this, please refer to “Connecting a Wireless
Client” on page 31.
Click Save to save the settings and return to the home page.
22D-Link DAP-1520 User Manual
Page 26

Section 3 - Web-based Conguration
Extended Wi-Fi Settings
This page lets you congure the settings for the DAP-1520’s extended wireless network. To access this page, click on the Settings
drop-down menu at the top of the page, and select Extended Wi-Fi.
Wi-Fi Name
(SSID):
Security:
Password:
This is the name of the DAP-1520’s extended network.
The DAP-1520 will rebroadcast the uplink router’s Internet
connection under this SSID. You can also choose to make
the SSID for the extended network the same as the SSID for
the uplink network.
Select the type of wireless security you wish to use for the
extended network. Choose None, WEP, or WPA/WPA2
Personal.
Enter the password or network key that you wish to use
for the extended network. You can also choose to make
the password for the extended network the same as the
password for the uplink network.
Click Save to save the settings and return to the home page.
23D-Link DAP-1520 User Manual
Page 27

Section 3 - Web-based Conguration
Network Settings
This page lets you congure the network settings for the DAP-1520. To access this page, click on the Settings drop-down menu
at the top of the page, and select Network. Click Save at any time to save the changes you have made on this page.
Device Name: You can change the name of the device by editing the text in
the text box. If you change the name of the device, you will
need to enter “http://xxxx.local.” (where “xxxx” corresponds
to the name of the device) in the address bar of your web
browser in order to access the conguration utility.
Advanced Settings
The Advanced Settings section of the Network Settings page allows you to congure both IPv4 and IPv6 settings which will
be used by the DAP-1520’s extended network.
IPv4 Device Management interface - You can select either a Dynamic or Static IPv4 conguration:
My LAN
Connection is:
IP Address:
Subnet Mask:
Gateway
Address:
Primary DNS
Server:
Secondary
DNS Server:
Here you can select whether you want the IP to have a
Dynamic IP or Static IP address. If you select Dynamic IP,
the options below will not be available.
Enter the Static IP address that you want to assign to the
extended network AP. This address should be outside of the
uplink router’s DHCP address pool.
Enter the subnet mask.
Enter the gateway address. This is usually the IP address of
the uplink router.
Enter the address of the primary DNS server.
Enter the address of the secondary DNS server. This is
optional but will provide backup if the primary server fails.
24D-Link DAP-1520 User Manual
Page 28

Section 3 - Web-based Conguration
IPv6 Device Management Interface - You can select an Autoconguration (dynamic), Static IP, or Link-local IPv6 conguration:
My IPv6
Connection is:
Obtain DNS
Server Address:
Primary DNS
Server:
Secondary DNS
Server:
My IPv6
Connection is:
IPv6 Address:
Select Autoconguration (SLAAC/DHCPv6) to have the
DAP-1520 automatically receive an IPv6 address from the
uplink router.
You can select to obtain IPv6 DNS server information
automatically, or you can select to congure DNS servers
manually.
Enter the primary IPv6 DNS server address.
Enter the secondary IPv6 DNS server address. This is optional
but will provide backup if the primary server fails.
Select Static IPv6 to manually assign an IP address to the
DAP-1520.
Enter the IPv6 address that you want to assign to the
extended network AP. This address should be outside of the
uplink router’s DHCP address pool.
Subnet Prex
Length:
Default Gateway:
Primary DNS
Server:
Secondary DNS
Server:
Enter the length of the IPv6 subnet prex.
Enter the default gateway.
Enter the primary IPv6 DNS server address.
Enter the secondary IPv6 DNS server address. This is optional
but will provide backup if the primary server fails.
25D-Link DAP-1520 User Manual
Page 29

Section 3 - Web-based Conguration
My IPv6
Connection is:
LAN IPv6 LinkLocal Address:
Select Link-local only to only set an IPv6 address for the
local network.
The link-local address of the DAP-1520.
26D-Link DAP-1520 User Manual
Page 30

Section 3 - Web-based Conguration
Maintenance
Admin
This page will allow you to set a new password for the administrator account used to congure the DAP-1520. You can also
enable graphical authentication (CAPTCHA) on this page. To access this page, click on the Management drop down menu at
the top of the page, and select Admin. Click Save at any time to save the changes you have made on this page.
Admin
Password:
Enable
Graphical
Authentication:
Enter the Admin password.
Click on the slider to enable graphical authentication,
or CAPTCHA. This provides an extra layer of security by
requiring you to enter a code that is displayed on-screen. This
can help prevent unauthorized users from gaining access to
your wireless network using automated methods.
27D-Link DAP-1520 User Manual
Page 31

Section 3 - Web-based Conguration
System
This page allows you to save or restore your system conguration, reset or reboot the DAP-1520. To access this page, click on
the Management drop down menu at the top of the page, and select System. Click Save at any time to save the changes
you have made on this page.
Save Settings
To Local Hard
Drive:
Load Settings
From Local
Hard Drive:
Restore
to Factory
Default
Settings:
Reboot the
Device:
Save the system settings onto a le to the local hard drive.
You will then see a le dialog where you can select a location
and le name for the settings.
Load the system settings from a le on the local hard drive.
Restore the system settings to factory default settings. This
will erase all currently stored settings.
Click Reboot to reboot the DAP-1520.
28D-Link DAP-1520 User Manual
Page 32

Section 3 - Web-based Conguration
Upgrade
Firmware and language upgrades may be provided for the DAP-1520 in future. You can check for and upgrade your rmware
and language pack on this page. To access this page, click on the Management drop down menu at the top of the page, and
select Upgrade. Click Save at any time to save the changes you have made on this page.
Firmware
Information:
Check For New
Firmware:
Language
Pack
Information:
Upgrade
Firmware:
Add a
Language
Pack:
This section displays the currently installed rmware version,
as well as the date on which the current rmware version
was released.
Click Check For New Firmware to nd out if there is new
or updated rmware. If there is, you can download it to your
computer.
This section will show the details of any language packs
currently installed.
Click Select File to locate the rmware le on your local
device and perform a manual rmware upgrade.
Click Select File to locate a language pack le on your local
device and add the language pack to the user interface.
29D-Link DAP-1520 User Manual
Page 33

Section 3 - Web-based Conguration
Statistics
This page displays details about your wireless and network connections. To access this page, click on the Management drop
down menu at the top of the page, and select Statistics.
Wi-Fi:
Extended
Wi-Fi:
Clear:
Click on the Wi-Fi tab to display the statistics for the
connection between the DAP-1520 and the uplink router.
Click on the Extended Wi-Fi tab to display the statistics for
the connection between the DAP-1520 and any connected
clients. .
Click the Clear button to reset the statistics.
30D-Link DAP-1520 User Manual
Page 34

Section 4 - Connecting a Wireless Client
Connecting a Wireless Client
WPS Button
WPS (Wi-Fi Protected Setup) is a simple and secure way to connect your wireless devices with the DAP-1520. Most wireless
devices such as wireless routers, media players, printers, and cameras will have a WPS button (or a software utility with WPS)
that you can press to connect to the DAP-1520. Please refer to the user manual for the wireless device you want to connect to
make sure you understand how to enable WPS. Once you know, follow the steps below:
Step 1 - Press the WPS button on the DAP-1520 for about 1 second. The LED on the device will start to blink. You can also use
the WPS option in the setup wizard section of the web interface.
Step 2 - Within 120 seconds, press the WPS button on your wireless device.
Step 3 - Allow up to 1 minute to congure. Once the LED light stops blinking and turns solid green, you will be connected and
your wireless connection will be secured with WPA2.
31D-Link DAP-1520 User Manual
Page 35

Section 4 - Security
Connect to a Wireless Network
Windows® 8
WPA/WPA2
It is recommended to enable wireless security (WPA/WPA2) on your wireless router or access point before conguring your
wireless adapter. If you are joining an existing network, you will need to know the security key (Wi-Fi password) being used.
To join an existing network, locate the wireless network icon in the taskbar, next to the
time display.
Wireless Icon
Clicking on this icon will display a list of wireless networks which are within connecting
proximity of your computer. Select the desired network by clicking on the network name.
32D-Link DAP-1520 User Manual
Page 36

Section 4 - Security
You will then be prompted to enter the network security key (Wi-Fi password) for
the wireless network. Enter the password into the box and click Next.
If you wish to use Wi-Fi Protected Setup (WPS) to connect to the router, you can also
press the WPS button on your router at this point to enable the WPS function.
When you have established a successful connection with a wireless network, the word
Connected will appear next to the name of the network to which you are connected.
33D-Link DAP-1520 User Manual
Page 37

Section 4 - Connecting a Wireless Client
Windows® 7
WPA/WPA2
It is recommended to enable wireless security (WPA/WPA2) on your wireless router or access point before conguring your
wireless adapter. If you are joining an existing network, you will need to know the security key or passphrase being used.
1. Click on the wireless icon in your system tray (lower-right corner).
2. The utility will display any available wireless networks in your area.
Wireless Icon
34D-Link DAP-1520 User Manual
Page 38

Section 4 - Connecting a Wireless Client
3. Highlight the wireless network (SSID) you would like to connect to
and click the Connect button.
If you get a good signal but cannot access the Internet, check your
TCP/IP settings for your wireless adapter. Refer to the Networking
Basics section in this manual for more information.
4. The following window appears while your computer tries to
connect to the router.
35D-Link DAP-1520 User Manual
Page 39

Section 4 - Connecting a Wireless Client
5. Enter the same security key or passphrase that is on your router and
click Connect.
It may take 20-30 seconds to connect to the wireless network. If the
connection fails, please verify that the security settings are correct. The
key or passphrase must be exactly the same as on the wireless router.
36D-Link DAP-1520 User Manual
Page 40

Section 4 - Connecting a Wireless Client
Windows Vista®
Windows Vista® users may use the built-in wireless utility. If you are using another company’s utility or Windows® 2000, please
refer to the user manual of your wireless adapter for help with connecting to a wireless network. Most utilities will have a “site
survey” option similar to the Windows Vista® utility as seen below.
If you receive the “Wireless Networks Are Available” bubble, click on the
center of the bubble to access the utility.
or
Right-click on the wireless computer icon in your system tray (lower-right
corner next to the time). Select Connect to a network.
The utility will display any available wireless networks in your area. Click
on a network (displayed using the SSID) and click Connect.
If you get a good signal but cannot access the Internet, check the TCP/
IP settings for your wireless adapter. Refer to “Troubleshooting” on page
43 for more information.
37D-Link DAP-1520 User Manual
Page 41

Section 4 - Connecting a Wireless Client
WPA/WPA2
It is recommended to enable wireless security (WPA/WPA2) on your wireless router or access point before conguring your
wireless adapter. If you are joining an existing network, you will need to know the security key or passphrase being used.
1. Open the Windows Vista® Wireless Utility by right-clicking on the
wireless computer icon in your system tray (lower right corner of
screen). Select Connect to a network.
2. Highlight the wireless network (SSID) you would like to connect
to and click Connect.
38D-Link DAP-1520 User Manual
Page 42

Section 4 - Connecting a Wireless Client
3. Enter the same security key or passphrase that is on your router and
click Connect.
It may take 20-30 seconds to connect to the wireless network. If the
connection fails, please verify that the security settings are correct. The
key or passphrase must be exactly the same as on the wireless router.
39D-Link DAP-1520 User Manual
Page 43

Section 4 - Connecting a Wireless Client
Windows® XP
Windows® XP users may use the built-in wireless utility (Zero Conguration Utility). The following instructions are for Service
Pack 2 users. If you are using another company’s utility, please refer to the user manual of your wireless adapter for help with
connecting to a wireless network. Most utilities will have a “site survey” option similar to the Windows® XP utility as seen below.
If you receive the Wireless Networks Detected bubble, click on the
center of the bubble to access the utility.
or
Right-click on the wireless computer icon in your system tray (lower-right
corner next to the time). Select View Available Wireless Networks.
The utility will display any available wireless networks in your area. Click
on a network (displayed using the SSID) and click the Connect button.
If you get a good signal but cannot access the Internet, check you TCP/
IP settings for your wireless adapter. Refer to the Networking Basics
section in this manual for more information.
40D-Link DAP-1520 User Manual
Page 44

Section 4 - Connecting a Wireless Client
WPA/WPA2
It is recommended to enable WPA on your wireless router or access point before conguring your wireless adapter. If you are
joining an existing network, you will need to know the WPA key being used.
1. Open the Windows® XP Wireless Utility by right-clicking on the
wireless computer icon in your system tray (lower-right corner
of screen). Select View Available Wireless Networks.
2. Highlight the wireless network (SSID) you would like to
connect to and click Connect.
41D-Link DAP-1520 User Manual
Page 45

Section 4 - Connecting a Wireless Client
3. The Wireless Network Connection box will appear. Enter the WPA-PSK
passphrase and click Connect.
It may take 20-30 seconds to connect to the wireless network. If the
connection fails, please verify that the WPA-PSK settings are correct. The
WPA-PSK passphrase must be exactly the same as on the wireless router.
42D-Link DAP-1520 User Manual
Page 46

Section 5 - Troubleshooting
Troubleshooting
This chapter provides solutions to problems that can occur during the installation and operation of the DAP-1520. Read the
following descriptions if you are having problems. The examples below are illustrated in Windows® XP. If you have a dierent
operating system, the screenshots on your computer will look similar to the following examples.
1. Why can’t I access the web-based conguration utility?
When entering the IP address of the Wireless AC750 Dual Band Range Extender (dlinkap.local for example), you are not
connecting to a website nor do you have to be connected to the Internet. The device has the utility built-in to a ROM chip in
the device itself. Your computer must be on the same IP subnet to connect to the web-based utility.
• Make sure you have an updated Java-enabled web browser. We recommend the following:
• Internet Explorer 7 or later
• Firefox 12.0 or later
• Safari 4 or later
• Google Chrome 20.0 or later
• Make sure that you are connected to the same wireless network which is listed on the base of the DAP-1520. If you have an
active wired LAN Ethernet connection, try temporarily unplugging the Ethernet cable from the computer you are using, as
this may eliminate possible conicts from having two simultaneous connections on the same computer.
• Disable any Internet security software running on the computer. Software rewalls such as ZoneAlarm, BlackICE, Sygate,
Norton Personal Firewall, and Windows® XP rewall may block access to the conguration pages. Check the help les included
with your rewall software for more information on disabling or conguring it.
43D-Link DAP-1520 User Manual
Page 47

Section 5 - Troubleshooting
• Congure your Internet settings:
• Go to Start > Settings > Control Panel. Double-click the Internet Options Icon. From the Security tab, click the button to restore
the settings to their defaults.
• Click the Connection tab and set the dial-up option to Never Dial a Connection. Click the LAN Settings button. Make sure nothing
is checked. Click OK.
• Go to the Advanced tab and click the button to restore these settings to their defaults. Click OK three times.
• Close your web browser (if open) and open it.
• Access the web management interface. Open your web browser and enter the address of your extender (http://dlinkap.
local) in the address bar. This should open the login page for your web management. If the DAP-1520 is not connected to
an uplink router, you can try accessing the web interface using the default IP address http://192.168.0.50.
• If you still cannot access the conguration, unplug the extender from the power outlet for at least 10 seconds and plug it
back in. Wait about 30 seconds and try accessing the conguration. If you have multiple computers, try connecting using a
dierent computer.
2. What can I do if I forgot my password?
If you forgot your password, you must reset your extender. Unfortunately this process will change all your settings back to the
factory defaults.
To reset the extender, locate the reset button (hole) on the underside panel of the unit. With the extender powered on, use
a paperclip to hold the button down for 10 seconds. Release the button and the extender will go through its reboot process
(indicated by the LED turning red). Wait about 30 seconds to access the extender. The default IP address is http://dlinkap.
local. When logging in, the username is admin and leave the password box empty.
44D-Link DAP-1520 User Manual
Page 48

Appendix A - Wireless Basics
Wireless Basics
D-Link wireless products are based on industry standards to provide easy-to-use and compatible high-speed wireless
connectivity within your home, business or public access wireless networks. Strictly adhering to the IEEE standard, the D-Link
wireless family of products will allow you to securely and conveniently access your network. You will be able to enjoy the
freedom that wireless networking delivers.
A wireless local area network (WLAN) is a cellular computer network that transmits and receives data with radio signals instead of
wires. Wireless LANs are used increasingly in both home and oce environments, and public areas such as airports, coee shops
and universities. Innovative ways to utilize WLAN technology are helping people to work and communicate more eciently.
Increased mobility and the absence of cabling and other xed infrastructure have proven to be benecial for many users.
Wireless users can use the same applications they use on a wired network. Wireless adapters used on laptop and desktop
systems support the same protocols as Ethernet adapter cards.
Under many circumstances, it may be desirable for mobile network devices to link to a conventional Ethernet LAN in order to
use servers, printers or an Internet connection supplied through the wired LAN. A wireless router is a device used to provide
this link.
45D-Link DAP-1520 User Manual
Page 49

Appendix A - Wireless Basics
Tips
Here are a few things to keep in mind when you are installing your Wireless AC750 Dual Band Range Extender.
Centralize the extender’s location
For best performance, make sure you place the extender in a centralized location within your desired usage area. Try to place
the extender so that there are minimal obstructions between it and the uplink router. If possible, use an elevated power outlet,
so the signal can be dispersed more easily. If you have a large home or usage area, you may need several extenders in order
to achieve optimal coverage.
Eliminate Interference
Place home appliances such as cordless telephones, microwaves, and televisions as far away as possible from the extender.
This can signicantly reduce any interference that the appliances might cause since they operate on same frequency.
Security
Don’t let your neighbors or intruders connect to your wireless network. Secure your wireless network by utilizing the WPA or
WEP security feature on the extender and uplink router. Refer to the relevant sections of this manual for further details.
46D-Link DAP-1520 User Manual
Page 50

Appendix B - Technical Specications
Technical Specications
Standards
• IEEE 802.11n
• IEEE 802.11g
• IEEE 802.11b
• IEEE 802.11ac draft
Wireless Frequency Range
• 2.4 GHz to 2.4835 GHz
• 5.18MHz~5.85MHz
Antenna
• Internal Antenna
Security
• Wi-Fi Protected Access (WPA/WPA2)
• WPS™ (PBC)
• Wired Equivalent Privacy (WEP) 64/128-bit
Advanced Features
• QRS Mobile setup app for iOS and Android devices
Device Management
• Web UI
Diagnostic LEDs
• Status/WPS
1
Operating Temperature
• 0 to 40 ˚C (32 to 104 ˚F)
Operating Humidity
• 0% to 90% non-condensing
Power Input
• AC 110-240 V
Maximum Power Consumption
• 5.5 W
Certications
• EMI/EMC
• FCC
• CE
• IC
• C-Tick
• UL
• Wi-Fi Certied
Dimensions
• 92x58x34.2 mm
Weight
• 104 grams
1
Frequency range varies depending on local regulations
47D-Link DAP-1520 User Manual
Page 51

Appendix C - GPL Code Statement
GPL Code Statement
This D-Link product includes software code developed by third parties, including software code subject to the GNU General
Public License (“GPL”) or GNU Lesser General Public License (“LGPL”). As applicable, the terms of the GPL and LGPL, and
information on obtaining access to the GPL code and LGPL code used in this product, are available to you at:
http://tsd.dlink.com.tw/GPL.asp
The GPL code and LGPL code used in this product is distributed WITHOUT ANY WARRANTY and is subject to the copyrights
of one or more authors. For details, see the GPL code and the LGPL code for this product and the terms of the GPL and LGPL.
WRITTEN OFFER FOR GPL AND LGPL SOURCE CODE
Where such specic license terms entitle you to the source code of such software, D-Link will provide upon written request
via email and/or traditional paper mail the applicable GPL and LGPLsource code les via CD-ROM for a nominal cost to cover
shipping and media charges as allowed under the GPL and LGPL.
Please direct all inquiries to:
Email: GPLCODE@DLink.com
Snail Mail:
Attn: GPLSOURCE REQUEST
D-Link Systems, Inc.
17595 Mt. Herrmann Street
Fountain Valley, CA 92708
GNU GENERAL PUBLIC LICENSE
Version 3, 29 June 2007
Copyright (C) 2007 Free Software Foundation, Inc. <http://fsf.org/> Everyone is permitted to copy and distribute verbatim
copies of this license document, but changing it is not allowed.
48D-Link DAP-1520 User Manual
Page 52

Appendix C - GPL Code Statement
Preamble
The GNU General Public License is a free, copyleft license for software and other kinds of works.
The licenses for most software and other practical works are designed to take away your freedom to share and change the
works. By contrast, the GNU General Public License is intended to guarantee your freedom to share and change all versions
of a program--to make sure it remains free software for all its users. We, the Free Software Foundation, use the GNU General
Public License for most of our software; it applies also to any other work released this way by its authors. You can apply it to
your programs, too.
When we speak of free software, we are referring to freedom, not price. Our General Public Licenses are designed to make
sure that you have the freedom to distribute copies of free software (and charge for them if you wish), that you receive source
code or can get it if you want it, that you can change the software or use pieces of it in new free programs, and that you know
you can do these things.
To protect your rights, we need to prevent others from denying you these rights or asking you to surrender the rights. Therefore,
you have certain responsibilities if you distribute copies of the software, or if you modify it: responsibilities to respect the
freedom of others.
For example, if you distribute copies of such a program, whether gratis or for a fee, you must pass on to the recipients the
same freedoms that you received. You must make sure that they, too, receive or can get the source code. And you must show
them these terms so they know their rights.
Developers that use the GNU GPL protect your rights with two steps:
(1) assert copyright on the software, and (2) oer you this License giving you legal permission to copy, distribute and/or
modify it.
For the developers’ and authors’ protection, the GPL clearly explains that there is no warranty for this free software. For both
users’ and authors’ sake, the GPL requires that modied versions be marked as changed, so that their problems will not be
attributed erroneously to authors of previous versions.
Some devices are designed to deny users access to install or run modied versions of the software inside them, although
the manufacturer can do so. This is fundamentally incompatible with the aim of protecting users’ freedom to change the
software. The systematic pattern of such abuse occurs in the area of products for individuals to use, which is precisely where it
is most unacceptable. Therefore, we have designed this version of the GPL to prohibit the practice for those products. If such
problems arise substantially in other domains, we stand ready to extend this provision to those domains in future versions of
the GPL, as needed to protect the freedom of users.
49D-Link DAP-1520 User Manual
Page 53

Appendix C - GPL Code Statement
Finally, every program is threatened constantly by software patents. States should not allow patents to restrict development
and use of software on general-purpose computers, but in those that do, we wish to avoid the special danger that patents
applied to a free program could make it eectively proprietary. To prevent this, the GPL assures that patents cannot be used
to render the program non-free.
The precise terms and conditions for copying, distribution and modication follow.
TERMS AND CONDITIONS
0. Denitions.
“This License” refers to version 3 of the GNU General Public License.
“Copyright” also means copyright-like laws that apply to other kinds of works, such as semiconductor masks.
“The Program” refers to any copyrightable work licensed under this License. Each licensee is addressed as “you”. “Licensees”
and “recipients” may be individuals or organizations.
To “modify” a work means to copy from or adapt all or part of the work in a fashion requiring copyright permission, other than
the making of an exact copy. The resulting work is called a “modied version” of the earlier work or a work “based on” the
earlier work.
A “covered work” means either the unmodied Program or a work based on the Program.
To “propagate” a work means to do anything with it that, without permission, would make you directly or secondarily liable
for infringement under applicable copyright law, except executing it on a computer or modifying a private copy. Propagation
includes copying, distribution (with or without modication), making available to the public, and in some countries other
activities as well.
To “convey” a work means any kind of propagation that enables other parties to make or receive copies. Mere interaction with
a user through a computer network, with no transfer of a copy, is not conveying.
An interactive user interface displays “Appropriate Legal Notices” to the extent that it includes a convenient and prominently
visible feature that (1) displays an appropriate copyright notice, and (2) tells the user that there is no warranty for the work
(except to the extent that warranties are provided), that licensees may convey the work under this License, and how to view a
copy of this License. If the interface presents a list of user commands or options, such as a menu, a prominent item in the list
meets this criterion.
50D-Link DAP-1520 User Manual
Page 54

Appendix C - GPL Code Statement
1. Source Code.
The “source code” for a work means the preferred form of the work for making modications to it. “Object code” means any
non-source form of a work.
A “Standard Interface” means an interface that either is an ocial standard dened by a recognized standards body, or, in the
case of interfaces specied for a particular programming language, one that is widely used among developers working in that
language.
The “System Libraries” of an executable work include anything, other than the work as a whole, that (a) is included in the
normal form of packaging a Major Component, but which is not part of that Major Component, and (b) serves only to enable
use of the work with that Major Component, or to implement a Standard Interface for which an implementation is available
to the public in source code form. A “Major Component”, in this context, means a major essential component (kernel, window
system, and so on) of the specic operating system (if any) on which the executable work runs, or a compiler used to produce
the work, or an object code interpreter used to run it.
The “Corresponding Source” for a work in object code form means all the source code needed to generate, install, and (for
an executable work) run the object code and to modify the work, including scripts to control those activities. However, it
does not include the work’s System Libraries, or general-purpose tools or generally available free programs which are used
unmodied in performing those activities but which are not part of the work. For example, Corresponding Source includes
interface denition les associated with source les for the work, and the source code for shared libraries and dynamically
linked subprograms that the work is specically designed to require, such as by intimate data communication or control ow
between those subprograms and other parts of the work.
The Corresponding Source need not include anything that users can regenerate automatically from other parts of the
Corresponding Source.
The Corresponding Source for a work in source code form is that same work.
51D-Link DAP-1520 User Manual
Page 55

Appendix C - GPL Code Statement
2. Basic Permissions.
All rights granted under this License are granted for the term of copyright on the Program, and are irrevocable provided the
stated conditions are met. This License explicitly arms your unlimited permission to run the unmodied Program. The
output from running a covered work is covered by this License only if the output, given its content, constitutes a covered
work. This License acknowledges your rights of fair use or other equivalent, as provided by copyright law.
You may make, run and propagate covered works that you do not convey, without conditions so long as your license otherwise remains in force. You may convey covered works to others for the sole purpose of having them make modications
exclusively for you, or provide you with facilities for running those works, provided that you comply with the terms of this
License in conveying all material for which you do not control copyright. Those thus making or running the covered works
for you must do so exclusively on your behalf, under your direction and control, on terms that prohibit them from making any
copies of your copyrighted material outside their relationship with you.
Conveying under any other circumstances is permitted solely under the conditions stated below. Sublicensing is not allowed;
section 10 makes it unnecessary.
3. Protecting Users’ Legal Rights From Anti-Circumvention Law.
No covered work shall be deemed part of an eective technological measure under any applicable law fullling obligations
under article 11 of the WIPO copyright treaty adopted on 20 December 1996, or similar laws prohibiting or restricting
circumvention of such measures.
When you convey a covered work, you waive any legal power to forbid circumvention of technological measures to the extent
such circumvention
is eected by exercising rights under this License with respect to the covered work, and you disclaim any intention to limit
operation or modication of the work as a means of enforcing, against the work’s users, your or third parties’ legal rights to
forbid circumvention of technological measures.
52D-Link DAP-1520 User Manual
Page 56

Appendix C - GPL Code Statement
4. Conveying Verbatim Copies.
You may convey verbatim copies of the Program’s source code as you receive it, in any medium, provided that you conspicuously
and appropriately publish on each copy an appropriate copyright notice; keep intact all notices stating that this License and
any non-permissive terms added in accord with section 7 apply to the code; keep intact all notices of the absence of any
warranty; and give all recipients a copy of this License along with the Program.
You may charge any price or no price for each copy that you convey, and you may oer support or warranty protection for a
fee.
5. Conveying Modied Source Versions.
You may convey a work based on the Program, or the modications to produce it from the Program, in the form of source
code under the terms of section 4, provided that you also meet all of these conditions:
a) The work must carry prominent notices stating that you modied it, and giving a relevant date.
b) The work must carry prominent notices stating that it is released under this License and any conditions added
under section 7. This requirement modies the requirement in section 4 to “keep intact all notices”.
c) You must license the entire work, as a whole, under this License to anyone who comes into possession of a
copy. This License will therefore apply, along with any applicable section 7 additional terms, to the whole of
the work, and all its parts, regardless of how they are packaged. This License gives no permission to license the
work in any other way, but it does not invalidate such permission if you have separately received it.
d) If the work has interactive user interfaces, each must display Appropriate Legal Notices; however, if the Program
has interactive interfaces that do not display Appropriate Legal Notices, your work need not make them do so.
A compilation of a covered work with other separate and independent works, which are not by their nature extensions of
the covered work, and which are not combined with it such as to form a larger program, in or on a volume of a storage or
distribution medium, is called an “aggregate” if the compilation and its resulting copyright are not used to limit the access or
legal rights of the compilation’s users beyond what the individual works permit. Inclusion of a covered work in an aggregate
does not cause this License to apply to the other parts of the aggregate.
53D-Link DAP-1520 User Manual
Page 57

Appendix C - GPL Code Statement
6. Conveying Non-Source Forms.
You may convey a covered work in object code form under the terms of sections 4 and 5, provided that you also convey the
machine-readable Corresponding Source under the terms of this License, in one of these ways:
a) Convey the object code in, or embodied in, a physical product (including a physical distribution medium),
accompanied by the Corresponding Source xed on a durable physical medium customarily used for software
interchange.
b) Convey the object code in, or embodied in, a physical product (including a physical distribution medium),
accompanied by a written oer, valid for at least three years and valid for as long as you oer spare parts or
customer support for that product model, to give anyone who possesses the object code either (1) a copy
of the Corresponding Source for all the software in the product that is covered by this License, on a durable
physical medium customarily used for software interchange, for a price no more than your reasonable cost of
physically performing this conveying of source, or (2) access to copy the Corresponding Source from a network
server at no charge.
c) Convey individual copies of the object code with a copy of the written oer to provide the Corresponding
Source. This alternative is allowed only occasionally and noncommercially, and only if you received the object
code with such an oer, in accord with subsection 6b.
d) Convey the object code by oering access from a designated place (gratis or for a charge), and oer equivalent
access to the Corresponding Source in the same way through the same place at no further charge. You need
not require recipients to copy the Corresponding Source along with the object code. If the place to copy the
object code is a network server, the Corresponding Source may be on a dierent server (operated by you or
a third party) that supports equivalent copying facilities, provided you maintain clear directions next to the
object code saying where to nd the Corresponding Source. Regardless of what server hosts the Corresponding
Source, you remain obligated to ensure that it is available for as long as needed to satisfy these requirements.
e) Convey the object code using peer-to-peer transmission, provided you inform other peers where the object
code and Corresponding Source of the work are being oered to the general public at no charge under
subsection 6d.
A separable portion of the object code, whose source code is excluded from the Corresponding Source as a System
Library, need not be included in conveying the object code work.
54D-Link DAP-1520 User Manual
Page 58

Appendix C - GPL Code Statement
A “User Product” is either (1) a “consumer product”, which means any tangible personal property which is normally used for
personal, family, or household purposes, or (2) anything designed or sold for incorporation into a dwelling. In determining
whether a product is a consumer product, doubtful cases shall be resolved in favor of coverage. For a particular product
received by a particular user, “normally used” refers to a typical or common use of that class of product, regardless of the status
of the particular user or of the way in which the particular user actually uses, or expects or is expected to use, the product. A
product is a consumer product regardless of whether the product has substantial commercial, industrial or non-consumer
uses, unless such uses represent the only signicant mode of use of the product.
“Installation Information” for a User Product means any methods, procedures, authorization keys, or other information required
to install and execute modied versions of a covered work in that User Product from a modied version of its Corresponding
Source. The information must suce to ensure that the continued functioning of the modied object code is in no case
prevented or interfered with solely because modication has been made.
If you convey an object code work under this section in, or with, or specically for use in, a User Product, and the conveying
occurs as part of a transaction in which the right of possession and use of the User Product is transferred to the recipient in
perpetuity or for a xed term (regardless of how the transaction is characterized), the Corresponding Source conveyed under
this section must be accompanied by the Installation Information. But this requirement does not apply if neither you nor any
third party retains the ability to install modied object code on the User Product (for example, the work has been installed in
ROM).
The requirement to provide Installation Information does not include a requirement to continue to provide support service,
warranty, or updates for a work that has been modied or installed by the recipient, or for the User Product in which it has
been modied or installed. Access to a network may be denied when the modication itself materially and adversely aects
the operation of the network or violates the rules and protocols for communication across the network.
Corresponding Source conveyed, and Installation Information provided, in accord with this section must be in a format that is
publicly documented (and with an implementation available to the public in source code form), and must require no special
password or key for unpacking, reading or copying.
55D-Link DAP-1520 User Manual
Page 59

Appendix C - GPL Code Statement
7. Additional Terms.
“Additional permissions” are terms that supplement the terms of this License by making exceptions from one or more of its
conditions. Additional permissions that are applicable to the entire Program shall be treated as though they were included in
this License, to the extent that they are valid under applicable law. If additional permissions apply only to part of the Program,
that part may be used separately under those permissions, but the entire Program remains governed by this License without
regard to the additional permissions.
When you convey a copy of a covered work, you may at your option remove any additional permissions from that copy, or
from any part of it. (Additional permissions may be written to require their own removal in certain cases when you modify
the work). You may place additional permissions on material, added by you to a covered work, for which you have or can give
appropriate copyright permission.
Notwithstanding any other provision of this License, for material you add to a covered work, you may (if authorized by the
copyright holders of that material) supplement the terms of this License with terms:
a) Disclaiming warranty or limiting liability dierently from the terms of sections 15 and 16 of this License; or
b) Requiring preservation of specied reasonable legal notices or author attributions in that material or in the
Appropriate Legal Notices displayed by works containing it; or
c) Prohibiting misrepresentation of the origin of that material, or requiring that modied versions of such material
be marked in reasonable ways as dierent from the original version; or
d) Limiting the use for publicity purposes of names of licensors or authors of the material; or
e) Declining to grant rights under trademark law for use of some trade names, trademarks, or service marks; or
f) Requiring indemnication of licensors and authors of that material by anyone who conveys the material (or
modied versions of it) with contractual assumptions of liability to the recipient, for any liability that these
contractual assumptions directly impose on those licensors and authors.
56D-Link DAP-1520 User Manual
Page 60

Appendix C - GPL Code Statement
All other non-permissive additional terms are considered “further restrictions” within the meaning of section 10. If the Program
as you received it, or any part of it, contains a notice stating that it is governed by this License along with a term that is a
further restriction, you may remove that term. If a license document contains a further restriction but permits relicensing
or conveying under this License, you may add to a covered work material governed by the terms of that license document,
provided that the further restriction does not survive such relicensing or conveying.
If you add terms to a covered work in accord with this section, you must place, in the relevant source les, a statement of the
additional terms that apply to those les, or a notice indicating where to nd the applicable terms.
Additional terms, permissive or non-permissive, may be stated in the form of a separately written license, or stated as
exceptions; the above requirements apply either way.
8. Termination.
You may not propagate or modify a covered work except as expressly provided under this License. Any attempt otherwise to
propagate or modify it is void, and will automatically terminate your rights under this License (including any patent licenses
granted under the third paragraph of section 11).
However, if you cease all violation of this License, then your license from a particular copyright holder is reinstated (a)
provisionally, unless and until the copyright holder explicitly and nally terminates your license, and (b) permanently, if the
copyright holder fails to notify you of the violation by some reasonable means prior to 60 days after the cessation.
Moreover, your license from a particular copyright holder is reinstated permanently if the copyright holder noties you of the
violation by some reasonable means, this is the rst time you have received notice of violation of this License (for any work)
from that copyright holder, and you cure the violation prior to 30 days after your receipt of the notice.
Termination of your rights under this section does not terminate the licenses of parties who have received copies or rights
57D-Link DAP-1520 User Manual
Page 61

Appendix C - GPL Code Statement
from you under this License. If your rights have been terminated and not permanently reinstated, you do not qualify to
receive new licenses for the same material under section 10.
9. Acceptance Not Required for Having Copies.
You are not required to accept this License in order to receive or run a copy of the Program. Ancillary propagation of a
covered work occurring solely as a consequence of using peer-to-peer transmission to receive a copy likewise does not
require acceptance. However, nothing other than this License grants you permission to propagate or modify any covered
work. These actions infringe copyright if you do not accept this License. Therefore, by modifying or propagating a covered
work, you indicate your acceptance of this License to do so.
10. Automatic Licensing of Downstream Recipients.
Each time you convey a covered work, the recipient automatically receives a license from the original licensors, to run, modify
and propagate that work, subject to this License. You are not responsible for enforcing compliance by third parties with this
License.
An “entity transaction” is a transaction transferring control of an organization, or substantially all assets of one, or subdividing
an organization, or merging organizations. If propagation of a covered work results from an entity transaction, each party
to that transaction who receives a copy of the work also receives whatever licenses to the work the party’s predecessor in
interest had or could give under the previous paragraph, plus a right to possession of the Corresponding Source of the work
from the predecessor in interest, if the predecessor has it or can get it with reasonable eorts.
You may not impose any further restrictions on the exercise of the rights granted or armed under this License. For example,
you may not impose a license fee, royalty, or other charge for exercise of rights granted under this License, and you may not
initiate litigation (including a cross-claim or counterclaim in a lawsuit) alleging that any patent claim is infringed by making,
using, selling, oering for sale, or importing the Program or any portion of it.
58D-Link DAP-1520 User Manual
Page 62

Appendix C - GPL Code Statement
11. Patents.
A “contributor” is a copyright holder who authorizes use under this License of the Program or a work on which the Program is
based. The work thus licensed is called the contributor’s “contributor version”.
A contributor’s “essential patent claims” are all patent claims owned or controlled by the contributor, whether already acquired
or hereafter acquired, that would be infringed by some manner, permitted by this License, of making, using, or selling its
contributor version, but do not include claims that would be infringed only as a consequence of further modication of
the contributor version. For purposes of this denition, “control” includes the right to grant patent sublicenses in a manner
consistent with the requirements of this License.
Each contributor grants you a non-exclusive, worldwide, royalty-free patent license under the contributor’s essential patent
claims, to make, use, sell, oer for sale, import and otherwise run, modify and propagate the contents of its contributor version.
In the following three paragraphs, a “patent license” is any express agreement or commitment, however denominated, not
to enforce a patent (such as an express permission to practice a patent or covenant not to sue for patent infringement). To
“grant” such a patent license to a party means to make such an agreement or commitment not to enforce a patent against the
party.
If you convey a covered work, knowingly relying on a patent license, and the Corresponding Source of the work is not available
for anyone to copy, free of charge and under the terms of this License, through a publicly available network server or other
readily accessible means, then you must either (1) cause the Corresponding Source to be so available, or (2) arrange to deprive
yourself of the benet of the patent license for this particular work, or (3) arrange, in a manner consistent with the requirements
of this License, to extend the patent license to downstream recipients. “Knowingly relying” means you have actual knowledge
that, but for the patent license, your conveying the covered work in a country, or your recipient’s use of the covered work in a
country, would infringe one or more identiable patents in that country that you have reason to believe are valid.
If, pursuant to or in connection with a single transaction or arrangement, you convey, or propagate by procuring conveyance
of, a covered work, and grant a patent license to some of the parties receiving the covered work authorizing them to use,
propagate, modify or convey a specic copy of the covered work, then the patent license you grant is automatically extended
to all recipients of the covered work and works based on it.
59D-Link DAP-1520 User Manual
Page 63

Appendix C - GPL Code Statement
A patent license is “discriminatory” if it does not include within the scope of its coverage, prohibits the exercise of, or is
conditioned on the non-exercise of one or more of the rights that are specically granted under this License. You may not
convey a covered work if you are a party to an arrangement with a third party that is in the business of distributing software,
under which you make payment to the third party based on the extent of your activity of conveying the work, and under which
the third party grants, to any of the parties who would receive the covered work from you, a discriminatory patent license (a)
in connection with copies of the covered work conveyed by you (or copies made from those copies), or (b) primarily for and in
connection with specic products or compilations that contain the covered work, unless you entered into that arrangement,
or that patent license was granted, prior to 28 March 2007.
Nothing in this License shall be construed as excluding or limiting any implied license or other defenses to infringement that
may otherwise be available to you under applicable patent law.
12. No Surrender of Others’ Freedom.
If conditions are imposed on you (whether by court order, agreement or otherwise) that contradict the conditions of this
License, they do not excuse you from the conditions of this License. If you cannot convey a covered work so as to satisfy
simultaneously your obligations under this License and any other pertinent obligations, then as a consequence you may not
convey it at all. For example, if you agree to terms that obligate you to collect a royalty for further conveying from those to
whom you convey the Program, the only way you could satisfy both those terms and this License would be to refrain entirely
from conveying the Program.
13. Use with the GNU Aero General Public License.
Notwithstanding any other provision of this License, you have permission to link or combine any covered work with a work
licensed under version 3 of the GNU Aero General Public License into a single combined work, and to convey the resulting
work. The terms of this License will continue to apply to the part which is the covered work, but the special requirements of
the GNU Aero General Public License, section 13, concerning interaction through a network will apply to the combination
as such.
60D-Link DAP-1520 User Manual
Page 64

Appendix C - GPL Code Statement
14. Revised Versions of this License.
The Free Software Foundation may publish revised and/or new versions of the GNU General Public License from time to time.
Such new versions will be similar in spirit to the present version, but may dier in detail to address new problems or concerns.
Each version is given a distinguishing version number. If the Program species that a certain numbered version of the GNU
General Public License “or any later version” applies to it, you have the option of following the terms and conditions either of
that numbered version or of any later version published by the Free Software Foundation. If the Program does not specify
a version number of the GNU General Public License, you may choose any version ever published by the Free Software
Foundation. If the Program species that a proxy can decide which future versions of the GNU General Public License can
be used, that proxy’s public statement of acceptance of a version permanently authorizes you to choose that version for the
Program.
Later license versions may give you additional or dierent permissions. However, no additional obligations are imposed on
any author or copyright holder as a result of your choosing to follow a later version.
15. Disclaimer of Warranty.
THERE IS NO WARRANTY FOR THE PROGRAM, TO THE EXTENT PERMITTED BY APPLICABLE LAW. EXCEPT WHEN OTHERWISE
STATED IN WRITING THE COPYRIGHT HOLDERS AND/OR OTHER PARTIES PROVIDE THE PROGRAM “AS IS” WITHOUT WARRANT Y OF
ANY KIND, EITHER EXPRESSED OR IMPLIED, INCLUDING, BUT NOT LIMITED TO, THE IMPLIED WARRANTIES OF MERCHANTABILITY
AND FITNESS FOR A PARTICULAR PURPOSE. THE ENTIRE RISK AS TO THE QUALITY AND PERFORMANCE OF THE PROGRAM IS
WITH YOU. SHOULD THE PROGRAM PROVE DEFECTIVE, YOU ASSUME THE COST OF ALL NECESSARY SERVICING, REPAIR OR
CORRECTION.
16. Limitation of Liability.
IN NO EVENT UNLESS REQUIRED BY APPLICABLE LAW OR AGREED TO IN WRITING WILL ANY COPYRIGHT HOLDER, OR ANY
OTHER PARTY WHO MODIFIES AND/OR CONVEYS THE PROGRAM AS PERMITTED ABOVE, BE LIABLE TO YOU FOR DAMAGES,
INCLUDING ANY GENERAL, SPECIAL, INCIDENTAL OR CONSEQUENTIAL DAMAGES ARISING OUT OF THE USE OR INABILITY TO
USE THE PROGRAM (INCLUDING BUT NOT LIMITED TO LOSS OF DATA OR DATA BEING RENDERED INACCURATE OR LOSSES
SUSTAINED BY YOU OR THIRD PARTIES OR A FAILURE OF THE PROGRAM TO OPERATE WITH ANY OTHER PROGRAMS), EVEN IF
SUCH HOLDER OR OTHER PARTY HAS BEEN ADVISED OF THE POSSIBILITY OF SUCH DAMAGES.
61D-Link DAP-1520 User Manual
Page 65

Appendix C - GPL Code Statement
17. Interpretation of Sections 15 and 16.
If the disclaimer of warranty and limitation of liability provided above cannot be given local legal eect according to their
terms, reviewing courts shall apply local law that most closely approximates an absolute waiver of all civil liability in connection
with the Program, unless a warranty or assumption of liability accompanies a copy of the Program in return for a fee.
62D-Link DAP-1520 User Manual
Page 66

Appendix D - Safety Statements
Safety Statements
CE Mark Warning:
This is a Class B product. In a domestic environment, this product may cause radio interference, in which case the user may be required to take
adequate measures.
FCC Statement:
This equipment has been tested and found to comply with the limits for a Class B digital device, pursuant to Part 15 of the FCC Rules. These limits are
designed to provide reasonable protection against harmful interference in a residential installation. This equipment generates, uses and can radiate
radio frequency energy and, if not installed and used in accordance with the instructions, may cause harmful interference to radio communications.
However, there is no guarantee that interference will not occur in a particular installation. If this equipment does cause harmful interference to radio
or television reception, which can be determined by turning the equipment o and on, the user is encouraged to try to correct the interference by
one of the following measures:
• Reorient or relocate the receiving antenna.
• Increase the separation between the equipment and receiver.
• Connect the equipment into an outlet on a circuit dierent from that to which the receiver is connected.
• Consult the dealer or an experienced radio/TV technician for help.
This device complies with Part 15 of the FCC Rules. Operation is subject to the following two conditions: (1) This device may not cause harmful
interference, and (2) this device must accept any interference received, including interference that may cause undesired operation.
FCC Caution:
Any changes or modications not expressly approved by the party responsible for compliance could void the user’s authority to operate this
equipment.
Operations in the 5.15-5.25 GHz band are restricted to indoor usage only.
IMPORTANT NOTICE:
FCC Radiation Exposure Statement:
This equipment complies with FCC radiation exposure limits set forth for an uncontrolled environment. This equipment should be installed and
operated with minimum distance 20cm between the radiator & your body. To maintain compliance with FCC RF exposure compliance requirements,
please avoid direct contact to the transmitting antenna during transmitting.
63D-Link DAP-1520 User Manual
Page 67

Appendix D - Safety Statements
If this device is going to be operated in 5.15 ~ 5.25 GHz frequency range, then it is restricted in indoor environment only. This transmitter must not
be co-located or operating in conjunction with any other antenna or transmitter.
The availability of some specic channels and/or operational frequency bands are country dependent and are rmware programmed at the factory
to match the intended destination. The rmware setting is not accessible by the end user.
ICC Notice:
Operation is subject to the following two conditions:
1) This device may not cause interference and
2) This device must accept any interference, including interference that may cause undesired operation of the device.
IMPORTANT NOTE:
IC Radiation Exposure Statement:
This equipment complies with IC radiation exposure limits set forth for an uncontrolled environment. End users must follow the specic operating
instructions for satisfying RF exposure compliance. This equipment should be installed and operated with minimum distance 20cm between the
radiator & your body.
This transmitter must not be co-located or operating in conjunction with any other antenna or transmitter.
(i) The device for the band 5150-5250 MHz is only for indoor usage to reduce potential for harmful interference to
co-channel mobile satellite systems;
(ii) The maximum antenna gain (2dBi) permitted (for devices in the band 5725-5825 MHz) to comply with the e.i.r.p. limits specied
for point-to-point and non point-to-point operation as appropriate, as stated in section A9.2(3).
In addition, users should also be cautioned to take note that high-power radars are allocated as primary users (meaning they have priority) of the
bands 5250-5350 MHz and 5650-5850 MHz and these radars could cause interference and/or damage to LE-LAN devices.
Règlement d’Industry Canada
Les conditions de fonctionnement sont sujettes à deux conditions:
(1) Ce périphérique ne doit pas causer d’interférence et.
(2) Ce périphérique doit accepter toute interférence, y compris les interférences pouvant perturber le bon fonctionnement de
ce périphérique.
64D-Link DAP-1520 User Manual
Page 68

Appendix D - Safety Statements
Federal Communication Commission Interference Statement
This device complies with Part 15 of the FCC Rules. Operation is subject to the following two conditions: (1) This device may not cause harmful
interference, and (2) this device must accept any interference received, including interference that may cause undesired operation.
This equipment has been tested and found to comply with the limits for a Class B digital device, pursuant to Part 15 of the FCC Rules. These limits are
designed to provide reasonable protection against harmful interference in a residential installation. This equipment generates, uses and can radiate
radio frequency energy and, if not installed and used in accordance with the instructions, may cause harmful interference to radio communications.
However, there is no guarantee that interference will not occur in a particular installation. If this equipment does cause harmful interference to radio
or television reception, which can be determined by turning the equipment o and on, the user is encouraged to try to correct the interference by
one of the following measures:
- Reorient or relocate the receiving antenna.
- Increase the separation between the equipment and receiver.
- Connect the equipment into an outlet on a circuit dierent from that to which the receiver is connected.
- Consult the dealer or an experienced radio/TV technician for help.
FCC Caution:
Any changes or modications not expressly approved by the party responsible for compliance could void the user’s authority to operate this
equipment.
Operations in the 5.15-5.25GHz band are restricted to indoor usage only.
This transmitter must not be co-located or operating in conjunction with any other antenna or transmitter.
Radiation Exposure Statement:
This equipment complies with FCC radiation exposure limits set forth for an uncontrolled environment. This equipment should be installed and
operated with minimum distance 20cm between the radiator & your body.
Note: The country code selection is for non-US model only and is not available to all US model. Per FCC regulation, all WiFi product marketed in US
must xed to US operation channels only.
Industry Canada statement:
This device complies with Industry Canada licence-exempt RSS standard(s). Operation is subject to the following two conditions: (1) this device may
not cause interference, and (2) this device must accept any interference, including interference that may cause undesired operation of the device.
65D-Link DAP-1520 User Manual
Page 69

Appendix D - Safety Statements
Le présent appareil est conforme aux CNR d’Industrie Canada applicables aux appareils radio exempts de licence. L’exploitation est autorisée aux deux
conditions suivantes : (1) l’appareil ne doit pas produire de brouillage, et (2) l’utilisateur de l’appareil doit accepter tout brouillage radioélectrique
subi, même si le brouillage est susceptible d’en compromettre le fonctionnement.
Caution :
(i) the device for operation in the band 5150-5250 MHz is only for indoor use to reduce the potential for harmful interference to co-channel mobile
satellite systems;
(ii) high-power radars are allocated as primary users (i.e. priority users) of the bands 5250-5350 MHz and 5650-5850 MHz and that these radars could
cause interference and/or damage to LE-LAN devices.
Avertissement:
(i) les dispositifs fonctionnant dans la bande 5 150-5 250 MHz sont réservés uniquement pour une utilisation à l’intérieur an de réduire les risques
de brouillage préjudiciable aux systèmes de satellites mobiles utilisant les mêmes canaux;
(ii) De plus, les utilisateurs devraient aussi être avisés que les utilisateurs de radars de haute puissance sont désignés utilisateurs principaux (c.-à-d.,
qu’ils ont la priorité) pour les bandes 5 250-5 350 MHz et 5 650-5 850 MHz et que ces radars pourraient causer du brouillage et/ou des dommages
aux dispositifs LAN-EL.
Radiation Exposure Statement:
This equipment complies with IC radiation exposure limits set forth for an uncontrolled environment. This equipment should be installed and
operated with minimum distance 20cm between the radiator & your body.
Déclaration d’exposition aux radiations:
Cet équipement est conforme aux limites d’exposition aux rayonnements IC établies pour un environnement non contrôlé. Cet équipement doit
être installé et utilisé avec un minimum de 20 cm de distance entre la source de rayonnement et votre corps.
66D-Link DAP-1520 User Manual
 Loading...