

Page 1
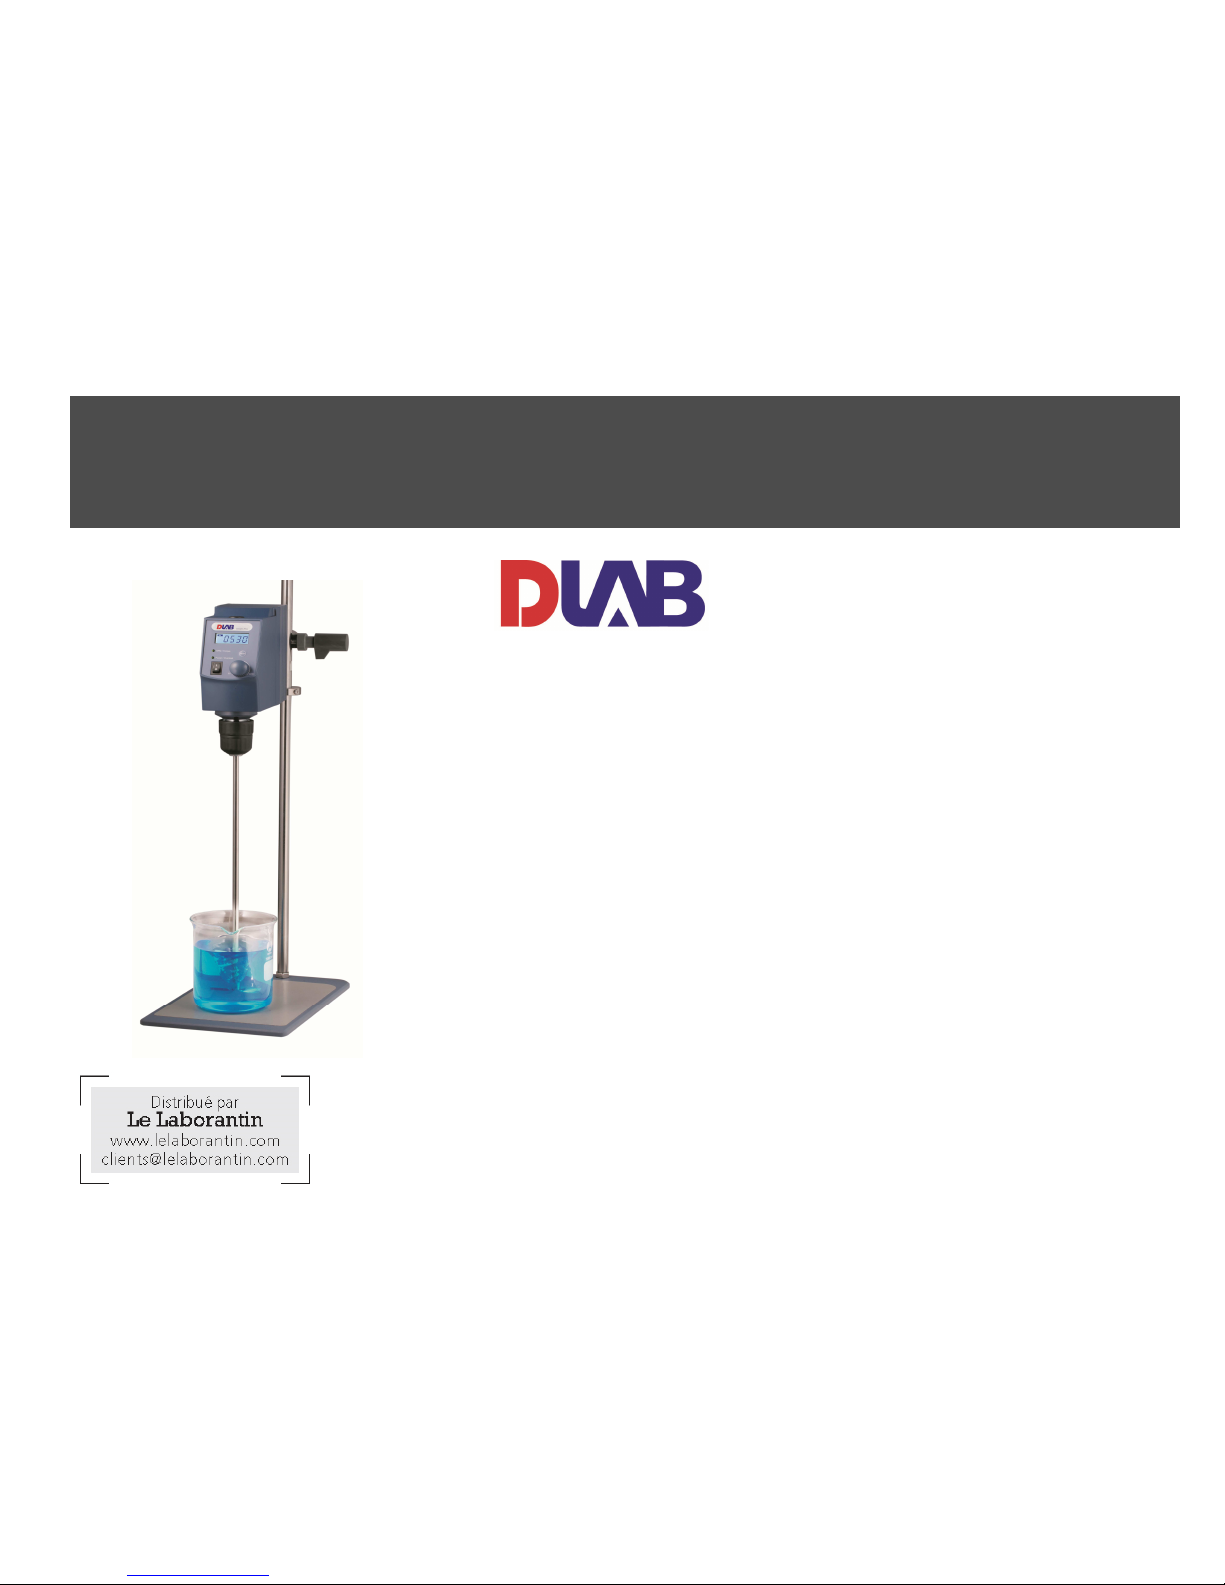
Digital
Overhead Stirrer
User Manual
OS40-Pro
LCD Digital Enhanced Overhead Stirrer
OS40-S
LED Digital Enhanced Overhead Stirrer
(Le Laborantin - réf.702323)
OS20-Pro
LCD Digital Overhead Stirrer
OS20-S
LED Digital Overhead Stirrer
(Le Laborantin - réf.701574)
Please read the User Manual carefully before use, and follow all
operating and safety instructions!
Technical specifications and outline are subject to change without prior
notice.
Page 2

Page 3

Contents
Preface ................................................................................. 1
Service ................................................................................. 1
Warranty .............................................................................. 1
1. Safety Instructions ...................................................... 2
2. Proper Use ................................................................... 3
3. Inspection .................................................................... 3
3.1 Receiving Inspection 3
3.2 Listing of Items 3
4. System Assembly ........................................................ 4
5. Trial Running .............................................................. 5
6. Function ...................................................................... 6
6.1 Control 6
6.2 Display 9
7. Overload Protection .................................................. 10
8. Interface and Output (LCD digital ) .......................... 10
9. Faults ......................................................................... 11
10. Maintenance and Cleaning ........................................ 13
11. Associated stndards and regulations ......................... 13
12. Specifications ............................................................ 14
13. Ordering Informations ............................................... 16
Page 4

Page 5

1
Preface
Welcome to the “Digital Overhead Stirrer User Manual”.
Users should read this manual carefully, follow the
instructions and procedures, and beware of all the cautions
when using this instrument.
Service
When help needed, you can always contact the Service
Department of manufacturer for technical support
Please provide the customer care representative with the
following information:
• Serial
number(on the rear panel)
• Certification
• Description of problem (i.e., hardware or software)
• Methods and procedures adopted to resolve the problems
• Your contact information
Warranty
This instrument is warranted to be free from defects in
materials and workmanship under normal use and service,
for a period of 24 months from the date of invoice. The
warranty is extended only to the original purchaser. It shall
not apply to any product or parts which have been damaged
on account of improper installation, improper connections,
misuse, accident or abnormal conditions of operation.
For claims under the warranty please contact your local
supplier. You may also send the instrument directly to
manufacturer, enclosing the invoice copy and by giving
reasons for the claim.
For all repairs, adjustments, or replacement parts, please
contact:
SAV – Le Laborantin
468 rue Jacques Monod
BP 1900
27019 EVREUX CEDEX France
0 8256 888 111*
* 0,15 € TTC/min. + prix appel
.
Page 6
2
1. Safety Instructions
Warning!
•
Read the operating instructions carefully
before use.
•
Ensure that only trained staff works with the
instrument.
Protective ground contact!
•
Ensure the socket must be grounded
(protective ground contact) before use.
•
When working wear personal safety guards to avoid
the risk of:
- Splashing liquids
- Broken glass containers
•
Follow the safety instructions, guidelines and accident
prevention regulations.
•
Do not touch the running parts, moving instrument
care not rolling your fingers.
•
Set up the instrument in a spacious area on a stable,
clean, non-slip, dry and fireproof surface. Do not
operate the instrument in explosive atmospheres, with
hazardous substances or under water.
•
Please note the vessel when set up the speed, to avoid
splashing the sample. If the instrument does not run
smoothly, please decrease the motor speed.
•
Firmly secure the accessories and vessels in place to
avoid damage or risk.
•
Preparation of samples may lead to dangerous
flammable. Only process samples that will not react
dangerous.
•
Use the standard accessories listed in the “accessories”
section, and follow the instructions to use accessories
to ensure safety. Please switch off the power before
assembly of accessories, confirm the instrument and
accessories are intact before switch on each time.
•
The instrument only be opened by expert, please
switch off before use.
•
The voltage stated on the nameplate must correspond
to the mains voltage.
•
Do not cover the instrument during running. Prevent
the collision and extrusion to instrument and
accessories.
•
Keep away from high magnetic field.
Page 7
3
2. Proper Use
The instrument is designed for mixing sticky substance in
schools, laboratories or factories. It can be installed on a
variety of impeller, for different viscosity of the medium.
This instrument is not suitable for using in residential areas
or other constraints mentioned in Chapter 1.
Do not use the accessories recommended by the
manufacturer, or failure to use the instructions, may be
caused unsafe situation.
3. Inspection
3.1 Receiving Inspection
Unpack the instrument carefully and check for any damages
which may have arisen during transport. If it happens,
please contact manufacturer/supplier for technical support.
Note:
If there is any apparent damage to the system,
please do not connect to the power line.
3.2 Listing of Items
Item
Qty
Main unit 1
Power cable 1
User manual 1
Table 1
Page 8
4
4. System Assembly
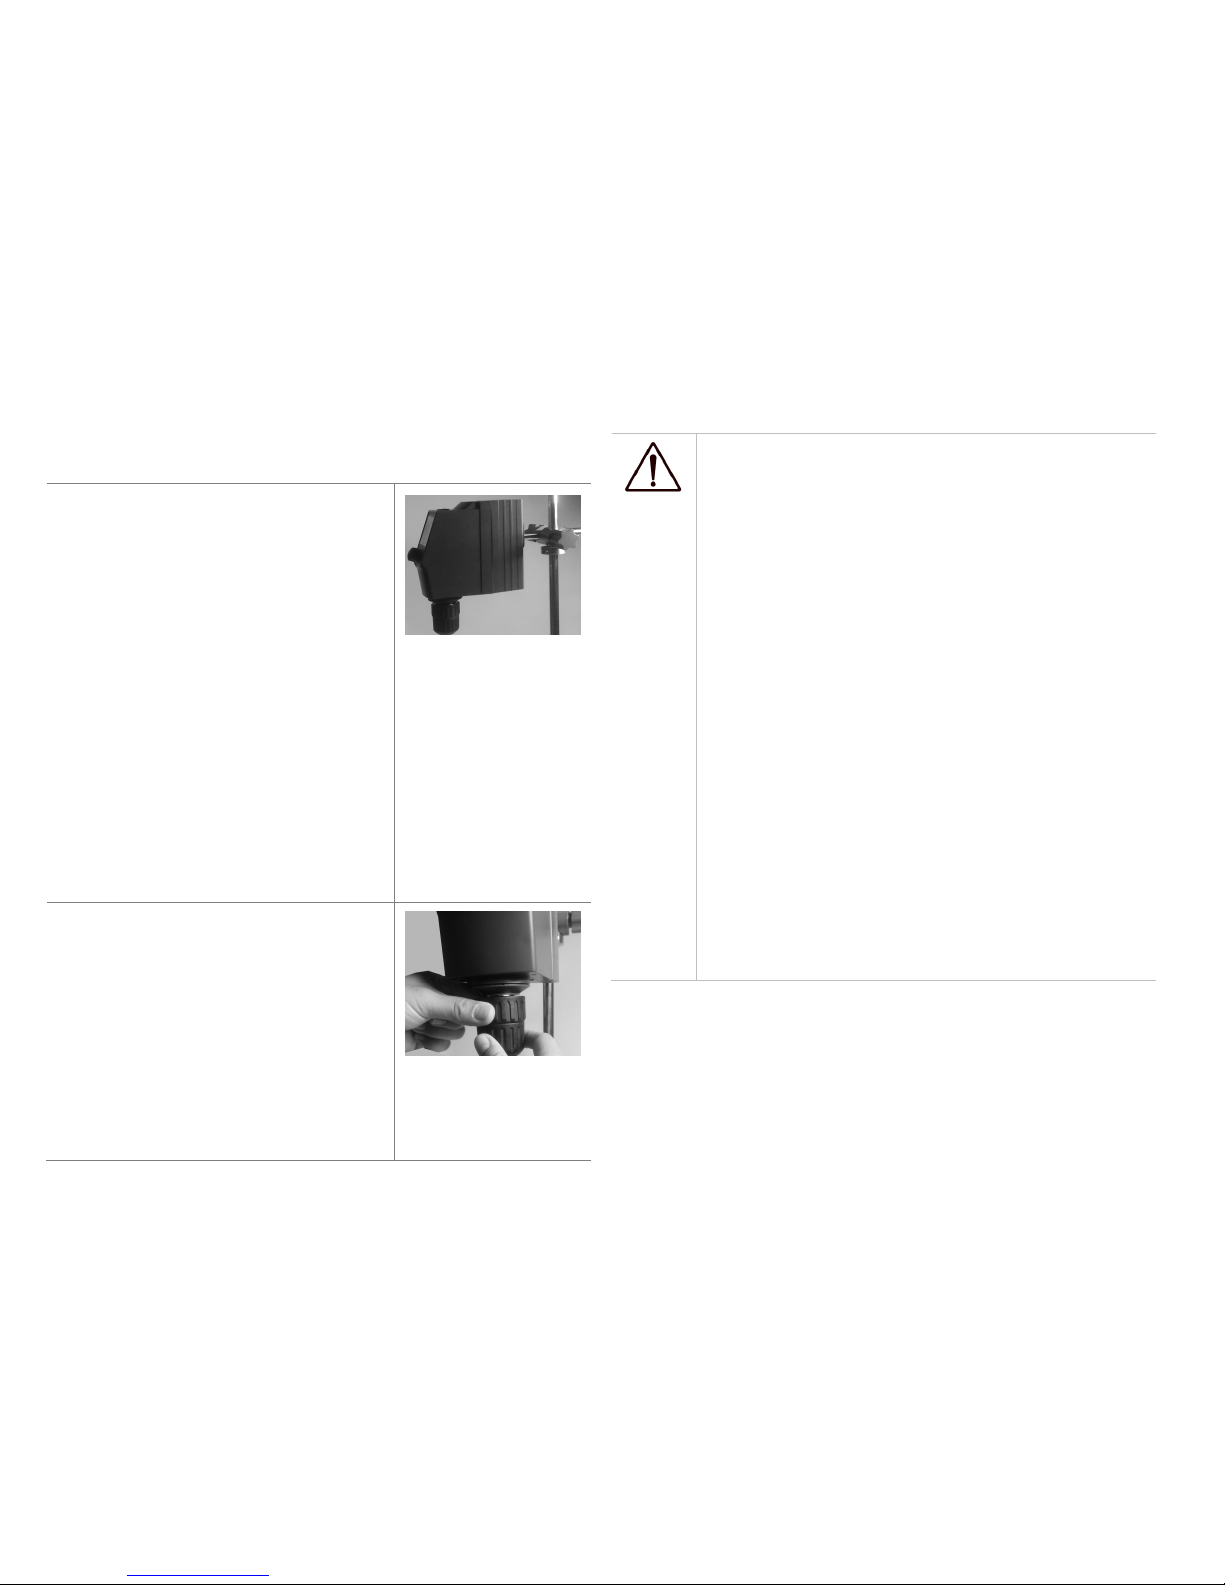
a. Install stand
The stand must be assembled
according to the following
instructions. Adjust the height
of the main unit, and the
distance from main unit to the
support holder by rotating the
locking device. Anti-drop
protector can be adjusted up or
down, ensure the locking
position is suitable for fixing
the main unit, and then attach
the main unit to the stand.
Figure 1
b. Install stirring impeller
Plug the stirring impeller into
the drill chuck, and adjust the
depth of stirring impeller into
vessel. Rotate the drill chuck
with your fingers to fix the
stirring impeller.
Figure 2
Note:
1. Overhead stirrer is a high-speed running
device. The system are required to lock
securely the corresponding components in
each step of the assembly to avoid any
movement of the main unit or stirring
impeller which would be caused harm or
damage to peripheral instrument and
personnel.
2. The stand is a support device for overhead
stirrer. The corresponding components are
required to be locked securely to avoid any
movement which would be caused harm or
damage.
3. When install main unit and anti-drop
protector, take care of your fingers to avoid
harm.
Page 9

5
5. Trial Running
Follow the instructions below to trial operate:
LCD digital LED digital
•Ensure the required operating voltage and power supply
voltage matched.
•Ensure the socket must be earthed reliably.
•Connect the power cable,ensure the power on and begin
self-checking.
•Rotate the stirring button and set stirring speed.
•Press stirring button and start stirring.
•Press again the stirring button and stop stirring.
•Ensure the required operating voltage and power supply
voltage matched.
•Ensure the socket must be earthed reliably.
•Counter-clockwise rotate the speed control button to the
end before switch on instrument.
•Connect the power cable,ensure the power on and begin
self-checking.
•Clockwise rotate the speed control button to the target
speed value, and start stirring function.
•Counter-clockwise rotate the speed control button to stop
stirring function.
If these operations above are normal, the instrument is ready to operate. If not, the instrument may be damaged during
transportation, please contact technical support of manufacturer/supplier.
Note: Do not touch components of high-speed running instrument during operation to avoid damage and harm.
Page 10
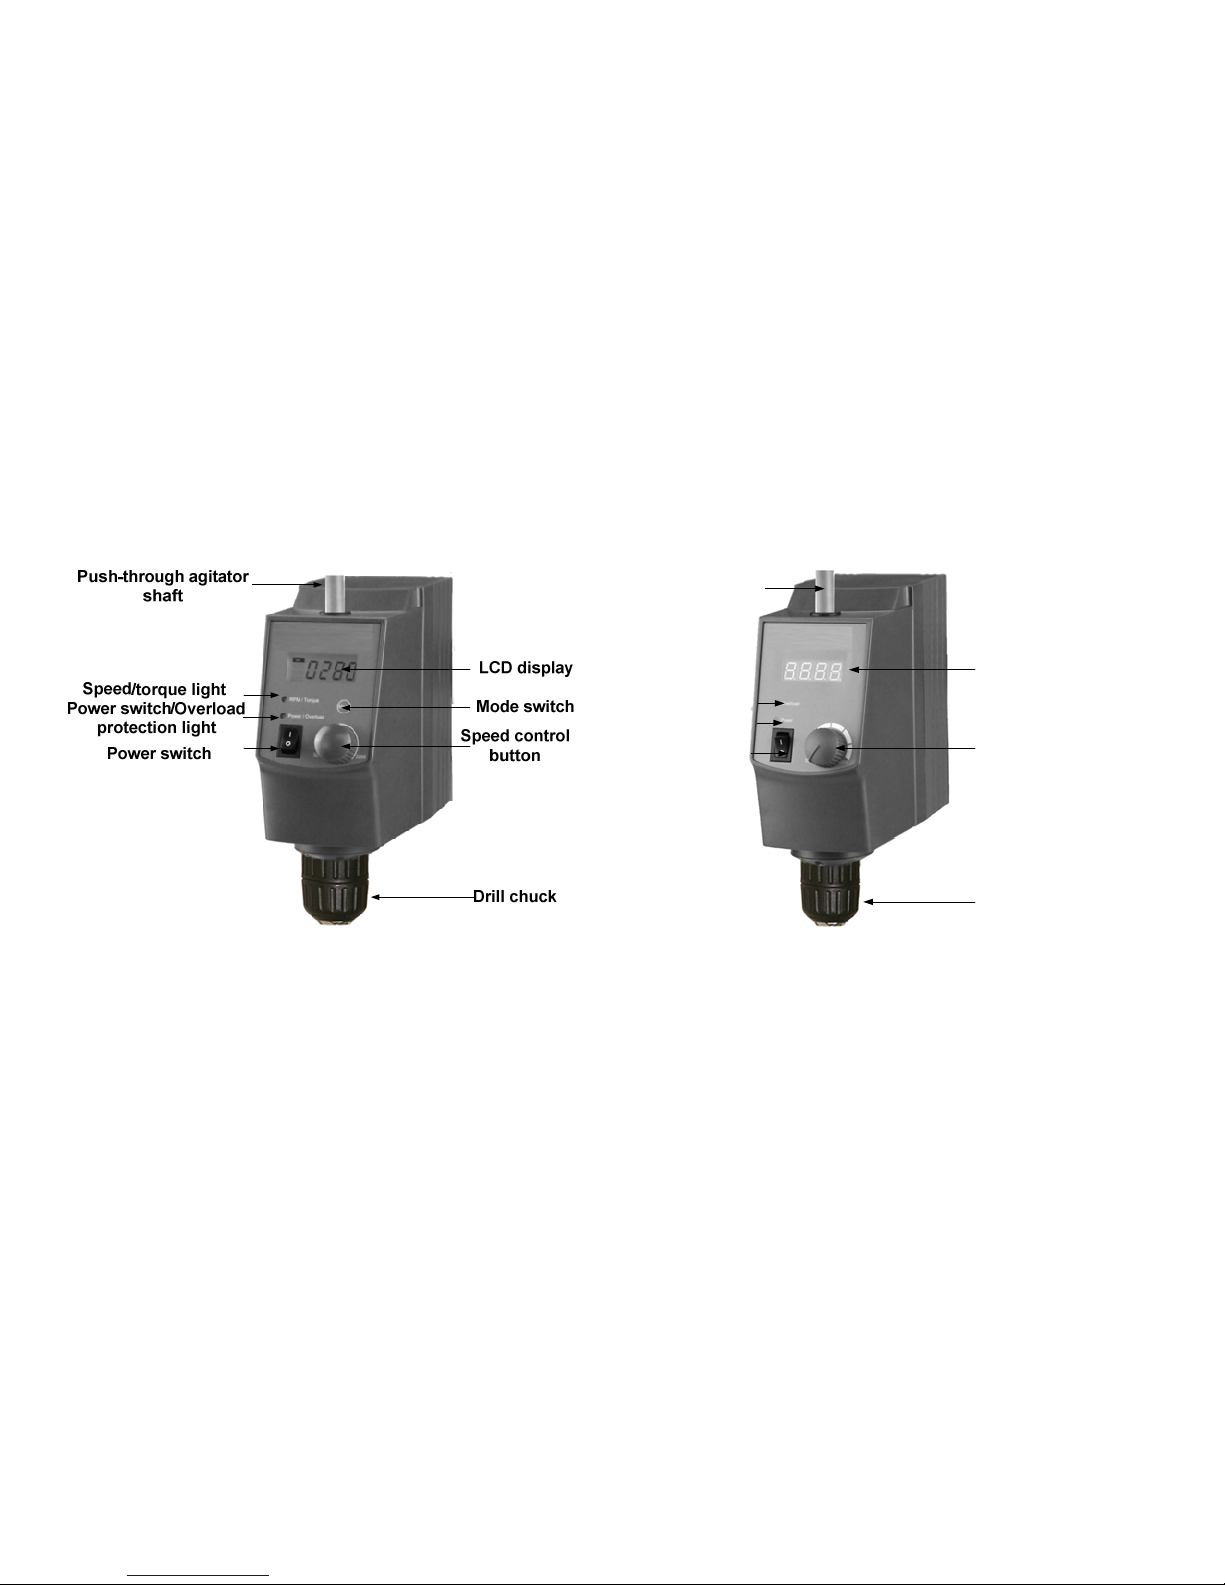
6
6. Function
6.1 Control
LED display
Speed control
button
Overload
protection light
Power switch light
Power switch
Drill chuck
Push-through agitator
shaft
Figure 4 LCD digital Figure 5 LED digital
Page 11
7
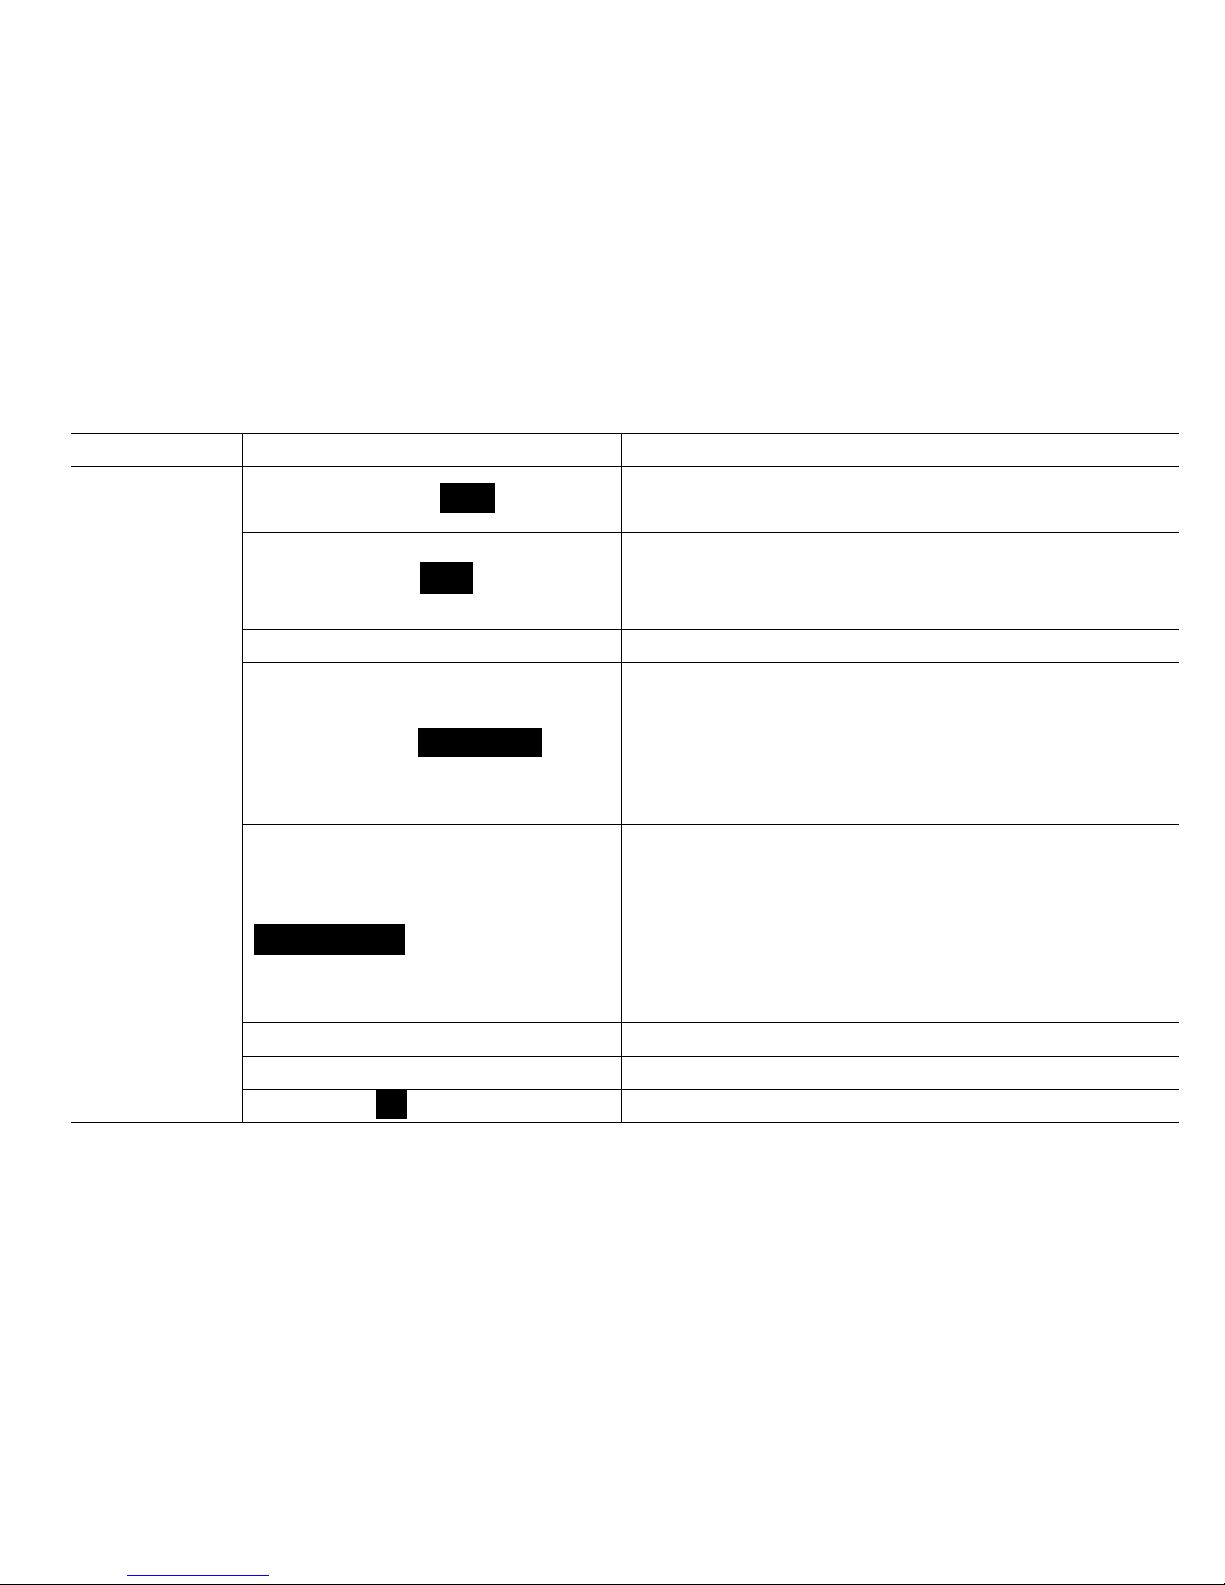
Items Default settings
LCD digital
Speed control button Speed
Set stirring speed, press the button to start/stop stirring
function.
Mode switch knob Mode
Shift speed and torque display. LCD displays the current
speed value at initial running. LCD displays the current
torque value when press the mode knob.
LCD display LCD displays the real working state and all setting values.
Speed/torque light RPM/Torque
Yellow/Green LED display light. Different color of LED
lights show the value for speed or torque that LCD screen
currently displays. Yellow LED light shows that LCD screen
currently displays speed. Green LED light shows that LCD
screen currently displays torque.
Power switch /Overload protection light
Power/Overload
Green/Red LED display light.
LED light shows green when switch on, LED light shows red
when starts overload protection. When the torque reaches
limited value, overload protection function will be started. At
the same time overload protection light flashes, while the
system stops running.
Drill chuck Can be held stirring impellers.
Push-through agitator shaft If needed, shaft can push-through agitator.
Power switch I/O Switch ON or OFF the instrument.
Page 12
8
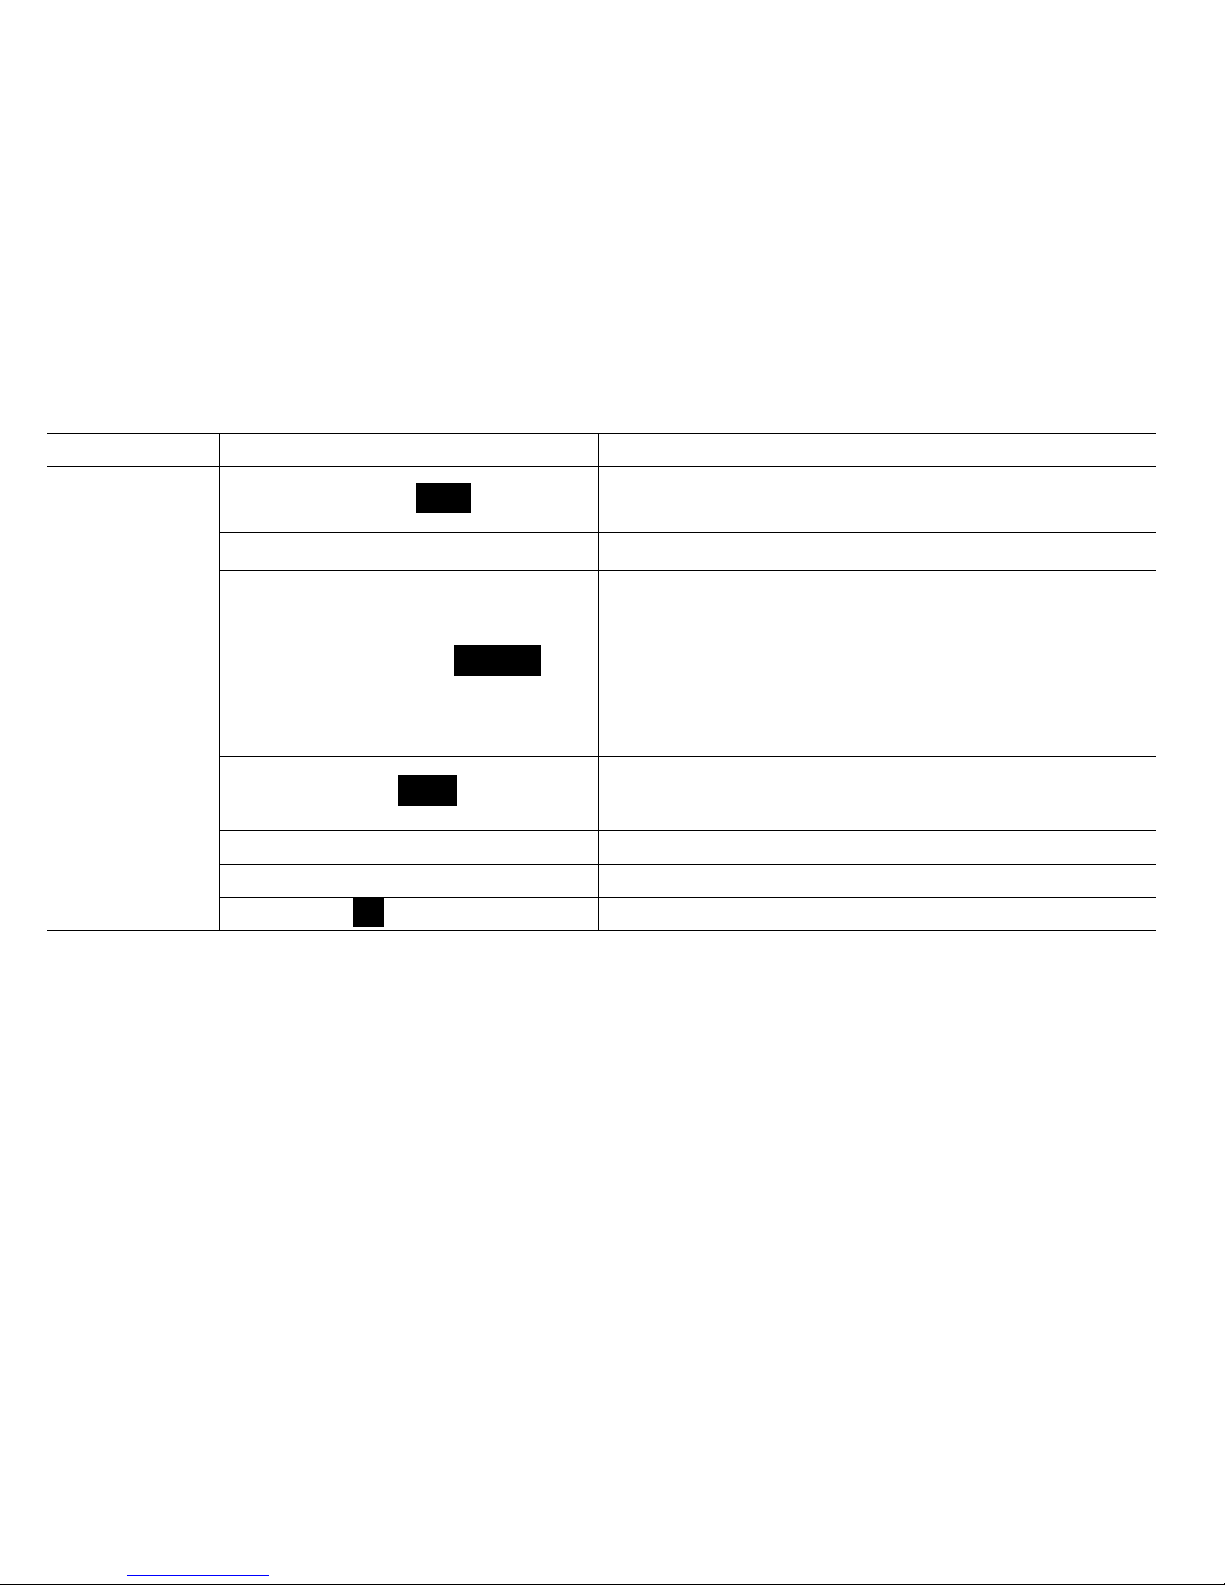
Items Default settings
LED digital
Speed control button Speed
Set stirring speed, press the button to start/stop stirring
function.
LED display LED displays speed value and warning code.
Overload protection light Overload
LED display light.
LED light shows red when starts overload protection. When
the torque reaches limited value, overload protection function
will be started. At the same time overload protection light
flashes, while the system stops running.
Power switch light Power
LED display light.
LED light shows green when switch on.
Drill chuck Can be held stirring impellers.
Push-through agitator shaft If needed, shaft can push-through agitator.
Power switch I/O Switch ON or OFF the instrument.
Page 13
9
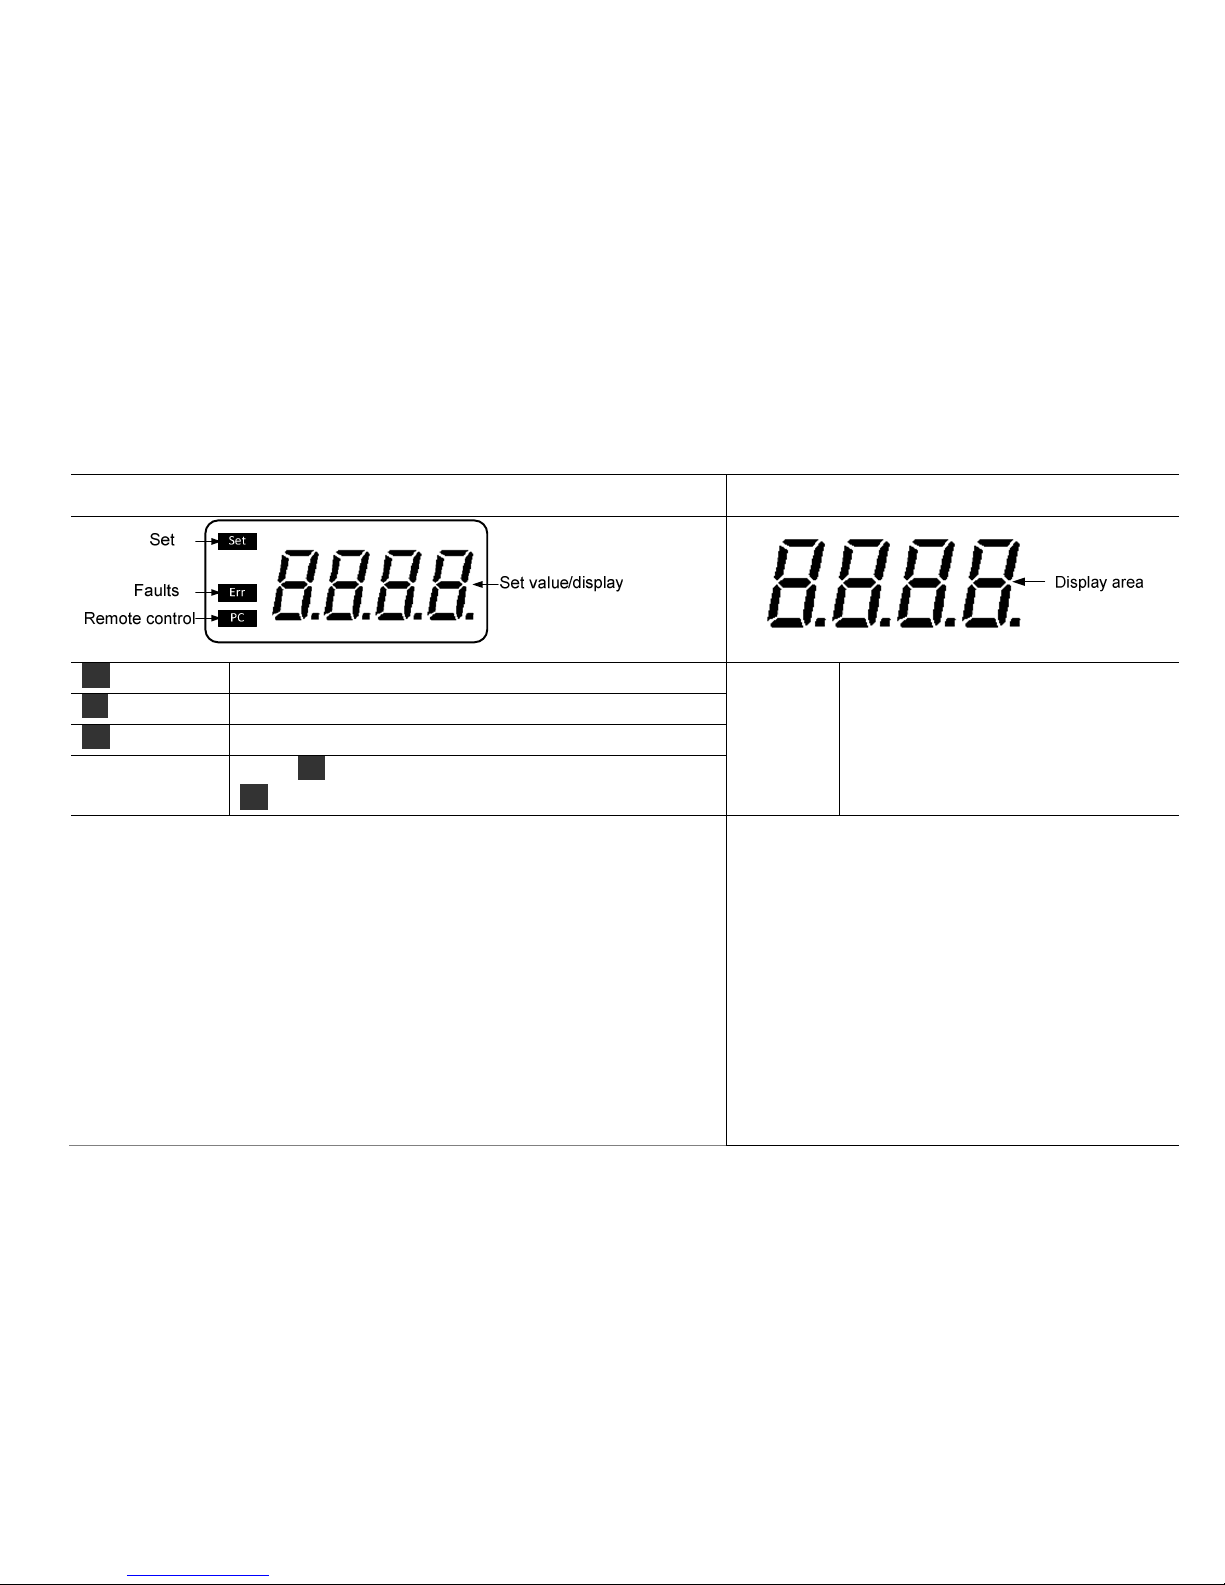
6.2 Display
LCD digital
LED digital
Set Display when set target speed value.
Display
area
LED displays speed value under
normal conditions.
LED displays warning code under
abnormal conditions.
PC Display when using external probe.
Err Display in case of error happening.
Value
set/display area
When Set display, this area shows setting value; When
Set disappears, this area shows running value.
•Place the overhead stirrer in safe and stable surface and connect power
cable.
• witch ON instrument.
•The instrument begins self-checking.
•When initialization is over, displays “set”, at the same time the area of
value setting/display flashes that indicate can be set speed value.
• Rotate speed control button to set stirring speed.
•LCD display no longer flashes when press speed button, “set”
disappear, the stirring function start.
•Press speed button again, LCD display flashes, “set” display, the
stirring function close.
•Place the overhead stirrer in safe and stable
surface and connect power cable.
•Switch ON instrument.
•Clockwise rotate the speed control button to the
target speed value, and start stirring function.
•Counter-clockwise rotate the speed control
button to stop stirring function.
Page 14

10
7. Overload Protection
Overhead Stirrer works continuous, the motor current is
electronically limited to achieve security stall and overload
protection. When the torque reaches limited value, overload
protection function will be started. At the same time
overload protection light flashes.
•
Starts overload protection
When the setting speed value does not match the
current medium viscosity, starts overload
protection.
When the motor output shaft is stuck, motor
protection starts.
•
Refer to Chapter 9 for the solutions of overload
protection and motor protection.
8. Interface and Output (LCD
digital )
LCD digital overhead stirrer makes use of special
accessories and cables to connect external devices. Standard
9-pin interface is used to be connected to the PC.
•
The cable between Overhead stirrer and PC are
selected from the specified communication line of the
EIA-standard RS232C, corresponding with DIN66020.
•
Transmission method: Asynchronous signal
transmission in start-stop-operation.
•
Mode of transmission: Fully Duplex. 1 starts bit; 7
character bits; 1 stop bit.
•
Transmission speed: 9600 bit/s
•
Data communication from laboratory instrument to
computer is only possible on demand of the computer.
Note:
Do not insert or remove the RS232C
communication line when switch on!
Page 15

11
9. Faults
LCD digital LED digital
•
Instrument can not be powered ON when start stirring
function.
Check whether the power cable is connected.
•
Speed can not reach set point.
The setting speed value does not match the
current medium viscosity, please reduce speed
then re-start.
•
Stirring function suddenly stop
Overload protection light changed to red, display
area shows “Er 03”, indicate the current failure is
“overload protection”. When the setting speed
value does not match medium viscosity that
caused overload protection, should be first
pressing speed control button to stop stirring
function. Restart stirring after lowered setting
speed value. If overhead protection continues
•
Instrument can not be powered ON when start stirring
function.
Check whether the power cable is connected.
•
Stirring function suddenly stop
Overload protection light changed to red, display
area shows “Er 03”, indicate the current failure is
“overload protection”. When the setting speed
value does not match medium viscosity that
caused overload protection, should be first
switching OFF the instrument. Switch ON the
instrument after lowered setting speed value. If
overhead protection continues starting, then
repeat the process and gradually reduce the
speed.
Page 16

12
LCD digital LED digital
starting, then repeat the process and gradually
reduce the speed.
Overload protection light changed to red, display
area shows “Er 04”, indicate the current failure is
“motor protection”. When the motor output shaft
is stuck that caused motor protection, should be
first pressing speed control button to stop stirring
function, remove the block material, and then
re-set original setting speed value to start stirring
function.
Overload protection light changed to red, display
area shows “Er 04”, indicate the current failure is
“motor protection”. When the motor output shaft
is stuck caused motor protection, should be first
switching OFF the instrument, remove the block
material, and then switch ON the instrument to
start stirring function.
If these faults are not resolved, please contact manufacturer/supplier.
Page 17
13
10. Maintenance and Cleaning
•
Proper maintenance can keep instrument working
properly and lengthen its lifetime.
•
Do not spray cleanser into the instrument when
cleaning.
•
Do not remove the power line when cleaning. Only
use recommended cleansers:
Dyes Isopropyl alcohol
Construction
materials
Water containing tenside /
Isopropyl alcohol
Cosmetics Water containing tenside /
Isopropyl alcohol
Foodstuffs Water containing tenside
Fuels Water containing tenside
Before using other method for cleaning or
decontamination, the user must ascertain with the
manufacturer that this method will not damage the
instrument. Wear the proper protective gloves during
cleaning of the instrument.
Note:
•
Electronic device can not clean with
cleanser.
•
If you require maintenance service, must
be cleaned the instrument in advance to
avoid pollution of hazardous substances,
and to send back into original packing.
•
If the instrument will not use for a long
time, please switch off and place in a dry,
clean, room temperature and stable
location.
11. Associated standards and
regulations
Construction in accordance with the following safety
standards:
EN 61010-1
UL 3101-1
CAN/CSA C22.2(1010-1)
EN 61010-2-10
Construction in accordance with the following EMC
standards:
EN 61326-1
Page 18

12. Specifications
Items
Specifications
LCD digital
enhanced overhead
stirrer
LCD digital
overhead stirrer
LED digital
enhanced overhead
stirrer
LED digital
overhead stirrer
Max. stirring quantity
(H2O) [L]
40 20 40 20
Motor rating input [W]
120 60 120 60
Motor rating output [ W]
100 50 100 50
Voltage [VAC]
100-240 100-240 100-240 100-240
Frequency [Hz]
50/60 50/60 50/60 50/60
Power [W]
130 70 130 70
Speed range [rpm]
50-2200 50-2200 50-2200 50-2200
Speed display accuracy
[rpm]
±3 ±3 — —
Speed display
LCD LCD LED LED
Speed display accuracy
[rpm]
±1 ±1 ±1 ±1
Max. torque [Ncm]
60 40 60 40
Max. viscosity [mPas]
50000 10000 50000 10000
Overload protection
LED light flash, auto LED light flash, auto LED light flash, LED light flash,
Page 19

Items
Specifications
LCD digital
enhanced overhead
stirrer
LCD digital
overhead stirrer
LED digital
enhanced overhead
stirrer
LED digital
overhead stirrer
stop stop auto stop auto stop
Motor protect
LED light flash, auto
stop
LED light flash, auto
stop
LED light flash,
auto stop
LED light flash,
auto stop
Chuck range diameter
[mm]
0.5-10 0.5-10 0.5-10 0.5-10
Stand (dia. x l) [mm] 14 x 220 14 x 220 14 x 220 14 x 220
Dimension[W x H x D]
[mm]
83 x 220 x 186 83 x 220 x 186 83 x 220 x 186 83 x 220 x 186
Weight [kg]
2.8 2.6 2.8 2.6
Protection class acc. to
DIN/EN 60529
IP21 IP21 IP21 IP21
Temperature [℃]
5-40 5-40 5-40 5-40
Permission relative
humidity [%]
80 80 80 80
RS232 interface Yes Yes No No
Table 2
Page 20
13. Ordering Informations
Accessories
18900131
(Le Laborantin - réf.702324)
Stand packing 2 (WxD: 200x315mm), including U-type basic, support holder (H: 780
mm) and fixing device
18900071
(Le Laborantin - réf.702325)
Crossed stirrer, shaft length 40cm,stirrer diameter 5cm, 316L stainless steel
18900072
(Le Laborantin - réf.702326)
Straight stirrer, shaft length 40cm,stirrer diameter 6cm, 316L stainless steel
18900073
(Le Laborantin - réf.702327)
Blade stirrer, shaft length 40cm,stirrer diameter 6.8cm, 316L stainless steel
18900074
(Le Laborantin - réf.702328)
Centrifugal stirrer, shaft length 40cm,stirrer diameter 9cm, 316L stainless steel
18900075
(Le Laborantin - réf.702329)
Crossed stirrer, shaft length 35cm,stirrer diameter 6.5cm, PTFE-coated
18900076
(Le Laborantin - réf.702330)
Straight stirrer, shaft length 35cm,stirrer diameter 7cm, PTFE-coated
18900077
(Le Laborantin - réf.702331)
Blade stirrer, shaft length 35cm,stirrer diameter 6.8cm, PTFE-coated
18900078
(Le Laborantin - réf.701575)
Centrifugal stirrer, shaft length 35cm,stirrer diameter 8.5cm, PTFE-coated
Page 21

 Loading...